
A5P | 01
3515387.1
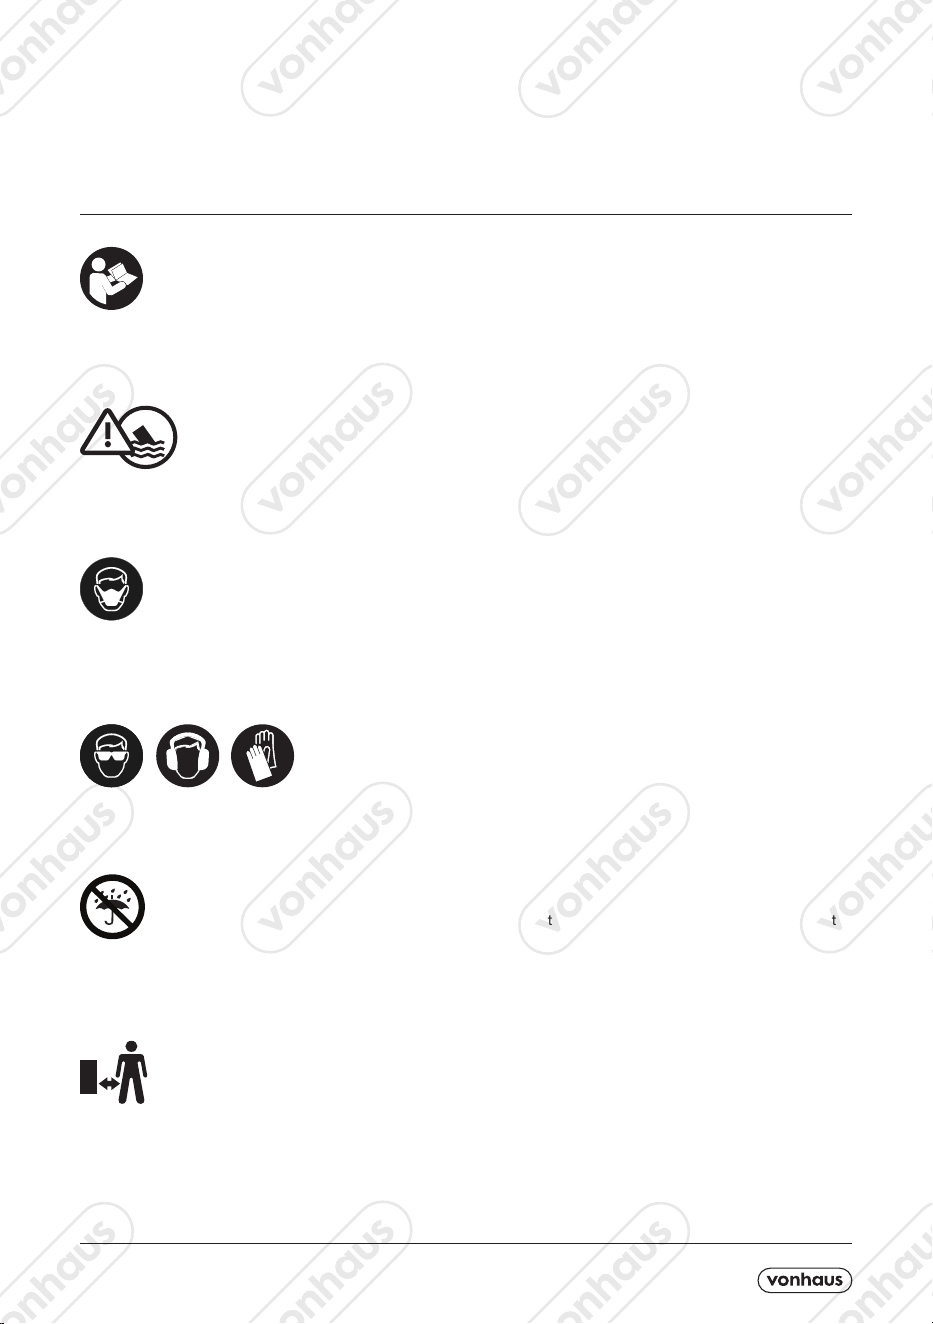
Please read all instructions carefully before use and
retain for future reference.
CAUTION Do not immerse in water.
Protect your eyes, ears and hands
Wear a dust mask.
INTENDED USE Only operate the power tool/machine
for its intended purpose and within the parameters
specied in this manual.
This power tool/machine is for domestic use only. Do not
use outdoors during wet conditions.
This power tool/machine is not intended for use by per-
sons with reduced physical, sensory or mental capabil-
ities, or lack of experience and knowledge, unless su-
pervised or given appropriate instruction concerning the
product’s use by a person responsible for their safety.
GENERAL PRECAUTION Do not allow to be used as a
toy. Children should be supervised to ensure they do not
play with the power tool/machine.
If the power tool/machine is not functioning properly,
has been dropped, damaged, left outdoors, or immersed
in liquid, do not use, contact DOMU Brands Customer
Services.
Do not use the power tool/machine if any parts appear to
be faulty, missing or damaged.
Ensure all parts are securely attached before use.
RISK OF PERSONAL INJURY Avoid body contact with
earthed or grounded surfaces such as pipes,radiators,
ranges and refrigerators. There is an increased risk of
electric shock if your
body is earthed or grounded.
Prevent unintentional starting. Ensure the switch is in the
o position before connecting to the power source and/
or battery pack, picking up or carrying the tool. Carrying
power tools with your nger on the switch, or energising
power tools that are switched on, invites accidents.
Do not operate power tools in explosive atmospheres
such as in the presence of ammable liquids, gases or
dust. Power tools create sparks which may ignite the
dust or fumes.
Always wear eye protection. Any power tool can throw
foreign objects into your eyes and cause permanent
eye damage. Always wear safety goggles (not glasses)
that comply with ANSI safety standard Z87.1. Every day
glasses have only impact resistant lenses.
Do not expose power tools to rain or wet conditions.
Water entering the power tools will increase the risk of
electric shock.
Stay alert, watch what you are doing and use common
sense when operating a power tool/machine. Do not use
a power tool/machine while you are tired or under the
inuence of drugs, alcohol or medication. A moment of
inattention while operating power tool/machine may re-
sult in serious personal injury.
Use personal protective equipment. Always wear eye
protection. Protective equipment such as dust mask,
non-skid safety shoes, hard hat, or hearing
protection used for appropriate conditions will reduce
personal injuries.
Prevent unintentional starting. Ensure the switch is in the
o-position before connecting to power source and/or
battery pack, picking up or carrying the tool.
Carrying power tool/machine with your nger on the
switch or energizing power tool/machine that have the
switch on invites accidents.
Remove any adjusting key or spanner before turning the
power tool/machine on. A spanner or a key left attached
to a rotating part of the power tool/machine may result in
personal injury.
Do not suitable in wet conditions.
Keep bystanders clear

A5P | 01
Do not overreach. Keep proper footing and balance at
all times. This enables better control of the power tool/
machine in unexpected situations.
Dress appropriately. Do not wear loose clothing or jew-
ellery.
Keep your hair, clothing and gloves away from moving
parts. Loose clothes, jewellery or long hair can be caught
in moving parts.
If devices are provided for the connection of dust extrac-
tion and collection facilities, ensure these are connected
and properly used. Use of dust collection can reduce
dust-related hazards.
WORK AREA SAFETY Keep work area clean and well lit.
Cluttered or dark areas invite accidents.
Do not operate power tool/machine in explosive
atmospheres, such as in the presence of ammable
liquids, gases or dust.
Power tool/machine create sparks which may ignite the
dust or fumes.
Keep children and bystanders away while operating a
power tool/machine. Distractions can cause you to lose
control.
GENERAL POWER TOOL USE AND CARE Do not force
the power tool/machine. Use the correct power tool/ma-
chine for your application. The correct power tool/ma-
chine will do the job better and safer at the rate for which
it was designed.
Do not use the power tool/machine if the switch does not
turn it on and o. Any power tool/machine that cannot
be controlled with the switch is dangerous and must be
repaired.
Disconnect the plug from the power source and/or the
battery pack from the power tool/machine before making
any adjustments, changing accessories, or storing pow-
er tool/machine tools. Such preventive safety measures
reduce the risk of starting the power tool/machine ac-
cidentally.
Store idle power tool/machine out of the reach of children
and do not allow persons unfamiliar with the power tool/
machine or these instructions to operate the power tool/
machine.
Power tool/machines are dangerous in the hands of un-
trained users.
Maintain power tool/machines. Check for misalignment
or binding of moving parts, breakage of parts and any
other condition that may aect the power tool/machines
operation. If damaged, have the power tool/machines re-
paired before use. Many accidents are caused by poorly
maintained power tool/machines.
Keep cutting tools sharp and clean.
Properly maintained cutting tools with sharp cutting edg-
es are less likely to bind and are easier to control.
Use the power tool/machine accessories and tool bits in
accordance with these instructions, take into account the
working conditions and the work to be performed.
Use of the power tool/machine for operations dierent
from those intended could result in a hazardous situation.
CLEANING & MAINTENANCE Never soak or immerse
electrical components and or a component that has a
plug attached.
Disconnect the plug from the power source before mak-
ing any adjustments, changing accessories, or storing.
Such preventive safety measures reduce the risk of start-
ing the power tool accidentally.
Ensure the motor has fully stopped before cleaning,
clearing a blockage, checking, or carrying out any main-
tenance on the tool.
Maintain your power tool. Check for misalignment or
binding of moving parts, breakage of parts and any oth-
er condition that may aect the power tool’s operation.
If damaged, have the power tool repaired by a qualied
repair person before use. Many accidents are caused by
poorly maintained power tools.
Keep cutting tools sharp and clean. Properly maintained
cutting tools with sharp cutting edges are less likely to
bind and are easier to control.
Regularly check external nuts and xings to ensure vibra-
tion caused by normal use has not begun to loosen them.
Store idle power tools out of reach of children and do
not allow persons unfamiliar with the power tool or these
instructions to operate the Breaker.
Locate the power tool out of reach of children, in a dry,
locked unit.
Make sure that the cord is located so that it will not be
stepped on, tripped over, or otherwise subjected to dam-
age or stress.
Remove the plug from the mains socket / battery (where
applicable) before carrying out any adjustment or main-
tenance.
Always store the power tool/machine in a dry place.
If the power cord is damaged, it must be replaced by a
qualied service technician.
Keep the ventilation slots and motor housing as free of
dirt and dust as possible (where applicable).
Clean the power tool/machine by rubbing it with a clean
cloth and blow it clean using low-pressure compressed
air is recommended.
Ensure you have all the pieces listed. If you are missing
any components, contact our customer services depart-
ment at
[email protected] DO NOT proceed with assembly
if any components are missing.

A5P | 01
HAND HELD SPRAY GUNS
Use only paints, solvents or other materials with a ash
point of 21°c or higher.
The materials used with this Spray Gun (paint, thinners,
etc.) may contain hazardous, harmful, explosive or
corrosive materials.
Always ensure there is adequate. ventilation when
spraying.
NEVER spray near an open ame, including an appliance
pilot ame.
NEVER smoke near the Spray Gun, paint or other
ammable objects.
Always disconnect the unit from the electrical outlet
when cleaning the Spray Gun.
Always ensure the spray area is safe and free from all
debris that may present a re or trip hazard.
NEVER, under any circumstances, point the Spray Gun
at another person or animal. In the event of an injury, seek
immediate medical attention.
NEVER allow children or unauthorised users to operate
or play with the spray equipment.
Always read the paint manufacturer is thinning
instructions before use.
Always wear a protective face mask when spraying. We
also recommend wearing gloves, goggles and overalls.
You must clean the Spray Gun thoroughly after each use.
Do not use or place paint or other ammable materials
near ignition sources such as static electric sparks, open
ames, pilot lights, electrical appliances, or hot objects.
Connecting or disconnecting power cords or working
light switches can make sparks.
Due to the high pressures involved during conventional
air-atomised and airless spray application, paint injec-
tion injuries can occur. Injuries caused by the injection of
paint under pressure into the body can be extremely seri-
ous and urgent medical attention is absolutely essential.
A few simple considerations follow that will help to mini-
mise the risk of injury during spraying: FIRE AND EXPLO-
SION The hazardous environment produced during the
spraying of ammable materials results in an increased
risk of re and explosion. All sources of ignition must be
eliminated from the spray area. Common ignition sources
such as the following must be avoided at all times:
•Electrical sparks and arcs from the discharge of static
electricity from poorly earthed equipment.
•Electrical short circuits.
•Naked ames.
•Lit cigarettes, cigars, pipes.
•Portable battery equipment.
•Hot surfaces (wires, metals).
•Equipment which could produce sparks (grinding
wheels)
•Exothermic (heat-generating) chemical reactions, such
as when two-component paints are left to “pot” before
disposal
•When the equipment is pressurised NEVER look directly
at the spray tip or bring the spray tip into close proximity
with any part of the body.
•Spray guns must NEVER be pointed directly at anyone.
•Fingers must NEVER be placed over the spray tip.
•No-one should carry out airless spraying unless fully
trained in the correct use of the equipment, the hazards
involved in spraying. and the necessary action to take in
the event of an accident.
•All equipment should be earthed at all times as there is a
potential danger of static electricity discharge.
•Chlorinated solvents must never be sprayed.
•Air hoses should be secure before spraying operations
are started.
•The spray gun trigger must be LOCKED before passing
the gun to someone else.
•Equipment must be depressurised when it is not in use
Spray painting equipment can be very noisy and can in-
duce deafness so it is essential that all sources of noise
comply with the local regulations in operation. Ear pro-
tection is recommended in circumstances where there
will be excessive noise levels and should always be worn.
TECHNICAL SPECIFICATION
Rated Voltage 220-240V
Rated Power 800W
Rated Frequency 50Hz
DECLARATION OF CONFORMITY
We:
DOMU Brands Ltd
6th Floor The Tower
Deva City Oce Park
Manchester
M3 7BF
Declare under our sole responsibility the product:
SKU
3515387.1
Description
800W Paint Station
Complies with the essential requirements
of the following directives:
2011/65/EU, 2014/30/EU
And the Standards:
EN 50580:2012, EN 13236, EN 62841-1,
EN 60745-1, BS 1363-1:2016, BS 1362:1973
Authorised Signatory on behalf of DOMU Brands Ltd.
A5P | 01
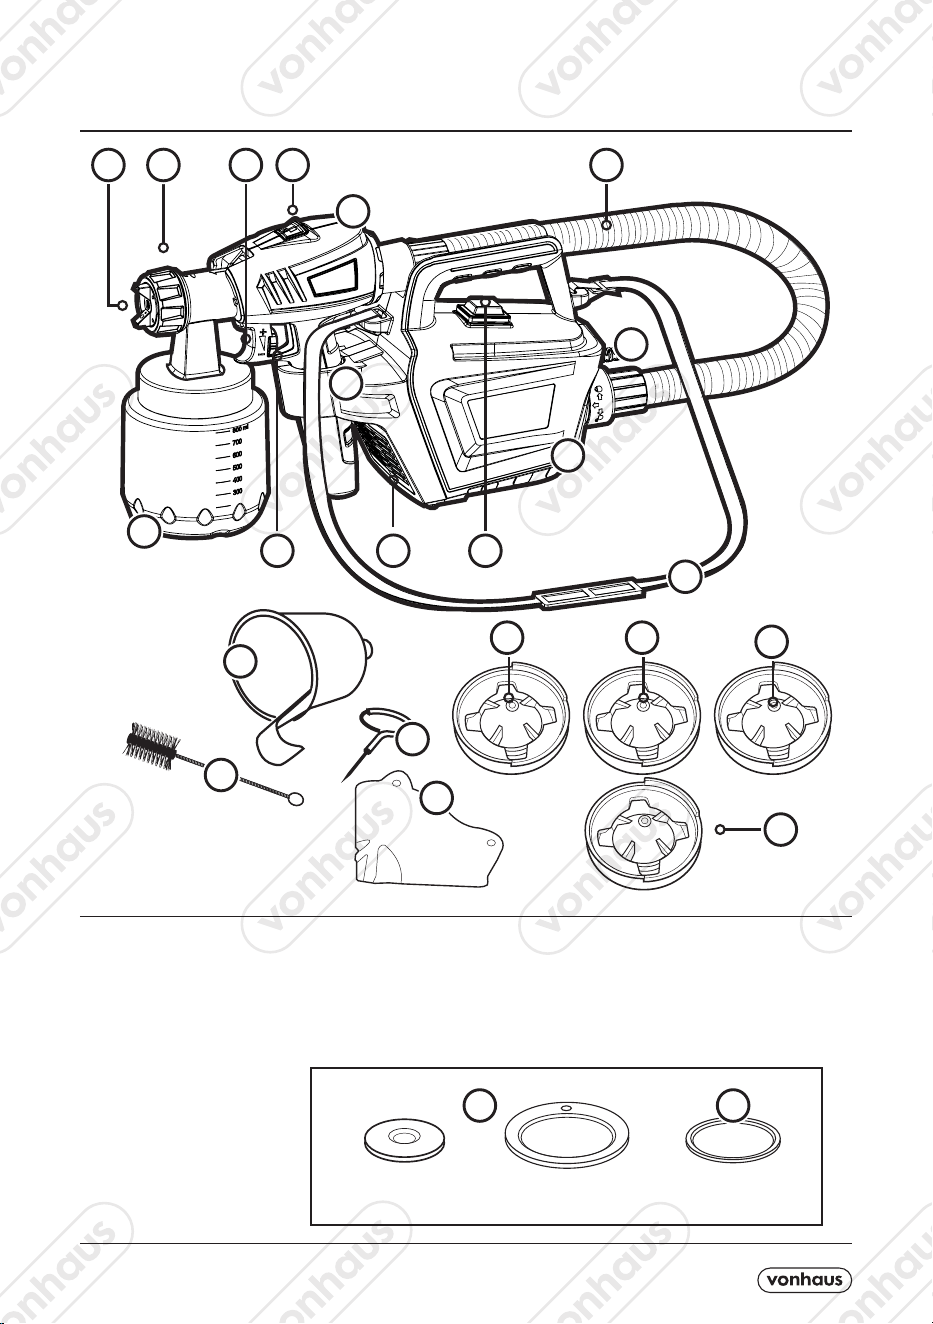
COMPONENTS
COMPONENT LIST
1. Pattern Adjuster.
2. Nozzle Locking Wheel.
3. Trigger.
4. Spray Gun Seat.
5. Quick Release Button.
6. Spray Gun Unit.
7. Air Hose.
8. ON/OFF Switch.
9. Power Cord.
10. Main Unit.
11. Shoulder Strap.
12. Air Filter Cover.
13. Volume Adjustment Dial.
14. Paint/Coating Container.
15. Viscosity Cup.
16. Cleaning Needle.
17. Cleaning Brush.
18. 5x Paper Filters.
19. 1.0mm Nozzle
20. 1.8mm Nozzle (pre-installed)
21. 2.6mm Nozzle
22. 3.0mm Nozzle
23. Rubber Gaskets (for Fixed Nozzle & Container).
24. O-Ring
5
6
7
9
10
11
1213
15
16
17
14
8
1
3
2
4
PLEASE NOTE! These components are supplied as spares and do not
require to be used during assembly. Store them in a safe location.
23
19 20
21
22
24
18
A5P | 01
MATERIAL PREPARATION
THINNING CHART
MATERIAL
*RUNOUT TIME (SEC)
OIL ENAMEL
OIL BASED PRIMER
OIL STAIN
CLEAR SEALER
POLYURETHANE
VARNISH
LACQUER/SANDING SEALER
25 - 45
30 - 50
NO THINNING REQUIRED
NO THINNING REQUIRED
NO THINNING REQUIRED
20 - 55
25 - 40
Impurities in the paint may give poor
performance and a poor finish. Please use the
Paper Filters supplied to prevent this.
IMPORTANT Material to be sprayed should
always be strained to remove any impurities in
the paint which may enter and clog the system.
Stir the spraying material thoroughly before
measuring viscosity.
Dip the VISCOSITY CUP completely into the spraying
material.
Hold the VISCOSITY CUP and measure the time in
seconds until the spray material empties out.
This time duration is referred to below as *Runout
Time.
IMPORTANT Before spraying, the material
being used may need to be thinned
with solvent; as specified by the material
manufacturer.
WARNING Do not use materials with a
flashpoint below 21°C (70ºF).
NOTE Follow the instructions below.
16
COATING MATERIALS SUITABLE - Water and solvent based paints, finishes, primers, 2 component
paints, clear finishes, automotive finishes, staining sealers and wood sealer-preservatives.
A5P | 01
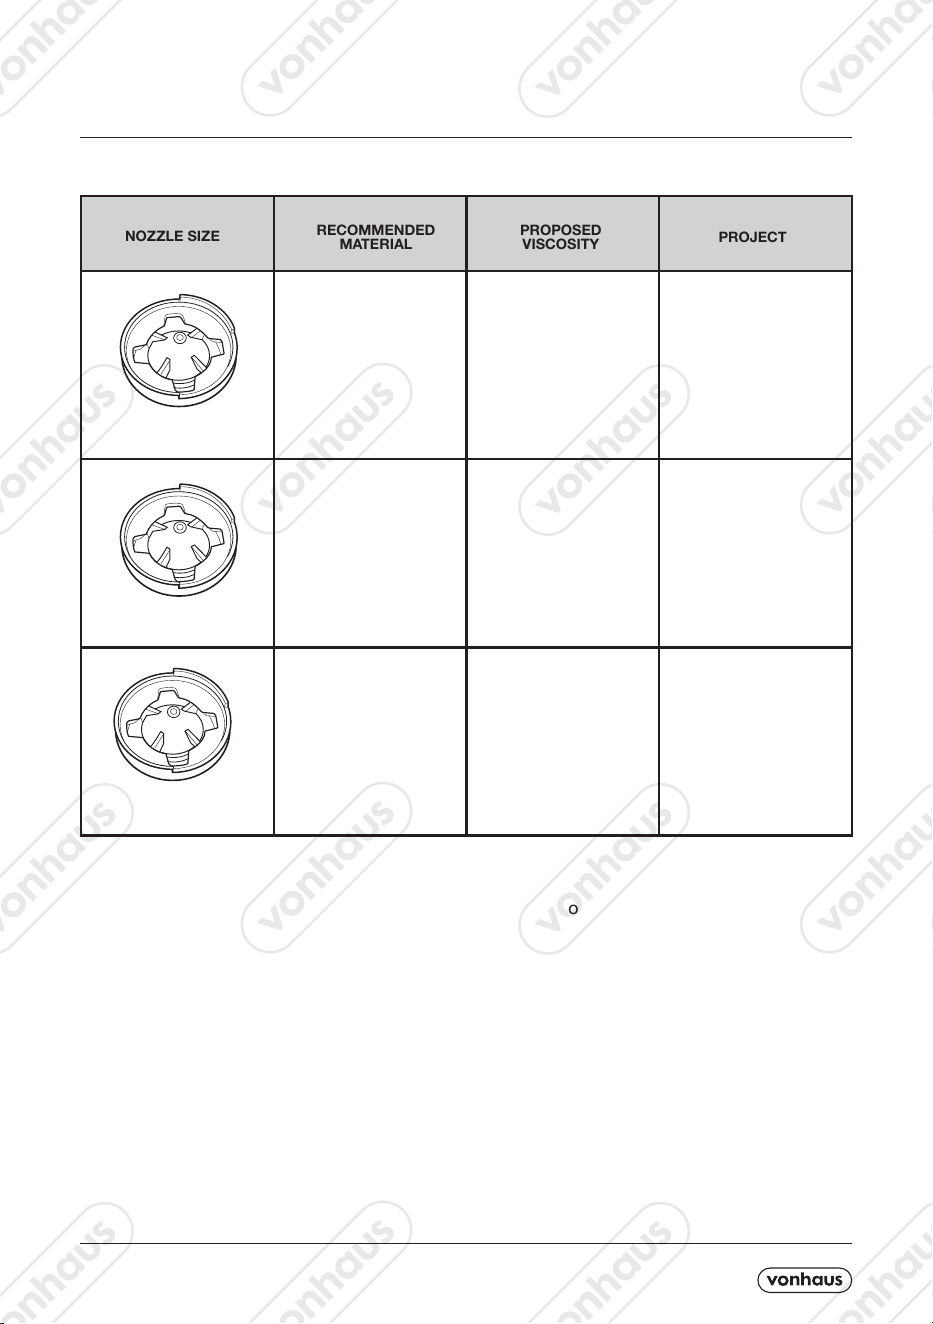
NOZZLE RECOMMENDATIONS & APPLICATIONS
IMPORTANT TIP -
The smaller the Nozzle size, the more delicate and smooth the paint eect will be.
The bigger diameter of Nozzle, the higher ow rate, thicker droplets and bigger working area.
NOZZLE SIZE
1.0mm- 1.8mm
Polyurethane,
chalk and milk
type paints
Railings, multi-frame
window frames,
heating pipes,
garden furniture,
garage doors, metal
garden fences
Internal walls,
wooden garden
fences and sheds
External walls,
Outdoor oors and
decked areas
Lower than
40Din-s
45Din-s
Greater than
60Din-s
Low viscoisty,
primer, wall
paint
Low viscoisty,
primer, wall
paint, latex
2.6mm
3.0mm
PROJECT
RECOMMENDED
MATERIAL
PROPOSED
VISCOSITY
A5P | 01
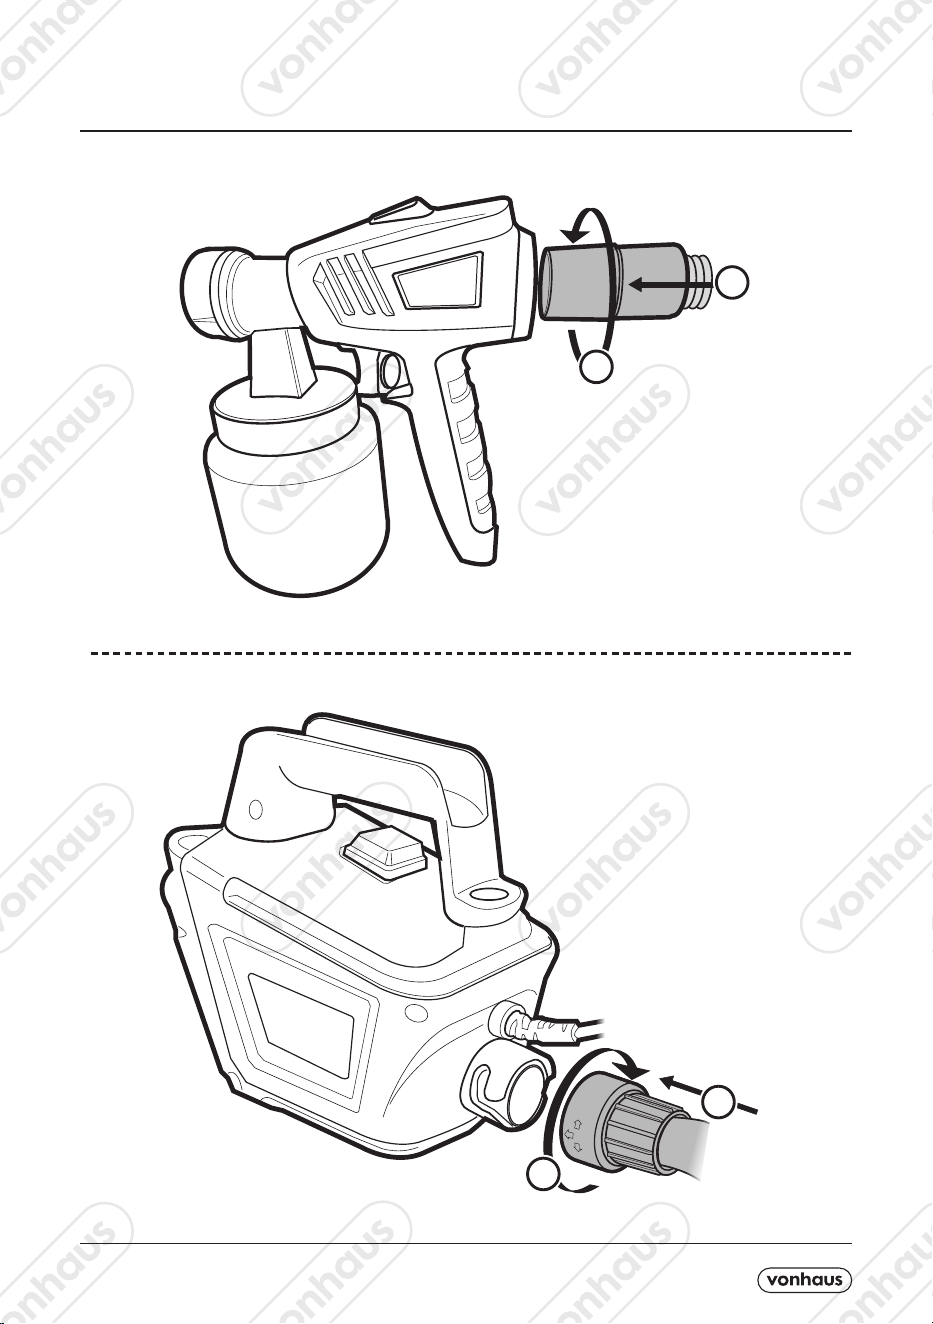
ASSEMBLY
1
2
Insert the Air Hose coupler into the
top of the Spray Gun Unit.
Turn clockwise to lock into position.
1
2
Connect the other end of the Air
Hose coupler into the rear of the
Main Unit.
Turn clockwise to lock into position.
A5P | 01
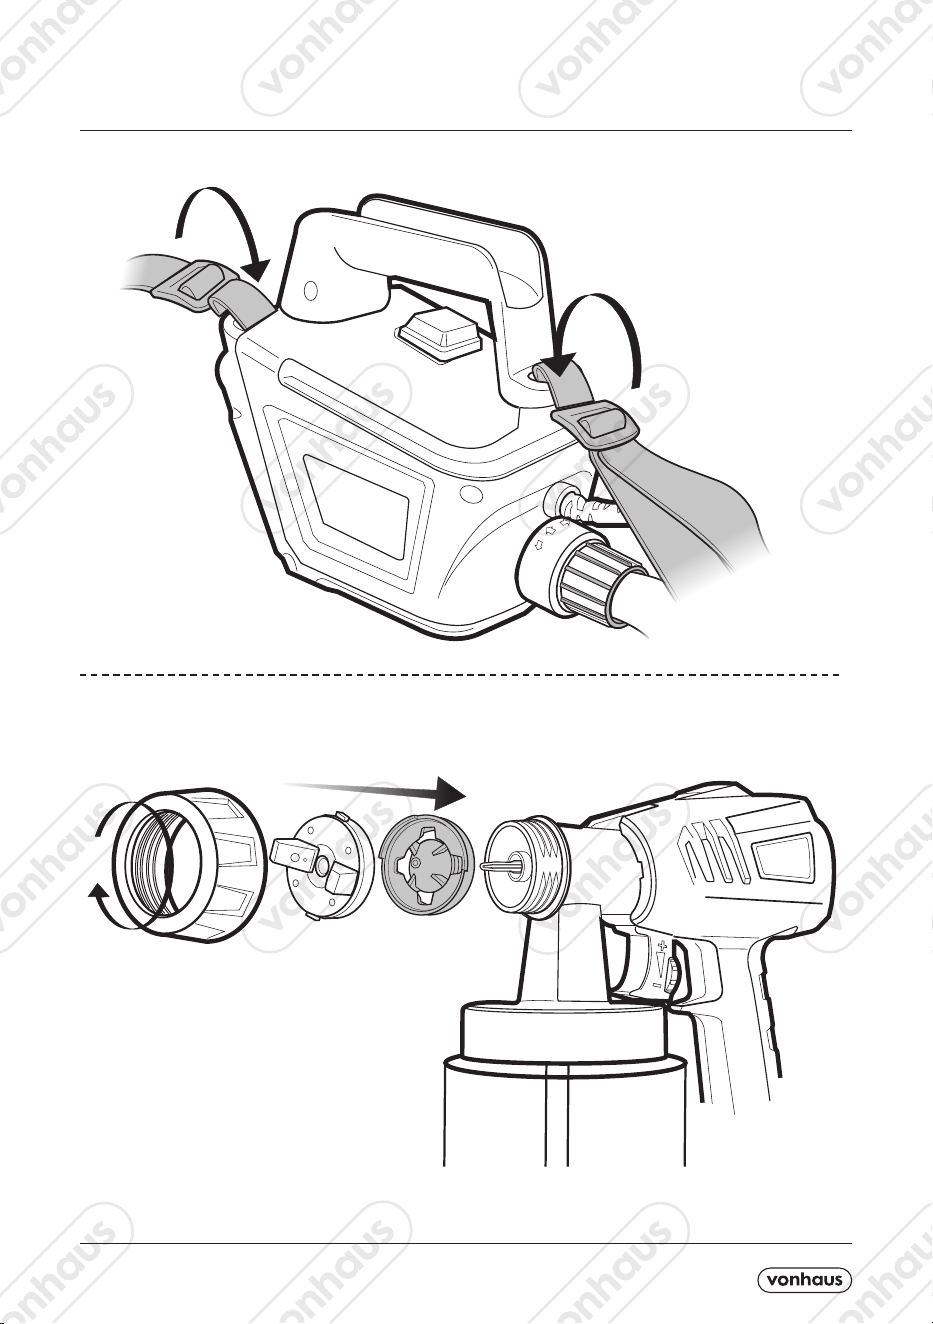
ASSEMBLY
If the task requires you to carry the
Paint Station, attach the Shoulder
Strap to each side of the Main Unit.
Pull the straps tightly through the
plastic adjustment tabs to secure.
Attach the required size Nozzle to the
Spray Gun as shown.
Once assembled, secure tighly by turning
the Nozzle Locking Wheel clockwise.
A5P | 01
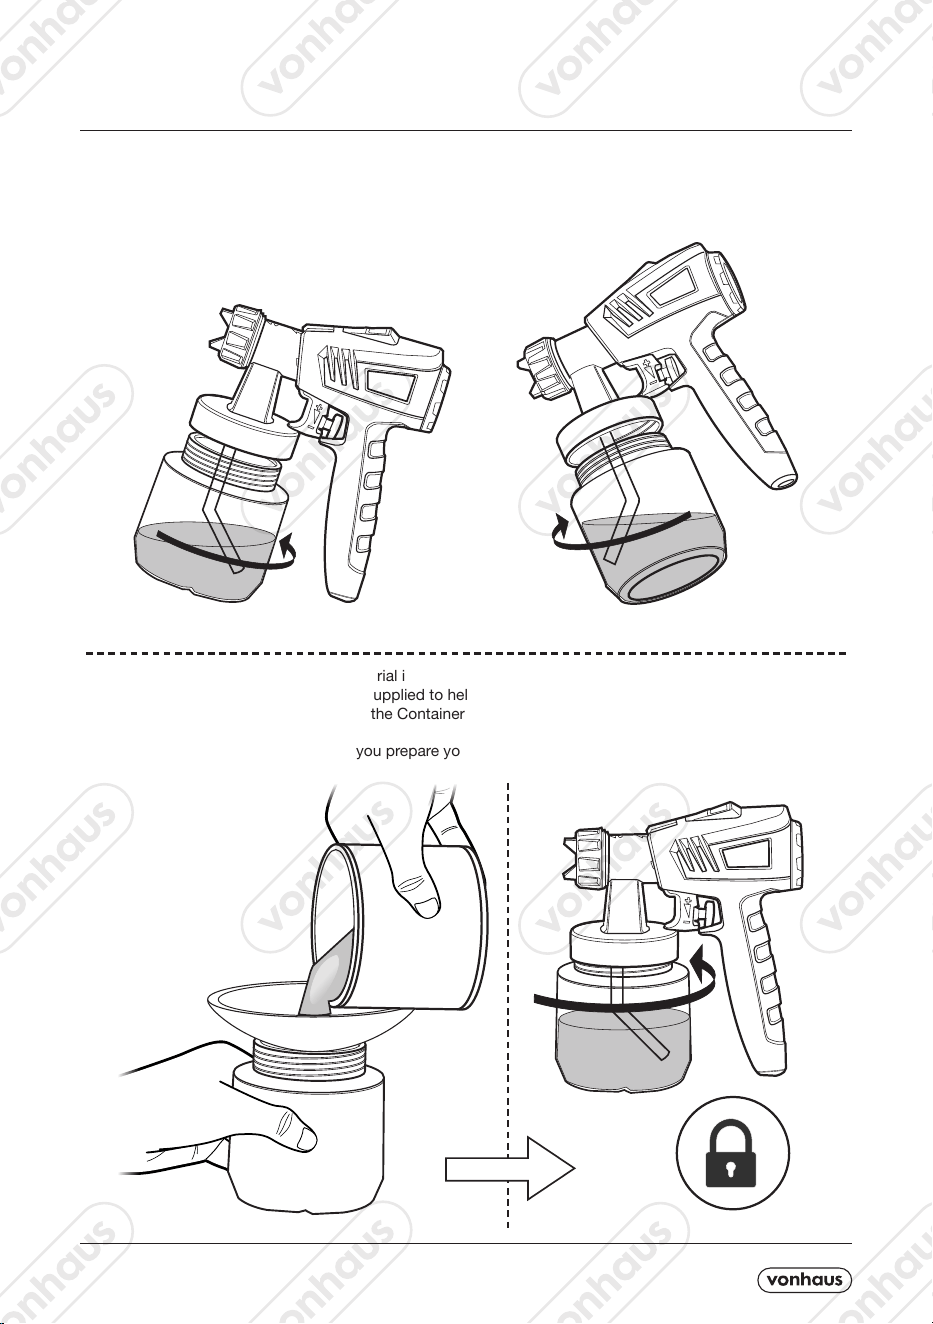
ASSEMBLY
Unscrew the Container from the Spray Gun and align the suction tube to suit the task at hand.
For horizontal surfaces, turn the suction tube towards the Spray Gun (g 1). When spraying
surfaces overhead, turn the suction tube away from the Spray Gun (g 2).
NOTE! The Container should not be lled at this stage, the images are for illustration purposes.
Carefully pour the prepared coating material into the Container and secure to the Spray Gun Unit.
We recommend using the Paper Filters supplied to help clear any impurities from the paint for an even
smoother nish to you surfaces. Ensure the Container is rmly attached before use.
Sit the Spray Gun into the Seat whilst you prepare your work area.
g1
g2
A5P | 01
All objects to be sprayed should be thoroughly
cleaned before spraying.
Areas excluded from spraying should be masked off
appropriately.
NOTE When spraying outdoors, the spraying
area must be free of dust in order to avoid
blowing dust onto the freshly sprayed surface.
SURFACE PREPARATION
SPRAY PATTERN ADJUSTMENT
The spray pattern shape is adjusted by rotating
the PATTERN ADJUSTER (1) to either the vertical,
horizontal or diagonal positions.
Loosen the LOCKING WHEEL (2) sufficiently to
enable you to rotate the PATTERN ADJUSTER (1).
Test each pattern and use whichever pattern is
suitable for your application.
The positions of the PATTERN ADJUSTER (1) and
corresponding spray pattern shapes are illustrated
below.
Test each pattern and use whichever pattern is
suitable for your application.
Spray
Pattern
Spray
Pattern
Spray
Pattern
21
A5P | 01
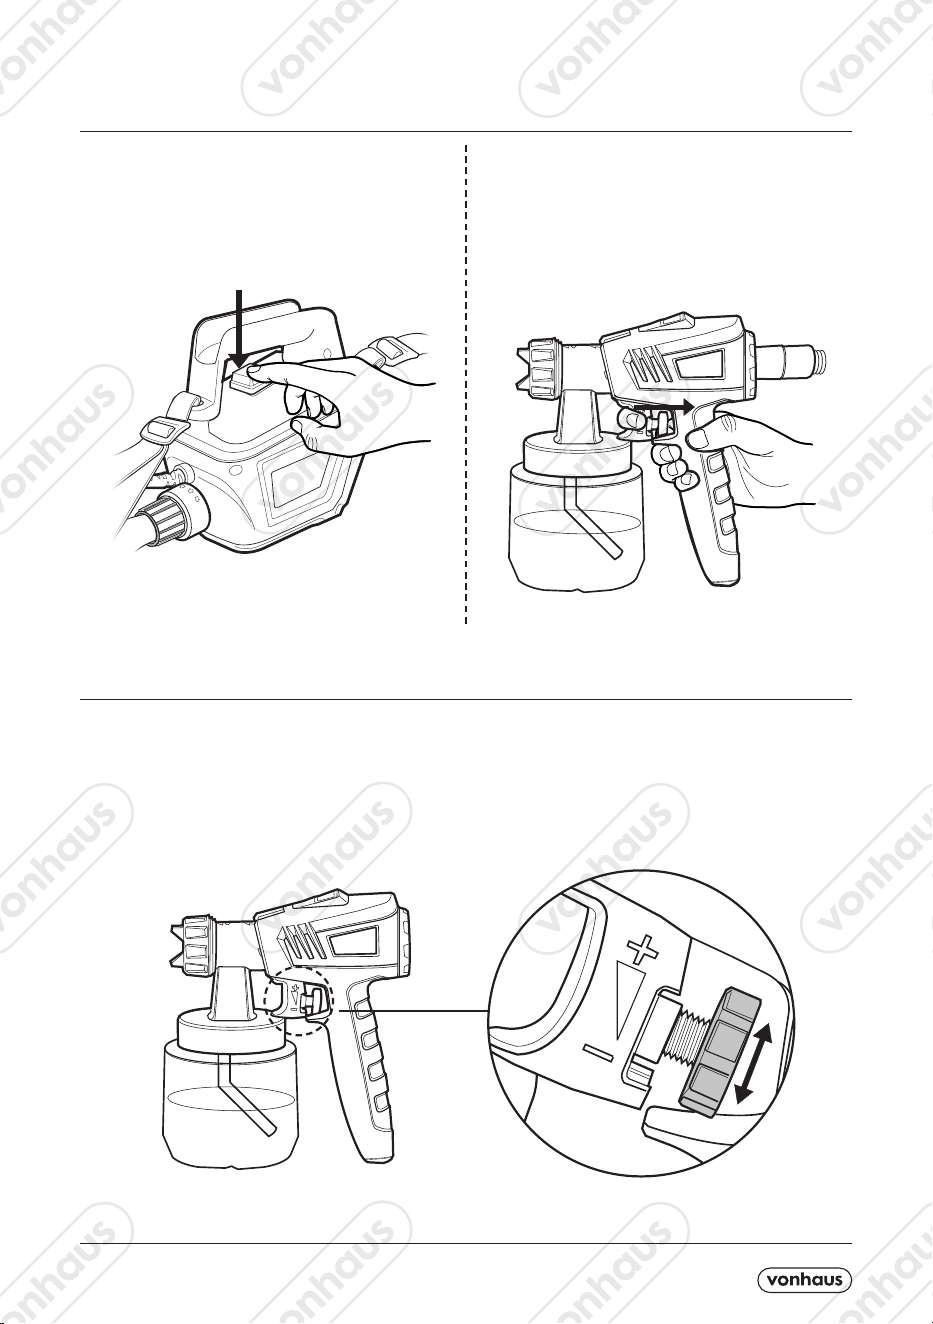
Set the material flow volume by rotating the VOLUME ADJUSTMENT DIAL behind the TRIGGER
(4) of the spray gun.
Rotate the VOLUME ADJUSTMENT DIAL clockwise for greater volume and anti-clockwise for
decreased volume.
To switch on, connect the Main Unit to a suitable
mains outlet and turn on using the ON/OFF
Switch on the top.
Firmly grip the Spray gun and squeeze the Trigger
to release the paint. Adjust the volume of coating
as shown in the ‘FLOW ADJUSTMENT’ section
below.
OPERATION
FLOW ADJUSTMENT
A5P | 01
SPRAY TECHNIQUE
ADVISORY It is strongly advisable to
practice on a piece of cardboard or wood
offcuts before proceeding on your intended
workpiece
Position the Spray Gun perpendicular to one or more
inches from the spray surface.
NOTE The closer the sprayer is to the object
being sprayed the lower the overspray.
Spray parallel to the surface with smooth passes at a
consistent speed as illustrated below. Adhering to this
will avoid irregularities in the final finish.
Always apply a thin coat of material on the first pass
and allow to dry before applying a second, slightly
heavier coat.
Keep strokes smooth and at an even speed.
ADVISORY When spraying, always trigger
the spray gun after spray pass has begun and
release the trigger before stopping the pass.
NOTE Always keep the spray gun pointed
squarely at the spray surface and overlap
passes slightly to obtain the most consistent
finish.
Light Coat Light CoatHeavy CoatEven Coat throughout
10-30
cm
When you notice coat build up on the Nozzle, this
is an indication it needs to be disassembled and
cleaned.
Refer to the ‘MAINTENANCE’ section for cleaning
instructions.
A5P | 01
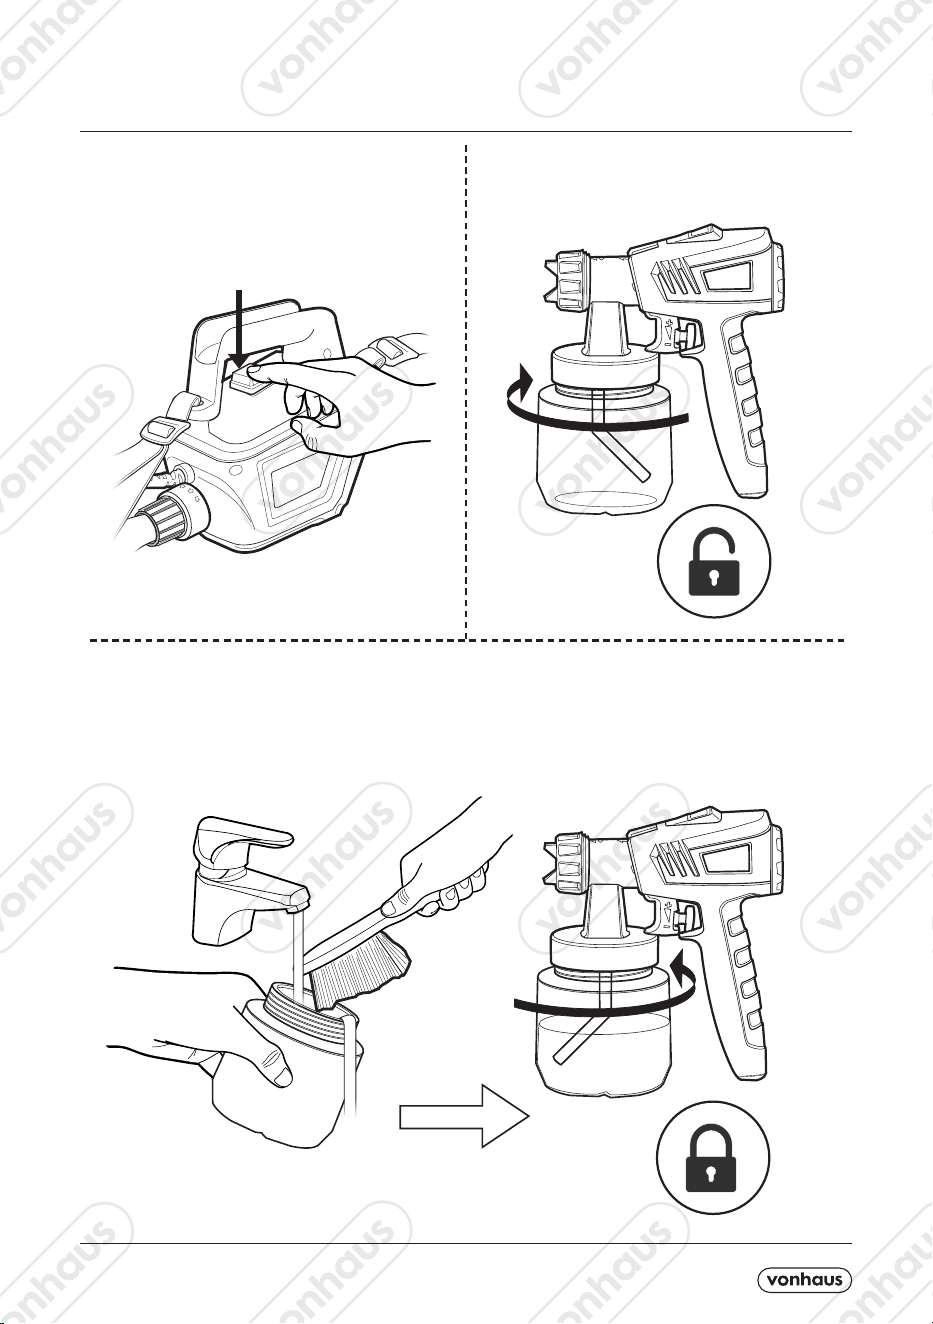
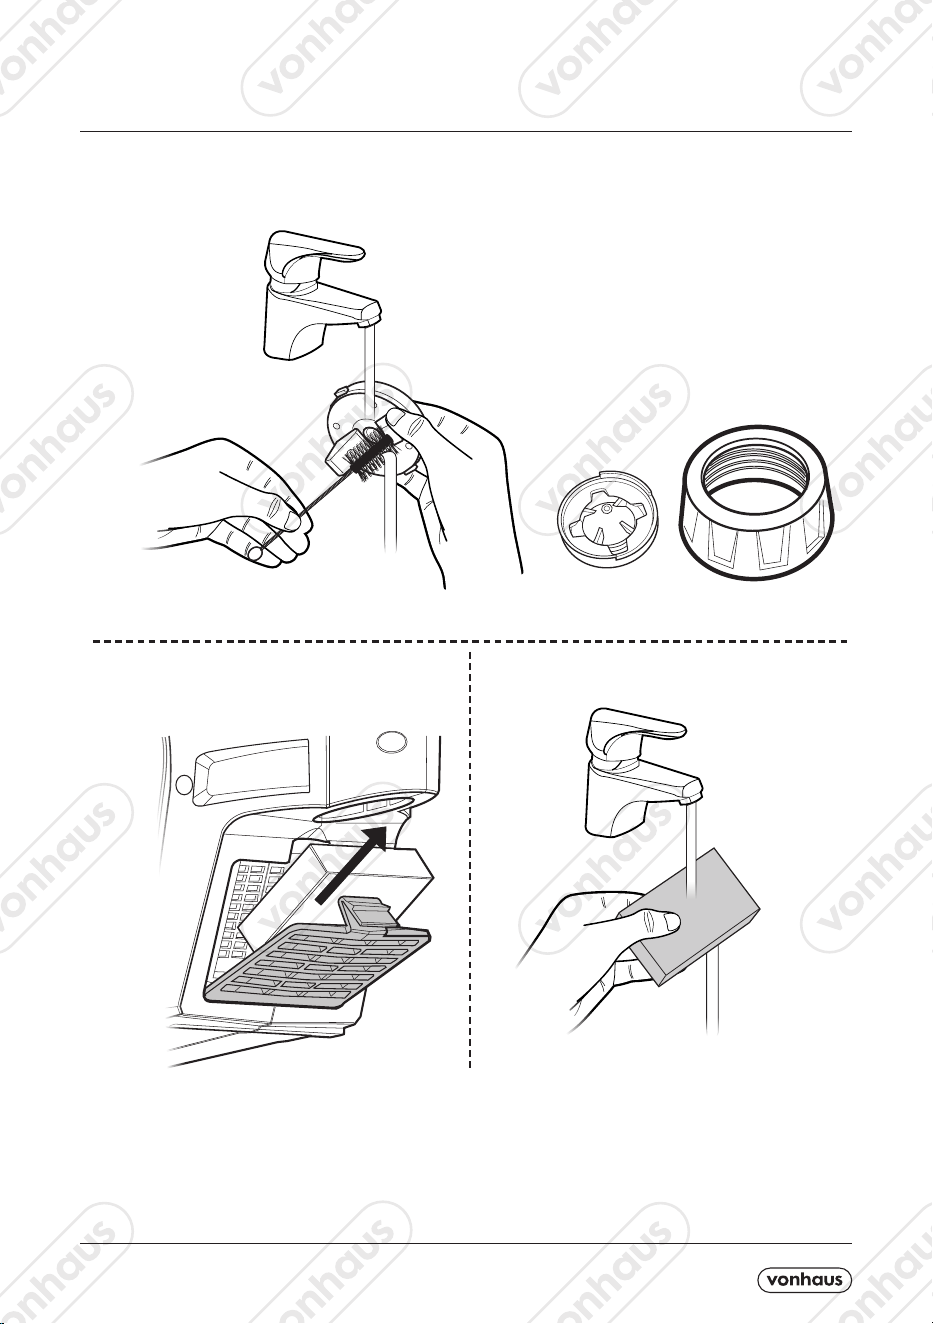
MAINTENANCE
Switch off the Paint Station and release the trigger
so that any remaining coating in the Spray Gun
flows back into the Container.
When the Container is scrubbed clean, fill the Container with luke-warm water and mild
detergent before re-attaching to the Spray Gun. Ensure the Suction Pipe is facing away from
the Spray Gun.
Remove the Container and empty any remaining
coating back into the tin. Clean the Container with
a scrubbing brush along with warm ,soapy water.
A5P | 01
MAINTENANCE
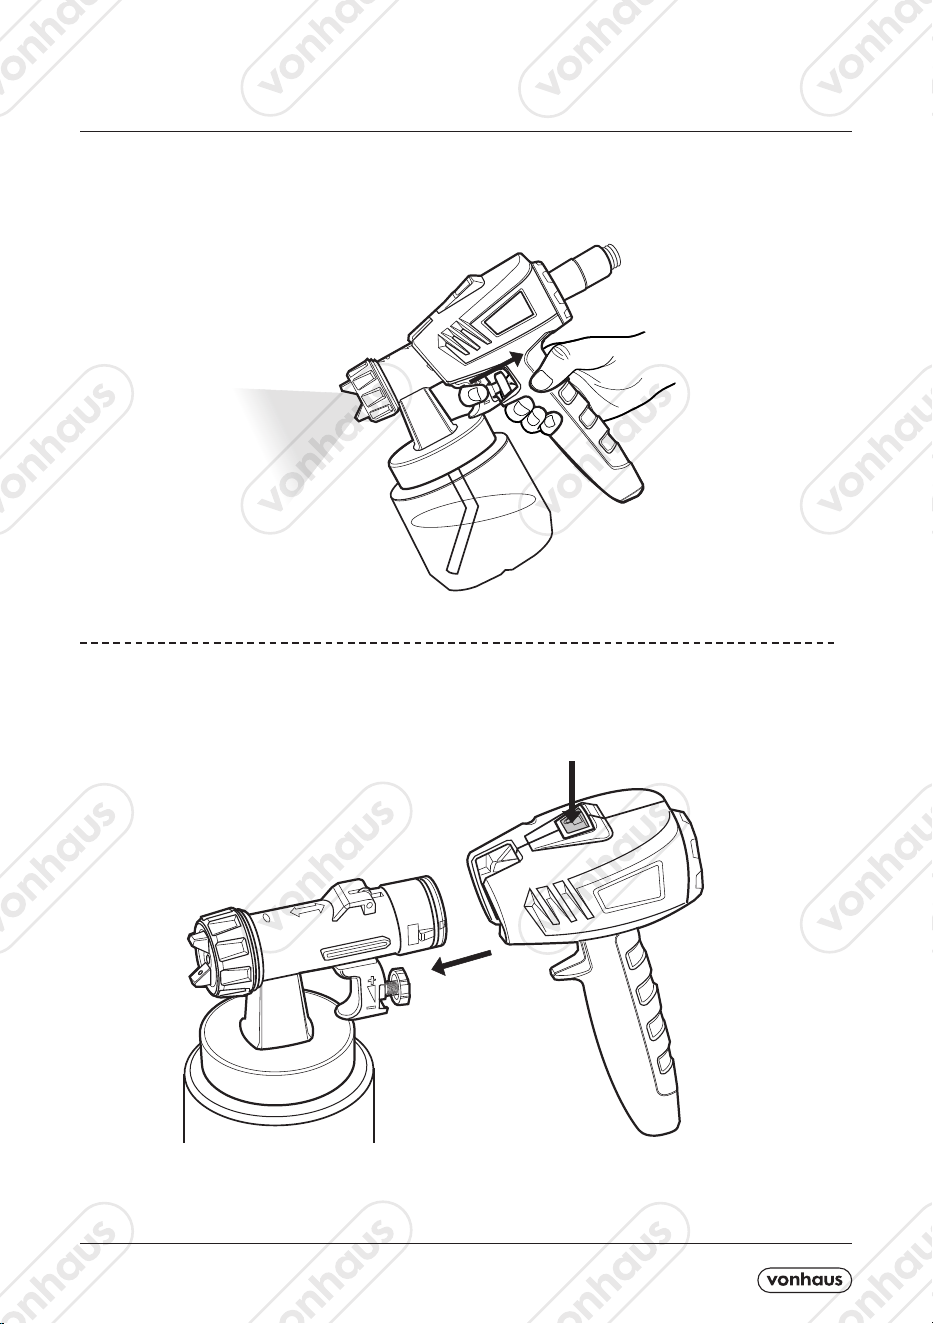
With the Main Unit switched back on, aim the Spray Gun at the sink or a large container and squeeze the
Trigger to discharge the water. Continue to do so until the water runs clear.
This will remove any remaining coating on the Nozzles and aid cleaning in the next stages.
CAUTION! Never run the Spray Gun with a completely empty container.
Switch the Main Unit back off, and disconnect from the mains outlet.
Press the Quick Release Button on the top of the Spray Gun and pull the the Nozzle unit to separate.
Securely sit the Spray Gun into the Seat on the Main Unit whilst cleaning is taking place.
Remove the container and clean again if required. Always check the sealant ring for damage and replace
if necessary to prolong the lifespan of the product.
A5P | 01
MAINTENANCE
If you notice a reduction in the performance of the Paint Station, this may indicate the filter
needs to be cleaned.
Simply unclip the Air Filter Cover at the front of the Main Unit.
Remove the filter and gently wash using warm water.
IMPORTANT! The filter must be thoroughly dry before re-inserting into the Main Unit
Click the cover back into place to secure.
Disassemble the Spray Gun Unit and clean thoroughly
using the Cleaning Brush (and Needle if required) supplied
with warm water and mild detergent.
Ensure all the accessories are completely dry before
reassembling.
A5P | 01
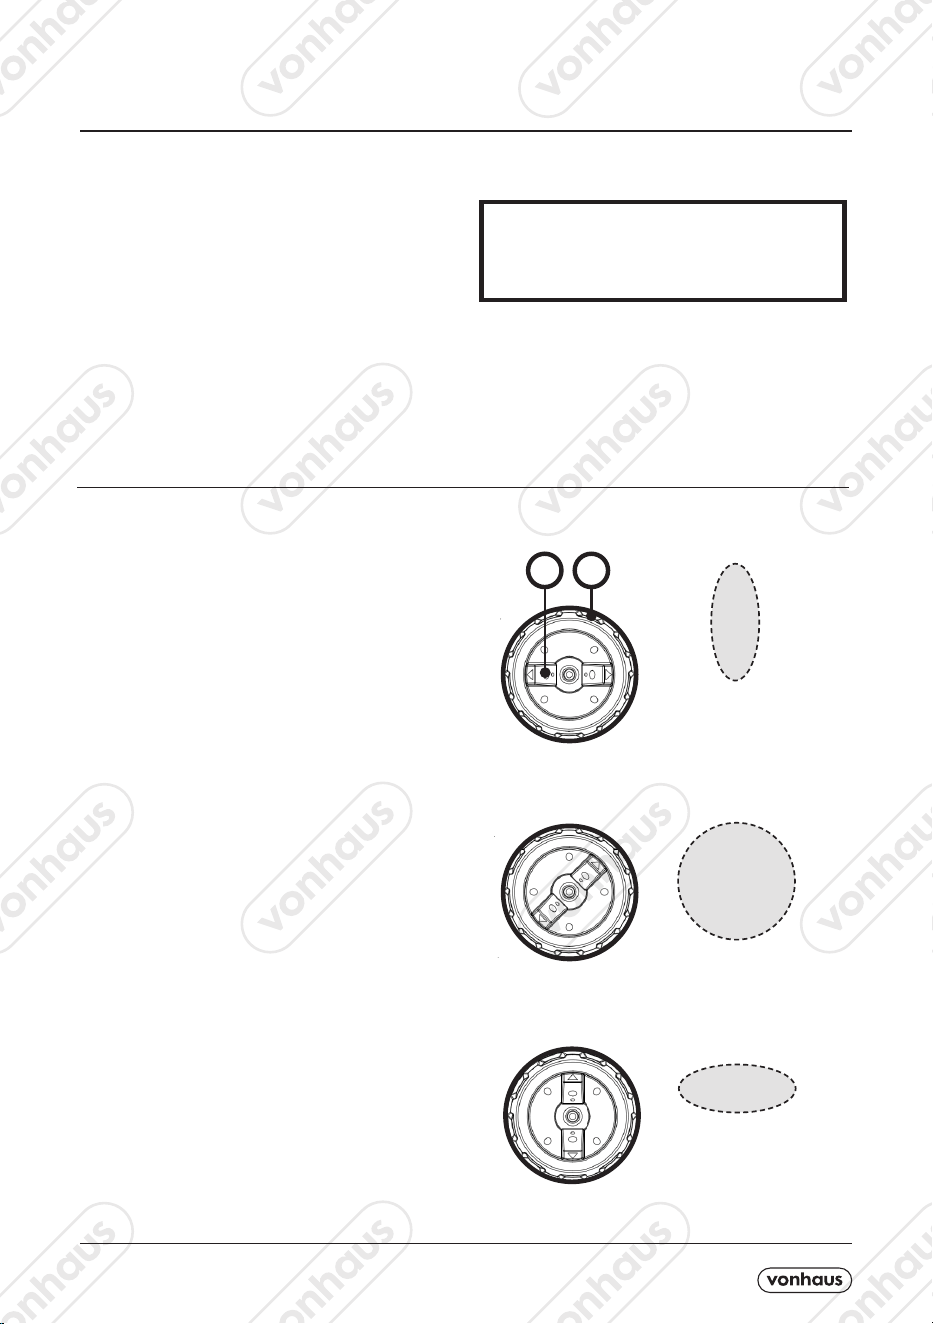
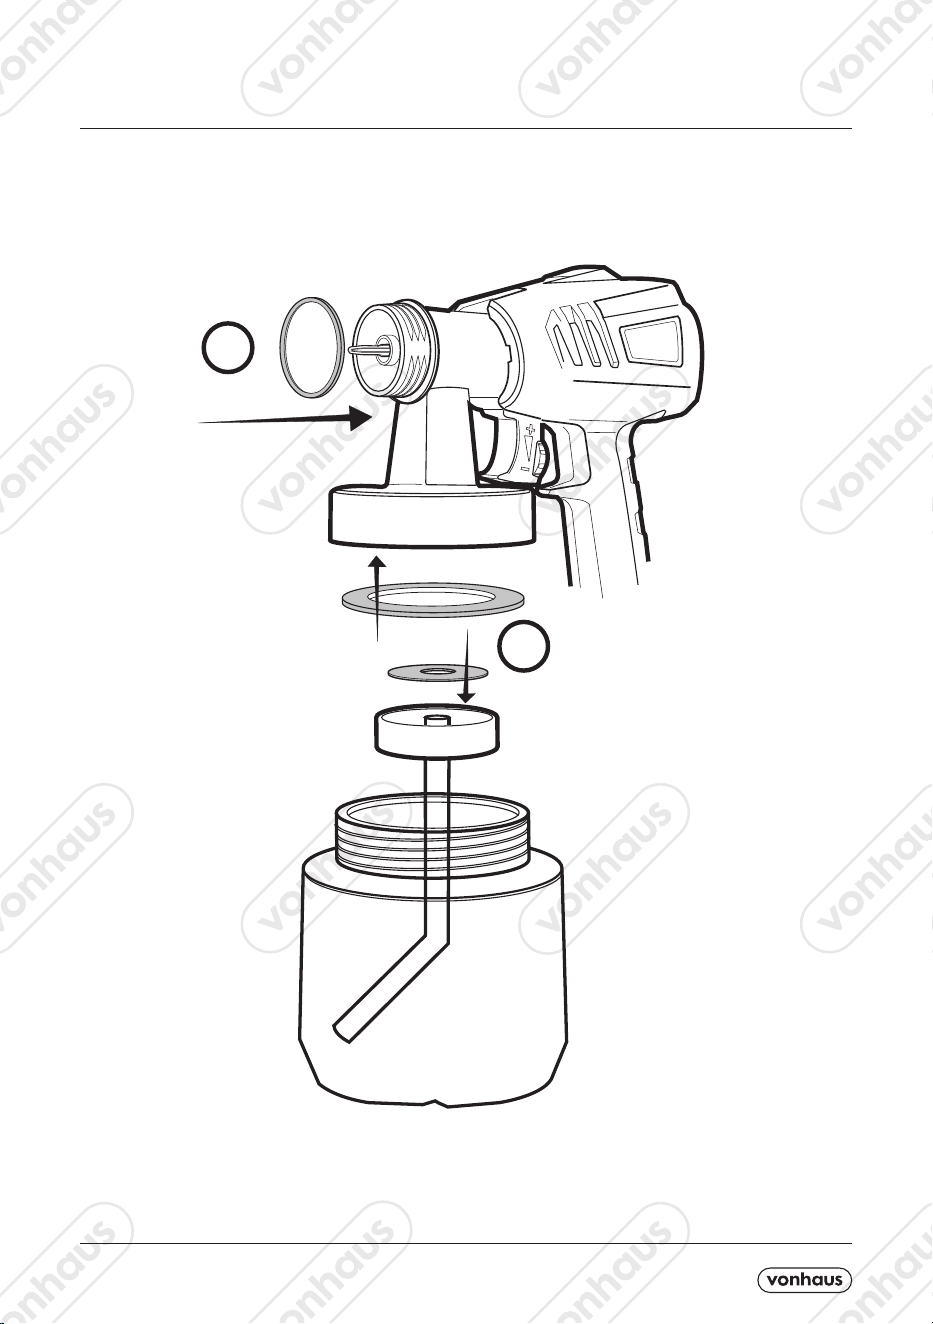
MAINTENANCE - SPARE SEAL REPLACEMENT
Regularly check the condition of the Seals and O-Ring. If you notice any signs of deterioration,
please use the spares that are supplied to prolong the lifespan of the Paint Station.
See the image below for reference on the position of the seals and O-Ring.
24
23

A5P | 01
T
PROBLEM CAUSE SOLUTION
LITTLE OR NO PAINT FLOW
MATERIAL LEAKING
SPRAY JET PULSATES
PATTERN RUNS/SAGS
PATTERN IS LIGHT & SPLOTCHY
1. Nozzle clogged
2. Suction tube clogged
3. Suction tube loose
4. No pressure build up
5. Air Filter clogged
1. Nozzle loose
2. Nozzle worn
3. Nozzle seal worn
4. Material build up on cap/nozzle
1. Clean
2. Clean
3. Insert
4. Tighten container
5. Change
1. Tighten
2. Replace
3. Replace
4. Clean
PAINT
ATOMISATION IS TOO COARSE
1. Viscosity is too high
2. Material volume too high
3. Nozzle clogged
4. No pressure build up
1. Decrease volume setting
2. Decrease volume setting
3. Clean
4. Tighten container
1. Material in container running out
2. Air Filter clogged
1. Refill
2. Clean
1. Applying too much Paint 1. Adjust flow or increase
movement of spray gun
TOO MUCH OVERSPRAY
1. Spray gun too far from spray
object
2. Too much material applied
1. Reduce distance
2. Decrease volume setting
1. Moving spray gun too fast
1. Adjust material flow or increase
movement of spray gun
TROUBLESHOOTING

A5P | 01
DISPOSAL INFORMATION Please recycle where facil-
ities exist. Check with your local authority for recycling
advice.
CUSTOMER SERVICE If you are having diculty using
this product and require support, please contact
WARRANTY To register your product and nd out if you
qualify for a free extended warranty please go to
www.vonhaus.com/warranty. Please retain a proof of
purchase receipt or statement as proof of the purchase
date. The warranty only applies if the product is used
solely in the manner indicated in the warnings page of
this manual, and all other instructions have been followed
accurately. Any abuse of the product or the manner in
which it is used will invalidate the warranty. Returned
goods will not be accepted unless re-packaged in its
original packaging and accompanied by a relevant and
completed returns form. This does not aect your stat-
utory rights. No rights are given under this warranty to a
person acquiring the appliance second-hand or for com-
mercial or communal use.
COPYRIGHT All material in this instruction manual are
copyrighted by DOMU Brands.Any unauthorised use
may violate worldwide copyright, trademark, and other
laws.
THANK YOU
Thank you for purchasing your product/appliance.
Should you require further assistance with your pur-
chase, you can contact us at
VonHaus is a registered trademark of DOMU Brands
Ltd. Made in China for DOMU Brands. M24 2RW.
C