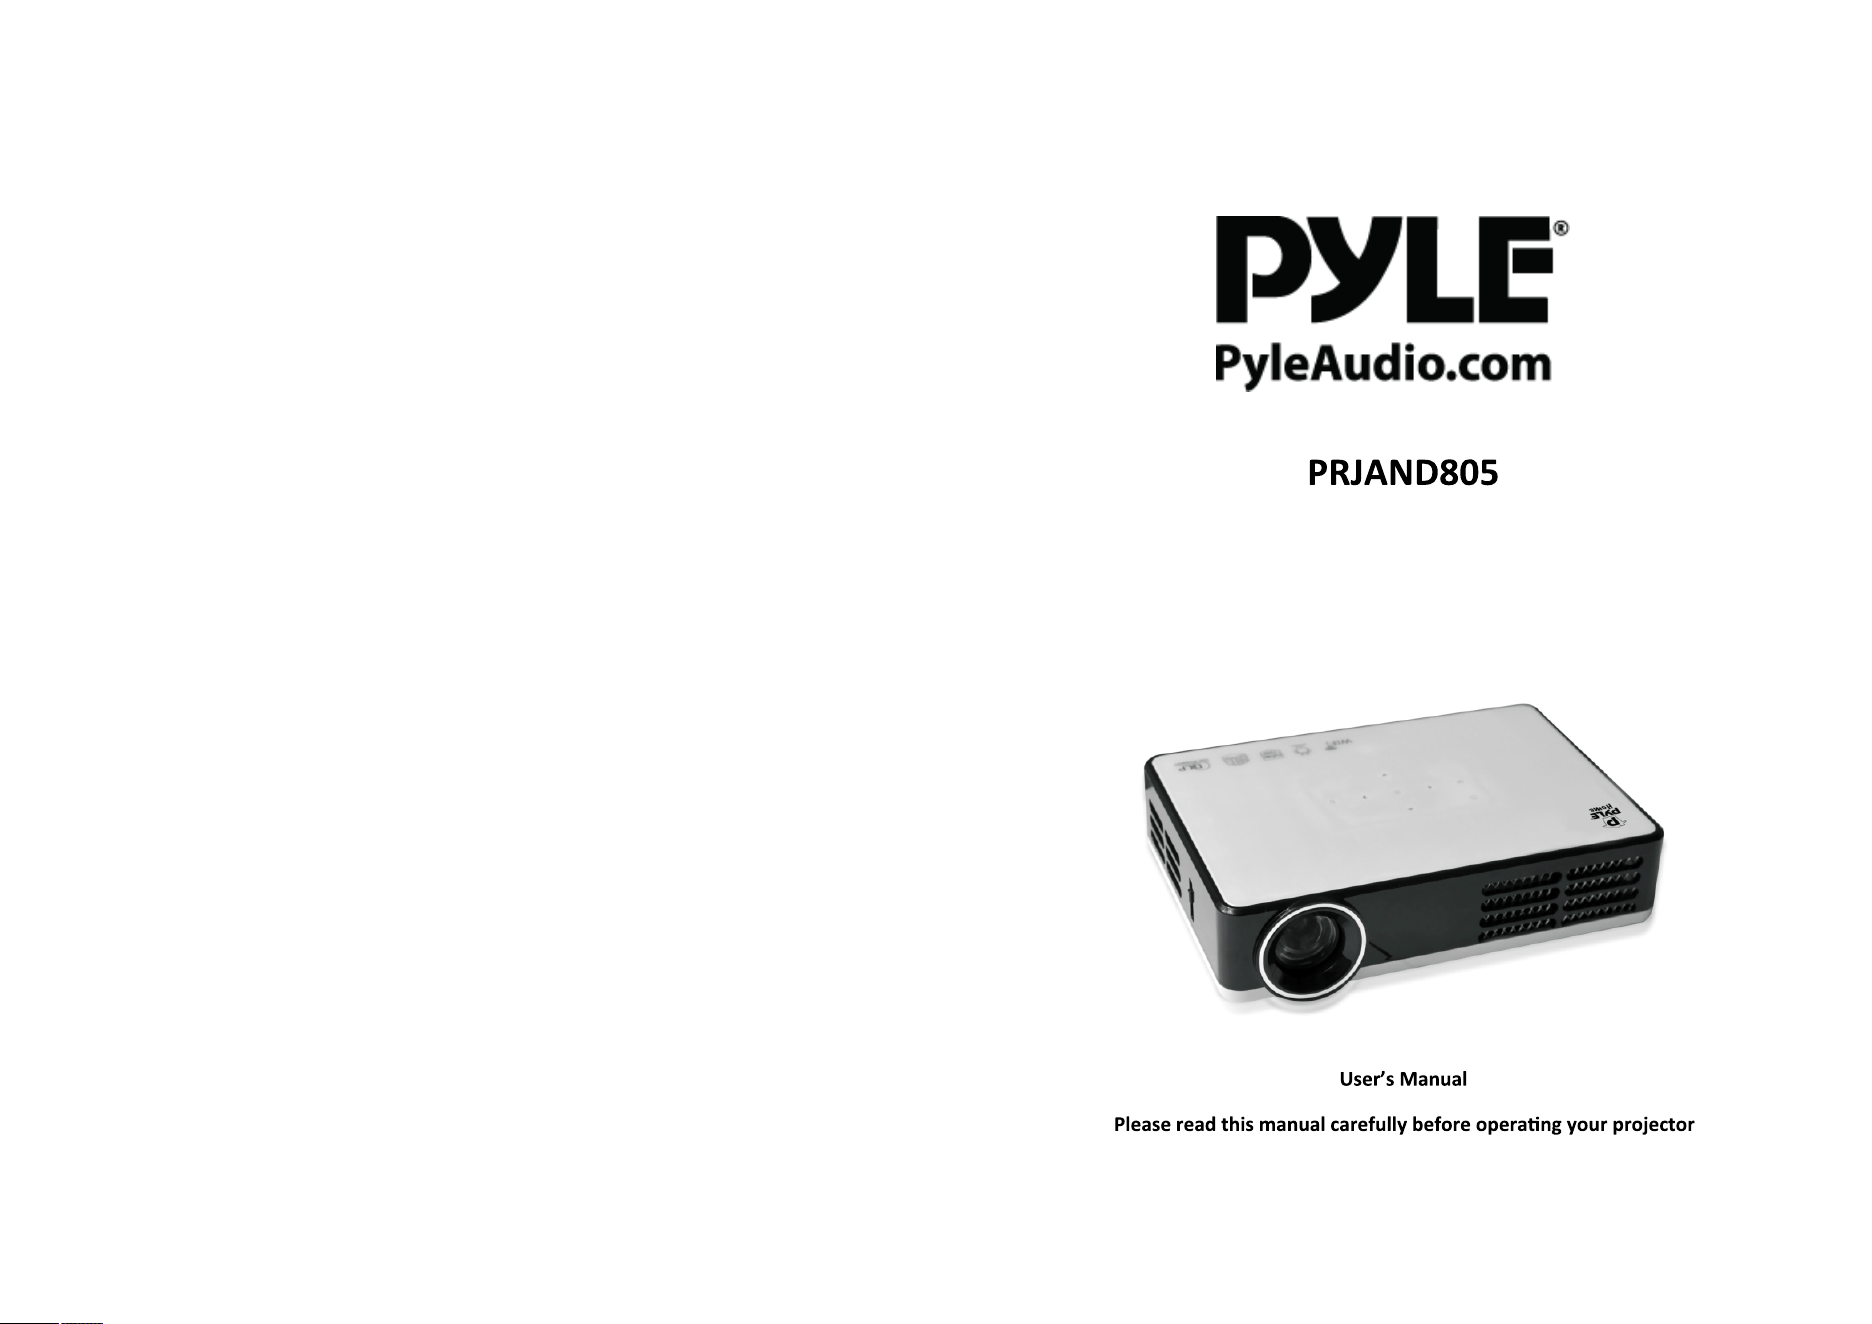
Android 4.2, Dual Core Processor,
3D Multimedia Stereo Mini Projector with Wi-Fi


Catalog
3D FUNCTION 28
Before Watching 3D 28
-
While Watching 3D
28
Requirements for Watching 3D Images
29
- To Use DLP-LINK (DLP-Ready) Type Glasses
30
Watching 3D Images 32
Customizing Settings 33
'' SET UP'' Menu 33
Picture settings 34
Sound Settings 36
Time Settings 37
Opitions settings 39
Making Connections 40
Connecting to an HD Receiver, DVD, or VCR Player
41
- HDMI Connection 41
Connecting to a PC 41
- RGB connection 41
42
- Component Connection 43
Connecting to headphone
43
Maintenence 46
Cleaning the projector 46
- Cleaning the projector lens 46
- Cleaning the projector Case 46
Specifications 47
Licences 1
Safety Instructions 2
Preparations 7
Accessories
7
Opitional Extras
8
Parts and Components
9
Installation 10
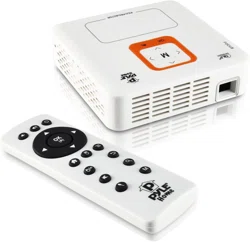
Remote control 13
Using the projector 15
Watching projector 15
Turning on the projector 15
- Music list 25
- File list 26
Catalog
- Installation Precautions 10
- Projection Distance per Screen Size 11
- How to Install the Projector
Using a Tripod
12
Andriod
Andriod specifications
44
How to use Andriod
44
44
- Entering WIFI Home Page
- Select or flip
-
My Application
- Wi-Fi Settings
- Installation and removal procedure
44
44
44
45
45
- Languages and Inputs
45
-
- Focus and Position of the Screen Image 15
- Watching projector 15
Using Additional Options 16
- Adjusting Aspect Ratio 16
- Using the Keystone Function 17
- Using the Input List 17
ENTERTAINMENT 18
MEDIA 18
- Connecting USB Storage Devices 18
-
Movie list
20
- Photo list 24
Connecting to the AV input
1
Licences
Licences
CAUTION
Image shown may differ from your projector.
Your projector’s OSD (On Screen Display) may differ slightly from that shown
in this manual.
As an A-class product, the projector may cause radio interference
Users shall take effective measures to deal with it.
2
SAFETY INSTRUCTIONS
Indoor installation
CAUTION
SAFETY INSTRUCTIONS
Please take note of the safety instructions to prevent any potential
accident or misuse of the projector.
The lightning flash with
arrowhead symbol, within
an equilateral triangle, is
intended to alert the user to the
presence of uninsulated “dangerous
voltage” within the product’s
enclosure that may be of sufficient
magnitude to constitute a risk of
electric shock to persons.
WARNING/CAUTION
-
TO REDUCE THE RISK OF FIRE
AND ELECTRIC SHOCK, DO NOT
EXPOSE THIS PRODUCT TO RAIN
OR MOISTURE.
The exclamation point
within an equilateral
triangle is intended to alert
the user to the presence
of important operating and
maintenance (servicing) instructions
in the literature accompanying the
appliance.
Read these instructions.
Keep these instructions.
Heed all warnings.
Follow all instructions
Do not place the projector in direct
sunlight or near heat sources such as
radiators, fires, stoves, etc.
- This may cause a fire.
Do not place flammable materials
such as aerosols near the projector.
- This may cause a fire.
Do not allow your children to cling to
or climb up to the projector.
- The projector may fall down and cause
personal injury or death.
Do not place the projector directly on
a carpet, rug or place where ventilation
is restricted such as a book shelf or closet.
- This may cause the projector's internal
temperature to rise and cause a fire.
Do not place the projector close to
sources of steam or oil such as a
humidifier or kitchen counter.
- This may cause a fire hazard or an electric shock.
Do not place the projector where it
might be exposed to excessive dust.
- This may cause a fire.
•
•
•
•
•
•
3
SAFETY INSTRUCTIONS
,
如浴室等潮湿的环境
- 可能导致火灾或触电。
不要堵塞通风孔。
- 可能造成投影机内部温度过度升高
而导致火灾。
为便于通风,投影机和墙之间的距离
应大于 30 厘米。
- 否则,可能造成投影机内部温度过
度升高而导致火灾。
Caution
Power
Caution
-
48
SPECIFICATIONS
HDMI/DVI-DTV
supported mode
Resolution
Horizontal
Frequency
(kHz)
Vertical
Frequency
(Hz)
720*480 31.469
31.5
59.94
60
720*576 31.25 50
1280*720 37.5
44.96
45
50
59.94
60
1920*1080 33.72
33.75
28.125
26.97
27
33.716
33.75
56.25
67.43
67.5
59.94
60
50
23.97
24
29.976
30.00
50
59.94
60
Component port connecting information
Signal
Component
480i / 576i
o
480p / 576p o
720p / 1080i o
Supported Monitor Display
Resolution
(KHz) (Hz)
640*350 31.468 70.09
720*400 31.469 70.08
640*480 31.469 59.94
800*600 37.879 60.31
1024*768 48.363
60.00
119.99
1152*864 54.348 60.053
1280*800 49.68 60
1360*768 47.712 60.015
1280*1024 63.981 60.020
1400*1050 65.317 59.979
1680*1050 65.3 60
Do not use the projector in a damp
place such as a bathroom where it is
likely to get wet.
- This may cause a fire or an electric shock .
Do not allow a tablecloth or curtain to
block the vents.
- This may cause the internal temperature
of the projector to rise andcause a fire.
The distance between the projector
and the wall should be more than 30
cm for ventilation purposes.
- Otherwise, this may cause the internal
temperature of the projector to
rise and cause a fire.
The earth wire should be connected.
- Inappropriate earth grounding may
cause damage to the projector or
an electric shock when there is an
electrical surge.If the projector must be
installed at a place where earth grounding
is not possible, purchase a circuit breaker
and connect the projector to its wall
outlet.Do not ground the projector to the
gas pipe, water pipe, lightning rod,
or telephone line, etc.
The power plug should be fully inserted
into the wall outlet.- Unstable connection may
cause a fire.
Do not place heavy objects on the
power cord or place the cord underneath
the projector.- This may cause a fire or an
electric shock.
Never touch the power plug with a
wet hand.- This may cause an electric shock.
Do not connect too many devices to
the same power extension.
- Overheating may cause a fire.
Remove dust or contaminants around
power plug pins or wall outlets.
- This may cause a fire.
To turn off the main power, remove
the power plug, which should be positioned
so it is easy to access for operation.
Horizontal
Frequency
Vertical
Frequency
If an invalid signal is input into the
projector, it will not be displayed
properly on the screen or a message
such as “No Signal” or “Invalid Mode”
will be displayed.
The projector supports the DDC1/2B type
as the Plug & Play function (Auto-recognition
of PC monitor).
PC synchronization signal types supported:
Separate type synchronization.
yyIn PC mode, 1280 x 800 is recommended
for the best picture quality.
•
•
•
•
•
•
•
•
•
•
•
•
When installing the projector on a
table, be careful not to place it near
the edge.Make sure that you use a stand
suitable for the size of projector.
Turn off the projector, disconnect the
power supply and remove all connections
before moving the projector.
- A damaged cord may cause a fire or an
electric shock.
Do not install the projector on an
unstable or vibrating surface such as
a vibrating shelf or tilted surface.
- It may fall and cause injury.
Be careful not to tip the projector over
When connecting external devices to the
projector.
- This may cause injury to persons or
damage to the projector.
•
•
•
4
SAFETY INSTRUCTIONS
CAUTION
When in Use
CAUTION
47
SPECIFICATIONS
SPECIFICATIONS
Operation
Environment
Hold the plug firmly when unplugging.
- A broken wire in the cord may cause a fire.
Ensure the power cord or plug is not
damaged, modified, severely bent,
twisted, pulled, sandwiched or heated.
Do not use a loose wall outlet.
- This may cause a fire or an electric
shock.
Keep the power cord away from any
heating devices.
- The cord coating may melt and cause an electric
shock.
Place the projector where people will
not trip over or tread on the power
cord or plug to protect the power
cord and plug from any damage.
- This may cause a fire hazard or an electric shock.
Do not turn the projector on or off by
plugging in the power plug or unplugging
it from the wall outlet.
(Do not use the power plug as a
switch.)
- This may cause an electric shock or
damage to the projector.
Do not insert a conductor into the
other side of the wall outlet while the
power plug is inserted into the wall
outlet.
In addition, do not touch the power
plug immediately after it is disconnected
from the wall outlet.
- This may cause an electric shock.
Use only the official power cord.
- Otherwise it may cause a fire or an electric
shock.
Do not use the projector near an
electronic device which generates a
strong magnetic field.
Store the vinyl envelope used to pack
the projector in a safe place away
from children.
- It could cause suffocation if used
improperly
Do not place anything containing
liquid, such as a vase, flowerpot, cup,
cosmetics, chemicals, decorations or
candles, etc., on top of the projector.
- Possible fire, electric shock , or falling
may cause physical injur y.
In the event that there is a big impact
to the projector or the cabinet is
damaged, switch it off, unplug it from
the wall outlet and contact an authorized
service center.
- Otherwise, this may cause a fire or an electric shock.
Do not insert pieces of metal such as
coins, hairpins or metal debris, nor
flammable materials such as paper or
matches into the projector.
- This may cause a fire or an electric shock .
In the event that liquid or a foreign
object falls into the projector, please
switch it off and unplug it from the
wall outlet and contact an HTP Service Center.
Otherwise, this may cause a fire or an electric shock.
When replacing a batter y of the remote
control, make sure a child does
not swallow the batter y. Keep the batter y
out of reach of children.
- In the case of a batter y being swallowed by a child,
please consult adoctor immediately.
Do not remove any covers except for
the lens cap. There is a high risk of
electric shock.
Do not look directly into the lens
when the projector is in use. The
strong light may damage your eyes.
When the lamp is on or has just been
turned off, avoid touching the air vent
or lamp because these will be ver y hot.
If there is a gas leak, do not touch
the wall outlet. Open the window for
ventilation. - A spark may cause a fire or burn.
Never touch the projector or power
cord during thunder or lightning.
- This may cause an electric shock.
•
•
•
•
•
•
•
•
•
•
•
•
•
•
•
•
•
•
•
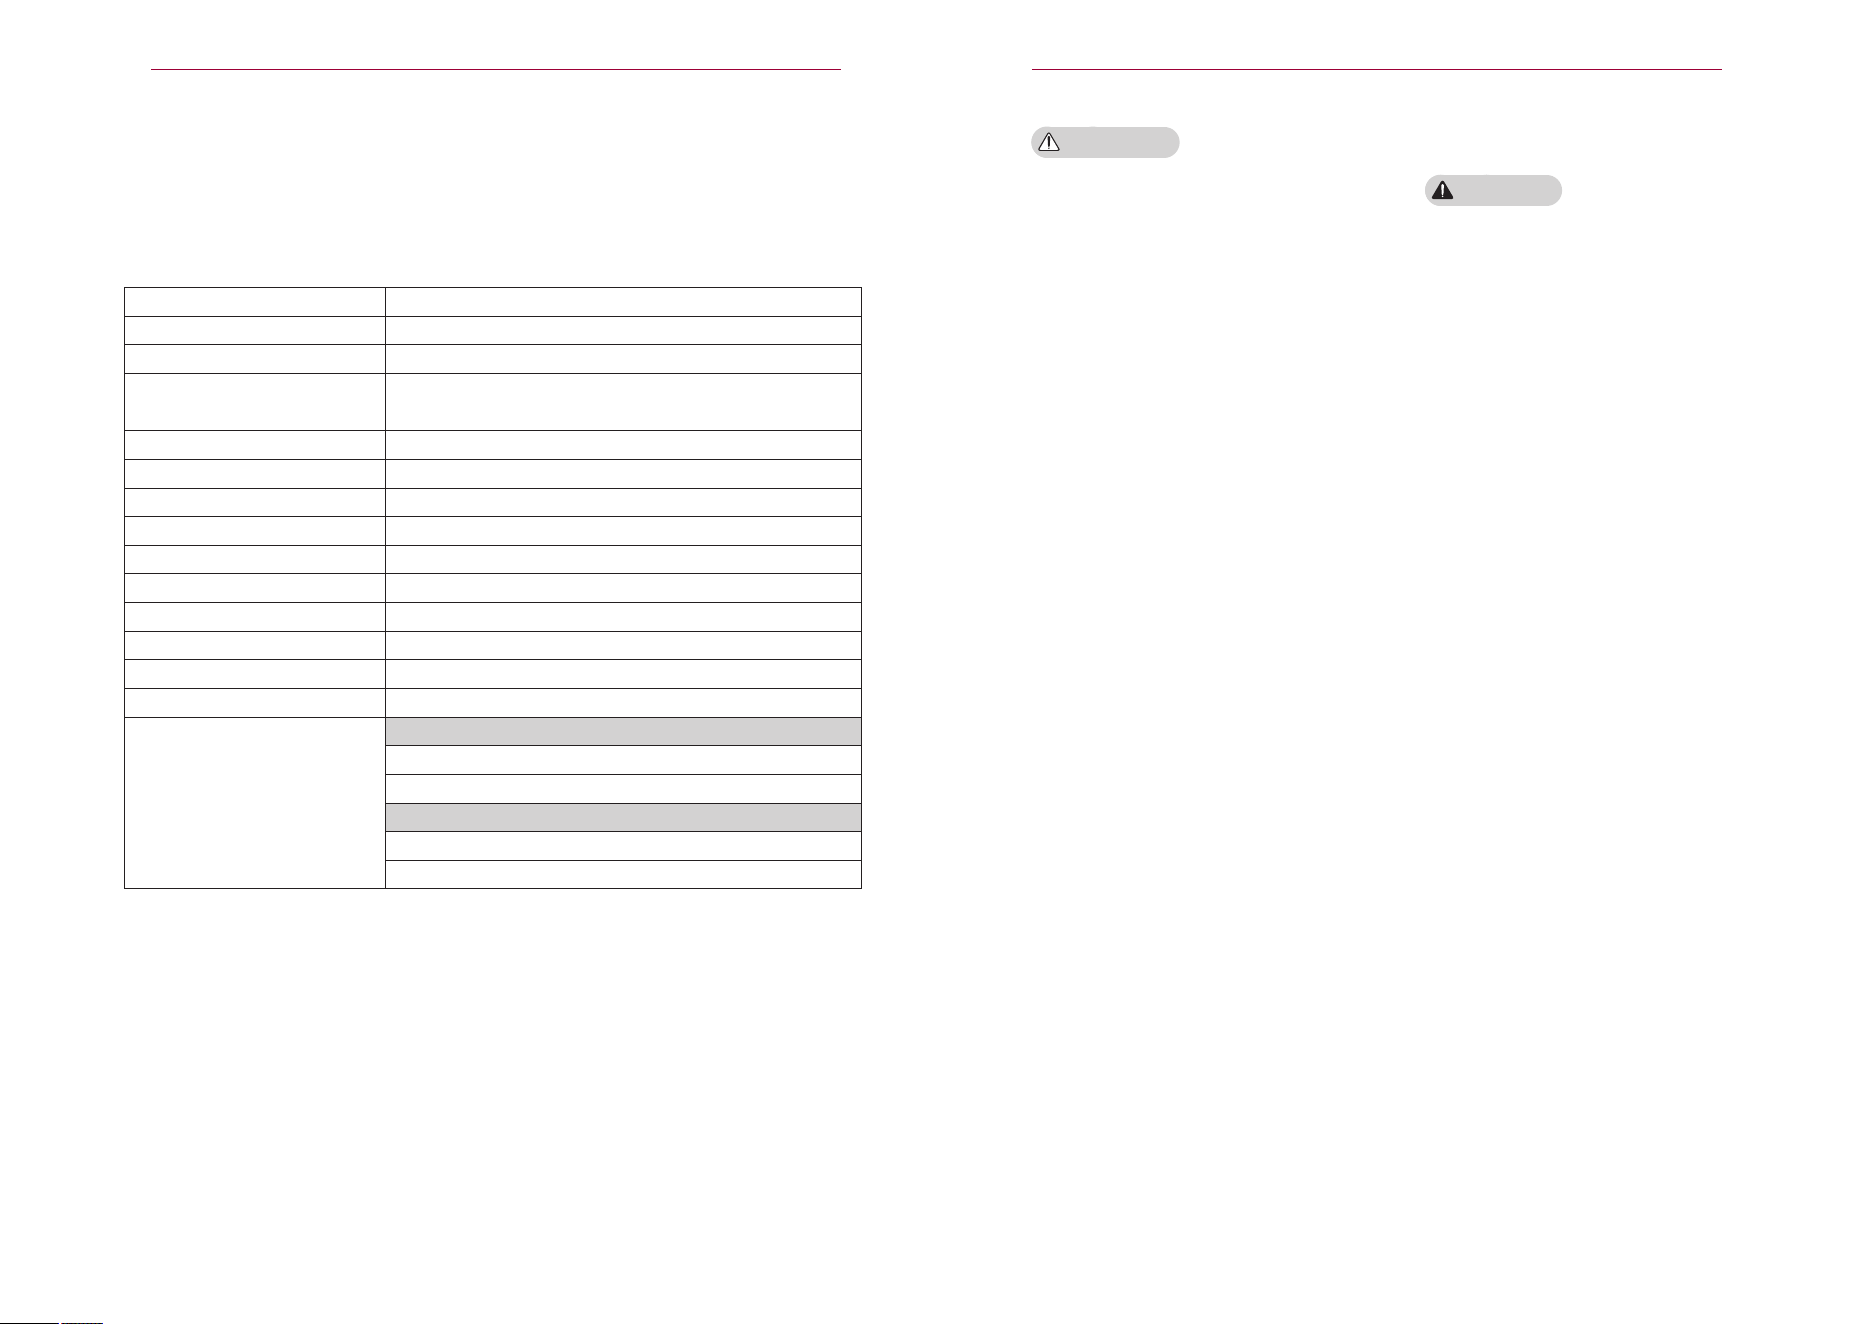
Resolution (pixel) 1280 (Horizontal) x 800 (Vertical)
Aspect Ratio 16:10 (Horizontal:Vertical) | (16:9 / 4:3 Support)
Panel size 0.45”
Projection Distance
(video size) 1’ - 10’
Ratio of Upward Projection 100%
Working Range of Remote 10 feet
Video Input NTSC M/PAL-B, D, G, H, I /PAL N/PAL 60/SECAM
AC-DC Adapter 110/120V 19 V, 3.7A
Audio Output 1W + 1W
Height 1.45” (without stand) to 1.57” (with stand)
Width 6.4”
Depth 4.4”
Weight 3.55 lbs
USB Device 5 V, 0.5 A (Max.)
Temperature
Operation
Storage
RelativeHumidity
Operation
Storage
32℉-104℉
0%-80%
0%-85%
-4℉-140℉
5
SAFETY INSTRUCTIONS
CAUTION
CLEAN
WARNING
CAUTION
46
MAINTENANCE
MAINTENANCE
Do not use 3D glasses if you do not
watch 3D.
Do not keep your hand on the projector
for a long time when it is running.
When you play a game by connecting
a game console to a projector, it is
recommended that you maintain a
distance of more than four times the
diagonal length of the screen.
Make sure that the length of
connecting cable is long enough.
Otherwise, the product may fall
causing personal injury or damage to
the product.
Do not place a heavy object on the
projector.
- It may fall down and cause physical
injury.
Be careful to prevent the lens from
heavy impact during transportation.
Do not touch the lens.
The lens may be damaged.
Do not use any sharp tools on the
projector such as a knife or hammer,
because this may damage the casing.
In the event that no image appears
on the screen, switch the projector
off, unplug it from the wall outlet and
contact an authorized service center.
- Otherwise, this may cause a fire or
an electric shock.
Do not drop an object onto the projector
or apply heavy pressure to it.
- This may cause injury to persons or
damage to the projector.
The distance between your eyes
and the screen must be around 5 -
7 times the diagonal length of the
screen.
- If you watch the screen at a close
distance for a long time, your eye
sight may become worse.
Do not spray the projector with water
when cleaning. Do not allow water to
go into the projector or do not allow it
to get wet.
- This may cause a fire or an electric shock .
When there is smoke or a strange smell coming
out from the projector or a foreign object falls
into the projector, please switch it off and unplug
it from the power outlet and contact HTP.
- If not, this may cause a fire or an electric shock.
Use an air spray or soft cloth or
cotton swab moistened with a lens
cleaning chemical or alcohol to
remove dust or stains on the front
projection lens.
Contact your seller or the Service
Center once a year to clean the internal
parts of the projector.
- If you do not clean the contaminated
interior of the projector for a long
time, there may be a fire or damage
to the projector.
When cleaning plastic parts such as
the projector case, unplug the power
first and wipe with a soft cloth. Do
not spray with water or wipe with a
wet cloth. When cleaning the plastic
parts, such as the projector case,
do not use cleanser, automobile or
industrial shiner, abrasive or wax, benzene,
alcohol, etc., which can damage
the product.
- This can cause fire, electric shock or
product damage (deformation, corrosion
and damage).
Clean your projector to keep it in optimum condition.
Cleaning the Projector
Cleaning the Lens
If there is any dust or staining on the
lens surface, you must clean the lens.
Use an air spray or a cleaning cloth to
clean the lens.
To remove dust or stains, use an air
spray or apply a small amount of cleaning
agent onto a swab or soft cloth to
lightly rub the lens.
Please be aware that liquid may flow
onto the lens if the product is sprayed
directly onto the lens.
Cleaning the Projector Case
To clean the projector case, first unplug
the power cord.
To remove dust or stains, use only a dry,
lint-free, nonabrasive cloth to polish the
lens.
Do not use alcohol, benzene, thinners
or other chemicals, which may damage
the case.
•
•
•
•
•
•
•
•
•
•
•
•
•
•
•
•
4
Wi-Fi setting
PRESS SETTING BUTTON TO ENTER INTO WIFI
5
45
ANDROID
6
SAFETY INSTRUCTIONS
OTHERS
WARNING
CAUTION
Only a qualified technician can disassemble
or modify the projector. For
inspection, adjustment, or repair, contact
your seller or the Ser vice Center.
- Otherwise, this may cause a fire or
an electric shock.
Dispose of the used battery properly.
- Otherwise, this may result in
explosion or fire.
The correct method of disposal may
vary depending on your countr y
or region. Dispose of the battery
pack according to the appropriate
instructions.
Do not throw or disassemble the
battery.
- Otherwise, this may result in fire or
explosion due to damage to the
battery.
Always use batteries approved and
certified by LG Electronics.
- Otherwise, this may result in fire or
explosion.
Store the batter y away from metallic
objects, such as keys and paper clips.
Excess current may cause a rapid
increase in temperature, resulting in
fire or burns.
Do not store the battery near any
heat source, such as a heater.
- This may result in fire or damage
the product.
Do not store it at temperatures higher
than 60 °C or in high humidity.
Keep the battery out of reach of children.
- This may result in personal injur y or
damage to the product.
Make sure that the batter y is installed
correctly.
-Incorrect batter y replacement may
cause fire.
Unplug the power cord if the projector
is not used for a long period.
- Accumulated dust may cause
overheating, an electric shock from
corroded insulation and a fire from an
electrical surge.
Only use the specified type of battery.
- Otherwise, this may cause an electric
shock caused by overheating and leakage.
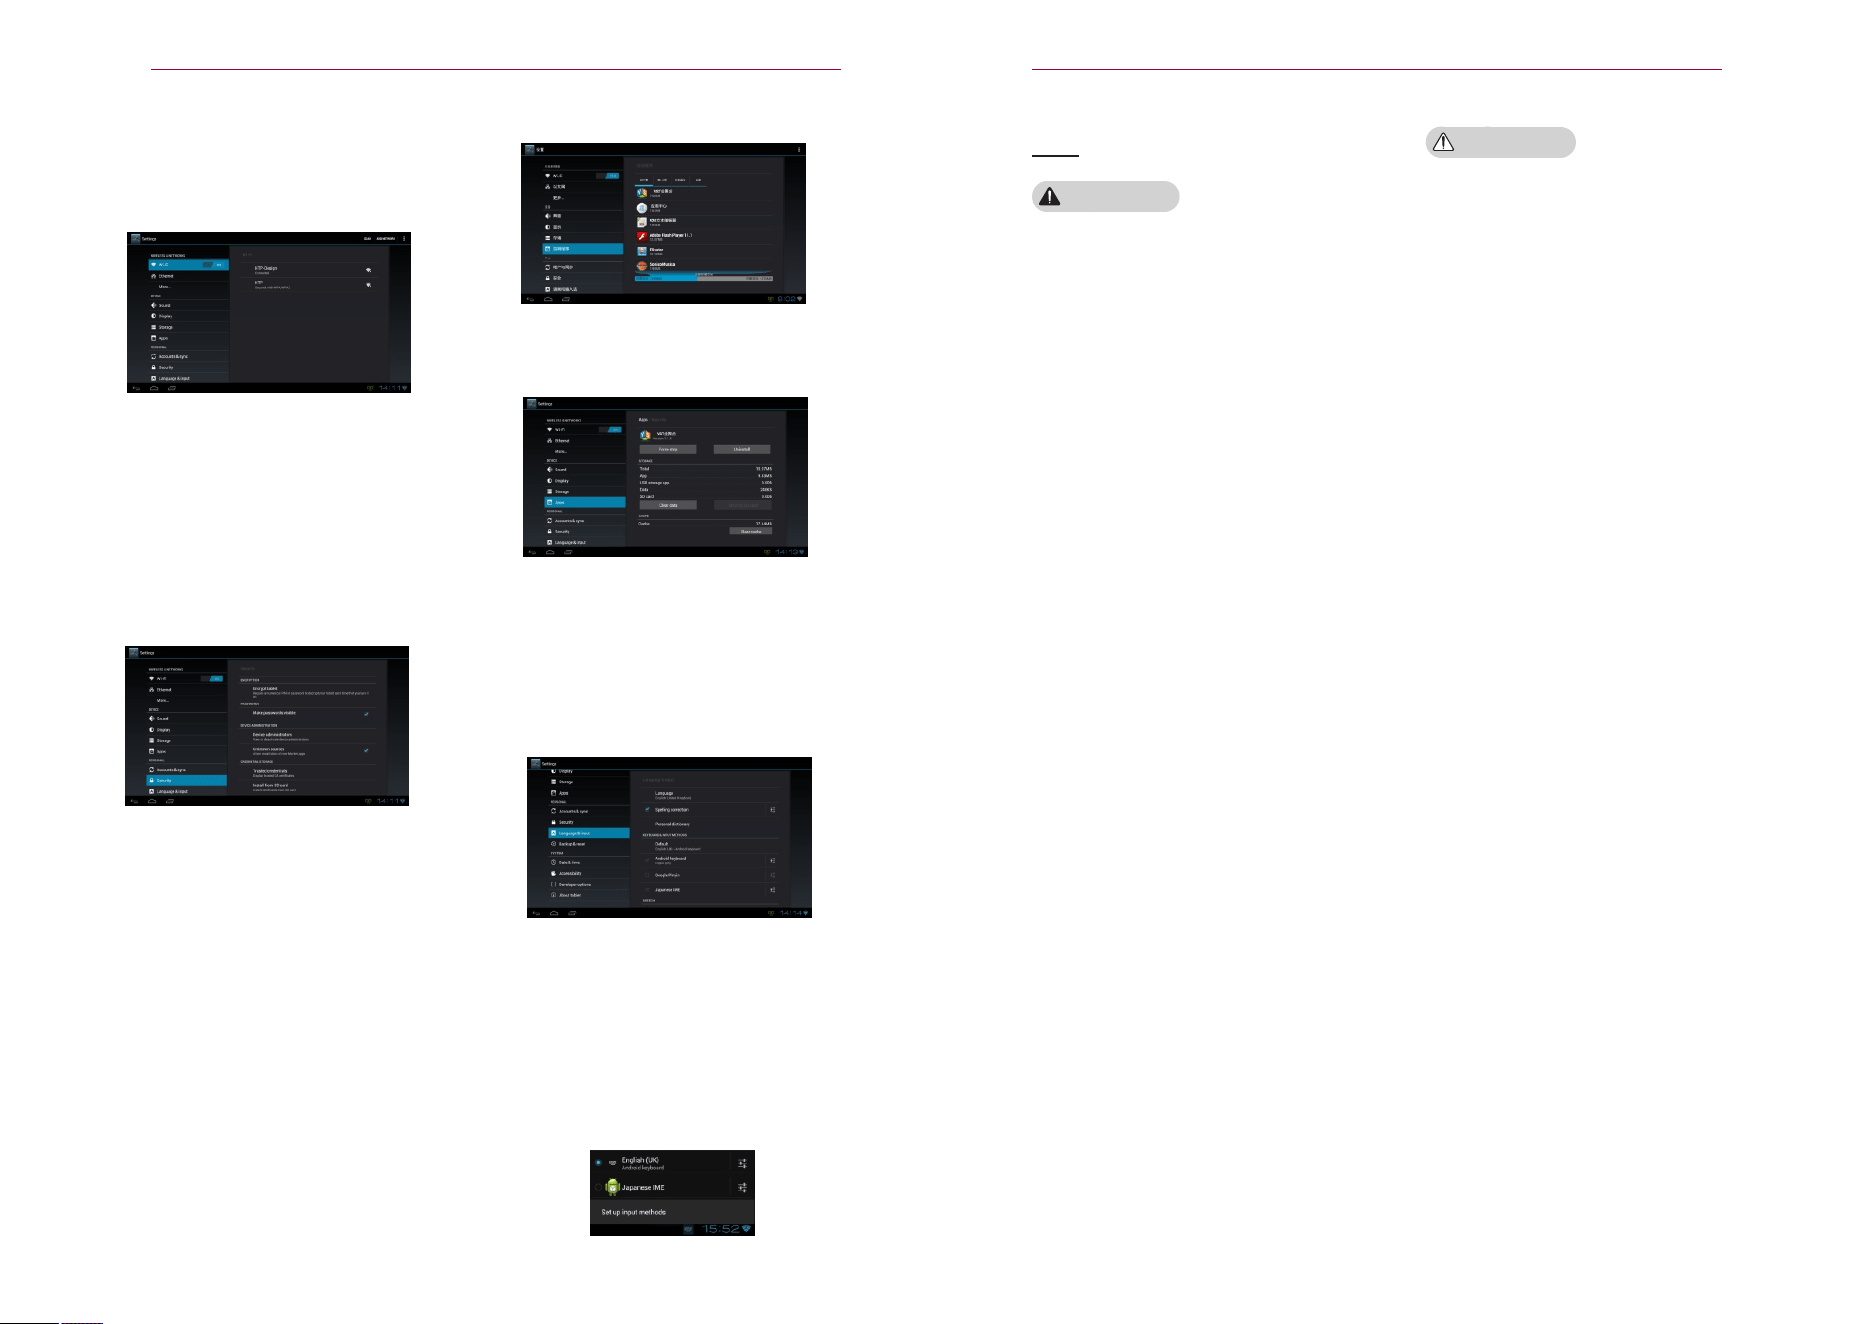
Installation and removal procedure
* setting unknown source
Please use the GOOGLE MARKET program,
If you install none GOOGLE MARKET recognition
program, please set the installation of the unknown
source at “Settings" - "security":
*The installation of the program
Please download the different application software
from the Internet. You must use the APK program;
download a good program, Click Install,
you can also from other storage The device Android
program (online; Download the program will be displayed
in the status bar, or Enter the toolbar Click to download
software, click Install)
*Remove program
Enter the settings - "application", will
set up.
* Click need to delete the software icon,
it will delete dialogue interface.
Click on the "uninstall", you can
delete the software.
Language and Input6
Select the language and common
input methodPlease use the "set" - "
language and input"
Different users from different countries and
regions, select and install his local input
method software, and do related settings.
* Switch the input method
When you click on any of the input box, you
can set your expected input method click
on the bottom right of the desktop.State bar
of the keyboard label, will immediately
appear a variety ofinstalled input methods
for your you choice.
•
•
•
•
•
•
•
•
•
•
•
•
•
44
ANDROID
USING ANDROID
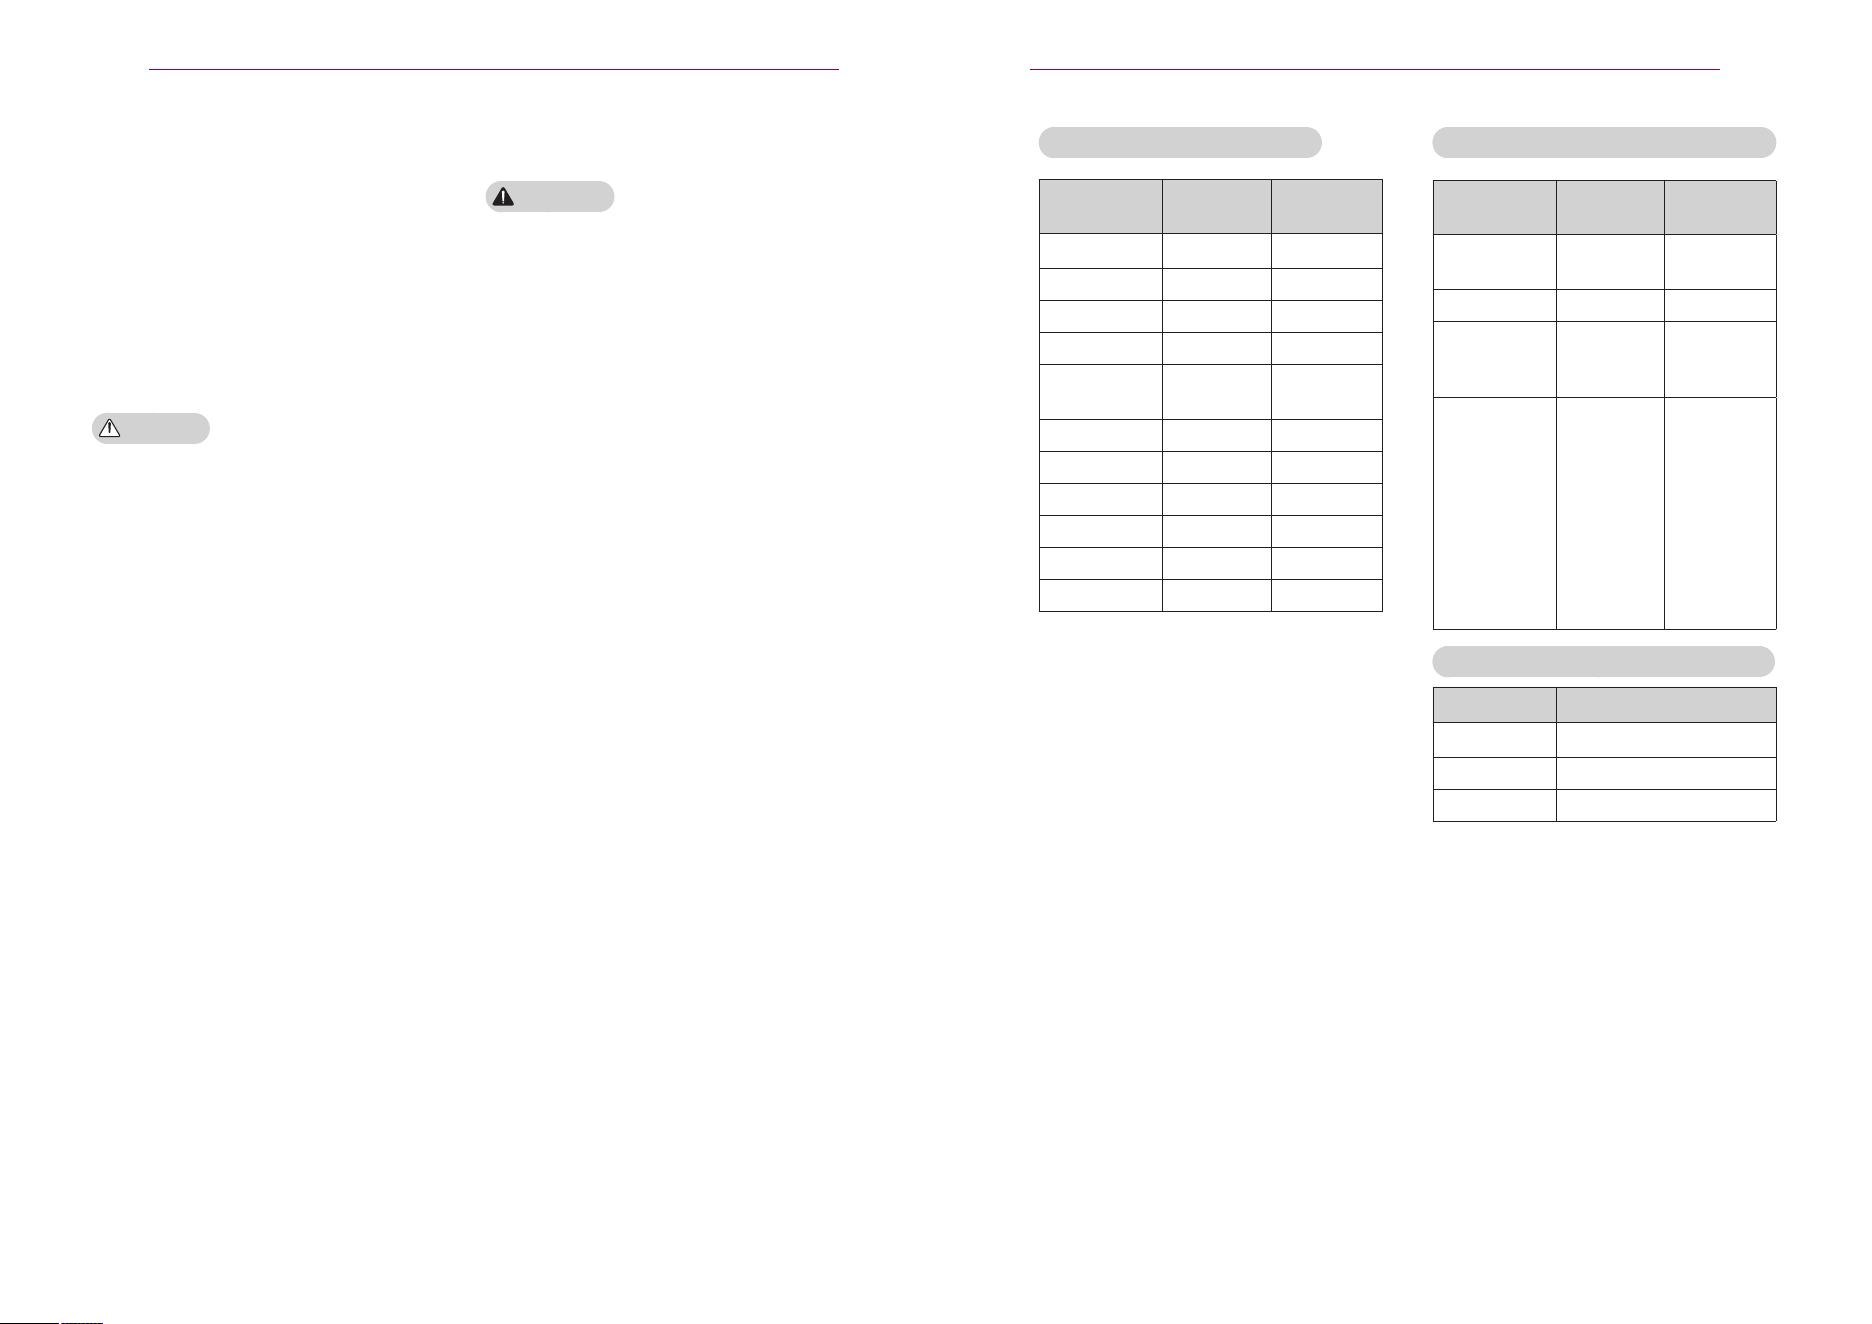
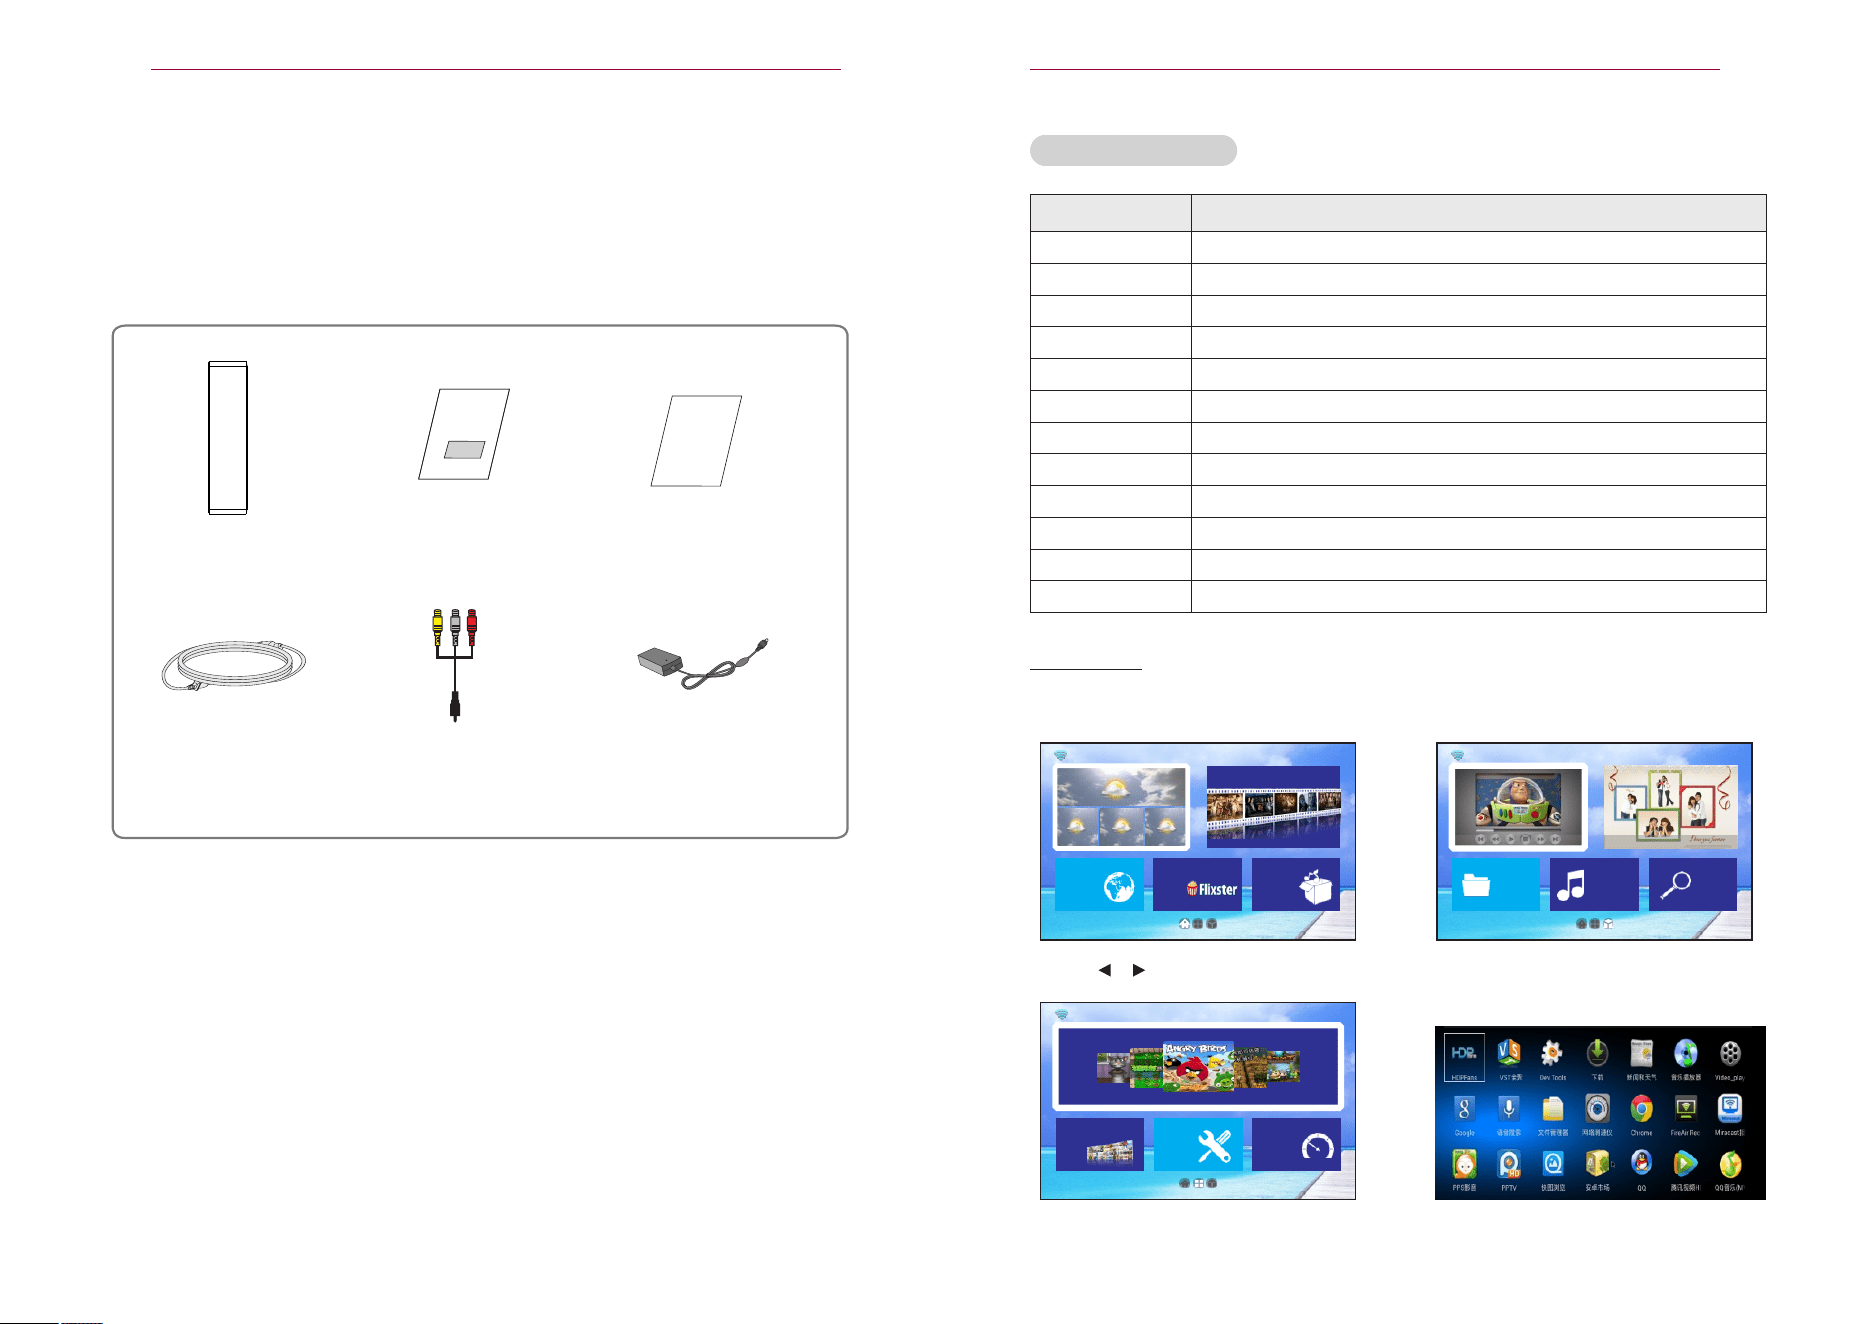
ITEM DESCRIPTION
CPU
USB OTG
Support Text
DRAM
CPU SYSTEM
Language
NAND Flash
Support video
WIFI
Support audio
USB
Support picture
DUAL CORE PROCESSOR 1.2GHz
1piece
PDF、WORD、EXECEL、PPT、TXT
1G DDR3 RAM, 4GB Flash Memory
Android 4.2
English
4G
MPEG4、AVI、FLV、WMV、3PG、MP4、TS、DAT、WKV、MOV
SUPPORT 802.11 b/g/n
MP3、WMA、WAV、APE、FLAC、AAC、OGG
1 piece
JPEG、BMP、GIF、PNG
ANDROID SPECIFICATIONS
YouTuBe
Music online
Flixster
Internet surfing
01:14
2013-08-31
Suzhou
Cloudy
Saturday
24℃~29℃ Humidity:45%
24℃~29℃ 21℃~31℃ 25℃~32℃
Cloudy
Cloudy
Cloudy
Sunday
Tuesday
1
2
SETTING
ANGRY BIRDS
App Market
My application
Search
Music on
File browsing
COLORFUL PHO1TOS
COLORFUL PHOTOS
3
Use or buttons to select items or flip
7
PREPARATION
PREPARATION
Accessories
.
Remote Control
Composite Gender
AC-DC Adaptor
Power cord
Warantee Card
Check enclosed accessories.
The picture may be different from an actual product.
User's Manual
Monday
Using the Android, the signal source, press the S button.
Switch to Android, Android system into the main interface.
Internet Connection Test
Click on the "my application", will appear
all the procedure tool icons.
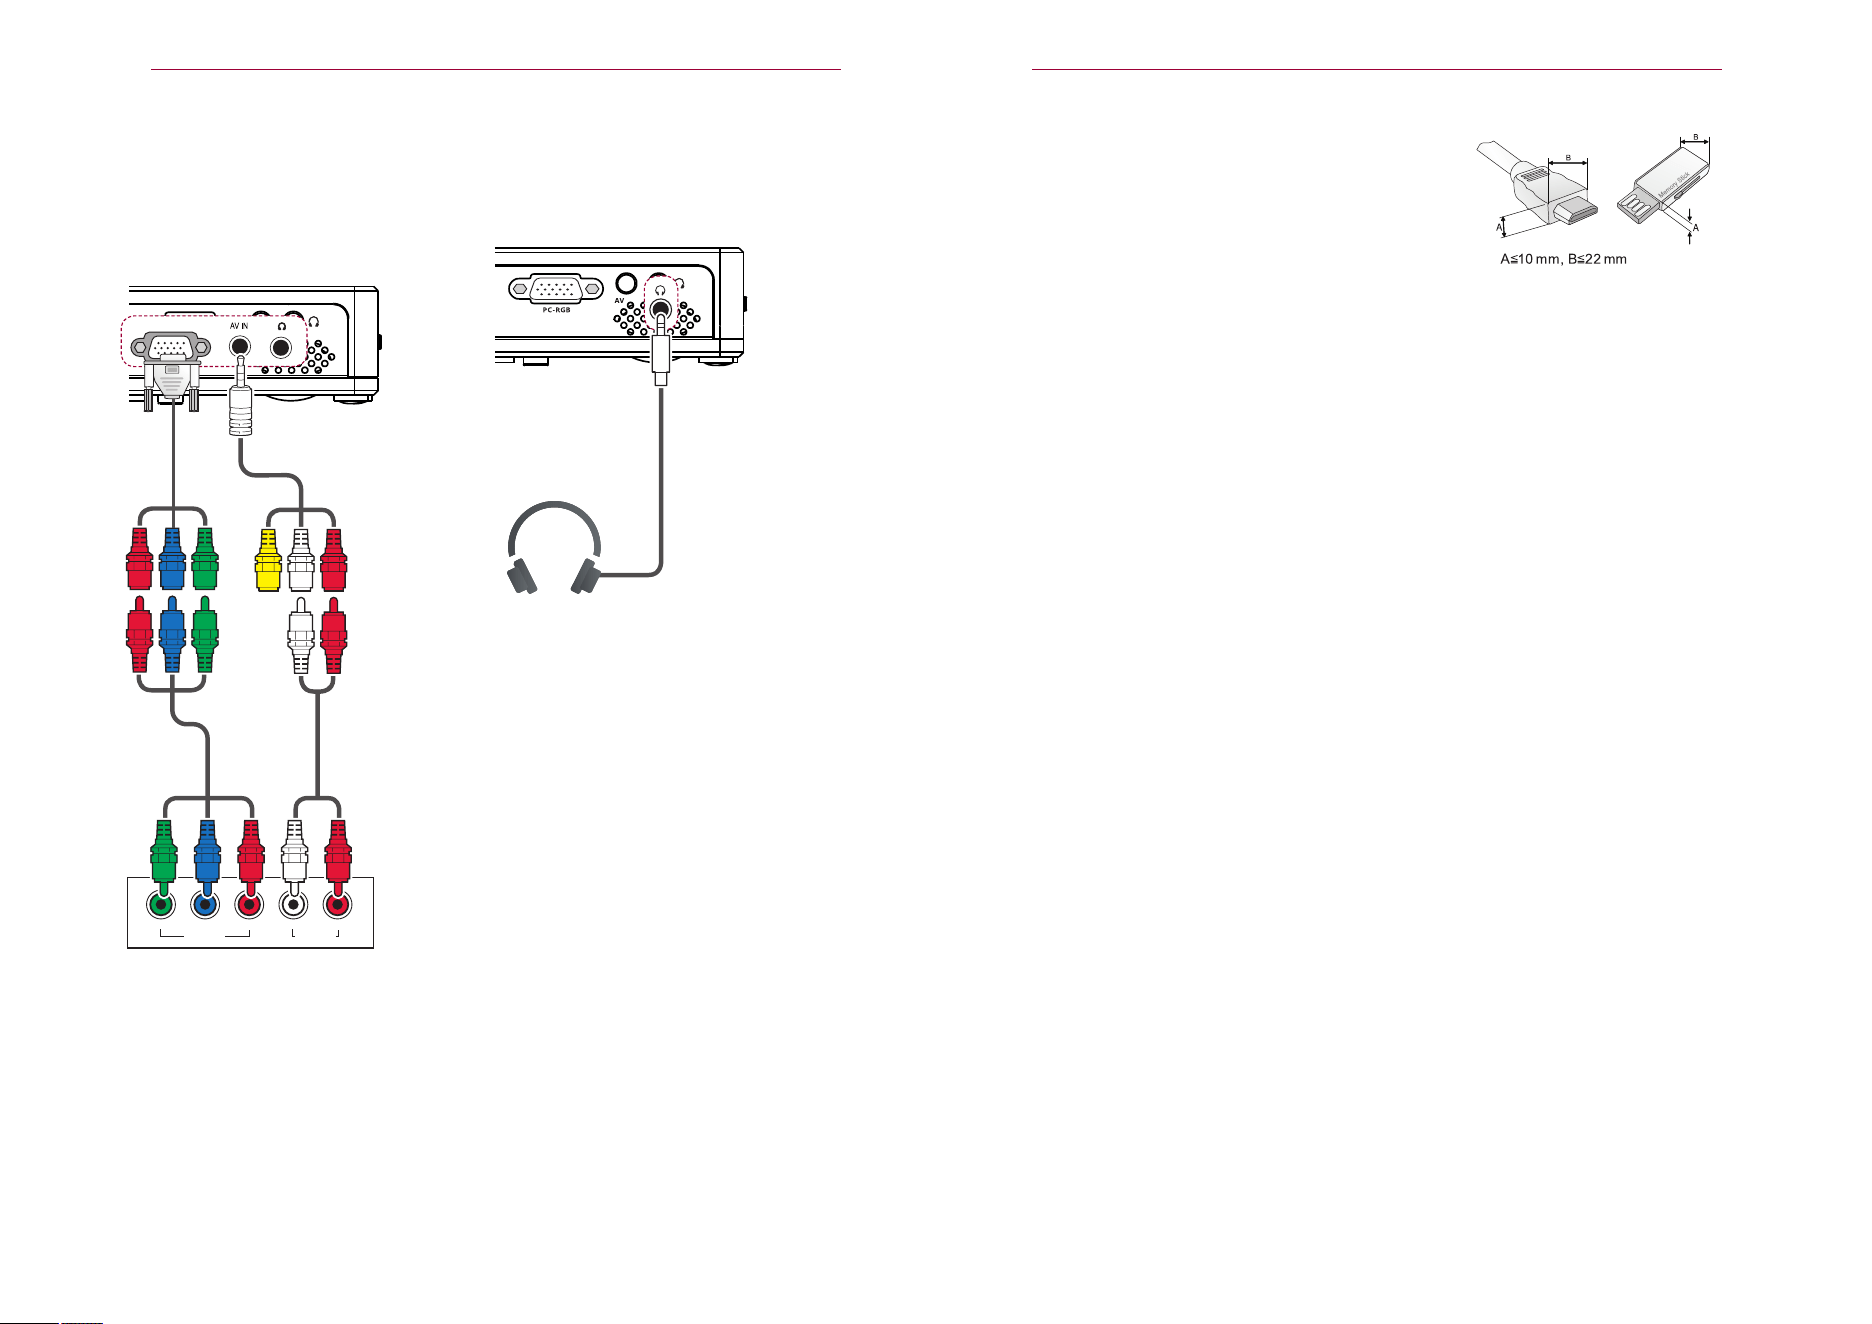
43
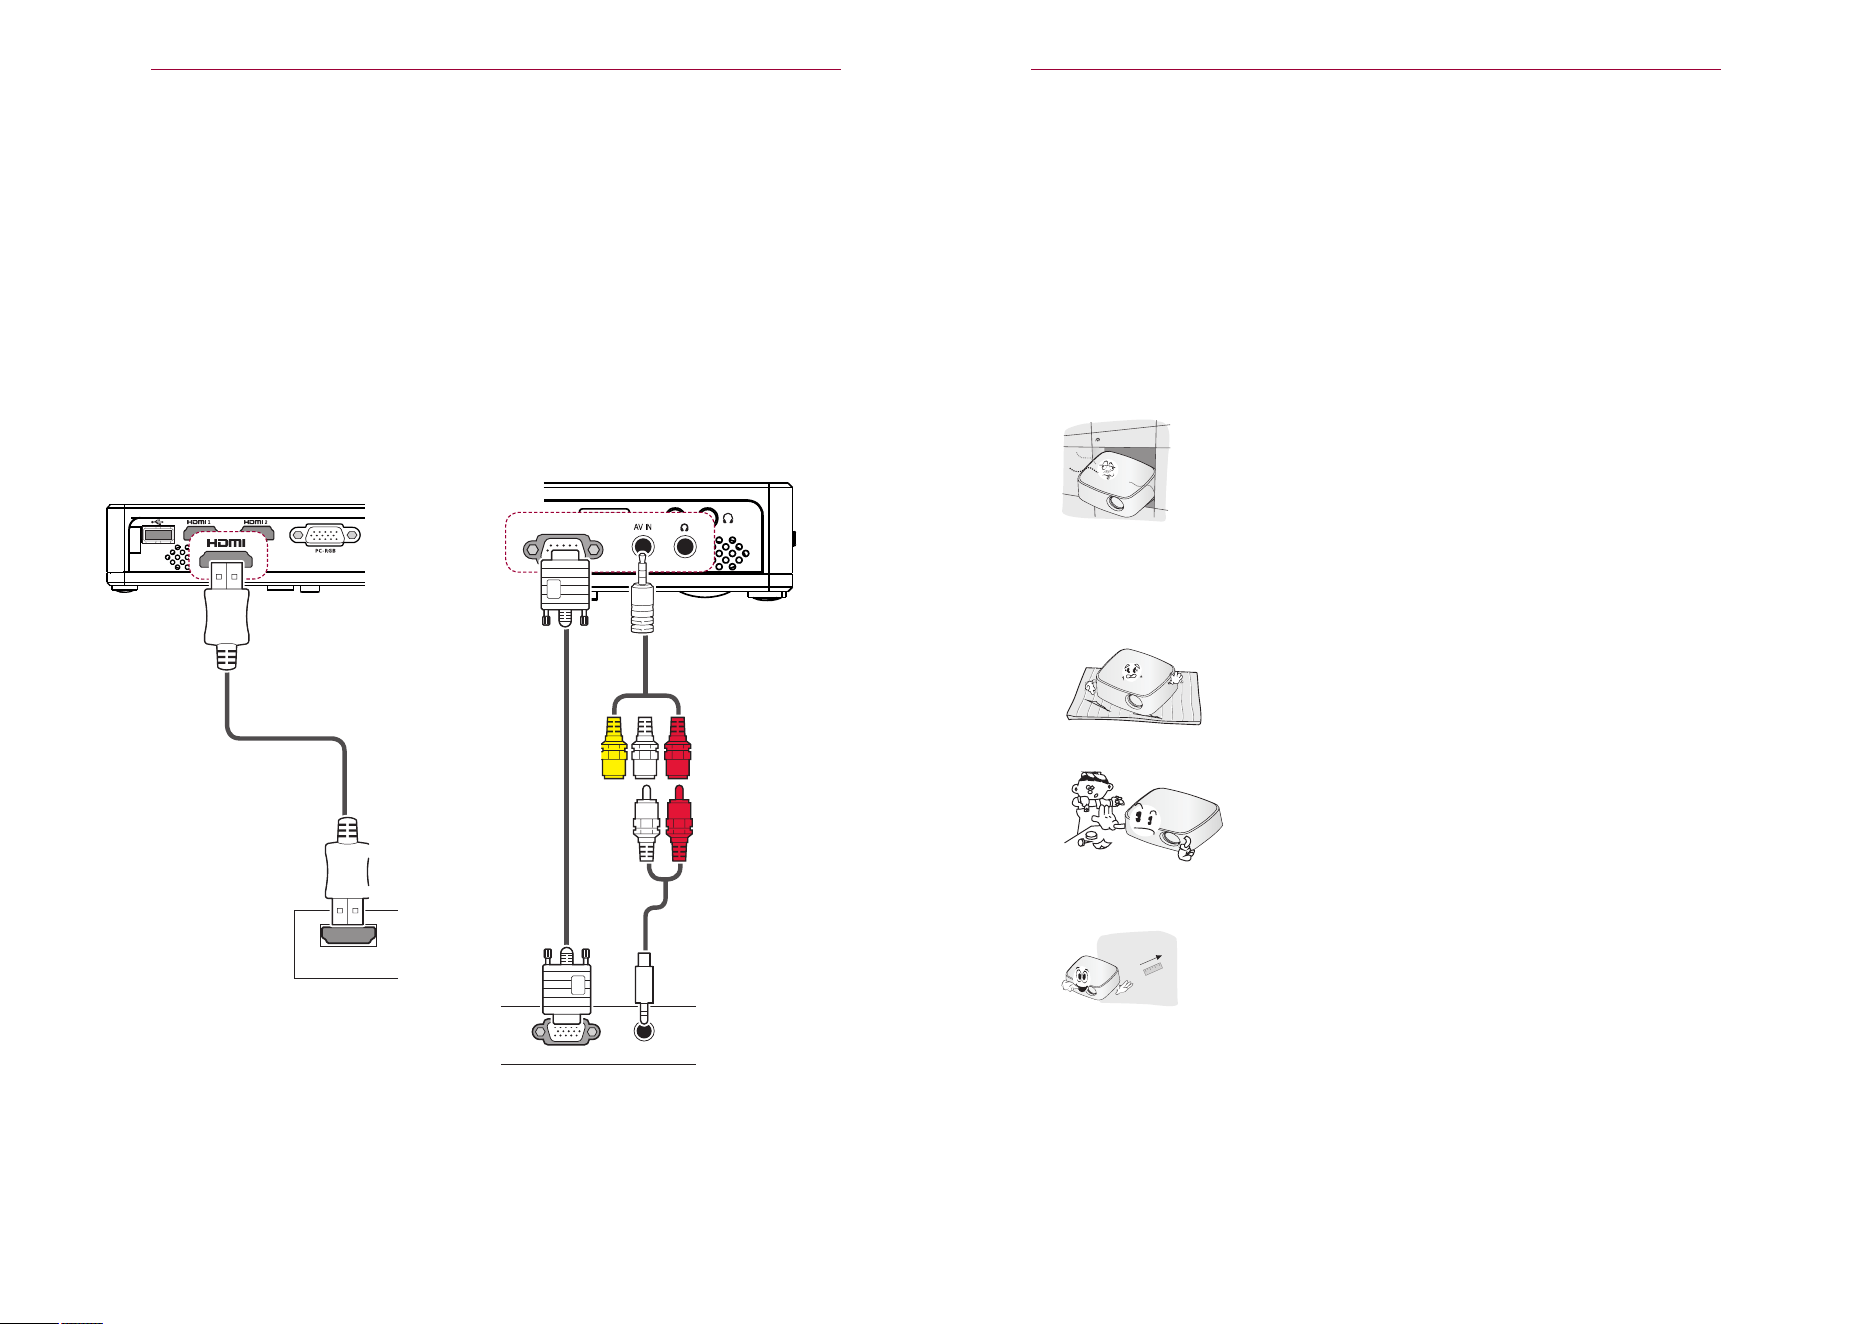
MAKING CONNECTIONS
Component Connection
VIDEO OUT
(L)Y PB PR (R)
AUDIO OUT
Connecting to the Headphones
You can listen to the audio through
8
PREPARATION
You can enjoy vivid images when you
connect an external device with a RGB
IN port to the component port of the
projector. Press the s button on
the remote control to select YPbPr.
a headphone
When connecting a cable to the HDMI or USB port,
it may not be connected properly if the size of jack to
the USB/HDMI port is too big.
Use a standard sized jack.
9
PREPARATION
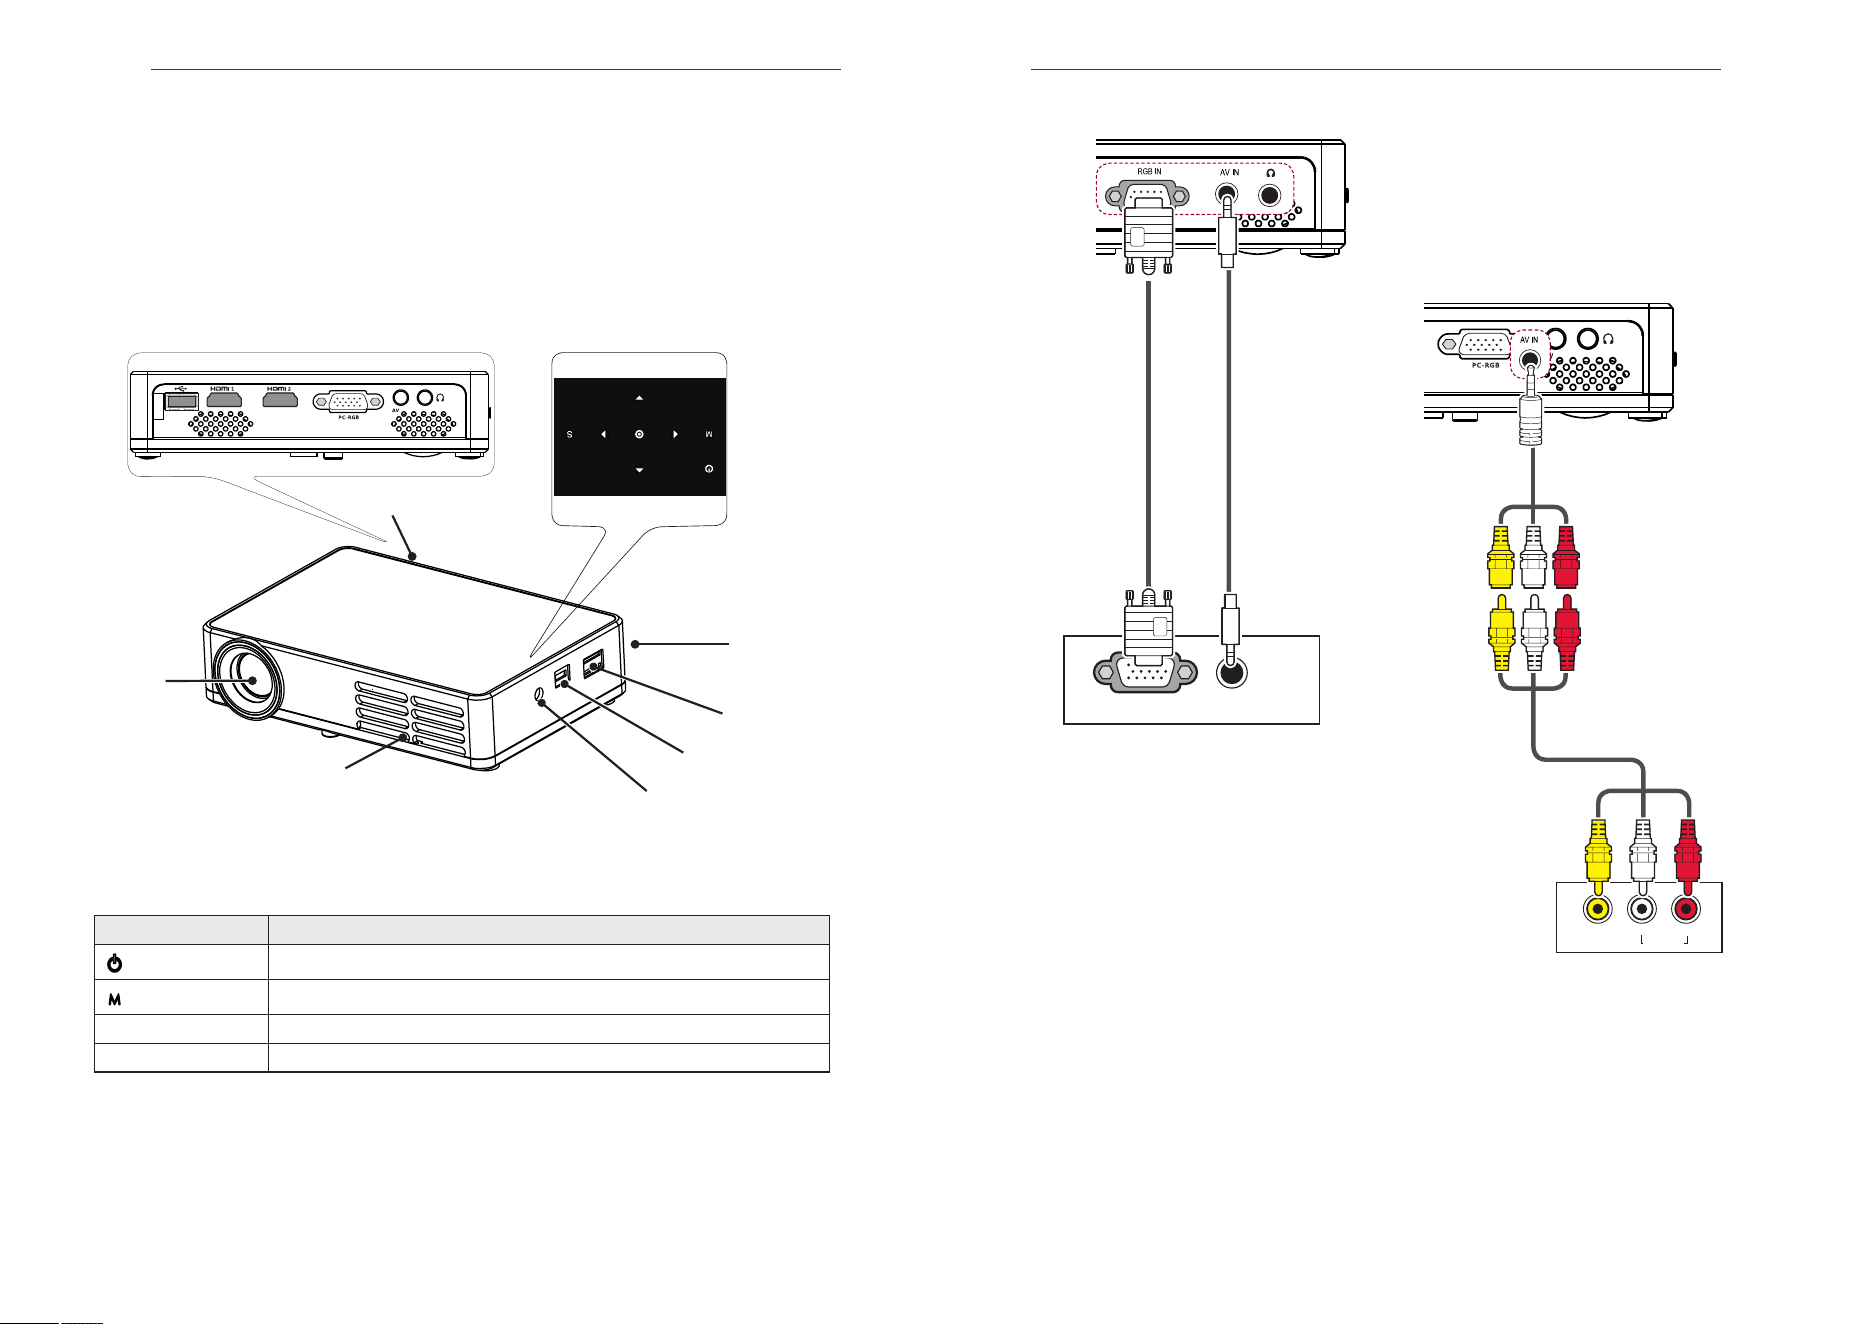
Parts and Components
*
* Power system initialization for about 10 seconds, press the red indicator light at the power button to let the
Button Description
(Lamp)
Turns the projector on or off.
(Menu)
Selects or closes menus.
∧, ∨, <, >
⊙(OK)
Checks present mode and saves function changes
。
Speacker
Control Panel
Back View
Tf Card
MICRO USB
Power in
Speacker
Rent
1
Lens
2
42
MAKING CONNECTIONS
Connecting to the AV
A/V OUT
L R
AUDIO OUT
AUDIO OUT
RGB OUT (PC)
Connect the output ports of an external
device and the AV INPUT port of the
projector. Press the INPUT button to
select AV.
You can connect the audio cable without
using a gender as shown in the illustration
above.
The projector is manufactured using high-precision technology. You may, however,
see tiny black dots and/or bright colored dots (red, blue or green) that continuously
appear on the projector screen. This is a normal result of the manufacturing process
and does not indicate a malfunction. When powered on, the LED of the control panel
turns on.
Sets the function or moves the cursor
1. Due to the high temperature air coming out of the vents, do not get close to the vents.
2. Do not touch the lens when using the projector. The lens may be damaged.
power on.
10
PREPARATION
Installation
Installation Precautions
-
-
。
-
-
41
MAKING CONNECTIONS
HDMI
AUDIO OUT
RGB OUT(PC)
Accessories
Opitional Extras
Connecting to an HD
Receiver, DVD, or VCR Player
Connect an HD receiver, DVD, or VCR
player to the projector and select an
appropriate input mode
.
HDMI Connection
With an HDMI cable, you can enjoy high
quality picture and sound. Press the
INPUT button on the remote control to
select HDMI.
Connecting to a PC
The projector supports Plug & Play.
A PC will automatically recognize the
projector and requires no driver to be
installed.
RGB Connection
Connect the PC output and the PC
video input port of the projector with the
RGB cable.
For audio signal, connect the PC and the
projector with an optional audio cable.
Place the projector in a well-ventilated
environment.
To prevent internal heat from building
up, install the projector in a wellventilated
place.
Do not place anything near the projector
as this may block its air vents.
If the air vents are blocked, the internal
temperature will increase.
-
Do not place the projector on a carpet
or rug. If a projector model has
its inlet vent on its bottom, do not
block the vent and use the projector
on a leveled solid surface.
Be sure to prevent foreign objects such as
paper debris from entering the projector.
Leave an adequate distance (30 cm
or more) around the projector.
Do not place the projector in a hot or
humid environment.
- Do not place the projector in a
hot, cold, or humid environment.
(See56Page regarding operating
temperature and humidity.)
Do not place the projector in a place
where it will easily attract dust.
- This may cause a fire.
Do not remove any covers except for
the lens cap. There is a high risk of
electric shock.
The projector is manufactured using
high-precision technology. You may,
however, see tiny black dots and/
or bright colored dots (red, blue or
green) that continuously appear on
the projector screen. This is a normal
result of the manufacturing process
and does not indicate a malfunction.
The remote control may not work
in an environment where a lamp
equipped with electronic ballasts or
a three-wavelength fluorescent lamp
is installed. Replace the lamp with an
internationally standardized lamp for
the remote control to work normally.
•
•
•
•
•
•
11
PREPARATION
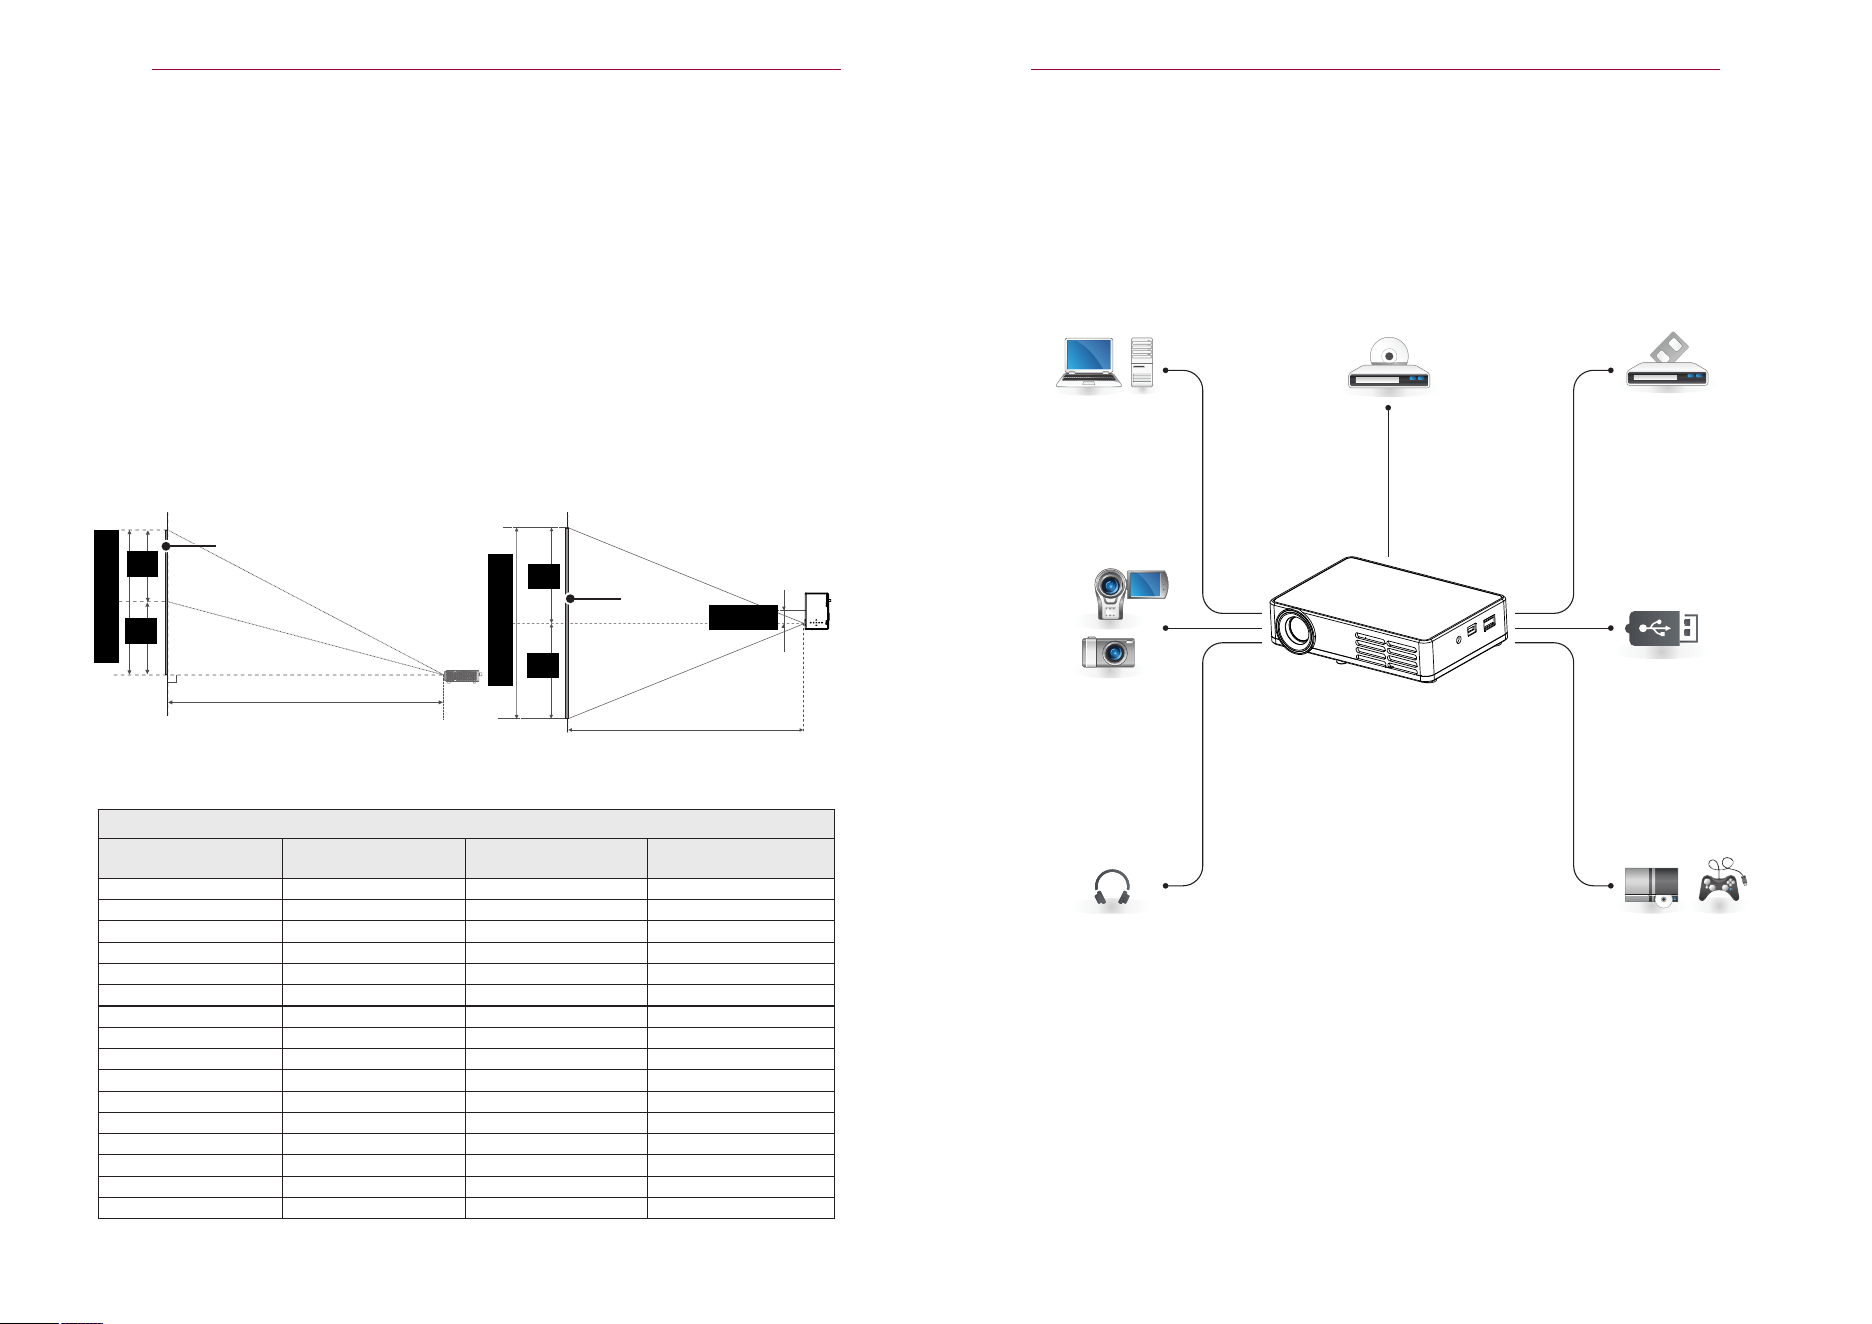
Projection Distance per Screen Size
1
2
3
4
16:10 Screen
Screen Size (mm)
Screen Width (Y) (mm)
Screen Height (X) (mm)
Projection Distance (D) (mm)
635/25 538 337 645
762/30 646 404 775
889/35 754 471 904
1016/40 861 539 1033
1143/45 969 606 1132
1270/50 1077 673 1292
1397/55 1185 741 1422
1524/60 1292 808 1550
1651/65 1400 875 1680
1778/70 1508 943 1809
1905/75 1615 1010 1938
2032/80 1723 1077 2067
2159/85 1831 1145 2197
2286/90 1938 1212 2325
2413/95 2046 1279 2476
2540/100 2154 1347 2584
画面高度 (X)
X/2
X/2
画面宽度 (Y)
Y/2
Y/2
DISPLAY
Projection distance (D)
Projection distance (D)
DISPLAY
30 mm
40
MAKING CONNECTIONS
MAKING CONNECTIONS
You can connect various external devices to the ports on the projector.
HDMI - 41 page
Component - 43 page
INPUT (AV) - 42 page
RGB - 41 page
Memory - 18 page
Headphones- 43page
Computer/Notebook VIDEODVD
Digital Device
USB
Headphones
Game Console
Place the projector on a sturdy, level surface, together with the PC or audio/video
source.
Place the projector at an appropriate distance from the screen. The distance between
the projector and the screen determines the actual size of the image.
Position the projector so that the lens is set at a right angle to the screen. If the
projector is not set at a right angle, the image on the screen will be tilted and the
image quality will be poor. If the screen image is crooked, use the Keystone function.
(see page52)
Connect the power cords of the projector and the connected devices to the wall
outlet.

12
PREPARATION
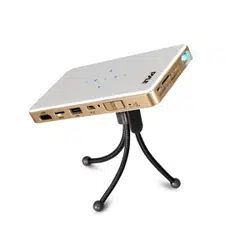
How to Install the Projector Using a Tripod
如下所示,您可以把投影机安装在摄像机三脚架上。
稳定三角架时,建议使用 4.5 mm 标准尺寸或更小的锁紧螺栓。 锁紧螺栓的最大允许
尺寸是 5.5 mm。 (如果比最大允许尺寸长,有可能损坏投影机。)
+
The projectors is connected
Triod
This is the bolt
Bottom side of the projector
=
﹥
39
CUSTOMIZING SETTINGS
SETUP Menu
1
2
3
-
4
5
The available option settings are described as follows.
Setting
Description
Language
Initial settings
Selects a desired Menu Language.
Resets all the projector settings to the factory default.
Selects menu transparency
Selects menu disappear time
Projector software update (USB)
S
Setting
You can install this projector using a camera tripod.
As shown below, you can mount the projector instead of a camera on the tripod.
When stabilizing the tripod, we recommend using the locking bolt of standard size 4.5
mm or less. The maximum size allowed for the locking bolt is 5.5 mm. (If it is longer
than the maximum allowed size, it may damage the projector.)
To this part
To fix the projector
Press the Setting button.
Use the or button to select PICTURE
and press the OK button.
Use the or button to set up a desired
item and press the OK button.
-To return to the previous menu, press the MENU
button.
When you are fi nished, press EXIT.
Use the or button to adjust the settings.
Menu Transparency
Menu disappear time
Software update(USB)
Menu Language
Initial settings
Menu transparency
Menu disappear time
Software update (USB)
•
•
13
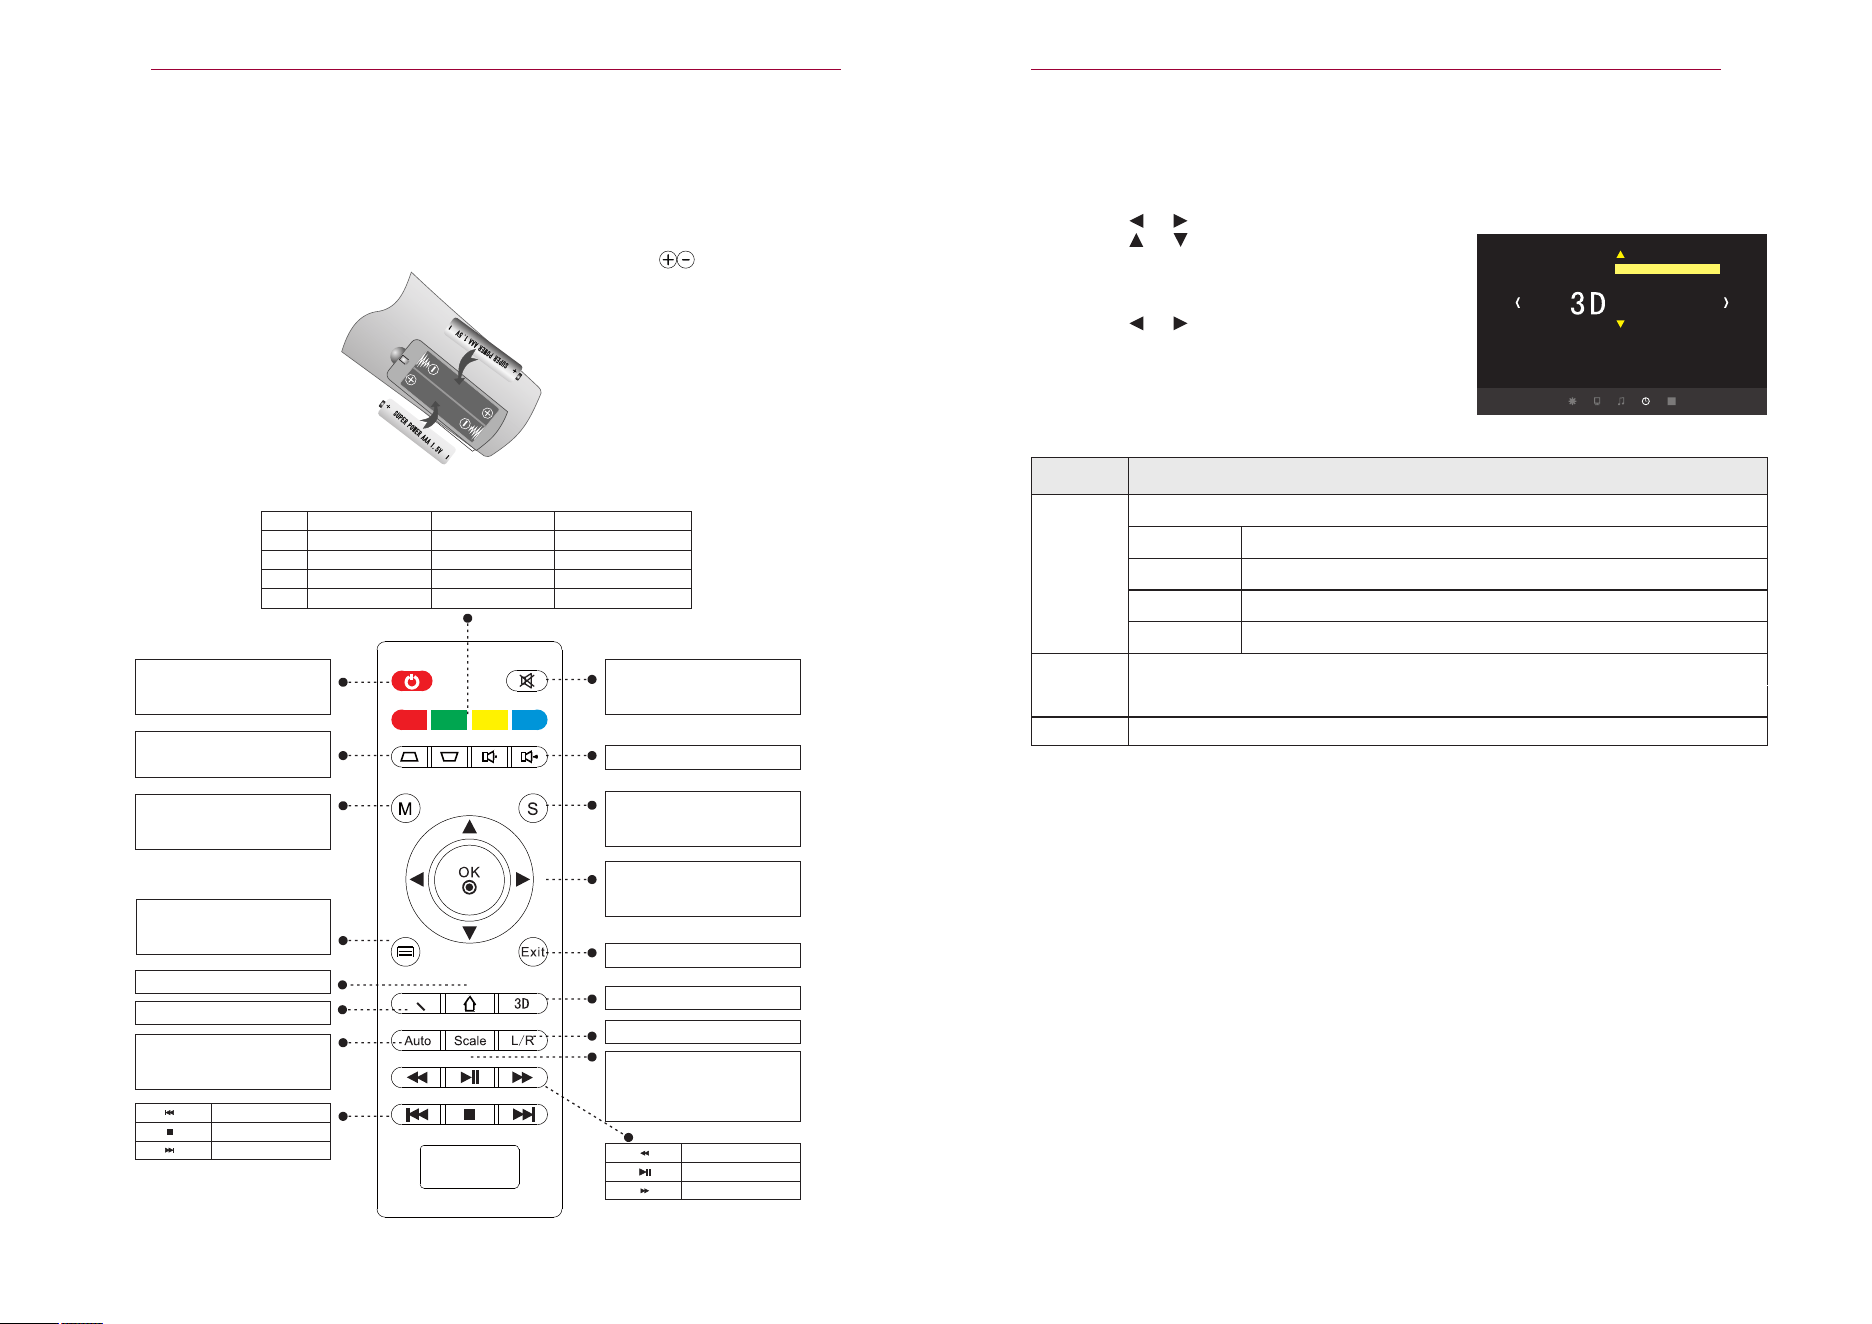
REMOTE CONTROL
REMOTE CONTROL
38
CUSTOMIZING SETTINGS
3D Mode SETTING
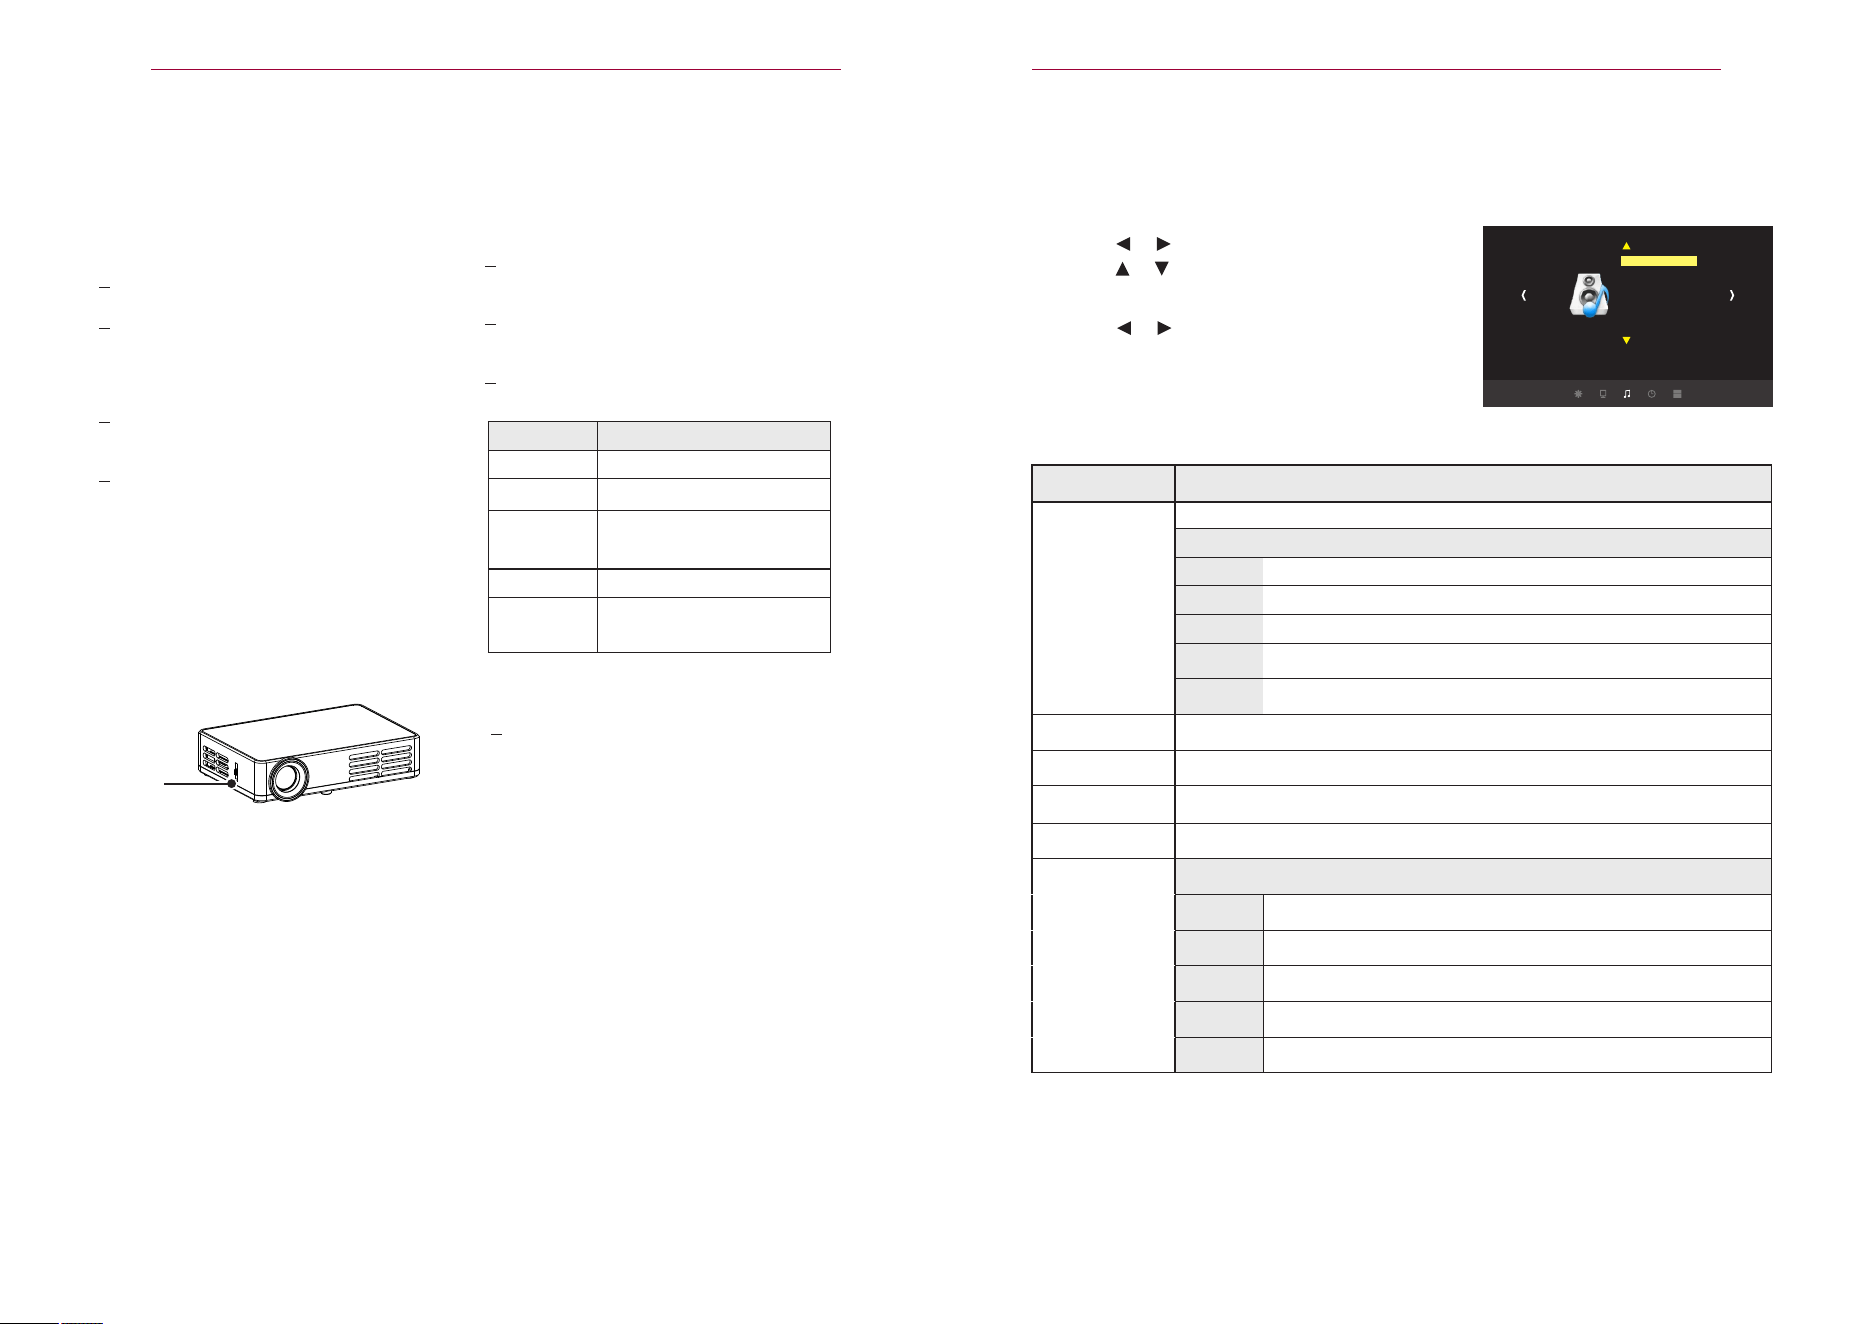
The available settings are described as follows.
Setting
Description
3D mode
3D depth
3D L/R
OPITION
STANDARD 2D
2D to 3D
L/R MODE 3D
U/D MODE 3D
ADJUST 3D DEPTH
-3D DEPTH IS AVAILABLE ONLY WHEN 2D CONVERTING TO 3D
OPITION
3D Mode
1. Press the Setting button.
2. Use the or button to select 3D mode
3. Use the or button to set up a desired
item and press the OK button.
-To return to the previous menu, press the MENU
button.
4. Use the or button to adjust all the settings.
5. When you are fi nished, press EXIT.
3D mode Standard 2D
3D DEPTH
3D R&L
Open the remote control on the back of the battery compartment cover
and follow the instructions to load the specified battery
◀
Power
turn on/off the power
Trapezoid adjustment
shortcut key
Menu key
open or switch the parameter
menu
Property key
Display the file property
under Android mode
Main menu key
Mouse mode key
Screen size function key
when in PC mode, adjust
screen size automatically
Previous key
Pause key
Next key
Mute
Open close the volume
Volume key
Source key
AV/PC/YPbPr/DMP,
select the source
Direction key
adjust parameter in menu mode
Exit key
3D mode key
Left-right image switch function key
Image scale switch shortcut key
Press scale to switch between 16:9
and 4:3 screen size. Then, press the
L/R button if you wish to view the
25 screen size options available.
REW key
Play/Pause key
FF key
Red
Green
Yellow
Blue
Android mode
Browser
My application
Settings
Files browsing
Channel edit mode
Delete
Re-name
Remove
skip
Manual search mode
Save
14
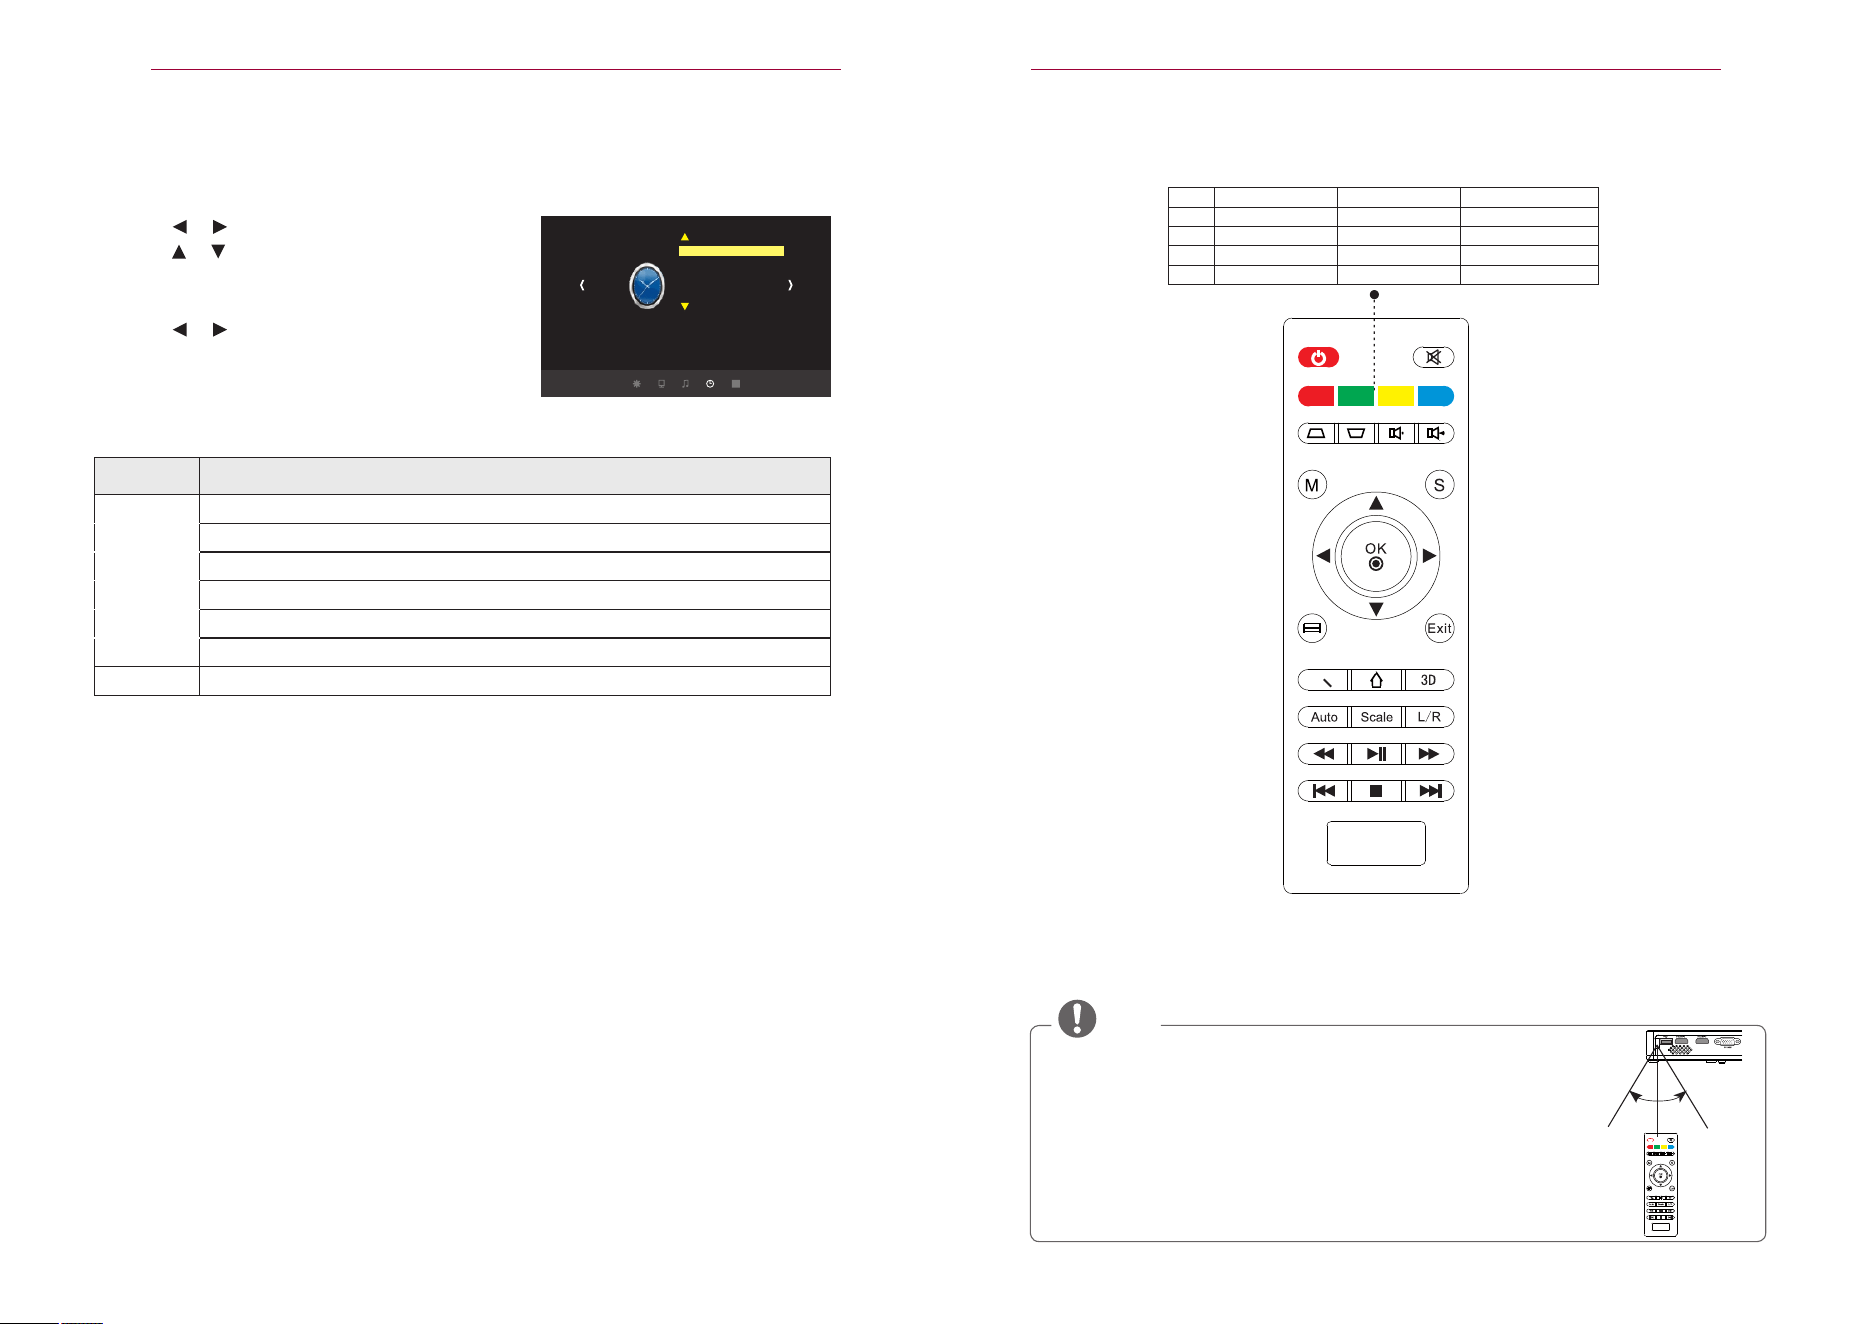
REMOTE CONTROL
37
CUSTOMIZING SETTINGS
TIME Settings
1 Press the SETTINGS button.
2
3 Use the o r
4
5
The available time settings are described as follows.
Setting
Description
TIME
ITEM
DATE
SLEEP TIMER
MONTH
YEAR
HOUR
MINUTE
The projector is turned off at the preset time.
TIME - - -- -- - -
SLEEPING TIME
TIME
Use the or button to select TIME
button to set up a desired
item and press the OK button.
- To return to the previous menu, press the MENU
button.
Use the or button to adjust the settings.
When you are fi nished, press EXIT.
CAUTION
30° 30°
When using the remote control, the optimal remote range is less than
3 meters (left/right) and within a 30 degree arc of the IR receiver.
For seamless operation, do not block the IR receiver.
When you carry the remote control in the portable bag, make sure that the
buttons on the remote control are not pressed by the projector, cables,
documents or any other accessories in the bag. Otherwise, it may
significantly reduce the battery life.
•
•
•
◀
Red
Green
Yellow
Blue
Android mode
Browser
My application
Settings
Files browsing
Channel edit mode
Delete
Re-name
Remove
skip
Manual search mode
Save
◀
15
Using the PROJECTOR
Using the PROJECTOR
Watching Projector
Focus ring
?
Watching Projector
Button Description
VOL -, +
Adjusts the volume leve.
Mute
Mutes all sounds
Munu
16:9/4:3
Resizes an image.
Keystone
36
CUSTOMIZING SETTINGS
AUDIO Settings
The available audio settings are described as follows.
SETTING DESCRIPTION
Sound Mode
Adjusts sound.
Option
Standard
Select when you want standard-quality sound.
Music
Select when you listen to music.
Movie
Select when you watch movies.
Sports
Select when you watch sports events.
Customzing
Adjust as per person prefer.
Balance
Adjusts the balance of the left and right speakers.
Auto Volume
Automatically adjusts the volume level.
Equilibrium
Equilibrium
Makes the voice from the projector crisp and clear.
Option
120Hz
500Hz 500 Hz Frequency regulation
1.5KHz 1.5 KHz Frequency regulation
5KHz 5 Khz Frequency regulation
10KHz 10 Khz Frequency regulation
Sound mode: standard
BAL ANCE
AUTO VOLUMN
Surround sound
Equilibrium
audio
Turning on the Projector
1 Connect the power cord correctly.
2 After waiting for a moment, press
the POWER button on the remote
control or the control panel.
(The light on the control panel will be
turned on.)
3 In the Language Selection screen,
select a language.
4 Select an input signal by using the
INPUT button on the remote control.
Focus and Position of the Screen Image
When an image appears on the screen,
check if it is in focus and fits the screen
properly.
To adjust the focus of the image,
rotate the focus ring.
1 In Standby mode, press the POWER
button to turn the projector on.
2 Press the INPUT button and select
the input signal you want.
3 Control the projector using the following
buttons while watching projector.
Accesses the quick menu.
(see page33)
Adjusts Keystone. (see
page17)
4 To turn the projector off, press the
POWER button.
1 Press the menu button.
2 Use the or button to select AUDIO
3 Use the or button to set up a desired
item and press the OK button.
- To return to the previous menu, press the MENU button.
4. Use the or button to adjust the settings.
4 When you are fi nished, press EXIT.
Surround sound
provides 5.1 channel stereo sound from two speakers.
120 Hz Frequency regulation
16
Using the PROJECTOR
Using Additional Options
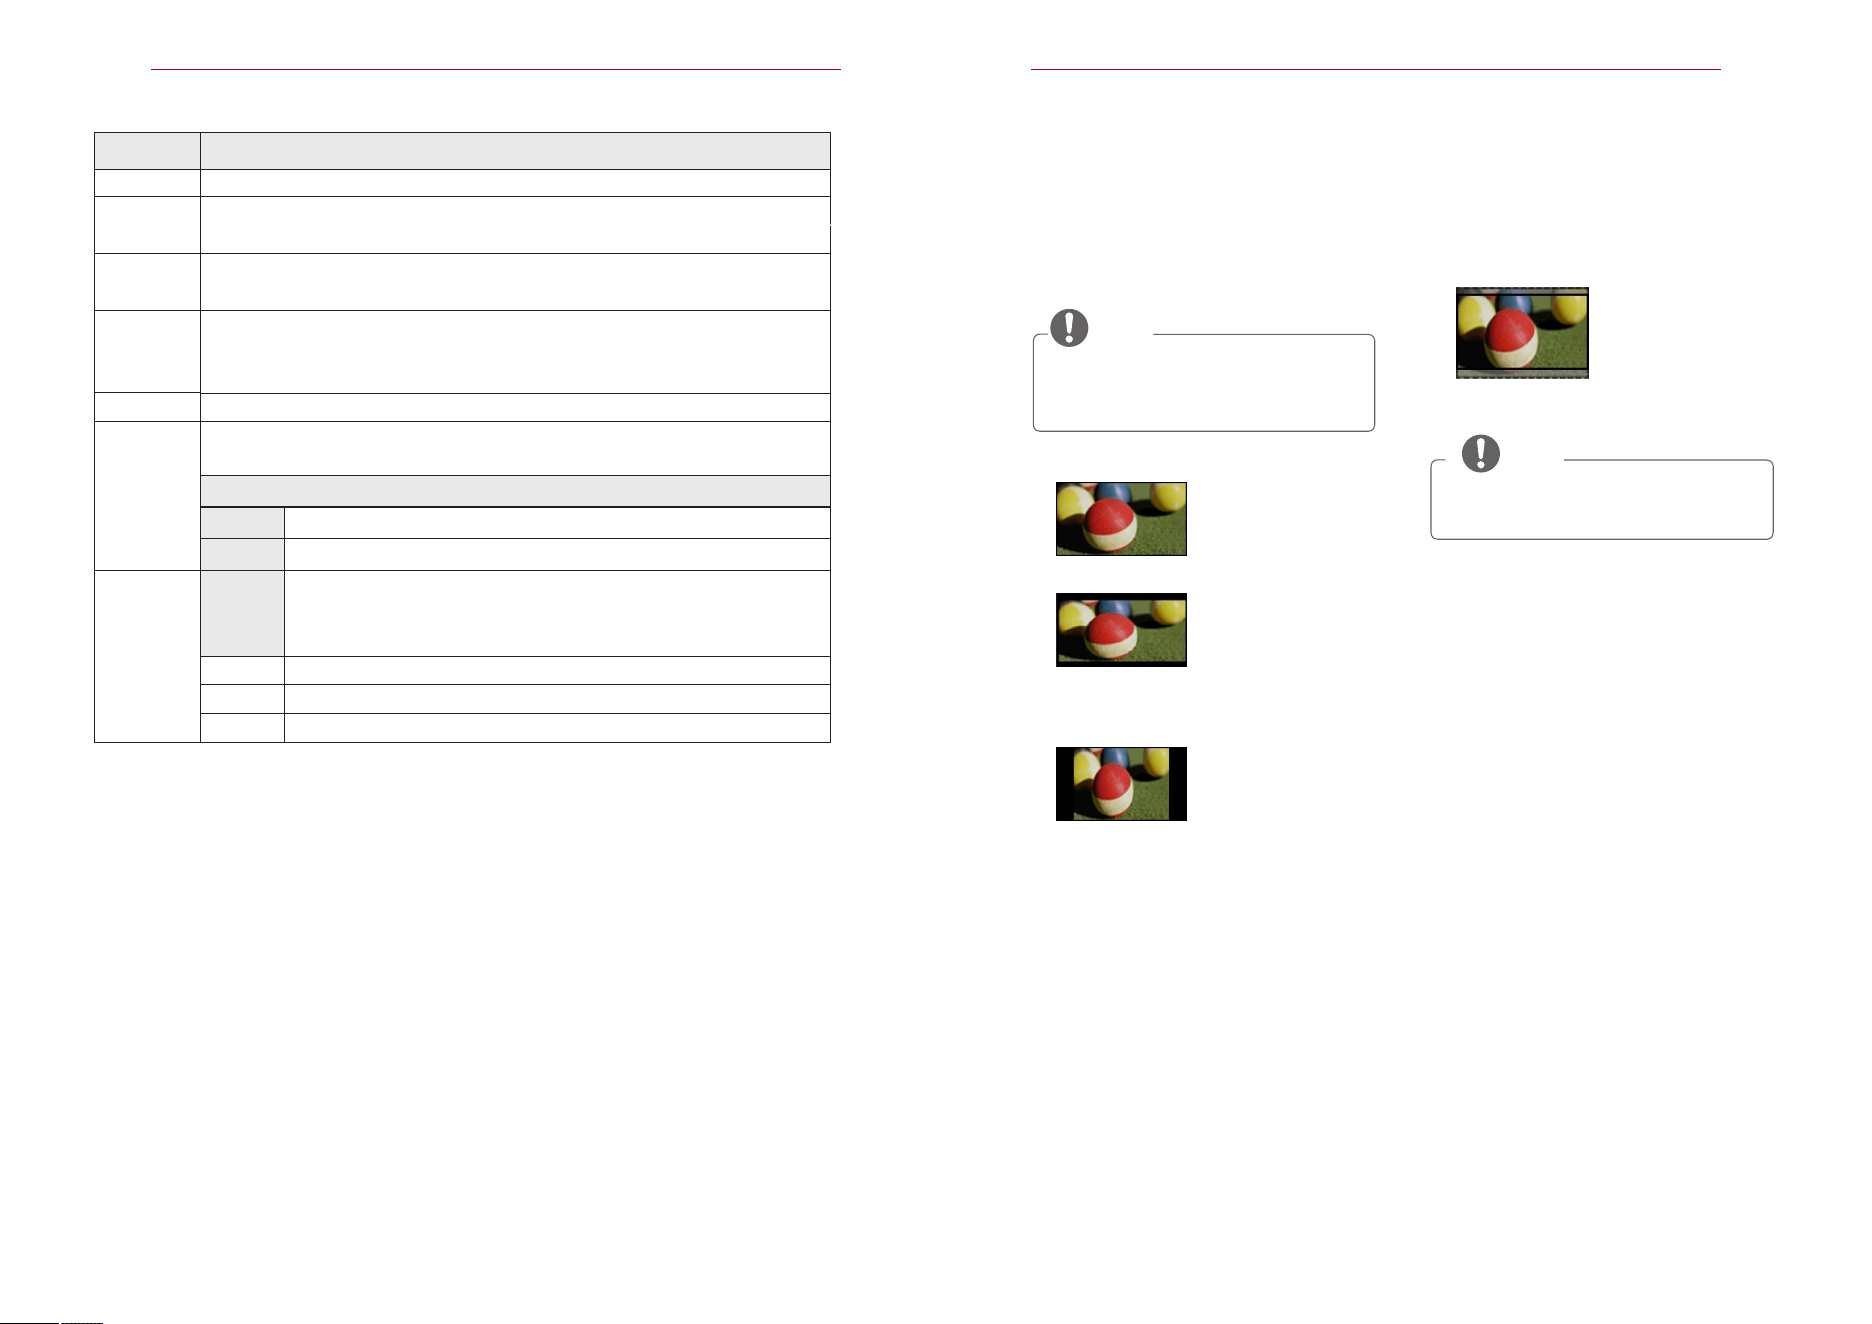
Adjusting Aspect Ratio
CAUTION
-
FULL
:
-
16:9:
-
4:3:
- ZOOM:
CAUTION
35
CUSTOMIZING SETTINGS
Setting
Description
Flip Horizontal
Flip Vertical
Keystone Correction
Energy Saving
Auto Keystone
Computer
mirror image flip horizontal
* It is not available when using auto keystone
mirror image flip vertical
* It is not available when using auto keystone
* It is not available when using auto keystone
OPTION
Open
Automatically adjust the proportion of trapezoidal correction.
Close
AUTO ADJUST
Line position
Phase
The manual adjustment of trapezoidal correction ratio.
Adjusts brightness
L/R button to move image
U/D button to move image
Image Noise
Resize an image to view at its optional
size by pressing RATIO button while you are
using the projector.
Some options may not be available
depending on input signals.
You can also change the image size
by pressing MENU→VIDEO →ZOOM MODE
Changes to the full screen
regardless of the aspect ratio.
Resizes images to fit the
screen width.
.
Resizes images to the 4:3
aspect ratio.
Enlarges an image to fit the
screen width. The top and bottom of
the image may be truncated.
If you enlarge or reduce an image,
the image may be distorted.
Reduce the image noise
SETTING
In order to prevent the screen image is in the shape of a trapezoid, width at the top of the
projector is not set at the correct angle screen when the trapezoidal correction will adjust
the image and the bottom
When because the projector tilt and trapezoidal screen image, automatic trapezoidal
correction can automatically adjust when because the projector tilt and trapezoidal
screen image, automatic trapezoidal correction by automatic adjustment
Through the automatic calibration between the projector and a plurality of
PC image signal is set inside the disharmony caused by the horizontal width
of not matching and image dithering, which provides the best picture quality.
Field position
Do some adjustments with this function
•
•
•
Input Source
AV
YPbPr
HDMI1
HDMI2
PC-RGB
ANDROID
17
Using the PROJECTOR
Using the Input List
Using the Input List
1
2
KEYSTONE
0
MENU
34
CUSTOMIZING SETTINGS
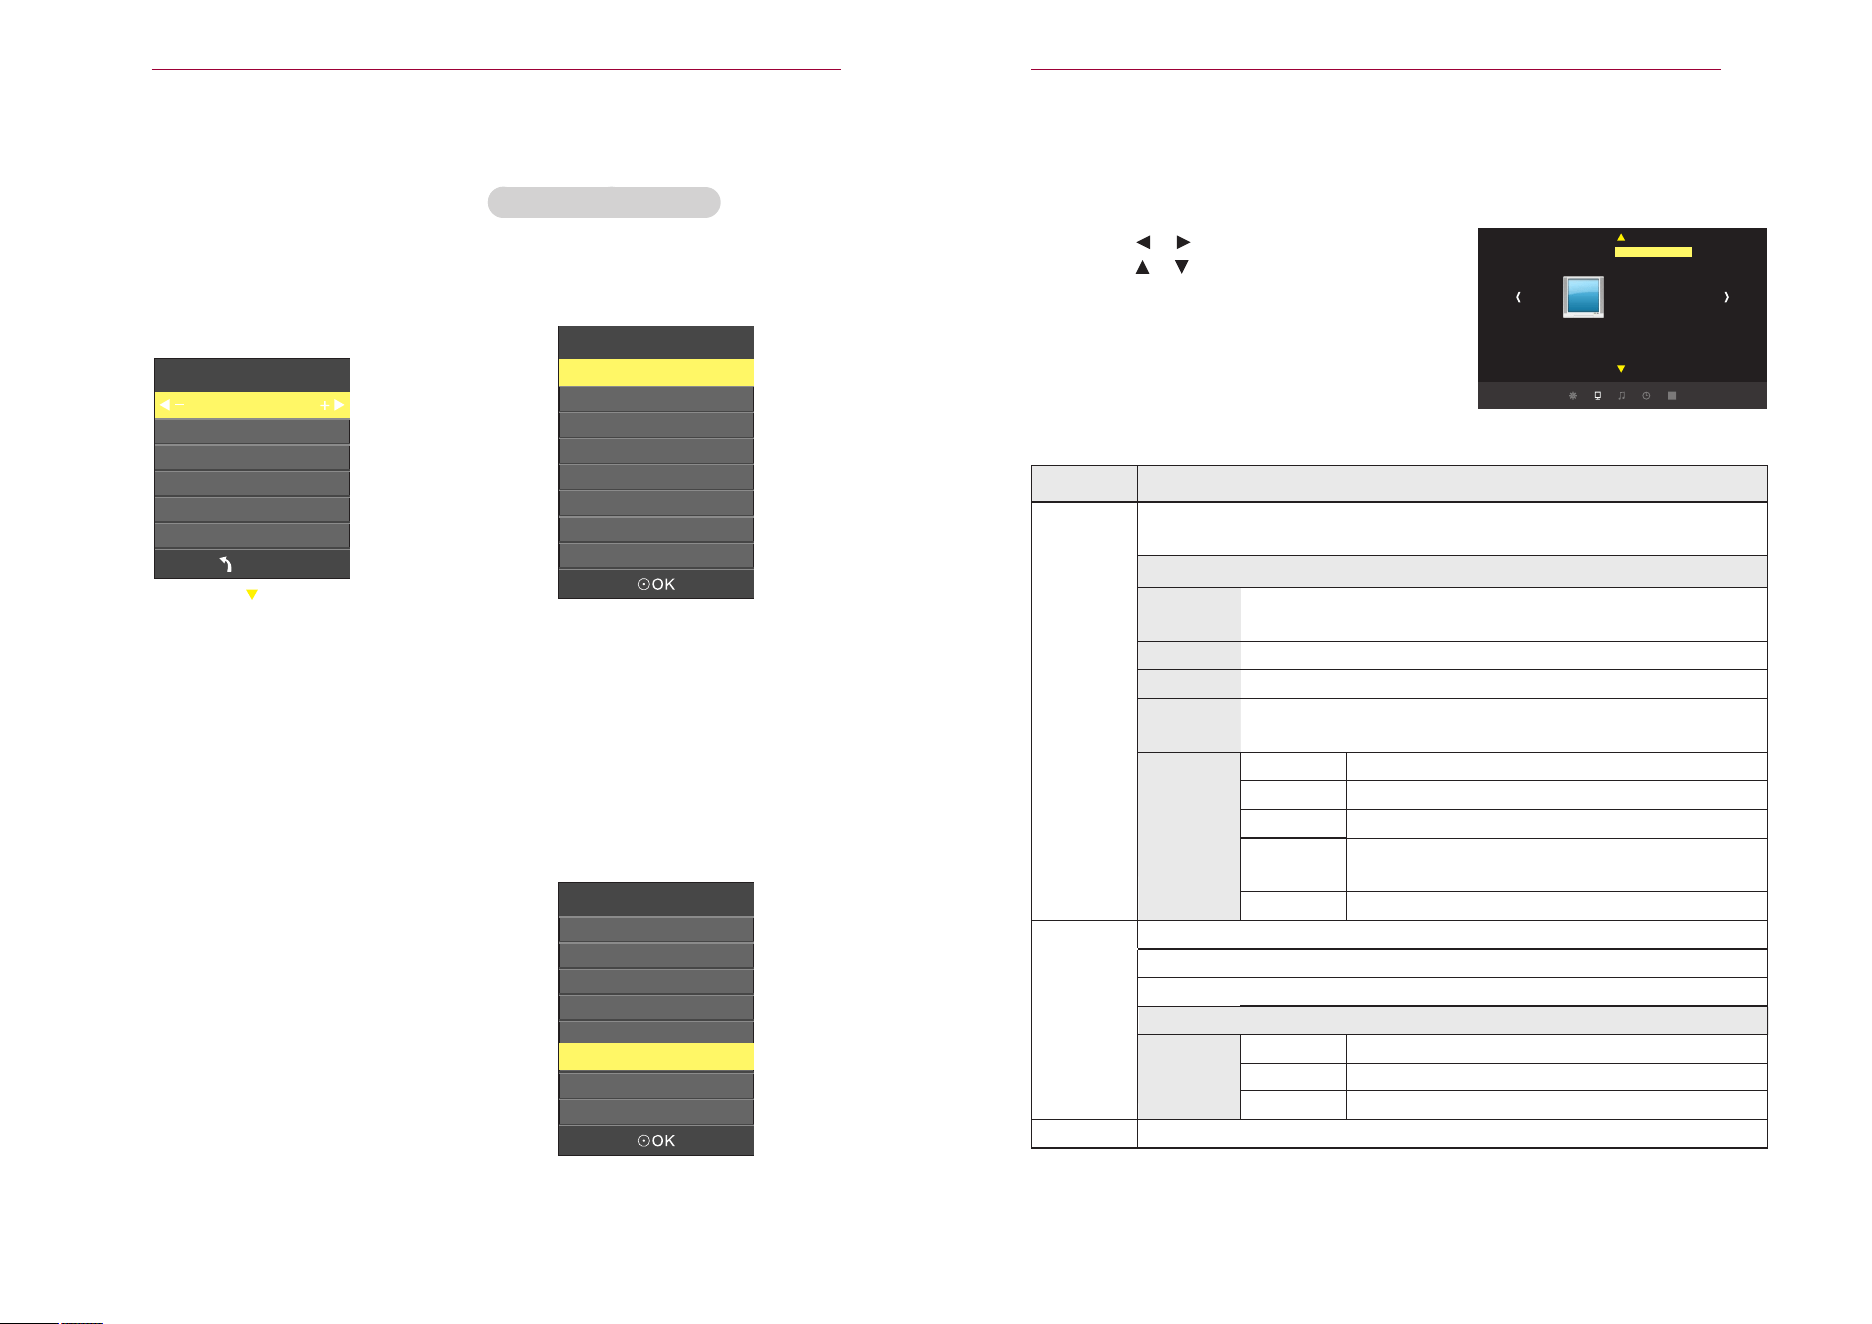
PICTURE SETTING
The available picture settings are described as follows.
Setting Description
Picture
Picture mode
Vivid
Standard
Has the contrast, brightness and sharpness at normal levels.
Soft
Optimizes the image for movie.
Expert
Adjusts the detailed image settings.
Adjusts the detailed image settings.
CONTRAST
BRIGHTNESS
Sharpness
Adjusts the level of sharpness in the edge between the light and dark
areas of the picture. The lower the level is, the softer the image looks.
COLOR
Adjusts the intensity of all colors.
Adjust the intensity of the red
Adjust the intensity of the green
Adjust the intensity of the blue
Tint
Adjusts the balance between red and green levels.
Color -Tem
Zoom mode
COOL COLOR
EXERT
Blue
STANDARD
Red
Adjust image’s size ( see page 18 about Adjusting Aspect Ratio)
WARM COLOR
Green
Pic ture mo de cust omizi ng
Color temperature
Zoom Mode
Nois e re ducti on
Flip Horizontal
flip vertical
KEYSTONE
Energy savi ng
Auto key stone
Computer setting
PICTURE
Using the Keystone
Function
To prevent the screen image from
becoming trapezoidal, Keystone adjusts
the top and bottom width of the image
if the projector is not set at a right angle
to the screen.
Because the Keystone function may
cause inferior screen image quality, use
this function only when it is not possible
to set up the projector at an optimal
angle.
1 Press the Key's ▲ or Key's ▼button
to adjust the screen.
-Keystone can be adjusted from -40
to 40.
2 Press the MENU or EXIT button after adjustment
Press the INPUT or S button to access
the input sources.
- The connected input mode appears
first.
Select an input signal using the INPUT OR S
button and the projector is switched
only to the connected input mode. You
can use the OK button to
switch into connected input modes.
1. Press the MENU button.
2. Use the or button to select Picture
3. Use the or button to set up a desired
item and press the OK button.
-To return to the previous menu, press the
button.
4. When you are fi nished, press EXIT.
mode
Selects one of the preset images or customizes options in each mode
for the best screen performance.
You are also able to customize advanced options of each mode.
Maximizes the visual effect of video. Displays a crystal clear picture
by enhancing contrast, brightness, and sharpness.
Increases or decreases the gradient of the video signal.
Adjusts the base level of the video signal to make the image brighter or
darker.
Perature
3
Android Access
Select the input signal source"Android",
and press "OK" button to access Android.
Input Source
AV
YPbPr
HDMI1
HDMI2
PC-RGB
ANDROID
18
ENTERTAINMENT
MEDIA
Connecting to Micro SD storage device
USB MEMORY STICK
MICRO SD MEMORY STICK
To disconnect the USB storage device,
1
2 Remove the USB device.
CAUTION
?
?
?
将Micro SD卡金色触点面向上插入。
上面的Micro SD卡为多媒体和安卓
共用。
下面的Micro SD卡为安卓专用。
ENTERTAINMENT
-
+
micro SD
33
CUSTOMIZING SETTINGS
CUSTOMIZING SETTINGS
SETUP Menu
MENU
DESCRIPTION
PICTURE
Adjusts the image quality for optimal viewing.
AUDIO
Adjusts the sound quality and volume level.
TIME
Time-related features.
3D MODE
3D MODEL SETTINGS
SETTING
Customizes the advanced settings.
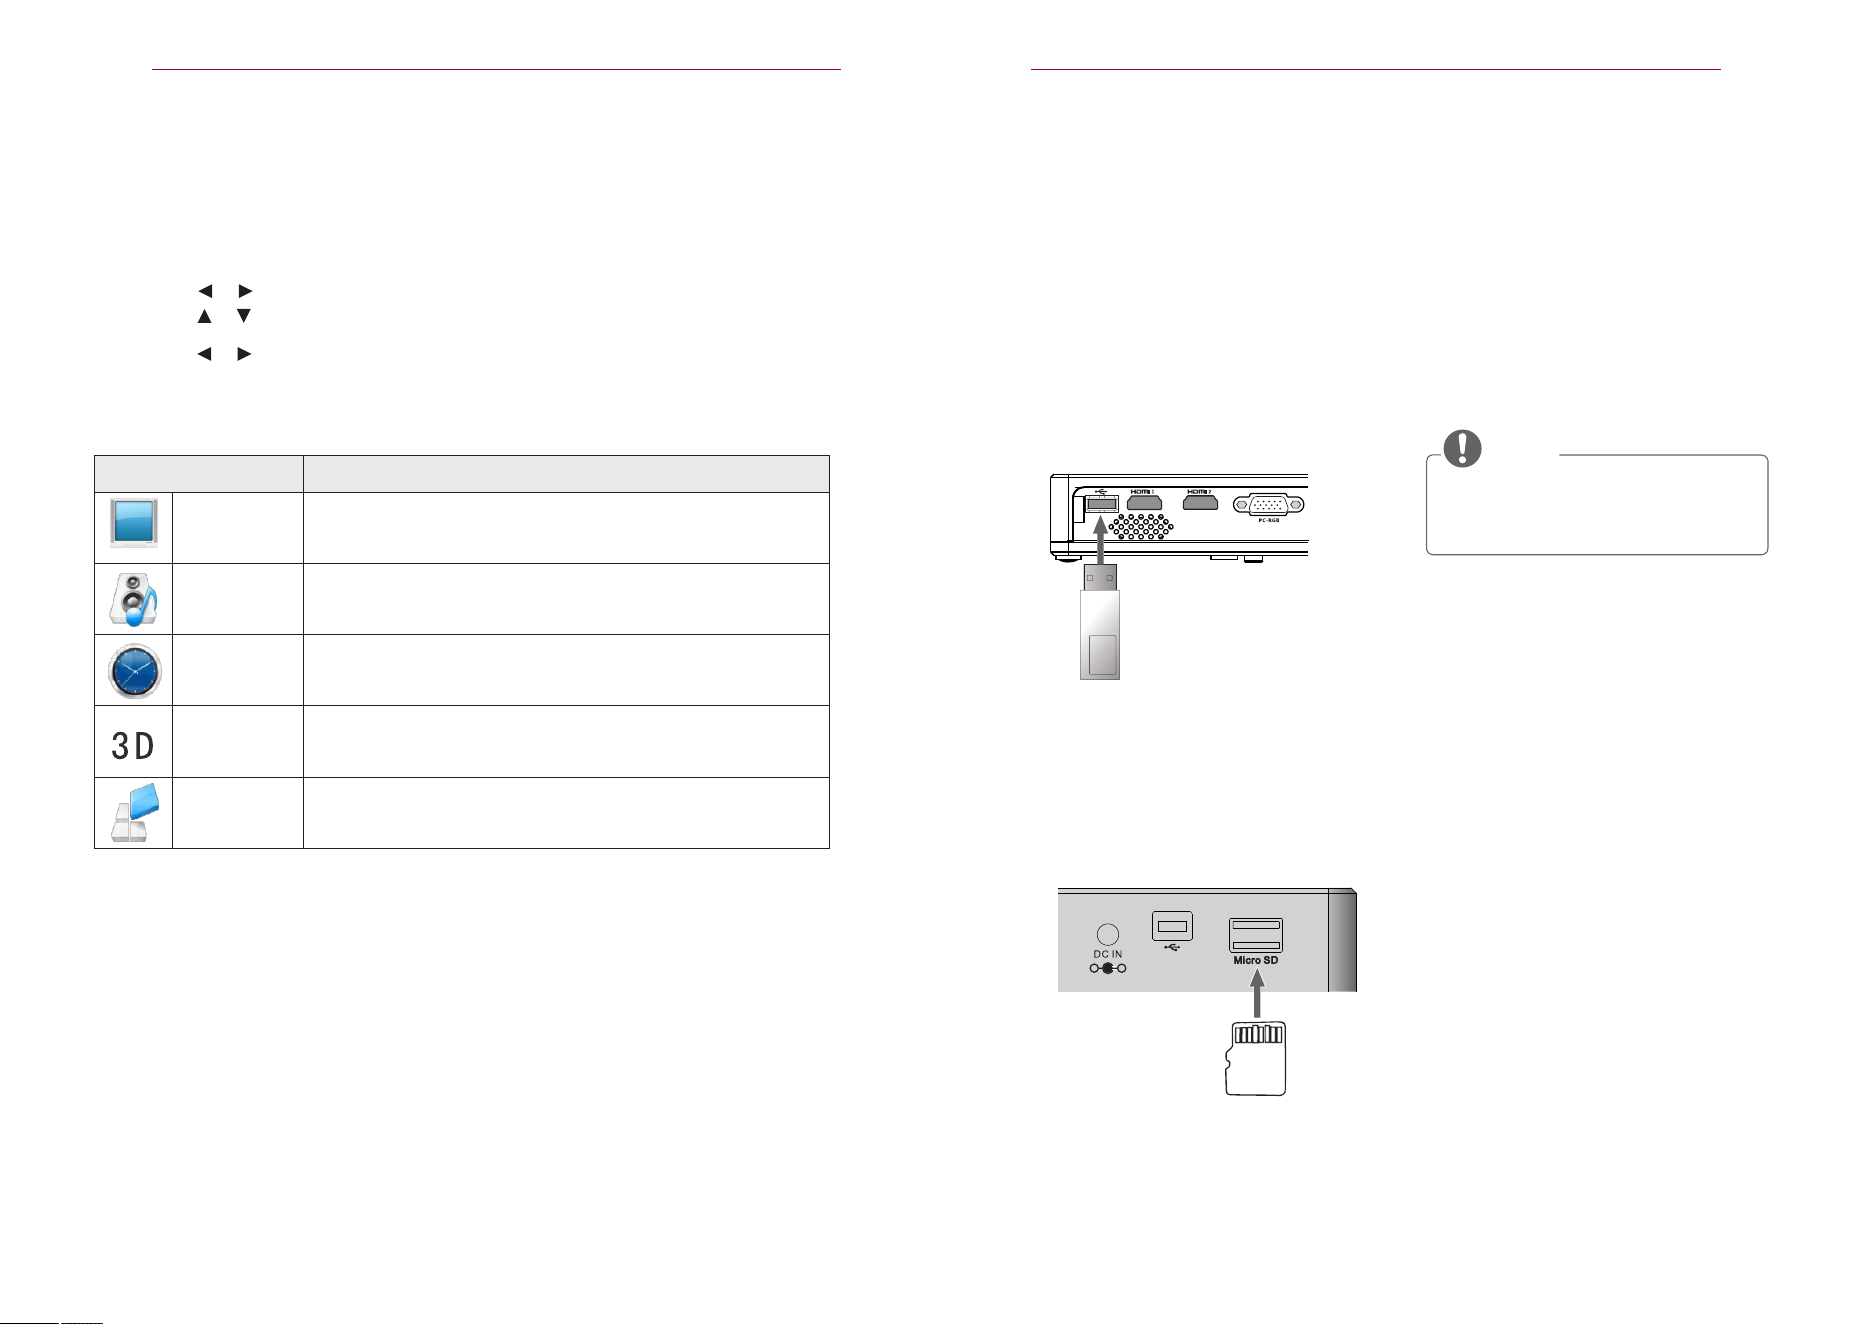
Connecting USB Storage Devices
Connect a USB memory stick as shown
below.
When a USB storage device is connected,
the USB adjustment screen appears.
You cannot write or delete data on the
USB storage device.
Press EXIT Or button to stop playing.■
After the USB storage device is
disconnected, it cannot be read.
Remove the USB storage device
and connect it again.
ENTERTAINMENT
1 Press the menu button.
2 Use the or button to select MENU
3 Use the or button to set up a desired
item and press the OK button.
4. Use the or button to adjust the settings.
5. When you are fi nished, press EXIT.
In the following ways to connect to the Micro SD memory stick.
Connect the USB storage device, there will be a USB adjusting screen.
You cannot write to or delete the USB data on a storage device.
The gold contacts for Micro SD card inserted.
The above Micro SD card for multimedia and the Android share.
The following Micro SD card is specially for Android.
•

32
3D FUNCTION
19
ENTERTAINMENT
Tips for Using USB Devices
Only a USB storage device is recognizable.
USB hubs are not supported.
A USB storage device which uses its
own driver may not be recognized.
The recognition speed of a USB
storage device will depend on each
device.
If a normal USB device does not
work, disconnect and reconnect it.
Please do not turn off the projector
or unplug the USB device when the
connected USB device is working.
The USB device or stored files may
be damaged.
Please do not connect the USB storage
device that has been manipulated
on the PC. The projector may
not operate properly or fail to play
files. Use a USB storage device which
contains normal music, photo, video,
or document files.
Please only use a USB storage device
formatted as a FAT16, FAT32, or
NTFS file system provided by Windows.
In case a storage device formatted
as a different utility program
is not supported by Windows, it may
not be recognized.
Please connect power to a USB storage
device which requires an external
power supply. If not, the device may
not be recognized.
Please connect a USB storage device
with a cable provided by the USB
manufacturer. When you use a cable
that is not provided by a USB manufacturer
or an excessively long cable,
the device may not be recognized.
Some USB devices may not be supported
or will not work properly.
If the length of a folder or file is too
long, the folder or file may not be
recognized properly.
The files in a USB storage device are
sorted in the same way as Windows
XP. Up to 100 English characters for
a file name are allowed.
The data of a USB device may be
damaged, so it is recommended to
backup any important files. Because
a user is responsible for data management,
the manufacturer is not
responsible.
It is recommended to use a USB
memory stick which is 32 GB or less
and a USB hard disk which is 1 TB or
less. Any device with more than the
recommended capacity may not work
properly.
If a USB storage device is not working
properly, disconnect it and connect it
again.
If a USB external hard disk with the
power saving function does not work,
turn the hard disk off and on again to
make it work properly.
USB storage devices below USB 2.0
are supported as well. However, they
may not work properly in the movie
list.
•
•
•
•
•
•
•
•
•
•
•
•
•
•
•
•
•
3D Image Playing Method
1. Select the 3D image file name, press the OK button.
2. Before watching 3D of RGB-PC, must button the auto adjust key on the remote control.
3. 3D setting is on page 38.
4. To watch 3D image by projectors, press the button on the glasses.
5. Adjust 3D image settings.
• To return to the general image, press 3D three-dimensional image button.
31
3D FUNCTION
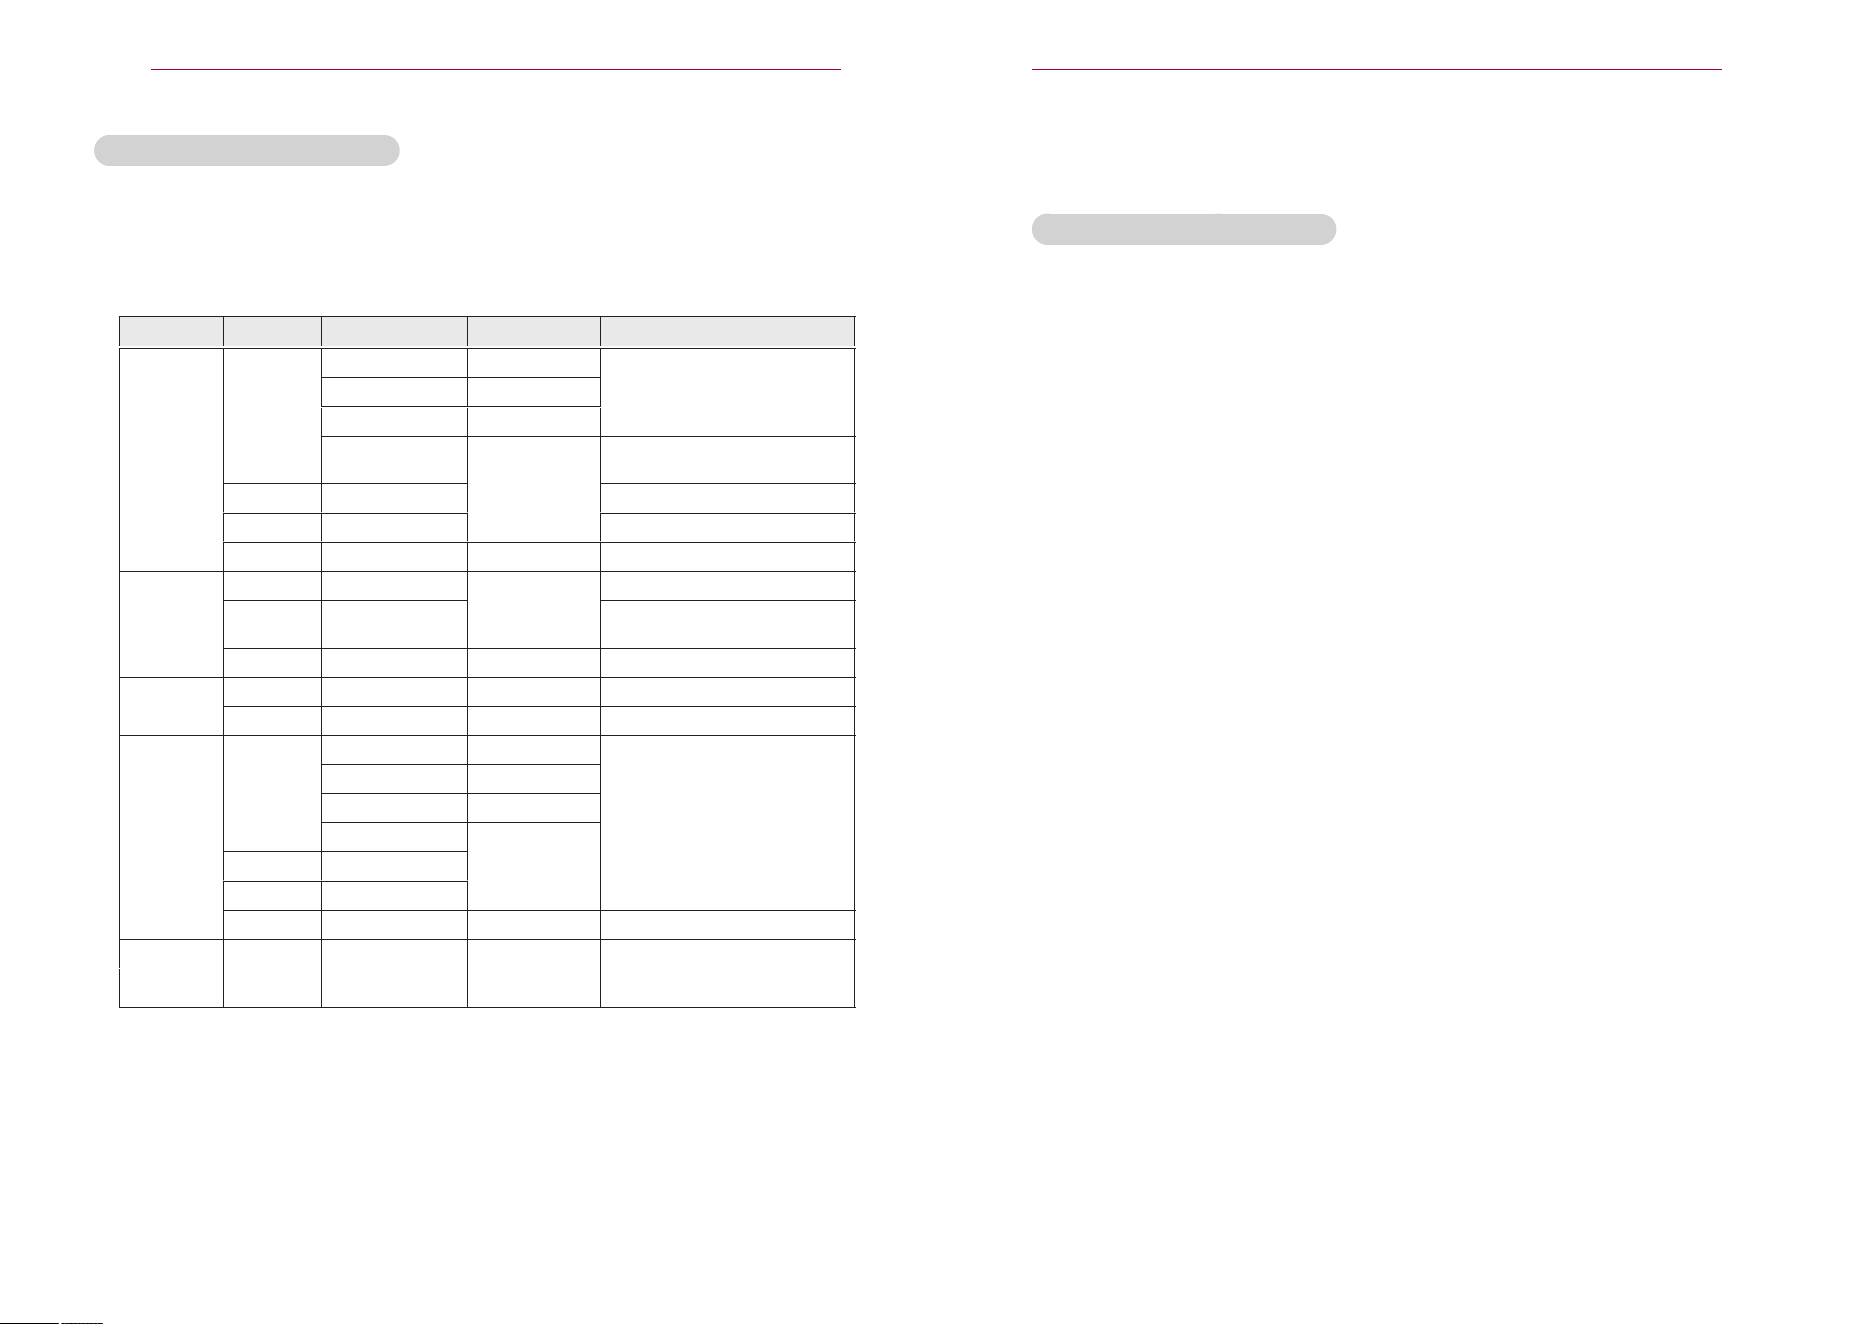
SUPPORTED 2D TO 3D FORMAT
signal
Horizontal frequency
(Khz)
Field frequency
(Hz)
Play video form
HDMI-DTV
1080
p
27
.
00 24
2
D to
3
D, S/S, T&B, C/B
28
.
12 25
33
.
75 30
56
.
25
50
2
D to
3
D, S/S, T&B, C/B, F/S, R/I,
C/I
1080
i
28
.
12 2
D to
3
D, S/S, T&B
720
p
37
.
50 2
D to
3
D, S/S, T&B, F/S
OTHER
-
-
2
D to
3
D
HDMI-PC
1024
x
768 48
.
36
60
2
D to
3
D, S/S, T&B
1920
x
1080 67
.
50
2
D to
3
D, S/S, T&B, C/B, F/S, R/I,
C/I
OTHER
- -
2
D to
3
D
RGB-PC
1024
x
768 48
.
36 60 2
D to
3
D, S/S, T&B
OTHER
- -
2
D to
3
D
Component
1080
p
27
.
00 24
2
D to
3
D, S/S, T&B
28
.
12 25
33
.
75 30
56
.
25
501080
i
28
.
12
720
p
37
.
50
OTHER
- -
2
D to
3
D
USB
1080
p
33
.
75 30
2
D to
3
D, S/S, T&B, C/B, F/S, R/I,
C/I
(Photo: S/S, T&B)
20
ENTERTAINMENT
MOVIE LIST
In the Movie List, you can watch movies stored on the connected USB device.
Tips for Playing Video Files
Some subtitles created by a user may
not work.
Some special characters are not supported
in subtitles.
HTML tags are not supported in subtitles.
Time information in a subtitle file
should be arranged in ascending
order to play the subtitle properly.
Changing font and color in subtitles
is not supported.
A language which is not specified
in the subtitle languages is not
supported. (see page30)
Subtitle files of 1 MB or larger are not
supported.
The screen may suffer temporar y
interruptions (image stoppage, faster
playback , etc.) when the audio language
is changed.
A damaged video file may not be
played properly, or some functions
may not be available.
Video files created with some encoders
may not be played properly.
yyEither audio or video may only be
supported depending on the video or
audio packet structure of a video file.
Video files with higher resolution than
the maximum supported for each
frame may not be played properly.
Video files in formats other than the
ones specified above may not be
played properly.
Streaming files which include GMC
(Global Motion Compensation) or
Qpel (Quarterpel Motion Estimation)
is not supported.
Up to 10,000 sync blocks are supported
in the subtitle file.
Seamless playback is not guaranteed
for files encoded level 4.1 or higher in
H.264/AVC.
DTS audio codec is not supported.
Video files larger than 30 GB (Gigabytes)
are not supported.
Playing a video via a USB connection
that does not support high speed
may not work properly.
A video file and its subtitle file must
be located in the same folder. A video
file name and its subtitle file name
must be identical in order to display
the subtitle properly.
While watching a video using the
movie list function, you cannot adjust
the picture mode.
Trick Mode does not support other
functions than if video files do not
have index information.
Video file names that contain special
characters may not be playable.
•
•
•
•
•
•
•
•
•
•
•
•
•
•
•
•
•
•
•
•
•
•
30
3D FUNCTION
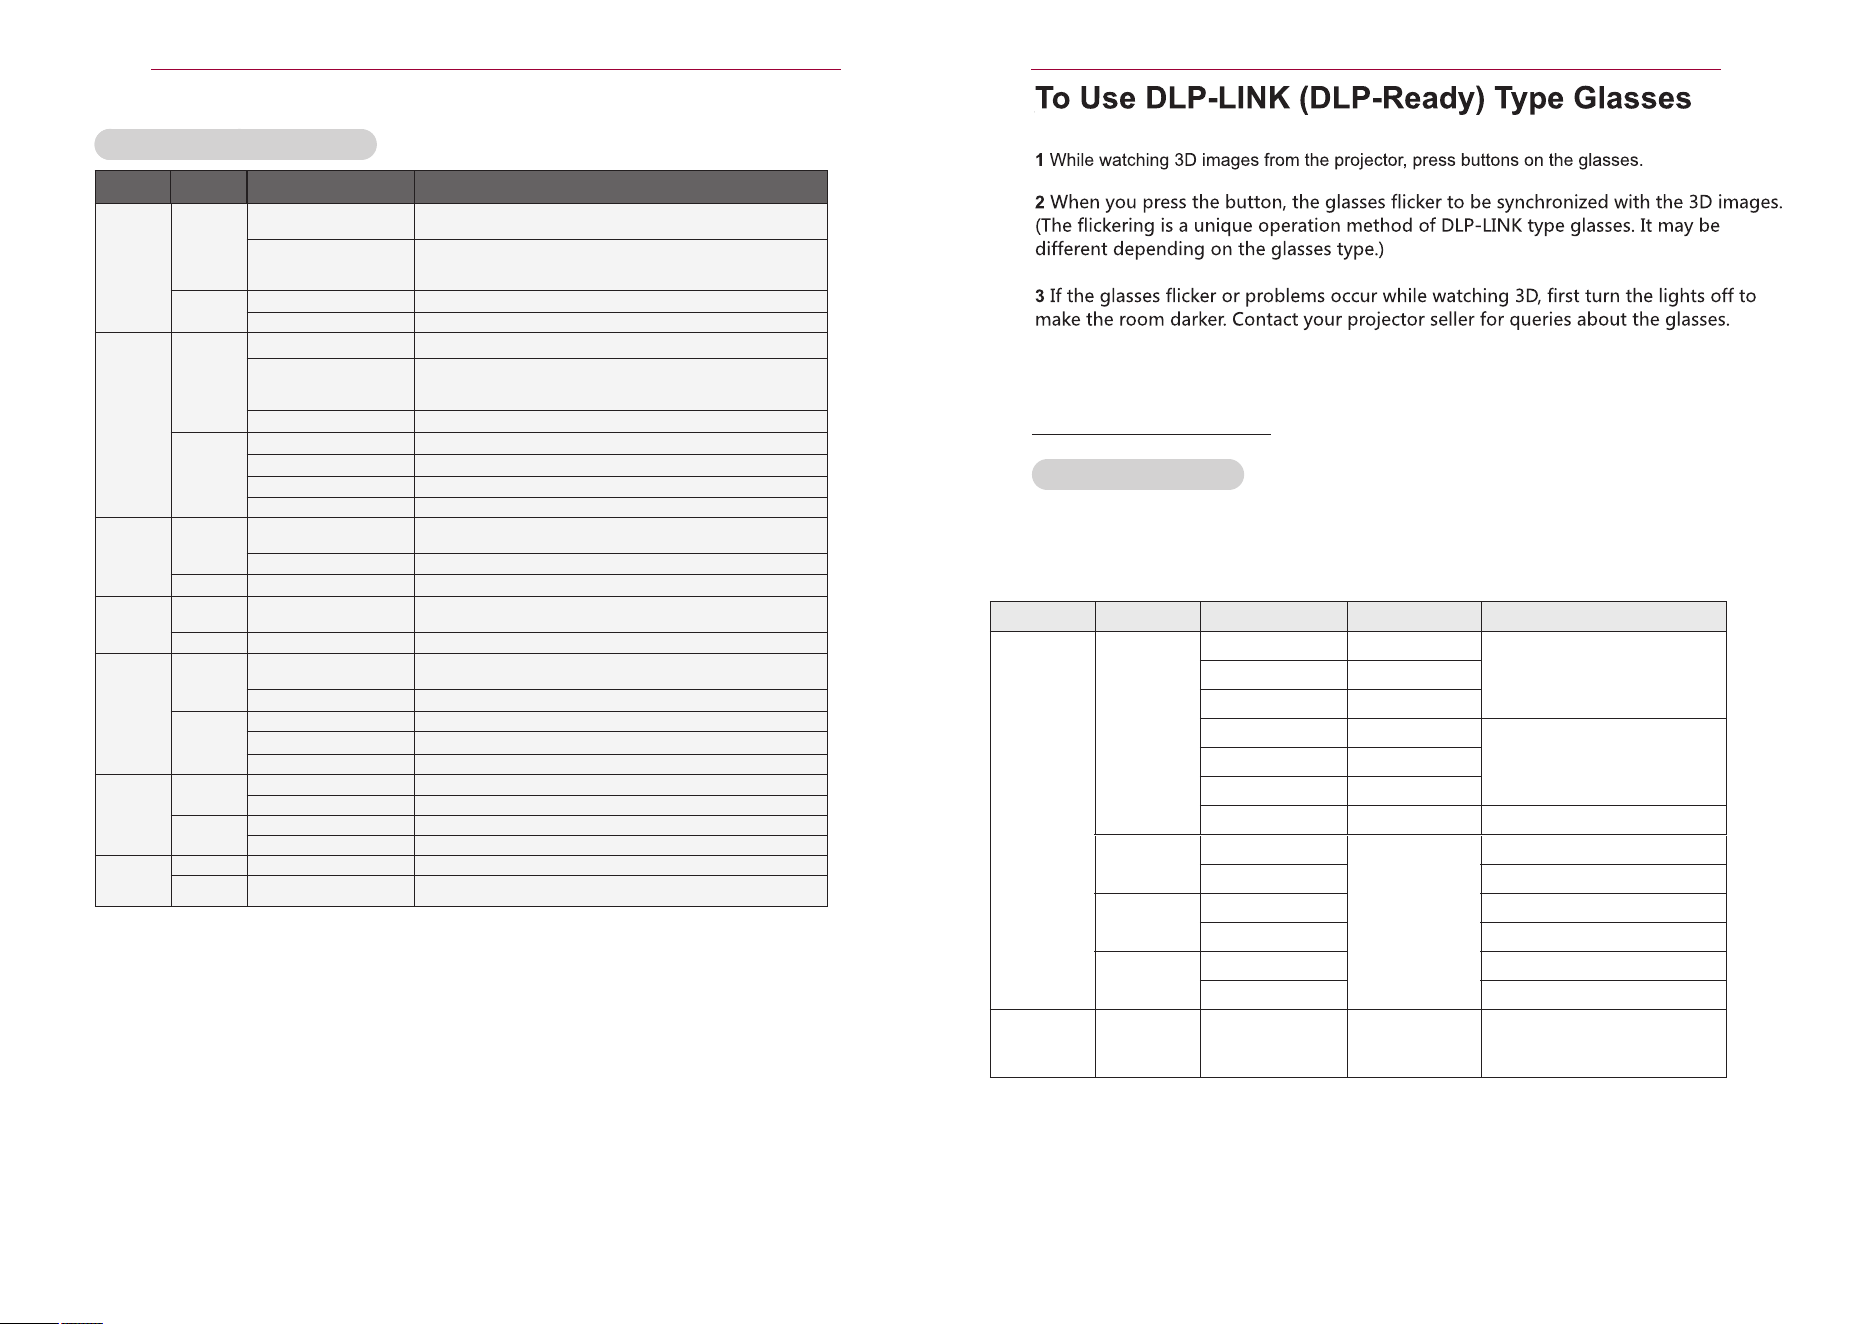
Supported 3 D input formats
Supported3Dformats
Signal
Play the stereo image form
HDMI
1080
p
54
.
00 24
F/P, L/A
56
.
25 25
67
.
50 30
27
.
00 24
S/S, T&B, S/S Full
28
.
125 25
33
.
75 30
56
.
25 50
S/S, T&B
1080
i
56
.
25
50
F/P, F/A
28
.
125
S/S, T&B, S/S Full
720
p
75
.
00
F/P, L/A
37
.
50
S/S, T&B, S/S Full
576
p
62
.
50
F/P,L/A
31
.
25
T/B,S/S,S/S Full
USB
1080
p
33
.
75 30
S/S, T&B, C/B, MPO (Photo)
21
ENTERTAINMENT
Supported Video Formats
Codec Profile/Level Support
.asf
.wmv
Video
VC-1 Advanced Profile
Audio
WMA Standard
WMA 9 Professional
.divx
.avi
Video
Divx3.11
Divx4
Divx5
Divx6
Advanced Simple Profile(720p/ 1080i)
XViD Advanced Simple Profile(720p/ 1080i)
Audio
MPEG-1 Layer III (Mp3)
WMA 9 Professional
.mp4
.m4v
Video
H.264 /AVC
Audio HE-AAC HE-AAC-LC & HE-AAC
.mkv
Video H.264 /AVC
Audio
HE-AAC HE-AAC-LC & HE-AAC
.ts
.trp
.tp
Video
H.264 /AVC
MPEG-2
Audio
MPEG-1 Layer I,II
HE-AAC HE-AAC-LC & HE-AAC
.vob
Video
MPEG-1
MPEG-2
Audio LPCM
MPEG-1 LAYER I、II
.mpg
.mpeg
.mpe
Video MPEG-1
Audio
MPEG-1 LAYER I、II
Only streams compliant configured properly for TS, PS or ES
File
Extensions
Audio/
Video
VC-1 Simple
and Main Profiles
MPEG-1 Layer I,II
WMA Standard
MPEG-4 Part 2
MPEG-1 Layer III (MP3)
Advanced Profile @ Level 3 (e.g.720p60, 1080i60, 1080p30)
Only streams compliant to SMPTE 421M VC-1 standard are supported.
Simple Profile @ Medium Level (e.g.CIF,QVGA)
Main Profile @ High Level (e.g.1080p30)
Only streams compliant to SMPTE 421M VC-1 standard are supported.
Main Profile @Level 4.1
High Profile @Level 4.1 (e.g.720p60, 1080i60, 1080p30)
Main Profile @Level 4.1
High Profile @Level 4.1 (e.g.720p60, 1080i60, 1080p30)
Main Profile @Level 4.1
High Profile @Level 4.1 (e.g.720p60, 1080i60, 1080p30)
Advanced Simple Profile(720p/ 1080i)
Main Profile @High Level (e.g.720p60, 1080i60)
Main Profile @High Level (e.g.720p60, 1080i60)
Vertical
Frequency (Hz)
horizontal frequency
(Khz)
29
3D FUNCTION
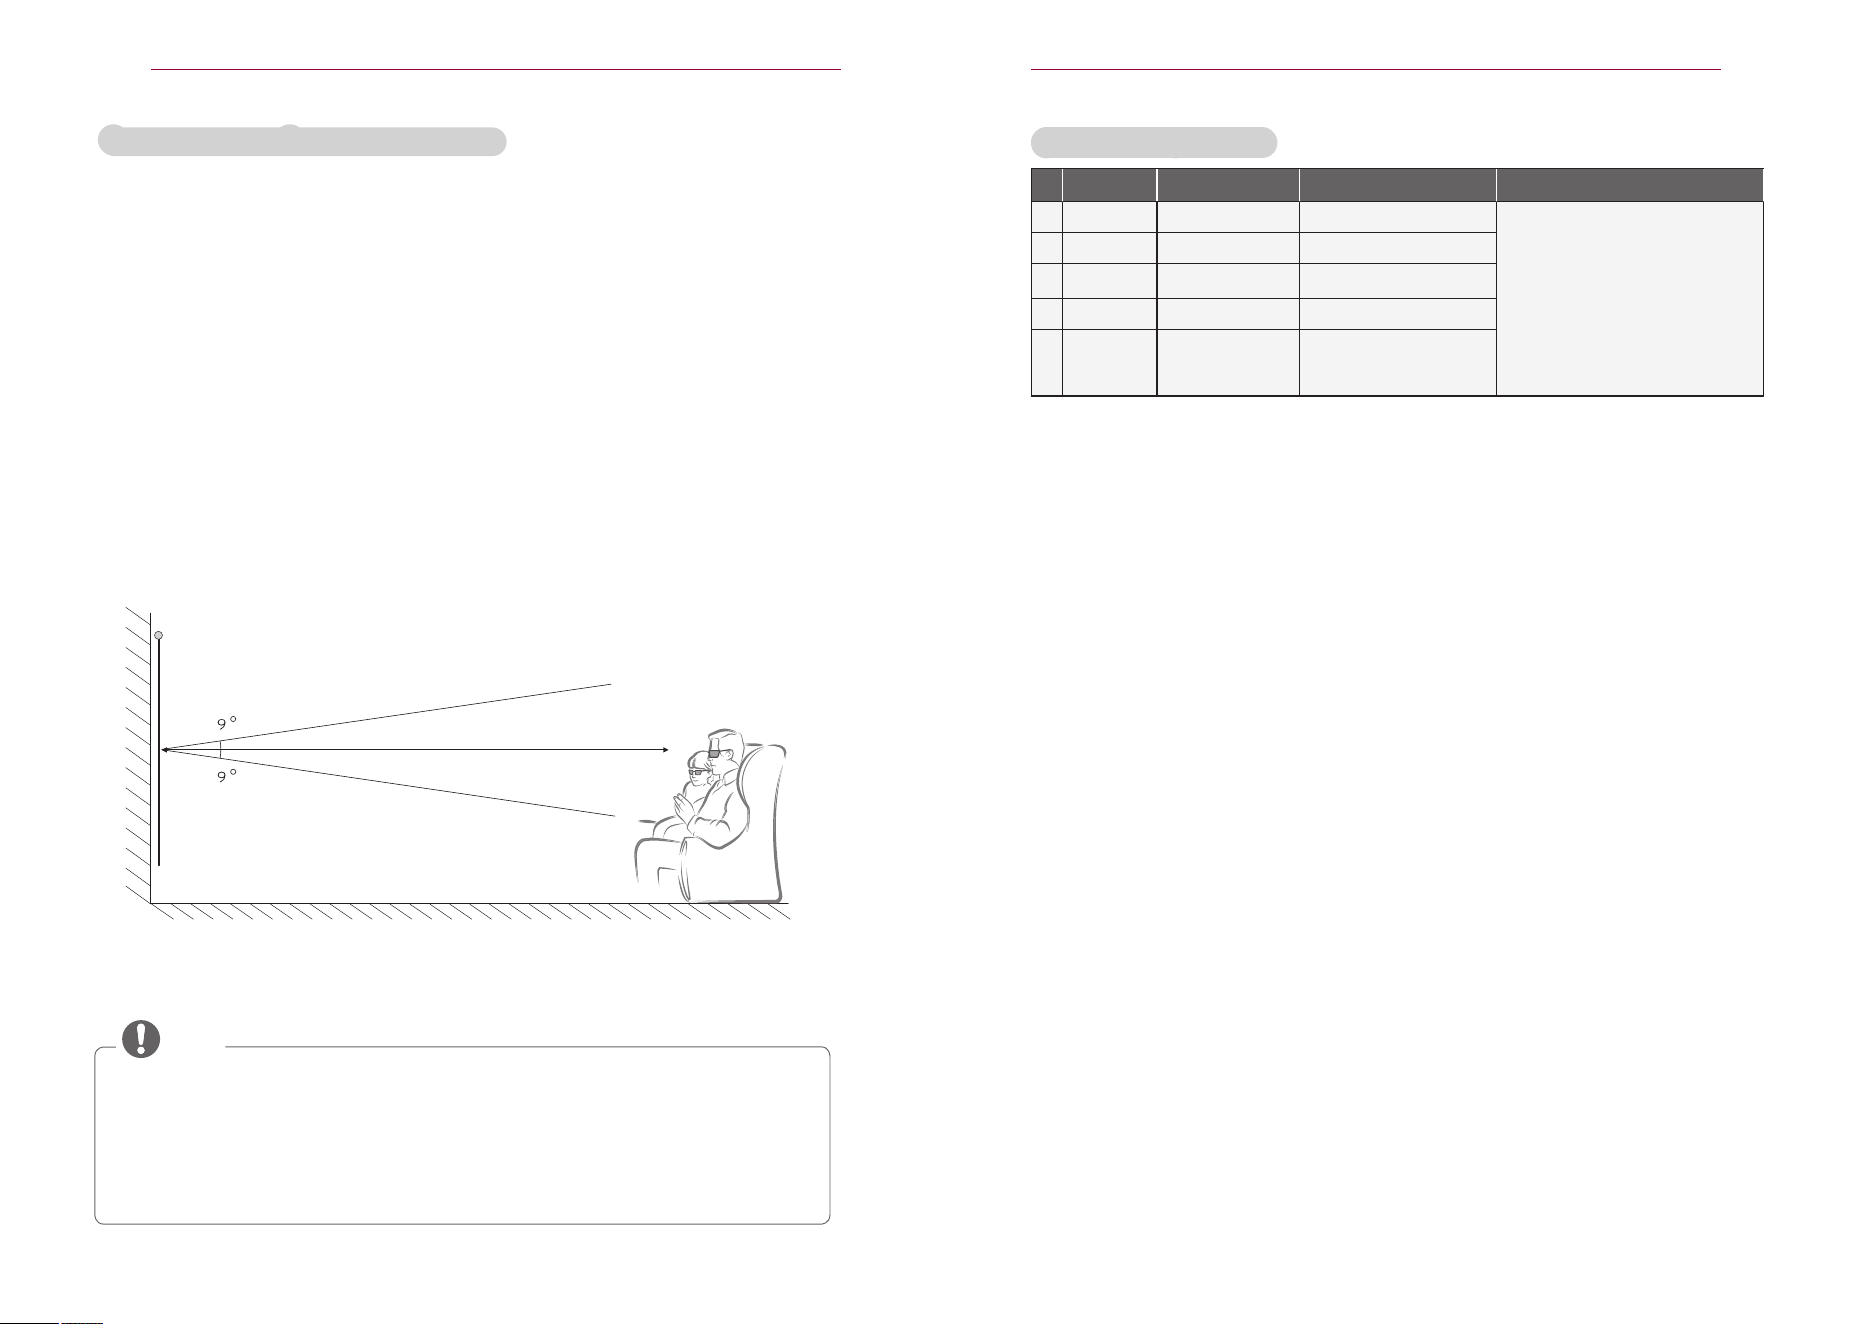
Please check the following when using 3D glasses
*有效视角:上下左右
9
度
推荐观看距离
3
米以上
5
米以内
推荐屏幕尺寸:
101
cm
CAUTION
Requirements for Watching 3D Images
*观看
3
D 影像条件以暗室为标准。
* 观看
3
D 影像时请调成最低耗电模式。
22
ENTERTAINMENT
Supported Audio Files
No.
Audio Codec
Bit rate
Sampling rate
Remark
1 MP3 32 kbps - 320 kbps 32 kHz - 48 kHz
2 MPEG 32 kbps - 448 kbps 32 kHz - 48 kHz
3 AAC,HEAAC
24 kbps -
3844 kbps
8 kHz - 96 kHz
4 CDDA 1.44 kbps 44.1 kHz
5 LPCM
1.41 Mbps -
9.6 Mbps
Do not use 3D glasses as ordinary glasses, sunglasses or protective goggles.
- If you do so, this may cause injury.
Do not store 3D glasses in very hot or very cold conditions. If you do, this
may cause them to become distorted.Do not use distorted glasses.
Do not drop 3D glasses or allow them to come into contact with other objects.
- This can result in damage to the product.
The lenses of 3D glasses are easily scratched. Use a soft clean cloth when
cleaning them. - Foreign particles on the cloth may cause scratches.
Do not scratch the surface of the 3D glasses' lenses with sharp objects or
wipe them with chemicals. - If the lenses get scratched, images may not look
normal when viewing3D.
* Optimum viewing angle: Top/Bottom/Left/Right 9°
Optimum viewing distance: Between 9 ft and 16 ft
Recommended screen size: 40 inches
* Basically, Watching 3D videos should be done in dark room environments only.
* For 3D watching, set the energy saving mode to Minimum.
The pairing with the DLP-LINK glasses is affected by the intensity of light reflected from the screen.
Therefore, the pairing with DLP-LINK glasses may not work properly if the light reflected from
the screen is not bright enough, such as when the surrounding area is bright, the screen is
big, or the maximum energy saving mode is enabled.
Some menus may not work while playing a 3D video.
You can only watch a 3D video properly when the 3D video format option has been selected
on the projector.
Multi-channel : 44.1 kHz,
88.2 kHz / 48 kHz, 96 kHz
Stereo : 176.4 kHz, 192 kHz
•
•
•
•
•
•
•
•
28
3D Function
3D FUNCTION
Before Watching 3D
CAUTION
CAUTION
When Watching 3D Video
?
C: \
RETU RN
** *
** *
** *
** *
** *
** *
** *
** *
** *
** *
** *
—— US B T F
Picture Music Movie TEXT
23
ENTERTAINMENT
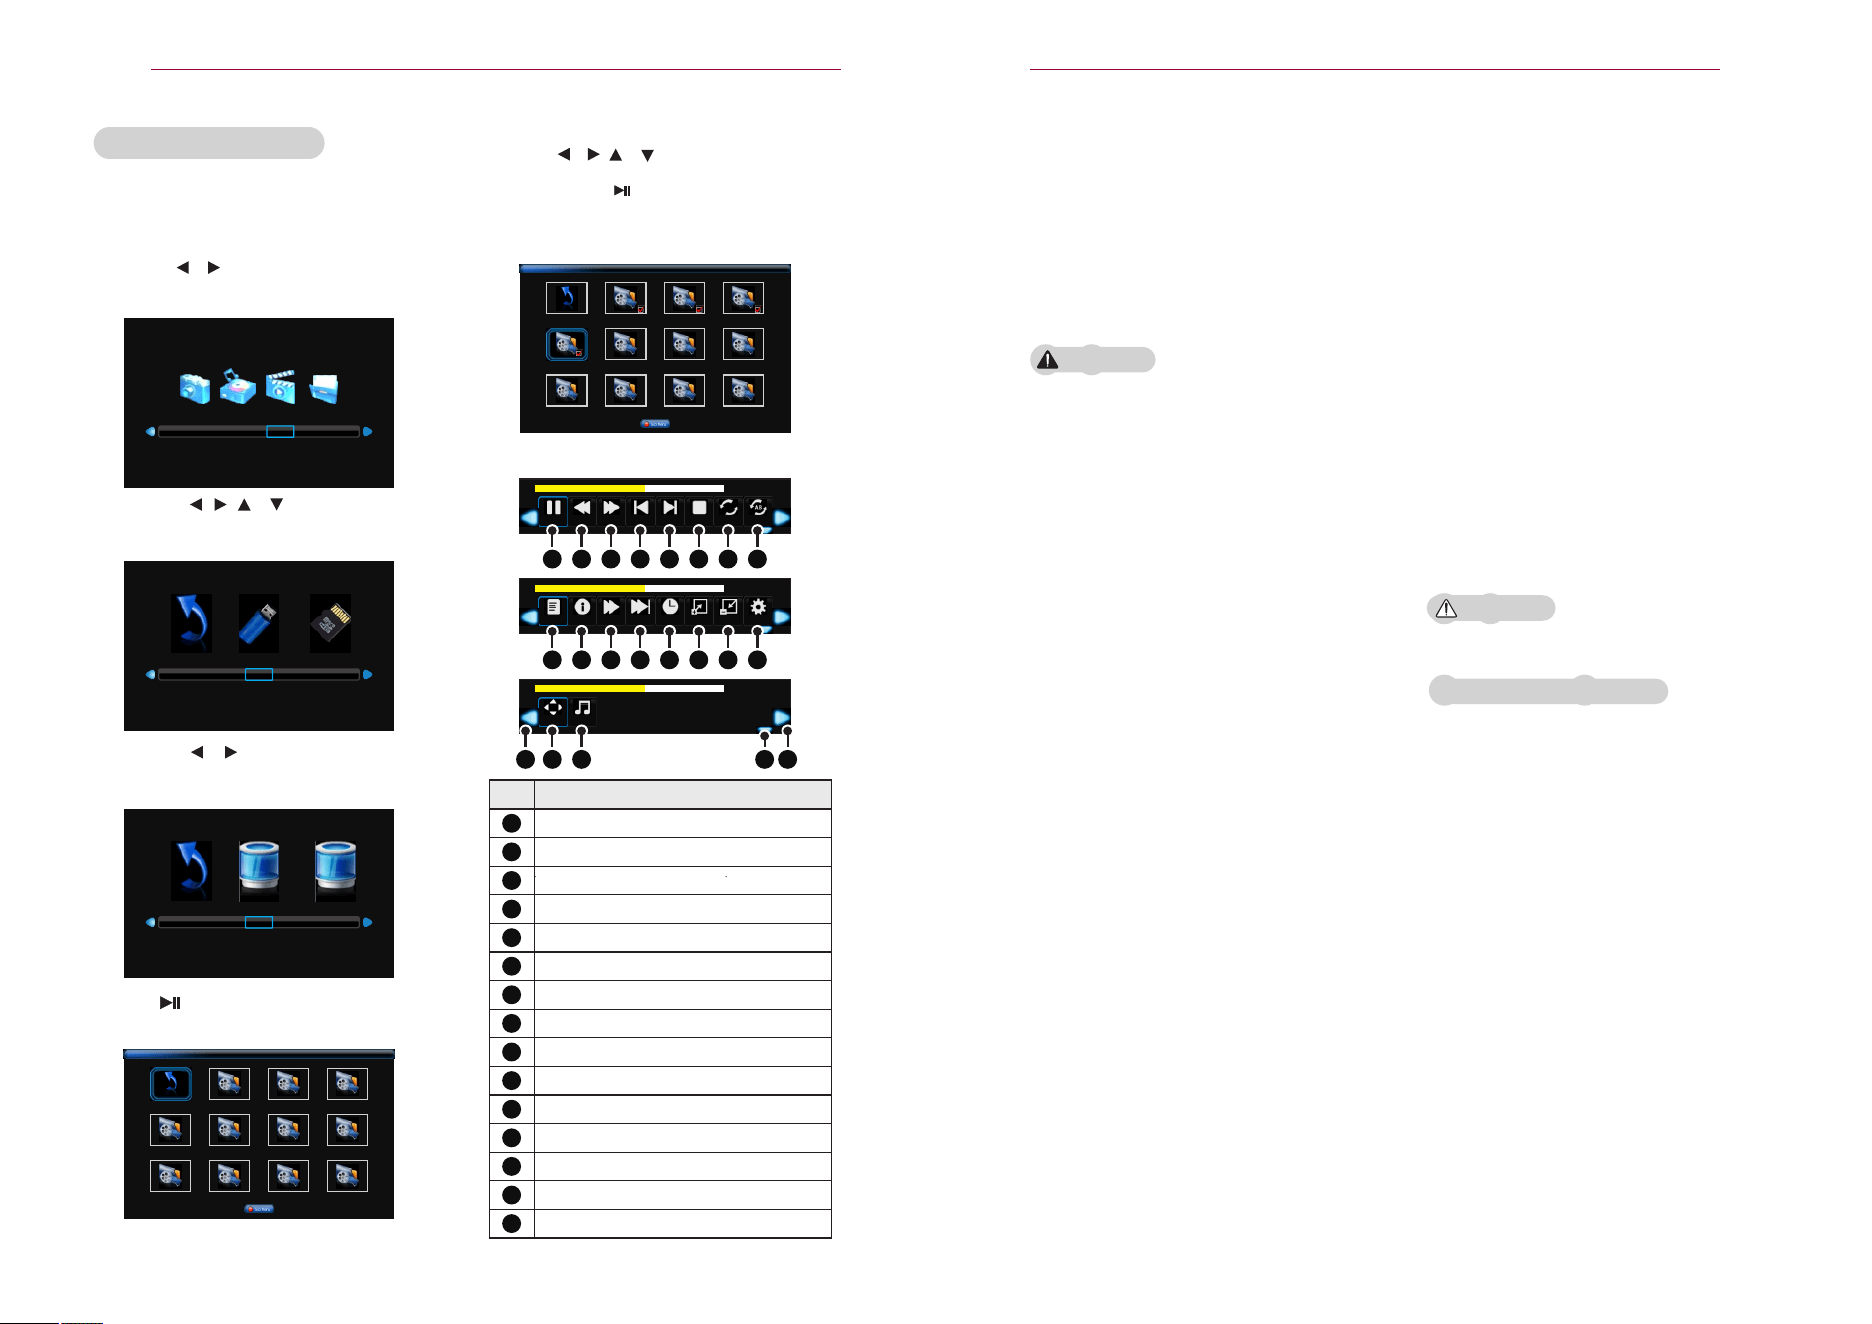
Browsing Movie List
1 Connect a USB storage device.
2
3
Use button to play the video in the root directory
Piece.
4
5
—— C: D:
6
7
Press the OK key when playing can popup control panel.
Pause
Forward
The next
Stop
00:01:06/00:02:13
Message
Backward
Forward
TIME UP
Enlarge
Smaller
Zoom
00:01:06/00:02:13
Move L+R
00:01:06/00:02:13
C: \
Return
** *
** *
** *
** *
** *
** *
** *
** *
** *
** *
** *
1
1
2
2
3
3
4
4
5
5
6
6
7
7
8
8
9
9
10
10
11
11
12
12
13
13
14
14
15
15
16
17 18
19
20 21
DESCRIPTION
Play、pause
Backward
Forward
The last movie
The next movie
Stop
Repeat
Setting
Play list
Movie message
Backward
Forward
Time up
Enlarge
Smaller
If you view 3D images too closely for
a long period of time, it may cause blurred vision.
If you watch the projector or game
screen for a long time with 3D glasses
on, you may experience dizziness or eye fatigue.
If you are pregnant, a senior citizen, intoxicated, have heart
problems, or easily feel motion sickness, we recommend
that you do not watch 3D images.
Because 3D images can be recognized as real, some
viewers may get surprised or overexcited.
Do not watch 3D images near fragile objects or any objects
that can be knocked over easily.
Take care not to injure yourself as you may subconsciously
try to move away from the life-like 3D images.
Prevent children of 5 years or younger from watching
a 3D video. It may impair the development of their eyes.
Warning about photosensitivity seizures
- Some users may experience a seizure or other abnormal
symptoms when they are exposed to a flashing light or
particular pattern from a video game or movie. If anyone in
your family has a history of epilepsy or has ever experienced
any kind of seizure, please consult your doctor before viewing
3D images.If you experience one of the followingsymptoms
while watching a 3Dvideo, stop watching the 3D video immediately
and take a rest.
- Dizziness, twitching of the eye or facial muscles, involuntary
movements,cramp, loss of consciousness,confusion, loss of
sense of direction,or nausea. If the symptom does not disappear,
please consult your doctor.
You can reduce the risk of photosensitive
seizures by taking the followingpreventive measures.
- Take a rest of 5 - 15 mins. for every
1 hour of viewing.
- If vision varies between each eye,
correct the variation before beginning
to watch a 3D video.
- Ensure that the 3D video is directly
in front of you, at eye level.
3D technology uses different video frames for each eye to add depth to the video.
- You should stop watching if you
experience a headache, fatigue or
dizziness.
- Do not view 3D images when you
are tired or ill.
Extra special care is required for children
watching a 3D video.
Watch 3D images within the optimum
viewing angle and distance.
If you are outside the viewing angle
or distance, you may not be able to
watch 3D images. You cannot view
3D images when you lie down.
You may see left and right images
overlapped during projector initialization
after it is powered on. It may take
some time for optimization.
I t may take some time for the 3D
image look normal after you turn your
eyes away from the screen and look
back at the 3D image.
I t may flicker slightly while watching
3D images under a 3 wavelength
lamp fluorescent light (50 Hz - 60
Hz) or near windows. If so, it is recommended
to block the sun light
with a curtain and to dim the lights.
The 3D glasses must be DLP-LINK
(DLP Ready) type.
You may not be able to watch 3D
properly if there is an obstacle between
the projector and 3D glasses.
yyInstall the 3D projector as far as possible
from other devices.
Play a video file stored in the connected
device.
Use the or button to
select Movie List and press the OK
button.
Use the , , or button to
select STORAGE DEVICE and press the OK
button.
Use the or button to
select HARDWARE DEVICE and press the OK
button.
Use 、 、 or button to move the cursor
to play the file, press the OK key to select,
Then press button to play the selected file.
Backward
Setting
Repeat
The last
Play
•
•
•
•
•
•
•
•
•
•
•
•
•
•
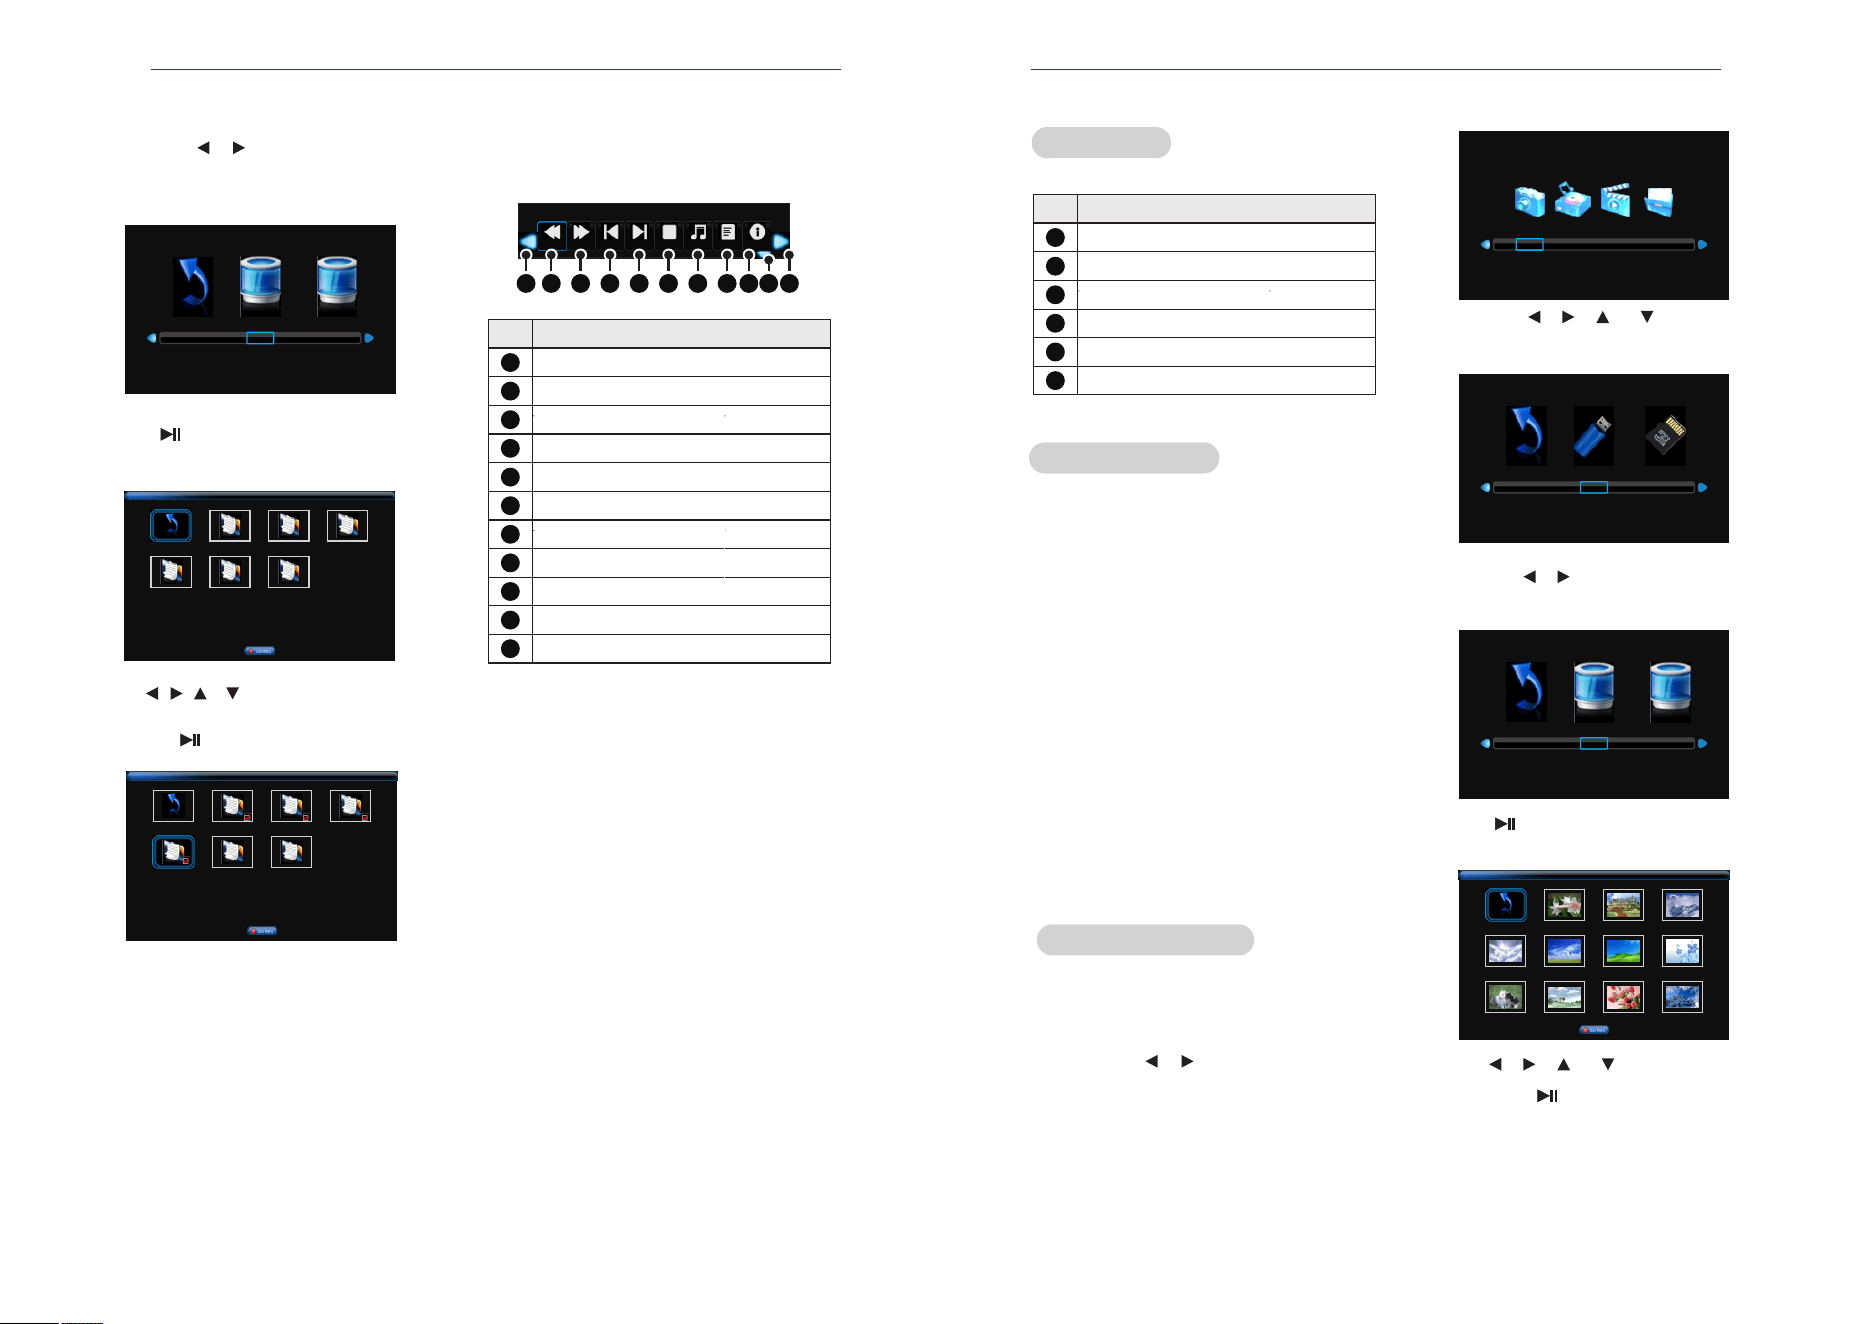
PHOTO LIST
Supported Photo Files
24
ENTERTAINMENT
MOVIE LIST
Description
Adjust the screen ratio
forward to another page of the control panel
Moving picture to enlarge screen position.
Track selection
forward to another page of the control panel
Close control panel
16
17
18
19
20
21
Browsing Photo List
—— US B T F
PH O TO MU S IC MO V IE TE X T
3
Use the or button to
select HARDWARE DEVICE and press the OK
button.
4
6
Use button to move the cursor , , or
to play the file, press the OK key to select,
Then press button to play the selected file.
Use button to play the video in the root
directory Piece.
5
—— C: D:
C: \
RETU RN
** *
** *
** *
** *
** *
** *
** *
** *
** *
** *
** *
Prev
Next
上一个 下一个 Stop Play
Message
27
ENTERTAINMENT
4
—— C: D:
6
Use button to play the video in the root directory
Piece.
5
C: \
RETURN
** *
** *** *
** *
** *
** *
C: \
返回
** *
** *** *
** *
** *
** *
9 1011
7
Press the OK key when playing can popup control panel.
1 2 3 4 5 6 7 8
1
2
3
4
DESCRIPTION
Backward to the last page
Forward to the next page
The last text
The next text
5
Stop
6
Background Music
7
Play list
Text message
8
9
10
11
Hidden control panel
forward to another page of the control panel
forward to another page of the control panel
?
?
Music on
Use the or button to
select HARDWARE DEVICE and press the OK
button.
Use button to move the cursor , , or
to play the file, press the OK key to select,
Then press button to play the selected file.
* When the audio file and the text is put in the same
directory , the background music will be on.
You can see the photos stored on a connected device.
PHOTO (*.JPEG)
Baseline: 64-pixel (width) x 64-pixel
(height) - 15360-pixel (width) x 8640-pixel (height)
Progressive: 64-pixel (width) x 64-pixel
(height) - 1920-pixel (width) x 1440-pixel (height)
Only JPEG files are supported.
Non-supported files are displayed in the form of an icon.
An error message is displayed for
corrupted files or file formats that
cannot be played.
Corrupted files may not be displayed properly.
It may take some time to view highresolution images
in full screen.
You can see the photos stored on a connected
device.
1. Connect a USB storage device.
2. Use the or button to
select Photo and press the OK
button.
Use the , , or button to
select STORAGE DEVICE and press the OK
button.
25
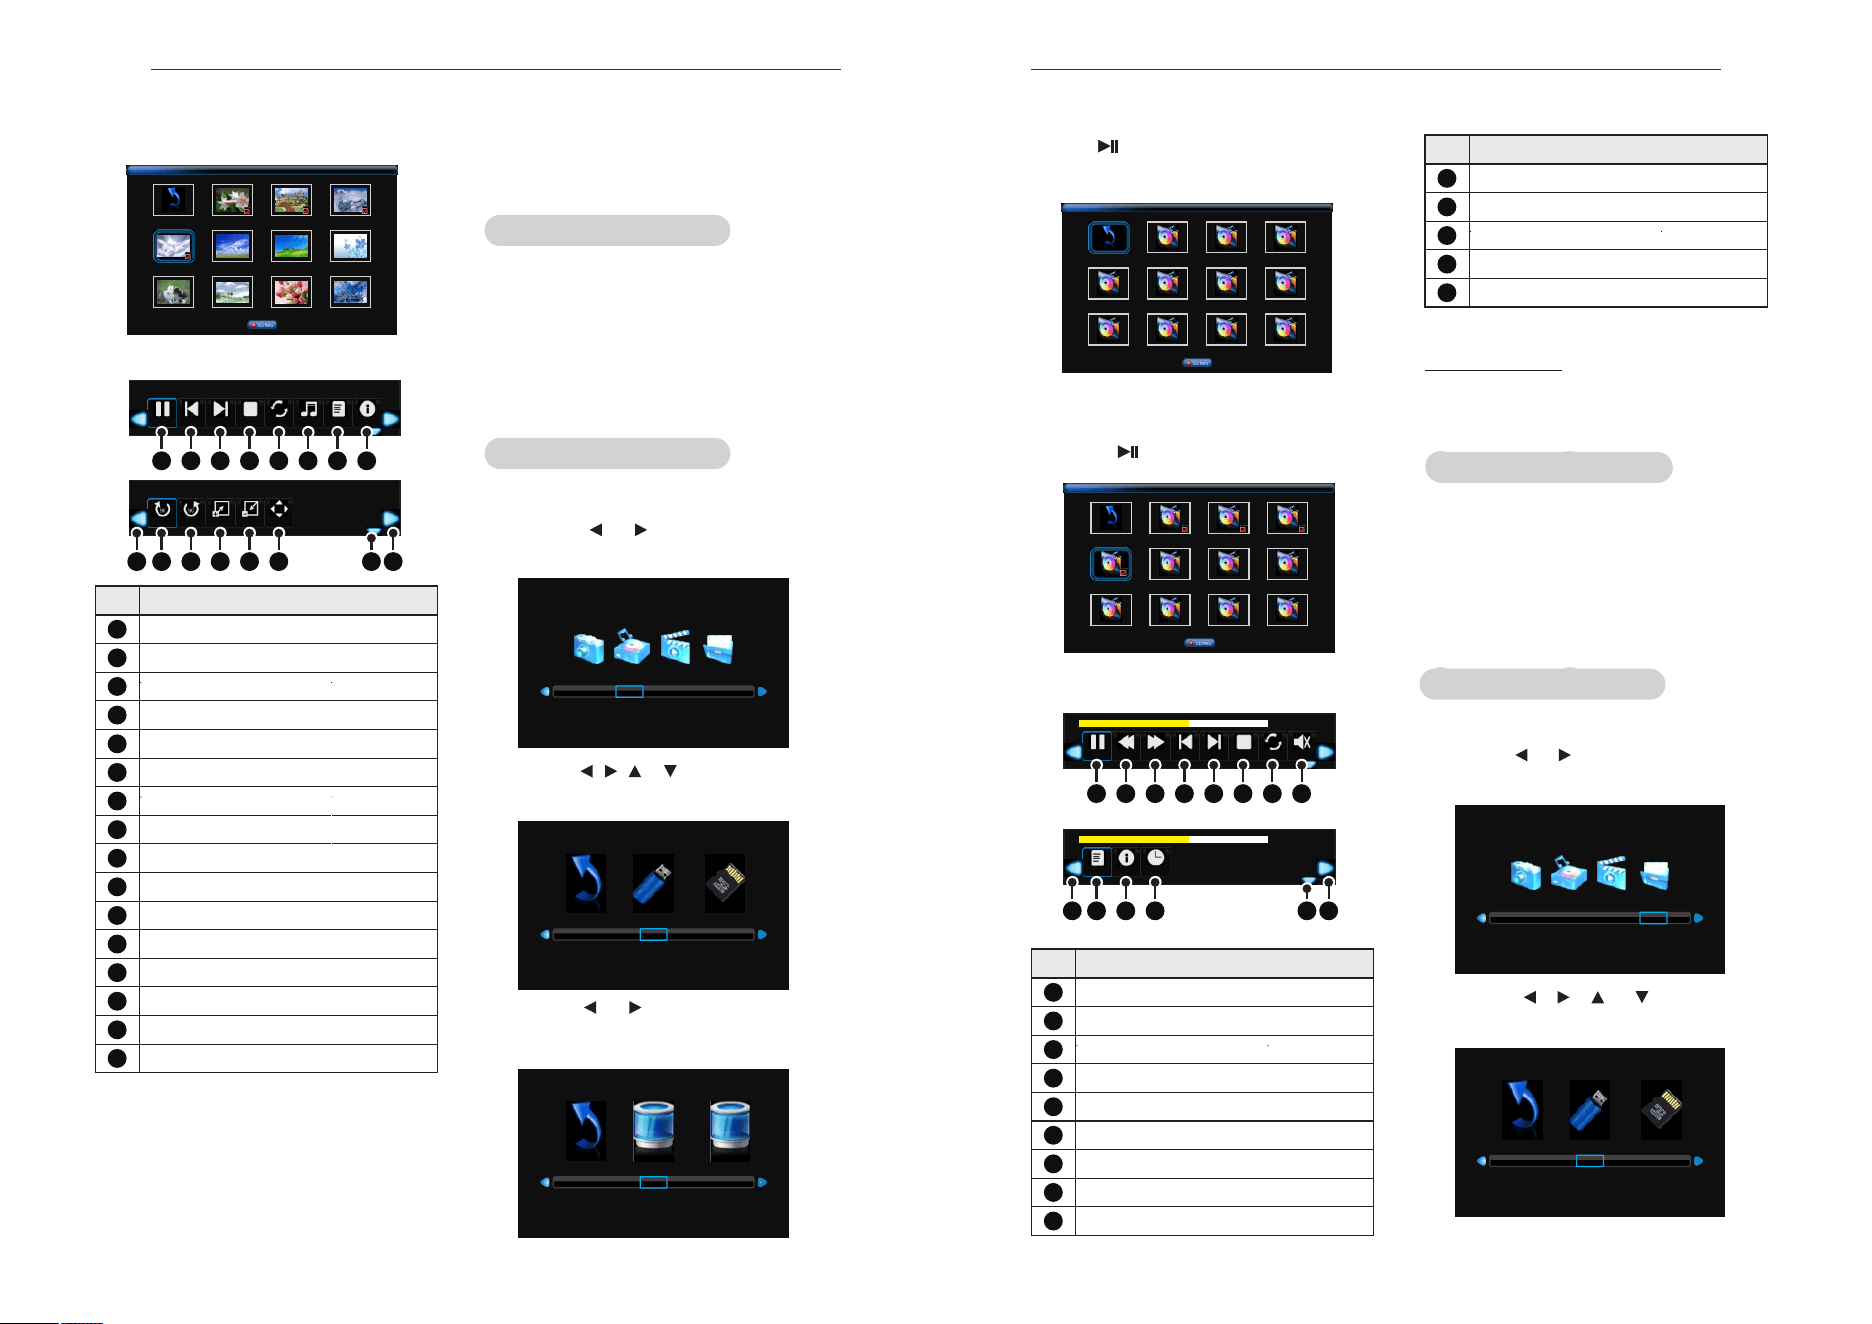
ENTERTAINMENT
ROTATE ROTATE
ENL ARGE
SMA LLER
THE LAST ONE
THE NEXT ONE
Stop
REPE AT
MUS IC ON P LAY
MES SAGE
7
Press the OK key when playing can popup control panel.
1 2 3 4 5 6 7 8
9 10 11 12 1314 15 16
1
2
3
4
DESCRIPTION
PALY,PAUSE
THE LAST PICTURE
THE NEXT PICTURE
STOP PLAYING
C: \
RETURN
** *
** *
** *
** *
** *
** *
** *
** *
** *
** *
** *
5
REPEAT PLAYING
6
BACKGROUND MUSIC
7
PLAY LIST
PICTURE MESSAGE
8
9
Clockwise rotation of 90 degrees
10
11
12
13
Counterclockwise rotation of 90 degrees
ENLARGE THE PICTURE
SMALLER THE PICTURE
Adjust the map position when enlarging the picture
14
15
FORWARD TO ANOTHER PAGE OF CONTROL PANEL
HIDDEN CONTROL PANEL
FORWARD TO ANOTHER PAGE OF CONTROL PANEL
16
MUSIC LIST
Supported Music Files
* When the audio file and the pictures is put in the same
directory , the background music will be on.
Browsing Music List
1
—— US B T F
PHOTO M U S I C M O V I E T E X T
Connect a USB storage device.
2
3
4
—— C: D:
PLAY
MESSAGE
TIME UP
00:01:06/00:02:13
PAUSE
BACKWARD
FORWARD
THE NEXT ONE Stop
REPEAT
MUTE
00:01:06/00:02:13
6
7
Press the OK key when playing can popup control panel.
C: \
返回
** *
** *** *
** *
** *
** *
** *
** *
** *
** *
** *
1
1
2
2
3
3
4
4
5
5
6
6
7
7
8
8
9
9
10
10
11
11
12 13 14
DESCRIPTION
DESCRIPTION
PLAY、PAUSE
BACKWARD
FORWARD
THE LAST MUSIC
THE NEXT MUSIC
STOP PLAYING
REPEAT PLAYING
MUTE
PALY LIST
MUSIC MESSAGE
START PALYING TIME
26
ENTERTAINMENT
Use button to play the video in the root directory
Piece.
5
C: \
返回
** *
** *** *
** *
** *
** *
** *
** *
** *
** *
** *
FORWARD TO ANOTHER PAGE OF CONTROL PANEL
12
13
HIDDEN CONTROL PANEL
FORWARD TO ANOTHER PAGE OF CONTROL PANEL
14
FILE LIST
Supported File Formats
BROWSING FILE LIST
—— US B T F
PICTU R E M U S I C M O V I E T E X T
You can play audio fi les stored on the
connected device.
*.MP3
Bit rate range 32 Kbps - 320 Kbps
Sampling rate MPEG1 Layer 3:
32 kHz, 44.1 kHz, 48 kHz
Sampling rate MPEG2 Layer 3:
16 kHz, 22.05 kHz, 24 kHz
Usethe or button to select
Music List and press the OK button.
Use the , , or button to
select the Removable DEVICE you want and
press the OK button.
Use the or button to
select the HARD DEVICE you want and
press the OK button.
THE LAST ONE
PAUS E
MOVE
Use or button to move the cursor
to play the file, press the OK key to select,
Then press button to play the selected file.
You can see document fi les stored on a
connected device.
File Viewer realigns a document, so
it may look different from what is
displayed on a PC.
For documents that include images,
the resolution may look lower during
the realigning process.
If the document volume is big or it
has many pages, it may take longer
to load the document.
Unsupported fonts may be replaced
by other fonts.
1 Connect a USB storage device.
2 Use the or button to
select File List and press the OK
button.
3 Use the , , or button to
select the storage device you want and press the
OK button.