Warning notices: Before using this product, please read this manual carefully and keep it for future reference.
The design and specifications are subject to change without prior notice for product improvement.
Consult with your dealer or manufacturer for details.
The diagram above is just for reference. Please take the appearance of the actual product as the standard.
MVU30W6AST
USER MANUAL
Range Hood
THANK YOU LETTER
Thank you for choosing Midea! Before using your new Midea product, please read
this manual thoroughly to ensure that you know how to operate the features and
CONTENTS
01
02
08
12
13
15
16
16
17
THANK YOU LETTER
SAFETY INSTRUCTIONS
05
SPECIFICATIONS
06
PRODUCT OVERVIEW
PRODUCT INSTALLATION
OPERATION INSTRUCTIONS
CLEANING AND MAINTENANCE
TROUBLE SHOOTING
TRADEMARKS, COPYRIGHTS AND LEGAL STATEMENT
DISPOSAL AND RECYCLING
DATA PROTECTION NOTICE
01
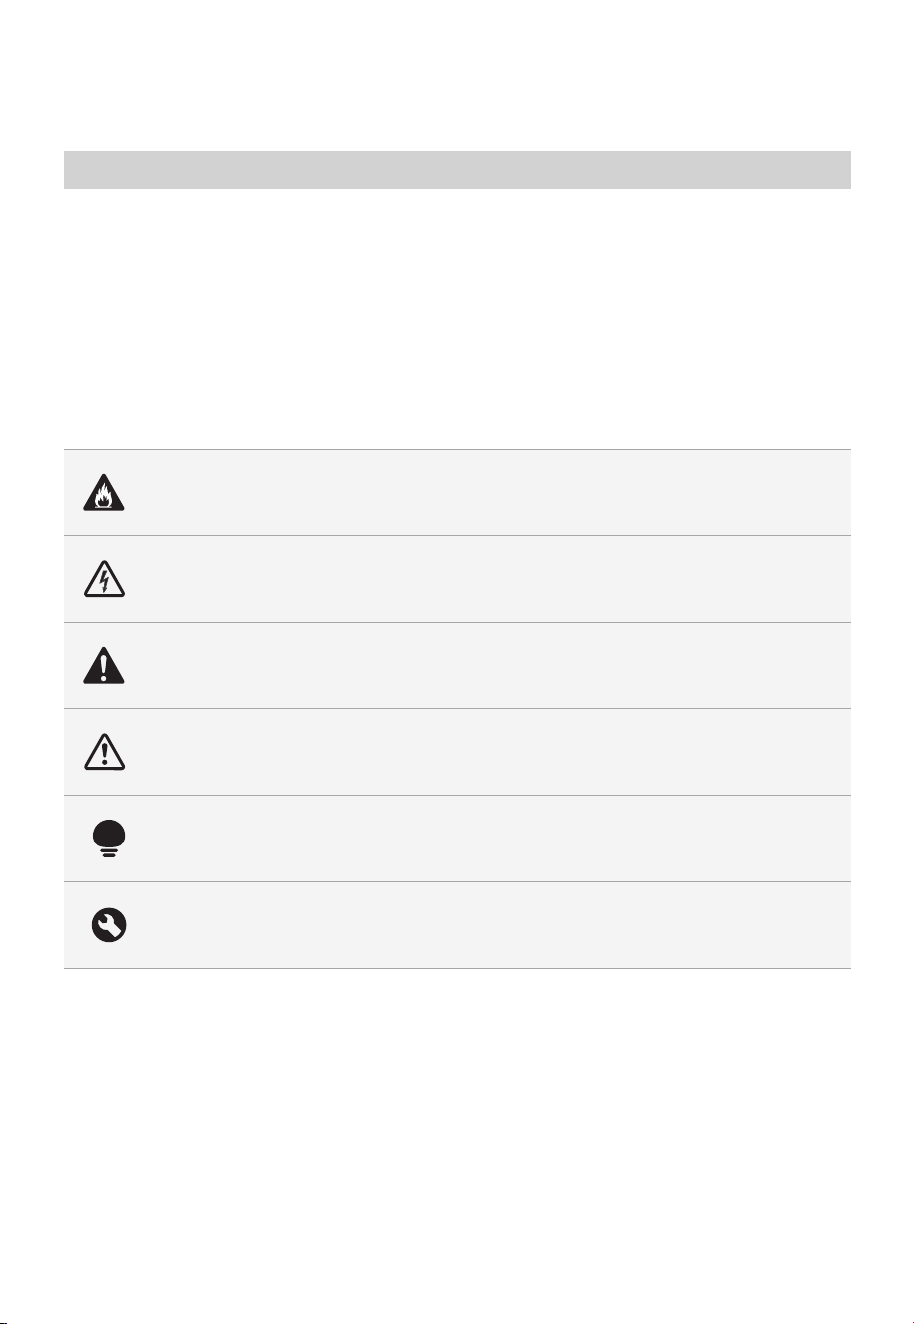
Danger
Warning of electrical voltage
This symbol indicates that there is a danger to life and health of
persons due to voltage.
Warning
The signal word indicates a hazard with a medium level of risk which, if
not avoided, may result in death or serious injury.
Caution
The signal word indicates a hazard with a low degree of risk which, if
not avoided, may result in minor or moderate injury.
Attention
The signal word indicates important information (e.g. damage to
property), but not danger.
Observe instructions
This symbol indicates that a service technician should only operate and
maintain this appliance in accordance with the operating instructions.
Read these operating instructions carefully and attentively before using/commissioning the
unit and keep them in the immediate vicinity of the installation site or unit for later use!
Intended Use
Explanation of Symbols
SAFETY INSTRUCTIONS
02
The following safety guidelines are intended to prevent unforeseen risks or damage from
unsafe or incorrect operation of the appliance. Please check the packaging and appliance
on arrival to make sure everything is intact to ensure safe operation. If you find any
damage, please contact the retailer or dealer. Please note modifications or alterations to
the appliance are not allowed for your safety concern. Unintended use may cause
hazards and loss of warranty claims.
This symbol indicates that there are dangers to the life and health of
persons due to extremely flammable gas.
03
WARNING
TO REDUCE THE RISK OF FIRE,
ELECTRIC SHOCK, OR INJURY TO
PERSONS, OBSERVE THE FOLLOWING:
Use this unit only in the manner
intended by the manufacturer. If you
have questions, contact the
manufacturer.
Before servicing or cleaning the unit,
switch power off at service panel and
lock service panel disconnecting
means to prevent power from being
switched on accidentally. When the
service disconnecting means cannot
be locked, securely fasten a prominent
warning device, such as a tag, to the
service panel.
Installation Work and Electrical Wiring
Must Be Done By Qualified Person(s)
In Accordance With all Aplicable
Codes & Standards, Including
Fire-rated Construction.
Sufficient air is needed for proper
combustion and exhausting of gases
through the flue (Chimney) of fuel
burning equipment to prevent
back-drafting. Follow the heating
equipment manufacturers guideline
and safety standards such as those
published by the National Fire
1.
2.
3.
4.
WARNING
WARNING alerts you to situations that
may cause serious body harm, death or
property damage.
CAUTION
CAUTION indicates a potentially
hazardous situation which, if not
avoided, may result inminor or
moderate injury.
IMPORTANT
IMPORTANT indicates installation,
operation,maintenance or valuable
information that is not hazard related.
Protection Association (NFPA), the
American Society for Heating, Refrig-
eration and Air Conditioning Engineers
(ASHRAE), and the local code
authorities.
When cutting or drilling into wall or
ceiling, do not damage electrical
wiring and other hidden utilities.
Ducted fans must always be vented to
the outdoors.
Do not use this unit with any
solid-state speed control device.
TO REDUCE THE RISK OF FIRE , USE
ONLY METAL DUCTWORK.
This unit must be grounded. This
appliance is equipped with a cord
having a grounding wire with a
grounding plug. The plug must be
plugged into an outlet that is properly
installed and grounded.
Do not use an extension cord. If the
power supply cord is too short, have a
qualified electrician install an outlet
near the appliance.
When applicable local regulations
comprise more restrictive installation
and/or certification requirements, the
aforementioned requirements prevail
on those of this document and the
installer agrees to conform to these at
his own expense.
Never leave surface units unattended
at high settings. Boilovers cause
smoking and greasy spillovers that
may ignite. Heat oils slowly on low or
medium settings.
Always turn hood ON when cooking at
high heat or when flambeing food (i.e.:
Crêpes Suzette, Cherries Jubilee,
Peppercorn Beef Flambé).
Clean ventilating fans frequently.
Grease should not be allowed to
accumulate on fan, filters or in exhaust
ducts.
Use proper pan size. Always use
cookware appropriate for the size of
the surface element.
5.
6.
7.
8.
9.
10.
11.
a)
b)
c)
d)
TO REDUCE THE RISK OF A RANGE
TOP GREASE FIRE:
INTENDED FOR RESIDENTIAL COOKING USE ONLY
04
TO REDUCE THE RISK OF INJURY TO
PERSONS, IN THE EVENT OF A RANGE
TOP GREASE FIRE, OBSERVE THE
FOLLOWING:
SMOTHER FLAMES with a close-fitting
lid, cookie sheet, or other metal tray,
then turn off the gas burner or the
electric element.BE CAREFUL TO
PREVENT BURNS. If the flames do not
go out immediately, EVACUATE AND
CALL THE FIRE DEPARTMENT.
NEVER PICK UP A FLAMING PAN- you
may be burned.
DO NOT USE WATER, including wet
dishcloths or towels - a violent steam
explosion will result.
Use an extinguisher ONLY if:
A.You know you have a class ABC
extinguisher,and you already know
how to operate it.
B.The fire is small and contained in the
area where it started.
C.The fire department is being called.
D.You can fight the fire with your back
to an exit.
1.
2.
3.
4.
5.
Based on “Kitchen Fire Safety Tips”
published by NFPA.
For indoor use only.
For general ventilating use only. Do
not use to exhaust hazardous or
explosive materials and vapors.
To avoid motor bearing damage and
noisy and/or unbalanced impeller,
keep drywall spray, construction dust,
etc. off power unit.
Install the vent hood in a location
away from strong drafts, such as
windows, door, and strong HVAC vent
for best performance
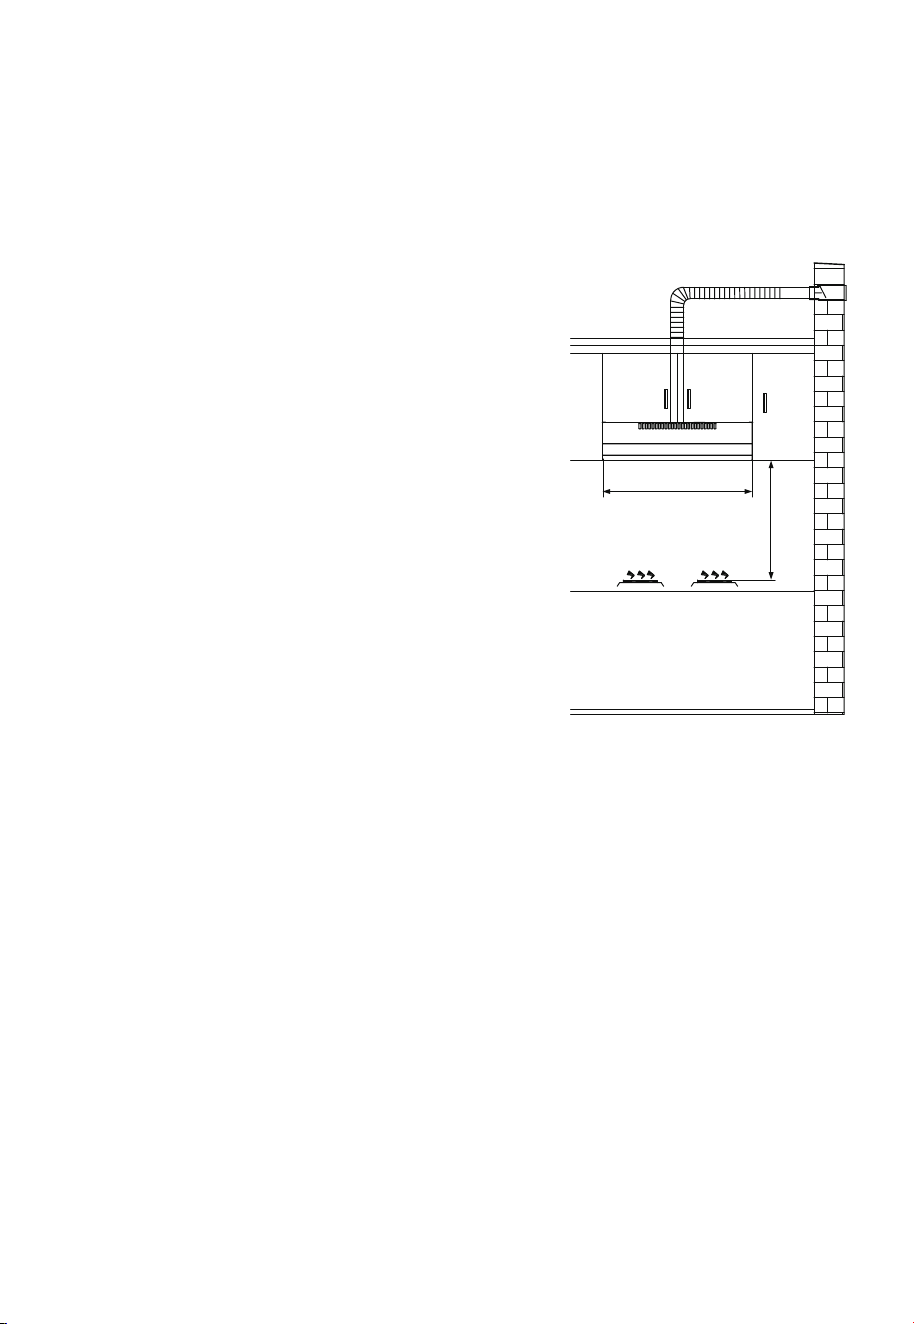
The minimum hood distance above
cooktop must not be less than
25-5/8". For best capture of cooking
impurities, the bottom of the hood
should be at a maximum of 29-1/2"
above cooking surface.
Two installers are recommended
because of the large size and weight
of this unit.
1.
2.
3.
4.
To reduce the risk of fire and to
properly exhaust air, be sure to duct
air outside — Do not exhaust air into
spaces within walls or ceiling or into
attics, crawl space or garage.
Because of the high exhausting
capacity of this unit, you should make
sure enough air is entering the house
to replace exhausted air by opening a
window close to or in the kitchen.
Always leave safety grills and filters in
place. Without these components,
operating blowers could catch onto
hair, fingers and loose clothing.
The vent hood and filters should be
cleaned frequently.
7.
8.
9.
10.
5.
6.
CAUTION
WARNING
WARNING
WARNING
READ AND SAVE THESE
INSTRUCTIONS
GROUNDING INSTRUCTIONS
This appliance must be grounded. In the
event of an electrical short circuit,
grounding reduces the risk of electric
shock by providing an escape wire for the
electric current. This appliance is
equipped with a cord having a grounding
wire with a grounding plug. The plug must
be plugged into an outlet that is properly
installed and grounded.
WARNING-Improper grounding can
result in a risk of electric shock.
Consuit a qualified electrician if the
grounding instructions are not complete-
ly understood, or if doubt exists as to
whether the appliance is properly
grounded.
Do not use an extension cord. If the
power supply cord is too short, have a
qualified electrician install an outlet near
the appliance.
Use only with rangehood cord-connec-
tion kits that have been investigated
and found acceptable for use with this
model rangehood.

05
SPECIFICATIONS
MVU30W6ASTProduct Model
Voltage
Rated Power
Lighting Power
Motor Input Power
Diameter of air tube
Air flow
Noise
120V~/60Hz
91.5 W
1.5 W
90 W
4.7''
200CFM
≤69 dB(A)
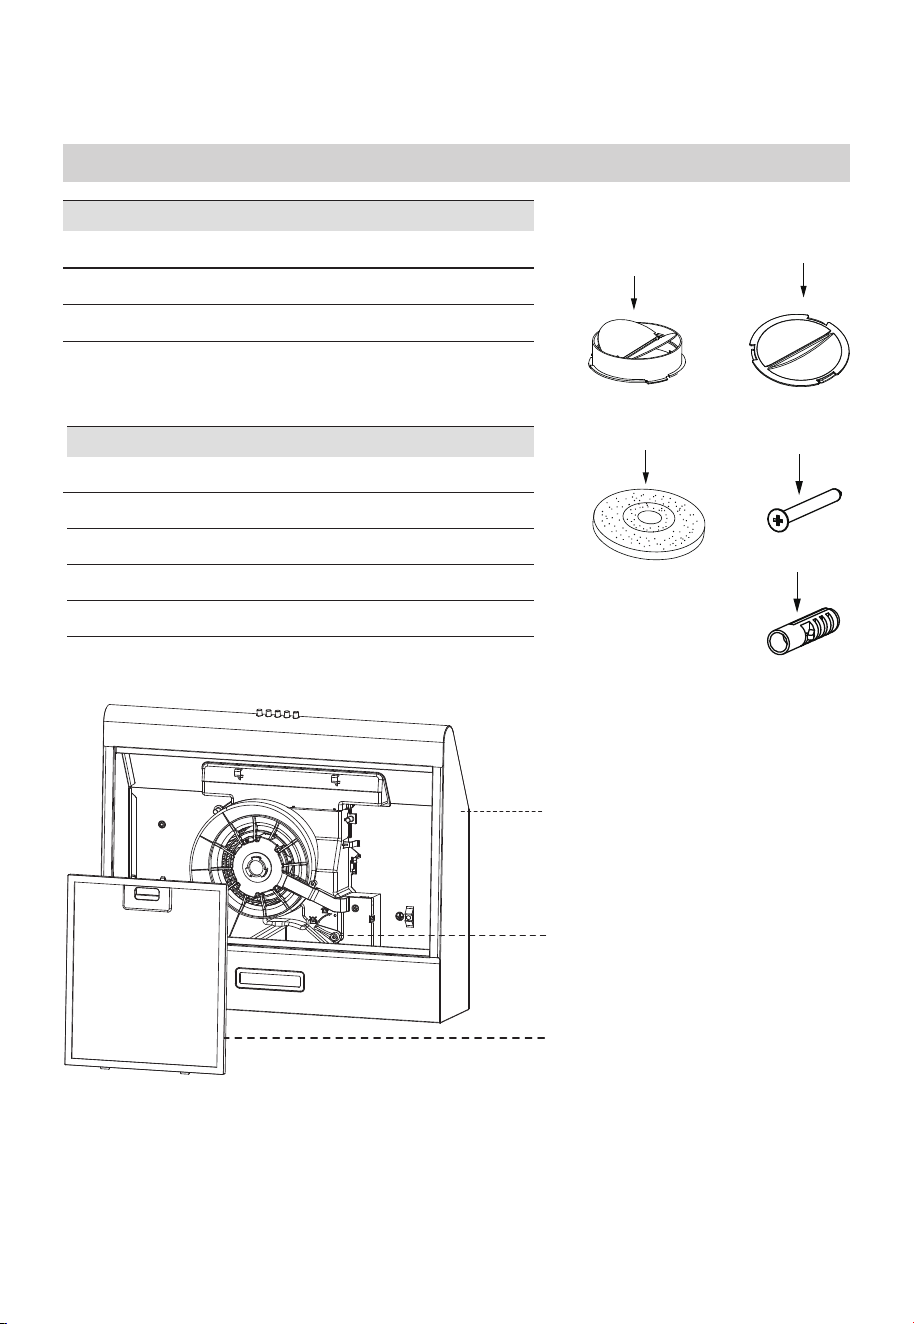
PRODUCT OVERVIEW
06
Components
1
Ref. Qty.
1
2
Main Body
1
3 2
Product Components
5
Ref. Qty.
1
6
Check Valve
4
1 Carbon Filter (12173000000039)
1 Air Outlet Cap
7
4 Screws M5 x 1.97''
8 4 Plastic Wall Plugs
Installation Components
7
6
8
5
4
Venting Knob
Grease filter
1
2
3
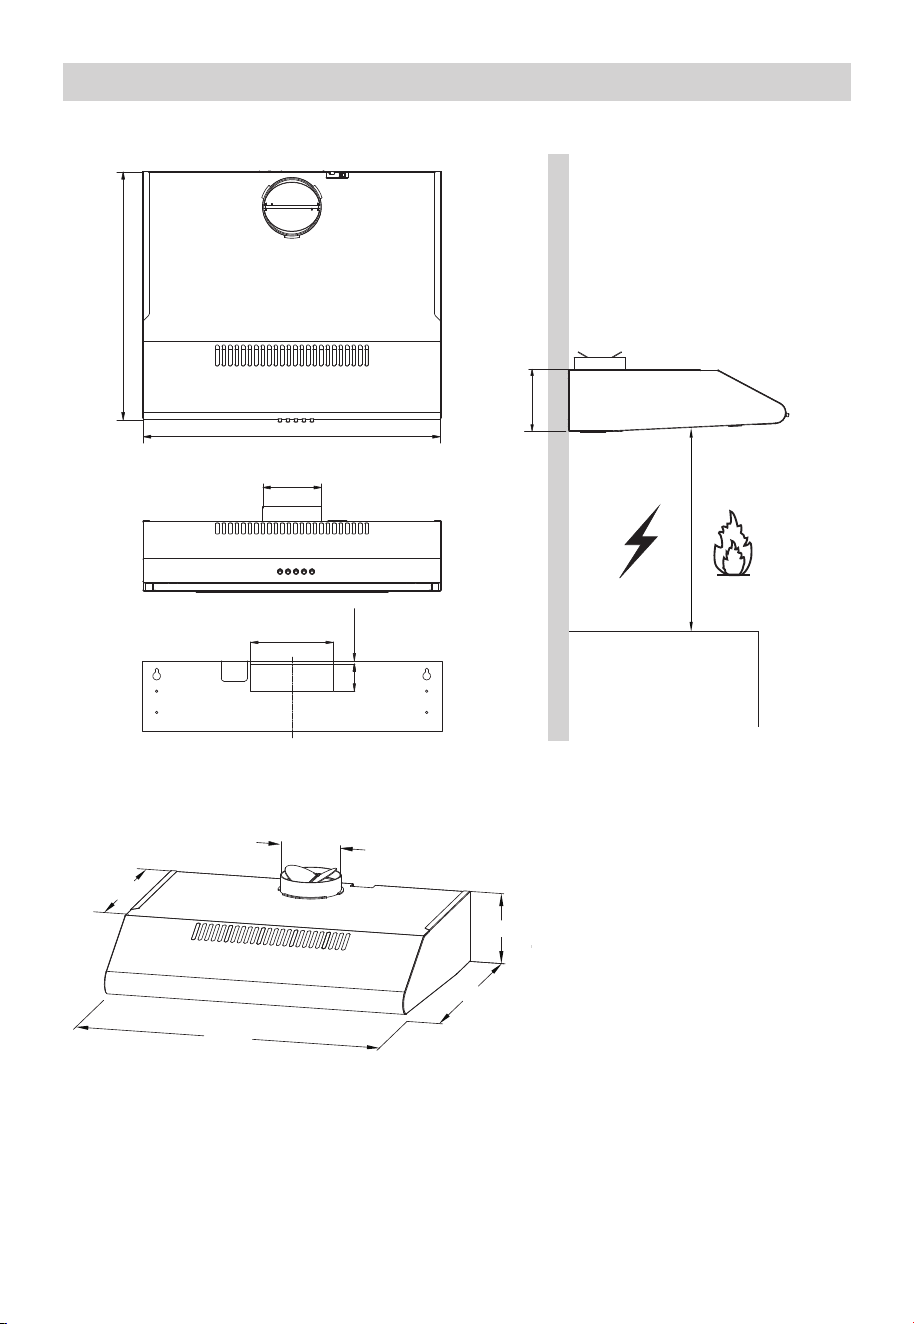
Dimensions
unit:inch
07
Min.
25.6''
Min.
25.6''
29.8''
5.5''
19.7"
5.5''
6.5''
0.23''
2.12''
29.8''/35.3''
Ф4.72''
Ф4.72''
19.7''
13.38''
Wall Dreilling And Bracket Fixing
●
●
●
●
●
●
Please read the instructions carefully.
Unpack the canopy and check that all functions are working. Ensure that the voltage
(V) and the frequency (Hz) indicated on the serial plate match the voltage and
frequency at the installation site.
Check that the area behind the installation surface to be drilled is clear of any
electrical cables or pipes, etc.
The stainless steel and glass surfaces of the canopy are very easily damaged during
installation if grazed or knocked by tools. Please take care to protect the surfaces
during installation.
Protect the cooktop surface below , to prevent damage occurring while the wall
canopy is being installed above.
The manufacturer shall not be liable for failure to observe all safety regulations for
the correct and normal operation of electrical parts.
08
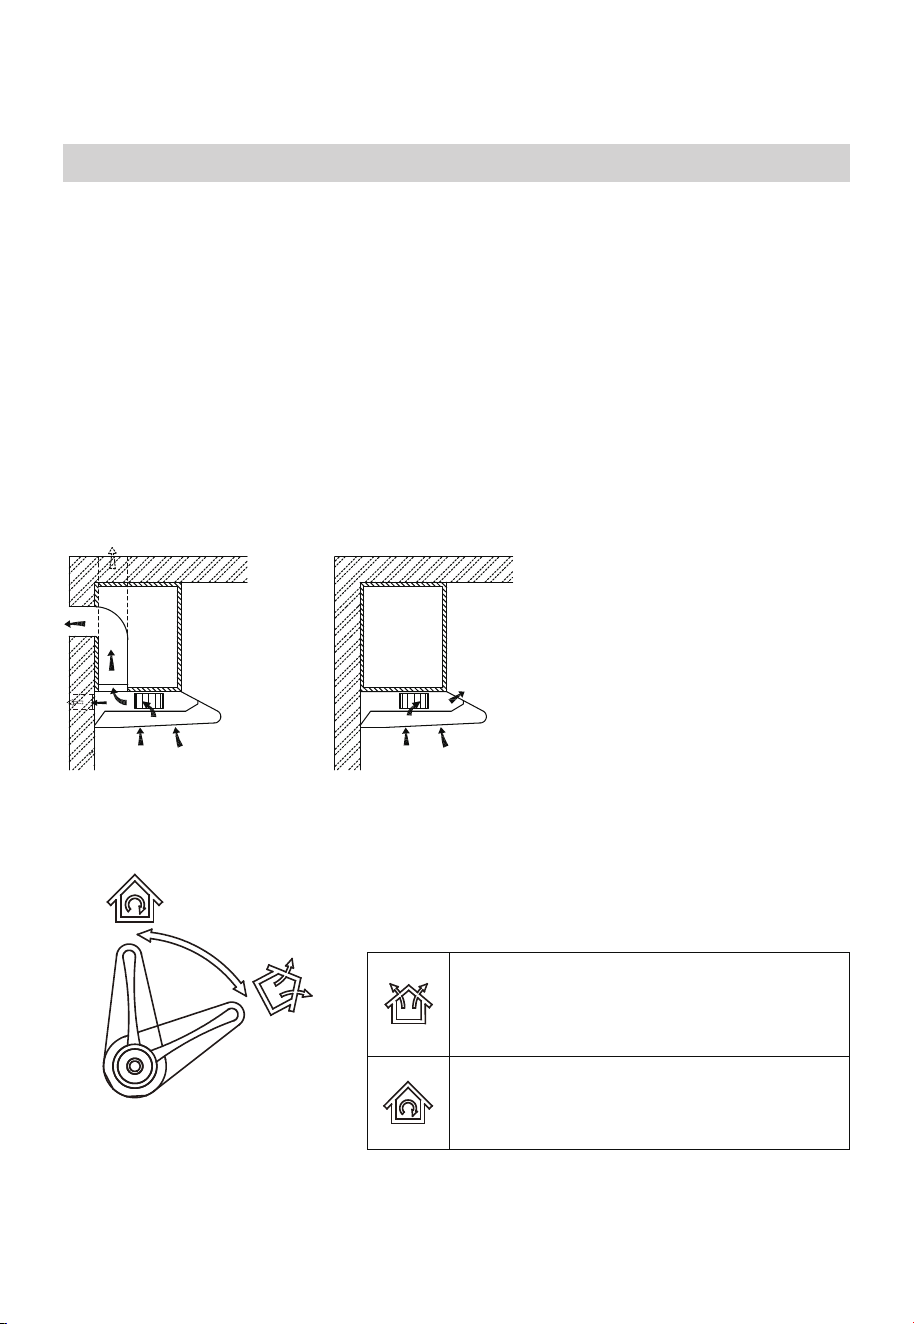
PRODUCT INSTALLATION
Choose a venting mode:
Extraction-air (out door)
venting option
Venting knob position
Recirculation Venting option
Extracon-air mode: Turn the venng
knob here means venng outside
Circulang-air mode: Turn the venng
knob here means recirculaon
09
●
●
●
●
●
Information
Sucient air is needed for proper combustion and exhausting of gases through the
flue (chimney) of fuel burning equipment to prevent back drafting. Ductless fans
must always be vented to the outdoors.
When assessing the air pressure, the entire ventilation system in the house/apart-
ment must be taken into account, e.g. hob and/or gas cooker, this rule does not
apply.
Government regulations must be observed for the conveyance of exhaust air. If the
extractor hood is used in circulating air mode with activated carbon filter, there are
no operating restrictions.
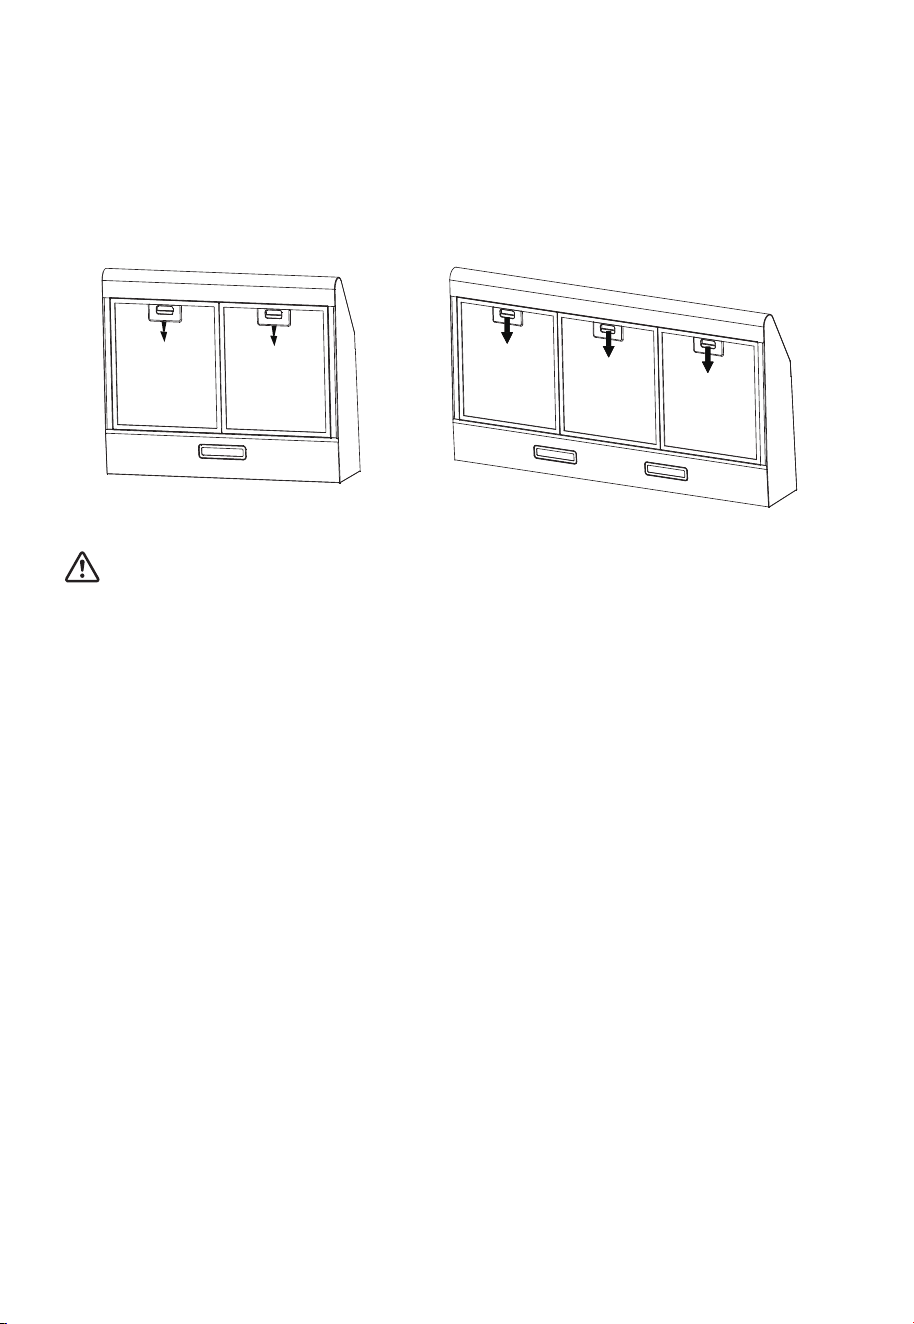
If you choose extraction-air mode, there are two methods for ventilation, including
‘horizontal ventilation’ and ‘vertical ventilation’. Please take out the cover before
using and install check valve in the hole.
The square air check valve for horizontal ventilation is not supplied.
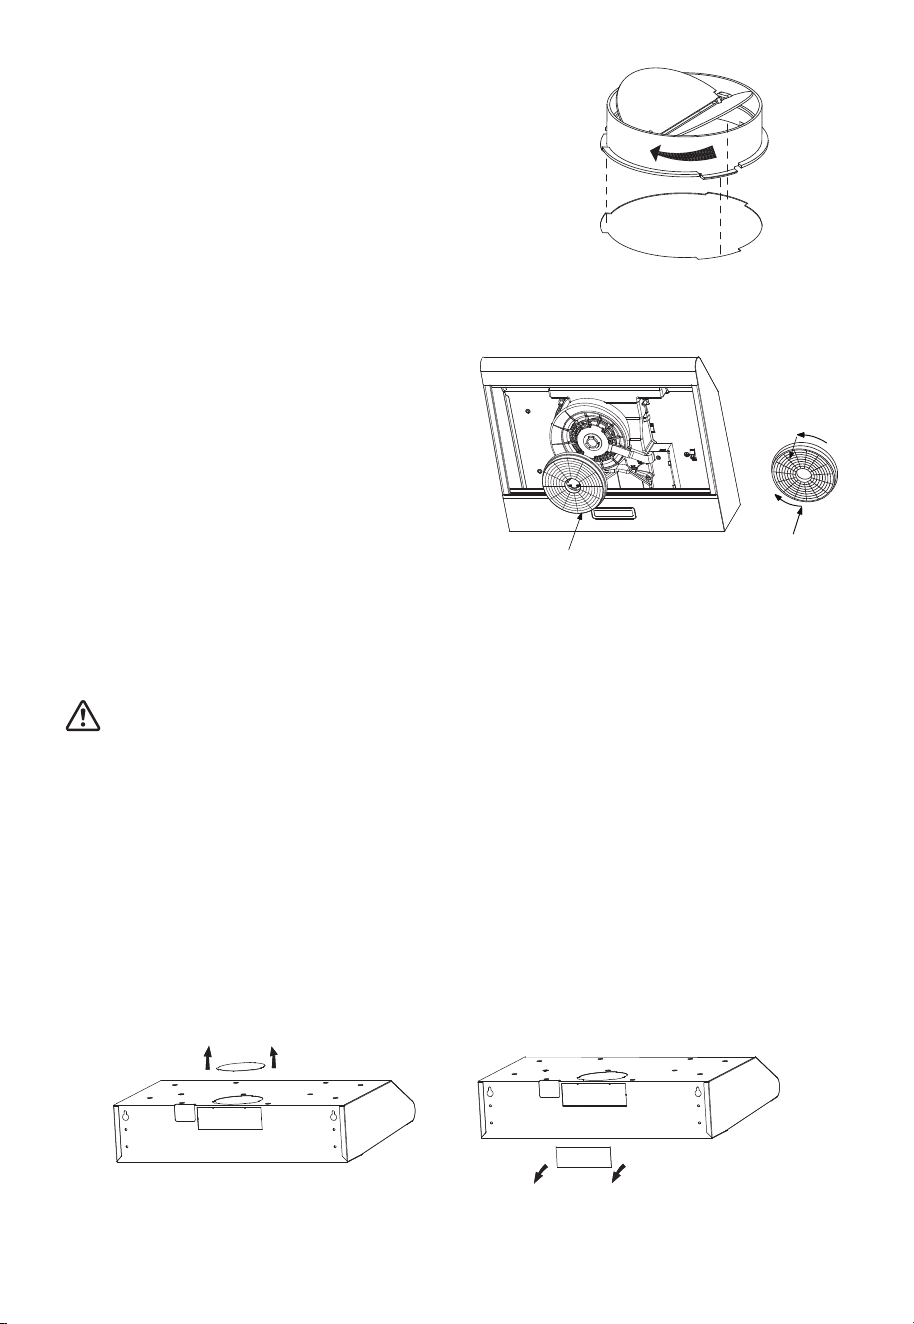
●
Check Valve Installation
Align check valve tabs with corresponding cut
outs in hood. Push down and turn check valve
clockwise until it locks in place.
●
●
●
Installing the Carbon Filter
Remove the grease filter.
The charcoal filter is located over the
motor.
Turn the filter counter clockwise to
remove.
Replace a new carbon filter,apply Close
reverse procedure for re installation.
Warning: The carbon filter cannot be
washed or recycled. It should be replaced
after approximately 2-3 months of use..
Remark: Carbon filter is not supplied with
your appliance.The service part number of
carbon filter is12173000000039.
Carbon Filter
Open
Close
10
●
●
Prepare the installation:
Ensure the power has been turned o before beginning this installation. Electrical
outlet must be located in an area that the power cord/plug can easily get routed to
and plugged into.
To install this hood you will require two assistants. You will need following tools
and material to complete this installation.
Tools you will need:
●
●
●
●
●
●
●
●
●
Drill appropriate to your wall
Phillips Screwdriver
Tape Measure
Hand Saw or Jig Saw
Installation work and electrical wiring must be
done by qualified person(s) in accordance with all
applicable codes and standards, including fire
rated construction.
Do not discharge the exhaust air into a flue from
other appliances burning gas or other fuels.
Regulations concerning the discharge of air have
to be fulfilled.
The cooker hood must be placed at a minimum
distance of 25.6'' above the cooking surface of a
hob.
The cooker hood must be placed at a maximum
distance of 29.5'' above the cooking surface of a
hob.
Min. 25.6''
29.8''
Max. 29.5''
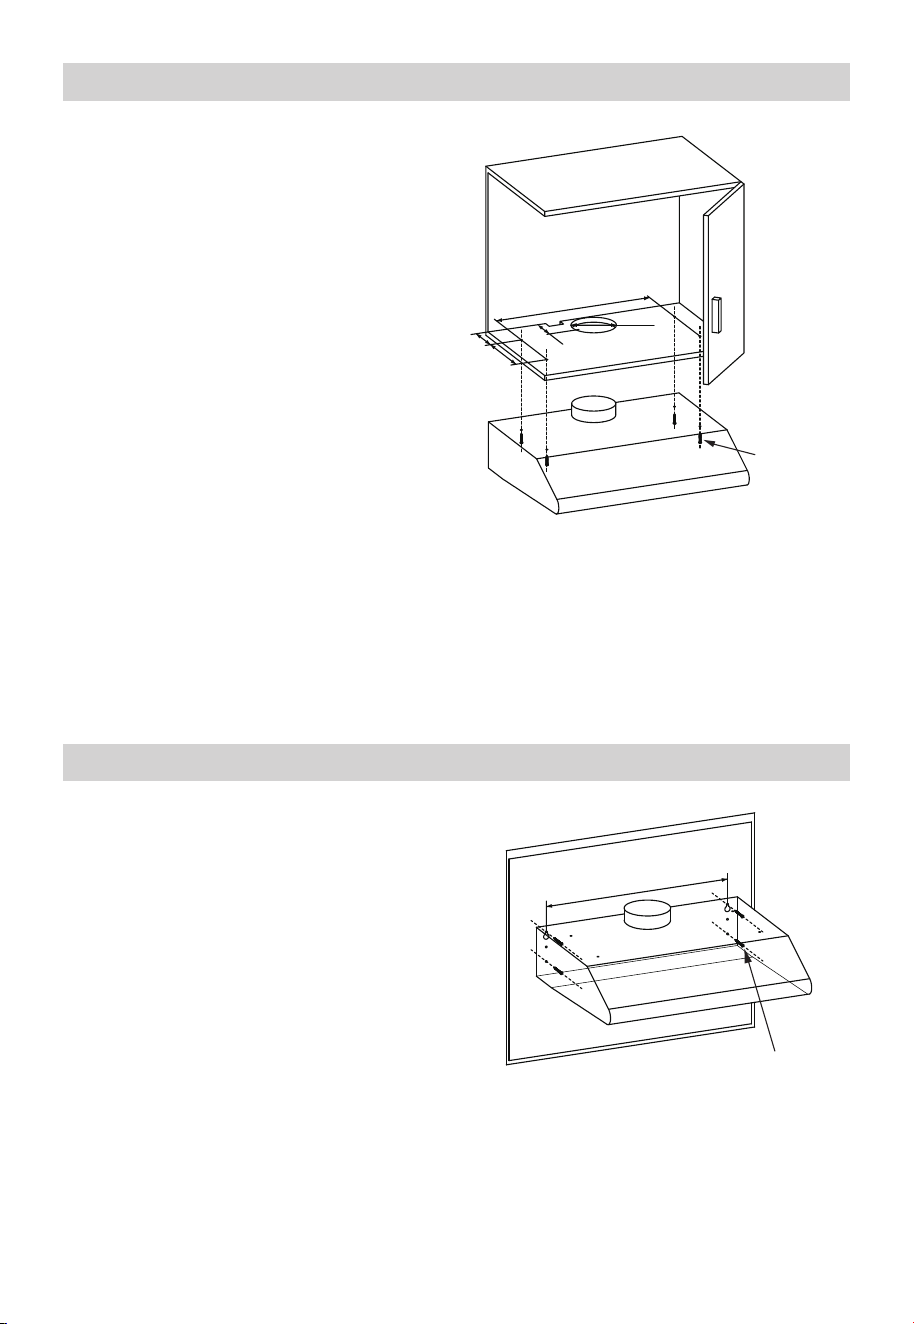
Cupboard Mounting Installation
11
Wall Mounting Installation
●
●
●
To mount on the wall, drill two 3.94''
diameter holes 26.6'' with the vent hole on
the top of the cooker hood in the middle
as below picture. Make sure the hood is
aligned directly over the hob.
Insert two plastics wall plugs(supplied)
into the holes.
Insert two screws into the upper two
plastic wall plugs and tighten them leaving
1.18'' protruding from the wall.
Mount the cooker hood onto the two
screws and mark the bottom two screw
positions.
Remove the hood and drill the bottom
two screw holes and Insert the plastic wall
plugs.
Mount the hood on the top screws, Insert
the bottom screws and fully tighten all the
screws.
●
●
●
26.6''
4×Screws
(ST0.02"*1.93")
●
●
●
●
ATTENTION: If your cooker hood
works at circulating-air mode, it is
not necessary to drill 5.12'' diame-
ter hole.
Drill a 5.12'' diameter, four 0.14''
diameter hole and a square hole
match your plug with the vent hole
on the top of the cooker hood in
the middle as below picture.
Warning: Failure to install the
screws or fixing device in accor-
dance with these instructions may
result in electrical hazards.
Use the 4 screws to fix the cooker
hood to a kitchen cupboard .Check
that your fixings are correctly
located, by temporarily fitting the
cooker hood. If correct, fit the unit
into position.
Tighten the screws if necessary.
3.94''
2.76''
25''
5.12''
4Screws
(ST0.2"*1.93")
7''
12
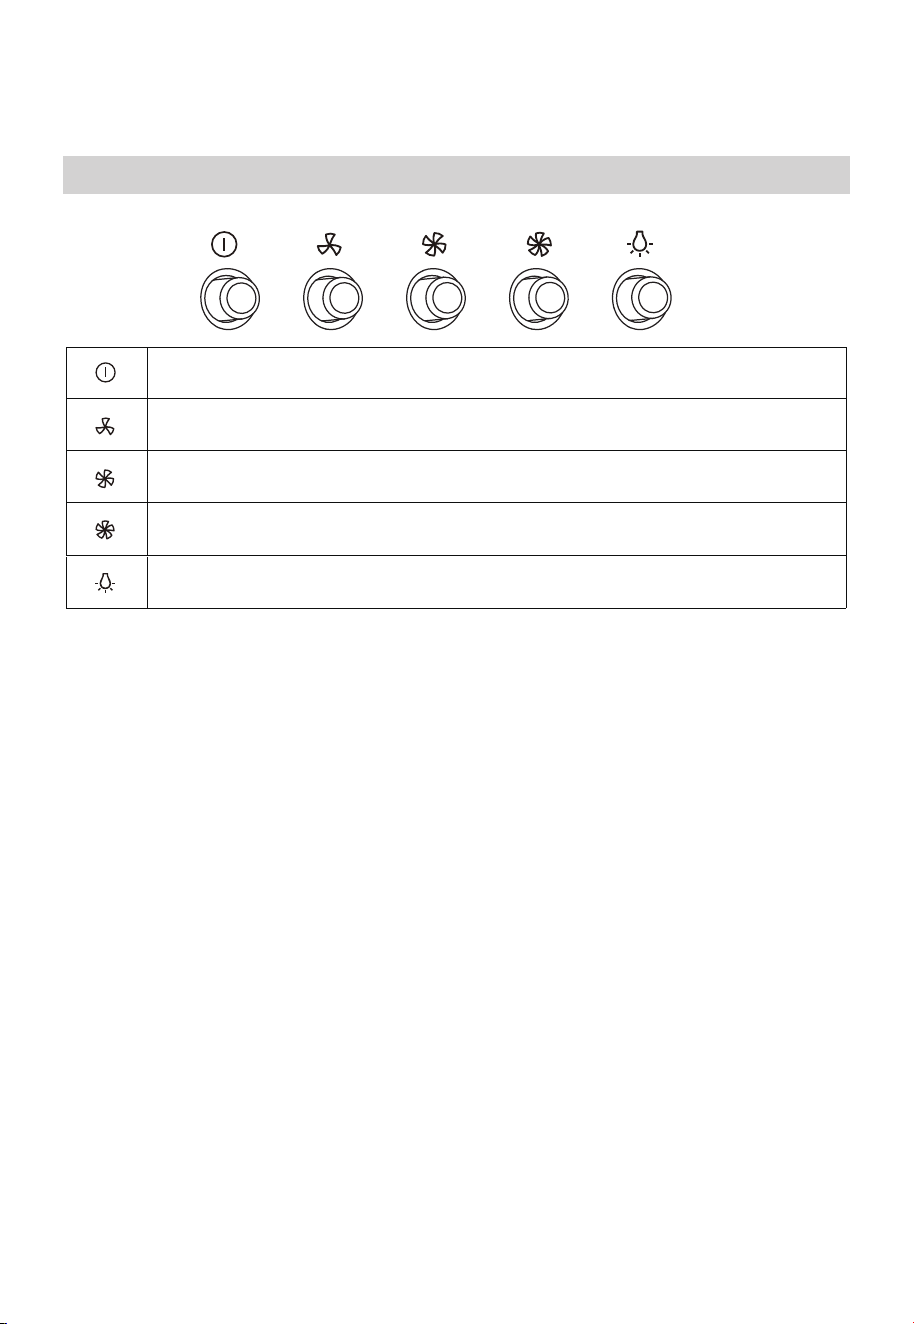
OPERATION INSTRUCTIONS
ON/OFF LIGHTING SWITCH: Press on this switch to turn on the lights, and
press again to turn them off.
OFF MOTOR SWITCH: Press on this switch to stop the motor operation.
SPEED SWITCH: Press on this switch, the motor runs at LOW speed.
SPEED SWITCH: Press on this switch, the motor runs at MEDIUM speed.
SPEED SWITCH: Press on this switch, the motor runs at HIGH speed.
Switch
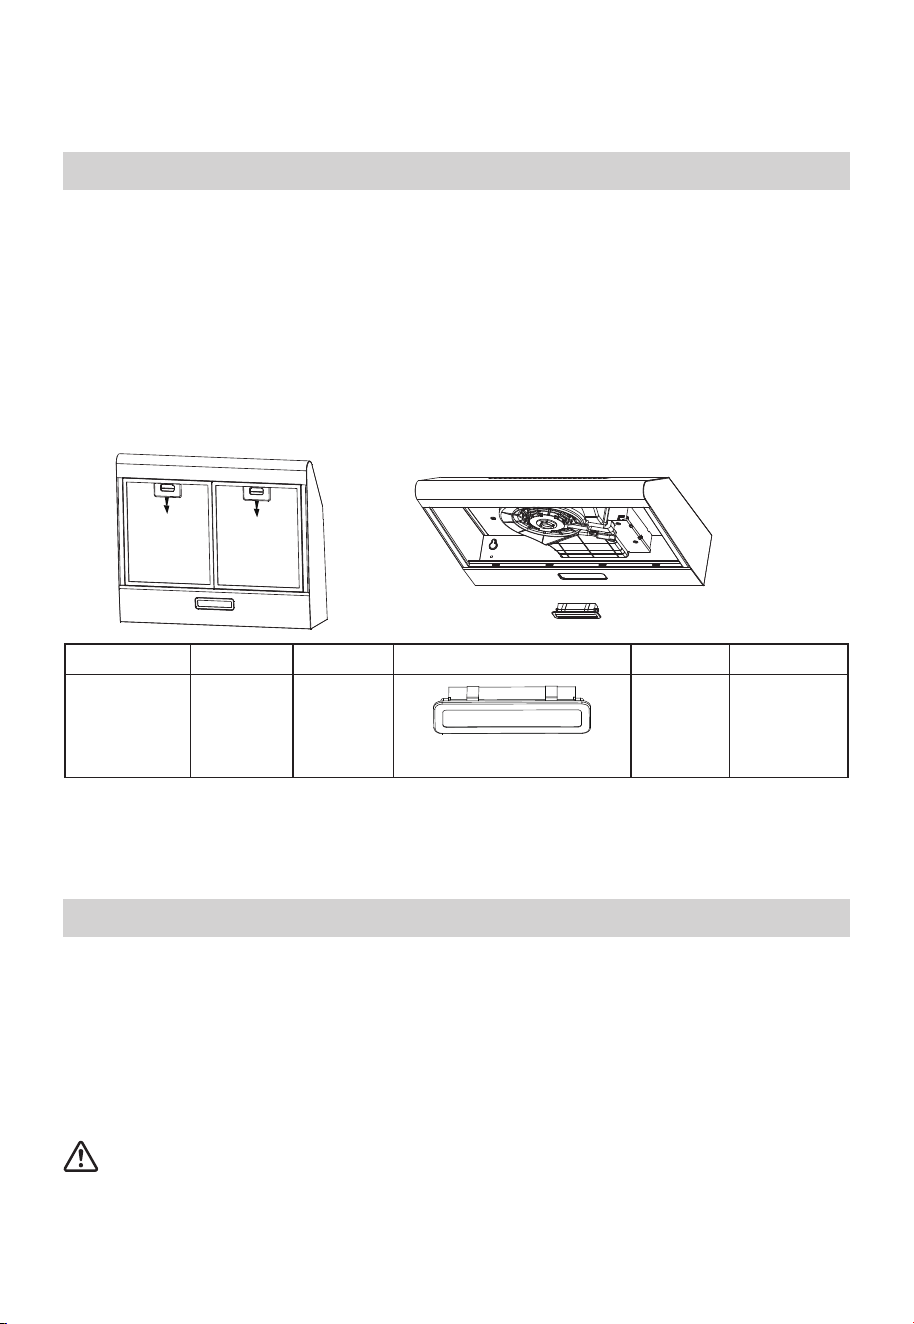
CLEANING AND MAINTENANCE
Lighting
LIGHT REPLACEMENT
●
●
●
●
●
●
Disconnect range hood from power supply.
Remove the grease filter.
Remove the light by pushing it out from the hood body (this may require pressure or
force to be applied).
Disconnect the connector of the light.
Replace the light (17473000A00881) with a new one of the same type,making sure
that you connect the light with the light cable correctly.
Reconnect range hood to power supply.
Max Power Voltage Picture Lamp Cap ILCOSD code
LED modules,
separete ballast
Square/Diameter: 33.2mmx120mm
1.5W 120V~
17473000A00881
——
DSH-1.5-
S-33.2/120
●
Information
Cleaning water must not enter into motor, control switch etc. electrical parts.
●
●
●
●
●
Cleaning And Maintenance
Disconnect range hood from power supply before cleaning or servicing.
Cleaning the surface of hood frequently. Use mild soap or detergent to clean the hood.
Do not use harsh alkalis or abrasives.
Avoid the use of scouring powers or dishwasher compounds.
Grease filter may be washed using mild soap or detergent. (Heavy grease build-up may
not be cleaned easily and the filter may require replacement).
Charcoal filter cannot be cleaned and must be replaced regularly.
13
14
It is recommended to clean the metallic filter every three months by carrying out the f
ollowing instruction:
●
●
●
Remove the metallic filter from the cooker hood and wash it in a solution of water and
neutral liquid detergent, leaving to soak.
Rinse thoroughly with warm water and leave to dry.
The metallic filter may alter in color after several washes. This is not cause for custom-
er complaint or replacement of metallic filter.
●
Information
There is a fire risk if cleaning is not carried out in accordance with the instructions.
15
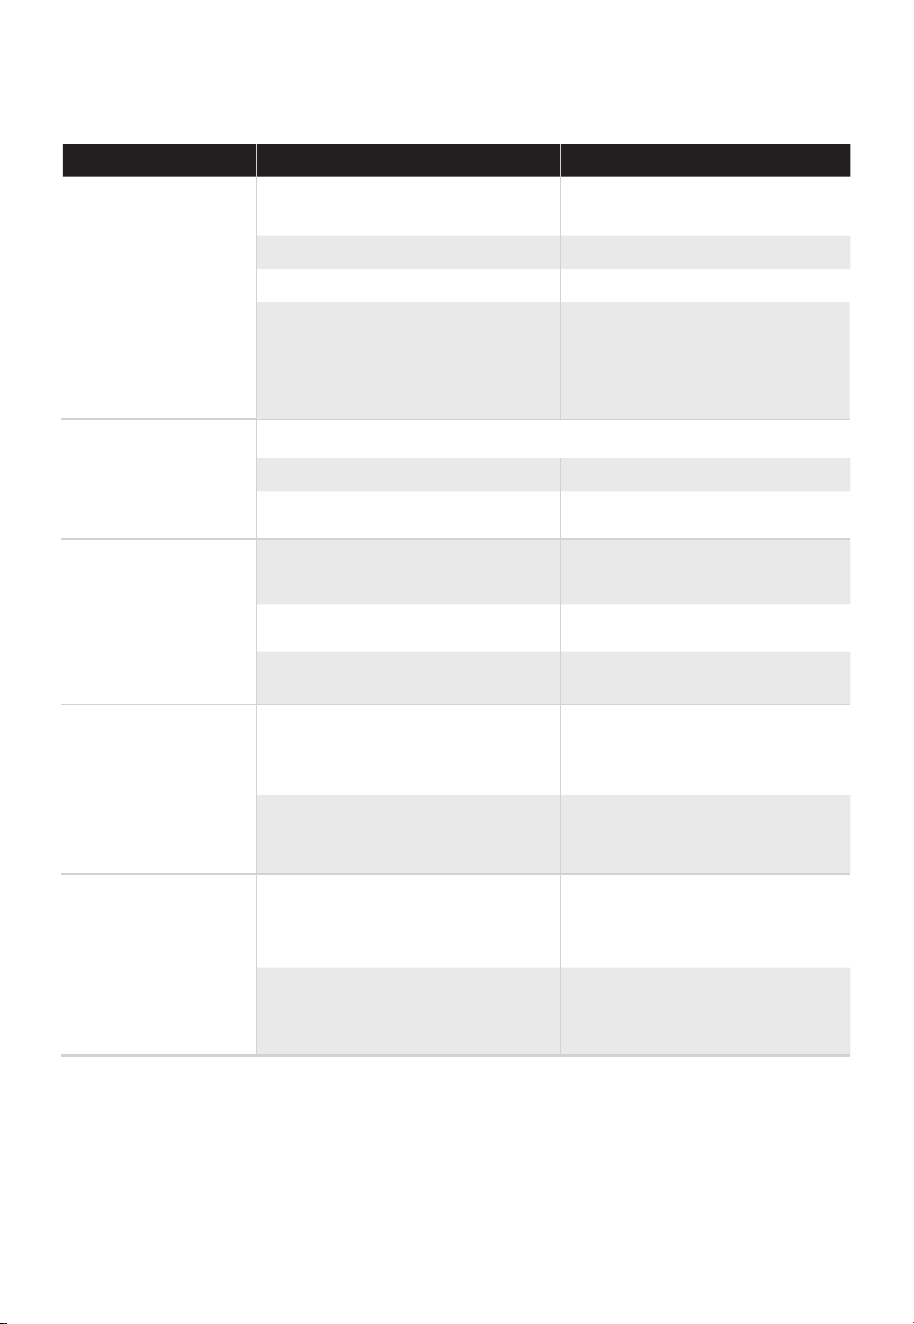
TROUBLESHOOTING
Possible reason SolutionProblem
Light on, but motor
does not work
Both light andmotor
do not work
●
●
●
●
●
●
●
The internal wiring of motor
is cut off/ disconnected. An
unpleasant smell may be
produced. Disconnect power
supply.
The blades are blocked.
The capacitor is damaged.
The motor is damaged.
Call Customer Support.
Call Customer Support.
Call Customer Support.
Disconnect power supply before
checking blades for obstruction.
Apart from the above mentioned, check the following:
Light damaged. Replace lights.
Power cord loose. Check power supply and
house electrical outlets.
●
●
●
●
●
●
●
Vibration
The blade, if damaged, can
cause vibrating.
Call Customer Support.
Call Customer Support.
Check installation.
The motor is not tightly fastened.
The cooker hood is not tightly
fixed.
Insufficient suction
The distance between the
cooker hood and the cooker top
is too large.
Readjust the distance : see
requirements for minimum
and max distance on page 7.
Too much ventilation from
open doors or windows.
Choose a new place to install
the appliance or close some
doors / windows.
The machine is
not level.
The screws securing the hood
into the cabinet are not tight
enough.
Tighten the screws securing
the hood into the cabinet and
make it horizontal.
The screws securing the
hood to the rear wall are not
tight enough.
Tighten the screws securing
the hood to the rear wall and
make it horizontal.
16
logo, word marks, trade name, trade dress and all versions thereof are
trademarks, copyrights and other intellectual property rights, and all goodwill derived
from using any part of an Midea trademark. Use of Midea trademark for commercial
purposes without the prior written consent of Midea may constitute trademark
infringement or unfair competition in violation of relevant laws.
This manual is created by Midea and Midea reserves all copyrights thereof. No entity or
individual may use, duplicate, modify, distribute in whole or in part this manual, or
bundle or sell with other products without the prior written consent of Midea.
All the described functions and instructions were up to date at the time of printing this
manual. However, the actual product may vary due to improved functions and designs.
TRADEMARKS, COPYRIGHTS
AND LEGAL STATEMENT
DISPOSAL AND RECYCLING
Important instructions for environment
Compliance with the WEEE Directive and Disposing of the Waster Product:
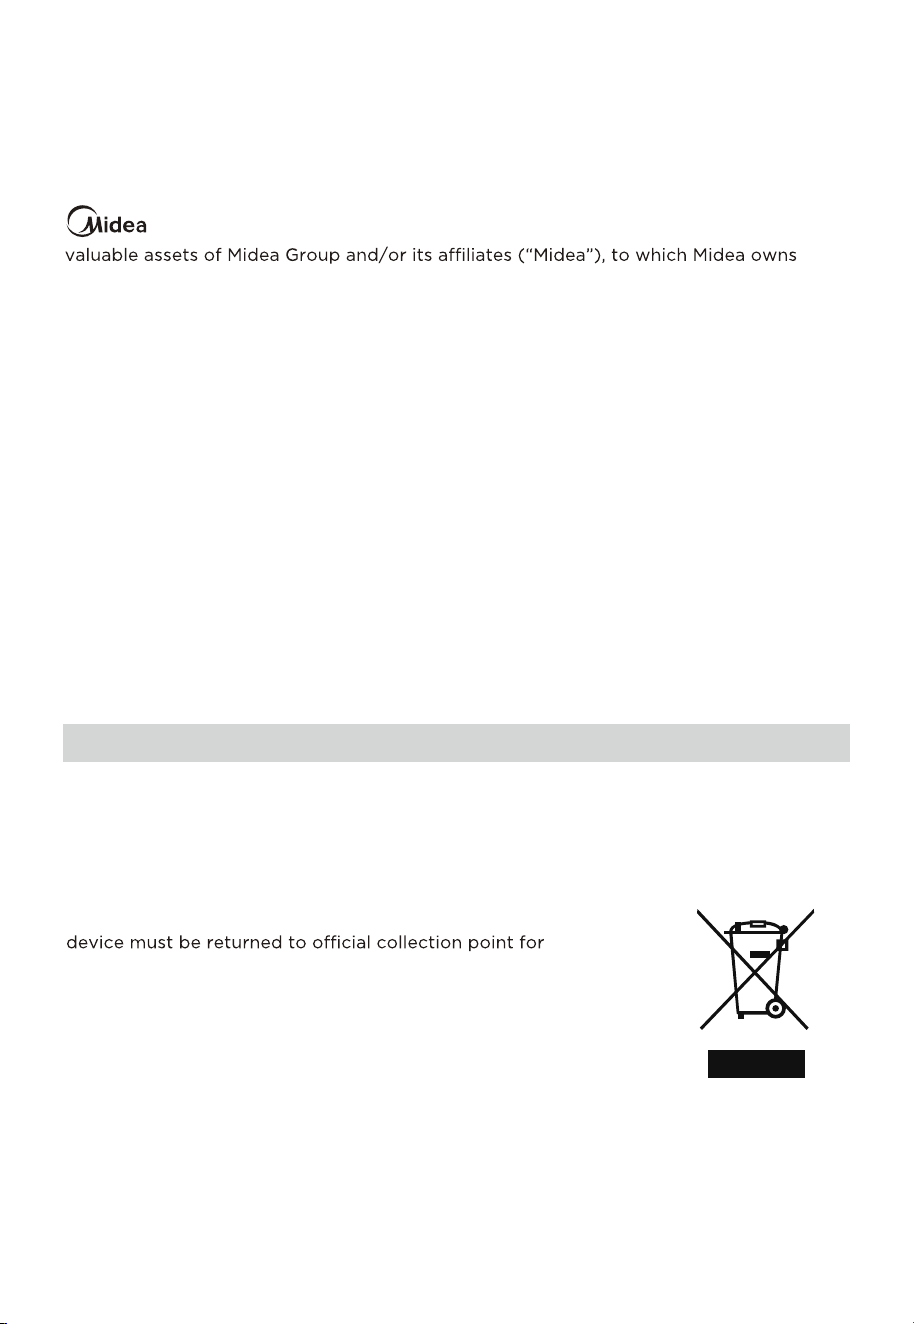
This product complies with EU WEEE Directive (2012/19/EU). This product bears a
classification symbol for waster electrical and electronic equipment (WEEE).
This symbol indicates that this product shall not be disposed
with other household wastes at the end of its service life. Used
recycling of electrical electronic devices. To find these
collection systems please contact to your local authorities or
retailer where the product was purchased. Each household
performs important role in recovering and recycling of old
appliance. Appropriate disposal of used appliance helps
prevent potential negative consequences for the environment
and human health.
17
Compliance with RoHS Directive
The product you have purchased complies with EU RoHS Directive (2011/65/EU). It does
not contain harmful and prohibited materials specified in the Directive.
Package information
Packaging materials of the product are manufactured from
recyclable materials in accordance with our National Environ-
ment Regulations. Do not dispose of the packaging materials
together with the domestic or other wastes. Take them to the
packaging material collection points designated by the local
authorities.
DATA PROTECTION NOTICE
For the provision of the services agreed with the customer,
we agree to comply without restriction with all stipulations of applicable data protection
law, in line with agreed countries within which services to the customer will be delivered,
as well as, where applicable, the EU General Data Protection Regulation (GDPR).
Generally, our data processing is to fulfil our obligation under contract with you and for
product safety reasons, to safeguard your rights in connection with warranty and
product registration questions. In some cases, but only if appropriate data protection is
ensured, personal data might be transferred to recipients located outside of the
European Economic Area.
Further information are provided on request. You can contact our Data Protection
[email protected]. To exercise your rights such as right to object your
personal date being processed for direct marketing purposes, please contact us via
[email protected]. To find further information, please follow the QR Code.


16173000A24727