GC
™
200 IP MARINE CAMERA
INSTALLATION INSTRUCTIONS
Mounting Considerations
WARNING
See the Important Safety and Product Information guide in the product box for product warnings and other
important information.
You can mount the camera upside-down or sideways. You can reverse the camera image to use in rearview
mode. See your chartplotter owner's manual for instructions.
NOTE: You must update your chartplotter software to setup and view the camera feed on your chartplotter.
• You must mount the camera in a location where it is not submerged, does not present a hazard in doorways
or walkways, and cannot be damaged by docks, pilings, or other pieces of equipment.
• You should mount the camera in a location strong enough to support the weight of the device and where you
can remove the camera.
• You should mount the camera so the LED is visible and the cables can be connected easily.
• To avoid interference with a magnetic compass, do not mount the camera closer to a compass than the
compass-safe distance value listed in the product specifications.
• You should test the camera in the selected location before you permanently mount the camera.
• You can use the Garmin
®
Power Module to help make the installation easier. The Power Module uses a single
camera cable instead of separate power and ethernet cables. This is especially beneficial when the camera is
located far away from other electronics, such as near the bow or on a mast.
Tools Needed
• Drill and 2mm (
1
/
16
in.) drill bit
• Pozidriv
®
screwdriver
GUID-95567C20-B681-4E56-B4B1-71CF15B4972A v4February 2024
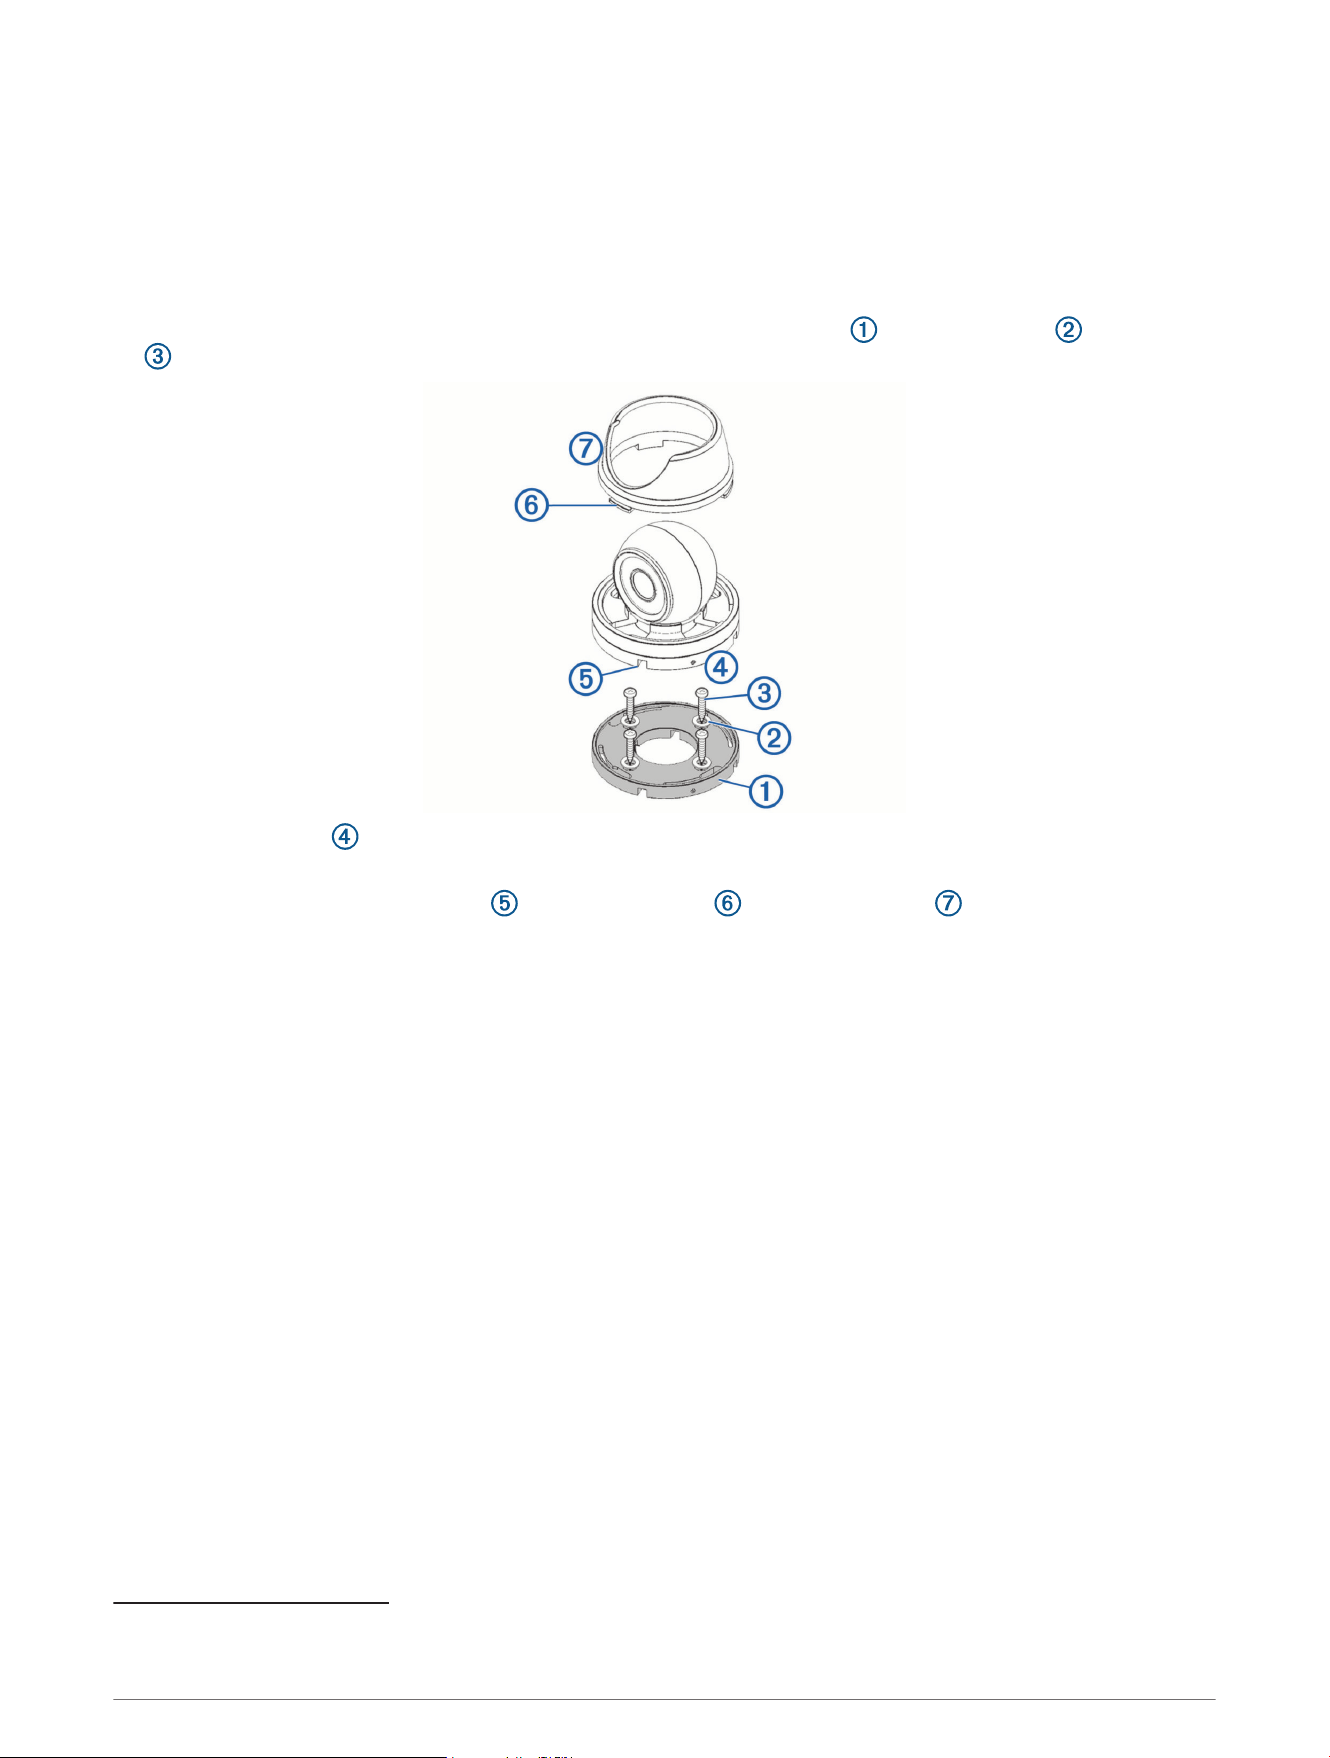
Mounting the Camera
1 Secure the template to the mounting location.
2 Using a 2mm (
1
/
16
in.) drill bit, drill the pilot holes.
3 Using the included hex wrench, loosen the screw in the side of the camera base.
4 Remove the base from the camera body.
5 Feed the camera cables through the camera base, or through one of the cable channels.
6 Align the camera base with the pilot holes, and secure the camera base with the washers and screws
.
7 Attach the camera to the base, and tighten the screw in the camera base.
8 Connect the camera cables.
9 Align the slots on the camera base with the collar lugs , and turn the collar until it locks.
Connection Considerations
Networking Considerations
This device uses Garmin BlueNet
™
networking technology, and is compatible with both Garmin BlueNet devices
and Garmin Marine Network devices. For more information about Garmin BlueNet technology, including best
practices for constructing a network including both Garmin BlueNet devices and Garmin Marine Network
devices, go to garmin.com/manuals/bluenet/.
Before connecting this device to the network, observe the following considerations:
• If your boat is equipped with a Garmin BlueNet chartplotter, you should use the included Garmin BlueNet
cable to connect the GC 200 device to an open network port or to a Garmin BlueNet 20 switch.
• If your boat is equipped with a Garmin BlueNet chartplotter and uses a Garmin BlueNet 30 gateway to
connect Garmin Marine Network devices, you can connect the GC 200 device directly to a Garmin BlueNet
device, or you can connect it to a Garmin Marine Network device using the Garmin Marine Network adapter
cable
1
. Routing the GC 200 device through the legacy side of your marine network does not impact its
performance.
• If your boat is equipped with only Garmin Marine Network devices, you must use the included Garmin Marine
Network adapter cable
1
to connect the GC 200 device to your network.
1
If a Garmin Marine Network adapter cable is not supplied in the product box, you can purchase one from your local Garmin dealer (part number 010-12531-01)
or online at garmin.com/accessories/GMNAdapterCable.
2
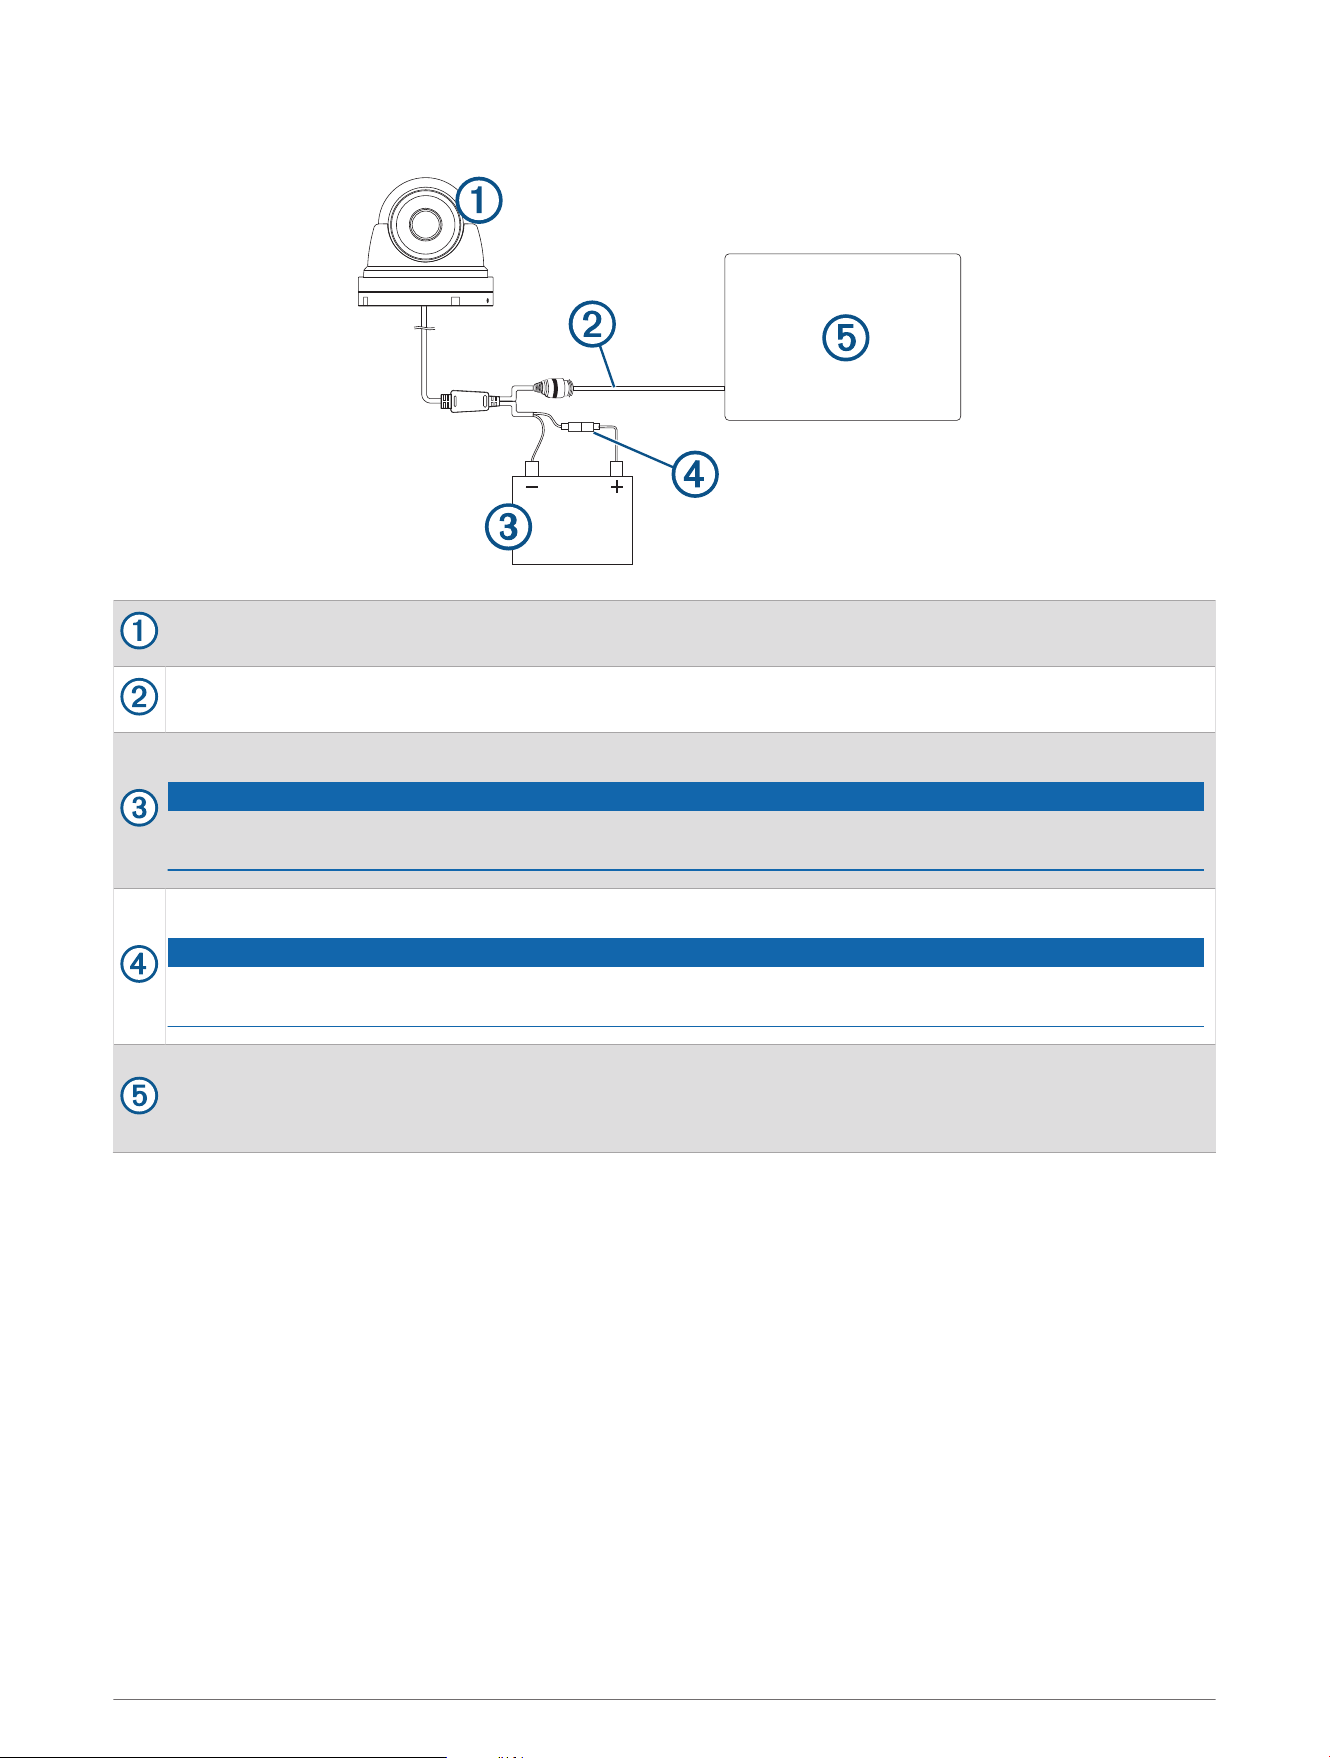
Connection Diagram with Direct Power
GC 200 marine IP camera
Garmin BlueNet cable (included)
9 to 18Vdc power source (not included)
NOTICE
To avoid permanently damaging the camera, do not connect the camera directly to a 24Vdc system. You
must use a Garmin Power Module when connecting to a 24Vdc system.
1A fast-acting fuse (required, not included)
NOTICE
You must connect the power wire through a 1A fast-acting fuse (not included). Without a fuse, the device
can malfunction.
Garmin chartplotter or Garmin network switch (not included)
NOTE: To connect the camera directly to a Garmin Marine Network chartplotter or GMS
™
10 port
expander, you must use the included Garmin Marine Network adapter cable.
3
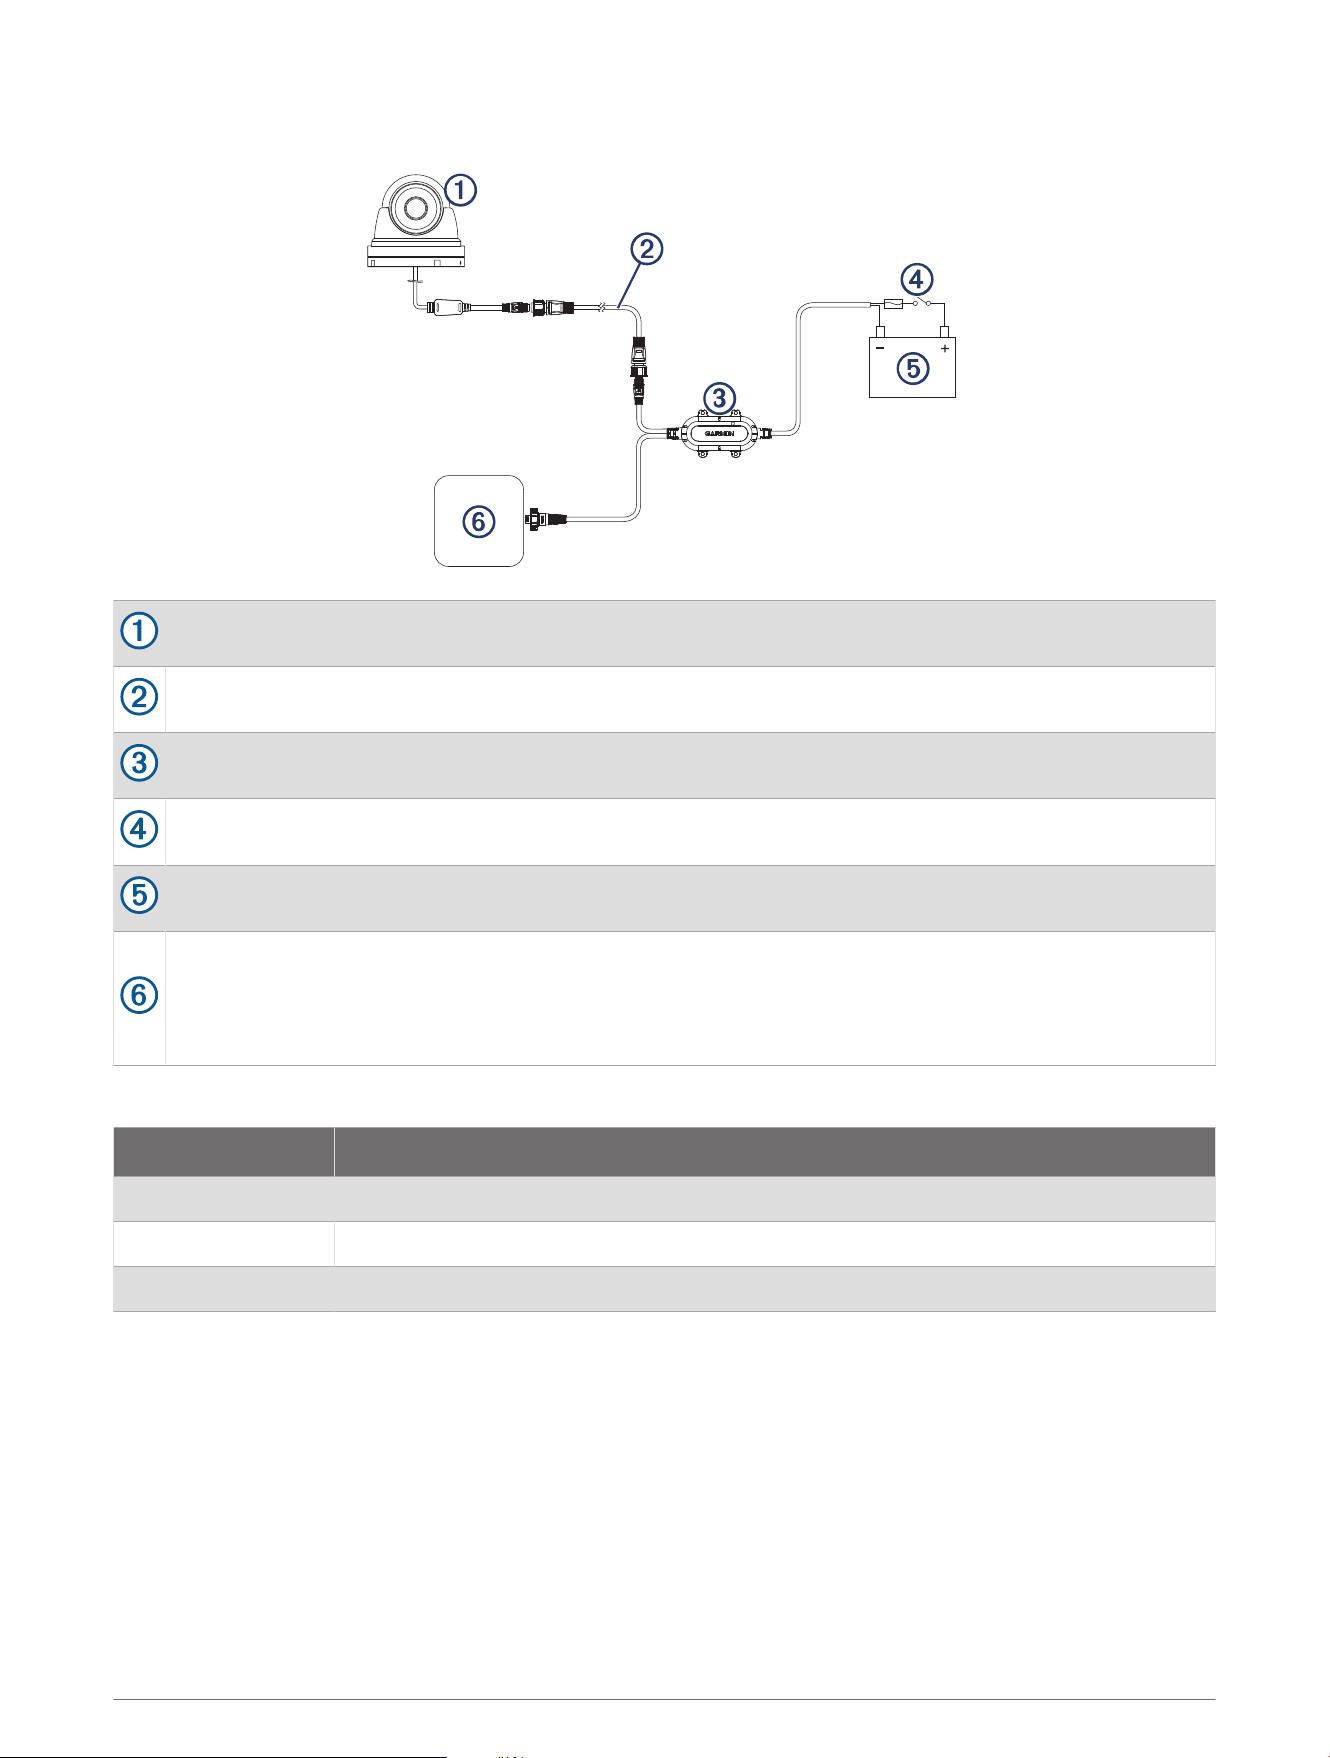
Connection Diagram with a Garmin Power Module
GC 200 marine IP camera
Garmin BlueNet cable (included)
Power module (010-12527-00, not included)
In-line switch (not included)
9 to 32Vdc power source (not included)
Chartplotter or network switch (not included)
NOTE: If your power module has a Garmin Marine Network connector, you must use the Garmin Marine
Network female-to-female adapter cable (not included, part number 010-13094-00) to connect it to a
Garmin BlueNet network.
Camera Status LED
LED Activity Status
Solid red The camera is on.
Solid green The camera is connected to the network and transmitting data.
Flashing green The camera detects motion.
4

Specifications
Dimensions (Base W x H) 87 x 79mm (3.4 x 3.1in.)
Weight 520g (1.2lbs.)
Water rating IEC 60529 IPX7
2
Operating temperature range From -20 to 60°C (from 14 to 140°F)
Storage temperature range From -30 to 60°C (from -4 to 140°F)
Input voltage From 9 to 18Vdc
Power module input voltage (not included) From 9 to 32Vdc
Operating current with infrared on 370mA
Operating current with infrared off 210mA
Power consumption Max 5 W with infrared on
Fuse 1A fast-acting (required for direct power connection, not included)
Horizontal viewing angle 99.2 +/- 3 degrees
Vertical viewing angle 74 +/- 3 degrees
Infrared distance 30m (98.4ft.)
Compass-safe distance 10cm (4in.)
© 2021 Garmin Ltd. or its subsidiaries
Garmin
®
and the Garmin logo are trademarks of Garmin Ltd. or its subsidiaries, registered in the USA and other countries. GC
™
is a trademark of Garmin Ltd. or its
subsidiaries. These trademarks may not be used without the express permission of Garmin.
Pozidriv
®
is a trademark of the American Screw Company.
2
The device withstands incidental exposure to water of up to 1m for up to 30min. For more information, go to www.garmin.com/waterrating.
5