PB
1
We want you to have a 5-star experience!
Should you have any questions or concerns about your new product, please call our Customer Service
Line at 1-800-465-6070 (U.S. and Canada). Please do not return to the store.
¡Deseamos que disfrute de una experiencia de 5 estrellas!
Si usted tiene alguna inquietud o pregunta con su producto, por favor llame a nuestra línea de servicio
al cliente al 1-800-465-6070 (EE.UU/Canadá) 01-800-714-2503 (México).
No lo devuelva a la tienda.
*One cup equals approximately 5 oz. (varies by brewing technique)
*Una taza equivale a aproximadamente 5 onzas. (varía de acuerdo al método de preparación utilizado)
12-CUP* PROGRAMMABLE
COFFEEMAKER
CAFETERA PROGRAMABLE
DE 12 TAZAS*
use and care manual
manual de uso y cuidado
CM0122-1BD
TM
CM0122-1BD_30185_ES_IB_A.indd 1CM0122-1BD_30185_ES_IB_A.indd 1 10/19/23 10:36 AM10/19/23 10:36 AM
2
3
WELCOME!
Congratulations on your purchase of the Black+Decker™ 12-Cup Programmable
Coffeemaker. We have developed this guide to ensure optimal product
performance and your complete satisfaction. Save this use and care manual
and be sure to register your appliance online at www.prodprotect.com/
blackanddecker.
CONTENTS
SAVE THESE INSTRUCTIONS.
This product is for household use only.
IMPORTANT SAFEGUARDS........................................... 3
GETTING TO KNOW YOUR COFFEEMAKER.............................. 4
GETTING STARTED . . . . . . . . . . . . . . . . . . . . . . . . . . . . . . . . . . . . . . . . . . . . . . . . . 5
PROGRAMMING YOUR COFFEE MAKER ................................ 5
BREWING HOT COFFEE ............................................. 6
SNEAK-A-CUP
TM
FEATURE ........................................... 6
KEEP WARM FUNCTION ............................................. 6
BREW LATER FUNCTION ............................................ 7
BREWING ICED COFFEE............................................. 8
CARE AND CLEANING .............................................. 9
AUTO CLEAN™ SYSTEM .............................................10
TROUBLESHOOTING ...............................................11
WARNING
RISK OF FIRE OR ELECTRIC SHOCK. DO NOT OPEN.
The lightning symbol refers to “dangerous voltage”; the exclamation symbol refers
to maintenance instructions. See below.
Warning: To reduce the risk of fire or electric shock, do not remove the cover of the
coffeemaker. There are no user-serviceable parts inside. Repair should be done by
authorized service personnel only.
CM0122-1BD_30185_ES_IB_A.indd 2CM0122-1BD_30185_ES_IB_A.indd 2 10/19/23 10:36 AM10/19/23 10:36 AM
2
3
POLARIZED PLUG (120V models only)
This appliance has a polarized plug
(one blade is wider than the other). To
reduce the risk of electric shock, this
plug is intended to t into a polarized
outlet only one way. If the plug does not
t fully into the outlet, reverse the plug.
If it still does not t, contact a qualied
electrician. Do not attempt to modify the
plug in any way.
TAMPER-RESISTANT SCREW
Warning: This appliance is equipped
with a tamper-resistant screw to
prevent removal of the outer cover. To
reduce the risk of re or electric shock,
do not attempt to remove the outer
cover. There are no user-serviceable
parts inside. Repair should be done only
by authorized service personnel.
ELECTRICAL CORD
1. A short power-supply cord is provided
to reduce the risk resulting from
becoming entangled in or tripping over a
longer cord.
2. Extension cords may be used if care
is exercised in their use.
3. If an extension cord is used:
a) The marked electrical rating of the
extension cord should be at least as
great as the electrical rating of the
appliance.
b) If the appliance is of the grounded
type, the extension cord should be a
grounding-type 3-wire cord.
c) The cord should be arranged so that
it will not drape over the countertop or
tabletop where it can be pulled on by
children or tripped over.
Note: If the power cord is damaged,
please contact the warranty
department listed in these instructions.
• Read all instructions.
• Do not touch hot surfaces. Use handles or knobs.
• To protect against fire, electric shock and injury to
persons do not immerse cord, plugs or appliance in
water or other liquid.
• Close supervision is necessary when any appliance
is used by or near children.
• Unplug from outlet when either the appliance or
display clock is not in use, and before cleaning. Allow
to cool before putting on or taking off parts, and
before cleaning the appliance.
• Do not operate any appliance with a damaged
cord or plug, or after the appliance malfunctions
or has been damaged in any manner. Contact
Consumer Support at the number listed in this
manual.
• The use of accessory attachments not
recommended by the appliance manufacturer may
result in fire, electric shock or injury to persons.
• Do not use outdoors.
• Do not let cord hang over edge of table or counter,
or touch hot surfaces.
• Do not place on or near a hot gas or electric
burner, or in a heated oven.
• To disconnect, turn the unit off by pressing the
BREW button, making sure the BREW light goes
out, then remove plug from wall outlet.
• Do not use this appliance for other than
intended use.
• Keep lid on the carafe when in use.
• Scalding may occur if the lid is removed during the
brewing cycles.
• The carafe is designed for use with this appliance.
It must never be used on a range top.
• Do not set a hot carafe on a wet or cold surface.
• Do not use a cracked carafe or a carafe having a
loose or weakened handle.
• Do not clean carafe with cleansers, steel wool pads
or other abrasive material.
• This appliance is not intended for use by persons
(including children) with reduced physical, sensory
or mental capabilities, or lack of experience
and knowledge, unless they have been given
supervision or instruction concerning use of the
appliance by a person responsible for their safety.
• Children should be supervised to ensure that they
do not play with the appliance.
Please Read and Save this Use and Care Book.
IMPORTANT SAFEGUARDS.
When using electrical appliances, basic safety precautions should always be fol-
lowed to reduce the risk of fire, electric shock, and/or injury, including the following:
SAVE THESE INSTRUCTIONS.
This product is for household use only.
CM0122-1BD_30185_ES_IB_A.indd 3CM0122-1BD_30185_ES_IB_A.indd 3 10/19/23 10:36 AM10/19/23 10:36 AM
4
5
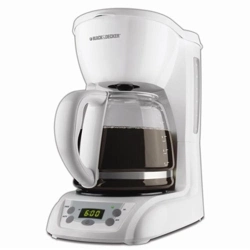
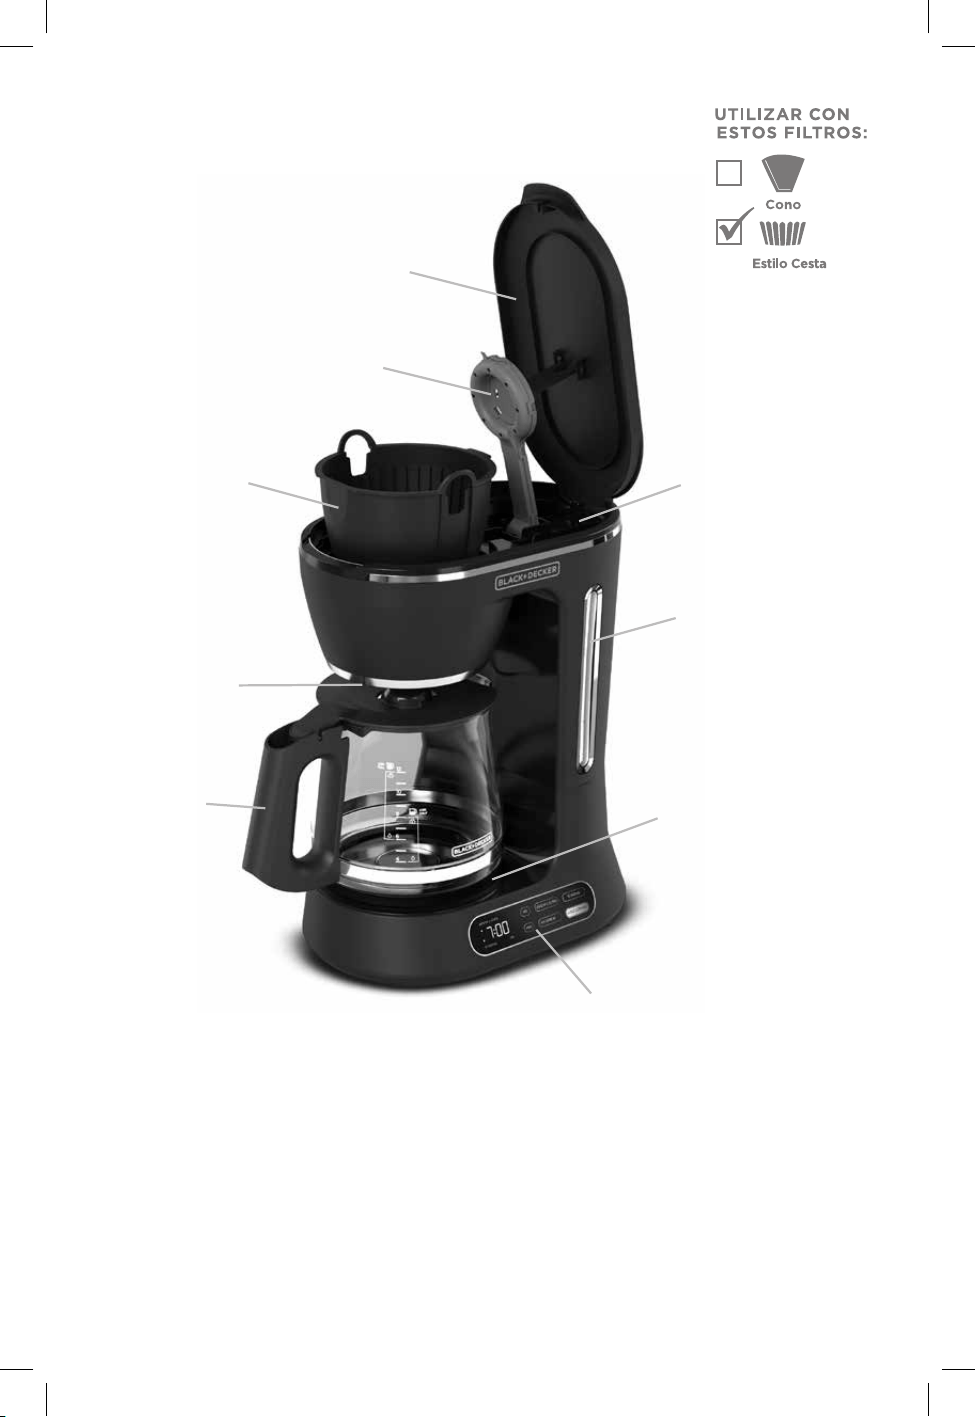
GETTING TO KNOW YOUR COFFEEMAKER
Product may vary slightly from what is illustrated.
1. Lid
2. Vortex™ showerhead
3. Brew basket
4. Sneak-A-Cup™ auto pause feature
5. Carafe with lid
6. Control panel
7. Water reservoir
8. Water level markings
9. Nonstick “keep hot” carafe plate
CM0122-1BD_30185_ES_IB_A.indd 4CM0122-1BD_30185_ES_IB_A.indd 4 10/19/23 10:36 AM10/19/23 10:36 AM
4
5
HOW TO USE
This product is for household use only.
GETTING STARTED
1. Remove all packing material, any stickers, and the plastic band around the
power plug.
2. Go to www.prodprotect.com/blackanddecker to register your product.
3. Wash removable parts as instructed in CARE AND CLEANING.
4. Clean the inside of your coffeemaker by running two full brewing cycles with
water only, no coffee.
a. Pour fresh, cold water into the water reservoir up to the 10-cup mark,
then place carafe onto the carafe plate.
b. Plug cord into standard electrical outlet.
c. Push the BREW button to immediately brew water through the
coffeemaker without adding coffee.
d. Once the cycle is nished, discard water.
e. Turn off appliance, unplug and allow to cool down for 15 minutes
before repeating.
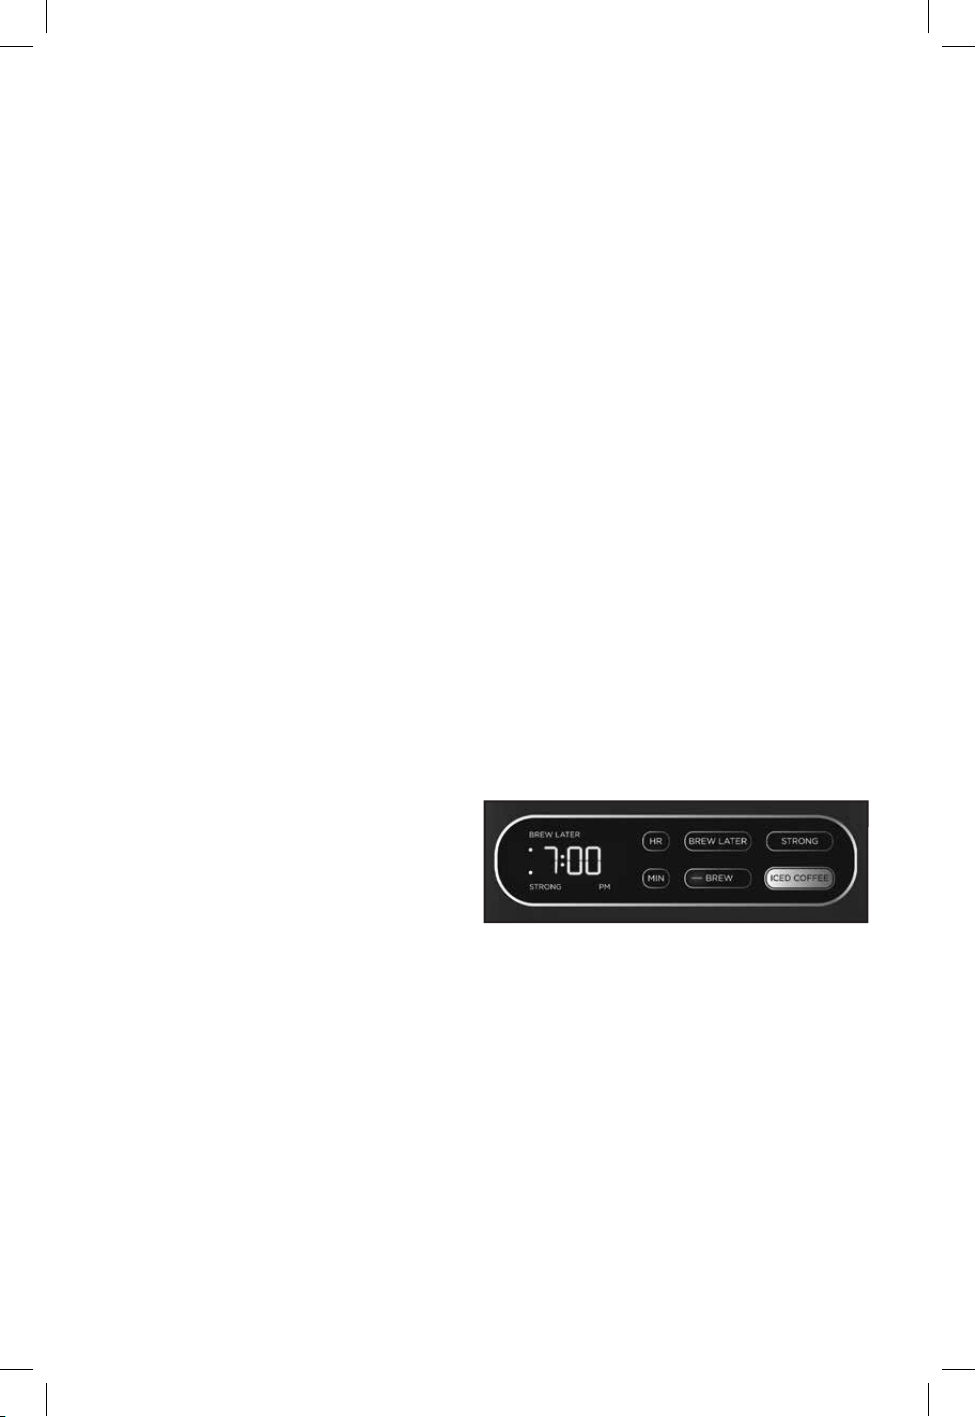
PROGRAMMING YOUR COFFEE MAKER
Setting the Digital Clock
1. Plug the coffeemaker into a
standard electrical outlet.
2. The numbers and colon “:” on
the digital clock display flashes
“12:00”.
3. Press HOUR and MIN buttons until the correct time appears on the
display. The colon “:” will continue to flash even after the time is set.
4. When the time passes noon, the LED light in the display next to PM
illuminates to let you know you are in PM time. If the PM light is not
illuminated it is AM time.
5. To change the time after it has been set, press either HOUR or MIN
once to enter the time setting mode. Then follow the steps above.
Note: If the appliance is unplugged or power is interrupted even
momentarily, the time may need to be reset.
CM0122-1BD_30185_ES_IB_A.indd 5CM0122-1BD_30185_ES_IB_A.indd 5 10/19/23 10:36 AM10/19/23 10:36 AM

6
7
BREWING HOT COFFEE
1. Open cover.
2. Fill water reservoir with desired amount of water. The 12 line on the
side of the reservoir represents a full carafe of coffee. Do not fill past
this 12 Cup line.
Note:
Use spring water or ltered water. Distilled water lacks the minerals
necessary to bind to elements of coffee.
Note: Filtered water will limit impurities and excessive minerals that can
detrimentally impact coffee avor and machine performance.
3. Insert a basket type paper filter into the brew basket.
4. Add desired amount of ground coffee. Close lid, making sure it clicks.
5. Make sure carafe lid is properly attached to the empty carafe. Close
the carafe lid.
Note: Coffee may overflow if carafe lid is not properly placed.
6. Place empty carafe on the carafe plate.
7. If not already plugged in, plug power cord into an outlet.
8. If regular brew strength is desired, your coffeemaker is set to brew coffee.
9. If strong coffee is desired, press the STRONG button once to select
the strong brew. The LED light in the display next to STRONG will
illuminate. To turn STRONG mode off press the STRONG button again
and the LED light will turn off.
Note: We recommend using the STRONG setting to ensure the best flavor
whenever brewing 4 cups of coffee or less.
10. Press BREW button and brewing begins. The BREW button illuminates
while brewing.
11. Once coffee grounds have cooled, carefully open cover and, discard
used grounds. Close cover.
12. The coffeemaker will keep brewed coffee hot for 4 hours and then
automatically turn off.
To turn off the coffeemaker at any time press the BREW button. The
BREW light goes off.
SNEAK-A-CUP™ FEATURE
Remove the carafe and brewing is paused. The carafe must be placed back
on the carafe plate in 30 seconds to prevent overflow. Brewing begins again.
KEEP WARM FUNCTION
The hot plate remains in “keep warm” mode for 4 hours (240 minutes)
following the brew cycle.
• During this time the BREW button remains illuminated and the elapsed
time will be displayed.
• After 4 hours have passed, the heater turns off and the BREW light
turns off.
To turn off the coffeemaker at any time press the BREW button.
CM0122-1BD_30185_ES_IB_A.indd 6CM0122-1BD_30185_ES_IB_A.indd 6 10/19/23 10:36 AM10/19/23 10:36 AM

6
7
BREW LATER FUNCTION
If BREW LATER function has not been previously set:
1. After the digital clock is set, press the BREW LATER button.
2. The LED light in the display next to BREW LATER illuminates and
flashes once per second.
3. Clock shows last BREW LATER time programmed (if no time has been
programmed, or unit has been unplugged, BREW LATER time defaults
to 12:00 a.m.).
4. Use HOUR and MIN buttons to set BREW LATER time (while BREW
LATER in display is blinking).
5. Press the BREW LATER button again to set the BREW LATER time.
Or, the coffeemaker will automatically set itself after 4 seconds with no
button pressed.
6. The unit will begin brewing at the BREW LATER time.
If BREW LATER function is already set:
1. Press BREW LATER button to check the BREW LATER time. The
clock will flash once per second and display the BREW LATER time
for 4 seconds. At this point, you may reset the BREW LATER setting if
desired.
2. To cancel the BREW LATER function; press and hold the “BREW
LATER” button for 3 seconds.
3. Four seconds after you stop pressing buttons, the clock reverts to
current time.
Note: Even though BREW LATER is disabled, the BREW LATER time will
still be stored unless unit is unplugged.
CM0122-1BD_30185_ES_IB_A.indd 7CM0122-1BD_30185_ES_IB_A.indd 7 10/19/23 10:36 AM10/19/23 10:36 AM
8
9
BREWING ICED COFFEE
1. Open cover.
2. Fill water reservoir. Refer to the table below for the recommended
amount of water for your desired number of servings.
Note:
Do not ll the water reservoir above the “6 MAX ICED” level.
Note: Filtered water will limit impurities and excessive minerals that can
detrimentally impact coffee avor and machine performance.
3. Insert a basket type paper filter into the brew basket.
4. Add desired amount of pre-ground coffee to the basket. Refer to the
table below for the recommended amount of ground coffee. Close lid,
making sure it clicks.
5. Make sure carafe lid is properly attached to the empty carafe.
Note: Coffee may overflow if carafe lid is not properly placed.
6. If not already plugged in, plug power cord into an outlet.
7. You can add additional grounds for a stronger coffee, or adjust the
amount of water, provided you do not fill the water reservoir above the “6
MAX ICED” level.
8. Add ice to the carafe to the desired line. Refer to the table below for
recommended amounts of ice cubes.
9. Place carafe on the carafe plate.
10. Press ICED COFFEE button and brewing begins. The BREW button
illuminates while brewing.
11. Once coffee grounds have cooled, carefully open cover and, discard
used grounds. Close cover.
Note: During the ICED function the keep warm plate will not turn on in
order to reduce the amount of ice that is melted.
To turn off the coffeemaker at any time press the BREW button. The BREW
light goes off.
Servings
Fill reservoir with
water to:
Fill carafe with
ice to:
Amount of
ground coffee
12 cups 6 mark 12 mark 12 Tbsp
8 cups 4 mark 8 mark 8 Tbsp
4 cups 2 mark 4 mark 4 Tbsp
CM0122-1BD_30185_ES_IB_A.indd 8CM0122-1BD_30185_ES_IB_A.indd 8 10/19/23 10:36 AM10/19/23 10:36 AM

8
9
CARE AND CLEANING
This product contains no user serviceable parts. Refer service to qualied
service personnel.
CLEANING
• Be sure the unit is unplugged and has cooled.
• Wash the removable parts in the top rack of the dishwasher or wash by
hand in hot water with dish detergent.
• Wipe the appliance’s exterior surface, control panel and carafe plate with
a soft damp cloth. Do not use abrasive cleansers or scouring pads. Never
immerse the coffeemaker in water.
• To clean the inside of the cover, open the cover and leave in the open
position. Wipe surfaces with a damp cloth.
CM0122-1BD_30185_ES_IB_A.indd 9CM0122-1BD_30185_ES_IB_A.indd 9 10/19/23 10:36 AM10/19/23 10:36 AM

10
11
AUTO CLEAN™ SYSTEM
Descaling with the Auto Clean™ function
Over time, calcium deposits or “scale” may build up in your brewer. Scale is
non-toxic but if left unattended will hinder brewer performance and cause
premature failure. Regularly descaling your brewer helps to maintain quality
coffee as well as the lifespan of the heating element, and other internal parts
that come in contact with water throughout the brew process.
To make the descaling process as effortless as possible, an Auto Clean™
system has been programmed into your coffeemaker.
When should I use the Auto Clean™ function?
You should clean your coffeemaker after every 60 brews (approximately 2
months). After 60 brews, the clean warning will be activated, and display
at the beginning of each brew cycle. “CLEAN” will scroll across the display
three times to remind you to clean the coffeemaker.
If you would like to clean your coffeemaker prior to 60 brew cycles because
of hard water, you may do so.
How do I use the Auto Clean™ function?
Follow the simple steps below. Your coffeemaker will take care of the rest.
1. Combine 6 cups of white vinegar and 4 cups of cold water in carafe.
2. Pour into water reservoir.
3. Make sure the lid of the carafe is in place and place empty carafe on
the carafe plate.
4. Press and Hold the BREW button for 4 seconds
5. BREW button LED illuminates (no blinking)
6. “CLEAN” scrolls through the display continuously and the Auto Clean
cycle begins.
During the Auto Clean™ Cycle Function:
1. Machine will brew approximately 5 cups of cleaning solution.
Remaining mixture will be held in coffeemaker for 30 minutes before
completing its brew through.
2. Machine will continue brewing remainder of cleaning solution
Note: The entire cleaning cycle will take 45–60 minutes to complete.
3. When the coffeemaker completes the AUTO CLEAN™ cycle, it shuts off
automatically.
4. Brew fresh water through appliance following instructions given in
GETTING STARTED before brewing coffee again.
CM0122-1BD_30185_ES_IB_A.indd 10CM0122-1BD_30185_ES_IB_A.indd 10 10/19/23 10:36 AM10/19/23 10:36 AM
10
11
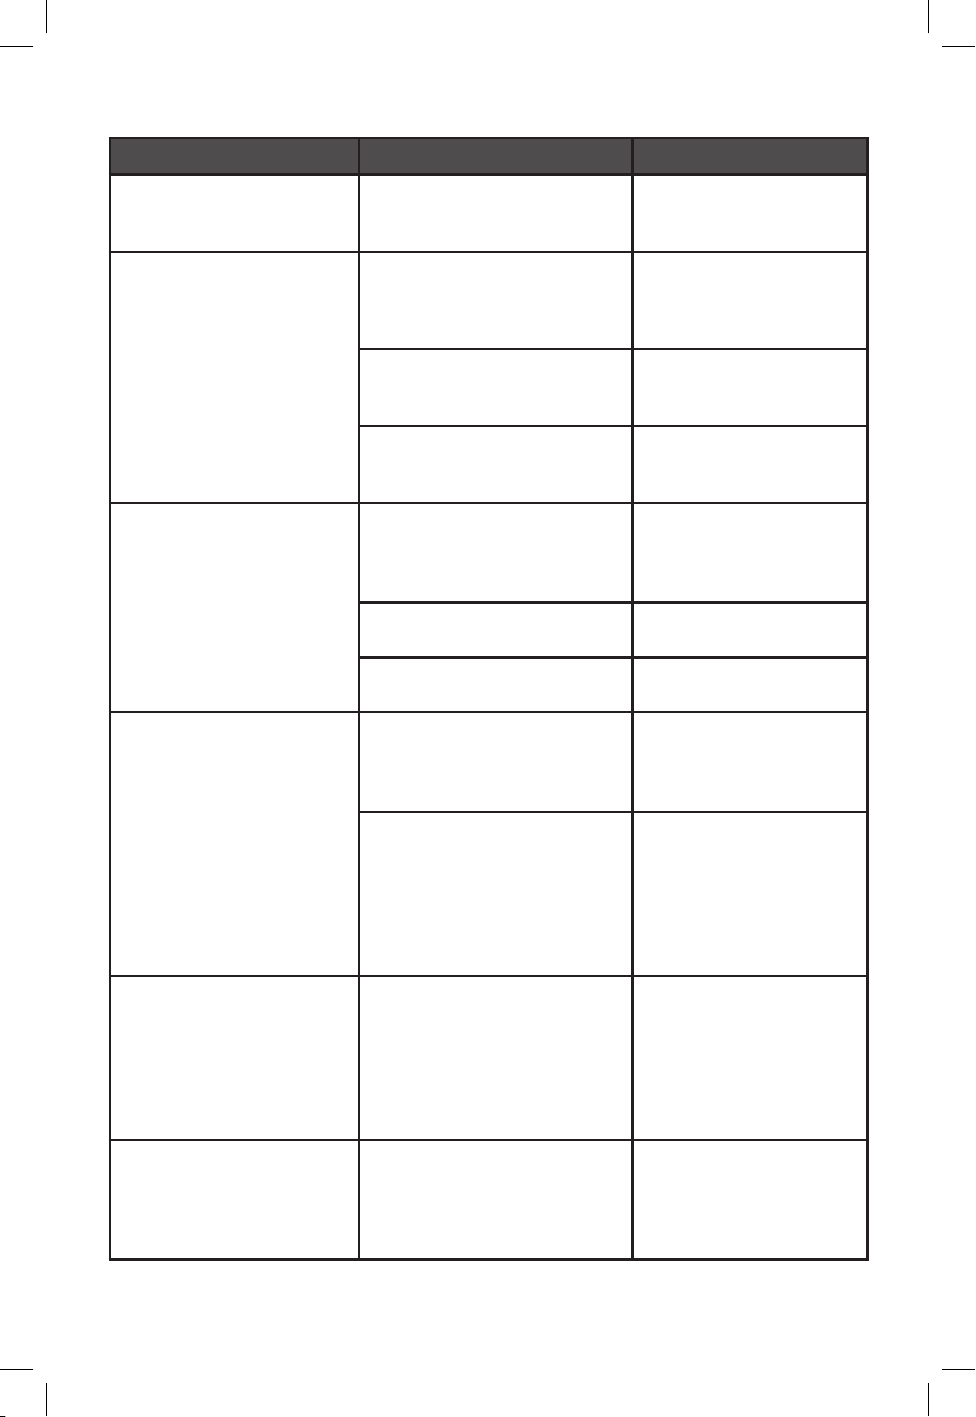
TROUBLESHOOTING
PROBLEM POSSIBLE CAUSE SOLUTION
Coeemaker does
not turn on.
Coffeemaker is not plugged in. Make sure appliance is
plugged into a working
outlet.
Coeemaker
is leaking.
Water reservoir may be
overlled.
Make sure water
reservoir has not been
lled beyond the 12-cup
line.
Cover may not be correctly
placed on carafe.
Make sure cover is
correctly placed and
tightened on carafe
Carafe may not be correctly
placed on the carafe plate.
Make sure carafe is
placed securely onto
the carafe plate.
The filter basket
overflows.
The carafe has been removed
for longer than 30 seconds
when using the Sneak-A-
Cup™ feature.
Make sure to replace
the carafe within 30
seconds during the
brewing cycle.
Excessive amount of coffee
is used.
Reduce the amount of
coffee used.
Brewing with softened
water.
Always brew with cold,
ltered water.
Coee sediment in
brewed cup of coee.
The lter and/or the brew
basket are not properly
placed.
Insert lter and basket
properly.
Coffee grounds are small
enough to pass through
the permanent lter.
While it is normal
to see some coffee
sediment when using
a permanent lter,
a coarser grind can
reduce the amount of
sediment.
The coeemaker
brews slowly.
The coffeemaker needs
cleaning.
Follow the instructions
in the Auto Clean™
function section. More
than one cleaning cycle
may be required if the
coffeemaker is heavily
calcied.
The coeemaker does
not brew all water in the
reservoir.
The coffeemaker needs
cleaning.
Follow the instructions in
the Auto Clean™ function
section. More than
one cleaning cycle is
probably needed.
If additional assistance is needed, please contact our consumer service team at
1-800-465-6070.
CM0122-1BD_30185_ES_IB_A.indd 11CM0122-1BD_30185_ES_IB_A.indd 11 10/19/23 10:36 AM10/19/23 10:36 AM
12
13
PRECAUCIÓN
RIESGO DE INCENDIO O DE DESCARGA ELÉCTRICA. NO ABRA.
El símbolo de un rayo indica voltaje peligroso. El signo de exclamación
indica importantes instrucciones de mantenimiento. Consulte a
continuación:
Precaución: Para reducir el riesgo de incendio o de descarga eléctrica,
no retire la cubierta de la cafetera. No contiene por dentro partes
reparables por el consumidor. Cualquier reparación deberá ser
efectuada únicamente por personal autorizado.
TABLA DE CONTENIDOS
INSTRUCCIONES IMPORTANTES DE SEGURIDAD ........................13
CONOZCA SU CAFETERA ............................................14
PRIMEROS PASOS ..................................................15
CÓMO PROGRAMAR SU CAFETERA ...................................15
CÓMO PREPARAR CAFÉ CALIENTE....................................16
FUNCIÓN SNEAK-A-CUP™ ...........................................17
FUNCIÓN DE MANTERNER CALIENTE ..................................17
FUNCIÓN BREW LATER (PREPARAR CAFÉ MÁS TARDE) ..................17
CÓMO PREPARAR CAFÉ HELADO .....................................18
CUIDADO Y LIMPIEZA...............................................19
SISTEMA DE LIMPIEZA AUTOMÁTICA AUTO CLEAN™ .................... 20
RESOLUCIÓN DE PROBLEMAS .......................................21
¡BIENVENIDO!
¡Felicitaciones por su compra de la cafetera de la BLACK+DECKER! Hemos
desarrollado este manual para asegurar rendimiento óptimo y su satisfacción
total. Conserve este manual de uso y cuidado y asegúrese de registrar su
producto en línea visitando www.prodprotect.com/blackanddecker.
CM0122-1BD_30185_ES_IB_A.indd 12CM0122-1BD_30185_ES_IB_A.indd 12 10/19/23 10:36 AM10/19/23 10:36 AM
12
13
• Lea todas las instrucciones antes de utilizar.
• No toque las superficies calientes. Use las asas
o las perillas.
• A fin de protegerse contra un incendio, descarga
eléctrica y lesiones a las personas, no sumerja el
cable, los enchufes ni el aparato en agua ni en
ningún otro líquido.
• Todo aparato eléctrico utilizado cerca de la
presencia de los niños o por ellos mismos, requiere
la supervisión de un adulto.
• Desenchufe del aparato del tomacorriente cuando
éste o el reloj de la pantalla no esté en uso y antes
de limpiarlo. Permita que el aparato se enfríe
antes de colocarle o retirar las piezas y antes de
limpiarlo.
• No opere ningún aparato eléctrico que tenga
el cable o el enchufe averiado, que presente un
problema de funcionamiento o que esté dañado.
Comuníquese con el departamento de Servicio
para el Cliente, llamando gratis al número que
aparece en la sección de Garantía.
• El uso de accesorios no recomendados por el
fabricante para ser utilizados con este aparato
puede ocasionar incendio, descarga eléctrica o
lesiones a las personas.
• No utilice este aparato a la intemperie.
• No permita que el cable cuelgue del borde de la
mesa o del mostrador ni que entre en contacto con
las superficies calientes.
• No coloque el aparato sobre ni cerca de una
hornilla de gas o eléctrica ni adentro de un horno
caliente.
• Para desconectar, apague la unidad presionando
el botón BREW, asegurando que la luz BREW se
apague, luego retire el enchufe del tomacorriente.
• Este aparato se debe usar únicamente con el fin
previsto.
• La tapa debe mantenerse sobre la jarra cuando el
aparato está en uso.
• El retirar o abrir la tapa durante el ciclo de colado
puede ocasionar quemaduras.
• La jarra está diseñada para ser utilizada con este
aparato. Jamás se deberá utilizar sobre una estufa.
• Nunca coloque una jarra caliente sobre una
superficie fría ni mojada.
• No utilice la jarra si el vidrio se ha rajado o si el asa
está floja o débil.
• No limpie la jarra con limpiadores abrasivos,
con almohadillas de fibra de metal ni demás
limpiadores abrasivos.
• Este aparato no está diseñado para ser usado
por personas (incluyendo los niños) con su
capacidad física, psíquica o sensorial reducida,
o con falta de experiencia o sabiduria, a menos
que sean supervisadas o instruidas acerca del uso
del aparato por una persona responsable de su
seguridad.
• Los niños deben ser supervisados para asegurar
que no jueguen con el aparato.
ENCHUFE POLARIZADO (Solamente
para los modelos de 120V)
Este aparato cuenta con un enchufe polarizado (un
contacto es más ancho que el otro). A n de reducir
el riesgo de un descarga eléctrica, este enchufe
encaja en un tomacorriente polarizada en un solo
sentido. Si el enchufe no entra en el tomacorriente,
inviértalo y si aun así no encaja, consulte con
un electricista. Por favor no trate de alterar esta
medida de seguridad.
TORNILLO DE SEGURIDAD
Advertencia: Este aparato cuenta con un tornillo
de seguridad para evitar la remoción de la cubierta
exterior del mismo. A n de reducir el riesgo de
incendio o de descarga eléctrica, por favor no trate
de remover la cubierta exterior. Este producto no
contiene piezas reparables por el consumidor. Toda
reparación se debe llevar a cabo únicamente por
personal de servicio autorizado.
CABLE ÉLECTRICO
1. El producto debe proporcionarse con un cable
corto para reducir el riesgo de enredarse o de
tropezar con un cable largo.
2. Se encuentran disponibles cables de extensión
más largos, que es posible utilizar si se emplea el
cuidado debido.
3. Si un cable de extensión es utilizado:
a) La capacidad eléctrica del cable de extensión
debe ser por lo menos igual que la capacidad
eléctrica nominal del electrodoméstico.
b) Si el aparato es de conexión a tierra, el cable
de extensión debe ser un cable de tres
alambres de conexión a tierra.
c) Uno debe de acomodar el cable más largo de
manera que no cuelgue del mostrador o de la
mesa, para evitar que un niño tire del mismo o
que alguien se tropiece.
Nota: Si el cable de alimentación está dañado,
por favor llame al número de Servicios para el
Cliente que aparece en estas instrucciones.
Por favor lea este instructivo antes de usar el producto.
INSTRUCCIONES IMPORTANTES DE SEGURIDAD
Cuando se utilizan aparatos eléctricos, siempre se debe respetar ciertas medidas de seguridad a fin de
reducir el riesgo de un incendio, un descarga eléctrica y (o) lesiones a las personas, incluyendo las siguientes:
CONSERVE ESTAS INSTRUCCIONES.
Este aparato eléctrico es para uso doméstico solamente.
CM0122-1BD_30185_ES_IB_A.indd 13CM0122-1BD_30185_ES_IB_A.indd 13 10/19/23 10:36 AM10/19/23 10:36 AM
14
15
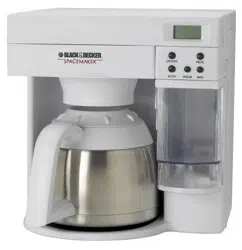
CONOZCA SU CAFETERA
El producto puede variar ligeramente del que aparece ilustrado aquí.
1. Tapa
2. Distribuidor de vórtice de agua
3. Cesta del filtro extraíble
4. Función de pausa automática
Sneak-A-Cup™
5. Jarra con tapa
6. Panel de control
7. Tanque de agua
8. Marcas de nivel de agua
9. Placa antiadherente de la jarra para
“Mantener Caliente” el café
CM0122-1BD_30185_ES_IB_A.indd 14CM0122-1BD_30185_ES_IB_A.indd 14 10/19/23 10:36 AM10/19/23 10:36 AM
14
15
CÓMO USAR
Este producto es para uso doméstico solamente.
PRIMEROS PASOS
1. Retire todo material de empaque, toda etiqueta adherida al producto y
la tira plástica alrededor del enchufe.
2. Vaya a www.prodprotect.com/blackandecker para registrar su
producto.
3. Lave las partes extraíbles según las instrucciones en la sección de
CUIDADO Y LIMPIEZA.
4. Limpie el interior de su cafetera realizando dos ciclos de preparación
completos con solo agua, sin café.
a. Vierta agua fresca y fría dentro del tanque de agua hasta la marca de 10
tazas, luego coloque la jarra sobre la placa de la jarra.
b. Enchufe el cable a un tomacorriente estándar.
c. Presione el botón BREW para colar inmediatamente agua a través de la
cafetera sin agregar café.
d. Después que termine el ciclo de preparación, deseche el agua.
e. Apague el aparato, desenchufe y deje que se enfríe por 15 minutos
antes de repetir el proceso.
CÓMO PROGRAMAR SU CAFETERA
Ajuste del Reloj Digital
1. Enchufe la cafetera a un
tomacorriente estándar.
2. Los números y los dos puntos
“:” en la pantalla del reloj
digital parpadean rápidamente
“12:00”.
3. Presione los botones HOUR (hora) y MIN (minutos) hasta que la hora
correcta aparezca en la pantalla. Los dos puntos “:” continuarán
parpadeando rápidamente aun después de fijar la hora.
4. Cuando la hora pase el mediodía, la luz LED al lado de PM en la
pantalla se ilumina para dejarle saber que está en horario PM. Si la luz
PM no está iluminada, está en horario AM.
5. Para cambiar la hora después de programarla, presione el botón HOUR
o MIN una vez para acceder el modo de ajuste de hora. Luego siga los
pasos de arriba.
Nota: Si se desenchufa el aparato o se interrumpe la electricidad, aunque
sea momentáneamente, puede ser necesario reajustar la hora.
CM0122-1BD_30185_ES_IB_A.indd 15CM0122-1BD_30185_ES_IB_A.indd 15 10/19/23 10:36 AM10/19/23 10:36 AM

16
17
CÓMO PREPARAR CAFÉ CALIENTE
1. Abra la tapa.
2. Llene el tanque de agua con la cantidad de agua deseada. La línea
marcada 12 tazas representa una jarra llena de café. No llene el tanque
pasado de esta línea de 12 tazas (máxima).
Nota: Utilice agua de manantial o agua ltrada. El agua destilada no
contiene los minerales necesarios para jarse a los elementos del café.
Nota: El agua ltrada limitará las impurezas y el exceso de minerales que
pueden impactar de manera perjudicial el sabor del café y el rendimiento
de la máquina.
3. Inserte un filtro de papel estilo cesta dentro de la cesta de preparación.
4. Agregue la cantidad deseada de café molido. Cierre la tapa,
asegurándose de que emita un sonido de clic al cerrarse.
5. Asegúrese de que la tapa esté instalada correctamente a la jarra.
Cierre la tapa.
Nota: El café puede desbordarse si la tapa de la jarra no está instalada
correctamente.
6. Coloque la jarra vacía sobre la placa de la jarra.
7. Si el cable de alimentación no está enchufado, enchúfelo a un
tomacorriente.
8. Si se desea la intensidad de preparación regular, su cafetera está lista
para preparar café.
9. Si se desea un café fuerte, presione el botón STRONG (fuerte) una
vez para elegir la preparación fuerte. La luz LED al lado de la palabra
STRONG en la pantalla se ilumina. Para apagar el modo de STRONG,
presione el botón STRONG una vez más y la luz LED se apagará.
Nota: Se recomienda utilizar la función STRONG para asegurar el mejor
sabor al preparar 4 tazas o menos de café.
10. Presione el botón BREW para comenzar el ciclo de preparación. El
botón BREW se ilumina durante el ciclo de preparación.
11. Una vez que se enfríen los granos de café molido, cuidadosamente
abra la tapa y deseche los granos de café molido utilizados. Cierre la
tapa.
12. La cafetera mantendrá caliente el café preparado por 4 horas y luego
se apagará automáticamente.
Para apagar la cafetera en cualquier momento, presione el botón BREW.
La luz del botón BREW se apaga.
CM0122-1BD_30185_ES_IB_A.indd 16CM0122-1BD_30185_ES_IB_A.indd 16 10/19/23 10:36 AM10/19/23 10:36 AM

16
17
FUNCIÓN SNEAK-A-CUP™
Retire la jarra y el ciclo de preparación pausará. La jarra debe ser colocada
de nuevo sobre la placa en 30 segundos para evitar derrames. El ciclo de
preparación comenzará de nuevo.
FUNCIÓN DE MANTENER CALIENTE
La placa para la jarra se mantiene en el modo de “mantener caliente” por 4
horas (240 minutos) seguido del ciclo de preparación.
• Durante este tiempo, el botón BREW se mantiene iluminado y se
mostrará el tiempo transcurrido.
• Después de pasar 4 horas, el calentador se apaga y la luz BREW se
apaga.
Para apagar la cafetera en cualquier momento, presione el botón
BREW.
FUNCIÓN BREW LATER (PREPARAR CAFÉ MÁS TARDE)
Si no se ha fijado la hora de la función BREW LATER:
1. Después de ajustar el reloj digital, presione el botón BREW LATER
(preparar más tarde).
2. La luz LED al lado de la función BREW LATER en la pantalla se ilumina
y parpadea rápidamente una vez por segundo.
3. El reloj muestra la última hora de preparación programada (si no se ha
programado ninguna hora o se ha desenchufado la unidad, la hora de
preparación de 12:00 a.m. aparece automáticamente).
4. Utilice los botones HOUR y MIN para fijar la hora de la función BREW
LATER (mientras BREW LATER esté parpadeando en la pantalla).
5. Presione el botón BREW LATER una vez más para programar la hora
de la función BREW LATER. O, si no se presiona ningún botón después
de 4 segundos. la cafetera se programará automáticamente.
6. La unidad comenzará la preparación a la hora fijada en la función
BREW LATER.
SI ya se ha fijado la hora de la función BREW LATER:
1. Presione el botón BREW LATER para verificar la hora fijada de la
función BREW LATER. El reloj parpadeará rápidamente una vez
por segundo y mostrará la hora de la función BREW LATER por 4
segundos. En ese momento, usted puede reajustar la función BREW
LATER si lo desea.
2. Para cancelar la función BREW LATER, presione y sostenga el botón
“BREW LATER” por 3 segundos.
3. Después de 4 segundos sin presionar ningún botón, el reloj regresa a la
hora actual.
Nota: Aun cuando la función BREW LATER está desactivada, la hora
jada de la función BREW LATER se mantendrá en memoria hasta que se
desenchufe la unidad.
CM0122-1BD_30185_ES_IB_A.indd 17CM0122-1BD_30185_ES_IB_A.indd 17 10/19/23 10:36 AM10/19/23 10:36 AM
18
19
CÓMO PREPARAR CAFÉ HELADO
1. Abra la tapa.
2. Llene el tanque de agua. Consulte la tabla más abajo para la cantidad
de agua recomendada para su número de porciones deseado.
Nota:
No llene el tanque de agua por encima del nivel que indica “6 MAX
ICED” (nivel máximo 6 para café helado).
Nota: El agua ltrada limitará las impurezas y el exceso de minerales que
pueden impactar de manera perjudicial el sabor del café y rendimiento de la
máquina.
3. Inserte un filtro de papel estilo cesta dentro de la cesta de preparación.
4. Añada a la cesta la cantidad deseada de café premolido. Consulte la
tabla más abajo para recomendaciones de la cantidad de café molido a
utilizar. Cierre la tapa, asegurándose de que emita un sonido de clic.
5. Asegúrese que la tapa de la jarra esté conectada adecuadamente en la
jarra vacía.
Nota: El café puede desbordarse si la jarra no esta colocada
correctamente.
6. Si aún no se ha enchufado el cable de alimentación, enchúfelo a un
tomacorriente.
7. Puede añadir granos de café adicionales para un café más fuerte o ajustar
la cantidad de agua, siempre y cuando no llene el tanque de agua por
arriba del nivel “6 MAX ICED” (nivel máximo 6 para café helado).
8. Añada hielo a la jarra hasta la línea del nivel deseado. Consulte la tabla de
abajo para las cantidades de cubos de hielo recomendadas.
9. Coloque la jarra en la placa de la jarra.
10. Presione el botón ICED COFFEE (café helado) y se inicia la
preparación. El botón BREW (preparar café) se iluma durante el ciclo
de preparación.
11. Cuado el café molido se enfríe, abra con cuidado la tapa y deseche los
granos molidos. Cierre la tapa.
Nota: Durante la función ICED (helado), la placa de mantener caliente no se
activará a fin de reducir la cantidad de hielo que se derrite.
Para apagar la cafetera en cualquier momento, presione el botón BREW
(preparar café). La luz indicador de BREW (preparar café) se apaga.
Porciones
Llene el tanque
con agua hasta:
Llene la jarra
con hielo hasta:
Cantidad de café
molido
12 tazas 6 marca 12 marca 12 cucharadas
8 tazas 4 marca 8 marca 8 cucharadas
4 tazas 2 marca 4 marca 4 cucharadas
CM0122-1BD_30185_ES_IB_A.indd 18CM0122-1BD_30185_ES_IB_A.indd 18 10/19/23 10:36 AM10/19/23 10:36 AM

18
19
CUIDADO Y LIMPIEZA
Este producto no contiene piezas que deban ser reparadas por el usuario.
Para servicio, consulte a personal de servicio calicado.
LIMPIEZA
• Asegúrese de que la unidad esté desenchufada y que se haya enfriado.
• Lave las piezas removibles en la rejilla superior de la máquina lavaplatos o
lávelas a mano con agua caliente y líquido de fregar.
• Limpie la supercie exterior de la cafetera, el panel de control y la placa
de la jarra con un paño suave húmedo. No utilice limpiadores abrasivos ni
estropajos. Nunca sumerja la cafetera en agua.
• Para limpiar el interior de la tapa, abra la tapa y deje en posición abierta.
Limpie las supercies con un paño húmedo.
CM0122-1BD_30185_ES_IB_A.indd 19CM0122-1BD_30185_ES_IB_A.indd 19 10/19/23 10:36 AM10/19/23 10:36 AM

20
21
SISTEMA DE LIMPIEZA AUTOMÁTICA AUTO CLEAN™
Descalcificación con el sistema Auto Clean™
Al transcurso del tiempo, depósitos de calcio o “sarro” pueden acumularse
en su cafetera. El sarro no es tóxico, pero si se deja desatendido, puede
obstaculizar el rendimiento de la cafetera y ocasionar un fallo prematuro. La
descalcicación con regularidad de su cafetera ayuda a mantener la calidad
del café al igual que la vida útil del elemento de calor y otras piezas internas
que entren en contacto con el agua durante el proceso de preparación.
Para hacer el proceso de descalcicación la más fácil posible, un sistema de
limpieza automática (Auto Clean) ha sido programado en su cafetera.
¿Cuándo debo utilizar el sistema Auto Clean™?
Debe limpiar su cafetera después de cada 60 ciclos de preparación
(aproximadamente 2 meses). Después de 60 ciclos de preparación, la señal
de advertencia de limpieza se activará y aparecerá al comienzo de cada
ciclo de preparación. La palabra “CLEAN” se desplazará a través de la
pantalla tres veces para recordarle que debe limpiar su cafetera.
Si desea limpiar su cafetera antes de los 60 ciclos de preparación por agua
dura, puede hacerlo..
¿Cómo utilizo el sistema Auto Clean?
Siga los pasos sencillos a continuación. Su cafetera se hará cargo del resto.
1. Combine 6 tazas de vinagre blanco y 4 tazas de agua fría en la jarra.
Recomendamos utilizar agua filtrada
.
2. Vierta en el tanque de agua.
3. Asegúrese de que la tapa de la jarra esté en su lugar y coloque la jarra
vacía sobre la placa de la jarra.
4. Presione y sostenga el botón BREW por 4 segundos.
5. La luz digital del botón BREW se ilumina (sin parpadear).
6. La palabra “CLEAN” se desplaza a través de la pantalla continuamente
y comienza el ciclo de limpieza Auto-Clean.
Durante el ciclo de la función Auto Clean:
1. La unidad colará aproximadamente 5 tazas de la solución de limpieza.
La mezcla restante se mantendrá en la cafetera por 30 minutos antes
de completar el proceso de colado.
2. El aparato continuará colando el resto de la solución de limpieza.
Nota: El ciclo de limpieza completo demorará de 45 a 60 minutos para
completarse.
3. Cuando la cafetera termine el ciclo de AUTO CLEAN, se apaga
automáticamente.
4. Cuele agua fresca siguiendo las instrucciones descritas en la sección
ANTES DE USAR POR PRIMERA VEZ, antes de preparar café de nuevo.
CM0122-1BD_30185_ES_IB_A.indd 20CM0122-1BD_30185_ES_IB_A.indd 20 10/19/23 10:36 AM10/19/23 10:36 AM
20
21
RESOLUCIÓN DE PROBLEMAS
PROBLEMA CAUSA POSIBLE SOLUCIÓN
La cafetera no se enci-
ende.
La cafetera no está enchufada. Asegúrese de que la
cafetera esté enchufada
a un tomacorriente que
funcione.
La cafetera gotea. El tanque de agua puede haberse
llenado en exceso.
Asegúrese de no llenar el
tanque de agua pasado de
la línea de 12 tazas.
La tapa puede no estar instalada
correctamente en la jarra.
Verifique que la tapa esté
instalada correctamente
y asegurada firmemente
sobre la jarra.
La jarra puede no estar colocada
correctamente sobre la placa de
la jarra.
Asegúrese de que la jarra este
colocada aseguradamente
sobre la placa.
La cesta del filtro se
desborda.
La jarra se ha mantenido retirada
de la placa por más de 30
segundos al utilizar la función
Sneak-A-Cup™.
Asegúrese de volver a
colocar la jarra en la placa
dentro de los 30 segundos
durante el ciclo de
preparación.
Se ha utilizado una cantidad
excesiva de café.
Reduzca la cantidad de café
utilizada.
Se utilizó agua suavizada para la
preparación.
Siempre utilice agua fría y
filtrada para la preparación.
Sedimentos de café en la
taza de café preparada.
El filtro y/o la cesta de
preparación no están colocados
correctamente.
Inserte el filtro y la cesta
correctamente.
Los granos de café son los
suficientemente pequeños para
penetrar el filtro permanente.
Los granos de café son los
suficientemente pequeños
para penetrar el filtro
permanente.
La cafetera prepara café
lentamente.
La cafetera necesita limpieza. Siga las instrucciones en
la sección de “Sistema de
Limpieza Automática Auto
Clean. Si la cafetera está
muy calcificada, puede
requerir más de un ciclo de
limpieza.
La cafetera no cuela toda
el agua en el tanque.
La cafetera necesita limpieza. Siga las instrucciones en
la sección de “Sistema de
Limpieza Automática Auto
Clean”. Probablemente
necesite más de un ciclo
de limpieza.
Si necesita asistencia adicional, favor the ponerse en contacto con nuestro
equipo de servicio al consumidor llamando al número 1-800-465-6070.
CM0122-1BD_30185_ES_IB_A.indd 21CM0122-1BD_30185_ES_IB_A.indd 21 10/19/23 10:36 AM10/19/23 10:36 AM

CM0122-1BD_30185_ES_IB_A.indd 22CM0122-1BD_30185_ES_IB_A.indd 22 10/19/23 10:36 AM10/19/23 10:36 AM
975 W 120 V ~ 60 Hz
Sello del Distribuidor:
Fecha de compra:
Modelo:
Please do not throw this product away with normal household waste. If possible, take it to
an official collection point in your area that recycles this type of product. Thank you for
considering the environment.
No deseche este producto junto con los residuos domésticos. Si es possible, llévalo a un lugar
oficial para su correcto reciclaje, ayúdanos a preservar elmedio ambiente.
BLACK+DECKER® y los logotipos BLACK+DECKER® son marcas registradas de Black &
Decker Corporation, utilizados por Empower Brands, LLC, una subsidiaria de Spectrum
Brands, Inc. bajo su licencia para su fabricación y venta de este producto. Todos los derechos
reservados. Todas la demas marcas son marca comercial de Empower Brands, LLC.
BLACK+DECKER® and the BLACK+DECKER® logos are trademarks of The Black & Decker
Corporation, used under license by Empower Brands, LLC, a subsidiary of Spectrum Brands,
Inc. for its manufacturing and sale of this product. All rights reserved. All other marks are
trademarks of Empower Brands, LLC.
CM0122-1BD_30185_ES_IB_A.indd 23CM0122-1BD_30185_ES_IB_A.indd 23 10/19/23 10:36 AM10/19/23 10:36 AM
www.BlackAndDeckerAppliances.com
Made in China.
Fabricado en China.
© 2023 Empower Brands, LLC. All rights reserved / Todos los derechos reservados.
Empower Brands, LLC, Middleton, WI 53562 10/2023
T22-9003624-A
E/S 30185
CM0122-1BD_30185_ES_IB_A.indd 24CM0122-1BD_30185_ES_IB_A.indd 24 10/19/23 10:36 AM10/19/23 10:36 AM