
USER MANUAL
Before using, please read the operating instructions carefully to
ensure proper application and achieve satisfactory results.
KoolMore Refrigerated Snack
Vending Machine
Models: KM-VMR-30-B | KM-VMR-40-B
VENDING MACHINE
KM-VMR-30-B

Stay informed with the latest information
for your KoolMore Appliance.
If you need any assistance or have questions, our customer
support team is here to help.

3
Contents
Parts ................................................................................................................................ 4
Setup ................................................................................................................................. 5
Safety .............................................................................................................................. 6
Operation .......................................................................................................................... 7
Menu Setup Flowchart
To Load Items Into The Machine .............................................................................................................................................. 8
To Clear Slot Error ............................................................................................................................................................................ 9
To See Total Sales .................................................................................................................................................................. 10
To Test The Slots .................................................................................................................................................................... 11
To Prell With Cash ................................................................................................................................................................ 12
To Empty The Machines Cash ........................................................................................................................................... 13
To Set The Price ......................................................................................................................................................................... 14
To Stock Up ................................................................................................................................................................................. 15
To Set Capacity ......................................................................................................................................................................... 16
To Set VMC Drop Sensor ON/OFF ........................................................................................................................................... 17
Drop Sensor Self Check ........................................................................................................................................................ 18
To Set The Slot Mode ..................................................................................................................................................................... 19
To Merge Slots ............................................................................................................................................................................. 20
To Split Slots ........................................................................................................................................................................ 21
To Set Slot Layout ................................................................................................................................................................... 22
Temperature Control Mode .......................................................................................................................................................... 23
Set Target Temp ......................................................................................................................................................................... 24
Set Defrost Time & Interverals ............................................................................................................................................. 25
Glass Heat ON/OFF ................................................................................................................................................................ 26
LED Light ON/OFF .................................................................................................................................................................. 27
Sales Per Slot .......................................................................................................................................................................... 28
Pay Type Stats ............................................................................................................................................................................ 29
Delete Sales Data ......................................................................................................................................................................... 30
Set Coin Change ON/OFF ........................................................................................................................................................ 31
Coin Denominations ...................................................................................................................................................................... 32
Set Bill Escrow ON/OFF .......................................................................................................................................................... 33
Bill Denominations .................................................................................................................................................................. 34
Empty Bill Recycle ........................................................................................................................................................................... 35
Set IC Card Reader ................................................................................................................................................................ 36
Set POS Device ON/OFF ................................................................................................................................................ 37
Set Max Credit .......................................................................................................................................................................... 38
Set Auto Change Dispensing ............................................................................................................................................... 39
Set Coin Exchange Without Sale ...................................................................................................................................... 40
Set Minimum Change ...................................................................................................................................................... 41
Auto Clear Balance Set Upon Timeout ........................................................................................................................ 42
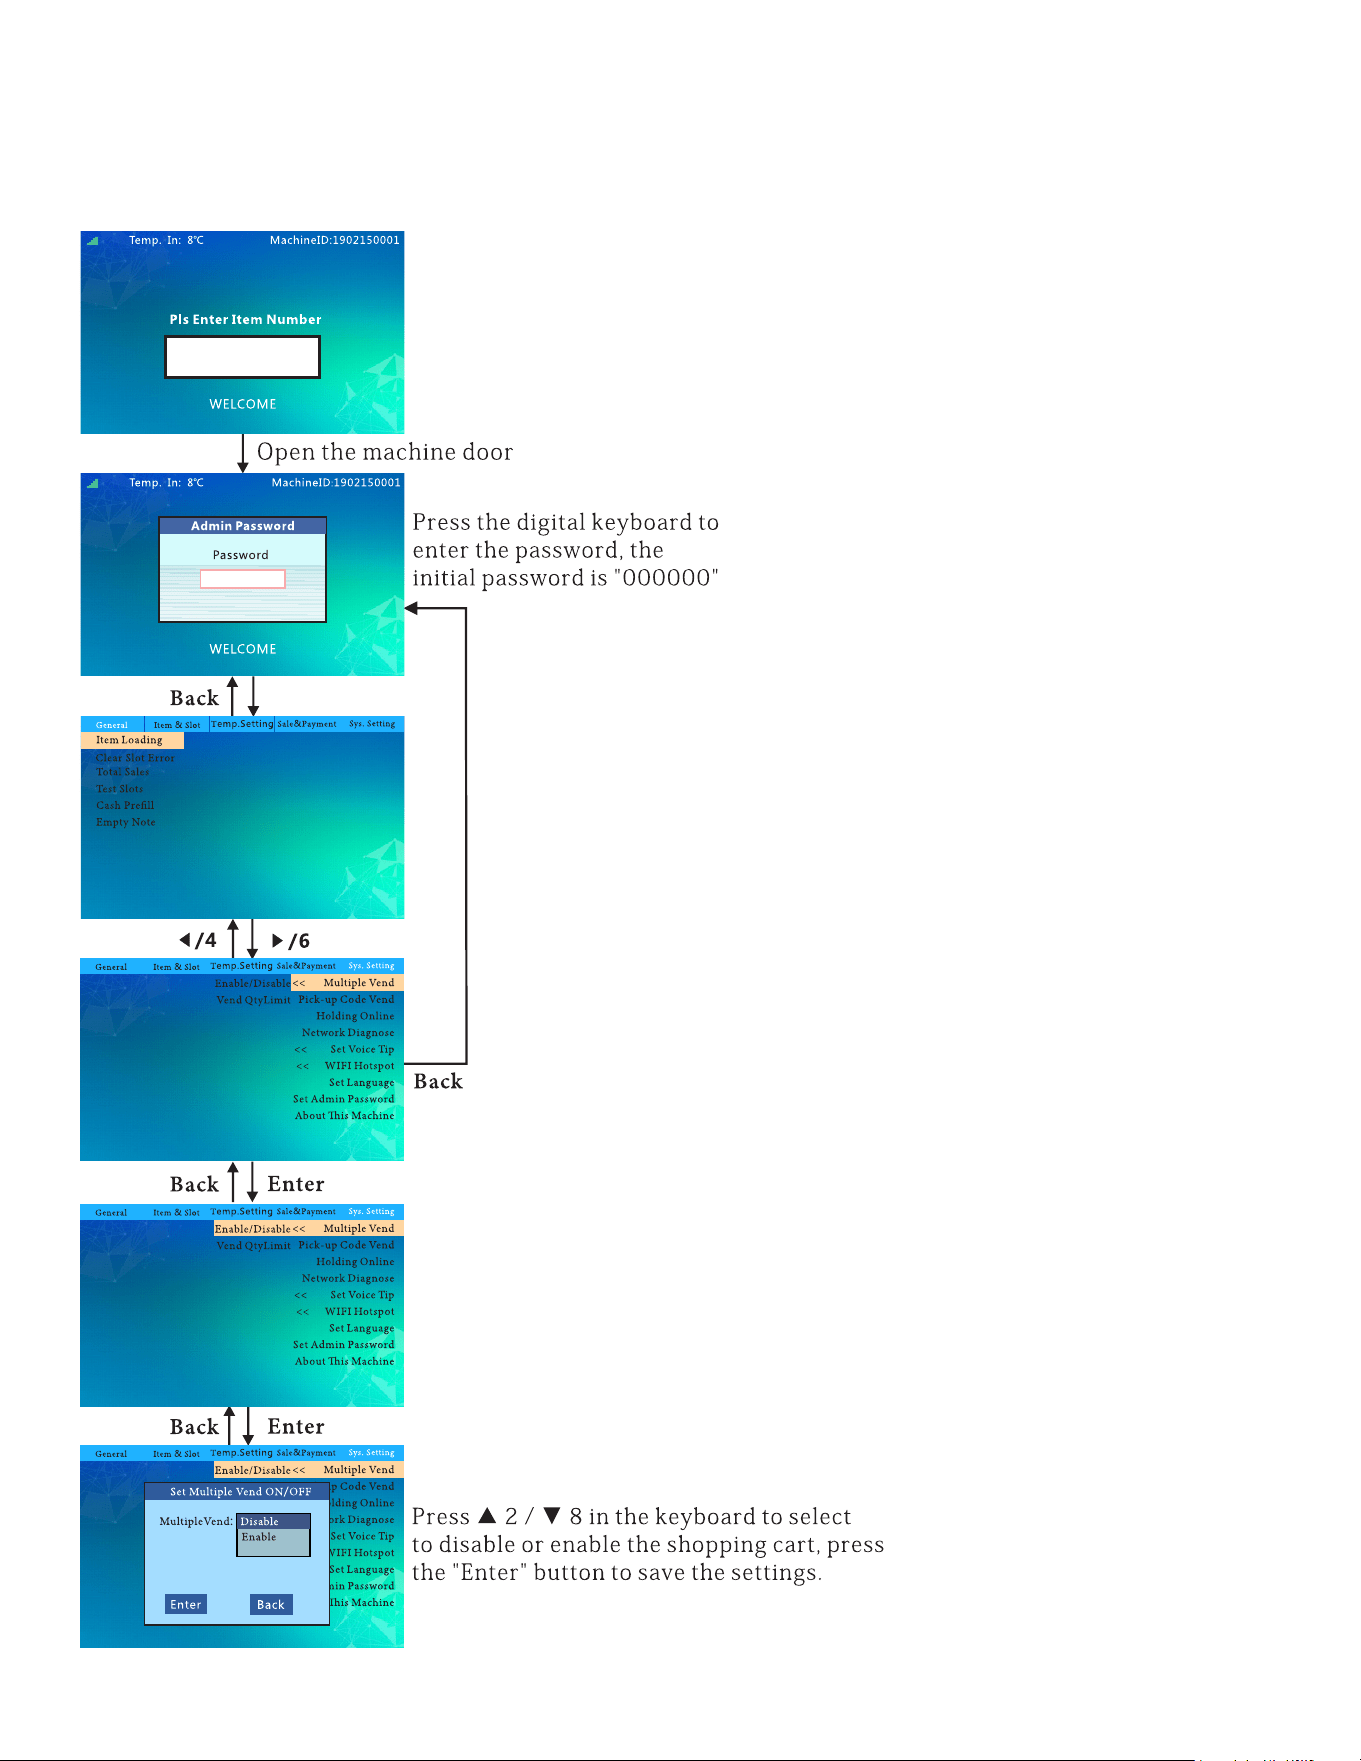
Set Multi-Vend ON/OFF ....................................................................................................................................................... 43
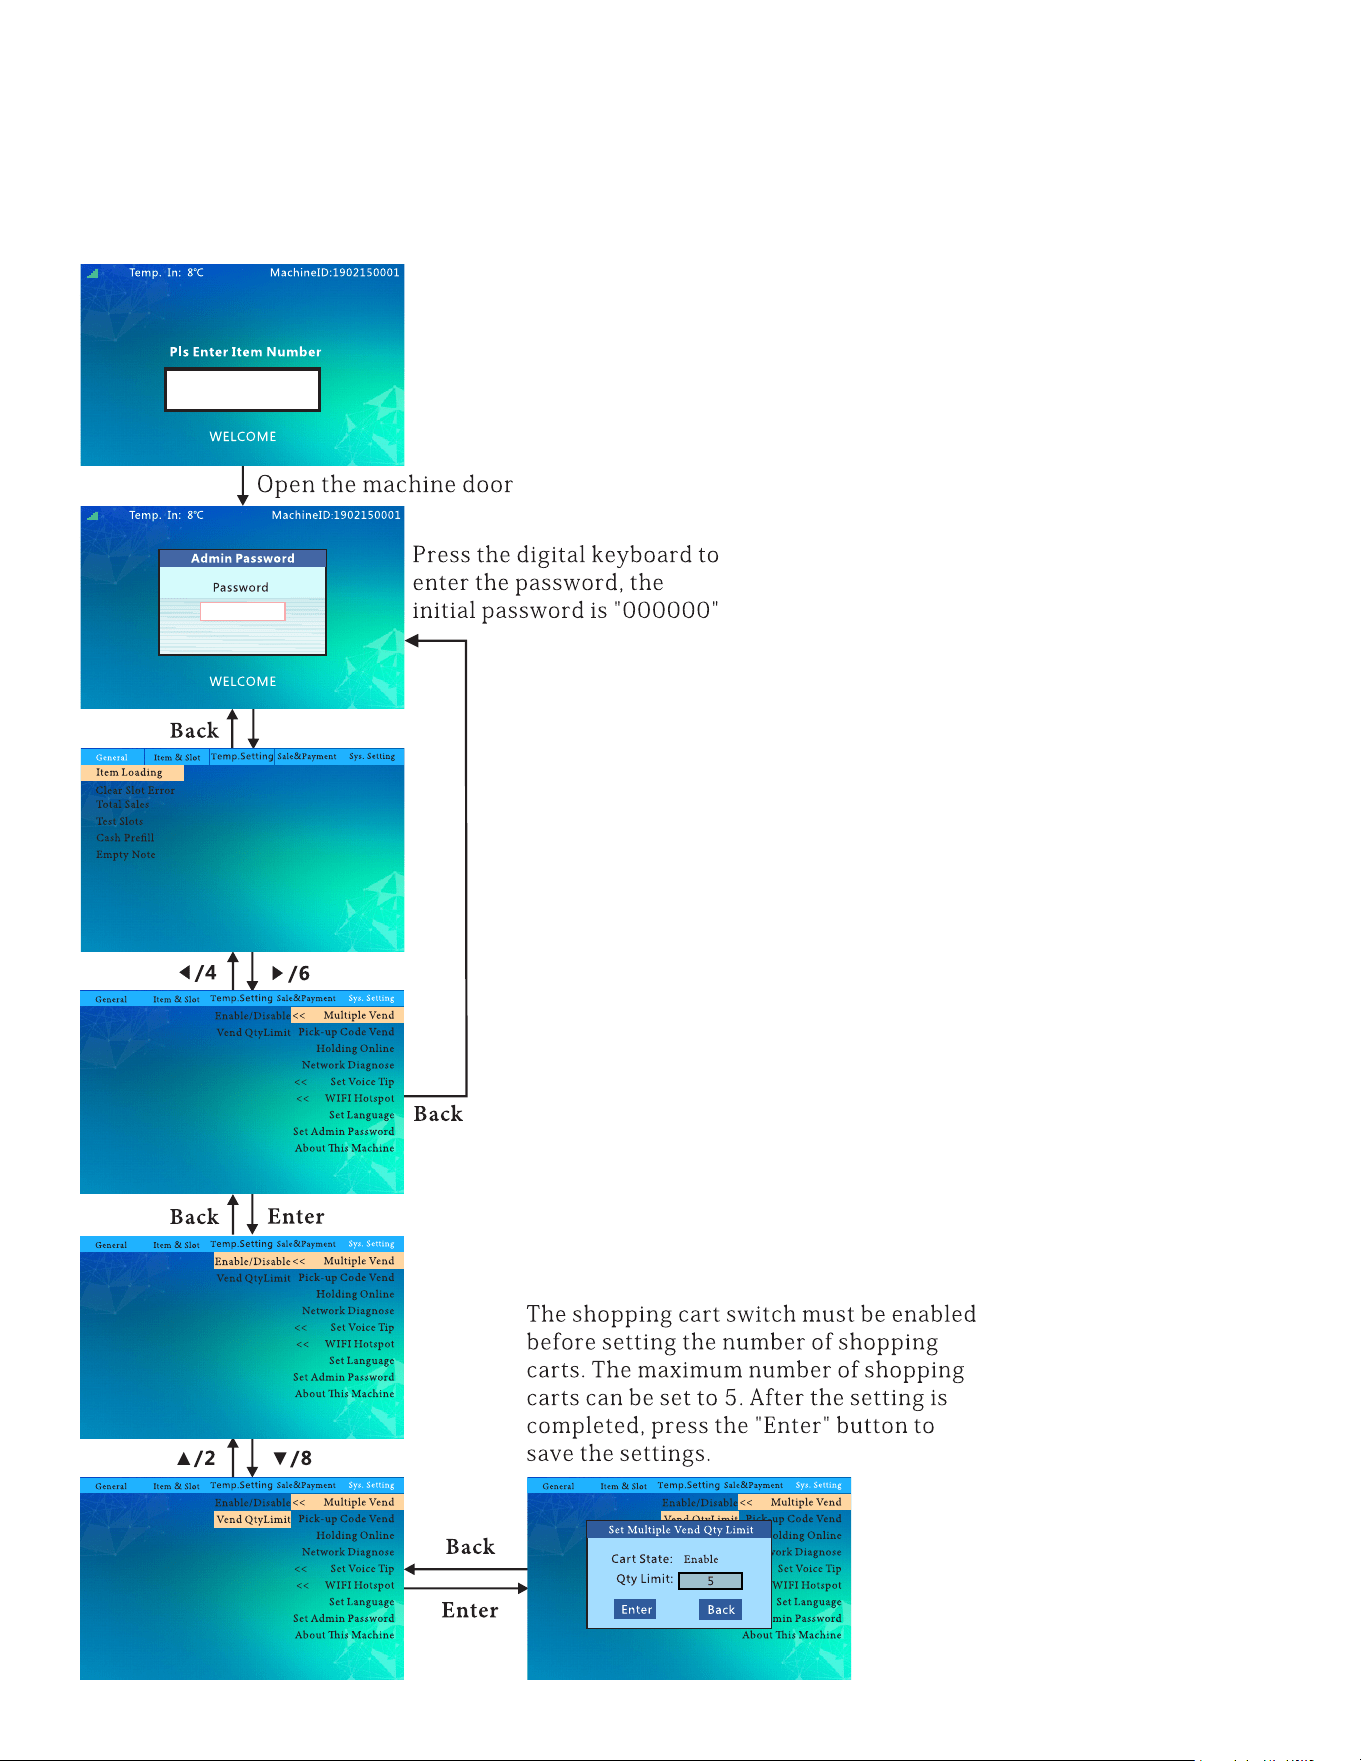
Set Multi-Vend Qty Limit ..................................................................................................................................................... 44
Set Pick Up Code ON/OFF ...................................................................................................................................................... 45
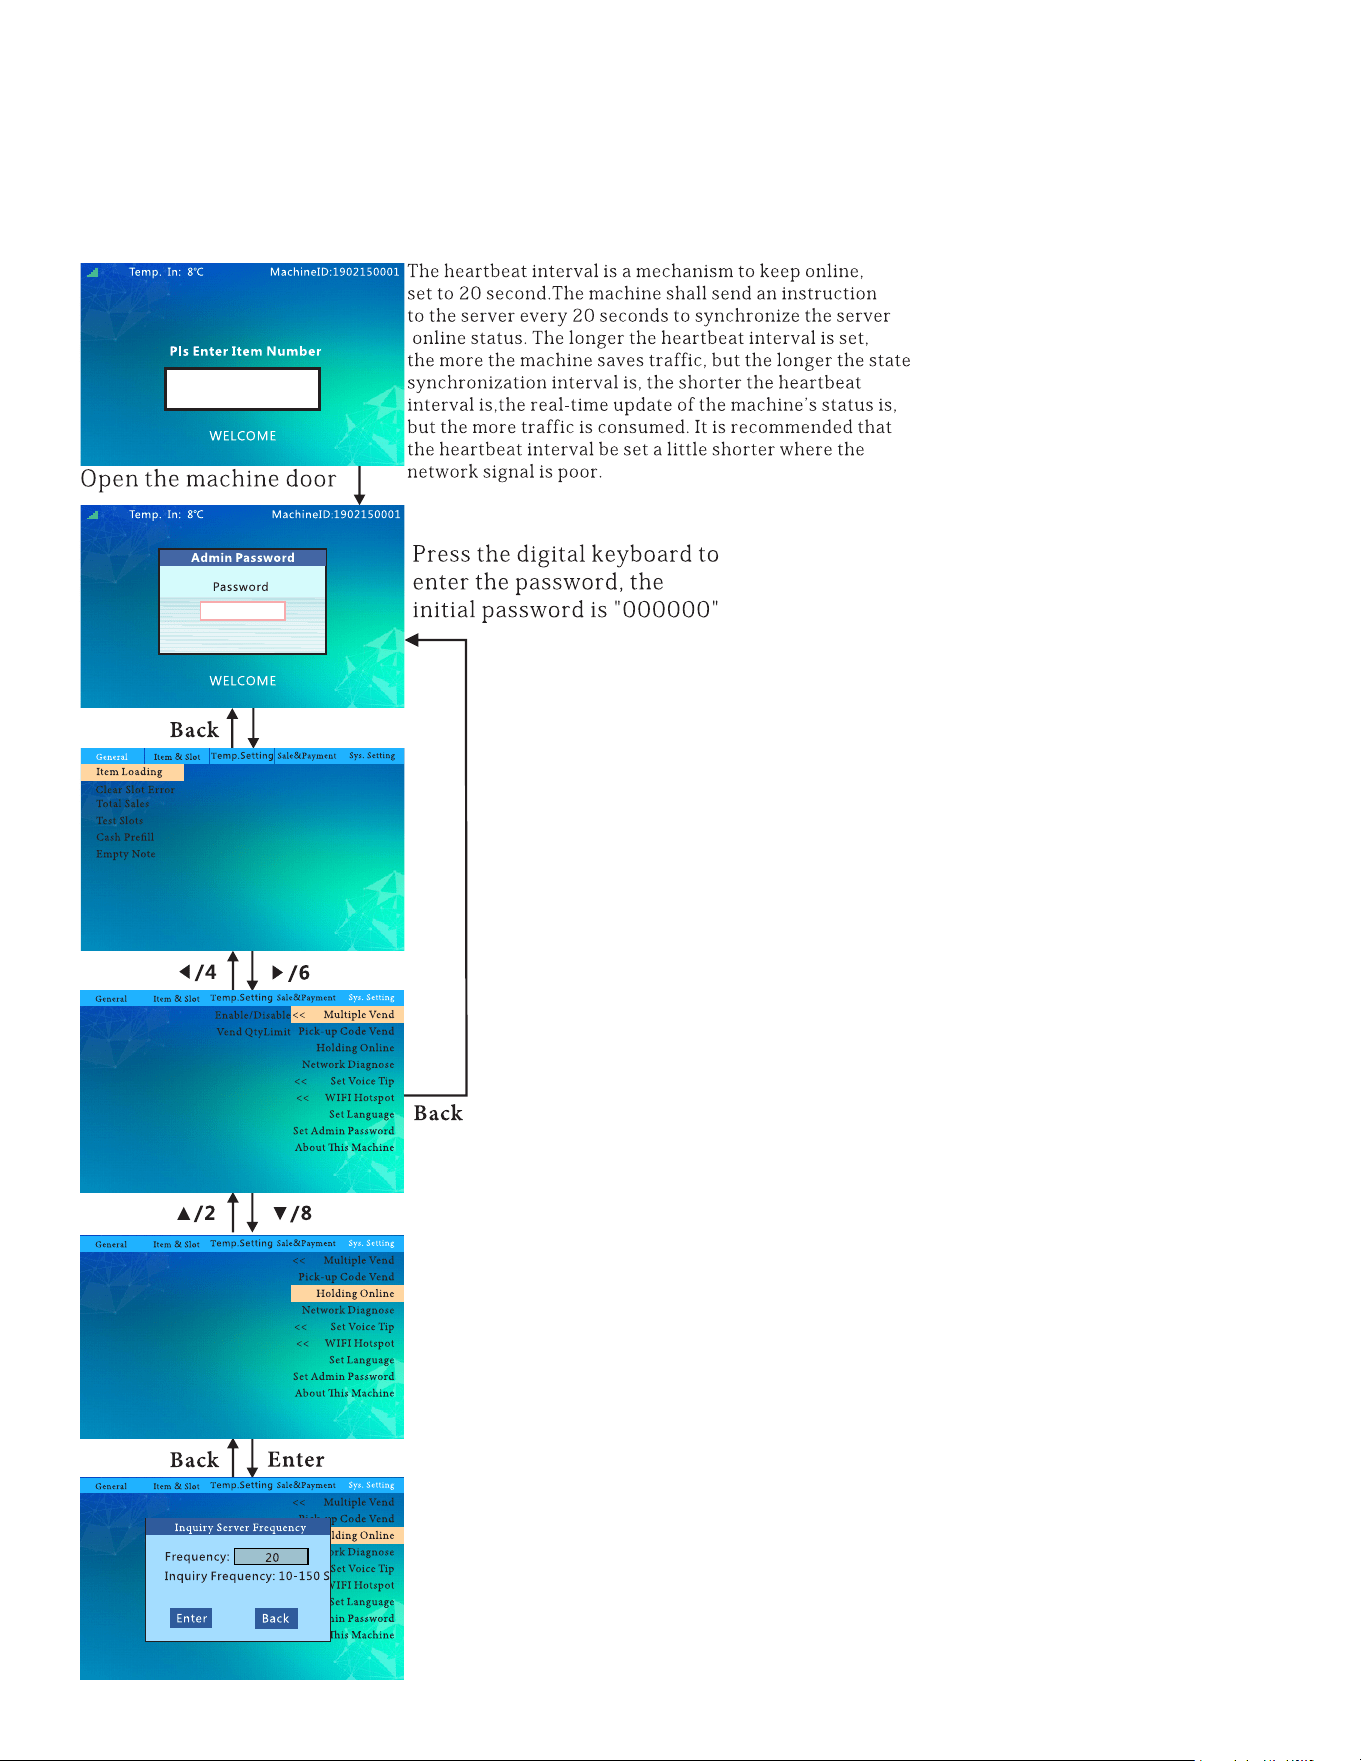
Inquiry Server Frequency ....................................................................................................................................................... 46
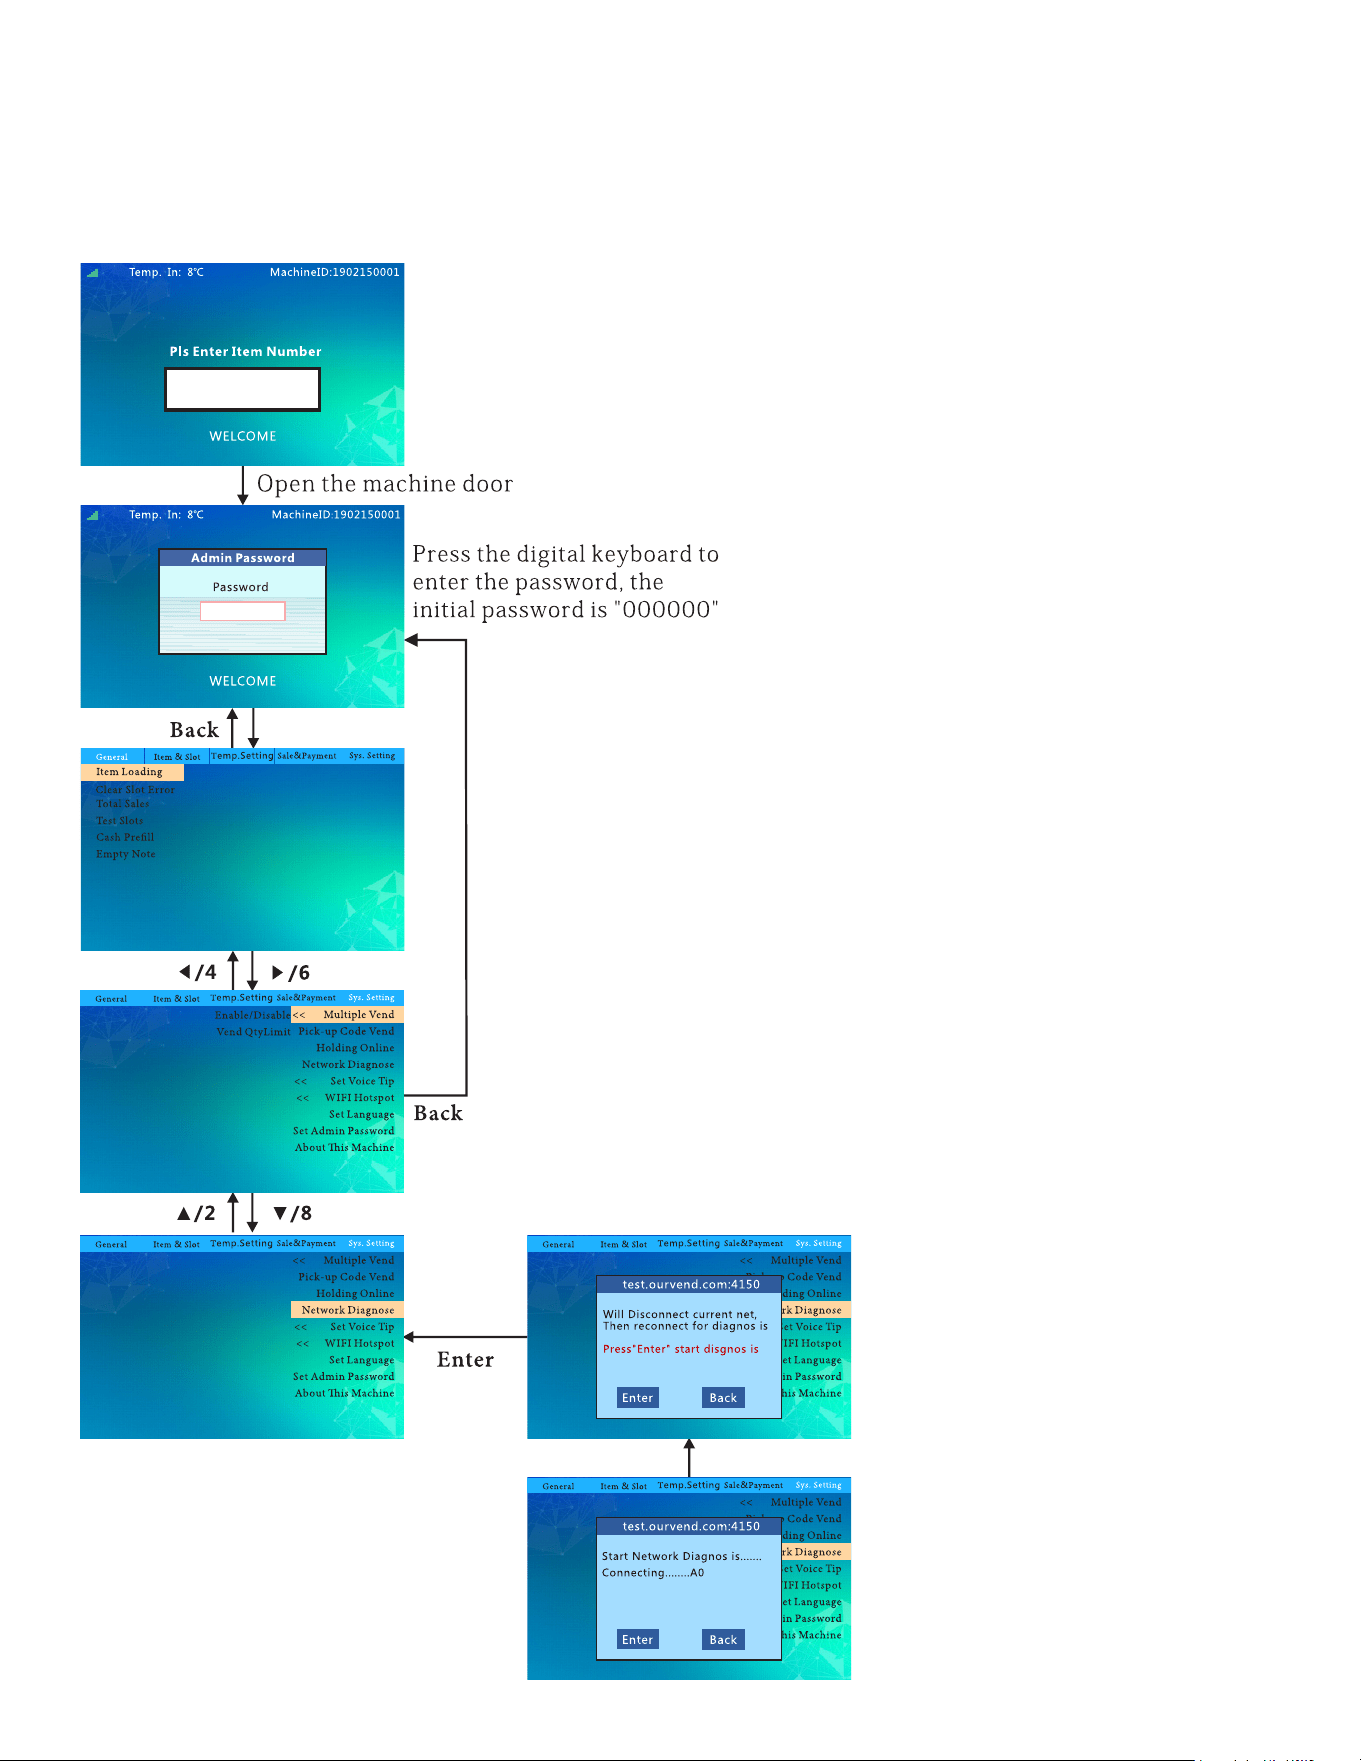
Network Diagnoses ....................................................................................................................................................................... 47
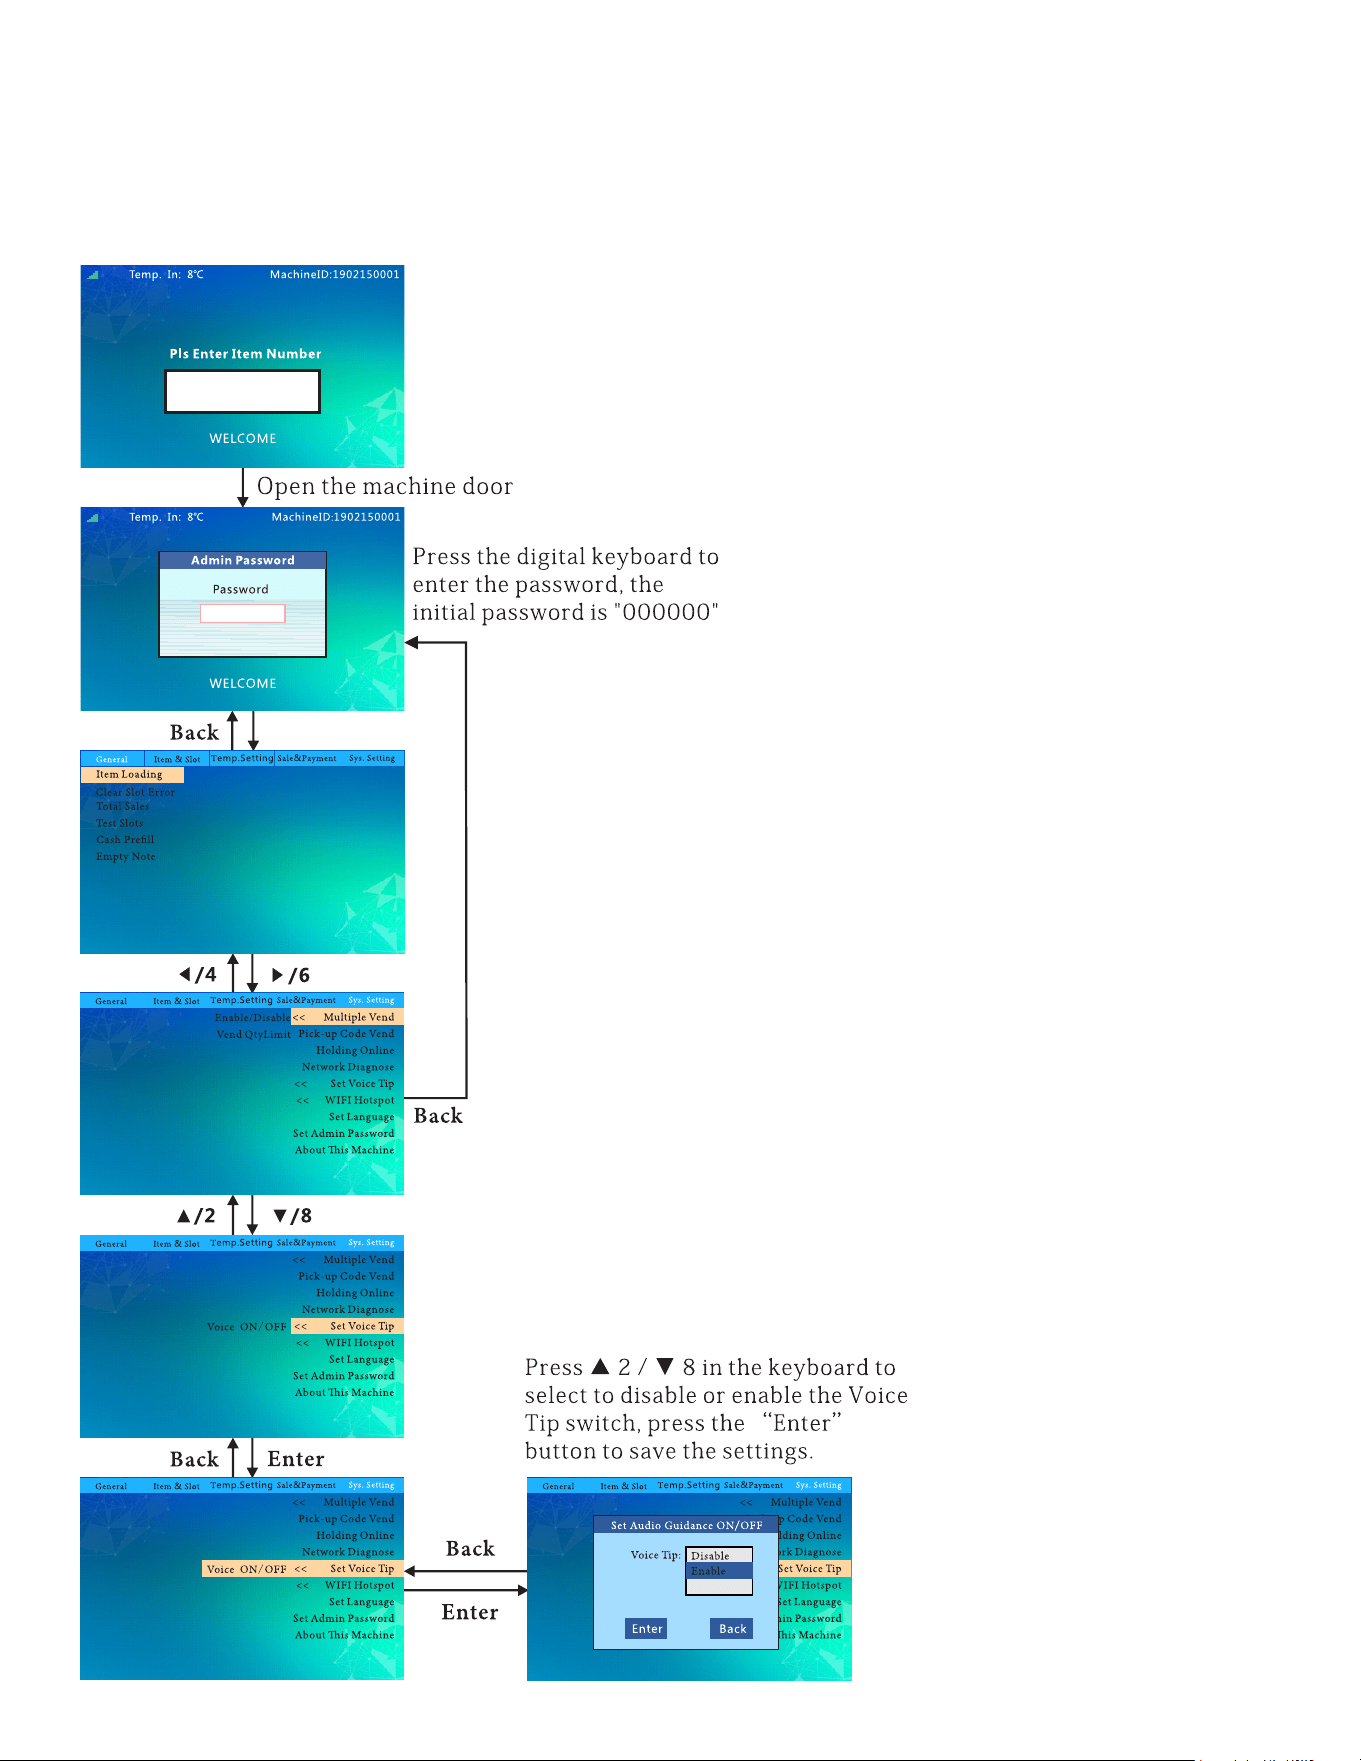
Set Audio Guidance ON/OFF ..................................................................................................................................................... 48
Set WIFI Hotspot ON/OFF ....................................................................................................................................................... 49
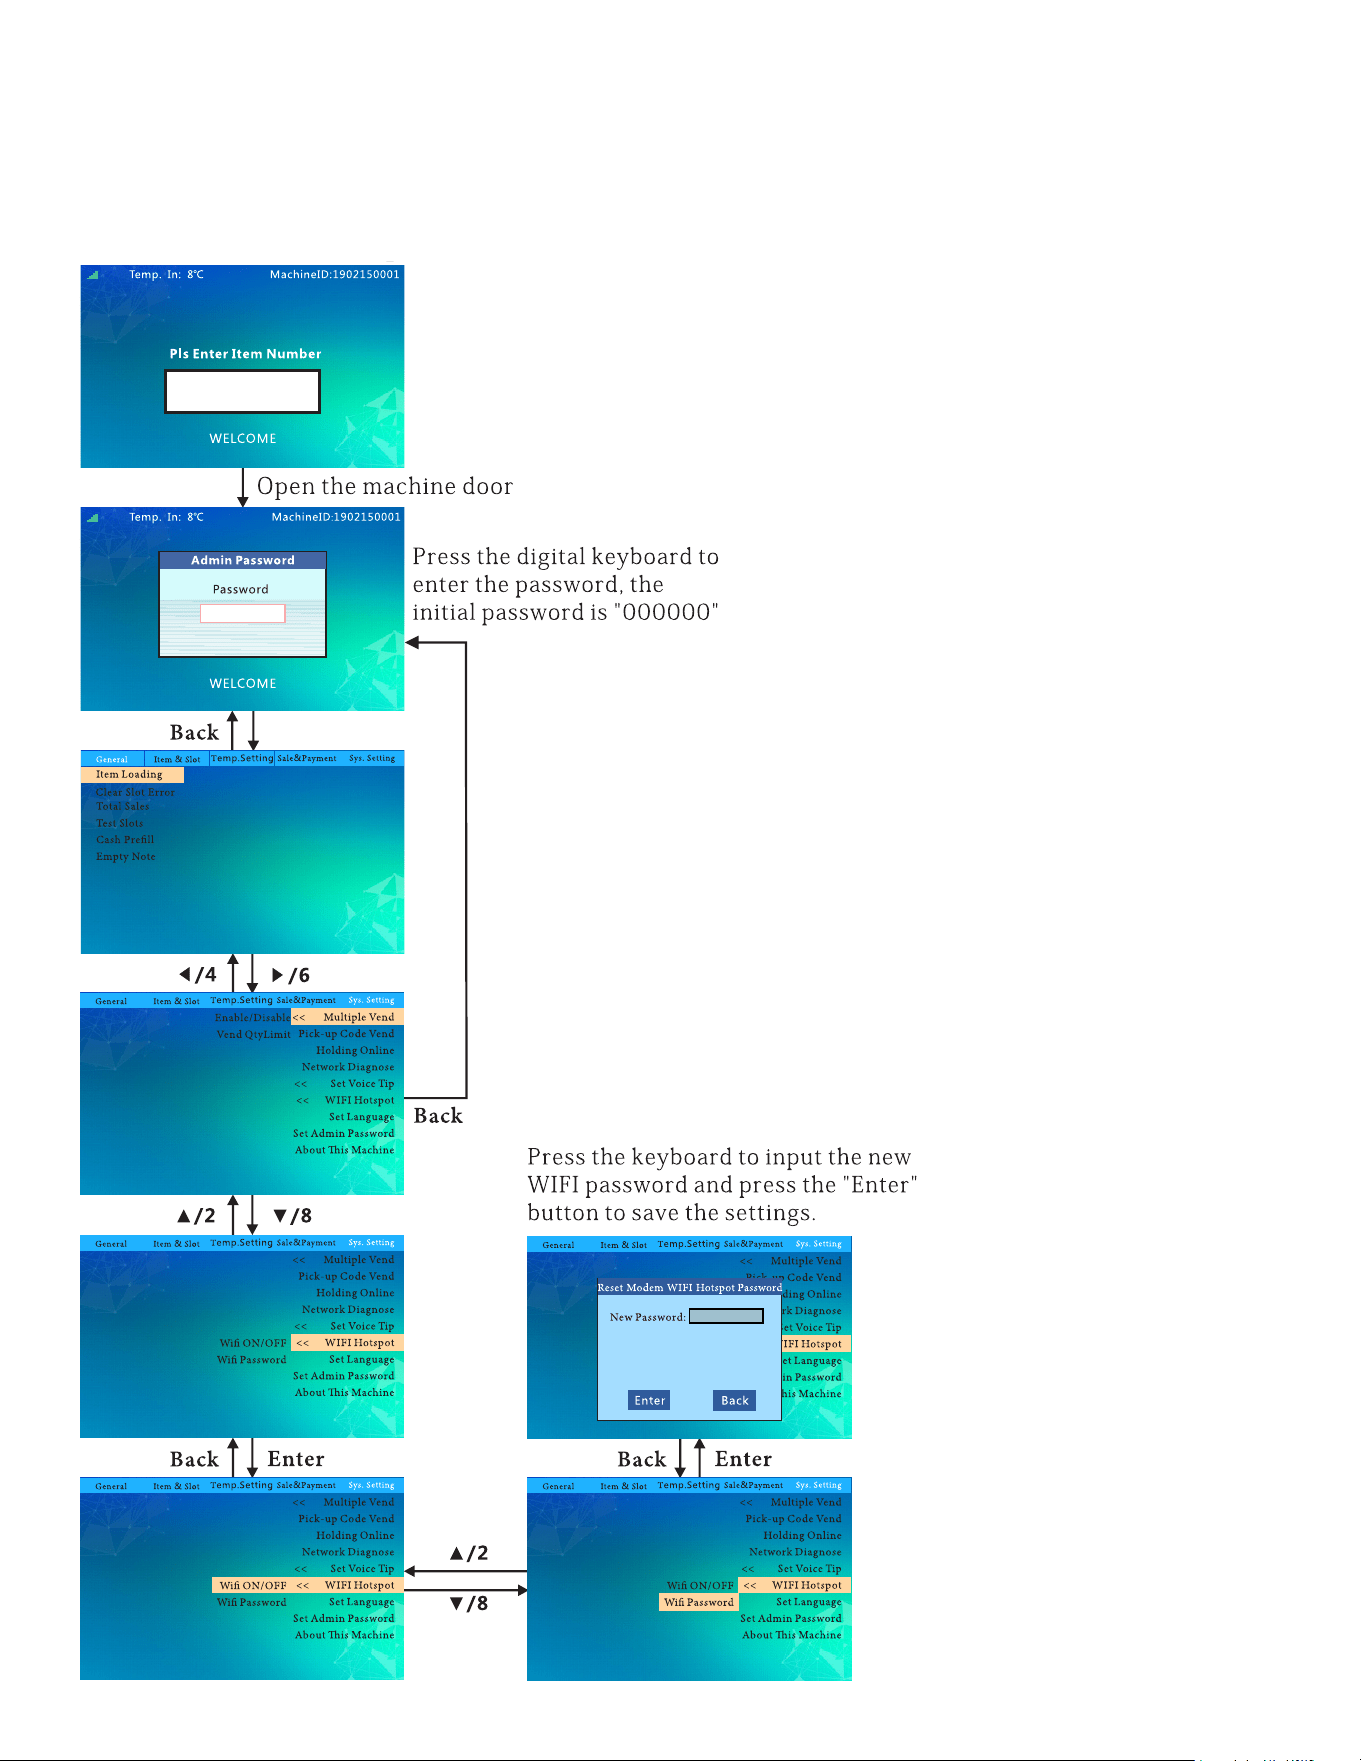
Reset Modem WIFI Hotspot Password ......................................................................................................................... 50
Set Display Language ....................................................................................................................................................... 51
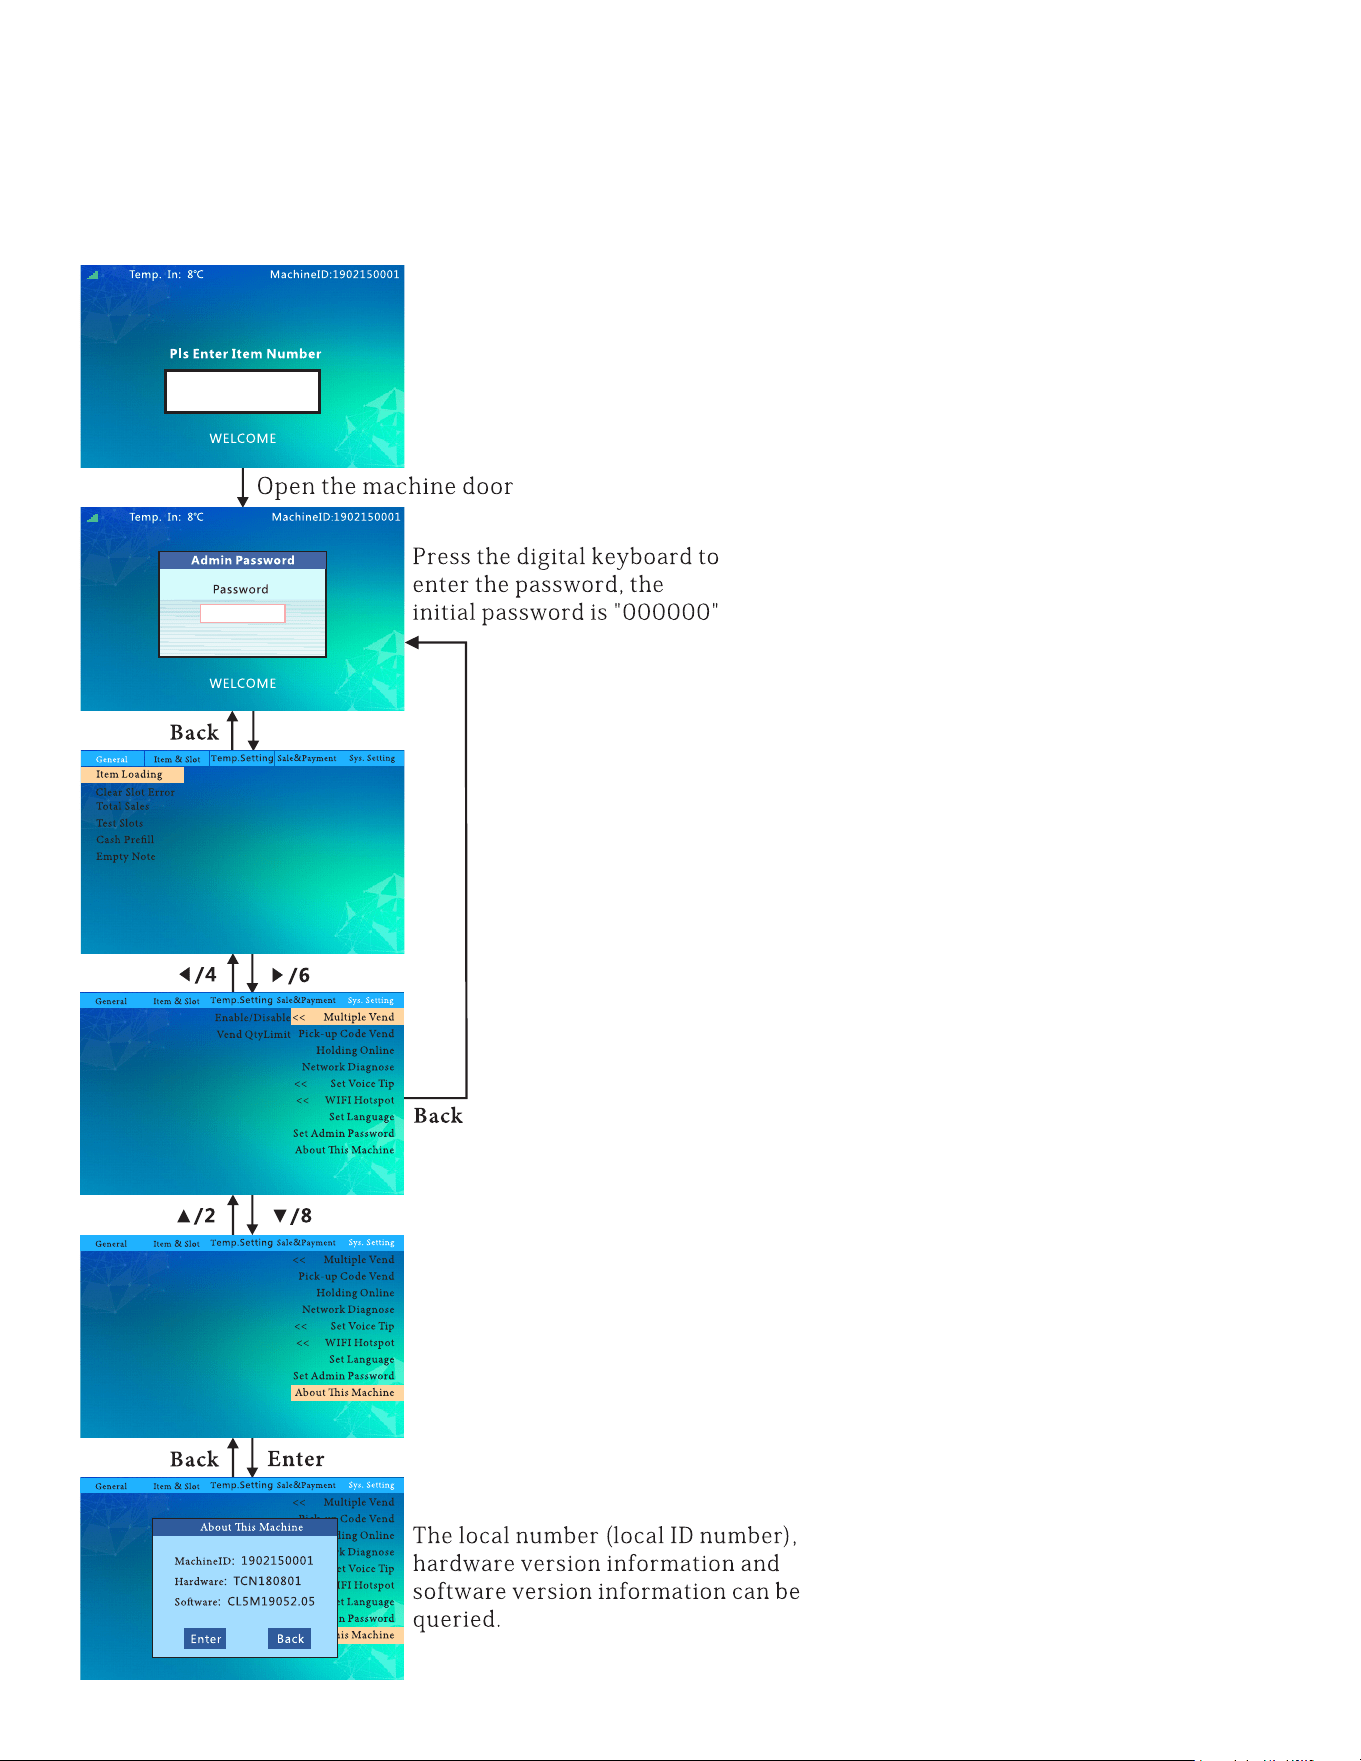
Machine Info .................................................................................................................................................................................... 52
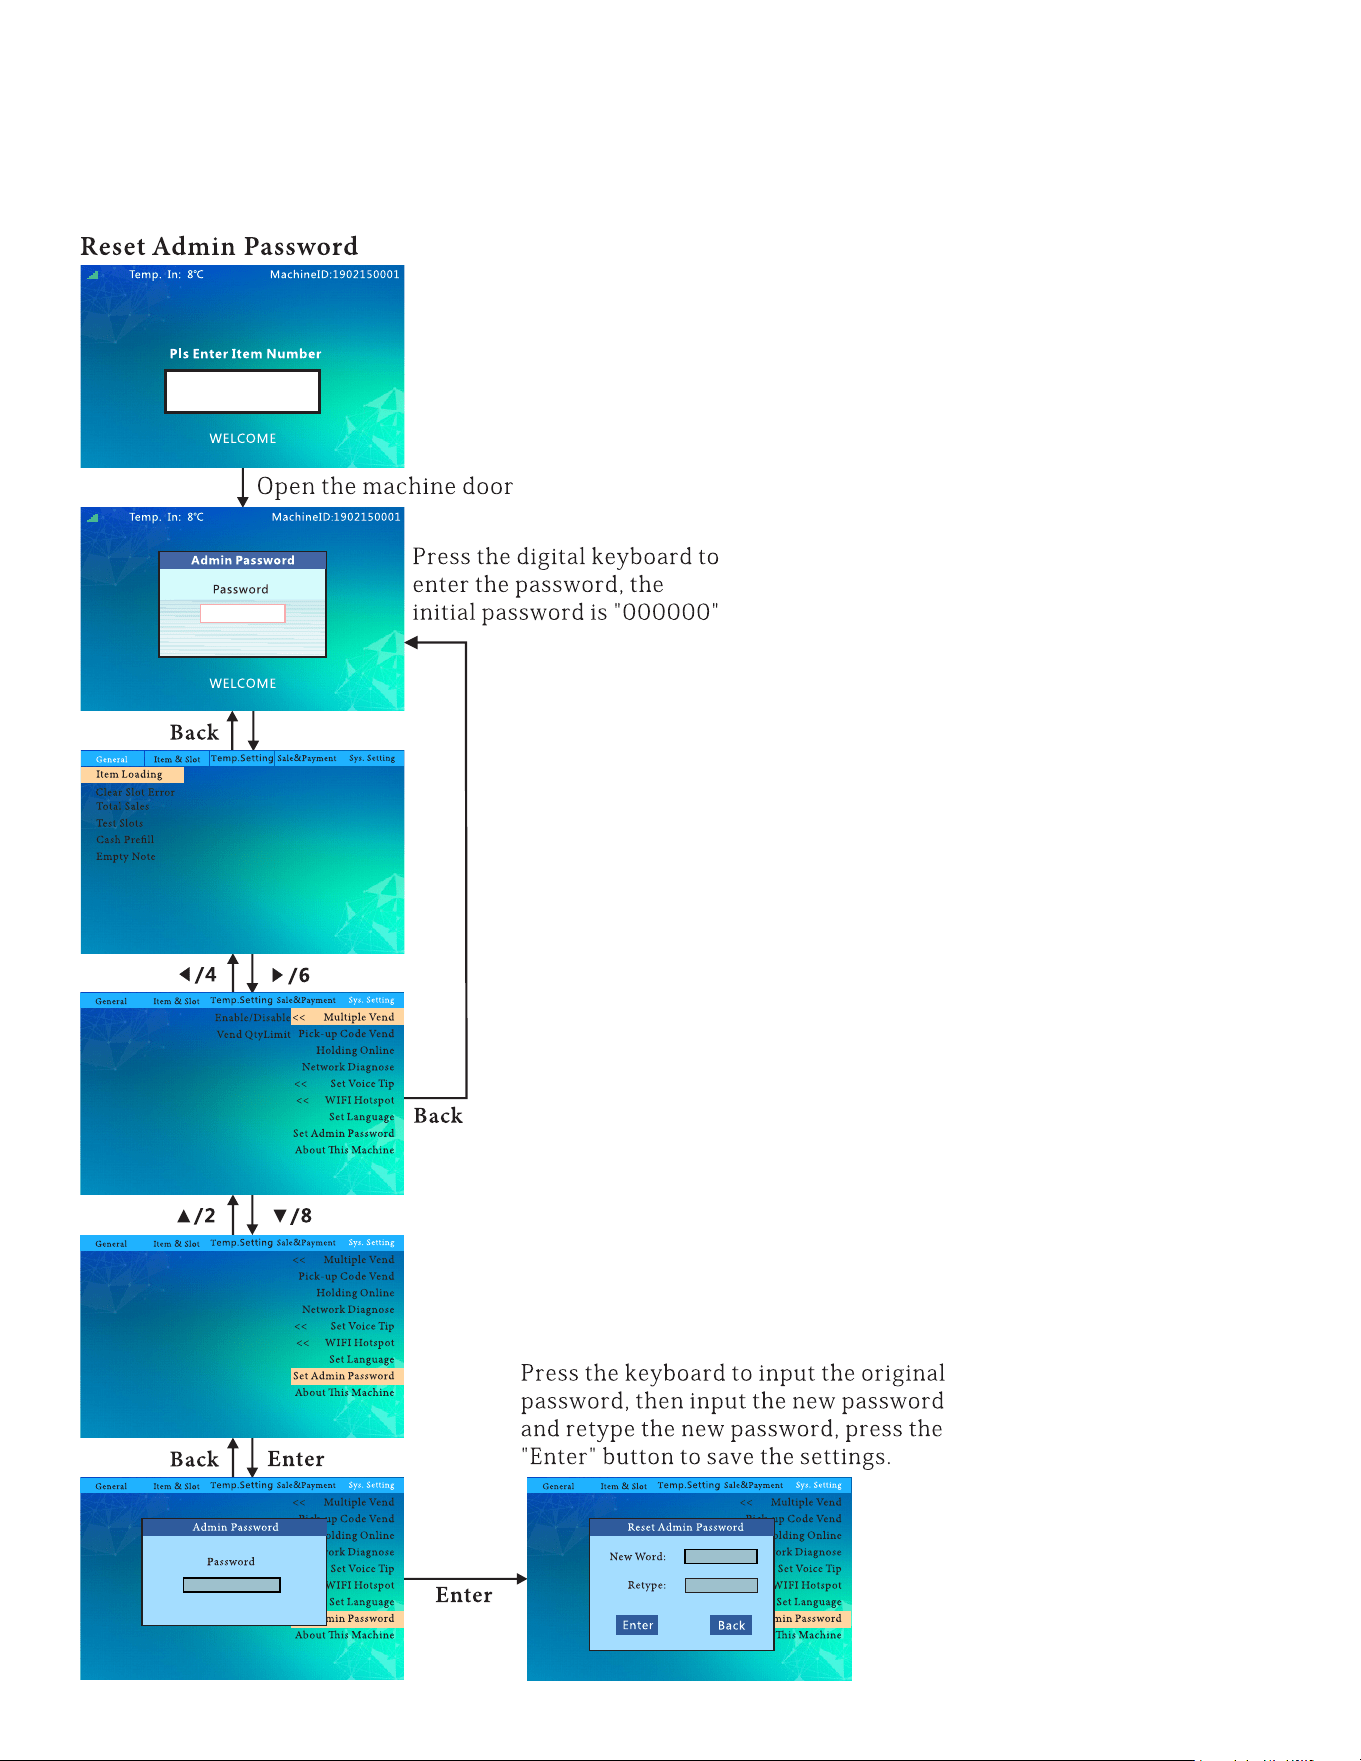
Reset Admin Password ....................................................................................................................................................... 53
Adjustments
Merge the Cargo Lanes ....................................................................................................................................................... 54
Adjustment of Layer Height ..................................................................................................................................................... 54
Installation of Blocking Device ..................................................................................................................................................... 55
Maintenance .................................................................................................................... 56
Troubleshooting ............................................................................................................. 58
Warranty ......................................................................................................................... 59
4
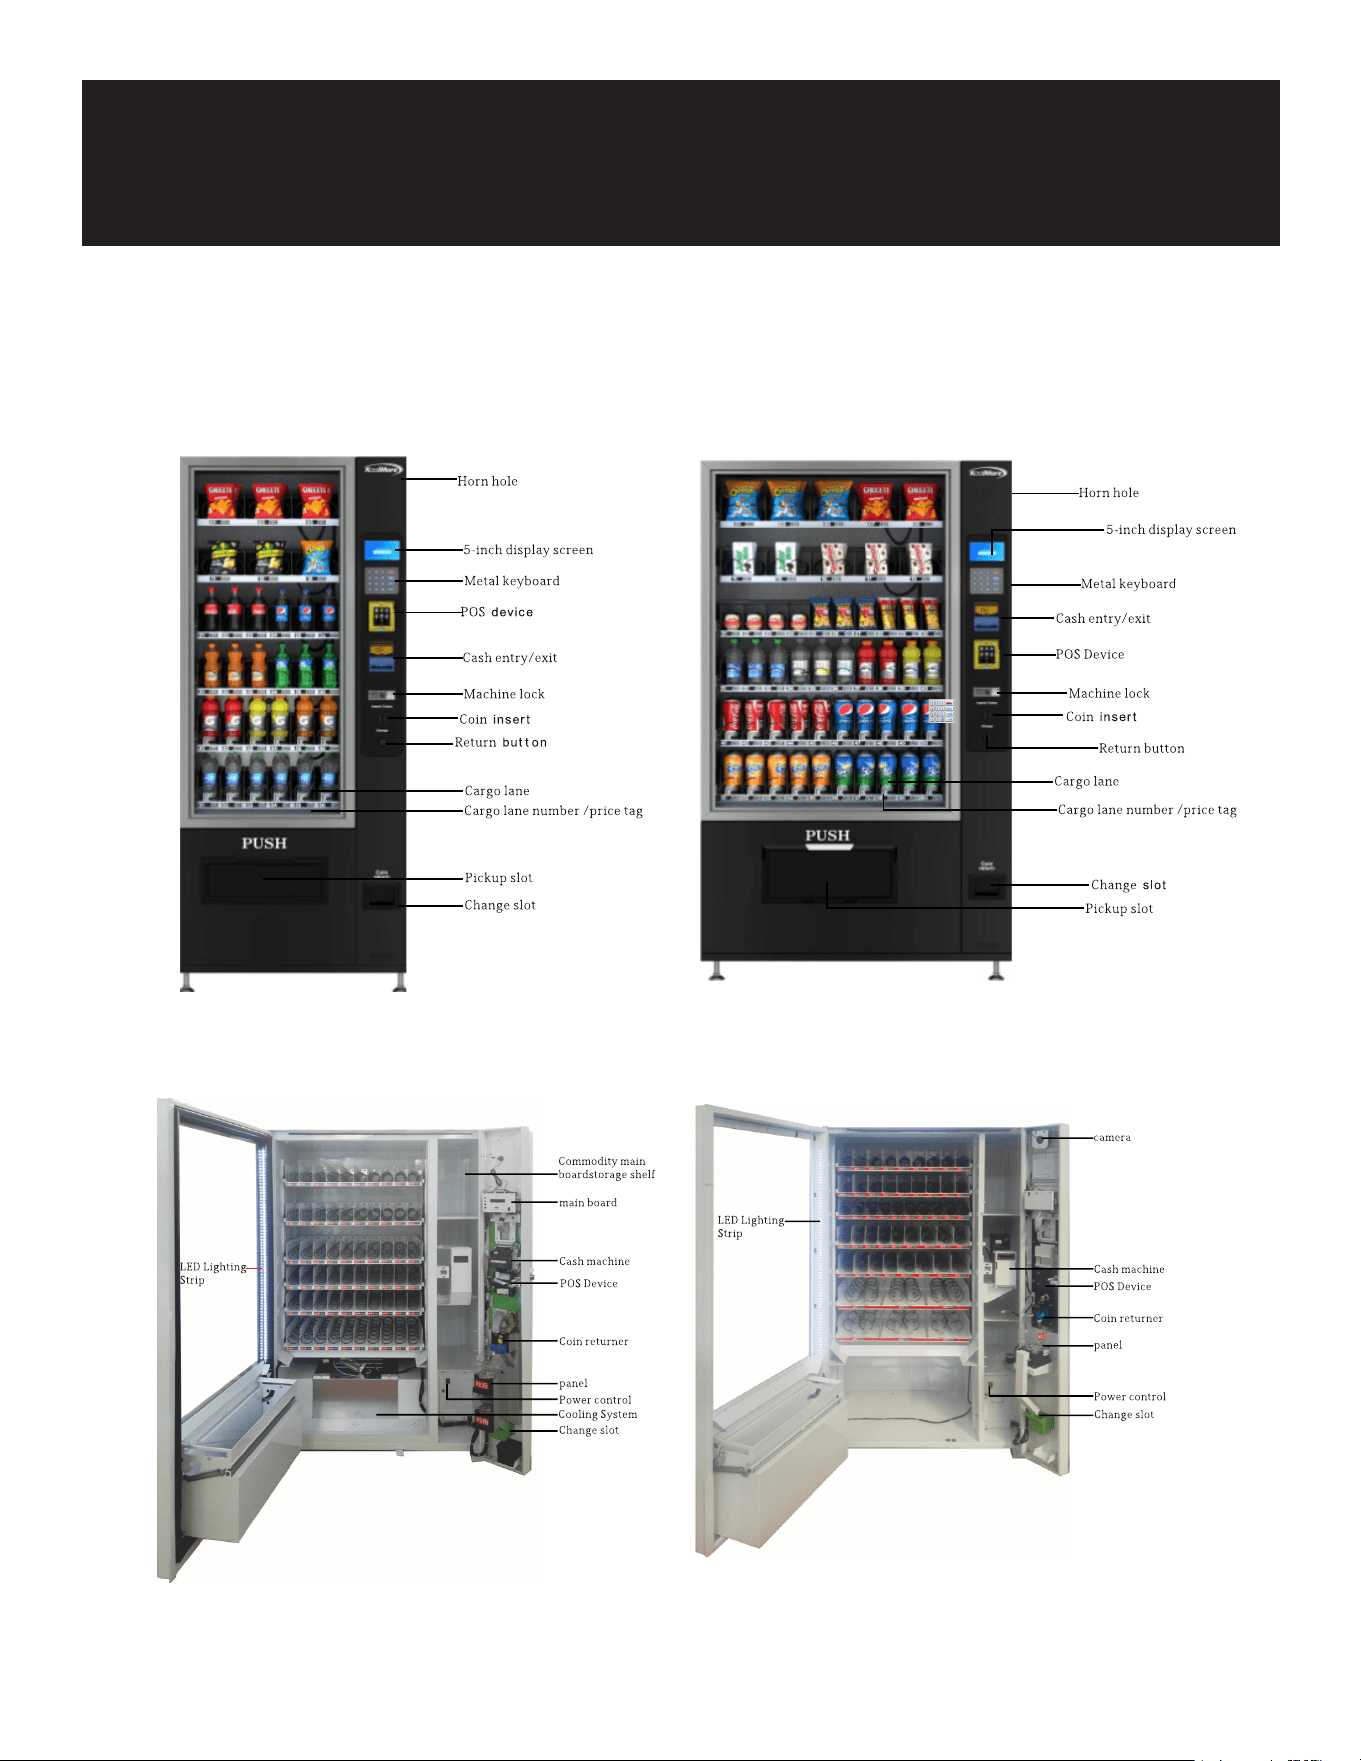
Parts
Note: The image is for reference. The machine that you bought might vary from shown in image.

5
Setup
Preparation and Placement Environment
• After receiving the machine, check the packaging to ensure it is in good condition. If there is any
damage, contact our customer service team.
• Remove all packaging materials such as wood boards, protective lm, foam, and cable ties before
using the machine.
• Place the machine in a dry, well-ventilated area, away from heat sources, rain, low temperatures,
and water splashes. Ensure it is on a solid, stable surface, at least 7.87 inches (20 cm) away from
the wall.
• After placing the machine, let it stand for more than 30 minutes before turning on the power to en-
sure normal operation. If cooling is needed, allow the machine to stand for 4-5 hours before turn-
ing on to avoid damaging the compressor. The machine operates at a normal temperature of 60W,
with a cooling capacity of up to 510W, and a heating capacity of up to 760W. Cooling and heating
are optional features.
Parts Functions
Cargo Lane: The tray is divided by a partition, and the goods can be transported using a spring or a
crawler.
Cash Slot: Used for inserting cash when purchasing goods. Ensure cash is placed at and in a single
tile; otherwise, it may not be recognized.
Coin Slot: Used for inserting coins one at a time when purchasing goods and prelling coins.
Cash Machine: Receives, recognizes, stores, and matches cash with an optional prell change func-
tion.
Coin Machine: Receives, identies, stores, and prells coins.
Refrigeration and Heating System: Optional feature for refrigerating or heating goods.
5-Inch Display Screen: Displays information to users.
Keyboard: Used for product selection and menu operation input.
Machine Lock: Secures the machine door and container to prevent loss of goods.
Coin Return Button: Returns the coin if it is not accepted or if there is an issue.
Change Slot: The exit slot where users receive their change or unaccepted coins.
Pickup Slot: The area where users retrieve purchased items.
Power Cord: Connects to an external power supply; ensure a reliable grounding socket is used.
POS Device: Used for credit card transactions.
Cargo Lane Number/Price Tag: Identies the cargo lane number and pricing, making it easy for users
to buy.

6
Safety
• Ensure the vending machine is carefully unpacked and inspected before use.
• Keep a minimum distance of 8 inches between the machine and the wall for proper ventilation.
• Place the machine away from heat sources to prevent overheating.
• Maintain a clearance of at least 8 inches on all sides (rear, left, and right) of the machine for ade-
quate airow.
• Protect the machine from contact with water to prevent electrical hazards.
• Avoid placing the machine in areas with low temperatures to prevent malfunction.
• The vending machine must be grounded; operating an ungrounded machine is unsafe and may
lead to security risks.
• Use an AC 110V/60Hz/10A power supply. Avoid voltage uctuations exceeding 200-240V, which
may cause machine failure.
• Use a reliable three-hole socket with grounding. The plug should be easily accessible to prevent
the danger of electric shock.
• Do not damage the power cord. Unplug by holding the plug tightly, not by pulling the cord. Avoid
pressing, stepping on, or crushing the power cord. Replace damaged cords or plugs with the help
of a professional.
• Unplug the power cord before cleaning, repairing, or replacing machine parts to prevent electric
shock.
• Do not dismantle or modify the machine privately; maintenance should be performed by profes-
sionals.
• To retrieve items, push the door of the pickup slot with one hand and reach into the slot with the
other hand to retrieve the goods. The pickup door may be heavy, so handle it carefully and super-
vise children.
• Ensure the machine is properly grounded to prevent electric shock hazards.
7
Operation
Menu Setup Flowchart
8
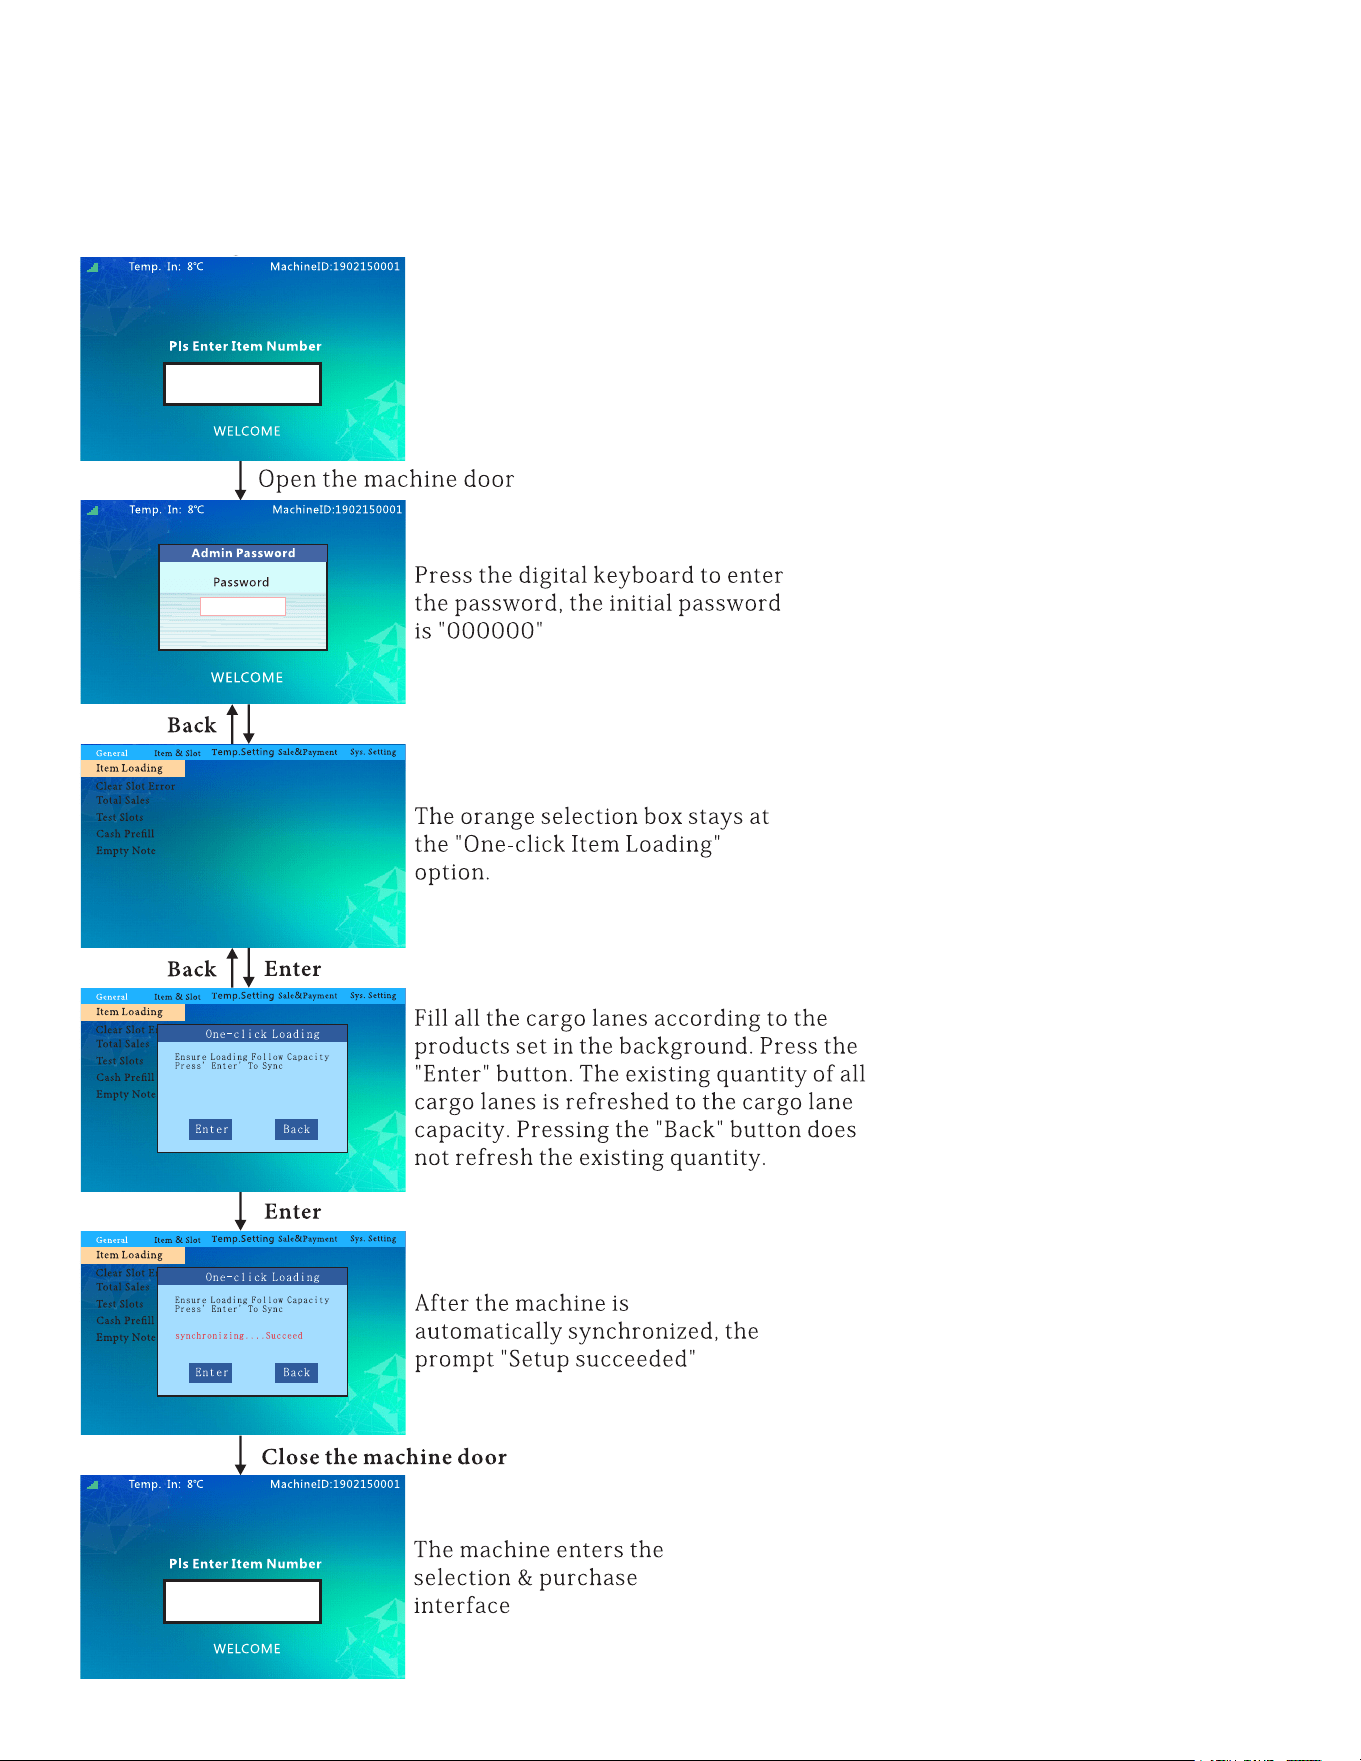
To Load Items Into The Machine:
follow this ow chart to load items into the machine.
9
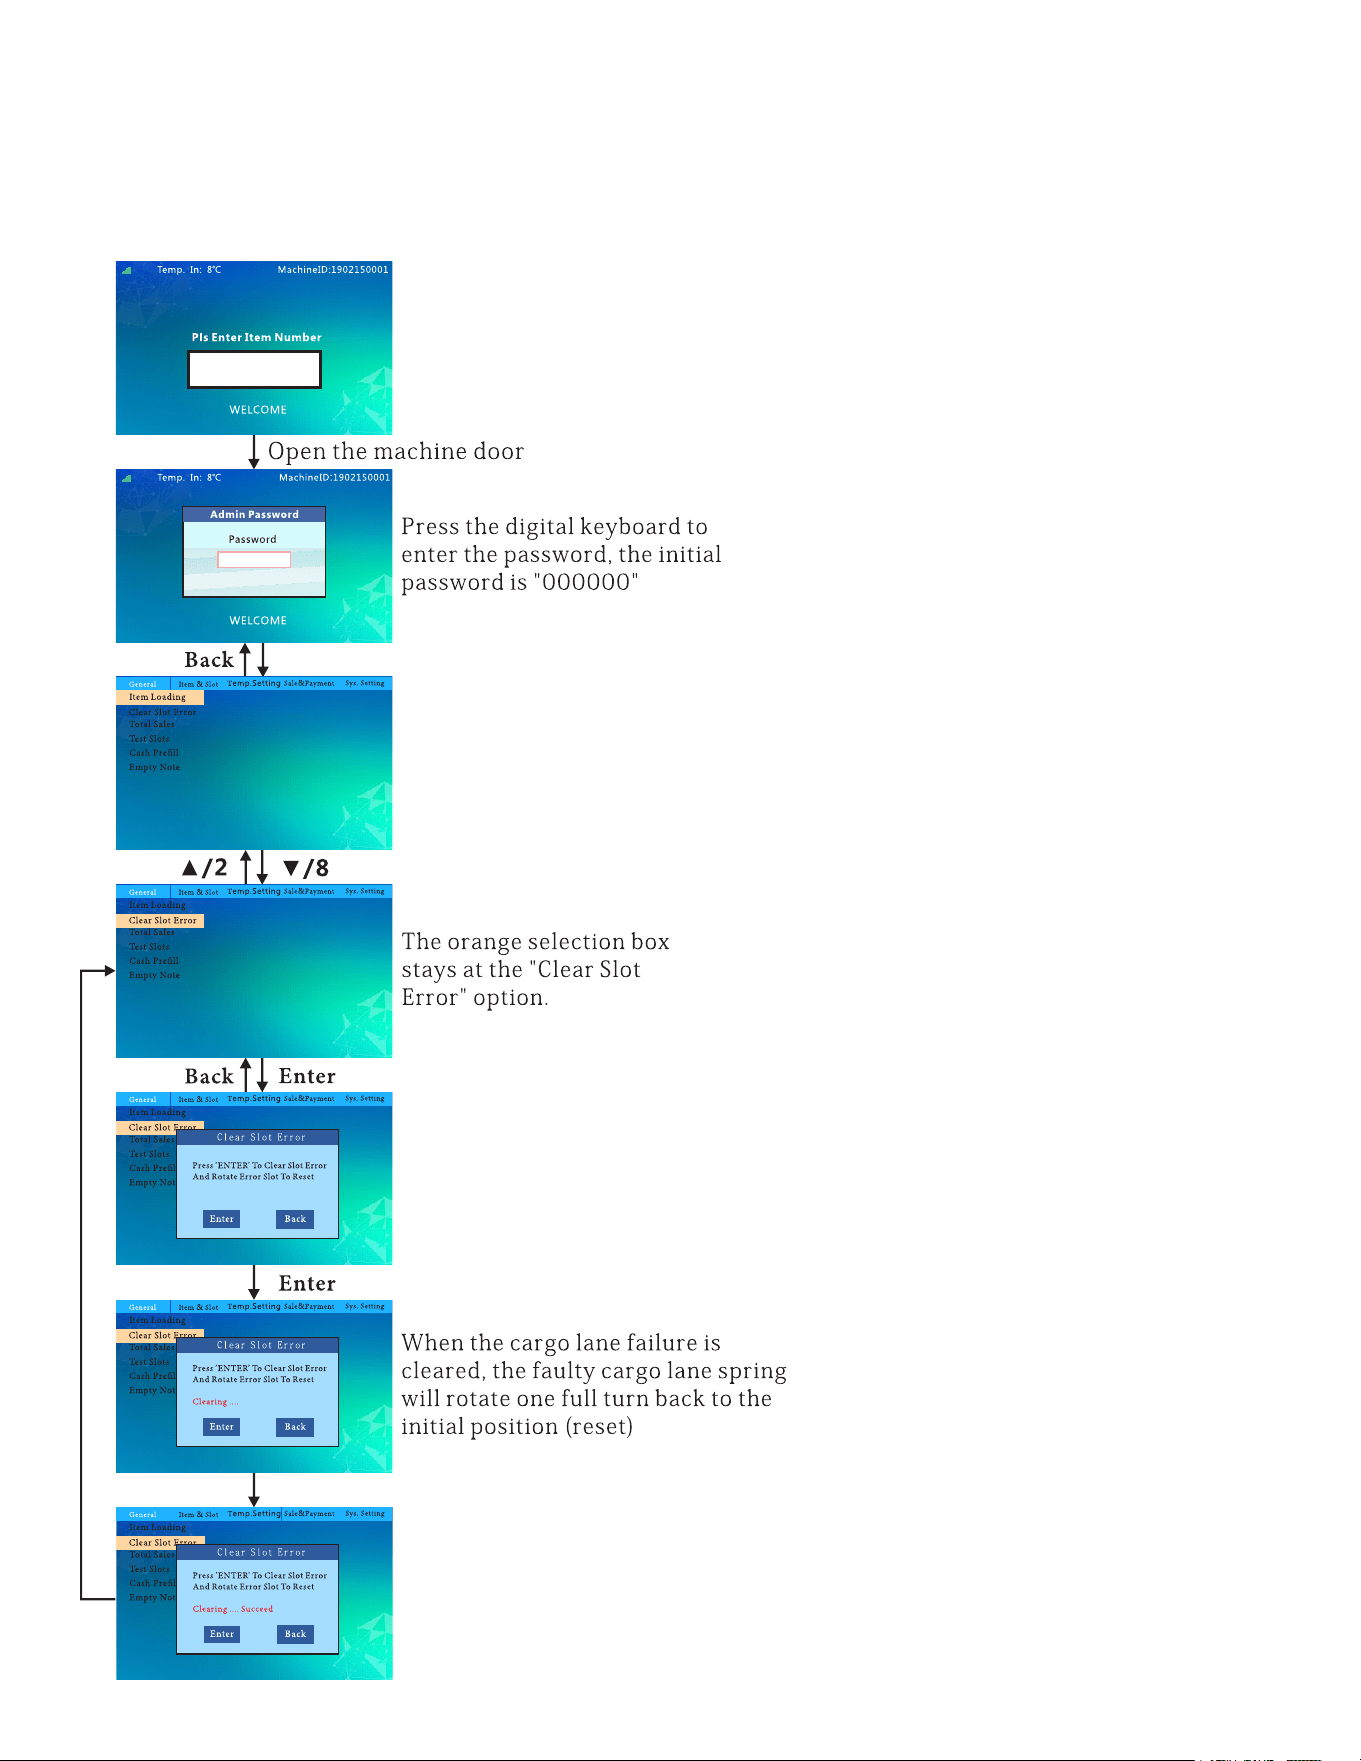
To Clear Slot Error:
follow this ow chart to clear slot error.
10
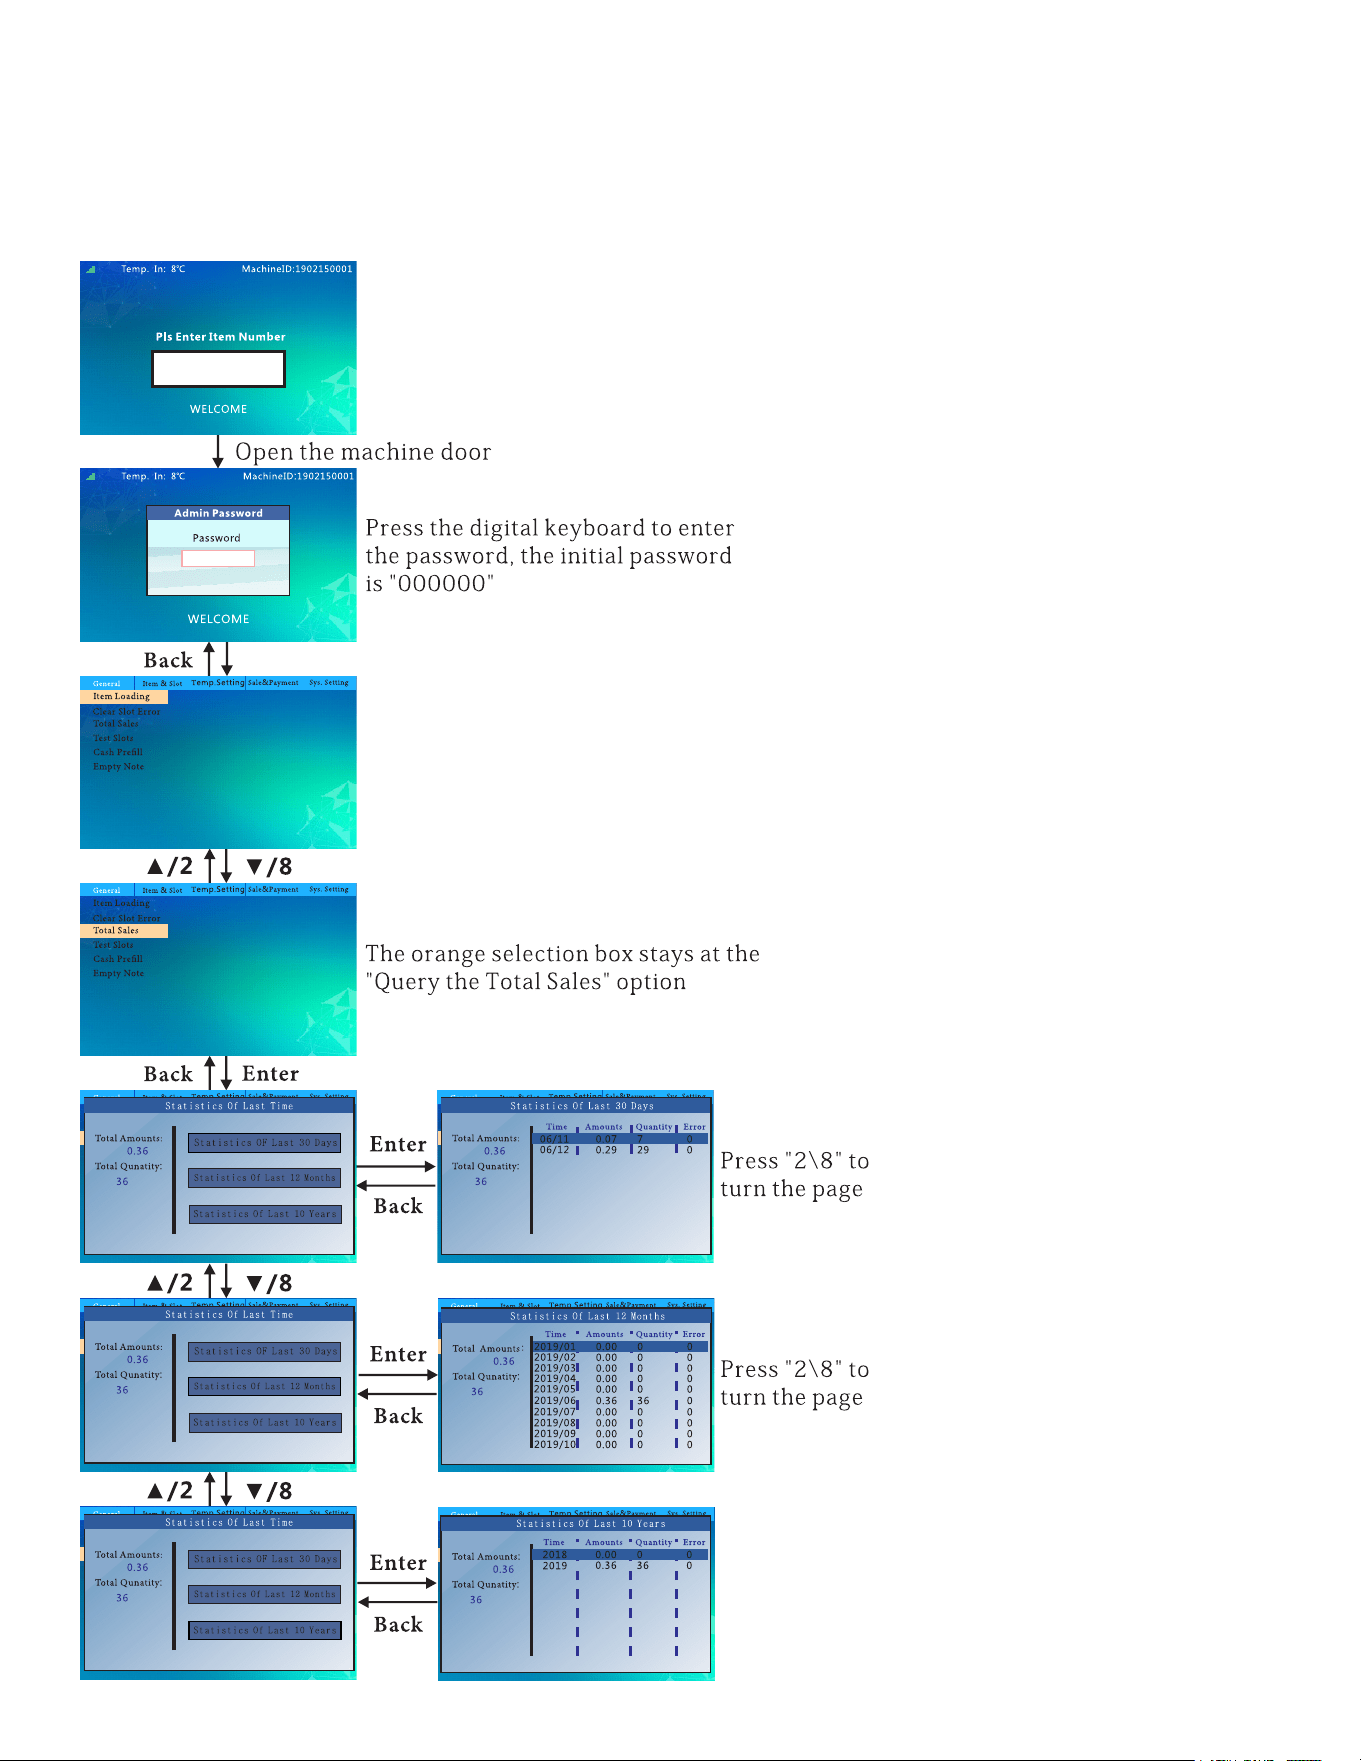
To See Total Sales:
follow this ow chart to see total sales for the last month, year and ten years.
11
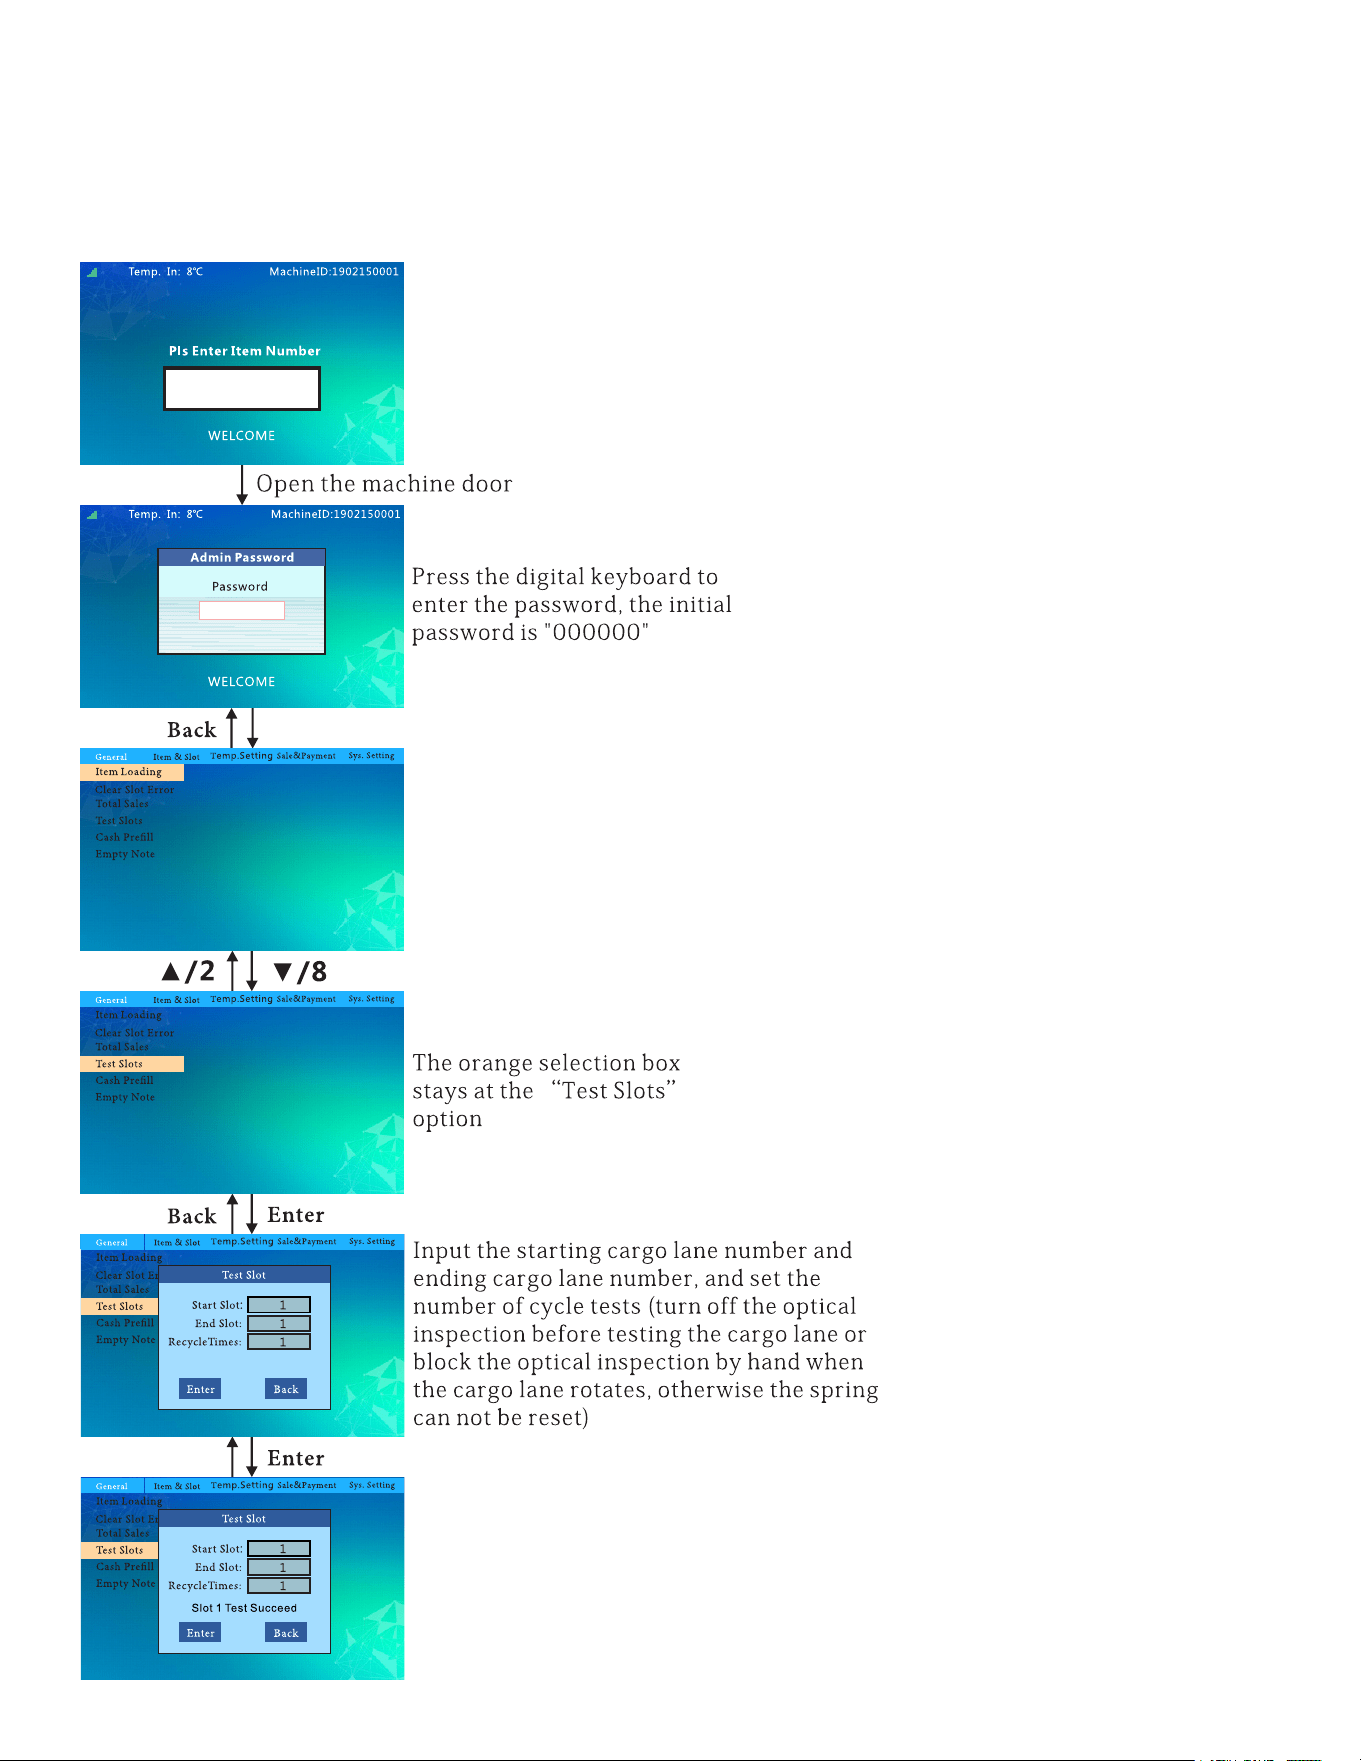
To Test The Slots:
follow this ow chart to test the slots.
12
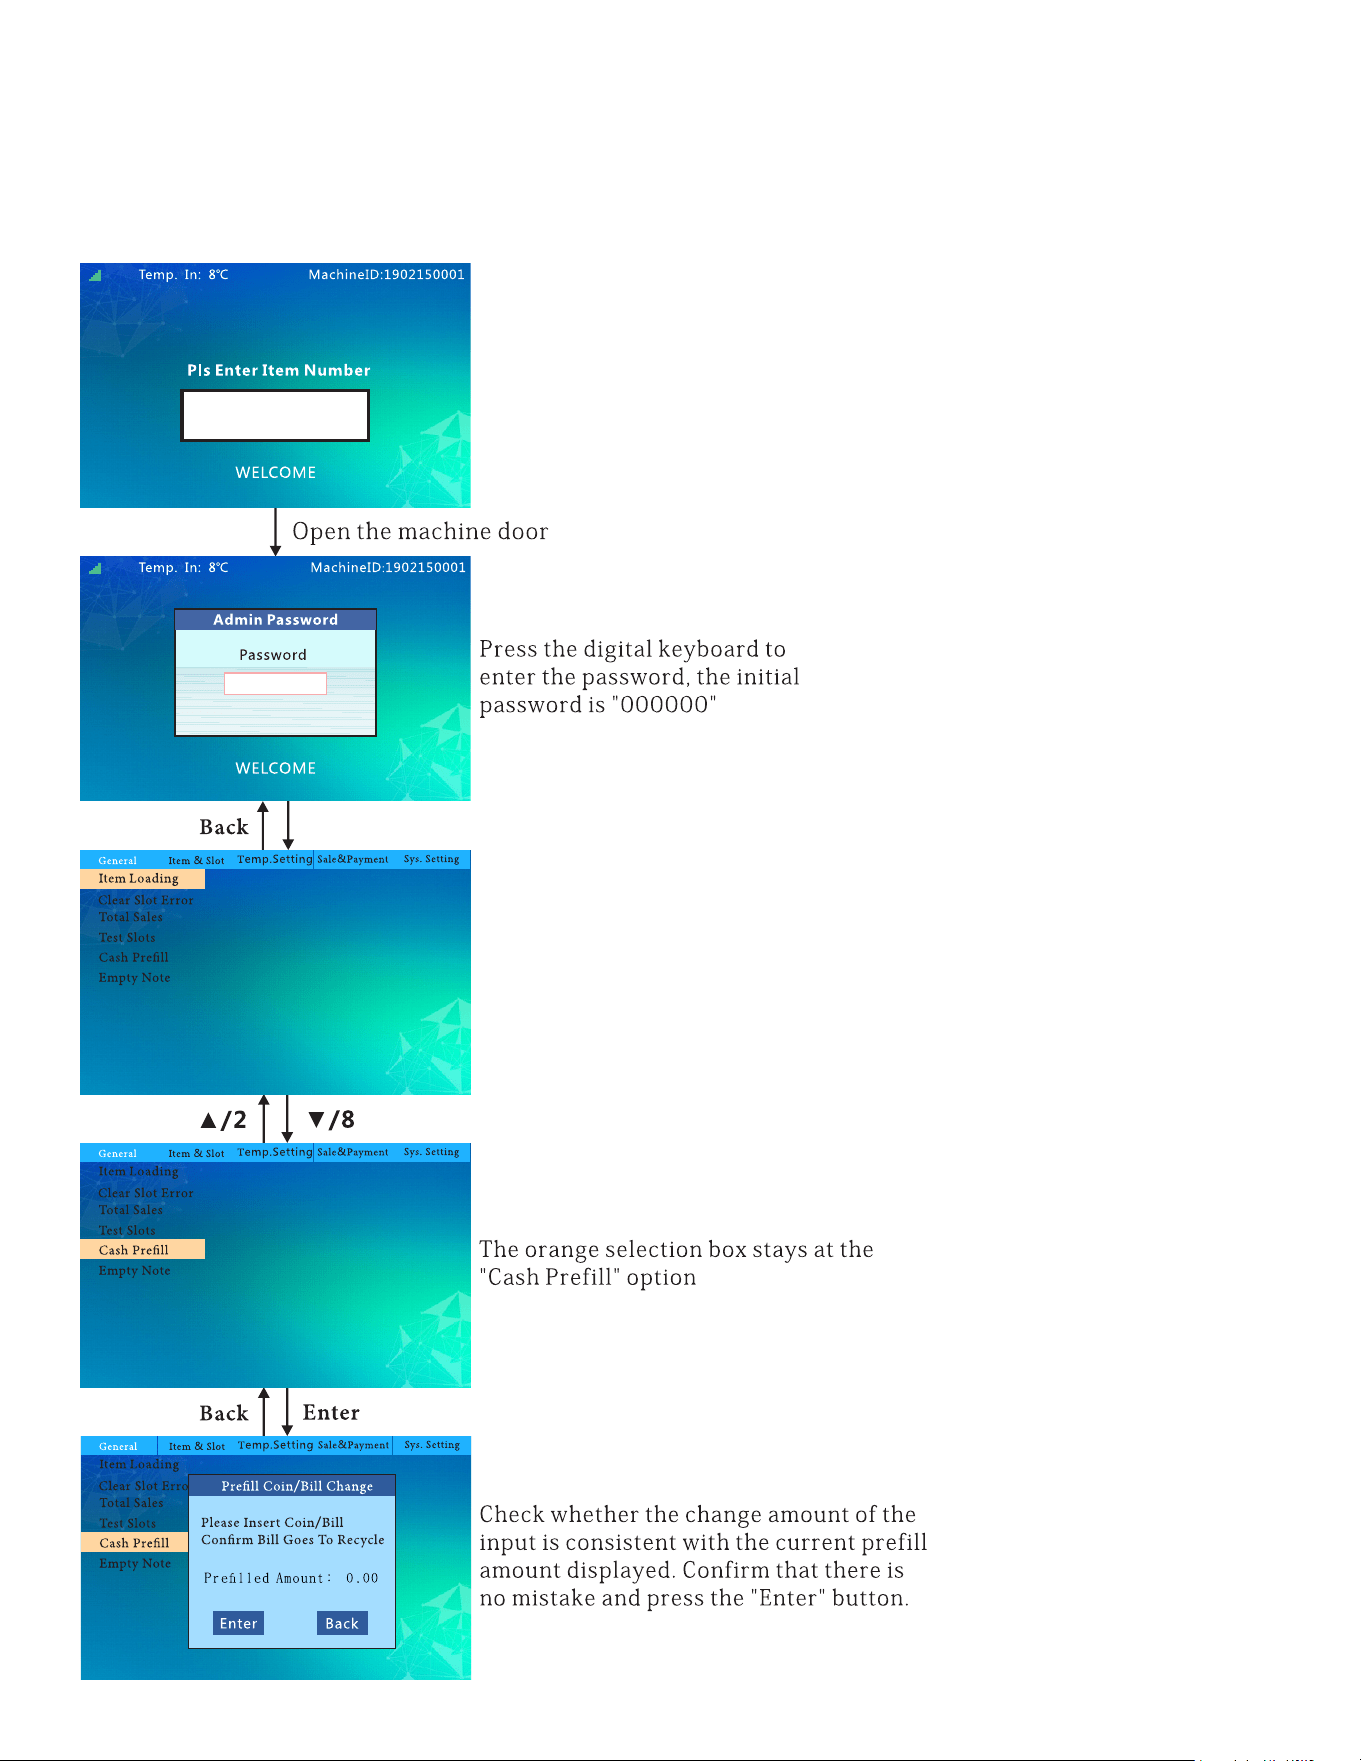
To Prell With Cash:
follow this ow chart to ll up the machine with cash for change.
13
To Empty The Machines Cash:
follow this ow chart to empty the cash.

14
To Set The Price:
follow this ow chart to set the prices for the products.

15
To Stock Up:
follow this ow chart to stock the machine.

16
To Set Capacity:
follow this ow chart to set the capacity.
17
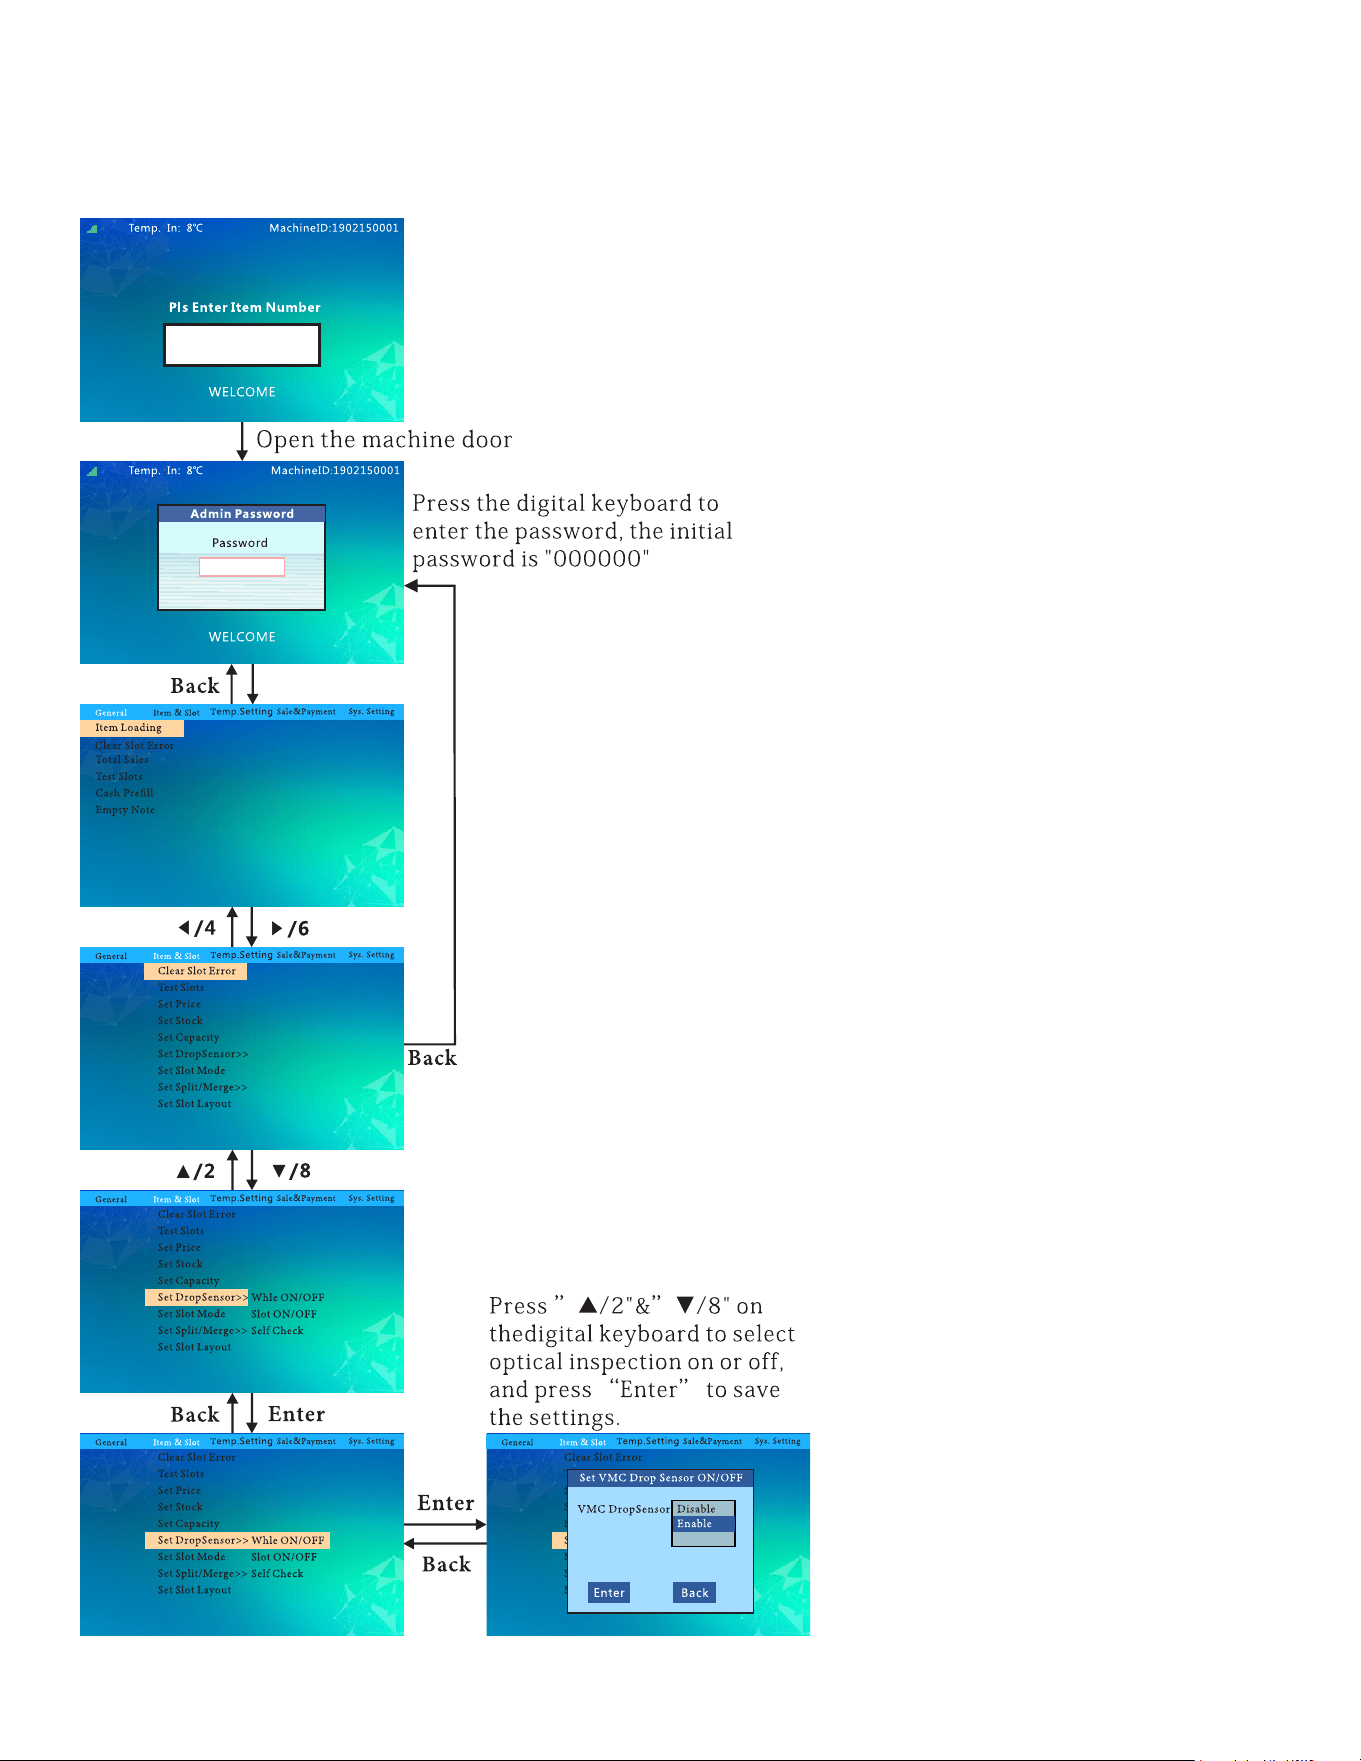
To Set VMC Drop Sensor ON/OFF:
18
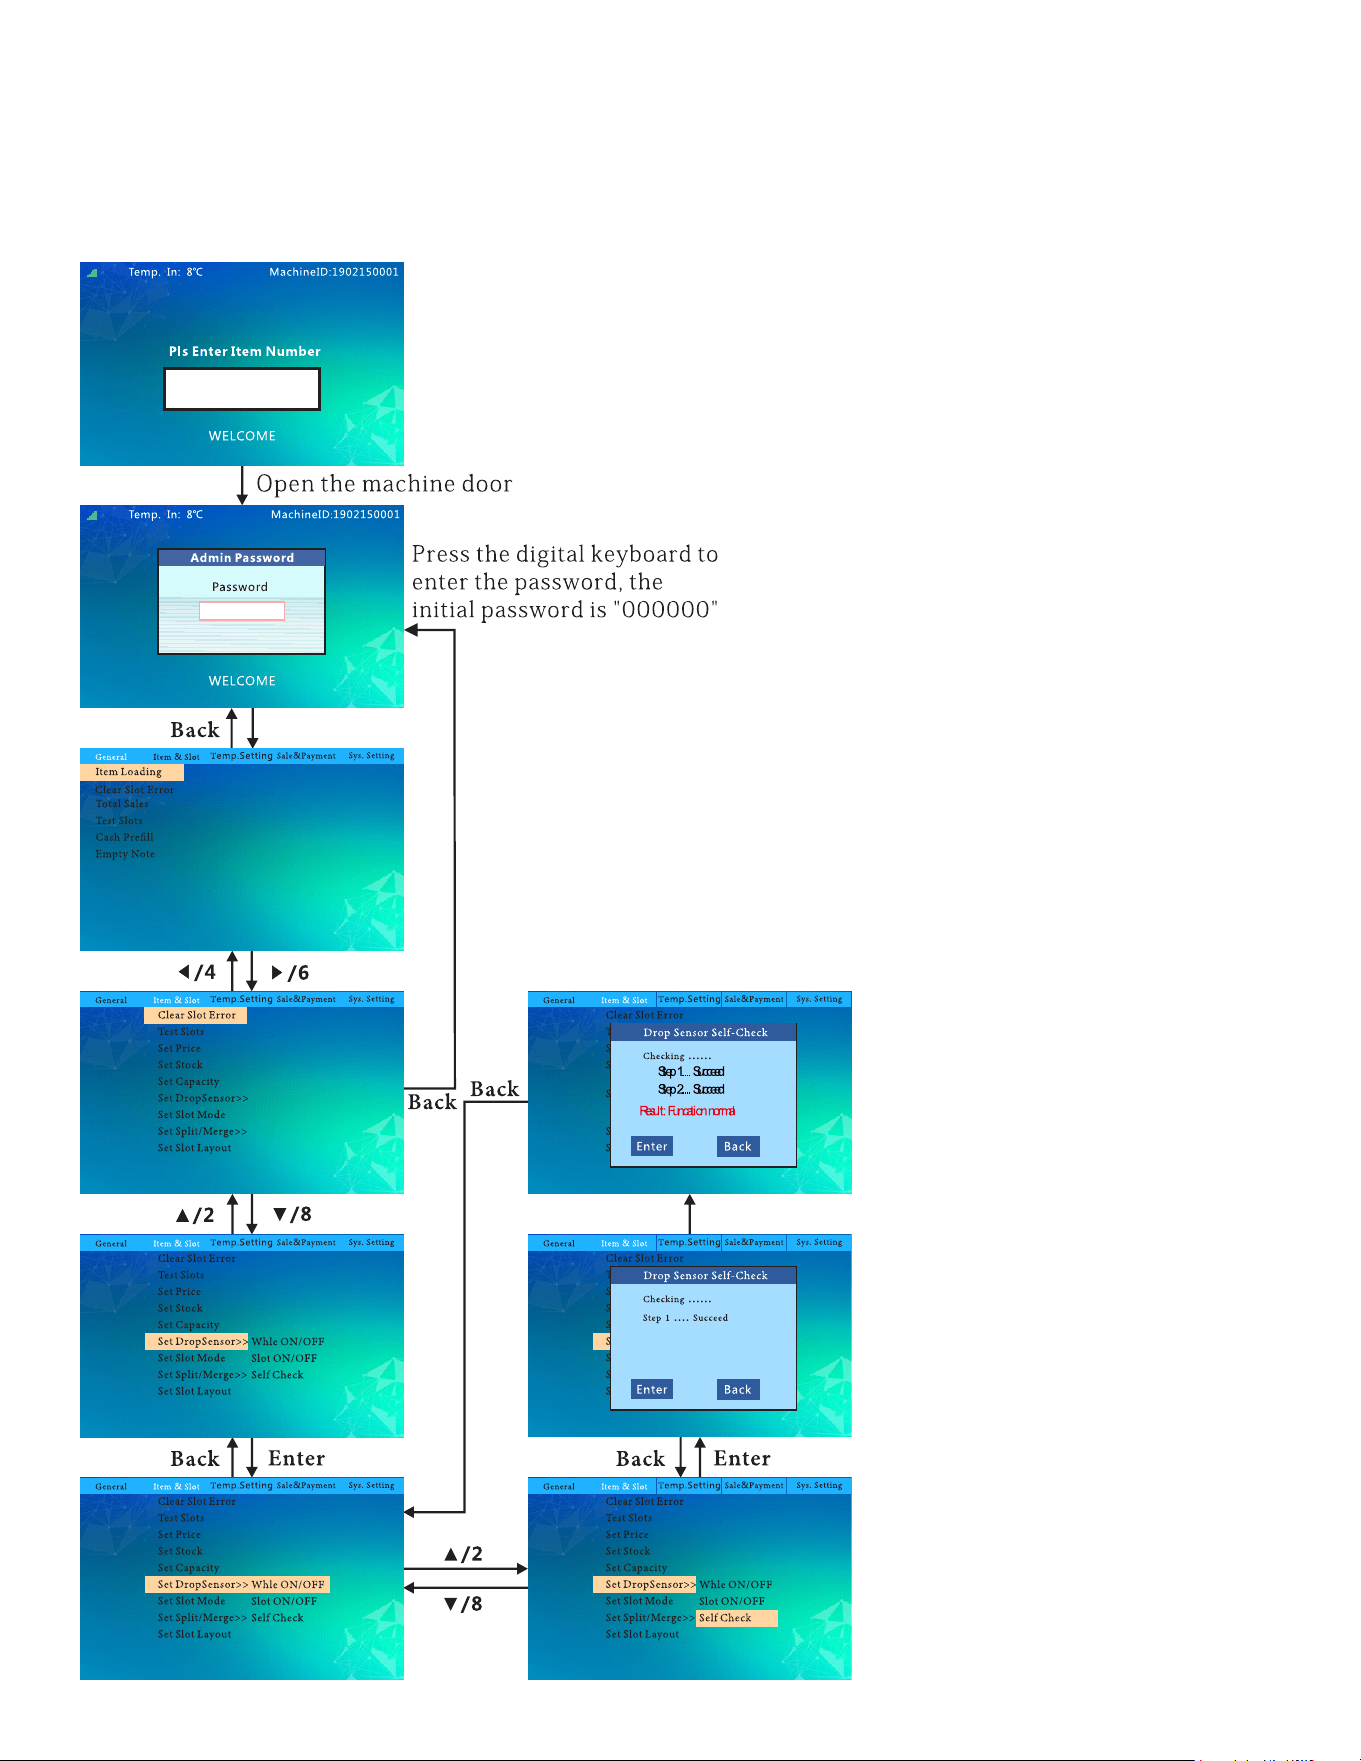
Drop Sensor Self Check:

19
To Set The Slot Mode:
follow this ow chart to switch the slot to locker,spring or belt.
20
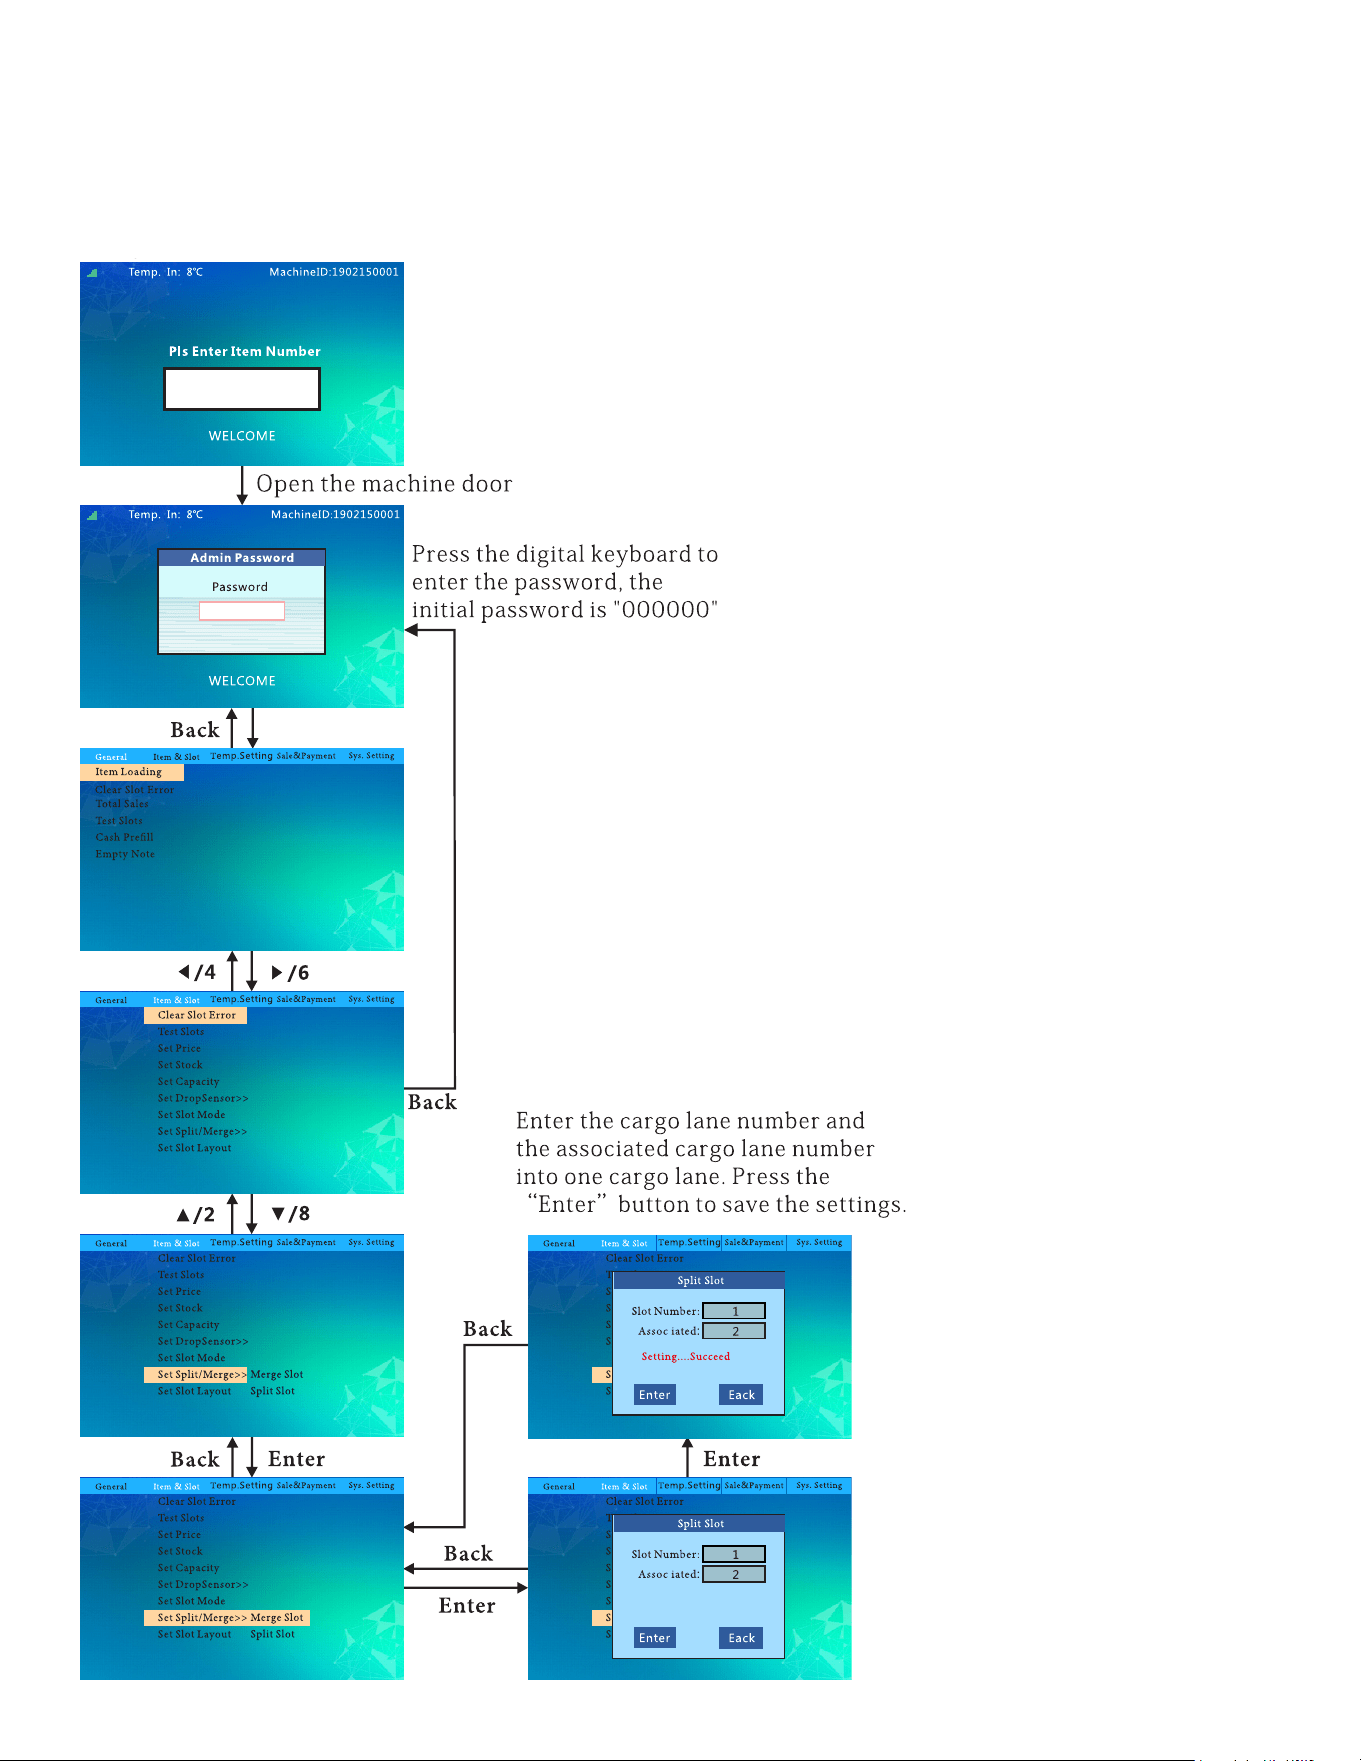
To Merge Slots:
follow this ow chart to merge or split slots.
21
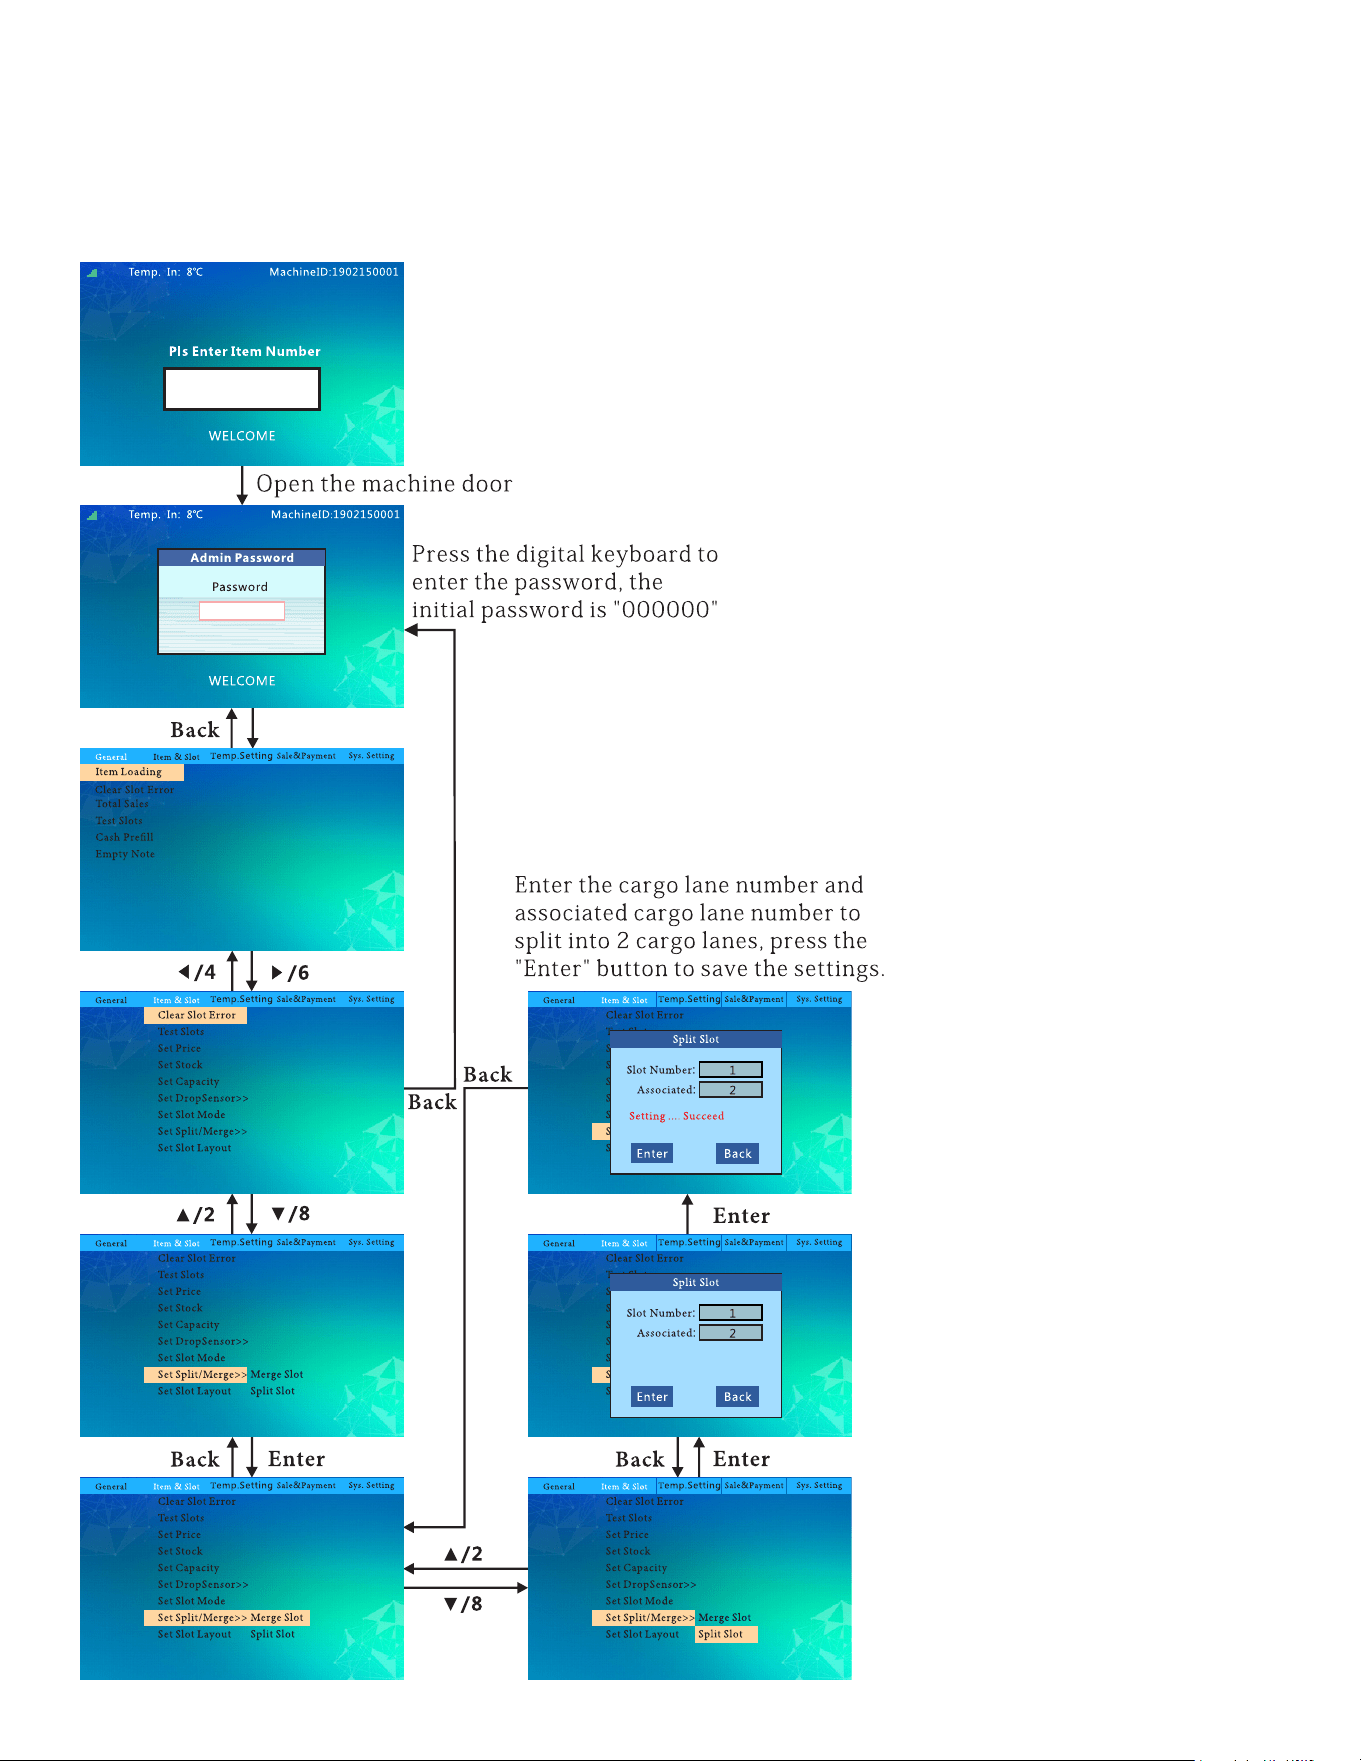
To Split Slots:
follow this ow chart to merge or split slots.
22
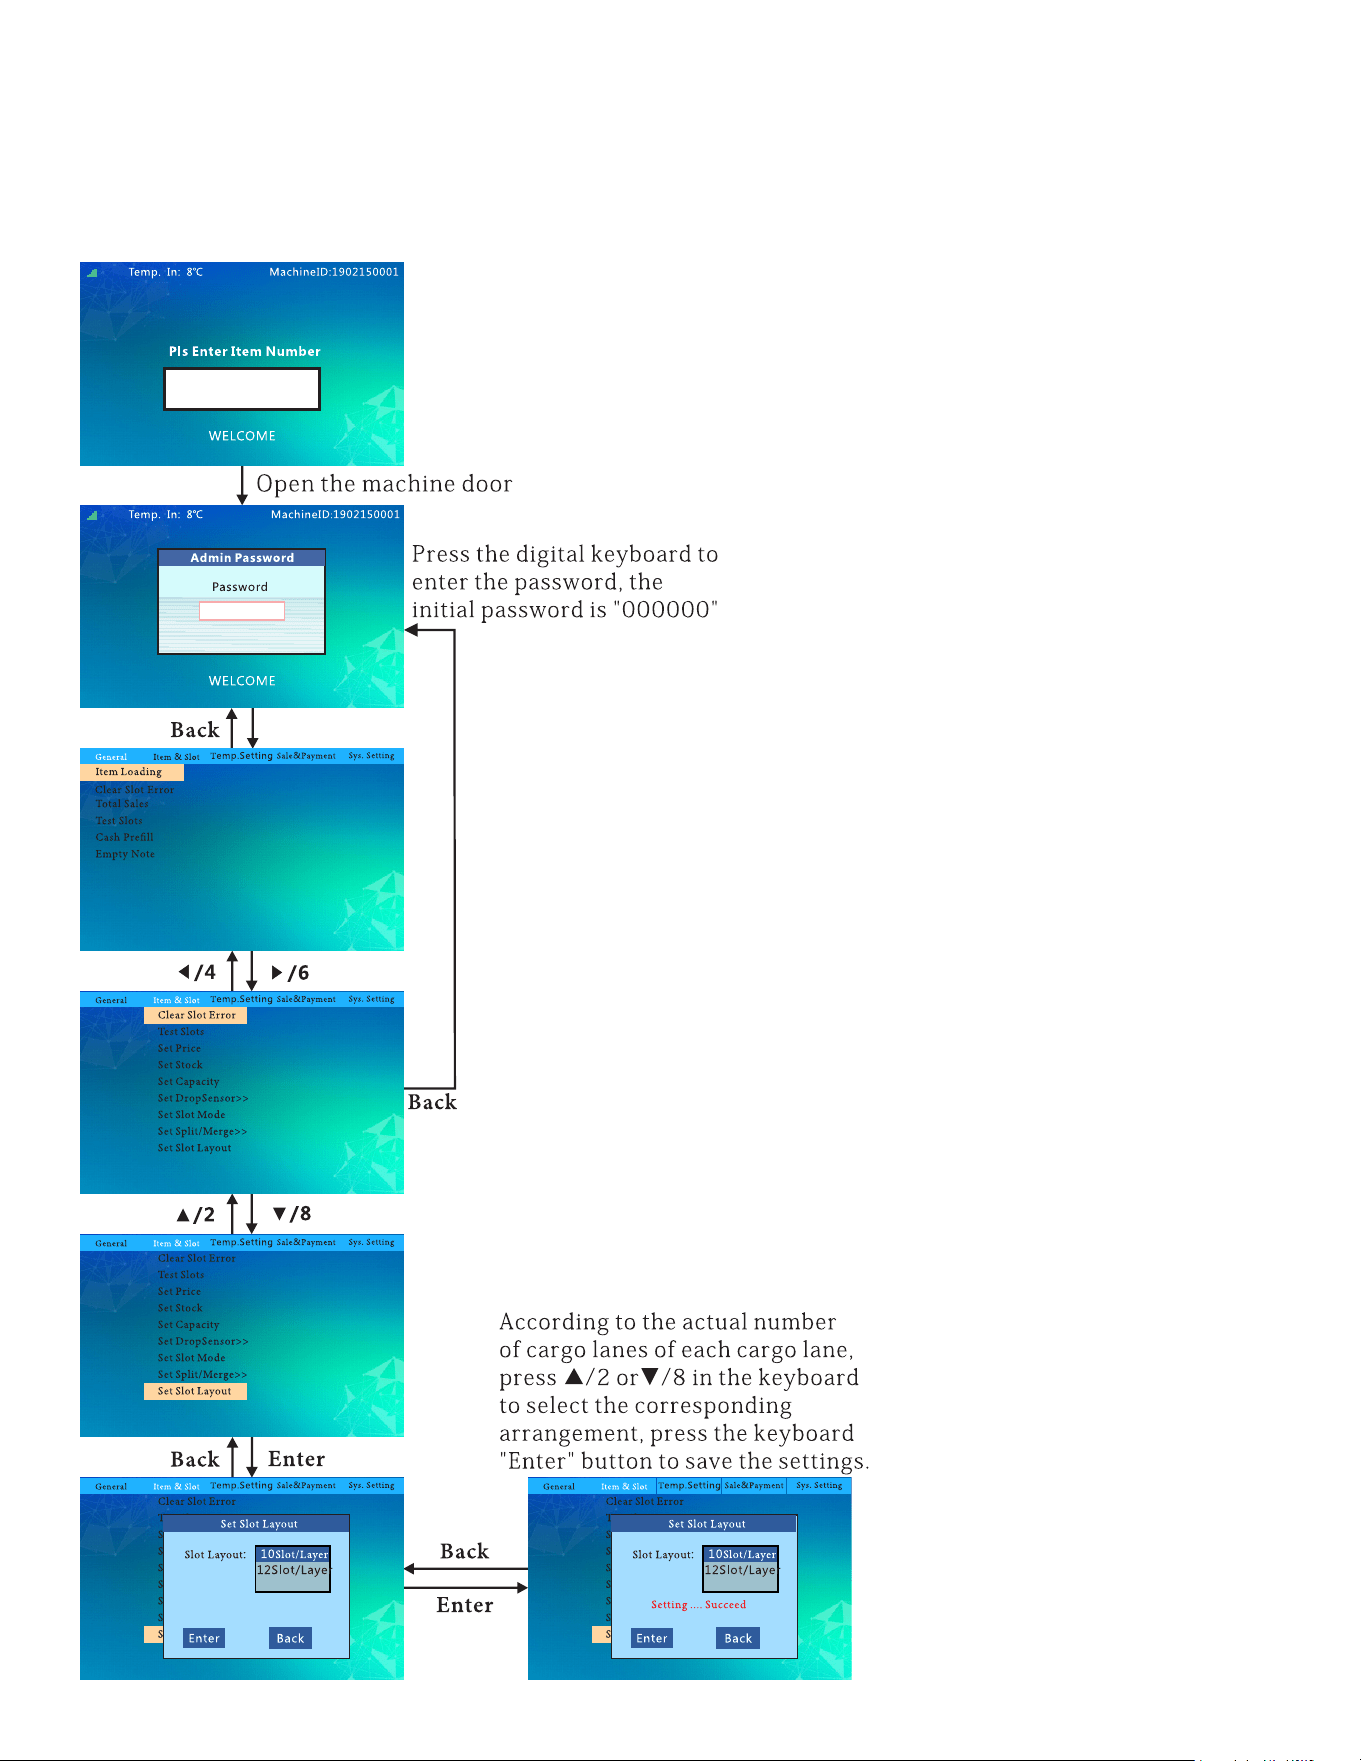
To Set Slot Layout:
follow this ow chart to set the layout of the slots.
23
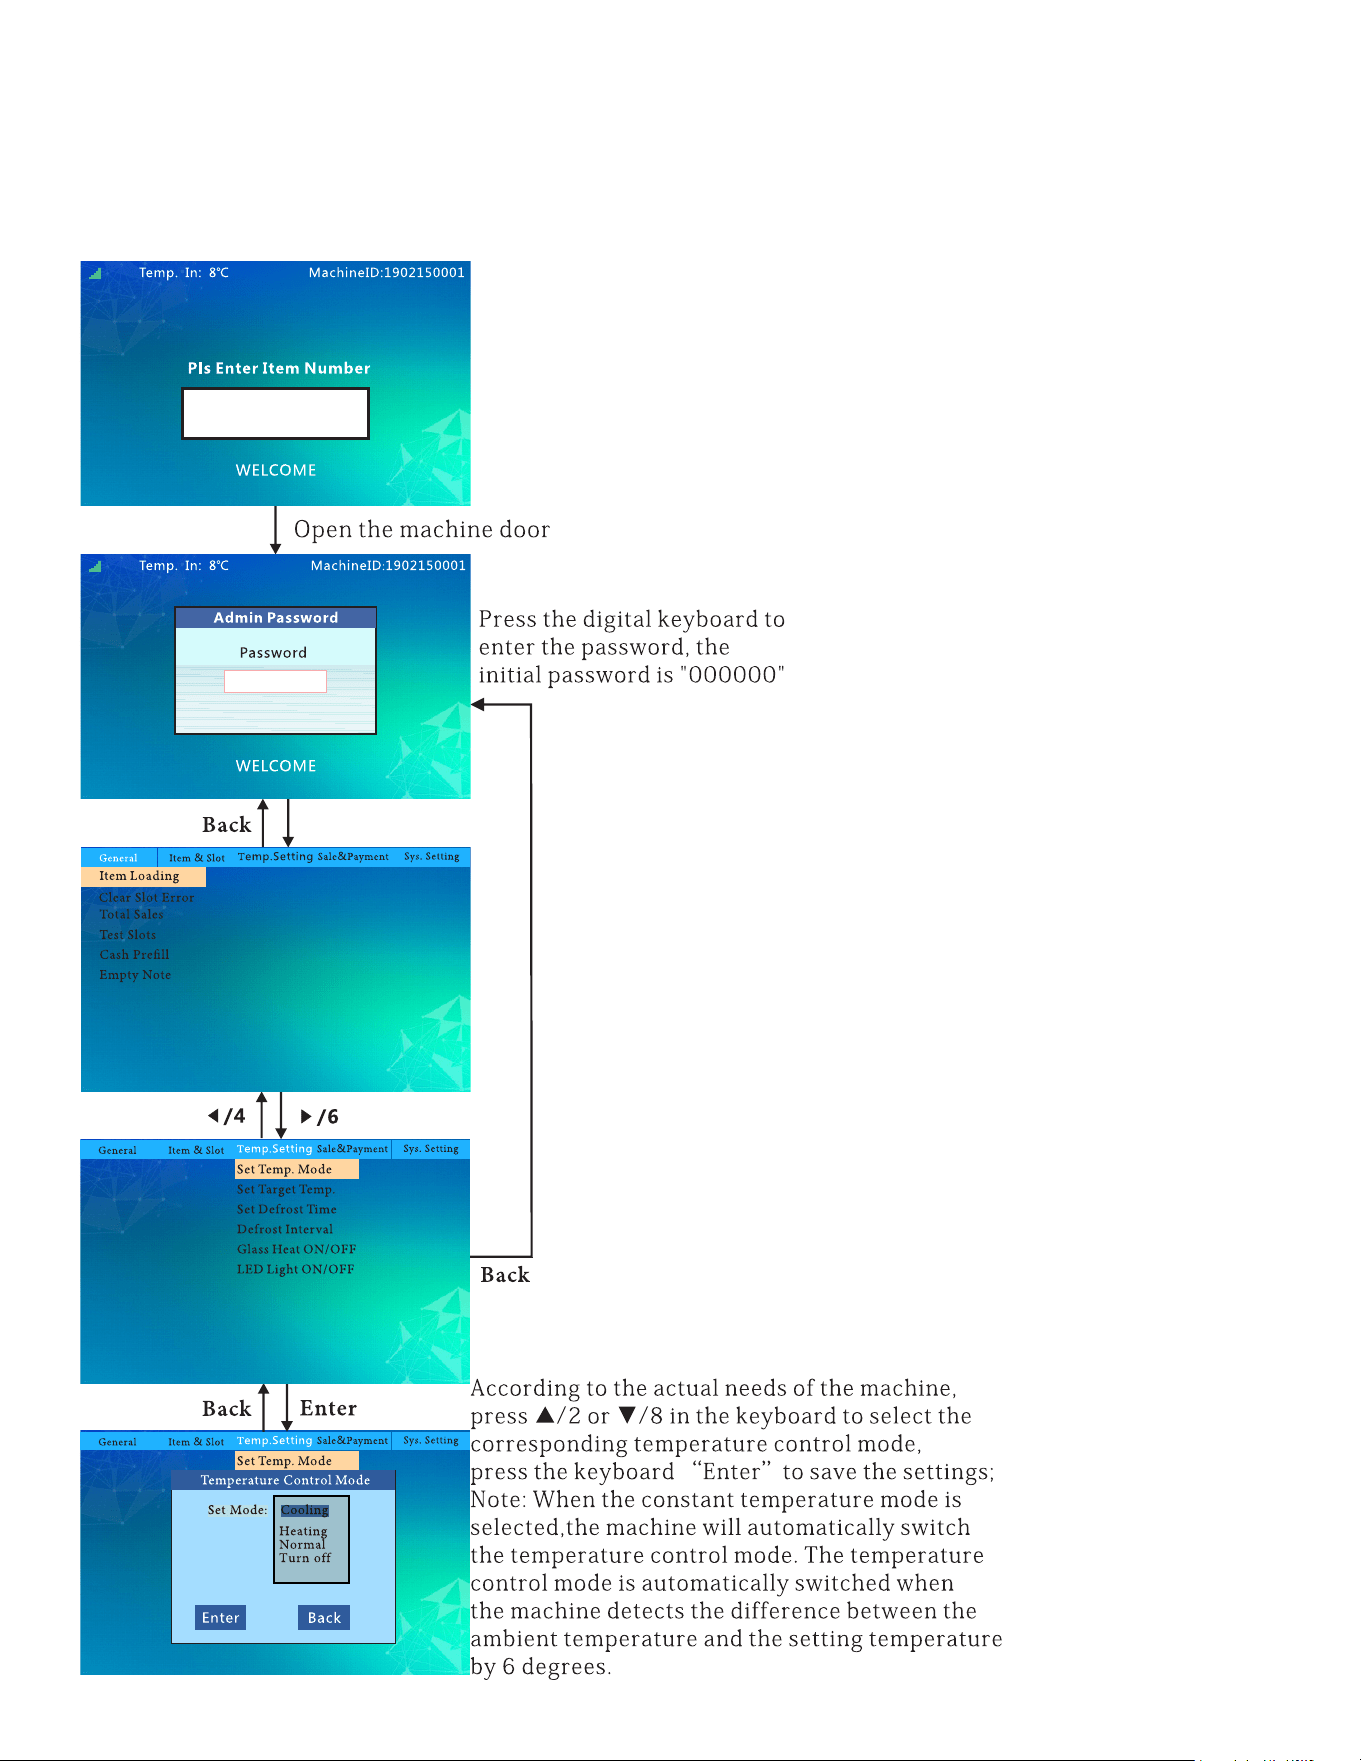
Temperature Control Mode:
follow this ow chart to set the temperature.

24
Set Target Temp:
follow this ow chart to set the target temperature.

25
Set Defrost Time & Interverals:

26
Glass Heat ON/OFF:
follow this ow chart to set up the glass heating feature.

27
LED Light ON/OFF:
follow this ow chart to set up the LED Light feature.
28
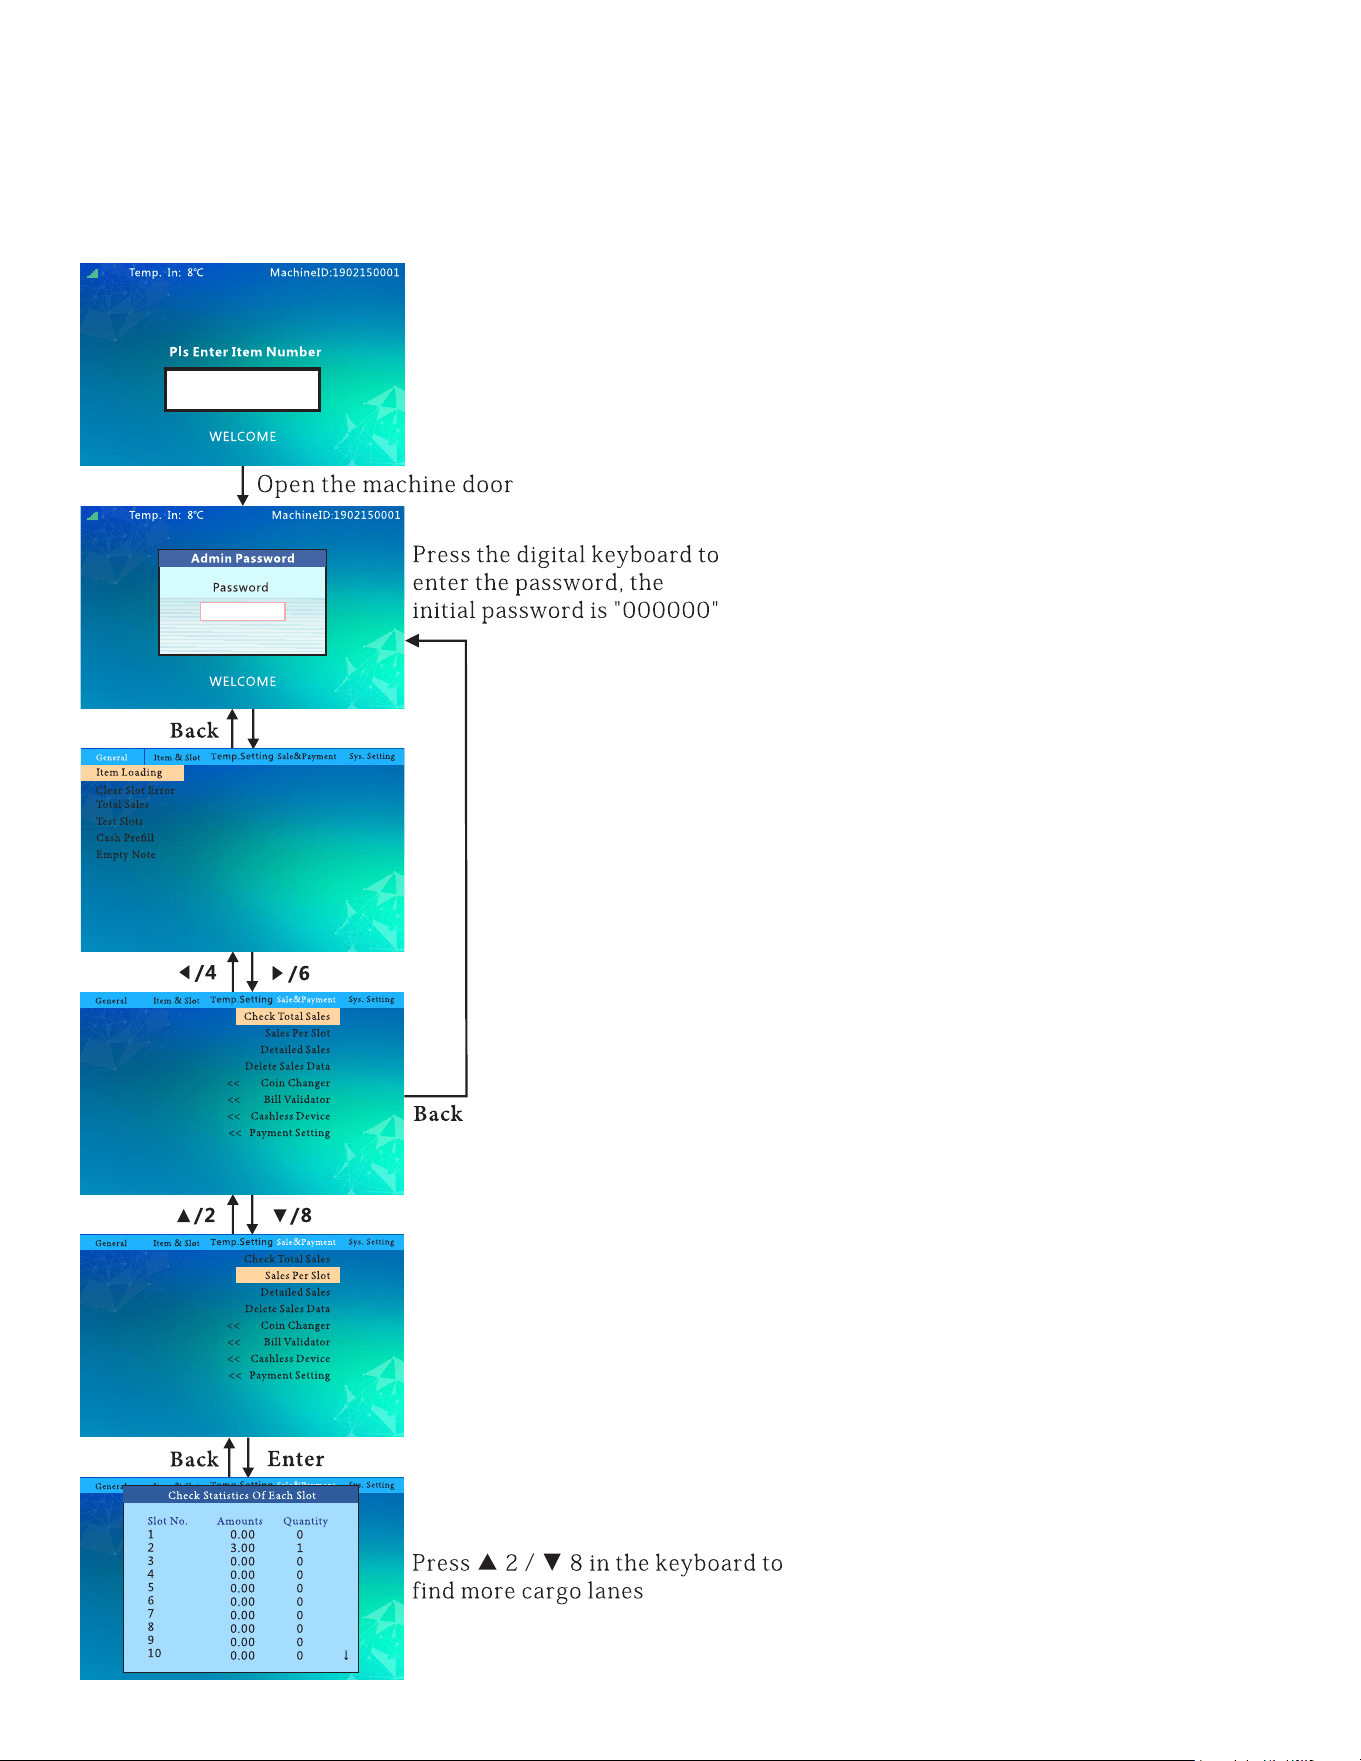
Sales Per Slot:
follow this ow chart to check the sale stats of individual slots.

29
Pay Type Stats:
follow this ow chart to check the sale stats per payment type.
30
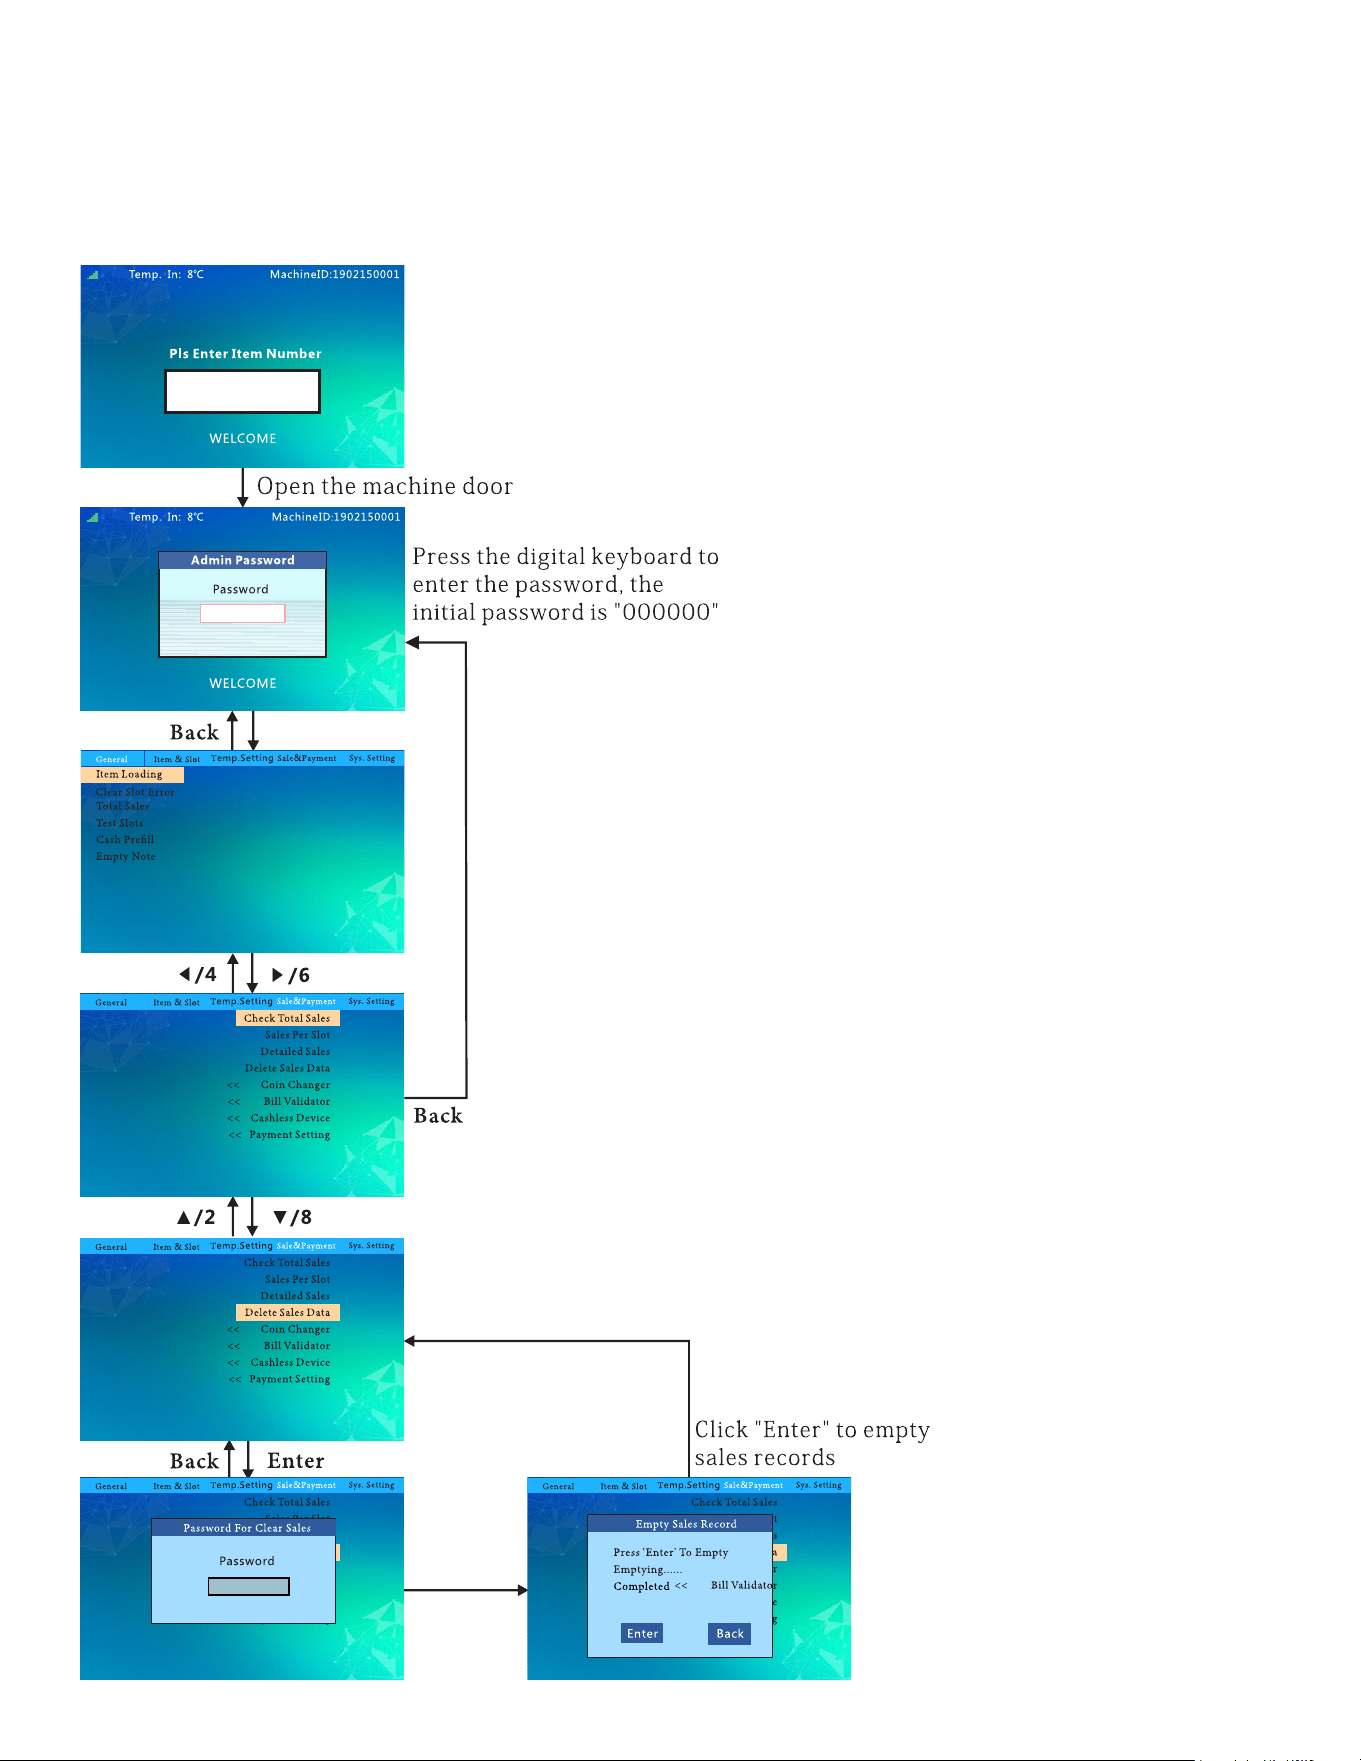
Delete Sales Data:
follow this ow chart to delete sales data.

31
Set Coin Change ON/OFF:
32
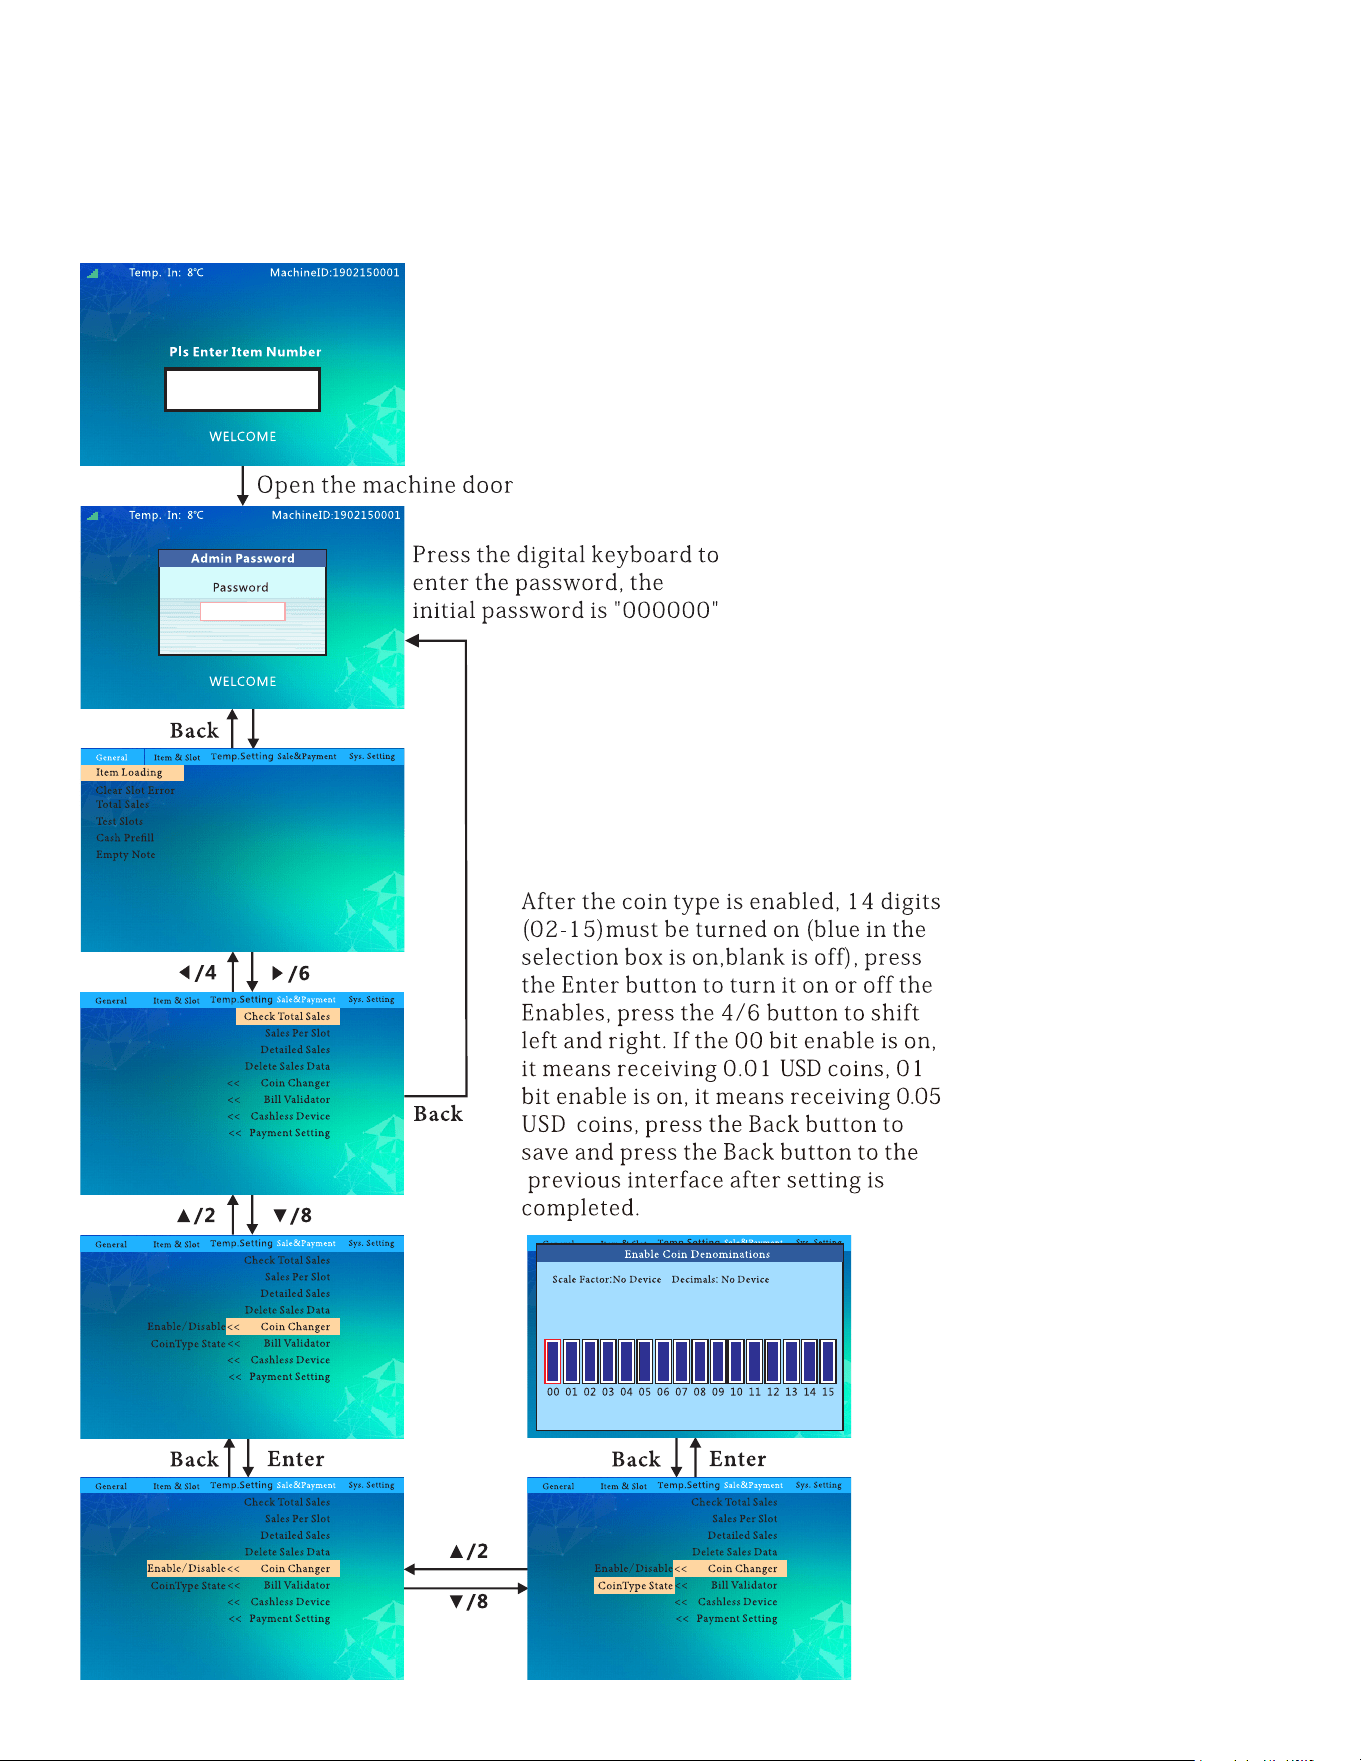
Coin Denominations:
follow this ow chart to allow/disable certain coin denominations.
33
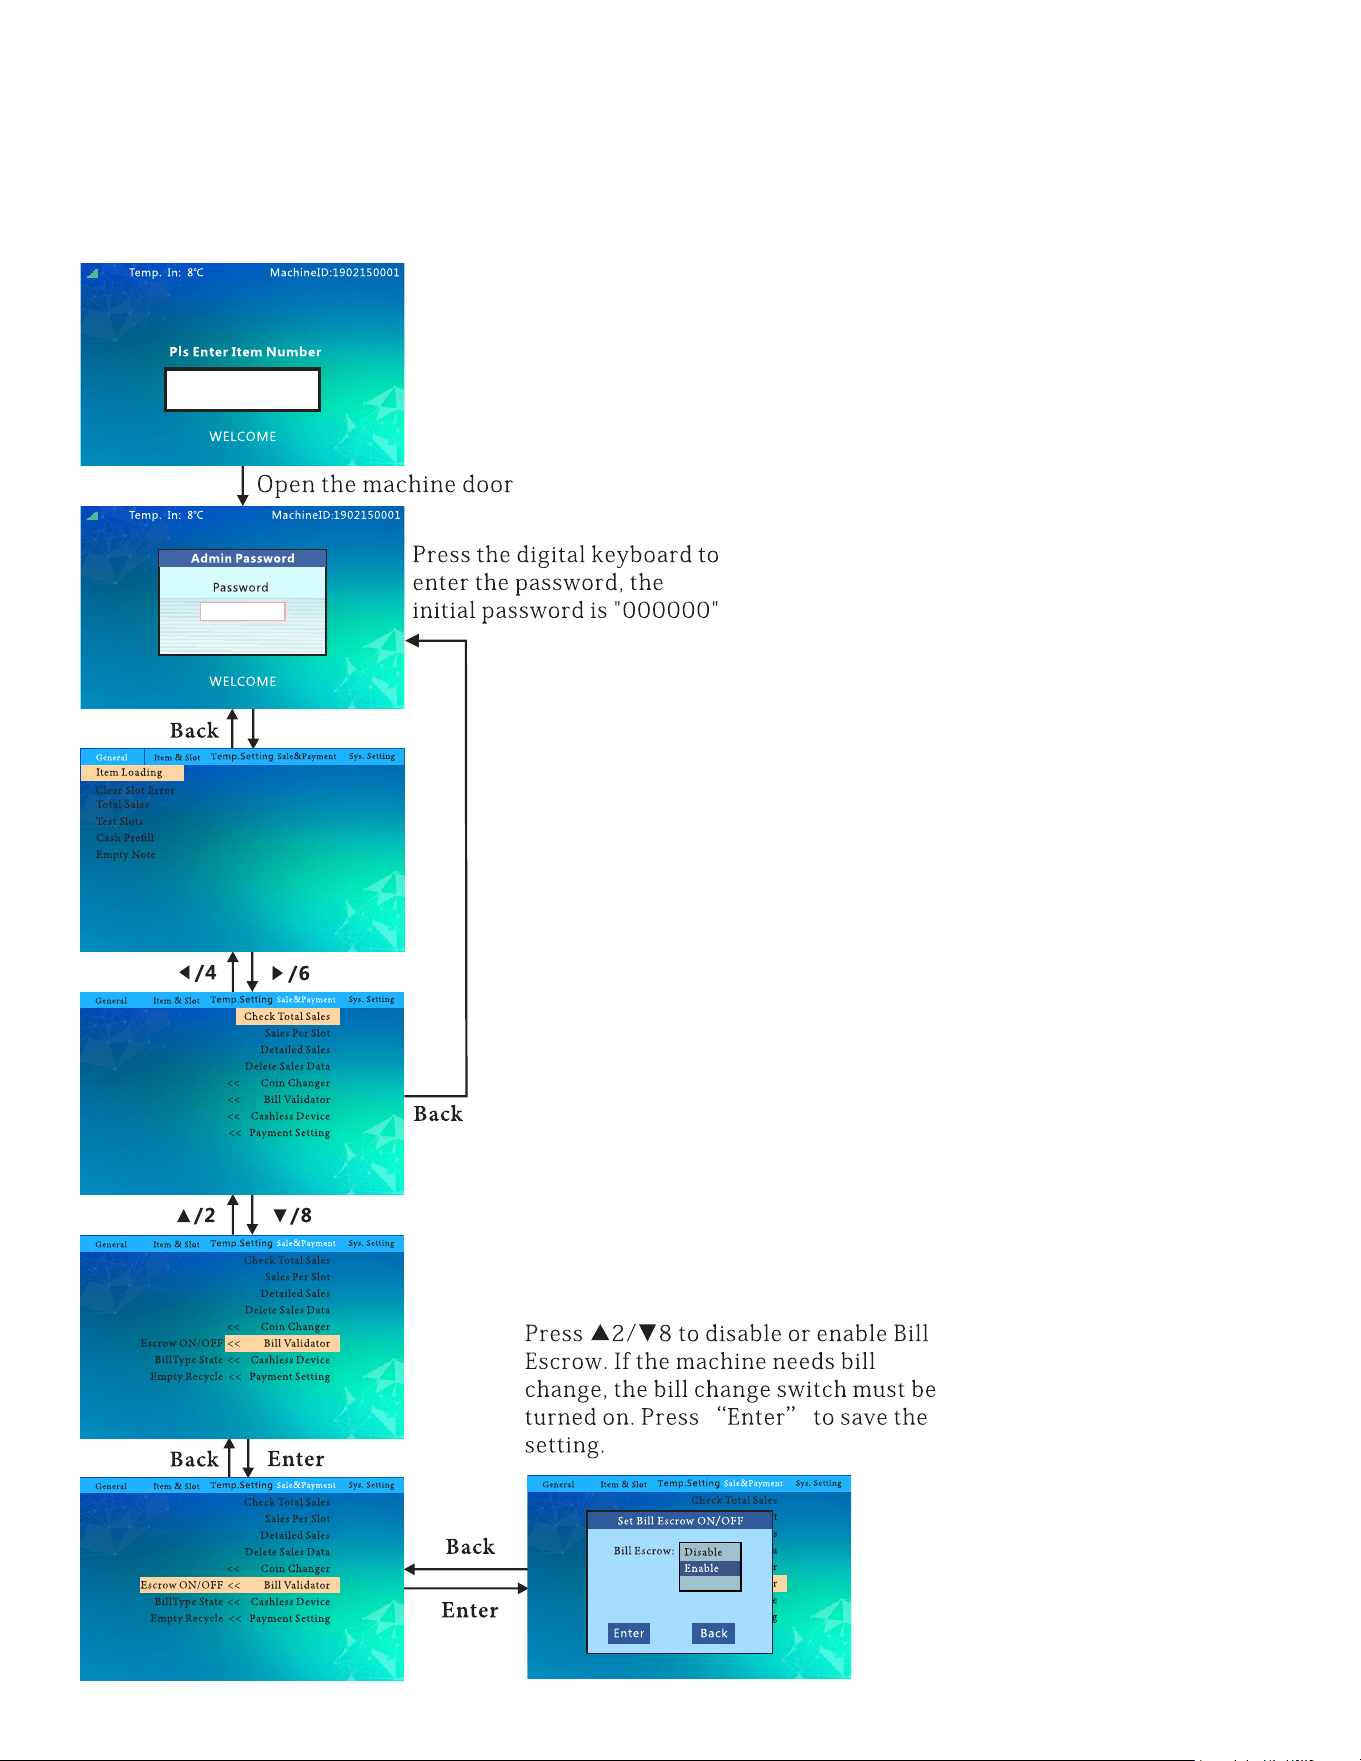
Set Bill Escrow ON/OFF:
follow this ow chart to set bill escrow.

34
Bill Denominations:
follow this ow chart to allow/disable certain bill denominations.
35
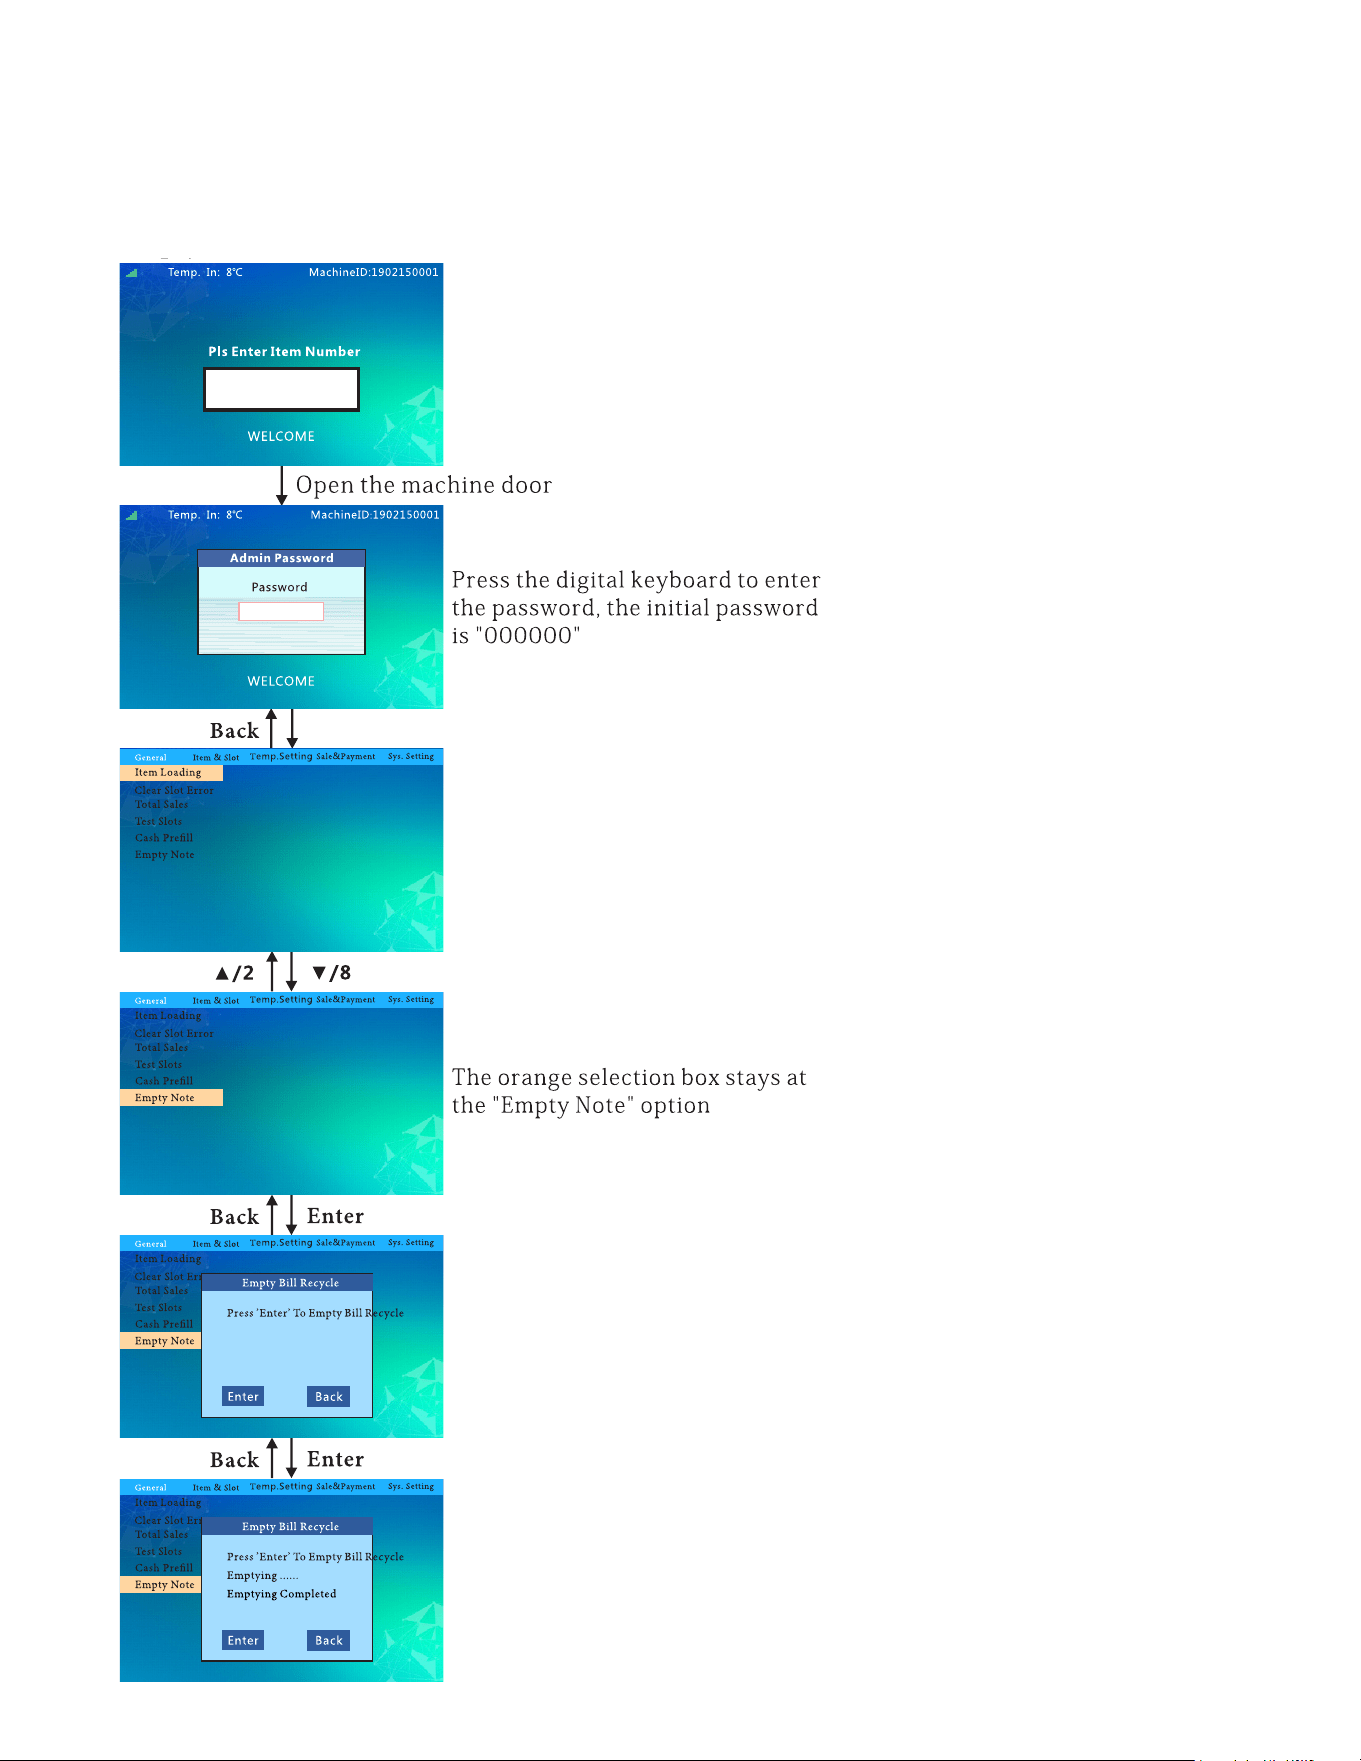
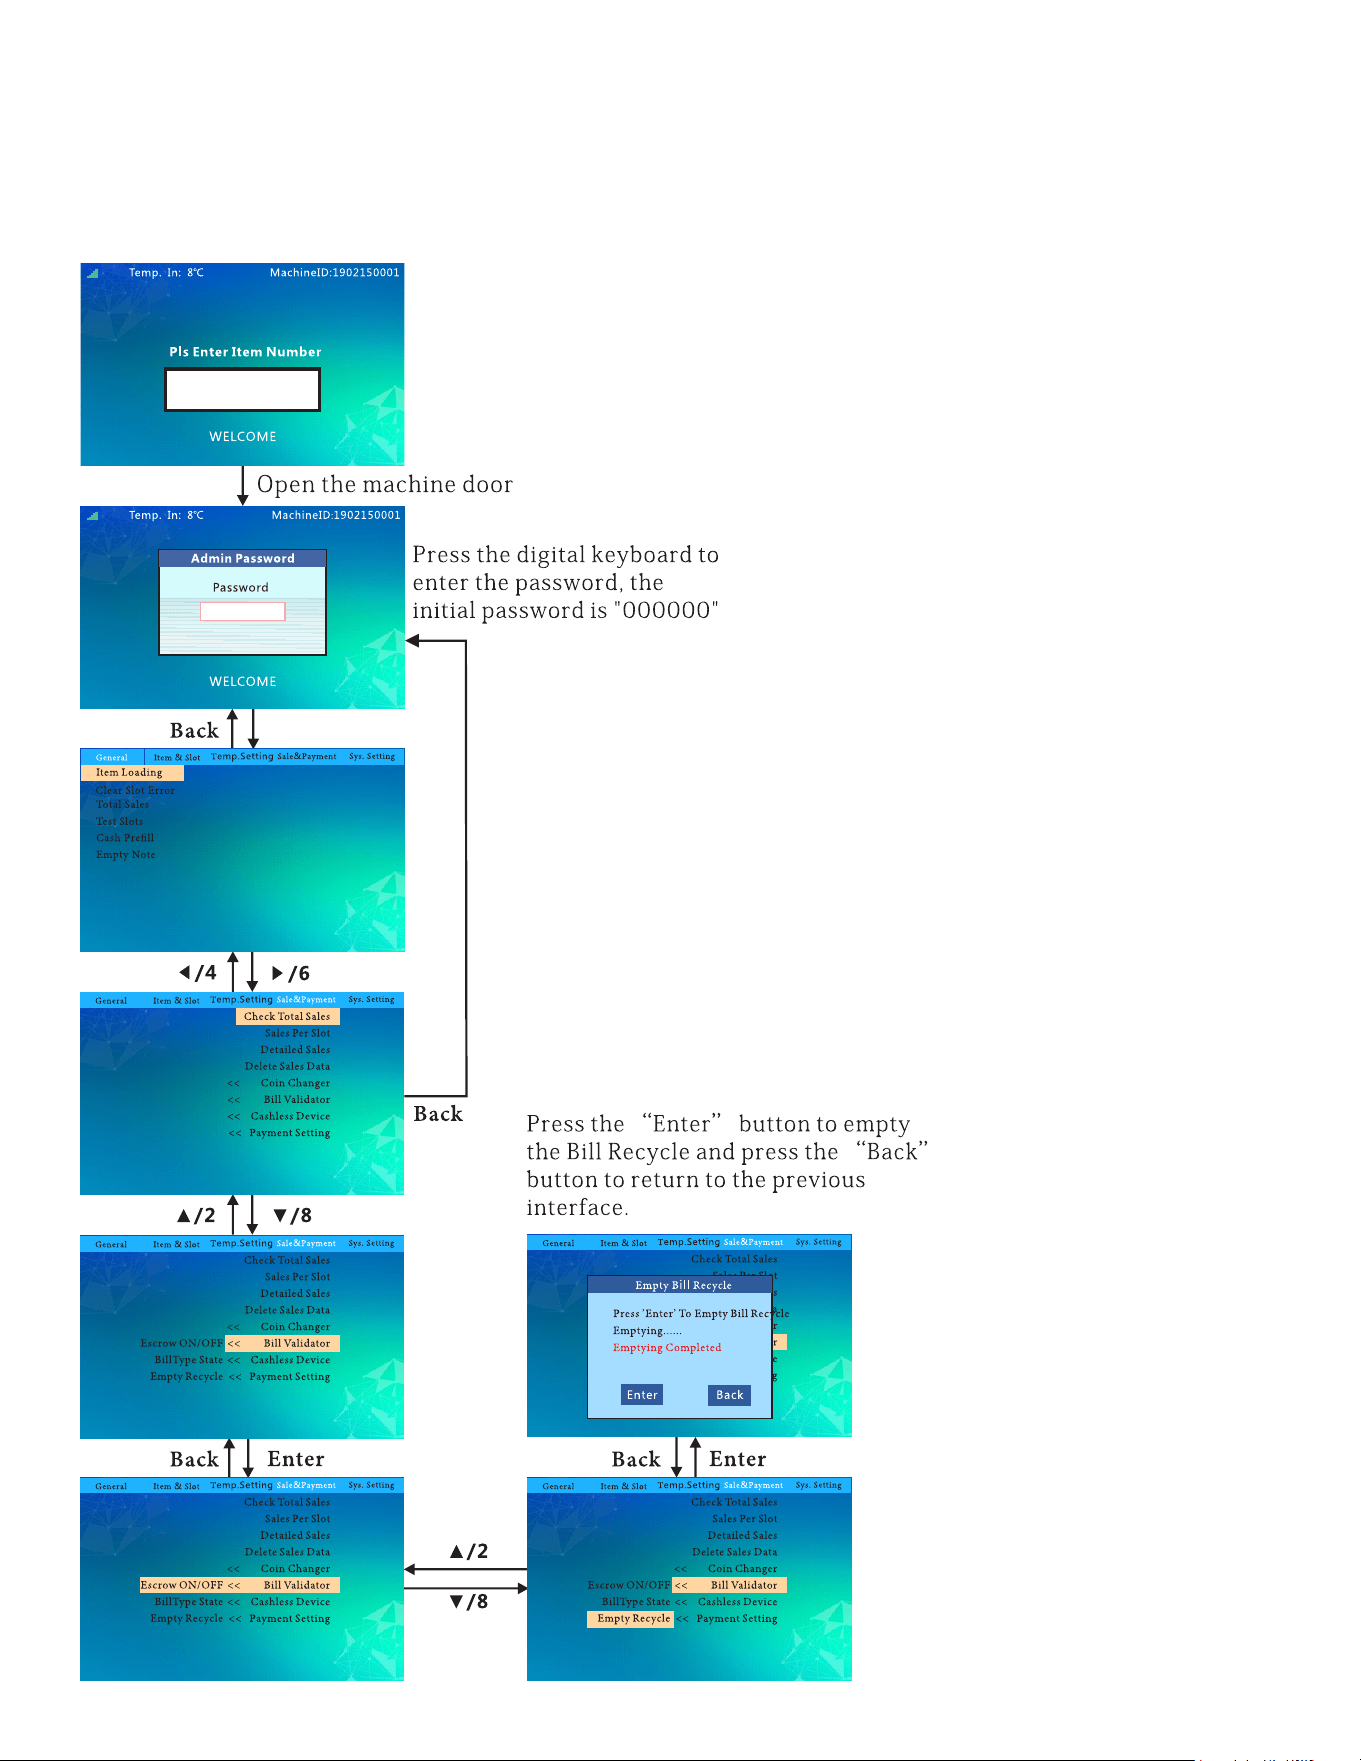
Empty Bill Recycle:
follow this ow chart to empty the bills.
36
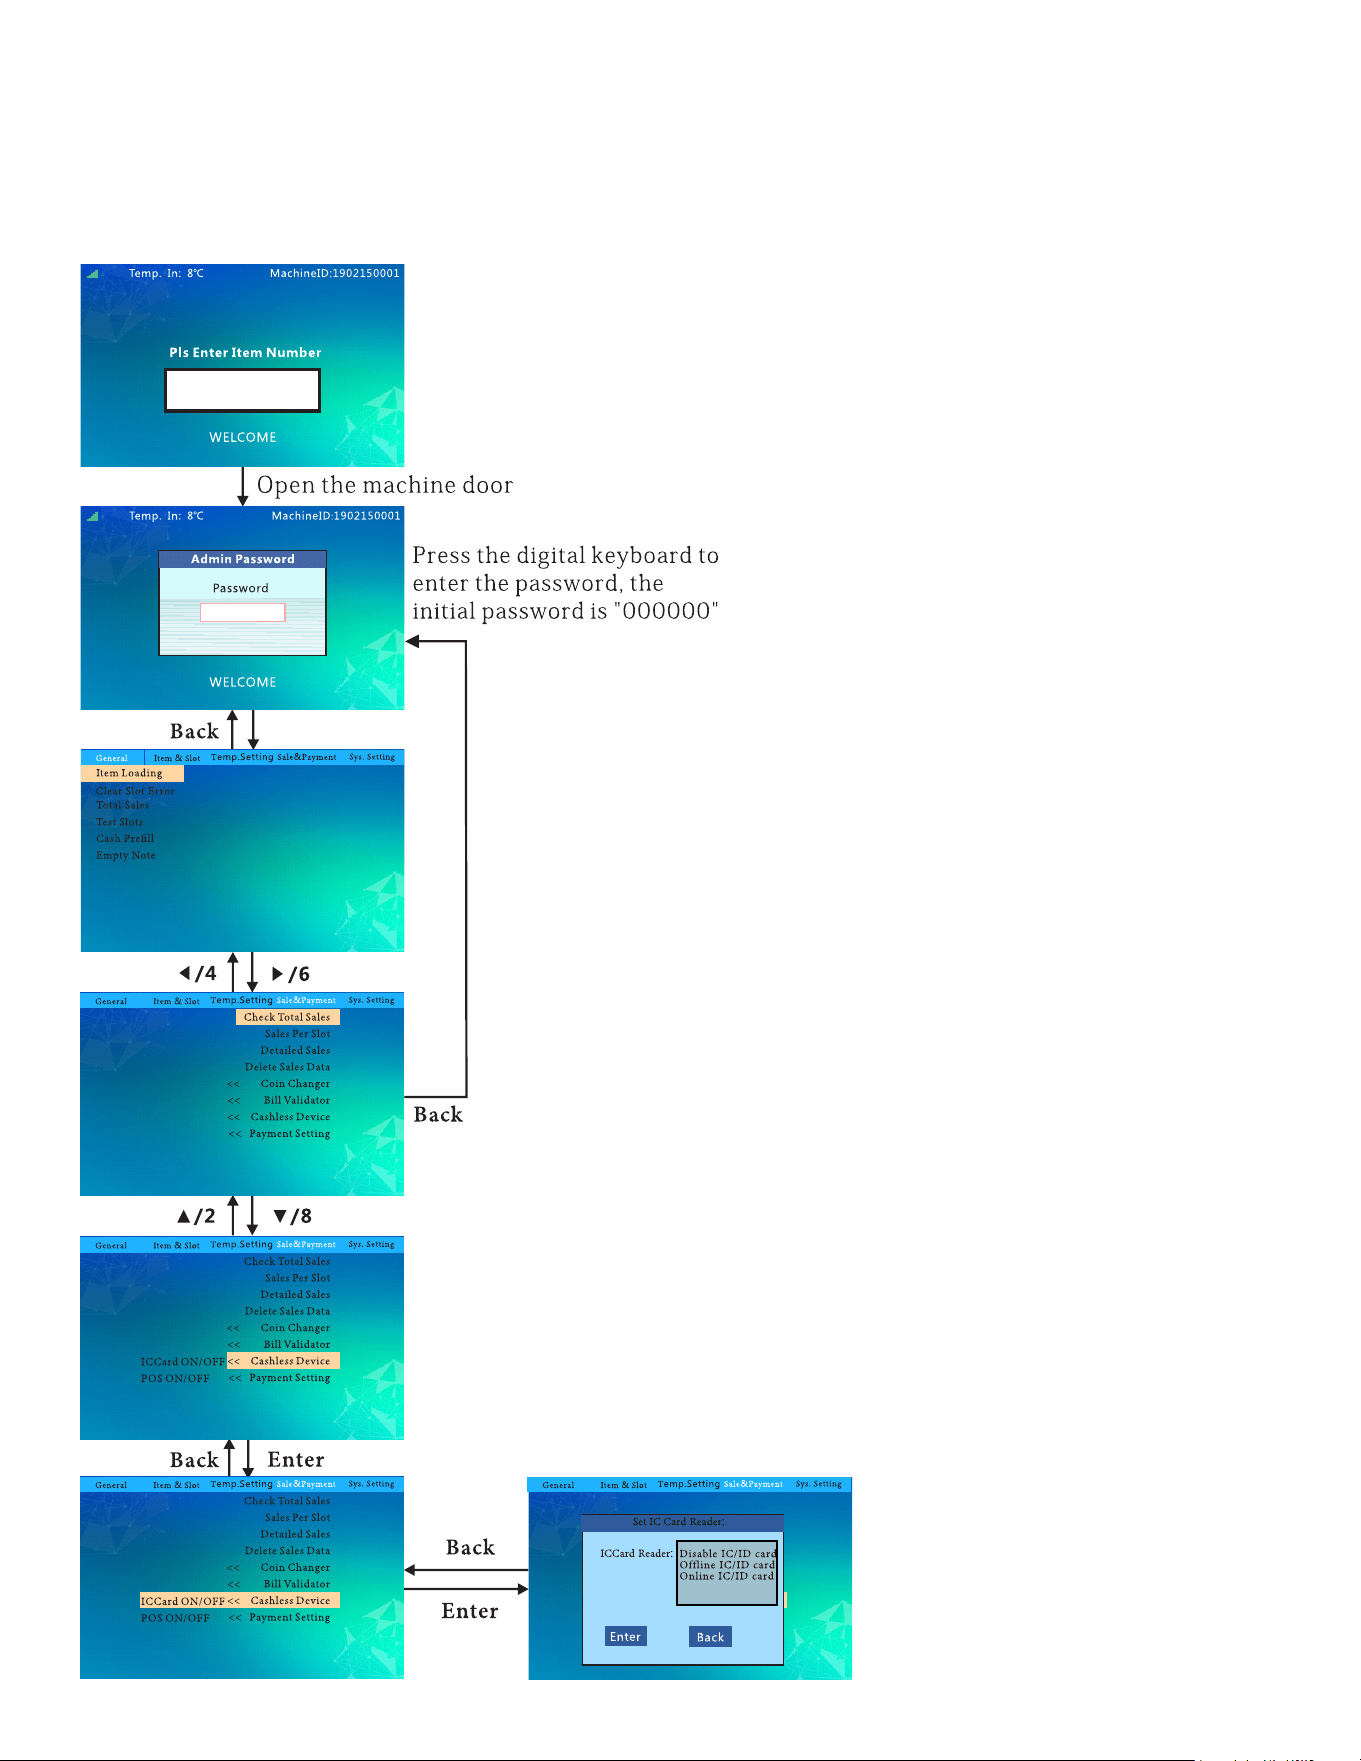
Set IC Card Reader:
37
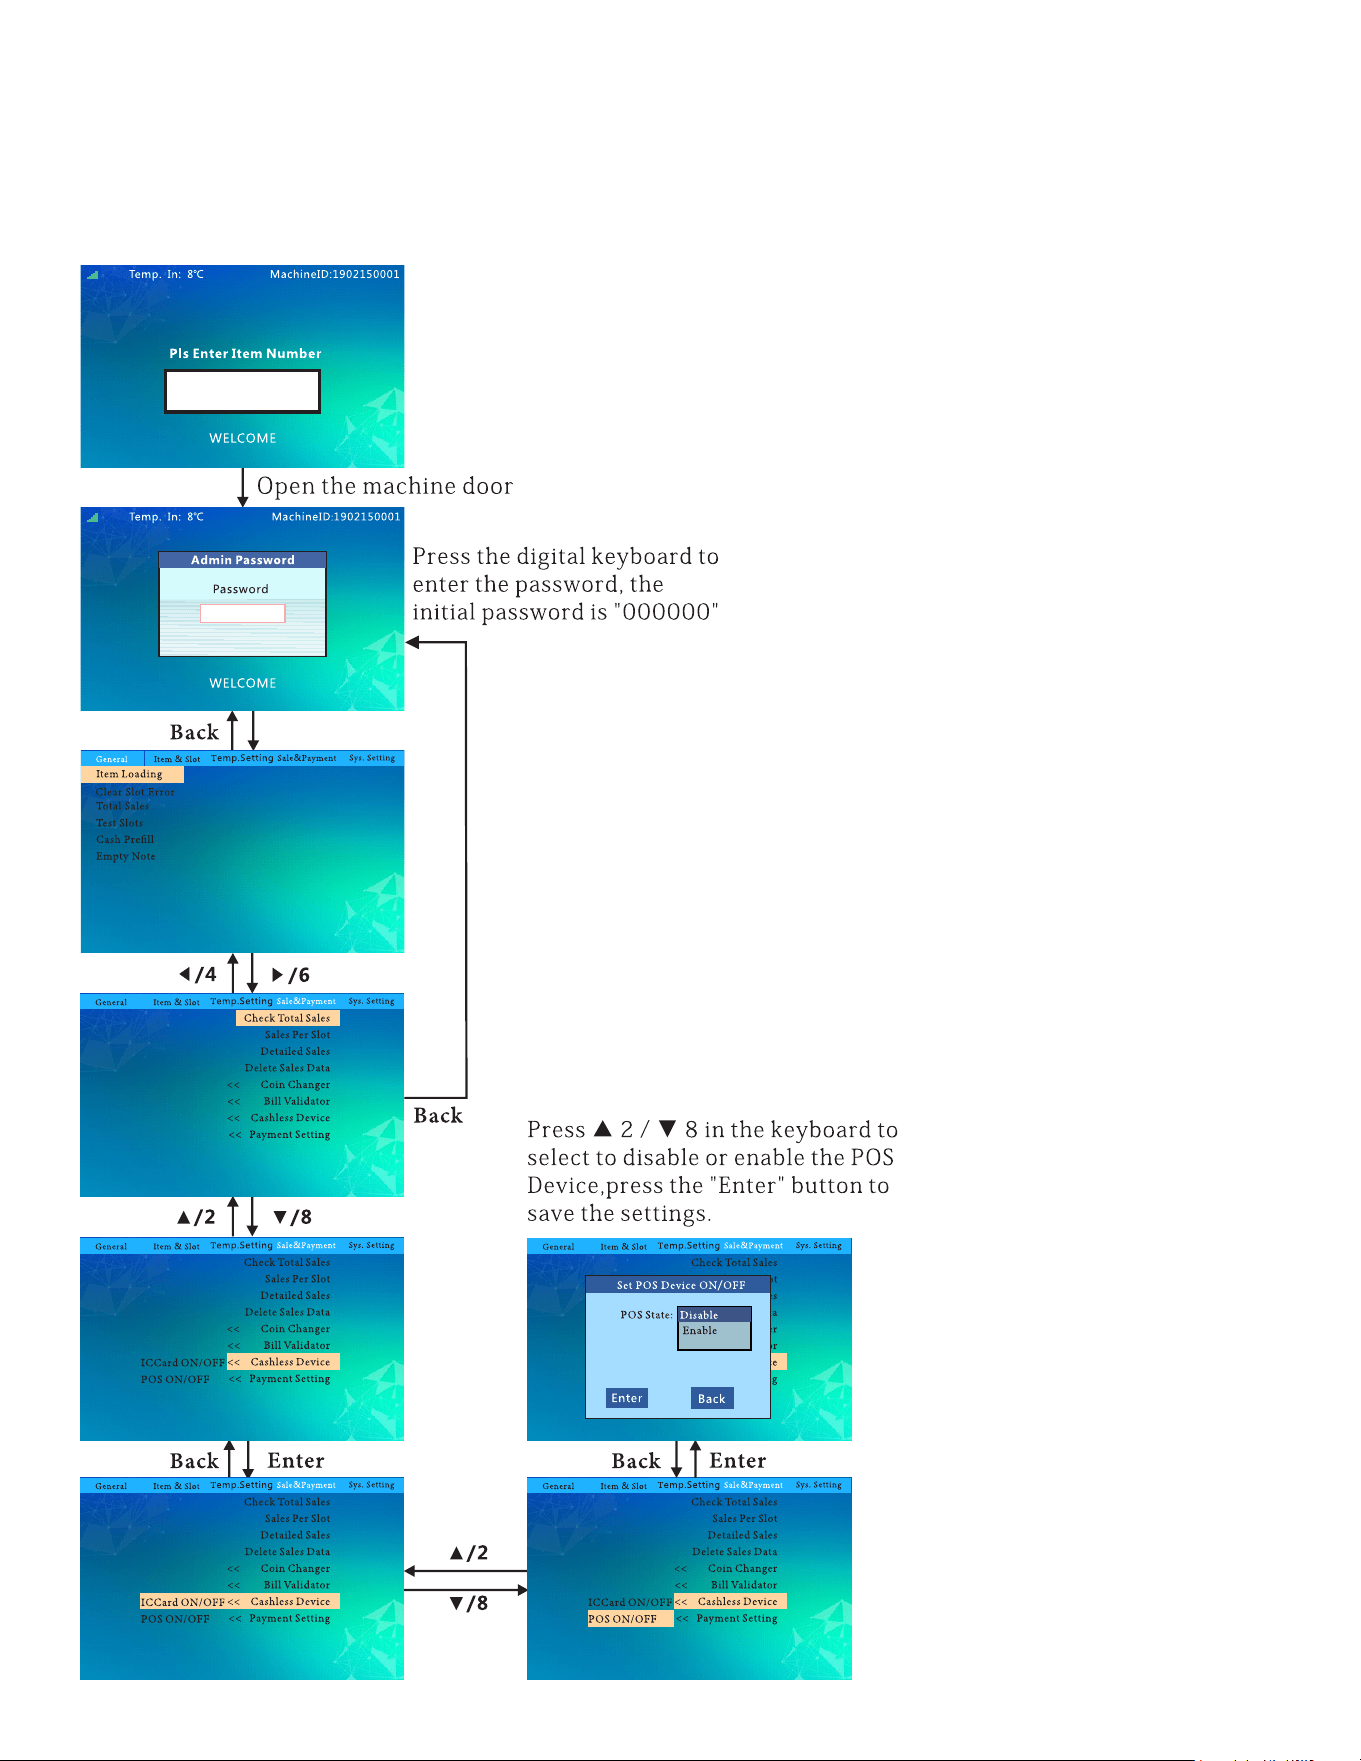
Set POS Device ON/OFF:
38
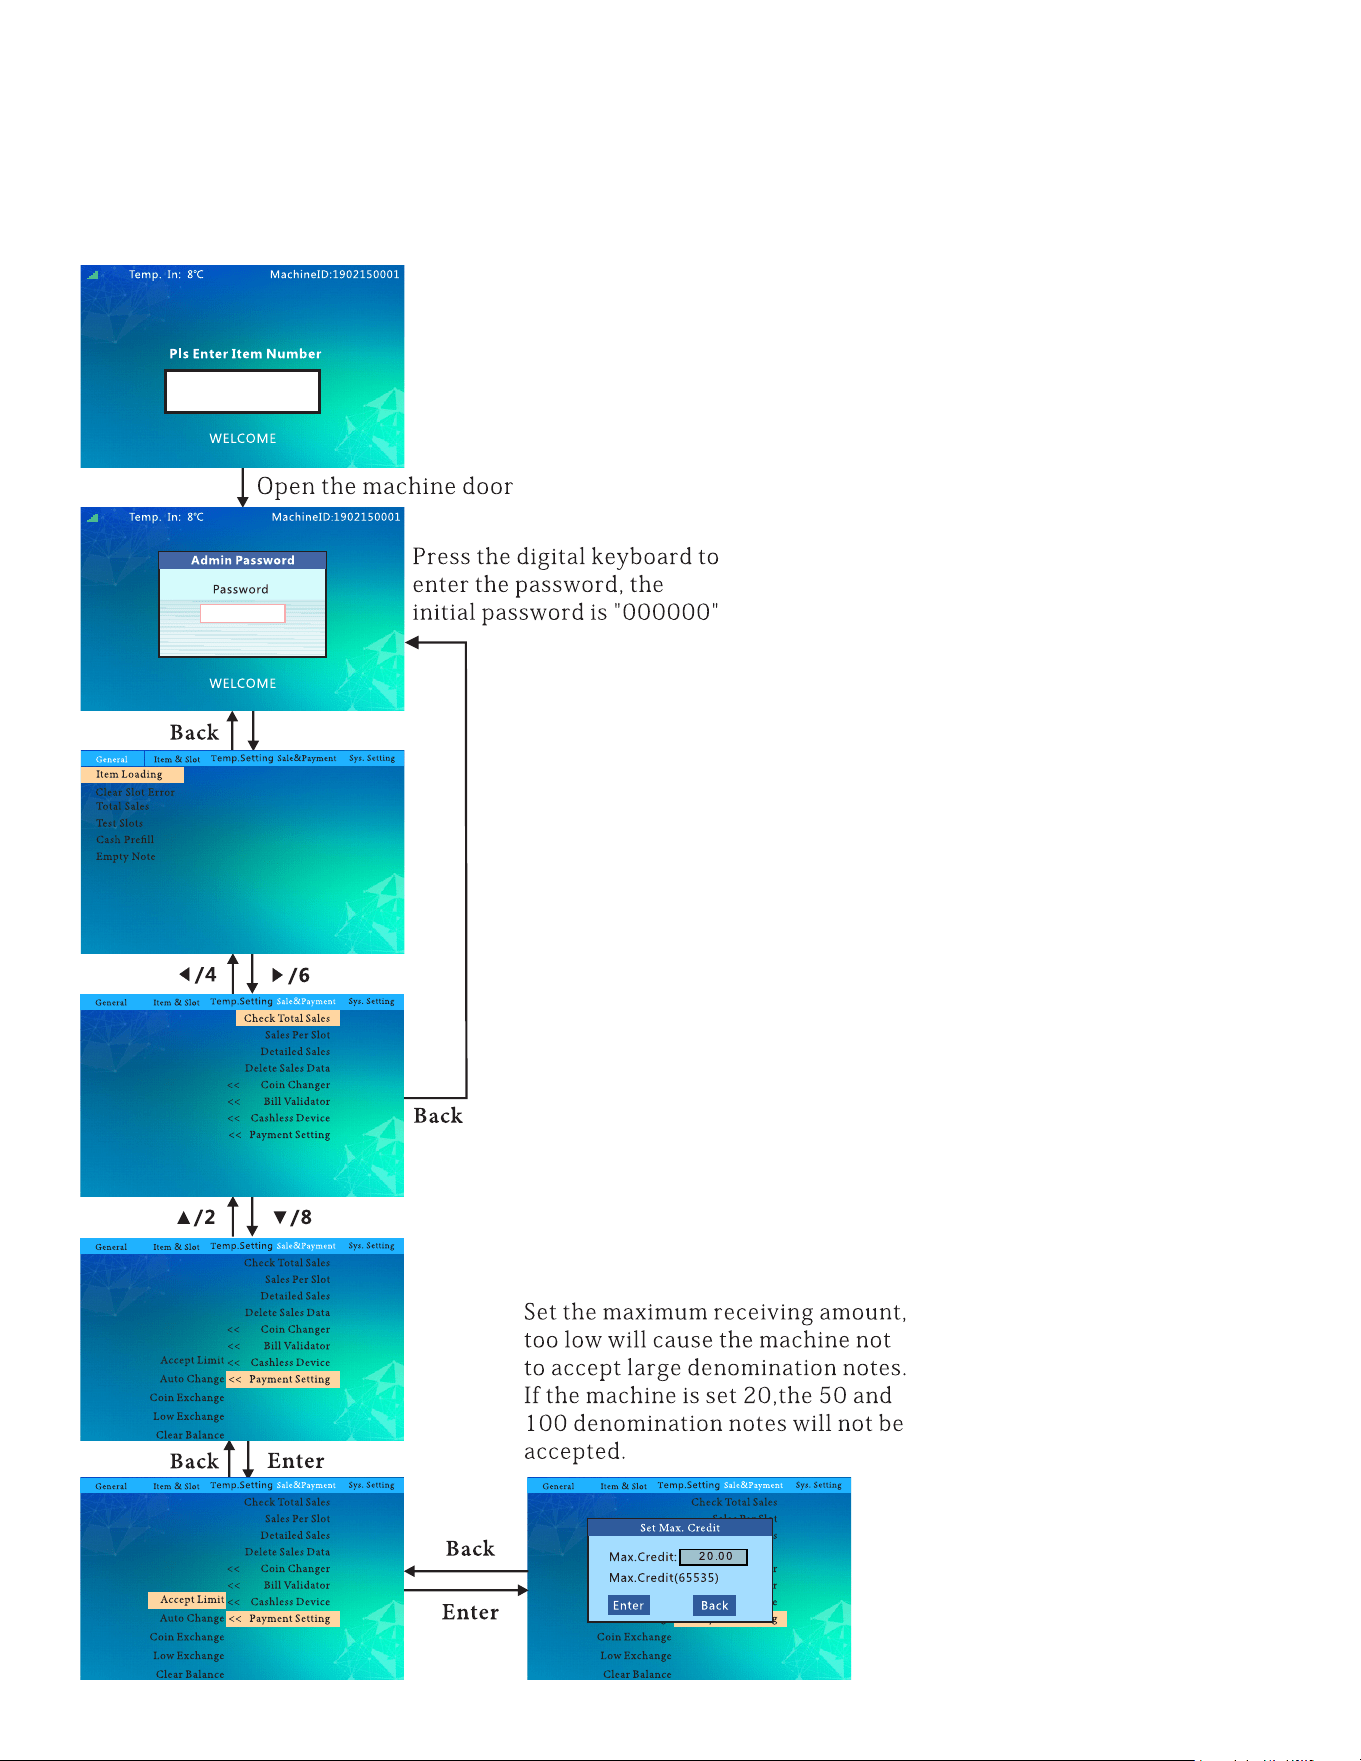
Set Max Credit:

39
Set Auto Change Dispensing:
40
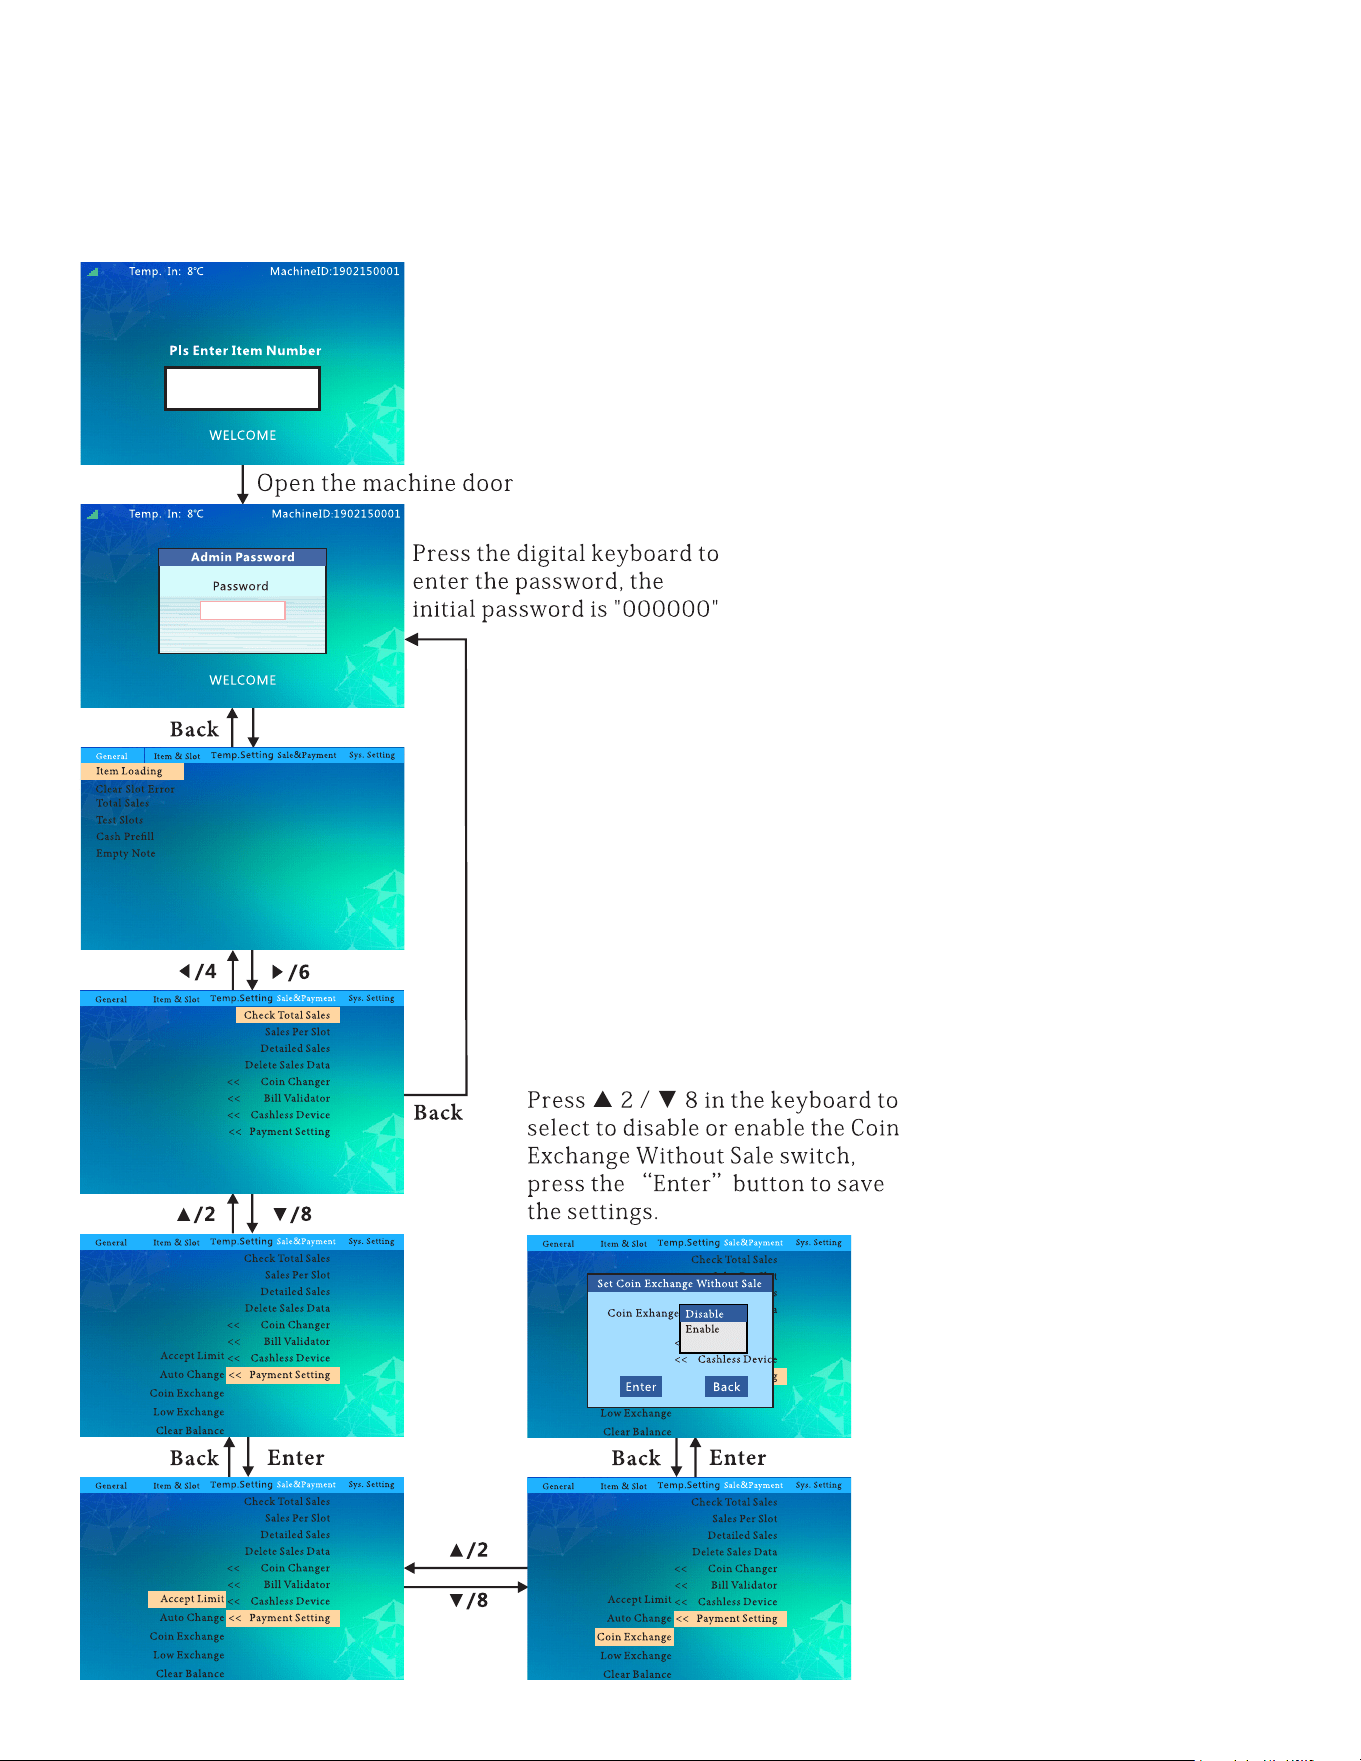
Set Coin Exchange Without Sale:

41
Set Minimum Change:

42
Auto Clear Balance Set Upon Timeout:
43
Set Multi-Vend ON/OFF:
44
Set Multi-Vend Qty Limit:

45
Set Pick Up Code ON/OFF:
46
Inquiry Server Frequency:
47
Network Diagnoses:
48
Set Audio Guidance ON/OFF:

49
Set WIFI Hotspot ON/OFF:
50
Reset Modem WIFI Hotspot Password:

51
Set Display Language:
52
Machine Info:
53
Reset Admin Password:
54
Adjustments
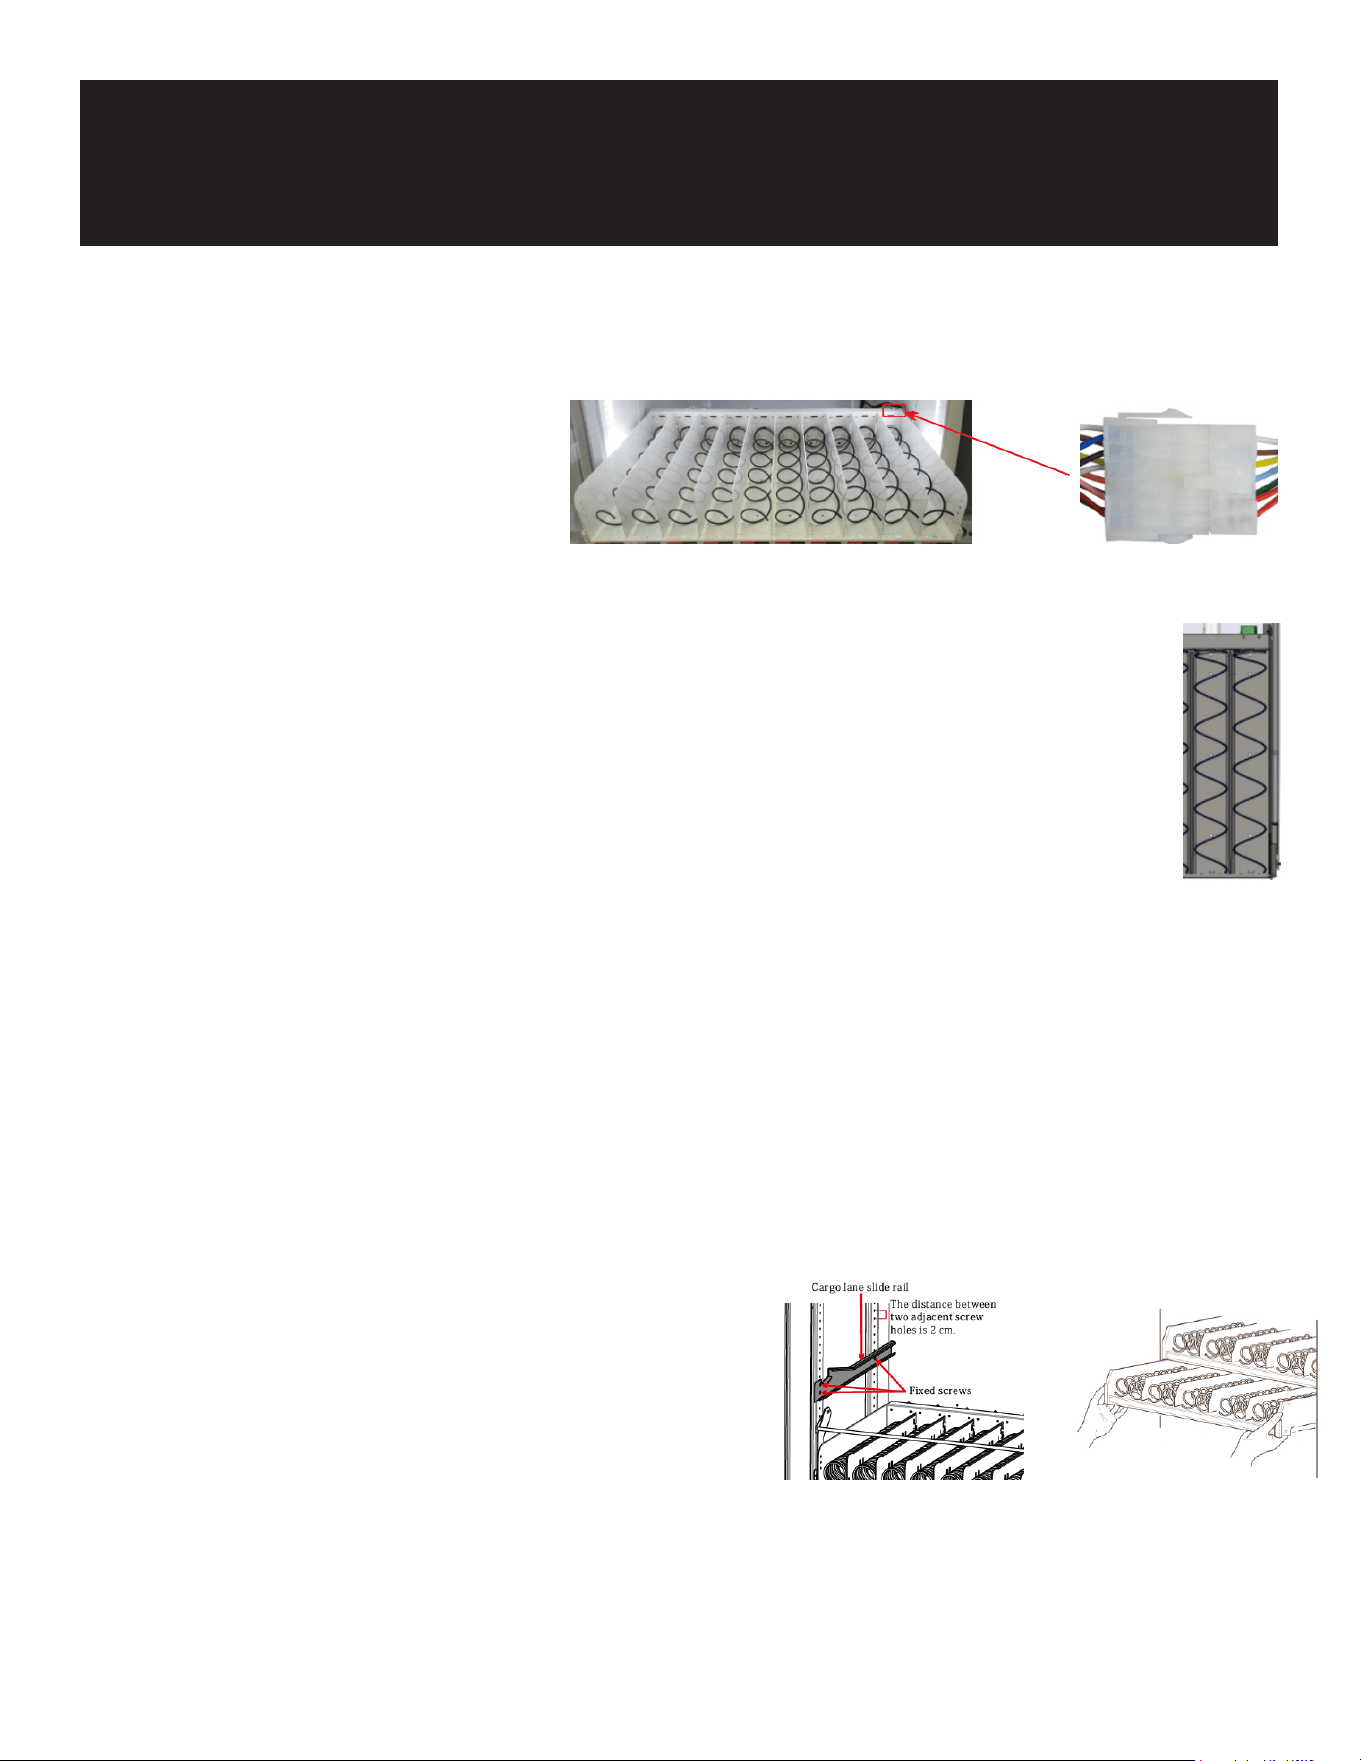
Merge the Cargo Lanes:
Disconnect the Tray:
• Cut the tie-up cable.
• Pull out the tray and disconnect the
terminal behind it.
Remove the Bae:
• Unscrew the spring on the right side of the cargo lane to be merged.
• Disassemble the middle bae screw (the plastic bae can be pushed directly inward
and removed).
• Ensure the bae xed by rivets does not support the merged cargo lane.
Replace the Spring and Price Tag:
• Disassemble the right spring and replace it with the left-handed spring.
• Remove the price tag of the right cargo lane and use the price tag of the left lane (e.g., after merg-
ing lane 141 and lane 142, the merged lane is 141).
Reconnect the Motor Wire:
• Pull out the plug of the motor wire on the right side of the cargo lane and insert it into another
jack.
• Connect the merged tray to the terminal.
• Arrange and bind the wiring harness and push it into the main cabinet.
• In the software menu, set the corresponding lane into the merged lane.
Adjustment of Layer Height
Disconnect the Tray:
• Cut the tie-up cable.
• Pull out the tray and disconnect the terminal behind it.
Adjust the Slide Rail:
• Use a screwdriver to loosen and remove the screws of the cargo lane slide rail.
• Adjust the slide rail to the appropriate height and x it with screws (ensure the height of the slide
rail on both sides is the same).
• Reconnect the Tray:
55
Connect the tray terminals.
• Tie up and bind the lane wiring harness.
• Push the lane into the main cabinet.
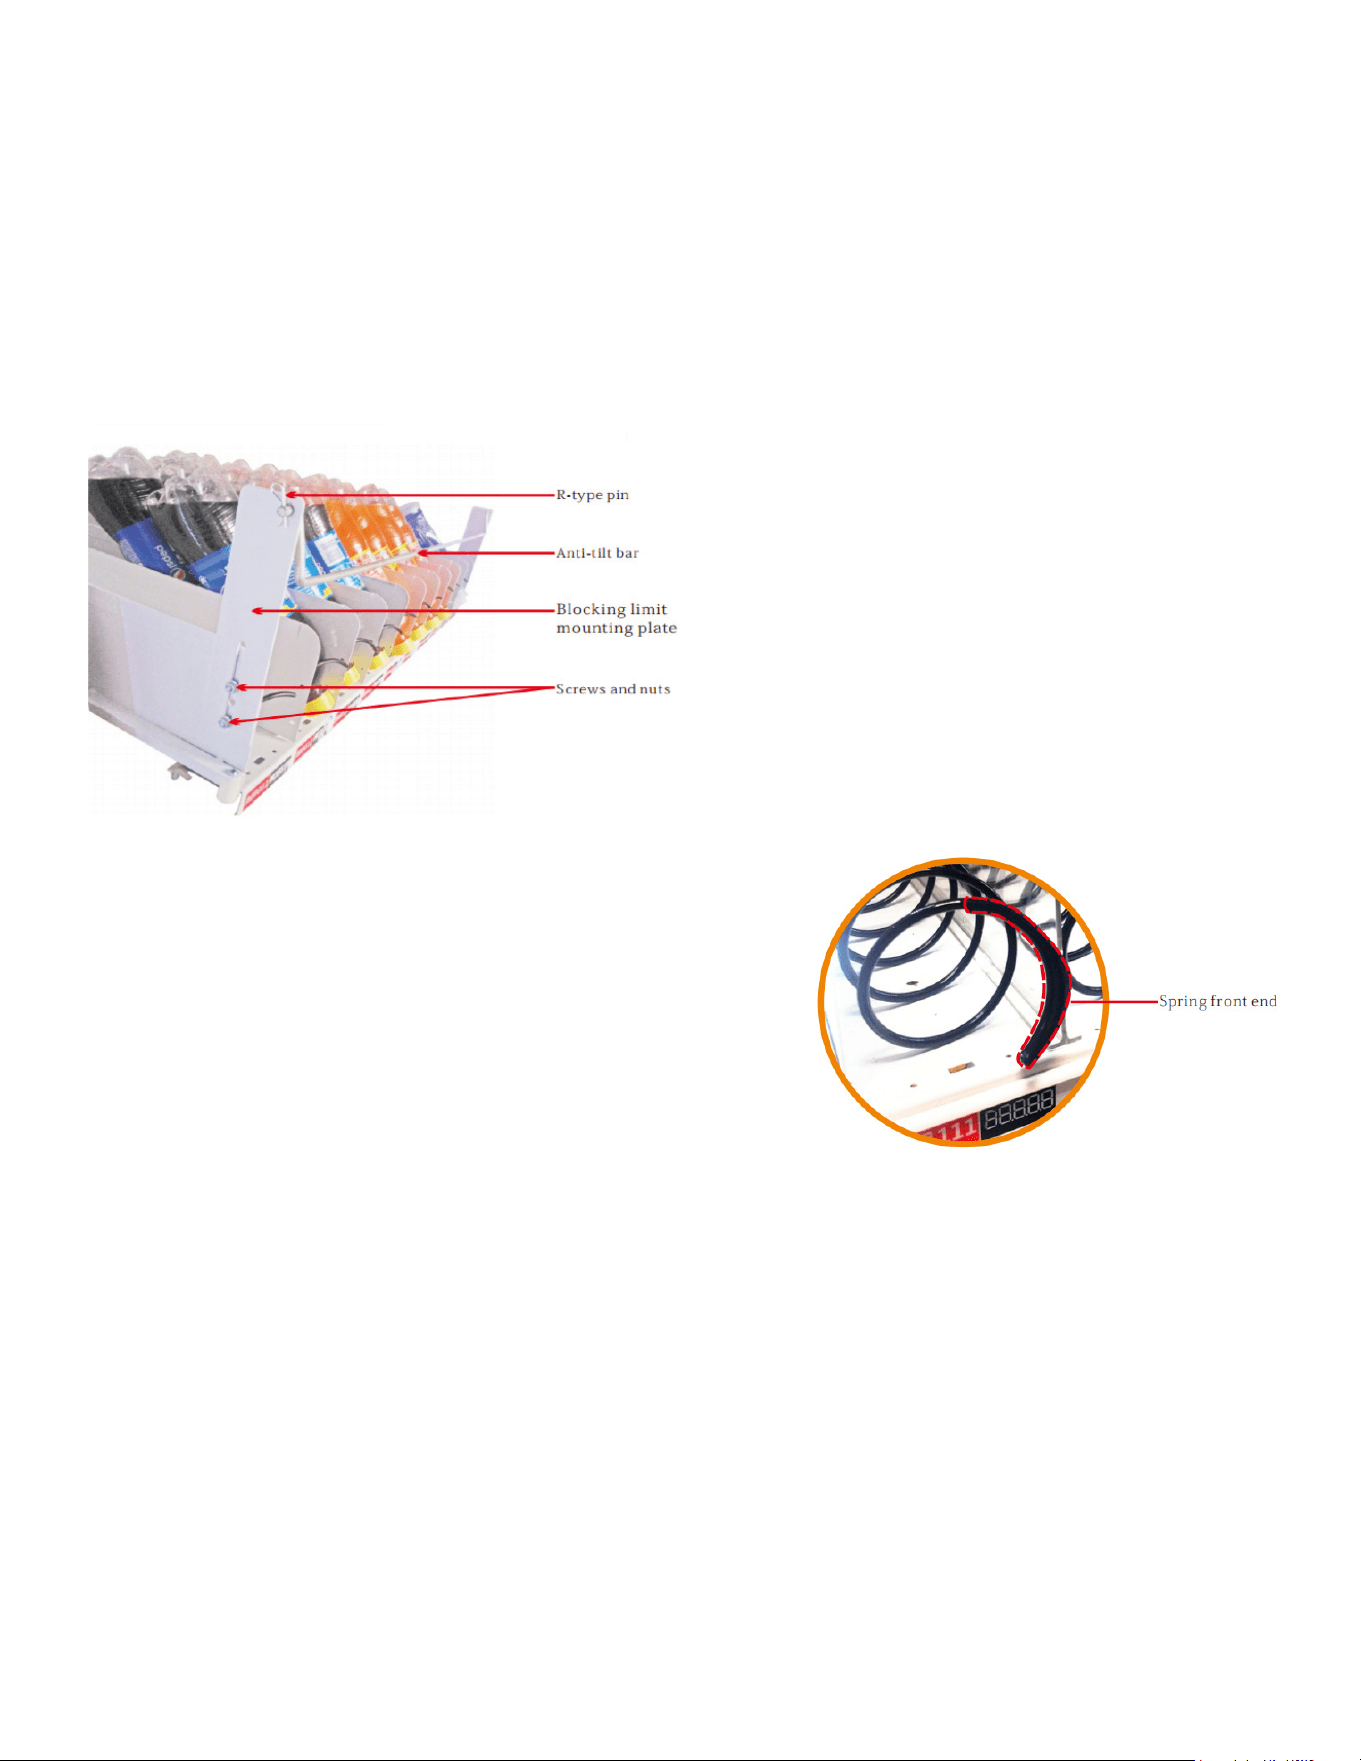
Installation of Blocking Device
Installation of the blocking device is to prevent taller products from falling forward,
and the upper end of item leaning against the glass, which causes the spring to
be unable to push the product out of the lane.
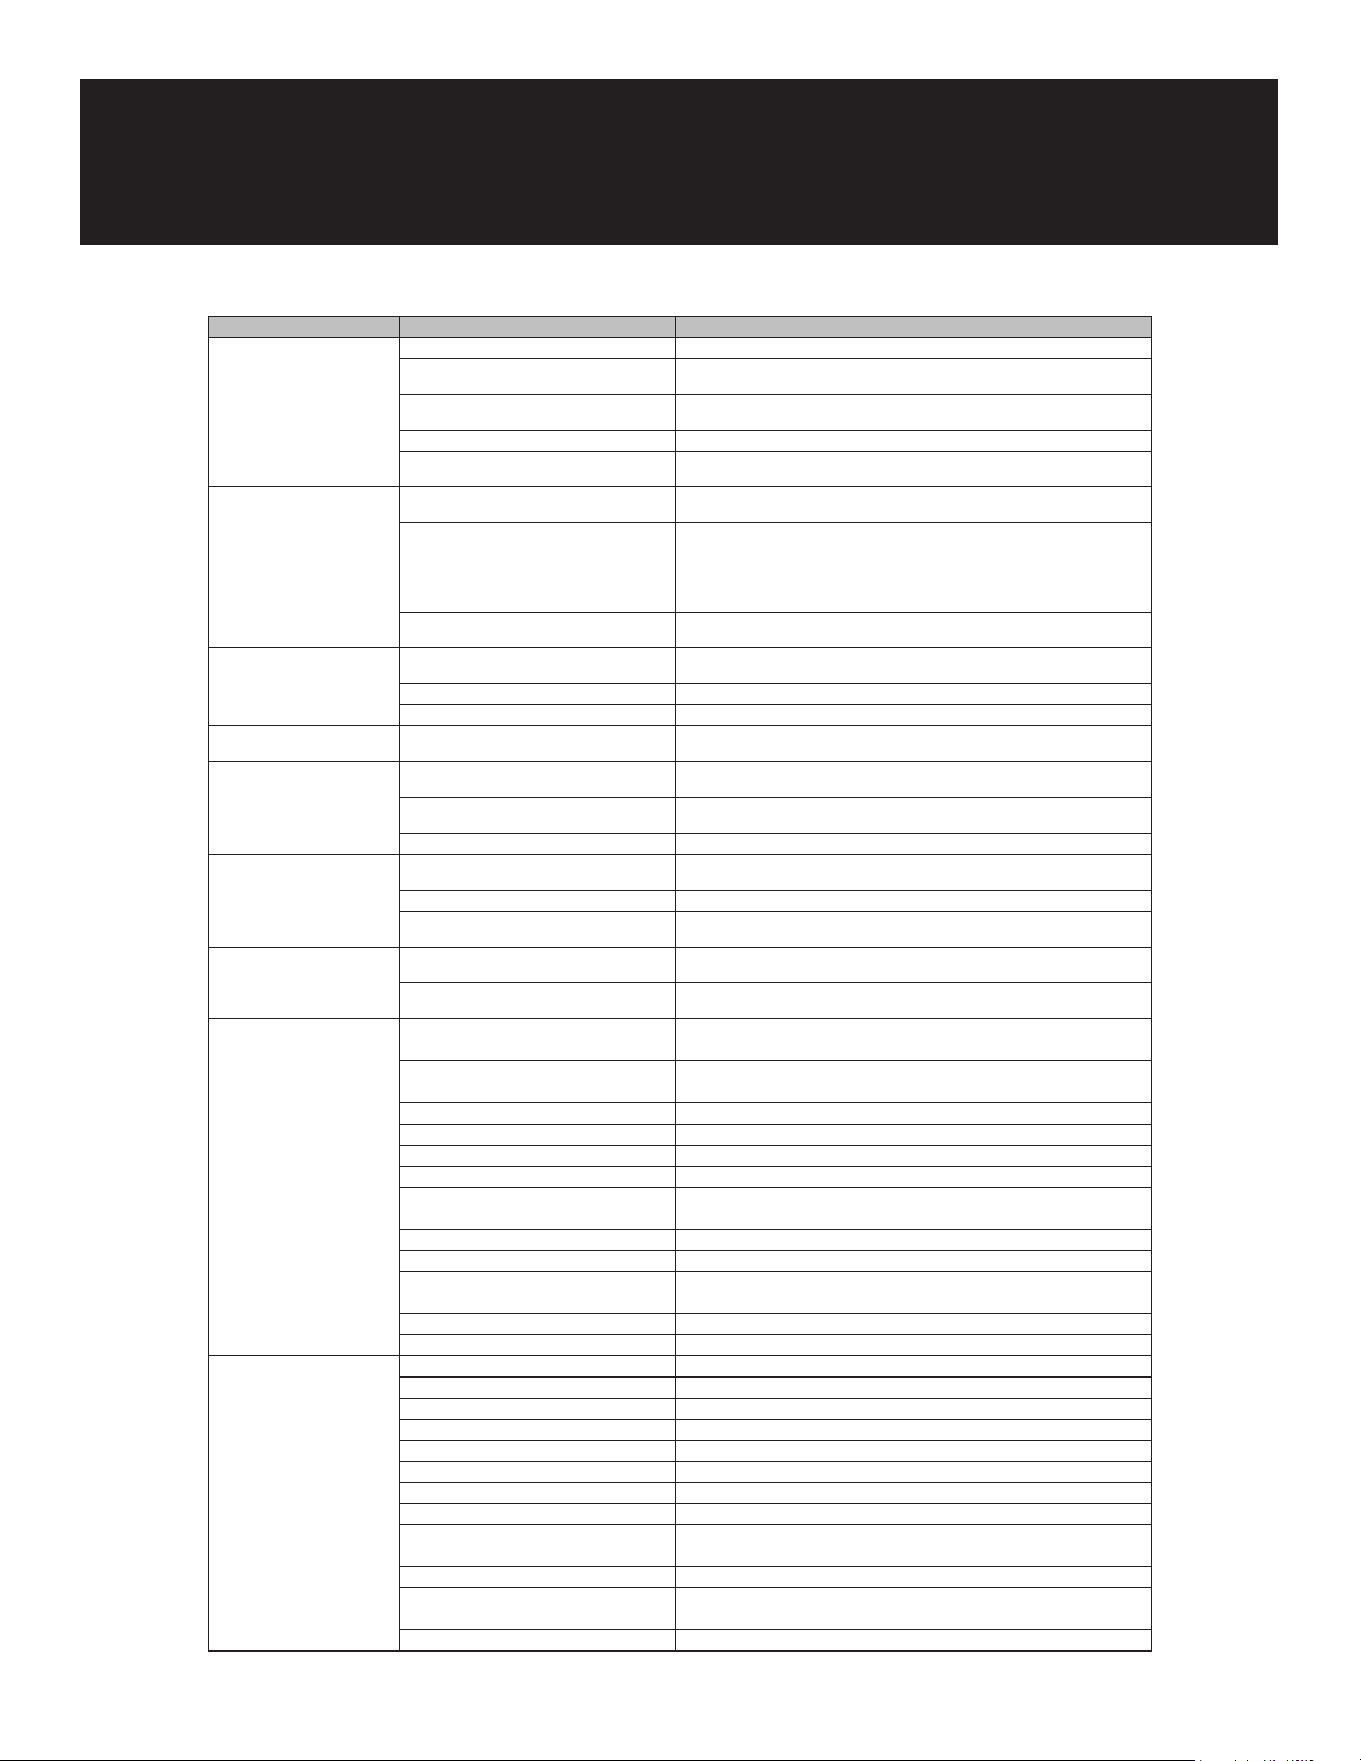
Installation of spring front end
The front end of the spring is used for some cargo lanes with
thinner products when
the goods can not be pushed out at one time.

56
Vending Machine Daily Management, Maintenance, and Cleaning
Cleaning Schedule
- Every Time You Replenish Goods:
• Wipe the exterior of the vending machine.
- Monthly:
• Clean the pickup slot.
• Clean the cargo lane.
• Clean the metal keyboard.
• Clean the delivery device.
• Clean the panel.
• Inspect the LED light.
- Every Six Months:
- Clean the evaporator.
- Clean the condenser.
- Test the leakage protection.
- Inspect the overall installation status.
How to Clean the Vending Machine
- Regular Dusting:
Use a dry cloth to wipe away dust from the machine.
- Removing Dirt:
For light dirt, use a cloth dampened with water.
For heavier dirt, use a cloth with diluted neutral detergent.
- Avoid Damage:
Do not use organic solvents or acidic/alkaline liquids to clean the machine; these can damage the
panel.
Avoid chemical solvents like paint thinners and banana water.
- Safe Cleaning Practices:
Avoid using solvents that can cause accidents.
Clean the evaporator and condenser with water every six months. For detailed instructions, refer to
Maintenance

57
the "Refrigerator Cleaning Guide" on the machine.
Radiator Cleaning:
• Open the machine door and unplug the machine.
• Remove the bezel or cargo bucket.
• Use a non-metallic brush to clean the dust from the radiator’s gaps.
• Testing the Leakage Protection Switch
Perform the Test:
• Press the test switch on the power plug.
• If the power indicator turns off and the machine powers down, the test is successful.
Restarting the Machine:
If the test is normal, plug the machine back in and wait three minutes before turning it on.
58
Issue Possible Causes Solution
The machine has no power. The power switch is not turned on. Turn on the machine power switch.
The fuse burned out. Check the machine to make sure it is not short-circuited and replace the fuse
with the same specications.
The circuit breaker is OFF. Check the machine to ensure no short circuits and turn on the circuit breaker.
The power plug is damaged. Seek professional help to replace power plugs.
110V power is not connected. Check the power supply to ensure the 110V power supply is normally
connected.
Not connected to the
Internet.
No signal. Power off and restart the machine.
Excessive trac or downtime of the card. Check if the antenna connection is properly installed and the antenna
extension cable is intact. Conrm that the antenna is placed on top of the
machine. Replace the SIM card with one from a different operator. Change
the position of the machine (there might be no network signal in that area).
Recharge the SIM card.
SIM card locked. Contact technical support to unlock; the SIM card can only be bound to the
specied machine, otherwise, the card may be locked.
Lighting strip does not
illuminate.
The power switch is not turned on. Turn on the lighting strip.
Loose connection of the lighting strip. Check the sockets of the lighting strip and re-plug them.
The lighting strip is damaged. Contact technical support to replace the lighting strip.
Unable to choose a cargo
lane.
Cargo lane failure not cleared up. Clear up cargo lane failures.
Delivery failure. The cloud background is inconsistent with
the product code set in the machine.
Synchronize the cloud background and the machine's product encoding.
The goods do not match the cargo lane. Replace the goods to match the cargo lane or adjust the cargo lane to
accommodate the size of the goods.
Cargo lane capacity setting error. Clear cargo lane failures and set the correct cargo lane.
The machine does not
refrigerate.
Refrigeration not turned on. Turn on the refrigeration (see the "Set Temperature Control Mode" section in
the manual).
Long-term use of the machine. Contact technical support to add refrigerant.
Too much dust in the condenser. Clean the dust in the condenser at the back (ensure regular maintenance and
cleaning).
Failure to reach the preset
temperature.
High ambient temperature due to product
sources and the machine.
Pre-cool goods in advance when they are popular. Change the placement
environment of the machine.
Poor ventilation of the machine. Ensure a clearance of 8 inches or more from the rear and left and right sides
of the machine to ensure good ventilation.
Machine won't accept
coins
Power issue with the coin system 1. Check if the MDB line is connected properly.
2. Make sure there's 24V power going to the coin changer and bill
validator.
Software not enabled 1. Make sure the coin type is enabled in the software settings.
2. Make sure the bill type is enabled in the software settings.
Interference from high frequency Remove any nearby high frequency devices (like antennas).
Coin system not installed correctly 1. Make sure the coin changer is mounted properly.
2. Check if the coin return button is stuck and x it so it can move
freely.
Coin passage is dirty Clean the coin passage.
Coin recycler not detected If reinstalling doesn't work, send the machine for repair.
Large bills not accepted 1. Check if the machine is set to accept large bills and adjust the
settings if needed.
2. If the coin hopper is full, empty it so users can get their change.
Bill is jammed Clear the jammed bill.
No change given Power issue 1. Check if the MDB line is connected properly.
2. Make sure there's 24V power going to the coin system.
Software not enabled 1. Make sure the coin change switch is on.
2. Make sure the bill storage switch is on.
No money in the coin recycler Pre-ll the coin recycler with coins.
Low exchange setting is wrong Adjust the setting for change so it matches the bill value.
No change for bills Rell the coin and bill areas.
Bill jam (indicator light ashing) 1. Check for jammed coins and reload if necessary.
2. Inspect coins for deformation or foreign objects and remove them.
3. Make sure the coin recycler is properly attached.
4. Check if the coin return mechanism is damaged and x or replace
it.
5. Ensure the coin changer base is correctly installed.
Troubleshooting

59
WARRANTY
LIMITED WARRANTY
Koolmore Supply, Inc. extends a limited warranty to the original purchaser, guaranteeing that this Koolmore
product is free from manufacturing defects in material or workmanship for one year from the date of
purchase.
Should you discover any such defect within the warranty period, Koolmore Supply, Inc., reserves the right to
repair or replace the product without charge, or to cover the cost of replacement parts and repair labor needed
to correct defects present at the time of purchase or resulting from regular usage, when the appliance has been
installed, operated, and maintained as per the instructions provided.
At its sole discretion, Koolmore Supply Inc. may decide to replace the product. In such an event, your replace-
ment appliance will carry the warranty for the remaining term of the original unit's warranty period.
This warranty is valid exclusively to the original purchaser of the product and only applicable within the United
States. The warranty commences from the date of original consumer purchase. Proof of the original purchase
date will be required to obtain service under this warranty.
Under this limited warranty, your sole and exclusive remedy will be product repair, as outlined above. All
services must be provided by a Koolmore-designated service company.
To claim warranty or request repair service:
Email support@koolmore.com. Please include your name, address, phone number, warranty repair request,
and a copy of your proof of purchase receipt. Alternatively, visit koolmore.com and use the contact us page. A
Koolmore customer service representative will promptly arrange service for your appliance.
We thank you for choosing Koolmore.
WARRANTY EXCLUSIONS
This limited warranty will not cover:
1. Failure of the product to perform during power failures or interruptions,
or due to inadequate electrical service.
2. Damage incurred during transportation or handling.
3. Damage caused by accidents, vermin, lightning, winds, re, oods, or acts of God.
4. Damage resulting from accidents, alterations, misuse, abuse, improper installation, repair, or maintenance.
This includes using any external device that alters or converts the voltage or frequency of
electricity.
5. Unauthorized product modications, repairs by unauthorized centers, or use of non-approved
replacement parts.
6. Abnormal cleaning and maintenance not aligned with the user's manual.
7. Use of incompatible accessories or components.
8. Any costs associated with repairs or replacements under these excluded circumstances shall be the
responsibility of the consumer.

