
Technical Support and E-Warranty Certificate www.vevor.com/support
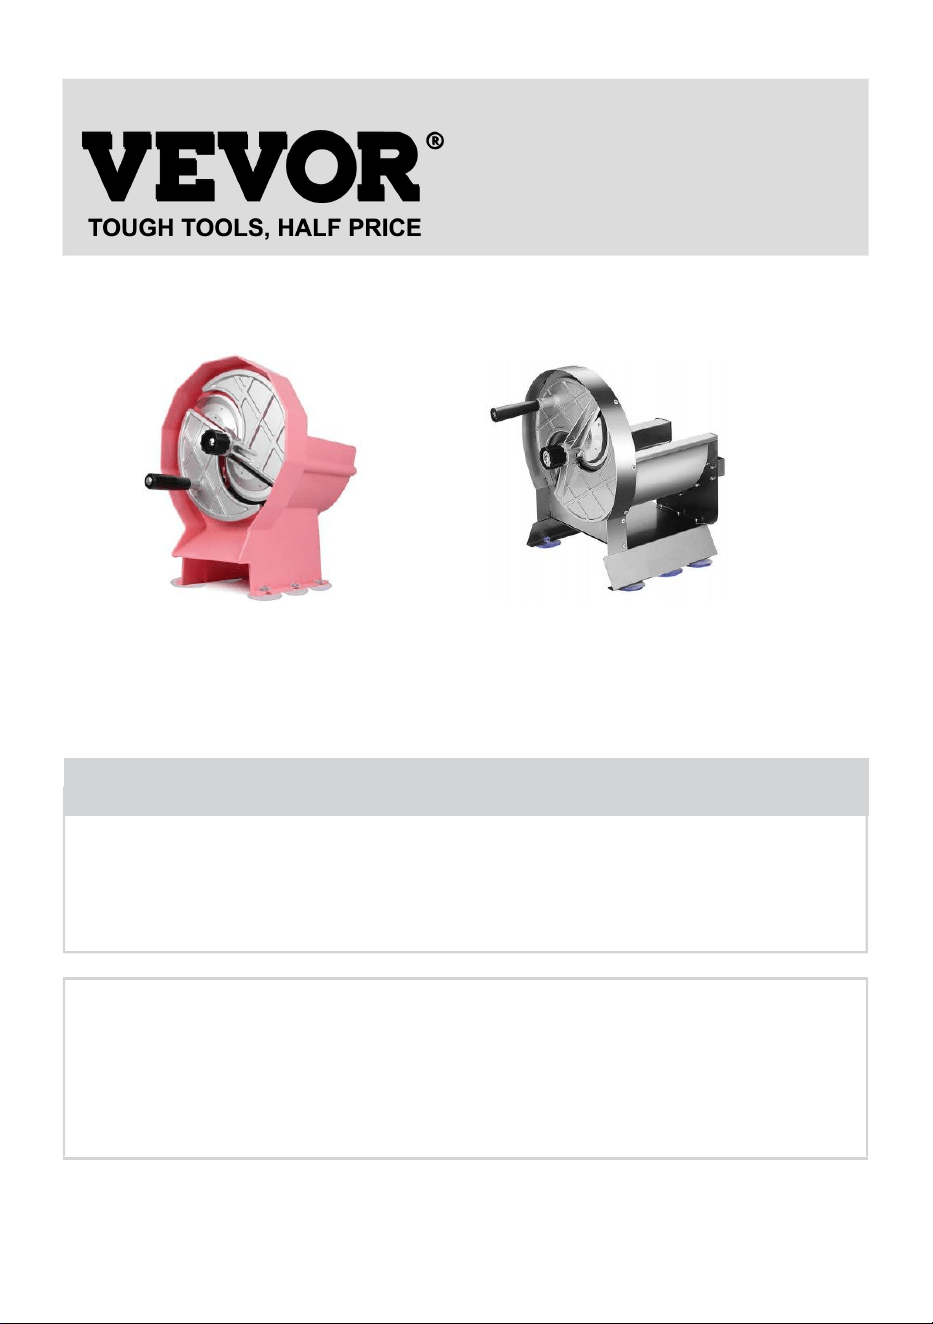
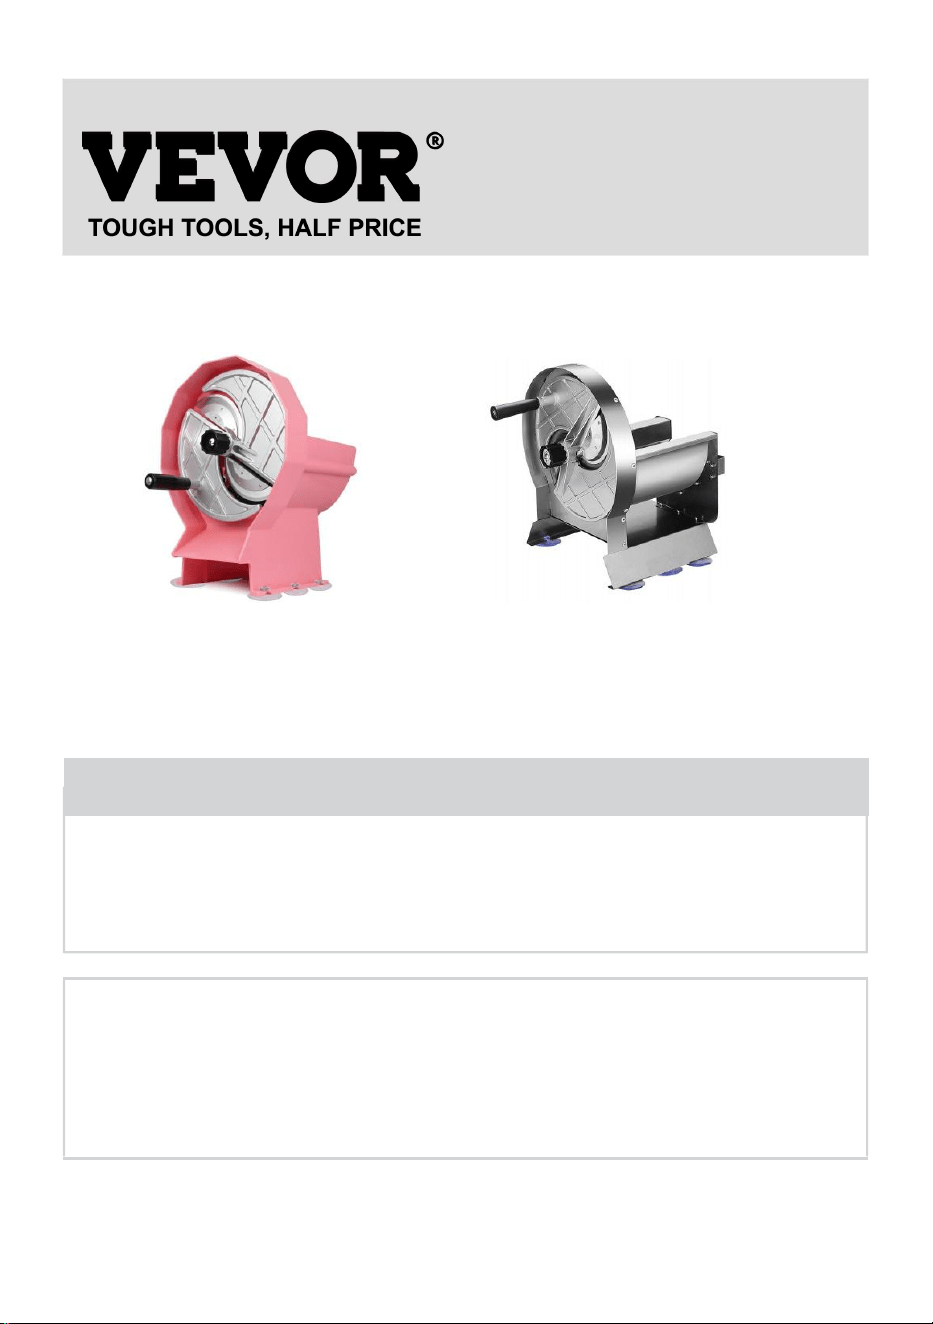
Multifunctional Fruit and
Vegetable Slicer
MODEL:SL-P01/SL-02
We continue to be committed to provide you tools with competitive price.
"Save Half", "Half Price" or any other similar expressions used by us only represents an
estimate of savings you might benefit from buying certain tools with us compared to the major
top brands and does not necessarily mean to cover all categories of tools offered by us. You
are kindly reminded to verify carefully when you are placing an order with us if you are
actually saving half in comparison with the top major brands.

- 1 -
MODEL:SL-P01/SL-02
SL-P01 SL-02
Have product questions? Need technical support? Please feel free to
contact us:
Technical Support and E-Warranty Certificate
www.vevor.com/support
NEED HELP? CONTACT US!
This is the original instruction, please read all manual instructions
carefully before operating. VEVOR reserves a clear interpretation of our
user manual. The appearance of the product shall be subject to the
product you received. Please forgive us that we won't inform you again if
there are any technology or software updates on our product.
Multifunctional Fruit and
Vegetable Slicer

- 2 -
IMPORTANT SAFEGUARDS
Warning-To reduce the risk of injury, user must read instructions
manual carefully. Always follow basic safety precautions when
using these devices. These include:
1.The device should not be used with children. There are very sharp
blades on the device. Children may encounter injury accidents. Therefore,
this product should be placed in a position not touched by children.
2.For optimal operation and service life of the device, please follow the
instructions.
3.Food acids will make blades dull and corrode the metal. Always clean
this food preparation equipment immediately after every use. To maintain
the appearance and increase the service life, clean it daily.
4.The machine blades are very sharp, and care should be taken not to
touch the banging blade or blade directly or to operate with gloves during
operation.
5.Do not put these devices in a dishwasher or other automatic cleaning
device for cleaning.
6.The use of accessories or modifications not provided by the
manufacturer may cause hazards.
7.Only use this equipment for cutting fruits and vegetables! This product is
not suitable for processing foods with a hardness similar to sweet potato.
8.Before using this equipment for the first time, please remove all
packaging and fixing materials according to the illustration and use them
after installation.
9.These devices require regular lubrication. Wipe the guide rod with
mineral oil,food-grade lubricant, or a towel when lubrication is needed. Do
not lubricate with cooking oil or another grease. Otherwise, it will become
viscous and affect the use.
10.Do not cut food beyond the opening of the plate.
11.To replace blade sets, please ensure that the specifications and models
of the blade plate and pressing block are consistent.
WARNING: Sharp Blade Hazard: Blades are sharp and can cause cuts. To

- 3 -
avoid injury from sharp blades, handle with care.
SAVE THESE INSTRUCTIONS
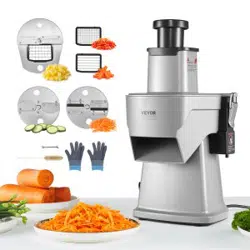
Summarize
This product has a hand-integrated slicer, high efficiency, light structure,
and easy to disassemble and wash. Applicable to various places such as
shops, restaurants, stalls, milk tea shops, canteen, households, and other
fruit and vegetable slice processing. Slice thickness is adjustable. The cut
pieces are even and easy to see. Green environmental protection,
maintain the original flavor, and are welcomed by users.
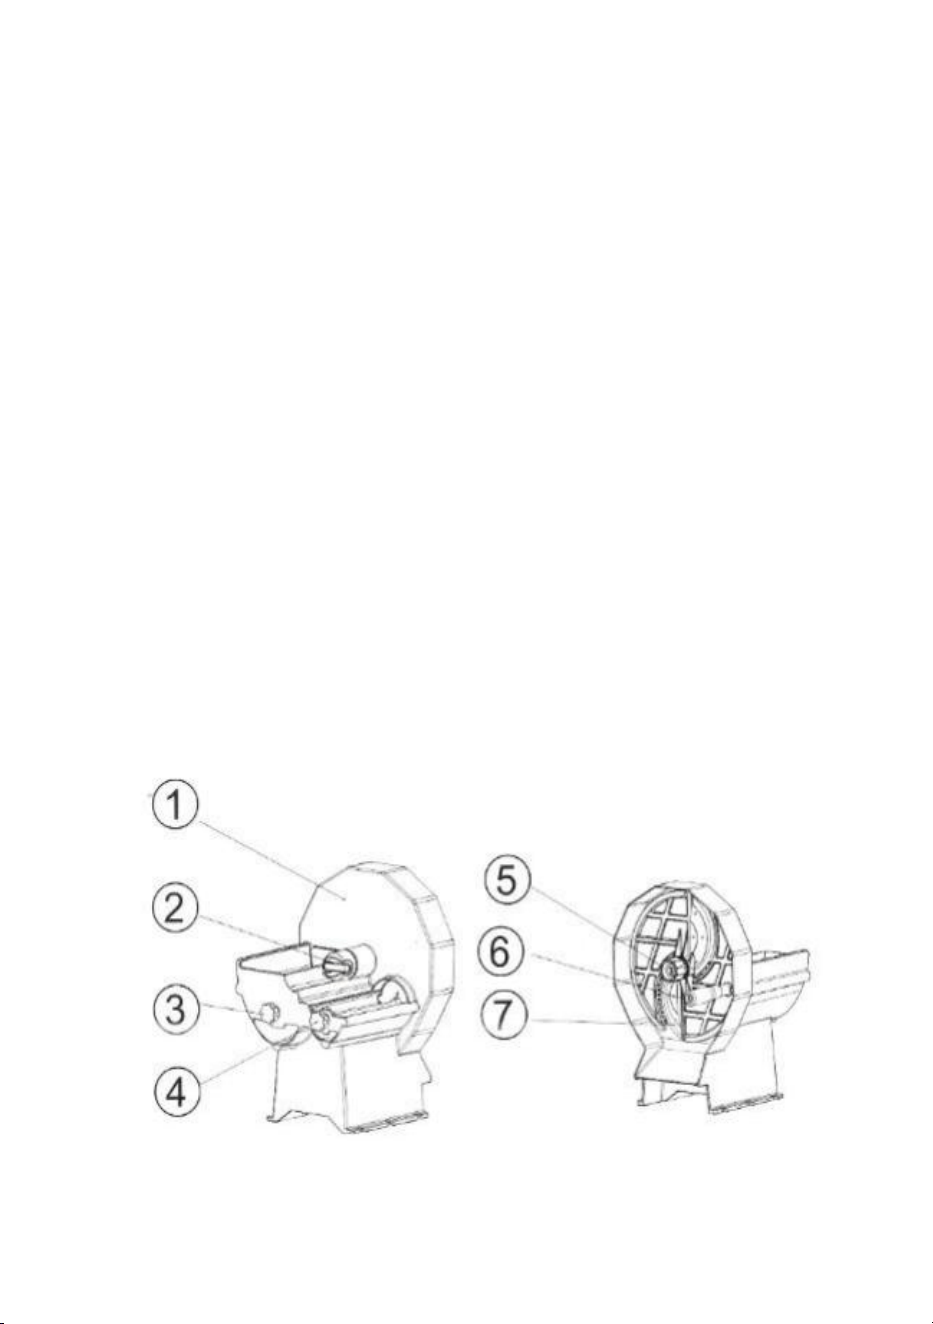
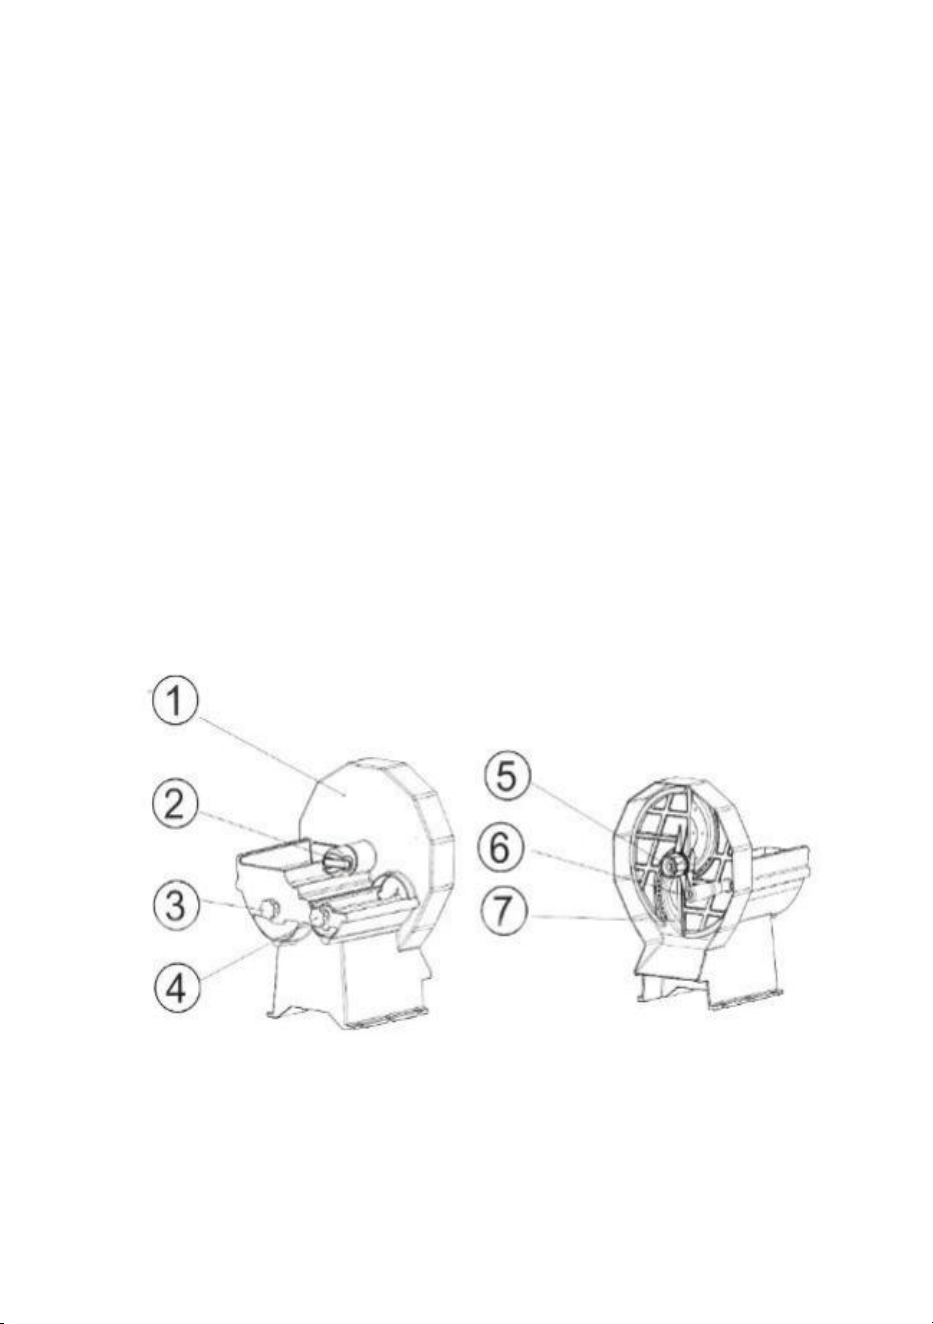
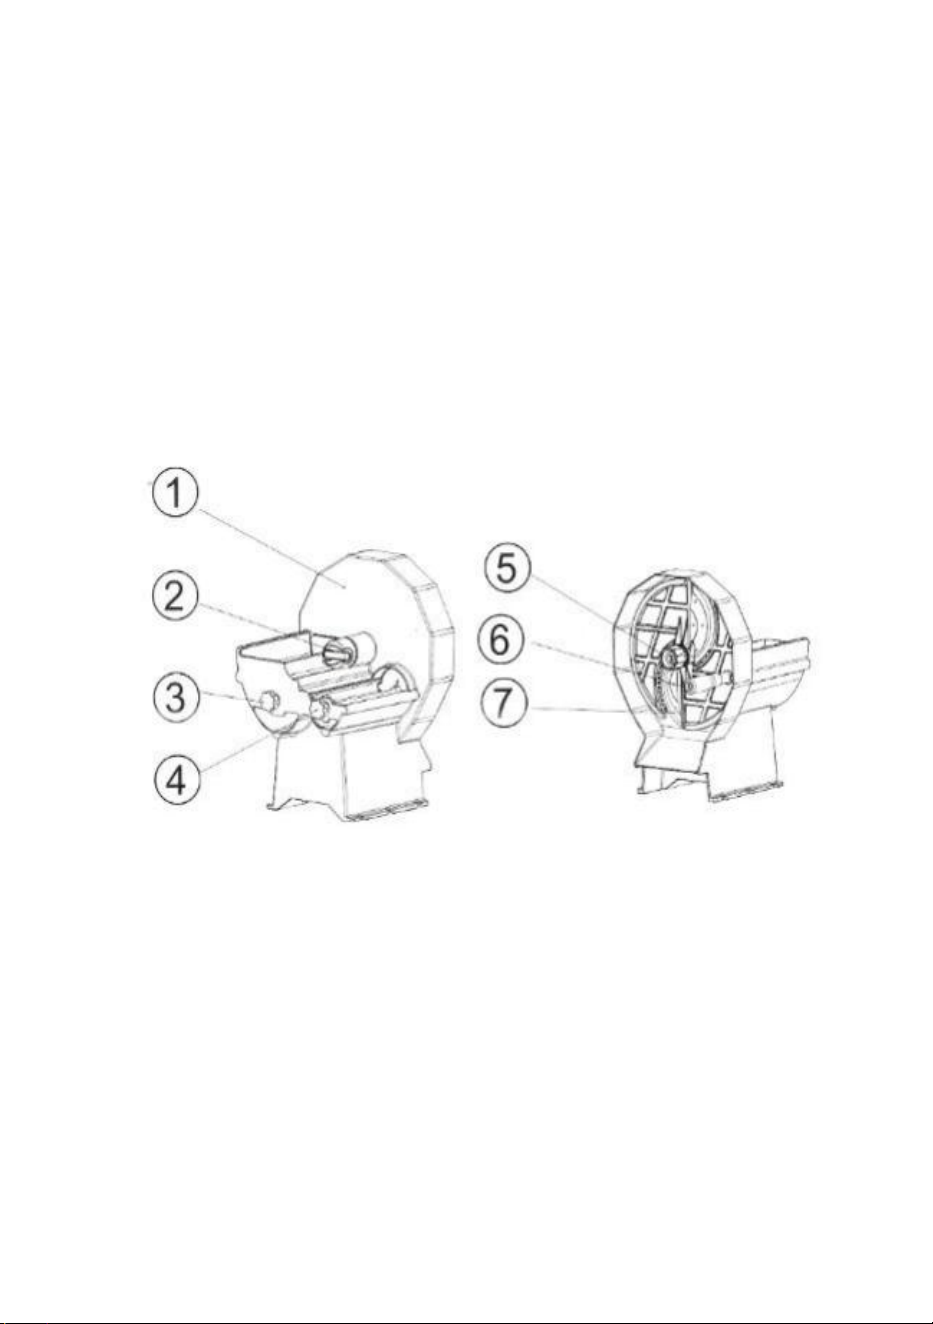
1.Main body
2.Elastic buckle(Cutter Head Fixing Clamp)
3.Large Inlet Food Push Rod
4.Small Inlet Food Push Rod(SL-02 NO)
5.Cutting thickness adjusting handle
6.Turning handle of cutter head
7.Cutting Blade
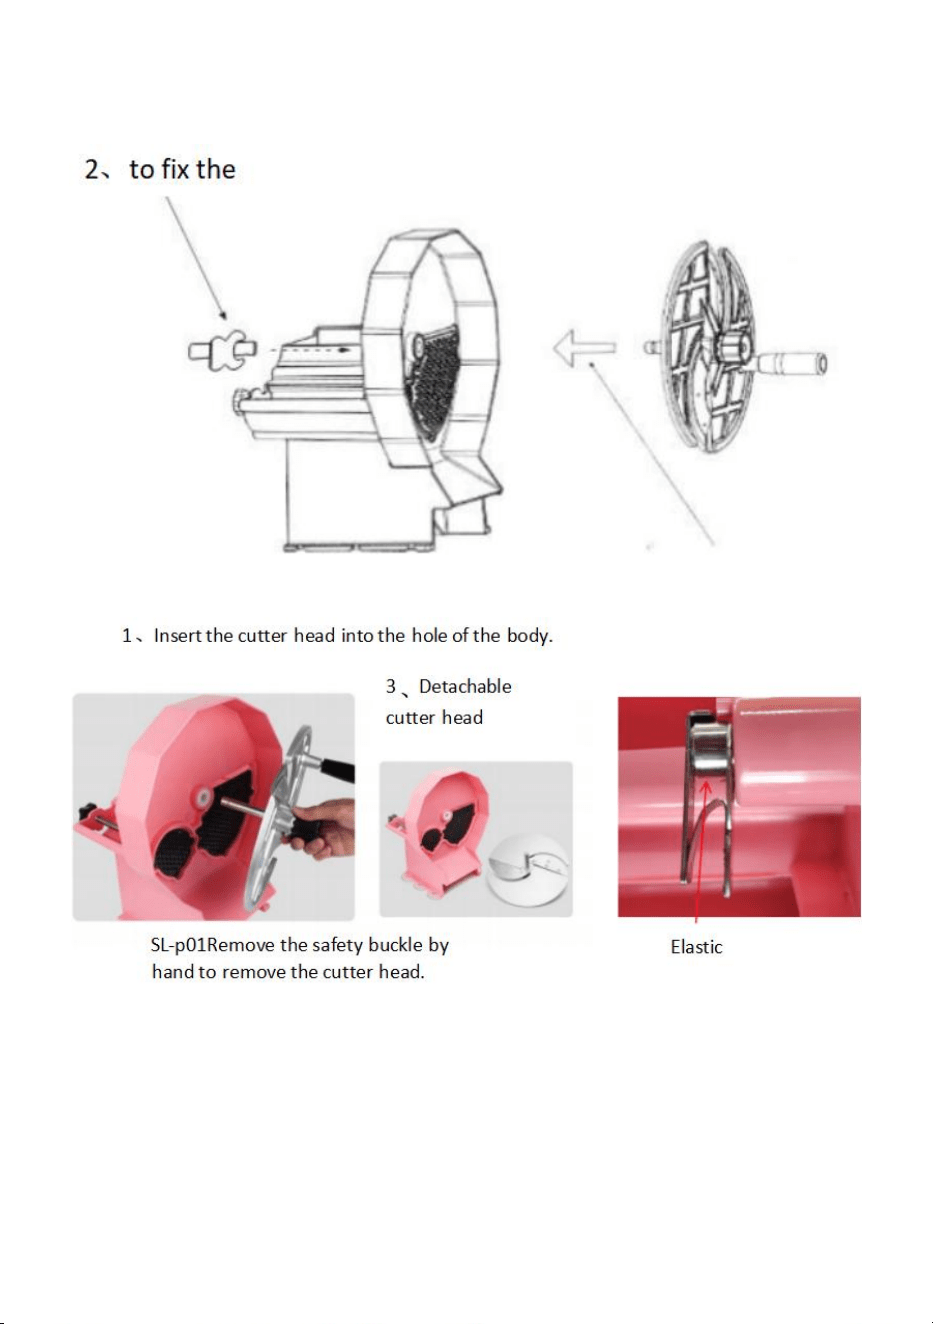
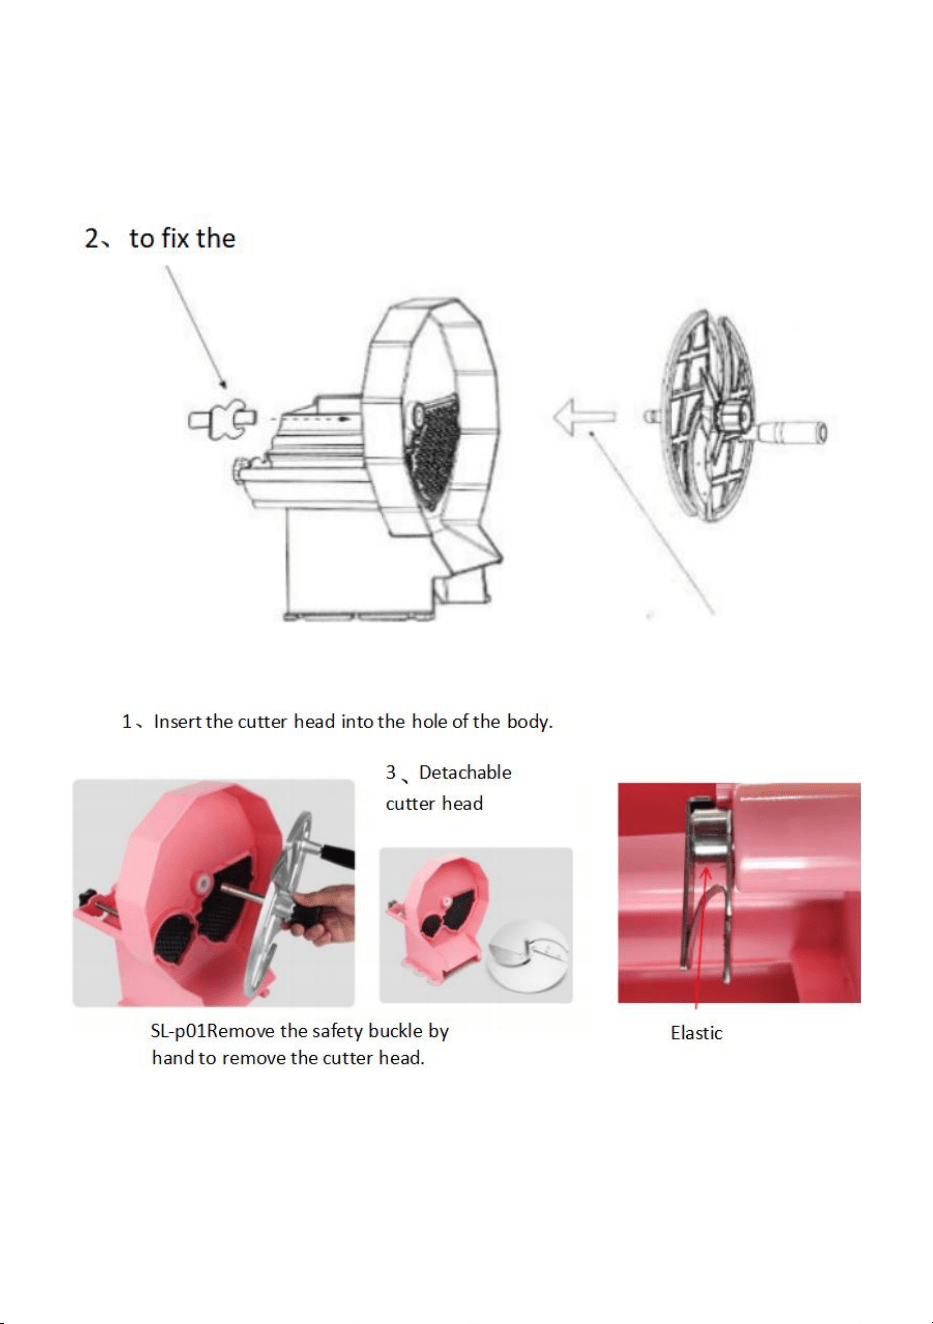
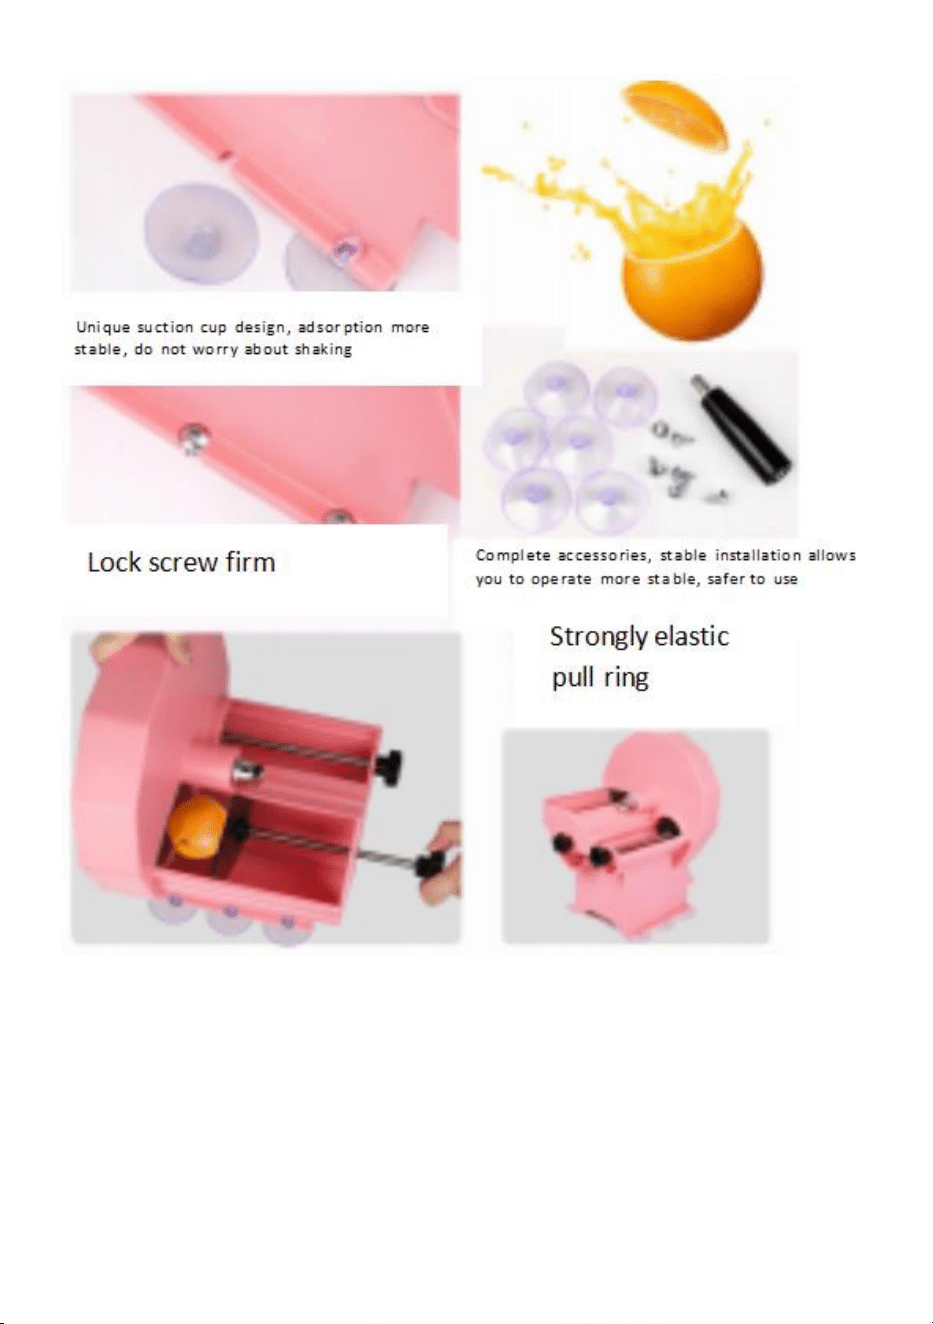
1.Installation operation of the machine
Take out the machine, install the handle on the cutter head with a
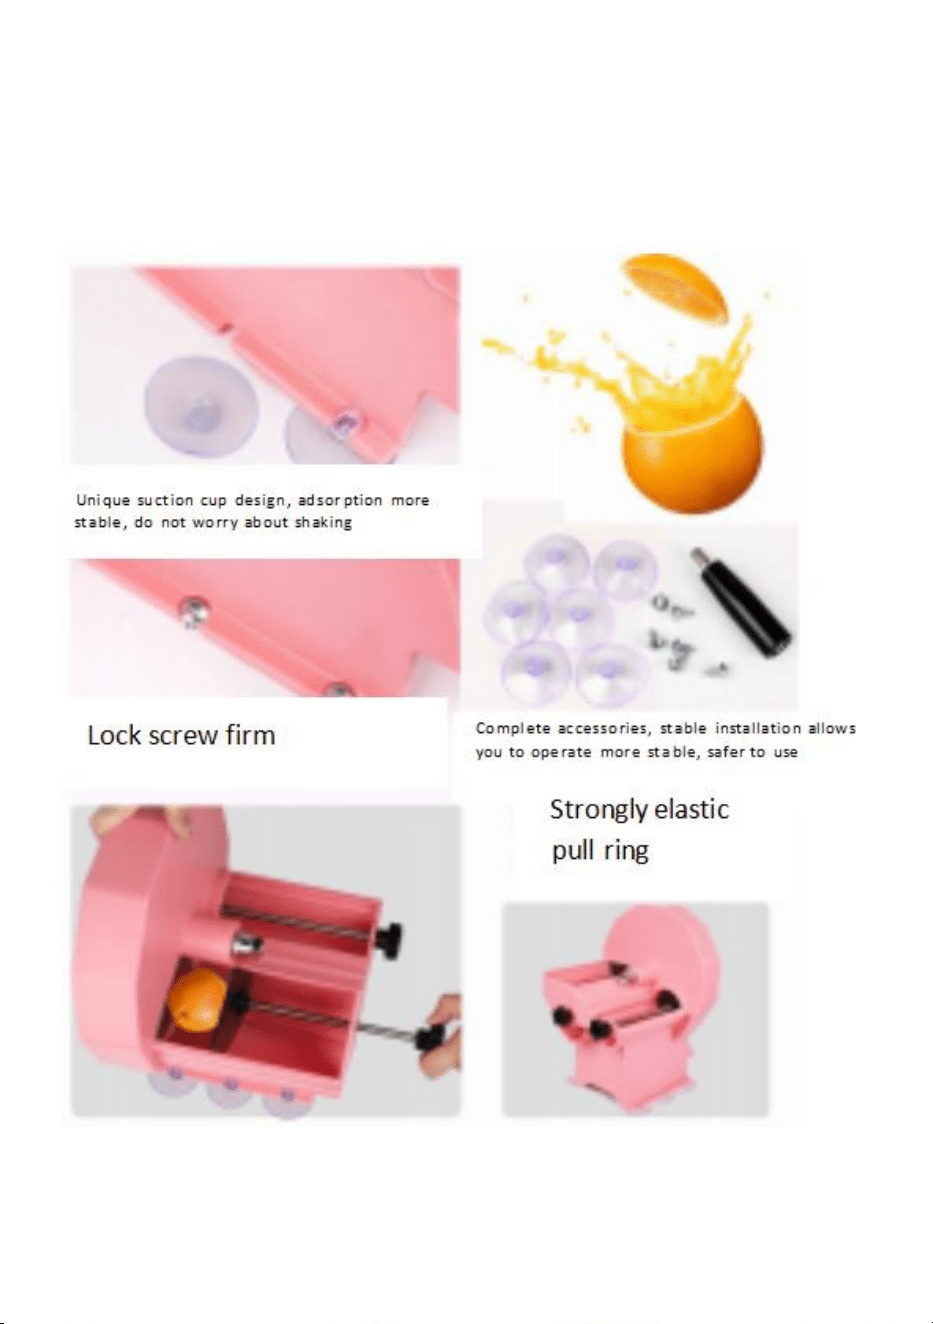
- 4 -
screwdriver and fix the nut with an inner Hexagon wrench. Then the
machine base is sheathed with suction cup (stainless steel, Marble and
other smooth table can be directly with 6 small suction cups; wood and
other non-smooth table can be randomly equipped with screws fixed. The
slicing operation can be carried out after installation.

- 5 -
- 6 -
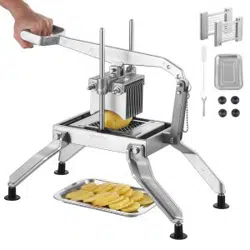
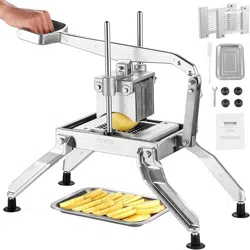
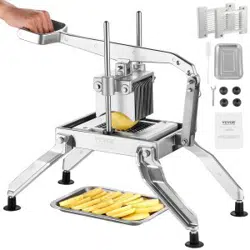
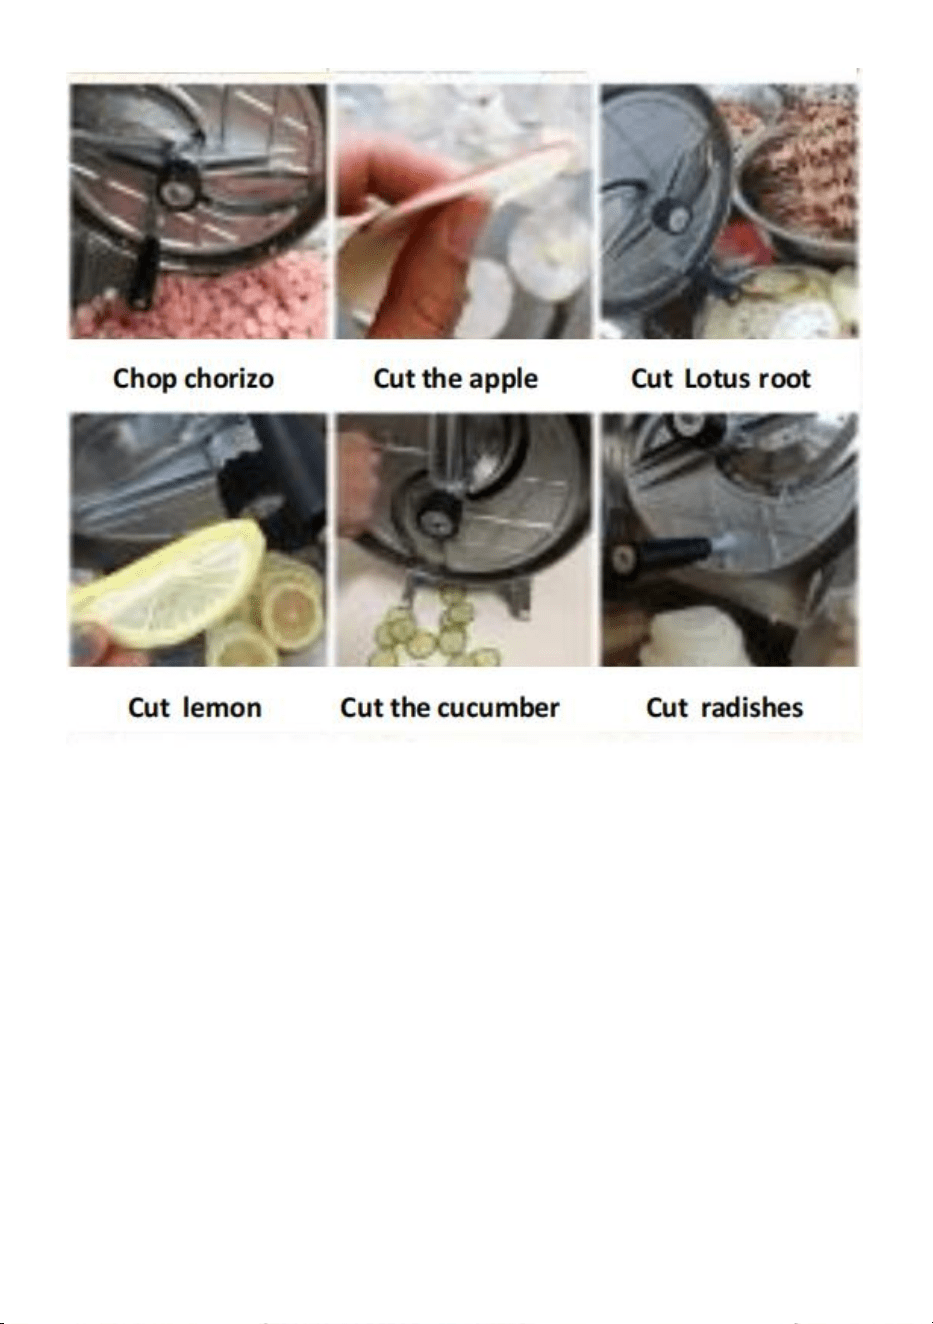
Easy Slice in three steps
Simple operation, everyone can use

- 7 -
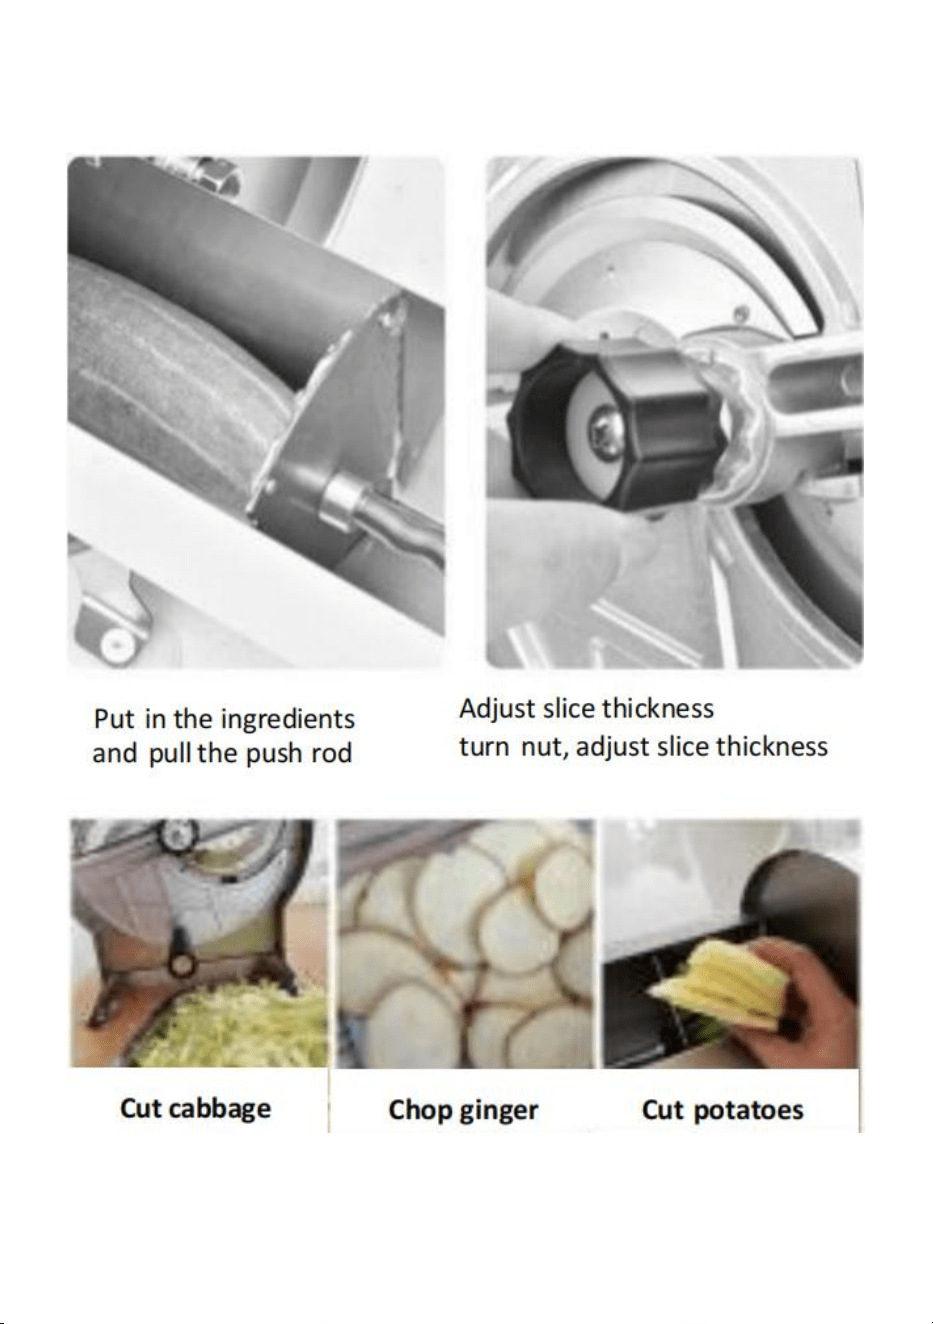
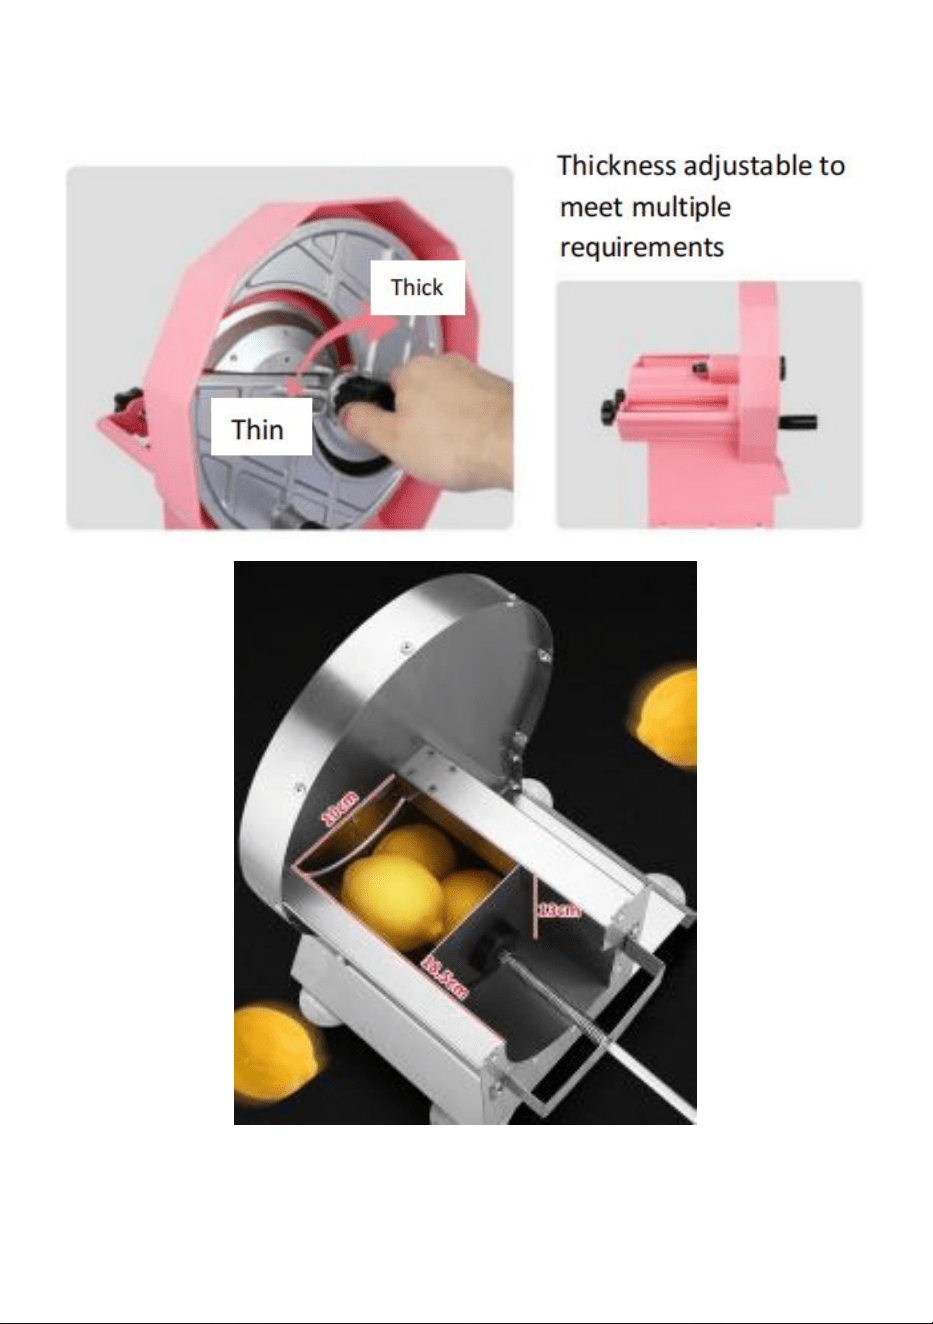
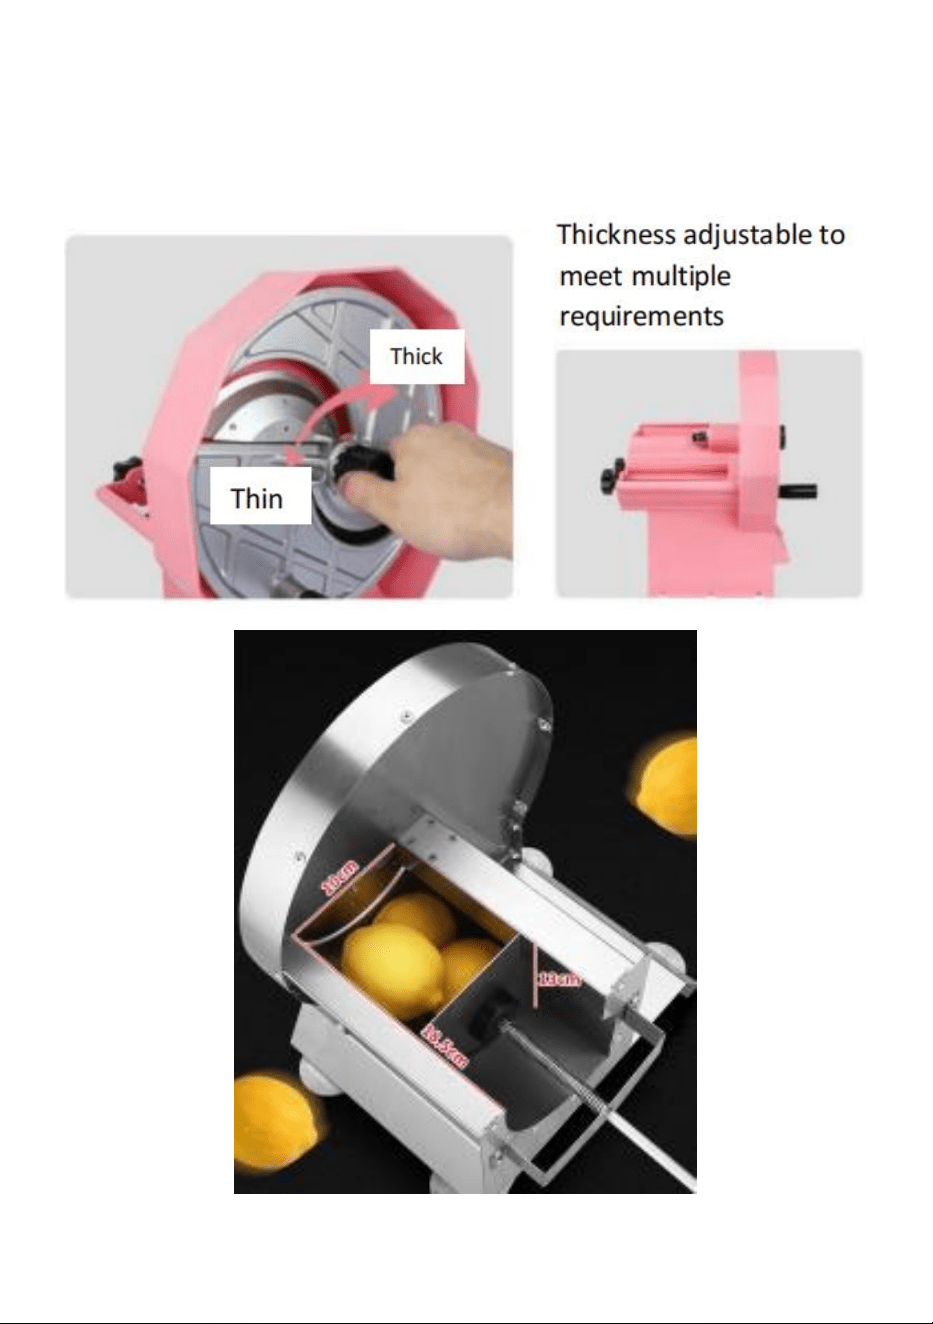
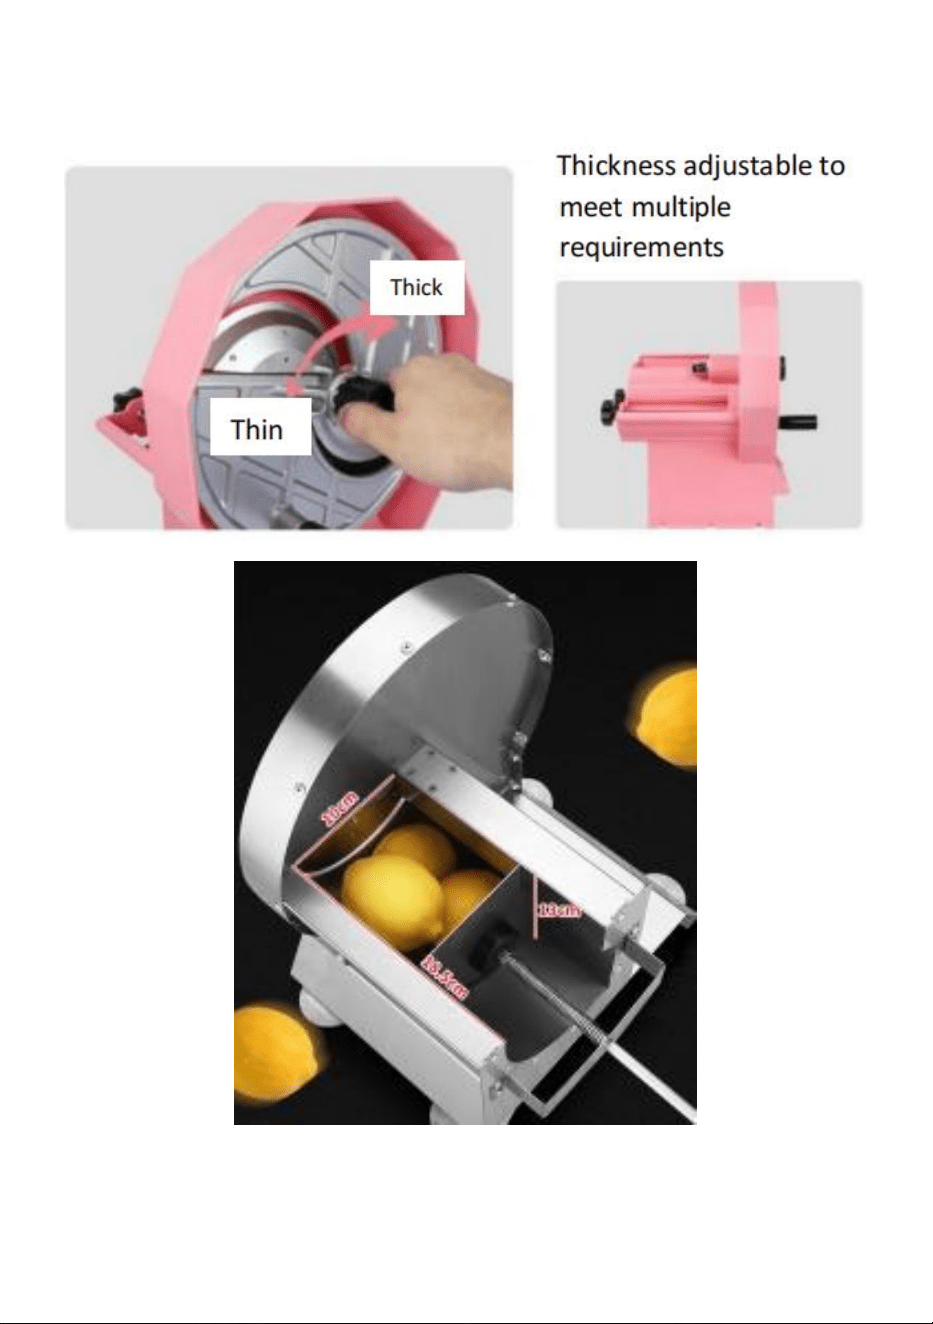
2.Thickness adjustment
Put the food into the groove and try to cut it to see the thickness. If it is not
suitable, you can adjust the thickness. (1): Pull the outer ring of the
adjusting knob out, (2) gently turn the knob to turn left and right, In the
counter-clockwise direction to adjust the thickness; to the clockwise
direction to adjust the thickness, the knob card back to the card slot; the
thickness will not run. Pay attention to the feeling in your hand. If there is
any resistance to rotation, it means that it has been rotated to the end. Or
you'll wear out the adjusting thread.)
Spring assisted propulsion
- 8 -
The spring drives the material into the knife, saving time and effort to
prevent cutting hands
Instructions for installation and disassembly of
- 9 -
machine
- 10 -
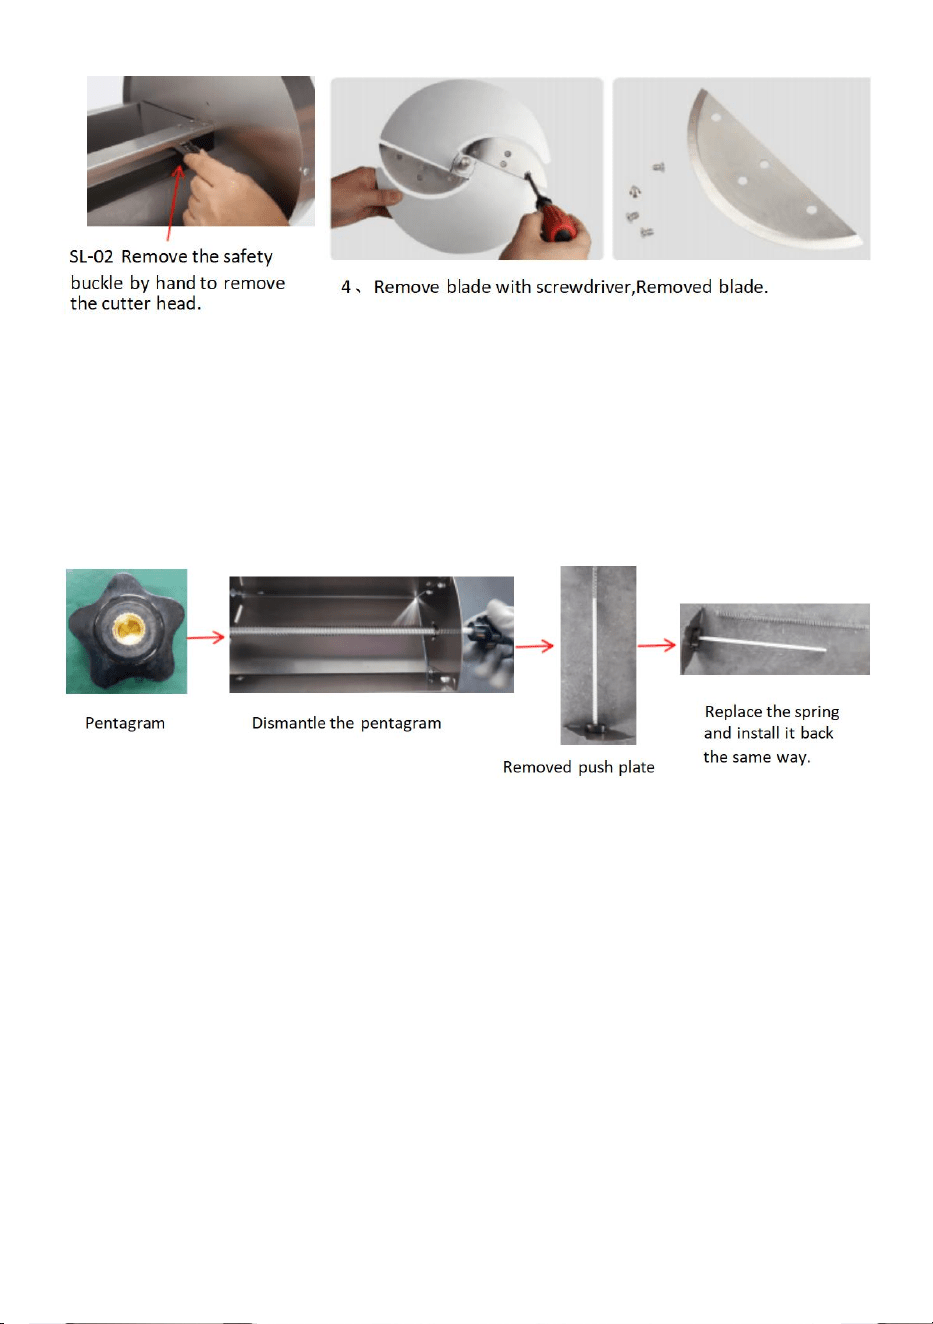
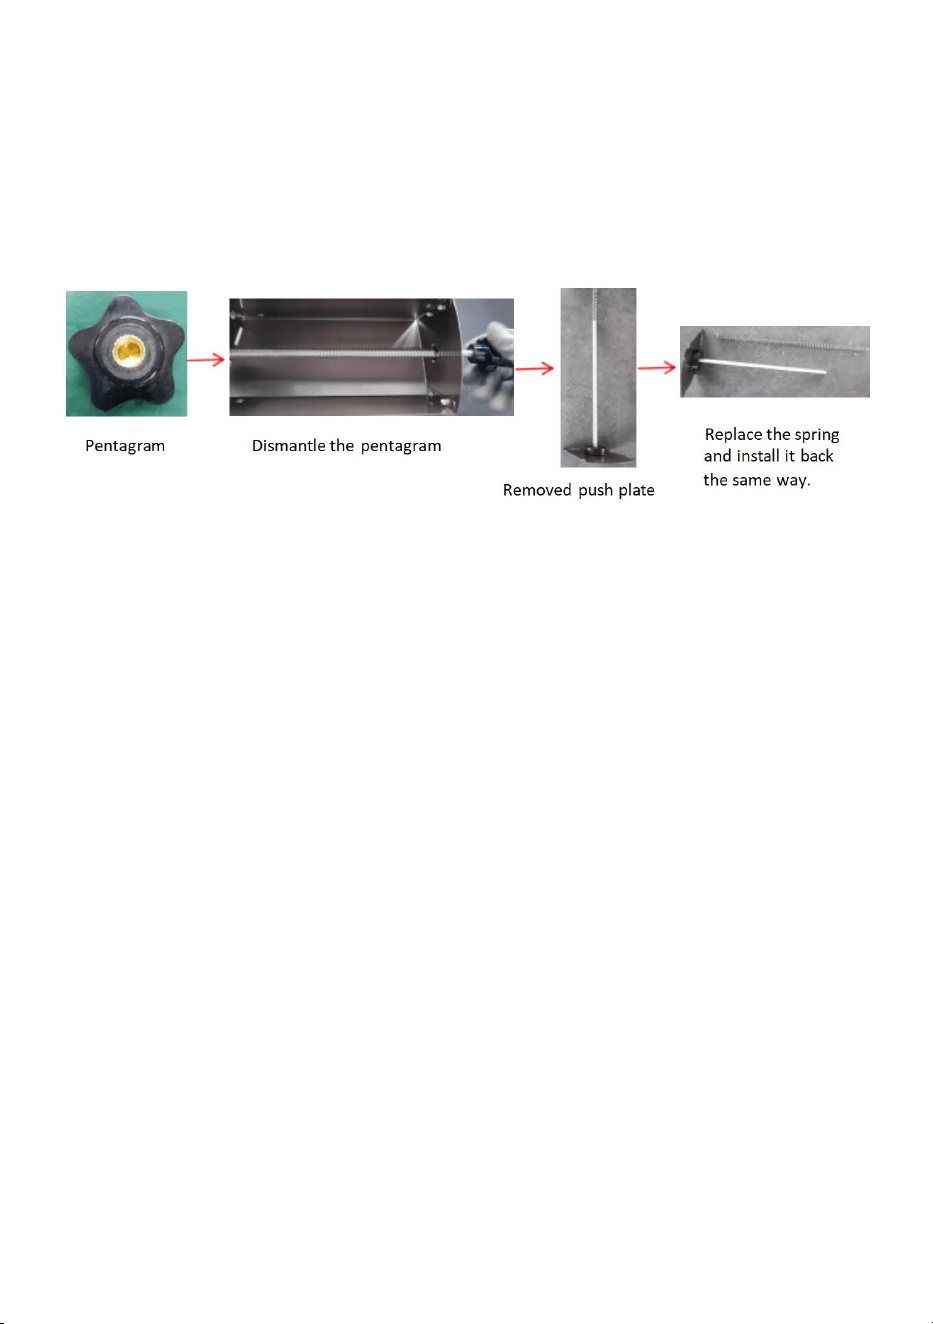
3.Step to replace spring
First, you need to remove the cutter head and then remove the tie rod tail
pentagram; the push plate can be removed to replace the spring. Replace
the spring, install the return groove on the push rod, fix it in place with the
pentagram, and install the cutter head. Lock the cutter head with the safety
buckle for normal use.
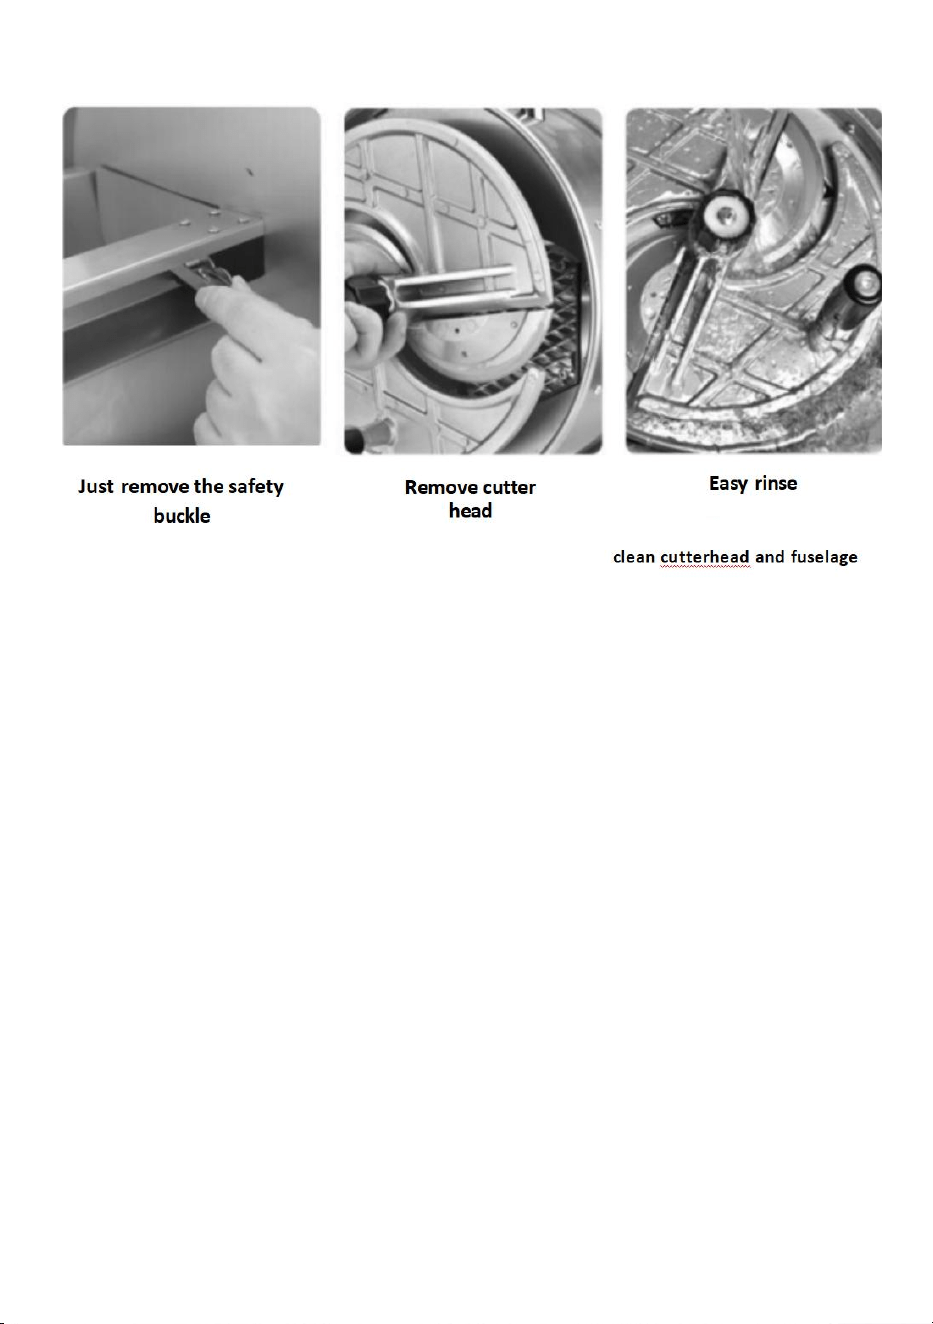
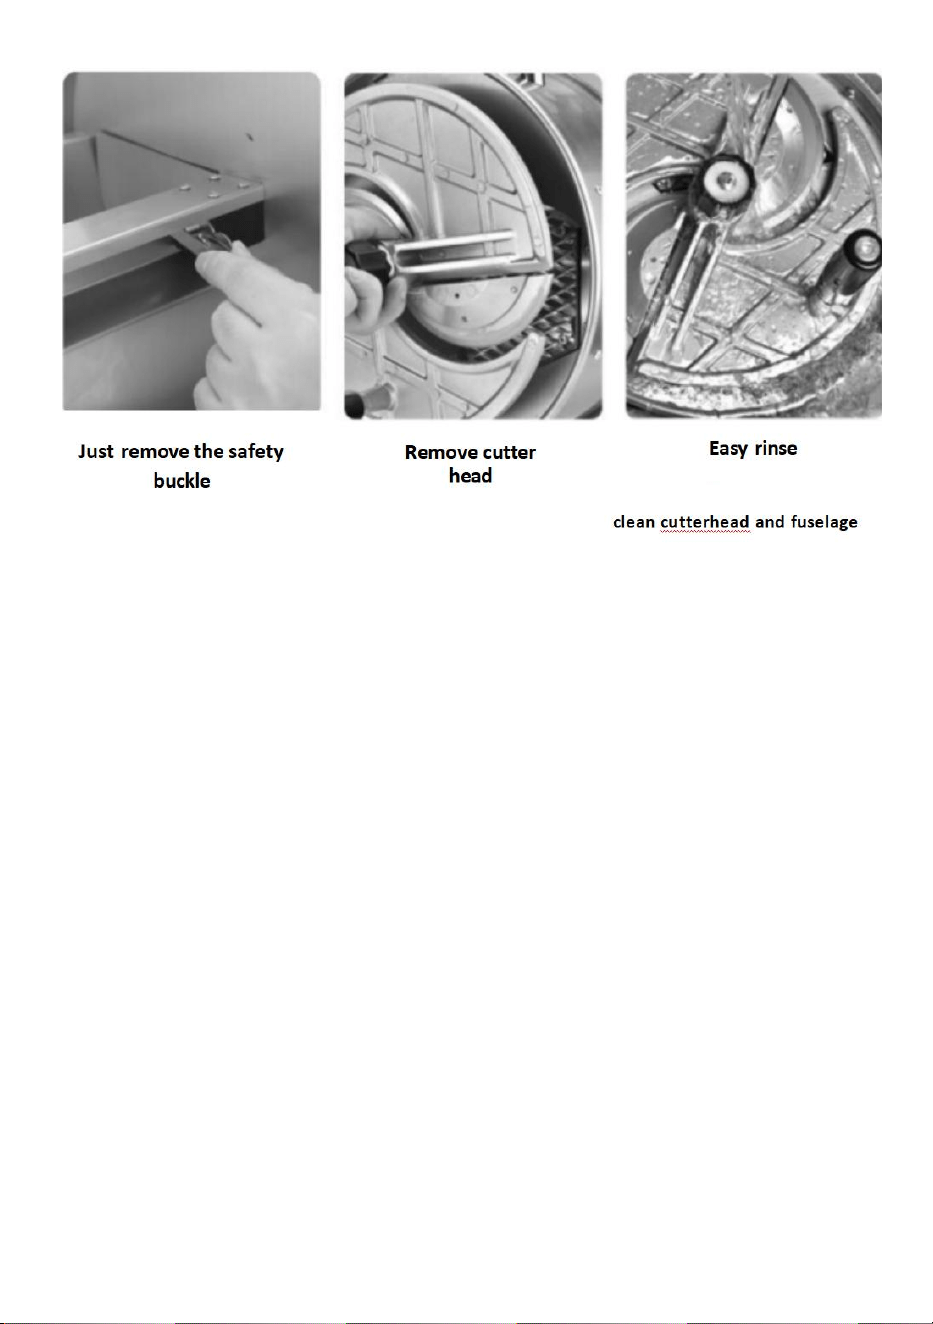
4. Cleaning
After slicing, the machine should be cleaned, the whole machine should be
cleaned, or the cutter head should be cleaned. After cleaning, it is
recommended to dry the water stains to keep the fuselage clean and
prevent rusting. (Note: Do not use dishwasher to clean cutter head and
fuselage)
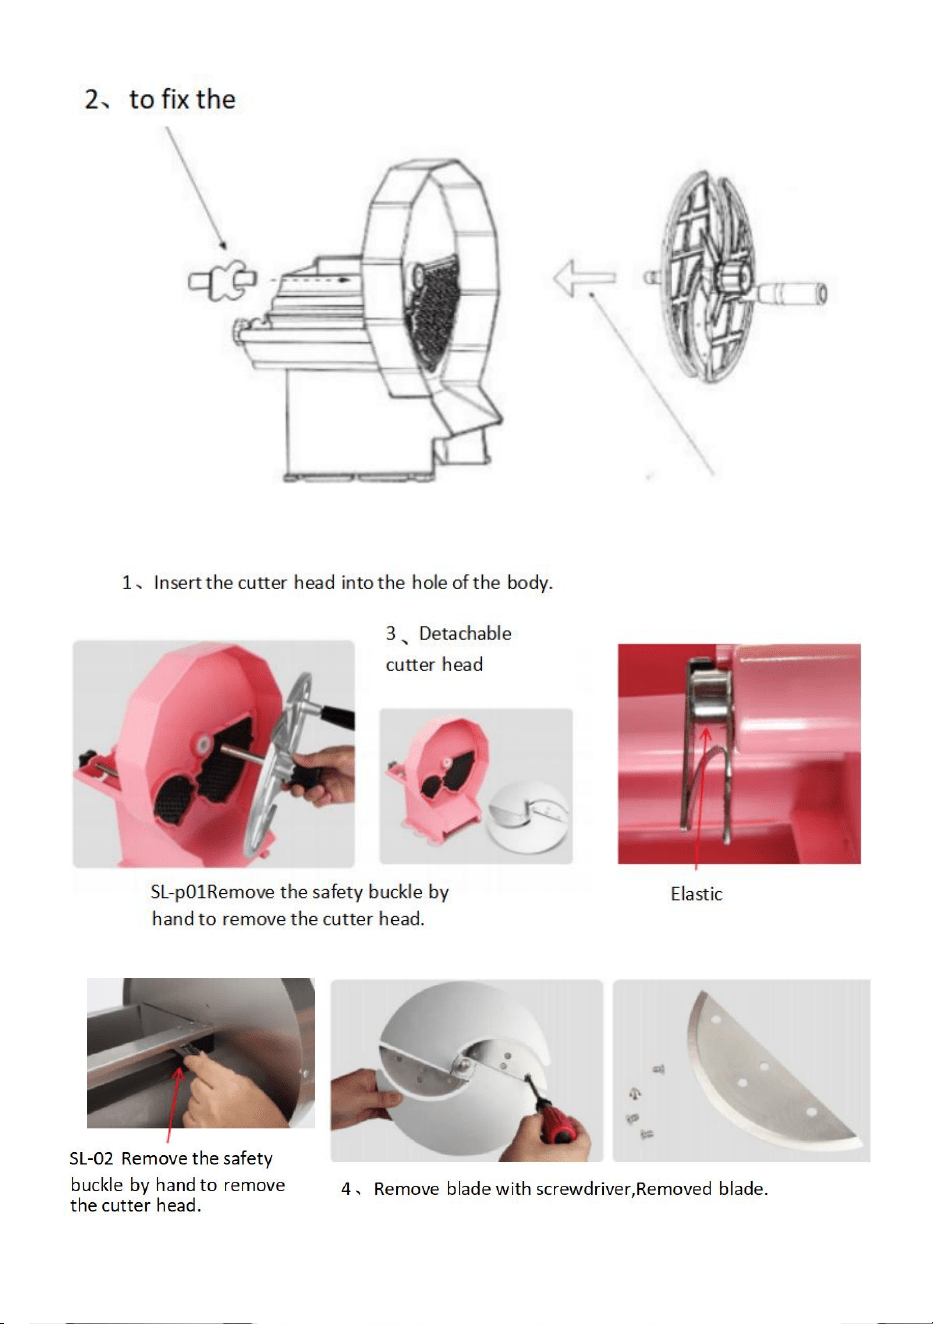
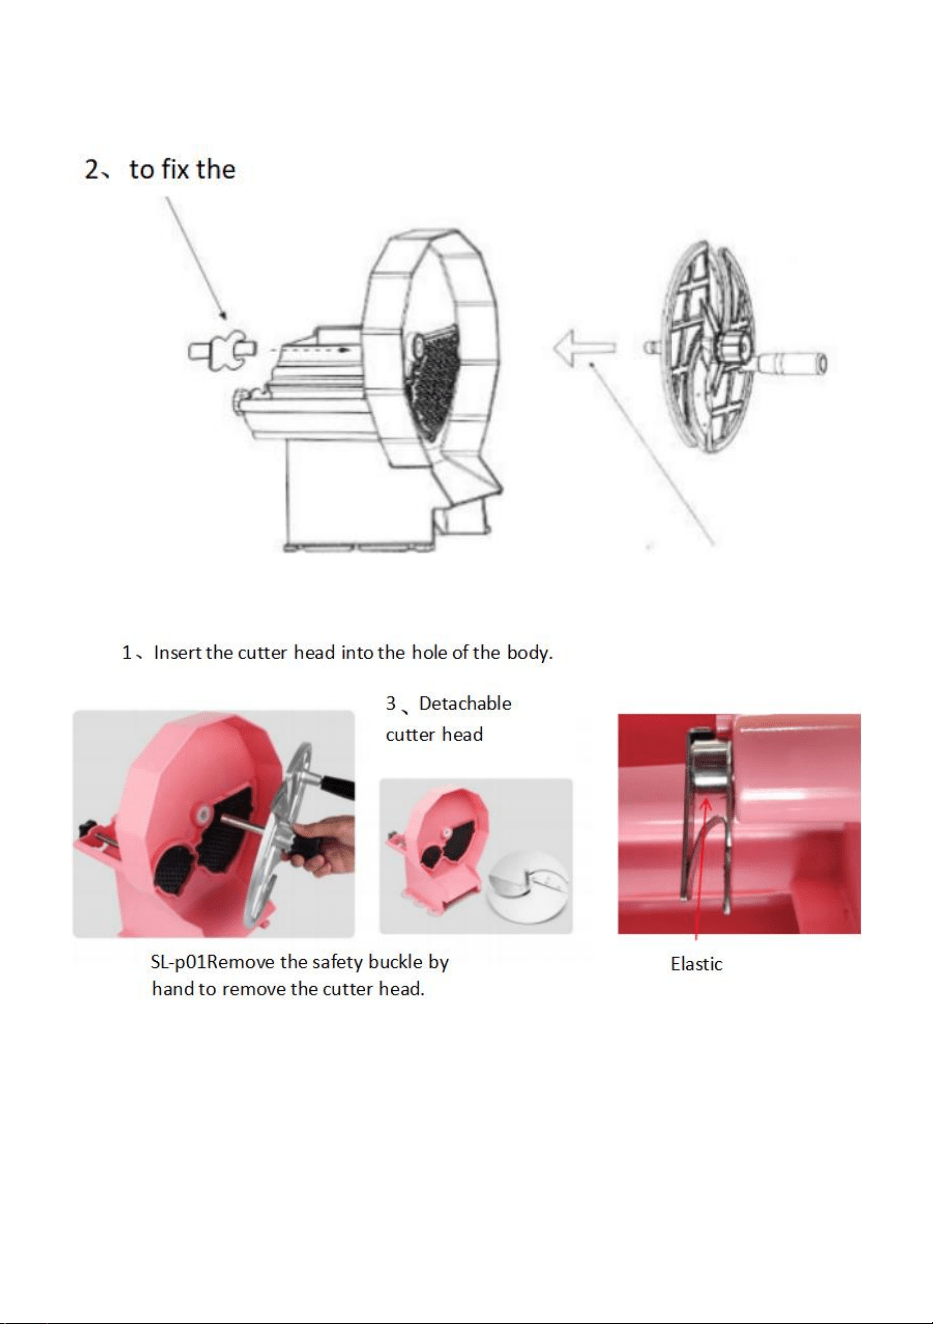
5.Procedure of removing cutter head
(1) Pull the buckle out and take off the safety buckle.
(2) The cutter head can be washed, or the blade can be replaced by
drawing out the cutter head.

- 11 -
Note: If there is any technical change, please refer to the nameplate on the
product without further notice.
Manufacturer: Shanghaimuxinmuyeyouxiangongsi
Address: Baoshanqu Shuangchenglu 803long 11hao 1602A-1609shi Shanghai
Imported to AUS: SIHAO PTY LTD. 1 ROKEVA STREETEASTWOOD NSW 2122
Australia
Imported to USA: Sanven Technology Ltd. Suite 250, 9166 Anaheim Place,
Rancho Cucamonga, CA 91730

- 12 -
Made In China


Technique Assistance et certificat de garantie électronique
www.vevor.com/support
Fruits multifonctionnels et
Coupe-légumes
MODÈLE: SL-P01/SL-02
We continue to be committed to provide you tools with competitive price.
"Save Half", "Half Price" or any other similar expressions used by us only represents an
estimate of savings you might benefit from buying certain tools with us compared to the major
top brands and does not necessarily mean to cover all categories of tools offered by us. You
are kindly reminded to verify carefully when you are placing an order with us if you are
actually saving half in comparison with the top major brands.


- 1 -
MODÈLE: SL-P01/SL-02
SL-P01 SL-02
Have product questions? Need technical support? Please feel free to
contact us:
Technical Support and E-Warranty Certificate
www.vevor.com/support
NEED HELP? CONTACT US!
This is the original instruction, please read all manual instructions
carefully before operating. VEVOR reserves a clear interpretation of our
user manual. The appearance of the product shall be subject to the
product you received. Please forgive us that we won't inform you again if
there are any technology or software updates on our product.
Multifunctional Fruit and
Vegetable Slicer

- 2 -
GARANTIES IMPORTANTES
Avertissement - Pour réduire le risque de blessure, l'utilisateur
doit lire attentivement le manuel d'instructions. Suivez toujours les
précautions de sécurité de base lorsque vous utilisez ces
appareils. Ceux-ci inclus:
1. L'appareil ne doit pas être utilisé avec des enfants. L'appareil comporte
des lames très tranchantes. Les enfants peuvent subir des accidents
corporels. Par conséquent, ce produit doit être placé dans une position non
touchée par les enfants.
2.Pour un fonctionnement et une durée de vie optimaux de l'appareil,
veuillez suivre les instructions.
3. Les acides alimentaires rendront les lames émoussées et corroderont le
métal. Nettoyez toujours cet équipement de préparation des aliments
immédiatement après chaque utilisation. Pour conserver l'apparence et
augmenter la durée de vie, nettoyez-le quotidiennement.
4. Les lames de la machine sont très tranchantes et il faut veiller à ne pas
toucher directement la lame ou la lame ou à utiliser des gants pendant le
fonctionnement.
5. Ne mettez pas ces appareils dans un lave-vaisselle ou tout autre
appareil de nettoyage automatique pour le nettoyage.
6. L'utilisation d'accessoires ou de modifications non fournis par le
fabricant peut entraîner des dangers.
7. Utilisez cet équipement uniquement pour couper des fruits et légumes !
Ce produit ne convient pas à la transformation d'aliments ayant une dureté
similaire à celle de la patate douce.
8. Avant d'utiliser cet équipement pour la première fois, veuillez retirer tous
les matériaux d'emballage et de fixation conformément à l'illustration et les
utiliser après l'installation.
9.Ces appareils nécessitent une lubrification régulière. Essuyez la tige de
guidage avec de l'huile minérale, un lubrifiant de qualité alimentaire ou une
serviette lorsqu'une lubrification est nécessaire. Ne pas lubrifier avec de
l'huile de cuisson ou une autre graisse. Sinon, il deviendra visqueux et

- 3 -
affectera l'utilisation.
10.Ne coupez pas les aliments au-delà de l’ouverture de l’assiette.
11.Pour remplacer les jeux de lames, veuillez vous assurer que les
spécifications et les modèles de la plaque à lames et du bloc de pressage
sont cohérents.
AVERTISSEMENT : Risque de lame tranchante : Les lames sont
tranchantes et peuvent provoquer des coupures. Pour éviter les blessures
causées par des lames tranchantes, manipulez-les avec précaution .
CONSERVEZ CES INSTRUCTIONS
Résumer
Ce produit est doté d'une trancheuse intégrée à la main, d'une haute
efficacité, d'une structure légère et facile à démonter et à laver. Applicable
à divers endroits tels que les magasins, les restaurants, les stands, les
magasins de thé au lait, les cantines, les ménages et autres tranches de
fruits et légumes. L'épaisseur des tranches est réglable. Les pièces
coupées sont uniformes et faciles à voir. Protection de l'environnement
verte , conserve la saveur originale et est bien accueillie par les
utilisateurs.
1 . Corps principal

- 4 -
2 . Boucle élastique ( pince de fixation de la tête de coupe )
3 . Tige de poussée alimentaire à grande entrée
4 . Tige de poussée alimentaire à petite entrée (SL-02 NO )
5 . Poignée de réglage de l'épaisseur de coupe
6 . Poignée tournante de la tête de coupe
7 . Lame coupante
1 . Opération d'installation de la machine
Retirez la machine, installez la poignée sur la tête de coupe avec un
tournevis et fixez l'écrou avec une clé hexagonale intérieure. Ensuite, la
base de la machine est gainée d'une ventouse (l'acier inoxydable, le
marbre et d'autres tables lisses peuvent être directement avec 6 petites
ventouses ; le bois et d'autres tables non lisses peuvent être équipés de
manière aléatoire avec des vis fixées. L'opération de tranchage peut être
effectuée après mise en place .

- 5 -

- 6 -

- 7 -
Easy Slice en trois étapes
Opération simple, tout le monde peut l'utiliser

- 8 -
2 . Réglage de l'épaisseur
Mettez les aliments dans la rainure et essayez de les couper pour voir
l'épaisseur. Si cela ne convient pas, vous pouvez ajuster l'épaisseur. (1) :
tirez la bague extérieure du bouton de réglage, (2) tournez doucement le
bouton pour tourner à gauche et à droite, dans le sens inverse des
aiguilles d'une montre pour régler l'épaisseur ; dans le sens des aiguilles
d'une montre pour régler l'épaisseur, le bouton de la carte revient à la fente
pour carte ; l'épaisseur ne coulera pas. Faites attention à la sensation dans
votre main. S'il y a une résistance à la rotation, cela signifie qu'il a été
tourné jusqu'au bout. Ou vous userez le fil de réglage.)

- 9 -
Propulsion assistée par ressort
Le ressort entraîne le matériau dans le couteau, ce qui permet
d'économiser du temps et des efforts pour éviter de se couper les mains.
- 10 -
Instructions pour l'installation et le démontage de
machine

- 11 -
3 . Étape pour remplacer le ressort
Tout d'abord, vous devez retirer la tête de coupe, puis retirer le
pentagramme de la tige de direction ; la plaque de poussée peut être
retirée pour remplacer le ressort. Remplacez le ressort, installez la rainure
de retour sur la tige de poussée, fixez-la en place avec le pentagramme et
installez la tête de coupe. Verrouillez la tête de coupe avec la boucle de
sécurité pour une utilisation normale.
5. Nettoyage
Après avoir tranché, la machine doit être nettoyée, la machine entière doit
être nettoyée ou la tête de coupe doit être nettoyée. Après le nettoyage, il
est recommandé de sécher les taches d'eau pour garder le fuselage
propre et éviter la rouille. (Remarque : n'utilisez pas de lave-vaisselle pour
nettoyer la tête de coupe et le fuselage)
5 . Procédure de retrait de la tête de coupe
(1) Tirez sur la boucle et retirez la boucle de sécurité.
(2) La tête de coupe peut être lavée ou la lame peut être remplacée en
retirant la tête de coupe.

- 12 -
Remarque : En cas de modification technique, veuillez vous référer à la
plaque signalétique sur le produit sans autre avis.
Fabricant : Shanghaimuxinmuyeyouxiangongsi
Adresse : Baoshanqu Shuangchenglu 803long 11hao 1602A-1609shi Shanghai
Importé en Australie : SIHAO PTY LTD. 1 ROKEVA STREETASTWOOD NSW
2122 Australie
Importé aux États-Unis : Sanven Technology Ltd. Suite 250, 9166 Anaheim Place,
Rancho Cucamonga, CA 91730

- 13 -
Fabriqué en Chine


Technisch Support- und E-Garantie-Zertifikat www.vevor.com/support
Multifunktionales Obst und
Gemüseschneider
MODELL: SL-P01/SL-02
We continue to be committed to provide you tools with competitive price.
"Save Half", "Half Price" or any other similar expressions used by us only represents an
estimate of savings you might benefit from buying certain tools with us compared to the major
top brands and does not necessarily mean to cover all categories of tools offered by us. You
are kindly reminded to verify carefully when you are placing an order with us if you are
actually saving half in comparison with the top major brands.


- 1 -
MODELL: SL-P01/SL-02
SL-P01 SL-02
Have product questions? Need technical support? Please feel free to
contact us:
Technical Support and E-Warranty Certificate
www.vevor.com/support
NEED HELP? CONTACT US!
This is the original instruction, please read all manual instructions
carefully before operating. VEVOR reserves a clear interpretation of our
user manual. The appearance of the product shall be subject to the
product you received. Please forgive us that we won't inform you again if
there are any technology or software updates on our product.
Multifunctional Fruit and
Vegetable Slicer

- 2 -
WICHTIGE SICHERHEITSMASSNAHMEN
Warnung: Um das Verletzungsrisiko zu verringern, muss der
Benutzer die Bedienungsanleitung sorgfältig lesen. Befolgen Sie
bei der Verwendung dieser Geräte stets die grundlegenden
Sicherheitsvorkehrungen. Diese beinhalten:
1. Das Gerät sollte nicht mit Kindern verwendet werden. Das Gerät verfügt
über sehr scharfe Klingen. Bei Kindern kann es zu Verletzungen kommen.
Daher sollte dieses Produkt an einem Ort aufgestellt werden, an dem
Kinder es nicht berühren können.
2.Für einen optimalen Betrieb und eine optimale Lebensdauer des Gerätes
befolgen Sie bitte die Anweisungen.
3. Lebensmittelsäuren machen die Klingen stumpf und korrodieren das
Metall. Reinigen Sie dieses Lebensmittelzubereitungsgerät immer sofort
nach jedem Gebrauch. Um das Aussehen zu erhalten und die
Lebensdauer zu erhöhen, reinigen Sie es täglich.
4.Die Maschinenklingen sind sehr scharf, und es sollte darauf geachtet
werden, die schlagende Klinge oder die Klinge nicht direkt zu berühren
oder während des Betriebs mit Handschuhen zu arbeiten.
5. Stellen Sie diese Geräte zur Reinigung nicht in die Spülmaschine oder
ein anderes automatisches Reinigungsgerät.
6. Die Verwendung von Zubehör oder Modifikationen, die nicht vom
Hersteller bereitgestellt wurden, kann zu Gefahren führen.
7. Benutzen Sie dieses Gerät nur zum Schneiden von Obst und Gemüse!
Dieses Produkt ist nicht für die Verarbeitung von Lebensmitteln mit einer
Härte ähnlich der von Süßkartoffeln geeignet.
8. Bevor Sie dieses Gerät zum ersten Mal verwenden, entfernen Sie bitte
alle Verpackungs- und Befestigungsmaterialien gemäß der Abbildung und
verwenden Sie diese nach der Installation.
9.Diese Geräte müssen regelmäßig geschmiert werden. Wischen Sie die
Führungsstange bei Bedarf mit Mineralöl, lebensmittelechtem
Schmiermittel oder einem Handtuch ab. Nicht mit Speiseöl oder einem
anderen Fett schmieren. Andernfalls wird es zähflüssig und beeinträchtigt
- 3 -
die Verwendung.
10. Schneiden Sie Lebensmittel nicht über die Öffnung des Tellers hinaus.
11.Stellen Sie beim Austausch von Messersätzen bitte sicher, dass die
Spezifikationen und Modelle der Messerplatte und des Pressblocks
übereinstimmen.
WARNUNG: Gefahr durch scharfe Klingen: Klingen sind scharf und
können Schnittverletzungen verursachen. Um Verletzungen durch scharfe
Klingen zu vermeiden, gehen Sie vorsichtig damit um .
ANLEITUNG AUFBEWAHREN
Zusammenfassen
Dieses Produkt verfügt über einen handintegrierten Allesschneider, hohe
Effizienz, leichte Struktur und ist leicht zu zerlegen und zu waschen.
Anwendbar an verschiedenen Orten wie Geschäften, Restaurants,
Verkaufsständen, Milchteeläden, Kantinen, Haushalten und anderen Obst-
und Gemüsescheibenverarbeitungsbetrieben. Die Scheibendicke ist
einstellbar. Die geschnittenen Stücke sind gleichmäßig und gut zu
erkennen. Grüner Umweltschutz, Beibehaltung des ursprünglichen
Geschmacks und werden von den Benutzern begrüßt.
1 . Hauptkörper

- 4 -
2 . Elastische Schnalle ( Schneidkopf-Befestigungsklemme )
3 . Lebensmittelschubstange mit großem Einlass
4 . Lebensmittel-Schubstange mit kleinem Einlass (SL-02 NO )
5 . Griff zur Einstellung der Schnittstärke
6 . Drehgriff des Schneidkopfes
7 . Schneideklinge
1 . Installationsvorgang der Maschine
Nehmen Sie die Maschine heraus, montieren Sie den Griff mit einem
Schraubendreher am Schneidkopf und befestigen Sie die Mutter mit einem
Innensechskantschlüssel. Dann wird die Maschinenbasis mit Saugnäpfen
ummantelt (Edelstahl, Marmor und andere glatte Tische können direkt mit
6 kleinen Saugnäpfen befestigt werden; Holz- und andere nicht glatte
Tische können beliebig mit Schrauben befestigt werden. Der
Schneidevorgang kann anschließend durchgeführt werden Installation .
- 5 -

- 6 -

- 7 -
Easy Slice in drei Schritten
Einfache Bedienung, jeder kann sie nutzen

- 8 -
2 . Dickeneinstellung
Legen Sie das Lebensmittel in die Rille und versuchen Sie, es zu
schneiden, um die Dicke festzustellen. Wenn es nicht geeignet ist, können
Sie die Dicke anpassen. (1): Ziehen Sie den äußeren Ring des
Einstellknopfs heraus. (2) Drehen Sie den Knopf vorsichtig, um ihn nach
links und rechts zu drehen. Gegen den Uhrzeigersinn, um die Dicke
einzustellen. Drehen Sie den Knopf im Uhrzeigersinn, um die Dicke
anzupassen, und schieben Sie die Karte wieder in den Kartensteckplatz.
Die Dicke wird nicht verlaufen. Achten Sie auf das Gefühl in Ihrer Hand.
Wenn beim Drehen ein Widerstand zu spüren ist, bedeutet dies, dass es
bis zum Ende gedreht wurde. Sonst verschleißt das Einstellgewinde.)
- 9 -
Federunterstützter Antrieb
Die Feder treibt das Material in das Messer und spart so Zeit und Mühe,
um ein Schneiden der Hände zu verhindern

- 10 -
Anleitung zur Montage und Demontage von Maschine

- 11 -
3 . Schritt zum Ersetzen der Feder
Zuerst müssen Sie den Schneidkopf und dann das
Spurstangenschwanzpentagramm entfernen. Die Druckplatte kann
entfernt werden, um die Feder auszutauschen. Ersetzen Sie die Feder,
installieren Sie die Rücklaufnut an der Schubstange, befestigen Sie sie mit
dem Pentagramm und installieren Sie den Schneidkopf. Verriegeln Sie den
Schneidkopf für den normalen Gebrauch mit der Sicherheitsschnalle.
6. Reinigung
Nach dem Schneiden sollte die Maschine gereinigt werden, die gesamte
Maschine sollte gereinigt werden oder der Schneidkopf sollte gereinigt
werden. Nach der Reinigung wird empfohlen, die Wasserflecken zu
trocknen, um den Rumpf sauber zu halten und Rostbildung zu verhindern.
(Hinweis: Schneidkopf und Rumpf nicht in der Spülmaschine reinigen)
5 . Verfahren zum Entfernen des Messerkopfes
(1) Ziehen Sie die Schnalle heraus und nehmen Sie die
Sicherheitsschnalle ab.
(2) Der Schneidkopf kann gewaschen werden, oder die Klinge kann durch
- 12 -
Herausziehen des Schneidkopfs ausgetauscht werden.
Hinweis: Bei technischen Änderungen beachten Sie bitte ohne weitere
Ankündigung das Typenschild am Produkt.
Hersteller: Shanghaimuxinmuyeyouxiangongsi
Adresse: Baoshanqu Shuangchenglu 803long 11hao 1602A-1609shi Shanghai
Importiert nach AUS: SIHAO PTY LTD. 1 ROKEVA STREETEASTWOOD NSW
2122 Australien
In die USA importiert: Sanven Technology Ltd. Suite 250, 9166 Anaheim Place,
Rancho Cucamonga, CA 91730

- 13 -
In China hergestellt


Tecnico Supporto e certificato di garanzia elettronica www.vevor.com/support
Frutta multifunzionale e
Affettatrice Di Verdure
MODELLO: SL-P01/SL-02
We continue to be committed to provide you tools with competitive price.
"Save Half", "Half Price" or any other similar expressions used by us only represents an
estimate of savings you might benefit from buying certain tools with us compared to the major
top brands and does not necessarily mean to cover all categories of tools offered by us. You
are kindly reminded to verify carefully when you are placing an order with us if you are
actually saving half in comparison with the top major brands.


- 1 -
MODELLO: SL-P01/SL-02
SL-P01 SL-02
Have product questions? Need technical support? Please feel free to
contact us:
Technical Support and E-Warranty Certificate
www.vevor.com/support
NEED HELP? CONTACT US!
This is the original instruction, please read all manual instructions
carefully before operating. VEVOR reserves a clear interpretation of our
user manual. The appearance of the product shall be subject to the
product you received. Please forgive us that we won't inform you again if
there are any technology or software updates on our product.
Multifunctional Fruit and
Vegetable Slicer

- 2 -
TUTELA IMPORTANTE
Avvertenza: per ridurre il rischio di lesioni, l'utente deve leggere
attentamente il manuale di istruzioni. Seguire sempre le
precauzioni di sicurezza di base quando si utilizzano questi
dispositivi. Questi includono:
1. Il dispositivo non deve essere utilizzato con i bambini. Sul dispositivo
sono presenti lame molto affilate. I bambini potrebbero subire incidenti con
lesioni. Pertanto, questo prodotto deve essere collocato in una posizione
non toccata dai bambini.
2.Per un funzionamento e una durata ottimali del dispositivo, seguire le
istruzioni.
3. Gli acidi alimentari rendono le lame opache e corrodono il metallo.
Pulisci sempre questa attrezzatura per la preparazione del cibo
immediatamente dopo ogni utilizzo. Per mantenere l'aspetto e aumentare
la durata, pulirlo quotidianamente.
4. Le lame della macchina sono molto affilate e occorre fare attenzione a
non toccare direttamente la lama che batte o la lama o a non utilizzare i
guanti durante il funzionamento.
5.Non mettere questi dispositivi in lavastoviglie o in altri dispositivi di pulizia
automatici per la pulizia.
6.L'uso di accessori o modifiche non forniti dal produttore può causare
pericoli.
7.Utilizzare questa attrezzatura solo per tagliare frutta e verdura! Questo
prodotto non è adatto alla lavorazione di alimenti con durezza simile alla
patata dolce.
8.Prima di utilizzare questa apparecchiatura per la prima volta, rimuovere
tutto l'imballaggio e i materiali di fissaggio come illustrato nell'illustrazione e
utilizzarli dopo l'installazione.
9.Questi dispositivi richiedono una lubrificazione regolare. Pulire l'asta di
guida con olio minerale, lubrificante per alimenti o con un panno quando è
necessaria la lubrificazione. Non lubrificare con olio da cucina o altro
grasso. Altrimenti diventerà viscoso e ne influenzerà l'uso.
- 3 -
10.Non tagliare gli alimenti oltre l'apertura del piatto.
11. Per sostituire i set di lame, assicurarsi che le specifiche e i modelli della
piastra della lama e del blocco di pressatura siano coerenti.
AVVERTENZA: pericolo di lame affilate: le lame sono affilate e possono
causare tagli. Per evitare lesioni causate da lame affilate, maneggiare con
cura .
CONSERVA QUESTE ISTRUZIONI
Riassumere
Questo prodotto ha un'affettatrice integrata manualmente, alta efficienza,
struttura leggera e facile da smontare e lavare. Applicabile a vari luoghi
come negozi, ristoranti, bancarelle, negozi di tè al latte, mense, famiglie e
altre lavorazioni di fette di frutta e verdura. Lo spessore della fetta è
regolabile. I pezzi tagliati sono uniformi e facili da vedere. La protezione
dell'ambiente verde , mantiene il sapore originale e viene accolta
favorevolmente dagli utenti.
1 . Corpo principale
2 . Fibbia elastica ( morsetto di fissaggio della testa di taglio )
3 . Asta di spinta per alimenti con ingresso grande
4 . Asta di spinta per alimenti con ingresso piccolo (SL-02 NO )

- 4 -
5 . Maniglia di regolazione dello spessore di taglio
6 . Maniglia girevole della testa di taglio
7 . Lama da taglio
1 . Operazione di installazione della macchina
Estrarre la macchina, installare la maniglia sulla testa della taglierina con
un cacciavite e fissare il dado con una chiave esagonale interna. Quindi la
base della macchina è rivestita con una ventosa (l'acciaio inossidabile, il
marmo e altri tavoli lisci possono essere direttamente con 6 piccole
ventose; il legno e altri tavoli non lisci possono essere dotati in modo
casuale di viti fissate. L'operazione di affettatura può essere eseguita dopo
installazione .

- 5 -

- 6 -

- 7 -
Taglia facilmente in tre passaggi
Funzionamento semplice, tutti possono usarlo

- 8 -
2 . Regolazione dello spessore
Mettere il cibo nella scanalatura e provare a tagliarlo per vedere lo
spessore. Se non è adatto, puoi regolare lo spessore. (1): estrarre l'anello
esterno della manopola di regolazione, (2) ruotare delicatamente la
manopola per girare a sinistra e a destra, in senso antiorario per regolare
lo spessore; in senso orario per regolare lo spessore, riportare la scheda
nella fessura per scheda; lo spessore non verrà eseguito. Presta
attenzione alla sensazione nella tua mano. Se c'è qualche resistenza alla
rotazione, significa che è stata ruotata fino in fondo. Altrimenti consumerai
il filo di regolazione.)

- 9 -
Propulsione assistita da molle
La molla spinge il materiale nel coltello, risparmiando tempo e fatica per
evitare di tagliarsi le mani

- 10 -
Istruzioni per l'installazione e lo smontaggio Di
macchina
- 11 -
3 . Passaggio per sostituire la molla
Innanzitutto è necessario rimuovere la testa della taglierina e quindi
rimuovere il pentagramma della coda del tirante; la piastra di spinta può
essere rimossa per sostituire la molla. Sostituire la molla, installare la
scanalatura di ritorno sull'asta di spinta, fissarla in posizione con il
pentagramma e installare la testa della taglierina. Bloccare la testa della
taglierina con la fibbia di sicurezza per l'uso normale.
7. Pulizia
Dopo l'affettatura, è necessario pulire la macchina, pulire l'intera macchina
o pulire la testa della taglierina. Dopo la pulizia, si consiglia di asciugare le
macchie d'acqua per mantenere pulita la fusoliera e prevenire la ruggine.
(Nota: non utilizzare la lavastoviglie per pulire la testa della taglierina e la
fusoliera)
5 . Procedura di rimozione della testa della taglierina
(1) Estrarre la fibbia e togliere la fibbia di sicurezza.
(2) La testa della taglierina può essere lavata oppure la lama può essere
sostituita estraendo la testa della taglierina.

- 12 -
Nota: in caso di modifiche tecniche, fare riferimento alla targhetta sul
prodotto senza ulteriore avviso.
Produttore: Shanghaimuxinmuyeyouxiangongsi
Indirizzo: Baoshanqu Shuangchenglu 803long 11hao 1602A-1609shi Shanghai
Importato in AUS: SIHAO PTY LTD. 1 ROKEVA STREETEASTWOOD NSW 2122
Australia
Importato negli Stati Uniti: Sanven Technology Ltd. Suite 250, 9166 Anaheim
Place, Rancho Cucamonga, CA 91730

- 13 -
Made in China


Técnico Soporte y certificado de garantía electrónica www.vevor.com/support
Fruta multifuncional y
Cortadora de verduras
MODELO: SL-P01/SL-02
We continue to be committed to provide you tools with competitive price.
"Save Half", "Half Price" or any other similar expressions used by us only represents an
estimate of savings you might benefit from buying certain tools with us compared to the major
top brands and does not necessarily mean to cover all categories of tools offered by us. You
are kindly reminded to verify carefully when you are placing an order with us if you are
actually saving half in comparison with the top major brands.


- 1 -
MODELO: SL-P01/SL-02
SL-P01 SL-02
Have product questions? Need technical support? Please feel free to
contact us:
Technical Support and E-Warranty Certificate
www.vevor.com/support
NEED HELP? CONTACT US!
This is the original instruction, please read all manual instructions
carefully before operating. VEVOR reserves a clear interpretation of our
user manual. The appearance of the product shall be subject to the
product you received. Please forgive us that we won't inform you again if
there are any technology or software updates on our product.
Multifunctional Fruit and
Vegetable Slicer

- 2 -
CONSIDERACIONES IMPORTANTES
Advertencia: para reducir el riesgo de lesiones, el usuario debe
leer atentamente el manual de instrucciones. Siga siempre las
precauciones básicas de seguridad al utilizar estos dispositivos.
Éstas incluyen:
1. El dispositivo no debe utilizarse con niños. El dispositivo tiene cuchillas
muy afiladas. Los niños pueden sufrir accidentes con lesiones. Por lo tanto,
este producto debe colocarse en una posición que los niños no toquen.
2. Para un funcionamiento y vida útil óptimos del dispositivo, siga las
instrucciones.
3. Los ácidos alimentarios desafilarán las cuchillas y corroerán el metal.
Limpie siempre este equipo de preparación de alimentos inmediatamente
después de cada uso. Para mantener la apariencia y aumentar la vida útil,
límpielo diariamente.
4. Las cuchillas de la máquina son muy afiladas y se debe tener cuidado
de no tocar la cuchilla que golpea directamente ni operar con guantes
durante la operación.
5. No coloque estos dispositivos en un lavavajillas u otro dispositivo de
limpieza automático para su limpieza.
6.El uso de accesorios o modificaciones no proporcionadas por el
fabricante puede causar peligros.
7. ¡Utilice este equipo únicamente para cortar frutas y verduras! Este
producto no es apto para procesar alimentos con una dureza similar a la
del boniato.
8.Antes de utilizar este equipo por primera vez, retire todo el embalaje y
los materiales de fijación según la ilustración y utilícelos después de la
instalación.
9.Estos dispositivos requieren una lubricación regular. Limpie la varilla
guía con aceite mineral, lubricante de calidad alimentaria o una toalla
cuando sea necesaria la lubricación. No lubrique con aceite de cocina u
otra grasa. De lo contrario, se volverá viscoso y afectará el uso.
10.No corte los alimentos más allá de la abertura del plato.

- 3 -
11. Para reemplazar los juegos de cuchillas, asegúrese de que las
especificaciones y modelos de la placa de la cuchilla y el bloque de
presión sean consistentes.
ADVERTENCIA: Peligro de cuchillas afiladas: Las cuchillas están afiladas
y pueden causar cortes. Para evitar lesiones causadas por hojas afiladas,
manipule con cuidado .
GUARDA ESTAS INSTRUCCIONES
Resumir
Este producto tiene una rebanadora integrada manualmente, alta
eficiencia, estructura liviana y fácil de desmontar y lavar. Aplicable a
diversos lugares como tiendas, restaurantes, puestos, tiendas de té con
leche, cantinas, hogares y otros procesamientos de rodajas de frutas y
verduras. El espesor de la rebanada es ajustable. Las piezas cortadas son
uniformes y fáciles de ver. Protección del medio ambiente verde ,
mantienen el sabor original y son bienvenidos por los usuarios.
1 . Cuerpo principal
2 . Hebilla elástica ( abrazadera de fijación del cabezal de corte )
3 . Varilla de empuje de alimentos de entrada grande
4 . Varilla de empuje de alimentos de entrada pequeña (SL-02 NO )

- 4 -
5 . Mango de ajuste del espesor de corte
6 . Mango giratorio del cabezal de corte
7 . Cuchilla de corte
1 . Operación de instalación de la máquina.
Saque la máquina, instale el mango en el cabezal de corte con un
destornillador y fije la tuerca con una llave hexagonal interior. Luego, la
base de la máquina se reviste con una ventosa (las mesas de acero
inoxidable, mármol y otras mesas lisas se pueden fijar directamente con 6
ventosas pequeñas; la madera y otras mesas no lisas se pueden equipar
aleatoriamente con tornillos fijos. La operación de corte se puede realizar
después instalación .

- 5 -

- 6 -

- 7 -
Easy Slice en tres pasos
Operación simple, todos pueden usar

- 8 -
2 . Ajuste de espesor
Coloque la comida en la ranura e intente cortarla para ver el grosor. Si no
es adecuado, puedes ajustar el grosor. (1): Tire del anillo exterior de la
perilla de ajuste hacia afuera, (2) gire suavemente la perilla para girar
hacia la izquierda y hacia la derecha, en sentido antihorario para ajustar el
grosor; en el sentido de las agujas del reloj para ajustar el grosor, la tarjeta
de perilla vuelve a la ranura para tarjeta; el espesor no se correrá. Presta
atención a la sensación en tu mano. Si hay alguna resistencia a la rotación,
significa que se ha girado hasta el final. O desgastarás el hilo de ajuste.)
Propulsión asistida por resorte

- 9 -
El resorte impulsa el material hacia el cuchillo, ahorrando tiempo y
esfuerzo para evitar cortarse las manos.
Instrucciones de instalación y desmontaje. de

- 10 -
máquina

- 11 -
3 . Paso para reemplazar el resorte
Primero, debe quitar el cabezal de corte y luego quitar el pentagrama de la
cola del tirante; la placa de empuje se puede quitar para reemplazar el
resorte. Reemplace el resorte, instale la ranura de retorno en la varilla de
empuje, fíjela en su lugar con el pentagrama e instale el cabezal de corte.
Bloquee el cabezal de corte con la hebilla de seguridad para un uso
normal.
8. Limpieza
Después de cortar, se debe limpiar la máquina, se debe limpiar toda la
máquina o se debe limpiar el cabezal de corte. Después de la limpieza, se
recomienda secar las manchas de agua para mantener limpio el fuselaje y
evitar la oxidación. (Nota: No utilice lavavajillas para limpiar el cabezal de
corte y el fuselaje)
5 . Procedimiento para retirar el cabezal cortador
(1) Saque la hebilla y retire la hebilla de seguridad.
(2) El cabezal de corte se puede lavar o se puede reemplazar la hoja
sacando el cabezal de corte.

- 12 -
Nota: Si hay algún cambio técnico, consulte la placa de identificación del
producto sin previo aviso.
Fabricante: Shanghaimuxinmuyeyouxiangongsi
Dirección: Baoshanqu Shuangchenglu 803long 11hao 1602A-1609shi Shanghai
Importado a AUS: SIHAO PTY LTD. 1 ROKEVA STREETASTWOOD NSW 2122
Australia
Importado a EE. UU.: Sanven Technology Ltd. Suite 250, 9166 Anaheim Place,
Rancho Cucamonga, CA 91730

- 13 -
Hecho en china


Techniczny Certyfikat wsparcia i e-gwarancji www.vevor.com/support
Wielofunkcyjne owoce i
Krajalnica do warzyw
MODEL: SL-P01/SL-02
We continue to be committed to provide you tools with competitive price.
"Save Half", "Half Price" or any other similar expressions used by us only represents an
estimate of savings you might benefit from buying certain tools with us compared to the major
top brands and does not necessarily mean to cover all categories of tools offered by us. You
are kindly reminded to verify carefully when you are placing an order with us if you are
actually saving half in comparison with the top major brands.


- 1 -
MODEL: SL-P01/SL-02
SL-P01 SL-02
Have product questions? Need technical support? Please feel free to
contact us:
Technical Support and E-Warranty Certificate
www.vevor.com/support
NEED HELP? CONTACT US!
This is the original instruction, please read all manual instructions
carefully before operating. VEVOR reserves a clear interpretation of our
user manual. The appearance of the product shall be subject to the
product you received. Please forgive us that we won't inform you again if
there are any technology or software updates on our product.
Multifunctional Fruit and
Vegetable Slicer

- 2 -
WAŻNI OCHRONIARZE
Ostrzeżenie — aby zmniejszyć ryzyko obrażeń, użytkownik musi
uważnie przeczytać instrukcję obsługi. Podczas korzystania z tych
urządzeń należy zawsze przestrzegać podstawowych zasad
bezpieczeństwa. Obejmują one:
1. Urządzenia nie należy używać w obecności dzieci. Urządzenie posiada
bardzo ostre ostrza. Dzieci mogą ulec wypadkom z obrażeniami. Dlatego
produkt ten należy umieścić w miejscu niedostępnym dla dzieci.
2. Dla optymalnego działania i żywotności urządzenia należy postępować
zgodnie z instrukcją.
3. Kwasy spożywcze powodują stępienie ostrzy i powodują korozję metalu.
Zawsze czyść ten sprzęt do przygotowywania żywności natychmiast po
każdym użyciu. Aby zachować wygląd i wydłużyć żywotność, czyść go
codziennie.
4. Ostrza maszyny są bardzo ostre, dlatego należy zachować ostrożność,
aby nie dotykać bezpośrednio uderzającego ostrza ani ostrza ani nie
pracować w rękawiczkach podczas pracy.
5. Nie wkładaj tych urządzeń do zmywarki lub innego automatycznego
urządzenia czyszczącego w celu czyszczenia.
6. Używanie akcesoriów lub modyfikacji niedostarczonych przez
producenta może spowodować zagrożenie.
7. Używaj tego urządzenia wyłącznie do krojenia owoców i warzyw!
Produkt nie nadaje się do przetwarzania żywności o twardości podobnej do
słodkich ziemniaków.
8.Przed pierwszym użyciem tego urządzenia należy usunąć całe
opakowanie i elementy mocujące zgodnie z ilustracją i wykorzystać je po
instalacji.
9. Urządzenia te wymagają regularnego smarowania. Jeśli konieczne jest
smarowanie, wytrzyj pręt prowadzący olejem mineralnym, smarem
dopuszczonym do kontaktu z żywnością lub ręcznikiem. Nie smarować
olejem spożywczym ani innym smarem. W przeciwnym razie stanie się
lepki i wpłynie na użytkowanie.
- 3 -
10.Nie kroj jedzenia poza otwór talerza.
11. Aby wymienić zestawy ostrzy, należy upewnić się, że specyfikacje i
modele płytki ostrza i bloku dociskowego są zgodne.
OSTRZEŻENIE: Niebezpieczeństwo ostrego ostrza: Ostrza są ostre i
mogą powodować skaleczenia. Aby uniknąć obrażeń spowodowanych
ostrymi ostrzami, należy obchodzić się z nią ostrożnie .
ZACHOWAJ TE INSTRUKCJE
Podsumować
ten charakteryzuje się krajalnicą zintegrowaną ręcznie, wysoką
wydajnością, lekką konstrukcją oraz łatwością demontażu i mycia. Ma
zastosowanie w różnych miejscach, takich jak sklepy, restauracje, stragany,
sklepy z herbatą mleczną, stołówka, gospodarstwa domowe i inne miejsca
przetwarzania plasterków owoców i warzyw. Grubość plasterka można
regulować. Wycięte elementy są równe i dobrze widoczne. Ekologiczna
ochrona środowiska, zachowanie oryginalnego smaku i zadowolenie
użytkowników.
1 . Główny korpus
2 . Elastyczna klamra ( zacisk mocujący głowicę tnącą )
3 . Popychacz z dużym wlotem żywności

- 4 -
4 . Mały popychacz do żywności wlotowej (SL-02 NO )
5 . Uchwyt do regulacji grubości cięcia
6 . Obrotowy uchwyt głowicy tnącej
7 . Ostrze tnące
1 . Działanie instalacji maszyny
Wyjmij maszynę, za pomocą śrubokręta zamontuj uchwyt na głowicy
tnącej i dokręć nakrętkę wewnętrznym kluczem sześciokątnym. Następnie
podstawa maszyny jest osłonięta przyssawką (stal nierdzewna, marmur i
inny gładki stół może być bezpośrednio wyposażony w 6 małych
przyssawek; drewno i inny niegładki stół można losowo wyposażyć w
zamocowane śruby. Operację krojenia można przeprowadzić po
instalacja .

- 5 -
- 6 -

- 7 -
Easy Slice w trzech krokach
Prosta obsługa, każdy może z niej skorzystać

- 8 -
2 . Regulacja grubości
Włóż żywność do rowka i spróbuj ją przeciąć, aby sprawdzić grubość. Jeśli
nie jest odpowiedni, możesz dostosować grubość. (1): Wyciągnij
zewnętrzny pierścień pokrętła regulacyjnego, (2) delikatnie obróć pokrętło,
aby obrócić w lewo i w prawo, w kierunku przeciwnym do ruchu
wskazówek zegara, aby wyregulować grubość; w kierunku zgodnym z
ruchem wskazówek zegara, aby wyregulować grubość, kartę z pokrętłem z
powrotem do gniazda karty; grubość nie będzie działać. Zwróć uwagę na
czucie w dłoni. Jeśli pojawia się opór przy obrocie oznacza to, że został
obrócony do końca. W przeciwnym razie zużyjesz nić regulacyjną.)

- 9 -
Napęd wspomagany sprężyną
Sprężyna wbija materiał w nóż, oszczędzając czas i wysiłek, zapobiegając
przecięciu dłoni
- 10 -
Instrukcje montażu i demontażu z maszyna

- 11 -
3 . Krok w celu wymiany sprężyny
Najpierw należy zdjąć głowicę tnącą, a następnie usunąć pentagram
ogona drążka kierowniczego; płytkę dociskową można zdjąć w celu
wymiany sprężyny. Wymień sprężynę, zamontuj rowek powrotny na
popychaczu, zamocuj go za pomocą pentagramu i zamontuj głowicę tnącą.
Do normalnego użytkowania zablokuj głowicę tnącą za pomocą klamry
zabezpieczającej.
9. Czyszczenie
Po pokrojeniu należy wyczyścić maszynę, oczyścić całą maszynę lub
oczyścić głowicę tnącą. Po czyszczeniu zaleca się osuszyć zacieki, aby
utrzymać kadłub w czystości i zapobiec rdzewieniu. (Uwaga: nie używaj
zmywarki do czyszczenia głowicy tnącej i kadłuba)
5 . Procedura demontażu głowicy tnącej
(1) Wyciągnij klamrę i zdejmij klamrę zabezpieczającą.
(2) Głowicę tnącą można umyć lub wymienić ostrze, wyciągając głowicę
tnącą.

- 12 -
Uwaga: W przypadku jakichkolwiek zmian technicznych należy zapoznać
się z tabliczką znamionową produktu bez dodatkowego powiadomienia.
Producent: Shanghaimuxinmuyeyouxiangongsi
Adres: Baoshanqu Shuangchenglu 803long 11hao 1602A-1609shi Szanghaj
Import do AUS: SIHAO PTY LTD. 1 ROKEVA STREETEASTWOOD NSW 2122
Australia
Import do USA: Sanven Technology Ltd. Suite 250, 9166 Anaheim Place, Rancho
Cucamonga, CA 91730

- 13 -
Wyprodukowano w Chinach


Technisch Ondersteuning en e-garantiecertificaat www.vevor.com/support
Multifunctioneel Fruit en
Groentesnijder
MODEL: SL-P01/SL-02
We continue to be committed to provide you tools with competitive price.
"Save Half", "Half Price" or any other similar expressions used by us only represents an
estimate of savings you might benefit from buying certain tools with us compared to the major
top brands and does not necessarily mean to cover all categories of tools offered by us. You
are kindly reminded to verify carefully when you are placing an order with us if you are
actually saving half in comparison with the top major brands.


- 1 -
MODEL: SL-P01/SL-02
SL-P01 SL-02
Have product questions? Need technical support? Please feel free to
contact us:
Technical Support and E-Warranty Certificate
www.vevor.com/support
NEED HELP? CONTACT US!
This is the original instruction, please read all manual instructions
carefully before operating. VEVOR reserves a clear interpretation of our
user manual. The appearance of the product shall be subject to the
product you received. Please forgive us that we won't inform you again if
there are any technology or software updates on our product.
Multifunctional Fruit and
Vegetable Slicer

- 2 -
BELANGRIJKE VEILIGHEIDSMAATREGELEN
Waarschuwing- Om het risico op letsel te verminderen, moet de
gebruiker de handleiding zorgvuldig lezen. Volg altijd de
basisveiligheidsmaatregelen bij het gebruik van deze apparaten.
Deze omvatten:
1. Het apparaat mag niet bij kinderen worden gebruikt. Er zitten zeer
scherpe messen op het apparaat. Kinderen kunnen te maken krijgen met
letselongevallen. Daarom moet dit product op een plaats worden geplaatst
die niet door kinderen kan worden aangeraakt.
2. Volg de instructies voor een optimale werking en levensduur van het
apparaat.
3. Voedingszuren maken de messen bot en corroderen het metaal. Maak
deze voedselbereidingsapparatuur altijd onmiddellijk na elk gebruik
schoon. Om het uiterlijk te behouden en de levensduur te verlengen, moet
u het dagelijks reinigen.
4. De machinemessen zijn zeer scherp en er moet op worden gelet dat u
het botsende mes of mes niet rechtstreeks aanraakt of tijdens het gebruik
met handschoenen bedient.
5. Plaats deze apparaten niet in een vaatwasser of ander automatisch
reinigingsapparaat om ze schoon te maken.
6.Het gebruik van accessoires of wijzigingen die niet door de fabrikant zijn
geleverd, kan gevaren veroorzaken.
7. Gebruik dit apparaat alleen voor het snijden van fruit en groenten! Dit
product is niet geschikt voor het verwerken van voedingsmiddelen met een
hardheid vergelijkbaar met zoete aardappel.
8. Voordat u dit apparaat voor de eerste keer gebruikt, dient u alle
verpakkings- en bevestigingsmaterialen te verwijderen volgens de
afbeelding en deze na installatie te gebruiken.
9. Deze apparaten vereisen regelmatige smering. Veeg de geleidestang af
met minerale olie, een geschikt smeermiddel voor levensmiddelen of een
handdoek als smering nodig is. Niet smeren met bakolie of een ander vet.
Anders wordt het stroperig en beïnvloedt het het gebruik.

- 3 -
10. Snij het voedsel niet verder dan de opening van het bord.
11. Zorg er bij het vervangen van messensets voor dat de specificaties en
modellen van de mesplaat en het persblok consistent zijn.
WAARSCHUWING: Gevaar voor scherpe messen: Messen zijn scherp en
kunnen snijwonden veroorzaken. Om letsel door scherpe messen te
voorkomen, moet u er voorzichtig mee omgaan .
BEWAAR DEZE INSTRUCTIES
Samenvatten
Dit product heeft een met de hand geïntegreerde snijmachine, een hoog
rendement, een lichte structuur en is gemakkelijk te demonteren en te
wassen. Van toepassing op verschillende plaatsen, zoals winkels,
restaurants, kraampjes, melktheewinkels, kantine, huishoudens en andere
verwerking van fruit- en groenteschijfjes. De snijdikte is instelbaar. De
uitgesneden stukken zijn gelijkmatig en gemakkelijk te zien. Groene
milieubescherming, behoud van de originele smaak en wordt verwelkomd
door gebruikers.
1 . Centrale gedeelte
2 . Elastische gesp ( snijkopbevestigingsklem )
3 . Grote inlaatvoedselduwstang

- 4 -
4 . Kleine inlaatvoedselduwstang (SL-02 NEE )
5 . Handgreep voor het aanpassen van de snijdikte
6 . Draaihendel van de snijkop
7 . Snijblad
1 . Installatiebediening van de machine
Haal de machine eruit, installeer de handgreep op de snijkop met een
schroevendraaier en bevestig de moer met een binnenzeskantsleutel.
Vervolgens wordt de machinebasis omhuld met een zuignap (roestvrij staal,
marmer en andere gladde tafels kunnen direct met 6 kleine zuignappen
worden geplaatst; hout en andere niet-gladde tafels kunnen willekeurig
worden uitgerust met vaste schroeven. De snijbewerking kan daarna
worden uitgevoerd installatie .

- 5 -

- 6 -

- 7 -
Easy Slice in drie stappen
Eenvoudige bediening, iedereen kan gebruiken
- 8 -
2 . Dikte aanpassing
Plaats het voedsel in de gleuf en probeer het te snijden om de dikte te zien.
Als het niet geschikt is, kunt u de dikte aanpassen. (1): Trek de buitenste
ring van de instelknop naar buiten, (2) draai de knop voorzichtig om naar
links en rechts te draaien, tegen de klok in om de dikte aan te passen; met
de klok mee om de dikte aan te passen, de knopkaart terug naar de
kaartsleuf; de dikte zal niet lopen. Let op het gevoel in je hand. Als er enige
weerstand tegen rotatie is, betekent dit dat deze tot het einde is gedraaid.
Anders verslijt u de steldraad.)
Veerondersteunde voortstuwing
- 9 -
De veer drijft het materiaal in het mes, waardoor tijd en moeite worden
bespaard en snijwonden in de handen worden voorkomen
Instructies voor installatie en demontage van machine
- 10 -
- 11 -
3 . Stap om de veer te vervangen
Eerst moet u de snijkop verwijderen en vervolgens het pentagram van de
trekstangstaart; de duwplaat kan worden verwijderd om de veer te
vervangen. Vervang de veer, installeer de retourgroef op de duwstang,
bevestig deze op zijn plaats met het pentagram en installeer de snijkop.
Vergrendel de snijkop met de veiligheidsgesp voor normaal gebruik.
10. Schoonmaak
Na het snijden moet de machine worden schoongemaakt, de hele machine
moet worden schoongemaakt of de snijkop moet worden schoongemaakt.
Na het reinigen wordt aanbevolen om de watervlekken te drogen om de
romp schoon te houden en roestvorming te voorkomen. (Opmerking:
gebruik geen vaatwasser om de snijkop en romp schoon te maken)
5 . Procedure voor het verwijderen van de snijkop
(1) Trek de gesp eruit en verwijder de veiligheidsgesp.
(2) De snijkop kan worden gewassen, of het mes kan worden vervangen
door de snijkop eruit te trekken.

- 12 -
Opmerking: Als er sprake is van een technische wijziging, raadpleeg dan
zonder voorafgaande kennisgeving het typeplaatje op het product.
Fabrikant: Shanghaimuxinmuyeyouxiangongsi
Adres: Baoshanqu Shuangchenglu 803long 11hao 1602A-1609shi Shanghai
Geïmporteerd naar AUS: SIHAO PTY LTD. 1 ROKEVA STREETEASTWOOD
NSW 2122 Australië
Geïmporteerd naar de VS: Sanven Technology Ltd. Suite 250, 9166 Anaheim
Place, Rancho Cucamonga, CA 91730

- 13 -
Gemaakt in China


Teknisk Support och e-garanticertifikat www.vevor.com/support
Multifunktionell frukt och
Grönsaksskärare
MODELL: SL-P01/SL-02
We continue to be committed to provide you tools with competitive price.
"Save Half", "Half Price" or any other similar expressions used by us only represents an
estimate of savings you might benefit from buying certain tools with us compared to the major
top brands and does not necessarily mean to cover all categories of tools offered by us. You
are kindly reminded to verify carefully when you are placing an order with us if you are
actually saving half in comparison with the top major brands.

- 1 -
MODELL: SL-P01/SL-02
SL-P01 SL-02
Have product questions? Need technical support? Please feel free to
contact us:
Technical Support and E-Warranty Certificate
www.vevor.com/support
NEED HELP? CONTACT US!
This is the original instruction, please read all manual instructions
carefully before operating. VEVOR reserves a clear interpretation of our
user manual. The appearance of the product shall be subject to the
product you received. Please forgive us that we won't inform you again if
there are any technology or software updates on our product.
Multifunctional Fruit and
Vegetable Slicer

- 2 -
VIKTIGA SÄKERHETSÅTGÄRDER
Varning- För att minska risken för skada måste användaren läsa
bruksanvisningen noggrant. Följ alltid grundläggande
säkerhetsföreskrifter när du använder dessa enheter. Dessa
inkluderar:
1. Enheten bör inte användas med barn. Det finns mycket vassa blad på
enheten. Barn kan råka ut för skadeolyckor. Därför bör denna produkt
placeras i en position som inte kan vidröras av barn.
2.Följ instruktionerna för optimal drift och livslängd för enheten.
3. Matsyror kommer att göra blad matta och fräta på metallen. Rengör alltid
denna matberedningsutrustning omedelbart efter varje användning. För att
behålla utseendet och öka livslängden, rengör den dagligen.
4. Maskinbladen är mycket vassa, och försiktighet bör iakttas så att du inte
vidrör klingan eller bladet direkt eller använder handskar under drift.
5. Placera inte dessa enheter i en diskmaskin eller annan automatisk
rengöringsanordning för rengöring.
6. Användning av tillbehör eller modifieringar som inte tillhandahålls av
tillverkaren kan orsaka faror.
7. Använd endast denna utrustning för att skära frukt och grönsaker!
Denna produkt är inte lämplig för bearbetning av livsmedel med en hårdhet
som liknar sötpotatis.
8. Innan du använder denna utrustning för första gången, ta bort allt
förpacknings- och fixeringsmaterial enligt illustrationen och använd dem
efter installationen.
9. Dessa enheter kräver regelbunden smörjning. Torka av styrstången med
mineralolja, livsmedelsgodkänt smörjmedel eller en handduk när smörjning
behövs. Smörj inte med matolja eller annat fett. Annars blir det trögflytande
och påverkar användningen.
10. Skär inte mat utanför tallrikens öppning.
11. För att byta ut bladuppsättningar, se till att specifikationerna och
modellerna för bladplattan och pressblocket överensstämmer.
VARNING: Fara för skarpa blad: Bladen är vassa och kan orsaka skärsår.
- 3 -
För att undvika skador från vassa knivar, hantera dem med försiktighet .
SPARA DESSA INSTRUKTIONER
Sammanfatta
Produkten har en handintegrerad skärmaskin, hög effektivitet, lätt struktur
och lätt att ta isär och tvätta. Tillämplig på olika platser som butiker,
restauranger, stånd, mjölktebutiker, matsal, hushåll och annan frukt- och
grönsaksbearbetning. Skivtjockleken är justerbar. De skurna bitarna är
jämna och lätta att se. Grön miljöskydd, bibehåll den ursprungliga smaken
och välkomnas av användarna.
1 . Huvuddel
2 . Elastiskt spänne ( fästklämma för skärhuvud )
3 . Stort inloppsmatningsstång
4 . Liten inloppsmatningsstång (SL-02 NO )
5 . Handtag för justering av skärtjocklek
6 . Vridande handtag på skärhuvudet
7 . Skärblad
1 . Installation av maskinen
Ta ut maskinen, montera handtaget på skärhuvudet med en skruvmejsel

- 4 -
och fixera muttern med en inre sexkantnyckel. Sedan är maskinbasen
mantlad med sugkopp (rostfritt stål, marmor och andra släta bord kan vara
direkt med 6 små sugkoppar; trä och andra icke-släta bord kan
slumpmässigt förses med skruvar fixerade. Skivningsoperationen kan
utföras efter installation .

- 5 -

- 6 -
Enkel skiva i tre steg
Enkel operation, alla kan använda

- 7 -
2 . Tjockleksjustering
Sätt maten i skåran och försök skära den för att se tjockleken. Om det inte
är lämpligt kan du justera tjockleken. (1): Dra ut den yttre ringen på
justeringsratten, (2) vrid försiktigt knappen för att svänga åt vänster och
höger, i moturs riktning för att justera tjockleken; medurs för att justera
tjockleken, rattkortet tillbaka till kortplatsen; tjockleken kommer inte att löpa.
Var uppmärksam på känslan i din hand. Om det finns något motstånd mot
rotation betyder det att det har roterats till slutet. Eller så sliter du ut
justeringstråden.)
Fjäderassisterad framdrivning

- 8 -
Fjädern driver in materialet i kniven, vilket sparar tid och ansträngning för
att förhindra skärande händer
Instruktioner för installation och demontering av
- 9 -
maskin

- 10 -
3 . Steg för att byta fjäder
Först måste du ta bort skärhuvudet och sedan ta bort dragstångens
svanspentagram; tryckplattan kan tas bort för att ersätta fjädern. Byt ut
fjädern, installera returspåret på tryckstången, fixera den på plats med
pentagrammet och montera skärhuvudet. Lås skärhuvudet med
säkerhetsspännet för normal användning.
11. Rengöring
Efter skivning ska maskinen rengöras, hela maskinen rengöras eller
skärhuvudet ska rengöras. Efter rengöring rekommenderas det att torka
vattenfläckarna för att hålla flygkroppen ren och förhindra rost. (Obs:
Använd inte diskmaskin för att rengöra skärhuvud och flygkropp)
5 . Procedur för att ta bort skärhuvudet
(1) Dra ut spännet och ta av säkerhetsspännet.
(2) Skärhuvudet kan tvättas, eller bladet kan bytas ut genom att dra ut
skärhuvudet.
- 11 -
Obs: Om det finns någon teknisk förändring, se märkskylten på produkten
utan ytterligare meddelande.
Tillverkare: Shanghaimuxinmuyeyouxiangongsi
Adress: Baoshanqu Shuangchenglu 803long 11hao 1602A-1609shi Shanghai
Importerad till AUS: SIHAO PTY LTD. 1 ROKEVA STREETEASTWOOD NSW
2122 Australien
Importerad till USA: Sanven Technology Ltd. Suite 250, 9166 Anaheim Place,
Rancho Cucamonga, CA 91730

- 12 -
Tillverkad i Kina