*HOME APPLIANCES
USER MANUAL
If you are having problems using this coffee maker
Please email
:
support@airmsen.com
for
assistance :
www.airmsen.com
THANK YOU FOR MAKING AIRMSEN APPLIANCES A PART OF YOUR HOME.
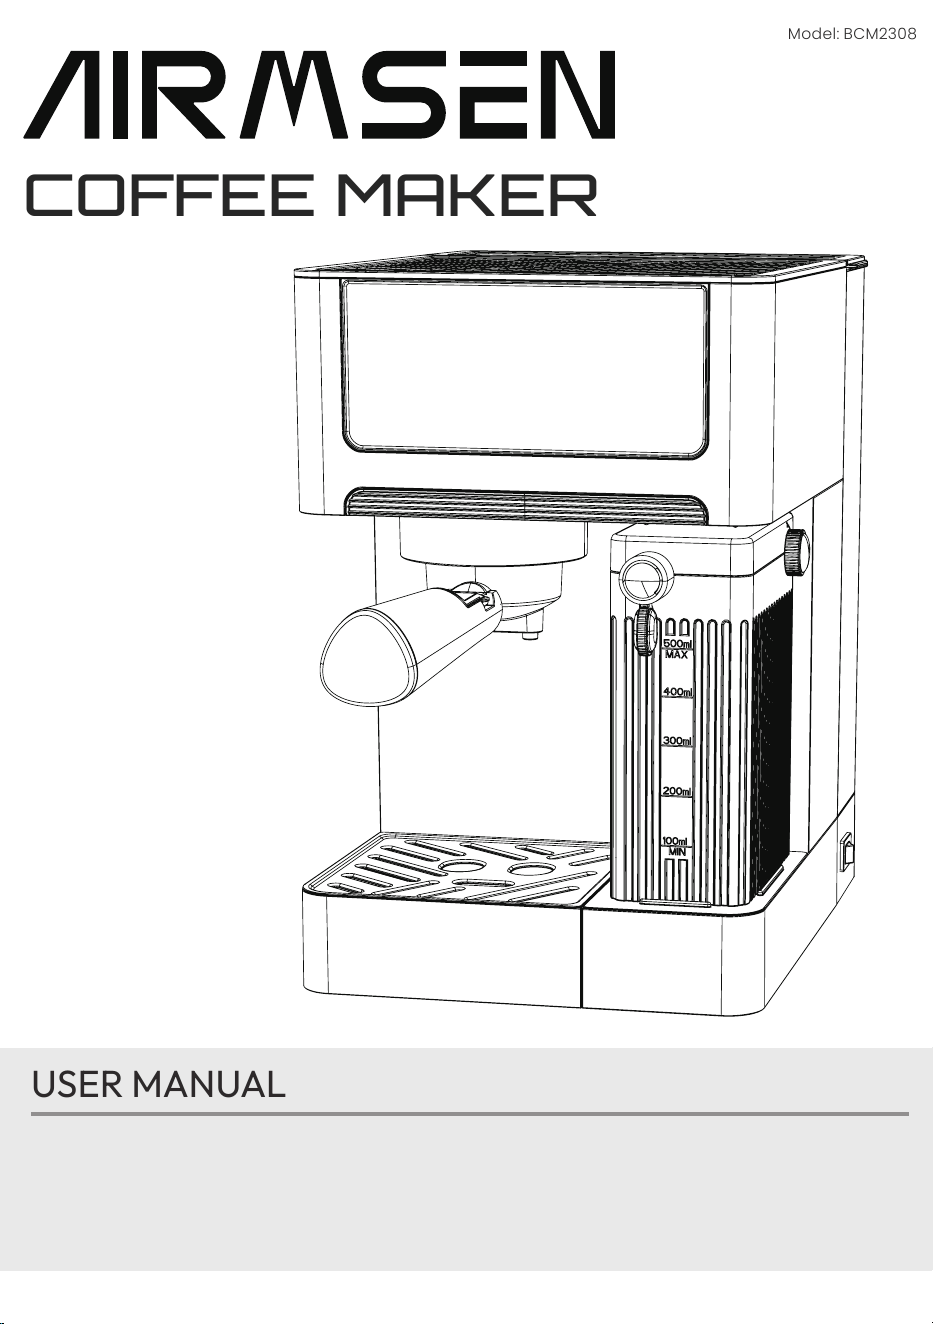
Model: BCM2308
COFFEE MAKER
02
CONSTANT INNOVATION TO ALLOW CONSUMERS
TO GET BETTER PRODUCTS
Take “technology, innovation, health” as its core value, to be the preferred brand of
household products in your healthy and quality life.
AIRMSEN focus on researching, developing and manufacturing various kinds of
household supplies with advanced technologies and the idea of sustainable
development, to promote the evolution and transform of our lifestyle, to make it more
healthy, green, intelligent and with high quality, and to bring a happy, healthy and
eco-friendly home life to around the world.
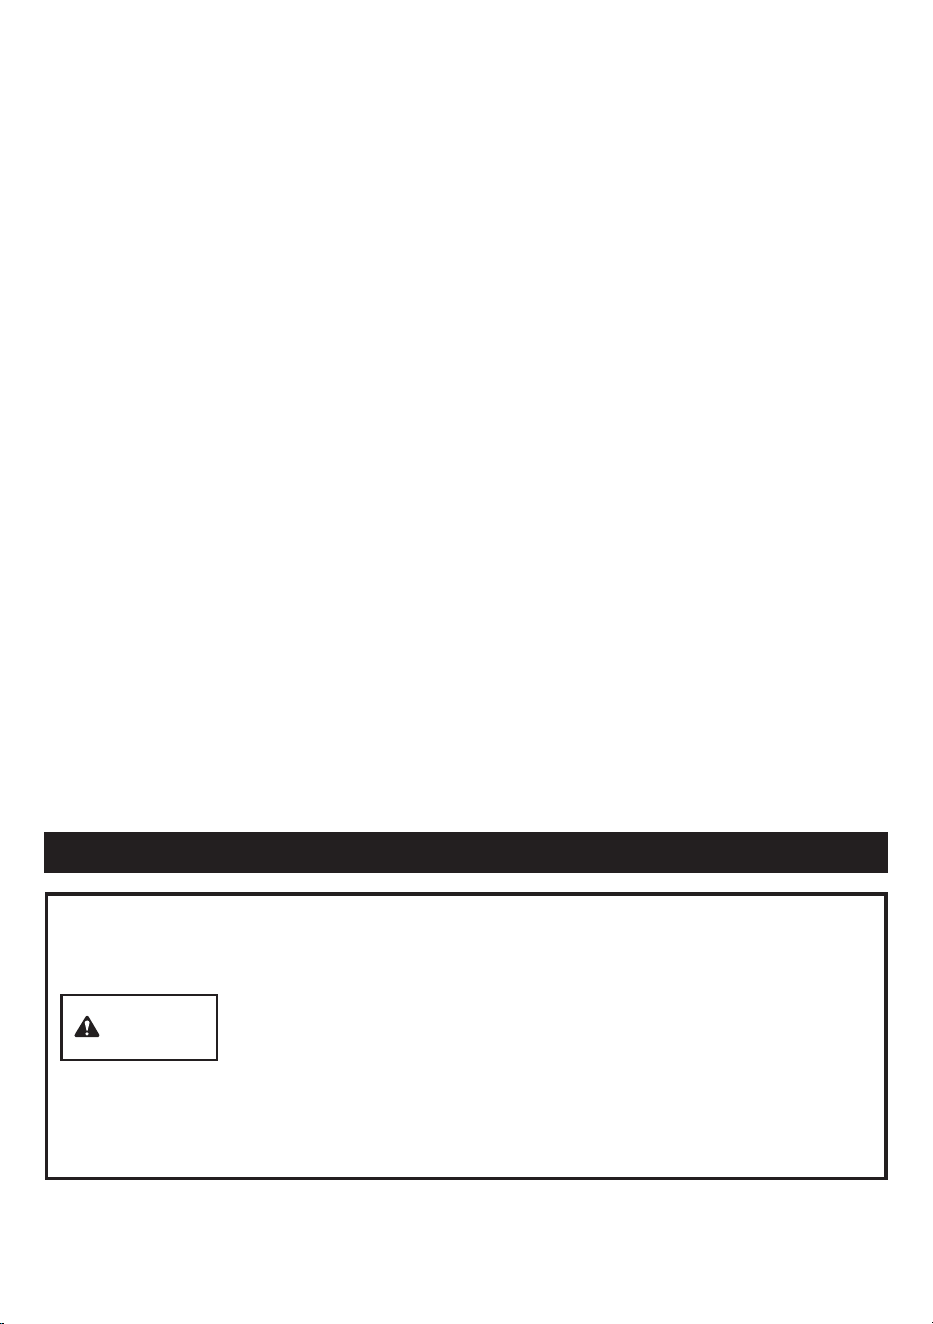
SAFETY
Your safety and the safety of others is very important.
We have provided many important safety messages in this manual and on your
appliance. Always read and obey all safety messages.
All safety messages will follow the safety alert symbol.
All safety messages will tell you what the potential hazard is, tell you how to reduce
the chance of injury, and tell you what can happen if the instructions are not
followed.
WARNING
This is the safety alert symbol.
This symbol alerts you to potential hazards that can cause
serious injury to you and others.

03
CONTENTS
IMPORTANT SAFEGUARDS 4
COMPONENT INTRODUCTION 6
PREPARATION BEFORE USE 7
SELECTING THE RIGHT COFFEE 7
OPERATION INSTRUCTIONS 8
FUNCTION 11
FROTH MILK 12
CLEAN 12
CLEANING AND MAINTENANCE 13
CLEANING THE MILK RESERVOIR AND FROTHING TUBE 13
CLEANING THE BREW HEAD, THE PORTA-FILTER AND FILTER 13
CLEANING THE WATER RESERVOIR 13
CLEANING THE UNIT 14
DESCALING 14
PROBLEMS AND CAUSES 15
WARRANTY 16
CUSTOMER SUPPORT 17

04
IMPORTANT SAFEGUARDS
Congratulations on your new Airmsen coffee maker. This manual contains important
information on the installation, use, and care of your appliance. Please take time to
read this manual to take full advantage of your coffee maker many benets and
features.
WHAT YOU NEED TO KNOW ABOUT THE SAFETY INSTRUCTIONS
When using electrical appliances, basic safety precautions should always be
followed to reduce the risk of re, electric shock and/or injury to persons, including the
following:
1. Read all instructions.
2. Make sure that your outlet voltage corresponds to the voltage stated on the
rating label of the coffee maker.
3. To protect against re, do not immerse cord, plug or unit in water or other liquid.
4. Close supervision is necessary when the appliance is using by or near children.
5. Unplug from outlet when not in use and before cleaning. Allow to cooling before
putting on or taking off parts, and before cleaning the appliance.
6. Do not operate appliance with a damaged cord or plug or after the appliance
malfunctions, or has been damaged in any manner. Return appliance to an
authorized service facility for examination, repair or adjustment.
7. The use of accessory not recommended by the appliance manufacturer may
result in re, electric shock or injury to persons.
8. To disconnect, turn all control to the off position then remove plug from wall
outlet.
9. Do not touch the hot surfaces.
10. Do not using outdoors or for commercial purposes.
11. Do not hang the cord over edge of table or counter
12. Use on a hard, at level surface only, to avoid interruption of airow underneath
the appliance.
13. Always be sure to place the water tank tightly back on the unit with its lid closed
and ll with water on or above the minimum before turning appliance on.
14. Do not remove the porta-lter while brewing coffee. Please make sure the three
lights are on before you remove the porta-lter to make additional coffee.
Caution should also be taken while removing the porta-lter since the metal
parts will be hot. Please make sure to hold it by the handle and to use the lter
retention clip to dispose the grounds. Caution should be taken when moving unit
with hot liquids.
15. Do not remove the water tank until unit is turned off.
16. This appliance is not intended to be operated by means of an external timer or
separate remote-control system.
17. The appliance can be used by children aged from 18 years and above and
persons with reduced physical, sensory or mental capabilities or lack of
experience and knowledge if they have been given supervision or instruction
concerning use of the appliance in a safe way and understand the hazards

05
involved. Children shall not play with the appliance. Cleaning and user
maintenance shall not be made by children unless they are older than 18 and
supervised.
18. Keep the appliance and its cord out of reach of children less than 18-year-old.
19. Before removing any of the parts and accessories, make sure the three lights are
on, press the power button to the off position “O” and unplug the appliance.
20. Do not remove the porta-lter at any time during the brewing process.
21. Use caution when removing the porta-lter. The metal parts may still be very
hot. Also, there may be hot water oating on the top of the lter. Hold it only by its
handle and dispose of the brewed coffee ground by using the lter retention clip.
22. If coffee does not drip, the lter is blocked. Turn off the appliance and allow it to
cool down. The blockage may be caused by the coffee being too nely ground.
See the “PROBLEMS AND CAUSES” section.
23. Do not place on or near a hot gas or electric burner, or in a heated oven.
24. Do not use appliance for other than intended use.
25. Do not leave the appliance on unattended.
26. This appliance is intended to be used in household and similar applications such
as:
- Staff kitchen areas in shops, ofces and other working environments;
- Farm houses;
- By clients in hotels, motels and other residential type environments;
- Bed and breakfast type environments.
27. Save these instructions.
CAUTION
PRESSURE:
In order to avoid possible burns to body parts and/or other injury from
hot steam and water or damages to the unit, never remove the water tank or the
porta-lter while your espresso/cappuccino maker is brewing coffee or frothing.
Make sure the the machine is not on the state that only one of the symbols blinks
before you can remove the porta-lter to make additional cups of coffee. If you
need to add more water or milk to the reservoirs, please make sure the ensure to
switch off the unit by pressing the button on the side of the unit to make all the
symbols off.
06
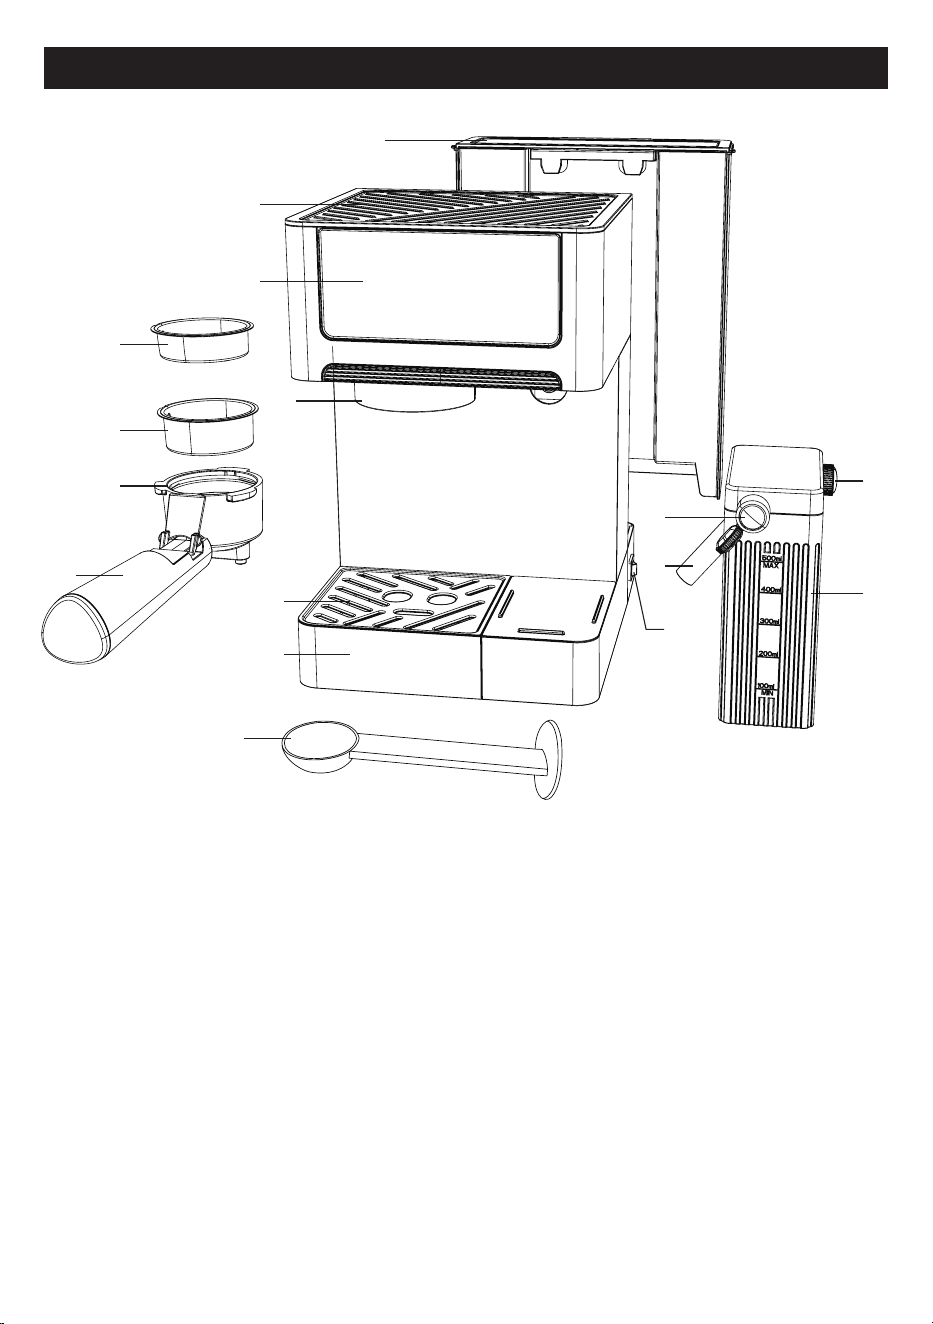
COMPONENT INTRODUCTION
1
2
3
8
10
11
9
4
5
6
7
12
1 3
14
15
16
1. 60.87 oz (1.8L) Water Tank
2. Stainless Steel Preheat Tray
3. LED Display
4. Brew Head
5. Drip Tray Lid
6. Drip Tray
7. On/Off Switch
8. Froth Milk Dispensing Tube
9. Froth Tube Lever
10. Removable Cleaning Knob
11. 16.9 oz (500ML) Milk Box
12. Single Filter
13. Double Filter
14. Funnel
15. Funnel Handle
16. Spoon

07
NOTE:
In order for your unit to work properly time after time, clean it after every use.
PREPARATION BEFORE USE
Cleaning and priming the unit prior to rst use.
1. Please make sure the all symbols are off by pressing the power button located
on the side of the unit. Make sure it is unplugged from the electrical outlet.
2. Remove stickers and labels from the unit.(If it has removable stickers and labels)
3. Remove and wash the water tank, the milk tank, the porta-lter, all lters
and measuring scoop in a mixture of mild detergent and water. Rinse each
thoroughly and place them back into the unit.
4. To clean the inside of the appliance, press the “Clean” button and use water in
both tanks and without coffee powder in the lter. Do not immerse the appliance
in water.
SELECTING THE RIGHT COFFEE
1. The coffee.
The coffee should be freshly ground and dark roasted. You may want to try a French
or Italian roast ground for espresso. Pre-ground coffee will only retain its avor for 7
– 8 days, provided it is stored in an airtight container and in a cool, dark area. Do not
store in a refrigerator or freezer. Whole beans are recommended to be ground just
before use. Coffee beans stored in an airtight container will keep its avor for up to 4
weeks.
2.The grind
This is a vital step in the espresso making process if you are grinding your own coffee
and takes practice. The coffee must be of a ne grind.
The correct grind should look like salt.
If the grind is too ne, the water will not ow through the coffee even under pressure.
These grinds look like powder and feel like our when rubbed between ngers.
If the grind is too coarse, the water ows through the coffee too fast, preventing a
full-avored extraction.
Be sure to use a quality grinder for uniform consistency.
08
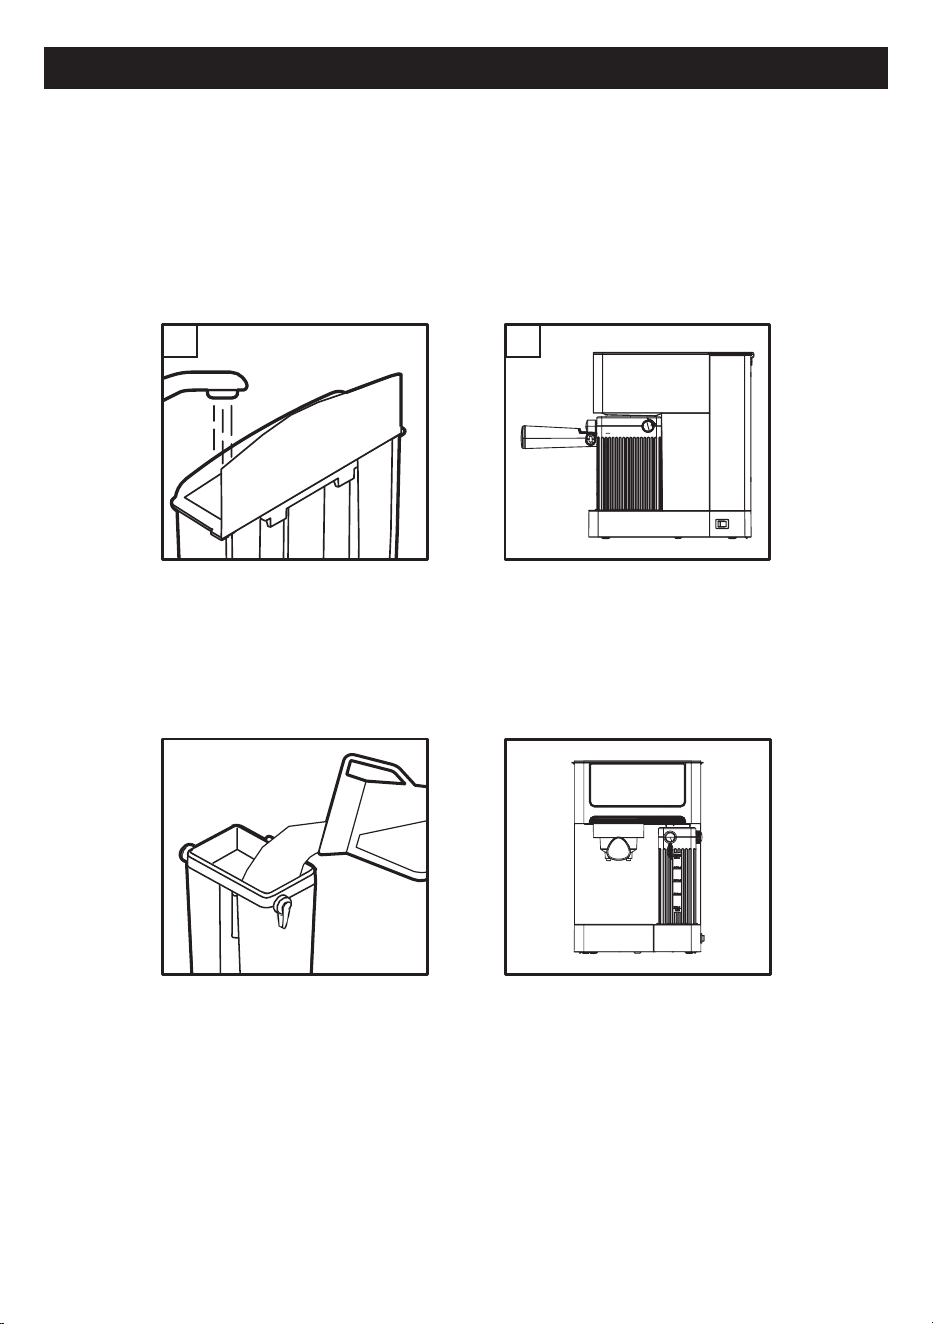
Fill the tank with water, you may either use a jar to ll it up or remove it from the
unit and then ll it up under the tap. If you have removed it from the unit to ll
up with water, please make sure to place it back tightly in its place. Fill the tank
with the desired amount of water ensuring it ranges within the “MIN” and “MAX”
markings on the tank. Never use warm or hot water to ll the water tank.
Close the water tank lid and place it back in the unit and ensuring it ts tightly.
A.
B.
A B
OPERATION INSTRUCTIONS
1. Filling the water reservoir.
2. Filling the milk reservoir.
If you plan to prepare cappuccino or latte, tilt it up before pulling it out before remove
the milk tank from the unit. Open the lid, then ll with the cold milk and make sure the
level is between the “Min” and “Max”. When done, place the milk tank back in the unit
sliding it rmly back into place.
NOTE:
There is the switch connect the milk tank. When take out the milk tank, the
control panel can operate espresso function only (Means the espresso function light
up only, others function light off.).

09
READY FOR BREWING COFFEE
1. Choose a suitable powder lter and install it rmly in the portalter.
2. Insert the lter into the lter holder.
NOTE:
Before you make coffee, please press the coffee button to brew one cup of
water without ll in coffee powder. This steps is to clean the machine and raise the
temperature before the next extraction.
3. Fill the freshly ground coffee powder into the lter with measuring spoon. Use
the tamper on the spoon to atten the coffee powder evenly and remove excess
powder from the edges.
Double cup lter(0.49oz)
2inch
single cup lter(0.24oz)
Align with grooves
for installation.
A B C
10
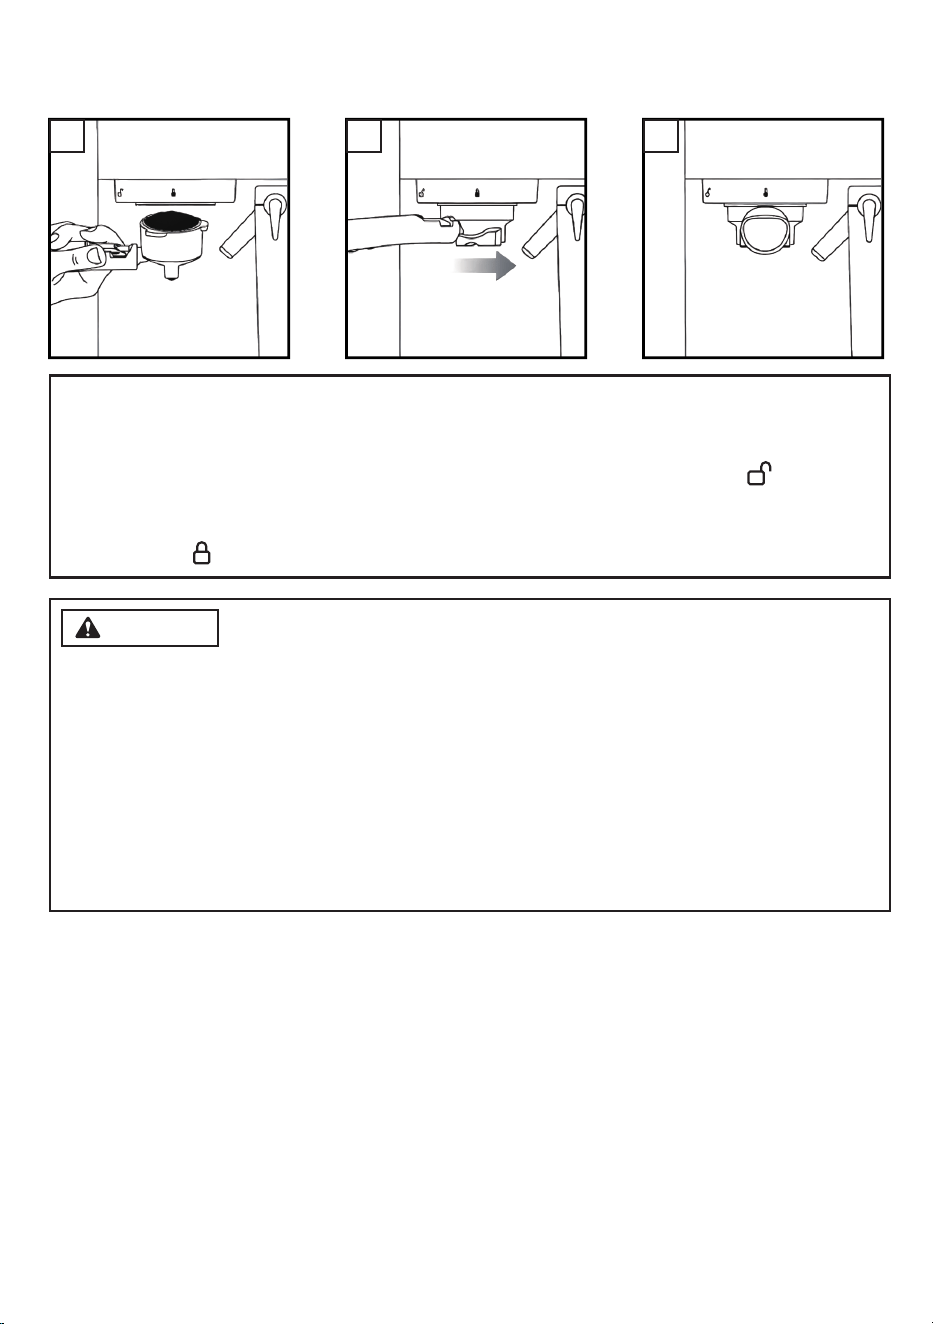
4. Install the handle under the coffee outlet. Align it with the unlock symbol, slide it
into the groove, and slowly rotate it to the right to the lock symbol.
5. Make sure unit is plugged in.
6. Turn the unit right side switch on.
7. The control panel all lights up, meanwhile the machine is preheating .Then the
machine is ready to use.
A B C
CAUTION
1. To avoid possible burns to body parts and/or other injury from hot steam
and water or damages to the unit, never remove the water reservoir or
the portalter while your espresso/cappuccino maker is brewing coffee or
frothing. If you intend to make a second cup of coffee, be sure the unit is in
standby mode—all buttons will be lit and solid—before removing or inserting
portalter. If you need to add more water or milk to the reservoirs, switch off
the unit by pressing the button on the side of the unit.
2. When brewing cappuccino or latte, please make sure to adjust the frothing
tube lever in order to position the froth milk dispensing tube inside the cup to
be used.
Note:
A. Position porta-lter underneath the brew head, attach porta-lter by rst
moving retainer clip back.
B. Position handle so that the handle lines up with the open lock icon ” ” on the
unit and ts into the groove.
C. Then, slowly turn it to the right until the retention clip is aligned with the closed
lock symbol “ ” on the unit.

11
FUNCTION
The Espresso/ Cappuccino/Latte button ashes after pressing the corresponding
button. This means the machine is preheating. Finish the preheating, then the
brewing process starts. Hot water is poured over the coffee powder to brew it. At the
end of the brewing process, all buttons’ light is lit up and the buzzer will beep 3 times
to remind nished.
Single Double
Coffee Milk Coffee Milk
Espresso
30-50ml
(1-1.69oz)
/
60-90ml
(2-3oz)
/
Cappucino
30-50ml
(1-1.69oz)
40-70ml
(1.35-2.36oz)
60-90ml
(2-3oz)
60-130ml
(2-4.39oz)
Latte
30-50ml
(1-1.69oz)
90-150ml
(3-5oz)
60-90ml
(2-3oz)
140-210ml
(4.73-7.10oz)

12
FROTH MILK
The FROTH button ashes after pressing the froth. This means the machine is
preheating. Finish the preheating, then the frothing process starts and keeps the 30s.
At the end of the frothing process, the all buttons lights are lit up and the buzzer will
beep 3 times to remind nished.
CLEAN
Press the CLEAN button, the machine will start to clean the inside and milk tank. The
process will start to clean 10 seconds, stop 5 seconds, then start to clean 30 seconds
again. The clean process is nished.
CAUTION
Customization:
• Coffee dispensing time:
Press and hold the espresso button for 3 seconds
to adjust the coffee dispensing time (single cup: 6-30 seconds, double
cup: 12-50 seconds). Press the button again to conrm the adjustment, and
the buzzer will beep three times. After the setting, the dispensing times for
single and double cups of espresso, cappuccino, and latte will be adjusted
simultaneously.
• Milk frothing time:
Press and hold one of the buttons for cappuccino single
cup, cappuccino double cup, latte single cup, or latte double cup for 3
seconds to adjust the milk frothing time (range: 5-50 seconds). Press the
button again to complete the adjustment, and the buzzer will beep three
times. This settings will be recorded in thecorresponding function.
NOTE:
• Long pressing the CLEAN button for 5 seconds will back to the system default
cup volume.
• Energy-Saving Mode: In standby mode, if no buttons are pressed for 15
minutes, the machine enters energy-saving mode: all lights turn off. In energy-
saving mode, touching any button on the panel will restore the display to
standby mode.
NOTE:
Between frothing, the milk froth volume can stop as your need.
13
CLEANING AND MAINTENANCE
Regular cleaning and maintenance keep the machine in working condition and
ensure perfect coffee avor, a constant coffee ow, and excellent milk froth for a long
period of time.
CLEANING THE MILK RESERVOIR AND FROTHING TUBE
Even though you can store the milk reservoir with left over milk in the refrigerator, it
is important to clean the reservoir and frothing tube regularly to avoid clogging and
building residues. In order to clean the milk reservoir, please follow the instructions
listed below:
1. Remove the milk reservoir from the unit
2. Remove the lid of the reservoir.
3. Pour the left milk and rinse and wash the milk reservoir and its lid thoroughly with
warm soapy water. Rinse and dry well. Do not use abrasive cleaners and scouring
pads, as they will scratch the nish. The milk reservoir is also dishwasher safe. Put
the lid of the milk reservoir in the dishwasher is viable( The frothing tube don’t put
in the dishwasher).
4. Place a large empty cup under the frothing tube.
5. Press and hold the clean button and then release it. The unit will start releasing
steam through the frothing tube, let it run for a few seconds. When done press
the clean button to stop the process.
6. Dispose any water left on the milk reservoir and place it back in the unit.
CLEANING THE BREW HEAD, THE PORTA-FILTER AND FILTER
1. Switch the power button on the side of the unit to the off position “O” and unplug
the power cord from the electrical outlet.
2. Some of the metal parts might still be hot. Do not touch them with your hands
until they have cooled they have completely cooled.
3. Remove the porta-lter and discard the coffee grounds or used pod. Wash both
the porta-lter and lter with warm soapy water and rinse them well.
4. Wipe lower part of the brew head in the unit with a damp cloth or paper towel to
remove any coffee grounds that might have been left.
5. Place the porta-lter (without any lter) back in the brew head in the unit.
6. Place an empty large cup under the porta-lter.
7. Press the espresso button once and let the unit brew with water only until it stops
automatically.
CLEANING THE WATER RESERVOIR
Discard the remaining water by removing the reservoir and turning it upside down
over the sink. It is recommended to empty the water reservoir after every use. Wash
the water reservoir with soapy water, rinse it well and wipe it dry. The water reservoir
is also dishwasher safe.
NOTE:
Do not wash the porta-lter and lters in the dishwasher.

14
CLEANING THE UNIT
1. Wipe the housing with a soft wet cloth. Do not use abrasive cleaners or scouring
pads, as they will scratch the nish.
2. Do not store the porta-lter in the brew head. This can adversely affect the seal
between the brew head and the porta-lter while brewing espresso.
DESCALING
“Regular descaling, recommended to be performed once a month, is crucial for
ensuring the stable operation and extending the life of the unit.
TO DELIME THE WATER RESERVOIR:
1. Fill the water reservoir with diluted descaling powder.
2. Allow appliance to sit few minutes with the descaling powder solution in the
water reservoir.
3. Discard descaling powder by removing the reservoir and turning it upside down
over the sink.
4. Rinse the water reservoir thoroughly with tap water by lling tank half full with
water and then pouring the water back out into the sink, repeating this step twice.
TO DELIME INTERNAL PARTS:
1. Make sure you descale the inside of the water reservoir rst.
2. Make sure to switch the power button to the “O” position and the power cord is
disconnected from the electrical outlet. Fill the reservoir with diluted descaling
powder water above the minimum level into reservoir.
3. Insert the porta-lter (with lter and no coffee) and place jar/carafe or regular
cup on top of the drip tray and under the porta-lter.
4. Plug the power cord into the electrical outlet.
5. Press the power button to switch the unit on “I”, press the Espresso Button. The
diluted descaling powder water will start owing through the unit and it will stop
automatically.
6. Place a pitcher or large cup under the tube. Fill the milk reservoir with water and
place it back on the unit. Turn the Froth milk tube clockwise inside the cup, then
press the clean button to activate the clean function. Let the unit dispense the
water through the tube then stop automatically.
7. Repeat Steps 1 – 7 as necessary, using only tap water to rinse any remaining
traces of descaling powder out of the machine
CAUTION
Do not immerse the appliance in water.
15
PROBLEMS AND CAUSES
PROBLEM
CAUSES
SOLUTIONS
Coffee does not
come out
1. No water in reservoir.
2. Coffee grind is too ne.
3. Too much coffee in the
lter.
4. Appliance was not turned
on or plugged in.
5. Coffee has been tamped/
compressed too much.
1. Add water
2. Grind medium ground
coffee
.
3. Fill lter with less coffee.
4. Plug the unit into
electrical outlet and
turn it on.
Coffee comes out
around the edge of
the porta-lter.
1. Porta-lter not rotated to
full lock position.
2. Coffee grounds around the
lter basket rim.
3. Too much coffee in the
lter.
1. Rotate lter holder to
full lock position.
2. Wipe off rim.
3. Fill with less coffee.
Milk is not foamy after
frothing or it is not
coming out of the
frothing tube
1. Ran out of steam
2. Milk is not cold enough.
3. Frothing tube is blocked.
1. Ensure there is enough
water in the reservoir.
2. Chill milk and frothing
pitcher prior to making
cappuccino.
3. Follow the instructions
to clean the milk
reservoirs &frothing
tube.
Coffee comes out too
quickly
1. Ground coffee is too
coarse.
2. No enough coffee in lter.
1. Use a ner grind.
2. Use more coffee.
Coffee is too weak.
1. Using small lter for double
shot of espresso.
2. Ground coffee is too
coarse.
1. Use large lter for
double shot of
espresso
2. Use a ner grind.
The three control
panel lights are
ashing alternatively
Water tank is out of water Add water to reservoir.

16
WARRANTY
TERMS & POLICY
AIRMSEN warrants all products to be of the highest quality in material, craftsmanship,
and service, effective from the date of purchase to the end of the warranty period.
AIRMSEN will replace any product found to be defective due to manufacturer aws
based on eligibility. Refunds are available within the rst 30 days of purchase. Refunds
are only available to the original purchaser of the product. This warranty extends
only to personal use and does not extend to any product that has been used for
commercial, rental, or any other use in which the product is not intended for. There
are no warranties other than the warranties expressly set forth with each product.
This warranty is non-transferrable. AIRMSEN is not responsible in any way for any
damages, losses, or inconveniences caused by equipment failure by user negligence,
abuse, or use noncompliant with the user manual or any additional safety or usage
warnings included in the product packaging and manual.
THIS WARRANTY DOES NOT APPLY TO THE FOLLOWING:
• Damage due to abuse, accident, alteration, misuse, tampering, or vandalism.
• Improper or inadequate maintenance.
• Damage in return transit.
• Unsupervised use by children under 18 years of age.
AIRMSEN assume no liability for damage caused by the use of the product other than
for its intended use or as instructed in the user manual. Some states do not allow
this exclusion or limitation of incidental or consequential losses, so the foregoing
disclaimer may not apply to you. This warranty gives you specic legal rights and you
may also have other rights, which may vary from state to state.
ALL EXPRESSED AND IMPLIED WARRANTIES, INCLUDING THE WARRANTY OF
MERCHANTABILITY, ARE LIMITED TO THE PERIOD OF THE LIMITED WARRANTY.
DEFECTIVE PRODUCTS & RETURNS
Should your product prove defective within the specied warranty period, please
contact Customer Support via
with your order number. DO
not dispose of your product before contacting us. Once our Customer Support Team
has approved your request, please return the unit with a copy of your invoice and
order number.
Product Name
Model
Number
Default
Warranty
Period
Date of
Purchase
Order
Number
For your own
reference,
we strongly
recommend that
you record your
order number and
date of purchase.
COFFEE MAKER
BCM2308 1 year

17
CUSTOMER SUPPORT
WE’RE HERE TO HELP!
If you encounter any issues or have any questions regarding your new product,
please contact our helpful Customer Support Team. Your satisfaction is our goal!
CUSTOMER SUPPORT
Email:
Website:
www.airmsen.com
If you need to purchase product accessories, please visit
www.airmsen.com.
* Please have your order conrmation number ready before contacting Customer
Support.
For product operation videos, please subscribe to AIRMSEN’s ofcial Youtube account.
https://www.facebook.com/Airmsen
https://www.youtube.com/@AIRMSEN

18
NOTES:
19
NOTES:
Printed in China
QUESTIONS OR COMMENTS?
CODE NO.: AM-2408_US