
Technical Support and E-Warranty Certificate www.vevor.com/support
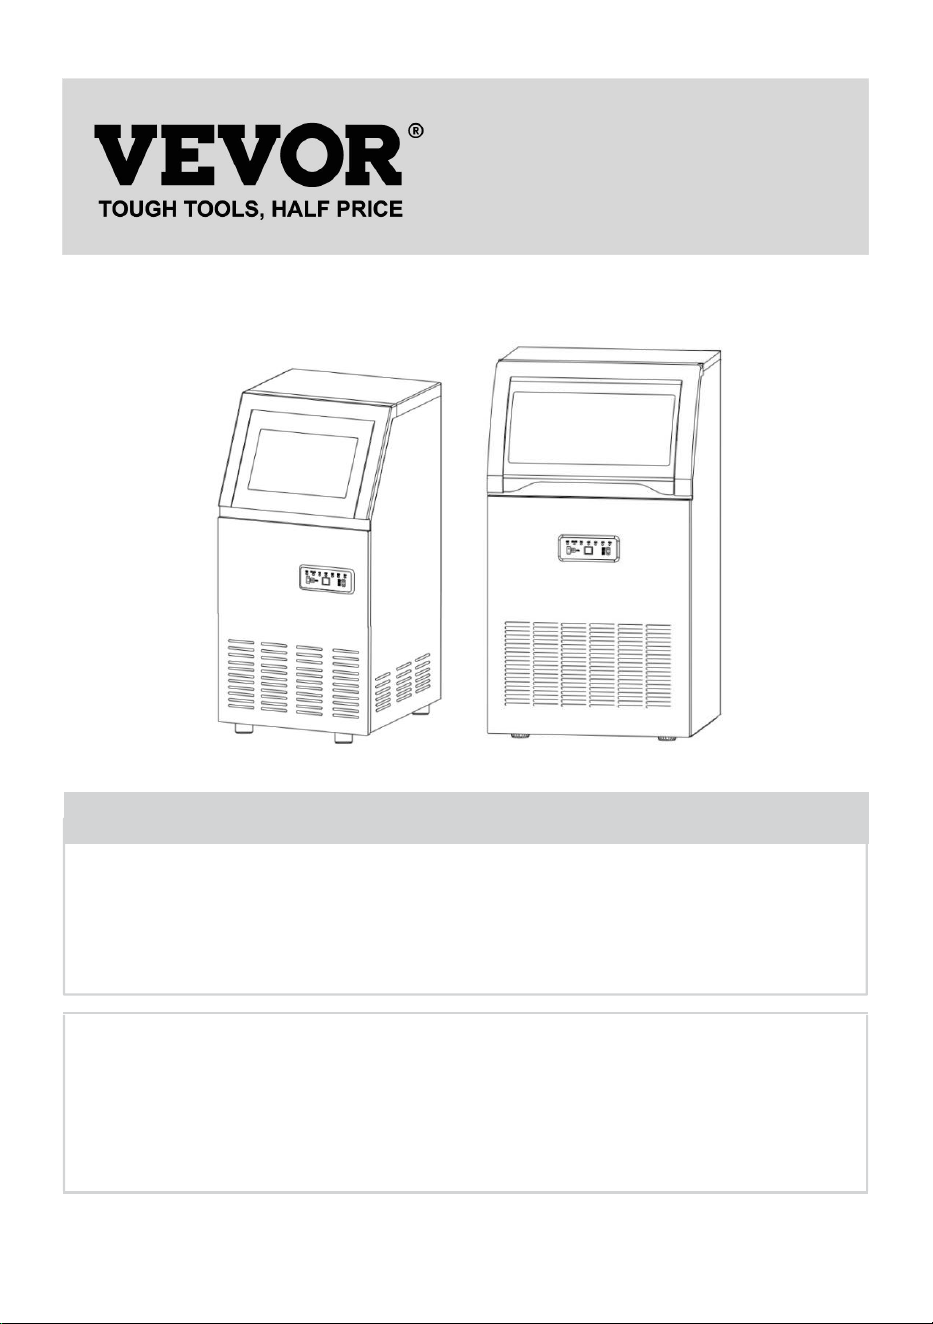
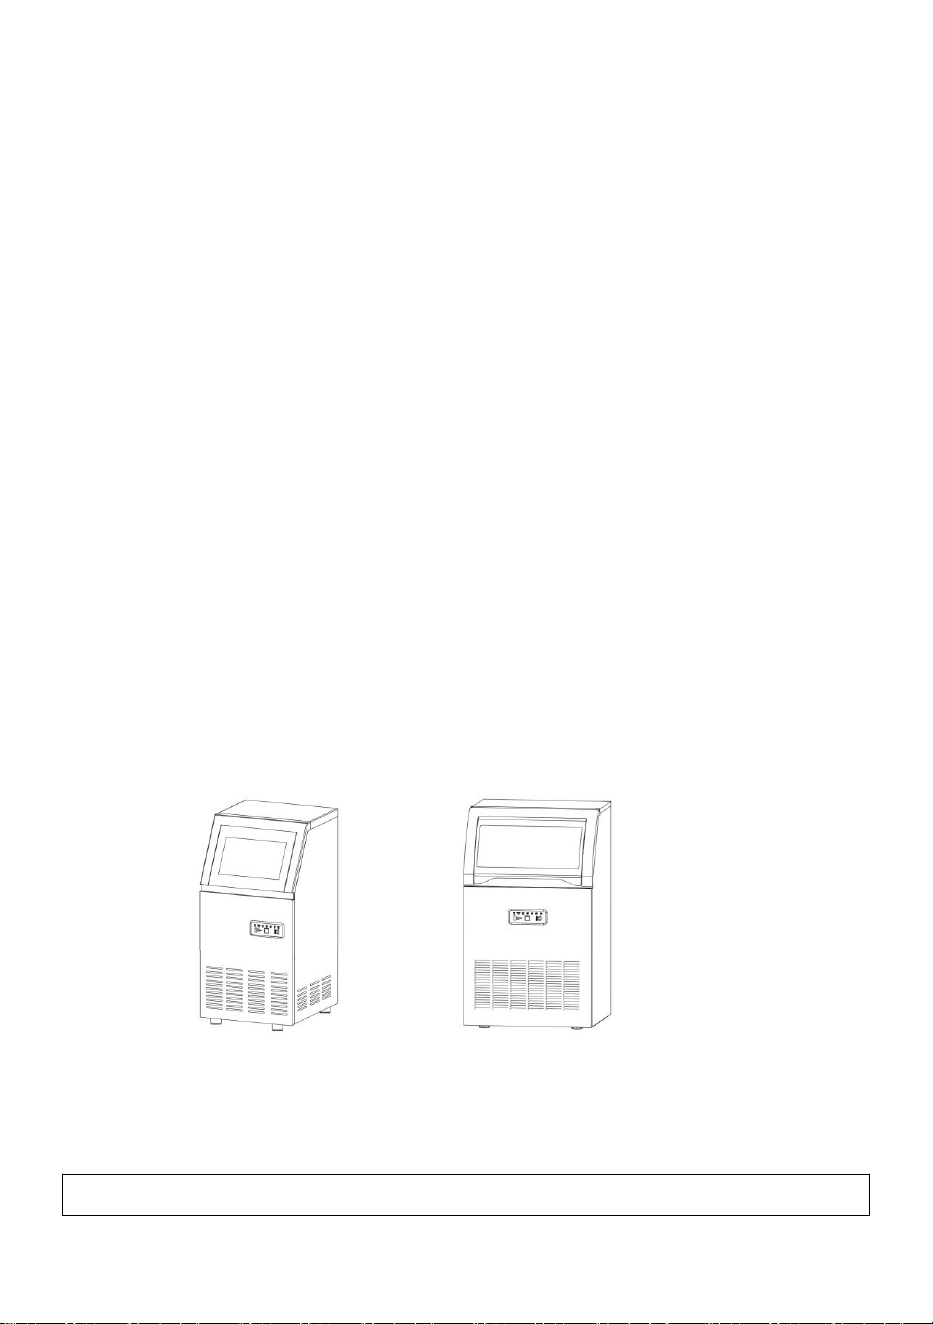
Commercial Ice Machine
Model: SKF-B40F SKF-B45F
SKF-C50F SKF-C55F
We continue to be committed to provide you tools with competitive price.
"Save Half", "Half Price" or any other similar expressions used by us only represents an
estimate of savings you might benefit from buying certain tools with us compared to the major
top brands and does not necessarily mean to cover all categories of tools offered by us. You
are kindly reminded to verify carefully when you are placing an order with us if you are
actually saving half in comparison with the top major brands.
- 1 -
MODEL: SKF-B40F SKF-B45F SKF-C50F SKF-C55F
Have product questions? Need technical support? Please feel free to
contact us:
Technical Support and E-Warranty Certificate
www.vevor.com/support
NEED HELP? CONTACT US!
This is the original instruction, please read all manual instructions
carefully before operating. VEVOR reserves a clear interpretation of our
user manual. The appearance of the product shall be subject to the
product you received. Please forgive us that we won't inform you again if
there are any technology or software updates on our product.
Commercial Ice
Machine
- 2 -
It is important that you read these instructions carefully and keep it for
future reference.
Warning-To reduce the risk of injury, user must read
instructions manual carefully.
This device complies with Part 15 of the FCC Rules. Operation
is subject to the following two conditions:(1)This device may
not cause harmful interference, and (2)this device must accept
any interference received, including interference that may
cause undesired operation.
This product is subject to the provision of European Directive
2012/19/EC. The symbol showing a wheelie bin crossed
through indicates that the product requires separate refuse
collection in the European Union. This applies to the product
and all accessories marked with this symbol. Products marked
as such may not be discarded with normal domestic waste, but
must be taken to a collection point for recycling electrical and
electronic devices
IMPORTANT SAFETY INSTRUCTIONS
When using electrical appliances, basic safety precautions should be
followed to reduce the risk of fire, electric shock , and injury to persons
or property. Read all instructions before operating the machine for the first
time.
CAUTION: ICE CAN’T BE STORED IN THE ICE BIN DURING
NIGHT-TIME, IT’S NOT FRIDGE, ICE WILL BE MELTED TO WATER AND
FLOW OUT OF THE MACHINE.
1.If connect with water supply, CAUTION: must connect the potable water
supply;
2.The machine is intended to be used in household and similar

- 3 -
applications such as:
-staff kitchen areas in shops, offices, and other working environments;
-farmhouses
-by clients in hotels, motels, and other residential type environments;
-Catering industry and similar industries.
3.The machine should be used indoors and without obstacles surrounded
good ventilation place. There is must be 50cm at least between the four
sides of the machine with the wall.
4.When using electrical appliances, basic safety precautions should be
followed to reduce the risk of fire, electric shock , and injury to persons or
property. Read all instructions before using any appliance.
5.Don’t operate this or any other appliance with a damaged cord.
6.Connect to properly polarized outlets only. No other appliance should be
plugged into the same outlet. Be sure that the plug is fully inserted into the
socket.
7.Don’t place the machine and power cord near flammable material. Do not
cover the cord. Do not submerge it in water.
8.We do not recommend the use of an extension cord, as it may overheat
and become a risk of fire.
9.Unplug the ice maker before cleaning or making any repairs or servicing.
10.Exercise caution and supervision when the appliance is used near
children.
11.Don’t use your ice maker outdoors. Avoid direct sunlight and make sure
that there is at least 5 inches of space between the back and sides of
your unit and the wall.
12.Don’t use any liquid other than water in the unit to make the ice.
13.Do not clean your ice maker with flammable detergents.The fumes can
create a fire hazard or explosion.
14.Do not tip the machine over.
15.If the ice maker is brought indoors from outdoors during the wintertime,
give it a few hours to warm up to room temperature before plugging into the
power source.
16.This unit should be properly grounded for your safety. The power cord is

- 4 -
equipped with a three-prong plug mated with standard three-prong wall
outlets to minimize the possibility of electric shock.
17.Plug your appliance into a dedicated, properly installed, and grounded
wall outlet. Do not, under any circumstance power and /or grounding
should be directed toward a certified electrician.
18.The foaming materials inside are combustible which must be kept away
from fire.
19.It’s forbidden to pull the cable to unplug the plug, pull the plug is a must.
IMPORTANCE: To avoid hazards due to instability,the unit must be placed
on an even and flat surface.
IMPORTANCE: To avoid hazards due to instability,the unit must be placed
on an even and flat surface.
WARNING: This appliance must be grounded.
1)The fuse on the PCB is 15A,if change,must be operated by a technician.
2)voltage fluctuation can’t be exceeded ±10% than the rated voltage,or a
Voltage stabilizer is needed.
IMPORTANCE: To avoid hazards due to instability, the unit must be
placed on an even and flat surface.
OPERATING PROCEDURES
UNPACKING YOUR ICE MAKER
1.Remove all exterior and interior packaging materials. Check whether all
the below accessories are included or not. If any parts are missing, please
contact our customer service. After you unpack the machine, we
recommend you to leaving it for 24 hours before turning it on.
2.Clean the interior with lukewarm water and a soft cloth or clean the unit
using the Self-Clean function.
3.Find a location for your ice maker where it’s protected from direct sunlight
and other sources of heat (i.e. stove, furnace, radiator). Place the ice
maker on a level surface. Make sure that there is at least 5 inches of space
between the back and sides of your ice maker and the wall.
4.Allow one hour for the refrigerant to settle before plugging the unit for
- 5 -
initial use.
5.The appliance must be positioned where the plug is accessible.
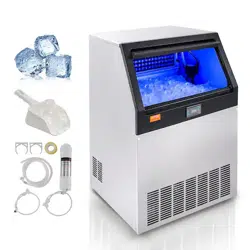
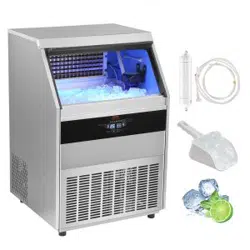
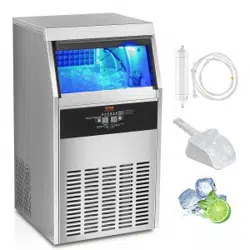
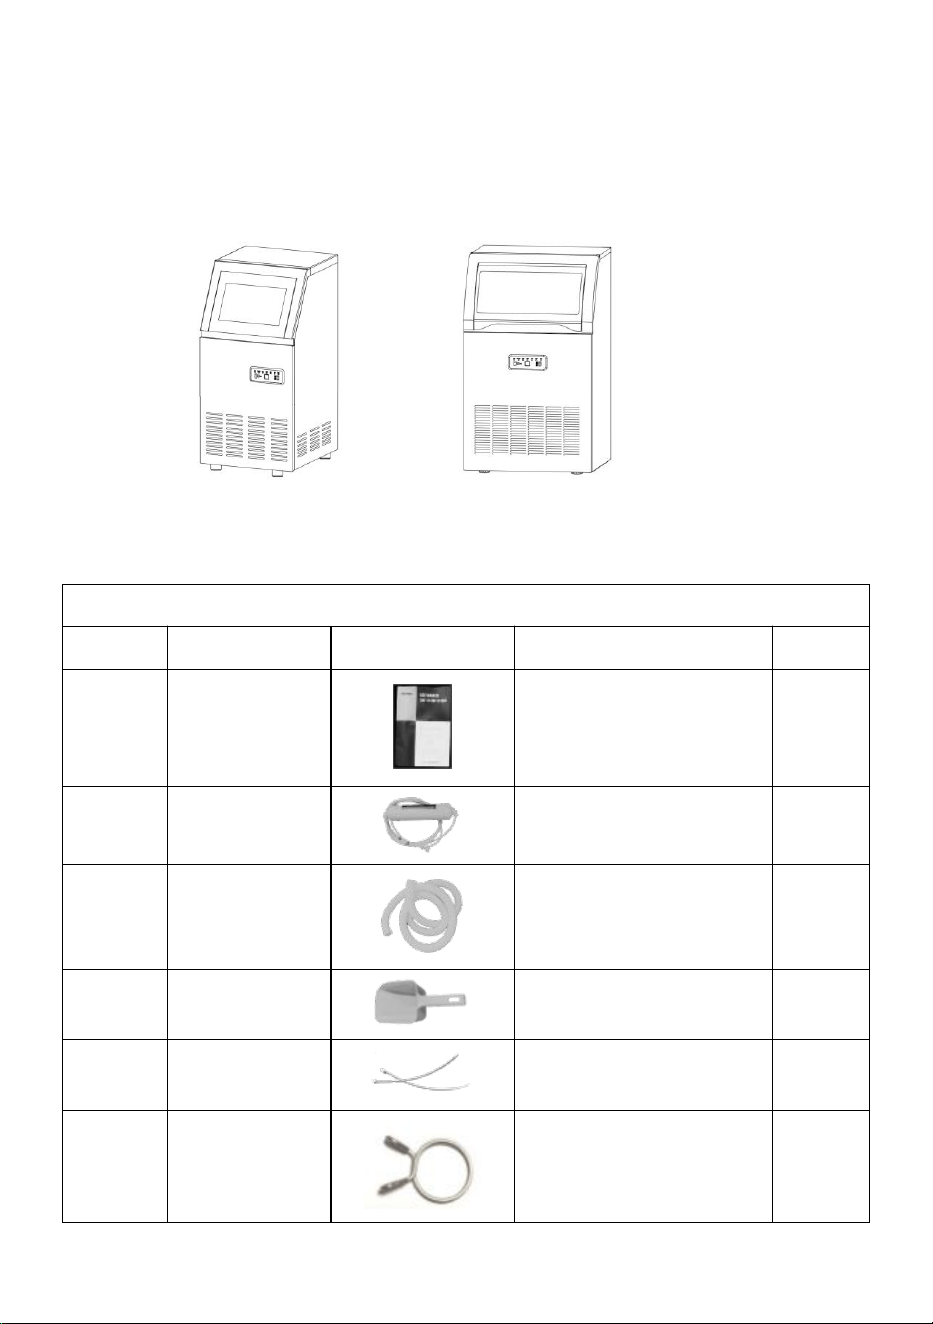
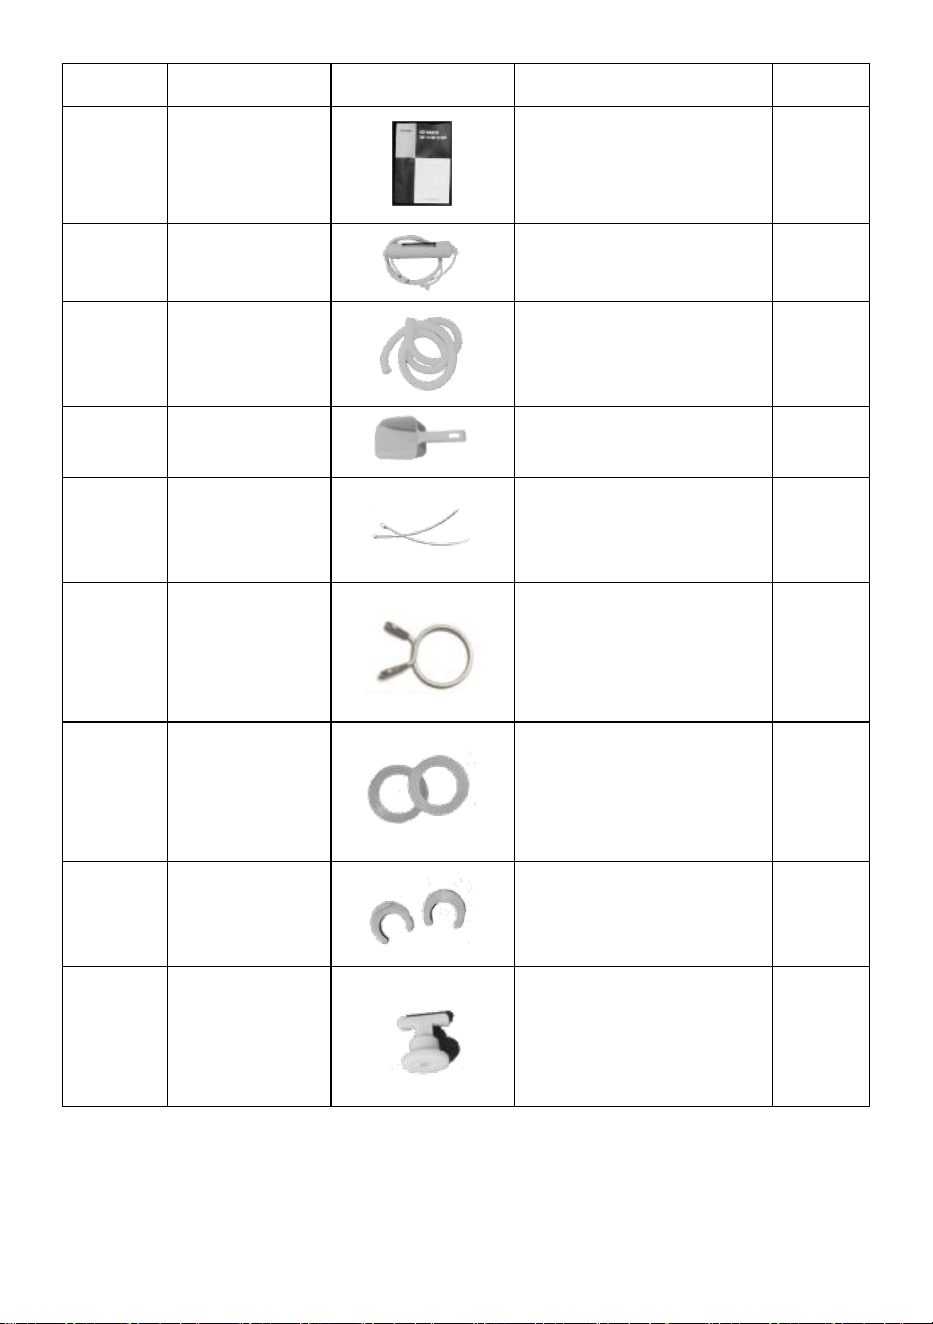
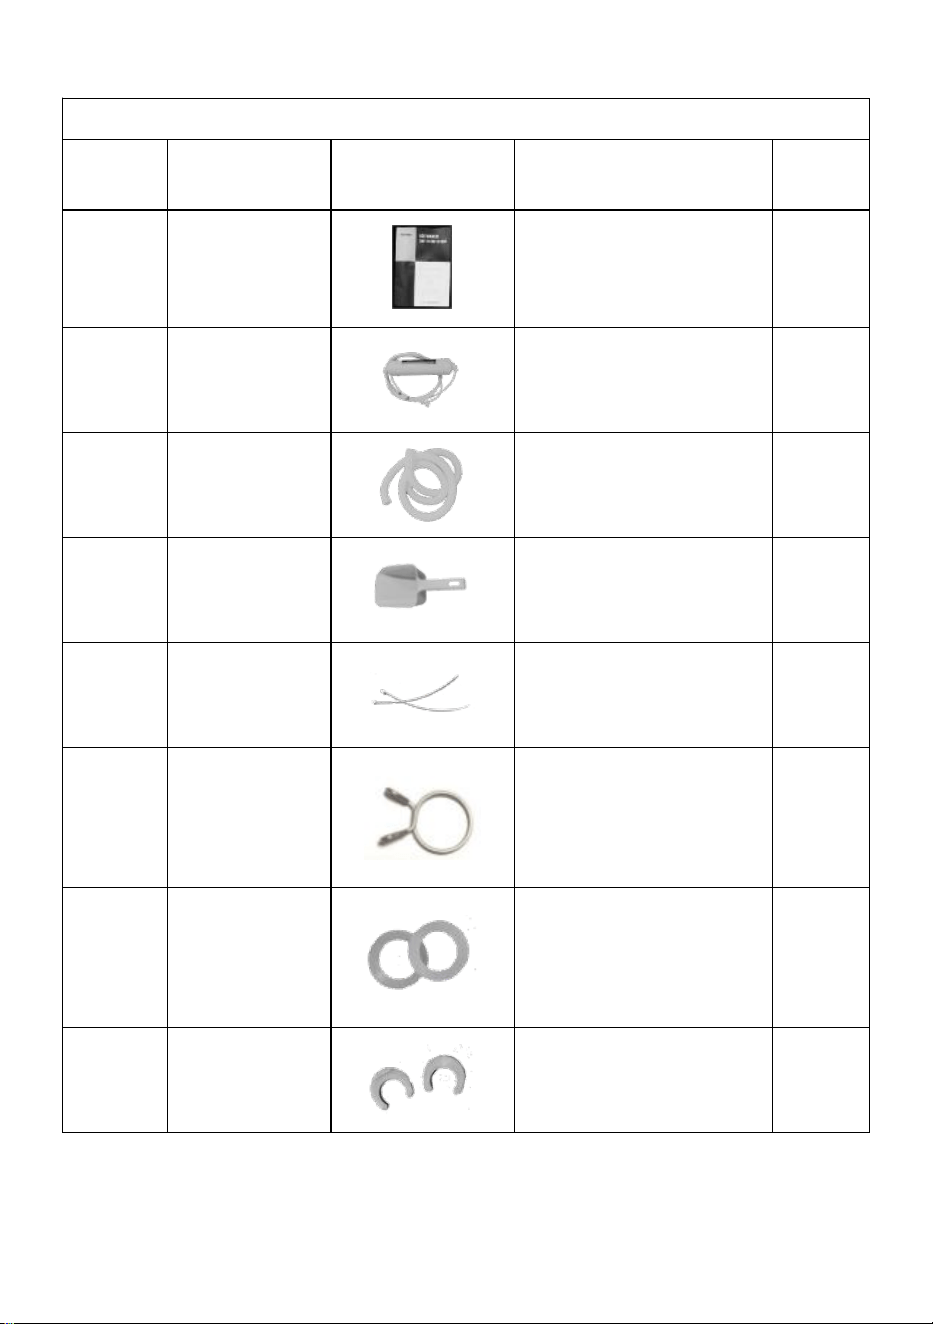
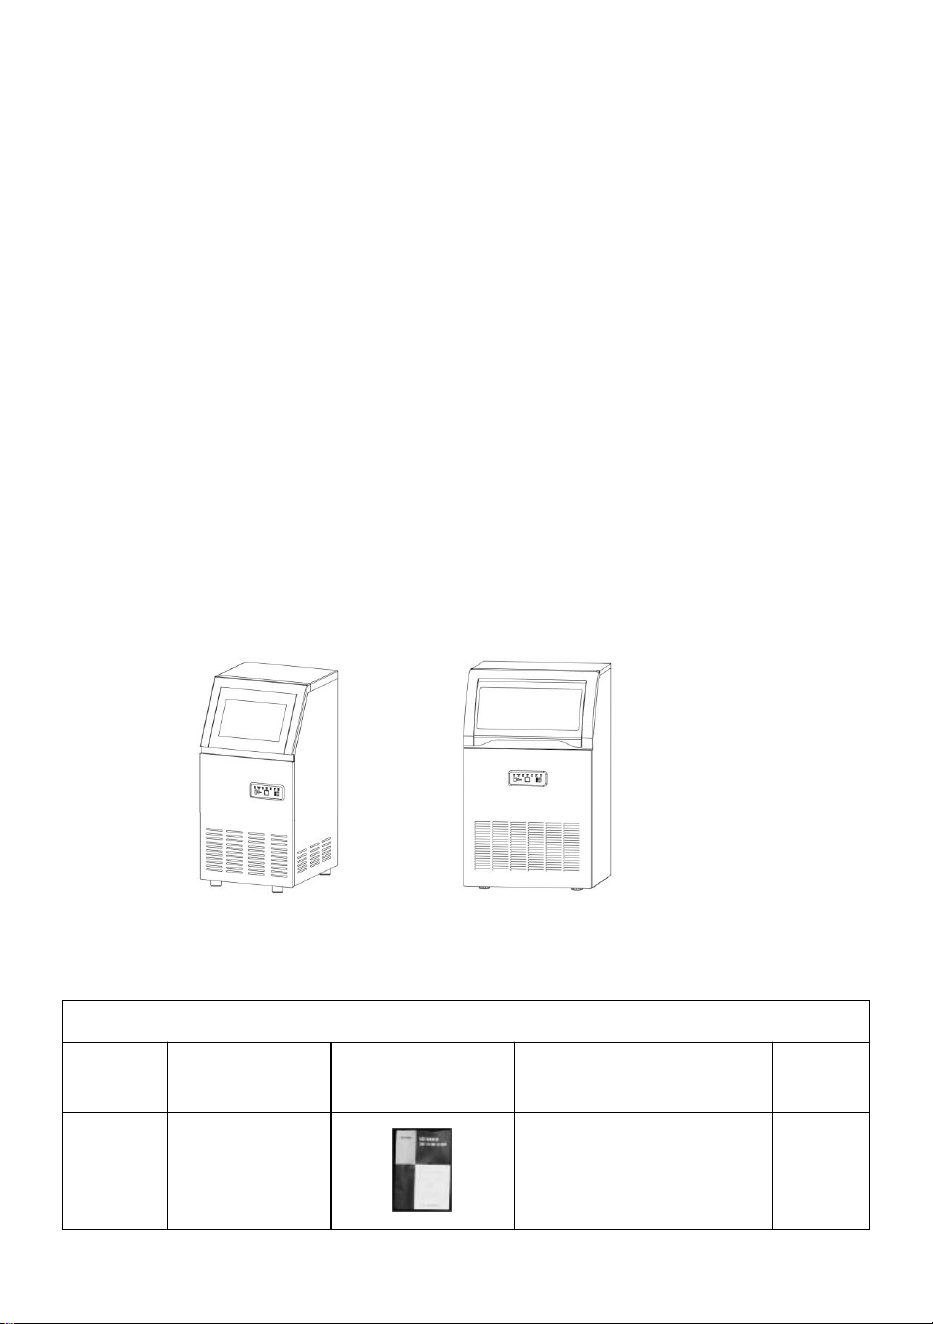
Package Contents
Ice maker machine x 1
Warm Tips: Check whether all below accessories are included.
Accessories list
NO
Description
Picture
Usage
QTY
1
Manual
Operation manual
1PC
2
Filter
Filter water
1PC
3
Drainage
pipe
Drain
1PC
4
Ice spoon
Take ice cubes
1PC
5
nylon cable
ties
Fix pipe if needed
2PCS
6
Jump ring
fasten the outlet and
the drainage pipe
together if needed
1PC
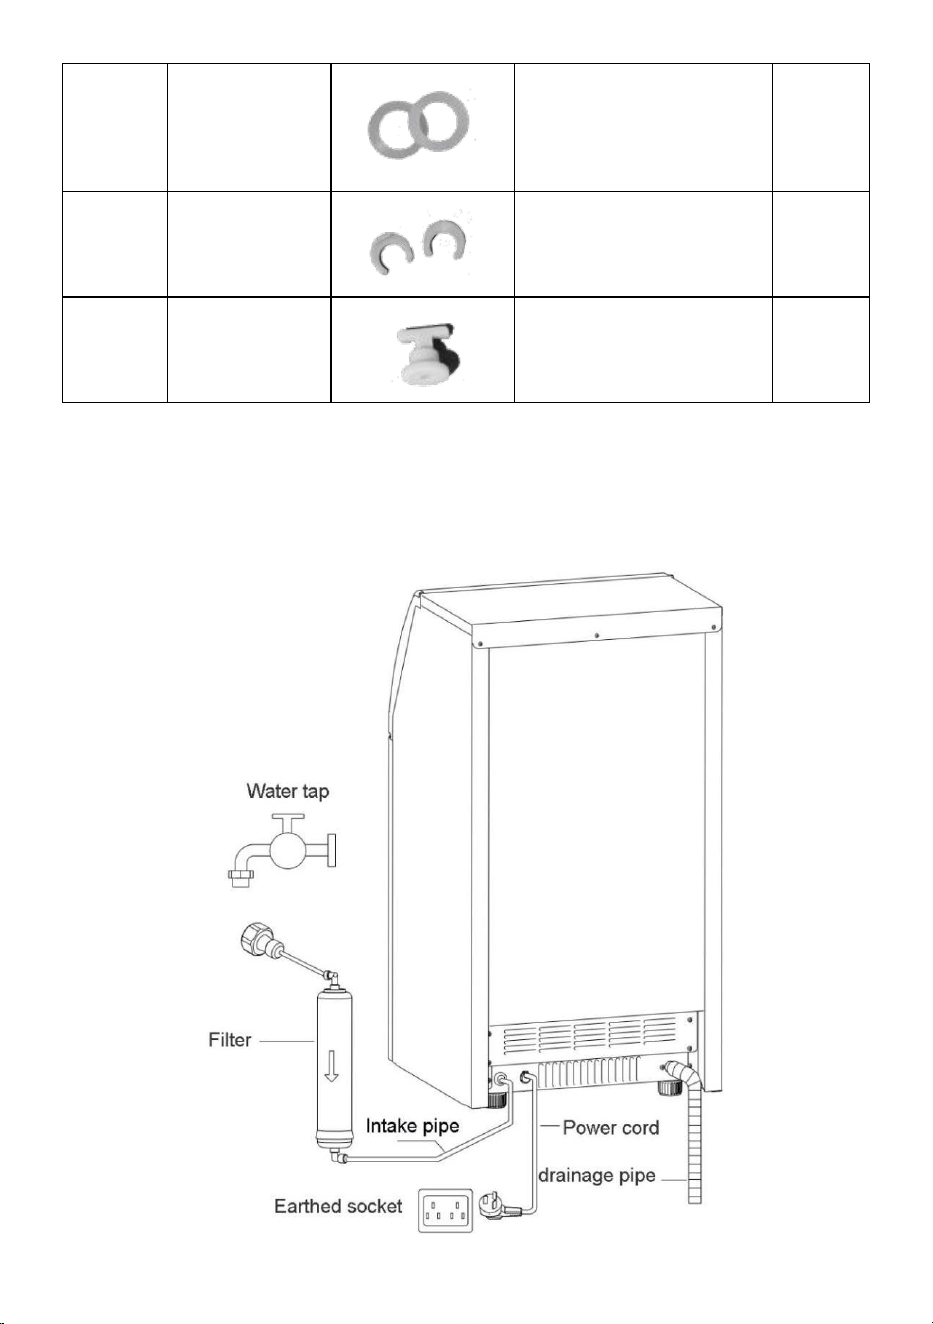
- 6 -
7
Seal ring
Do put it in the faucet
of the intake pipe.The
other one is spare.
2PCS
8
Spare blue
clip
Spare blue clip if
needed.
2PCS
9
Spare plug
Spare plug which
plug the tank if
needed.
1PC
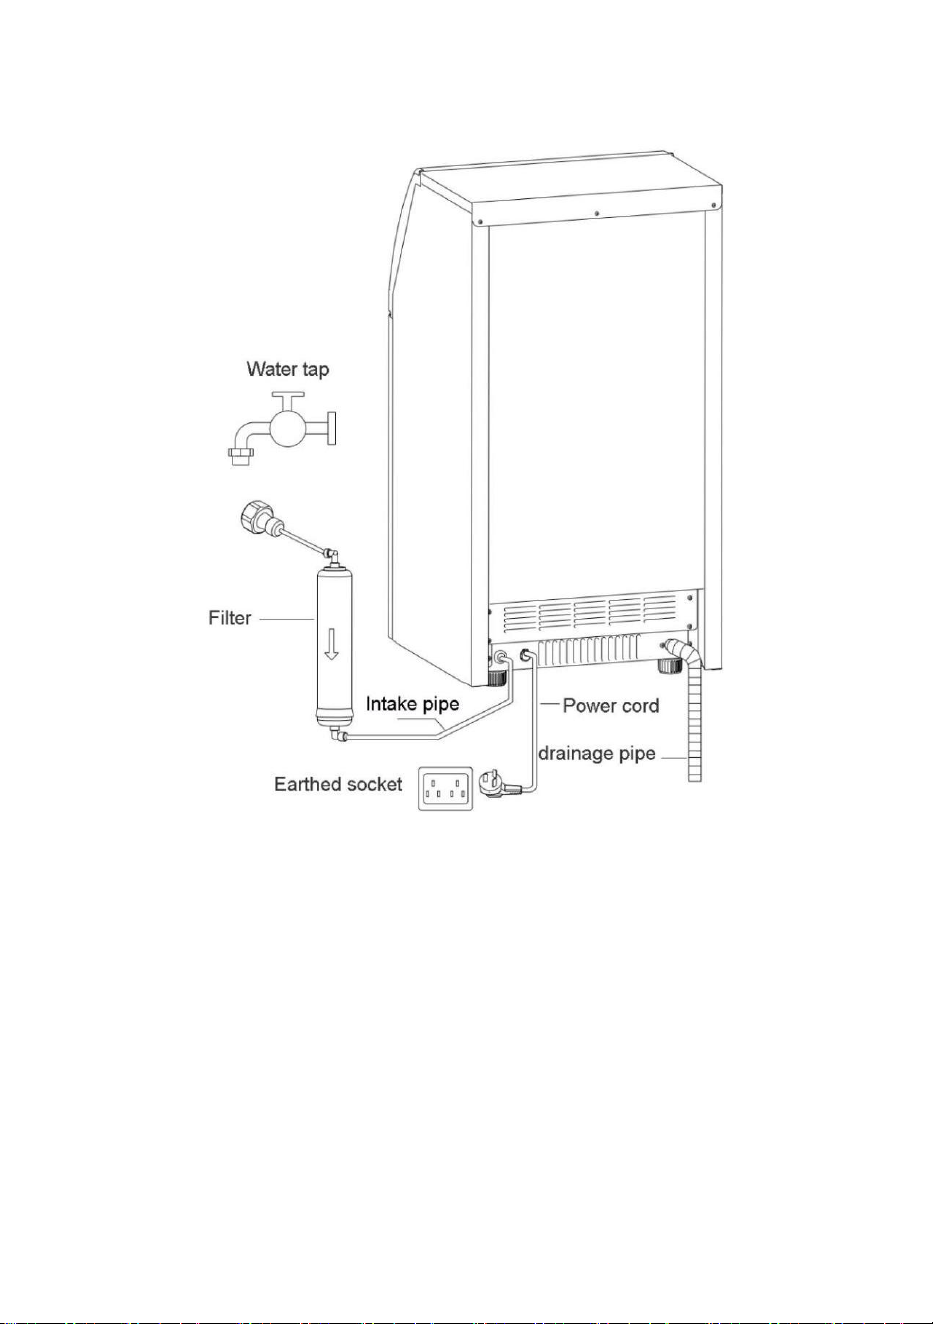
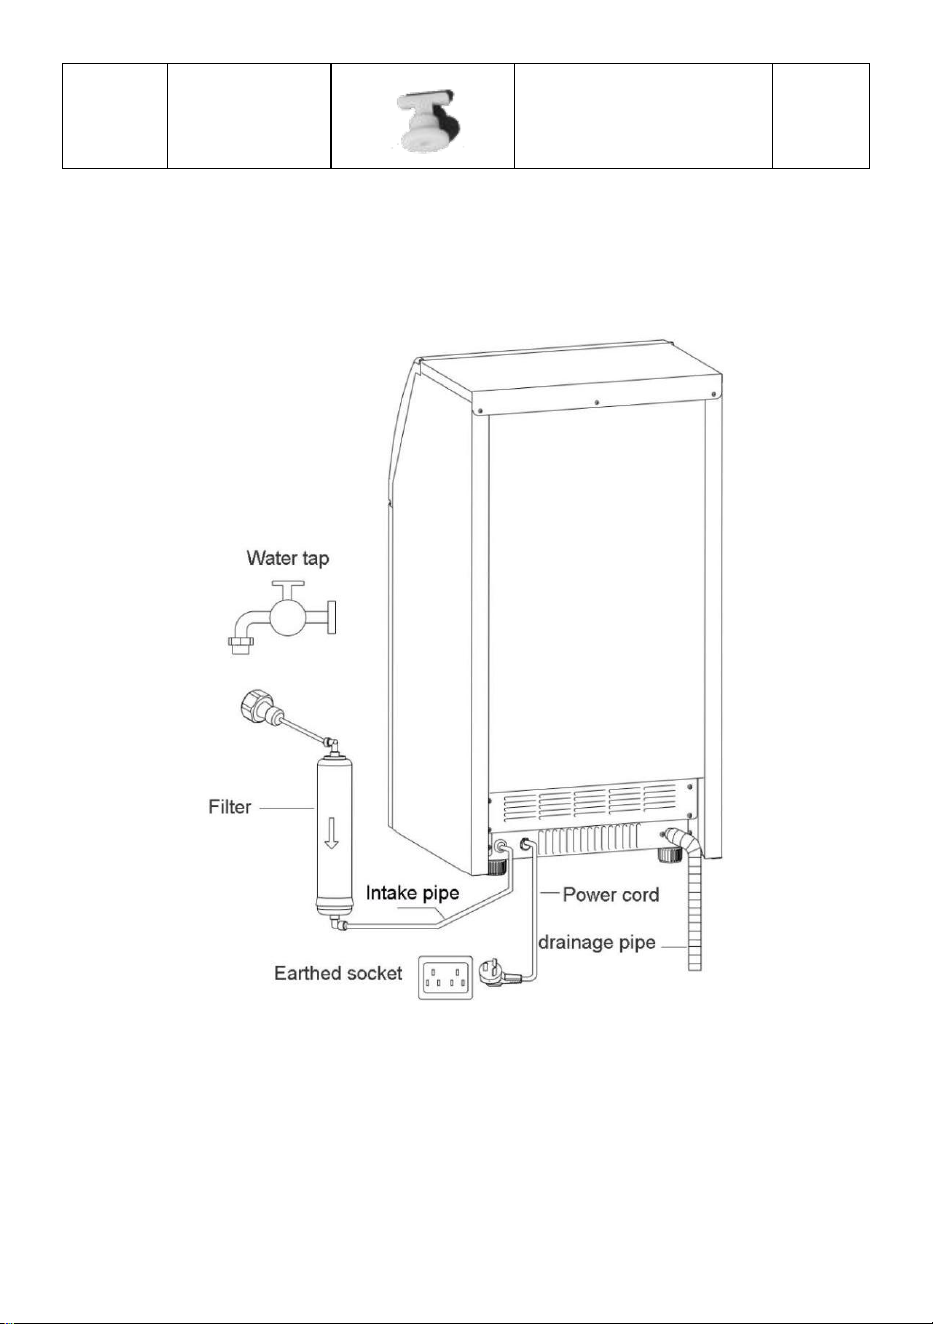
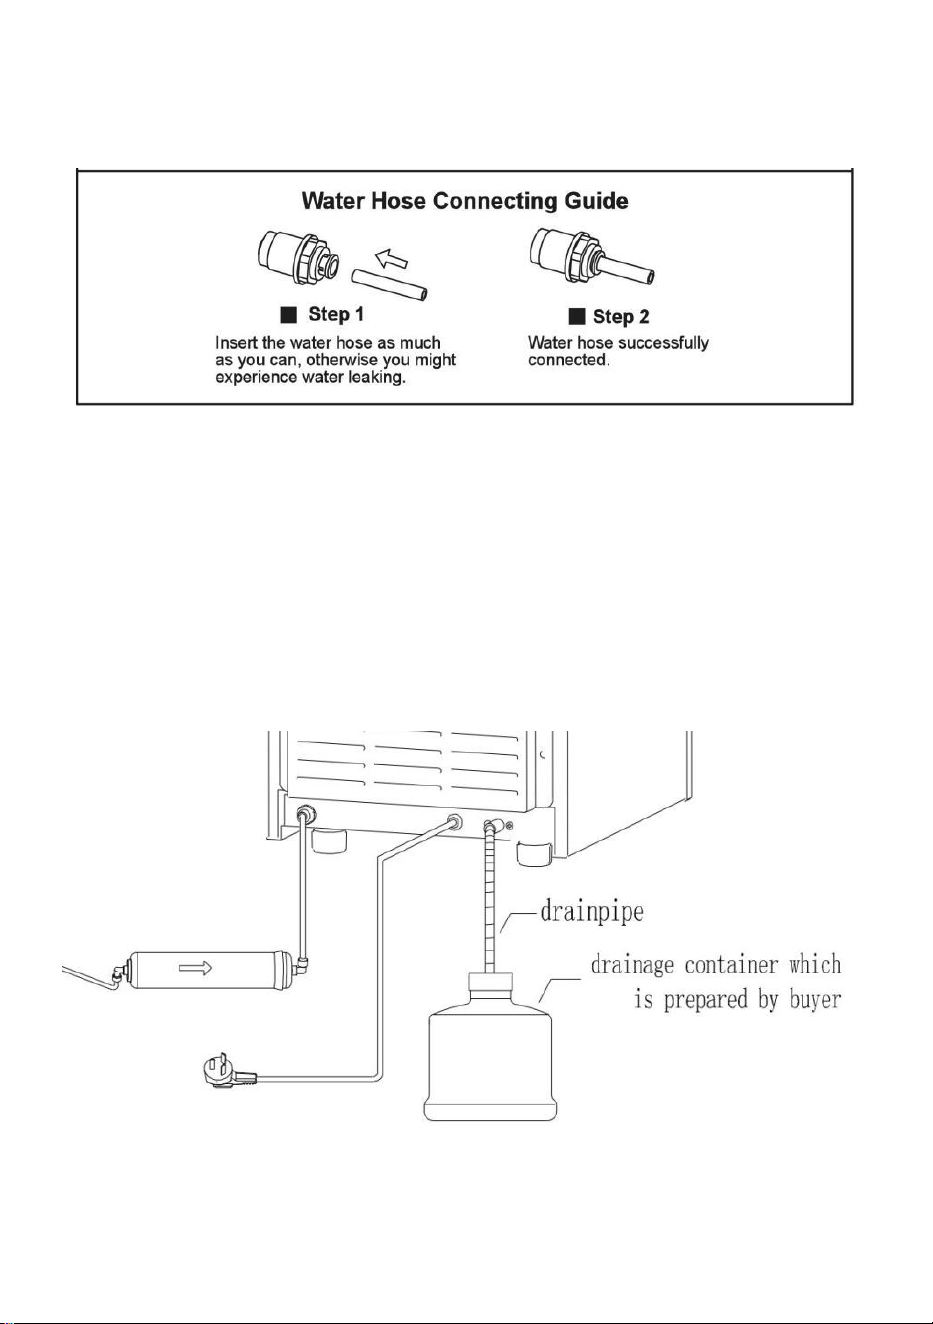
CONNECTING YOUR ICE MAKER WTTH OTHER PARTS
Please connect your ice maker with other parts by referring the diagram
below.
- 7 -
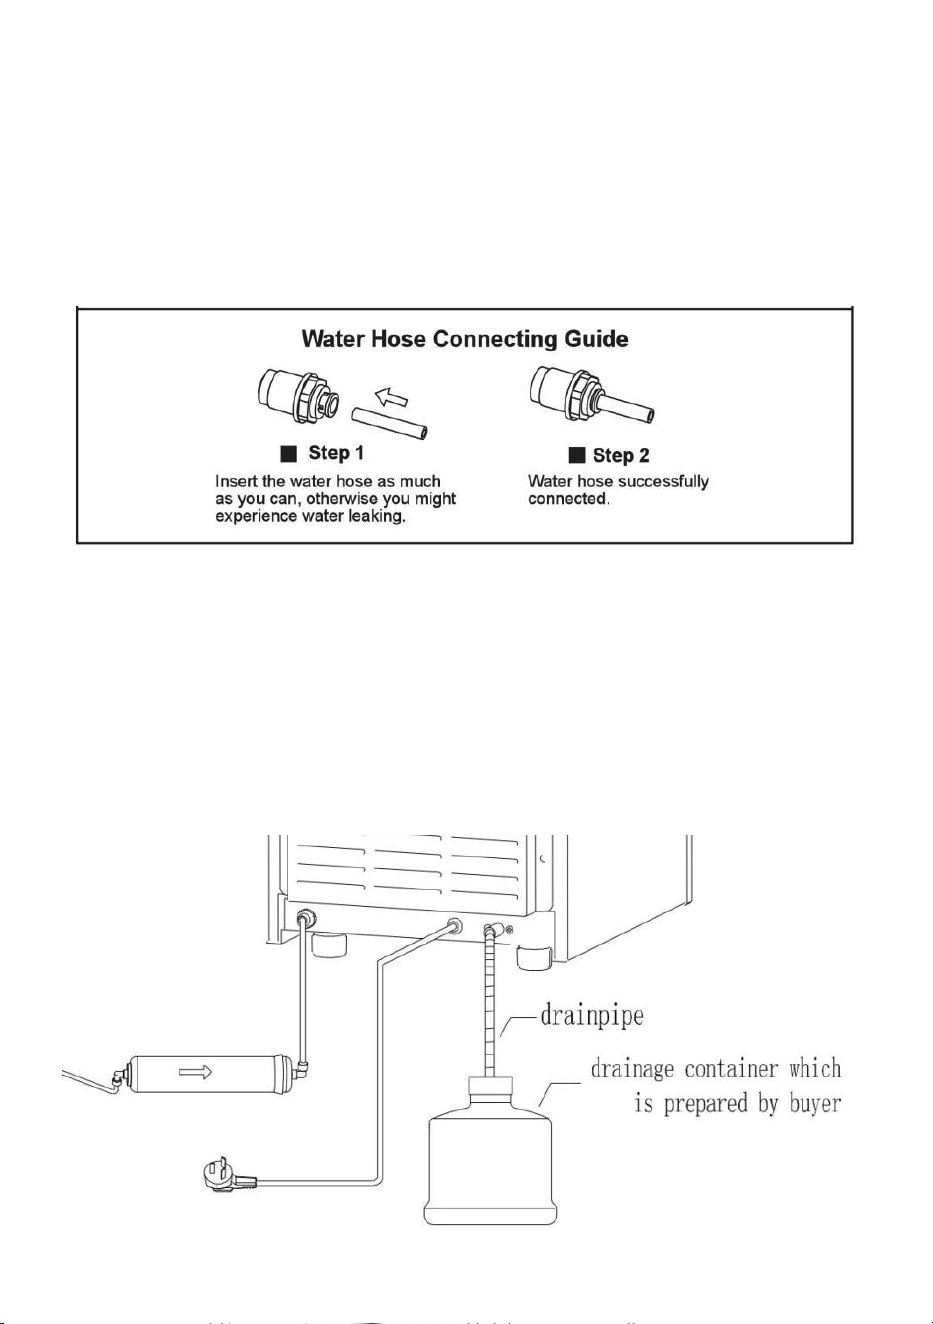
Connect drainage pipe and water intake pipe
Warning:1)The machine can only connect with drinking water sources,and
must meet local drinking water standards
2)The water pressure must be in 0.1-0.4Mpa,if exceed 0.4Mpa,a pressure
reducing valve must be connected.
3)Drainage: The outlet of the drainage pipe must be lower than the outlet
on the machine
Drain.
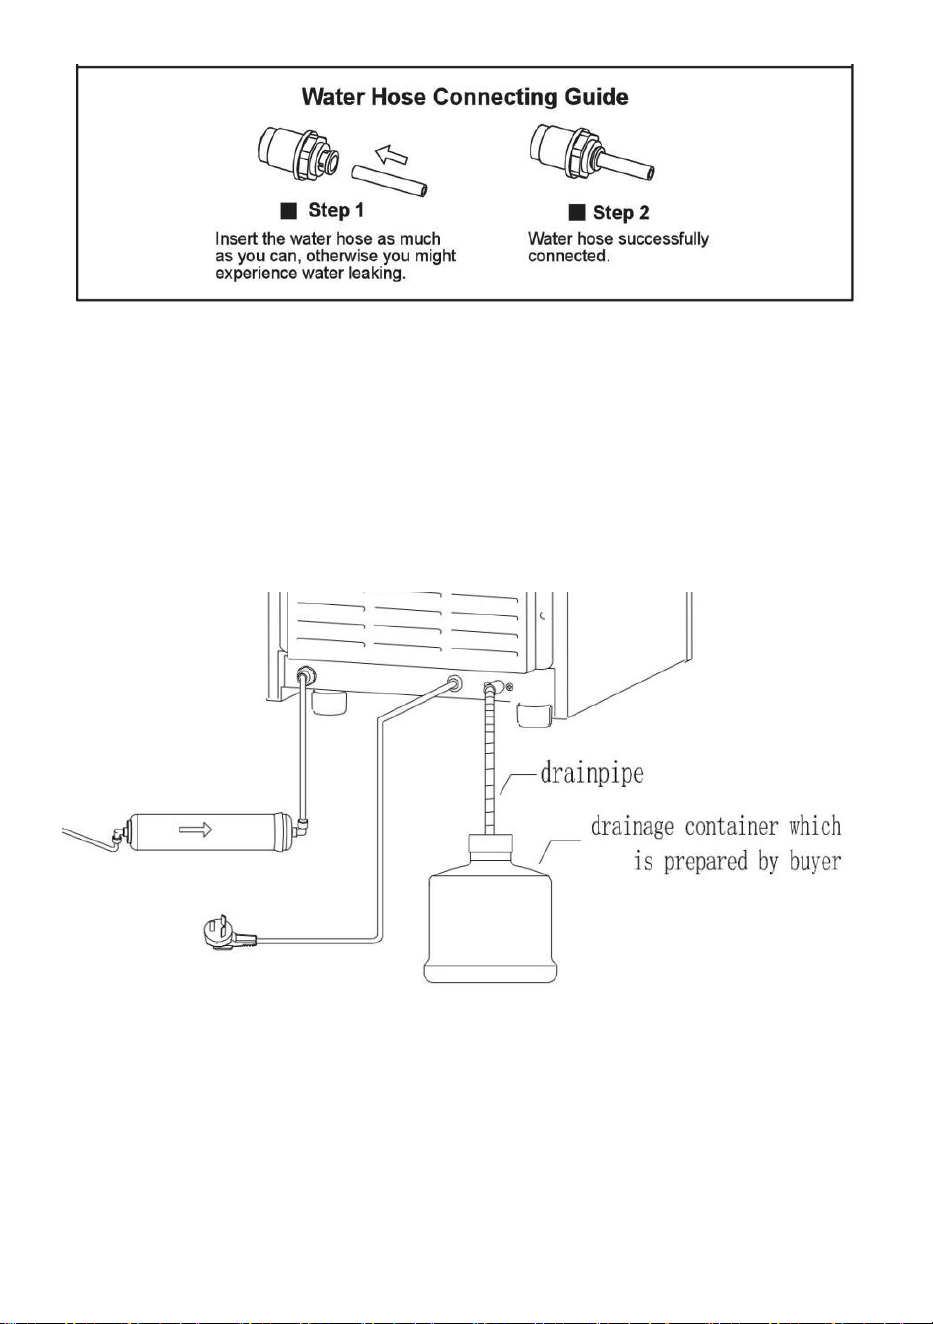
Warning: Because the ice in the inner tank will melt, drain pipe must be
connected before using, and insert the drain pipe into a container or into
the sewer.
Note: Connect one end of the drain pipe to the machine, and the other end
to a container or sewer. The other port of the drain pipe must be lower than
the drain port of the machine.
- 8 -
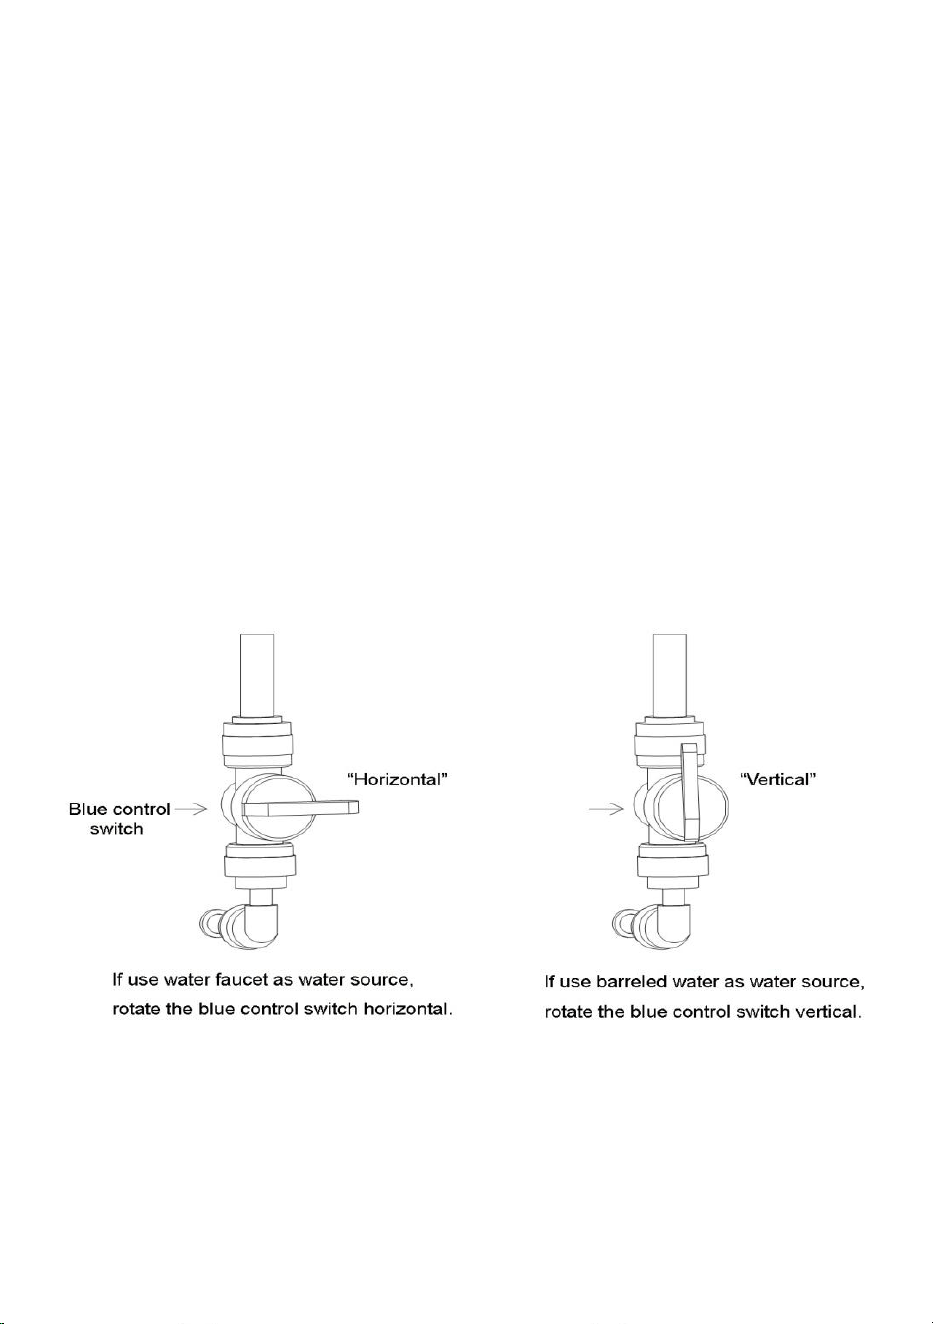
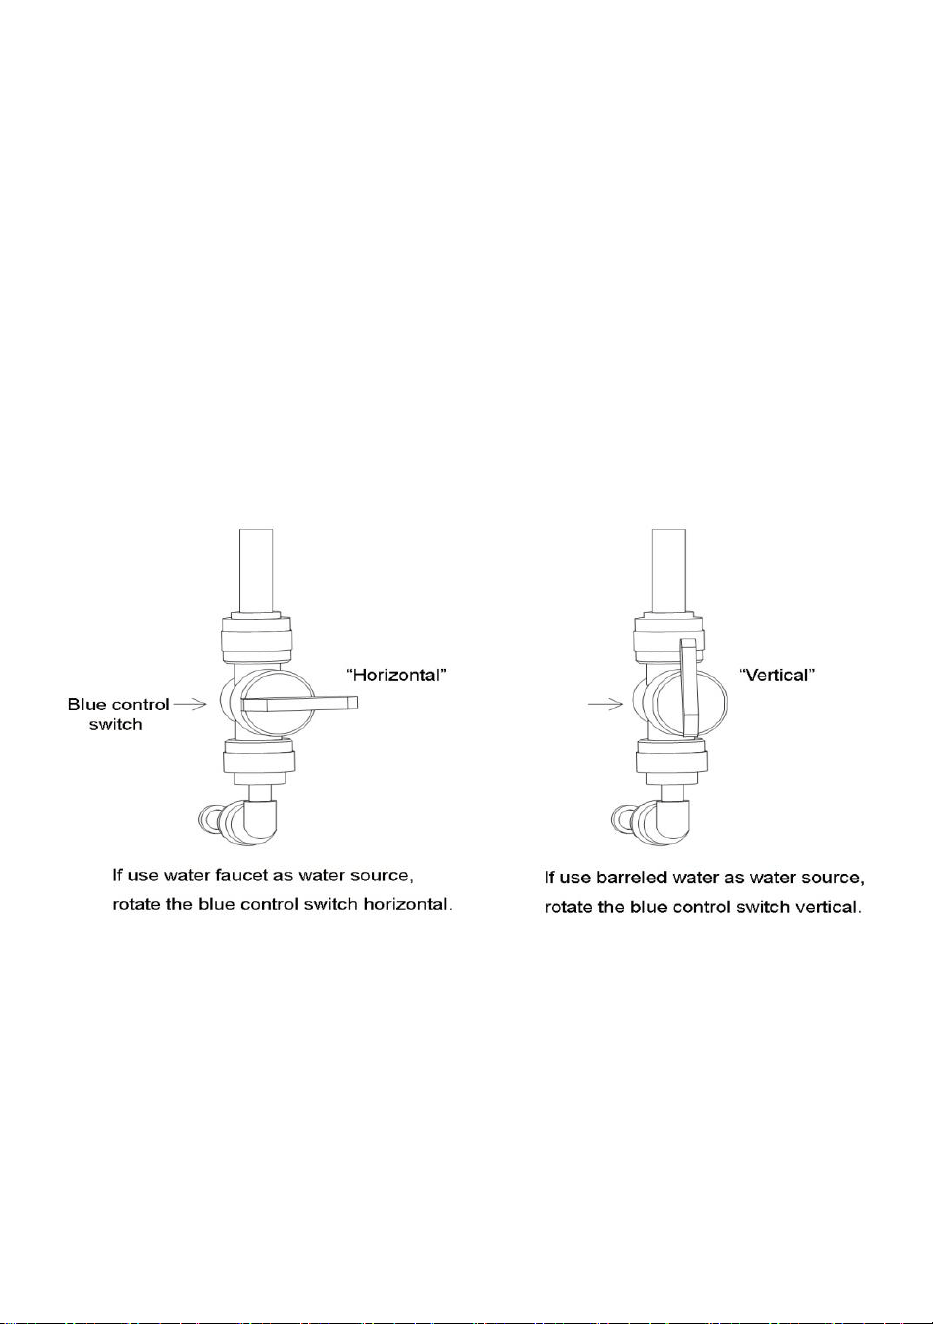
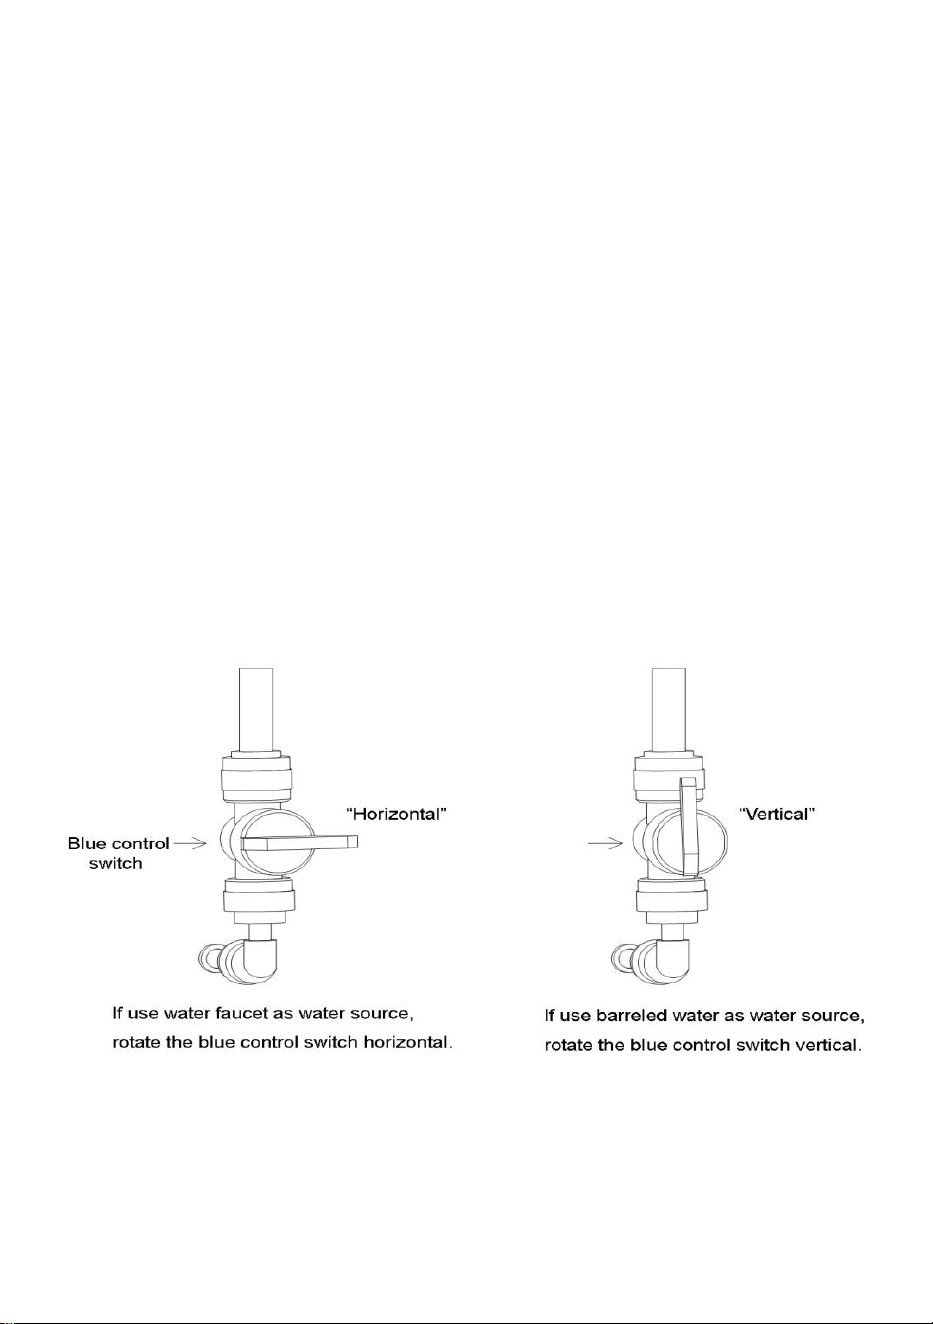
USING BARRELED WATER AS WATER SOURCE
You can use barreled water as water source. Please remember to
replenish water regularly. Besides, please rotate the blue control switch
vertical and turn off the pipe water supply.
1.If you use water faucet as water source, please ensure that the water
faucet is open for continuous water supply. If water runs out, the “add
water” indicator will light on.
2.If you use barreled water as water source. Please remember to replenish
water regularly or the “stoppage” indicator will light on.
3.When you use water faucet as water source, please rotate the blue
control switch in the machine horizontal. On the other hand, if you use
barreled water as water source, please rotate the blue control switch
vertical. Please refer to the picture below.
MACHINE OPERATIONS

- 9 -
Operation Panel
Ice making operation:
1.Connect the machine to the power and press the “ON/OFF” button. The
“ice making” indicator will light on.
Through “+”/”-” to increase or decrease ice making time ,which will be
effected at the current cycle .
Press “+” button,if the screen display “1”,means ice making time will be
added 1 min,max time can be added 8min. If press “-” button and display
“-1”,means ice making time will be decreased 1min,the max time is 5
min. That means the time can be adjusted from -5 to 8 min.
2.When the countdown of time is finished, the “melting” indicator will light
on. The ice cubes will come off the freezing panel later.
3.After the ice cubes come off. The machine will enter another loop of ice
making automatically.
Auto Turning On/Off:
1.When the machine is turned off while connected to the power, press the
“Reservation/Clean” button and the “+”/“-” button to set the auto-turning-on
time (in
hours).The machine will automatically turns on after the countdown
isfinished.
When the machine is at the middle of ice making, press the
“Reservation/Clean” buttonandthe“+”/“-”buttontosettheauto-turning-off
time(inhours).Themachine will automatically turns off after the countdown is

- 10 -
finished.
Self-cleaning:
1. When the machine is turned off while connected to the power, press the
“Reservation/Clean” button and hold it for a while. The machine will
automatically enter self-clean program.
Notes:
1)If you change the countdown time during the middle of the ice making
procedure, it will take effect at the next loop. You can long press the “HOT”
button during the ice making to unload the ice cubes ahead of time.
2)The surrounding environmental temperature will influence the time
needed for ice making.
CLEANING & MAINTENANCE
Please thoroughly clean your ice maker before initial use.
Exterior: the outside of the ice maker should be cleaned regularly with a
mild detergent and warm water. Always use a soft cloth to avoid scratching
or damaging the housing.
INTERIOR: please use the following Self-Clean function:
1.Add water and vinegar or lemon juice mix (1:1 ratio)
2.Plug in unit,press and hold the CLEAN button for approximately 3
seconds,then release.The unit will automatically enter Self-clean program.
This process takes about 5-6 minutes.When the Self-Clean program is
finished,unit will automatically power off.
3.The fan blade will be rotating.This process rinses the inside parts several
times.
4.After the Self-Clean program is completed,unplug the power cord and
drain out the water by unplugging the drain cap on the side.Replace drain
cap.
5.Add fresh water to the water reservoir,up to the water level mark.
6.Plug the unit and repeat the Self-Clean process by repeating steps 3 to 5.
This will rinse out the vinegar/lemon residue.
7.After draining the water,replace and tighten drain cap.
8.Dry the interior and exterior with a clean,soft cloth.
- 11 -
NOTE: It is strongly recommended to clean the unit before initial use or
after the unit has not been in use for a long period of time.
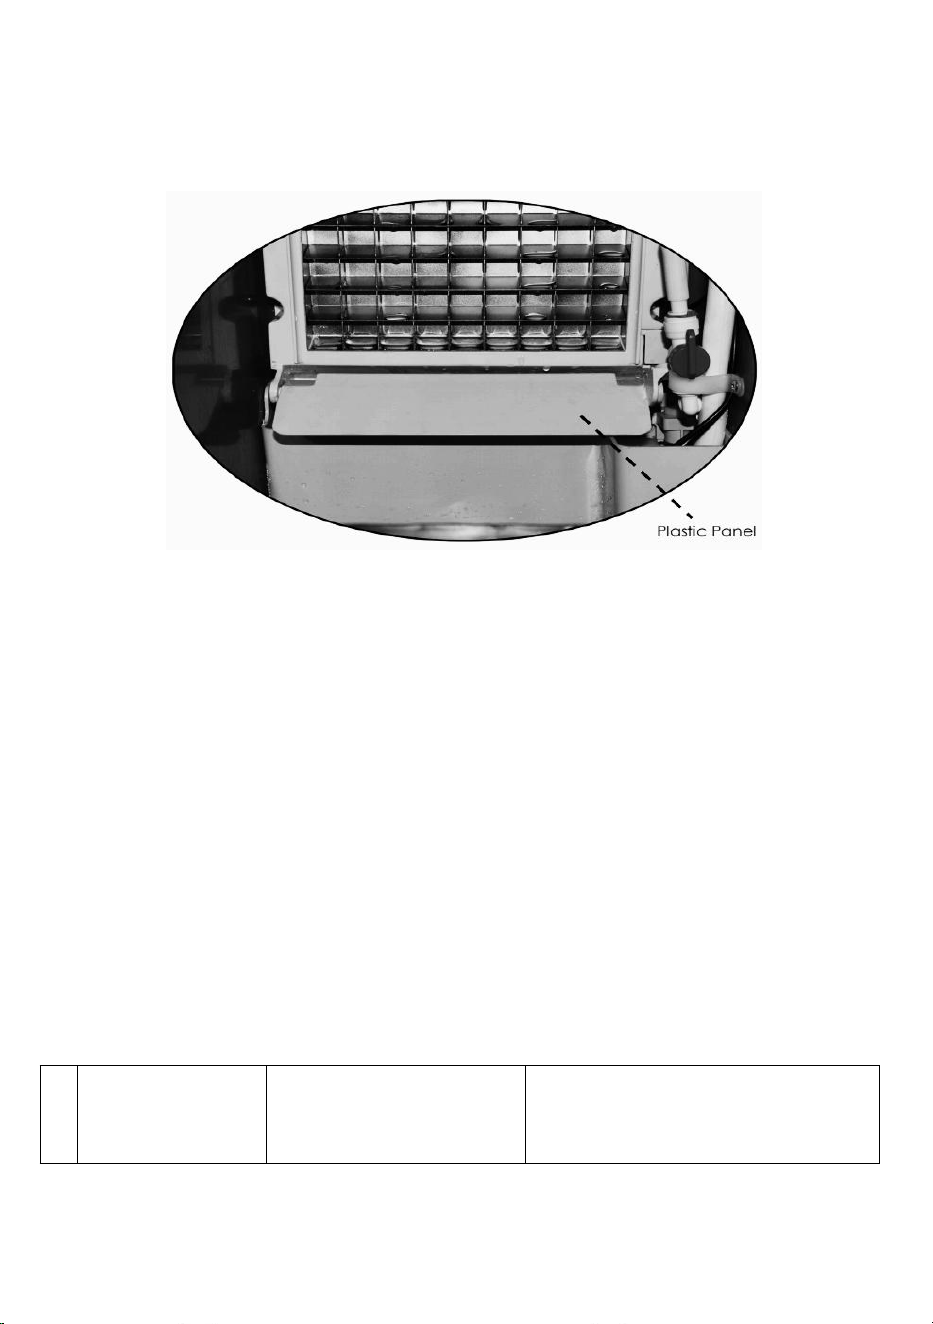
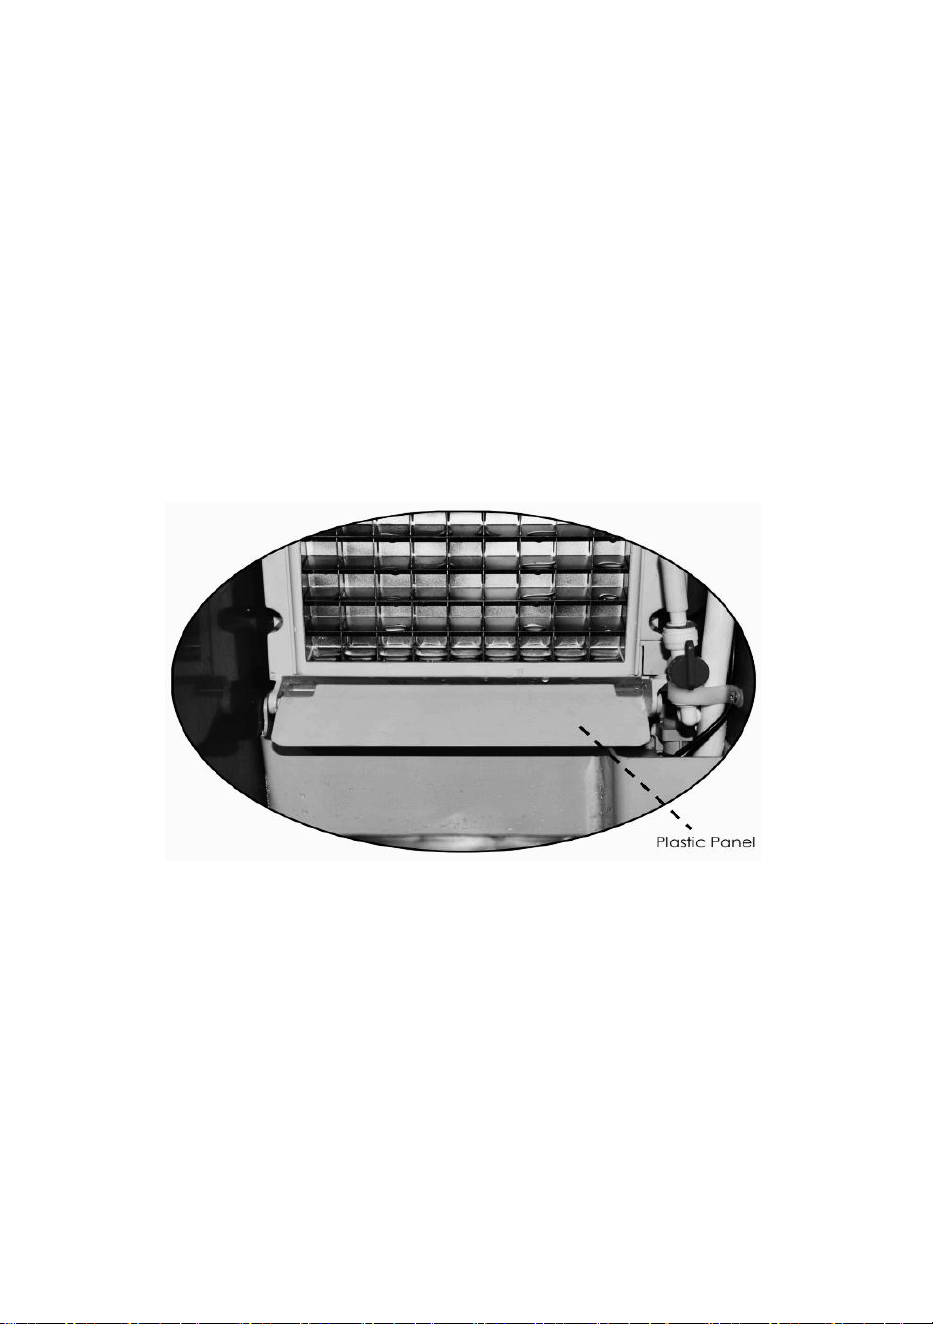
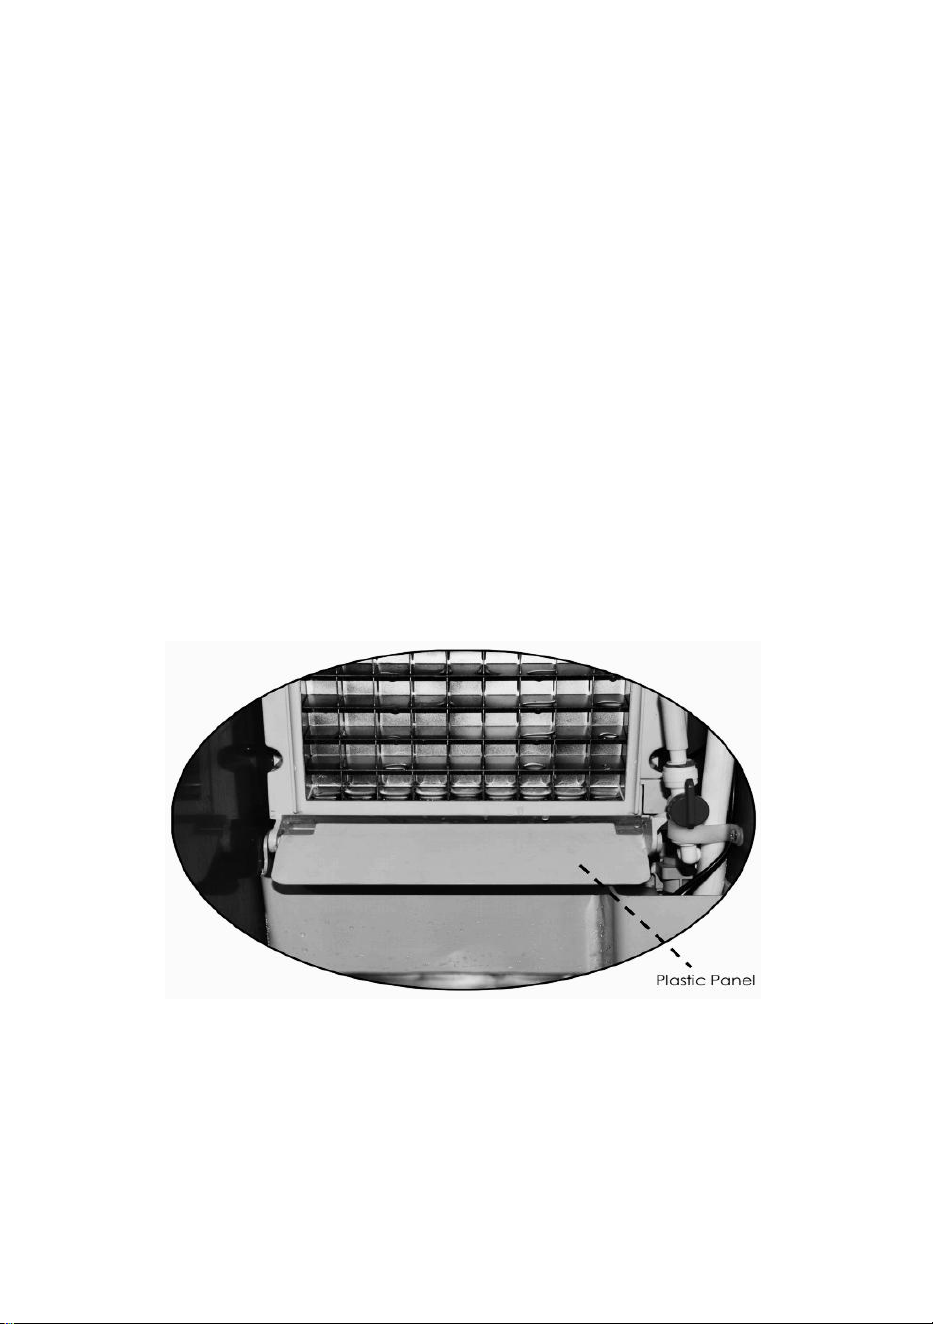
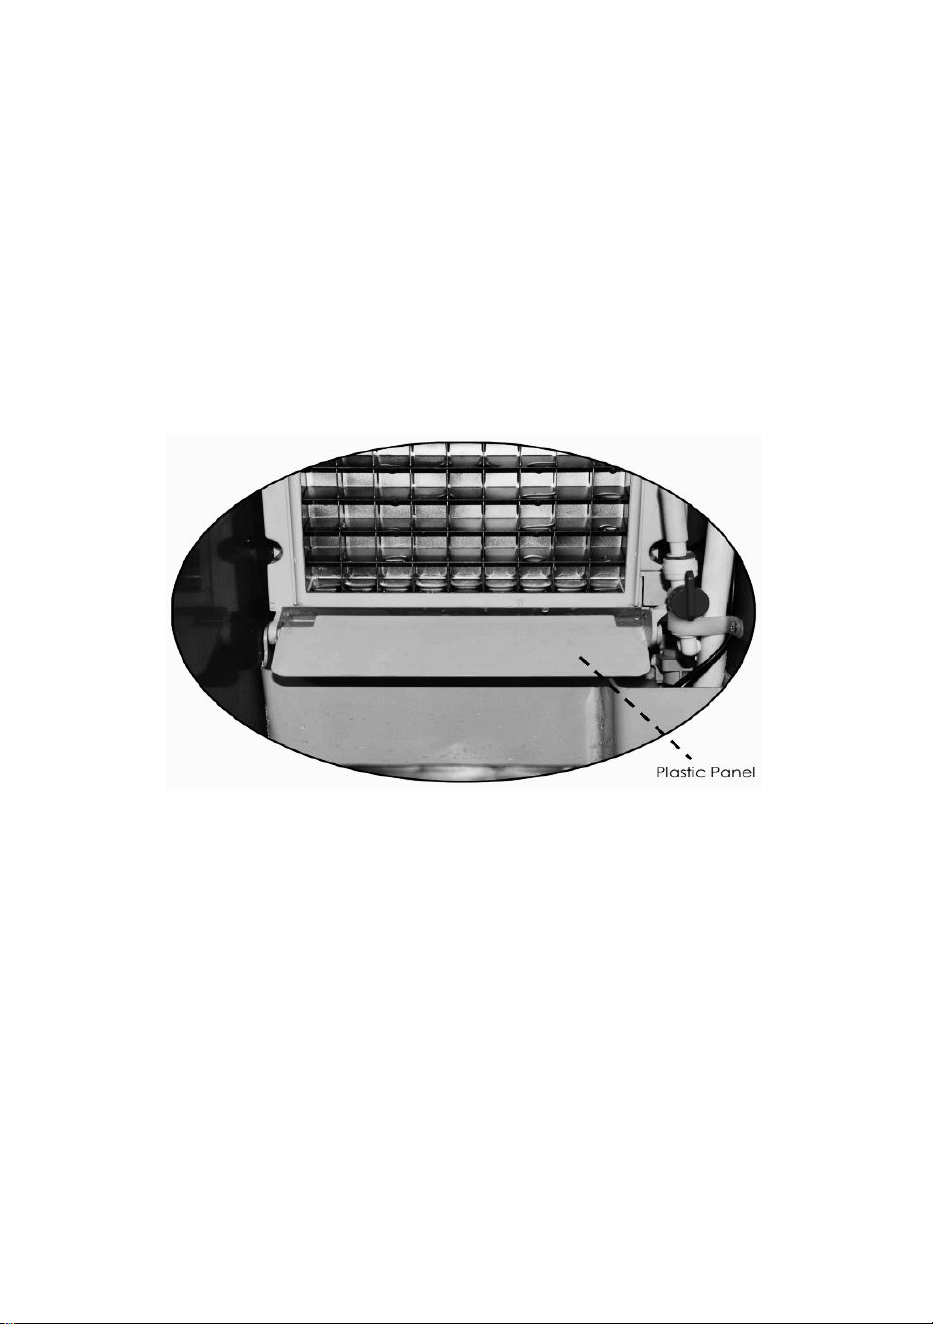
NOTE
1.As the production of ice cubes increases, the plastic panel inside the m
achine (shown above) might be pressed down by the ice cubes. When
the plastic panel is pressed
down, the machine will stop producing ice cubes automatically and the
“stoppage”
indicator will light on. Please clean out the ice cubes regularly for
continuation of ice
making.
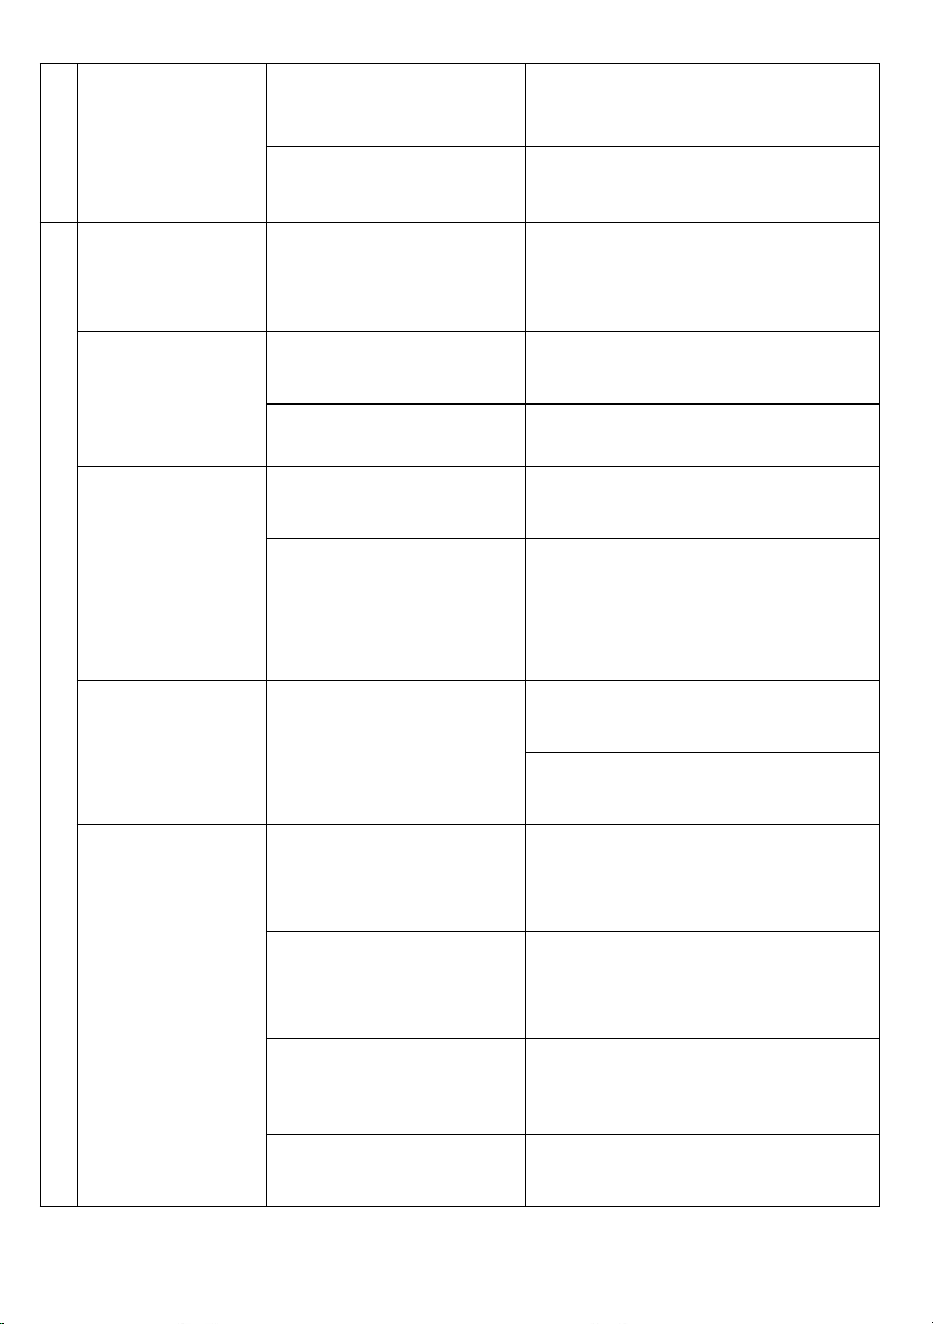
Common malfunction analysis
E1
No ice deflector
detected
The ice guide plate
came off
Reinstall the ice guide
- 12 -
Magnetic sensitive
switch damaged
Replace the magnetic
sensitive switch
The ice guide plate is
not reset
Reset ice guide plate
E2
Ice making is
normal
The fourth ice cycle
stops
Replace the magnetic sensitive
switch
There is no
water in the
water-box
The drain plug is not
installed correctly
Install drain plug correctly
External water supply
Check the water supply
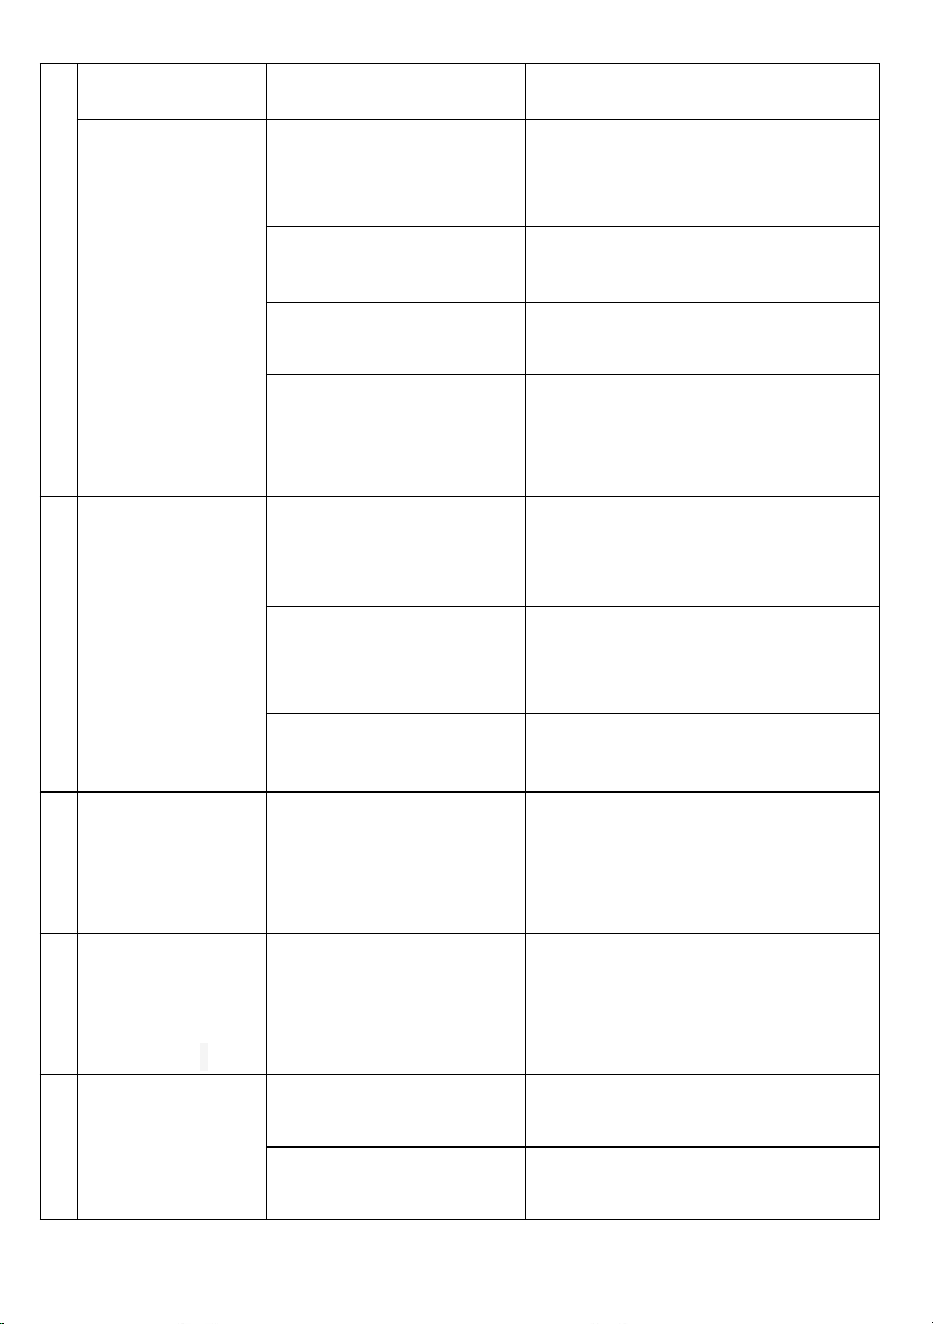
The water tank
overflowed into
the refrigerator
External water supply
The water valve above the tank
does not rotate horizontally
Use tap water as a
source of water
The external water pressure is
too high to cause the float valve
to work, reduce the water
pressure or change a new valve
There is water in
the water box
There is no water, nor
does the shower pipe
run
The pump is seriously blocked,
should be replaced or cleaned
The shower pipe is blocked.
Clean it up
Just running
water, not
cooling or a little
cold
There is thin ice on the
ice mold
Increase manufacturing time by
pressing the "+" button on the
operating panel
There is thick ice on the
ice mold
Reduce manufacturing time by
pressing the "-" button on the
operating panel
Some water splashed
into the refrigerator
Rotate and adjust the shower
pipe
The back of the water
box is leaking into the
Adjust the installation position of
the water box
- 13 -
refrigerator
The water is not
cold
The main board is not
powering the
compressor
Replace the mainboard
Compressor failure
Replace compressor
Compressor high
temperature
Replace compressor
Compressor working,
not cooling
Refrigerant leak, need repair
E3
High
temperature
alarm
condensation
temperature sensor is
damage
Replacement
The cooling fan is
blocked by foreign
matter
Remove the barricade
Damage to cooling fan
Replacement
E4
Abnormal
condensation
temperature
sensor
Condensation
temperature sensor
short circuit or open
circuit
Replacement
E5
Abnormal
ambient
temperature
sensor
Ambient temperature
sensor short circuit or
open circuit
Replacement
E6
Lack of water
Interruption of external
water supply
Restore water supply
Water intake solenoid
valve damaged
Replacement
- 14 -
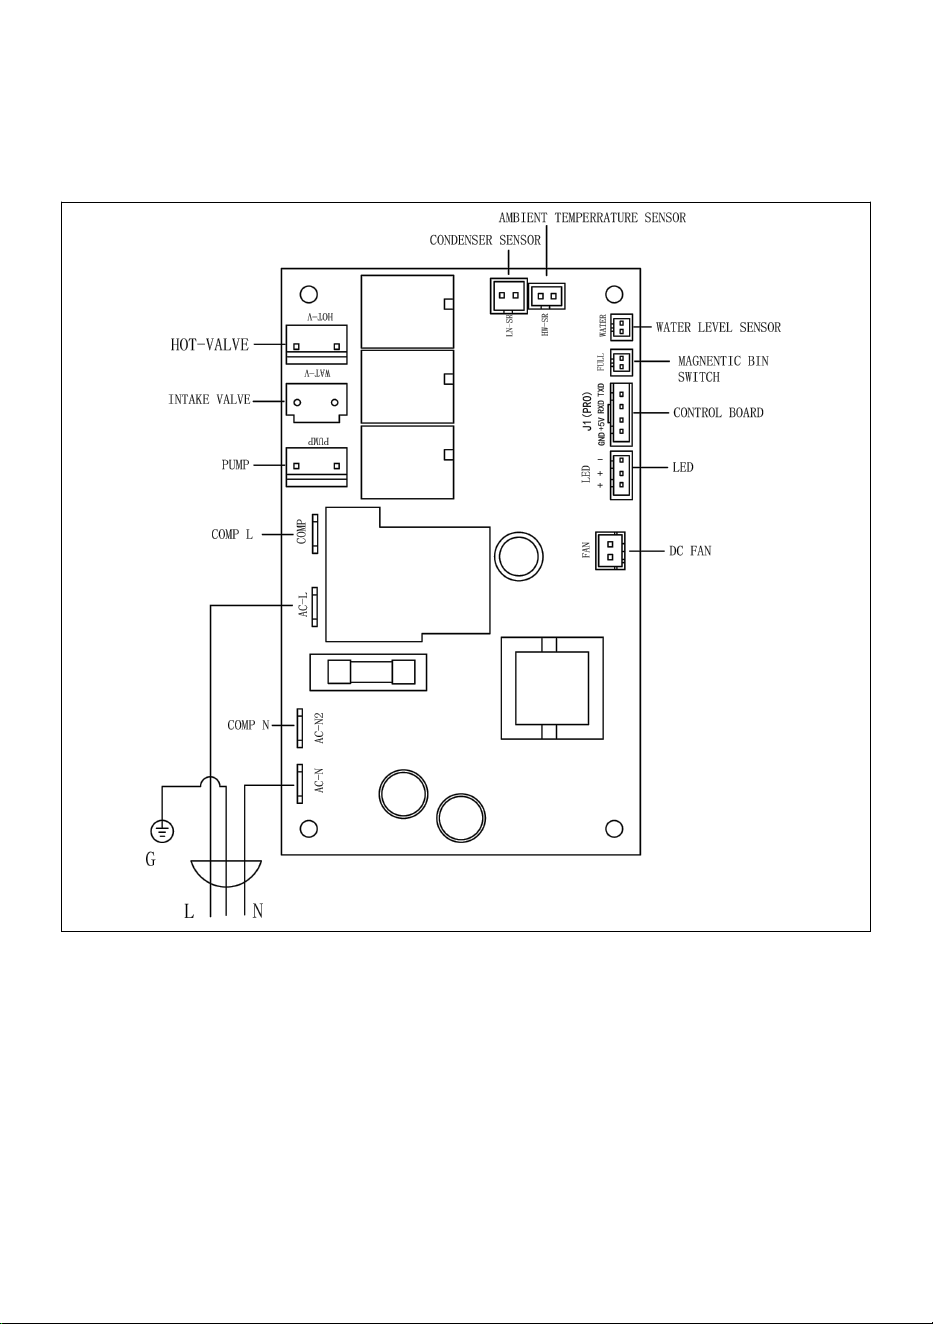
Circuit Diagram
Made In China


- 2 -
Technique Assistance et certificat de garantie électronique
www.vevor.com/support
Machine à glace commerciale
Modèle: SKF-B40F SKF-B45F
SKF-C50F SKF-C55F
We continue to be committed to provide you tools with competitive price.
"Save Half", "Half Price" or any other similar expressions used by us only represents an
estimate of savings you might benefit from buying certain tools with us compared to the major
top brands and does not necessarily mean to cover all categories of tools offered by us. You
are kindly reminded to verify carefully when you are placing an order with us if you are
actually saving half in comparison with the top major brands.

- 3 -

- 1 -
MODÈLE: SKF-B40F SKF-B45F SKF-C50F SKF-C55F
Have product questions? Need technical support? Please feel free to
contact us:
Technical Support and E-Warranty Certificate
www.vevor.com/support
NEED HELP? CONTACT US!
This is the original instruction, please read all manual instructions
carefully before operating. VEVOR reserves a clear interpretation of our
user manual. The appearance of the product shall be subject to the
product you received. Please forgive us that we won't inform you again if
there are any technology or software updates on our product.
Commercial Ice
Machine

- 2 -
Il est important de lire attentivement ces instructions et de les conserver
pour référence future.
Avertissement : Pour réduire le risque de blessure, l'utilisateur
doit lire attentivement le manuel d'instructions.
Cet appareil est conforme à la partie 15 des règles FCC. Son
fonctionnement est soumis aux deux conditions suivantes : (1)
Cet appareil ne doit pas provoquer d'interférences nuisibles et
(2) cet appareil doit accepter toute interférence reçue, y
compris les interférences susceptibles de provoquer un
fonctionnement indésirable.
Ce produit est soumis aux dispositions de la directive
européenne 2012/19/CE. Le symbole représentant une
poubelle barrée indique que le produit nécessite une collecte
sélective des déchets dans l'Union européenne. Ceci
s'applique au produit et à tous les accessoires marqués de ce
symbole. Les produits marqués comme tels ne peuvent pas
être jetés avec les ordures ménagères normales, mais doivent
être déposés dans un point de collecte pour le recyclage des
appareils électriques et électroniques.
CONSIGNES DE SÉCURITÉ IMPORTANTES
Lors de l'utilisation d'appareils électriques, des précautions de sécurité de
base doivent être suivies pour réduire le risque d'incendie, de choc
électrique et de blessure. à des personnes ou des biens. Lisez toutes les
instructions avant d'utiliser la machine pour la première fois.
ATTENTION : LA GLACE NE PEUT PAS ÊTRE STOCKÉE DANS LE BAC
À GLACE PENDANT LA NUIT , Ce n'est pas un réfrigérateur. LA GLACE
SERA FONDÉE EN EAU ET S'ÉCOULERA DE LA MACHINE.
1. En cas de raccordement à l'alimentation en eau, ATTENTION : doit être

- 3 -
raccordé à l'alimentation en eau potable ;
2. La machine est destinée à être utilisée dans des applications
domestiques et similaires telles que :
-des espaces cuisine du personnel dans les magasins, bureaux et autres
environnements de travail ;
-fermes
-par les clients des hôtels, motels et autres environnements de type
résidentiel ;
-Restauration et industries assimilées .
3. La machine doit être utilisée dans des portes et sans obstacles entourés
bon endroit de ventilation. Il doit y avoir au moins 50 cm entre les quatre
côtés de la machine et le mur.
4. Lors de l'utilisation d'appareils électriques, des précautions de sécurité
de base doivent être suivies pour réduire le risque d'incendie, choc
électrique et blessures aux personnes ou aux biens. Lisez toutes les
instructions avant d'utiliser un appareil.
5. N'utilisez pas cet appareil ou tout autre appareil dont le cordon est
endommagé.
6. Connectez-vous uniquement à des prises correctement polarisées.
Aucun autre appareil ne doit être branché sur la même prise. Assurez-vous
que la fiche est complètement insérée dans la prise.
7. Ne placez pas la machine et le cordon d'alimentation à proximité de
matériaux inflammables. Ne couvrez pas le cordon. Ne le plongez pas
dans l'eau.
8. Nous déconseillons l'utilisation d'une rallonge, car il pourrait surchauffer
et constituer un risque d'incendie.
9. Débranchez la machine à glaçons avant de la nettoyer ou d'effectuer
toute réparation ou entretien.
10. Faites preuve de prudence et de surveillance lorsque l' appareil est
utilisé à proximité d'enfants.
11. N'utilisez pas votre machine à glaçons à l'extérieur. Évitez la lumière
directe du soleil et assurez-vous qu'il y a au moins 5 pouces d'espace
entre l'arrière et les côtés de votre appareil et le mur.

- 4 -
12. N'utilisez aucun liquide autre que de l'eau dans l'appareil pour préparer
la glace.
13. Ne nettoyez pas votre machine à glaçons avec des détergents
inflammables. Les fumées peuvent créer un risque d'incendie ou
d'explosion.
14. Ne renversez pas la machine.
15. Si la machine à glaçons est amenée à l'intérieur depuis l'extérieur
pendant l'hiver, laissez-lui quelques heures pour se réchauffer à
température ambiante avant de le brancher à la source d'alimentation.
16. Cet appareil doit être correctement mis à la terre pour votre sécurité.
Le cordon d'alimentation est équipé d'une fiche à trois broches reliée à des
prises murales standard à trois broches pour minimiser le risque de choc
électrique.
17. Branchez votre appareil sur une prise dédiée, correctement installé et
prise murale mise à la terre. Ne pas, en toutes circonstances,
l’alimentation et/ou la mise à la terre doivent être dirigées vers un
électricien certifié.
18. Les matériaux moussants à l'intérieur sont combustibles et doivent être
tenus à l'écart du feu.
19. Il est interdit de tirer sur le câble pour débrancher la prise, débrancher
la prise est indispensable.
IMPORTANCE : Pour éviter les dangers dus à l'instabilité, l' appareil doit
être placé sur une surface plane et plane.
IMPORTANCE : Pour éviter les dangers dus à l'instabilité, l' appareil doit
être placé sur une surface plane et plane.
AVERTISSEMENT : Cet appareil doit être mis à la terre.
1) Le fusible sur le PCB est de 15 A. En cas de changement, il doit être
utilisé par un technicien.
2) la fluctuation de tension ne peut pas dépasser ± 10 % de la tension
nominale, ou un stabilisateur de tension est nécessaire.
IMPORTANCE : à éviter le danger est dû En cas d'instabilité, l' appareil
doit être placé sur une surface plane et plane .
- 5 -
PROCÉDURES OPÉRATIONNELLES
DÉBALLAGE DE VOTRE MACHINE À GLAÇONS
1. Retirez tous les matériaux d'emballage extérieurs et intérieurs. Vérifiez
si tous les accessoires ci-dessous sont inclus ou non . S'il manque des
pièces, veuillez contacter notre service client. Après avoir déballé la
machine, nous vous recommandons de la laisser reposer 24 heures avant
de la mettre en marche.
2. Nettoyez l'intérieur avec de l'eau tiède et un chiffon doux ou nettoyez
l'appareil à l'aide de la fonction d'autonettoyage.
3. Trouvez un emplacement pour votre machine à glaçons où elle est
protégée de la lumière directe du soleil et d'autres sources de chaleur
(c.-à-d. cuisinière, fournaise, radiateur). Placez la machine à glaçons sur
une surface plane. Assurez-vous qu'il y a au moins 5 pouces d'espace
entre l'arrière et les côtés de votre machine à glaçons et le mur.
4. Attendez une heure pour que le réfrigérant se stabilise avant de
brancher l'appareil pour la première utilisation.
5. L'appareil doit être placé là où la fiche est accessible.
Contenu du colis
Machine à glaçons x 1
Conseils chaleureux : vérifiez si tous les accessoires ci-dessous sont
inclus.
Liste des accessoires
- 6 -
NON
Description
Image
Usage
QTÉ
1
Manuel
Mode d'emploi
1 PC
2
Filtre
Filtrer l'eau
1 PC
3
Tuyau de
drainage
Vidange
1 PC
4
Cuillère à
glace
Prenez des glaçons
1 PC
5
attaches de
câble en
nylon
Réparer le tuyau si
nécessaire
2
pièces
6
Anneau de
saut
fixer la sortie et le
tuyau de drainage
ensemble si
nécessaire
1 PC
7
Bague
d'étanchéité
Mettez-le dans le
robinet du tuyau
d'admission. L'autre
est de rechange.
2
pièces
8
Clip bleu de
rechange
Clip bleu de
rechange si
nécessaire.
2
pièces
9
Prise de
rechange
Bouchon de
rechange qui permet
de boucher le
réservoir si besoin.
1 PC
CONNEXION DE VOTRE MACHINE À GLACE AVEC D'AUTRES
PIÈCES
- 7 -
Veuillez connecter votre machine à glaçons à d'autres pièces en vous
référant au schéma ci-dessous.
Connectez le tuyau de drainage et le tuyau d'arrivée d'eau.
Avertissement : 1) La machine ne peut se connecter qu'à des sources
d'eau potable et doit répondre aux normes locales en matière d'eau
potable.
2) La pression de l'eau doit être comprise entre 0,1 et 0. 4 Mpa, si dépasse
0. 4 Mpa, un réducteur de pression doit être connecté.
3 )Évacuation : Le la sortie du tuyau d'évacuation doit être plus basse que
la sortie de la machine
- 8 -
Vidange.
Avertissement : étant donné que la glace dans le réservoir intérieur fondra,
le tuyau de vidange doit être connecté avant utilisation et insérez le tuyau
de vidange dans un récipient ou dans les égouts.
Remarque : Connectez une extrémité du tuyau de vidange à la machine et
l'autre extrémité à un conteneur ou à un égout. L'autre port du tuyau de
vidange doit être plus bas que le port de vidange de la machine.
UTILISER L'EAU EN BARIL COMME SOURCE D'EAU
Vous pouvez utiliser de l’eau en baril comme source d’eau. N'oubliez pas
de faire le plein d'eau régulièrement. En outre, veuillez faire pivoter l’
interrupteur de commande bleu verticalement et couper l’alimentation en
eau du tuyau.
1. Si vous utilisez un robinet d'eau comme source d'eau, veuillez vous
- 9 -
assurer que le robinet d'eau est ouvert pour un approvisionnement en eau
continu. Si l’eau vient à manquer, l’indicateur « ajouter de l’eau »
s’allumera.
2. Si vous utilisez de l’eau en baril comme source d’eau. N'oubliez pas de
faire le plein d'eau régulièrement, sinon le voyant « arrêt » s'allumera.
3. Lorsque vous utilisez le robinet d'eau comme source d'eau, veuillez faire
pivoter l' interrupteur de commande bleu dans la machine horizontalement.
D'un autre côté, si vous utilisez de l'eau en baril comme source d'eau,
veuillez faire pivoter l' interrupteur de commande bleu verticalement.
Veuillez vous référer à l' image ci-dessous.
OPÉRATIONS DE LA MACHINE

- 10 -
Panneau de commande
Opération de fabrication de glace :
1. Connectez-vous le machine à le pouvoir et presse le bouton
« ON/OFF » . La « fabrication de glace » l'indicateur s'allumera sur.
Grâce à « + » / « - » pour augmenter ou diminuer le temps de fabrication
de glace, qui sera effectué au cycle en cours.
Presse Bouton « + » , si l'écran affiche « 1 » , cela signifie que le temps de
fabrication de glace sera ajouté 1 min, le temps maximum peut être ajouté
8 min. Si vous appuyez sur le bouton « - » et affichez « -1 » , cela signifie
que le temps de fabrication de la glace sera diminué de 1 minute, le temps
maximum est de 5 minutes. Cela signifie que le temps peut être réglé de -5
à 8 minutes.
2. Une fois le compte à rebours terminé, l'indicateur « fusion » s'allumera.
Les glaçons se détacheront plus tard du panneau de congélation.
3. Une fois les glaçons retirés. La machine entrera automatiquement dans
une autre boucle de fabrication de glace.
Allumage/arrêt automatique :
1. Lorsque la machine est éteinte alors qu'elle est connectée à
l'alimentation, appuyez sur le bouton
« Réservation/Nettoyage » bouton et
le "+"/"-" bouton à ensemble le allumage automatique temps (en
heures). Le
machinevolonté automatiquementse tournesuraprès le compte à rebours
estfini.

- 11 -
Lorsque la machine est en train de fabriquer des glaçons, appuyez sur le
boutonBouton « Réservation/Nettoyage »etle"+"/"-"boutonàensemblele
arrêt automatiquetemps(dansheures).Lela machine va automatiquement
se tourne désactivé après le compte à rebours est fini.
Autonettoyant:
1. Lorsque la machine est éteinte alors qu'elle est connectée à
l'alimentation électrique, appuyez sur le bouton « Réservation/Nettoyage
» et maintenez-le enfoncé pendant un moment. La machine entrera
automatiquement dans le programme d'autonettoyage.
Remarques:
1) Si vous modifiez le compte à rebours au milieu de la procédure de
fabrication de glace, cela prendra effet à la boucle suivante. Vous pouvez
appuyer longuement sur le bouton « HOT » pendant la fabrication des
glaçons pour décharger les glaçons à l'avance.
2) La température ambiante influencera le temps nécessaire à la
fabrication de la glace.
NETTOYAGE & ENTRETIEN
Veuillez nettoyer soigneusement votre machine à glaçons avant la
première utilisation.
Extérieur : l'extérieur de la machine à glaçons doit être nettoyé
régulièrement avec un détergent doux et de l'eau tiède. Utilisez toujours un
chiffon doux pour éviter de rayer ou d'endommager le boîtier.
INTÉRIEUR : veuillez utiliser la fonction d'autonettoyage suivante :
1. Ajoutez de l'eau et du vinaigre ou du mélange de jus de citron (rapport
1:1)
2. Branchez l'appareil, appuyez et maintenez le bouton CLEAN pendant
environ 3 secondes, puis relâchez. L'appareil entrera automatiquement
dans le programme d'auto-nettoyage. Ce processus prend environ 5 à 6
minutes. Une fois le programme d'autonettoyage terminé, l'appareil s'éteint
automatiquement.
3. La pale du ventilateur tourne. Ce processus rince les pièces intérieures
plusieurs fois .
- 12 -
4. Une fois le programme d'autonettoyage terminé, débranchez le cordon
d'alimentation et vidangez l'eau en débranchant le bouchon de vidange sur
le côté. Remplacez le bouchon de vidange.
5. Ajoutez de l'eau fraîche dans le réservoir d'eau, jusqu'au repère de
niveau d'eau.
6. Branchez l'appareil et répétez le processus d'autonettoyage en répétant
les étapes 3 à 5. Cela rincera les résidus de vinaigre/citron.
7. Après avoir vidé l'eau, replacez et serrez le bouchon de vidange.
8. Séchez l'intérieur et l'extérieur avec un chiffon propre et doux.
REMARQUE : Il est fortement recommandé de nettoyer l'appareil avant la
première utilisation ou après une longue période d'inutilisation.
NOTE
1. À mesure que la production de glaçons augmente, le panneau en
plastique à l'intérieur du m La machine (illustré ci-dessus) pourrait
être pressée par les glaçons. Lorsque le panneau en plastique est pressé
vers le bas, la machine cessera automatiquement de produire des glaçons
et « l'arrêt »
Le voyant s’allumera. Veuillez nettoyer régulièrement les glaçons pour que
la glace continue
fabrication.
Analyse des dysfonctionnements courants
- 13 -
E1
Aucun
déflecteur de
glace détecté
La plaque de guidage
des glaces s'est
détachée
Réinstallez le guide de glace
Interrupteur sensible
magnétique
endommagé
Remplacer l'interrupteur
sensible magnétique
La plaque de guidage
de glace n'est pas
réinitialisée
Réinitialiser la plaque de
guidage de glace
E2
Glace faire est
normal
Le quatrième cycle
glaciaire s'arrête
Remplacer l'interrupteur
sensible magnétique
Il n'y a pas d'eau
dans la boîte à
eau
Le bouchon de
vidange n'est pas
installé correctement
Installer correctement le
bouchon de vidange
Alimentation en eau
externe
Vérifier l'approvisionnement en
eau
Le réservoir
d'eau a débordé
dans le
réfrigérateur
Alimentation en eau
externe
La vanne d'eau au dessus du
réservoir ne tourne pas
horizontalement
Utiliser l’eau du robinet
comme source d’eau
La pression externe de l'eau est
trop élevée pour faire
fonctionner le robinet à flotteur,
réduire la pression de l'eau ou
changer un nouveau robinet.
Il y a de l'eau
dans la boîte à
eau
Il n'y a pas d'eau et le
tuyau de douche ne
coule pas
La pompe est sérieusement
bloquée, doit être remplacée ou
nettoyée
- 14 -
Le tuyau de douche est bouché.
Nettoie ça
Juste de l'eau
courante, pas
de
refroidissement
ou un peu froide
Il y a de la glace fine
sur le moule à glace
Augmentez le temps de
fabrication en appuyant sur le
bouton "+" du panneau de
commande
Il y a de la glace
épaisse sur le moule à
glace
Réduisez le temps de
fabrication en appuyant sur le
bouton "-" du panneau de
commande
De l'eau a éclaboussé
le réfrigérateur
Faites pivoter et ajustez le
tuyau de douche
L'arrière de la boîte à
eau fuit dans le
réfrigérateur
Ajuster la position d'installation
de la boîte à eau
L'eau n'est pas
froide
La carte principale
n'alimente pas le
compresseur
Remplacer la carte mère
Panne du
compresseur
Remplacer le compresseur
Température élevée du
compresseur
Remplacer le compresseur
Le compresseur
fonctionne, ne refroidit
pas
Fuite de réfrigérant, besoin de
réparation
E3
Alarme haute
température
Le capteur de
température de
condensation est
endommagé
Remplacement
Le ventilateur de
refroidissement est
Retirer la barricade
- 15 -
Schéma
bloqué par un corps
étranger
Dommages au
ventilateur de
refroidissement
Remplacement
E4
Capteur de
température de
condensation
anormale
Court-circuit ou circuit
ouvert du capteur de
température de
condensation
Remplacement
E5 _
Capteur de
température
ambiante
anormale
Court-circuit ou circuit
ouvert du capteur de
température ambiante
Remplacement
E6 _
Manque d'eau
Interruption de
l'approvisionnement en
eau externe
Rétablir l'approvisionnement en
eau
Électrovanne
d'admission d'eau
endommagée
Remplacement

- 16 -
Fabriqué en Chine


- 2 -
Technisch Support- und E-Garantie-Zertifikat www.vevor.com/support
Kommerzielle Eismaschine
Modell: SKF-B40F SKF-B45F
SKF-C50F SKF-C55F
We continue to be committed to provide you tools with competitive price.
"Save Half", "Half Price" or any other similar expressions used by us only represents an
estimate of savings you might benefit from buying certain tools with us compared to the major
top brands and does not necessarily mean to cover all categories of tools offered by us. You
are kindly reminded to verify carefully when you are placing an order with us if you are
actually saving half in comparison with the top major brands.

- 1 -
MODELL: SKF-B40F SKF-B45F SKF-C50F SKF-C55F
Have product questions? Need technical support? Please feel free to
contact us:
Technical Support and E-Warranty Certificate
www.vevor.com/support
NEED HELP? CONTACT US!
This is the original instruction, please read all manual instructions
carefully before operating. VEVOR reserves a clear interpretation of our
user manual. The appearance of the product shall be subject to the
product you received. Please forgive us that we won't inform you again if
there are any technology or software updates on our product.
Commercial Ice
Machine

- 2 -
Es ist wichtig, dass Sie diese Anweisungen sorgfältig lesen und zum
späteren Nachschlagen aufbewahren.
Warnung: Um das Verletzungsrisiko zu verringern, muss der
Benutzer die Bedienungsanleitung sorgfältig lesen.
Dieses Gerät entspricht Teil 15 der FCC-Bestimmungen. Der
Betrieb unterliegt den folgenden beiden Bedingungen: (1)
Dieses Gerät darf keine schädlichen Störungen verursachen
und (2) dieses Gerät muss alle empfangenen Störungen
akzeptieren, einschließlich Störungen, die einen
unerwünschten Betrieb verursachen können.
Dieses Produkt unterliegt den Bestimmungen der
europäischen Richtlinie 2012/19/EG. Das Symbol einer
durchgestrichenen Mülltonne weist darauf hin, dass das
Produkt in der Europäischen Union einer getrennten
Müllsammlung bedarf. Dies gilt für das Produkt und alle
Zubehörteile, die mit diesem Symbol gekennzeichnet sind. Als
solche gekennzeichnete Produkte dürfen nicht über den
normalen Hausmüll entsorgt werden, sondern müssen an
einer Sammelstelle für das Recycling von Elektro- und
Elektronikgeräten abgegeben werden
WICHTIGE SICHERHEITSANWEISUNGEN
Bei der Verwendung von Elektrogeräten sollten grundlegende
Sicherheitsvorkehrungen befolgt werden, um das Risiko von Bränden,
Stromschlägen und Verletzungen zu verringern Zu Personen oder
Eigentum. Lesen Sie alle Anweisungen, bevor Sie die Maschine zum
ersten Mal in Betrieb nehmen.
ACHTUNG: EIS KANN NACHTS NICHT IM EISBEHÄLTER
AUFBEWAHRT WERDEN . Es ist kein Kühlschrank, Das Eis wird zu

- 3 -
Wasser geschmolzen und fließt aus der Maschine.
1. Bei Anschluss an die Wasserversorgung: ACHTUNG: Es muss die
Trinkwasserversorgung angeschlossen werden.
2. Die Maschine ist für den Einsatz im Haushalt und ähnlichen
Anwendungen bestimmt, wie zum Beispiel:
-Personalküchenbereiche in Geschäften, Büros und andere
Arbeitsumgebungen;
-Bauernhäuser
-von Kunden in Hotels, Motels und andere Wohnumgebungen;
-Gastronomie und ähnliche Branchen .
3. Die Maschine sollte in Türen und ohne Hindernisse verwendet werden
guter Belüftungsort. Zwischen den vier Seiten der Maschine und der Wand
muss ein Abstand von mindestens 50 cm bestehen.
4. Bei der Verwendung von Elektrogeräten Es sollten grundlegende
Sicherheitsvorkehrungen befolgt werden, um die Brandgefahr zu
verringern. Es kann zu Stromschlägen und Personen- oder Sachschäden
kommen. Lesen Sie alle Anweisungen, bevor Sie ein Gerät verwenden.
5. Betreiben Sie dieses oder ein anderes Gerät nicht mit einem
beschädigten Kabel.
6. Schließen Sie das Gerät nur an ordnungsgemäß gepolte Steckdosen an.
An die gleiche Steckdose darf kein anderes Gerät angeschlossen werden.
Stellen Sie sicher, dass der Stecker vollständig in die Steckdose
eingesteckt ist.
7. Stellen Sie das Gerät und das Netzkabel nicht in der Nähe von
brennbarem Material auf. Decken Sie das Kabel nicht ab. Tauchen Sie es
nicht in Wasser.
8. Wir raten von der Verwendung eines Verlängerungskabels ab. da es zu
Überhitzung und Brandgefahr kommen kann.
9. Trennen Sie den Eisbereiter vom Stromnetz, bevor Sie ihn reinigen,
reparieren oder warten.
10. Lassen Sie Vorsicht und Aufsicht walten, wenn das Gerät in der Nähe
von Kindern verwendet wird.
11. Benutzen Sie Ihren Eisbereiter nicht im Freien. Vermeiden Sie direkte

- 4 -
Sonneneinstrahlung und stellen Sie sicher, dass zwischen der Rückseite
und den Seiten Ihres Geräts und der Wand mindestens 5 Zoll Platz ist.
12. Verwenden Sie im Gerät keine andere Flüssigkeit als Wasser, um das
Eis zuzubereiten.
13. Reinigen Sie Ihren Eisbereiter nicht mit brennbaren Reinigungsmitteln.
Die Dämpfe können zu Brand- oder Explosionsgefahr führen.
14. Kippen Sie die Maschine nicht um.
15. Wenn der Eisbereiter im Winter von draußen ins Haus gebracht wird,
Geben Sie ihm einige Stunden Zeit, um sich auf Raumtemperatur
aufzuwärmen, bevor Sie ihn an die Stromquelle anschließen .
16. Dieses Gerät sollte zu Ihrer Sicherheit ordnungsgemäß geerdet sein.
Das Netzkabel ist mit einem dreipoligen Stecker ausgestattet, der in
standardmäßige dreipolige Wandsteckdosen passt, um die Gefahr eines
Stromschlags zu minimieren.
17. Schließen Sie Ihr Gerät an eine dafür vorgesehene Steckdose an.
ordnungsgemäß installierte und geerdete Steckdose. Nicht, In jedem Fall
sollten die Stromversorgung und/oder die Erdung an einen zertifizierten
Elektriker erfolgen.
18. Die schäumenden Materialien im Inneren sind brennbar und müssen
von Feuer ferngehalten werden.
19. Es ist verboten, am Kabel zu ziehen, um den Stecker herauszuziehen.
Den Stecker ziehen ist ein Muss.
WICHTIG: Um Gefahren aufgrund von Instabilität zu vermeiden , muss das
Gerät auf einer ebenen und flachen Oberfläche aufgestellt werden.
WICHTIG: Um Gefahren aufgrund von Instabilität zu vermeiden , muss das
Gerät auf einer ebenen und flachen Oberfläche aufgestellt werden.
WARNUNG: Dieses Gerät muss geerdet werden.
1) Die Sicherung auf der Platine beträgt 15 A, bei Änderung muss sie von
einem Techniker betätigt werden.
2) Die Spannungsschwankung darf ±10 % der Nennspannung nicht
überschreiten , andernfalls ist ein Spannungsstabilisator erforderlich.
WICHTIGKEIT: Zu vermeiden Gefahr ist fällig Um Instabilität zu vermeiden,
- 5 -
muss das Gerät auf einer ebenen und ebenen Fläche aufgestellt werden .
ARBEITSANWEISUNGEN
Auspacken Ihres Eisbereiters
1. Entfernen Sie alle äußeren und inneren Verpackungsmaterialien.
Überprüfen Sie , ob alle unten aufgeführten Zubehörteile im Lieferumfang
enthalten sind oder nicht . Sollten Teile fehlen, wenden Sie sich bitte an
unseren Kundenservice. Nachdem Sie das Gerät ausgepackt haben,
empfehlen wir Ihnen, es 24 Stunden lang stehen zu lassen, bevor Sie es
einschalten.
2. Reinigen Sie den Innenraum mit lauwarmem Wasser und einem
weichen Tuch oder reinigen Sie das Gerät mit der Self-Clean-Funktion.
3. Suchen Sie für Ihren Eisbereiter einen Standort, an dem er vor direkter
Sonneneinstrahlung und anderen Wärmequellen (z. B. Herd, Ofen,
Heizkörper) geschützt ist. Stellen Sie den Eisbereiter auf eine ebene
Fläche. Stellen Sie sicher, dass zwischen der Rückseite und den Seiten
Ihres Eisbereiters und der Wand mindestens 5 Zoll Platz sind.
4. Warten Sie eine Stunde, bis sich das Kältemittel abgesetzt hat, bevor
Sie das Gerät für den ersten Gebrauch anschließen.
5. Das Gerät muss so aufgestellt werden, dass der Stecker zugänglich ist.
Packungsinhalt
Eismaschine x 1
Warme Tipps : Überprüfen Sie, ob alle unten aufgeführten Zubehörteile
- 6 -
im Lieferumfang enthalten sind.
Zubehörliste
NEIN
Beschreibu
ng
Bild
Verwendung
MEN
GE
1
Handbuch
Bedienungsanleitung
1
STÜC
K
2
Filter
Wasser filtern
1
STÜC
K
3
Abflussrohr
Abfluss
1
STÜC
K
4
Eislöffel
Nimm Eiswürfel
1
STÜC
K
5
Nylon
Kabelbinder
Bei Bedarf Rohr
reparieren
2
STÜC
K
6
Sprungring
Befestigen Sie bei
Bedarf den Auslass
und das Abflussrohr
aneinander
1
STÜC
K
7
Dichtungsrin
g
Stecken Sie es in den
Wasserhahn des
Ansaugrohrs. Das
andere ist übrig.
2
STÜC
K
8
Blauer
Ersatzclip
Ersetzen Sie bei
Bedarf den blauen
Clip.
2
STÜC
K
- 7 -
9
Ersatzsteck
er
Ersatzstopfen, der
den Tank bei Bedarf
verschließt.
1
STÜC
K
VERBINDEN IHRES EISBEREITERS MIT ANDEREN TEILEN
Bitte verbinden Sie Ihren Eisbereiter mit anderen Teilen, indem Sie sich auf
das Diagramm unten beziehen.
Abflussrohr und Wasserzulaufrohr anschließen
Warnung: 1) Die Maschine kann nur an Trinkwasserquellen
angeschlossen werden und muss den örtlichen Trinkwasserstandards
entsprechen
2) Der Wasserdruck muss zwischen 0,1 und 0 liegen. 4 MPa, wenn 0,4
MPa überschritten werden, muss ein Druckminderventil angeschlossen
- 8 -
werden.
3 ) Entwässerung: Der Der Auslass des Abflussrohrs muss tiefer liegen
als der Auslass an der Maschine
Abfluss.
Warnung: Da das Eis im Innentank schmilzt, muss das Abflussrohr vor der
Verwendung angeschlossen und in einen Behälter oder in die Kanalisation
eingeführt werden.
Hinweis: Schließen Sie ein Ende des Abflussrohrs an die Maschine und
das andere Ende an einen Behälter oder Abwasserkanal an. Der andere
Anschluss des Abflussrohrs muss tiefer liegen als der Abflussanschluss
der Maschine.
VERWENDUNG VON FASSWASSER ALS WASSERQUELLE
Als Wasserquelle können Sie Fasswasser verwenden. Bitte denken Sie
- 9 -
daran, regelmäßig Wasser nachzufüllen. Drehen Sie außerdem bitte den
blauen Steuerschalter in die Vertikale und schalten Sie die
Leitungswasserzufuhr ab.
1. Wenn Sie einen Wasserhahn als Wasserquelle verwenden, stellen Sie
bitte sicher, dass der Wasserhahn für eine kontinuierliche
Wasserversorgung geöffnet ist. Wenn das Wasser ausgeht, leuchtet die
Anzeige „Wasser hinzufügen“ auf.
2. Wenn Sie Fasswasser als Wasserquelle verwenden. Bitte denken Sie
daran, regelmäßig Wasser nachzufüllen, da sonst die „ Stopp “-Anzeige
aufleuchtet.
3. Wenn Sie einen Wasserhahn als Wasserquelle verwenden, drehen Sie
bitte den blauen Steuerschalter in der Maschine horizontal. Wenn Sie
hingegen Fasswasser als Wasserquelle verwenden, drehen Sie bitte den
blauen Steuerschalter vertikal. Bitte beachten Sie das Bild unten.
MASCHINENBETRIEB

- 10 -
Bedienfeld
Eisherstellung:
1. Verbinden Die Maschine Zu Die Leistung Und Drücken Sie die
„EIN/AUS“ -Taste. Die „Eisherstellung“ Die Anzeige leuchtet auf An.
Mit „ + “ / „ - “ erhöhen oder verkürzen Sie die Eisbereitungszeit, die im
aktuellen Zyklus erfolgt.
Drücken Sie „ + “- Taste: Wenn auf dem Bildschirm „ 1 “ angezeigt wird ,
bedeutet dies, dass die Eisbereitungszeit um 1 Minute hinzugefügt wird,
die maximale Zeit kann um 8 Minuten hinzugefügt werden. Wenn Sie die
Taste „ - “ drücken und „ -1 “ anzeigen , bedeutet dies, dass die
Eisbereitungszeit um 1 Minute verkürzt wird, die maximale Zeit beträgt 5
Minuten. Das heißt, die Zeit kann von -5 bis 8 Minuten eingestellt werden.
2. Wenn der Countdown abgelaufen ist, leuchtet die „Schmelz“-Anzeige
auf. Die Eiswürfel lösen sich später von der Gefrierplatte.
3. Nachdem sich die Eiswürfel gelöst haben. Die Maschine startet
automatisch eine weitere Eisherstellungsschleife.
Automatisches Ein-/Ausschalten:
1. Wenn die Maschine ausgeschaltet ist, während sie an das Stromnetz
angeschlossen ist, drücken Sie die Taste
„Reservieren/Reinigen“. Taste
Und Die „+“/„-“ Taste Zu Satz Die automatisches Einschalten Zeit (in
Stunden).
Der Maschine Wille automatisch wendet sich An nach Die Countdown Ist
fertig.

- 11 -
Wenn sich die Maschine mitten in der Eisherstellung befindet, drücken Sie
die TasteSchaltfläche „Reservieren/Reinigen“.UndDie„+“/„-“TasteZu
SatzDieautomatisches AusschaltenZeit(InStd).DerMaschine wird
automatisch wendet sich aus nach Die Countdown Ist fertig.
Selbstreinigung:
1. Wenn die Maschine ausgeschaltet ist, während sie an das Stromnetz
angeschlossen ist, drücken Sie die Taste „Reservierung/Reinigung“ und
halten Sie sie eine Weile gedrückt. Die Maschine startet automatisch das
Selbstreinigungsprogramm.
Anmerkungen:
1) Wenn Sie die Countdown-Zeit während der Eisherstellung ändern, wird
sie bei der nächsten Schleife wirksam. Sie können während der
Eisherstellung die Taste „HOT“ lange drücken , um die Eiswürfel vorzeitig
zu entnehmen.
2) Die Umgebungstemperatur beeinflusst die für die Eisherstellung
benötigte Zeit.
REINIGUNG & WARTUNG
Bitte reinigen Sie Ihren Eisbereiter vor dem ersten Gebrauch gründlich.
Außen: Die Außenseite des Eisbereiters sollte regelmäßig mit einem
milden Reinigungsmittel und warmem Wasser gereinigt werden.
Verwenden Sie immer ein weiches Tuch, um Kratzer oder Beschädigungen
am Gehäuse zu vermeiden.
INNENRAUM: Bitte nutzen Sie die folgende Selbstreinigungsfunktion:
1. Wasser und Essig- oder Zitronensaftmischung hinzufügen (Verhältnis
1:1)
2. Schließen Sie das Gerät an die Stromversorgung an, halten Sie die
CLEAN-Taste etwa 3 Sekunden lang gedrückt und lassen Sie sie dann los.
Das Gerät startet automatisch das Selbstreinigungsprogramm. Dieser
Vorgang dauert etwa 5–6 Minuten. Wenn das Selbstreinigungsprogramm
beendet ist, schaltet sich das Gerät automatisch aus.
3. Der Lüfterflügel dreht sich. Bei diesem Vorgang werden die Innenteile
mehrmals gespült .
- 12 -
4. Nachdem das Selbstreinigungsprogramm abgeschlossen ist, ziehen Sie
das Netzkabel ab und lassen Sie das Wasser ablaufen, indem Sie die
Ablasskappe an der Seite abziehen. Setzen Sie die Ablasskappe wieder
auf.
5. Füllen Sie frisches Wasser bis zur Wasserstandsmarkierung in den
Wasserbehälter.
6. Schließen Sie das Gerät an die Stromversorgung an und wiederholen
Sie den Selbstreinigungsvorgang, indem Sie die Schritte 3 bis 5
wiederholen. Dadurch werden die Essig-/Zitronenrückstände ausgespült.
7. Nachdem Sie das Wasser abgelassen haben, setzen Sie die
Ablasskappe wieder auf und ziehen Sie sie fest.
8. Trocknen Sie die Innen- und Außenseite mit einem sauberen, weichen
Tuch ab.
HINWEIS: Es wird dringend empfohlen, das Gerät vor dem ersten
Gebrauch oder nach längerem Nichtgebrauch zu reinigen.
NOTIZ
1. Wenn die Produktion von Eiswürfeln zunimmt, wird die Kunststoffplatte
im Inneren des m Die Maschine (siehe oben) könnte durch die
Eiswürfel nach unten gedrückt werden. Wenn die Kunststoffplatte gedrückt
wird
heruntergefahren wird, stoppt die Maschine automatisch die
Eiswürfelproduktion und die „Stopp“-Funktion wird angezeigt.

- 13 -
Die Anzeige leuchtet auf. Bitte reinigen Sie die Eiswürfel regelmäßig, damit
das Eis erhalten bleibt
Herstellung.
Häufige Störungsanalyse
E1
Kein Eisabweiser erkannt
Die Eisleitplatte hat sich gelöst
Bringen Sie die
Eisführung wieder an
Magnetisch empfindlicher
Schalter beschädigt
Ersetzen der
magnetisch
empfindliche
Schalter
Das Eisleitblech wird nicht
zurückgesetzt
Eisleitblech
zurücksetzen
E2
Eis Herstellung ist normal
Der vierte Eiszyklus stoppt
Ersetzen Sie den
magnetempfindlichen
Schalter
Im Wasserkasten befindet sich
kein Wasser
Die Ablassschraube ist nicht
richtig installiert
Ablassschraube
richtig einbauen
Externe Wasserversorgung
Überprüfen Sie die
Wasserversorgung
Der Wassertank lief in den
Kühlschrank über
Externe Wasserversorgung
Das Wasserventil
über dem Tank dreht
sich nicht horizontal
Verwenden Sie Leitungswasser
als Wasserquelle
Der äußere
Wasserdruck ist zu
hoch, sodass das
Schwimmerventil
- 14 -
nicht funktioniert.
Reduzieren Sie den
Wasserdruck oder
tauschen Sie ein
neues Ventil aus
Im Wasserkasten befindet sich
Wasser
Es gibt kein Wasser und auch die
Duschleitung läuft nicht
Die Pumpe ist stark
verstopft und sollte
ausgetauscht oder
gereinigt werden
Das Duschrohr ist
verstopft. Mach es
sauber
Nur fließendes Wasser, nicht
kühlend oder etwas kalt
Auf der Eisform befindet sich
dünnes Eis
Erhöhen Sie die
Fertigungszeit,
indem Sie die
„+“-Taste auf dem
Bedienfeld drücken
Auf der Eisform befindet sich
dickes Eis
Reduzieren Sie die
Fertigungszeit,
indem Sie die Taste
„-“ auf dem
Bedienfeld drücken
Etwas Wasser spritzte in den
Kühlschrank
Drehen Sie das
Duschrohr und
stellen Sie es ein
Die Rückseite des
Wasserkastens leckt in den
Kühlschrank
Passen Sie die
Einbauposition des
Wasserkastens an
Das Wasser ist nicht kalt
Die Hauptplatine versorgt den
Kompressor nicht mit Strom
Ersetzen Sie das
Mainboard
Kompressorausfall
Kompressor
austauschen
- 15 -
Schaltplan
Hohe Temperatur des
Kompressors
Kompressor
austauschen
Kompressor funktioniert, kühlt
nicht
Kältemittelleck,
Reparatur
erforderlich
E3
Alarm bei hoher Temperatur
Der
Kondensationstemperatursensor
ist beschädigt
Ersatz
Der Kühlventilator ist durch
Fremdkörper blockiert
Entfernen Sie die
Barrikade
Beschädigung des Kühlgebläses
Ersatz
E4
Anormaler
Kondensationstemperatursensor
Kurzschluss oder offener
Stromkreis des
Kondensationstemperatursensors
Ersatz
E 5
Anormaler
Umgebungstemperatursensor
Kurzschluss oder offener
Stromkreis des
Umgebungstemperatursensors
Ersatz
E 6
Wassermangel
Unterbrechung der externen
Wasserversorgung
Wasserversorgung
wiederherstellen
Wassereinlass-Magnetventil
beschädigt
Ersatz

- 16 -
In China hergestellt


- 2 -
Tecnico Supporto e certificato di garanzia elettronica www.vevor.com/support
Macchina per il ghiaccio commerciale
Modello: SKF-B40F SKF-B45F
SKF-C50F SKF-C55F
We continue to be committed to provide you tools with competitive price.
"Save Half", "Half Price" or any other similar expressions used by us only represents an
estimate of savings you might benefit from buying certain tools with us compared to the major
top brands and does not necessarily mean to cover all categories of tools offered by us. You
are kindly reminded to verify carefully when you are placing an order with us if you are
actually saving half in comparison with the top major brands.

- 1 -
MODELLO: SKF-B40F SKF-B45F SKF-C50F SKF-C55F
Have product questions? Need technical support? Please feel free to
contact us:
Technical Support and E-Warranty Certificate
www.vevor.com/support
NEED HELP? CONTACT US!
This is the original instruction, please read all manual instructions
carefully before operating. VEVOR reserves a clear interpretation of our
user manual. The appearance of the product shall be subject to the
product you received. Please forgive us that we won't inform you again if
there are any technology or software updates on our product.
Commercial Ice
Machine

- 2 -
È importante leggere attentamente queste istruzioni e conservarle per
riferimento futuro.
Avvertenza: per ridurre il rischio di lesioni, l'utente deve
leggere attentamente il manuale di istruzioni.
Questo dispositivo è conforme alla Parte 15 delle norme FCC.
Il funzionamento è soggetto alle seguenti due condizioni: (1)
Questo dispositivo non può causare interferenze dannose e
(2) questo dispositivo deve accettare qualsiasi interferenza
ricevuta, comprese le interferenze che potrebbero causare un
funzionamento indesiderato.
Questo prodotto è soggetto alle disposizioni della Direttiva
Europea 2012/19/CE. Il simbolo del bidone della spazzatura
barrato indica che nell'Unione Europea il prodotto richiede la
raccolta differenziata dei rifiuti. Ciò vale per il prodotto e tutti gli
accessori contrassegnati da questo simbolo. I prodotti
contrassegnati come tali non possono essere smaltiti con i
normali rifiuti domestici, ma devono essere portati in un punto
di raccolta per il riciclaggio di dispositivi elettrici ed elettronici
IMPORTANTI ISTRUZIONI DI SICUREZZA
Quando si utilizzano apparecchi elettrici, è necessario seguire le
precauzioni di sicurezza di base per ridurre il rischio di incendio, scosse
elettriche e lesioni A persone o cose. Leggere tutte le istruzioni prima di
utilizzare la macchina per la prima volta.
ATTENZIONE: IL GHIACCIO NON PUÒ ESSERE CONSERVATO NEL
CONTENITORE DEL GHIACCIO DURANTE LA NOTTE , NON È
FRIGORIFERO, IL GHIACCIO VERRÀ SCIOLTO IN ACQUA E USCIRÀ
DALLA MACCHINA.
1. Se si collega alla rete idrica, ATTENZIONE: è necessario collegare la

- 3 -
fornitura di acqua potabile;
2. La macchina è destinata all'uso in applicazioni domestiche e simili
come:
-aree cucina per il personale nei negozi, uffici e altri ambienti di lavoro;
-fattorie
-dai clienti negli hotel, motel e altri ambienti di tipo residenziale;
-Ristorazione e industrie affini .
3. La macchina deve essere utilizzata all'interno di porte e senza ostacoli
circondati buon posto di ventilazione. Tra i quattro lati della macchina e la
parete devono esserci almeno 50 cm.
4. Quando si utilizzano apparecchi elettrici, è necessario seguire le
precauzioni di sicurezza di base per ridurre il rischio di incendio, scosse
elettriche e lesioni a persone o cose. Leggere tutte le istruzioni prima di
utilizzare qualsiasi apparecchio.
5. Non utilizzare questo o qualsiasi altro apparecchio con un cavo
danneggiato.
6. Collegare solo a prese adeguatamente polarizzate. Nessun altro
apparecchio deve essere collegato alla stessa presa. Assicurarsi che la
spina sia completamente inserita nella presa.
7. Non posizionare la macchina e il cavo di alimentazione vicino a
materiale infiammabile. Non coprire il cavo. Non immergerlo in acqua.
8. Si sconsiglia l'uso di prolunghe, poiché potrebbe surriscaldarsi e
costituire pericolo di incendio.
9. Scollegare il produttore di ghiaccio prima di pulirlo o effettuare qualsiasi
riparazione o manutenzione.
10. Prestare attenzione e supervisione quando l' apparecchio viene
utilizzato vicino a bambini.
11. Non utilizzare il produttore di ghiaccio all'aperto. Evitare la luce solare
diretta e assicurarsi che ci siano almeno 5 pollici di spazio tra il retro e i lati
dell'unità e il muro.
12. Non utilizzare liquidi diversi dall'acqua nell'unità per produrre il
ghiaccio.
13. Non pulire il produttore di ghiaccio con detergenti infiammabili. I fumi

- 4 -
possono creare pericolo di incendio o esplosione.
14. Non ribaltare la macchina.
15. Se il produttore di ghiaccio viene portato all'interno dall'esterno durante
il periodo invernale, attendere alcune ore per riscaldarsi a temperatura
ambiente prima di collegarlo alla fonte di alimentazione.
16. Questa unità deve essere adeguatamente messa a terra per la vostra
sicurezza. Il cavo di alimentazione è dotato di una spina a tre poli
accoppiata con prese a muro standard a tre poli per ridurre al minimo la
possibilità di scosse elettriche .
17. Collega il tuo apparecchio ad una presa dedicata, presa a muro
correttamente installata e collegata a terra. Non, in ogni circostanza
l'alimentazione e/o la messa a terra devono essere indirizzate a un
elettricista certificato.
18. I materiali schiumosi all'interno sono combustibili e devono essere
tenuti lontani dal fuoco.
19. È vietato tirare il cavo per staccare la spina, staccare la spina è
d'obbligo.
IMPORTANTE: Per evitare pericoli dovuti a instabilità, l' unità deve essere
posizionata su una superficie piana e uniforme.
IMPORTANTE: Per evitare pericoli dovuti a instabilità, l' unità deve essere
posizionata su una superficie piana e uniforme.
ATTENZIONE: questo apparecchio deve essere collegato a terra.
1) Il fusibile sul PCB è da 15 A, se modificato, deve essere azionato da un
tecnico.
2) la fluttuazione della tensione non può essere superata del ±10% rispetto
alla tensione nominale oppure è necessario uno stabilizzatore di tensione.
IMPORTANZA: A Evitare il pericolo è dovuto a causa di instabilità, l' unità
deve essere posizionata su una superficie piana e uniforme .
PROCEDURE OPERATIVE
DISIMBALLAGGIO DEL PRODUTTORE DI GHIACCIO
1. Rimuovere tutti i materiali di imballaggio esterni ed interni. Controllare se
- 5 -
tutti gli accessori seguenti sono inclusi o meno . Se mancano delle parti,
contattare il nostro servizio clienti. Dopo aver disimballato la macchina, si
consiglia di lasciarla riposare per 24 ore prima di accenderla.
2. Pulire l'interno con acqua tiepida e un panno morbido oppure pulire
l'unità utilizzando la funzione Self-Clean.
3. Trova una posizione per il produttore di ghiaccio in cui sia protetta dalla
luce solare diretta e da altre fonti di calore (ad esempio fornello, forno,
radiatore). Posizionare il produttore di ghiaccio su una superficie piana.
Assicurati che ci siano almeno 5 pollici di spazio tra la parte posteriore e i
lati del produttore di ghiaccio e il muro.
4. Attendere un'ora affinché il refrigerante si stabilizzi prima di collegare
l'unità per l'uso iniziale.
5. L'apparecchio deve essere posizionato in un punto in cui la spina sia
accessibile.
Contenuto del pacco
Macchina per il ghiaccio x 1
Suggerimenti caldi : controlla se tutti gli accessori seguenti sono inclusi.
Elenco accessori
NO
Descrizione
Immagine
Utilizzo
QUAN
TITÀ
1
Manuale
Manuale operativo
1 PC

- 6 -
2
Filtro
Filtra l'acqua
1 PC
3
Tubo di
drenaggio
Drenare
1 PC
4
Cucchiaio di
ghiaccio
Prendi dei cubetti di
ghiaccio
1 PC
5
fascette in
nylon
Se necessario,
riparare il tubo
2
pezzi
6
Anello di
salto
se necessario,
fissare insieme lo
scarico e il tubo di
drenaggio
1 PC
7
Anello di
tenuta
Mettilo nel rubinetto
del tubo di
aspirazione. L'altro è
di riserva.
2
pezzi
8
Clip blu di
ricambio
Clip blu di ricambio
se necessario.
2
pezzi
9
Spina di
ricambio
Tappo di ricambio
che collega il
serbatoio se
necessario.
1 PC
COLLEGAMENTO DEL PRODUTTORE DI GHIACCIO CON
ALTRE PARTI
Collegare il produttore di ghiaccio ad altre parti facendo riferimento allo
schema seguente.

- 7 -
Collegare il tubo di scarico e il tubo di ingresso dell'acqua
Avvertenza: 1) La macchina può essere collegata solo a fonti di acqua
potabile e deve soddisfare gli standard locali sull'acqua potabile
2) La pressione dell'acqua deve essere compresa tra 0,1-0. 4 Mpa, se
supera 0,4 Mpa , è necessario collegare una valvola riduttrice di pressione.
3 ) Drenaggio: IL l'uscita del tubo di scarico deve essere più bassa
dell'uscita della macchina

- 8 -
Drenare.
Avvertenza: poiché il ghiaccio nel serbatoio interno si scioglierà, il tubo di
scarico deve essere collegato prima dell'uso e inserirlo in un contenitore o
nella fogna.
Nota: collegare un'estremità del tubo di scarico alla macchina e l'altra
estremità a un contenitore o a una fogna. L'altra porta del tubo di scarico
deve essere più bassa della porta di scarico della macchina.
UTILIZZANDO L'ACQUA DELLA BOTTE COME FONTE D'ACQUA
È possibile utilizzare l'acqua in botte come fonte d'acqua. Ricordatevi di
rifornire regolarmente l'acqua. Inoltre, ruotare l'interruttore di controllo blu
in verticale e chiudere l'alimentazione dell'acqua nel tubo.
1. Se si utilizza il rubinetto dell'acqua come fonte d'acqua, assicurarsi che il
rubinetto dell'acqua sia aperto per una fornitura d'acqua continua. Se

- 9 -
l'acqua finisce, l'indicatore "aggiungere acqua" si accenderà.
2. Se si utilizza l'acqua in botte come fonte d'acqua. Ricordarsi di riempire
regolarmente l'acqua altrimenti l'indicatore di " arresto " si accenderà.
3. Quando si utilizza il rubinetto dell'acqua come fonte d'acqua, ruotare l'
interruttore di controllo blu nella macchina in orizzontale. D'altra parte, se si
utilizza acqua in botte come fonte d'acqua, ruotare l' interruttore di controllo
blu in verticale. Si prega di fare riferimento all'immagine qui sotto.
OPERAZIONI DELLA MACCHINA

- 10 -
Pannello operativo
Operazione di produzione del ghiaccio:
1. Connetti IL macchina A IL energia E premere il pulsante “ON/OFF” . La
“produzione del ghiaccio” l'indicatore si accenderà SU.
Attraverso “ + ” / ” - ” per aumentare o diminuire il tempo di produzione del
ghiaccio, che verrà effettuato al ciclo corrente.
Premere Pulsante " + " , se sullo schermo viene visualizzato " 1 " ,
significa che il tempo di produzione del ghiaccio verrà aggiunto 1 minuto, il
tempo massimo può essere aggiunto 8 minuti. Se si preme il pulsante “ - ”
e viene visualizzato “ -1 ” , significa che il tempo di produzione del ghiaccio
verrà ridotto di 1 minuto, il tempo massimo è di 5 minuti. Ciò significa che il
tempo può essere regolato da -5 a 8 minuti.
2. Al termine del conto alla rovescia, l'indicatore di "scioglimento" si
accenderà. I cubetti di ghiaccio si staccheranno dal pannello di
congelamento più tardi.
3. Dopo che i cubetti di ghiaccio si sono staccati. La macchina entrerà
automaticamente in un altro ciclo di produzione del ghiaccio.
Accensione/spegnimento automatico:
1. Quando la macchina è spenta mentre è collegata all'alimentazione,
premere il pulsante
"Prenotazione/Pulizia" pulsante E IL “+”/“-” pulsante A
impostato IL accensione automatica tempo (in
ore). IL macchina Volere
automaticamentegiri SUDopo ILconto alla rovesciaÈfinito.

- 11 -
Quando la macchina è nel mezzo della produzione del ghiaccio, premere il
pulsantePulsante “Prenotazione/Pulisci”.EIL“+”/“-”pulsanteAimpostato
ILspegnimento automaticotempo(Inore).ILla macchina lo farà
automaticamente giri spento Dopo IL conto alla rovescia È finito.
Autopulente:
1. Quando la macchina è spenta mentre è collegata all'alimentazione,
premere il pulsante "Prenotazione/Pulizia" e tenerlo premuto per un po'.
La macchina entrerà automaticamente nel programma di autopulizia.
Appunti:
1) Se si modifica il tempo del conto alla rovescia durante la metà della
procedura di produzione del ghiaccio, avrà effetto al ciclo successivo. È
possibile premere a lungo il pulsante “HOT” durante la produzione del
ghiaccio per scaricare i cubetti di ghiaccio in anticipo.
2) La temperatura ambientale circostante influenzerà il tempo necessario
per la produzione del ghiaccio.
PULIZIA E MANUTENZIONE
Si prega di pulire accuratamente il produttore di ghiaccio prima dell'uso
iniziale.
Esterno: l'esterno del produttore di ghiaccio deve essere pulito
regolarmente con un detergente delicato e acqua tiepida. Utilizzare
sempre un panno morbido per evitare di graffiare o danneggiare
l'alloggiamento.
INTERNO: utilizzare la seguente funzione Self-Clean:
1. Aggiungi acqua e aceto o una miscela di succo di limone (rapporto 1:1)
2. Collegare l'unità, tenere premuto il pulsante CLEAN per circa 3 secondi,
quindi rilasciarlo. L'unità entrerà automaticamente nel programma di
pulizia automatica. Questo processo richiede circa 5-6 minuti. Al termine
del programma Self-Clean, l'unità si spegnerà automaticamente.
3. Le pale della ventola ruoteranno. Questo processo risciacqua più volte
le parti interne .
4. Una volta completato il programma Self-Clean, scollegare il cavo di
alimentazione e scaricare l'acqua scollegando il tappo di scarico sul lato.
- 12 -
Riposizionare il tappo di scarico.
5. Aggiungere acqua fresca al serbatoio dell'acqua, fino al segno del livello
dell'acqua.
6. Collegare l'unità e ripetere il processo di autopulizia ripetendo i passaggi
da 3 a 5. Questo eliminerà i residui di aceto/limone.
7. Dopo aver scaricato l'acqua, riposizionare e serrare il tappo di scarico.
8. Asciugare l'interno e l'esterno con un panno pulito e morbido.
NOTA: si consiglia vivamente di pulire l'unità prima dell'uso iniziale o dopo
che l'unità non è stata utilizzata per un lungo periodo di tempo.
NOTA
1. All'aumentare della produzione di cubetti di ghiaccio, il pannello di
plastica all'interno del m La macchina (mostrata sopra) potrebbe
essere premuta dai cubetti di ghiaccio. Quando viene premuto il pannello
di plastica
giù, la macchina smetterà automaticamente di produrre cubetti di ghiaccio
e il “blocco”
l'indicatore si accenderà. Si prega di pulire regolarmente i cubetti di
ghiaccio per mantenere il ghiaccio
fabbricazione.
Analisi dei malfunzionamenti comuni

- 13 -
E1
Nessun
deflettore di
ghiaccio rilevato
La piastra guida del
ghiaccio si è staccata
Reinstallare la guida del
ghiaccio
Interruttore sensibile
magnetico
danneggiato
Sostituire l'interruttore
sensibile magnetico
La piastra di guida del
ghiaccio non viene
ripristinata
Ripristinare la piastra guida del
ghiaccio
E2
Ghiaccio fare è
normale
Il quarto ciclo del
ghiaccio si ferma
Sostituire l'interruttore sensibile
magnetico
Non c'è acqua
nella cassetta
dell'acqua
Il tappo di scarico non
è installato
correttamente
Installare correttamente il tappo
di scarico
Approvvigionamento
idrico esterno
Controllare la fornitura d'acqua
Il serbatoio
dell'acqua è
traboccato nel
frigorifero
Approvvigionamento
idrico esterno
La valvola dell'acqua sopra il
serbatoio non ruota
orizzontalmente
Utilizzare l'acqua del
rubinetto come fonte
d'acqua
La pressione esterna dell'acqua
è troppo elevata per far
funzionare la valvola a
galleggiante, ridurre la
pressione dell'acqua o sostituire
una nuova valvola
C'è acqua nella
cassetta
Non c'è acqua, né
scorre il tubo della
La pompa è gravemente
bloccata, deve essere sostituita
- 14 -
dell'acqua
doccia
o pulita
Il tubo della doccia è ostruito.
Puliscilo
Solo acqua
corrente, non di
raffreddamento
o un po' fredda
C'è del ghiaccio sottile
sullo stampo per il
ghiaccio
Aumenta i tempi di produzione
premendo il pulsante "+" sul
pannello operativo
C'è del ghiaccio
spesso sullo stampo
del ghiaccio
Riduci i tempi di produzione
premendo il pulsante "-" sul
pannello operativo
Un po' d'acqua è
entrata nel frigorifero
Ruotare e regolare il tubo della
doccia
La parte posteriore
della scatola
dell'acqua perde nel
frigorifero
Regolare la posizione di
installazione della scatola
dell'acqua
L'acqua non è
fredda
La scheda principale
non alimenta il
compressore
Sostituire la scheda madre
Guasto del
compressore
Sostituire il compressore
Compressore ad alta
temperatura
Sostituire il compressore
Il compressore
funziona, non raffredda
Perdita di refrigerante,
necessita riparazione
E3
Allarme alta
temperatura
il sensore della
temperatura di
condensa è
danneggiato
Sostituzione
- 15 -
Schema elettrico
La ventola di
raffreddamento è
bloccata da corpi
estranei
Rimuovere la barricata
Danni alla ventola di
raffreddamento
Sostituzione
E4
Sensore di
temperatura di
condensazione
anomalo
Sensore temperatura
di condensazione in
corto circuito o aperto
Sostituzione
E5 _
Sensore
temperatura
ambiente
anomalo r
Cortocircuito o circuito
aperto del sensore
della temperatura
ambiente
Sostituzione
E6 _
Mancanza
d'acqua
Interruzione della
fornitura idrica esterna
Ripristinare
l'approvvigionamento idrico
Elettrovalvola ingresso
acqua danneggiata
Sostituzione

- 16 -
Made in China


- 2 -
Técnico Soporte y certificado de garantía electrónica www.vevor.com/support
Máquina de hielo comercial
Modelo: SKF-B40F SKF-B45F
SKF-C50F SKF-C55F
We continue to be committed to provide you tools with competitive price.
"Save Half", "Half Price" or any other similar expressions used by us only represents an
estimate of savings you might benefit from buying certain tools with us compared to the major
top brands and does not necessarily mean to cover all categories of tools offered by us. You
are kindly reminded to verify carefully when you are placing an order with us if you are
actually saving half in comparison with the top major brands.

- 1 -
MODELO: SKF-B40F SKF-B45F SKF-C50F SKF-C55F
Have product questions? Need technical support? Please feel free to
contact us:
Technical Support and E-Warranty Certificate
www.vevor.com/support
NEED HELP? CONTACT US!
This is the original instruction, please read all manual instructions
carefully before operating. VEVOR reserves a clear interpretation of our
user manual. The appearance of the product shall be subject to the
product you received. Please forgive us that we won't inform you again if
there are any technology or software updates on our product.
Commercial Ice
Machine

- 2 -
Es importante que lea atentamente estas instrucciones y las conserve
para consultarlas en el futuro.
Advertencia: para reducir el riesgo de lesiones, el usuario
debe leer atentamente el manual de instrucciones.
Este dispositivo cumple con la Parte 15 de las normas de la
FCC. El funcionamiento está sujeto a las dos condiciones
siguientes: (1) Este dispositivo no puede causar interferencias
dañinas y (2) este dispositivo debe aceptar cualquier
interferencia recibida, incluidas las interferencias que puedan
causar un funcionamiento no deseado.
Este producto está sujeto a las disposiciones de la Directiva
Europea 2012/19/CE. El símbolo que muestra un contenedor
con ruedas tachado indica que el producto requiere recogida
selectiva de basura en la Unión Europea. Esto se aplica al
producto y a todos los accesorios marcados con este símbolo.
Los productos marcados como tales no podrán desecharse
con la basura doméstica normal, sino que deberán llevarse a
un punto de recogida para el reciclaje de aparatos eléctricos y
electrónicos.
INSTRUCCIONES DE SEGURIDAD IMPORTANTES
Al utilizar aparatos eléctricos, se deben seguir precauciones básicas de
seguridad para reducir el riesgo de incendio, descarga eléctrica y lesiones.
a personas o bienes. Lea todas las instrucciones antes de operar la
máquina por primera vez.
PRECAUCIÓN: EL HIELO NO SE PUEDE ALMACENAR EN EL
DEPÓSITO DE HIELO DURANTE LA NOCHE , NO ES NEVERA, EL
HIELO SE DERRETIRÁ EN AGUA Y FUERA DE LA MÁQUINA.
1. Si se conecta con el suministro de agua, PRECAUCIÓN: debe conectar

- 3 -
el suministro de agua potable;
2. La máquina está diseñada para ser utilizada en aplicaciones domésticas
y similares, tales como:
-áreas de cocina para el personal en tiendas, oficinas y otros entornos de
trabajo;
-cortijos
-por clientes en hoteles, moteles y otros entornos de tipo residencial;
-Industria de la restauración e industrias similares .
3. La máquina debe usarse en puertas y sin obstáculos rodeados. buen
lugar de ventilación. Debe haber una distancia mínima de 50 cm entre los
cuatro lados de la máquina con la pared.
4. Al utilizar aparatos eléctricos, Se deben seguir precauciones básicas de
seguridad para reducir el riesgo de incendio. descargas eléctricas y
lesiones a personas o propiedades. Lea todas las instrucciones antes de
usar cualquier electrodoméstico.
5. No opere este ni ningún otro aparato con un cable dañado.
6. Conéctelo únicamente a tomas de corriente debidamente polarizadas.
No se debe enchufar ningún otro aparato en el mismo tomacorriente.
Asegúrese de que el enchufe esté completamente insertado en el enchufe.
7. No coloque la máquina ni el cable de alimentación cerca de materiales
inflamables. No cubra el cable. No lo sumerjas en agua.
8. No recomendamos el uso de un cable de extensión, ya que puede
sobrecalentarse y convertirse en un riesgo de incendio.
9. Desenchufe la fábrica de hielo antes de limpiarla o realizar cualquier
reparación o servicio.
10. Tenga cuidado y supervise cuando utilice el aparato cerca de niños.
11. No utilices tu máquina de hielo al aire libre. Evite la luz solar directa y
asegúrese de que haya al menos 5 pulgadas de espacio entre la parte
posterior y los lados de su unidad y la pared.
12. No utilice ningún líquido que no sea agua en la unidad para hacer el
hielo.
13. No limpie su máquina de hielo con detergentes inflamables. Los
vapores pueden crear riesgo de incendio o explosión.

- 4 -
14. No vuelque la máquina.
15. Si la fábrica de hielo se lleva al interior desde el exterior durante el
invierno, dale unas horas para que alcance la temperatura ambiente antes
de enchufarlo a la fuente de alimentación.
16. Esta unidad debe estar correctamente conectada a tierra para su
seguridad. El cable de alimentación está equipado con un enchufe de tres
clavijas acoplado a tomas de pared estándar de tres clavijas para
minimizar la posibilidad de descarga eléctrica .
17. Conecte su electrodoméstico a un enchufe dedicado, Tomacorriente de
pared correctamente instalado y conectado a tierra. No, Bajo cualquier
circunstancia, la alimentación y/o la conexión a tierra deben dirigirse a un
electricista certificado.
18. Los materiales espumosos del interior son combustibles y deben
mantenerse alejados del fuego.
19. Está prohibido tirar del cable para desenchufar el enchufe,
desconectar el enchufe es imprescindible.
IMPORTANCIA: Para evitar peligros debidos a la inestabilidad, la unidad
debe colocarse sobre una superficie plana y uniforme.
IMPORTANCIA: Para evitar peligros debidos a la inestabilidad, la unidad
debe colocarse sobre una superficie plana y uniforme.
ADVERTENCIA: Este aparato debe estar conectado a tierra.
1) El fusible de la PCB es de 15 A; si se cambia, debe ser operado por un
técnico.
2) la fluctuación de voltaje no puede exceder el ±10% del voltaje nominal,
o se necesita un estabilizador de voltaje.
IMPORTANCIA: Para evitar peligro debido _ Para evitar la inestabilidad, la
unidad debe colocarse sobre una superficie uniforme y plana .
PROCEDIMIENTOS DE OPERACIÓN
DESEMBALAJE DE SU FABRICADOR DE HIELO
1. Retire todos los materiales de embalaje exterior e interior. Compruebe si
todos los accesorios siguientes están incluidos o no . Si falta alguna pieza,
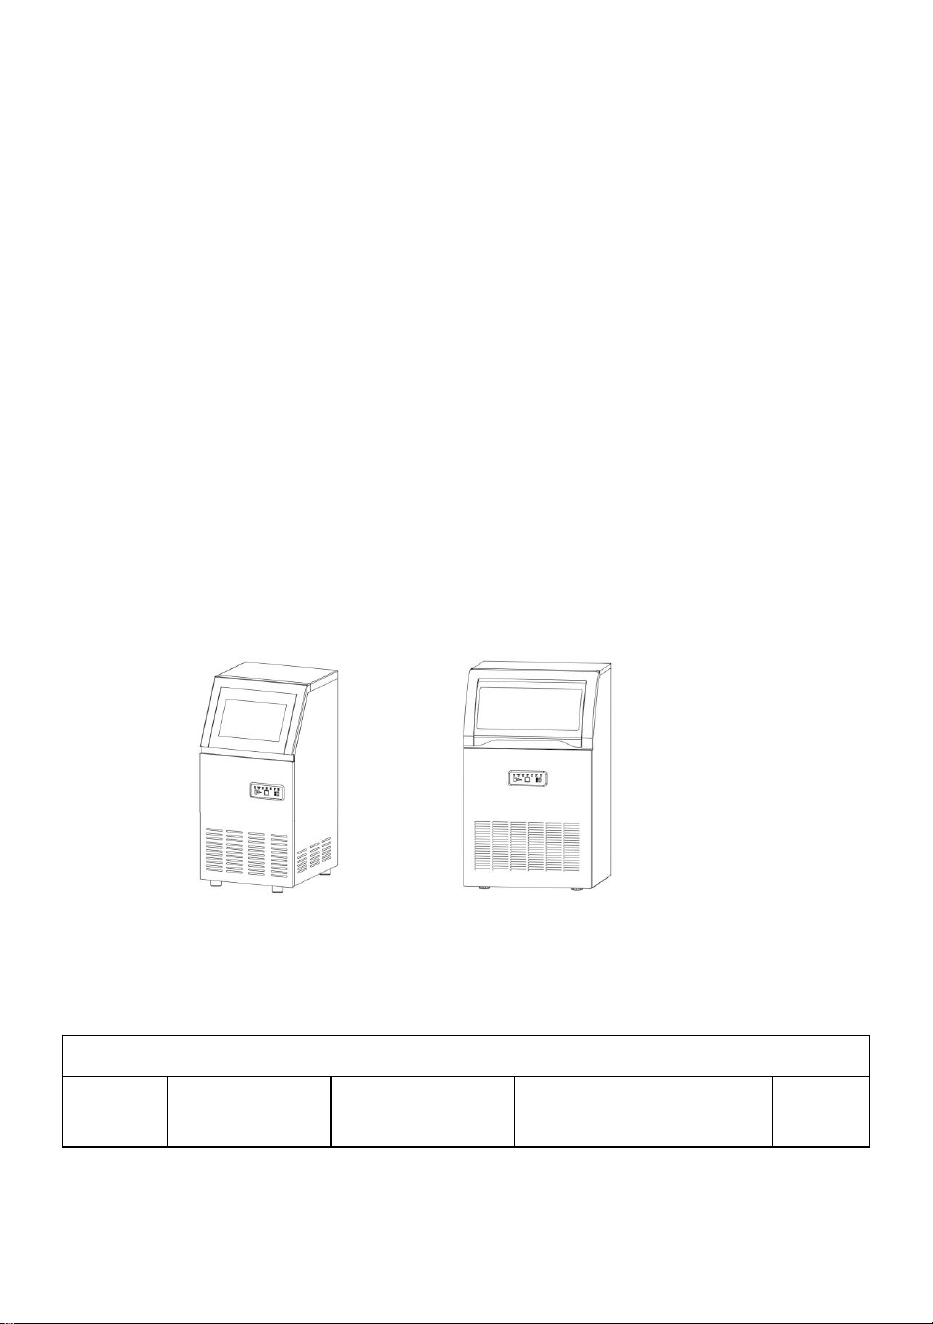
- 5 -
póngase en contacto con nuestro servicio de atención al cliente. Después
de desembalar la máquina, le recomendamos dejarla durante 24 horas
antes de encenderla.
2. Limpie el interior con agua tibia y un paño suave o limpie la unidad
usando la función de autolimpieza.
3. Encuentre un lugar para su máquina de hielo donde esté protegida de la
luz solar directa y otras fuentes de calor (es decir, estufa, caldera,
radiador). Coloque la máquina de hielo sobre una superficie nivelada.
Asegúrese de que haya al menos 5 pulgadas de espacio entre la parte
posterior y los lados de su máquina de hielo y la pared.
4. Espere una hora para que el refrigerante se asiente antes de enchufar
la unidad para su uso inicial.
5. El aparato debe colocarse en un lugar donde se pueda acceder al
enchufe.
contenidos del paquete
Máquina para hacer hielo x 1
Consejos cálidos : compruebe si todos los accesorios siguientes están
incluidos.
Lista de accesorios
NO
Descripció
n
Imagen
Uso
CANT
IDAD
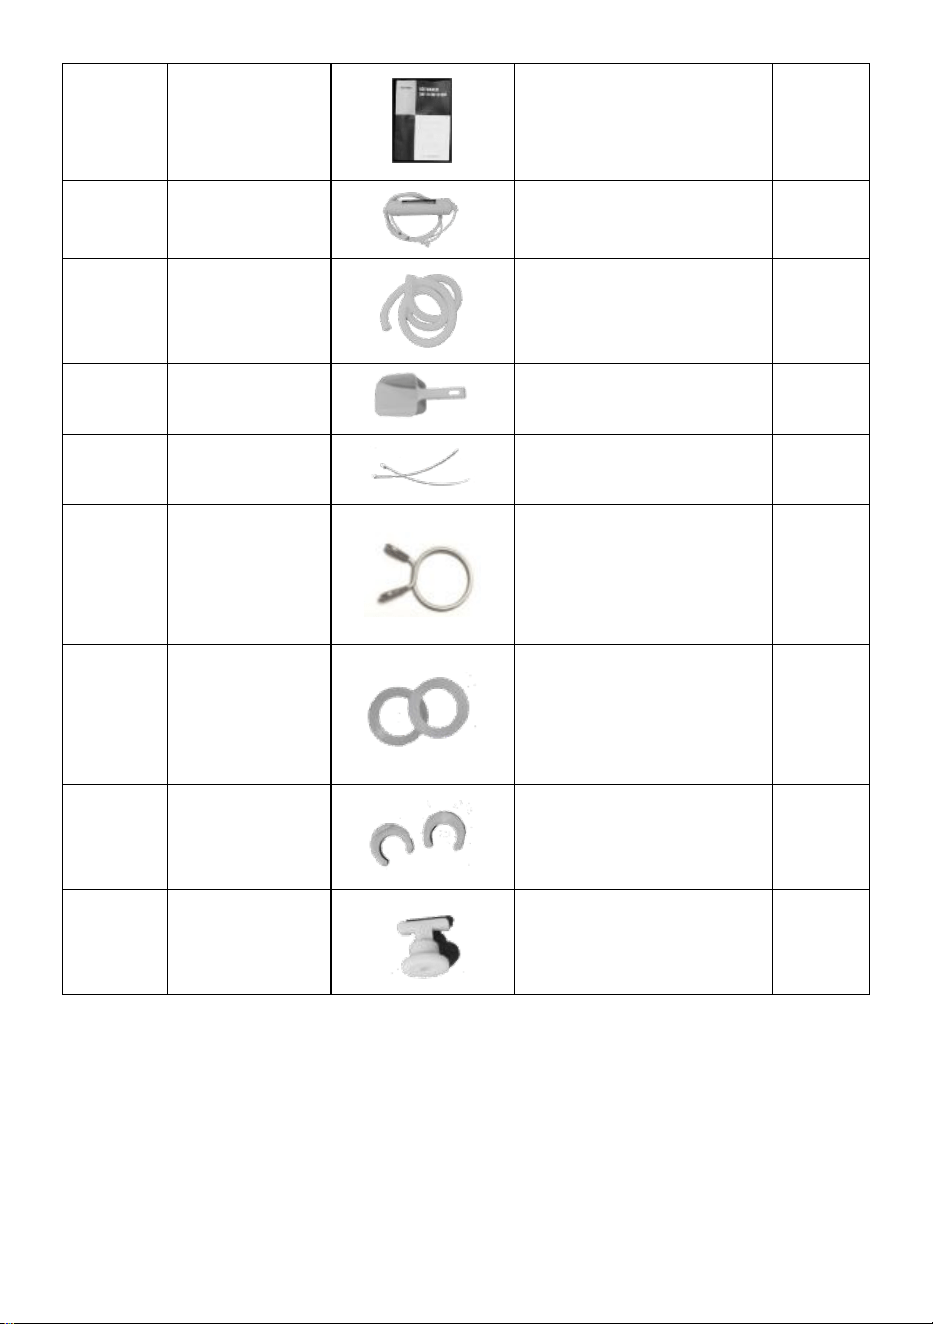
- 6 -
1
Manual
Operación manual
1 PC
2
Filtrar
Filtrar agua
1 PC
3
Tubo de
drenaje
Drenar
1 PC
4
Cuchara de
hielo
Toma cubitos de
hielo
1 PC
5
bridas de
nailon
Repare la tubería si
es necesario
2
piezas
6
Anillo de
salto
Sujete la salida y el
tubo de drenaje
juntos si es
necesario.
1 PC
7
Anillo de
sello
Póngalo en el grifo
del tubo de admisión.
El otro es de
repuesto.
2
piezas
8
Clip azul de
repuesto
Clip azul de repuesto
si es necesario.
2
piezas
9
enchufe de
repuesto
Tapón de repuesto
que tapa el depósito
si es necesario.
1 PC
CONECTAR SU FABRICADOR DE HIELO CON OTRAS PIEZAS
Conecte su máquina de hielo con otras piezas consultando el diagrama a
continuación.

- 7 -
Conecte la tubería de drenaje y la tubería de entrada de agua.
Advertencia: 1) La máquina solo puede conectarse a fuentes de agua
potable y debe cumplir con los estándares locales de agua potable.
2) La presión del agua debe estar entre 0,1-0. 4 Mpa, si supera los 0, 4
Mpa, se debe conectar una válvula reductora de presión.
3 )Drenaje: El La salida del tubo de drenaje debe ser más baja que la
salida de la máquina.

- 8 -
Drenar.
Advertencia: Debido a que el hielo en el tanque interior se derretirá, se
debe conectar el tubo de drenaje antes de usarlo e insertar el tubo de
drenaje en un recipiente o en la alcantarilla.
Nota: Conecte un extremo del tubo de drenaje a la máquina y el otro
extremo a un contenedor o alcantarillado. El otro puerto del tubo de
drenaje debe estar más bajo que el puerto de drenaje de la máquina.
USO DE AGUA DE BARRIL COMO FUENTE DE AGUA
Puede utilizar agua de barril como fuente de agua. Recuerde reponer agua
periódicamente. Además, gire el interruptor de control azul verticalmente y
cierre el suministro de agua de la tubería.
1. Si utiliza un grifo de agua como fuente de agua, asegúrese de que el
grifo de agua esté abierto para un suministro continuo de agua. Si se
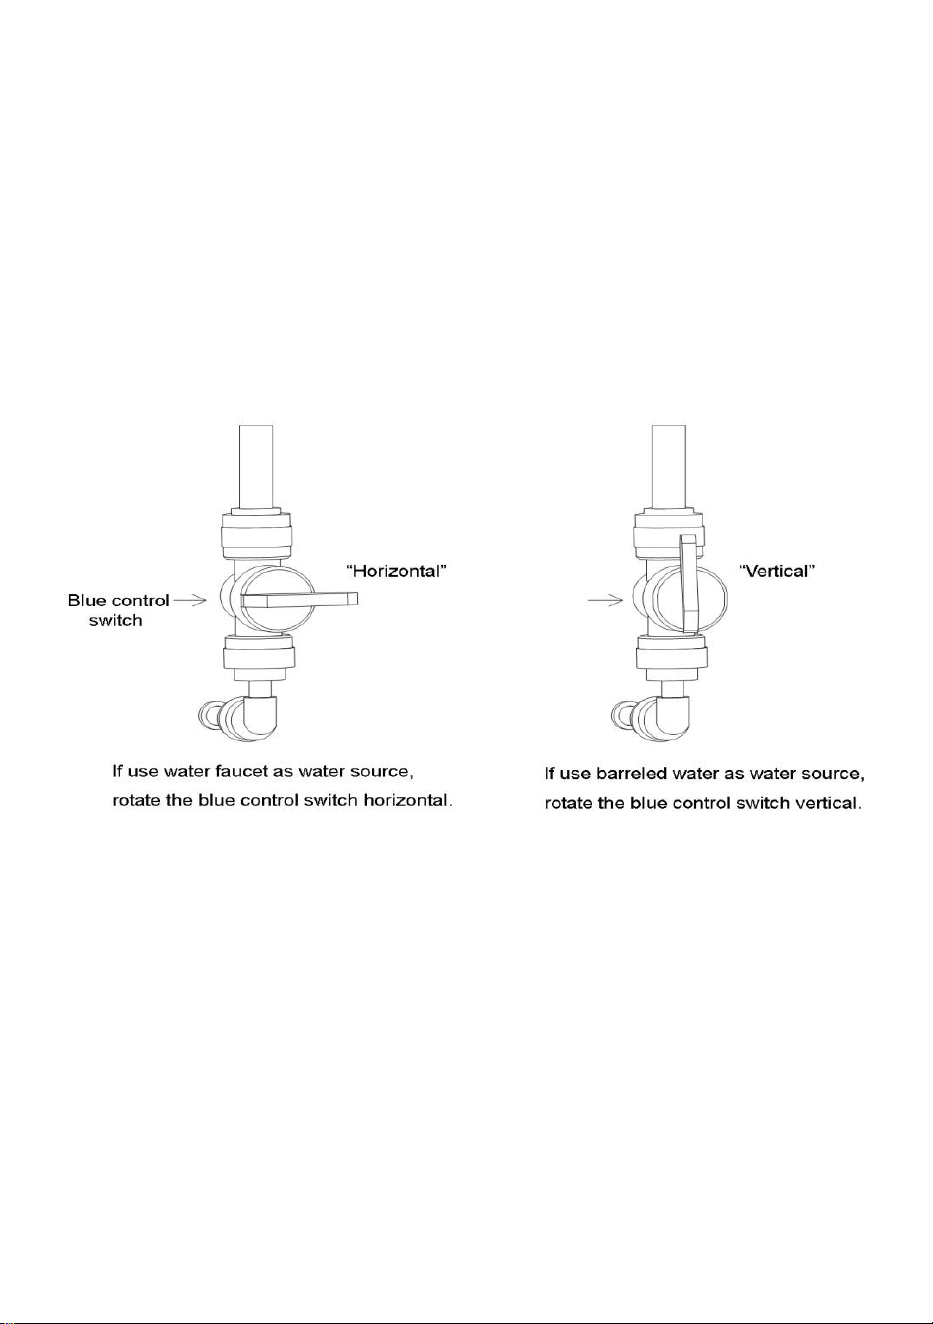
- 9 -
acaba el agua, se encenderá el indicador "agregar agua".
2. Si utiliza agua de barril como fuente de agua. Recuerde reponer agua
con regularidad o se encenderá el indicador de " parada ".
3. Cuando utilice el grifo de agua como fuente de agua, gire el interruptor
de control azul en la máquina en posición horizontal. Por otro lado, si
utiliza agua de barril como fuente de agua, gire el interruptor de control
azul en posición vertical. Consulte la imagen a continuación.
OPERACIONES DE LA MÁQUINA
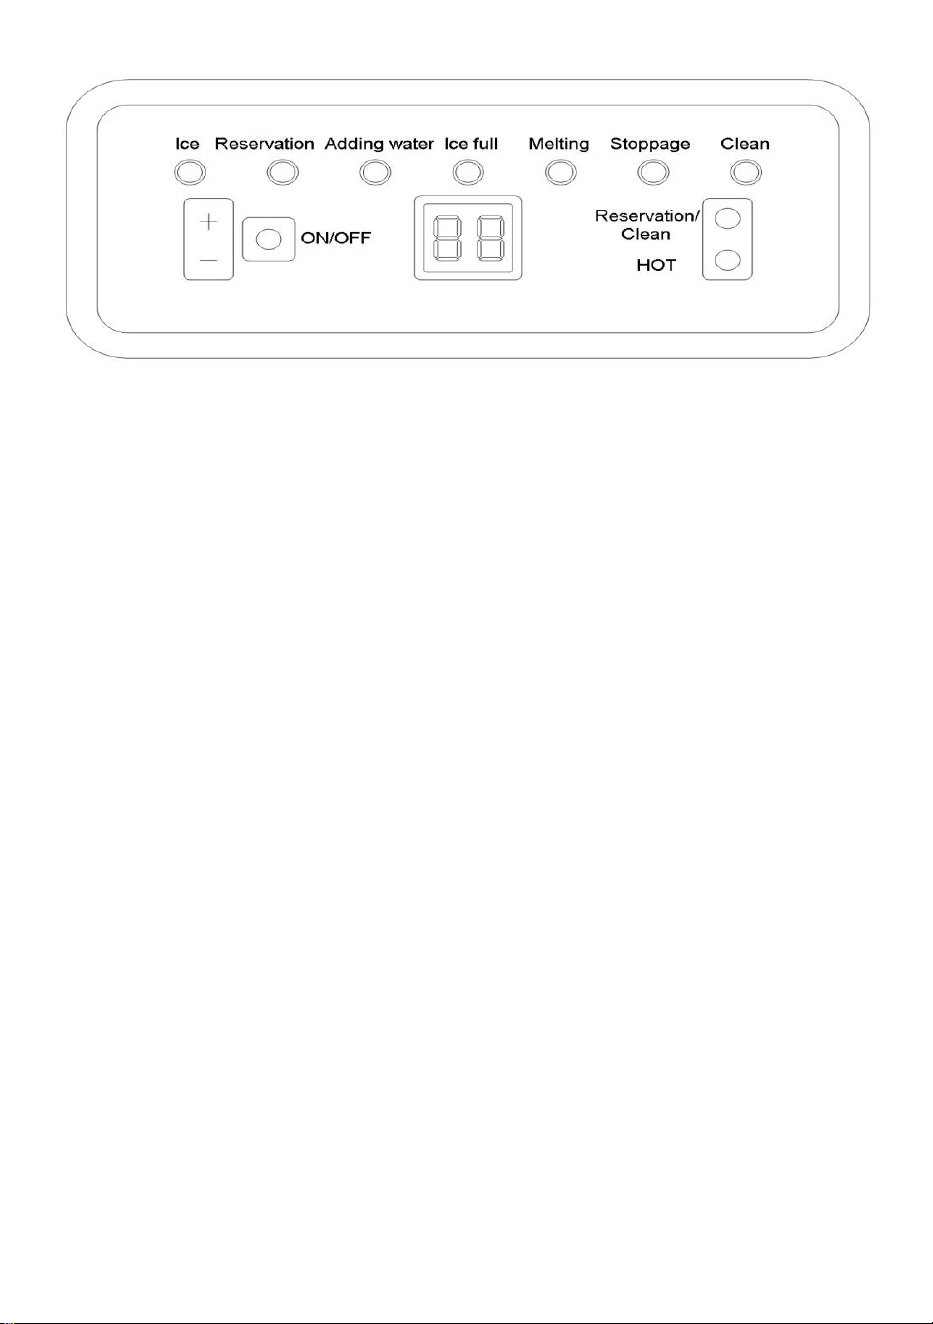
- 10 -
Panel de operaciones
Operación de fabricación de hielo:
1. Conectar el máquina a el fuerza y prensa el botón
“ENCENDIDO/APAGADO” . La “fabricación de hielo” el indicador se
iluminará en.
A través de “ + ” / ” - ” para aumentar o disminuir el tiempo de fabricación
de hielo, que se efectuará en el ciclo actual.
Prensa Botón " + " , si la pantalla muestra " 1 " , significa que el tiempo de
fabricación de hielo se agregará 1 min, el tiempo máximo se puede
agregar 8 min. Si presiona el botón " - " y muestra " -1 " , significa que el
tiempo de fabricación de hielo se reducirá en 1 minuto, el tiempo máximo
es de 5 minutos. Eso significa que el tiempo se puede ajustar de -5 a 8
min.
2. Cuando finalice la cuenta regresiva del tiempo, el indicador de "fusión"
se encenderá. Los cubitos de hielo se desprenderán del panel de
congelación más tarde.
3. Después de que se desprendan los cubitos de hielo. La máquina entrará
automáticamente en otro circuito de fabricación de hielo.
Encendido/apagado automático:
1. Cuando la máquina esté apagada mientras está conectada a la
corriente, presione el botón
“Reservar/Limpiar” botón y el “+”/“-” botón a
colocar el encendido automático tiempo (en
horas). El máquina voluntad

- 11 -
automáticamentevueltasen despuésel cuenta regresivaesfinalizado.
Cuando la máquina esté en mitad de la fabricación de hielo, presione el
botónBotón “Reservar/Limpiar”yel“+”/“-”botónacolocarelapagado
automáticotiempo(enhoras).Ella máquina lo hará automáticamente
vueltas apagado después el cuenta regresiva es finalizado.
Autolimpieza:
1. Cuando la máquina esté apagada mientras está conectada a la
corriente, presione el botón “Reservar/Limpiar” y manténgalo presionado
por un momento. La máquina ingresará automáticamente al programa de
autolimpieza.
Notas:
1) Si cambia el tiempo de cuenta atrás durante la mitad del procedimiento
de fabricación de hielo, entrará en vigor en el siguiente ciclo. Puede
presionar prolongadamente el botón "CALIENTE" durante la fabricación
de hielo para descargar los cubitos de hielo con anticipación.
2) La temperatura ambiental circundante influirá en el tiempo necesario
para fabricar hielo.
LIMPIEZA Y MANTENIMIENTO
Limpie a fondo su máquina de hielo antes del uso inicial.
Exterior: el exterior de la máquina de hielo debe limpiarse periódicamente
con un detergente suave y agua tibia. Utilice siempre un paño suave para
evitar rayar o dañar la carcasa.
INTERIOR: utilice la siguiente función de autolimpieza:
1. Agregue agua y vinagre o mezcla de jugo de limón (proporción 1:1)
2. Enchufe la unidad, presione y mantenga presionado el botón CLEAN
durante aproximadamente 3 segundos y luego suéltelo. La unidad
ingresará automáticamente al programa de autolimpieza. Este proceso
tarda entre 5 y 6 minutos. Cuando finalice el programa de autolimpieza, la
unidad se apagará automáticamente.
3. Las aspas del ventilador girarán. Este proceso enjuaga las piezas
interiores varias veces .
4. Una vez completado el programa de autolimpieza, desenchufe el cable
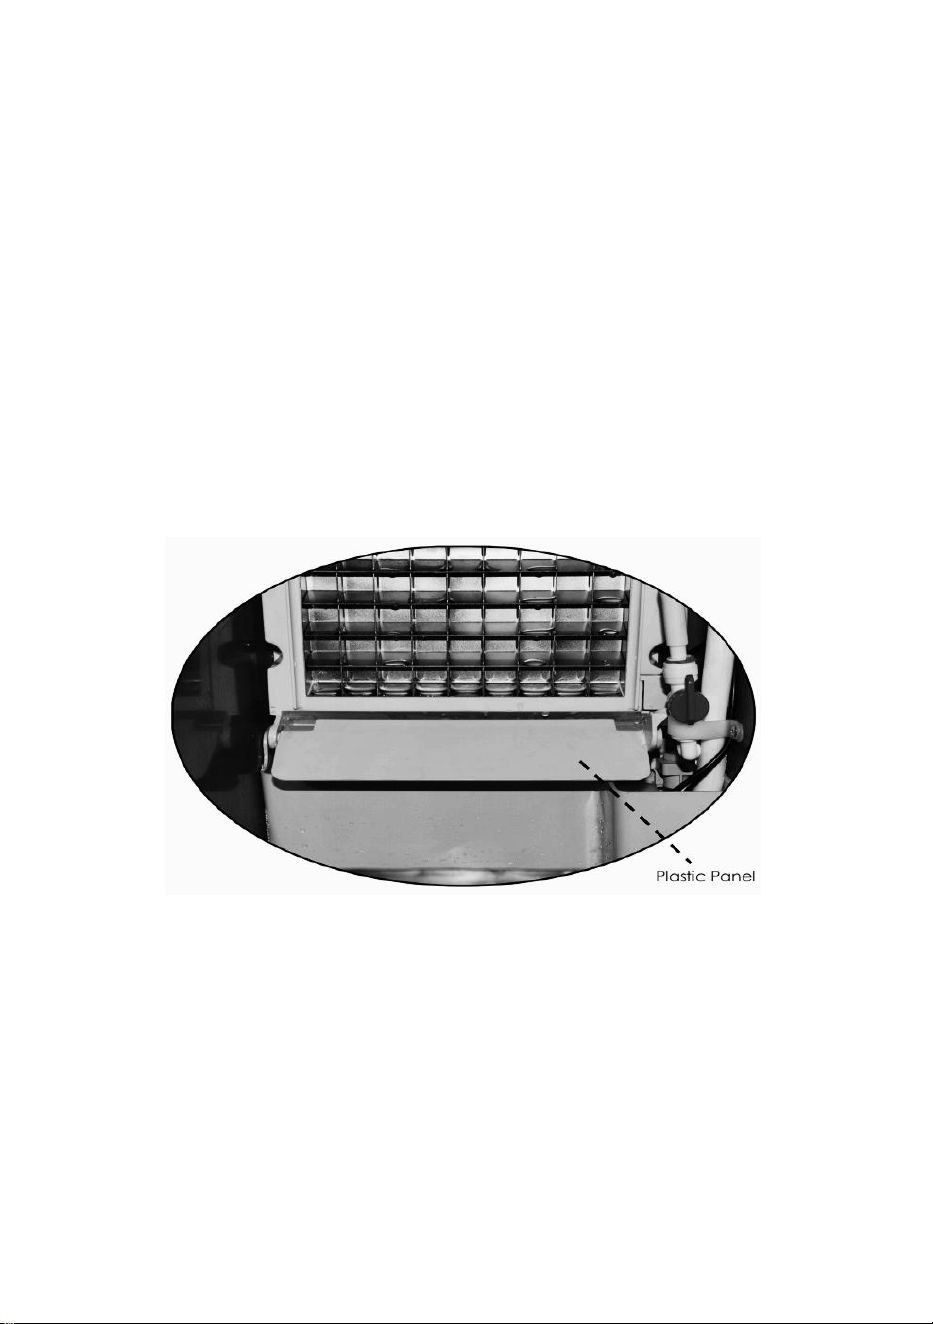
- 12 -
de alimentación y drene el agua desenchufando el tapón de drenaje lateral.
Vuelva a colocar el tapón de drenaje.
5. Agregue agua dulce al depósito de agua, hasta la marca del nivel del
agua.
6. Enchufe la unidad y repita el proceso de autolimpieza repitiendo los
pasos 3 a 5. Esto enjuagará los residuos de vinagre/limón.
7. Después de drenar el agua, vuelva a colocar y apriete el tapón de
drenaje.
8. Seque el interior y el exterior con un paño suave y limpio.
NOTA: Se recomienda encarecidamente limpiar la unidad antes del uso
inicial o después de que no haya estado en uso durante un período
prolongado.
NOTA
1. A medida que aumenta la producción de cubitos de hielo, el panel de
plástico dentro del m Los cubitos de hielo podrían presionar la
máquina (como se muestra arriba). Cuando se presiona el panel de
plástico
hacia abajo, la máquina dejará de producir cubitos de hielo
automáticamente y se activará el “paro”.
El indicador se encenderá. Limpie los cubitos de hielo con regularidad
para que el hielo continúe.
haciendo.

- 13 -
Análisis de fallos comunes
E1
No se detectó
ningún deflector
de hielo
La placa guía de hielo
se desprendió
Vuelva a instalar la guía de
hielo
Interruptor sensible
magnético dañado
Reemplazar el interruptor
sensible magnético
La placa guía de hielo
no se reinicia
Restablecer la placa guía de
hielo
E2
Hielo hacer es
normal
El cuarto ciclo del hielo
se detiene
Reemplace el interruptor
sensible magnético
No hay agua en
la caja de agua.
El tapón de drenaje no
está instalado
correctamente.
Instale el tapón de drenaje
correctamente
Suministro de agua
externo
Comprobar el suministro de
agua
El tanque de
agua se
desbordó dentro
del refrigerador.
Suministro de agua
externo
La válvula de agua sobre el
tanque no gira horizontalmente
Utilice agua del grifo
como fuente de agua.
La presión externa del agua es
demasiado alta para hacer que
la válvula de flotador funcione,
reducir la presión del agua o
cambiar una válvula nueva.
Hay agua en la
caja de agua.
No hay agua, ni corre
el caño de la ducha.
La bomba está seriamente
bloqueada, debe ser
reemplazada o limpiada.
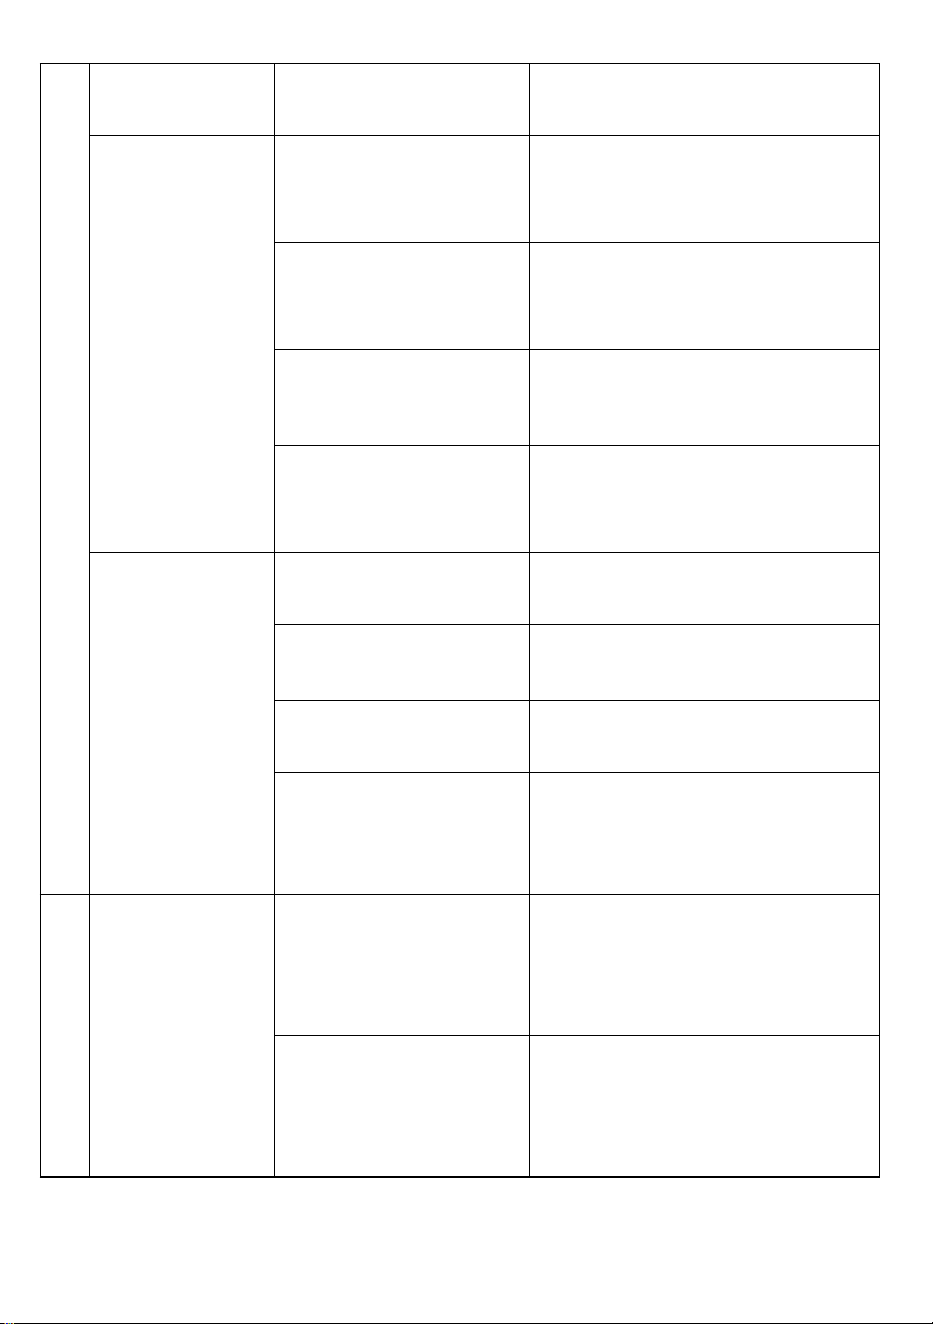
- 14 -
La tubería de la ducha está
bloqueada. Limpialo
Solo agua
corriente, sin
refrigeración o
un poco de frío.
Hay hielo fino en el
molde de hielo.
Aumente el tiempo de
fabricación presionando el
botón "+" en el panel operativo
Hay hielo espeso en el
molde de hielo.
Reduzca el tiempo de
fabricación presionando el
botón "-" en el panel operativo
Un poco de agua
salpicó el refrigerador.
Girar y ajustar el tubo de la
ducha.
La parte posterior de la
caja de agua gotea
hacia el refrigerador.
Ajuste la posición de instalación
de la caja de agua.
el agua no esta
fria
La placa principal no
alimenta el compresor.
Reemplace la tarjeta principal
Fallo del compresor
Reemplace el compresor
Alta temperatura del
compresor
Reemplace el compresor
Compresor
funcionando, no
enfriando
Fuga de refrigerante, necesita
reparación.
E3
Alarma de alta
temperatura
El sensor de
temperatura de
condensación está
dañado.
Reemplazo
El ventilador de
refrigeración está
bloqueado por materia
extraña.
quitar la barricada
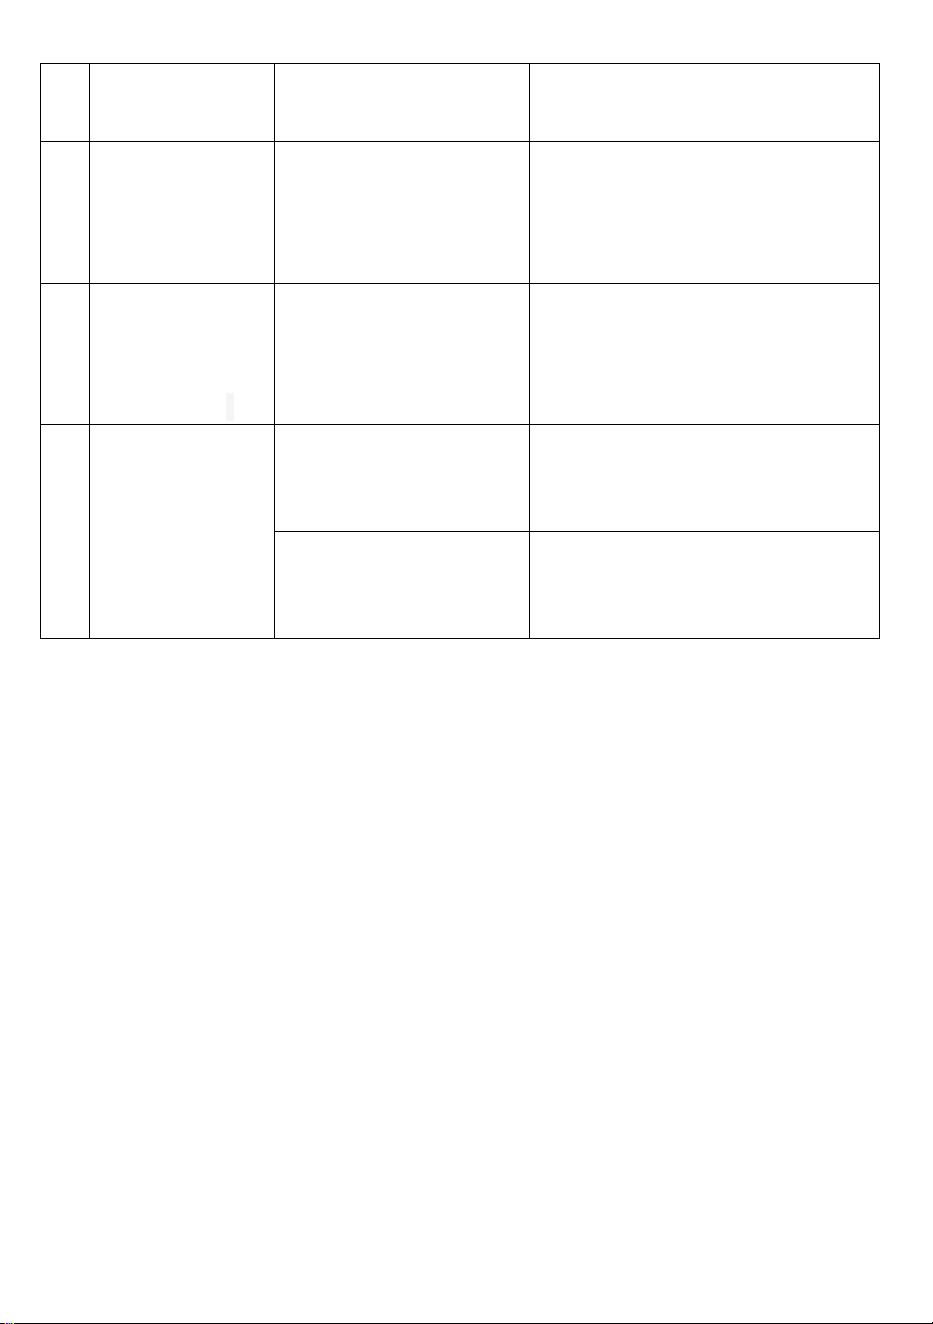
- 15 -
Diagrama de circuito
Daños al ventilador de
refrigeración
Reemplazo
E4
Sensor de
temperatura de
condensación
anormal
Cortocircuito o circuito
abierto del sensor de
temperatura de
condensación
Reemplazo
mi 5
Sensor de
temperatura
ambiente
anormal r
Cortocircuito o circuito
abierto del sensor de
temperatura ambiente
Reemplazo
mi 6
La falta de agua
Interrupción del
suministro externo de
agua.
Restaurar el suministro de agua
Electroválvula de
entrada de agua
dañada
Reemplazo

- 16 -
Hecho en china


- 2 -
Techniczny Certyfikat wsparcia i e-gwarancji www.vevor.com/support
Komercyjna maszyna do lodu
Model: SKF-B40F SKF-B45F
SKF-C50F SKF-C55F
We continue to be committed to provide you tools with competitive price.
"Save Half", "Half Price" or any other similar expressions used by us only represents an
estimate of savings you might benefit from buying certain tools with us compared to the major
top brands and does not necessarily mean to cover all categories of tools offered by us. You
are kindly reminded to verify carefully when you are placing an order with us if you are
actually saving half in comparison with the top major brands.

- 1 -
MODEL: SKF-B40F SKF-B45F SKF-C50F SKF-C55F
Have product questions? Need technical support? Please feel free to
contact us:
Technical Support and E-Warranty Certificate
www.vevor.com/support
NEED HELP? CONTACT US!
This is the original instruction, please read all manual instructions
carefully before operating. VEVOR reserves a clear interpretation of our
user manual. The appearance of the product shall be subject to the
product you received. Please forgive us that we won't inform you again if
there are any technology or software updates on our product.
Commercial Ice
Machine

- 2 -
Ważne jest, aby dokładnie przeczytać niniejszą instrukcję i zachować ją na
przyszłość.
Ostrzeżenie — aby zmniejszyć ryzyko obrażeń, użytkownik
musi uważnie przeczytać instrukcję obsługi.
To urządzenie jest zgodne z częścią 15 przepisów FCC.
Działanie podlega następującym dwóm warunkom: (1) to
urządzenie nie może powodować szkodliwych zakłóceń oraz
(2) to urządzenie musi akceptować wszelkie odbierane
zakłócenia, w tym zakłócenia, które mogą powodować
niepożądane działanie.
Ten produkt podlega przepisom Dyrektywy Europejskiej
2012/19/EC. Symbol przekreślonego kosza na śmieci
oznacza, że produkt wymaga selektywnej zbiórki śmieci na
terenie Unii Europejskiej. Dotyczy to produktu i wszystkich
akcesoriów oznaczonych tym symbolem. Produktów
oznaczonych jako takie nie można wyrzucać razem ze
zwykłymi odpadami domowymi, lecz należy je oddać do
punktu zbiórki w celu recyklingu urządzeń elektrycznych i
elektronicznych
WAŻNE INSTRUKCJE BEZPIECZEŃSTWA
Podczas korzystania z urządzeń elektrycznych należy przestrzegać
podstawowych środków ostrożności, aby zmniejszyć ryzyko pożaru,
porażenia prądem elektrycznym i obrażeń Do osób lub mienia. Przed
pierwszym uruchomieniem maszyny przeczytaj wszystkie instrukcje.
UWAGA: LÓDU NIE MOŻNA PRZECHOWYWAĆ W POJEMNIKU NA
LÓD W NOCY, TO NIE JEST LODÓWKA, LÓD ZOSTANIE STOPNIONY
DO WODY I WYPŁYNIE Z MASZYNY.
1. Jeśli podłączasz do źródła wody, UWAGA: należy podłączyć do źródła

- 3 -
wody pitnej;
2. Maszyna przeznaczona jest do użytku domowego i podobnych
zastosowań, takich jak:
- kuchnie dla personelu w sklepach, biura i inne środowiska pracy;
-Zagroda
-przez klientów hoteli, motele i inne środowiska mieszkalne;
-Branża gastronomiczna i branże pokrewne .
3. Maszynę należy użytkować w drzwiach i bez przeszkód dobre miejsce
do wentylacji. Odległość między czterema bokami maszyny a ścianą musi
wynosić co najmniej 50 cm.
4. Podczas korzystania z urządzeń elektrycznych, należy zachować
podstawowe środki ostrożności, aby zmniejszyć ryzyko pożaru, porażenie
prądem elektrycznym i obrażenia osób lub mienia. Przed użyciem
jakiegokolwiek urządzenia przeczytaj wszystkie instrukcje.
5. Nie używaj tego ani żadnego innego urządzenia z uszkodzonym
przewodem.
6. Podłączaj wyłącznie do odpowiednio spolaryzowanych gniazdek. Żadne
inne urządzenie nie powinno być podłączone do tego samego gniazdka.
Upewnij się, że wtyczka jest całkowicie włożona do gniazdka.
7. Nie umieszczaj urządzenia i przewodu zasilającego w pobliżu
materiałów łatwopalnych. Nie zakrywaj przewodu. Nie zanurzaj go w
wodzie.
8. Nie zalecamy stosowania przedłużacza, ponieważ może się przegrzać i
spowodować ryzyko pożaru.
9. Odłącz kostkarkę do lodu przed czyszczeniem, naprawami lub
serwisowaniem.
10. Zachowaj ostrożność i nadzór, gdy urządzenie jest używane w pobliżu
dzieci.
11. Nie używaj kostkarki do lodu na zewnątrz. Unikaj bezpośredniego
światła słonecznego i upewnij się, że między tyłem i bokami urządzenia a
ścianą jest co najmniej 5 cali wolnej przestrzeni.
12. Do przygotowania lodu nie używaj żadnych innych płynów niż woda.
13. Nie czyść kostkarki do lodu łatwopalnymi detergentami. Opary mogą

- 4 -
spowodować pożar lub eksplozję.
14. Nie przewracaj maszyny.
15. Jeżeli kostkarka do lodu zostanie w okresie zimowym przeniesiona do
pomieszczenia z zewnątrz, przed podłączeniem do źródła zasilania
poczekaj kilka godzin, aby ogrzało się do temperatury pokojowej .
16. Dla własnego bezpieczeństwa to urządzenie powinno być odpowiednio
uziemione. Przewód zasilający jest wyposażony w trójbolcową wtyczkę
pasowaną do standardowych trójbolcowych gniazdek ściennych, aby
zminimalizować ryzyko porażenia prądem.
17. Podłącz urządzenie do dedykowanego, prawidłowo zainstalowane i
uziemione gniazdko ścienne. Nie rób, w każdym przypadku zasilanie i/lub
uziemienie należy kierować do wykwalifikowanego elektryka.
18. Znajdujące się w środku materiały pieniące są łatwopalne i należy je
chronić przed ogniem.
19. Zabrania się ciągnięcia kabla w celu wyciągnięcia wtyczki,
wyciągnięcie wtyczki jest koniecznością.
WAŻNE: Aby uniknąć zagrożeń wynikających z niestabilności, urządzenie
należy ustawić na równej i płaskiej powierzchni.
WAŻNE: Aby uniknąć zagrożeń wynikających z niestabilności, urządzenie
należy ustawić na równej i płaskiej powierzchni.
OSTRZEŻENIE: To urządzenie musi być uziemione.
1) Bezpiecznik na płytce drukowanej wynosi 15 A. W przypadku zmiany
musi być obsługiwany przez technika.
2) wahania napięcia nie mogą przekraczać ± 10% od napięcia
znamionowego , gdyż w przeciwnym razie konieczny jest stabilizator
napięcia.
WAŻNE: Do unikać zagrożenie jest uzasadnione ze względu na
niestabilność, urządzenie należy ustawić na równej i płaskiej powierzchni .
PROCEDURY OPERACYJNE
ROZPAKOWANIE kostkarki do lodu
1. Usuń wszystkie zewnętrzne i wewnętrzne materiały opakowaniowe.

- 5 -
Sprawdź , czy wszystkie poniższe akcesoria są dołączone, czy nie . Jeżeli
brakuje jakiejś części, prosimy o kontakt z naszym działem obsługi klienta.
Po rozpakowaniu urządzenia zalecamy pozostawienie go na 24 godziny
przed włączeniem.
2. Wyczyść wnętrze letnią wodą i miękką szmatką lub wyczyść urządzenie
za pomocą funkcji Self-Clean.
3. Znajdź miejsce, w którym kostkarka do lodu będzie chroniona przed
bezpośrednim działaniem promieni słonecznych i innymi źródłami ciepła
(np. kuchenka, piec, grzejnik). Umieść kostkarkę do lodu na płaskiej
powierzchni. Upewnij się, że między tyłem i bokami kostkarki do lodu a
ścianą jest co najmniej 5 cali wolnej przestrzeni.
4. Przed pierwszym użyciem należy odczekać godzinę, aż czynnik
chłodniczy opadnie.
5. Urządzenie należy ustawić w miejscu zapewniającym dostęp do wtyczki.
Zawartość Paczki
Maszyna do robienia lodu x 1
Ciepłe wskazówki : Sprawdź, czy wszystkie poniższe akcesoria są
dołączone.
Lista akcesoriów
NIE
Opis
Zdjęcie
Stosowanie
ILOŚ
Ć

- 6 -
1
podręcznik
Instrukcja obsługi
1 szt
2
Filtr
Filtruj wodę
1 szt
3
Rura
drenażowa
Odpływ
1 szt
4
Łyżka do
lodu
Weź kostki lodu
1 szt
5
nylonowe
opaski
kablowe
W razie potrzeby
napraw rurę
2szt
6
Kółko do
skakania
w razie potrzeby
połączyć ze sobą
odpływ i rurę
odpływową
1 szt
7
Pierścień
uszczelniają
cy
Włóż go do kranu
rury ssącej. Drugi jest
zapasowy.
2szt
8
Zapasowy
niebieski
klips
W razie potrzeby
zapasowy niebieski
klips.
2szt
9
Zapasowa
wtyczka
Zapasowa wtyczka,
która w razie
potrzeby zatyka
zbiornik.
1 szt
ŁĄCZENIE KROSZARKI DO LODU Z INNYMI CZĘŚCIAMI
Połącz kostkarkę do lodu z innymi częściami, postępując zgodnie ze
schematem poniżej.
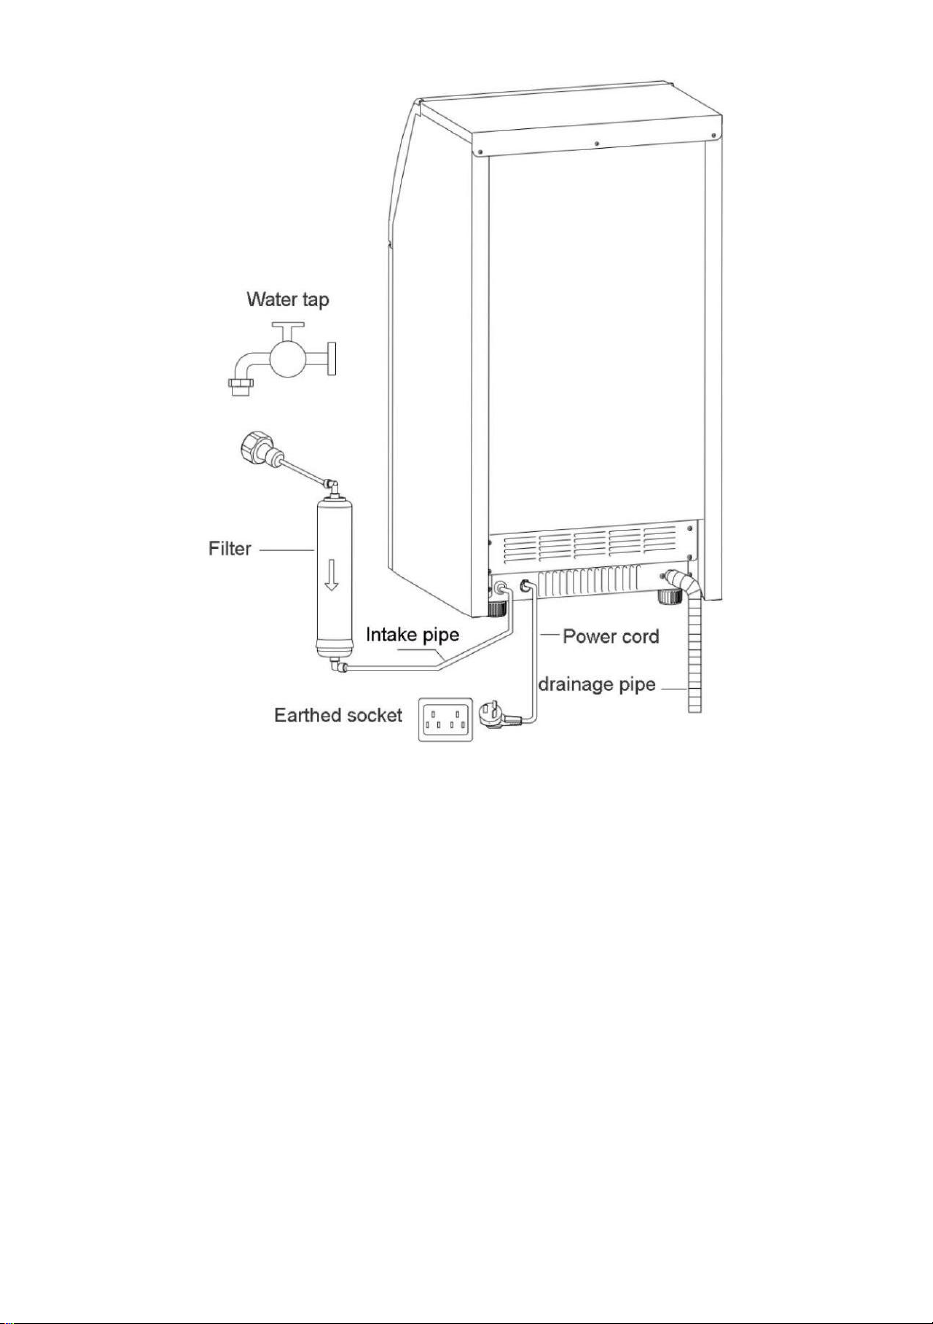
- 7 -
Podłączyć rurę drenażową i rurę doprowadzającą wodę
Ostrzeżenie:1) Urządzenie można podłączyć wyłącznie do źródeł wody
pitnej i musi ono spełniać lokalne standardy dotyczące wody pitnej
2) Ciśnienie wody musi wynosić 0,1-0. 4 Mpa, jeżeli przekracza 0,4 Mpa,
należy podłączyć zawór redukcyjny.
3 ) Drenaż: The wylot rury spustowej musi znajdować się niżej niż wylot
maszyny

- 8 -
Odpływ.
Uwaga: Ponieważ lód w zbiorniku wewnętrznym topi się, przed użyciem
należy podłączyć rurę spustową i włożyć rurę spustową do pojemnika lub
do kanalizacji.
Uwaga: Podłącz jeden koniec rury spustowej do urządzenia, a drugi
koniec do pojemnika lub kanalizacji. Drugi otwór rury spustowej musi
znajdować się niżej niż otwór spustowy urządzenia.
WYKORZYSTANIE WODY BĘCZONEJ JAKO ŹRÓDŁA WODY
Jako źródła wody możesz użyć wody beczkowej. Pamiętaj o regularnym
uzupełnianiu wody. Poza tym obróć niebieski przełącznik sterujący do
pionu i zamknij dopływ wody z rury.
1. Jeśli używasz kranu jako źródła wody, upewnij się, że kran jest otwarty,
aby zapewnić ciągły dopływ wody. Jeżeli skończy się woda, zaświeci się
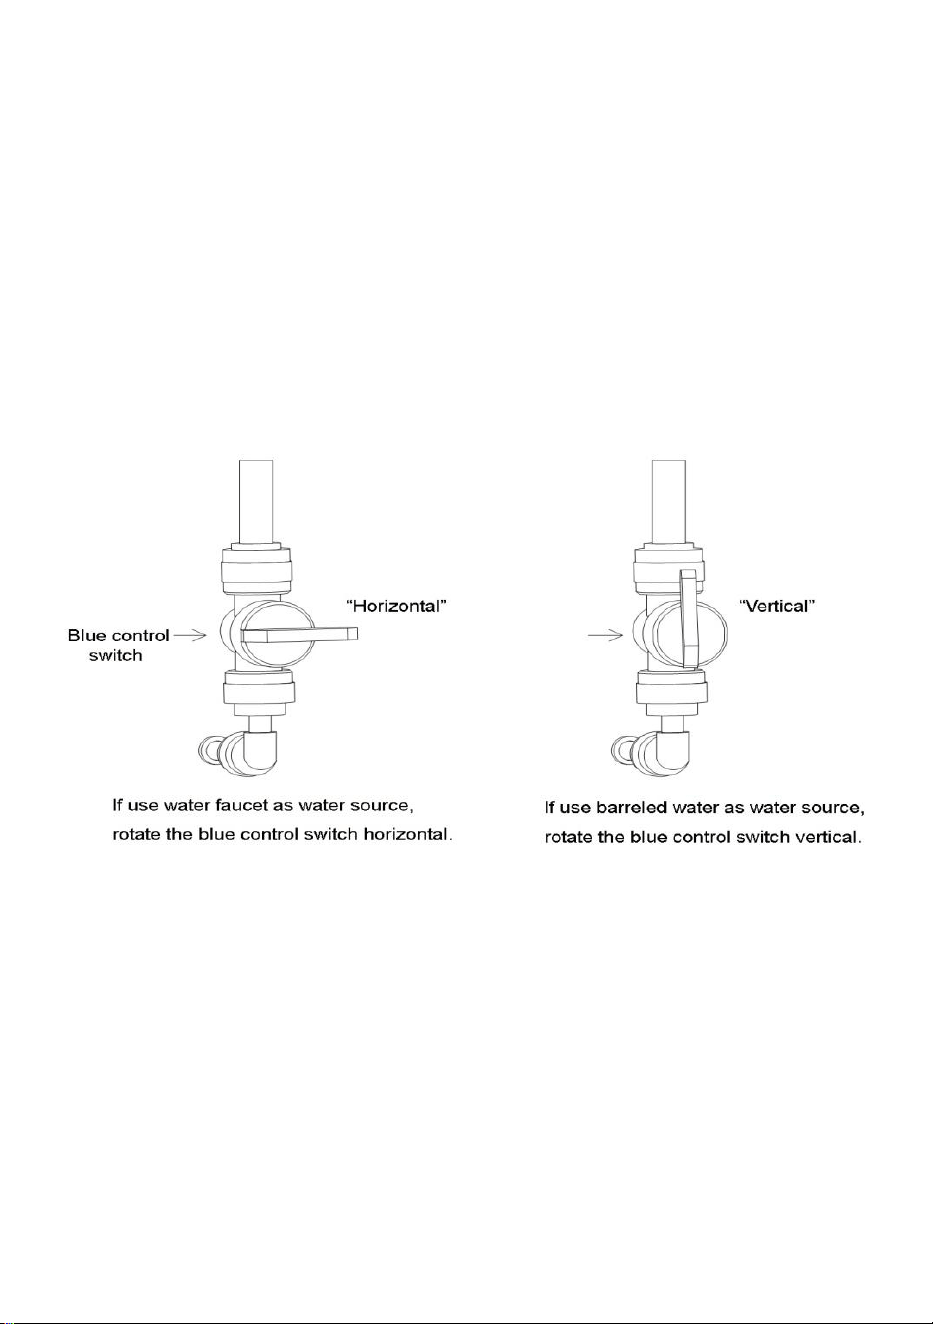
- 9 -
wskaźnik „dodaj wodę”.
2. Jeśli używasz wody beczkowej jako źródła wody. Pamiętaj o regularnym
uzupełnianiu wody, w przeciwnym razie zaświeci się wskaźnik „
przestoju ”.
3. Jeśli używasz kranu jako źródła wody, obróć niebieski przełącznik
sterujący w poziomie urządzenia. Z drugiej strony, jeśli używasz wody
beczkowej jako źródła wody, obróć niebieski przełącznik sterujący do pionu.
Proszę zapoznać się z poniższym obrazkiem .
OBSŁUGA MASZYNY

- 10 -
Panel sterujący
Operacja wytwarzania lodu:
1. Połącz the maszyna Do the moc I naciskać przycisk
„WŁĄCZ/WYŁĄCZ” . „Wytwarzanie lodu” wskaźnik zaświeci się NA.
Poprzez „ + ” / „ - ” można wydłużyć lub skrócić czas wytwarzania lodu,
który będzie miał wpływ w bieżącym cyklu.
Naciskać Przycisk „ + ” , jeśli na ekranie wyświetli się „ 1 ” , oznacza to, że
czas wytwarzania lodu zostanie dodany o 1 minutę, maksymalny czas
można dodać o 8 minut. Jeśli naciśniesz przycisk „ - ” i wyświetli się „ -1 ” ,
oznacza to, że czas wytwarzania lodu zostanie skrócony o 1 minutę,
maksymalny czas wynosi 5 minut. Oznacza to, że czas można regulować
w zakresie od -5 do 8 minut.
2. Po zakończeniu odliczania czasu zaświeci się wskaźnik „topienia”.
Kostki lodu spadną później z panelu zamrażającego.
3. Gdy kostki lodu odejdą. Urządzenie automatycznie przejdzie do kolejnej
pętli wytwarzania lodu.
Automatyczne włączanie/wyłączanie:
1. Gdy maszyna jest wyłączona po podłączeniu do prądu, naciśnij
przycisk
„Rezerwacja/Czyszczenie” przycisk I the „+”/„-” przycisk Do
ustawić the automatyczne włączanie czas (w
godzinach). The maszyna
będzieautomatycznieobraca sięNAPo theodliczanie Jestskończone.
Gdy urządzenie jest w trakcie wytwarzania lodu, naciśnij przyciskPrzycisk

- 11 -
„Rezerwacja/Sprzątanie”.Ithe„+”/„-”przyciskDoustawićthe
automatyczne wyłączanieczas(Wgodziny).Themaszyna będzie
automatycznie obraca się wyłączony Po the odliczanie Jest skończone.
Samo czyszczący:
1. Gdy urządzenie zostanie wyłączone po podłączeniu do prądu, wciśnij
przycisk „Rezerwacja/Czyszczenie” i przytrzymaj go przez chwilę.
Urządzenie automatycznie przejdzie do programu samooczyszczania.
Uwagi:
1) Jeśli zmienisz czas odliczania w połowie procedury wytwarzania lodu,
zacznie to obowiązywać w następnej pętli. Podczas wytwarzania lodu
można przytrzymać przycisk „HOT”, aby wcześniej wyładować kostki lodu.
2) Temperatura otoczenia będzie miała wpływ na czas potrzebny do
wytworzenia lodu.
CZYSZCZENIE I KONSERWACJA
Przed pierwszym użyciem dokładnie wyczyść kostkarkę do lodu.
Obudowa: Obudowę kostkarki do lodu należy regularnie czyścić łagodnym
detergentem i ciepłą wodą. Zawsze używaj miękkiej szmatki, aby uniknąć
zarysowania lub uszkodzenia obudowy.
WNĘTRZE: skorzystaj z funkcji Self-Clean:
1. Dodaj wodę i ocet lub mieszankę soku z cytryny (w proporcji 1:1)
2. Podłącz urządzenie, naciśnij i przytrzymaj przycisk CLEAN przez około
3 sekundy, a następnie zwolnij. Urządzenie automatycznie przejdzie do
programu samooczyszczania. Proces ten zajmuje około 5-6 minut. Po
zakończeniu programu Self-Clean urządzenie automatycznie się wyłączy.
3. Łopatki wentylatora będą się obracać. Podczas tego procesu
wewnętrzne części urządzenia zostaną kilkakrotnie przepłukane .
4. Po zakończeniu programu Self-Clean odłącz przewód zasilający i spuść
wodę, odłączając korek spustowy z boku. Załóż korek spustowy.
5. Dodaj świeżą wodę do zbiornika na wodę, aż do znaku poziomu wody.
6. Podłącz urządzenie i powtórz proces samooczyszczania, powtarzając
kroki od 3 do 5. Spowoduje to wypłukanie resztek octu/cytryny.
7. Po spuszczeniu wody załóż i dokręć korek spustowy.
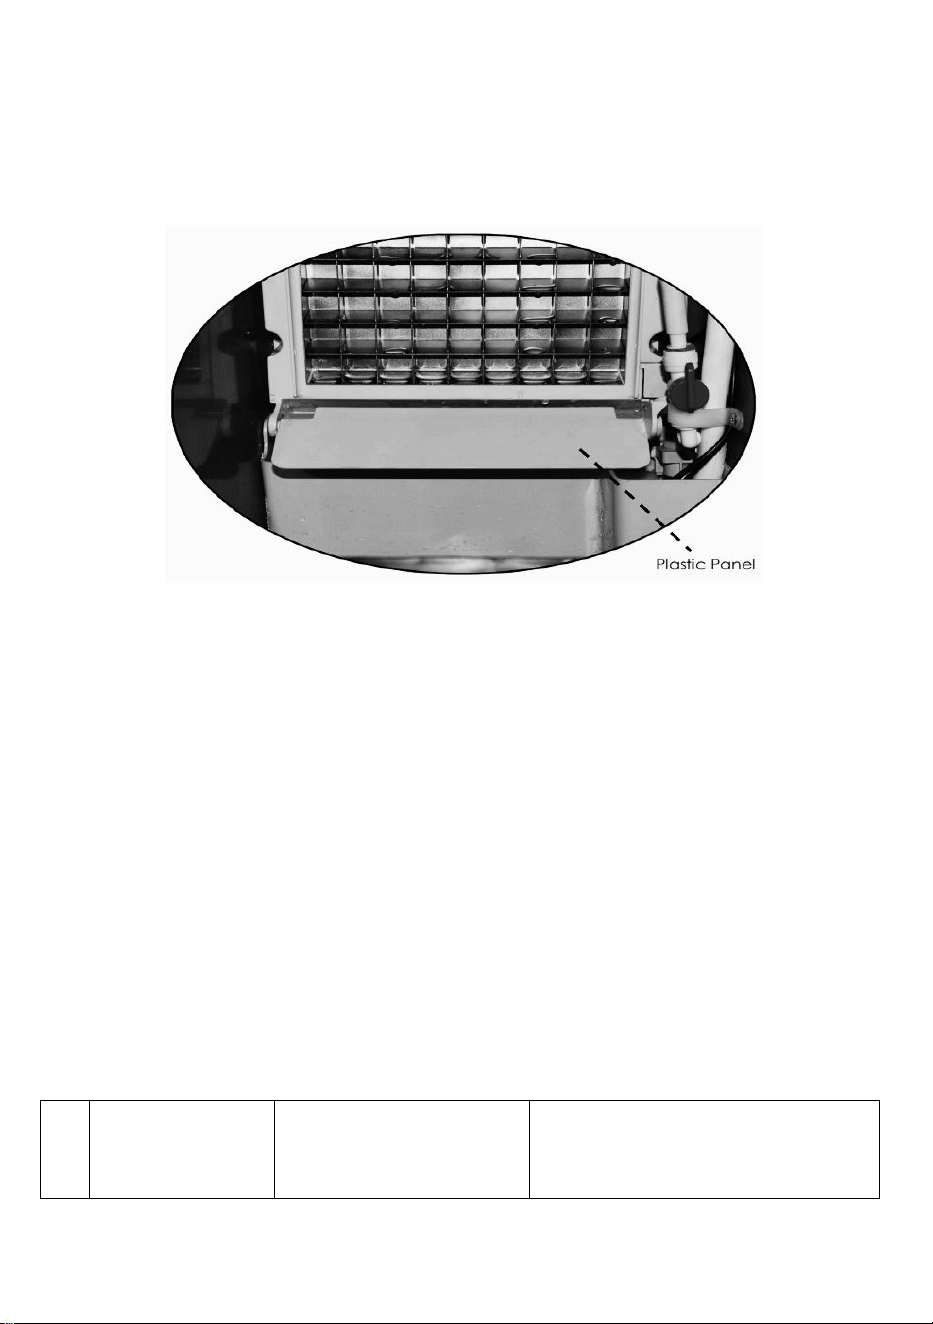
- 12 -
8. Wytrzyj wnętrze i zewnętrzną część czystą, miękką szmatką.
UWAGA: Zdecydowanie zaleca się wyczyszczenie urządzenia przed
pierwszym użyciem lub po dłuższym okresie nieużywania.
NOTATKA
1. W miarę wzrostu produkcji kostek lodu plastikowy panel wewnątrz m.in
ból (pokazany powyżej) może zostać wciśnięty przez kostki lodu. Po
naciśnięciu plastikowego panelu
w dół, maszyna automatycznie przestanie produkować kostki lodu i nastąpi
„przestój”
wskaźnik zaświeci się. Aby utrzymać lód, należy regularnie czyścić kostki
lodu
zrobienie.
Analiza typowych usterek
E1
Nie wykryto
deflektora lodu
Odpadła płyta
prowadząca lód
Zainstaluj ponownie
prowadnicę lodu
- 13 -
Uszkodzony
przełącznik
magnetyczny
Zastępować przełącznik czuły
na magnes
Płytka prowadząca lód
nie jest zresetowana
Zresetuj płytkę prowadzącą lód
E2
lód robienie jest
normalne
Czwarty cykl lodowy
zatrzymuje się
Wymień przełącznik
magnetyczny
W skrzynce na
wodę nie ma
wody
Korek spustowy nie
jest prawidłowo
zainstalowany
Zamontuj prawidłowo korek
spustowy
Zewnętrzne
zaopatrzenie w wodę
Sprawdź dopływ wody
Zbiornik na
wodę przelał się
do lodówki
Zewnętrzne
zaopatrzenie w wodę
Zawór wody nad zbiornikiem nie
obraca się w poziomie
Jako źródło wody
używaj wody z kranu
Zewnętrzne ciśnienie wody jest
zbyt wysokie, aby spowodować
zadziałanie zaworu
pływakowego, zmniejszenie
ciśnienia wody lub wymianę
nowego zaworu
W skrzynce na
wodę znajduje
się woda
Nie ma wody, ani nie
działa rura
prysznicowa
Pompa jest poważnie
zablokowana, należy ją
wymienić lub wyczyścić
Rura prysznicowa jest zatkana.
Posprzątaj to
Tylko bieżąca
woda, nie
chłodząca ani
trochę zimna
Na formie lodowej
znajduje się cienki lód
Wydłuż czas produkcji,
naciskając przycisk „+” na
panelu operacyjnym
Na formie lodowej
znajduje się gruby lód
Skróć czas produkcji,
naciskając przycisk „-” na
panelu operacyjnym
- 14 -
Trochę wody dostało
się do lodówki
Obróć i wyreguluj rurę
prysznicową
Tylna część pojemnika
na wodę przecieka do
lodówki
Dostosuj pozycję montażową
skrzynki wodnej
Woda nie jest
zimna
Płyta główna nie zasila
sprężarki
Wymień płytę główną
Awaria sprężarki
Wymienić sprężarkę
Wysoka temperatura
sprężarki
Wymienić sprężarkę
Sprężarka działa, nie
chłodzi
Wyciek czynnika chłodniczego,
wymaga naprawy
E3
Alarm wysokiej
temperatury
uszkodzony jest
czujnik temperatury
kondensacji
Wymiana
Wentylator chłodzący
jest zablokowany przez
ciała obce
Usuń barykadę
Uszkodzenie
wentylatora
chłodzącego
Wymiana
E 4
Nieprawidłowy
czujnik
temperatury
kondensacji
Zwarcie lub przerwa w
obwodzie czujnika
temperatury skraplania
Wymiana
mi 5
Nieprawidłowy
czujnik
temperatury
otoczenia
Zwarcie lub przerwa w
obwodzie czujnika
temperatury otoczenia
Wymiana
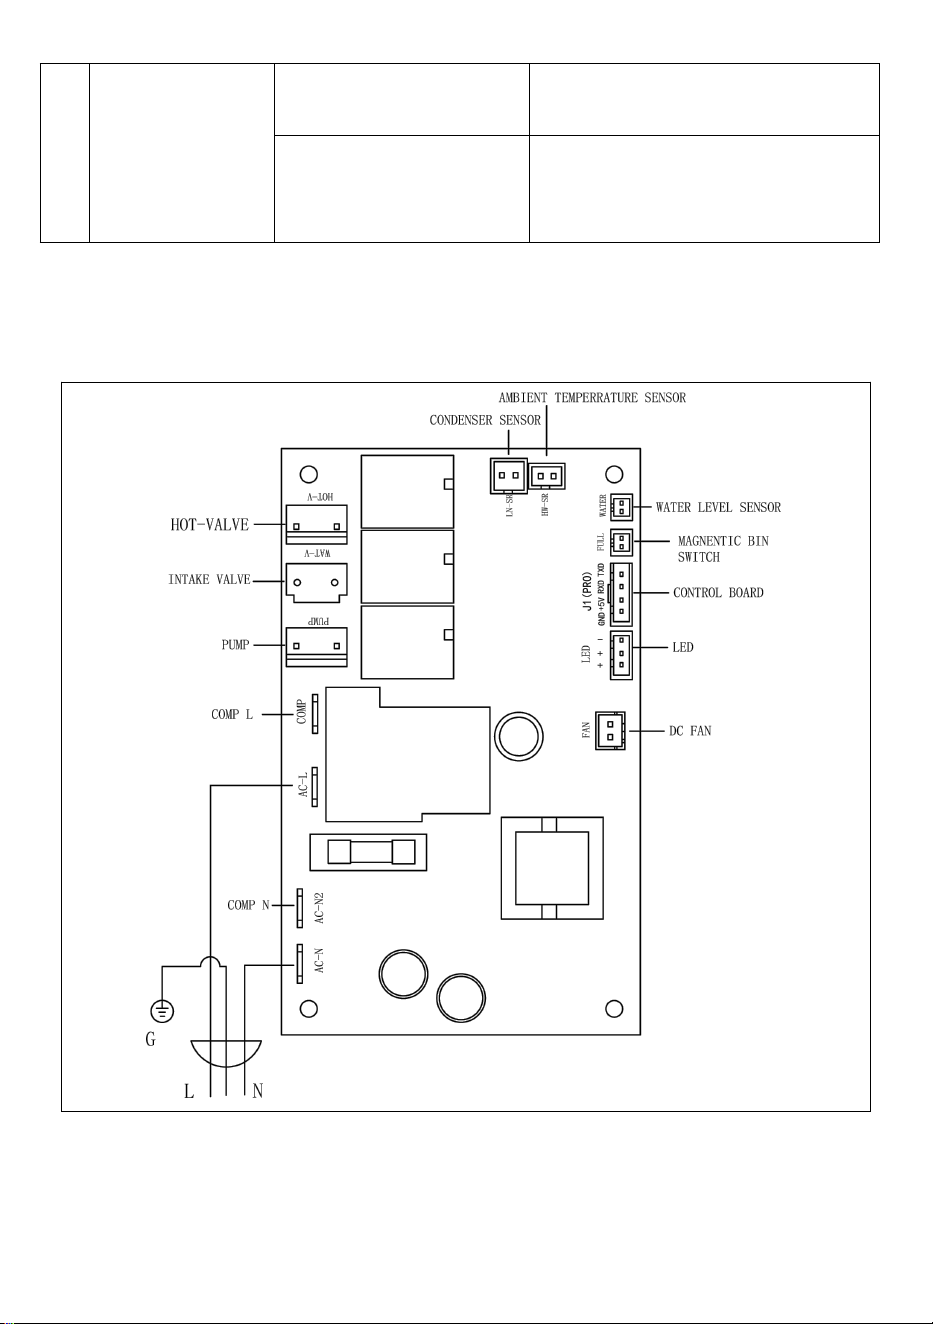
- 15 -
Schemat obwodu
Wyprodukowano w Chinach
mi 6
Brak wody
Przerwa w dostawie
wody z zewnątrz
Przywróć zaopatrzenie w wodę
Uszkodzony
elektrozawór poboru
wody
Wymiana

- 16 -


- 2 -
Technisch Ondersteuning en e-garantiecertificaat www.vevor.com/support
Commerciële ijsmachine
Model: SKF-B40F SKF-B45F
SKF-C50F SKF-C55F
We continue to be committed to provide you tools with competitive price.
"Save Half", "Half Price" or any other similar expressions used by us only represents an
estimate of savings you might benefit from buying certain tools with us compared to the major
top brands and does not necessarily mean to cover all categories of tools offered by us. You
are kindly reminded to verify carefully when you are placing an order with us if you are
actually saving half in comparison with the top major brands.

- 1 -
MODEL: SKF-B40F SKF-B45F SKF-C50F SKF-C55F
Have product questions? Need technical support? Please feel free to
contact us:
Technical Support and E-Warranty Certificate
www.vevor.com/support
NEED HELP? CONTACT US!
This is the original instruction, please read all manual instructions
carefully before operating. VEVOR reserves a clear interpretation of our
user manual. The appearance of the product shall be subject to the
product you received. Please forgive us that we won't inform you again if
there are any technology or software updates on our product.
Commercial Ice
Machine

- 2 -
Het is belangrijk dat u deze instructies aandachtig leest en bewaart voor
toekomstig gebruik.
Waarschuwing-Om het risico op letsel te verminderen, moet
de gebruiker de handleiding zorgvuldig lezen.
Dit apparaat voldoet aan Deel 15 van de FCC-regels. Het
gebruik is onderworpen aan de volgende twee voorwaarden:
(1) Dit apparaat mag geen schadelijke interferentie
veroorzaken, en (2) dit apparaat moet alle ontvangen
interferentie accepteren, inclusief interferentie die een
ongewenste werking kan veroorzaken.
Dit product valt onder de bepalingen van de Europese richtlijn
2012/19/EG. Het symbool met een doorgestreepte
afvalcontainer geeft aan dat het product in de Europese Unie
een aparte afvalinzameling vereist. Dit geldt voor het product
en alle accessoires die met dit symbool zijn gemarkeerd.
Producten die als zodanig gemarkeerd zijn, mogen niet met
het normale huisvuil worden weggegooid, maar moeten naar
een inzamelpunt voor recycling van elektrische en
elektronische apparaten worden gebracht
BELANGRIJKE VEILIGHEIDSINSTRUCTIES
Bij het gebruik van elektrische apparaten moeten elementaire
veiligheidsmaatregelen worden gevolgd om het risico op brand, elektrische
schokken en letsel te verminderen naar personen of eigendommen. Lees
alle instructies voordat u de machine voor de eerste keer gebruikt.
DE NACHT NIET IN DE IJSBAK WORDEN OPGESLAGEN . Het is geen
koelkast, IJS ZAL WORDEN GESLOTEN TOT WATER EN STROOMT UIT
DE MACHINE.
1. Indien aangesloten op de watertoevoer, LET OP: moet de

- 3 -
drinkwatertoevoer aansluiten;
2. De machine is bedoeld voor gebruik in huishoudelijke en soortgelijke
toepassingen, zoals:
- personeelskeukens in winkels, kantoren en andere werkomgevingen;
-boerderijen
-door klanten in hotels, motels en andere residentiële omgevingen;
-Horeca en soortgelijke industrieën .
3. De machine moet binnen deuren en zonder obstakels worden gebruikt
goede ventilatieplaats. Er moet minimaal 50 cm ruimte zijn tussen de vier
zijden van de machine en de muur.
4. Bij gebruik van elektrische apparaten: fundamentele
veiligheidsmaatregelen moeten worden gevolgd om het risico op brand te
verminderen, elektrische schokken en letsel aan personen of
eigendommen. Lees alle instructies voordat u een apparaat gebruikt.
5. Gebruik dit of enig ander apparaat niet met een beschadigd snoer.
6. Sluit uitsluitend aan op correct gepolariseerde stopcontacten. Er mag
geen ander apparaat op hetzelfde stopcontact worden aangesloten. Zorg
ervoor dat de stekker volledig in het stopcontact zit.
7. Plaats de machine en het netsnoer niet in de buurt van brandbaar
materiaal. Bedek het snoer niet. Dompel het niet onder in water.
8. Wij raden het gebruik van een verlengsnoer af, omdat het oververhit kan
raken en brandgevaar kan ontstaan.
9. Haal de stekker van de ijsmaker uit het stopcontact voordat u hem
schoonmaakt, reparaties of onderhoud uitvoert.
10. Wees voorzichtig en houd toezicht als het apparaat in de buurt van
kinderen wordt gebruikt.
11. Gebruik uw ijsmachine niet buitenshuis. Vermijd direct zonlicht en zorg
ervoor dat er minimaal 15 cm ruimte is tussen de achterkant en zijkanten
van uw apparaat en de muur.
12. Gebruik geen andere vloeistof dan water in het apparaat om ijs te
maken.
13. Maak uw ijsblokjesmachine niet schoon met brandbare
schoonmaakmiddelen. De dampen kunnen brandgevaar of een explosie

- 4 -
veroorzaken.
14. Laat de machine niet kantelen.
15. Als de ijsmaker in de winter van buiten naar binnen wordt gebracht,
geef het een paar uur de tijd om op te warmen tot kamertemperatuur
voordat u de stekker in het stopcontact steekt.
16. Voor uw veiligheid moet dit apparaat goed geaard zijn. Het netsnoer is
uitgerust met een driepolige stekker die is gekoppeld aan standaard
driepolige stopcontacten om de kans op een elektrische schok te
minimaliseren.
17. Sluit uw apparaat aan op een speciaal, correct geïnstalleerd en geaard
stopcontact. Niet doen, onder alle omstandigheden moet de
stroomvoorziening en/of aarding worden gericht aan een gecertificeerde
elektricien.
18. De schuimende materialen binnenin zijn brandbaar en moeten uit de
buurt van vuur worden gehouden.
19. Het is verboden om aan de kabel te trekken om de stekker uit het
stopcontact te halen, de stekker eruit trekken is een must.
BELANGRIJK: Om gevaren als gevolg van instabiliteit te voorkomen ,
moet het apparaat op een vlakke en vlakke ondergrond worden geplaatst.
BELANGRIJK: Om gevaren als gevolg van instabiliteit te voorkomen ,
moet het apparaat op een vlakke en vlakke ondergrond worden geplaatst.
WAARSCHUWING: Dit apparaat moet geaard zijn.
1) De zekering op de printplaat is 15 A. Bij verandering moet deze door een
technicus worden bediend.
2) De spanningsschommelingen mogen niet groter zijn dan ±10% van de
nominale spanning, anders is een spanningsstabilisator nodig.
BELANGRIJK: Tot voorkomen gevaar is het gevolg Om instabiliteit te
voorkomen, moet het apparaat op een vlakke en vlakke ondergrond
worden geplaatst .
BEDRIJFSPROCEDURES
UW IJSMAKER UITPAKKEN
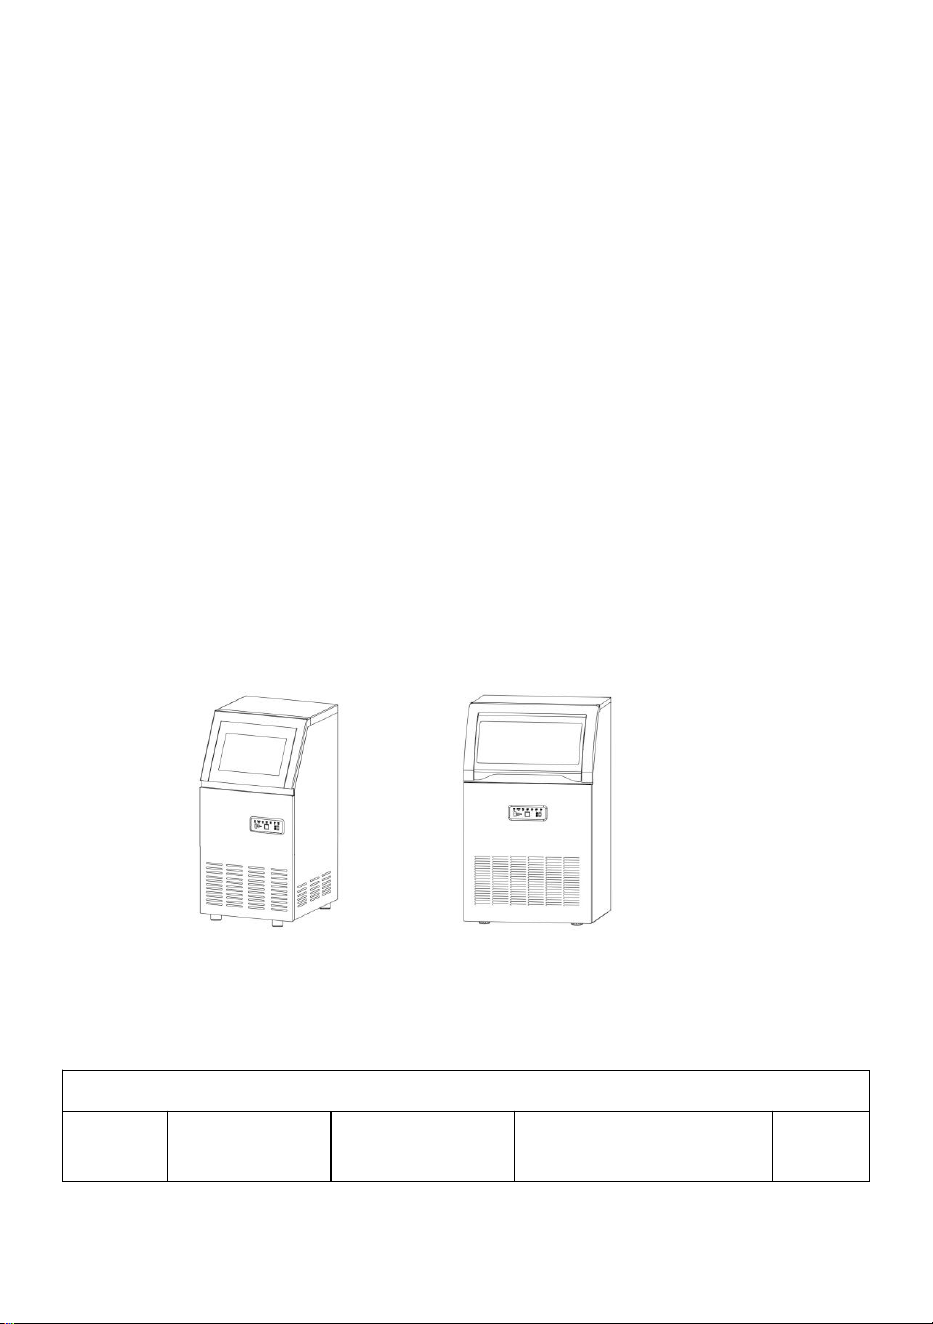
- 5 -
1. Verwijder al het verpakkingsmateriaal aan de buiten- en binnenkant.
Controleer of alle onderstaande accessoires zijn meegeleverd of niet .
Mochten er onderdelen ontbreken, neem dan contact op met onze
klantenservice. Nadat u de machine heeft uitgepakt, raden wij u aan deze
24 uur te laten staan voordat u hem inschakelt.
2. Maak de binnenkant schoon met lauw water en een zachte doek of
maak het apparaat schoon met de zelfreinigingsfunctie.
3. Zoek een locatie voor uw ijsmachine waar deze beschermd is tegen
direct zonlicht en andere warmtebronnen (zoals fornuis, oven, radiator).
Plaats de ijsmaker op een vlakke ondergrond. Zorg ervoor dat er minimaal
15 cm ruimte is tussen de achterkant en zijkanten van uw
ijsblokjesmachine en de muur.
4. Wacht een uur totdat het koelmiddel is bezonken voordat u de stekker
van het apparaat voor het eerste gebruik aansluit.
5. Het apparaat moet zo worden geplaatst dat de stekker toegankelijk is.
Verpakkingsinhoud
IJsmachine x 1
Warme tips : Controleer of alle onderstaande accessoires zijn
inbegrepen.
Accessoireslijst
NEE
Beschrijvin
g
Afbeelding
Gebruik
AANT
AL
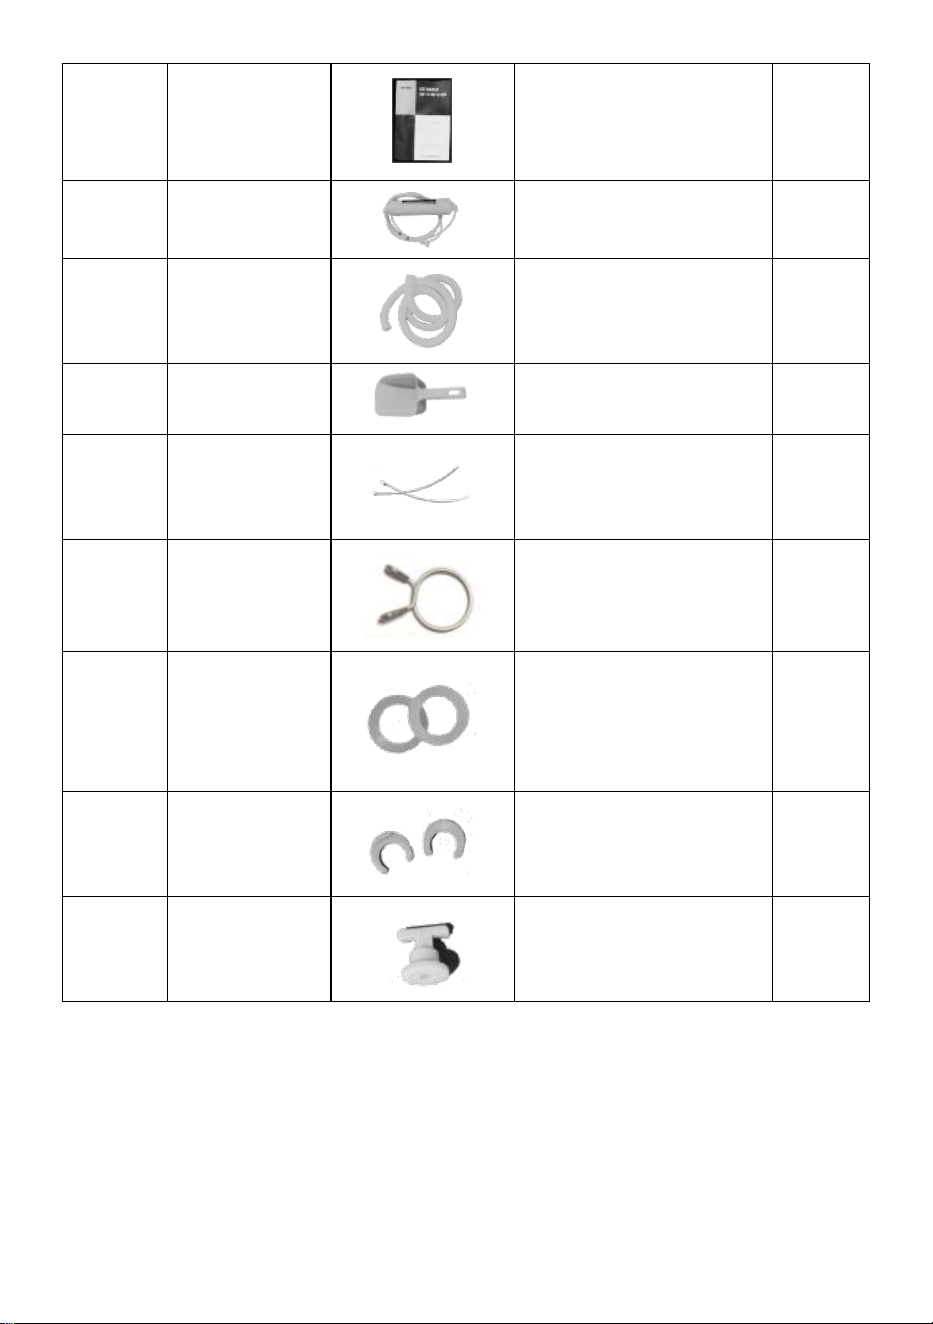
- 6 -
1
Handmatig
Handleiding
1 ST
2
Filter
Filter water
1 ST
3
Afvoerbuis
Droogleggen
1 ST
4
IJslepel
Neem ijsblokjes
1 ST
5
nylon
kabelbinders
Bevestig de leiding
indien nodig
2
STUK
S
6
Springring
bevestig indien nodig
de uitlaat en de
afvoerbuis aan elkaar
1 ST
7
Zegelring
Plaats hem wel in de
kraan van de
inlaatpijp. De andere
is reserve.
2
STUK
S
8
Reserve
blauwe clip
Reserve blauwe clip
indien nodig.
2
STUK
S
9
Reservestek
ker
Reservestekker die
de tank indien nodig
afsluit.
1 ST
UW IJSMAKER AANSLUITEN OP ANDERE ONDERDELEN
Sluit uw ijsmachine aan op andere onderdelen door het onderstaande
diagram te raadplegen.

- 7 -
Sluit de afvoerleiding en de waterinlaatleiding aan
Waarschuwing:1) De machine kan alleen worden aangesloten op
drinkwaterbronnen en moet voldoen aan de plaatselijke drinkwaternormen
2) De waterdruk moet 0,1-0 zijn. 4 Mpa, indien groter dan 0,4 Mpa, moet
een drukreduceerventiel worden aangesloten.
3 ) Afwatering: De de uitlaat van de afvoerleiding moet lager zijn dan de
uitlaat op de machine
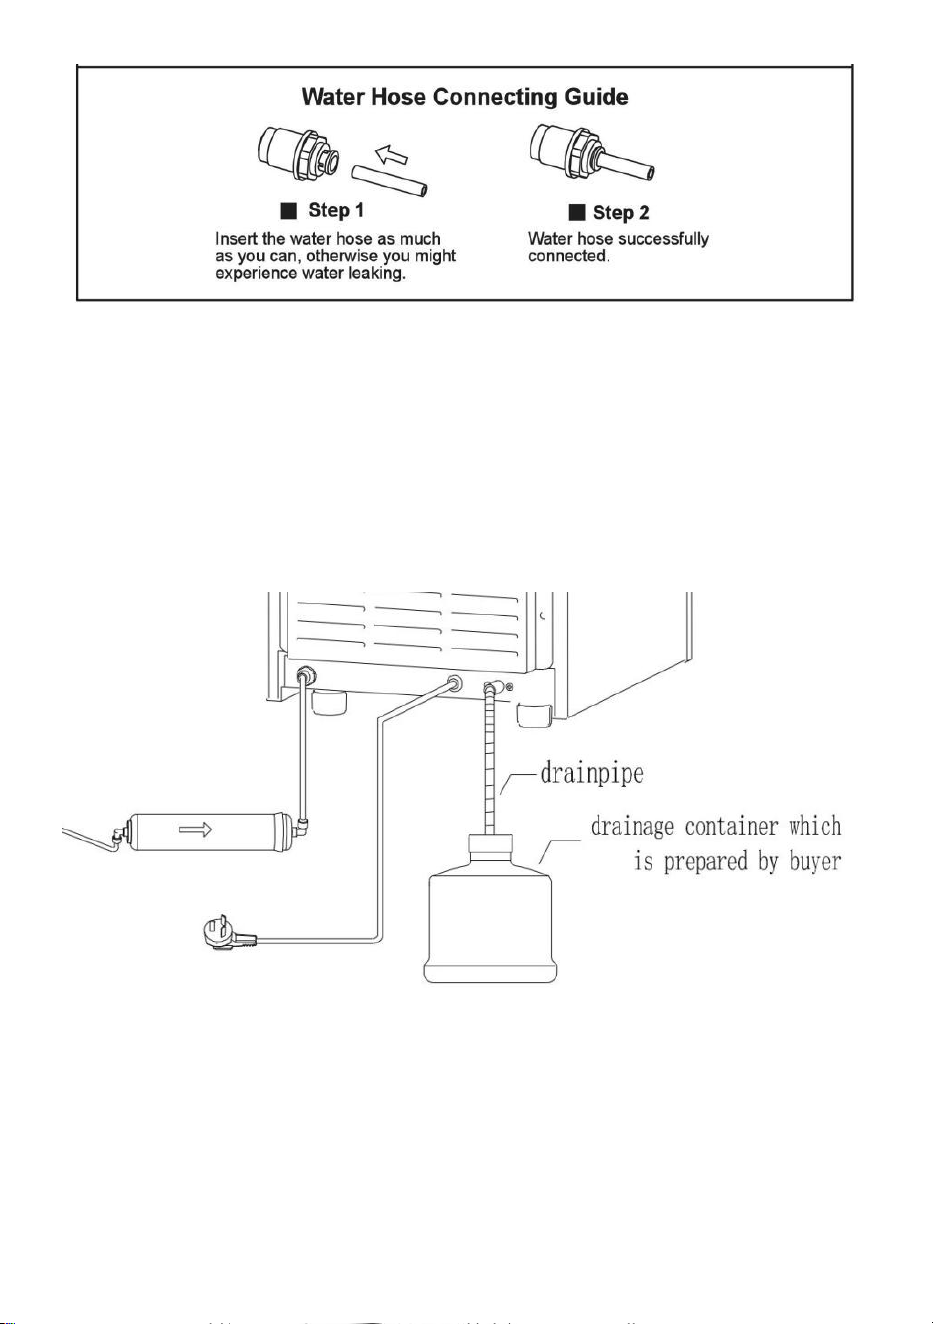
- 8 -
Droogleggen.
Waarschuwing: Omdat het ijs in de binnentank zal smelten, moet de
afvoerleiding vóór gebruik worden aangesloten en de afvoerleiding in een
container of in het riool steken.
Let op: Sluit het ene uiteinde van de afvoerleiding aan op de machine en
het andere uiteinde op een opvangbak of riool. De andere poort van de
afvoerleiding moet lager zijn dan de afvoerpoort van de machine.
GEBRUIK VAN TONWATER ALS WATERBRON
Als waterbron kunt u tonwater gebruiken. Vergeet niet om regelmatig water
bij te vullen. Draai bovendien de blauwe bedieningsschakelaar verticaal en
schakel de watertoevoer uit.
1. Als u een waterkraan als waterbron gebruikt, zorg er dan voor dat de
waterkraan open staat voor een continue watertoevoer. Als het water

- 9 -
opraakt, gaat het indicatielampje “water toevoegen” branden.
2. Als u tonwater als waterbron gebruikt. Vergeet niet om regelmatig water
bij te vullen, anders gaat de “ stopping ”-indicator branden.
3. Wanneer u een waterkraan als waterbron gebruikt, draai dan de blauwe
bedieningsschakelaar in de machine horizontaal. Als u daarentegen
tonwater als waterbron gebruikt, draai dan de blauwe
bedieningsschakelaar verticaal. Raadpleeg de onderstaande afbeelding .
MACHINEBEDIENING

- 10 -
Bedieningspaneel
IJsbereiding:
1. Verbinden de machine naar de stroom En druk op de “AAN/UIT” -knop.
Het “ijs maken” indicator gaat branden op.
Via “ + ” / ” - ” kunt u de tijd voor het maken van ijs verlengen of verkorten,
wat in de huidige cyclus zal gebeuren.
druk op “ + ” knop, als het scherm “ 1 ” weergeeft , betekent dit dat de tijd
voor het maken van ijs 1 minuut wordt toegevoegd, de maximale tijd kan 8
minuten worden toegevoegd. Als u op de “ - ” knop drukt en “ -1 ”
weergeeft , betekent dit dat de tijd voor het maken van ijs met 1 minuut
wordt verkort, de maximale tijd is 5 minuten. Dat betekent dat de tijd kan
worden aangepast van -5 tot 8 minuten.
2. Wanneer het aftellen van de tijd is afgelopen, gaat de “smelt”-indicator
branden. De ijsblokjes zullen later van het vriespaneel loskomen.
3. Nadat de ijsblokjes loskomen. De machine gaat automatisch naar een
nieuwe lus voor het maken van ijs.
Automatisch in-/uitschakelen:
1. Wanneer de machine is uitgeschakeld terwijl deze op de stroom is
aangesloten, drukt u op de knop
“Reserveren/Reinigen” knop En de
“+”/“-” knop naar set de automatisch inschakelen tijd (in
uren). De machine
zullenautomatischdraaitop na deaftellenisafgerond.
Wanneer de machine bezig is met het maken van ijs, drukt u op de knop

- 11 -
Knop “Reserveren/Reinigen”.Ende“+”/“-”knopnaarsetdeautomatisch
uitschakelentijd(inuur).Demachine zal automatisch draait uit na de aftellen
is afgerond.
Zelfreinigend:
1. Wanneer de machine is uitgeschakeld terwijl deze op de stroom is
aangesloten, drukt u op de knop “Reserveren/Reinigen” en houdt u deze
een tijdje ingedrukt. De machine gaat automatisch naar het
zelfreinigingsprogramma.
Opmerkingen:
1) Als u de afteltijd tijdens het maken van ijs wijzigt, wordt deze van kracht
bij de volgende lus. U kunt tijdens het maken van ijs lang op de “HOT”
-knop drukken om de ijsblokjes van tevoren te verwijderen.
2) De omgevingstemperatuur heeft invloed op de tijd die nodig is voor het
maken van ijs.
REINIGING & ONDERHOUD
Maak uw ijsblokjesmachine grondig schoon vóór het eerste gebruik.
Buitenkant: de buitenkant van de ijsblokjesmachine moet regelmatig
worden schoongemaakt met een mild schoonmaakmiddel en warm water.
Gebruik altijd een zachte doek om krassen of beschadiging van de
behuizing te voorkomen.
INTERIEUR: gebruik de volgende zelfreinigingsfunctie:
1. Voeg water en azijn of citroensapmengsel toe (verhouding 1:1)
2. Sluit het apparaat aan, houd de CLEAN-knop ongeveer 3 seconden
ingedrukt en laat vervolgens los. Het apparaat gaat automatisch naar het
zelfreinigingsprogramma. Dit proces duurt ongeveer 5-6 minuten. Wanneer
het zelfreinigingsprogramma is voltooid, wordt het apparaat automatisch
uitgeschakeld.
3. Het ventilatorblad draait. Tijdens dit proces worden de binnenste delen
meerdere keren gespoeld .
4. Nadat het zelfreinigingsprogramma is voltooid, haalt u de stekker uit het
stopcontact en laat u het water weglopen door de afvoerdop aan de zijkant
los te maken. Plaats de afvoerdop terug.

- 12 -
5. Voeg vers water toe aan het waterreservoir, tot aan de
waterniveaumarkering.
6. Sluit het apparaat aan en herhaal het zelfreinigingsproces door stap 3
tot en met 5 te herhalen. Hierdoor worden de azijn-/citroenresten
weggespoeld.
7. Nadat het water is afgetapt, plaatst u de afvoerdop terug en draait u
deze vast.
8. Droog de binnen- en buitenkant af met een schone, zachte doek.
OPMERKING: Het wordt ten zeerste aanbevolen om het apparaat schoon
te maken vóór het eerste gebruik of nadat het apparaat langere tijd niet is
gebruikt.
OPMERKING
1. Naarmate de productie van ijsblokjes toeneemt, wordt het plastic paneel
in de m achine (hierboven weergegeven) kan door de ijsblokjes
naar beneden worden gedrukt. Wanneer het plastic paneel wordt ingedrukt
omlaag, stopt de machine automatisch met het produceren van ijsblokjes
en de “stop”
indicator gaat branden. Maak de ijsblokjes regelmatig schoon, zodat er
voldoende ijs blijft zitten
maken.
Algemene storingsanalyse
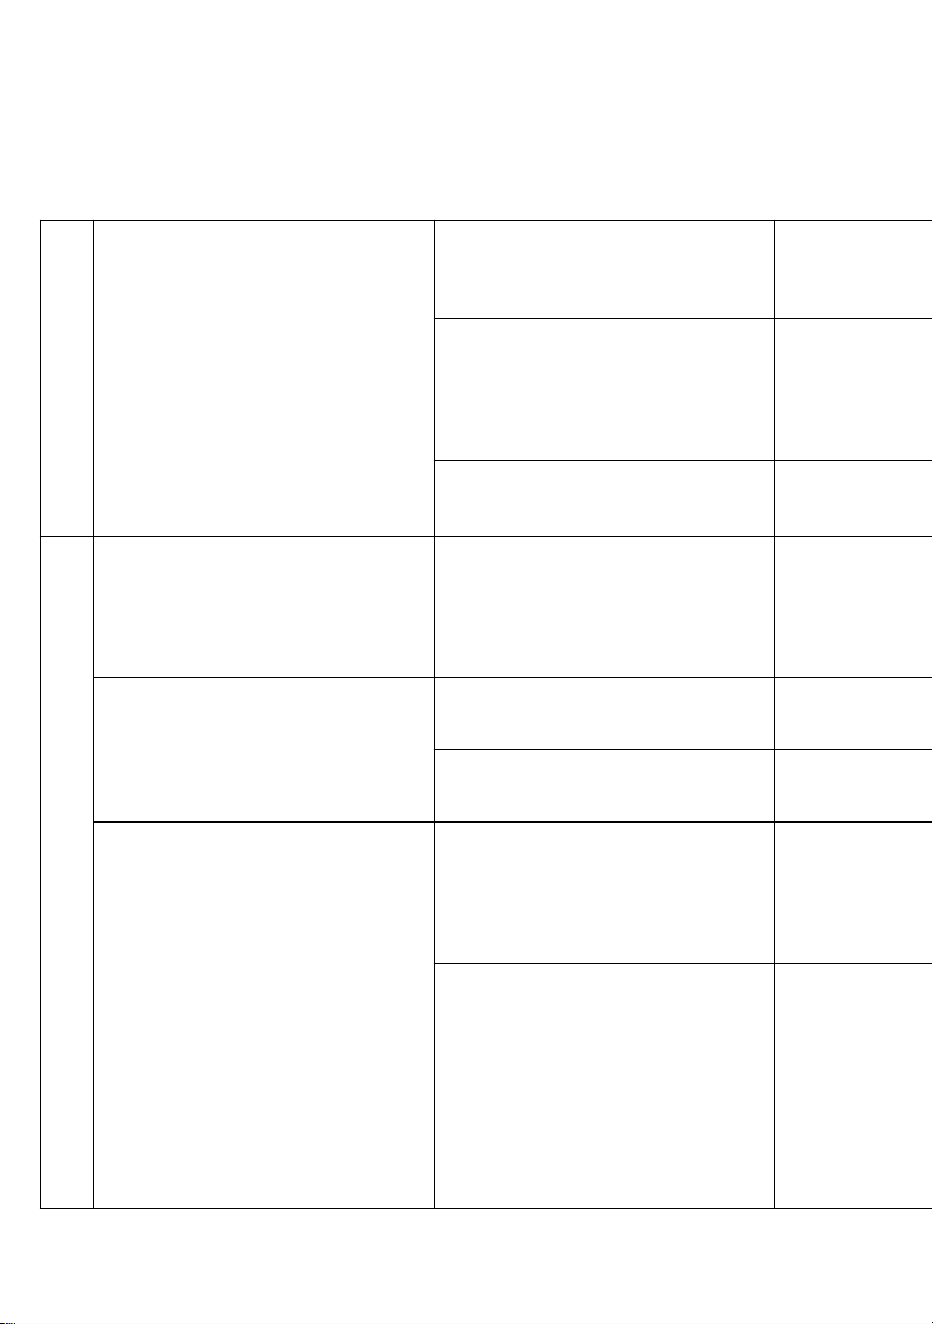
- 13 -
E1
Geen ijsdeflector gedetecteerd
De ijsgeleidingsplaat kwam los
Installeer de
ijsgeleider opnieuw
Magnetisch gevoelige
schakelaar beschadigd
Vervangen de
magnetisch
gevoelige
schakelaar
De ijsgeleidingsplaat wordt niet
gereset
Reset de
ijsgeleidingsplaat
E2
Ijs maken is normaal
De vierde ijscyclus stopt
Vervang de
magnetisch
gevoelige
schakelaar
Er zit geen water in de
waterbox
De aftapplug is niet correct
geïnstalleerd
Installeer de
aftapplug correct
Externe watervoorziening
Controleer de
watertoevoer
Het waterreservoir liep over in
de koelkast
Externe watervoorziening
De waterklep
boven de tank
draait niet
horizontaal
Gebruik leidingwater als
waterbron
De externe
waterdruk is te
hoog om de
vlotterklep te laten
werken, de
waterdruk te
verlagen of een
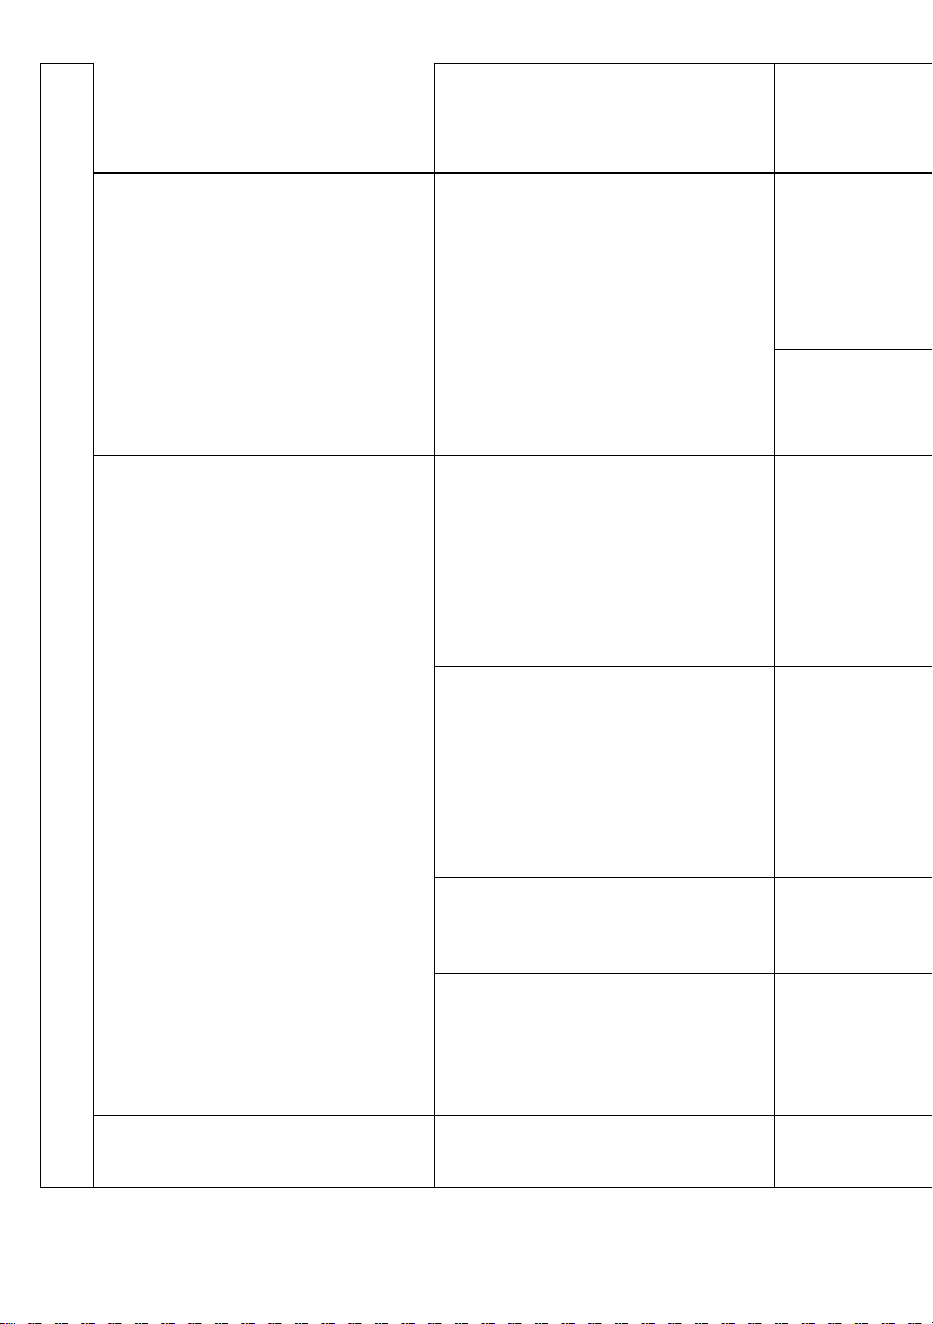
- 14 -
nieuwe klep te
vervangen
Er zit water in de waterbox
Er is geen water en de
doucheleiding loopt ook niet
De pomp is ernstig
geblokkeerd en
moet worden
vervangen of
gereinigd
De doucheleiding is
verstopt. Maak het
schoon
Gewoon stromend water, geen
koeling of een beetje koud
Er ligt dun ijs op de ijsvorm
Verleng de
productietijd door
op de knop "+" op
het
bedieningspaneel
te drukken
Er ligt dik ijs op de ijsvorm
Verkort de
productietijd door
op de "-" knop op
het
bedieningspaneel
te drukken
Er spatte wat water in de
koelkast
Draai en verstel de
douchepijp
De achterkant van de
waterkast lekt in de koelkast
Pas de
installatiepositie
van de waterbox
aan
Het water is niet koud
Het moederbord voedt de
compressor niet
Vervang het
moederbord
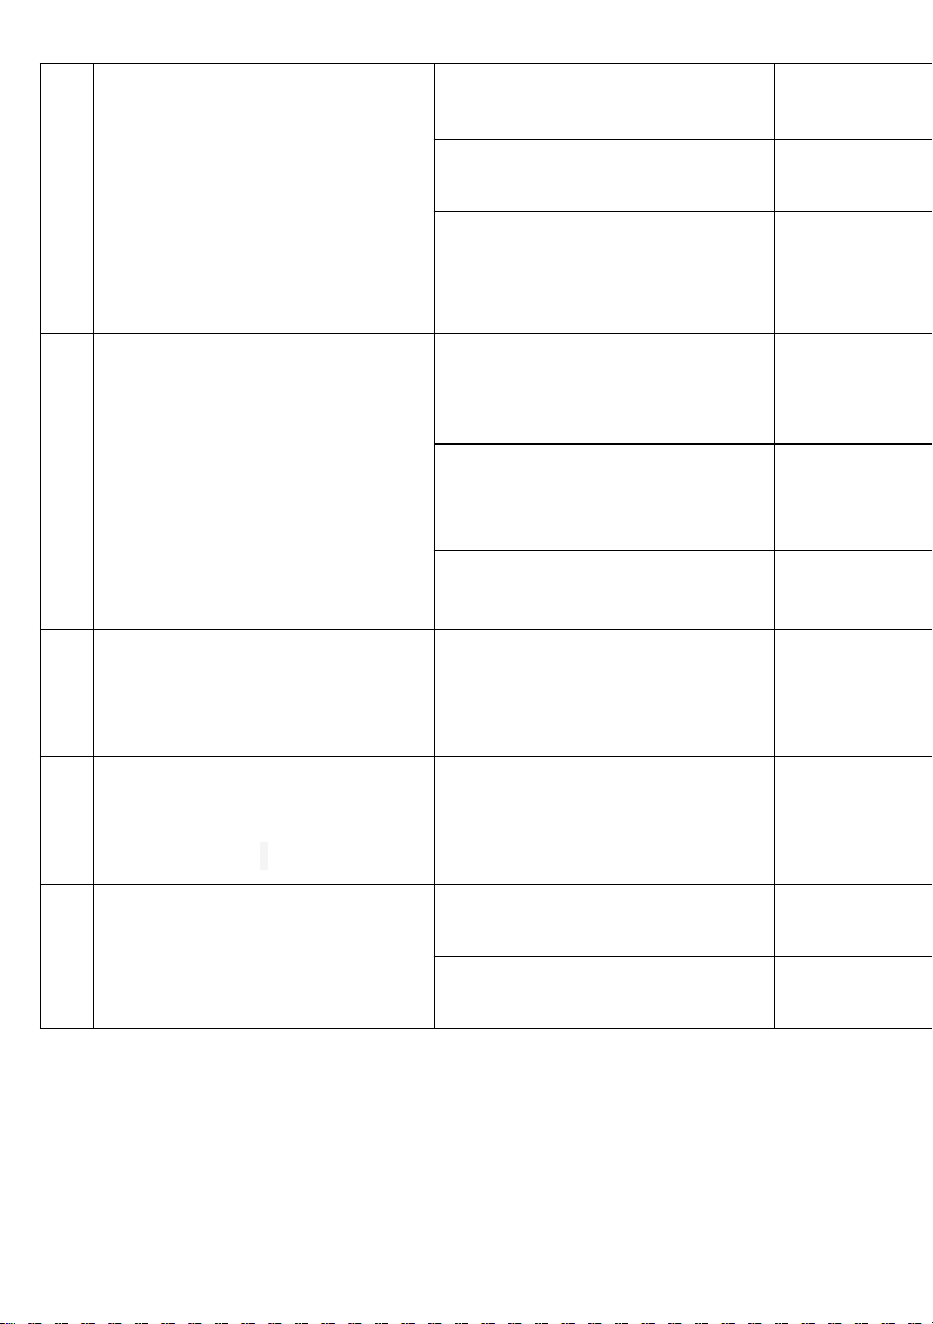
- 15 -
Schakelschema
Compressorstoring
Vervang
compressor
Compressor hoge temperatuur
Vervang
compressor
Compressor werkt, koelt niet
Koelmiddellekkage,
reparatie nodig
E3
Alarm voor hoge temperaturen
condensatietemperatuursensor
is beschadigd
Vervanging
De koelventilator wordt
geblokkeerd door vreemde
voorwerpen
Verwijder de
barricade
Schade aan koelventilator
Vervanging
E 4
Abnormale
condensatietemperatuursensor
Kortsluiting of open circuit
condensatietemperatuursensor
Vervanging
E 5
Abnormale
omgevingstemperatuursensor
r
Kortsluiting of open circuit
omgevingstemperatuursensor
Vervanging
E6 _
Gebrek aan water
Onderbreking van de externe
watervoorziening
Herstel de
watervoorziening
Magneetklep waterinlaat
beschadigd
Vervanging

- 16 -
Gemaakt in China


- 2 -
Teknisk Support och e-garanticertifikat www.vevor.com/support
Kommersiell ismaskin
Modell: SKF-B40F SKF-B45F
SKF-C50F SKF-C55F
We continue to be committed to provide you tools with competitive price.
"Save Half", "Half Price" or any other similar expressions used by us only represents an
estimate of savings you might benefit from buying certain tools with us compared to the major
top brands and does not necessarily mean to cover all categories of tools offered by us. You
are kindly reminded to verify carefully when you are placing an order with us if you are
actually saving half in comparison with the top major brands.

- 1 -
MODELL: SKF-B40F SKF-B45F SKF-C50F SKF-C55F
Have product questions? Need technical support? Please feel free to
contact us:
Technical Support and E-Warranty Certificate
www.vevor.com/support
NEED HELP? CONTACT US!
This is the original instruction, please read all manual instructions
carefully before operating. VEVOR reserves a clear interpretation of our
user manual. The appearance of the product shall be subject to the
product you received. Please forgive us that we won't inform you again if
there are any technology or software updates on our product.
Commercial Ice
Machine

- 2 -
Det är viktigt att du läser dessa instruktioner noggrant och sparar dem för
framtida referens.
Varning - För att minska risken för skada måste användaren
läsa instruktionerna noggrant.
Denna enhet uppfyller del 15 av FCC-reglerna. Driften är
föremål för följande två villkor: (1) Den här enheten får inte
orsaka skadliga störningar och (2) den här enheten måste
acceptera alla mottagna störningar, inklusive störningar som
kan orsaka oönskad funktion.
Denna produkt omfattas av bestämmelserna i det europeiska
direktivet 2012/19/EC. Symbolen som visar en soptunna
korsad anger att produkten kräver separat sophämtning i EU.
Detta gäller för produkten och alla tillbehör märkta med denna
symbol. Produkter märkta som sådana får inte slängas
tillsammans med vanligt hushållsavfall, utan måste lämnas till
en insamlingsplats för återvinning av elektriska och
elektroniska apparater
VIKTIGA SÄKERHETS INSTRUKTIONER
När du använder elektriska apparater bör grundläggande
säkerhetsåtgärder följas för att minska risken för brand, elektriska stötar
och skador till personer eller egendom. Läs alla instruktioner innan du
använder maskinen för första gången.
FÖRSIKTIGHET: IS KAN INTE FÖRVARAS I ISBEHÅNGEN UNDER
NATT - TID , DET ÄR INTE KYLSKÅL, IS KOMMER ATT SMÄLTAS TILL
VATTEN OCH FLÖDA UT UR MASKINEN.
1. Om anslutning till vattenförsörjning, VARNING: måste ansluta
dricksvattenförsörjningen;
2. Maskinen är avsedd att användas i hushåll och liknande applikationer

- 3 -
som:
- personalkök i butiker, kontor och andra arbetsmiljöer ;
-bondgårdar
-av kunder på hotell, motell och andra bostadsmiljöer ;
-Catering och liknande industrier .
3. Maskinen ska användas i dörrar och utan hinder omgivna bra
ventilationsplats. Det måste finnas minst 50 cm mellan maskinens fyra
sidor med väggen.
4. När du använder elektriska apparater, grundläggande säkerhetsåtgärder
bör följas för att minska risken för brand, elektriska stötar och skador på
personer eller egendom . Läs alla instruktioner innan du använder någon
apparat.
5. Använd inte denna eller någon annan apparat med en skadad sladd.
6. Anslut endast till korrekt polariserade uttag. Ingen annan apparat får
anslutas till samma uttag. Se till att kontakten är helt isatt i uttaget.
7. Placera inte maskinen och nätsladden nära brännbart material. Täck
inte över sladden. Sänk den inte i vatten.
8. Vi rekommenderar inte användning av en förlängningssladd, eftersom
det kan överhettas och bli en brandrisk.
9. Koppla ur ismaskinen innan du rengör eller utför någon reparation eller
service.
10. Iaktta försiktighet och uppsikt när apparaten används nära barn.
11. Använd inte din ismaskin utomhus. Undvik direkt solljus och se till att
det finns minst 5 tum utrymme mellan baksidan och sidorna av din enhet
och väggen.
12. Använd ingen annan vätska än vatten i enheten för att göra isen.
13. Rengör inte din ismaskin med brandfarliga rengöringsmedel. Ångorna
kan skapa brandrisk eller explosion.
14. Tippa inte maskinen.
15. Om ismaskinen tas med inomhus från utomhus under vintertid, låt den
värmas upp till rumstemperatur några timmar innan den ansluts till
strömkällan .
16. Denna enhet bör vara ordentligt jordad för din säkerhet. Nätsladden är

- 4 -
utrustad med en trestiftskontakt ihopkopplad med vanliga trestiftiga
vägguttag för att minimera risken för elektriska stötar.
17. Anslut din apparat till en dedikerad, korrekt installerat och jordat
vägguttag . Låt bli, under alla omständigheter ska ström och/eller jordning
riktas mot en certifierad elektriker.
18. De skummande materialen inuti är brännbara som måste hållas borta
från eld.
19. Det är förbjudet att dra i kabeln för att dra ur kontakten, dra i kontakten
är ett måste.
VIKTIGT: För att undvika faror på grund av instabilitet måste enheten
placeras på en jämn och plan yta.
VIKTIGT: För att undvika faror på grund av instabilitet måste enheten
placeras på en jämn och plan yta.
VARNING: Denna apparat måste vara jordad.
1) Säkringen på kretskortet är 15 A, om byte måste användas av en
tekniker.
2) spänningsfluktuationer får inte överstiga ± 10 % än märkspänningen ,
eller så behövs en spänningsstabilisator.
VIKTIGT: Till undvika fara beror på för instabilitet måste enheten placeras
på en jämn och plan yta .
ANVÄNDNINGSPROCEDURER
UPPACKNING AV DIN ISMASKIN
1. Ta bort allt yttre och inre förpackningsmaterial. Kontrollera om alla
nedanstående tillbehör ingår eller inte . Om några delar saknas, kontakta
vår kundtjänst. När du har packat upp maskinen rekommenderar vi att du
lämnar den i 24 timmar innan du sätter på den.
2. Rengör interiören med ljummet vatten och en mjuk trasa eller rengör
enheten med Self-Clean-funktionen.
3. Hitta en plats för din ismaskin där den är skyddad från direkt solljus och
andra värmekällor (t.ex. spis, ugn, radiator). Placera ismaskinen på en
jämn yta. Se till att det finns minst 5 tum mellan baksidan och sidorna av
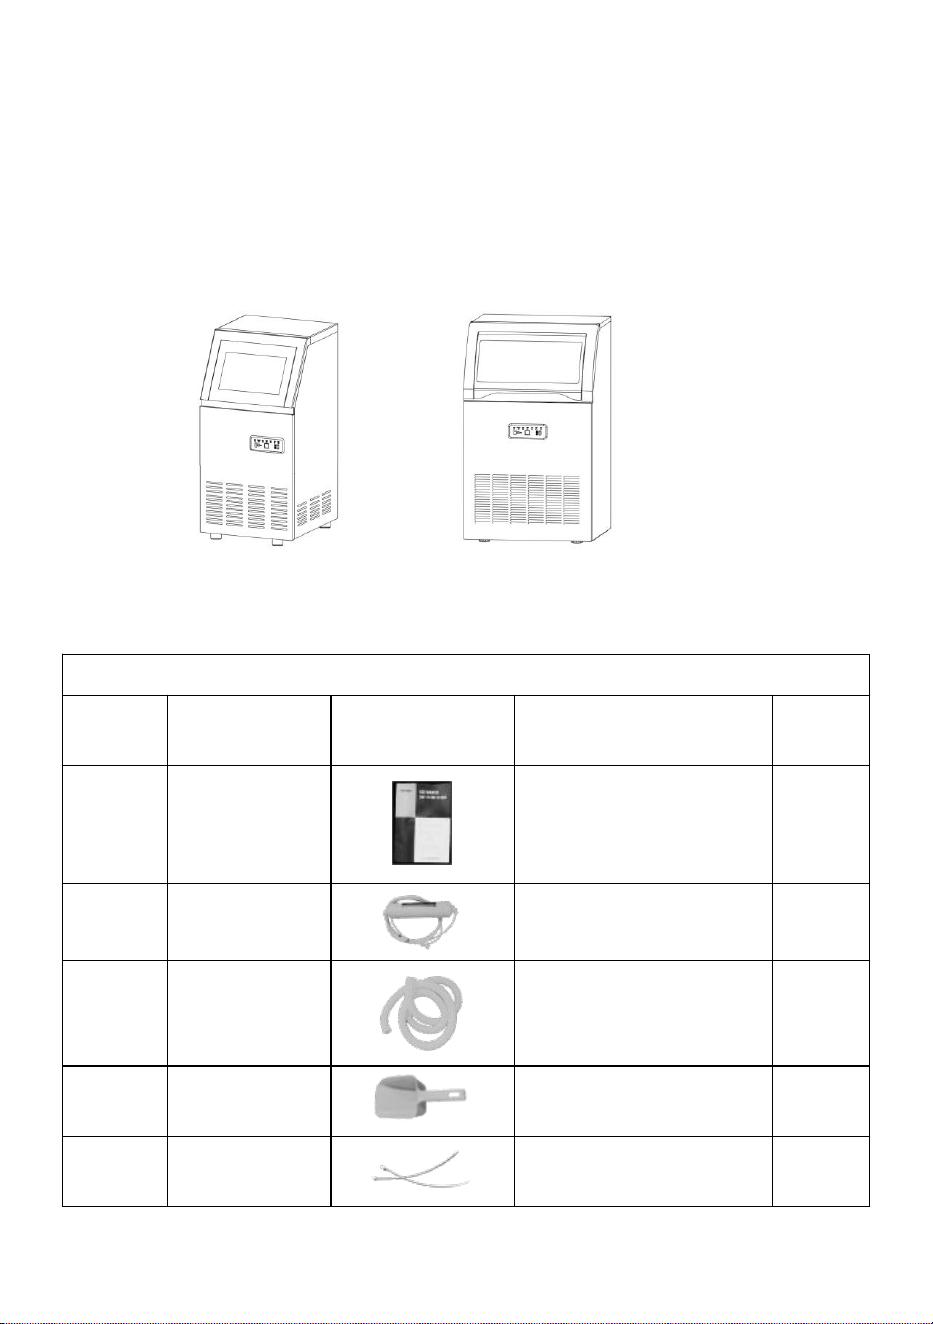
- 5 -
din ismaskin och väggen.
4. Låt köldmediet sätta sig i en timme innan du ansluter enheten för första
användning.
5. Apparaten måste placeras där kontakten är åtkomlig.
paket innehåll
Ismaskin x 1
Varma tips : Kontrollera om alla nedanstående tillbehör ingår.
Tillbehörslista
NEJ
Beskrivnin
g
Bild
Användande
ANTA
L
1
Manuell
Bruksanvisning
1 ST
2
Filtrera
Filtrera vatten
1 ST
3
Dräneringsr
ör
Dränera
1 ST
4
Issked
Ta isbitar
1 ST
5
buntband av
nylon
Fixa röret vid behov
2 st
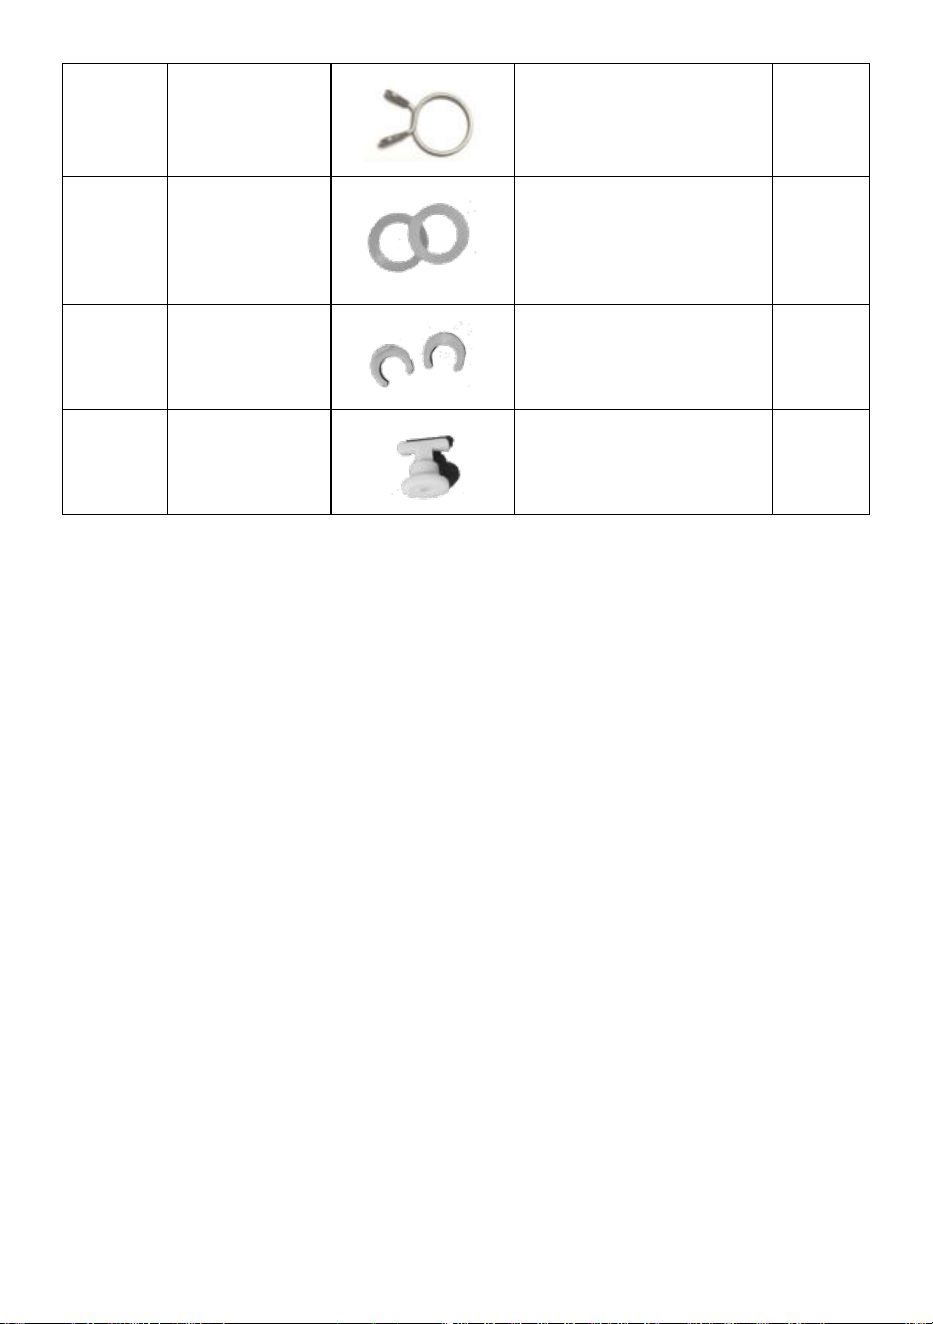
- 6 -
6
Hoppa ring
fäst ihop utloppet och
dräneringsröret vid
behov
1 ST
7
Tätningsring
Lägg den i kranen på
insugningsröret. Den
andra är reserv.
2 st
8
Reserv blå
klämma
Reserv blå klämma
vid behov.
2 st
9
Reservplugg
Reservplugg som
täpper till tanken vid
behov.
1 ST
ANSLUTA DIN ISMASKIN TILL ANDRA DELAR
Anslut din ismaskin med andra delar genom att se diagrammet nedan.

- 7 -
Anslut dräneringsrör och vattenintagsrör
Varning:1) Maskinen kan endast anslutas till dricksvattenkällor och måste
uppfylla lokala dricksvattenstandarder
2) Vattentrycket måste vara i 0,1-0. 4 Mpa, om överstiger 0. 4 Mpa, måste
en tryckreduceringsventil anslutas.
3 ) Dränering: De dräneringsrörets utlopp måste vara lägre än utloppet på
maskinen

- 8 -
Dränera.
Varning: Eftersom isen i den inre tanken kommer att smälta måste
avloppsröret anslutas före användning och föra in avloppsröret i en
behållare eller i avloppet.
Obs: Anslut ena änden av avloppsröret till maskinen och den andra änden
till en behållare eller avlopp. Den andra porten på avloppsröret måste vara
lägre än maskinens avloppsport.
ANVÄNDNING AV VATTEN MED TUNN SOM VATTENKÄLLA
Du kan använda fatvatten som vattenkälla. Kom ihåg att fylla på vatten
regelbundet. Vrid dessutom den blå kontrollomkopplaren vertikalt och
stäng av rörets vattentillförsel.
1. Om du använder vattenkran som vattenkälla, se till att vattenkranen är
öppen för kontinuerlig vattentillförsel. Om vattnet tar slut tänds indikatorn

- 9 -
"tillsätt vatten".
2. Om du använder fatvatten som vattenkälla. Kom ihåg att fylla på vatten
regelbundet annars tänds " stopp "-indikatorn.
3. När du använder vattenkran som vattenkälla, vrid den blå
kontrollomkopplaren horisontellt i maskinen. Å andra sidan, om du
använder fatvatten som vattenkälla, vrid den blå kontrollomkopplaren
vertikalt. Se bilden nedan .
MASKINFUNKTIONER
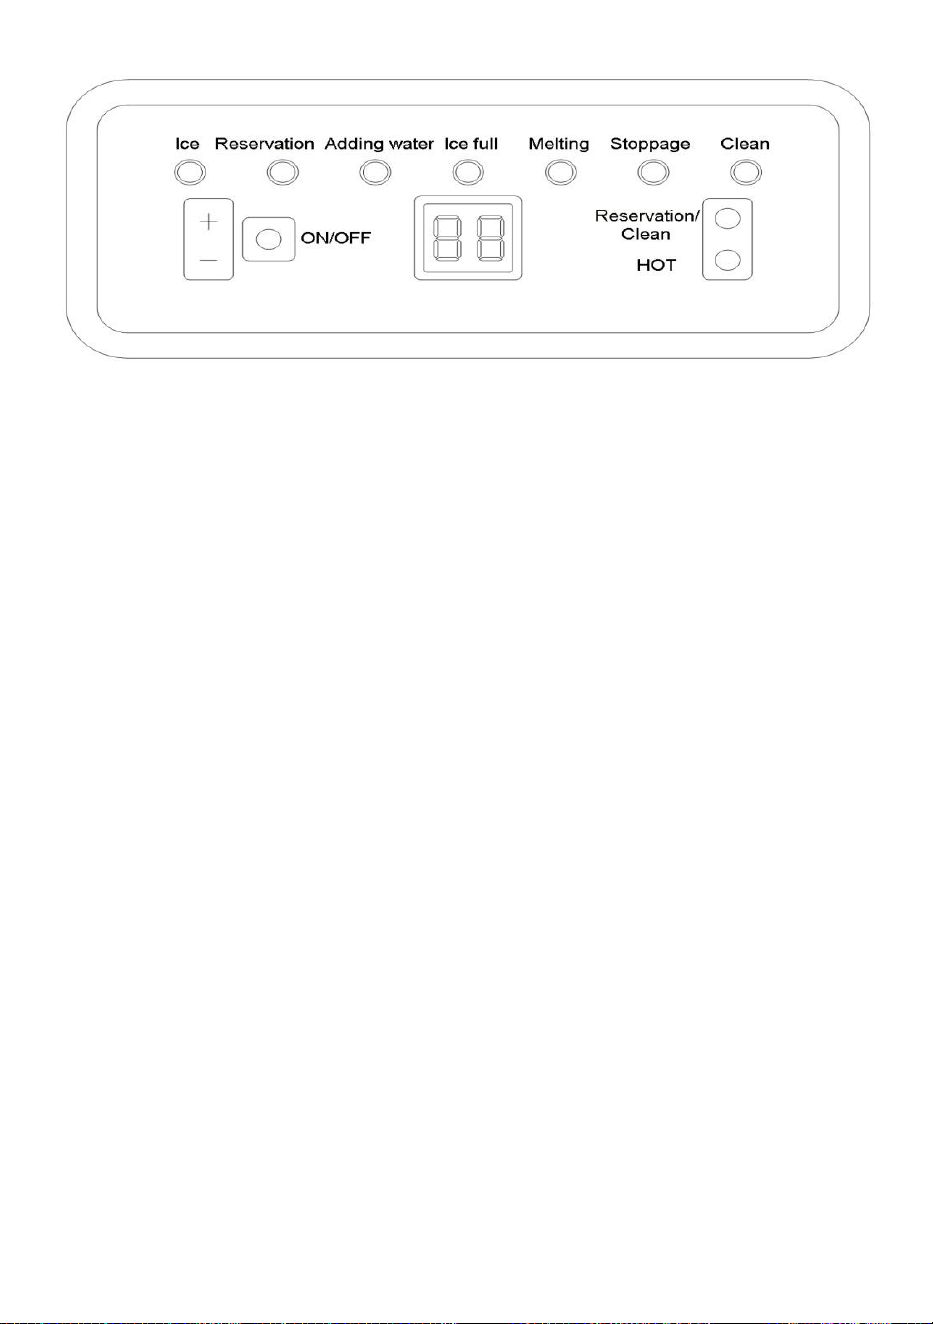
- 10 -
Manöverpanel
Istillverkning:
1. Anslut de maskin till de kraft och Tryck "ON/OFF" -knappen .
"Istillverkningen" indikatorn tänds på.
Genom " + " / " - " för att öka eller minska istillverkningstiden, vilket
kommer att utföras vid den aktuella cykeln.
Tryck " + " -knappen, om skärmen visar " 1 " , betyder istillverkningstid
kommer att läggas till 1 min, max tid kan läggas till 8 min. Om du trycker på
" - "- knappen och visar " -1 " , betyder det att istillverkningstiden kommer
att minskas med 1 min, maxtiden är 5 min. Det betyder att tiden kan
justeras från -5 till 8 min.
2. När nedräkningen av tiden är klar tänds "smältnings"-indikatorn.
Isbitarna kommer att lossna från fryspanelen senare.
3. Efter att isbitarna lossnat. Maskinen går automatiskt in i en annan
isslinga.
Automatisk påslagning/avstängning:
1. När maskinen är avstängd medan den är ansluten till strömmen, tryck
på
"Reservation/Clean" knapp och de "+"/"-" knapp till uppsättning de
automatisk påslagning tid (i
timmar). De maskin kommer automatiskt vänder
påefterdenedräkningärfärdiga.
När maskinen är mitt i istillverkningen, tryck påKnappen
"Bokning/Rengör".ochde"+"/"-"knapptilluppsättningdeautomatisk

- 11 -
avstängningtid(itimmar).Demaskinen kommer automatiskt vänder av efter
de nedräkning är färdiga.
Självrengörande:
1. När maskinen är avstängd medan den är ansluten till strömmen, tryck på
knappen "Reservation/Clean" och håll den nedtryckt en stund. Maskinen
går automatiskt in i programmet för självrengöring.
Anmärkningar:
1) Om du ändrar nedräkningstiden under mitten av
istillverkningsproceduren, kommer det att träda i kraft vid nästa slinga. Du
kan trycka länge på "HOT" -knappen under istillverkningen för att ladda ur
isbitarna i förväg.
2) Den omgivande miljötemperaturen kommer att påverka den tid som
behövs för isframställning.
RENGÖRING & UNDERHÅLL
Rengör din ismaskin noggrant före första användningen.
Utsida: ismaskinens utsida bör rengöras regelbundet med ett milt
rengöringsmedel och varmt vatten. Använd alltid en mjuk trasa för att
undvika repor eller skador på höljet.
INTERIÖR: använd följande självrengörande funktion:
1. Tillsätt vatten och vinäger eller citronsaftblandning (förhållande 1:1)
2. Koppla in enheten, tryck och håll knappen CLEAN i cirka 3 sekunder,
släpp sedan. Enheten går automatiskt in i programmet för självrengöring.
Denna process tar cirka 5-6 minuter. När Self-Clean-programmet är klart
stängs enheten av automatiskt.
3. Fläktbladet kommer att rotera. Denna process sköljer de inre delarna
flera gånger .
4. Efter att självrengöringsprogrammet har slutförts, koppla ur nätsladden
och töm ut vattnet genom att dra ur avtappningslocket på sidan. Sätt
tillbaka dräneringslocket.
5. Tillsätt färskvatten till vattenbehållaren, upp till vattennivåmärket.
6. Anslut enheten och upprepa självrengöringsprocessen genom att
upprepa steg 3 till 5. Detta kommer att skölja ut ättika/citronrester.
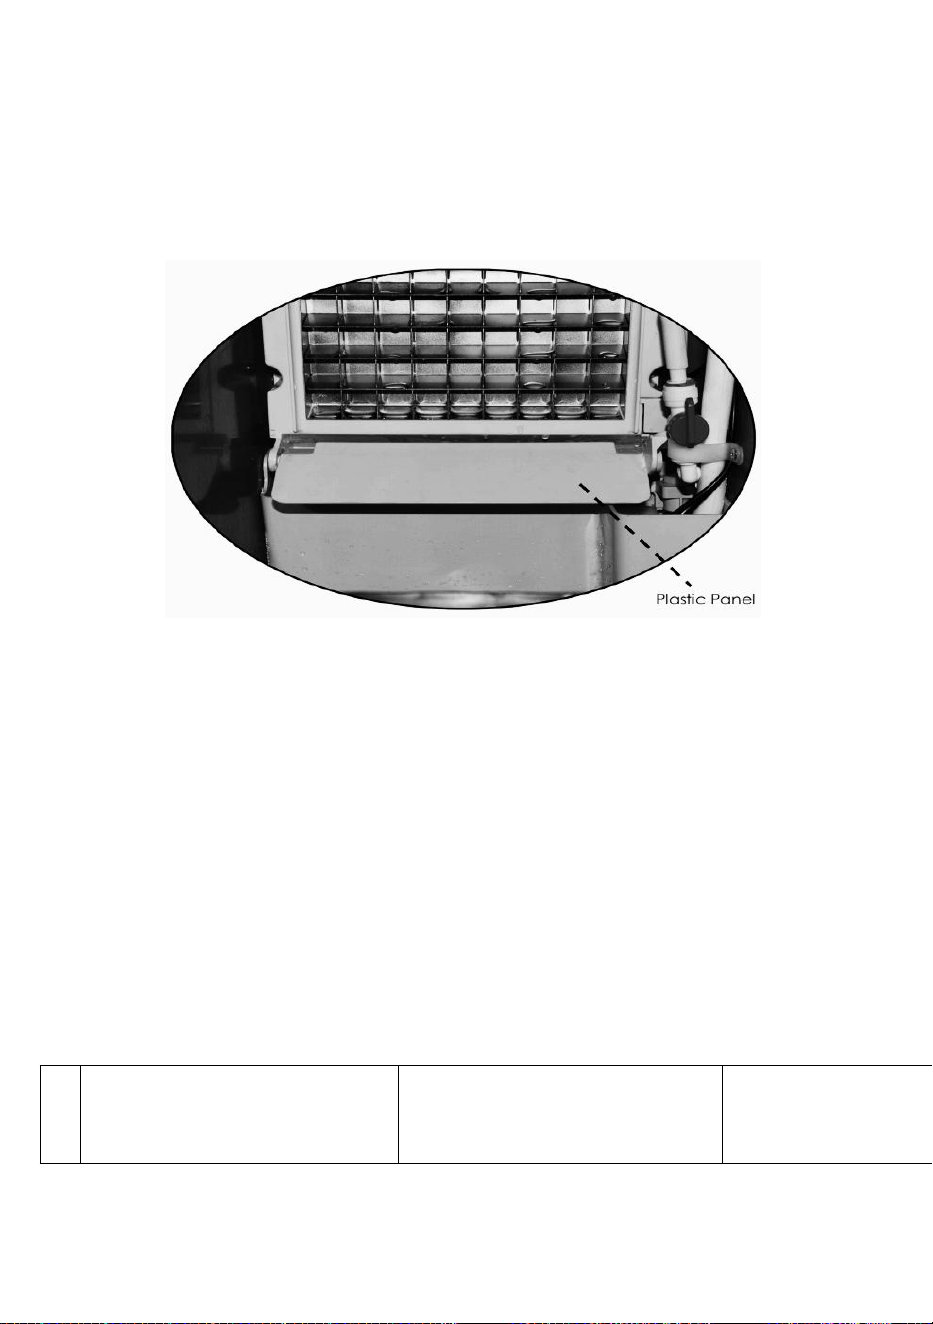
- 12 -
7. Efter att ha tömt vattnet, sätt tillbaka och dra åt avtappningslocket.
8. Torka av insidan och utsidan med en ren, mjuk trasa.
OBS: Det rekommenderas starkt att rengöra enheten före första
användningen eller efter att enheten inte har använts under en längre tid.
NOTERA
1. I takt med att produktionen av isbitar ökar kommer plastpanelen inuti m
achine (visas ovan) kan pressas ner av isbitarna. När plastpanelen trycks
ned
ner kommer maskinen att sluta producera isbitar automatiskt och "stopp"
indikatorn tänds. Rengör isbitarna regelbundet för fortsatt is
tillverkning.
Vanlig felanalys
E1
Ingen isavvisare upptäckt
Isstyrplattan lossnade
Sätt tillbaka
isguiden
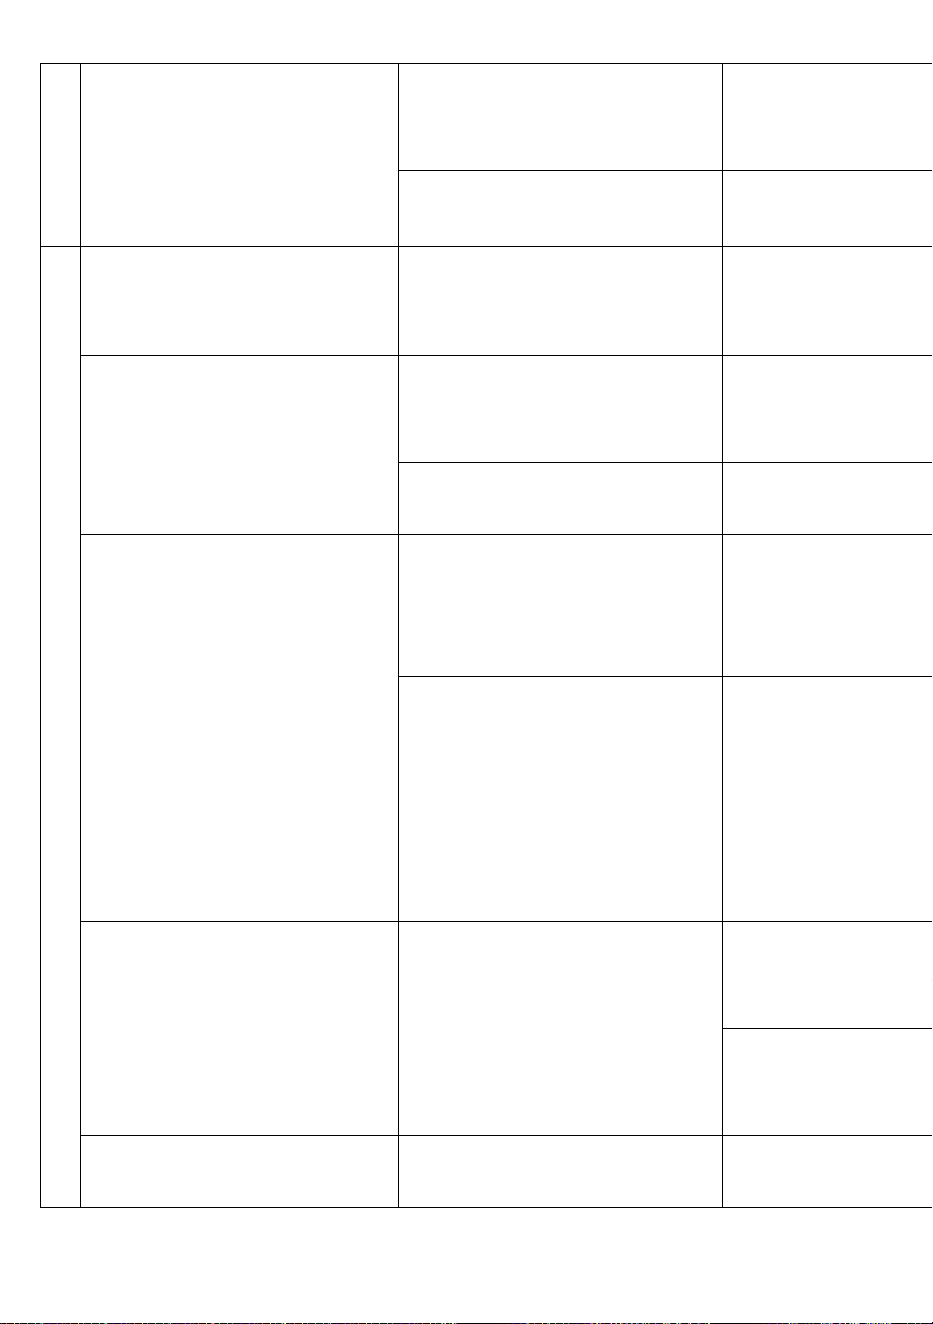
- 13 -
Magnetisk känslig
strömbrytare skadad
Byta ut den
magnetiskt känsliga
omkopplaren
Isstyrplattan är inte återställd
Återställ
isstyrplattan
E2
Is att göra är normalt
Den fjärde iscykeln stannar
Byt ut den
magnetiskt känsliga
omkopplaren
Det finns inget vatten i
vattenlådan
Avtappningspluggen är inte
korrekt installerad
Installera
avtappningspluggen
korrekt
Extern vattenförsörjning
Kontrollera
vattentillförseln
Vattentanken svämmade
över i kylen
Extern vattenförsörjning
Vattenventilen
ovanför tanken
roterar inte
horisontellt
Använd kranvatten som
vattenkälla
Det externa
vattentrycket är för
högt för att
flottörventilen ska
fungera, minska
vattentrycket eller
byta ny ventil
Det finns vatten i vattenlådan
Det finns inget vatten och inte
heller duschröret
Pumpen är allvarligt
blockerad, bör bytas
ut eller rengöras
Duschröret är
blockerat. Städa
upp det
Bara rinnande vatten, inte
kylande eller lite kallt
Det är tunn is på isformen
Öka
tillverkningstiden
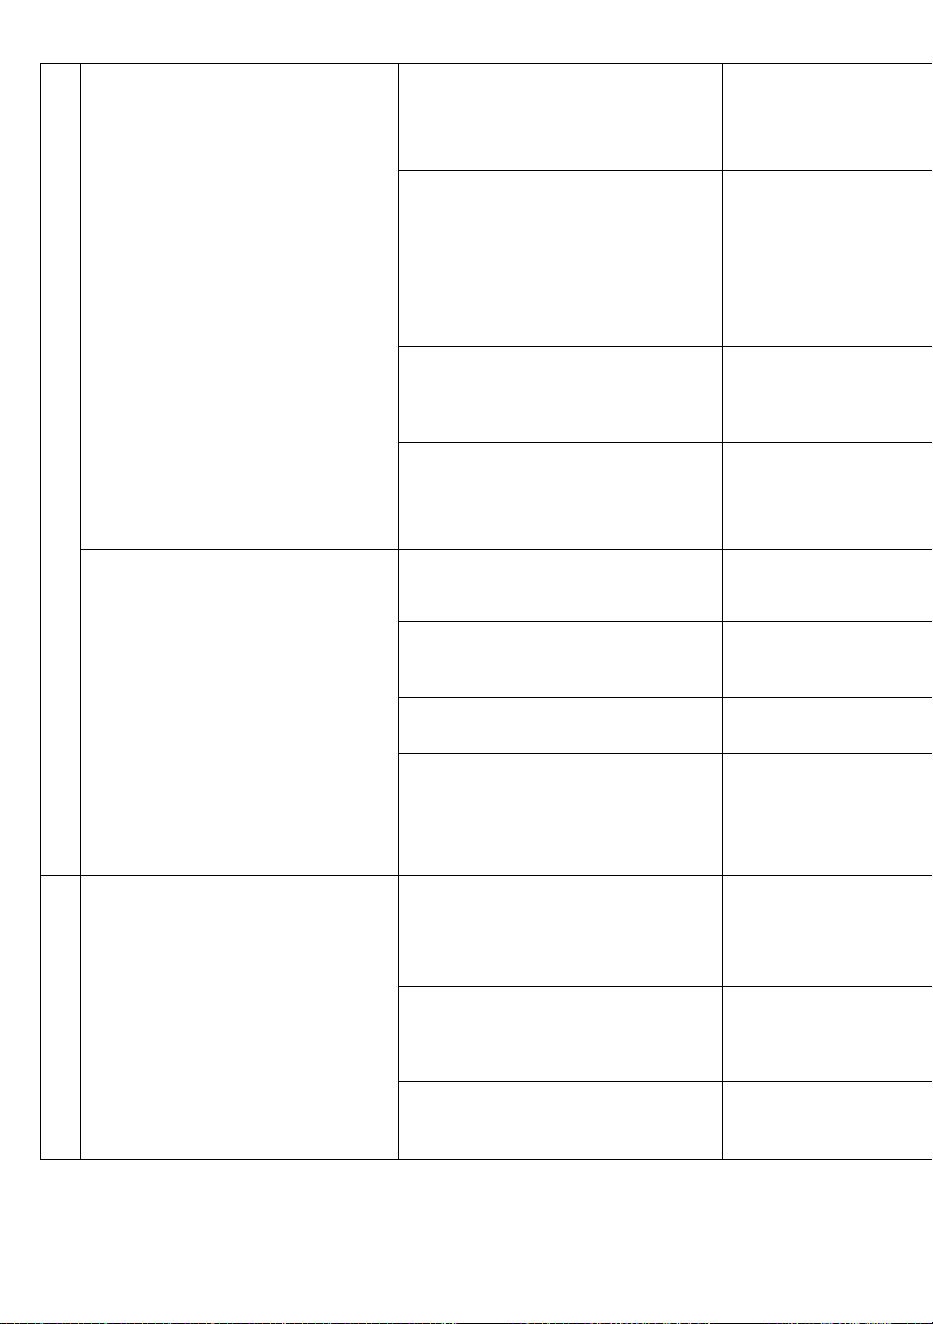
- 14 -
genom att trycka på
"+"-knappen på
manöverpanelen
Det är tjock is på isformen
Minska
tillverkningstiden
genom att trycka på
knappen "-" på
manöverpanelen
Lite vatten stänkte in i kylen
Vrid och justera
duschröret
Baksidan av vattenlådan
läcker in i kylskåpet
Justera
installationsläget för
vattenlådan
Vattnet är inte kallt
Huvudkortet driver inte
kompressorn
Byt ut moderkortet
Kompressorfel
Byt ut kompressorn
Kompressor hög temperatur
Byt ut kompressorn
Kompressorn fungerar, inte
kyler
Köldmedieläckage,
behöver repareras
E3
Högtemperaturlarm
kondenstemperaturgivaren är
skadad
Ersättning
Kylfläkten är blockerad av
främmande föremål
Ta bort barrikaden
Skador på kylfläkten
Ersättning
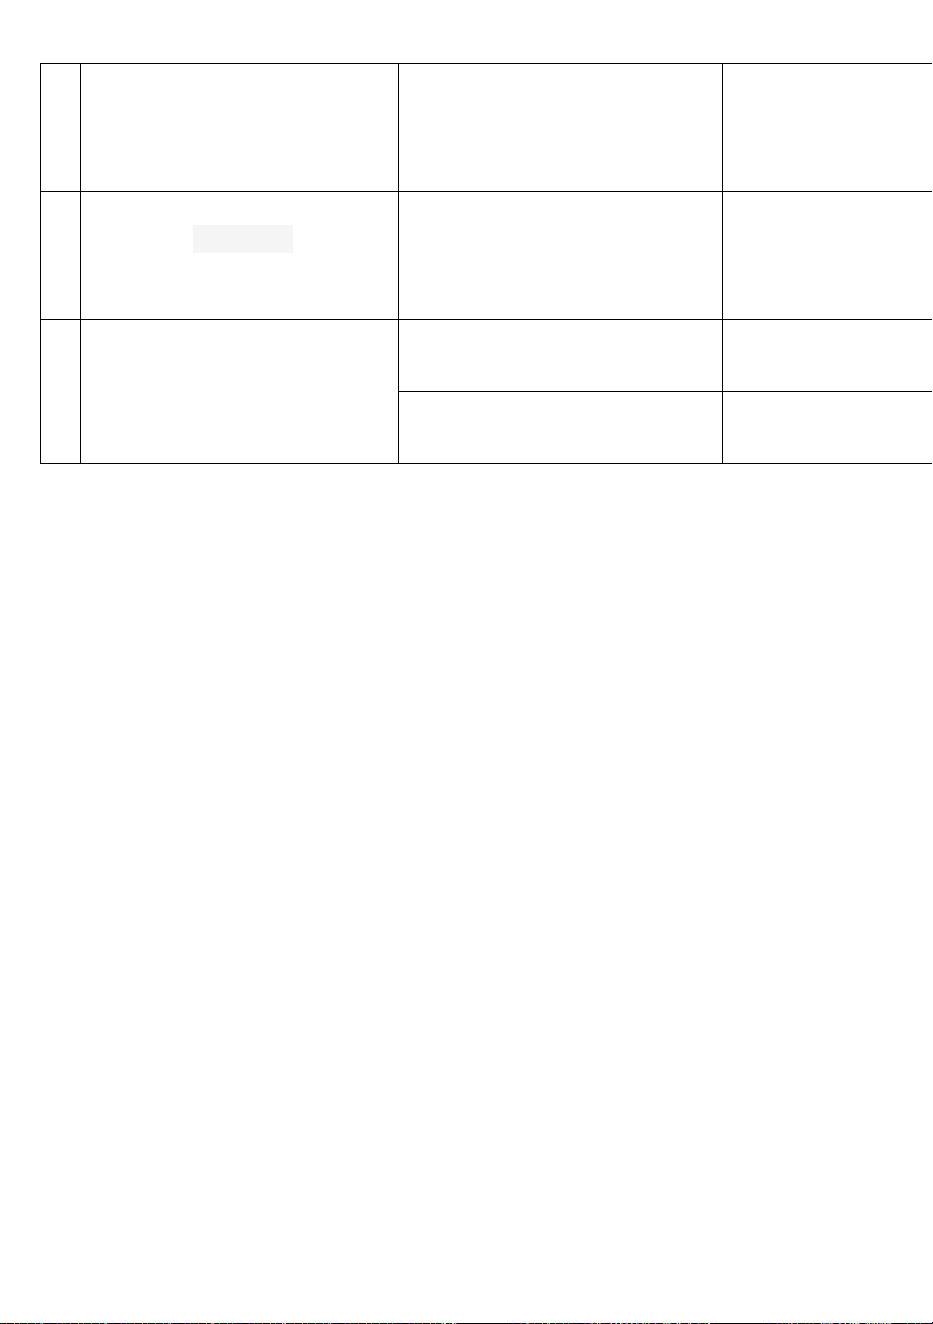
- 15 -
Kretsdiagram
E4
Onormal
kondenstemperaturgivare
Kondenstemperaturgivare
kortslutning eller öppen krets
Ersättning
E 5
Onormal
omgivningstemperatursensor
Omgivningstemperatursensor
kortslutning eller öppen krets
Ersättning
E 6
Brist på vatten
Avbrott i extern
vattenförsörjning
Återställ
vattenförsörjningen
Vattenintagsmagnetventil
skadad
Ersättning
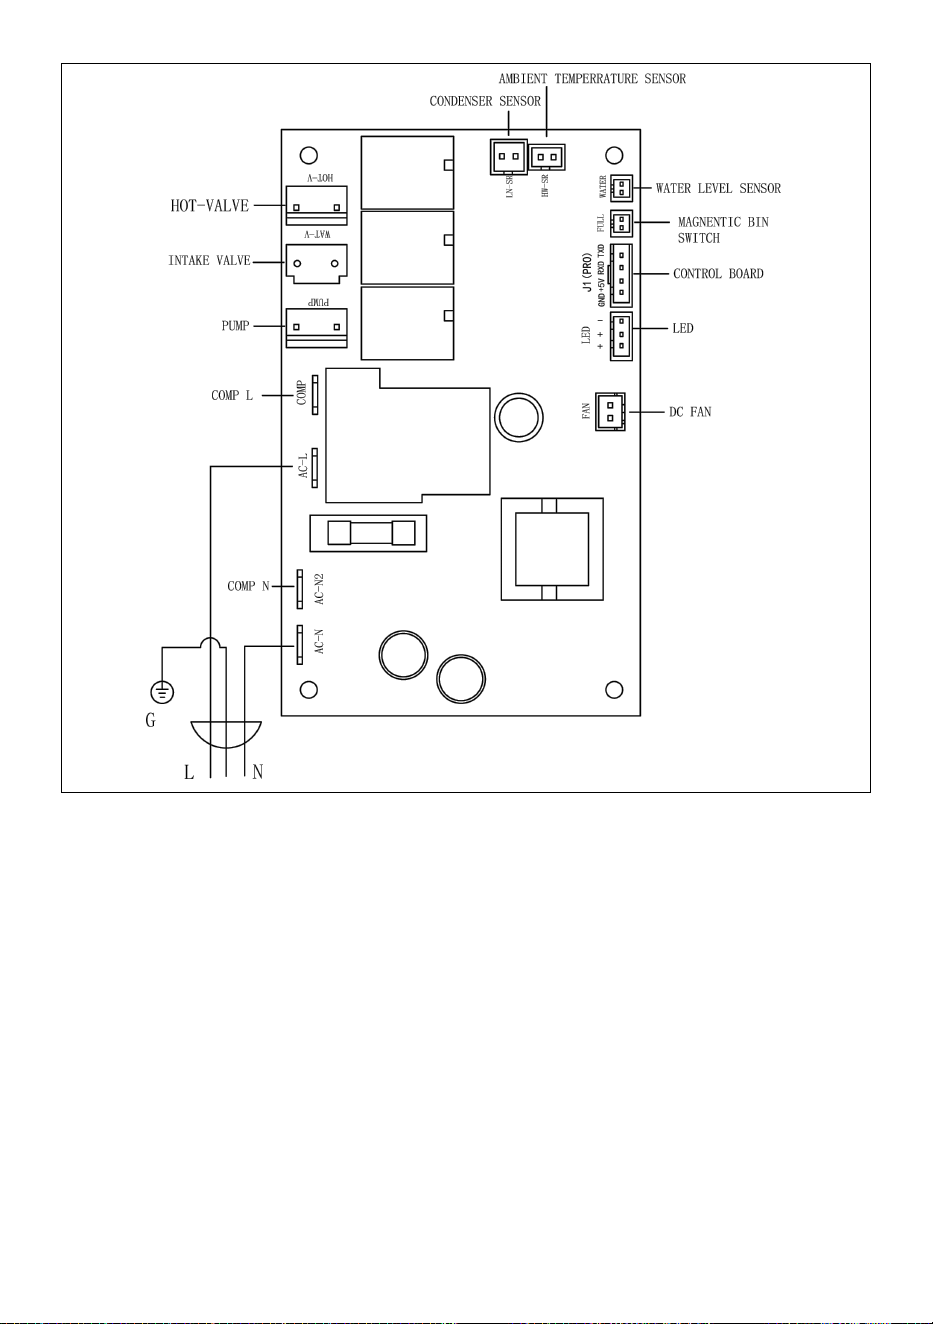
- 16 -
Tillverkad i Kina