
www.moulinex.com
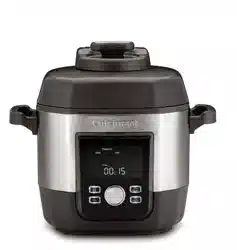
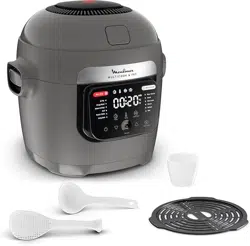
Multicook & Fry
EN
FR
NL
32
EN
3
*Non-removable parts. Do not dismantle.
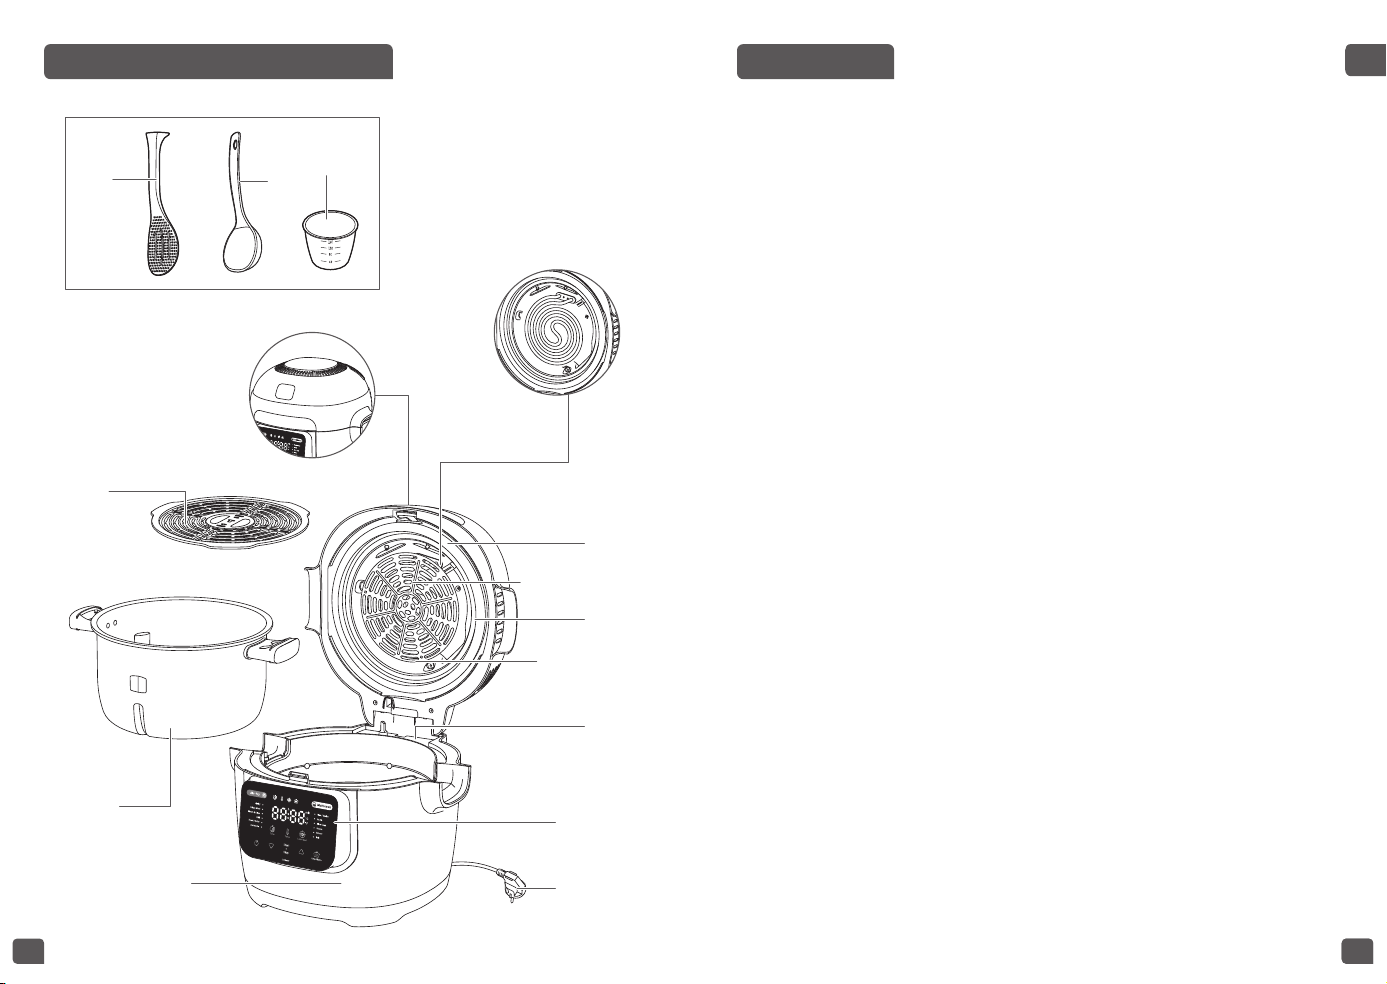
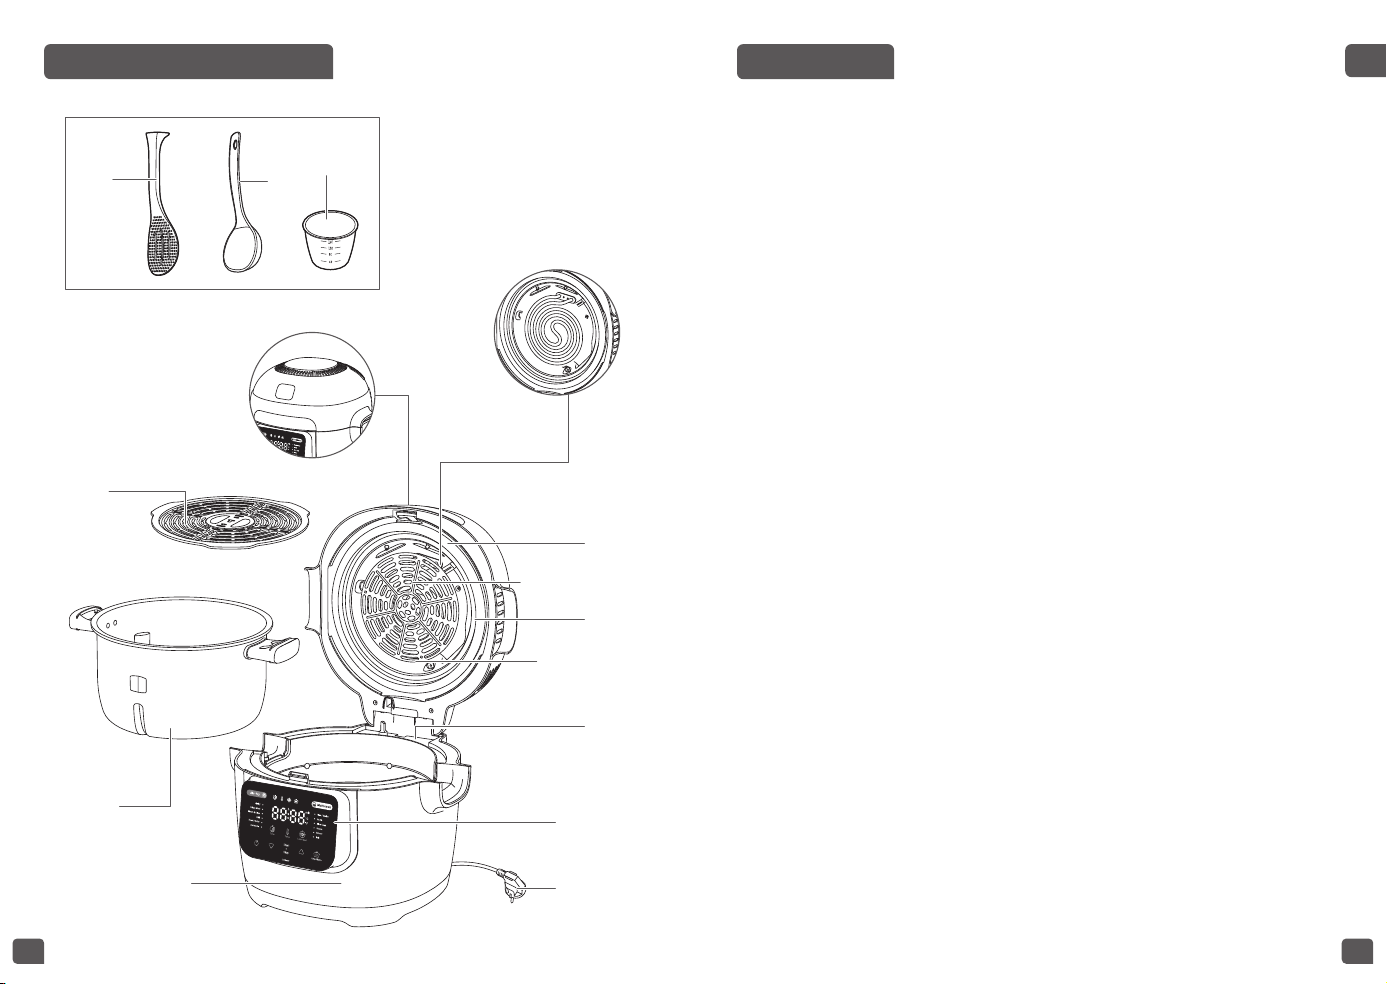
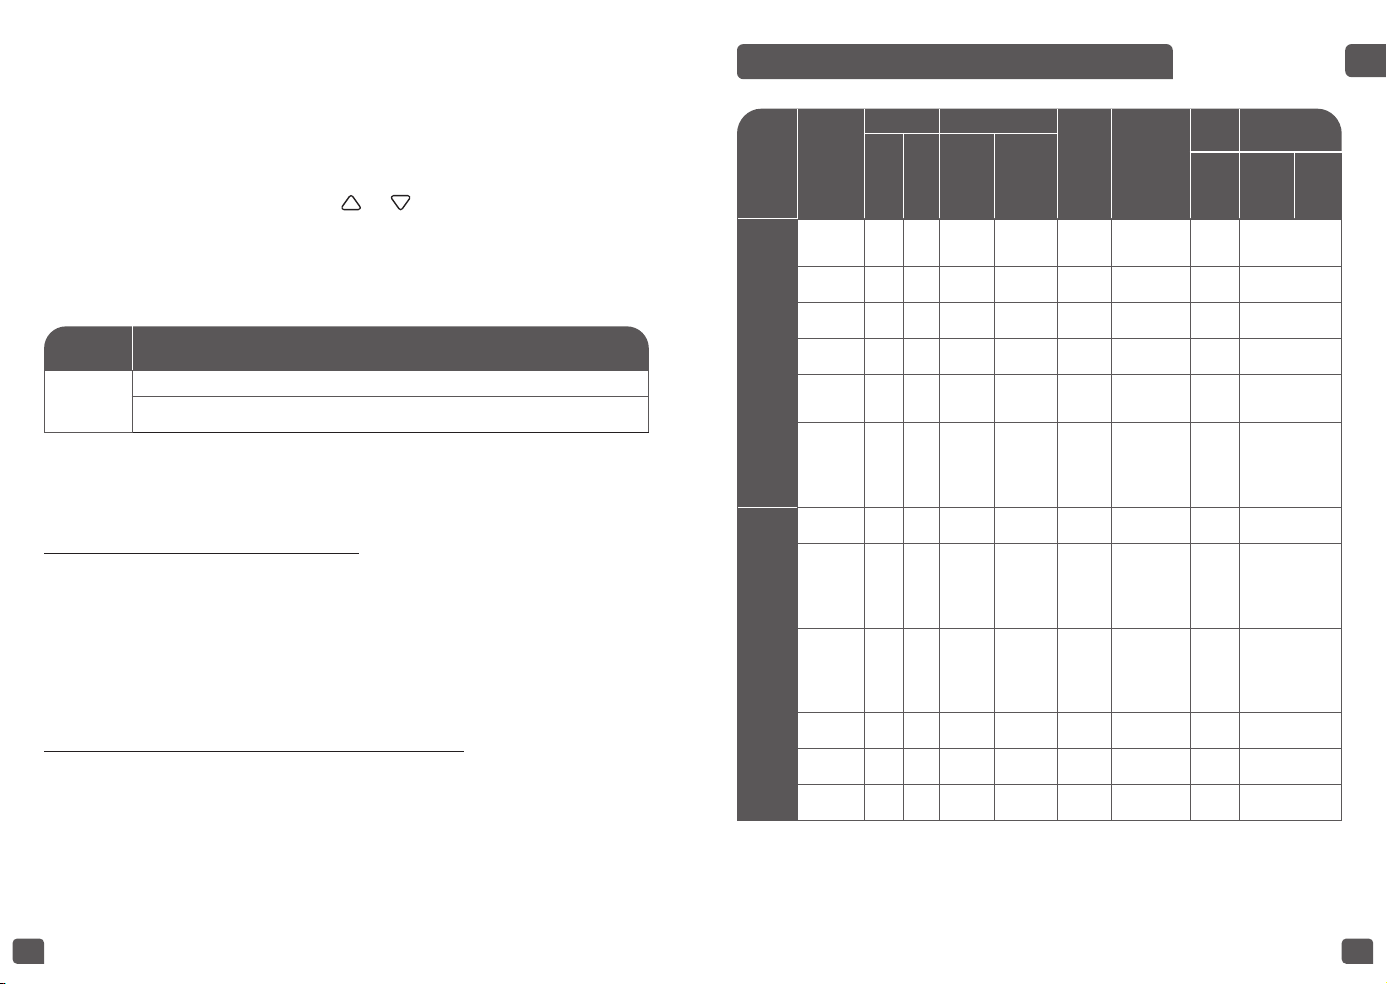
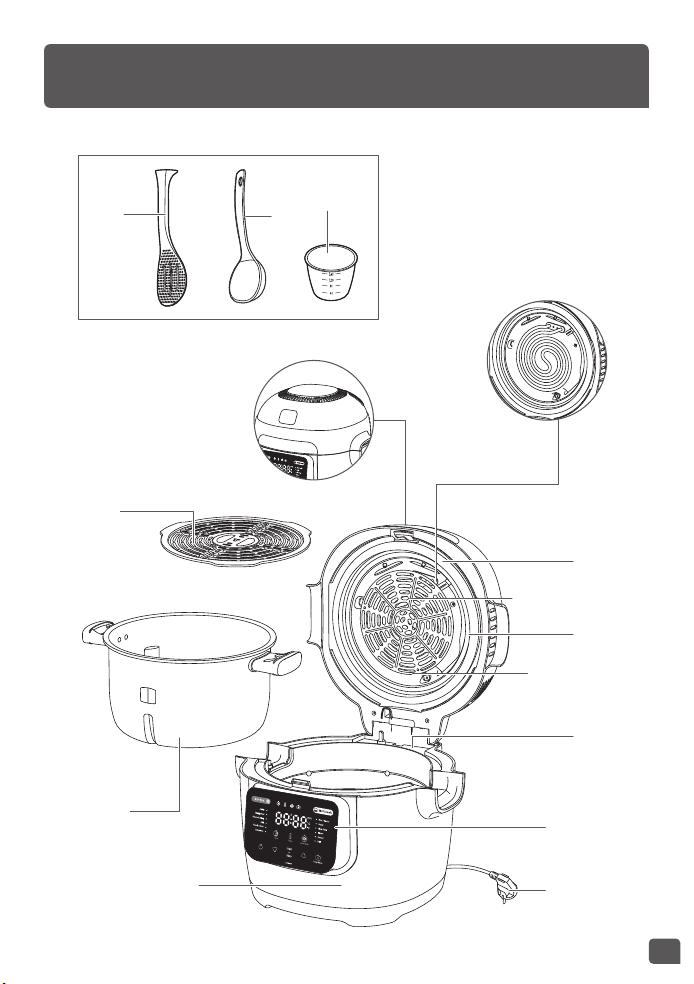
DESCRIPTION
A Product Body
B Control panel
C Lid*
C1 Inner ceramic heater
protecter*
C2 Silicon gasket*
C3 Steam outlet
D Opening button
E Removable cooking bowl
F Heating element
G Condensation collector area
(to be wiped off after each use)
H Power cord
I Spatula
J Soup Ladle
K Measuring cup
L Cooking tray
MAIN EXPLODED VIEW - PRODUCT
J
I
K
B
H
C
G
C1
C2
C3
A
E
L
F
D
ACCESSORIES INCLUDED
54
EN
SAFETY INSTRUCTIONS
IMPORTANT SAFEGUARDS
• This appliance is intented to be used in household
only. It is not intended to be used in the following
applications, and the guarantee will not apply for:
-staff kitchen areas in shops, ofces and other
working environments;
- farm houses;
- by clients in hotels, motels and other residential
type environments;
- bed and breakfast type environments.
• This appliance is not intended for use by persons
(including children) with reduced physical, sensory
or mental capabilities, or lack of experience and
knowledge, unless they have been given supervision
or instruction concerning use of the appliance by a
person responsible for their safety.
• Children must be supervised to ensure that they do
not play with the appliance.
• This appliance shall not be used by children from
0 year to 8 years. This appliance can be used by
children aged from 8 years and above if they are
continuously supervised. This appliance can be
used by people with reduced physical, sensory
or mental capabilities or lack of experience and
IMAGE REFERENCES
MAX
4 L
* Do not use metallic tools.
Fig. 1 Fig. 2 Fig. 3 Fig. 4
Fig. 5 Fig. 6 Fig. 7 Fig. 8
Fig. 9 Fig. 10 Fig. 11 Fig. 12
Fig. 13 Fig. 14

76
EN
• Caution : risk of injury due to improper use of the
appliance.
• Caution : do not spill liquid on the connector
(depending on model).
•
WARNING: Keep the appliance out of reach from young
children, particularly during use and cool down.
• The appliance must not be immersed in water or any
other liquid.
For your safety, this appliance conforms with applicable
standards and regulations (Directives on Low Voltage,
Electromagnetic Compatibility, Materials in contact with
food, Environment, etc.).
• Check that the voltage of your mains network
corresponds to the voltage given on the rating
plate on the appliance (alternative current).
• Given that there are so many different standards,
if the appliance is to be used in a country other
than that in which it was bought, have it checked
by Approved Service Centre.
• For models with detachable power cords, only use
the original power cord.
• Always unplug your appliance: after use, to move
it, or to clean it.
• Never operate the appliance underneath kitchen
cupboards or close to walls, allow at least 15cm
around the appliance
• Never move the appliance when it still contains hot
food.
knowledge if they have been given supervision
or instruction concerning use of the appliance in
a safe way and understand the hazards involved.
Keep the appliance and its cord out of reach of
children aged less than 8 years. Cleaning and user
maintenance shall not be carried out by children.
• Cooking appliances should be positioned in a stable
situation with the handles (if any) positioned to
avoid spillage of the hot liquids.
• This appliance is not intended to be operated by
means of an external timer or a separate remote-
control system.
• If the power supply cord is damaged, it must be
replaced by the manufacturer, an authorised
service centre or a similarly qualied person in
order to avoid any danger.
•
The temperature of accessible surfaces may be
high when the appliance is operating. Do not touch
the hot surfaces of the appliance.
• Clean the lid, bowl, body and basket with a sponge
and some water. Clean the heating element
separately with a damp cloth. Please refer to the
«Cleaning» section of the instructions for use.
• Never immerse the appliance or the heating
element unit in water!
•Theappliancecanbeuseduptoanaltitudeof2000m.
• Caution : the surface of heating element is subject to
residual heat after use.

98
EN
• Follow the instructions on “HOW TO GET STARTED” section to set
your cooking menu and refer to each menu for more details about the
recommended usage.
• Do not touch the heating element at the bottom of the appliance,
metal plate on the inner part of the lid when the product is plugged in
or after cooking. Do not carry the product in use or just after cooking.
• This appliance is only intended for indoor use.
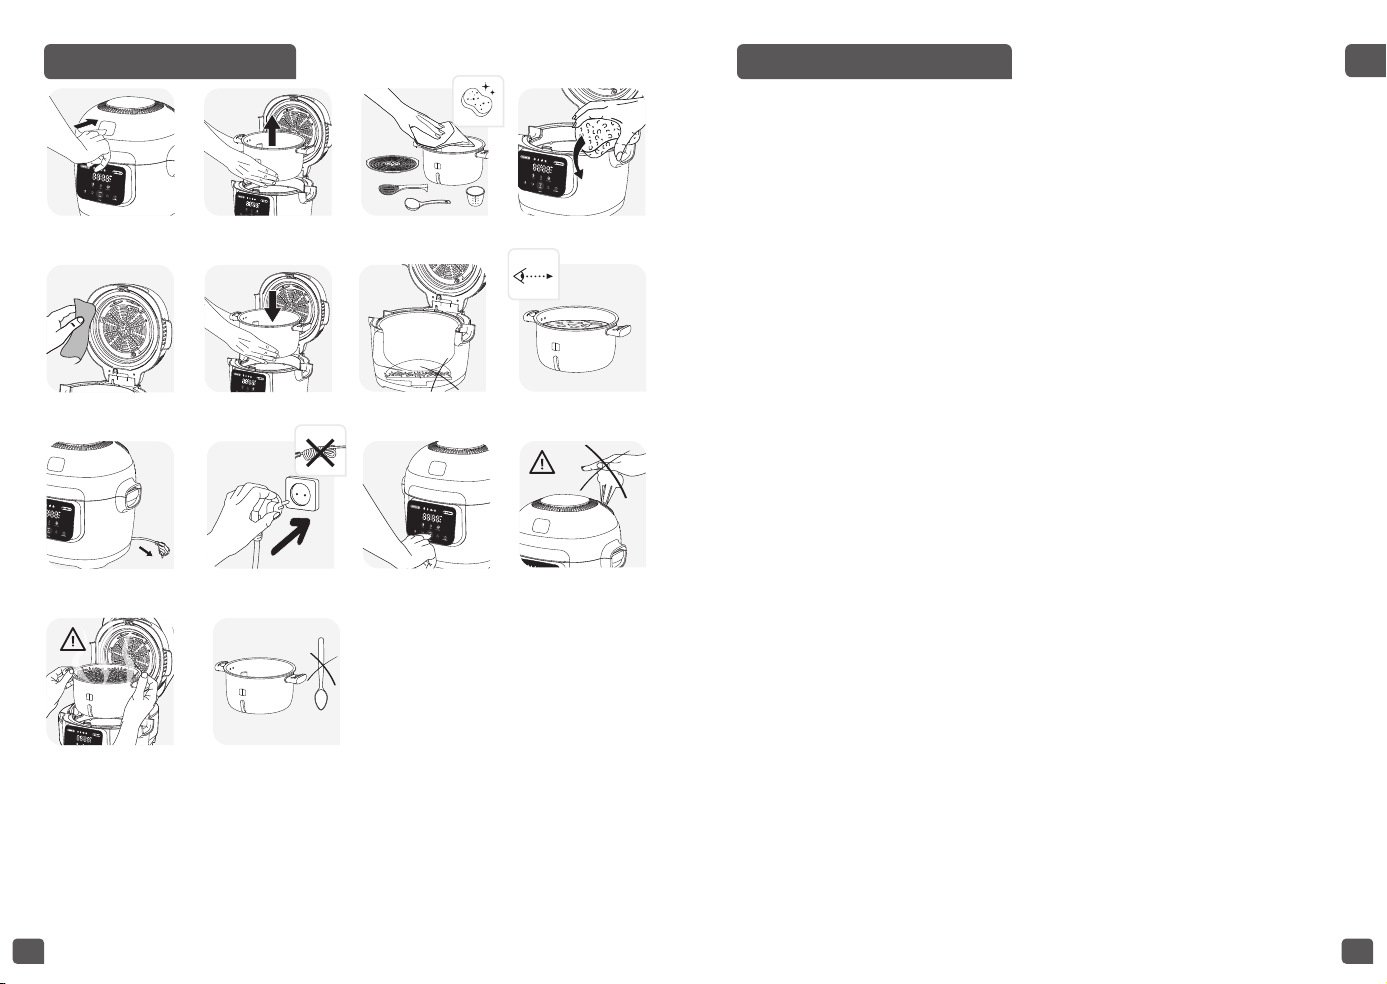
• Never place your hand on the steam vent during cooking, as there is
a danger of burns – fig.12
• Only use the inner bowl provided with the appliance.
• Do not pour water or put ingredients in the appliance without the
bowl inside.
• The maximum quantity of water + ingredient should not exceed the
highest mark (4L) inside the bowl - fig.8
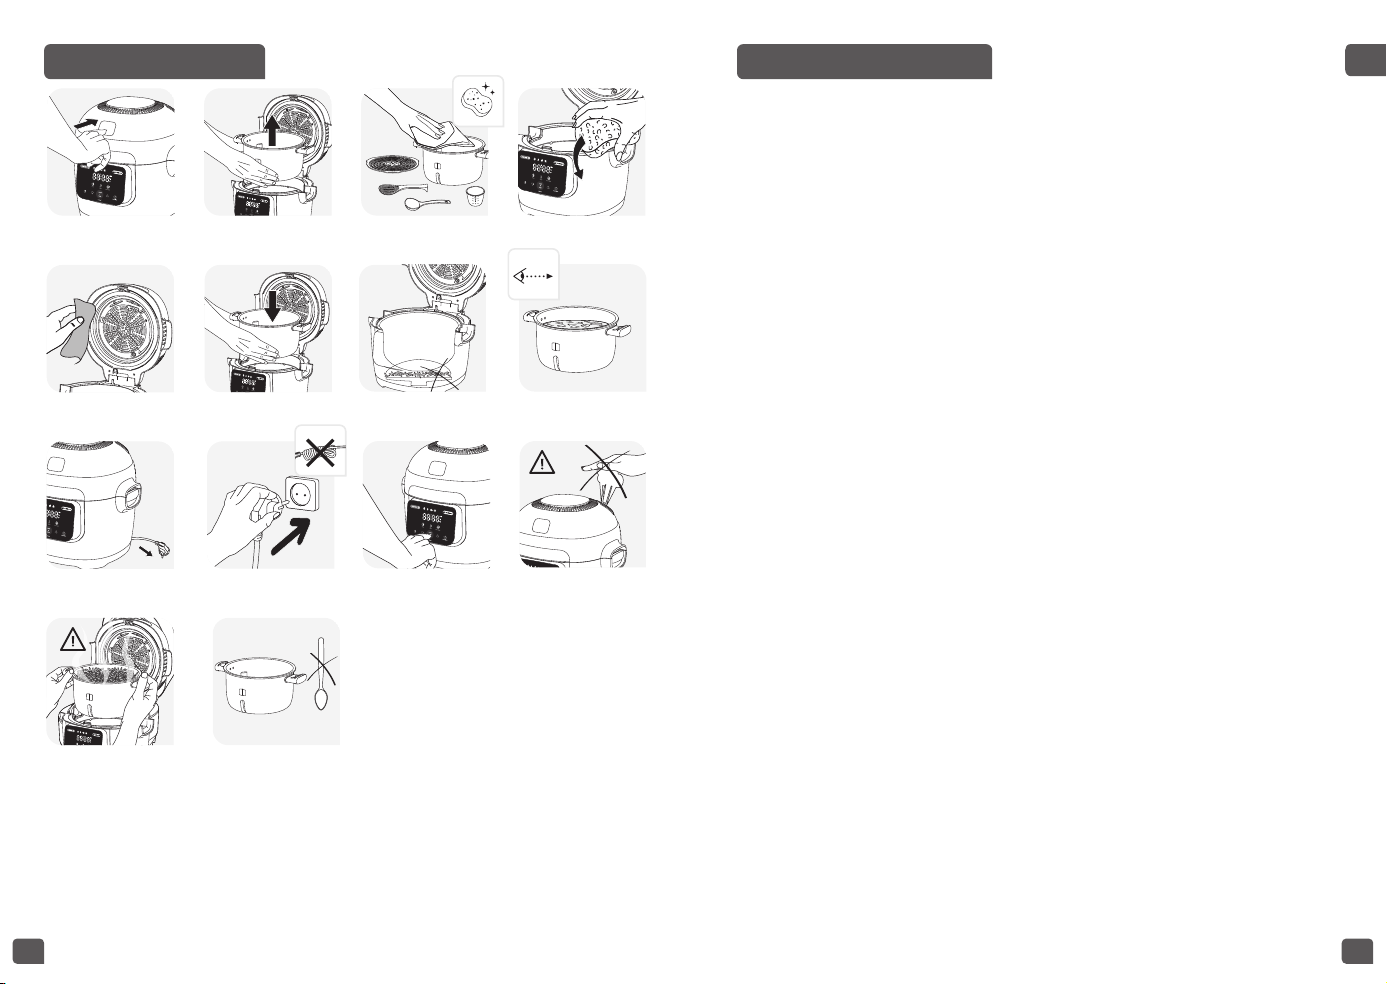
Connecting to the power supply
• Do not use the appliance if:
– the appliance or the cord is damaged
– the appliance has fallen or shows visible damage or does not work
properly
– In the event of the above, the appliance must be sent to an approved
Service Centre. Do not take the appliance apart yourself.
• Do not leave the cord hanging
• Always plug the appliance into an earthed socket.
• Do not use an extension lead. If you accept liability for doing so, only
use an extension lead which is in good condition, has an earthed plug
and is suited to the power of the appliance.
• Do not unplug the appliance by pulling on the cord.
• Always disconnect the appliance from the supply before assembling,
disassembling or cleaning
Protect the environment
• Your appliance has been designed to run for many years. However,
when you decide to replace it, remember to think about how you can
contribute to protecting the environment.
• Before discarding your appliance you should remove the battery from
the timer and dispose of it at a local civic waste collection centre
(according to model).
• Never operate your appliance when empty.
• Never leave the appliance unattended whilst it is
plugged in and switched on.
When using the product for the rst time, it may
release a non-toxic odour. This will not affect use
and will disappear rapidly. After cooking, open
carefully using the side handles on the lid.
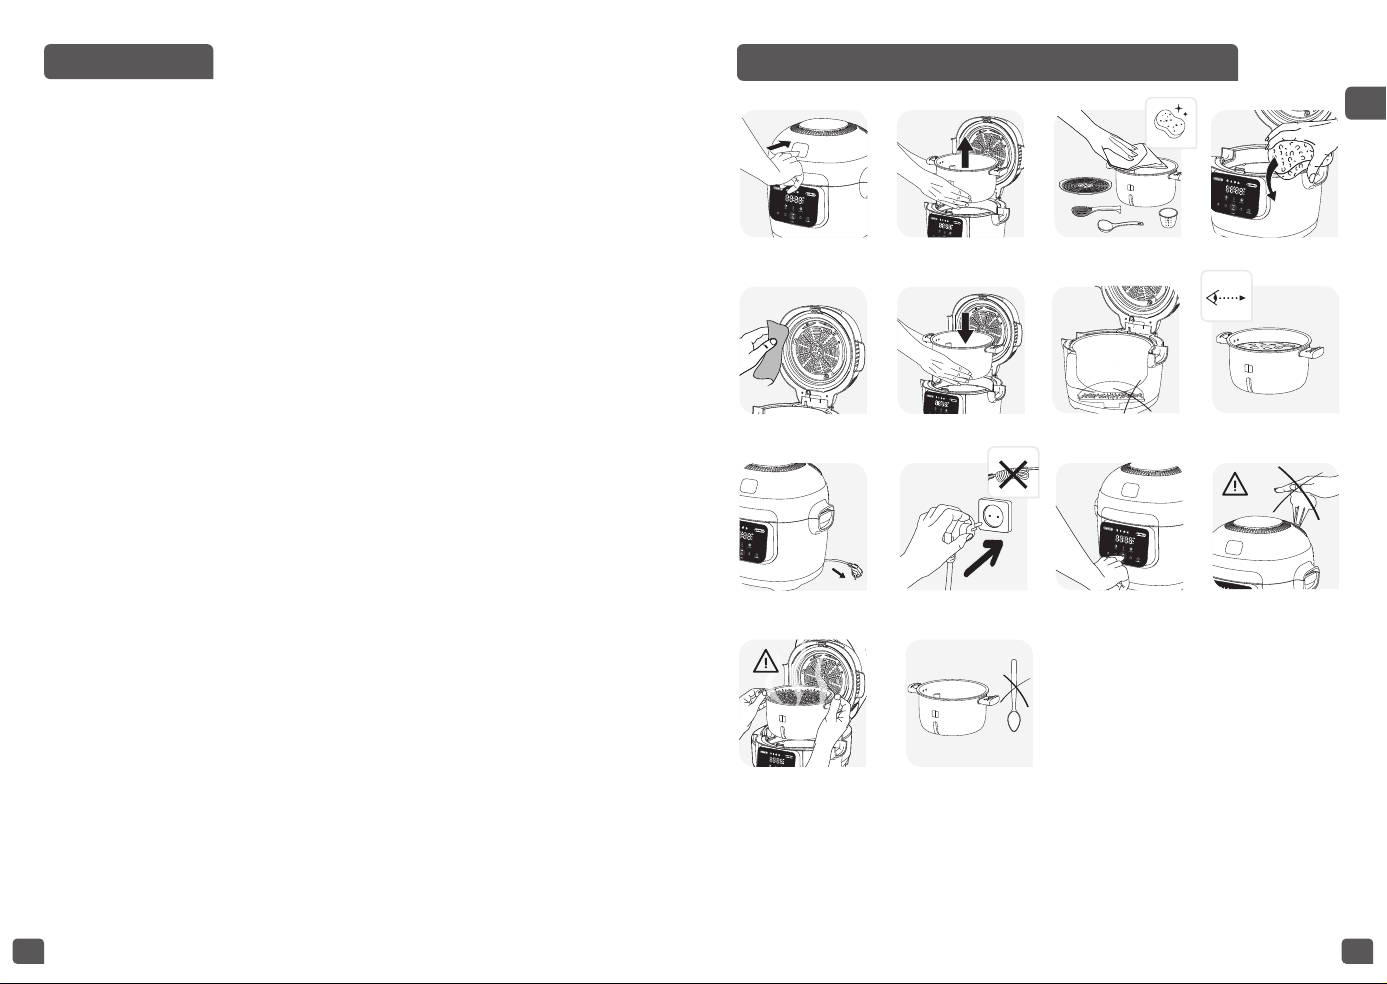
BEFORE THE FIRST USE
Unpack the appliance
• Remove all the stickers applied on the product.
• Remove the appliance from the packaging and unpack all the
accessories and printed documents.
• Open the lid by pushing the opening button on the housing on the top lid–
g.1. Read the Instructions and carefully follow the operation method.
• Please note : The silicon ring around the tray must be used during cooking.
Clean the appliance
• Remove the bowl – g.2 the accessories and all the plastic and inserts
from the product.
• Clean the bowl with a sponge and washing up liquid.
• Wipe the outside of the appliance, the ceramic plate of the lid and the
lid with a damp cloth.
• Dry off carefully.
• Put all the elements back in their original position.
FOR THE APPLIANCE AND ALL FUNCTIONS
• Carefully wipe the outside of the bowl (especially the bottom). Make
sure that there are no foreign residues or liquid underneath the bowl
and on the heating element – g.7.
• Place the bowl into the appliance, making sure that it is correctly
positioned – g.6.
• Close the lid in place so you hear a “click”.
1110
EN
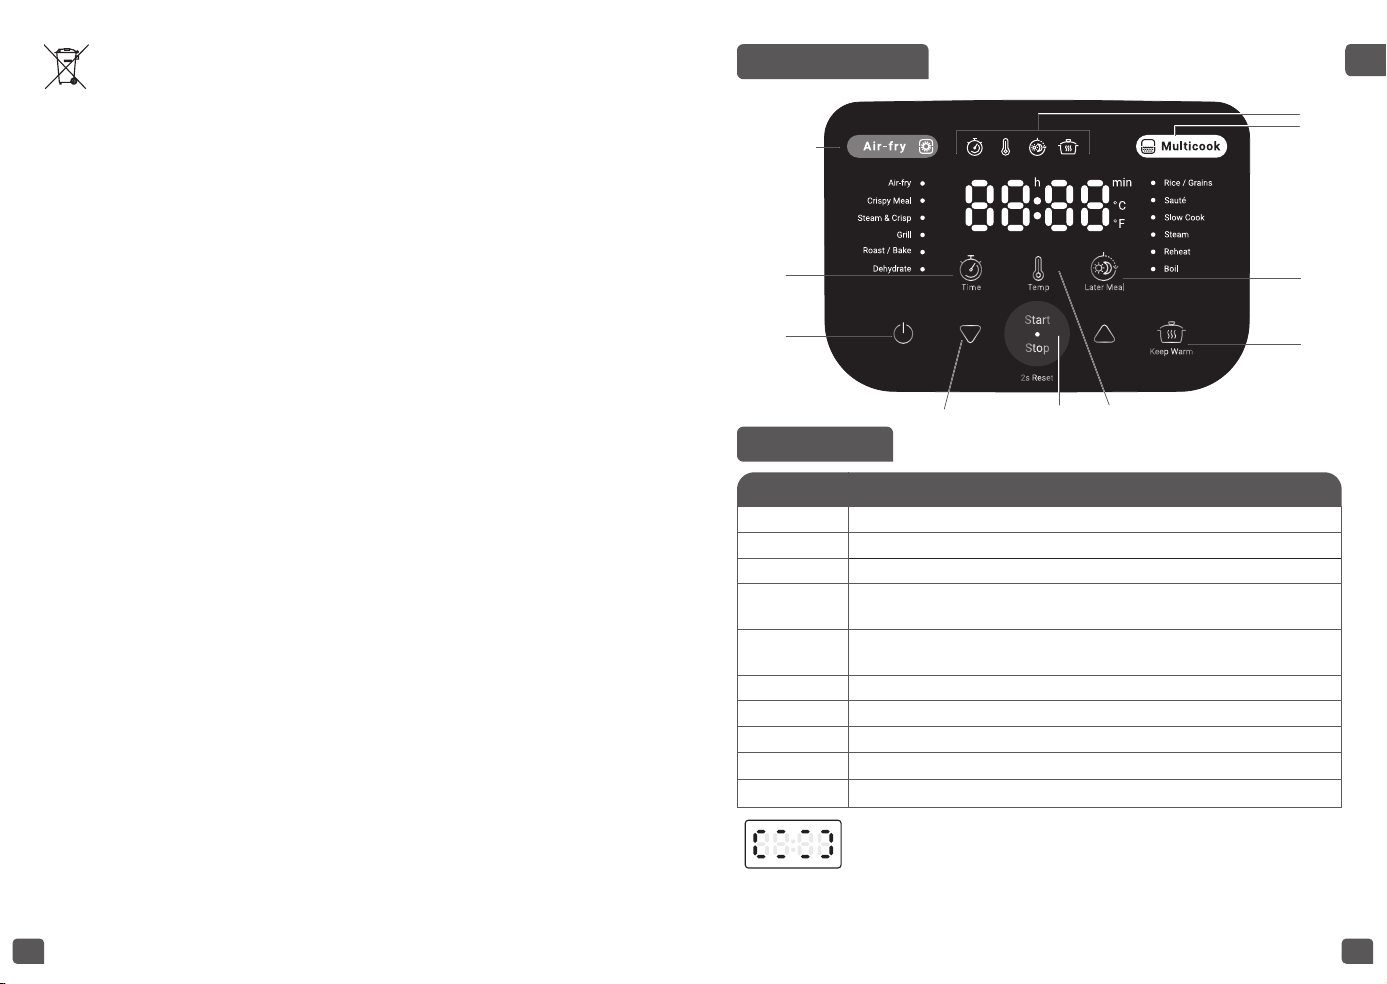
A
B
J
I
H
C
D
G
E
F
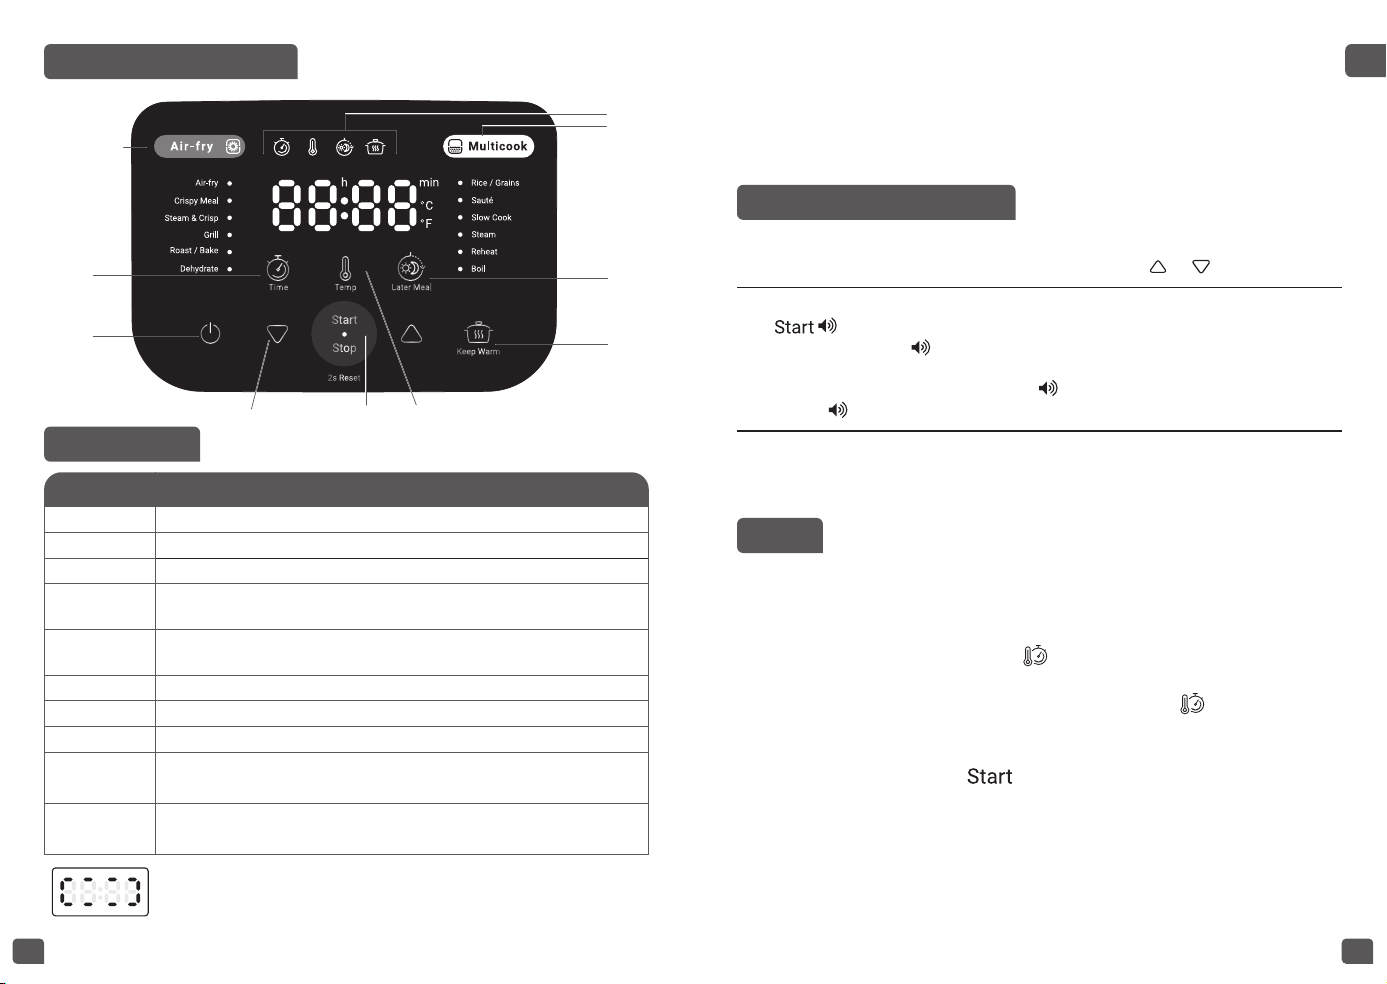
DESCRIPTION
SETTING Description
A Indicates cooking program with Air fryer function
B Press to set the time
C Power on / off
D
Using arrow up and down to choose cooking program and adjust
the time and temperature
E Start / Stop,
Long press for 2 sec to reset
F Press to set the Temperature
G Keep warm
H later meal
I Indicates cooking program with Multicooker function
J Displays TIME, TEMP, LATER MEAL, KEEP WARM mode on
Indicates that temperature is rising during pre-heating
phase.
THE CONTROL PANEL
Environment protection first!
Your appliance contains valuable materials which can be recovered
or recycled.
Leave it at a local civic waste collection point.
Using
• Use a at, stable, heat-resistant work surface away from any water
splashes and any sources of heat
• Do not allow the base of the appliance to come into contact with water.
• Never try to operate the appliance when the bowl is empty or without
the bowl.
• Do not prevent or obstruct the function from automatically changing
to the keep warm function.
• Do not remove the bowl while the appliance is working.
• Do not put the appliance directly onto a hot surface, or any other
source of heat or ame, as it will cause a failure or danger.
• The bowl and the heating plate should be in direct contact. Any object
or food inserted between these two parts would interfere with the
correct operation.
• Do not place the appliance near a heat source or in a hot oven, as
serious damage could result.
• Do not put any food or water into the appliance until the bowl is in place.
• Respect the quantities indicated in the recipes.
• Should any part of your appliance catch re, do not attempt to put it
out with water. To smother the ames, use a damp tea towel.
• Any intervention should only be made by a service centre with original
spare parts.
1312
EN
Crispy meal
1. Machine displays the full cooking time by default.
The machine air frys from the top and heats from the bottom to create
a crispy meal.
2. Press Time icon to set the cooking time. Once cooking, the display will
show the time remaining.
The Crispy Meal cooking program – default Air fry time : 15m (starting
display when setting the time) | Preheating+Steaming : 10m
• Press Arrow key up / down to select function «Crispy meal ». The screen
displays the default cooking time
• Press «Time» key to activate the time setting function and then press
Arrow key up / down to change the Air fryer cooking time. Press «temp»
to change the temperature by pressing Arrow key up / down to adjust
Air fryer temperature
• Press «Start» key. Launch the cooking program, the «Start» light comes
on and the screen displays the time.
• Press «Stop» key to stop the cooking program
• At the end of cooking, the beep will sound to indicate the program has
nished.
• It is not recommended to use the keep warm for the Air Fry cooking
program.
Steam & Crisp
1. Machine displays the full cooking time by default
2. Press Time icon to set the cooking time. Once cooking, the display will
show the time remaining.
The Steam & Crisp cooking program default Air fry time is 20m |
Preheating+Steaming : 20m
• Press Arrow key up / down to select function «Steam & Crisp». The
screen displays the default cooking time
• Press «Time» key to activate the time setting function and then press
Arrow key up / down to change the Air fryer cooking time. Press «temp»
to change the temperature by pressing Arrow key up / down to adjust
Air fryer temperature
• Press «Start» key. Launch the cooking program, the «Start» light comes
on and the screen displays the time.
• Press «Stop» key to stop the cooking program
Sound management
Your Multicook will make beep sounds when; it turns on or off, when
launching a program, when a program is nished, when the Multicook
displays an error code.
Activate sounds for everything by Long pressing "time+Temp" together
for 3 seconds.
HOW TO GET STARTED?
General
• Temp/Timer => Shared option keys and
• Operations that require a beep
1.
=> “Beep” 1 time short
2. Key Beeps
=> While user operating the machine (Selecting
program/ adjust Time and TEMP)
3. After the cooking program
=> “Finished sound”
4. Error
=> “Beep” 2 times
• The Lighting status:
1. Always on - working status
2. Blinking- select status
USAGE
Air-fry (Manual programming)
• Press Arrow key up / down to select function «Air Fry». The screen
displays the default cooking time
• Press «Time» key to activate the time setting function and then
press Arrow key up / down to change the cooking time. Press «temp»
to change the temperature by pressing Arrow key up / down to adjust
Temperature
• Press «
» key. Launch the cooking program, the «Start» light on and
the screen displays the time.
• Press «Stop» key to stop the cooking Program if you want to stop
immediately, otherwise it will stop automatically after cooking nished.
• At the end of cooking, the beep will sound to indicate the program has
nished.
• Note: Always use this function with oil and food. With oil only, it may
cause a failure or danger

1514
EN
• Press «Start» key. Launch the cooking program, the «Start» light comes
on and the screen displays the time.
• Press «Stop» key to stop the cooking program
• At the end of cooking, the Beep will sound to indicate the program has
nished.
• Note: Always use this function with oil and food. With oil only, it may
cause a failure or danger
• Recommended Tray position : upper position and lower position
• It is not recommended to use the keep warm for the Air Fry cooking program.
Rice/Grains
• Press Arrow key up / down to select function «Rice/Grains». The screen
displays the default cooking time
• Press «Time» key to activate the time setting function and then press
Arrow key up / down to change the cooking time. Press «temp» to
change the temperature by pressing Arrow key up / down to adjust
temperature.
• Press «Start» key. Launch the cooking program, the «Start» light comes
on and the screen displays the time.
• Press «Stop» key to stop the cooking program
• At the end of cooking, the Beep will sound to indicate the program has
nished.
• Keep warm : For best results we recommend using the keep warm for a
maximum of 6 hours.
Boil
• Press Arrow key up / down to select function «Boil». The screen displays
the default cooking time
• Press «Time» key to activate the time setting function and then press
Arrow key up / down to change the cooking time.
• Press «Start» key. Launch the cooking program, the «Start» light comes
on and the screen displays the time.
• Press «Stop» key to stop the cooking program
• At the end of cooking, the Beep will sound to indicate the program has
nished.
• Note: No keep warm function for this function
• At the end of cooking, the Beep will sound to indicate the program has
nished.
• Recommended Tray position : upper position and lower position
• It is not recommended to use the keep warm for the Air Fry cooking program.
Grill
• Press Arrow key up / down to select function «Grill». The screen displays
the default cooking time
• Press «Time» key to activate the time setting function and then press
Arrow key up / down to change the cooking time. Press «temp» to
change the temperature by pressing Arrow key up / down to adjust
temperature
• Press «Start» key. Launch the cooking program, the «Start» light comes
on and the screen displays the time.
• Press «Stop» key to stop the cooking program
• At the end of cooking, the Beep will sound to indicate the program has
nished.
• Recommended Tray position : upper position and lower position
• It is not recommended to use the keep warm for the Air Fry cooking
program.
Roast/ Bake
• Press Arrow key up / down to select function «Roast/ Bake». The screen
displays the default cooking time
• Press «Time» key to activate the time setting function and then press
Arrow key up / down to change the cooking time. Press «temp» to change
the temperature by pressing Arrow key up / down to adjust temperature
• Press «Start» key. Launch the cooking program, the «Start» light comes
on and the screen displays the time.
• Press «Stop» key to stop the cooking program
• At the end of cooking, the Beep will sound to indicate the program has
nished.
• Recommended Tray position : upper position and lower position
• It is not recommended to use the keep warm for the Air Fry cooking program.
Dehydrate
• Press Arrow key up / down to select function «Dehydrate». The screen
displays the default cooking time
• Press «Time» key to activate the time setting function and then press
Arrow key up / down to change the cooking time. Press «temp» to change
the temperature by pressing Arrow key up / down to adjust Temperature

1716
EN
• At the end of cooking, the Beep will sound to indicate the program has
nished.
Reheat
• This function is intended to reheat only cooked food.
• Press Arrow key up / down to select function «Reheat ». The screen
displays the default cooking Time
• Count with Max 1 hour for time , not able to adjust the time setting
• Press «Time / temp» to change the temperature by pressing Arrow key
up / down to adjust Temperature
• Press «Start» key. Launch the cooking program, the «Start» light comes
on and the screen displays the time.
• Press «Stop» key to stop the cooking program
CAUTION
• The cold food should not exceed 1/2 of the cooker’s volume. Too
much food cannot be thoroughly heated. Repeated use of “Reheat“
or too little food will lead to burnt food and hard layer at the bottom.
• It is recommended not to reheat thick porridge, or it may become
pasty.
• Do not reheat long-stored cold food to avoid smell.
KEEP WARM
1. Keep warm function:
1.1 Manual Keep warm:
• You can press «Keep warm» key manually, the "Keep Warm" light
comes on, the multicooker enters into keep warm status.
1.2 Automatic keep warm:
• The multicooker will enter “keep warm” status automatically at
the end of the cooking (certain menus are excluded). The beep
will sound to indicate the program has nished.
• Then the multicooker will enter automatically into keep warm
status with the“Keep Warm” indicator turning on and the screen
will start to count the time of keeping warm.
• In case you need to pre-cancel the automatic keep warm when
the cooking finished : long press «Keep warm» for 5 s before
starting the cooking program. If you want to restart automatic
keep warm, press again during 5s the keep warm button.
Sauté (Manual programming)
• Press Arrow key up / down to select function «Saute». The screen
displays the default cooking time
• Press «Time» key to activate the time setting function and then press
Arrow key up / down to change the cooking time. Press «temp» to
change the temperature by pressing Arrow key up / down to adjust
temperature
• Press «Start» key. Launch the cooking program, the «Start» light comes
on and the screen displays the time.
• Press «Stop» key to stop the cooking program
• At the end of cooking, the Beep will sound to indicate the program has
nished.
• Keep warm : No auto keep warm for this recipe, user can manually turn
it on by pressing keep warm button
Slow cook
• Press Arrow key up / down to select function «Slow cook». The screen
displays the default cooking time
• Press «Time» key to activate the time setting function and then press
Arrow key up / down to change the cooking time. Press again «temp»
to change the temperature by pressing Arrow key up / down to adjust
Temperature
• Press «Start» key. Launch the cooking program, the «Start» light comes
on and the screen displays the time.
• Press «Stop» key to stop the cooking program
• At the end of cooking, the Beep will sound to indicate the program has
nished.
• Keep warm : up to24 hours, be sure to put enough liquid in the pot to
avoid burning the bottom of the pot and drying up the food
Steam
• Press Arrow key up / down to select function «Steam». The screen
displays the default cooking time
• Press «Time» key to activate the time setting function and then press
Arrow key up / down to change the cooking time.
• Press «Start» key. Launch the cooking program, the «Start» light comes
on and the screen displays the time after pre-heating.
• Press «Stop» key to stop the cooking program
1918
EN
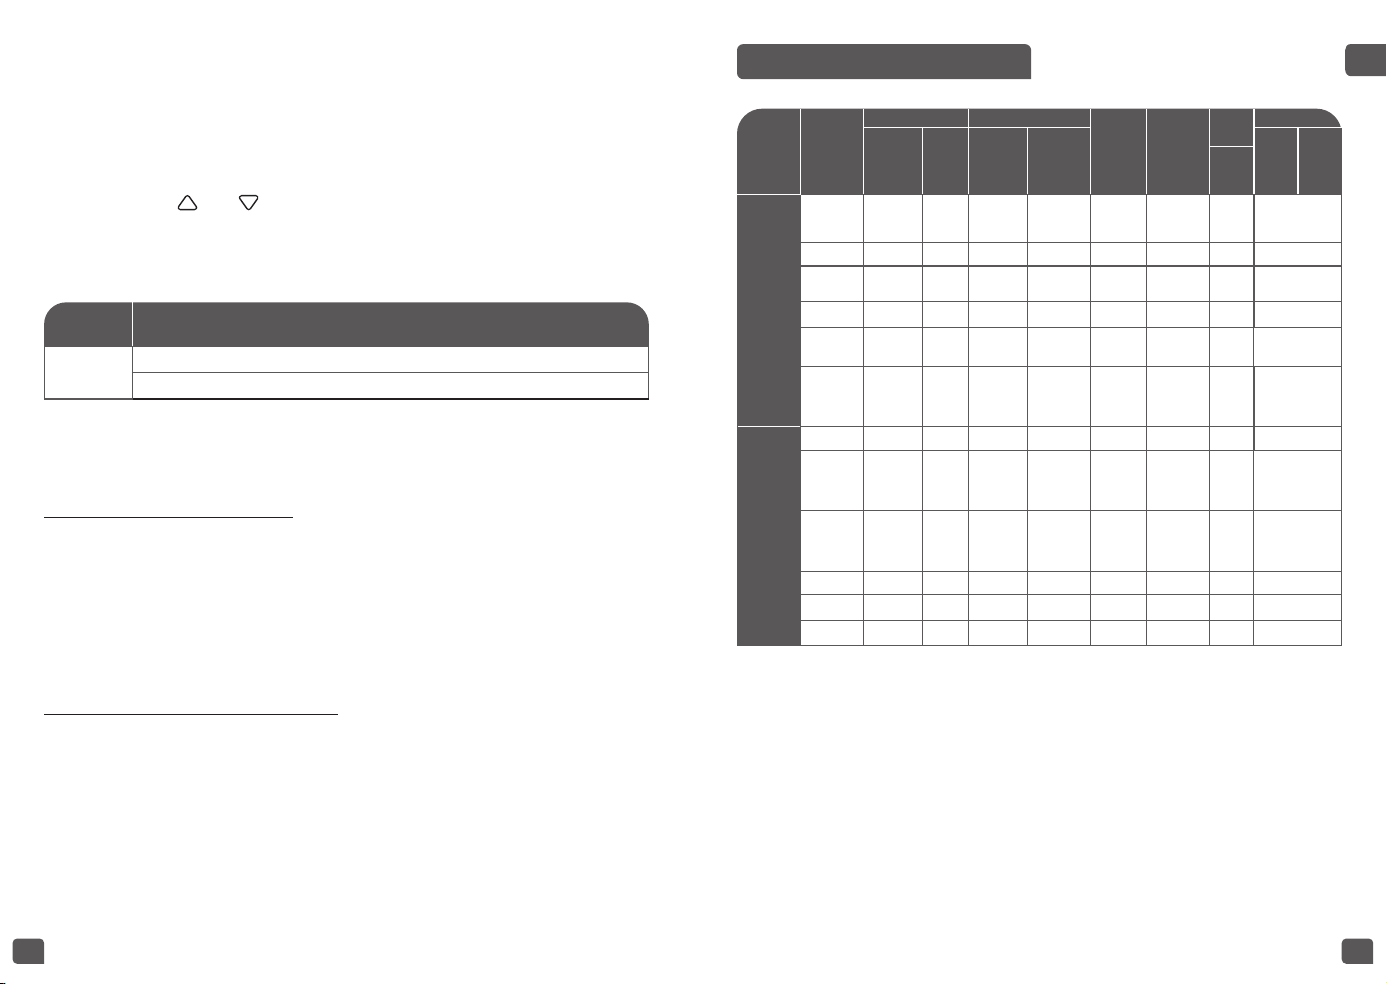
COOKING PROGRAM TABLE
Cooking
Menus
Cooking Time Temperature
Keep
warm
Later Meal
type #1 =
start heating
immediately
type #2
= start
heating later
Lid
Position
Rack
Default Range Default Range
Upper
position
Bottom
position
Open
Multicooker
Function
Rice/Grains
AUTO
(FUZZY
LOGIC)
NO
AUTO
(FUZZY
LOGIC)
NO
Up to 12H
(reco 6 H)
Type #2 Closed NO
Boil 1h 5m-4h
AUTO(100°C)
NA NO Type #1 Closed NO
Sauté
20mins
1min-1H 160°C 120°C-160°C NO NO
Open or
closed
NO
Steam 10min 1m-2h 100°C NO NO Type #2 Closed YES
Slow Cook 4H 30m-12h 80°C
70°C/80°C/
90°C
UP to 24H Type #1 Closed YES
Reheat
count up
with max
1h for
safety
NO 100°C 80°C-100°C
Up to 24H
(reco 6 H)
NO
Open or
closed
NO
Airfry
Function
Air-fry
30m
1m-1h 180°C 160°C-200°C NO NO Closed YES
Crispy Meal
15m (AIR
FRYER time)
1m-1h
Top: 200°C
Bottom:
Auto (keep
boiling)
Top only
160°C-200°C
NO NO Closed YES
Steam &
Crisp
20min (AIR
FRYER time)
5m-4h
Top: 200°C
Bottom:
Auto (keep
boiling)
Top only
160°C-200°C
NO NO Closed YES
Grill 15 m 1m-1h 200°C 160°C-200°C NO NO Closed YES
Roast/Bake 45m 5m-4h 180°C 140°C-200°C NO NO Closed YES
Dehydrate 8h 1h-12 h 60°C 40°C-70°C NO NO Closed YES
LATER MEAL
• To use the Later meal function, choose a cooking program press the key
«Later meal» and choose the preset time.
• The preset time corresponds to the time for end of cooking.
• The default preset time will change depending on the selected cooking
time. The Range of preset is from 1 up to 15 hours.
• Each press of and key can increase or decrease the time.
• When you have chosen the required preset time, press the «Start» key
to enter cooking status, the «Start» indicator will remain on and screen
will display the number of hours you have chosen.
Setting
logic
Types of Later meal
Set Later
meal
Program type #1: Start cooking immediately
Program type #2: Start cooking later (rice, steam)
USAGE SCENARIO
Setting logic: Set Later meal time
Program with Later meal #1:
• Program with Later meal type #1:
• Select a program and Press [LATER MEAL]
• Screens displays default time up to 15 hours (15:00), later meal light
ashes. User can adjust the time by pressing down arrow or up arrow.
• Press [START/STOP] to validate and launch the program. Appliance
beeps, heating starts immediately. Screen shows count down and later
meal light is on.
Program with Later meal time #2:
• Select a program and Press [LATER MEAL]
• Press [LATER MEAL], screens displays default time up to 15 hours
(15:00), later meal light ashes. User can adjust the time by pressing
down arrow or up arrow.
• Press [START/STOP] to validate and launch the program. Appliance
beeps, heating will start later closer to completion time. Screen shows
count down and later meal light is on.

2120
EN
these stains, we recommend taking out the bowl from the appliance and
placing the outer part of the bowl in a sink with a white vinegar solution
(1/4 vinegar, 3/4 water) for 15-20 mins. Rinse and wipe dry.
• Do not touch the inner lid while it is hot.
• It is recommended to clean the interior of the lid after each use to
avoid hard stains.
• The lid and the silicon seal (B) should not be dismantled.
• Wipe dry with a non-abrasive soft damp cloth and hot water. It is
recommended to avoid metallic and abrasive cleaning products.
• To clean any dirty traces around the seal (B), it is recommended to use
food-safe sanitizing wipes, damp cloth or non-abrasive sponge with hot
water (and vinegar in case of stubborn stains).
• To clean the steam outlet (D), it is recommended to use a small bottle
brush, dipped in hot water, to clean the outlet.
• To clean stains on the Grid (A) on the metallic ring of the hot plate (C)
and to nalize the cleaning of the lid, it is recommended to launch a
steam clean cycle. Mix 500ml of water to 500 ml of white vinegar and
pour into the cooking bowl. Then close the lid and activate the Steam
function for 20 mins. At the end of the cycle, open the lid and wipe off.
Bowl, steam basket
• Scouring powders and metal sponges are not recommended.
• If food has stuck to the bottom, you may put water in the bowl to soak
for a while before washing.
• Dry the bowl carefully.
Taking care of the bowl
• For the bowl, carefully follow the instructions below:
• To ensure the maintenance of bowl quality, it is recommended not to
cut food in it.
• Make sure you put the bowl back into the multicooker.
• Use the spoon provided or a wooden spoon and not a metal type so as
to avoid damaging the bowl surface –
• The colour of the bowl surface may change after using for the rst time
or after longer use. This change in colour is due to the action of steam
and water and does not have any effect on the use of the multicooker,
nor is it dangerous for your health, it is perfectly safe to continue using it.
On completion of cooking
• Open the lid
• Oven gloves must be used when handling the steam tray
• Serve the food using the spoon provided with your appliance and
reclose the lid.
• 24 hours is the maximum keeping warm time.
• Press «STOP» key to nish keep warm status.
• Press power off before unplugging the appliance
MISCELLANEOUS INFORMATION?
The appliance has a memory function. In case of power failure, the
multicooker will memorize the cooking state right before the failure, and it
will continue the cooking process if the power is resumed within 2 seconds.
If the power failure lasts for more than 2 seconds, the multicooker will
cancel previous cooking and return to standby status.
CLEANING AND MAINTENANCE
• Ensure the multicooker is unplugged and completely cool before
performing any cleaning or maintenance.
• It is strongly recommended that clean the appliance using a sponge
after each usage
• We do not recommend to use abrasive powders or scouring pads.
• If food is stuck to the bottom, pour some water into the bowl and leave
to soak for a while before washing up.
• Dry off the cooking bowl and other accessories thoroughly after each
cleaning. The bowl and the cooking tray are dishwasher safe.
• To ensure that the bowl remains in good condition, we recommend not
to cut food directly in the bowl.
• Be sure to always return the bowl to the multicooker.
• After several uses, you may notice some visible marks on the inner
coating. These marks are a normal occurrence on this special type of
coating and will not impact the functionality or non-stick performance
of the pot.
• Some discoloration may also occur on the outer material of the bowl.
This occurrence is normal at high temperature on stainless steel. This
discoloration will not affect the cooking performance of the pot. To remove
2322
EN
TROUBLESHOOTING
ProblemProblem CausesCauses SolutionsSolutions
Any indicator light off
and no heating.
The appliance is not
plugged in.
Please ensure that the
power cord is plugged
into the socket and
turned on
Any indicator light off
and heating
The indicator light has
connection issues or is
damaged."
Send the appliance to
an authorised service
centre for repair
Steam leakage during
using
The lid has been closed
incorrectly
Please open and close
the lid again.
The lid is damaged.
Send the appliance to
an authorised service
centre for repair
Automatic Keep Warm
fails (machine remains in
the cooking mode or not
heating)
The 'keep warm' function
was cancelled by the user
during the setup. Please
refer to the section on the
'keep warm' function for
more information.
Send the appliance to
an authorised service
centre for repair
The Air Fry fan is not
working
The air fryer can only
operate when the lid is
closed.
Please close the lid.
Send the appliance to
an authorized service
center for repair
The Air Fryer is not
working
Some functions have
different cooking stages,
and the air fryer may not
start immediately. This is
normal.
Refer to the cooking
program table in the
Instruction for Use
There is a little smoke
coming from the steam
vent
The following scenarios
are considered normal:
During initial use. When
there is excess oil in or
added to the food. If
there is food residue
inside the pot.
No action needed.
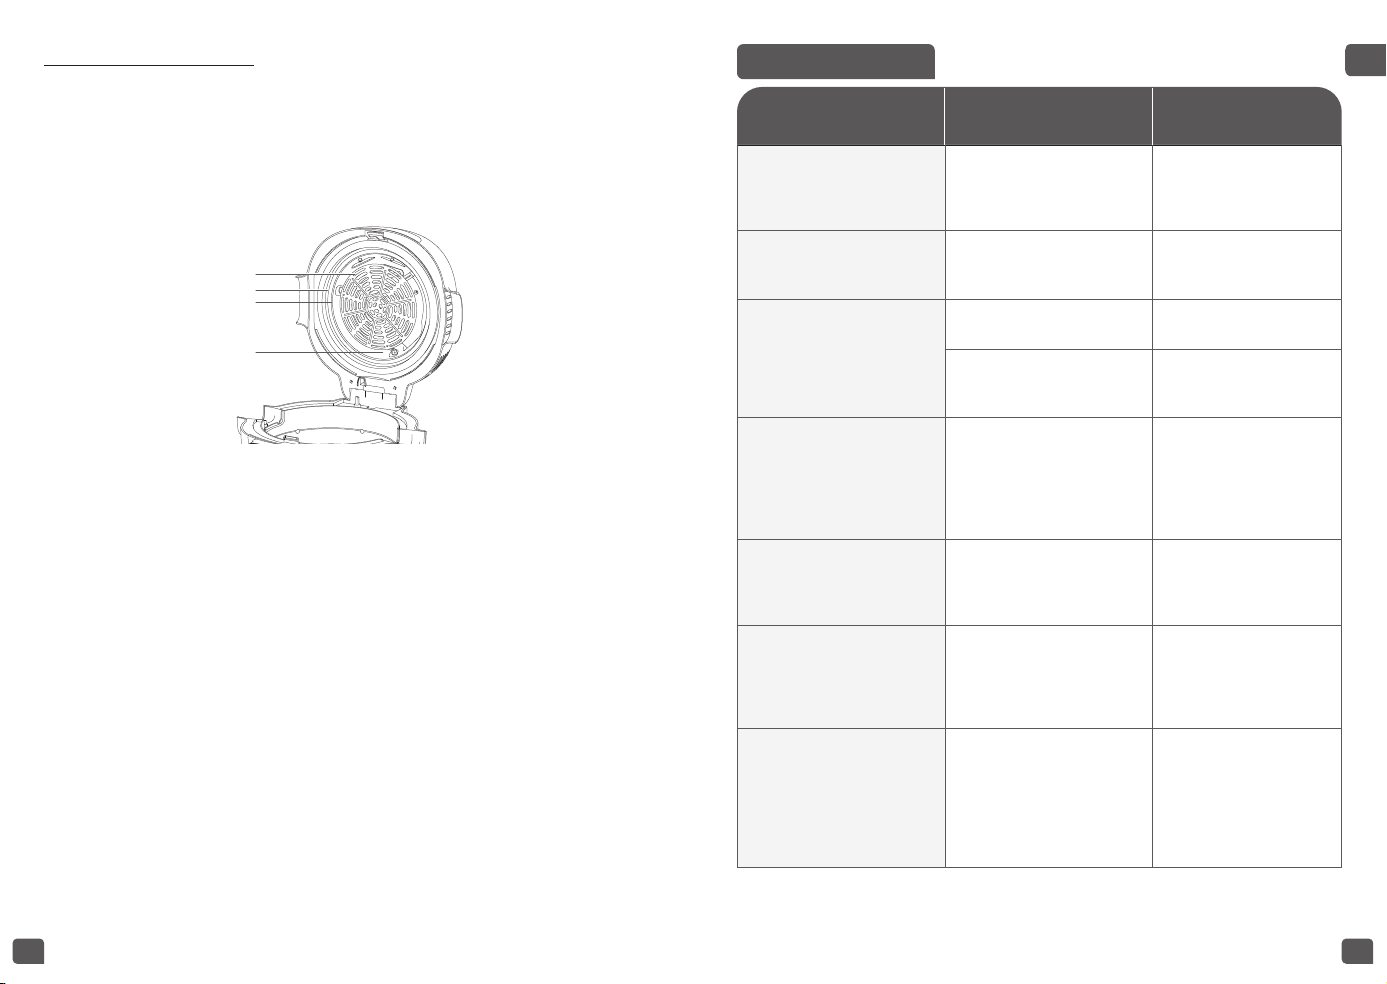
Cleaning the top lid
• Unplug the appliance and let it cool down before cleaning.
• Do not touch the inner lid while it is hot.
• It is recommended to clean the interior of the lid after each use to
avoid hard stains.
• The lid and the seal (B) should not be dismantled.
• Wipe dry with a non-abrasive soft damp cloth and hot water.
A
B
C
D
• It is recommended to avoid metallic and abrasive cleaning products.
• To clean any dirty residues around the seal it is recommended to use
food-safe sanitizing wipes, damp cloth or non-abrasive sponge with hot
water (and vinegar in case of stubborn stains).
• To clean the steam outlet (D), it is recommended to use small bottle
brush , dipped in a hot water.
• To clean o stains on the heating plate (A) on the metallic ring
of the hot plate (C) and to finalize the cleaning of the lid, it is
recommended to launch a steam clean cycle. Mix 500ml of water to
500 ml of white vinegar, and pour into the cooking bowl. Then close the
lid and activate the Steam function for 20 mins. At the end of the cycle,
open the lid and wipe off.
Cleaning and care of the other parts of the appliance
• Clean the outside of the multicooker –the inside of the lid and the cord
with a damp cloth and wipe dry. Do not use abrasive products.
• Do not use water to clean the interior of the appliance body as it could
damage the heat sensor.
24
NOTE
If you see any error codes, contact an authorised service centre
Error codeError code CauseCause Product behaviorProduct behavior
E1
Top sensor has a short
circuit
An immediate alarm is triggered on all
functions when the power is turned on.
E2
Top sensor has an open
circuit
An immediate alarm is triggered on all
functions when the power is turned on.
E3
Bottom sensor has a
short circuit
An immediate alarm is triggered on all
functions when the power is turned on.
E4
Bottom sensor has an
open circuit
An immediate alarm is triggered on all
functions when the power is turned on.
OPEN The lid failed to open
There is no open lid alarm for the Reheat,
Keep Warm, and Sauté functions.
NO Pot
There is no pot
available.
An immediate alarm is triggered on all
functions when the power is turned on.
Note: If inner bowl is deformed, do not use it anymore and get a
replacement from an authorised service centre.
2726
FR
VUE PRINCIPALE – PRODUIT
J
I
K
B
H
C
G
C1
C2
C3
A
E
L
F
D
ACCESSOIRES INCLUS
*Pièces non démontables. Ne pas démonter.
DESCRIPTION
A Corps du produit
B Panneau de commande
C Couvercle*
C1 Protection intérieure de
l’élément chauffant en
céramique*
C2Joint en silicone*
C3Sortie vapeur
D Bouton d’ouverture
E Cuve de cuisson amovible
F Élément chauffant
G Zone du récupérateur de
condensation
H Cordon d’alimentation
I Spatule
J Louche
K Verre doseur
L Grille de cuisson
2928
FR
MAX
4 L
* Do not use metallic tools.
Fig. 1 Fig. 2 Fig. 3 Fig. 4
Fig. 5 Fig. 6 Fig. 7 Fig. 8
Fig. 9 Fig. 10 Fig. 11 Fig. 12
Fig. 13 Fig. 14
IMAGES DE RÉFÉRENCE CONSIGNES DE SÉCURITÉ
PRÉCAUTIONS IMPORTANTES
• Cet appareil est destiné uniquement à un usage
domestique. Il n’est pas conçu pour être utilisé
pour les applications suivantes et la garantie ne
s’appliquepasdanslescasd’utilisationsuivants:
-lescuisinesdestinéesaupersonneldesmagasins,
bureauxetautresenvironnementsdetravail;
-lesfermes;
-les clients des hôtels, motels et autres lieux à
caractèrerésidentiel;
–lesenvironnementsdetypechambresd’hôtes.
• Cet appareil n’est pas destiné à être utilisé par
des personnes (notamment des enfants) dont les
capacités physiques, sensorielles ou intellectuelles
sont réduites, ou ayant un manque d’expérience
et de connaissances, à moins qu’elles ne soient
surveillées ou qu’elles n’aient reçu des instructions
quant à l’utilisation de l’appareil par une personne
responsable de leur sécurité.
• Il convient de surveiller les enfants pour s’assurer
qu’ils ne jouent pas avec l’appareil.
• Cet appareil ne doit pas être utilisé par des enfants
de0à8ans.Cetappareilpeutêtreutilisépardes
enfants âgés de 8 ans et plus sous surveillance

3130
FR
continue. Cet appareil peut être utilisé par des
personnes dont les capacités physiques, sensorielles
ou mentales sont réduites ou dont l’expérience
ou les connaissances ne sont pas sufsantes,
sous surveillance, si elles ont reçu des instructions
concernant l’utilisation sécurisée de l’appareil et si
elles comprennent les dangers encourus. Conservez
l’appareil et son câble hors de portée des enfants
demoinsde8ans.Lenettoyageetl’entretienpar
l’utilisateur ne doivent pas être effectués par des
enfants.
• L’appareil de cuisson doit être placé dans une
position stable et les poignées doivent être
positionnées de manière à éviter tout déversement
de liquide chaud (le cas échéant).
• Cet appareil n’est pas conçu pour fonctionner au
moyen d’une minuterie externe ou d’un système
de télécommande.
• Si le câble d’alimentation est endommagé, il doit
être remplacé par le fabricant, un centre de service
agréé ou une personne de qualication similaire
and’évitertoutdanger.
•
La température des surfaces accessibles peut
être élevée lorsque l’appareil fonctionne. Ne
touchez pas les surfaces chaudes de l’appareil.
• Nettoyez le couvercle, la cuve, le corps et la grille avec
une éponge et un peu d’eau. Nettoyez l’élément
chauffant séparément avec un chiffon humide.
Veuillezvousreporteràlasection«Nettoyage»du
mode d’emploi.
• Ne plongez jamais l’appareil ou l’élément chauffant
dansl’eau!
•L'appareilpeutêtreutiliséàunealtitudemaximalede
2000m.
• Attention : la surface de la résistance peut rester
chaude une fois l’appareil éteint.
• Attention:risque deblessureen cas d’utilisation
incorrecte de l’appareil.
• Attention:nerenversezpasdeliquidesurleconnecteur
(selon le modèle).
•
AVERTISSEMENT:gardezl’appareilhorsdeportéedes
jeunes enfants, en particulier pendant son utilisation et
son refroidissement.
•L'appareil ne doit pas être immergé dans l’eau ni
dans tout autre liquide.
Pour votre sécurité, cet appareil est conforme aux normes
et réglementations applicables (Directives basse tension,
Compatibilité électromagnétique, Matériaux en contact
avec des aliments, Environnement, etc.).
•Vériez que la tension secteur correspond à la
tension indiquée sur la plaque signalétique de
l’appareil (courant alternatif).
• Compte tenu du grand nombre de normes, si
l’appareil doit être utilisé dans un autre pays que
celui de l’achat, faites-le vérier par un centre
d’entretien agréé.

3332
FR
• Pour les modèles équipés de cordons d’alimentation
amovibles, utilisez uniquement le cordon
d’alimentation d’origine.
•Débranchez toujours votre appareil : après
utilisation, pour le déplacer ou pour le nettoyer.
• Ne faites jamais fonctionner l’appareil sous des
placards de cuisine ou près des murs, laissez au
moins15cmautourdel’appareil
• Ne déplacez jamais l’appareil s’il contient des
aliments chauds.
•N'utilisezjamaisl’appareilàvide.
• Ne laissez jamais l’appareil sans surveillance
lorsqu’il est branché et allumé.
Une odeur non toxique peut se dégager de
l’appareil lors de la première utilisation. Cela n’a pas
d’incidence sur l’utilisation de l’appareil et l’odeur
disparaîtra rapidement. Après la cuisson, ouvrez-
le délicatement à l’aide des poignées latérales du
couvercle.
AVANT LA PREMIÈRE UTILISATION
Déballage de l’appareil
• Retirez tous les autocollants apposés sur le produit.
• Sortez l’appareil de l’emballage et déballez tous les accessoires et les
documents imprimés.
• Ouvrez le couvercle en appuyant sur le bouton d’ouverture sur le couvercle
supérieur (g. 1). Lisez les instructions et suivez attentivement la
méthode d’utilisation.
• Note: l’anneau en silicone autour de la plaque doit être utilisé pendant
la cuisson.
Nettoyage de l’appareil
• Retirez la cuve (g.2), les accessoires, tout le plastique et les inserts du
produit.
• Nettoyez la cuve avec une éponge et du liquide vaisselle.
• Essuyez l’extérieur de l’appareil, la plaque en céramique du couvercle
et le couvercle avec un chiffon humide.
• Séchez-les soigneusement.
• Replacez tous les éléments dans leur position d’origine.
POUR L’APPAREIL ET TOUTES LES FONCTIONS
• Essuyez soigneusement l’extérieur de la cuve (notamment le fond).
Assurez-vous qu’il n’y a aucun résidu de nourriture ou de liquide sous la
cuve ni sur l’élément chauffant (g.7).
• Placez la cuve dans l’appareil, en vous assurant qu’elle est positionnée
correctement (g.6).
• Fermez le couvercle jusqu’à entendre un «clic».
• Suivez les indications de la section « COMMENT COMMENCER »
pour régler votre programme de cuisson et reportez-vous à chaque
programme pour plus de détails sur l’utilisation recommandée.
• Ne touchez pas l’élément chauffant au bas de l’appareil ni la plaque
métallique située à l’intérieur du couvercle lorsque le produit est
branché ou après la cuisson. Ne transportez pas le produit lorsqu’il est
en cours d’utilisation ou juste après la cuisson.
• Cet appareil est prévu pour un usage en intérieur uniquement.
• Ne placez jamais votre main sur l’orifice d’évacuation de la vapeur
pendant la cuisson, au risque de vous brûler (fig.12).
• Utilisez exclusivement la cuve fournie avec l’appareil.
• Ne versez pas d’eau et ne mettez pas d’ingrédients dans l’appareil
sans la cuve à l’intérieur.
• La quantité maximale d’eau et d’ingrédients ne doit pas dépasser le
niveau le plus élevé (4l) de la cuve. (fig.8).

3534
FR
Connexion à l’alimentation
• Ne pas utiliser l’appareil si:
– L’appareil ou le câble d’alimentation est endommagé.
– l’appareil est tombé et présente des détériorations visibles ou des
anomalies de fonctionnement
– Dans ce cas, il doit être envoyé à un centre de service agréé. Ne
démontez pas l’appareil vous-même.
• Ne laissez pas pendre le câble.
• Toujours brancher l’appareil sur une prise reliée à la terre.
• N’utilisez pas de rallonge électrique. Si vous en assumez la
responsabilité, utilisez uniquement une rallonge en bon état reliée à la
terre et adaptée à la puissance de l’appareil.
• Ne débranchez pas l’appareil en tirant sur le câble.
• Débranchez toujours l’appareil avant le montage, le démontage et le
nettoyage
Protection de l’environnement
• Votre appareil est conçu pour fonctionner pendant de nombreuses
années. Cependant, si vous décidez de le remplacer, pensez à protéger
l’environnement.
• Avant de mettre votre appareil au rebut, retirez la batterie de la
minuterie et jetez-la dans un centre de collecte des déchets local (selon
le modèle).
Participons à la protection de l’environnement!
Votre appareil contient des matériaux précieux qui peuvent être
récupérés ou recyclés.
Apportez-le dans un centre de collecte des déchets municipaux.
Utilisation
• Utilisez l’appareil sur une surface de travail plane, stable et résistante
à la chaleur, à l’abri des éclaboussures d’eau et de toutes sources de
chaleur.
• Ne laissez pas le socle de l’appareil entrer en contact avec de l’eau.
• Ne tentez jamais de faire fonctionner le produit avec la cuve vide ou
sans la cuve.
• N’empêchez pas la fonction de passer automatiquement à la fonction
de maintien au chaud.
• Ne retirez pas la cuve lorsque l’appareil fonctionne.
• Ne placez pas l’appareil directement sur une surface chaude, ni sur
toute autre source de chaleur ou de amme, au risque de provoquer
une panne ou une situation dangereuse.
• La cuve et la plaque chauffante doivent être en contact direct. Tout
objet ou aliment inséré entre ces deux pièces interférerait avec le bon
fonctionnement de l’appareil.
• Ne placez pas l’appareil à proximité d’une source de chaleur ni dans un
four chaud au risque de l’endommager sérieusement.
• Ne placez ni liquide ni aliments dans l’appareil tant que la cuve n’est pas
mise en place.
• Respectez les quantités indiquées dans les recettes.
• Si une partie quelconque de votre appareil prend feu, ne l’aspergez pas
d’eau. Pour étouffer les ammes, utilisez un torchon humide.
• Toute intervention doit uniquement être effectuée par un centre de
service à l’aide de pièces de rechange d’origine.
3736
FR
A
B
J
I
H
C
D
G
E
F
DESCRIPTION
PARAMÈTRE Description
A Indique les programmes de cuisson avec la fonction air fryer
B Pour régler le temps de cuisson
C Mise sous tension/hors tension
D
Utilisez les touches échées haut/bas pour choisir le programme
de cuisson et régler la durée et la température
E Marche/arrêt,
appuyez longuement pendant 2s pour réinitialiser
F Appuyez pour régler la température
G Maintien au chaud
H Repas différé
I Indique les programmes de cuisson avec la fonction
multicuiseur
J Afche la DURÉE, la TEMPÉRATURE, le DEPART DIFFÉRÉ et
le mode MAINTIEN AU CHAUD
Indique que la température augmente pendant la phase de
préchauffage.
LE PANNEAU DE COMMANDE
COMMENT COMMENCER?
Généralités
• Temp/minuteur => touches d’option partagées et
• Opérations nécessitant un bip sonore
1.
=> «bip» 1 fois brièvement
2. Bips des touches
=> lorsque l’utilisateur utilise la machine (sélection
du programme/réglage de la durée et de la TEMPÉRATURE)
3. Après le programme de cuisson
=> «son terminé»
4. Erreur
=> «bip» 2 fois
• État de la lumière
1. Allumée en continu : appareil en fonctionnement
2. Clignote : sélection à faire
USAGE
Air fry (programmation manuelle) (Frire à l’air chaud)
• Appuyez sur la touche échée haut/bas pour sélectionner la fonction
«Air Fry». L’écran afche le temps de cuisson par défaut
• Appuyez sur la touche «Time» pour activer la fonction de réglage
de la durée, puis appuyez sur les touches échées haut/bas pour
modier le temps de cuisson. Appuyez sur «temp» pour modier la
température et appuyer sur les touches échées haut/bas pour régler
la température
• Appuyez sur la touche «
». Lancez le programme de cuisson, le
voyant «Start» s’allume et l’écran afche la durée.
• Appuyez sur la touche «Stop» pour arrêter le programme de cuisson si vous
souhaitez l’arrêter immédiatement, sinon il s’arrêtera automatiquement
une fois la cuisson terminée.
• À la n de la cuisson, le bip sonore retentit pour indiquer que le
programme est terminé.
Gestion du son
Votre Multicook émet des bips sonores lorsqu’il s’allume ou s’éteint,
lors du lancement d’un programme, lorsqu’un programme est terminé,
lorsque le Multicook afche un code d’erreur.
Activez les sons pour tout en appuyant longuement et simultanément sur
«time+Temp» pendant 3secondes.

3938
FR
• Remarque: Utilisez toujours cette fonction avec des aliments et de
l’huile. L’utilisation d’huile uniquement peut provoquer une panne ou
un danger
Crispy meal (repas croustillant)
1. Le programme Crispy meal (repas croustillant) combine 2 modes de
cuisson : air fry et cuisson vapeur. Le produit chauffe par le bas et l’air
fryer frit par le haut pour préparer un repas croustillant.
L’appareil afche le temps de cuisson complet par défaut.
2. Appuyez sur l’icône Time pour régler le temps de cuisson. Une fois la
cuisson terminée, l’afchage indique le temps restant.
Temps de cuisson : air fry : 15 min par défaut (afchage de départ, avant réglage
de la durée) préchauffage+cuisson à la vapeur : 10 min (non modiable)
• Appuyez sur la touche échée haut/bas pour sélectionner la fonction
«Crispy meal». L’écran afche le temps de cuisson par défaut
• Appuyez sur la touche «Time» pour activer la fonction de réglage de la
durée, puis appuyez sur les touches échées haut/bas pour modier le
temps de cuisson du mode air fryer. Appuyez sur «temp» pour modier
la température en appuyant sur les touches échées haut/bas pour
régler la température du mode air fryer.
• Appuyez sur la touche «Start». Lancez le programme de cuisson, le
voyant «Start» s’allume et l’écran afche la durée.
• Appuyez sur la touche «Stop» pour arrêter le programme de cuisson
• À la n de la cuisson, le bip sonore retentit pour indiquer que le
programme est terminé.
• Il n’est pas recommandé d’utiliser la fonction de maintien au chaud
pour le programme de cuisson air fryer.
Steam & crisp (Vapeur et croustillant)
1. Le programme Steam & Crisp (vapeur et croustillant) combine 2 modes
de cuisson : air fry et cuisson vapeur.
L’appareil afche le temps de cuisson complet par défaut.
2. Appuyez sur l’icône Time pour régler le temps de cuisson. Une fois la
cuisson terminée, l’afchage indique le temps restant.
Temps de cuisson par défaut : préchauffage+cuisson à la vapeur : 20 min
(non modiable) air fryer : 20 min par défaut
• Appuyez sur la touche échée haut/bas pour sélectionner la fonction
«Steam & Crisp». L’écran afche le temps de cuisson par défaut
• Appuyez sur la touche «Time» pour activer la fonction de réglage de la
durée, puis appuyez sur les touches échées haut/bas pour modier le
temps de cuisson du mode air fryer. Appuyez sur «temp» pour modier
la température en appuyant sur les touches échées haut/bas pour
régler la température du mode air fryer.
• Appuyez sur la touche «Start». Lancez le programme de cuisson, le
voyant «Start» s’allume et l’écran afche la durée.
• Appuyez sur la touche «Stop» pour arrêter le programme de cuisson
• À la n de la cuisson, le bip sonore retentit pour indiquer que le
programme est terminé.
• Position de la plaque recommandée: position supérieure et position
inférieure.
• Si cuisson sur 2 étages, position recommandée de la grille de cuisson :
position supérieure ou inférieure.
Grill
• Appuyez sur la touche échée haut/bas pour sélectionner la fonction
«Grill». L’écran afche le temps de cuisson par défaut
• Appuyez sur la touche «Time» pour activer la fonction de réglage de la
durée, puis appuyez sur les touches échées haut/bas pour modier le
temps de cuisson. Appuyez sur «temp» pour modier la température en
appuyant sur les touches échées haut/bas pour régler la température.
• Appuyez sur la touche «Start». Lancez le programme de cuisson, le
voyant «Start» s’allume et l’écran afche la durée.
• Appuyez sur la touche «Stop» pour arrêter le programme de cuisson
• À la n de la cuisson, le bip sonore retentit pour indiquer que le
programme est terminé.
• Position recommandée de la grille de cuisson: position supérieure
ou inférieure
• Il n’est pas recommandé d’utiliser la fonction de maintien au chaud
pour le programme de cuisson air fryer.
Roast/bake (rôtir / cuire au four)
• Appuyez sur la touche échée haut/bas pour sélectionner la fonction
«Roast/ Bake». L’écran afche le temps de cuisson par défaut
• Appuyez sur la touche «Time» pour activer la fonction de réglage de la
durée, puis appuyez sur les touches échées haut/bas pour modier le
temps de cuisson. Appuyez sur «temp» pour modier la température en
appuyant sur les touches échées haut/bas pour régler la température.

4140
FR
• Appuyez sur la touche «Start». Lancez le programme de cuisson, le
voyant «Start» s’allume et l’écran afche la durée.
• Appuyez sur la touche «Stop» pour arrêter le programme de cuisson
• À la n de la cuisson, le bip sonore retentit pour indiquer que le
programme est terminé.
• Position recommandée de la grille de cuisson: position supérieure
ou inférieure
• Il n’est pas recommandé d’utiliser la fonction de maintien au chaud pour le
programme de cuisson air fryer.
Dehydrate (déshydrater)
• Appuyez sur la touche échée haut/bas pour sélectionner la fonction
«Dehydrate». L’écran afche le temps de cuisson par défaut
• Appuyez sur la touche «Time» pour activer la fonction de réglage de la
durée, puis appuyez sur les touches échées haut/bas pour modier le
temps de cuisson. Appuyez sur «temp» pour modier la température en
appuyant sur les touches échées haut/bas pour régler la température.
• Appuyez sur la touche «Start». Lancez le programme de cuisson, le
voyant «Start» s’allume et l’écran afche la durée.
• Appuyez sur la touche «Stop» pour arrêter le programme de cuisson
• À la n de la cuisson, le bip sonore retentit pour indiquer que le
programme est terminé.
• Remarque: Utilisez toujours cette fonction avec des aliments et de
l’huile. L’utilisation d’huile uniquement peut provoquer une panne ou
un danger
• Position recommandée de la grille de cuisson: position supérieure
ou inférieure
• Il n’est pas recommandé d’utiliser la fonction de maintien au chaud pour le
programme de cuisson air fryer.
Rice/grains (riz/céréales)
• Appuyez sur les touches échées haut/bas pour sélectionner la fonction
«Rice/Grains». L’écran afche le temps de cuisson par défaut
• Appuyez sur la touche «Time» pour activer la fonction de réglage de la
durée, puis appuyez sur les touches échées haut/bas pour modier le
temps de cuisson. Appuyez sur «temp» pour modier la température en
appuyant sur les touches échées haut/bas pour régler la température.
• Appuyez sur la touche «Start». Lancez le programme de cuisson, le
voyant «Start» s’allume et l’écran afche la durée.
• Appuyez sur la touche «Stop» pour arrêter le programme de cuisson
• À la n de la cuisson, le bip sonore retentit pour indiquer que le
programme est terminé.
• Maintien au chaud : pour de meilleurs résultats, nous vous
recommandons d’utiliser le maintien au chaud pendant un maximum
de 6heures.
Boil (bouillir)
• Appuyez sur la touche échée haut/bas pour sélectionner la fonction
«Boil». L’écran afche le temps de cuisson par défaut
• Appuyez sur la touche «Time» pour activer la fonction de réglage de
la durée, puis appuyez sur les touches échées haut/bas pour modier
le temps de cuisson.
• Appuyez sur la touche «Start». Lancez le programme de cuisson, le
voyant «Start» s’allume et l’écran afche la durée.
• Appuyez sur la touche «Stop» pour arrêter le programme de cuisson
• À la n de la cuisson, le bip sonore retentit pour indiquer que le
programme est terminé.
• Remarque : aucune fonction de maintien au chaud pour cette
fonction
Sauté (programmation manuelle)
• Appuyez sur la touche échée haut/bas pour sélectionner fonction
«Saute». L’écran afche le temps de cuisson par défaut
• Appuyez sur la touche «Time» pour activer la fonction de réglage de la
durée, puis appuyez sur les touches échées haut/bas pour modier le
temps de cuisson. Appuyez sur «temp» pour modier la température en
appuyant sur les touches échées haut/bas pour régler la température.
• Appuyez sur la touche «Start». Lancez le programme de cuisson, le
voyant «Start» s’allume et l’écran afche la durée.
• Appuyez sur la touche «Stop» pour arrêter le programme de cuisson
• À la n de la cuisson, le bip sonore retentit pour indiquer que le
programme est terminé.
• Maintien au chaud: pas de maintien au chaud automatique pour ce
programme, l’utilisateur peut l’activer manuellement en appuyant sur
le bouton de maintien au chaud

4342
FR
Slow cook (mijoter)
• Appuyez sur la touche échée haut/bas pour sélectionner la fonction
«Slow cook». L’écran afche le temps de cuisson par défaut
• Appuyez sur la touche «Time» pour activer la fonction de réglage de
la durée, puis appuyez sur les touches échées haut/bas pour modier
le temps de cuisson. Appuyez de nouveau sur «temp» pour modier la
température en appuyant sur les touches échées haut/bas pour régler
la température.
• Appuyez sur la touche «Start». Lancez le programme de cuisson, le
voyant «Start» s’allume et l’écran afche la durée.
• Appuyez sur la touche «Stop» pour arrêter le programme de cuisson
• À la n de la cuisson, le bip sonore retentit pour indiquer que le
programme est terminé.
• Maintien au chaud : jusqu’à 24 heures, assurez-vous de mettre
sufsamment de liquide dans la cuve pour éviter de brûler le fond de la
cuve et de sécher les aliments
Steam (vapeur)
• Appuyez sur la touche échée haut/bas pour sélectionner la fonction
«Steam». L’écran afche le temps de cuisson par défaut
• Appuyez sur la touche «Time» pour activer la fonction de réglage de
la durée, puis appuyez sur les touches échées haut/bas pour modier
le temps de cuisson.
• Appuyez sur la touche « Start ». Lancez le programme de cuisson,
le voyant « Start » s’allume et l’écran afche la durée après le
préchauffage.
• Appuyez sur la touche «Stop» pour arrêter le programme de cuisson
• À la n de la cuisson, le bip sonore retentit pour indiquer que le
programme est terminé.
Reheat (réchauer)
• Cette fonction permet de réchauer uniquement des aliments cuits.
• Appuyez sur la touche échée haut/bas pour sélectionner la fonction
«Reheat». L’écran afche le temps de cuisson par défaut.
• Pour des raisons de sécurité, ne pas dépasser une durée d’1h. Il n’est
pas possible de régler la durée.
• Appuyez sur «Time / temp» pour modier la température en appuyant
sur les touches échées haut/bas pour régler la température
• Appuyez sur la touche «Start». Lancez le programme de cuisson, le
voyant «Start» s’allume et l’écran afche la durée.
• Appuyez sur la touche «Stop» pour arrêter le programme de cuisson
ATTENTION
• Les aliments froids ne doivent pas dépasser la moitié du volume
du multicuiseur. S’il y a trop de nourriture, elle ne pourra pas être
entièrement chauée. L’utilisation répétée du menu Réchauer ou
une quantité de nourriture insusante risque de faire brûler les
aliments et de former une couche dure dans le fond du bol.
• Il est recommandé de ne pas réchauer du porridge épais, sinon il
risque de devenir pâteux.
• Ne réchauez pas les aliments froids entreposés depuis longtemps
pour éviter les odeurs.
MAINTIEN AU CHAUD
1. Fonction maintien au chaud:
1.1 Maintien au chaud manuel:
• Vous pouvez appuyer sur la touche «Keep Warm» manuellement,
le voyant « Keep Warm » s’allume et le multicuiseur passe en
mode de maintien au chaud.
1.2 Maintien au chaud automatique:
• Le multicuiseur passe automatiquement en mode «keep warm»
à la n de la cuisson (à l’exception de certains programmes). Le
bip sonore retentit pour indiquer que le programme est terminé.
• Ensuite, le multicuiseur passera automatiquement en mode
maintien au chaud avec l’indicateur de «Keep Warm» allumé et
l’écran commencera à décompter le temps de maintien au chaud.
• Dans le cas où vous devez préannuler le maintien au chaud
automatique lorsque la cuisson est terminée : appuyez
longuement sur «Keep warm» pendant 5s avant de démarrer le
programme de cuisson. Si vous souhaitez redémarrer le maintien
au chaud automatique, appuyez de nouveau pendant 5s sur le
bouton de maintien au chaud.
4544
FR
Later meal (Départ diéré)
• Pour utiliser la fonction Départ différé, choisissez un programme de cuisson,
appuyez sur la touche «Later meal» et choisissez l’heure préréglée.
• L’heure préréglée correspond à l’heure de n de la cuisson.
• La durée dénie par défaut change en fonction de la durée de cuisson
sélectionnée. La plage de préréglages est comprise entre 1 et 15heures.
• Chaque pression sur les touches et permet d’augmenter ou de
diminuer l’heure.
• Lorsque vous avez choisi l’heure souhaitée, appuyez sur la touche
«Start» pour entrer l’état de cuisson. L’indicateur «Start» reste allumé
et l’écran afche le nombre d’heures que vous avez choisi.
Logique de
réglage
Types de repas programmés
Régler un
Départ
différé
Départ différé type N°1: commencer la cuisson immédiatement
Départ différé type N°2: commencer la cuisson plus tard (riz, vapeur)
SCÉNARIO D’UTILISATION
Logique de configuration: Réglez l’heure du départ diéré
Programme avec Repas diéré nº1:
• Sélectionnez un programme et appuyez sur [LATER MEAL]
• L’écran afche l’heure par défaut jusqu’à 15heures (15h), le voyant
Départ différé clignote. L’utilisateur peut régler l’heure en appuyant
sur les touches échées haut/bas.
• Appuyez sur [START/STOP] pour valider et lancer le programme.
L’appareil émet un bip sonore, le chauffage démarre immédiatement.
L’écran afche le compte à rebours et le Départ différé s’allume.
Programme avec heure Départ diéré type N°2:
• Sélectionnez un programme et appuyez sur [LATER MEAL]
• Appuyez sur [LATER MEAL], l’écran afche l’heure par défaut jusqu’à
15heures (15h), le voyant Départ différé clignote. L’utilisateur peut
régler l’heure en appuyant sur les touches échées haut/bas.
• Appuyez sur [START/STOP] pour valider et lancer le programme.
L’appareil émet un bip, le chauffage démarrera plus tard plus près de
l’heure de n. L’écran afche le compte à rebours et le voyant Départ
différé s’allume.
TABLEAU DES PROGRAMMES DE CUISSON
Modes de
cuisson
Temps de
cuisson
Température
Maintien
au chaud
Départ diéré
type nº1 =
commencer
immédiatement
la cuisson
type nº2 =
commencer le
chauage plus
tard
Position
du
couvercle
Grille de cuisson
Par
défaut
Plage Par défaut Plage
Ouvert
Position
supérieure
Position
inférieure
Fonction
multicuiseur
Rice/Grains
(riz/céréales)
AUTO
(FUZZY
LOGIC)
NON
AUTO
(FUZZY
LOGIC)
NON
Jusqu’à
12h (reco
6h)
Type nº2 Fermé NON
Boil
(ébullition)
1h
5min
à 4h
AUTO
(100°C)
NA NON Type nº1 Fermé NON
Sauté
20min
1min
à 1h
160°C 120°C-160°C NON NON
Ouvert ou
fermé
NON
Steam
(vapeur)
10min
1min
à 2h
100°C NON NON Type nº2 Fermé OUI
Slow Cook
(cuisson
douce)
4h
30min
à 12h
80°C
70°C/80°C/
90°C
JUSQU’à
24h
Type nº1 Fermé OUI
Reheat
(réchauer)
Max 1h
pour
des
raisons
de
sécurité
NON 100°C 80°C-100°C
Jusqu’à
24h (reco
6h)
NON
Ouvert ou
fermé
NON
Fonction
air fry
Air fry
30min
1min
à 1h
180°C 160°C-200°C NON NON Fermé OUI
Crispy Meal
(repas
croustillant)
15min
(durée
friteuse
à air
chaud)
1min
à 1h
Haut:
200°C
Bas: auto
(maintien
de
l’ébullition)
Dessus
seulement
160°C-200°C
NON NON Fermé OUI
Steam
& Crisp
(vapeur et
croustillant)
20min
(durée
friteuse
à air
chaud)
5min
à 4h
Haut:
200°C
Bas: auto
(maintien
de
l’ébullition)
Dessus
seulement
160°C-200°C
NON NON Fermé OUI
Grill 15min
1min
à 1h
200°C 160°C-200°C NON NON Fermé OUI
Roast/Bake
(Rôtir/cuire)
45min
5min
à 4h
180°C 140°C-200°C NON NON Fermé OUI
Dehydrate
(déshydrater)
8h
1h à
12h
60°C 40°C-70°C NON NON Fermé OUI

4746
FR
Une fois la cuisson terminée
• Ouvrir le couvercle
• Des gants de cuisine doivent être utilisés lors de la manipulation de la
grille
• Servez les aliments avec la cuillère fournie avec votre appareil et
refermez le couvercle.
• La durée maximale de maintien au chaud est de 24heures.
• Appuyez sur la touche «STOP» pour terminer l’état de maintien au
chaud.
• Appuyez sur Arrêt avant de débrancher l’appareil
INFORMATIONS DIVERSES?
L’appareil dispose d’une fonction de mémoire. En cas de coupure de
courant, le multicuiseur mémorise l’état de cuisson juste avant la coupure
et la reprend si le courant est rétabli dans les 2secondes. Si la coupure
de courant dure plus de 2 secondes, le multicuiseur annule la cuisson
précédente et revient en mode veille.
NETTOYAGE ET ENTRETIEN
• Vériez que le multicuiseur est bien débranché et a complètement
refroidi avant d’effectuer tous travaux de nettoyage ou entretien.
• Il est vivement recommandé de nettoyer l’appareil avec une éponge
après chaque utilisation
• Les poudres à récurer et les éponges métalliques ne sont pas
recommandées.
• Si de la nourriture est collée au fond, mettez de l’eau dans la cuve et
laissez tremper un moment avant de le laver.
• Séchez soigneusement la cuve de cuisson et les autres accessoires
après chaque nettoyage. La cuve et la grille de cuisson passent au lave-
vaisselle
• Pour conserver la cuve en bon état, il est recommandé de ne pas couper
d’aliments directement dans la cuve.
• Assurez-vous de remettre la cuve en place dans le multicuiseur.
• Après plusieurs utilisations, vous remarquerez peut-être des marques
visibles sur le revêtement intérieur. Ces marques sont un phénomène
normal sur ce type de revêtement spécial et n’affecteront pas la
fonctionnalité ou la performance antiadhésive de la cuve.
• Une certaine décoloration peut également se produire sur le revêtement
extérieur de la cuve.Ce phénomène est normal à haute température sur
acier inoxydable. Cette décoloration n’affectera pas les performances de
cuisson de la cuve. Pour éliminer ces taches, nous vous recommandons de
sortir la cuve de l’appareil et de placer la partie extérieure de la cuve dans
un évier avec une solution de vinaigre blanc (1/4 de vinaigre, 3/4 d'eau)
pendant 15 à 20minutes. Rincez et essuyez.
• Ne touchez pas le couvercle intérieur lorsqu’il est chaud.
• Il est recommandé de nettoyer l’intérieur du couvercle après chaque
utilisation pour éviter les taches tenaces.
• Le couvercle et le joint en silicone (B) ne doivent pas être démontés.
• Essuyez avec un chiffon doux humide non abrasif et de l’eau chaude.
Il est recommandé d’éviter les produits de nettoyage métalliques et
abrasifs.
• Pour nettoyer toute trace de saleté autour du joint (B), il est recommandé
d’utiliser des lingettes désinfectantes alimentaires, un chiffon humide
ou une éponge non abrasive avec de l’eau chaude (et du vinaigre en
cas de taches tenaces).
• Pour nettoyer la sortie vapeur (D), il est recommandé d’utiliser un petit
goupillon trempé dans de l’eau chaude pour nettoyer la sortie.
• Pour nettoyer les taches sur la grille (A) sur l’anneau métallique de la
plaque chauffante (C) et pour naliser le nettoyage du couvercle, il est
recommandé de lancer un cycle de nettoyage à la vapeur. Mélanger
500 ml d’eau à 500 ml de vinaigre blanc et verser dans la cuve de
cuisson. Fermez ensuite le couvercle et activez la fonction vapeur
pendant 20minutes. À la n du cycle, ouvrez le couvercle et essuyez-le.
Cuve, panier vapeur
• Il est recommandé de ne pas utiliser de poudre à récurer ni d’éponge
métallique.
• Si des aliments sont collés au fond, vous pouvez mettre de l’eau dans la
cuve pour le faire tremper un moment avant de le laver.
• Séchez soigneusement la cuve.

4948
FR
Entretien de la cuve
• Pour la cuve, suivez attentivement les instructions ci-dessous:
• Pour que la cuve reste en bon état, ne coupez pas d’aliments dedans.
• Veillez à replacer la cuve dans le multicuiseur.
• Utilisez la cuillère fournie ou une cuillère en bois (évitez toute cuillère en
métal) pour éviter d’endommager la surface de la cuve.
• La couleur de la surface de la cuve peut changer après la première
utilisation ou après une utilisation prolongée. Ce changement de couleur
est dû à l’action de la vapeur et de l’eau, il n’a aucune incidence sur
l’utilisation du multicuiseur et n’est pas dangereux pour votre santé.
Vous pouvez continuer à l’utiliser en toute sécurité.
Nettoyer le couvercle supérieur
• Débranchez l’appareil et laissez-le refroidir avant de le nettoyer.
• Ne touchez pas le couvercle intérieur lorsqu’il est chaud.
• Il est recommandé de nettoyer l’intérieur du couvercle après chaque
utilisation pour éviter les taches tenaces.
• Le couvercle et le joint (B) ne doivent pas être démontés.
• Essuyez avec un chiffon doux humide non abrasif et de l’eau chaude.
A
B
C
D
• Il est recommandé d’éviter les produits de nettoyage métalliques et
abrasifs.
• Pour nettoyer tout résidu de saleté autour du joint, il est recommandé
d’utiliser des lingettes désinfectantes alimentaires, un chiffon humide
ou une éponge non abrasive avec de l’eau chaude (et du vinaigre en cas
de taches tenaces).
• Pour nettoyer la sortie vapeur (D), il est recommandé d’utiliser un petit
goupillon trempé dans de l’eau chaude.
• Pour éliminer les taches sur la plaque chauante (A) sur l’anneau
métallique de la plaque chauante (C) et pour finaliser le nettoyage
du couvercle, il est recommandé de lancer un cycle de nettoyage à
la vapeur. Mélanger 500 ml d’eau à 500 ml de vinaigre blanc et
verser dans la cuve de cuisson. Fermez ensuite le couvercle et activez
la fonction vapeur pendant 20 minutes. À la n du cycle, ouvrez le
couvercle et essuyez-le.
Nettoyage et entretien des autres pièces de l’appareil
• Nettoyez l’extérieur du multicuiseur, l’intérieur du couvercle et le câble
avec un chiffon humide, puis essuyez. N’utilisez pas de produits abrasifs.
• N’utilisez pas d’eau pour nettoyer l’intérieur de l’appareil, au risque
d’endommager le capteur thermique.
5150
FR
DÉPANNAGE
ProblèmeProblème CausesCauses SolutionsSolutions
Tous les voyants sont
éteints et l’appareil ne
chauffe pas.
L’appareil n’est pas
branché.
Assurez-vous que le
cordon d’alimentation
est branché sur la prise
et sous tension
Tous les voyants sont
éteints et l’appareil ne
chauffe pas
Le voyant présente des
problèmes de connexion
ou est endommagé.»
Envoyez l’appareil à un
centre de réparation
agréé pour le faire
réparer
Fuite de vapeur durant
l’utilisation
Le couvercle n’a pas été
fermé correctement
Veuillez ouvrir et
refermer le couvercle.
Le couvercle est
endommagé.
Envoyez l’appareil à un
centre de réparation
agréé pour le faire
réparer
Échec du maintien au
chaud automatique (le
produit reste en mode
cuisson ou ne chauffe
pas)
La fonction «keep
warm» a été annulée
par l’utilisateur pendant
le réglage. Pour plus
d’informations, reportez-
vous à la section relative
à la fonction «keep
warm».
Envoyez l’appareil à un
centre de réparation
agréé pour le faire
réparer
L’air fryer ne fonctionne
pas
L’air fryer ne peut
fonctionner que lorsque
le couvercle est fermé.
Veuillez fermer le
couvercle.
Envoyez l’appareil à un
centre de réparation
agréé pour le faire
réparer
L’air fryer ne fonctionne
pas
Certaines fonctions
ont différentes étapes
de cuisson et l’air fryer
peut ne pas démarrer
immédiatement. Ce
phénomène est normal.
Reportez-vous
au tableau des
programmes de
cuisson dans le mode
d’emploi
Si des codes d’erreur s’afchent, contacter un centre de service agréé
Code erreurCode erreur CauseCause Comportement du produitComportement du produit
E1
Le capteur supérieur
présente un court-
circuit
Une alarme est immédiatement
déclenchée sur toutes les fonctions lors
de la mise sous tension.
E2
Le capteur supérieur
présente un circuit
ouvert
Une alarme est immédiatement
déclenchée sur toutes les fonctions lors
de la mise sous tension.
E3
Le capteur inférieur
présente un court-
circuit
Une alarme est immédiatement
déclenchée sur toutes les fonctions lors
de la mise sous tension.
E4
Le capteur inférieur
présente un circuit
ouvert
Une alarme est immédiatement
déclenchée sur toutes les fonctions lors
de la mise sous tension.
OUVERT
Le couvercle ne s’ouvre
pas
Il n’y a pas d’alarme pour couvercle
ouvert pour les fonctions Réchauffer,
Maintien au chaud et Sauté.
PAS de
cuve
Il n’y a pas de cuve
disponible.
Une alarme est immédiatement
déclenchée sur toutes les fonctions lors
de la mise sous tension.
Remarque: si la cuve est déformée, ne l’utilisez plus et procurez-vous
une cuve de rechange auprès d’un centre de service agréé.
ProblèmeProblème CausesCauses SolutionsSolutions
Il y a un peu de fumée
qui sort de l’orice de
vapeur
Les scénarios suivants
sont considérés comme
normaux: Lors de la
première utilisation.
Lorsqu’il y a un excès
d’huile versé ou ajouté
aux aliments. S’il y a
des résidus d’aliments à
l’intérieur de la cuve.
Aucune action n’est
nécessaire.
REMARQUE
53
HOOFDOVERZICHT - OPENGEWERKTE TEKENING VAN HET
PRODUCT
J
I
K
B
H
C
G
C1
C2
C3
A
E
L
F
D
INBEGREPEN ACCESSOIRES
5554
NL
AFBEELDINGEN WAARNAAR WORDT VERWEZEN
MAX
4 L
* Do not use metallic tools.
Fig. 1 Fig. 2 Fig. 3 Fig. 4
Fig. 5 Fig. 6 Fig. 7 Fig. 8
Fig. 9 Fig. 10 Fig. 11 Fig. 12
Fig. 13 Fig. 14
*Niet-verwijderbare onderdelen. Niet demonteren.
A Productbehuizing
B Bedieningspaneel
C Deksel*
C1 Binnenste keramische
verwarmingsbescherming*
C2 Siliconen pakking*
C3 Stoomuitlaat
D De Open-knop
E Verwijderbare kom
F Verwarmingselement
G Gebied met
condensopvangbak (na elk
gebruik afvegen)
H Netsnoer
I Spatel
J Soeplepel
K Maatbeker
L Bakplaat
BESCHRIJVING

5756
NL
worden gebruikt door personen met fysieke, visuele
of mentale beperkingen, of die te weinig ervaring
en kennis hebben, mits ze onder toezicht staan of
aanwijzingen hebben gekregen omtrent het veilige
gebruik van het apparaat en ze de bijbehorende
gevaren begrijpen. Houd het apparaat en het
snoer buiten het bereik van kinderen jonger dan 8
jaar. Reiniging en onderhoud mogen niet worden
uitgevoerd door kinderen.
• Kookapparaten moeten worden geplaatst op een
stabiele ondergrond met de handgrepen (indien
aanwezig) zodanig geplaatst dat morsen van de
hete vloeistoffen wordt voorkomen.
• Gebruik geen externe timer of afzonderlijke
afstandsbediening om dit apparaat te bedienen.
• Als het netsnoer beschadigd is, moet het door
de fabrikant, een erkend servicecentrum of
iemand met een gelijkwaardige vakbekwaamheid
vervangen worden om elk gevaar te vermijden.
•
Toegankelijke oppervlakken kunnen heet zijn
wanneer het apparaat wordt gebruikt. Raak de
hete oppervlakken van het apparaat niet aan.
• Reinig het deksel, de kom, de behuizing van het
apparaat en de mand met een spons en wat water.
Maak het verwarmingselement afzonderlijk schoon
met een vochtige doek. Raadpleeg het gedeelte
"Reiniging" van de gebruiksaanwijzing.
• Dompel het apparaat of het verwarmingselement
VEILIGHEIDSINSTRUCTIES
BELANGRIJKE VEILIGHEIDSINSTRUCTIES
• Dit apparaat is uitsluitend bedoeld voor
huishoudelijk gebruik. Het apparaat is niet geschikt
om in de volgende toepassingen gebruikt te
worden, en de garantie geldt niet voor:
- personeelskantines in winkels, kantoren en andere
werkomgevingen;
- boerderijen;
- gebruik door gasten in hotels, motels en andere
verblijfsaccommodaties;
- gebruik in pensions en dergelijke omgevingen.
• Dit apparaat is niet bedoeld om te worden gebruikt
door personen (kinderen inbegrepen) met beperkte
fysieke, zintuiglijke of mentale vermogens, of door
personen die niet over de nodige kennis of ervaring
beschikken, tenzij zij van tevoren instructies hebben
ontvangen over het gebruik van het apparaat door
iemand die verantwoordelijk is voor hun veiligheid.
• Houd kinderen nauwlettend in het gaten, zodat ze
niet met het apparaat spelen.
• Dit apparaat mag niet worden gebruikt door
kinderen van 0 tot 8 jaar. Dit apparaat kan worden
gebruikt door kinderen van 8 jaar en ouder als deze
voortdurend onder toezicht staan. Dit apparaat kan

5958
NL
• Haal altijd de stekker uit het stopcontact na gebruik
en als u het apparaat verplaatst of reinigt.
• Gebruik het apparaat nooit onder keukenkastjes of
dicht bij muren. Zorg ervoor dat er ten minste 15
cm ruimte rondom het apparaat is.
• Beweeg het apparaat nooit als er nog heet voedsel
in zit.
• Gebruik het apparaat nooit wanneer het leeg is.
•Laathetapparaatnooitonbeheerdachterterwijl
het aangesloten en ingeschakeld is.
Wanneer u het product voor de eerste keer gebruikt,
kan er een niet-giftige geur vrijkomen. Dit heeft geen
invloed op het gebruik. De geur trekt snel weg.
Open het apparaat na de bereiding van etenswaren
voorzichtig met de handgrepen aan de zijkant van
het deksel.
VÓÓR EERSTE INGEBRUIKNAME
Het apparaat uitpakken
• Verwijder alle stickers die op het product zijn aangebracht.
• Haal het apparaat uit de verpakking en pak alle toebehoren en
documentatie uit.
• Open de deksel door op de ontgrendelingstoets op het bovendeksel van
de behuizing te drukken - afbeelding 1. Lees en volg de instructies die in
deze gebruikshandleiding zijn vermeld.
• Let op: De siliconen ring rond de plaat moet tijdens het bereiden van
etenswaren worden gebruikt.
nooit onder in water!
•Hetapparaatkantotop2000meterhoogteworden
gebruikt.
• Letop:debuitenkantvanhetverwarmingselementis
na gebruik nog warm.
• Letop:erbestaathetgevaarvanverwondingdoor
onjuist gebruik van het apparaat.
• Letop:laathetaansluitpuntnietinaanrakingkomen
met vloeistoffen (afhankelijk van het model).
•
WAARSCHUWING: Houd het apparaat buiten bereik
van jonge kinderen, vooral tijdens gebruik en tijdens het
afkoelen van het apparaat.
• Dompel het apparaat nooit onder in water of een
andere vloeistof.
Voor uw veiligheid voldoet dit apparaat aan de geldende
normen en voorschriften (richtlijnen met betrekking tot lage
voltages, elektromagnetische compatibiliteit, materialen die
in aanraking komen met voedingsmiddelen, het milieu, enz.).
• Controleer of de spanning van uw elektriciteitsnet
overeenkomt met de spanning op het typeplaatje
op het apparaat (wisselstroom).
• Aangezien er zoveel verschillende normen zijn,
moet u het apparaat, als het in een ander land
gebruikt gaat worden dan waar het gekocht is,
laten nakijken door een erkend servicecentrum.
• Gebruik voor modellen met verwijderbare
netsnoeren alleen het originele netsnoer.

6160
NL
– Het apparaat is gevallen, zichtbare schade heeft of niet goed werkt.
– In elk van bovenstaande situaties moet het apparaat naar een
erkend servicecentrum worden gestuurd. Haal het apparaat niet zelf
uit elkaar.
• Laat het snoer niet hangen.
• Sluit het apparaat altijd aan op een geaard stopcontact.
• Gebruik geen verlengsnoer. Als u hiervoor de aansprakelijkheid
aanvaardt, gebruik dan alleen een verlengsnoer dat in goede
staat verkeert, een geaarde stekker heeft en geschikt is voor de
stroomvoorziening van het apparaat.
• Ontkoppel het apparaat niet van de voeding door aan het snoer te
trekken.
• Haal altijd de stekker uit het stopcontact voordat u het apparaat in
elkaar zet, uit elkaar haalt of schoonmaakt
Bescherm het milieu
• Uw apparaat is ontworpen voor jarenlang gebruik. Besluit u echter het
apparaat te vervangen, denk er dan aan hoe u kunt bijdragen aan de
bescherming van het milieu.
• Voordat u het apparaat laat recyclen, moet u de batterij uit de
timer verwijderen en deze inleveren bij een plaatselijk gemeentelijk
afvalinzamelingspunt (afhankelijk van het model).
Denk aan het milieu!
Uw apparaat bevat materialen die geschikt zijn voor hergebruik.
Lever het in bij een afvalinzamelpunt in uw gemeente.
Gebruik
• Gebruik op een vlak, stabiel, hittebestendig werkblad, uit de buurt van
spattend water en warmtebronnen.
• Voorkom dat het basisstation van het apparaat in contact komt met
water.
• Gebruik het apparaat nooit wanneer de kom leeg is of zonder de kom.
• De functie voor het bereiden van etenswaren moet vrij kunnen werken.
• Voorkom of blokkeer de werking van de automatische warmhoudfunctie
niet.
• Verwijder de kom niet terwijl het apparaat in bedrijf is.
• Plaats het apparaat niet rechtstreeks op een heet oppervlak, op het
Het apparaat schoonmaken
• Verwijder de kom (afbeelding 2), de accessoires en alle plastic onderdelen
en inzetstukken van het product.
• Maak de kom schoon met een spons en afwasmiddel.
• Neem de buitenkant van het apparaat, de keramische plaat van het
deksel en het deksel zelf af met een vochtige doek.
• Droog alles voorzichtig af.
• Plaats alle elementen weer op hun oorspronkelijke plek.
VOOR HET APPARAAT EN ALLE FUNCTIES
• Veeg de buitenkant van de kom grondig schoon (in het bijzonder de
onderkant). Zorg ervoor dat er zich geen resten of vloeistoffen aan
de onderkant van de kom en op het verwarmingselement bevinden -
afbeelding 7.
• Plaats de kom op een juiste manier in het apparaat - afbeelding 6.
• Sluit het deksel, zodat u een klikgeluid hoort.
• Volg de instructies in het gedeelte AAN DE SLAG om uw kookmenu
in te stellen en raadpleeg elk menu voor meer informatie over het
aanbevolen gebruik.
• Raak wanneer het product is aangesloten of na de bereiding van
etenswaren nooit het verwarmingselement aan de onderkant van
het apparaat en de metalen plaat aan de binnenkant van het deksel
aan. Draag of til het apparaat niet wanneer in gebruik of net na de
bereiding.
• Dit apparaat is alleen bestemd voor gebruik binnenshuis.
• Plaats uw hand nooit op of in de nabijheid van de stoomopening
tijdens het bereiden van etenswaren. U loopt gevaar voor
brandwonden - afbeelding 12.
• Gebruik alleen de binnenkom die met het apparaat is meegeleverd.
• Giet geen water en doe geen ingrediënten in het apparaat zonder
de kom erin.
• De maximale hoeveelheid water en ingrediënten mogen de bovenste
markering binnenin de kom niet overschrijden - afbeelding 8.
Op het elektriciteitsnet aansluiten
• Gebruik het apparaat niet als:
– het apparaat of het snoer beschadigd is.
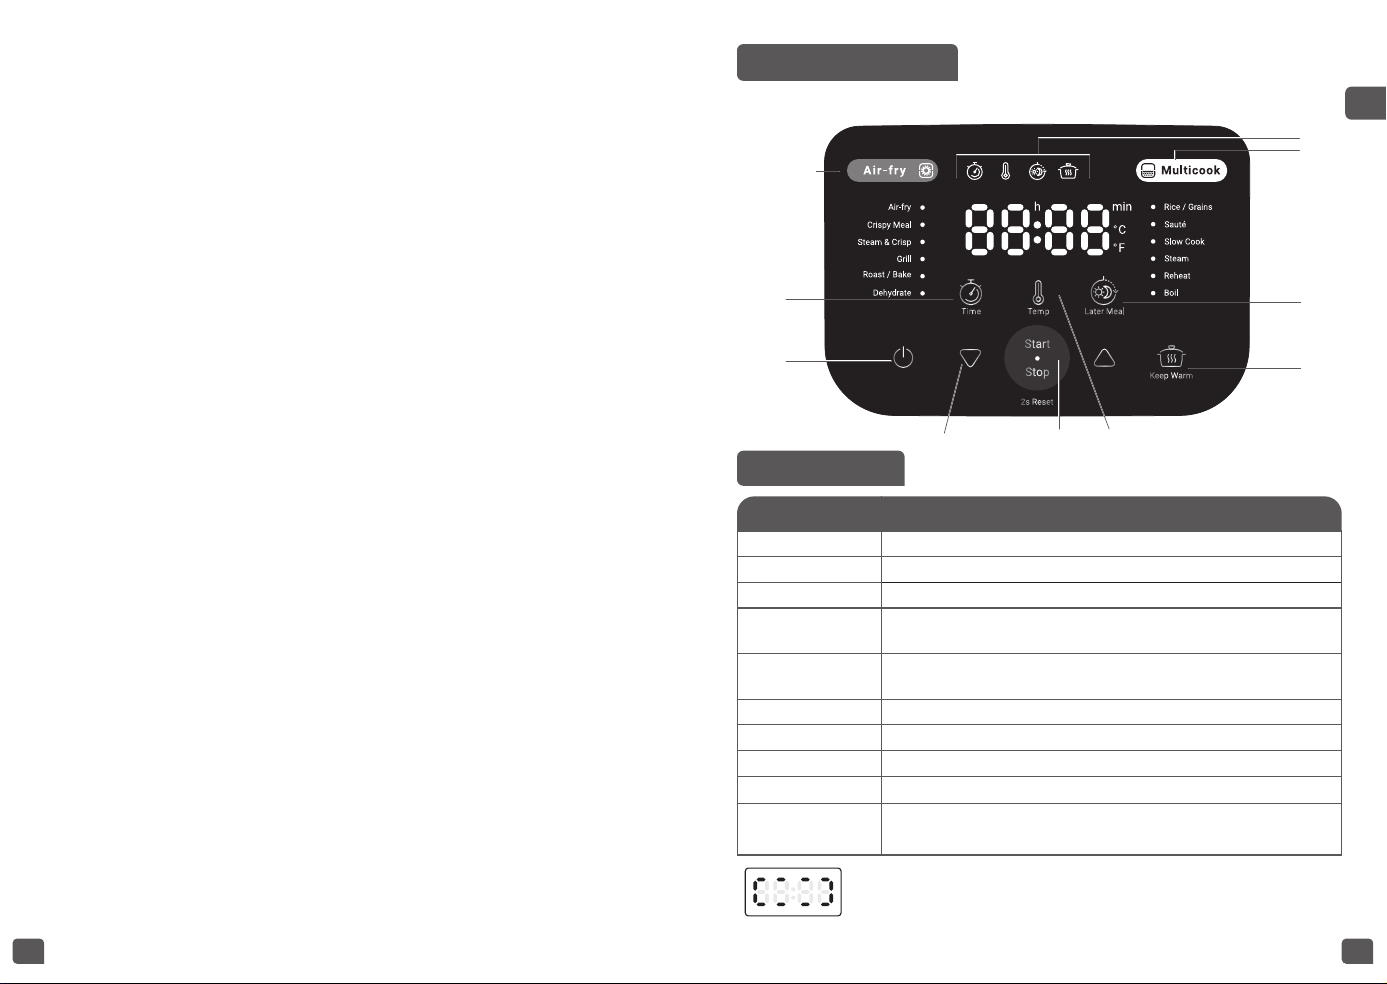
6362
NL
HET BEDIENINGSPANEEL
A
B
J
I
H
C
D
G
E
F
BESCHRIJVING
INSTELLING Beschrijving
A Geeft het kookprogramma met heteluchtfrituren aan
B Druk om de tijd in te stellen
C Voeding aan/uit
D
Kies het kookprogramma met de pijl omhoog/omlaag en
pas hiermee de tijd en temperatuur aan
E Start/Stop,
Houd 2 seconden lang ingedrukt om te resetten
F Druk om de temperatuur in te stellen
G Warm houden
H Latere maaltijd
I Geeft kookprogramma met Multicooker-functie aan
J Geeft TIJD, TEMP, LATERE MAALTIJD en WARM
HOUDEN aan
Geeft aan dat de temperatuur stijgt tijdens de
voorverwarmingsfase.
vuur of op een andere warmtebron, omdat dit schade en gevaar kan
opleveren.
• De kom en de verwarmingsplaat moeten rechtstreeks contact met
elkaar maken. Voorwerpen of etenswaren die tussen deze twee
onderdelen zijn geplaatst, kunnen de juiste werking verstoren.
• Plaats het apparaat niet bij een warmtebron of in een hete oven,
omdat dit ernstige schade kan veroorzaken.
• Doe geen etenswaren of water in het apparaat tot de kom op zijn plek zit.
• Houd u aan de hoeveelheden die in de recepten worden aangegeven.
• Als een onderdeel van het apparaat vlam vat, probeer het vuur dan
niet met water te doven. Doof de vlammen met een vochtige theedoek.
• Werkzaamheden mogen alleen met originele reserveonderdelen door
een servicecentrum worden uitgevoerd.
6564
NL
Crispy meal (knapperige maaltijd)
1. Het apparaat geeft standaard de volledige bereidingstijd weer.
Het apparaat frituurt etenswaren met hete lucht van boven naar
beneden en verwarmt etenswaren van onderen tot een knapperige
maaltijd.
2. Druk op het pictogram voor Tijd om de bereidingstijd in te stellen. Tijdens
de bereiding wordt op het display de resterende tijd weergegeven.
Het kookprogramma Crispy Meal - standaardtijd voor heteluchtfrituren:
15 minuten (startdisplay bij het instellen van de tijd) | Voorverwarmen en
stomen: 10 minuten
• Druk op de pijltoets omhoog/omlaag om de functie 'Crispy meal'
te selecteren. Op het display wordt de standaard bereidingstijd
weergegeven.
• Druk op 'Time' om de functie voor het instellen van de tijd te
activeren en druk vervolgens op de pijltoets omhoog/omlaag om de
bereidingstijd van de heteluchtfriteuse te wijzigen. Druk op 'Temp' om
de temperatuur te wijzigen door op de pijltoets omhoog/omlaag te
drukken
• Druk op 'Start'. Start het kookprogramma. Het lampje bij 'Start' gaat
branden en op het display wordt de tijd weergegeven.
• Druk op 'Stop' om het kookprogramma te stoppen
• Aan het einde van de bereiding hoort u een pieptoon om aan te geven
dat het programma is voltooid.
• Het wordt afgeraden om het warmhoudprogramma te gebruiken bij
het heteluchtfrituren.
Steam & Crisp (stomen en knapperig)
1. Het apparaat geeft standaard de volledige bereidingstijd weer
2. Druk op het pictogram voor Tijd om de bereidingstijd in te stellen. Tijdens
de bereiding wordt op het display de resterende tijd weergegeven.
Het kookprogramma Steam & Crisp heeft standaard een
heteluchtfrituurtijd van 20 minuten | Voorverwarmen + stomen: 20
minuten
• Druk op de pijltoets omhoog/omlaag om de functie 'Steam & Crisp'
te selecteren. Op het display wordt de standaard bereidingstijd
weergegeven.
• Druk op 'Time' om de functie voor het instellen van de tijd te
HOE U AAN DE SLAG GAAT
Algemeen
• Temp/Timer => Optietoetsen met meerdere functies en
• Bewerkingen met een pieptoon
1.
=> pieptoon = 1 keer kort
2. Pieptonen van toetsen
=> terwijl de gebruiker het apparaat
bedient (programma selecteren/tijd en temperatuur instellen)
3. Na het kookprogramma
=> voltooid-geluid
4. Fout
=> 2 pieptonen
• Lichtstatus
1. Altijd aan - in bedrijf
2. Knipperend - selecteer status
GEBRUIK
Air-fry (heteluchtfrituren) (handmatig programmeren)
• Druk op de pijltoets omhoog/omlaag om de functie 'Air-fry' te selecteren.
Op het display wordt de standaard bereidingstijd weergegeven
• Druk op 'Time'
om de tijdinstelfunctie te activeren en druk vervolgens
op de toets met de pijltoets omhoog/omlaag om de bereidingstijd te
wijzigen. Druk op 'Temp'
en op de pijltoets omhoog/omlaag om de
temperatuur te wijzigen
• Druk op '
'. Start het kookprogramma, het lampje bij 'Start' gaat
aan en op het display wordt de tijd aangegeven.
• Druk op 'Stop' om het kookprogramma te stoppen als u onmiddellijk wilt
stoppen, anders stopt het programma automatisch nadat de bereiding is
voltooid.
• Aan het einde van de bereiding hoort u een pieptoon om aan te geven
dat het programma is voltooid.
• Opmerking: Gebruik deze functie altijd met olie en etenswaren. Als u
alleen olie toevoegt, kan er een storing optreden of gevaar ontstaan
Geluiden beheren
De Multicook laat een pieptoon horen wanneer deze wordt in- of
uitgeschakeld, wanneer er een programma wordt gestart, wanneer een
programma is voltooid, wanneer de Multicook een foutcode weergeeft.
Activeer geluiden voor alles door de toetsen ‘Time+Temp’ 3 seconden
lang ingedrukt te houden.

6766
NL
• Druk op 'Stop' om het kookprogramma te stoppen
• Aan het einde van de bereiding klinkt de pieptoon om aan te geven dat
het programma is voltooid.
• Aanbevolen stand van de plaat: bovenste stand en onderste stand
• Het wordt afgeraden om het warmhoudprogramma te gebruiken bij het
heteluchtfrituren.
Dehydrate
• Druk op de pijltoets omhoog/omlaag om de functie 'Dehydrate'
te selecteren. Op het display wordt de standaard bereidingstijd
weergegeven.
• Druk op 'Time' om de tijdinstelfunctie te activeren en druk vervolgens
op de pijltoets omhoog/omlaag om de bereidingstijd te wijzigen. Druk
op 'Temp' en op de pijltoets omhoog/omlaag om de temperatuur te
wijzigen
• Druk op 'Start'. Start het kookprogramma. Het lampje bij 'Start' gaat
branden en op het display wordt de tijd weergegeven.
• Druk op 'Stop' om het kookprogramma te stoppen
• Aan het einde van de bereiding klinkt de pieptoon om aan te geven dat
het programma is voltooid.
• Opmerking: Gebruik deze functie altijd met olie en etenswaren. Als u
alleen olie toevoegt, kan er een storing optreden of gevaar ontstaan
• Aanbevolen stand van de plaat: bovenste stand en onderste stand
• Het wordt afgeraden om het warmhoudprogramma te gebruiken bij het
heteluchtfrituren.
Rice/Grains (rijst en granen)
• Druk op de pijltoets omhoog/omlaag om de functie 'Rice/Grains'
te selecteren. Op het display wordt de standaard bereidingstijd
weergegeven.
• Druk op 'Time' om de tijdinstelfunctie te activeren en druk vervolgens
op de pijltoets omhoog/omlaag om de bereidingstijd te wijzigen. Druk
op 'Temp' en op de pijltoets omhoog/omlaag om de temperatuur te
wijzigen
• Druk op 'Start'. Start het kookprogramma. Het lampje bij 'Start' gaat
branden en op het display wordt de tijd weergegeven.
• Druk op 'Stop' om het kookprogramma te stoppen
• Aan het einde van de bereiding klinkt de pieptoon om aan te geven dat
het programma is voltooid.
activeren en druk vervolgens op de pijltoets omhoog/omlaag om de
bereidingstijd van de heteluchtfriteuse te wijzigen. Druk op 'Temp' om
de temperatuur te wijzigen door op de pijltoets omhoog/omlaag te
drukken
• Druk op 'Start'. Start het kookprogramma. Het lampje bij 'Start' gaat
branden en op het display wordt de tijd weergegeven.
• Druk op 'Stop' om het kookprogramma te stoppen
• Aan het einde van de bereiding klinkt de pieptoon om aan te geven dat
het programma is voltooid.
• Aanbevolen stand van de plaat: bovenste stand en onderste stand
• Het wordt afgeraden om het warmhoudprogramma te gebruiken bij het
heteluchtfrituren.
Grill (grillen)
• Druk op de pijltoets omhoog/omlaag om de functie 'Grill' te selecteren.
Op het display wordt de standaard bereidingstijd weergegeven.
• Druk op 'Time' om de tijdinstelfunctie te activeren en druk vervolgens
op de pijltoets omhoog/omlaag om de bereidingstijd te wijzigen. Druk
op 'Temp' en op de pijltoets omhoog/omlaag om de temperatuur te
wijzigen
• Druk op 'Start'. Start het kookprogramma. Het lampje bij 'Start' gaat
branden en op het display wordt de tijd weergegeven.
• Druk op 'Stop' om het kookprogramma te stoppen
• Aan het einde van de bereiding klinkt de pieptoon om aan te geven dat
het programma is voltooid.
• Aanbevolen stand van de plaat: bovenste stand en onderste stand
• Het wordt afgeraden om het warmhoudprogramma te gebruiken bij
het heteluchtfrituren.
Roast/Bake (braden/bakken)
• Druk op de pijltoets omhoog/omlaag om de functie 'Roast/Bake'
te selecteren. Op het display wordt de standaard bereidingstijd
weergegeven.
• Druk op 'Time' om de tijdinstelfunctie te activeren en druk vervolgens
op de pijltoets omhoog/omlaag om de bereidingstijd te wijzigen. Druk
op 'Temp' en op de pijltoets omhoog/omlaag om de temperatuur te
wijzigen
• Druk op 'Start'. Start het kookprogramma. Het lampje bij 'Start' gaat
branden en op het display wordt de tijd weergegeven.

6968
NL
• Druk op 'Start'. Start het kookprogramma. Het lampje bij 'Start' gaat
branden en op het display wordt de tijd weergegeven.
• Druk op 'Stop' om het kookprogramma te stoppen
• Aan het einde van de bereiding klinkt de pieptoon om aan te geven dat
het programma is voltooid.
• Warm houden: tot 24 uur. Zorg ervoor dat er voldoende vloeistof in de
kom zit om te voorkomen dat de bodem van de kom aanbrandt en de
etenswaren opdrogen
Steam (stomen)
• Druk op de pijltoets omhoog/omlaag om de functie 'Steam' te
selecteren. Op het display wordt de standaard bereidingstijd
weergegeven.
• Druk op 'Time' om de tijdinstelfunctie te activeren en druk vervolgens
op de pijltoets omhoog/omlaag om de bereidingstijd te wijzigen.
• Druk op 'Start'. Start het kookprogramma. Het lampje bij 'Start'
gaat branden en op het display wordt de tijd na het voorverwarmen
weergegeven.
• Druk op 'Stop' om het kookprogramma te stoppen
• Aan het einde van de bereiding klinkt de pieptoon om aan te geven dat
het programma is voltooid.
Reheat (opwarmen)
• Deze functie is alleen bedoeld om gekookte voedingswaren opnieuw
op te warmen.
• Druk op de pijltoets omhoog/omlaag om de functie 'Reheat'
te selecteren. Op het display wordt de standaardbereidingstijd
weergegeven.
• Een tijd van maximaal 1 uur. Het is niet mogelijk om de tijdsinstelling
aan te passen.
• Druk op 'Time/Temp' en op de pijltoets omhoog/omlaag om de
temperatuur te wijzigen
• Druk op 'Start'. Start het kookprogramma. Het lampje bij 'Start' gaat
branden en op het display wordt de tijd weergegeven.
• Druk op 'Stop' om het kookprogramma te stoppen
• Warm houden: Voor de beste resultaten raden we aan de
warmhoudfunctie niet langer dan 6 uur te gebruiken.
Boil (koken)
• Druk op de pijltoets omhoog/omlaag om de functie 'Boil' te selecteren.
Op het display wordt de standaard bereidingstijd weergegeven.
• Druk op 'Time' om de tijdinstelfunctie te activeren en druk vervolgens
op de pijltoets omhoog/omlaag om de bereidingstijd te wijzigen.
• Druk op 'Start'. Start het kookprogramma. Het lampje bij 'Start' gaat
branden en op het display wordt de tijd weergegeven.
• Druk op 'Stop' om het kookprogramma te stoppen
• Aan het einde van de bereiding klinkt de pieptoon om aan te geven dat
het programma is voltooid.
• Opmerking: Deze functie heeft geen Warm houden
Sauté (fruiten) (handmatig programmeren)
• Druk op de pijltoets omhoog/omlaag om de functie 'Sauté' te selecteren.
Op het display wordt de standaard bereidingstijd weergegeven.
• Druk op 'Time' om de tijdinstelfunctie te activeren en druk vervolgens
op de pijltoets omhoog/omlaag om de bereidingstijd te wijzigen. Druk
op 'Temp' en op de pijltoets omhoog/omlaag om de temperatuur te
wijzigen
• Druk op 'Start'. Start het kookprogramma. Het lampje bij 'Start' gaat
branden en op het display wordt de tijd weergegeven.
• Druk op 'Stop' om het kookprogramma te stoppen
• Aan het einde van de bereiding klinkt de pieptoon om aan te geven dat
het programma is voltooid.
• Warm houden: Er is geen automatische warmhoudfunctie voor dit
recept. De gebruiker kan het recept handmatig inschakelen door op
'Keep warm' te drukken.
Slow cook (langzaam koken)
• Druk op de pijltoets omhoog/omlaag om de functie 'Slow Cook'
te selecteren. Op het display wordt de standaard bereidingstijd
weergegeven.
• Druk op 'Time' om de tijdinstelfunctie te activeren en druk vervolgens
op de pijltoets omhoog/omlaag om de bereidingstijd te wijzigen. Druk
nog een keer op 'Temp' en op de pijltoets omhoog/omlaag om de
temperatuur te wijzigen

7170
NL
• De vooraf ingestelde tijd komt overeen met de eindtijd van het
bereidingsproces.
• De standaardinsteltijd wordt gewijzigd en is afhankelijk van de
geselecteerde bereidingstijd. Het bereik van de insteltijd is tussen 1 en
15 uur.
• Met elke druk op de toets
of wordt de tijd aangepast.
• Druk na het kiezen van de gewenste insteltijd op 'Start' om de
bereidingsstatus te starten. Het lampje bij 'Start' blijft branden en op
het display wordt het aantal uren weergegeven dat u hebt gekozen.
Instellings
logica
Soorten Latere maaltijd
Stel latere
maaltijd in
Programmatype 1: Onmiddellijk beginnen met koken
Programmatype 2: Later beginnen met koken (Rice, Steam)
GEBRUIKSSCENARIO
Instellingslogica: Latere maaltijd instellen
Programma met Latere maaltijd 1:
• Programma met Latere maaltijd type 1:
• Selecteer een programma en druk op 'Later meal'
• Op het display wordt de standaardtijd tot 15 uur (15:00) weergegeven,
waarna het lampje bij 'Later Meal' knippert. De gebruiker kan de tijd
aanpassen door op de pijl omhoog/omlaag te drukken.
• Druk op 'Start/Stop' om het programma te bevestigen en te starten.
Het apparaat piept, het verwarmen begint onmiddellijk. Op het display
wordt het aftellen weergegeven en het lampje bij 'Later Meal' gaat
branden.
Programma met tijd voor Latere maaltijd 2:
• Selecteer een programma en druk op 'Later meal'
• Druk op 'Later meal'. Op het display wordt de standaardtijd tot 15 uur
(15:00) weergegeven, waarna het lampje bij 'Later meal' knippert. De
gebruiker kan de tijd aanpassen door op de pijl omhoog/omlaag te
drukken.
• Druk op 'Start/Stop' om het programma te bevestigen en te starten.
Het apparaat piept, het verwarmen begint later en dichter bij de tijd
dat het voltooid is. Op het display wordt aftellen weergegeven en het
lampje bij 'Later Meal' gaat branden.
LET OP
• De koude etenswaren mogen de helft van het volume van de kom
niet overschrijden. De koude etenswaren worden onvoldoende
opgewarmd wanneer er zich te veel etenswaren in de kom bevinden.
Het herhaaldelijk gebruiken van 'Reheat' of te weinig etenswaren
in de kom leidt tot aangebrande etenswaren of een harde laag
onderin.
• Het wordt niet aanbevolen om dikke havermoutpap opnieuw op te
warmen, omdat deze papperig wordt.
• Warm lang bewaarde, koude etenswaren niet op om geuren te
voorkomen.
KEEP WARM (WARM HOUDEN)
1. De warmhoudfunctie:
1.1 Handmatig warm houden:
• Druk handmatig op 'Keep warm'. Het lampje bij 'Keep warm' gaat
aan en de Multicooker schakelt over naar de warmhoudstatus.
1.2 Automatisch warm houden:
• De Multicooker schakelt automatisch de warmhoudstatus in
na het einde van het bereidingsproces (bepaalde menu's zijn
uitgesloten). Er klinkt een pieptoon om aan te geven dat het
programma is voltooid.
• Daarna schakelt de Multicooker automatisch over naar
de warmhoudstatus, wordt het indicatielampje bij 'Keep
warm' ingeschakeld en wordt het display met de resterende
warmhoudtijd weergegeven.
• In het geval u de automatische warmhoudfunctie vooraf wilt
annuleren wanneer de bereiding klaar is: Houd 'Keep warm' 5
seconden lang ingedrukt voordat u het kookprogramma start.
Als u het automatisch warm houden opnieuw wilt inschakelen,
druk dan nog een keer 5 seconden op 'Keep warm'.
LATER MEAL (LATERE MAALTIJD)
• Als u de functie Latere maaltijd wilt gebruiken, kies dan eerst een
kookprogramma, druk daarna op 'Later Meal' en kies de vooraf ingestelde
tijd.
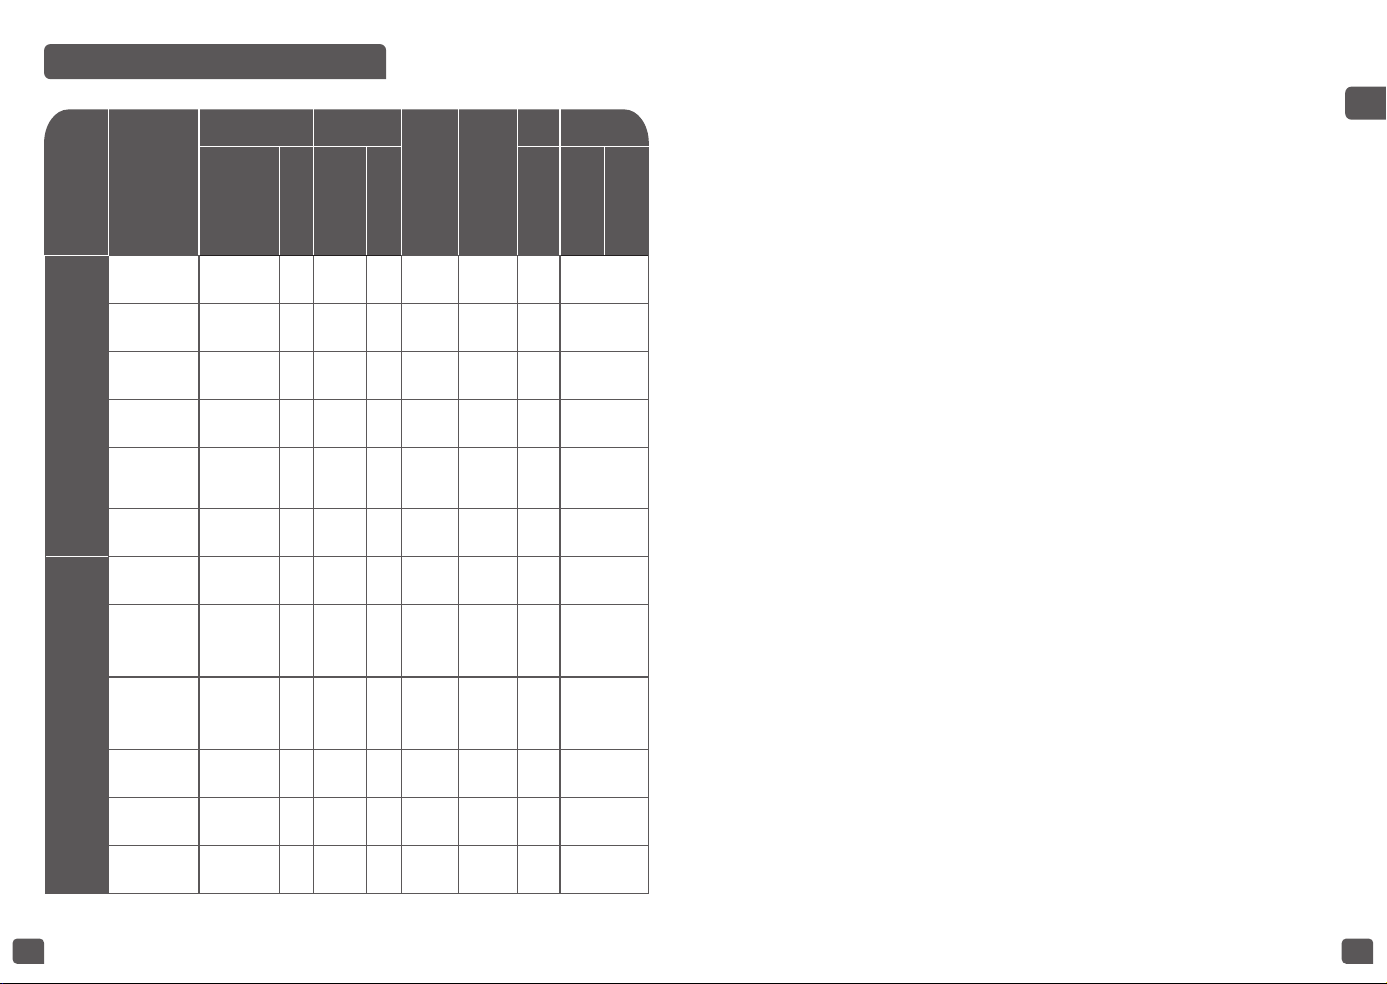
7372
NL
Na het koken
• Open het deksel
• Gebruik ovenhandschoenen bij het hanteren van de stoomplaat
• Dien de etenswaren op met de meegeleverde lepel en sluit het deksel.
• De maximale warmhoudtijd is 24 uur.
• Druk op 'Stop' om de warmhoudstatus te beëindigen.
• Druk op de uit-toets voordat u de stekker uit het stopcontact haalt
EXTRA INFORMATIE?
Het apparaat beschikt over een geheugenfunctie. In geval van een
stroomonderbreking onthoudt de Multicooker de bereidingsstatus net
voor de onderbreking. Het bereidingsproces wordt hervat in geval de
stroomonderbreking korter dan 2 seconden is. Als de stroomonderbreking
langer dan 2 seconden is, dan wordt de vorige bereidingsstatus
geannuleerd en gaat de Multicooker over op de Stand-by-stand.
REINIGING EN ONDERHOUD
• Controleer of de stekker uit het stopcontact is verwijderd en laat de
Multicooker volledig afkoelen voorafgaand aan reiniging of onderhoud.
• Het wordt ten zeerste aanbevolen het apparaat na elk gebruik met een
spons schoon te maken
• Het gebruik van schuurpoeders en schuursponsjes wordt afgeraden.
• Als er etenswaren op de bodem vast zijn komen te zitten, giet dan
wat water in de kom en laat de resten enige tijd weken voordat u de
viezigheid wegspoelt.
• Droog de kom en andere accessoires na elke reiniging grondig af. De
kom en de bakplaat mogen in de vaatwasmachine.
• Om ervoor te zorgen dat de kom in goede staat blijft, raden we aan
geen etenswaren rechtstreeks in de kom te snijden.
• Plaats de kom altijd terug in de Multicooker.
• Na meerdere keren gebruik ziet u mogelijk enkele zichtbare markeringen
op de binnenste coating. Deze markeringen komen normaal voor op dit
speciale type coating en hebben geen invloed op de functionaliteit of
de anti-aanbakwerking van de kom.
• Er kan ook enige verkleuring optreden op het buitenste materiaal van
de kom.Dit gebeurt normaal bij hoge temperatuur op roestvrij staal. Deze
TABEL MET KOOKPROGRAMMA'S
Kookmenu's
Bereidingstijd Temperatuur
Keep warm
(warm
houden)
Later meal
(latere
maaltijd)
type 1 = nu
beginnen
met
verwarmen
type 2
= later
beginnen
met
verwarmen
Stand
van
deksel
Rooster
Standaard Bereik Standaard Bereik Openen
Bovenste
stand
Onderste
stand
Multicooker-
functie
Rice/Grains (rijst
en granen)
AUTO
(FUZZY LOGIC)
NEE
AUTO
(FUZZY
LOGIC)
NEE
Tot 12
uur (6 uur
aanbevolen)
Type 2 Dicht NEE
Boil (koken) 1 uur
5 min.
- 4
uur
AUTO
(100 °C)
N.V.T. NEE Type 1 Dicht NEE
Sauté (fruiten)
20 min.
1 min.
- 1
uur
160 °C
120 °C-
160 °C
NEE NEE
Open of
gesloten
NEE
Steam (stomen) 10 min.
1 min.
- 2
uur
100 °C NEE NEE Type 2 Dicht JA
Slow Cook
(langzaam koken)
4 uur
30
min.
- 12
uur
80 °C
70 °C/
80 °C/
90°C
TOT 24 uur Type 1 Dicht JA
Reheat
(opwarmen)
Maximaal 1
uur voor de
veiligheid
NEE 100 °C
80 °C-
100 °C
Tot 24
uur (6 uur
aanbevolen)
NEE
Open of
gesloten
NEE
Air-fry-
functie
Air-fry
(heteluchtfrituren)
30 min.
1 min.
- 1
uur
180 °C
160 °C-
200 °C
NEE NEE Dicht JA
Crispy meal
(knapperige
maaltijd)
15 min (tijd
heteluchtfriteuse)
1 min.
- 1
uur
Boven:
200°C
Onder:
Auto (blijft
koken)
Boven
slechts
160 °C-
200 °C
NEE NEE Dicht JA
Steam & Crisp
(stomen en
knapperig)
20 min. (tijd
heteluchtfriteuse)
5 min.
- 4
uur
Boven:
200°C
Onder:
Auto (blijft
koken)
Boven
slechts
160 °C-
200 °C
NEE NEE Dicht JA
Grill (grillen) 15 min.
1 min.
- 1
uur
200 °C
160 °C-
200 °C
NEE NEE Dicht JA
Roast/Bake
(braden/bakken)
45 min.
5 min.
- 4
uur
180 °C
140 °C-
200 °C
NEE NEE Dicht JA
Dehydrate
(drogen)
8 uur
1 uur
- 12
uur
60 °C
40 °C-
70 °C
NEE NEE Dicht JA

7574
NL
keukengerei om schade aan de kom te voorkomen.
• De kleur van het oppervlak kan na ingebruikname of na verloop van tijd
wijzigen. Deze kleurwijziging is te wijten aan de werking van stoom en
water en heeft geen invloed op de juiste werking van de Multicooker. Dit
is tevens niet schadelijk voor uw gezondheid. U kunt het apparaat dus
zonder enig probleem verder gebruiken.
Het bovendeksel schoonmaken
• Haal de stekker van het apparaat uit het stopcontact en laat het
afkoelen alvorens te reinigen.
• Raak het binnendeksel niet aan als het heet is.
• Het wordt aanbevolen de binnenkant van het deksel na elk gebruik
schoon te maken om hardnekkige vlekken te voorkomen.
• Het deksel en de afdichting (B) mogen niet uit elkaar worden gehaald.
• Veeg droog met een niet-schurende, zachte, vochtige doek en heet
water.
A
B
C
D
• Het wordt aanbevolen om metalen en schurende reinigingsmiddelen te
vermijden.
• Voor het verwijderen van vuil rond de afdichting wordt aangeraden
om voedselveilige reinigingsdoekjes, een vochtige doek of een niet-
schurende spons met heet water te gebruiken (en azijn in geval van
hardnekkige vlekken).
• Voor het schoonmaken van de stoomuitlaat (D) wordt aangeraden
een kleine essenborstel te gebruiken die in warm water gedompeld is.
• Voor het verwijderen van vlekken op de verwarmingsplaat (A) op de
metalen ring van de verwarmingsplaat (C) en het schoonmaken van
het deksel wordt aangeraden een stoomreinigingscyclus te starten.
Meng 500 ml water en 500 ml witte azijn en giet dit in de kom. Sluit
verkleuring heeft geen invloed op de bereidingsprestaties van de kom.
Om deze vlekken te verwijderen, raden we u aan de kom uit het apparaat
te halen en het buitenste gedeelte van de kom 15-20 minuten in een
gootsteen te plaatsen met een witte-azijnoplossing (1/4 azijn, 3/4 water).
Spoel af en veeg droog.
• Raak het binnendeksel niet aan als het heet is.
• Het wordt aanbevolen de binnenkant van het deksel na elk gebruik
schoon te maken om hardnekkige vlekken te voorkomen.
• Het deksel en de siliconen afdichting (B) mogen niet gedemonteerd
worden.
• Veeg droog met een niet-schurende, zachte, vochtige doek en heet water.
Het wordt aanbevolen om metalen en schurende reinigingsmiddelen te
vermijden.
• Voor het verwijderen van vuil rond de afdichting (B) wordt aangeraden
om voedselveilige reinigingsdoekjes, een vochtige doek of een niet-
schurend sponsje met heet water te gebruiken (en azijn in geval van
hardnekkige vlekken).
• Om de stoomuitlaat (D) schoon te maken, raden wij aan om een kleine
essenborstel te gebruiken die in heet water gedompeld is.
• Om vlekken op het rooster (A) op de metalen ring van de
verwarmingsplaat (C) te verwijderen en het deksel schoon te maken,
is het raadzaam een stoomreinigingscyclus te starten. Meng 500 ml
water en 500 ml witte azijn en giet dit in de kom. Sluit vervolgens het
deksel en activeer de Steam-functie gedurende 20 minuten. Open aan
het einde van de cyclus het deksel en veeg het vuil weg.
Kom, stoommand
• Gebruik geen schuurpoeders of metalen sponsjes.
• Als er etenswaren aan de bodem vastkleven, giet dan water in de kom
en laat dit weken. Was daarna de kom uit.
• Veeg de kom voorzichtig droog.
De kom onderhouden
• Volg onderstaande instructies voor de kom:
• Om de kom in goede staat te houden, moet u geen etenswaren snijden
die in de kom liggen.
• Zorg dat u de kom vervolgens opnieuw in de Multicooker plaatst.
• Gebruik de meegeleverde of een houten lepel en geen metalen
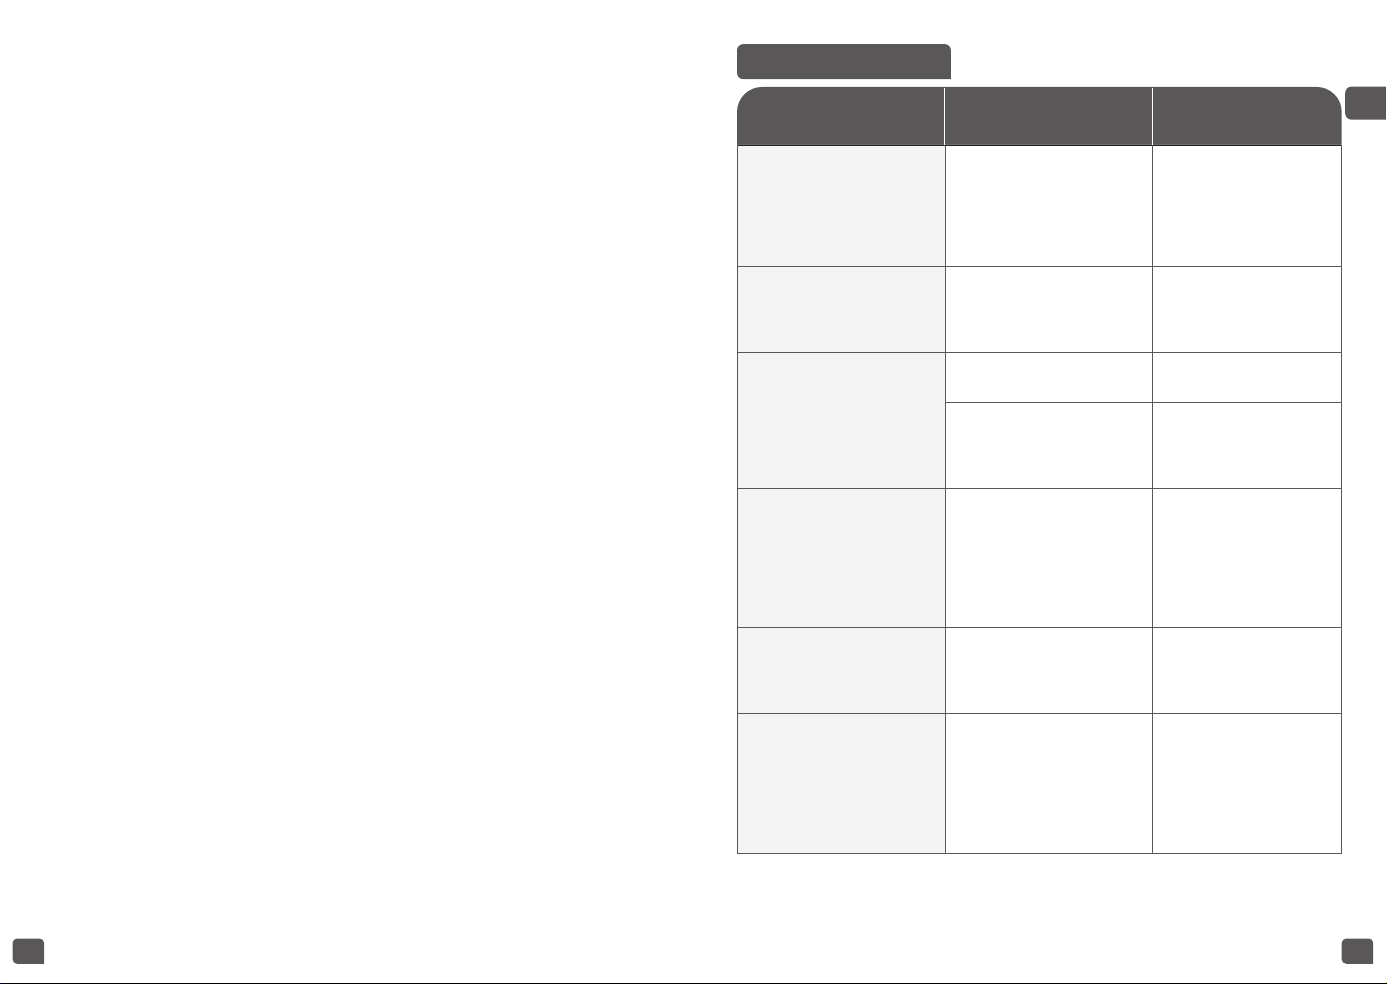
7776
NL
PROBLEEMOPLOSSING
ProbleemProbleem OorzaakOorzaak OplossingenOplossingen
Alle indicatielampjes
uit en apparaat warmt
niet op.
De stekker steekt niet in
het stopcontact.
Zorg ervoor dat
het netsnoer is
aangesloten op
het stopcontact
en het apparaat is
ingeschakeld
Alle indicatielampjes uit,
maar apparaat warmt op.
Het indicatielampje heeft
een verbindingsprobleem
of is beschadigd.
Stuur het apparaat
ter reparatie naar een
erkend servicecentrum.
Stoomlek tijdens werking
Het deksel is niet goed
gesloten
Open het deksel en
sluit dit opnieuw.
Het deksel is beschadigd.
Stuur het apparaat
ter reparatie naar een
erkend servicecentrum.
De automatische
warmhoudfunctie werkt
niet (apparaat blijft in
de bereidingsmodus of
verwarmt niet)
De warmhoudfunctie
is tijdens het instellen
door de gebruiker
uitgeschakeld. Raadpleeg
het gedeelte over de
warmhoudfunctie voor
meer informatie.
Stuur het apparaat
ter reparatie naar een
erkend servicecentrum.
De ventilator voor
heteluchtfrituren werkt
niet
De heteluchtfriteuse
werkt alleen als het
deksel gesloten is.
Sluit het deksel.
Stuur het apparaat
ter reparatie naar een
erkend servicecentrum
De heteluchtfriteuse
werkt niet
Sommige functies
hebben verschillende
bereidingsfasen en
de heteluchtfriteuse
start mogelijk niet
onmiddellijk. Dit is
normaal.
Raadpleeg
de tabel met
kookprogramma's in
de gebruiksaanwijzing
vervolgens het deksel en activeer de Steam-functie gedurende 20
minuten. Open aan het einde van de cyclus het deksel en veeg het vuil
weg.
Reiniging en onderhoud van andere delen van het
apparaat
• Reinig de buitenkant van de Multicooker, de binnenkant van de deksel
en het snoer met een vochtige doek en veeg droog. Gebruik geen
schurende middelen.
• Gebruik geen water om de binnenkant van de behuizing van het
apparaat schoon te maken, omdat dit de hittesensor kan beschadigen
78
OPMERKING
Neem contact op met een erkend servicecentrum als er foutcodes
worden weergegeven
FoutcodeFoutcode OorzaakOorzaak Gedrag van het productGedrag van het product
E1
De bovenste sensor
heeft kortsluiting
Er wordt bij elke functie onmiddellijk
een alarm geactiveerd wanneer de
stroom wordt ingeschakeld.
E2
De bovenste sensor is
onderbroken
Er wordt bij elke functie onmiddellijk
een alarm geactiveerd wanneer de
stroom wordt ingeschakeld.
E3
Onderste sensor heeft
kortsluiting
Er wordt bij elke functie onmiddellijk
een alarm geactiveerd wanneer de
stroom wordt ingeschakeld.
E4
Onderste sensor is
onderbroken
Er wordt bij elke functie onmiddellijk
een alarm geactiveerd wanneer de
stroom wordt ingeschakeld.
Openen
Het deksel kan niet
worden geopend
Er is geen alarm voor een open deksel
tijdens het gebruik van de functies
Reheat, Keep warm en Sauté.
GEEN kom
Er is geen kom
beschikbaar.
Er wordt bij elke functie onmiddellijk
een alarm geactiveerd wanneer de
stroom wordt ingeschakeld.
Opmerking: Als de binnenkom vervormd is, gebruik deze dan niet meer
en schaf een nieuwe binnenkom aan bij een erkend servicecentrum.
ProblèmeProblème CausesCauses SolutionsSolutions
Er komt een beetje rook
uit de stoomopening
De volgende scenario's
worden als normaal
beschouwd: Tijdens
het eerste gebruik. Als
er overtollige olie in of
aan de etenswaren is
toegevoegd. Als er resten
etenswaren in de kom
zitten.
Geen actie nodig.

3206001657/02