

RS- 70
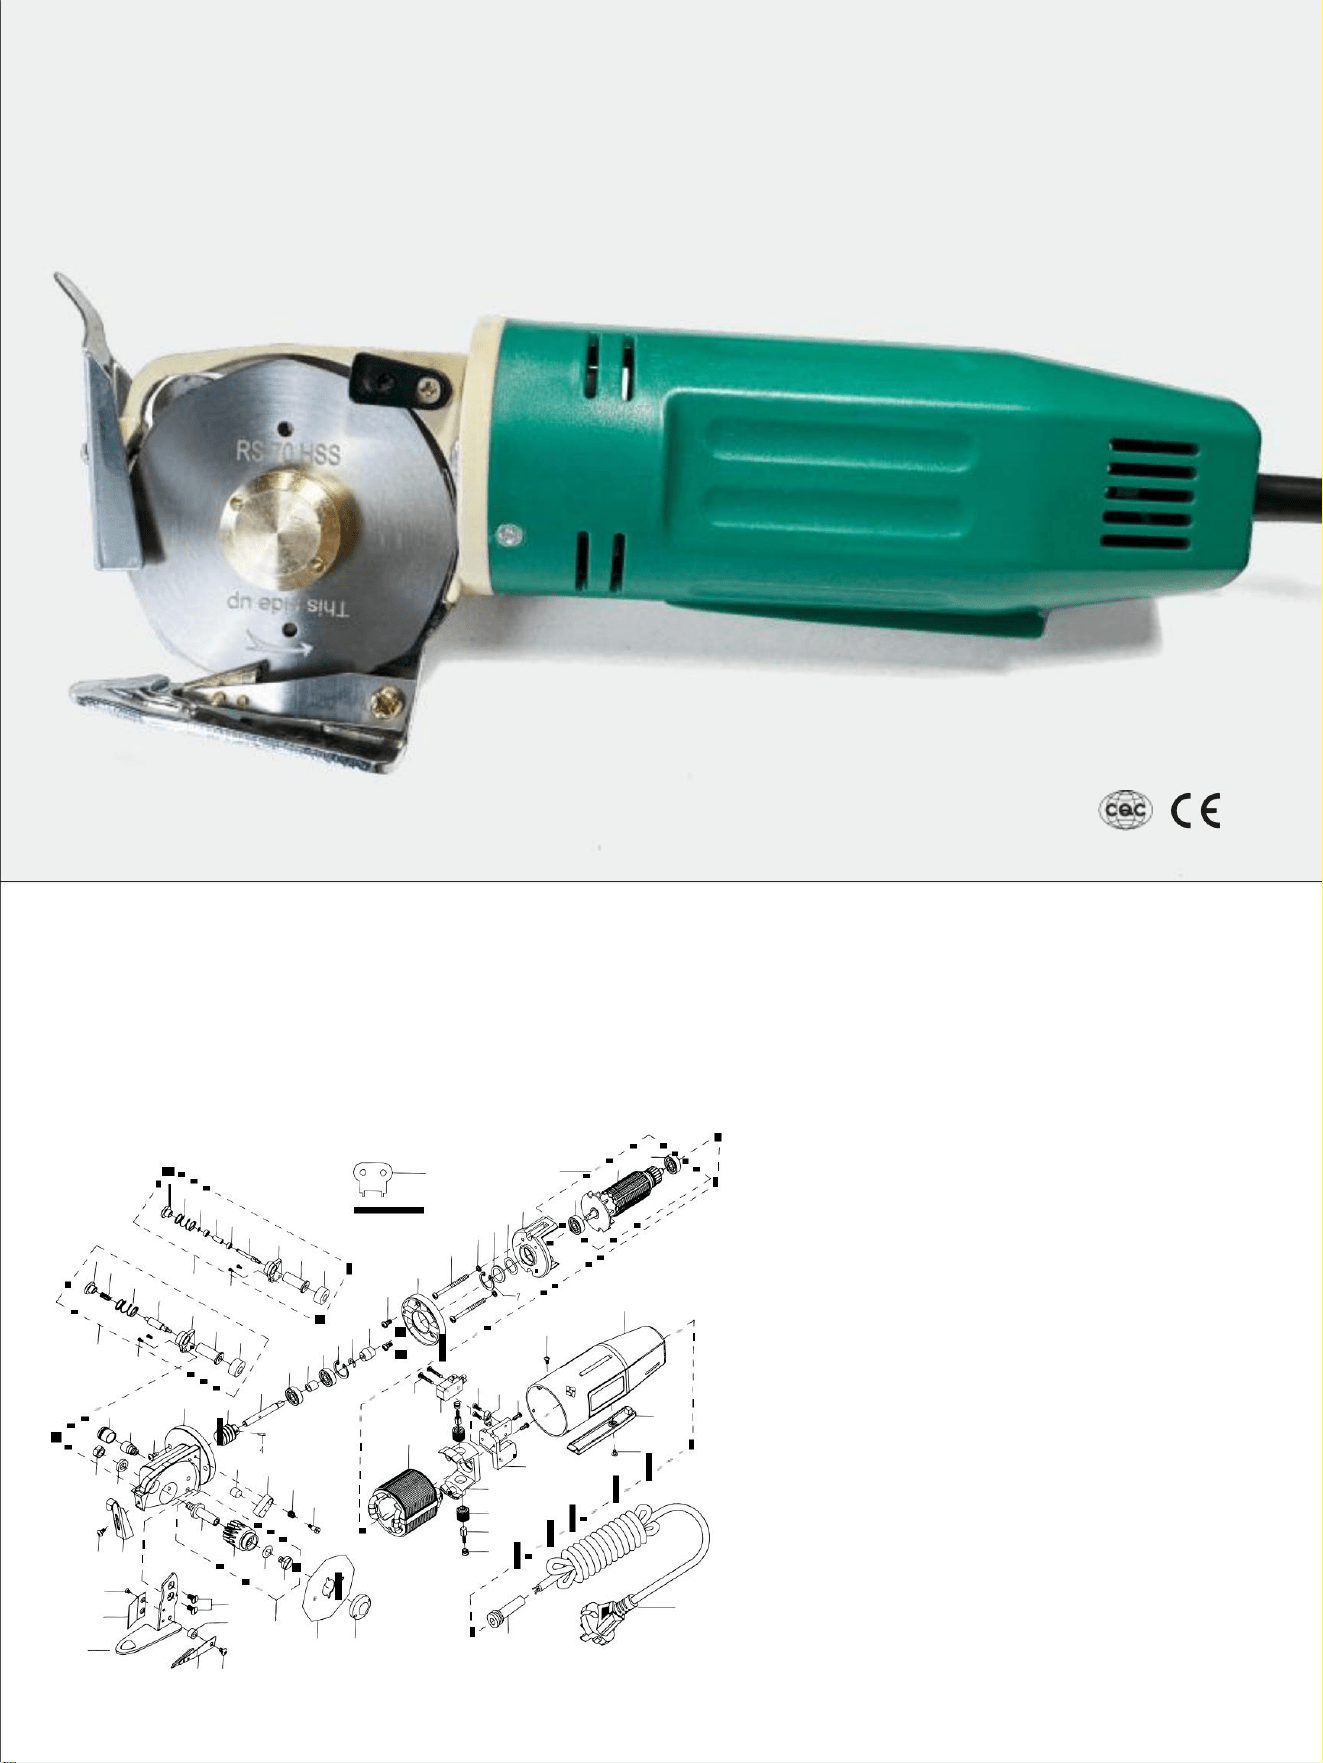
ROUND CUTTING MACHINE
RS- 70
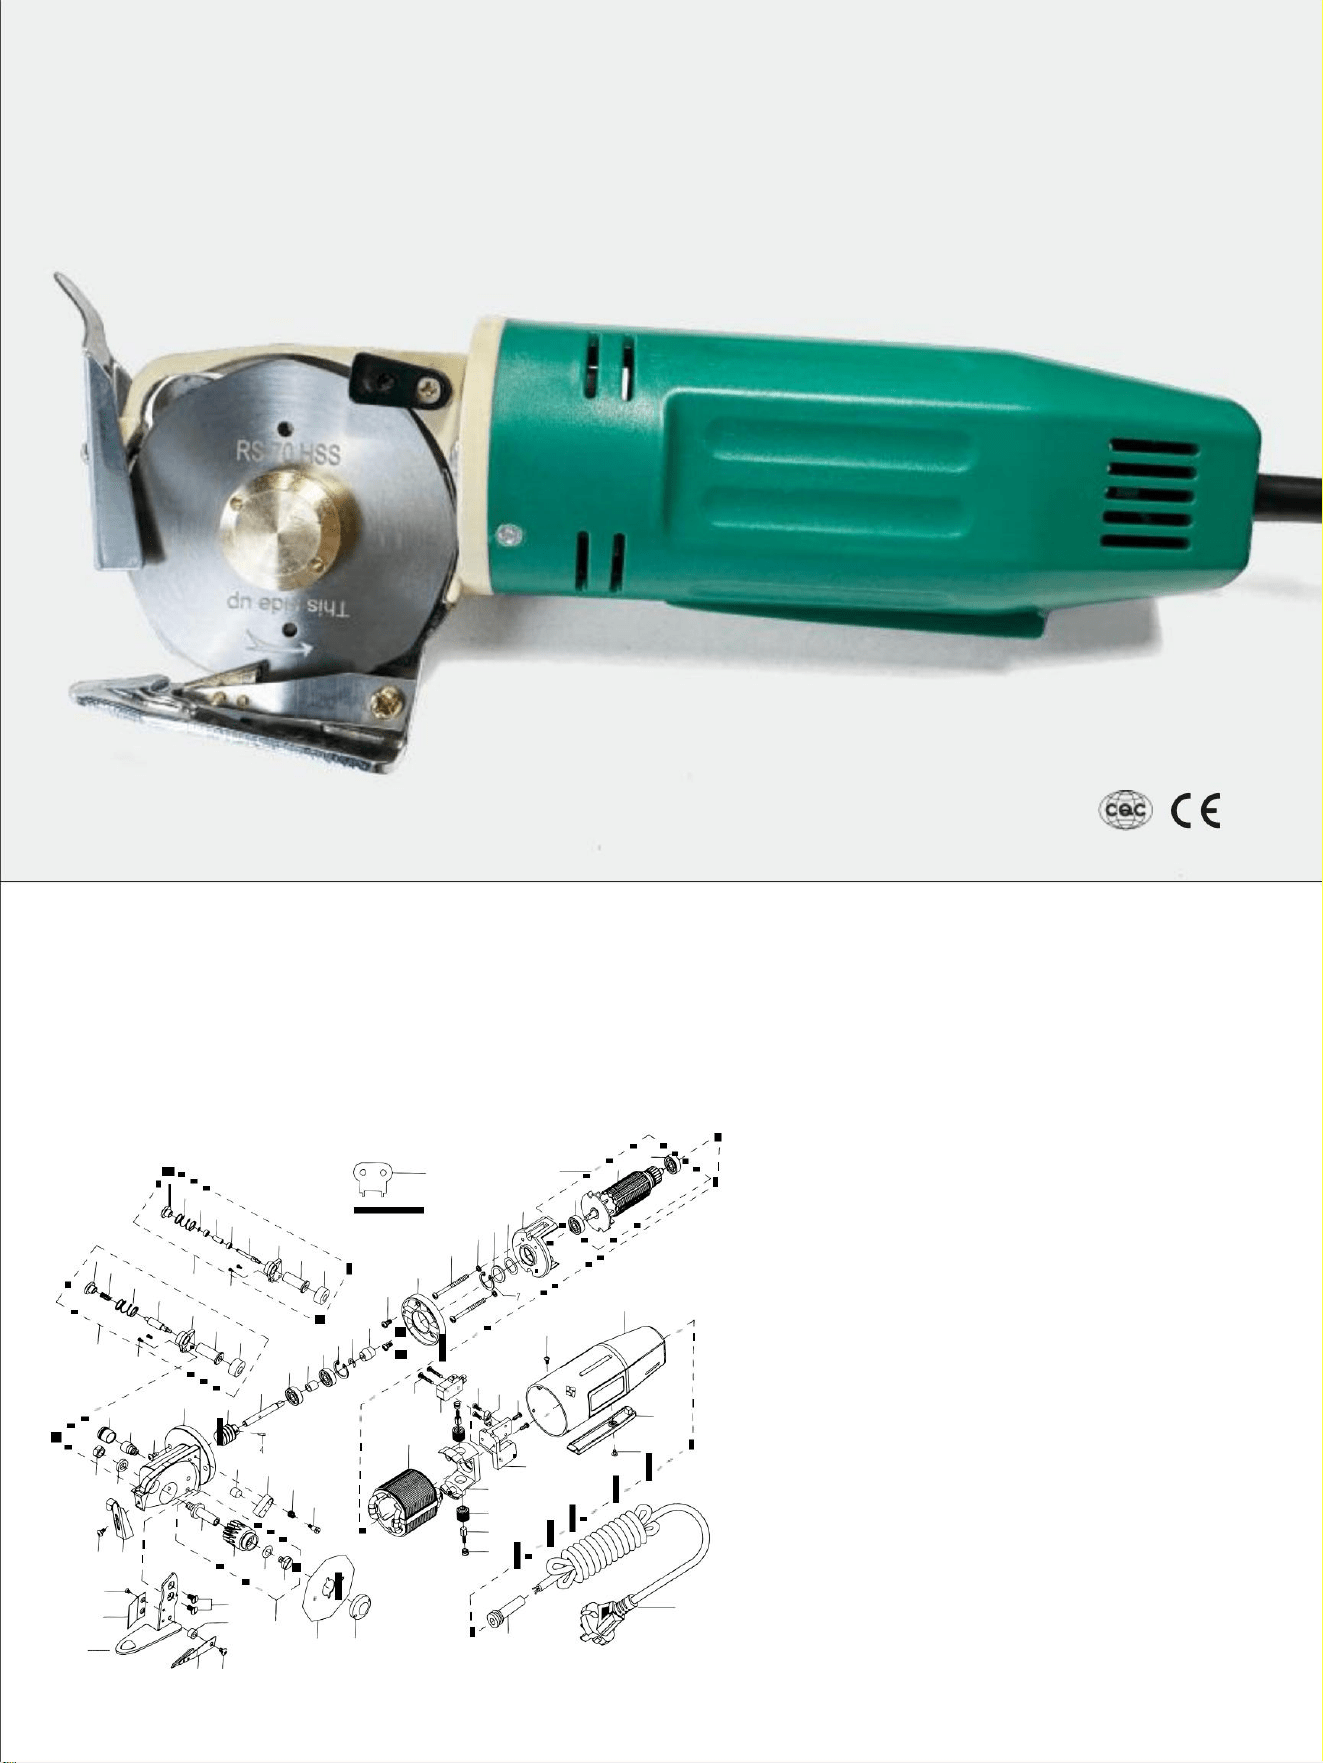
Three Dimensional Assembly Picture
18
74
65
11
30
9
26
29
45
32
24
47
20
59
21
22
23
48
38
39
55
50
40
41
49
53 54
35
43
25
25
44
36
17
19
15
14
5
5
42
34
52
51
37
32
58
46
57
56
28 31
27
8
10
76
16
75
13
67
33
60
3
6
61
65
62
66
5
4
7
68
63
72
1 2
73
64
25
71
70
69
63
61
Ref.no. Part.no & Description
1 B3 0 Gear Housing
2 B31 D rive Gear
3 B33 D rive Gear S haft
4 W33 Φ 2X12 Roll P in
5 W5 62 6 Bearing
6 B35 Collar
7 W42 Φ 19 Collar
8 W38 Φ 6E S haft R ing
9 B4 1 Coupling
1 0 W2 5 M4 X8 Standard Screw
11 B40 I nsulator
1 2 B4 5 M4 X4 8 Standard Screw
13 W46 Φ 4 Washer
1 4 W4 3 Washer
15 W44 Φ 19 X0 .3 U ndulated Washer
1 6 B4 7 Holder For Motor Cooler
17 B50 Rotor
1 8 B7 3 Rotor Assembly
1 9 B48 Stator
2 0 B54 Base For Carbon B rush
2 1 B6 3 Socket For Carbon B rush
22 W5 4 Carbon B runsh
2 3 W55 Cap For Carbon B rush
2 4 B6 4 Base For Switck
2 5 W1 9 M3 X8 Standard Screw
26 B68 Cord P ress B lock
2 7 G10 M3 X1 0 Standard Screw
2 8 W57 Switck
2 9 G57 M3 X1 8 Standard Screw
30 B58 Arm
3 1 B59 Switck B utton
3 2 W6 7 M3 X4 Standard Screw
3 3 W1 1 M3 X6 Standard Screw
3 4 G65 R ubber Cover
35 G66 Cord
3 6 B18 Worm W heel S haft
37 B19 Worm W heel
38 B74 B rass Washer
Ref.no. Part.no & Description
39 B2 0 Screw
4 0 B7 9 Worm W heel Assembly
41 B21 B lade
42 B22 B lade N ut
4 3 G5 0 M4 X1 0 Standard Screw
44 B10 0 il C up
45 B9 O il C up Cover
4 6 B17 Φ 6 Washer
47 B16M6X5 .2 N ut
48 B2 Safe C uard
4 9 B25 P ress Foot
5 0 B27 G uide P late
5 1 B2 6 M2 . 5 X3 Standard Screw
52 G40 Collar
5 3 B24 Lower K nife
5 4 G4 2 M4 X8 Standard Screw
5 5 G3 9 M4 X8 Standard Screw
56 W28 O il Felt
57 W27 K nife O iler
5 8 W29 Spring For O iler
5 9 W30 Screw For O iler
60 B7 2 G rind Assembly
61 B7 G rinding W heel
62 B8 G rind W heel S haft
6 3 B6 G rinding W heel Base
64 B55 G ringder S haft
65 B56 Spring
66 B4 S pring
67 B3 G rind B utton
68 B7 7 G rind Assembly
69 B8- 1 G rind W heel S haft
70 B74 G ringder S haft
7 1 B75 618-3 Bearing
7 2 B76 Collar
73 B78 Φ 2E S haft R ing
74 B3- 1 G rind B utton
75 B71 P in
76 B70 S panner
12

D I R E C T I O N
RS-70 electric scissors is suitable for clothes , shoes and hats ties, umbrella enterprise. lt can cut
off quickly and is portable and flexible . This machine has reasonable structure and all the necessary
function.
Technical specification:
Blade Size: φ70 mm
Pruning height:25 mm
Power: 170 w
Blade speed:2400 cycles
Voltage: single-phrase 100V~120V;220V~240V
1. Common usage and assembling
1.Mill blade: Start electric scissors , press abrasive stick (B3) the abrasive wheel (B7) will mill the blades
automatically, to keep the blade sharp.lf the abrasive wheel has more greasy dirt,should use it after cleaning
or changing.
2.Blade load and unload: The blade is revolved to abrasive wheel hole , insert cylindrical pin to use flatt
hand (appendix) to revolve out or compress blade hat (B22) .
3. Change other parts according to the order of three - dimensional assembly drawing.
2 . Maintenance point
1. The abrasive wheel (B7) has more greasy dirt , it should be cleaned and changed in time to make sure
of milling blade effectively and keep the blade sharp, reduce the shoulder of the electric machine.
2. Clean fine dirt: Should clean the fine dirt behind the blade and in the electric machine to avoid damage.
3. Worm wheel lubricate: Normally use electric scissors, the grease in the oil cup (B9)stakes abrasive
wheel twice ~three times a month.
4. Blade lubricate: Before using , stakes 30 # oil to lubricative cotton(W28)to reduce the friction between
the small blade and below blade.
5. Change the electric brush:After turning for a long time , has damaged a half,should change the electric
brush with the power cut off (if the electric motor is operating unnormally,please stop the machine at once to check
the electric brush is normal).
3. The reason of cancelling cloth , blocking cloth and cut down hard and remove
Reason
Remove
Below blade (B24) or blade (B21) has breach or demage
Change
The position , angle and elasticity between blade and below
blade
1 . Adjust blade below
2. Below blade must be leaned against the blade as min
angle , suitable elasticity
Over greasy dirt of the abrasive wheel
After getting rid of abrasive wheel greasy dirt , start mill blade
4 . Make sure to:
1 . Opearating voltage must be normal and connect earth wire for safety,to avoid shock.
2.Do not touch the high speed moving blade with fingers or another body organ.
3.When to load and unload parts,the power plug must be pulled down.
4.Forbid to plug the fanlight.

Nr ref. Nr części i opisNr ref.Nr części i opis
Ramię 30 B58
4 W33 Φ 2X12 Zwiń P w
1 2 B4 5 M4X4 8 Standardowa śruba
67 B3 Przycisk szlifowania
3 4 G65 Osłona gumowa
60 B72 Zespół szlifierski
5 4 G4 2 M4 X8 Standardowa śruba
44 B10 0 w górę C
7 2 B76 Kołnierz
74 B3- 1 Przycisk mielenia
8 W38 Φ 6E Pierścień trzonu S
2 7 G1 0 M3 X1 0 Śruba standardowa
22 W54 Carbon B bieg
64 B55 G pierścień S trzonek
5 1 B26 M2 .5X3 Standardowa śruba
15 W44 Φ 19X0.3 Podkładka falista
4 0 B7 9 Zespół koła ślimakowego
2 9 G5 7 M3 X1 8 Śruba standardowa
76 B70 S panner
56 W28 Filc olejny
2 1 B6 3 Gniazdo do karbonu B rush
3 2 W6 7 M3X4 Standardowa śruba
2 5 W1 9 M3X8 Standardowa śruba
5 3 B24 Dolny nóż
5 9 W30 Śruba do oleju
4 3 G5 0 M4 X1 0 Śruba standardowa
3 3 W1 1 M3X6 Standardowa śruba
7 1 B75 618-3 Łożysko
38 B74 Podkładka mosiężna
62 B8 Szlifowanie Węża W trzon
Wirnik 17 B50
47 B16M6X5 .2 Nakrętka
50 B27 Płytka prowadząca
Śruba 39 B20
6 3 B6 Koło szlifierskie Podstawa
2 0 B54 Podstawa do węgla B rush
14 W43 Podkładka
5 5 G3 9 M4 X8 Standardowa śruba
11 B40 Izolator
3 B33 Przekładnia napędowa S
52 Kołnierz G40
42 B22 Nakrętka łopatki
70 B74 G pierścień S trzonek
5 8 W29 Sprężyna do oleju
46 B17 Φ 6 Podkładka
6 B35 Kołnierz
7 W42 Φ 19 Kołnierz
69 B8- 1 Szlifowanie Węża W trzon
37 B19 Worm W heel
26 B68 Blokada prasy sznurowej
49 B25 Stopka dociskowa
73 B78 Φ 2E Pierścień trzonu
75 B71 P w
1 9 B48 Stojan
1 0 W2 5 M4X8 Standardowa śruba
2 B31 Przekładnia napędowa
2 4 B6 4 Podstawa do przełącznika
66 B4 S sprężyna
3 1 B59 Przycisk przełączający
57 W27 Olej do noży
13 W46 Φ 4 Podkładka
5 W5 626 Łożysko
68 B77 Zespół szlifierski
35 G66 Przewód
61 B7 Koło szlifierskie
36 B18 Worm W heel S trzpień
45 B9 Pokrywa zbiornika oleju
48 B2 Sejf
1 8 B7 3 Zespół wirnika
9 B4 1 Sprzęgło
2 8 W57 Przełącznik
1 B3 0 Obudowa przekładni
2 3 W55 Cap Do Carbon B rush
65 B56 Wiosna
1 6 B4 7 Uchwyt do chłodnicy silnika
41 B21 B lade
Trójwymiarowy obraz montażowy
MASZYNA DO CIĘCIA OKRĄGŁEGO
RS-70
RS-70
5
11
38
56
33
25
76
43
27
21
40
29
36
30
73
69
55
28
58
32
62
18
59
4
6
14
64
25
65
12
53 54
51
47
70
61
37
42
17
35
46
25
44
65
7
15
50
3
19
22
61
2
75
71
57
66
9
31
20
39
60
16
68
8
24
10
26
74
63
5
1
13
72
34
32
67
63
5
52
48
41
23
45
49
Machine Translated by Google

skutecznie frezującego ostrza i utrzymuje ostrze ostre, zmniejszając ramię maszyny elektrycznej.
1. Tarcza ścierna (B7) ma więcej tłustego brudu
,
1. Napięcie robocze musi być normalne, a przewód uziemiający musi być podłączony ze względów bezpieczeństwa, aby uniknąć porażenia prądem.
lub zmienia się.
należy go czyścić i zmieniać na czas, aby mieć pewność
automatycznie, aby ostrze pozostało ostre. Jeśli tarcza ścierna ma więcej tłustego brudu, należy jej używać po wyczyszczeniu
1. Frezowanie ostrza: Uruchom nożyce
elektryczne, naciśnij ściernicę (B3), a tarcza ścierna (B7) zacznie frezować ostrza.
2. Nie dotykaj szybko obracającego się ostrza palcami ani innymi narządami ciała.
3. Podczas załadunku i rozładunku części należy odłączyć wtyczkę od zasilania.
Zmiana
ostrze
Pozycja, kąt i elastyczność pomiędzy ostrzem a spodem
Po usunięciu tłustego brudu z tarczy ściernej
Poniżej ostrza (B24) lub ostrza (B21) występuje pęknięcie lub uszkodzenie
Przez tłusty brud ściernicy
UsunąćPowód
rozpocznij ostrze młyna
,
1. Wyreguluj ostrze poniżej
kąt, odpowiednia elastyczność
2. Dolne ostrze musi być oparte o ostrze w stopniu min.
3. Powód anulowania tkaniny, blokowania tkaniny i mocnego cięcia i usuwania
Specyfikacja techniczna:
1.Wspólne użytkowanie i montaż
2. Punkt konserwacji
Prędkość ostrza: 2400 cykli
uszkodził połowę, powinien wymienić elektrykę
,
2. Załadunek i rozładunek ostrza: Ostrze obraca się w otworze tarczy ściernej
Napięcie: jednofazowe 100V~120V;220V~240V
szczotka z odciętym zasilaniem (jeśli silnik elektryczny pracuje nieprawidłowo, należy natychmiast zatrzymać maszynę, aby to sprawdzić)
2. Wyczyść drobny brud: Aby uniknąć uszkodzeń, należy wyczyścić drobny brud za ostrzem i w maszynce elektrycznej.
włóż cylindryczny sworzeń, aby użyć płaskiego
Rozmiar ostrza: φ70 mm
szczotka elektryczna jest normalna).
,
Nożyczki elektryczne RS-70 nadają się do odzieży
Wysokość cięcia: 25 mm
ręka (dodatek) do obracania lub ściskania kapelusza ostrza (B22).
3. Smarowanie koła ślimakowego: Zwykle należy używać nożyc elektrycznych, smar w misce olejowej (B9) ma właściwości ścierne
Moc: 170 W
buty i kapelusze krawaty, przedsiębiorstwo parasolowe. Można ciąć
3. Wymień pozostałe części zgodnie z kolejnością przedstawioną na trójwymiarowym rysunku montażowym.
koło dwa ~trzy razy w miesiącu.
4. Smarowanie ostrza: Przed użyciem nasmaruj bawełnę smarującą (W28) olejem 30 #, aby zmniejszyć tarcie między ostrzami.
,
szybko się wyłącza i jest przenośny i elastyczny. Ta maszyna ma rozsądną strukturę i wszystkie niezbędne
małe ostrze i dolne ostrze.
5. Wymień szczotkę elektryczną: Po dłuższym kręceniu
4. Zabrania się zatykania naświetla.
funkcjonować.
KIERUNEK
4. Pamiętaj, aby:
Machine Translated by Google

Rif.n.Part.n. e descrizione Rif. n. Parte n. e Descrizione
5 5 G3 9 M4 X8 Vite standard
70 B74 Albero di macinazione
5 8 W29 Molla per oliatore
52 Collare G40
42 B22 Dado lama
69 B8- 1 Albero della ruota di rettifica
7 W42 ÿ 19 Collare
26 B68 Blocco pressacavo
6 Collare B35
46 B17 ÿ 6 Rondella
37 B19 Ruota senza fine
1 9 B48 Statore
73 B78 ÿ 2E Anello albero
49 B25 Piedino premistoffa
75 B71 P in
2 4 B6 4 Base per interruttore
66 B4 Primavera
3 1 B59 Pulsante interruttore
1 0 W2 5 M4X8 Vite standard
2 B31 Ingranaggio di trasmissione
5 W5 626 Cuscinetto
13 W46 ÿ 4 Rondella
36 B18 Albero a ruota elicoidale
57 W27 Oliatore per coltelli
45 B9 Coperchio del serbatoio dell'olio
68 B77 Gruppo di macinazione
35 G66 Cavo
61 B7 Ruota per rettifica
1 B3 0 Scatola ingranaggi
9 B4 1 Accoppiamento
2 8 W57 Interruttore
48 B2 Cassaforte
1 8 B7 3 Gruppo rotore
1 6 B4 7 Supporto per radiatore motore
30 Braccio B58
41 B21 B carico
2 3 W55 Tappo per spazzola di carbonio
65 B56 Primavera
67 B3 Pulsante di macinazione
3 4 G65 Copertura in gomma
60 B72 Gruppo di macinazione
4 W33 ÿ 2X12 Rotolo P in
1 2 B4 5 M4X4 8 Vite standard
7 2 B76 Collare
74 B3- 1 Pulsante di macinazione
5 4 G4 2 M4 X8 Vite standard
44 B10 0 il C su
22 W54 Carbonio B corsa
64 B55 Albero di macinazione
8 W38 ÿ 6E Anello albero
2 7 G1 0 M3 X1 0 Vite standard
56 W28 Feltro ad olio
2 1 B6 3 Presa per spazzola di carbonio
4 0 B7 9 Gruppo ruota a vite senza fine
5 1 B26 M2 .5X3 Vite standard
15 W44 ÿ 19X0 ,3 Rondella ondulata
2 9 G5 7 M3 X1 8 Vite standard
5 3 B24 Coltello inferiore
5 9 W30 Vite per oliatore
3 3 W1 1 M3X6 Vite standard
4 3 G5 0 M4 X1 0 Vite standard
76 B70 S panner
3 2 W6 7 M3X4 Vite standard
2 5 W1 9 M3X8 Vite standard
17 Rotore B50
47 B16M6X5 .2 Dado
7 1 B75 618-3 Cuscinetto
38 B74 Rondella in ottone
62 B8 Albero della ruota di rettifica
39 Vite B20
50 B27 Piastra guida
6 3 B6 Base per mola da rettifica
11 B40 Isolante
3 B33 Albero di trasmissione
2 0 B54 Base per spazzola in carbonio
14 W43 Rondella
MACCHINA PER TAGLIO TONDO
Immagine di assemblaggio tridimensionale
RS-70
RS-70
48
41
23
45
49
46
25
44
17
35
50
3
65
7
15
61
2
75
19
22
66
9
71
57
16
68
31
20
39
60
10
26
63
74
8
24
34
72
32
5
1
13
5
52
67
63
56
33
5
11
38
27
43
21
25
76
30
73
69
40
29
36
28
58
55
18
32
62
6
14
59
4
53 54
51
64
25
65
12
70
61
37
42
47
Machine Translated by Google

La posizione, l'angolo e l'elasticità tra la lama e sotto
lama
Sopra lo sporco grasso della mola abrasiva
Dopo aver eliminato lo sporco grasso della mola abrasiva
La lama inferiore (B24) o la lama (B21) presenta una rottura o un danno Modifica
RimuovereMotivo
,
avviare la lama del mulino
dovrebbe essere pulito e cambiato in tempo per assicurarsi
,
della lama di fresatura in modo efficace e mantenendo la lama affilata, ridurre la spalla della macchina elettrica.
1. La tensione di esercizio deve essere normale e il filo di terra deve essere collegato per sicurezza, per evitare scosse elettriche.
o mutevoli.
1. La mola abrasiva (B7) ha più sporco grasso
automaticamente, per mantenere la lama affilata. Se la mola abrasiva ha più sporco grasso, dovrebbe essere utilizzata dopo la pulizia
1. Lama del mulino: avviare le forbici
elettriche, premere il bastoncino abrasivo (B3) la mola abrasiva (B7) macinerà le lame
2. Non toccare la lama in movimento ad alta velocità con le dita o con altri organi del corpo.
3. Quando si caricano e si scaricano parti, la spina di alimentazione deve essere staccata.
1. Regolare la lama sottostante
angolo, elasticità adatta
2. La lama sottostante deve essere appoggiata alla lama come minimo
3. Il motivo per cui si annulla il tessuto, si blocca il tessuto e si taglia con forza e si rimuove
Specifiche tecniche:
1.Uso comune e assemblaggio
2. Punto di manutenzione
Tensione: frase singola 100V~120V;220V~240V
2. Carico e scarico della lama: la lama viene ruotata verso il foro della mola abrasiva
5. Cambiare la spazzola elettrica: dopo averla girata per un lungo periodo
spazzola con l'alimentazione interrotta (se il motore elettrico funziona in modo anomalo, fermare immediatamente la macchina per controllare
Velocità della lama: 2400 cicli
,
,
3. Lubrificazione della ruota elicoidale: normalmente utilizzare forbici elettriche, il grasso nella tazza dell'olio (B9) è abrasivo
4. Vietare di tappare la luce del sopraluce.
Le forbici elettriche RS-70 sono adatte per i vestiti
Altezza di potatura: 25 mm
inserire il perno cilindrico per utilizzare la parte piatta
mano (appendice) per ruotare o comprimere la lama del cappello (B22).
Dimensioni lama: ÿ70 mm
2. Pulire lo sporco sottile: pulire lo sporco sottile dietro la lama e all'interno della macchina elettrica per evitare danni.
la spazzola elettrica è normale).
,
la lama piccola e quella inferiore.
ruota due ~tre volte al mese.
scarpe e cappelli cravatte, impresa di ombrelli. può tagliare
Potenza: 170 W
3. Sostituire le altre parti seguendo l'ordine del disegno di assieme tridimensionale.
funzione.
4. Lubrificazione della lama: prima dell'uso, applicare 30 # di olio sul cotone lubrificante (W28) per ridurre l'attrito tra
ha danneggiato la metà, dovrebbe cambiare l'elettrico
si spegne rapidamente ed è portatile e flessibile. Questa macchina ha una struttura ragionevole e tutti i necessari
D IREZIONE
4. Assicurati di:
Machine Translated by Google

Ref.no.Pieza.noyDescripciónRef.no.Part.noyDescripción
55G39M4X8Tornilloestándar
70B74Ejedetransmisión
58W29Resorteparaaceite
52CuelloG40
42B22Tuercadecuchilla
69B81Ejedemueladeafilar
7W42Φ19Cuello
26B68Bloquedeprensadecable
6B35Cuello
46B17Φ6Arandela
37B19Ruedasinfin
19B48Estator
73B78Φ2EAnillodeeje
49B25Prensatelas
75B71Pen
24B64Baseparainterruptor
66B4Sprimavera
31B59Botóndeinterruptor
10W25M4X8Tornilloestándar
2B31Engranajedetransmisión
5W5626Cojinete
13W46Φ4Arandela
36B18Ejederuedahelicoidal
57W27Engrasadordecuchillos
45B9Tapadelatazadeaceite
68B77Conjuntodemolienda
Cordón35G66
61B7Ruedadeafilar
1B30Cajadeengranajes
9B41Acoplamiento
28W57Interruptor
48B2Cuarddeseguridad
18B73Conjuntoderotor
16B47SoporteParaEnfriadorDeMotor
30B58Brazo
41B21Bcarga
23W55Tapaparabujedecarbono
65B56Primavera
67B3Botóndemolido
34G65Cubiertadegoma
60B72Conjuntodemolienda
4W33Φ2X12RolloPen
12B45M4X48Tornilloestándar
72B76Cuello
74B31Botóndemolido
54G42M4X8Tornilloestándar
44B100ilCarriba
22W54CarbonoBenfuncionamiento
64B55Ejedetransmisión
8W38Φ6EAnillodeeje
27G10M3X10Tornilloestándar
56W28Aceitedefieltro
21B63Zócaloparabujedecarbono
40B79Conjuntoderuedahelicoidal
51B26M2.5X3Tornilloestándar
15W44Φ19X0.3ArandelaOndulada
29G57M3X18Tornilloestándar
53B24Cuchillainferior
59W30Tornilloparaengrasador
33W11M3X6Tornilloestándar
43G50M4X10Tornilloestándar
Llaveinglesa76B70S
32W67M3X4Tornilloestándar
25W19M3X8Tornilloestándar
17B50Rotor
47B16M6X5.2Tuerca
71B756183Cojinete
38B74Arandeladelatón
62B8Ejedemueladeafilar
Tornillo39B20
50B27Placaguía
63B6Basedelamuelaabrasiva
11B40Aislante
3B33Ejedelengranajeimpulsor
20B54BaseparaBdecarbono
14W43Lavadora
Imagendeensamblajetridimensional
MAQUINADECORTEREDONDO
RS70
RS70
48
41
23
45
49
46
25
44
17
35
50
3
65
7
15
61
2
75
19
22
66
9
71
57
16
68
31
20
39
60
10
26
74
63
8
24
34
72
32
5
1
13
5
52
67
63
56
33
5
11
38
27
43
21
25
76
30
73
69
40
29
36
28
58
55
18
32
62
6
14
59
4
5354
51
64
25
65
12
70
61
37
42
47
Machine Translated by Google

Laposición,elánguloylaelasticidadentrelahojaylaparteinferior.
cuchilla
Sobresuciedadgrasosadelaruedaabrasiva
Lacuchilladeabajo(B24)olacuchilla(B21)tienenunaroturaodaño Cambiar
EliminarRazón
hojademolinodearranque
,
Despuésdeeliminarlasuciedadgrasosadelaruedaabrasiva
Debelimpiarseycambiarseatiempoparaasegurarse.
,
delacuchilladefresadodemaneraefectivaymantenerlacuchillaafilada,reducirelhombrodelamáquinaeléctrica.
ocambiando.
1.Laruedaabrasiva(B7)tienemássuciedadgrasosa.
automáticamente,paramantenerlacuchillaafilada.Silaruedaabrasivatienemássuciedadgrasosa,debeusarladespuésdelimpiarla.
1.Fresarlacuchilla:Enciendalastijeras
eléctricas,presionelavarillaabrasiva(B3),laruedaabrasiva(B7)fresarálascuchillas.
3.Alcargarodescargarpiezas,sedebedesenchufarelaparato.
2.Notoquelacuchillaquesemueveaaltavelocidadconlosdedosuotroórganodelcuerpo.
1.Elvoltajedefuncionamientodebesernormalyconectarelcabledetierraporseguridad,paraevitardescargaseléctricas.
1.Ajustelacuchillaacontinuación
ángulo,elasticidadadecuada
2.Lahojadeabajodebeapoyarsecontralahojacomomínimo.
3.Elmotivodecancelarlatela,bloquearlatelaycortarlaconfuerzayeliminarla
Especificacióntécnica:
1.Usocomúnymontaje.
2.Puntodemantenimiento
Voltaje:monofásico100V~120V;220V~240V
2.Cargaydescargadelacuchilla:Lacuchillagirahastaelorificiodelaruedaabrasiva.
5.Cambieelcepilloeléctrico:Despuésdegirardurantemuchotiempo
cepilloconlaenergíacortada(sielmotoreléctricoestáfuncionandodemaneraanormal,detengalamáquinadeinmediatoparaverificar)
Velocidaddelacuchilla:2400ciclos
,
,
3.Lubricacióndelaruedahelicoidal:Normalmenteseutilizantijeraseléctricas,lagrasaenlatazadeaceite(B9)seadhierealabrasivo.
4.Prohibidoenchufareltragaluz.
LastijeraseléctricasRS70sonadecuadaspararopa.
Alturadepoda:25mm
Inserteelpasadorcilíndricoparautilizarloplano.
mano(apéndice)paragirarocomprimirlatapadelahoja(B22).
Tamañodelahoja:φ70mm
2.Limpiarlasuciedadfina:Sedebelimpiarlasuciedadfinadetrásdelacuchillayenlamáquinaeléctricaparaevitardaños.
Elcepilloeléctricoesnormal).
,
lahojapequeñaylahojadeabajo.
ruedadosotresvecesalmes.
Zapatosysombreroscorbatas,empresaparaguas.Puedecortar
Potencia:170w
3.Cambieotraspiezassegúnelordendeldibujodeensamblajetridimensional.
función.
4.Lubricacióndelacuchilla:antesdeusarla,apliqueaceiten.°30enunalgodónlubricante(W28)parareducirlafricciónentrelacuchillaylacuchilla.
selehaestropeadolamitad,deberíacambiarelelectrico
Seapagarápidamenteyesportátilyflexible.Estamáquinatieneunaestructurarazonableytodolonecesario.
DIRECCIÓN
4.Asegúresede:
Machine Translated by Google
Ref.nr. Art.nr & BeskrivningRef.nr.Art.nr & Beskrivning
Tredimensionell monteringsbild
RUNDSKÄRMASKIN
RS-70
RS-70
11
52
5
67
63
32
34
72
13
5
1
74
63
10
26
8
24
16
68
60
31
20
66
9
39
57
71
75
61
2
19
22
3
50
15
65
7
25
44
46
35
17
37
42
70
61
47
51
53 54
65
64
25
12
14
6
4
59
18
62
32
28
58
55
73
69
30
29
36
40
27
43
21
76
25
33
56
38
5
41 B21 B ladd
30 B58 Arm
1 6 B4 7 Hållare För Motorkylare
2 3 W55 Cap För Carbon B rush
65 B56 Fjäder
2 8 W57 Switch
9 B4 1 Koppling
1 B3 0 Kugghjulshus
48 B2 Safe C uard
1 8 B7 3 Rotorenhet
45 B9 O il C up lock
61 B7 G spolhäl
68 B77 G rind montering
35 G66 sladd
13 W46 ÿ 4 Bricka
5 W5 626 Lager
36 B18 Mask W heel S skaft
57 W27 K nife O iler
2 4 B6 4 Base För Switck
66 B4 S pring
2 B31 drivväxel
3 1 B59 Växelknapp
1 0 W2 5 M4X8 Standardskruv
1 9 B48 Stator
49 B25 Tryckfot
73 B78 ÿ 2E S haft R ing
75 B71 P in
26 B68 Sladdpress B-lås
7 W42 ÿ 19 Krage
69 B8- 1 G rind W heel S skaft
46 B17 ÿ 6 Bricka
6 B35 Krage
37 B19 Worm W klack
5 8 W29 Fjäder För O iler
70 B74 G ringer S haft
42 B22 B lade N ut
52 G40 krage
3 B33 D rive Gear S skaft
11 B40 I isolator
14 W43 Bricka
5 5 G3 9 M4 X8 Standardskruv
2 0 B54 Base För Carbon B rush
6 3 B6 G rindande W heel Base
50 B27 Guide P late
39 B20 Skruv
47 B16M6X5 ,2 N ut
17 B50 Rotor
62 B8 G rind W heel S skaft
7 1 B75 618-3 Lager
38 B74 B rass Bricka
4 3 G5 0 M4 X1 0 Standardskruv
3 3 W1 1 M3X6 Standardskruv
5 3 B24 Nedre kniv
5 9 W30 Skruv För olja
2 5 W1 9 M3X8 Standardskruv
3 2 W6 7 M3X4 Standardskruv
56 W28 O il Filt
2 1 B6 3 Uttag För Carbon B rush
2 9 G5 7 M3 X1 8 Standardskruv
5 1 B26 M2 ,5X3 Standardskruv
4 0 B7 9 Worm W häl Montage
15 W44 ÿ 19X0 ,3 U ndulerad bricka
76 B70 S panner
22 W54 Carbon B runsh
64 B55 G ringer S haft
2 7 G1 0 M3 X1 0 Standardskruv
8 W38 ÿ 6E S haft R ing
7 2 B76 Krage
74 B3- 1 Slipknapp
44 B10 0 il C upp
5 4 G4 2 M4 X8 Standardskruv
60 B72 G rind montering
67 B3 G rind B utton
3 4 G65 gummihölje
4 W33 ÿ 2X12 Roll P in
1 2 B4 5 M4X4 8 Standardskruv
48
23
45
49
41
Machine Translated by Google

den bör rengöras och bytas ut i tid för att vara säker
,
av fräsklingan effektivt och hålla bladet skarpt, minska axeln på den elektriska maskinen.
eller förändras.
1. Slipskivan (B7) har mer fet smuts
automatiskt för att hålla bladet skarpt. Om slipskivan har mer fet smuts, bör du använda den efter rengöring
1. Fräsblad: Starta en elektrisk sax, tryck på
slipstaven (B3) slipskivan (B7) kommer att fräsa bladen
2. Rör inte det höghastighetsrörliga bladet med fingrarna eller något annat kroppsorgan.
3.När delar ska laddas och lossas måste strömkontakten dras ner.
1. Driftspänningen måste vara normal och anslut jordkabel för säkerhet, för att undvika stötar.
1. Vanlig användning och montering
2 . Underhållspunkt
blad
Läget, vinkeln och elasticiteten mellan bladet och undersidan
Över fet smuts på slipskivan
Nedanför bladet (B24) eller bladet (B21) har brott eller skada Ändra
Ta bortResonera
starta kvarnbladet
,
Efter att ha blivit av med slipande hjul fet smuts
2. Under bladet måste lutas mot bladet som min
vinkel , lämplig elasticitet
3. Anledningen till att avbryta tyget, blockera tyget och skära ner hårt och ta bort
Teknisk specifikation:
1 . Justera bladet nedan
,
skor och hattar slipsar, paraply företag. Den kan skära
Effekt: 170 W
3. Byt andra delar enligt ordningen på tredimensionell monteringsritning.
3. Smörjning av snäckhjul: Använd normalt en elektrisk sax, fettet i oljekoppen (B9) är slitande
,
hjul två gånger ~ tre gånger i månaden.
4. Bladsmörj: Innan du använder, satsa 30 # olja till smörjande bomull (W28) för att minska friktionen mellan
det lilla bladet och under bladet.
5. Byt den elektriska borsten: Efter att ha vänt länge
av snabbt och är portabel och flexibel. Denna maskin har rimlig struktur och allt som behövs
den elektriska borsten är normal).
4. Förbjud att koppla in fläktljuset.
har skadat en halv, ska byta el
fungera.
,
Bladhastighet: 2400 cykler
2. Lastning och lossning av bladet: Bladet roteras till ett slipande hjulhål
Spänning: enfras 100V~120V;220V~240V
Bladstorlek: ÿ70 mm
borsta med strömavbrott (om elmotorn fungerar onormalt, vänligen stoppa maskinen genast för att kontrollera
2. Rengör fin smuts: Bör rengöra den fina smutsen bakom bladet och i den elektriska maskinen för att undvika skador.
sätt i cylindrisk stift för att använda platt
RS-70 elektrisk sax är lämplig för kläder
Beskärningshöjd: 25 mm
hand (bilaga) för att rotera ut eller komprimera knivhatten (B22) .
RIKTNING
4. Se till att:
Machine Translated by Google
Ref.nr. Onderdeelnr. & OmschrijvingRef.nr. Onderdeelnr. & Omschrijving
61 B7 Slijpschijf
64 B55 G ringder-as
22 W54 Carbon B-runsh
8 W38 ÿ 6E Asring
2 7 G1 0 M3 X1 0 Standaardschroef
2 1 B6 3-aansluiting voor koolstofborstel
56 W28 Olie Vilt
15 W44 ÿ 19X0.3 Gegolfde sluitring
4 0 B7 9 Wormwielmontage
5 1 B26 M2 .5X3 Standaardschroef
2 9 G5 7 M3 X1 8 Standaardschroef
3 4 G65 rubberen hoes
67 B3 Maalknop
60 B72 Maalkorst Montage
76 B70 S-panner
4 W33 ÿ 2X12 Rol P in
1 2 B4 5 M4X4 8 Standaardschroef
74 B3- 1 Maalknop
7 2 B76 Kraag
5 4 G4 2 M4 X8 Standaardschroef
44 B10 0 il C omhoog
50 B27 G eleidingsplaat
39 B20 Schroef
6 3 B6 Slijpschijf Basis
11 B40 Isolator
3 B33 aandrijftandwielas
2 0 B54 Basis Voor Carbon B-rush
5 5 G3 9 M4 X8 Standaardschroef
14 W43 Ring
5 9 W30 Schroef voor oliepomp
5 3 B24 Onderste K nife
4 3 G5 0 M4 X1 0 Standaardschroef
3 3 W1 1 M3X6 Standaardschroef
3 2 W6 7 M3X4 Standaardschroef
2 5 W1 9 M3X8 Standaardschroef
17 B50-rotor
47 B16M6X5 .2 Moer
38 B74 Messing ring
7 1 B75 618-3 Lager
62 B8 Slijpwiel As
1 9 B48-stator
49 B25 P ers voet
73 B78 ÿ 2E Asring
75 B71 P binnen
3 1 B59 Schakelknop
2 4 B6 4 Basis voor schakelaar
66 B4 S lente
1 0 W2 5 M4X8 Standaardschroef
2 B31 Aandrijftandwiel
70 B74 G ringder-as
5 8 W29 Veer voor oliepomp
52 G40 Kraag
42 B22 Bladmoer
7 W42 ÿ 19 Kraag
69 B8- 1 Slijpwiel As
26 B68 Koordpersblok
46 B17 ÿ 6 Ring
6 B35 Kraag
9 B4 1 Koppeling
1 B3 0 Tandwielhuis
37 B19 Wormwiel
2 8 W57 schakelaar
1 8 B7 3 Rotormontage
48 B2 Veilige C uard
1 6 B4 7 Houder voor motorkoeler
41 B21 B lade
30 B58-arm
65 B56 Lente
2 3 W55 dop voor koolstofborstel
13 W46 ÿ 4 Ring
5 W5 626 Lager
36 B18 Wormwielas
57 W27 Mesolie
45 B9 Oliereservoirdeksel
35 G66 snoer
68 B77 Maalkorstmontage
Driedimensionale assemblagefoto
RONDE SNIJMACHINE
RS-70
RS-70
8
30
69
73
40
36
29
58
28
55
56
33
11
5
38
21
27
25
43
76
53 54
51
25
64
12
65
61
70
42
37
47
18
32
62
6
14
59
4
2
61
75
22
19
9
66
71
57
46
44
25
17
35
50
3
7
65
15
72
34
32
1
5
13
5
52
63
67
68
16
39
31
60
20
26
10
74
63
24
48
41
23
45
49
Machine Translated by Google

,
het moet op tijd worden schoongemaakt en vervangen om er zeker van te zijn
van het freesblad effectief en houdt het blad scherp, vermindert de schouder van de elektrische machine.
of veranderen.
1. Het slijpwiel (B7) heeft meer vettig vuil
automatisch, om het mes scherp te houden. Als het slijpwiel meer vettig vuil bevat, moet u het gebruiken na het reinigen
1. Freesblad: Start de elektrische schaar,
druk op de schuurstaaf (B3) en het schuurwiel (B7) zal de bladen frezen
3. Wanneer u onderdelen laadt of lost, moet de stekker naar beneden zijn getrokken.
2. Raak het snel bewegende mes niet aan met uw vingers of een ander lichaamsdeel.
1. De bedrijfsspanning moet normaal zijn en voor de veiligheid moet er een aarddraad worden aangesloten om schokken te voorkomen.
De positie, hoek en elasticiteit tussen het blad en de onderkant
Over vettig vuil van het slijpwiel
blad
Verwijderen
WijzigingOnder het blad (B24) of blad (B21) is er sprake van een breuk of beschadiging
Reden
start molenblad
Na het verwijderen van het schurende wielvettige vuil
,
1. Stel het mes onder af
hoek, geschikte elasticiteit
2. Het onderste blad moet tegen het blad worden geleund, min.
2. Maak fijn vuil schoon: Maak het fijne vuil achter het mes en in de elektrische machine schoon om schade te voorkomen.
3. Smering van het wormwiel: Gebruik normaal gesproken een elektrische schaar, het vet in de oliebeker (B9) zet schurende
het kleine mesje en het onderste mesje.
,
(de elektrische borstel is normaal).
wiel twee tot drie keer per maand.
Vermogen: 170 W
schoenen en hoeden stropdassen, paraplubedrijf. Het kan snijden
functie.
3. Vervang de overige onderdelen volgens de volgorde van de driedimensionale montagetekening.
4. Smeer het mes: smeer voor gebruik 30 # olie op een katoenen smeermiddel (W28) om de wrijving tussen de messen te verminderen.
heeft een helft beschadigd, moet de elektrische vervangen
snel uit en is draagbaar en flexibel. Deze machine heeft een redelijke structuur en alle benodigde
5. Vervang de elektrische borstel:Nadat u de borstel langere tijd hebt laten draaien
2. Laden en lossen van het zaagblad: Het zaagblad wordt naar het gat in het schuurwiel gedraaid
Voltage: enkelvoudige zin 100V~120V;220V~240V
borstel met de stroomonderbreker uit (als de elektromotor ongewoon werkt, stop dan onmiddellijk de machine om te controleren
Bladsnelheid: 2400 cycli
,
4. Het is verboden het bovenlicht af te sluiten.
,
RS-70 elektrische schaar is geschikt voor kleding
Snoeihoogte: 25 mm
hand (bijlage) om de hoed van het mes naar buiten te draaien of samen te drukken (B22).
plaats een cilindrische pen om een vlakke ondergrond te gebruiken
Bladgrootte: ÿ70 mm
2. Onderhoudspunt
1. Algemeen gebruik en montage
3. De reden voor het annuleren van doek, het blokkeren van doek en het hard afsnijden en verwijderen
Technische specificatie:
RICHTING
4. Zorg ervoor dat:
Machine Translated by Google

Réf.N°depièceetdescriptionRéf.N°depièceetdescription
23
48
45
49
41
Imaged'assemblagetridimensionnelle
MACHINEDECOUPERONDE
RS70
RS70
42ÉcroudelameB22
Collier52G40
58W29Ressortpourhuileur
70B74Arbredebroyeur
6CollierB35
Rondelle46B17Φ6
37B19Roueàvissansfin
26B68Blocpressecordon
69B81Arbredemeule
Collier7W42Φ19
73B78Φ2EBagued'arbre
49B25Piedpresseur
75B71Pdans
19B48Stator
2pignonsd'entraînementB31
10W25M4X8Visstandard
24B64Basepourinterrupteur
66B4Sressort
Huileurdecouteaux57W27
31B59Boutondecommutation
Roulement5W5626
Rondelle13W46Φ4
36B18Arbrederoueàvissansfin
61B7Meule
68B77Ensembledebroyage
Cordon35G66
45B9Couvercledelacoupelled'huile
48B2Coffrefort
18B73Ensemblederotor
Interrupteur28W57
1B30Carterd'engrenage
9B41Accouplement
23W55CappourCarboneBrush
65B56Printemps
Bras30B58
41B21Bcharge
16B47Supportpourrefroidisseurdemoteur
Rouleau4W33Φ2X12Pen
12B45M4X48Visstandard
60B72Ensembledebroyage
67B3Boutondebroyage
34G65Couvercleencaoutchouc
44B100ilCjusqu'à
54G42M4X8Visstandard
72B76Collier
74B31Boutondebroyage
27G10M3X10Visstandard
Bagued'arbre8W38Φ6E
22W54CarboneBrun
64B55Arbredebroyeur
29G57M3X18Visstandard
40B79Ensemblederoueàvissansfin
51VisstandardB26M2.5X3
Rondelleondulée15W44Φ19X0,3
Feutreàl'huile56W28
21B63DouillepourCarbonBrush
76B70Spanner
Visstandard25W19M3X8
Visstandard32W67M3X4
33W11M3X6Visstandard
43G50M4X10Visstandard
53B24Couteauinférieur
Vis59W30pourhuileur
62B8Arbredemeule
71B756183Roulement
Rondelleenlaiton38B74
47B16M6X5.2Écrou
Rotor17B50
63B6Basedemeule
Vis39B20
50B27Plaquedeguidage
Rondelle14W43
Visstandard55G39M4X8
20B54BasepourcarboneBrush
3B33Arbredetransmission
11IsolateurB40
61
70
17
35
25
44
46
15
65
7
3
50
19
22
75
61
2
57
71
66
9
60
31
20
39
16
68
8
24
74
10
26
63
13
5
1
32
34
72
67
63
52
5
38
5
11
33
56
76
25
43
27
21
29
36
40
73
69
30
55
28
58
62
32
18
4
59
14
6
65
12
64
25
51
5354
47
37
42
Machine Translated by Google

2.Pointd'entretien
1.Utilisationcouranteetassemblage
ildoitêtrenettoyéetchangéàtempspours'assurer
,
1.Lameuleabrasive(B7)aplusdesaletégrasse
1.Latensiondefonctionnementdoitêtrenormaleetconnecterlefildeterrepourdesraisonsdesécurité,afind'éviterleschocs.
ouentraindechanger.
delalamedefraisageefficacementetgarderlalametranchante,réduirel'épaulementdelamachineélectrique.
automatiquement,pourgarderlalametranchante.Silameuleabrasiveaplusdesaletégrasse,elledoitêtreutiliséeaprèslenettoyage
1.Lamedefraisage:Démarrezlesciseaux
électriques,appuyezsurlebâtonabrasif(B3),lameuleabrasive(B7)fraiseraleslames
2.Netouchezpaslalameàgrandevitesseaveclesdoigtsouunautreorganeducorps.
3.Lorsduchargementetdudéchargementdespièces,lafiched'alimentationdoitêtredébranchée.
1.Réglezlalamecidessous
2.Lalameinférieuredoitêtreappuyéecontrelalameauminimum
angle,élasticitéappropriée
fonction.
,
Vitessedelalame:2400cycles
Tension:monophasé100V~120V;220V~240V
2.Chargementetdéchargementdelalame:lalameesttournéeversletroudelameuleabrasive
brosseavecl'alimentationcoupée(silemoteurélectriquefonctionneanormalement,veuillezarrêterlamachineimmédiatementpourvérifier
Tailledelalame:φ70mm
insérerunegoupillecylindriquepourutiliserlapartieplate
2.Nettoyerlasaletéfine:Nettoyezlasaletéfinederrièrelalameetdanslamachineélectriquepourévitertoutdommage.
labrosseélectriqueestnormale).
LesciseauxélectriquesRS70conviennentauxvêtements
,
Hauteurdetaille:25mm
chaussuresetchapeauxcravates,entrepriseparapluie.ltpeutcouper
Puissance:170W
main(appendice)pourfairetourneroucomprimerlechapeaudelame(B22).
3.Changezlesautrespiècesselonl'ordredudessind'assemblagetridimensionnel.
,
3.Lubrificationdelaroueàvissansfin:utiliseznormalementdesciseauxélectriques,lagraissedanslacoupelled'huile(B9)estabrasive
rouedeuxàtroisfoisparmois.
4.Lubrificationdelalame:Avantutilisation,ajoutezdel'huile30#aucotonlubrifiant(W28)pourréduirelafrictionentre
lapetitelameetlalameinférieure.
5.Changerlabrosseélectrique:Aprèsavoirtournépendantunelonguepériode
4.Interdiredebrancherlefanlight.
s'éteintrapidementetestportableetflexible.Cettemachineaunestructureraisonnableettoutlenécessaire
aendommagéunemoitié,ilfautchangerl'électrique
lame
Laposition,l'angleetl'élasticitéentrelalameetledessous
Surlasaletégrassedelameuleabrasive
Aprèsavoiréliminélasaletégrassedelameuleabrasive
Lalamecidessous(B24)oulalame(B21)présenteunebrècheouundommage Changement
RetirerRaison
,
démarrerlalamedumoulin
3.Laraisondel'annulationdutissu,dublocagedutissuetdelacoupedureetduretrait
Spécificationstechniques:
DIRECTION
4.Assurezvousde:
Machine Translated by Google

Ref.-Nr. Teile-Nr. & BeschreibungRef.nr.Teilenummer & Beschreibung
61 B7 Schleifrad
64 B55 G ringerwelle
22 W54 Carbon B Laufsh
8 W38 ÿ 6E Wellenring
2 7 G1 0 M3 X1 0 Standardschraube
2 1 B6 3 Buchse für Kohlebürste
56 W28 Ölfilz
15 W44 ÿ 19X0,3 Wellscheibe
4 0 B7 9 Schneckenradbaugruppe
5 1 B26 M2 .5X3 Standardschraube
2 9 G5 7 M3 X1 8 Standardschraube
3 4 G65 Gummiabdeckung
67 B3 Schleiftaste
60 B72 Schleifeinheit
76 B70 S Panner
4 W33 ÿ 2X12 Rolle P in
1 2 B4 5 M4X4 8 Standardschraube
74 B3- 1 Mahlknopf
7 2 B76 Kragen
5 4 G4 2 M4 X8 Standardschraube
44 B10 0 il C oben
50 B27 Führungsplatte
39 B20 Schraube
6 3 B6 Schleifscheibensockel
11 B40 Isolator
3 B33 Antriebswelle
2 0 B54 Basis für Carbonbürste
5 5 G3 9 M4 X8 Standardschraube
14 W43 Unterlegscheibe
5 9 W30 Schraube für Öler
5 3 B24 Unteres Messer
4 3 G5 0 M4 X1 0 Standardschraube
3 3 W1 1 M3X6 Standardschraube
3 2 W6 7 M3X4 Standardschraube
2 5 W1 9 M3X8 Standardschraube
17 B50 Rotor
47 B16M6X5 .2 Mutter
38 B74 Messingscheibe
7 1 B75 618-3 Lager
62 B8 Schleifradwelle
1 9 B48 Stator
49 B25 Pressfuß
73 B78 ÿ 2E Wellenring
75 B71 P in
3 1 B59 Schalterknopf
2 4 B6 4 Sockel für Schalter
66 B4 S Feder
1 0 W2 5 M4X8 Standardschraube
2 B31 Antriebsrad
70 B74 G ringerwelle
5 8 W29 Feder für Öler
52 G40 Kragen
42 B22 Blattmutter
7 W42 ÿ 19 Kragen
69 B8- 1 Schleifradwelle
26 B68 Kabelpressenblock
46 B17 ÿ 6 Unterlegscheibe
6 B35 Kragen
9 B4 1 Kupplung
1 B3 0 Getriebegehäuse
37 B19 Schneckenrad
2 8 W57 Schalter
1 8 B7 3 Rotorbaugruppe
48 B2 Sicherer Schutz
1 6 B4 7 Halter für Motorkühler
41 B21 Klinge
30 B58 Arm
65 B56 Feder
2 3 W55 Kappe für Kohlebürsten
13 W46 ÿ 4 Unterlegscheibe
5 W5 626 Lager
36 B18 Schneckenradwelle
57 W27 Messeröler
45 B9 Ölbehälterdeckel
35 G66 Kabel
68 B77 Schleifeinheit
Dreidimensionales Montagebild
RUNDSCHNEIDEMASCHINE
RS-70
RS-70
8
30
69
73
40
36
29
58
28
55
56
33
11
5
38
21
27
25
43
76
53 54
51
25
64
12
65
61
70
42
37
47
18
32
62
6
14
59
4
2
61
75
22
19
9
66
71
57
46
44
25
17
35
50
3
7
65
15
72
34
32
1
5
13
5
52
63
67
68
16
39
31
60
20
26
10
74
63
24
23
41
48
45
49
Machine Translated by Google

,
Es sollte rechtzeitig gereinigt und gewechselt werden, um sicherzustellen,
der Fräsklinge effektiv und hält die Klinge scharf, reduziert die Schulter der elektrischen Maschine.
1. Die Betriebsspannung muss normal sein und aus Sicherheitsgründen muss ein Erdungskabel angeschlossen sein, um einen Stromschlag zu vermeiden.
oder ändern.
1. Die Schleifscheibe (B7) hat mehr fettigen Schmutz
automatisch, um die Klinge scharf zu halten. Wenn das Schleifrad mehr fettigen Schmutz aufweist, sollte es nach der Reinigung verwendet werden
1. Klinge fräsen: Elektrische Schere
einschalten, Schleifstift (B3) drücken, die Schleifscheibe (B7) fräst die Klingen
2. Berühren Sie die sich mit hoher Geschwindigkeit bewegende Klinge nicht mit den Fingern oder anderen Körperorganen.
3.Zum Be- und Entladen von Teilen muss der Netzstecker gezogen werden.
Die Position, der Winkel und die Elastizität zwischen Klinge und Unterseite
Über fettigen Schmutz der Schleifscheibe
Klinge
Nach dem Entfernen von fettigem Schmutz von der Schleifscheibe
Entfernen
ÄndernUnten hat die Klinge (B24) oder Klinge (B21) einen Bruch oder eine Beschädigung
Grund
,
Mühlenblatt starten
1. Klinge unten einstellen
Winkel, geeignete Elastizität
2.Unterhalb der Klinge muss so weit wie möglich gegen die Klinge gelehnt werden
3.Der Grund für das Abbrechen des Stoffes, das Blockieren des Stoffes und das harte Abschneiden und Entfernen
Technische Daten:
2. Wartungspunkt
1.Allgemeine Verwendung und Montage
2. Feinen Schmutz reinigen: Um Schäden zu vermeiden, sollte der feine Schmutz hinter der Klinge und in der Elektromaschine gereinigt werden.
3. Schneckenrad schmieren: Normalerweise verwenden Sie eine elektrische Schere, das Fett im Ölbehälter (B9) setzt Schleifmittel frei
die kleine Klinge und die Unterklinge.
,
die elektrische Bürste ist normal).
Rad zwei- bis dreimal im Monat.
Leistung: 170 W
Schuhe und Hüte Krawatten, Dachunternehmen. Es kann schneiden
Funktion.
3. Ändern Sie andere Teile entsprechend der Reihenfolge der dreidimensionalen Montagezeichnung.
4. Klinge schmieren: Vor dem Gebrauch, Einsätze 30 # Öl zu Schmierwatte (W28) um die Reibung zwischen zu reduzieren
hat eine Hälfte beschädigt,sollte die elektrische ändern
schnell aus und ist tragbar und flexibel. Diese Maschine hat eine vernünftige Struktur und alle notwendigen
5. Wechseln Sie die Elektrobürste: Nach längerem Drehen
2. Laden und Entladen der Klinge: Die Klinge wird zum Loch der Schleifscheibe gedreht
Spannung: einphasig 100 V ~ 120 V; 220 V ~ 240 V
Bürste mit ausgeschaltetem Strom (wenn der Elektromotor nicht normal läuft, stoppen Sie die Maschine sofort, um zu überprüfen
Klingengeschwindigkeit: 2400 Zyklen
,
4.Verbieten Sie das Verstopfen des Oberlichts.
,
Die elektrische Schere RS-70 eignet sich für Kleidung
Schnitthöhe: 25 mm
Hand (Anhang) zum Ausfahren oder Zusammendrücken der Klingenkappe (B22).
Zylinderstift einsetzen, um Flachstift zu verwenden
Klingengröße: ÿ70 mm
RICHTUNG
4. Achten Sie darauf:
Machine Translated by Google