
Creative Consumer Electronics
Jet Fryer - AF1
PLEASE READ ALL THE INSTRUCTIONS BEFORE USE

3
English Manual
Manuel d’utilisation en Français
Gebrauchsanleitung auf Deutsch
Manual de Instrucciones en Español
Manuale D’istruzioni In Italiano
5
21
35
51
67
Contents
Instrukcja obsługi. Polski
82

4 5

6 7
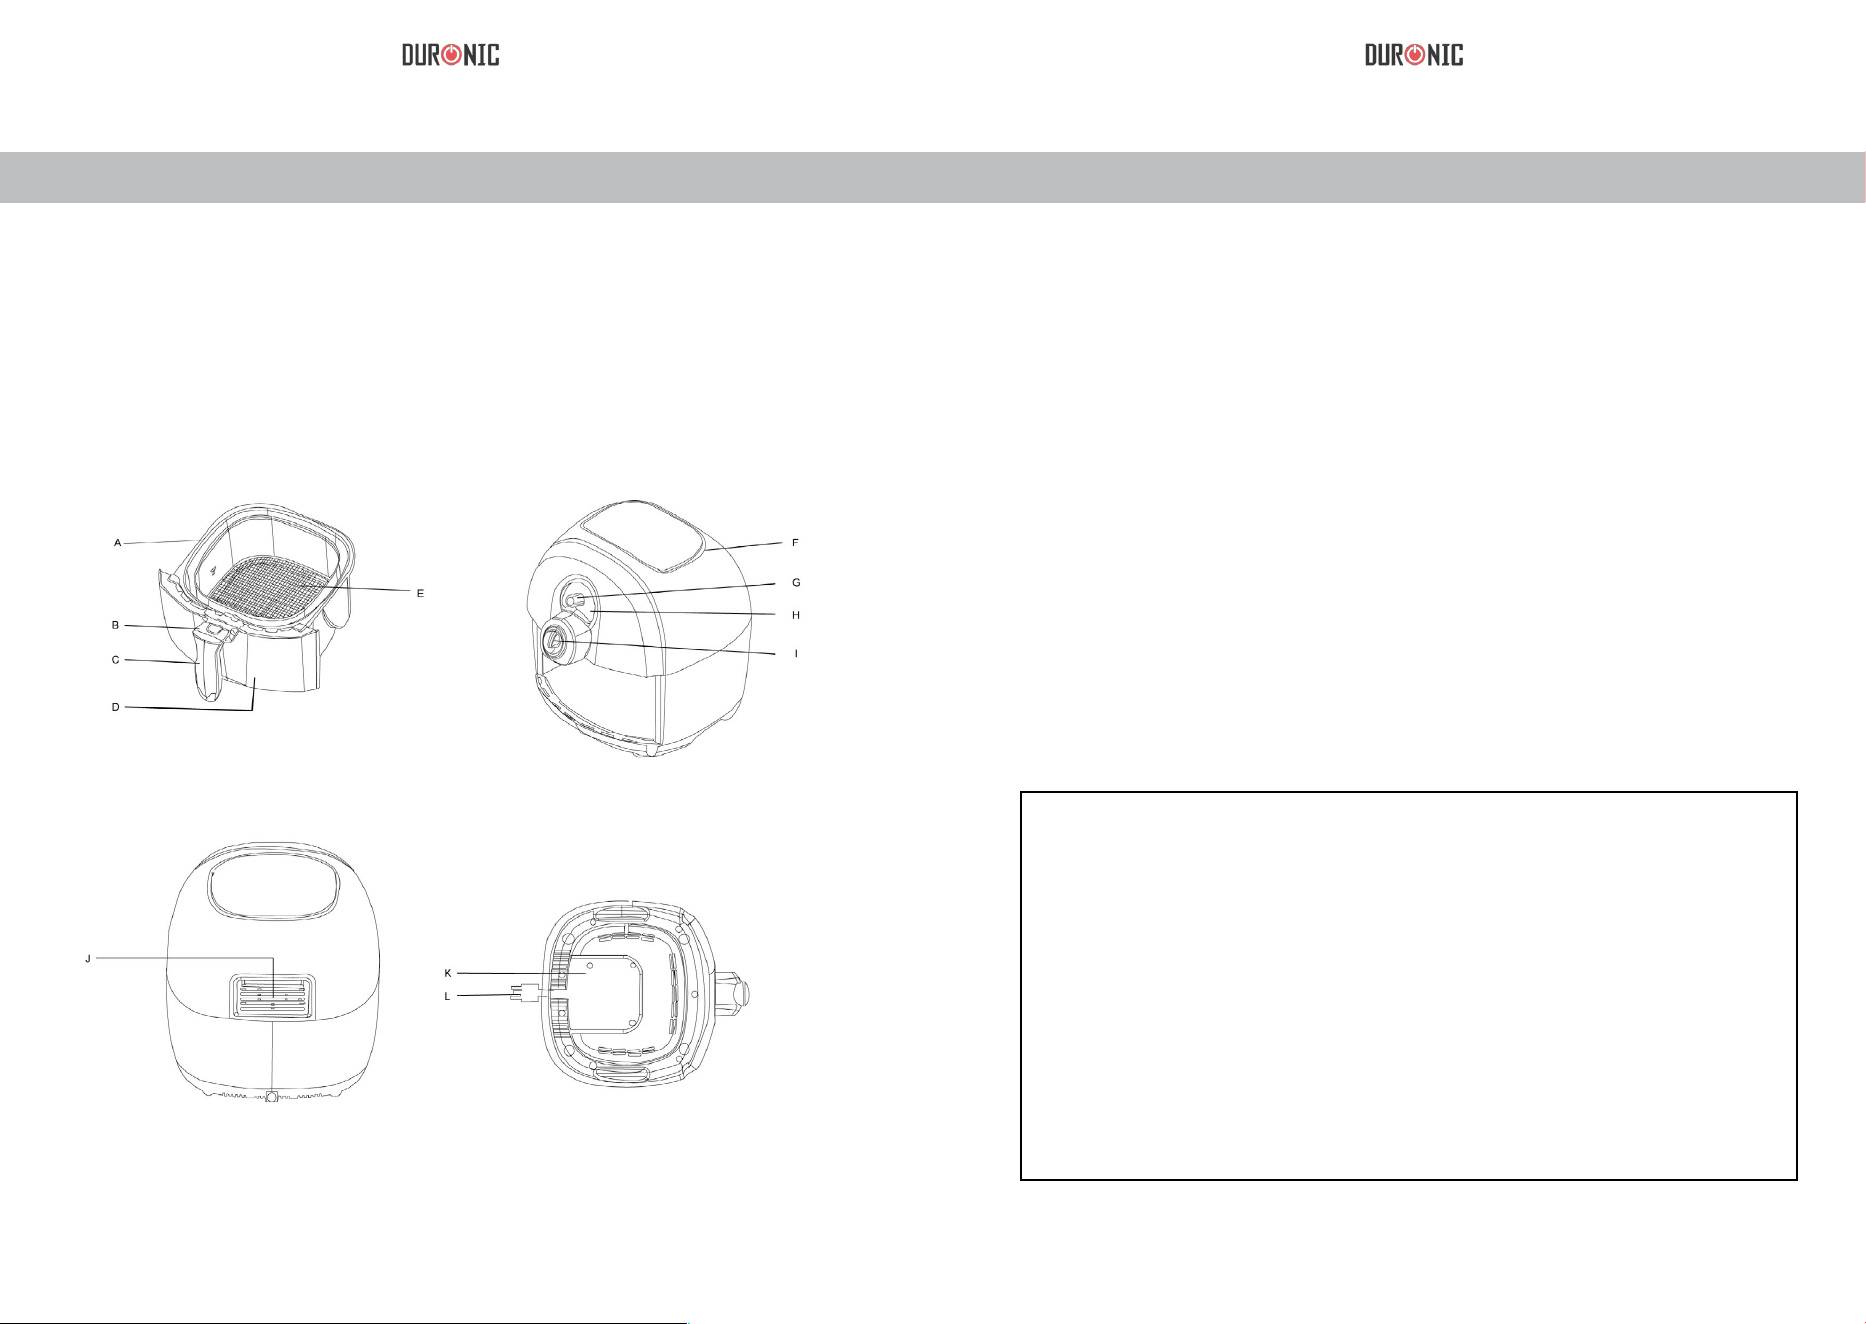
Introduction General Descriptions (Fig.1)
Air Fryer uses air heating circulation (High-Speed Air) system and top grill
to cook your ingredients in a fast, easy and healthy way. Your ingredients
are heated from all sides at once and there is no need to add oil to most of
the ingredients. The additional baking plate, allows you easily to make some
dishes like cakes, quiches and cook fragile food.
A fry basket
B fry basket release button
C fry basket handle
D frying pan
E frying net
F air inlet
G temperature control knob
H heating indicator
I power on-knob / timer
J air outlet
K wire storage case
L power cord
A heat resistant mat has been included for you to put the tray on when you
take it out of the appliance.
Note:
Please read the instructions carefully before using
this appliance. Keep this instruction manual for
future reference.

8 9
-Never submerged in water or clean it under the tap because the appliance
contains electronic components and heating elements
-Do not let the water or liquid enter into the appliance this will prevent electric
shock.
-Always place the ingredients in the fry basket, to prevent any contact with
the heating elements.
-Do not cover the air inlet or air outlet while the appliance is in operation.
-Do not ll the pan with oil that may cause a re hazard.
-Do not touch the inside while the appliance is operating.
-Please check the appliance voltage and your country power supply voltage
are match before connecting the appliance.
-Do not use the appliance if the power cord is damage.
- If the power cord is damaged, you must have it replaced by a qualied
electrician, in order to avoid a hazard.
This appliance can be used by children from 8 years old or above and by
people with reduced physical, sensory or mental capabilities, or lack of
experience and knowledge, provided they are supervised or guided by a
person to ensure their safety.
-Children should be supervised to ensure that they do not play with the
appliance
-Keep the appliance and the power cord out of reach of children when the
appliance is switched on or is cooling down
-Keep the power cord away from the surface of high temperature.
-Do not insert the plug of the appliance or operate control panel with wet
hands.
xxxxxxxxxxxxxx
xxxxxxxxxxxxxx
xxxxxxxxxxxxxx
Dangerous
Automatically Shut Off
Warning Note
-Make sure the plug is inserted into the wall socket properly.
-Do not intend to operate the appliance by means of an external timer.
-Do not place the appliance on or nearby the ammable material, such as a
tablecloth or curtain.
-Never place the appliance against the wall or others appliance. Keep a
distance at least 10cm free space on the back and sides and 10cm free
space above the appliance. Never place any item on top of the appliance.
-Never use this appliance for any other purpose than described in this
instruction manual.
-Appliance must be used in a sensible manner.
-Hot steam will be released through the air outlet during frying. Keep your
hand and face from a safe distance. Also be careful of hot steam and high
temperatures when removing the pan.
-The surface of the appliance may become very hot when in use. (gure 2)
-Immediately switched off the power or unplug the appliance if you see dark
smoke coming out from the appliance. Wait for the smoke emission to stop
before you remove the frying pan.
-Place the appliance on a horizontal or a stable surface.
-Return the appliance to manufacturer or authorised service centre for repair
or inspection. Do not repair the appliance yourself; otherwise the guarantee
will become invalid.
-Be sure to unplug the appliance after use.
-Let the appliance cool down for about 30 minutes before you clean it.
-Ensure the ingredients presented in golden brown, not dark or brown.
This appliance is equipped with a timer. When the timer has countdown to 0,
the appliance will ring a bell and automatically shut off. If manually shut off,
please turn the timer knob to 0.

10 11
Electromagnetic Fields (EMF) The Use Of This Product
Before First Use
To Use
This product conforms to the electronic magnetic eld (EMF) related
standards. If used correctly according to the instructions of the user manual,
this product is safe.
Air Fryer can be used for cooking many ingredients. The enclosed recipe
book will help you understand the product and what is made with it. Please
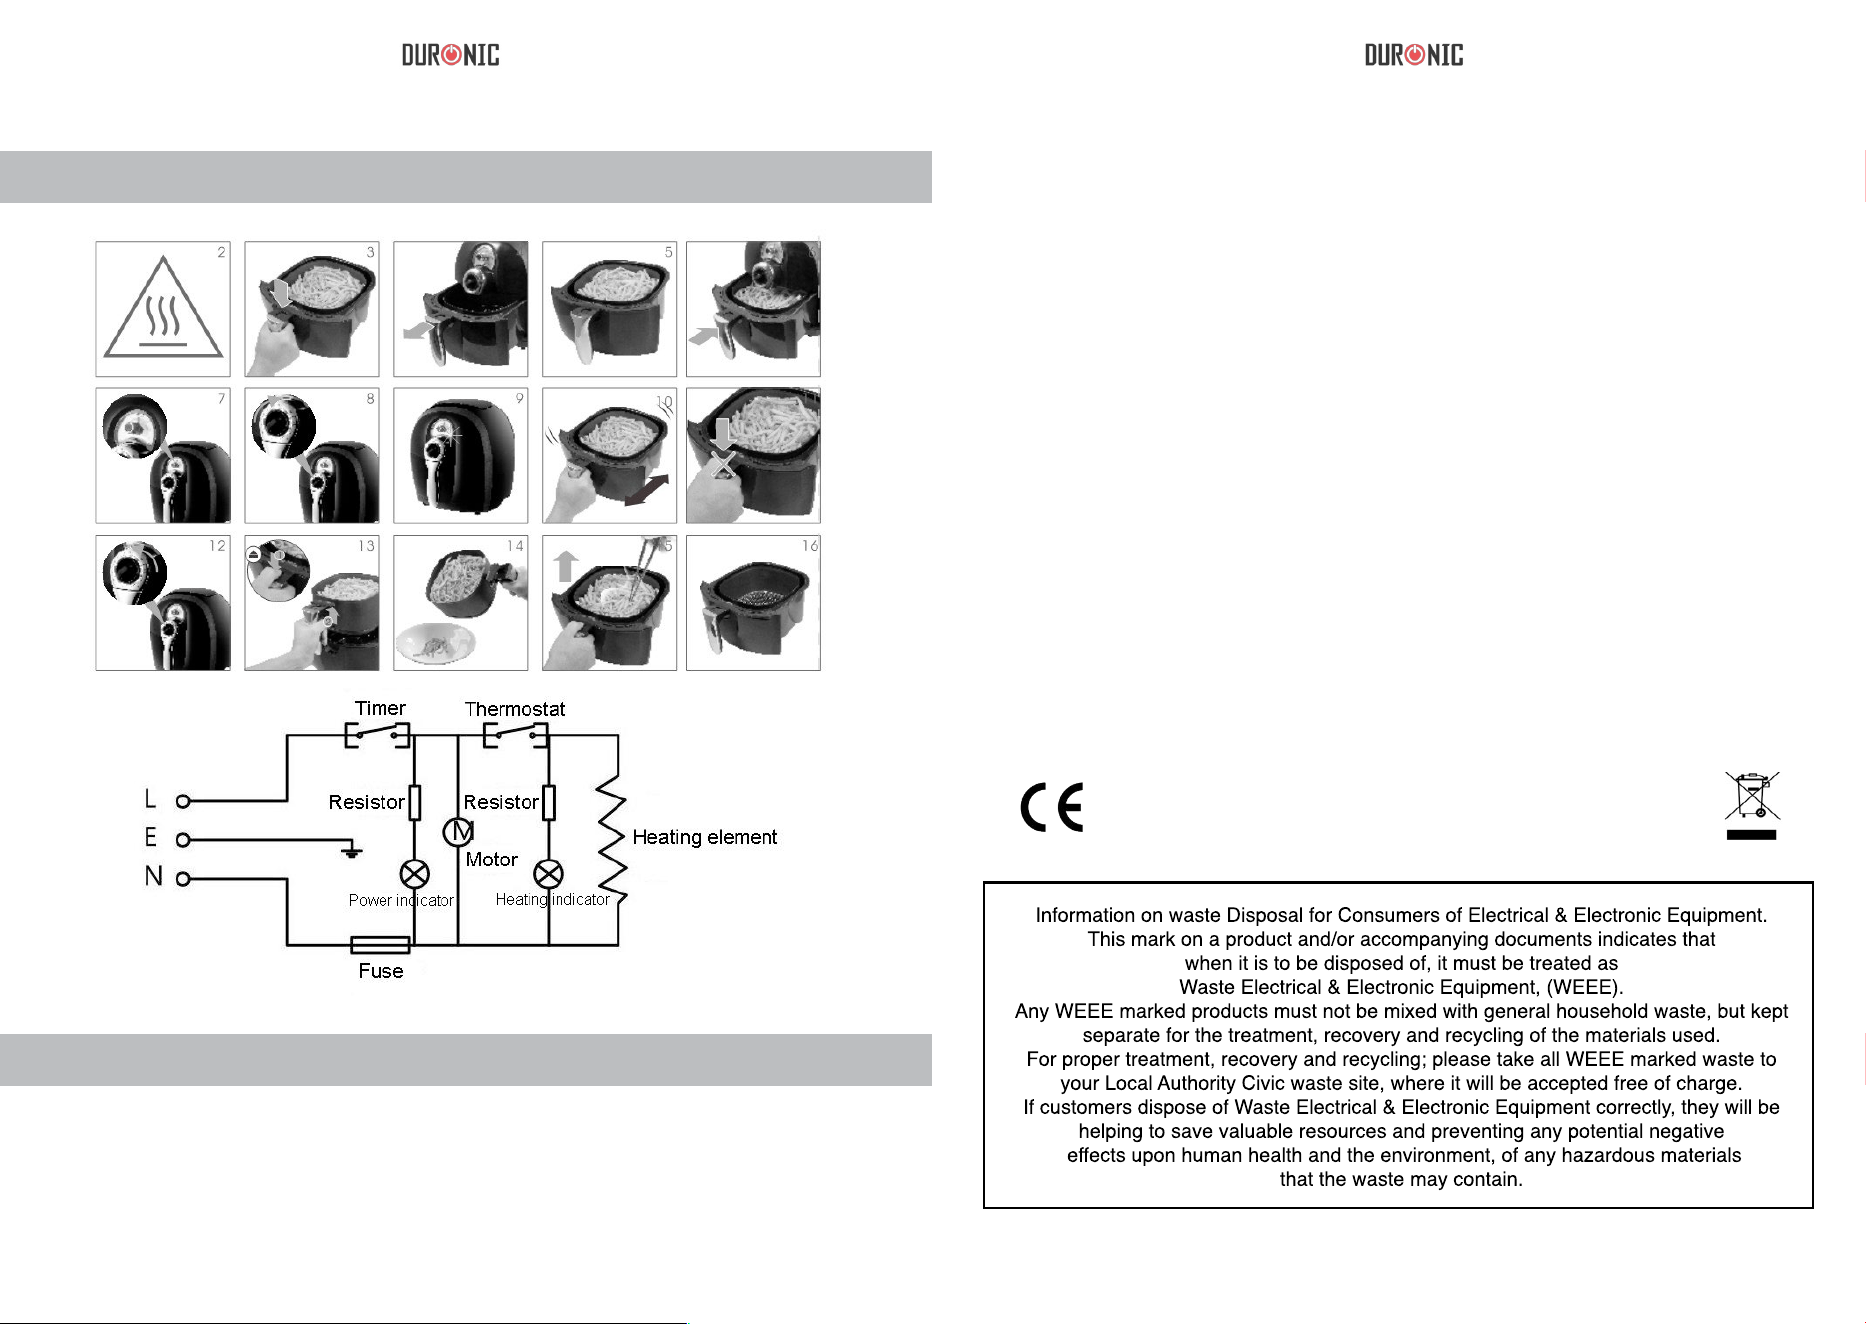
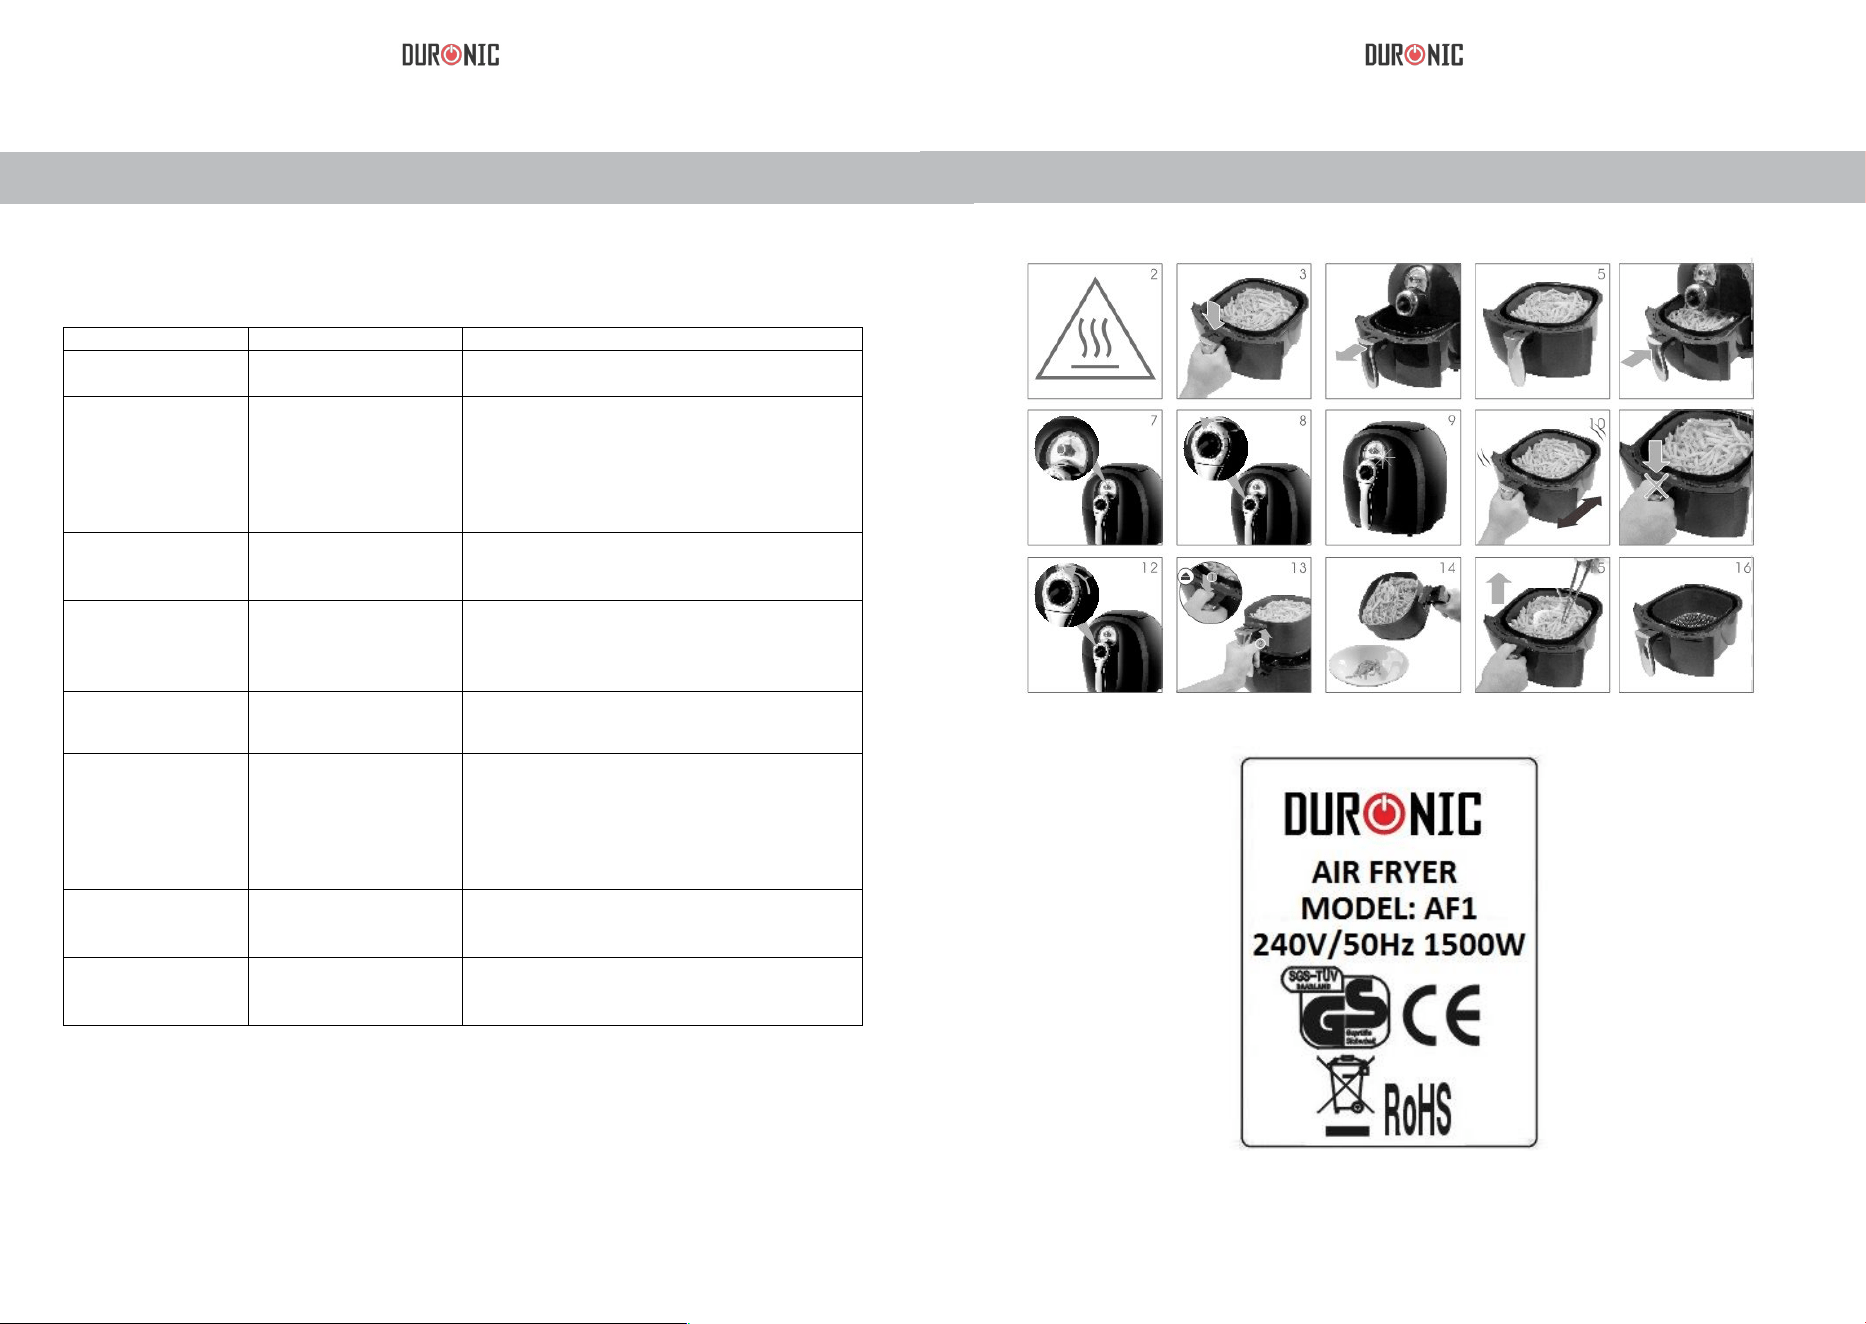
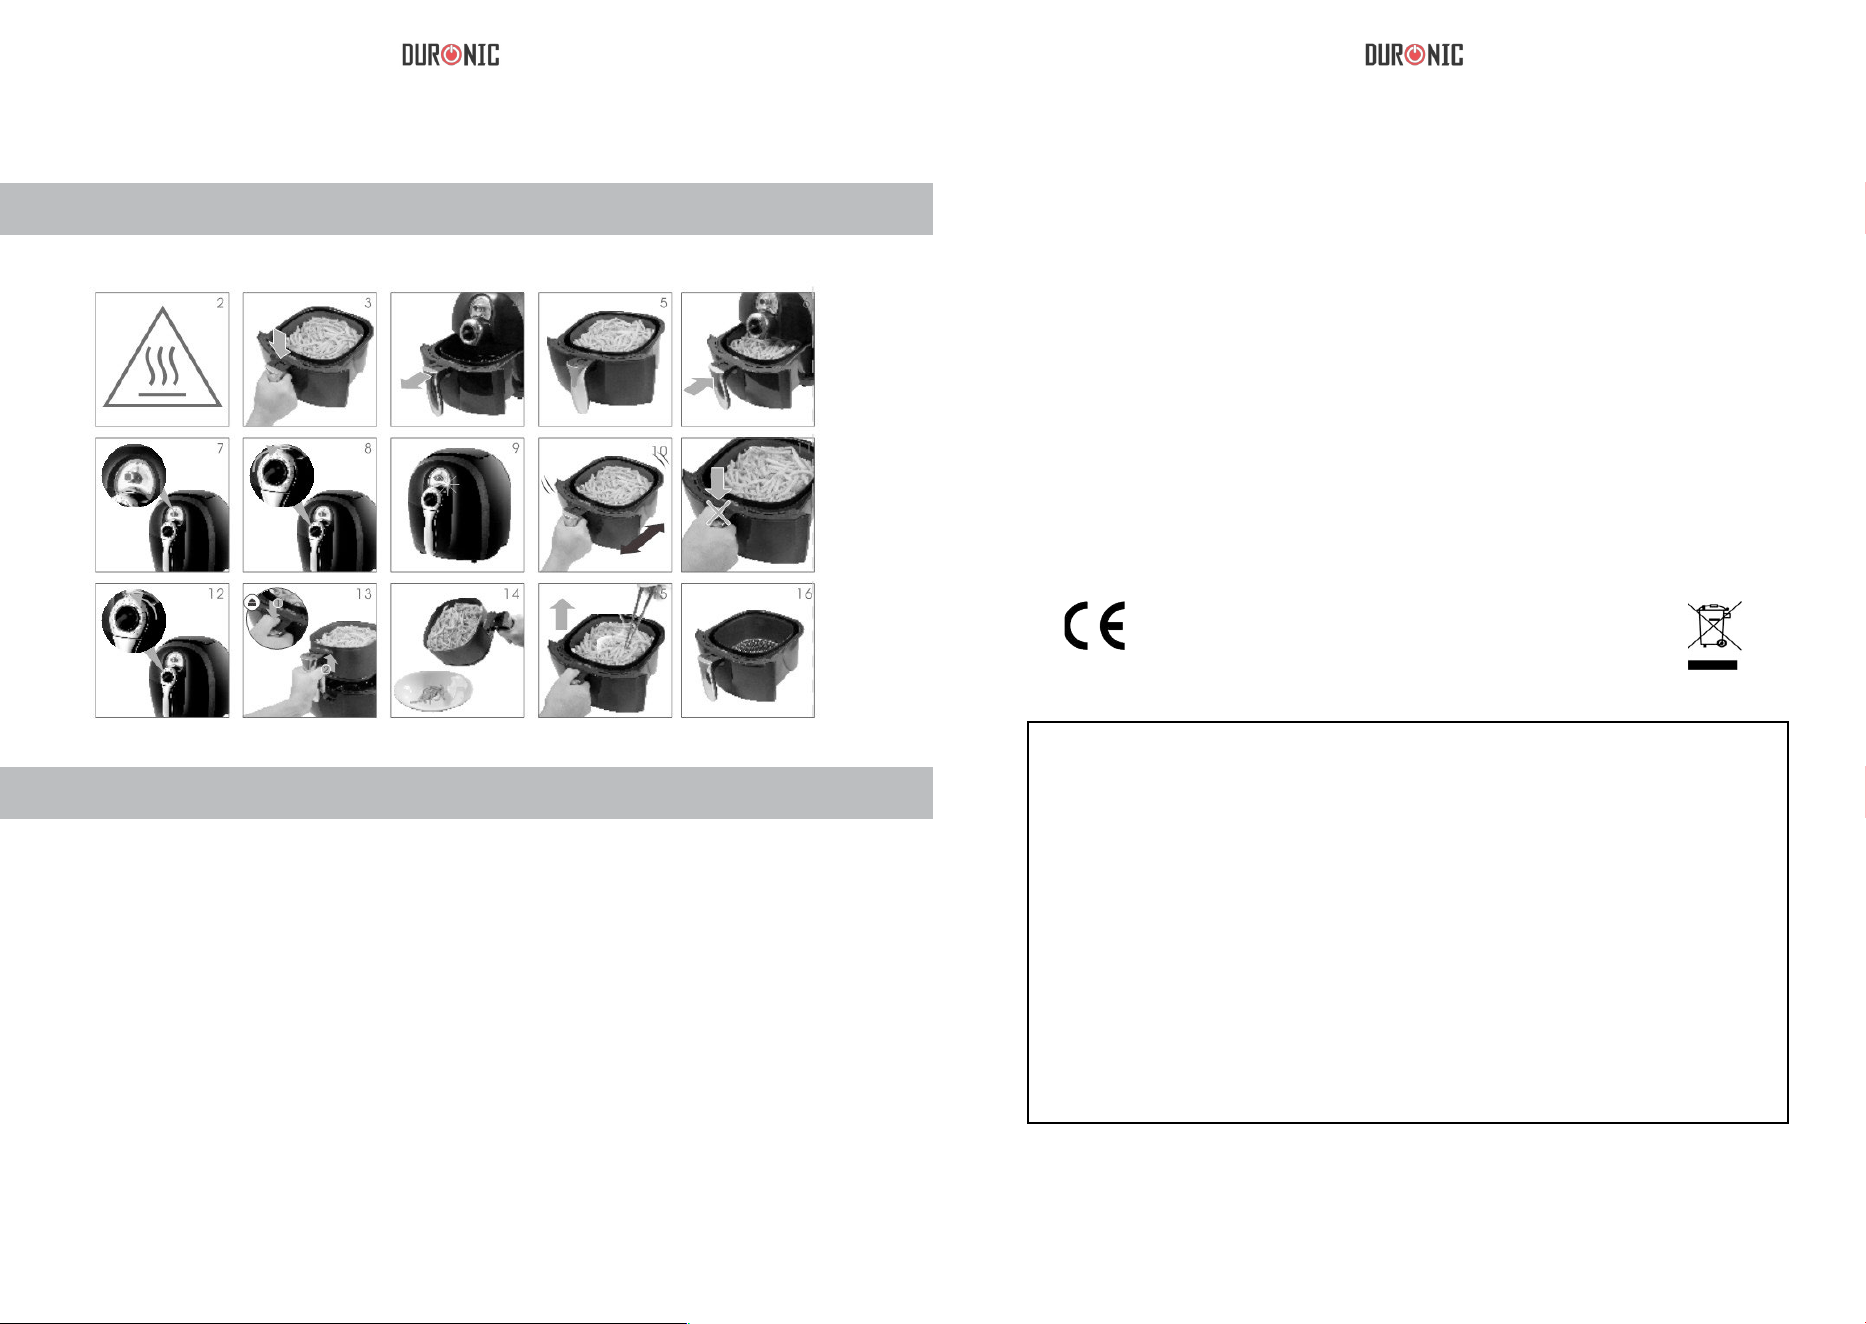
check image gures at the end of this manual to relate to the below points.
1 Insert the plug into the earthed wall socket
2 Carefully pull the frying pan from the appliance. (gure 4)
3 Put the ingredients in the fry basket. (gure 5)
Note: Do not put the ingredient exceeding the MAX indicator line or more
than indicator table (refer to the chapter of the “Setting”), because this may
affect the frying result.
4 Slide the frying pan back to the Air Fryer. (gure 6)
Never use the frying pan without the fry basket.
Note: Do not use or touch the frying pan, because it is very hot. Kindly hold
the handle when removing the frying pan.
5 Adjust the temperature control knob to the required temperature. Please
refer to the chapter of the “Setting” part to determine the right temperature.
(gure 7)
6 Determine the time required for cooking ingredients (please refer to the
chapter of the “Settings” part)
7 To switch on the appliance, please adjust to the necessary timer knob to
cooking time. (gure 8)
If the appliance is cold, the cooking time should be increased by 3
minutes.
Note: You can also preheat the appliance before putting in the ingredients by
adjusting the timer knob about 3 minutes, and wait for the heating indicator
light goes out (about 3 minutes). Then put in the frying basket and adjust the
timer knob to the cooking time.
· at this time, the power cord indicator and the heating indicator will light up.
(gure 9)
· timer will countdown from set cooking time.
· Appliance process when heating indicator light up and goes out from times
to times. This means that heating element in constant on and off, in order to
maintain the temperature.
· Excess oil is collected on the bottom of frying pan.
1 Take away all the packaging material.
2 Remove the sticker or label from the appliance.
3 Use hot water, washing liquid and non-abrasive sponge to thoroughly clean
the frying basket and pan.
Note: You can also use the dishwasher to clean the components part.
4 Wipe the appliance inner part and outer part with a wet cloth.
This is a no oil Air Fryer. Do not ll the frying pan with oil.
1 Place the appliance on a horizontal or a stable surface.
Do not put the appliance on non-heat resistance surface.
2 Properly place the fry basket in frying pan. (gure 3)
Pull the power cord out of the cord storage part in the bottom of the
appliance.
Do not ll the frying pan with oil or other liquid.
Do not place any item on top of the appliance to cut off the airow and
inuence the hot air heating.

12 13
8 Some ingredients in the cooking process need to shake halfway (refer
to the chapter of the “Setting” part). Pull the frying pan from appliance and
shake it, then slide back the pan into the appliance. (gure 10)
Note: Do not press the fry basket remove button during shaking the frying
pan. (gure 11)
Tip: You can remove the fry basket from pan and shake only to reduce
the weight. Pull the pan out of appliance and place it on a heat-resistance
surface and press the fry basket remove button.
Tip: If you set the timer to half of the cooking time, listen to the timer bell
when you want to shake the ingredients. However, this means that you have
to set the timer again for the remaining cooking times after shaking.
9 If you listen the timer bell, said the cooking times has elapsed. Pull the
frying pan out of the appliance and place it on heat-resistance surface.
Note: You can also manually stop frying. Adjust the timer control knob to 0.
(gure 12)
10 Check whether the ingredients are cooked.
If still need to cook, slide the frying pan back to the appliance and set the
timer for a few minutes.
11 To pour out small ingredients (such as French fries), please press fry
basket remove button (1) and then lift the fry basket out of frying pan. (2).
(gure 13)
Do not turn the frying basket upside down with the pan still attach to it as it
may cause excess oil that has collected at the bottom of the frying pan will
leak onto the ingredients.
After frying, the pan and the ingredient are still hot. It is depending on the
different ingredients; hot steam may escape from the frying pan.
12 Empty the ingredient from fry basket onto a plate or bowl. (gure 14)
Tip: To remove the large or fragile ingredients, can use a pair of tongs to lift
the ingredients out of the basket. (gure 15)
13 The Air Fryer is instantly ready for cook the next batch of ingredients after
a batch of ingredients is ready. (gure 16)
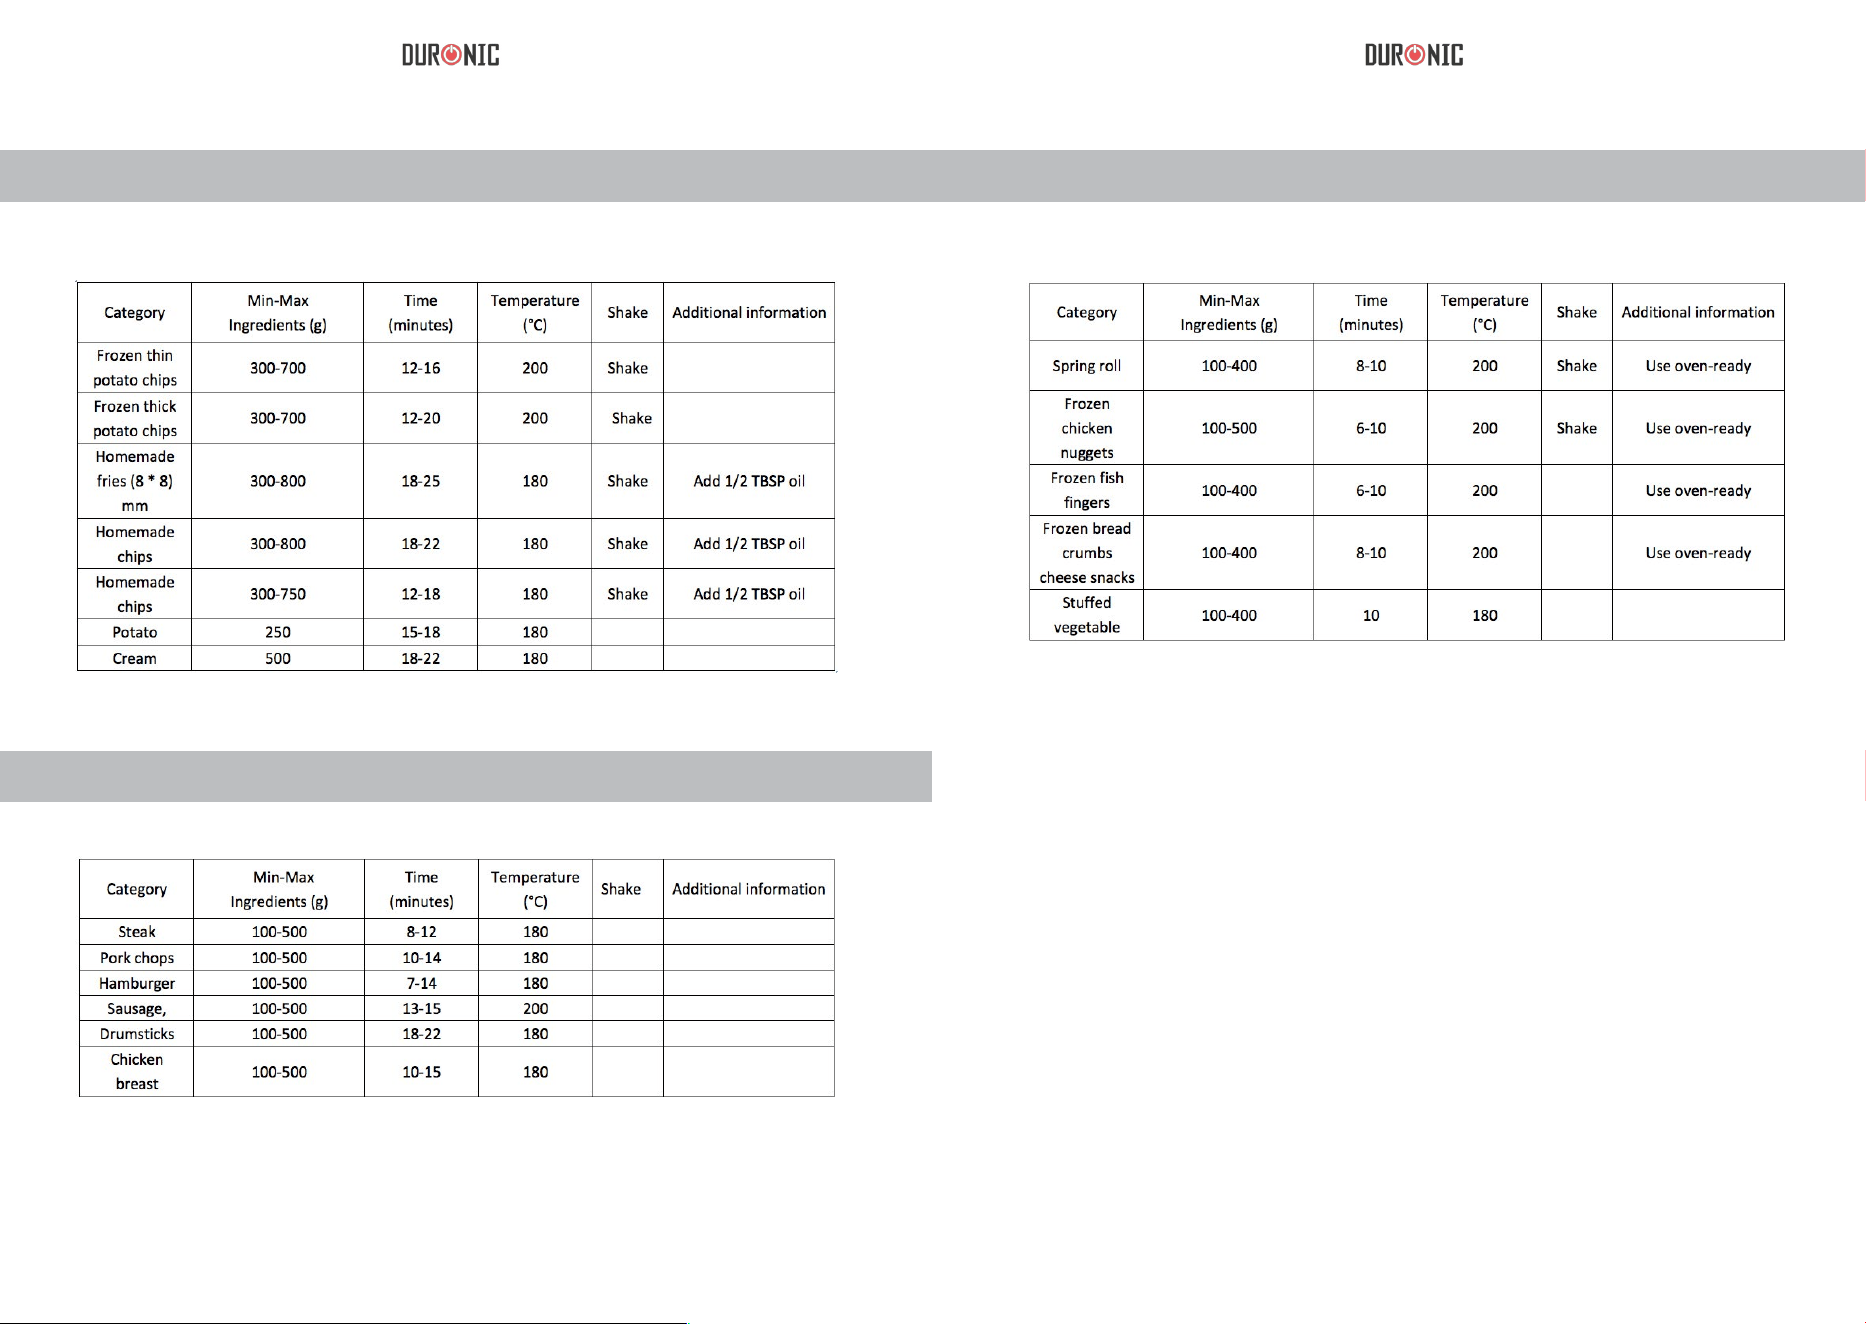
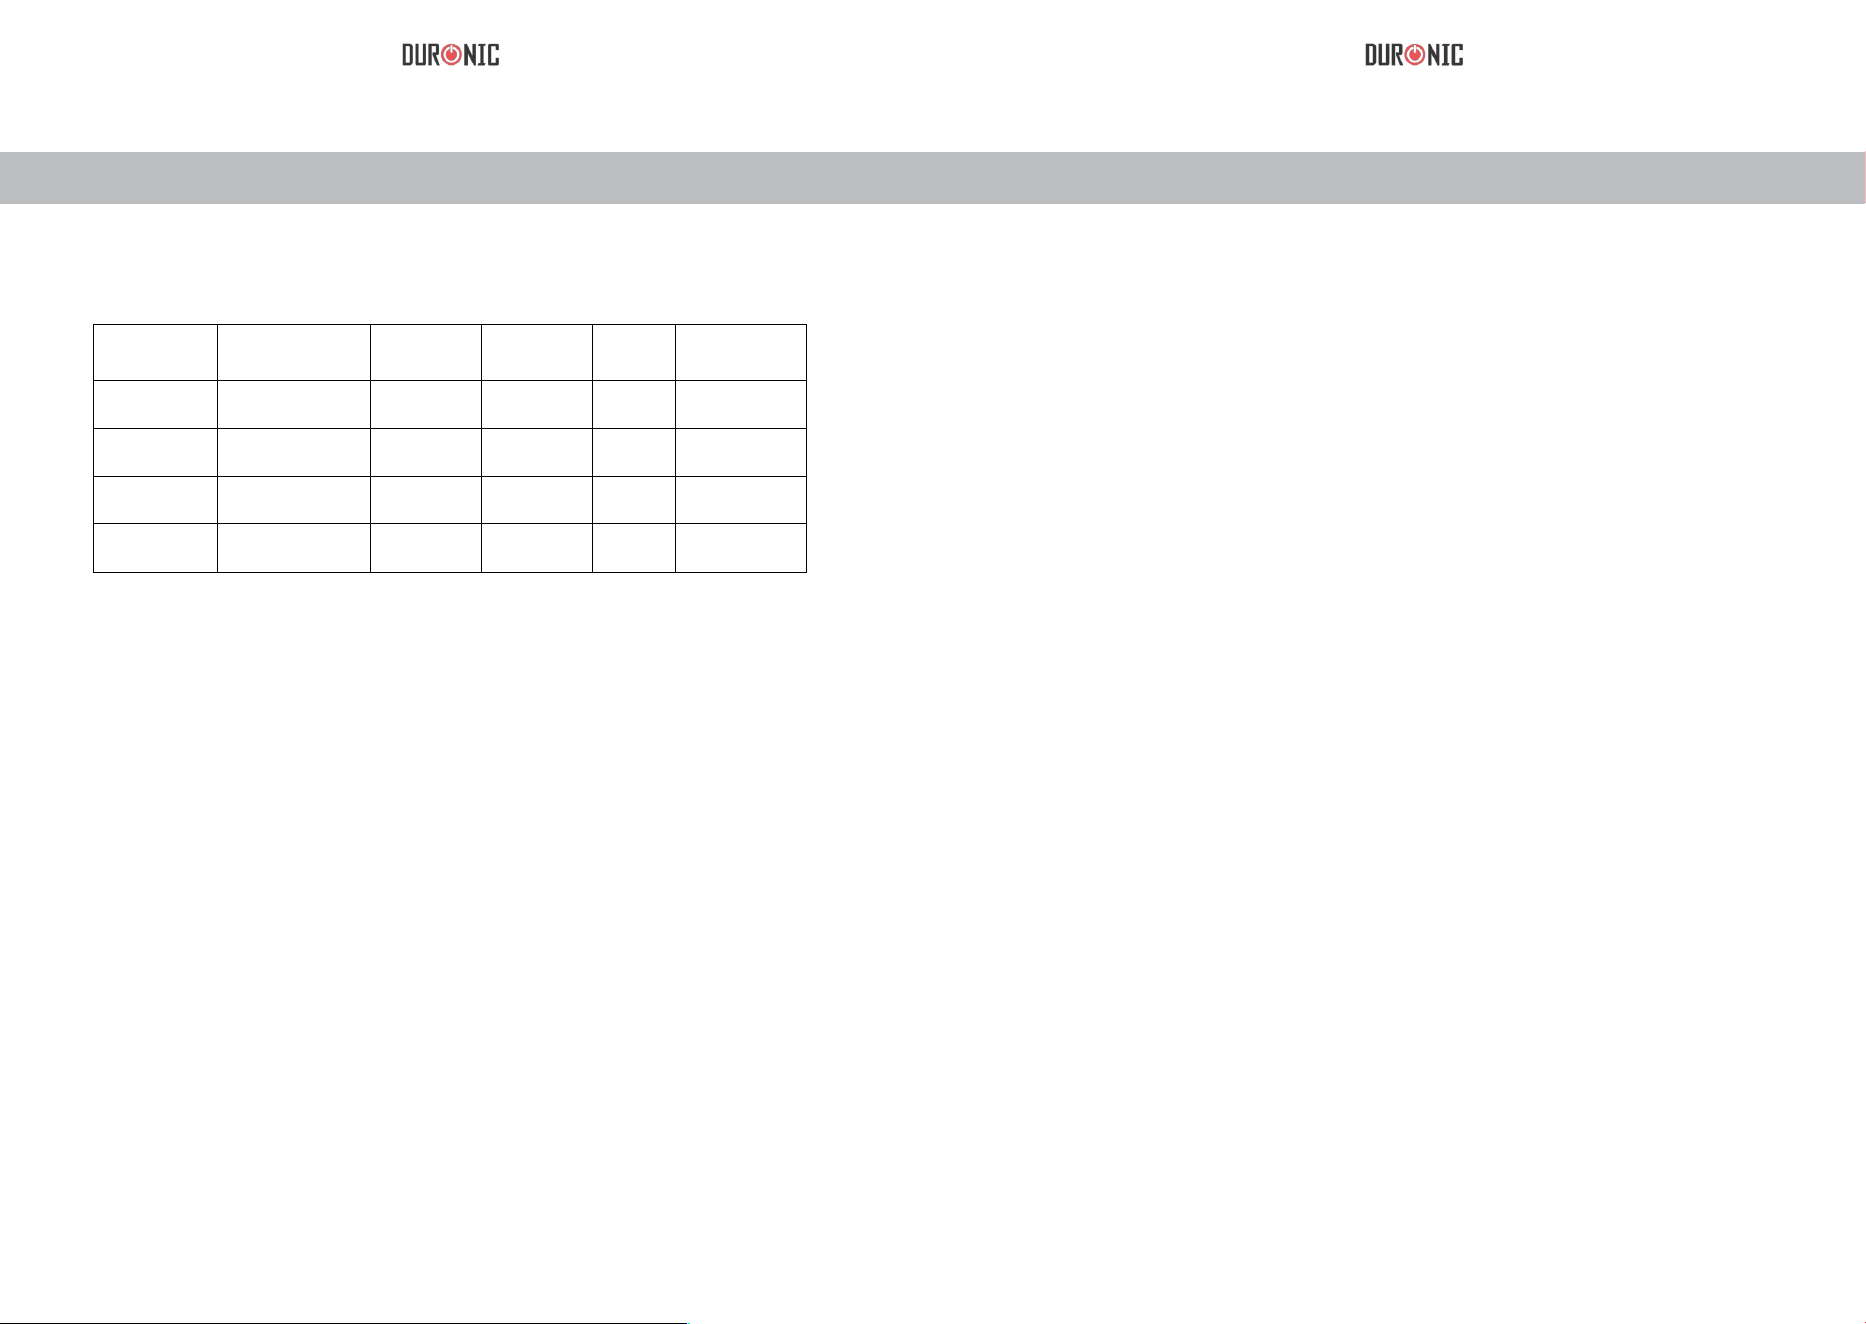
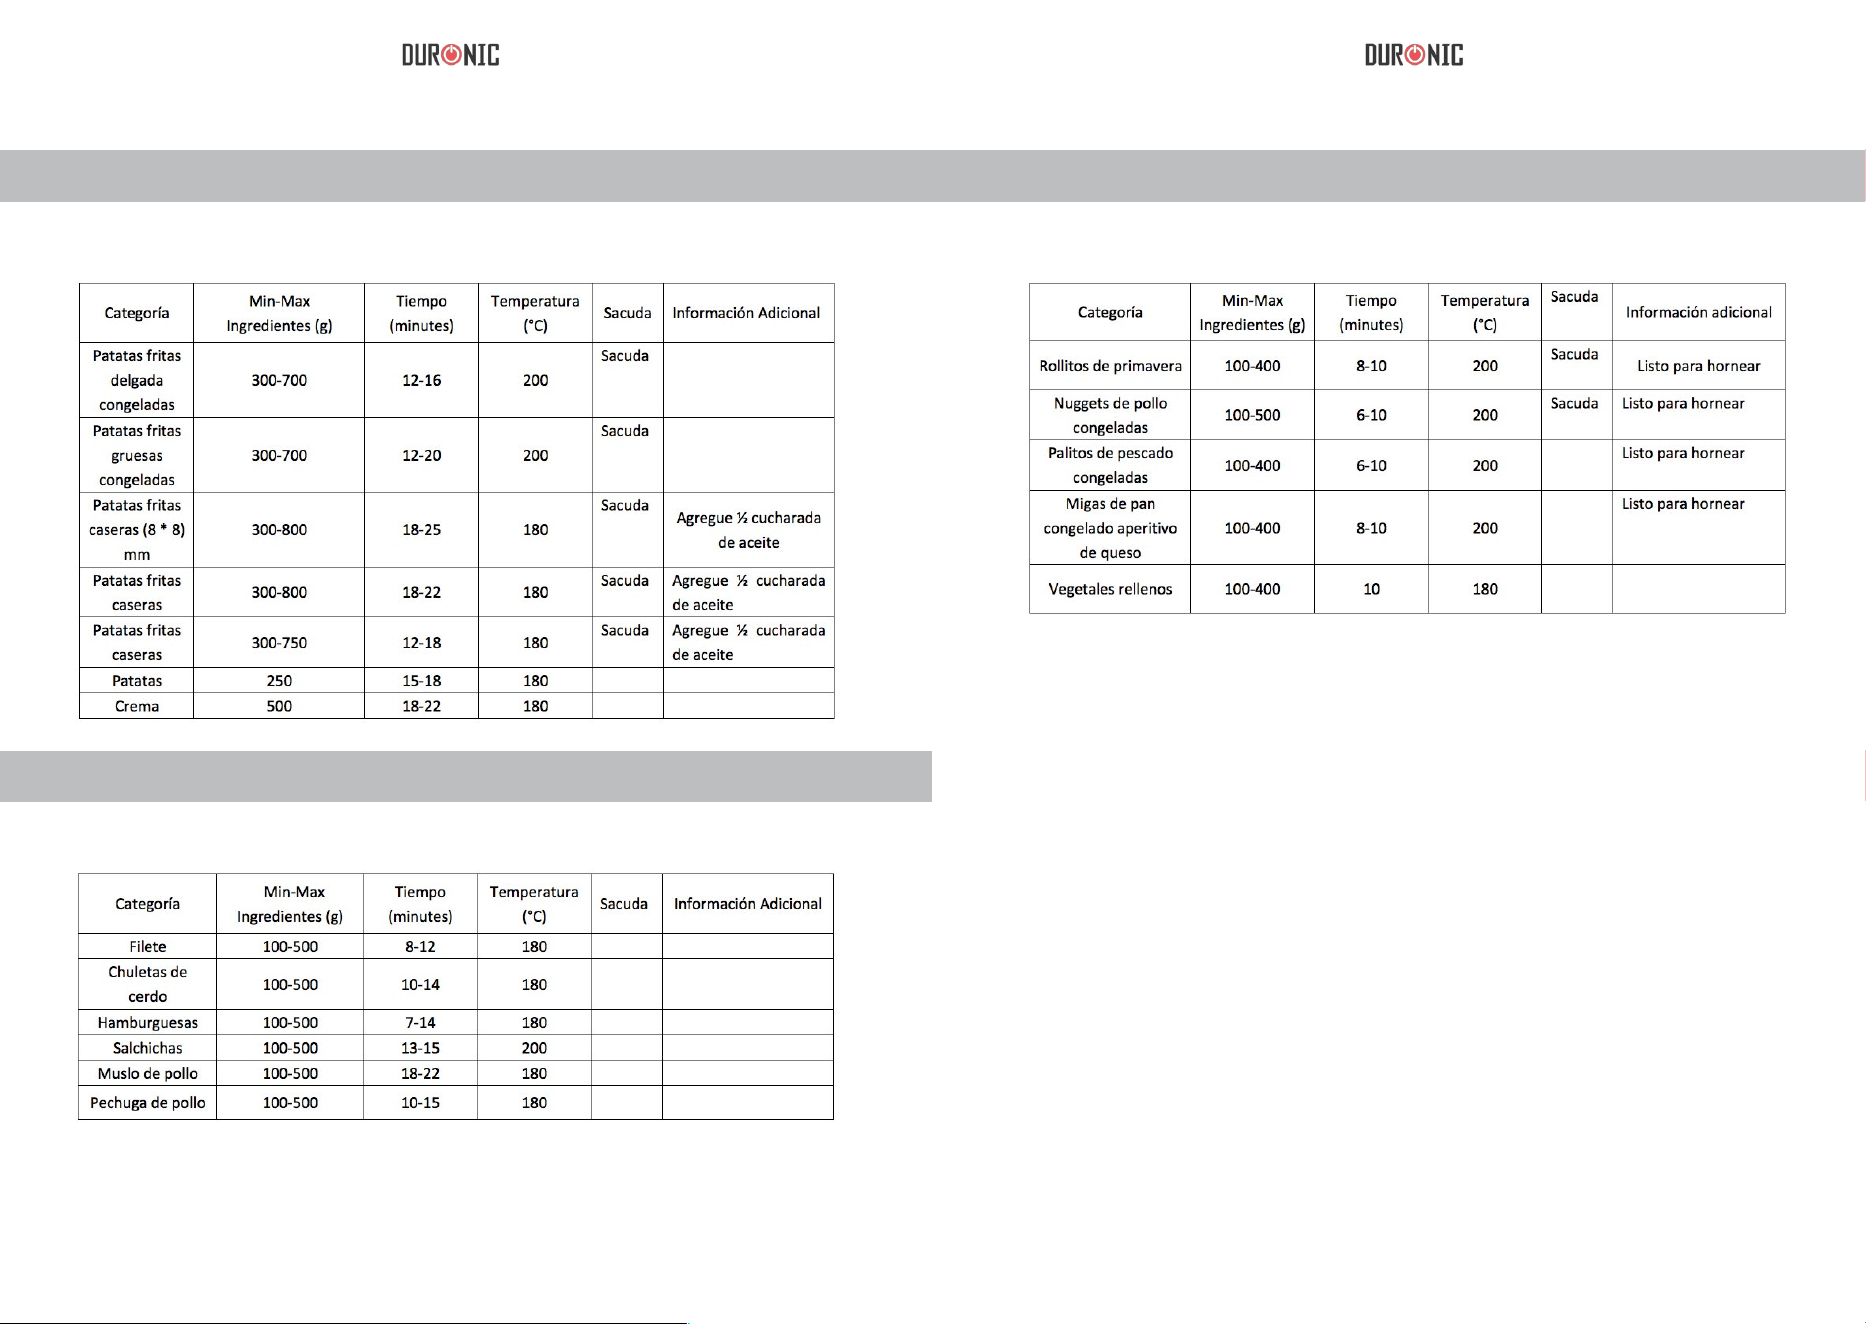
Below table will help you to choose the basic settings for the ingredients you
want to cook.
Note: Please remember these Settings are only reference. We cannot
guarantee the best setting for your ingredients because there is difference in
source, size, shape and brand.
Because the high-speed air circulation technology instantly reheats the air
inside the appliance, pull out the pan briey from appliance during hot air
frying barely disturbs the process.
-Slightly shorter the cooking time for smaller ingredients.
-Slightly longer the cooking time for larger amount of ingredients.
-Shake the smaller ingredients halfway of cooking time, this can optimise the
end result and can prevent unevenly fried of the ingredients.
-Add small volume of oil to fresh potatoes for crispy and crunchy result and
fry it within a few minutes after added oil.
-Do not cook some ingredient with extremely greasy, such as sausage.
-Snacks that can be cook in oven can be cook in this appliance as well.
-To cook crunchy French fries the best ingredients for that quantity is 500
grams.
-Use pre-made dough to cook lled snack in fast and convenient way.
Compared with homemade dough, the pre-made also need a shorter cook.
-Set the temperature to 150°C for up to 10 minutes to reheat ingredients.
Settings
Tip
14 15
Potatoes and French fries
Snacks
Meat and Poultry
Note: If the appliance is still cold, add another 3 minutes the cooking time.
Homemade French-fried
For best result, we suggest you to use pre-baked (such as frozen fries). If
homemade French-fries, please follow the steps as below.
1 Peel the potatoes and cut them into small sticks.
2 Soak the potatoes sticks in a bowl at least 30 minutes and then dry them
with kitchen paper.
3 Put ½ spoon of olive oil into a bowl and smear over the potatoes sticks.
4 Take out the potatoes sticks from bowl by hand or a kitchen utensil so the
excess oil left in the bowl. Put the potatoes sticks in the fry basket.
Note: Do not put all potatoes sticks into fry basket in one go, to prevent
excess oil on the bottom of frying pan.
5 Fry the potatoes sticks by following the instruction of chapter 5.
16 17
Meat and Poultry
Storage
Immediately clean the appliance after use. Give 30 minutes for everything to
coold down.
The frying pan, baking tray, fry basket and inside of the appliance have a
non-stick coating. If you use metal kitchen utensils or abrasive materials to
clean them will damage the non-stick coating.
1 Unplug the power cord from socket and let the appliance cool down.
Note: Take out the frying pan from appliance to let the appliance cool down
more quickly.
2 Clean the outer part of the appliance by wet cloth.
3 Use hot water, washing liquid and non-abrasive sponge thoroughly cleans
the fry basket and frying pan and soaks for about 10 minutes.
4 Use hot water and non-abrasive sponge to clean the inner part of
appliance.
5 Use cleaning brush to clean the food residues at the heating elements.
1 Unplug the power cord from socket and let the appliance cool down
completely.
2 Ensure all parts have clean and dry.
3 Place the power cord into the cord storage compartment and x it by insert
into power cord xing slot.
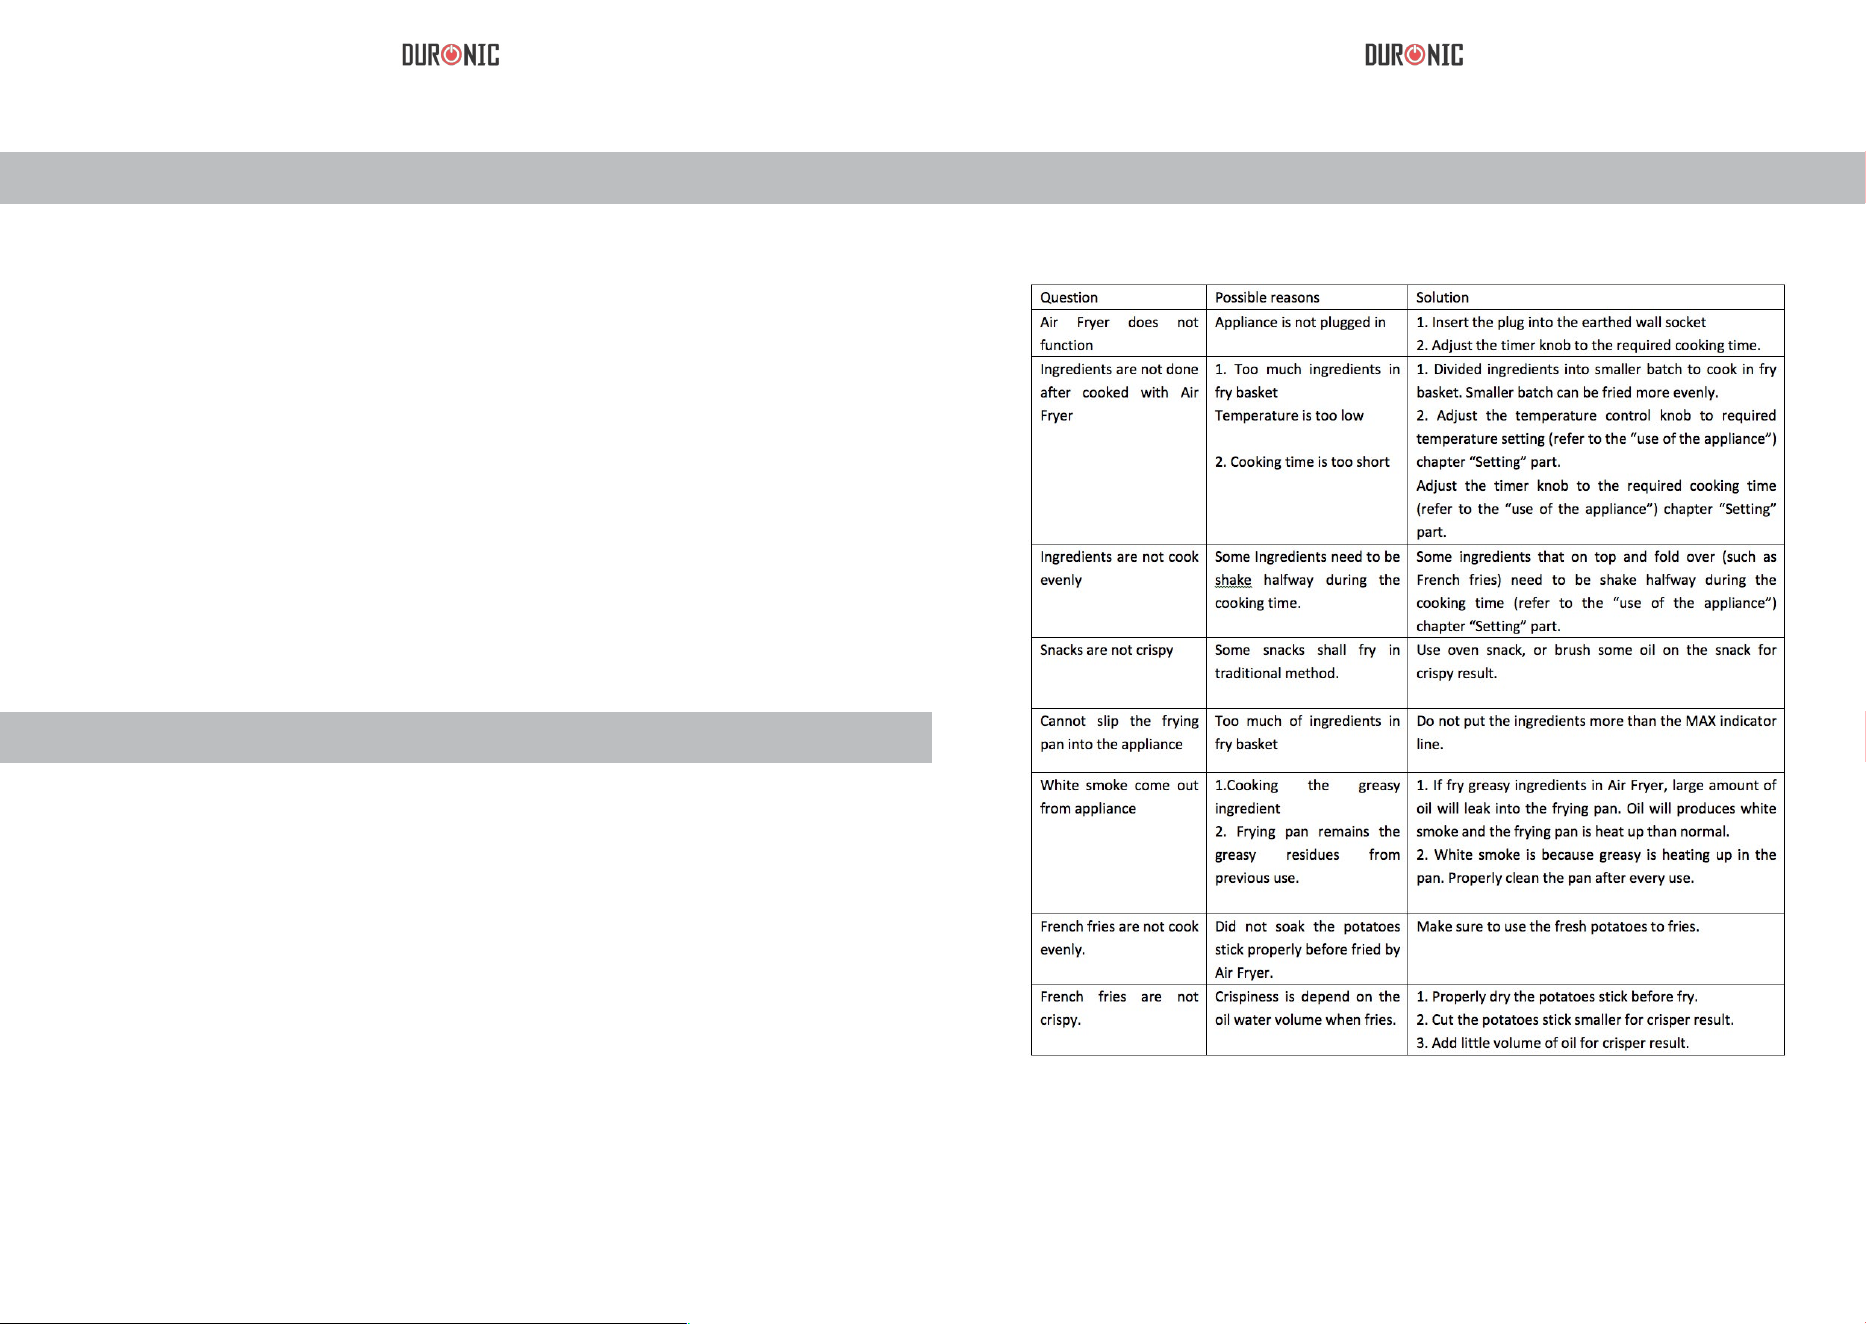
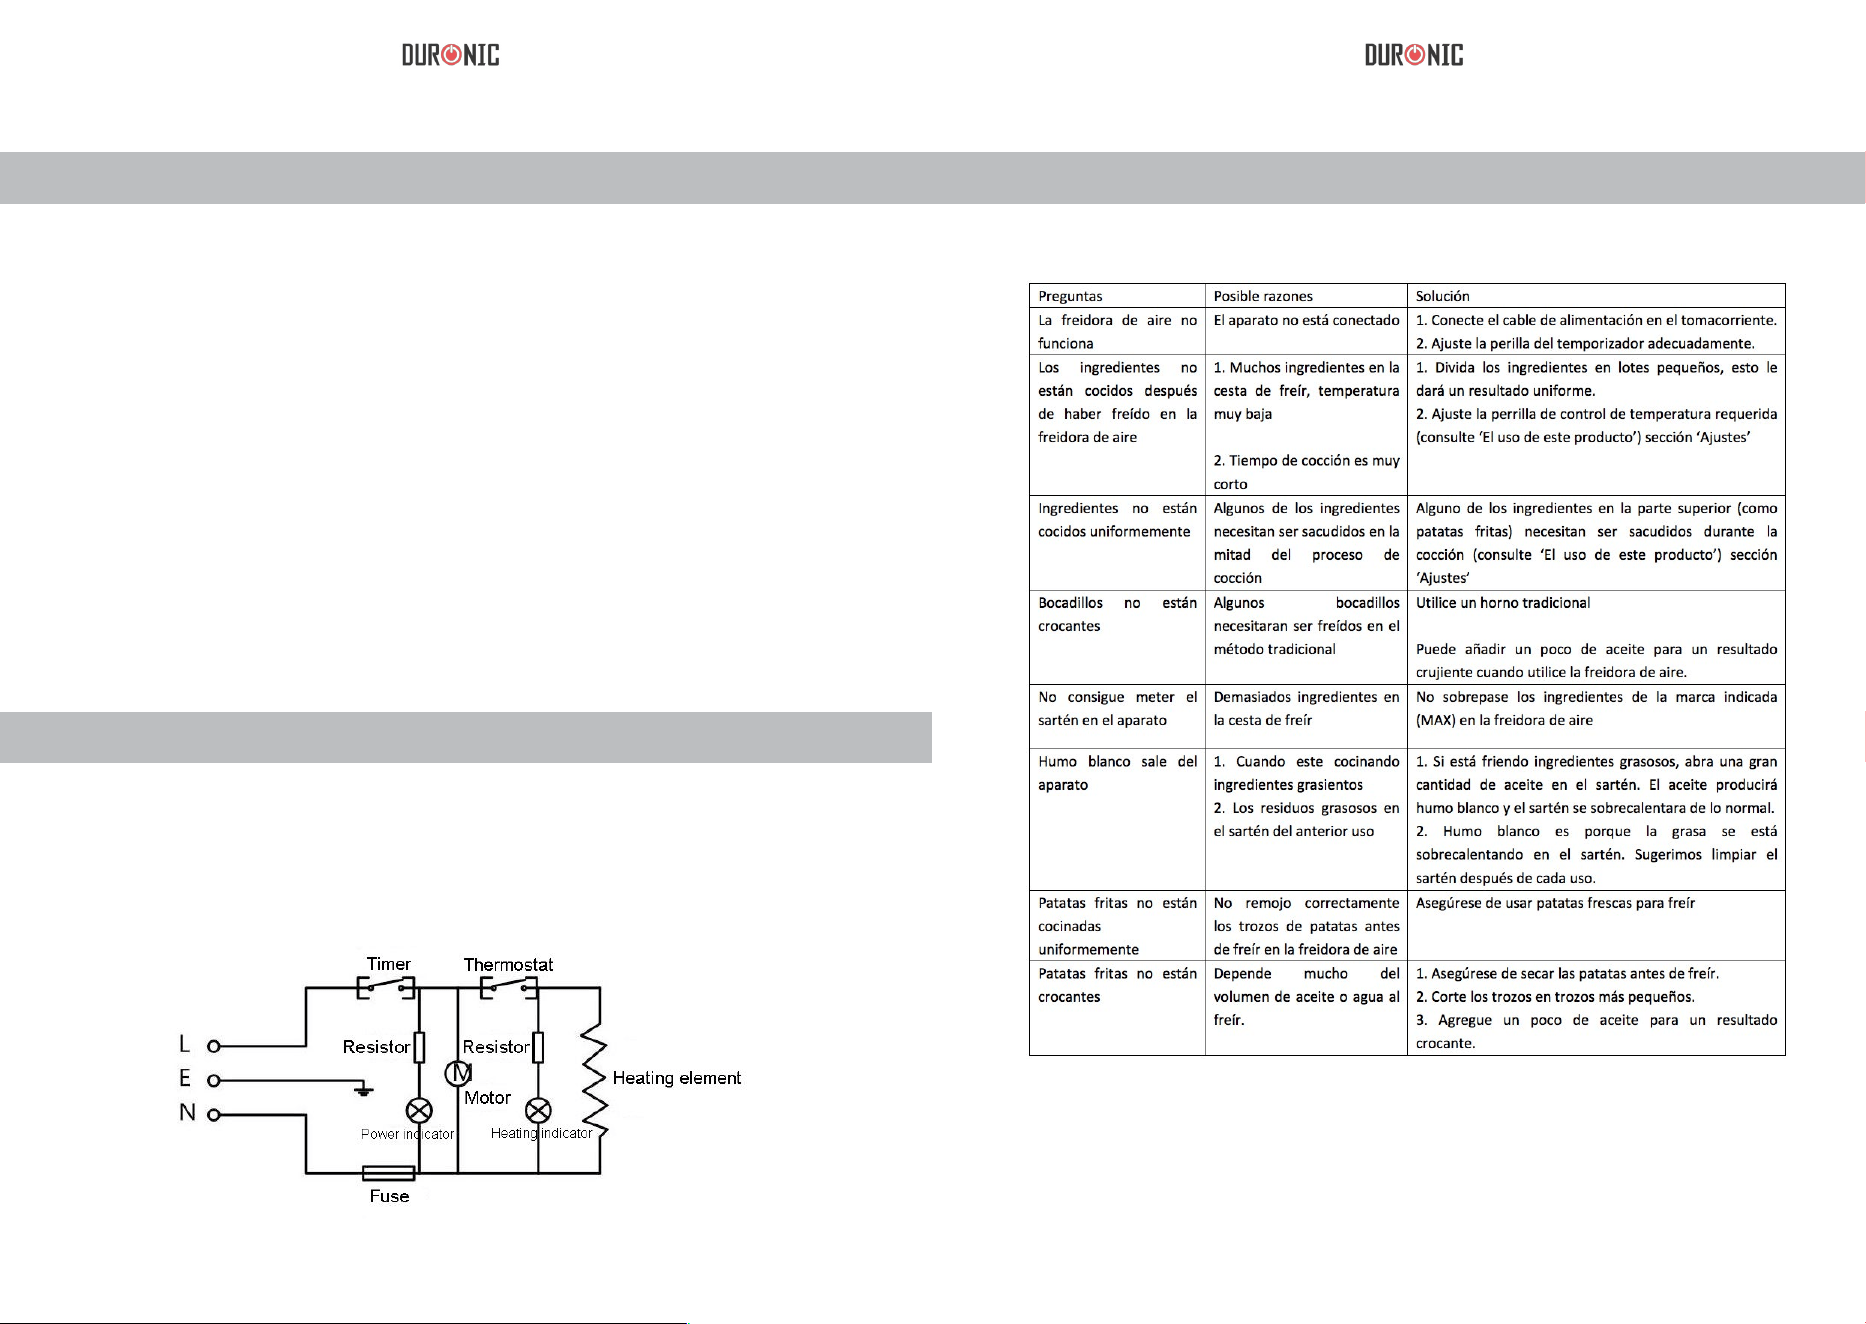
Troubleshooting
18 19
Image Figures
Warranty and Service
1 Year Guarantee from Shine-Mart Ltd, Trademark owners of Duronic
Products.
NOTE: THESE STATEMENTS DO NOT AFFECT YOUR STATUTORY
RIGHTS AS A CONSUMER
This product has been manufactured under the strictest or quality control
procedures, and using the highest quality of materials, to ensure excellent
performance and reliability. It will give very good and long lasting service,
provided it is properly used and maintained.
The product is guaranteed for 1 years from the date of original purchase.
If any defect arises due to a faulty materials or poor workmanship, the
faulty product must be returned to the original place of purchase. Refund or
replacement is at the discretion of that company.
Duronic Products are offered with a 1 year guarantee under the following
conditions:
1. The product must be returned to the retailer with original proof of
purchase.
2. The product must be installed and used in accordance with the
instructions contained in this operating manual.
3. It must be used only for domestic purposes.
4. It does not cover wear and tear, malicious damage, misuse, neglect,
inexpert repairs or consumable parts.
5. Shine-Mart Ltd has no responsibilities for accidental or consequential loss
or damage.
6. Shine-Mart Ltd are not liable to carry out any type of servicing work, under
the guarantee
7. Valid in the UK only
This product is tted with BS:1363 plug and fuse
Imported by Shine-Mart Ltd, RM3 8SB

20 21
Manuel D’utilisation En Français
22 23
Introduction
Description Générale (Fig. 1)
La friteuse sans huile utilise un système de circulation d’air chaud à grande
vitesse et une grille supérieure pour préparer vos ingrédients d’une manière
rapide, facile et saine. Vos ingrédients sont chauffés de tous les côtés à la
fois et il n’est pas nécessaire d’ajouter de l’huile à la plupart des recettes. La
plaque de cuisson supplémentaire vous permet de préparer facilement des
gâteaux, des quiches et autres repas « fragiles ».
A panier à friture
B bouton de déverrouillage du panier à friture
C poignée du panier à friture
D tiroir à friture
E let de friture
F entrée d’air
G bouton de commande de température
H indicateur de chauffage
I Bouton d’alimentation /minuteur
J sortie d’air
K boîtier de stockage de l
L cordon d’alimentation
Un tapis résistant à la chaleur a été inclus pour y déposer le plateau lor-
sque vous le sortez de l’appareil.
ATTENTION : Avant toute utilisation de l’appareil
et de ces accessoires, lisez attentivement
les instructions de sécurité qui suivent. Tout
manquement aux instructions de sécurité pourrait
vous exposer à un danger réel d’incendie, de
choc électrique, de blessures corporelles et de
dommages matériels. Gardez ce manuel pour
consultation ultérieure.

24 25
• N’immergez jamais l’appareil. Ne nettoyez jamais l’appareil en le mettant
sous le robinet. Ne laissez pas de l’eau ou de liquides pénétrer l’appareil.
L’appareil contient des composants électroniques et des éléments
chauffants.
• Placez toujours les ingrédients dans le panier à friture, pour éviter tout
contact avec les éléments chauffants.
• Ne couvrez pas l’entrée d’air ou la sortie d’air lorsque l’appareil est en
marche.
• Ne remplissez pas le tiroir d’huile qui pourrait provoquer un risque
d’incendie.
- Ne touchez pas l’intérieur de la friteuse lorsque l’appareil est en marche.
• Veuillez vérier que la tension de l’appareil correspond à la tension
d’alimentation de votre installation électrique avant de brancher l’appareil.
• N’utilisez pas l’appareil si son cordon d’alimentation est endommagé.
• Si le cordon d’alimentation est endommagé, remplacez-le uniquement par
un électricien qualié pour éviter tout danger.
- Il convient de surveiller les enfants pour s’assurer qu’ils ne jouent pas avec
l’appareil.
• Gardez l’appareil et son cordon d’alimentation hors de portée des enfants
lorsque l’appareil est en cours d’utilisation ou lorsque celui-ci refroidit.
• Gardez le cordon d’alimentation loin de la surface chaude de l’appareil et
de toute autres sources de chaleur.
• Ne branchez pas l’appareil et n’utilisez pas l’appareil avec les mains
mouillées.
• Assurez-vous que l’appareil est correctement branché dans la prise de
courant.
• Ne branchez jamais l’appareil sur une rallonge non-homologuée.
• Ne tentez jamais de faire fonctionner l’appareil à l’aide d’une minuterie
externe.
• Ne placez pas l’appareil sur ou à proximité de matières inammables,
comme une nappe ou un rideau.
• Ne placez pas l’appareil contre le mur ou d’autres appareils. Gardez une
distance d’au moins 10 cm d’espace libre à l’arrière et sur les côtés et un
espace libre de 10 cm au-dessus de l’appareil. Ne placez jamais un objet sur
le dessus de l’appareil.
xxxxxxxxxxxxxx
xxxxxxxxxxxxxx
Précautions D’utilisation - A Lire Attentivement
Arrêt Automatique
Avant La Première Utilisation
• N’utilisez jamais l’appareil à d’autres ns que celles décrites dans ce mode
d’emploi.
• De la vapeur chaude s’échappe à travers la sortie d’air pendant la cuisson.
Gardez vos mains et votre visage hors de portée des émanations de vapeur.
Faites également attention à la vapeur chaude et aux températures élevées
en retirant le tiroir à friture.
• La surface de l’appareil peut devenir très chaude lors de son utilisation.
(gure 2)
• Éteignez immédiatement l’alimentation ou débrancher l’appareil si vous
voyez de la fumée noire sortant de l’appareil. Attendre l’arrêt d’émission de
fumée avant de retirer le tiroir.
• Placez toujours l’appareil sur une surface horizontale ou stable.
• Si l’appareil ne fonctionne plus, retournez-le auprès du service réparation
du vendeur. Ne réparez pas l’appareil vous-même, la garantie risquerait dans
ce cas d’être annulée.
• Assurez-vous de toujours débrancher l’appareil après l’avoir utilisé.
• Laissez refroidir l’appareil pendant environ 30 minutes avant de le nettoyer.
• Assurez-vous de respecter les temps de cuisson.
Cet appareil est équipé d’une minuterie. Lorsque le décompte de la minuterie
atteint ‘’0’’, l’appareil sonne et s’éteint automatiquement. Pour l’éteindre
manuellement, placer le bouton de la minuterie sur ‘’0’’.
1. Retirez l’appareil de son emballage.
2. Retirez les autocollants et les étiquettes de l’appareil.
3. Utilisez de l’eau chaude, du liquide nettoyant et une éponge non abrasive
pour nettoyer le panier et le tiroir à friture. Remarque : Vous pouvez
également utiliser le lave-vaisselle pour nettoyer le panier et le tiroir à friture.
4. Nettoyez uniquement les parties internes et extérieures de l’appareil avec
un chiffon humide.
5. Ce produit est un appareil à friture sans huile. Ne remplacez pas le tiroir à
friture avec de l’huile.

26 27
Installation De L’appareil
Utilisation De L’appareil
1. Placez l’appareil sur une surface stable ou horizontale. Ne placez pas
l’appareil sur une surface ne résistant pas à la chaleur.
2. Ne placez pas l’appareil sur ou à proximité de matières inammables,
comme une nappe ou un rideau.
3. Ne placez pas l’appareil contre le mur ou d’autres appareils. Gardez une
distance d’au moins 10 cm d’espace libre à l’arrière et sur les côtés et un
espace libre de 10 cm au-dessus de l’appareil. Ne placez jamais un objet sur
le dessus de l’appareil.
4. Placez correctement le panier à friture dans le tiroir (gure 3)
5. Retirez le cordon d’alimentation de son compartiment de rangement situé
dans la partie inférieure de l’appareil. Ne remplissez jamais le tiroir à friture
avec de l’huile ou tout autre liquide inammable.
6. Ne placez jamais un objet sur le dessus de l’appareil qui pourrait
interrompre le ux d’air et affecter son bon fonctionnement.
La friteuse peut être utilisée pour la cuisson de nombreux ingrédients. Nous
vous conseillons de lire attentivement le livre de recette joint avec la notice.
1. Branchez l’appareil à une prise de courant murale.
2. Retirez soigneusement le tiroir à friture de l’appareil. (gure 4)
3. Placez les ingrédients dans le panier à friture. (gure 5)
Remarque : Les ingrédients ne doivent pas dépasser le repère MAX ou la
quantité indiqué dans le tableau correspondant (se reporter au chapitre «
Réglages »), car cela peut affecter la cuisson des aliments.
4. Faites glisser le tiroir à friture pour le réinsérer dans la friteuse. (gure 6)
N’utilisez jamais le tiroir sans son panier à friture.
Remarque : Pendant la cuisson, ne touchez pas le tiroir à friture, car il est
très chaud. Retirez doucement le tiroir à l’aide de la poignée.
5. Déterminez le temps nécessaire pour cuire les ingrédients (veuillez vous
référer au chapitre « Réglages »)
6. Ajustez le bouton de commande de température (gure 7) à la
température requise. Veuillez vous référer au chapitre « Réglages» pour
déterminer la bonne température. (gure 7)
7. Pour allumer l’appareil, veuillez ajuster le bouton de la minuterie au temps
de cuisson nécessaire. (gure 8). L’indicateur de cuisson s’allume. (gure
9) Si l’appareil est froid, le temps de cuisson devrait être augmenté de 3
minutes. Remarque : Vous pouvez également préchauffer l’appareil avant
d’y mettre les ingrédients en réglant le bouton de la minuterie sur 3 minutes.
Attendez ensuite que le voyant de chauffage s’éteigne (environ 3 minutes).
Placez ensuite vos aliments dans le panier à friture et réglez la température
et le temps de cuisson désiré.
8. Lorsque l’appareil a atteint la température programmée, il interrompt
alors la montée en température du panier. L’indicateur de cuisson s’éteint
alors pour vous signaler l’arrêt de la montée en température. Lorsque la
température présente à l’intérieur de la friteuse diminue, celle-ci se rallumera
ensuite pour maintenir la température désirée.
Remarque : Pendant la cuisson des aliments, l’excédent d’huile est recueilli
sur le fond du tiroir à friture.
Remarque : Lors du processus de cuisson ; certains ingrédients doivent
être secoués à mi-cuisson (se reporter au chapitre « Réglages »). Sortez le
tiroir de l’appareil et secouez-le pour retourner les aliments à l’intérieur de
l’appareil, puis replacez le tiroir dans l’appareil. (gure 10)
Remarque : N’appuyez pas sur le bouton de retrait du panier à friture
pendant que vous secouez le tiroir (gure 11) .
9. Lorsque vous entendez la sonnerie de la minuterie, le temps de cuisson
est écoulé. Sortez le tiroir de l’appareil et placez-le sur une surface résistante
à la chaleur.
Remarque : Vous pouvez également arrêter la cuisson manuellement.
Positionnez le bouton de réglage de la minuterie sur 0. (gure 12)
10. Vériez si les ingrédients sont cuits.
11. Si vous souhaitez prolonger la cuisson, remettez le tiroir dans l’appareil et
réglez la minuterie sur quelques minutes supplémentaires.
12. Pour verser de petits ingrédients pendant la cuisson (tels que les
pommes frites), appuyez sur le bouton de déverrouillage du panier à friture
(1), puis soulevez le panier à friture pour le sortir du tiroir. (2). (gure 13)
Attention ! Ne retournez pas le panier à friture lorsqu’il est encore à l’intérieur
du tiroir, ce qui risquerait de faire couler l’excès d’huile recueilli au fond du
tiroir sur les ingrédients.
Après la friture, le tiroir et les ingrédients sont encore chauds. En fonction
des différents ingrédients, de la vapeur chaude peut s’échapper du tiroir à
friture.
13. Videz les ingrédients du panier à friture dans une assiette ou un bol.
(gure 14)
Conseil : Vous pouvez utiliser des pinces pour enlever les ingrédients grands
ou fragiles du panier. (gure 15)
14. La friteuse est de nouveau prête à cuire vos aliments. (gure 16)
28 29
• Réduisez légèrement le temps de cuisson pour les petits ingrédients.
• Augmentez légèrement le temps de cuisson pour une plus grande quantité
d’ingrédients.
• Secouez les petits ingrédients à mi-chemin de la durée de cuisson, an
d’optimiser le résultat nal et empêcher une friture inégale des ingrédients.
• Ajoutez une cuillère d’huile sur vos pommes de terre fraîches pour obtenir
un résultat croustillant et croquant et lancez la friture quelques minutes après
avoir ajouté l’huile.
• N’utilisez pas la friteuse pour cuire les ingrédients extrêmement gras
comme des saucisses.
• Les en-cas qui peuvent être préparés au four peuvent être cuits dans cet
appareil.
• Pour faire cuire des pommes frites, vous pouvez remplir la friteuse de 500
grammes maximum de pommes frites.
• Pour cuire vos tartes, vos pizzas ou vos gâteaux, utilisez de préférence une
pâte de cuisson pré-préparée. Contrairement à la pâte maison, la pâte de
cuisson préparée a besoin d’un temps de cuisson plus court.
• Pour réchauffer vos ingrédients, réglez la température à 150°C et réglez le
minuteur sur 10 minutes.
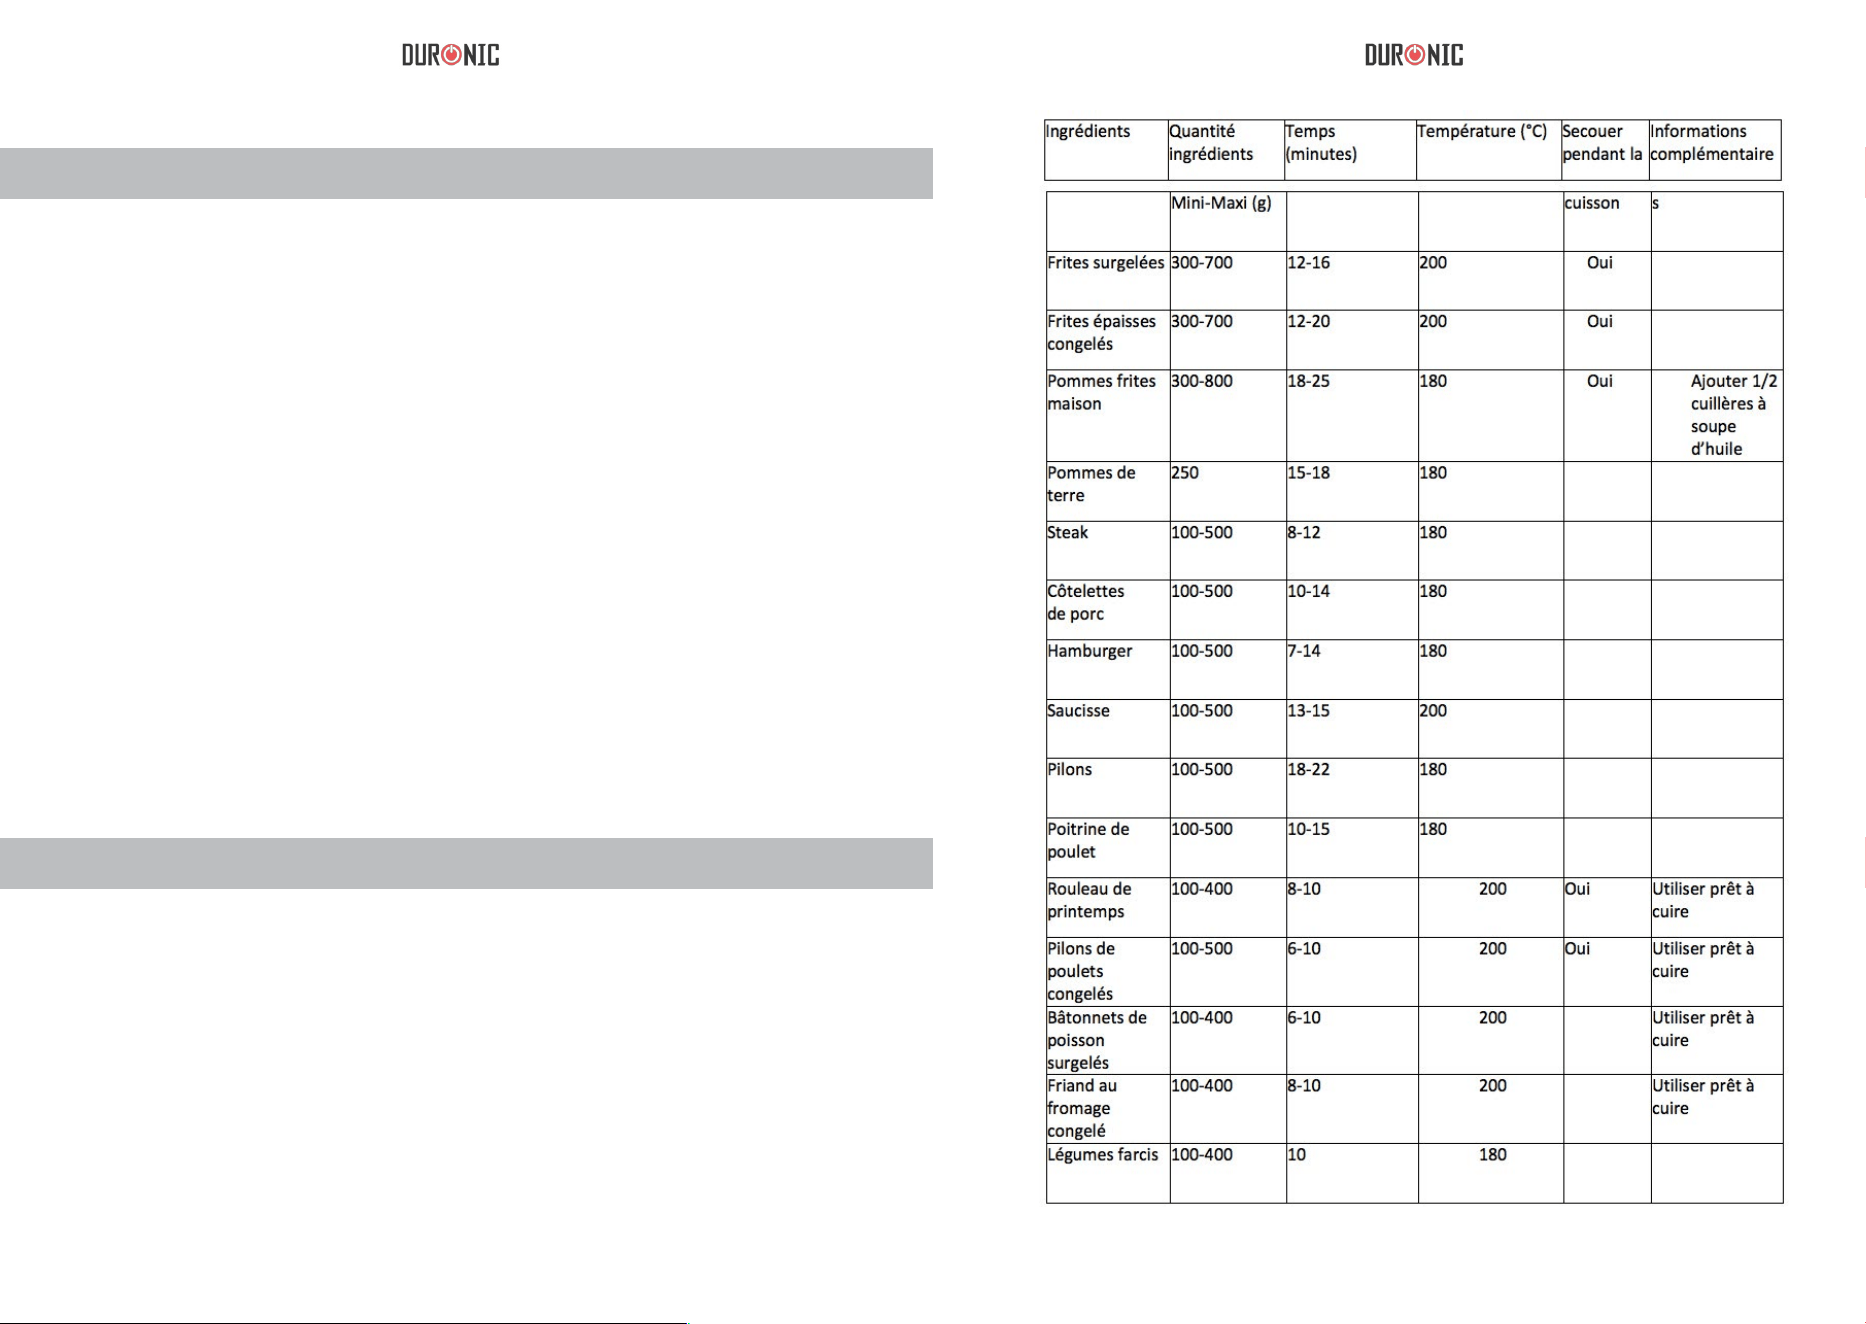
Le tableau ci-dessous vous aidera à choisir les réglages de base pour les
ingrédients que vous voulez faire cuire.
Remarque : N’oubliez pas que ces réglages sont indiqués uniquement pour
référence. Nous ne pouvons pas garantir le meilleur réglage pour chaque
ingrédient, à cause des différences d’origine, de taille, de forme et de
marque des ingrédients.
Remarque : Si la friteuse est froide, ajouter encore 3 minutes au temps de
cuisson.
Conseils
Tableau Récapitulatif Des Temps/Températures De Cuisson

30 31
Cuisson Des Frites Maison (De 300 À 800Gr) Stockage
Nettoyage
Garantie Et Service Après-Vente
• Débranchez le cordon d’alimentation de la prise et laissez l’appareil
refroidir.
• Assurez-vous que toutes les pièces sont propres et sèches.
• Placez le cordon d’alimentation dans son compartiment de rangement et
xez son extrémité en l’insérant dans la fente prévue à cet usage.
1 an de garantie de la part de Shine-Mart Ltd, propriétaire de la marque
Duronic.
Note : Ces déclarations n’affectent en rien votre droit statutaire en tant que
consommateur
Ce produit est garanti pour 1 an à partir de la date originale d’achat. Si
ce produit était endommage en raison d’un problème électrique ou d’une
fabrication imparfaite, le produit défectueux peut être remplacé au vendeur
sous conditions :
• Le produit doit être retourné avec la preuve originale d’achat.
• Le produit doit être installé et utilisé en accord avec les instructions
contenues dans ce manuel d’utilisation.
• Le produit doit être réservé à un usage privé.
• La garantie ne protège pas contre les dommages dus à l’usure normale,
l’utilisation malveillante, la mauvaise utilisation, la négligence, les réparations
conduites par des non-experts ainsi que les pièces consommables.
• Shine-Mart Ltd ne porte pas de responsabilité pour tout damage ou perte
accidentel ou conséquent causé par ce produit.
• Shine-Mart Ltd se dégage de toute responsabilité en matière de réparation
durant la période de garantie.
• Valide dans toute l’Union Européenne.
Pour un meilleur résultat, nous vous suggérons d’utiliser des frites
surgelées.
Pour des frites maison, veuillez suivre les étapes ci-dessous.
• Pelez les pommes de terre et coupez-les en petits bâtonnets.
• Trempez les bâtonnets de pommes de terre dans de l’eau pendant au
moins 30 minutes, puis séchez-les avec du papier absorbant.
• Rajoutez 1/2 cuillère d’huile d’olive dans un bol et en badigeonner
les bâtonnets de pommes de terre à l’aide d’un pinceau en silicone de
préférence (non-fournis).
• Mettez les bâtonnets de pommes de terre dans le panier à friture.
• Remarque : rajoutez les pommes de terre par petite quantité dans le panier
à friture an d’éviter de mettre de l’huile dans le fond du tiroir de cuisson.
• Faites frire les frites maison pendant 18 à 23minutes à 180°C. Secouez le
bac à friture toutes les 5 minutes.
• Débranchez le cordon d’alimentation et laissez l’appareil refroidir pendant
30 minutes.
• Remarque : Sortez le tiroir de l’appareil pour le laisser refroidir plus
rapidement.
• Nettoyez la partie extérieure de l’appareil avec un tissu humide.
• Utilisez de l’eau chaude, du liquide vaisselle et une éponge non abrasive
pour nettoyer le panier et le tiroir à friture et laisser tremper pendant 10
minutes.
• Utilisez de l’eau chaude et une éponge non abrasive pour nettoyer la partie
intérieure de l’appareil.
• Utilisez une brosse pour nettoyer les résidus d’aliments sur les éléments
chauffants.
Remarque : Le tiroir à friture, le panier à friture et l’intérieur de l’appareil
ont un revêtement antiadhésif. Si vous utilisez des ustensiles de cuisine en
métal ou des matériaux abrasifs pour nettoyer le tiroir et le bac à friture vous
pouvez endommager le revêtement antiadhésif.
32 33
Ce produit est fourni avec une prise européenne et un fusible
de 3 ampères.
Importé par Shine-Mart Ltd, RM3 8SB.
Informations sur la destruction des produits et équipements
électriques et électroniques.
Ce symbole apparaît sur le produit et/ou les documents accompagnant ce
produit pour indiquer que pour procéder à la destruction de ce produit, celui-
ci doit être traité comme un déchet électrique et électronique (WEEE).
Les produits marqués WEEE ne doivent être mélangés avec les déchets
ménagers et doivent être séparés pour traitement et recyclage des
composants. An de traiter et recycler ce produit, veuillez prendre tous les
composants marqués WEEE au site de recyclage le plus proche où ce
produit sera repris gratuitement. Si les clients jettent les déchets électriques
et électroniques WEEE correctement, ce geste aidera la préservation des
ressources précieuses et prévient les potentiels effets négatifs que ces
composants ou tout autre composant dangereux
ont sur la santé humaine et l’environnement.

34 35
Gebrauchsanleitung auf Deutsch

36 37
A
B
C
D
E
F
G
H
I
J
K
L
Eine hitzebeständige Matte wird mitgeliefert, damit Sie das fertige Gericht auf
der Polsterung platzieren können.
Bitte lesen Sie die Gebrauchsanleitung vor dem
Gebrauch sorgfältig durch und bewahren Sie
dies für die Zukunft auf.
E
inführung
Die Duronic Fritteuse verwendet Umlufttechnik (High-Speed Luft) um
Ihre Zutaten schnell, einfach und gesund zu kochen. Das Essen wird von
allen Seiten umluftet und Sie brauchen dabei kein Öl, oder sehr wenig,
zu benutzen. Es gibt ein extra Backkorb für Speise wie Kuchen und
Quiche.
Frittierkorb
Auslöseknopf für den Korb
Handgriff
Pfanne
Netzkorb
Lufteinlass
Temperaturregler
Temperaturanzeige
Einschalten / Timer
Luftausfuhr
Kabelablage
Netzkabel
Bauteile

38 39
-Nicht ins Wasser tauchen oder unter fließendes Wasser halten.
-Vermeiden Sie, dass Wasser oder andere Flüssigkeiten in die
Fritteuse eindringen. -Die Fritteuse nicht ohne den Korb benutzen.
-Die Luftein- und ausfuhr während des Betriebes nicht bedecken.
-Füllen Sie die Pfanne nicht mit Öl. Dies könnte Feuer auslösen
-Berühren Sie während dem Vorgang nicht die Innenteile der
Fritteuse.
-Beachten Sie vor der Benutzung die Kompatibilität der Spannung mit
Ihrem Stecker.
-Keine Verwendung der Geräte mit einem geschädigten Kabel.
-Bei geschädigter Kabel kontaktieren Sie den Hersteller, den Verkäufer
oder eine zuständige Person. Dieser muss das Gerät neu ersetzen.
-Das Gerät kann von Personen mit reduzierten physischen oder mentalen
Fähigkeiten oder Mangel an Erfahrungen benutzt werden, wenn sie
beaufsichtigt oder bezüglich des sicheren Gebrauchs des Gerätes
aufgeklärt wurden und die Gefahren verstanden wurden.
-Kinder beaufsichtigen und nicht mit dem Produkt spielen lassen.
-Das Kabel von Hitzequellen fernhalten.
xxxxxxxxxxxxxx
Vorsicht
Warnung
Automatische Ausschaltfunktion
Hinweis
-Nicht mit nassen Hände benutzen.
-Das Gerät nicht in der Nähe von brennbaren Gegenständen platzieren, wie
zum Beispiel Tischdecken oder Vorhänge.
-Das Gerät nicht an der Wand oder direkt neben andere Gegenständen
stellen. Halten Sie bitte mindestens 10 cm Abstand. Nichts auf das Gerät
stellen.
-Verwenden Sie die Fritteuse nur für den zugelassenen Einsatzzweck.
-Heißdampf wird während des Betriebs durch die Luftauslaufstelle
freigegeben werden. Seien Sie vorsichtig! Ebenfalls sorgfältiger Umgang
mit dem Korb, nach der Benutzung. Die Außenfläche des Gerätes kann
heiß werden.
-Schalten Sie die Fritteuse sofort aus und trennen Sie vom Strom, sobald
Sie Rauch sehen.
-Das Gerät auf eine horizontale und stabile Oberfläche stellen.
-Senden Sie das Produkt zurück an den Hersteller, wenn ein Schaden
vorhanden ist. Versuchen Sie den Fehler nicht selbst zu beheben. Dabei
kann die Garantie verfallen. -Trennen Sie nach der Benutzung die Fritteuse
vom Strom.
-Lassen Sie das Gerät ca. 30 Minuten abkühlen, bevor Sie die Reinigung
vornehmen.
Eine eingebaute Zeituhr ist vorhanden. Sobald der Timer 0 erreicht, wird
ein Signal ertönen und die Fritteuse wird sich automatisch ausschalten.
Ebenfalls können Sie den Timer manuell zurücksetzen, indem Sie den
Knopf langsam auf Null drehen.

40 41
Elektrom
agnetische Felder (EMF)
Vor der ersten Verwendung
Anweisungen
Dieses Gerät kann elektromagnetische Felder generieren. Erfolgt die
Benutzung jedoch richtig und nach dieser Anleitung, besteht keine
gesundheitlichen Gefahren.
1.
Entfernen Sie die Verpackung
2.
Entfernen Sie die Aufkleber und Folien.
3.
Reinigen Sie das Gerät mit lauwarmen Wasser und Spülmittel.
Hinweis: Die Komponenten (außer das Hauptgerät) sind Spülmaschinenfest.
4.
Wischen Sie das innen der Gehäuse mit einem feuchten Tuch ab.
1 Das Gerät auf eine horizontale und stabile Oberfläche stellen. Die
Oberfläche kann sehr heiß werden. Vermeiden Sie deshalb
Oberflächen, die nicht hitzebeständig sind.
2 Setzen Sie den Korb immer richtig ein.(Abb.3)
3 Kabel von der Kabelablage abwickeln und das Gerät einstecken.
Füllen Sie die Pfanne nicht mit Öl.
Bedienung
1. Schließen Sie den Stecker an Strom.
2. Ziehen Sie vorsichtig den Korb heraus (Abb.4) und geben Sie Ihr
e Zutaten hinzu
(Abb.5) und setzen Sie den Korb wieder ein (Abb.6).
Hinweis: L
egen Sie nicht mehr Zutaten als die MAX-Anzeige in den Korb.Die falsche
Menge w
ird das Ergebnis beeinflussen. Sehen Sie sich dazu die Tabelle unter dem
Abschnitt
"Einstellungen" an. Zu beachten: Die Pfanne kann sehr heiß werden. Vorsicht!
3. Stellen Sie die gewünschte Temperatur ein. Dafür ist auf den folgenden Seiten eine
Tabelle a
ufgelistet.
4. Stellen Sie den Timer ein. Je nachdem wie lange das Gericht benötigt. Sobald Sie
den Timer einstellen, wird die Fritteuse angehen. Sollte das Gerät kalt sein, wird die
Kochzeit um 3 Minuten verlängert.
Hinweis: Heizen Sie die Fritteuse 3 Minuten vor, bevor Sie mit dem Kochen beginnen.
Warten Sie bis die Beleuchtung ausgeht ( nach 3 Minuten) und setzen Sie den vollen
Korb e
in.
-Die Beleuchtung wird zwischendurch ausgehen. Das bedeutet, dass die Temperatur
konstant ist und die richtige Temperatur hat.
-Das ü
berflüssige Öl wird heruntertropfen und wird im Korb aufgesammelt.
5. E
inige Gerichte, müssen zwischendurch durchgeschüttelt werden. Nehmen Sie den
Korb heraus, schütteln Sie und setzen Sie den Korb wieder ein.
Hinweis: Drücken Sie nicht während dem Schütteln den Auslöseknopf für den Korb
(Abb.11).
Tipp: Wenn Sie zuerst die Hälfte der Zeit einstellen und nach dem Klingeln die Zutaten
durchschütteln, kann Ihnen nichts anbrennen. Danach stellen Sie den Timer nochmals
mit den verbleibenden Minuten ein.
6. Nachdem der Timer geklingelt hat, wissen Sie dass Ihr Gericht zum Verzehr fertig
ist. Stellen Sie die Pfanne auf eine hitzebeständige Oberfläche.
Hinweis: S
ie können den Vorgang auch manuell beenden. Setzen Sie einfach den
Timer auf 0 zurück (Abb.12).
7. S
tellen Sie sicher, dass Ihre Zutaten durchgekocht sind. Falls dies Ihnen nicht
genug ist, können Sie den Timer wieder auf weitere Minuten einstellen.
8. Wenn Sie kleine Gerichte aus dem Korb entfernen möchten, lösen Sie die Pfanne
vom Korb, indem Sie den Auslöse-Knopf drücken (Abb.13). Drehen Sie nicht den Korb
um, da das überflüssige Öl vom Korb auslaufen könnte.
9. Leeren Sie den Inhalt aus dem Frittierkorb auf einen Teller oder in eine Schüssel
(A
bb.14).
Tipp: Um große oder zerbrechliche Bestandteile zu entfernen, können Sie eine Zange
v
erwenden (Abb.15).
10. Die Fritteuse ist sofort für den nächsten Vorgang bereit (Abb.16).
Sie brauchen beim frittieren kein Öl zu benutzen.
42 43
- Wahrscheinlich kürzere Kochzeiten für kleine Bestandteile.
- Wahrscheinlich längere Kochzeiten für größere und dickere Bestandteile. -
Schütteln Sie bei Halbzeit die Zutaten, um sicher zu stellen, dass keine
rohen Kartoffeln verbleiben.
- Fügen Sie kleine Mengen an Öl zu frischen Kartoffeln, damit sie schön
knusprig werden.
- Snacks, die Sie im Ofen backen, können Sie auch mit der Fritteuse
vorbereiten.
- Um knusprige Pommes zu bekommen, ist die beste Menge 500g.
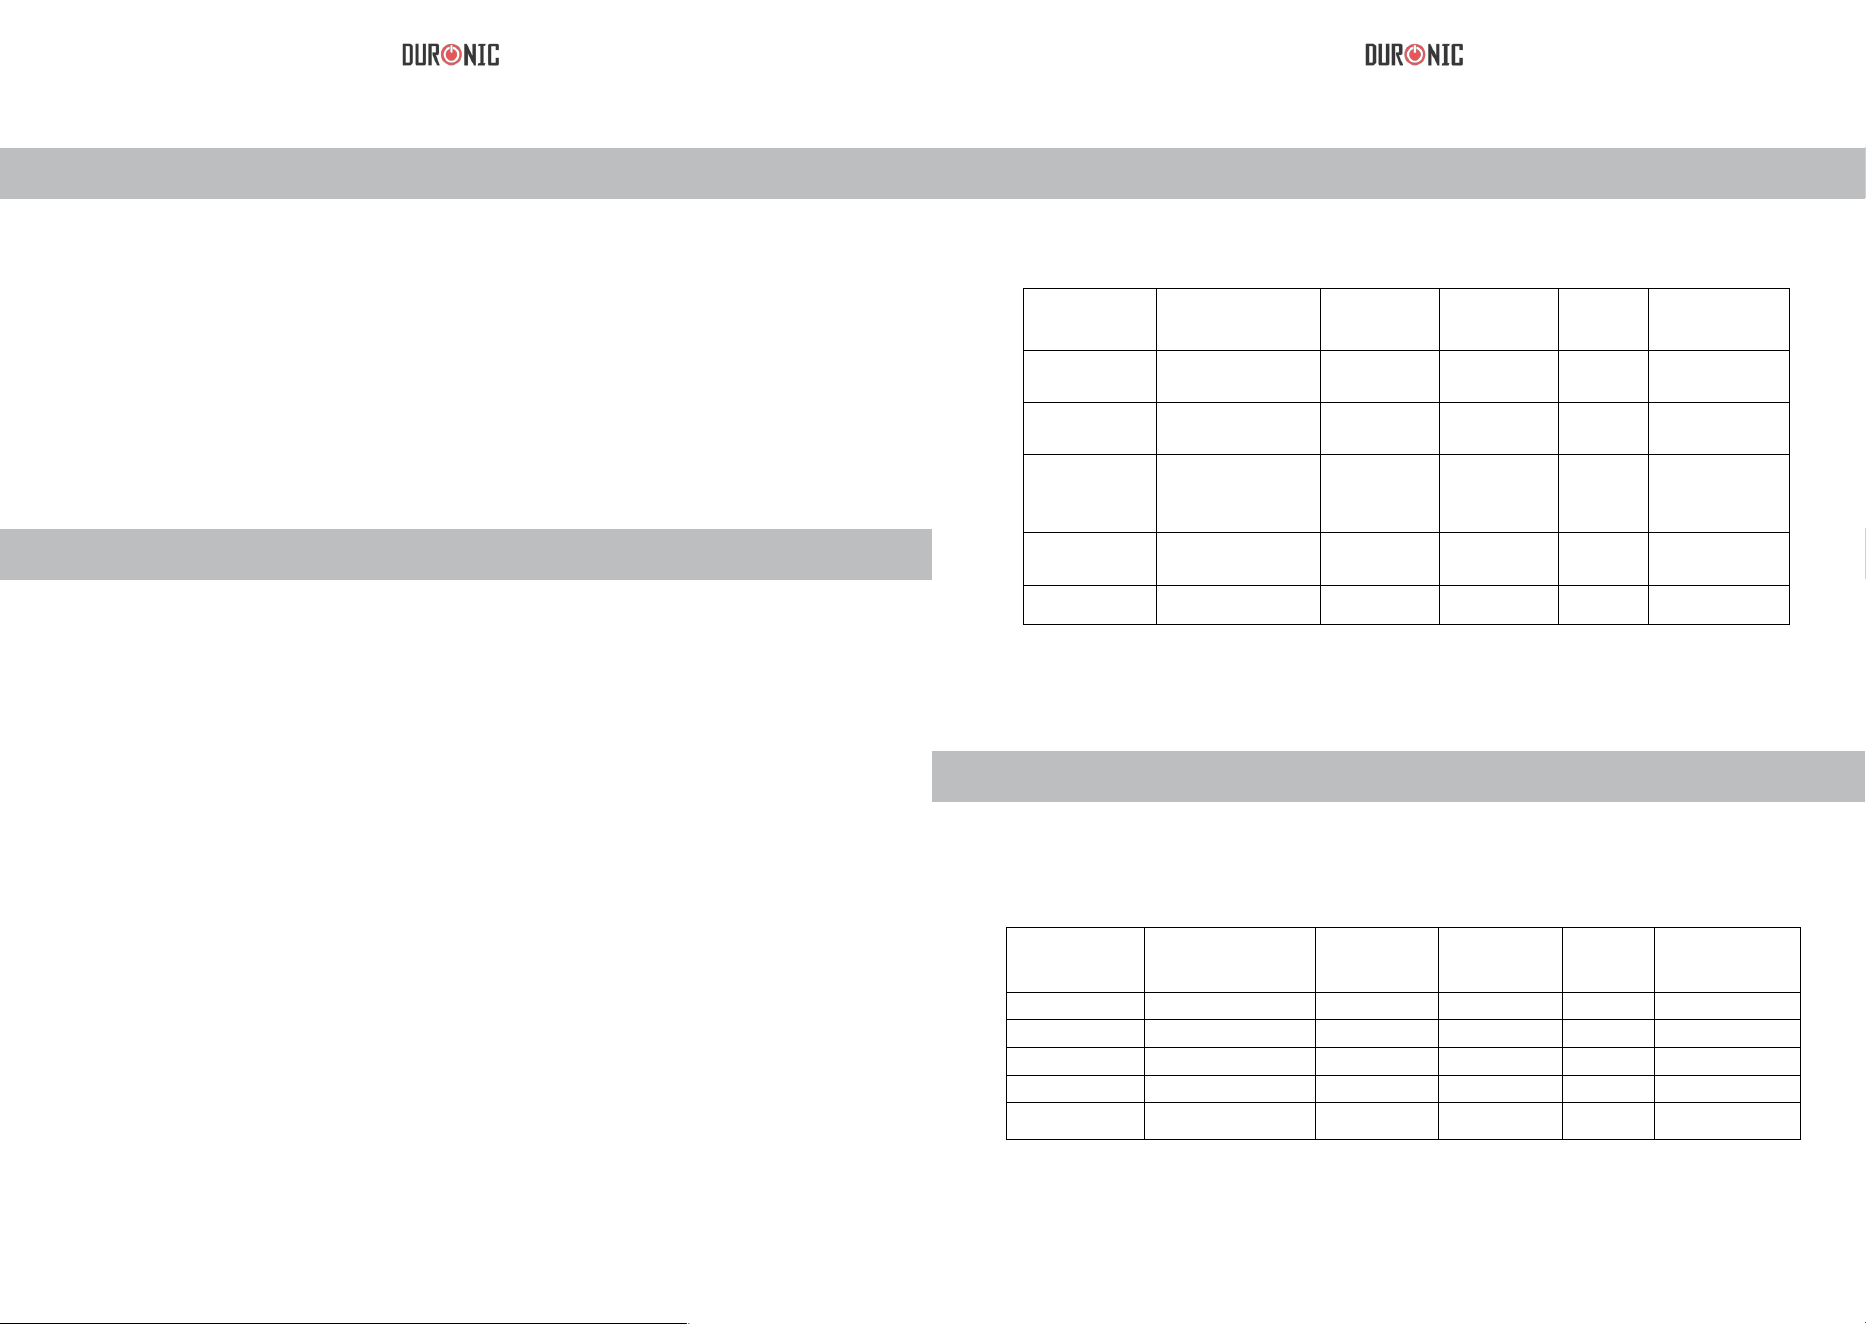
Die folgenden Tabellen werden Ihnen behilflich sein, einfache standard
Gerichte zu frittieren. Hinweis: Diese Angaben sind nur Vorschläge. Wir
können für Ihre Zutaten nicht die besten Angaben garantieren. Alle Zutaten
haben verschiedene Größe, F
orm und Marke.
Tipp
Einstellungen:
Kartoffeln und Pommes Frites
Fleisch und Geügel
Kategorie
Min-Max an
Zutaten (g)
Zeit (In
Minuten)
Temperatur
(°C)
Schütteln
Zusätzliche
Information
Tiefkühl dünne
Pommes
300-700 12-16 200 X
Tiefkühl dicke
Pommes
300-700 12-20 200 X
Hausgemachte
Pommes (8 * 8)
mm
300-800 18-25 180 X 1/2 Esslöffel Öl
Hausgemachte
Pommes
300-750 12-18 180 X 1/2 Esslöffel Öl
Kartoffeln 250 15-18 180
Kategorie
Min-Max an
Zutaten (g)
Zeit (In
Minuten)
Temperatur
(°C)
Schütteln
Zusätzliche
Information
Steak 100-500 8-12 180
Schweinekotlett 100-500 10-14 180
Hamburger 100-500 7-14 180
Wurst 100-500 13-15 200
Hähnchenbrust 100-500 10-15 180
44 45
Snacks
Hausgemachte Pommes Frites
1. Schälen Sie die Kartoffeln und schneiden Sie diese in kleine
Stücke.
2. Lassen Sie die Kartoffelstücke für ca.30 Minuten in Wasser
ruhen. Trocknen Sie danach die Kartoffeln mit Küchenpapier ab.
3. Fügen Sie einen halben Löffel Öl zu den Kartoffeln und
vermischen Sie diese.
4. Geben Sie nun die Zutaten in die Pfanne.
5. Sie können nach den vorgaben in der Tabelle die Kartoffeln
frittieren.
Lagerung und Reinigung
Reinigung sollte nach jeder Benutzung folgen. Warten Sie ca. 30 Minuten,
damit das Gerät abkühlen kann.
1. Trennen Sie die Fritteuse vom Strom und lassen Sie das Gerät abkühlen.
Sie können um den Vorgang zu beschleunigen den Korb herausnehmen.
2. Für d
as außen Gehäuse verwenden Sie ein feuchtes Tuch.
3. Für den Korb und Pfannen könne Sie heißes Wasser, Spülmittel und
Schwamm benutzen. 4 Weiterhin kann eine Reinigungsbürste benutzt
werden.
Lagerung
1. Nachdem alles abgekühlt und gereinigt ist, rollen Sie den Kabel auf und
lagern Sie diese in der Ablage.
2. Sicherstellen, dass alle Teile trocken sind.
Kategorie
Min-Max an
Zutaten (g)
Zeit (In
Minuten)
Temperatur
(°C)
Schütteln
Zusätzliche
Information
Frühlingsrolle 100-400 8-10 200 X Bratfertig
Tiefkühl
Chicken nuggets
100-500 6-10 200 X Bratfertig
Fischstäbchen 100-400 6-10 200 Bratfertig
Gefülltes
Gemüse
100-400 10 180
46 47
Fehlersuche Bilder
Frage Mögliche Gründe Antwort
Fritteuse geht nicht an. Das Gerät ist nicht an
Strom angeschlossen.
1. Schließen Sie den Kabel an Strom.
2.Stellen Sie den Timer auf die gewünschte Zeit.
Die Zutaten sind noch
ungebacken nach
Ablauf der Zeit.
1. Die Menge ist zuviel oder
die Temperatur ist zu
niedrig.
2. Die Backzeit war zu kurz.
1. Halbieren Sie die Menge an Zutaten.
2.Passen Sie die gewünschte Temperatur an.
Verwenden Sie dazu die vorgegebene Tabelle.
Zutaten werden nicht
gleichmäßig gekocht.
Einige Gerichte müssen bei
Halbzeit durchgeschüttelt
werden.
Einige Zutaten, wie z.B. Pommes, müssen geschüttelt
werden, sodass sie gleichmäßig frittiert werden.
Snacks sind nicht
knusprig.
Einige Gerichte sollten auf
traditionelle Weise frittiiert
werden.
Streichen Sie ein wenig Öl auf die Zutaten.
Der Frittierkorb passt
nicht in die Fritteuse.
Zu viele Zutaten befinden
sich im Korb.
Die Zutaten sollten die Max. Markierung nicht
überschreiten.
Weißer Rauch ist
sichtbar
1.Fettige Zutaten befinden
sich in der Fritteuse.
2. In der Pfanne befinden
sich fettige Reste von der
vorherigen Benutzung.
1. Bei fettigen Gerichten kann Öl in die Pfanne
tropfen. Dies wird den Rauch verursachen und die
Pfanne wird sich schneller aufheizen als vorgesehen.
Pommes Frites wird
nicht gleichmäßig
frittiert.
Die
vorher
Kartoffeln wurden
nicht richtig
eingeweicht.
Benutzen Sie frische Kartoffeln dafür.
Pommes Frites sind
nicht knusprig genug.
Dies ist abhängig von der
Wasser- und Ölvolumen.
1. Trocknen Sie die Kartoffeln richtig ab.
2. Schneiden Sie die Kartoffeln in kleinere Stücke.
3. Geben Sie eine kleine Menge öl hinzu.
48 49
Gewährleistung
74 75
1 Jahr Gewährleistung von Shine-Mart Ltd, der Markeninhaber von Duronic Produkte.
ZUR BEACHTUNG : DIESE BEDINGUNGEN HABEN KEINE BEEINFLUSSUNG AUF
IHRE GESETZLICHE RECHTE ALS VERBRAUCHER
Dieses Produkt wurde unter strengen Qualitätskontrollen hergestellt, und wurde aus
hochwertigen Werkstoffen produziert, um ausgezeichnete Leistung und Zuverlässigkeit zu
gewährleisten. Sorfern das Produkt korrekt benutzt und gewartet wird, wird eine langlebige
Lebensdauer garantiert.
Das Produkt ist für 1 Jahr, ab dem Kaufdatum, gewährleistet. Beim Auftreten eines Schadens,
durch schlechten Werkstoffe oder Verarbeitung, sollte das fehlerhafte Produkt an den
ursprünglichen Verkäufer zurückgegeben werden. Eine Rückerstättung oder einen Umtausch
erfolgt nach Vorschriften des Unternehmens.
Duronic Produkte haben 1 Jahr Gewährleistung unter folgenden Bedingungen :
Duronic Produkte kommt mit 1 Jahr Gewährleistung unter den folgenden Bedingungen :
1.
Das Produkt sollte mit dem ursprünglichen Kaufnachweis zurückgegeben werden.
2.
Das Produkt sollte unter den Anweisungen und Anleitungen installiert und benutzt
worden sein.
3.
Die Produkte sind nur für den Hausgebrauch geeignet.
4.
Natürliche Abnutzung oder Schäden, bößwillige Beschädigung, Missbrauch, unsachgemäße
Reparaturen von Verschleißteile sind von der Gewährleistung ausgeschlossen.
5.
Shine-Mart Ltd hat keine Verantwortung für indirekte Verluste oder Folgeschäden.
6.
Shine-Mart Ltd ist nicht für Wartungsarbeiten zuständig. Diese fallen nicht unter die Gewährleistung.
7. Gultig in der EU
Diese Produkt ist mit tted CE geprüfte Typ-F Euro Stecker/BS Stecker ausgestattet
Von Shine-Mart Ltd, RM3 8SB importiert
Information über Abfalllagerung für Verbraucher von elektronischen Geräten. Dieses
Zeichen auf dem Produkt
und/oder auf mitgelieferte Dokumenten zeigt, dass wenn eine Beseitigung erfolgt, diese
an Elektro-Altgeräte (WEEE)- Stellen beseitigt werden muss. Für weitere Behandlungen
und Weiterverarbeitung der Werkstoffe, dürfen diese WEEE- markierte Produkte nicht
mit dem Hausmüll vermischt werden.
Für die korrekte Behandlung, Aufbereitung und Wiederverwendung bitte alle WEEE -
markierten Produkte zu Ihren kommunalen Abfallbeseitigungsanlage nehmen. Dort
können Sie diese kostenlos abgeben.
Wenn die Beseitigung von Elektro-und Elektronik-Altgeräten richtig beseitigt wird,
werden Sie helfen, wertvolle Ressourcen zu gewinnen und mögliche negative
Auswirkungen auf Gesundheit und der Umwelt zu vermeiden.
Gewährleistung
Dieses Produkt ist mit einem EU Stecker und Sicherung
ausgestattet, die
von Shine-Mart Ltd, RM3 8SB importiert sind
50 51
Manual De Instrucciones En Español

52 53
Introducción
La freidora de aire utiliza un sistema de circulación de calefacción (aire de
alta velocidad) con una parrilla superior para cocinar los ingredientes en
una manera rápida, fácil y saludable. Sus ingredientes son calentados por
todos lados a la vez y no hay necesidad de agregar aceite a la mayoría de
los ingredientes. La placa para hornear adicional, permite fácilmente hacer
algunos platos como las tortas, quiches y cocinar alimentos frágiles.
Descripción General (Figura 1)
A Cesta de freír
B Botón de liberación de la cesta de freír
C Mango de la cesta de freír
D Sartén
E Malla
F Entrada de aire
G Perilla de control de temperatura
H Indicador de calefactor
I Perilla de encender / temporizador
J Salida de aire
K Almacenamiento para el cable
L Cable de alimentación
Una alfombrilla resistente es incluida para que usted ponga la bandeja
cuando saque de su freidora de aire
Nota:
Por favor lea cuidadosamente las instrucciones
antes de utilizar este aparato. Conserve este
manual de instrucciones para futura referencia

54 55
-Nunca sumerja en agua o limpie bajo el grifo ya que el aparato contiene
componentes eléctricos y elementos de calefacción.
-No permita ningún contacto con agua o cosas liquidad ya que esto evitara
el riesgo de descargas eléctricas.
-Coloque siempre los ingredientes en la cesta de freír, evitara cualquier
contacto con los elementos de calefacción.
-No cubra la entrada o salida de aire mientras su freidora de aire esté en
funcionamiento.
-No llene el sartén con aceites que puedan causar riesgos de incendio.
-No toque el interior mientras su freidora de aire esté en funcionamiento.
-Por favor compruebe que el voltaje de su aparato con el voltaje de
alimentación sean compatibles en el país que usted se encuentre antes de
conectar.
-No utilicé el aparato si el cable de alimentación esta defectuoso.
-Si el cable de alimentación esta defectuoso, debe ser reemplazado con un
electricista calicado, con el n de evitar cualquier riesgo.
-Este aparato puede ser utilizado por niños de 8 años de edad en adelante,
por personas discapacitadas o personas con falta de experiencia y
conocimientos con una persona que los supervise o sean guiados para
garantizar su seguridad.
-Niños deben ser supervisados para evitar que jueguen con el aparato.
-Mantenga el aparato junto con el cable de alimentación fuera del alcance
de los niños cuando esté en funcionamiento o enfriando.
-Mantenga el cable de alimentación lejos de supercies calientes.
-No inserte el enchufe del aparato u opere el panel de control con las manos
mojadas.
-Asegúrese de que el enchufe este insertado correctamente en el
tomacorriente.
xxxxxxxxxxxxxx
xxxxxxxxxxxxxx
Peligro
Advertencia
xxxxxxxxxxxxxxApague Automático
Nota
-No intente de operar el aparato con un temporizador externo.
-No coloque el aparato cerca de materiales inamables como un mantel o
una Cortina.
-Nunca coloque el aparato contra la pared u otros aparatos. Mantenga
una distancia libre de 10cm entre la parte trasera y a los lados y 10cm por
encima del aparato y nunca coloque ningún elemento en la parte superior
del aparato.
-Nunca utilicé este aparato para otro propósito almenos de que estén
descritos en este manual de instrucciones.
-Este aparato debe ser utilizado de una manera sensata.
-Vapor caliente será liberado a través de la salida de aire durante este
en operación, Mantenga las manos y cara a una distancia segura. Tenga
cuidado con el vapor caliente y temperaturas altas al momento de extraer la
cesta.
-La supercie del aparato puede calentarse a una temperatura alta cuando
este en uso. (Figura 2)
-Inmediatamente apague u desenchufe el aparato si ve que humo oscuro
sale del aparato. Espere a que la emisión de humo pare antes de sacar la
cesta de freír.
-Coloque el aparato en una supercie estable o posición horizontal.
-Devuelva el aparato al fabricante o ah un centro de servicio autorizado
para una reparación o inspección. No intente reparar por su cuenta; de lo
contrario la garantía será anulada.
- Asegúrese de desenchufar después de usar el aparato.
-Deje enfriar el aparato durante 30 minutos antes de proceder a limpiarlo.
-Asegúrese que los ingredientes tengan un color dorado, no oscuro o
marrón.
Este aparato está equipado con un temporizador. Cuando el temporizador
llegue a 0, el aparato timbrara un timbre y automáticamente se apagara.
Si apaga manualmente, por favor asegúrese de poner la perilla del
temporizador a 0.

56 57
Campos Electrodomésticos (EMF)
Antes Del Primer Uso
P a r a U t i l i z a r
Este producto se conforma con los estándares relacionados del campo
magnético electrónico (EMF). Si se utiliza correctamente según las
instrucciones del manual del usuario, este producto es seguro.
1 Quitar todo el material de embalaje.
2 Retire el adhesivo o etiqueta del aparato.
3 Use agua caliente, detergente con esponja no abrasiva para limpiar la
cesta de freír y el sartén.
Nota: También puede utilizar el lavavajillas para lavar los componentes.
4 Limpie la parte interior/exterior del aparato con un paño húmedo. Esta
freidora de aire no es para uso con aceites. No llene el sartén con aceite.
1 Coloque el aparato en posición horizontal o en una supercie estable.
No coloque el aparato en supercies que no sean resistentes al calor.
2 Coloque correctamente la cesta de freír en el sartén. (gura3)
Tire el cable de alimentación de la parte inferior del aparato.
No llene el sartén con aceite u otros líquidos.
Asegúrese de no bloquear el ujo de aire en la parte superior del aparato
para prevenir recalentamiento.
El Uso De Este Producto
La freidora de aire puede ser útil para cocinar muchos ingredientes.
El libro de recetas incluido le ayudara a entender el producto y lo que se
puede hacer con él.
Consulte las guras de imagines al nal de este manual para referirse a los
siguientes puntos.
1 Conecte el cable de alimentación en el tomacorriente en la pared.
2 Saque con cuidado el sartén del aparato (gura 4)
3 Coloque los ingredientes en la cesta de freír. (gura 5)
Nota: La cantidad de los ingredientes no debe exceder la línea que indica
(MAX) puede referirse al sección de ‘Ajustes’, esto pueda que afecte el
resultado nal.
4 Deslice el sartén asía la freidora de aire (gure 6)
Nunca utilice el sartén sin la cesta de freír.
Nota: No utilice ni toque el sartén, porque estaría muy caliente.
Cuidadosamente sostenga del mango cuando saque el sartén de la freidora
de aire.
5 Ajuste la perilla de control de temperatura para obtener la temperatura
deseada. Por favor reérase a la sección de ‘Ajustes’’ para determinar la
temperatura correcta. (gura 7)
6 Determine el tiempo adecuado para cocinar los productos (por favor
reérase al sección de ‘Ajustes’)
7 Para encender el aparato, ajuste de la perilla del temporizador el tiempo de
cocción. (Figura 8)
Si el aparato esta frio, el tiempo de cocción debe ser aumentado a 3
minutos.
Nota: También puede recalentar el aparato antes de poner los ingredientes,
tan solo ajuste el temporizador a más o menos 3 minutos, y espere a que
la luz del indicador de calentamiento apague (3 minutos). Luego coloque la
cesta de freír y ajuste el tiempo de temporizador de cocción.
· En este momento, el indicador de luz que esta encendido y de
calentamiento se prendera. (gura 9)
· El temporizador empezará a dar cuenta atrás del tiempo de cocción.
· El proceso del aparato indica la luz de calentamiento que se prenda y
apague de vez en cuando para mantener la temperatura.
· El exceso de aceite se recoge en el sartén de la freidora de aire.

58 59
8 Algunos de los ingredientes necesitan ser sacudidos en la mitad del
proceso para que se pueda cocinar uniformemente (consulte con el sección
de ‘Ajustes’). Tire la cesta de freír del aparato para sacudir los ingredientes,
regrese la cesta en posición para seguir cociendo. (gura 10)
Nota: No presione el botón de (remover) de la cesta de freír mientras sacuda
los ingredientes. (gura 11)
Sugerencia: Se puede remover la cesta de freír de la cazuela y sacudir para
reducir el peso. Saque el sartén del aparato y coloque en una supercie que
resista al calor y pulse el botón para sacar la cesta de freír.
Sugerencia: Si establece el temporizador a la mitad del tiempo de cocción,
escuche el timbre y sacuda los ingredientes. Sin embargo, esto signica que
debería ajustar el temporizador para completar de cocinar sus ingredientes.
9 Si escucha el timbre del temporizador, esto indica que el tiempo ha
terminado. Tire el sartén fuera del aparato y coloque en una supercie
resistente.
Nota: También puede manualmente parar la cocción, posicione la perilla del
temporizador a 0. (gura 12)
10 Asegúrese de que los ingredientes estén cocinados.
Si aún necesitan ser cocinados, coloque la cesta de freír nuevamente en el
aparato y ajuste el tiempo necesario
11 Para servir pequeños ingredientes como (patatas fritas) por favor
presione el botón para remover la cesta de freír (1) luego levante la cesta de
freír del sartén (2). (gura 13)
No gire la cesta boca abajo si aún está atada al sartén, esto puede causar
que el aceite aculado se riegue en los ingredientes.
Después de freír, el sartén junto con los ingredientes estarán sumamente
calientes, todo depende del tipo de los diferentes ingredientes; vapor
caliente pueda que salga del sartén.
12 Vacié los ingredientes de la cesta de freír en un plato o un recipiente.
(gura 14)
Sugerencia: Para vaciar los ingredientes grandes o frágiles, puede utilizar un
par de pinzas. (gura 15)
13 La freidora de aire siempre está listo para cocinar el siguiente lote de
ingredientes después de que el primer lote esté listo. (gura 16)
La siguiente tabla le ayudara a decidir los ajustes básicos para los
ingredientes que desee cocinar.
Nota: Por favor recuerde que estos ajustes son solamente referencias. No
podemos garantizar los mejores ajustes para los ingredientes ya que vienen
en diferente tipo como fuente, tamaño, forma y marca.
Ya que la tecnología del aire de circulación de alta velocidad recalienta
al instante por el interior. Sacar el sartén cuidadosamente de la freidora
mientras que el aire caliente apenas perturbara el proceso de cocción.
-El tiempo de cocción es ligeramente menos para los ingredientes
pequeños.
-El tiempo de cocción es un copo más largo para los ingredientes más
grandes.
-Sacuda los ingredientes pequeños en la mitad del proceso de cocción, esto
puede optimizar el resultado nal y puede prevenir un cocido irregular entre
los ingredientes.
-Agregue un poco de aceite en patatas para un resultado crujiente y
crocante y fríalos dentro de unos minutos.
-No cocine ingredientes muy grasientos, como salchichas.
-Bocadillos adecuados para cocinar en el horno pueden ser cocinados con
esta freidora de aire.
-Para cocinar patatas fritas crujientes la cantidad recomendable es de 500
gramos.
-Utilice masa/pasta prehecha para cocinar en una manera rápida y
conveniente. En comparación con pasta/masa casera, el tiempo de cocción
es más corto.
-Ajuste el temporizador a 150°C durante 10 minutes para recalentar los
ingredientes.
Ajustes
Sugerencia
60 61
Patatas y Patatas Fritas
Carnes
Bocadillos
Nota: Si el aparato sigue frio, añada 3 minutos adicionales al tiempo del
temporizador
Patatas fritas caseras
Para mejores resultados, le sugerimos que utilice pre cocido como (Patatas
fritas congeladas). Si utiliza patatas fritas caseras, por favor sigua los
siguientes pasos.
1 Pele las patatas y córtelos en pequeños trozos.
2 Remoje las patatas en un recipiente durante 30 minutos y luego séquelas
con papel de cocina.
3 Agregue ½ cucharada de aceite de oliva en un recipiente y mezcle.
4 Saque las patatas del recipiente con las manos o con algún utensilio de
cocina para que el exceso de aceite mantenga en el recipiente y luego
coloque las patatas en la cesta de la freidora.
Nota: No ponga todas las patatas en la cesta de freír en una sola vez, esto
evitara el exceso de aceite en la parte inferior del sartén.
5 Fría las patatas siguiendo las instrucciones en la sección 5.
62 63
Limpieza
Almacenamiento
Inmediatamente limpie la freidora después de haber utilizado. Deje 30
minutos para que se enfrié.
El sartén, bandeja de hornear, cesta de freír y la parte interior de su
freidora tiene una capa antiadherente. Si utiliza utensilios de cocina de
metal o materiales agresivos para limpiar entonces podría dañar la capa
antiadherente.
1 Desenchufe el cable de alimentación de tomacorriente y deje enfriar.
Nota: Saque el sartén del aparato para que se enfrié rápidamente.
2 Limpie la parte exterior del aparato con un paño húmedo.
3 Utilice agua caliente, líquido detergente y una esponja no agresiva para
limpiar la cesta de la freidora, el sartén y remójelos por unos 10 minutos.
4 Utilice agua caliente, esponja no agresiva para limpiar la parte interior del
aparato.
5 Utilice un cepillo de limpieza para limpiar los residuos en los elementos de
calefacción.
1 Desconecte el cable de alimentación del tomacorriente y deje que enfrié
completamente.
2 Asegúrese de que todas las partes estén limpias y secas.
3 Coloque el cable de alimentación en el compartimiento de almacenaje y
acomode bien en la ranura.
Solución de problemas
64 65
Figuras de imaginas
1 Año de garantía de Shine-Mart Ltd, titulares de marca de productos
Duronic.
NOTA: THESE STATEMENTS DO NOT AFFECT YOUR STATUTORY
RIGHTS AS A CONSUMER
Este producto ha sido fabricado bajo las más estrictas o control de calidad
de procedimientos y utilizando la más alta calidad de materiales, para
garantizar conabilidad y un excelente rendimiento. Dará servicio muy bueno
y duradero, siempre y cuando se utilice correctamente y manteniéndolo.
El producto está garantizado por 1 año desde la fecha de compra original.
Si surge cualquier defecto debido a un defecto material o mano de obra,
el producto defectuoso debe ser devuelto al lugar original de compra.
Reembolso o reemplazo es a discreción de la compañía.
G a r a n t í a y s e r v i c i o
Los productos de Duronic se ofrecen con una garantía de 1 año bajo las
siguientes condiciones:
1. El producto debe ser devuelto al vendedor con el comprobante de compra
original.
2. El producto debe ser instalado y utilizado de acuerdo con las
instrucciones contenidas en este manual.
3. Debe utilizarse únicamente para propósitos domésticos.
4. No cubre desgaste, daños maliciosos, uso indebido, negligencia,
reparaciones inexpertas o partes consumibles.
5. Shine-Mart Ltd no tiene ninguna responsabilidad por pérdida o daño
accidental o consecuencial.
6. Shine-Mart Ltd no son responsables de llevar a cabo cualquier tipo de
reparación, en virtud de la garantía.
Este producto está equipado con enchufe Europeo
y un fusible importado por Shine-Mart Ltd, RM38SB
Información sobre la eliminación de residuos para los consumidores de
equipos eléctricos/electrónico. Esta marca en un producto y/o documentos
adjuntos indica que cuando se va a desechar, se debe tratar como residuos
eléctricos/electrónico (WEEE). Cualquier producto marcado WEEE no debe
ser mezclado con la basura doméstica, sino separado para el tratamiento,
recuperación y reciclaje de los materiales utilizados.
Para el tratamiento adecuado, recuperación y reciclaje; por favor, tome
todos los productos WEEE y llévelo a su sitio de desechos Local autoridad
cívica, donde será aceptado de forma gratuita
Si los clientes disponen de residuos eléctricos/electrónico correctamente,
ayudaran a ahorrar valiosos recursos y prevenir los potenciales efectos neg-
ativos sobre la salud humana y el medio ambiente, de materiales peligrosos
que pueden contener los residuos.

66 67
Manuale D’istruzioni In Italiano

68 69
Introduzione
La friggitrice ad aria usa la tecnologia di circolazione dell’aria (Aria ad alta
velocità) e la migliore griglia per cucinare i vostri ingredienti in modo veloce,
semplice e salutare. I vostri ingredienti vengono cotti da tutte le parti con-
temporanemente e non è necessario aggiungere olio per la maggior parte
degli ingredienti. Il piano di cottura da forno aggiuntiva, vi permetterà di fare
facilmente alcuni piatti come torte, crostate o cucinare cibi delicati.
D e s c r i z i o n e G e n e r a l e ( F i g u r a 1 )
A cestino
B tasto di rilascio del cestino
C manico del cestino
D piano di frittura
E griglia di frittura
F presa d’aria in entrata
G manopola della temperatura
H indicatore di riscaldamento
I manopola di accensione / timer
J presa d’aria in uscita
K contenitore di conservazione del cavo
L presa elettrica
E’ incluso un tappetino resistente al calore per metterci sopra il cestello,
quando lo si toglie dall’apparecchio.
Note:
Vi preghiamo di leggere attentamente le istruzioni
prima dell’utilizzo. Conservate il manuale
d’istruzioni per consultazioni future.

70 71
-Mai immergere in acqua o pulire sotto il rubinetto, poichè l’apparecchio
contiene componenti elettronici e inammabili.
-Non fare entrare acqua o liquidi all’interno dell’apparecchio, onde evitare
corto circuiti.
-Mettere gli ingredienti sempre nel cestino di frittura, onde evitare contatti
con gli elementi inammabili.
-Mai coprire la presa d’aria in entrata e uscita mentre l’apparecchio è in
funzione.
-Non riempire d’olio il cestello, poichè potrebbe causare un pericolo di fuoco.
-Non toccare l’interno mentre l’apparecchio è in funzione.
-Prima di collegare l’apparecchio, si prega di vericare il voltaggio della
friggitrice in modo che combaci con il voltaggio dell’alimentazione elettrica
del Vostro paese.
-Non utilizzare l’apparecchio se il cavo elettrico è danneggiato. Se il cavo
elettrico è danneggiato, dovete sostituirlo da un elettricista qualicato, in
modo da evitare un pericolo di fuoco.
-Questo apparecchio può essere utilizzato dai bambini dagli 8 anni in
su e da persone con capacità siche, sensoriali e mentali ridotte, o con
mancanza di esperienza e conoscenza, purchè siano supervisionati o guidati
da una persona che assicuri la loro incolumità. I bambini devono essere
supervisionati per assicurarsi che non giochino con l’apparecchio.
-Tenere l’apparecchio e il cavo elettrico fuori dalla portata dei bambini mentre
l’apparecchio è in funzione o si sta raffreddando. Tenere il cavo elettrico
lontano dalle superci con alte temperature.
-Non inserire la spina dell’apparecchio o utilizzare il pannello di controllo con
le mani bagnate. Assicuratevi che la spina sia opportunamente inserita nella
xxxxxxxxxxxxxx
xxxxxxxxxxxxxx
Pericoli
Avvertenze
xxxxxxxxxxxxxx
Spegnimento Automatico
Note
presa della corrente.
-Non provate a utlizzare l’applicazione mediante un timer esterno.
-Non posizionare l’apparecchio vicino a materiali inammabili, come una
tovaglia o una tenda.
-Mai posizionare l’apparecchio contro il muro o altri apparecchi. Tenere
una distanza di almeno 10cm di spazio libero dietro e nei lati e 10cm di
spazio libero sopra l’apparecchio. Mai posizionare qualche oggetto sopra
l’apparecchio.
-Mai utilizzare questo apparecchio per qualsiasi altro proposito diverso da
quelli descritti nel manuale d’istruzioni.
-Il vapore caldo sarà rilasciato dalla presa dell’aria in uscita durante la
frittura. Tieni le mani e il viso a distanza di sicurezza. Fare inoltre attenzione
al vapore caldo e alle temperature alte quando si rimuove il cestello.
- La superce potrebbe diventare molto calda durante l’utilizzo. (gura 2)
-Spegni immediatamente o togli la spina dall’apparecchio se vedi fumo scuro
venire fuori dall’apparecchio. Attendi che la fuoriuscita di fumo nisca prima
di rimuovere il cestello.
-Posizione l’apparecchio in una superce orizzontale o stabile.
-Restituisci l’apparecchio alla fabbrica o a un centro di riparazioni
autorizzato. Non riparare l’apparecchio da solo; altrimenti la garanzia
diventerà invalida.
-Assicurati di togliere la spina dall’apparecchio dopo l’utilizzo. Fare
raffreddare per circa 30 minuti prima di pulire. Assicurati che gli ingredienti si
presentino di un colore dorato, non scuro.
Questo apparecchio è dotato di un timer. Quando il timer raggiunge lo
0, l’apparecchio suonerà e si spegnerà automaticamente. Per spegnerla
manualmente, portate il timer a 0.

72 73
Campi Elettromagnetici
P r i m a d e l l ’ u t i l i z z o
C o m e u t i l i z z a r e
Questo prodotto è conforme agli standard relativi al campo magnetico. Se
usato correttamente seguendo il manuale d’istruzioni, il prodotto è sicuro.
1 Mettere a distanza tutto il materiale nell’imballaggio.
2 Rimuovere gli adesivi dall’apparecchio.
3 Usare acqua calda, lavapiatti e una spugna non abrasiva per pulire bene il
cestino ed il contenitore.
Nota: Si può anche usare la lavastoviglie per pulire questi componenti.
4 Pulire le parti interne e le altre parti con un panno umido.
Questa non è una friggitrice ad olio. Non riempire il contenitore con olio.
1 Posizionare l’apparecchio su una supercie orizzontale o stabile.
Non posizionare l’apparecchio su una superce non resistente ad alta
temperatura.
2 Posizionare opportunamente il cestino dentro il contenitore. (gura 3)
Togliere il cavo elettrico dal contenitore di conservazione del cavo sul fondo
all’apparecchio.
Non riempire il contenitore con olio o altri liquidi.
Non posizionare alcun oggetto sopra l’apparecchio per bloccare il usso
d’aria ed alterare il risaldamente dell’aria calda.
L’ u t i l i z z o d i q u e s t o p r o d o t t o
La friggitrice può essere utilizzata per moltissimi ingredient. Il libro di ricette
incluso vi aiuterà a capire il prodotto e cosa si può fare con esso. Guardate
anche le gure alla ne del manuale in relazione ai punti seguenti.
1 Inserire la spina nella presa della corrente.
2 Rimuovere accuratamente il contenitore dall’apparecchio. (gura 4)
3 Mettere gli ingredienti nel cestino della frittura. (gura 5)
Nota: Non inserire un numero di ingredienti superiore alla voce “massimi”
nella tabella guida (in riferimento al capitolo “Settaggi”), poichè potrebbe
alterare il risultato di frittura.
4 Inserire nuovamente il contenitore dentro la friggitrice. (gura 6)
Mai utilizzare il contenitore senza il cestino.
Nota: Non usare o toccare il contenitore, poichè è bollente. Tenere
delicatamente il manico quando si rimuove il contenitore.
5 Girare la manopola alla temperatura desiderata. Fate riferimento al capitolo
dei “Settaggi” per determinare la giusta temperatura. (gura 7)
6 Impostare il tempo richiesto per la cottura degli ingredienti (fate riferimento
al capitolo dei “Settaggi”).
7 Per accendere l’apparecchio, portare il timer al tempo necessario di
cottura. (gura 8)
Se l’apparecchio è freddo, il tempo di cottura deve essere aumentato di 3
minuti.
Nota: E’ possibile anche riscaldare l’apparecchio prima di inserire gli
ingredienti all’interno, portando il timer a 3 minuti, e aspettare che la spia che
indica il raggiungimento della temperatura si spenga (dopo circa 3 minuti).
Fatto ciò, inserire il cestino e portare il timer al tempo di cottura adeguato.
· a questo punto, l’indicatore di accensione e la spia che indica il
riscaldamento si accenderanno. (gura 9)
· il timer farà il conto alla rovescia a partire dal tempo di cottura selezionato.
· Quando l’apparecchio è in funzione, la spia che indica il riscaldamento può
accendersi e spegnersi di volta in volta. Ciò signica che i componenti si
accendono e spengono costantemente per mantenere la temperatura.
· L’olio in eccesso viene raccolto in fondo al cestino.
8 Alcuni ingredienti durante il processo di cottura necesittano di
essere mescolati (vedi il capitolo sui “Settaggi”). Rimuovere il cestino
dall’apparecchio, mescolare e rimettere il cestino all’interno. (gura 10)

74 75
Nota: Non premere il tasto di rimozione del cestino mentre lo si mescola.
(gura 11)
Suggerimento: Se si desidera rimuovere il cestino dal contenitore per ridurre
il peso e mescolare, rimuovere il contenitore dall’apparecchio, appoggiarlo
su una superce resistente al calore e premere il tasto di rimozione.
Suggerimento: Se si setta il timer a metà del tempo di cottura, si potrà sentire
il campanello del timer suonare in modo da avvisare quando mescolare.
Tuttavia, ciò signica che si dovrà nuovamente settare il timer per la seconda
parte del tempo di cottura rimanente.
9 Quando la campanella del timer suonerà, signica che il tempo di cottura è
trascorso. Rimuovere il contenitore e appoggiarlo su una superce resistente
al calore.
Nota: E’ possibile anche fermare manualmente la cottura portando il timer a
0. (gura 12)
10 Controllare che gli ingredienti siano cotti. Se necessitano ancora di
cuocersi, rimettere il contenitore all’interno dell’apparecchio e settare il timer
per qualche altro minuto.
11 Per versare piccoli ingredienti (come patatine fritte), premere il tasto di
rimozione del cestino (1) e sollevare il cestino dal contenitore. (2). (gura
13). Non capovolgere il cestino con il contenitore ancora attaccato, poichè
potrebbe far colare un eccesso di olio che è stato raccolto nel fondo del
contenitore. Dopo la frittura, il contenitore e gli ingredienti sono ancora
bollenti, a seconda degli ingredienti; dal contenitore potrebbe fuoriuscire
vapore.
12 Svuotare gli ingredienti dal cestino in un piatto o una ciotola. (gura 14)
Suggerimento: Per rimuovere ingredienti più grandi e fragili, si possono
utilizzare delle pinze per raccogliere gli ingredient dal cestino. (guta 15)
13 La friggitrice è subito pronta per cucinare la prossima quantità di
ingredienti. (gura 16)
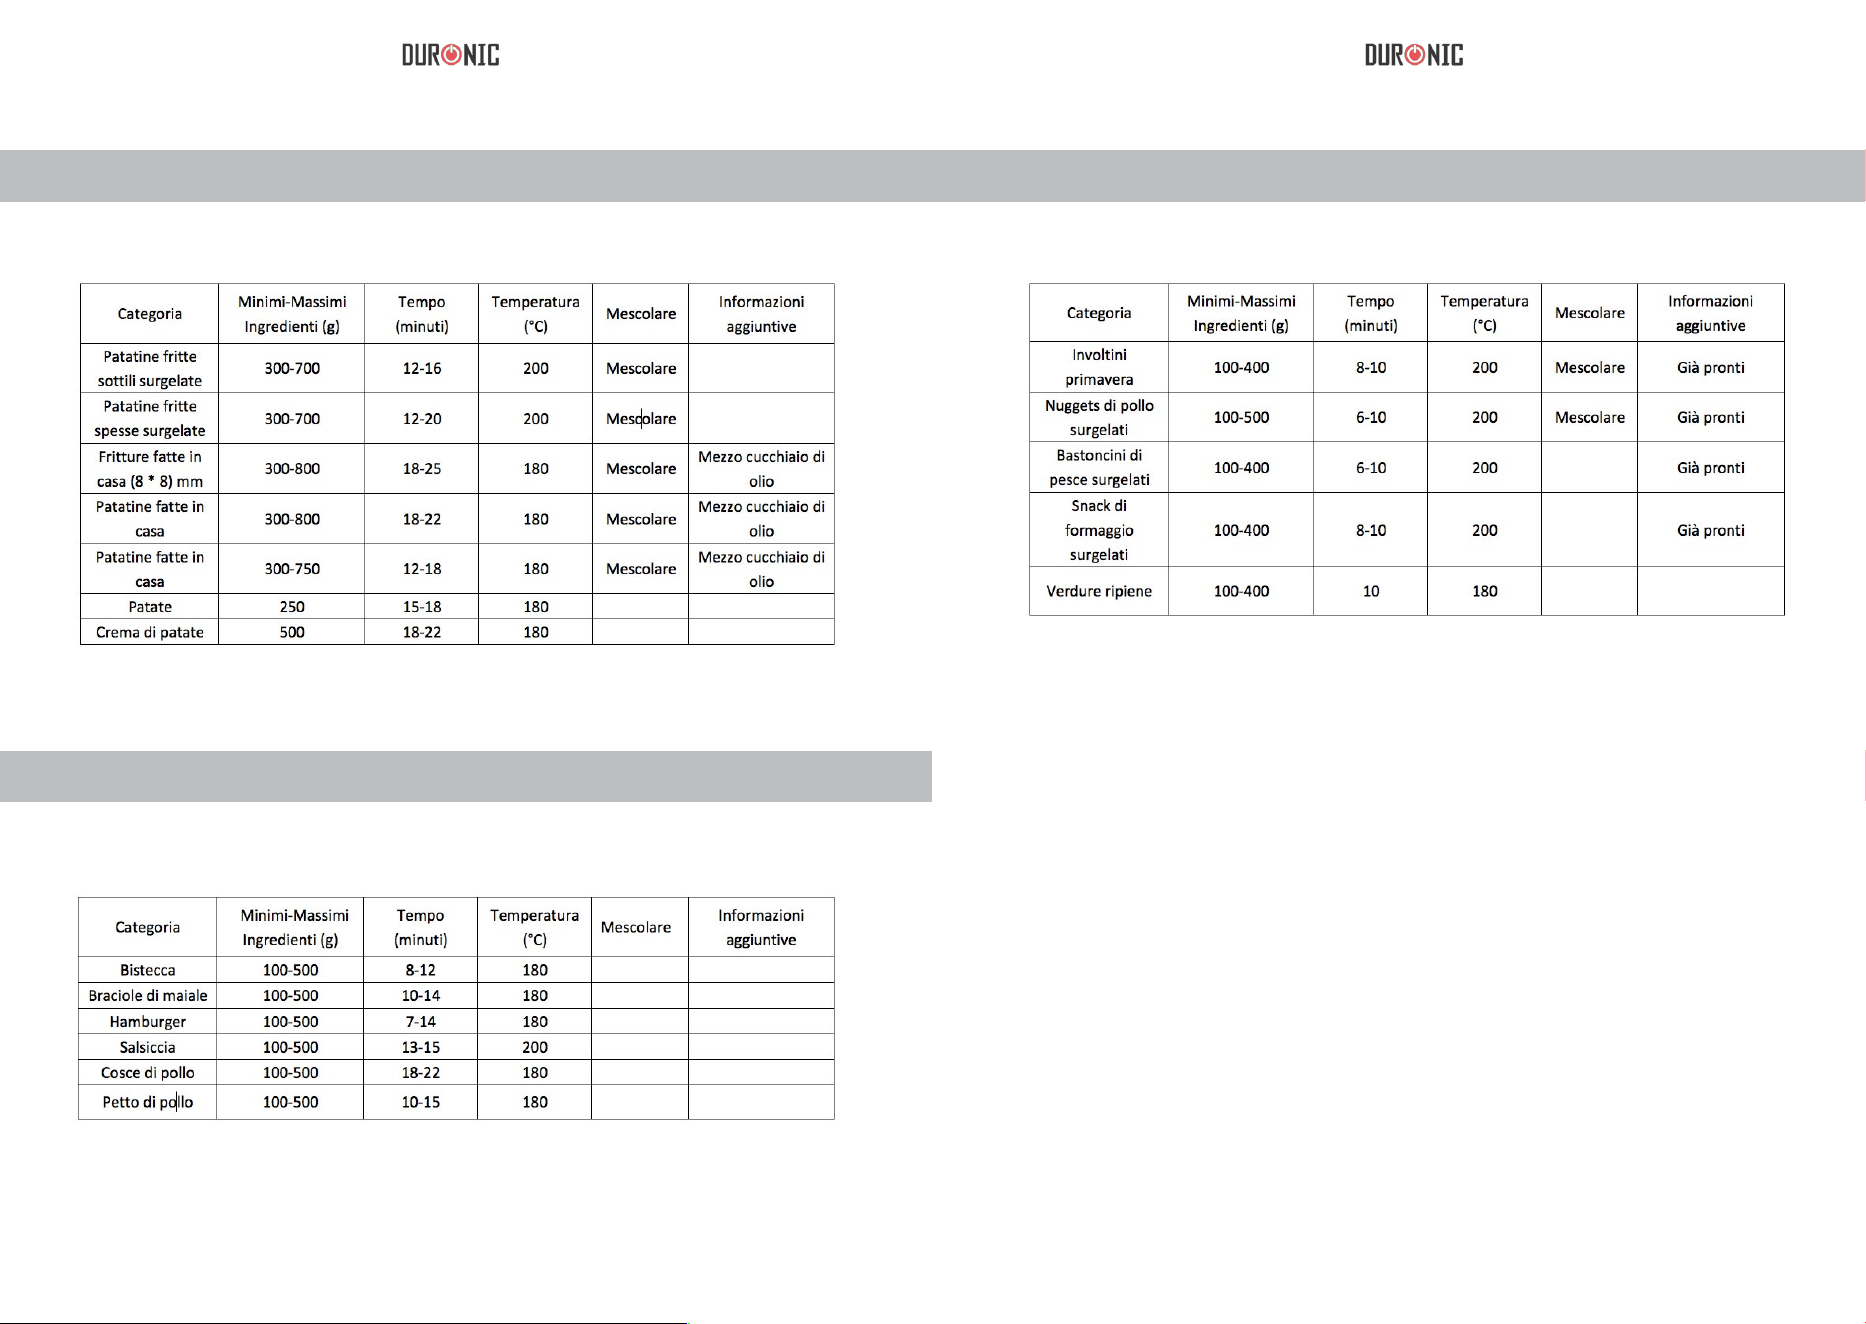
La tabella sottostante vi aiuterà a scegliere i settaggi per gli ingredienti che
volete cucinare.
Nota: Ricorda che questi Settaggi sono solo riferimenti. Non possiamo
garantire il miglior settaggio per i vostri ingredienti poichè c’è differenza di
provenienza, misura, forma e marca.
Poichè la tecnologia di circolazione dell’aria riscalda istantaneamente
l’aria all’interno dell’apparecchio, la rimozione repentina del contenitore
dall’apparecchio durante il riscaldamento dell’aria potrebbe disturabare il
processo.
-Diminuire leggermente il tempo di cottura per gli ingredienti più piccoli.
-Aumentare leggermente il tempo di cottura per quantità maggiori di
ingredienti.
-Mescolare gli ingredienti più piccoli a metà cottura può ottimizzare il risultato
nale e può impedire cotture non uniformi.
-Aggiungere una piccola quantità di olio per le patate fresche in modo da
renderle croccanti e friggerle per qualche minuto dopo aver aggiunto l’olio.
-Non cuocere alcuni ingredienti estremamente grassosi, come la salsiccia.
-Snack che possono essere cotti in forno, possono essere cotti anche
nell’apparecchio.
-Per cuocere in modo croccante le patatine fritte, la miglior quantità
consigliata è 500 grammi.
-E’ possibile usare la pasta sfoglia già pronta per cuocerla ripiena in modo
facile e veloce. A differenza della pasta sfoglia fatta in casa, quella già pronta
necessita di una cottura più breve.
-Per riscaldare gli ingredienti settare la temperatura a 150 gradi per 10
minuti.
Settaggi
Tip
76 77
Patate E Patatine Fritte
Carne e Pollo
Snacks
Nota: Se l’apparecchio è ancora freddo, aggiungere 3 minuti di cottura.
· Patatine fritte fatte in casa
Per il miglior risultato, suggeriamo di utilizzarle precotte (come le patatine
surgelate). Per le patatine fritte fatte in casa, seguire i seguenti passi.
1 Pelare le patate e tagliarle in piccoli bastoncini.
2 Immergere in acqua i bastoncini di patate in una ciotola per almeno 30
minuti e asciugarle con carta da cucina.
3 Mettere mezzo cucchiaio di olio d’oliva dentro una ciotola e mescolarci
all’interno i bastoncini di patate.
4 Togliere i bastoncini dalla ciotola con le mani o con un utensile da cucina in
modo che l’olio in eccesso rimanga nella ciotola. Mettere i bastoncini dentro
il cestino.
Nota: Non mettere tutti i bastoncini di patate in una volta sola, in modo da
evitare che si accumuli troppo olio in fondo al contenitore.
5 Friggere le patatine seguendo le istruzioni del capitolo 5.
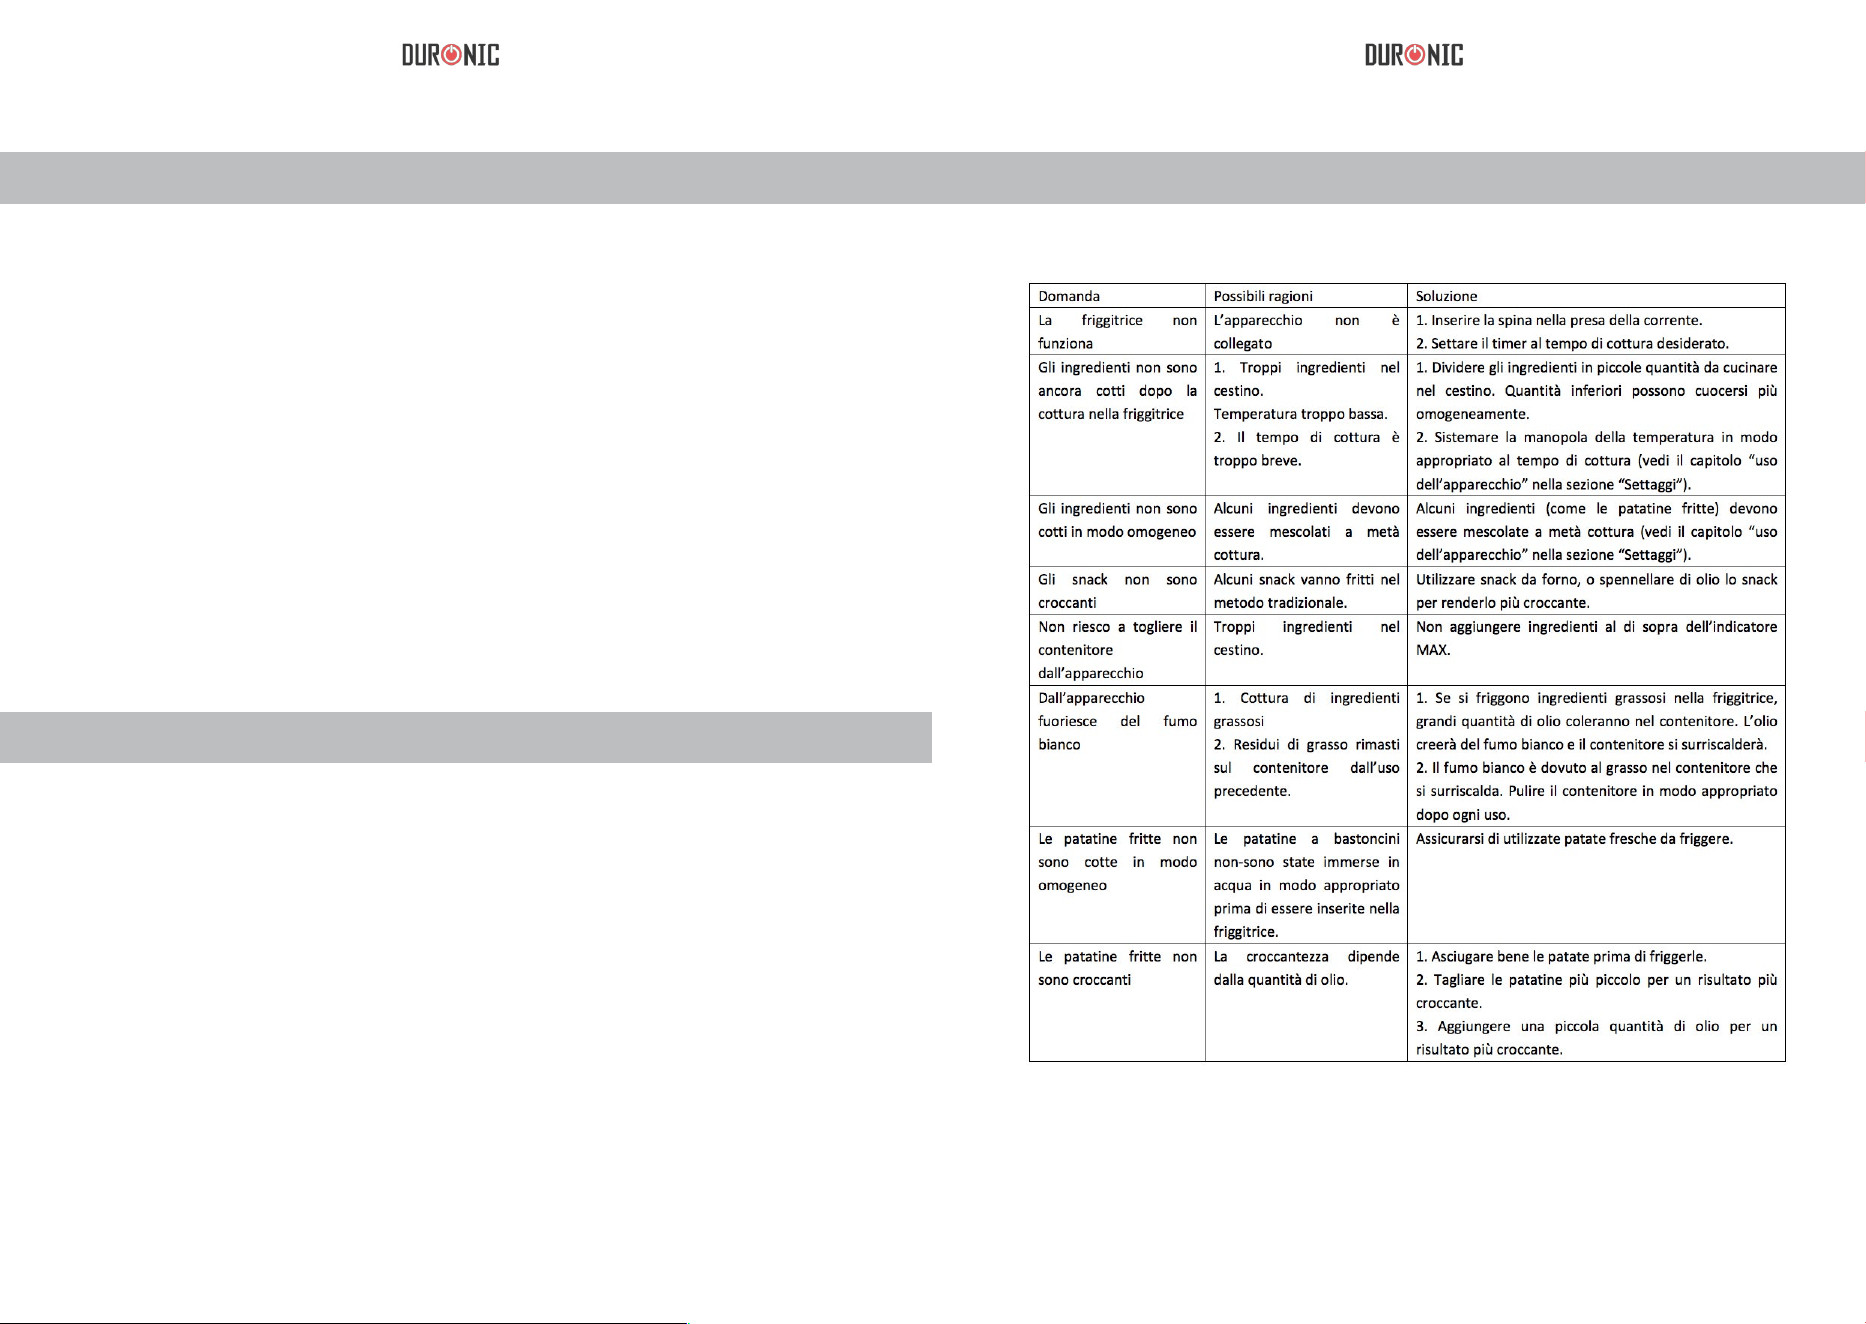
78 79
Pulizia
Conservazione
Pulire immediatamente l’apparecchio dopo l’utilizzo. Dare 30 minuti per
raffreddarsi.
Il contenitore, teglia, cestino e l’interno dell’apparecchio hanno un
rivestimento antiaderente. Se si utilizzano utensili da cucina di metallo o
materiali abrasivi per pulire, ciò danneggerà il rivestimento.
1 Scollegare il cavo di alimentazione e lasciare raffreddare l’apparecchio.
Nota: Rimuovere il contenitore dall’apparecchio per farlo raffreddare più
velocemente.
2 Pulire il resto dell’apparecchio con un panno umido.
3 Usare acqua calda, lavapiatti e una spugna non abrasiva per pulire a fondo
il cestino e immergerlo per circa 10 minuti.
4 Usare acqua calda e una spugna non abrasiva per pulire l’interno
dell’apparecchio.
5 Usare una spazzola per pulire i residui di cibo.
1 Scollegare la presa della corrente e lasciare raffreddare completamente.
2 Assicurarsi che tutte le parti siano lavate e asciutte.
3 Posizionare il cavo dell’alimentazione nel contenitore di conservazione del
cavo e sistemarlo inserendo il cavo nello slot di ssaggio.
R i s o l u z i o n e d e i p r o b l e m i
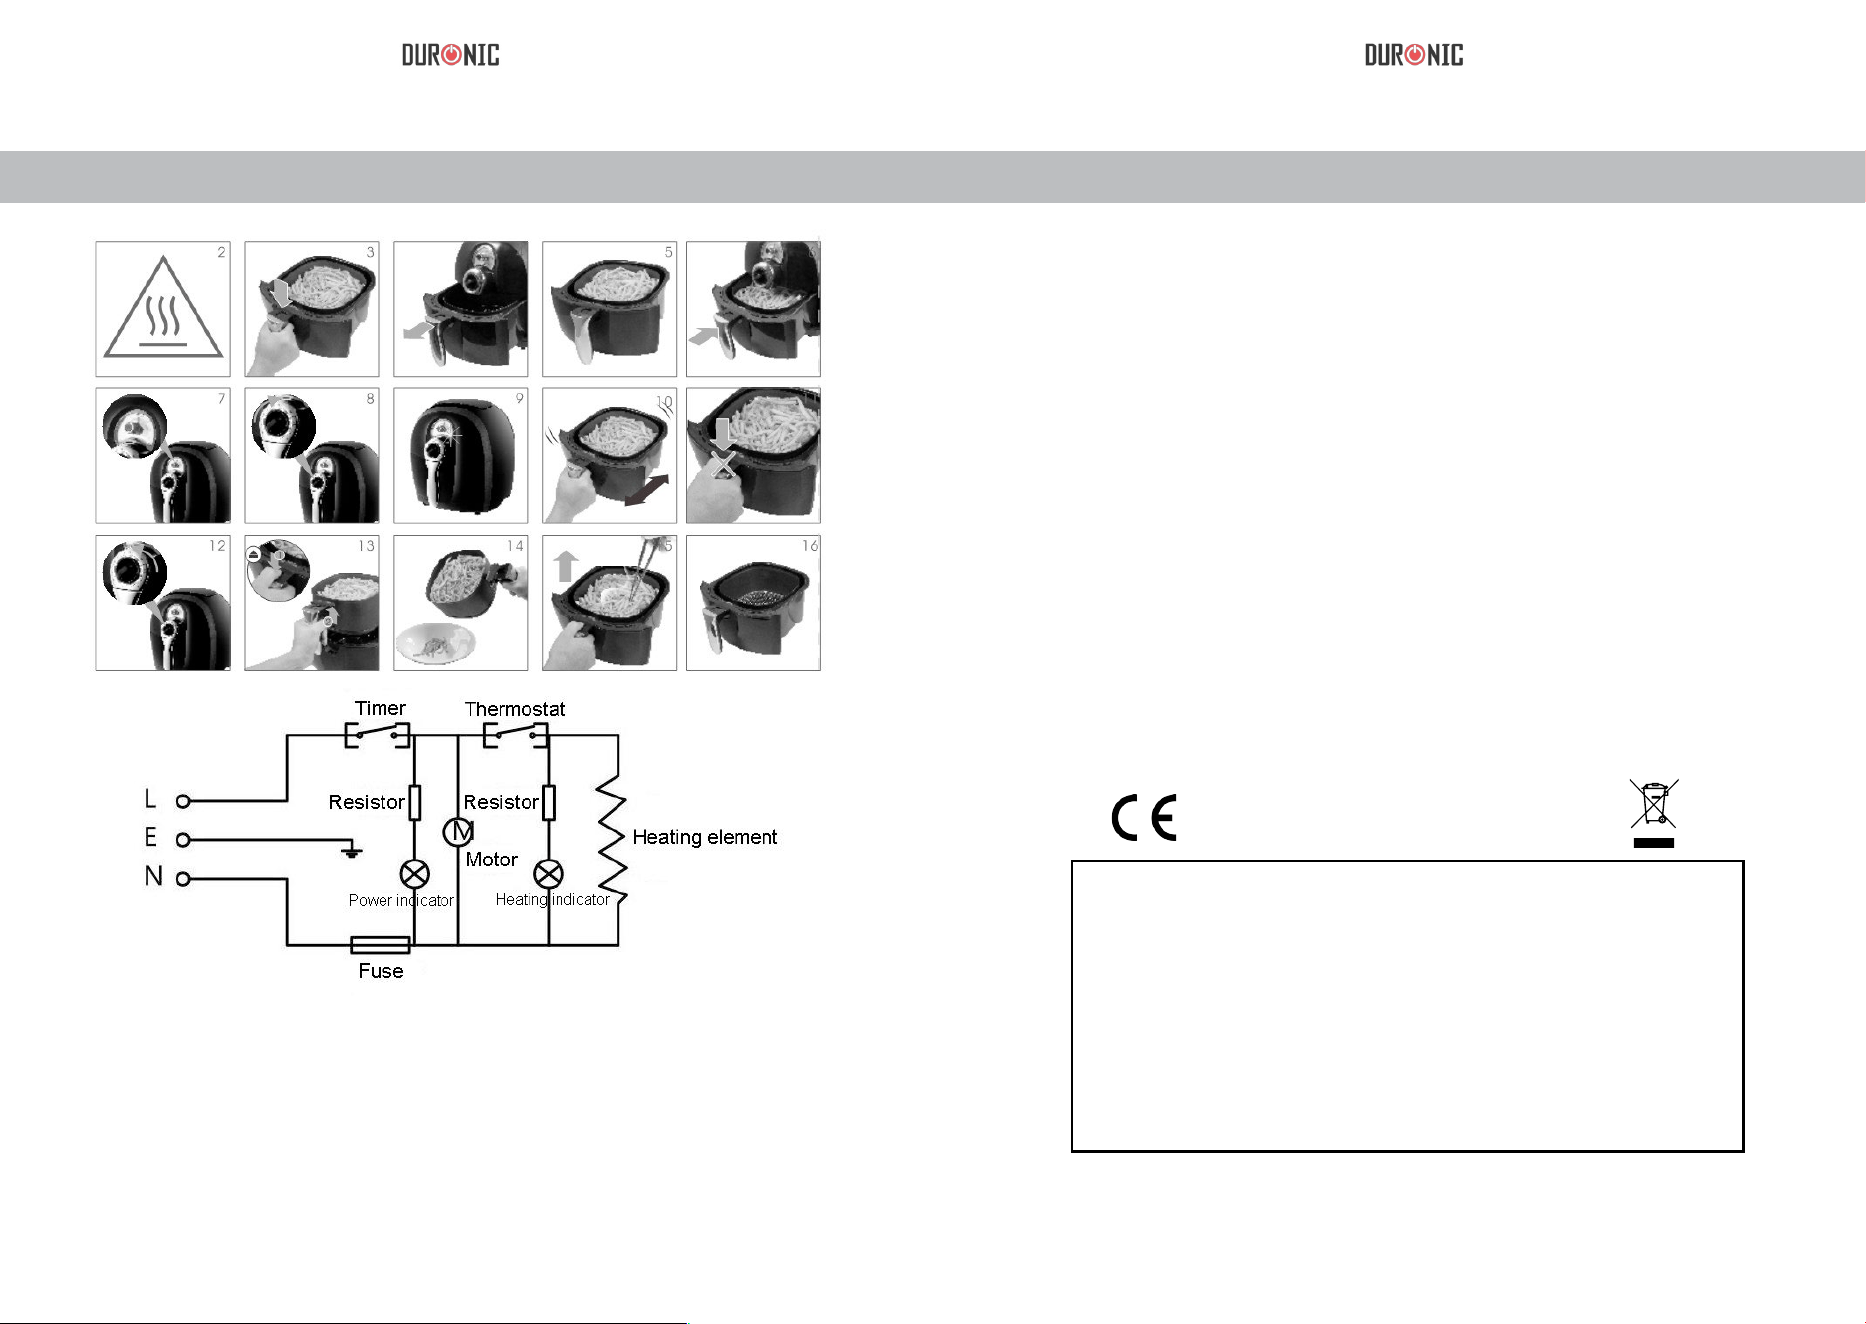
80 81
Questo segno su un prodotto o su documenti indica che quando deve essere
smaltito, deve essere trattato come i riuti elettrici ed elettronici (WEEE)
Tutti I prodotti marcati WEEE non devono essere buttati nei riuti domenistici
generici, ma separati per il trattamento, il recupero e il riciclaggio dei materiali
utilizzati.
Per un corretto trattamento, recupero e riciclaggio; si prega di portare tutti I
prodotti marcati WEEE al Vostro centro smaltimenti riuti autorizzato, dove
saranno accettati gratuitamente.
Se i consumatori sono propensi allo smaltimento corretto di riuti elettrici ed
elettronici, aiuteranno a salvare risorse importanti e a prevenire i potenziali effetti
negativi sulla salute umana e sull’ambiente di tutti i materiali pericolosi che i
riuti possono contenere.
Image Figures G a r a n z i a e s e r v i z i
Questo prodotto è garantito per una durata determinata con il distributore a partire dalla data di
acquisto contro ogni difetto derivante da difetti di fabbricazione o dei materiali. Questa garanzia non
copre difetti o danni derivanti da installazione impropria, uso improprio o usura anomala del prodotto.
L’apparecchio deve essere restituito nella sua confezione originale e accompagnato dalla ricevuta
e deve essere stato utilizzato in modo corretto. È importante rispettare le istruzioni per l’uso e le
precauzioni di sicurezza indicate di seguito. Inoltre, non possiamo garantire l’apparecchio se è stato
modicato o riparato dall’acquirente o da terzi.
1 anno di garanzia da Shine-Mart Ltd, proprietari del marchio commerciale Duronic.
NOTA: QUESTE DICHIARAZIONI NON INFLUISCONO SUI DIRITTI LEGALI DEL CONSUMATORE
Questo prodotto è stato realizzato con le rigorose procedure del controllo qualità, e utilizzando
materiali di altissima qualità, per garantire afdabilità e prestazioni eccellenti. Vi regalerà un servizio
ottimo e a lungo termine, purchè venga opportunamente usata e mantenuta.
Il prodotto è garantito per 1 anno dalla data di acquisto. Se sorge qualche difetto a causa di materiali
difettosi o scarsa manodopera, il prodotto difettoso dovrà essere restituito al luogo originale di
acquisto. Il rimborso o la sostituzione sono a discrezione dell’azienda.
I prodotti Duronic offrono 1 anno di garanzia alle seguenti condizioni:
1. Il prodotto deve essere restituito al rivenditore con la prova d’acquisto originale
2. Il prodotto deve essere installato e usato seguendo le istruzioni contenute nel manuale.
3. Il prodotto va utilizzato solo per scopi domestici. Non è da utilizzarsi per uso commerciale.
4. La garanzia non copre usura, danni volontari, abuso, negligenza, riparazioni inesperte o
consumo dei materiali.
5. Shine-Mart Ltd non è responsabile per Danni accidentali o consequenziali.
6. Shine-Mart Ltd non è tenuta a eseguire qualsiasi tipo di riparazione, ai sensi della garanzia.
7. Termini validi in tutta l’unione europea
*Ci riserviamo il diritto di modicare le sopracitate condizioni
Per parti di ricambio si prega di consultare il sito www.duronic.com
Corretto smaltimento del prodotto
CONSERVARE QUESTE ISTRUZIONI
QUESTO PRODOTTO E’ SOLO PER USO DOMESTICO!
Qusto prodotto è inclusivo di spina certicata BS
importata da Shine-Mart Ltd, RM3 8SB

82 83
Instrukcja Obsługi. Polski
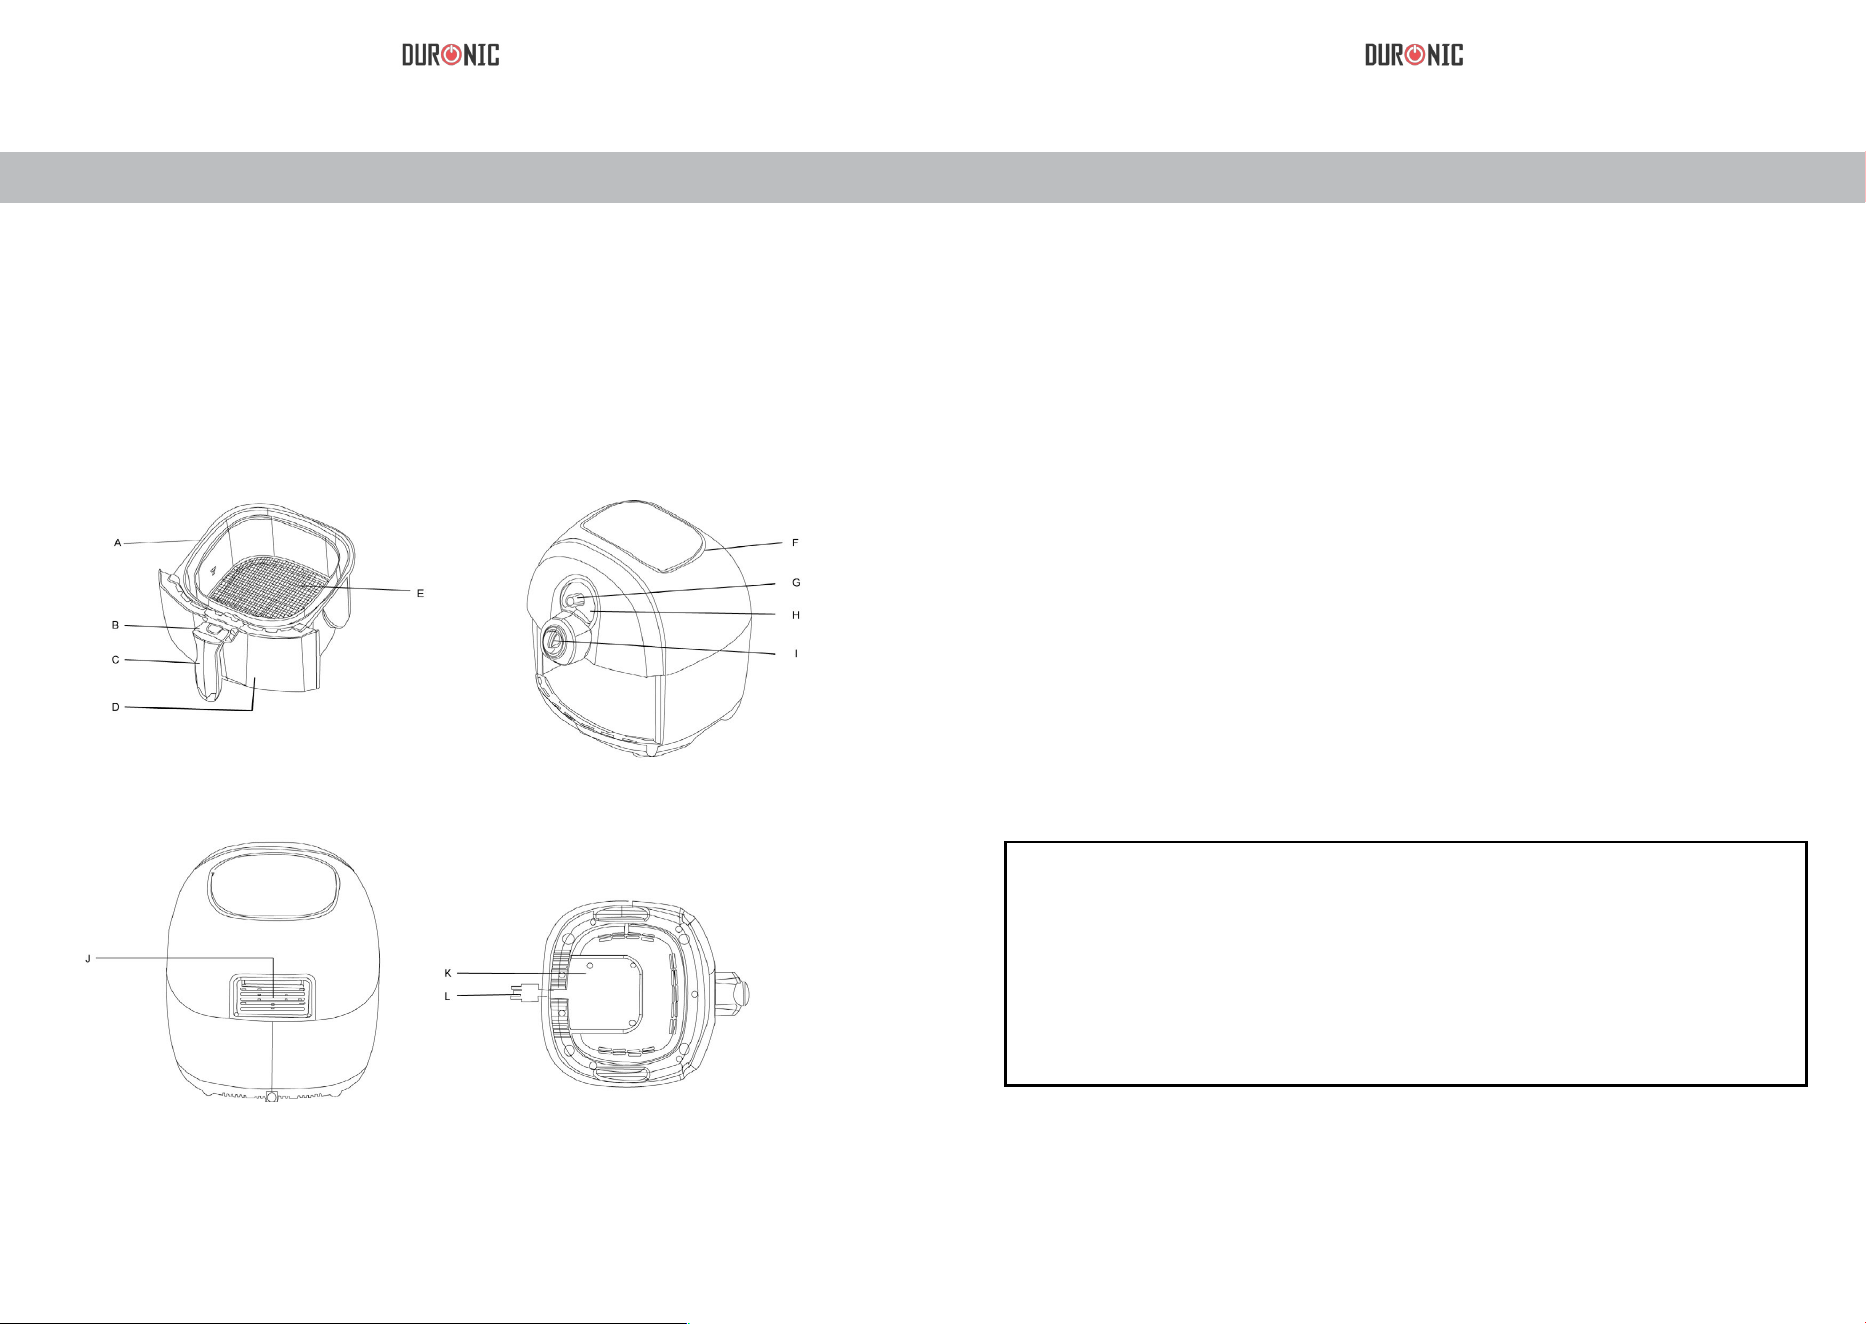
84 85
Wprowadzenie
Elementy urządzenia (Rys.1)
Frytownica wykorzystuje cyrkulację nagrzanego powietrza oraz górną płytę
grzejną do przygotowania posiłków w szybki, prosty, a przede wszystkim -
zdrowy sposób. Potrawy są podgrzewane jednocześnie z każdej strony.
Nie zachodzi potrzeba dodawania oleju do większości składników.
Dodatkowa podstawka do pieczenia sprawia, że możesz swobodnie
przygotowywać ciasta, opiekać kurczaki i kruche potrawy.
A
B
C
D
E
F
G
H
I
J
K
L
Kosz do smażenia
Przycisk zwalniający kosz
Uchwyt kosza do smażenia
Misa do smażenia
Sitko
Wlot powietrza
Pokrętło kontroli temperatury
Czujnik temperatury
Pokrętło włącznika / czasomierz
Wylot powietrza
Przechowywanie kabla Przewód
zasilający
Żaroodporna mata została dołączona do urządzenia w celu
zabezpieczenia kosza podczas wyciągania z urządzenia.
Uwaga:
Przed użyciem uważnie zapoznaj się z instrukcją
obsługi. Zachowaj ten dokument do wglądu.

86 87
-Nigdy nie zanurzać urządzenia w wodzie lub nie czyścić pod bieżącą
wodą. Produkt zawiera elektroniczne i grzewcze elementy
-Aby zapobiec porażeniu prądem nie pozwól wodzie lub innym płynom
dostać się do urządzenia.
-Zawsze umieszczaj składniki w koszu do smażenia, aby zapobiec
kontaktowi z nagrzewającymi się elementami.
-Nie zakrywaj wylotu powietrza podczas pracy urządzenia.
-Nie wypełniaj misy do smażenia olejem. Może to spowodować
ryzyko pożaru.
-
Nie dotykaj wnętrza urządzenia, w czasie jego pracy.
-Przed podłączeniem urządzenia sprawdź napięcie urządzenia i napięcie
zasilania w Twoim kraju.
- Nie używaj urządzenia, gdy przewód zasilający jest uszkodzony
- Jeżeli przewód jest uszkodzony musi zostać wymieniony przez
wykwalifikowanego elektryka, aby uniknąć ryzyka porażenia prądem.
-Urządzenie może być użytkowane przez dzieci powyżej 8 roku życia oraz
osoby o ograniczonych zdolnościach fizycznych, sensorycznych lub
umysłowych, lub braku doświadczenia i wiedzy, o ile otrzymali oni nadzór
lub instrukcję dotyczące użytkowania urządzenia przez osobę
odpowiedzialną za ich bezpieczeństwo.
-
Dzieci powinny znajdować się pod stałym nadzorem, aby nie bawiły
się urządzeniem.
-
Urządzenie oraz przewód zasilający powinien znajdować się
poza zasięgiem dzieci podczas pracy lub schładzania urządzenia.
-
Trzymaj przewód zasilający z dala od gorących powierzchni oraz
wysokiej temperatury.
-
Nie operuj wtyczką oraz panelem kontrolnym mokrymi rękami.
Zagrożenia
Autowyłączanie
Ostrzeżenia
Uwagi
-Upewnij się, czy wtyczka jest prawidłowo zamontowana do
gniazdka elektrycznego.
-Nie operuj urządzenia przy pomocy zewnętrznego timera.
-Nie umieszczaj urządzenia na lub w pobliżu łatwopalnych materiałów
jak zasłony, obrusy, ścierki.
-nigdy nie umieszczaj urządzenia naprzeciwko ściany lub inych urządzeń.
Zachowaj przynajmniej 10 cm wolnej przestrzeni z każdej strony. Nigdy
nie umieszczaj żadnego przedmiotu na górze urządzenia.
- Nigdy nie używaj urządzenia w innym celu niż jest to zaznaczone w
instrukcji.
-
Urządzenie może musi być użytkowane z rozsądkiem.
- Para gorącego powietrza będzie emitowana poprzez wentylatory podczas
pracy urządzenia. Zachowaj bezpieczny dystans i szczególną ostrożność
podczas wydobywania się gorącej pary i podczas wyjmowania kosza.
-
Powierzchnia urządzenia mocno się nagrzewa podczas pracy. (Rys. 2) -
Natychmiast wyłącz lub odłącz urządzenie od zasilania, jeżeli pojawia się
dym. Przed przystąpieniem do usuwania misy do smażenia odczekaj, aż
dym przestanie się ulatniać.
-Umieść urządzenie horyzontalnie, na stabilnej powierzchni.
-Jeżeli urządzenie ulegnie uszkodzeniu nie naprawiaj go na własną rękę.
Należy je zwrócić lub oddać do autoryzowanego serwisu. Nie przestrzeganie
tej zasady może skutkować utratą gwarancji.
- Odłącz urządzenie od zasilania, gdy go nie używasz.
-Pozwól urządzeniu schłodzić się przez ok. 30 min przed przystąpieniem
do czyszczenia.
- Przestrzegaj czasów gotowania.
Urządzenie jest wyposażone w programator. Jeżeli czas osiągnie poziom
0, wtedy urządzenie emituje sygnał dźwiękowy i automatycznie wyłącza
się. Jeżeli wyłączasz urządzenie automatycznie upewnij się, że pokrętło
czasomierza jest ustawione na 0.

88 89
Pole elektromagnetyczne (EMF)
Instrukcja użytkowania
Instrukcja użytkowania
Produkt jest zgodny ze standardami pola magnetycznego (EMF).
W przypadku użytkowania zgodnie z instrukcją obsługi jest całkowicie
bezpieczny.
Frytownica może służyć do przygotowywania kilku składników
jednocześnie. Załączone przepisy pomogą w zrozumieniu zasady
działania produktu i jego przeznaczenia. Zapoznaj się z z rysunkiem
prezentującym elementy urządzenia, aby lepiej zrozumieć instrukcję.
1 Umieść wtyczkę urządzenia w kontakcie.
2 Ostrożnie wyciągnij misę do smażenia z urządzenia. (rys. 4)
3 Umieść składniki w koszu do smażenia. (Rys. 5)
Uwaga: Nie umieszczaj składników powyżej linii MAX lub powyżej
zalecanej ilości zaznaczonej w tabeli (rozdział: Ustawienia), ponieważ
może to mieć wpływ na rezultat gotowania.
4 Wsuń kosz do smażenia do frytownicy. (
Rys. 6)
Nigdy nie używaj urządzenia bez kosza do smażenia.
Uwaga: Nie dotykaj urządzenia podczas pracy, ponieważ jest
bardzo gorące. Użyj uchwytów do operowania urządzeniem.
5 Określ czas potrzebny do przygotowania składników. W tym celu
zapoznaj się z rozdziałem "Ustawienia", aby zastosować właściwe
parametry.
6 Zapoznaj się z właściwym czasem przygotowania potrawy.
(
rozdział Ustawienia) (rys. 7)
7 Przy pomocy pokrętła ustawy właściwy czas pracy. (
rys. 8)
Jeżeli urządzenie jest zimne, czas gotowania powinien
być wydłużony o 3 min.
Uwaga: Możesz także wstępnie podgrzać urządzenie przed umieszczeniem
składników, poprzez ustawienie czasomierza na 3 min. Po upływie czasu
podgrzewania umieść składniki w koszu i ustaw właściwy czas i
temperaturę gotowania.
·
W tym czasie wskaźnik pracy urządzenia oraz nagrzewania będzie
włączony.(rys.9).
·
pokrętło czasomierza będzie się zmniejszać zgodnie z upływającym czasem.
·
Urządzenie jest aktywne, a wskaźnik temperatury włącza się i wyłącza w czasie
pracy. Związane jest to z nagrzewaniem lub ochładzaniem się urządzenia w
celu utrzymania wlaścicej temperatury.
·
Nadmiar oleju jest gromadzony na dole misy do smażenia.
1 Usuń całość opakowania.
2 Usuń naklejki ochronne oraz metki z opakowania.
3 Przy pomocy gorącej wody, płynu do naczyń oraz gąbki umyj, kosz do
smażenia oraz misę.
Uwaga: Możesz użyć zmywarki do czyszczenia tych komponentów.
4 Przetrzyj urządzenie oraz wewnętrzne elementy przy pomocy wilgotnej
ściereczki.
Jest to beztłuszczowa frytownica. Nie wypełniaj kosza do smażenia olejem.
1 Umieść urządzenie na płaskiej, stabilnej powierzchni.
Umieszczaj urządzenie na żaroodpornej powierzchni.
2 Prawidłowo umieść kosz do smażenia w misie. (Rys. 3) Wyciągnij
przewód zasilający z pojemnika do przechowywania kabla,
znajdującego się na spodzie urządzenia.
Nie wypełniaj kosza do smażenia olejem lub innym płynem.
Nie umieszczaj żadnego przedmiotu na górze urządzenia, aby nie
zablokować przebiegu gorącego powietrza.
Przed pierwszym użyciem

90 91
8 Niektóre składniki wymagają w czasie procesu gotowania/ smażenia
przemieszania składników (patrz rozdział: Ustawienia). Wyciągnij kosz do
smażenia i energicznie nim wstrząśnij, a następnie włóż spowrotem do
frytownicy. (rys.10)
Uwaga: Nie naciskaj przycisku zwalniającego kosz to smażenia (rys. 11)
podczas wstrząsania składnikami na sitku.
Rada: Możesz usunąć kosz do smażenia z misy oraz wstrząsnąć sitkiem,
aby zredukować wagę. Wyciągnij misę do smażenia i umieść na
żaroodpornej powierzchni, a następnie wciśnij przycisk zwolnienia kosza.
Rada: Możesz ustawić czasomierz na połowę wymaganego czasu
gotowania i przemieszać składniki po jego upłynięciu. Ponownie umieść
misę w urządzeniu i nastaw na pozostały czas wymagany do ugotowania
składników.
9 Sygnał dźwiękowy oznacza, że ustawiony czas gotowania dobiegł końca.
Wyciągnij misę z przygotowaną potrawą i umieść na żaroodpornej
powierzchni.
Uwaga: Możesz także manualnie wyłączyć urządzenie, przekręcają pokrętło
czasomierza do pozycji 0 (rys. 12).
10 Sprawdź, czy składniki są właściwie ugotowane.
Jeżeli w dalszym ciągu potrzebują ugotowania, ponownie włóż misę
do smażenia i ustaw temperaturę i czasomierz na kilka minut.
11 W celu wyciągnięcia małych składników (jak np. frytki) wciśnij przycisk
zwolnienia kosza do smażenia (1) i odłącz od misy (2). rys. 13.
Nie próbuj odwracać kosza do smażenia razem z misą. Może to
spowodować wyciek tłuszczu, jaki został zgromadzony w misie i wylanie go
na potrawę.
Po zakończeniu smażenia, kosz i gotowane produkty pozostają gorące. W
zależności od zastosowanych składników, gorące powietrze może się
uwalniać z misy do smażenia.
12 Opróżnij kosz do smażenia z gotowych produktów (rys.14). Rada:
W celu usunięcia dużych lub kruchych produktów możesz użyć
szpatułki. (rys.15)
13 Frytownicę możesz użyć od razu do przygotowania kolejnej potrawy
lub porcji produktu. (rys.16)
Poniższa tabela będzie pomocna przy dobieraniu podstawowych ustawień
dla poszczególnych składników.
Uwaga: Pamięta, że poniższe ustawienia są szacunkowe. Nie
gwarantujemy, że poniższe ustawienia będą najlepsze dla Twoich
składników. Produkty mogą różnić się źródłem, rozmiarem, kształtem oraz
marką.
Ponieważ wysokoobrotowa cyrkulacja powietrza cały czas podgrzewa
powietrze wewnątrz urządzenia, wyciąganie misy do smażenia podczas
jego pracy, praktycznie nie ma wpływu na proces gotowania.
- Minimalnie skróć czas gotowania w przypadku mniejszych składników.
- Minimalnie wydłuż czas gotowania dla większych składników.
- Wstrząśnij mniejszymi składnikami mniej więcej w połowie wymaganego
czasu gotowania. Zoptymalizuje to rezultat gotowania oraz zapewni
właściwy rezultat.
- Dodaj małą ilość oleju do smażenia świeżych ziemniaków na frytki
lub chipsy i smaż przez kilka minut.
-
Nie gotuj składników o wysokiej zawartości tłuszczu jak np.
kiełbasa. - Przekąski przeznaczone do przygotowania w piekarniku
mogą być przygotowane we frytownicy.
-
Aby przygotować chrupiące frytki, gotuj do 500 g tego produktu.
- Użyj gotowego ciasta, aby szybko i wygodnie przygotować przekąski. W
porównaniu z domowym ciastem, gotowe wymaga krótszego gotowania.
- Ustaw temperaturę do 150 ° C na maksymalnie 10 minut, aby podgrzać
składniki.
Ustawienia
Porady
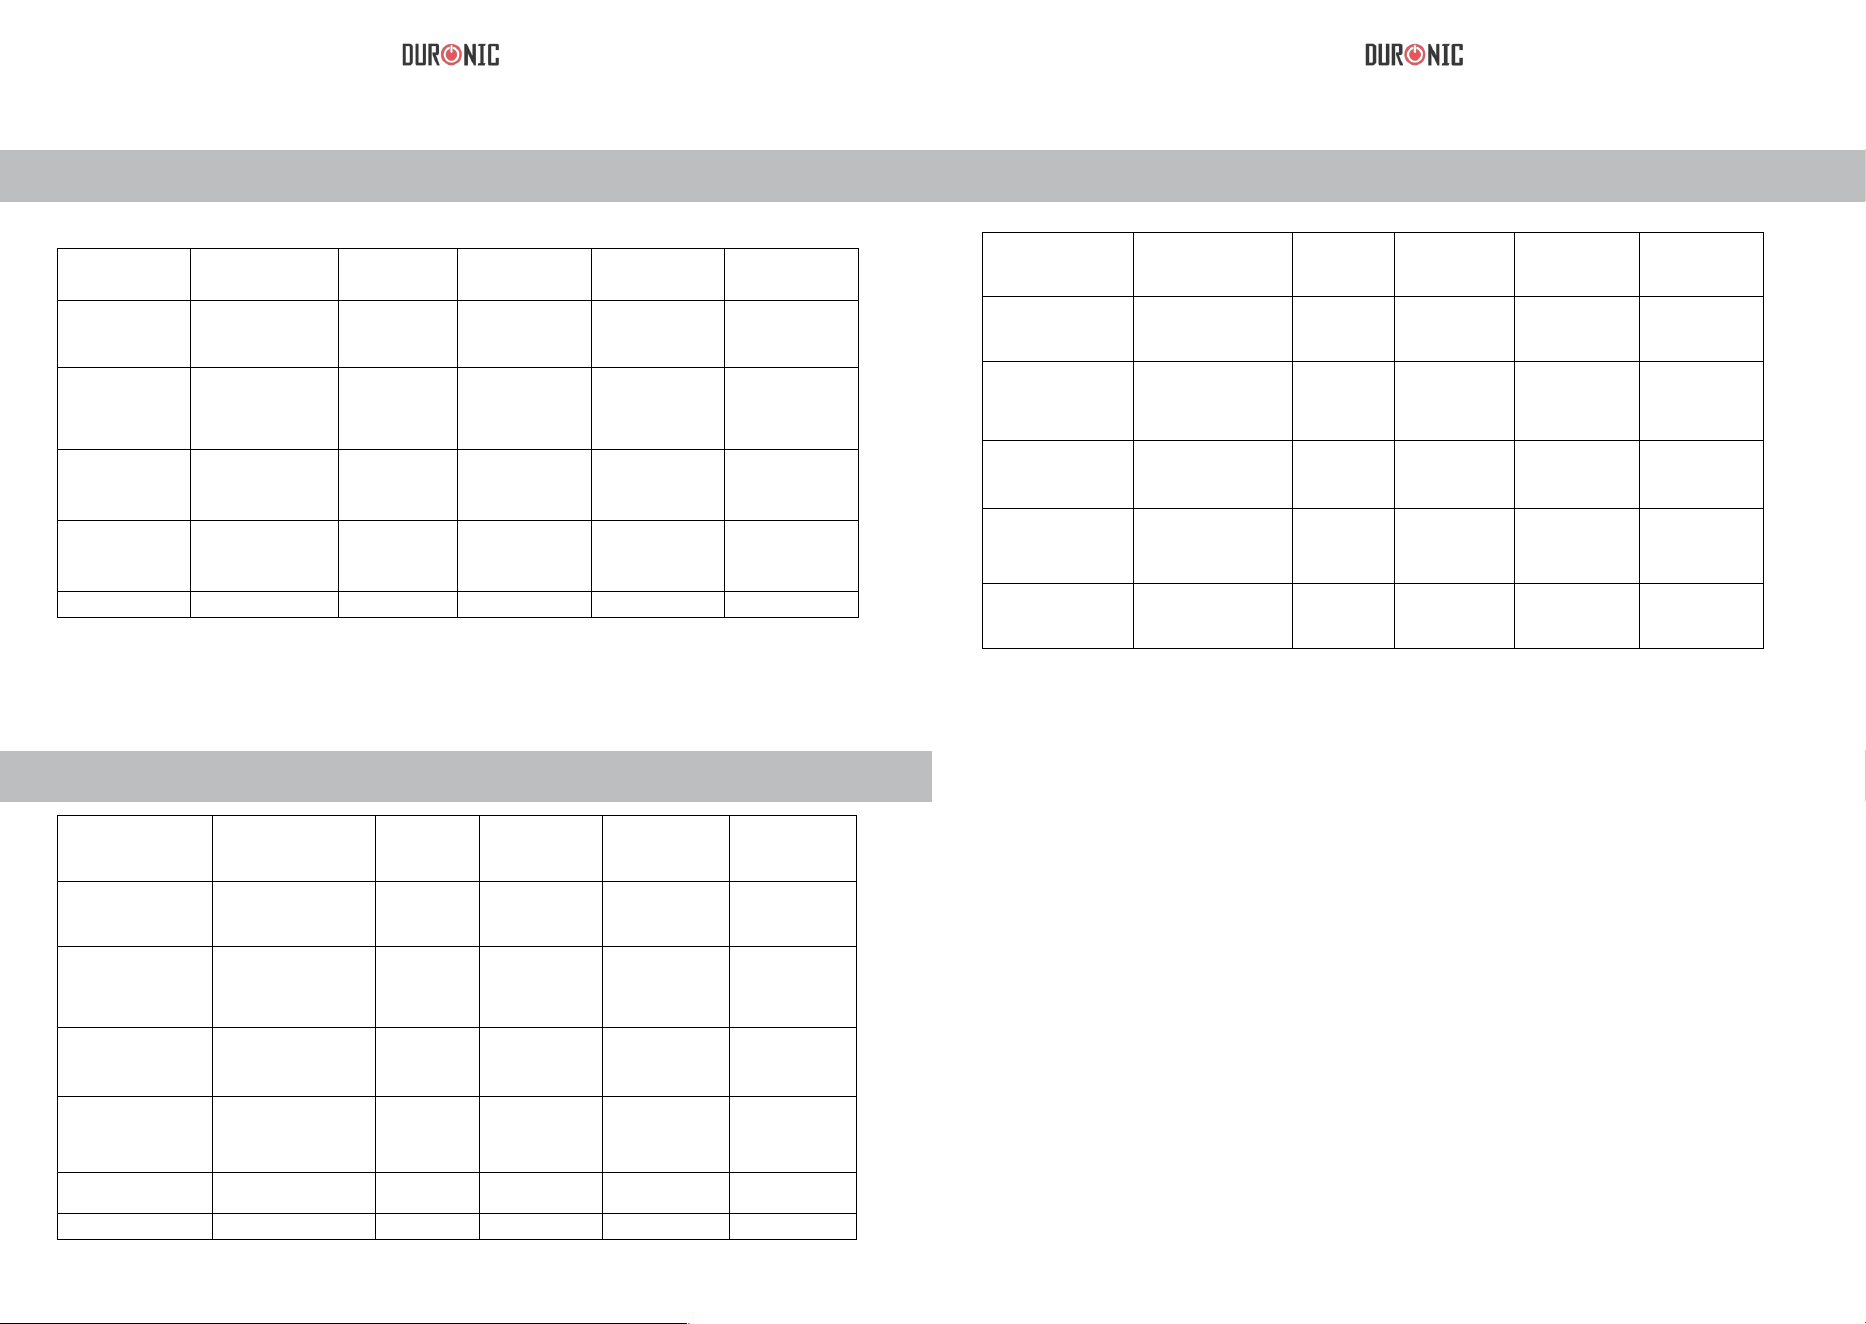
92 93
Przekąski
Mięso i podroby
Uwaga: Jeżeli urządzenie jest zimne, podgrzej je przez 3 min.
Domowe frytki:
Dla lepszego rezultatu sugerujemy, aby zastosować wstępne smażenie
(tak w przypadku zamrożonych frytek). Zastosuj poniższą instrukcję:
1. Obierz ziemniaki i pokrój na frytki.
2. Zamocz przygotowane ziemniaki w wodzie na 30 min., a następnie osusz
ręcznikiem.
3 Wymieszaj ziemniaki z ½ łyżeczki oliwy z oliwek.
4 Przenieś frytki na kosz do smażenia przy pomocy rąk lub
kuchennego cedzaka, tak aby nadmiar oleju pozostał w misie.
Uwaga: Nie umieszcza wszystkich frytek za jednym razem, aby uniknąć
nagromadzenia się nadmiaru oleju w misie do smażenia.
5 Smażyć przez 18 do 23 minut w 180° C. Potrząśnij koszem do smażenia
co 5 minut.
Ziemniaki i Frytki
Kategoria
Min. – maks.
składników [g]
Czas [min.]
Temperatura
[⁰C]
Wstrząsnąć
Dodatkowe
informacje
Zamrożone,
grube frytki
300 - 700 12 - 16 200 Tak
Zamrożone,
cienkie frytki
300 - 700 12 – 20 200 Tak
Domowe,
cienkie frytki
300 - 800
18 – 25
180 Tak
Dodać ½
łyżeczki oleju
Domowe,
grube frytki
300 - 750 18 - 22 180 Tak
Dodać ½
łyżeczki oleju
Ziemniaki 250 15 - 18 180
Kategoria
Min. – maks.
Składników [g]
Czas
[min.]
Temperatura
[⁰C]
Wstrząsnąć
Dodatkowe
informacje
Sajgonki 100 - 400 8 - 10 200 Tak
Użyj funkcji
piekarnika
Zamrożone
naggetsy
100 - 500 6 - 10 200 Tak
Użyj funkcji
piekarnika
Zamrożone
paluszki rybne
100 - 400 6 - 10 200
Użyj funkcji
piekarnika
Zamrożone
bułeczki serowe
100 - 400 8 - 10 200
Użyj funkcji
piekarnika
Nadziewane
warzywa
100 - 400 10 180
Kategoria
Min. – maks.
Składników [g]
Czas
[min.]
Temperatura
[⁰C]
Wstrząsnąć
Dodatkowe
informacje
Stek 100 - 500 8 - 12 180
kotlety
wieprzowe
100 - 500 10 - 14 180
Hamburgery 100 - 500 7 - 14 180
Kiełbaski 100 - 500 13 - 15 200
Szaszłyki 100 – 500 18 - 22 180
Pierś z kurczaka 100 – 500 10 - 15 180
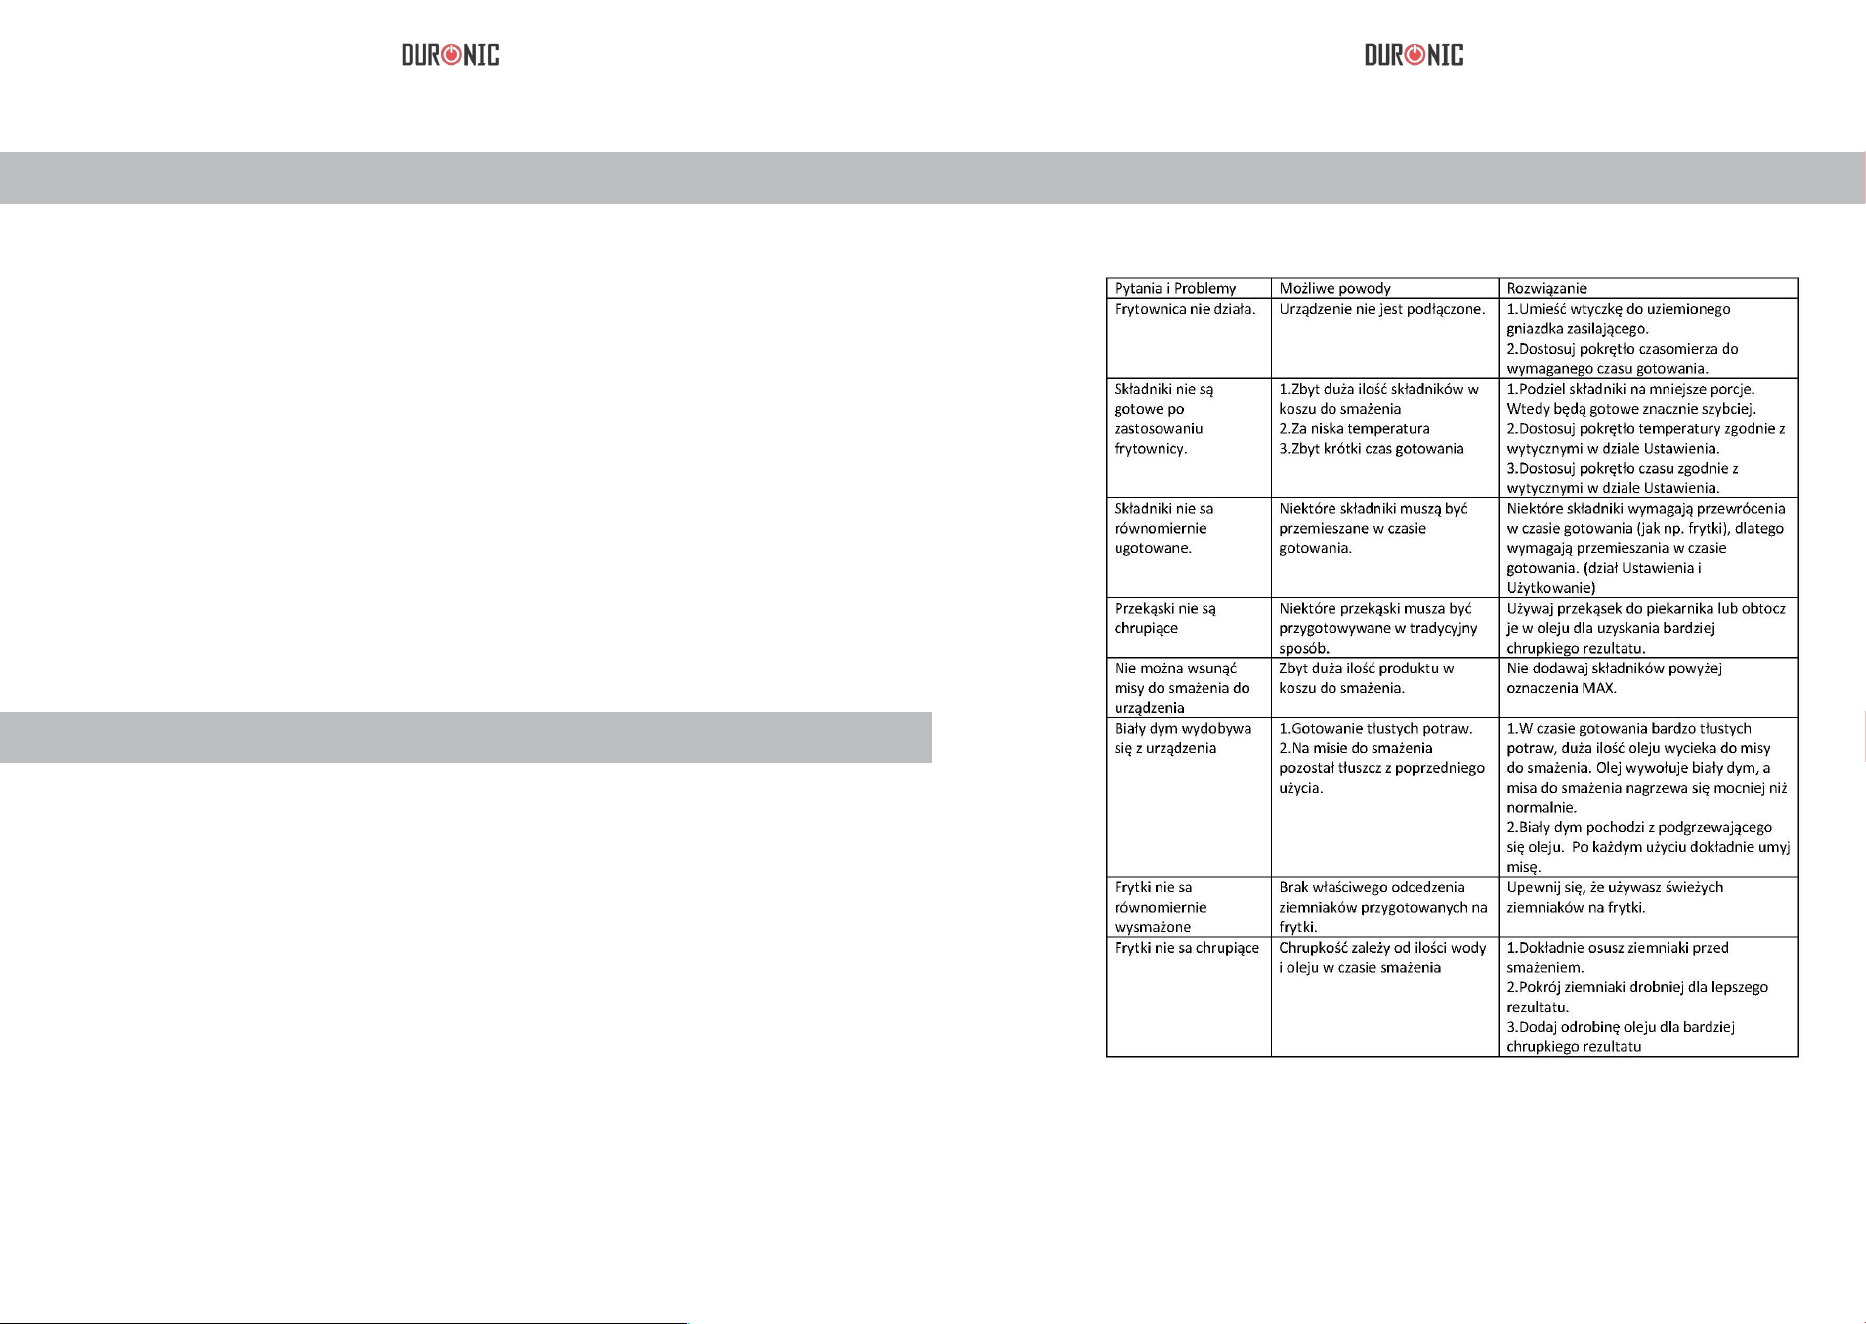
94 95
Mięso i podroby
Przechowy
wanie
Wyczyść urządzenie zaraz po użyciu. Odstaw do ochłodzenia na ok. 30
min. Kosz do smażenia, misa, tacka oraz wnętrze urządzenia wyłożone są
powierzchnia nieprzywierającą. Używanie metalowych akcesoriów
kuchennych lub druciarek do czyszczenia może uszkodzić nieprzywierająca
powierzchnię.
1 Odłącz urządzenie z kontaktu i pozostaw do ochłodzenia. Rada: wyjmij
kosz do smażenia, aby szybciej schłodzić urządzenie.
2 Wyczyść zewnętrzne części urządzenia przy pomocy mokrej ściereczki.
3 Użyj gorącej wody, płynu do naczyń
i gąbki, aby wyczyścić kosz i misę
do smażenia i odstaw do osuszenia.
4 Użyj gorącej wody i gąbki, aby wyczyścić
wewnętrzne części urządzenia.
5 Użyj szczotki do mycia, aby oczyścić elementy grzejne z resztek jedzenia.
1 Odłącz urządzenie od zasilania i pozostaw do całkowitego ochłodzenia.
2 Upewnij się, że wszystkie elementy są czyste i osuszone.
3 Umieść przewód zasilający w pojemniku do przechowywania
kabla. Zablokuj je, umieszczając wtyczkę w dopowiednim otworze.
Rozwiązywanie problemów
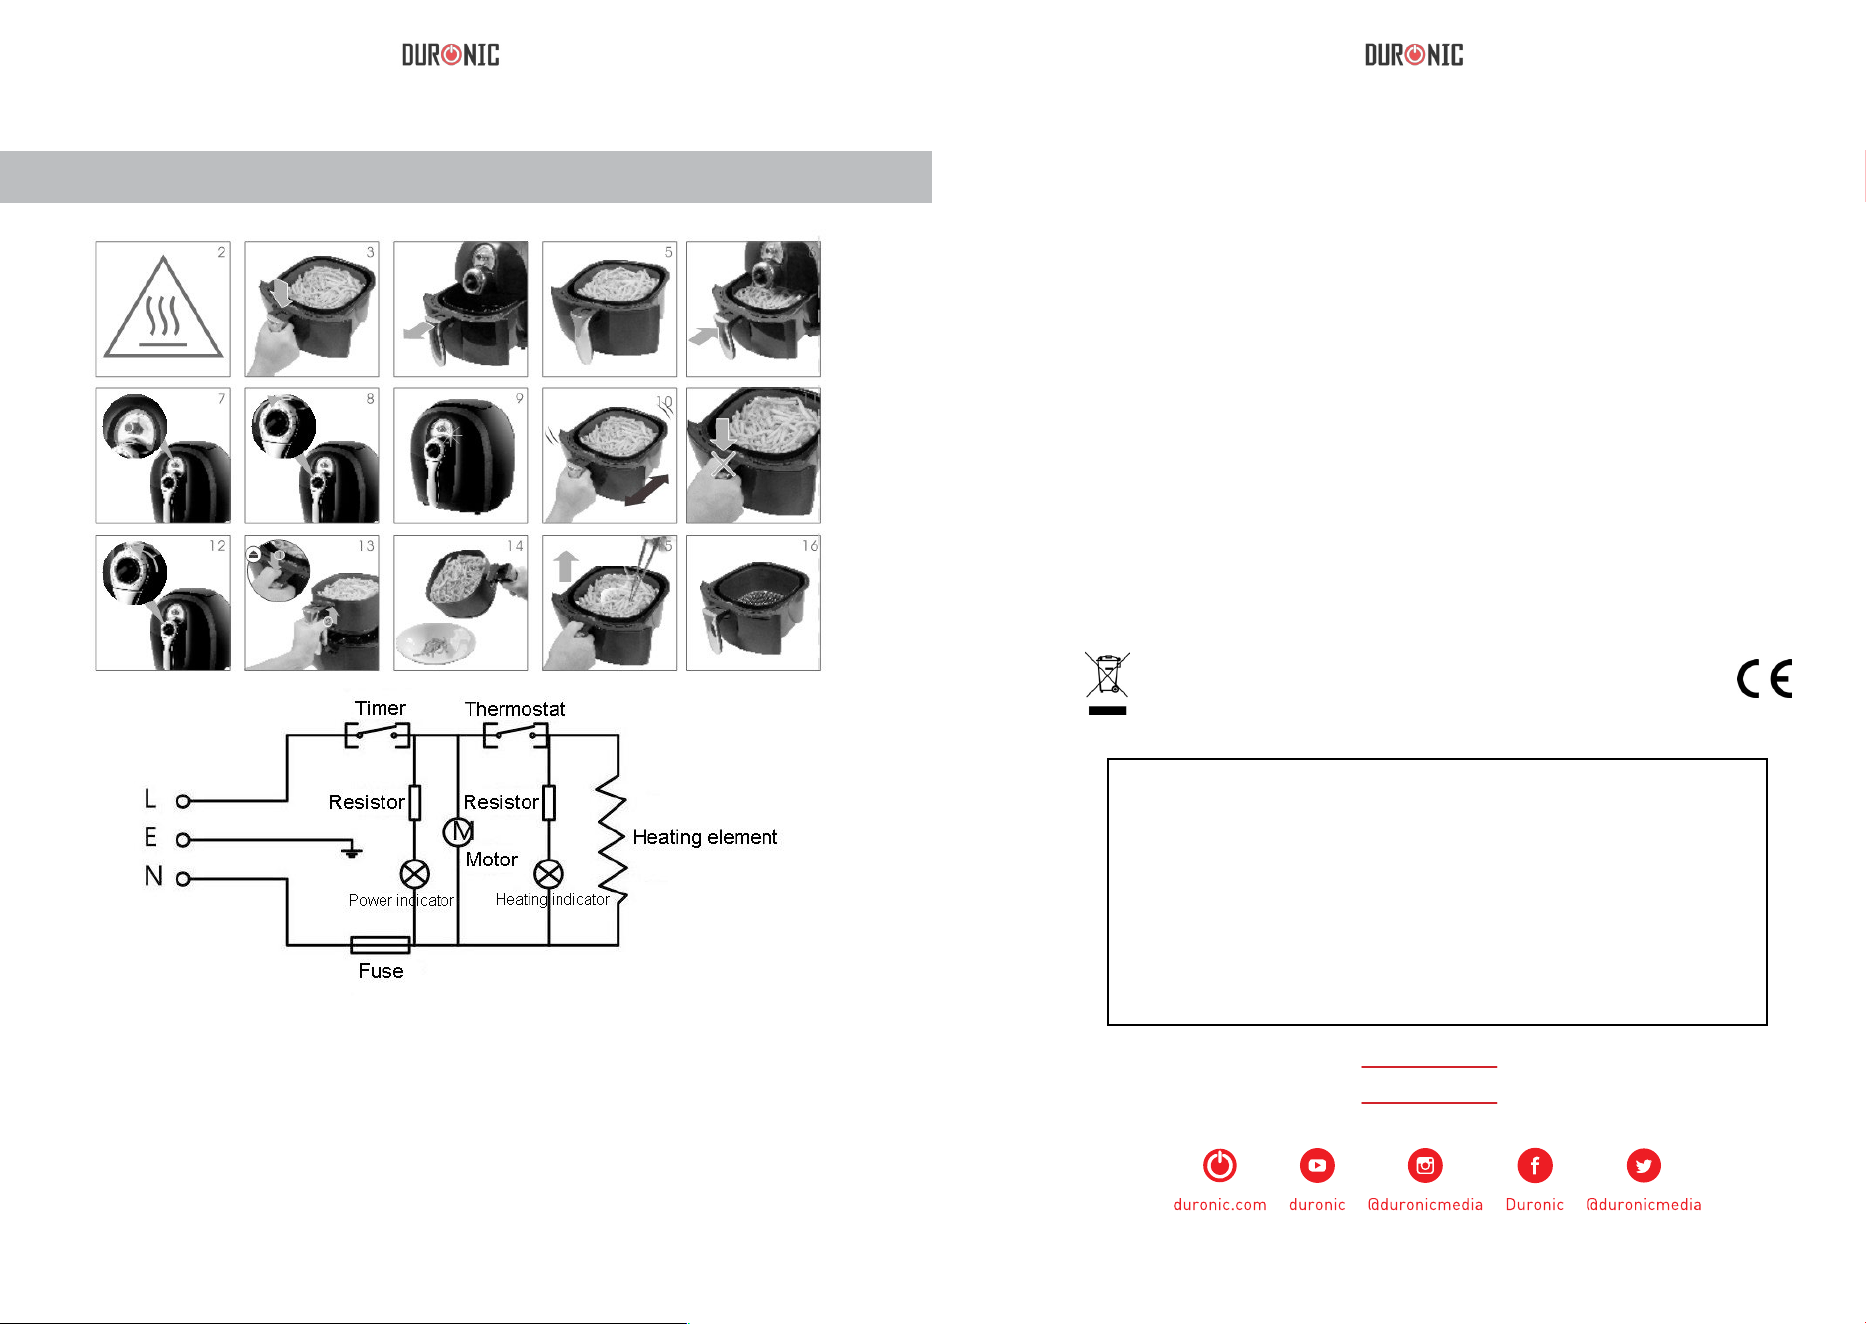
96 98
Zdjęcia i Rysunki
Warunki Gwarancji
1 Rok Gwarancji firmy Shine-Mart LTD, marki handlowej Duronic Products.
UWAGA: ten dokument nie wpływa na twoje ustawowe prawo jako konsumenta.
Ten produkt jest wyposażony we wbudowaną wtyczkę typu Euro-Plug / BS
z certyfikatem CE importowaną przez Shine-Mart Ltd, RM3 8SB
Informacja o odpadach i utylizacja dla użytkowników sprzętu elektrycznego i
elektronicznego.
Usuwanie wyeksploatowanych urządzeń elektrycznych i elektronicznych (dotyczy
krajów Unii Europejskiej i innych krajów europejskich z wydzielonymi systemami
zbierania odpadów). Ten symbol na produkcie lub jego opakowaniu oznacza, że
produkt nie powinien być zaliczany do odpadów domowych. Należy go przekazać
do odpowiedniego punktu, który zajmuje się zbieraniem i recyklingiem urządzeń
elektrycznych i elektronicznych. Prawidłowe usunięcie produktu zapobiegnie
potencjalnym negatywnym konsekwencjom dla środowiska naturalnego i zdrowia
ludzkiego, których przyczyną mogłoby być niewłaściwe usuwanie produktu.
Recykling materiałów pomaga w zachowaniu surowców naturalnych.
Ten produkt został wykonany zgodnie z restrykcyjnymi normami kontroli i wykorzystuje
najwyższej jakości materiały dla uzyskania doskonałej wydajności i niezawodności.
Długotrwałość produkty zostaje osiągnięta przez właściwe użytkowanie i konserwację.
Gwarancja obejmuje 1 rok od daty zamówienia. Jeżeli jakikolwiek defekt powstanie ze
względu na wadliwość materiału lub niewłaściwe wykonanie to uszkodzony produkt musi
zostać dostarczony do miejsca, z którego został z
amówiony. Zwrot pieniędzy lub wymiana
produktu jest w gestii firmy.
Duronic Products oferuje jeden rok gwarancji na podstawie poniższych warunków:
1. Produkt musi zostać zwrócony do sprzedawcy z oryginalnym dowodem zakupu.
2. Produkt był instalowany i użytkowany zgodnie z instrukcją obsługi.
3. Produkt użytkowany był wyłącznie w celach domowych.
4. Gwarancja nie obejmuje naturalnego zużycia się produktu, celowego uszkodzenia,
niewłaściwego użycia, zaniedbania, niewłaściwych napraw lub części eksploatacyjnych.
5. Shine-Mart Ltd. nie ponosi odpowiedzialności za przypadkowe albo celowe zgubienie
produktu lub jego uszkodzenie.
6. Firma Shine-Mart Ltd nie jest zobowiązana do przeprowadzania jakichkolwiek prac
serwisowych w ramach gwarancji.
7. Obowiązuje na obszarze Unii Europejskiej.
Śledź Nas
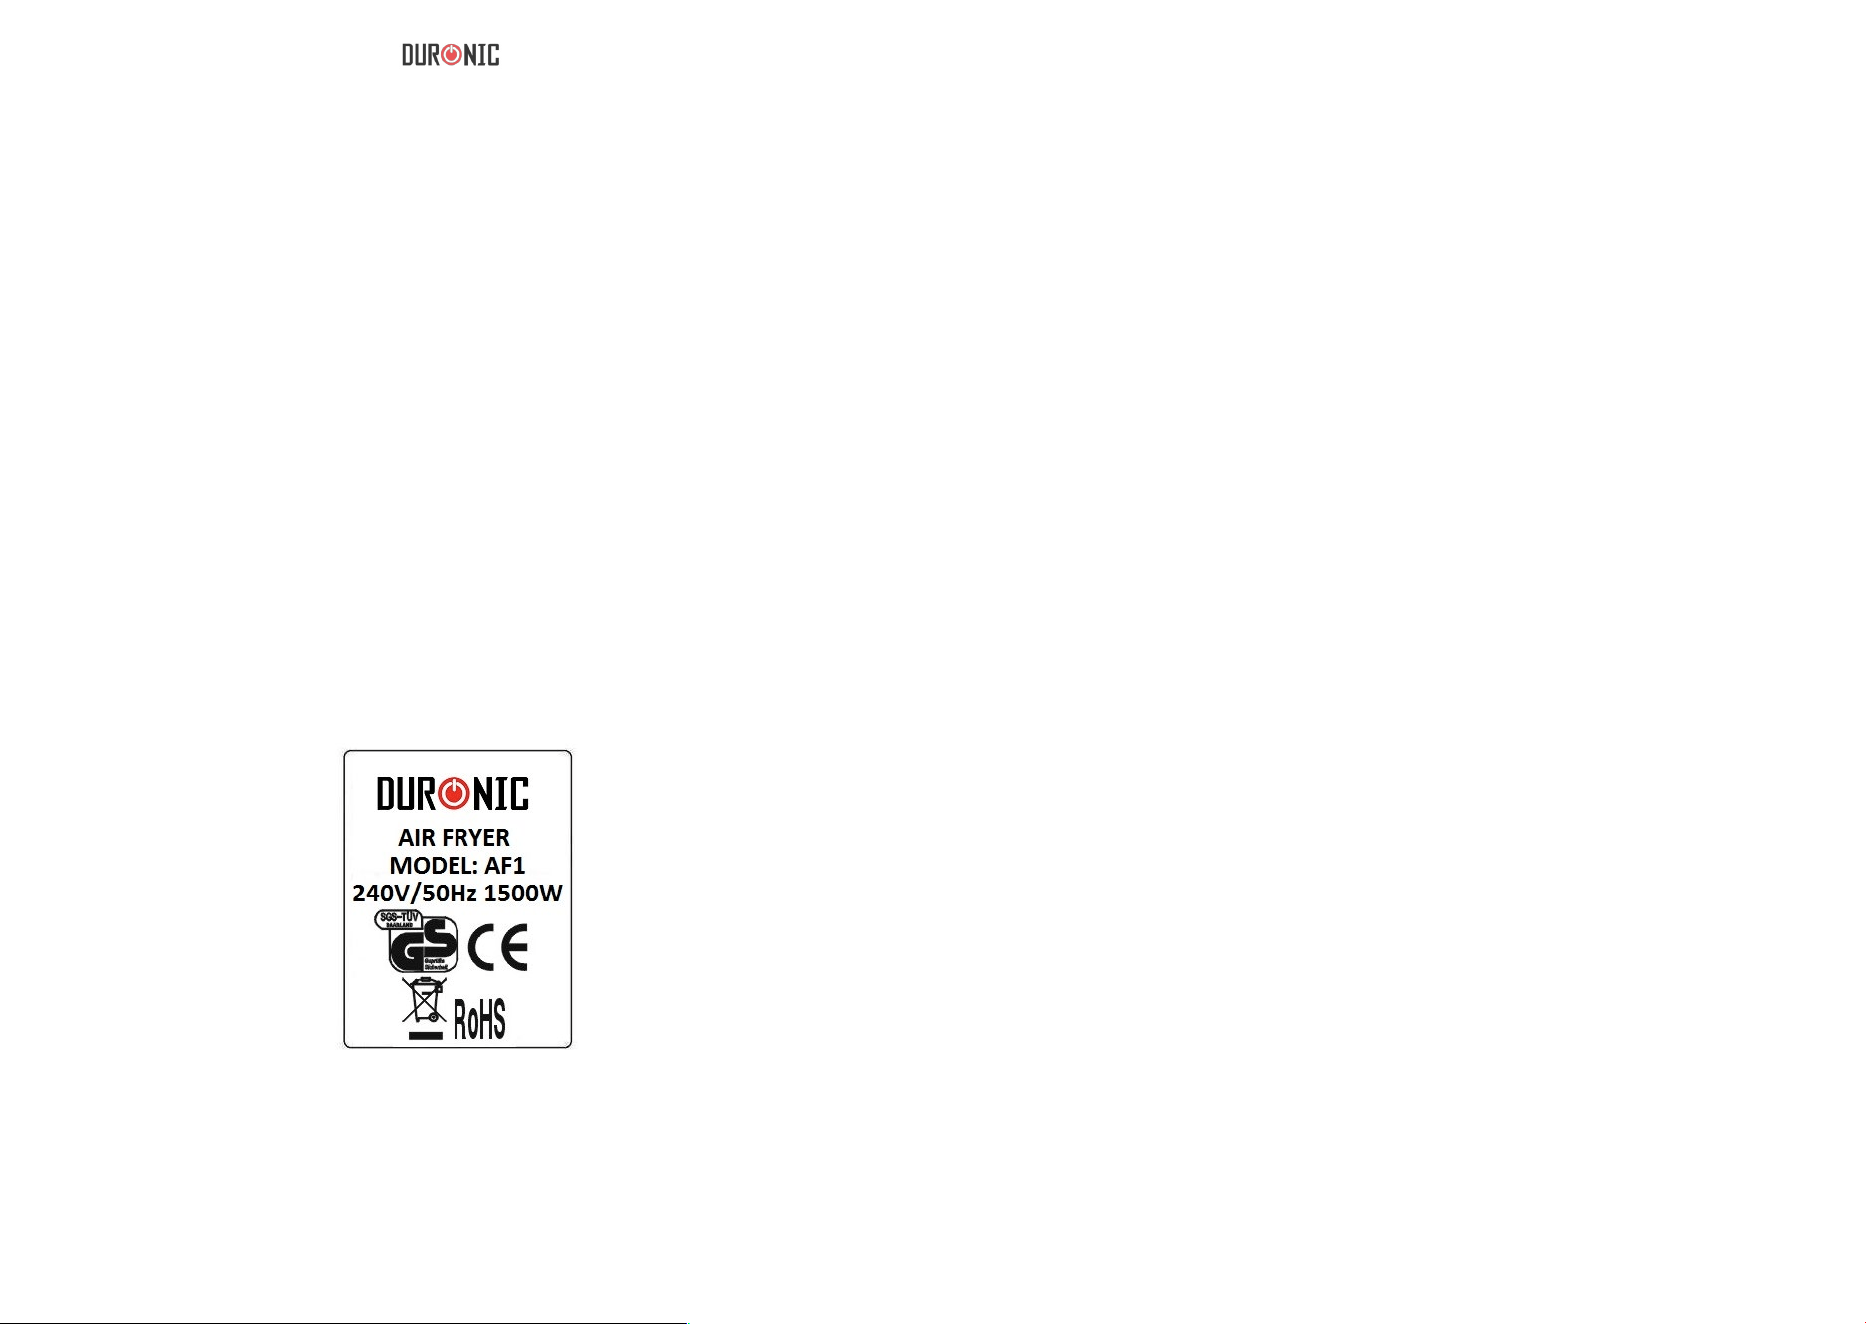
82