Scan to register
bellakitchenware.com
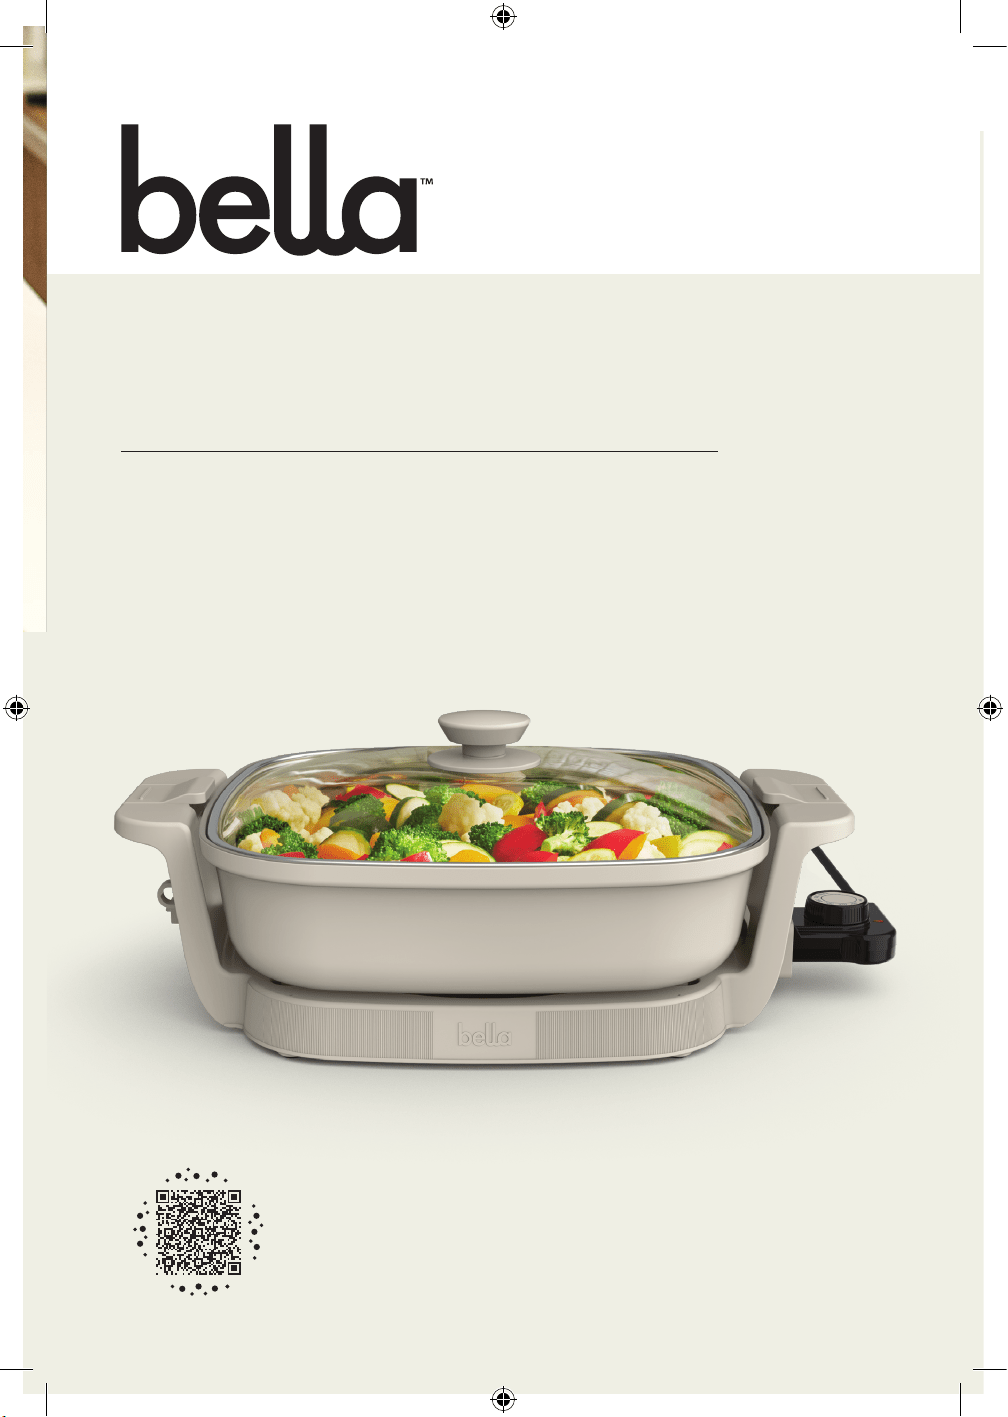
Make & Take
Electric Skillet
Instruction Manual and Recipe Guide
Sartén Eléctrico
Make & Take
Manual de instrucciones y guía de recetas
35256_35257_35258_35259_35260_Bella_MultiUSA_Make and Take_Skillet_IM_R1.indd 135256_35257_35258_35259_35260_Bella_MultiUSA_Make and Take_Skillet_IM_R1.indd 1 2024-11-07 12:51 PM2024-11-07 12:51 PM

35256_35257_35258_35259_35260_Bella_MultiUSA_Make and Take_Skillet_IM_R1.indd 235256_35257_35258_35259_35260_Bella_MultiUSA_Make and Take_Skillet_IM_R1.indd 2 2024-11-07 12:51 PM2024-11-07 12:51 PM

1
TABLE OF CONTENTS
IMPORTANT SAFEGUARDS ................................................................................................................................................... 2
ADDITIONAL IMPORTANT SAFEGUARDS .................................................................................................................. 2-3
NOTES ON THE PLUG ............................................................................................................................................................ 3
NOTES ON THE CORD........................................................................................................................................................... 3
PLASTICIZER WARNING ....................................................................................................................................................... 3
ELECTRIC POWER .................................................................................................................................................................... 3
GETTING TO KNOW YOUR ELECTRIC SKILLET ............................................................................................................. 4
TEMPERATURE CONTROL PROBE ...................................................................................................................................... 4
BEFORE USING FOR THE FIRST TIME ............................................................................................................................... 4
USING YOUR ELECTRIC SKILLET .................................................................................................................................... 4-5
COOKING METHODS ........................................................................................................................................................ 5-6
COOKING TEMPERATURE TIMETABLE ......................................................................................................................... 6-7
USER MAINTENANCE INSTRUCTIONS .......................................................................................................................... 7
CARE AND CLEANING INSTRUCTIONS .......................................................................................................................... 7
STEPS FOR STAIN REMOVAL AND PROPER CARE OF YOUR CERAMIC NON-STICK COATING ................. 7
STORING INSTRUCTIONS .....................................................................................................................................................8
WARRANTY ................................................................................................................................................................................ 9
ÍNDICE
PRECAUCIONES IMPORTANTES ......................................................................................................................................10
PRECAUCIONES ADICIONALES IMPORTANTES ..........................................................................................................11
NOTAS SOBRE EL ENCHUFE ................................................................................................................................................11
NOTAS SOBRE EL CABLE .......................................................................................................................................................11
ADVERTENCIA SOBRE PLASTIFICANTES ................................................................................................................. 11-12
ENERGÍA ELÉCTRICA ............................................................................................................................................................12
CONOZCA SU SARTÉN ELÉCTRICA ..................................................................................................................................12
SONDAS DE CONTROL DE TEMPERATURA .................................................................................................................. 12
ANTES DE USAR EL PRODUCTO POR PRIMERA VEZ ................................................................................................. 12
USANDO SU SARTÉN ELÉCTRICA ................................................................................................................................... 13
MÉTODOS DE COCCIÓN .............................................................................................................................................. 13-14
HORARIO DE TEMPERATURA DE COCCIÓN ......................................................................................................... 14-15
INSTRUCCIONES DE MANTENIMIENTO PARA EL USUARIO..................................................................................15
INSTRUCCIONES DE CUIDADO Y LIMPIEZA .................................................................................................................15
PASOS PARA LA ELIMINACIÓN DE MANCHAS Y EL CUIDADO ADECUADO
DE SU RECUBRIMIENTO CERÁMICO ANTIADHERENTE ...........................................................................................16
INSTRUCCIONES DE ALMACENAMIENTO ..................................................................................................................16
GARANTÍA ................................................................................................................................................................................. 17
35256_35257_35258_35259_35260_Bella_MultiUSA_Make and Take_Skillet_IM_R1.indd 135256_35257_35258_35259_35260_Bella_MultiUSA_Make and Take_Skillet_IM_R1.indd 1 2024-11-07 12:51 PM2024-11-07 12:51 PM

2
IMPORTANT SAFEGUARDS
When using electrical appliances, basic safety precautions shouldalways
be followed, including the following:
1. READ ALL INSTRUCTIONS.
2. Do not touch hot surfaces. Use handles or knobs.
3. To protect against electrical shock, do not immerse cord, plugs, or appliance in
water or other liquid.
4. This appliance is not intended for use by persons (including children) with
reduced physical, sensory or mental capabilities, or lack of experience and
knowledge, unless they have been given supervision or instruction concerning
use of the appliance by a person responsible for their safety.
5. Close supervision is necessary when any appliance is used by or near children.
6. Turn unit Off and unplug from outlet when not in use and before cleaning.
Allow to cool before putting on or taking off parts, and before cleaning
the appliance.
7. Do not operate any appliance with a damaged cord or plug or after
the appliance malfunctions, or has been damaged in any manner. Return
appliance to the nearest authorized service facility for examination, repair
or adjustment.
8. The use of accessory attachments not recommended by the appliance
manufacturer may cause injuries.
9. Do not use outdoors.
10. Do not let cord hang over the edge of table or counter, or touch hot surfaces.
11. Do not place on or near a hot gas or electric burner, or in a heated oven.
12. Extreme caution must be used when moving an appliance containing hot oil or
other hot liquids.
13. Always attach temperature control probe to appliance first, then plug cord
in the wall outlet. To disconnect, turn temperature control probe to OFF, then
remove plug from wall outlet. Never yank or pull.
14. Do not use appliance for other than intended use.
15. Lift and open the cover carefully to avoid scalding and to allow hot
condensation to drip back into the unit.
16. Do not lift appliance from lid handle. Always use the side handles on the base
of the appliance.
FOR HOUSEHOLD USE ONLY
SAVE THESE INSTRUCTIONS
ADDITIONAL IMPORTANT
SAFEGUARDS
35256_35257_35258_35259_35260_Bella_MultiUSA_Make and Take_Skillet_IM_R1.indd 235256_35257_35258_35259_35260_Bella_MultiUSA_Make and Take_Skillet_IM_R1.indd 2 2024-11-07 12:51 PM2024-11-07 12:51 PM

3
CAUTION, HOT SURFACES: This appliance generates heat and escaping steam
during use. Proper precautions must be taken to prevent the risk of burns, fires, or
other injury to persons or damage to property.
CAUTION: This appliance is hot during operation and retains heat for some time
after turning OFF. Always use oven mitts when handling hot materials and allow
metal parts to cool before cleaning. Do not place anything on top of the appliance
while it is operating or while it is hot.
1. All users of this appliance must read and understand this Instruction Manual
before operating or cleaning this appliance.
2. The cord to this appliance should be plugged into a 120 V AC
electrical outlet only.
3. If this appliance begins to malfunction during use, turn unit Off and
immediately unplug the cord. Then remove the temperature control probe. Do
not use or attempt to repair the malfunctioning appliance.
4. Do not leave this appliance unattended during use.
NOTES ON THE PLUG
This appliance has a polarized plug (one blade is wider than the other). To reduce
the risk of electric shock, this plug will fit in a polarized outlet only one way. If the
plug does not fit fully into the outlet, reverse the plug. If it still does not fit, contact a
qualified electrician. Do not modify the plug in any way.
NOTES ON THE CORD
A. A short power-supply cord (or detached power-supply cord) is provided
to reduce the risk resulting from becoming entangled in or tripping over
a long cord.
B. Longer detachable power-supply cords or extension cords are available
and may be used if care is exercised in their use.
C. If a long detachable power-supply cord or extension cord is used:
1. The marked electrical rating of the cord set, or extension cord should
be at least as great as the electrical rating of the appliance.
2. If the appliance is of the grounded type, the extension cord should
be a grounding-type3-wire cord.
3. The longer cord should be arranged so that it will not drape over
the countertop or tabletop where it can be pulled on by children
or tripped over.
PLASTICIZER WARNING
CAUTION: To prevent plasticizers from migrating to the finish of the countertop or
tabletop or other furniture, place NON-PLASTIC coasters or place mats between
the appliance and the finish of the countertop or tabletop. Failure to do so may
cause the finish to darken, permanent blemishes may occur, or stains can appear.
ELECTRIC POWER
If the electrical circuit is overloaded with other appliances, your appliance may not
operate properly. It should be operated on a separate electrical circuit from other
appliances.
35256_35257_35258_35259_35260_Bella_MultiUSA_Make and Take_Skillet_IM_R1.indd 335256_35257_35258_35259_35260_Bella_MultiUSA_Make and Take_Skillet_IM_R1.indd 3 2024-11-07 12:51 PM2024-11-07 12:51 PM
4
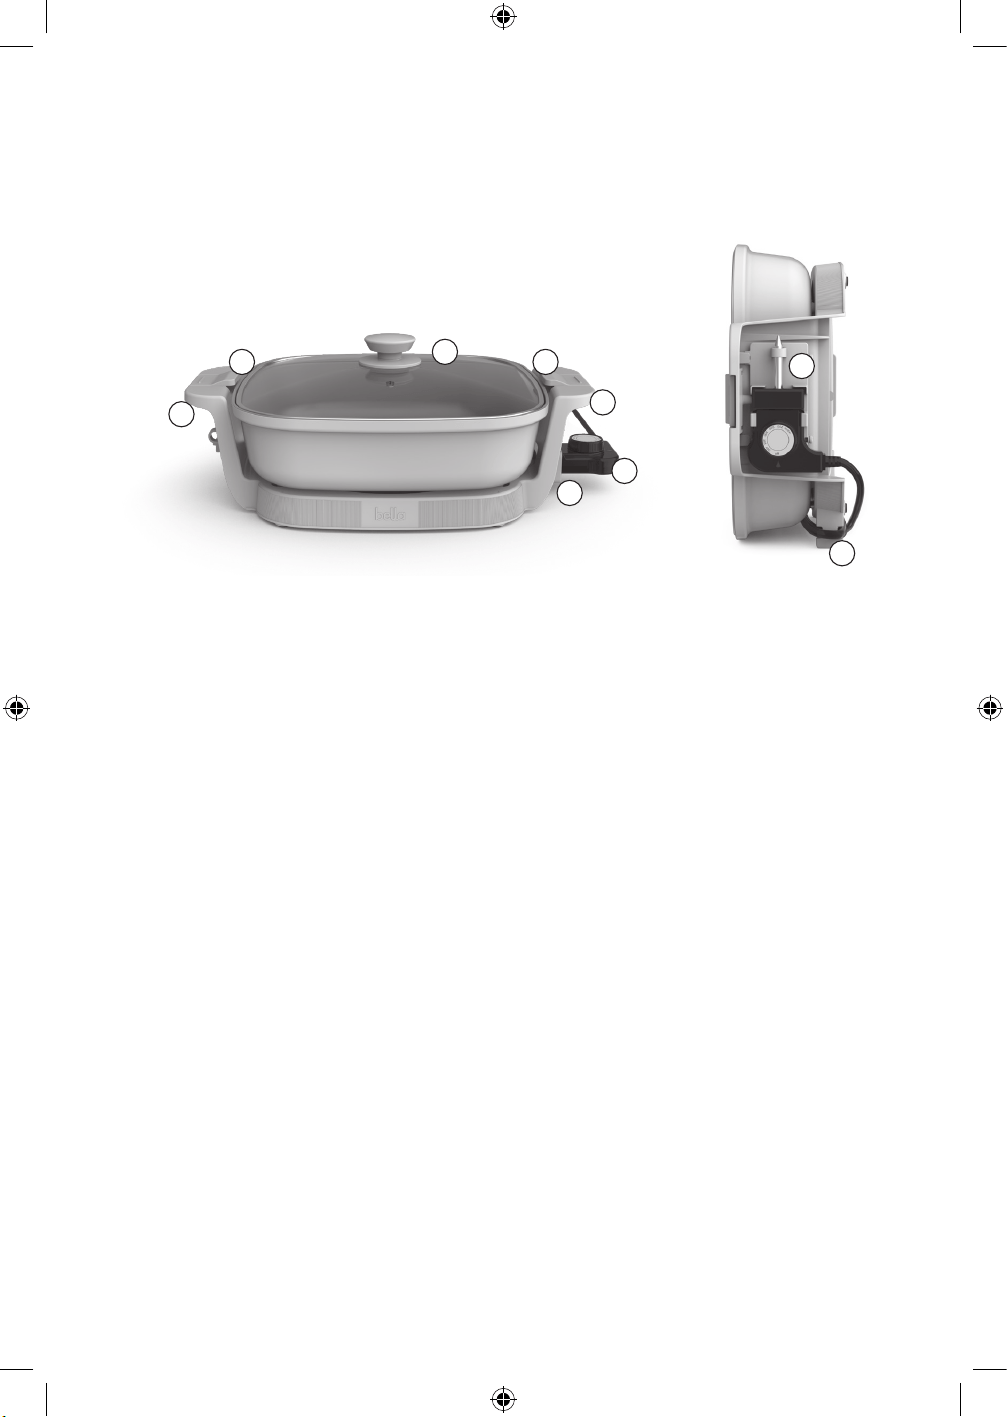
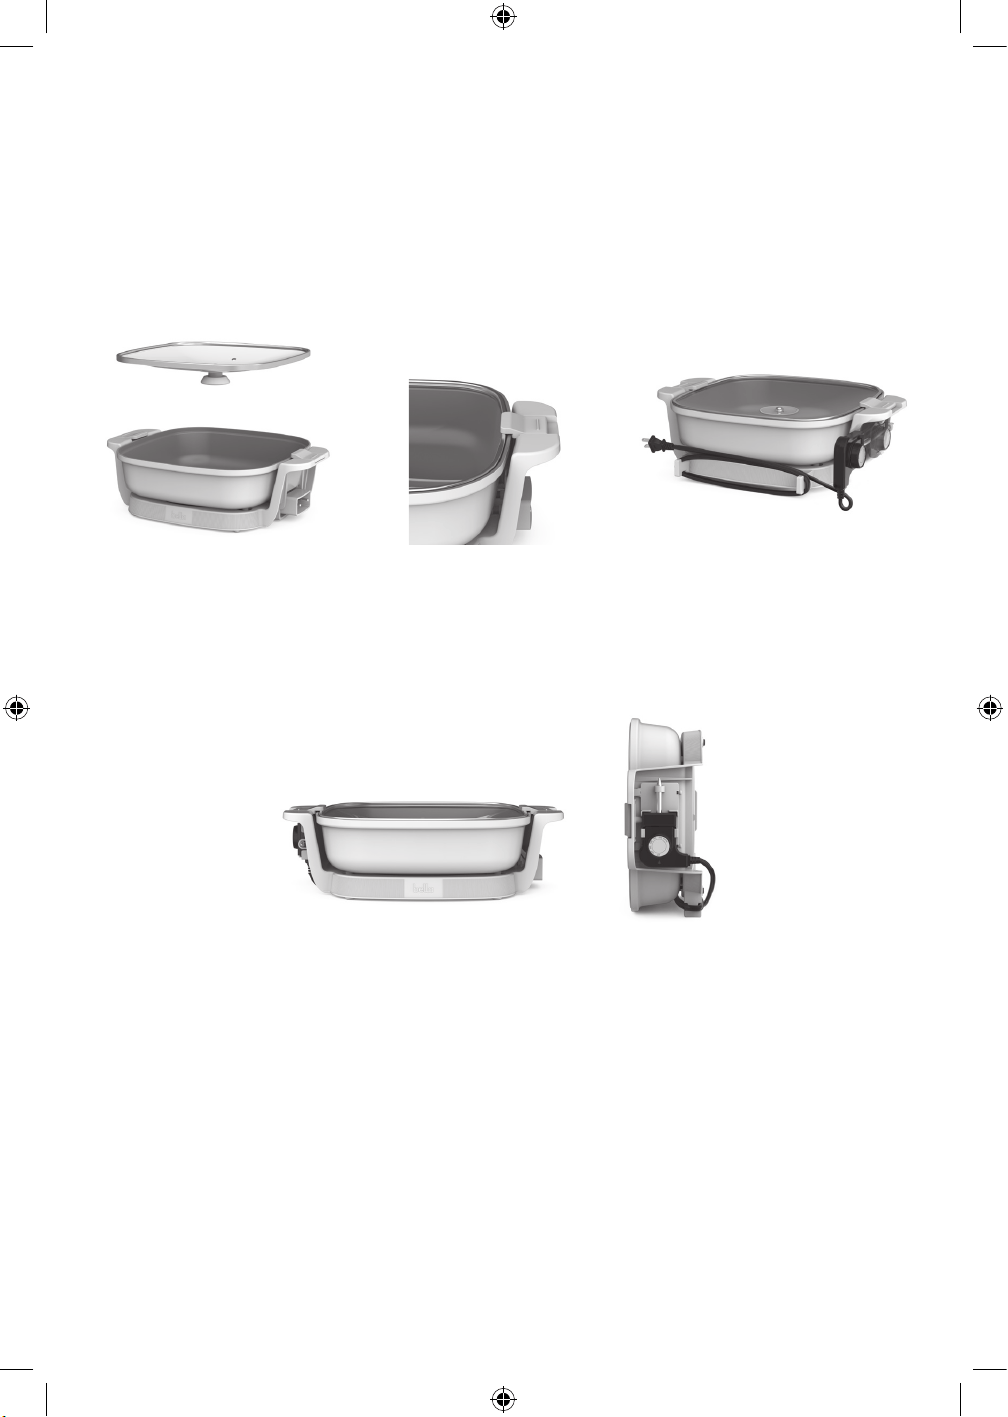
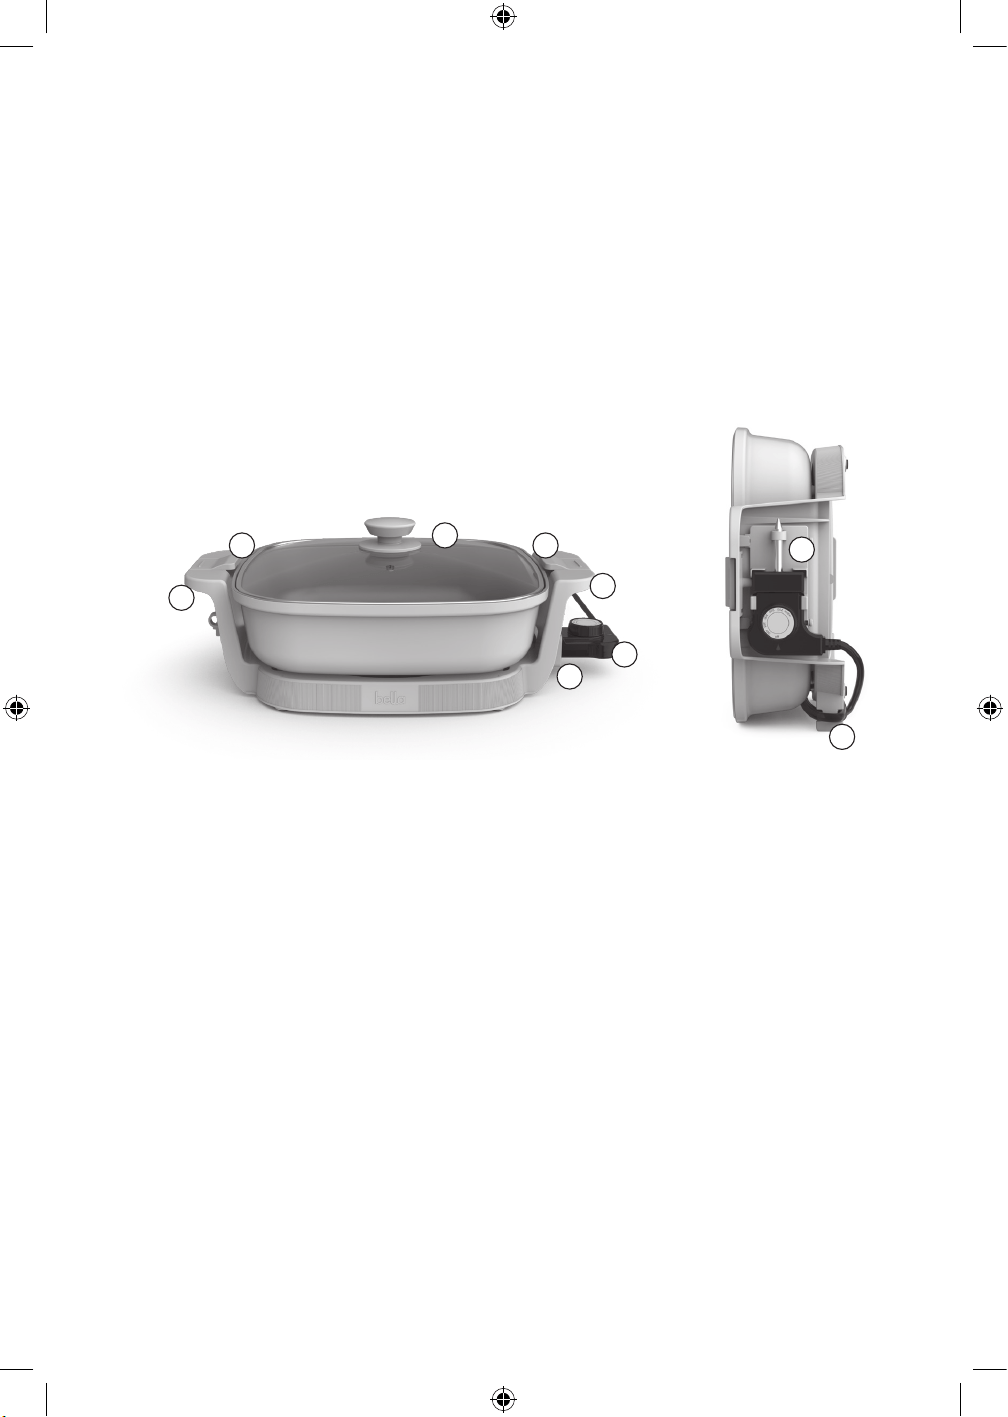
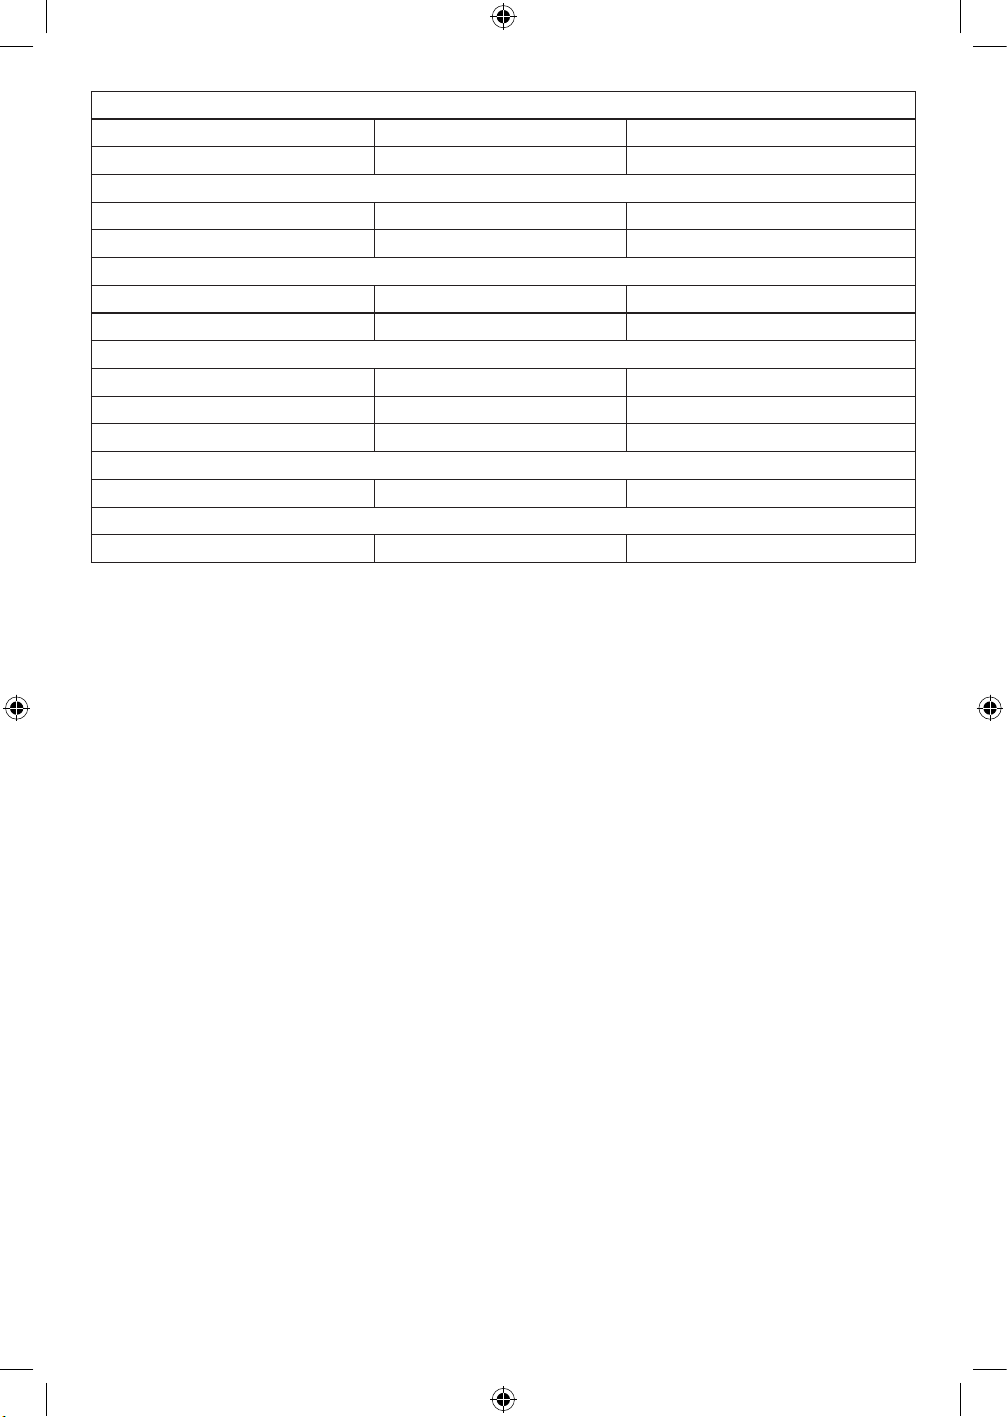
GETTING TO KNOW YOUR ELECTRIC SKILLET
Product may vary slightly from illustration.
1. Tempered Glass Lid
2. Cool touch Handles
3. Removable Temperature probe
4. Lid locking Clamps
5. Probe Socket
6. Cord storage
7. Temperature probe storage
1
44
2
2
7
6
3
5
TEMPERATURE CONTROL PROBE
1. The temperature control probe is the nerve center and brain of the Electric Skillet. Treat it carefully.
Dropping or banging it could change its calibration and make the temperature settings inaccurate.
2. Rotate the dial to select the temperature as called for in the recipe.
3. The indicator light on the temperature control probe will illuminate as soon as the dial is rotated.
The light will go out once the selected temperature has been reached.
4. Allow the Electric Skillet to cool before removing the temperature control probe.
5. To clean the temperature control probe, simply wipe down with a soft, damp cloth.
Make sure you dry it thoroughly before using again.
NOTE: The temperature control probe is not submersible.
CAUTION: Use the temperature control probe supplied with this Electric Skillet only. The use of any other temperature
control probe may cause fire, electric shock, or injury.
BEFORE USING FOR THE FIRST TIME
1. Carefully unpack the Electric Skillet and remove all packaging materials.
2. Before cooking for the first time, wash the Electric Skillet in mild dishwashing soap, wipe and allow to dry.
IMPORTANT: Always hold the lid locking clamps in the OPEN position before removing and placing the glass lid
onto the electric skillet.
IMPORTANT: Do not use lid handle when moving the unit. always use the handles on the base of electric skillet
when moving or storing.
NOTE: THE ELECTRIC SKILLET IS NOT DISHWASHER SAFE.
3. Turn the temperature control to 400 °F and heat empty Electric Skillet uncovered for approximately 5 minutes.
This will ensure the Ceramic Non-Stick coating is ready for use. You will notice a slight odor; this is normal and
should quickly disappear.
4. Turn the temperature control to OFF and allow to cool for 15 minutes.
USING YOUR ELECTRIC SKILLET
1. Place the Electric Skillet on a level surface such as a countertop or table.
NOTE: Some countertop and table surfaces, such as Corian® and other surfaces, are not designed
to withstand the prolonged heat generated by this electric skillet. We recommend placing a hot pad or trivet under the
electric skillet beforehand to avoid possible damage to the surface.
2. Be sure the sides and back of the electric skillet are at least 4 inches away from any walls, cabinets, or objects
on the counter or table.
3. Turn temperature control probe to the OFF position.
4. Plug the temperature control probe securely into Electric Skillet’s control probe socket. Plug cord into any
standard 120V AC wall outlet.
35256_35257_35258_35259_35260_Bella_MultiUSA_Make and Take_Skillet_IM_R1.indd 435256_35257_35258_35259_35260_Bella_MultiUSA_Make and Take_Skillet_IM_R1.indd 4 2024-11-07 12:51 PM2024-11-07 12:51 PM
5
IMPORTANT: ALWAYS PLUG CORD INTO SKILLET FIRST, THEN INTO WALL OUTLET.
5. Preheat Electric Skillet for approximately 5 minutes before cooking. To preheat, turn the temperature control to
desired temperature. The indicator light on the temperature control probe will illuminate as soon as the dial is
rotated. The light will go out once the selected temperature has been reached.
6. Add food and cook according to the recipe. Adjust temperature control dial as necessary.
NOTE: During cooking, the light will go on and off indicating that the Electric Skillet is maintaining
proper temperature.
IMPORTANT: DO NOT USE LID HANDLE WHEN MOVING THE UNIT. ALWAYS USE THE HANDLES ON THE BASE
OF ELECTRIC SKILLET WHEN MOVING OR STORING.
CAUTION: DO NOT USE COOKING SPRAYS. THEY CAN CAUSE A BUILD-UP ON THE COOKING PLATES AND MAY
AFFECT THE CERAMIC NON-STICK PERFORMANCE OF THE PRODUCT.
7. Liquids such as broth, water, etc. may be added to the Electric Skillet during cooking.
8. When cooking has been completed, turn the temperature control to the OFF position. The indicator light on the
temperature control probe will turn off.
9. Unplug cord from wall outlet. Let the Electric Skillet cool completely.
10. Remove temperature control probe from Electric Skillet. Follow the Care & Cleaning Instructions described in
this Owner’s Manual.
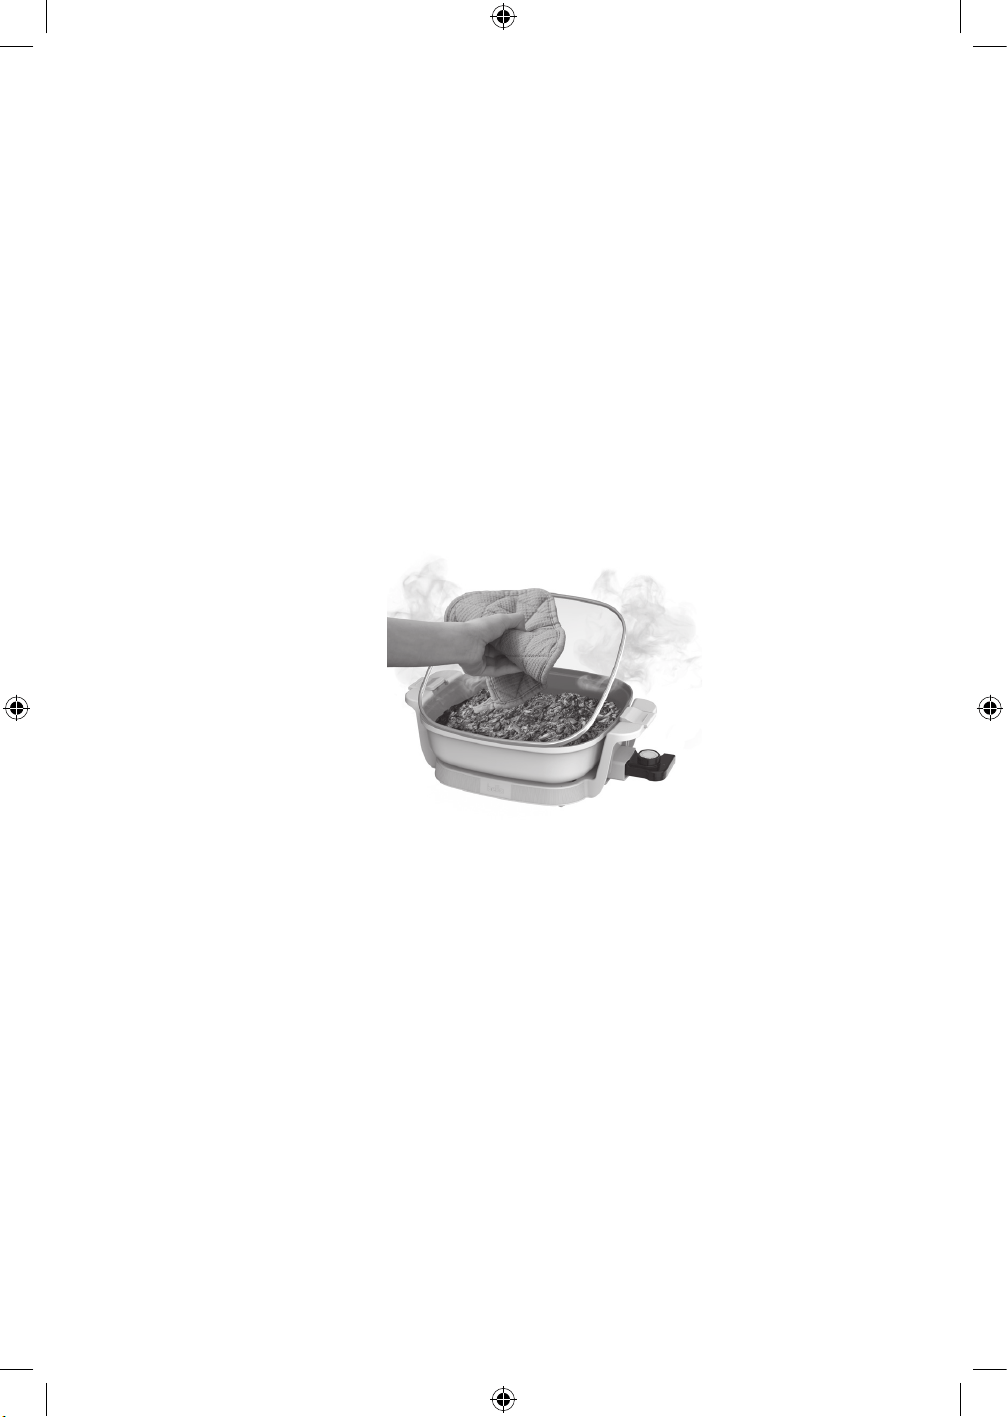
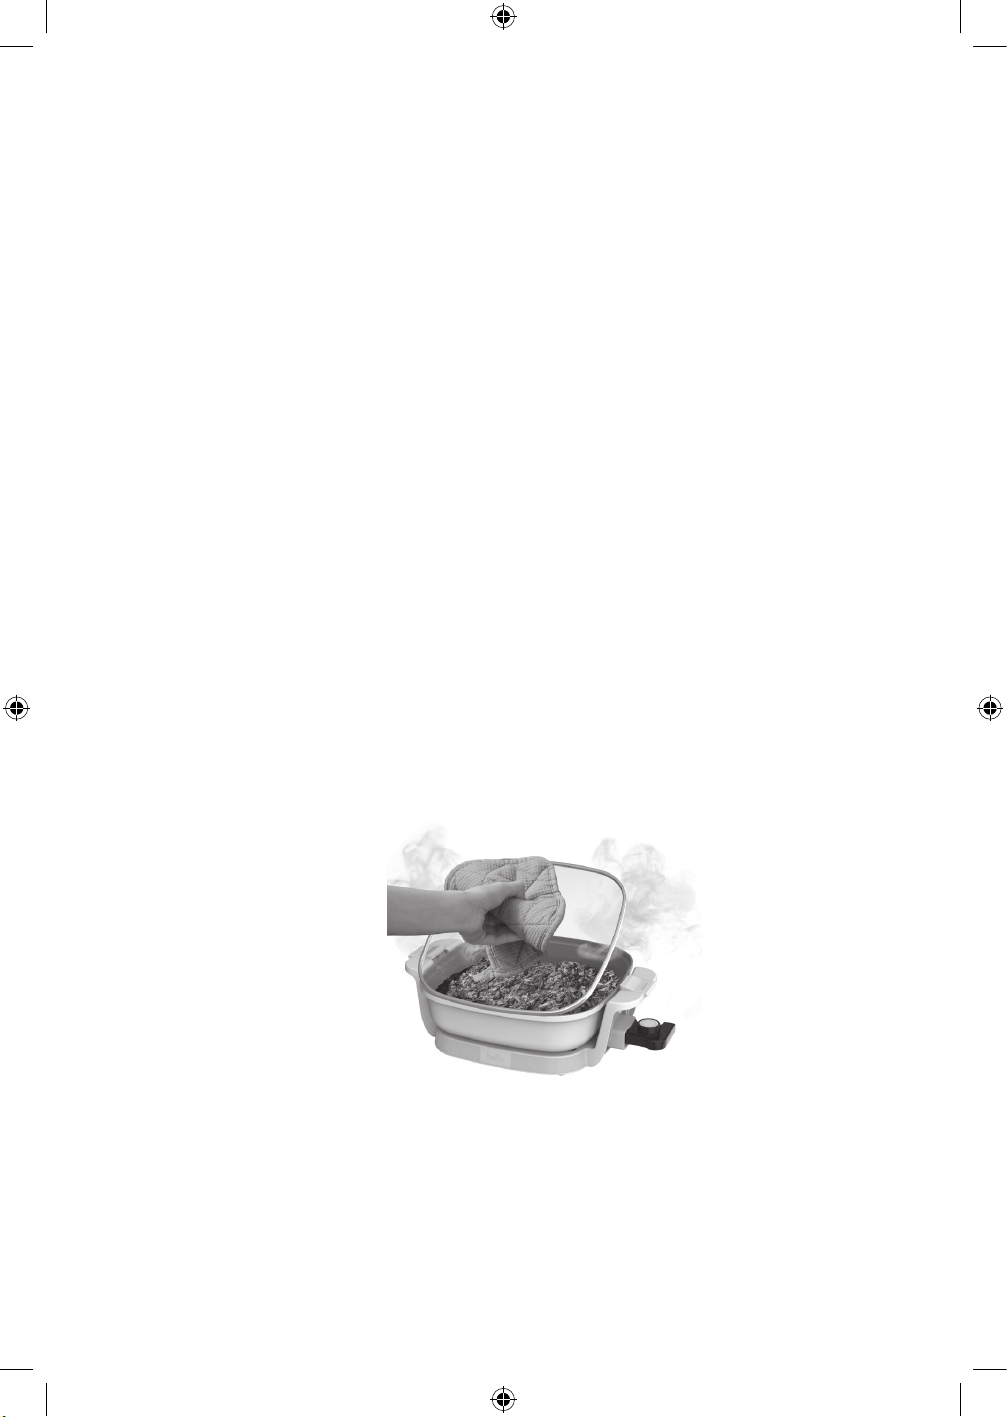
11. CAUTION: ESCAPING STEAM IS HOT! BE CAREFUL WHEN REMOVING OR LIFTING LID. HOT WATER
CONDENSATION MAY BE CREATED ON THE LID, ALWAYS HANDLE WITH CARE.
To prevent personal injury or steam burns due to hot water condensation follow those instruction:
When removing lid from skillet, always use oven mitts or hot pads. Tilt the lid away to avoid hot water condensation
(Figure 1)
Figure 1
COOKING METHODS
NOTE: This appliance is not intended for deep frying foods.
IMPORTANT: DO NOT USE MORE THAN 1 CUP OF OIL.
FRY/SAUTÉ
Add oil, shortening, butter or margarine to Electric Skillet and preheat to 350 °F. The amount of fat used will vary
accordingly to recipe and type or amount of food to be prepared. Pan-fry (or sauté) food rapidly in the open Electric
Skillet using a small quantity of fat.
NOTE: When heating oil, always remove the lid. If oil smokes, immediately turn the temperature control to OFF and
allow to cool.
IMPORTANT: To pan-fry, do not use more than 1 cup of oil. Select a vegetable oil or peanut oil for frying.
Butter and olive oil should only be used to sauté foods on a lower temperature setting.
PAN-BROIL
Select a tender (not too thick) cut of beef such as fillet mignon or top sirloin steak. Pan-broiling is best achieved using
high heat in an open skillet with no oil. If a recipe calls for it, use only a small amount of oil or shortening. (Butter must
be used with oil to prevent burning.) Preheat to 400 °F. Place food in the open, hot Electric Skillet. Brown food, turning
often. Remove excess fat as it accumulates.
BRAISE
Add a small quantity of fat to the Electric Skillet and preheat to 400 °F. Sear food in hot fat until browned on all sides.
Add specified amount of liquid, cover and turn temperature control dial down to 300 °F, just until the indicator light
goes out (simmer point). Cook as specified in recipe, or until food is tender. Check during cooking and add more liquid
as necessary. DO NOT LET SKILLET BOIL DRY.
35256_35257_35258_35259_35260_Bella_MultiUSA_Make and Take_Skillet_IM_R1.indd 535256_35257_35258_35259_35260_Bella_MultiUSA_Make and Take_Skillet_IM_R1.indd 5 2024-11-07 12:51 PM2024-11-07 12:51 PM
6
SIMMER
Add oil, shortening, butter or margarine to Electric Skillet and preheat to desired temperature. If required, brown food
on all sides. Add liquid or make a sauce as directed in recipe. With the temperature control set to 300 °F - 350 °F, bring
liquid to a boil. Turn temperature control dial down just until indicator light goes out. This is the simmer point. Cover.
Simmer food for the directed length of time or until food is done. Check periodically during cooking and add more
liquid as necessary. DO NOT LET SKILLET BOIL DRY.
STEAM
Place a small amount of water in the bottom of Electric Skillet. Add vegetables or other foods and cover. Turn
temperature control dial to 300 °F and steam food until done. Check often, adding more water as necessary.
DO NOT LET SKILLET BOIL DRY.
WARMING
After cooking is completed set temperature control dial down to WARMING. Turn or stir occasionally. When serving
previously cooked and cooled food, it may be necessary to heat food first; then turn the temperature control
to WARMING.
Food Temperature ( °F) Approximate Cooking Time
in Minutes
Frying
Bacon 325 °F - 350 °F 5 min - 8 min
Chicken 325 °F - 350 °F 25 min - 40 min
Eggs (fried) 300 °F 3 min - 5 min
Eggs (scrambled) 325 °F 2 min - 3 min
Fish 325 °F - 375 °F 5 min - 10 min
French Toast 300 °F - 325 °F 4 min - 6 min
Ham 1/2″ thick 325 °F - 350 °F 10 min - 12 min
Ham 3/4″ thick 325 °F - 350 °F 14 min - 16 min
Hamburgers 1/2″ thick 325 °F - 375 °F 8 min - 12 min
Liver 325 °F - 350 °F 5 min - 10 min
Minute Steak 375 °F - 400 °F 4 min - 5 min
Pork Chops 1/2″ thick 325 °F - 375 °F 15 min - 20 min
Pork Chops 3/4″ thick 325 °F - 375 °F 20 min - 25 min
Potatoes (cottage fried) 300 °F - 325 °F 10 min - 12 min
Link Sausage 300 °F - 325 °F 20 min - 30 min
Precooked Sausage 325 °F - 350 °F 10 min - 12 min
Grilled Sandwiches 300 °F - 325 °F 5 min - 10 min
Beef Steak 1″ thick
RARE 350 °F - 400 °F 6 min - 7 min
MEDIUM 350 °F - 400 °F 10 min - 12 min
Beef Steak 1 1/2″ thick
RARE 350 °F - 400 °F 8 min -10 min
MEDIUM 350 °F - 400 °F 18 min - 20 min
Braising And Roasting
Browning 325 °F - 400 °F 5 min - 10 min
Roasting (on rack) 325 °F - 350 °F 60 min - 90 min
Stewing
Browning 325 °F - 400 °F 10 min - 15 min
Stewing* 200 °F - 225 °F 30 min - 90 min
Casserole Dishes Warm - 225 °F 30 min - 60 min
35256_35257_35258_35259_35260_Bella_MultiUSA_Make and Take_Skillet_IM_R1.indd 635256_35257_35258_35259_35260_Bella_MultiUSA_Make and Take_Skillet_IM_R1.indd 6 2024-11-07 12:51 PM2024-11-07 12:51 PM

7
Baking
Pancakes 350 °F - 400 °F 2 min - 3 min
Holding Temperature
(after cooking period) Warm
** Add additional liquid during cooking (if necessary), to obtain consistency.
USDA COOKING GUIDELINES
NOTE: The United States Department of Agriculture recommends that meat and poultry be cooked to the following
internal temperatures to be sure any harmful bacteria has been killed. Ground turkey and chicken should be cooked to
an internal temperature of 165 °F/74 °C and ground beef, veal, lamb and pork be cooked to an internal temperature
160 °F/71 °C. Whole chicken and turkey should be cooked to an internal temperature of 180 °F/82 °C; 170 °F/77 °C for
the breast. Goose and duck should be cooked to an internal temperature of 180 °F/82 °C. Fresh beef, veal and lamb,
etc., should be cooked to an internal temperature of at least 145 °F/63 °C. Fresh pork should be cooked to an internal
temperature of at least 160 °F/71 °C. When re-heating meat and poultry products, they should also be cooked to an
internal temperature of 165 °F/74 °C.
USER MAINTENANCE INSTRUCTIONS
This appliance requires little maintenance. It contains no user serviceable parts. Do not try to repair it yourself. Any
servicing requiring disassembly other than cleaning must be performed by a qualified appliance repair technician.
CARE & CLEANING INSTRUCTIONS
CAUTION: Do not immerse the cord, plug or temperature control probe in water or any other liquid.
CAUTION: To avoid accidental burns, allow your Electric Skillet to cool thoroughly before cleaning.
1. When cooking is completed, unplug cord from wall outlet. Allow Electric Skillet to cool.
2. Remove temperature control probe from Electric Skillet.
CAUTION: The probe may become hot after use. Allow to cool before handling.
3. If necessary, wipe temperature control case and probe with a damp, soft cloth. Dry temperature control probe
completely. Set aside.
CAUTION: The temperature control probe is not immersible.
4. The Electric skillet base is NOT dishwasher safe. You can wash it with warm soapy water and rinse it dry after
each use.
NOTE: Only the TEMPERED GLASS LID is top rack dishwasher safe.
5. To wash by hand, immerse Electric Skillet and glass lid in hot, sudsy water. Clean thoroughly using a sponge or
soft cloth. Rinse in hot water. Dry completely.
6. For stubborn food particles, loosen with a plastic cleaning pad. Avoid hard scouring of the Ceramic Non-Stick
finish as this may cause surface scratches. Do not use steel wool, scouring pads, or abrasive cleaners on any
part of the Electric Skillet.
STEPS FOR STAIN REMOVAL AND PROPER CARE OF YOUR CERAMIC NON-STICK COATING
1. Identify stained areas on the cooking surface and sprinkle some baking soda on the stains.
2. Moisten the baking soda to get a paste like texture by adding some water.
3. Let the paste stand for a few minutes on the stains (not more than an hour)
4. Rub with a soft damp cloth or lightly scrub with a plastic scouring pad, wipe clean and dry thoroughly.
NOTE: Do not rub vigorously when using a plastic scouring pad and NEVER use a metal scouring pad as this may
damage the Ceramic Non-Stick coating.
5. Repeat the cycle once again if necessary. The performance and non-stick property of the Ceramic Non-Stick
coating will not be affected due to stains.
35256_35257_35258_35259_35260_Bella_MultiUSA_Make and Take_Skillet_IM_R1.indd 735256_35257_35258_35259_35260_Bella_MultiUSA_Make and Take_Skillet_IM_R1.indd 7 2024-11-07 12:51 PM2024-11-07 12:51 PM
8
STORING INSTRUCTIONS
1. Turn control dial to OFF. Unplug unit and allow to cool. Never store the Electric Skillet while it is hot or still
plugged in.
2. Clean the Electric Skillet thoroughly before storing.
3. Carefully place the tempered glass lid knob first onto the Electric Skillet’s rim. (Figure 2)
4. Use the Clamps on both sides of the cool touch handles and slide to secure lid in place (Figure 3)
5. Carefully secure the temperature control probe to the side of Electric Skillet and wrap cord around the cord
storage. (Figure 4)
Figure 2 Figure 3 Figure 4
WARNING: Never wrap cord tightly around the unit. Never place any stress on the cord, especially where the cord
enters the unit, as this could cause the cord to fray and break.
WARNING: Make sure to unroll from the cord storage before next use.
WARNING: Do not use the lid handle to lift and store the skillet. Always use the handles on the skillet base.
6. Store horizontally or vertically in a clean, dry place. (Figure 5)
Figure 5
35256_35257_35258_35259_35260_Bella_MultiUSA_Make and Take_Skillet_IM_R1.indd 835256_35257_35258_35259_35260_Bella_MultiUSA_Make and Take_Skillet_IM_R1.indd 8 2024-11-07 12:51 PM2024-11-07 12:51 PM

9
SENSIO Inc. hereby warrants that for a period of TWO YEARS from the date of purchase,
this product will be free from mechanical defects in material and workmanship, and
for 90 days in respect to non-mechanical parts. At its sole discretion, SENSIO Inc. will
either repair or replace the product found to be defective, or issue a refund on the
product during the warranty period.
The warranty is only valid for the original retail purchaser from the date of initial retail
purchase and is not transferable. Keep the original sales receipt, as proof of purchase is
required to obtain warranty validation. Retail stores selling this product do not have the
right to alter, modify, or in any way revise the terms and conditions of the warranty.
EXCLUSIONS:
The warranty does not cover normal wear of parts or damage resulting from any of the
following: negligent use of the product, use of improper voltage or current, improper
routine maintenance, use contrary to the operating instructions, disassembly, repair, or
alteration by anyone other than qualied SENSIO Inc. personnel. Also, the warranty
does not cover Acts of God such as re, oods, hurricanes, or tornadoes.
SENSIO Inc. shall not be liable for any incidental or consequential damages caused
by the breach of any express or implied warranty. Apart from the extent prohibited
by applicable law, any implied warranty of merchantability or tness for a particular
purpose is limited in time to the duration of the warranty. Some states, provinces or
jurisdictions do not allow the exclusion or limitation of incidental or consequential
damages, or limitations on how long an implied warranty lasts, and therefore, the
above exclusions or limitations may not apply to you. The warranty covers specic legal
rights which may vary by state, province and/or jurisdiction.
HOW TO OBTAIN WARRANTY SERVICE:
You must contact Customer Service at our toll-free number: 1-866-832-4843.
A Customer Service Representative will attempt to resolve warranty issues over the
phone. If the Customer Service Representative is unable to resolve the problem, you will
be provided with a case number and asked to return the product to SENSIO Inc. Attach
a tag to the product that includes: your name, address, daytime contact telephone
number, case number, and description of the problem. Also, include a copy of the
original sales receipt. Carefully package the tagged product with the sales receipt,
and send it (with shipping and insurance prepaid) to SENSIO Inc.’s address. SENSIO
Inc. shall bear no responsibility or liability for the returned product while in transit to
SENSIOInc.’s Customer Service Center.
LIMITED TWO-YEAR WARRANTY
35256_35257_35258_35259_35260_Bella_MultiUSA_Make and Take_Skillet_IM_R1.indd 935256_35257_35258_35259_35260_Bella_MultiUSA_Make and Take_Skillet_IM_R1.indd 9 2024-11-07 12:51 PM2024-11-07 12:51 PM

10
PRECAUCIONES IMPORTANTES
Antes de utilizar el aparato eléctrico, deben seguirse siempre las siguientes
precauciones básicas, entre las que se incluyen las siguientes:
1. LEA TODAS LAS INSTRUCCIONES.
2. No toque las superficies calientes. Utilice las asas o perillas.
3. Para protegerse contra descargas eléctricas no sumerja el aparato, el cable o
los enchufes en agua u otros líquidos.
4. Este aparato no está diseñado para ser utilizado por personas (incluidos
niños) con capacidades físicas, sensoriales o mentales reducidas, o con falta
de experiencia y conocimientos, a menos que hayan recibido supervisión o
instrucciones sobre el uso del aparato por parte de una persona responsable
de su seguridad.
5. Es necesaria una estrecha supervisión cuando cualquier aparato sea utilizado
por niños o cerca de ellos.
6. Apague la unidad y desenchúfela de la toma de corriente cuando no lo utilice
y antes de limpiarlo. Deje que se enfríe antes de limpiar, poner o quitar piezas,
y antes de limpiar el aparato.
7. No haga funcionar ningún aparato con un cable o enchufe dañado o después
de que el aparato funcione mal o haya sufrido algún tipo de daño. Envíe el
aparato al servicio técnico autorizado más cercano para que lo examinen,
reparen o ajusten.
8. El uso de accesorios no recomendados por el fabricante del aparato puede
causar lesiones.
9. No lo utilice al aire libre.
10. No deje que el cable cuelgue del borde de la mesa o encimera, ni que toque
superficies calientes.
11. No lo coloque sobre o cerca de un quemador de gas o eléctrico caliente, ni en
un horno caliente.
12. Extreme las precauciones al mover un aparato que contenga aceite caliente u
otros líquidos calientes.
13. Siempre conecte primero la sonda de control de temperatura al
electrodoméstico y luego enchufe el cable en el tomacorriente de pared. Para
desconectar, coloque la sonda de control de temperatura en la posición OFF y
luego retire el enchufe del tomacorriente de pared. Nunca jale o tire.
14. No utilice el aparato para un uso distinto al previsto.
15. Levante y abra la cubierta con cuidado para evitar quemaduras y permitir que
la condensación caliente vuelva a gotear en la unidad.
16. No levante el aparato del mango de la tapa. Utilice siempre las manijas
laterales de la base del aparato.
SOLO PARA USO DOMÉSTICO
GUARDE ESTAS INSTRUCCIONES
35256_35257_35258_35259_35260_Bella_MultiUSA_Make and Take_Skillet_IM_R1.indd 1035256_35257_35258_35259_35260_Bella_MultiUSA_Make and Take_Skillet_IM_R1.indd 10 2024-11-07 12:51 PM2024-11-07 12:51 PM

11
PRECAUCIONES ADICIONALES
IMPORTANTES
PRECAUCIÓN SOBRE SUPERFICIES CALIENTES: Este aparato genera calor y
escape de vapor durante su uso. Deben tomarse las precauciones adecuadas
para evitar el riesgo de quemaduras, incendios u otros daños físicos o materiales.
PRECAUCIÓN: Este aparato se calienta durante el funcionamiento y conserva
el calor durante algún tiempo después de apagarlo. Utilice siempre guantes de
cocina cuando manipule materiales calientes y deje que las piezas metálicas se
enfríen antes de limpiarlas. No coloque nada encima del aparato mientras esté
funcionando o mientras esté caliente.
1. Todos los usuarios de este aparato deben leer y comprender este manual de
instrucciones antes de ponerlo en funcionamiento o limpiarlo.
2. El cable de este electrodoméstico debe enchufarse únicamente a un
tomacorriente eléctrico de 120 V CA.
3. Si este aparato comienza a funcionar mal durante el uso, apague la unidad
y desenchufe inmediatamente el cable. Luego retire la sonda de control de
temperatura. No utilice ni intente reparar el aparato que no
funciona correctamente.
4. No deje este aparato sin supervisión mientras esté en uso.
NOTAS SOBRE EL ENCHUFE
Este aparato tiene un enchufe polarizado (una pata es más ancha que la otra).
Para reducir el riesgo de descarga eléctrica, este enchufe solo encajará en una
toma polarizada en un sentido. Si el enchufe no encaja completamente en la
toma de corriente, delo vuelta. Si sigue sin encajar, póngase en contacto con un
electricista cualificado. No modifique el enchufe de ninguna manera.
NOTAS SOBRE EL CABLE
A. Se proporciona un cable de alimentación corto (o un cable de alimentación
desmontable) para reducir el riesgo derivado de enredarse o tropezar con
un cable largo.
B. Existen cables de alimentación desmontables o alargadores más extensos y
pueden utilizarse si se tiene cuidado en su uso.
C. Si se utiliza un cable de alimentación desmontable extenso o un alargador:
1. La capacidad eléctrica marcada del juego de cables o del alargador debe
ser al menos tan alta como la capacidad eléctrica del aparato.
2. Si el aparato es del tipo con toma de tierra, el alargador debe ser un
cable de 3 hilos con toma de tierra.
3. El cable más largo debe colocarse de manera que no quede colgando
sobre la encimera o la mesa, donde los niños puedan tirar de él o
tropezar con él.
ADVERTENCIA SOBRE PLASTIFICANTES
PRECAUCIÓN: Para evitar que los plastificantes migren al acabado de la
encimera o mesa u otros muebles, coloque posavasos NO PLÁSTICOS o coloque
tapetes entre el aparato y el acabado de la encimera o la mesa.
35256_35257_35258_35259_35260_Bella_MultiUSA_Make and Take_Skillet_IM_R1.indd 1135256_35257_35258_35259_35260_Bella_MultiUSA_Make and Take_Skillet_IM_R1.indd 11 2024-11-07 12:51 PM2024-11-07 12:51 PM
12
Si no lo hace, el acabado puede oscurecerse; pueden producirse manchas
permanentes o pueden aparecer marcas.
ENERGÍA ELÉCTRICA
Si el circuito eléctrico está sobrecargado con otros aparatos, es posible que
su aparato no funcione correctamente. Debe funcionar en un circuito eléctrico
separado de otros aparatos.
CONOZCA SU SARTÉN ELÉCTRICA
El producto puede variar ligeramente con respecto a la ilustración.
1. Tapa de vidrio templado
2. Manijas táctiles frías
3. Sonda de temperatura extraíble
4. Abrazaderas de bloqueo de la tapa
5. Conector hembra de sonda
6. Almacenamiento del cable
7. Almacenamiento de la sonda de temperatura
1
44
2
2
7
6
3
5
SONDA DE CONTROL DE TEMPERATURA
1. La sonda de control de temperatura es el centro nervioso y el cerebro de la sartén eléctrica. Trátela con
cuidado. Dejarla caer o golpearla podría cambiar su calibración y hacer que los ajustes de temperatura
sean inexactos.
2. Gire el dial para seleccionar la temperatura como se indica en la receta.
3. La luz indicadora de la sonda de control de temperatura se iluminará tan pronto como se gire el dial. La luz se
apagará una vez que se haya alcanzado la temperatura seleccionada.
4. Deje que la sartén eléctrica se enfríe antes de retirar la sonda de control de temperatura.
5. Para limpiar la sonda de control de temperatura, simplemente limpie con un paño suave y húmedo.
Asegúrese de secarlo bien antes de volver a usarlo.
NOTA: La sonda de control de temperatura no es sumergible.
PRECAUCIÓN: Utilice únicamente la sonda de control de temperatura suministrada con esta sartén eléctrica. El uso de
cualquier otra sonda de control de temperatura puede provocar incendios, descargas eléctricas o lesiones.
ANTES DE USAR EL PRODUCTO POR PRIMERA VEZ
1. Desempaquete con cuidado la sartén eléctrica y retire todos los materiales de embalaje.
2. Antes de cocinar por primera vez, lave la sartén eléctrica con jabón suave para lavar platos, limpie y
deje secar.
IMPORTANTE: Siempre sostenga las abrazaderas de bloqueo de la tapa en la posición ABIERTA antes de retirar y
colocar la tapa de vidrio
en la sartén eléctrica. IMPORTANTE: No use el mango de la tapa cuando mueva la unidad. Siempre use los mangos
en la base de la sartén eléctrica cuando se mueva o almacene.
NOTA: LA SARTÉN ELÉCTRICA NO ES APTA PARA LAVAVAJILLAS.
3. Gire el control de temperatura a 400 °F y caliente la sartén eléctrica vacía sin cubrir durante
aproximadamente 5 minutos. Esto garantizará que el recubrimiento de cerámica antiadherente esté listo para
usar. Notará un ligero olor; esto es normal y debería desaparecer rápidamente.
4. Ponga el control de temperatura en APAGADO y deje enfriar durante 15 minutos.
35256_35257_35258_35259_35260_Bella_MultiUSA_Make and Take_Skillet_IM_R1.indd 1235256_35257_35258_35259_35260_Bella_MultiUSA_Make and Take_Skillet_IM_R1.indd 12 2024-11-07 12:51 PM2024-11-07 12:51 PM
13
USANDO SU SARTÉN ELÉCTRICA
1. Coloque la sartén eléctrica sobre una superficie nivelada, como una encimera o una mesa. NOTA: Algunas
superficies de mesas y encimeras, como Corian® y otras superficies, no están diseñadas para soportar el calor
prolongado generado por esta sartén eléctrica. Recomendamos colocar una almohadilla caliente o un trípode
debajo de la sartén eléctrica de antemano para evitar posibles daños en la superficie.
2. Asegúrese de que los lados y la parte posterior de la sartén eléctrica estén al menos a 4 pulgadas de distancia
de cualquier pared, gabinete u objeto en el mostrador o la mesa.
3. Gire la sonda de control de temperatura a la posición de APAGADO.
4. Enchufe firmemente la sonda de control de temperatura en el enchufe de la sonda de control de la sartén
eléctrica. Enchufe el cable en cualquier tomacorriente de pared estándar de 120V CA.
IMPORTANTE: ENCHUFE SIEMPRE EL CABLE EN LA SARTÉN PRIMERO, LUEGO EN EL TOMACORRIENTE DE PARED.
5. Precaliente la sartén eléctrica durante aproximadamente 5 minutos antes de cocinar. Para precalentar, gire el
control de temperatura a la temperatura deseada. La luz indicadora de la sonda de control de temperatura
se iluminará tan pronto como se gire el dial. La luz se apagará una vez que se haya alcanzado la temperatura
seleccionada.
6. Agregue los alimentos a la sartén eléctrica y cocine de acuerdo con la receta. Ajuste el dial de control de
temperatura según sea necesario.
NOTA: Durante la cocción, la luz se encenderá y apagará para indicar que la sartén eléctrica mantiene la
temperatura adecuada.
IMPORTANTE: NO USE EL MANGO DE LA TAPA CUANDO MUEVA LA UNIDAD. SIEMPRE USE LOS MANGOS EN
LA BASE DE LA SARTÉN ELÉCTRICA CUANDO SE MUEVA O ALMACENE. PRECAUCIÓN: NO UTILICE AEROSOLES
DE COCINA.PUEDEN CAUSAR UNA ACUMULACIÓN EN LAS PLACAS DE COCCIÓN Y PUEDEN AFECTAR EL
RENDIMIENTO CERÁMICO ANTIADHERENTE DEL PRODUCTO.
7. Se pueden agregar líquidos como caldo, agua, etc. a la sartén eléctrica durante la cocción.
8. Cuando se haya completado la cocción, gire el control de temperatura a la posición APAGADO. La luz
indicadora de la sonda de control de temperatura se apagará.
9. Desenchufe el cable del tomacorriente de pared. Deje que la sartén eléctrica se enfríe por completo.
10. Retire la sonda de control de temperatura de la sartén eléctrica. Siga las instrucciones de cuidado y limpieza
descritas en este Manual del propietario.
11. PRECAUCIÓN: ¡EL VAPOR QUE ESCAPA ESTÁ CALIENTE! TENGA CUIDADO AL RETIRAR O LEVANTAR LA
TAPA. PUEDE CREARSE CONDENSACIÓN DE AGUA CALIENTE EN LA TAPA, SIEMPRE MANIPÚLELA
CON CUIDADO.
Para evitar lesiones personales o quemaduras por vapor debido a la condensación de agua caliente, siga estas
instrucciones: Al retirar la tapa de la sartén, siempre use guantes para horno o almohadillas calientes. Incline la tapa
hacia afuera para evitar la condensación de agua caliente (Figura 1)
Figura 1
MÉTODOS DE COCCIÓN
NOTA: Este electrodoméstico no está diseñado para freír alimentos a fondo.
IMPORTANTE: NO USE MÁS DE 1 TAZA DE ACEITE.
FREIR/SALTEAR
Agregue aceite, manteca vegetal, mantequilla o margarina a la sartén eléctrica y precaliente a 350 °F. La cantidad de
grasa utilizada variará según la receta y el tipo o la cantidad de alimentos que se prepararán. Fria en sartén (o saltee)
los alimentos rápidamente en la sartén eléctrica abierta con una pequeña cantidad de grasa.
NOTA: Al calentar aceite, siempre retire la tapa. Si el aceite bota humo, apague inmediatamente el control de
temperatura y deje que se enfríe.
35256_35257_35258_35259_35260_Bella_MultiUSA_Make and Take_Skillet_IM_R1.indd 1335256_35257_35258_35259_35260_Bella_MultiUSA_Make and Take_Skillet_IM_R1.indd 13 2024-11-07 12:51 PM2024-11-07 12:51 PM
14
IMPORTANTE: Para freír en sartén, no use más de 1 taza de aceite. Seleccione un aceite vegetal o de maní para freír.
La mantequilla y el aceite de oliva solo deben usarse para saltear alimentos a una temperatura más baja.
PAN-BROIL
Seleccione un corte tierno (no demasiado grueso) de carne de res, como filete miñón o bistec de solomillo. La mejor
manera de asar a la sartén es usando fuego alto en una sartén abierta sin aceite. Si una receta lo requiere, use solo
una pequeña cantidad de aceite o manteca vegetal. (La tolva debe usarse con aceite para evitar quemaduras).
Precaliente a 400 °F. Coloque los alimentos en la sartén eléctrica abierta y caliente. Comida marrón, girándola a
menudo. Elimine el exceso de grasa a medida que se acumula.
COCER A FUEGO LENTO
Agregue una pequeña cantidad de grasa a la sartén eléctrica y precaliente a 400 °F. Selle los alimentos en grasa
caliente hasta que estén dorados de todos los lados. Agregue la cantidad especificada de líquido, cubra y gire el dial
de control de temperatura hacia abajo a 300 °F, justo hasta que se apague la luz indicadora (punto de cocción lenta).
Cocine como se especifica en la receta o hasta que los alimentos estén tiernos. Controle durante la cocción y agregue
más líquido según sea necesario. NO DEJE QUE LA SARTÉN HIERVA EN SECO.
HERVIR A FUEGO LENTO
Agregue aceite, manteca vegetal, mantequilla o margarina a la sartén eléctrica y precaliente a la temperatura
deseada. Si es necesario, dore los alimentos de todos los lados. Agrega líquido o prepara una salsa como se indica en
la receta. Con el control de temperatura configurado en 300 °F - 350 °F, lleve el líquido a ebullición. Gire el dial de
control de temperatura hacia abajo hasta que se apague la luz indicadora. Este es el punto de cocción. Cubra. Hierva
los alimentos a fuego lento durante el tiempo indicado o hasta que los alimentos estén listos. Revise periódicamente
durante la cocción y agregue más líquido según sea necesario. NO DEJE QUE LA SARTÉN HIERVA EN SECO.
VAPOR
Coloque una pequeña cantidad de agua en el fondo de la sartén eléctrica. Agregue verduras u otros alimentos y
cubra. Gire el dial de control de temperatura a 300 °F y cocine la comida al vapor hasta que esté listo. Revise con
frecuencia, agregando más agua según sea necesario. NO DEJE QUE LA SARTÉN HIERVA EN SECO.
CALENTAMIENTO
Una vez finalizada la cocción, ajuste el dial de control de temperatura en CALENTAMIENTO. Gire o revuelva
ocasionalmente. Al servir alimentos previamente cocidos y enfriados, es posible que sea necesario calentar primero los
alimentos y luego cambiar el control de temperatura a CALENTAMIENTO.
Comida Temperatura ( °F) Tiempo de cocción aproximado
en minutos
Freír
Tocino 325 °F - 350 °F 5 min - 8 min
Pollo 325 °F - 350 °F 25 min - 40 min
Huevos (fritos) 300 °F 3 min - 5 min
Huevos (revueltos) 325 °F 2 min - 3 min
Pescado 325 °F - 375 °F 5 min - 10 min
Tostadas francesas 300 °F - 325 °F 4 min - 6 min
Jamón de ½″ de espesor 325 °F - 350 °F 10 min - 12 min
Jamón de 3⁄4″ de espesor 325 °F - 350 °F 14 min - 16 min
Hamburguesas de ½″ de espesor 325 °F - 375 °F 8 min - 12 min
Hígado 325 °F - 350 °F 5 min - 10 min
Bistec de minutos 375 °F - 400 °F 4 min - 5 min
Chuletas de cerdo de ½″ de espesor 325 °F - 375 °F 15 min - 20 min
Chuletas de cerdo de 3⁄4″ de espesor 325 °F - 375 °F 20 min - 25 min
Papas (fritas al estilo cottage) 300 °F - 325 °F 10 min - 12 min
Salchicha Link 300 °F - 325 °F 20 min - 30 min
Salchicha precocida 325 °F - 350 °F 10 min - 12 min
Sandwiches a la parrilla 300 °F - 325 °F 5 min - 10 min
35256_35257_35258_35259_35260_Bella_MultiUSA_Make and Take_Skillet_IM_R1.indd 1435256_35257_35258_35259_35260_Bella_MultiUSA_Make and Take_Skillet_IM_R1.indd 14 2024-11-07 12:51 PM2024-11-07 12:51 PM
15
Carne de Res Bistec 1″ de grosor
POCO COCIDO 350 °F - 400 °F 6 min - 7 min
MEDIO 350 °F - 400 °F 10 min - 12 min
Carne de Res Bistec 1 1/2″ de grosor
POCO COCIDO 350 °F - 400 °F 8 min -10 min
MEDIO 350 °F - 400 °F 18 min- 20 min
Estofado y asado
Dorado 325 °F - 400 °F 5 min -10 min
Asado (en la rejilla) 325 °F - 350 °F 60 min - 90 min
Estofado
Dorado 325 °F - 400 °F 10 min - 15 min
Estofado 200 °F - 225 °F 30 min - 90 min
Platos de cazuela Warm - 225 °F 30 min - 60 min
Horneado
Panqueques 350 °F - 400 °F 2 min - 3 min
Temperatura de retención
(después del período de cocción) Tibio
** Agregue líquido adicional durante la cocción (si es necesario) para obtener consistencia.
PAUTAS DE COCCIÓN DEL USDA
NOTA: El Departamento de Agricultura de los Estados Unidos (United States Department of Agriculture, USDA)
recomienda que la carne y las aves se cocinen a las siguientes temperaturas internas para asegurarse de que se ha
eliminado cualquier bacteria dañina. El pavo y el pollo picados deben cocinarse a una temperatura interna de 74 °C
(165 °F) y la carne picada de ternera, cordero y cerdo debe cocinarse a una temperatura interna de 71 °C (160 °F). El
pollo y el pavo enteros deben cocinarse a una temperatura interna de 82 °C (180 °F); 77 °C (170 °F) para la pechuga.
El ganso y el pato deben cocinarse a una temperatura interna de 82 °C (180 °F). La carne fresca de vaca, ternera y
cordero, etc., debe cocinarse a una temperatura interna de al menos 63 °C (145 °F). La carne de cerdo fresca debe
cocinarse a una temperatura interna de al menos 71 °C. (160 °F) Al recalentar productos cárnicos y de aves de corral,
también deben cocinarse a una temperatura interna de 74 °C (165 °F).
INSTRUCCIONES DE MANTENIMIENTO PARA EL USUARIO
Este aparato requiere poco mantenimiento. No contiene piezas que puedan ser reparadas por el usuario. No intente
repararlo usted mismo. Cualquier mantenimiento que requiera un desmontaje distinto a la limpieza debe ser realizado
por un técnico cualificado en reparación de electrodomésticos.
INSTRUCCIONES DE CUIDADO Y LIMPIEZA
PRECAUCIÓN: No sumerja el cable, el enchufe o la sonda de control de temperatura en agua ni en ningún otro
líquido.
PRECAUCIÓN: Para evitar quemaduras accidentales, deje que su sartén eléctrica se enfríe completamente antes
de limpiarla.
1. Una vez finalizada la cocción, desenchufe el cable del tomacorriente de pared. Deje que la sartén eléctrica
se enfríe.
2. Retire la sonda de control de temperatura de la sartén eléctrica.
PRECAUCIÓN: La sonda puede calentarse después de su uso. Deje enfriar antes de manipular.
Si es necesario, limpie la caja de control de temperatura y la sonda con un paño húmedo y suave. Seque
completamente la sonda de control de temperatura. Reservar.
PRECAUCIÓN: La sonda de control de temperatura no es sumergible.
4. La base de la sartén eléctrica NO es apta para lavavajillas. Puede lavarlo con agua tibia jabonosa y
enjuagarlo después de cada uso.
NOTA: Solo la TAPA DE VIDRIO TEMPERADO es apta para lavavajillas en la rejilla superior.
5. Para lavar a mano, sumerja la sartén eléctrica y la tapa de vidrio en agua caliente y con jabón. Limpie bien con
una esponja o un paño suave. Enjuague con agua caliente. Seque completamente.
6. Para partículas de alimentos difíciles, afloje con una almohadilla de limpieza de plástico. Evite el raspado duro
del acabado de cerámica antiadherente, ya que esto puede causar rayones en la superficie. No utilice lana de
acero, almohadillas de limpieza ni limpiadores abrasivos en ninguna parte de la sartén eléctrica.
35256_35257_35258_35259_35260_Bella_MultiUSA_Make and Take_Skillet_IM_R1.indd 1535256_35257_35258_35259_35260_Bella_MultiUSA_Make and Take_Skillet_IM_R1.indd 15 2024-11-07 12:51 PM2024-11-07 12:51 PM
16
PASOS PARA LA ELIMINACIÓN DE MANCHAS Y EL CUIDADO ADECUADO DE SU
RECUBRIMIENTO CERÁMICO ANTIADHERENTE
1. Identifique las áreas manchadas en la superficie de cocción y espolvoree un poco de bicarbonato de sodio
sobre las manchas.
2. Humedezca el bicarbonato de sodio para obtener una textura similar a la pasta agregando un poco de agua.
3. Deje reposar la pasta durante unos minutos en las manchas (no más de una hora)
4. Frote con un paño suave y húmedo o frote ligeramente con una almohadilla de plástico para fregar, limpie y
seque bien.
NOTA: No frote vigorosamente cuando utilice una almohadilla de estropajo de plástico y NUNCA utilice una
almohadilla de estropajo de metal, ya que esto puede dañar el recubrimiento de cerámica antiadherente.
Repita el ciclo una vez más si es necesario. El rendimiento y la propiedad antiadherente del recubrimiento de cerámica
antiadherente no se verán afectados debido a las manchas.
INSTRUCCIONES DE ALMACENAMIENTO
1. Gire el dial de control a APAGADO. Desenchufe la unidad y déjela enfriar. Nunca almacene la sartén eléctrica
mientras esté caliente o aún esté enchufada.
2. Limpie bien la sartén eléctrica antes de guardarla.
3. Coloque con cuidado la perilla de la tapa de vidrio templado primero en el borde de la sartén eléctrica.
(Figura 2)
4. Use las abrazaderas a ambos lados de las manijas táctiles frías y deslícelas para asegurar la tapa en su lugar
(Figura 3)
5. Asegure con cuidado la sonda de control de temperatura al costado de la sartén eléctrica y enrolle el cable
alrededor del almacenamiento del cable. (Figura 4)
Figura 2 Figura 3 Figura 4
ADVERTENCIA: Nunca envuelva el cable firmemente alrededor de la unidad. Nunca ejerza tensión sobre el cable,
especialmente donde el cable entra en la unidad, ya que esto podría hacer que el cable se deshilache y se rompa.
ADVERTENCIA: Asegúrese de desenrollar del almacenamiento del cable antes del próximo uso.
ADVERTENCIA: No use el mango de la tapa para levantar y almacenar la sartén. Utilice siempre las manijas de la
base de la sartén.
6. Almacene horizontal o verticalmente en un lugar limpio y seco. (Figura 5)
Figura 5
35256_35257_35258_35259_35260_Bella_MultiUSA_Make and Take_Skillet_IM_R1.indd 1635256_35257_35258_35259_35260_Bella_MultiUSA_Make and Take_Skillet_IM_R1.indd 16 2024-11-07 12:51 PM2024-11-07 12:51 PM

17
Mediante la presente, SENSIO Inc. garantiza que, durante el plazo de DOS AÑOS a partir
de la fecha de compra, este producto no presentará defectos mecánicos en el material
ni en la mano de obra, y durante 90 días, no los presentará en las piezas no mecánicas.
A su entera discreción, SENSIO Inc. reparará o reemplazará el producto que resulte
defectuoso, o emitirá un reembolso por el producto durante el plazo de garantía.
Esta garantía es válida únicamente para el comprador minorista original a partir de
la fecha de compra minorista inicial y no es transferible. Conserve el recibo de compra
original, ya que se exige una prueba de compra para obtener la validación de la garantía.
Las tiendas minoristas no tienen derecho a alterar, modicar ni corregir de ninguna
manera los términos y condiciones de la garantía.
EXCLUSIONES:
La garantía no cubre el desgaste normal de las piezas ni el daño ocasionado por
cualquiera de las siguientes causas: uso negligente del producto, uso de un voltaje
o corriente incorrectos, mantenimiento de rutina inadecuado, uso contrario al de las
instrucciones de funcionamiento, desarmado, reparación o alteración a cargo de personas
que no sean miembros del personal calicado de SENSIO Inc. Asimismo, la garantía no
cubre actos de la naturaleza, como incendios, inundaciones, huracanes o tornados.
SENSIO Inc. no asumirá responsabilidad por daños incidentales o resultantes ocasionados
por la violación de cualquier garantía expresa o implícita. Salvo en la medida en que lo
prohíban las leyes aplicables, cualquier garantía implícita de comerciabilidad o aptitud
para un propósito particular se limita temporalmente a la duración de la garantía. Algunos
estados, provincias o jurisdicciones no permiten la exclusión ni la limitación de daños
incidentales o resultantes, o limitaciones sobre la duración de una garantía implícita y, por
lo tanto, es posible que las exclusiones o limitaciones mencionadas no le correspondan.
La garantía cubre derechos legales especícos que pueden variar de un estado, una
provincia o una jurisdicción a otros.
CÓMO OBTENER EL SERVICIO DE GARANTÍA:
Debe comunicarse con el Servicio de atención al cliente a nuestro número telefónico
gratuito: 1-866-832-4843. Un representante del Servicio de atención al cliente intentará
resolver los problemas referidos a la garantía por teléfono. Si este no puede resolver el
problema, le proporcionarán un número de caso y le solicitarán que devuelva el producto
a SENSIO Inc. Adhiera una etiqueta al producto que incluya: su nombre, dirección,
número telefónico de contacto durante el día, número de caso y descripción del problema.
Además, incluya una copia del recibo de compra original. Envuelva cuidadosamente
el producto etiquetado con el recibo de compra, y envíelo (con el envío y el seguro
prepagados) a la dirección de SENSIO Inc. SENSIO Inc. no asumirá obligación ni
responsabilidad alguna por el producto devuelto que esté en el trayecto hacia el Centro
de servicio al cliente de SENSIO Inc.
GARANTÍA LIMITADA DE DOS AÑOS
35256_35257_35258_35259_35260_Bella_MultiUSA_Make and Take_Skillet_IM_R1.indd 1735256_35257_35258_35259_35260_Bella_MultiUSA_Make and Take_Skillet_IM_R1.indd 17 2024-11-07 12:51 PM2024-11-07 12:51 PM
For customer service questions or comments
Dudas o comentarios contactar el departamento de servicio al cliente
1-866-832-4843 / help@bellahousewares.com
Sensio Inc.
dba Made by Gather
TM
New York, NY 10016/USA
35256_35257_35258_35259_35260 R. 1
35256_35257_35258_35259_35260_Bella_MultiUSA_Make and Take_Skillet_IM_R1.indd 1835256_35257_35258_35259_35260_Bella_MultiUSA_Make and Take_Skillet_IM_R1.indd 18 2024-11-07 12:51 PM2024-11-07 12:51 PM