
Operation and maintenance manual
Before using the machine, please read the attached operating instructions.
Carefully read the safety rules
Mode d'emploi
Veuillez lire attentivement le mode d'emploi
(notamment les consignes de sécurité) avant d'utiliser l'appareil.
FOR HOUSEHOLD USE ONLY

IMPORTANT SAFEGUARDS
When using electrical appliances, basic safety precautions should always be
followed to reduce the risk of fire, electric shock, and/or injury to persons,
including the following:
1 Read all instructions and information in this instruction book and any
other literature included in this carton referring to this product before
operating or using this appliance.
2 Do not touch hot surfaces. Use handles or knobs.
3 To protect against fire, electric shock and personal injury do not immerse
cord, plugs or appliance in water or other liquid.
4 Close supervision is necessary when any appliance is used by or near
children.
5 Unplug from outlet when not in use and before cleaning. Allow to
cool before putting on or taking off parts, and before cleaning the
appliance.
6 Do not operate any appliance with a damaged cord or plug or after
the appliance malfunctions or has been damaged in any way. Return
appliance to the nearest authorized service centre for examination,
repair or adjustment.
7 The use of accessory attachments not recommended by the appliance
manufacturer may result in fire, electric shock or personal injury.
8 Do not use outdoors.
9 Do not let cord hang over edge of table or counter, or touch hot
surfaces.
10 Do not place on or near a hot gas or electric burner, or in a heated
oven.
11 Always turn appliance “OFF”, then plug cord into the wall outlet. To
disconnect, turn switch to “OFF”, then remove plug from wall outlet.
12 Do not use appliance for other than intended household use.
13 Use extreme caution when using hot steam.
SAVE THESE INSTRUCTIONS

CAUTION
This appliance is for household use only. Any servicing, other than cleaning
and user maintenance, should be performed by an authorized service
centre. Do not immerse machine in water. To reduce the risk of fire or
electric shock, do not disassemble the machine. There are no parts inside
the machine serviceable by the user. Repair should be done by authorized
service personnel only.
1 Check voltage to be sure that the voltage indicated on the nameplate
corresponds with your voltage.
2 Never use warm or hot water to fill the water tank. Use cold water only.
3 Keep your hands and the cord away from hot parts of the appliance
during operation.
4 Never clean with scrubbing powders or harsh cleaners. Simply use a soft
cloth dampened with water.
5 For optimal taste of your coffee, use purified or bottled water. Periodic
descaling is still recommended every 2-3 months.
INSTRUCTIONS FOR THE POWER
SUPPLY CORD
A A short power-supply cord is provided to reduce risks of tangling or
tripping over a longer cord.
B Longer extension cords are available and may be used if care is exercised in
their use.
C If a long extension cord is used:
1 the marked electrical rating of the extension cord should be at least as great
as the electrical rating of the appliance.
2 if the appliance is of the grounded type, the extension cord should be a
grounding type
3 the cord should not hang from the table to avoid the risk of tangling or
tripping.

2
CONTENTS
GENERAL INFORMATION................................................................................................................... 3
APPLIANCE......................................................................................................................................... 4
ACCESSORIES ......................................................................................................................................................4
INSTALLATION .................................................................................................................................... 5
STARTING THE MACHINE .........................................................................................................................................5
SETTING THE LANGUAGE.........................................................................................................................................6
“
AQUA PRIMA” WATER FILTER ...................................................................................................................................7
DISPLAY .............................................................................................................................................. 8
(OPTI-DOSE) INDICATES THE COFFEE DOSE PER CUP .................................................................................................... 8
ADJUSTMENTS................................................................................................................................... 9
COFFEE INTENSITY ................................................................................................................................................9
ADJUSTING THE HEIGHT OF THE DRIP TRAY ................................................................................................................. 9
COFFEE GRINDER ADJUSTMENT ................................................................................................................................9
BEVERAGE DISPENSING................................................................................................................. 10
ESPRESSO / COFFEE / LONG COFFEE ...................................................................................................................... 10
DISPENSING BEVERAGES WITH GROUND COFFEE ........................................................................................................ 11
HOT WATER DISPENSING .......................................................................................................................................12
DISPENSING STEAM ............................................................................................................................................. 13
MAKING CAPPUCCINO ........................................................................................................................................... 14
MILK ISLAND (OPTIONAL) ......................................................................................................................................15
BEVERAGE PROGRAMMING............................................................................................................16
1. PROGRAMMING FOR SELF-LEARNING ....................................................................................................................16
2.
PROGRAMMING FROM THE “BEVERAGE SETTINGS” MENU .......................................................................................... 16
PROGRAMMING THE MACHINE....................................................................................................... 18
MACHINE SETTINGS ............................................................................................................................................. 19
“
LANGUAGE” MENU.............................................................................................................................................. 19
“
WATER HARDNESS” MENU .................................................................................................................................... 20
“
ACOUSTIC ALARM” MENU .....................................................................................................................................20
“
FILTER ALARM” MENU ......................................................................................................................................... 21
“
RINSE” MENU .................................................................................................................................................... 21
MAINTENANCE ................................................................................................................................. 22
“WATER FILTER” MENU ......................................................................................................................................... 22
“
DESCALING” MENU ............................................................................................................................................. 24
BREW GROUP WASHING ........................................................................................................................................27
PROGRAMMING THE MACHINE....................................................................................................... 28
ENERGY SAVING ................................................................................................................................................. 28
SPECIAL FUNCTIONS ............................................................................................................................................ 29
CLEANING AND MAINTENANCE ...................................................................................................... 30
GENERAL MACHINE CLEANING ................................................................................................................................ 30
CLEANING THE BREW GROUP. ................................................................................................................................ 31
ERROR CODES................................................................................................................................. 32
TROUBLESHOOTING........................................................................................................................
33
SAFETY RULES................................................................................................................................. 34
TECHNICAL DATA ............................................................................................................................. 36

3
The coffee machine is suitable for preparing espresso coffee using coffee beans, and it is equipped with a
device to dispense steam and hot water.
The machine is designed for domestic use only, and is not suitable for heavy or professional use.
Warning: no liability is assumed for any damage caused by:
• incorrect use not in accordance with the intended uses;
• repairs not carried out by authorized customer service centres;
• tampering with the power cable;
• tampering with any part of the machine;
• the use of non-original spare parts and accessories;
• failure to descale the machine or use at temperatures below 0°C (32°F).
IN THESE CASES, THE WARRANTY IS NOT VALID.
Keep these operating instructions in a safe place and make them available to anyone else who may use the coffee
machine. For further information or in case of problems, please refer to any authorized service centre.
THE WARNING TRIANGLE INDICATES ALL IMPORTANT INSTRUCTIONS
FOR THE USER’S SAFETY. PLEASE FOLLOW THESE INSTRUCTIONS
CAREFULLY TO PREVENT SERIOUS INJURIES!
HOW TO USE THESE OPERATING INSTRUCTIONS.
GENERAL INFORMATION
4
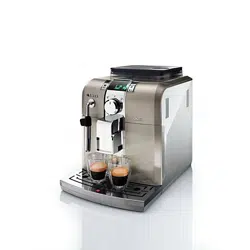
Compartment for pre-
ground coffee
ACCESSORIES
“Aqua Prima”
ZDWHU¿OWHU
Ground coffee
measuring scoop
Cleaning brushWater hardness tester
APPLIANCE
Grinder adjustment key Power cable
Brew Group
Coffee grounds drawer
Socket for power cable
Coffee bean hopper
Power button
Service door
Coffee bean hopper cover
Drip tray
Control panel
SBS knob
Dispensing head
'ULSWUD\JULOODQGÀRDW
Hot water / steam
spout
Water tank
Hot water / steam knob
“Milk Island” connection
Cup stacking surface
5
1 2 3
4
7
65
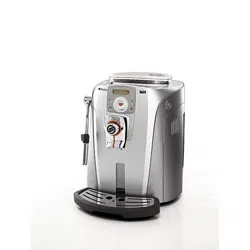
INSTALLATION
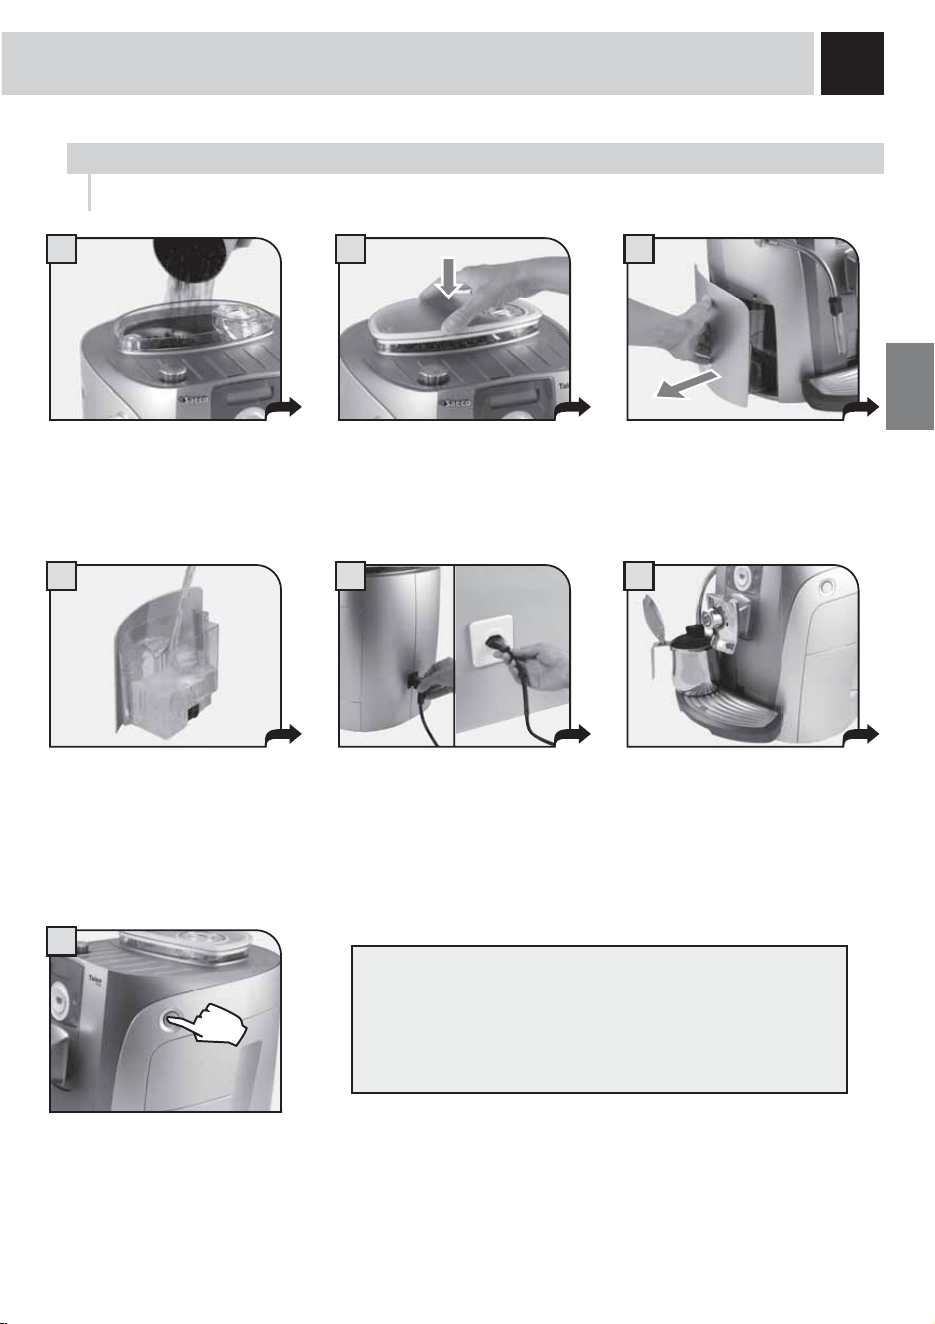
Attach the female end of the power
cord to the machine. Insert the
male end into the power outlet
(see data tag).
Place a container beneath the hot
water spout.
Remove the coffee bean hopper
cover.
Fill the hopper with coffee beans.
Close the cover pushing it down
completely.
Remove the water tank. We
recommend installing the “Aqua
3ULPD´ZDWHU¿OWHUVHHSDJH
Press the main power button to the
“ON” position.
Make sure that the main power button is not pressed in the “ON” position.
Fill the tank with fresh drinking
water. Do not exceed the “max”
level indicated on the water tank.
2QFH¿OOHGSODFHWKHWDQNEDFNLQWR
the machine.
STARTING THE MACHINE
TO ASSESS WATER HARDNESS, SEE “WATER
HARDNESS MENU” ON PAGE 20.
The machine automatically
primes the water circuit.
The machine is now ready for
use.
Water may not be dispensed
into the container.
This should not be considered a
malfunction.
6
1 2 3
4 5 6
7 8
2.1 language
English
Talea Ring
INSTALLATION
SETTING THE LANGUAGE
2.1 language
English
rinse cycle
please wait
rinse cycle
please wait
medium aroma
espresso
2.1 language
English
warming up
:KHQWKHPDFKLQHLVVZLWFKHGRQIRUWKH¿UVWWLPHLWUHTXLUHVWKHVHOHFWLRQRIWKHGHVLUHGODQJXDJH
This allows you to adjust the parameters of the beverages to the typical parameters of the country
where the machine is used. This is why some languages are differentiated also by country.
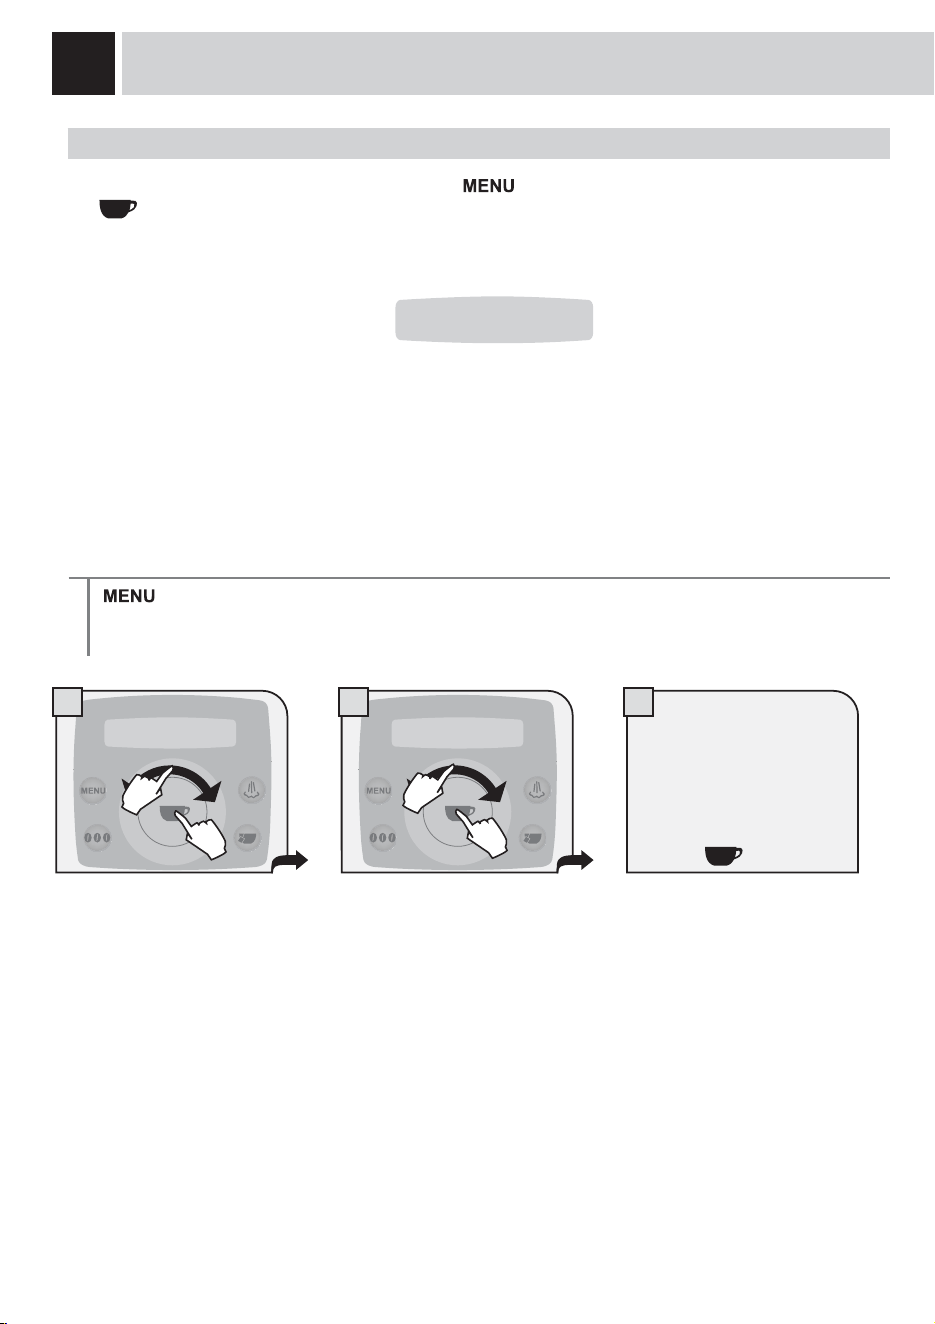
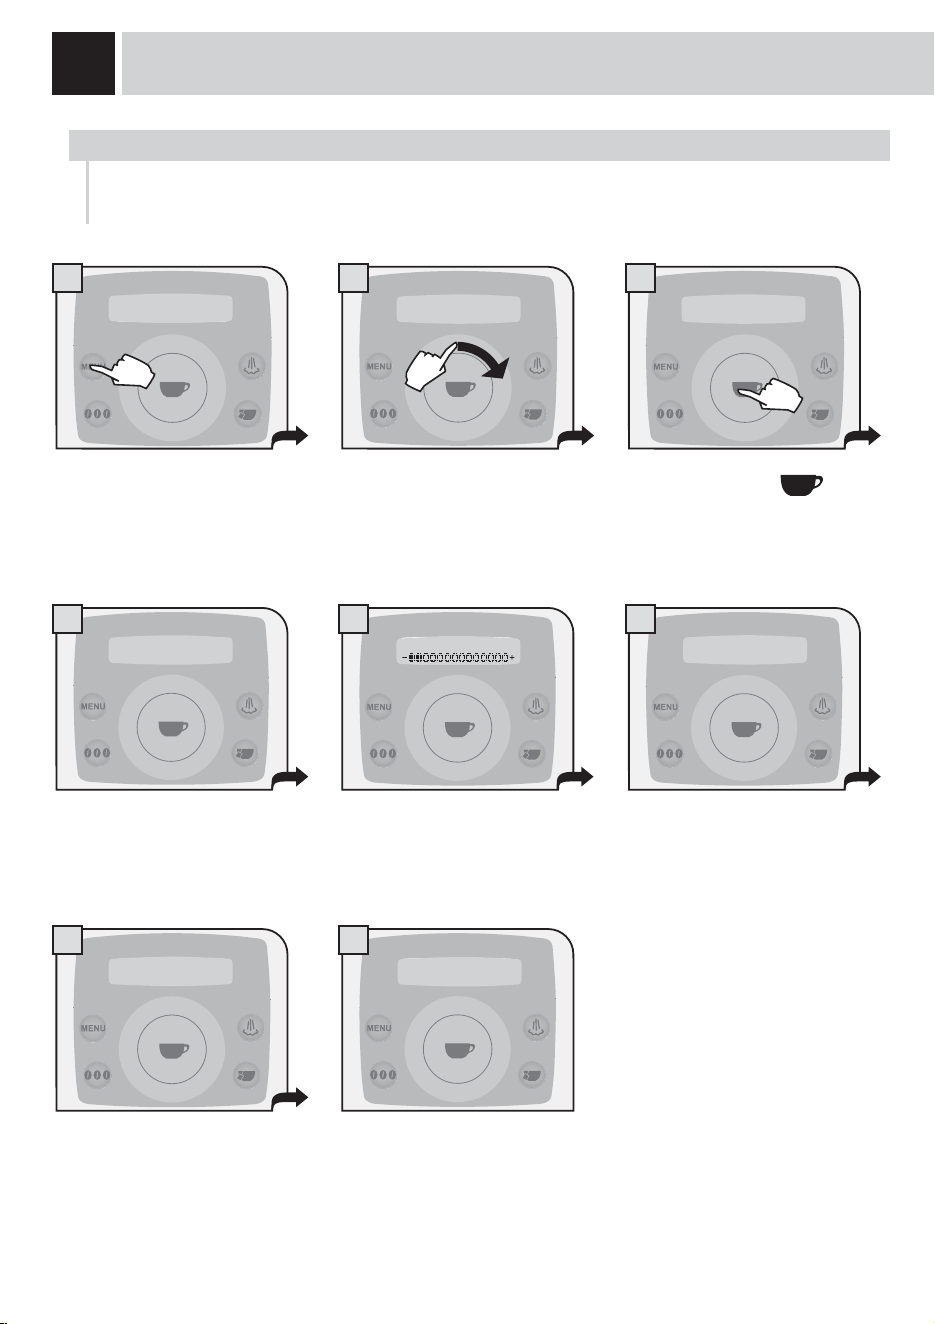
Select the desired language by
navigating the click wheel with
\RXU¿QJHU
When the desired language is
displayed, press
.
The machine starts and displays
all the messages in the selected
language.
Wait until the machine completes
the heating stage.
When the right temperature is
reached, the machine performs a
rinse cycle of the internal circuits.
The screen for product
dispensing appears on the
display.
A small quantity of water is
dispensed. Wait for this cycle to
be completed automatically. See
page 21 to enable/disable the
function.

7
3
4
1
2
5 6
7 8 9
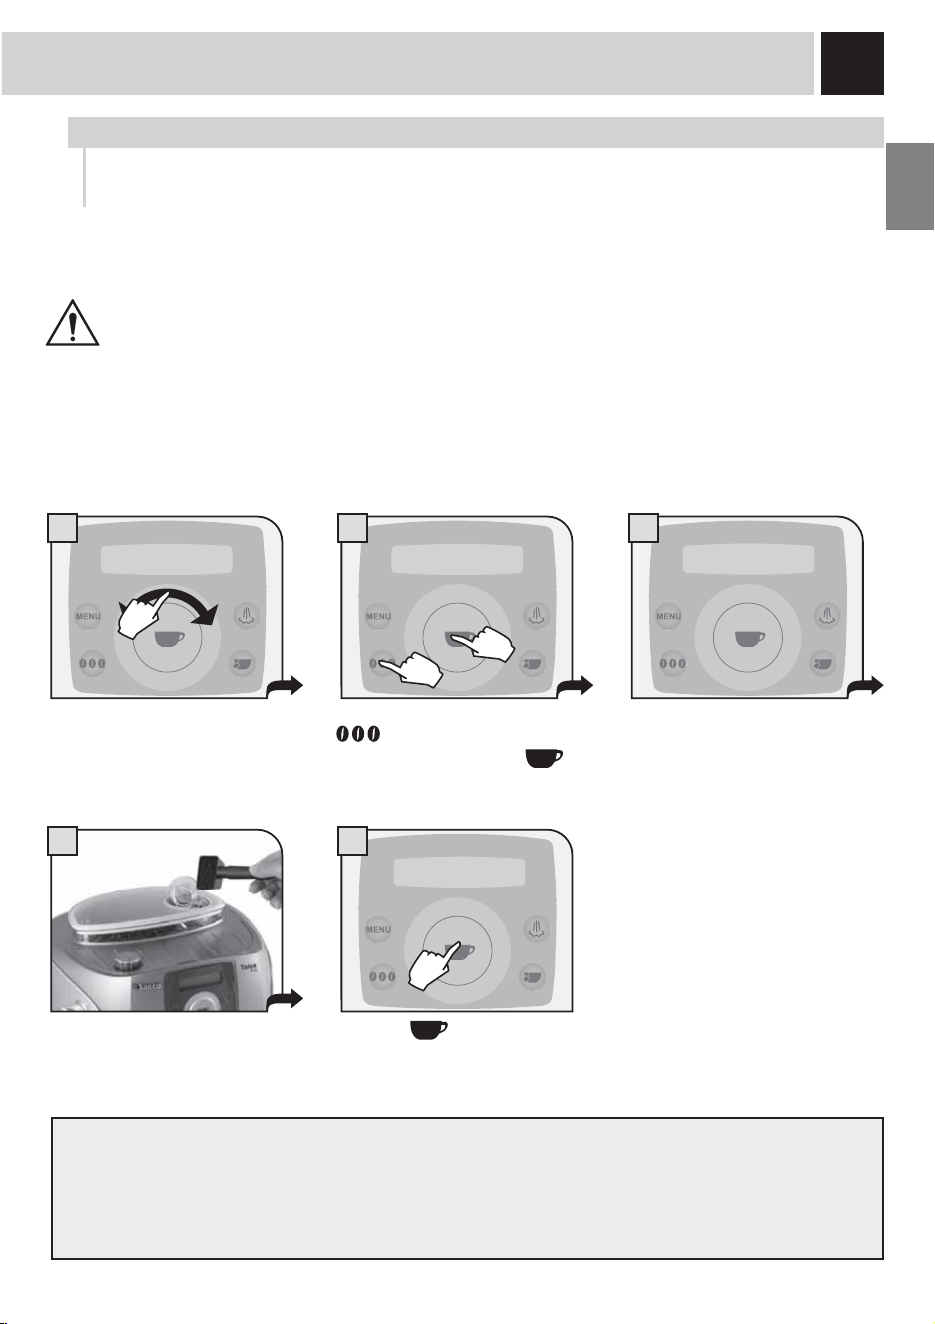
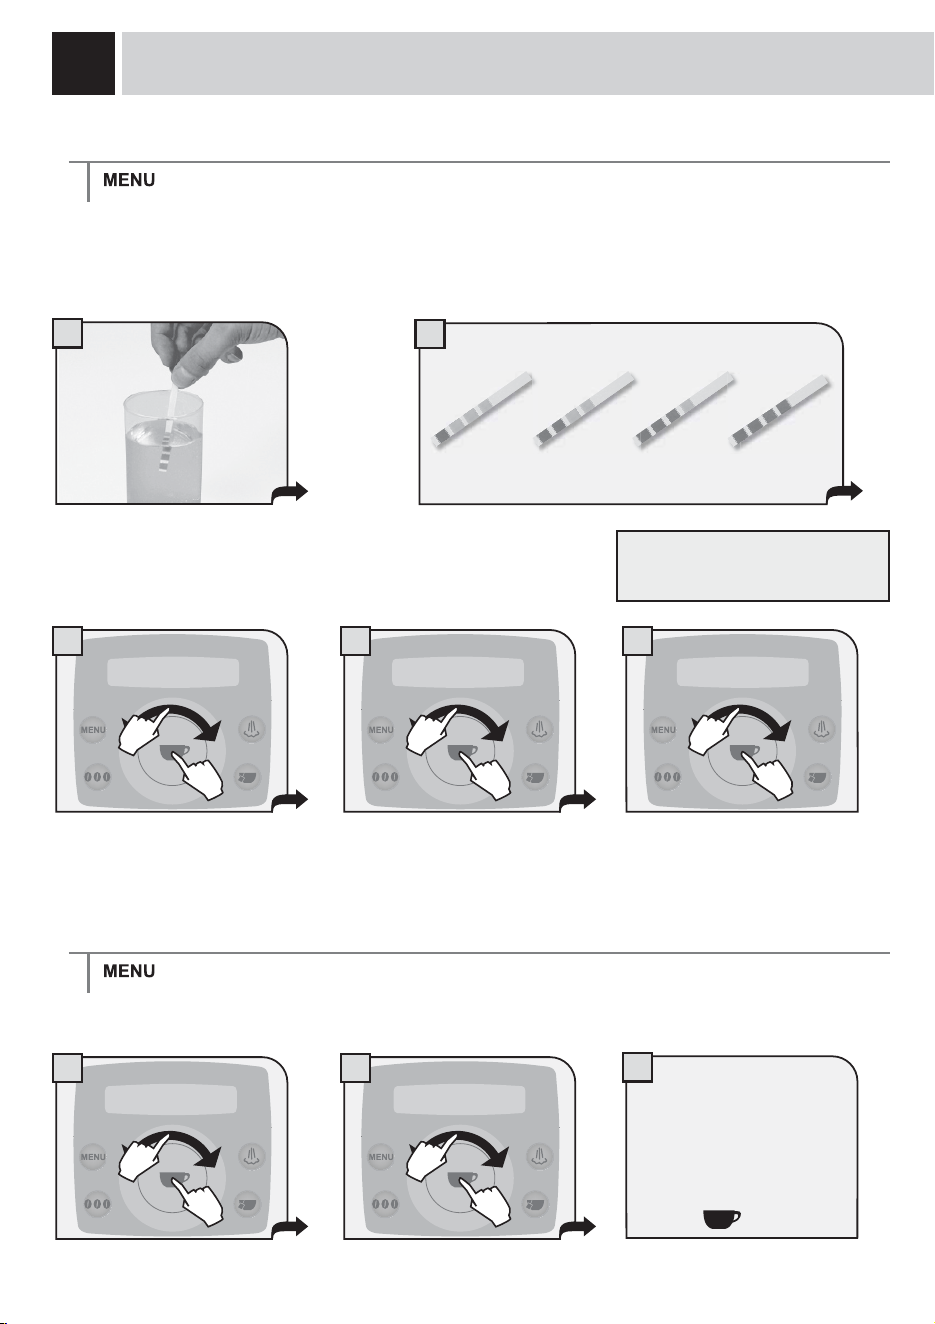
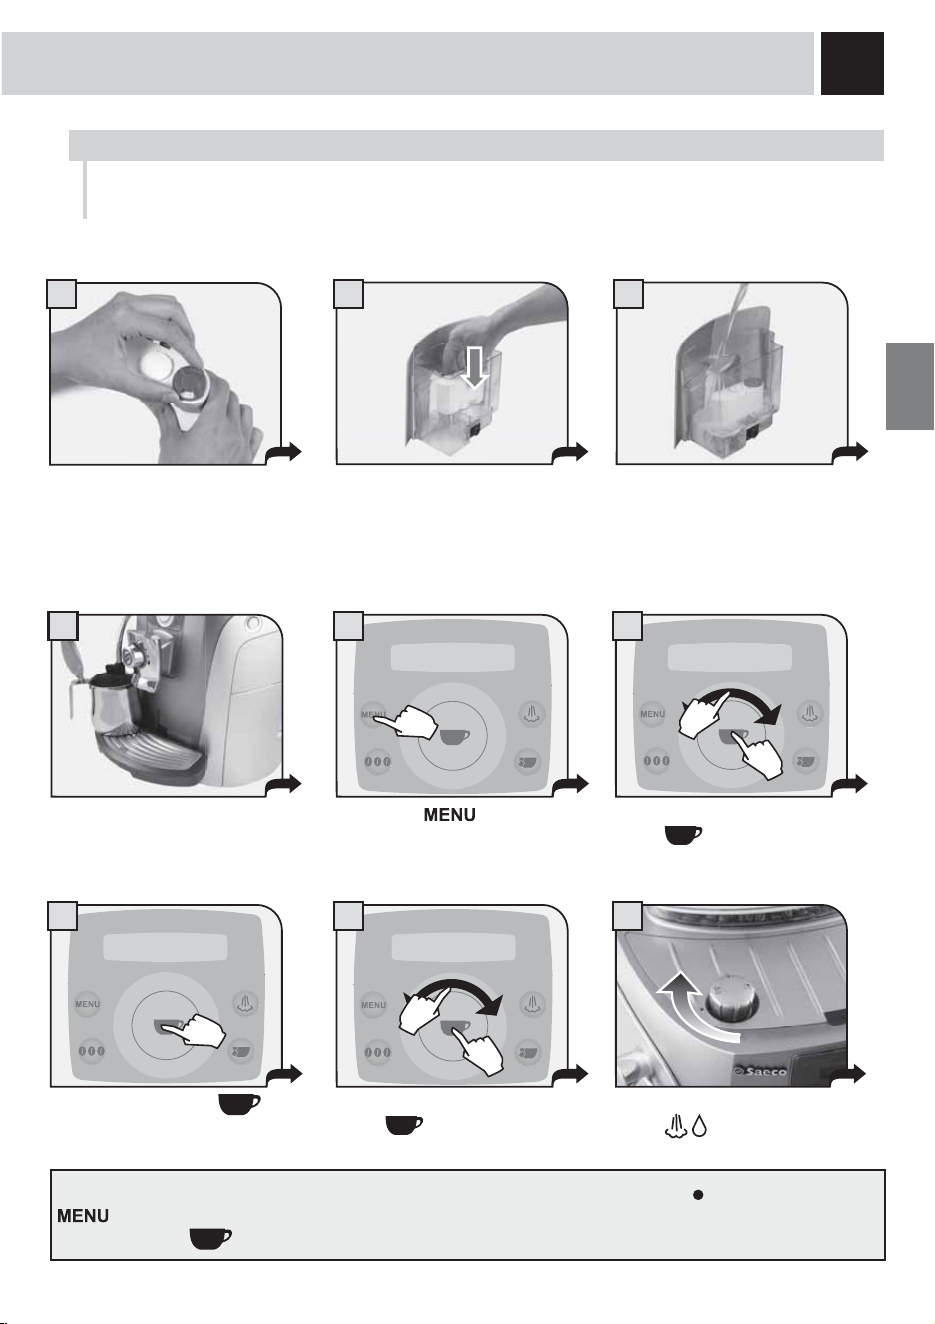
Remove the “Aqua Prima” water
¿OWHUIURPLWVSDFNDJLQJ(QWHUWKH
date of the current month.
“AQUA PRIMA” WATER FILTER
To improve the quality of the water you use, and guarantee longer machine life at the same time, it is
UHFRPPHQGHGWKDW\RXLQVWDOOWKH³$TXD3ULPD´ZDWHU¿OWHU$IWHULQVWDOODWLRQJRWRWKH¿OWHULQLWLDOL]DWLRQ
SURJUDPVHHSURJUDPPLQJ,QWKLVZD\WKHPDFKLQHDGYLVHVWKHXVHUZKHQWKH¿OWHUPXVWEHUHSODFHG
,QVHUWWKH¿OWHULQLWVSODFHZLWKLQWKH
HPSW\WDQNVHH¿JXUH3UHVVGRZQ
until it clicks into place.
Press again.
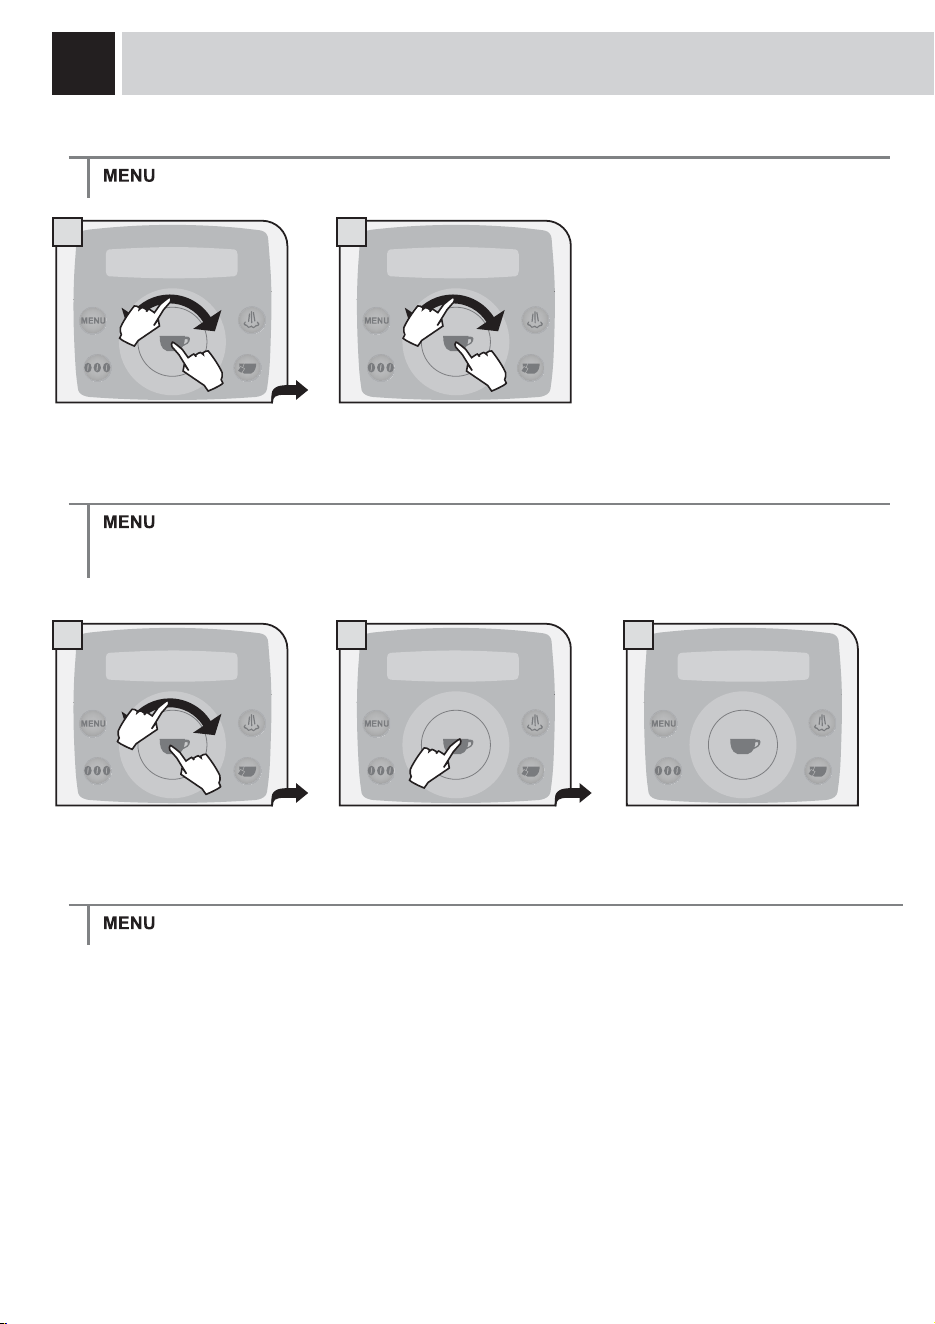
:KHQWKHPDFKLQHKDV¿QLVKHGWXUQWKHNQREXQWLOLWLVLQWKHUHVWSRVLWLRQ ). Press a few times until the
“exit” message is displayed. Then press
. The machine is now ready for use.
Fill the tank with fresh drinking
ZDWHU/HWWKH¿OWHUVRDNLQWKHIXOO
tank for 30 minutes for correct
initialization.
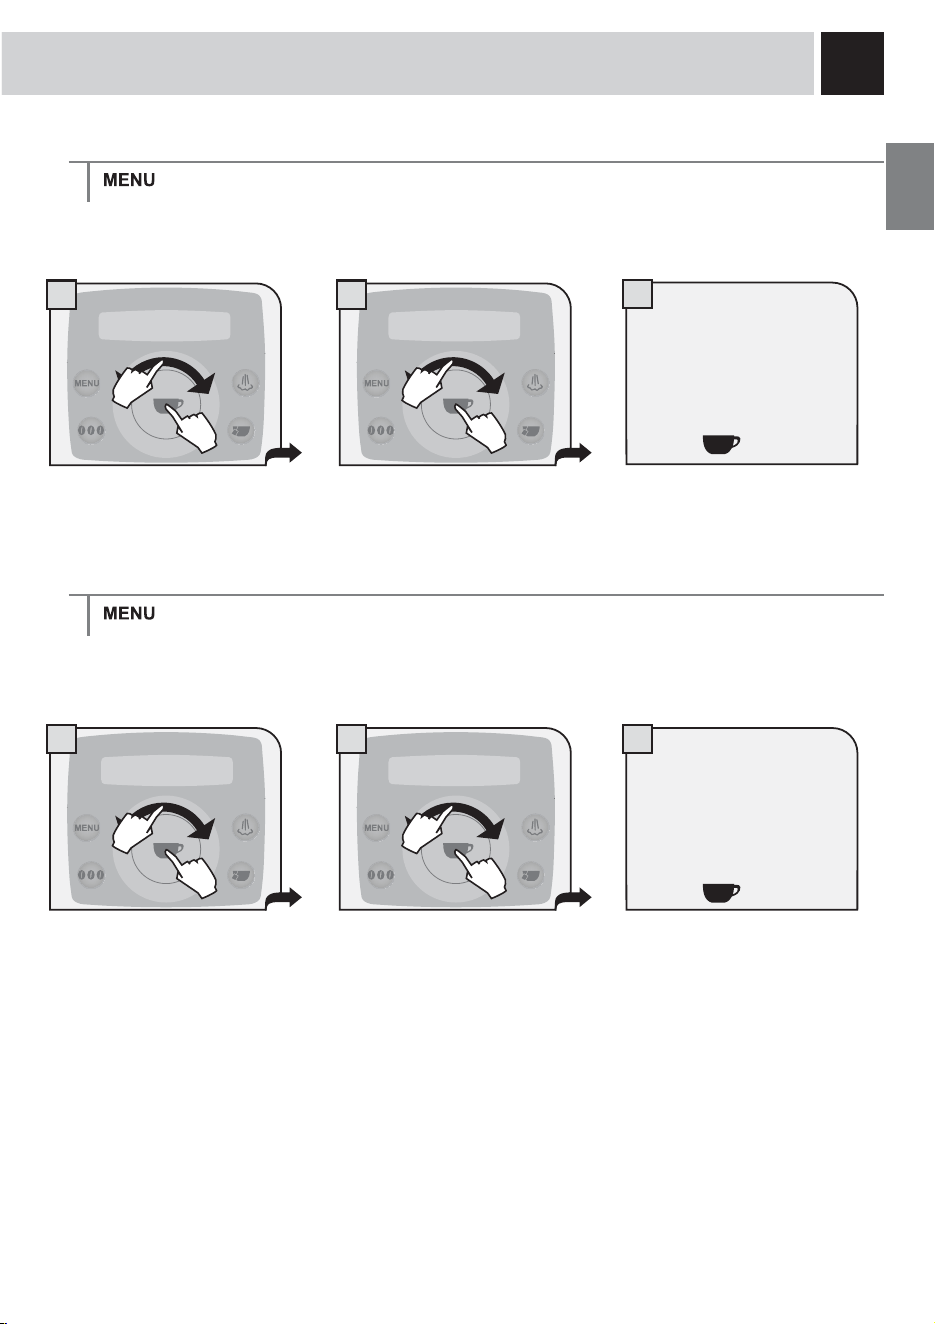
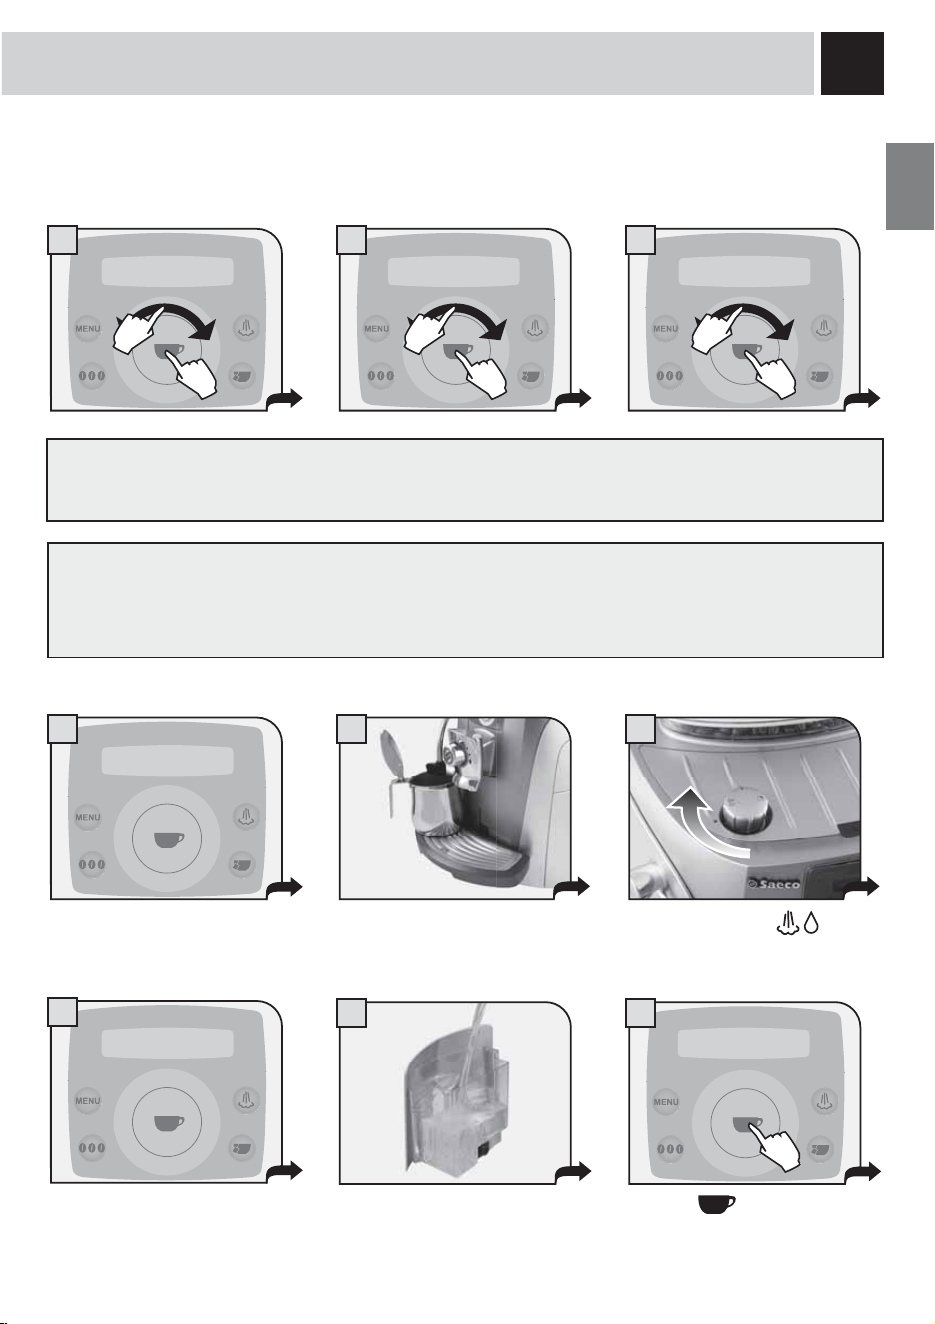
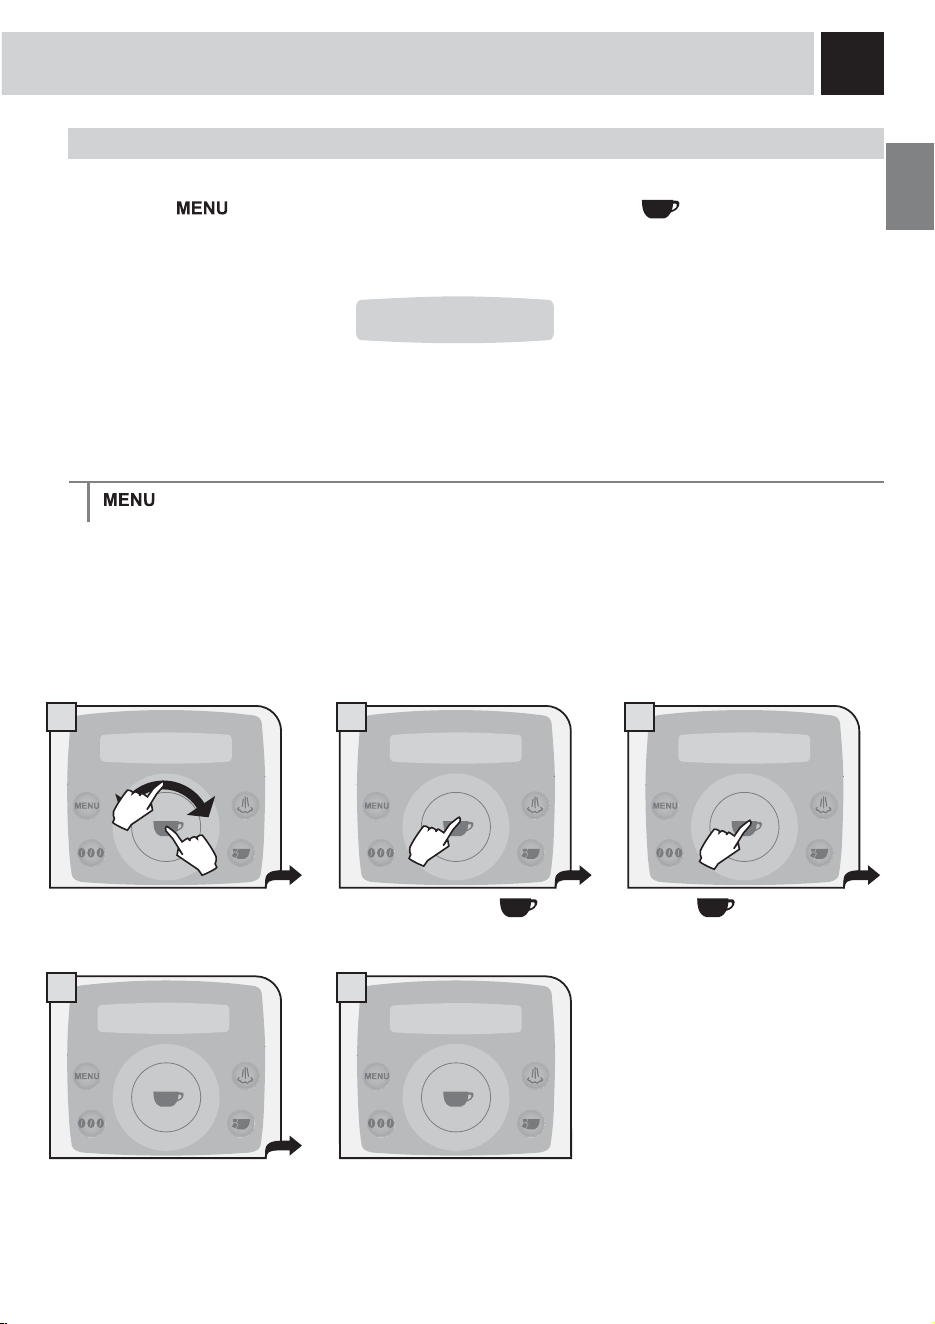
Place a container beneath the
steam/hot water spout.
Press
.
Select “maintenance” and press the
button.
Select “activate” and press the
button.
Turn the knob to the position.
Water dispensing begins.
1 bev. settings 3 maintenance
3.1 filter
3.1.3 activate
execute now
1.
2.
1.
2.
8
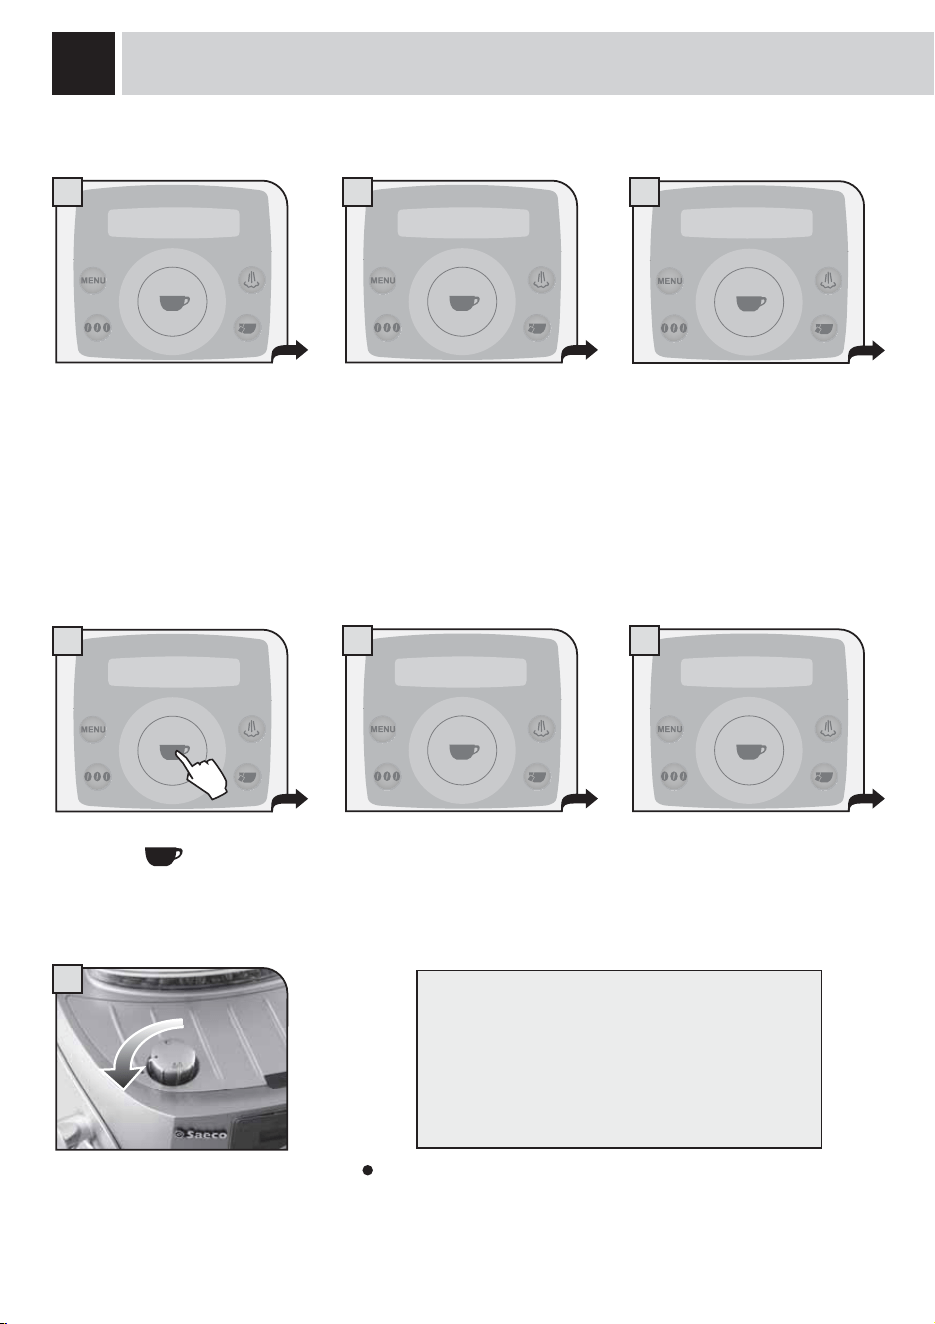
• Press the button twice to make 2 cups.
7KLVRSHUDWLRQFDQEHSHUIRUPHGXSXQWLOWKHJULQGLQJRIWKH¿UVWFXSLVFRPSOHWH
Press twice
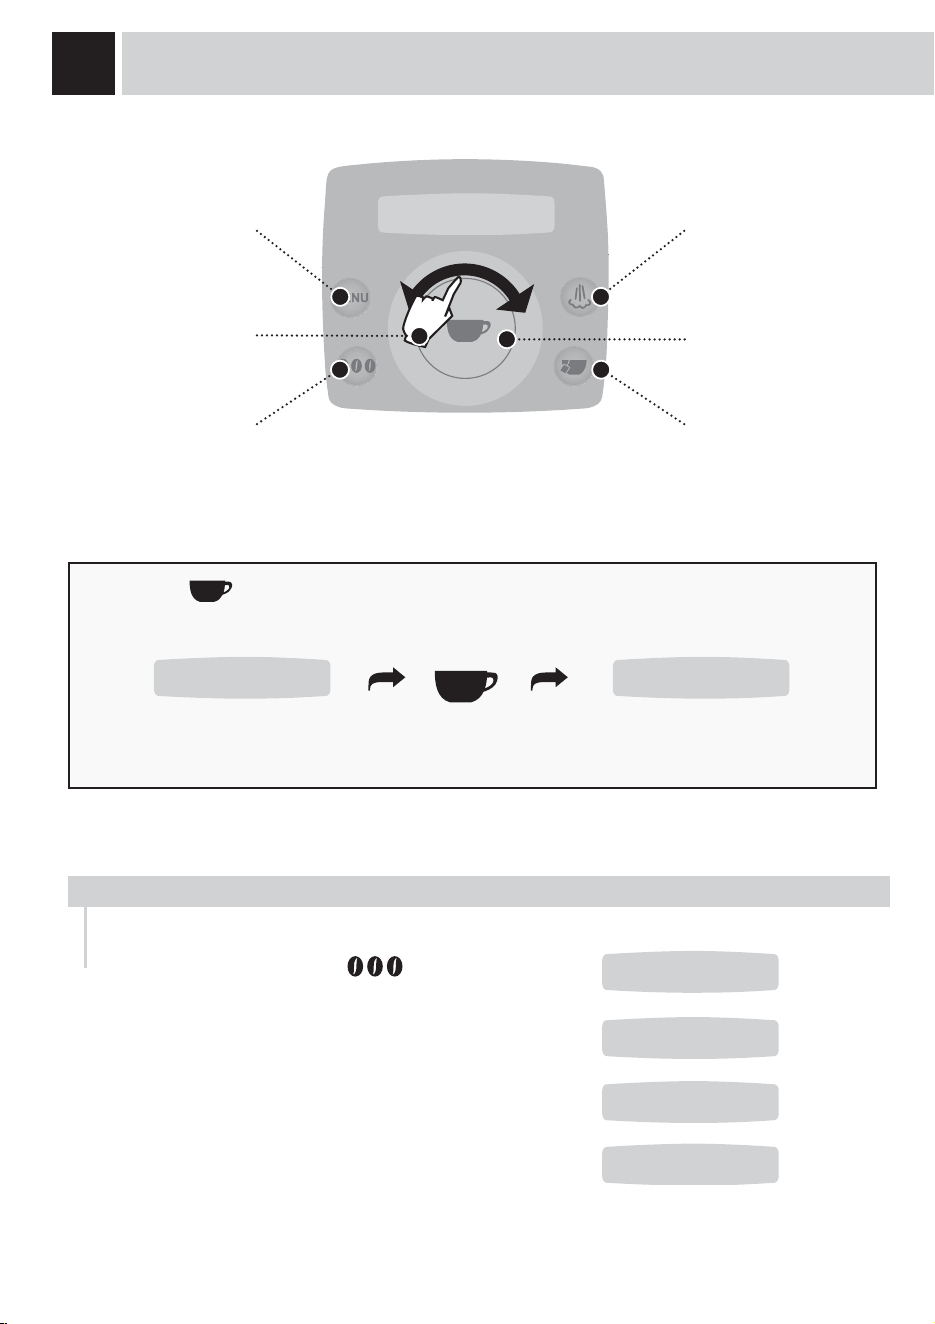
It is possible to choose three options (strong,
medium and mild) by pressing the
button.
These indicate the quantity of coffee the machine
grinds for each beverage. This button is also used
to select the pre-ground coffee function.
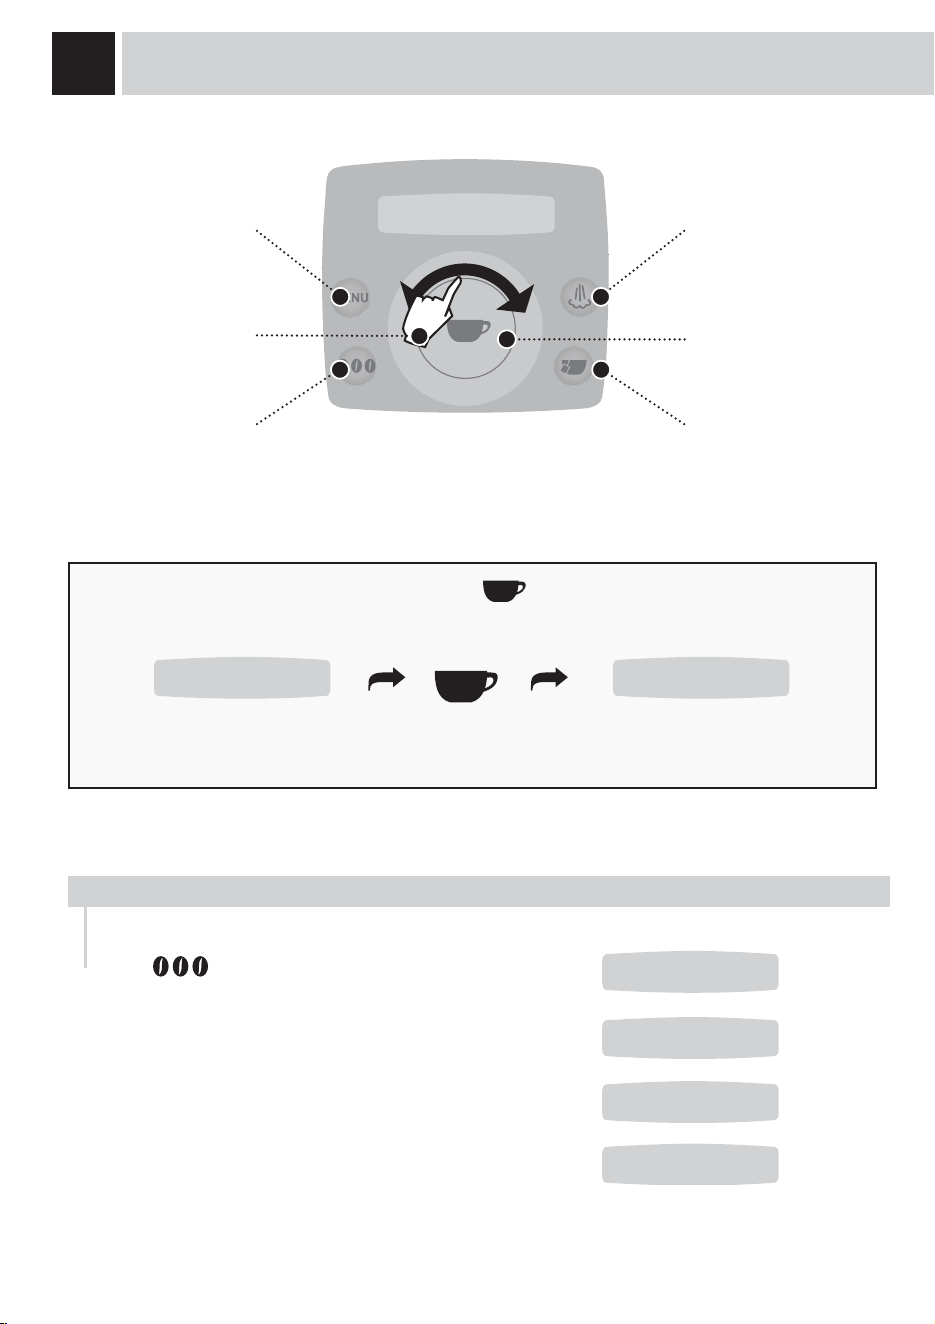
DISPLAY
Accessing the
programming menu
(OPTI-DOSE) INDICATES THE GROUND COFFEE QUANTITY
Click wheel
Select the coffee bean
dose or the quantity of
pre-ground coffee
Steam button
&RQ¿UPDWLRQEXWWRQ
Hot water button
7REUHZFXSVWKHPDFKLQHGLVSHQVHVKDOIRIWKHHQWHUHGTXDQWLW\DQGEULHÀ\LQWHUUXSWVGLVSHQVLQJLQ
order to grind the second serving of coffee.
Coffee dispensing is then restarted and completed.
SELECT THE AMOUNT OF COFFEE TO
BE GROUND BEFORE DISPENSING
THE BEVERAGE.
strong aroma
espresso
selected
espresso
selected
double espresso
strong aroma
espresso
medium aroma
espresso
mild aroma
espresso
pre-ground
espresso
9
MEDIUM
COFFEE
STRONG
COFFEE
MILD
COFFEE
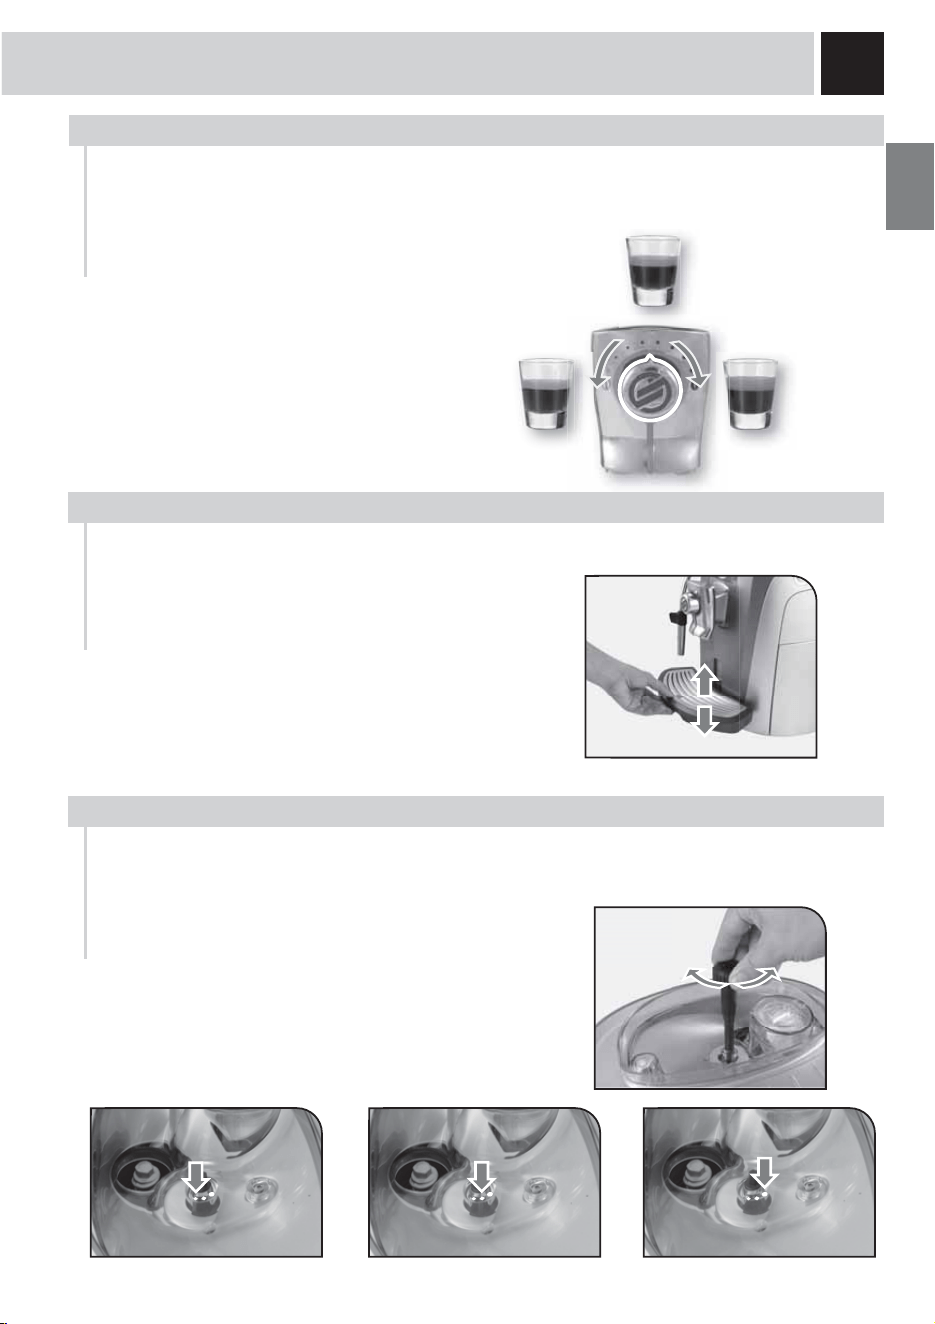
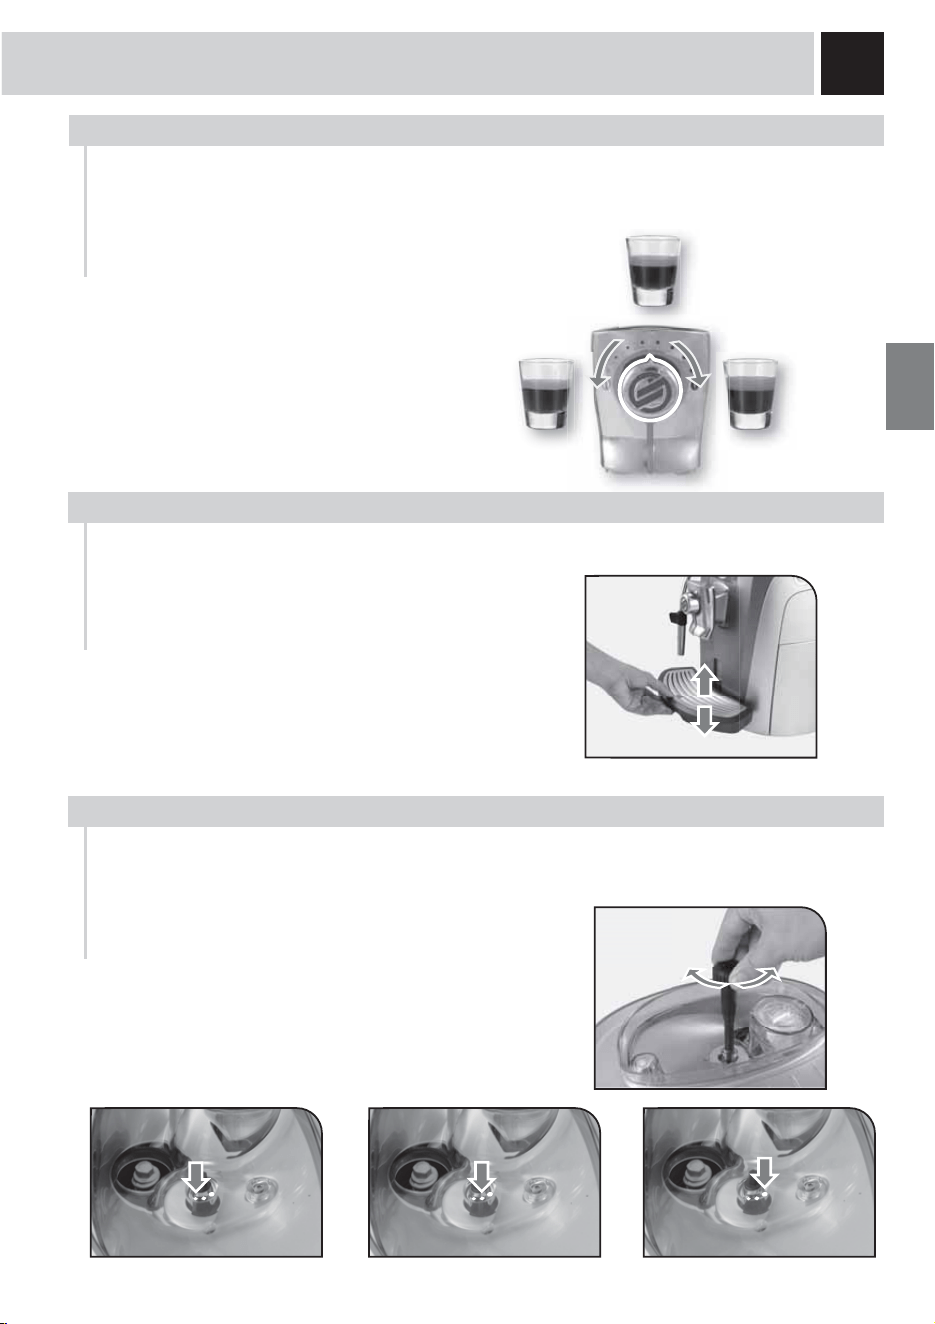
SBS adjusts the intensity of the brewed
coffee. The coffee may even be adjusted
while brewing. This adjustment has an
immediate effect on the selected type of
brewing.
COFFEE INTENSITY
SBS – SAECO BREWING SYSTEM
Height-adjustable drip tray.
To adjust the drip tray, lift it or lower it manually until it
reaches the desired height.
1RWH7KHUHLVDUHGÀRDWLQWKHGULSWUD\WRZDUQZKHQLW
is necessary to empty the tray.
ADJUSTING THE HEIGHT OF THE DRIP TRAY
ADJUSTMENTS
The SBS system has been carefully designed to give your coffee the intense taste you desire. Simply turn
the dial and you will notice that the coffee goes from mild intensity to strong intensity.
Adjust the drip tray before dispensing any beverages so as to be able to use any kind of cup.
The machine lets you make slight adjustments to the coffee grinder to adapt it to the kind of coffee used.
The adjustment must be performed by turning the pin
– located inside the coffee container – by means of
the supplied key only. Turn the pin one notch at a time
and brew 2-3 cups of coffee; the grinder adjustment
can only be noticed in this way.
The references located inside the container indicate
the grind setting.
COFFEE GRINDER ADJUSTMENT
FINE GRIND MEDIUM GRIND COARSE GRIND
10
3
4 5
1 2
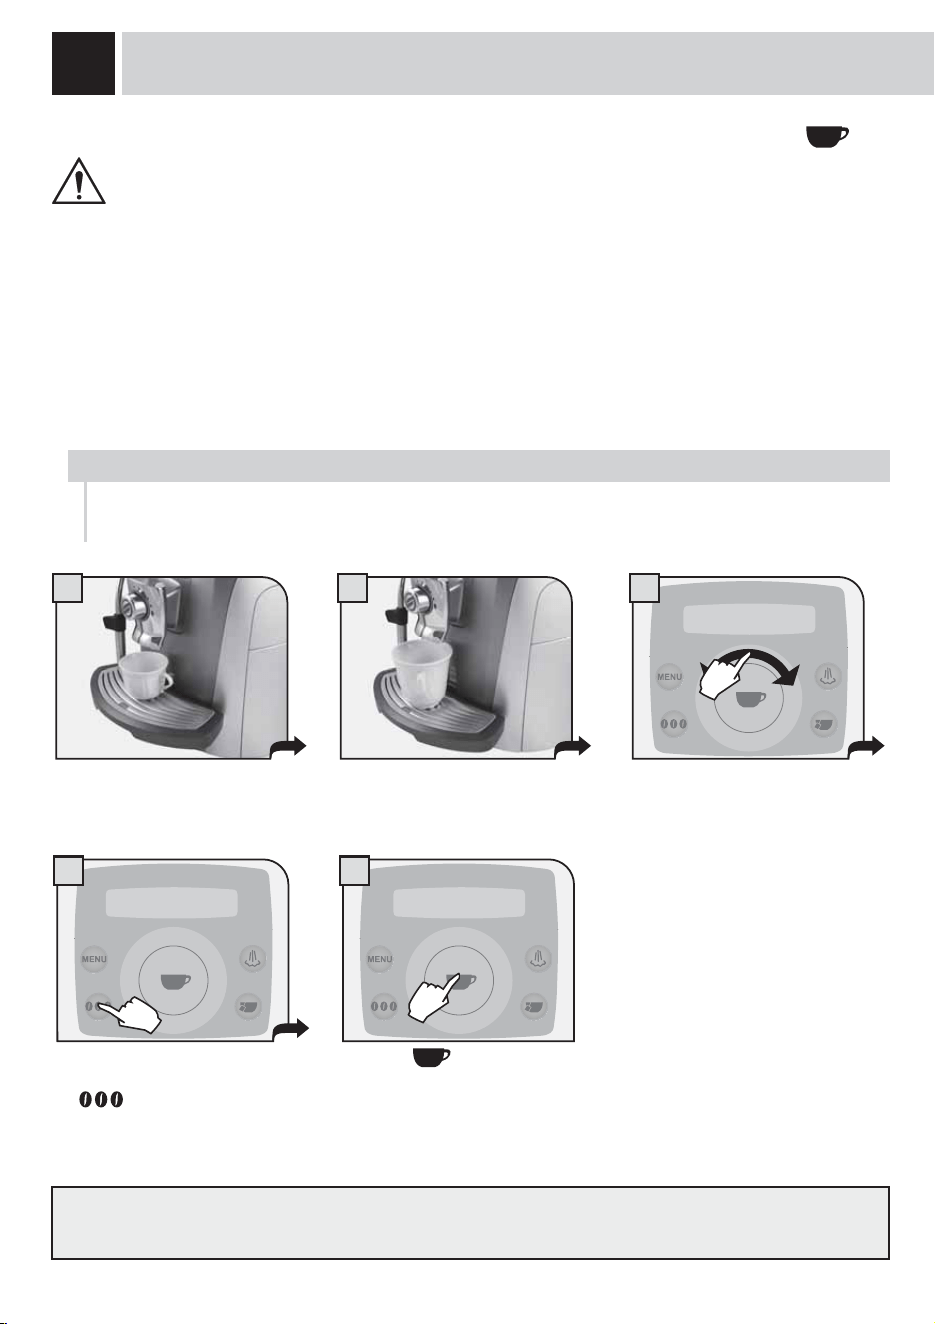
COFFEE BREWING CAN BE STOPPED AT ANY TIME BY PRESSING THE
BUTTON AGAIN.
THE STEAM SPOUT MAY REACH HIGH TEMPERATURES: DANGER OF
SCALDING. DO NOT TOUCH IT WITH BARE HANDS.
Check that all the containers are clean. To carry out this operation, follow the instructions in the “Cleaning
and Maintenance” section (see page 30).
7REUHZFXSVWKHPDFKLQHGLVSHQVHVWKH¿UVWFRIIHHDQGEULHÀ\VWRSVGLVSHQVLQJLQRUGHUWRJULQGWKH
second serving of coffee. Coffee dispensing is then restarted and completed.
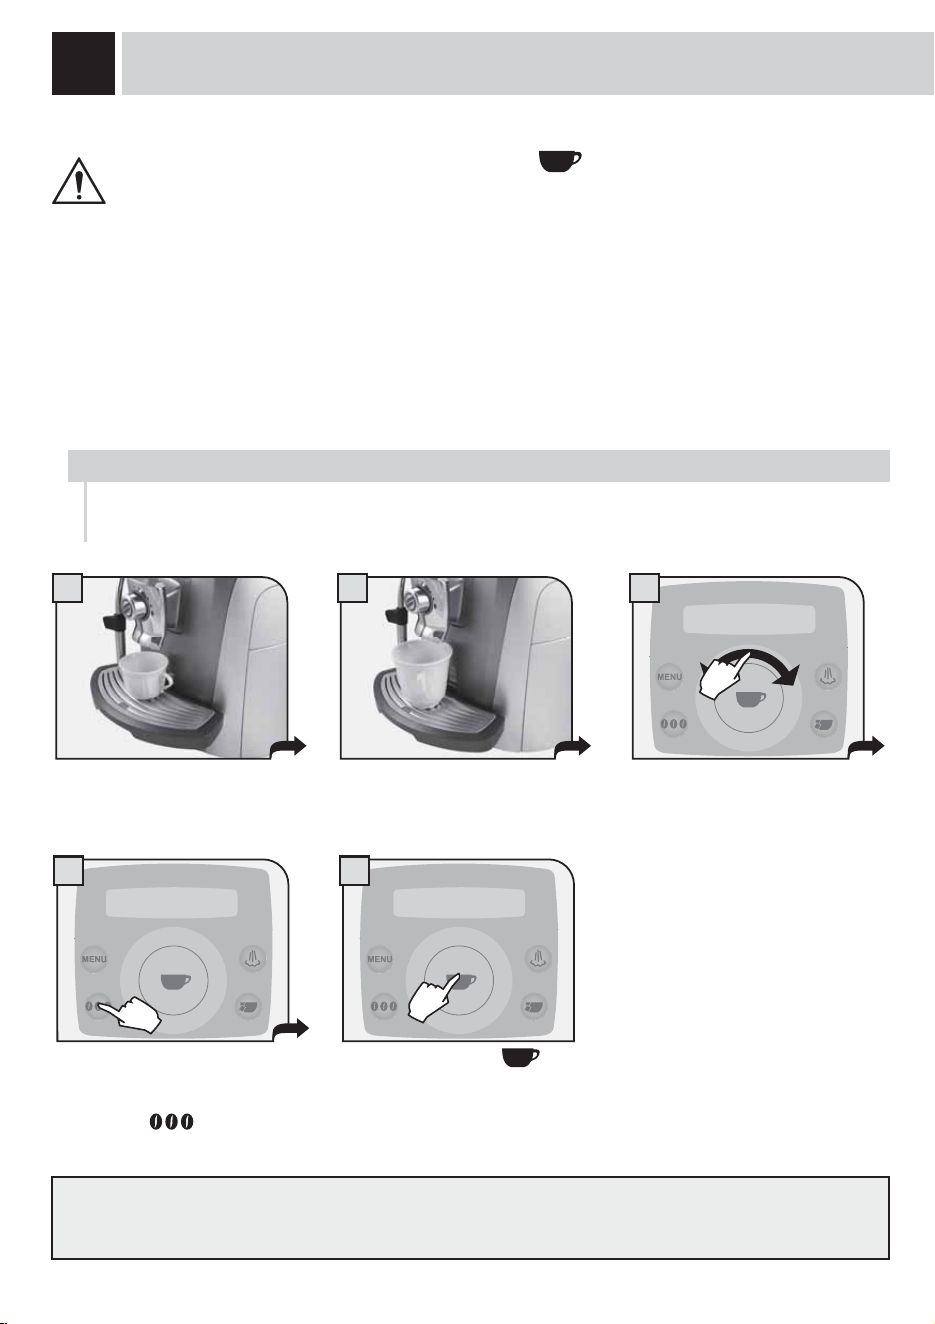
ESPRESSO / COFFEE / LONG COFFEE
If desired, select the quantity of
coffee to be ground by pressing
the
button one or more
times.
Press the
button: once for 1
cup and twice for 2 cups. The
machine begins dispensing the
selected beverage.
BEVERAGE DISPENSING
This procedure shows how to dispense an espresso. To dispense another type of coffee, select it by navigating
WKHFOLFNZKHHOZLWK\RXU¿QJHU8VHDSSURSULDWHHVSUHVVRRUFRIIHHFXSVVRWKDWWKHFRIIHHZLOOQRWRYHUÀRZ
The machine ends dispensing automatically on the basis of the quantity determined by the manufacturer. It is
possible to customize this quantity (see page 16).
Select the desired beverage by
navigating the click wheel with
\RXU¿QJHU
Position 1 - 2 cup(s) to dispense
an espresso
Position 1 - 2 cup(s) to dispense a
coffee or a long coffee
strong aroma
espresso
strong aroma
espresso
strong aroma
espresso
11
4
1 2
5
3
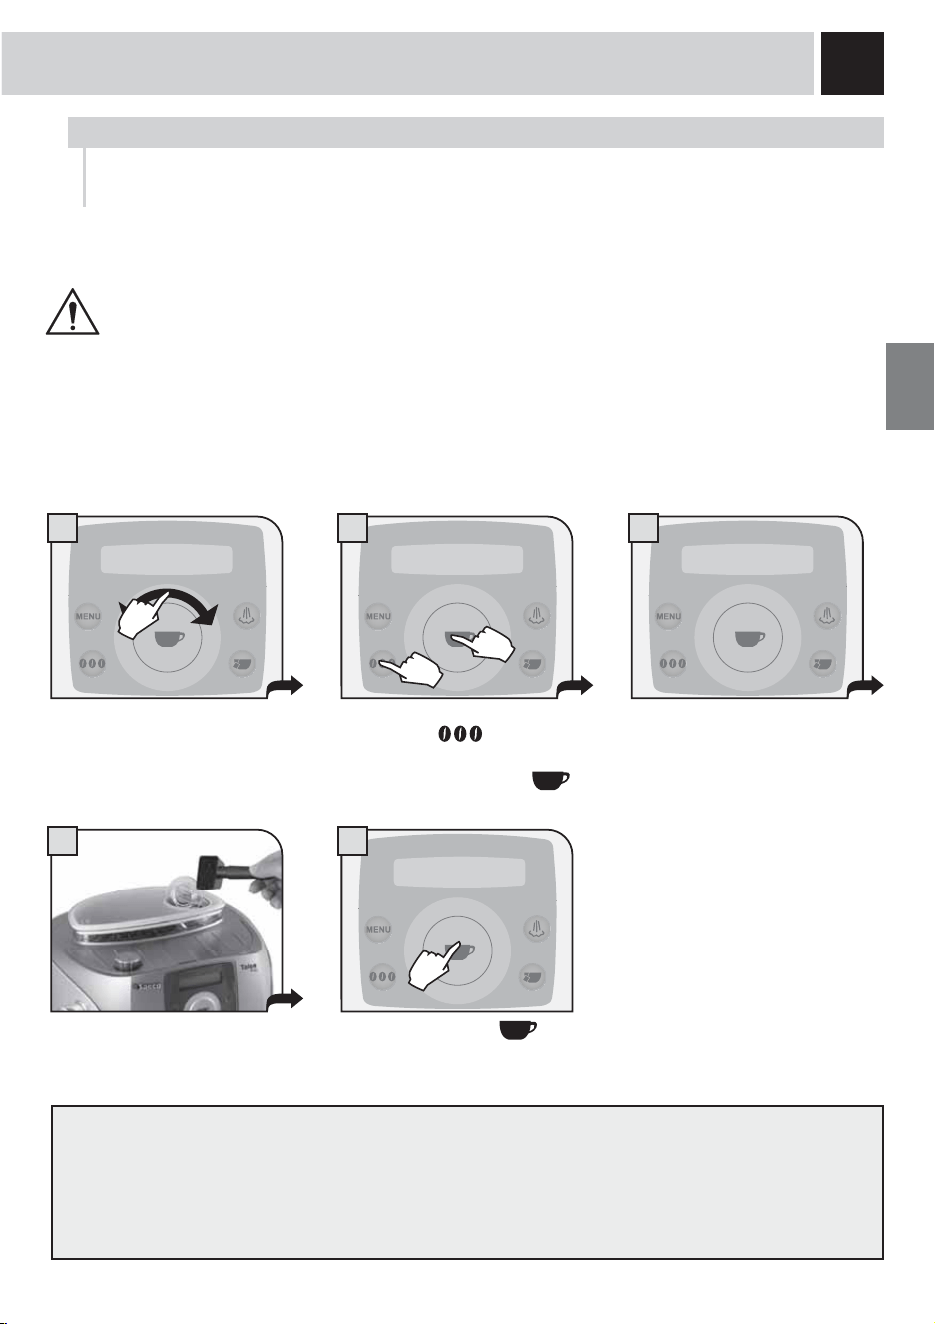
DISPENSING BEVERAGES WITH GROUND COFFEE
The machine allows you to use pre-ground and decaffeinated coffee.
Pre-ground coffee must be poured into the appropriate compartment positioned next to the coffee bean
hopper. Only use coffee ground for espresso machines and never coffee beans or instant coffee.
WARNING: ONLY PUT PRE-GROUND COFFEE INTO THE COMPARTMENT WHEN YOU WISH TO
DISPENSE THIS TYPE OF BEVERAGE.
ONLY INSERT ONE SCOOP OF GROUND COFFEE AT A TIME. TWO CUPS OF COFFEE CANNOT
BE DISPENSED AT THE SAME TIME.
Select the function by pressing the
button until the pre-ground
option appears. Press the
EXWWRQWRFRQ¿UP
Note:
• If brewing does not start within 30 seconds from the appearance of the message (3), the machine will
return to the main menu and discharge any inserted coffee into the coffee grounds drawer;
• If no pre-ground coffee is poured into the compartment, only water will be dispensed;
• If the dose is excessive or if 2 or more scoops of coffee are added, the machine will not dispense the
beverage and the coffee in the compartment will be discharged into the grounds drawer.
The preparation of an espresso using pre-ground coffee is shown in the example given below. The
customized choice of using pre-ground coffee is shown on the display.
Select the desired beverage by
navigating the click wheel with
\RXU¿QJHU
Press the
button to start
brewing.
Pour one scoop of ground coffee
into the appropriate compartment
using the measuring scoop
provided.
strong aroma
espresso
pre-ground
espresso
insert gr.coffee
and press ok
A message reminds the user to
pour ground coffee into the
appropriate compartment.
brewing
please wait
1.
2.
12
1 2 3
5
6
7
4
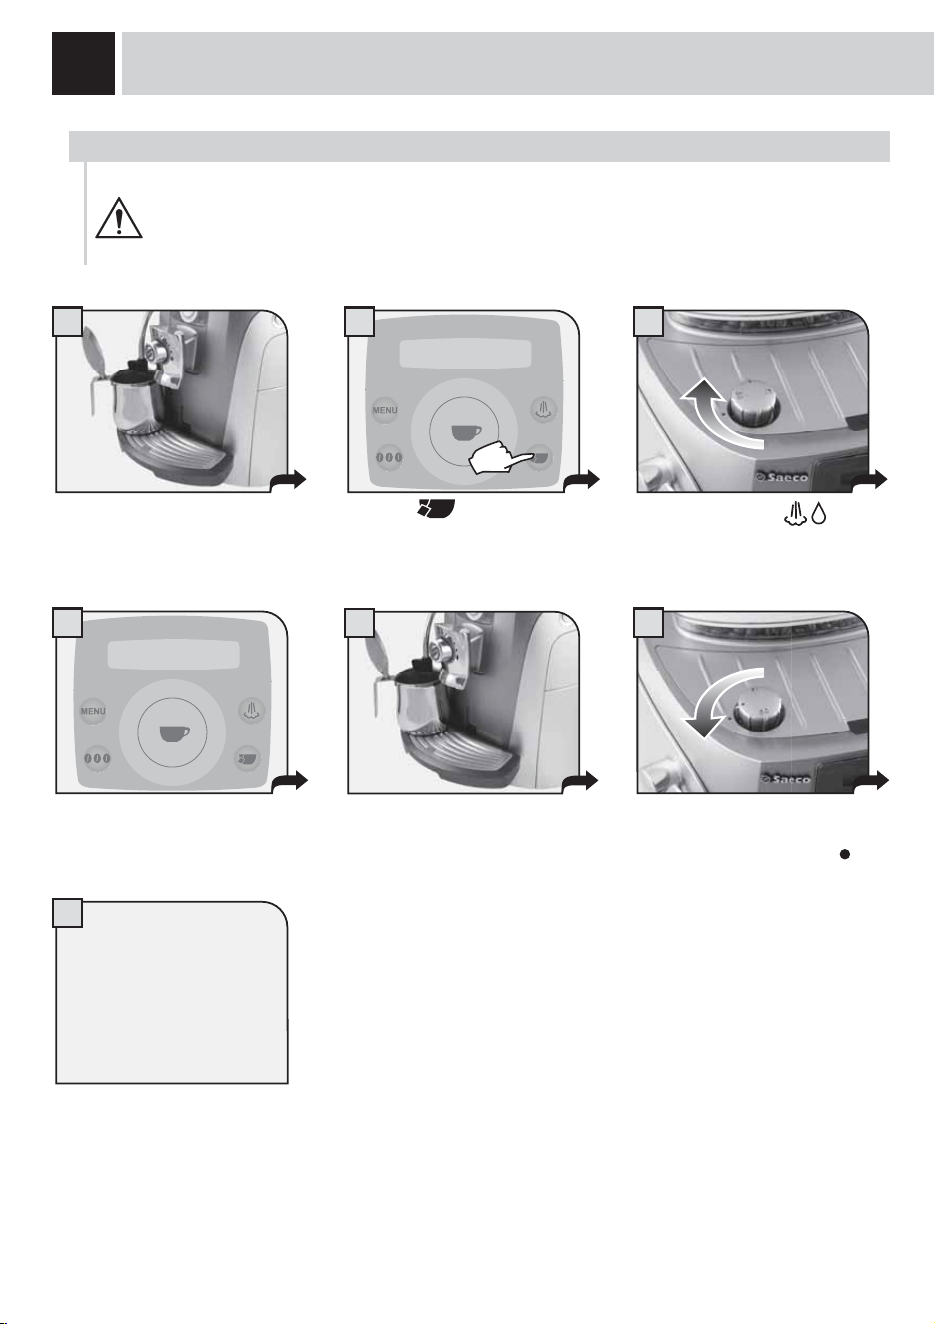
HOT WATER DISPENSING
DISPENSING MAY BE PRECEDED BY SHORT SPURTS OF HOT WATER AND SCALDING IS
POSSIBLE. THE HOT WATER/STEAM SPOUT MAY REACH HIGH TEMPERATURES: DO NOT
TOUCH IT WITH BARE HANDS. USE THE APPROPRIATE HANDLE ONLY.
BEVERAGE DISPENSING
Press the button.
Place a container beneath the
steam/hot water spout.
Turn the knob to the
position.
Wait until the machine has
dispensed the desired quantity of
water.
When the machine has dispensed
the desired quantity, turn the knob
until it is in the rest position (
).
To dispense another cup
of hot water, repeat this
operation.
selected
hot water
The display shows “brewing... hot
water”.
brewing
hot water
13
1 2 3
5 6
7
4
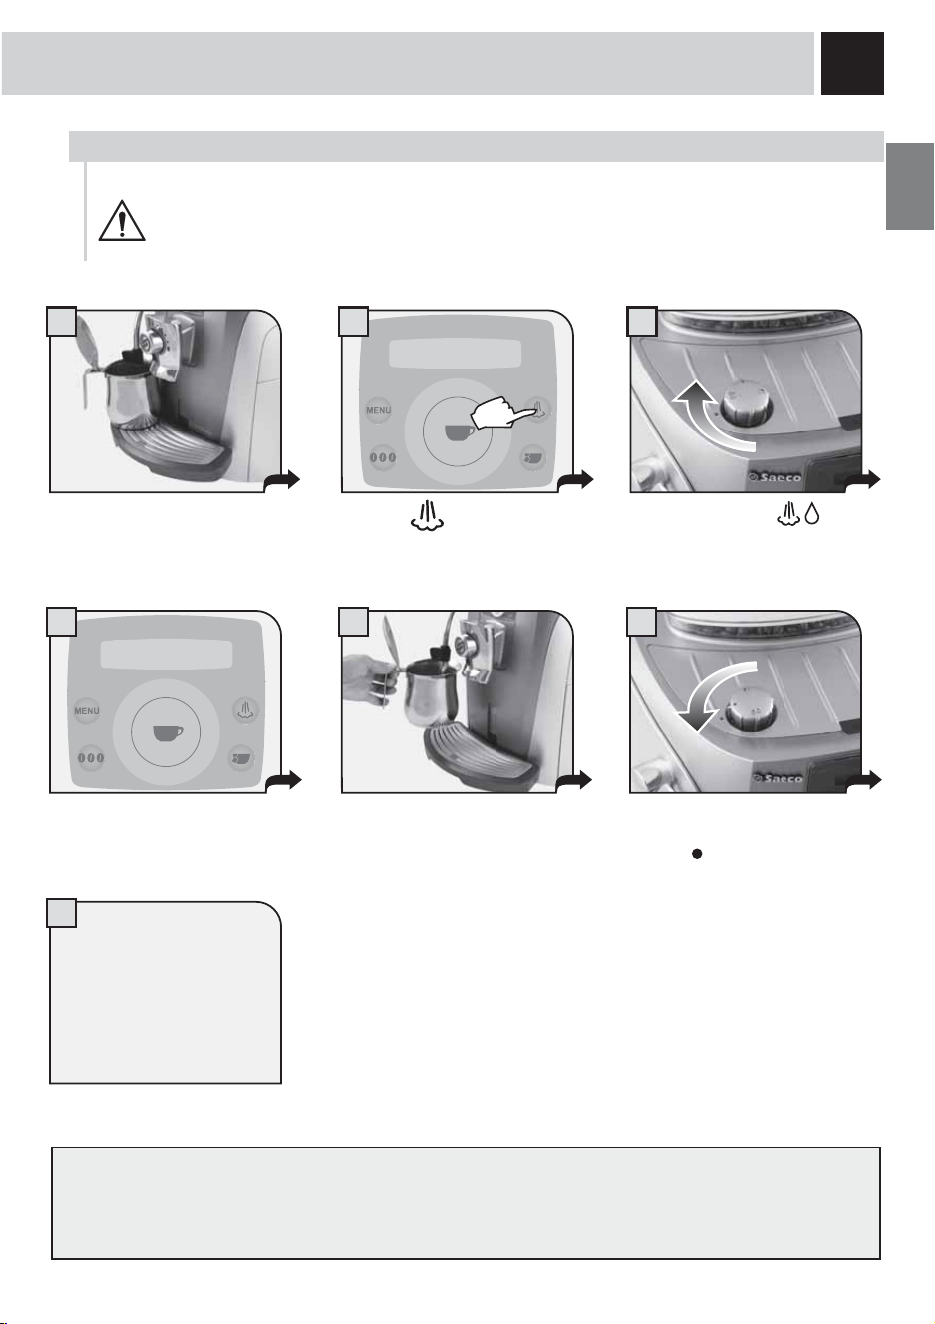
DISPENSING STEAM
Press the button.
Place a container with the
beverage to be warmed up
beneath the steam spout.
Turn the knob to the
position.
Heat the beverage; move the
container while heating.
:KHQ\RXKDYH¿QLVKHGWXUQ
the knob until it is in the rest
position (
).
After dispensing, clean the steam spout as described on page 30.
Repeat the operation to
heat another beverage.
DISPENSING MAY BE PRECEDED BY SHORT SPURTS OF HOT WATER AND SCALDING
IS POSSIBLE. THE HOT WATER/STEAM SPOUT MAY REACH HIGH TEMPERATURES:
DO NOT TOUCH IT WITH BARE HANDS. USE THE APPROPRIATE HANDLE ONLY.
The display shows “brewing...
steam”
selected
steam
brewing
steam
14
32
4 5 6
1
87
BEVERAGE DISPENSING
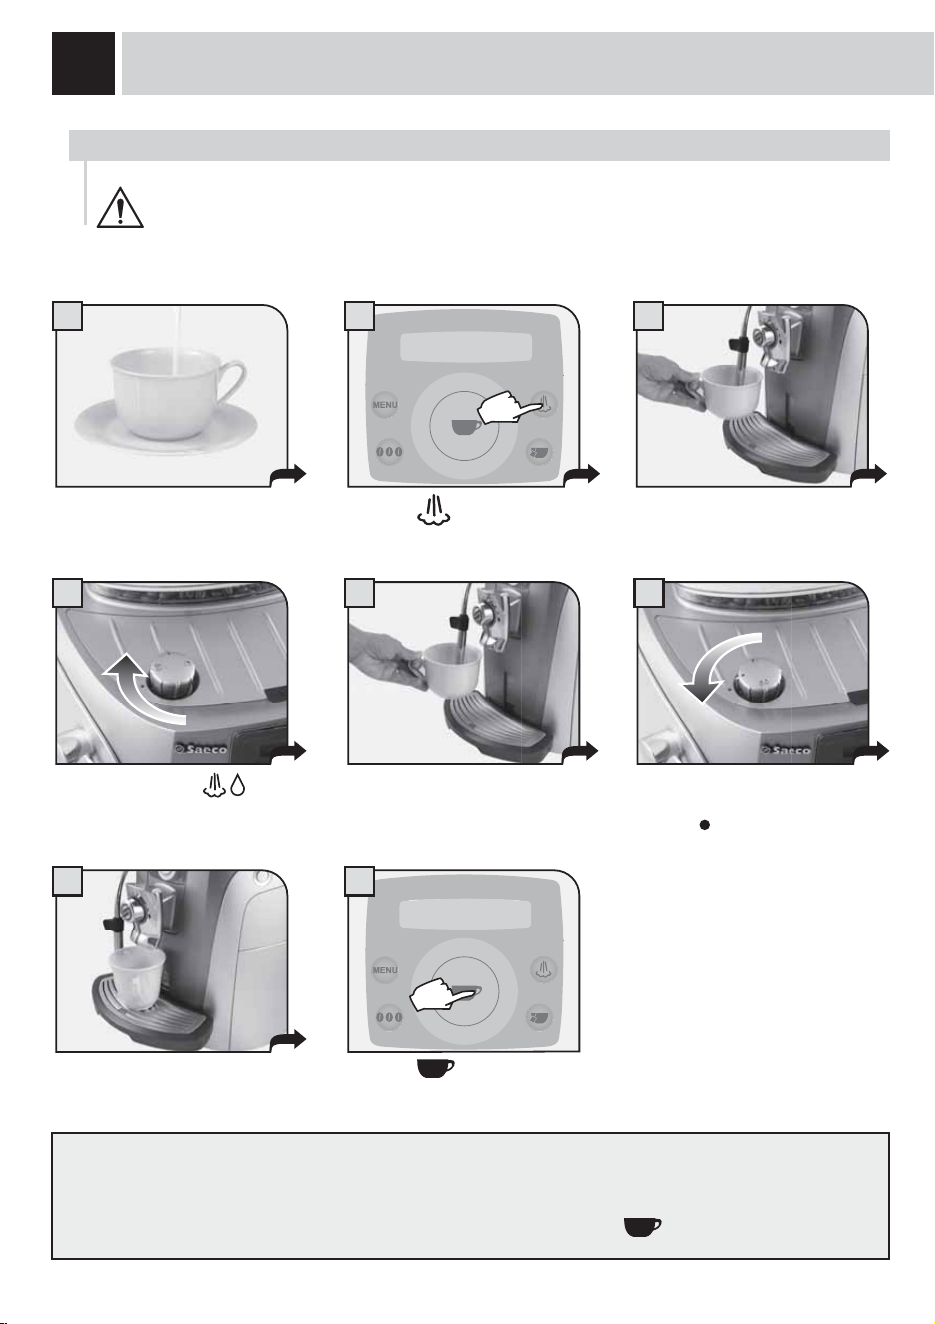
MAKING CAPPUCCINO
DISPENSING MAY BE PRECEDED BY SHORT SPURTS OF HOT WATER AND SCALDING IS
POSSIBLE. THE HOT WATER/STEAM SPOUT MAY REACH HIGH TEMPERATURES: DO NOT
TOUCH IT WITH BARE HANDS. USE THE APPROPRIATE HANDLE ONLY.
Press the button.
Immerse the steam spout in the
milk.
Turn the knob to the
.
position.
Froth the milk by gently swirling
the cup.
:KHQ\RXKDYH¿QLVKHGWXUQ
the knob until it is in the rest
position (
).
After dispensing, clean the steam spout as described on page 30.
To dispense 2 cappuccinos:
• froth two cups of milk by following step 1 to 6;
GLVSHQVHWZRFRIIHHVE\IROORZLQJVWHSVDQGLQWKLVFDVHSUHVVWKH
button twice).
Fill 1/3 of the cup with cold milk.
Press the
button once:
coffee dispensing begins.
Place the cup beneath the
dispensing head.
selected
steam
strong aroma
espresso
15
1 2 3
5
4
6 7 8
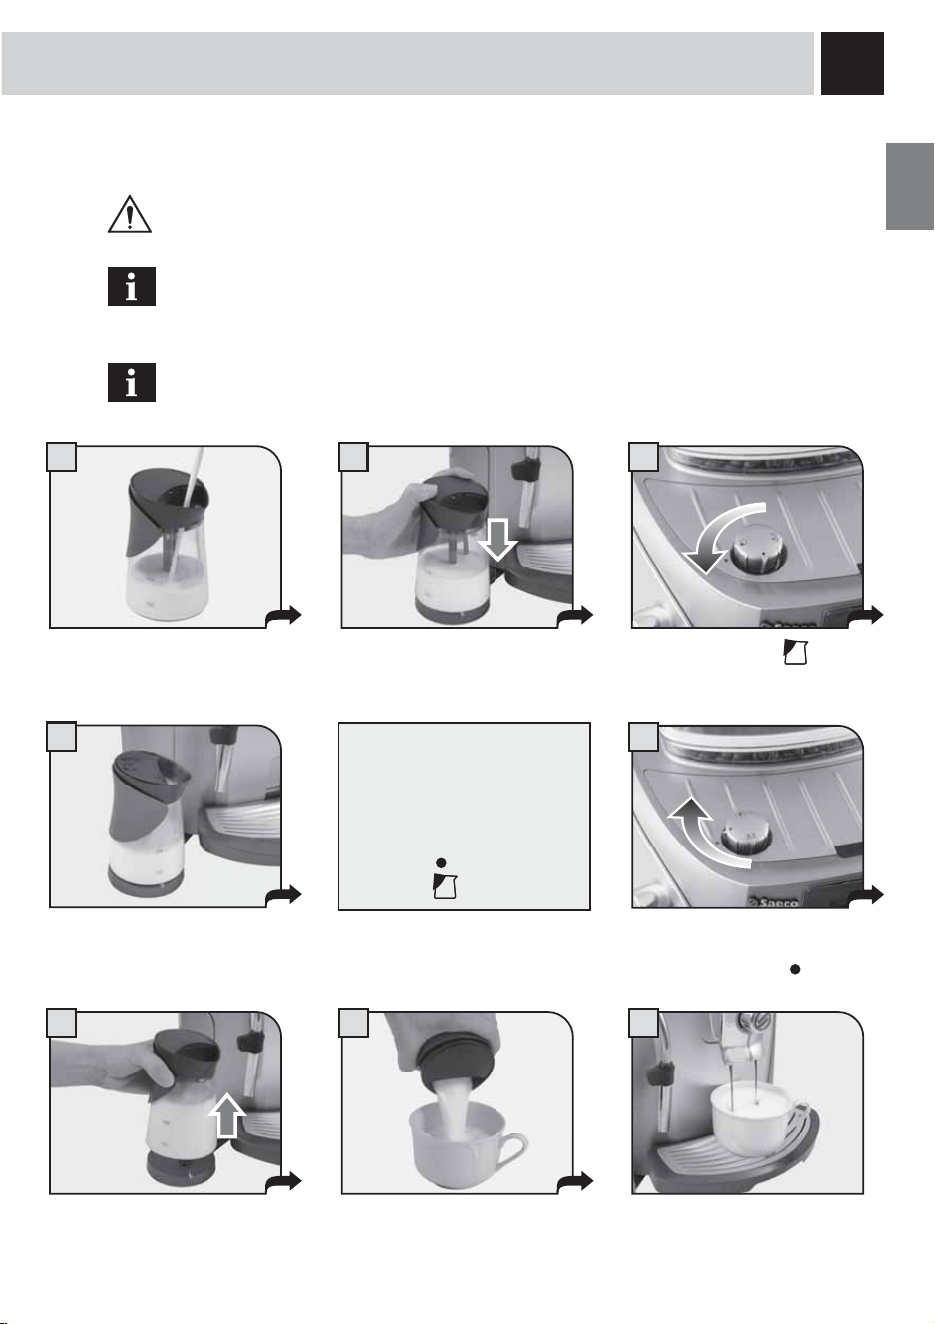
MILK ISLAND (OPTIONAL)
This device, which may be purchased separately, enables you to easily and comfortably prepare delicious
cappuccinos.
Warning: before using the Milk Island, read the manual and all precautions carefully for
correct use.
Important note: the quantity of milk in the carafe must never be below the “MIN” minimum
level nor exceed the “MAX” maximum level. Thoroughly clean all the Milk Island components
after use.
To guarantee best results when preparing cappuccino, we recommend using cold
(0-8°C / 32-45°F), partially skimmed milk.
Fill the milk carafe with the quantity of
milk desired (between the MIN and
MAX levels indicated).
Place the milk carafe onto the base
of the Milk Island. Check that the
light on the base is green.
Remove the carafe using the
handle.
Gently swirl the carafe and pour
the milk into the cup.
Position the cup with frothed
milk under the dispensing head.
Dispense coffee into the cup.
Turn the knob to the
position.
Wait for the milk to be frothed.
When the desired emulsion has
been reached, turn the knob until it
is in the rest position (
).
The machine will stop
automatically after dispensing
steam continuously for 2
minutes.
To dispense more steam turn the
knob to the (
) position and then
back to the
position.
16
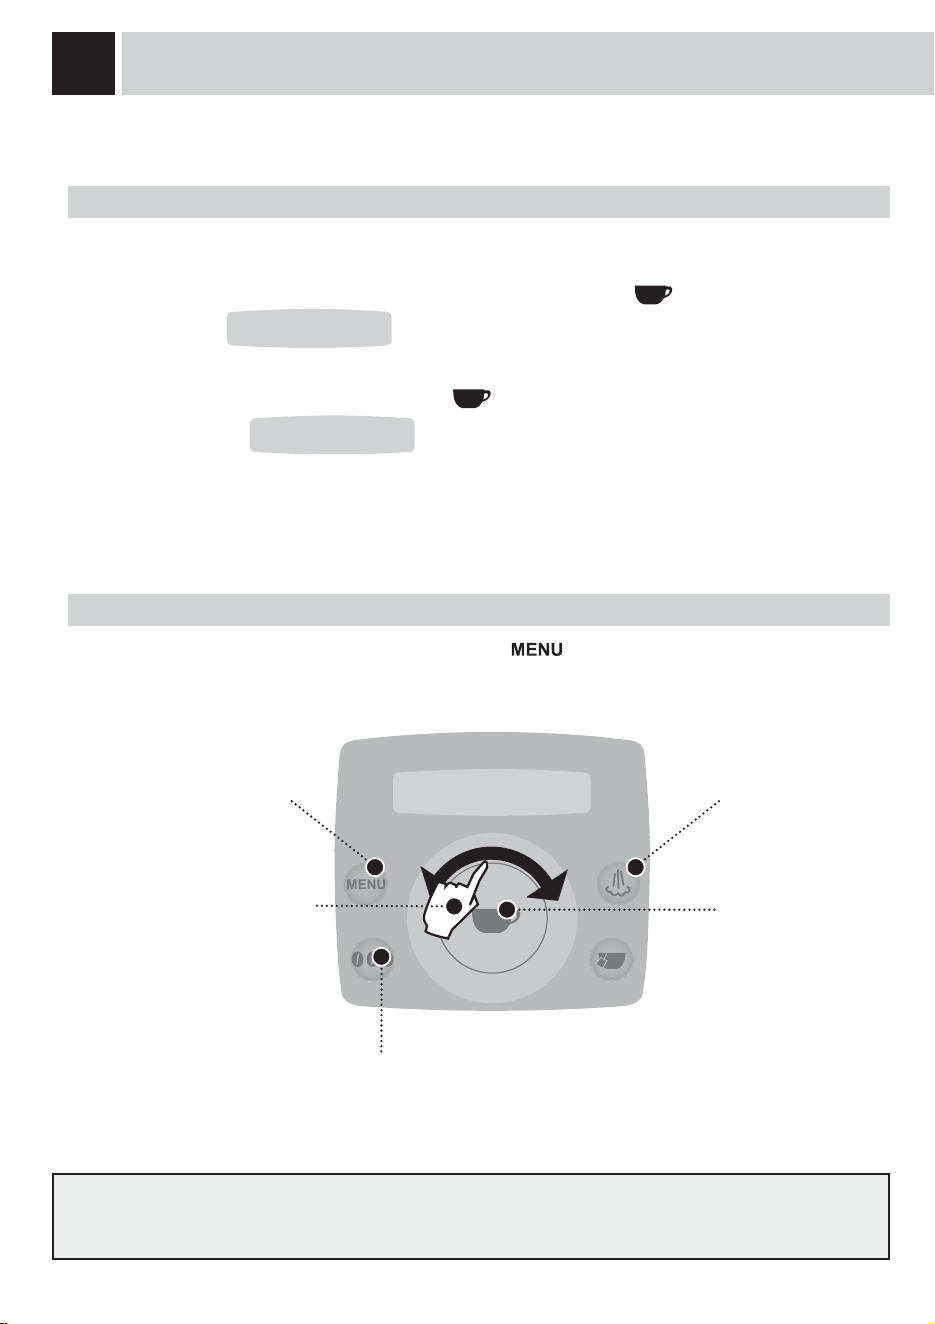
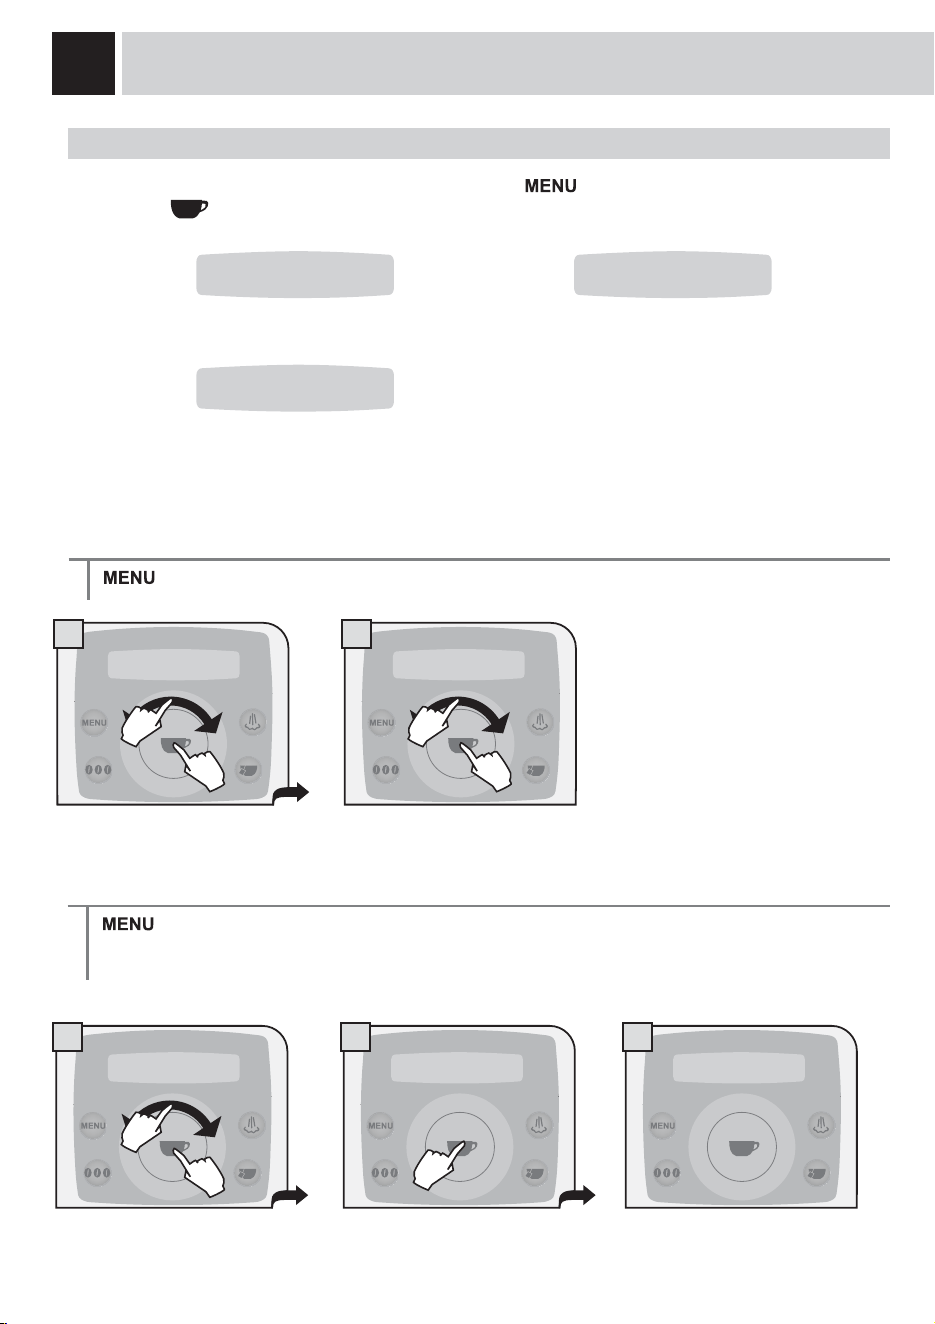
BEVERAGE PROGRAMMING
The following page describes how to program coffee beverages; the settings to set to program each beverage may
differ depending on the type of beverage.
2. PROGRAMMING FROM THE “BEVERAGE SETTINGS” MENU
To adjust the settings for preparing beverages: press the button and select “bev. settings” by
QDYLJDWLQJWKHFOLFNZKHHOZLWK\RXU¿QJHU
In this phase you can:
by navigating the click wheel with
\RXU¿QJHU\RXFDQFKDQJHWKH
settings for:
- the quantity of coffee to be
brewed;
- the coffee temperature;
- prebrewing the coffee.
- select the quantity of coffee to be ground (opti-dose)
or
select the function to set:
- the coffee temperature;
- coffee prebrewing.
restore factory settings
save the new settings.
1 bev. settings
Every beverage can be programmed according to your individual tastes.
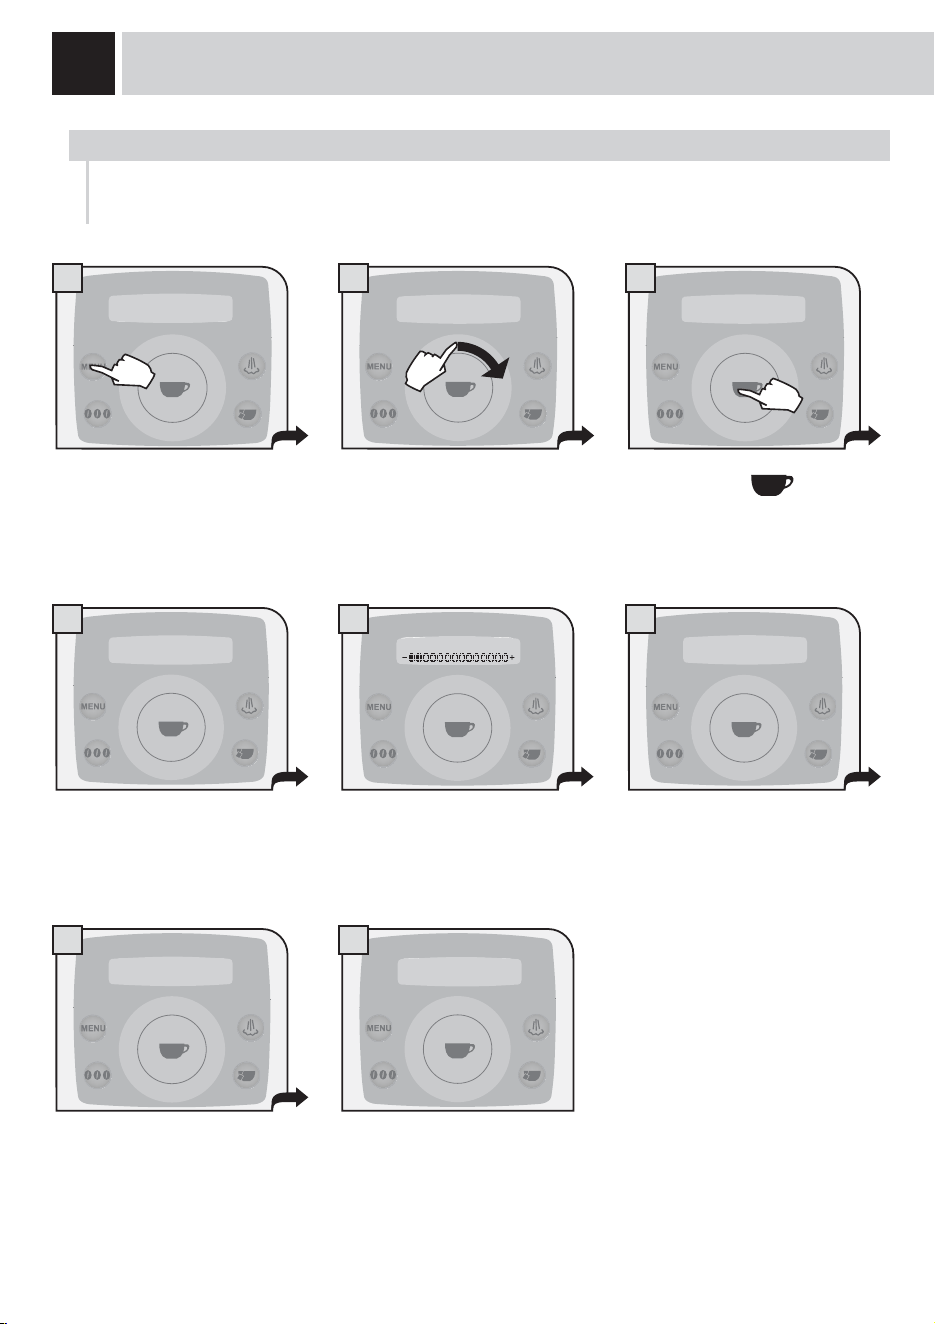
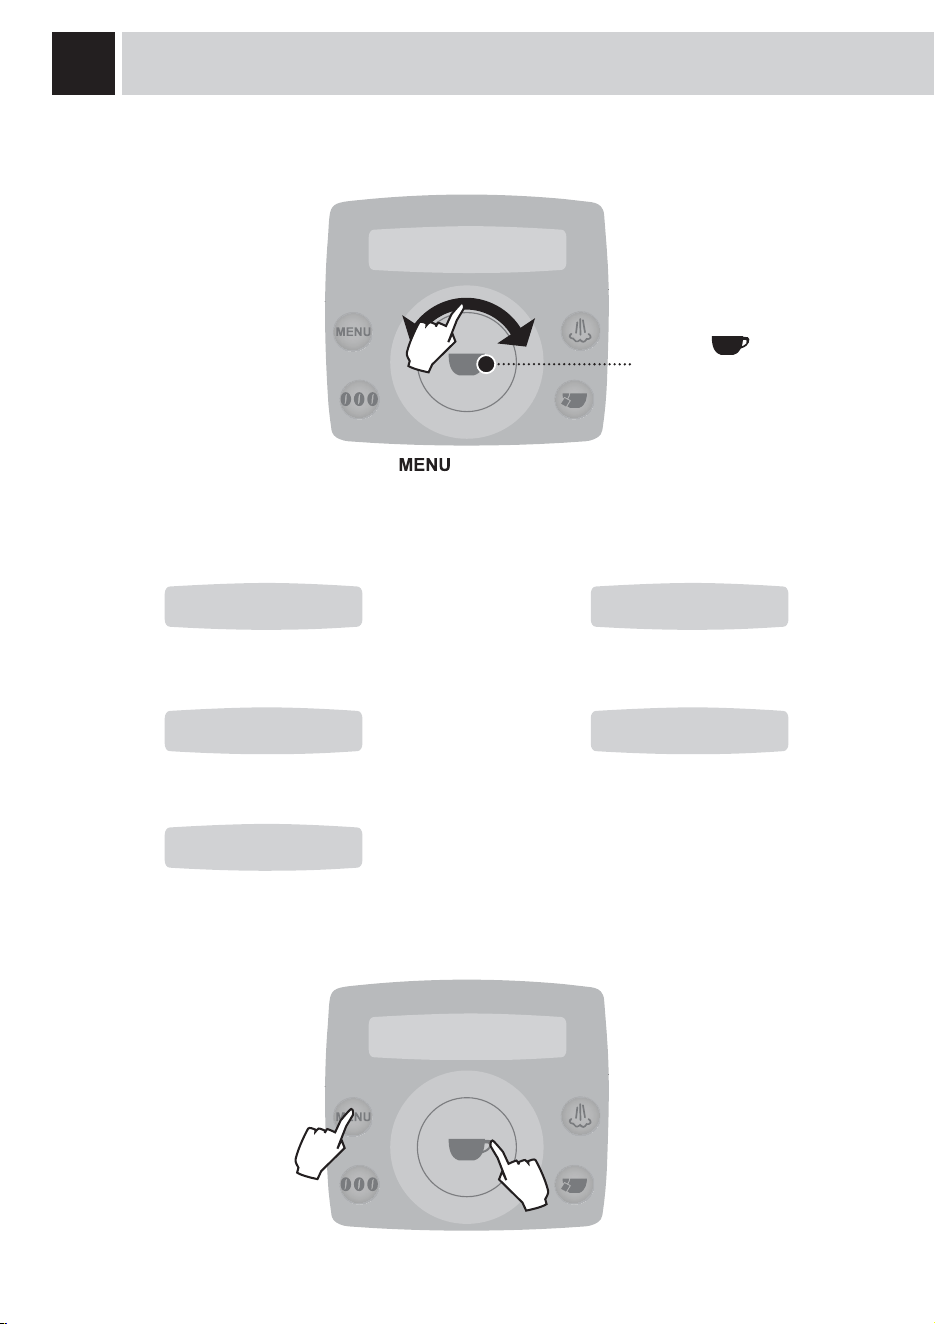
1. PROGRAMMING FOR SELF-LEARNING
You can program the quantity of coffee and/or milk you wish to be dispensed into the cups when you press
the button for any beverage.
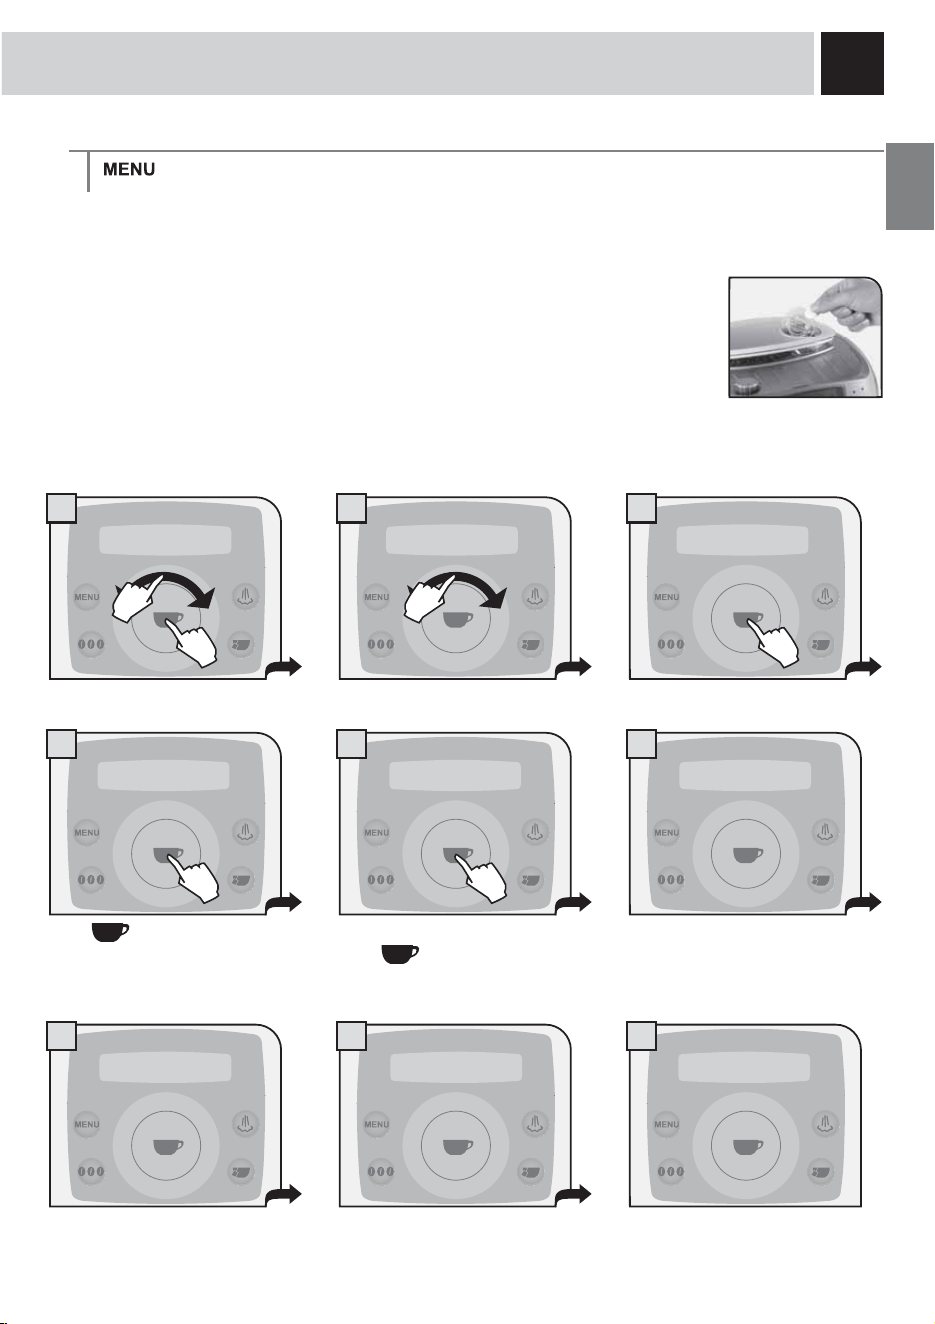
Select the type of beverage you want to program, then press and hold the
button until the display shows
(for example):
The machine dispenses coffee.
When the required amount is reached, press the
button again.
The display shows:
The dispensed quantity of coffee and/or milk is memorized and replaces any previous settings.
programming
espresso
saved
espresso
exit the programming mode.
(see page 18)

17
1 2 3
4 5
6 7
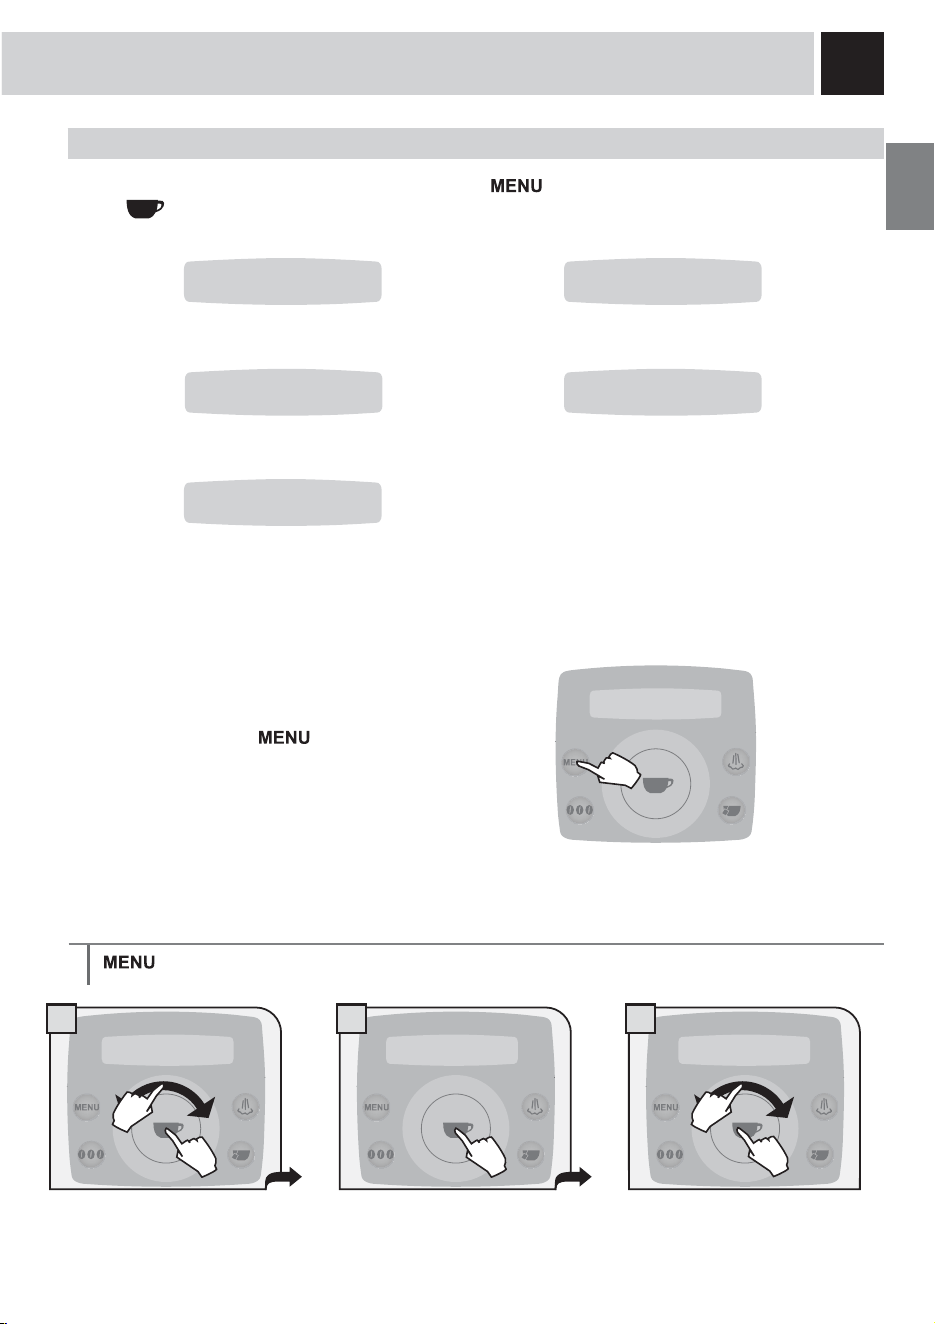
8
9 10
Check that the water and coffee bean
container are full; place the cup under
the dispensing head.
Press the button.
Press the button
a few times
to adjust the quantity of coffee to be
ground or select the use of pre-
ground coffee. Press the
button to save.
Select the beverage to program.
Press the
EXWWRQWRFRQ¿UP
Select “bev. settings”. Press the
EXWWRQWRFRQ¿UP
Change the coffee quantity by
navigating the click wheel with your
¿QJHUFRQ¿UPZLWK
.
Press the
button for more
than two seconds to access the
other settings to program.
Change the temperature setting
(high, medium, low) by navigating
WKHFOLFNZKHHOZLWK\RXU¿QJHU
Press the
button to save.
Press the
button to select the
prebrew setting.
Change the prebrew value (normal, long,
off) by turning the click wheel with your
¿QJHU3UHVVWKH
button to save.
strong aroma
espresso
1 bev. settings
1.1 espresso
medium aroma
espresso
espresso
temp.: medium
espresso
prebrew: normal
espresso
temp.: medium
espresso
prebrew: normal
espresso
Prebrewing: the coffee is
slightly dampened before
brewing to bring out the full
aroma of the coffee which
acquires an excellent taste.
When the settings are
changed, the message on the
GLVSOD\VWDUWVÀDVKLQJ
When the changes are stored
WKHPHVVDJHVWRSVÀDVKLQJ
1.
1.
2.
1.
2.
2.
2.
2.
2.
1.
1.
1.
18
PROGRAMMING THE MACHINE
Some of the machine’s functions can be programmed to customize operations according to your
individual preferences.
Press the button to:
FRQ¿UPWKHVHOHFWLRQ
- save the new settings.
1 Press the
button.
1DYLJDWHWKHFOLFNZKHHOZLWK\RXU¿QJHUWR
- select the functions
- change the function settings.
Beverage setting
(see page 16)
Machine settings
(see page 19)
Maintenance
(see page 22)
To exit the programming mode:
Energy saving
(see page 28)
Special functions
(see page 29)
1 bev. settings
1 bev. settings
2 mach. settings
3 maintenance
4 energy saving
5 special funct.
exit
1.
2.
19
1 2 3
2.1 language
English
“LANGUAGE” MENU
MACHINE SETTINGS
To change the machine’s operation settings, press the button and select “mach. settings” and press
the
EXWWRQ1DYLJDWHWKHFOLFNZKHHOZLWK\RXU¿QJHUWR
set the menu
language.
activate/deactivate the “Aqua Prima”
ZDWHU¿OWHUDODUP
set the water hardness.
set the coffee circuit rinse cycle.
set/activate the acoustic
alarms.
To exit any level of “mach. settings” without saving the
changes made, press the
button. For example:
Select the desired language. After
selected, the machine displays all the
messages in the language selected.
> mach. settings > language . To change the language of the display.
2.1 language
English
2.3 acoust.alert
on
2.4 filter alarm
on
2.5 rinsing
on
2.2 water hardn.
3
2 mach. settings
2 mach. settings 2.1 lingua
italiano
1.
2.
1.
2.
20
3
1 2
1
2
3 4 5
“ACOUSTIC ALARM” MENU
> mach. settings > acoust.alert
To turn on/off a tone each time a button is pressed.
PROGRAMMING THE MACHINE
Immerse the water hardness tester
included with the machine in water
for one second.
Check the value.
The test can be used for one
measurement only.
“WATER HARDNESS” MENU
> mach. settings > water hardn.
With the “Water hardness” function you can adapt your machine to the degree of hardness of the water you
use, so that the machine will request descaling at the right moment.
Hardness is expressed on a scale from 1 to 4. The machine is preset at value 3.
Set the water hardness obtained
from the test and save it.
2 mach. settings 2.3 acoust.alert
on
2 mach. settings 2.2 water hardn.
3
2.2 water hardn.
3
Select by navigating the click
ZKHHOZLWK\RXU¿QJHU
It is possible to set:
- on
- off
Press the
button to save.
1234
1.
2.
1.
2.
1.
2.
1.
2.
1.
2.
21
3
1 2
31 2
“FILTER ALARM” MENU
> mach. settings > filter alarm
7RWXUQRQRIIVLJQDOOLQJWKHQHHGWRFKDQJHWKH³$TXD3ULPD´ZDWHU¿OWHU7KHPDFKLQHLQIRUPVWKHXVHU
ZKHQWKH³$TXD3ULPD´¿OWHUQHHGVWREHUHSODFHG
“RINSE” MENU
Note: This rinse cycle is performed every time the machine is turned on after the warming phase.
> mach. settings > rinsing
The rinse setting cleans the internal circuits in order to guarantee that the beverages are only made with
fresh water. The function is enabled as default by the manufacturer.
2 mach. settings 2.4 filter alarm
on
2 mach. settings 2.5 rinsing
on
Select by navigating the click
ZKHHOZLWK\RXU¿QJHU
It is possible to set:
- on
- off
Press the
button to save.
Select by navigating the click
ZKHHOZLWK\RXU¿QJHU
It is possible to set:
- on
- off
Press the
button to save.
1.
2.
1.
2.
1.
2.
1.
2.
22
1 2
1 2 3
DFFHVVWKHVSHFL¿FGHVFDOLQJPHQX
MAINTENANCE
To access the machine’s maintenance programs, press the button and select “maintenance” and
press the
EXWWRQ1DYLJDWHWKHFOLFNZKHHOZLWK\RXU¿QJHUWR
DFFHVVWKHVSHFL¿F³$TXD3ULPD´
ZDWHU¿OWHUPHQX
wash the Brew Group.
“WATER FILTER” MENU
> maintenance > filter 7RPDQDJHWKH³$TXD3ULPD´ZDWHU¿OWHU
In this menu you can:
- check the number of litres before
replacement;
WXUQWKH¿OWHUVWDWHRQRII
ORDGLQLWLDOL]HWKH¿OWHU
Litres remaining
> maintenance > filter > litres left
7RGLVSOD\KRZPDQ\OLWUHVRIZDWHUFDQVWLOOEHWUHDWHGEHIRUHFKDQJLQJWKH³$TXD3ULPD´ZDWHU¿OWHU
MAINTENANCE
3.1 filter
3.2 descaling
3.3 group wash
3 maintenance 3.1 filter
3 maintenance 3.1 filter 3.1.1 filter
litres left 59
1.
2.
1.
2.
1.
2.
23
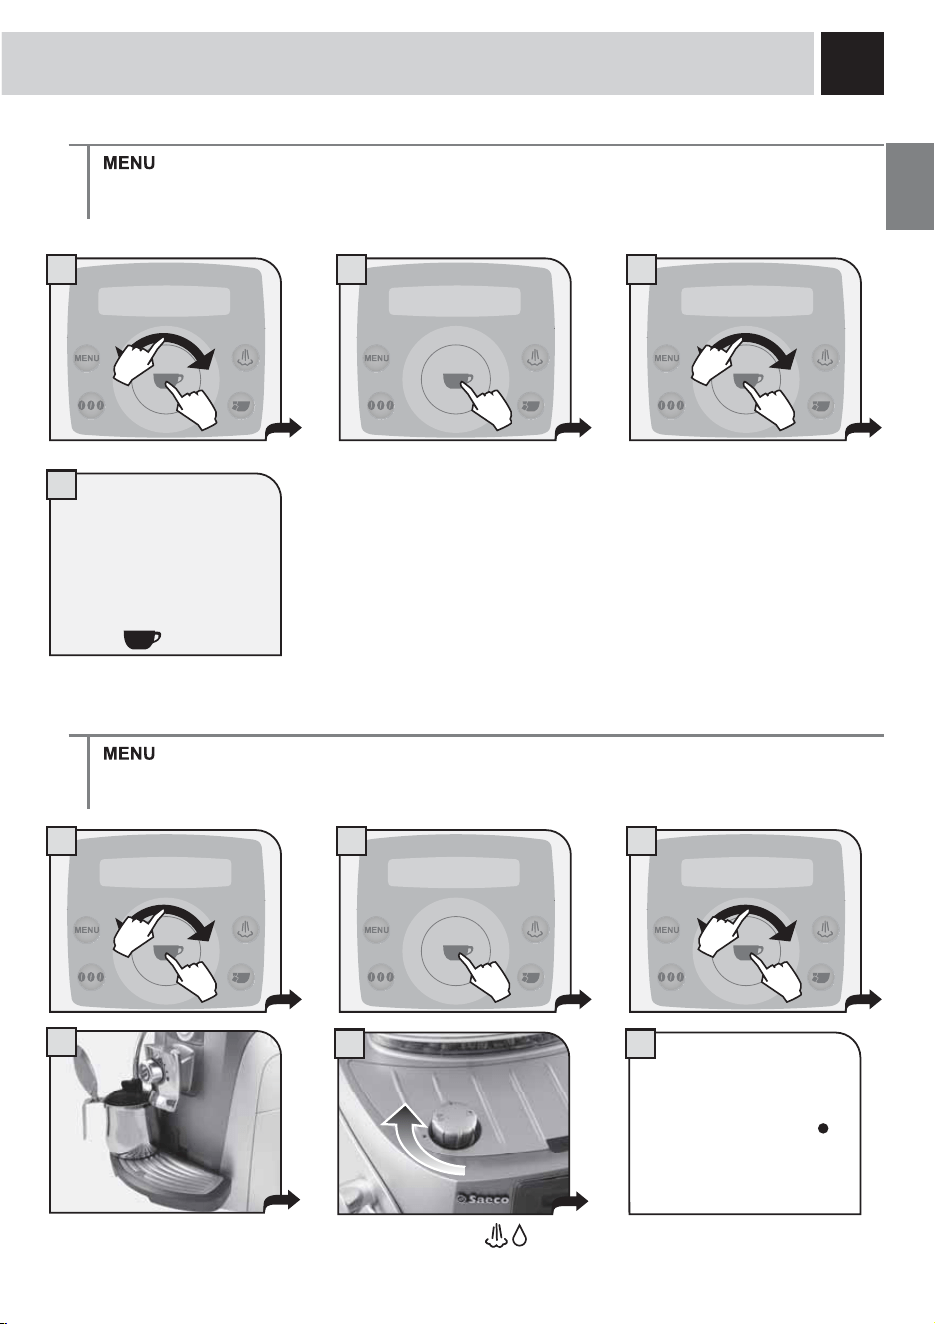
1 2
4
1 2
5
3
4
3
When the cycle ends, turn the
knob to the rest position (
)
and remove the container.
7KH¿OWHULVLQLWLDOL]HG
Filter state
> maintenance > filter > status
7RWXUQWKH¿OWHUFKHFNRQRIIWKHPDFKLQHFKHFNVZKHQWKH³$TXD3ULPD´ZDWHU¿OWHUQHHGVWREHFKDQJHG
DQGLQIRUPVWKHXVHU7KLVIXQFWLRQPXVWEHDFWLYDWHGZKHQWKH¿OWHULVLQVWDOOHG
Load filter
> maintenance > filter > activate
7RLQLWLDOL]HWKH³$TXD3ULPD´¿OWHUWKLVPXVWEHFDUULHGRXWZKHQ\RXLQVWDOODQHZ¿OWHU
Turn the knob to the
reference.
Place a container beneath the
steam spout.
3 maintenance 3.1 filter
3 maintenance 3.1 filter
3.1.3 activate
execute now
3.1.2 status
off
Select by navigating the click
ZKHHOZLWK\RXU¿QJHU
It is possible to set:
- on
- off
Press the
button to save.
6
1.
2.
1.
2.
1.
2.
1.
2.
24
1 2
1 2 3
“DESCALING” MENU
> maintenance > descaling7RPDQDJHWKHGHFDOFL¿FDWLRQRIWKHPDFKLQH¶VFLUFXLWV
In this menu you can:
- check the number of litres before
descaling;
- carry out the machine descaling
cycle.
Litres remaining
> maintenance > descaling > litres left
To display how many litres of water can still be used before the machine requests a descaling cycle.
To perform the automatic descaling cycle. Descaling is necessary every 3-4 months when water dispenses more
slowly than normal or when the machine indicates it. The machine must be turned on and will automatically manage
the distribution of the descaling agent.
A PERSON MUST BE PRESENT DURING THE OPERATION.
WARNING! NEVER USE VINEGAR AS A DESCALER.
Saeco descaler is recommended; however, you can use any non-toxic and/or non-harmful descaling product for
coffee machines. The used solution is to be disposed of according to the manufacturer’s instructions and/or
regulations in force in the country of use.
Descaling cycle
> maintenance > descaling > execute now
MAINTENANCE
3 maintenance 3.2 descaling
3 maintenance 3.2.1 descaling
litres left 119
3.2.1 descaling
litres left 119
1.
2.
1.
2.
1.
2.
25
1 2 3
64
7
8 9
5
Descaling is carried out at a controlled temperature. If the machine is cold, you must wait until it has reached the
right temperature; otherwise you must cool the boiler as follows:
Note: before beginning the descaling cycle make sure that:
1. a large enough container is positioned under the water spout;
2. THE “AQUA PRIMA” FILTER HAS BEEN REMOVED.
Turn the knob to the
reference.
Place a container beneath the
steam spout.
When the following message
appears, the heater is at the right
temperature
If the boiler needs to be heated, the machine does so automatically. When the heating stage is complete, the
“open water knob” message appears. Then proceed as described in point 5.
3 maintenance 3.2 descaling
3.2.2 descaling
execute now
open
water knob
insert descaler
ok to start
Pour the descaling solution into
the tank. Insert the tank into the
machine.
Press the
button to start.
insert descaler
ok to start
1. 1. 1.
2.2.2.
26
10
12
13
14 15
16
11
:KHQWKHVROXWLRQLV¿QLVKHGWKH
following message appears on
the display:
Remove the water tank, rinse
with fresh drinking water to
eliminate traces of descaling
VROXWLRQWKHQUH¿OOZLWKIUHVK
drinking water.
Insert the tank with fresh
drinking water.
Rinse the machine’s circuits by
pressing the
button.
The machine performs the rinse
cycle. During the rinse cycle, the
machine may require the water tank
WREH¿OOHG
The machine begins to dispense
the descaling solution through the
hot water spout. The dispensing
occurs at predetermined intervals,
in order to allow the solution to be
more effective.
:KHQWKHULQVHF\FOHLV¿QLVKHGWKH
following screen appears. Then the
display shows the maintenance
screen.
Turn the knob until it is in the rest position (
).
Check the quantity of water in the tank and
LQVWDOOWKH³$TXD3ULPD´ZDWHU¿OWHUDJDLQLI
desired.
MAINTENANCE
descaling cycle
please wait
When descaling is complete, return to the main menu
to dispense to dispense beverages.
The intervals are displayed in such
a way as to check the state of
progress of the process.
passage
[ 6/15]
fill the
water tank
rinse cycle
ok to start
rinse cycle
please wait
rinse cycle
completed
27
1 2
5 6
3
8 9
4
7
Group washing
> maintenance > group wash
Insert the tablet as shown above.
Press
to start.
To clean the machine’s internal circuits used for brewing coffee.
To wash the Brew Group, simply clean with water as shown on page 31. This wash completes
maintenance of the Brew Group. We recommend using Saeco tablets, which can be purchased
separately at your dealer’s.
Note: before performing this function make sure that:
1. a large enough container is positioned under the spout;
2. the appropriate tablet for cleaning the Brew Group has been inserted into the
compartment for pre-ground coffee;
WKHZDWHUWDQNFRQWDLQVDVXI¿FLHQWTXDQWLW\RIZDWHU
THE WASH CYCLE CANNOT BE INTERRUPTED.
A PERSON MUST BE PRESENT DURING THE OPERATION.
Wait for the cycle to end.
The Brew Group has been washed.
Exiting programming mode.
(see page 18)
Press
EXWWRQWRFRQ¿UP
You can check the status of
washing.
3 maintenance
3.3 group wash
3.3.1 group wash
execute now
3.3 group wash
insert tablet
and press ok
group wash
please wait
passage
[2/3]
wash completed
please wait
3 maintenance
1.
2.
28
31 2
ENERGY SAVING
To adjust the energy saving parameters, press the button and select “energy saving” and press the
EXWWRQ1DYLJDWHWKHFOLFNZKHHOZLWK\RXU¿QJHUWR
Set the time which must pass before the
machine enters energy saving mode.
TURN OFF DELAY
> energy saving > t-off delay
By default, the off delay time is set at 180 minutes.
PROGRAMMING THE MACHINE
4 energy saving
4 energy saving 4.1 t-off delay
minutes 180
Select by navigating the click
ZKHHOZLWK\RXU¿QJHU
It is possible to set:
- 15 miniutes - min
- 180 miniutes - max
Press the
button to save.
1.
2.
1.
2.
29
1 2
5
3
4
SPECIAL FUNCTIONS
This menu allows you to access special functions present on the machine.
Press the
button to access and select “special funct.”and press the button. Navigate the click
ZKHHOZLWK\RXU¿QJHUWR
restore the basic machine operating
parameters.
RESTORE SETTINGS
> special funct. > factory set.
The function for restoring all the factory settings is contained in this menu. This function is particularly
important for restoring the basic parameters.
ALL THE CUSTOM SETTINGS WILL BE LOST AND CANNOT BE RECOVERED. AFTER
RESTORING FACTORY SETTINGS, YOU WILL NEED TO RE-PROGRAM ALL THE MACHINE
FUNCTIONS, IF DESIRED.
5 special funct.
Press the button to reset.
The display shows the parameter
UHVHWFRQ¿UPDWLRQ
All parameters have been
restored. Exit programming mode.
Select by pressing the
button.
5 special funct. 5.1 factory set.
execute now
factory set.
are you sure?
factory set.
in progress..
5 special funct.
1.
2.

30
1
2 3
4 65
98
7
CLEANING AND MAINTENANCE
With the brush, clean the pre-
ground coffee compartment.
Switch off the machine and unplug
it.
Clean the tank and the cover. Remove the drip tray, empty and
wash it.
Remove the coffee grounds
drawer.
Clean the display with a dry cloth.Remove and wash the steam
spout support; then re-insert it.
Remove the outer sleeve of the
steam spout; then re-insert it.
GENERAL MACHINE CLEANING
The cleaning described below must be performed once a week.
Note: if water remains in the tank for several days, do not use it.
WARNING! Never immerse the machine in water.
If you remove grounds with the machine off or when not signaled on the display, the count of the grounds
emptied into the drawer is not reset. For this reason the machine might display the “empty grounds” message
even after preparing just a few coffees.
Empty and clean it.
31
1 2 3
4
7 8 9
5 6
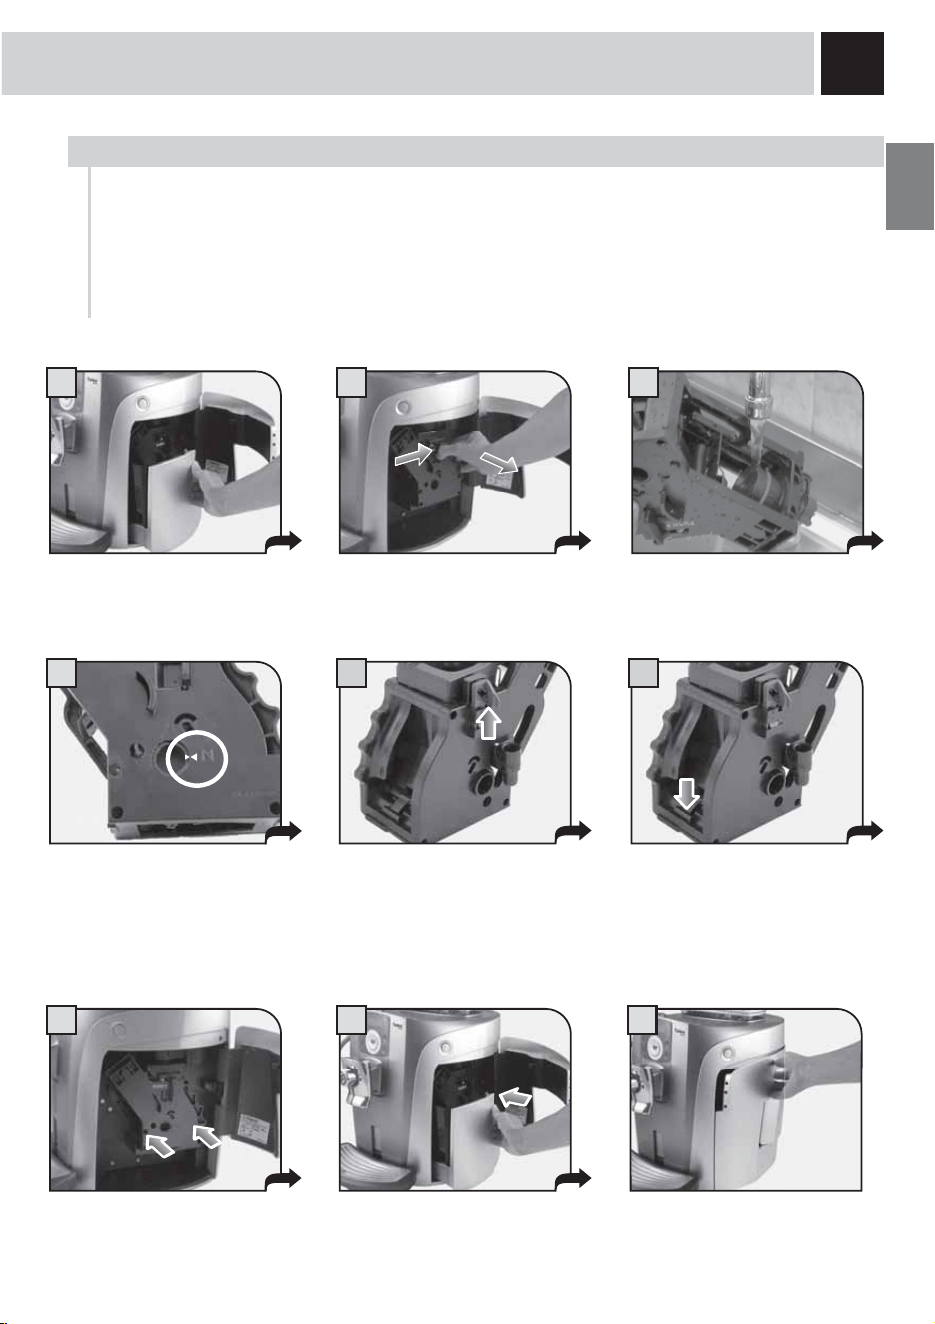
Open the service door and remove
the coffee grounds drawer.
The Brew Group must be cleaned at least once a week.
Wash the Brew Group with warm water.
WARNING! Do not wash the Brew Group with detergents that can compromise its correct operation.
Do not wash in the dishwasher.
Wash the Brew Group and the
¿OWHUDQGGU\
Press the PUSH button to remove
the Brew Group.
Insert the washed and dried Brew
Group. DO NOT PRESS THE
“PUSH” BUTTON.
Make sure the Brew Group is in
rest position; the two references
must match.
Close the service door.
Insert the coffee grounds drawer.
CLEANING THE BREW GROUP
Make sure the components are in
the correct position.The hook
shown must be in the correct
position; to check its position,
¿UPO\SUHVVWKH³386+´EXWWRQ
The lever on the rear part of the
group must be in contact with
the group base.
32
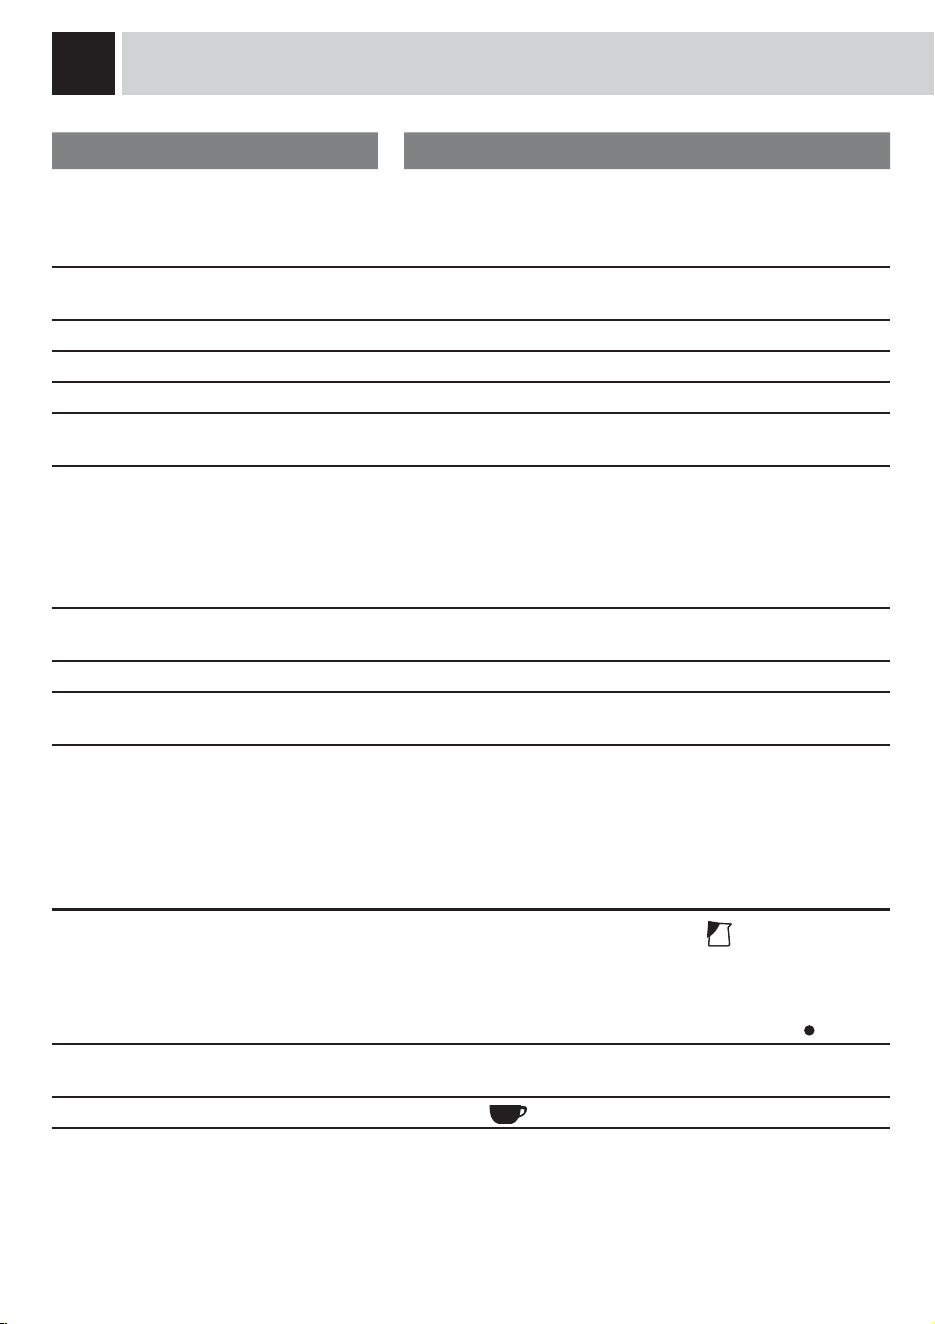
ERROR CODES
GUIDE MESSAGE THAT APPEARS HOW TO REMOVE THE MESSAGE
out of service (xx)
restart to fix…
:KHUH[[LGHQWL¿HVDQHUURUFRGH7XUQRIIDQGDIWHU
seconds turn the machine on again to restore normal operation.
If the problem persists, call the service centre and give the code
(xx) shown on the display.
close coffee bean lid
Close the coffee bean hopper cover to be able to make a
beverage.
fill container wth coffee
Put coffee beans into the bean hopper.
insert the brew group
Insert the Brew Group in its place.
insert grounds drawer
Insert the coffee grounds drawer.
empty grounds
Warning that does not block the machine. Proceed as for the
next alarm.
empty grounds drawer
Remove the grounds drawer and empty the grounds into an
appropriate container (See page 30 steps 4 and 5).
Note: The grounds drawer must be emptied only when the
machine requires it and when the machine is turned on. If
you empty the drawer with the machine turned off it will not
record the emptying operation.
close door
In order for the machine to operate, the side door must be
closed.
fill the water tank.
7KHWDQNPXVWEHUHPRYHGDQGUH¿OOHGZLWKIUHVKGULQNLQJZDWHU
empty drip tray
Open the side door and empty the drip tray located under the
Brew Group.
change the filter
7KH$TXD3ULPD¿OWHUPXVWEHUHSODFHGLQWKHIROORZLQJFDVHV
1. 60 litres of water have been dispensed;
2. 90 days have passed since its installation;
3. 20 days have passed and the machine has not been used.
Note: this message only appears when “on” has been selected
LQWKHZDWHU¿OWHUIXQFWLRQ6HHSDJH
carafe missing
milk island missing
The steam knob has been turned to the
position and either
the Milk Island has not been installed or the carafe is not
positioned correctly. Install the Milk Island or position the carafe
correctly.
Otherwise, turn the knob until it is in the rest position (
).
descale
A descaling cycle must be performed on the machine’s internal
circuits.
stand-by…
Press the
button.

33
TROUBLESHOOTING
PROBLEMS CAUSES SOLUTIONS
The machine does not turn on. The machine is not connected to the
power source.
Connect the machine to the power
source.
The plug has not been plugged into the
back of the machine.
Insert the plug into the machine’s power
socket.
Hot water or steam is not
dispensed.
The hole of the steam spout is clogged. Clean the hole of the steam spout using a
pin.
Coffee has little crema. The coffee blend is unsuitable or coffee
is not freshly roasted.
Change coffee blend.
SBS knob turned towards the left Turn the SBS knob to the right
The Brew Group does not come
out.
The Brew Group is out of place. Turn the machine on. Close the service
door. The Brew Group is automatically
placed in the correct position.
Coffee grounds drawer is inserted. 5HPRYHWKHJURXQGVGUDZHU¿UVWWKHQWKH
Brew Group.
Coffee is not brewed. Water tank is empty. Fill the water tank and prime the circuit
again.
Brew Group is dirty. Clean the Brew Group.
Coffee is brewed slowly. &RIIHHLVWRR¿QH Change coffee blend.
Decrease the dose.
Brew Group dirty. Clean the Brew Group.
Coffee leaks out of the dispensing
head.
Dispensing head is clogged. Clean the dispensing holes with a soft
cloth.
Please contact the service centre for any problems not covered in the above table or when the suggested
solutions do not solve the problem.

34
SAFETY RULES
IN CASE OF EMERGENCY
IMMEDIATELY UNPLUG THE CORD FROM THE OUTLET.
ONLY USE THE APPLIANCE
• Indoors.
• For preparing coffee, hot water and for frothing milk.
• For domestic use.
• By adults in non altered psycho-physical conditions.
PRECAUTIONS FOR THE USE OF THE MACHINE
• Do not use the machine for purposes other than those indicated above, in order to avoid danger.
• Do not introduce any substances other than those indicated in the instruction manual.
'XULQJWKHQRUPDO¿OOLQJRIDQ\UHVHUYRLUVDOOQHDUE\UHVHUYRLUVPXVWEHFORVHG
• Fill the water tank only with fresh drinking water: Hot water and/or any other liquid may damage the
machine.
• Do not use carbonated water.
'RQRWSXW¿QJHUVRUDQ\PDWHULDORWKHUWKDQFRIIHHEHDQVLQWKHFRIIHHJULQGHU
• Before manipulating the coffee grinder, turn of the machine’s main switch and unplug the cord.
• Do not put instant coffee or whole bean coffee in the ground coffee container.
2QO\XVH\RXU¿QJHUZKHQRSHUDWLQJWKH/&'VFUHHQ
CONNECTION TO ELECTRICAL POWER
The connection to the electrical network must be carried out in accordance with the safety regulations in
force in the user’s country.
The machine must be connected to a socket which is:
• compatible with the type of plug installed on the machine;
VXLWDEO\VL]HGWRFRPSO\ZLWKWKHUDWLQJVVKRZQRQWKHPDFKLQHLGHQWL¿FDWLRQSODWH
• effectively grounded.
The power cord must not:
FRPHLQWRFRQWDFWZLWKDQ\W\SHRIOLTXLGGDQJHURIHOHFWULFVKRFNVDQGRU¿UH
• be crushed and/or come in contact with sharp surfaces;
• be used to move the machine;
• be used if damaged;
• be handled with damp or wet hands;
• be wound in a coil when the machine is being operated.
• Be tampered with.
INSTALLATION
&KRRVHDVROLGVWDWLRQDU\ÀDWVXUIDFHQRPRUHWKDQRILQFOLQDWLRQ
• Do not install the machine in areas where water could be sprayed.
• Optimal operational temperature: 10°C - 40°C / 50-104 degrees Fahrenheit
• maximum humidity: 90%.
• The machine should be installed in an adequately lit, ventilated, hygienic location and the electric socket
should be within easy reach.
• Do not place on heated surfaces!
• Install it at least 10 cm / 4” from the walls and cooking surfaces.
• Do not use in places where the temperature may drop to a level equal to and/or lower than 0°C / 32
degrees Fahrenheit. If the machine has been exposed to such conditions notify the customer service
center, who will have to carry out a safety check.
'RQRWXVHWKHPDFKLQHQHDULQÀDPPDEOHDQGRUH[SORVLYHVXEVWDQFHV
• The machine must not be used in an explosive or volatile atmosphere or where there is a high
concentration of dust or oily substances suspended in the air.
• Do not install the machine on top of other appliances.
SOS
35
FAILURES
'RQRWXVHWKHDSSOLDQFHLIDIDLOXUHKDVEHHQYHUL¿HGRUVXVSHFWHGIRUH[DPSOHDIWHUEHLQJGURSSHG
• Any repairs must be performed by an authorized customer service center.
• Do not use the appliance with a defective power cord. The manufacturer or its customer service center
will have to replace the power cable if damaged. (Caution! Electrical Current!)
• Turn off the appliance before opening the service door. Danger of burns!
CLEANING / DESCALING
• For cleaning the milk and coffee circuits use only recommended detergents provided with the machine.
These detergents must not be used for other purposes.
• Before cleaning the machine, the main switch must be turned to OFF (0), unplugged from the socket
and cooled down.
• Keep the appliance from coming into contact with splashes of water or immersing in water.
• Do not dry the machine’s parts in conventional or microwave ovens.
• The machine and its components must be cleaned and washed after the machine has not been used for
a certain period.
REPLACEMENT PARTS
For safety reasons, use only original replacement parts and original accessories.
WASTE DISPOSAL
- The packing materials can be recycled.
- Appliance: unplug the appliance and cut the power cord.
- Deliver the appliance and power cord to a service center or public waste disposal facility
This product complies with eu directive 2002/96/ec.
The symbol on the product or on its packaging indicates that this product may not be treated as household
waste. Instead it shall be handed over to the applicable collection point for the recycling of electrical and
electronic equipment.
By ensuring this product is disposed of correctly, you will help prevent potential negative consequences for
the environment and human health, which could otherwise be caused by inappropriate waste handling of
this product. For more detailed information about recycling of this product, please contact your local city
RI¿FH\RXUKRXVHKROGZDVWHGLVSRVDOVHUYLFHRUWKHVKRSZKHUH\RXSXUFKDVHGWKHSURGXFW
DANGERS
• The appliance must not be used by children and persons who have not been informed of its operation.
• The appliance is dangerous to children. When left unattended, unplug from the electrical outlet.
• Keep the coffee machine packaging out of the reach of children.
• Never direct the jet of hot water and/or steam towards yourself or others. Danger of scalding.
• Do not insert objects through the appliance’s openings. (Danger! Electrical Current!).
• Do not pull out the plug by yanking on the power cord or touching it with wet hands.
• Warning. Danger of burning when in contact with hot water, steam and the hot water spout.
FIRE SAFETY
,QFDVHRI¿UHXVH&DUERQ'LR[LGHH[WLQJXLVKHUV&2
2
).
Do not use water or dry-powder extinguishers.

36
TECHNICAL DATA
Nominal voltage
See label on the appliance
Power rating
See label on the appliance
Power supply
See label on the appliance
Shell material
ABS - Thermoplastic
Size (w x h x d)
[[PP´[´[´
Weight
9 Kg - 19.8 lbs
Cable length
PP´
Control panel
Front (display 2x24 characters)
Water tank
OLWHUVR]5HPRYDEOH
Coffee bean hopper capacity
250 grams - 8.9 oz / coffee beans
Pump pressure
15 bar
Boiler
Stainless steel
Coffee grinder
With ceramic burrs
Quantity of ground coffee
JUDPVR]
Grounds drawer capacity
14
Safety devices
Boiler pressure safety valve – Double safety thermostat.
TECHNICAL DATA
Subject to engineering and manufacturing changes due to technological developments.
7KHPDFKLQHFRQIRUPVWRWKH(XURSHDQ'LUHFWLYH((&,WDOLDQ/HJLVODWLYH'HFUHHGDWHG
concerning electromagnetic compatibility.

37

IMPORTANT
Lors de l’utilisation d’appareils électriques, il est important de prendre les
précautions suivantes, afin d’éviter les décharges électriques, les courts circuits
et les accidents corporels.
1 Lire toutes les instructions et les indications données dans cette brochure,
ainsi que toute autre information indiquée sur l’emballage, avant de mettre
la machine en marche.
2 Ne pas toucher les surfaces chaudes de la machine. Utiliser les poignées
ou boutons.
3 Ne pas plonger le fil électrique, la prise ou l’appareil lui-même dans
l’eau ou tout autre liquide.
4 Faire très attention lorsque l’appareil est utilisé par ou près des enfants.
5 Débrancher l’appareil lorsqu’il n’est pas en service et laissez-le refroidir
avant de retirer les accessoires pour le nettoyage ou de les mettre en
place.
6 Ne pas utiliser l’appareil avec un cordon ou une prise en mauvais état
ou après que l’appareil ait été endommagé de quelque manière que
ce soit. Confiez votre appareil au service après-vente autorisé le plus
proche pour examen ou réparation.
7 L’utilisation d’accessoires non recommandés par le fabricant de l’appareil
pourrait poser des problèmes.
8 Ne pas utiliser à l’extérieur.
9 Ne pas laisser le cordon pendre de la table ou de la surface de travail,
ni toucher des surfaces chaudes.
10 Ne pas poser sur une cuisinière ou dans un four chaud.
11 Mettre toujours l’appareil en position «arrêt» avant de le débrancher.
Mettre aussi tous les interrupteurs à «arrêt» avant de le débrancher.
12 Usage domestique seulement.
13 Faire très attention en utilisant la vapeur.
CONSERVER CES ISTRUCTIONS

PRÉCAUTIONS
Cette machine est réservée à un usage domestique. Tout entretien, en dehors
du nettoyage et de l’entretien usuel par l’usager, doit être fait par un centre
de service autorisé. Ne pas plonger la base dans l’eau. Pour éviter les courts-
circuits et les décharges électriques, ne pas démonter la base. Elle ne contient
aucune pièce qui demande un entretien de la part de l’usager. Toute réparation
doit être effectuée par le personnel d’un service après-vente autorisé.
1 Vérifier si le voltage correspond bien aux spécifications apparaissant sur
la plaque signalétique.
2 Ne jamais mettre de l’eau tiède ou chaude dans le réservoir; mais toujours de
l’eau froide.
3 Ne pas toucher les surfaces chaudes de l’appareil pendant le
fonctionnement et en écarter le cordon électrique.
4 Ne pas utiliser d’alcool éthylique, de solvants, d’essences, de poudre à
récurer et/ou d’objets abrasifs pour le nettoyage de la machine.
5 Utiliser de l’eau purifiée ou en bouteille pour assurer le bon goût du café.
Quand même il vous sera nécessaire de faire le détrartage de votre machine
tous les 2-3 mois.
INSTRUCTIONS SUR LE
CORDON ELECTRIQUE
A Votre appareil est muni d’un cordon électrique court afin d’éviter qu’il ne
s’emmêle ou qu’on ne s’y accroche.
B On peut utiliser une rallonge électrique en prenant certaines
précautions.
C Si on utilise une rallonge, vérifier:
1 que sa tension est au moins égale à celle de l’appareil
2 qu’elle est munie d’une prise à trois fiches, avec mise à la terre, si c’est le
cas pour le cordon de l’appareil
3 que le câble ne pende pas du meuble.

2
TABLE DES MATIÈRES
GÉNÉRALITÉS .................................................................................................................................... 3
APPAREIL ............................................................................................................................................ 4
ACCESSOIRES ......................................................................................................................................................4
MISE EN PLACE .................................................................................................................................. 5
MISE EN MARCHE DE LA MACHINE .............................................................................................................................5
SÉLECTIONNER LA LANGUE......................................................................................................................................6
FILTRE « AQUA PRIMA » ......................................................................................................................................... 7
AFFICHEUR ......................................................................................................................................... 8
(OPTI-DOSE) INDICATION DE LA QUANTITÉ DE CAFÉ MOULU .............................................................................................8
RÉGLAGES ......................................................................................................................................... 9
DENSITÉ DU CAFÉ .................................................................................................................................................9
RÉGLAGE DE LA HAUTEUR DU BAC D’ÉGOUTTEMENT ......................................................................................................9
RÉGLAGE DU MOULIN À CAFÉ ...................................................................................................................................9
DISTRIBUTION DE LA BOISSON ...................................................................................................... 10
CAFÉ EXPRESSO / CAFÉ / CAFÉ ALLONGÉ ................................................................................................................. 10
DISTRIBUTION DE LA BOISSON AVEC DU CAFÉ MOULU .................................................................................................. 11
DISTRIBUTION D’EAU CHAUDE ................................................................................................................................12
DISTRIBUTION VAPEUR ......................................................................................................................................... 13
DISTRIBUTION CAPPUCCINO ................................................................................................................................... 14
MILK ISLAND (EN OPTION) .....................................................................................................................................15
PROGRAMMATION BOISSON ...........................................................................................................16
1. PROGRAMMATION POUR REGLAGES PERSONNELS ...................................................................................................16
2.
PROGRAMMATION À PARTIR DU MENU « RÉGLAGE DES BOISSONS » ............................................................................ 16
PROGRAMMATION MACHINE .......................................................................................................... 18
RÉGLAGE DE LA MACHINE ..................................................................................................................................... 19
MENU « LANGUE » .............................................................................................................................................. 19
MENU « DURETÉ DE L’EAU » .................................................................................................................................20
MENU « ALERTES SONORES » ...............................................................................................................................20
MENU « ALERTE FILTRE » ..................................................................................................................................... 21
MENU « RINÇAGE » ............................................................................................................................................ 21
ENTRETIEN ....................................................................................................................................... 22
MENU « FILTRE À EAU » .......................................................................................................................................22
MENU « DÉTARTRAGE » .......................................................................................................................................24
LAVAGE DU GROUPE ............................................................................................................................................ 27
PROGRAMMATION MACHINE .......................................................................................................... 28
ÉCONOMIE D’ÉNERGIE .......................................................................................................................................... 28
FONCTIONS SPÉCIALES ......................................................................................................................................... 29
NETTOYAGE ET ENTRETIEN ...........................................................................................................30
NETTOYAGE GÉNÉRAL DE LA MACHINE .....................................................................................................................30
NETTOYAGE DU GROUPE DE DISTRIBUTION ................................................................................................................31
MESSAGES D’ERREUR .................................................................................................................... 32
PROBLÈMES - CAUSES - R
EMÈDES ............................................................................................... 33
CONSIGNES DE SÉCURITÉ
............................................................................................................. 34
DONNÉES T
ECHNIQUES .................................................................................................................. 36

3
Cette machine à café est prévue pour la préparation de café expresso avec du café en grains et dispose d’un
dispositif pour la distribution d’eau chaude et de vapeur.
Au design elegant, cet appareil a ete conçu exclusivement pour un usage domestique et n’est donc pas
indique pour un fonctionnement continu de type professionnel.
Attention : la societe decline toute responsabilite en cas :
• d’emploi inapproprié et non conforme à l’usage prévu ;
• de réparations non effectuées dans des centres d’assistance agréés ;
• d’altération du câble d’alimentation ;
• d’altération de tout composant de la machine ;
• d’emploi de pièces de rechange et d’accessoires qui ne sont pas d’origine ;
• de defaut de detartrage de la machine ou de fonctionnement a des temperatures en dessous de 0°c.
DANS TOUS CES CAS, LA GARANTIE N’EST PAS VALABLE.
Conserver ces instructions dans un lieu sur. Les joindre a la machine a cafe au cas ou Une autre personne devrait
l’utiliser.. Pour d’ulterieures informations ou en cas de problemes s’adresser aux centres d’assistance Agréés.
CONSERVER TOUJOURS CES CONSIGNES.
LE TRIANGLE D’AVERTISSEMENT INDIQUE TOUTES LES CONSIGNES
IMPORTANTES POUR LA SÉCURITÉ DE L’UTILISATEUR. SE CONFORMER
SCRUPULEUSEMENT À CES INDICATIONS POUR ÉVITER TOUT RISQUE
DE BLESSURES GRAVES !
UTILISER CES INSTRUCTIONS POUR L’UTILISATION
GÉNÉRALITÉS

4
Logement café prémoulu
ACCESSOIRES
Filtre « Aqua Prima » Doseur pour le
café moulu
Pinceau de nettoyageTest de dureté
de l’eau
APPAREIL
Clé pour régler la mouture Câble d’alimentation
Groupe de distribution
Tiroir à marc
Prise pour câble
d’alimentation
Réservoir à café en grains
Interrupteur général
Porte de service
Couvercle du réservoir à
café en grains
Bac de récupération
liquides
Tableau de commande
SBS
Distributeur
Bac d’égouttement +
JULOOHHWÀRWWHXU
Tuyau de distribution de
l’eau chaude/vapeur
Réservoir d’eau
Bouton robinet eau-
chaude/vapeur
Raccord « Milk Island »
Plaque pour poser les tasses
5
1 2 3
4
7
65
MISE EN PLACE
%UDQFKHUOD¿FKHVXUODSULVH
située au dos de la machine.
Brancher l’autre extrémité du câble
sur une prise de courant
appropriée (voir la plaquette des
données).
Placer un récipient sous la buse
de distribution de l’eau chaude.
Retirer le couvercle du réservoir à
café.
Remplir le réservoir avec du café
en grains.
Fermer le couvercle en appuyant
jusqu’au bout.
Retirer le réservoir à eau.
1RXVFRQVHLOORQVG¶LQVWDOOHUOH¿OWUH
« Aqua Prima » (voir page 7).
Appuyer sur l’interrupteur général et
le mettre sur la position « Allumé ».
S’assurer que l’interrupteur général ne soit pas actionné.
Remplir le réservoir avec de l’eau
fraîche et potable, en veillant à ne
jamais dépasser le niveau maximal
marqué sur le réservoir. Replacer
ensuite le réservoir.
MISE EN MARCHE DE LA MACHINE
RÉGLER LE DEGRÉ DE DURETÉ DE L’EAU, VOIR
« MENU DURETÉ DE L’EAU » PAGE 20.
La machine effectue
automatiquement l’amorçage
du circuit hydraulique.
La machine est maintenant
prête à fonctionner.
Il se peut que l’eau ne soit pas
distribuée dans le récipient.
Ceci ne doit pas être considéré
comme une anomalie.
6
1 2 3
4 5 6
7 8
2.1 language
English
Talea Ring
MISE EN PLACE
SÉLECTIONNER LA LANGUE
2.1 langue
français
cycle rinçage
veuil. patienter
cycle rinçage
veuil. patienter
arôme moyen
expresso
2.1 langue
français
chauffage
Lors de la première mise en marche de la machine, il faut sélectionner la langue souhaitée ; cela
permet d’adapter les paramètres des boissons à ceux du Pays d’utilisation. C’est pourquoi certaines
langues sont différenciées aussi en fonction du pays.
Sélectionner la langue souhaitée
en faisant glisser le doigt sur le
disque de sélection.
Lorsque la langue choisie est
DI¿FKpHDSSX\HUVXU
.
La machine se met en marche et
SHUPHWG¶DI¿FKHUWRXVOHV
messages dans la langue
souhaitée.
Attendre que la machine termine
la phase de chauffage.
Une fois la phase de chauffage
terminée, la machine effectue un
cycle de rinçage des circuits
internes.
Ensuite l’écran de distribution
GHVSURGXLWVV¶DI¿FKH
Une petite quantité d’eau est
distribuée. Attendre que ce cycle
se termine automatiquement.
Pour activer/désactiver la
fonction, voir page 21.
7
3
4
1
2
5 6
7 8 9
'pEDOOHUOH¿OWUH©$TXD3ULPDª
régler la date sur le mois en cours.
FILTRE « AQUA PRIMA »
Pour améliorer la qualité de l’eau utilisée, tout en garantissant la longévité de l’appareil, il est conseillé
G¶LQVWDOOHUOH¿OWUH©$TXD3ULPDª$SUqVO¶LQVWDOODWLRQSURFpGHUDYHFOHSURJUDPPHG¶DFWLYDWLRQGX¿OWUHYRLU
SURJUDPPDWLRQGHPDQLqUHjFHTXHODPDFKLQHSXLVVHSUpYHQLUO¶XWLOLVDWHXUSRXUOHUHPSODFHPHQWGX¿OWUH
,QVpUHUOH¿OWUHGDQVVRQORJHPHQW
à l’intérieur du réservoir vide (voir
¿JXUH$SSX\HUMXVTX¶DXSRLQW
d’arrêt.
Appuyer à nouveau sur .
Quand la machine a terminé, tourner le bouton pour le mettre dans la position de repos ( ). Appuyer ensuite sur
à plusieurs reprises jusqu’à ce que l’inscription « sortie » apparaisse.
Appuyer alors sur
. La machine est ainsi prête à l’emploi.
Remplir le réservoir avec de l’eau
IURLGHSRWDEOH/DLVVHUOH¿OWUHGDQV
le réservoir plein pendant 30 minutes
pour que l’activation soit correcte
Placer un récipient sous la buse
de distribution de l’eau chaude/
vapeur
Appuyer sur
.
Choisir et appuyer sur la
touche
.
Choisir et appuyer sur la
touche
.
Tourner le bouton jusqu’au point de
repère . La distribution de l’eau
chaude commence.
1 rég. boissons 3 entretien
3.1 filtre 3.1.3 charge
exéc. maintenant
1.
2.
1.
2.
8
• Pour obtenir 2 tasses, appuyer 2 fois sur la touche .
Cette opération est possible jusqu’à ce que le café de la première sélection soit moulé.
appuyer 2 fois
Trois sélections sont possibles en appuyant sur la
touche
(fort, moyen et léger) qui indiquent
la quantité de café que la machine mout pour la
préparation de la boisson. Cette touche permet
également de sélectionner la fonction de café
prémoulu.
AFFICHEUR
Accéder au menu de
programmation
(OPTI-DOSE) INDICATION DE LA QUANTITÉ DE CAFÉ MOULU
Disque de sélection
Sélectionner la
quantité de café à
moudre ou prémoulu
Touche de sélection
distribution de la vapeur
7RXFKHGHFRQ¿UPDWLRQ
Touche de sélection
distribution d’eau chaude
• Pour la préparation de 2 tasses, la machine distribue la moitié de la quantité réglée et interrompt
brièvement la distribution pour moudre la seconde dose de café.
La distribution de café est ensuite reprise et terminée.
SÉLECTIONNER LA QUANTITÉ DE
CAFÉ À MOUDRE AVANT DE
DISTRIBUER LA BOISSON.
arôme fort
expresso
sélectionné
expresso
sélectionné
expresso double
arôme fort
expresso
arôme moyen
expresso
arôme léger
expresso
prémoulu
expresso
9
CAFE
MOYEN
CAFE
FORT
CAFÉ
LÉGER
Pour régler la densité du café distribué. Le
réglage peut également être effectué durant
la distribution du café. Ce réglage a un effet
immédiat sur la distribution sélectionnée.
DENSITÉ DU CAFÉ
SBS – SAECO BREWING SYSTEM
RÉGLAGE DE LA HAUTEUR DU BAC D’ÉGOUTTEMENT
RÉGLAGES
Le dispositif SBS a été spécialement conçu pour permettre de donner la densité et l’intensité de goût
YRXOXHVDXFDIp,OVXI¿WGHWRXUQHUOHERXWRQSRXUPRGL¿HUOHFDUDFWqUHTXLFRUUHVSRQGOHPLHX[DXJRW
5pJOHUOHEDFG¶pJRXWWHPHQWDYDQWGHGLVWULEXHUOHVERLVVRQVD¿QGHSRXYRLUXWLOLVHUQ¶LPSRUWHTXHOW\SHGH
tasses.
Bac d’égouttement réglable en hauteur.
Pour régler le bac d’égouttement, le lever ou le baisser
manuellement jusqu’à atteindre la hauteur souhaitée.
5HPDUTXHXQÀRWWHXUFRXOHXUDPEUHTXLVHUWjLQGLTXHU
quand il faut vider le bac d’égouttement, est prévu dans ce
dernier.
La machine permet de régler légèrement le degré de mouture pour l’adapter au type de café utilisé.
Le réglage doit être effectué en tournant le pivot situé
à l’intérieur du réservoir à café, et ce uniquement
avec la clé fournie. Ne tourner le pivot que d’un seul
FUDQjODIRLVHWGLVWULEXHURXFDIpVSRXUYpUL¿HUOH
degré de mouture.
Les repères à l’intérieur du réservoir indiquent le
degré de mouture réglé.
RÉGLAGE DU MOULIN À CAFÉ
MOUTURE FINE MOUTURE MOYENNE MOUTURE GROSSIÈRE
10
3
4 5
1 2
LA DISTRIBUTION DE CAFÉ PEUT ÊTRE INTERROMPUE À TOUT MOMENT EN
APPUYANT DE NOUVEAU SUR LA TOUCHE .
LA VAPEUR PEUT ATTEINDRE UNE TEMPÉRATURE ÉLEVÉE : RISQUE DE
BRÛLURES. ÉVITER TOUT CONTACT DIRECT AVEC LES MAINS.
9pUL¿HUTXHWRXVOHVUpVHUYRLUVVRLHQWSURSUHVVXLYUHSRXUFHODOHVLQGLFDWLRQVGXFKDSLWUH©1HWWR\DJHHW
entretien » (voir page 30).
Pour la préparation de 2 tasses, la machine distribue le premier café et interrompt brièvement la
distribution pour moudre la seconde dose de café. La distribution de café est ensuite reprise et terminée.
CAFÉ EXPRESSO / CAFÉ / CAFÉ ALLONGÉ
Sélectionner éventuellement la
quantité de café à moudre en
appuyant une ou plusieurs fois
sur la touche
.
Appuyer sur la touche
: une fois
pour 1 tasse et deux fois pour deux
tasses. La distribution de la boisson
sélectionnée commence alors.
DISTRIBUTION DE LA BOISSON
Cette procédure montre comment préparer un expresso. Pour préparer un autre type de café, le sélectionner
en faisant glisser le doigt sur le disque. Utiliser des tasses appropriées pour éviter que le café ne déborde.
La machine termine automatiquement la distribution du café selon les quantités réglées en usine. Il est possible de
personnaliser les quantités (voir page 16).
Sélectionner la boisson désirée en
faisant glisser le doigt sur le
disque de sélection.
Mettre 1/2 tasse(s) pour préparer
un expresso
Mettre 1/2 tasse(s) pour préparer
un café ou un café allongé.
arôme fort
expresso
arôme fort
expresso
arôme fort
expresso
11
4
1 2
5
3
DISTRIBUTION DE LA BOISSON AVEC DU CAFÉ MOULU
La machine permet d’utiliser du café prémoulu ou décaféiné moulu.Verser le café prémoulu dans le
compartiment prévu à cet effet à côté du réservoir à café en grains. Ne verser que du café moulu pour
machines à café expresso mais jamais du café en grains ou soluble.
ATTENTION : NE VERSER DU CAFÉ PRÉMOULU DANS LE COMPARTIMENT QUE POUR
PRÉPARER UNE BOISSON AVEC CE TYPE DE CAFÉ.
NE VERSER QU’UNE SEULE MESURE DE CAFE MOULU À LA FOIS. LA MACHINE NE PEUT PAS
DISTRIBUER DEUX CAFÉS EN MÊME TEMPS.
Sélectionner la fonction en appuyant
sur la touche
jusqu’à ce que
l’option prémoulu apparaisse.
&RQ¿UPHUHQDSSX\DQWVXU
.
Remarque :
6LODGLVWULEXWLRQQHGpPDUUHSDVGDQVOHVVHFRQGHVTXLVXLYHQWO¶DI¿FKDJHGHODSDJHpFUDQOD
machine retourne au menu principal et décharge l’éventuel café introduit dans le tiroir à marc ;
• Si le café prémoulu n’est pas versé dans son compartiment, la machine ne distribuera que de l’eau ;
• Si la dose est excessive ou que 2 ou plusieurs mesures de café sont ajoutées dans le compartiment, la
machine ne distribue pas de boisson et le café versé sera déchargé dans le tiroir à marc.
L’exemple reporté ci-dessous montre la préparation d’un expresso avec du café prémoulu. Le choix
SHUVRQQDOLVpG¶XWLOLVHUGXFDIpSUpPRXOXDSSDUDvWVXUO¶DI¿FKHXU
Sélectionner la boisson désirée en
faisant glisser le doigt sur le
disque de sélection.
Appuyer sur la touche
; la
distribution commence.
Verser le café moulu dans le
compartiment prévu à cet effet à
l’aide de la mesure fournie.
arôme fort
expresso
prémoulu
expresso
insérer poudre
et appuy. sur ok
La page écran rappelle à
l’utilisateur de verser le café moulu
dans le compartiment prévu à cet
effet.
distribution
veuil. patienter
1.
2.
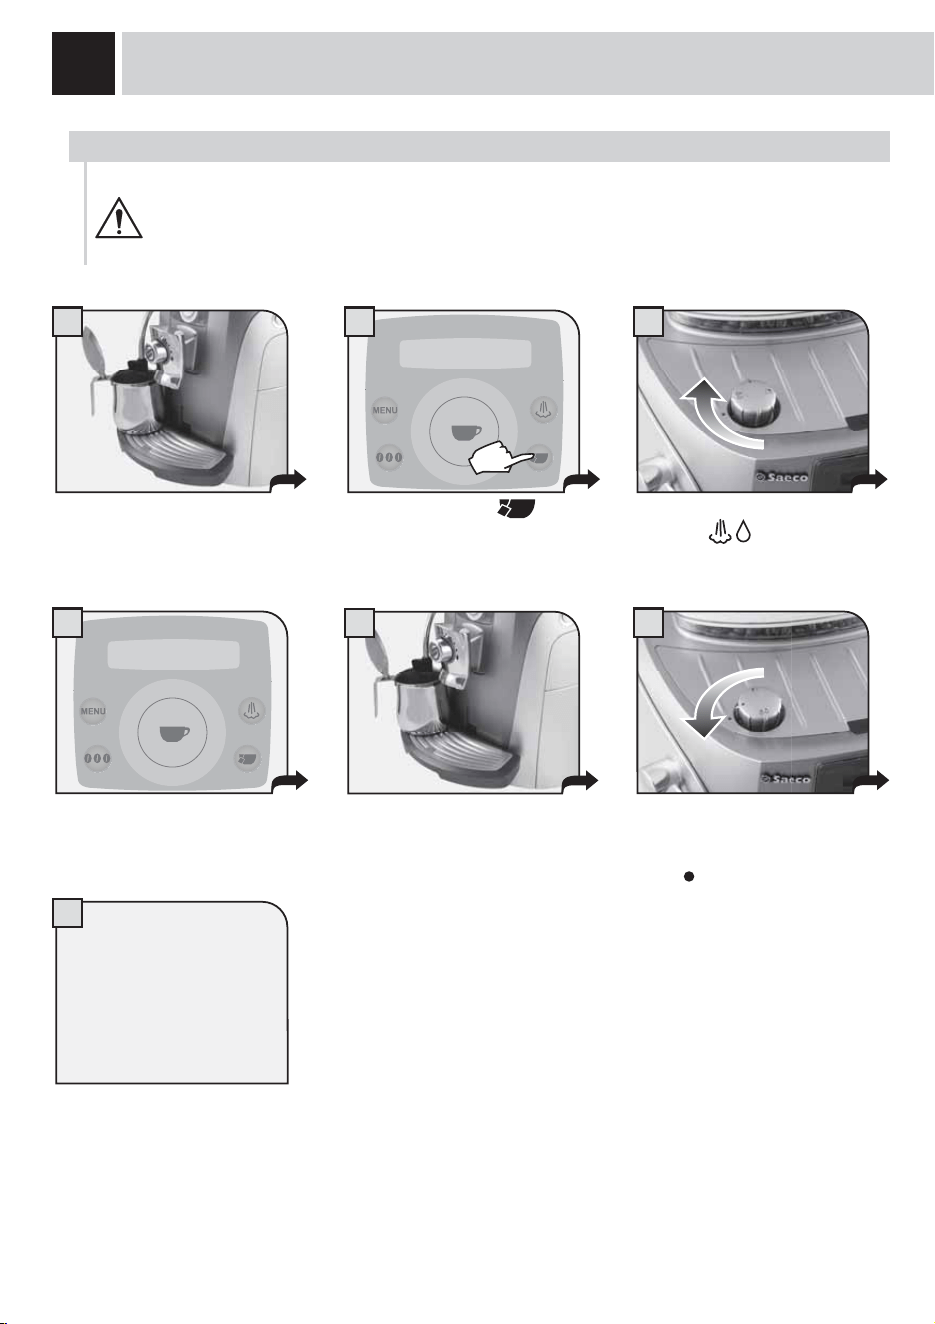
12
1 2 3
5
6
7
4
DISTRIBUTION D’EAU CHAUDE
AU DÉBUT DE LA DISTRIBUTION, FAIRE ATTENTION AU RISQUE DE BRÛLURES CAR IL
PEUT Y AVOIR DES ÉCLABOUSSURES D’EAU CHAUDE. LA BUSE POUR LA DISTRIBUTION
DE L’EAU CHAUDE/ VAPEUR PEUT ATTEINDRE DES TEMPÉRATURES ÉLEVÉES : ÉVITER
DE LA TOUCHER DIRECTEMENT AVEC LES MAINS, UTILISER EXCLUSIVEMENT LA
POIGNÉE PRÉVUE À CET EFFET.
DISTRIBUTION DE LA BOISSON
Appuyer sur la touch .
Placer un récipient sous la buse
de l’eau chaude.
Tourner le bouton jusqu’au point
de repère
.
Attendre que la quantité d’eau
souhaitée ait été distribuée.
Quand la machine a distribué la
quantité désirée, tourner le bouton
pour le mettre dans la position de
repos ( ).
Répéter la procédure pour
la distribution d’une tasse
d’eau chaude
supplémentaire.
sélectionné
eau chaude
/¶DI¿FKHXULQGLTXH«
distribution
eau chaude
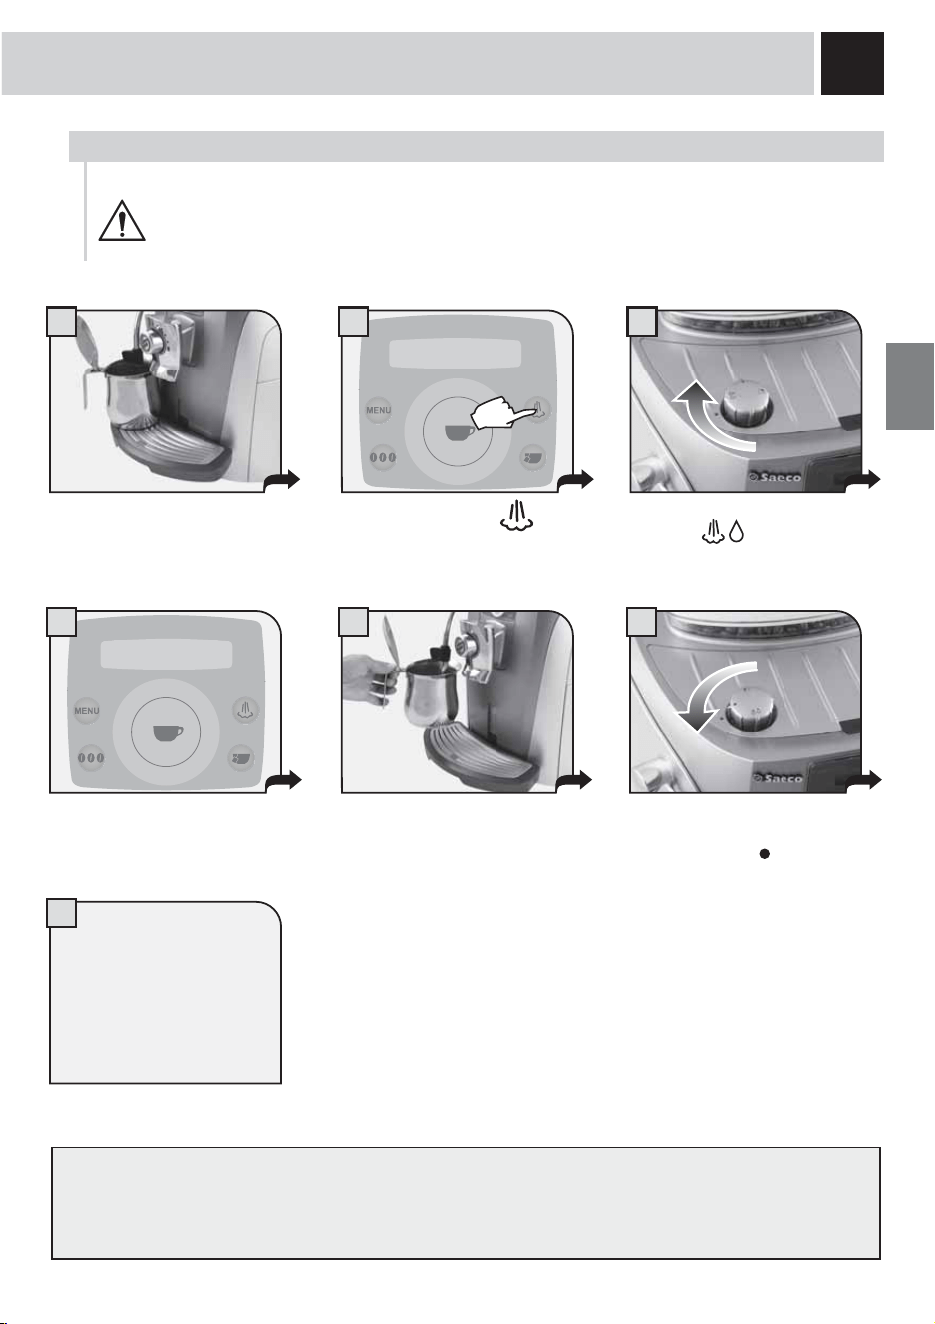
13
1 2 3
5 6
7
4
DISTRIBUTION VAPEUR
Appuyer sur la touche .
Placer un récipient contenant la
boisson à réchauffer sous la buse
de vapeur.
Tourner le bouton jusqu’au point
de repère
.
Chauffer la boisson en agitant le
récipient durant cette opération.
Quand la boisson est chaude,
tourner le bouton jusqu’à la
position de repos (
).
Nettoyer ensuite la buse de vapeur comme indiqué à la page 30.
Procéder de la même
façon pour chauffer une
autre boisson.
AU DÉBUT DE LA DISTRIBUTION, FAIRE ATTENTION AU RISQUE DE BRÛLURES CAR IL
PEUT Y AVOIR DES ÉCLABOUSSURES D’EAU CHAUDE. LA BUSE POUR LA
DISTRIBUTION DE L’EAU CHAUDE/ VAPEUR PEUT ATTEINDRE DES TEMPÉRATURES
ÉLEVÉES : ÉVITER DE LA TOUCHER DIRECTEMENT AVEC LES MAINS, UTILISER
EXCLUSIVEMENT LA POIGNÉE PRÉVUE À CET EFFET.
/¶DI¿FKHXULQGLTXH«
sélectionné
vapeur
distribution
vapeur
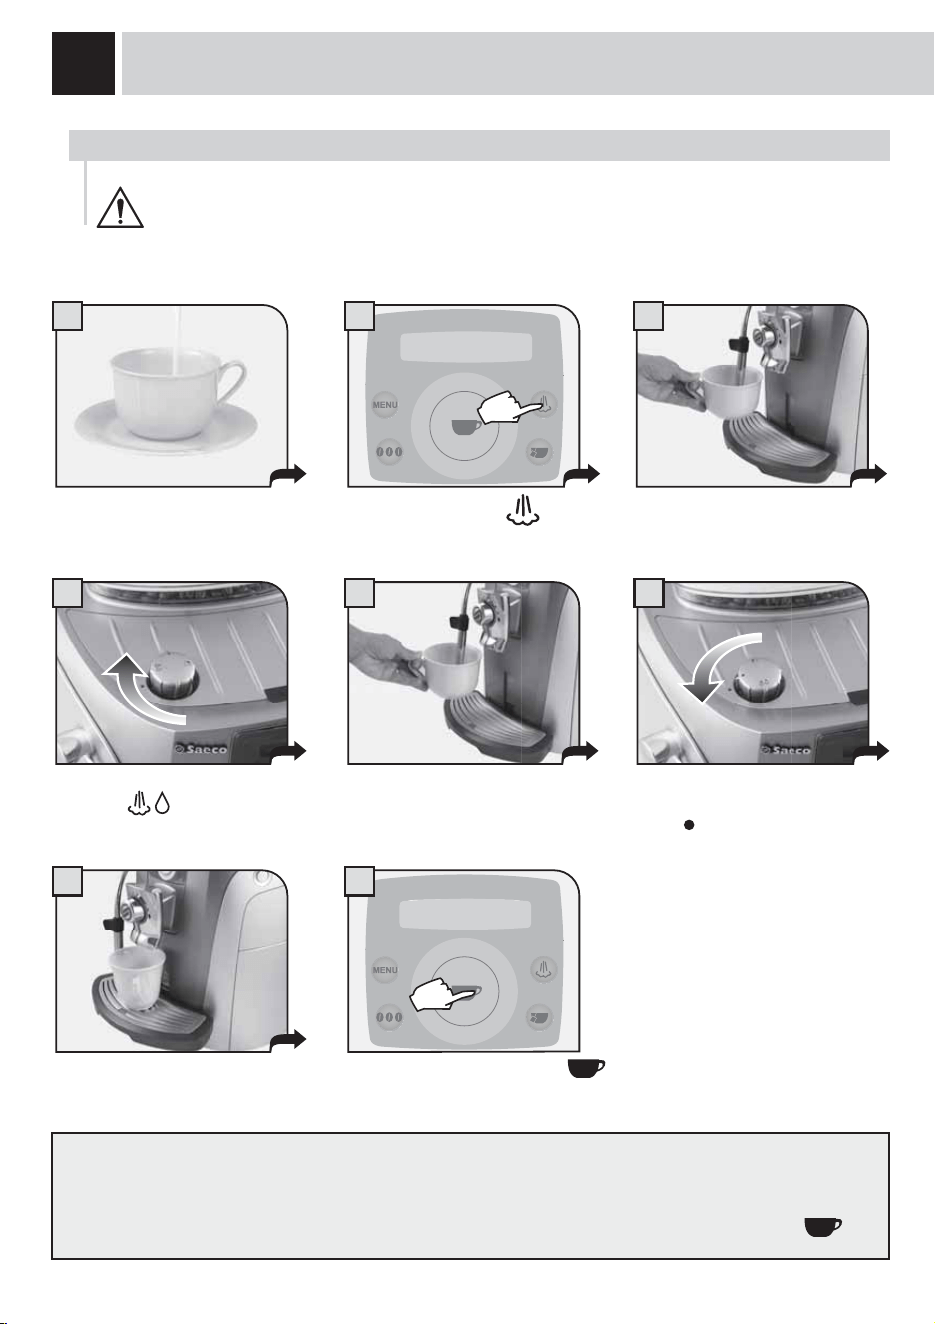
14
32
4 5 6
1
87
DISTRIBUTION DE LA BOISSON
DISTRIBUTION CAPPUCCINO
AU DÉBUT DE LA DISTRIBUTION, FAIRE ATTENTION AU RISQUE DE BRÛLURES CAR IL
PEUT Y AVOIR DES ÉCLABOUSSURES D’EAU CHAUDE. LA BUSE POUR LA DISTRIBUTION
DE L’EAU CHAUDE/ VAPEUR PEUT ATTEINDRE DES TEMPÉRATURES ÉLEVÉES : ÉVITER
DE LA TOUCHER DIRECTEMENT AVEC LES MAINS, UTILISER EXCLUSIVEMENT LA
POIGNÉE PRÉVUE À CET EFFET.
Appuyer sur la touche .
Mettre la tasse sous la buse de
vapeur.
Tourner le bouton jusqu’au point
de repère
.
Émulsionner le lait en agitant la
tasse durant cette opération.
Quand le lait est chaud, tourner
le bouton jusqu’à la position de
repos (
).
Nettoyer ensuite la buse de vapeur comme indiqué à la page 30.
Pour préparer 2 cappuccinos :
• émulsionner deux tasses de lait en suivant les points de 1 à 6 ;
• préparer deux cafés en suivant les points de 7 à 8 (appuyer dans ce cas deux fois sur la touche
).
Remplir la tasse avec 1/3 de lait
froid.
Appuyer une fois sur la touche
: la distribution de café commence.
Mettre la tasse sous le groupe de
distribution.
sélectionné
vapeur
arôme fort
expresso
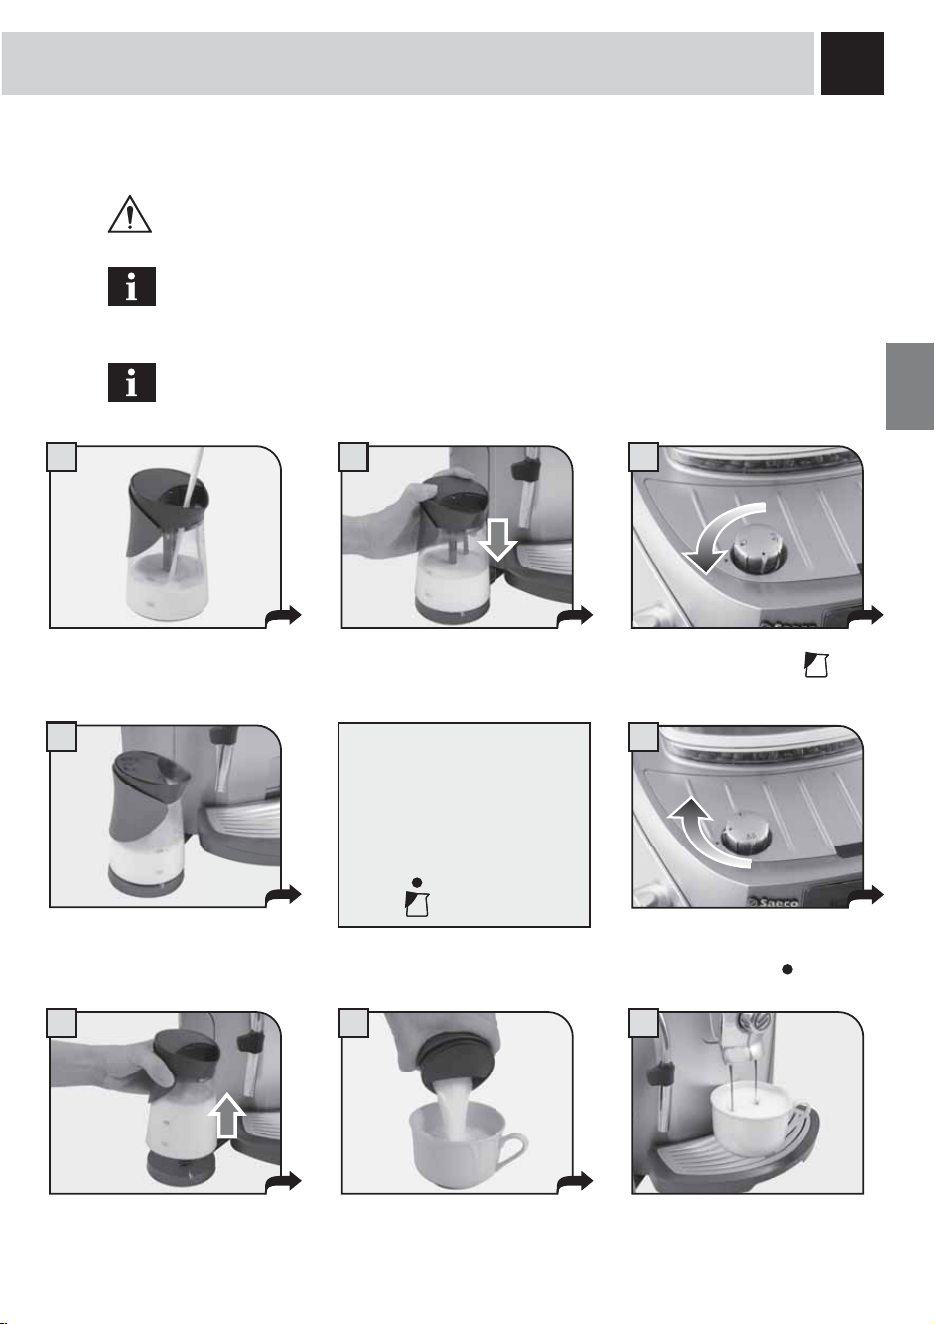
15
1 2 3
5
4
6 7 8
MILK ISLAND (EN OPTION)
Cet accessoire, que l’on peut acheter à part, permet de préparer très facilement et en toute commodité
d’excellents cappuccinos.
Attention : avant d’utiliser le Milk Island consulter le manuel correspondant contenant toutes
les précautions pour une utilisation correcte.
Remarque importante : la quantité de lait dans la carafe ne doit pas être inférieure au niveau
minimal « MIN » et ne doit jamais dépasser le niveau maximal « MAX ». Après avoir utilisé le
Milk Island, nettoyer soigneusement tous ses composants.
Il est conseillé d’utiliser du lait demi-écrémé et froid (0-8°C) pour préparer le cappuccino,
DÀQG·REWHQLUOHPHLOOHXUUpVXOWDW
Remplir la carafe avec la
quantité de lait souhaitée.
Poser la carafe sur la base du Milk
,VODQG9pUL¿HUTXHOD'(/'LRGH
électro-luminescente) qui se trouve
sur la base soit verte.
Prélever la carafe en la prenant
par la poignée.
Verser le lait dans la tasse après
avoir fait quelques mouvements
circulaires.
Mettre la tasse avec le lait
émulsionné sous le distributeur.
Distribuer le café dans la tasse.
Tourner le bouton jusqu’à ce qu’il
se place sur la position
.
Attendre que le lait soit
émulsionné.
Une fois l’émulsion souhaitée
atteinte, tourner le bouton jusqu’à
la position de repos (
).
La machine s’arrête
automatiquement au bout de 2
minutes de distribution continue
de vapeur.
Pour distribuer encore de la
vapeur, mettre le bouton sur la
position (
) et à nouveau sur la
position
.
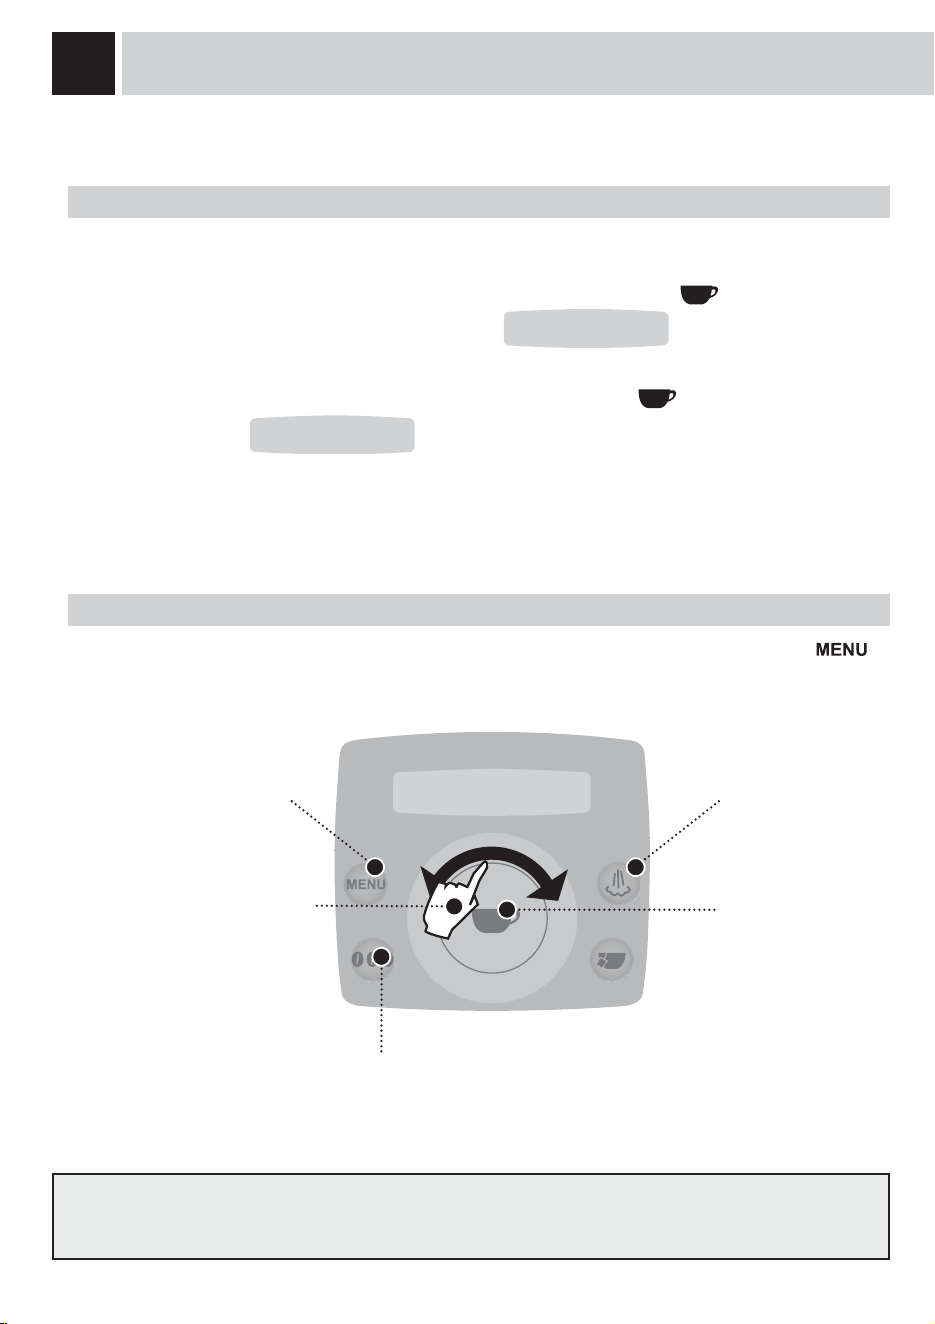
16
PROGRAMMATION BOISSON
Pour plus de précision, la page suivante montre comment programmer une boisson contenant du café ; les
paramètres à saisir pour programmer chaque boisson peuvent être différents en fonction du type de boisson.
2. PROGRAMMATION À PARTIR DU MENU « RÉGLAGE DES BOISSONS »
Ce menu permet de régler les paramètres pour la préparation des boissons : appuyer sur la touche et
sélectionner « rég. des boissons » en faisant tourner le disque de sélection d’un doigt :
Au cours de cette phase, on peut :
le fait de laisser glisser son doigt
VXUOHGLVTXHSHUPHWGHPRGL¿HUOHV
réglages pour :
- la quantité de café distribuée ;
- la température du café ;
- la pré-infusion du café.
sélectionner la quantité de café à moudre (opti-dose)
sélectionner la fonction à régler :
- température du café ;
- pré-infusion du café.
rétablir les réglages
SUpGp¿QLVHQXVLQH
mémoriser les
nouveaux réglages
1 rég. boissons
L’utilisateur peut programmer chaque boisson selon son goût personnel.
1. PROGRAMMATION POUR REGLAGES PERSONNELS
La quantité de café qui est distribuée dans la tasse chaque fois que l’on appuie sur le bouton peut être
programmée rapidement pour toutes les boissons.
Après avoir sélectionné le type de boisson à programmer, appuyer sur la touche
sans la relâcher
MXVTX¶jFHTX¶DSSDUDLVVHSDUH[HPSOHVXUO¶DI¿FKHXU
La machine distribue le café.
Quand la quantité souhaitée est atteinte, appuyer à nouveau sur la touche
.
/¶DI¿FKHXULQGLTXH
Cette quantité de café distribuée reste mémorisée et remplace les réglages précédents.
programmation
expresso
memorisé
expresso
quitter la programmation
(voir page 18)
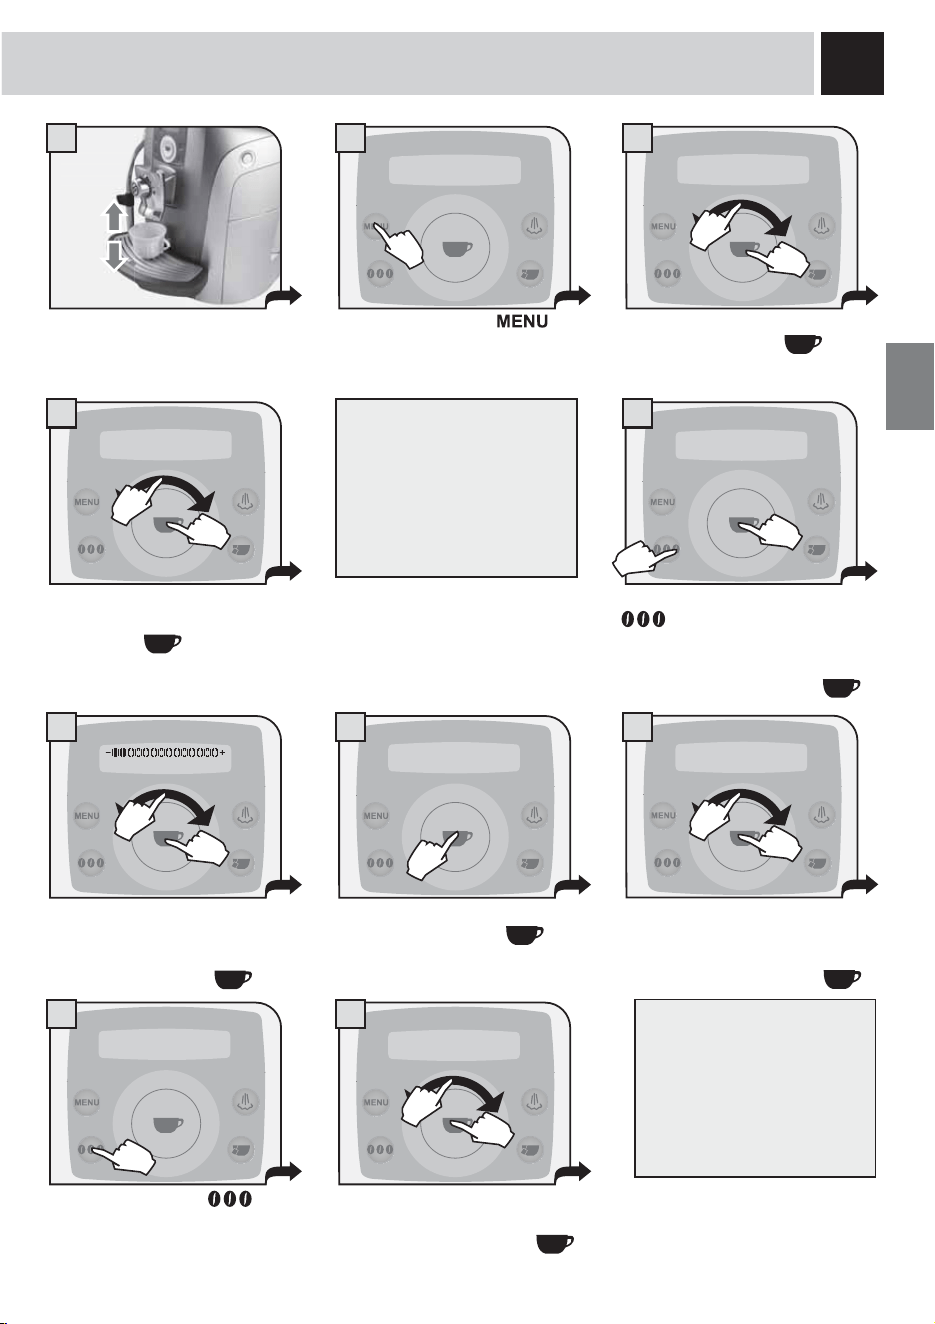
17
1 2 3
4 5
6 7
8
9 10
9pUL¿HUTXHOHUpVHUYRLUjHDXHWOH
réservoir à café en grains soient
pleins ; mettre la tasse sous le
distributeur.
Appuyer sur la touche .
Appuyer plusieurs fois sur la touche
pour régler la quantité de
café à moudre ou sélectionner
l’emploi de café prémoulu.
Mémoriser en appuyant sur
.
Sélectionner la boisson à
SURJUDPPHU&RQ¿UPHUHQ
appuyant sur
.
Sélectionner « rég. boissons ».
Appuyer sur la touche pour
FRQ¿UPHU
0RGL¿HUODGHQVLWpGXFDIpHQ
faisant glisser le doigt sur le
GLVTXHGHVpOHFWLRQFRQ¿UPHUHQ
appuyant sur la touche
.
Appuyer pendant plus de deux
secondes sur la touche
pour
pouvoir accéder aux autres
paramètres à programmer.
0RGL¿HUODYDOHXUGHODWHPSpUDWXUH
(elevée, moyenne, basse) en
tournant le disque d’un doigt.
Mémoriser en appuyant sur
.
Appuyer sur la touche
pour
sélectionner le paramètre pré-
infusion.
0RGL¿HUODYDOHXUGHODSUpLQIXVLRQQRUPDOH
longue, non) en tournant le disque d’un doigt.
Mémoriser en appuyant sur
.
arôme fort
expresso
1 rég. boissons
1.1 expresso
arôme moyen
expresso
expresso
temp. moyenne
expresso
pré-inf. normale
expresso
temp. moyenne
expresso
pré-inf. normale
expresso
La pré-infusion : le café est
OpJqUHPHQWKXPLGL¿pDYDQW
l’infusion, ce qui lui permet de
développer l’ensemble de son
arôme, lui conférant ainsi un
goût incomparable.
Lorsqu’on change les réglages,
OHPHVVDJHDI¿FKpjO¶pFUDQ
commence à clignoter.
Le clignotement se termine
lorsque les variations
effectuées sont mémorisées.
1.
1.
2.
1.
2.
2.
2.
2.
2.
1.
1.
1.
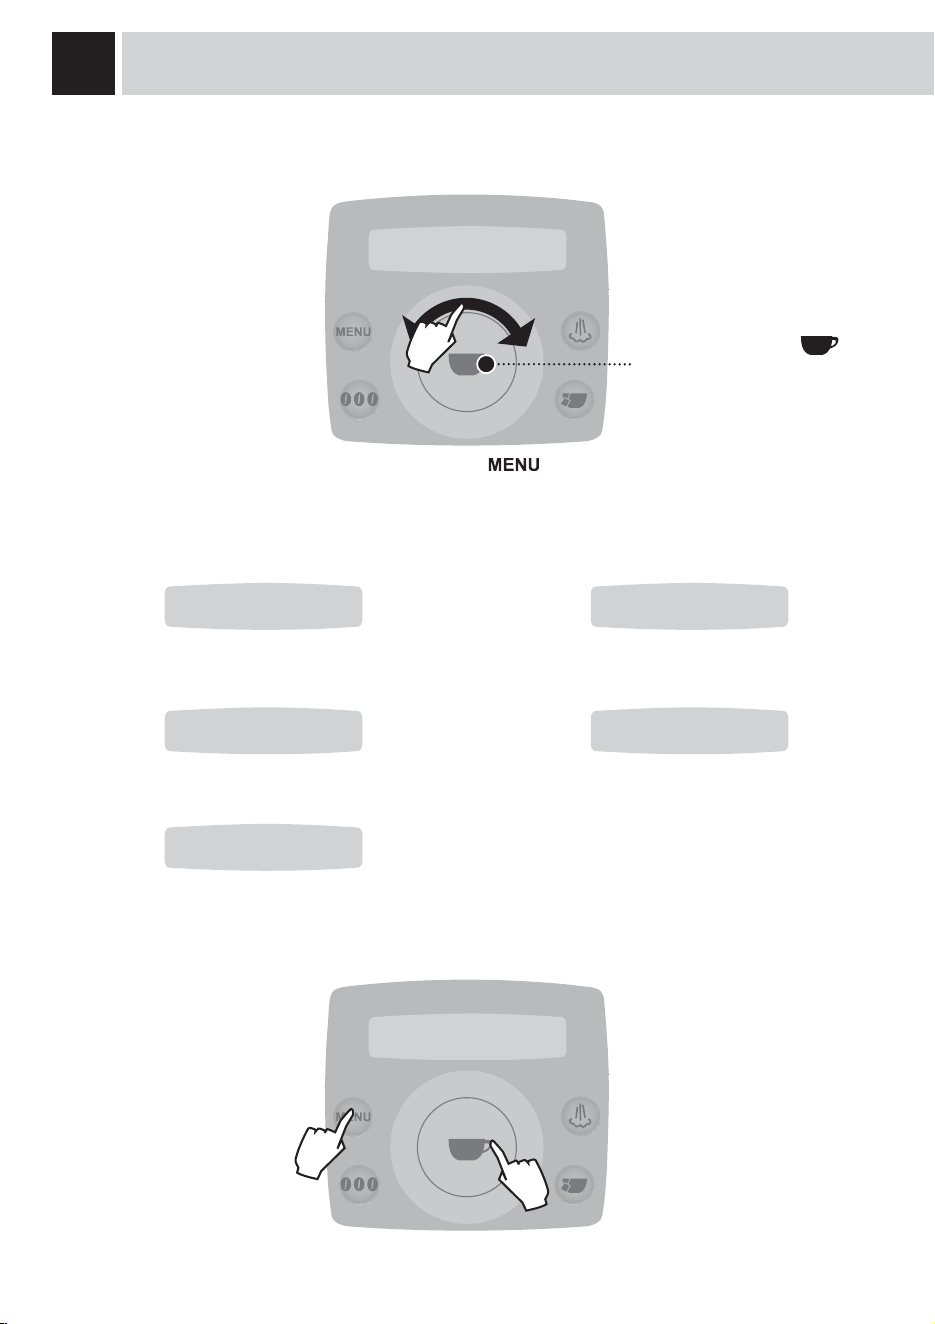
18
PROGRAMMATION MACHINE
&HUWDLQHVIRQFWLRQVGHODPDFKLQHSHXYHQWrWUHSURJUDPPpHVD¿QGHOHVDGDSWHUDX[H[LJHQFHV
personnelles.
Appuyer sur la touche pour :
FRQ¿UPHUODVpOHFWLRQ
- mémoriser les nouveaux
réglages
1 Appuyer sur la touche
.
2 Faire glisser le doigt sur le disque pour :
- sélectionner les fonctions
PRGL¿HUOHVSDUDPqWUHVGHVIRQFWLRQV
Réglage des boissons
(voir page 16)
Réglage de la machine
(voir page 19)
Entretien
(voir page 22)
Pour quitter la programmation :
Économie d’énergie
(voir page 28)
Fonctions spéciales
(voir page 29)
1 rég. boissons
1 rég. boissons
2 rég. machine
3 entretien
4 economie d'én.
5 fonct. spéc.
sortie
1.
2.
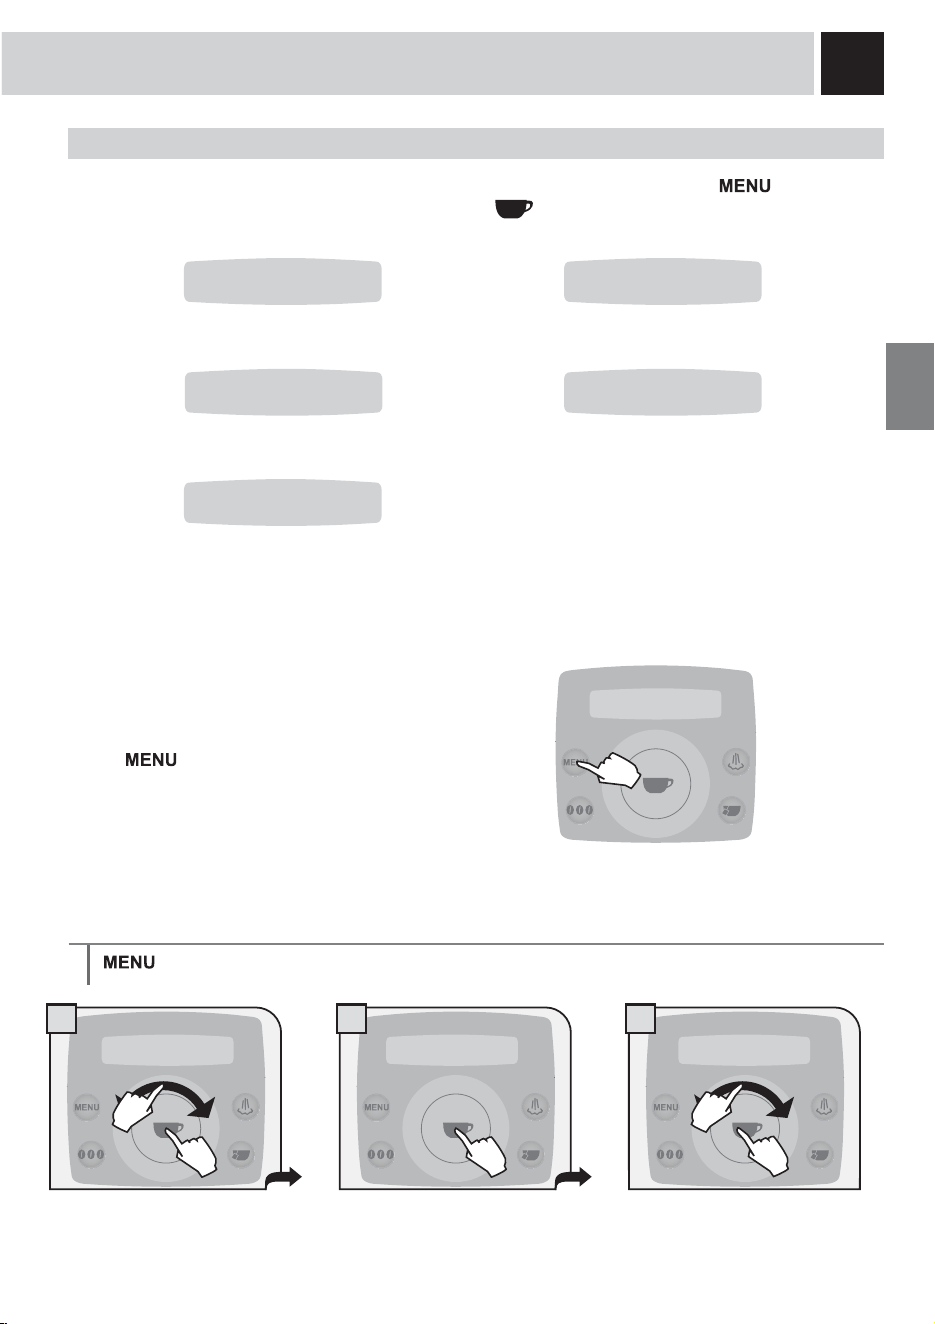
19
1 2 3
2.1 language
English
MENU « LANGUE »
RÉGLAGE DE LA MACHINE
3RXUPRGL¿HUOHVSDUDPqWUHVGHIRQFWLRQQHPHQWGHODPDFKLQHDSSX\HUVXUODWRXFKH ,
sélectionner « rég. machine » et appuyer sur la touche
. Faire glisser le doigt sur le disque de
sélection pour :
sélectionner la langue
des menus.
activer/ désactiver l’alerte
¿OWUH©$TXD3ULPDª
choisir le degré de dureté de l’eau.
régler le rinçage des
circuits du café.
activer les alertes sonores
Pour quitter la fonction « rég. machine » à n’importe quel
QLYHDXVDQVPpPRULVHUOHVPRGL¿FDWLRQVDSSX\HUVXUOD
touche
. Par exemple :
Sélectionner la langue souhaitée. La
PDFKLQHDI¿FKHHQVXLWHWRXVOHV
messages dans la langue souhaitée.
> rég. machine > langue &HPHQXSHUPHWGHPRGL¿HUODODQJXHGHO¶DI¿FKHXU
2.1 langue
français
2.3 alertes son.
activé
2.4 al. filtre
activé
2.5 rinçage
activé
2.2 dureté eau
3
2 rég. machine
2 rég. machine 2.1 langue
français
1.
2.
1.
2.
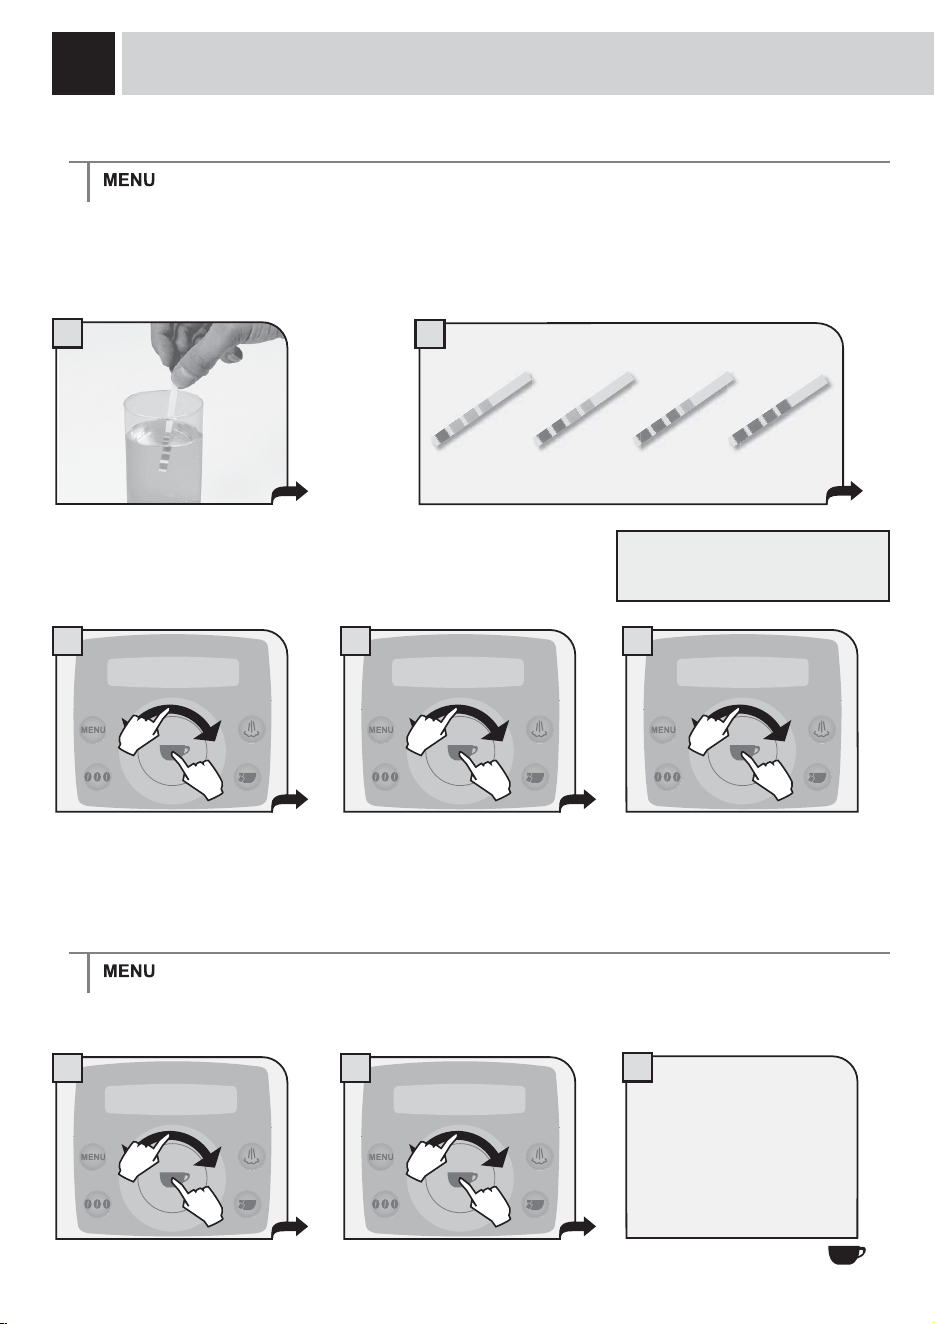
20
3
1 2
1
2
3 4 5
MENU « ALERTES SONORES »
> rég. machine > alertes son.
Pour activer/ désactiver le signal sonore chaque fois que l’on appuie sur une touche.
PROGRAMMATION MACHINE
Plonger dans l’eau la bande de test
fournie avec le kit pendant une
VHFRQGHD¿QGHYpUL¿HUODGXUHWp
de l’eau.
Déterminer la valeur.
La bande ne peut être utilisée que
pour une seule mesure.
MENU « DURETÉ DE L’EAU »
> rég. machine > dureté eau
/DIRQFWLRQ©'XUHWpGHO¶HDXªSHUPHWG¶DGDSWHUODPDFKLQHDXGHJUpGHGXUHWpGHO¶HDXXWLOLVpHD¿QTX¶HOOH
puisse demander de faire un cycle de détartrage au moment voulu.
La dureté est exprimée avec une échelle de 1 à 4. La machine est préréglée sur 3.
Régler la dureté de l’eau sur la
valeur du test et mémoriser.
2 rég. machine 2.3 alertes son.
activé
2 rég. machine 2.2 dureté eau
3
2.2 dureté eau
3
Sélectionner en glissant le
doigt sur le disque de
sélection.
Il est possible de régler :
- activé
- désactivé
Mémoriser en appuyant sur
.
1234
1.
2.
1.
2.
1.
2.
1.
2.
1.
2.
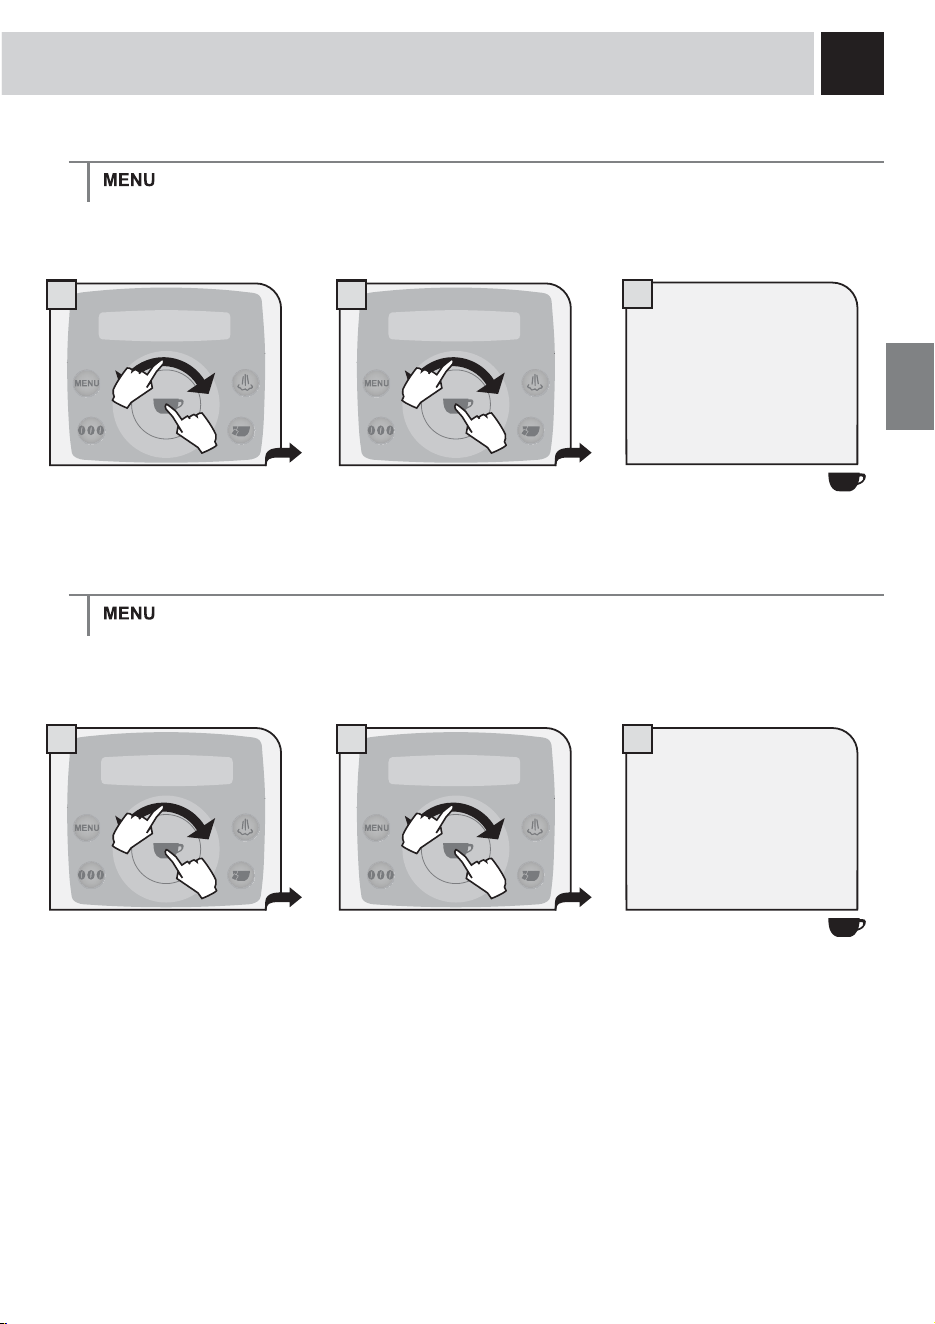
21
3
1 2
31 2
MENU « ALERTE FILTRE »
> rég. machine > al. filtre
3RXUDFWLYHUGpVDFWLYHUOHVLJQDOLQGLTXDQWTX¶LOIDXWUHPSODFHUOH¿OWUH©$TXD3ULPDª(QDFWLYDQWFHWWH
IRQFWLRQODPDFKLQHDYHUWLWO¶XWLOLVDWHXUTXDQGOH¿OWUH©$TXD3ULPDªGRLWrWUHUHPSODFp
MENU « RINÇAGE »
Remarque : ce rinçage doit être fait après la phase de chauffage à chaque mise en marche de la machine.
> rég. machine > rinçage
&HPHQXSHUPHWOHQHWWR\DJHGHVFRQGXLWHVLQWHUQHVD¿QGHJDUDQWLUTXHODGLVWULEXWLRQGHVERLVVRQVVRLW
effectuée uniquement avec de l’eau fraîche. Cette fonction est activée par défaut par le fabricant.
2 rég. machine 2.4 al. filtre
activé
2 rég. machine
2.5 rinçage
activé
Sélectionner en glissant le
doigt sur le disque de
sélection.
Il est possible de régler :
- activé
- désactivé
Sélectionner en glissant le
doigt sur le disque de
sélection.
Il est possible de régler :
- activé
- désactivé
Mémoriser en appuyant sur
.
Mémoriser en appuyant sur
.
1.
2.
1.
2.
1.
2.
1.
2.
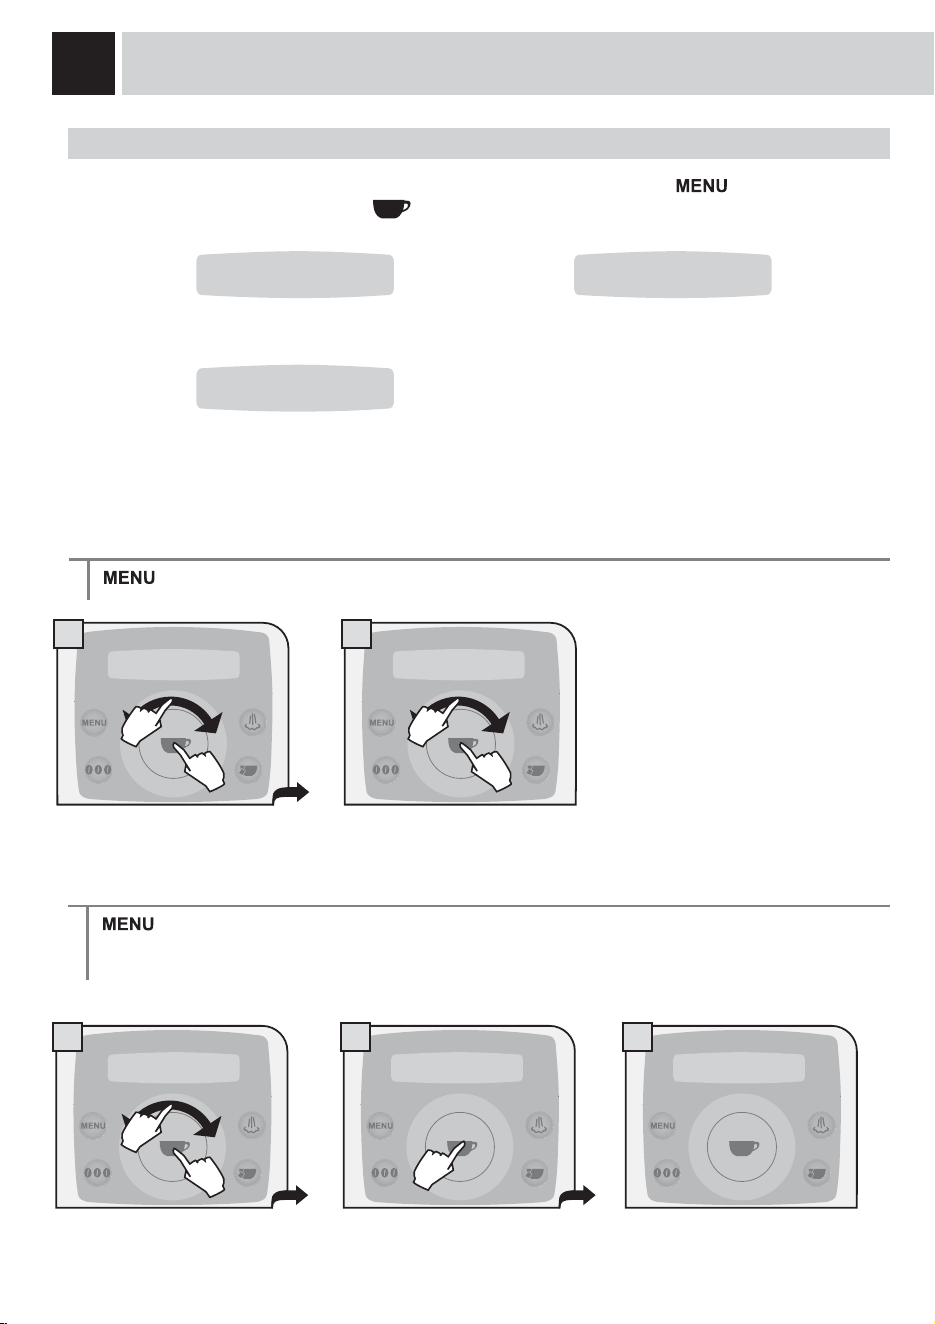
22
1 2
1 2 3
DFFpGHUDXPHQXVSpFL¿TXHSRXUOD
gestion du détartrage.
ENTRETIEN
Pour accéder aux programmes d’entretien de la machine, appuyer sur la touche et sélectionner
« entretien » et appuyer sur la touche
. Faire glisser le doigt sur le disque de sélection pour :
DFFpGHUDXPHQXVSpFL¿TXHSRXUOD
JHVWLRQGX¿OWUH©$TXD3ULPDª
laver le groupe de distribution.
MENU « FILTRE À EAU »
> entretien > filtre 3RXUJpUHUOH¿OWUH©$TXDSULPDª
Dans ce menu, on peut :
- voir la quantité d’eau (en litres) qu’il
UHVWHDYDQWGHUHPSODFHUOH¿OWUH
DFWLYHUGpVDFWLYHUO¶pWDWGX¿OWUH
- exécuter le remplissage/ activation
GX¿OWUH
Litres restants
> entretien > filtre > litres rest.
3RXUDI¿FKHUFRPELHQGHOLWUHVG¶HDXSHXYHQWHQFRUHrWUHWUDLWpVDYDQWGHUHPSODFHUOH¿OWUH©$TXD3ULPDª
ENTRETIEN
3.1 filtre
3.2 détart.
3.3 lav. groupe
3 entretien 3.1 filtre
3 entretien 3.1 filtre 3.1.1 filtre
litres rest. 59
1.
2.
1.
2.
1.
2.
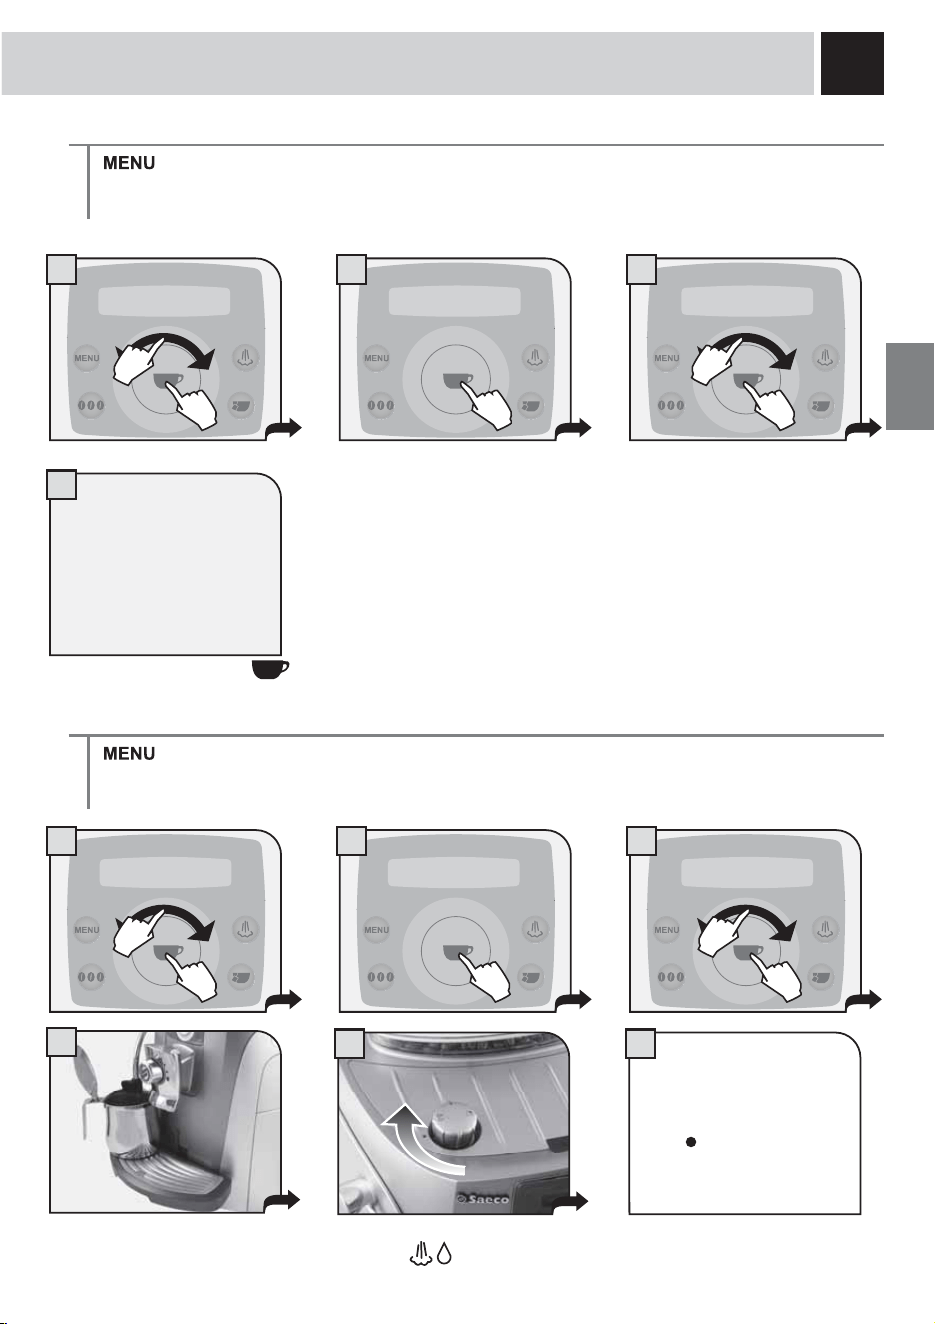
23
1 2
4
1 2
5
3
4
3
Quand le cycle est terminé,
tourner le bouton pour le
mettre dans la position de
repos (
) et enlever le
UpFLSLHQW/H¿OWUHHVWDFWLYp
État du filtre
> entretien > filtre > état
3RXUDFWLYHUGpVDFWLYHUOHFRQWU{OHGX¿OWUHODPDFKLQHYpUL¿HTXDQGOH¿OWUH©$TXDSULPDªGRLWrWUH
UHPSODFpHWOHFRPPXQLTXHjO¶XWLOLVDWHXU&HWWHIRQFWLRQGRLWrWUHDFWLYpHTXDQGOH¿OWUHHVWPRQWp
La charge du filtre
> entretien > filtre > charge
3RXULQLWLDOLVHUOH¿OWUH©$TXDSULPDªFHWWHRSpUDWLRQGRLWrWUHH[pFXWpHDXPRPHQWGHPRQWHUXQ¿OWUHQHXI
Tourner le bouton jusqu’au point
de repère
.
Placer un récipient sous la buse
de vapeur.
3 entretien 3.1 filtre
3 entretien 3.1 filtre 3.1.3 charge
exéc. maintenant
3.1.2 etat
désactivé
Sélectionner en glissant le
doigt sur le disque de
sélection.
Il est possible de régler :
- activé
- désactivé
Mémoriser en appuyant sur
.
6
1.
2.
1.
2.
1.
2.
1.
2.

24
1 2
1 2 3
MENU « DÉTARTRAGE »
> entretien > détart. Pour gérer le détartrage des circuits de la machine.
Dans ce menu, on peut :
- voir les litres qui restent avant le
détartrage ;
- exécuter le cycle de détartrage de la
machine.
Litres restants
> entretien > détart. > litres rest.
3RXUDI¿FKHUFRPELHQGHOLWUHVG¶HDXSHXYHQWHQFRUHrWUHWUDLWpVDYDQWTXHODPDFKLQHQHGHPDQGHXQF\FOH
de détartrage.
Cette fonction permet d’exécuter le cycle automatique de détartrage. Le détartrage est nécessaire tous les 3-4 mois,
quand l’eau s’écoule plus lentement que d’habitude ou quand la machine le signale. La machine doit être allumée et
elle gère automatiquement la distribution du détartrant.
PENDANT CETTE OPÉRATION, LA PRÉSENCE D’UNE PERSONNE EST NÉCESSAIRE.
ATTENTION ! NE JAMAIS UTILISER DE VINAIGRE POUR DÉTARTRER LA MACHINE.
Il est recommandé d’utiliser de préférence le détartrant Saeco ou un des produits détartrants pour machines à café
non toxiques ni nocifs que l’on trouve dans le commerce. La solution utilisée doit être éliminée conformément à ce
qui est prévu par le fabricant et/ou par les normes en vigueur dans le pays où la machine est utilisée.
Cycle de détartrage
> entretien > détart. > exéc. maintenant
ENTRETIEN
3 entretien 3.2 détart.
3 entretien 3.2.1 détart.
litres rest. 119
3.2.1 détart.
litres rest. 119
1.
2.
1.
2.
1.
2.
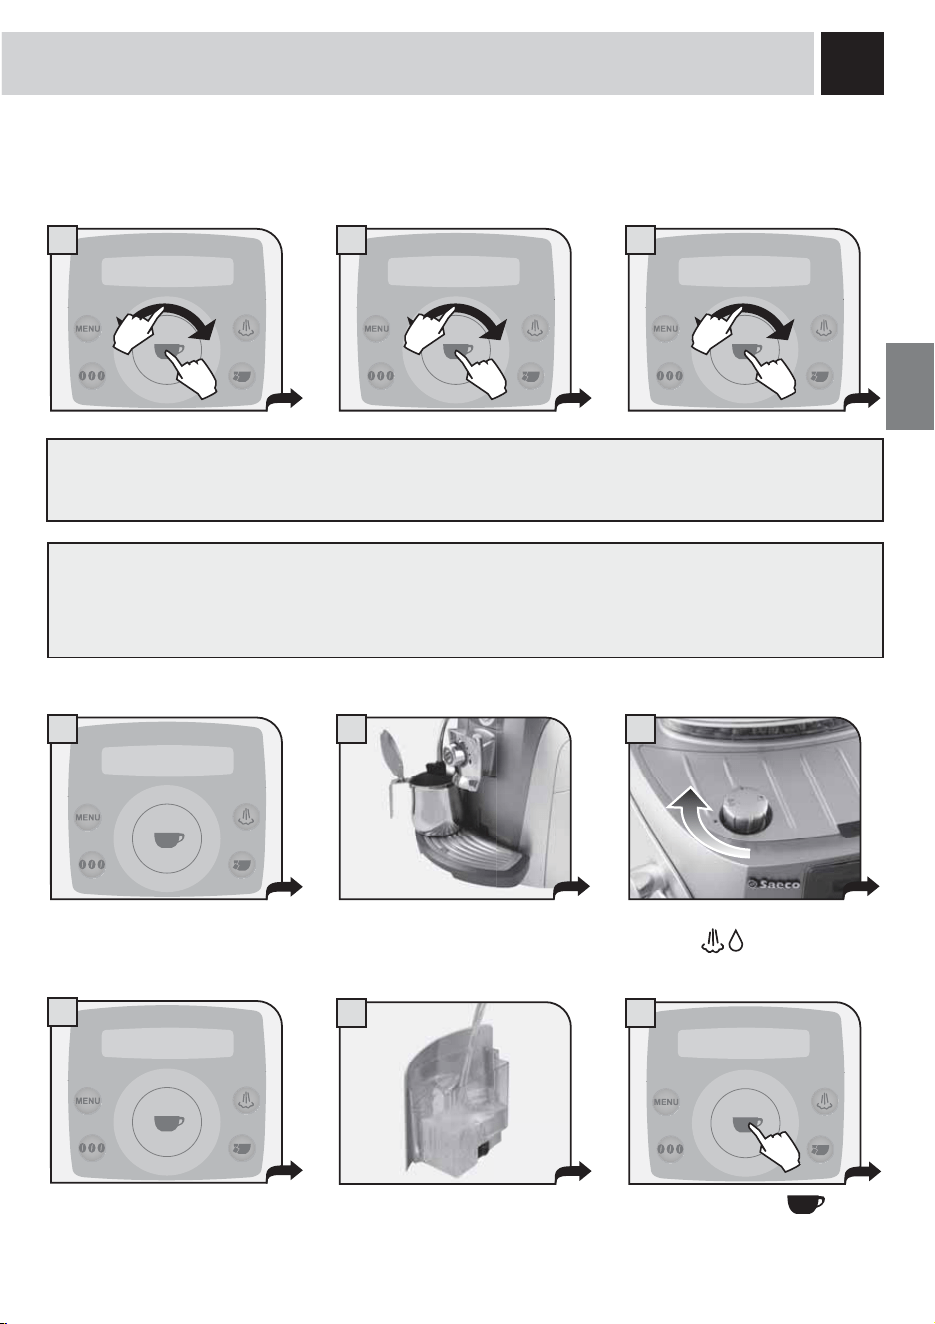
25
1 2 3
64
7
8 9
5
Le détartrage a lieu à une température contrôlée. Si la machine est froide, attendre qu’elle arrive à la juste
température ; dans le cas contraire, procéder comme suit pour refroidir la chaudière :
5HPDUTXHDYDQWGHFRPPHQFHUOHF\FOHGHGpWDUWUDJHYpULÀHU
TX·XQUpFLSLHQWGHWDLOOHVXIÀVDQWHDLWpWpPLVVRXVODEXVHGHO·HDX
2. QUE LE FILTRE « AQUA PRIMA » NE SOIT PLUS DANS LE RÉSERVOIR À EAU .
Tourner le bouton jusqu’au point
de repère
.
Placer un récipient sous la buse
de vapeur.
La chaudière est à la juste
température quand le message
VXLYDQWHVWDI¿FKp
S’il est nécessaire de chauffer la chaudière, la machine exécute ce processus de façon autonome ; quand la
SKDVHGHFKDXIIDJHHVWWHUPLQpHOHPHVVDJH©RXYULUOHURELQHWG¶HDXªHVWDI¿FKp3URFpGHUHQVXLWHFRPPH
décrit à partir du point 5.
3 entretien 3.2 détart.
3.2.2 détart.
exéc. maintenant
ouvrir
robinet eau
intr. détartrant
ok pour marche
Verser la solution détartrante dans
le réservoir. Remettre ce dernier
dans la machine.
Appuyer sur la touche
pour
faire démarrer le cycle.
intr. détartrant
ok pour marche
1. 1. 1.
2.2.2.
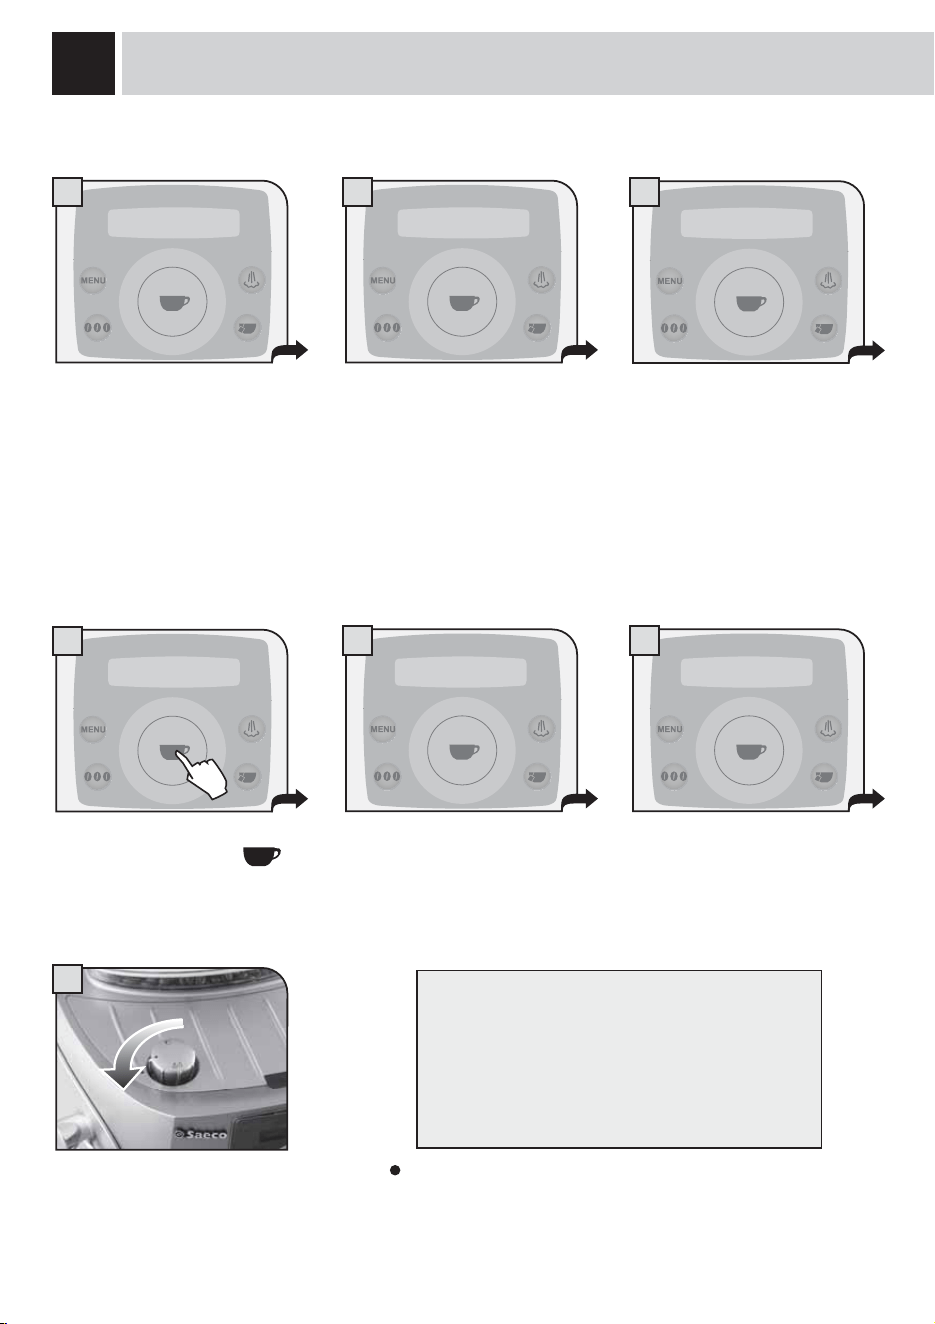
26
10
12
13
14 15
16
11
Quand la solution est terminée,
O¶DI¿FKHXULQGLTXH
Enlever le réservoir à eau, le
rincer à l’eau froide pour
éliminer toute trace de solution
détartrante et le remplir d’eau
froide potable.
Remettre le réservoir contenant
de l’eau froide potable dans la
machine.
Rincer les circuits de la machine
en appuyant sur la touche
.
La machine procède au rinçage.
Durant le rinçage, la machine peut
demander de remplir le réservoir à
eau.
La machine commence à distribuer
la solution détartrante dans la buse
de distribution de l’eau chaude. La
distribution a lieu à des intervalles
préétablis pour permettre à la
VROXWLRQG¶DJLUGHIDoRQHI¿FDFH
La page écran suivante apparaît
quand le rinçage est terminé. L’écran
DI¿FKHHQVXLWHODSDJHpFUDQGH
l’entretien.
Tourner le bouton jusqu’à la position de repos (
).
9pUL¿HUODTXDQWLWpG¶HDXGDQVOHUpVHUYRLUHW
PRQWHUGHQRXYHDXpYHQWXHOOHPHQWOH¿OWUH©$TXD
prima ».
ENTRETIEN
cycle détart.
veuil. patienter
Lorsque le détartrage est terminé, retourner au menu
principal pour la distribution des boissons.
/HVLQWHUYDOOHVVRQWDI¿FKpVD¿QGH
SRXYRLUYpUL¿HUO¶pWDWG¶DYDQFHPHQW
du processus.
passage
[ 6/15]
remplir le
réservoir à eau
cycle rinçage
ok pour marche
cycle rinçage
veuil. patienter
cycle rinçage
terminé
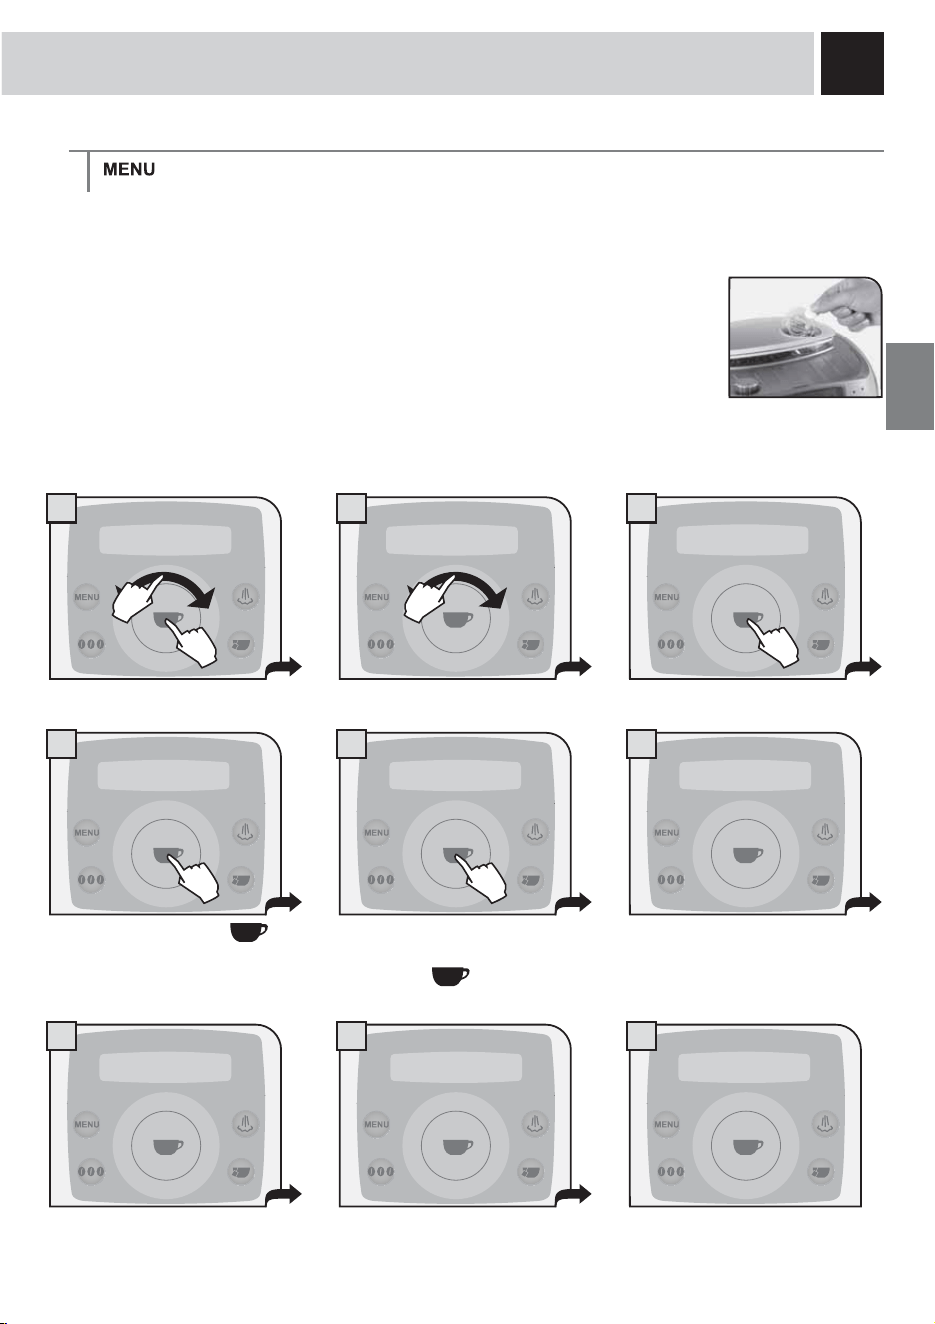
27
1 2
5 6
3
8 9
4
7
Lavage du groupe
> entretien > lav. groupe
Introduire la pastille comme
indiqué plus haut.
Appuyer sur
pour
commencer.
Cette fonction permet d’effectuer le nettoyage des circuits internes de l’appareil qui servent à la distribution du café.
,OVXIÀWGHODYHUOHJURXSHGHGLVWULEXWLRQDYHFGHO·HDXFRPPHLQGLTXpjODSDJH&HODYDJH
complète l’entretien du groupe de distribution. Il est conseillé d’utiliser des pastilles Saeco, que l’on
peut acheter à part auprès de votre revendeur.
5HPDUTXHDYDQWG¶DFWLYHUFHWWHIRQFWLRQYpUL¿HU
TX¶XQUpFLSLHQWGHWDLOOHVXI¿VDQWHVHWURXYHVRXVODEXVHGXGLVWULEXWHXU
2. que la pastille spéciale pour le nettoyage ait été introduite dans le groupe de
distribution ;
TXHOHUpVHUYRLUjHDXFRQWLHQQHXQHTXDQWLWpG¶HDXVXI¿VDQWH
LE CYCLE DE LAVAGE NE PEUT PAS ÊTRE INTERROMPU.
PENDANT CETTE OPÉRATION, LA PRÉSENCE D’UNE PERSONNE EST NÉCESSAIRE.
Attendre que le cycle soit terminé.
Le groupe est lavé. Quitter la
programmation. (voir page 18).
&RQ¿UPHUDYHFODWRXFKH
.
,OHVWSRVVLEOHGHYpUL¿HUO¶pWDW
d’avancement du lavage.
3 entretien 3.3 lav. groupe
3.3.1Lav. groupe
exéc. maintenant
3.3 lav. groupe
ins. pastille
et appuy. sur ok
lav. groupe
veuil. patienter
passage
[2/3]
rinçage terminé
veuil. patienter
3 entretien
1.
2.
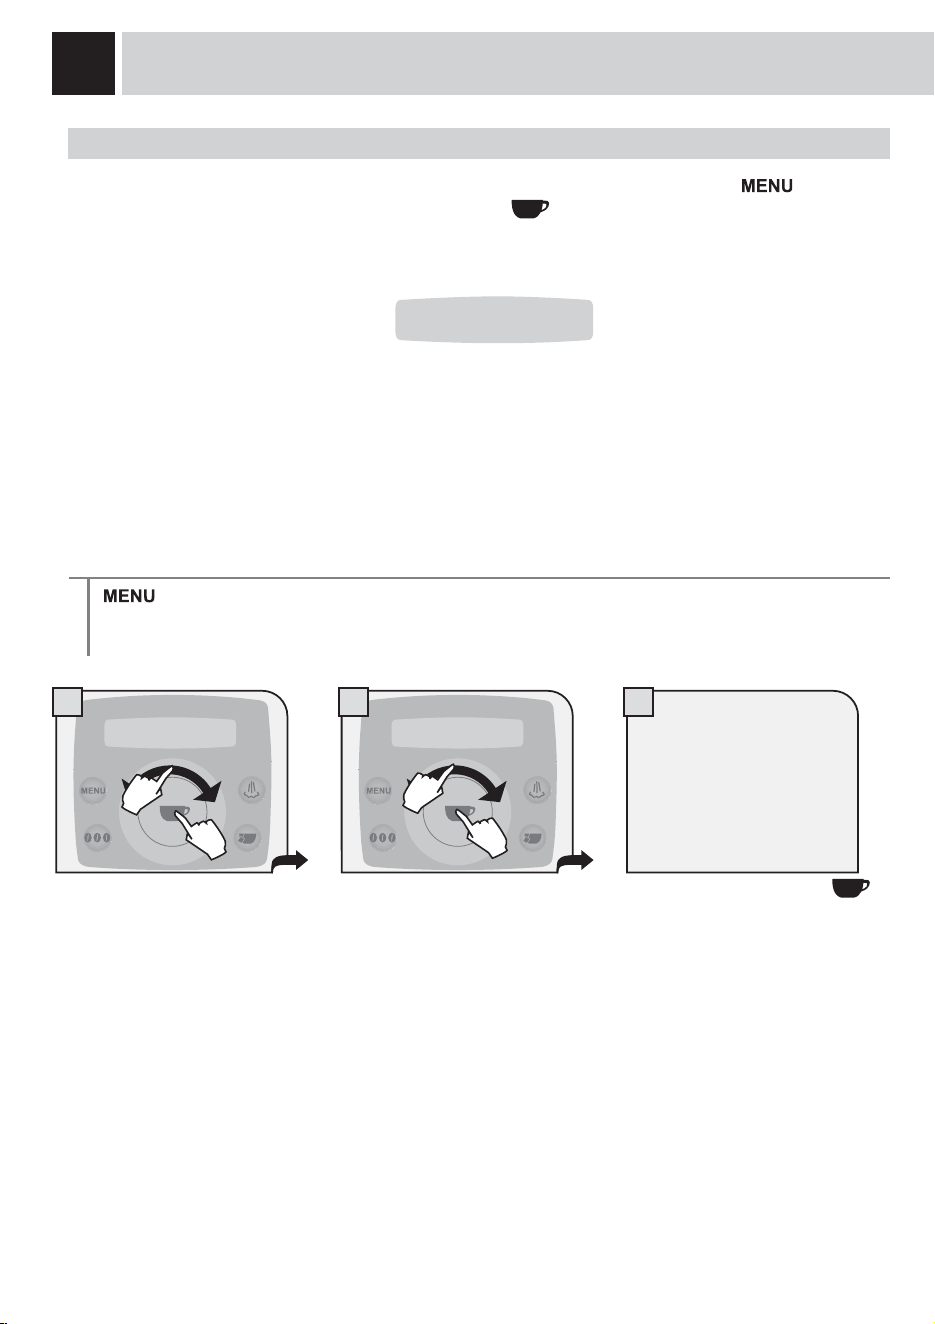
28
31 2
ÉCONOMIE D’ÉNERGIE
Pour régler les paramètres de l’économie d’énergie de la machine, appuyer sur la touche et
sélectionner « économie d’én. » et appuyer sur la touche
. Faire tourner le disque de sélection d’un
doigt pour :
Saisir le temps qui doit s’écouler avant
que la machine se mette en économie
d’énergie.
RETARD ARRÊT
> économie d’én., > ret. arrêt
/HWHPSVGHUHWDUGjO¶DUUrWHVW¿[pSDUGpIDXWjPLQXWHV
PROGRAMMATION MACHINE
4 economie d'én.
4 economie d'én. 4.1 ret. arrêt
minutes 180
Sélectionner en glissant le
doigt sur le disque de
sélection.
Il est possible de régler :
- 15 minutes - min
- 180 minutes - max
Mémoriser en appuyant sur
.
1.
2.
1.
2.
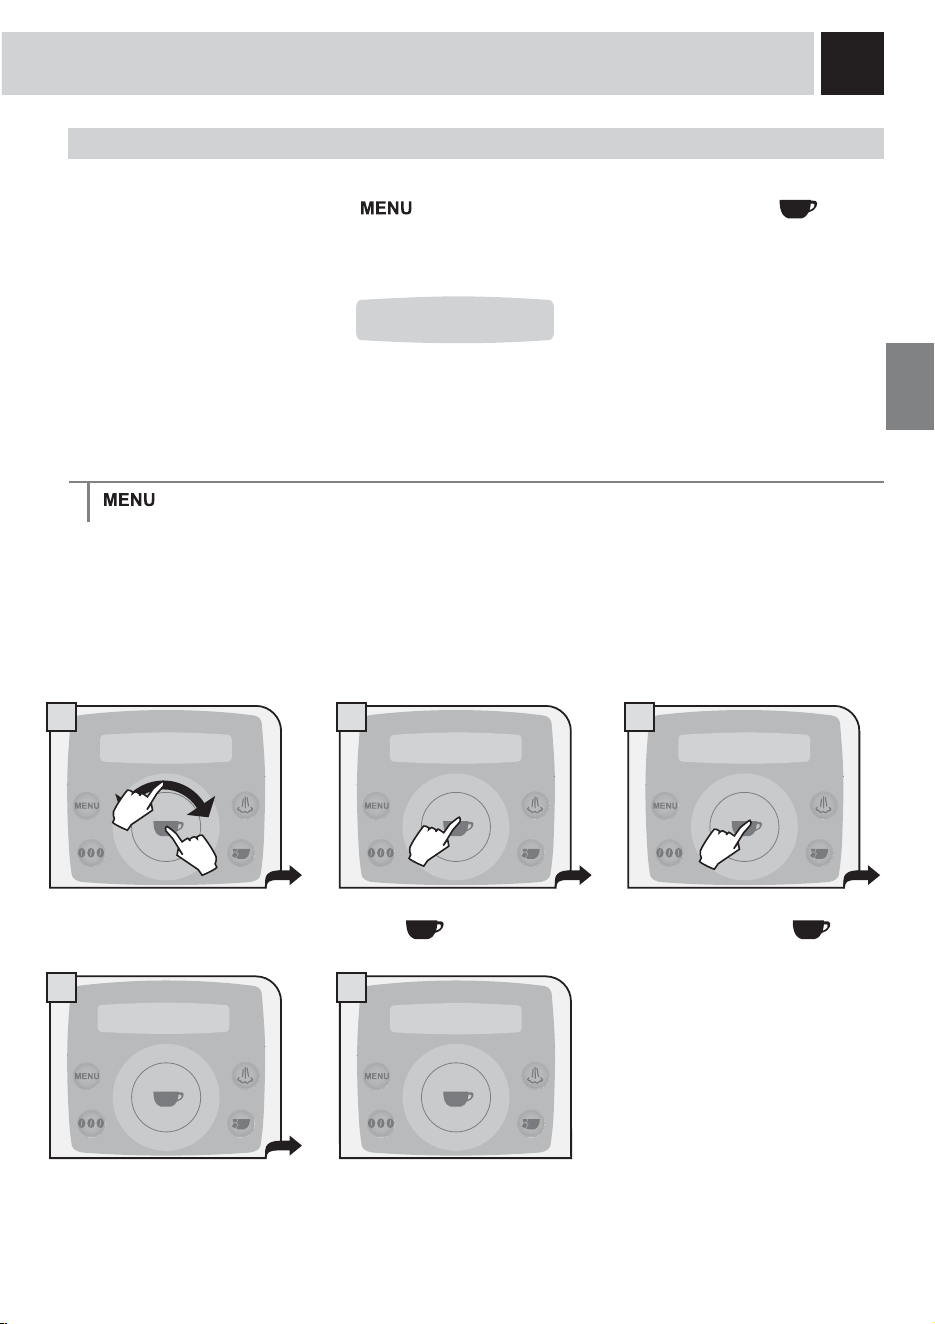
29
1 2
5
3
4
DES FONCTIONS SPÉCIALES
Ce menu permet d’accéder aux fonctions spéciales prévues sur la machine.
Pour ce faire, appuyer sur la touche
et choisir « fonct. spéc. » et appuyer sur la touche . Faire
glisser le doigt sur le disque de sélection pour :
rétablir les paramètres de base de la
machine.
RÉTABLIR RÉGLAGES
> fonct. spéc. > rég. prédéf.
Ce menu contient la fonction pour rétablir toutes les valeurs réglées en usine. Cette fonction est
particulièrement importante pour rétablir les paramètres de base.
TOUS LES RÉGLAGES PERSONNELS SERONT DÉFINITIVEMENT PERDUS ET NE POURRONT
PLUS ÊTRE RÉCUPÉRÉS. UNE FOIS LES PARAMÈTRES STANDARD RÉTABLIS, L’UTILISATEUR
POURRA REPROGRAMMER TOUTES LES FONCTIONS DE LA MACHINE, S’IL LE SOUHAITE.
5 fonct. spéc.
Le rétablissement est exécuté en
appuyant sur la touche
.
/HPHVVDJHFRQ¿UPDQWTXHOHV
paramètres ont été remis à zéro
DSSDUDvWVXUO¶DI¿FKHXU
Les paramètres ont été rétablis.
Quitter la programmation.
Sélectionner en appuyant sur
la touche .
5 fonct. spéc. 5.1 rég. prédéf.
exéc. maintenant
rég. prédéf.
vous êtes sûrs?
rég. prédéf.
en cours
5 fonct. spéc.
1.
2.
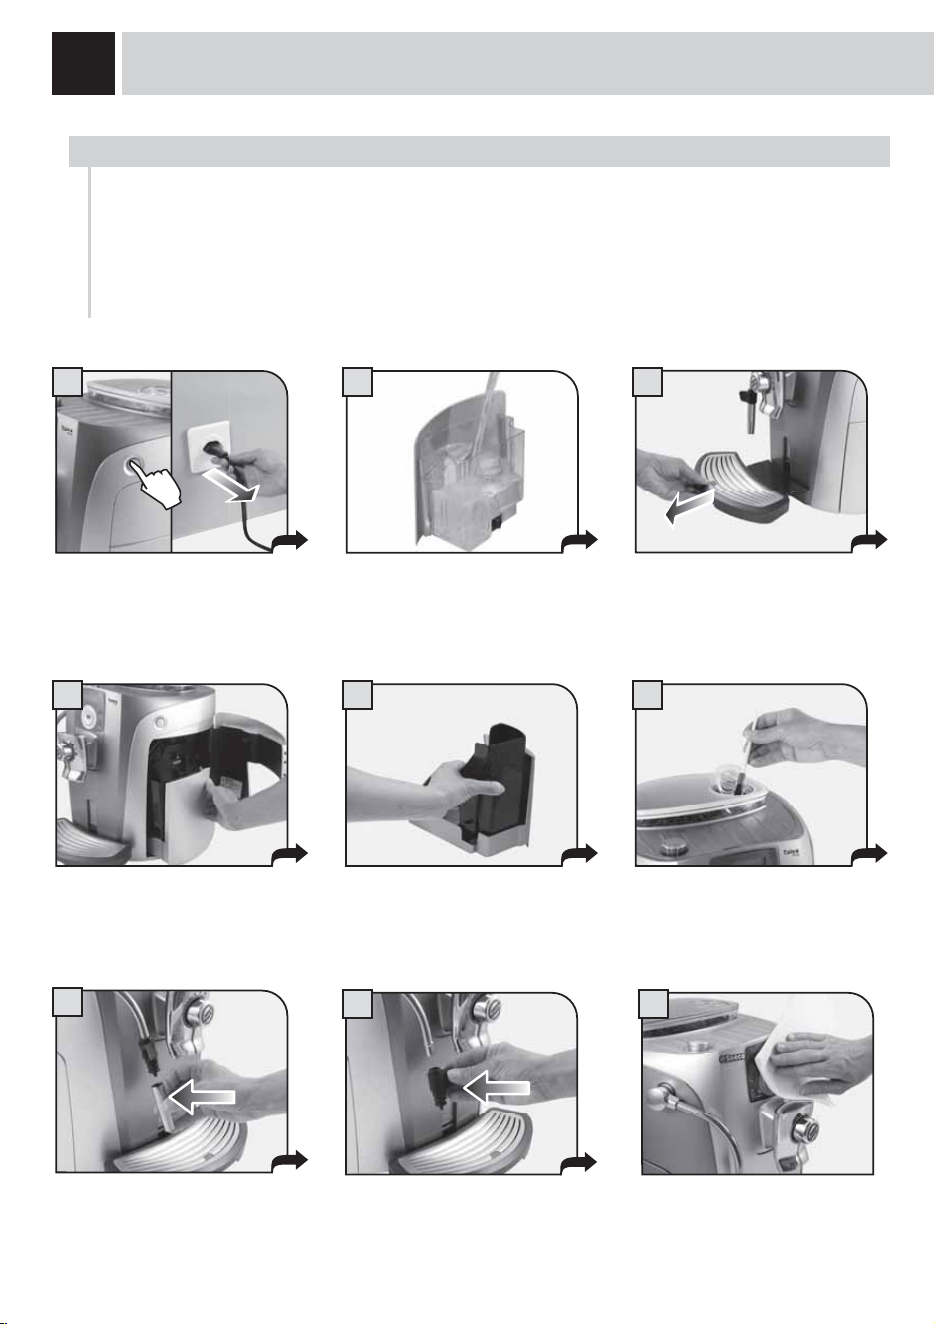
30
1
2 3
4 65
98
7
NETTOYAGE ET ENTRETIEN
Nettoyer le compartiment du café
prémoulu à l’aide du pinceau.
Éteindre la machine et débrancher
OD¿FKH
Laver le réservoir et le couvercle. Retirer le bac d’égouttement, le
vider et le laver.
Retirer le tiroir à marc.
1HWWR\HUO¶DI¿FKHXUDYHFXQFKLIIRQ
sec.
Retirer et laver le support de la
buse de vapeur et le remonter
ensuite.
Enlever la partie terminale de la
buse de vapeur et la remonter
ensuite.
NETTOYAGE GÉNÉRAL DE LA MACHINE
Le nettoyage décrit ci-dessous doit être fait au moins une fois par semaine.
Remarque : ne pas utiliser de l’eau qui n’a pas été remplacée depuis plusieurs jours.
ATTENTION ! Ne pas plonger la machine dans l’eau.
Le comptage du marc déposé dans le tiroir n’est pas remis à zéro en vidant le marc quand la machine est
pWHLQWHRXTXDQGFHWWHRSpUDWLRQQ¶HVWSDVVLJQDOpHVXUO¶DI¿FKHXU&¶HVWODUDLVRQSRXUODTXHOOHODPDFKLQH
SHXWDI¿FKHUOHPHVVDJH©YLGHUPDUFªPrPHDSUqVQ¶DYRLUSUpSDUpTXHTXHOTXHVFDIpV
Le vider et le laver
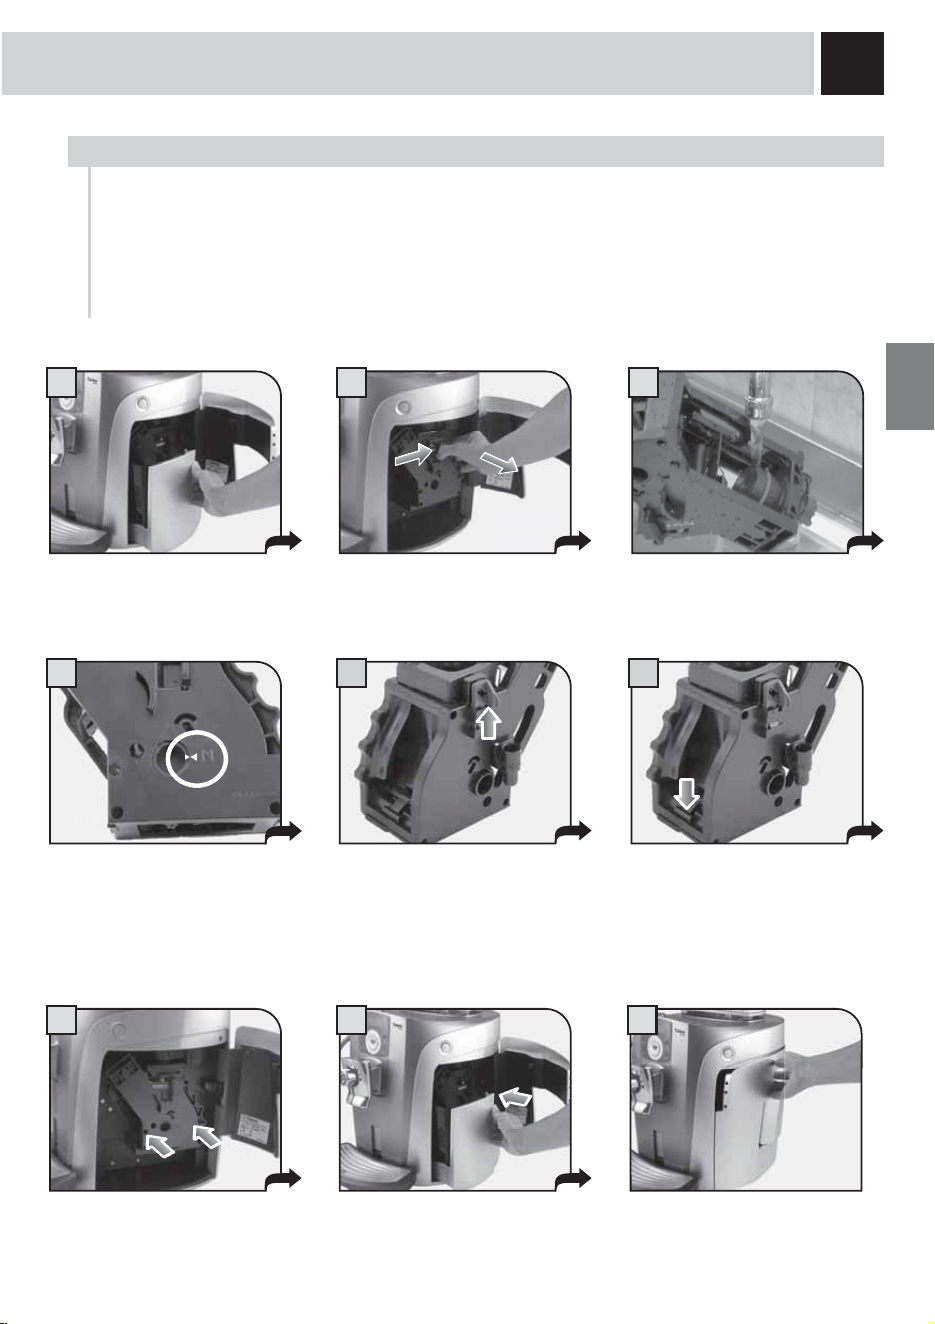
31
1 2 3
4
7 8 9
5 6
Ouvrir la porte de service et
enlever le tiroir à marc.
Le groupe de distribution doit être nettoyé au moins une fois par semaine.
Laver le groupe de distribution à l’eau tiède.
ATTENTION ! Ne pas laver le groupe de distribution avec des détergents qui pourraient affecter son
fonctionnement. Ne pas le laver au lave-vaisselle
/DYHUOHJURXSHHWOH¿OWUHHWOHV
faire sécher.
Pour retirer le groupe de
distribution, appuyer sur la touche
PUSH.
Le remonter sans appuyer sur la
touche PUSH !
S’assurer que le groupe de
distribution est en position de repos
; les deux repères doivent
coïncider.
Fermer la porte de service.
Insérer le tiroir à marc.
NETTOYAGE DU GROUPE DE DISTRIBUTION
S’assurer que tous les
composants se trouvent dans la
bonne position.Le crochet indiqué
doit être dans la position correcte
SRXUYpUL¿HUDSSX\HUG¶XQFRXS
sec sur la touche « PUSH ».
Le levier placé sur la partie
arrière du groupe doit être en
contact avec la base.

32
MESSAGES D’ERREUR
MESSAGE QUI APPARAÎT COMMENT RÉTABLIR LE MESSAGE
hors service (xx)
redémarrer pour résoudre…
Où (xx) indique un code d’erreur.Éteindre et rallumer la
machine au bout de 30 secondes pour rétablir le
fonctionnement normal.Si le problème persiste, demander
l’intervention du Centre d’assistance agréé et communiquer
OHFRGH[[UHSRUWpVXUO¶DI¿FKHXU
fermer couvercle café
Fermer le couvercle du réservoir à café en grains pour
pouvoir préparer une boisson quelconque.
introduire café dans réservoir
Introduire le café en grains dans le réservoir prévu à cet
effet.
insérer groupe distrib.
Insérer le groupe de distribution dans son logement.
insérer tiroir à marc
Insérer le tiroir à marc.
vider marc
Avertissement qui ne bloque pas la machine. Procéder
comme pour l’alerte suivante.
vider tiroir à marc
Retirer le tiroir à marc et le vider dans un bac approprié
(Voir page 30 points 4 et 5).
Remarque : le tiroir à marc ne doit être vidé que quand
la machine le demande et quand elle est allumée. Le fait
de vider le tiroir quand la machine est éteinte empêche
tout enregistrement du vidage effectué.
fermer porte
Pour que la machine puisse de nouveau fonctionner, fermer
la porte latérale.
remplir le réservoir à eau
Enlever le réservoir et le remplir d’eau fraîche potable
vider bac d’égout.
Ouvrir la porte latérale et vider le bac d’égouttement qui se
trouve sous le groupe de distribution.
remplacer le filtre
/H¿OWUH$TXD3ULPDGRLWrWUHUHPSODFpGDQVOHVFDV
suivants
1. 60 litres d’eau ont déjà été distribués ;
2. 90 jours se sont écoulés depuis son installation ;
3. 20 jours se sont écoulés, au cours desquels la machine
n’a pas été utilisé.
Remarque : ce message n’apparaît que si « activé » a été
VpOHFWLRQQpGDQVODIRQFWLRQ¿OWUHjHDX9RLUSDJH
carafe absente
milk island absente
Le bouton de la vapeur a été mis sur
, le Milk Island
n’est pas installé ou la carafe n’est pas bien placée.
Installer le Milk Island ou placer correctement la carafe.
Dans le cas contraire, mettre le bouton dans la position de
repos (
).
détartrer
Faire un cycle de détartrage des circuits internes de la
machine.
standby…
Appuyer sur la touche
.

33
PROBLÈMES - CAUSES - REMÈDES
PROBLÈMES CAUSES REMÈDES
La machine ne s’allume pas La machine n’est pas branchée sur
le réseau électrique.
Brancher la machine sur le réseau
électrique.
/D¿FKHQ¶HVWSDVEUDQFKpHVXUOD
prise située au dos de la machine.
%UDQFKHUOD¿FKHVXUODSULVHGHODPDFKLQH
La machine ne distribue ni eau
chaude ni vapeur.
Le trou de la buse de vapeur est
obturé.
Nettoyer le trou de la buse de vapeur à
l’aide d’une aiguille.
Le café ne mousse pas. Le mélange ne convient pas ou il y a
ORQJWHPSVTXHOHFDIpDpWpWRUUp¿p
Changer le mélange de café.
Le bouton du système SBS est
tourné vers la gauche.
Tourner le bouton du système SBS vers la
droite.
Le groupe de distribution ne peut
pas être démonté.
Le groupe de distribution est mal
positionné.
Allumer la machine. Fermer la porte de
service. Le groupe de distribution retourne
automatiquement à sa position d’origine.
Tiroir à marc inséré. Retirer le tiroir à marc avant d’extraire le
groupe de distribution.
Le café ne coule pas. Le réservoir à eau est vide. Remplir le réservoir d’eau et réamorcer le
circuit.
Le groupe est encrassé. Nettoyer le groupe de distribution
Le café coule lentement. /HFDIpHVWWURS¿Q Changer de mélange de café.
Diminuer la dose.
Le groupe de distribution est
encrassé.
Nettoyer le groupe de distribution
Le café coule en dehors du
distributeur.
Le distributeur est obturé. Nettoyer le distributeur et ses trous de
sortie à l’aide d’un petit morceau de tissu.
3RXUWRXWHSDQQHQRQGpWDLOOpHGDQVOHWDEOHDXFLGHVVXVRXHQFDVGHVROXWLRQVLQVXIÀVDQWHVV·DGUHVVHUj
un centre d’assistance agréé.

34
CONSIGNES DE SÉCURITÉ
EN CAS D’URGENCE
5HWLUHULPPHGLDWHPHQWOD¿FKHGHODSULVHHOHFWULTXH
N’UTILISER L’APPAREIL
• que dans des locaux fermés
• que pour la préparation de café, d’eau chaude et de mousse de lait
TX¶jGHV¿QVGRPHVWLTXHV
• Que par des adultes dotés d’une bonne constitution physique et mentale.
MESURES DE PRÉCAUTION CONCERNANT L’UTILISATION DE
L’A P PA R E I L
$¿QG¶pYLWHUWRXWHVLWXDWLRQGHGDQJHUQHSDVXWLOLVHUO¶DSSDUHLOjG¶DXWUHV¿QVTXHFHOOHVSUpYXHV
• Ne pas mettre dans les réservoirs et récipients d’autres substances que celles prévues dans le mode
d’emploi.
• Lorsqu’un réservoir / récipient a été correctement rempli, tous les autres réservoirs doivent être fermés.
• Ne mettre que de l’eau potable fraîche dans le réservoir d’eau : l’eau chaude et / ou d’autres liquides
peuvent endommager l’appareil.
• Ne pas utiliser d’eau gazeuse.
• Ne pas mettre les doigts dans le moulin à café et ne pas y mettre d’autres substances que des grains de
café. Avant d’inspecter le moulin à café, vous devez éteindre l’appareil en appuyant sur l’interrupteur
JpQpUDOSXLVGpEUDQFKHUOD¿FKHGHODSULVHpOHFWULTXH
• Ne pas mettre de café soluble ou de café en grains dans le réservoir pour café en poudre
$¿QGHFRPPDQGHUO¶DSSDUHLODXPR\HQGHO¶HFUDQDWRXFKHVWDFWLOHVYRXVGHYH]XQLTXHPHQWXWLOLVHUOHVGRLJWV
RACCORDEMENT ÉLECTRIQUE
Le raccordement électrique doit être conforme aux dispositions de sécurité de votre pays.
La prise électrique à laquelle la machine est branchée doit :
rWUHFRPSDWLEOHDYHFOD¿FKHGXFkEOHGHO¶DSSDUHLO
SUpVHQWHUODERQQHWDLOOHD¿QGHVHFRQIRUPHUDX[LQVWUXFWLRQVGHODSODTXHGXIDEULFDQWVLWXpHVXUOD
partie inférieure de l’appareil ;
• être correctement reliée à la terre.
Le câble électrique ne doit en aucun cas :
• entrer en contact avec un quelconque liquide : risque de décharge électrique et / ou d’incendie ;
• être coincé et / ou entrer en contact avec des objets pointus ;
• être utilisé pour déplacer l’appareil ;
• être utilisé lorsqu’il est endommagé ;
• être en contact avec des mains humides ou mouillées ;
• être tordu lorsque l’appareil est en service ;
• être endommagé
INSTALLATION
• Choisir comme lieu d’emplacement de l’appareil un endroit bien aménagé, plat et solide (l’angle
d’inclinaison ne doit en aucun cas être supérieur à 2°).
1HSDVSODFHUO¶DSSDUHLOGDQVGHVHQGURLWVRO¶HDXSRXUUDLWV¶LQ¿OWUHUGHGDQV
• Température de service optimale : entre 10°C et 40°C.
• Humidité maximale de l’air : 90 %.
• Le lieu d’emplacement doit être propre, bien éclairé et bien aéré. La prise électrique doit être facilement
accessible.
• Ne pas poser l’appareil sur des surfaces brûlantes ou chaudes !
• Respecter un intervalle de 10 cm à partir des murs et des plaques de cuisson.
1HSDVXWLOLVHUO¶DSSDUHLOGDQVGHVSLqFHVDI¿FKDQWXQHWHPSpUDWXUHpJDOHRXLQIpULHXUHj&6L
O¶DSSDUHLOHVWH[SRVpjGHWHOOHVFRQGLWLRQVFRQWDFWHUOHVHUYLFHDSUqVYHQWHD¿QTX¶XQFRQWU{OHGH
sécurité puisse être effectué.
1HSDVPHWWUHHQPDUFKHO¶DSSDUHLOjSUR[LPLWpGHVXEVWDQFHVIDFLOHPHQWLQÀDPPDEOHVHWRXH[SORVLYHV
• Il est strictement interdit d’utiliser l’appareil dans des pièces soumises à un risque élevé d’explosion ou
dont l’air contient une haute concentration de poudres ou de substances à base d’huile.
• Ne pas placer la machine sur d’autres appareils.
SOS
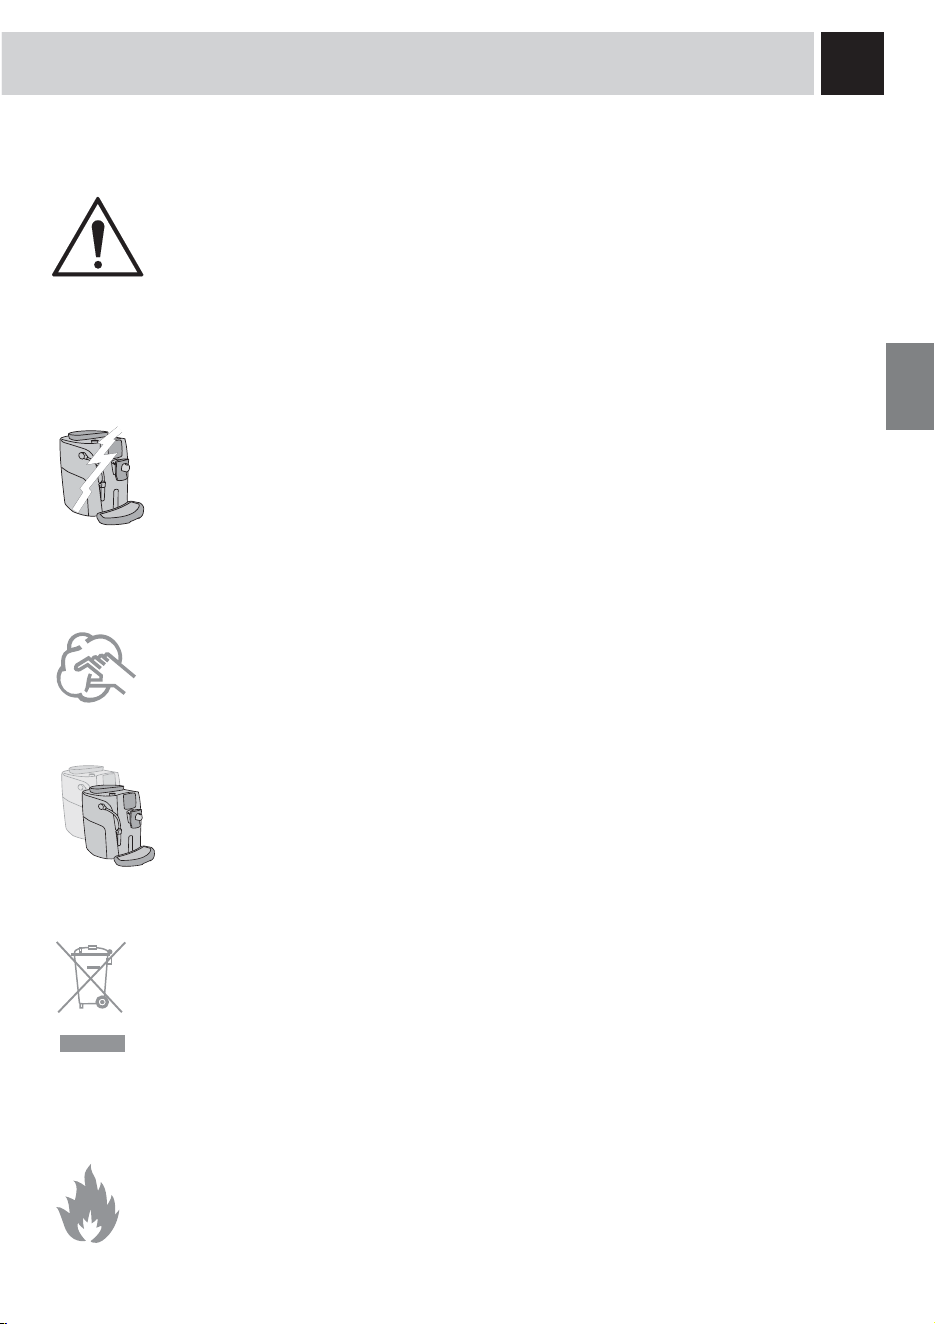
35
PANNES
• Ne pas utiliser l’appareil en cas de problèmes de fonctionnement ou en cas de doute (par ex. : après
que l’appareil est tombé par terre).
• Faire procéder aux réparations éventuelles par le service après-vente agréé.
• Ne jamais utiliser l’appareil lorsque le câble électrique est défectueux. Le câble défectueux doit être
remplacé par le producteur ou le service après-vente agréé (danger : courant électrique !).
• Eteindre l’appareil avant d’ouvrir la porte de maintenance. Risque de brulures !
NETTOYAGE / DÉTARTRAGE
• Pour le nettoyage des circuits lait et café, n’utilisez que les détergents recommandés et fournis avec la
machine. N’utilisez pas ces produits pour des usages différents.
• Avant de pouvoir commencer le nettoyage, l’interrupteur doit être en position OFF (0).
'pEUDQFKHUOD¿FKHHWODLVVHUUHIURLGLUO¶DSSDUHLO
• Protéger l’appareil contre les éclaboussures d’eau et ne pas le plonger dans l’eau.
• Ne pas faire sécher les pièces de l’appareil dans les fours traditionnels et / ou dans le micro-ondes.
• Nettoyer l’appareil et ses composants apres une mise hors service prolongee.
PIÈCES DÉTACHÉES
Pour des raisons de securite, toujours utiliser les pieces detachees et les accessoires du fabricant.
ELIMINATION
L’ appareil est en conçu et fabriqué pour faciliter sa valorisation, son recyclage ou sa réutilisation
conformément à la directive européenne 2002/96/CEE relative aux appareils électriques et électroniques
usagés (waste electrical and electronic equipment - WEEE).
Le logo ci-contre apposé sur l’appareil indique que ce produit ne peut pas être éliminé avec les déchets
ménagers non triés.
/RUVTXHYRXVDXUH]GpFLGpGHYRXVHQVpSDUHUGp¿QLWLYHPHQWLOFRQYLHQWGHIDLUHSURFpGHUjODFROOHFWH
sélective de cet appareil en vous conformant au mode de reprise mis en place dans votre commune
(collecte ponctuelle des encombrants, déchèterie), ou en faisant appel au service de reprise proposé par
YRWUHGLVWULEXWHXURXELHQHQOHFRQ¿DQWjGHVRUJDQLVDWLRQVFDULWDWLYHVHWGHVDVVRFLDWLRQVjEXWQRQ
lucratif.
En vous assurant que ce produit est éliminé correctement, vous favorisez la prévention des conséquences
négatives pour l’environnement et la santé humaine.
DANGERS
• Ne pas laisser les enfants se servir de l’appareil. Cette consigne vaut également pour les personnes qui
ne connaissent pas le fonctionnement de l’appareil.
• L’appareil peut représenter un danger pour les enfants. Si l’appareil est laissé sans surveillance,
GpEUDQFKHUOD¿FKH
• Ne pas conserver les matériaux d’emballage à la portée des enfants.
• Ne jamais orienter le jet de vapeur ou d’eau chaude sur soi-même ou sur d’autres personnes : risque
de brûlures.
• Ne pas insérer d’objets dans les ouvertures de l’appareil (danger : courant électrique !).
1HSDVWRXFKHUOD¿FKHpOHFWULTXHDYHFGHVPDLQVRXGHVSLHGVPRXLOOpVQHSDVGpEUDQFKHUOD¿FKHHQ
tirant sur le câble.
• Attention : risque de brulures lors du contact avec l’eau chaude, la vapeur et la buse d’eau chaude
PROTECTION CONTRE LES INCENDIES
En cas d’incendie, utiliser un extincteur à base de gaz carbonique (extincteur CO
2
).
Ne pas utiliser d’eau ni d’extincteur à base de poudre.

36
DONNÉES TECHNIQUES
Tension nominale
Voir plaque signalétique placée sur l’appareil.
Puissance nominale
Voir plaque signalétique placée sur l’appareil.
Alimentation
Voir plaque signalétique placée sur l’appareil.
Matériau du corps
ABS - Thermoplastique
Dimensions (l x a x p)
320 x 370 x 400 mm
Poids
9Kg
Longueur du câble
1200 mm
Tableau de commande
3DQQHDXDQWpULHXUDI¿FKHXU[FDUDFWqUHV
Réservoir d’eau
1,7 litre - Extractible
Capacité du réservoir à café
250 de café en grains
Pression de la pompe
15 bar
Chaudière
Acier Inox
Moulin à café
en céramique
Quantité de café moulu
7-10,5 g
Capacité du tiroir à marc
14
Dispositifs de sécurité
Soupape de sécurité pression chaudière – double
thermostat de sécurité
DONNÉES TECHNIQUES
7RXWHVPRGL¿FDWLRQVGHFRQVWUXFWLRQHWG¶H[pFXWLRQUpVHUYpHVGDQVOHFDGUHG¶XQHDPpOLRUDWLRQWHFKQLTXHGH
l’appareil. Conformité de l’appareil avec la directive européenne 89/336/CEE relative à la compatibilité
électromagnétique (Décret n° 92-587 du 26/06/92 relatif à la compatibilité électromagnétique des appareils
pOHFWULTXHVHWpOHFWURQLTXHV-25)GXPRGL¿p

37


Saeco
International Group S.p.A.
Via Torretta, 240
I-40041 Gaggio Montano, Bologna
Tel: + 39 0534 771111
Fax: + 39 0534 31025
www.saeco.com
© Saeco International Group S.p.A.
The manufacturer reserves the right to change the features of the product without prior notice.
Le producteur se réserve le droit d“apporter toutes modifications sans préavis.
Type SUP-032NR Cod.15000736 Rev.02 del 02-10-06