HALOSPIN
INSTRUCTION MANUAL
MEDIUM
32 FOOT RC RANGE

Under-voltage protection function of drone battery: When the battery is low, the protection
program will cut o the power supply of drone motor. The battery must be charged before
continuing to fly.
Drone stuck protection function: When the drone blades are stuck, the program will cut o the
power supply of the motor to avoid damage.
1. Product size: 129mm×129mm×32mm
2. Fuselage weight about: 50g
3. Flight time about: 7 minutes.
4. Charging time is about 30 minutes.
5. Battery specification: 500mAh/3.7V lithium battery.
6. Remote control distance: about 32ft (10 meters).
Note: Please read the instructions carefully before operation.
Safety Instructions
• This product contains small parts which are a
choking hazard. Keep away from small children.
• When using drones, pay attention to keeping a
distance of 2-3 meters between drones and
controllers or onlookers to avoid personal
injury.
• Children need to fly with adults and control the
drone within sight.
• Do not attempt to disassemble, repair or
process the electronic circuit. Neither the drone
nor the remote controller is equipped with
electronic parts.
• When not in use, turn o the power supply of
the remote controller and drone, and take out
its battery.
• When the drone takes o, slowly push the
throttle lever to prevent it from suddenly
accelerating.
• After the flight, turn o the drone power and
then turn o the remote control.
• Do not put the battery into fire or put it next to
a heat source such as a heater.
• Do not disassemble or pierce the battery with
sharp objects.
• Please do not place the battery in a damp
place or in water, and it is strictly forbidden to
get wet. Please do not fly on rainy days.
• Do not use a charger that is not from the
original factory to avoid short circuit and fire.
• Do not overcharge; When the battery is fully
charged, cut o the power immediately.
SAFETY INSTRUCTIONS
BATTERY PROTECTION
FCC STATEMENT:
FCC ID: 2ANSF-HSBSV
This product complies with Part 15 of the FCC Rules. Operation is subject to the following two
conditions: (1) This device may not cause harmful interference and (2) this device must accept any
interference receiver, including interference that may cause undesirable operation.
• Do not charge or use an inflated, leaking or
damaged battery.
• Be careful when charging, and make sure to
charge within your sight. Please keep it out of
the reach of children to avoid danger.
• If there is suspicious odor, noise or smoke
during charging, please unplug the power
immediately.
• Please wipe the drone with a clean soft cloth.
• Check whether the drone and its accessories
are damaged. If so, please repair them before
using them.
• Manufacturers and dealers disclaim all
responsibility for damage caused by misuse.
• Keep hair and loose clothing away when
powered on.
• Check the batteries regularly for potential
leakage or corrosion that may occur.
• When installing the batteries carefully follow
the polarity marking +/-.
• Do not mix dierent battery types.
• Remove exhausted or drained batteries.
• Do not place the unit near powerful,
un-shielded magnets.
• Do not expose the unit to extreme hot or cold
temperatures.
• Do not hit, drop, or smash the unit or battery
with extreme force.
NOT FOLLOWING THESE PRECAUTIONS WILL
VOID YOUR WARRANTY.
Lighting control
Throttle, left
and right steering
Fly forward, backward,
left and right.
switch
High and low speed
Headless mode
Halo rotation, horizontal
The halo is vertical and horizontal
Halo forward adjustment
Halo backward adjustment
Forward adjustment of fuselage
Backward adjustment of fuselage
Come back
power light
Adjust the fuselage
to the right
Adjust the fuselage
to the left
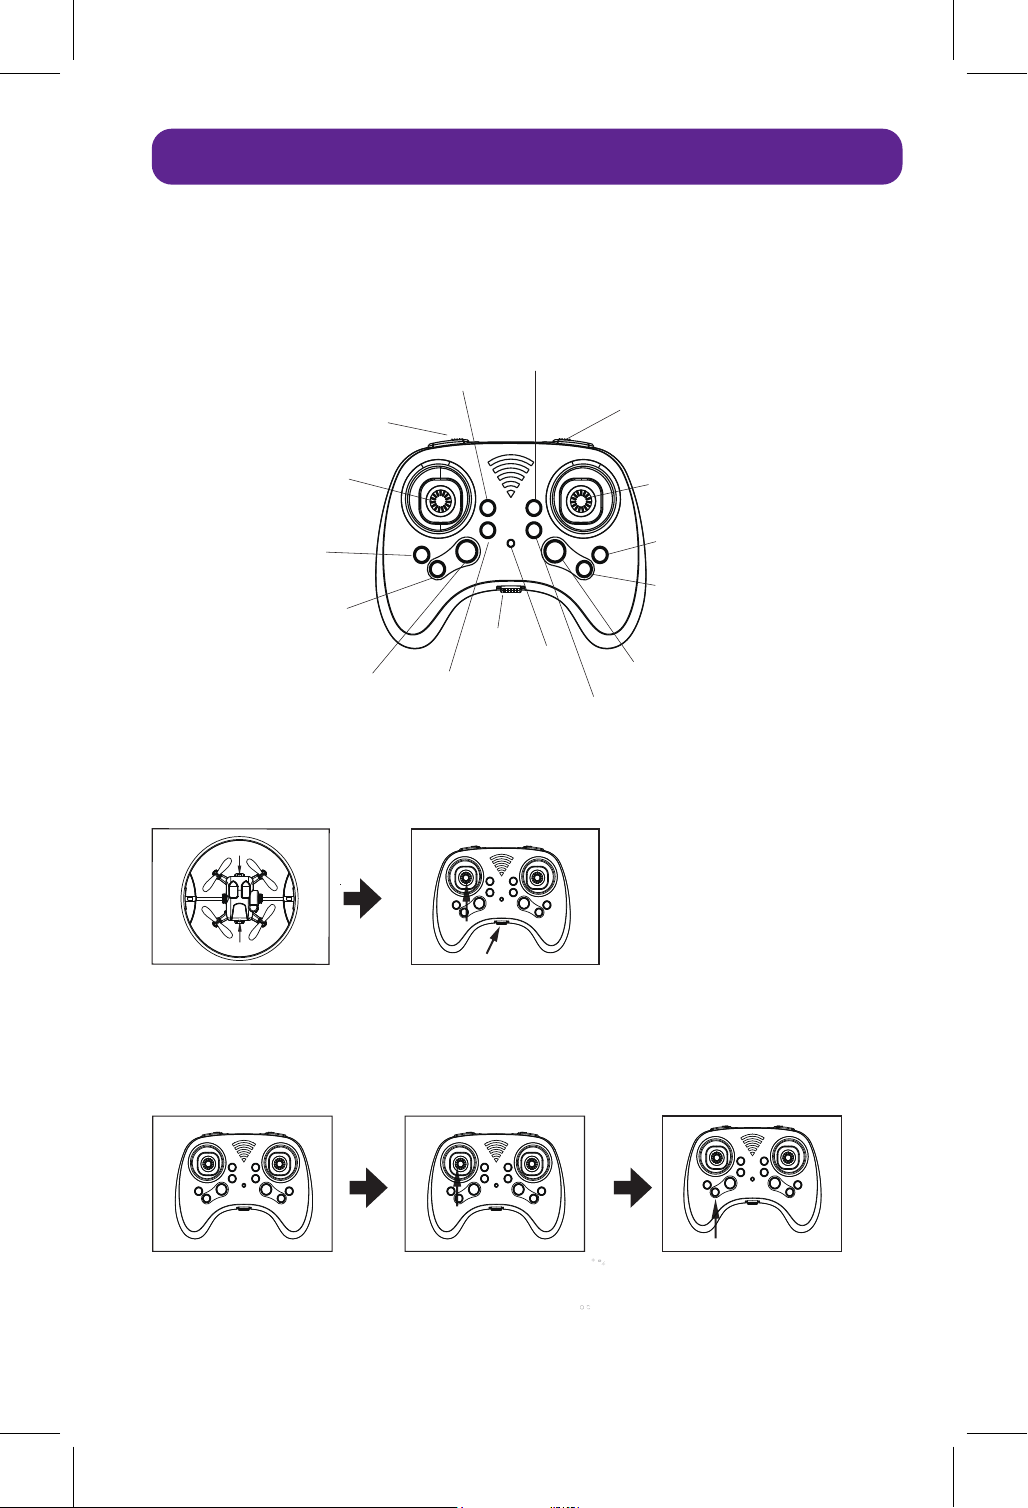
Remote Control Functions
BOOTING AND FREQUENCY MATCHING
Put the drone on level
ground, with the nose facing
straight ahead, press the
power switch, and the
indicator light in front of the
fuselage will flash.
Turn the power switch to the right, and the indicator light of the
remote controller will flash, push the left rocker up to the highest
position, and then pull it down to the lowest position. After doing
so, the body light will also be on, and the remote controller light
will be on, and the frequency alignment will be successful.
Push the left rocker
upward, and the propeller
will rotate slowly.
Push the left joystick up
slowly again and the
drone will take o.
Press the light control key,
and the halo light will light
up in any mode.
STOP
switch
power light
Open the battery cover, install three ‘AAA' batteries according to the positive and negative poles
marked in the battery compartment, and replace the battery cover.
REMOTE BATTERY INSTALLATION
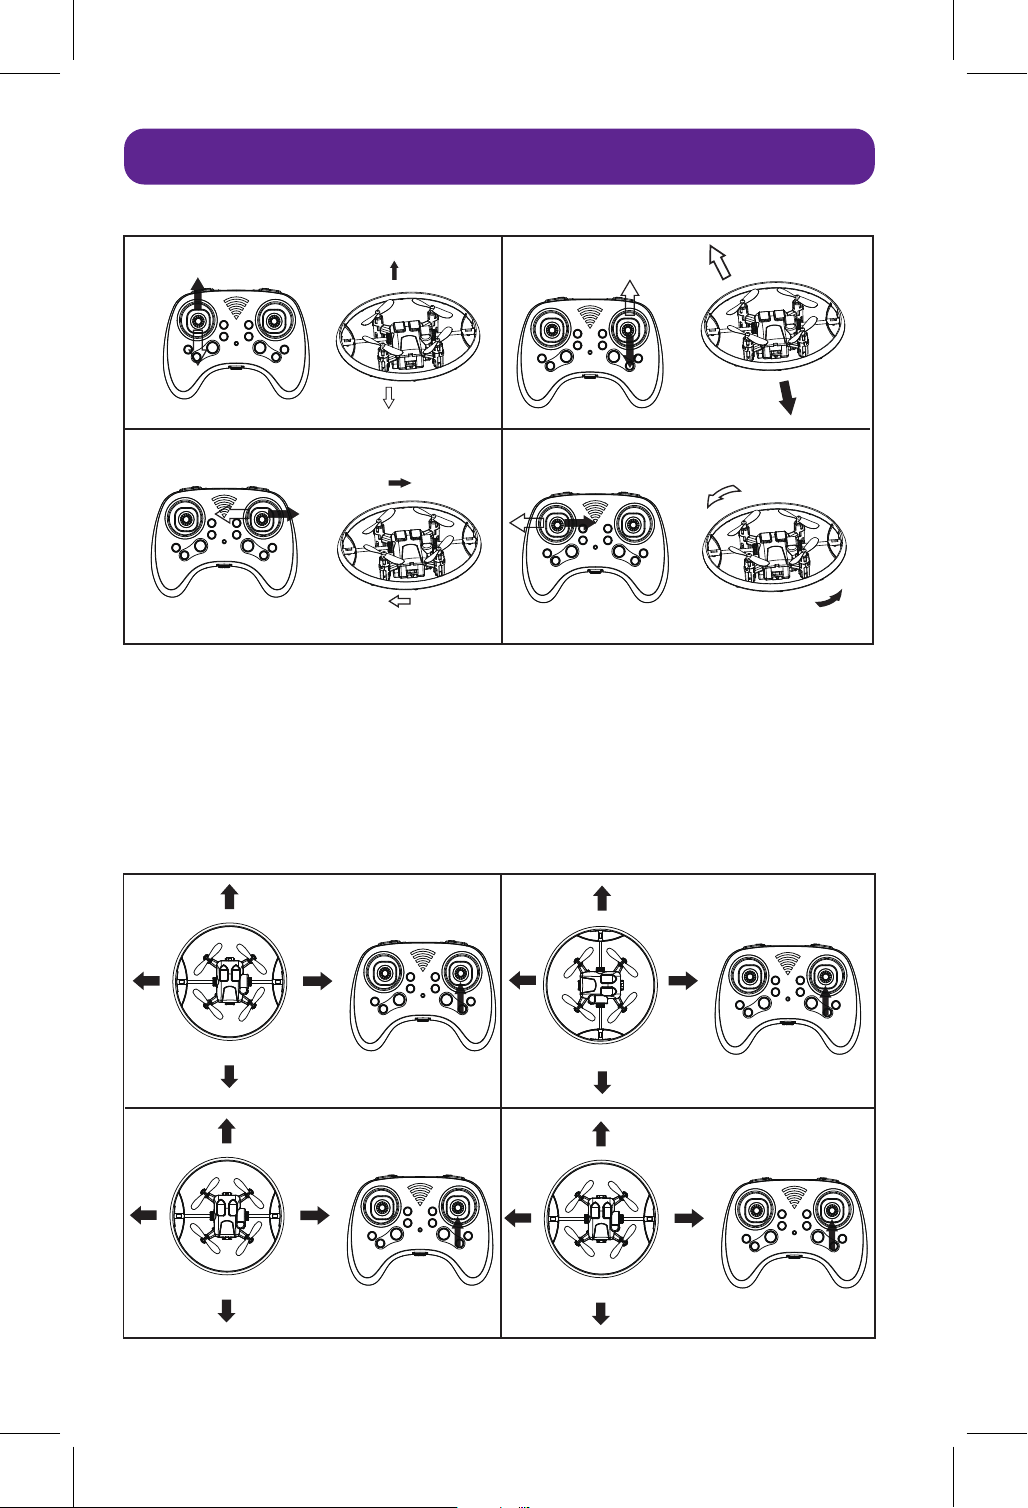
Controls and Operations
HEADLESS MODE
Fly to the left
Fly to the right
rise
descend
Up and down
Front and back
advance
retreat
Left and right
Left and right sides
Turn left
Turn left
比例 25.400
比例 25.400
比例 25.400
比例 25.400
When the headless mode button is pressed, the remote controller makes a drip ... drip ... drip ...
sound, and the drone lights flash. The drone will have entered headless mode. In headless mode,
the fuselage rotates, and the drone defaults to the direction it was facing when it enters headless
mode.
Note: There is no headless mode function while the halo is rotating.
front
front
back
back
back
back
left
left
right
right
front
left
right
front
left
right
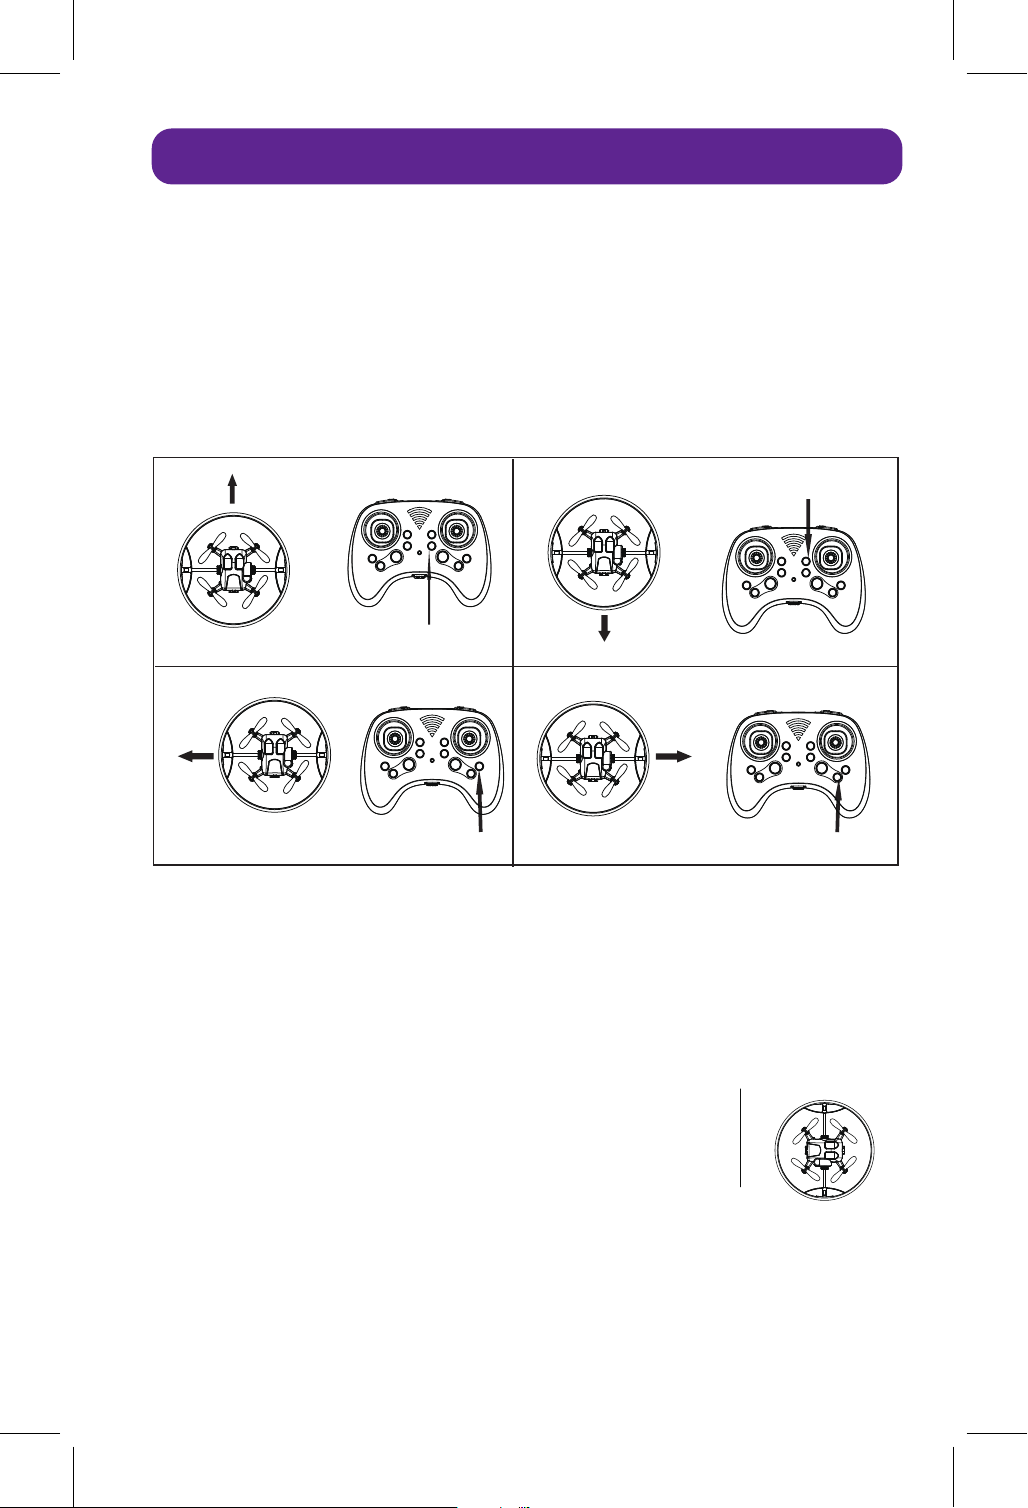
If the drone leans in a certain direction when hovering, it needs to be re-calibrated. The method is
as follows:
1. Land the drone on the ground and wait for the propeller to stop completely.
2. Aim the drone’s head in the same direction as the remote. Hit the two rockers in the direction
indicated by the arrow below. The remote controller will make the "drip" sound, and the fuselage
light will flash, and then lights up, when calibration is completed.
When you press the Return button, the remote controller will make a sound - ‘Didi Didi Didi’, the
lights on the drone will start flashing, and the drone will return. By default, the direction the drone
takes o in is forward, and it will start to return in the opposite direction when Return button is
pressed. When it has returned, it is necessary to press the Return button again or push the right
rocker to stop returning (the lights will light up after stopping returning).
Note:
1. Before operating the one-button homing function, it is necessary to
ensure that the head direction is consistent with the direction of the
controller when the frequency is aligned or corrected, and the drone
is always in front of the position where the controller is standing
during the flight, so that the drone will fly to the controller when
returning. If the drone is behind the controller when flying, you can't
press the return button at this time, because the drone will fly away
from the controller. (The positional relationship between the drone
and the controller is shown on the right.)
2. When the halo rotates, there is no one-button anti-return function.
Settings
RECALIBRATION
ONE-BUTTON RETURN FLIGHT
Press this key until it is balanced.
Press this key until it is balanced.
Press this key until it is balanced.
Forward tilt
Right tilt
Left tilt
Press this key until it is balanced.
Backward tilt
The position of the operator station
front
front
back
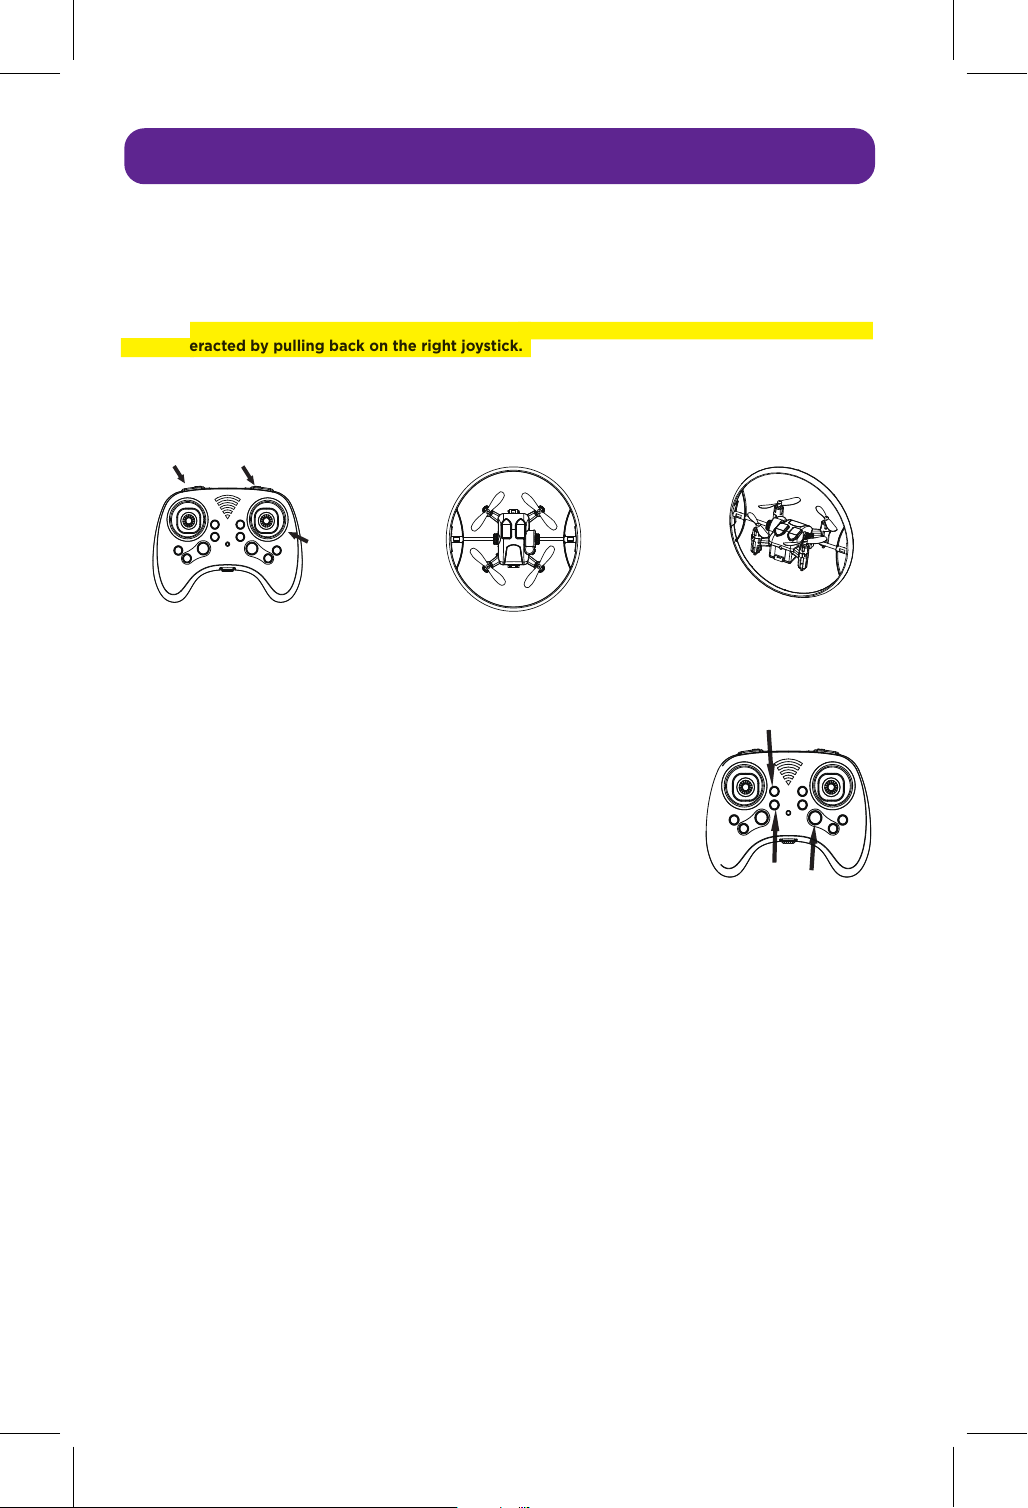
When the drone takes o and you press button A (shown in the diagram), the halo will rotate, forming
a beautiful halo in the air. Pressing button A again will stop the halo at a position parallel to the
fuselage. However, when engaging the halo spin (button A), the drone may jump forward, which can
be counteracted by pulling back on the right joystick.
When B button is pressed, the halo switches between the horizontal position and the vertical position
with the fuselage.
When the drone takes o, press the halo adjustment key (as indicated by
arrows C and D in the right figure) to adjust the halo at any angle with
the fuselage.
Note: These two keys have no function when the drone has not taken o.
When E button is pressed short, the halo light will light up, and then switch the light mode on. Long
press this button to turn o the halo light.
Note: The lighting pattern is random every time the machine is turned on.
When the drone's battery is low, the halo light goes out, the halo automatically stops in a horizontal
position and cannot rotate, and the fuselage light flashes, so you should return as soon as possible.
When the UAV gets stuck or touches an obstacle, the blades stop rotating and the lights flash, so it
can be restored by pulling the throttle of the remote control to the lowest position.
Note: When the halo is stuck, it stops rotating and stops at any position. At this time, you can't
forcibly pull the halo by hand, restart it and the halo will return to the horizontal position.
Settings
HALO MANIPULATION
HALO POSITION ADJUSTMENT
LIGHT MODE SWITCHING
LOW VOLTAGE AND STUCK PROTECTION
The halo is parallel to the fuselage. Vertical halo
A
Right
Joystick
B
C
D
E

Blades and Charging
REPLACEMENT OF UAV BLADES
CHARGING THE DRONE
When the drone blades are damaged or deformed, consumers can take them out of the accessory
package to replace them. The drone blades are installed with position requirements. The letters
engraved on the blades must be the same as those engraved on the motor cover of the drone, that is,
"A" for "A" and "B" for "B", otherwise the drone cannot take o normally.
This device complies with part 15 of the FCC Rules. Operation is subject to the following two
conditions: (1) this device may not cause harmful interference, and (2) this device must accept any
interference received, including interference that may cause undesired operation. Any changes or
modifications not expressly approved by the party responsible for compliance could void the user's
authority to operate the equipment.
NOTE: This equipment has been tested and found to comply with the limits for a Class B digital
device, pursuant to Part 15 of the FCC Rules.
These limits are designed to provide reasonable protection against harmful interference in a
residential installation. This equipment generates, uses and can radiate radio frequency energy and, if
not installed and used in accordance with the instructions, may cause harmful interference to radio
communications. However, there is no guarantee that interference will not occur in a particular
installation. If this equipment does cause harmful interference to radio or television reception, which
can be determined by turning the equipment o and on, the user is encouraged to try to correct the
interference by one or more of the following measures:
• Reorient or relocate the receiving antenna.
• Increase the separation between the equipment and receiver.
• Connect the equipment to a dierent outlet to which the receiver is connected.
• Consult the dealer or an experienced radio/TV technician for help.
The device has been evaluated to meet general RF exposure requirement. The device can be used in
portable exposure condition without restriction.
Take out the battery, insert the USB into the battery charging port, and connect the other end with
the charger. When charging, the indicator lights up, and the full lamp goes out.
Note: Only the USB charging cable distributed by the manufacturer can be used for charging. If other
charging cables are used, the battery may be damaged or may explode and burn.
60 DAY LIMITED WARRANTY
Odyssey Marketing / Odyssey Toys warrants to the
original purchaser, when used in North America only,
that this product shall be free of defects in material and
workmanship. This warranty applies within 60 days of
the original purchase date with normal home use. This
warranty does not apply for commercial use of this
product. Use outside of North America is not covered
by this warranty. During the warranty period, we will at
our discretion, repair or replace this product without
charge, as long as the product has not been abused or
mishandled as by our determination. Our determination
shall be final and be the consumer’s sole remedy.
ALL RETURNS must be accompanied by a Return
Authorization Number which is issued by Odyssey
Marketing’s Customer Service Department.
Please contact Customer Service BEFORE returning
any products or parts thereof. Once you have obtained
a Return Authorization Number, you will be provided
a return address within the Customer Service email.
This warranty does not cover installation,
adjustments in the home, nor damage due to
accidents, misuse, abuse, fire, or any acts of God,
incorrect line voltage, damage to other equipment
caused by improper installation, unauthorized or
improper modifications. This warranty gives you
specific legal rights and you may also have other
rights that vary from state to state.
** THIS WARRANTY IS EXPRESSLY IN LIEU OF ALL
OTHER WARRANTIES, EXPRESSED OR IMPLIED
INCLUDING THE WARRANTIES OF
MERCHANTABILITY AND FITNESS.**
©2024 Odyssey Toys LLC
Please do not return this product to the store.
For Customer Service please email:
Care@OdysseyToys.com
Please note the units model number and name in your email:
Model no. ODY-7700 • HaloSpin
www.odysseytoys.com/support
1-(305)-933-4480
Hours of operation: 10:00am - 5:00pm EST
Serial
Number
1
2
3
4
5
6
7
8
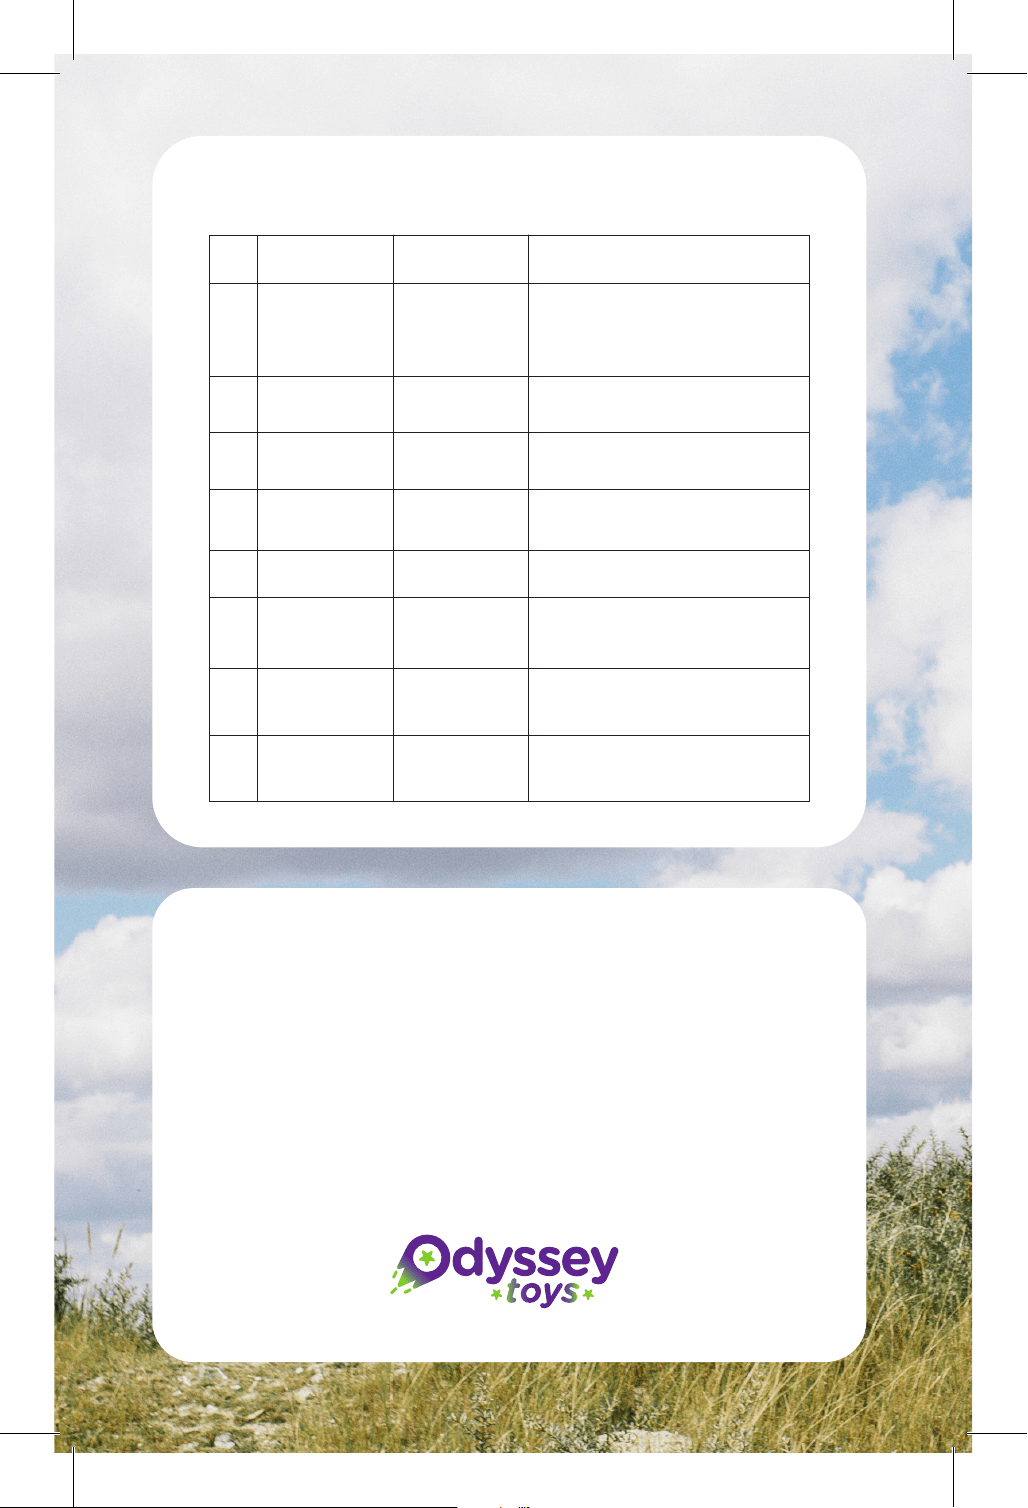
Fault Phenomenon Failure Cause
When idling, the
propeller does
not turn.
Planes can take o
but always lean to
one side.
After the drone hits,
taking o immediately
will lean to one side.
Always take o to one
side and can't take o.
After the impact, the
halo can't stop in a
horizontal position.
The battery cannot be
charged.
The remote control
keeps sounding "drip,
drip"
The remote controller
keeps sounding "drip,
drip" and the indicator
light keeps flashing.
1. Pull the propeller up properly to make
the propeller rotate flexibly;
2. Clean up the entanglement.
Put the drone on a level ground and
recalibrate it.
Put the drone on a level ground and
recalibrate it.
Reinstall the propeller. Propeller A is installed
in the position of fuselage A, and propeller B is
installed in the position of fuselage B.
Reboot can restore to the horizontal position.
1. Replace the charger
2. Replace the charging cable.
Turn o headless mode or return function.
Replace the battery
1. Propeller and stuck
motor housing
2. Hair, silk thread and
other articles are
entangled at the
propeller.
The drone was not
placed horizontally
when it was turned on.
Gyroscope is not reset
The propeller is
installed backwards.
The program started
protection.
Poor contact between
charger and charger
The headless mode or
return function of the
remote control is
turned on.
Low battery
Maintenance method
Common Faults and Troubleshooting


