
7HFKQLFDO 6XSSRUW DQG (:DUUDQW\ &HUWLILFDWH
ZZZYHYRUFRPVXSSRUW
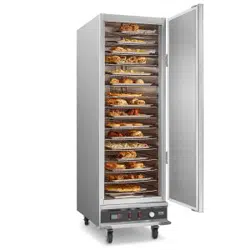
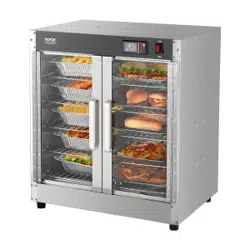
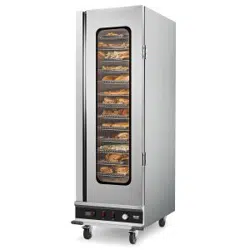
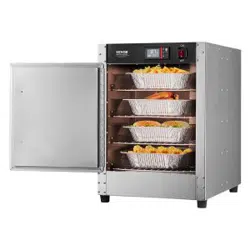
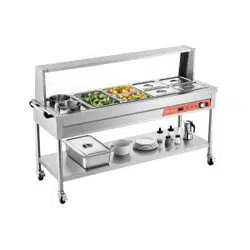
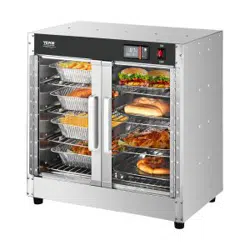
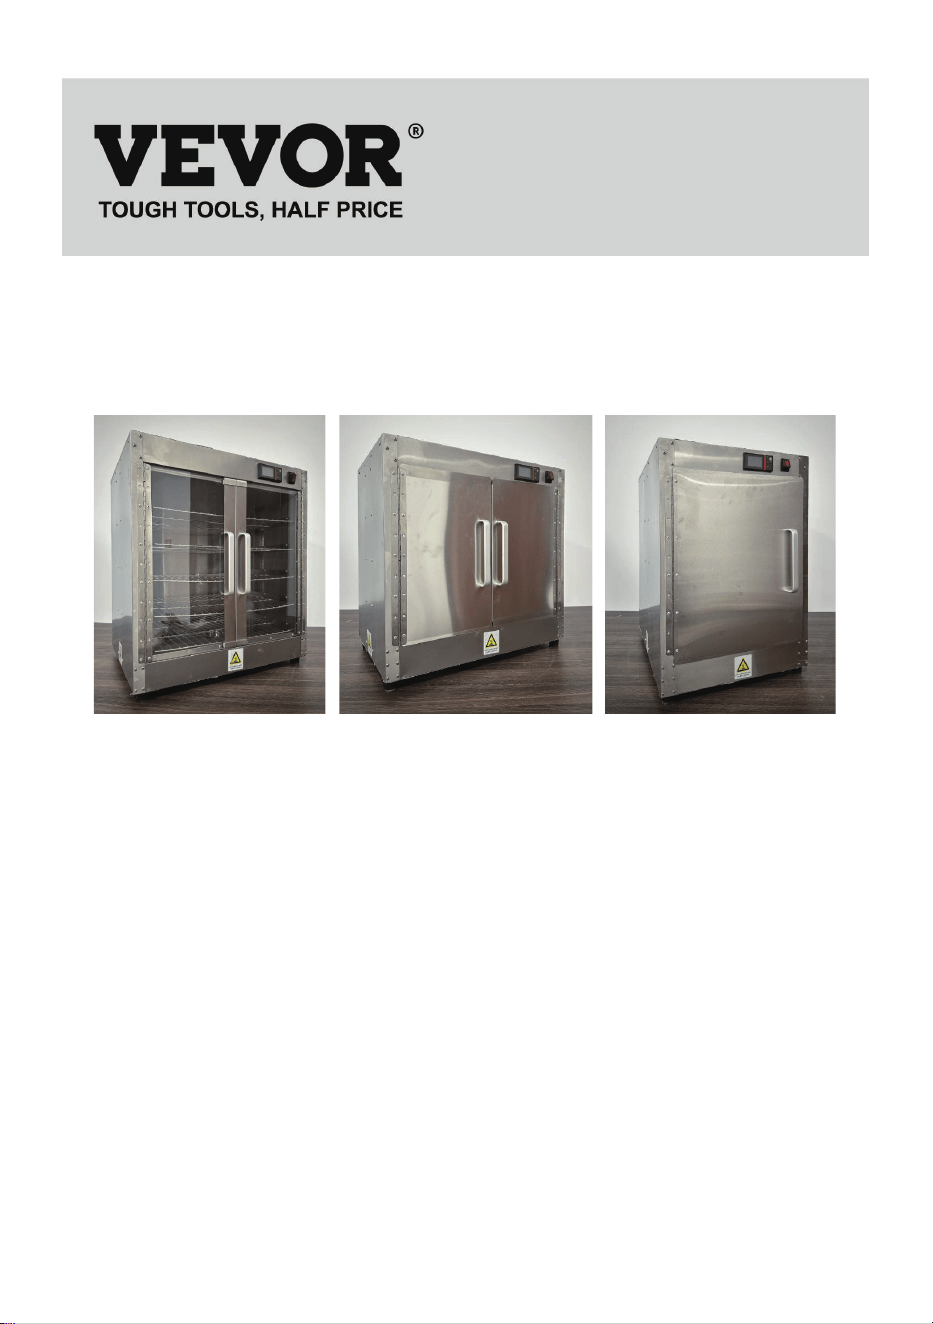
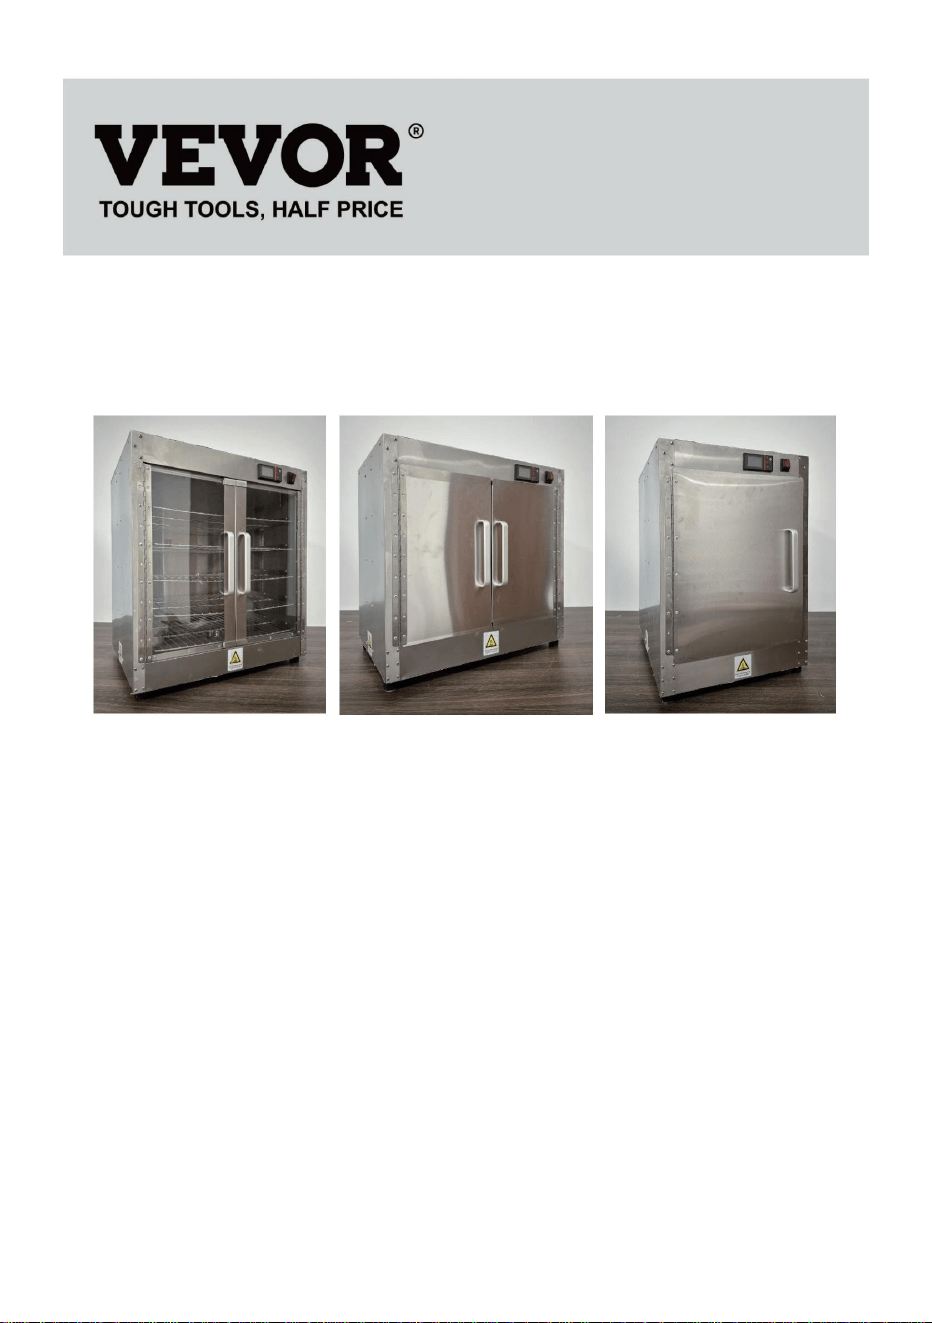
)22' 6725$*( &$%,1(76
02'(/):+%):+%):+%.6
):+%):+%
:H FRQWLQXH WR EH FRPPLWWHG WR SURYLGH \RX WRROV ZLWK FRPSHWLWLYH SULFH
6DYH +DOI +DOI 3ULFH RU DQ\ RWKHU VLPLODU H[SUHVVLRQV XVHG E\ XV RQO\
UHSUHVHQWV DQ HVWLPDWH RI VDYLQJV \RX PLJKW EHQHILW IURP EX\LQJ FHUWDLQ WRROV
ZLWK XV FRPSDUHG WR WKH PDMRU WRS EUDQGV DQG GRHV QRW QHFHVVDULO\ PHDQ WR
FRYHU
DOO FDWHJRULHV RI WRROV RIIHUHG E\ XV <RX DUH NLQGO\ UHPLQGHG WR YHULI\ FDUHIXOO\
ZKHQ \RX DUH SODFLQJ DQ RUGHU ZLWK XV LI \RX DUH DFWXDOO\ 6DYLQJ
+DOI LQ FRPSDULVRQ ZLWK WKH WRS PDMRU EUDQGV

02'(/ ):+%):+%):+%.6
):+%):+%
1((' +(/3" &217$&7 86
+DYH SURGXFW TXHVWLRQV" 1HHG WHFKQLFDO VXSSRUW" 3OHDVH IHHO IUHH WR
FRQWDFW XV
7HFKQLFDO 6XSSRUW DQG (:DUUDQW\ &HUWLILFDWH
ZZZYHYRUFRPVXSSRUW
7KLV LV WKH RULJLQDO LQVWUXFWLRQ SOHDVH UHDG DOO PDQXDO LQVWUXFWLRQV
FDUHIXOO\ EHIRUH RSHUDWLQJ 9(925 UHVHUYHV D FOHDU LQWHUSUHWDWLRQ RI RXU
XVHU PDQXDO 7KH DSSHDUDQFH RI WKH SURGXFW VKDOO EH VXEMHFW WR WKH
SURGXFW \RX UHFHLYHG 3OHDVH IRUJLYH XV WKDW ZH ZRQW LQIRUP \RX DJDLQ LI
WKHUH DUH DQ\ WH
FKQRORJ\ RU VRIWZDUH XSGDWHV RQ RXU SURGXFW
)22' 6725$*(
&$%,1(76

,03257$17 6$)(*8$5'6
:KHQ XVLQJ HOHFWULFDO DSSOLDQFHV EDVLF VDIHW\ SUHFDXWLRQV VKRXOG
DOZD\V EH IROORZHG LQFOXGLQJ WKH IROORZLQJ
3
OHDVH UHDG WKLV PDQXDO FDUHIXOO\ EHIRUH XVLQJ WKLV SURGXFW
0
DNH VXUH \RX DUH IDPLOLDU ZLWK DOO VDIHW\ DQG XVDJH LQVWUXFWLRQV
.
HHS WKLV PDQXDO LQ D VDIH SODFH IRU IXWXUH UHIHUHQFH
)25 <285 6$)(7<
)ROORZ WKHVH SUHFDXWLRQV DOO WKH WLPH WR DYRLG SHUVRQDO LQMXU\ WR \RXUVHOI RU
RWKHUV
'R QRW VSUD\ ZLWK ZDWHU RU FOHDQLQJ SURGXFWV
'R QRW XVH WKH XQLW ZLWK D GDPDJHG RU PRGLILHG HOHFWULF FRUG
7R UHGXFH WKH ULVN RI HTXLSPHQW GDPDJH DQG SHUVRQDO LQMXU\
2QO\ XVH JURXQGHG SRZHU RXWOHWV WKDW PDWFK WKH UDWHG YROWDJH RQ WKH
QDPHSODWH
2QO\ XVH LQ D KRUL]RQWDO SRVLWLRQ
'R QRW XVH D SRZHU VWULS VXUJH SURWHF
WRU RU H[WHQVLRQ FRUG ZLWK WKH
HTXLSPHQW
8QSOXJ WKH HTXLSPHQW EHIRUH FOHDQLQJ RU PRYLQJ
'R QRW XVH FOHDQLQJ DJHQWV RU OLTXLGV RQ WKH RXWVLGH RI WKH XQLW.HHS
DZD\ IURP RSHQ IODPHV DQG RWKHU KHDW VRXUFHV
'R QRW RSHUDWH GDPDJHG RU PDOIXQFWLRQLQJ HTXLSPHQW
'R QRW OHDYH HTXLSPHQW 21 XQDWWHQGHG
'R QRW OHW FKLOGUHQ RU PLQRUV WRXFK RU XVH WKLV SURGXFW3OHDVH EH FDUHIXO
GXULQJ XVH
'R QRW SXW QRQ IRRG LQWR WKH SURGXFW IRU KHDWLQJ
3OHDVH XVH SXULILHG ZDWHU
7KLV DSSOLDQFH LV QRW LQWHQGHG IRU XVH E\ SHUVRQV LQFOXGLQJ FKLOGUHQ
ZLWK UHGXFHG SK\VLFDO VHQVRU\ RU PHQWDO FDSDELOLWLHV RU ODFN RI H[SHULHQFH
DQG NQRZOHGJH XQOHVV WKH\ KDYH EHHQ JLYHQ VXSHUYLVLRQ RU LQVWUXFWLRQ
FRQFHUQLQJ XVH RI WKH DSSOLDQFH E\ D SHUVRQ UHVSRQVLEOH IRU WKHLU VDIHW\
&KLOGUHQ VKRXOG EH VXSHUYLVHG WR HQVXUH WKDW WKH\ GR QRW SOD\ ZLWK WKH
DSSOLDQFH
,I WKH VXSSO\ FRUG LV GDPDJHG LW PXVW EH UHSODFHG E\ WKH PDQXIDFWXUHU
LWV VHUYLFH DJHQW RU VLPLODUO\ TXDOLILHG SHUVRQV LQ RUGHU WR DYRLG D KD]DUG
6$9( 7+(6( ,16758&7,216
23(5$7,1* ,16758&7,216
,QFOXGHV WKH IROORZLQJ DFFHVVRULHV SRZHU FRUG DQWLVFDOG JORYHVWLQ IRLO ER[
DOXPLQXP DOOR\ KDQGOH KDQGOH VFUHZV FDELQHW IHHW FDELQHWIRRW VFUHZV
VPDOO ZUHQFK ZDWHU ER[ PDQXDO VKHOI
6WHS $WWHQWLRQ7HDU RI WKH ZKLWH SURWHFWLYH ILOP RQ WKH VXUIDFH 0RGH RI
RSHU
DWLRQ 8VH KDLU GU\HU WR KHDW WKH SURWHFWLYH ILOP KHDW LW IRU D SHULRGRI
WLPH DQG WKHQ WHDU LW RII E\ KDQG
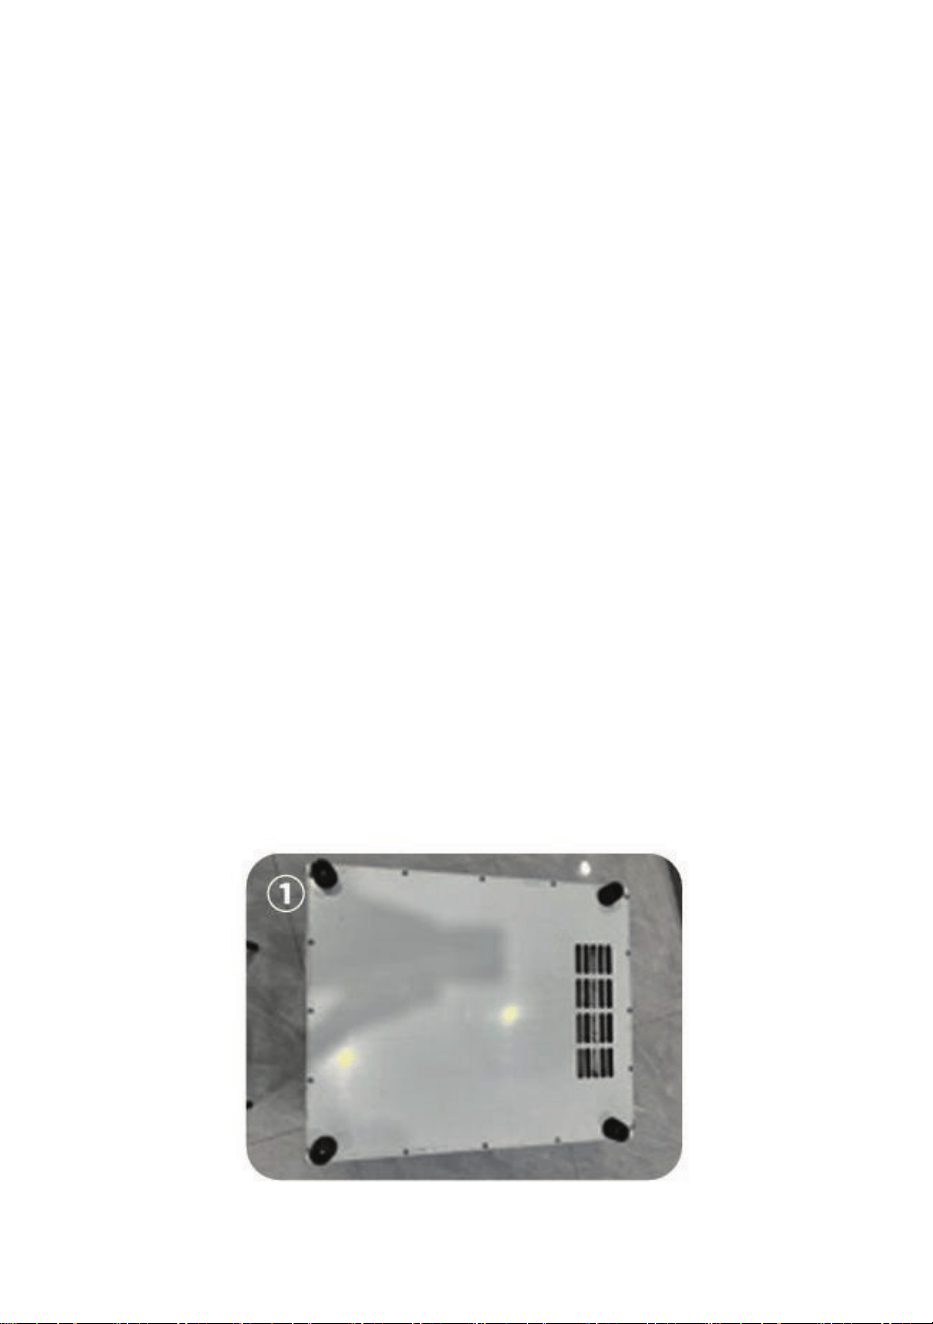
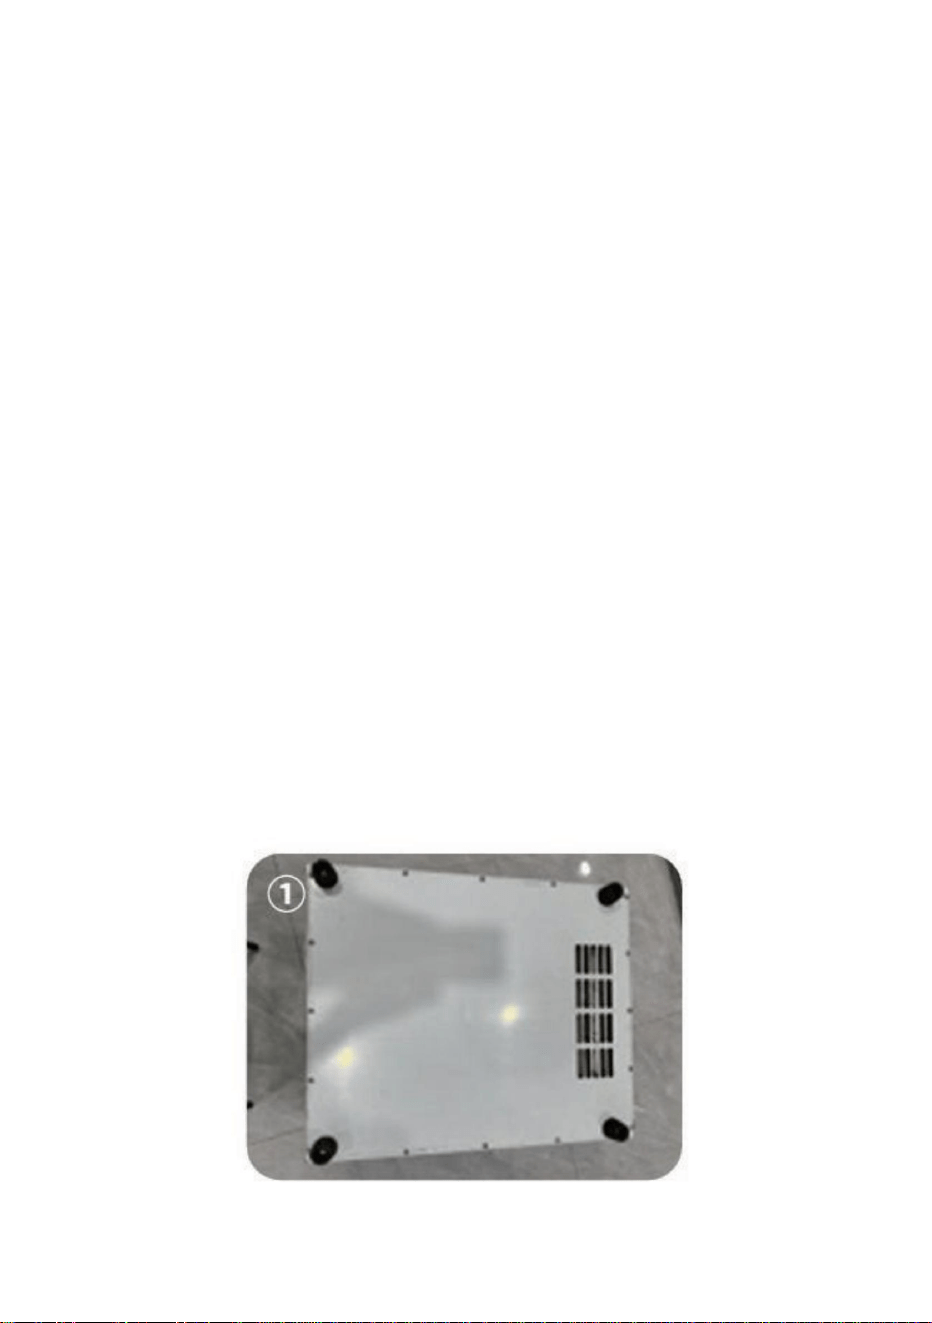
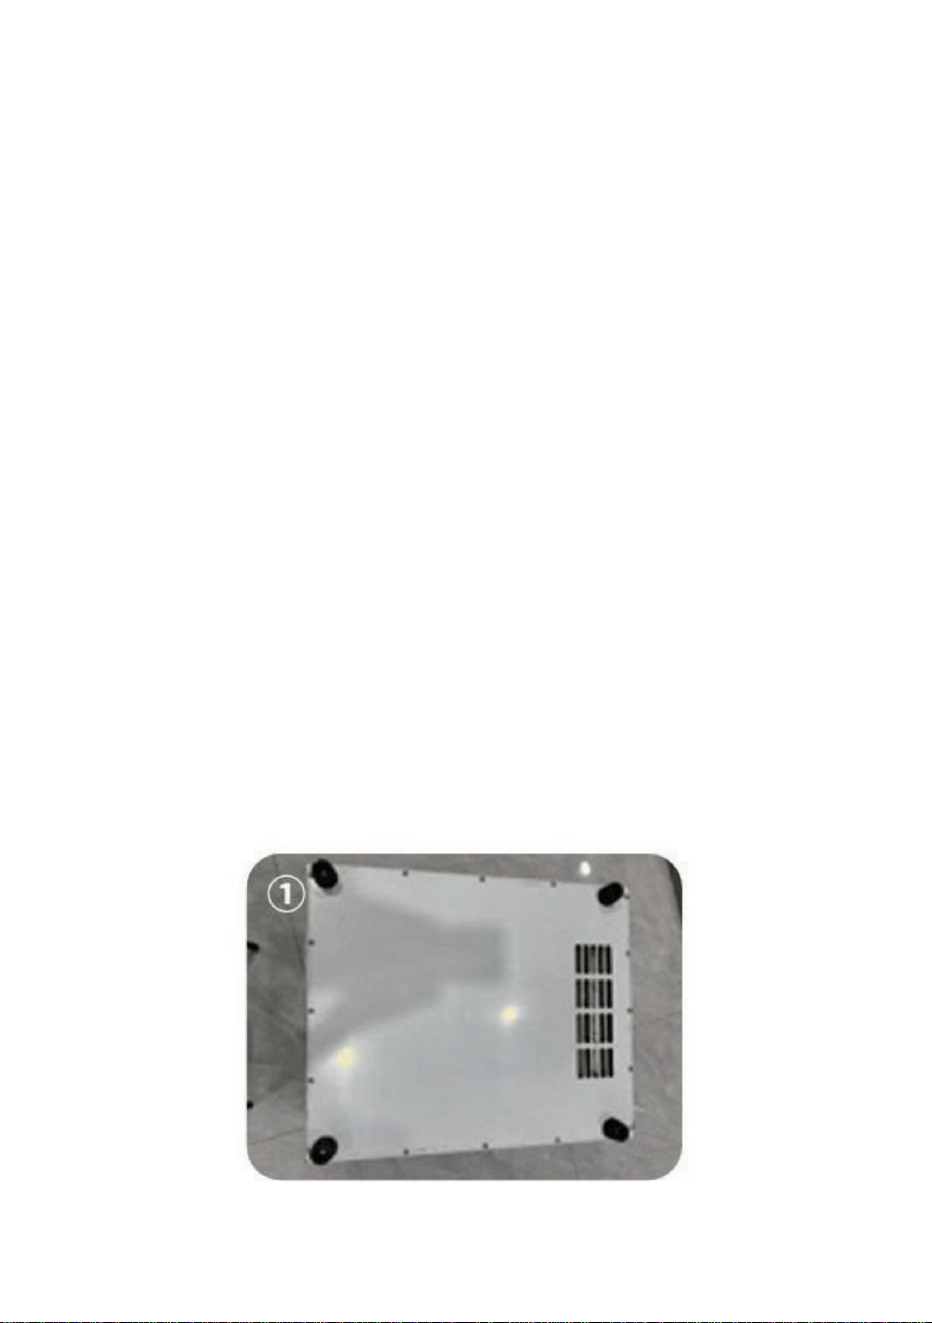
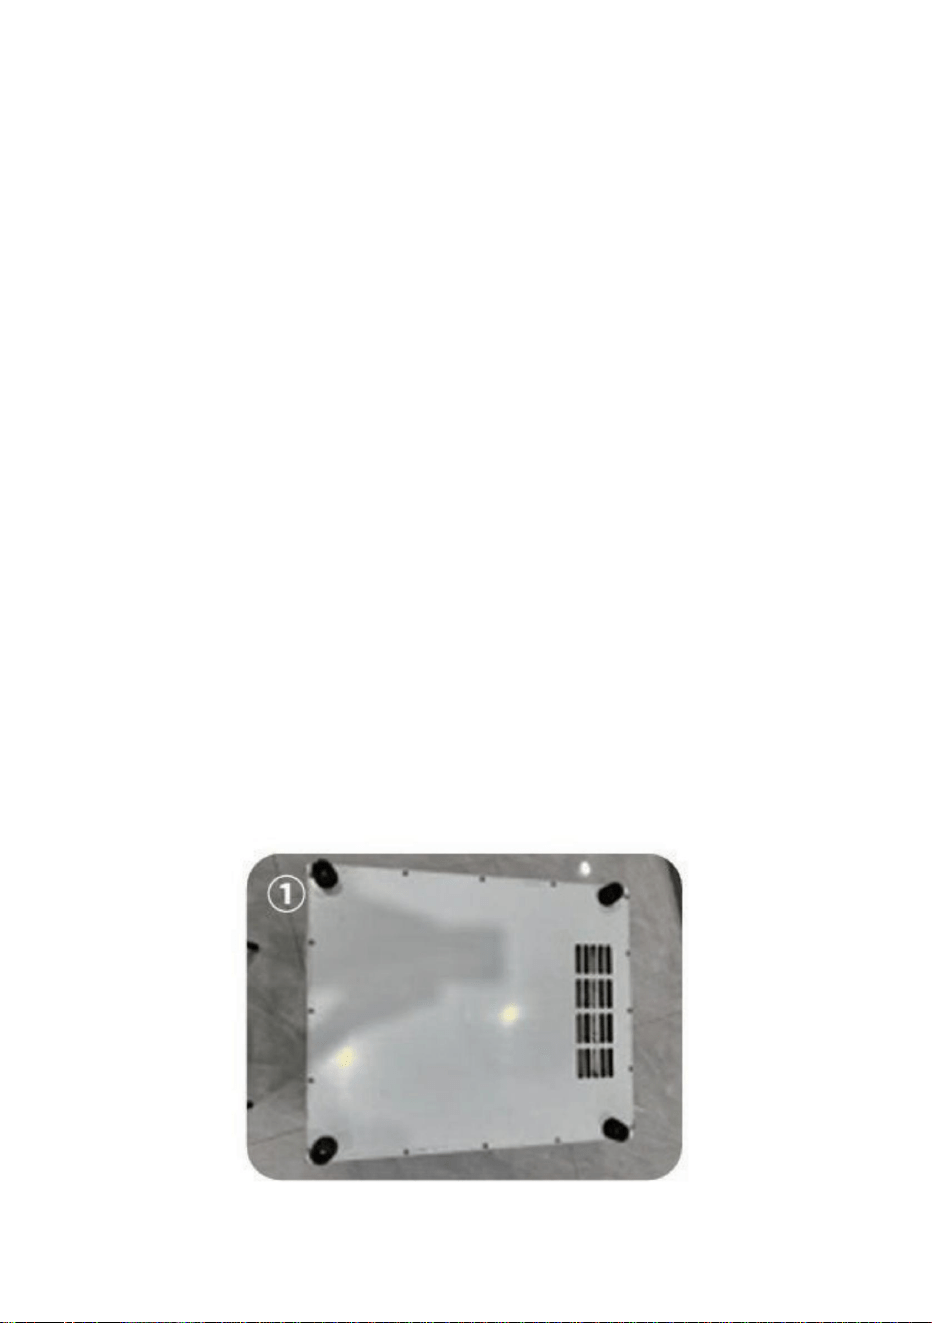
6WHS 7XUQ WKH FDELQHW XSVLGH GRZQ VR WKDW LWV ERWWRP LV IDFLQJ XS
WDNHRXW WKH EDJ ZLWK WKH FDELQHW OHJV DQG LQVWDOO WKH ORQJ VFUHZV DQG
DZUHQFK ZLWK IRXU FDELQHW OHJV LQVLGH SDVV WKH VFUHZV RI WKH FDELQHWIHHW
WKURXJK WKH KROHV LQ WKH PLGGOH RI WKH FDELQHW IHHW DQG WKHQLQVWDOO WKHP RQ
WKH QXWV RQ WKH IRXU FRUQHUV RI WKH ERWWRP RI WKHFDELQHW ZKLFK LV IL[HG
ILUPO\ ZLWK D ZUH
QFK$V VKRZQ LQ )LJXUHķ
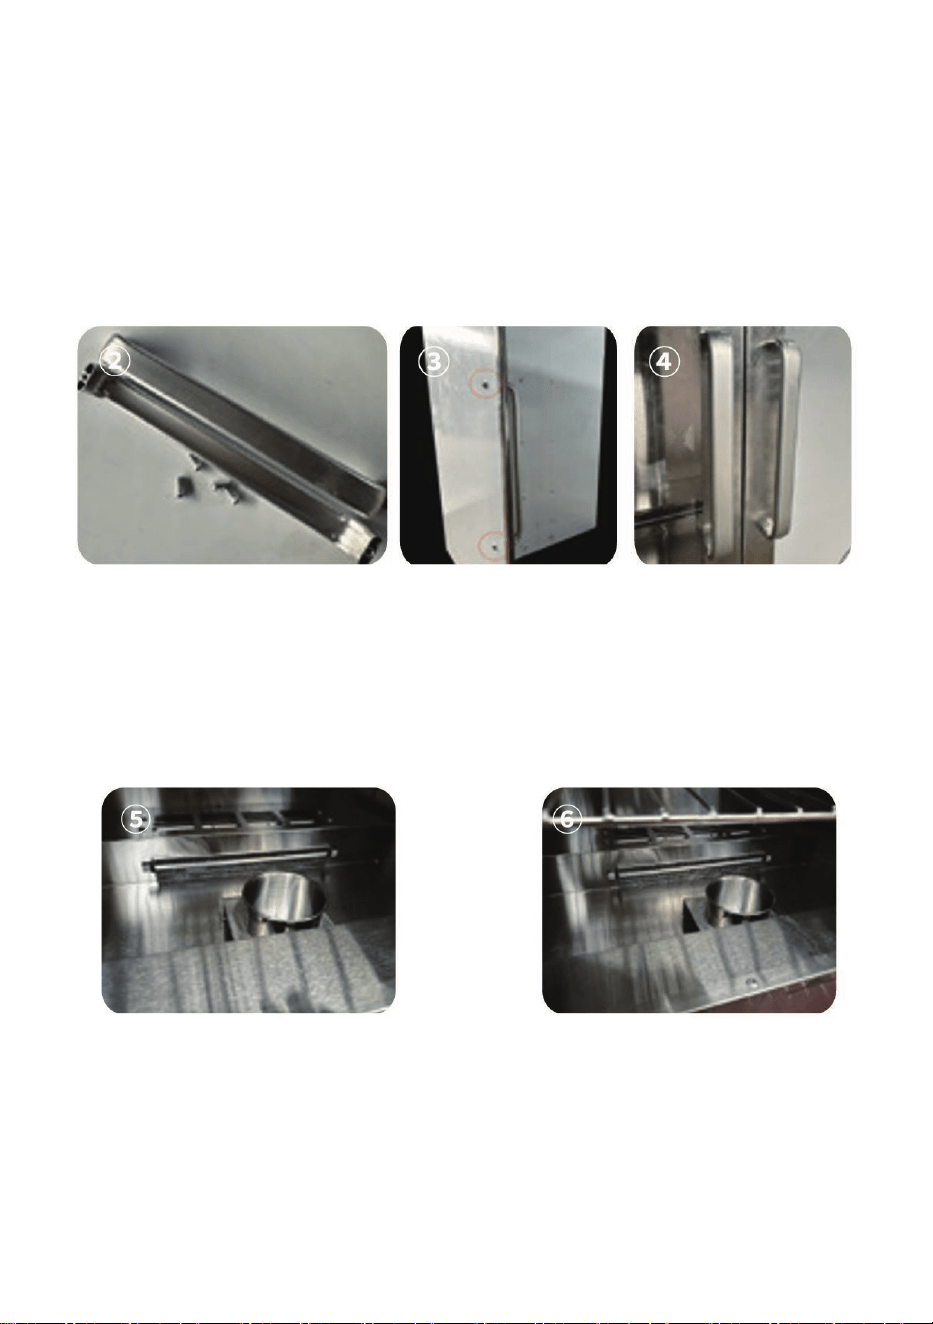
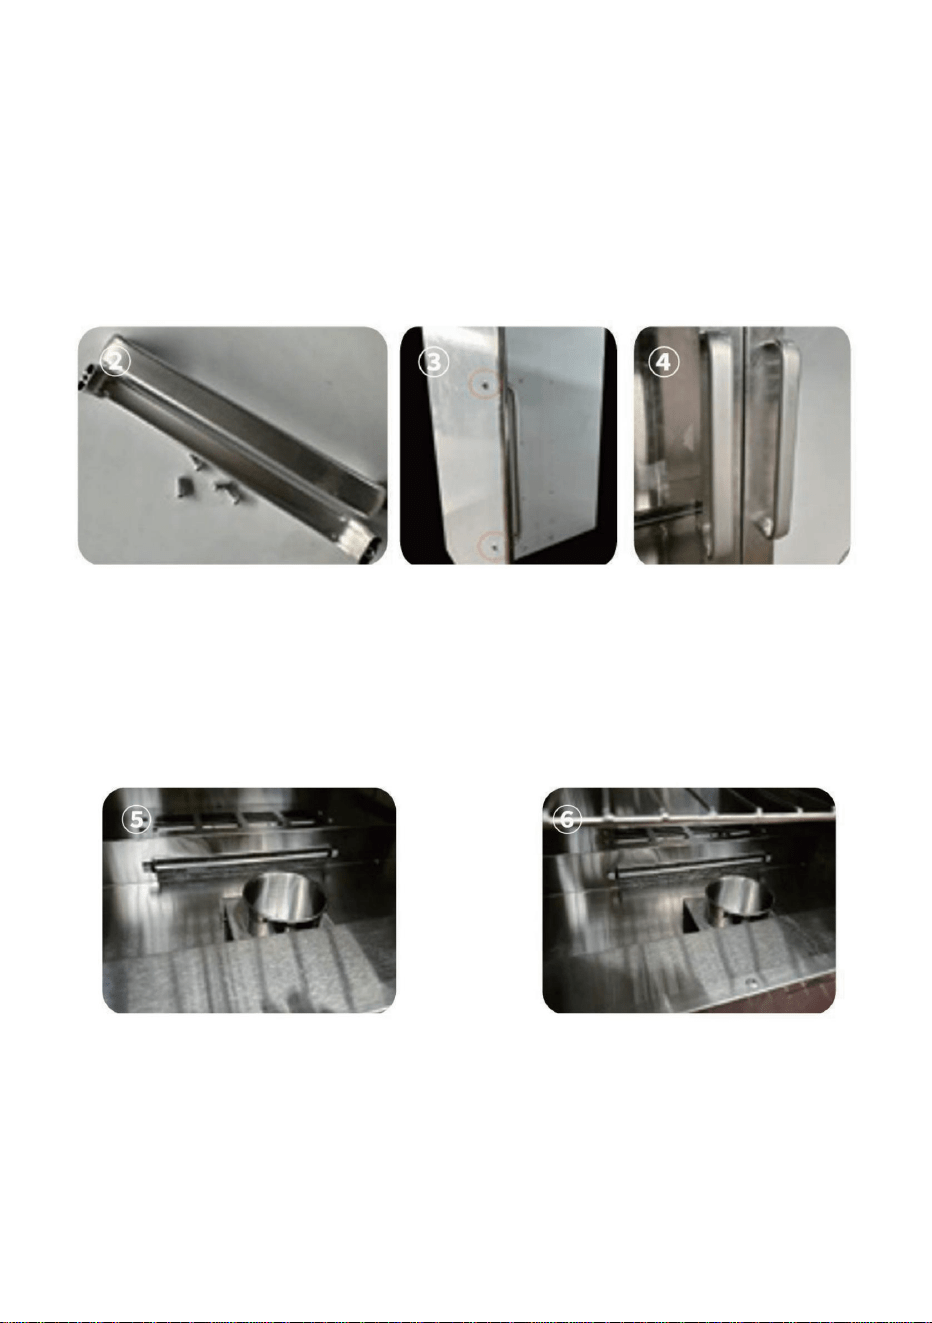
6WHS
,QVWDOO WKH DOXPLQXP DOOR\ KDQGOH RI WKH FDELQHW RQ WKH FDELQHW GRRUWKHUH
DUH WZR VFUHZ KROHV RQ WKH WRS DQG ERWWRP RI WKH DOXPLQXPDOOR\ KDQGOH
WDNH RXW WKH PDWFKLQJ VFUHZV XVHG WR LQVWDOO WKH DOXPLQXP DOOR\ KDQGOH LQ
WKH DFFHVVRULHV SDVV WKH VFUHZV WKURXJK WKH WZR KROHV RQ WKH FDELQHW GRRU
DQG WKHQ DOLJQ WKH VFUHZ KROHV RI WKH DOXPLQXP DOOR\ KDQGOH ZLWK WKH VFUHZ
DQG WLJKWHQ LW ZLWK DZUHQFK$V VKRZQ LQ )LJXUHĸĹĺ
6WHS 3ODFH WKH ZDWHU ER[ LQ WKH ORZHVW VSDFH RI WKH FDELQHW DQG WKH
ZDWHU ER[ QHHGV WR EH SODFHG FORVH WR WKH VLGH RI WKH FDELQHW GRRU WR DYRLG
EORFNLQJ WKH DLU RXWOHW DQG DIIHFWLQJ WKH KHDWLQJ HIIHFW$V VKRZQ LQ
)LJXUHĻļ
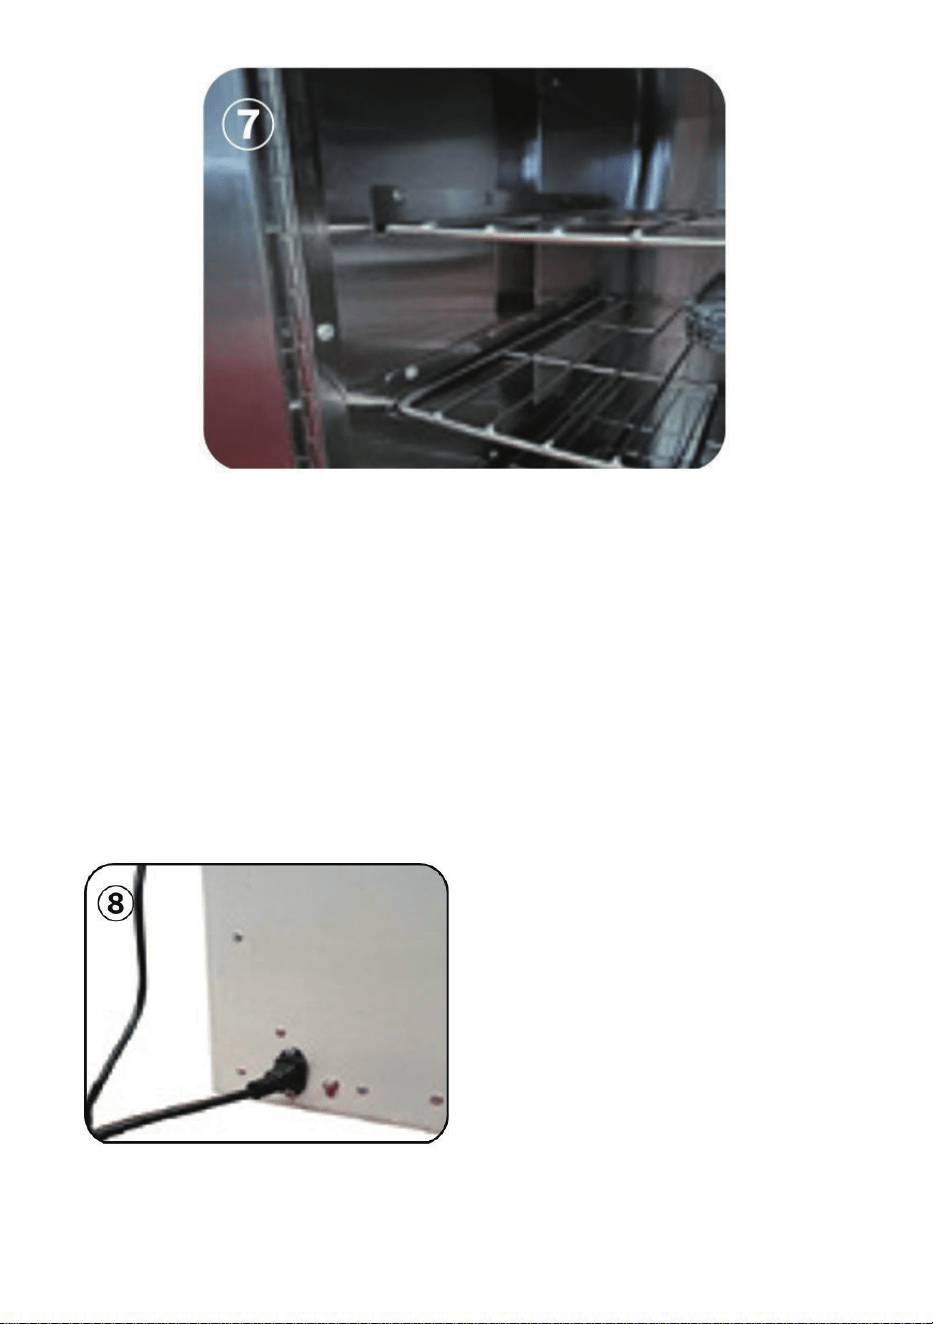
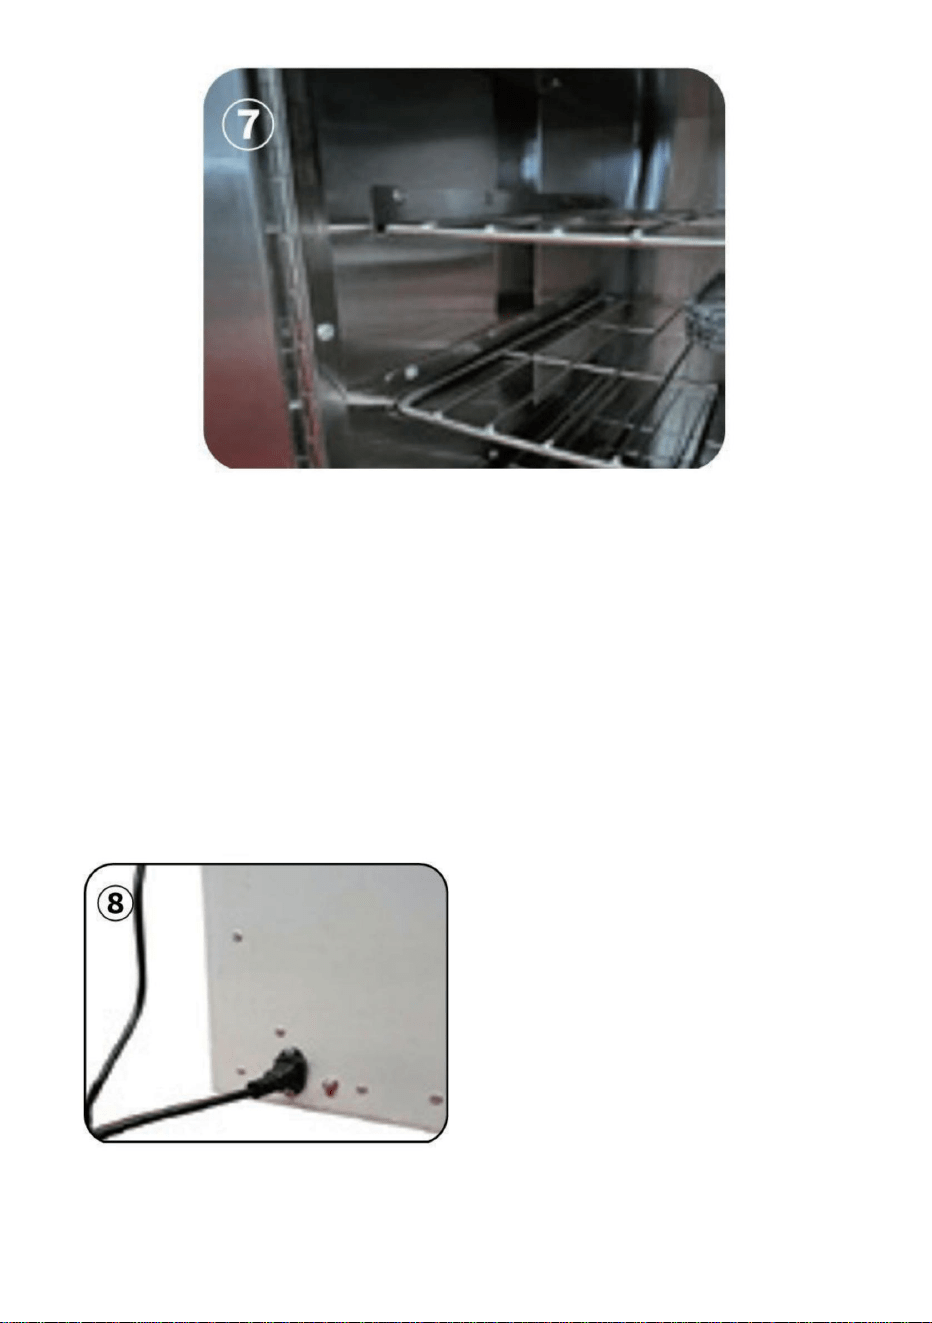
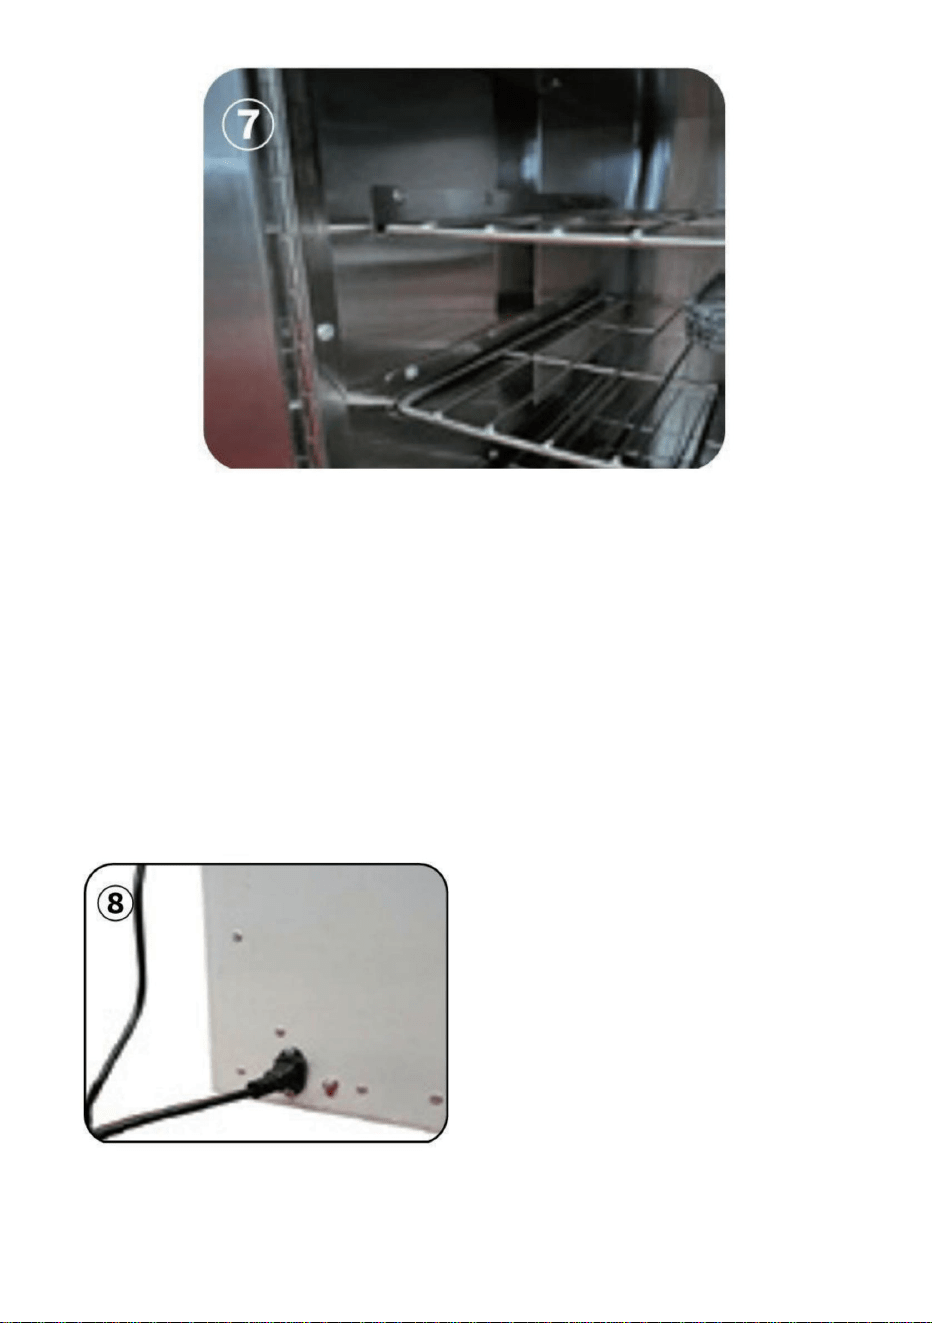
6WHS 7DNH RXW WKH VKHOYHV DQG SODFH WKHP RQ WRS RI WKH VKHOYHV$V
VKRZQ LQ )LJXUH Ľ
- 5 -
Step 6:
1.At the position of the power plug, connect the ground wire (the
connection ground wire must be effectively grounded).
.
2
3.Set the desired temperature: Click the "set" key, and the blue set value on
the screen will flash. Use the up and down keys to adjust it to the required
temperature value, and then click the "set" key to save the setting and exit
the temperature setting mode.
. Plug the power cord into the powersocket behind the cabinet.poweron,
press the red switch on the front of the cabinet, the cabinet is energized,
the display screen is lit
As shown in
Figure(8)
- 6 -
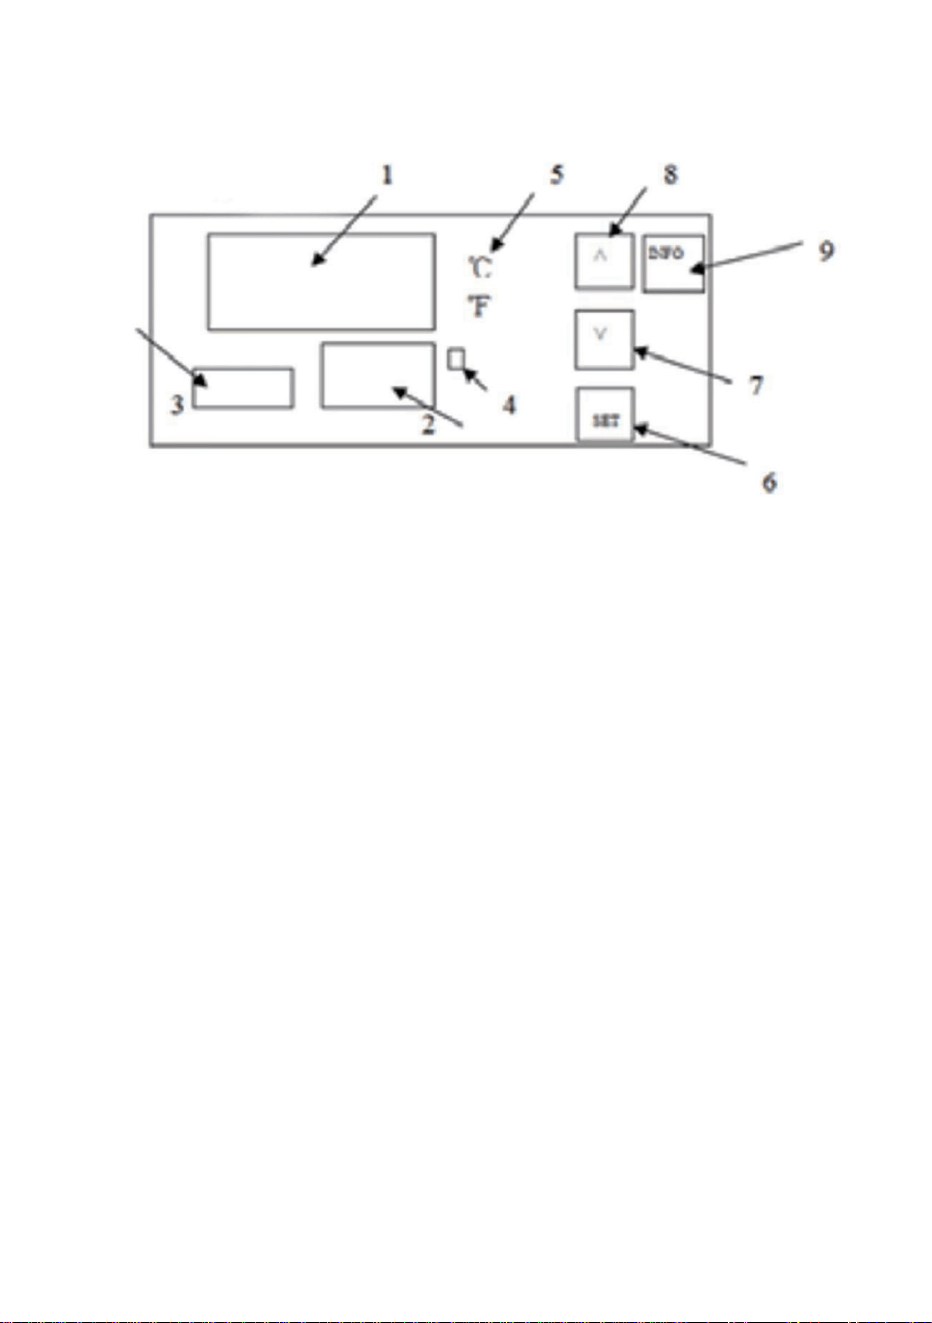
Step 7:Temperature setting Description of the function of the thermostat
operation panel
1.Display the measured value
2. Display the set value.
3.Timekeeping time.When the power is on, press the SET key for 3 seconds
to display P00, and the SET value is changed to 8. Then press the SET key
to enter the internal parameter settings. Press the SET key continuously to
find the P07 countdown setting, then press the up and down keys to SET the
countdown time. Finally, press the SET key to save, and press the SET key
for 3 seconds to save and exit the internal settings.
4.Heating indicator light, heating when it is on.
5. Celsius / Degree Fahrenheit indication.Press and hold the up increase key
for 3 seconds to switch the display degrees Celsius/Fahrenheit
6.SET key:
FunctionⅠ: click this key, the upper row will display SV, the lower row will
flash, press the upper or lower key to set the temperature.and then click the
lower key to set it to completion.
FunctionⅡ: Press and hold this buttonfor 3 seconds to enter the interna
parameters.
7.Subtract key: Press this key to decrease the value.
8. Add button:
Ⅰ. Press this button to increase the value when setting.
Ⅱ. Press and hold the up increase key for 3 seconds to switch the display
degrees Celsius/Fahrenheit.
9.INFO button:
Function Ⅰ: Press and hold this button for3 seconds to power off or on.
Function Ⅱ: When you are in an internalparameter, click this key to rewind
the previous parameter
- 7 -
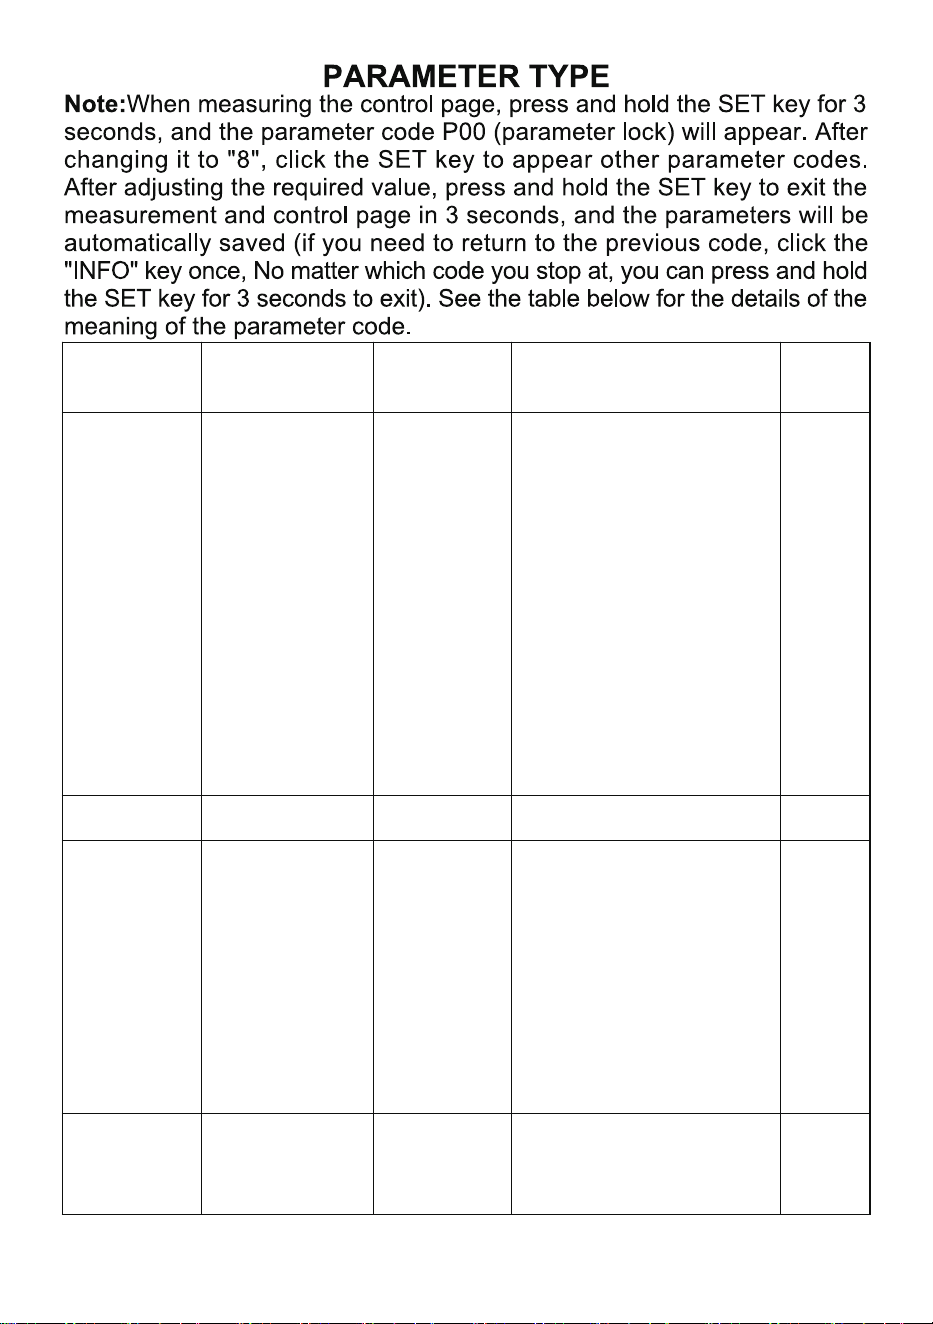
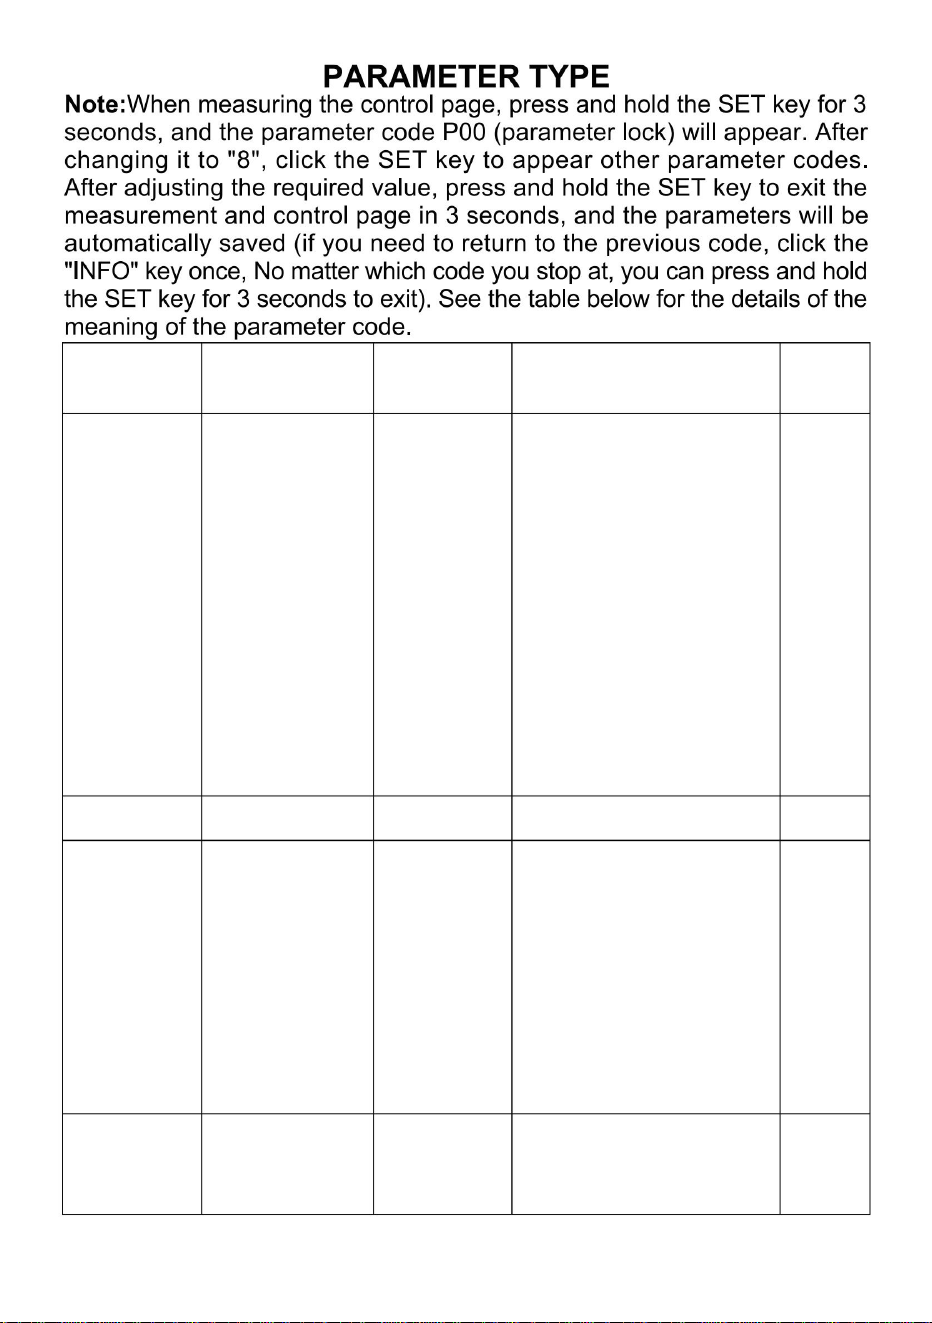
Parameter Name Set Description
Initial
Value
P00
Parameter
locks
8、110
8:When the
permission is
unlocked the following
parameter
codes(P01,P04, P06,
and P07)appear and if
this value is a different
value no other
parameter code
appears.110:Factory
reset
0
P01 Return 0-10 Modify as needed 2
P04
Temperature
correction
-20~20
It is used for
temperature
correction when there
is a problem with the
position of the sensor
or other factors that
affect the temperature.
0
P06
℃
°F
switching
℃
°F
0:celsius 1:degree
Fahrenheit
1

- 8 -
P07
Keep warm
at are qular
time
0~999unit
minutes
0
Note: This product has the function of food heat preservation andconstant
temperature drying, with a maximum setting temperatureof177'F and
80'C.The access voltage is required to be 120V+10%and the device power
is 850W.
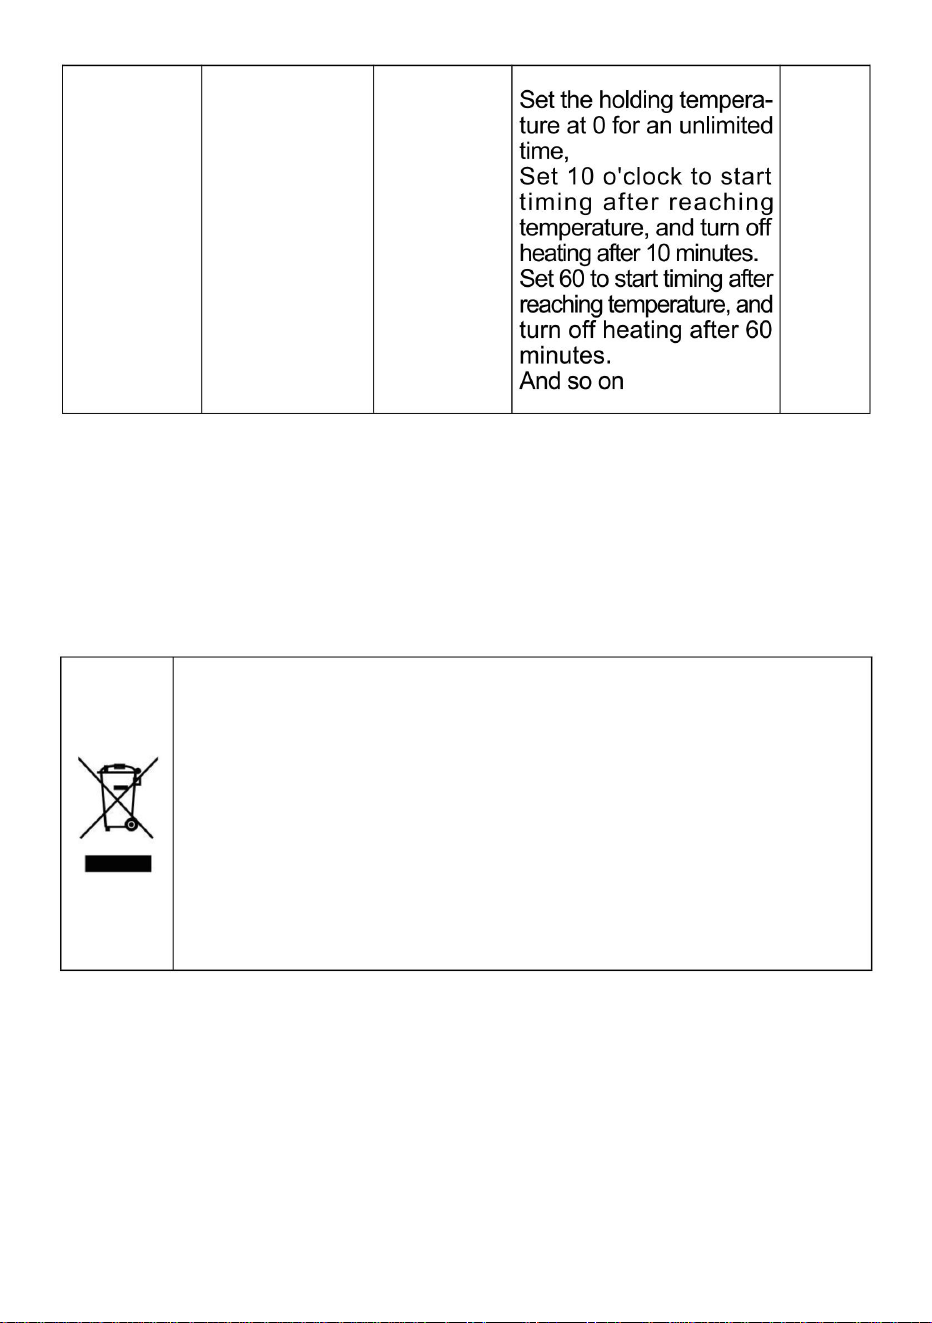
CORRECT DISPOSAL
This product is subject to the provision of European Directive
2012/19/EC. The symbol showing a wheelie bin crossed
through indicates that the product requires separate refuse
collection in the European Union. This applies to the product
and all accessories marked with this symbol. Products marked
as such may not be discarded with normal domestic waste, but
must be taken to a collection point for recycling electrical and
electronic devices


7HFKQLFDO 6XSSRUW DQG (:DUUDQW\ &HUWLILFDWH
ZZZYHYRUFRPVXSSRUW

Machine Translated by Google

Machine Translated by Google

Machine Translated by Google

Machine Translated by Google
Machine Translated by Google

Machine Translated by Google

3.Réglezlatempératuresouhaitée:appuyezsurlatouche«set»etlavaleurde
consignebleueclignoteraàl'écran.Utilisezlestoucheshautetbaspourréglerla
températuresouhaitée,puisappuyezsurlatouche«set»pourenregistrerle
réglageetquitterlemodederéglage.
Étape6:
1.Àl'emplacementdelaprised'alimentation,connectezlefildeterre(lefildeterredeconnexion
doitêtrecorrectementmisàlaterre).2.Branchezlecordond'alimentationsurla
prisesituéeàl'arrièredel'armoire.Mettezl'armoiresoustension,appuyezsurl'interrupteurrougeàl'avant;
l'armoireestsoustensionetl'écrans'allume,commeillustréàlafigure(8).
.
5
Machine Translated by Google

5.IndicationCelsius/DegréFahrenheit.Appuyezetmaintenezlatouched'augmentationverslehautpendant3
secondespourchangerl'affichageendegrésCelsius/Fahrenheit.6.ToucheSET:Fonction
:cliquezsur
cettetouche,larangéesupérieureafficheraSV,larangéeinférieureclignotera,appuyezsurlatouchesupérieure
ouinférieurepourréglerlatempérature,puiscliquezsurlatoucheinférieurepourlaréglercomplètement.
Fonction:Appuyezsurceboutonetmaintenezleenfoncépendant3secondespouraccéderauxparamètres
internes.
7.ToucheSoustraire:Appuyezsurcettetouchepourdiminuerlavaleur.
9.BoutonINFO:
Fonction:Appuyezsurceboutonetmaintenezleenfoncépendant3secondespouréteindreouallumer.
3.Chronométrage.Àlamisesoustension,appuyezsurlatoucheSETpendant3secondespourafficherP00.
LavaleurSETpassealorsà8.AppuyezensuitesurlatoucheSETpouraccéderauxparamètresinternes.
AppuyezlonguementsurlatoucheSETpouraccéderaucompteàreboursP07,puisappuyezsurlestouches
hautetbaspourréglerlecompteàrebours.Enfin,appuyezsurlatoucheSETpourenregistrer,puisappuyez
pendant3secondespourenregistreretquitterlesparamètresinternes.
4.Voyantdechauffage,chauffagelorsqu'ilestallumé.
1.Affichezlavaleurmesurée2.Affichezla
valeurdéfinie.
Étape7:RéglagedelatempératureDescriptiondelafonctiondupanneaudecommandeduthermostat
Fonction:Lorsquevousêtesdansunparamètreinterne,cliquezsurcettetouchepourrevenirauparamètre
précédent
8.BoutonAjouter:
.Appuyezsurceboutonpouraugmenterlavaleurlorsduréglage..
Appuyezsurlatouched'augmentationverslehautetmaintenezlaenfoncéependant3secondespourchanger
l'affichageendegrésCelsius/Fahrenheit.
6
Machine Translated by Google

7
Température
0
Ilestutilisépour
déverrouillélesélémentssuivants
Valeur
codes(P01,P04,P06,
codedeparamètre
8à110
positionducapteur
20~20
8:Quandle
P00
010
°C°F
Fahrenheit
°C°F
correction
P01
Paramètre
Ensemble
commutation
etP07)apparaissentetsi
Paramètre
apparaît.110:Usine
correctionquandilya
affecterlatempérature.
Initial
paramètre
oud'autresfacteursqui
aucuneautrevaleur
2
1
P06
0
lapermissionest
Modifierselonlesbesoins
estunproblèmeavecle
0:celsius1:degré
Retour
Description
serrures
P04
température
réinitialiser
Nom
cettevaleurestdifférente
Machine Translated by Google

8
P07 0
ÉLIMINATIONCORRECTE
Ceproduitestsoumisauxdispositionsdeladirectiveeuropéenne2012/19/CE.Le
symbolereprésentantunepoubellebarréeindiquequeleproduitdoitfaire
l'objetd'unecollectesélectivedansl'Unioneuropéenne.Cecis'appliqueauproduit
etàtouslesaccessoiresmarquésdecesymbole.Lesproduitsainsimarquésne
doiventpasêtrejetésaveclesorduresménagères,maisdoiventêtredéposésdansun
pointdecollectepourlerecyclagedesappareilsélectriquesetélectroniques.
0à999unités
minutes
Remarque:ceproduitalafonctiondeconservationdelachaleurdesalimentsetdeséchageà
températureconstante,avecunetempératurederéglagemaximalede177°Fet80°C.La
tensiond'accèsdoitêtrede120V+10%etlapuissancedel'appareilestde850W.
Restezau
chaudàune
heureprécise
Machine Translated by Google

Machine Translated by Google

Machine Translated by Google

Machine Translated by Google

Machine Translated by Google
Machine Translated by Google

Machine Translated by Google

Machine Translated by Google

Machine Translated by Google

3. Stellen Sie die gewünschte Temperatur ein: Klicken Sie auf die Schaltfläche „Set“. Der blaue
Sollwert auf dem Bildschirm blinkt. Stellen Sie die gewünschte Temperatur mit den Auf- und Ab-
Tasten ein. Klicken Sie anschließend auf die Schaltfläche „Set“, um die Einstellung zu speichern und
den Temperatureinstellungsmodus zu verlassen.
Schritt 6:
1. Schließen Sie an der Stelle des Netzsteckers das Erdungskabel an (das Erdungskabel
muss ordnungsgemäß geerdet sein). 2. Stecken Sie das Netzkabel in die
Steckdose hinter dem Schrank. Schalten Sie das Gerät ein, indem Sie den roten Schalter an der
Vorderseite des Schranks drücken. Der Schrank wird mit Strom versorgt und der Bildschirm leuchtet
wie in Abbildung (8) gezeigt.
.
- 5 -
Machine Translated by Google

5. Anzeige von Celsius/Grad Fahrenheit. Halten Sie die Aufwärtstaste 3 Sekunden lang gedrückt, um
zwischen der Anzeige von Grad Celsius und Grad Fahrenheit umzuschalten. 6. SET-
Taste: Funktion
ÿ: Klicken Sie auf diese Taste. In der oberen Reihe wird SV angezeigt, die untere Reihe blinkt. Drücken Sie
die obere oder untere Taste, um die Temperatur einzustellen. Klicken Sie dann auf die untere Taste, um die
Einstellung abzuschließen.
Funktion 2: Halten Sie diese Taste 3 Sekunden lang gedrückt, um die internen Parameter einzugeben.
7. Subtraktionstaste: Drücken Sie diese Taste, um den Wert zu verringern.
8. Hinzufügen-
Taste: ÿ. Drücken Sie diese Taste, um den Wert beim Einstellen zu erhöhen.
ÿ. Halten Sie die Taste zum Erhöhen 3 Sekunden lang gedrückt, um zwischen der Anzeige Grad Celsius und
Grad Fahrenheit umzuschalten.
3. Uhrzeit. Drücken Sie bei eingeschaltetem Gerät die SET-Taste 3 Sekunden lang, um P00 anzuzeigen. Der
SET-Wert wird auf 8 geändert. Drücken Sie anschließend die SET-Taste, um die internen Parametereinstellungen
aufzurufen. Drücken Sie die SET-Taste kontinuierlich, um die Countdown-Einstellung P07 zu finden, und
drücken Sie anschließend die Auf- und Ab-Tasten, um die Countdown-Zeit einzustellen. Drücken Sie
abschließend die SET-Taste zum Speichern und drücken Sie die SET-Taste 3 Sekunden lang, um die
internen Einstellungen zu speichern und zu verlassen.
4.Heizungsanzeigeleuchte, Heizung, wenn sie eingeschaltet ist.
1. Anzeige des gemessenen Wertes. 2.
Anzeige des eingestellten Wertes.
Schritt 7: Temperatureinstellung Beschreibung der Funktion des Thermostat-Bedienfelds
9.INFO-Taste:
Funktion ÿ: Halten Sie diese Taste 3 Sekunden lang gedrückt, um das Gerät aus- oder einzuschalten.
Funktion ÿ: Wenn Sie sich in einem internen Parameter befinden, klicken Sie auf diese Taste, um zum
vorherigen Parameter zurückzukehren
- 6 -
Machine Translated by Google

- 7 -
Anfänglich
Parameter
Wert keinen anderen
2
oder andere Faktoren, die
1
P06
0
Erlaubnis ist
Bei Bedarf ändern
ist ein Problem mit der
Zurückkehren
P04
Beschreibung
Schlösser
0:Celsius 1:Grad
Temperatur
0
Name
dieser Wert ist ein anderer
zurücksetzen
Temperatur
ÿ °F
8, 110
Folgendes freigeschaltet
Wert
Codes (P01, P04, P06,
Parametercode
Es wird verwendet für
-20 bis 20
Position des Sensors
P00
0-10
8:Wenn die
Fahrenheit
ÿ °F
P01
Parameter
Satz
Korrektur
Umschalten
und P07) erscheinen und wenn
Parameter
erscheint.110:Fabrik
Korrektur, wenn es
die Temperatur beeinflussen.
Machine Translated by Google

P07 0
RICHTIGE ENTSORGUNG
Dieses Produkt unterliegt der europäischen Richtlinie 2012/19/EG. Das Symbol
einer durchgestrichenen Mülltonne weist darauf hin, dass dieses Produkt
in der Europäischen Union einer getrennten Müllentsorgung unterliegt. Dies
gilt für das Produkt und alle mit diesem Symbol gekennzeichneten Zubehörteile.
Entsprechend gekennzeichnete Produkte dürfen nicht im Hausmüll entsorgt
werden, sondern müssen an einer Sammelstelle für das Recycling von Elektro-
und Elektronikgeräten abgegeben werden.
Hinweis: Dieses Produkt verfügt über die Funktion der Wärmekonservierung und des Trocknens
bei konstanter Temperatur mit einer maximalen Einstelltemperatur von 177 °F und 80 °C.
Die erforderliche Zugangsspannung beträgt 120 V + 10 % und die Geräteleistung beträgt 850 W.
Minuten
0~999 Einheiten
Halten Sie
sich warm zu
jeder Zeit
- 8 -
Machine Translated by Google

Machine Translated by Google

Machine Translated by Google

Machine Translated by Google

Machine Translated by Google

Machine Translated by Google

Machine Translated by Google
Machine Translated by Google

Machine Translated by Google
.
Fase 6:
1. Nella posizione della spina di alimentazione, collegare il filo di terra (il filo di terra
di collegamento deve essere effettivamente messo a terra). 2. Collegare
il
cavo di alimentazione alla presa di corrente dietro l'armadio. Accendere, premere l'interruttore
rosso sulla parte anteriore dell'armadio, l'armadio è alimentato, lo schermo del display è acceso
Come mostrato nella Figura (8)
3.Impostare la temperatura desiderata: fare clic sul tasto "set" e il valore impostato blu sullo
schermo lampeggerà. Utilizzare i tasti su e giù per regolarlo sul valore di temperatura richiesto,
quindi fare clic sul tasto "set" per salvare l'impostazione e uscire dalla modalità di impostazione
della temperatura.
- 5 -
Machine Translated by Google

5. Indicazione Celsius / Gradi Fahrenheit. Tenere premuto il tasto di aumento per 3 secondi per cambiare la
visualizzazione dei gradi Celsius/Fahrenheit. 6. Tasto SET: Funzioneÿ: fare clic su questo
tasto, la riga
superiore visualizzerà SV, la riga inferiore lampeggerà, premere il tasto superiore o inferiore per impostare la
temperatura, quindi fare clic sul tasto inferiore per completare l'impostazione.
Funzioneÿ: tenere premuto questo pulsante per 3 secondi per accedere ai parametri interni.
7. Tasto Sottrai: premere questo tasto per diminuire il valore.
8. Pulsante Aggiungi:
ÿ. Premere questo pulsante per aumentare il valore durante l'impostazione. ÿ.
Premere e tenere premuto il tasto di aumento per 3 secondi per cambiare la visualizzazione gradi Celsius/
Fahrenheit.
3. Ora di cronometraggio. Quando l'alimentazione è accesa, premere il tasto SET per 3 secondi per visualizzare
P00 e il valore SET viene modificato in 8. Quindi premere il tasto SET per accedere alle impostazioni dei
parametri interni. Premere continuamente il tasto SET per trovare l'impostazione del conto alla rovescia P07,
quindi premere i tasti su e giù per IMPOSTARE il tempo del conto alla rovescia. Infine, premere il tasto SET per
salvare e premere il tasto SET per 3 secondi per salvare e uscire dalle impostazioni interne.
4.Spia luminosa di riscaldamento, riscaldamento quando è acceso.
1. Visualizza il valore misurato 2. Visualizza
il valore impostato.
Fase 7: Impostazione della temperatura Descrizione della funzione del pannello operativo del termostato
9.Pulsante INFO:
Funzione ÿ: tenere premuto questo pulsante per 3 secondi per accendere o spegnere.
Funzione ÿ: quando ci si trova in un parametro interno, fare clic su questo tasto per tornare indietro al parametro
precedente
- 6 -
Machine Translated by Google

- 7 -
codici(P01,P04, P06,
Valore
codice parametro
0
8, 110
sbloccato quanto segue
Viene utilizzato per
posizione del sensore
ÿ °F
-20~20
Fahrenheit
P00
Da 0 a 10
8:Quando il
P01
Parametro
Impostato
correzione
commutazione
influenzare la temperatura.
e P07)appaiono e se
Parametro
appare.110:Fabbrica
correzione quando c'è
non ha valore per nessun altro
2
Iniziale
parametro
o altri fattori che
1
P06
0
il permesso è
Modificare secondo necessità
è un problema con il
Ritorno
P04
Descrizione
serrature
0:celsius 1:grado
Nome
questo valore è diverso
reset
Temperatura
ÿ °F
temperatura
Machine Translated by Google

- 8 -
P07 0
SMALTIMENTO CORRETTO
0~999 unità
minuti
Nota: questo prodotto ha la funzione di conservare il calore degli alimenti ed essiccarli a
temperatura costante, con una temperatura massima di impostazione di 177°F e 80°C.
La tensione di accesso richiesta è di 120V+10% e la potenza del dispositivo è di 850W.
Mantenetevi al
caldo durante il
giorno
Questo prodotto è soggetto alle disposizioni della Direttiva Europea 2012/19/
CE. Il simbolo raffigurante un bidone della spazzatura barrato indica che
il prodotto richiede la raccolta differenziata dei rifiuti nell'Unione Europea.
Ciò si applica al prodotto e a tutti gli accessori contrassegnati con questo
simbolo. I prodotti contrassegnati come tali non possono essere smaltiti con i
normali rifiuti domestici, ma devono essere portati in un punto di raccolta per il
riciclaggio di dispositivi elettrici ed elettronici
Machine Translated by Google

Machine Translated by Google

Machine Translated by Google

Machine Translated by Google

Machine Translated by Google

Machine Translated by Google

Machine Translated by Google

Machine Translated by Google

Machine Translated by Google

3.Ajustelatemperaturadeseada:Pulselatecla"set"yelvalorazulparpadearáenlapantalla.
Utilicelasteclasarribayabajoparaajustarlatemperaturadeseaday,acontinuación,pulsela
tecla"set"paraguardarlaconfiguraciónysalirdelmododeajustedetemperatura.
Paso6:
1.Conecteelcabledetierraalenchufedealimentación(debeestarcorrectamente
conectadoatierra).2.Conecteelcabledealimentaciónalatomade
corrientesituadadetrásdelgabinete.Enciendaelequipoypresioneelinterruptorrojoenla
partefrontaldelgabinete.Esteseenergizaylapantallaseilumina,comosemuestraenla
Figura(8).
.
5
Machine Translated by Google

5.IndicaciónCelsius/GradosFahrenheit.Mantengapresionadalatecladeaumentohaciaarriba
durante3segundosparacambiarlosgradosCelsius/Fahrenheitdelapantalla.6.
TeclaSET:
Función:hagaclicenestatecla,lafilasuperiormostraráSV,lafilainferiorparpadeará,presionela
teclasuperioroinferiorparaconfigurarlatemperaturayluegohagaclicenlateclainferiorpara
configurarlaporcompleto.
FunciónII:Mantengapresionadoestebotóndurante3segundosparaingresaralosparámetros
internos.
7.TeclaRestar:Presioneestateclaparadisminuirelvalor.
3.Horadecronometraje.Coneldispositivoencendido,pulselateclaSETdurante3segundospara
visualizarP00;elvalorSETcambiaráa8.Acontinuación,pulselateclaSETparaaccederala
configuracióndelosparámetrosinternos.PulselateclaSETcontinuamenteparaencontrarelajuste
decuentaregresivaP07y,acontinuación,pulselasteclasarribayabajoparaconfigurareltiempode
cuentaregresiva.Finalmente,pulselateclaSETparaguardarloscambiosy,acontinuación,pulsela
teclaSETdurante3segundosparaguardarysalirdelaconfiguracióninterna.
4.Luzindicadoradecalentamiento,calentamientocuandoestáencendido.
1.Mostrarelvalormedido.2.Mostrar
elvalorestablecido.
Paso7:AjustedetemperaturaDescripcióndelafuncióndelpaneldeoperacióndeltermostato
9.BotónINFO:
Función:Mantengapresionadoestebotóndurante3segundosparaapagaroencender.
8.Botóndeañadir:
.Pulseestebotónparaaumentarelvalordurantelaconfiguración..
Mantengapulsadalatecladeaumentohaciaarribadurante3segundosparacambiarlavisualización
entregradosCelsiusyFahrenheit.
Función:Cuandoestéenunparámetrointerno,hagaclicenestateclapararebobinarelparámetro
anterior
6
Machine Translated by Google

7
Colocar
corrección
Parámetro
P01
afectarlatemperatura.
traspuesta
yP07)aparecenysi
Parámetro
aparece.110:Fábrica
correccióncuandohay
códigodeparámetro
Valor
Seutilizapara
Desbloqueólosiguiente
códigos(P01,P04,P06,
8110
posicióndelsensor
°C°F
8:Cuandoel
P00
010
20~20
Descripción
cabellos
0:centígrados1:grado
Devolver
P04
Fahrenheit
reiniciar
Nombre
Estevaloresdiferente
temperatura
Temperatura
0
uotrosfactoresque
novaloroningúnotro
2
°C°F
1
Inicial
parámetro
0
elpermisoes
Modificarsegúnseanecesario
esunproblemaconel
P06
Machine Translated by Google

8
P07 0
ELIMINACIÓNCORRECTA
EsteproductoestásujetoalaDirectivaEuropea2012/19/CE.Elsímbolode
uncontenedordebasuratachadoindicaqueelproductorequiere
recogidaselectivaderesiduosenlaUniónEuropea.Estoaplicaalproducto
yatodoslosaccesoriosmarcadosconestesímbolo.Losproductosmarcados
conestesímbolonopuedendesecharseconlabasuradomésticanormal,sino
quedebenllevarseaunpuntoderecogidaparaelreciclajedeaparatoseléctricos
yelectrónicos.
Nota:Esteproductotienelafuncióndeconservacióndelcalordelosalimentosysecadoa
temperaturaconstante,conunatemperaturamáximadeajustede177°Fy80°C.El
voltajedeaccesodebeserde120V+10%ylapotenciadeldispositivoesde850W.
minutos
0~999unidades
Mantenerse
abrigadoen
cualquiermomento
Machine Translated by Google

Machine Translated by Google

Machine Translated by Google

Machine Translated by Google

Machine Translated by Google

Machine Translated by Google

Machine Translated by Google

Machine Translated by Google

Machine Translated by Google
3. Ustaw żądaną temperaturę: Kliknij przycisk „set”, a niebieska wartość ustawienia na ekranie
zacznie migać. Użyj przycisków w górę i w dół, aby ustawić wymaganą wartość temperatury, a
następnie kliknij przycisk „set”, aby zapisać ustawienie i wyjść z trybu ustawiania temperatury.
Krok 6: 1.
W miejscu wtyczki zasilania podłącz przewód uziemiający (przewód uziemiający musi
być skutecznie uziemiony). 2. Podłącz przewód zasilający do gniazdka
zasilania z tyłu szafy. Włącz zasilanie, naciśnij czerwony przełącznik z przodu szafy, szafa zostanie
podłączona, a ekran wyświetlacza zostanie podświetlony, jak pokazano na rysunku (8).
.
- 5 -
Machine Translated by Google

5. Wskazanie stopni Celsjusza/Fahrenheita. Naciśnij i przytrzymaj przycisk zwiększania wartości w górę
przez 3 sekundy, aby przełączyć wyświetlanie stopni Celsjusza/Fahrenheita. 6.
Przycisk SET:
Funkcja I: kliknij ten przycisk, a w górnym wierszu wyświetli się SV, a dolny wiersz zacznie migać. Naciśnij
górny lub dolny przycisk, aby ustawić temperaturę. Następnie kliknij dolny przycisk, aby zakończyć
ustawianie.
Funkcja II: Naciśnij i przytrzymaj ten przycisk przez 3 sekundy, aby wejść do parametrów wewnętrznych.
7. Klawisz odejmowania: Naciśnij ten klawisz, aby zmniejszyć wartość.
9. Przycisk INFO:
Funkcja I: Naciśnij i przytrzymaj ten przycisk przez 3 sekundy, aby wyłączyć lub włączyć urządzenie.
1. Wyświetl zmierzoną wartość. 2.
Wyświetl ustawioną wartość.
4. Kontrolka ogrzewania, ogrzewanie, gdy jest włączone.
3. Czas pomiaru czasu. Gdy zasilanie jest włączone, naciśnij przycisk SET przez 3 sekundy, aby wyświetlić
P00, a wartość SET zostanie zmieniona na 8. Następnie naciśnij przycisk SET, aby wprowadzić ustawienia
parametrów wewnętrznych. Naciśnij przycisk SET w sposób ciągły, aby znaleźć ustawienie odliczania
P07, a następnie naciśnij przyciski w górę i w dół, aby ustawić czas odliczania. Na koniec naciśnij przycisk
SET, aby zapisać, a następnie naciśnij przycisk SET przez 3 sekundy, aby zapisać i wyjść z ustawień
wewnętrznych.
Krok 7: Ustawienie temperatury Opis funkcji panelu operacyjnego termostatu
Funkcja II: Gdy znajdujesz się w parametrze wewnętrznym, kliknij ten klawisz, aby cofnąć poprzedni
parametr
8. Przycisk Add:
. Naciśnij ten przycisk, aby zwiększyć wartość podczas ustawiania. .
Naciśnij i przytrzymaj przycisk zwiększania w górę przez 3 sekundy, aby przełączyć wyświetlanie stopni
Celsjusza/Fahrenheita.
- 6 -
Machine Translated by Google
- 7 -
Temperatura
0
Jest używany do
odblokowano następujące
Wartość
kody (P01, P04, P06,
kod parametru
8110
położenie czujnika
-20~20
8: Kiedy
P00
0-10
℃ °F
Fahrenheit
℃ °F
korekta
P01
Parametr
Ustawić
przełączanie
i P07)pojawiają się i jeśli
Parametr
pojawia się.110:Fabryka
korekta, gdy jest
wpływać na temperaturę.
Wstępny
parametr
lub inne czynniki, które
nie cenię niczego innego
2
1
P06
0
pozwolenie jest
Modyfikuj według potrzeb
jest problem z
0:Celsjusza 1:stopień
Powrót
Opis
zamki
P04
temperatura
nastawić
Nazwa
ta wartość jest inna
Machine Translated by Google

P07 0
PRAWIDŁOWA UTYLIZACJA
Ten produkt podlega postanowieniom Dyrektywy Europejskiej 2012/19/WE.
Symbol przedstawiający przekreślony kosz na śmieci na kółkach oznacza,
że produkt wymaga oddzielnej zbiórki odpadów w Unii Europejskiej. Dotyczy
to produktu i wszystkich akcesoriów oznaczonych tym symbolem. Produktów
oznaczonych w ten sposób nie można wyrzucać razem ze zwykłymi odpadami
domowymi, ale należy je oddać do punktu zbiórki w celu recyklingu urządzeń
elektrycznych i elektronicznych.
Uwaga: Produkt ten ma funkcję konserwacji żywności w cieple i suszenia w stałej temperaturze,
przy maksymalnym ustawieniu temperatury 177'F i 80'C. Wymagane napięcie sieciowe
wynosi 120 V + 10%, a moc urządzenia wynosi 850 W.
protokół
0~999 jednostek
Utrzymuj ciepło
w odpowiednim
czasie
- 8 -
Machine Translated by Google

Machine Translated by Google

Machine Translated by Google

Machine Translated by Google

Machine Translated by Google
Machine Translated by Google

Machine Translated by Google
Machine Translated by Google
Machine Translated by Google

3. Stel de gewenste temperatuur in: Klik op de "set"-toets en de blauwe ingestelde waarde op het
scherm zal knipperen. Gebruik de omhoog- en omlaagtoetsen om het aan te passen naar de
gewenste temperatuurwaarde en klik vervolgens op de "set"-toets om de instelling op te slaan en
de temperatuurinstellingsmodus te verlaten.
Stap 6:
1. Sluit op de positie van de stekker de aardingsdraad aan (de verbindingsaardingsdraad
moet effectief geaard zijn). 2. Steek het netsnoer in het stopcontact
achter de kast. Schakel het in, druk op de rode schakelaar aan de voorkant van de kast, de kast
is onder spanning, het display is verlicht Zoals weergegeven in Figuur (8)
.
- 5 -
Machine Translated by Google

5. Celsius/Graden Fahrenheit-indicatie. Houd de omhoog-toets 3 seconden ingedrukt om de weergave in graden
Celsius/Fahrenheit te wijzigen. 6. SET-toets: Functie ÿ: klik op deze toets, de bovenste rij
geeft SV weer,
de onderste rij knippert, druk op de bovenste of onderste toets om de temperatuur in te stellen en klik vervolgens
op de onderste toets om de instelling te voltooien.
Functieÿ: Houd deze knop 3 seconden ingedrukt om de interne parameters te openen.
7. Aftrektoets: Druk op deze toets om de waarde te verlagen.
9.INFO-knop: Functie
ÿ: Houd deze knop 3 seconden ingedrukt om het apparaat uit of in te schakelen.
3. Tijdwaarnemingstijd. Wanneer de stroom is ingeschakeld, drukt u 3 seconden op de SET-toets om P00 weer
te geven en de SET-waarde wordt gewijzigd naar 8. Druk vervolgens op de SET-toets om de interne
parameterinstellingen te openen. Druk continu op de SET-toets om de P07-aftelinstelling te vinden en druk
vervolgens op de omhoog- en omlaagtoetsen om de afteltijd IN te stellen. Druk ten slotte op de SET-toets om op
te slaan en druk 3 seconden op de SET-toets om op te slaan en de interne instellingen te verlaten.
4. Verwarmingsindicatielampje, verwarming wanneer deze aan staat.
1. Weergave van de gemeten waarde. 2.
Weergave van de ingestelde waarde.
Stap 7: Temperatuurinstelling Beschrijving van de functie van het bedieningspaneel van de thermostaat
Functie ÿ: Wanneer u zich in een interne parameter bevindt, klikt u op deze toets om de vorige parameter terug
te draaien
8. Knop Toevoegen:
ÿ. Druk op deze knop om de waarde te verhogen tijdens het instellen. ÿ. Houd
de omhoog-toenametoets 3 seconden ingedrukt om de weergave in graden Celsius/Fahrenheit te wisselen.
- 6 -
Machine Translated by Google

- 7 -
Temperatuur
0
Het wordt gebruikt voor
het volgende ontgrendeld
Waarde
code(P01,P04, P06,
parametercode
8ÿ110
positie van de sensor
-20~20
8:Wanneer de
P00
0-10
°C °F
graden Celsius
°C °F
correctie
P01
Parameter
Set
schakelen
en P07) verschijnen en als
Parameter
verschijnt.110:Fabriek
correctie wanneer er
de temperatuur beïnvloeden.
Voorletter
parameter
of andere factoren die
waardeer geen andere
2
1
P06
0
toestemming is
Indien nodig aanpassen
is een probleem met de
0:Celsius 1:Graad
Opbrengst
Beschrijving
sloten
P04
temperatuur
opnieuw instellen
Naam
deze waarde is anders
Machine Translated by Google
P07 0
CORRECTE VERWIJDERING
0~999 eenheden
notulen
Let op: Dit product heeft de functie om voedsel op warmte te houden en bij een constante
temperatuur te drogen, met een maximale insteltemperatuur van 177°F en 80°C. De
toegangsspanning moet 120V+10% zijn en het apparaatvermogen is 850W.
Blijf warm op
onze kwartijd
Dit product is onderworpen aan de bepalingen van de Europese richtlijn 2012/19/
EG. Het symbool met een doorgestreepte afvalbak geeft aan dat het
product in de Europese Unie gescheiden afvalinzameling vereist. Dit geldt
voor het product en alle accessoires die met dit symbool zijn gemarkeerd.
Producten die als zodanig zijn gemarkeerd, mogen niet met het normale
huishoudelijke afval worden weggegooid, maar moeten worden ingeleverd bij een
inzamelpunt voor recycling van elektrische en elektronische apparaten.
- 8 -
Machine Translated by Google

Machine Translated by Google

Machine Translated by Google

Machine Translated by Google

Machine Translated by Google

Machine Translated by Google

Machine Translated by Google

Machine Translated by Google

Machine Translated by Google

.
Steg 6:
1. Anslut jordkabeln vid strömkontaktens position (anslutningens jordkabel måste vara
effektivt jordad). 2 . Anslut nätsladden till eluttaget bakom skåpet. Sätt
på, tryck på den röda strömbrytaren på framsidan av skåpet, skåpet är strömsatt, displayen lyser
Som visas i figur(8)
3. Ställ in önskad temperatur: Klicka på "set"-tangenten och det blå inställda värdet på skärmen
blinkar. Använd upp- och nedknapparna för att justera det till önskat temperaturvärde och klicka
sedan på "set"-tangenten för att spara inställningen och avsluta temperaturinställningsläget.
- 5 -
Machine Translated by Google
- 6 -
5. Celsius / Grad Fahrenheit indikation.Tryck och håll nere ökningsknappen i 3 sekunder för att växla
visningsgrader Celsius/Fahrenheit 6.SET-tangent: Funktionÿ: klicka på denna
tangent, den
övre raden visar SV, den nedre raden blinkar, tryck på den övre eller nedre knappen för att ställa in
temperaturen.och klicka sedan på den nedre knappen för att ställa in.
Funktionÿ: Tryck och håll ned denna knapp i 3 sekunder för att ange de interna parametrarna.
7. Subtrahera tangent: Tryck på denna tangent för att minska värdet.
8. Lägg till-knapp:
ÿ. Tryck på denna knapp för att öka värdet vid inställning. ÿ. Tryck på
och håll ned upp-ökningsknappen i 3 sekunder för att växla visningsgrader Celsius/Fahrenheit.
3.Tidvisningstid. När strömmen är på, tryck på SET-tangenten i 3 sekunder för att visa P00, och SET-
värdet ändras till 8. Tryck sedan på SET-tangenten för att gå in i de interna parameterinställningarna.
Tryck på SET-tangenten kontinuerligt för att hitta P07-nedräkningsinställningen, tryck sedan på upp-
och nerknapparna för att ställa in nedräkningstiden. Tryck slutligen på SET-tangenten för att spara
och tryck på SET-tangenten i 3 sekunder för att spara och avsluta de interna inställningarna.
4.Värmeindikatorlampa, värme när den är på.
1.Visa det uppmätta värdet 2. Visa det
inställda värdet.
Steg 7: Temperaturinställning Beskrivning av termostatens funktionspanel
9.INFO-knapp:
Funktion ÿ: Tryck och håll ned denna knapp i 3 sekunder för att stänga av eller slå på.
Funktion ÿ: När du är i en intern parameter, klicka på denna tangent för att spola tillbaka föregående
parameter
Machine Translated by Google

- 7 -
0
tillstånd är
Ändra efter behov
är ett problem med
P06
Första
parameter
eller andra faktorer som
värde inget annat
2
1
temperatur
0
återställa
Namn
detta värde är ett annat
Temperatur
ÿ °F
Beskrivning
lås
0:celsius 1:grad
Återvända
8: När
P00
0-10
P04
-20~20
Fahrenheit
Den används för
låste upp följande
8, 110
sensorns läge
ÿ °F
Värde
koder(P01,P04, P06,
parameterkod
och P07) visas och om
Parameter
visas.110:Fabrik
korrigering när det finns
påverka temperaturen.
Uppsättning
korrektion
Parameter
P01
växlande
Machine Translated by Google

- 8 -
P07 0
KORREKT AVFALLSHANTERING
Obs: Denna produkt har funktionen att bevara matens värme och torka konstant temperatur, med en maximal
inställningstemperatur på 177'F och 80'C. Åtkomstspänningen måste vara 120V+10% och enhetens effekt
är 850W.
minuter
0~999 enheter
Håll dig varm
vid qular tid
Denna produkt omfattas av bestämmelserna i det europeiska direktivet 2012/19/
EC. Symbolen som visar en soptunna korsad anger att produkten kräver
separat sophämtning i EU. Detta gäller för produkten och alla tillbehör märkta
med denna symbol. Produkter märkta som sådana får inte slängas tillsammans
med vanligt hushållsavfall, utan måste lämnas till en insamlingsplats för återvinning
av elektriska och elektroniska apparater
Machine Translated by Google

Machine Translated by Google

Machine Translated by Google