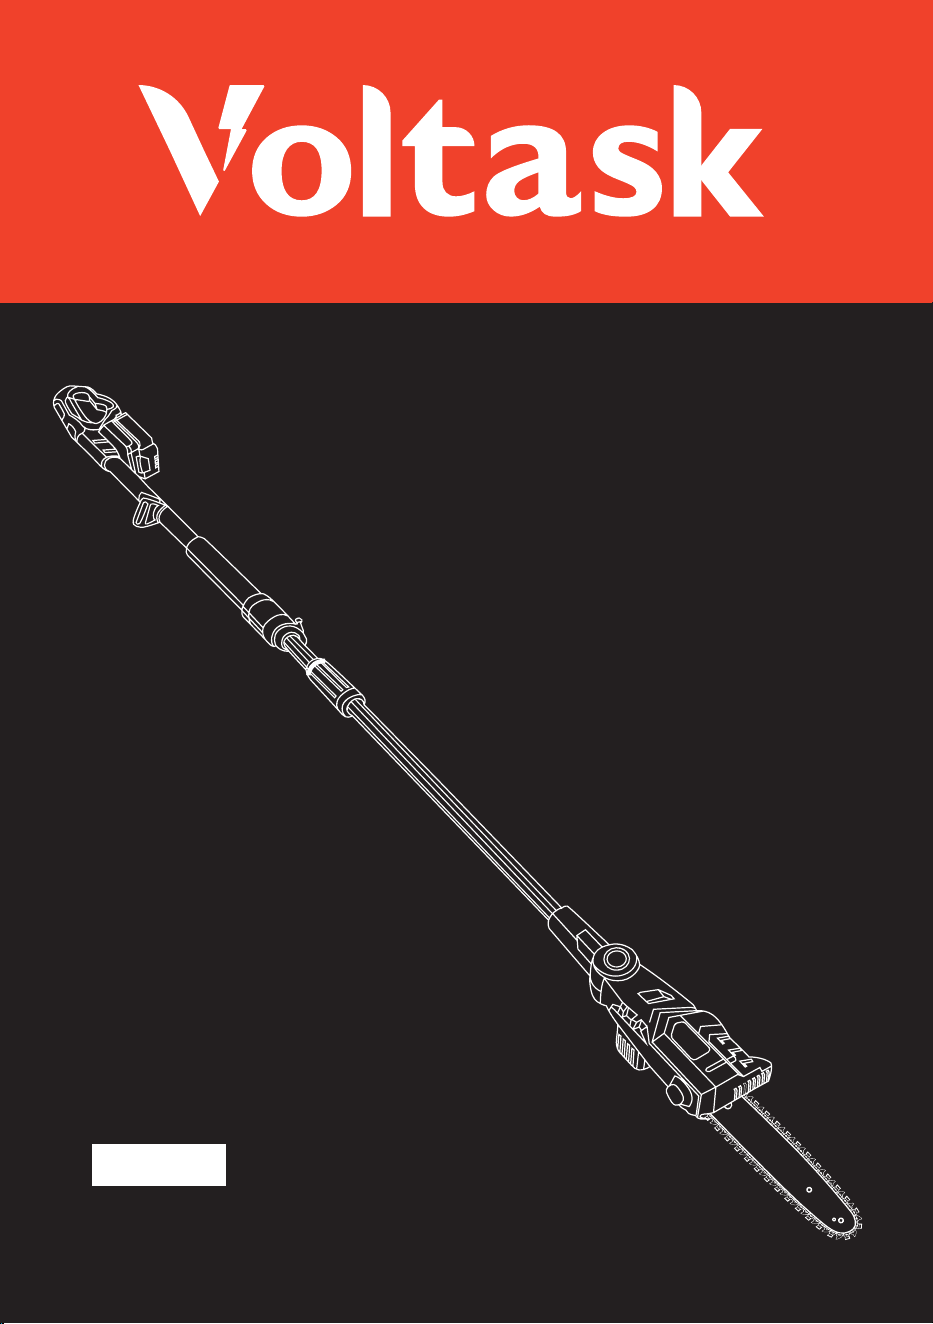
20V Pole Saw
PS-20A

Thank you for purchasing our Voltask 20 V Pole Saw. This Pole saw has been engineered and
manufactured to meet Voltask's high standards in product reliability, ease of use and safety.
When properly used, it will give you years of powerful trouble-free performance.
To reduce risk of injury, the user should read and understand this user
manual before using this product.
Save this user manual for future reference.
If you sell or pass this device on, you must also hand over these
operating instructions.
WARNING
Webside: www.voltask.com Email: [email protected]
FB: @voltasktools IG: @voltasktools

CONTENTS
INTRODUCTION 01
01
02
03
06
07
08
09
09
10
11
16
17
18
21
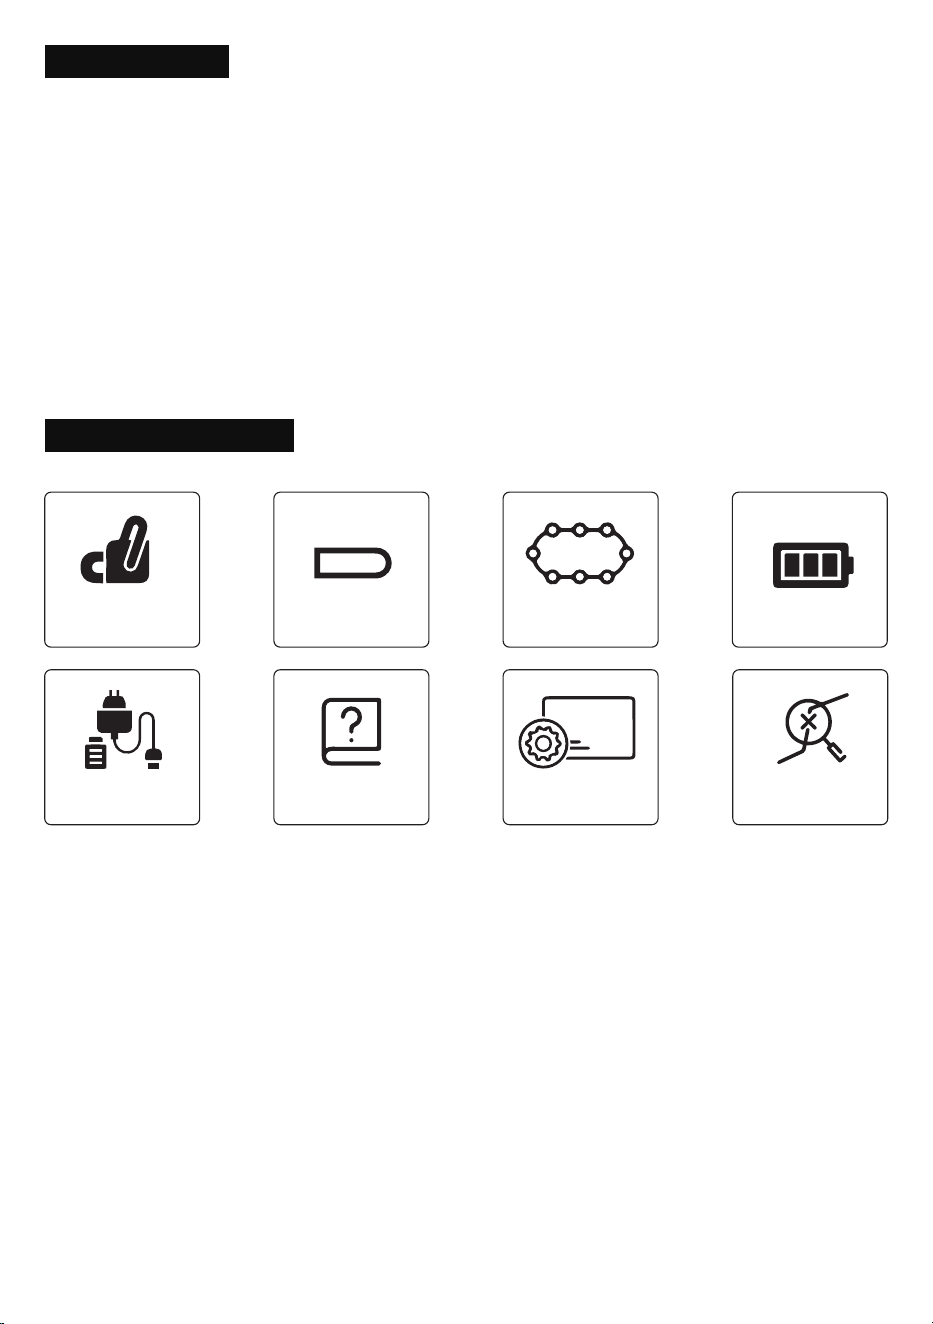
SYMBOLS
GENERAL SAFETY INSTRUCTIONS
PACKAGE CONTENTS
PRODUCT OVERVIEW
TECHNICAL SPECIFICATIONS
CHARGER INDICATORS
IMPORTANT CHARGING NOTES
POLE SAW TRIMMING PRECAUTIONS
POLE SAW ASSEMBLY
CARE AND MAINTENANCE
Filing Cutter Depth Gauges
SHARPENING SAW CHAIN
RECHARGEABLE BATTERY
TROUBLESHOOTING
22
WARRANTY
-This device should only be used with the approved original chain for cutting wood.
-Do not use this power tool at temperatures below 14 F(-10"C).
-This power tool may only be used with the accessory parts listed under accessories.
-This product is not intended for commercial use, Generally acknowledged accident prevention
regulations and endorsed safety instructions must be observed.
-Only perform work described in these instructions for use. Any other use is improper.
-The manufacturer will not assume responsibility for damage resulting from such use.
INTRODUCTION
PACKAGE CONTENTS
INTRODUCTION-PACKAGE CONTENTS 01
Main Unit × 1 Guide Bar × 1 Saw Chain × 1 Battery Pack × 1
Battery Charger
× 1
User Manual × 1 Warranty card
× 1
Troubleshooting
× 1
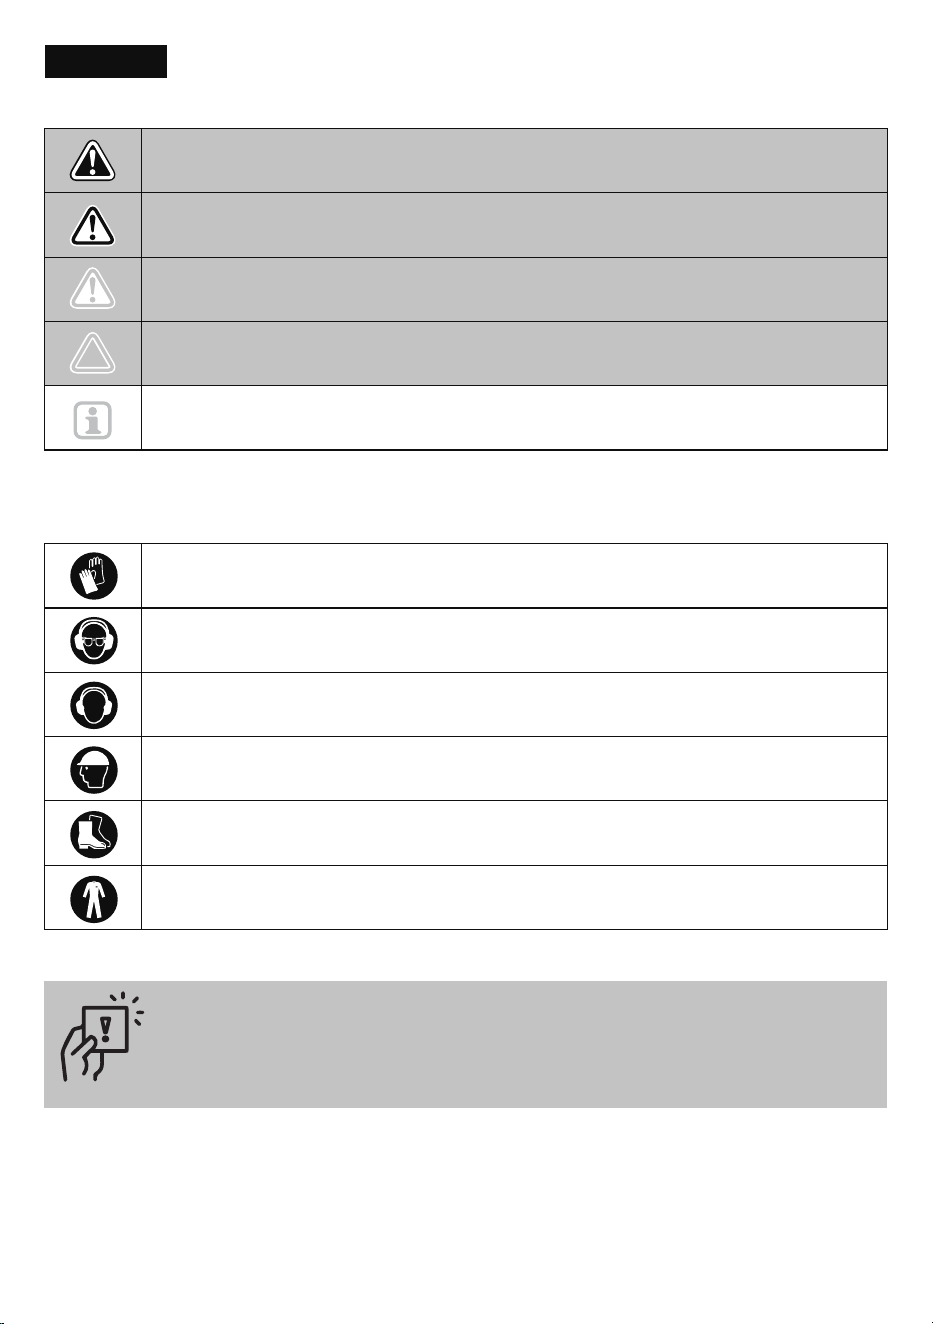
-These symbols identify the required personal protective equipment:
Avoid clothing that could get caught on something:
-Wear only close-fitting clothing
-Do not wear jewelry
-If you have long hair, wear a hair net
SYMBOLS
SYMBOLS 02
DANGER! Direct danger to life and risk of injury! Directly dangerous situation that
may lead to death or severe injuries.
Hand protection: protective chainsaw gloves
Eye protection: wrap-around goggles/protective visor on the helmet
Ear protection: earplugs/earmuffs
Head protection: safety helmet with visor
Foot protection: safety shoes with gripping soles, steel caps, and leg protection
Clothing: Wear dose-fitting work clothes
CAUTIONI Possible risk of injury!
Dangerous situation that may lead to injuries.
NOTICE! Risk of damage to the device! Situation that may lead to property damage.
Note: Information to help you reach a better understanding of the processes involved.
WARNING! Probable danger to life and risk of injury! Generally dangerous
situation that may lead to death or severe injuries.

GENERAL SAFETY INSTRUCTIONS 03
GENERAL SAFETY INSTRUCTIONS
To safely operate this device, the user must have read and understood these instructions for use
before using the device for the first time.If you sell or pass this device on, you must also hand over
these operating instructions.
● Save all warnings and instructions for future reference. The term power tool in the warnings refers to your
mains operated (corded) power tool or battery operated (cordless) power tool.
● Keep work area clean and well lit. Cluttered and dark areas may cause accidents.
● Do not operate power tools in explosive atmospheres, such as in the presence of flammable liquids, gases,
or dust. Power tools create sparks which may ignite the dust or fumes.
● Keep children and bystanders away while operating a power tool. Distractions can cause you to lose control.
● Stay alert, watch what you are doing, and use common sense when operating a power tool. Do not use a
power tool when you are tired or under the influence of drugs, alcohol or medication. A moment of inattention
while operating power tools may result in serious personal injury.
● Use personal protective equipment. Always wear eye protection devices. Protective equipment such as
dust masks, non-skid safety shoes, hard hats, or hearing protection used for appropriate conditions will
reduce personal injuries.
● Prevent unintentional startup. Ensure the switch is in the "off" position before connecting to a power source
and/or battery pack, picking up, or carrying this tool. Carrying power tools with your finger on the switch or
energizing power tools that have the switch on may cause accidents.
● Remove any adjusting key or wrench before turning the power tool on. A wrench or a key left attached to
a rotating part of the power tool may result in personal injury.
● Do not overreach. Keep proper footing and balance at all times. This enables better control of the power tool
in unexpected situations.
● Dress properly. Do not wear loose clothing or jewelry. Keep your hair, clothing, and gloves away from moving
parts. Loose clothes, jewelry or long hair can be caught in moving parts.
● If devices are provided for the connection of dust extraction and collection facilities, ensure these are
connected and properly used. Use of these devices can reduce dust-related hazards.
● Do not force the power tool. Use the correct power tool for your application. The correct power tool will do
the job better and safer at the rate for which it was designed.
● Do not use the power tool if the switch does not turn it on and off. Any power tool that cannot be controlled
with the switch is dangerous and must be repaired.
● Disconnect the plug from the power source and/or the battery pack from the power tool before making any
adjustments, changing accessories, or storing power tools, Such preventive safety measures reduce the risk
of starting the power tool accidentally.
WARNING! Read all safety warnings and instructions. Failure to follow these warnings and instructions
may result in electric shock, fire, and/or serious injury.
General Power Tool Safety Warnings
Work Area Safety
Personal Safety
Power Tool use and Care
GENERAL SAFETY INSTRUCTIONS 04
● Store idle power tools out of reach from children and do not allow persons unfamiliar with the power tool or
these instructions to operate the power tool. Power tools are dangerous in the hands of untrained users.
● Maintain power tools. Check for misalignment or binding of moving parts, broken parts, and any other
condition that may affect the power tools operation. If damaged, have the power tool repaired before use.
Many accidents are caused by poorly maintained power tool.
● Keep cutting tools sharp and clean. Properly maintained cutting tools with sharp cutting edges are less likely
to bind and are easier to control.
● Use the power tools, accessories, and tool bits etc., in accordance with these instructions, takeing into
account the working conditions and the work to be performed. Use of the power tool for operations different
from those intended could result in a hazardous situation.
● Recharge only with the charger specified by the manufacturer. A charger that is suitable for one type of
battery pack may create a risk of fire when used with another battery pack.
● Use power tools only with specifically designated battery packs. Use of any other battery packs may create
a risk of injury and fire.
● When battery pack is not in use, keep it away from other metal objects, like paper clips, coins, keys, nails,
screws or other small metal objects, that can make a connection from one terminal to another. Shorting the
battery terminals together may cause burns or a fire.
● Under abusive conditions, liquid may be ejected from the battery; avoid contact. If contact accidentally
occurs, flush with water. If liquid contacts eyes, additionally seek medical help. Liquid ejected from the
battery may cause irritation or burns.
Have your power tool serviced by a qualified repair person using only identical replacement parts. This will
ensure that the safety of this power tool is maintained.
Battery Tool Use and Care
Service
Additional Safety Information
Be careful when handling this device! Observe all safety instructions in the manual for use.
Read and observe operating instructions before commissioning.
Do not expose this machine to moisture.
Always maintain a sufficiently safe distance.
Beware of falling objects.
Beware of thrown objects.
Beware of hand injuries.

GENERAL SAFETY INSTRUCTIONS 05
If you notice any of the following symptoms: numbness of body parts, loss of sense of feeling, itching, pins and
needles, pain, or change in skin color, stop working and seek medical attention immediately.
The vibration values specified in the technical data represent the main uses of the device. The actual existing
vibrations during use may deviate from these as a result of the following factors:
-Incorrect use of the product.
-Unsuitable tools inserted.
-Unsuitable material.
-Insufficient maintenance.
You can reduce these risks considerably by following the tips below:
-Maintain the device in accordance with the instructions in the operating manual.
-Avoid working at low temperatures.
-When it is cold, make sure your body, your hands in particular, are kept warm.
-Take regular breaks and move your hands at the same time to promote circulation.
Risks Caused by vibration
CAUTION! Risk of injury due to vibration! Vibration may, in particular for persons with circulation problems,
cause damage to blood vessels and/or nerves.
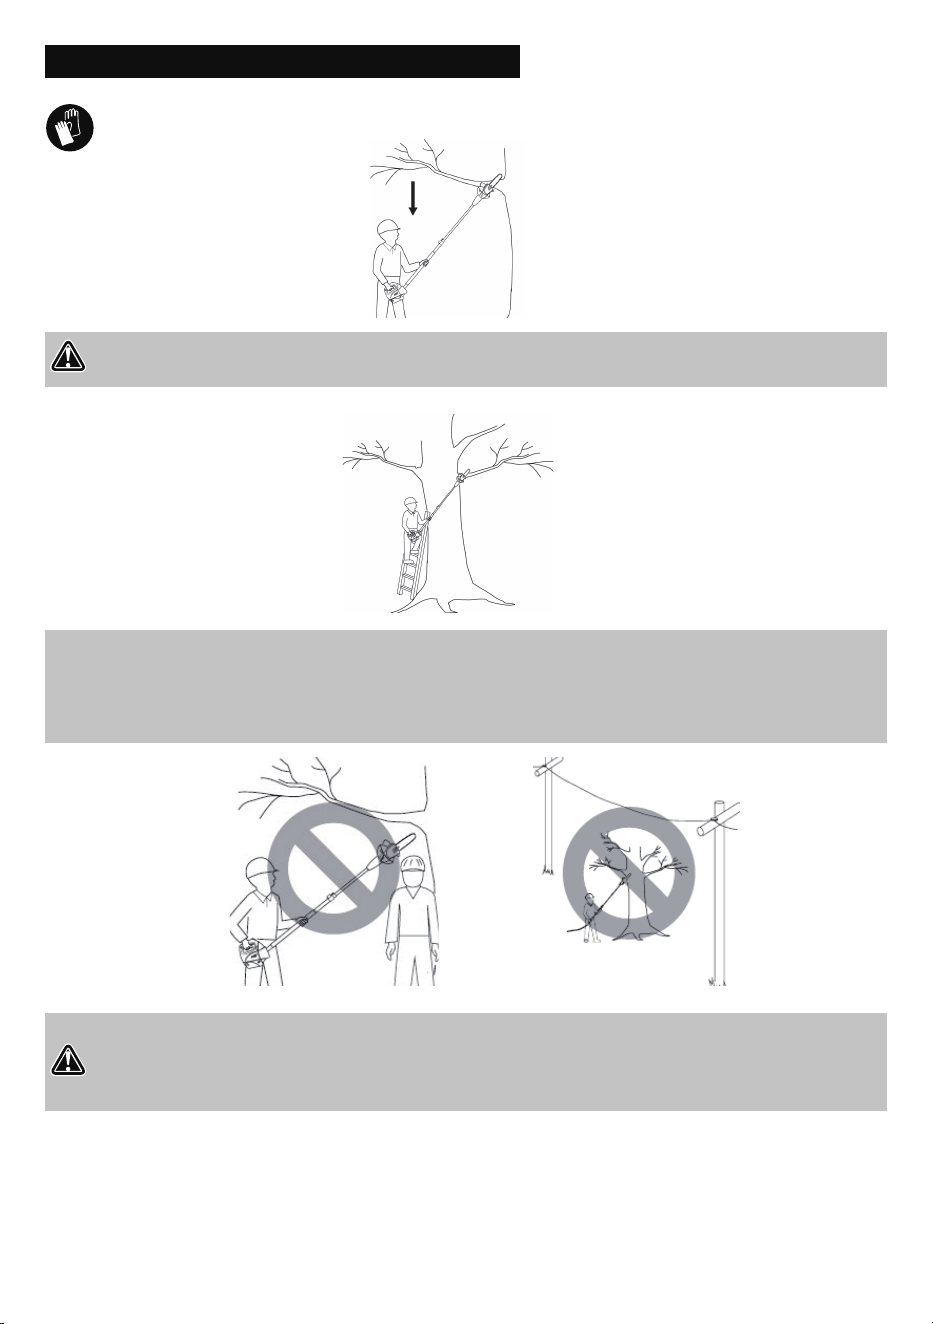
Risk of fatal electric shock. At least keep 10m from the overhead lines.
PRODUCT OVERVIEW 06
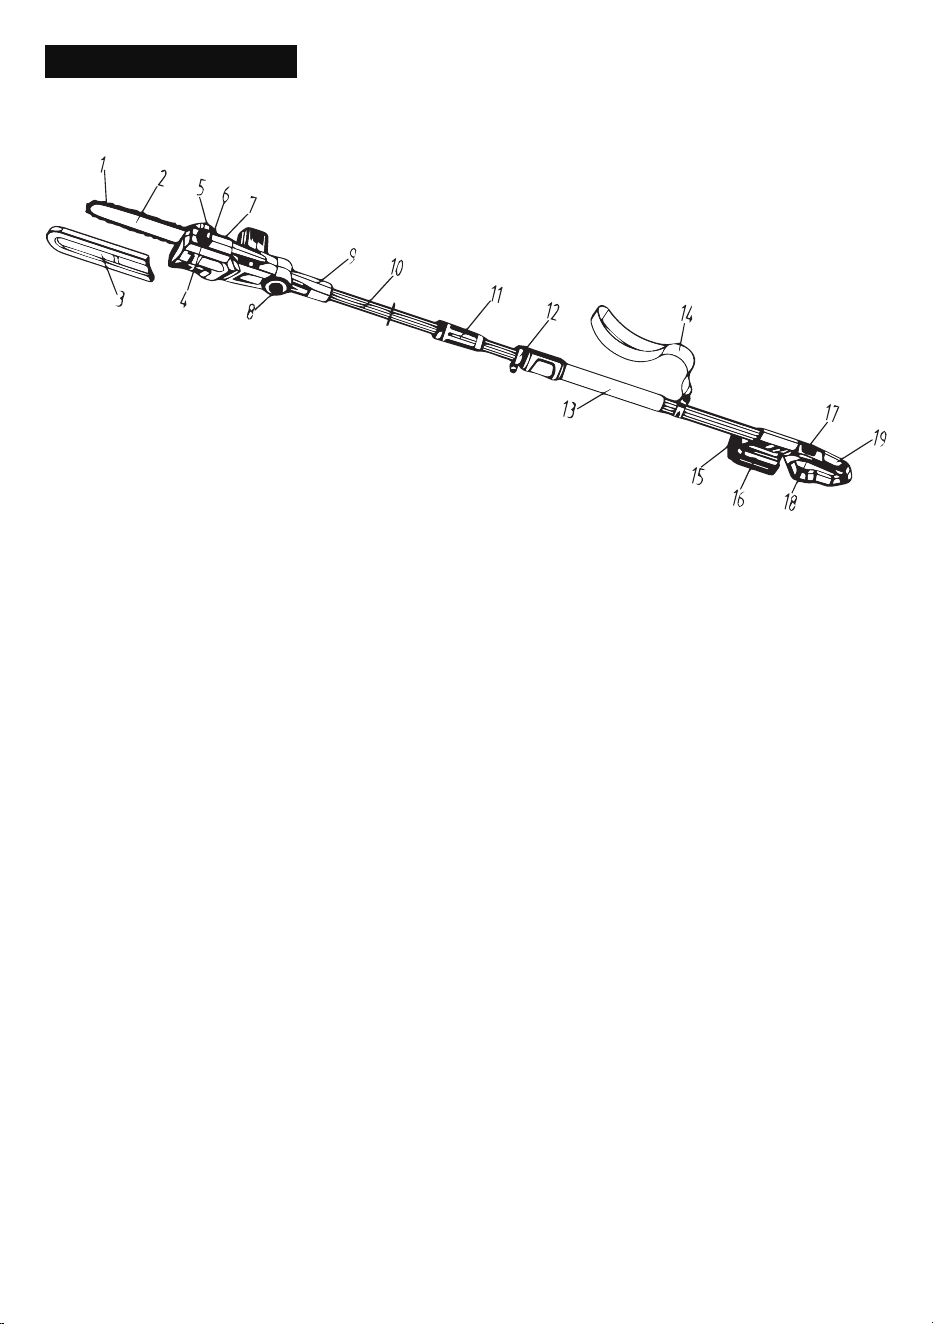
PRODUCT OVERVIEW
① Saw Chain
② Guide Bar
③ Scabbard
④ Cap
⑤ Tension Wheel
⑥ Adjusting Wheel
⑦ Sprocket Cover
⑧ Button
⑨ Connecting rod
⑩ Connecting Pipe
⑪ Locking nut
⑫ Telescopic Pipe
⑬ Grip Area
⑭ Strap
⑮ Battery Release Button
⑯ Battery Pack
⑰ Trigger Lockout
⑱ Trigger
⑲ Handle

TECHNICAL SPECIFICATIONS 07
TECHNICAL SPECIFICATIONS
Pole Saw
Idling speed
Guide bar length
Cutting speed
Oil tank capacity
Total length
Maximum cutting length
Noise pressure level
Weight (including battery and charger)
2800 r/min
8 in (203mm)
5.5 m/s
3.5 oz (100ml)
2.1-2.57m
170mm
96dB
8.82 lbs(4kg)
Battery Charger
Rated voltage
Charging voltage
Charging current
Protection class
120V, 60Hz
21V
2.2A
Battery Pack
Battery pack type
Rated voltage
Capacity
Charging time
Li-ion
2000 mAh
60 minutes
Maximum: 20V
Nominal: 18V
RECHARGEABLE BATTERY 08
RECHARGEABLE BATTERY
The battery needs to be charged before first use and whenever it fails to produce sufficient power on jobs that
were easily done before.
The battery may become warm while charging; this is normal and does not indicate a problem.
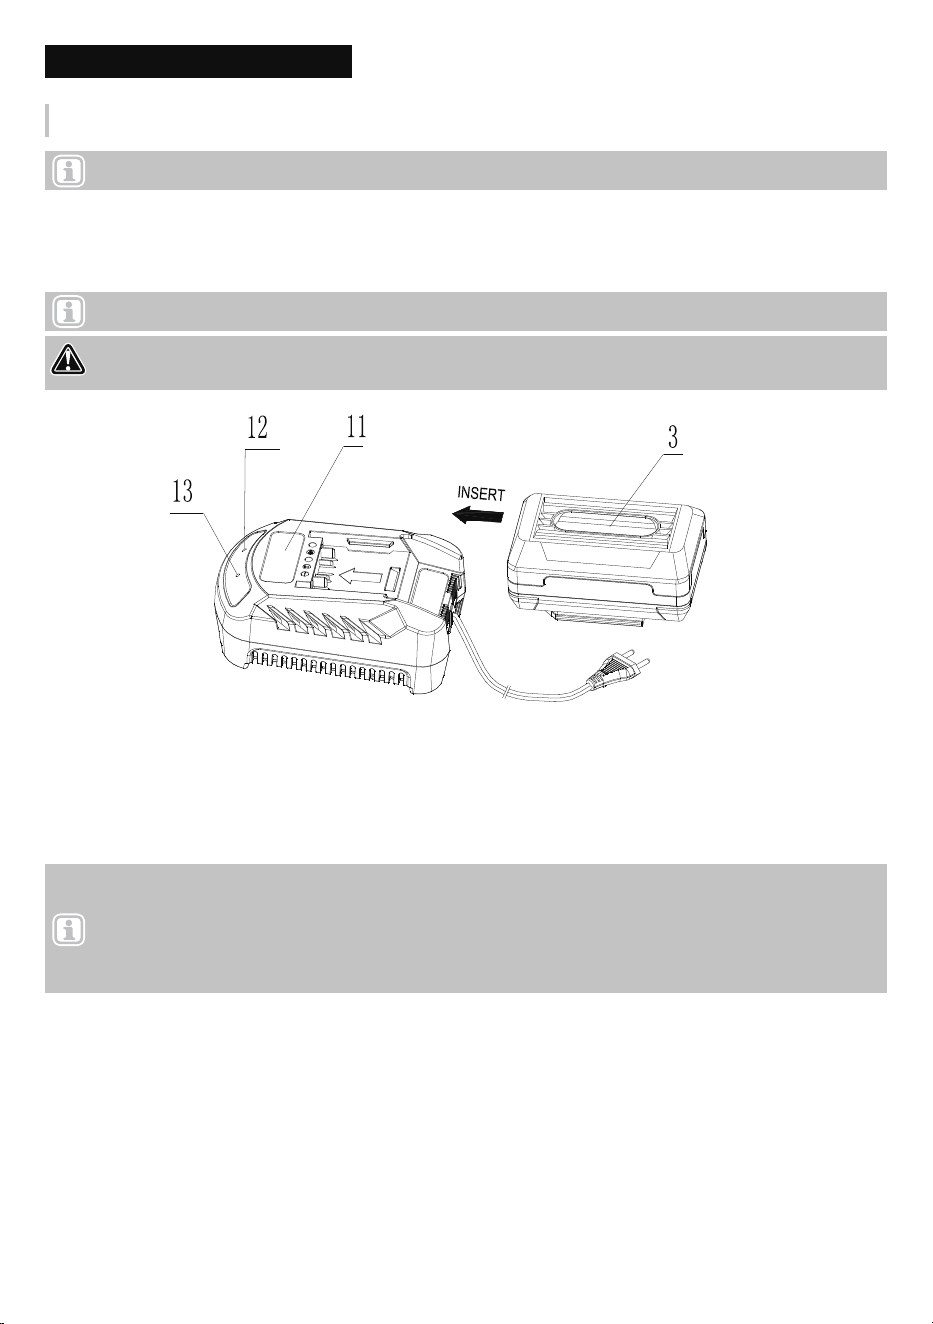
1. Plug the charger into an appropriate AC power outlet. The red indicator 13 lights on to tell you that the charger
is ready for use.
2. Insert the battery pack 3 into the charger 11, as shown in Fig.1, making sure the pack is fully seated in the
charger. The green indicator 12 flashes 1Hz to tell you that the battery pack is on charge.
Charing battery(Fig.1)
3. The battery pack will be fully charged in about 2 hours. The green indicator 12 stops flashing and keeps
green on to tell you that the battery pack is fully charged.
Fig.1
Note: Before attempting to charge the battery pack, thoroughly read all Safety Instructions.
Note: After several charge and discharge cycles, the battery will attain full capacity.
Note:
1. If the red indicator 13 flashes 1Hz means the battery is too hot and it can not be charged. It can not be
charged if charging the battery immediately after using the machine. The battery pack should be cooling for a
period of time.
2. If the red indicator 13 and the green indicator 12 flash together, that means the battery pack is faulty.
DANGER! DO NOT CHARGE THE BATTERY AT AMBIENT TEPERATURES BELOW 4ºC OR ABOVE
40ºC (BELOW 40ºF OR ABOVE 104ºF).

CHARGER INDICATORS-IMPORTANT CHARGING NOTES 09
IMPORTANT CHARGING NOTES
Red indicator
Power
ON OFF
OFF
Flashes(1Hz)OFF
OFF
Flashes(1Hz)
Flashes(1Hz)Flashes(1Hz)
ON
Charging
Fully charged
Overheat
Faulty
Green indicator
1. After normal usage, your battery pack should be fully charged in about 1 hour. Allow the battery to cool
down before charging after using the saw. (NOTE: A hot battery placed in the charger will not charge)
2. DO NOT charge the battery pack in an air temperature below 40°F (4 °C) or above 104°F (40 °C). This is
important and will prevent serious damage to the battery pack. Longest life and best performance can be
obtained if battery pack is charged when air temperature is about 75°F (24°C).
3. While charging, the charger may hum and become warm to touch. This is a normal condition and does not
indicate a problem.
4. If the battery pack does not charge properly
● Check current at receptacle by plugging in a lamp or other appliance.
● Check to see if receptacle is connected to a light switch which turns power off when you turn out the lights.
● Move charger and battery pack to a surrounding air temperature of 40°F (4°C) to 104°F (40°C)
● If the receptacle and temperature are OK, and you do not get proper charging contact (DESA Power Tools)
service center.
5. The battery pack need to be charged before first using and should be recharged when it fails to produce
sufficient power on jobs which were easily done previously. DO NOT CONTINUE using this product with its
battery pack in a depleted condition. (NOTE: After several charge and discharge cycles, the battery will
attain full capacity.)
6. To prolong battery life, avoid leaving the battery pack on charger for extended periods of time (over 30 days
without use). Although overcharging is not a safety concern, it can significantly reduce overall battery life.
7. The battery pack will reach optimum performance after being cycled 5 times during normal usage. There is
no need to run the batteries down completely before recharging. Normal usage is the best method of
discharging and recharging the batteries.
CHARGER INDICATORS
POLE SAW TRIMMING PRECAUTIONS 10
POLE SAW TRIMMING PRECAUTIONS
DANGER! Never stand directly under the limb you are trimming. Always position yourself out of the
path of falling debris.
DANGER!
● Keep other persons away from cutting end of pole saw and at a safe distance from work area.
● Do not use pole saw near cable, electric power or telephone lines. Maintain a minimum clearance of
10 feet from all power lines.
● Never stand on a ladder or other type of unstable support while using the Pole saw.
● Always use both hands to operate pole saw. Keep a firm, steady pressure on the pole saw while cutting, but
do not try to force the saw to cut through the wood.
● Do not use the pole saw to cut limbs larger in diameter than the length of the guide bar.
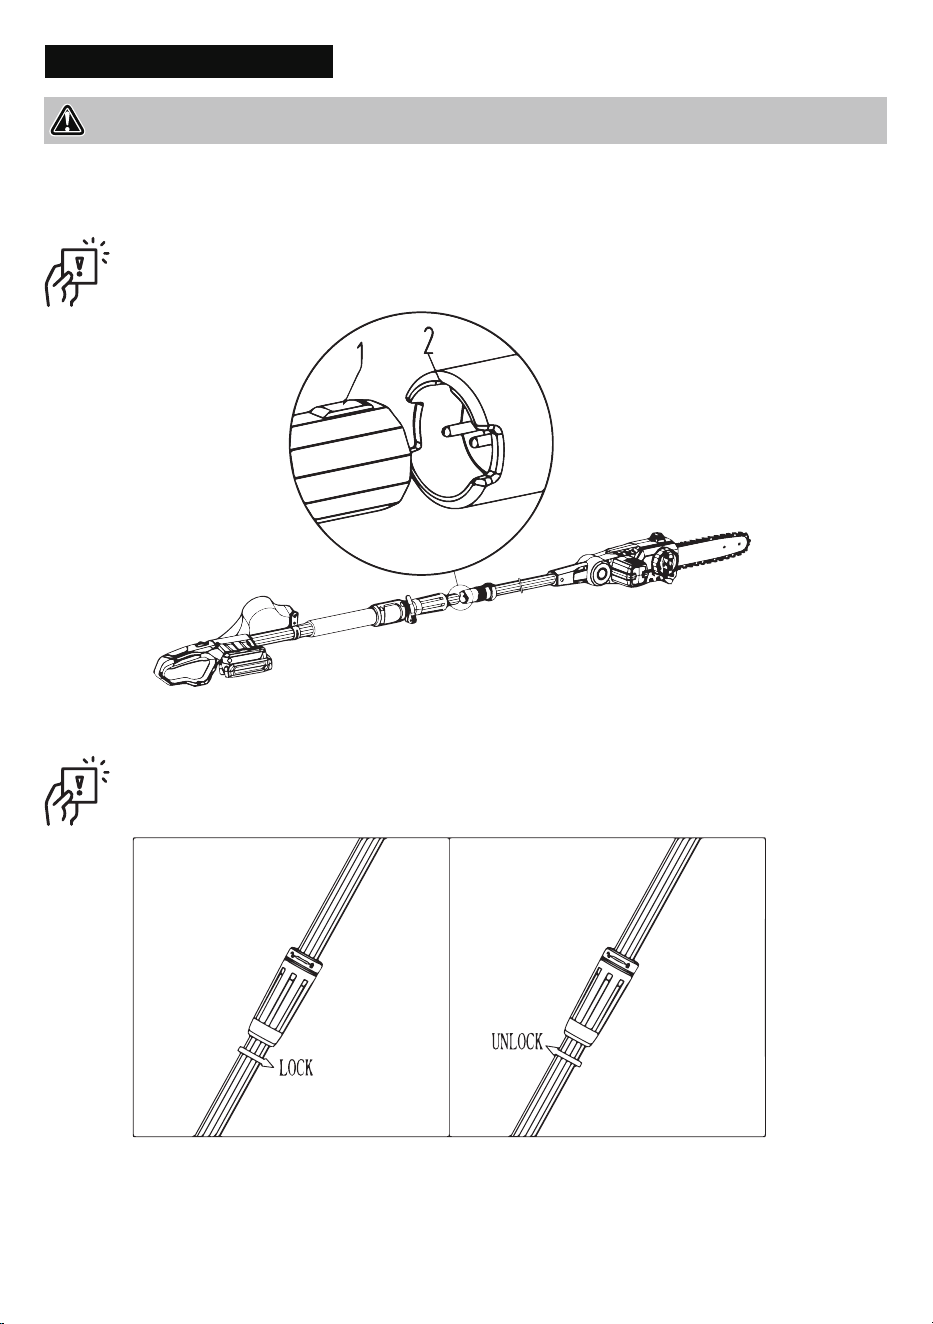
POLE SAW ASSEMBLY 11
POLE SAW ASSEMBLY
1. Remove battery from chain saw.
2. Plug the head of Former pole into the Under pole which with a handle.
(See Fig.2)
3. Lock pole joints with the locking knob.(See Fig.3)
IMPORTANT: When inserted, the convex 1 would have to target the groove 2, and must be inserted in
the end
IMPORTANT: IMPORTANT: Rotate the pole untill it cannot move anymore
Fig.2
Fig.3
WARNING: Cutting edges on chain are sharp. Use protective gloves when handling chain.
POLE SAW ASSEMBLY 12
4. To adjust the height (See Fig.4)
● Hold the tube (5)with one hand, and then loosen the trigger (3).
● Set the handle to the correct length and tighten the trigger (3).
IMPORTANT: Before locking the trigger preloaded need to tighten the nut(4)
5. Buckle the screw whit the buttons on the strap(See Fig.5)
Fig.4
Fig.5
POLE SAW ASSEMBLY 13
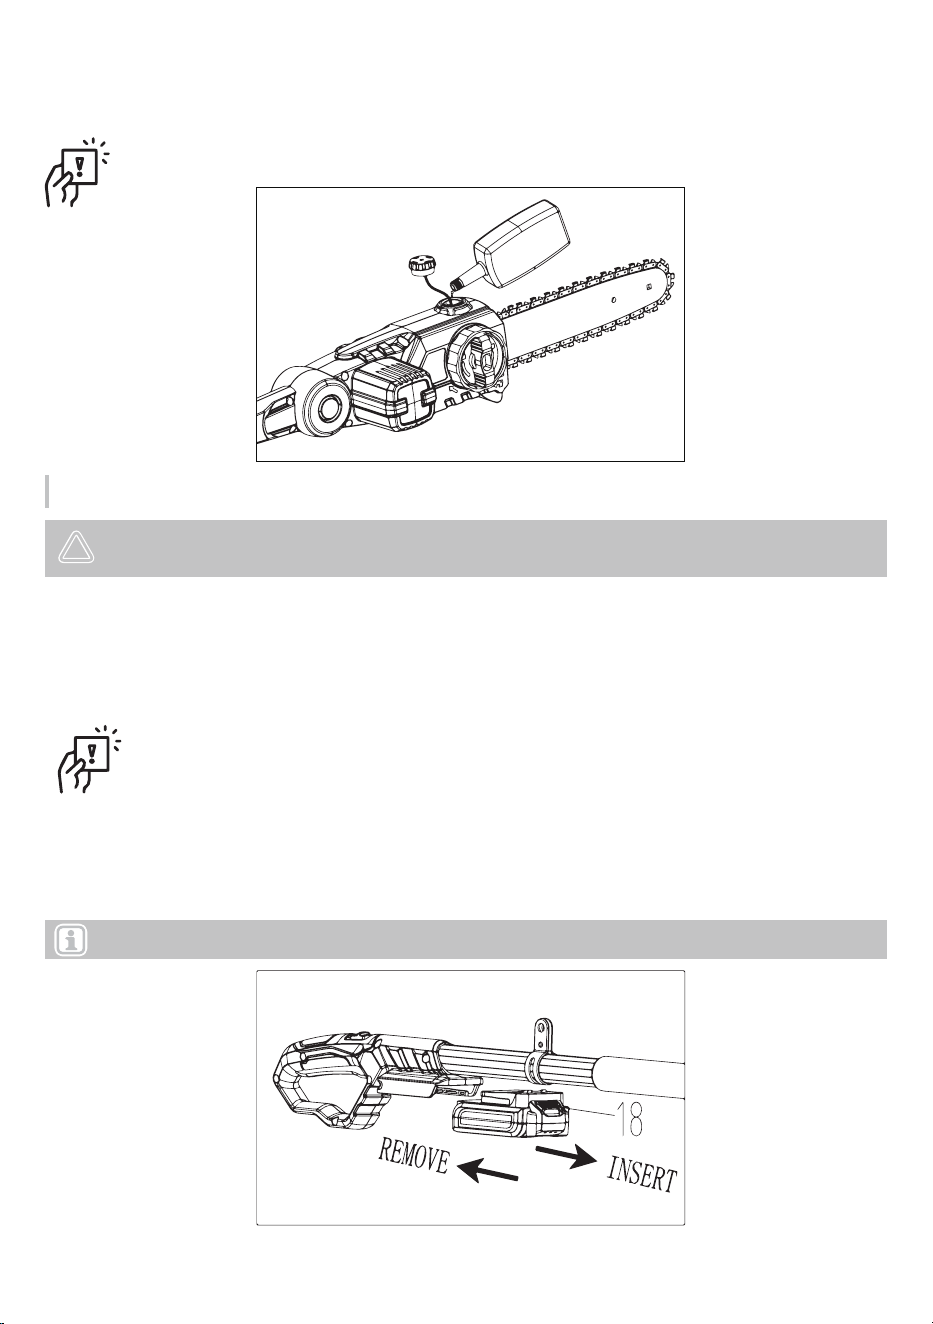
6. Use the oiler to pour oil into the pole saw's fuel tank.(See Fig.6)
7. To insert the battery pack, groove along the handle and insert in the full position, until the Battery Release
Button (18) bounce back to normal position again.
To remove the battery pack, withdraw it from the tool while pulling the Battery Release Button (18) down
(See Fig.7)
IMPORTANT: You must tighten the cap after filling up
Fig.6
Fig.7
Note: Fully charge battery before first use.
Chain oiling
NOTICE! Environmental damage! Since the saw chain oil can penetrate the environment during operation,
only biologically degradable vegetable-based saw chain oils should be used.
1. Lay the device down in a secure position with the oil tank cover upwards.
2. Before opening, clean the oil tank cover if necessary.
3. Remove the oil tank cover by rotating anticlockwise.
4. Carefully fill up with saw chain oil. Do not spill. If you do spill any saw chain oil, be sure to wipe it up.
5. Read the oil level at the oil level window.
6. Attach the oil tank cover by rotating clockwise.
Note: This device contains an automatic oil pump that services the chain. The remaining oil level can
be checked through the oil level window.
POLE SAW ASSEMBLY 14
1. Remove battery from chain saw.
2. Place chain saw on a firm surface to check chain
tension.
3. Pull chain with light force 1/8" away from bottom
of guide bar and release (See Fig 9). If chain
lightly snaps back into place, tension is correct. A
slight sag (1/16" or less) between chain and
bottom of guide bar is acceptable.
DANGER! Remove battery from pole saw before servicing. Severe injury or death could occur from
body contact with moving chain.
ADJUSTING CHAIN TENSION
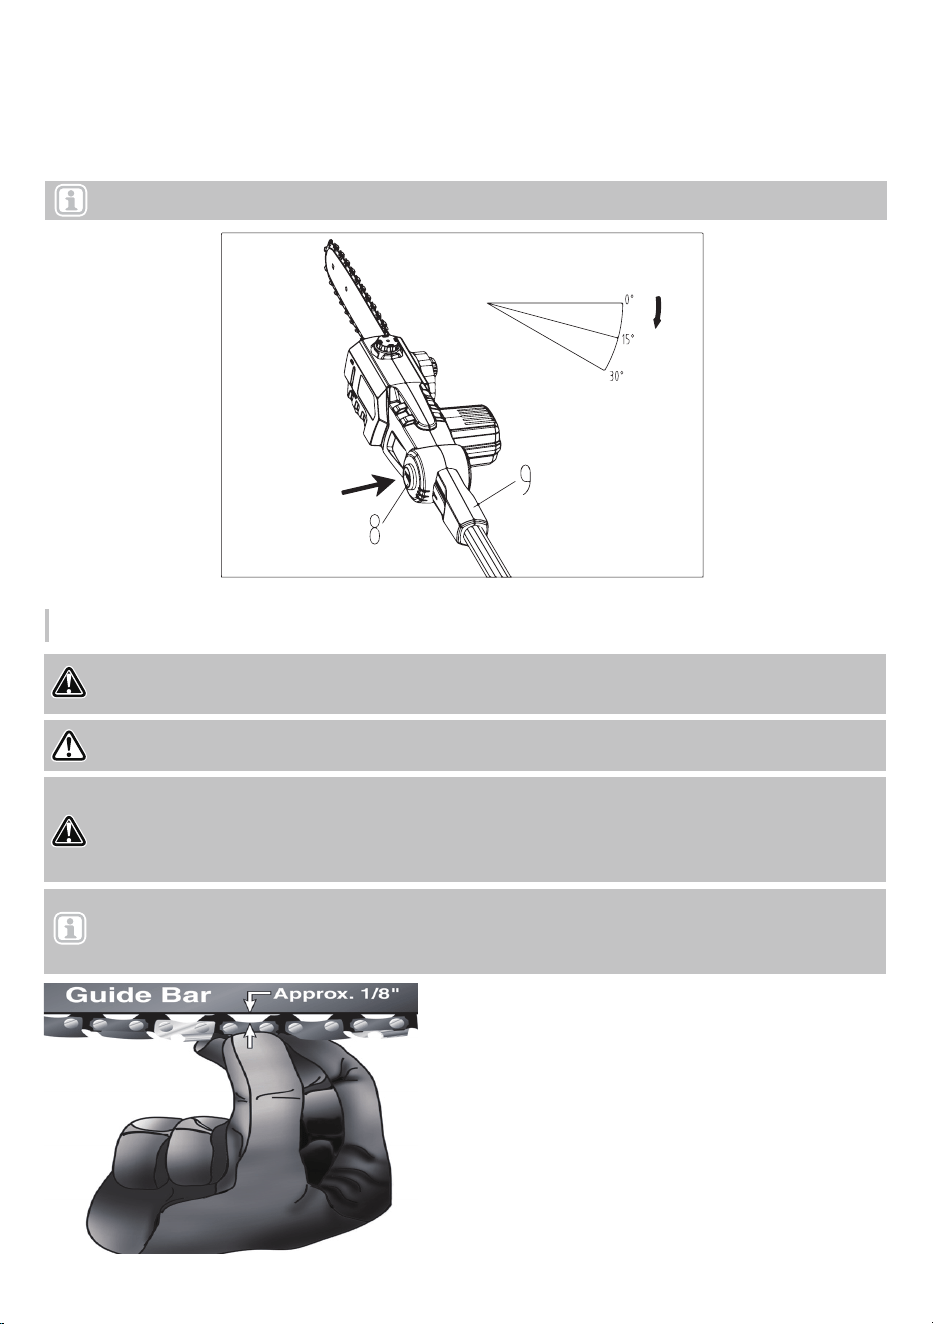
8. Hold the Connecting rod 9 tightly. Slide the locking press button 8 up and then turn the work head to the
desired position. Release the locking press button 8 again and check whether the work head is locked in
place. (See Fig.8)
Note: The work head can be locked in three positions(0°、15°、30°).
Note: The saw chain tension is properly set at the factory. A new chain will stretch. Check new chain tension
frequently (after disconnecting battery) during the first 2 hours of operation. Allow chain to cool down. Follow steps
below to check saw chain tension.
WARNING! Cutting edges on chain are sharp. Use protective gloves when handling chain.
DANGER! When cleaning saw body
● do not submerge saw in any liquids
● do not use products that contain ammonia, chlorine, or abrasives
● do not use chlorinated cleaning solvents, carbon tetrachloride, kerosene, or gasoline
Fig.9
Fig.8
POLE SAW ASSEMBLY 15
1. Fill up the pole saw's fuel tank.
2. Attach battery to saw.
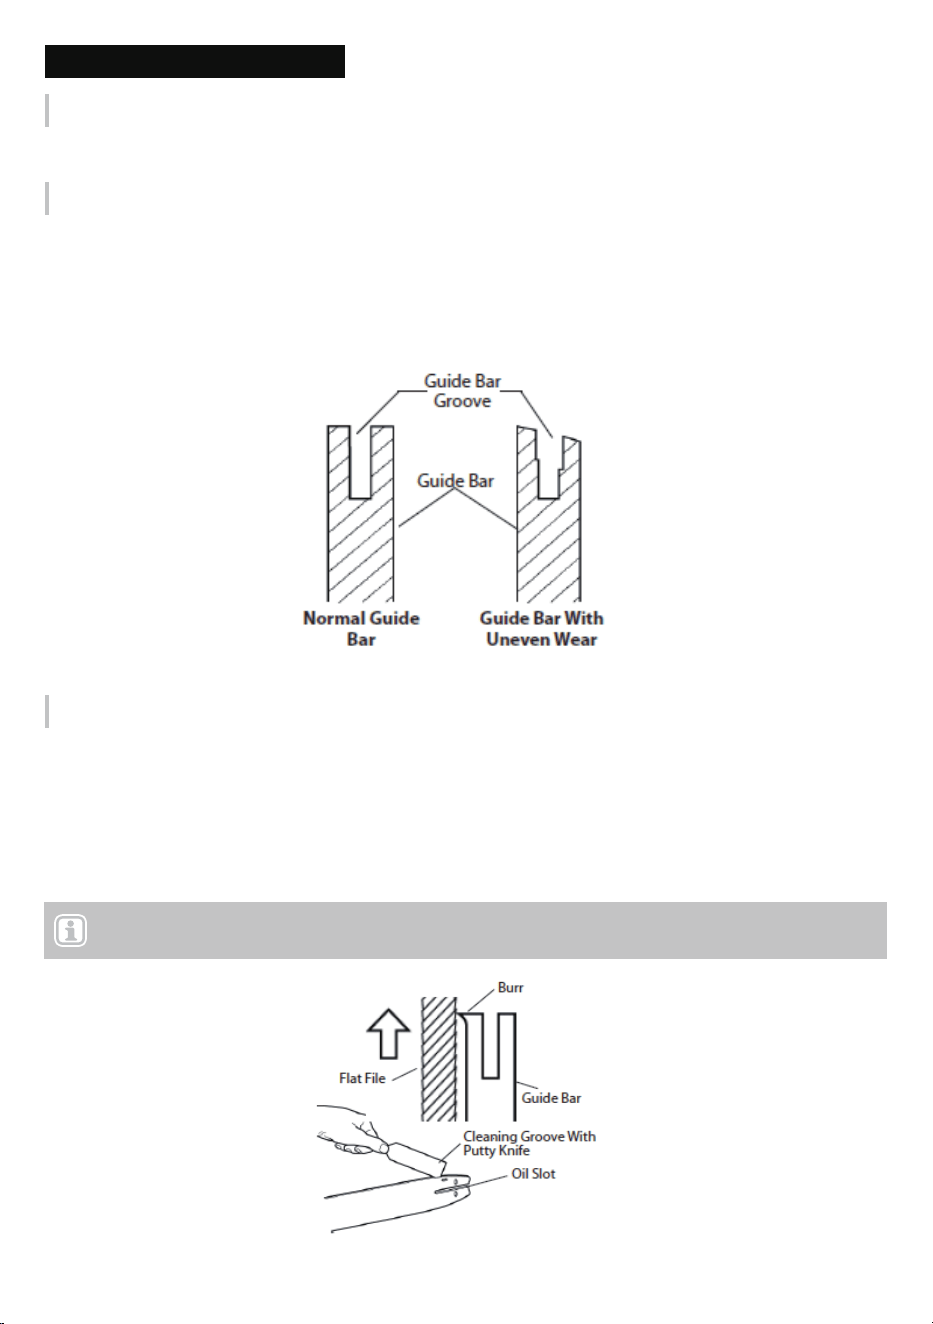
3. Use both hands to grip pole saw. Use designated grip areas and strap
when operating pole saw. (See Fig.11) Use firm grip. Thumbs and fingers
must wrap around pole saw handle and pole.
4. Make sure you have a firm footing. Keep feet apart. Divide your weight
evenly on both feet.
5. When you are ready to make a cut, turn on the safety switch by pressing
the trigger. This will turn the pole saw on. Releasing the trigger will turn the
pole saw off. Make sure the saw is running before starting a cut.
6. When starting a cut, place moving chain against wood. Hold pole saw firmly
in place to avoid possible bouncing or skating (sideways movement) of saw.
7. Remove pole saw from a cut with saw running at full speed. Stop pole saw
by releasing trigger. Make sure chain has stopped before setting pole saw
down.
Saw Chain Tension Adjustment
CUTTING WITH THE CHAIN SAW
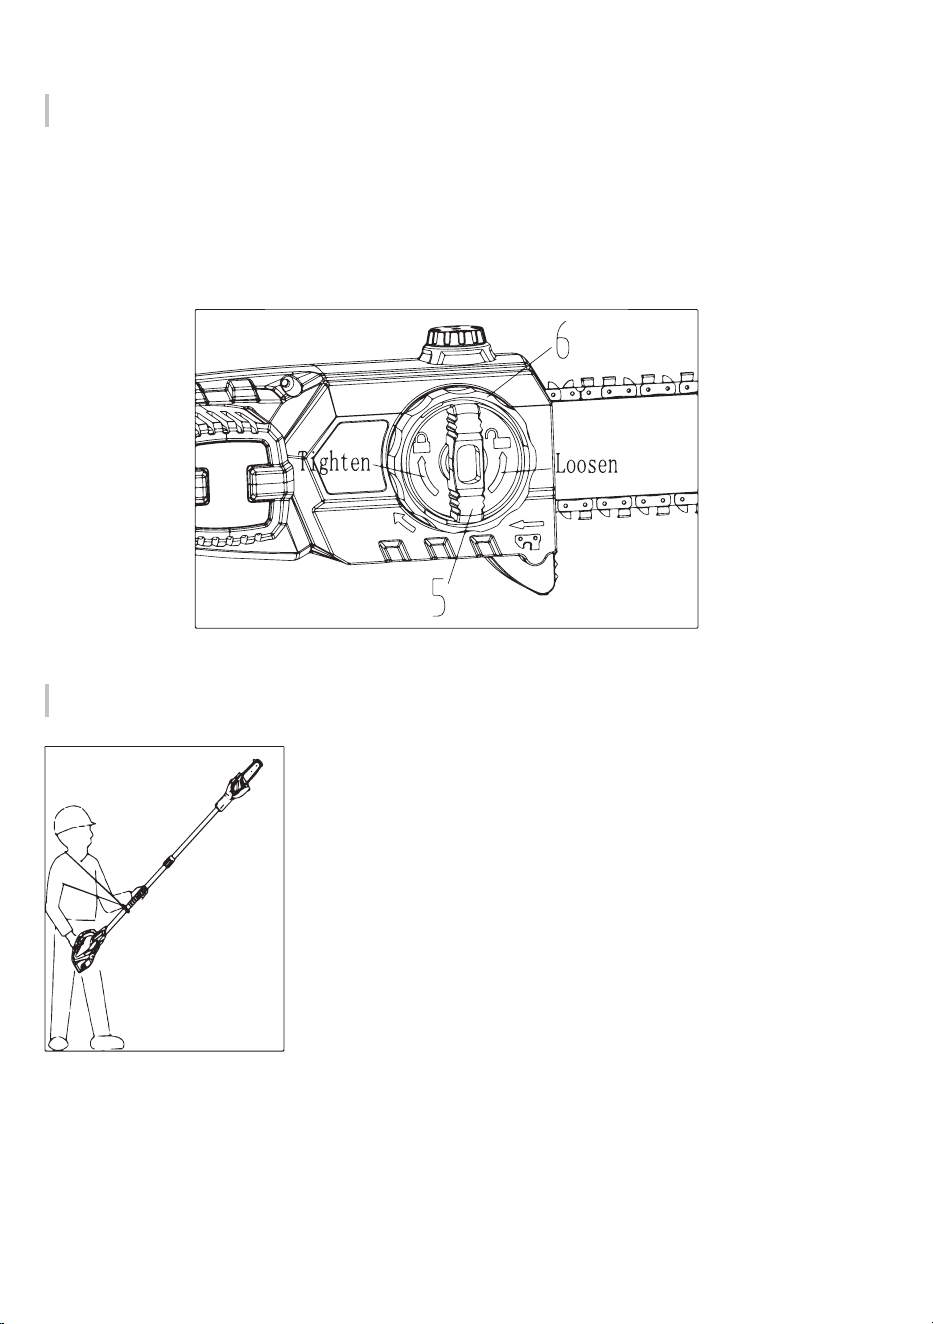
1. Loosen tension wheel (5) before adjusting chain.
2. Turn the adjusting wheel (6) until slack is out of chain.
3. Wearing protective gloves, pull down on chain to check chain tension
4. Do not over-tension chain. Over-tensioning will cause excessive wear and will reduce the life of the guide bar
and chain. Over-tensioning also reduces the amount of cuts per battery charge.
5. After correcting the chain tension, tighten tension wheel (5) firmly.
(See Fig.10)
Fig.10
Fig.11
CARE AND MAINTENANCE 16
1. Remove guide bar from chain saw.
2. Remove sawdust from guide bar groove periodically. Use putty knife or wire (See Fig.13).
3. Clean oil slots after each day of use.
4. Remove burrs from sides of guide bar. Use flat file to make side edges square.
Replace guide bar when
● bar is bent or cracked
● the inside groove of bar is badly worn
CARE AND MAINTENANCE
Cleaning saw body
Keep saw body clean. Use a soft cloth dampened with a mild soap and water mixture. Wipe saw body to clean.
Care of guide bar
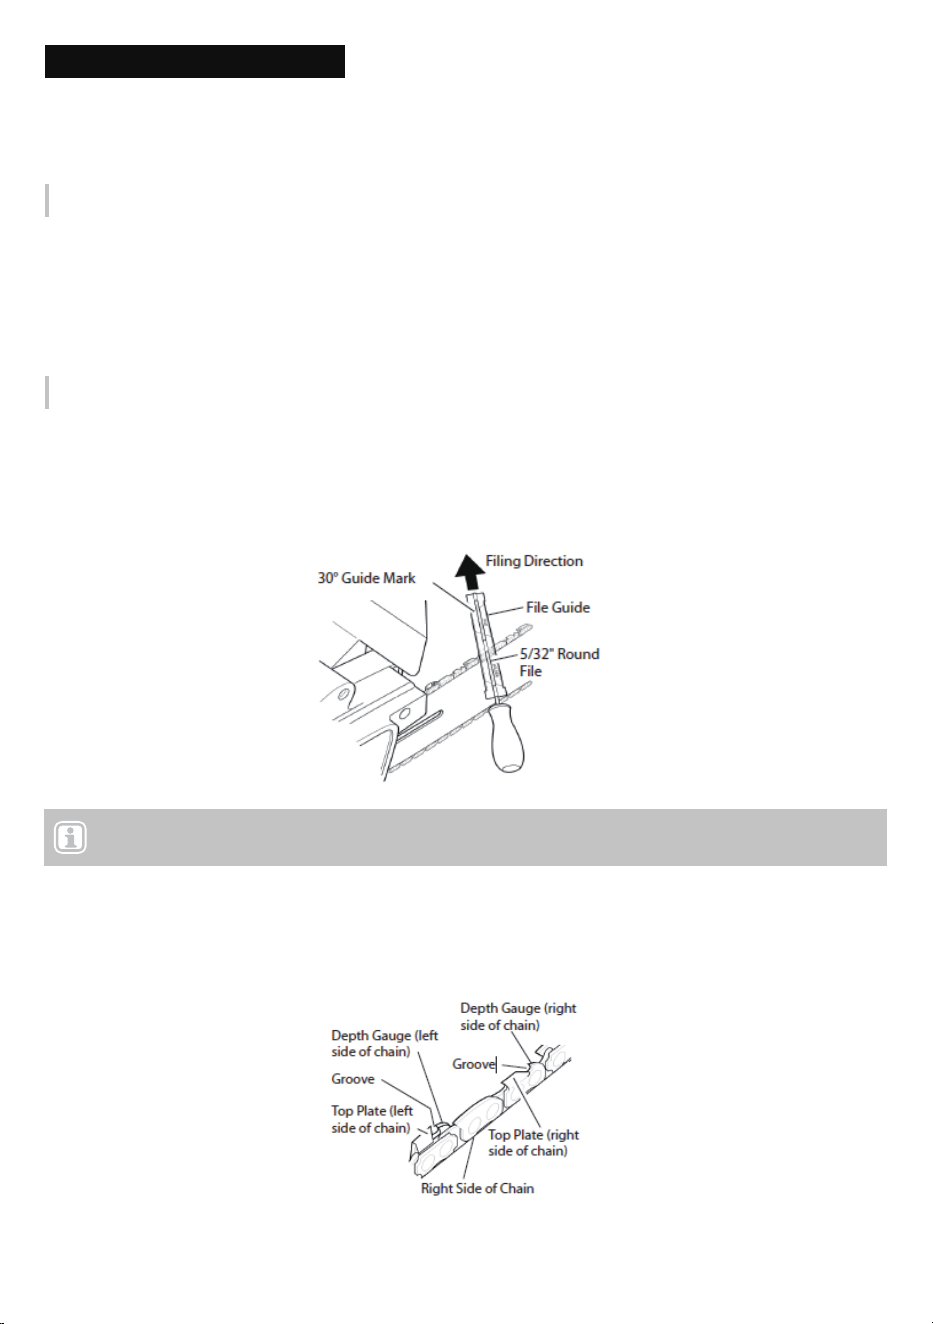
Normal Guide Bar Maintenance
Uneven bar wear causes most guide bar problems. Incorrect sharpening of chain cutter and depth gauge
settings often cause this. When bar wears unevenly, it widens guide bar groove (See Fig.12). This causes
chain clatter and rivet popping. Saw will not cut straight. Replace guide bar if this occurs.
Inspect guide bar before sharpening chain. A worn or damaged guide bar is unsafe. A worn or damaged guide
bar will damage chain. It will also make cutting harder.
Fig.12
Fig.13
Note: When replacing guide bar, see Replacement Parts and Accessories for replacement information. See Parts
List for correct bar.
SHARPENING SAW CHAIN 17
Keep chain sharp. Your saw will cut faster and more safely. A dull chain will cause undue sprocket, guide bar,
chain, and motor wear. If you must force chain into wood and cutting creates only sawdust with few large chips,
chain is dull.
Purchase these items from your local dealer, hardware store, or pole saw supplies outlet.
● 5/32" round file
● Depth gauge tool
● File guide
● Vise
● Medium sized flat file
Use file guide for 30° filing.
1. Adjust chain for proper tension.
2. Clamp guide bar in vise to hold saw steady. (Note: Do not clamp chain.)
3. Press 5/32" round file (attached to file guide) into groove between top plate and depth gauge on chain. File
guide should rest on both top plate and depth gauge (see Fig.14). (Note: File at midpoint of guide bar.)
4. Hold file guide level. Make sure 30° mark on file guide is parallel to the center of guide bar (see Fig.15). This
will ensure that you file cutters at 30° angle.
5. Sharpen the cutter by filing it from inside to outside. Only file in this one direction (see Fig.15). (Note: Two or
three strokes with file should sharpen the cutter.)
SHARPENING SAW CHAIN
Items Needed to Sharpen Chain
Sharpening Cutters
Note: This illustration shows file guide placement and filing direction for sharpening cutters on left side of the
chain.
Fig.14
Fig.15
Filing Cutter Depth Gauges 18
IMPORTANT: Do not clamp chainsaw in vise to replace saw chain or guide bar.
Filing Cutter Depth Gauges
Replacing saw chain
The cutter depth gauge clearance is reduced as cutters are sharpened. After every second or third sharpening,
reset cutter depth gauges.
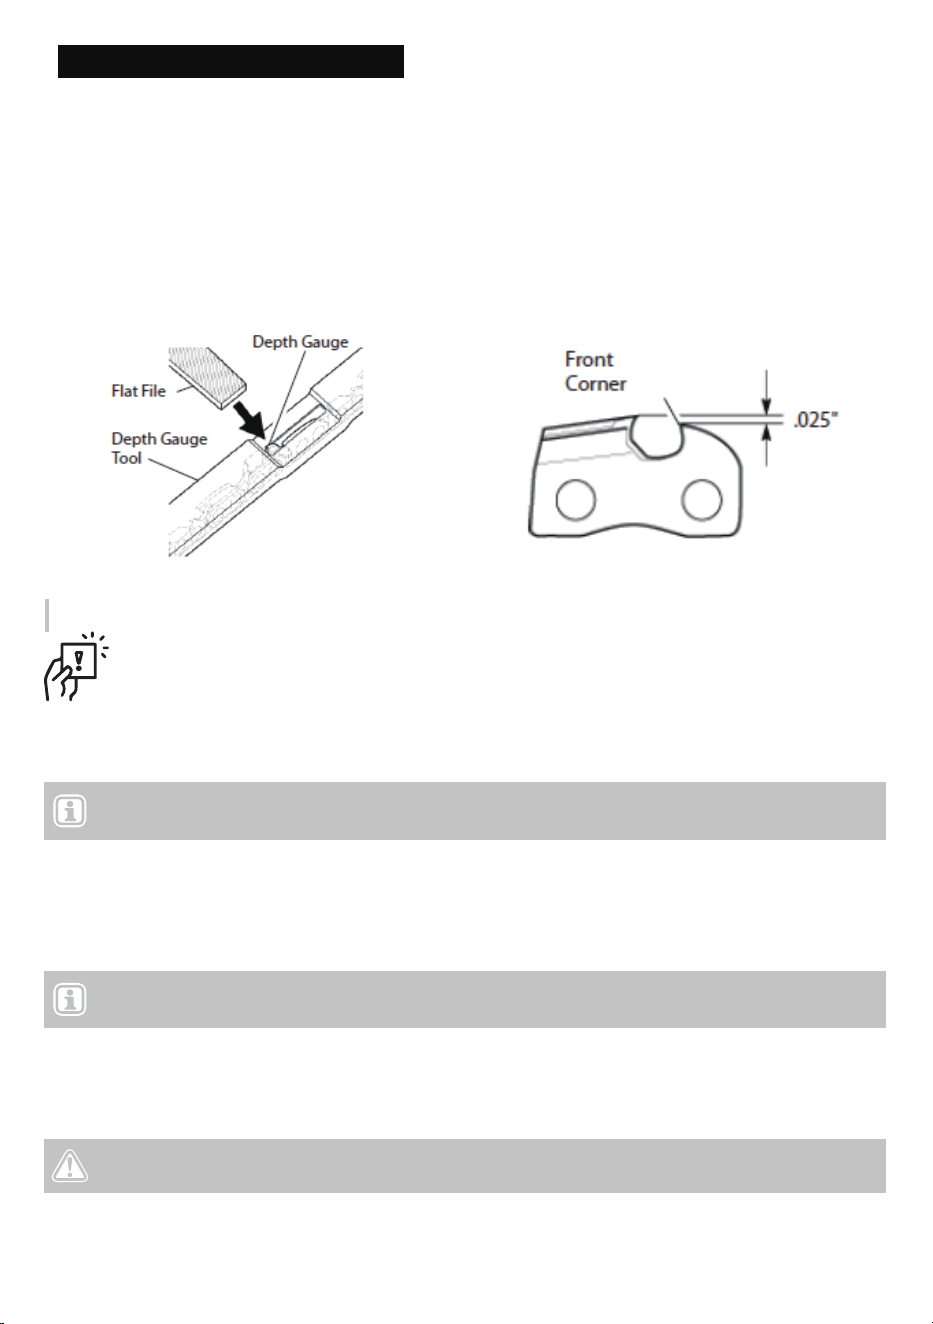
1. Place depth gauge tool (.025") firmly across top of two cutters. Make sure depth gauge enters slot in depth
gauge tool (see Fig.16).
2. Use a medium flat file. File depth gauge level with depth gauge tool.
3. Remove depth gauge tool. With flat file, round off front corner of cutter depth gauge (see Fig.17).After
several hand filings, have an authorized service center or sharpening service machine sharpen chain. This
will ensure even filing.
Replace chain when cutters are too worn to sharpen or when chain breaks. Only use replacement chain noted
in this manual. Always include new drive sprocket when replacing chain. This will maintain proper driving of
chain.
Refer to Figure 18 while completing the following steps.
1. Loosen tension wheel.
2. Remove sprocket cover, tension wheel and adjusting wheel.
3. Remove saw chain.
4. Place new chain around drive sprocket, along top groove of guide bar, and around guide bar nose.
5. Place sprocket cover into Positioning groove.
6. Locking the sprocket cover with tension wheel. (IMPORTANT: Do not spin very tight.)
7. Adjust chain tension.
8. Securely tighten tension wheel.
Note: For proper chain and drive sprocket, see Parts List.
Note: Make sure cutting edges of chain are facing in the right direction. Position chain so cutting edges
on top of guide bar face guide bar nose (see Fig 19 and indicator on the side cover of saw).
Fig.16 Fig.17
CAUTION! Do not place chain on saw backwards. If chain is backwards, the saw will vibrate badly
and will not cut.

Filing Cutter Depth Gauges 19
Fig.18
Fig.19

Filing Cutter Depth Gauges 20
If storing saw for more than 30 days, follow the steps below.
1. Remove battery from chain saw.
2. Charge battery completely. (Note: It could take up to 7 hours to completely charge the battery.)
3. When the battery is completely charged, remove it from the charger and put a protective cap on battery
terminals.
4. Remove and clean guide bar and chain. Clean guide bar and chain by soaking in petroleum-based solvent
or mild soap and water mixture.
5. Dry guide bar and chain.
6. Place the chain in a container filled with oil. This will prevent rust.
7. Wipe a thin coating of oil over the surface of the guide bar.
8. Wipe off outside of saw body. Do this with a soft cloth dampened with a mild soap and water mixture.
9. Store chain saw and battery
● in a high or locked place, out of children’s reach
● in a dry place
● in a carrying case or with scabbard over guide bar
This product uses nickel-cadmium batteries. Local, state, or federal laws may prohibit the disposal of
nickel-cadmium batteries in the ordinary trash. To help protect the environment and conserve natural resources,
please dispose of batteries properly. You may contact your local recycling center for information on where to
drop off the batteries.
IMPORTANT: To prolong battery life, avoid leaving the battery on the charger for extended periods of
time (over 30 days without use).
Barrery disposal and recycling
Storge

TROUBLESHOOTING 21
TROUBLESHOOTING
When Something lsn' Working
DANGER! Risk of injury! Improperly performed repairs can lead to the device not functioning safely. This can
endanger yourself and the environme
nt.
Problem Possible Cause Possible Solution
• Tool will not start. • Battery not installed properly.
• Battery not charged.
• Lock-out button not actuated.
• Check battery installation.
• Check battery charging
requirements.
• Push lock off button/actuate trigger.
• Unit will not charge. • Battery not inserted into charger. • Insert battery into charger until
green LED appears. Charge up to
5 hours if battery totally drained.
• Bar/chain overheated. • Chain too tight.
• Lubrication needed.
• Refer to "adjusting chain tension"
section.
• Refer to "chain oiling" section.
• Chain is loose. • Chain tension set incorrectly. • Refer to "adjusting chain tension"
section.
• Poor cut quality. • Chain tension set incorrectly.
• Chain needs replacement.
• Refer to "adjusting chain tension'
section. Note: Excessive tension
leads to excessive wear and
reduction in life of bar & chain.
Lubricate before each cut. Refer to
''replacing the chain" section.
• Unit runs but does
not cut.
• Chain installed backwards. • Refer to sections for installing and
removing chain.
• Unit stops while cutting. • Lithium battery depleted.
• Voltage limit protection exceeded.
• Battery too hot.
• Charge battery.
• Unit is being forced. Restart and
apply less pressure.
• Allow battery to cool for 30 minutes
before proceeding.
• Unit does not oil. • Oil reservoir emptied.
• Oiling hole on guide bar clogged.
• Refill reservoir.
• Clean guide bar, sprocket and
sprocket cover. Refer to "care and
maintenance" section.

WARRANTY 22
Voltask offers a limited warranty ("warranty period") on all of our products. The warranty
service covers the situations after you purchase new and unused product from Voltask company, with
anoriginal proof of purchase and where a defect has arisen, wholly or substantially, as a result of faulty
manufacture, parts or workmanship during the warranty period. The warranty does not apply where
damage is caused by other factors, including but not limited to:
(a) normal wear and tear;
(b) abuse, mishandling, accident, or failure to follow operating instructions;
(c) exposure to liquid or infiltration of foreign particles;
(d) servicing or modifications of the product by products or accessories other than Voltask's;
(e) commercial or non-household use.
The Voltask warranty covers all costs related to restoring the proven defective product through repair
or replacement of any defective part and necessary labor, so that it conforms to its original
specifications. A replacement product may be provided instead of repairing a defective product.
Voltask's exclusive obligation under this warranty is limited to such repair or replacement. A receipt
indicating the purchase date is required for any claim, so please keep all receipts in a safe place.
Although greatly appreciated, the product registration is not required to activate any warranty and
product registration does not eliminatethe need for the original proof of purchase. The warranty
becomes void if attempts at repair are made by non-authorized third parties and/or if spare parts, other
than those provided by Voltask, are used.
You may also arrange for service after the warranty expires at an additional cost. These are our general
terms for warranty service, but we always encourage our customers to reach out to us with any
problems,regardless of warranty terms. If you have problems with a Voltask product, please contact us
([email protected]), and we will do our best to solve it for you.
Webside: www.voltask.com Email: [email protected] FB: @voltasktools IG: @voltasktools
WARRANTY
3-year

Webside: www.voltask.com Email: [email protected] FB: @voltasktools IG: @voltasktools