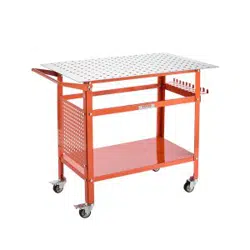

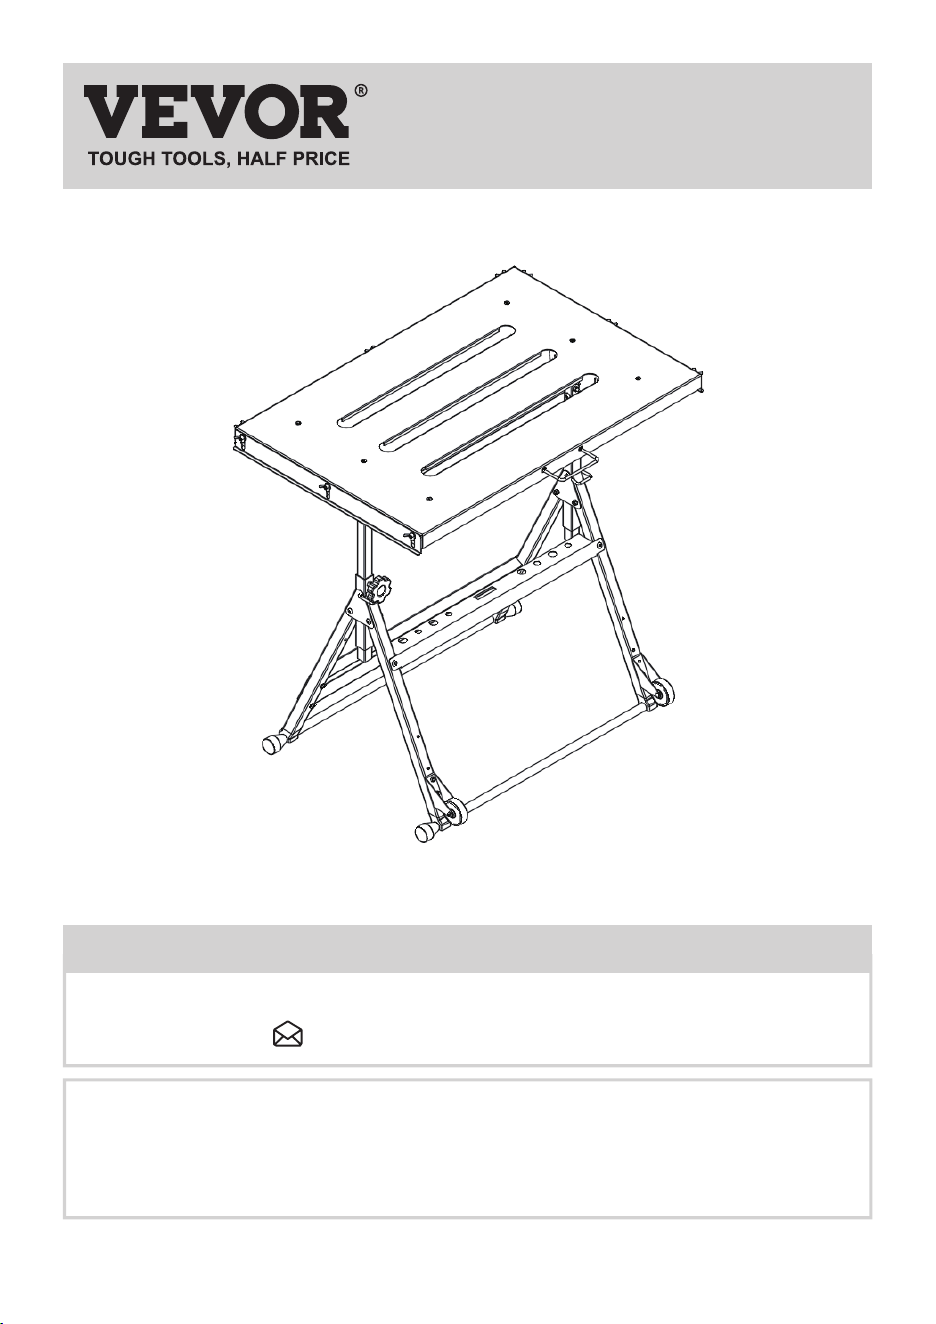
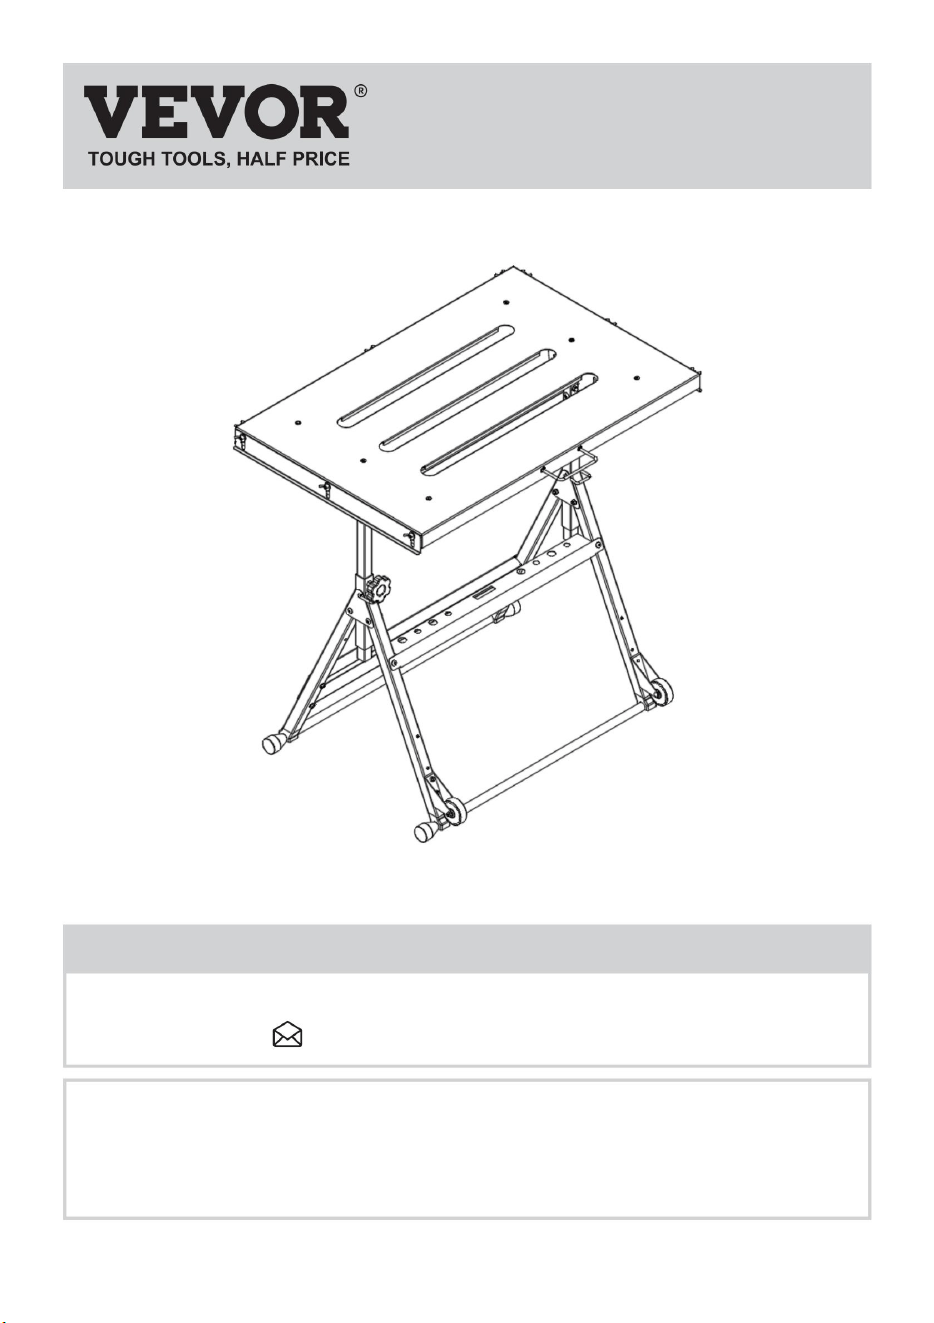
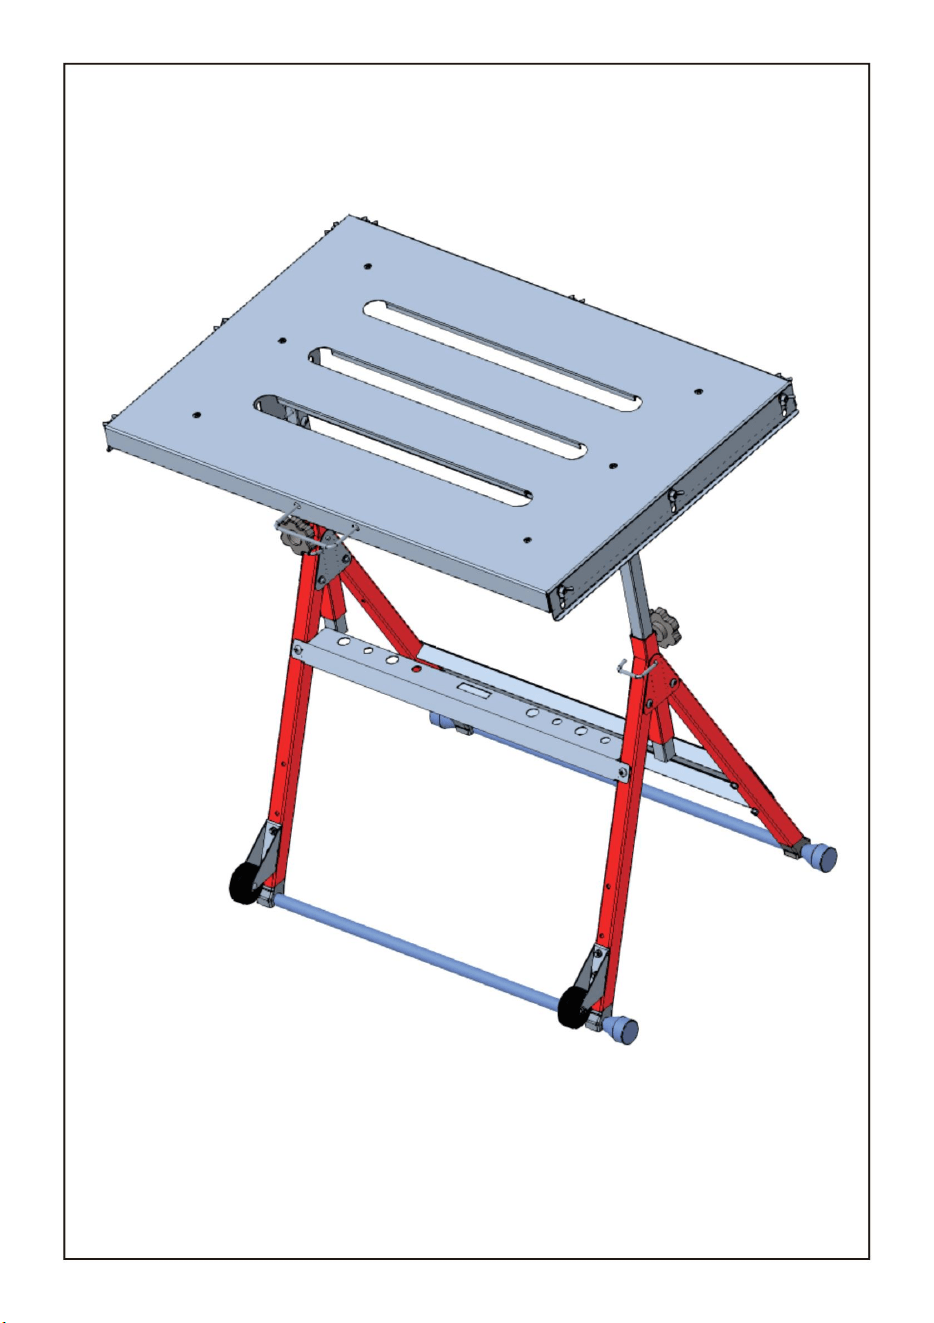
WELDING TABLE
USER MANUAL
Technical Support and E-Warranty Certificate
www.vevor.com/support
We continue to be committed to provide you tools with competitive price.
"Save Half", "Half Price" or any other similar expressions used by us only represents an
estimate of savings you might benefit from buying certain tools with us compared to the
major top brands and doses not necessarily mean to cover all categories of tools offered
by us. You are kindly reminded to verify carefully when you are placing an order with us
if you are actually saving half in comparison with the top major brands.
NEED HELP? CONTACT US!
Have product questions? Need technical support? Please feel free to contact us:
This is the original instruction, please read all manual instructions carefully before operating.
VEVOR reserves clear interpretation of our user manual. The appearance of the product shall be
subject to the product you received. Please forgive us that we won't inform you again if there is
any technology or software updates on our product.
WELDING TABLE
INSTALLATION INSTRUCTION
Note: the quantity of parts shown in the manual is the actual usage and the unused
parts are spare parts.
01
Model: WT400
1. Assemble only according to these instructions. Incorrect assembly can be a hazard.
2. Wear safety goggles and heavy-duty work gloves during assembly.
3. Do not assemble when tired or when under the influence of alcohol, drugs or medication.
4. Weight capacity and other product capabilities apply to properly and completely assembled
product only.
1. This product is not a toy. Do not allow children to play with or approach this item.
2. Use as intended only. Do not sit or stand on table.
3. Inspect before every use. Do not use if parts are loose or damaged.
4. Use only on flat, level, hard surface.
5. Do not exceed listed weight capacity. Tighten all knobs securely before applying load.
Be aware of dynamic loading! Sudden load movement may briefly create excess load causing
product failure.
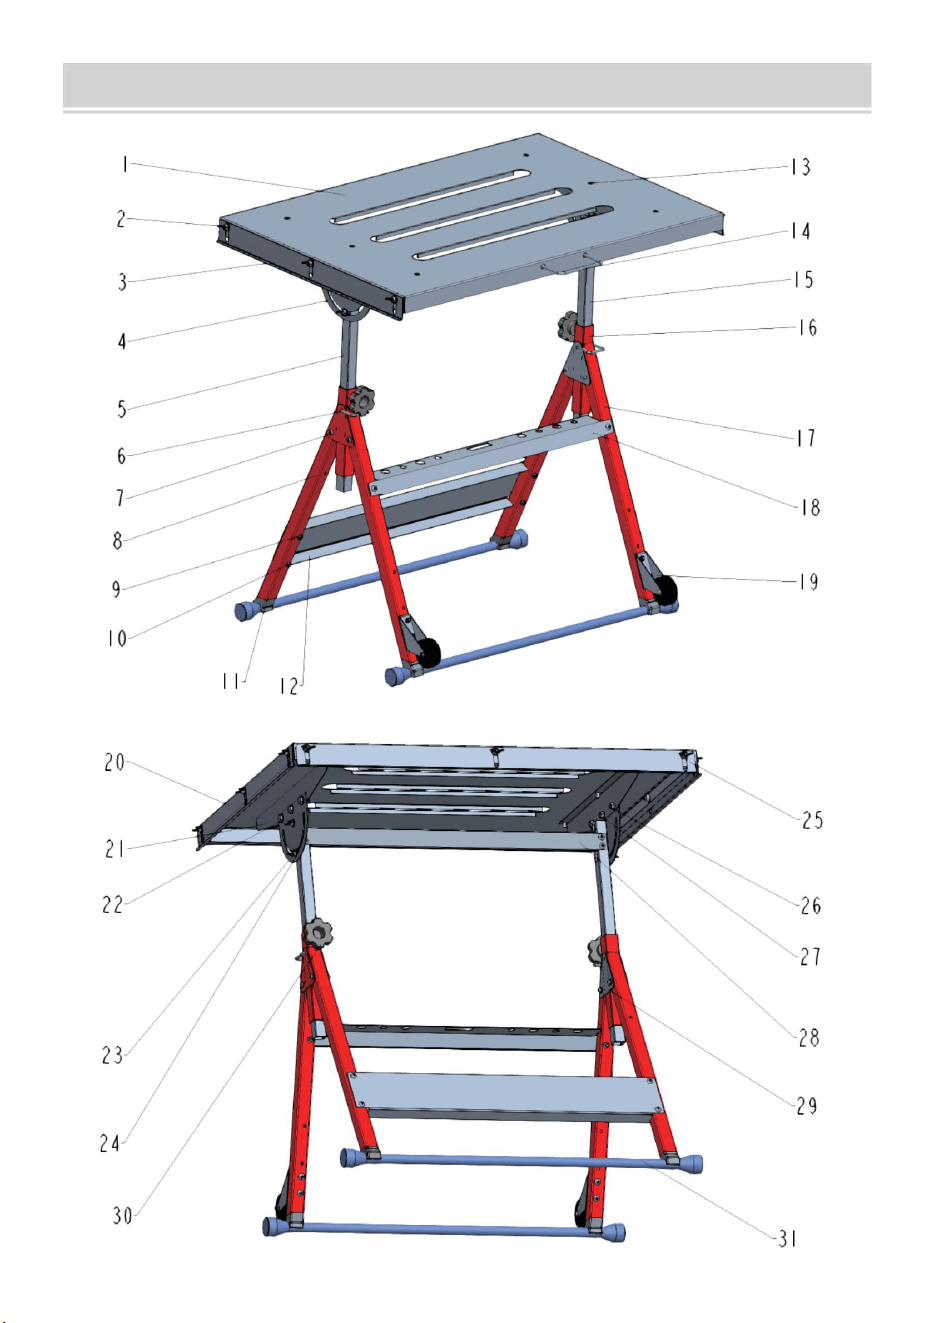
For additional information regarding the parts listed in the following pages, refer to the Assembly
Diagram of this manual. Unwrap and separate all parts on a clear work area.
ASSEMBLY PRECAUTIONS
USE PRECAUTIONS
ASSEMBLY INSTRUCTIONS
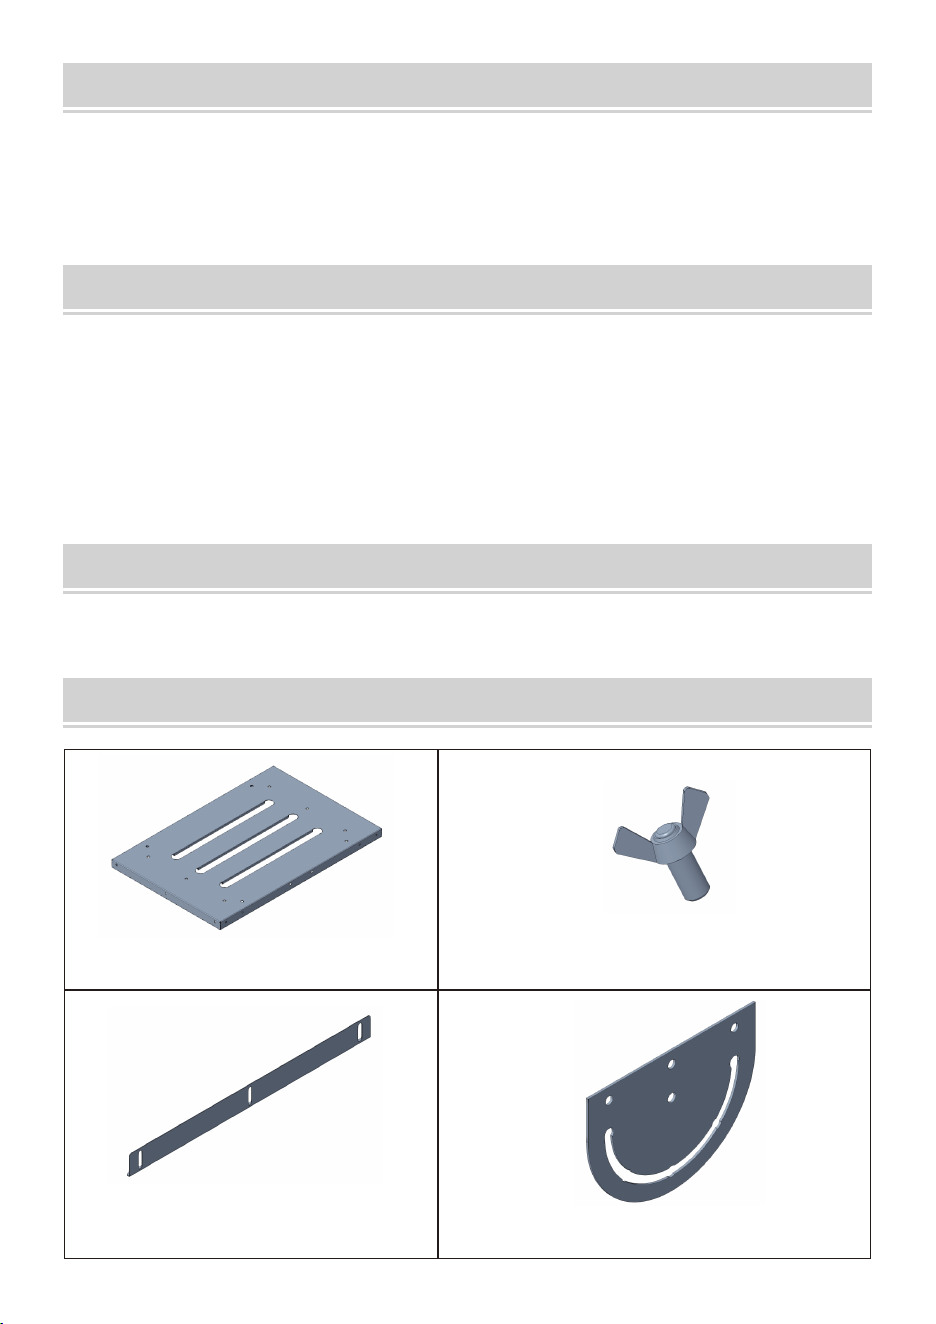
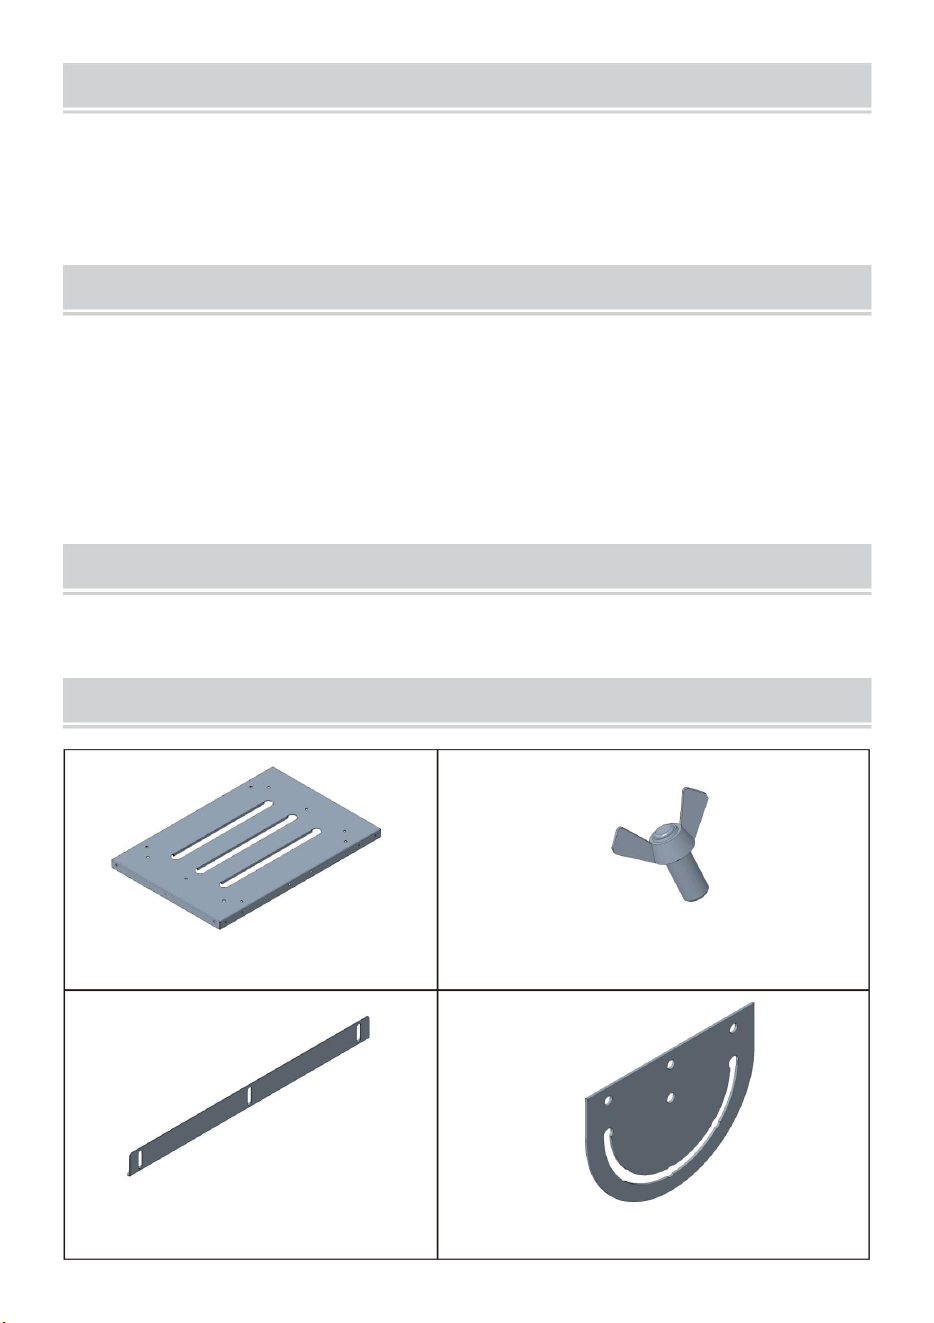
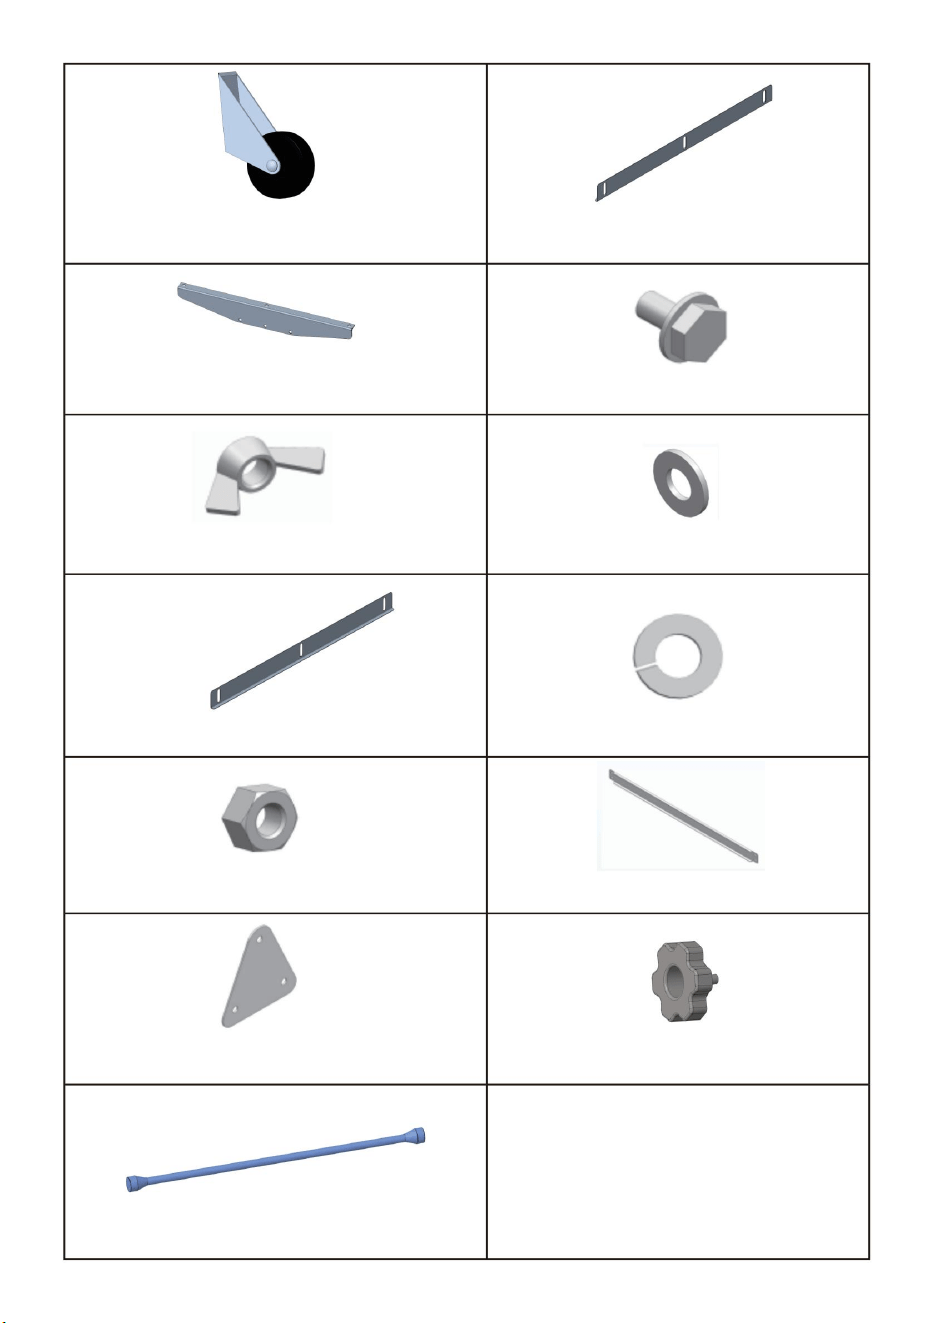
PACKAGE CONTENTS
1. Table Top × 1
3. Plate 1 × 1 4. Locking Angle Plate × 2
2. M8 x 16mm Wing Screw × 9
02
6. The maximum load of the product is 400 lb (181Kg).
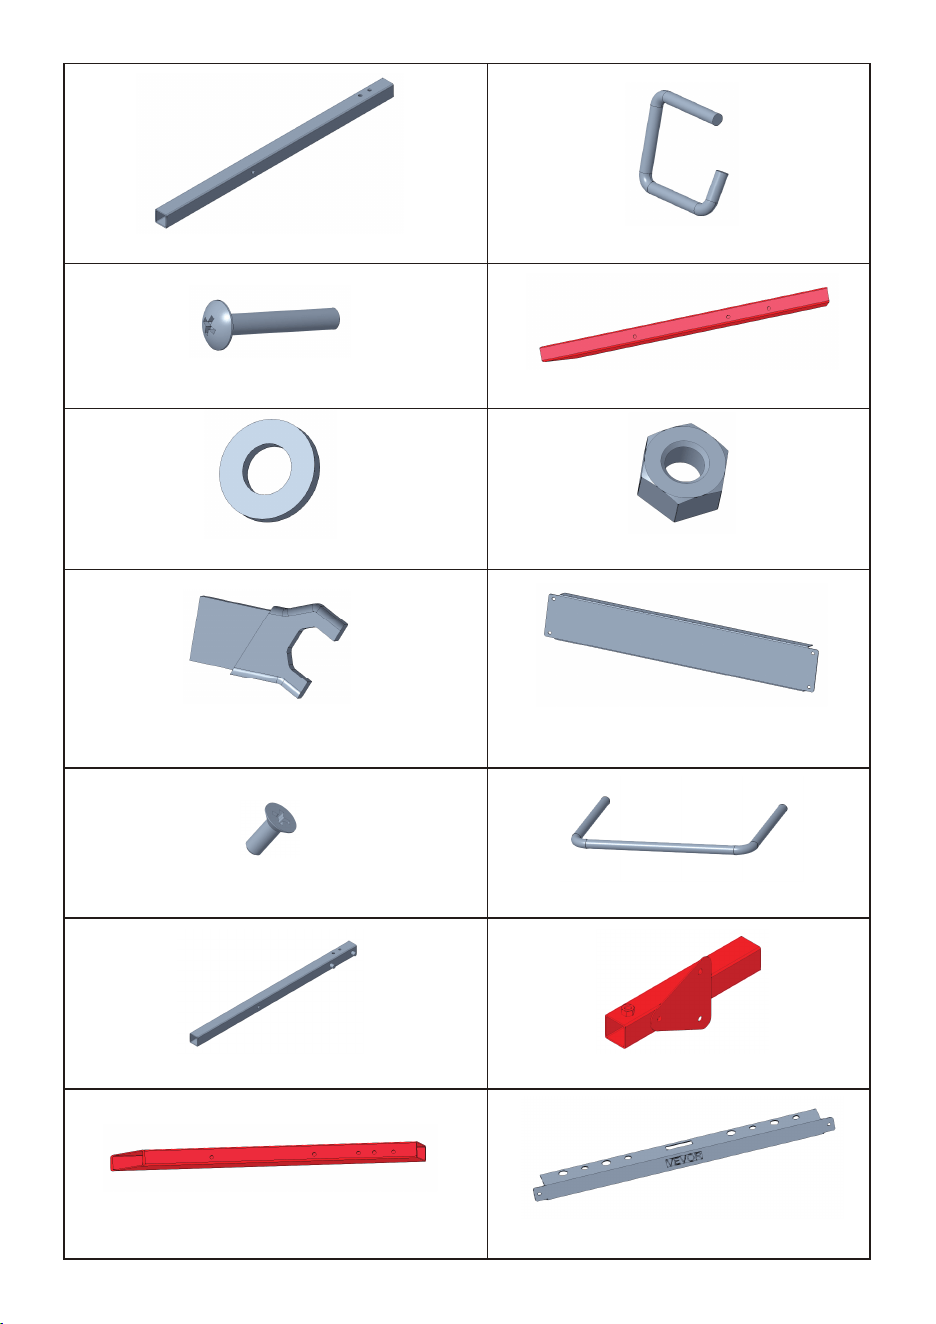
5. Left Square Tube × 1 6. Locking Device × 2
7. M6 x 40mm Screw × 18
9. M6 Flat Gasket × 18
11. Plastic buckle × 4
13. M6 x 16mm Screw × 4
15. Right Square Tube × 1 16. Plate 4 × 2
14. Handle × 1
12. Plate 3 × 1
8. Plate 2 × 2
10. M6 Nut × 18
17. Plate 5 × 2 18. Plate 6 × 1
03
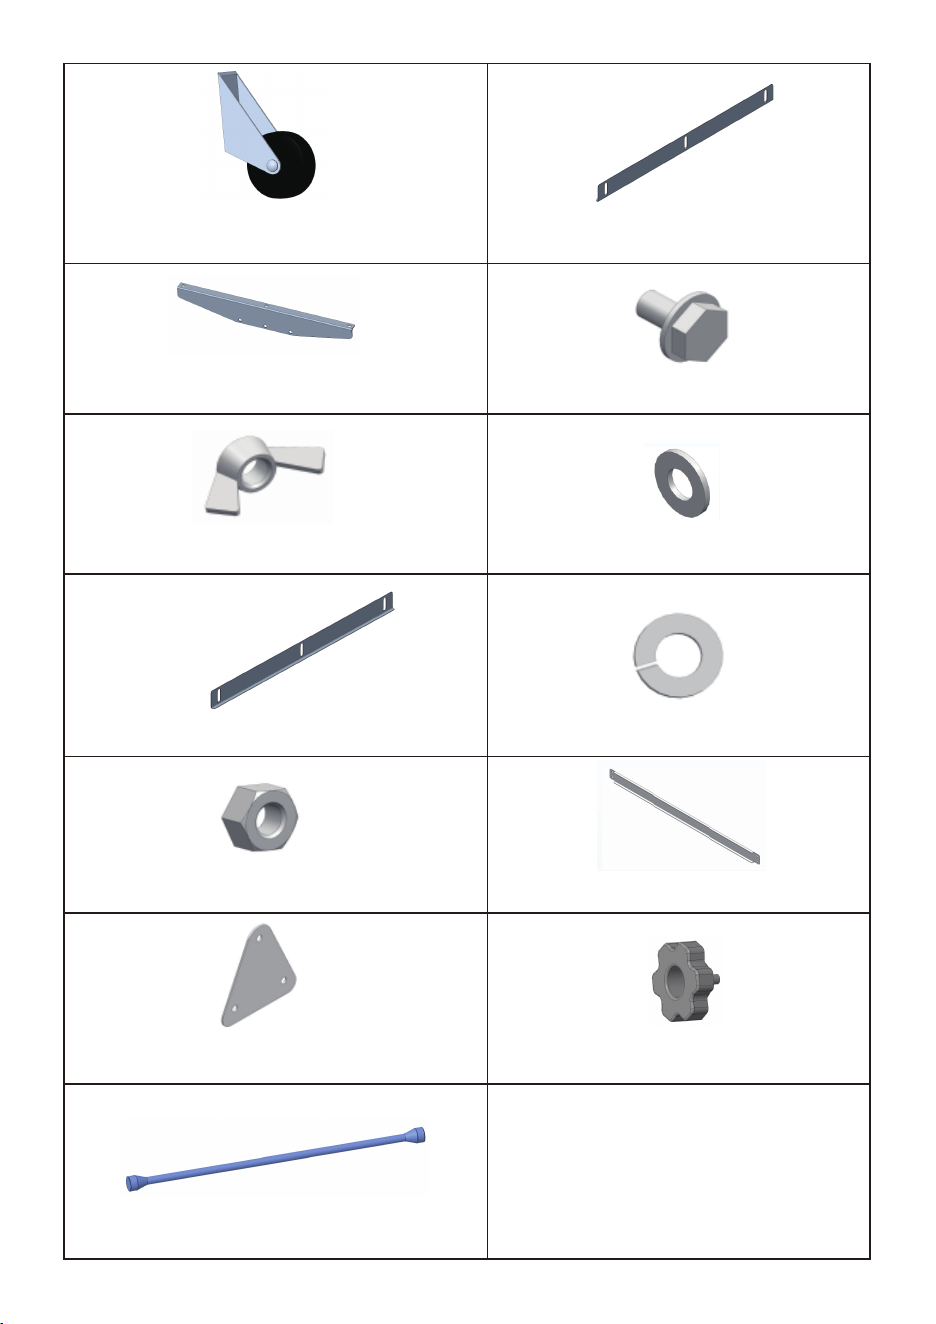
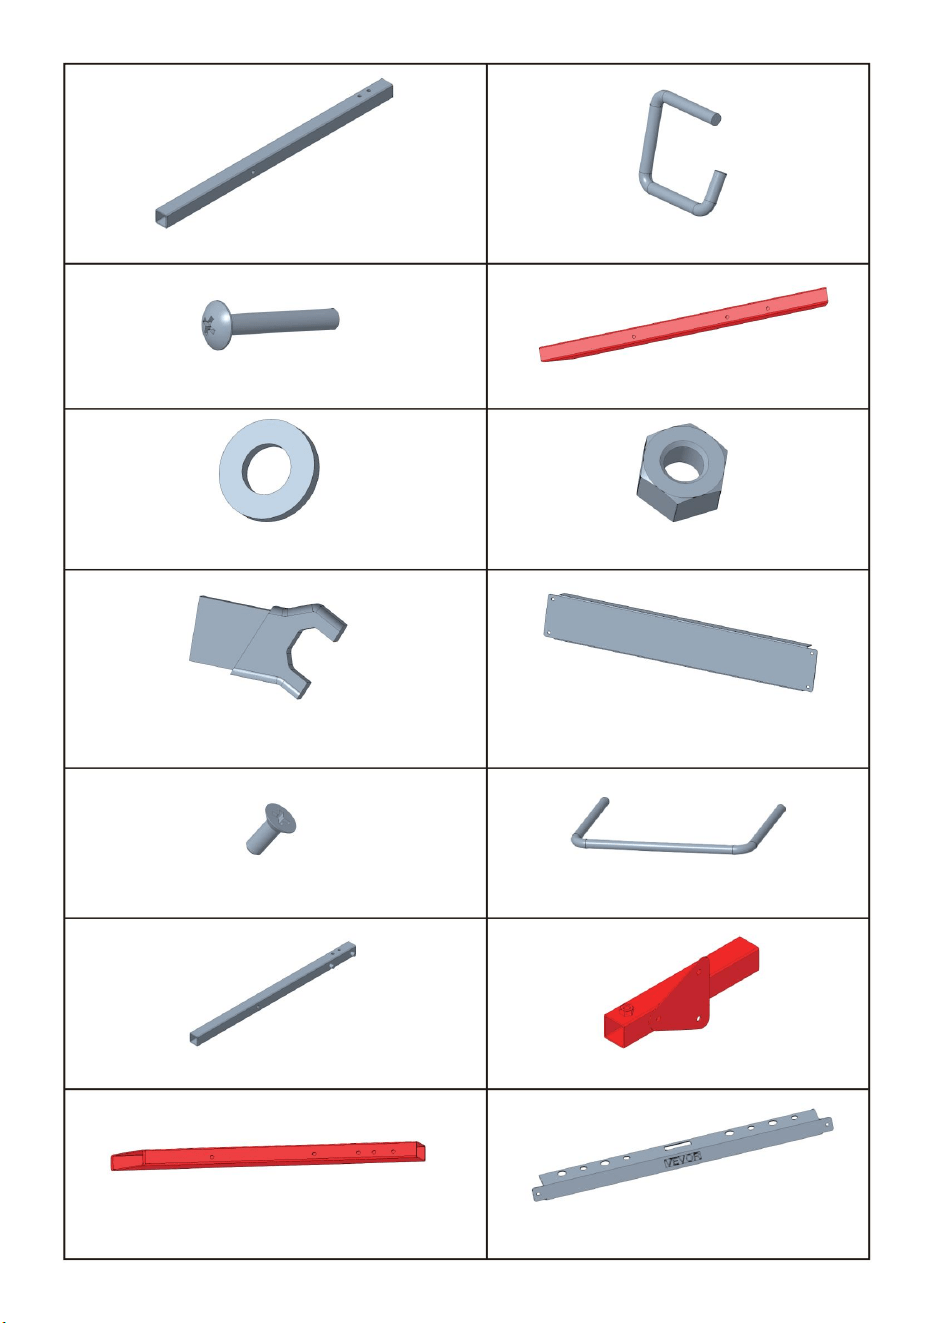
19. Casters Wheel × 2
21. Plate 8 × 2
23. M8 Wing Nut × 4
25. Plate 9 × 1
27. M8 Nut × 6 28. Plate 10 × 1
26. M8 Spring Washer × 6
24. M8 Flat Gasket × 4
20. Plate 7 × 1
22. M8 x 16mm Screw × 6
29. Triangular Iron Plate × 2 30. Hand shank × 2
04
31. Support rod × 2

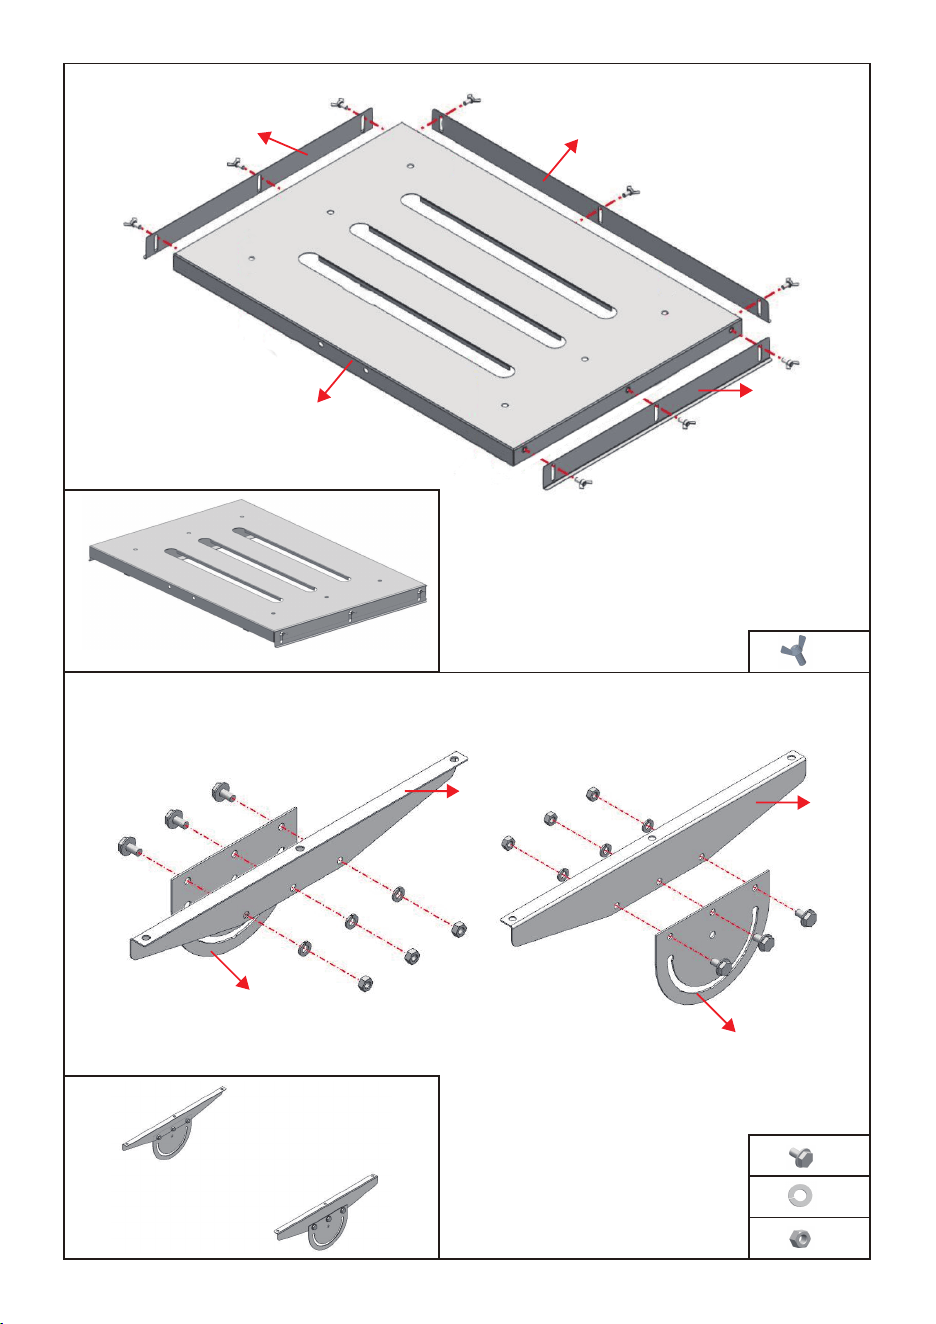
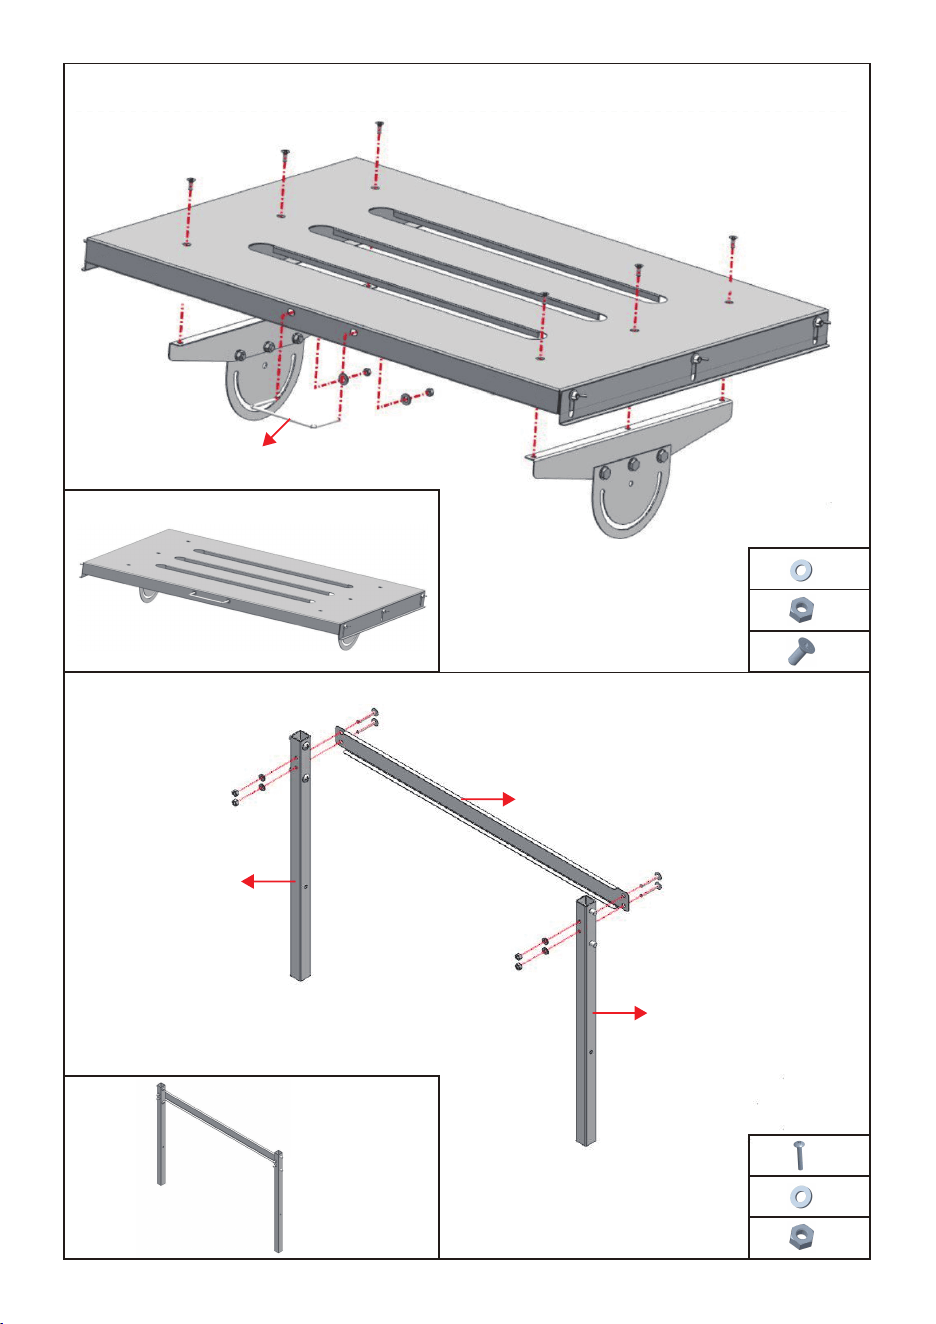
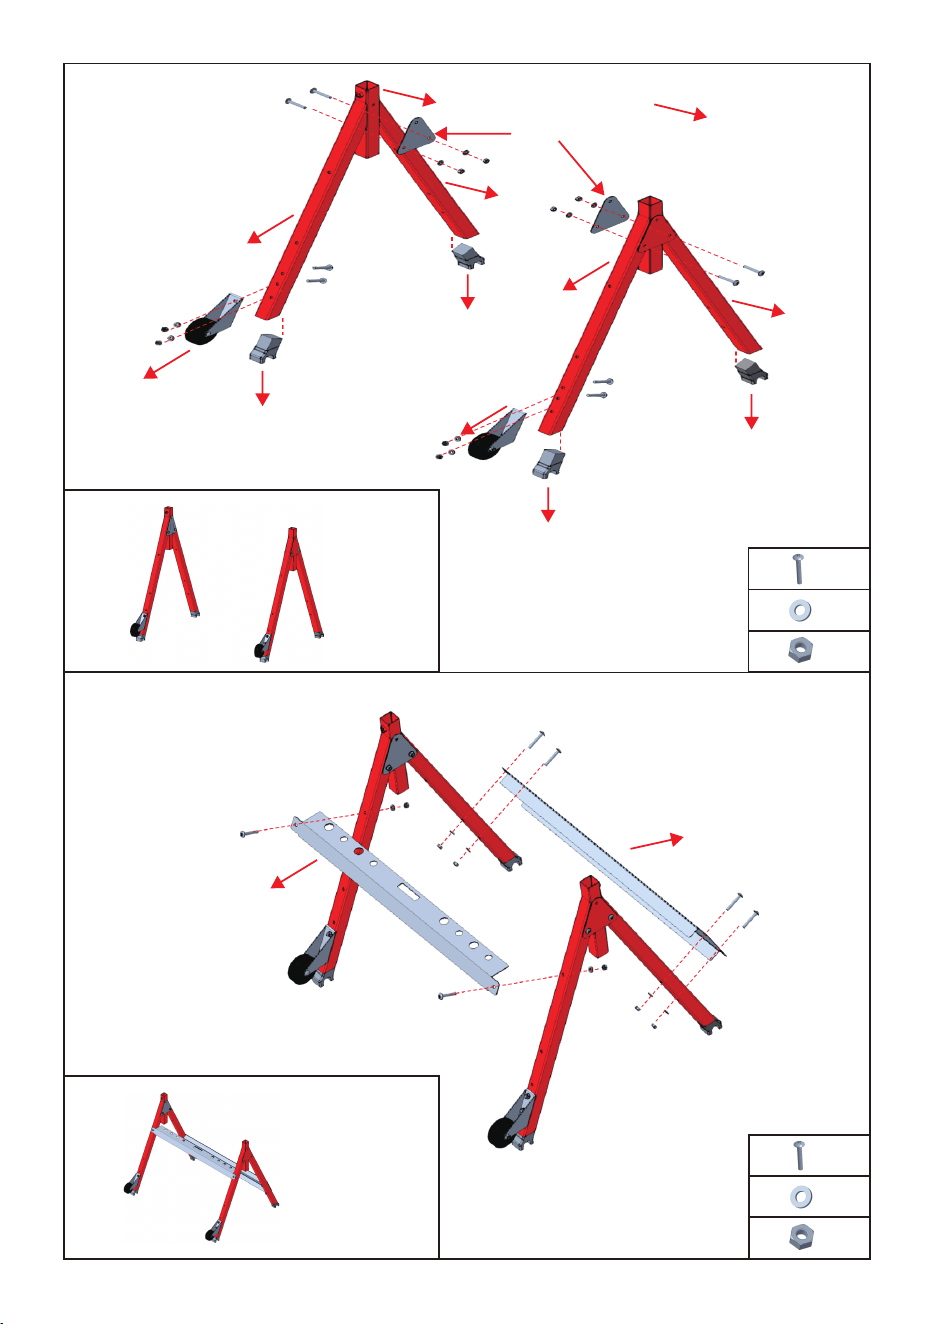
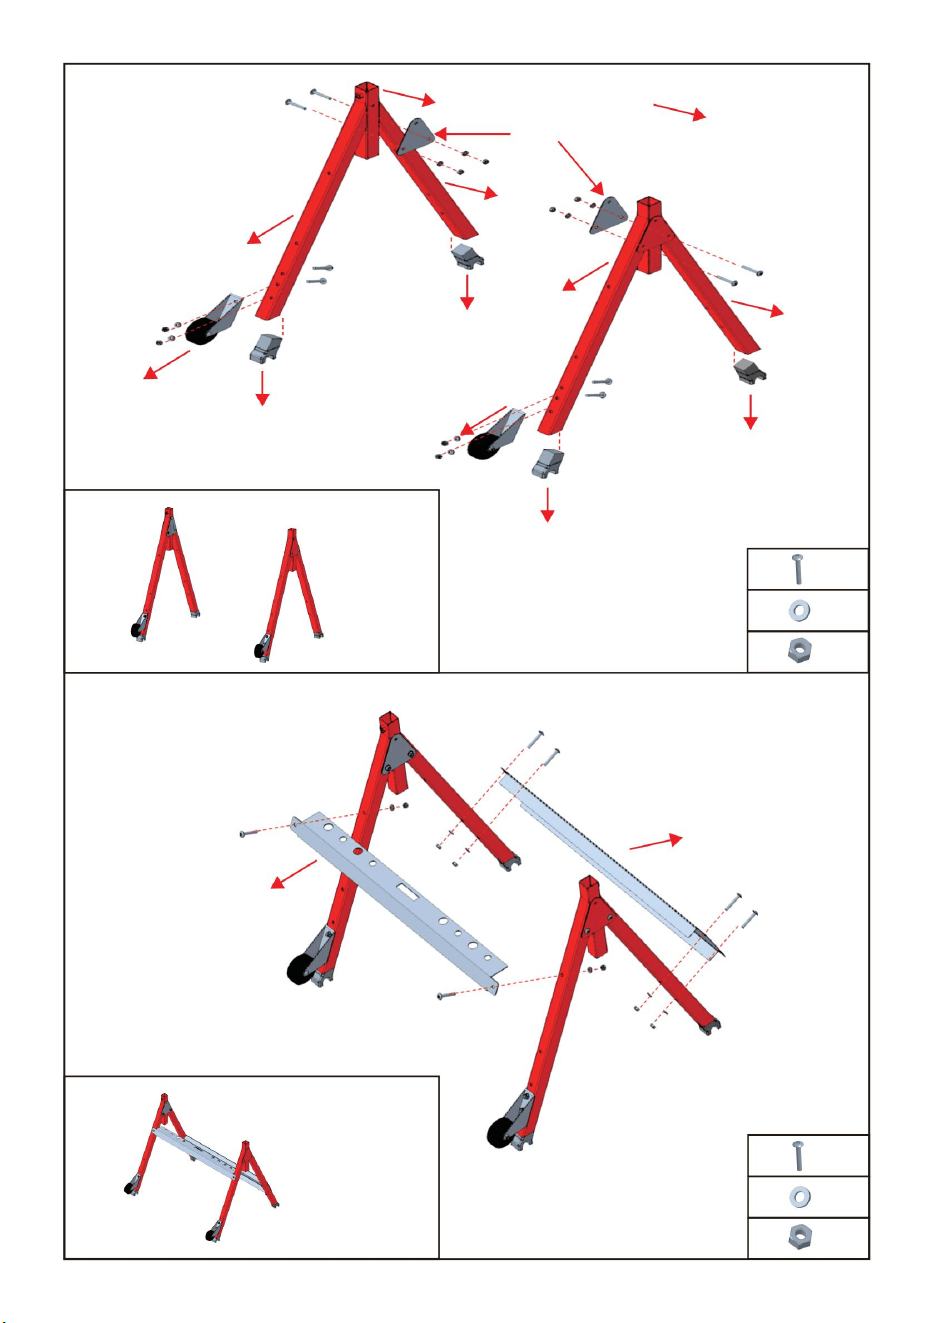
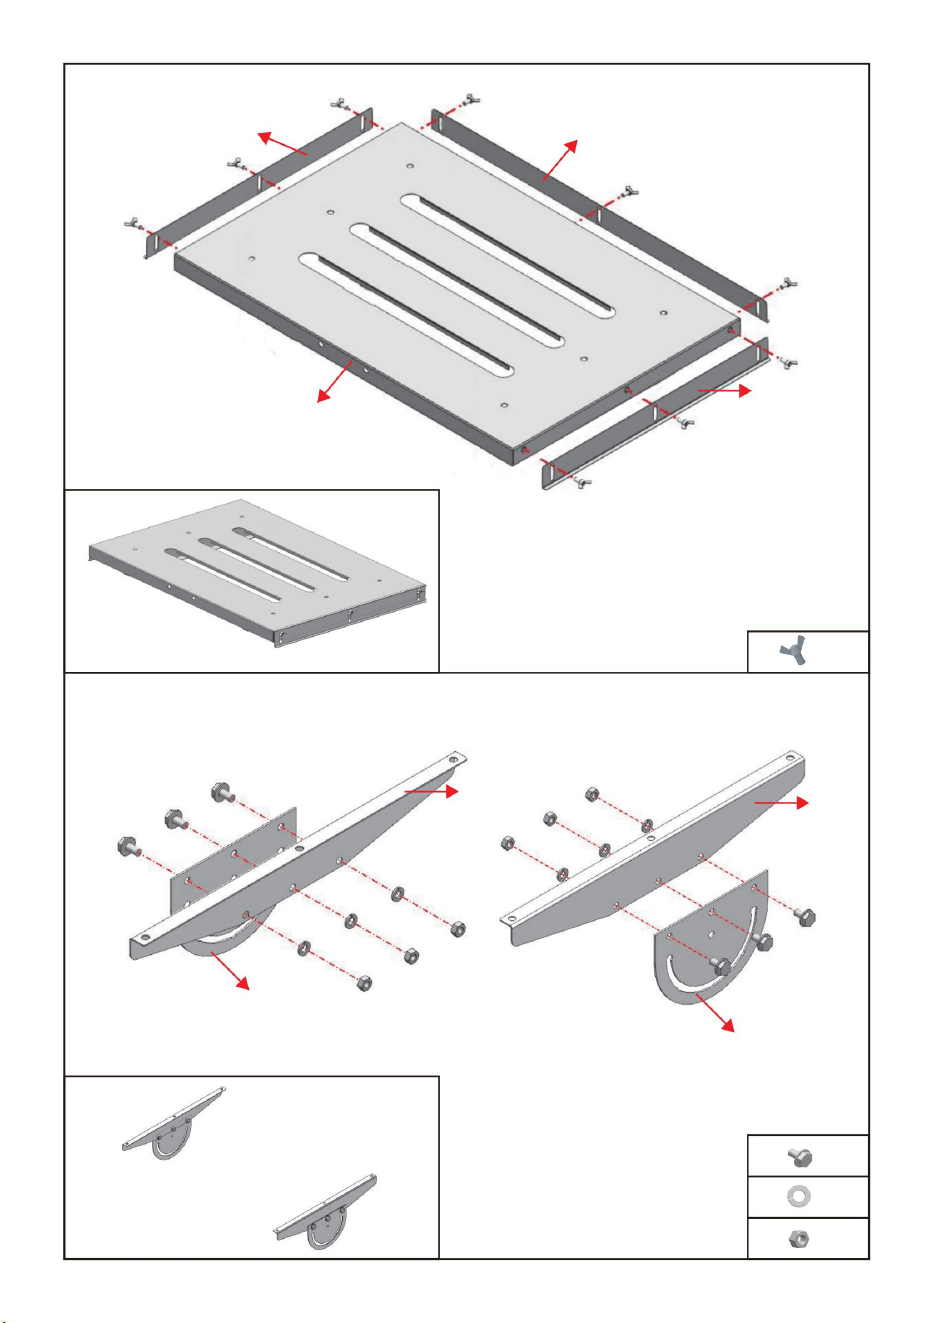
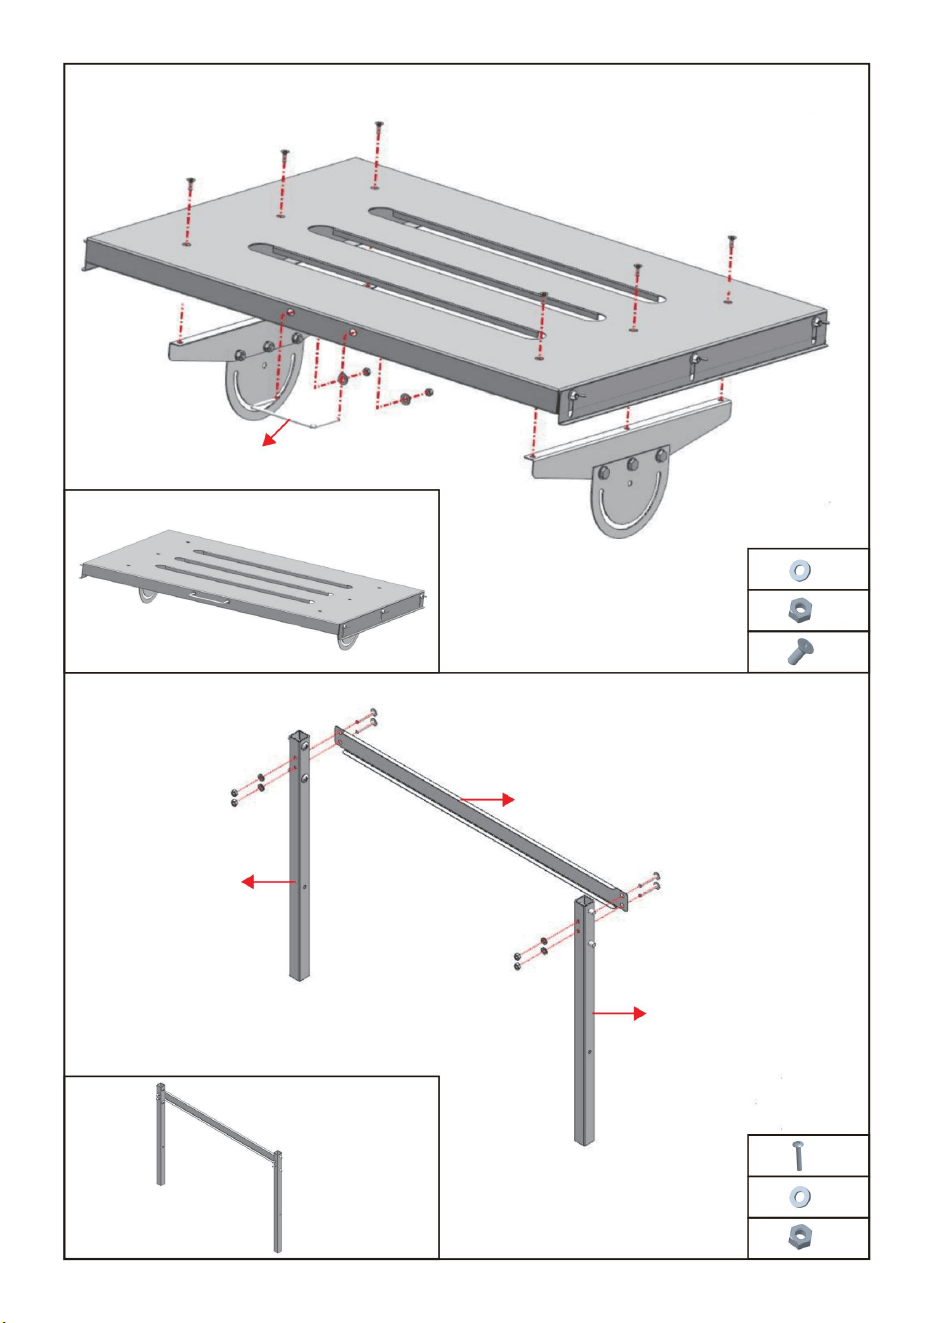
ASSEMBLY STEPS
05
× 9
STEP 1
STEP 2
1
3
20
25
2
× 6
27
× 6
26
× 6
22
4
21
Component 1
Component 2
4
21
06
× 613
× 2
10
× 2
9
× 410
× 4
9
× 47
STEP 3
STEP 4
14
5
15
28
Component 3
Component 4
07
× 810
× 8
9
× 87
STEP 5
STEP 6
29
17
19
18
11
8
16
Component 6
Component 5
16
8
12
11
11
11
19
17
× 610
× 6
9
× 67
08
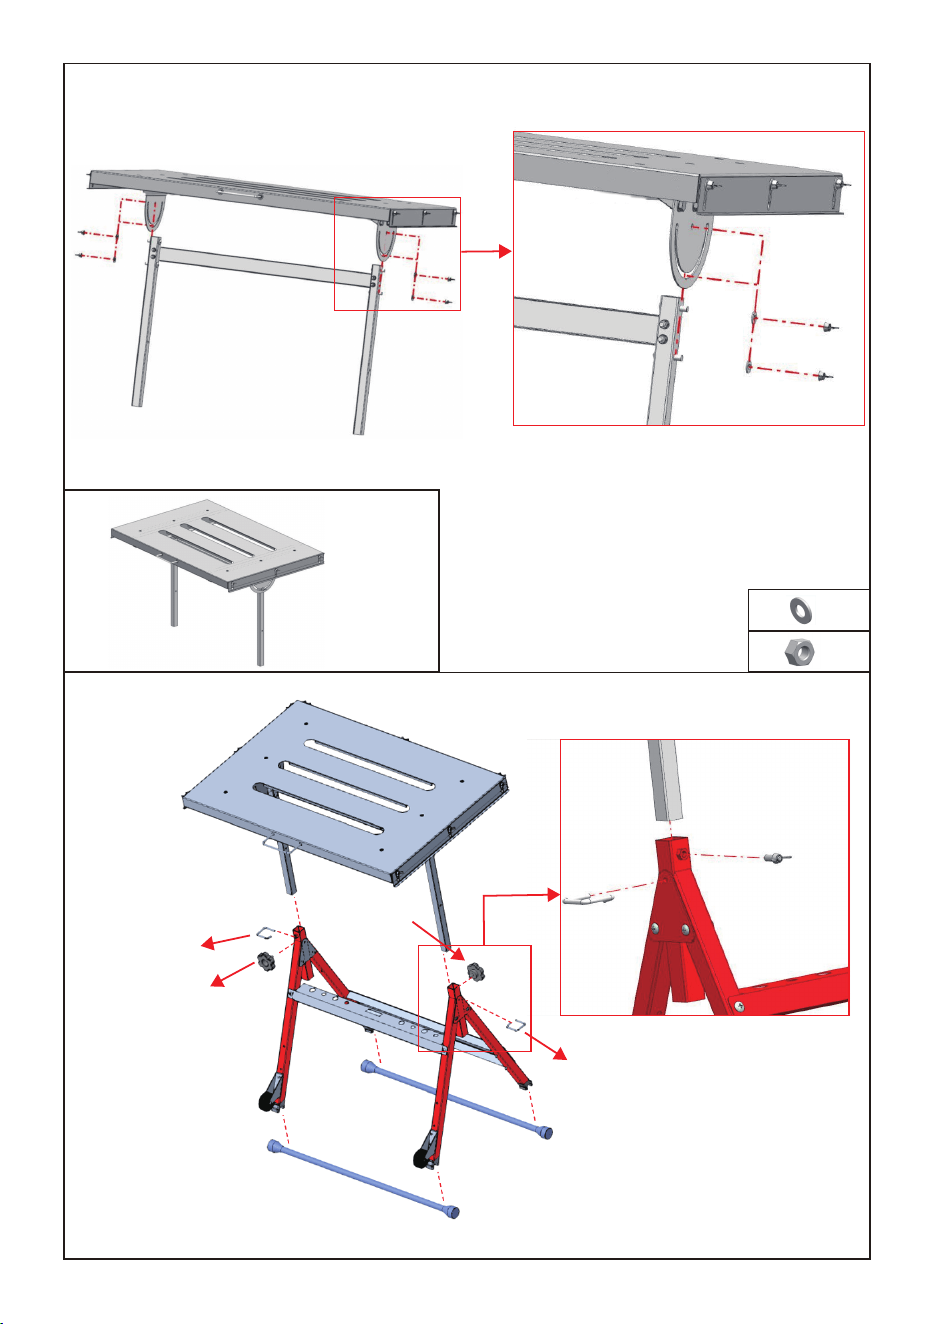
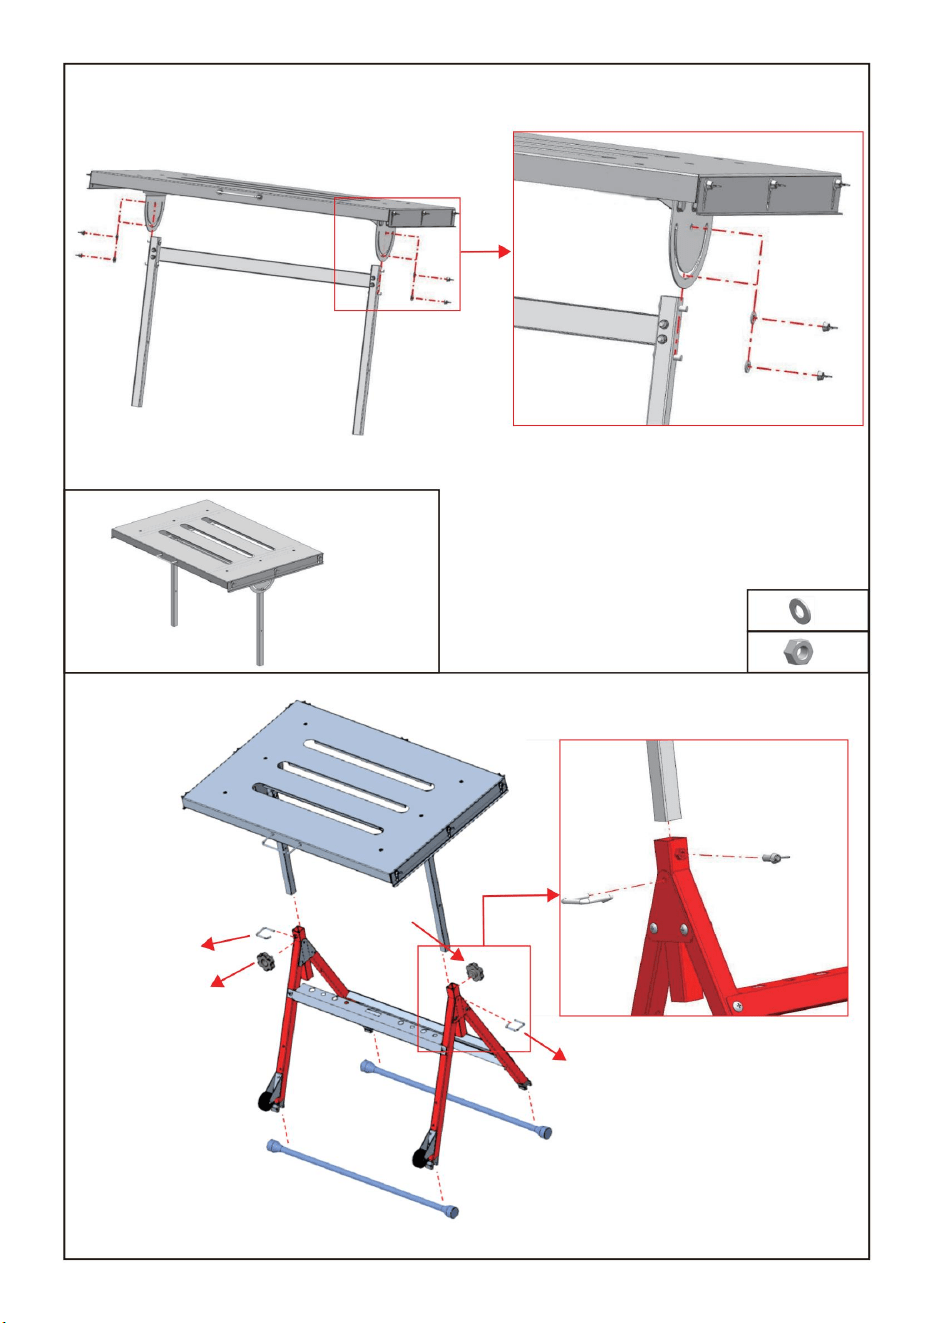
STEP 7
STEP 8
6
6
× 427
× 424
Component 7
09
30
30

STEP 10
10

Technical Support and E-Warranty Certificate
www.vevor.com/support
Made In China

MANUELD'UTILISATION
Nouscontinuonsànousengageràvousfournirdesoutilsàdesprixcompétitifs.
«Économisezlamoitié»,«Moitiéprix»outouteautreexpressionsimilaireutiliséeparnousnereprésente
qu'uneestimationdeséconomiesquevouspourriezréaliserenachetantcertainsoutilscheznouspar
rapportauxgrandesmarquesetnecouvrepasnécessairementtouteslescatégoriesd'outilsquenous
proposons.Nousvousrappelonsdebienvouloirvérifiersoigneusementlorsquevouspassezune
commandecheznoussivouséconomisezréellementlamoitiéparrapportauxgrandesmarques.
TABLEDESOUDAGE
Assistancetechniqueetcertificatdegarantie
électroniquewww.vevor.com/support
Machine Translated by Google

Modèle:WT400
BESOIND'AIDE?CONTACTEZNOUS!
Ils'agitdesinstructionsd'origine,veuillezlireattentivementtouteslesinstructionsdumanuelavantdel'utiliser.
Remarque:laquantitédepiècesindiquéedanslemanuelcorrespondàl'utilisationréelleetlespiècesnonutilisées
sontdespiècesderechange.
VEVORseréserveledroitd'interpréterclairementnotremanueld'utilisation.L'apparenceduproduitdépendduproduitquevousavez
reçu.Veuilleznousexcuser,nousnevousinformeronsplussidesmisesàjourtechnologiquesoulogiciellessontdisponiblessur
notreproduit.
INSTRUCTIONSD'INSTALLATION
TABLEDESOUDAGE
Vousavezdesquestionssurlesproduits?Vousavezbesoind'uneassistancetechnique?N'hésitezpas
ànouscontacter:[email protected]
01
Machine Translated by Google

3.Plaque1×1
2.VisàoreillesM8x16mm×9
1.Plateaudetable×1
4.Plaqued'angledeverrouillage×2
02
produituniquement.
1.Ceproduitn'estpasunjouet.Nelaissezpaslesenfantsjoueravecous'enapprocher.
2.Utiliseruniquementcommeprévu.Nepass'asseoirousetenirdeboutsurlatable.
3.Inspectezl'appareilavantchaqueutilisation.N'utilisezpasl'appareilsicertainespiècessontdesserréesouendommagées.
3.Nemontezpaslorsquevousêtesfatiguéousousl'influencedel'alcool,dedroguesoudemédicaments.
4.Lacapacitédepoidsetlesautrescapacitésduproduits'appliquentauxproduitscorrectementetcomplètementassemblés.
2.Portezdeslunettesdesécuritéetdesgantsdetravailrésistantspendantl’assemblage.
1.Assemblezuniquementensuivantcesinstructions.Unassemblageincorrectpeutêtredangereux.
4.Utiliseruniquementsurunesurfaceplane,horizontaleetdure.
Soyezattentifauxchargesdynamiques!Unmouvementdechargesoudainpeutbrièvementcréerunechargeexcessiveentraînantunedéfaillancedu
produit.
6.Lachargemaximaleduproduitestde400lb(181kg).
5.Nepasdépasserlacapacitédepoidsindiquée.Bienserrertouslesboutonsavantd'appliquerlacharge.
Pourplusd'informationssurlespiècesrépertoriéesdanslespagessuivantes,reportezvousauschémad'assemblagedecemanuel.Déballezetséparez
touteslespiècessurunezonedetravaildégagée.
PRÉCAUTIONSD'EMPLOI
CONTENUDUCOLIS
INSTRUCTIONSDEMONTAGE
PRÉCAUTIONSD'ASSEMBLAGE
Machine Translated by Google

03
9.JointplatM6×18
10.ÉcrouM6×18
11.Boucleenplastique×4
13.VisM6x16mm×4
7.VisM6x40mm×18 8.Planche2×2
6.Dispositifdeverrouillage×2
5.Tubecarrégauche×1
14.Poignée×1
15.Tubecarrédroit×1
16.Planche4×2
18.Planche6×117.Planche5×2
12.Planche3×1
Machine Translated by Google

04
23.ÉcrouàoreillesM8×4
24.JointplatM8×4
25.Planche9×1
27.ÉcrouM8×6
20.Planche7×1
22.VisM8x16mm×6
21.Planche8×2
19.Roulettes×2
28.Planche10×1
29.Plaquedefertriangulaire×2
30.Tigeàmain×2
31.Tigedesupport×2
26.RondelleélastiqueM8×6
Machine Translated by Google

05
ÉTAPESD'ASSEMBLAGE
Machine Translated by Google

Composante2
Composante1
27
×6
×6
×6
22
26
×9
2
21
21
4
25
1
3
20
4
ÉTAPE2
ÉTAPE1
06
Machine Translated by Google

Composante3
Composante4
×2
7
×6
×4
13
×2
10
9
10
×4
9
×4
5
15
28
14
ÉTAPE4
ÉTAPE3
07
Machine Translated by Google

Composante5
Composante6
×8
×8
7
9
9
10
×8
7
10
×6
×6
×6
16
12
17
11
18
19
29
8
11
11
19
16
11
17
8
ÉTAPE6
ÉTAPE5
08
Machine Translated by Google

×4
×427
24
30
6
6
30
Composante7
ÉTAPE8
ÉTAPE7
09
Machine Translated by Google

10
ÉTAPE10
Machine Translated by Google

Assistancetechniqueetcertificatdegarantieélectronique
www.vevor.com/support
FabriquéenChine
Machine Translated by Google

BENUTZERHANDBUCH
SCHWEISSTISCH
Technischer Support und E-Garantie-Zertifikat
www.vevor.com/support
„Sparen Sie die Hälfte“, „Halber Preis“ oder andere ähnliche Ausdrücke, die wir verwenden, stellen nur eine
Schätzung der Ersparnis dar, die Sie beim Kauf bestimmter Werkzeuge bei uns im Vergleich zu den großen
Topmarken erzielen können, und bedeuten nicht unbedingt, dass sie alle von uns angebotenen
Werkzeugkategorien abdecken. Wir möchten Sie freundlich daran erinnern, bei Ihrer Bestellung bei uns
sorgfältig zu prüfen, ob Sie im Vergleich zu den großen Topmarken tatsächlich die Hälfte sparen.
Wir sind weiterhin bestrebt, Ihnen Werkzeuge zu wettbewerbsfähigen Preisen anzubieten.
Machine Translated by Google

INSTALLATIONSANLEITUNG
Brauchen Sie Hilfe? Kontaktieren Sie uns!
Modell: WT400
SCHWEISSTISCH
Dies ist die Originalanleitung. Lesen Sie vor der Inbetriebnahme bitte alle Anweisungen im Handbuch sorgfältig durch.
Hinweis: Die in der Anleitung angegebene Teilemenge entspricht der tatsächlichen Nutzung und die nicht
verwendeten Teile sind Ersatzteile.
VEVOR behält sich die genaue Auslegung unseres Benutzerhandbuchs vor. Das Erscheinungsbild des Produkts richtet sich nach
dem Produkt, das Sie erhalten haben. Bitte verzeihen Sie uns, dass wir Sie nicht erneut informieren, wenn es Technologie- oder
Software-Updates für unser Produkt gibt.
Haben Sie Fragen zum Produkt? Benötigen Sie technischen Support? Kontaktieren Sie
uns gerne: [email protected]
01
Machine Translated by Google

2. M8 x 16 mm Flügelschraube × 9
4. Verriegelungswinkelplatte × 2
3. Platte 1 × 1
1. Tischplatte × 1
nur Produkt.
1. Dieses Produkt ist kein Spielzeug. Erlauben Sie Kindern nicht, mit diesem Produkt zu spielen oder sich ihm zu nähern.
4. Die Gewichtskapazität und andere Produkteigenschaften gelten für ordnungsgemäß und vollständig montierte
3. Vor jedem Gebrauch überprüfen. Nicht verwenden, wenn Teile lose oder beschädigt sind.
3. Nicht montieren, wenn Sie müde sind oder unter dem Einfluss von Alkohol, Drogen oder Medikamenten stehen.
2. Nur bestimmungsgemäß verwenden. Nicht auf dem Tisch sitzen oder stehen.
2. Tragen Sie während der Montage eine Schutzbrille und strapazierfähige Arbeitshandschuhe.
1. Bauen Sie das Gerät nur gemäß dieser Anleitung zusammen. Eine falsche Montage kann gefährlich sein.
4. Nur auf flachen, ebenen und harten Oberflächen verwenden.
Achten Sie auf dynamische Belastungen! Plötzliche Lastbewegungen können kurzzeitig zu einer Überlastung und damit zu Produktversagen
führen.
6. Die maximale Belastung des Produkts beträgt 400 lb (181 kg).
Weitere Informationen zu den auf den folgenden Seiten aufgeführten Teilen finden Sie im Montagediagramm dieses Handbuchs. Packen Sie alle
Teile auf einem freien Arbeitsbereich aus und trennen Sie sie voneinander.
5. Die angegebene Gewichtskapazität darf nicht überschritten werden. Ziehen Sie alle Knöpfe fest an, bevor Sie eine Last aufbringen.
MONTAGEANLEITUNG
PACKUNGSINHALT
VORSICHTSMASSNAHMEN BEIM GEBRAUCH
VORSICHTSMASSNAHMEN BEI DER MONTAGE
02
Machine Translated by Google

03
10. M6-Mutter × 18
11. Kunststoffschnalle × 4
9. M6 Flachdichtung × 18
15. Rechtes Vierkantrohr × 1
7. M6 x 40 mm Schraube × 18 8. Platte 2 × 2
6. Verriegelungsvorrichtung × 2
5. Linkes Vierkantrohr × 1
13. M6 x 16 mm Schraube × 4
14. Griff × 1
17. Platte 5 × 2
12. Platte 3 × 1
16. Platte 4 × 2
18. Platte 6 × 1
Machine Translated by Google

04
24. M8 Flachdichtung × 4
25. Platte 9 × 1
23. M8 Flügelmutter × 4
29. Dreieckige Eisenplatte × 2
21. Platte 8 × 2
22. M8 x 16 mm Schraube × 6
20. Platte 7 × 119. Lenkrollen × 2
27. M8 Mutter × 6 28. Platte 10 × 1
31. Stützstange × 2
26. M8 Federscheibe × 6
30. Handschaft × 2
Machine Translated by Google

05
MONTAGEANLEITUNG
Machine Translated by Google

Komponente 1
Komponente 2
21
4
1
4
25
21
3
20
SCHRITT 1
SCHRITT 2
27
× 6
26
22
× 6
× 9
2
× 6
06
Machine Translated by Google

Komponente 4
Komponente 3
5
15
28
14
SCHRITT 4
SCHRITT 3
× 2
7
× 2
× 4
13
× 6
10
9
9
10
× 4
× 4
07
Machine Translated by Google
Komponente 6
Komponente 5
16
12
17
29
11
19
18
8
11
19
11
16
11
17
8
SCHRITT 6
SCHRITT 5
× 8
× 8
7
× 6
× 8
10
9
7
9
× 6
× 610
08
Machine Translated by Google

× 4
× 427
24
Komponente 7
SCHRITT 8
SCHRITT 7
6
6
30
30
09
Machine Translated by Google

10
SCHRITT 10
Machine Translated by Google

In China hergestellt
Technischer Support und E-Garantie-Zertifikat
www.vevor.com/support
Machine Translated by Google

MANUALE D'USO
TAVOLO DI SALDATURA
Supporto tecnico e certificato di garanzia
elettronica www.vevor.com/support
Continuiamo a impegnarci per fornirvi strumenti a prezzi competitivi.
"Risparmia la metà", "Metà prezzo" o qualsiasi altra espressione simile da noi utilizzata rappresenta
solo una stima del risparmio che potresti ottenere acquistando determinati utensili con noi rispetto
ai principali marchi principali e non necessariamente intende coprire tutte le categorie di utensili da
noi offerti. Ti ricordiamo cortesemente di verificare attentamente quando effettui un ordine con noi
se stai effettivamente risparmiando la metà rispetto ai principali marchi principali.
Machine Translated by Google
Modello: WT400
HAI BISOGNO DI AIUTO? CONTATTACI!
ISTRUZIONI PER L'INSTALLAZIONE
TAVOLO DI SALDATURA
Hai domande sul prodotto? Hai bisogno di supporto tecnico? Non esitare a
contattarci: [email protected]
VEVOR si riserva la chiara interpretazione del nostro manuale utente. L'aspetto del prodotto sarà soggetto al prodotto
ricevuto. Vi preghiamo di perdonarci se non vi informeremo di nuovo se ci saranno aggiornamenti tecnologici o
software sul nostro prodotto.
Nota: la quantità di parti indicata nel manuale corrisponde all'uso effettivo e le parti non utilizzate sono
pezzi di ricambio.
Queste sono le istruzioni originali, leggere attentamente tutte le istruzioni del manuale prima di utilizzare il prodotto.
01
Machine Translated by Google
2. Vite ad alette M8 x 16 mm × 9
4. Piastra angolare di bloccaggio × 2
3. Piatto 1 × 1
1. Piano del tavolo × 1
1. Questo prodotto non è un giocattolo. Non permettere ai bambini di giocare con questo articolo o di avvicinarsi ad esso.
4. La capacità di peso e le altre capacità del prodotto si applicano a prodotti correttamente e completamente assemblati
2. Utilizzare solo come previsto. Non sedersi o stare in piedi sul tavolo.
5. Non superare la capacità di peso indicata. Serrare saldamente tutte le manopole prima di applicare il carico.
2. Durante il montaggio, indossare occhiali protettivi e guanti da lavoro resistenti.
solo prodotto.
3. Non riunirsi quando si è stanchi o sotto l'effetto di alcol, droghe o farmaci.
1. Montare solo secondo queste istruzioni. Un montaggio non corretto può essere pericoloso.
3. Ispezionare prima di ogni utilizzo. Non utilizzare se le parti sono allentate o danneggiate.
Siate consapevoli del carico dinamico! Un movimento improvviso del carico può creare brevemente un carico eccessivo, causando il
guasto del prodotto.
6. Il carico massimo del prodotto è di 400 libbre (181 kg).
Per ulteriori informazioni sulle parti elencate nelle pagine seguenti, fare riferimento allo schema di montaggio di questo manuale. Disimballare
e separare tutte le parti su un'area di lavoro libera.
4. Utilizzare solo su superfici piane, livellate e dure.
ISTRUZIONI DI MONTAGGIO
CONTENUTO DELLA CONFEZIONE
PRECAUZIONI D'USO
PRECAUZIONI DI MONTAGGIO
02
Machine Translated by Google
10. Dado M6 × 18
9. Guarnizione piatta M6 × 18
11. Fibbia in plastica × 4
12. Piatto 3 × 1
7. Vite M6 x 40 mm × 18 8. Piatto 2 × 2
6. Dispositivo di bloccaggio × 2
5. Tubo quadrato sinistro × 1
14. Maniglia × 1
16. Piatto 4 × 2
17. Piatto 5 × 2
13. Vite M6 x 16 mm × 4
15. Tubo quadrato destro × 1
18. Piatto 6 × 1
03
Machine Translated by Google

04
24. Guarnizione piatta M8 × 4
23. Dado ad alette M8 × 4
25. Tavola 9 × 1
26. Rondella elastica M8 × 6
21. Piatto 8 × 2
22. Vite M8 x 16 mm × 6
20. Piatto 7 × 119. Ruota girevole × 2
30. Gambo della mano × 2
27. Dado M8 × 6 28. Piatto 10 × 1
31. Asta di supporto × 2
29. Piastra di ferro triangolare × 2
Machine Translated by Google

05
FASI DI MONTAGGIO
Machine Translated by Google

Componente 1
Componente 2
21
1
4
4
25
21
3
20
PASSO 2
PASSO 1
06
× 6
26
× 6
22
27
× 9
2
× 6
Machine Translated by Google

Componente 3
Componente 4
5
15
28
14
PASSO 4
PASSO 3
07
× 6
× 2
7 × 4
13
× 2
10
9
9
10
× 4
× 4
Machine Translated by Google

Componente 6
Componente 5
19
29
8
11
12
16
18
17
11
17
8
19
11
16
11
PASSO 6
PASSO 5
08
× 8
× 8
7
× 6
9
10
× 8
7
9
10 × 6
× 6
Machine Translated by Google

27 × 4
× 424
Componente 7
PASSO 8
PASSO 7
09
6
6
30
30
Machine Translated by Google

PASSO 10
10
Machine Translated by Google

Made in China
Supporto tecnico e certificato di garanzia
elettronica www.vevor.com/support
Machine Translated by Google

MANUALDELUSUARIO
"Ahorrelamitad","mitaddeprecio"ocualquierotraexpresiónsimilarqueutilicemossolorepresenta
unaestimacióndelahorroquepodríaobteneralcomprarciertasherramientasconnosotrosen
comparaciónconlasprincipalesmarcasynonecesariamentesignificaquecubratodaslascategorías
deherramientasqueofrecemos.Lerecordamosque,alrealizarunpedidoconnosotros,verifique
cuidadosamentesirealmenteestáahorrandolamitadencomparaciónconlasprincipalesmarcas.
Seguimoscomprometidosabrindarleherramientasaprecioscompetitivos.
MESADESOLDADURA
Soportetécnicoycertificadodegarantía
electrónicawww.vevor.com/support
Machine Translated by Google

INSTRUCCIONESDEINSTALACIÓN
Estassonlasinstruccionesoriginales,leaatentamentetodaslasinstruccionesdelmanualantesdeoperar.
Nota:lacantidaddepiezasquesemuestraenelmanualeselusorealylaspiezasnoutilizadas
sonpiezasderepuesto.
VEVORsereservaelderechodeinterpretarnuestromanualdeusuario.Laaparienciadelproductodependerá
delproductoquehayarecibido.Lerogamosquenosdisculpepornoinformarlenuevamentesihay
actualizacionestecnológicasodesoftwareennuestroproducto.
¿NECESITAAYUDA?¡CONTÁCTENOS!
Modelo:WT400
MESADESOLDADURA
¿Tienepreguntassobreelproducto?¿Necesitaasistenciatécnica?Nodudeenponerseen
contactoconnosotros:[email protected]
01
Machine Translated by Google

Sóloproducto.
1.Esteproductonoesunjuguete.Nopermitaquelosniñosjueguenconesteartículoniseacerquenaél.
2.Utilíceloúnicamenteparaelfinprevisto.Nosesienteniseparesobreunamesa.
5.Noexcedalacapacidaddepesoindicada.Ajustebientodaslasperillasantesdeaplicarlacarga.
3.Nosereúnacuandoestécansadoobajolainfluenciadelalcohol,drogasomedicamentos.
4.Lacapacidaddepesoyotrascapacidadesdelproductoseaplicanaproductosensambladosdemaneracorrectaycompleta.
2.Usegafasdeseguridadyguantesdetrabajoresistentesduranteelmontaje.
1.Realiceelmontajeúnicamentedeacuerdoconestasinstrucciones.Unmontajeincorrectopuedesuponerunriesgo.
¡Tengacuidadoconlacargadinámica!Elmovimientorepentinodelacargapuedegenerarbrevementeunexcesodecargaqueprovoque
lafalladelproducto.
Paraobtenerinformaciónadicionalsobrelaspiezasqueseenumeranenlaspáginassiguientes,consulteeldiagramadeensamblajede
estemanual.Desenvuelvayseparetodaslaspiezasenunáreadetrabajodespejada.
3.Inspeccioneelproductoantesdecadauso.Noloutilicesihaypiezassueltasodañadas.
6.Lacargamáximadelproductoesde400lb(181kg).
4.Úseloúnicamenteensuperficiesplanas,niveladasyduras.
02
3.Placa1×1
2.TornillodemariposaM8x16mm×9
1.Tablerodemesa×1
4.Placaangulardebloqueo×2
INSTRUCCIONESDEMONTAJE
CONTENIDODELPAQUETE
PRECAUCIONESDEUSO
PRECAUCIONESDEMONTAJE
Machine Translated by Google

9.JuntaplanaM6×18
10.TuercaM6×18
11.Hebilladeplástico×4
12.Plato3×1
7.TornilloM6x40mm×18 8.Placa2×2
6.Dispositivodebloqueo×2
5.Tubocuadradoizquierdo×1
16.Placa4×2
17.Lámina5×2
15.Tubocuadradorecto×1
18.Lámina6×1
13.TornilloM6x16mm×4
14.Mango×1
03
Machine Translated by Google

23.TuercademariposaM8×4
24.JuntaplanaM8×4
25.Lámina9×1
26.ArandelaelásticaM8×6
21.Lámina8×2
22.TornilloM8x16mm×6
20.Lámina7×119.Ruedasgiratorias×2
30.Mangodemano×2
31.Varilladesoporte×2
29.Placadehierrotriangular×2
27.TuercaM8×6 28.Lámina10×1
04
Machine Translated by Google

05
PASOSDEMONTAJE
Machine Translated by Google

Componente2
Componente1
27
×6
×6
×6
22
26
×9
2
21
21
4
25
1
3
20
4
PASO1
PASO2
06
Machine Translated by Google

Componente3
Componente4
×2
7
×6
×4
10
×2
13
9
10
×4
9
×4
5
15
28
14
PASO4
PASO3
07
Machine Translated by Google

Componente6
Componente5
×8
×8
7
×6
9
10
×8
7
9
×6
×6
10
17
18
8
11
19
16
11
19
29
8
16
11
12
17
11
PASO6
PASO5
08
Machine Translated by Google

×4
×427
24
30
6
6
30
Componente7
PASO7
PASO8
09
Machine Translated by Google

10
PASO10
Machine Translated by Google

Hechoenchina
Soportetécnicoycertificadodegarantía
electrónicawww.vevor.com/support
Machine Translated by Google

INSTRUKCJA OBSŁUGI
STÓŁ SPAWALNICZY
Wsparcie techniczne i certyfikat gwarancji
elektronicznej www.vevor.com/support
„Oszczędź połowę”, „Połowa ceny” lub inne podobne wyrażenia używane przez nas stanowią
jedynie szacunkowe oszczędności, jakie możesz uzyskać kupując u nas określone narzędzia w
porównaniu z głównymi markami i niekoniecznie oznaczają one objęcie wszystkich kategorii
narzędzi oferowanych przez nas. Uprzejmie przypominamy, aby dokładnie sprawdzić, czy
składając u nas zamówienie faktycznie oszczędzasz połowę w porównaniu z głównymi markami.
Nadal staramy się oferować Państwu narzędzia w konkurencyjnych cenach.
Machine Translated by Google

Model: WT400
POTRZEBUJESZ POMOCY? SKONTAKTUJ SIĘ Z NAMI!
INSTRUKCJA INSTALACJI
STÓŁ SPAWALNICZY
Masz pytania dotyczące produktu? Potrzebujesz wsparcia technicznego? Skontaktuj
się z nami: [email protected]
VEVOR zastrzega sobie prawo do jasnej interpretacji naszej instrukcji obsługi. Wygląd produktu będzie zależał od
produktu, który otrzymałeś. Prosimy o wybaczenie, że nie poinformujemy Cię ponownie, jeśli w naszym produkcie
pojawią się jakiekolwiek aktualizacje technologiczne lub oprogramowania.
Uwaga: ilość części podana w instrukcji oznacza faktyczne zużycie, części nieużywane są częściami
zamiennymi.
To jest oryginalna instrukcja, przed rozpoczęciem użytkowania należy uważnie przeczytać wszystkie instrukcje.
01
Machine Translated by Google

1. Ten produkt nie jest zabawką. Nie pozwalaj dzieciom bawić się tym przedmiotem ani zbliżać się do niego.
4. Nośność i inne parametry produktu dotyczą produktu prawidłowo i całkowicie zmontowanego.
2. Używać wyłącznie zgodnie z przeznaczeniem. Nie siadać ani nie stawać na stole.
3. Przed każdym użyciem sprawdź. Nie używaj, jeśli części są luźne lub uszkodzone.
3. Nie przychodź na spotkania, jeśli jesteś zmęczony lub pod wpływem alkoholu, narkotyków lub leków.
tylko produkt.
2. Podczas montażu należy nosić okulary ochronne i solidne rękawice robocze.
1. Montaż należy wykonywać wyłącznie zgodnie z niniejszą instrukcją. Nieprawidłowy montaż może być niebezpieczny.
4. Stosować wyłącznie na płaskiej, równej i twardej powierzchni.
Należy pamiętać o dynamicznym obciążeniu! Nagły ruch obciążenia może chwilowo spowodować nadmierne obciążenie powodujące awarię
produktu.
5. Nie przekraczaj podanego udźwigu. Przed zastosowaniem obciążenia dokręć mocno wszystkie pokrętła.
6. Maksymalne obciążenie produktu wynosi 400 funtów (181 kg).
Aby uzyskać dodatkowe informacje dotyczące części wymienionych na kolejnych stronach, zapoznaj się ze schematem montażu w tym podręczniku.
Rozpakuj i oddziel wszystkie części na czystym obszarze roboczym.
3. Talerz 1 × 1
4. Blokada kątowa × 2
2. Śruba skrzydełkowa M8 x 16 mm × 9
1. Blat stołu × 1
ŚRODKI OSTROŻNOŚCI
ZAWARTOŚĆ OPAKOWANIA
INSTRUKCJA MONTAŻU
ŚRODKI OSTROŻNOŚCI PODCZAS MONTAŻU
02
Machine Translated by Google

03
10. Nakrętka M6 × 18
9. Uszczelka płaska M6 × 18
11. Klamra plastikowa × 4
13. Śruba M6 x 16 mm × 4
6. Urządzenie blokujące × 2
8. Talerz 2 × 27. Śruba M6 x 40 mm × 18
5. Lewa rura kwadratowa × 1
14. Uchwyt × 1
15. Prawa rura kwadratowa × 1
16. Talerz 4 × 2
17. Talerz 5 × 2 18. Talerz 6 × 1
12. Talerz 3 × 1
Machine Translated by Google

04
24. Uszczelka płaska M8 × 4
23. Nakrętka skrzydełkowa M8 × 4
25. Talerz 9 × 1
26. Podkładka sprężysta M8 × 6
21. Talerz 8 × 2
22. Śruba M8 x 16 mm × 6
20. Talerz 7 × 119. Kółka × 2
28. Talerz 10 × 1
30. Trzonek ręczny × 2
31. Pręt podporowy × 2
27. Nakrętka M8 × 6
29. Trójkątna płyta żelazna × 2
Machine Translated by Google

05
KROKI MONTAŻU
Machine Translated by Google

Składnik 1
Komponent 2
21
1
4
4
25
21
3
20
KROK 2
KROK 1
06
×6
26
×6
× 9
27
22
2
×6
Machine Translated by Google

Komponent 4
Komponent 3
5
15
28
14
KROK 3
KROK 4
07
×6
×2
7
10
13
×2
10
9
×4
×4
×4
9
Machine Translated by Google

19
29
8
11
12
16
18
17
11
17
8
19
11
16
11
Komponent 6
Komponent 5
KROK 5
KROK 6
08
×8
×8
7
×6
9
10
×8
7
9
10
×6
×6
Machine Translated by Google

Komponent 7
×4
×427
24
KROK 8
KROK 7
09
30
6
6
30
Machine Translated by Google

10
KROK 10
Machine Translated by Google

Wyprodukowano w Chinach
Wsparcie techniczne i certyfikat gwarancji elektronicznej
www.vevor.com/support
Machine Translated by Google

GEBRUIKERSHANDLEIDING
LASTAFEL
Technische ondersteuning en e-
garantiecertificaat www.vevor.com/support
"Bespaar de helft", "halve prijs" of andere soortgelijke uitdrukkingen die wij gebruiken, geven alleen een schatting
van de besparingen die u kunt behalen door bepaalde gereedschappen bij ons te kopen in vergelijking met de
grote topmerken en doseringen betekenen niet noodzakelijkerwijs dat ze alle categorieën gereedschappen dekken
die wij aanbieden. Wij herinneren u eraan om zorgvuldig te controleren of u daadwerkelijk de helft bespaart in
vergelijking met de grote topmerken wanneer u een bestelling bij ons plaatst.
Wij streven er voortdurend naar om u gereedschappen tegen concurrerende prijzen te leveren.
Machine Translated by Google

HULP NODIG? NEEM CONTACT MET ONS OP!
Model: WT400
INSTALLATIE-INSTRUCTIES
LASTAFEL
Heeft u vragen over het product? Heeft u technische ondersteuning nodig? Neem dan gerust
contact met ons op: [email protected]
Dit zijn de originele instructies. Lees de volledige handleiding zorgvuldig door voordat u het product gebruikt.
Let op: de in de handleiding vermelde hoeveelheid onderdelen is het daadwerkelijke gebruik. De ongebruikte
onderdelen zijn reserveonderdelen.
VEVOR behoudt zich een duidelijke interpretatie van onze gebruikershandleiding voor. Het uiterlijk van het product is afhankelijk van
het product dat u hebt ontvangen. Vergeef ons dat we u niet opnieuw zullen informeren als er technologie- of software-updates voor
ons product zijn.
01
Machine Translated by Google

3. Plaat 1 × 1
4. Vergrendelingshoekplaat × 2
2. M8 x 16mm vleugelschroef × 9
1. Tafelblad × 1
1. Dit product is geen speelgoed. Laat kinderen niet met dit item spelen of in de buurt ervan komen.
4. Het draagvermogen en andere producteigenschappen zijn van toepassing op correct en volledig gemonteerde producten.
2. Gebruik alleen zoals bedoeld. Ga niet op de tafel zitten of staan.
3. Inspecteer voor elk gebruik. Niet gebruiken als onderdelen los of beschadigd zijn.
3. Kom niet bijeen als u moe bent of onder invloed van alcohol, drugs of medicijnen.
alleen product.
2. Draag tijdens de montage een veiligheidsbril en stevige werkhandschoenen.
1. Monteer alleen volgens deze instructies. Onjuiste montage kan gevaarlijk zijn.
4. Alleen gebruiken op een vlakke, vlakke en harde ondergrond.
Let op dynamische belasting! Plotselinge belastingbewegingen kunnen kortstondig overmatige belasting veroorzaken, waardoor
het product kan falen.
6. De maximale belasting van het product bedraagt 400 lb (181 kg).
5. Overschrijd de vermelde gewichtscapaciteit niet. Draai alle knoppen stevig vast voordat u de belasting aanbrengt.
Voor aanvullende informatie over de onderdelen die op de volgende pagina's worden vermeld, raadpleegt u het montageschema van
deze handleiding. Pak alle onderdelen uit en scheid ze op een leeg werkgebied.
GEBRUIK VOORZORGSMAATREGELEN
INHOUD VAN HET PAKKET
MONTAGE-INSTRUCTIES
MONTAGEVOORZORGSMAATREGELEN
02
Machine Translated by Google

03
10. M6 moer × 18
9. M6 platte pakking × 18
11. Kunststof gesp × 4
15. Rechter vierkante buis × 1
7. M6 x 40mm schroef × 18 8. Plaat 2 × 2
6. Vergrendelingsapparaat × 2
5. Linker vierkante buis × 1
13. M6 x 16mm schroef × 4
14. Handvat × 1
12. Plaat 3 × 1
17. Plaat 5 × 2 18. Plaat 6 × 1
16. Plaat 4 × 2
Machine Translated by Google

04
24. M8 platte pakking × 4
23. M8 vleugelmoer × 4
25. Plaat 9 × 1
27. M8 moer × 6
21. Plaat 8 × 2
22. M8 x 16mm schroef × 6
20. Plaat 7 × 119. Zwenkwielen × 2
28. Plaat 10 × 1
29. Driehoekige ijzeren plaat × 2
30. Handschacht × 2
26. M8 veerring × 6
31. Steunstang × 2
Machine Translated by Google

05
MONTAGESTAPPEN
Machine Translated by Google
21
1
4
4
3
21
25
20
Onderdeel 1
Onderdeel 2
STAP 2
STAP 1
06
× 6
26
× 6
× 6
× 9
27
22
2
Machine Translated by Google

Onderdeel 4
Onderdeel 3
5
15
28
14
STAP 4
STAP 3
07
× 6
× 2
7
× 4
13
× 2
10
9
10
× 4
9
× 4
Machine Translated by Google

Onderdeel 6
Onderdeel 5
19
29
8
11
12
16
18
17
11
17
8
19
11
16
11
STAP 6
STAP 5
08
× 8
× 8
7
× 6
× 8
10
9
7
9
10 × 6
× 6
Machine Translated by Google
27 × 4
× 424
Onderdeel 7
STAP 8
STAP 7
09
30
6
6
30
Machine Translated by Google
10
STAP 10
Machine Translated by Google

Gemaakt in China
Technische ondersteuning en e-garantiecertificaat
www.vevor.com/support
Machine Translated by Google

SVETSBORD
"Spara halva", "halva priset" eller andra liknande uttryck som används av oss representerar bara
en uppskattning av besparingar du kan dra nytta av att köpa vissa verktyg hos oss jämfört med
de stora toppmärkena och doser behöver inte nödvändigtvis täcka alla kategorier av verktyg som
erbjuds av oss. Du påminns vänligen om att noggrant kontrollera när du gör en beställning hos
oss om du faktiskt sparar hälften i jämförelse med de främsta stora varumärkena.
Vi fortsätter att vara engagerade i att ge dig verktyg till konkurrenskraftiga priser.
ANVÄNDARMANUAL
Teknisk support och e-garanticertifikat
www.vevor.com/support
Machine Translated by Google

BEHÖVER HJÄLP? KONTAKTA OSS!
Modell: WT400
Detta är den ursprungliga instruktionen, läs alla instruktioner noggrant innan du använder den.
Obs: mängden delar som visas i manualen är den faktiska användningen och de oanvända
delarna är reservdelar.
VEVOR reserverar sig för en tydlig tolkning av vår användarmanual. Utseendet på produkten är beroende
av den produkt du fått. Ursäkta oss att vi inte kommer att informera dig igen om det finns någon teknik
eller mjukvaruuppdateringar på vår produkt.
INSTALLATIONSANVISNING
SVETSBORD
01
Har du produktfrågor? Behöver du teknisk support? Kontakta oss gärna:
Machine Translated by Google

3. Tallrik 1 × 1
4. Låsvinkelplatta × 2
2. M8 x 16 mm vingskruv × 9
1. Bordsskiva × 1
02
1. Denna produkt är inte en leksak. Låt inte barn leka med eller närma sig detta föremål.
endast produkt.
2. Använd endast på avsett sätt. Sitt eller stå inte på bordet.
4. Använd endast på plan, jämn, hård yta.
3. Sätt dig inte ihop när du är trött eller påverkad av alkohol, droger eller mediciner.
4. Viktkapacitet och andra produktegenskaper gäller för korrekt och fullständigt monterade
2. Använd skyddsglasögon och kraftiga arbetshandskar vid montering.
1. Montera endast enligt dessa instruktioner. Felaktig montering kan vara en fara.
5. Överskrid inte den angivna viktkapaciteten. Dra åt alla knoppar ordentligt innan du applicerar belastning.
Var uppmärksam på dynamisk laddning! Plötsliga laströrelser kan kortvarigt skapa överbelastning som orsakar
produktfel.
6. Produktens maximala belastning är 400 lb (181 kg).
3. Inspektera före varje användning. Använd inte om delar är lösa eller skadade.
För ytterligare information om delarna som listas på följande sidor, se monteringsdiagrammet i denna handbok.
Packa upp och separera alla delar på en fri arbetsyta.
MONTERINGSINSTRUKTIONER
ANVÄND FÖRSIKTIGHETSÅTGÄRDER
FÖRSIKTIGHETSÅTGÄRDER FÖR MONTERING
PAKETENS INNEHÅLL
Machine Translated by Google

03
11. Plastspänne × 4
10. M6 Mutter × 18
8. Tallrik 2 × 2
12. Tallrik 3 × 1
6. Låsenhet × 2
9. M6 platt packning × 18
7. M6 x 40 mm skruv × 18
5. Vänster fyrkantsrör × 1
13. M6 x 16 mm skruv × 4
15. Höger fyrkantsrör × 1
16. Tallrik 4 × 2
14. Handtag × 1
17. Tallrik 5 × 2 18. Tallrik 6 × 1
Machine Translated by Google
25. Tallrik 9 × 1
24. M8 platt packning × 4
22. M8 x 16 mm skruv × 6
26. M8 fjäderbricka × 6
21. Tallrik 8 × 2
23. M8 vingmutter × 4
20. Tallrik 7 × 119. Hjul Hjul × 2
28. Tallrik 10 × 1
30. Handskaft × 2
31. Stödstång × 2
29. Triangulär järnplatta × 2
27. M8 Mutter × 6
04
Machine Translated by Google
MONTERINGSSEG
05
Machine Translated by Google

Komponent 1
Komponent 2
× 6
27
× 6
× 6
22
26
× 9
2
21
21
4
4
25
1
3
20
STEG 2
STEG 1
06
Machine Translated by Google
Komponent 4
Komponent 3
× 2
× 6
7 × 4
13
× 2
10
9
9
× 4
10
× 4
5
28
14
15
STEG 4
STEG 3
07
Machine Translated by Google

Komponent 6
Komponent 5
10 × 8
7
× 6
9
× 8
× 8
7
10
9
× 6
× 6
18
17
11
12
16
11
8
19
29
16
11
19
11
8
17
STEG 6
STEG 5
08
Machine Translated by Google

Komponent 7
30
6
6
30
× 4
27
24
× 4
STEG 7
STEG 8
09
Machine Translated by Google

10
STEG 10
Machine Translated by Google

Teknisk support och e-garanticertifikat
www.vevor.com/support
Tillverkad i Kina
Machine Translated by Google