
Technical Support and E-Warranty Certificate
www.vevor.com/support
PASTE LIQUID FILLING MACHINE
USER MANUAL
We continue to be committed to provide you tools with competitive price.
"Save Half", "Half Price" or any other similar expressions used by us only represents an
estimate of savings you might benefit from buying certain tools with us compared to the major
top brands and does not necessarily mean to cover all categories of tools offered by us. You
are kindly reminded to verify carefully when you are placing an order with us if you are
actually saving half in comparison with the top major brands.

- 1 -
Have product questions? Need technical support? Please feel free to
contact us:
Technical Support and E-Warranty Certificate
www.vevor.com/support
NEED HELP? CONTACT US!
This is the original instruction, please read all manual instructions
carefully before operating. VEVOR reserves a clear interpretation of our
user manual. The appearance of the product shall be subject to the
product you received. Please forgive us that we won't inform you again if
there are any technology or software updates on our product.
Paste Liquid Filling
Machine
SY-1200-V1
SY-1200-V2
SY-1200-V3
SY-M90-V1
SY-M90-V2
SY-M90-V3

- 2 -
1. Read carefully and understand all ASSEMBLY AND OPERATION
INSTRUCTIONS before operating.
2. Failure to follow the safety rules and other basic safety precautions may
result in serious personal injury.
GENERAL SAFETY RULES
Important reminder
1.Before use, please carefully read the product manual and ensure that
you understand and comply with all safety warnings and usage
precautions.
2. Do not use this product for other non-designated purposes to avoid
unexpected risks.
3. This product is only applicable to users within the specified age group
and scope of application. Please strictly comply with relevant age
restrictions and warnings.
4. If there are any abnormalities in the product, please stop using it
immediately and contact the after-sales service center for consultation or to
arrange for repair.
Environmental requirements for use
1. Please use in a dry and well ventilated environment to avoid extreme
environmental conditions such as water activation, high temperature, high
humidity, and extremely low temperature.
2. Avoid direct sunlight or contact with fire sources to prevent product
damage or fire.
3. Please ensure a stable usage environment and prevent the product from
being hit or dropped to avoid damage.
Safety Operation Guidelines
1. Please use a suitable power supply and voltage, and do not use
damaged power cords or plugs.
2. When using this product, do not short-circuit circuits or connect
mismatched devices to avoid risks such as electric shock and fire.

- 3 -
3. When foreign objects are found on the surface of the product, please
immediately stop using and remove the foreign objects before continuing to
use.
4. When using this product continuously for a long time, please rest in good
time to avoid excessive fatigue.
5. Do not apply external force to the battery to avoid safety hazards such
as battery rupture and leakage.
Maintenance and upkeep
1. Regularly maintain and clean the product. Before cleaning, please
disconnect the power supply and wipe it with a dry cloth. Be careful not to
use alcohol, acid or alkali solutions,corrosive substances, etc
2. When the product is not in use for a long time, please disconnect the
power supply promptly to save energy and extend the product's lifespan.
3. Do not disassemble the product or replace components on your own. If
you encounter any malfunctions, please contact the after-sales service
center.
Emergency handling measures
1. When there are abnormal situations or accidents with the product,
please stop using it as soon as possible.If overheating, smoking, or
abnormal sound are found, please immediately cut off the power supply
and contact the after-sales service center.
2. If the product involves an emergency situation that may harm personal
safety, please call the emergency rescue number in a timely manner.
Disclaimers
We attach great importance to the safety and quality of our products, but
cannot assume responsibility for safety accidents caused by improper use
or operation.
SAVE THESE INSTRUCTIONS

- 4 -
MODEL AND PARAMETERS
Model
SY-120
0-V1
SY-120
0-V2
SY-120
0-V3
SY-M90
-V1
SY-M90
-V2
SY-M90
-V3
Suitable
liquid
All free-flowing pastes and
liquids (no particles) such as
Soy sauce, beverages, white
wine, vinegar, milk, alcohol
( less than 75%) etc
All free-flowing pastes and
liquids (no particles) such as
Soy sauce, beverages, white
wine, vinegar, milk, alcohol
( less than 75%) etc
Filling
Range
5g~300g
5~50g
Max Flow
Rate
1000ml/min
100ml/min
Control
Mode
Automatic
Automatic
Rating(s)
AC 120V
60Hz
AC 230V
50Hz
AC 230V
50Hz
AC 120V
60Hz
AC 230V
50Hz
AC 230V
50Hz
Power(Max.)
39W
39W
39W
15W
15W
15W
- 5 -
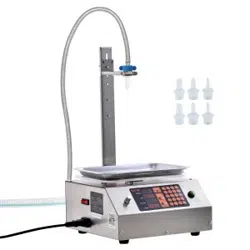
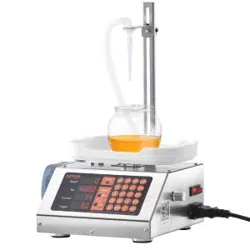
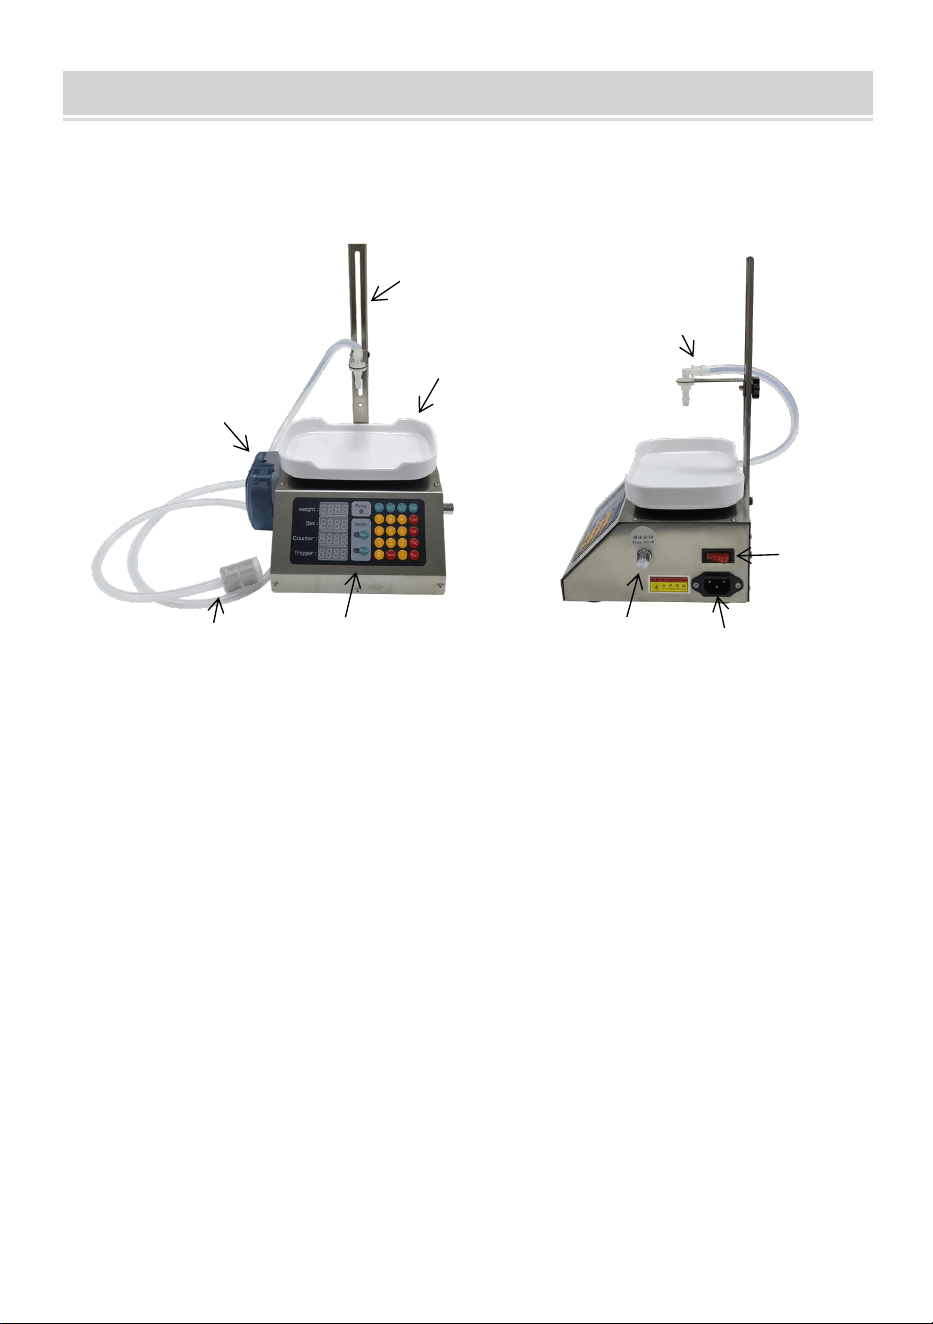
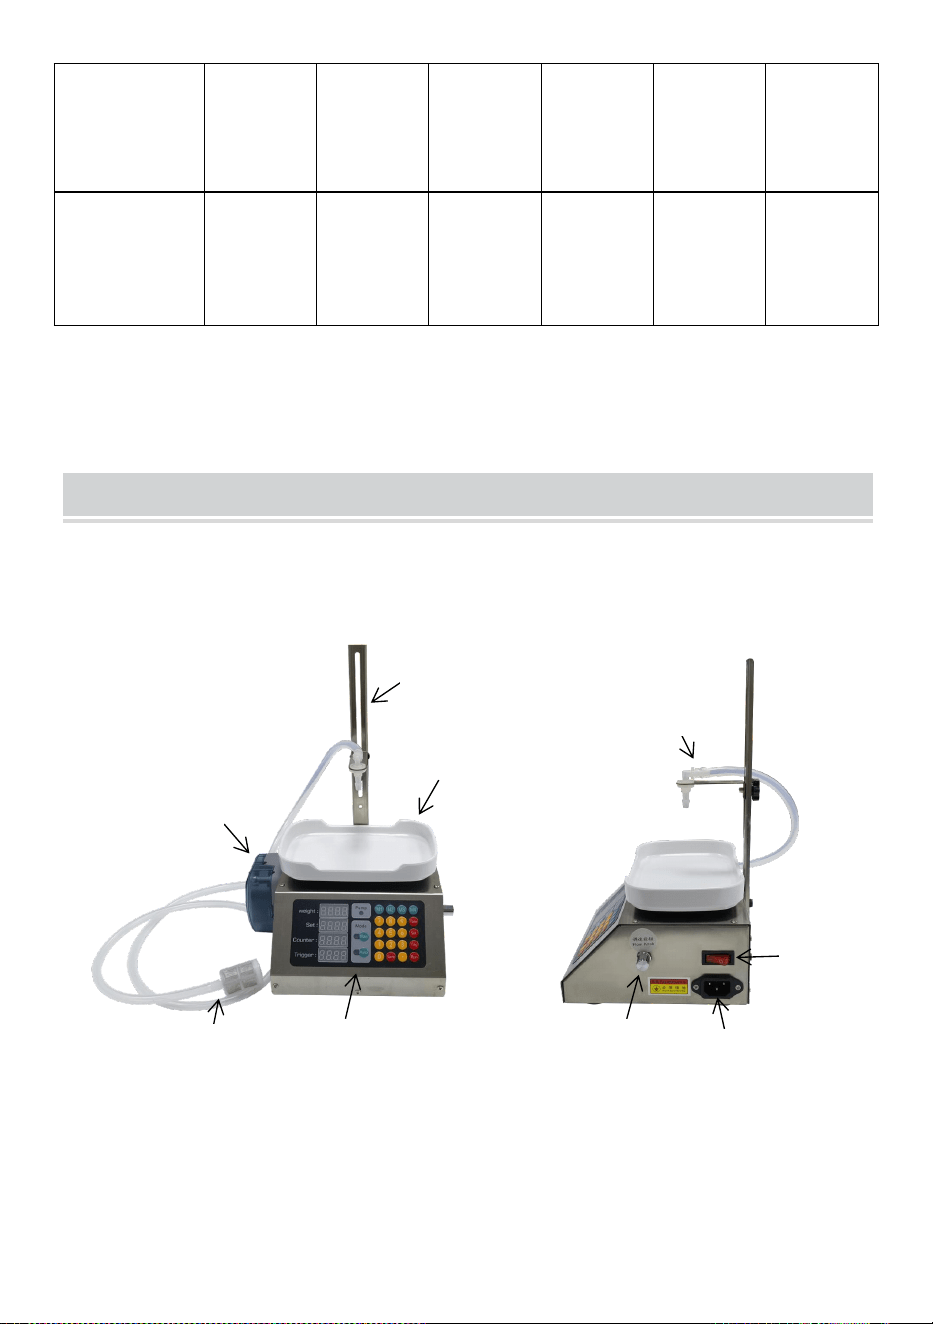
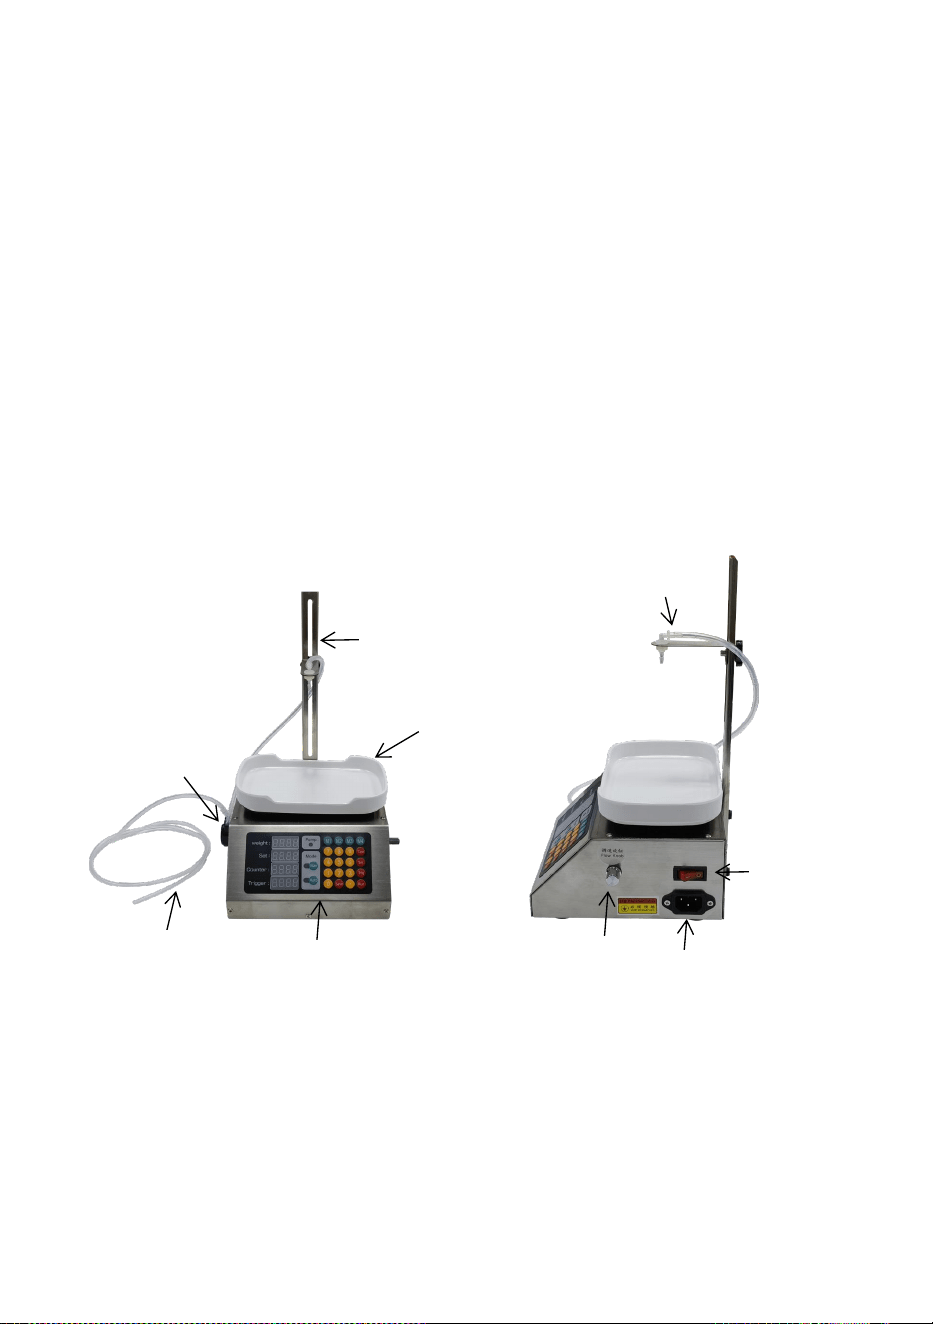
STRUCTURE DIAGRAM
SY-1200-V1,SY-1200-V2,SY-1200-V3
1. Bracket 2. Tray 3. Control Panel 4. Inlet Hose and Filter
5.Peristaltic Pump 6.Outlet Hose and Filling Nozzle
7. Power Switch 8. AC Power Socket 9. Flow Knob
1
2
3
4
5
6
7
8
9
- 6 -
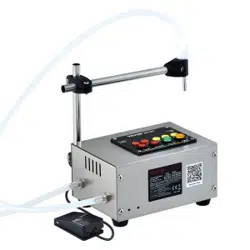
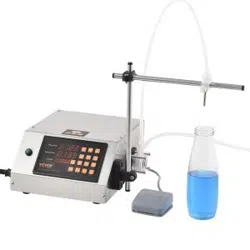
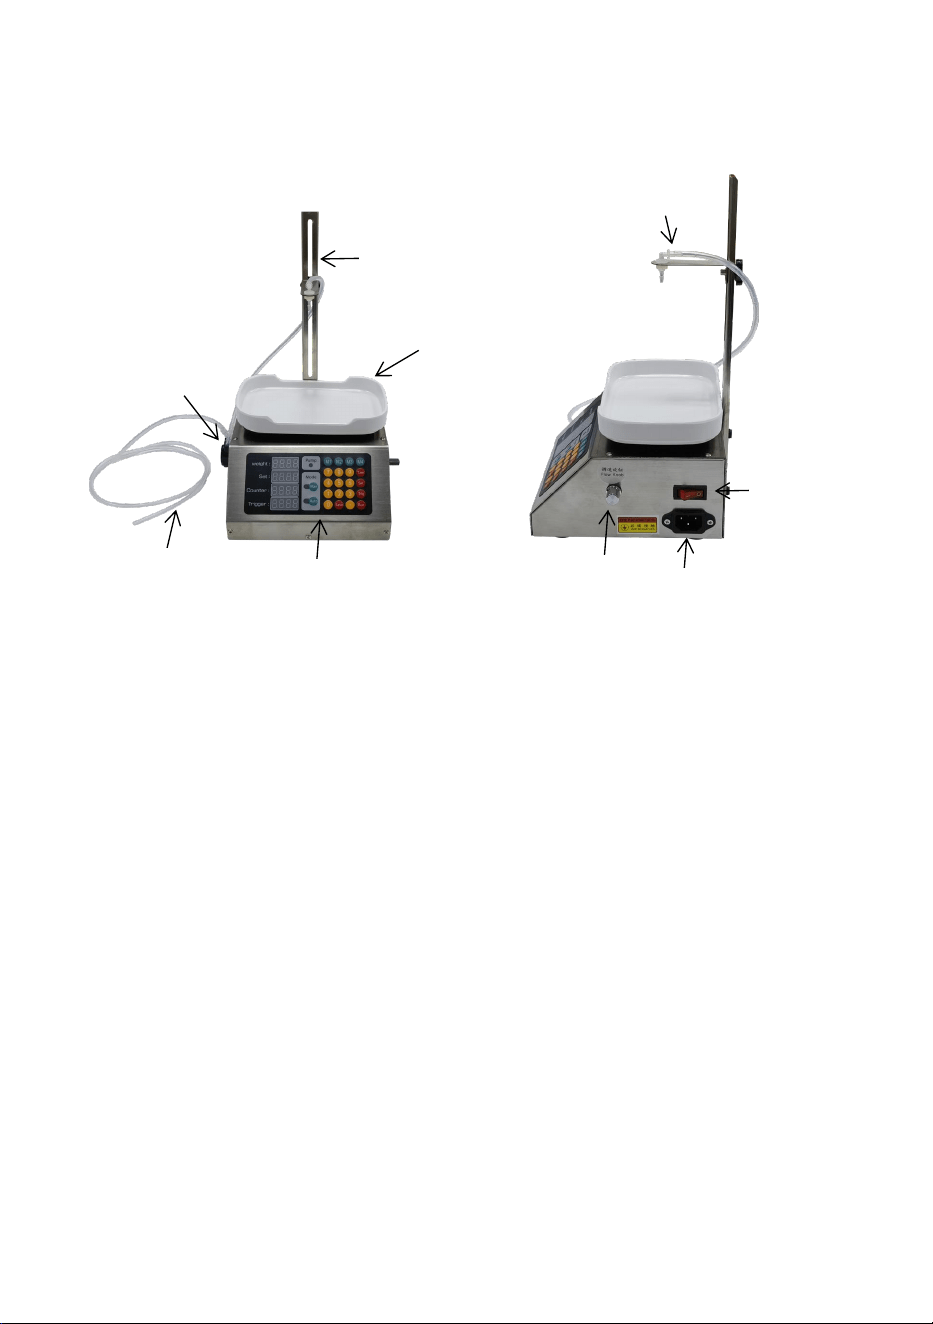
SY-M90-V1,SY-M90-V2,SY-M90-V3
1.Bracket 2. Tray 3. Control Panel 4. Inlet Hose
5.Peristaltic Pump 6.Outlet Hose and Filling Nozzle
7. Power Switch 8. AC Power Socket 9. Flow Knob
2
3
1
4
6
5
7
8
9

- 7 -
COMPONENTS
SY-1200-V1
SY-1200-V2
SY-1200-V3
SY-M90-V1
SY-M90-V2
SY-M90-V3
Power Cord
×1
×1
Bracket
×1
×1
Hose(with filter)
×1
/
Silicone Hose(short)
×1
/
Inlet Hose
/
×1
Outlet Hose
/
×1
Sponge Strip(black)
×1
×1
Filling Nozzle
×2
×2
User Manual
×1
×1
Model
Parts
- 8 -
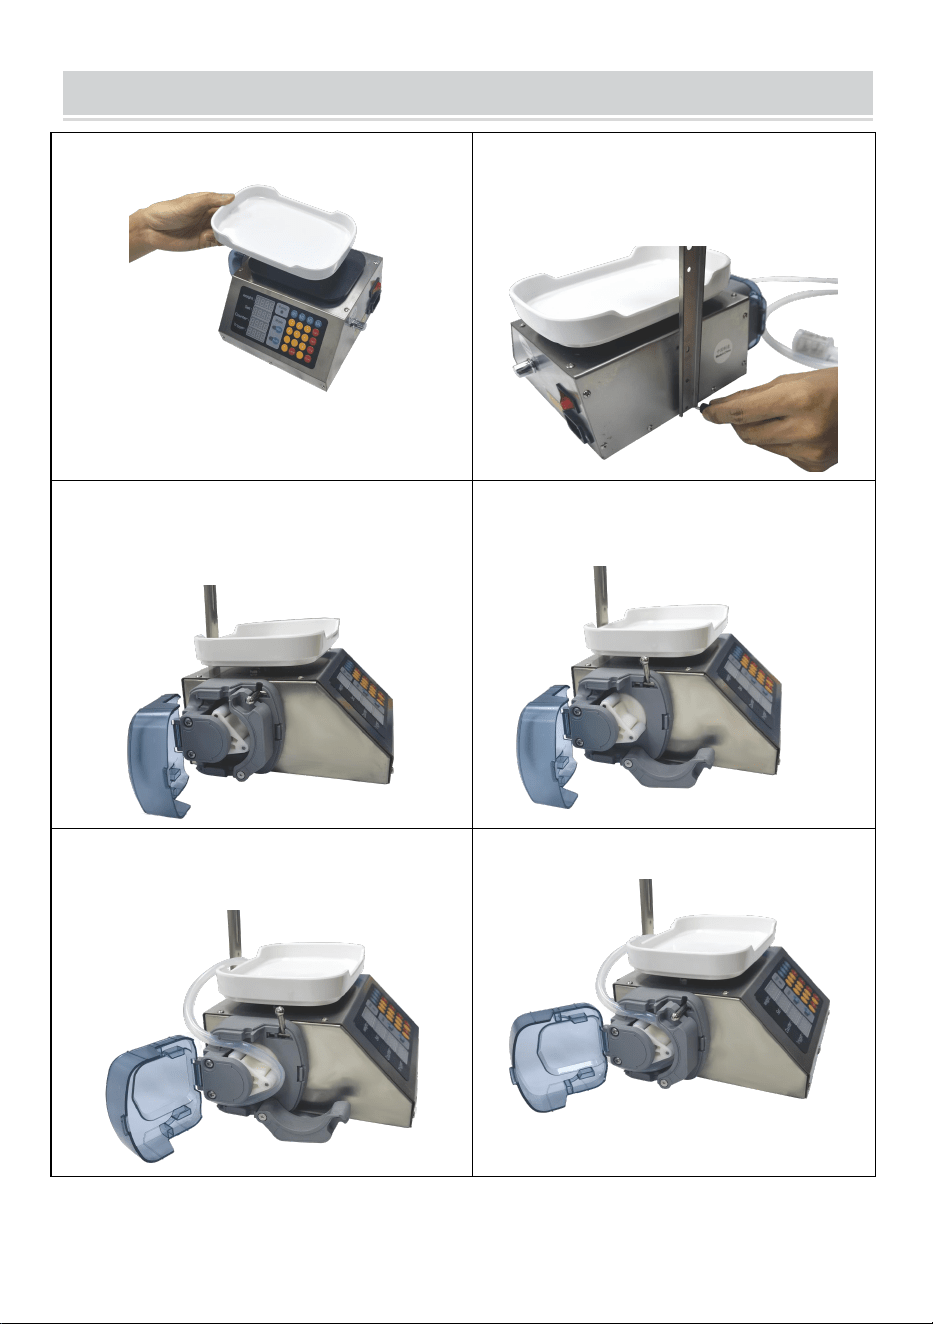
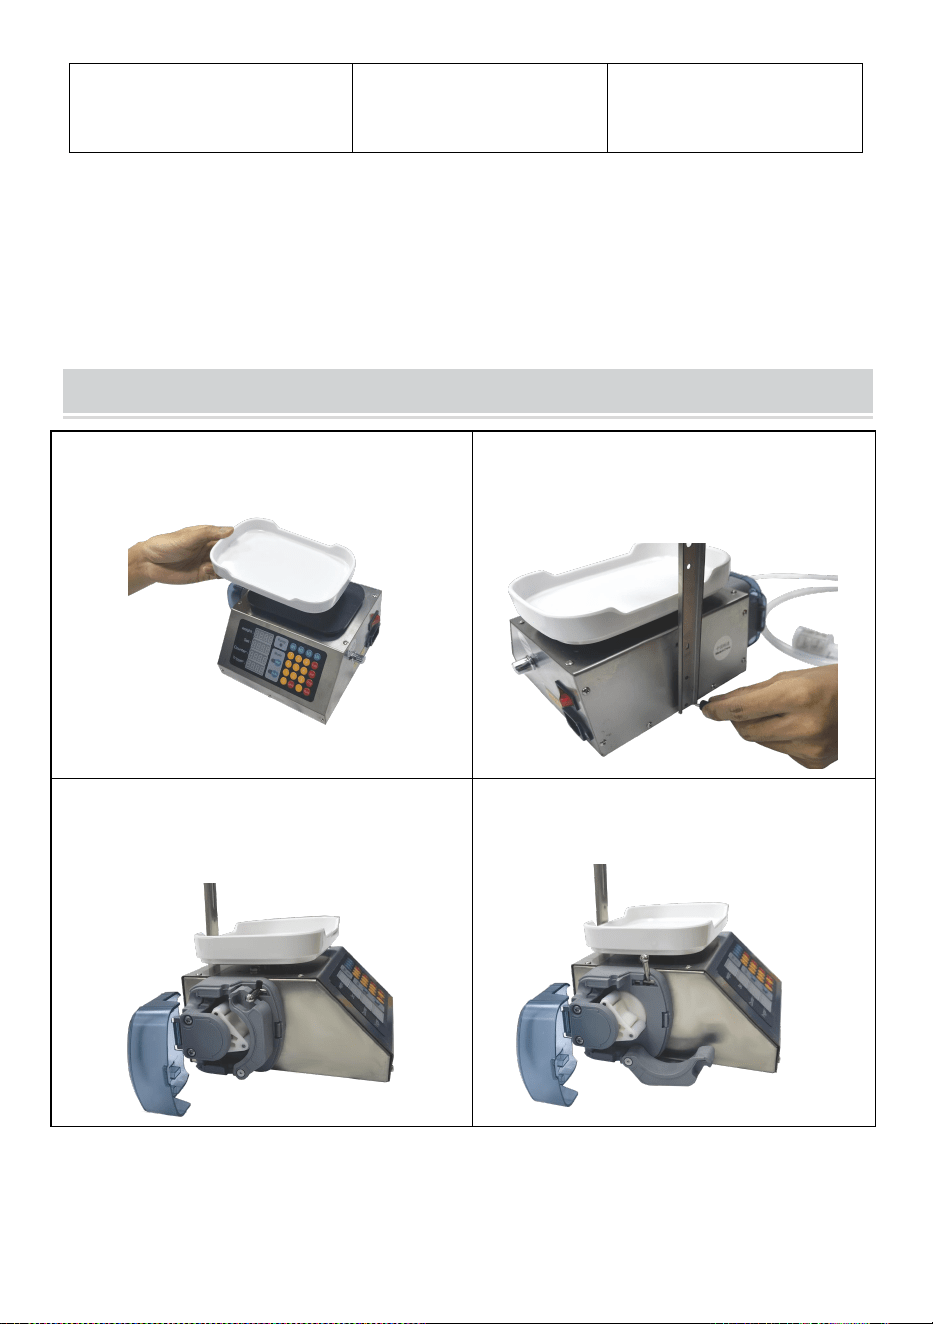
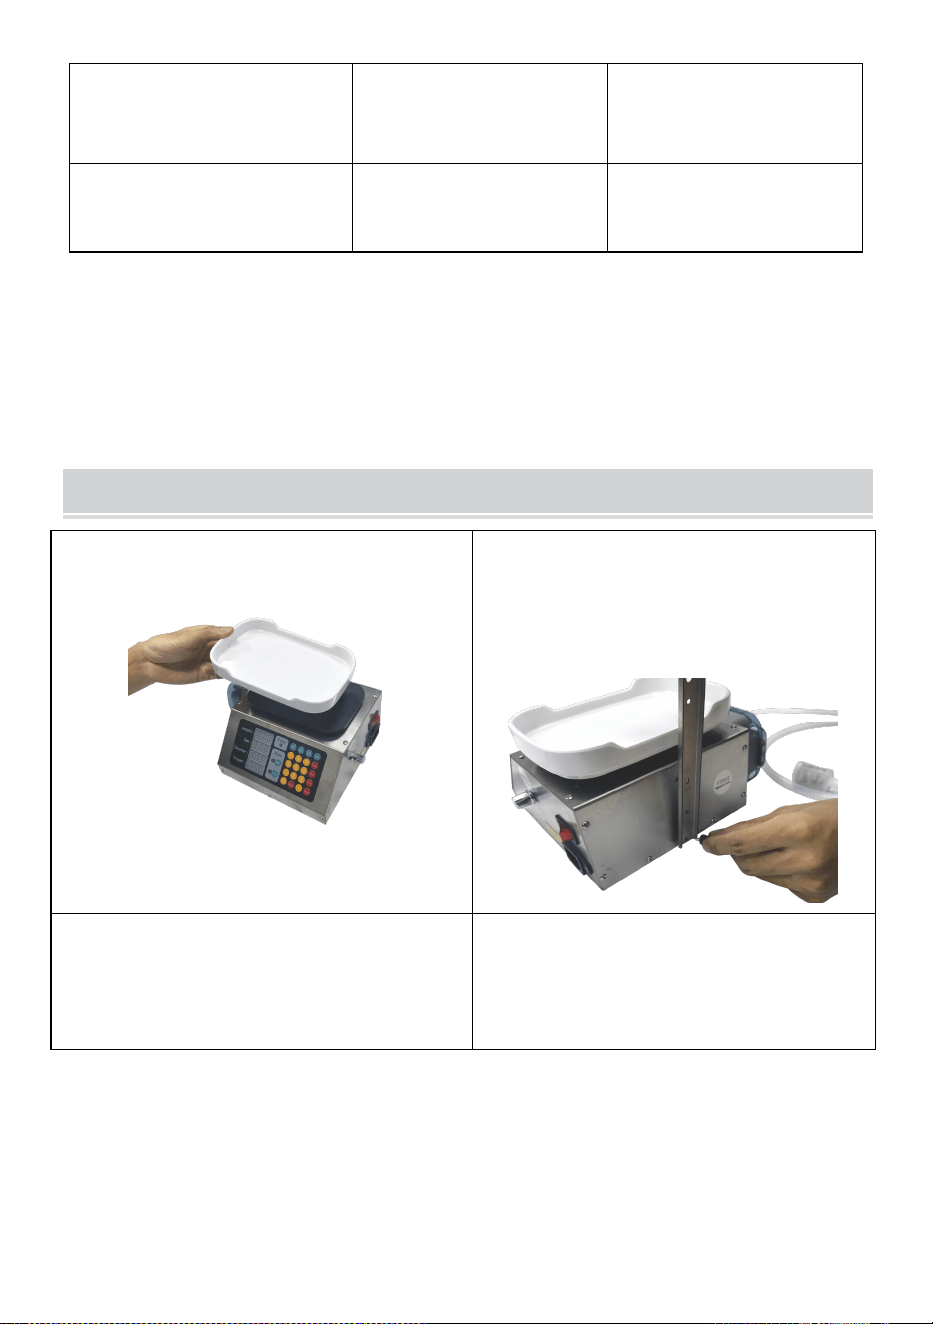
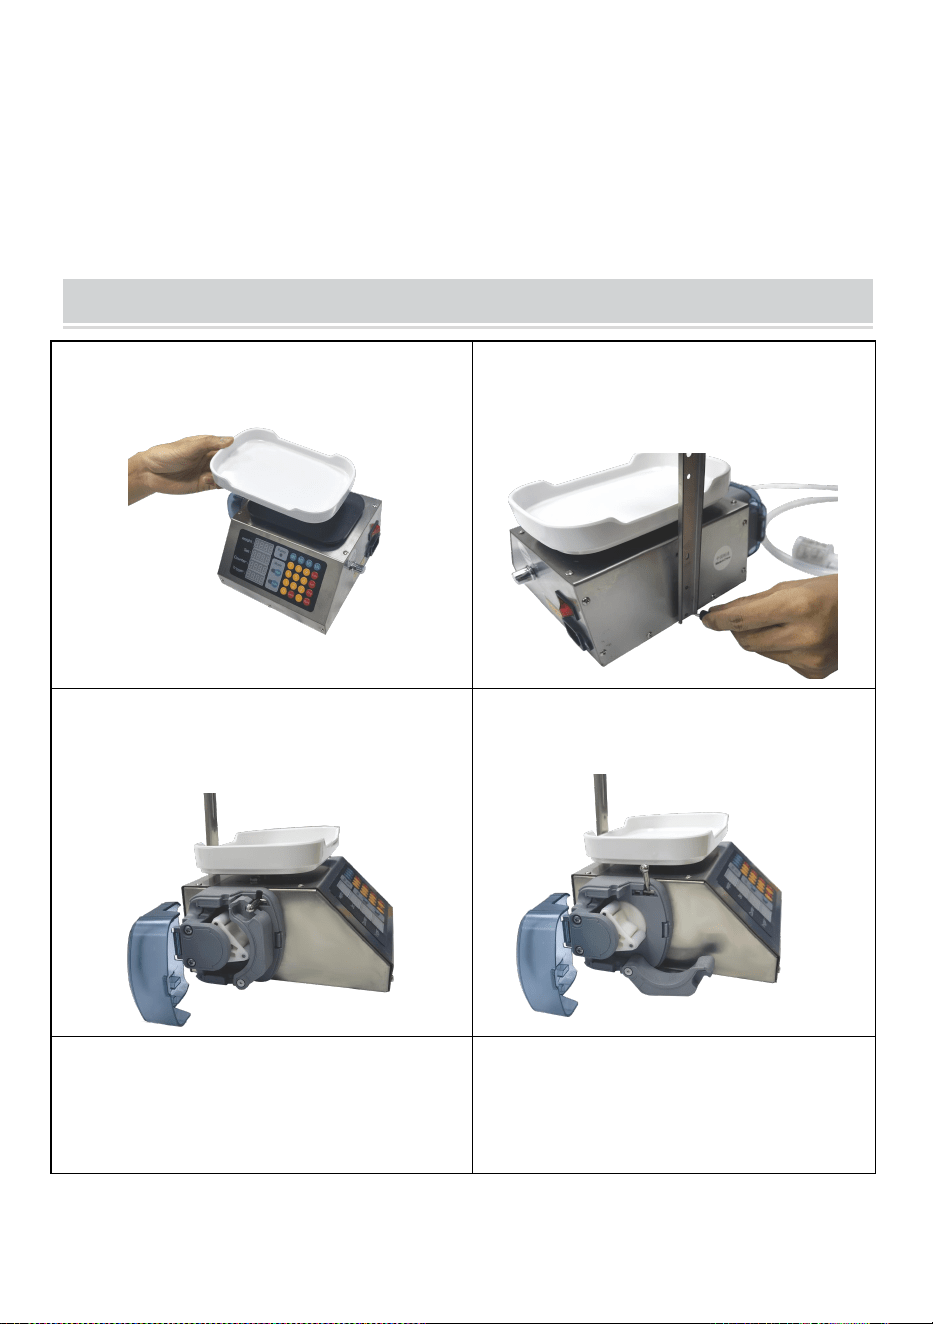
OPERATING INSTRUCTIONS
1.Place the tray on top as shown
2.Removal screws and Install the
bracket and lock it with screws as
shown.
3.Open the cover of the peristaltic
pump.
4.Open the clips of the peristaltic
pump.
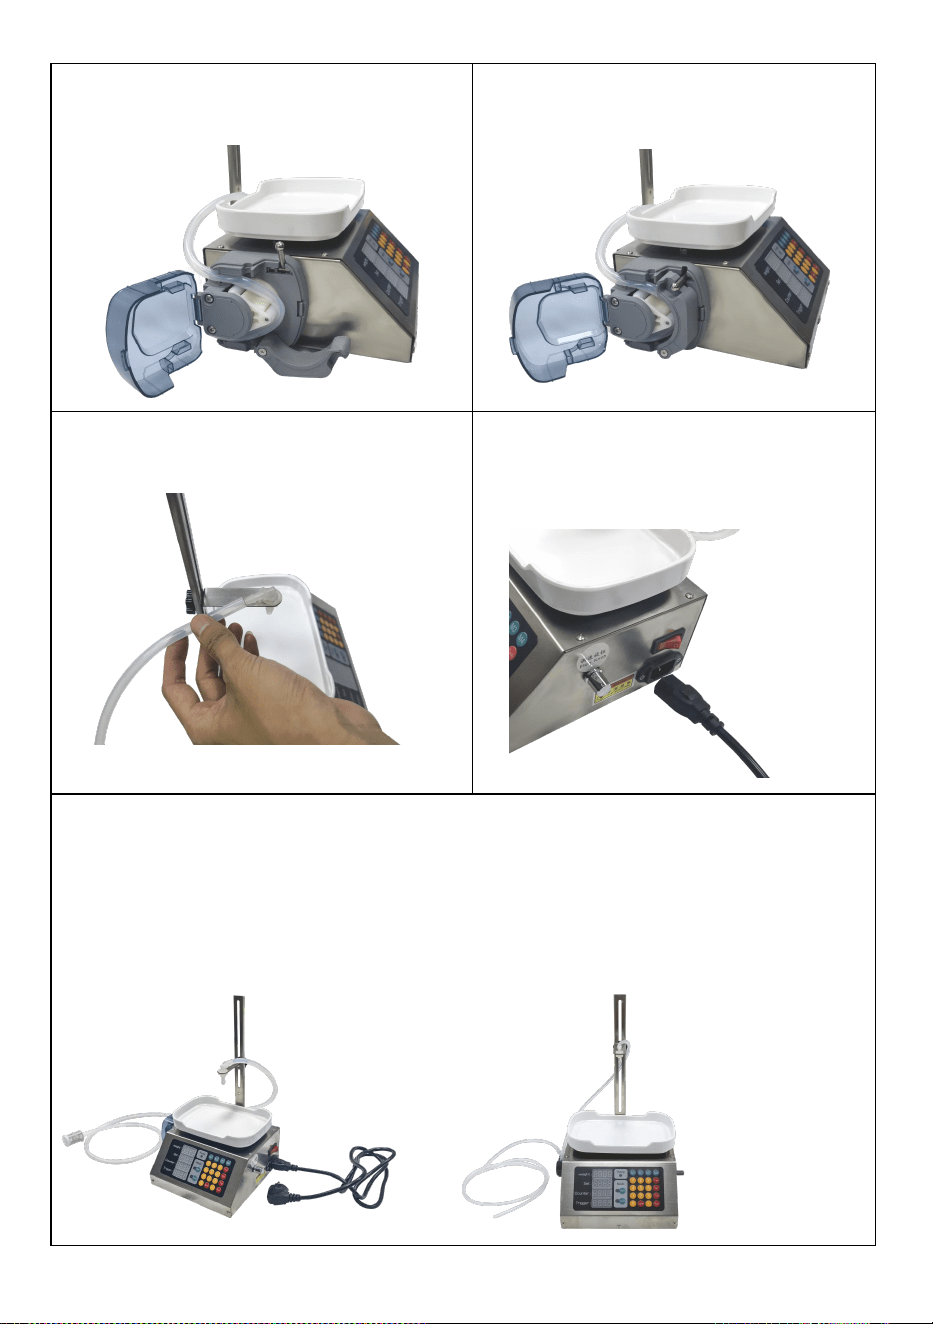
5.Wrap the hose into the peristaltic
pump as shown.
6. Fasten the clips and cover the lid.
- 9 -
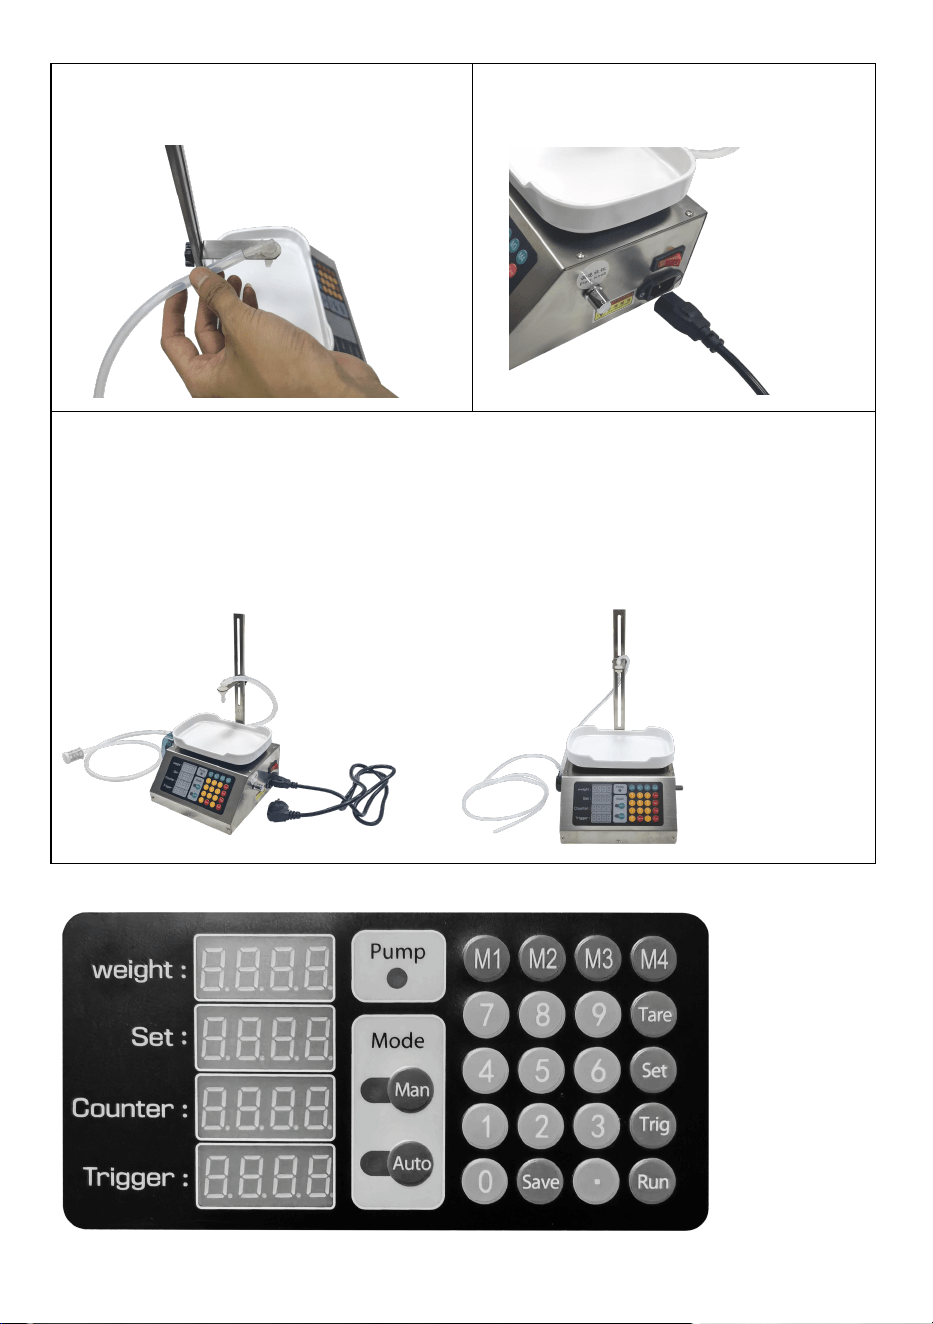
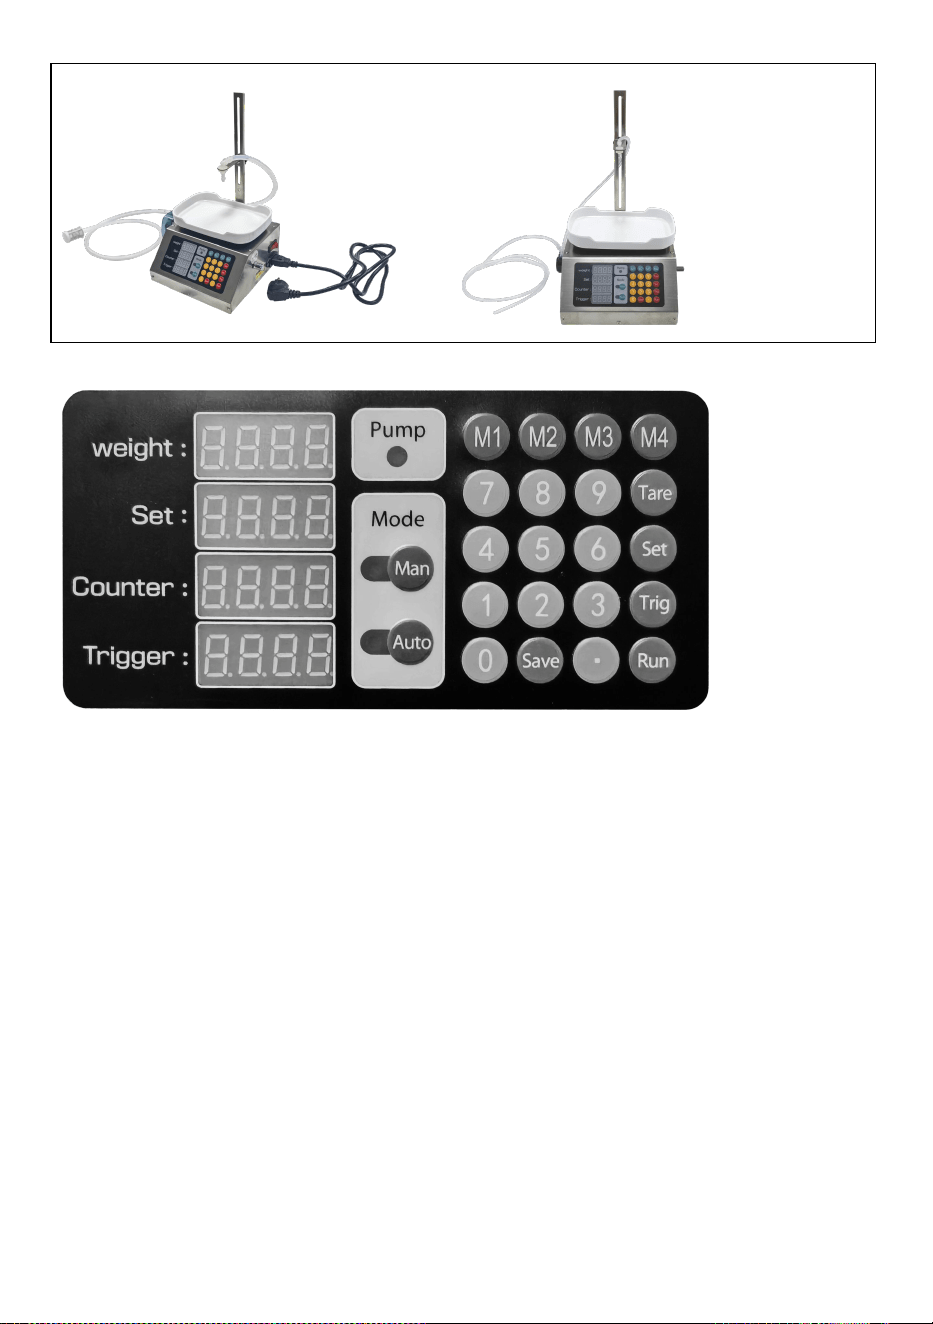
7.Adjust filling nozzle height and plug
in hose.
8.Insert the power cord as shown.
9. Product assembly completed.
Note:The product is supplied with a thin filling nozzle.You can install it as
needed.
After use,it can be cleaned by repeatedly pumping water.Or replace the
hose.
The operating instructions

- 10 -
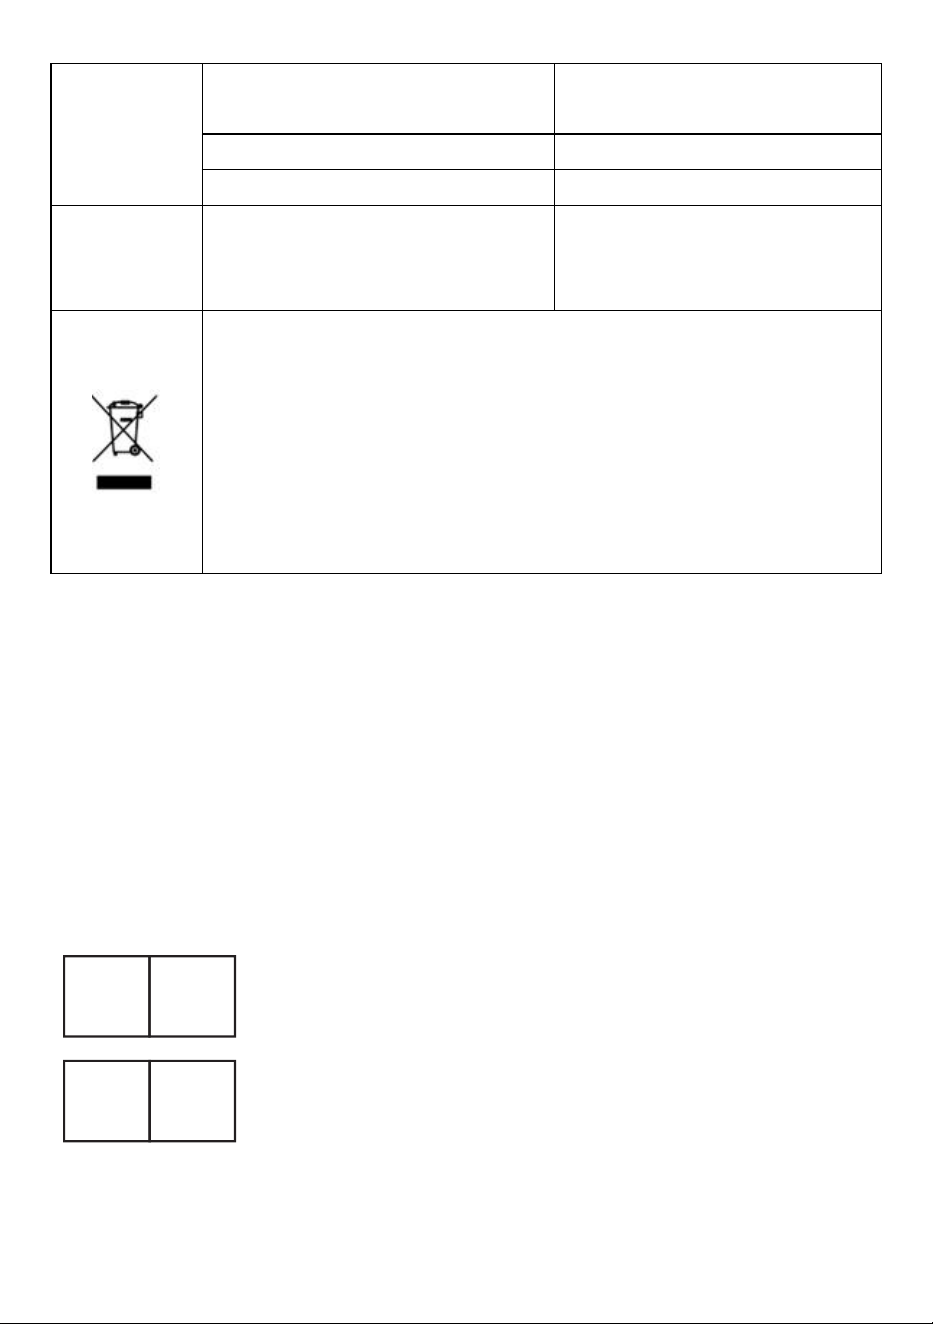
The display window and button function description
1, Display window:
Weight : displays the actual weight of the item being weighed
Set: User. set weight to be filled
Counter : number of bottles that have been filled
Trigger : the weight value that triggers the auto start
2,Button function:
[Man] : Enter manual mode
[Auto] : enter automatic mode
[Tare]: Peel and set to zero
[Set]: set the filling weight
[Trig]: set the trigger value
[Run]: manually start the filling function (click again to pause)
[Save]: store 4 groups of commonly used filling data
[M1-4]: Call the stored filling weight data
[ 0 ]: Counter value is cleared
The big green button and foot switch have the same function as the [Run]
on the keyboard.
The operating instructions
1,"Set " setting method: Press the [Set] key to enter the value (e. g. , set
100g, enter 1 0 ), and then press [Set] again.
2, "Trigger" setting method: (trigger value can not be less than 3 grams)
Press the [Trig] key, enter the value (e. g. , set 35g. enter 35), and then
press [Trig] again.
Note: The trigger value is set to≤empty bottle weight.In automatic mode,
the automatic filling is
triggered when the weight of the empty bottle exceeds the trigger value.
3, "Manual mode" operation method: (Press the [Man] key, the manual light
is on, enter the manual mode;)
(1) Put the empty bottle, press the [Tare] button to remove the empty bottle
weight, press the [Run] button to start the filling.The weight of the poured
liquid reaches the set filling weight and stops
automatically.

- 11 -
(2) Remove the filled bottle, put down an empty bottle, press the [Tare]
[Run] button to start the next filling.
4,"Automatic mode" operation method: (Press the [Auto] key, the
automatic light is on, enter the automatic mode)
Put the empty bottle, the system automatically peels and automatically
starts filling after a delay
of x seconds. When the weight reaches the filling weight, the filling is
automatically stopped.Remove the filled bottle and the system will
automatically reset to zero after a delay of x seconds.Put the next
empty bottle and automatically start the next filling.
Note: When using the automatic mode, if the machine is not properly filled,
it is because of a
mistake caused by a cycle not end yet.At this point, remove the bottle and
press [Tare] to use it normally.
5,The setting method of "storing 4 groups of filling weights to M1-M4":
Press the [Save] key (the number of filling weights starts to flash), input the
value to be stored,
and finally press the [M1] key (the number of“filling weight" stops flashing)
and the number to be entered is stored in M1. When you need to use the
value of m1 as the filling weight, you can press m1 to set the value of m1
as the filling weight. (Set M2, M3, M4 as the method of setting M1)
6,How to cancel the automatic peeling function :
Restart the machine, press the [Auto] button, and then hold down the [3]
button until you hear the alarm sound of the machine and let go. At this
time, the automatic peeling function has been cancelled.
If you want to turn on the automatic peeling function, repeat the above
operation. Once set up, the machine will remember forever.
7,How to set the“MID-RANGE DECELERATION RATIO":At a few percent
of the set amount, it automatically goes to medium speed
Press [ auto ], set the flow rate to a proportional value (e. g.,80) , press the
speed Knob long enough to let go when the“Beep"is heard.
8, How to set the "The value of slow down": (How many grams before the
end automatically slows down)
Press [Trig] [Save], .

- 12 -
then enter the value to be set , and then press [Trig] again.
9, "factory settings" method: press the [ auto ] button, and then hold the [5]
button not to let go, until the machine alarm "beep" after the release. The
machine is back to factory status.
About flow rate regulation
1, This product with flow rate adjustment KNOB, speed 1-100 adjustable,
and digital display flow rate value;
2,Rotating knob adjustment, the speed value will be a digital display, no
operation 3 seconds after the exit.
3, Press the KNOB, the flow rate value will display, You can view the
current flow rate value, no operation after 3 seconds of exit.
4,Flow rate can be adjusted at any time, after the adjustment,it will
automatically save, power-off memory.
How to use the set time method of filling
I, Press [ auto ],long press [2] can switch to“the set time method of
filling”(the same method can also be restored to“ the set method of filling”).
2,The set time method of filling displays the number in seconds, accurate
to 0.01 seconds.
3,Press [ settings ] , input filling time, press [ settings ] , you can set the
filling time.
4,Press [ trigger ], input interval time, press [ trigger ] , can set the interval
time of automatic filling.
5,Press [ set ][ start ], load to the amount needed, then press [ start ][ set ],
can extract filling time.
6,Automatic mode can be fixed interval between the automatic start,
manual mode by pressing the start button to start.

- 13 -
MAINTENANCE
1.The user shall select a quantitative filling machine of a suitable range
according to the said products.
2.The machine contains a precision electronic scale, it is forbidden to be
overweight.
3.The Height of filling head can be adjusted to about 10 mm from the bottle
mouth.
4.When in use, please keep the machine level and stable to avoid big
vibrations or impact, otherwise it may cause damage.
5.Machine first use or long time no use, very few will not absorb water,
because the pump is internally dry result. You need to add some water
from the intake pipe to the pump and then start the machine.
6.It is better to clean the machine with clean water after every use, which
can prolong the service life of the pump. .
7.When the machine is not in use, please empty the liquid and store it in a
ventilated and dry place.
8.Please clean the product and the filter in time after each use.
9.Always keep the product outside clean.
10. Please store the product in a dry and ventilated place.
11.If not used for a long time, please clean and empty the liquid in the
product.
12.Please replace the following consumable parts regularly:
Hose,Filter,Filling Nozzle
TROUBLESHOOTING
Problem
Possible Cause
Possible Solution
Not
absorbing
water
Machine first use or long time no
use, very few will not absorb
water, because the pump internal
dry result.
You need to add some water
from the intake pipe to the
pump and then start the
machine.
- 14 -
The pump
can't get the
liquid out
Hose inlet and outlet are inverted
Confirm hose inlet into liquid
tank.
The power cord is not plugged in
Reconnect the power cord
Hose folded or damaged
Smooth hose or replace hose
The power
indicator is
off
The power cord is not plugged in
Reconnect the power cord
This product is subject to the provision of European Directive
2012/19/EC. The symbol showing a wheelie bin crossed through
indicates that the product requires separate refuse collection in the
European Union. This applies to the product and all accessories
marked with this symbol. Products marked as such may not be
discarded with normal domestic waste, but must be taken to a
collection point for recycling electrical and electronic devices.
Address:Baoshanqu Shuangchenglu 803long 11hao 1602A-1609shi
Shanghai
Imported to AUS: SIHAO PTY LTD, 1 ROKEVA STREETEASTWOOD
NSW 2122 Australia
Imported to USA: Sanven Technology Ltd, Suite 250, 9166 Anaheim
Place, Rancho Cucamonga, CA 91730
REP
EC
SHUNSHUN GmbH
Römeräcker 9 Z2021, 76351
Linkenheim-Hochstetten, Germany
REP
UK
Pooledas Group Ltd
Unit 5 Albert Edward House, The
Pavilions Preston, United Kingdom
Made In China


Assistance technique et certificat de garantie électronique
www.vevor.com/support
MACHINE DE REMPLISSAGE DE LIQUIDE DE
PÂTE
MANUEL DE L'UTILISATEUR
We continue to be committed to provide you tools with competitive price.
"Save Half", "Half Price" or any other similar expressions used by us only represents an
estimate of savings you might benefit from buying certain tools with us compared to the major
top brands and does not necessarily mean to cover all categories of tools offered by us. You
are kindly reminded to verify carefully when you are placing an order with us if you are
actually saving half in comparison with the top major brands.

- 1 -
Have product questions? Need technical support? Please feel free to
contact us:
Technical Support and E-Warranty Certificate
www.vevor.com/support
NEED HELP? CONTACT US!
This is the original instruction, please read all manual instructions
carefully before operating. VEVOR reserves a clear interpretation of our
user manual. The appearance of the product shall be subject to the
product you received. Please forgive us that we won't inform you again if
there are any technology or software updates on our product.
Paste Liquid Filling
Machine
SY-1200-V1
SY-1200-V2
SY-1200-V3
SY-M90-V1
SY-M90-V2
SY-M90-V3

- 2 -
3. Lisez attentivement et comprenez toutes les INSTRUCTIONS
D'ASSEMBLAGE ET D'UTILISATION avant d'utiliser l'appareil.
4. Le non-respect des règles de sécurité et des autres précautions de
sécurité de base peut entraîner des blessures graves.
GENERAL SAFETY RULES
Rappel important
1. Avant utilisation, veuillez lire attentivement le manuel du produit et vous
assurer que vous comprenez et respectez tous les avertissements de
sécurité et précautions d'utilisation.
2. N'utilisez pas ce produit à d'autres fins non désignées pour éviter les
risques inattendus.
3. Ce produit s'applique uniquement aux utilisateurs appartenant au
groupe d'âge et au champ d'application spécifiés. Veuillez respecter
strictement les restrictions d'âge et les avertissements pertinents.
4. S'il y a des anomalies dans le produit, veuillez cesser de l'utiliser
immédiatement et contacter le centre de service après-vente pour
consultation ou pour organiser une réparation.
Exigences environnementales d'utilisation
1. Veuillez utiliser dans un environnement sec et bien ventilé pour éviter les
conditions environnementales extrêmes telles que l'activation de l'eau, les
températures élevées, l'humidité élevée et les températures extrêmement
basses.
2. Évitez la lumière directe du soleil ou tout contact avec des sources
d'incendie pour éviter d'endommager le produit ou d'incendier.
3. Veuillez garantir un environnement d'utilisation stable et éviter que le
produit ne soit heurté ou laissé tomber pour éviter tout dommage.
Directives d'exploitation de sécurité
1. Veuillez utiliser une alimentation et une tension appropriées, et n'utilisez
pas de cordons d'alimentation ou de fiches endommagés.
2. Lorsque vous utilisez ce produit, ne court-circuitez pas les circuits et ne

- 3 -
connectez pas d'appareils incompatibles pour éviter les risques tels que
les chocs électriques et les incendies.
3. Lorsque des corps étrangers sont trouvés sur la surface du produit,
veuillez cesser immédiatement de l'utiliser et retirer les corps étrangers
avant de continuer à l'utiliser.
4. Lorsque vous utilisez ce produit en continu pendant une longue période,
veuillez vous reposer à temps pour éviter une fatigue excessive.
5. N'appliquez pas de force externe sur la batterie pour éviter les risques
de sécurité tels que la rupture et la fuite de la batterie.
Entretien et maintenance
1. Entretenez et nettoyez régulièrement le produit. Avant le nettoyage,
veuillez débrancher l'alimentation électrique et l'essuyer avec un chiffon
sec. Veillez à ne pas utiliser d'alcool, de solutions acides ou alcalines, de
substances corrosives, etc.
2. Lorsque le produit n'est pas utilisé pendant une longue période, veuillez
débrancher rapidement l'alimentation électrique pour économiser de
l'énergie et prolonger la durée de vie du produit.
3. Ne démontez pas le produit et ne remplacez pas les composants
vous-même. Si vous rencontrez des dysfonctionnements, veuillez
contacter le centre de service après-vente.
Mesures de gestion d'urgence
1. En cas de situations anormales ou d'accidents avec le produit, veuillez
cesser de l'utiliser dès que possible. En cas de surchauffe, de fumée ou de
bruit anormal, veuillez immédiatement couper l'alimentation électrique et
contacter le centre de service après-vente.
2. Si le produit implique une situation d'urgence pouvant nuire à la sécurité
personnelle, veuillez appeler le numéro de secours d'urgence en temps
opportun.
Avis de non-responsabilité
Nous attachons une grande importance à la sécurité et à la qualité de nos
produits, mais ne pouvons assumer la responsabilité des accidents de

- 4 -
sécurité causés par une utilisation ou une utilisation inappropriée.
CONSERVEZ CES INSTRUCTIONS
MODEL AND PARAMETERS
Modèle
SY-120
0-V1
SY-120
0-V2
SY-120
0-V3
SY-M90
-V1
SY-M90
-V2
SY-M90
-V3
Liquide
approprié
Toutes les pâtes et liquides
fluides (sans particules) tels
que la sauce soja, les boissons,
le vin blanc, le vinaigre, le lait,
l'alcool (moins de 75 %), etc.
Toutes les pâtes et liquides
fluides (sans particules) tels
que la sauce soja, les boissons,
le vin blanc, le vinaigre, le lait,
l'alcool (moins de 75 %), etc.
Gamme de
remplissage
5g ~ 300g
5~50g
Débit
maximum
1000 ml/min
100 ml/min
Mode de
contrôle
Automatique
Automatique
Notation(s)
C.A. 120
V 60 Hz
C.A. 230
V 50 Hz
C.A. 230
V 50 Hz
C.A. 120
V 60 Hz
C.A. 230
V 50 Hz
C.A. 230
V 50 Hz

- 5 -
Puissance
(Max.)
39W
39W
39W
15W
15W
15W
STRUCTURE DIAGRAM
SY-1200-V1,SY-1200-V2,SY-1200-V3
2. Support 2. Plateau 3. Panneau de commande 4. Tuyau d'arrivée et
filtre
5. Pompe péristaltique 6. Tuyau de sortie et buse de remplissage
7. Interrupteur d'alimentation 8. Prise de courant CA 9. Bouton de débit
1
2
3
4
5
6
7
8
9

- 6 -
SY-M90-V1,SY-M90-V2,SY-M90-V3
1. Support 2. Plateau 3. Panneau de commande 4. Tuyau d'arrivée
5. Pompe péristaltique 6. Tuyau de sortie et buse de remplissage
7. Interrupteur d'alimentation 8. Prise de courant CA 9. Bouton de débit
2
3
1
4
6
5
7
8
9
- 7 -
COMPONENTS
SY-1200-V1
SY-1200-V2
SY-1200-V3
SY-M90-V1
SY-M90-V2
SY-M90-V3
Cordon d'alimentation
×1
×1
Support
×1
×1
Tuyau (avec filtre)
×1
/
Tuyau en silicone
(court)
×1
/
Tuyau d'arrivée
/
×1
Tuyau de sortie
/
×1
Bande éponge (noire)
×1
×1
Buse de remplissage
×2
×2
Model
Parts
- 8 -
OPERATING INSTRUCTIONS
1. Placez le plateau sur le dessus
comme indiqué
2. Retirez les vis, installez le support
et verrouillez-le avec les vis comme
indiqué.
3.Ouvrez le couvercle de la pompe
péristaltique.
4.Ouvrez les clips de la pompe
péristaltique.
Manuel de l'Utilisateur
×1
×1
- 9 -
5.Enroulez le tuyau dans la pompe
péristaltique comme indiqué.
7. Fixez les clips et couvrez le
couvercle.
7. Ajustez la hauteur de la buse de
remplissage et branchez le tuyau.
8.Insérez le cordon d'alimentation
comme indiqué.
10.Assemblage du produit terminé.
Remarque : le produit est fourni avec une fine buse de remplissage. Vous
pouvez l'installer selon vos besoins.
Après utilisation , il peut être nettoyé en pompant de l'eau à plusieurs
reprises. Ou remplacez le tuyau .

- 10 -
Le mode d'emploi
La fenêtre d'affichage et la description de la fonction des boutons
1, fenêtre d'affichage :
Poids : affiche le poids réel de l'article à peser
Définir : Utilisateur. régler le poids à remplir
Compteur : nombre de bouteilles remplies
Trigger : la valeur du poids qui déclenche le démarrage automatique
2, fonction du bouton :
[Man] : Passer en mode manuel
[Auto] : entrez en mode automatique
[Tare] : Décoller et mettre à zéro
[Set] : définir le poids de remplissage
[Trig] : définir la valeur de déclenchement
[Exécuter] : démarrer manuellement la fonction de remplissage (cliquez à
nouveau pour mettre en pause)
[Enregistrer] : stocker 4 groupes de données de remplissage couramment
utilisées
[M1-4] : Appeler les données de poids de remplissage stockées
[ 0 ] : la valeur du compteur est effacée
Le gros bouton vert et la pédale ont la même fonction que le [Run] du
clavier.
Le mode d'emploi
1, méthode de réglage « Définir » : Appuyez sur la touche [Set] pour saisir

- 11 -
la valeur (par exemple, définissez 100 g, saisissez 1 0 ), puis appuyez à
nouveau sur [Set].
2, méthode de réglage « Déclencheur » : (la valeur de déclenchement ne
peut pas être inférieure à 3 grammes)
Appuyez sur la touche [Trig], entrez la valeur (par exemple, définissez 35g.
entrez 35), puis appuyez à nouveau sur [Trig].
Remarque : La valeur de déclenchement est réglée sur ≤poids de la
bouteille vide. En mode automatique, le remplissage automatique est
déclenché lorsque le poids de la bouteille vide dépasse la valeur de
déclenchement.
3, méthode de fonctionnement « Mode manuel » : (Appuyez sur la touche
[Man], le voyant manuel est allumé, entrez le mode manuel;)
(1) Mettez la bouteille vide, appuyez sur le bouton [Tare] pour retirer le
poids de la bouteille vide, appuyez sur le bouton [Run] bouton pour
démarrer le remplissage. Le poids du liquide versé atteint le poids de
remplissage défini et s'arrête
automatiquement.
(2) Retirez la bouteille remplie, déposez une bouteille vide, appuyez sur le
bouton [Tare] [Run] pour démarrer le prochain remplissage . _
4, méthode de fonctionnement « mode automatique » : (appuyez sur la
touche [Auto], la lumière automatique est allumée, entrez le mode
automatique)
Mettez la bouteille vide, le système se décolle automatiquement et
commence automatiquement à se remplir après un certain délai.
de x secondes. Lorsque le poids atteint le poids de remplissage , le
remplissage est automatiquement arrêté. La bouteille remplie et le
système se remettront automatiquement à zéro après un délai de x
secondes. Mettez le suivant
vider la bouteille et démarrer automatiquement le prochain remplissage.
Remarque : Lors de l'utilisation du mode automatique, si la machine n'est
pas correctement remplie , c'est à cause d'un
erreur causée par un cycle qui n'est pas encore terminé. À ce stade, retirez
la bouteille et appuyez sur [Tare] pour l'utiliser normalement.
5, la méthode de réglage du « stockage de 4 groupes de poids de

- 12 -
remplissage dans M1-M4 » :
Appuyez sur la touche [Enregistrer] (le nombre de poids de remplissage
commence à clignoter), saisissez la valeur à stocker,
et enfin appuyer sur la touche [M1] (le numéro du « poids de remplissage »
arrête de clignoter) et le numéro à saisie est stockée dans M1. Lorsque
vous devez utiliser la valeur de m1 comme poids de remplissage , vous
pouvez appuyer sur m1 pour définir la valeur de m1 comme poids de
remplissage . (Définissez M2, M3, M4 comme méthode de réglage de M1)
6, comment annuler la fonction de pelage automatique :
Redémarrez la machine, appuyez sur le bouton [Auto], puis maintenez le
bouton [3] enfoncé jusqu'à ce que vous entendiez le son d'alarme de la
machine et lâchez prise. À l’heure actuelle, la fonction de pelage
automatique a été annulée .
Si vous souhaitez activer la fonction de pelage automatique, répétez
l'opération ci-dessus. Une fois configuré, le la machine s'en souviendra
pour toujours.
7, comment régler le «ratio de décélération de milieu de gamme» : à
quelques pour cent de la quantité définie, il passe automatiquement à
vitesse moyenne
Appuyez sur [auto], réglez le débit sur une valeur proportionnelle (par
exemple, 80), appuyez longuement sur le bouton de vitesse. de quoi
lâcher prise lorsque le« Beep» se fait entendre.
8, Comment définir la « valeur du ralentissement » : (combien de grammes
avant la fin ralentit automatiquement vers le bas)
Appuyez sur [Trig] [Enregistrer], .
entrez ensuite la valeur à définir, puis appuyez à nouveau sur [Trig].
9, méthode « paramètres d'usine » : appuyez sur le bouton [auto], puis
maintenez le bouton [5] enfoncé pour ne pas lâcher prise, jusqu'à ce que
l'alarme de la machine « bip » après la libération. La machine est revenue
à son état d'usine.
À propos de la régulation du débit
1, ce produit avec bouton de réglage du débit, vitesse 1-100 réglable et
débit à affichage numérique valeur;

- 13 -
2, réglage du bouton rotatif, la valeur de la vitesse sera un affichage
numérique, aucune opération 3 secondes après le sortie.
3, appuyez sur le bouton, la valeur du débit s'affichera, vous pouvez voir la
valeur actuelle du débit, aucune opération après 3 secondes de sortie.
4, le débit peut être ajusté à tout moment, après le réglage , il sera
automatiquement enregistré et mis hors tension mémoire.
Comment utiliser la méthode de remplissage à temps défini
I, appuyez sur [auto], appuyez longuement sur [2] pour passer à « la
méthode de remplissage à temps défini » (la même méthode peut
également être restauré à « la méthode de remplissage définie » ).
2, la méthode de remplissage réglée affiche le nombre en secondes, avec
une précision de 0,01 seconde.
3 , Appuyez sur [ paramètres ] , saisissez le temps de remplissage,
appuyez sur [ paramètres ] , vous pouvez définir le temps de remplissage .
4, appuyez sur [déclencheur], entrez le temps d'intervalle, appuyez sur
[déclencheur], vous pouvez définir le temps d'intervalle automatique.
remplissage . _
5, appuyez sur [set] [start], chargez jusqu'à la quantité nécessaire, puis
appuyez sur [start] [set], vous pouvez extraire le temps de remplissage .
6, le mode automatique peut être un intervalle fixe entre le démarrage
automatique, le mode manuel en appuyant sur le bouton bouton de
démarrage pour démarrer.
MAINTENANCE
1. L'utilisateur doit sélectionner une machine de remplissage quantitative d'
une gamme appropriée en fonction desdits produits.
2. La machine contient une balance électronique de précision, il est interdit

- 14 -
d'être en surpoids.
3. La hauteur de la tête de remplissage peut être ajustée à environ 10 mm
du goulot de la bouteille.
4. Lors de l'utilisation, veuillez maintenir la machine à niveau et stable pour
éviter de fortes vibrations ou des impacts, sinon cela peut causer des
dommages.
5. Première utilisation de la Machine ou longue période d'inutilisation, très
peu n'absorberont pas l'eau, car la pompe est internement sèche . Vous
devez ajouter un peu d'eau du tuyau d'admission à la pompe, puis
démarrer la machine.
6. Il est préférable de nettoyer la machine avec de l'eau propre après
chaque utilisation, ce qui peut prolonger la durée de vie de la pompe. .
7. Lorsque la machine n'est pas utilisée, veuillez vider le liquide et le
stocker dans un endroit aéré et sec.
8. Veuillez nettoyer le produit et le filtre à temps après chaque utilisation .
9. Gardez toujours le produit propre à l'extérieur .
10 . Veuillez stocker le produit dans un endroit sec et aéré.
11. S'il n'est pas utilisé pendant une longue période, veuillez nettoyer et
vider le liquide contenu dans le produit .
12. Veuillez remplacer régulièrement les consommables suivants :
Tuyau, filtre, buse de remplissage
TROUBLESHOOTING
Problème
Cause possible
Solution possible
N'absorbe pas
l'eau
Machine première utilisation ou
longue période sans utilisation,
très peu n'absorberont pas l'eau,
car la pompe interne résultat
sec .
Vous devez ajouter un peu
d'eau du tuyau d'admission
à la pompe, puis démarrer
la machine.
La pompe ne
parvient pas à
évacuer le
L'entrée et la sortie du tuyau
sont inversées
Confirmez l’entrée du
tuyau dans le réservoir de
liquide.
- 15 -
liquide
Le cordon d'alimentation n'est
pas branché
Rebranchez le cordon
d'alimentation
Tuyau plié ou endommagé
Lisser le tuyau ou
remplacer le tuyau
Le voyant
d'alimentation
est éteint
Le cordon d'alimentation n'est
pas branché
Rebranchez le cordon
d'alimentation
Ce produit est soumis aux dispositions de la directive
européenne 2012/19/CE. Le symbole représentant une
poubelle barrée indique que le produit nécessite une collecte
sélective des déchets dans l'Union européenne. Ceci
s'applique au produit et à tous les accessoires marqués de ce
symbole. Les produits marqués comme tels ne peuvent pas
être jetés avec les ordures ménagères normales, mais doivent
être déposés dans un point de collecte pour le recyclage des
appareils électriques et électroniques.
Adresse : Baoshanqu Shuangchenglu 803long 11hao 1602A-1609shi
Shanghai
Importé en Australie : SIHAO PTY LTD, 1 ROKEVA STREETASTWOOD
NSW 2122 Australie
Importé aux États-Unis : Sanven Technology Ltd, Suite 250, 9166
Anaheim Place, Rancho Cucamonga, CA 91730
REP
EC
SHUNSHUN GmbH
Römeräcker 9 Z2021, 76351
Linkenheim-Hochstetten, Germany
REP
UK
Pooledas Group Ltd
Unit 5 Albert Edward House, The
Pavilions Preston, United Kingdom
Fabriqué en Chine

- 16 -


Zertifikat für technischen Support und E-Garantie
www.vevor.com/support
PASTE-FLÜSSIGKEITSFÜLLMASCHINE
BENUTZERHANDBUCH
We continue to be committed to provide you tools with competitive price.
"Save Half", "Half Price" or any other similar expressions used by us only represents an
estimate of savings you might benefit from buying certain tools with us compared to the major
top brands and does not necessarily mean to cover all categories of tools offered by us. You
are kindly reminded to verify carefully when you are placing an order with us if you are
actually saving half in comparison with the top major brands.

- 1 -
Have product questions? Need technical support? Please feel free to
contact us:
Technical Support and E-Warranty Certificate
www.vevor.com/support
NEED HELP? CONTACT US!
This is the original instruction, please read all manual instructions
carefully before operating. VEVOR reserves a clear interpretation of our
user manual. The appearance of the product shall be subject to the
product you received. Please forgive us that we won't inform you again if
there are any technology or software updates on our product.
Paste Liquid Filling
Machine
SY-1200-V1
SY-1200-V2
SY-1200-V3
SY-M90-V1
SY-M90-V2
SY-M90-V3

- 2 -
5. Lesen Sie alle MONTAGE- UND BETRIEBSANWEISUNGEN
sorgfältig durch und verstehen Sie sie , bevor Sie das Gerät in Betrieb
nehmen.
6. Die Nichtbeachtung der Sicherheitsregeln und anderer grundlegender
Sicherheitsvorkehrungen kann zu schweren Verletzungen führen.
GENERAL SAFETY RULES
Wichtige Erinnerung
1. Bitte lesen Sie vor der Verwendung das Produkthandbuch sorgfältig
durch und stellen Sie sicher, dass Sie alle Sicherheitswarnungen und
Vorsichtsmaßnahmen bei der Verwendung verstanden und eingehalten
haben.
2. Verwenden Sie dieses Produkt nicht für andere, nicht
bestimmungsgemäße Zwecke, um unerwartete Risiken zu vermeiden.
3. Dieses Produkt ist nur für Benutzer innerhalb der angegebenen
Altersgruppe und des angegebenen Anwendungsbereichs anwendbar.
Bitte beachten Sie unbedingt die entsprechenden Altersbeschränkungen
und Warnhinweise.
4. Wenn es irgendwelche Anomalien am Produkt gibt, beenden Sie bitte
sofort die Verwendung und wenden Sie sich an das Kundendienstzentrum,
um eine Beratung zu erhalten oder eine Reparatur zu veranlassen.
Umweltanforderungen für die Nutzung
1. Bitte in einer trockenen und gut belüfteten Umgebung verwenden, um
extreme Umgebungsbedingungen wie Wasseraktivierung, hohe
Temperaturen, hohe Luftfeuchtigkeit und extrem niedrige Temperaturen zu
vermeiden.
2. Vermeiden Sie direkte Sonneneinstrahlung oder Kontakt mit
Feuerquellen, um Produktschäden oder Brände zu vermeiden.
3. Bitte sorgen Sie für eine stabile Nutzungsumgebung und verhindern Sie,
dass das Produkt Stößen oder Stürzen ausgesetzt wird, um Schäden zu
vermeiden.

- 3 -
Sicherheitsrichtlinien für den Betrieb
1. Bitte verwenden Sie eine geeignete Stromversorgung und Spannung
und verwenden Sie keine beschädigten Netzkabel oder Stecker.
2. Schließen Sie bei der Verwendung dieses Produkts keine Stromkreise
kurz und schließen Sie keine nicht übereinstimmenden Geräte an, um
Risiken wie Stromschlag und Feuer zu vermeiden.
3. Wenn Fremdkörper auf der Oberfläche des Produkts gefunden werden,
beenden Sie bitte sofort die Verwendung und entfernen Sie die
Fremdkörper, bevor Sie die Verwendung fortsetzen.
4. Wenn Sie dieses Produkt über einen längeren Zeitraum kontinuierlich
verwenden, ruhen Sie sich bitte rechtzeitig aus, um übermäßige Ermüdung
zu vermeiden.
5. Üben Sie keine äußere Kraft auf die Batterie aus, um Sicherheitsrisiken
wie Batteriebruch und Auslaufen zu vermeiden.
Wartung und Instandhaltung
1. Warten und reinigen Sie das Produkt regelmäßig. Trennen Sie vor der
Reinigung bitte die Stromversorgung und wischen Sie das Gerät mit einem
trockenen Tuch ab. Achten Sie darauf, keinen Alkohol, Säure- oder
Alkalilösungen, ätzende Substanzen usw. zu verwenden
2. Wenn das Produkt längere Zeit nicht verwendet wird, trennen Sie es
bitte umgehend von der Stromversorgung, um Energie zu sparen und die
Lebensdauer des Produkts zu verlängern.
3. Zerlegen Sie das Produkt nicht und tauschen Sie keine Komponenten
selbst aus. Bei Störungen wenden Sie sich bitte an den Kundendienst.
Maßnahmen zur Notfallbehandlung
1. Wenn es zu ungewöhnlichen Situationen oder Unfällen mit dem Produkt
kommt, stellen Sie die Verwendung des Produkts bitte so schnell wie
möglich ein. Wenn Überhitzung, Rauchen oder ungewöhnliche Geräusche
festgestellt werden, unterbrechen Sie bitte sofort die Stromversorgung und
wenden Sie sich an das Kundendienstzentrum.
2. Wenn es sich bei dem Produkt um eine Notfallsituation handelt, die die
persönliche Sicherheit gefährden könnte, rufen Sie bitte rechtzeitig die

- 4 -
Notrufnummer an.
Haftungsausschluss
Wir legen großen Wert auf die Sicherheit und Qualität unserer Produkte,
können jedoch keine Verantwortung für Sicherheitsunfälle übernehmen,
die durch unsachgemäße Verwendung oder Bedienung verursacht
werden.
ANLEITUNG AUFBEWAHREN
MODEL AND PARAMETERS
Modell
SY-120
0-V1
SY-120
0-V2
SY-120
0-V3
SY-M90
-V1
SY-M90
-V2
SY-M90
-V3
Geeignete
Flüssigkeit
Alle frei fließenden Pasten und
Flüssigkeiten (keine Partikel)
wie Sojasauce, Getränke,
Weißwein, Essig, Milch, Alkohol
(weniger als 75 %) usw
Alle frei fließenden Pasten und
Flüssigkeiten (keine Partikel)
wie Sojasauce, Getränke,
Weißwein, Essig, Milch, Alkohol
(weniger als 75 %) usw
Füllbereich
5g~300g
5~50g
Maximale
Durchflussra
te
1000 ml/min
100 ml/min
Steuermodu
s _
Automatisch
Automatisch
- 5 -
Bewertung(e
n)
Wechsel
strom
120 V 60
Hz
Wechsel
strom
230 V 50
Hz
Wechsel
strom
230 V 50
Hz
Wechsel
strom
120 V 60
Hz
Wechsel
strom
230 V 50
Hz
Wechsel
strom
230 V 50
Hz
Leistung
max.)
39W
39W
39W
15W
15W
15W
STRUCTURE DIAGRAM
SY-1200-V1,SY-1200-V2,SY-1200-V3
3. Halterung 2. Ablage 3. Bedienfeld 4. Einlassschlauch und Filter
5. Peristaltische Pumpe 6. Auslassschlauch und Fülldüse
7. Netzschalter 8. Wechselstromsteckdose 9. Durchflussknopf
1
2
3
4
5
6
7
8
9
- 6 -
SY-M90-V1,SY-M90-V2,SY-M90-V3
1. Halterung 2. Ablage 3. Bedienfeld 4. Einlassschlauch
5. Peristaltische Pumpe 6. Auslassschlauch und Fülldüse
7. Netzschalter 8. Wechselstromsteckdose 9. Durchflussknopf
2
3
1
4
6
5
7
8
9

- 7 -
COMPONENTS
SY-1200-V1
SY-1200-V2
SY-1200-V3
SY-M90-V1
SY-M90-V2
SY-M90-V3
Netzkabel
×1
×1
Halterung
×1
×1
Schlauch (mit Filter)
×1
/
Silikonschlauch (kurz)
×1
/
Einlassschlauch
/
×1
Auslassschlauch
/
×1
Schwammstreifen
(schwarz)
×1
×1
Model
Parts
- 8 -
OPERATING INSTRUCTIONS
1. Stellen Sie das Tablett wie
abgebildet darauf
2. Entfernen Sie die Schrauben,
installieren Sie die Halterung und
befestigen Sie sie wie gezeigt mit
den Schrauben.
3.Öffnen Sie den Deckel der
Peristaltikpumpe.
4.Öffnen Sie die Clips der
Peristaltikpumpe.
Fülldüse
×2
×2
Benutzerhandbuch
×1
×1

- 9 -
5.Wickeln Sie den Schlauch wie
abgebildet in die Peristaltikpumpe.
8. Befestigen Sie die Clips und
decken Sie den Deckel ab.
7. Stellen Sie die Höhe des
Füllstutzens ein und schließen Sie den
Schlauch an.
8. Stecken Sie das Netzkabel wie
abgebildet ein.
11.Produktmontage abgeschlossen.
Hinweis: Das Produkt wird mit einer dünnen Fülldüse geliefert. Sie können
diese nach Bedarf installieren.
Nach dem Gebrauch kann er durch wiederholtes Pumpen von Wasser
gereinigt werden. Alternativ kann der Schlauch ausgetauscht werden .
- 10 -
Die Bedienungsanleitung
Beschreibung des Anzeigefensters und der Tastenfunktion
1, Anzeigefenster:
Gewicht: Zeigt das tatsächliche Gewicht des zu wiegenden Artikels an
Set: Benutzer. Legen Sie das zu befüllende Gewicht fest
Zähler: Anzahl der gefüllten Flaschen
Auslöser: Der Gewichtswert, der den Autostart auslöst
2, Tastenfunktion:
[Mann]: Manuellen Modus aufrufen
[Auto]: Automatischen Modus aufrufen
[Tara]: Abziehen und auf Null stellen
[Einstellen]: Füllgewicht einstellen
[Trig]: Legen Sie den Triggerwert fest
Füllfunktion manuell starten (zum Anhalten erneut klicken)
[ Speichern]: Speichern Sie 4 Gruppen häufig verwendeter Fülldaten
[M1-4]: Abruf der gespeicherten Füllgewichtsdaten

- 11 -
[ 0 ]: Zählerwert wird gelöscht
Die große grüne Taste und der Fußschalter haben die gleiche Funktion wie
[Run] auf der Tastatur.
Die Bedienungsanleitung
1,Einstellungsmethode „Setzen“: Drücken Sie die Taste [Set], um den
Wert einzugeben (z. B. 100 g einstellen, 1 0 eingeben) und drücken Sie
dann erneut [Set].
2, „Trigger“-Einstellungsmethode: (Triggerwert darf nicht weniger als 3
Gramm betragen)
Drücken Sie die Taste [Trig], geben Sie den Wert ein (z. B. stellen Sie 35 g
ein. Geben Sie 35 ein) und drücken Sie dann erneut [Trig].
Hinweis: Der Auslösewert ist auf ≤Flaschenleergewicht eingestellt. Im
Automatikmodus erfolgt die automatische Befüllung
ausgelöst, wenn das Gewicht der leeren Flasche den Auslösewert
überschreitet.
3, Betriebsmethode „Manueller Modus“: (Drücken Sie die Taste [Man], das
manuelle Licht ist an, geben Sie ein manueller Modus;)
(1) Legen Sie die leere Flasche ein, drücken Sie die Taste [Tare], um das
Gewicht der leeren Flasche zu entfernen, drücken Sie die Taste [Run] Mit
der Taste starten Sie den Füllvorgang. Das Gewicht der eingefüllten
Flüssigkeit erreicht das eingestellte Füllgewicht und stoppt
automatisch.
(2) Nehmen Sie die gefüllte Flasche heraus, stellen Sie eine leere Flasche
ab und drücken Sie die Taste [Tare] [Run], um mit der nächsten zu
beginnen Füllung . _
4, Betriebsmethode „Automatikmodus“: (Drücken Sie die Taste [Auto], das
automatische Licht ist an, geben Sie die ein automatischer Modus)
Legen Sie die leere Flasche ein, das System schält automatisch ab und
beginnt nach einer Verzögerung automatisch mit dem Befüllen
von x Sekunden. Wenn das Gewicht das Füllgewicht erreicht , wird die
Befüllung automatisch gestoppt. Entfernen Die gefüllte Flasche und das
System werden nach einer Verzögerung von x Sekunden automatisch auf
Null zurückgesetzt. Geben Sie die nächste ein

- 12 -
leere Flasche und startet automatisch die nächste Befüllung.
Hinweis: Wenn die Maschine im Automatikmodus nicht richtig befüllt wird ,
liegt dies an a
Fehler, der dadurch verursacht wurde, dass ein Zyklus noch nicht beendet
ist. Nehmen Sie jetzt die Flasche heraus und drücken Sie [Tare], um sie zu
verwenden normalerweise.
5, Die Einstellungsmethode „Speichern von 4 Gruppen von Füllgewichten
in M1-M4“:
Drücken Sie die Taste [Speichern] (die Anzahl der Füllgewichte beginnt zu
blinken), geben Sie den zu speichernden Wert ein,
und drücken Sie abschließend die Taste [M1] (die Zahl „ Füllgewicht “ hört
auf zu blinken) und die gewünschte Zahl Der eingegebene Wert wird in M1
gespeichert. Wenn Sie den Wert von m1 als Füllgewicht verwenden
müssen , können Sie m1 drücken um den Wert von m1 als Füllgewicht
festzulegen . (Stellen Sie M2, M3, M4 als Einstellungsmethode für M1 ein)
6, So brechen Sie die automatische Schälfunktion ab:
Starten Sie das Gerät neu, drücken Sie die Taste [Auto] und halten Sie
dann die Taste [3] gedrückt, bis Sie das hören Alarmton der Maschine
hören und loslassen. Zu diesem Zeitpunkt wurde die automatische
Schälfunktion abgebrochen .
Wenn Sie die automatische Schälfunktion einschalten möchten,
wiederholen Sie den obigen Vorgang. Einmal eingerichtet, wird die
Maschine wird für immer in Erinnerung bleiben.
7, So stellen Sie das „MID-RANGE DECELERATION RATIO“ ein: Bei
einigen Prozent des eingestellten Wertes, es geht automatisch auf mittlere
Geschwindigkeit
Drücken Sie [Auto], stellen Sie die Durchflussrate auf einen proportionalen
Wert ein (z. B. 80) und drücken Sie lange auf den Geschwindigkeitsknopf
genug, um loszulassen, wenn der „Piepton“ zu hören ist.
8, So stellen Sie den „Wert der Verlangsamung“ ein: (Wie viele Gramm bis
zum Ende wird automatisch verlangsamt). runter)
Drücken Sie [Trig] [Speichern], .
Geben Sie dann den einzustellenden Wert ein und drücken Sie dann
erneut [Trig].

- 13 -
9. Methode „Werkseinstellungen“: Drücken Sie die Taste [Auto] und halten
Sie dann die Taste [5] gedrückt, um sie nicht loszulassen. bis der
Maschinenalarm nach der Auslösung „piept“. Die Maschine befindet sich
wieder im Werkszustand.
Über die Durchflussregulierung
1, Dieses Produkt verfügt über einen Einstellknopf für die
Durchflussmenge, eine einstellbare Geschwindigkeit von 1 bis 100 und
eine Durchflussmenge mit digitaler Anzeige Wert;
2, drehen knopf einstellung, die geschwindigkeit wert wird eine digitale
anzeige, keine bedienung 3 sekunden nach dem Ausfahrt.
3. Drücken Sie den KNOPF, der Durchflusswert wird angezeigt. Sie
können den aktuellen Durchflusswert anzeigen, ohne dass eine Bedienung
erforderlich ist nach 3 Sekunden Ausstieg .
4. Die Durchflussrate kann jederzeit angepasst werden. Nach der
Einstellung wird automatisch gespeichert und ausgeschaltet Erinnerung.
So verwenden Sie die Zeiteinstellungsmethode zum Befüllen
I,Drücken Sie [Auto], langes Drücken von [2] kann zur „Füllmethode mit
eingestellter Zeit“ wechseln (dieselbe Methode kann auch verwendet
werden). auch auf die „eingestellte Füllmethode “ zurückgesetzt werden .
2, Die eingestellte Zeitmethode zum Befüllen zeigt die Zahl in Sekunden
mit einer Genauigkeit von 0,01 Sekunden an.
3, Drücken Sie [Einstellungen ] , geben Sie die Füllzeit ein , drücken Sie
[Einstellungen], Sie können die Füllzeit einstellen .
4. Drücken Sie [Trigger], geben Sie die Intervallzeit ein, drücken Sie
[Trigger], um die Intervallzeit der Automatik einzustellen Füllung . _
5. Drücken Sie [Set][Start], laden Sie die benötigte Menge ein und drücken
Sie dann [Start][Set], um die Füllzeit zu extrahieren .
6. Der automatische Modus kann durch Drücken der Taste zwischen dem
automatischen Start und dem manuellen Modus festgelegt werden
Starttaste zum Starten.

- 14 -
MAINTENANCE
1. Der Benutzer muss eine Mengenfüllmaschine mit einem geeigneten
Sortiment entsprechend den genannten Produkten auswählen .
2. Das Gerät verfügt über eine elektronische Präzisionswaage, es ist
verboten, übergewichtig zu sein.
3. Die Höhe des Füllkopfes kann auf etwa 10 mm über der
Flaschenmündung eingestellt werden.
4. Halten Sie die Maschine während des Gebrauchs bitte waagerecht und
stabil, um starke Vibrationen oder Stöße zu vermeiden kann zu Schäden
führen.
5. Beim ersten Gebrauch oder bei längerer Nichtbenutzung der Maschine
nehmen nur sehr wenige kein Wasser auf, da die Pumpe innen trocken ist .
Sie müssen etwas Wasser aus dem Ansaugrohr zur Pumpe hinzufügen
und dann die Maschine starten.
6. Es ist besser, die Maschine nach jedem Gebrauch mit klarem Wasser zu
reinigen, was die Lebensdauer verlängern kann der Pumpe. .
7. Wenn die Maschine nicht verwendet wird, entleeren Sie bitte die
Flüssigkeit und lagern Sie sie an einem belüfteten und trockenen Ort.
8. Bitte reinigen Sie das Produkt und den Filter rechtzeitig nach jedem
Gebrauch .
9. Halten Sie das Produkt von außen immer sauber .
10 . Bitte lagern Sie das Produkt an einem trockenen und belüfteten Ort.
11. Wenn Sie das Produkt längere Zeit nicht verwenden, reinigen Sie es
bitte und entleeren Sie die Flüssigkeit .
12. Bitte ersetzen Sie regelmäßig die folgenden Verschleißteile :
Schlauch, Filter, Fülldüse

- 15 -
TROUBLESHOOTING
Problem
Mögliche Ursache
Mögliche Lösung
Nimmt kein Wasser
auf
Beim ersten Gebrauch oder bei
längerer Nichtbenutzung der
Maschine nehmen nur sehr
wenige kein Wasser auf, da die
Pumpe intern ist trockenes
Ergebnis .
Sie müssen etwas
Wasser aus dem
Ansaugrohr zur Pumpe
hinzufügen und dann die
Maschine starten.
Die Pumpe kann
die Flüssigkeit
nicht
herausbefördern
Schlaucheinlass und -auslass
sind vertauscht
Bestätigen Sie den
Schlaucheintritt in den
Flüssigkeitstank.
Das Netzkabel ist nicht
eingesteckt
Schließen Sie das
Netzkabel wieder an
Schlauch gefaltet oder
beschädigt
Schlauch glätten oder
Schlauch ersetzen
Die
Betriebsanzeige ist
aus
Das Netzkabel ist nicht
eingesteckt
Schließen Sie das
Netzkabel wieder an
Dieses Produkt unterliegt den Bestimmungen der
europäischen Richtlinie 2012/19/EG. Das Symbol einer
durchgestrichenen Mülltonne weist darauf hin, dass das
Produkt in der Europäischen Union einer getrennten
Müllsammlung bedarf. Dies gilt für das Produkt und alle
Zubehörteile, die mit diesem Symbol gekennzeichnet sind.
Als solche gekennzeichnete Produkte dürfen nicht über den
normalen Hausmüll entsorgt werden, sondern müssen an
einer Sammelstelle für das Recycling von Elektro- und
Elektronikgeräten abgegeben werden.
Adresse: Baoshanqu Shuangchenglu 803long 11hao 1602A-1609shi

- 16 -
Shanghai
Importiert nach AUS: SIHAO PTY LTD, 1 ROKEVA STREETEASTWOOD
NSW 2122 Australien
In die USA importiert: Sanven Technology Ltd, Suite 250, 9166 Anaheim
Place, Rancho Cucamonga, CA 91730
REP
EC
SHUNSHUN GmbH
Römeräcker 9 Z2021, 76351
Linkenheim-Hochstetten, Germany
REP
UK
Pooledas Group Ltd
Unit 5 Albert Edward House, The
Pavilions Preston, United Kingdom
In China hergestellt


Supporto tecnico e certificato di garanzia elettronica
www.vevor.com/support
MACCHINA PER IL RIEMPIMENTO DI LIQUIDI
PER PASTA
MANUALE D'USO
We continue to be committed to provide you tools with competitive price.
"Save Half", "Half Price" or any other similar expressions used by us only represents an
estimate of savings you might benefit from buying certain tools with us compared to the major
top brands and does not necessarily mean to cover all categories of tools offered by us. You
are kindly reminded to verify carefully when you are placing an order with us if you are
actually saving half in comparison with the top major brands.

- 1 -
Have product questions? Need technical support? Please feel free to
contact us:
Technical Support and E-Warranty Certificate
www.vevor.com/support
NEED HELP? CONTACT US!
This is the original instruction, please read all manual instructions
carefully before operating. VEVOR reserves a clear interpretation of our
user manual. The appearance of the product shall be subject to the
product you received. Please forgive us that we won't inform you again if
there are any technology or software updates on our product.
Paste Liquid Filling
Machine
SY-1200-V1
SY-1200-V2
SY-1200-V3
SY-M90-V1
SY-M90-V2
SY-M90-V3

- 2 -
7. Leggere attentamente e comprendere tutte le ISTRUZIONI DI
MONTAGGIO E FUNZIONAMENTO prima dell'uso.
8. La mancata osservanza delle norme di sicurezza e di altre precauzioni
di sicurezza di base può provocare gravi lesioni personali.
GENERAL SAFETY RULES
Promemoria importante
1.Prima dell'uso, leggere attentamente il manuale del prodotto e
assicurarsi di comprendere e rispettare tutte le avvertenze di sicurezza e le
precauzioni d'uso.
2. Non utilizzare questo prodotto per altri scopi non previsti per evitare
rischi imprevisti.
3. Questo prodotto è applicabile solo agli utenti all'interno della fascia di
età e dell'ambito di applicazione specificati. Si prega di rispettare
rigorosamente le limitazioni e le avvertenze relative all'età.
4. In caso di anomalie nel prodotto, interrompere immediatamente l'utilizzo
e contattare il centro di assistenza post-vendita per consulenza o per
organizzare la riparazione.
Requisiti ambientali per l'uso
1. Utilizzare in un ambiente asciutto e ben ventilato per evitare condizioni
ambientali estreme come l'attivazione dell'acqua, temperature elevate,
umidità elevata e temperature estremamente basse.
2. Evitare la luce solare diretta o il contatto con fonti di fuoco per evitare
danni al prodotto o incendi.
3. Garantire un ambiente di utilizzo stabile ed evitare che il prodotto venga
colpito o lasciato cadere per evitare danni.
Linee guida per le operazioni di sicurezza
1. Utilizzare un alimentatore e una tensione adeguati e non utilizzare cavi o
spine danneggiati.
2. Quando si utilizza questo prodotto, non cortocircuitare o collegare
dispositivi non corrispondenti per evitare rischi come scosse elettriche e

- 3 -
incendi.
3. Quando si trovano oggetti estranei sulla superficie del prodotto,
interrompere immediatamente l'uso e rimuovere gli oggetti estranei prima
di continuare a utilizzare.
4. Quando si utilizza questo prodotto ininterrottamente per un lungo
periodo, riposarsi in tempo utile per evitare un affaticamento eccessivo.
5. Non applicare forza esterna alla batteria per evitare rischi per la
sicurezza come rottura e perdite della batteria.
Manutenzione e manutenzione
1. Mantenere e pulire regolarmente il prodotto. Prima della pulizia,
scollegare l'alimentazione e pulirla con un panno asciutto. Fare attenzione
a non utilizzare alcool, soluzioni acide o alcaline, sostanze corrosive, ecc
2. Quando il prodotto non viene utilizzato per un lungo periodo, scollegare
immediatamente l'alimentazione per risparmiare energia e prolungare la
durata del prodotto.
3. Non smontare il prodotto né sostituire i componenti autonomamente. Se
si riscontrano malfunzionamenti, contattare il centro di assistenza
post-vendita.
Misure di gestione delle emergenze
1. In caso di situazioni anomale o incidenti con il prodotto, interrompere
l'utilizzo il prima possibile. Se si riscontrano surriscaldamento, fumo o
suoni anomali, interrompere immediatamente l'alimentazione e contattare
il centro di assistenza post-vendita.
2. Se il prodotto comporta una situazione di emergenza che potrebbe
compromettere la sicurezza personale, chiamare tempestivamente il
numero di soccorso di emergenza.
Disclaimer
Attribuiamo grande importanza alla sicurezza e alla qualità dei nostri
prodotti, ma non possiamo assumerci la responsabilità per incidenti di
sicurezza causati da un uso o funzionamento improprio.

- 4 -
CONSERVA QUESTE ISTRUZIONI
MODEL AND PARAMETERS
Modello
SY-120
0-V1
SY-120
0-V2
SY-120
0-V3
SY-M90
-V1
SY-M90
-V2
SY-M90
-V3
Liquido
adatto
Tutte le paste e i liquidi
scorrevoli (senza particelle)
come salsa di soia, bevande,
vino bianco, aceto, latte, alcol
(meno del 75 %) ecc.
Tutte le paste e i liquidi
scorrevoli (senza particelle)
come salsa di soia, bevande,
vino bianco, aceto, latte, alcol
(meno del 75 %) ecc.
Intervallo di
riempimento
5 g~300 g
5~50 g
Portata
massima
1000 ml/min
100 ml/min
Modalità di
controllo
Automatico
Automatico
Giudizi)
CA 120
V 60 Hz
CA 230
V 50 Hz
CA 230
V 50 Hz
CA 120
V 60 Hz
CA 230
V 50 Hz
CA 230
V 50 Hz
Potenza
(massima)
39 W
39 W
39 W
15 W
15 W
15 W

- 5 -
STRUCTURE DIAGRAM
SY-1200-V1,SY-1200-V2,SY-1200-V3
4. Staffa 2. Vassoio 3. Pannello di controllo 4. Tubo di ingresso e filtro
5. Pompa peristaltica 6. Tubo di uscita e ugello di riempimento
7. Interruttore di alimentazione 8. Presa di alimentazione CA 9.
Manopola del flusso
1
2
3
4
5
6
7
8
9

- 6 -
SY-M90-V1,SY-M90-V2,SY-M90-V3
1.Staffa 2. Vassoio 3. Pannello di controllo 4. Tubo di ingresso
5. Pompa peristaltica 6. Tubo di uscita e ugello di riempimento
7. Interruttore di alimentazione 8. Presa di alimentazione CA 9.
Manopola del flusso
2
3
1
4
6
5
7
8
9

- 7 -
COMPONENTS
SY-1200-V1
SY-1200-V2
SY-1200-V3
SY-M90-V1
SY-M90-V2
SY-M90-V3
Cavo di alimentazione
×1
×1
Staffa
×1
×1
Tubo (con filtro)
×1
/
Tubo in silicone (corto)
×1
/
Tubo di ingresso
/
×1
Tubo di uscita
/
×1
Striscia di spugna
(nera)
×1
×1
Ugello di riempimento
×2
×2
Manuale d'uso
×1
×1
Model
Parts
- 8 -
OPERATING INSTRUCTIONS
1. Posizionare il vassoio sopra come
mostrato
2.Rimuovere le viti, installare la
staffa e bloccarla con le viti come
mostrato.
3.Aprire il coperchio della pompa
peristaltica.
4.Aprire le clip della pompa
peristaltica.
5.Avvolgere il tubo nella pompa
peristaltica come mostrato.
9. Fissare le clip e coprire il
coperchio.

- 9 -
7.Regolare l'altezza dell'ugello di
riempimento e collegare il tubo.
8.Inserire il cavo di alimentazione
come mostrato.
12.Assemblaggio del prodotto completato.
Nota: il prodotto viene fornito con un ugello di riempimento sottile. È possibile
installarlo secondo necessità.
Dopo l'uso , può essere pulito pompando ripetutamente acqua. Oppure
sostituire il tubo .
Le istruzioni per l'uso

- 10 -
La finestra di visualizzazione e la descrizione delle funzioni dei
pulsanti
1, finestra di visualizzazione:
Peso: visualizza il peso effettivo dell'articolo pesato
Impostato: Utente. impostare il peso da riempire
Contatore: numero di bottiglie riempite
Trigger: il valore del peso che attiva l'avvio automatico
2, Funzione del pulsante:
[Uomo]: consente di accedere alla modalità manuale
[Auto]: accede alla modalità automatica
[Tara]: sbucciare e impostare a zero
[Imposta]: imposta il peso di riempimento
[Trig]: imposta il valore di attivazione
[Esegui]: avvia manualmente la funzione di riempimento (fare nuovamente
clic per mettere in pausa)
[Salva]: memorizza 4 gruppi di dati di riempimento comunemente utilizzati
[M1-4]: richiamare i dati relativi al peso di riempimento memorizzati
[ 0 ]: il valore del contatore viene cancellato
Il grande pulsante verde e l'interruttore a pedale hanno la stessa funzione
di [Esegui] sulla tastiera.
Le istruzioni per l'uso
1, metodo di impostazione "Imposta": Premere il tasto [Imposta] per
immettere il valore (ad esempio, impostare 100 g, immettere 1 0 ), quindi

- 11 -
premere nuovamente [Imposta].
2, metodo di impostazione "Trigger": (il valore di attivazione non può
essere inferiore a 3 grammi)
Premere il tasto [Trig], immettere il valore (ad esempio, impostare 35g.
immettere 35), quindi premere nuovamente [Trig].
Nota: il valore di attivazione è impostato su ≤ peso della bottiglia vuota. In
modalità automatica, il riempimento automatico è
attivato quando il peso della bottiglia vuota supera il valore di attivazione.
3, Metodo operativo "Modalità manuale": (Premere il tasto [Man], la luce
manuale è accesa, inserire modalità manuale;)
(1) Mettere la bottiglia vuota, premere il pulsante [Tare] per rimuovere il
peso della bottiglia vuota, premere il pulsante [Run] per avviare il
riempimento. Il peso del liquido versato raggiunge il peso di riempimento
impostato e si ferma
automaticamente.
(2) Rimuovere la bottiglia piena, posare una bottiglia vuota, premere il
pulsante [Tare] [Run] per avviare la successiva riempimento . _
4, Metodo operativo "Modalità automatica": (Premere il tasto [Auto], la luce
automatica è accesa, inserire il Modalità automatica)
Metti la bottiglia vuota, il sistema si sbuccia automaticamente e inizia a
riempirsi automaticamente dopo un ritardo
di x secondi. Quando il peso raggiunge il peso di riempimento , il
riempimento viene automaticamente interrotto.Rimuovere la bottiglia
riempita e il sistema si azzererà automaticamente dopo un ritardo di x
secondi.Inserisci il successivo
svuotare la bottiglia e avviare automaticamente il riempimento successivo.
Nota: Quando si utilizza la modalità automatica, se la macchina non è
riempita correttamente , è a causa di a
errore causato da un ciclo non ancora terminato. A questo punto togliere la
bottiglia e premere [Tare] per utilizzarla normalmente.
5, Il metodo di impostazione per "memorizzare 4 gruppi di pesi di
riempimento su M1-M4":
Premere il tasto [Salva] (il numero dei pesi di riempimento inizia a
lampeggiare), inserire il valore da memorizzare,

- 12 -
ed infine premere il tasto [M1] (il numero del “ peso di riempimento ” smette
di lampeggiare) e il numero da immesso viene memorizzato in M1.
Quando è necessario utilizzare il valore di m1 come peso di riempimento ,
è possibile premere m1 per impostare il valore di m1 come peso di
riempimento. (Impostare M2, M3, M4 come metodo per impostare M1)
6, Come annullare la funzione di peeling automatico:
Riavviare la macchina, premere il pulsante [Auto], quindi tenere premuto il
pulsante [3] finché non si sente il messaggio suono di allarme della
macchina e lasciarla andare. A questo punto, la funzione di sbucciatura
automatica è stata annullata .
Se si desidera attivare la funzione di sbucciatura automatica, ripetere
l'operazione precedente. Una volta impostato, il la macchina ricorderà per
sempre.
7, Come impostare il "Rapporto di decelerazione a medio raggio": ad una
piccola percentuale del valore impostato, passa automaticamente alla
velocità media
Premere [auto], impostare la portata su un valore proporzionale (ad
esempio, 80), premere a lungo la manopola della velocità abbastanza da
lasciarlo andare quando si sente il "Beep".
8, Come impostare "Il valore del rallentamento": (Quanti grammi prima
della fine rallentano automaticamente giù)
Premere [Trig] [Salva], .
quindi immettere il valore da impostare, quindi premere nuovamente [Trig].
9, metodo "impostazioni di fabbrica": premere il pulsante [auto], quindi
tenere premuto il pulsante [5] per non lasciarlo andare, fino al "beep"
dell'allarme della macchina dopo il rilascio. La macchina è tornata allo
stato di fabbrica.
Informazioni sulla regolazione della portata
1, questo prodotto con MANOPOLA di regolazione della portata, velocità
1-100 regolabile e portata del display digitale valore;
2, Regolazione della manopola rotante, il valore della velocità sarà un
display digitale, nessuna operazione 3 secondi dopo Uscita.
3, premere la MANOPOLA, verrà visualizzato il valore della portata, è

- 13 -
possibile visualizzare il valore della portata corrente, nessuna operazione
dopo 3 secondi dall'uscita .
4, La portata può essere regolata in qualsiasi momento, dopo la
regolazione , verrà salvata automaticamente e si spegnerà memoria.
Come utilizzare il metodo di riempimento a tempo impostato
I, premere [auto], premere a lungo [2] per passare al "metodo di
riempimento impostato per l'ora" (lo stesso metodo può essere ripristinato
anche al “metodo di riempimento impostato ” ).
2, Il metodo di riempimento impostato visualizza il numero in secondi, con
una precisione di 0,01 secondi.
3, premere [ impostazioni ], inserire il tempo di riempimento , premere
[impostazioni], è possibile impostare il tempo di riempimento .
4, premere [trigger], inserire l'intervallo di tempo, premere [trigger], è
possibile impostare l'intervallo di tempo automatico riempimento . _
5, premere [set], [start], caricare la quantità necessaria, quindi premere
[start], [set], è possibile estrarre il tempo di riempimento.
6, La modalità automatica può essere un intervallo fisso tra l'avvio
automatico e la modalità manuale premendo il tasto pulsante di avvio per
iniziare.
MAINTENANCE
1. L'utente dovrà selezionare una riempitrice quantitativa di una gamma
adeguata in base a detti prodotti.
2. La macchina contiene una bilancia elettronica di precisione, è vietato
essere in sovrappeso.
3. L'altezza della testa di riempimento può essere regolata a circa 10 mm
dalla bocca della bottiglia.

- 14 -
4. Durante l'uso, mantenere la macchina in piano e stabile per evitare forti
vibrazioni o urti, altrimenti potrebbe verificarsi potrebbe causare danni.
5. Macchina al primo utilizzo o inutilizzo per molto tempo, pochissimi non
assorbiranno l'acqua, perché la pompa è internamente asciutta . È
necessario aggiungere un po' d'acqua dal tubo di aspirazione alla pompa e
quindi avviare la macchina.
6. È meglio pulire la macchina con acqua pulita dopo ogni utilizzo, per
prolungarne la durata della pompa. .
7. Quando la macchina non è in uso, svuotare il liquido e conservarlo in un
luogo ventilato e asciutto.
8. Si prega di pulire il prodotto e il filtro in tempo dopo ogni utilizzo .
9. Mantenere sempre pulito il prodotto all'esterno .
10 . Conservare il prodotto in un luogo asciutto e ventilato.
11. Se non viene utilizzato per un lungo periodo, pulire e svuotare il liquido
nel prodotto .
12. Sostituire regolarmente le seguenti parti di consumo :
Tubo flessibile, filtro, ugello di riempimento
TROUBLESHOOTING
Problema
Causa possibile
Possibile soluzione
Non assorbe
acqua
Primo utilizzo della macchina o
inutilizzo per molto tempo,
pochissimi non assorbiranno
l'acqua, perché la pompa è
interna risultato secco .
È necessario aggiungere
un po' d'acqua dal tubo di
aspirazione alla pompa e
quindi avviare la macchina.
La pompa non
riesce a far
uscire il liquido
L'ingresso e l'uscita del tubo
sono invertiti
Confermare l'ingresso del
tubo flessibile nel serbatoio
del liquido.
Il cavo di alimentazione non è
collegato
Ricollegare il cavo di
alimentazione
Tubo piegato o danneggiato
Lisciare il tubo o sostituirlo
- 15 -
L'indicatore di
alimentazione è
spento
Il cavo di alimentazione non è
collegato
Ricollegare il cavo di
alimentazione
Questo prodotto è soggetto alle disposizioni della Direttiva
Europea 2012/19/CE. Il simbolo del bidone della spazzatura
barrato indica che nell'Unione Europea il prodotto richiede la
raccolta differenziata dei rifiuti. Ciò vale per il prodotto e tutti gli
accessori contrassegnati da questo simbolo. I prodotti
contrassegnati come tali non possono essere smaltiti con i
normali rifiuti domestici, ma devono essere portati in un punto
di raccolta per il riciclaggio di dispositivi elettrici ed elettronici.
Indirizzo: Baoshanqu Shuangchenglu 803long 11hao 1602A-1609shi
Shanghai
Importato in AUS: SIHAO PTY LTD, 1 ROKEVA STREETEASTWOOD
NSW 2122 Australia
Importato negli Stati Uniti: Sanven Technology Ltd, Suite 250, 9166
Anaheim Place, Rancho Cucamonga, CA 91730
REP
EC
SHUNSHUN GmbH
Römeräcker 9 Z2021, 76351
Linkenheim-Hochstetten, Germany
REP
UK
Pooledas Group Ltd
Unit 5 Albert Edward House, The
Pavilions Preston, United Kingdom
Made in China


Soporte técnico y certificado de garantía electrónica
www.vevor.com/support
MÁQUINA DE LLENADO DE PASTA LÍQUIDA
MANUAL DE USUARIO
We continue to be committed to provide you tools with competitive price.
"Save Half", "Half Price" or any other similar expressions used by us only represents an
estimate of savings you might benefit from buying certain tools with us compared to the major
top brands and does not necessarily mean to cover all categories of tools offered by us. You
are kindly reminded to verify carefully when you are placing an order with us if you are
actually saving half in comparison with the top major brands.
- 1 -
Have product questions? Need technical support? Please feel free to
contact us:
Technical Support and E-Warranty Certificate
www.vevor.com/support
NEED HELP? CONTACT US!
This is the original instruction, please read all manual instructions
carefully before operating. VEVOR reserves a clear interpretation of our
user manual. The appearance of the product shall be subject to the
product you received. Please forgive us that we won't inform you again if
there are any technology or software updates on our product.
Paste Liquid Filling
Machine
SY-1200-V1
SY-1200-V2
SY-1200-V3
SY-M90-V1
SY-M90-V2
SY-M90-V3

- 2 -
9. Lea atentamente y comprenda todas las INSTRUCCIONES DE
MONTAJE Y OPERACIÓN antes de operar.
10. El incumplimiento de las reglas de seguridad y otras precauciones
básicas de seguridad puede provocar lesiones personales graves.
GENERAL SAFETY RULES
Recordatorio importante
1.Antes de usar, lea atentamente el manual del producto y asegúrese de
comprender y cumplir con todas las advertencias de seguridad y
precauciones de uso.
2. No utilice este producto para otros fines no designados para evitar
riesgos inesperados.
3. Este producto solo es aplicable a usuarios dentro del grupo de edad y
ámbito de aplicación especificados. Cumpla estrictamente con las
restricciones de edad y advertencias pertinentes.
4. Si hay alguna anomalía en el producto, deje de usarlo inmediatamente y
comuníquese con el centro de servicio posventa para realizar consultas o
concertar una reparación.
Requisitos ambientales para su uso.
1. Úselo en un ambiente seco y bien ventilado para evitar condiciones
ambientales extremas como activación de agua, altas temperaturas, alta
humedad y temperaturas extremadamente bajas.
2. Evite la luz solar directa o el contacto con fuentes de fuego para evitar
daños al producto o incendios.
3. Asegúrese de que haya un entorno de uso estable y evite que el
producto se golpee o caiga para evitar daños.
Pautas de operación segura
1. Utilice una fuente de alimentación y un voltaje adecuados y no utilice
cables de alimentación ni enchufes dañados.
2. Al utilizar este producto, no provoque cortocircuitos ni conecte
dispositivos que no coincidan para evitar riesgos como descargas

- 3 -
eléctricas e incendios.
3. Cuando se encuentren objetos extraños en la superficie del producto,
deje de usarlo inmediatamente y retire los objetos extraños antes de
continuar usándolo.
4. Cuando utilice este producto de forma continua durante un período
prolongado, descanse a tiempo para evitar la fatiga excesiva.
5. No aplique fuerza externa a la batería para evitar riesgos de seguridad
como roturas y fugas de la batería.
Mantenimiento y conservación
1. Mantenga y limpie periódicamente el producto. Antes de limpiar,
desconecte la fuente de alimentación y límpiela con un paño seco. Tenga
cuidado de no utilizar alcohol, soluciones ácidas o alcalinas, sustancias
corrosivas, etc.
2. Cuando el producto no esté en uso durante un período prolongado,
desconecte la fuente de alimentación lo antes posible para ahorrar energía
y prolongar la vida útil del producto.
3. No desmonte el producto ni reemplace componentes por su cuenta. Si
encuentra algún mal funcionamiento, comuníquese con el centro de
servicio posventa.
Medidas de manejo de emergencia
1. Cuando existan situaciones anormales o accidentes con el producto,
deje de usarlo lo antes posible. Si detecta sobrecalentamiento, humo o un
sonido anormal, corte inmediatamente el suministro de energía y
comuníquese con el centro de servicio posventa.
2. Si el producto implica una situación de emergencia que pueda dañar la
seguridad personal, llame al número de rescate de emergencia de manera
oportuna.
Descargos de responsabilidad
Damos gran importancia a la seguridad y la calidad de nuestros productos,
pero no podemos asumir responsabilidad por accidentes de seguridad
causados por un uso u operación inadecuados.

- 4 -
GUARDA ESTAS INSTRUCCIONES
MODEL AND PARAMETERS
Modelo
SY-120
0-V1
SY-120
0-V2
SY-120
0-V3
SY-M90
-V1
SY-M90
-V2
SY-M90
-V3
Líquido
adecuado
Todas las pastas y líquidos que
fluyen libremente (sin
partículas), como salsa de soja,
bebidas, vino blanco, vinagre,
leche, alcohol (menos del
75 %), etc.
Todas las pastas y líquidos que
fluyen libremente (sin
partículas), como salsa de soja,
bebidas, vino blanco, vinagre,
leche, alcohol (menos del
75 %), etc.
Rango de
llenado
5g ~ 300g
5~50g
Caudal
máximo
1000ml/minuto
100ml/minuto
Modo de
control
Automático
Automático
Calificación(
es)
CA 120
V 60 Hz.
CA 230
V 50 Hz
CA 230
V 50 Hz
CA 120
V 60 Hz.
CA 230
V 50 Hz
CA 230
V 50 Hz
Potencia
(máx.)
39W
39W
39W
15W
15W
15W
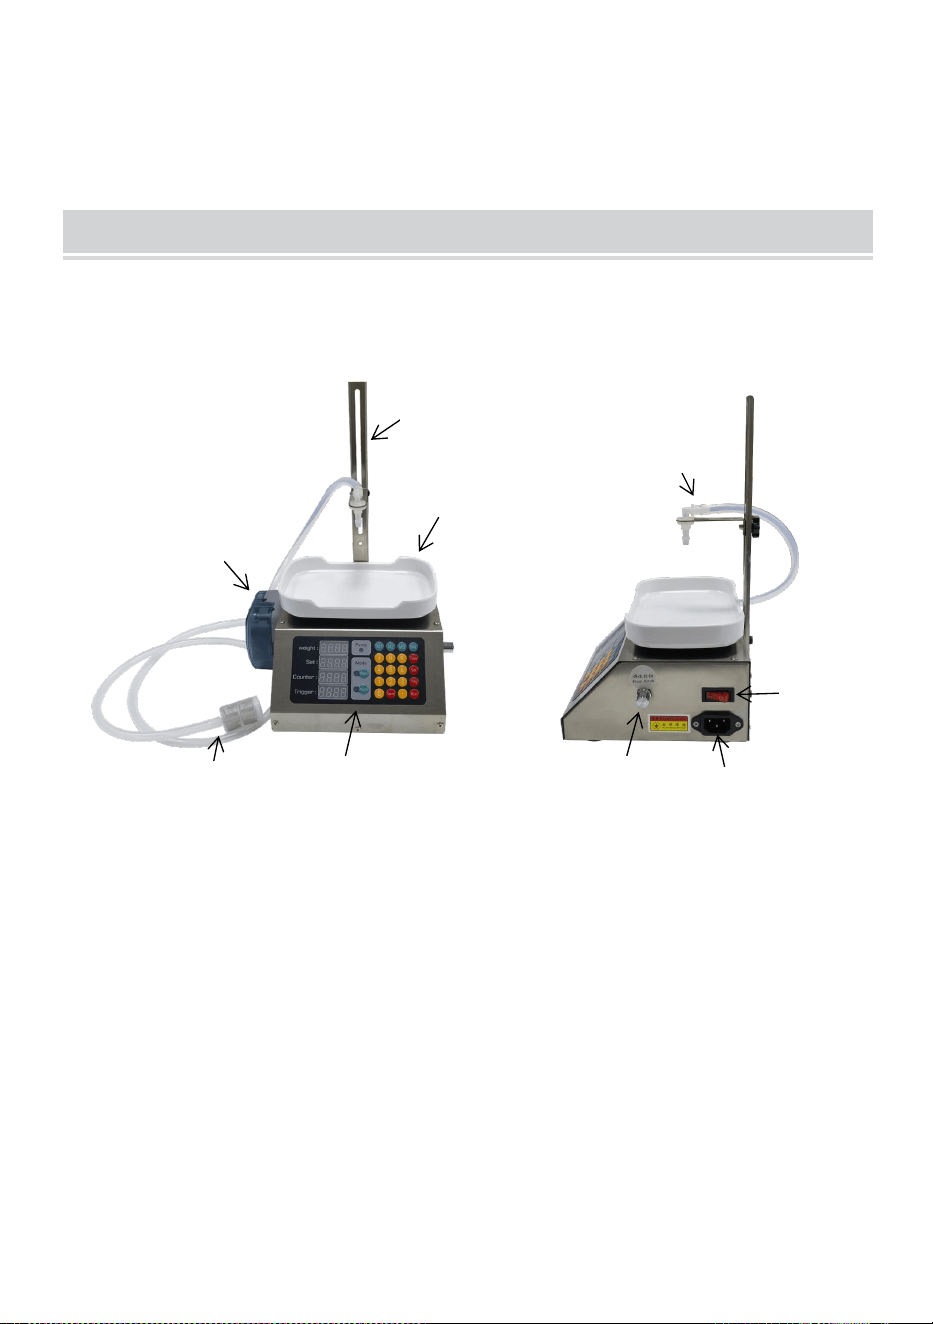
- 5 -
STRUCTURE DIAGRAM
SY-1200-V1, SY-1200-V2, SY-1200-V3
5. Soporte 2. Bandeja 3. Panel de control 4. Manguera de entrada y
filtro
5. Bomba peristáltica 6. Manguera de salida y boquilla de llenado
7. Interruptor de encendido 8. Toma de corriente CA 9. Perilla de flujo
1
2
3
4
5
6
7
8
9
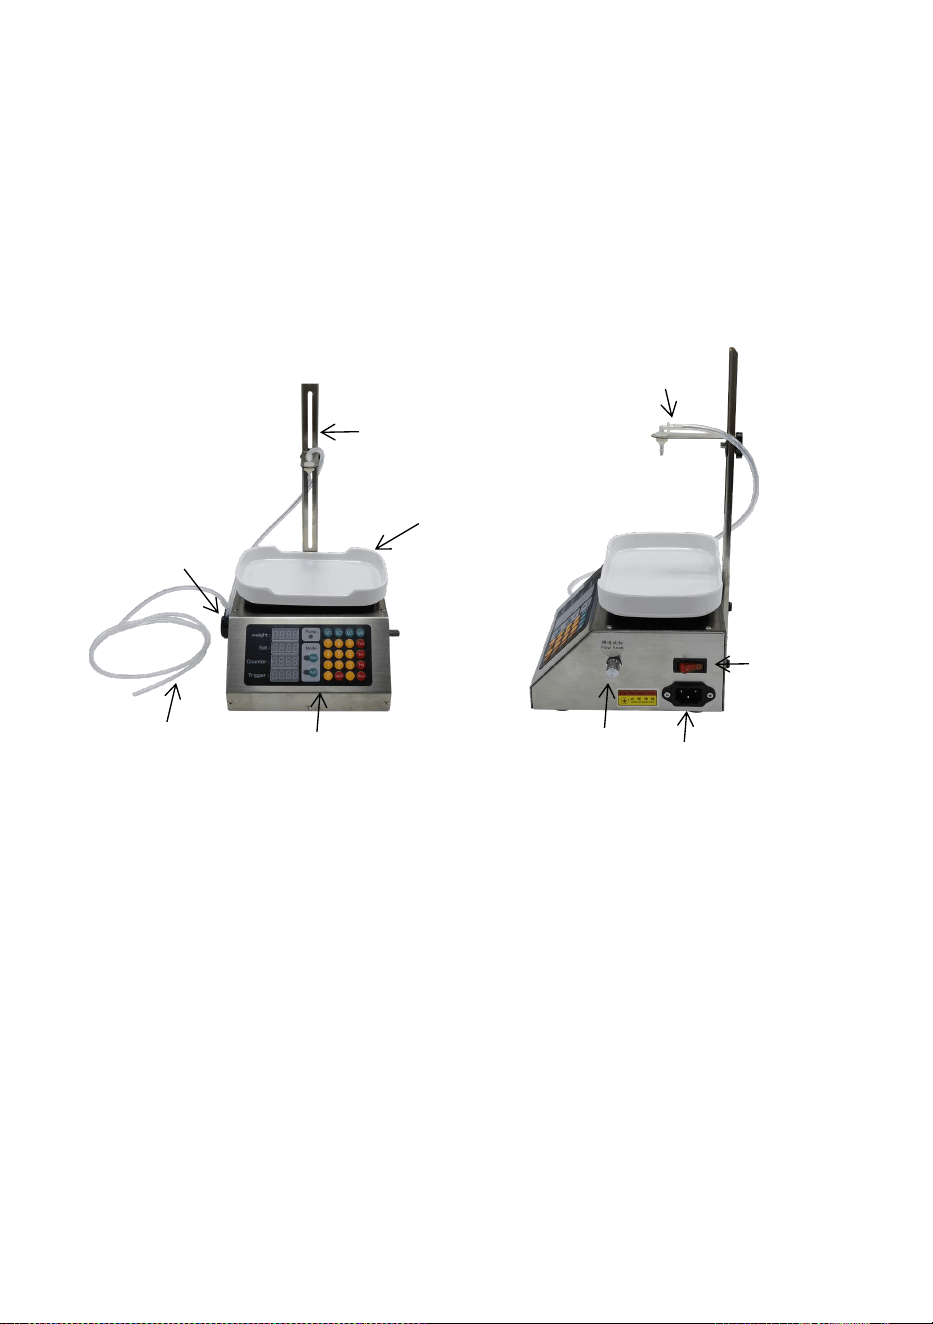
- 6 -
SY-M90-V1, SY-M90-V2, SY-M90-V3
1.Soporte 2. Bandeja 3. Panel de control 4. Manguera de entrada
5. Bomba peristáltica 6. Manguera de salida y boquilla de llenado
7. Interruptor de encendido 8. Toma de corriente CA 9. Perilla de flujo
2
3
1
4
6
5
7
8
9
- 7 -
COMPONENTS
SY-1200-V1
SY-1200-V2
SY-1200-V3
SY-M90-V1
SY-M90-V2
SY-M90-V3
Cable de alimentación
×1
×1
Soporte
×1
×1
Manguera (con filtro)
×1
/
Manguera de silicona
(corta)
×1
/
Manguera de entrada
/
×1
Manguera de salida
/
×1
Tira de esponja (negra)
×1
×1
Boquilla de llenado
×2
×2
Manual de usuario
×1
×1
Model
Parts
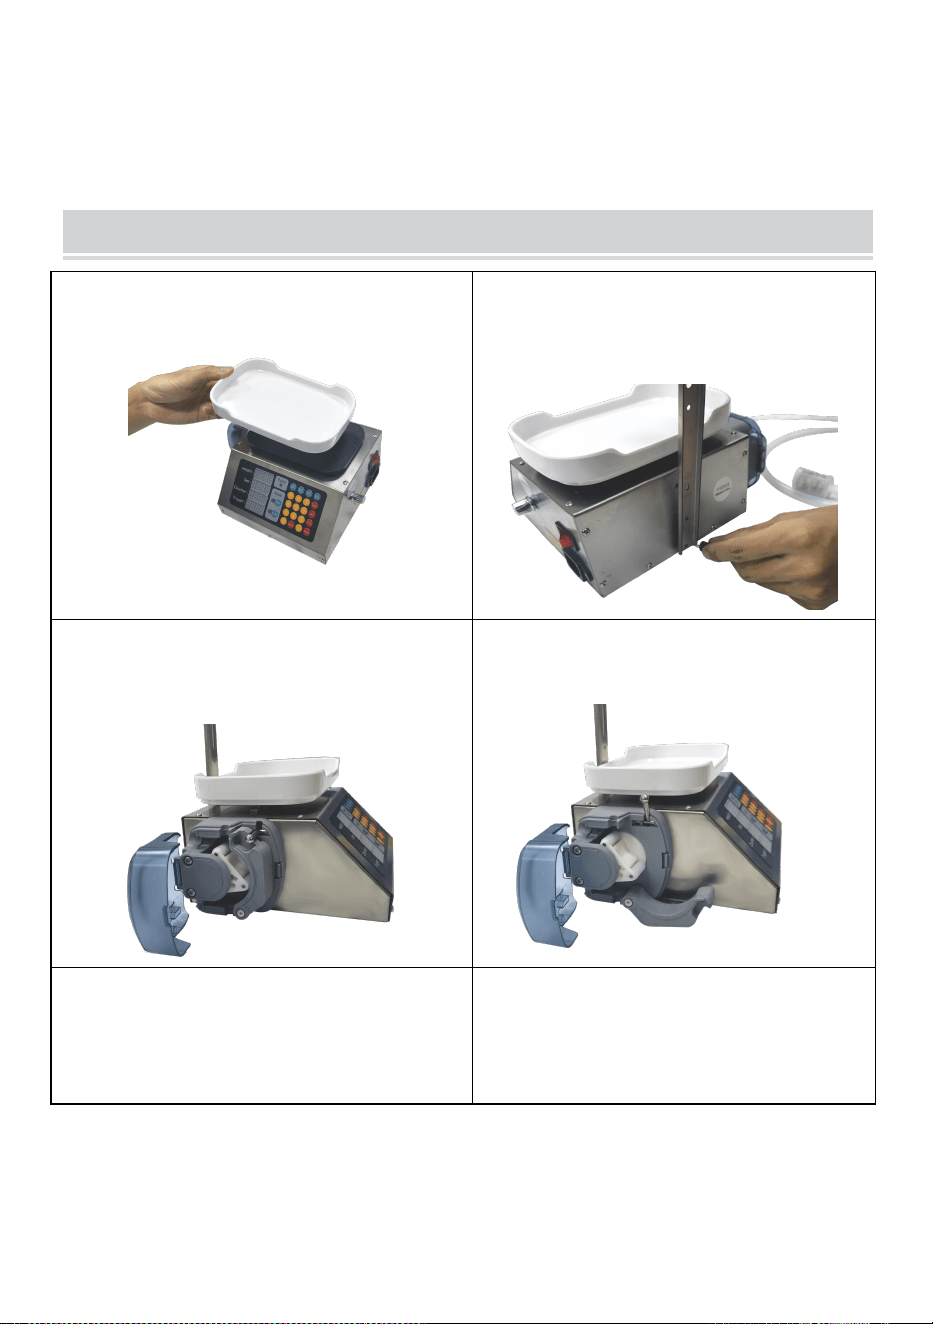
- 8 -
OPERATING INSTRUCTIONS
1. Coloque la bandeja encima como
se muestra.
2.Quite los tornillos e instale el
soporte y fíjelo con tornillos como se
muestra.
3.Abra la tapa de la bomba
peristáltica.
4.Abra los clips de la bomba
peristáltica.
5.Enrolle la manguera dentro de la
bomba peristáltica como se muestra.
10.Sujete los clips y cubra la tapa.
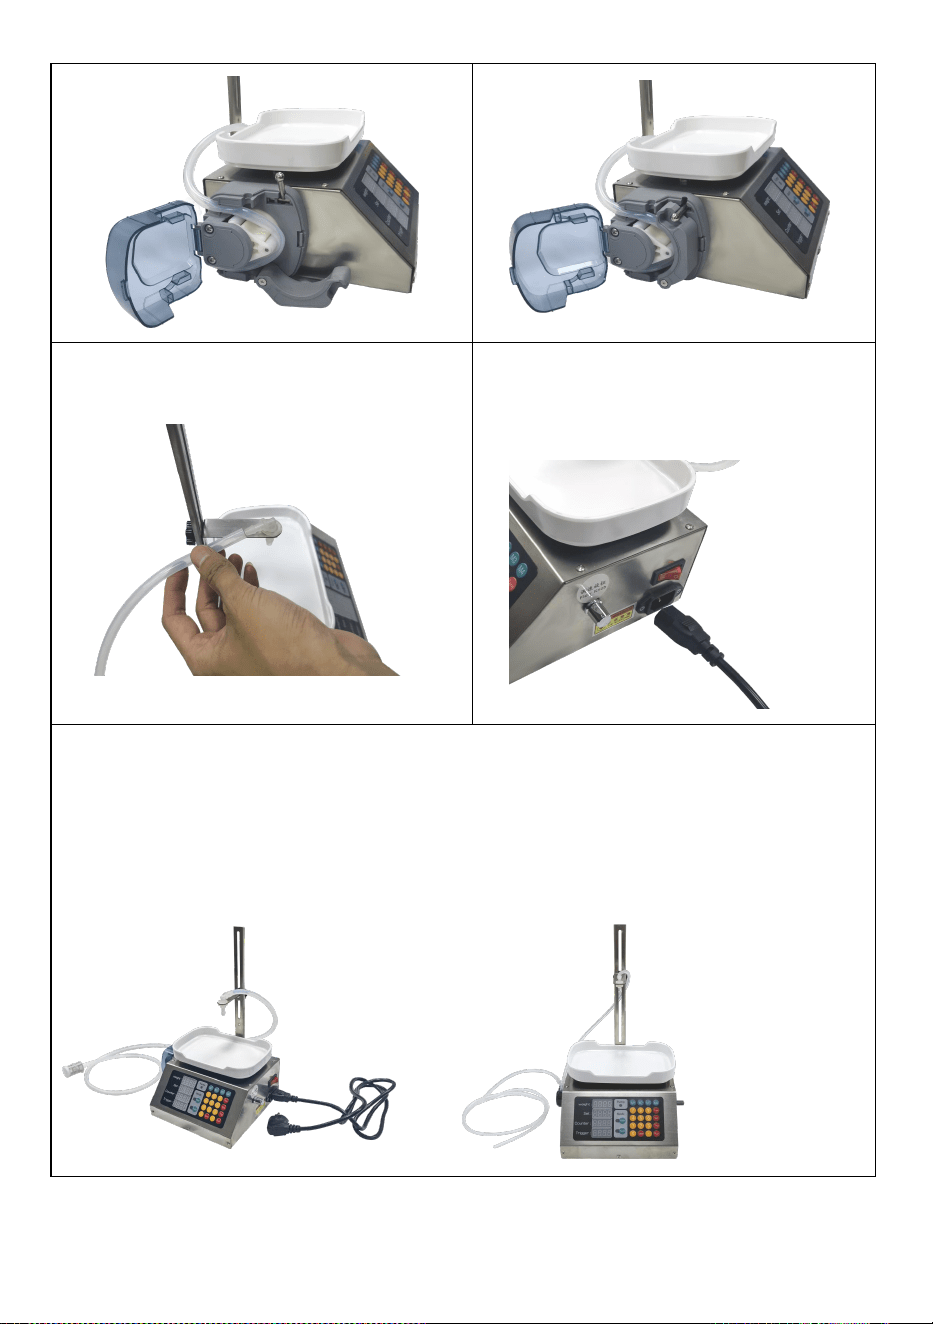
- 9 -
7.Ajuste la altura de la boquilla de
llenado y enchufe la manguera.
8.Inserte el cable de alimentación
como se muestra.
13.Montaje del producto completado.
Nota: El producto se suministra con una boquilla de llenado fina. Puede
instalarla según sea necesario.
Después de su uso , se puede limpiar bombeando agua repetidamente o
reemplazando la manguera .
Las instrucciones de funcionamiento

- 10 -
La ventana de visualización y la descripción de la función del botón.
1, ventana de visualización:
Peso: muestra el peso real del artículo que se pesa
Establecer: Usuario. establecer el peso a llenar
Contador: número de botellas que se han llenado
Activador: el valor de peso que activa el inicio automático.
2, función del botón:
[Hombre]: ingresa al modo manual
[Auto]: ingresa al modo automático
[Tara]: Pelar y poner a cero
[Establecer]: establece el peso de llenado
[Trig]: establece el valor de activación
[Ejecutar]: inicia manualmente la función de llenado (haga clic nuevamente
para pausar)
[Guardar]: almacena 4 grupos de datos de llenado de uso común
[M1-4]: Recupera los datos de peso de llenado almacenados
[ 0 ]: El valor del contador se borra
El gran botón verde y el pedal tienen la misma función que [Ejecutar] en el
teclado.
Las instrucciones de funcionamiento
1, método de configuración "Establecer": Presione la tecla [Establecer]
para ingresar el valor (por ejemplo, establezca 100 g, ingrese 1 0) y luego
presione [Establecer] nuevamente.

- 11 -
2, método de configuración "Disparador": (el valor del disparador no puede
ser inferior a 3 gramos)
Presione la tecla [Trig], ingrese el valor (p. ej., configure 35g. ingrese 35) y
luego presione [Trig] nuevamente.
Nota: El valor de activación se establece en ≤ peso de la botella vacía. En
el modo automático, el llenado automático es
Se activa cuando el peso de la botella vacía excede el valor de activación.
3, método de operación "Modo manual": (presione la tecla [Man], la luz
manual está encendida, ingrese el modo manual;)
(1) Coloque la botella vacía, presione el botón [Tara] para quitar el peso de
la botella vacía, presione el botón [Ejecutar] Botón para iniciar el llenado.
El peso del líquido vertido alcanza el peso de llenado establecido y se
detiene.
automáticamente.
(2) Retire la botella llena, coloque una botella vacía, presione el botón
[Tara] [Ejecutar] para iniciar el siguiente llenado . _
4, método de operación del "modo automático": (presione la tecla [Auto], la
luz automática está encendida, ingrese el modo automatico)
Coloque la botella vacía, el sistema se pela automáticamente y comienza
a llenarse automáticamente después de un retraso.
de x segundos. Cuando el peso alcanza el peso de llenado, el llenado se
detiene automáticamente.Retire la botella llena y el sistema se
restablecerá automáticamente a cero después de un retraso de x
segundos. Coloque la siguiente
Vacíe la botella y comience automáticamente el siguiente llenado.
Nota: Al utilizar el modo automático, si la máquina no se llena
correctamente es por un
Error causado por un ciclo que aún no finaliza. En este punto, retire la
botella y presione [Tare] para usarla. normalmente.
5, el método de configuración de "almacenar 4 grupos de pesos de relleno
en M1-M4":
Presione la tecla [Guardar] (el número de pesos de llenado comienza a
parpadear), ingrese el valor que se almacenará,
y finalmente presione la tecla [M1] (el número de “ peso de relleno " deja

- 12 -
de parpadear) y el número a ser ingresado se almacena en M1. Cuando
necesite utilizar el valor de m1 como peso de relleno , puede presionar m1
para establecer el valor de m1 como peso de llenado. (Establezca M2, M3,
M4 como método para configurar M1)
6,Cómo cancelar la función de pelado automático:
Reinicie la máquina, presione el botón [Auto] y luego mantenga
presionado el botón [3] hasta que escuche el Sonido de alarma de la
máquina y soltar. En este momento, la función de pelado automático ha
sido cancelada .
Si desea activar la función de pelado automático, repita la operación
anterior. Una vez configurado, el La máquina recordará para siempre.
7, cómo configurar la "RELACIÓN DE DECELERACIÓN DE RANGO
MEDIO": en un pequeño porcentaje de la cantidad establecida,
automáticamente pasa a velocidad media
Presione [auto], ajuste el caudal a un valor proporcional (por ejemplo, 80),
presione la perilla de velocidad durante mucho tiempo. lo suficiente como
para soltarlo cuando se escuche el “Beep”.
8, Cómo configurar el "valor de desaceleración": (¿Cuántos gramos antes
del final se desacelera automáticamente? abajo)
Presione [Trig] [Guardar], .
luego ingrese el valor a configurar y luego presione [Trig] nuevamente.
9, método de "configuración de fábrica": presione el botón [auto] y luego
mantenga presionado el botón [5] para no soltarlo, hasta que la alarma de
la máquina emita un pitido después del lanzamiento. La máquina vuelve al
estado de fábrica.
Acerca de la regulación del caudal
1, este producto con PERILLA de ajuste de caudal, velocidad 1-100
ajustable y caudal de pantalla digital valor;
2. Ajuste de la perilla giratoria, el valor de la velocidad será una pantalla
digital, no funcionará 3 segundos después del salida.
3. Presione la PERILLA, se mostrará el valor del caudal. Puede ver el valor
del caudal actual, sin operación. después de 3 segundos de salida.
4. El caudal se puede ajustar en cualquier momento; después del ajuste ,

- 13 -
se guardará automáticamente y se apagará. memoria.
Cómo utilizar el método de tiempo establecido para llenar
I, presione [ auto ], presione prolongadamente [2] para cambiar al "método
de llenado de tiempo establecido" (el mismo método puede también se
restablecerá al “método de llenado establecido ” ).
2. El método de llenado del tiempo establecido muestra el número en
segundos, con una precisión de 0,01 segundos.
3, presione [ configuración ], ingrese el tiempo de llenado , presione
[configuración], puede configurar el tiempo de llenado .
4, presione [disparador], ingrese el tiempo del intervalo, presione
[disparador], puede configurar el intervalo de tiempo de automático
llenado . _
5, presione [set][start], cargue hasta la cantidad necesaria, luego presione
[start][set], puede extraer el tiempo de llenado.
6. El modo automático puede tener un intervalo fijo entre el inicio
automático y el modo manual presionando el botón botón de inicio para
comenzar.
MAINTENANCE
1. El usuario deberá seleccionar una máquina llenadora cuantitativa de un
rango adecuado según dichos productos.
2. La máquina contiene una balanza electrónica de precisión, está
prohibido tener sobrepeso.
3. La altura del cabezal de llenado se puede ajustar a unos 10 mm desde
la boca de la botella.
4. Cuando esté en uso, mantenga la máquina nivelada y estable para
evitar grandes vibraciones o impactos, de lo contrario puede causar

- 14 -
daños.
5. La máquina se usa por primera vez o durante mucho tiempo sin usarse,
muy pocas no absorberán agua, porque la bomba tiene un resultado
interno seco . Debe agregar un poco de agua desde el tubo de entrada a la
bomba y luego encender la máquina.
6. Es mejor limpiar la máquina con agua limpia después de cada uso, lo
que puede prolongar la vida útil. de la bomba. .
7. Cuando la máquina no esté en uso, vacíe el líquido y guárdelo en un
lugar ventilado y seco.
8. Limpie el producto y el filtro a tiempo después de cada uso .
9. Mantenga siempre limpio el exterior del producto .
10 . Guarde el producto en un lugar seco y ventilado.
11. Si no se utiliza durante mucho tiempo, limpie y vacíe el líquido del
producto .
12. Reemplace periódicamente los siguientes consumibles :
Manguera, filtro, boquilla de llenado
TROUBLESHOOTING
Problema
Causa posible
Solución posible
No absorber
agua
La máquina se usa por primera vez
o durante mucho tiempo sin uso,
muy pocas no absorberán agua,
porque la bomba interna resultado
seco .
Debe agregar un poco de
agua desde el tubo de
entrada a la bomba y luego
encender la máquina.
La bomba no
puede sacar
el líquido.
La entrada y salida de la manguera
están invertidas.
Confirme la entrada de la
manguera al tanque de
líquido.
El cable de alimentación no está
enchufado
Vuelva a conectar el cable
de alimentación
Manguera doblada o dañada
Alise la manguera o
reemplace la manguera
- 15 -
El indicador
de encendido
está
apagado.
El cable de alimentación no está
enchufado
Vuelva a conectar el cable
de alimentación
Este producto está sujeto a las disposiciones de la Directiva
Europea 2012/19/CE. El símbolo que muestra un contenedor con
ruedas tachado indica que el producto requiere recogida selectiva
de basura en la Unión Europea. Esto se aplica al producto y a
todos los accesorios marcados con este símbolo. Los productos
marcados como tales no podrán desecharse junto con la basura
doméstica normal, sino que deberán llevarse a un punto de
recogida para el reciclaje de aparatos eléctricos y electrónicos.
Dirección: Baoshanqu Shuangchenglu 803long 11hao 1602A-1609shi
Shanghai
Importado a AUS: SIHAO PTY LTD, 1 ROKEVA STREETEASTWOOD
NSW 2122 Australia
Importado a EE. UU.: Sanven Technology Ltd, Suite 250, 9166 Anaheim
Place, Rancho Cucamonga, CA 91730
REP
EC
SHUNSHUN GmbH
Römeräcker 9 Z2021, 76351
Linkenheim-Hochstetten, Germany
REP
UK
Pooledas Group Ltd
Unit 5 Albert Edward House, The
Pavilions Preston, United Kingdom
Hecho en china


Wsparcie techniczne i certyfikat e-gwarancji
www.vevor.com/support
MASZYNA DO NAPEŁNIANIA PŁYNEM WKLEJ
INSTRUKCJA OBSŁUGI
We continue to be committed to provide you tools with competitive price.
"Save Half", "Half Price" or any other similar expressions used by us only represents an
estimate of savings you might benefit from buying certain tools with us compared to the major
top brands and does not necessarily mean to cover all categories of tools offered by us. You
are kindly reminded to verify carefully when you are placing an order with us if you are
actually saving half in comparison with the top major brands.

- 1 -
Have product questions? Need technical support? Please feel free to
contact us:
Technical Support and E-Warranty Certificate
www.vevor.com/support
NEED HELP? CONTACT US!
This is the original instruction, please read all manual instructions
carefully before operating. VEVOR reserves a clear interpretation of our
user manual. The appearance of the product shall be subject to the
product you received. Please forgive us that we won't inform you again if
there are any technology or software updates on our product.
Paste Liquid Filling
Machine
SY-1200-V1
SY-1200-V2
SY-1200-V3
SY-M90-V1
SY-M90-V2
SY-M90-V3

- 2 -
11. przeczytaj uważnie i zrozum całą INSTRUKCJĘ MONTAŻU I
OBSŁUGI .
12. Nieprzestrzeganie zasad bezpieczeństwa i innych podstawowych
środków ostrożności może skutkować poważnymi obrażeniami ciała.
GENERAL SAFETY RULES
Ważne przypomnienie
1. Przed użyciem przeczytaj uważnie instrukcję produktu i upewnij się, że
rozumiesz i przestrzegasz wszystkich ostrzeżeń dotyczących bezpieczeń
stwa i środków ostrożności podczas użytkowania.
2. Nie używaj tego produktu do innych, nieprzeznaczonych celów, aby
uniknąć nieoczekiwanego ryzyka.
3. Ten produkt jest przeznaczony wyłącznie dla użytkowników w określonej
grupie wiekowej i zakresie zastosowania. Należy ściśle przestrzegać
odpowiednich ograniczeń wiekowych i ostrzeżeń.
4. W przypadku jakichkolwiek nieprawidłowości w produkcie należy
natychmiast zaprzestać jego używania i skontaktować się z centrum
obsługi posprzedażnej w celu konsultacji lub umówienia naprawy.
Wymagania środowiskowe dotyczące stosowania
1. Proszę używać w suchym i dobrze wentylowanym środowisku, aby
uniknąć ekstremalnych warunków środowiskowych, takich jak aktywacja
wody, wysoka temperatura, wysoka wilgotność i wyjątkowo niska
temperatura.
2. Unikaj bezpośredniego światła słonecznego lub kontaktu ze źródłami
ognia, aby zapobiec uszkodzeniu produktu lub pożarowi.
3. Zapewnij stabilne środowisko użytkowania i chroń produkt przed
uderzeniem lub upuszczeniem, aby uniknąć uszkodzeń.
Wytyczne dotyczące bezpieczeństwa
1. Należy używać odpowiedniego zasilacza i napięcia oraz nie używać
uszkodzonych przewodów zasilających lub wtyczek.
2. Podczas korzystania z tego produktu nie należy zwierać obwodów ani

- 3 -
podłączać niedopasowanych urządzeń, aby uniknąć ryzyka, takiego jak
porażenie prądem lub pożar.
3. Jeśli na powierzchni produktu zostaną znalezione ciała obce, należy
natychmiast zaprzestać korzystania z produktu i usunąć je przed dalszym
użytkowaniem.
4. W przypadku ciągłego używania tego produktu przez długi czas należy
odpocząć w odpowiednim czasie, aby uniknąć nadmiernego zmęczenia.
5. Nie przykładaj siły zewnętrznej do akumulatora, aby uniknąć zagrożeń
bezpieczeństwa, takich jak pęknięcie lub wyciek akumulatora.
Konserwacja i utrzymanie
1. Regularnie konserwuj i czyść produkt. Przed czyszczeniem należy
odłączyć zasilanie i wytrzeć suchą szmatką. Należy uważać, aby nie
używać alkoholu, roztworów kwasów lub zasad, substancji żrących itp
2. Jeżeli produkt nie jest używany przez dłuższy czas, należy natychmiast
odłączyć zasilanie, aby oszczędzać energię i wydłużyć żywotność
produktu.
3. Nie demontuj produktu ani nie wymieniaj podzespołów samodzielnie. W
przypadku stwierdzenia jakichkolwiek usterek prosimy o kontakt z
serwisem posprzedażowym.
Środki postępowania w sytuacjach awaryjnych
1. W przypadku wystąpienia nietypowych sytuacji lub wypadków z
produktem należy jak najszybciej zaprzestać jego używania. W przypadku
stwierdzenia przegrzania, dymienia lub nietypowego dźwięku, należy
natychmiast odłączyć zasilanie i skontaktować się z centrum obsługi
posprzedażnej.
2. Jeżeli produkt wiąże się z sytuacją awaryjną mogącą zagrozić
bezpieczeństwu osobistemu, należy niezwłocznie zadzwonić pod numer
ratunkowy.
Zastrzeżenia
Przywiązujemy dużą wagę do bezpieczeństwa i jakości naszych produktów,
ale nie możemy ponosić odpowiedzialności za wypadki związane z

- 4 -
bezpieczeństwem spowodowane niewłaściwym użytkowaniem lub
obsługą.
ZACHOWAJ TE INSTRUKCJE
MODEL AND PARAMETERS
Model
SY-120
0-V1
SY-120
0-V2
SY-120
0-V3
SY-M90
-V1
SY-M90
-V2
SY-M90
-V3
Odpowiedni
płyn
Wszystkie sypkie pasty i płyny
(bez cząstek), takie jak sos
sojowy, napoje, białe wino,
ocet, mleko, alkohol (poniżej
75 %) itp.
Wszystkie sypkie pasty i płyny
(bez cząstek), takie jak sos
sojowy, napoje, białe wino,
ocet, mleko, alkohol (poniżej
75 %) itp.
Zakres
napełniania
5g ~ 300g
5~50g
Maksymalne
natężenie
przepływu
1000ml/min
100ml/min
Tryb
sterowania
Automatyczny
Automatyczny
Ocena(y)
AC 120
V 60 Hz
AC 230
V 50 Hz
AC 230
V 50 Hz
AC 120
V 60 Hz
AC 230
V 50 Hz
AC 230
V 50 Hz
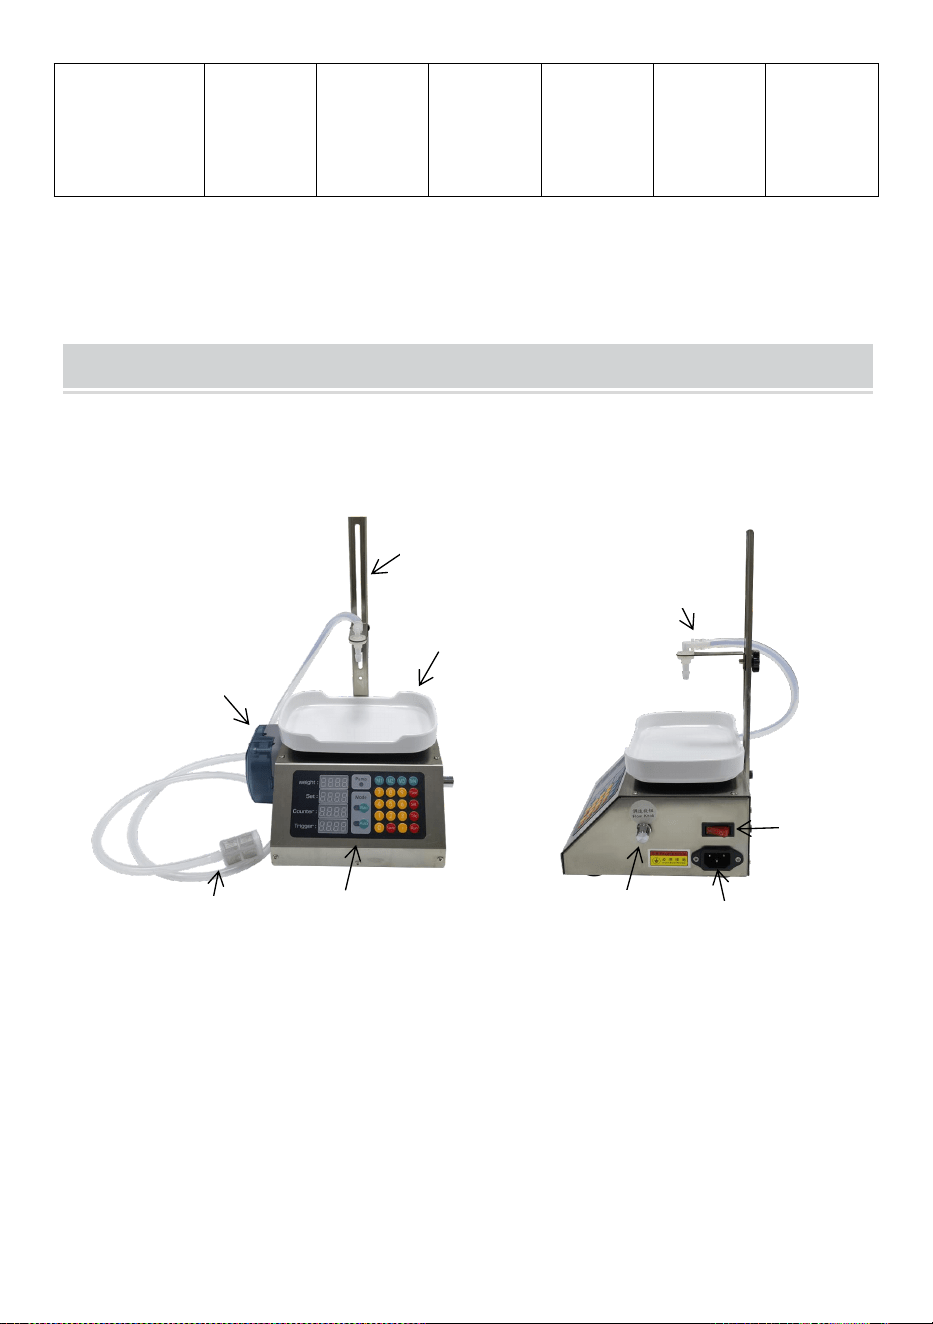
- 5 -
Moc (maks.)
39 W
39 W
39 W
15W
15W
15W
STRUCTURE DIAGRAM
SY-1200-V1, SY-1200-V2, SY-1200-V3
6. Wspornik 2. Taca 3. Panel sterowania 4. Wąż wlotowy i filtr
5. Pompa perystaltyczna 6. Wąż wylotowy i dysza napełniająca
7. Przełącznik zasilania 8. Gniazdo zasilania prądem przemiennym 9.
Pokrętło przepływu
1
2
3
4
5
6
7
8
9

- 6 -
SY-M90-V1, SY-M90-V2, SY-M90-V3
1. Wspornik 2. Taca 3. Panel sterowania 4. Wąż wlotowy
5. Pompa perystaltyczna 6. Wąż wylotowy i dysza napełniająca
7. Przełącznik zasilania 8. Gniazdo zasilania prądem zmiennym 9.
Pokrętło przepływu
2
3
1
4
6
5
7
8
9

- 7 -
COMPONENTS
SY-1200-V1
SY-1200-V2
SY-1200-V3
SY-M90-V1
SY-M90-V2
SY-M90-V3
Kabel zasilający
×1
×1
Nawias
×1
×1
Wąż (z filtrem)
×1
/
Wąż silikonowy (krótki)
×1
/
Wąż wlotowy
/
×1
Wąż wylotowy
/
×1
Pasek gąbkowy
(czarny)
×1
×1
Model
Parts

- 8 -
OPERATING INSTRUCTIONS
1. Umieść tacę na górze, jak
pokazano
2. Wykręć śruby, zamontuj wspornik
i zablokuj go śrubami, jak pokazano.
3.Otwórz pokrywę pompy
perystaltycznej.
4. Otwórz zaciski pompy
perystaltycznej.
Dysza do napełniania
×2
×2
Instrukcja obsługi
×1
×1
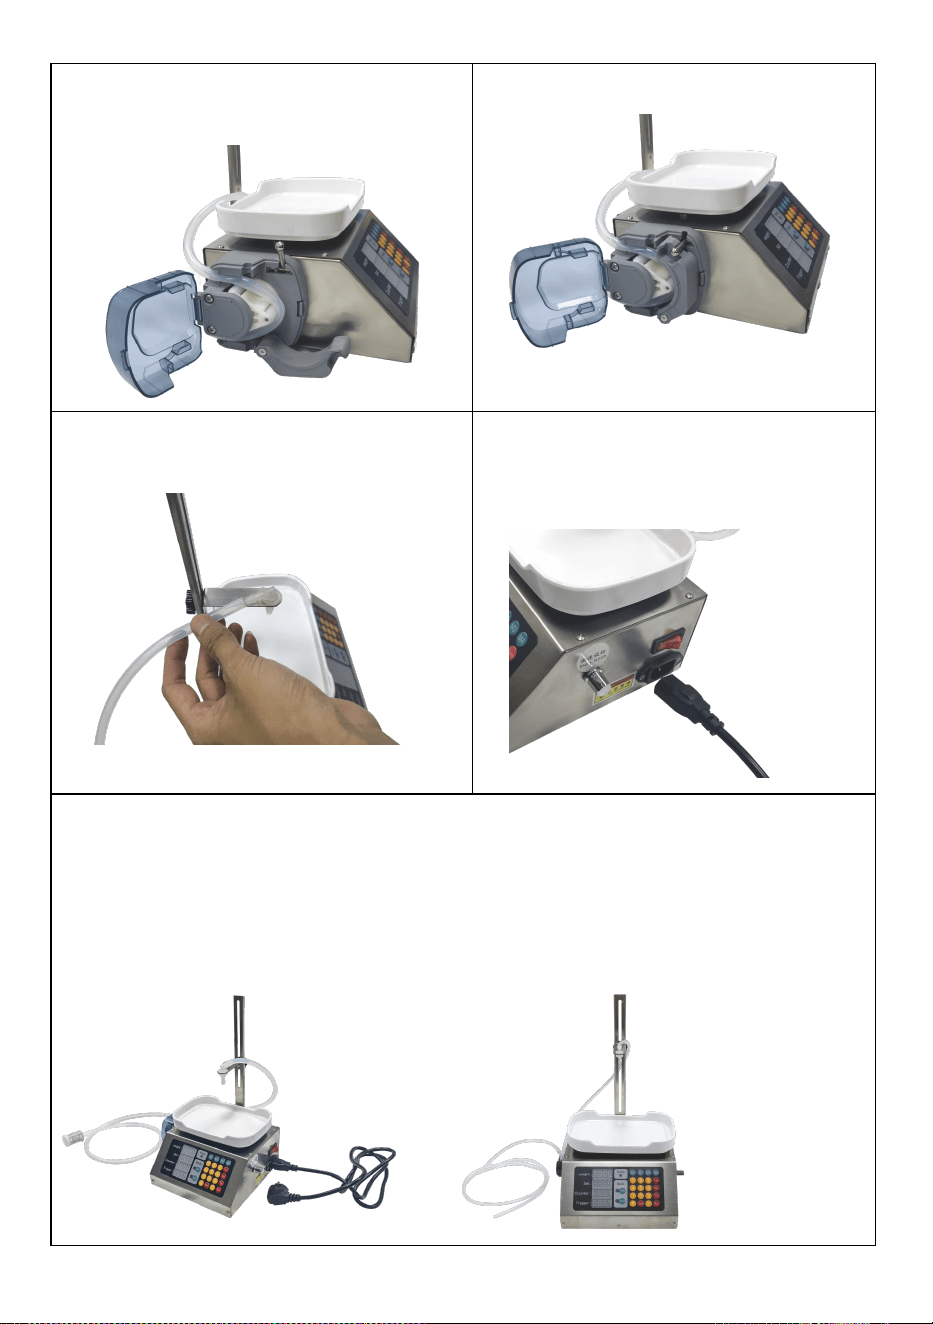
- 9 -
5. Owiń wąż pompą perystaltyczną,
jak pokazano.
11.Zamocuj klipsy i zakryj pokrywę.
7.Wyreguluj wysokość dyszy
napełniającej i podłącz wąż.
8. Podłącz przewód zasilający
zgodnie z ilustracją.
14.Montaż produktu zakończony.
Uwaga: Produkt jest dostarczany z cienką dyszą napełniającą. Można ją
zainstalować w razie potrzeby.
Po użyciu można go oczyścić poprzez wielokrotne pompowanie wody .
Lub wymienić wąż .

- 10 -
Instrukcje obsługi
Okno wyświetlacza i opis funkcji przycisku
1, okno wyświetlacza:
Waga: wyświetla rzeczywistą wagę ważonego przedmiotu
Zestaw: Użytkownik. ustawić wagę do napełnienia
Licznik: liczba napełnionych butelek
Wyzwalacz: wartość ciężaru, która wyzwala automatyczny start
2, funkcja przycisku:
[Man]: Wejdź w tryb ręczny
[Auto]: wejście w tryb automatyczny
[Tara]: Obierz i wyzeruj
[Ustaw]: ustawienie ciężaru napełnienia
[Trig]: ustaw wartość wyzwalania
[Uruchom]: ręczne uruchomienie funkcji napełniania (kliknij ponownie, aby
wstrzymać)
[Zapisz]: zapisz 4 grupy często używanych danych napełniania
[M1-4]: Wywołaj zapisane dane dotyczące ciężaru napełnienia
[ 0 ]: Wartość licznika jest wyczyszczona
Duży zielony przycisk i przełącznik nożny pełnią tę samą funkcję, co
przycisk [Run] na klawiaturze.
Instrukcje obsługi
1. Metoda ustawiania „Ustaw”: Naciśnij przycisk [Set], aby wprowadzić
wartość (np. ustaw 100g, wprowadź 1 0), a następnie ponownie naciśnij

- 11 -
przycisk [Set].
2, metoda ustawiania „wyzwalacza”: (wartość wyzwalania nie może być
mniejsza niż 3 gramy)
Naciśnij klawisz [Trig], wprowadź wartość (np. ustaw 35g. wprowadź 35), a
następnie ponownie naciśnij [Trig].
Uwaga: Wartość wyzwalająca jest ustawiona na ≤ masa pustej butelki. W
trybie automatycznym automatyczne napełnianie jest
wyzwalane, gdy waga pustej butelki przekracza wartość wyzwalającą.
3, Metoda obsługi „Tryb ręczny”: (Naciśnij klawisz [Man], zapali się
kontrolka trybu ręcznego, wejdź do tryb ręczny;)
(1) Umieść pustą butelkę, naciśnij przycisk [Tara], aby usunąć wagę pustej
butelki, naciśnij przycisk [Run] przycisk , aby rozpocząć napełnianie. Masa
nalewanego płynu osiąga ustawioną masę napełnienia i zatrzymuje się
automatycznie.
(2) Wyjmij napełnioną butelkę, odłóż pustą butelkę, naciśnij przycisk [Tara]
[Run], aby rozpocząć następną filluję . _
4, Metoda działania „Tryb automatyczny”: (Naciśnij klawisz [Auto], zapali
się kontrolka automatyczna, wejdź do tryb automatyczny)
Połóż pustą butelkę, system automatycznie obierze i automatycznie
rozpocznie napełnianie po pewnym czasie
x sekund. Gdy odważnik osiągnie masę napełnienia , napełnianie zostanie
automatycznie zatrzymane. Wyjmij napełnioną butelkę, a system
automatycznie zresetuje się do zera po upływie x sekund. Włóż następną
opróżnij butelkę i automatycznie rozpocznij kolejne napełnianie.
Uwaga: Jeśli w trybie automatycznym maszyna nie jest prawidłowo
napełniona , przyczyną może być:
błąd spowodowany tym, że cykl się jeszcze nie skończył. W tym momencie
wyjmij butelkę i naciśnij [Tara], aby z niej skorzystać normalnie.
5, Metoda ustawiania „zapisu 4 grup ciężarów wypełnienia do M1-M4”:
Wciśnij przycisk [Zapisz] (liczba napełnień zacznie migać), wprowadź
wartość, która ma zostać zapisana,
i na koniec wcisnąć klawisz [M1] (liczba „ ciężaru napełnienia ” przestanie
migać) i liczbę, którą należy wprowadzone dane są przechowywane w M1.
Jeśli chcesz użyć wartości m1 jako ciężaru wypełnienia , możesz nacisnąć

- 12 -
m1 aby ustawić wartość m1 jako wagę wypełnienia . (Ustaw M2, M3, M4
jako metodę ustawiania M1)
6. Jak anulować funkcję automatycznego obierania:
Uruchom ponownie urządzenie, naciśnij przycisk [Auto], a następnie
przytrzymaj przycisk [3], aż usłyszysz dźwięk alarmu maszyny i puść. W
tym momencie funkcja automatycznego obierania została wyłączona .
Jeżeli chcesz włączyć funkcję automatycznego obierania powtórz
powyższą operację. Po skonfigurowaniu maszyna zapamięta na zawsze.
7, Jak ustawić „WSPÓŁCZYNNIK ZWOLNIENIA ŚREDNIEGO ZAKRESU”:
Przy kilku procentach ustawionej wartości, automatycznie przechodzi na
średnią prędkość
Naciśnij [auto], ustaw natężenie przepływu na wartość proporcjonalną (np.
80), naciśnij długo pokrętło prędkości wystarczy, aby puścić, gdy usłyszysz
sygnał dźwiękowy.
8, Jak ustawić „Wartość spowolnienia”: (Ile gramów przed końcem
automatycznie zwalnia w dół)
Naciśnij [Trig] [Zapisz], .
następnie wprowadź wartość do ustawienia i ponownie naciśnij [Trig].
9, metoda „ustawienia fabryczne”: naciśnij przycisk [auto], a następnie
przytrzymaj przycisk [5], aby nie puścić, aż do momentu, gdy alarm
maszyny wyda sygnał dźwiękowy po zwolnieniu. Maszyna wróciła do
stanu fabrycznego.
O regulacji natężenia przepływu
1, ten produkt z pokrętłem regulacji natężenia przepływu, regulowaną
prędkością 1-100 i cyfrowym wyświetlaczem natężenia przepływu wartość;
2, regulacja pokrętłem, wartość prędkości będzie wyświetlana cyfrowo ,
brak operacji 3 sekundy po Wyjście.
3, Naciśnij POKRĘTŁO, wyświetli się wartość natężenia przepływu.
Możesz zobaczyć aktualną wartość natężenia przepływu, bez żadnej
operacji po 3 sekundach wyjścia .
4, Natężenie przepływu można regulować w dowolnym momencie. Po
regulacji nastąpi automatyczne zapisanie i wyłączenie zasilania pamięć.

- 13 -
Jak korzystać z metody napełniania w ustalonym czasie
I, naciśnij [ auto ], długie naciśnięcie [2] może przełączyć się na „metodę
napełniania z ustawionym czasem” (ta sama metoda może również zostać
przywrócony do „ustawionego sposobu napełniania ” ).
2. Metoda napełniania z ustawionym czasem wyświetla liczbę w
sekundach z dokładnością do 0,01 sekundy.
3,Naciśnij [ ustawienia ], wprowadź czas napełniania , naciśnij [ustawienia],
możesz ustawić czas napełniania .
4, naciśnij [wyzwalacz], wprowadź odstęp czasu, naciśnij [wyzwalacz],
możesz ustawić odstęp czasu automatycznego filluję . _
5,Naciśnij [ set ][ start ], załaduj do potrzebnej ilości, a następnie naciśnij
[ start ][ set ], możesz wyodrębnić czas napełniania.
6, tryb automatyczny można ustawić odstęp pomiędzy uruchomieniem
automatycznym, a trybem ręcznym, naciskając przycisk start, aby
rozpocząć.
MAINTENANCE
1. Użytkownik wybiera maszynę do napełniania ilościowego o
odpowiednim asortymencie , zgodnie ze wspomnianymi produktami.
2. Maszyna posiada precyzyjną wagę elektroniczną, niedopuszczalna jest
nadwaga.
3. Wysokość głowicy napełniającej można regulować w odległości około 10
mm od wylotu butelki.
4. Podczas użytkowania trzymaj maszynę poziomo i stabilnie, aby uniknąć
dużych wibracji lub uderze ń , w przeciwnym razie może spowodować
uszkodzenie.
5. Urządzenie zostało użyte po raz pierwszy lub nie było używane przez
długi czas, bardzo niewiele z nich nie wchłonie wody, ponieważ pompa jest

- 14 -
wewnętrznie sucha . Należy dolać trochę wody z rury ssącej do pompy i
następnie uruchomić maszynę.
6. Lepiej czyścić maszynę czystą wodą po każdym użyciu, co może
przedłużyć żywotność pompy. .
7. Gdy urządzenie nie jest używane, należy opróżnić płyn i przechowywać
go w wentylowanym i suchym miejscu.
8. Po każdym użyciu należy regularnie czyścić produkt i filtr .
9. Zawsze utrzymuj produkt na zewnątrz w czystości .
10 . Proszę przechowywać produkt w suchym i wentylowanym miejscu.
11. Jeśli produkt nie będzie używany przez dłuższy czas, należy go
oczyścić i opróżnić z płynu .
12. Należy regularnie wymieniać następujące części eksploatacyjne :
Wąż, filtr, dysza napełniająca
TROUBLESHOOTING
Problem
Możliwa przyczyna
Możliwe rozwiązanie
Nie chłonie
wody
Maszyna została użyta po raz
pierwszy lub nie była używana przez
długi czas, bardzo niewiele nie
wchłania wody, ponieważ pompa
znajduje się wewnątrz suchy wynik .
Należy dolać trochę
wody z rury ssącej do
pompy i następnie
uruchomić maszynę.
Pompa nie
może
wypompować
cieczy
Wlot i wylot węża są odwrócone
Potwierdzić wejście
węża do zbiornika
cieczy.
Przewód zasilający nie jest
podłączony
Podłącz ponownie
przewód zasilający
Wąż zagięty lub uszkodzony
Wygładź wąż lub wymie
ń wąż
Wskaźnik
zasilania jest
wyłączony
Przewód zasilający nie jest
podłączony
Podłącz ponownie
przewód zasilający

- 15 -
Ten produkt podlega przepisom Dyrektywy Europejskiej
2012/19/WE. Symbol przekreślonego kosza na śmieci
oznacza, że produkt wymaga selektywnej zbiórki śmieci na
terenie Unii Europejskiej. Dotyczy to produktu i wszystkich
akcesoriów oznaczonych tym symbolem. Produktów
oznaczonych jako takie nie można wyrzucać razem ze
zwykłymi odpadami domowymi, lecz należy je oddać do punktu
zbiórki w celu recyklingu urządzeń elektrycznych i
elektronicznych.
Adres: Baoshanqu Shuangchenglu 803long 11hao 1602A-1609shi
Szanghaj
Import do AUS: SIHAO PTY LTD, 1 ROKEVA STREETEASTWOOD NSW
2122 Australia
Import do USA: Sanven Technology Ltd, Suite 250, 9166 Anaheim Place,
Rancho Cucamonga, CA 91730
REP
EC
SHUNSHUN GmbH
Römeräcker 9 Z2021, 76351
Linkenheim-Hochstetten, Germany
REP
UK
Pooledas Group Ltd
Unit 5 Albert Edward House, The
Pavilions Preston, United Kingdom
Wyprodukowano w Chinach


Technische ondersteuning en e-garantiecertificaat
www.vevor.com/support
PASTA VLOEISTOF VULMACHINE
HANDLEIDING
We continue to be committed to provide you tools with competitive price.
"Save Half", "Half Price" or any other similar expressions used by us only represents an
estimate of savings you might benefit from buying certain tools with us compared to the major
top brands and does not necessarily mean to cover all categories of tools offered by us. You
are kindly reminded to verify carefully when you are placing an order with us if you are
actually saving half in comparison with the top major brands.

- 1 -
Have product questions? Need technical support? Please feel free to
contact us:
Technical Support and E-Warranty Certificate
www.vevor.com/support
NEED HELP? CONTACT US!
This is the original instruction, please read all manual instructions
carefully before operating. VEVOR reserves a clear interpretation of our
user manual. The appearance of the product shall be subject to the
product you received. Please forgive us that we won't inform you again if
there are any technology or software updates on our product.
Paste Liquid Filling
Machine
SY-1200-V1
SY-1200-V2
SY-1200-V3
SY-M90-V1
SY-M90-V2
SY-M90-V3

- 2 -
13. Lees zorgvuldig alle MONTAGE- EN BEDIENINGSINSTRUCTIES
voordat u ermee aan de slag gaat.
14. Het niet naleven van de veiligheidsregels en andere elementaire
veiligheidsmaatregelen kan leiden tot ernstig persoonlijk letsel.
GENERAL SAFETY RULES
Belangrijke herinnering
1. Lees vóór gebruik zorgvuldig de producthandleiding en zorg ervoor dat u
alle veiligheidswaarschuwingen en gebruiksvoorzorgsmaatregelen begrijpt
en naleeft.
2. Gebruik dit product niet voor andere niet-aangewezen doeleinden om
onverwachte risico's te voorkomen.
3. Dit product is alleen van toepassing op gebruikers binnen de
aangegeven leeftijdsgroep en toepassingsgebied. Houd u strikt aan de
relevante leeftijdsbeperkingen en waarschuwingen.
4. Als er afwijkingen aan het product zijn, stop dan onmiddellijk met het
gebruik ervan en neem contact op met het after-sales servicecentrum voor
advies of om een reparatie te regelen.
Omgevingseisen voor gebruik
1. Gebruik het in een droge en goed geventileerde omgeving om extreme
omgevingsomstandigheden zoals wateractivering, hoge temperaturen,
hoge luchtvochtigheid en extreem lage temperaturen te voorkomen.
2. Vermijd direct zonlicht of contact met vuurbronnen om productschade of
brand te voorkomen.
3. Zorg voor een stabiele gebruiksomgeving en voorkom dat het product
wordt geraakt of valt om schade te voorkomen.
Richtlijnen voor veilige bediening
1. Gebruik een geschikte voeding en spanning, en gebruik geen
beschadigde netsnoeren of stekkers.
2. Wanneer u dit product gebruikt, mag u geen kortsluiting maken en
niet-overeenkomende apparaten aansluiten om risico's zoals elektrische

- 3 -
schokken en brand te voorkomen.
3. Als er vreemde voorwerpen op het oppervlak van het product worden
aangetroffen, stop dan onmiddellijk met het gebruik en verwijder de
vreemde voorwerpen voordat u het product verder gebruikt.
4. Als u dit product langdurig continu gebruikt, rust dan tijdig uit om
overmatige vermoeidheid te voorkomen.
5. Oefen geen externe kracht uit op de batterij om veiligheidsrisico's zoals
het scheuren en lekken van de batterij te voorkomen.
Onderhoud en onderhoud
1. Onderhoud en reinig het product regelmatig. Voordat u gaat
schoonmaken, koppelt u de voeding los en veegt u deze af met een droge
doek. Zorg ervoor dat u geen alcohol, zure of alkalische oplossingen,
bijtende stoffen enz. gebruikt
2. Als het product langere tijd niet wordt gebruikt, koppel dan onmiddellijk
de voeding los om energie te besparen en de levensduur van het product
te verlengen.
3. Haal het product niet zelf uit elkaar en vervang geen onderdelen. Als u
storingen ondervindt, neem dan contact op met het after-sales
servicecentrum.
Maatregelen voor noodbehandeling
1. Als er abnormale situaties of ongelukken met het product optreden, stop
dan zo snel mogelijk met het gebruik ervan. Als u oververhitting, roken of
abnormaal geluid constateert, sluit dan onmiddellijk de stroomtoevoer af
en neem contact op met het after-sales servicecentrum.
2. Als er bij het product sprake is van een noodsituatie die de persoonlijke
veiligheid in gevaar kan brengen, bel dan tijdig het noodhulpnummer.
Disclaimers
Wij hechten veel belang aan de veiligheid en kwaliteit van onze producten,
maar kunnen geen verantwoordelijkheid aanvaarden voor
veiligheidsongevallen veroorzaakt door oneigenlijk gebruik of bediening.

- 4 -
BEWAAR DEZE INSTRUCTIES
MODEL AND PARAMETERS
Model
SY-120
0-V1
SY-120
0-V2
SY-120
0-V3
SY-M90
-V1
SY-M90
-V2
SY-M90
-V3
Geschikte
vloeistof
Alle vrij stromende pasta's en
vloeistoffen (geen deeltjes)
zoals sojasaus, dranken, witte
wijn, azijn, melk, alcohol
(minder dan 75 %) enz.
Alle vrij stromende pasta's en
vloeistoffen (geen deeltjes)
zoals sojasaus, dranken, witte
wijn, azijn, melk, alcohol
(minder dan 75 %) enz.
Vulbereik
5g~300g
5~50g
Maximale
stroomsnelh
eid
1000 ml/min
100 ml/min
Controlemo
dus _
Automatisch
Automatisch
Waardering
en)
Wisselst
room
120 V 60
Hz
Wisselst
room
230 V 50
Hz
Wisselst
room
230 V 50
Hz
Wisselst
room
120 V 60
Hz
Wisselst
room
230 V 50
Hz
Wisselst
room
230 V 50
Hz
Vermogen
(max.)
39W
39W
39W
15W
15W
15W
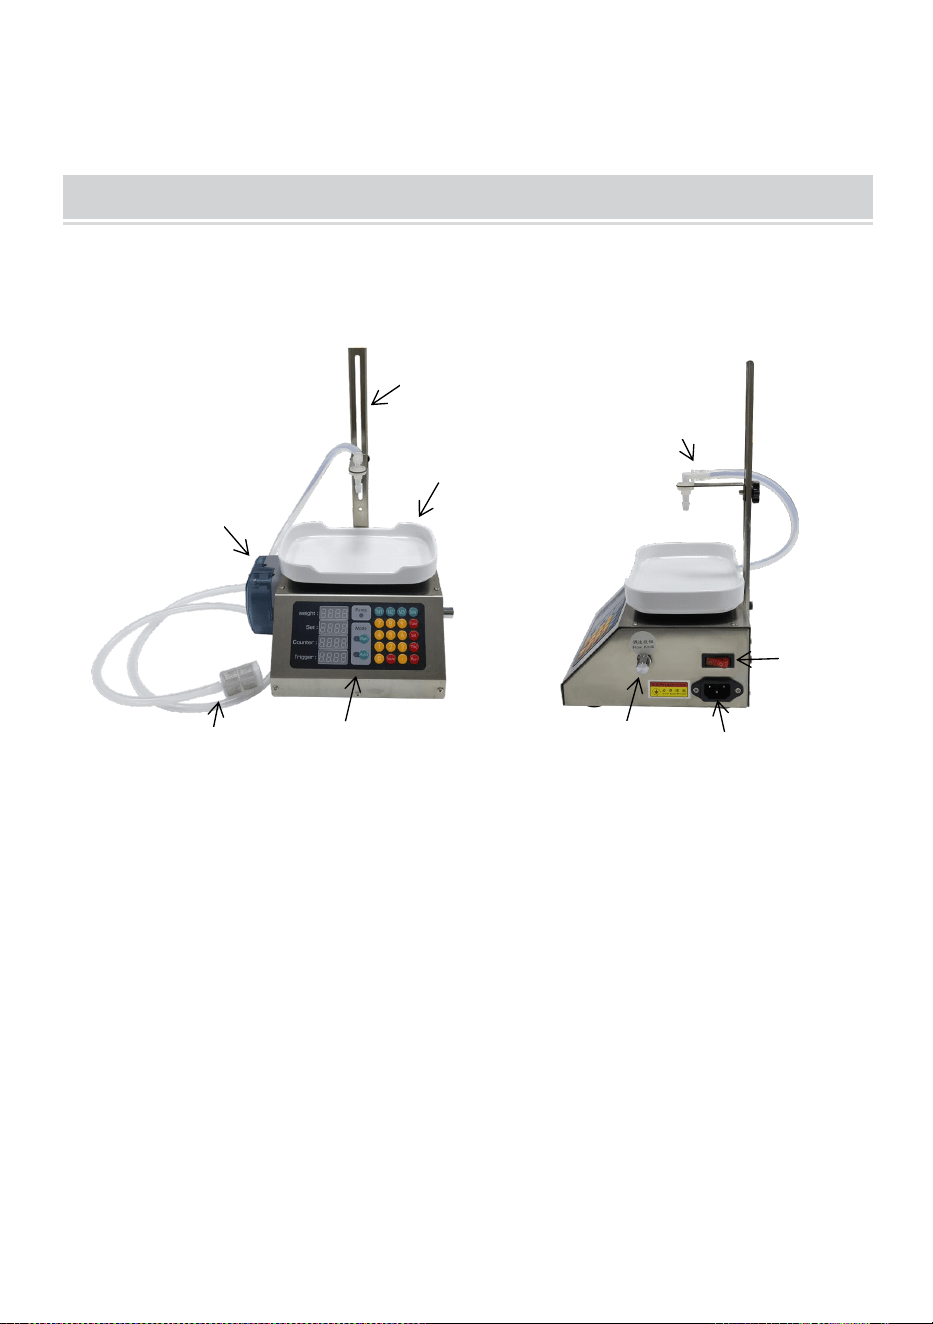
- 5 -
STRUCTURE DIAGRAM
SY-1200-V1,SY-1200-V2,SY-1200-V3
7. Beugel 2. Lade 3. Bedieningspaneel 4. Inlaatslang en filter
5. Peristaltische pomp 6. Uitlaatslang en vulmondstuk
7. Aan/uit-schakelaar 8. Wisselstroomaansluiting 9. Stroomknop
1
2
3
4
5
6
7
8
9

- 6 -
SY-M90-V1,SY-M90-V2,SY-M90-V3
1. Beugel 2. Lade 3. Bedieningspaneel 4. Inlaatslang
5. Peristaltische pomp 6. Uitlaatslang en vulmondstuk
7. Aan/uit-schakelaar 8. Wisselstroomaansluiting 9. Stroomknop
2
3
1
4
6
5
7
8
9

- 7 -
COMPONENTS
SY-1200-V1
SY-1200-V2
SY-1200-V3
SY-M90-V1
SY-M90-V2
SY-M90-V3
Stroomdraad
×1
×1
Haakje
×1
×1
Slang (met filter)
×1
/
Siliconenslang (kort)
×1
/
Inlaatslang
/
×1
Uitlaatslang
/
×1
Sponsstrip (zwart)
×1
×1
Vulmondstuk
×2
×2
Handleiding
×1
×1
Model
Parts
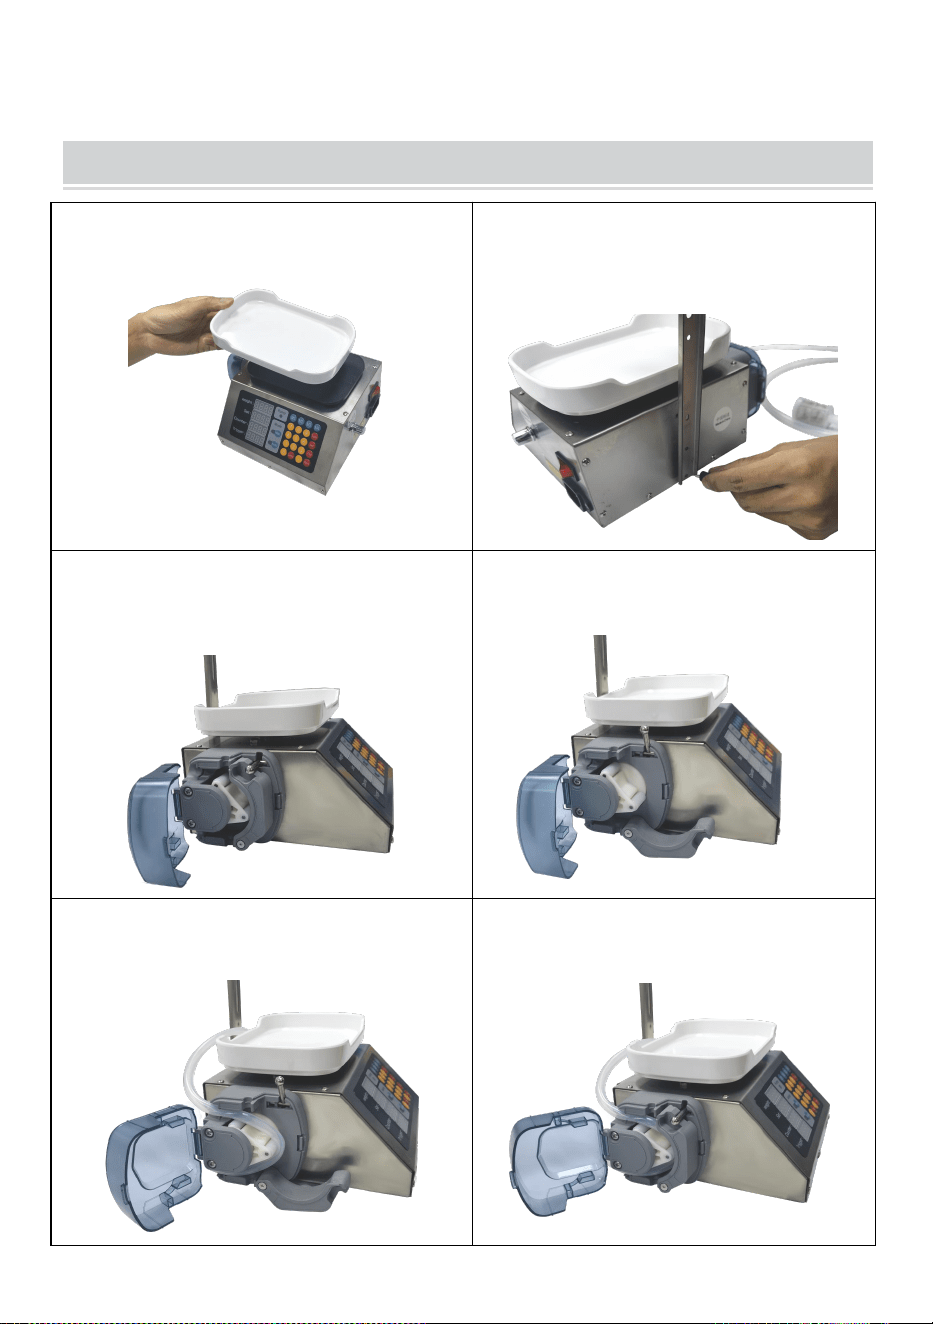
- 8 -
OPERATING INSTRUCTIONS
1. Plaats de lade erop, zoals
weergegeven
2. Verwijder de schroeven en
installeer de beugel en zet deze vast
met schroeven zoals afgebeeld.
3.Open het deksel van de
peristaltische pomp.
4.Open de clips van de peristaltische
pomp.
5.Wikkel de slang in de peristaltische
pomp, zoals afgebeeld.
12.Maak de clips vast en bedek het
deksel.
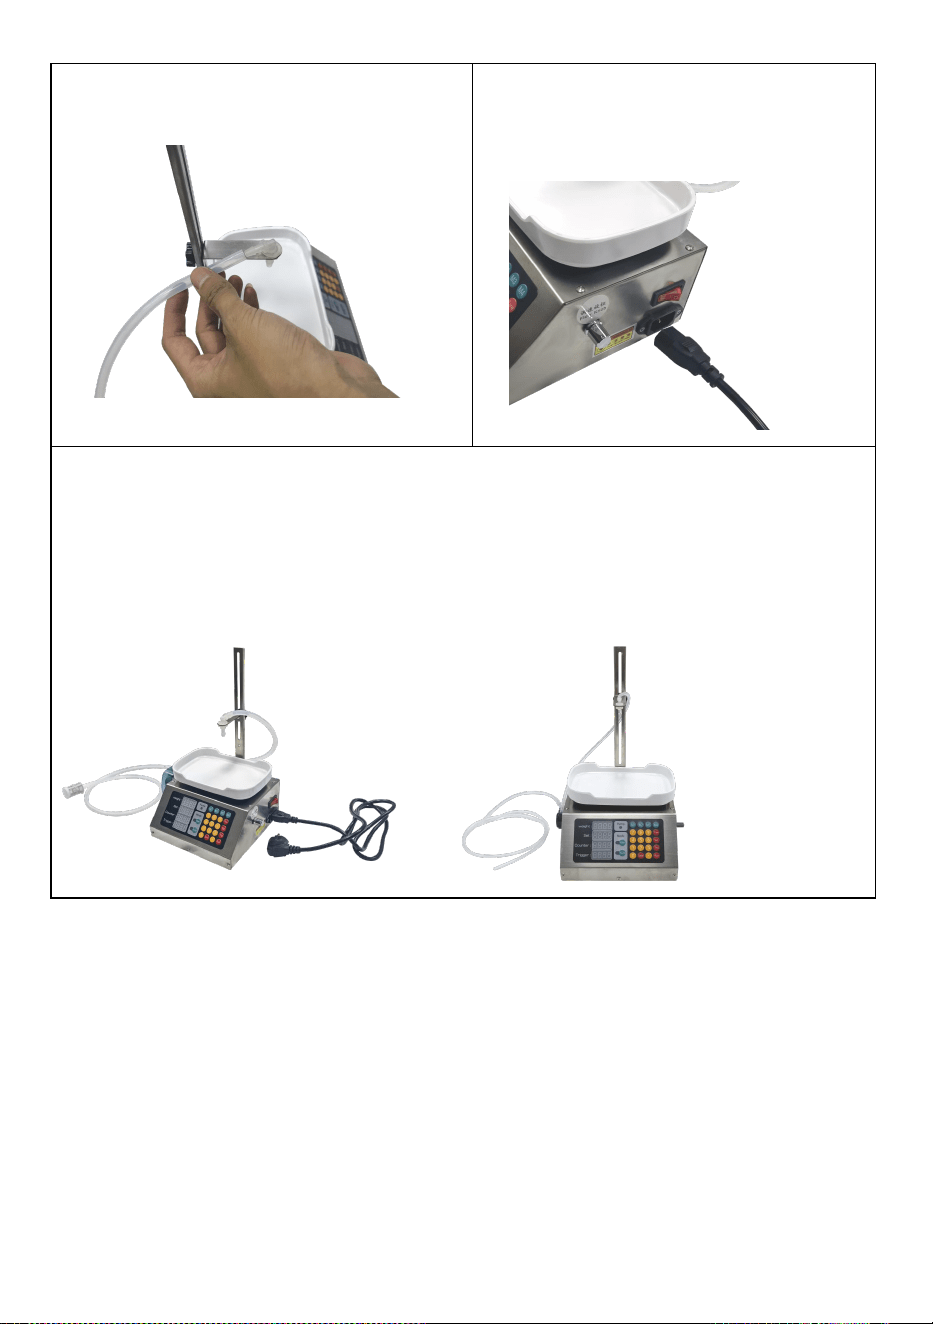
- 9 -
7. Pas de hoogte van het vulmondstuk
aan en sluit de slang aan.
8. Sluit het netsnoer aan zoals
afgebeeld.
15.Productmontage voltooid.
Opmerking: het product wordt geleverd met een dun vulmondstuk. U kunt dit
indien nodig installeren.
Na gebruik kan het worden gereinigd door herhaaldelijk water te pompen.
Of de slang vervangen .
De gebruiksaanwijzing

- 10 -
Het weergavevenster en de functiebeschrijving van de knoppen
1, etalage:
Gewicht: geeft het werkelijke gewicht weer van het te wegen artikel
Instellen: Gebruiker. stel het te vullen gewicht in
Teller: aantal flessen dat gevuld is
Trigger: de gewichtswaarde die de automatische start activeert
2, Knopfunctie:
[Man]: Ga naar de handmatige modus
[Auto]: ga naar de automatische modus
[Tarra]: schillen en op nul zetten
[Set]: stel het vulgewicht in
[Trig]: stel de triggerwaarde in
vulfunctie handmatig (klik opnieuw om te pauzeren)
: sla 4 groepen veelgebruikte vulgegevens op
[M1-4]: Opgeslagen vulgewichtgegevens oproepen
[ 0 ]: Tellerwaarde wordt gewist
De grote groene knop en voetschakelaar hebben dezelfde functie als de
[Run] op het toetsenbord.
De gebruiksaanwijzing
1,Instelmethode "Instellen": Druk op de toets [Set] om de waarde in te
voeren (stel bijvoorbeeld 100g in, voer 1 0 in) en druk vervolgens opnieuw
op [Set].
2, "Trigger" instelmethode: (triggerwaarde mag niet minder zijn dan 3

- 11 -
gram)
Druk op de [Trig]-toets, voer de waarde in (stel bijvoorbeeld 35g in, voer 35
in) en druk vervolgens opnieuw op [Trig].
Opmerking: De triggerwaarde is ingesteld op ≤lege flesgewicht. In de
automatische modus vindt het automatisch vullen plaats
geactiveerd wanneer het gewicht van de lege fles de triggerwaarde
overschrijdt.
3, Bedieningsmethode "Handmatige modus": (Druk op de [Man]-toets, het
handmatige lampje brandt, voer de handmatige modus;)
(1) Plaats de lege fles, druk op de knop [Tare] om het gewicht van de lege
fles te verwijderen, druk op de knop [Run] knop om het vullen te starten.
Het gewicht van de gegoten vloeistof bereikt het ingestelde vulgewicht en
stopt
automatisch.
(2) Verwijder de gevulde fles, zet een lege fles neer en druk op de knop
[Tare] [Run] om de volgende te starten vullen . _
4, Bedieningsmethode "Automatische modus": (Druk op de toets [Auto],
het automatische lampje is aan, voer de automatische modus)
Plaats de lege fles, het systeem pelt automatisch en begint na enige
vertraging automatisch te vullen
van x seconden. Wanneer het gewicht het vulgewicht bereikt , wordt het
vullen automatisch gestopt.Verwijderen de gevulde fles en het systeem
wordt na een vertraging van x seconden automatisch op nul gezet. Plaats
de volgende
lege fles en start automatisch de volgende vulling.
Let op: Wanneer u de automatische modus gebruikt en de machine niet
goed gevuld is , komt dit door:
fout veroorzaakt doordat een cyclus nog niet is afgelopen. Verwijder nu de
fles en druk op [Tare] om deze te gebruiken normaal gesproken.
5, De instelmethode voor "opslaan van 4 groepen vulgewichten in M1-M4":
Druk op de toets [Opslaan] (het aantal vulgewichten begint te knipperen),
voer de waarde in die moet worden opgeslagen,
en druk tenslotte op de toets [M1] (het getal “ vulgewicht ” stopt met
knipperen) en het getal dat moet worden ingevoerd, wordt opgeslagen in

- 12 -
M1. Wanneer u de waarde van m1 als vulgewicht moet gebruiken , kunt u
op m1 drukken om de waarde van m1 in te stellen als vulgewicht . (Stel M2,
M3, M4 in als instellingsmethode voor M1)
6. Hoe u de automatische peelingfunctie kunt annuleren:
Start de machine opnieuw op, druk op de knop [Auto] en houd vervolgens
de knop [3] ingedrukt totdat u de melding hoort alarmgeluid van de
machine en laat los. Op dit moment is de automatische peelingfunctie
geannuleerd .
Als u de automatische schilfunctie wilt inschakelen, herhaalt u
bovenstaande handeling. Eenmaal ingesteld, wordt de machine zal het
voor altijd onthouden.
7. Hoe de “MID-RANGE DECELERATION RATIO” in te stellen: Bij een
paar procent van de ingestelde hoeveelheid, hij gaat automatisch naar
gemiddelde snelheid
Druk op [auto], stel het debiet in op een proportionele waarde (bijv. 80),
druk de snelheidsknop lang in genoeg om los te laten als de "piep"
hoorbaar is.
8, Hoe de "De waarde van vertragen" in te stellen: (Hoeveel gram voor het
einde vertraagt automatisch omlaag)
Druk op [Trig] [Opslaan], .
voer vervolgens de in te stellen waarde in en druk vervolgens nogmaals op
[Trig].
9, "fabrieksinstellingen" -methode: druk op de knop [auto] en houd
vervolgens de knop [5] ingedrukt om niet los te laten, tot het
machine-alarm "piep" na de vrijgave. De machine is terug naar de
fabrieksstatus.
Over debietregeling
1, dit product met debietaanpassingsknop, snelheid 1-100 instelbaar en
digitaal displaydebiet waarde;
2. Draaiknopaanpassing, de snelheidswaarde zal een digitaal display zijn,
geen bediening 3 seconden na de Uitgang.
3. Druk op de KNOP, de stroomsnelheidswaarde wordt weergegeven. U
kunt de huidige stroomsnelheidswaarde bekijken, geen bewerking na 3

- 13 -
seconden verlaten .
4. De stroomsnelheid kan op elk moment worden aangepast, na de
aanpassing wordt deze automatisch opgeslagen en uitgeschakeld
geheugen.
Hoe u de ingestelde tijdmethode voor het vullen gebruikt
I, Druk op [ auto ], druk lang op [2] om over te schakelen naar “de
ingestelde tijdmethode voor het vullen” (dezelfde methode kan ook worden
hersteld naar “de ingestelde vulmethode ” ).
2. De ingestelde tijdmethode voor het vullen geeft het getal in seconden
weer, nauwkeurig tot op 0,01 seconde.
3. Druk op [ instellingen ], voer de vultijd in , druk op [instellingen], u kunt
de vultijd instellen .
4. Druk op [trigger], voer de intervaltijd in, druk op [trigger], u kunt de
intervaltijd van automatisch instellen vullen . _
5. Druk op [set ][ start ], laad tot de benodigde hoeveelheid en druk
vervolgens op [ start ][ set ], u kunt de vultijd extraheren .
6. De automatische modus kan een vast interval instellen tussen de
automatische start en de handmatige modus door op de knop te drukken
startknop om te starten.
MAINTENANCE
1. De gebruiker selecteert een kwantitatieve vulmachine van een geschikt
assortiment op basis van de genoemde producten.
2. De machine bevat een elektronische precisieweegschaal, het is
verboden om te zwaar te zijn.
3. De hoogte van de vulkop kan worden aangepast tot ongeveer 10 mm
vanaf de flesmond.

- 14 -
4. Houd de machine tijdens gebruik waterpas en stabiel om grote trillingen
of stoten te voorkomen kan schade veroorzaken.
5. Machine voor het eerst gebruiken of langdurig niet gebruiken, zeer
weinigen zullen geen water opnemen, omdat de pomp intern droog is . U
moet wat water uit de inlaatleiding aan de pomp toevoegen en vervolgens
de machine starten.
6. Het is beter om de machine na elk gebruik met schoon water schoon te
maken, wat de levensduur kan verlengen van de pomp. .
7. Wanneer de machine niet in gebruik is, verwijder dan de vloeistof en
bewaar deze op een geventileerde en droge plaats.
8. Reinig het product en het filter na elk gebruik op tijd .
9. Houd het product altijd schoon aan de buitenkant .
10 . Bewaar het product op een droge en geventileerde plaats.
11. Als u het product langere tijd niet gebruikt, maak het dan schoon en
leeg het .
12. Vervang de volgende verbruiksartikelen regelmatig :
Slang, filter, vulmondstuk
TROUBLESHOOTING
Probleem
Mogelijke oorzaak
Mogelijke oplossing
Neemt geen
water op
Machine voor het eerst gebruiken
of langdurig niet gebruiken, zeer
weinigen zullen geen water
opnemen, omdat de pomp intern
is droog resultaat .
U moet wat water uit de
inlaatleiding aan de pomp
toevoegen en vervolgens
de machine starten.
De pomp kan de
vloeistof niet
wegpompen
Slanginlaat en -uitlaat zijn
omgekeerd
Bevestig de slanginlaat in
de vloeistoftank.
Het netsnoer is niet aangesloten
Sluit het netsnoer opnieuw
aan
Slang gevouwen of beschadigd
Maak de slang glad of
vervang de slang
- 15 -
Het
stroomlampje is
uit
Het netsnoer is niet aangesloten
Sluit het netsnoer opnieuw
aan
Dit product valt onder de bepalingen van de Europese richtlijn
2012/19/EG. Het symbool met een doorgestreepte
afvalcontainer geeft aan dat het product in de Europese Unie
een aparte afvalinzameling vereist. Dit geldt voor het product
en alle accessoires die met dit symbool zijn gemarkeerd.
Producten die als zodanig zijn gemarkeerd, mogen niet bij het
normale huisvuil worden weggegooid, maar moeten worden
ingeleverd bij een inzamelpunt voor recycling van elektrische
en elektronische apparaten.
Adres: Baoshanqu Shuangchenglu 803long 11hao 1602A-1609shi
Shanghai
Geïmporteerd naar AUS: SIHAO PTY LTD, 1 ROKEVA
STREETEASTWOOD NSW 2122 Australië
Geïmporteerd naar de VS: Sanven Technology Ltd, Suite 250, 9166
Anaheim Place, Rancho Cucamonga, CA 91730
REP
EC
SHUNSHUN GmbH
Römeräcker 9 Z2021, 76351
Linkenheim-Hochstetten, Germany
REP
UK
Pooledas Group Ltd
Unit 5 Albert Edward House, The
Pavilions Preston, United Kingdom
Gemaakt in China


Teknisk support och e-garanticertifikat
www.vevor.com/support
KLISTRA VÄTSKEFYLLNINGSMASKIN
ANVÄNDARMANUAL
We continue to be committed to provide you tools with competitive price.
"Save Half", "Half Price" or any other similar expressions used by us only represents an
estimate of savings you might benefit from buying certain tools with us compared to the major
top brands and does not necessarily mean to cover all categories of tools offered by us. You
are kindly reminded to verify carefully when you are placing an order with us if you are
actually saving half in comparison with the top major brands.

- 1 -
Have product questions? Need technical support? Please feel free to
contact us:
Technical Support and E-Warranty Certificate
www.vevor.com/support
NEED HELP? CONTACT US!
This is the original instruction, please read all manual instructions
carefully before operating. VEVOR reserves a clear interpretation of our
user manual. The appearance of the product shall be subject to the
product you received. Please forgive us that we won't inform you again if
there are any technology or software updates on our product.
Paste Liquid Filling
Machine
SY-1200-V1
SY-1200-V2
SY-1200-V3
SY-M90-V1
SY-M90-V2
SY-M90-V3

- 2 -
15. Läs noga och förstå alla MONTERINGS- OCH
DRIFTINSTRUKTIONER innan användning.
16. Underlåtenhet att följa säkerhetsreglerna och andra grundläggande
säkerhetsåtgärder kan leda till allvarliga personskador.
GENERAL SAFETY RULES
Viktig påminnelse
1. Innan användning, läs noga igenom produktmanualen och se till att du
förstår och följer alla säkerhetsvarningar och försiktighetsåtgärder vid
användning.
2. Använd inte denna produkt för andra icke-avsedda ändamål för att
undvika oväntade risker.
3. Denna produkt är endast tillämplig på användare inom den specificerade
åldersgruppen och tillämpningsområdet. Vänligen följ strikt relevanta
åldersbegränsningar och varningar.
4. Om det finns några avvikelser i produkten, vänligen sluta använda den
omedelbart och kontakta kundservice för konsultation eller för att ordna
reparation.
Miljökrav för användning
1. Använd i en torr och välventilerad miljö för att undvika extrema
miljöförhållanden som vattenaktivering, hög temperatur, hög luftfuktighet
och extremt låg temperatur.
2. Undvik direkt solljus eller kontakt med brandkällor för att förhindra
produktskador eller brand.
3. Se till en stabil användningsmiljö och förhindra att produkten träffas eller
tappas för att undvika skador.
Riktlinjer för säkerhet och drift
1. Använd lämplig strömförsörjning och spänning, och använd inte
skadade nätsladdar eller kontakter.
2. När du använder denna produkt ska du inte kortsluta kretsar eller
ansluta felaktiga enheter för att undvika risker som elektriska stötar och

- 3 -
brand.
3. När främmande föremål hittas på produktens yta, sluta omedelbart att
använda och ta bort främmande föremål innan du fortsätter att använda.
4. När du använder denna produkt kontinuerligt under en längre tid,
vänligen vila i god tid för att undvika överdriven trötthet.
5. Använd inte extern kraft på batteriet för att undvika säkerhetsrisker som
att batteriet går sönder och läcker.
Underhåll och skötsel
1. Underhåll och rengör produkten regelbundet. Före rengöring, vänligen
koppla bort strömförsörjningen och torka av den med en torr trasa. Var
försiktig så att du inte använder alkohol, syra eller alkalilösningar, frätande
ämnen etc
2. När produkten inte används under en längre tid, koppla ur
strömförsörjningen omgående för att spara energi och förlänga produktens
livslängd.
3. Ta inte isär produkten eller byt ut komponenter på egen hand. Om du
stöter på några fel, vänligen kontakta servicecentret.
Akuthanteringsåtgärder
1. Om det inträffar onormala situationer eller olyckor med produkten,
vänligen sluta använda den så snart som möjligt. Om överhettning, rökning
eller onormalt ljud upptäcks, bryt omedelbart strömförsörjningen och
kontakta kundservice.
2. Om produkten innebär en nödsituation som kan skada den personliga
säkerheten, ring nödräddningsnumret i tid.
Friskrivningsklausuler
Vi lägger stor vikt vid våra produkters säkerhet och kvalitet, men kan inte ta
ansvar för säkerhetsolyckor orsakade av felaktig användning eller
användning.
SPARA DESSA INSTRUKTIONER

- 4 -
MODEL AND PARAMETERS
Modell
SY-120
0-V1
SY-120
0-V2
SY-120
0-V3
SY-M90
-V1
SY-M90
-V2
SY-M90
-V3
Lämplig
vätska
Alla fririnnande pastor och
vätskor (inga partiklar) som
sojasås, drycker, vitt vin,
vinäger, mjölk, alkohol (mindre
än 75 %) etc.
Alla fririnnande pastor och
vätskor (inga partiklar) som
sojasås, drycker, vitt vin,
vinäger, mjölk, alkohol (mindre
än 75 %) etc.
Fyllningsomr
åde
5g~300g
5~50g
Max
flödeshastig
het
1000 ml/min
100 ml/min
Kontrollläge
_
Automatisk
Automatisk
Betyg(er)
AC 120V
60Hz
AC 230V
50Hz
AC 230V
50Hz
AC 120V
60Hz
AC 230V
50Hz
AC 230V
50Hz
Effekt (max.)
39W
39W
39W
15W
15W
15W
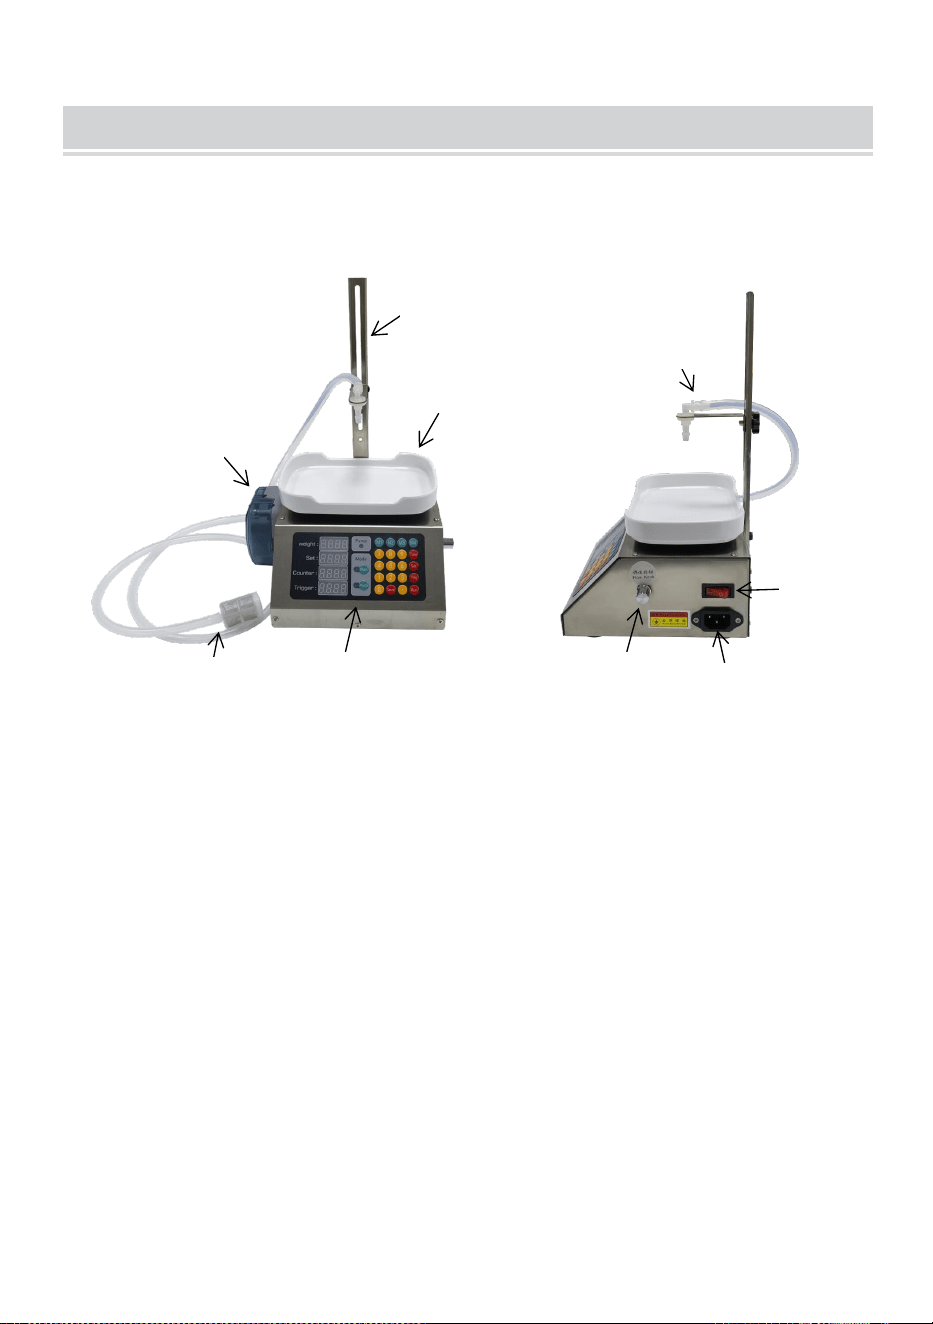
- 5 -
STRUCTURE DIAGRAM
SY-1200-V1,SY-1200-V2,SY-1200-V3
8. Fäste 2. Fack 3. Kontrollpanel 4. Inloppsslang och filter
5. Peristaltisk pump 6. Utloppsslang och påfyllningsmunstycke
7. Strömbrytare 8. Växelströmsuttag 9. Flödesratt
1
2
3
4
5
6
7
8
9
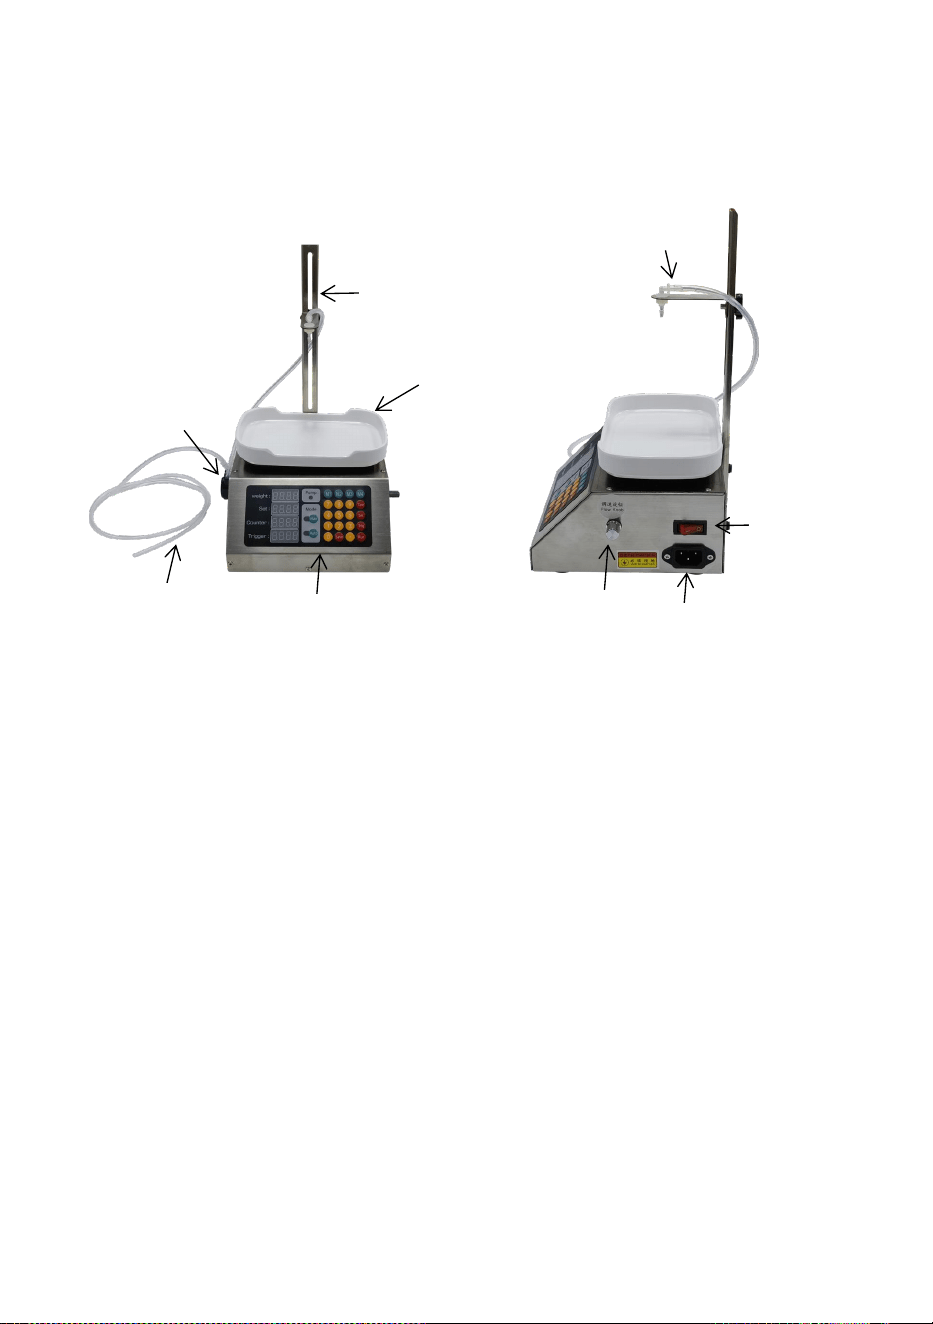
- 6 -
SY-M90-V1, SY-M90-V2, SY-M90-V3
1. Fäste 2. Fack 3. Kontrollpanel 4. Inloppsslang
5. Peristaltisk pump 6. Utloppsslang och påfyllningsmunstycke
7. Strömbrytare 8. Växelströmsuttag 9. Flödesratt
2
3
1
4
6
5
7
8
9

- 7 -
COMPONENTS
SY-1200-V1
SY-1200-V2
SY-1200-V3
SY-M90-V1
SY-M90-V2
SY-M90-V3
Strömsladd
×1
×1
Konsol
×1
×1
Slang (med filter)
×1
/
Silikonslang (kort)
×1
/
Inloppsslang
/
×1
Utloppsslang
/
×1
Svampremsa (svart)
×1
×1
Påfyllningsmunstycke
×2
×2
Användarmanual
×1
×1
Model
Parts

- 8 -
OPERATING INSTRUCTIONS
1. Placera brickan ovanpå enligt
bilden
2.Ta bort skruvarna och installera
konsolen och lås den med skruvar
enligt bilden.
3.Öppna locket till den peristaltiska
pumpen.
4. Öppna klämmorna på den
peristaltiska pumpen.
5. Linda in slangen i den peristaltiska
pumpen enligt bilden.
13.Fäst klämmorna och täck locket.
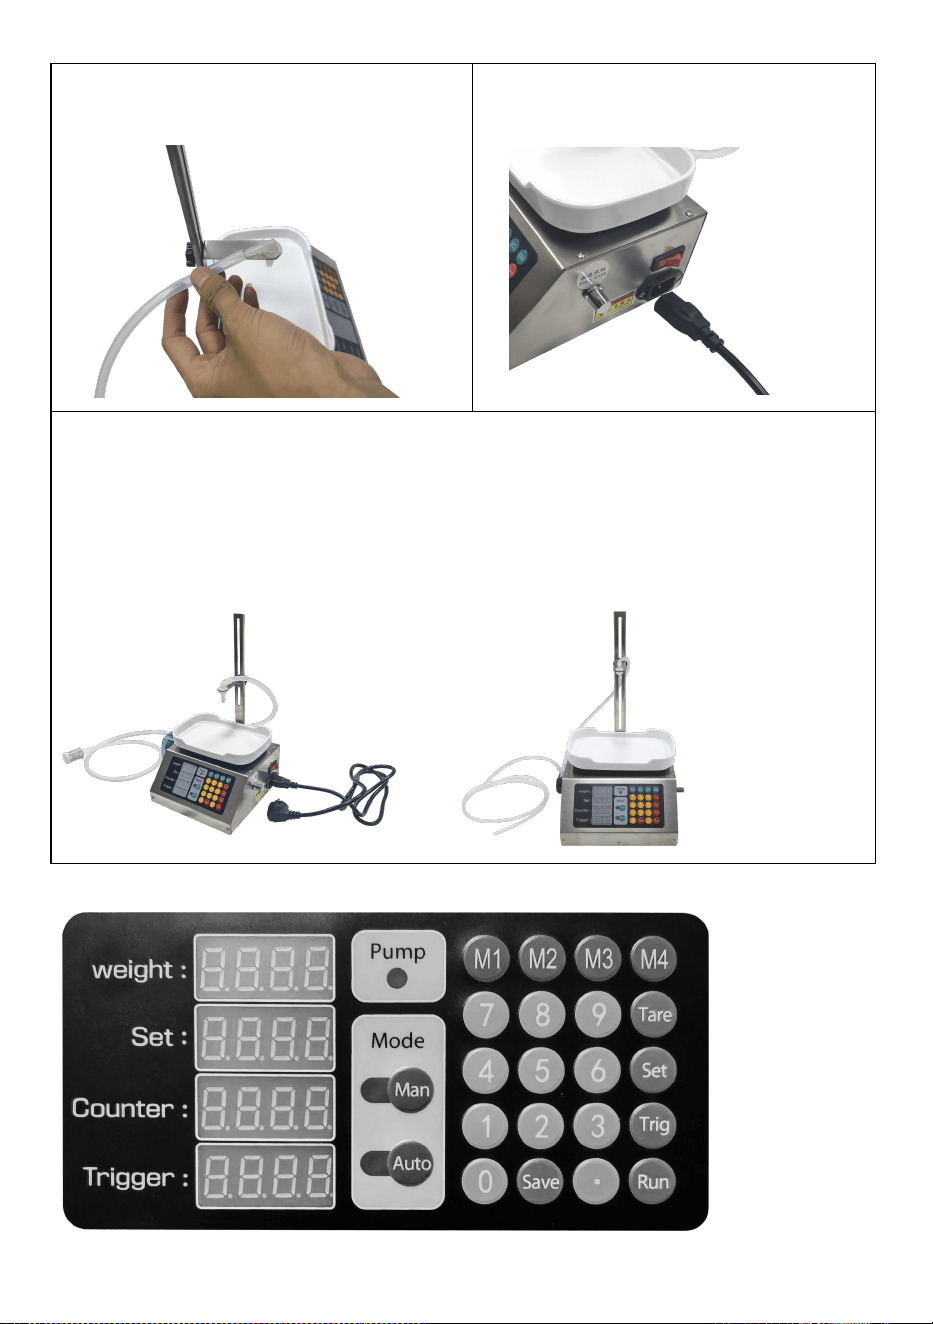
- 9 -
7.Justera påfyllningsmunstyckets höjd
och koppla in slangen.
8. Sätt i nätsladden enligt bilden.
16.Produktmontering klar.
Obs: Produkten levereras med ett tunt påfyllningsmunstycke. Du kan
installera det efter behov.
Efter användning kan den rengöras genom att pumpa vatten upprepade
gånger . Eller byt ut slangen .
Bruksanvisningen

- 10 -
Beskrivning av displayfönstret och knappens funktion
1, Displayfönster:
Vikt : visar den faktiska vikten för föremålet som vägs
Set: Användare. ställ in vikt som ska fyllas
Räknare : antal flaskor som har fyllts
Trigger : viktvärdet som utlöser autostart
2, Knappfunktion:
[Man] : Gå in i manuellt läge
[Auto] : gå in i automatiskt läge
[Tara]: Skala och ställ in på noll
[Set]: ställ in påfyllningsvikten
[Trig]: ställ in triggervärdet
påfyllningsfunktionen manuellt (klicka igen för att pausa)
: lagra 4 grupper av vanliga ifyllningsdata
[M1-4]: Ring upp lagrade fyllviktsdata
[ 0 ]: Räknarvärdet raderas
Den stora gröna knappen och fotkontakten har samma funktion som [Run]
på tangentbordet.
Bruksanvisningen
1,"Ställ in" inställningsmetod: Tryck på [Set]-tangenten för att ange värdet
(t.ex. ställ in 100g, ange 1 0 ), och tryck sedan på [Set] igen.
2, "Trigger"-inställningsmetod: (triggervärdet får inte vara mindre än 3
gram)
Tryck på [Trig]-tangenten, ange värdet (t.ex. ställ in 35g. ange 35), och
tryck sedan på [Trig] igen.
Obs: Utlösningsvärdet är inställt på ≤ tom flaska vikt. I automatiskt läge är
den automatiska påfyllningen
utlöses när vikten av den tomma flaskan överstiger triggervärdet.
3, "Manuellt läge" driftmetod: (Tryck på [Man]-tangenten, den manuella
lampan lyser, ange manuellt läge;)
(1) Sätt den tomma flaskan, tryck på [Tare]-knappen för att ta bort den
tomma flaskans vikt, tryck på [Run] knappen för att starta påfyllningen.
Vikten av den hällda vätskan når den inställda påfyllningsvikten och

- 11 -
stannar
automatiskt.
(2) Ta bort den fyllda flaskan, lägg ner en tom flaska, tryck på [Tare]
[Run]-knappen för att starta nästa f i lling.
4, "Automatiskt läge" driftmetod: (Tryck på [Auto]-tangenten, den
automatiska lampan är tänd, ange automatiskt läge)
Lägg den tomma flaskan, systemet skalar automatiskt och börjar
automatiskt fylla på efter en fördröjning
på x sekunder. När vikten når påfyllningsvikten stoppas påfyllningen
automatiskt. Ta bort den fyllda flaskan och systemet återställs automatiskt
till noll efter en fördröjning på x sekunder. Lägg nästa
töm flaskan och starta automatiskt nästa fyllning.
Obs: När du använder det automatiska läget, om maskinen inte är
ordentligt påfylld, beror det på en
misstag orsakat av en cykel som inte har slutat ännu. Ta bort flaskan och
tryck på [Tare] för att använda den i vanliga fall.
5,Inställningsmetoden för "lagring av 4 grupper av fyllnadsvikter till
M1-M4":
Tryck på [Spara]-tangenten (antalet fyllvikter börjar blinka), mata in värdet
som ska lagras,
och tryck slutligen på [M1]-tangenten (numret för " påfyllningsvikt " slutar
blinka) och numret som ska angivna lagras i M1. När du behöver använda
värdet på m1 som påfyllningsvikt kan du trycka på m1 för att ställa in värdet
på m1 som påfyllningsvikt . (Ställ in M2, M3, M4 som metod för att ställa in
M1)
6,Hur man avbryter den automatiska skalningsfunktionen:
Starta om maskinen, tryck på [Auto]-knappen och håll sedan ned
[3]-knappen tills du hör larmljud från maskinen och släpp. För närvarande
har den automatiska skalningsfunktionen avbrutits .
Om du vill aktivera den automatiska skalningsfunktionen, upprepa
ovanstående operation. När den väl har ställts in maskinen kommer att
minnas för alltid.
7,Hur man ställer in “MID-RANGE DECELERATION RATIO”: Vid några få
procent av det inställda beloppet, den går automatiskt till medelhastighet

- 12 -
Tryck på [ auto ], ställ in flödeshastigheten till ett proportionellt värde
(t.ex. ,80), tryck länge på hastighetsratten tillräckligt för att släppa taget
när "pipet" hörs.
8, Hur man ställer in "Värdet av sakta ner": (Hur många gram innan slutet
saktar automatiskt ner)
Tryck på [Trig] [Spara], .
ange sedan värdet som ska ställas in och tryck sedan på [Trig] igen.
9, "fabriksinställningar"-metoden: tryck på [ auto ]-knappen och håll sedan
[5]-knappen för att inte släppa taget, tills maskinlarmet "pipar" efter släppet.
Maskinen är tillbaka till fabriksstatus.
Om flödesreglering
1, denna produkt med flödesjusteringsknapp, hastighet 1-100 justerbar och
digital display flödeshastighet värde;
2, Justering av vridknappen, hastighetsvärdet kommer att vara en digital
display, ingen operation 3 sekunder efter utgång.
3, Tryck på Vridknappen, flödesvärdet visas. Du kan se aktuellt flödesvärde,
ingen operation efter 3 sekunders utgång .
4, Flödeshastigheten kan justeras när som helst, efter justeringen sparas
den automatiskt, stängs av minne.
Hur man använder den inställda tidsmetoden för påfyllning
I, Tryck på [ auto ] , lång tryckning [2] kan växla till "inställd tidsmetod för
fyllning" (samma metod kan även återställas till "inställd metod för
påfyllning" ) .
2,Den inställda tidsmetoden för påfyllning visar antalet i sekunder, exakt
0,01 sekunder.
3,Tryck på [inställningar ] , ange påfyllningstid , tryck på [inställningar], du
kan ställa in påfyllningstiden .
4,Tryck på [trigger], mata in intervalltid, tryck på [trigger], kan ställa in
intervalltiden för automatisk f i lling.
5,Tryck på [ set ][ start ], ladda till den mängd som behövs och tryck sedan
på [ start ][ set ] ,kan extrahera påfyllningstiden .
6,Automatiskt läge kan fastställas intervall mellan automatisk start,

- 13 -
manuellt läge genom att trycka på startknappen för att starta.
MAINTENANCE
1. Användaren ska välja en kvantitativ påfyllningsmaskin av lämpligt
sortiment enligt nämnda produkter.
2. Maskinen innehåller en elektronisk precisionsvåg, det är förbjudet att
vara överviktig.
3. Påfyllningshuvudets höjd kan justeras till ca 10 mm från flaskans
mynning.
4. När den används, håll maskinen plant och stabil för att undvika stora
vibrationer eller stötar, annars kan orsaka skada.
5. Maskin första användning eller lång tid ingen användning, mycket få
kommer inte att absorbera vatten, eftersom pumpen är invändigt torrt
resultat. Du måste tillsätta lite vatten från inloppsröret till pumpen och
sedan starta maskinen.
6. Det är bättre att rengöra maskinen med rent vatten efter varje
användning, vilket kan förlänga livslängden av pumpen. .
7. När maskinen inte används, töm vätskan och förvara den på en
ventilerad och torr plats.
8. Rengör produkten och filtret i tid efter varje användning .
9. Håll alltid produkten ren utomhus .
10 . Förvara produkten på en torr och ventilerad plats.
11. Om den inte används under en längre tid, rengör och töm vätskan i
produkten .
12. Byt ut följande förbrukningsdelar regelbundet :
Slang, filter, påfyllningsmunstycke
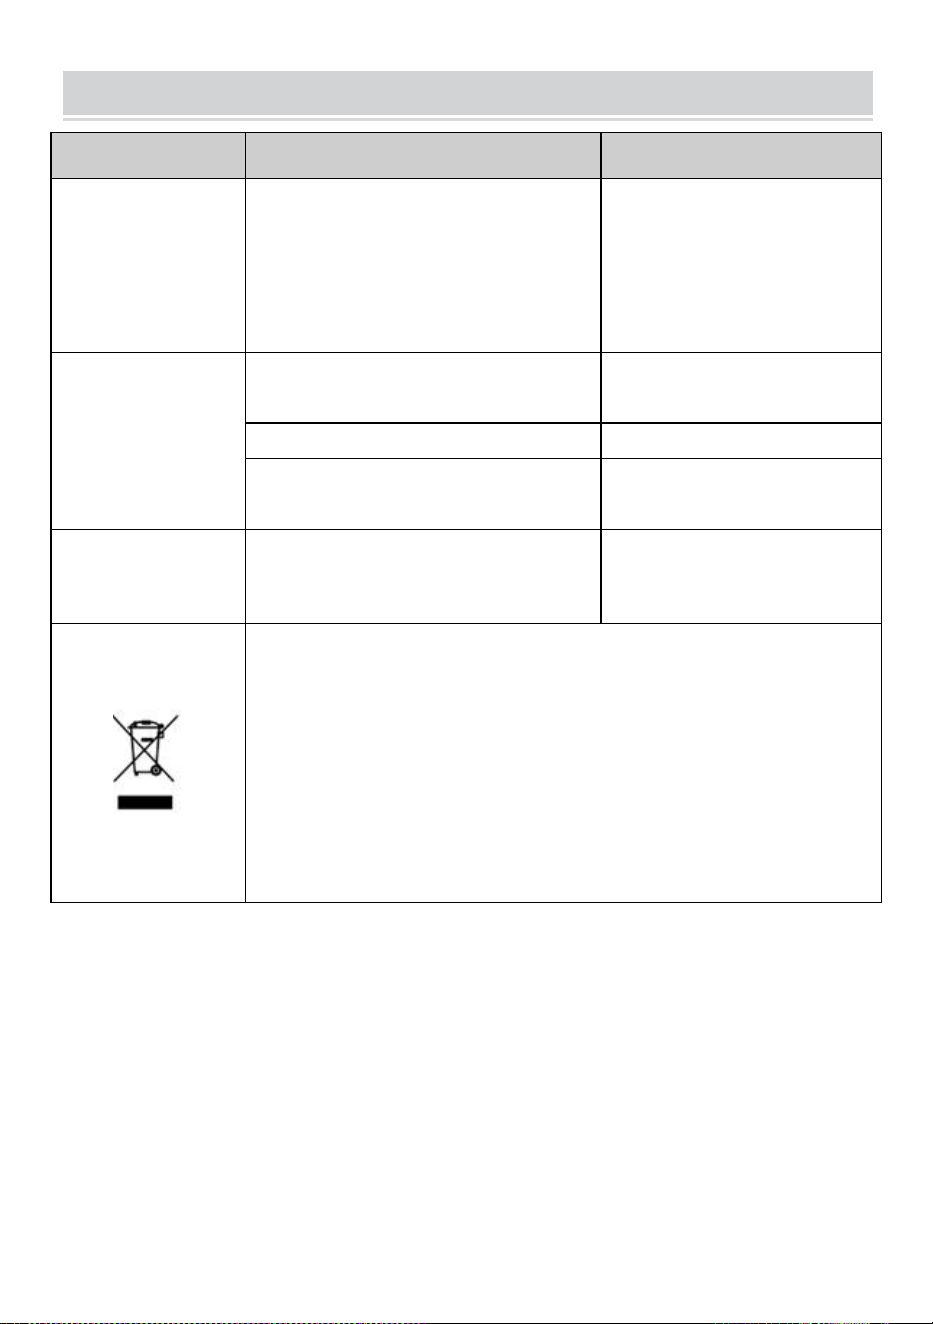
- 14 -
TROUBLESHOOTING
Problem
Möjlig orsak
Möjlig lösning
Absorberar inte
vatten
Maskin första användning eller
lång tid ingen användning,
mycket få kommer inte att
absorbera vatten, eftersom
pumpen interna torrt resultat .
Du måste tillsätta lite
vatten från inloppsröret till
pumpen och sedan starta
maskinen.
Pumpen kan inte
få ut vätskan
Slanginlopp och utlopp är
inverterade
Bekräfta slanginloppet i
vätsketanken.
Nätsladden är inte ansluten
Anslut nätsladden igen
Slangen vikt eller skadad
Släta till slangen eller byt
ut slangen
Strömindikatorn
är släckt
Nätsladden är inte ansluten
Anslut nätsladden igen
Denna produkt omfattas av bestämmelserna i det europeiska
direktivet 2012/19/EC. Symbolen som visar en soptunna
korsad anger att produkten kräver separat sophämtning i EU.
Detta gäller för produkten och alla tillbehör märkta med denna
symbol. Produkter märkta som sådana får inte kasseras
tillsammans med vanligt hushållsavfall, utan måste lämnas till
en insamlingsplats för återvinning av elektriska och
elektroniska apparater.
Adress: Baoshanqu Shuangchenglu 803long 11hao 1602A-1609shi
Shanghai
Importerad till AUS: SIHAO PTY LTD, 1 ROKEVA STREETEASTWOOD
NSW 2122 Australien
Importerad till USA: Sanven Technology Ltd, Suite 250, 9166 Anaheim
Place, Rancho Cucamonga, CA 91730

- 15 -
REP
EC
SHUNSHUN GmbH
Römeräcker 9 Z2021, 76351
Linkenheim-Hochstetten, Germany
REP
UK
Pooledas Group Ltd
Unit 5 Albert Edward House, The
Pavilions Preston, United Kingdom
Tillverkad i Kina