ENGLISH MANUAL
®
™
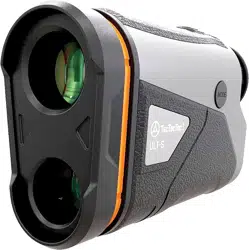
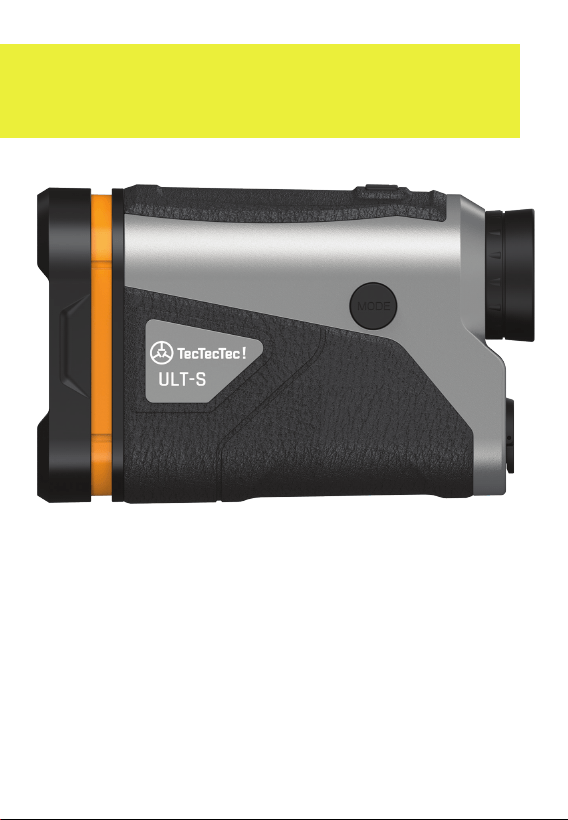
STABILIZED GOLF RANGEFINDER
2
JUST OKAY IS NOT ACCEPTABLE
WE WANT YOU TO BE HAPPY
VISIT US
us.tectectec.com
CALL US
(833) 383-2669
facebook.com/tectectecusa
instagram.com/tectectecusa
FOLLOW US
twitter.com/tectectecusa
EMAIL US
us@tectectec.com

3
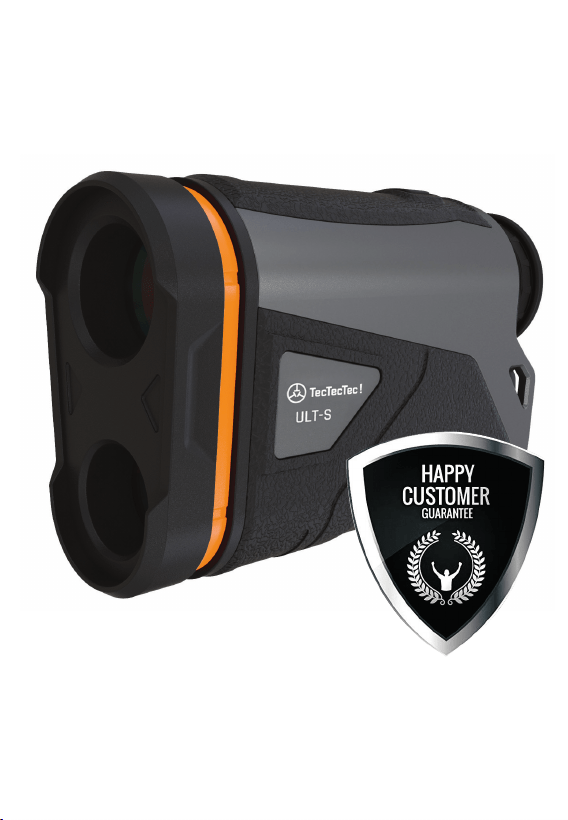
LOVE IT OR YOUR MONEY BACK!
JUST OKAY IS NOT ACCEPTABLE
WE WANT YOU TO BE HAPPY
®
4
HIGH-CLASS
CUSTOMER SUPPORT
(833) 383-2669
WE PROUDLY STAND BEHIND
OUR PRODUCTS

You have made a great choice with
TecTecTec !
We truly care that you are
happy with your purchase. Please read
this manual before use to learn how to
operate and care for your rangefinder.
If you have any questions or any issues
at all, email or call us, we will work with
you until you’re happy!
Be sure to include your Order ID Number
in the subject line of your email to us:
Write your Order ID Number above for reference.
WE PROUDLY STAND BEHIND
OUR PRODUCTS
THANK YOU
us@tectectec.com
5
®
REGISTER NOW!
us.tectectec.com/warranty
6

7
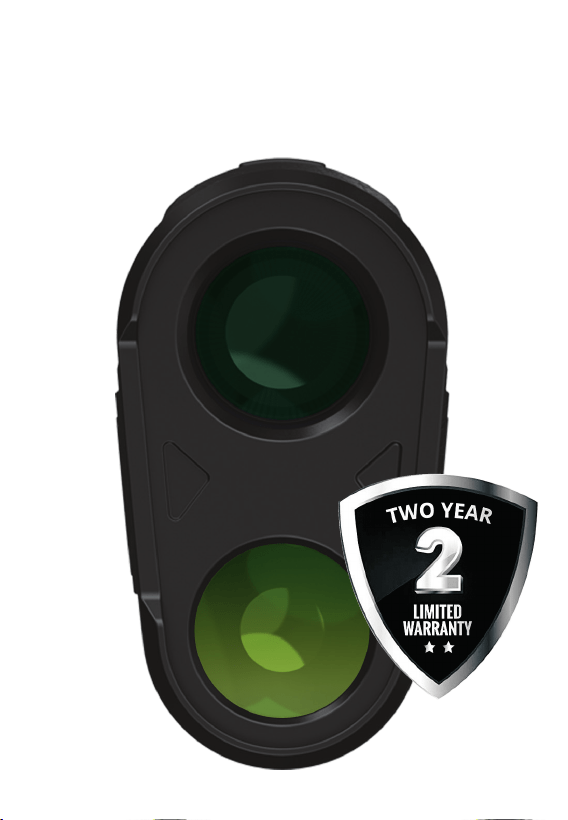
Please be sure to register the 2-Year
Limited Warranty for your TecTecTec !
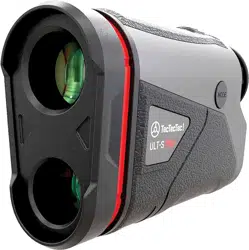
ULT-S
™
Rangefinder immediately!
Visit tectectec.com/warranty to
validate and subscribe to this already
included free service. We recommend
that you do it now, so that you don’t
miss out in case you need it.
• 30 DAY MONEY BACK GUARANTEE
• 2-YEAR LIMITED WARRANTY
(ONLINE REGISTRATION REQUIRED)
• EXCLUSIVE DISCOUNTS
WARRANTY
REGISTER NOW!
us.tectectec.com/warranty
®

1x Rangefinder
1x CR123 Battery
1x Microfiber Cloth
1x Pouch
1x Wrist Strap
1x Manual
WHAT’S IN THE BOX
FEATURES
• USGA Tournament Rule 14-3 compliant
• Visible Slope Switch
• LCD Display
• Fog Mode
• Automatic Shut-O
• Rubber Eyepiece adapts to glasses
• Transmits laser up to 1O seconds
• Maximum range to pin: 300 yards
• Maximum range to trees: 800 yards
• Maximum range to a reflective target:
up to 1200 yards
8
9
Objective Lens
Magnification
Field of View
Exit Pupil Diameter
Diopter Adjust Range
Working Temperature
Accuracy
Battery Type
Battery Meter
Stabilization
Vibration
Flag-Lock
Weight
Dimensions
22mm
6x
6°
3.6mm
±3
-10 to 55° C
+-1 m(Y)
CR123
Ye s
Ye s
Ye s
204g
112x76x42mm
SPECS
Advanced laser technology
zeros in on the flag.
TARGET SEEKER
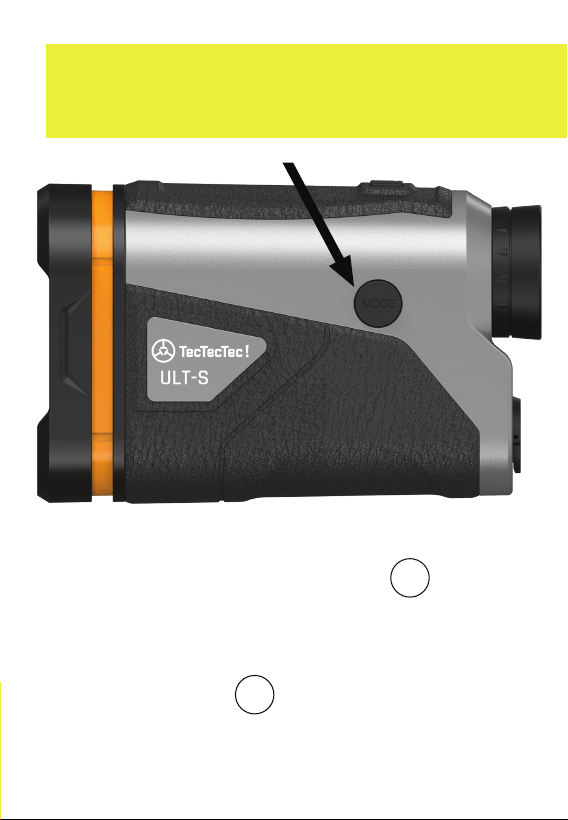
MODE BUTTON
NORMAL/SCAN > PIN SEEKER
Press briefly to change modes from
Normal/Scan to Pin Seeker. Press and hold
for 3 seconds to access the Settings.
LET’S GET STARTED
(See page 22).
SLOPE READY
10
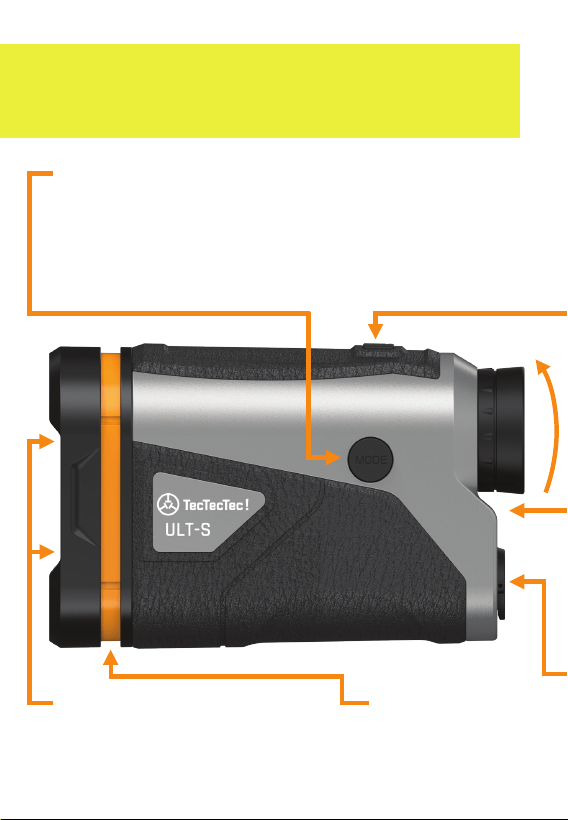
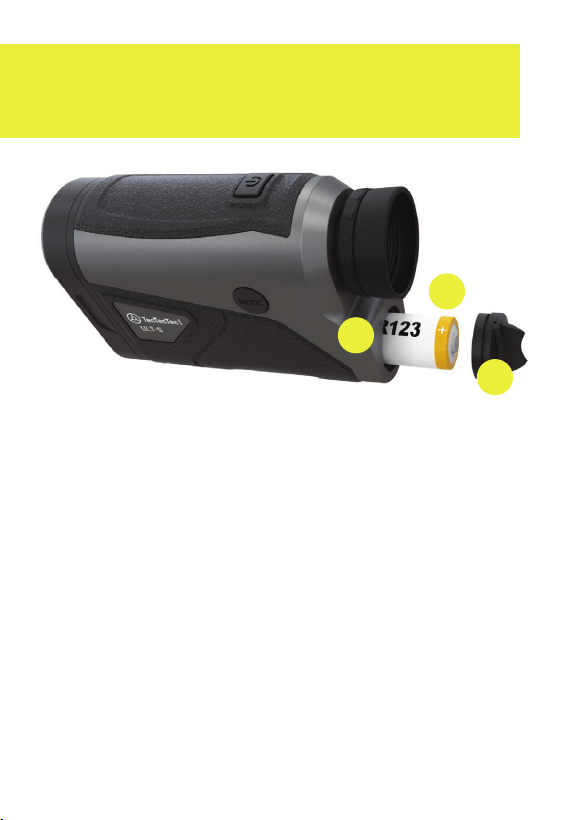
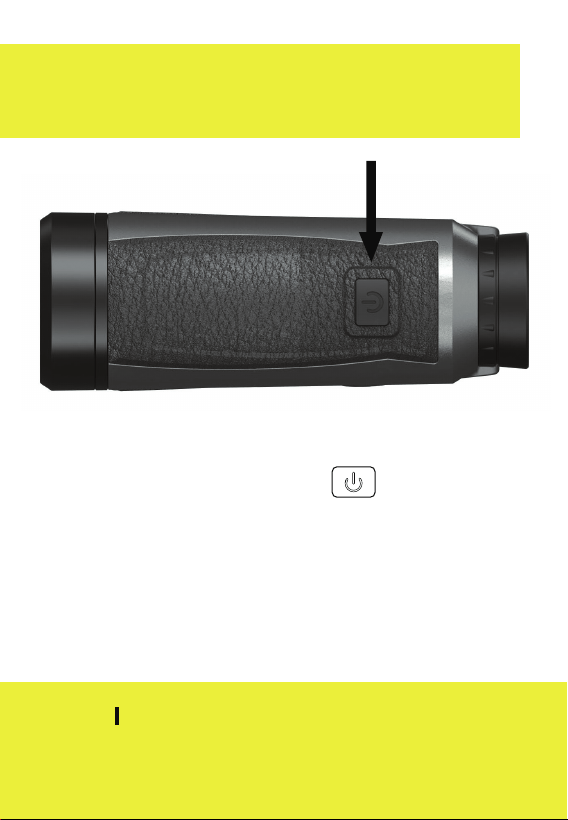
BATTERY COVER
EYEPIECE
Rotate left or
right to adjust the
diopter until the
view is in focus.
WRIST STRAP SLOT
To attach the wrist
strap, loop it through
the slot located on
the bottom.
POWER BUTTON
One button operation point.
Automatic shut-o after
8 seconds unattended.
Slide down to open.
Insert a CR123
lithium battery firmly.
11
TRUST YOUR RANGE
MASTER YOUR GAME
12
1
2
3
1. Locate the battery compartment
near the bottom of the unit, lift the flap
and use it to turn the cover to open.
2. Insert the CR123 lithium battery with
the negative end is against the spring.
3. Replace the battery cover by turning
the cover back over the top of the
battery inside of the compartment.
* Removing the battery will reset the
rangefinder to default settings.
INSERTING THE BATTERY
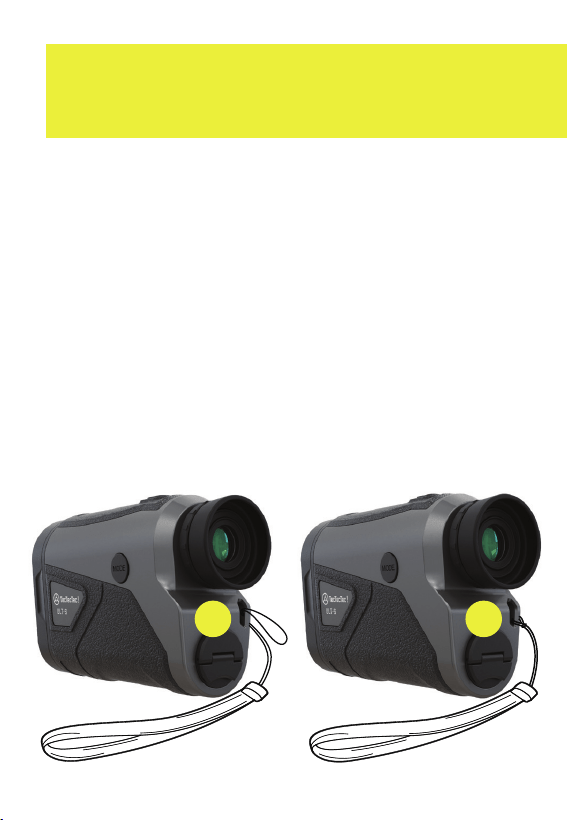
ATTACHING THE STRAP
1. Loop the wrist strap through the slot
on the back of the rangefinder.
2. Pull the large end of the wrist strap
through the small end to form a knot.
3. The wrist strap can be worn around
your wrist to prevent the risk of the
rangefinder accidentally falling out
of you hands and becoming damaged.
1
2
13
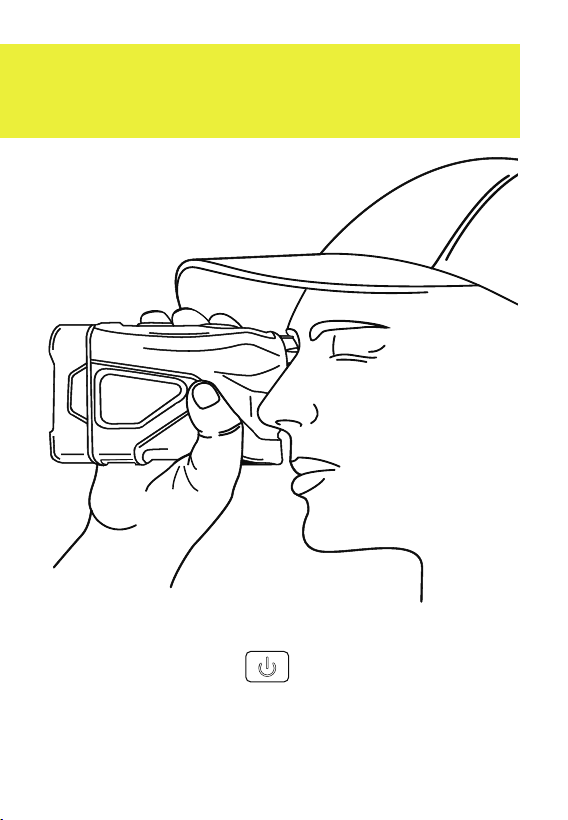
HOLDING THE RANGEFINDER
1. Hold the rangefinder straight with the
Power Button facing up to the sky.
2. Look through the rubber eyepiece
at the back of the rangefinder.
14

STABILIZATION
The Optical Image Stabilization (OIS)
will automatically turn on. There are
no parameters to activate.
The Optical Image Stabilization (OIS)
will automatically reduce any slight
movements for a smooth, steady view
when aiming at a target.
Holding the rangefinder steady is
essential to getting an accurate reading.
In addition to golfing, you can use the
rangefinder for hunting and surveying
equipment for architectural and outdoor
projects. Weather conditions and the
size, shape, surface, and color of the
target can aect performance.
15
16
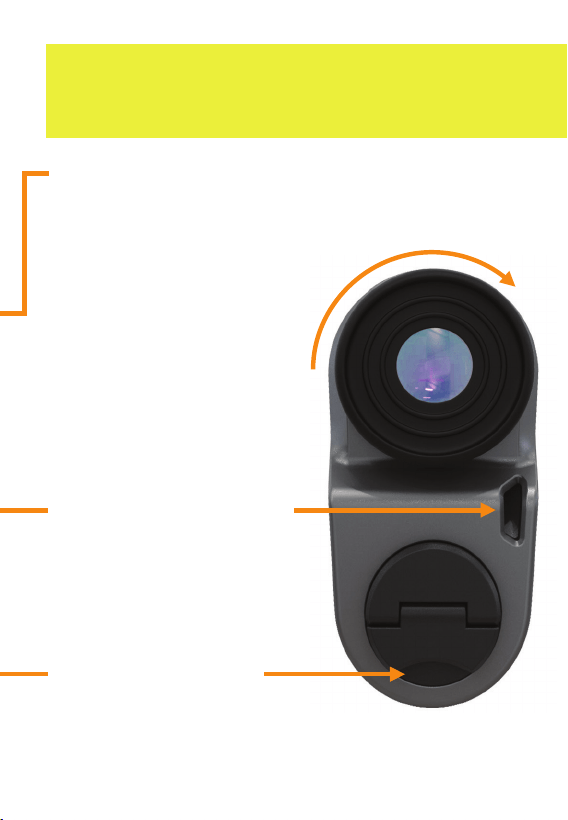
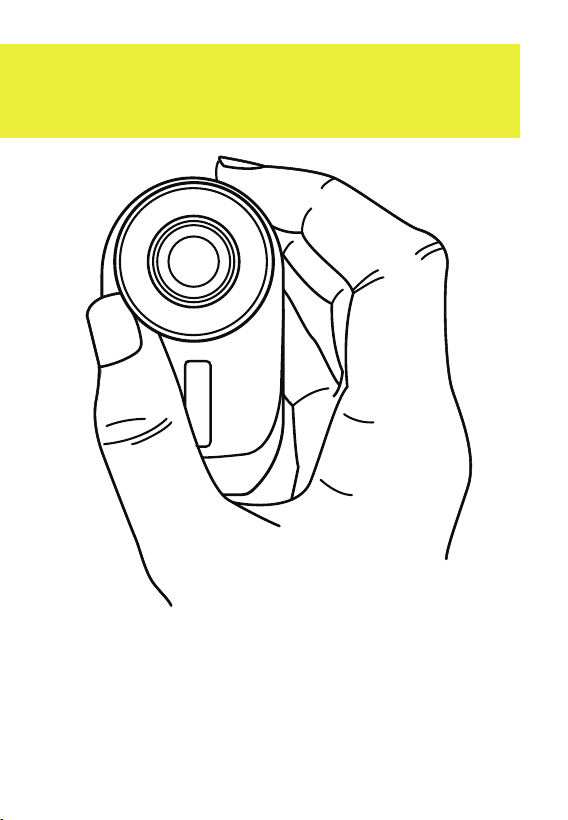
ADJUSTING THE EYEPIECE
1. Look through the rubber eyepiece.
2. Rotate the dial left or right to adjust
the diopter until the view is in focus.
17
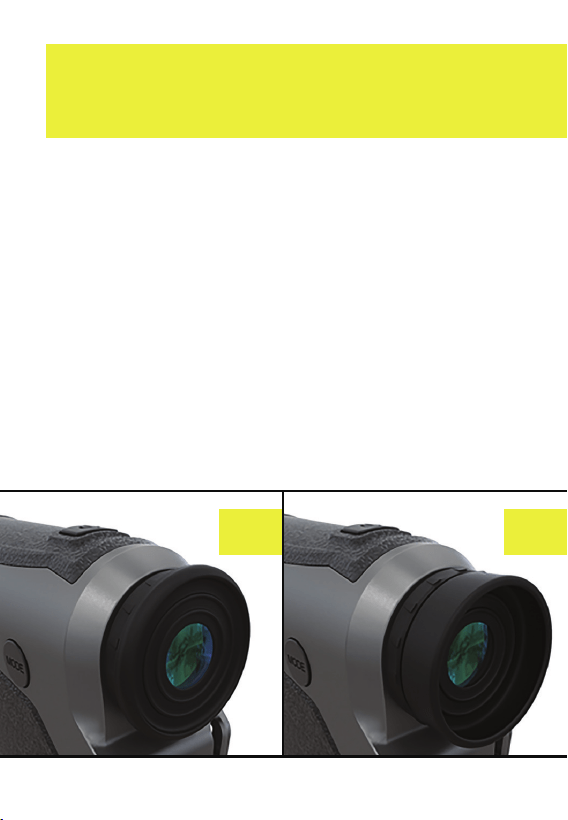
WEARING GLASSES
1. If you wear glasses or sunglasses,
you can fold the rubber eyepiece
backward in the direction of the front
of the rangefinder.
2. Keep the rubber eyepiece unfolded
when you are not wearing glasses.
It keeps the outside light out to view
the measurements most clearly.
1 2

18
ACTIVATED LASER
The TecTecTec ! ULT-S
™
Rangefinder
uses eye-safe laser beams to measure
the distance to objects up to 1093 yards
away, by measuring the time it takes
for the laser pulse to reflect o of the
target and return.
Each Mode shows the Activated Laser
slightly dierent. When powering the
rangefinder a symbol will appear at the
top of the screen that represents "M" for
Mode. The number beside it represents
which Mode it is. The Activated Laser
will appear and disappear briefly before
the measurement is calculated.
®
19
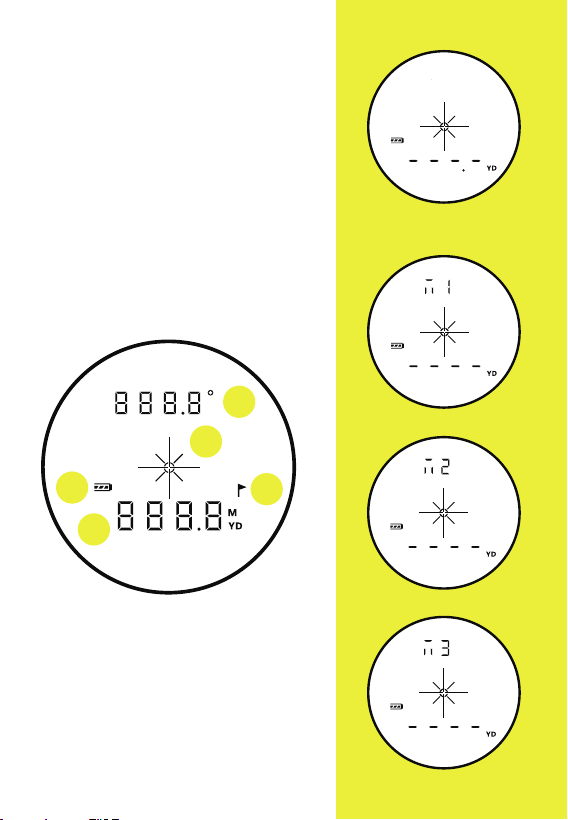
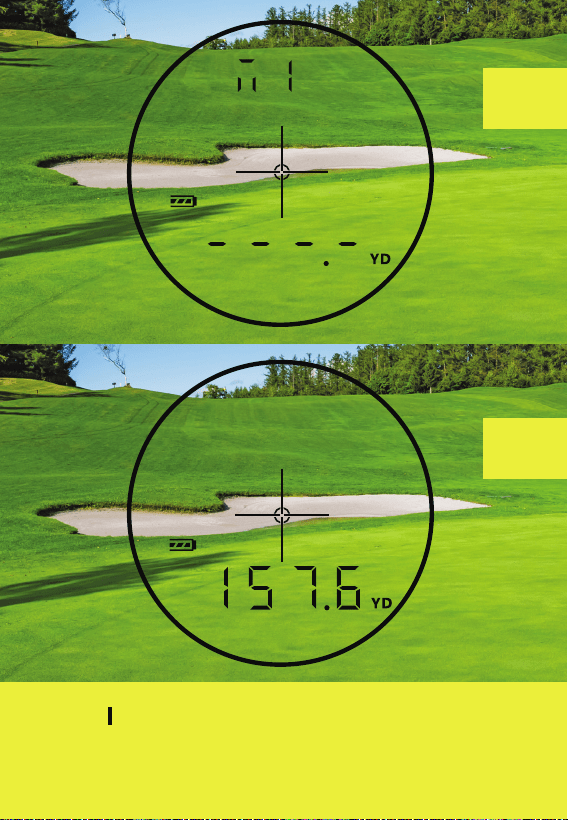
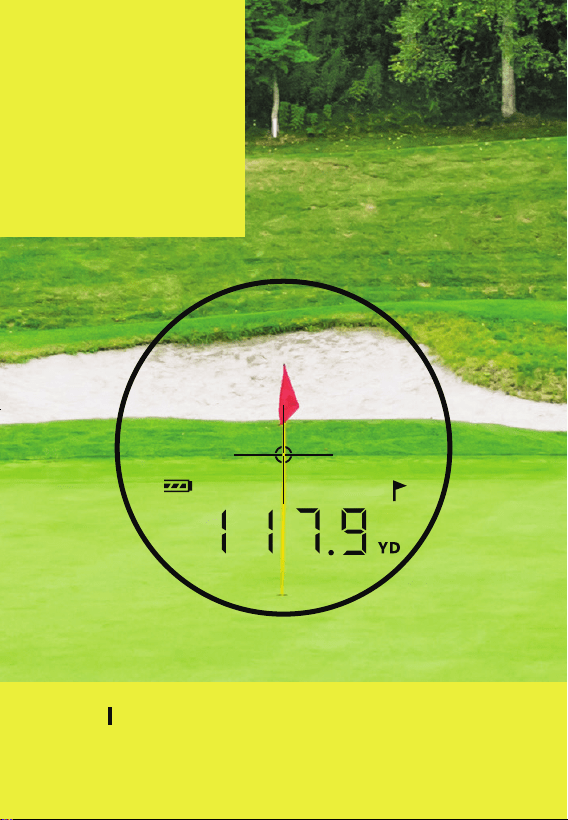
A) Slope Corrected Distance
/Angle Display
B) Aiming Crosshairs
C) Battery Meter
D) Pin Seeker Indicator (Flag)
E) Distance (Meters/Yards)
Modes M1 and M2 will result
in the distance measurement
shown below the crosshairs
(E) - the display will show
nothing at the top above
the crosshairs. Mode M3 for
Pin Slope Mode will show
the slope corrected distance
at the top (A), pressing the
Mode button will show
the angle.
DISTANCE BEING
MEASURED
NORMAL/SCAN MODE - M1
PIN SEEKER MODE - M2
ACTIVATED LASER
A
C
B
D
E
PIN SEEKER MODE - M2
PIN SLOPE MODE - M3
POWER BUTTON
TURN ON
Press the Power Button to turn
the rangefinder on.
TURN OFF
The rangefinder will automatically turn
o after 8 seconds if left unattended.
NOTE When you turn on the rangefinder,
it will hold the last settings and mode set up.
20
21
MODE BUTTON
1. To access the Settings Menu, press
and hold the Mode Button down
for 3 seconds.
2. To change Modes (M1, M2) press the
Mode Button briefly to toggle
between each Mode: Normal/scan
(M1) > Pin Seeker (M2)
MODE
MODE
22
SLOPE READY
TURN SLOPE ON
Pull the Faceplate out to turn on
Slope Ready Mode.
23
NOTE A closed faceplate is tournament
legal. This rangefinder is USGA Tournament
Rule 14-3 Compliant.
TURN SLOPE OFF
Push the Faceplate in to turn o
Slope Ready Mode.
23

24
Normal/Scan Mode
Pin Mode
Pin Slope Mode
M1:
M2:
M3:
MODES
MODES
To recap, these are the measurement
modes for your rangefinder:

25
SETTINGS
To customize your rangefinder, and to
activate Fog Mode, these are the settings
that you can access when you hold the
Mode Button down for 3 seconds:
Fog Mode
Unit of Measurement (yd/m)
Crosshair/Target Style
1:
2:
3:
SETTINGS
MODE
26
To activate Fog Mode, press and hold the
Mode Button to access Settings. Then
press the Mode Button once, and then
to turn the Fog Mode on or o, press the
Power Button . The "Fog Mode On"
display will blink twice to indicate that it is
on when you turn on the rangefinder.
A measurement reading in Normal Mode
will take approximately 0.6 seconds.
A measurement reading in Fog Mode will
take longer depending on the thickness of
the fog. Fog Mode will remain on even after
the rangefinder is o unless you turn it o.
FOG MODE ON/OFF
To activate Fog Mode, press and hold the
Mode Button to access Settings. Then
press the Mode Button once, and then
to turn the Fog Mode on or o, press the
Power Button . The "Fog Mode On"
display will blink twice to indicate that it is
on when you turn on the rangefinder.
A measurement reading in Normal Mode
will take approximately 0.6 seconds.
A measurement reading in Fog Mode will
take longer depending on the thickness of
the fog. Fog Mode will remain on even after
the rangefinder is o unless you turn it o.
ON OFF
MODE
MODE
27
STYLE 1
STYLE 2
CROSSHAIR/TARGET STYLES
STYLE 3
METERS YARDS
UNIT OF MEASUREMENT
Access Settings, then press the Mode
Button twice. Press the Power Button
to change unit of measurement (yd/m).
Access Settings then press the Mode
Button three times. Press the
Power Button to change the style.
MODE
MODE
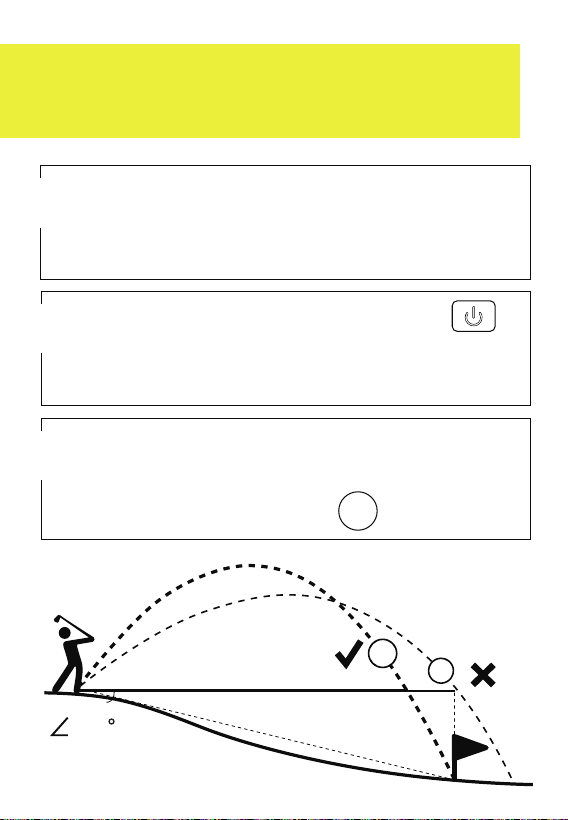
"Normal Mode" will allow you to find
the exact distance quickly. Use Normal
Mode when you are measuring the
distance to an area or a flag that is
clearly defined with a simple background.
Golfers tell us that they prefer Normal
Mode for targets within 150 yards.
Aim at the object whose distance
you want to calculate.
1
Press the Power Button once
briefly while aiming at a target, such
as a bunker. The display screen will
show the distance. After taking a
measurement, press "Power" again
to find the distance to a new target.
2
NORMAL MODE
28
29
1
2
NOTE NORMAL MODE will not show the
FLAG ICON which is only visible in PIN SEEKER
and PIN SLOPE MODES.
29

Use "SCAN MODE" while in "NORMAL
MODE" just by holding down the POWER
BUTTON when determining the distance
to hazards and when you want to have a
comprehensive understanding of multiple
distances on the course. Use SCAN
MODE when it’s windy and for targets
surrounded by background objects.
The word "SCAN" appears on screen.
SCAN MODE
Hold the Power Button for
8 seconds. At the same time, sweep
the rangefinder from object to object.
1
The display screen will show
continuous distance measurement.
Press the Power Button to find
the distance to a new target.
2
31
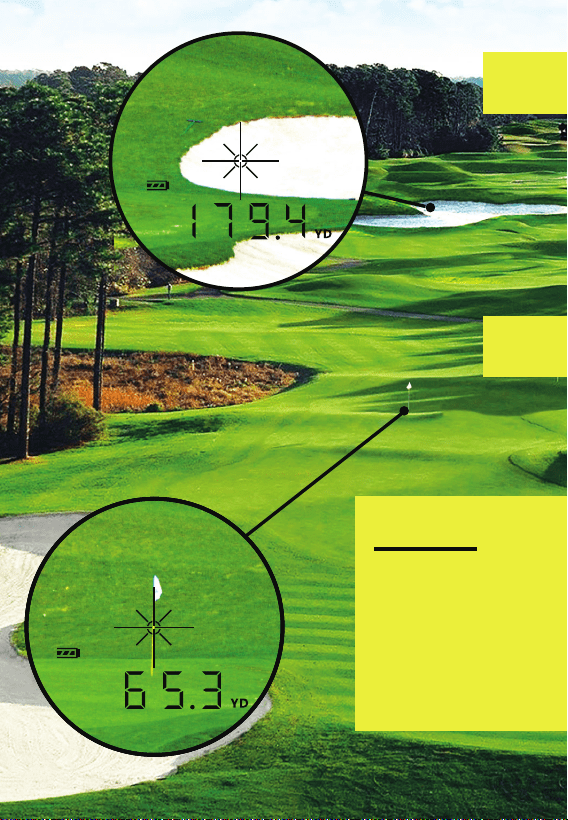
YARDAS
Y
NOTE
SCAN MODE
will not show the
FLAG ICON which
is only visible in
Pin Seeker and
Pin Slope Modes.
179 YARD
BUNKER
65 YARD
PIN
1
2
31
32
Use "Pin Seeker Mode" (to find the
closest vertical object) the distance to
a flagstick on a green with woods in the
background; as well as when measuring
overlapping targets. It is also good to
use on a windy day. The locking function
allows you to confidently take your shot.
PIN SEEKER MODE + VIBRATION
Press the Mode Button briefly to
see "M2" on the display which indicates
that you are in Pin Seeker Mode.
1
Target an object behind the flag.
Press and hold the Power Button
while slowly sweeping over the flag.
The rangefinder will vibrate when you
lock onto the target.
2
MODE
33
The rangefinder
will lock onto
the nearest
target (the flag)
and display
the distance.
NOTE The rangefinder will vibrate when
locked onto the flag, and flag will appear on
the screen.
33
PIN SLOPE MODE + VIBRATION
Press and hold the Power Button
while aiming at a target whose distance
you want to calculate.
2
1
Pull the Slope Switch out. M3 will
appear on the screen for few seconds
to indicate that you are in Mode 3.
The corrected distance, will appear at the
top part of the screen. To see the angle
press the Mode Button .
3
MODE
32.1 YD
40.1 YD
-10
34
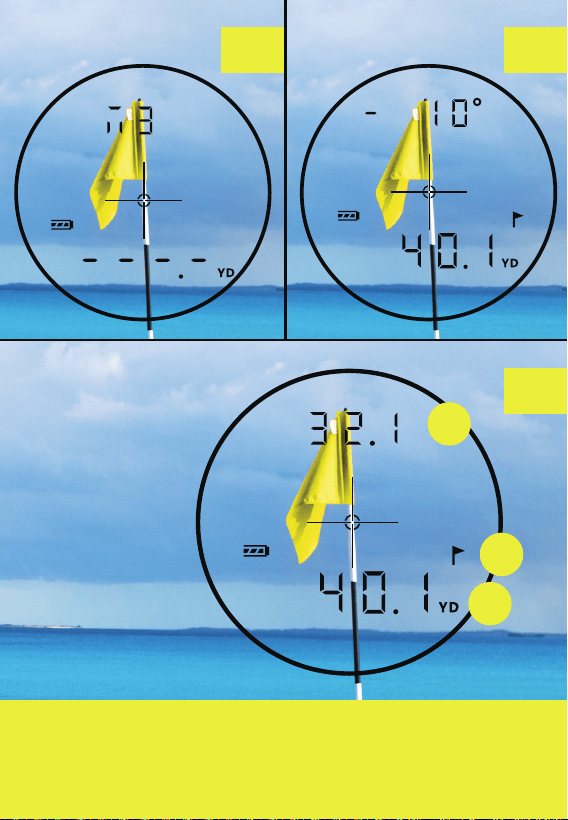
A) Slope Corrected Distance/Angle
B) Flag Indicator
C) Actual Distance and Unit of Measurement
A
B
C
1 3
2
The rangefinder
will vibrate
when locked
onto the flag,
and flag will
appear on
the screen.

1
Remove dust or dirt on the lens
surface using a soft, oil free brush
before storing the rangefinder
back in the carrying case.
2
Remove smudges or fingerprints
by gently rubbing with a soft glass
cleaning cloth or a high-quality,
oil-free tissue.
3
Use lens cleaners designed for
use with photographic equipment
or isopropyl alcohol to wipe the
lenses. Always apply cleaning fluid
to the cleaning cloth first. DO NOT
pour any liquids onto the lens.
MAINTENANCE
37
4
If water vapor enters the unit
place it in direct sunlight for two
to three hours. DO NOT turn on.
5
When storing the rangefinder
for periods longer than 30 days,
remove the battery first to
avoid corrosion.
Always store the rangefinder at
room temperature or a controlled
temperature in a dry place with
low humidity. Never keep it in
a very hot or very cold place,
such as inside a car.
6

38
TROUBLESHOOTING
NO DISPLAY
1. Reinsert the battery.
2. Check the polarity (+/-) of the battery.
3. Clean the battery contacts.
4. Make sure the battery is not drained.
5. Be sure battery contacts are straight
and that nothing is blocking them.
6. Press the Power Button rmly.
7. Try another battery.
FADING DISPLAY
1. Be sure that the rangender and
its case are completely dry.
2. Place it under direct sunlight
for 3-4 hours.

39
CANNOT MEASURE
1. Be sure the device is powered on.
2. Be sure that nothing is blocking
the lenses.
3. Make sure you are not trying to
measure beyond the maximum
measuring distance.
4. The target must be further away
than 15 meters/16 yards.
5. Press the Power Button briey
in Normal Mode.
DOES NOT MEASURE SLOPE
1. Aim the horizontal crosshairs at
the point from which you wish to
measure slope.
2. The crosshairs should be level with
the ground and the unit should be
tilted up or down.

1. KEEP AWAY
from children
2. DO NOT
power on while looking
into the objective lens
or the light-receiving
aperture on the front
of the rangefinder
3. DO NOT
aim at the eyes of
people, animals,
or at the sun
4. DO NOT
disassemble, doing
so will also void
the warranty
5. DO NOT
submerge or expose
to water or liquids,
this is not waterproof
6. DO NOT
place on any unstable
surface in case of falls
7. DO NOT
take measurements
while aiming through
glass such as golf cart
windshields, etc.
SAFETY
TO AVOID INJURY,
FOLLOW THESE
GUIDELINES
®
™
STABILIZED GOLF
RANGEFINDER