

P-145BT, P-143BT Owner’s Manual
2
The model number, serial number, power require-
ments, etc., may be found on or near the name plate,
which is at the bottom of the unit. You should note this
serial number in the space provided below and retain
this manual as a permanent record of your purchase
to aid identification in the event of theft.
Model No.
Serial No.
(1003-M06 plate bottom en 01)
Information for users on collection and disposal of old equipment:
This symbol on the products, packaging, and/or accompanying documents means that used electrical and electronic
products should not be mixed with general household waste.
For proper treatment, recovery and recycling of old products, please take them to applicable collection points, in accord-
ance with your national legislation.
By disposing of these products correctly, you will help to save valuable resources and prevent any potential negative
effects on human health and the environment which could otherwise arise from inappropriate waste handling.
For more information about collection and recycling of old products, please contact your local municipality, your waste
disposal service or the point of sale where you purchased the items.
For business users in the European Union:
If you wish to discard electrical and electronic equipment, please contact your dealer or supplier for further information.
Information on Disposal in other Countries outside the European Union:
This symbol is only valid in the European Union. If you wish to discard these items, please contact your local authorities
or dealer and ask for the correct method of disposal.
(58-M02 WEEE en 01)

P-145BT, P-143BT Owner’s Manual
3
4
P-145BT, P-143BT Owner’s Manual
PRECAUTIONS
PLEASE READ CAREFULLY BEFORE PROCEEDING
Especially in the case of children, a guardian should provide guidance on
how to properly use and handle the product before actual use.
Please keep this manual in a safe and handy place for future reference.
WARNING
Always follow the basic precautions listed below to avoid the possibility of serious injury or even death from electrical
shock, short-circuiting, damages, fire or other hazards. These precautions include, but are not limited to, the
following:
• Do not place the power cord near heat sources such as heaters or radiators. Also,
do not excessively bend or otherwise damage the cord, or place heavy objects on
it.
• Do not touch the product or the power plug during an electrical storm.
• Use only the correct voltage specified for the product. The required voltage is
printed on the name plate of the product.
• Use only the supplied or the specified AC adaptor (page 16). Do not use the AC
adaptor for other devices.
• Check the power plug periodically and remove any dirt or dust which may have
accumulated on it.
• Insert the power plug firmly all the way into the AC outlet. Using the product
when it is not plugged in sufficiently can cause dust to accumulate on the plug,
possibly resulting in fire or skin burns.
• When setting up the product, make sure that the AC outlet you are using is easily
accessible. If some trouble or malfunction occurs, immediately turn off the power
switch and disconnect the plug from the outlet. Even when the power switch is
turned off, as long as the power cord is not unplugged from the wall AC outlet,
the product will not be disconnected from the power source.
• Do not connect the product to an electrical outlet using a multi-plug outlet
extender. Doing so can result in lower sound quality, or possibly cause
overheating in the outlet.
• When disconnecting the power plug, always hold the plug itself and not the cord.
Pulling by the cord can damage it and cause electric shocks or a fire.
• If not using the product for long periods of time, be sure to pull the power plug
from the AC outlet.
• This product contains no user-serviceable parts. Do not attempt to disassemble
the internal parts or modify them in any way.
• Do not expose the product to rain, use it near water or in damp or wet conditions,
or place on it any containers (such as vases, bottles or glasses) containing
liquids which might spill into any openings or places where water may drop. A
liquid such as water getting into the product may cause a fire, electric shocks, or
malfunctions.
• Use the AC adaptor indoors only. Do not use in any wet environments.
• Never insert or remove a power plug with wet hands.
• Do not place any burning items or open flames near the product, since they may
cause a fire.
• Radio waves from this product may affect electro-medical devices, such as a
heart pacemaker implant or defibrillator implant.
- Do not use the product near medical devices or inside medical facilities. Radio
waves from this product may affect electro-medical devices.
- Do not use the product within 15 cm (6 in.) of persons with a heart pacemaker
implant or a defibrillator implant.
• If any of the following problems occur, immediately turn off the power switch and
disconnect the power plug from the outlet.
Finally have the device inspected by Yamaha service personnel.
- The power cord or plug becomes frayed or damaged.
- Unusual smells or smoke are emitted.
- Some object, or water has been dropped into the product.
- There is a sudden loss of sound during use of the product.
- Cracks or other visible damage appear on the product.
Power supply
Do not disassemble
Water warning
Fire warning
Wireless unit
If you notice any abnormality
5
P-145BT, P-143BT Owner’s Manual
CAUTION
Always follow the basic precautions listed below to avoid the possibility of physical injury to you or others, or damage
to the product or other property. These precautions include, but are not limited to, the following:
• Do not place the product in an unstable position or a location with excessive
vibration, where it might accidentally fall over and cause injury.
• Before moving the product, remove all connected cables, to prevent damage to
the cables or injury to anyone who might trip over them.
• Use only the stand specified for the product. When attaching it, use the provided
screws only. Failure to do so could cause damage to the internal components or
result in the product falling over.
• Before connecting the product to other devices, turn off the power for all devices.
Before turning the power on or off for all devices, set all volume levels to
minimum.
• Be sure to set the volumes of all devices at their minimum levels and gradually
raise the volume controls while playing the product to set the desired listening
level.
• Do not insert foreign materials such as metal or paper into any openings or gaps
of the product. Failure to observe this may cause a fire, electric shocks, or
malfunctions.
• Do not rest your weight on, or place heavy objects on the product, and do not use
excessive force on the buttons, switches or connectors.
• Do not use the product or headphones for a long period of time at a high or
uncomfortable volume level, since this can cause permanent hearing loss. If you
experience any hearing loss or ringing in the ears, consult a physician.
• Remove the power plug from the AC outlet before cleaning the unit. Failure to
observe this may cause electric shocks.
Always turn the power off when the product is not in use.
Even when the [ ] (Standby/On) switch is in standby status (power lamp is off), electricity is still flowing to the product at the minimum level.
When you are not using the product for a long time, make sure you unplug the power cord from the wall AC outlet.
NOTICE
To avoid the possibility of malfunction/ damage to the product,
damage to data, or damage to other property, follow the notices
below.
Handling
• Do not use the product in the vicinity of a TV, radio, stereo equipment, mobile
phone, or other electric devices. Otherwise, this product or the other device may
generate noise.
When you use the product along with an app on your smart device, such as a
smartphone or tablet, we recommend that you enable “Airplane Mode” on the
device to avoid noise caused by communication. When turning on airplane mode,
Bluetooth
®
settings may be turned off. Make sure that the setting is turned on
before use.
• Do not expose the product to excessive dust or vibrations, or extreme cold or heat
(such as in direct sunlight, near a heater, or in a car during the day) to prevent the
possibility of disfiguration, damage to the internal components or unstable
operation. (Verified operating temperature range: 5° – 40°C, or 41° – 104°F.)
• Do not place vinyl, plastic or rubber objects on the product, since this might
discolor the product.
• This instrument has a built-in speaker on the back (terminal side). Do not place
any object that is affected by magnetism, such as a watch or magnetic card on the
instrument, since that may damage the object.
Maintenance
• When cleaning the product, use a soft and dry/slightly damp cloth. Do not use
paint thinners, solvents, alcohol, cleaning fluids, or chemical-impregnated
wiping cloths.
Information
About copyrights
• The copyright of the “content”
*1
installed in this product belongs to Yamaha
Corporation or its copyright holder. Except as permitted by copyright laws and
other relevant laws, such as copying for personal use, it is prohibited to
“reproduce or divert“
*2
without the permission of the copyright holder. When
using the content, consult with a copyright expert.
If you create music or perform with the contents through the original use of the
product, and then record and distribute them, the permission of Yamaha
Corporation is not required regardless of whether the distribution method is paid
or free of charge.
*1: The word “content” includes a computer program, audio data,
Accompaniment Style data, MIDI data, waveform data, voice recording data,
music score, and score data, etc.
*2: The phrase “reproduce or divert” includes taking out the content itself in this
product, or recording and distributing it without changes in a similar manner.
About functions/data bundled with the product
• Some of the preset Songs have been edited for length or arrangement, and may
not be exactly the same as the original.
About this manual
• The illustrations as shown in this manual are for instructional purposes only.
• The Bluetooth
®
word mark and logos are registered trademarks owned by
Bluetooth SIG, Inc. and any use of such marks by Yamaha Corporation is under
license.
• “QR Code” is a registered trademark of DENSO WAVE INCORPORATED.
• The company names and product names in this manual are the trademarks or
registered trademarks of their respective companies.
Tuning
• Unlike an acoustic piano, this instrument does not need to be tuned by an expert
(although the pitch can be user-adjusted to match other instruments). This is
because the pitch of digital instruments is always maintained perfectly.
About disposal
• When disposing of this product, please contact the appropriate local authorities.
Location
Connections
Handling
Yamaha cannot be held responsible for damage caused by improper use or modifications to the product, or data that is lost or destroyed.
DMI-11

P-145BT, P-143BT Owner’s Manual
6
Contents
PRECAUTIONS............................................................ 4
About the Manuals........................................................ 7
Panel Controls and Terminals 8
Setting Up 9
Power Requirements.................................................... 9
Turning the Power On/Off............................................. 9
Auto Power Off Function .............................................. 9
Using a Footswitch or a Foot pedal .............................. 9
Functions List 10
Listening to Audio playback of the Bluetooth
device on this instrument 12
Backup and Initialization 15
Troubleshooting 15
Specifications 16
Separately Sold Accessories 17
Pedal Functions (For Pedal Unit LP-5A) .................... 17
Using this instrument with smart device apps
You can use the following apps by connecting the instrument to a smart device.
Smart Pianist
By using this instrument with the Smart Pianist app, you can remotely control your digital piano
for even more convenience and flexibility.
For information on how to connect the instrument to a smart device and how to use the app, see the
Smart Pianist User Guide.
Rec'n'Share
Rec’n’Share allows you to record, make videos of, and edit your performances on the instrument
and then share them with the world.
To connect the instrument to a smart device, you need a USB cable (Type A - Type B) and a
conversion adaptor that matches the connector of the smart device.
Smart Pianist User Guide
https://manual.yamaha.com/mi/app/smartpianist/
For details about each app, refer to the following website.
https://www.yamaha.com/2/apps/
[USB TO HOST] jack (page 8)
USB Cable
+ USB conversion adaptor, etc.
Instrument Smart device
Connection example
P-145BT, P-143BT Owner’s Manual
7
About the Manuals
This instrument has the following documents and instructional materials.
Included Documents
Owner’s Manual (this book)
Explains the functions and usage of this instrument.
Online Materials
• Quick Operation Guide
This guide lets you call up various functions on the instrument by pressing certain keys while holding down the
[GRAND PIANO/FUNCTION] button (page 10). The Quick Operation Guide lists all of the functions assigned to the
keys, and can be printed out and placed it on a music rest for use as a quick reference for important operations.
The Quick Operation Guide can be downloaded directly by using the QR Code below.
• Smart Device Connection Manual
Explains how to connect the instrument to smart devices, such as a smartphone, tablet, etc.
• Computer-related Operations
Includes instructions on connecting this instrument to a computer.
•MIDI Reference
Contains MIDI-related information.
To obtain these manuals, access the Yamaha Downloads website. After selecting your country and clicking on “Manual
Library,” enter the model name, etc. to search for the desired files.
Yamaha Downloads
https://download.yamaha.com/
• For a general overview of MIDI and how you can effectively use it, search for “MIDI Basics” (only in English, German, French and Spanish) on the website above.
https://manual.yamaha.com/mi/rt/p-145bt/
NOTE
Thank you for choosing this Yamaha digital piano.
This instrument provides exceptionally high-quality sound and expressive control for your playing
enjoyment. In order to make the most of the performance potential and features of the instrument,
please read the manuals thoroughly, and keep them in a handy place for later reference.
Accessories
• Owner’s Manual (this book) × 1
• Footswitch × 1
•AC Adaptor* × 1
• Online Member Product Registration × 1
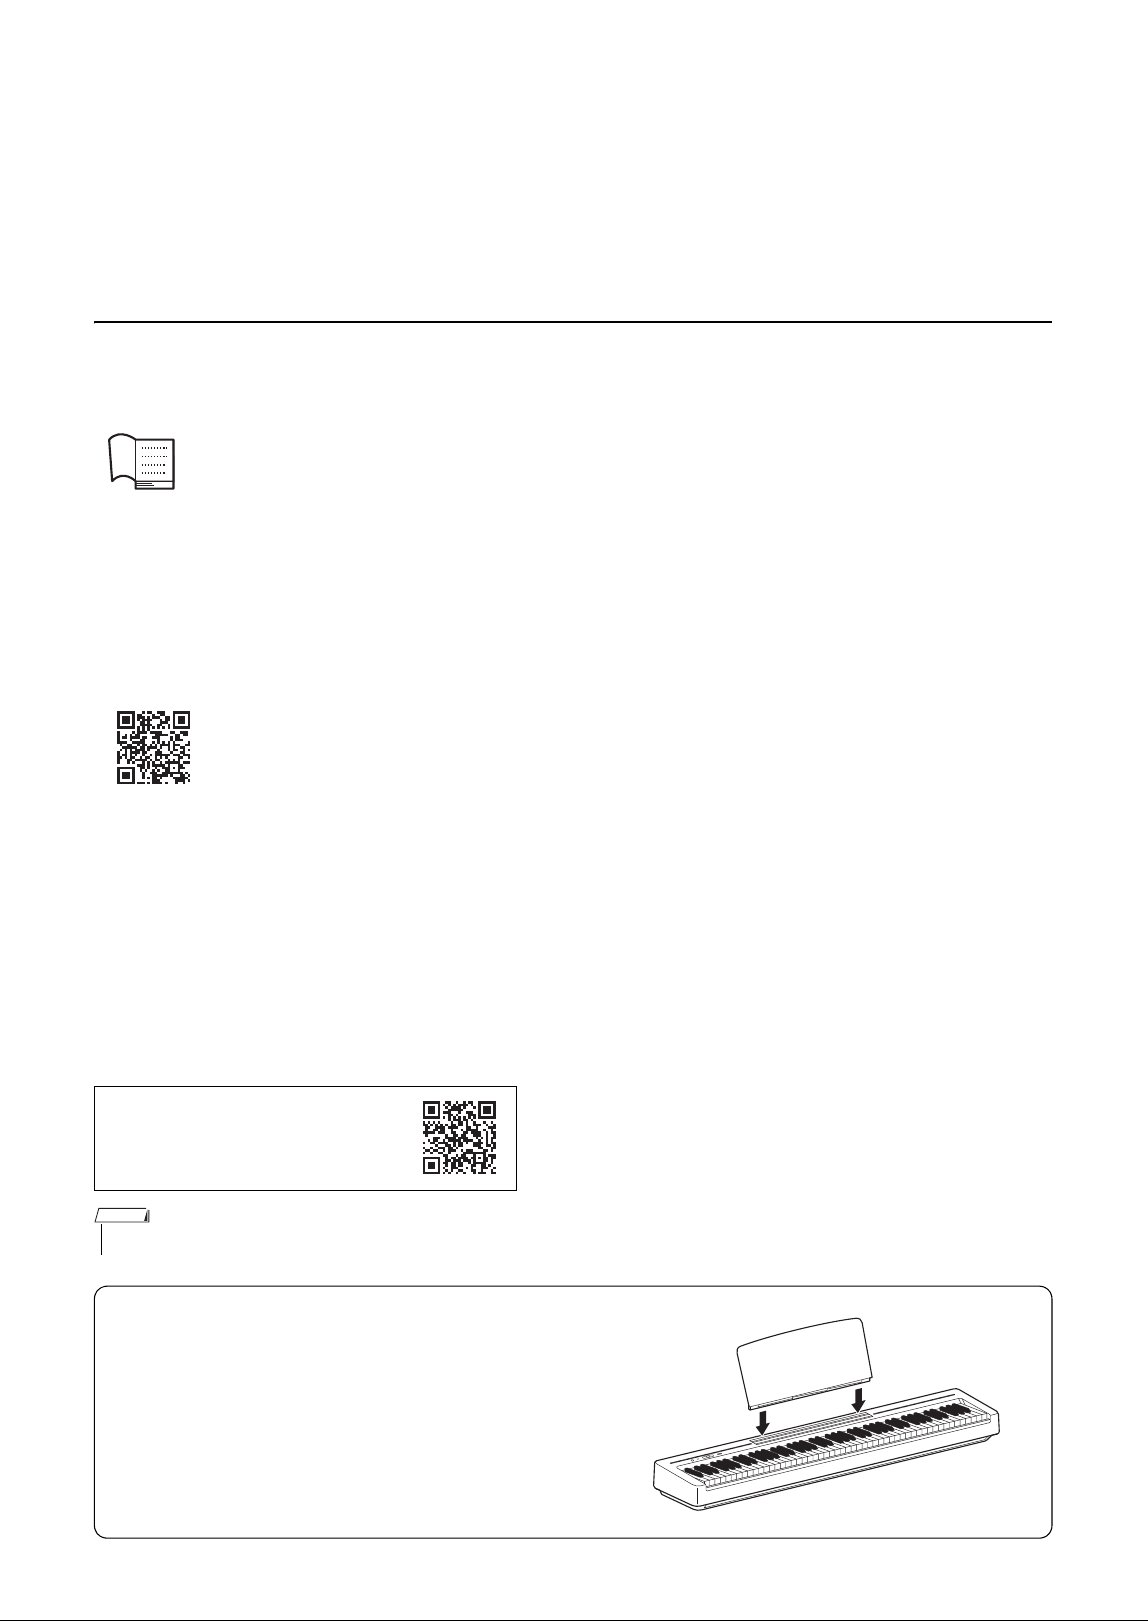
• Music Rest × 1
* May not be included depending on your particular area. Please check with your Yamaha
dealer.
Insert into the
slot
P-145BT, P-143BT Owner’s Manual
8
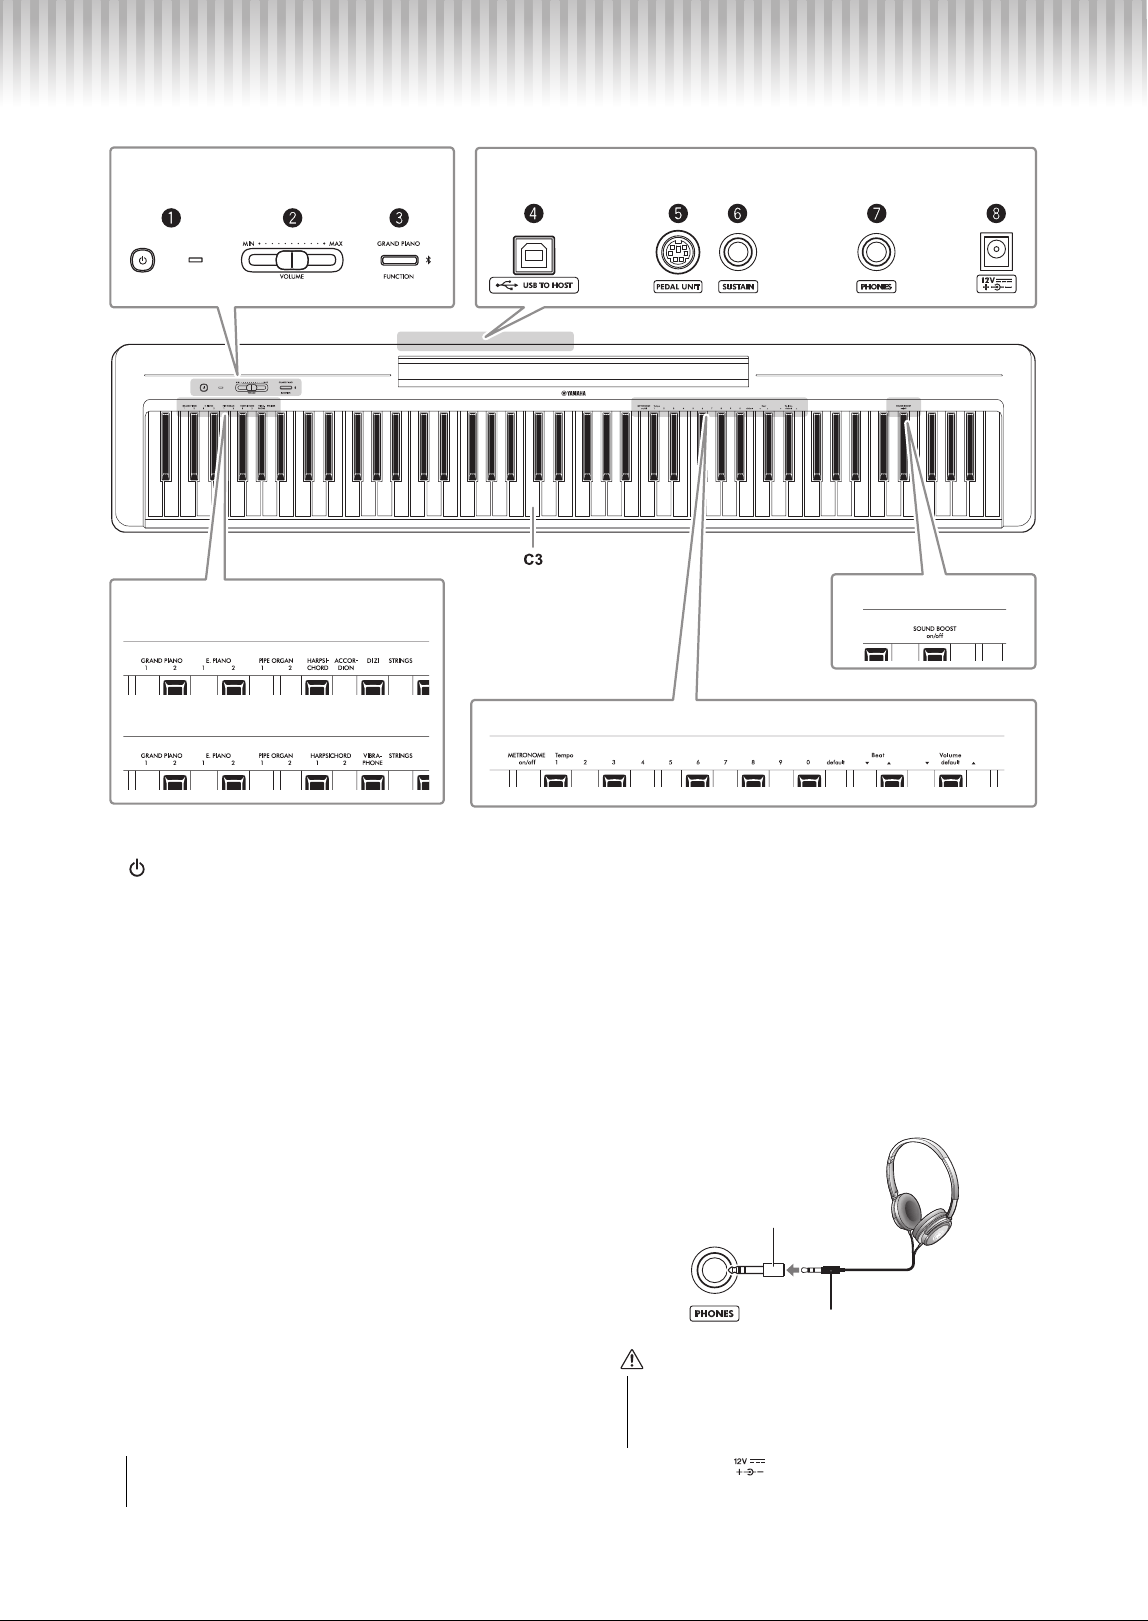
Panel Controls and Terminals
q [ ](Standby/On) switch, Power lamp (page 9)
For turning the power on or setting to standby.
w [VOLUME] slider
For adjusting the volume of the entire sound.
e [GRAND PIANO/FUNCTION] button
For instantly calling up the Grand Piano 1 Voice. You
can set various parameters by pressing a note on the
keyboard while holding this button (page 10).
Moreover, holding down this button for longer than
three seconds starts pairing between this instrument
and a Bluetooth-equipped device (page 12).
r [USB TO HOST] jack
For connecting to a computer or a smart device using
a commercially available USB cable. When
connected, you can send and receive both MIDI and
audio data, such as playing audio data from a smart
device on the instrument and using dedicated
applications (page 6).
For details on how to connect the computer or the
smart device, refer to “Computer-related Operations”
on the website or “Smart Device Connection
Manual.”
Notice
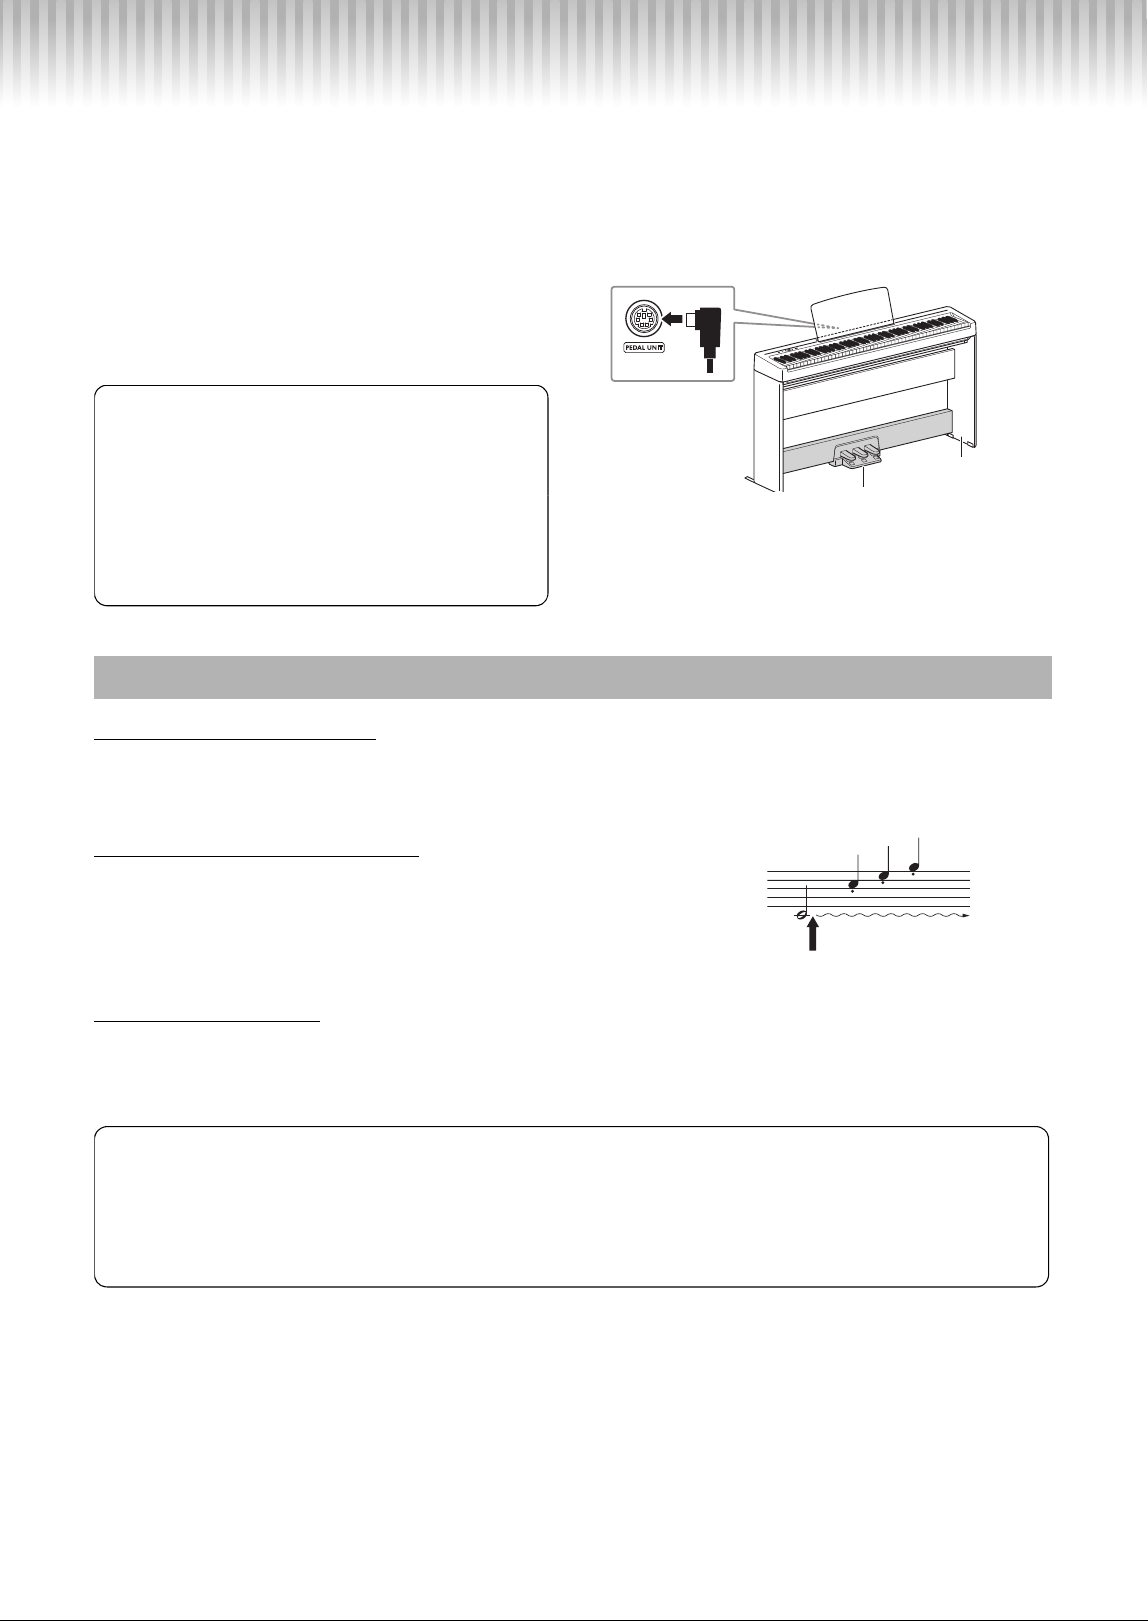
t [PEDAL UNIT] jack (P-145BT only) (page 17)
For connecting a separately sold pedal unit.
y [SUSTAIN] jack (page 9)
For connecting the included footswitch, a separately
sold footswitch or a separately sold foot pedal.
u [PHONES] jack (Standard stereo headphone
jack)
For connecting a set of standard stereo headphones.
The speakers are automatically shut off when a plug is
inserted into this jack.
i DC IN jack ( ) (page 9)
For connecting the AC adaptor.
Shows the jacks and terminals as seen when viewed from the rear of the instrument.
(P-145BT)
(P-143BT)
(P-145BT only)
Functions List (page 10)
Sound boost (page 11)
Voice List (page 14)
• Make sure to use a USB cable (Type A - Type B) of less
than 3 meters. USB 3.0 cables cannot be used.
• To protect your hearing, avoid listening with the
headphones at a high volume level for long periods of
time.
Adaptor plug
(3.5 mm
→ 6.3 mm)
Stereo mini plug (3.5 mm)
CAUTION
P-145BT, P-143BT Owner’s Manual
9
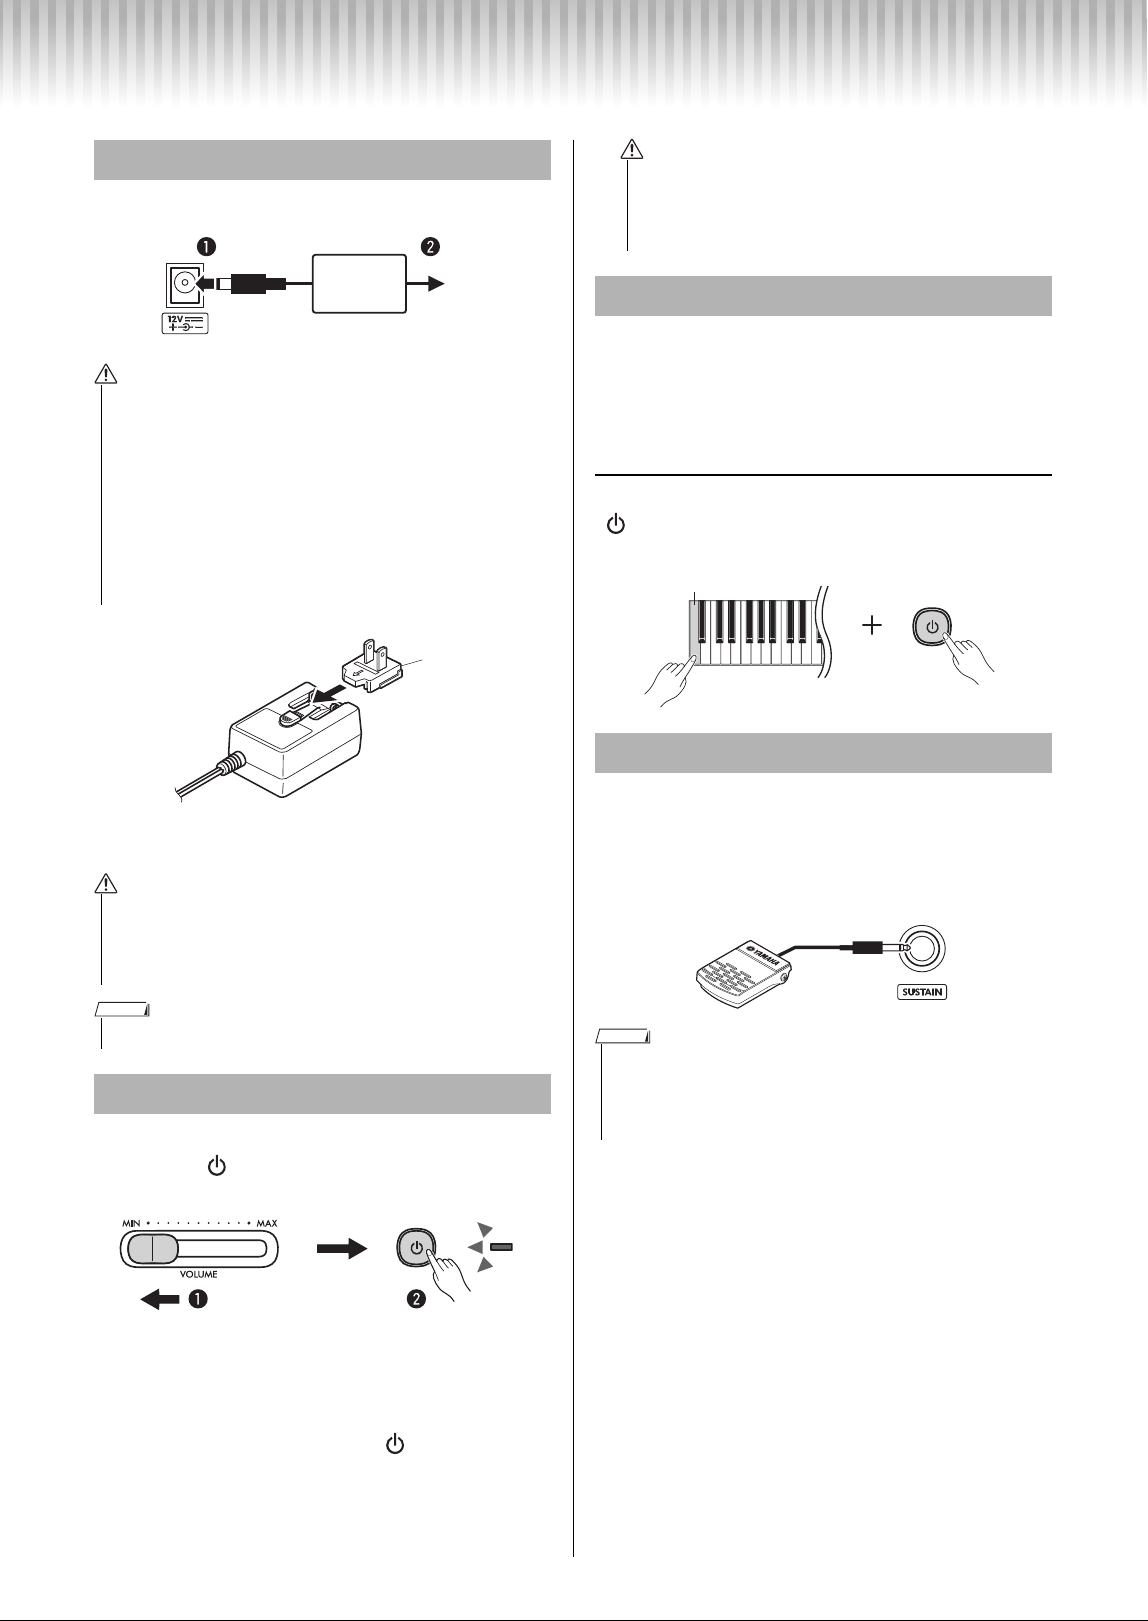
Setting Up
Connect the AC adaptor plugs in the following order.
q Set the volume to the minimum.
w Press the [ ] (Standby/On) switch to turn on the
power.
When the power is supplied to the instrument, the
power lamp located on the right of the power switch is
turned on. While playing the keyboard, adjust the
volume level by using the [VOLUME] slider.
To turn off the power, press the [ ] (Standby/On)
switch again for a second.
To prevent unnecessary power consumption, this
function automatically turns the power off if no buttons
or keys are operated for approximately 15 minutes. For
the settings of the Auto Power Off function, see page 10.
Disabling Auto Power Off (simple method)
While holding down the lowest key (A−1), press the
[ ] (Standby/On) switch. The power turns on with the
Auto Power Off function disabled.
The [SUSTAIN] jack is for connecting the included
footswitch, which works in the same way as a damper
pedal on an acoustic piano. Also a separately sold foot
pedal or footswitch (page 17) can be connected to this
jack.
Power Requirements
• Use the supplied or the specified AC adaptor (page 16)
only. Using the wrong AC adaptor can result in damage to
the instrument or overheating.
• When using the AC adaptor with a removable plug, make
sure to keep the plug attached to the AC adaptor. Using
the plug alone can cause electric shock or fire.
• Never touch the metallic section when attaching the plug.
To avoid electric shock, short circuit or damage, also be
careful that there is no dust between the AC adaptor and
plug.
• When setting up the product, make sure that the AC outlet
you are using is easily accessible. If some trouble or
malfunction occurs, immediately turn the power off and
disconnect the plug from the outlet.
• Follow this procedure in reverse order when disconnecting the AC adaptor.
Turning the Power On/Off
AC
Adaptor
AC Outlet
DC IN
jack
WARNING
Slide the plug as
indicated
Plug
The shape of the plug and outlet differ depending on the
locale.
WARNING
NOTE
• Even when the power switch is turned off, electricity is
still flowing to the product at the minimum level. When
you are not using the product for a long time, make
sure to unplug the power cord from the wall AC outlet.
Auto Power Off Function
Using a Footswitch or a Foot pedal
• Make sure that power is OFF when connecting or disconnecting the footswitch
or pedal.
• Do not press the footswitch when turning the power on. Doing this changes the
recognized polarity of the footswitch, resulting in reversed footswitch operation.
WARNING
Lowest key (A−1)
NOTE
P-145BT, P-143BT Owner’s Manual
10
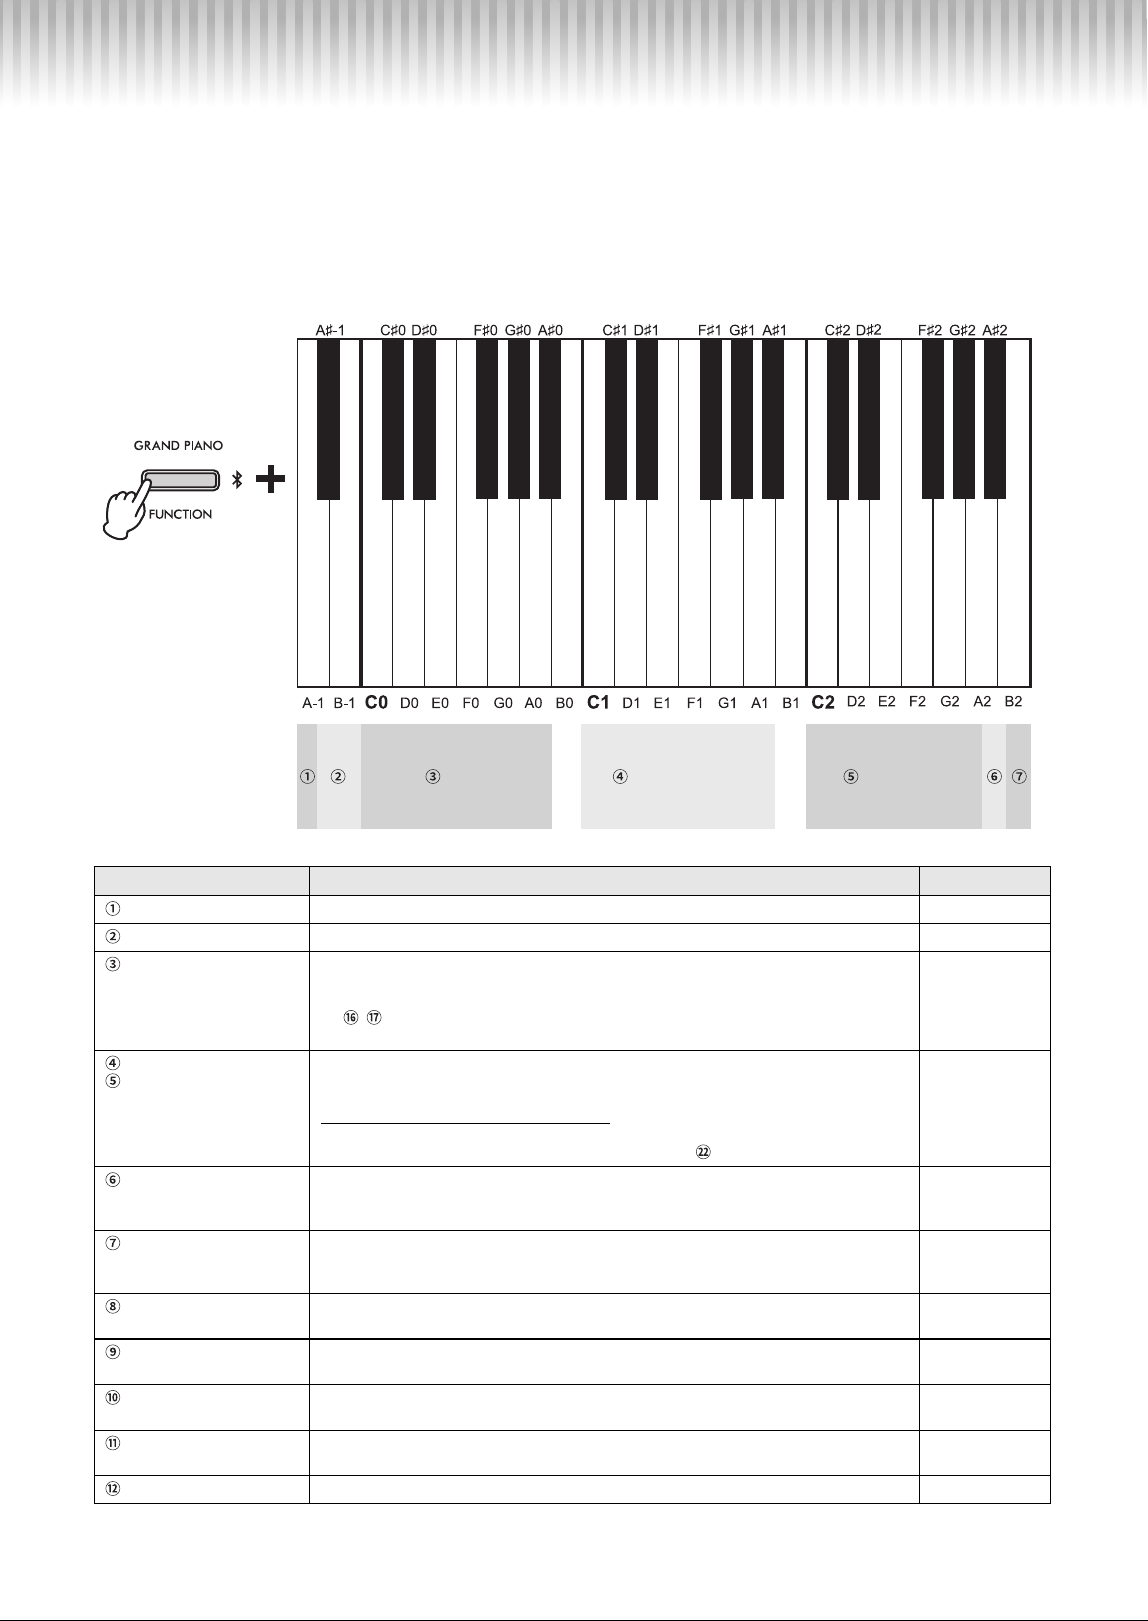
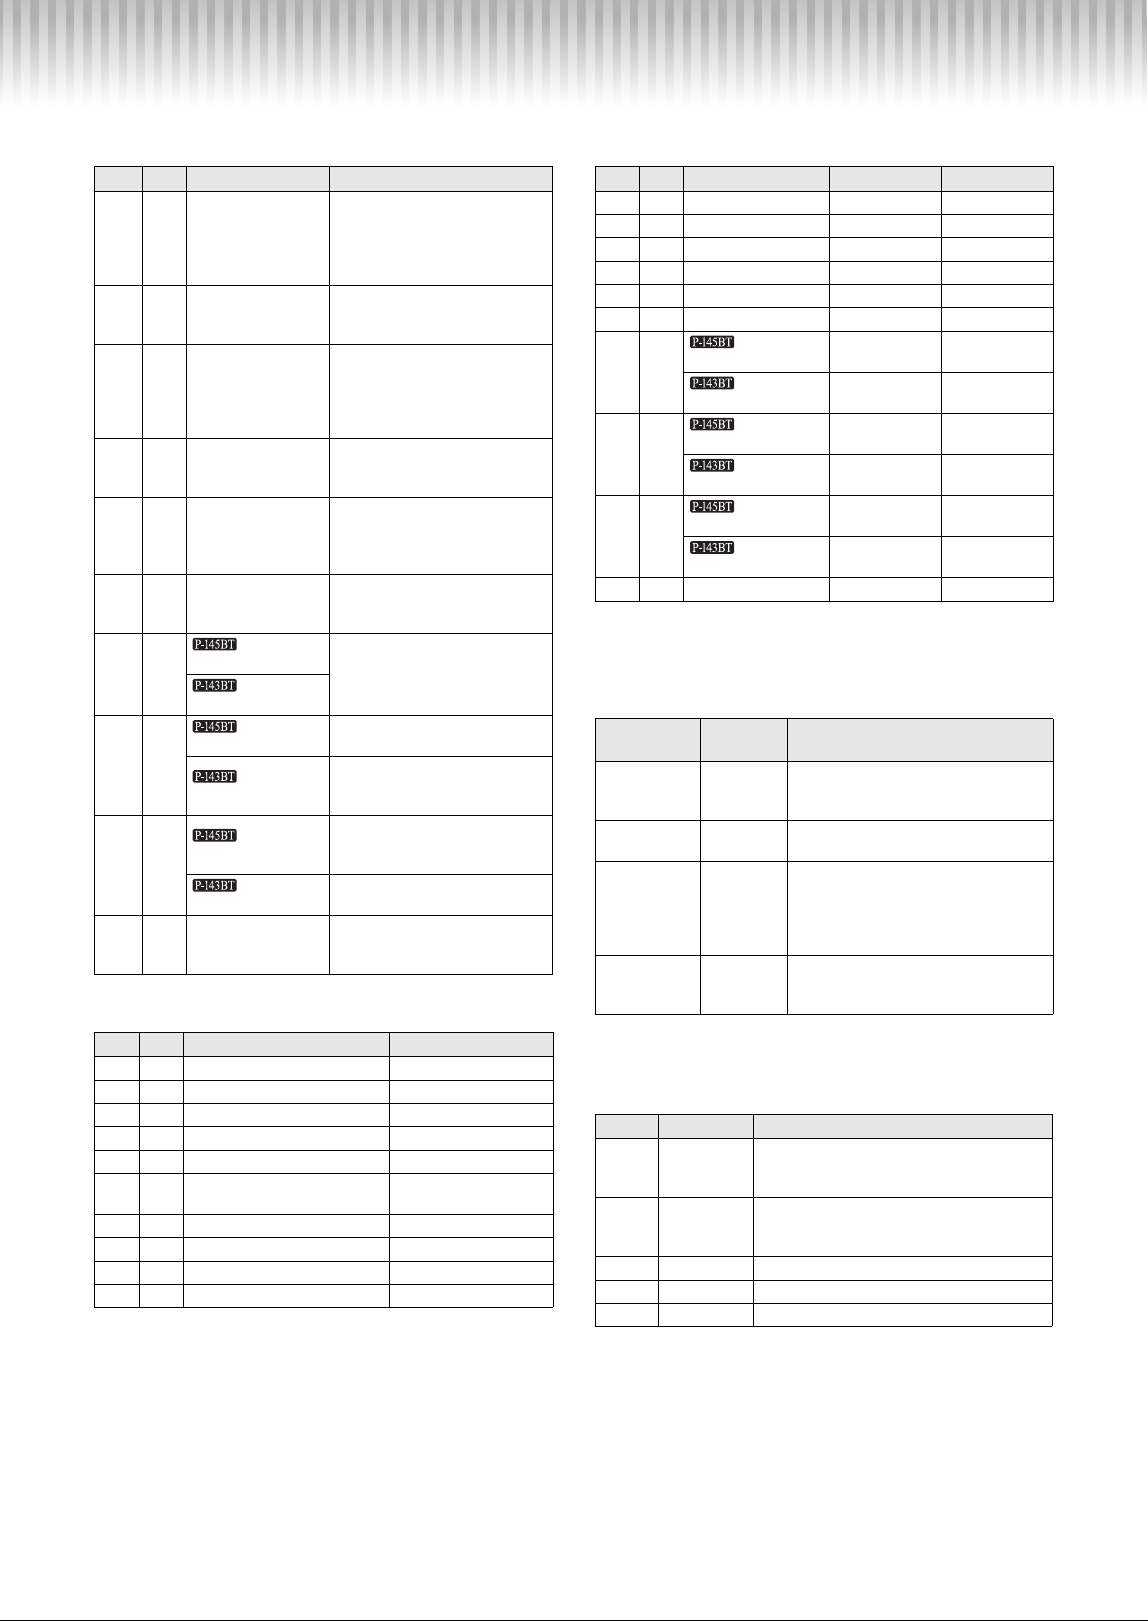
Functions List
You can call up a function by holding down the [GRAND PIANO / FUNCTION] button and pressing the
specified key. For certain functions, changing the setting produces a confirmation sound.
Simply pressing the [GRAND PIANO / FUNCTION] button calls up the Grand Piano 1 Voice.
Function Description Default Setting
Current Tempo value Confirms the Current Tempo Value by audible voice (in English). –
Auto Power Off Enables/disables the Auto Power Off function (page 9). Enabled
Voices Pressing one key selects a specific Voice; pressing two keys simultaneously layers two
Voices (Dual). → Voice List (page 14)
In Dual mode, the lower numbered Voice is Voice 1 and the higher numbered voice is Voice 2
(→ , ).
To exit from Dual, select another Voice or press the [GRAND PIANO / FUNCTION] button.
–
Voice Demo Song
Preset Song
The selected song will start playing, followed by the Voice Demo Songs or Preset Songs in order.
→ Demo Song List / Preset Song List (page 14)
To stop playback, press the [GRAND PIANO / FUNCTION] button.
To play back the selected Song repeatedly
While holding down the [GRAND PIANO / FUNCTION] button, press and hold one of the
specified keys until you hear the confirmation sound twice ( ).
–
Touch Sensitivity Determines how the sound responds to your playing strength. Each press of the key switches
the setting in sequence: Soft (1), Medium (2), Hard (3) and Fixed (4).
→ Touch Sensitivity List (page 14)
2 (Medium)
Duo On/Off Engages or exits from the Duo function, which allows two different players to play the
instrument in the same octave range, on the left and right side with the E3 key as the
boundary.
Off
Reverb Type Selects the Reverb type which simulate the reverberation of different performance spaces.
→ Reverb Type List (page 14)
Depending on
the Voice
Reverb Depth Adjusts the Reverb depth.
Setting range: 0 (no effect) – 10 (maximum depth)
Depending on
the Voice
Damper Resonance On/
Off
Turns the Damper Resonance effect on/off. The Damper Resonance effect simulates the
resonance of the strings of an acoustic piano when its damper pedal is pressed.
On
Transpose Transposes the pitch up or down in semitones.
Setting range: −6 – 0 – +6
0
Metronome Start/stop the Metronome. Off (stop)
Current Tempo Value
Auto Power Off Disable
Voice No. 1
Voice No. 3
Voice No. 5
Voice No 6
Voice No. 8
Voice No. 1
Voice No. 3
Voice No. 5
Voice No. 6
Voice No. 8
Voice No. 10
Voice No. 10
Song No. 1
Song No. 3
Song No. 5
Song No. 6
Song No. 8
Song No. 10
Duo On/Off
Voice No. 2
Voice No. 4
Voice No. 7
Voice No. 9
Auto Power Off Enable
Voice No. 2
Voice No. 4
Voice No. 7
Voice No. 9
Song No. 2
Song No. 4
Song No. 7
Song No. 9
Touch Sensitivity
Voices Voice Demo Song Preset Song
While holding down
P-145BT, P-143BT Owner’s Manual
11
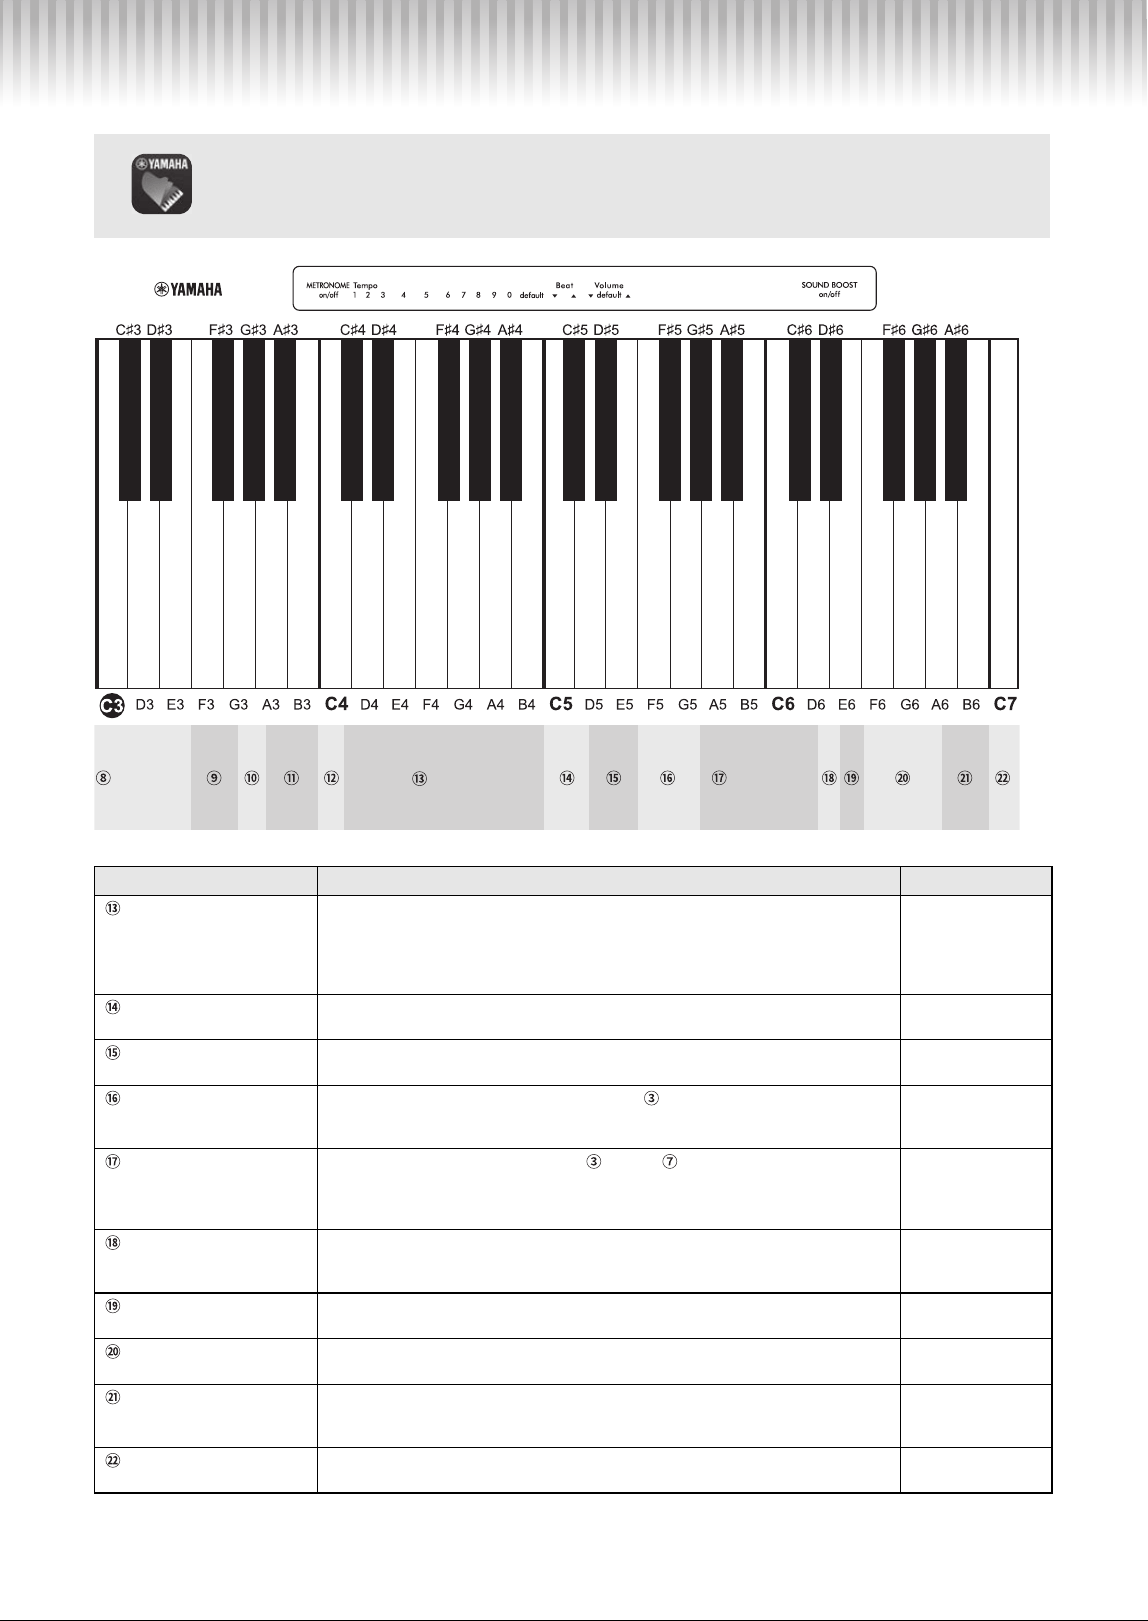
Function Description Default Setting
Tempo Changes the tempo of Song playback or the Metronome.
The number key is used to specify the tempo numerically. To specify “70,” press the G4
(Number key 7) and A#4 (Number key 0) keys in order while holding down [GRAND
PIANO / FUNCTION].
Setting range: 32 – 280
120
(Metronome)
Metronome Beat Selects a Metronome Beat from 0 and 2 – 6.
Setting range: 0 (no beat), 2, 3, 4, 5, 6
0 (no beat)
Metronome Volume Adjusts the Metronome Volume.
Setting range: 1 – 20
10
Volume Balance
(Dual)
Adjusts the Balance between two Voices in Dual ( ). The Settings above “0” increase
the volume of Voice 1, and vice versa.
Setting range: −6 – +6
Depending on the
combination of
Voices
Octave Shift
(Dual/Duo)
Shifts the octave for each Voice in Dual ( ) or Duo ( ). In Duo, the right-hand range is
Voice 1, while the left-hand range is Voice 2. In Dual, the Voice assigned to the left key
becomes Voice 1.
Setting range: −1, 0, +1
Depending on the
combination of
Voices
Sound Boost
On/Off
Raises the volume and enhances the overall sound presence. This function is
particularly useful when you want all the notes you play—both loud and soft—to be
clearly audible.
Off
Audio Loop Back
On/Off
Sets whether the audio sound input from the [USB TO HOST] terminal is returned to the
computer/smart device or not, along with the performance played on the instrument.
On
Tuning Fine tunes the pitch of the entire instrument in approx. 0.2 Hz increments.
Setting range: 414.8 Hz – 440.0 Hz – 466.8 Hz
A3 = 440.0 Hz
MIDI Transmit Channels Sets the MIDI Transmit Channels. For details, refer to “MIDI Reference” on the Yamaha
website (page 7).
Setting range: 1 – 16
1
Operation Confirmation
Sounds On/Off
Turns on/off the Operation Confirmation Sounds, which occur when you change a setting
using the keys of the keyboard.
On
You can also change the settings from the Smart device by using the Smart Pianist app.
(→ page 6)
Hall 1
Room
Off
Reverb Depth −
Reverb Depth +
Transpose −
Transpose +
Hall 2
Stage
Reverb Depth Default
Damper Resonance On/Off
Transpose 0 (Default)
Metronome On/Off
Number key 2
Number key 4
Number key 5
Number key 7
Number key 9
Default Tempo
Number key 1
Number key 3
Number key 6
Number key 8
Number key 0
Metronome Beat −
Metronome Volume −
Metronome Volume +
Volume Balance (Dual) −
Volume Balance (Dual) +
Octave −1 (Voice 2)
Octave +1 (Voice 2)
Metronome Beat +
Default Metronome Volume
Volume Balance Default
Octave Default (Voice 2)
Octave −1 (Voice 1)
Octave +1 (Voice 1)
Audio Loop Back On/Off
Tuning −0.2 Hz
Tuning +0.2 Hz
MIDI Transmit Channel −
MIDI Transmit Channel +
Octave Default (Voice 1)
Sound Boost On/Off
A3 = 440.0 Hz
A3 = 442.0 Hz
MIDI Transmit Channel Default
Operation Confirmation Sounds On/Off
Reverb Type
Tempo
Octave Shift
P-145BT, P-143BT Owner’s Manual
12
Listening to Audio playback of the Bluetooth
device on this instrument
Connecting a Bluetooth-equipped device, such as a smartphone or portable audio player, to this instrument enables audio
playback from that connected device through the instrument (Bluetooth Audio function).
Before using the Bluetooth function, be sure to read “About Bluetooth
®” on page 13.
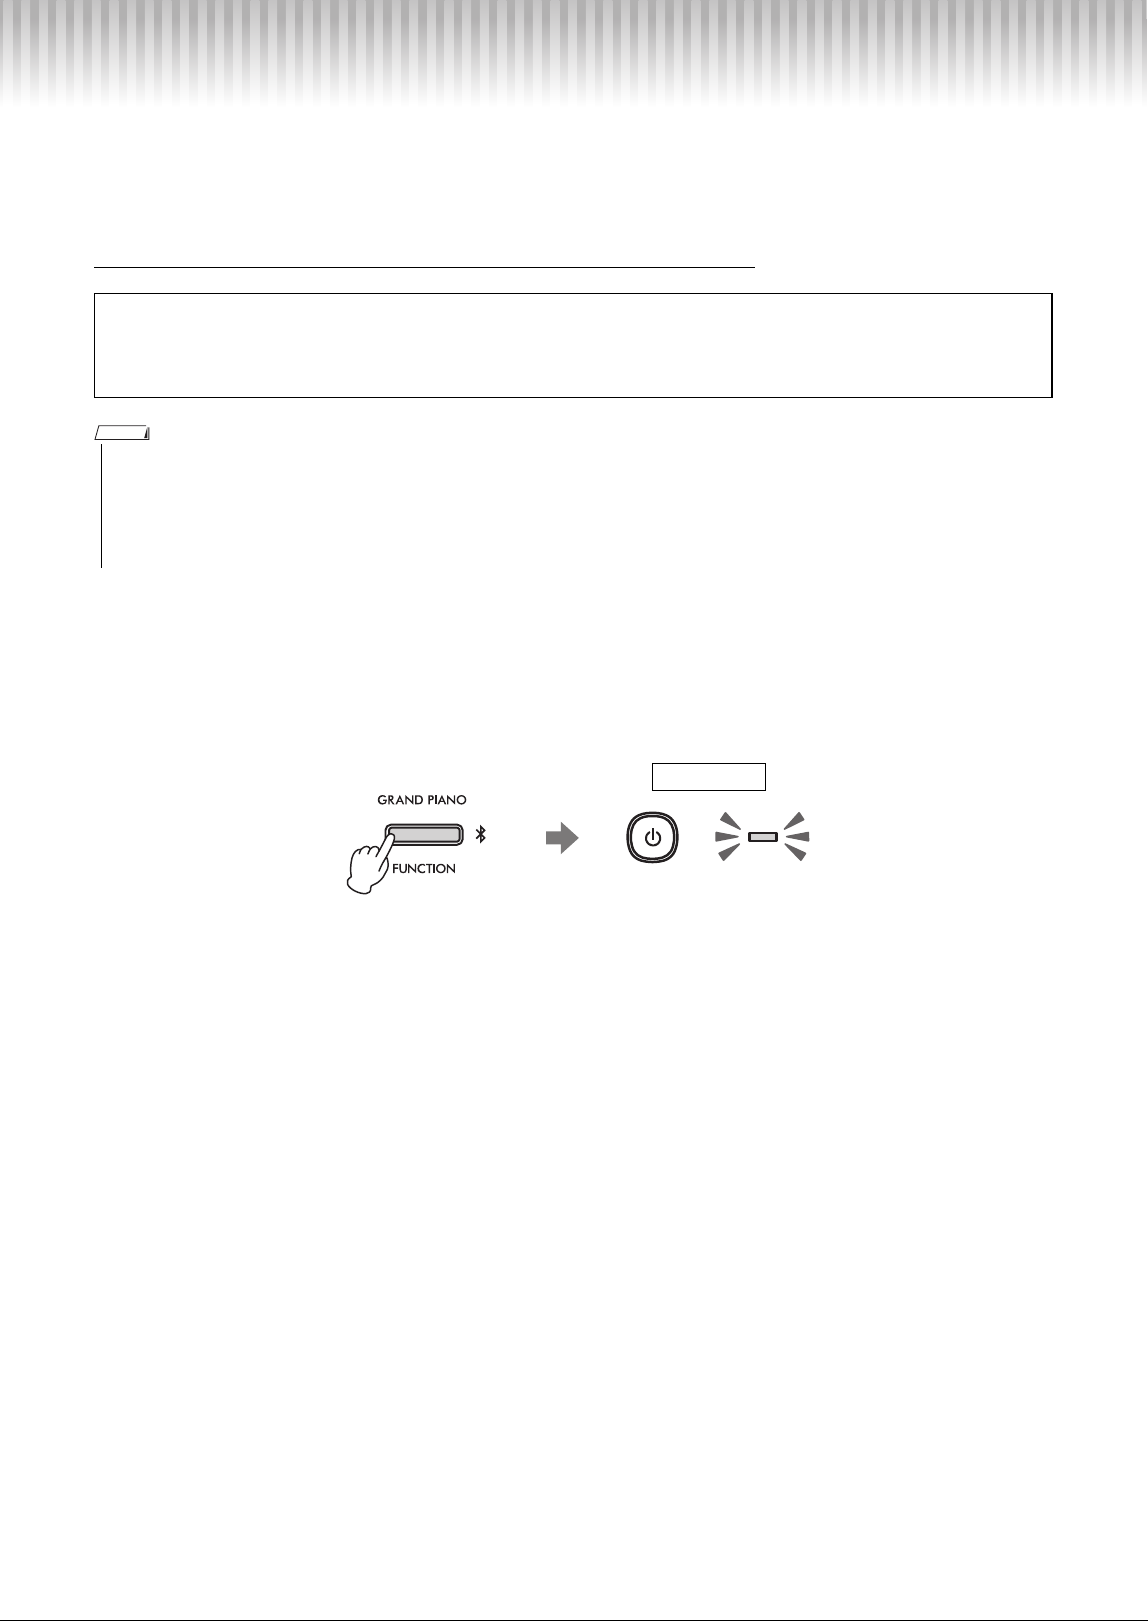
1. Hold down the [GRAND PIANO/FUNCTION] button for three seconds or longer to pair
with a Bluetooth-equipped device (Pairing*).
* Pairing: Refers to registering this instrument on a Bluetooth-equipped device to establish mutual recognition for
wireless communication between the two.
If you wish to connect your Bluetooth-equipped device to the instrument, the device needs to be paired with the
instrument first.
The instrument’s power lamp flashes while it is in pairing mode.
To cancel the pairing operation, press the [GRAND PIANO/FUNCTION] button once more.
2. On the Bluetooth-equipped device such as a smartphone, set the Bluetooth function to
on and select the instrument “P-145BT Audio” or “P-143BT Audio” from the connection
list.
After selecting this instrument from the connection list on your Bluetooth-equipped device, the pairing is completed.
Make sure to complete this operation while the instrument’s power lamp is flashing (within five minutes).
3. Play back audio data on the Bluetooth-equipped device to confirm that the instrument
can output the audio sound.
Disconnecting the current Bluetooth connection is done by turning off the Bluetooth function on the Bluetooth-equipped
device or disconnecting the instrument from the Bluetooth-equipped device.
When you turn on the instrument the next time, the last-connected Bluetooth-equipped device will be connected to this
instrument automatically, if the Bluetooth function of the Bluetooth-equipped device is set to on. To disable auto
connection of Bluetooth-equipped device to the instrument, delete the pairing information from the Bluetooth-equipped
device.
IMPORTANT
Even while playing audio playback from a Bluetooth-equipped device through the instrument, the instrument will
automatically turn off if it is not operated for 15 minutes, due to the Auto Power Off function. If desired, disable the Auto
Power Off function, see page 9.
• This instrument cannot transmit audio data to Bluetooth-equipped devices via Bluetooth.
• Bluetooth headphones or Bluetooth speakers cannot be connected or used with this instrument.
• Smart device apps such as Smart Pianist cannot be used via the Bluetooth Audio function described here.
• Only one Bluetooth-equipped device can be connected to this instrument at a time (although up to 8 devices can be paired to this instrument). When pairing with the 9th
device has succeeded, pairing data for the device with the oldest connection date will be deleted.
NOTE
Flashes
Pairing

P-145BT, P-143BT Owner’s Manual
13
If you cannot pair or connect your Bluetooth-equipped device to the instrument:
• Check that the Bluetooth function of the Bluetooth-equipped device is activated and select this instrument again from
the connection list on your device.
• The device you are trying to connect to the instrument may be connected via Bluetooth to a device other than this
instrument. Disconnect from the currently connected device.
• If the instrument is already paired with multiple devices, it may automatically be connected to an unintended device. If
this occurs, disconnect the nearby device unintended for Bluetooth connection from the instrument, and then select this
instrument from the connection list on your device. Alternatively, begin the pairing process again.
• In case there is a device (microwave oven, wireless LAN device, etc.) that outputs signals in the 2.4 GHz frequency
band nearby, move this instrument away from the device that is emitting radio-frequency signals.
About Bluetooth
®
Bluetooth is a technology for wireless communication between devices within an area of about 10 meters (33 ft.)
employing the 2.4 GHz frequency band.
Handling Bluetooth communications
• The 2.4 GHz band used by Bluetooth compatible devices is a radio band shared by many types of equipment.
While Bluetooth compatible devices use a technology minimizing the influence of other components using the
same radio band, such influence may reduce the speed or distance of communications and in some cases
interrupt communications.
• The speed of signal transfer and the distance at which communication is possible differs according to the distance
between the communicating devices, the presence of obstacles, radio wave conditions and the type of equipment.
• Yamaha does not guarantee all wireless connections between this unit and devices compatible with Bluetooth
function.
P-145BT, P-143BT Owner’s Manual
14
Voice List
Preset Song List
Demo Song List
The Demo Songs excluding original Songs are short rearranged
excerpts from the original compositions. The original Demo Songs are
Yamaha originals (© Yamaha Corporation).
Touch Sensitivity List
Touch Sensitivity cannot be used for pipe organ Voices and harpsichord
Voices.
Reverb Type List
No. Key Voice Name Description
1 C0 GRAND PIANO 1
Recorded samples from a full
concert grand piano. Perfect for
classical compositions as well as
any other style that requires
acoustic piano.
2C#0 GRAND PIANO 2
Bright piano sound. Clear tone
helps the sound to “cut through”
when playing in an ensemble.
3 D0 E. PIANO 1
Vintage electric piano sound of
hammerstruck metallic “tines.”
Soft tone when played lightly,
and an aggressive tone when
played hard.
4D#0 E. PIANO 2
An electronic piano sound
created by FM synthesis. Good
for standard popular music.
5 E0 PIPE ORGAN 1
A typical pipe organ sound (8
feet + 4 feet + 2 feet). Good for
sacred music from the Baroque
period.
6 F0 PIPE ORGAN 2
This is the organ’s full coupler
sound, often associated with
Bach’s “Toccata and Fugue.”
7F#0
HARPSICHORD
The definitive instrument for
baroque music. Authentic
harpsichord sound, with plucked
strings, no touch response.
HARPSICHORD 1
8G0
ACCORDION
An accordion sound often used
for tango and chanson music.
HARPSICHORD 2
Mixes the same Voice an octave
higher for a more brilliant,
dynamic tone.
9G#0
DI ZI
Chinese transverse flute. It
features a clear and a crisp
sound.
VIBRAPHONE
Played with relatively soft
mallets.
10 A0 STRINGS
Spacious and large-scale string
ensemble. Try combining this
Voice with piano in Dual.
No. Key Title Composer
1 C2 Menuett G dur BWV Anh.114 J. S. Bach
2C#2 Turkish March W. A. Mozart
3 D2 Für Elise L. v. Beethoven
4D#2 Valse op.64-1 “Petit chien” F. F. Chopin
5 E2 Träumerei R. Schumann
6F2
Dolly’s Dreaming and
Awakening
T. Oe sten
7F#2 Arabesque J. F. Burgmüller
8 G2 Humoresque A. Dvořák
9G#2 The Entertainer S. Joplin
10 A2 La Fille aux Cheveux de Lin C. A. Debussy
No. Key Voice Name Title Composer
1 C1 GRAND PIANO 1 Original –
2C#1 GRAND PIANO 2 Original –
3 D1 E. PIANO 1 Original –
4D#1 E. PIANO 2 Original –
5 E1 PIPE ORGAN 1 Original –
6 F1 PIPE ORGAN 2 Original –
7F#1
HARPSICHORD
Gavotte J. S. Bach
HARPSICHORD 1
Gavotte J. S. Bach
8G1
ACCORDION
Original –
HARPSICHORD 2
Invention No. 1 J. S. Bach
9
G#1
DI ZI
Original –
VIBRAPHONE
Original –
10 A1 STRINGS Original –
Voice
Confirmation
Touch
Sensitivity
Description
1Soft
The volume level does not change
much when you play the keyboard soft
or hard.
2 Medium
This is the standard piano touch
response (default setting).
3Hard
The volume level changes very widely
from pianissimo to fortissimo to
facilitate dynamic and dramatic
expression. You have to hit the keys
hard to produce a loud sound.
4Fixed
The volume level does not change at all
regardless of whether you play the
keyboard soft or hard.
Key Reverb Type Description
C3 Hall1
For a bigger reverb sound. This effect
simulates the natural reverberation of a
small-size concert hall.
C#3 Hall2
For a truly spacious reverb sound.
This effect simulates the natural
reverberation of a large concert hall.
D3 Room Simulates the reverb you hear in a room.
D#3 Stage Simulates the reverb of a stage environment.
E3 Off No effect is applied.
P-145BT, P-143BT Owner’s Manual
15
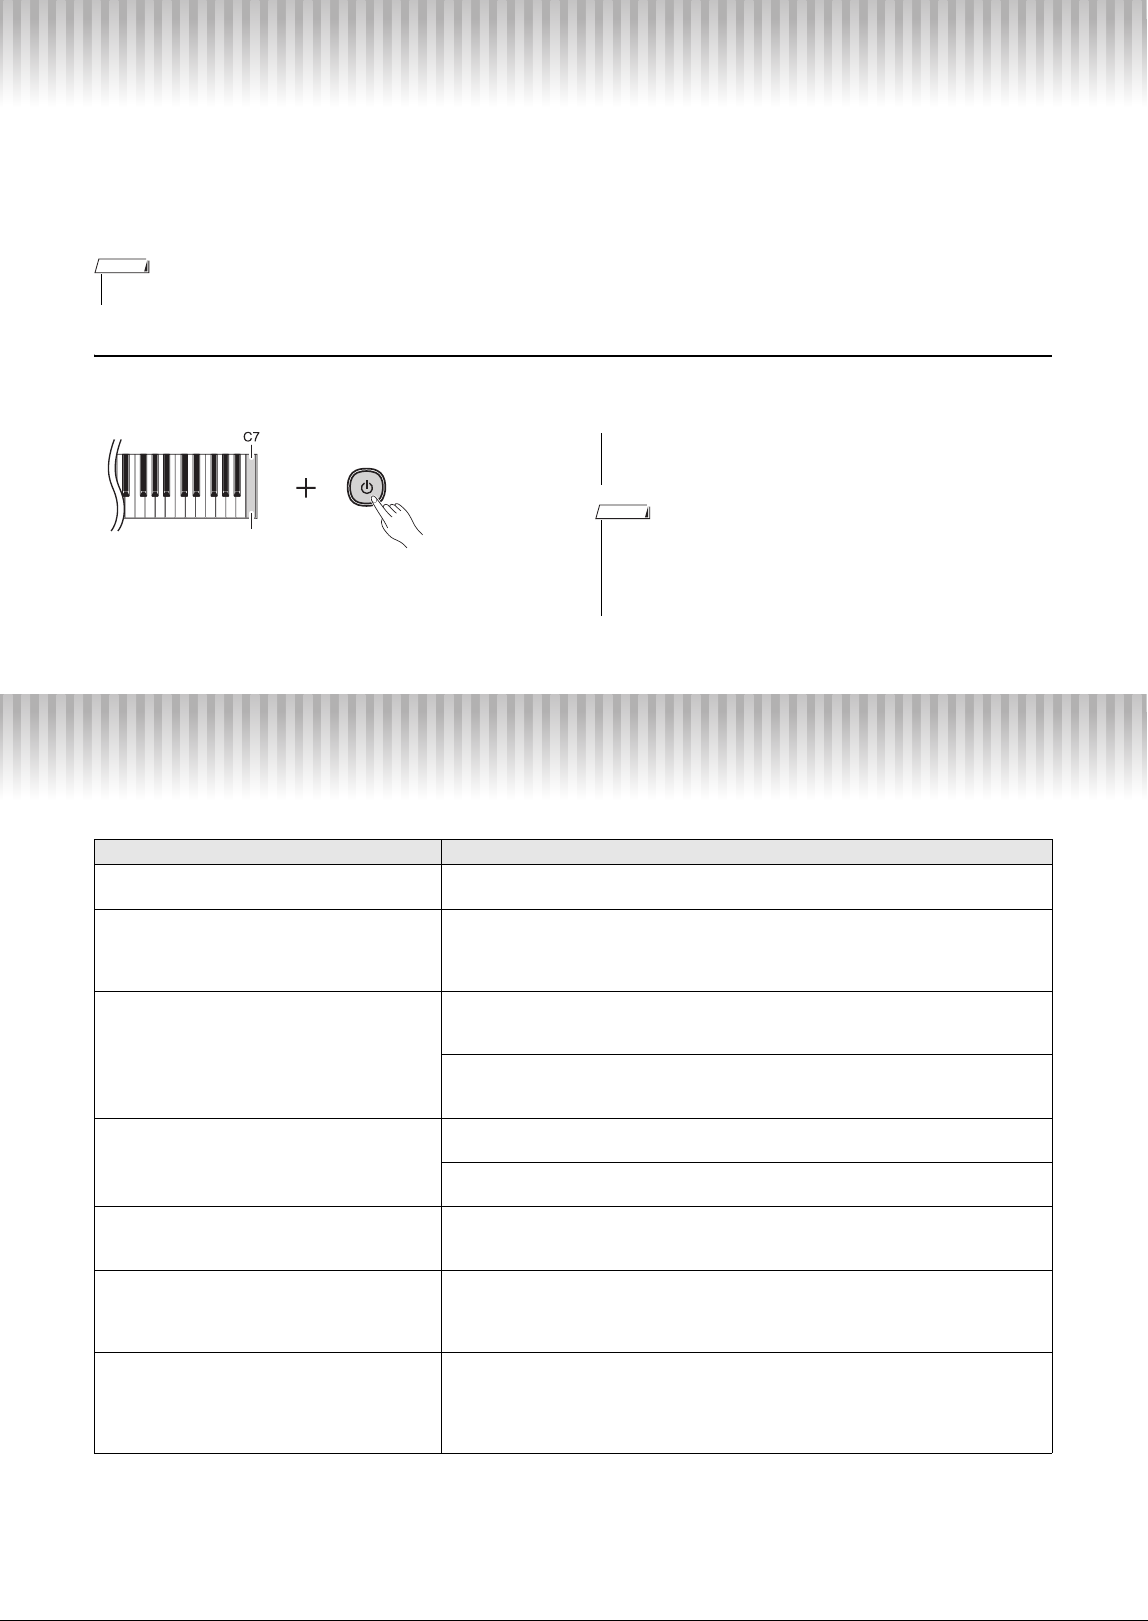
Troubleshooting
Problem Possible Cause and Solution
The instrument does not turn on.
The instrument has not been plugged in properly. Securely insert the female plug into
the jack on the instrument, and the male plug into a proper AC outlet (page 9).
The instrument is automatically turned off even if
no operation is done.
This is normal and due to the Auto Power Off function. Even if audio is being played
back from a smart device or another device connected to the instrument via USB cable
or Bluetooth, the instrument will automatically turn off if it is not operated. If you want to
prevent this from happening, disable the Auto Power Off function (page 9).
Noise is heard from the speakers or
headphones.
The noise may be due to interference caused by the use of a mobile phone in close
proximity to this instrument. Turn off the mobile phone, or move it further away from this
instrument.
When you use the instrument along with the application on your smart device, we
recommend that you set “Airplane Mode” to “ON” on your smart device in order to avoid
noise caused by communication.
The overall volume is low, or no sound is heard.
The Master Volume is set too low. Set it to an appropriate level using the [VOLUME]
slider (page 8).
Make sure a pair of headphones or conversion adaptor is not connected to the
[PHONES] jack (page 8).
The pedal has no effect.
The pedal cable/plug may not be properly connected. Turn off the power and make sure
to securely insert the pedal plug into the [SUSTAIN] jack or [PEDAL UNIT] jack (page 9,
17).
The footswitch (for sustain) seems to produce
the opposite effect. For example, pressing the
footswitch cuts off the sound and releasing it
sustains the sounds.
The polarity of the footswitch is reversed because the footswitch was pressed when the
power was turned on. Turn off the power and turn it on again to reset the function. Make
sure to not press the footswitch when turning the power on.
When connecting the computer or smart device
to the instrument’s [USB TO HOST] jack with a
USB cable and playing back audio data, no
sound comes out from the instrument or noise
occurs.
Depending on the model or OS of the computer and smart device, communication may
not be possible.
Backup and Initialization
The following backup parameters will automatically be maintained even if you turn off the power.
Backup parameters
Metronome Volume, Metronome Beat, Touch Sensitivity, Tuning, Auto Power Off, Operation Confirmation Sound on/
off, Bluetooth pairing information
To initialize the backup parameters:
While holding down the C7 key (highest key), turn the power on to initialize the backup data to the factory initial
settings.
NOTICE
• Tempo settings are not backed up.
NOTE
Highest key
• Never turn off the power while the initialization is being
executed.
• If this instrument somehow malfunctions or fails to operate properly, try
executing the initialization.
• Bluetooth pairing information (page 12) will not be lost even when the
initializing is executed.
NOTE
P-145BT, P-143BT Owner’s Manual
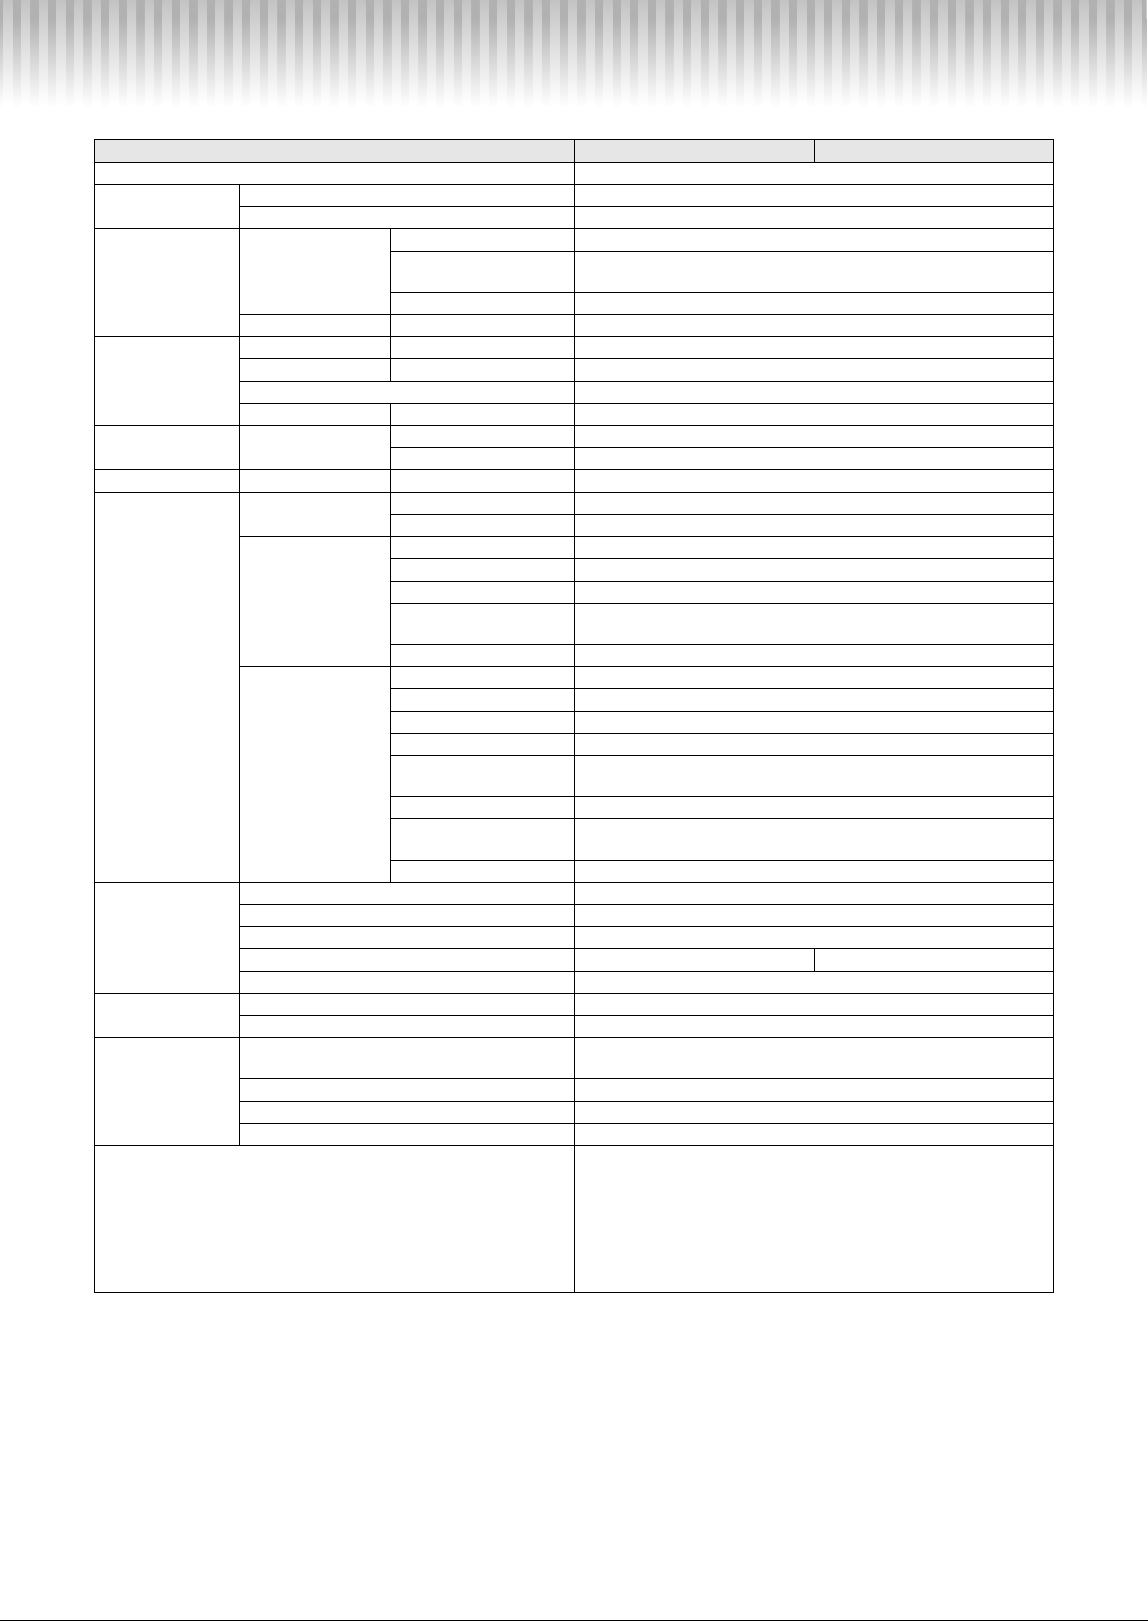
16
Specifications
The contents of this manual apply to the latest specifications as of the publishing date. To obtain the latest manual,
access the Yamaha website then download the manual file. Specifications, equipment or separately sold accessories may
not be the same in every locale, and the models available on the market also may vary by region. Please check with your
Yamaha dealer.
P-145BT P-143BT
Product Name Digital Piano
Size/Weight
Dimensions (W × H × D) 1,326 × 129 × 268 (mm) (52-3/16″ × 5-1/16″ × 10-9/16″)
Weight 11.1 kg (24 lb, 8 oz)
Control Interface
Keyboard
Number of Keys 88 keys
Typ e
GHC (Graded Hammer Compact) keyboard
with matte black keytops
Touch Sensitivity Soft/Medium/Hard/Fixed
Panel Language English
Voices
Tone Generator Piano Sound Yamaha CFIIIS
Piano Effect Damper Resonance Yes
Polyphony (max.) 64
Preset Number of Voices 10
Effects Types
Reverb 4 types
Sound Boost Yes
Songs (MIDI) Preset Number of Preset Songs 10 Voice Demo Songs + 10 Piano Preset Songs
Functions
Voices
Dual Yes
Duo Yes
Overall Controls
Metronome Yes
Tempo Range 32 – 280
Transpose −6 – 0 – +6
Tuning
414.8 – 440.0 – 466.8 Hz
(approx. 0.2 Hz increments)
USB audio interface 44.1 kHz, 16 bit, stereo
Bluetooth
(Audio only)
Bluetooth version 5.0
Supported profile A2DP
Compatible codec SBC
Wireless output Bluetooth Class 2
Maximum
communication distance
Approx. 10 m
Radio Frequency 2,401 – 2,481 MHz
Maximum output power
(EIRP)
4 dBm
Type of modulation GFSK
Connectivity
DC IN 12 V
PHONES Standard stereo headphone jack (× 1)
SUSTAIN Yes
PEDAL UNIT Yes No
USB TO HOST Yes (MIDI/Audio)
Sound System
Amplifiers 7 W × 2
Speakers Oval (12 cm × 8 cm) × 2
Power Supply
AC Adaptor
AC Adaptor PA-150 or
an equivalent recommended by Yamaha (Output : DC 12 V, 1.5 A)
Power Consumption 6 W (When using the PA-150 adaptor)
Standby Power Consumption 0.3 W
Auto Power Off Yes
Included Accessories
• Owner’s Manual (this book)
• Footswitch
• AC Adaptor PA-150 or an equivalent recommended by Yamaha*
• Online Member Product Registration
• Music Rest
* May not be included depending on your particular area. Please check with
your Yamaha dealer.
P-145BT, P-143BT Owner’s Manual
17
May not be available depending on your locale.
• AC Adaptor: PA-150 or an equivalent recommended by
Yamaha
• Headphone: HPH-150, HPH-100, HPH-50
• Keyboard Stand: L-100
• Keyboard bag: SC-KB851
• Wireless MIDI Adaptor: UD-BT01
• Footswitch: FC4A, FC5
• Foot pedal: FC3A (features Half-pedal function)
• [P-145BT only] Pedal Unit: LP-5A (features Half-pedal
function)
* Make sure to assemble the unit on a separately sold Keyboard Stand
(L-100).
Damper pedal (right pedal)
Notes will be sustained as long as this pedal is depressed, even if you release your fingers from the keys. It corresponds to the Damper
Resonance function. The deeper you depress the pedal, the longer the note is sustained (corresponding to the Half Pedal function).
Sostenuto pedal (center pedal)
If you play a note or chord on the keyboard and press the sostenuto pedal while
holding the note(s), the notes will sustain as long as the pedal is held. Since this
pedal does not affect notes played while it is depressed, you can achieve playing
styles such as a staccato melody while sustaining a chord.
Soft pedal (left pedal)
Keys played after depressing this pedal will be slightly softer and less resonant. The effect continues as long as the pedal is depressed.
Since this pedal does not affect the sound of keys that were already held down when it is depressed, depress the pedal just before
playing the note(s) that you would like to alter.
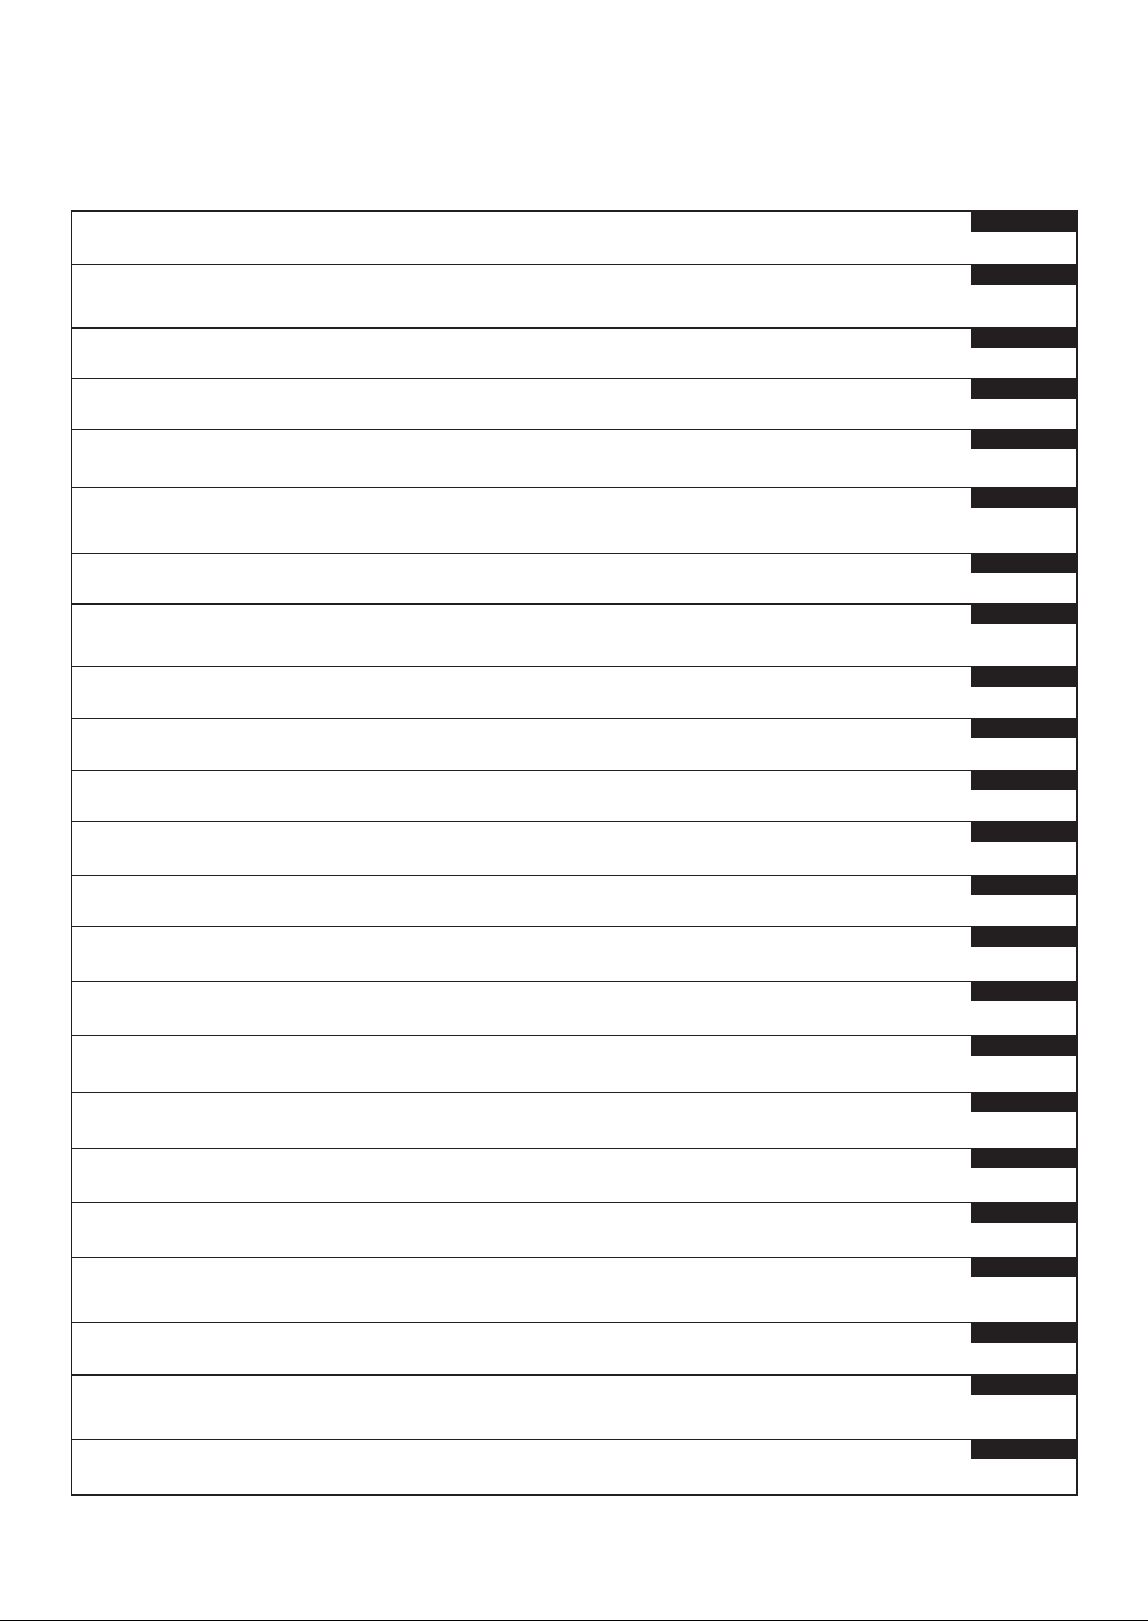
Half-pedal function
This function allows you to vary the sustain length
depending on how far the Damper pedal is pressed. The
farther down you press the pedal, the more the sound
sustains. For example, if you press the damper pedal and
all notes you are playing sound a bit murky and loud with
too much sustain, you can release the pedal half way or
higher to decrease the sustain (murkiness).
L-100
LP-5A
(Compatible only with the P-145BT)
Pedal Functions (For Pedal Unit LP-5A)
When you press the sostenuto pedal here while holding the
note(s), the notes will sustain as long as you hold the pedal.
Pedal function in Duo (page 10)
In Duo, the pedal function changes as follows.
• Right Pedal: Damper pedal for the right-hand range.
• Center Pedal: Damper pedal for both the right-hand and left-hand ranges.
• Left Pedal: Damper pedal for the left-hand range.
Separately Sold Accessories

P-145BT, P-143BT Owner’s Manual
18
For European Union and United Kingdom
(559-M01 RED DoC URL 03)
EN SIMPLIFIED EU DECLARATION OF CONFORMITY /
SIMPLIFIED UK DECLARATION OF CONFORMITY
Hereby, Yamaha Corporation declares that the radio equipment type [P-145BT,
P-143BT] is in compliance with Directive 2014/53/EU and the radio equipment
regulations of UK. The full texts of the EU declaration of conformity and the UK
declaration of conformity are available at the following internet address:
https://europe.yamaha.com/en/support/compliance/doc.html
FR DECLARATION UE DE CONFORMITE SIMPLIFIEE
Le soussigné, Yamaha Corporation, déclare que l'équipement radioélectrique
du type [P-145BT, P-143BT] est conforme à la directive 2014/53/UE. Le texte
complet de la déclaration UE de conformité est disponible à l'adresse internet
suivante:
https://europe.yamaha.com/en/support/compliance/doc.html
DE VEREINFACHTE EU-KONFORMITÄTSERKLÄRUNG
Hiermit erklärt Yamaha Corporation, dass der Funkanlagentyp [P-145BT, P-
143BT] der Richtlinie 2014/53/EU entspricht. Der vollständige Text der EU-Kon-
formitätserklärung ist unter der folgenden Internetadresse verfügbar:
https://europe.yamaha.com/en/support/compliance/doc.html
SV
FÖRENKLAD EU-FÖRSÄKRAN OM ÖVERENSSTÄMMELSE
Härmed försäkrar Yamaha Corporation att denna typ av radioutrustning [P-
145BT, P-143BT] överensstämmer med direktiv 2014/53/EU. Den fullständiga
texten till EU-försäkran om överensstämmelse finns på följande webbadress:
https://europe.yamaha.com/en/support/compliance/doc.html
IT DICHIARAZIONE DI CONFORMITÀ UE SEMPLIFICATA
Il fabbricante, Yamaha Corporation, dichiara che il tipo di apparecchiatura radio
[P-145BT, P-143BT] è conforme alla direttiva 2014/53/UE. Il testo completo
della dichiarazione di conformità UE è disponibile al seguente indirizzo Internet:
https://europe.yamaha.com/en/support/compliance/doc.html
ES DECLARACIÓN UE DE CONFORMIDAD SIMPLIFICADA
Por la presente, Yamaha Corporation declara que el tipo de equipo radioeléc-
trico [P-145BT, P-143BT] es conforme con la Directiva 2014/53/UE. El texto
completo de la declaración UE de conformidad está disponible en la dirección
Internet siguiente:
https://europe.yamaha.com/en/support/compliance/doc.html
PT DECLARAÇÃO UE DE CONFORMIDADE SIMPLIFICADA
O(a) abaixo assinado(a) Yamaha Corporation declara que o presente tipo de
equipamento de rádio [P-145BT, P-143BT] está em conformidade com a Dire-
tiva 2014/53/UE. O texto integral da declaração de conformidade está dis-
ponível no seguinte endereço de Internet:
https://europe.yamaha.com/en/support/compliance/doc.html
NL VEREENVOUDIGDE EU-CONFORMITEITSVERKLARING
Hierbij verklaar ik, Yamaha Corporation, dat het type radioapparatuur [P-145BT,
P-143BT] conform is met Richtlijn 2014/53/EU. De volledige tekst van de EU-
conformiteitsverklaring kan worden geraadpleegd op het volgende interne-
tadres:
https://europe.yamaha.com/en/support/compliance/doc.html
BG ОПРОСТЕНА ЕС ДЕКЛАРАЦИЯ ЗА СЪОТВЕТСТВИЕ
С настоящото Yamaha Corporation декларира, че този тип
радиосъоръжение [P-145BT, P-143BT] е в съответствие с Директива 2014/
53/ЕС. Цялостният текст на ЕС декларацията за съответствие може да
се намери на следния интернет адрес:
https://europe.yamaha.com/en/support/compliance/doc.html
CS ZJEDNODUŠENÉ EU PROHLÁŠENÍ O SHODĚ
Tímto Yamaha Corporation prohlašuje, že typ rádiového zařízení [P-145BT, P-
143BT] je v souladu se směrnicí 2014/53/EU. Úplné znění EU prohlášení o
shodě je k dispozici na této internetové adrese:
https://europe.yamaha.com/en/support/compliance/doc.html
DA FORENKLET EU-OVERENSSTEMMELSESERKLÆRING
Hermed erklærer Yamaha Corporation, at radioudstyrstypen [P-145BT, P-
143BT] er i overensstemmelse med direktiv 2014/53/EU. EU-overensstem-
melseserklæringens fulde tekst kan findes på følgende internetadresse:
https://europe.yamaha.com/en/support/compliance/doc.html
ET LIHTSUSTATUD ELI VASTAVUSDEKLARATSIOON
Käesolevaga deklareerib Yamaha Corporation, et käesolev raadioseadme tüüp
[P-145BT, P-143BT] vastab direktiivi 2014/53/EL nõuetele. ELi vastavusdeklar-
atsiooni täielik tekst on kättesaadav järgmisel internetiaadressil:
https://europe.yamaha.com/en/support/compliance/doc.html
EL ΑΠΛΟΥΣΤΕΥΜΕΝΗ ΔΗΛΩΣΗ ΣΥΜΜΟΡΦΩΣΗΣ ΕΕ
Με την παρούσα ο/η Yamaha Corporation, δηλώνει ότι ο ραδιοεξοπλισμός [P-
145BT, P-143BT] πληροί την οδηγία 2014/53/ΕΕ. Το πλήρες κείμενο της
δήλωσης συμμόρφωσης ΕΕ διατίθεται στην ακόλουθη ιστοσελίδα στο
διαδίκτυο:
https://europe.yamaha.com/en/support/compliance/doc.html
HR POJEDNOSTAVLJENA EU IZJAVA O SUKLADNOSTI
Yamaha Corporation ovime izjavljuje da je radijska oprema tipa [P-145BT, P-
143BT] u skladu s Direktivom 2014/53/EU. Cjeloviti tekst EU izjave o sukladno-
sti dostupan je na sljedećoj internetskoj adresi:
https://europe.yamaha.com/en/support/compliance/doc.html
LV VIENKĀRŠOTA ES ATBILSTĪBAS DEKLARĀCIJA
Ar šo Yamaha Corporation deklarē, ka radioiekārta [P-145BT, P-143BT] atbilst
Direktīvai 2014/53/ES. Pilns ES atbilstības deklarācijas teksts ir pieejams šādā
interneta vietnē:
https://europe.yamaha.com/en/support/compliance/doc.html
LT SUPAPRASTINTA ES ATITIKTIES DEKLARACIJA
Aš, Yamaha Corporation, patvirtinu, kad radijo įrenginių tipas [P-145BT, P-
143BT] atitinka Direktyvą 2014/53/ES. Visas ES atitikties deklaracijos tekstas
prieinamas šiuo interneto adresu:
https://europe.yamaha.com/en/support/compliance/doc.html
HU EGYSZERŰSÍTETT EU-MEGFELELŐSÉGI NYILATKOZAT
Yamaha Corporation igazolja, hogy a [P-145BT, P-143BT] típusú rádióberen-
dezés megfelel a 2014/53/EU irányelvnek. Az EU-megfelelőségi nyilatkozat
teljes szövege elérhető a következő internetes címen:
https://europe.yamaha.com/en/support/compliance/doc.html
PL UPROSZCZONA DEKLARACJA ZGODNOŚCI UE
Yamaha Corporation niniejszym oświadcza, że typ urządzenia radiowego [P-
145BT, P-143BT] jest zgodny z dyrektywą 2014/53/UE. Pełny tekst deklaracji
zgodności UE jest dostępny pod następującym adresem internetowym:
https://europe.yamaha.com/en/support/compliance/doc.html
RO DECLARAȚIA UE DE CONFORMITATE SIMPLIFICATĂ
Prin prezenta, Yamaha Corporation declară că tipul de echipamente radio [P-
145BT, P-143BT] este în conformitate cu Directiva 2014/53/UE. Textul integral al
declarației UE de conformitate este disponibil la următoarea adresă internet:
https://europe.yamaha.com/en/support/compliance/doc.html
SK ZJEDNODUŠENÉ EÚ VYHLÁSENIE O ZHODE
Yamaha Corporation týmto vyhlasuje, že rádiové zariadenie typu [P-145BT, P-
143BT] je v súlade so smernicou 2014/53/EÚ. Úplné EÚ vyhlásenie o zhode je
k dispozícii na tejto internetovej adrese:
https://europe.yamaha.com/en/support/compliance/doc.html
SL POENOSTAVLJENA IZJAVA EU O SKLADNOSTI
Yamaha Corporation potrjuje, da je tip radijske opreme [P-145BT, P-143BT]
skladen z Direktivo 2014/53/EU. Celotno besedilo izjave EU o skladnosti je na
voljo na naslednjem spletnem naslovu:
https://europe.yamaha.com/en/support/compliance/doc.html
FI
YKSINKERTAISTETTU EU-VAATIMUSTENMUKAISUUSVAKUUTUS
Yamaha Corporation vakuuttaa, että radiolaitetyyppi [P-145BT, P-143BT] on
direktiivin 2014/53/EU mukainen. EU-vaatimustenmukaisuusvakuutuksen täy-
simittainen teksti on saatavilla seuraavassa internetosoitteessa:
https://europe.yamaha.com/en/support/compliance/doc.html
TR
BASİTLEŞTİRİLMİŞ AVRUPA BİRLİĞİ UYGUNLUK BİLDİRİMİ
İşbu belge ile, Yamaha Corporation, radyo cihaz tipinin [P-145BT, P-143BT],
Direktif 2014/53/ AB'ye uygunluğunu beyan eder. AB uyumu beyanının tam
metni aşağıdaki internet adresinden edinilebilir:
https://europe.yamaha.com/en/support/compliance/doc.html
P-145BT, P-143BT Owner’s Manual
19
Deutsch
Français
Nederlands
Español
Italiano
Português
ǼȜȜȘȞȚțȐ
Svenska
Norsk
Dansk
Suomi
Polski
ýHãWLQD
Magyar
Eesti
/DWYLHãX
/LHWXYLǐ
6ORYHQþLQD
6ORYHQãþLQD
Ȼɴɥɝɚɪɫɤɢ
5RPkQă
English
Hrvatski
Türkçe
Important Notice: Power management information for customers in European Economic Area (EEA),
Switzerland and Turkey
Remarque importante : Informations sur la gestion de l'alimentation pour les clients de l'Espace
économique européen (EEE), de Suisse et de Turquie
Yamaha-Produkte sind mit einer Power-Management-Funktion ausgestattet. Bei einigen Produkten können Sie diese Funktion ausschalten oder
die Zeitdauer, die verstreicht, bis das Instrument ausgeschaltet oder in Bereitschaft versetzt wird, verlängern. In diesen Fällen erhöht sich der
Energieverbrauch.
Les produits Yamaha sont équipés d’une fonction de gestion de l’alimentation. Certains produits vous permettent de désactiver cette fonction ou
d'allonger le délai avant la mise hors tension ou la mise en veille. Dans ces cas, la consommation d’énergie augmente.
Yamaha-producten zijn uitgerust met een energiebeheerfunctie. Bij sommige producten kunt u die functie uitschakelen of de tijd verlengen die
verstrijkt voordat de stroom wordt uitgeschakeld of in stand-by wordt gezet. In deze gevallen zal het energieverbruik toenemen.
Los productos Yamaha están equipados con una función de administración de energía. Algunos productos permiten desactivar esa función o
ampliar el tiempo que transcurre antes de apagar la alimentación o poner el producto en modo de espera. En estos casos, el consumo de energía
aumentará.
I prodotti Yamaha sono dotati di una funzione di gestione dell'alimentazione. Alcuni prodotti consentono di disattivare tale funzione o di
estendere il periodo di tempo che trascorre prima che l'alimentazione venga spenta o impostata in standby. In questi casi, il consumo energetico
aumenterà.
Yamaha products are equipped with a power management function. Some products allow you to disable that function, or to extend the amount of
time that elapses before the power is turned off or set to standby. In these cases, energy consumption will increase.
Os produtos Yamaha são equipados com uma função de gerenciamento de energia. Alguns produtos permitem desativar essa função ou
estender o tempo decorrido antes de se desligar ou entrar em standby. Nesses casos, o consumo de energia aumentará.
ȉĮʌȡȠȧȩȞIJĮIJȘȢ<DPDKDİȓȞĮȚİȟȠʌȜȚıȝȑȞĮȝİȝȚĮȜİȚIJȠȣȡȖȓĮįȚĮȤİȓȡȚıȘȢȚıȤȪȠȢȅȡȚıȝȑȞĮʌȡȠȧȩȞIJĮıȐȢįȓȞȠȣȞIJȘįȣȞĮIJȩIJȘIJĮȞĮ
ĮʌİȞİȡȖȠʌȠȚİȓIJİĮȣIJȒIJȘȜİȚIJȠȣȡȖȓĮȒȞĮİʌİțIJİȓȞİIJİIJȠȤȡȠȞȚțȩįȚȐıIJȘȝĮȝȑȤȡȚIJȘȞĮʌİȞİȡȖȠʌȠȓȘıȘȒIJȘșȑıȘıİțĮIJȐıIJĮıȘĮȞĮȝȠȞȒȢȈİ
ĮȣIJȑȢIJȚȢʌİȡȚʌIJȫıİȚȢȘțĮIJĮȞȐȜȦıȘİȞȑȡȖİȚĮȢșĮĮȣȟȘșİȓ
Yamaha-produkterna är utrustade med en energihanteringsfunktion. För vissa produkter kan du inaktivera den funktionen eller för att förlänga
tiden som förflutit innan strömmen stängs av eller ställs i vänteläge. I dessa fall ökar energiförbrukningen.
Yamahas produkter har en strømstyringsfunktion. På nogle produkter er det muligt at deaktivere denne funktion eller at forlænge den tid, der går,
før der slukkes for strømmen, eller sættes på standby. I disse tilfælde vil strømforbruget stige.
Yamaha-tuotteet on varustettu virranhallintatoiminnolla. Joissakin tuotteissa voit poistaa toiminnon käytöstä tai pidentää aikaa, joka kuluu ennen
virran katkaisemista tai valmiustilaan asettamista. Näissä tapauksissa energiankulutus kasvaa.
3URGXNW\<DPDKDVąZ\SRVDĪRQHZIXQNFMĊ]DU]ąG]DQLDHQHUJLą1LHNWyUHSURGXNW\XPRĪOLZLDMąZ\áąF]HQLHWHMIXQNFMLOXEZ\GáXĪHQLHF]DVX
MDNLXSá\ZDGRZ\áąF]HQLD]DVLODQLDOXESU]HMĞFLDZWU\EJRWRZRĞFL:WDNLFKSU]\SDGNDFK]XĪ\FLHHQHUJLLZ]URĞQLH
3URGXNW\<DPDKDMVRXY\EDYHQ\IXQNFtVSUiY\QDSiMHQt1ČNWHUpSURGXNW\XPRåĖXMtWXWRIXQNFL]DNi]DWQHERSURGORXåLWGREXNWHUiPi
XEČKQRXWSĜHGY\SQXWtPQDSiMHQtQHERSRKRWRYRVWQtPUHåLPHP9WČFKWRSĜtSDGHFKVH]YêãtVSRWĜHEDHOHNWĜLQ\
$<DPDKDWHUPpNHNHQHUJLDPHQHG]VPHQWIXQNFLyYDOYDQQDNHOOiWYD(J\HVWHUPpNHNOHKHWĘYpWHV]LNKRJ\OHWLOWVDH]WDIXQNFLyWYDJ\
PHJKRVV]DEEtWVDDNLNDSFVROiVYDJ\NpV]HQOpWLiOODSRWEDKHO\H]pVHOĘWWHOWHOWLGĘW(]HNEHQD]HVHWHNEHQD]HQHUJLDIRJ\DV]WiVQ|YHNHGQLIRJ
Yamaha tooted on varustatud toitehalduse funktsiooniga. Mõned tooted võimaldavad teil selle funktsiooni keelata või pikendada aega, mis
P||GXEHQQHWRLWHYlOMDOOLWDPLVWY}LRRWHUHåLLPLVHDGPLVW6HOOLVWHOMXKWXGHOVXXUHQHEHQHUJLDWWDUELPLQH
<DPDKDL]VWUƗGƗMXPLLUDSUƯNRWLDUEDURãDQDVSƗUYDOGƯEDVIXQNFLMX'DåLHPL]VWUƗGƗMXPLHPãRIXQNFLMXYDUDWVSƝMRWYDLSDLOG]LQƗWODLNXNDP
MƗSDLHWSLUPVEDURãDQDVDWVOƝJãDQDVYDLSƗULHãDQDVJDLGVWƗYHVUHåƯPƗâƗGƗJDGƯMXPƗSDOLHOLQƗVLHVHQHUƧLMDVSDWƝULƼã
Ä<DPDKD³JDPLQLXRVH\UDHQHUJLMRVVąQDXGǐYDOG\PRIXQNFLMD.DLNXULHJDPLQLDLOHLGåLDLãMXQJWLãLąIXQNFLMąDUEDSUDWĊVWLODLNąSUDơMXVƳSULHã
LãMXQJLDQWPDLWLQLPąDUEDƳMXQJLDQWEXGơMLPRUHåLPą7RNLDLVDWYHMDLVHQHUJLMRVVXYDUWRMLPDVSDGLGơV
3URGXNW\VSRORþQRVWL<DPDKDV~Y\EDYHQpIXQNFLRXVSUiY\QDSiMDQLD1LHNWRUpSURGXNW\YiPXPRåĖXM~W~WRIXQNFLXY\SQ~ĢDOHERSUHGĎåLĢþDV
SRXSO\QXWtNWRUêFKVDQDSiMDQLHY\SQHDOHERQDVWDYtGRSRKRWRYRVWQpKRUHåLPX9WDNêFKWRSUtSDGRFKVD]YêãLVSRWUHEDHQHUJLH
<DPDKLQLL]GHONLLPDMRIXQNFLMRXSUDYOMDQMD]QDSDMDQMHP1HNDWHULL]GHONLYDPRPRJRþDMRGDRQHPRJRþLWHWRIXQNFLMRDOLSRGDOMãDWHþDVNLPRUD
SUHWHþLSUHGHQVHQDSDMDQMHL]NORSLDOLQDVWDYLYVWDQMHSULSUDYOMHQRVWL9WHKSULPHULKVHERSRUDEDHQHUJLMHSRYHþDOD
ɉɪɨɞɭɤɬɢɬɟɧɚ<DPDKDɫɚɫɧɚɛɞɟɧɢɫɮɭɧɤɰɢɹɡɚɭɩɪɚɜɥɟɧɢɟɧɚɡɚɯɪɚɧɜɚɧɟɬɨɇɹɤɨɢɩɪɨɞɭɤɬɢɜɢɩɨɡɜɨɥɹɜɚɬɞɚɡɚɛɪɚɧɢɬɟɬɚɡɢ
ɮɭɧɤɰɢɹɢɥɢɞɚɭɞɴɥɠɢɬɟɜɪɟɦɟɬɨɤɨɟɬɨɳɟɢɡɬɟɱɟɩɪɟɞɢɡɚɯɪɚɧɜɚɧɟɬɨɞɚɫɟɢɡɤɥɸɱɢɢɥɢɞɚɫɟɧɚɫɬɪɨɢɜɪɟɠɢɦɧɚɝɨɬɨɜɧɨɫɬ
ȼɬɟɡɢɫɥɭɱɚɢɤɨɧɫɭɦɚɰɢɹɬɚɧɚɟɧɟɪɝɢɹɳɟɫɟɭɜɟɥɢɱɢ
3URGXVHOH<DPDKDVXQWHFKLSDWHFXRIXQF܊LHGHJHVWLRQDUHDHQHUJLHL8QHOHSURGXVHYăSHUPLWVăGH]DFWLYD܊LDFHDVWăIXQF܊LHVDXVăSUHOXQJL܊L
SHULRDGDGHWLPSFDUHWUHFHvQDLQWHFDDOLPHQWDUHDVăILHRSULWăVDXVHWDWăvQVWDQGE\ÌQDFHVWHFD]XULFRQVXPXOGHHQHUJLHYDFUH܈WH
<DPDKDSURL]YRGLRSUHPOMHQLVXIXQNFLMRPXSUDYOMDQMDSRWURãQMRPHQHUJLMH1HNLYDPSURL]YRGLRPRJXüXMXRQHPRJXüDYDQMHWHIXQNFLMHLOL
SURGXOMHQMHYUHPHQDNRMHSURWHNQHSULMHLVNOMXþLYDQMDQDSDMDQMDLOLSRVWDYOMDQMDXVWDQMHSULSUDYQRVWL8WLPüHVHVOXþDMHYLPDSRYHüDWLSRWURãQMD
energije
.
<DPD
KDUQOHULQGHJo\|QHWLPLLúOHYLYDUGÕU%D]ÕUQOHUEXLúOHYLGHYUHGÕúÕEÕUDNPDQÕ]DYH\DJoNDSDWÕOPDGDQ\DGDEHNOHPHPRGXQD
DOÕQPDGDQ|QFHJHoHQVUH\LX]DWPDQÕ]DRODQDNWDQÕU%XJLELGXUXPODUGDHQHUMLWNHWLPLDUWDFDNWÕU
(574-M06 EU erp 01)
Yamaha Worldwide Representative Offices
For details on the product(s), contact your nearest Yamaha representative or the authorized distributor,
found by accessing the 2D barcode below.
English
Wenden Sie sich für nähere Informationen zu Produkten an eine Yamaha-Vertretung oder einen
autorisierten Händler in Ihrer Nähe. Diese finden Sie mithilfe des unten abgebildeten 2D-Strichodes.
Deutsch
Pour obtenir des informations sur le ou les produits, contactez votre représentant ou revendeur agréé
Yamaha le plus proche. Vous le trouverez à l'aide du code-barres 2D ci-dessous.
Français
Para ver información detallada sobre el producto, contacte con su representante o distribuidor autorizado
Yamaha más cercano. Lo encontrará escaneando el siguiente código de barras 2D.
Español
Untuk detail produk, hubungi perwakilan Yamaha terdekat atau distributor resmi Anda dengan
mengakses barcode 2D di bawah ini.
Bahasa indonesia
Para mais informações sobre o(s) produto(s), fale com seu representante da Yamaha mais próximo ou com
o distribuidor autorizado acessando o código de barras 2D abaixo.
Português
ɑɬɨɛɵɭɡɧɚɬɶɩɨɞɪɨɛɧɟɟɨɩɪɨɞɭɤɬɟɩɪɨɞɭɤɬɚɯɫɜɹɠɢɬɟɫɶɫɛɥɢɠɚɣɲɢɦɩɪɟɞɫɬɚɜɢɬɟɥɟɦɢɥɢ
ɚɜɬɨɪɢɡɨɜɚɧɧɵɦɞɢɫɬɪɢɛɶɸɬɨɪɨɦ<DPDKDɜɨɫɩɨɥɶɡɨɜɚɜɲɢɫɶɞɜɭɯɦɟɪɧɵɦɲɬɪɢɯɤɨɞɨɦɧɢɠɟ
Ɋɭɫɫɤɢɣ
㞝僗⪩◲⿁氳陣篱⟔䕜陴纭硍饄䖻僄鲤氳 :BNBIB ♏辑䡝䪧儹篺ꛖら⺎鵠鲋阼ꠋ┖亡氳◅簟溞䤓⮽鲹◙
♏辑䡝篺ꛖら氳⟔䕜ն
甏⛮╈乄
㞞ꧏ榣⿁氳鎌碸鞴銻鑃绤礙艃䖼ꦗ鲥氳:BNBIBꊸす♏辑䡝䪧垷祺ꊸり䖼⺎♓䬟┖亡氳◅禵半澰刨
洇注绤礙鞴乣
籗넓⚥俒
혗폋샻햋켳혐쫯삏팿얓%쨏싗폋폌켳킟폧맻뱇풯:BNBIB샯샴쟟혋쐋삏뫰탘샻잧혋폋
줳핓탨탗퐟
뭨펯
https://manual.yamaha.com/dmi/address_list/
Head Office/Manufacturer: Yamaha Corporation 10-1, Nakazawa-cho, Chuo-ku, Hamamatsu, 430-8650, Japan
Importer (European Union): Yamaha Music Europe GmbH Siemensstrasse 22-34, 25462 Rellingen, Germany
Importer (United Kingdom): Yamaha Music Europe GmbH (UK) Sherbourne Drive, Tilbrook, Milton Keynes, MK7 8BL, United Kingdom
DMI36_10m
© 2025 Yamaha Corporation
Published 01/2025
IITY-A0
VHP7010
Yamaha Global Site
https://www.yamaha.com/
Yamaha Downloads
https://download.yamaha.com/
