FR
NL
AR
EN
1
1
1
2
4
3
6
6
6
5
7
7
7
!!
MIN
8
8
8
!!
MAX
9
9
2
1
10
1
0
10
E
e1
e2
e3
D
d1
d2
d3
d4
d5
F*
f1
f2
A
B
c1
c5
c11
c2 c3* c4 c6 c7 c8 c9
c10
b2
b5
b1 b4b3
C
*
FR Selon modèle / EN Depending on the model / NL Afhankelijk van model
b.
c.
1
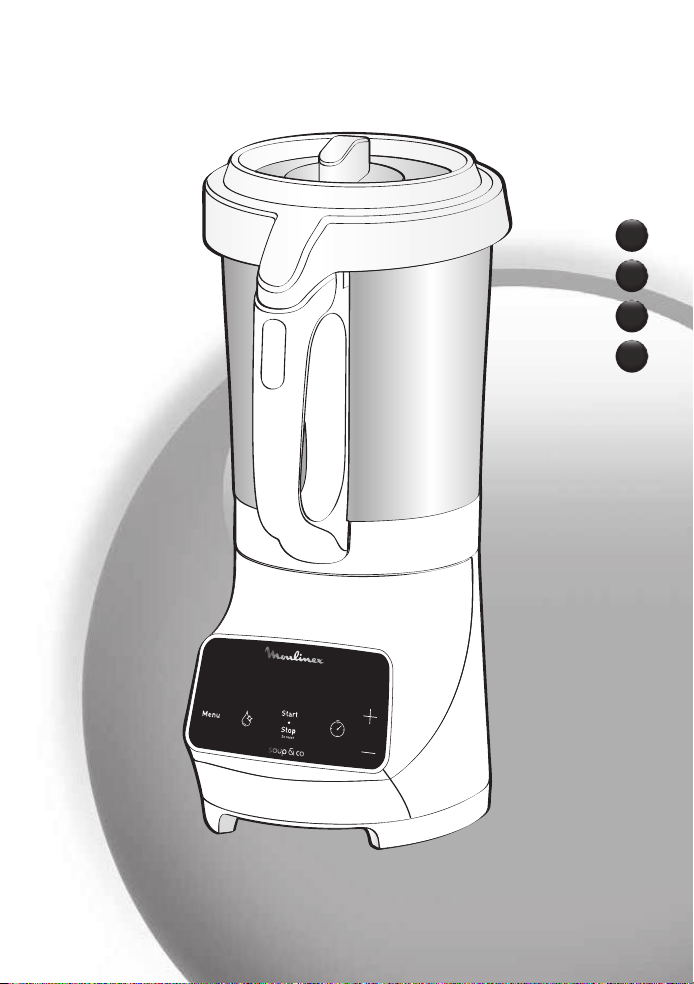
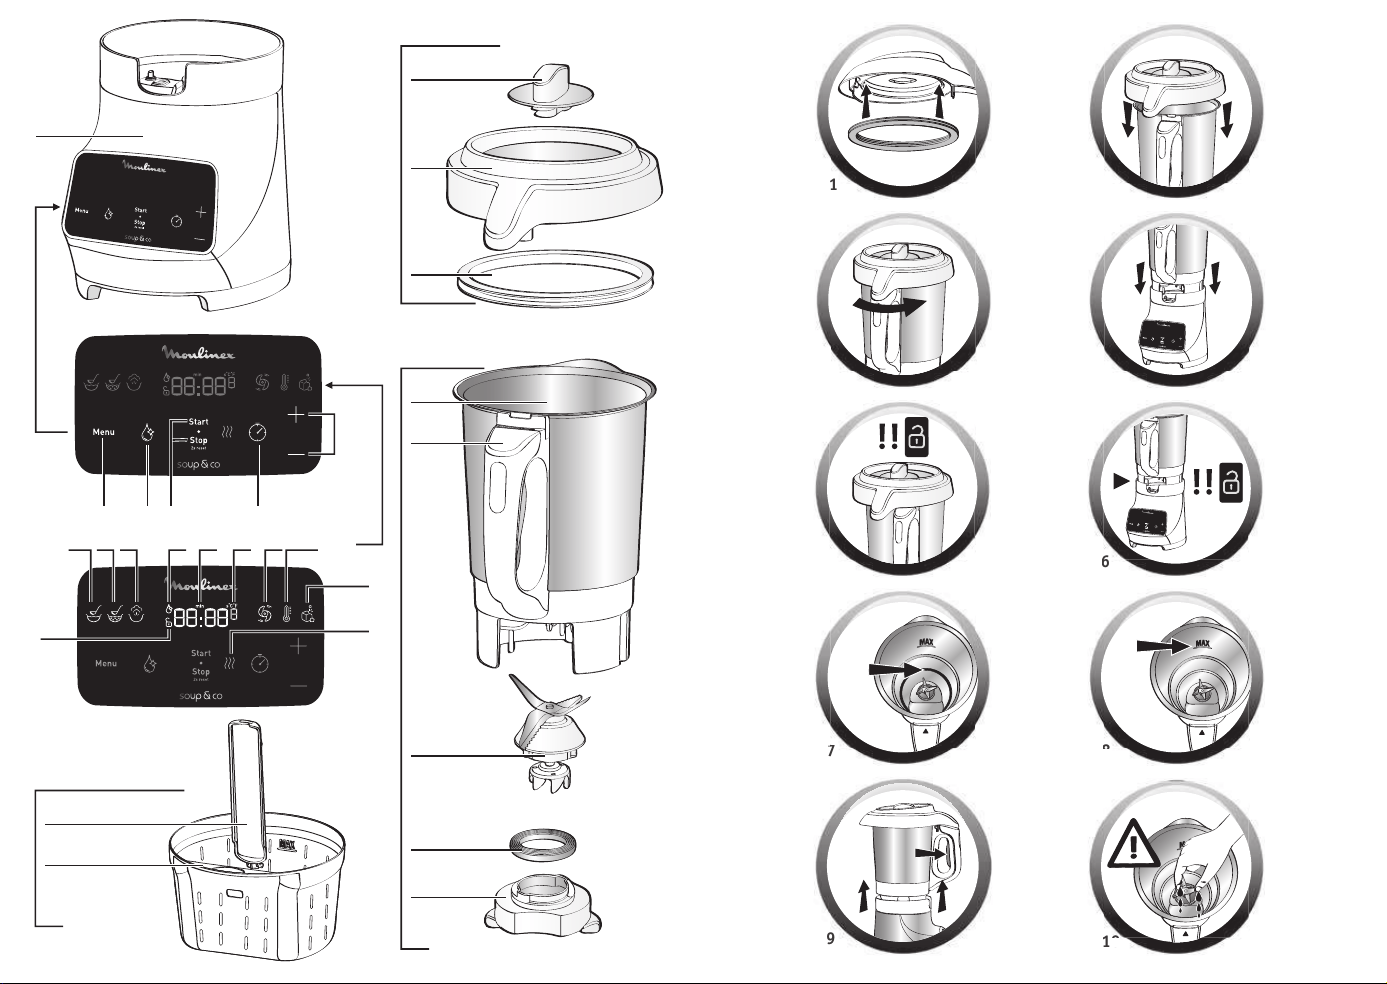
A Bloc moteur
B Tableau de commande
b1 Bouton MENU
b2 Bouton AUTOCLEAN
b3 Bouton START / STOP / RESET
b4 Sélecteur de durée de fonctionnement
(le timer)
b5 Sélecteur de Vitesse / Température / Temps +/-
C Ecran d’affichage
c1 SOUPE VELOUTEE
c2 SOUPE MOULINEE
c3 VAPEUR * (selon modèle)
c4 Affichage autoclean
c5
Affichage témoin de sécurité
START START
c6 Affichage temps
c7 Affichage vitesse ou température
c8 MODE BLENDER
c9 MODE CUISSON
c10 GLACE PILEE
c11 Voyant de chauffe
D Ensemble Bol blender
d1 Bol inox
d2 Gâchette poignée
d3 Couteau démontable
d4 Joint
d5 Bague de verrouillage
E Ensemble couvercle
e1 Bouchon
e2 Couvercle
e3 Joint d’étanchéité
F Panier de cuisson (selon modèle*)
f1 Poignée
f2 Panier
Données techniques de l’appareil :
Température maximum : 100°C
Puissance : 1100W
Temps de programmation maximum :
59 minutes.
En parcourant cette notice, vous découvrirez des conseils d’utilisation qui vous feront entrevoir
le potentiel de votre appareil : préparation de soupes veloutées ou moulinées, de soupes avec
morceaux, de sauces et de compotes, de smoothies, de cocktails et des recettes vapeur.
Vis-à-vis de la sécurité de la
personne
• Lisez attentivement le mode
d’emploi avant la première
utilisation de votre appareil
et conservez-le : une utilisation
non conforme au mode d’emploi
dégagerait le fabricant de toute
responsabilité.
• Ne pas laisser les enfants utiliser
l’appareil sans surveillance.
• AVERTISSEMENT : Lors de
l’utilisation de l’appareil, certaines
pièces atteignent des températures
élevées et présentent une chaleur
résiduelle après utilisation:
paroi inox du bol, parties non
préhensibles du couvercle et du
bouchon, pièces métalliques sous
le bol, panier (selon modèle).
Elles peuvent occasionner des
brûlures. Manipulez l’appareil
par les pièces plastiques froides:
poignées, bloc moteur, zones de
préhension du couvercle ou du
bouchon pendant la chauffe et
jusqu’au refroidissement complet.
Le témoin lumineux de chauffe
FR
DESCRIPTION DE L’APPAREIL
CONSIGNES DE SECURITE
START START
2
1
a.
13
*
12
a.
c.
1
2
d.
1
2
b.
11

3
- les zones de travail de cuisine
dans les magasins, bureaux et
autres environnements de travail.
- des coins cuisines réservés au
personnel dans des magasins,
bureaux et autres environ-
nements professionnels.
- des fermes.
- l’utilisation par les clients des
hôtels, motels et autres environ-
nements à caractère résidentiel.
- des environnements du type
chambres d’hôtes.
Vis-à-vis du raccordement
électrique
• L’appareil doit être branché sur
une prise de courant électrique
reliée à la terre.
• L’appareil est conçu pour
fonctionner uniquement en
courant alternatif. Vérifiez que la
tension d’alimentation indiquée
sur la plaque signalétique de
l’appareil corresponde bien
à celle de votre installation
électrique.
• Toujours déconnecter l’appareil
de l’alimentation, si on le laisse
sans surveillance et avant
montage, démontage et
nettoyage.
• Toute erreur de branchement
annule la garantie.
• Ne tirez jamais sur le câble
d’alimentation pour débrancher
l’appareil.
• Ne mettez pas l’appareil, le câble
d’alimentation ou la prise dans
du liquide.
• L’appareil ne doit pas être
immergé.
• Ne laissez pas le câble
d’alimentation à portée de mains
des enfants, être à proximité ou en
contact avec les parties chaudes
de l’appareil, près d’une source de
chaleur ou sur un angle vif.
Vis-à-vis d’une mauvaise
utilisation
• N’utilisez pas votre appareil s’il ne
fonctionne pas correctement, s’il
est endommagé. Faites le réparer
dans un centre service agréé (voir
liste dans le livret service).
• N’utilisez jamais le bol blender
sans ingrédient ou avec des
produits secs uniquement.
• Versez toujours les ingrédients
solides en premier dans le bol
avant d’ajouter des ingrédients
liquides, sans dépasser le repère
MAX gravé ou marqué sur le bol
(Cf Fig.8). Si le blender est trop
rempli, de l’eau bouillante peut-
être éjectée. Attention à avoir un
niveau de liquide suffisant pour
recouvrir le repère mini(Fig.7).
• Certaines recettes peuvent
provoquer des débordements
intempestifs, en raison de
l’apparition de bulles, en
particulier lors de l’utilisation de
légumes congelés. Dans ce cas,
il vous appartient de réduire les
volumes en conséquence. En
cas de débordement, veuillez
2
rouge indique qu’il y a un risque de
brûlure.
• Si le câble d’alimentation ou
la prise est endommagé, il doit
être remplacé par le fabricant,
son service après-vente ou des
personnes de qualification
similaire afin d’éviter un danger
(voir liste des centres service
agréés dans le livret service).
• Votre machine a été conçue pour
un usage domestique seulement
et à une altitude inférieure à 2000
m. Le fabricant décline toute
responsabilité et se réserve le droit de
résilier la garantie en cas d’utilisation
commerciale ou inadaptée, ou de
non respect des consignes.
START START
• AVERTISSEMENT : Votre
appareil émet de la vapeur
qui peut occasionner des
brûlures.
Manipulez avec précau tion le
couvercle et le bouchon (utilisez si
nécessaire un gant, une manique,
etc.) Manipulez le bouchon par sa
partie centrale.
• Être vigilant si un liquide chaud
est versé dans le préparateur
culinaire ou le mélangeur dans
la mesure où il peut être éjecté
de l’appareil en raison d’une
ébullition soudaine.
• Ne faites pas fonctionner
l’appareil si le bouchon n’est
pas positionné dans l’orifice du
couvercle et/ou si le joint n’est
pas positionné dans le couvercle.
• AVERTISSEMENT : Attention
aux risques de blessure en cas
de mauvaise utilisation de
l’appareil.
START START
• Les lames sont très
coupantes : manipulez-
les avec précaution pour
ne pas vous blesser lors
du vidage du bol, du
nettoyage, du montage et
démontage du couteau.
• AVERTISSEMENT : Soyez prudent
lors de la manipulation de votre
appareil (nettoyage, remplissage
et versage) : éviter tout
débordement de liquide sur l’écran
d’affichage et les connecteurs.
• Reportez-vous au mode d’emploi
pour le réglage des vitesses et le
temps de fonctionnement de
chaque programme.
• Reportez-vous au mode d’emploi
pour l’assemblage et le montage
des accessoires sur l’appareil.
• Reportez-vous au mode d’emploi
pour le nettoyage et l’entretien
de votre appareil.
• Toujours suivre les instructions
de nettoyage pour nettoyer
votre appareil:
- Débrancher l’appareil.
- Ne pas nettoyer l’appareil chaud.
- Nettoyer avec un chiffon ou
une éponge humide.
- Ne jamais mettre l’appareil dans
l’eau ou sous l’eau courante.
• Cet appareil est destiné à être
utilisé dans des applications
domestiques et analogues sauf :

hors de portée des enfants âgés
de moins de 8 ans.
• Les enfants ne doivent pas
utiliser l’appareil comme un
jouet.
• Cet appareil peut être utilisé
par des personnes dont les
capacités physiques, sensorielles
ou mentales sont réduites ou
dont l’expérience ou les connais-
sances ne sont pas suffisantes,
à condition qu’ils bénéficient
d’une surveillance ou qu’ils
aient reçu des instructions quant
à l’utilisation de l’appareil en
toute sécurité et en compren-
nent bien les dangers potentiel.
SAV
• Pour votre sécurité, n’utilisez
pas d’accessoires ou de pièces
de rechange, autres que ceux
fournis par les centres de service
après-vente agréés.
• Toute intervention autre que le
nettoyage et l’entretien usuel
par le client doit être effectuée
par un centre service agréé.
4
débrancher le produit et
attendre le séchage complet du
produit avant de le réutiliser.
• Ne placez jamais vos doigts
ou tout autre objet dans le bol
blender pendant le fonction-
nement de l’appareil.
• N’utilisez pas le bol comme
récipient (congélation, stérilisa-
tion).
• Placez l’appareil sur un plan
de travail stable, résistant à la
chaleur, propre et sec.
• Ne placez pas l’appareil près
d’un mur ou d’un placard :
la vapeur produite pouvant
endommager les éléments.
•
Ne laissez pas pendre vos cheveux,
un foulard, une cravate,…
au dessus du bol pendant le
fonctionnement de l’appareil.
• Ne passez jamais les accessoires
dans un four à micro-ondes.
• N’utilisez pas l’appareil en plein
air.
• Ne dépassez jamais la quantité
maximum indiquée dans la
notice.
• Rangez l’appareil lorsqu’il est
refroidi. Ne pas mettre de l’eau
sur l’écran d’affichage.
• Ne pas utiliser l’appareil avec les
doigts humides.
MARCHES HORS EUROPE
UNIQUEMENT
•
Cet appareil n’est pas prévu pour
être utilisé par des personnes
(y compris les enfants) dont les
capacités phy siques, sensorielles
ou mentales sont réduites ou des
personnes dénuées d’expérience
ou de connaissance, sauf si
elles ont pu bénéficier, par
l’inter médiaire d’une personne
responsable de leur sécurité, d’une
surveillance ou d’instructions
préalables concernant l’utilisation
de l’appareil.
• Il convient de surveiller les
enfants pour s’assurer qu’ils ne
jouent pas avec l’appareil.
MARCHÉS EUROPÉENS
SEULEMENT :
•
En fonction chauffe seule : Cet
appareil peut être utilisé par des
enfants âgés d’au moins 8 ans, à
condition qu’ils bénéficient d’une
surveillance ou qu’ils aient reçu des
instructions quant à l’utilisation
de l’appareil en toute sécurité
et qu’ils comprennent bien les
dangers encourus. Le nettoyage
et l’entretien par l’utilisateur ne
doivent pas être effectués par
des enfants sans surveillance, à
moins qu’ils ne soient âgés de
plus de 8 ans et qu’ils soient sous
la surveillance d’un adulte.
• Dans toutes les utilisations
en mode mixage ou blender :
Cet appareil ne doit pas
être utilisé par les enfants.
Conserver l’appareil et son câble
hors de portée des enfants.
• En fonction chauffe seule :
Conserver l’appareil et son câble
• L’appareil démarre uniquement si le bol et le
couvercle sont correctement positionnés et
verrouillés sur le bloc moteur.
Mise en place du couteau sur le bol
• Montage du couteau démontable (Cf. Fig. 11 a; b; c) :
1. Vérifiez que le joint est bien positionné sur la partie
couteau (Cf. 11.a).
2. Prenez le couteau avec un linge et placez-le dans
son logement dans le fond du bol, en veillant à bien
positionner les ergots du couteau dans les encoches
du bol (Cf. 11.b).
3. Retournez le bol en maintenant le couteau dans son
logement (Cf. 11.c).
4. Verrouillez la partie couteau à l’aide de la bague de
verrouillage (Cf. 11.c).
• Démontage du couteau démontable (Cf. Fig. 11.d) :
Placez le bol au dessus d’un plan de travail.
1. Maintenez le couteau à l’aide d’un linge.
2. Retournez le bol tout en maintenant le couteau.
3. Faites tourner la bague de verrouillage pour
déverrouiller le couteau.
Avertissement : les lames sont très coupantes :
manipulez-les avec précaution pour ne pas vous blesser
lors du montage, démontage et nettoyage du bol et
du couteau.
En cas de mauvais positionnement ou de mauvais
verrouillage de l’un ou de l’autre (Cf. Fig. 5 et 6), le
logo
START START
se met à clignoter lorsque l’on active une
fonction.
Votre appareil possède 2 modes de fonctionnement
• Mode automatique : température, durée de cuisson et
le mixage sont préprogrammées. La durée de cuisson
peut être ajustée
-
: soupe veloutée (texture fine)
-
: soupe moulinée (texture dense)
-
*: cuisson vapeur avec l’accessoire panier vapeur
• Mode manuel : réglage des paramètres selon votre
convenance
-
: savoureux smoothies et cocktails. Réglage
personnalisé de la vitesse et de la durée de mixage
-
: cuisson. Réglage personnalisé de la température
et de la durée de cuisson. Possibilité d’activer la
vitesse en cours de cuisson
-
: glace pilée. Réglage de la durée des pulses
Mise en place du bol et de l’ensemble couvercle
• Avant la première utilisation, nettoyez tous les
accessoires (D, E et F) à l’eau chaude savonneuse, mais
pas le bloc moteur (A).
• Assurez-vous que tout emballage soit retiré avant le
fonctionnement de l’appareil.
• Placez le joint sur le couvercle (Cf. Fig. 1).
• Pour réaliser des cuissons vapeur, positionnez le panier
avec les légumes coupés en morceaux et remplissez le
bol avec 0.5 litre d’eau froide sans dépasser le bas du
panier (Cf. Fig.13 a; b; c).
• Positionnez le couvercle (E) sur le bol (D) (Cf. Fig.2),
verrouillez le couvercle sans appuyer en tournant dans
le sens de la flèche (Cf. Fig.3).
• Positionnez le bol blender (D) sur le bloc moteur (A)
jusqu’à entendre un « clic » (Cf. Fig. 4).
MISE EN SERVICE
5
6
UTILISATION DE L’APPAREIL
Votre appareil se met en veille après 10 minutes d’inactivité. Vous pouvez réactiver l’appareil en appuyant sur la touche
start/stop. En cas de débranchement rapide, l’appareil peut rester en mode veille.
MODE PROGRAMMES AUTOMATIQUES
Une fois l’eau et les ingrédients placés au fond du bol ou dans le panier vapeur, verrouillez le couvercle et positionnez le
bol sur le bloc moteur (voir mise en service), puis sélectionnez le programme automatique désiré.
Vous pouvez modifier vos paramètres temps en appuyant sur le timer . Puis ajustez le temps à l’aide des touches + (augmenter)
et - (diminuer) (b5). Pour démarrer le programme automatique, appuyez sur START/STOP (b3)
Lorsque le programme est terminé, l’appareil émet 3 bips.
Déverrouillez le bol en appuyant sur la gâchette (d2) située à l’intérieur de la poignée (cf. Fig. 9) et servez de suite ou
laissez le bol en place en maintien au chaud (jusqu’à 40 minutes).
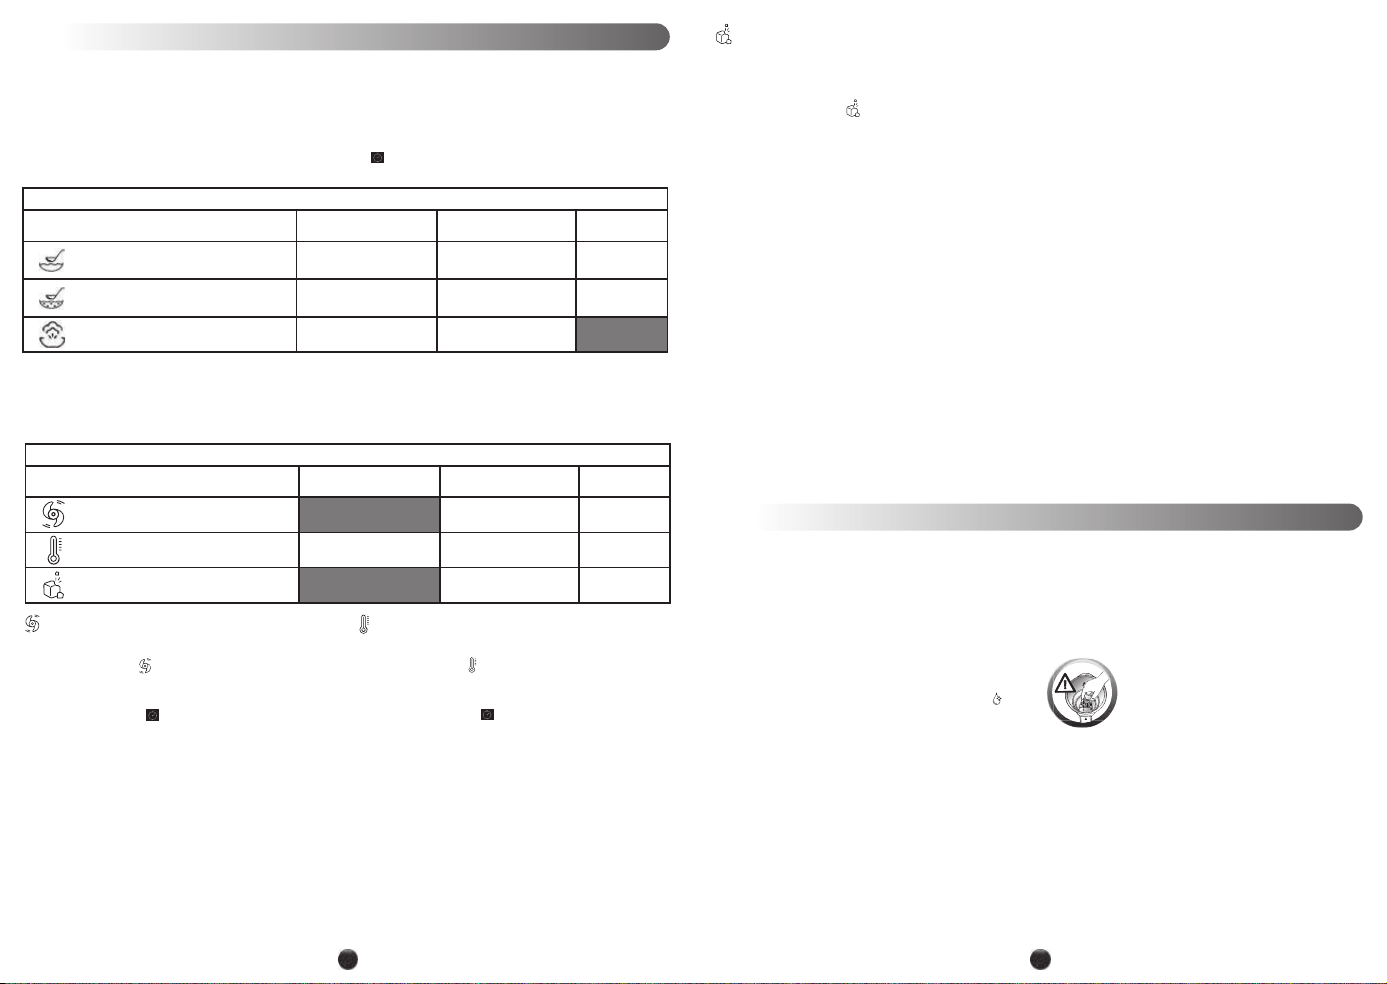
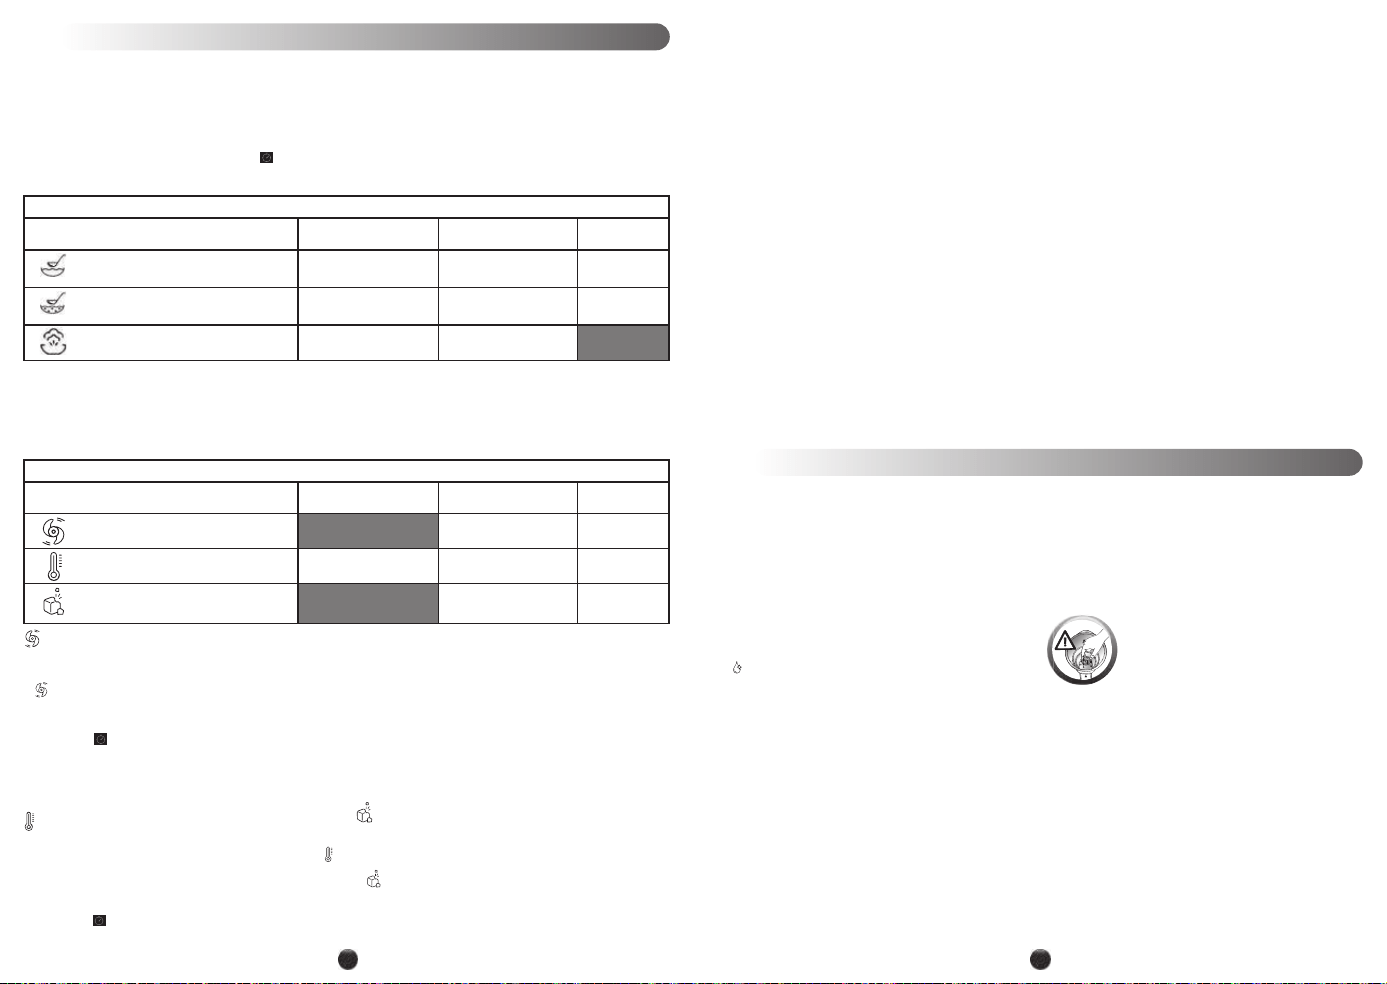
Découvrez les programmes automatiques proposés
Température (max) Temps ajustable Mixage
Soupe Veloutée (texture fine) 100°C
30 min. (+ ou -10 min)
Vitesse maxi
1 min
Soupe Moulinée (texture dense) 100°C
40 min. (+ ou -10 min)
Vitesse mini
13s
Cuisson vapeur avec le panier de
cuisson et 50 cl d’eau *
100°C
30 min. (+ ou -20 min)
CONSEILS PRATIQUES
• Attention à avoir un niveau de liquide suffisant pour
recouvrir le repère mini (Cf. Fig. 7). et à ne pas dépasser
le repère MAX gravé à l’intérieur du bol (Cf. Fig. 8).
• Certaines recettes peuvent provoquer des
débordements intempestifs, en raison de
l’apparition de bulles, en particulier lors de
l’utilisation de légumes congelés. Dans ce cas, il vous
appartient de réduire les volumes en conséquence.
• L’information temps ou température clignote : vous
avez la possibilité de modifier cette information. Ajustez
si besoin le temps à l’aide des touches + (augmenter) et
– (diminuer) (b5), en fonction des ingrédients utilisés et
du volume préparé (voir tableau des temps de cuisson
des soupes dans le livret recettes).
• Le panier de cuisson (selon modèle*) vous permet de
réaliser des cuissons vapeur (avec 0.5 litre d’eau),
ou pour une préparation avec morceaux, de cuire
des ingrédients entiers tels que viandes, poissons,
légumes, en même temps que votre soupe.
• A la fin des programmes automatiques, l’appareil
passe automa tiquement en maintien au chaud
pendant 40minutes pour conserver la préparation
prête à être consommée. Pour stopper le maintien au
chaud, il suffit d’appuyer sur la touche START/STOP.
Si vous ouvrez le couvercle, appuyez sur la gâchette
ou retirez le bol, le maintien au chaud sera
automatiquement arrêté.
• Lorsque le programme est lancé, vous avez la
possibilité d’arrêter l’appareil à tout moment en
appuyant sur la touche START/STOP (émission de
2 bips sonores). Le programme est alors en mode
pause, vous avez la possibilité de le relancer en
appuyant de nouveau sur START/STOP (émission
d’un bip sonore).
Si vous vous êtes trompé de programme et si vous
voulez annuler, appuyez pendant 2 secondes sur le
bouton START/STOP, cela permet de réinitialiser les
temps et les températures.
• Lorsque vous transportez l’appareil portez-le par son
bloc moteur A.
MODE CUISSON
• Appuyez sur la touche MENU jusqu’au pictogramme
MODE CUISSON
puis sélectionnez la température
avec les touches + et – .
• Si vous souhaitez programmer le temps de cuisson,
appuyez sur TIMER
, et réglez le temps à l’aide des
touches +/-.
• Appuyez sur START/STOP pour démarrer la cuisson.
Le témion luminueux rouge s’allume pour vous
informer que la cuisson a démarré.
• A tout moment en cours de programme, vous pouvez
actionner le moteur en appuyant sur la touche +
- en vitesse lente (v1) pour mélanger des aliments
liquides (ex: réalisation de sauces)
- en vitesse rapide (à partir v2) pour mixer
• Une fois votre cuisson terminée, appuyez sur la
gachette (d2) puis soulevez le bol blender
MODE BLENDER (sans cuisson)
• Appuyez sur la touche MENU jusqu’au pictogramme
MODE BLENDER
puis sélectionnez la vitesse de
mixage avec les touches +/-.
• Si vous souhaitez programmer le temps de mixage,
appuyez sur TIMER
et réglez le temps à l’aide des
touches +/-.
• Appuyez sur START/STOP pour démarrer le mixage.
• Une fois votre préparation mixée, appuyez sur la
gachette (d2) puis soulevez le bol blender.
7
• L’appareil ne doit pas être immergé. Ne passez pas le
bloc moteur (A) sous l’eau chaude courante.
• Nettoyez immédiatement votre bol après utilisation.
• Remplissez le bol avec 1 litre d’eau chaude
additionné de 2, 3 gouttes de produit vaisselle.
Respectez les quantités d’eau et de liquide
vaisselle préconisés. Un surplus de liquide
vaisselle augmente fortement le moussage et par
conséquent favorise les débordements.
• Utilisez le programme automatique Autoclean :
pour
réaliser un prélavage du bol.
• Une fois le programme terminé, débranchez l’appareil.
• Appuyez sur la gâchette (d2) puis soulevez le bol
blender (D).
• Placez le bol sur une surface plane.
• Déverrouillez le couvercle en le tournant d’un quart
de tour dans le sens des aiguilles d’une montre.
Retirez le couvercle avec précaution.
• Lorsque le couvercle est refroidi, retirez le joint
d’étanchéité. Pour cela, attrapez-le entre le pouce et
l’index, puis tirez pour l’extraire. Le joint se démonte
sans risque de détérioration (Cf. fig.12).
• Finissez le nettoyage du bol à l’aide d’une éponge.
• Rincez l’intérieur du bol sous l’eau courante ainsi que
son couvercle.
• En cas d’encrassement prononcé de la partie
chauffante du bol, laissez tremper pendant
plusieurs heures avec de l’eau additionnée de
liquide vaisselle pour faciliter le nettoyage.
• Prenez des précautions avec les lames
(d3) du bol blender lorsque vous les
nettoyez et lorsque vous videz le bol,
elles sont coupantes.
• Pour nettoyer le bloc moteur (A), utilisez un chiffon
humide. Séchez-le soigneusement.
• Les éléments amovibles (couvercle, joint, bouchon,
panier de cuisson) se nettoient à l’aide d’une
éponge et d’eau chaude savonneuse.
• Afin de préserver l’aspect et la longévité du couvercle
de votre appareil, lavez-le à la main. N’utilisez pas
le côté abrasif de l’éponge afin d’éviter les rayures.
• Le couteau démontable ne passe pas au lave-vaisselle,
lavez-le sous le robinet à l’aide d’une brosse.
NETTOYAGE DE L’APPAREIL
9
9
9
MODES MANUELS
Découvrez les programmes automatiques proposés
Température (max) Temps ajustable Mixage
Mode blender
De 0 à 3 minutes
De V1 à V5
Mode Cuisson De 60°C à 100°C
De 0 à 59 minutes
De V1 à V5
Glace pilée
De 5 secondes à
30secondes
Pulse
MODE GLACE PILEE :
• Mettre de 6 à 8 glaçons maximum dans le bol et
fermez le couvercle
• Appuyez sur la touche MENU jusqu’au pictogramme
MODE GLACE PILEE
.
• Par défaut le temps de mixage est réglé à 30s.
Si vous souhaitez ajuster ce temps, appuyez sur
TIMER et réglez à l’aide des touches +/-
• Appuyez sur START/STOP pour démarrer le mixage
• Une fois votre préparation mixée, appuyez sur la
gachette (d2) puis soulevez le bol blender

9
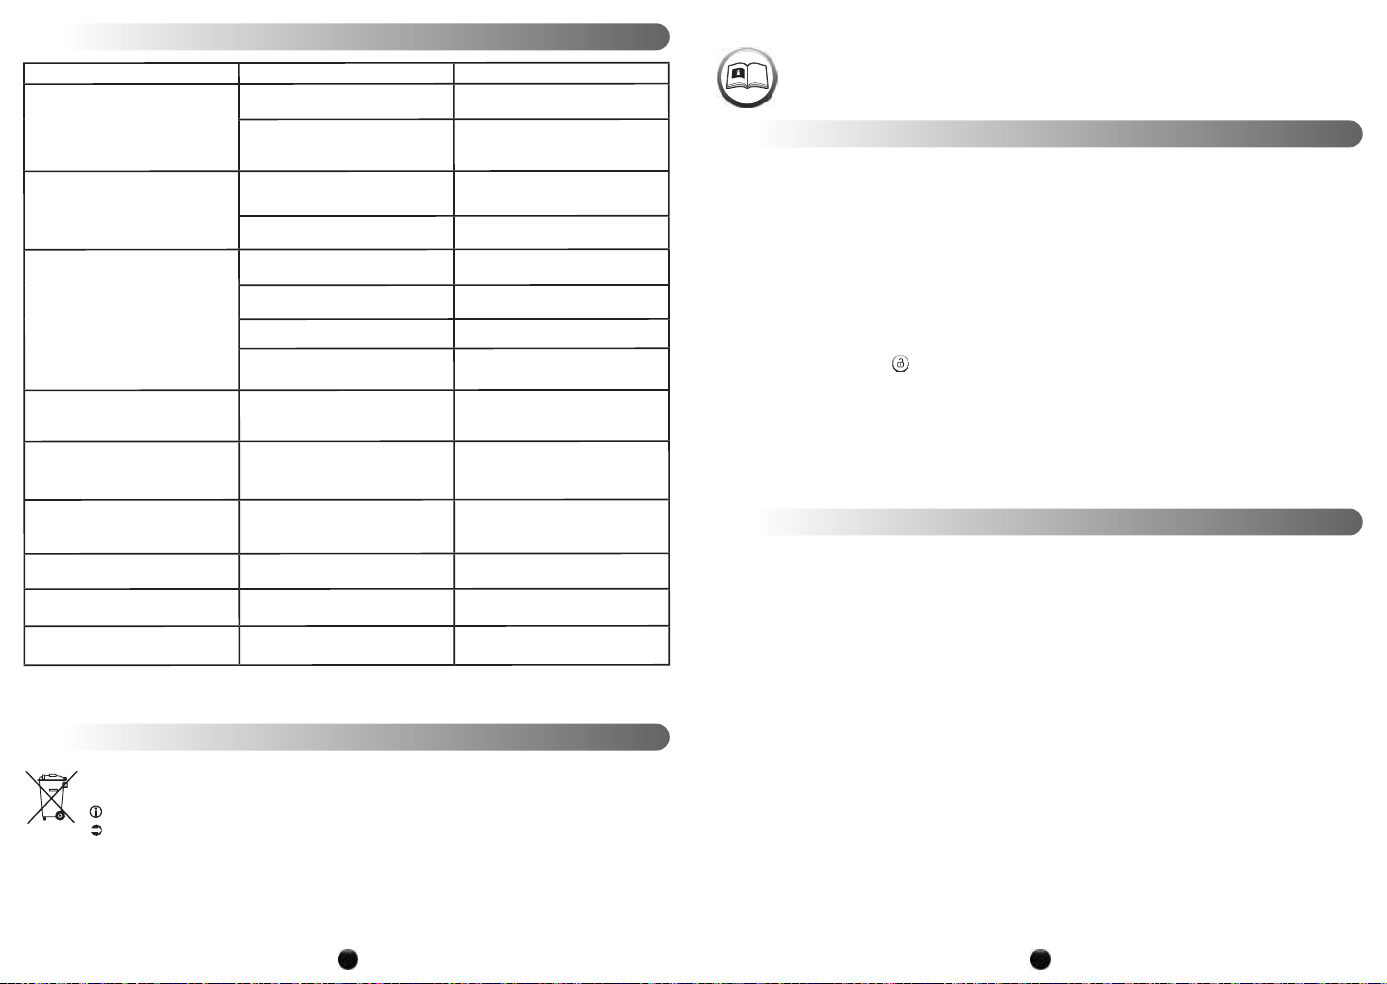
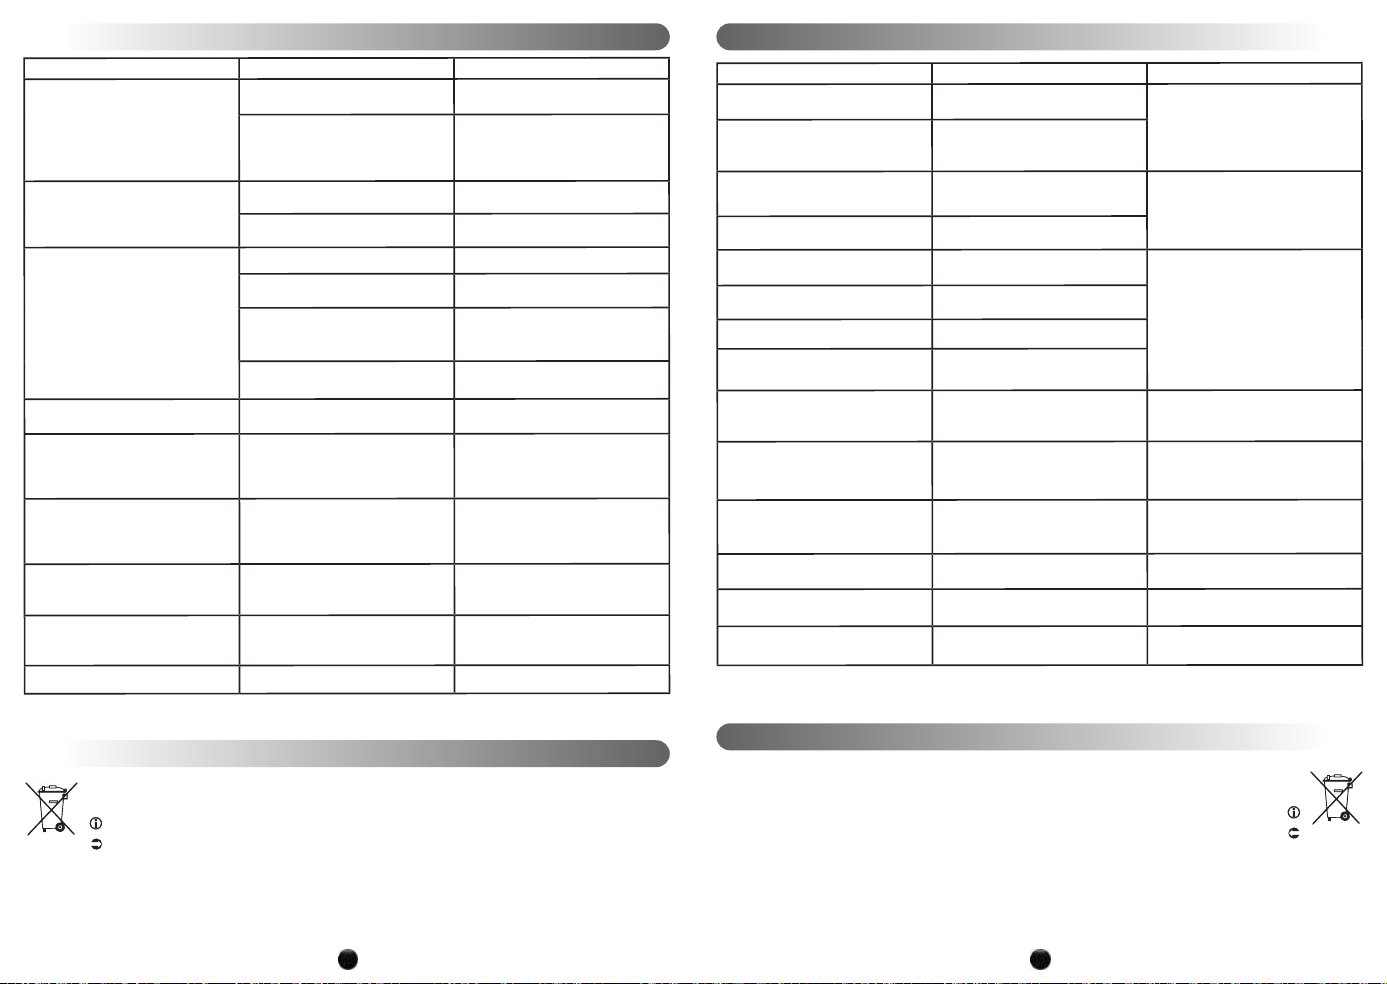
SI VOTRE APPAREIL NE FONCTIONNE PAS, QUE FAIRE ?
PROBLÈMES CAUSES SOLUTIONS
L’appareil ne fonctionne pas
La prise n’est pas branchée Branchez l’appareil sur une prise.
Le bol ou le couvercle ne sont pas
correctement positionnés
ou verrouillés
Vérifiez que le bol ou le couvercle sont
bien positionnés et verrouillés suivant
les schémas de la notice
Vibrations excessives
L’appareil n’est pas posé sur une
surface plane, l’appareil n’est pas stable
Placez l’appareil sur une surface plane
Volume d’ingrédients trop important
ou trop faible
Respecter le volume min ou max
autorisé.
Fuite par le couvercle
Volume d’ingrédients
trop important
Réduisez la quantité d’ingrédients
traités
Le couvercle n’est pas bien
positionné ou verrouillé
Verrouillez correctement
le couvercle sur le bol
Le joint d’étanchéité
n’est pas présent
Positionnez le joint d’étanchéité sur
le couvercle.
Le joint d’étanchéité est coupé,
détérioré
Changez le joint, contactez
un centre service agréé
Les lames ne tournent
pas facilement
Morceaux d’aliments
trop gros ou trop durs
Réduisez la taille ou la quantité
d’ingrédients traités. Ajoutez du liquide.
Affichage “StoP”
Surcharge moteur provoquée par une
quantité d’ingrédients trop importante
ou des morceaux trop durs ou trop gros.
Débranchez votre appareil. Laissez
refroidir l’appareil 30min et réduisez la
quantité d’ingrédients à traiter.
Affichage “SECU” + témoin
lumineux rouge clignote
Bol vide, presque vide ou préparation
pas assez liquide
Débranchez votre appareil. Ajoutez du
liquide jusqu’au niveau minimum du
bol (Cf. Fig. 7).
Affichage « Err4 »
+ témoin lumineux rouge clignote
La résistance chauffante
ne fonctionne pas
Débranchez votre appareil et contactez
un centre agréé.
Affichage « ntc »
+ témoin lumineux rouge clignote
Le capteur de température
ne fonctionne plus
Débranchez votre appareil et contactez
un centre agréé.
L’écran tactile ne fonctionne pas L’écran est peut-être humide Laisser reposer l’appareil 15 minutes
Votre appareil ne fonctionne toujours pas ?
Adressez-vous à un centre service agréé (voir la liste dans le livret service).
RECYCLAGE
Participons à la protection de l’environnement !
Votre appareil contient de nombreux matériaux valorisables ou recyclables.
Confiez celui-ci dans un point de collecte pour que son traitement soit effectué.
8 9
By reading this guide, you will find some user instructions that will help you discover the full potential
of your appliance: make creamy or thick soups, chunky soups, sauces and fruit purées, smoothies,
cocktails and steam based recipes and much more.
Personal safety
• Read the instruction
manual carefully before
you use your appliance
for the first time and
retain them for future use:
improper use will release
the manufacturer from any
liability.
• Do not allow children to use
the appliance unsupervised.
• WARNING: When using the
appliance, some parts become
very hot and give off a residual
heat after use: the stainless
steel wall of the bowl, parts of
the lid and cap that cannot be
gripped, metal parts under the
bowl, basket (depending on
the model). This can lead to
burns. Handle the appliance by
the cold plastic parts: handles,
motor block, grip areas of the
lid or cap, during heating and
until the appliance has cooled
completely. The red heating
indicator light warns of a risk
of burns.
EN
SAFETY INSTRUCTIONS
START START
A Motor unit
B Control panel
b1 MENU button
b2 AUTOCLEAN button
b3 START/STOP/RESET button
b4 Operating time selector (timer)
b5 Speed/Temperature/Time +/- selector
C Display screen
c1 FINE BLENDING
c2 COARSE BLENDING
c3 STEAM* (depending on model)
c4 Autoclean display
c5 Safety indicator display
START START
c6 Time display
c7 Speed or temperature
c8 BLENDER MODE:
c9 COOKING MODE:
c10 CRUSHED ICE
c11 Heating indicator
D Blender jug unit
d1 Stainless steel jar
d2 Handle with trigger
d3 Removable blade assembly
d4 Seal
d5 Locking ring
E Lid unit
e1 Measuring cap
e2 Lid
e3 Waterproof seal
F Cooking basket (depending on model*)
f1 Handle
f2 Basket
Technical data on appliance:
Maximum temperature: 100°C
Power: 1100W
Maximum programming time: 59 minutes.
APPLIANCE DESCRIPTION
Cet appareil,
ses accessoires
et cordons
se recyclent
Points de collecte sur www.quefairedemesdechets.fr
Privllégiez la réparation ou le don de votre apparell !
À DÉPOSER À DÉPOSER
FR
EN MAGASIN
EN D
É
CH
É
TERIE

10 11
10
• Do not use your appliance if
it is not working correctly, if
it has been damaged or if the
power cord or plug have been
damaged. To avoid any danger
have the cord replaced by an
approved service centre (see
list in the service booklet).
• Your appliance has been
designed for domestic use only
and at an altitude lower than
2000 m. The manufacturer
shall not accept any liability
and reserves the right to cancel
the guarantee in the event of
commercial or unsuitable use,
or if the instructions have not
been followed.
START START
• WARNING: Your
appliance releases steam
that could cause burns.
Handle the lid and measuring
with care (if necessary, use a
glove, hotpad, etc.). Handle the
measuring by its central part.
• Be careful if pouring hot liquid
into the food processor or
mixer, as it could be ejected
from the appliance due to a
sudden steaming.
• Do not operate the appliance if
the measuring is not correctly
positioned in the hole in the
lid and/or if the seal is not
correctly positioned on the lid.
• WARNING: Injuries may
occur if the appliance is used
incorrectly.
START START
• The blades are very
sharp: handle them with
care so as not to injure
yourself when emptying
the bowl, as well as
cleaning, assembling and
disassembling the blade
assembly.
• WARNING: Take care when
handling your appliance
(cleaning, filling and pouring):
avoid any overflow of liquids
onto the display screen and
the connectors.
• Refer to the instruction
manual to set the speeds
and operating times for each
program.
• Refer to the instruction manual
for details on assembling and
fitting the accessories to the
appliance.
• Refer to the instruction manual
for details on cleaning and
maintaining your appliance.
• Always follow the cleaning
instructions to clean your
appliance:
- Disconnect the appliance.
11
- Do not clean the appliance
when it is hot.
- Clean with a damp cloth or
sponge.
- Never put the appliance in
water or under running water.
• This appliance is not intended
to be used in the following
applications, and the
guarantee will not apply for:
- kitchen work areas in shops,
offices and other work
environments.
- kitchens used by employees
in shops, offices and other
working environments.
- farms.
- use by guests in hotels,
motels and other residential
environments.
- other bed and breakfast-type
accommodation.
Electrical connection
• The appliance must be
connected to an earthed
electrical socket.
• The appliance is designed to
operate on alternating current
only. Check that your mains
voltage matches the voltage
indicated on the appliance’s
identification plate.
• Given the diverse standards in
effect, if the appliance is used
in a country other than that
in which it is purchased, have
it checked by an Approved
Service Centre.
• Always disconnect the
appliance from the mains if
leaving unattended and before
assembling, disassembling
and cleaning.
• Any error in connection will
invalidate the guarantee.
• Never pull out the power cable
to disconnect the appliance.
• Never submerge the appliance,
power cable or plug in liquid.
• The appliance must not be
immersed in water or any
other liquid..
• The power cord must be kept
out of the reach of children
and must not be placed near
or come into contact with the
hot parts of the appliance,
sources of heat or sharp edges.
Incorrect use
• Never use the blender bowl
without ingredients or with
only dry products.
• Always add solid ingredients
into the bowl before adding
liquid ingredients, without
exceeding the MAX mark
engraved or marked on the
bowl (depending on the
model). If the blender is too
full, boiling water may be
ejected. Ensure that the liquid
level is sufficient to cover the
minimum mark (Fig.7).

12 13
12
• Some recipes can cause
unwanted overflows, due to
the appearance of bubbles,
especially when using frozen
vegetables. In this case, it is up
to you to reduce the volumes
accordingly.
• Never place your fingers or
other objects in the blender
bowl while the appliance is
operating.
• Do not use the bowl as
a container (freezing,
sterilisation).
• Set the appliance on a stable,
heat-resistant, clean and dry
work surface.
• Do not place the unit
near a wall or cupboard:
the steam produced may
damage the components.
• Do not allow your hair, scarf,
tie, etc. to hang over the bowl
during operation.
• Never put the accessories into
a microwave oven.
• Never use the appliance
outdoors.
• Never exceed the maximum
quantity indicated in the
instructions.
• Store the appliance when it
has cooled down. Do not get
water on the control screen.
• Do not operate the appliance
with wet hands.
NON-EUROPEAN MARKETS
ONLY
• This appliance is not intended
to be used by those (including
children) with reduced
physical, sensory or mental
abilities, or those lacking
experience or knowledge,
unless they have been given
prior instruction on how to
safely use the appliance or
are under the supervision of
a person responsible for their
safety.
• Children must be supervised to
ensure that they do not play
with the appliance.
EUROPEAN MARKETS ONLY:
• When heating only: This
appliance can be used by
children aged 8 years or over,
on the condition that they
are supervised or that they
have received instructions
on how to use the appliance
in total safety and that they
fully understand the dangers
related to the appliance.
Cleaning and maintenance of
the appliance should not be
performed by children without
supervision, unless they are 8
years of age or older and under
the supervision of an adult.
• When using the
mixer or blender: This
appliance must not
be used by children.
Keep the appliance and its
cable out of reach of children.
When heating only: Keep the
13
lid are correctly in place and are locked onto the
motor unit.
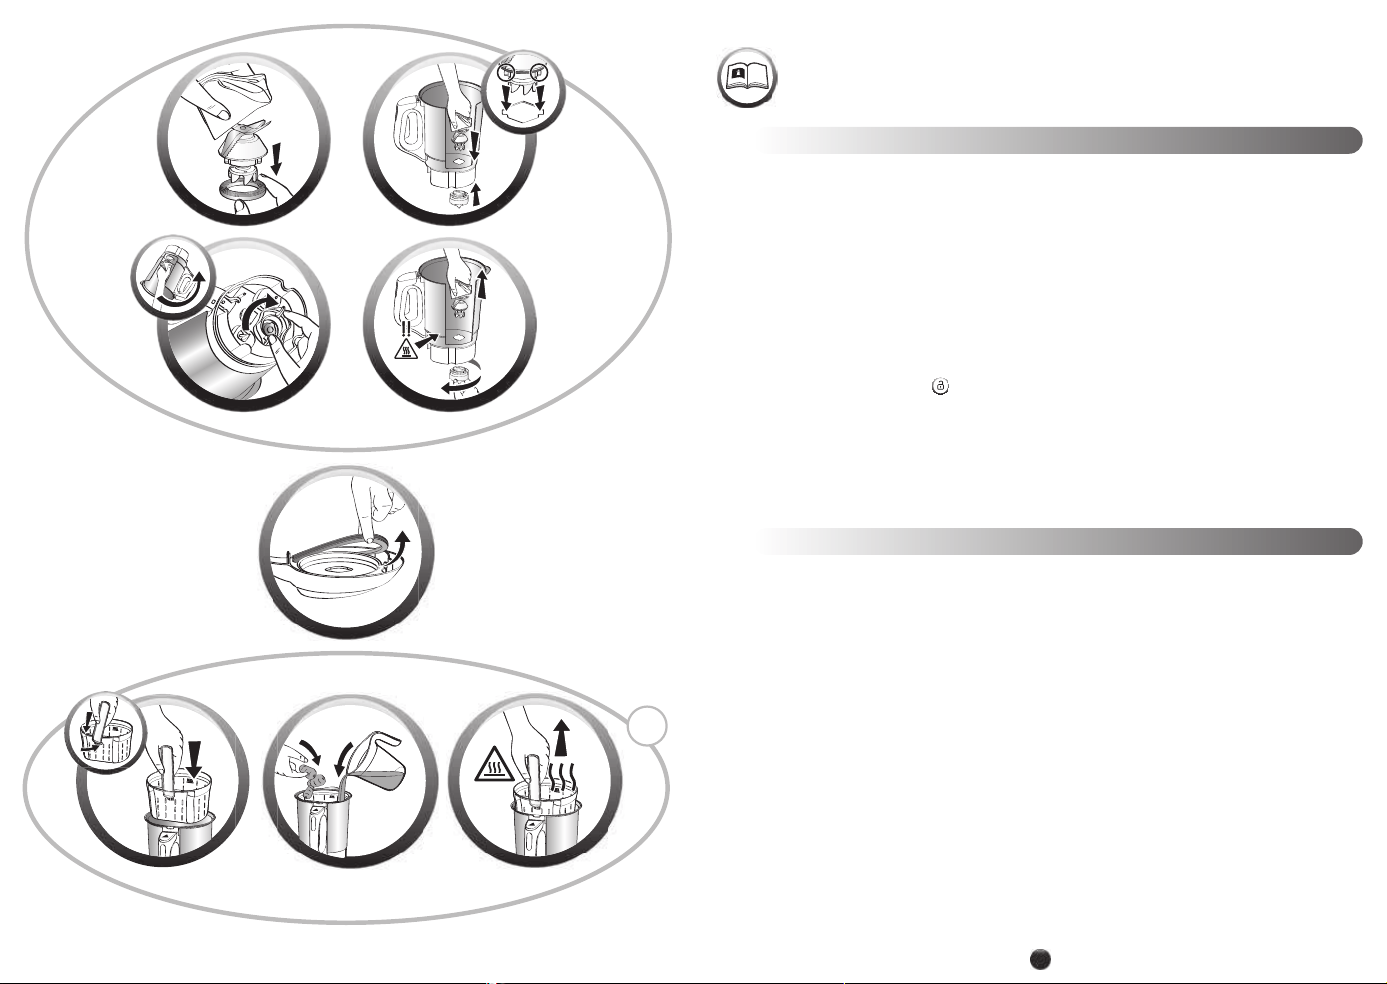
Installing the blade assembly in the jar (*depending
on the model)
• Fitting the removable blade assembly (*depending
on the model
Cf. Fig. 11 a; b; c):
1. Make sure that the seal is properly positioned over
the blade assembly
(Cf. 11.a)
.
2. Pick up the blade assembly using a cloth and place
it in its slot at the bottom of the jar, making sure
you carefully position the blade assembly grips in
the jar grooves
(Cf. 11.b)
.
3. Return the jar keeping the blade assembly in its slot
(Cf. 11.c)
.
4. Lock the blade assembly section using the locking
ring
(Cf. 11.c)
.
• Dismounting the removable blade assembly
(*depending on the model
Cf. Fig. 11.d)
:
Place the jar on a work surface.
1. Use a cloth to help hold the blade assembly.
2. Return the jar while holding the blade assembly.
3. Turn the locking ring to unlock the blade assembly.
Warning: the blades are very sharp: handle them
with care so as not to injure yourself whilst fitting,
dismounting and cleaning the jar and the blade
assembly.
In the event of incorrect positioning or locking of one
or the other (Cf. Fig. 5 and 6), the lock sign
START START
starts
to flash when you activate a function.
Your appliance has 2 operating modes
• Automatic mode: temperature, cooking time and
mixing are pre-programmed. The cooking time may
be adjusted.
-
: fine blending
-
: coarse blending
-
*: steam cooking with steam basket accessory
• Manual mode: adjust the settings to your liking
-
: tasty smoothies and cocktails. Customised setting
of mixing speed and duration
-
: cooking. Customised setting of temperature and
cooking time. Option to activate the speed during
cooking
-
: crushed ice. Setting the pulse time
Positioning of the jug and the lid unit
• Before using for the first time, wash all the
accessories (D, E and F) in hot soapy water except
for the motor unit (A).
• Make sure that all packaging is removed before
operating the appliance.
• Place the seal on the lid (Cf. Fig. 1).
• To steam cook, put the basket with the sliced
vegetables in position and fill up the jug with 0.5
litres of cold water without exceeding the bottom
of the basket
(Cf. Fig.13 a; b; c).
• Position the lid (E) on the jar (D) (Cf. Fig. 2), lock the
lid without pressing by turning it in the direction of
the arrow (Cf. Fig. 3).
• Position the blender jar (D) on the motor unit (A)
until you hear it click (Cf. Fig. 4).
• The appliance only starts up once the jug and
BEFORE FIRST USE
appliance and its cord out of
the reach of children less than 8
years old.
• Children must not use the
appliance as a toy.
• This appliance can be used
by persons with reduced
physical, sensory or mental
abilities or lacking experience
or knowledge on the condition
that they have been given
supervision or instructions
for using the appliance in a
safe way and understand the
dangers involved.
AFTER-SALES
• For your safety, do not use
accessories or spare parts,
other than those provided by
authorised service centres.
• Any operation other
than cleaning or routine
maintenance should be
performed by an approved
service centre.

14 15
14
USING THE APPLIANCE
Product become in stand-by after 10minutes of inactivity. You can reactive the product by touching Start/stop key. In
case of quick unplug and plug product, it can stay in stand-by mode.
PROGRAM MODE
Once the water and ingredients are in the bottom of the bowl or in the steam basket, lock the lid and place the bowl on
the motor unit (see Getting Started), then select the desired automatic program.
You can modify your settings by pressing on the timer
.
Next, adjust the time using the + and - (b5). To start the
automatic program, press START/STOP (b3)
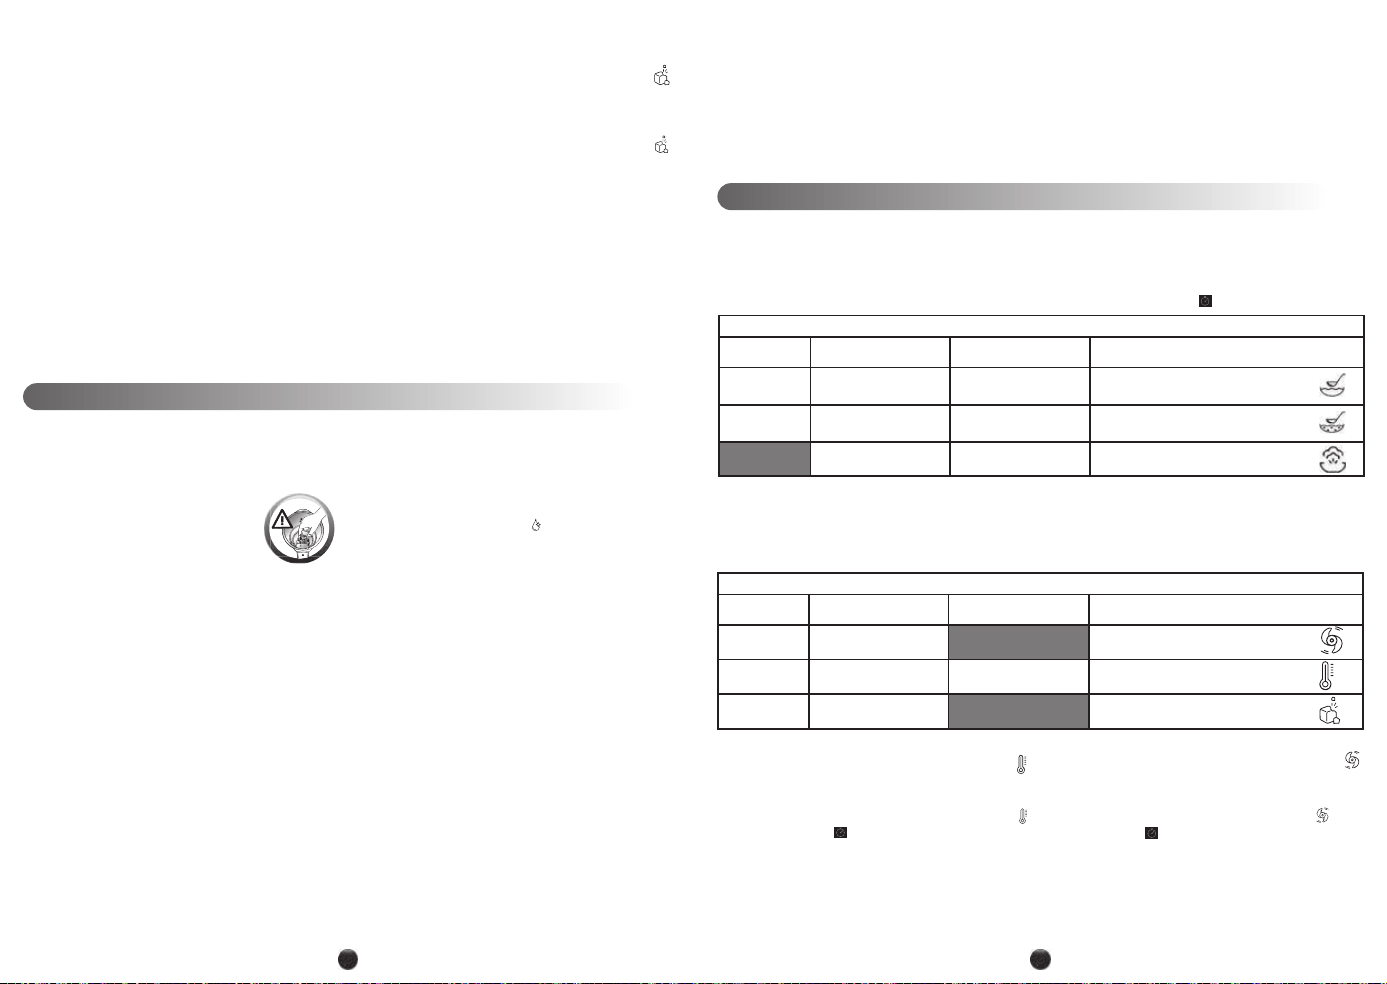
Introducing the suggested automatic programs
Temperature (Max) Adjustable times Mixing
Creamy soup (thin texture) 100°C
30 min. (+ or -10 min)
Max speed
1 min
Chunky Soup (texture dense) 100°C
40 min. (+ or -10 min)
Min speed
13 secs
Steam cooking with cooking basket
and 50 cl water *
100°C
30 min. (+ or -20 min)
When the program is finished, the appliance gives out 3 beeps.
Unlock the jug by pressing the trigger (d2) located on the inside of the handle (cf. Fig. 9) and serve immediately or leave
the jug in place to keep warm (up to 40 minutes).
BLENDER MODE (without cooking)
• Press MENU until you reach the BLENDER MODE
icon
then select the mixing speed with the +/-
buttons.
• If you want to program the mixing time, press on
TIMER
and set the time using the buttons +/-.
• Press on START/STOP for starting up the mixing.
• Once your preparation is mixed, press the release
button (d2) and remove the blender bowl.
COOKING MODE
•
Press the MENU button until you reach the COOKING
MODE icon
then select the temperature with the +
and – buttons.
•
If you want to program the cooking time, press TIMER ,
and set the time using the +/- buttons.
•
Press START/STOP to start cooking. The red indicator
light comes on to let you know that cooking has started.
•
At any time during the program, you can operate the
motor by pressing the + key.
- at slow speed (v1) to mix liquid foods (e.g. making
sauces)
- at high speed (from v2) for mixing
•
When you have finished cooking, press the release
button (d2) then remove the blender bowl
CRUSHED ICE MODE:
•
Put 6 to 8 ice cubes in the bowl and close the lid.
•
Put Press the MENU key until you reach the CRUSED
ICE icon
.
• The default mixing time is set to 30s. If you want
to adjust this time, press TIMER and adjust it using
the +/- buttons
• Press START/STOP to start mixing
- Once your preparation is mixed, press the release
button (d2) then remove the blender bowl
PRACTICAL GUIDANCE
• Make sure you have enough liquid to cover the Min
limit marker (Cf. Fig. 7). and take care not to exceed
the MAX limit marker engraved inside the jug (Cf.
Fig. 8).
• Some recipes may cause sudden overflowing, due
to the formation of bubbles, particularly when using
frozen vegetables. In this case, it is up to you to
reduce the quantities accordingly.
• Time and temperature information is flashing:
you can modify this information. Adjust the time
as required with the aid of the + (increase) and -
(decrease) buttons, depending on the ingredients
used and the amount to be made (see table of the
cooking times for soups in the recipe booklet).
• With the cooking basket (depending on model*)
you can steam cook (use P3 with 0.5 litres of water),
or for chunky soup recipes and cooking whole
ingredients such as meat, fish, vegetables at the
same time as your soup (use P1 or P2).
• At the end of the programs, the appliance
automatically keeps the recipe warm for 40 minutes
so it remains ready to be consumed. To stop
warming, simply press the OFF button.
• If you open the lid, press the trigger or remove the
jug, the warming process will automatically stop.
• When the program has started, you can stop the
appliance at any time by pressing the P button (2
beeps will sound). The program is then in pause
mode and you can restart it by pressing the P button
again or by pressing the OK button (a beep signal
will be emitted).
• If you choose the wrong program by mistake and
you wish to cancel it, press the OFF button for 2
seconds and that will allow you to restart the times
and the temperatures.
15
• Do not immerse the appliance in water. Never put
the motor unit (A) under hot running water.
• Clean the jug immediately after use.
• Fill up the jug with 1 litre of hot water along with
2 or 3 drops of washing up liquid Only use the
recommended amount of water and washing up
liquid. An excess of washing up liquid creates more
foam and consequently can lead to overflowing.
• Use the Autoclean automatic program:
to pre-
wash the bowl.
• Once the program has stopped, unplug the
appliance.
• Press on the trigger (d2) then remove the blender
jug (D).
• Place the jug on a flat surface.
• Unlock the lid by turning it a quarter turn clockwise.
Remove the lid with care.
• When the lid is cool, remove the carrier seal. To do
so, grip it between your thumb and index finger, then
pull to extract it. The seal dismounts without risk of
deterioration (Cf. Fig. 12).
• Finish cleaning the jug with the aid of a sponge.
• Rinse the inside of the jug and the lid under running
water.
• In the event of the heated part of the jug getting
extremely dirty, leave to soak for a few hours in a mix
of water and washing up liquid to help get it clean.
• Take care when cleaning the blades
(d3) in the blender jug and when you
empty the bowl as they are sharp.
• Use a damp cloth to clean the motor unit (A). Dry
it carefully.
• The detachable parts (lid, seal, measuring cap,
cooking basket) can be cleaned with a sponge and
hot soapy water.
• To preserve the appearance and service life of the
lid of your appliance, hand wash it. Do not use the
abrasive side of the sponge to avoid scratches.
• The removable blade is not dishwasher safe — wash
it under running water using a brush.
9
9
9
CLEANING THE APPLIANCE
Manual Mode
Introducing the suggested automatic programs
Temperature (Max) Adjustable times Mixing
Blender Mode
0 - 3 min.
V1 - V5
Cooking Mode
60°C - 100°C
0 - 59 min.
V1 - V5
Crushed Ice 5 - 30sec. Pulse
16 17
16
WHAT TO DO IF YOUR APPLIANCE DOES NOT WORK
PROBLEMS CAUSES SOLUTIONS
The appliance does not work.
It is not plugged in.
Plug your appliance into the mains
power supply.
The jug and the lid are not in the
correct place or are not locked
correctly.
Check that the jug and the lid are
correctly positioned and locked following
the diagrams in the instructions
Excessive vibrations.
The appliance is not placed on a flat
surface, the appliance is not stable
Place the appliance on a flat stable
surface.
Amount of ingredients too big or
too small.
Respect the minimum or maximum
authorised volume.
Leak through lid.
Volume of ingredients is too high.
Reduce the quantity of ingredients
processed.
The lid is not positioned or locked
correctly
Lock the lid firmly onto the jug
The waterproof seal is not present Position the carrier seal on the lid.
The waterproof seal has been cut
through or damaged
Change the seal or contact an
approved service centre
The blades do not rotate easily Pieces of food too big or too hard
Reduce the size or quantity of the
ingredients processed.
Add some liquid
Display “STOP”
Motor overload caused by too large
an amount of ingredients or pieces of
food that are too hard or too large
Unplug your appliance and let it cool
for 30 mins and reduce the amount of
ingredients to be processed.
Displays “SECU” + red indicator
light is flashing
Empty jug, nearly empty or
not enough liquid in recipe
Unplug your appliance. Add some
liquid up to the minimum level of the
bowl (See Fig. 7).
Displays “Err”
+ red indicator light is flashing
The heating element does not work
Unplug your appliance and contact an
authorised centre.
Displays « ntc »
+ red indicator light is flashing
The temperature sensor is no longer
working
Unplug your appliance and contact an
authorised centre.
The touchscreen is not working The screen may be damp Let the appliance rest for 15 minutes
Your appliance still doesn’t work?
Contact the Customer Relations Helpline - see contact list.
RECYCLING
Environment protection first !
Your appliance contains valuable materials which can be recovered or recycled.
Leave it at a local civic waste collection point.
17
A Motorblok
B Bedieningspaneel
b1 MENU knop
b2 AUTOCLEAN knop
b3 START / STOP / RESET knop
b4 Timerregelaar
b5 Snelheid / Temperatuur / Tijd +/- regelaar
C Beeldscherm
c1 GLADDE SOEP
c2 GEPUREERDE SOEP
c3 STOMEN * (afhankelijk van het model)
c4 Autoclean-indicator
c5
Veiligheidsindicator
START START
c6 Tijdsweergave
c7 Snelheids- of temperatuurweergave
c8 BLENDERMODUS
c9 KOOKMODUS
c10 IJSGRUIS
c11 Verwarmingscontrolelampje
D Blenderkom met toebehoren
d1 Roestvrijstalen kom
d2 Pal handgreep
d3 Demonteerbaar mes
d4 Ring
d5 Vergrendelingsring
E Deksel met toebehoren
e1 Doseerdop
e2 Deksel
e3 Afdichtingsring
F Kookmandje (afhankelijk van het model*)
f1 Handgreep
f2 Mand
Technische gegevens van het apparaat
Maximum temperatuur: 100°C
Vermogen: 1100W
Maximum programmeertijd: 59 minuten.
In deze handleiding vindt u enkele gebruikstips om optimaal van de mogelijkheden van uw apparaat
gebruik te maken: veloutésoepen of gepureerde soepen, soepen met stukjes, sauzen en compotes,
smoothies, cocktails, stoomrecepten ...
Inzake de veiligheid van
personen
• Lees deze gebruiksaanwijzing
aandachtig door voordat u
uw apparaat voor de eerste
gebruikt en bewaar het voor
latere raadpleging. De fabrikant
is niet aansprakelijk voor schade
of letsel door verkeerd gebruik.
• Kinderen mogen het apparaat
niet gebruiken wanneer er geen
toezicht is.
• WAARSCHUWING: Tijdens
het gebruik van het apparaat
kunnen er bepaalde delen een
hoge temperatuur bereiken
en een restwarmte na gebruik
behouden: roestvrijstalen wand
van kom, niet vast te nemen
delen van het deksel en de dop,
metalen delen onder de kom,
mand (naargelang het model).
Deze kunnen brandwonden
veroorzaken. Neem het apparaat
vast bij de koude kunststof
delen, handvatten, motorblok,
vasthoudzones van het deksel
of de dop, tijdens het opwarmen
en tot volledig afgekoeld. Het
rode controlelampje brandt om
NL
BESCHRIJVING VAN HET APPARAAT
VEILIGHEIDSVOORSCHRIFTEN
START START

18 19
18
aan te geven dat er risico op
brandwonden is.
• Als het snoer beschadigd is, moet
het vervangen worden door de
fabrikant, zijn servicecentrum of
een gelijkwaardig vakbekwaam
persoon om elk gevaar te
vermijden (raadpleeg de lijst
met erkende servicecentra in het
serviceboekje).
• Uw apparaat is alleen ontworpen
voor een huishoudelijk gebruik
en op een hoogte lager dan
2000 m. De fabrikant aanvaardt
geen enkele aansprakelijkheid
en behoudt zich het recht voor
om de garantie te beëindigen
in geval van een commercieel
of ongepast gebruik of het
negeren van de voorschriften.
START START
• WAARSCHUWING: Uw
apparaat geeft stoom af
dat brandwonden kan
veroorzaken.
Wees voorzichtig wanneer u
het deksel en de dop vastneemt
(indien nodig, gebruik een
ovenwant, pannenlap, etc.). Houd
de dop alleen via het middelste
deel vast.
• Wees voorzichtig wanneer
u een warme vloeistof in de
keukenmachine of blender
giet, om het opspatten van
de vloeistof uit het apparaat
door het plotseling koken te
vermijden.
• Schakel het apparaat niet in als
de dop niet in de opening van
het deksel is geplaatst en/of
de pakking niet in het deksel is
aangebracht.
• WAARSCHUWING: Er is risico
op letsel wanneer het apparaat
op een verkeerde manier wordt
gebruikt.
START START
• De messen zijn zeer scherp:
wees voorzichtig wanneer
u de kom leegmaakt
en tijdens de reiniging,
montage en demontage
van het mes om letsel te
vermijden.
• WAARSCHUWING: Wees
voorzichtig wanneer u uw
apparaat aanraakt (reinigen,
vullen of legen): vermijd dat er
vloeistof op het beeldscherm of
de aansluitingen stroomt.
• Raadpleeg de
gebruiksaanwijzing voor
de snelheidsstand en de
werkingstijd van elk programma.
• Raadpleeg de
gebruiksaanwijzing voor het in
elkaar zetten en monteren van
de accessoires op het apparaat.
• Raadpleeg de
gebruiksaanwijzing voor het
reinigen en onderhouden van
het apparaat.
• Volg altijd de
reinigingsinstructies voor het
reinigen van uw apparaat:
- Haal de stekker uit het
stopcontact.
- Reinig het apparaat niet als het
nog warm is.
19
- Maak het apparaat schoon met
een vochtige doek of spons.
- Dompel het apparaat nooit in
water en reinig het nooit onder
de kraan.
• Dit apparaat is bestemd
voor huishoudelijk gebruik en
gelijksoortige toepassingen,
uitgezonderd:
- kantines in winkels, kantoren en
andere werkruimten.
- kantines voor personeel in
winkels, kantoren en andere
werkruimten.
-boerderijen.
- gebruik door gasten in hotels,
motels en andere residentiële
omgevingen.
bed & breakfasts.
Inzake de elektrische
aansluiting
• Sluit het apparaat alleen aan op
een geaard stopcontact.
• Het apparaat is alleen
ontworpen om te werken
op wisselstroom. Controleer
of de spanning dat op het
typeplaatje van het apparaat is
vermeld overeenstemt met de
netspanning van uw woning.
• Haal altijd de stekker uit het
stopcontact als u het apparaat
zonder toezicht achterlaat en
voordat u het apparaat in elkaar
zet, uit elkaar haalt of reinigt.
• Een verkeerde aansluiting
maakt de garantie ongeldig.
• Haal de stekker nooit uit het
stopcontact door aan het snoer
te trekken.
• Plaats het apparaat, het snoer of
de stekker niet in een vloeistof.
• Dompel het apparaat nooit
onder.
• Leg het snoer nooit binnen het
bereik van kinderhanden en laat
het geen contact maken met de
warme delen van uw apparaat.
Leg het tevens niet nabij een
warmtebron of een scherpe
rand.
Inzake een verkeerde werking
• Gebruik uw apparaat niet als het
niet juist werkt of beschadigd is.
Laat het apparaat repareren
door een erkend servicecentrum
(zie de lijst in het serviceboekje).
• Gebruik de blenderkom niet
zonder ingrediënten of met
alleen droge producten.
Doe altijd eerst de vaste
ingrediënten in de kom voordat u
vloeibare ingrediënten toevoegt
en zorg dat de MAX markering
die op de kom is gegraveerd of
vermeld (naargelang het model)
niet wordt overschreden. Het
kokend water kan uit de kom
spatten als de blender te veel is
gevuld. Zorg dat de kom minstens
tot aan de minimum markering
met vloeistof wordt gevuld (Afb.8)
• Bepaalde recepten kunnen
omwille van bellenvorming
tot overstroming van de
ingrediënten leiden, in het

20 21
20
bijzonder wanneer bevroren
groente wordt gebruikt. Als
dit zich voordoet, doe minder
ingrediënten in de kom.
• Stop nooit uw vingers of
een ander voorwerp in de
blenderkom tijdens de werking
van het apparaat.
• Gebruik de kom niet als houder
(om levensmiddelen in te
vriezen of te steriliseren).
• Plaats het apparaat op een
stabiel, warmtebestendig,
schoon en droog oppervlak.
• Plaats het apparaat niet in de
nabijheid van een muur of kast:
de vrijgekomen stoom kan
schade aanrichten.
• Laat geen haar, sjaal of das, etc.
boven de kom hangen wanneer
het apparaat in werking is.
• Plaats het toebehoren nooit in
een magnetronoven.
• Gebruik het apparaat niet in de
open lucht.
• Overschrijd nooit de
maximum hoeveelheid die
in de gebruiksaanwijzing is
aangegeven.
• Berg het apparaat op eenmaal
het is afgekoeld. Mors geen
water op het beeldscherm.
• Gebruik het apparaat niet met
natte vingers.
ALLEEN VOOR MARKTEN
BUITEN EUROPA:
• Dit apparaat kan niet worden
gebruikt door personen
(waaronder kinderen) met
beperkte fysische, visuele of
mentale mogelijkheden, of die
een gebrek hebben aan ervaring
en kennis, tenzij ze onder toezicht
staan of instructies hebben
gekregen over de werking van
het apparaat door een persoon
die verantwoordelijk is voor hun
veiligheid.
• Houd kinderen nauwlettend in
het oog opdat ze niet met het
apparaat spelen.
ALLEEN VOOR EUROPESE
MARKTEN:
• Alleen voor de opwarmfunctie:
Dit apparaat kan worden
gebruikt door kinderen jonger
dan 8 jaar, als ze onder toezicht
staan of instructies hebben
gekregen over het veilig
gebruik van het apparaat en de
gevaren die het gebruik van het
apparaat met zich meebrengt
begrijpen. Kinderen jonger dan
8 jaar en zonder toezicht van
een volwassene mogen het
apparaat niet schoonmaken of
onderhouden.
• In alle mix- of blendermodi:
Kinderen mogen dit
apparaat niet gebruiken.
Houd het apparaat en snoer uit
de buurt van kinderen.
Alleen voor de opwarmfunctie:
Houd het apparaat en het snoer
altijd uit de buurt van kinderen
jonger dan 8 jaar.
• Kinderen mogen het apparaat
niet als speelgoed gebruiken.
21
Het mes op de kom zetten (*afhankelijk van model)
• Montage van het demonteerbare mes (*afhankelijk
van model Cf. Fig. 11 a; b; c):
1. Controleer of de ring goed op het mesgedeelte zit
(Cf. 11.a).
2. Neem het mes vast met een doek en zet het in zijn
behuizing onderaan de kom. Zorg ervoor dat de
pennen van het mes in de inkepingen van de kom
passen (Cf. 11.b).
3. Draai de kom om en houd intussen het mes in zijn
behuizing (Cf. 11.c).
4. Vergrendel het mesgedeelte met de
vergrendelingsring (Cf. 11.c).
• Demontage van het demonteerbare mes
(*afhankelijk van model Cf. Fig. 11.d):
Zet de kom op een werkblad.
1. Houd het mes vast met een doek.
2. Draai de kom om en houd intussen het mes vast.
3. Draai de vergrendelingsring om het mes te
ontgrendelen.
Waarschuwing: de messen zijn heel scherp: neem
ze voorzichtig vast zodat je je niet verwondt bij het
monteren, demonteren en reinigen van de kom het
mes.
Wanneer een van beide onderdelen niet correct
is geplaatst of vergrendeld (Cf. Fig. 5 en 6), begint
het logo
START START
te knipperen wanneer we een functie
activeren.
Uw apparaat is voorzien van 2 werkingsmodi
• Automatische modus: de temperatuur, de kooktijd en
het mixen zijn reeds geprogrammeerd. De kooktijd kan
worden aangepast.
-
: gladde soep (fijne textuur)
-
: gepureerde soep (compacte textuur)
-
*: stoomkoken met de stoommand
• Handmatige modus: de instellingen kunnen naar wens
worden aangepast
-
: lekkere smoothies en cocktails. Persoonlijke
instelling van de snelheid en de mixtijd
-
: koken. Persoonlijke instelling van de temperatuur
en de kooktijd. De snelheid kan tijdens het
kookproces worden geactiveerd.
-
: IJsgruis. Instelling van de pulstijd
Montage van de kom en het deksel met toebehoren
• Maak alle accessoires (D, E en F) , uitgezonderd het
motorblok (A). met warm zeepwater schoon voor
het eerste gebruik.
• Vóór het eerste gebruik controleert u of al het
verpakkingsmateriaal is verwijderd.
• Plaats de ring op het deksel (Cf. Fig. 1).
• Om stoomgerechten te bereiden plaatst u het
mandje met de in stukjes gesneden groenten en vult
u de kom met 0,5 liter koud water (Cf. Fig.13 a; b; c).
• Zet het deksel (E) op de kom (D) (Cf. Fig.2),
vergrendel het deksel zonder te duwen door te
draaien in de richting van de pijl (Cf. Fig.3).
• Zet de blenderkom (D) op het motorblok (A) totdat
je een “klik” hoort (Cf. Fig. 4).
• Het apparaat werkt alleen als de kom en het
deksel correct zijn geplaatst en zijn vergrendeld
op het motorblok.
Ingebruikname
• Dit apparaat kan worden
gebruikt door personen met
beperkte fysische, visuele of
mentale mogelijkheden, of
die een gebrek hebben aan
ervaring en kennis, als ze onder
toezicht staan of instructies
hebben gekregen over het veilig
gebruik van het apparaat en de
gevaren die het gebruik van het
apparaat met zich meebrengt
begrijpen.
SERVICECENTRUM
• Voor uw veiligheid, gebruik
alleen accessoires of
reserveonderdelen die door een
erkend servicecentrum worden
geleverd.
• Elke tussenkomst, uitgezonderd
reiniging en regelmatig
onderhoud van het apparaat,
moet door een erkend
servicecentrum worden
uitgevoerd.
22 23
22
GEBRUIK VAN HET APPARAAT
Het product gaat over op stand-by na 10 minuten inactiviteit. U kunt het product opnieuw activeren door op start/stop
te drukken. In het geval dat de stekker snel wordt uitgetrokken en weer ingestoken, kan hij in de stand-by modus blijven.
PROGRAMMEERMODUS
Wanneer het water en de ingrediënten aan de kom of de stoommand zijn toegevoegd, zet het deksel vast en breng de
kom aan op het motorblok (zie ingebruikname) en selecteer dan het gewenste automatische programma.
U kunt de tijd aanpassen door op de timer
te drukken. Stel vervolgens de gewenste tijd in met de + (verhogen) en -
(verlagen) toets (b5). Om het automatisch programma te starten, druk op START/STOP (b3)
Wanneer het programma stopt, klinken er 3 pieptonen.
Druk op de pal (d2) aan de binnenkant van de handgreep (cf. Fig. 9) om de kom te ontgrendelen en dien onmiddellijk
op of laat de kom staan en maak gebruik van de warmhoudfunctie (tot 40 minuten).
BLENDERMODUS (zonder koken)
• Druk op de MENU toets totdat het BLENDERMODUS
pictogram wordt verlicht en selecteer vervolgens
de mixsnelheid met de +/- toetsen.
• Als u een bepaalde mixtijd wilt programmeren, druk
op TIMER
en stel de tijd in met de +/- toetsen.
• Druk op START/STOP om het mixproces te starten.
• Wanneer uw bereiding voldoende is gemixt, druk op
de pal (d2) en verwijder de blenderkom.
KOOKMODUS
• Druk op de MENU toets totdat het KOOKMODUS
pictogram wordt verlicht en selecteer vervolgens de
temperatuur met de toetsen +/-.
•
Als u een bepaalde kooktijd wilt programmeren, druk
op TIMER
en stel de tijd in met de +/- toetsen.
• Druk op START/STOP om het kookproces te starten.
Het rode controlelampje brandt om aan te geven
dat het kookproces is gestart.
•
U kunt op elk moment tijdens het programma de
motor inschakelen door op de + toets te drukken.
- op de lage snelheid (v1) om vloeistoffen te mengen
(bijv. het bereiden van sauzen)
- op de hoge snelheid (vanaf v2) om te mixen
•
Wanneer uw kookproces voltooid is, druk op de pal (d2)
en verwijder de blenderkom.
IJSGRUIS
•
Doe maximaal 6 tot 8 ijsblokjes in de kom en sluit het
deksel.
•
Druk op de toets MENU totdat het IJSGRUISMODUS
pictogram wordt verlicht.
• De mixtijd is standaard op 30 seconden ingesteld.
Als u deze tijd wilt aanpassen, druk op TIMER en stel
de gewenste tijd in met de +/- toetsen.
23
• Druk op START/STOP om het mixproces te starten.
- Wanneer uw bereiding voldoende is gemixt, druk op
de pal (d2) en verwijder de blenderkom.
HANDIGE TIPSS
• Zorg voor voldoende vloeistof. Vul het apparaat tot
boven de MIN-aanduiding (Cf. Fig. 7). Respecteer
de MAX-aanduiding aan de binnenkant van de kom
(Cf. Fig. 8).
• Tijdens bepaalde bereidingen worden luchtbelletjes
gevormd en kan de kom overlopen. Wees vooral
voorzichtig als u diepvriesgroenten gebruikt. Gebruik
kleinere hoeveelheden om overlopen te voorkomen.
• De informatie over tijd of temperatuur knippert:
u heeft de mogelijkheid om deze informatie
te wijzigen. Stel de tijd in met de knoppen +
(verlengen) en - (verkorten) afhankelijk van de
gebruikte ingrediënten en de bereide hoeveelheid
(zie tabel met de kooktijden van de soepen in het
receptenboekje).
• Met het stoommandje (afhankelijk van het model)
kunt u stoomgerechten bereiden (op P3 met 0.5 liter
water), of hele ingrediënten zoals vlees, vis, groenten
koken als u soep met stukjes wilt maken (op P1 of
P2).
• Na afloop van de programma’s, schakelt
het apparaat automatisch over naar de
warmhoudmodus om de bereiding serveerklaar te
houden. Deze fase duurt 40 minuten. Druk op de
knop OFF om de warmhoudmodus uit te schakelen.
• Als u het deksel opent, op de pal drukt of de kom
verwijdert, wordt de warmhoudmodus automatisch
uitgeschakeld.
• Wanneer het programma is gestart, kunt u het op elk
moment onderbreken door op de knop P te drukken
(er klinken 2 pieptonen). Het programma schakelt
over naar de pauzemodus. Druk opnieuw op P of op
de knop OK om de bereiding voort te zetten (er klinkt
een pieptoon).
• Als u het verkeerde programma heeft gekozen en u
het programma wilt annuleren, houdt u de knop OFF
2 seconden ingedrukt. Daarna kunt u de tijd en de
temperatuur opnieuw instellen.
• Houd het apparaat nooit onder de kraan. Houd het
motorblok (A) niet onder stromend, warm water.
• Maak de kom onmiddellijk schoon na gebruik.
• Vul de kom met 1 liter warm water en voeg 2,
3 druppels afwasmiddel toe. Houd u aan de
vastgestelde hoeveelheden water en afwasmiddel.
Als u te veel afwasmiddel gebruikt, wordt er te veel
schuim gevormd en wordt de kans op overlopen
vergroot.
• Gebruik het automatisch Autocleanprogramma:
om de kom voor te wassen.
• Trek de stekker van het apparaat uit het stopcontact
na afloop van het programma.
• Druk op de pal (d2) en verwijder de blenderkom (D).
• Zet de kom op een vlak werkblad.
• Draai het deksel een kwartslag in tegen de klok
in om het te ontgrendelen. Verwijder het deksel
voorzichtig.
• Verwijder de afdichtingsring wanneer het deksel is
afgekoeld. Neem hiervoor de ring vast tussen duim
en wijsvinger en trek om hem te verwijderen. Je kunt
de ring verwijderen zonder gevaar voor beschadiging
(Cf. fig.12).
• Eindig het reinigen van de kom met een spons.
• Spoel de binnenkant van de kom en het deksel onder
stromend water.
• Als het verwarmingselement zeer vuil is, laat u het
onderdeel enkele uren in zeepwater weken om het
schoonmaken te vergemakkelijken.
• Wees voorzichtig wanneer u de messen
(d3) van de blenderkom schoonmaakt
en de kom leegt. De messen zijn zeer
scherp.
• Gebruik een vochtige doek om het motorblok (A),
schoon te maken. Droog het daarna zorgvuldig af.
• De verwijderbare elementen (deksel, rubber,
doseerdop, kookmand) kunnen met een spons en
warm zeepwater schoongemaakt worden.
• Om het deksel van uw apparaat lang te kunnen
gebruiken en in goede staat te houden, kunt u
het het beste met de hand afwassen. Om krassen
te vermijden, kunt u beter geen schuursponsje
gebruiken.
• Het afneembaar mes mag niet in de vaatwasser.
Maak het mes onder de kraan schoon en gebruik
een afwasborstel.
9
9
9
HET APPARAAT SCHOONMAKEN
Ontdek de geadviseerde, automatische programma’s
Temperatuur (Max) Instelbare tijd Mixen
Veloutésoep (fijne textuur) 100°C
30 min. (+ of -10 min.)
Max. snelheid
1 min
Gepureerde soep (dichte textuur) 100°C
40 min. (+ of -10 min.)
Min. snelheid
13s
Stoomkoken met de stoommand en
50 cl water *
100°C
30 min. (+ of -20 min)
HANDMATIGE MODUS
Introducing the suggested automatic programs
Temperatuur (Max) Instelbare tijd Mixen
Blendermodus
0 - 3 min.
V1 - V5
Kookmodus 60°C - 100°C
0 - 59 min.
V1 - V5
Ijsgruis 5 - 30s Pols
24 25
UW APPARAAT WERKT NIET. WAT NU?
PROBLEMEN OORZAKEN OPLOSSINGEN
Het apparaat werkt niet
De stekker zit niet in het stopcontact.
Steek de stekker van het apparaat in
het stopcontact.
De kom of het deksel zijn niet correct
geplaatst of vergrendeld.
Controleer of de kom en het
deksel correct zijn geplaatst en
vergrendeld volgens de schema’s in de
gebruiksaanwijzing
Overmatige trillingen
Het apparaat staat niet op een vlakke
en stabiele ondergrond.
Zet het apparaat op een vlakke
ondergrond.
De hoeveelheid ingrediënten is te
groot of te klein.
Neem de minimum en maximum
toegestane hoeveelheid in acht.
Het deksel lekt
De hoeveelheid ingrediënten is te groot. Verminder de hoeveelheid ingrediënten
Het deksel is niet correct geplaatst of
vergrendeld.
Zet de afdichtingsring op het deksel.
De afdichtingsring is niet geplaatst.
afdichtingsringhouder en klik het
geheel op het deksel.
Vervang de afdichtingsring.
De afdichtingsring is gebarsten of
versleten.
Neem contact op met een erkend
service center.
De messen draaien niet vrij rond De stukjes zijn te groot of te hard.
Maak kleinere stukjes of verminder de
hoeveelheden. Voeg vloeistof toe.
Weergave ‘STOP’
De motor is overbelast door een te
grote hoeveelheid ingrediënten of te
harde of te grote stukjes.
Trek de stekker eruit en laat het
apparaat 30 minuten afkoelen en
verminder de hoeveelheid ingrediënten
die u wilt verwerken.
‘SECU’ verschijnt op het scherm
+ rood controlelampje knippert
De kom is leeg of bijna leeg of de
bereiding is niet vloeibaar genoeg
Trek de stekker van het apparaat uit
het stopcontact. Voeg een beetje
vloeistof toe tot het minimum niveau
van de kom (zie afb. 7).
Weergave « Err »
+ rood controlelampje knippert
De verwarmingsweerstand werkt niet.
Trek de stekker van het apparaat uit het
stopcontact en neem contact op met
een geautoriseerd service-centrum.
Weergave « ntc »
+ rood controlelampje knippert
De temperatuursensor 1 werkt niet
meer.
Trek de stekker van het apparaat uit het
stopcontact en neem contact op met
een geautoriseerd service-centrum.
Het aanraakscherm werkt niet Het scherm kan vochtig zijn Laat het apparaat 15 minuten met rust
Uw apparaat werkt nog steeds niet?
Ga naar een erkend service center (zie bijgevoegde lijst).
AFVALVERWERKING
Wees vriendelijk voor het milieu !
Uw apparaat bevat materialen die geschikt zijn voor hergebruik.
Lever het in bij het milieustation in uw gemeente of bij onze technische dienst.
24
25
زاهجلا ليغشت ر
ّ
ذعت دنع هلعف بجي ام
لولحلا بابسا تكشا
.سيئرلا رايتلا ردص زاهجلا ليصوتب مق .ةقاطلاب ل
ّ
صوم غ زاهجلا
.لمعي زاهجلا
عابتاب هلفقو حيحص لكشب ءاطغلاو قيربا عضو نم ققحت
تيلعتلا ةدراولا ةيحيضوتلا تاططخا
هلفق متي وأ حيحصلا ناكا اسيل ءاطغلاو قيربا
.حيحص لكشب
.تباثو
ٍ
وتسم حطس ع زاهجلا عض
زاهجلا نأ ينعي م ،
ٍ
وتسم حطس ع زاهجلا عضو متي
تباث غ
.مزلا نع ةدئاز تازازتها
.اهب حا ةيمكلل قا دحلا وأ دا دحلاب مزتلا .ةياغلل ةغص وأ ةياغلل ةبك تانوكا ةيمك
.اهضحت يراجلا تانوكا رادقم للق .ةياغلل ةبك تانوكا ةيمك
.يولعلا ءاطغلا ع بت
قيربا ع ماكحإب ءاطغلا لفقا حيحص وحن ع لفقم غ وأ هعضوم تبثم غ ءاطغلا
.ءاطغلا ع لماحلا ةدادس عض ةدوجوم غ ءلل ةمواقا ةدادسلا
دمتعم ةمدخ زكر لصتا وأ ةدادسلا يغتب مق اهفتإ وأ ءلل ةمواقا ةدادسلا عطق مت
.اهرادقم وأ اهضحت يراجلا تانوكا ةيمك للق
لئاسلا ضعب فضأ
ةياغلل ةبلص وأ ةياغلل ةبك ماعطلا عطق ةلوهسب تارفشلا رودت
تانوكا ةيمك للقو ،ةقيقد 30 ةد دي هكرتاو زاهجلا لصفا
.اهضحت متيس يتلا
وأ تانوكا نم ةياغلل ةبك ةيمك ببسب كرحا ع دئاز لمح
ةياغلل ةبكلا وأ ةبصلا ةديدش ماعطلا عطق
)فاقيإ( "STOP" ضرع
دا دحلا ىوتسم ىتح لئاسلا ضعب فضأ .زاهجلا لصفا
.)7 لكشلا عجار( ءاعولل
وأ غراف هبش وأ ،غراف قيربا
ةفصولا
ٍ
فاك لئاس دجوي
حابصم ضموي + "SECU" ضرع
رمحا ؤا
.دمتعم زكر لصتاو زاهجلا لصفا لمعي خستلا نع
)أطخ( "Err" ضرع
رمحا ؤا حابصم ضموي +
.دمتعم زكر لصتاو زاهجلا لصفا لمعي ةرارحلا ةجرد رعشتسم دعي
» ntc « ضرع
رمحا ؤا حابصم ضموي +
ةقيقد 15 ةد هكرتاو زاهجلا فقوأ ةللبم ةشاشلا نوكت دق لمعت سمللا ةشاش
؟لمعي زاهجلا لازي أ
.لاصتا تاهج ةاق عجار - ءمعلا تاقعب صاخلا ةدعاسا طخب لصتا
ريودتلا ةداعإ
!ًوأ ةئيبلا ةيح
.اهريودت وأ اهعينصت ةداعإ نك يتلاو ةيعانصلا ةميقلا تاذ داوا نم ثكلا ع جتنا اذه يوتحي
.ةيلزنا تايافنلا عيمجت زكرم ىدل زاهجلا عد
26 27
2726
.نخاسلا يراجلا ءاا تحت ا
ً
قلطم )أ( كرحا ةدحو عضت .ءاا زاهجلا رمغت •
.ةابم مادختسا دعب قيربا فظن •
لئاس نم تارطق 3 وأ ترطق عم نخاسلا ءاا نم دحاو ل اهرادقم ةيمكب قيربا ما •
ثيح ،قابطا ليسغ لئاسو ءاا نم اهب وا ةيمكلا ىوس مدختست ،قابطا ليسغ
.بت ثودح إ يدؤي دق ام وهو ةوغرلا نم
ٌ
ديزم قابطا ليسغ لئاس ةدايز نع جتني
.ءاعولل قبسا ليسغلل :اقلتلا فيظنتلا جمانرب مدختسا •
.ةقاطلا نع زاهجلا لصفا ،جمانلا فقوت درج •
.)د( طخلا قيربإ لزأ مث )2د( رزلا ع طغضا •
.
ٍ
وتسم حطس ع قيربا عض •
لزأ .ةعاسلا براقع هاجتا ةفل عبر رادق هريودت قيرط نع ءاطغلا لفق حتفا •
.رذحب ءاطغلا
ماهبا يعبصإ ب اهكسمأ ،كلذب مايقللو .لماحلا ةدادس لزأ ،ءاطغلا دي امدنع •
.)12 لكشلا عجار( فلت ثودح رطخ نود ةدادسلا كفنت .اهجارخ اهبحسا مث ،ةبابسلاو
.ةجنفسإ مادختساب قيربا فيظنت ةيلمع ءاهنإب مق •
زاهجلا فيظنت
.يراجلا ءاا تحت ءاطغلاو قيربا نم خادلا ءزجلا فطشا •
ءاا نم جيزم تاعاس عضب هعقنا ،قيربا نم نخسا ءزجلل ديدشلا خاستا لاح •
.هفيظنت ع ةدعاسملل قابطا ليسغ لئاسو
)3د( تارفشلا فيظنت دنع رذحلا
خوت •
.ةداح اهن ءاعولا غيرفت دنعو طخلا قيربإ
.ةيانعب اهففجو )أ( كرحا ةدحو فيظنتل ةللبم شق ةعطق مدختسا •
)يهطلا ةلسو ،سايقلا ءاطغو ،ةدادسلاو ،ءاطغلا( ةلازل ةلباقلا ءازجا فيظنت نك •
.نوباصو نخاس ءامو ةجنفسإ مادختساب
بناجلا مدختست .ا
ً
يودي هلسغا ،افا هرمعو زاهجلل ءاطغلا رهظم ع ظافحلل •
.شودخلا ثودح بنجتل ةجنفسا نم طشاكلا
يراجلا ءاا تحت اهلسغا — قابطا ةلاسغ ةلازل ةلباقلا ةرفشلا لسغ نك •
.ةاشرف مادختساب
9
9
9
طلخلل )v2 نم( ةيلاع ةعب -
طخلا ءاعو ل
ِ
زأ مث )2د( ريرحتلا رز ع طغضا ،يهطلا نم ءاهتنا دنع
•
:جلثلا قحس عضو
.ءاطغلا قلغأو ءاعولا جلث تابعكم 8 إ 6 عض
•
)جلثلا قحس( CRUSED ICE زمر إ لصت نأ إ )ةاقلا( MENU حاتفم ع طغضا
•
.
ع طغضاف ،تقولا اذه طبض تدرأ اذإ .ةيناث 30 ع افا طلخلا تقو طبض متي •
-/+ نيرزلا مادختساب هطبضاو تقؤا
طلخلا ءدبل )فاقيإ/ءدب( START/STOP رزلا ع طغضا •
طخلا ءاعو ل
ِ
زأ مث )2د( ريرحتلا رز ع طغضا ،جيزا طلخ درج -
ةيلمع تاداشرإ
.)7 لكشلا عجار( دا دحلا ةمع يطغت لئاسلا نم ةيفاك ةيمك دوجو نم دكأت •
عجار( قيربا لخاد ةروفحا )قا دحلا( MAX ةمع زواجت مدع ع صرحاو
.)8 لكشلا
ا
ً
صوصخ ،تاعاقفلا ن
ّ
وكت ببسب ئجافم بت ثودح تافصولا ضعب ببستت دق •
.بسانا ردقلا إ تايمكلا ليلقت بجي ،ةلاحلا هذه .ةدمجا تاواخلا مادختسا دنع
تقولا طبضا .تامولعا هذه ليدعت كنك :ضموت ةرارحلا ةجردو تقولا تامولعم •
ةمدختسا تانوكا ع ا
ً
دتعا ،)ليلقت( -و )ةدايز( + نيرزلاب بولطا وحنلا ع
.)تافصولا بيتك ءاسحلا يهط تاقوأ لودج عجار( هضحت بولطا رادقاو
0.5 عم P3 مدختسا( راخبلاب يهطلا كنك ،)*زارطلا بسح( يهطلا ةلس مادختساب •
ةلماك تانوكم يهطو ةبك عطق ع يوتحي يذلا ءاسحلا تافصول وأ ،)ءاا نم ل
.)P2 وأ P1 مدختسا( ءاسحلا عم هسفن تقولا تاواخلاو كساو موحللا لثم
ةزهاج لظت ىتح ةقيقد 40 ةد ا
ً
يئاقلت ةئفاد ةفصولا زاهجلا يقب
ُ
ي ،جمالا ةياهن •
.)ليغشتلا فاقيإ( OFF رز ع طغضا ،ةئفدتلا فاقي .لوانتلل
ةيلمع فقوتتسف ،قيربا تلزأ وأ ريرحتلا رز ع تطغض وأ ءاطغلا تحتف اذإ •
.ا
ً
يئاقلت ةئفدتلا
P رزلا ع طغضلاب تقو يأ زاهجلا ليغشت فاقيإ كنك ،جمانلا ليغشت ءدب دنع •
ةداعإ كنكو تقؤا فقوتلا عضو
ٍ
ذئدنع جمانلا نوكي .)ناتيتوص ناتراشإ ردصتس(
ردصتس( )قفاوم( OK رزلا ع طغضلاب وأ ىرخأ ةرم P رزلا ع طغضلاب هليغشت
.)ةيتوص ةراشإ
ع طغضاف ،هئاغلإ بغرت تنكو أطخلا قيرط نع حيحصلا غ جمانلا تخا اذإ •
تاجردو تاقوا ليغشت ةداعإب كل حمسي م تيناث ةد )ليغشتلا فاقيإ( OFF رز
.ةرارحلا
،ءاعولا لفسأ اهتحتف اهعضو شق ةعطق مادختساب تارفشلا ةعومجم ك
ِ
سمأ .2
لكشلا عجار(
ءاعولا زوزح ةيانعب تارفشلا ةعومجم تاكسام عضو نم دكأتو
.
)ب.11
.
)ج.11 لكشلا عجار(
اهتحتف تارفشلا ةعومجم ءاقبإ عم ءاعولا د
ِ
عأ .3
.
)ج.11 لكشلا عجار(
لفقلا ةقلح مادختساب تارفشلا ةعومجم مسق لفقا .4
:)
د.11 لكشلا عجار
زارطلا بسح*( ةلازل ةلباقلا تارفشلا ةعومجم كف •
.لمع حطس ع ءاعولا عض
.تارفشلا ةعومج كاسما ع ةدعاسملل شق ةعطق مدختسا .1
.تارفشلا ةعومج كاسما ءانثأ ءاعولا د
ِ
عأ .2
.تارفشلا ةعومجم لفق حتفل لفقلا ةقلح ر
ِ
دأ .3
ءاعولا بيكرت دنع كسفن يذؤت ىتح صرحب اهعم لماعت :ةياغلل ةداح تارفشلا :ريذحت
.هفيظنتو هكفو تارفشلا ةعومجمو
زاهجلا مادختسا
نأ نك ،ةعب هليصوتو جتنا لصف لاح .)فاقيإ/ءدب( Start/stop حاتفم س قيرط نع جتنا طيشنت ةداعإ كنك .طاشنلا مدع نم قئاقد 10 رورم دعب دادعتسا عضو إ جتنا لقتني
.دادعتسا عضو لظي
جمانلا عضو
.بولطا اقلتلا جمانلا ددح مث ،)ليغشتلا ءدب عجار( كرحا ةدحو ع ءاعولا عضو ءاطغلا لفقا ،راخبلا ةلس وأ ءاعولا لفسأ تانوكاو هايا حبصت نأ درج
)3ب( )فاقيإ/ءدب( START/STOP رزلا ع طغضا ،اقلتلا جمانلا ليغشت ءدبل .)5ب( -و + نيرزلا مادختساب تقولا طبضا ،كلذ دعب
.
تقؤا ع طغضلاب تادادعا ليدعت كنك
ةحقا ةيئاقلتلا جمالا ميدقت
جزا ليدعتلل لباقلا تقولا )ىوصقلا( ةرارحلا ةجرد
ةع قأ
ةدحاو ةقيقد
)قئاقد -10 وأ +( ةقيقد 30 ةيوئم ةجرد 100 )لئاس ماوق( يرك ءاسح
ةع دأ
ةيناث 13
)قئاقد -10 وأ +( ةقيقد 40 ةيوئم ةجرد 100 )كيمس ماوق( ةبك عطق ع يوتحي ءاسح
)ةقيقد -20 وأ +( ةقيقد 30 ةيوئم ةجرد 100 * ءاا نم ا
ً
ليتنس 50و يهطلا ةلس مادختساب راخبلاب يهطلا
.ةيتوص تاراشإ 3 زاهجلا ردصي ،جمانلا ءاهتنا دنع
.)ةقيقد 40 ىتح( ا
ً
ئفاد لظيل هناكم قيربا كرتا وأ روفلا ع ميدقتلل )9 لكشلا عجار( ضبقا لخاد دوجوا )2د( رزلا ع طغضلاب قيربا لفق حتفا
)يهط نود( طخلا عضو
عضو( BLENDER MODE زمر إ لصت ىتح )ةاقلا( MENU رز ع طغضا •
.-/+ نيرزلا مادختساب طلخلا ةع ددح مث )طخلا
مادختساب تقولا طبضاو
تقؤا ع طغضاف ،طلخلا تقو ةجمرب تدرأ اذإ •
.-/+ نيرزلا
.طلخلا ءدبل )فاقيإ/ءدب( START/STOP رزلا ع طغضا •
.طخلا ءاعو ل
ِ
زأو )2د( ريرحتلا رز ع طغضا ،جيزا طلخ درج •
يوديلا عضولا
ةحقا ةيئاقلتلا جمالا ميدقت
جزا ليدعتلل لباقلا تقولا )ىوصقلا( ةرارحلا ةجرد
V1 - V5
قئاقد 3 - 0
طخلا عضو
V1 - V5
ةقيقد 59 - 0
ةيوئم ةجرد 100 - 60
يهطلا عضو
عطقتا ليغشتلا ةيناث 30 -
ٍ
ناوث 5 جلثلا قحس
يهطلا عضو
)يهطلا عضو( COOKING MODE زمر إ لصت نأ إ )ةاقلا( MENU رز ع طغضا
•
.–و + نيرزلا مادختساب ةرارحلا ةجرد ددح مث
، تقؤا ع طغضاف ،يهطلا تقو ةجمرب تدرأ اذإ
•
.-/+ نيرزلا مادختساب تقولا طبضاو
رمحا ؤا حابصم ءي .يهطلا ءدبل )فاقيإ/ءدب( START/STOP رزلا ع طغضا
•
.يهطلا ءدبب كمع
.+ حاتفا ع طغضلاب كرحا ليغشت كنك ،جمانلا لخ تقو يأ
•
)لاثا ليبس ع تاصلصلا عنصل( ةلئاسلا ةمعطا طلخل )v1( ةئيطب ةعب -

28 29
29
ل 0.5 رادق قيربا ماو اهناكم ةعطقا تاواخلا عم ةلسلا عض ،راخبلاب يهطلل •
.)ج ؛ب ؛أ 13 لكشلا عجار(
ةلسلا عاق زواجت نود درابلا ءاا نم
قيرط نع طغض نود ءاطغلا لفقا ،)2 لكشلا عجار( )د( ءاعولا ع )ـه( ءاطغلا عض •
.)3 لكشلا عجار( مهسلا هاجتا هريودت
لكشلا عجار( ةقطقط توص ردصي نأ إ )أ( كرحا ةدحو ع )د( طخلا ءاعو عض •
.)4
هلفقو حيحص لكشب هناكم ءاطغلاو قيربا عضو دعب إ لمعلاب زاهجلا أدبي •
.كرحا ةدحو ع
)زارطلا بسح*( ءاعولا تارفشلا ةعومجم بيكرت
:)ج ؛ب ؛أ 11 لكشلا عجار
زارطلا بسح*( ةلازل ةلباقلا تارفشلا ةعومجم بيكرت •
.
)أ.11 لكشلا عجار(
تارفشلا ةعومجم قوف حيحص لكشب ةدادسلا عضو نم دكأت .1
ةمع أدبت ،)6و 5 لكشلا عجار( حيحص لكشب هلفق وأ نيأزجلا دحأ عضو متي امدنع
.ةفيظو طيشنت دنع ضيمولاب
START START
لفقلا
ليغشتلل عضو زاهجلا نمضتي
طبض نك .اًفلس طلخلاو يهطلا تقوو ةرارحلا ةجرد ةجمرب متت :اقلتلا عضولا •
.يهطلا تقو
معان طلخ : -
نشخ طلخ :
-
راخبلا ةلس قحلم مادختساب راخبلاب يهط :*
-
كتبغر بسح تادادعا طبضا :يوديلا عضولا •
هتدمو طلخلا ةعل صصخم دادعإ .ةذيذللا تيتكوكلاو يذومسلا تابوم :
-
ءانثأ ةعلا طيشنتل رايخ .يهطلا تقوو ةرارحلا ةجردل صصخم دادعإ .يهطلا : -
يهطلا
عطقتا ليغشتلا تقو طبض .جلثلا قحس :
-
ءاطغلا ةدحوو قيربا عضو
عم نخاس ءا )"و"و "ـه"و "د"( تاقحلا عيمج لسغا ،وا ةرملل مادختسا لبق •
.)أ( كرحا ةدحو ءانثتساب نوباصلا
.زاهجلا ليغشت لبق فيلغتلا داوم عيمج ةلازإ ع صرحلا ىجر
ُ
ي •
.)1 لكشلا عجار( ءاطغلا ع ةدادسلا عض •
وا ةرملل مادختسا لبق
28
:ةنازخ وأ طئاح نم برقلاب زاهجلا عضت •
.تانوكا فلت إ جتانلا راخبلا يدؤي دق
ام وأ ،قنع ةطبر وأ حاشو وأ رعشلا دتب حمست •
.ليغشتلا ءانثأ ءاعولا قوف ،هباش
.فيووركيا نرف ا
ً
قلطم تاقحلا عضت •
.ةحوتفا نكاما ا
ً
قلطم زاهجلا مدختست •
اهيلإ راش
ُ
ا ةيمكلل قا دحلا ا
ً
قلطم زواجتت •
.تيلعتلا
مكحتلا ةشاش عدت .دي امدنع إ زاهجلا ن
زخ
ُ
ت •
.ءلل ضرعتت
.تلتبم كاديو زاهجلا لغش
ُ
ت •
طقف ةيبوروا غ قاوسا
مهيف ن( صاخشا همدختسيل دع
ُ
م غ زاهجلا اذه •
ةيدسجلا تاردقلا فعض نم نوناعي نيذلا )لافطا
إ نورقتفي نيذلا صاخشا وأ ،ةيلقعلا وأ ةيسحلا وأ
ةقباس تيلعت مهؤاطعإ متي ام ،ةفرعا وأ ةخلا
فاإ تحت وأ نامأب زاهجلا مادختسا ةيفيك لوح
.مهتمس نع لوؤسم صخش
ثبعلا نم مهعن كلذو ؛ا
ً
ديج لافطا ةبقارم بجي •
.زاهجلاب
:طقف ةيبوروا قاوسا
نيذلا لافطا مدختسي نأ نك :طقف خستلا دنع •
طب ،زاهجلا اذه كأ وأ تاونس 8 رمعلا نم نوغلبي
ةيفيك لوح تيلعت اوقلت وأ فاإ تحت اونوكي نأ
رطاخا ا
ً
ما اومهفي نأو مات نامأب زاهجلا مادختسا
زاهجلا فيظنتب لافطا موقي أ بجي .زاهجلاب ةطبترا
8 رمعلا نم نوغلبي اوناك اذإ إ ،فاإ نود هتنايص وأ
.غلابلا دحأ فا نوعضخيو كأ وأ تاونس
مدختسي أ بجي :طخلا مادختسا دنع •
.زاهجلا اذه لافطا
نع ا
ً
ديعب هب صاخلا لباكلاو زاهجلاب ظافتحا ىجر
ُ
ي
.لافطا لوانتم
كلسلاو زاهجلاب ظافتحا ىجر
ُ
ي :طقف خستلا دنع
مهرعأ لقت نيذلا لافطا لوانتم نع ا
ً
ديعب هب صاخلا
.تاونس 8 نع
.ةبعلك زاهجلا عم لافطا لماعتي أ بجي •
فعض نم نوناعي نيذلا صاخشا مدختسي نأ نك •
نيذلا وأ ةيلقعلا وأ ةيسحلا وأ ةيدسجلا تاردقلا
مهحنم طب زاهجلا اذه ةفرعا وأ ةخلا إ نورقتفي
ةنمآ ةقيرطب زاهجلا مادختس تيلعتلا وأ فاا
.هب ةطبترا رطاخا مهفو
عيبلا دعب
فخب رايغ عطق وأ تاقحلم مدختست ،كتمسل •
.ةدمتعا ةمدخلا زكارم اهرفوت يتلا كلت
وأ فيظنتلا ةيلمع فخب ةيلمع يأ ذيفنت بجي •
.دمتعم ةمدخ زكرم ةطساوب ةيرودلا ةنايصلا
ضحت زاهج نخاس لئاس بكس دنع رذحلا
خوت •
ببسب زاهجلا نم هجارخإ متي دقف ،طخلا وأ ماعطلا
.ئجافا رخبتلا
لكشب سايقلا بوك عضو متي اذإ زاهجلا لغش
ُ
ت •
متي اذإ وأ/و ءاطغلا ةدوجوا ةحتفلا حيحص
.ةحيحص ةقيرطب ءاطغلا ع ةدادسلا عضو
زاهجلا مادختسا ةلاح تاباصإ ثدحت دق :ريذحت •
.حيحص غ لكشب
صرحب اهعم لماعت :ةياغلل ةداح تارفشلا •
START START
كلذكو ،ءاعولا غيرفت دنع كسفن يذؤت ىتح
اهعيمجتو تارفشلا ةعومجم فيظنت دنع
.اهكيكفتو
فيظنتلا( زاهجلا عم لماعتلا دنع رذحلا
خوت :ريذحت •
ةشاش ع لئاوسلل بت يأ بنجت :)بصلاو ءلاو
.تصواو ضرعلا
تاقوأو تاعلا يعتل تيلعتلا ليلد عجار •
.جمانرب لكل ليغشتلا
لوح ليصافت ع عطل تيلعتلا ليلد عجار •
.زاهجلا اهبيكرتو تاقحلا عيمجت
لوح ليصافت ع عطل تيلعتلا ليلد عجار •
.هتنايصو زاهجلا فيظنت
:زاهجلا فيظنتل فيظنتلا تيلعت اًاد عبتا •
.زاهجلا لصفا -
.ا
ً
نخاس نوكي امدنع زاهجلا فظنت -
.ةللبم شق ةعطق وأ ةجنفسإ مادختساب زاهجلا فظن -
يراجلا ءاا تحت هعضت وأ ءاا زاهجلا رمغت -
.ا
ً
قلطم
متي نلو ،ةيتا تامادختسل دعم غ زاهجلا اذه •
: نضلا قيبطت
لمعلا تائيبو بتاكاو تحا خباطا تاحاسم -
.ىرخا
تحا نوفظوا اهمدختسي يتلا خباطا -
.ىرخا لمعلا تائيبو بتاكاو
.عرازا -
نكامأو ل
ُ
ز
نلاو قدانفلا ءزن لب
ِ
ق نم مادختسا -
.ىرخا ةماقا
.طقف راطفاو مونلل ةصصخا ىرخا ةماقا نكامأ -
ابرهكلا ليصوتلا
.ض
ّ
رؤم ابرهك سبق زاهجلا ليصوت بجي •
.طقف ددا رايتلا مادختساب لمعيل م
مص
ُ
م زاهجلا •
ةيتلوفلا عم قباطتت سيئرلا رايتلا ةيتلوف نأ نم ققحت
.زاهجلا فيرعت ةحول ع اهيلإ راشا
مادختسا لاح ،ةيراسلا ياعا فتخا إ ا
ً
رظن •
زكرم ىدل هصحف بجي ،ءالا دلب غ دلب زاهجلا
.دمتعم ةمدخ
نود هكرت لاح سيئرلا رايتلا نع اًاد زاهجلا لصفا •
.هفيظنتو هكيكفتو هعيمجت لبقو ةبقارم
.نضلا لاطبإ إ ليصوتلا أطخ يأ يدؤي •
.زاهجلا لصفل ةقاطلا لباك ا
ً
قلطم بحست •
لئاوسلا سباقلا وأ ةقاطلا لباك وأ زاهجلا رمغت •
.ا
ً
قلطم
.ىرخأ لئاوس يأ وأ ءاا زاهجلا رمغ مدع بجي •
لافطا لوانتم نع ا
ً
ديعب ةقاطلا كلس ءاقبإ بجي •
نم ةنخاسلا ءازجا نم برقلاب هعضو مدع بجيو
هتسمم وأ ةداحلا فاوحلا وأ ةرارحلا رداصم وأ زاهجلا
.اهل
حيحصلا غ مادختسا
عم وأ تانوكم نود طخلا ءاعو ا
ً
قلطم مدختست •
.طقف ةفاج تاجتنم
ةفاضإ لبق ءاعولا إ ةبلصلا تانوكا اًاد فضأ •
دحلا( MAX ةمع زواجت مدع عم ،ةلئاسلا تانوكا
بسح( هيلع ةبوتكا وأ ءاعولا ع ةروفحا )قا
ءاا بتي دقف ،ةياغلل ا
ً
ئلتمم طخلا ناك اذإ .)زارطلا
ةمع ةيطغتل
ٍ
فاك لئاسلا ىوتسم نأ نم دكأت .غا
.)7 لكشلا( دا دحلا
بت ثودح تافصولا ضعب ببستت نأ نك •
دنع ا
ً
صوصخ ،تاعاقفلا روهظ ببسب هيف بوغرم غ
بجي ،ةلاحلا هذه .ةدمجا تاواخلا مادختسا
.بسانا ردقلا إ تايمكلا ليلقت
ءاعو ا
ً
قلطم ىرخأ ماسجأ يأ وأ كعباصأ عضت •
.زاهجلا ليغشت ءانثأ طخلا
.)ميقعتلا وأ ديمجتلل( ةيواحك ءاعولا مدختست •
ةرارحلل مواقمو رقتسم لمع حطس ع زاهجلا عض •
.فاجو فيظنو

30
30
كيمسلا وأ يركلا ءاسحلا ضحت كنك :زاهجلل ةلماكلا تاناكما فاشتكا ع كدعاستس يتلا مدختساب ةصاخلا تيلعتلا ضعب دجتس ،ليلدلا اذه ةءارق دنع
.ثكلا كلذ غو ،راخبلاب ى
َ
هط
ُ
ت يتلا تافصولاو تيتكوكلاو يذومسلا تابومو هكاوفلا سورهمو تاصلصلاو ةبك عطق ع يوتحي يذلا ءاسحلاو
ةيصخشلا ةمسلا
زاهجلا مادختسا لبق ةيانعب تيلعتلا ليلد أرقا •
:لبقتسا هيلإ عوجرلل ليلدلاب ظفتحاو وا ةرملل
ةكلا ءافعإ إ حيحصلا غ مادختسا يدؤيس
.ةيلوؤسم يأ نم ةع
ّ
نصا
.فاإ نود زاهجلا مادختساب لافطل حمست •
ءازجا ضعب حبصت ،زاهجلا مادختسا دنع :ريذحت •
:مادختسا دعب ةيقبتم ةرارح اهنم ثعبنتو ا
ً
دج ةنخاس
ءازجأو ،أدصلل مواقا ذوفلا نم عونصا ءاعولا رادج
ءازجاو ،اهكاسمإ نك يتلا ءاطغلاو يولعلا حطسلا
دق .)زارطلا بسح( ةلسلاو ،ءاعولا لفسأ ةيندعا
ك
ِ
سمأ .قورحب ةباصا إ ءازجا هذه ةسمم يدؤي
ةدحو وأ ضباقا :ةدرابلا ةيكيتسبلا ءازجا نم زاهجلا
يولعلا حطسلا ةدوجوا كاسما قطانم وأ كرحا
.ا
ً
ما زاهجلا دي نأ إو خستلا ءانثأ ءاطغلا وأ
ةيبرعلا
ةمسلا تيلعت
START START
كرحا ةدحو A
مكحتلا ةحول B
)ةاقلا( MENU رز b1
)اقلتلا فيظنتلا( AUTOCLEAN رز b2
)طبض ةداعإ/فاقيإ/ءدب( START/STOP/RESET رز b3
)تقؤا( ليغشتلا تقو د
ّ
دح
ُ
م b4
-/+ تقولا/ةرارحلا ةجرد/ةعلا ددحم b5
ضرعلا ةشاش C
معان طلخ c1
نشخ طلخ c2
)زارطلا بسح( *راخب c3
اقلتلا فيظنتلا ضرع ةشاش c4
START START
ةمسلا ؤم ضرع ةشاش c5
تقولا ضرع ةشاش c6
ةرارحلا ةجرد وأ ةعلا c7
:طخلا عضو c8
:يهطلا عضو c9
جلثلا قحس c10
خستلا ؤم c11
طخلا قيربإ ةدحو D
أدصلل مواقا ذوفلا نم ءاعو d1
رزب دوزم ضبقم d2
ةلازل ةلباقلا تارفشلا ةعومجم d3
ةدادس d4
لفق ةقلح d5
ءاطغلا ةدحو E
سايقلا ءاطغ e1
ءاطغلا e2
ءلل ةداضم ةدادس e3
)*زارطلا بسح( يهطلا ةلس F
ضبقم f1
ةلس f2
:زاهجلاب ةصاخلا ةينفلا تانايبلا
ةيوئم ةجرد 100 :ىوصقلا ةرارحلا ةجرد
طاو 1100 :ةقاطلا
.ةقيقد 59 :ةجملل تقو قأ
زاهجلا فصو
ةباصا رطخ نم رمحا خستلا ؤم ءوض رذحي
.قورحب
،حيحص وحن ع لمعي ناك اذإ زاهجلا مدختست •
.سباقلا وأ ةقاطلا كلس فلت ةلاح وأ اًفلات ناك اذإ وأ
دمتعم ةمدخ زكرم كلسلا لدبتسا ،رطخ يأ بنجتل
.)ةمدخلا بيتك ةاقلا عجار(
عو طقف زنا مادختسل زاهجلا ميمصت مت •
ةع
ّ
نصا ةكلا لمحتت نل .م 2000 نم لقأ عافترا
ةلاح نضلا ءاغلإ قحلاب ظفتحتو ةيلوؤسم يأ
وأ ،بسانا غ مادختسا وأ يراجتلا مادختسا
.تيلعتلا عابتا مدع ةلاح
ببستي دق ا
ً
راخب زاهجلا قلط
ُ
ي :ريذحت •
START
START
.قورح
،رما مزل اذإ( ةيانعب سايقلا بوكو ءاطغلا ك
ِ
سمأ
إ امو ،ةرارحلا نم ةيح ةداسو وأ ا
ً
زافق مدختسا
.طسوا ءزجلا نم سايقلا بوك ك
ِ
سمأ .)كلذ

1520015958
FR p. 1 - 8
EN p. 9 - 16
NL p. 17 - 24
AR p. 30 - 25