Operating and Installation
Instructions
Fridge-freezer Combination
To prevent accidents and damage to the range, you must read all in-
structions supplied before installing or using the appliance.
en-US, CA M.-Nr. 12 616 180

Contents
IMPORTANT SAFETY INSTRUCTIONS................................................................... 6
Sustainability and environmental protection.......................................................... 17
How to save energy.......................................................................................................
18
Installation...................................................................................................................... 19
Fastening the refrigeration appliance in the niche.....................................................
19
Installation dimensions .................................................................................................
20
KFMC 3836 R/L ....................................................................................................... 20
Installation site ...............................................................................................................
21
Climate range ............................................................................................................ 22
Before installation ..........................................................................................................
22
Load-bearing capacity of the niche floor............................................................... 22
Side-by-side installation................................................................................................
23
Ventilation........................................................................................................................
23
Door hinge change .........................................................................................................
23
Safety notes for the plumbed water connection .......................................................
23
Water filter.......................................................................................................................
24
Changing the water filter (active charcoal filter) or replacing with a mesh fil-
ter................................................................................................................................
25
Lead-free certificate ................................................................................................. 30
Electrical connection .....................................................................................................
31
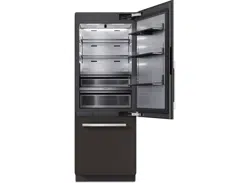
Overview......................................................................................................................... 33
Your KFMC3836R/L refrigeration appliance............................................................
33
Main menu on display KFMC3836R/L.....................................................................
35
Symbols on the display .................................................................................................
36
Operation.........................................................................................................................
36
Networking......................................................................................................................
37
Interior lighting (SmartLight).........................................................................................
38
SuperCool&AirClean...............................................................................................
38
SuperFreeze ...............................................................................................................
39
QuickIce...........................................................................................................................
39
Vacation mode................................................................................................................
39
Eco mode.........................................................................................................................
40
Sabbath mode ................................................................................................................
40
Charcoal filter (AirClean System).................................................................................
41
Camera (FoodView) ......................................................................................................
41
Temperature alarm in the freezer zone........................................................................
41
Door alarm.......................................................................................................................
42
2

Contents
Adjusting the interior fittings ........................................................................................
42
Removing or moving the door shelves .................................................................. 42
Removing or moving the shelves............................................................................ 43
Removing the MasterFresh drawer........................................................................ 43
Inserting the MasterFreshPro drawer .................................................................. 43
Removing the DailyFresh ExtraCool drawer ......................................................... 44
Inserting the DailyFresh ExtraCool drawer........................................................... 44
Removing containers from the freezer drawer ..................................................... 45
Placing containers in the freezer drawer............................................................... 45
Removing ice cube containers................................................................................ 45
Accessories supplied.....................................................................................................
45
Optional accessories .....................................................................................................
46
Commissioning.............................................................................................................. 47
Before using for the first time.......................................................................................
47
Connecting the refrigeration appliance ................................................................. 47
Inserting the charcoal filter (AirClean System) into the holders in the
fridge zone .................................................................................................................
47
Requirements for networking ......................................................................................
49
Switching on the refrigeration appliance ....................................................................
49
Performing Initial set-up................................................................................................
50
Switching on the cameras.............................................................................................
50
Switching off cameras ...................................................................................................
50
Selecting a water filter...................................................................................................
51
Switching off the refrigeration appliance ....................................................................
51
To note when switching off for longer periods of time........................................ 51
Operation........................................................................................................................ 52
Temperature in the fridge zone.....................................................................................
52
Temperature in the freezer zone...................................................................................
52
Temperature display.......................................................................................................
53
Switching on the Vacation mode function..................................................................
53
Switching off the Vacation mode function .................................................................
53
Switching on the Eco mode function ..........................................................................
53
Switching off the Eco mode function ..........................................................................
53
Switching on the Sabbath mode function ..................................................................
54
Switching off the Sabbath mode function..................................................................
54
Storing food in the fridge zone .....................................................................................
54
Different storage zones............................................................................................ 55
Should food be stored loose or in packaging? ..................................................... 55
Storing food in the MasterFresh Pro drawer..............................................................
56
Selecting the right setting for the MasterFreshPro drawer............................... 56
Creating a favorite for the individual setting in the MasterFresh Pro drawer .. 57
DailyFresh ExtraCool drawer ........................................................................................
57
3

Contents
Freezing and storing fresh food ....................................................................................
58
Cooling drinks quickly .............................................................................................. 58
Water dispenser..........................................................................................................
58
Dispensing water from the Water dispenser.................................................... 58
Setting favorites for the Water dispenser ......................................................... 59
Deleting favorites for the Water dispenser ....................................................... 60
Locking the Water dispenser............................................................................... 60
Unlocking the Water dispenser .......................................................................... 60
Ice maker .........................................................................................................................
60
Turning on the ice maker.......................................................................................... 60
Turning off the ice maker ......................................................................................... 61
Customizing settings.................................................................................................... 62
Opening the Settings menu..........................................................................................
62
Settings: Overview ...................................................................................................
62
General.............................................................................................................................
63
Display brightness .................................................................................................... 63
Sounds ....................................................................................................................... 63
Security ...................................................................................................................... 63
Networking......................................................................................................................
63
Wi-Fi ........................................................................................................................... 63
Connection ................................................................................................................ 63
Appliance function .........................................................................................................
64
Cameras..................................................................................................................... 64
Interior lighting .......................................................................................................... 64
Filter management.................................................................................................... 64
Automatic SuperFrost.............................................................................................. 64
Information......................................................................................................................
65
Data plate................................................................................................................... 65
Software..................................................................................................................... 65
Legal Information...................................................................................................... 65
Service .............................................................................................................................
65
Cleaning and care ......................................................................................................... 66
Cleaning agents ..............................................................................................................
66
Preparing the refrigeration appliance for cleaning.....................................................
66
Cleaning the interior of the appliance .........................................................................
67
Cleaning the camera ......................................................................................................
67
Cleaning the water filter (mesh filter, spare part) ......................................................
69
Cleaning the door seal...................................................................................................
71
Cleaning the ventilation openings................................................................................
71
After cleaning ..................................................................................................................
71
Defrosting........................................................................................................................
71
Frequently asked questions........................................................................................ 72
4

Contents
Customer Service ......................................................................................................... 79
Contact in the event of a fault......................................................................................
79
Appliance warranty and product registration .............................................................
79
Information..................................................................................................................... 80
Declaration of conformity..............................................................................................
80
5
IMPORTANT SAFETY INSTRUCTIONS
This refrigeration appliance complies with current safety require-
ments. Inappropriate use can, however, lead to personal injury and
material damage.
Please read the operating and installation instructions carefully be-
fore using the refrigeration appliance for the first time. They contain
important information on installation, safety, use, and maintenance.
This will prevent both personal injury and damage to the refrigera-
tion appliance.
Miele expressly and strongly advises that you read and follow the
instructions in the chapter on installing the refrigeration appliance
as well as in the “IMPORTANT SAFETY INSTRUCTIONS”.
Miele cannot be held liable for injury or damage caused by non-
compliance with these instructions.
Keep these instructions in a safe place and pass them on to any fu-
ture owner.
Risk of injury and damage due to very heavy refrigeration appli-
ance tipping over.
The refrigeration appliance is very heavy and can tip forward when
the doors/drawers are open.
Do not remove the refrigeration appliance from the pallet until the
preparations for installing it are complete.
Keep the doors/drawers shut until the refrigeration appliance has
been built in and secured in its niche in accordance with the instal-
lation instructions.
Appropriate use
This appliance is intended for use in domestic households and
similar residential environments such as
–staff kitchen areas in shops, offices and other working environ-
ments
–farm houses and by clients in hotels, motels and other residential
type environments
–bed and breakfast type environments
–catering and similar non-retail applications.
This appliance is not intended for use outdoors, in damp environ-
ments or in places exposed to rain.
6

IMPORTANT SAFETY INSTRUCTIONS
This refrigeration appliance is intended for domestic use only for
cooling and storing food and drink, as well as for storing deep frozen
food, freezing fresh food, making ice, and dispensing drinking water.
Any other usage is at the owner’s risk and could be dangerous.
This refrigeration appliance is not suitable for storing and keeping
cool medicines, blood plasma, laboratory preparations, or other simi-
lar substances or products that are subject to the Medical Device Di-
rective. Incorrect use of the refrigeration appliance for such purposes
may cause deterioration of the items stored. The refrigeration appli-
ance is also not suitable for use in areas where there is a risk of ex-
plosion.
Miele cannot be held liable for damage resulting from incorrect or im-
proper use or operation.
This refrigeration appliance may only be used by people (including
children) with reduced physical, sensory, or mental capabilities or
lack of experience and knowledge if they are supervised while using
it.
Safety with children
Children should be supervised in the vicinity of the appliance.
To reduce the risk of injury, do not allow children to play in, on or
near the appliance.
The door hinges can cause injury. Keep children well away at all
times.
Ensure that any packing material is disposed of safely and kept out
of the reach of children. DANGER of suffocation!
7
IMPORTANT SAFETY INSTRUCTIONS
Technical safety
The coolant circuit has been checked for leaks. The refrigeration
appliance complies with statutory and regulatory requirements.
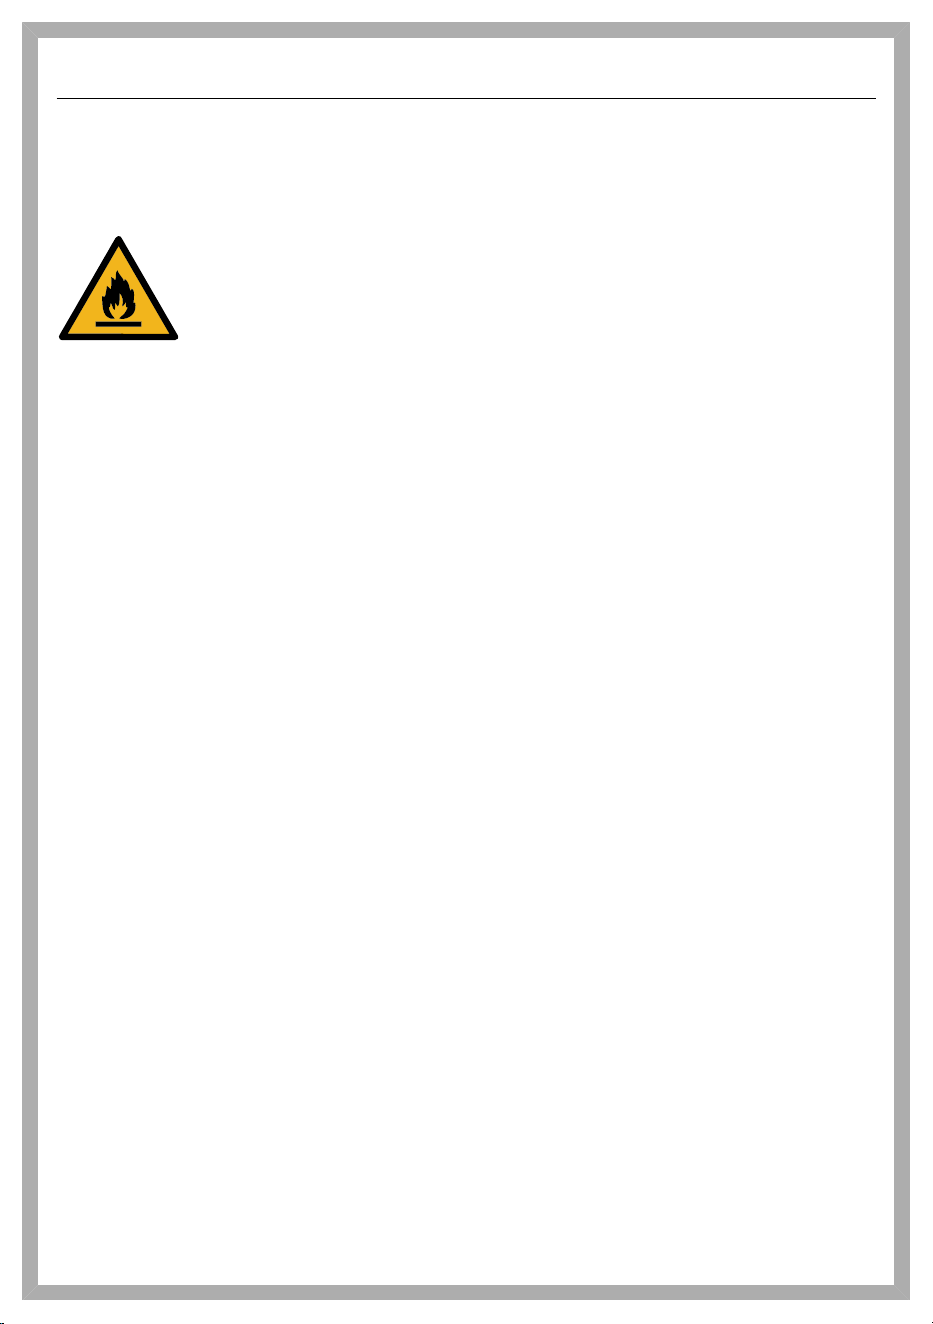
If the cooling circuit is damaged, refrigerant and oil can escape and ignite.
Warning: fire hazard/flammable materials. This symbol is on the
compressor and indicates flammable materials. Do not remove this
sticker.
The refrigerant inside the appliance (details on the data plate) is envi-
ronmentally friendly but flammable.
The use of this refrigerant does, however, sometimes lead to a slight
increase in the noise level of the appliance. In addition to the noise of
the compressor, you might be able to hear the refrigerant flowing
around the cooling circuit. Unfortunately, this cannot be avoided, but
it does not affect the performance of the refrigeration appliance.
When transporting and installing the refrigeration appliance, ensure
that no parts of the cooling circuit are damaged. Splashes of refriger-
ant can damage the eyes and leaking refrigerant can ignite.
In the event of damage:
- Avoid open flames or anything which creates a spark.
- Disconnect the refrigeration appliance from the power supply.
- Ventilate the room where the refrigeration appliance is located for
several minutes.
- Contact Miele Service.
The more refrigerant there is in a refrigeration appliance, the larger
the room it should be installed in. In the event of a leakage, if the ap-
pliance is in a small room, there is the danger of a combustible gas/
air mixture building up. For every 8g of refrigerant, at least 3.3ft
(1m)
3
of room space is required. The amount of refrigerant in the re-
frigeration appliance is stated on the data plate inside the appliance.
If the ventilation openings are covered or blocked, a combustible
gas/air mixture can form if the cooling circuit is damaged. It is essen-
tial to observe the required ventilation openings. The ventilation
openings must never be obstructed.
8

IMPORTANT SAFETY INSTRUCTIONS
To avoid the risk of damage to the appliance, make sure that the
connection data (fuse rating, frequency and voltage) on the data plate
corresponds to the household supply.
Check that this is the case before connecting the appliance. Consult
a qualified electrician if in any doubt.
The electrical safety of the appliance can only be guaranteed when
correctly grounded. It is essential that this standard safety require-
ment is met. If in any doubt please have the electrical installation
tested by a qualified electrician.
Temporary or permanent operation on an autonomous power sup-
ply system or a power supply system that is not synchronized with
the grid power supply (e.g., island networks, back-up systems) is pos-
sible. A prerequisite for operation is that the power supply system
complies with national and local codes.
The function and operation of the protective measures provided in
the domestic electrical installation and in this Miele product must
also be maintained in isolated operation or in operation that is not
synchronized with the grid power supply, or these measures must be
replaced by equivalent measures in the installation.
The outlet must not be concealed behind the appliance and must
be easily accessible so that the appliance can be quickly discon-
nected from the electrical supply in case of an emergency. If free ac-
cess is not possible, an all-pole isolating switch must be integrated in
the permanent electrical installation according to the installation reg-
ulations.
If the power cord is damaged, disconnect the refrigeration appli-
ance from the power supply immediately. Close the water supply
shut-off valve. Contact Miele Service.
If the power cord supplied is damaged, it must only be replaced by
an original part to prevent a hazard for the user. Miele can only guar-
antee the safety of the appliance when original Miele parts are used.
For safety reasons, this replacement should only be carried out by a
qualified specialist or MieleService.
The electrical outlet must be properly grounded.
Do not connect the appliance to the electrical supply with a power
bar or extension cord. These are a fire hazard and do not guarantee
the required safety of the appliance.
9

IMPORTANT SAFETY INSTRUCTIONS
If moisture gets into electrical components or into the power cord,
it could cause a short circuit. Therefore, do not operate the machine
in areas where there may be moisture or splashing water (e.g.,
garages, laundry rooms).
This appliance must not be installed and operated in mobile instal-
lations (e.g. on a ship).
Do not use a damaged appliance. It could be dangerous. Check the
appliance for visible signs of damage.
For safety reasons, this appliance may only be used after it has
been built in.
The machine must be disconnected from the power supply during
installation, maintenance, and repair work, and installation work on
the fresh water connection. The machine is only completely isolated
from the power supply when:
- the fuses have been switched off, or
- the circuit breaker has been removed completely, or
- the power cord has been unplugged. Pull on the plug and not on
the power cord when disconnecting it from the power supply.
Unauthorized installation, maintenance, and repairs, or a faulty
plumbed water connection, can cause considerable danger for the
user.
Installation, maintenance, and repairs, installation work on the fresh
water connection, and all repairs on the water dispenser must only
ever be carried out by a Miele authorized technician.
The ice cube maker must only be connected to a cold water line.
Miele cannot be held liable for damage caused by a faulty plumbed
water connection.
When installing the water hose, make sure that the water hose is nei-
ther kinked nor damaged.
Only use the water hose supplied. Never use a water hose that has
already been used.
Risk of injury. Rotating parts in the ice maker may cause injuries.
Never reach under or into the ice maker.
Any manufacturer's warranty may be void if the appliance is not re-
paired by a Miele approved service technician.
Faulty components should only be replaced by genuine Miele re-
placement parts. Miele can only guarantee the safety standards of
the appliance when Miele replacement parts are used.
10

IMPORTANT SAFETY INSTRUCTIONS
This refrigeration appliance is supplied with a special bulb to cope
with particular conditions (e.g., temperature, moisture, chemical re-
sistance, abrasion resistance, and vibration). This bulb must only be
used for the purpose for which it is intended. The bulb is not suitable
for room lighting. Replacement bulbs may only be installed by an au-
thorized technician or by Miele Service. This refrigeration appliance
contains several light sources with at least energy efficiency classE.
DANGER of injury! Never tamper with the movable components
on the ice cube maker or the element on the ice cube maker.
Proper installation
Install the refrigeration appliance in accordance with the installa-
tion instructions.
Always wear protective gloves when transporting and installing the
refrigeration appliance.
The refrigeration appliance is very heavy and can tip forward when
the appliance doors/drawers are open:
- At least 2people are required to transport or move the refrigera-
tion appliance.
- At least 2people are required to install the refrigeration appliance.
- Never leave the refrigeration appliance unattended while it is being
installed.
- Always use the anti-tip brackets provided to secure the refrigera-
tion appliance in the niche (installation accessories).
Only install the refrigeration appliance in a solid, rectangular, and
level housing unit, positioned on an even and level floor.
The refrigeration appliance is supplied with a fixed door hinge. On
no account should you attempt to change the door hinge yourself. If
you need to change the door hinge to the other side, please contact
Miele Service.
11
IMPORTANT SAFETY INSTRUCTIONS
Correct use
The refrigeration appliance is designed for use within a specific cli-
mate class (room temperature range). Do not use in a climate class
for which it is not designed. A lower room temperature will cause the
compressor to switch off for longer periods, meaning that the refrig-
eration appliance is unable to maintain the required temperature.
WARNING! DANGER of overheating! Do not cover or block the air
vents. This can impair the efficiency of the appliance, increase the
power consumption and cause damage to the appliance.
If storing food which contains a lot of fat or oil in the appliance,
make sure that it does not come into contact with plastic compo-
nents as this could cause stress cracks or break the plastic.
Refrigeration appliance components which are made of metal or
look like metal can contain aluminum. If acidic food comes into con-
tact with aluminum, aluminum ions can be released into the food. Do
not store food loose in the refrigeration appliance.
Risk of fire and explosion. Do not store any explosive materials or
products containing flammable propellants (e.g., spray cans) in the
appliance. Electrical components can cause flammable mixes of
gases to ignite.
WARNING! Risk of explosion. Do not operate any electrical equip-
ment (e.g., an electric ice-cream maker) inside the refrigeration appli-
ance. Risk of sparking and explosion.
Risk of injury and damage. Do not store cans or bottles containing
carbonated drinks or liquids which could freeze in the freezer zone,
the MasterFresh Pro drawer, or the DailyFresh ExtraCool drawer.
Otherwise they could burst.
Risk of injury and damage. When chilling drinks in the freezer zone,
make sure that bottles are not left in for more than one hour. Other-
wise they could burst.
Risk of injury. Never handle frozen food or the metal parts of the
appliance with wet hands. Your hands may freeze to the frozen food
or to the metal.
Risk of injury. Do not take ice cubes out with your bare hands and
never place ice cubes or ice pops in your mouth straight from the
freezer section. The very low temperature of the frozen food can
cause frost burn to the lips and tongue.
12

IMPORTANT SAFETY INSTRUCTIONS
Do not refreeze partially or fully defrosted food. Consume de-
frosted food as soon as possible, as it will lose its nutritional value
and spoil if left for too long. Defrosted food may only be refrozen after
it has been cooked.
When eating stored food, there is a danger of food poisoning.
Storage times will depend on several factors, including the freshness
and quality of the food, as well as the temperature at which it is
stored. Observe the manufacturer's “use-by” dates and storage in-
structions.
Do not sit, stand, or lean on the shelves or drawers when they are
pulled out. This could damage the refrigeration appliance.
Accessories and parts
Use only genuine original Miele parts. If parts or accessories from
other manufacturers are used, the warranty may become invalid.
Cleaning and maintenance
Do not use any oil or grease on the door seals.
They can cause the seals to deteriorate over time.
WARNING! DANGER of injury and damage! Do not use any me-
chanical tools or other types of aid which are not recommended by
the manufacturer to accelerate the defrosting process.
Never use a steam cleaner to clean the appliance.
The steam can reach the electrical components and cause a short
circuit.
Sharp edged or pointed objects will damage the evaporator, caus-
ing irreversible damage to the appliance. Do not use sharp edged or
pointed objects to
- remove frost or ice,
- separate frozen foods or remove ice trays.
Never place electric heaters or candles in the appliance to defrost
it. These can damage the plastic parts.
Do not use defrosting sprays or de-icers, as they could contain
substances which could damage the plastic parts or which might
cause the build-up of gases and pose a danger to health.
13

IMPORTANT SAFETY INSTRUCTIONS
Transport
To avoid damage to the refrigeration appliance, always transport it
upright and in its packaging.
Risk of injury and damage. The refrigeration appliance is very heavy
and must be transported by two people.
Before transporting the refrigeration appliance, remove the char-
coal filter (AirClean system) and the filter holders from the fridge
zone.
Check that the charcoal filter is intact before inserting it into the
fridge zone. Never use a damaged charcoal filter.
14
IMPORTANT SAFETY INSTRUCTIONS
Disposal of your old appliance
DANGER! Risk of child entrapment! Children could become
trapped in the refrigeration appliance and could suffocate.
- Remove the appliance door(s).
- Remove the drawers.
- Leave the adjustable shelves in the refrigeration appliance so chil-
dren cannot climb inside.
- If your old refrigeration appliance has a door lock, destroy it. This
will prevent the risk of children playing accidentally locking them-
selves in and endangering their lives.
Risk of electric shock!
- Cut the electrical plug off the power cord.
- Cut the power cord off the old appliance.
Dispose of the electrical plug and power cord separately from the old
appliance.
Ensure that the appliance is not stored in the vicinity of gasoline or
inflammable gases and liquids during and after disposal.
WARNING! Risk of fire due to escaping oil or refrigerant!
The refrigerant and oil inside the appliance are flammable. In high
enough concentrations, escaping refrigerant or oil may ignite if they
come into contact with an external heat source.
During disposal, make sure that the cooling circuit is not damaged in
order to prevent refrigerant and oil escaping in an uncontrolled man-
ner (see the data plate for details of the refrigerant).
Splashes of coolant can cause damage to the eyes. Be careful not
to damage any part of the pipework while awaiting disposal, e.g. by
- puncturing the coolant channels in the evaporator,
- kinking any pipework,
- scratching the surface coating.
Symbol on the compressor (depending on model)
This information is only relevant for recycling. There is no risk during normal opera-
tion.
15
IMPORTANT SAFETY INSTRUCTIONS
The oil in the compressor can be fatal if swallowed or if it pene-
trates the airways.
Symbol on the rear of the appliance (depending on model)
This label or a similar one is only relevant for recycling. Do not remove the lable.
This information refers to the foamed-in panels in the door and/or
the housing.
16
Sustainability and environmental protection
Disposal of the packing material
The cardboard box and packing materi-
als protect the appliance during ship-
ping. They have been designed to be
biodegradable and recyclable.
Ensure that any plastic wrappings, bags,
etc. are disposed of safely and kept out
of the reach of children. Danger of suffo-
cation!
Disposing of your old appliance
Electrical and electronic appliances con-
tain many valuable materials. They also
contain certain materials, compounds,
and components which were essential
for their correct functioning and safety.
These could be hazardous to your health
and to the environment if disposed of
with household waste or if handled in-
correctly. Please do not, therefore, dis-
pose of your old appliance with house-
hold waste.
Take care not to damage your refrigera-
tor before or during disposal in an au-
thorized, environmentally-friendly man-
ner.
This is to ensure that refrigerant in the
cooling circuit and oil in the compressor
is contained, and will not leak into the
environment.
Instead, please make use of officially
designated collection and disposal loca-
tions to dispose of and recycle electrical
and electronic appliances in your local
community, with your dealer, or with
Miele, free of charge. By law, you are
solely responsible for deleting any per-
sonal data from the appliance prior to
disposal. You are legally obliged to re-
move any old batteries which are not
securely enclosed by the appliance and
to remove any lamps without destroying
them, where this is possible. These
must be taken to a suitable collection
point where they can be handed in free
of charge. Please ensure that your old
appliance poses no risk to children while
being stored for disposal.
17

Sustainability and environmental protection
How to save energy...
Installation site The refrigeration appliance has to cool more often at higher ambi-
ent temperatures and consumes more energy in the process.
Therefore, you should:
- Install the refrigeration appliance in a well-ventilated room.
- Do not install the refrigeration appliance near to a heat source
(heater element, range).
- Protect the refrigeration appliance from direct sunlight.
- Ensure an ideal ambient temperature of 68°F (20°C).
- Clean the ventilation gaps on a regular basis to remove any
dust.
Temperature
setting
The colder the temperature, the higher the energy consumption.
The following settings are recommended:
- 39 to 41°F (4 to 5°C) in the refrigerator section.
- 0°F (-18°C) in the freezer section.
Use Energy consumption is increased by heat input and impeded air
circulation. Therefore, you should:
- Only open the appliance door(s) when necessary and for as
short a time as possible. Arrange the food in such a way that
makes it easy to find in the appliance.
- Always close the appliance door(s) properly after opening
them.
- Allow hot food and drinks to cool down before placing them in
the refrigeration appliance.
- Store food well packaged or covered.
- Do not overfill the compartments to allow air to circulate.
- When placing food in the appliance, make sure that it is kept
away from the back.
- Place frozen food in the refrigerator section to defrost.
- When placing food in the appliance, make sure that the ventila-
tion slots in the fridge zone are not blocked.
18
Installation
Carry out the installation in accor-
dance with the installation instructions
(see QR code).
Material number 12 616 350 –
KFMC3836R/L
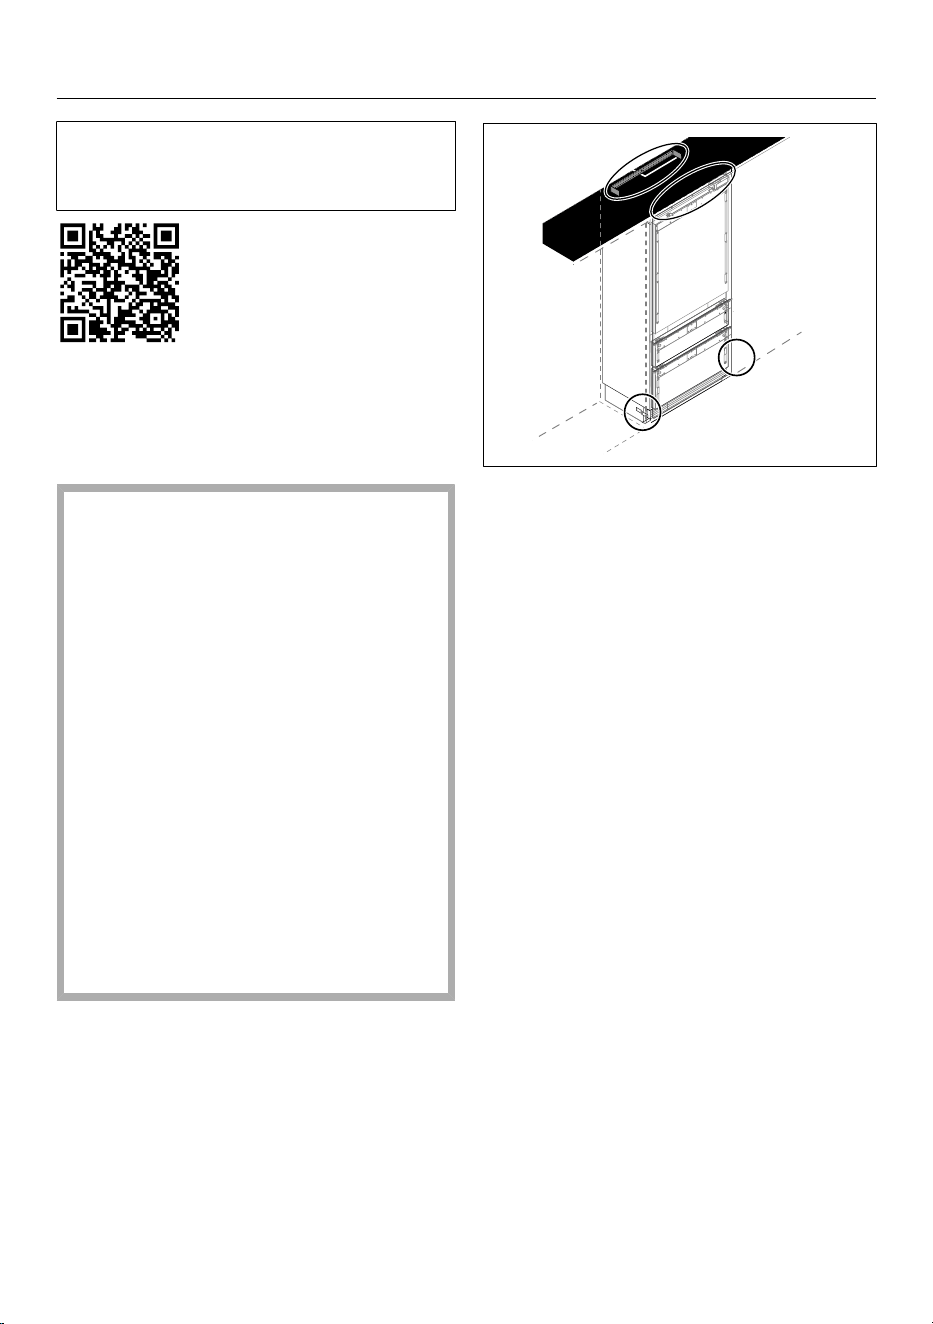
Fastening the refrigeration ap-
pliance in the niche
Risk of damage and injury due to
the refrigeration appliance tipping
over.
This refrigeration appliance is very
heavy and can tip forward when the
appliance door is open.
Keep the appliance door(s) closed
until the refrigeration appliance has
been built in.
Secure the niche firmly to the wall
behind and/or above it with several
screws.
It is essential that you secure the re-
frigeration appliance in the niche us-
ing the enclosed anti-tip bracket in
accordance with the installation in-
structions.
Only this can ensure that the refriger-
ation appliance will not tip over.
19
Installation
*INSTALLATION*
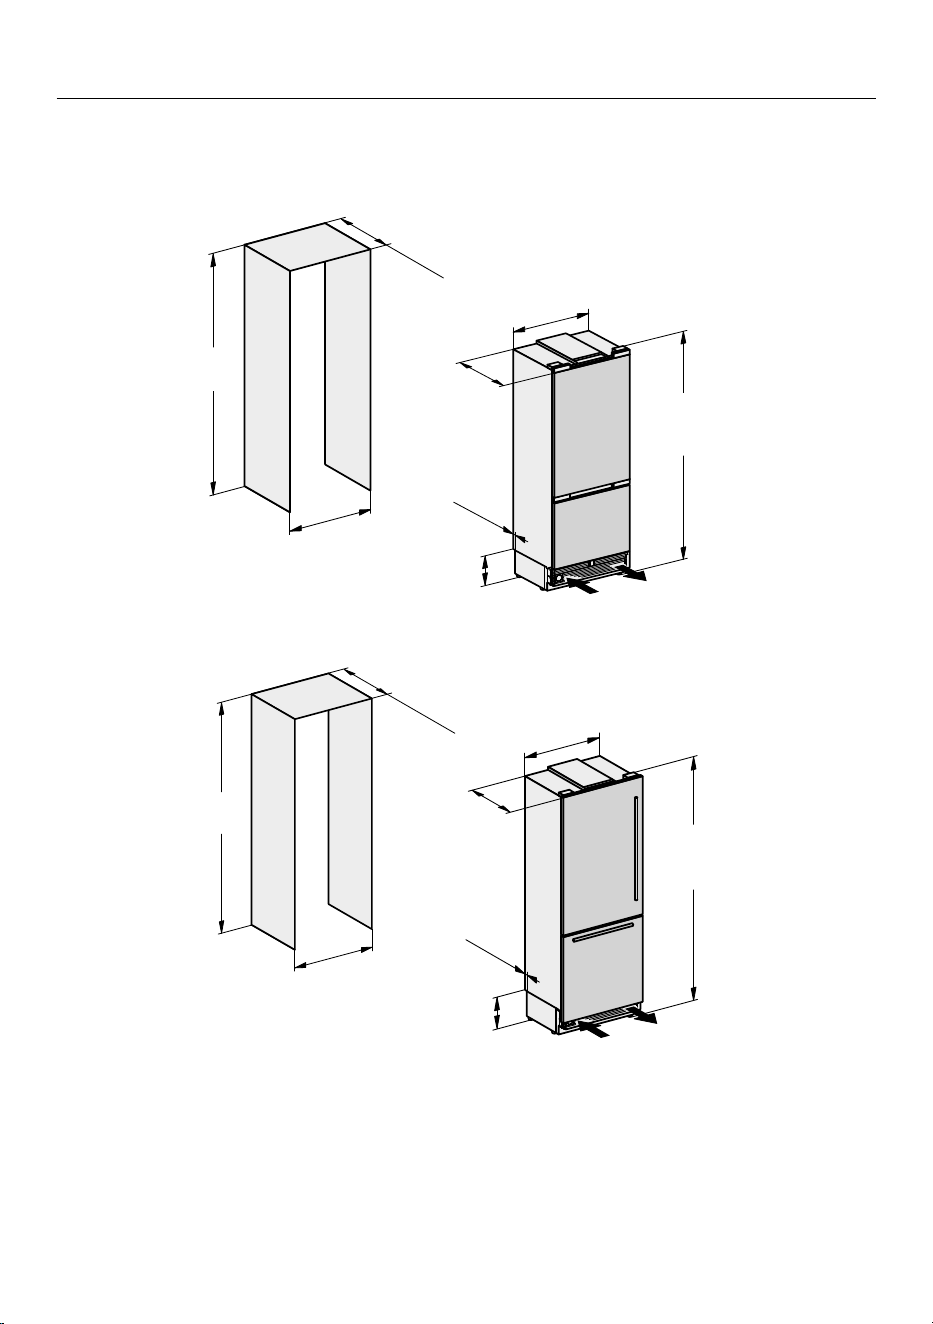
Installation dimensions
KFMC 3836 R/L
24"
(
610
)
1
3/16
"
(
30
)
7
1/4
"
(185)
83
9/16
"-
85
1/2
"
(2123-2171)
29
3/4
"
(756)
84"
(2134)
30"
(762)
≥
25"
(
≥ 635
)
frameless cabinet
≥
24"
(
≥ 610
)
84"
(2134)
30"
(762)
24"
(
610
)
1
3/16
"
(
30
)
29
3/4
"
(756)
7
1/4
"
(185)
83
9/16
"-
85
1/2
"
(2123-2171)
framed cabinet
20
Installation
Installation site
Fire hazard and risk of damage
from appliances that give off heat.
Appliances that give off heat can
catch fire and set fire to the refrigera-
tion appliance.
The power cord must not come into
contact with heat sources.
This refrigeration appliance must not
be installed underneath a cooktop.
Fire hazard and risk of damage
from open flames.
Open flames can set fire to the refrig-
eration appliance.
Keep open flames (such as a candle)
away from the refrigeration appli-
ance.
Risk of fire and damage due to
improper installation.
If electrical plugs and power cords
touch the back of the refrigeration
appliance, they may be damaged by
vibrations and cause a short circuit.
Electrical plugs or power cords must
not touch the refrigeration appliance.
Power cords must not be trapped or
damaged.
Do not connect any other appliances
to sockets located directly behind
this refrigeration appliance.
Do not place or operate power bars,
distributor strips, or other electronic
devices (such as halogen transform-
ers) behind the appliance.
This appliance should be installed in a
dry, well-ventilated room.
Only install the refrigeration appliance in
a solid, rectangular, and level housing
unit, positioned on an even and level
floor.
Risk of damage due to high hu-
midity.
In environments with high humidity,
condensation can build up on exter-
nal refrigeration appliance panels.
This condensation can cause corro-
sion on external appliance panels.
Install the refrigeration appliance in a
dry and/or air-conditioned room with
sufficient ventilation.
After installation please make sure
that the appliance door(s) closes
(close) properly and the refrigeration
appliance is installed in accordance
with these installation instructions.
The specified ventilation opening
specifications must be observed.
When deciding on the installation site,
please bear in mind that your refrigera-
tion appliance will use more energy if in-
stalled near to a heater, a range, or an-
other appliance that gives off heat.
Avoid direct sunlight. Higher ambient
temperatures increase energy con-
sumption as the compressor runs for
longer.
If installation near a heat source is un-
avoidable, observe the following mini-
mum distances between the appliance
and the heat source:
- at least 1" (3cm)
to electric or gas stoves
- at least 11" (30cm)
to oil or coal-based stoves
If it is not possible to observe these
minimum distances, an isolation plate
must be installed between the refrigera-
tion appliance and the heat source.
21
Installation
Climate range
This refrigeration appliance is designed
for the SN-T climate class range (ambi-
ent temperature range). Do not use in
ambient temperatures for which it is not
designed.
A lower ambient temperature leads to
the compressor switching off for longer
periods. This can cause the internal
temperature in the refrigeration appli-
ance to rise with the risk of food deteri-
orating and going off.
Climate range Ambient temper-
ature
SN 50 to 90°F
(10 to 32°C)
N 61 to 90°F
(16 to 32°C)
ST 61 to 100°F
(16 to 38°C)
T 61 to 109°F
(16 to 43°C)
SN-ST 50 to 100°F
(10 to 38°C)
SN-T 50 to 109°F
(10 to 43°C)
The refrigeration appliance can operate
without any difficulties in rooms with a
cooler ambient temperature (down to
+41°F/5°C).
Before installation
Do not install a damaged refrigeration
appliance.
Risk of damaging the floor from
the load.
Moving the refrigeration appliance
can cause damage to the floor.
Move the refrigeration appliance
carefully on floors that are sensitive
to scratching.
Load-bearing capacity of the niche
floor
To ensure the safe installation of the re-
frigeration appliance and to guarantee
its correct functioning, the floor of the
niche where the appliance is to be in-
stalled must be smooth and even.
It must be made from strong, rigid ma-
terial.
Because the refrigeration appliance is
extremely heavy when fully loaded, it is
essential that the floor it stands on is
able to bear its weight. If necessary,
seek the advice of an architect or con-
struction expert.
When fully loaded, the weight of the re-
frigeration appliance is approx. 1054 lbs
(478 kg).
22
Installation
Side-by-side installation
Your refrigeration appliance can be in-
stalled with another refrigeration appli-
ance next to it as it is equipped with in-
tegrated heaters in the side panels.
Tip: Please contact your dealer for spe-
cific information about which combina-
tions will work with your refrigeration
appliance.
The side-by-side installation kit can be
purchased from Miele Service or your
Miele dealer.
Ventilation
Fire hazard and risk of damage
due to inadequate ventilation.
If the refrigeration appliance is not
ventilated sufficiently, the compres-
sor will run more frequently and for
longer periods. This causes increased
energy consumption and an in-
creased compressor operating tem-
perature, which can result in damage
to the refrigeration appliance.
Please ensure that there is adequate
ventilation around the refrigeration
appliance.
It is essential to observe the required
ventilation openings.
The ventilation openings must never
be obstructed.
Clean the ventilation areas regularly
to remove dust and dirt.
Air at the back of the refrigeration appli-
ance gets warm. The appliance housing
unit must therefore be constructed to
allow sufficient space for ventilation.
Door hinge change
Risk of damage and injury when
changing the door hinges.
Changing the door hinges single-
handedly can cause damage to the
appliance and injury.
The refrigeration appliance is sup-
plied with a fixed door hinge. On no
account should you attempt to
change the door hinge yourself.
If you need to change the door hinge
to the other side, please contact the
Technical Service department.
Safety notes for the plumbed
water connection
Follow the installation instructions
supplied for the plumbed water con-
nection.
Risk of injury and appliance dam-
age if appliance is not connected
properly.
Failing to connect the appliance
properly can result in personal injury
and/or material damage.
The appliance may only be con-
nected to the plumbed-water con-
nection by qualified specialists.
Disconnect the refrigeration ap-
pliance from the power supply before
connecting it to the water supply.
Close the shut-off valve before con-
necting the refrigeration appliance to
the water supply.
23
Installation
WARNING! Risk to health and
risk of damage due to contaminated
water!
The quality of the incoming water
must conform to the requirements
for drinking water in the country
where the refrigeration appliance is
being used.
Connect the refrigeration appliance
to the drinking-water supply.
This refrigeration appliance meets the
requirements of IEC61770 and
EN61770.
Connection to the water supply must
comply with the applicable regula-
tions in the country where the appli-
ance is being installed. All appliances
and systems used to supply water to
the refrigeration appliance must also
comply with the applicable regula-
tions in the respective country.
The refrigeration appliance is only
suitable for connection to a cold water
supply, which
- is directly connected to the plumbed
water supply in order to ensure that
water is circulated in the cold water
line
Avoid connection to a water supply in
which the water might stagnate. This
can affect the taste of water and ice
cubes.
- withstands the operating pressure
- fulfills hygiene regulations
The water pressure must be between
29 and 116psi (2 and 8bar/0.2 and
0.8MPa).
Unduly high water pressure in the
system can result in damage to the
refrigeration appliance.
Install a pressure reducing valve if the
water pressure in the system ex-
ceeds 116psi (8bar/0.8MPa).
Contact a plumber if you are unsure
of your water pressure.
A shut-off valve must be provided be-
tween the water line and the water sup-
ply of the building to ensure that the
water supply can be cut off if necessary.
Make sure that the shut-off valve is
still accessible after the refrigeration
appliance has been installed.
Risk of damage to the ice maker.
If the water inlet is interrupted while
the ice maker is switched on, the
electronic may be damaged. The wa-
ter inlet pipe may also freeze up.
Turn the ice maker off if the water
supply is interrupted (e.g., while on
vacation).
Water filter
The water system will only function if a
water filter is installed in the refrigera-
tion appliance.
Your refrigeration appliance is equipped
with a water filter (active charcoal fil-
ter) that filters tap water for making ice
cubes and using the water dispenser.
The active charcoal filter does not filter
bacteria or microbes out of the water.
The active charcoal filter removes chlo-
rine and other substances that may im-
pair the taste and smell from the tap
water so that only high-quality water is
used for ice cube production and the
24
Installation
water dispenser.
The active charcoal filter must be re-
placed on a regular basis.
Alternatively (if an external water filter
is attached to your household water
supply, for example), you can use a
mesh filter in place of an active char-
coal filter.
Unlike the active charcoal filter, the
mesh filter only filters larger particles
out of tap water.
The mesh filter does not have to be
changed. The mesh filter must be
cleaned on a regular basis.
If you wish to use a mesh filter instead
of an active charcoal filter, you must
adjust the Settings: Set-
tingsAppliance functionFilter
managementFilter type.
New active charcoal filters are avail-
able from Miele Service, your Miele
dealer, or via the Internet.
You can buy the mesh filter as a spare
part from Miele Service, your Miele
dealer, or via the Internet.
Changing the water filter (active char-
coal filter) or replacing with a mesh fil-
ter
Air in the system can cause water to
gush out and the filter cartridge to
spring out when it is removed. Take
great care when changing the water
filter.
Depending on the quantity of water
dispensed or ice cubes produced, the
active charcoal filter needs to be
changed approximately every
6months. A notification on the display
will remind you to do so.
If you have not used the refrigeration
appliance, the water dispenser, or the
ice maker much in the last few weeks
or months, or if the ice cubes smell un-
pleasant, replace the charcoal filter
early.
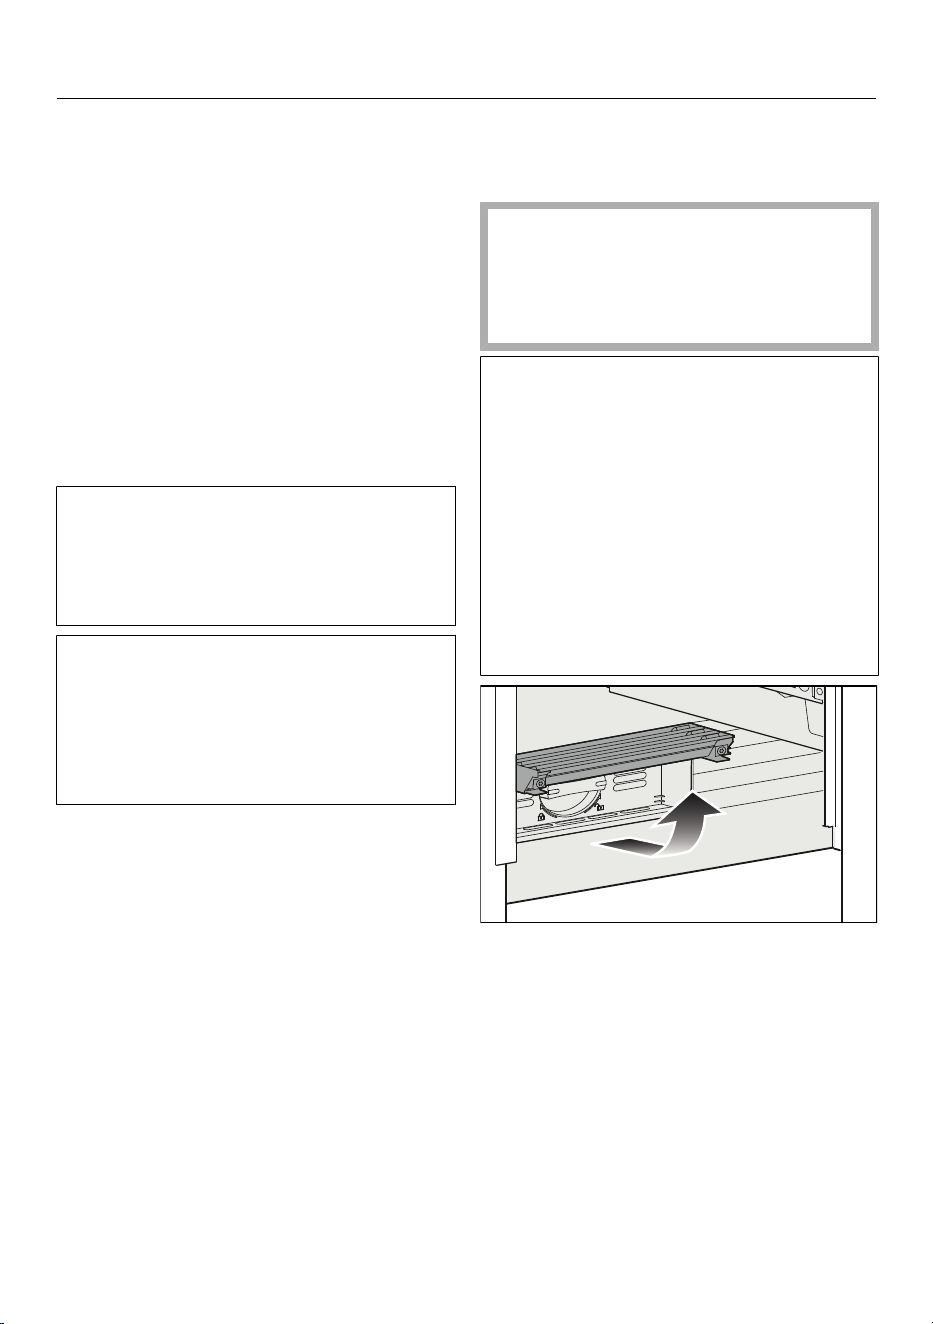
Fold up the cover at the bottom of the
refrigeration appliance.
25
Installation
2
1
Turn the filter cartridge 90° counter-
clockwise until it is in the vertical po-
sition and slide it out carefully .
Caution. The filter cartridge may be
under pressure.
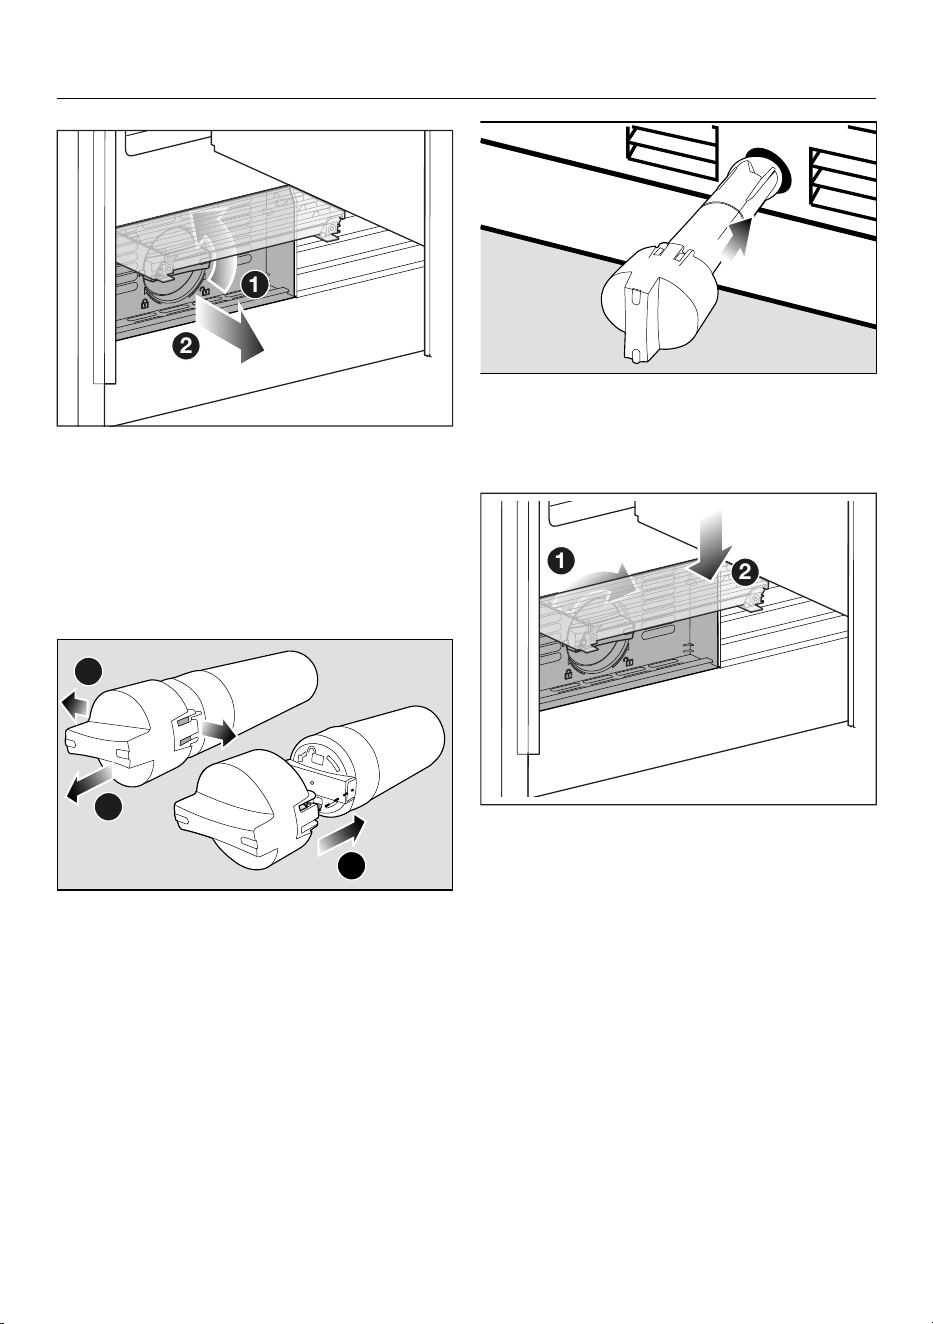
Remove the safety cap from the new
filter cartridge.
1
2
3
Loosen the cap on each side of the
old filter cartridge and pull the cap
off.
Put the cap on the new filter car-
tridge.
Empty the old filter cartridge.
Tip: The old filter cartridge can be dis-
posed of with household waste.
Slide the new filter cartridge or the
mesh filter into the filter opening as
far as it will go, making sure the cap is
vertical.
2
1
Turn the filter cartridge clockwise 90°
as far as it will go until it is in the hori-
zontal position.
26
Installation
Risk of damage caused by water
running out.
If the filter cartridge is not inserted
correctly, there is a risk of water leak-
ing out of the refrigeration appliance.
When inserting the new filter car-
tridge, be sure to turn it as far as the
marker.
Fold the cover back down.
Once the active charcoal filter has been
replaced, the filter display must be re-
set. A notification on the display will re-
mind you to do so.
After inserting a new active charcoal
filter, dispose of all ice cubes pro-
duced in the next 24hours.
Also dispose of the first 3liters of
water that is dispensed from the wa-
ter dispenser after the charcoal filter
is replaced.
27
Installation
Performance Data Sheet
Model: Miele 07134220
Use Replacement Cartridge 07134220
2.0mg/L ± 10% 97.2% ≥ 50% N/A
3.0mg/L ± 10% 97.2% N/A 0.5 mg/L
at least 10,000
particles/mL
>99.9% ≥ 85% N/A
0.009 >94.4%mg/L ± 10% N/A 0.003mg/L
0.015 >96.8%mg/L ± 10% N/A 0.005mg/L
$arbofuran 0.08mg/L ± 10% >98.8% N/A 0.04mg/L
0.225 >99.8%mg/L ± 10% N/A 0.075mg/L
0.15mg/L ± 10% 98.8% N/A 0.010mg/L
0.15mg/L ± 10% 97.9% N/A 0.010mg/L
0.006 >96.5%mg/L ± 10% N/A 0.002mg/L
0.006 >96.6%mg/L ± 10% N/A 0.002mg/L
11 ± 1 NTU 99.1% N/A 0.5 NTU
2.1mg/L ± 10% >99.9% N/A 0.7mg/L
0.015 >93.3%mg/L ± 10% N/A 0.003mg/L
10
7
to 10
8
fibers/L;
fibers greater than
10 μm in length
>99% 99% N/A
99.99%minimum 50,000/L 99.95% N/A
400ng/L ± 20% >95.2% N/A 60ng/L
200ng/L ± 20% >95.6% N/A 30ng/L
1,400ng/L ± 20% >98.6% N/A 200ng/L
NSF System Trade name: WFS200MF & WFS210MF
NSF Replacement Cartridge No: WFC100MF
(for WFS200MF) & WFC110MF
(for WFS210MF)
System tested and certified by NSF International against NSF/ANSI
Standard 42, 53, 401 for the reduction of the claims listed below.
This system has been tested according to NSF/ANSI 42, 53, 401 for reduction of the substances listed below.
The concentration of the indicated substances in water entering the system was reduced to a concentration less than or equal to
the permissible limit for water leaving the system, as specified in NSF/ANSI 42, 53, 401.
4ubstance
Influent
Dhallenge
concentration
Average
Seduction
Reduction
requirement
Max
Qermissible
Qroduct
water concentration
$hloramine
1articulate, Class I
particles ≥0.5 to <1 μm
"trazine
#enzene
p-%ichlorobenzene
Lead pH
6.5
Lead pH
8.5
Mercury pH
6.5
Mercury pH
8.5
5urbidity
&thylbenzene
5oxaphene
"sbestos
$yst
Meprobamate
Atenolol
Carbamazepine
Chlorine
Uaste
and Pdor
28
Installation
1,400 200N/A>98.7%ng/L ± 20% ng/L
30N/A>94.4% ng/L
200ng/L±20%
1,400ng/L ± 20%
200N/A>98.7% ng/L
400ng/L±20%
60N/A>95.3% ng/L
140 20N/A>96.7%ng/L ± 20% ng/L
140 20N/A>96.6%ng/L ± 20% ng/L
140 20N/A>96.2%ng/L ±20% ng/L
140 20N/A>96.3%ng/L ±20% ng/L
2,000 300N/A>99.0%ng/L ±20% ng/L
1,400 200N/A>96.3%ng/L ±20% ng/L
4ubstance
Influent
Dhallenge
concentration
Average
Seduction
Reduction
requirement
Max
Qermissible
Qroduct
water concentration
DEET
Phenytoin
Metolachlor
Ibuprofen
Trimethoprim
Linuron
Naproxen
Estrone
Bisphenol A
Nonyl phenol
Tested using a flow rate
PG55
HHQN-NJO,
Q)PG
QQSessure of 60
QQTiH,
BOE
temperature of 68
±
5
'
NOTE : The testing was performed under standard laboratory conditions, actual performance may vary.
0QFSBUJPODPOEJUJPOT
Service
Glow rate
Water
Qressure
Water
Uemperature
Function
Capacity
0.55
gpm
(2
-m)
30
QTJo
125
psi
(206
L1B
–
861
k1a)
35
'o
100
°F
(2
$o
38
°C)
Dhemical/Nechanical
WFS200MF 250
gallons
(946
L), WFS210MF 150
gallons
(567
L)
Warning :
Do not use with water that is microbiologically unsafe or of unknown quality without ad-equate
disinfection before or after the system. Systems certified for cyst reduction may be used on disinfected water
that may contain
filterable cyst.
Notice :
- Adsorption media will not be regenerated and used.
- Systems must be installed and operated in accordance with manufacturer’s recommended procedures and
guidelines. The system and installation shall comply with applicable state and local regulations.
Install on cold water line only.
- Flush
3
gallons through
filter before use
(Glush approximately 5
minutes).
- To maintain proper
filtration, replace the
filter
BUMFBTU
every 6 months.
Manufacturer :
Microfilter Co., Ltd., 162-1,Sansu, Deoksan, Jinchun, Chungbuk, Korea
Tel. No.: +82-43-531-7022
29

Installation
Lead-free certificate
This product F 1413 Vi (KIMSDF18US) is tested and certified by WQA against
NSF/ANSI 372 for "lead free" compliance.
Miele & Cie. KG
Carl-Miele-Straße 29
D-33332 Gütersloh
Lead free certificate
35
This product is tested and certified by WQA against NSF/ANSI/CAN 372 and
NSF/ANSI/CAN 61: Q ≤ 1 (pursuant to California Health & Safety Code Section
116876(c)).
Miele & Cie. KG
Carl-Miele-Straße 29
33332 Gütersloh
Germany
30
Installation
*INSTALLATION*
Electrical connection
Risk of electric shock!
The refrigeration appliance must only
be switched on when it has been in-
stalled in accordance with the instal-
lation instructions.
Ground the refrigeration appliance.
The refrigeration appliance must not
be grounded via a gas pipe.
If in doubt, have a suitably qualified
and experienced electrician check
that the installation complies with
relevant regulations.
Do not install a fuse into neutral cur-
rent or grounding electrical circuit.
Do not use an extension cord or
power bar.
Do not use a frayed or damaged
power cord.
Risk of electric shock!
For protection against electric shock,
this refrigeration appliance is
equipped with a pole-free electrical
plug which is protected against re-
verse polarity. The electrical socket
must be properly grounded.
Do not remove the round grounding
connector pin from the electrical
plug.
Use only a grounded plug adapter.
Wait for 1hour after installation before
plugging the refrigeration appliance into
the electricity supply. This allows
coolant and refrigeration oil to settle in
accordance with regulations.
Ensure that the voltage of the power
supply corresponds with the connection
voltage of the refrigeration appliance. A
power supply of 110–120V, 60Hz, and
10–16A, which is protected by a power
switch or a fuse, is required to operate
the refrigeration appliance.
The manufacturer recommends operat-
ing the refrigeration appliance on a sep-
arate circuit to avoid overloading the
electrical circuit.
All relevant legal electrical, fire, and
building regulations must be observed
when installing the socket and/or the re-
frigeration appliance.
In certain countries, refrigeration appli-
ances are required to be connected to
the electrical supply via a wall-mounted
ON/OFF switch.
To avoid the risk of fire, electric shock,
or other injuries, the refrigeration appli-
ance must be installed and connected
by a suitably qualified electrician in ac-
cordance with all relevant local and na-
tional regulations and standards, includ-
ing fire prevention.
The outlet must not be concealed be-
hind the refrigeration appliance and
must be easily accessible so that the
appliance can be quickly disconnected
from the electrical supply in case of an
emergency.
If the outlet is no longer accessible after
installation, an additional means of dis-
connection must be provided for all
poles. Suitable means of disconnection
include switches with an all-pole con-
31
Installation
*INSTALLATION*
tact gap of at least 1/8" (3mm). These
can be circuit breakers, fuses, and relay
switches.
The electrical plug and power cord must
not come into contact with the back of
the refrigeration appliance as vibrations
can cause damage to these compo-
nents. This could result in a short circuit.
Do not plug in other appliances behind
the refrigeration appliance.
Do not connect the refrigeration appli-
ance to a stand-alone inverter such as
those used with an autonomous power
supply e.g., solar power.
When the refrigeration appliance is
switched on, power surges could result
in a safety shut-off. This can damage the
electronics. The refrigeration appliance
must not be used with so-called energy
saving devices either. These reduce the
amount of energy supplied to the appli-
ance, causing it to overheat.
If the power cord needs to be replaced,
this must be performed by a qualified
electrician.
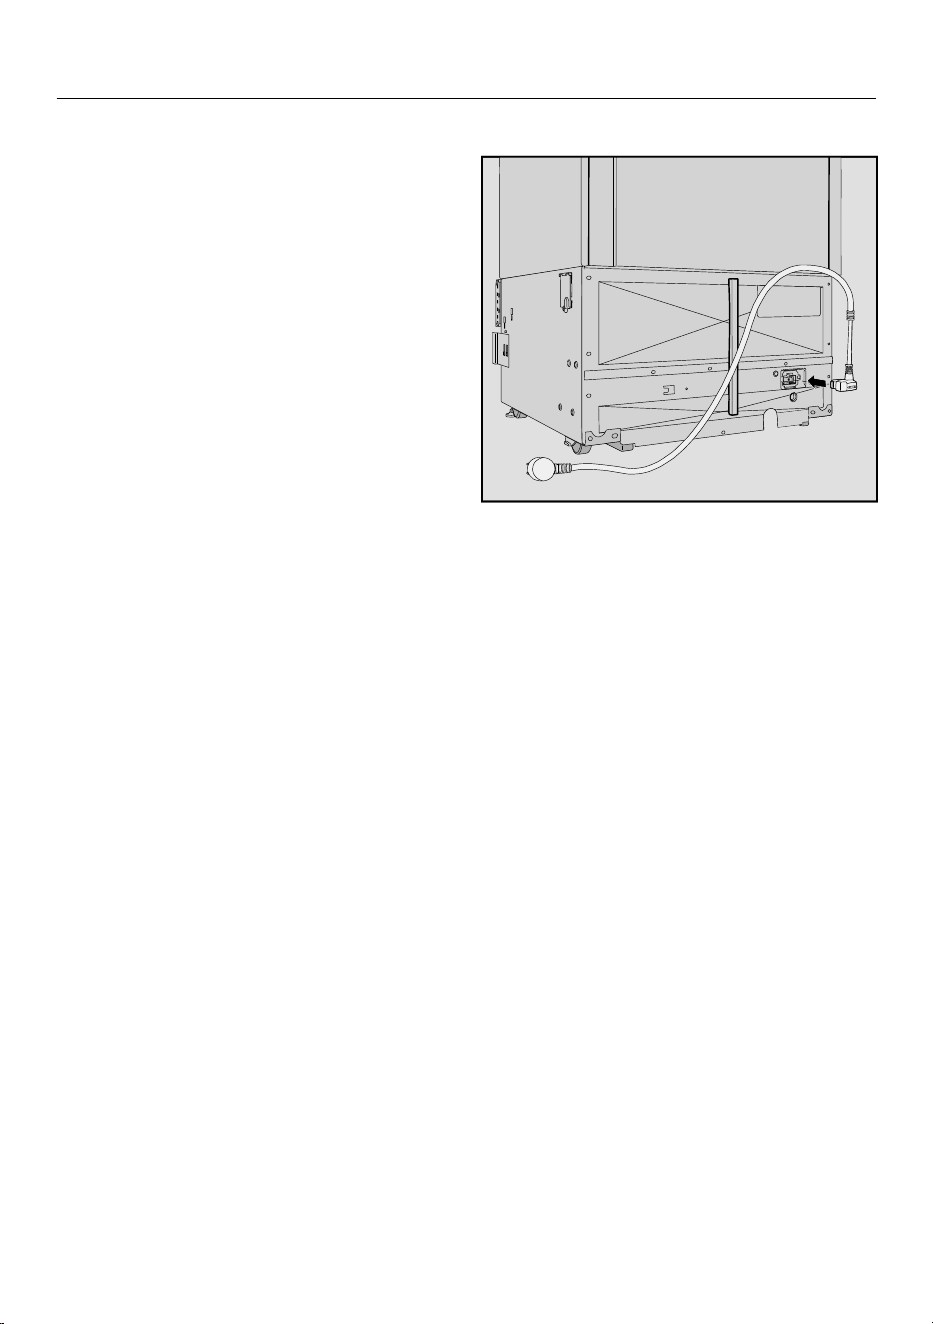
Connecting the appliance
Insert the plug into the back of the
appliance.
Make sure that the plug has clicked into
position correctly.
Insert the plug into the electrical out-
let and switch on.
The appliance is now connected to the
electricity supply.
32
Overview
Your KFMC3836R/L refrigeration appliance
33

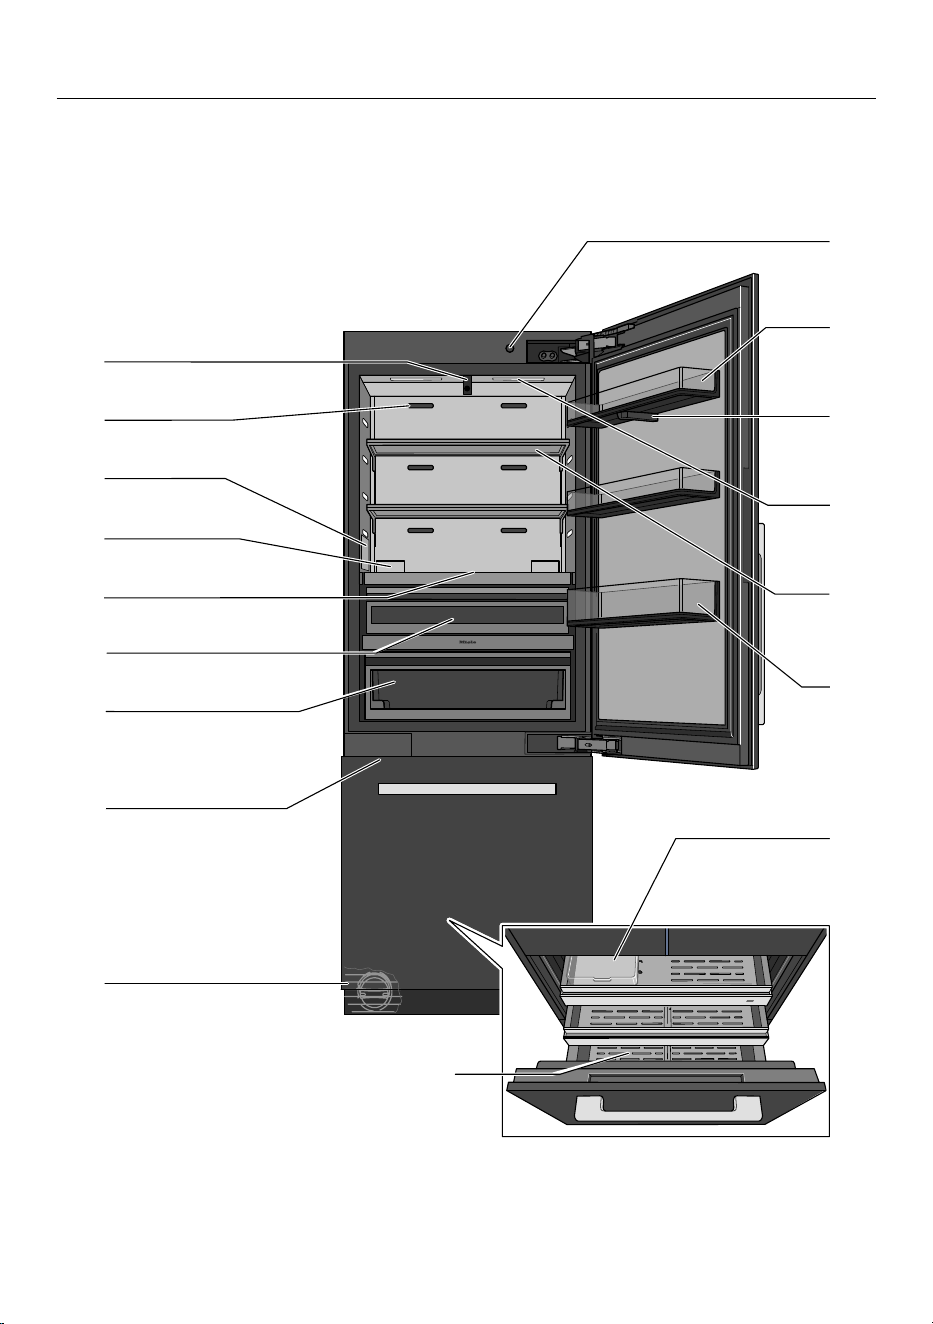
Overview
a
On/Off switch
b
Door shelves
c
Camera (FoodView):
The camera takes photos of the interior of the fridge zone.
d
Interior lighting (SmartLight):
The interior lighting adapts to the lighting conditions in the room.
e
Adjustable shelf
f
Gallon bin: Place large bottles and containers here.
g
Ice-cube container
h
Freezer drawer: For storing large items of frozen food.
i
Water filter
j
IceMaker
k
MasterFreshPro drawer:
For storing fruit, vegetables, dairy products, meat, and fish at
32°F (0°C) and an ideal humidity level.
l
DailyFreshExtraCool drawer:
Use this low-temperature drawer to store food that goes bad quickly.
m
Display
n
Holder for the charcoal filter (AirClean system)
o
Water dispenser
p
Ventilation slots:
When placing food in the fridge zone, make sure that the ventilation slots are
not blocked.
q
2 cameras (FoodView):
The cameras take photos of the door shelves and the MasterFreshPro drawer.
34
Overview
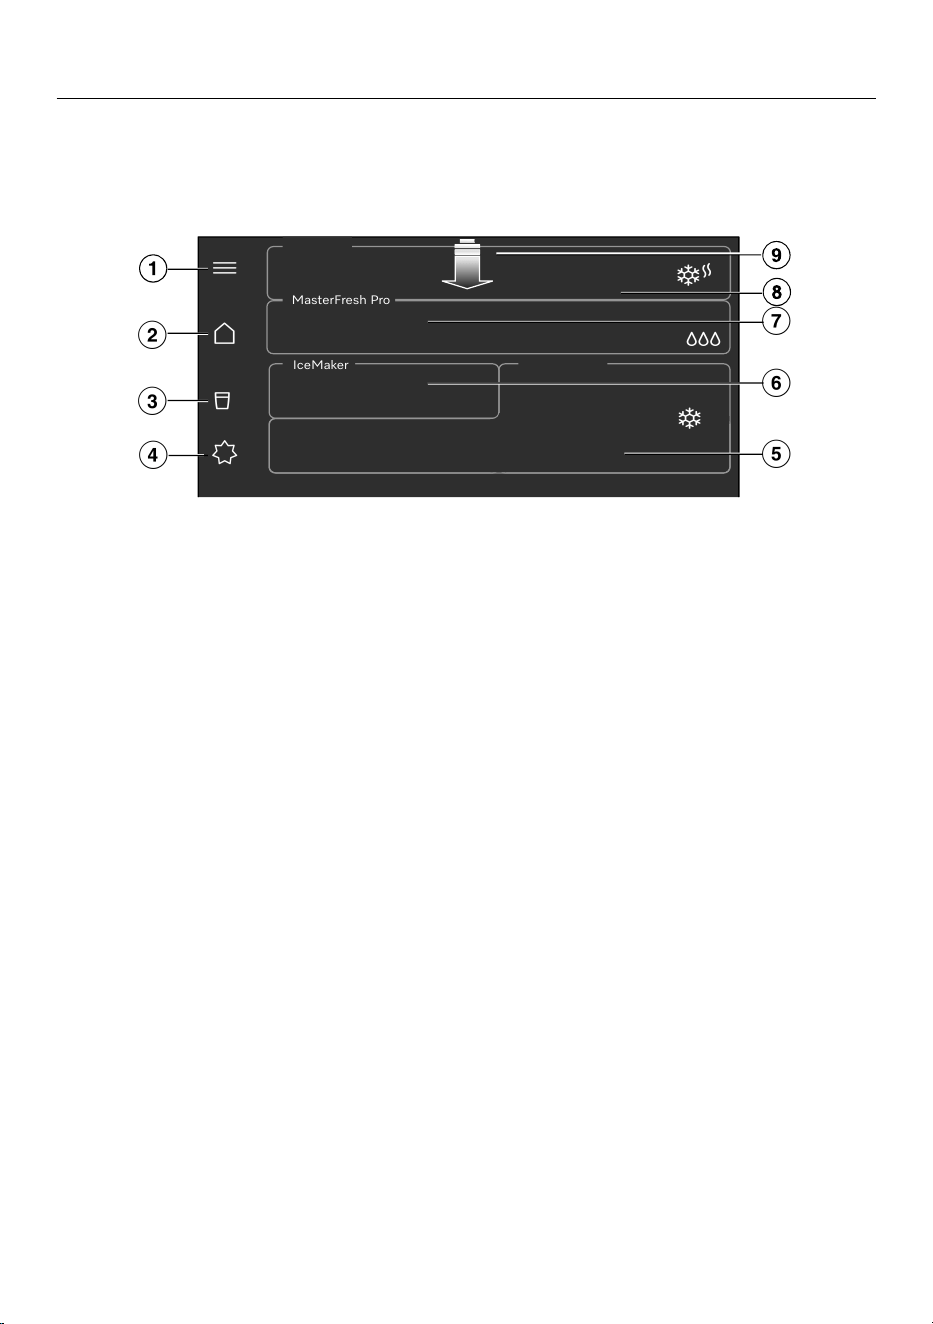
Main menu on display
KFMC3836R/L
MasterFresh Pro
IceMaker
a
Make the Settings, check the filter levels (Water filter, AirClean System),
call up the Notifications and Tips (e.g.,how to use, replace, or reactivate the Air-
Clean System or how to replace or clean the Water filter)
b
Main menu
c
Display and select favorites for the Water dispenser,
lock the Water dispenser
d
Switch the Standard, Eco mode, Sabbath mode, and Vacation mode functions
on and off
e
Display the required temperature for the Freezer zone,
set the temperature; switch the SuperFreeze function on and off
f
Switching the ice maker and the
QuickIce function on and off
g
Display and select the setting in the MasterFresh Pro drawer
h
Display the required temperature for the Fridge zone,
set the temperature, switch the SuperCool&AirClean function on and off
i
Pull-down menu with quick access to various functions
(e.g., checking the filter levels (Water filter, AirClean System), switching Sensor
lock on and off)
35
Overview
Symbols on the display
Various different symbols are used on
the display.
See the operating instructions
Delete last character
Next step
Previous step
OK
Accept
Back
Close window
Menu
Favorites
Information
Note
Context menu
Edit
Delete
Process successfully completed
Operation
Navigating the display
Your refrigeration appliance display
shows the different refrigeration areas/
functions of your refrigeration appliance.
The display can be scratched by
pointed or sharp objects, e.g., pens.
Only touch the display with your fin-
gertips.
Touch the required refrigeration area
or function on the display to select
settings.
A subsection opens or the function is
selected directly by being highlighted in
color.
To display additional functions, swipe
your finger in the required direction on
the display.
Touch to see useful information
about the selected function.
Exiting a menu level
You are in a menu.
Depending on the menu, select
Close window or Back.
The higher-level menu is displayed.
36
Overview
Adjusting parameters
You can switch parameters on or off or
adjust them on a scale (e.g., the tem-
perature).
Selecting or deselecting parameters
Activated parameters are highlighted in
color.
Touch the parameter that you wish to
select or deselect.
Confirm with OK.
The parameter is saved.
Changing parameters on a scale
Select the parameter you want to
change.
Move the scale to the left or right until
the required value is highlighted.
Confirm with OK.
The value is saved.
Displaying the pull-down menu
The pull-down menu provides quick ac-
cess to certain functions such as
switching the network connection or the
sensor lock on and off. You can also
open filter statuses and notifications via
the pull-down menu.
Open the pull-down menu by pulling
it down from the top edge of the dis-
play.
Select the function you want.
The selected function will light up white.
Touch Close window to close the
pull-down menu.
Networking
Your refrigeration appliance is equipped
with an integrated Wi-Fi module. The
Wi-Fi module makes it possible to con-
nect to your home network and to use
the Mieleapp on a mobile device.
Once your refrigeration appliance has
been connected via Wi-Fi, the connec-
tion is automatically re-established ev-
ery time it is switched on.
Make sure that your Wi-Fi network sig-
nal is strong enough in the place where
you intend to install your refrigeration
appliance.
Connecting your refrigeration appli-
ance to your Wi-Fi network will in-
crease energy consumption, even
when the appliance is switched off.
37
Overview
Smart Extras via the Miele app*
Networking via the Miele app gives you
access to numerous Smart Extras, in-
cluding:
- Access status information.
- Use additional helpful functions.
- Keep your refrigeration appliance up
to date with the latest Miele develop-
ments via software updates.
You can find more detailed information
about Smart Extras on the Miele web-
site, in the Apple App Store
®
, or in the
Google Play Store™.
*This is a separate digital offer from
Miele & Cie. KG. The range of func-
tions can vary depending on the model
and the country. Acceptance of the
General Terms and Conditions and Pri-
vacy Policy for Miele digital products
and services in the Miele app required.
Miele reserves the right to change or
discontinue the digital offers at any
time.
Interior lighting (SmartLight)
Your refrigeration appliance has auto-
matic interior lighting. The automatic in-
terior lighting in the fridge zone auto-
matically adapts to the lighting condi-
tions in the room.
To ensure that the cameras can func-
tion correctly, the interior lighting must
be set to maximum brightness.
When the automatic interior lighting is
switched on, its intensity might not be
sufficient to assure the quality of the
camera images taken.
If this is the case, switch the auto-
matic interior lighting off: Set-
tingsAppliance functionInterior
lightingAutomatic.
Then set the controller manually to
maximum brightness.
SuperCool&AirClean
When the SuperCool&AirCleanfunc-
tion is switched on, the temperature
in the fridge zone drops to 33°F (1°C).
Select this function for the rapid chilling
of large amounts of fresh food or drink.
If you want to rapidly chill large
amounts of fresh food or drinks, the
SuperCool&AirCleanfunction
must be switched on before placing
food or drinks in the fridge zone.
Tip: You should also activate the Super-
Cool&AirCleanfunction temporarily
if you are storing strong-smelling food in
the fridge zone. When the Super-
Cool&AirCleanfunction is selected,
the charcoal filter works even harder to
further reduce odors in the fridge zone.
38
Overview
The SuperCool&AirCleanfunction
will switch itself off automatically after
max. 6hours.
SuperFreeze
When the SuperFreezefunction is
switched on, the temperature in the
freezer zone drops to -15°F (-26°C).
Select this function before freezing fresh
food weighing 4.4lbs (2kg) or more.
Fresh food will be frozen quickly, so that
the nutritional value, vitamin content,
appearance, and taste are maintained.
In addition, the QuickIce function is ac-
tivated in the ice maker and ice-cube
production speeds up.
The SuperFreezefunction must be
turned on around4–6hours before
placing the food in the freezer zone.
The SuperFreezefunction turns off
automatically after a maximum of
8hours. The exact amount of time will
vary according to how much fresh food
is placed in the freezer.
If you place a large amount of food in
the freezer zone and the temperature in
the freezer zone rises, the Automatic
SuperFrost function switches on auto-
matically for a while.
Ideally, place the food in the right-hand
section of the freezer drawer for this
purpose.
QuickIce
When the ice maker is switched on,
you can select the QuickIce function.
When the QuickIce function is switched
on, ice cube production speeds up.
The temperature in the freezer zone
drops to -15°F (-26°C).
The QuickIce function will switch itself
off automatically after max. 48hours.
Vacation mode
The Vacation mode function is useful
when you go on vacation, for example,
if you do not wish to switch off the
fridge zone completely or do not need
a high degree of cooling.
The fridge zone therefore remains in
operation while saving energy.
When the Vacation mode function is
switched on:
- The fridge zone and the Master-
FreshPro drawer are regulated to a
temperature of 57°F (14°C).
- The temperature in the DailyFresh Ex-
traCool drawer increases to approx.
54°F (12°C).
- No settings can be selected in the
MasterFreshPro drawer.
- The SuperCool&AirClean and Su-
perFreezefunctions are switched
off.
- The freezer zone remains switched on
at the previously set temperature.
- The ice maker is switched off tempo-
rarily.
Tip: Food which does not spoil quickly
can be stored in the refrigeration appli-
ance for some time at this moderate
fridge zone temperature.
This also prevents the build-up of odors
and bacteria which can occur if the
fridge zone is switched off and the ap-
pliance door is closed.
39
Overview
Health risk caused by decompos-
ing food.
The usability and quality of food in
the fridge zone may deteriorate if the
temperature remains above 39°F
(4°C) for an extended period.
Only ever switch on the Vacation
modefunction for a limited period.
Do not store any temperature-sensi-
tive food which spoils easily, such as
fruit, vegetables, fish, meat, and dairy
products, during this time.
Eco mode
The Eco mode function is useful if you
do not need a high degree of cooling in
the fridge zone and in the freezer zone.
Energy consumption is lower than in
normal operation.
When the Eco modefunction is
switched on:
- The fridge zone is regulated to a tem-
perature of 43°F (6°C); the tempera-
ture in the MasterFreshPro drawer is
increased to around 37°F (3°C).
- The temperature in the DailyFresh Ex-
traCool drawer increases to approx.
4°C (39°F).
- The freezer zone is regulated to a tem-
perature of 3°F (-16°C).
- The QuickIce function is switched off.
- The SuperCool&AirClean and Su-
perFreezefunctions are switched
off.
Health risk caused by decompos-
ing food.
The usability and quality of food in
the fridge zone may deteriorate if the
temperature remains above 39°F
(4°C) for an extended period.
Only ever switch on the Eco
modefunction for a limited period.
Do not store any temperature-sensi-
tive food which spoils easily, such as
fruit, vegetables, fish, meat, and dairy
products, during this time.
Health risk caused by decompos-
ing food.
Storing food at a temperature higher
than 0°F (-18°C) in the freezer zone
for an extended period of time may
impair the storage life and quality of
the food.
Only ever switch on the Eco
modefunction for a limited period.
When switching to the Eco
modefunction, check that the food in
the freezer zone is already properly
frozen.
Do not freeze any new food while the
Eco modefunction is switched on.
Sabbath mode
The refrigeration appliance has a Sab-
bath mode function to support the ob-
servance of religious customs.
Switching on the Sabbath mode func-
tion temporarily switches off the follow-
ing features:
- interior lighting
- all audible and visual signals
- the cameras: The camera does not
take any photos and no photos are
displayed in the Miele app.
40
Overview
- reminders (e.g., to change or clean the
water filter): The set time interval is
paused.
- all other functions including Super-
Freeze, SuperCool&AirClean,
the water dispenser, and the ice
maker
When the Sabbath mode function is
switched on, you cannot make any set-
tings on your refrigeration appliance or
via the Miele app. Only Sabbath mode
can be switched off.
Charcoal filter (AirClean Sys-
tem)
The charcoal filters in the AirClean Sys-
tem neutralize unpleasant odors in the
fridge zone and stop odors from being
transferred to the food.
Tip: We recommend selecting the Su-
perCool&AirCleanfunction tempo-
rarily if you are storing strong-smelling
food in the fridge zone. When the Su-
perCool&AirCleanfunction is se-
lected, the charcoal filter works even
harder to further reduce odors in the
fridge zone.
The charcoal filters in the AirClean Sys-
tem can be reactivated in the oven or a
similar domestic appliance with an oven
function in a sustainable way and used
again (a notification reminding you to re-
activate them appears on the display
approximately every 6months).
The charcoal filters can be reactivated
approximately 5times; they must be
replaced with new ones after approxi-
mately 3years. A notification on the
display will remind you to do so.
Used charcoal filters can be disposed
of with household waste.
New charcoal filters are available from
Miele Service, your Miele dealer, or via
the Internet (see “Familiarization”,
“Optional accessories”).
Camera (FoodView)
Your refrigeration appliance is supplied
with several cameras in the fridge zone.
Every time you open and close the
fridge zone doors, the cameras take
photos of the inside of the fridge zone
and the door shelves.
Every time you open and close the Mas-
terFreshPro drawer, the camera takes
photos of the content of the Master-
FreshPro drawer.
When the refrigeration appliance is in
use, it is possible that users, people, or
the area around it will be captured by
the cameras and appear in the images
in the Mieleapp. The images are pro-
cessed for the purpose of being made
available in the Mieleapp. Information
about data processing is available
here: SettingsInforma-
tionLegal InformationOpen source
licensesMieleCamera.
Temperature alarm in the
freezer zone
The refrigeration appliance has been
equipped with a temperature alarm so
that the temperature in the freezer
zone cannot rise unnoticed.
If the temperature in the freezer zone
becomes too warm, a message appears
in the display and the highest tempera-
ture that has been reached is shown. An
alarm will also sound until the cause of
the alarm is rectified or the alarm is
switched off.
41
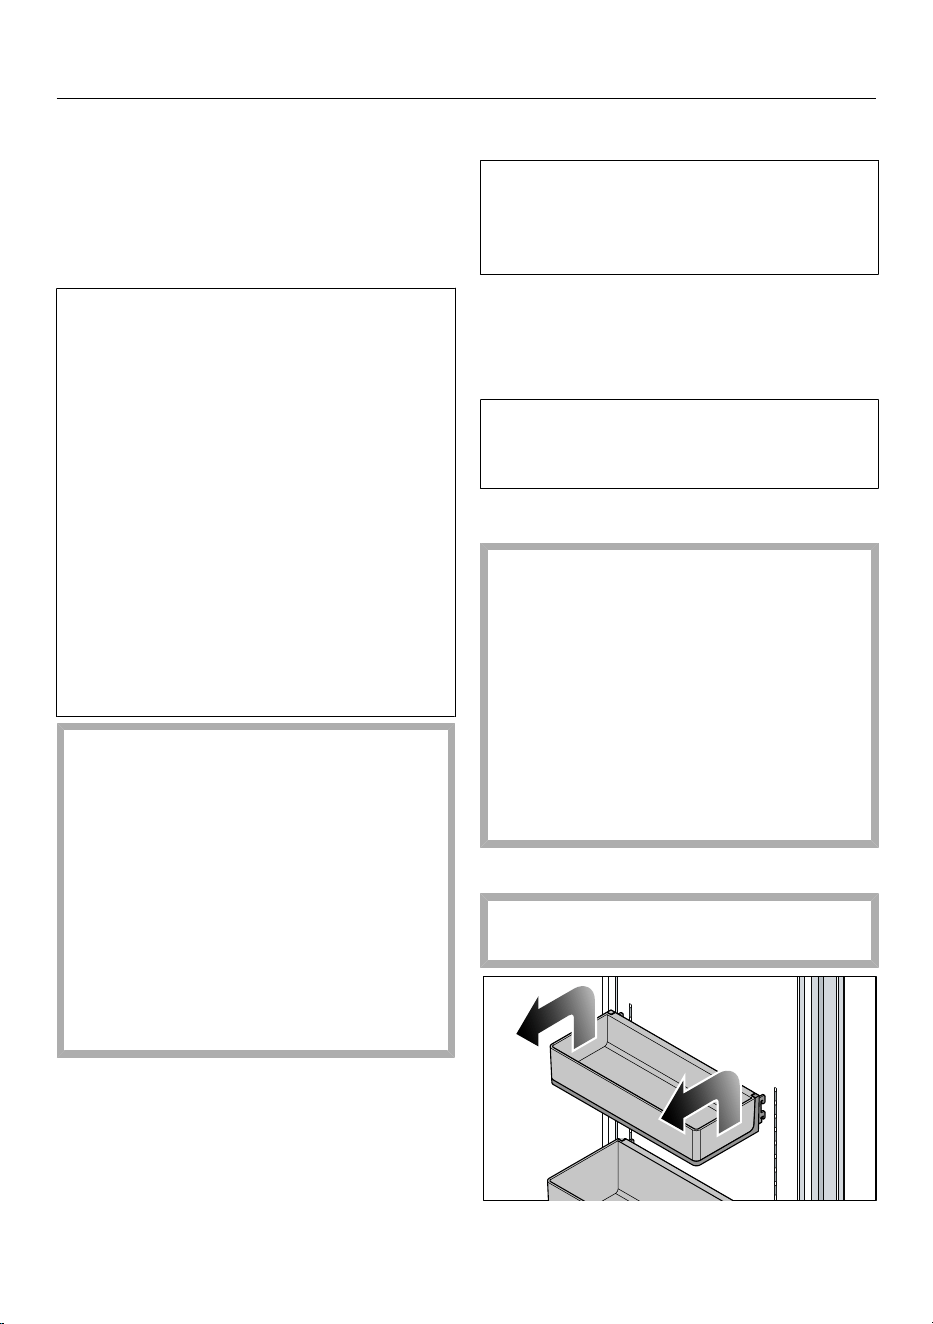
Overview
Tip: Before you switch the temperature
alarm off, you must determine the cause
and rectify it.
The set temperature determines when
the appliance recognizes a temperature
as being too warm.
The audible and visual signals may be
activated in the following situations:
- You switch on the refrigeration ap-
pliance and the temperature in the
freezer zone differs greatly from the
set temperature.
- A lot of warm room air enters the
freezer zone when you are rearrang-
ing or taking out frozen food.
- You are freezing large amounts of
food at once.
- You are freezing warm food.
- A power outage has occurred.
- The refrigeration appliance has a
fault.
Health risk caused by decompos-
ing food.
If the temperature in the freezer re-
mains above 0°F (-18°C) for a long
time, the frozen food may start to de-
frost. This will reduce the storage life
of the food.
Check whether the frozen food has
started to defrost. If it has, check that
the food is safe to use and if it is,
then use it as soon as possible or
cook it before freezing it again.
Door alarm
The refrigeration appliance is supplied
with a door alarm to avoid increased
energy consumption and food becom-
ing warm if the door is left open.
A door alarm will sound if an appliance
door is left open for too long.
As soon as the appliance door is closed,
the door alarm will stop.
The audible door alarm can also be de-
activated: SettingsGen-
eralSoundsBuzzer tones.
Adjusting the interior fittings
The stainless steel surfaces are very
susceptible to scratching.
Be careful when handling the door
shelves, storage shelves, and draw-
ers in the refrigeration appliance and
make sure that the stainless steel
surfaces are not damaged.
Fully open the appliance doors when
you want to move or remove door
shelves, storage shelves, and draw-
ers.
Removing or moving the door shelves
Only move or remove the door
shelves when they are empty.
42
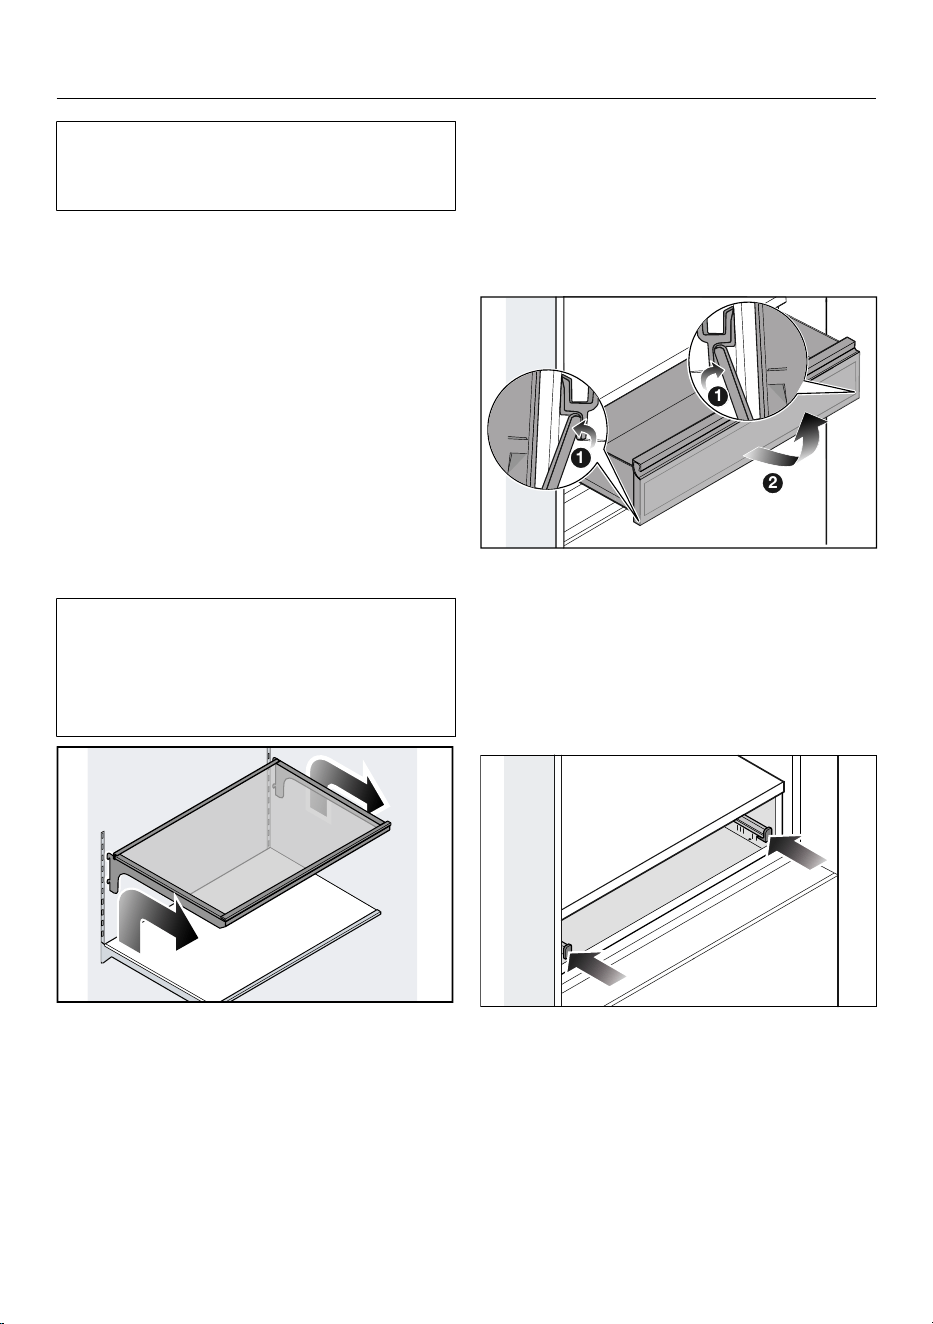
Overview
Do not move the bottom door shelf.
The door shelf must remain in the low-
est position.
Lift the door shelf on both sides so
that it is lifted over the guide with the
retainers on the sides.
Remove the door shelf or place the
door shelf in the required position
with the retainers in the guide at the
same height again.
Make sure that the door shelf is
straight.
Tip: The clip-on containers in the door
shelves can be removed completely for
filling, emptying, or cleaning.
Removing or moving the shelves
The retainers for the shelves can
scratch the rear panel of the fridge
zone if they are attached at an angle.
Take care to install the shelves hori-
zontally and hook the retainers in fully.
Raise the shelf slightly so that the
shelf is lifted with the retainers over
the guide at the back.
Pull the shelf out to the front.
Remove the shelf or place the shelf in
the required position, with the retain-
ers engaged in the guide.
Removing the MasterFresh drawer
The MasterFresh drawer is on tele-
scopic runners and can be pulled out
some distance for filling and emptying.
The MasterFresh drawer can be com-
pletely removed for cleaning purposes:
2
1
1
1
Pull the MasterFreshPro drawer out
as far as it will go.
Press the drawer stops out on both
sides of the MasterFresh drawer .
Remove the MasterFresh drawer .
Inserting the MasterFreshPro drawer
Push both telescopic runners in as far
as they will go.
43

Overview
Place the MasterFreshPro drawer on
the telescopic runners and push in
the MasterFreshPro drawer as far as
it will go so that the drawer stops on
both sides engage.
Removing the DailyFresh ExtraCool
drawer
The DailyFresh ExtraCool drawer is on
telescopic runners and can be pulled
out some distance for filling and empty-
ing.
The DailyFresh ExtraCool drawer can be
completely removed for cleaning pur-
poses:
2
1
1
1
Pull the DailyFresh ExtraCool drawer
out as far as it will go.
Press the drawer stops out on both
sides at the bottom of the DailyFresh
ExtraCool drawer.
Lift up the DailyFresh ExtraCool
drawer to remove it.
Inserting the DailyFresh ExtraCool
drawer
Push both telescopic runners in as far
as they will go.
2
Place the DailyFresh ExtraCool
drawer on the telescopic runners and
push in the DailyFresh ExtraCool
drawer as far as it will go so that the
drawer stops on both sides engage.
44
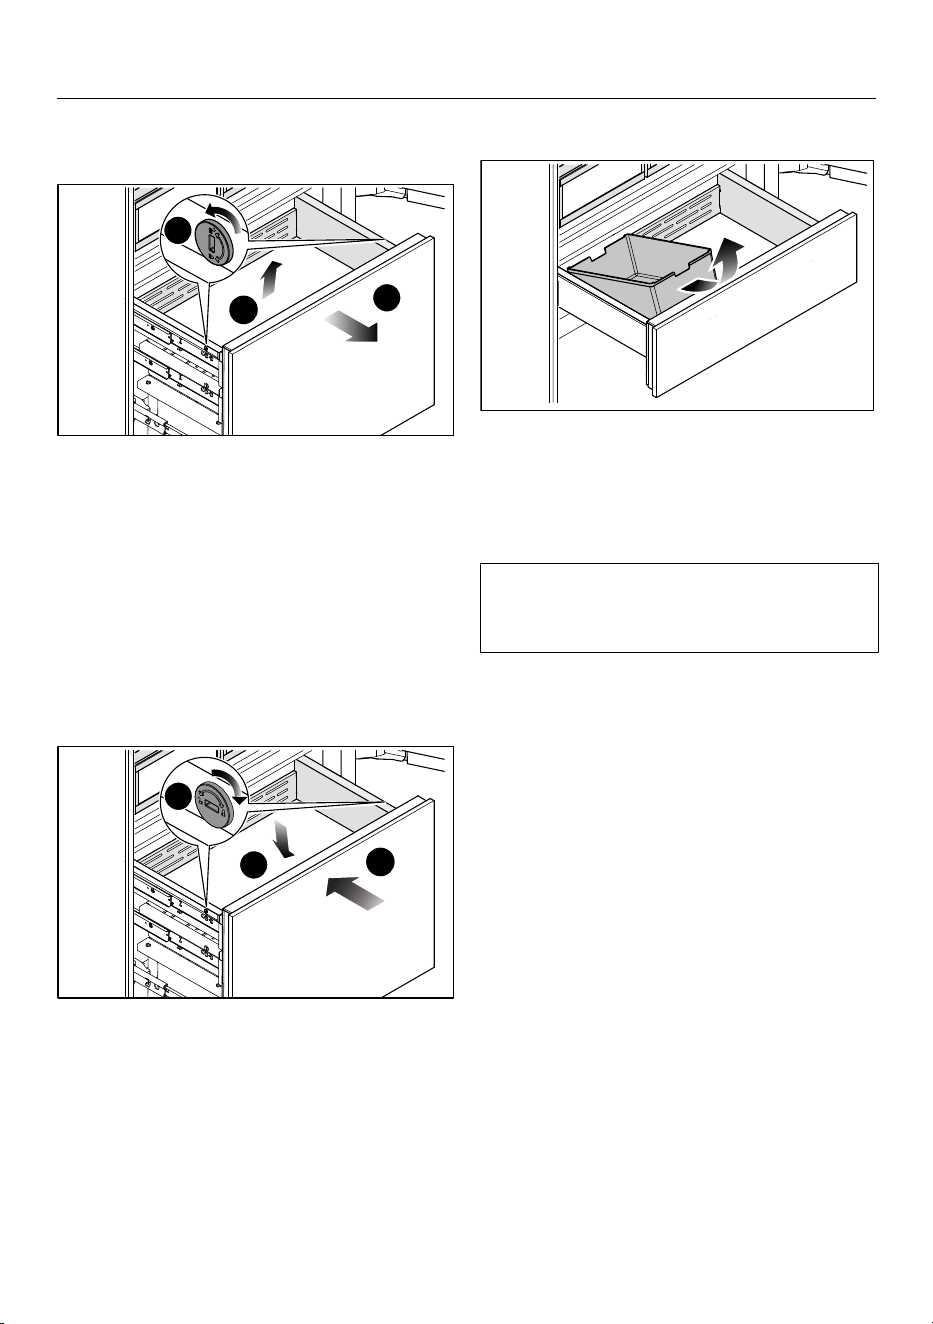
Overview
Removing containers from the freezer
drawer
1
2
2
3
3
Pull the freezer drawer out as far as it
will go.
Release the retainers on both sides of
the container by turning the slots in
the retainers into a horizontal position
with a suitable object.
Pull the container upward to remove
it.
Placing containers in the freezer
drawer
1
2
2
3
3
Place the container in the freezer
drawer from above.
Secure the container by turning the
slots in the retainers on both sides of
the container into a vertical position
.
Push the freezer drawer all the way
back in .
Removing ice cube containers
Pull the freezer drawer out as far as it
will go.
Tilt the ice cube container forward
and pull the ice cube container up and
out to remove it.
Caution. Ice cube production does not
stop when the ice cube container is re-
moved.
Accessories supplied
Ice cube scoop
Appliance plug
Charcoal filter
(Longlife AirClean system)
Water filter
(IntensiveClear charcoal filter)
45
Overview
Optional accessories
Products specially tailored to your re-
frigeration appliance – such as appli-
ance care products and accessories –
are available from the Miele online
store, Miele Service, or your Miele
dealer.
You can access the Miele online store
via the following QR code:
46
Commissioning
Before using for the first time
Remove all packaging material and
protective film.
Remove all advertising materials and
labels from the inside of the refrigera-
tion appliance.
Clean the inside of the appliance and
the accessories.
Tip: Reactivating the charcoal filters for
their first use improves the quality of the
charcoal filters (see „Cleaning and care
– Reactivating the charcoal filter (Air-
Clean system) in the oven“.)
Connecting the refrigeration appliance
Connect the refrigeration appliance to
the electricity supply as described in
“Installation – Electrical connection”.
Inserting the charcoal filter (AirClean
System) into the holders in the
fridge zone
Risk of mold.
For hygiene reasons, the charcoal fil-
ters should not be left in the fridge
zone from more than 6months with-
out being reactivated or replaced.
Put the charcoal filter in the fridge
zone just before commissioning the
refrigeration appliance.
Your refrigeration appliance is supplied
with 2 charcoal filters in the fridge zone.
Remove the cover from each charcoal
filter.
Remove the retainer for the charcoal
filter from the holder.
47
Commissioning
To replace a charcoal filter, remove
the used charcoal filter from the re-
tainer and dispose of the charcoal fil-
ter with normal household waste.
Please note: Do not dispose of the re-
tainer for the charcoal filter as the re-
tainer will be reused.
Clean the retainer for the charcoal fil-
ter under running water and then dry
it with an all-purpose cloth.
Take the charcoal filter out of its pack-
aging together with the filter protec-
tion.
Risk of damage as a result of in-
correct handling.
The carbon filters are breakable.
When handling the carbon filters, be
careful not to drop them.
Do not press down on the honey-
comb structure of the carbon filters.
Before using the charcoal filter, check
it for any visible damage. Never use a
damaged charcoal filter.
2
1
Insert the new charcoal filter into the
retainer.
Remove the filter protection.
To improve the quality of the charcoal
filters, reactivate them before insert-
ing them into the fridge zone for the
first time (see „Cleaning and care –
Reactivating the charcoal filter (Air-
Clean system) in the oven“).
48
Commissioning
Insert the charcoal filter and retainer
into the holder.
Clean the cover by hand with a damp
hand towel, not in the dishwasher.
Place the cover on the retainer.
The charcoal filters in the AirClean
System contain active charcoal. Active
charcoal can leave significant marks.
Wash your hands with soap and water
after inserting the charcoal filter.
The AirClean System is now active.
The charcoal filters must be reacti-
vated approx. every 6months or re-
placed after approx. 3years. A notifi-
cation on the display will remind you to
do so.
Tip: Activate the SuperCool&Air-
Cleanfunction temporarily if you are
storing strong-smelling food in the
fridge zone. When the SuperCool&Air-
Cleanfunction is selected, the char-
coal filter works even harder to further
reduce odors in the fridge zone.
Requirements for networking
Note the following requirements for net-
working:
1. A home network is available at the
installation site.
Have the Wi-Fi password ready.
2. The Mieleapp is available on a mo-
bile device.
3. You have a user account in the
Mieleapp.
You can also carry out networking at a
later date. Skip the “Networking” menu
option during commissioning.
Switching on the refrigeration
appliance
Open the upper appliance door.
Switch on the refrigeration appliance
by firmly pressing in the On/Off
switch once.
Close the appliance door and wait for
3minutes.
The refrigeration appliance will power
up slowly.
Keep the appliance door(s) closed
during this process.
49
Commissioning
The refrigeration appliance will adjust to
the preset temperature.
To enable the temperature to get suf-
ficiently cold inside the refrigeration
appliance, allow the appliance to run
for a few hours. Do not place food in
the refrigeration appliance until it has
reached the preset temperature.
Do not place food in the freezer sec-
tion until it has reached the preset
temperature (min. 0°F/-18°C).
Danger of damage due to unat-
tended operation.
Do not switch the refrigeration appli-
ance on if you are going to be away
for a long period of time.
Do not leave the refrigeration appli-
ance unattended for a long period of
time while it is switched on.
Performing Initial set-up
After switching on the refrigeration ap-
pliance, Initial set-up is completed.
Follow the instructions on the display.
Initial set-up cannot be canceled. Ini-
tial set-up can be interrupted by
switching off the refrigeration appli-
ance. After switching on the refrigera-
tion appliance again, Initial set-up
must be resumed.
Switching on the cameras
The cameras in your refrigeration appli-
ance are switched off as standard.
To enable the cameras to take photos
of the inside of the fridge zone, your
refrigeration appliance must be net-
worked and registered in the
Mieleapp.
The photos can then be viewed in the
Mieleapp.
Switch on the cameras via the dis-
play: SettingsAppliance
functionCameras.
Before the cameras can be switched
on via the display, you must first
agree to the data privacy statement
in the Miele app.
You will be prompted to consent to the
data privacy statement before being
able to switch on the cameras via the
display.
To ensure that the cameras can func-
tion correctly, the interior lighting must
be set to maximum brightness.
When the automatic interior lighting is
switched on, its intensity might not be
sufficient to assure the quality of the
camera images taken.
If this is the case, switch the auto-
matic interior lighting off: Set-
tingsAppliance functionInterior
lightingAutomatic.
Then set the controller manually to
maximum brightness.
Switching off cameras
Switch off the cameras via the dis-
play: SettingsAppliance
functionCameras.
50
Commissioning
Selecting a water filter
Your water system is equipped with an
active charcoal filter as standard.
If you wish to use a mesh filter in
your water system, make the setting
on the display: SettingsAp-
pliance functionFilter manage-
mentFilter type.
Switching off the refrigeration
appliance
Switch the refrigeration appliance off
by pressing the On/Off switch.
The cooling and interior lighting are
switched off.
Please note: The refrigeration appli-
ance is not disconnected from the
power supply when it is switched off.
To note when switching off for longer
periods of time
If, during a long absence, the refriger-
ation appliance is switched off but
not cleaned and the door is left shut,
there is a danger of bacteria building
up inside the appliance.
It is essential to clean the refrigera-
tion appliance.
If the refrigeration appliance is not going
to be used for a longer period of time,
observe the following:
Turn the refrigeration appliance off.
Switch on the Vacation mode func-
tion if required. The fridge zone re-
mains in operation at a higher temper-
ature while saving energy, while the
freezer zone remains switched on.
Unplug the electrical plug or trip the
circuit breaker.
Empty the ice cube container.
Risk of damage to the ice maker.
If the water inlet is interrupted while
the ice maker is switched on, the
electronic may be damaged. The wa-
ter inlet pipe may also freeze up.
Turn the ice maker off if the water
supply is interrupted (e.g., while on
vacation).
Close the ball valve in the water inlet
(approximately 3hours before switch-
ing off the refrigeration appliance to
avoid the build-up of bacteria caused
by stagnant water).
Replace the water filter (charcoal fil-
ter) or clean the water filter (mesh fil-
ter).
Remove the charcoal filters from the
fridge zone and reactivate the char-
coal filters directly before inserting
them into the fridge zone.
Clean the refrigeration appliance and
leave the door open to air the appli-
ance and avoid odors building up in-
side.
51
Operation
Temperature in the fridge zone
A refrigerator temperature of 39°F
(4°C) is recommended in the fridge
zone.
A temperature setting of 39°F (4°C)
combined with appropriate hygiene
measures delays the growth of bac-
teria, e.g., salmonella and listeria,
which can lead to serious food poi-
soning.
The temperature in the fridge zone can
be set between 33°F (1°C) and 43°F
(6°C).
Switching on SuperCool&AirClean
The SuperCool&AirCleanfunction
must be switched on before placing
large amounts of food or drinks in the
fridge zone.
Touch SuperCool&AirClean in the
temperature display for the fridge
zone.
The symbol lights up orange.
The temperature in the fridge zone
drops to 33°F (1°C).
Switching off SuperCool&AirClean
The SuperCool&AirCleanfunction
will switch itself off automatically after
max. 6hours.
To save energy, you can switch off the
SuperCool&AirCleanfunction early
yourself once food and drinks are suffi-
ciently chilled.
Touch SuperCool&AirClean in the
temperature display for the fridge
zone.
The symbol no longer lights up or-
ange.
Temperature in the freezer zone
Health risk caused by decompos-
ing food.
To freeze fresh food, a temperature of
0°F (-18°C) is required. Please note
that, if the temperature is any
warmer, the food will have a shorter
shelf life.
When freezing food and storing it
over the long term, set a minimum
temperature of 0°F (-18°C).
Tip: By keeping the freezer zone at a
constant temperature of 0°F (-18°C)
and taking appropriate hygiene mea-
sures, you can maximize the storage life
of your food and avoid food waste.
The temperature in the freezer zone can
be set between 6°F(-14°C) and -7°F
(-22°C).
Switching on SuperFreeze
The SuperFreezefunction must be
turned on around4–6hours before
placing the food in the freezer zone.
You do not need to switch on the Su-
perFreezefunction:
- When you place food that is already
frozen in the freezer.
- If you are only freezing up to 4.4lbs
(2kg) of fresh food daily.
Touch SuperFreeze in the tempera-
ture display for the freezer zone.
The symbol lights up orange.
The temperature in the freezer zone
drops to -15°F (-26°C).
52

Operation
Switching off SuperFreeze
The SuperFreezefunction turns off
automatically after a maximum of
8hours.
To save energy, you can switch off the
SuperFreezefunction early yourself
once food and drinks are sufficiently
chilled.
Touch SuperFreeze in the tempera-
ture display for the freezer zone.
The symbol no longer lights up or-
ange.
Temperature display
The temperature display always shows
the required temperature.
Depending on the ambient temperature
and the temperature setting, it can take
the appliance a few hours to reach the
required temperature.
The temperature in the refrigeration ap-
pliance will always rise:
- the more often the appliance door is
opened and the longer it is kept open
- the more food that is stored in it
- the warmer the food is that is being
put into it
- the higher the ambient temperature
surrounding the refrigeration appli-
ance is. This refrigeration appliance is
designed for use within specific ambi-
ent temperatures (climate range). Do
not use in ambient temperatures for
which it is not designed.
Switching on the Vacation
mode function
Switch off the Vacation mode func-
tion under on the display.
Confirm your selection with OK.
The temperature in the fridge zone in-
creases.
Switching off the Vacation
mode function
Switch off the Standard function un-
der on the display.
Confirm your selection with OK.
The Vacation mode function switches
itself off and the refrigeration appliance
returns to operation at the currently set
temperatures.
Switching on the Eco mode
function
Switch off the Eco mode function un-
der on the display.
Confirm your selection with OK.
The temperature in the entire refrigera-
tion appliance will rise.
Switching off the Eco mode
function
Switch off the Standard function un-
der on the display.
Confirm your selection with OK.
The Eco mode function switches itself
off and the refrigeration appliance re-
turns to operation at the currently set
temperatures.
53
Operation
Switching on the Sabbath mode
function
Switch off the Sabbath mode func-
tion under on the display.
Touch Context menu to set the du-
ration of the Sabbath mode function
if necessary.
Touch Edit.
Set the required duration (between
26 and 74hours) and confirm your
setting with OK.
Confirm your setting again with
OK.
The symbol lights up in the display.
Ensure that the appliance door is prop-
erly closed, as visual and audible
alarms are switched off.
Switching off the Sabbath mode
function
The Sabbath mode function will
switch off after the duration you have
defined.
The symbol lights up in the display.
Touch the display for 4seconds.
The Sabbath mode function switches
off and the main menu appears in the
display.
Storing food in the fridge zone
Always follow USDA/CFIA guidelines
on food safety.
Risk of fire from electrical appli-
ances.
Operating electrical devices in the
appliance can cause sparks to form.
Do not operate any electrical devices
inside the appliance.
Risk of explosion due to
flammable mixes of gases.
Electrical components can cause
flammable mixes of gases to ignite.
Do not store any explosive materials
or products containing flammable
propellants (e.g., spray cans) in the
appliance. The spray cans in question
can be identified by the contents
printed on the can or by a flame sym-
bol. Electrical components can cause
escaping gases to ignite.
Risk of damage due to greasy or
oily foods.
If storing food which contains a lot of
fat or oil in the refrigeration appliance
or the appliance door, make sure that
it does not come into contact with
plastic components as this could
cause stress cracks or break the plas-
tic.
Make sure that no fat or oil leaks onto
the plastic parts of the refrigeration
appliance.
54
Operation
If there is insufficient air circulation,
the cooling performance will de-
crease and energy consumption will
increase.
To allow air to circulate efficiently, do
not pack food too closely together in
the appliance.
Do not cover the ventilation slots in
the fridge zone.
If food is stored too close to the ven-
tilation slots in the rear wall, the food
may freeze.
Store food in such a way that it does
not touch the rear wall of the fridge
zone.
Different storage zones
Due to natural air circulation, there are
different temperature zones in the re-
frigerator section.
Cold, heavy air sinks to the lowest sec-
tion of the refrigeration section. Make
use of the different zones when placing
food in the appliance.
This is a refrigeration appliance with
automatic temperature distribution
(DynaCool). The refrigeration appli-
ance switches the fan on automatically
when the cooling system for the fridge
zone switches on. This means that the
cold is distributed evenly in the fridge
zone and the difference between the
various temperature zones is less pro-
nounced. All stored food is thus cooled
to approximately the same tempera-
ture.
Warmest area
The warmest area in the refrigerator
section is in the top section of the door.
Use this for storing butter so that it re-
mains spreadable and cheese so that it
retains its flavor.
Coldest area
The coldest area in the fridge zone is at
the bottom at the back of the appliance.
However, the temperature in the Mas-
terFresh Pro drawer is even colder.
Use these areas to store all delicate and
highly perishable food, such as:
- fish, meat, poultry
- cold cuts, ready-made meals
- dishes or baked goods containing
eggs or cream
- fresh dough, cake mixtures, pizza
dough, or pie dough
- raw milk cheese and other raw milk
products
- hummus, vegetable spreads, plant-
based cream cheese substitutes
- pre-packed vegetables
- other fresh food (with a label stating it
should be kept at a temperature of
around 39°F (4°C))
Should food be stored loose or in
packaging?
Ensure that food stored in the fridge
zone is in packaging or covered properly
(some exceptions apply in the Master-
Fresh Pro drawer).
This will prevent food odors from affect-
ing other food, stop food from drying
out, and also prevent any cross-contam-
ination of bacteria. This is particularly
important when storing meat products.
55
Operation
Make sure that food such as raw meat
and fish in particular does not come into
contact with other food.
By ensuring that the temperature
settings are correct and by taking ap-
propriate hygiene measures, you can
prolong the storage life of your food
considerably. This prevents food
waste.
Storing food in the MasterFresh
Pro drawer
The MasterFresh Pro drawer fulfills the
requirements of a cold storage com-
partment according to
DINEN62552:2020.
The MasterFresh Pro drawer provides
ideal storage conditions for fruit, vegeta-
bles, fish, meat, and dairy products.
Food stays fresh considerably longer
while retaining both flavor and vitamins.
In the MasterFresh Pro drawer, the tem-
perature is controlled automatically and
is in the range of around 32°F (0°C).
While lower than the temperature in a
standard fridge zone, this is the opti-
mum temperature range for storing
fresh food which is not sensitive to cold.
The deterioration process is deceler-
ated at this temperature range so food
can be stored without loss of fresh-
ness for considerably longer than in a
standard fridge and you do not need to
shop as often.
In the MasterFresh Pro drawer, the hu-
midity level is regulated to suit the food
being stored. Food retains its own mois-
ture if stored at a higher humidity and so
does not dry out as quickly.
Selecting the right setting for the Mas-
terFreshPro drawer
Clean the MasterFreshPro drawer
before placing new food in it.
Select the MasterFreshPro drawer on
the display.
Select the food that you wish to load
into the MasterFreshPro drawer.
Alternatively, select the Favorite that
you have saved with your individual
settings (see “Creating a favorite for
the individual setting in the Master-
Fresh Pro drawer”).
Confirm your selection with OK.
The appropriate humidity (, , or )
is set automatically based on the se-
lected food.
Now load your food into the Master-
FreshPro drawer.
Tip: For hygiene reasons, do not store
fruit and vegetables together with meat
and fish.
56
Operation
In the Dairy Products, Meat &
Fishsetting, the humidity is similar to
the humidity in the conventional fridge
zone.
This compartment is ideal for food that
spoils easily as well as home-cooked
meals as any microorganisms that may
still be present cannot multiply:
- fresh fish and shellfish
- meat, poultry, and sausage
- deli salads
- dairy products, such as milk, yo-
gurt, cheese, cream, etc.
- plant-based products such as tofu,
oat drinks, hummus, vegetable
spreads, meat and cheese substi-
tutes, etc.
Any type of food can in fact be stored
in this compartment, as long as it is
packaged.
Please note that foods rich in protein
deteriorate faster than others.
Shellfish, for example, deteriorates
faster than fish, and fish deteriorates
faster than meat.
Tip: In the Dairy Products, Meat &
Fishsetting, always keep food covered
or wrapped for hygiene reasons.
Creating a favorite for the individual
setting in the MasterFresh Pro drawer
You can save the individual setting with
your preferred temperature and humid-
ity for the MasterFreshPro drawer as a
Favorite.
Select the MasterFreshPro drawer on
the display.
Swipe left in the display and touch
Context menu under Favorite.
Touch Edit.
Select the required temperature and
humidity.
- Adjustable temperature: 32°F (0°C) to
37°F (3°C)
- Adjustable humidity: , , .
Confirm your selection with OK.
Your chosen setting will now be saved
under Favorite.
DailyFresh ExtraCool drawer
The DailyFresh ExtraCool drawer is ideal
for storing food which goes off quickly,
such as:
- fresh fish and shellfish
- meat, poultry, and sausage
- deli salads
- dairy products such as yogurt, cheese,
cream, etc.
- You can also store any other type of
food in the DailyFresh ExtraCool
drawer, as long as it is packaged.
In the DailyFresh ExtraCool drawer, the
temperature is approx. 2°C below the
temperature you have set for the fridge
zone. For example, the DailyFresh Ex-
traCool drawer has a temperature of
approx. 2°C when a temperature of
4°C has been set in the fridge zone.
If the ambient temperature is high
(above 30°C) and the temperature in
the fridge zone is low (below 5°C),
minus temperatures may be reached
in the DailyFresh ExtraCool drawer.
This can cause food to be damaged
or to freeze.
Lower the ambient temperature or in-
crease the temperature in the fridge
zone.
57
Operation
Please note that foods rich in protein
deteriorate faster than others.
Shellfish, for example, deteriorates
faster than fish, and fish deteriorates
faster than meat.
Always keep these foods covered or
wrapped.
Freezing and storing fresh food
Always follow USDA/CFIA guidelines
on food safety.
Risk of fire from electrical appli-
ances.
Operating electrical devices in the
appliance can cause sparks to form.
Do not operate any electrical devices
inside the appliance.
Before placing food in the freezer
Only freeze food that is fresh and in
good condition.
When freezing more than 4.4lbs
(2kg) of fresh food, switch on the Su-
perFreeze function for 4–6hours
before placing the food in the freezer.
This helps frozen food which is already
stored in the freezer to stay frozen.
Placing food in the freezer
Unfrozen food should not touch
frozen food as this will cause the
frozen food to begin to thaw.
To prevent food sticking together
when frozen, make sure that the pack-
aging and containers are dry.
Distribute the food to be frozen flat
across the bottom of the freezer
drawer or in contact with the interior
side walls, so that it freezes through
to the core as quickly as possible.
After freezing fresh food
Switch the SuperFreeze function
off.
Cooling drinks quickly
When cooling drinks quickly in the
freezer section, make sure bottles are
not left in for more than 1hour. Oth-
erwise they could burst.
Water dispenser
The Water dispenser requires a
plumbed water connection in order to
operate.
All materials used in the water dis-
penser are odorless and do not affect
flavor.
Dispensing water from the Water dis-
penser
Risk to health due to contami-
nated water.
Bacteria can develop in water that
has been sitting in the water supply
lines for too long. This poses a risk to
your health.
Dispose of the first 3liters of water
dispensed from the Water dispenser
after commissioning, as the water
will have been used for the initial
rinsing of the water supply line.
This applies to the initial commis-
sioning as well as when using the re-
frigeration appliance again after it has
been switched off for a long while
(more than 5days approx.) or when
no water is dispensed from the Wa-
ter dispenser for an extended period
of time.
58
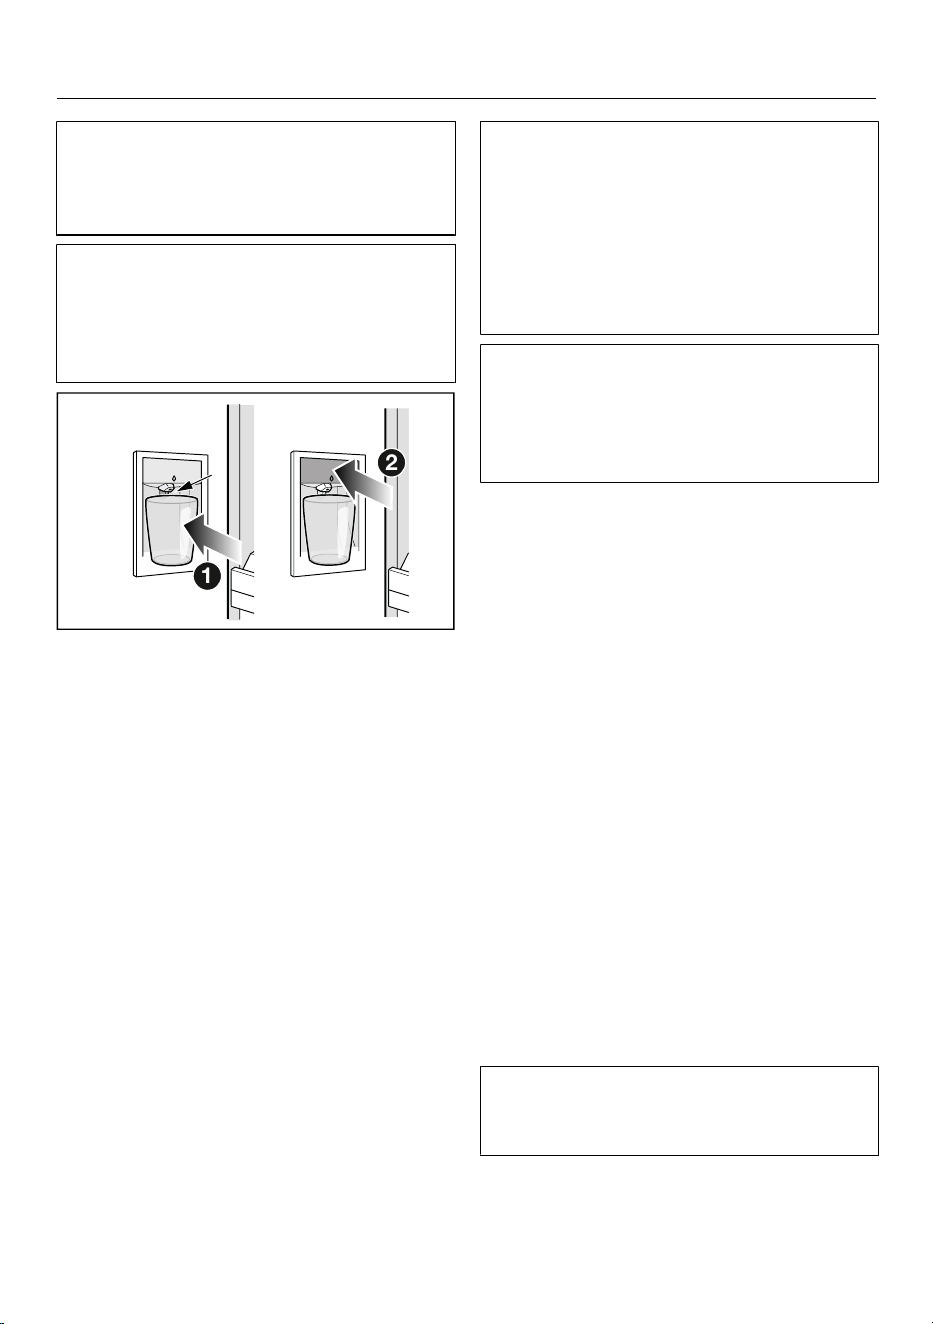
Operation
After the initial commissioning, there
may be air in the water circuit. Dis-
pense water until there are no more air
bubbles.
If you do not dispense water from the
Water dispenser for a longer period of
time, the water may be stale. Regularly
dispense water in order to achieve the
best water quality.
2
1
If you have set favorites for the Water
dispenser (see “Setting favorites for
the Water dispenser”):
Touch on the display and select
your favorite with the desired dis-
pensing quantity.
Hold a solid vessel such as a glass or
cup against the contact switch or
press the sensor on the Water dis-
penser.
If you have selected a favorite for the
dispensing quantity, the water dispenser
will stop automatically when it is
reached.
If you have not selected a favorite:
Hold the vessel against the contact
switch or press and hold the
sensor for as long as you wish to
dispense water.
Chilled water will be dispensed from
the spout as long as the Water dis-
penser is activated.
After approximately 60seconds, dis-
pensing stops automatically. Wait
5seconds and activate the Water dis-
penser again if you wish to dispense
more water.
After you have activated the Water
dispenser several times in a row, water
stops being dispensed.
Water can be dispensed again after a
few minutes.
Setting favorites for the Water dis-
penser
You can set different dispensing quanti-
ties for the Water dispenser as fa-
vorites.
Hold a solid vessel such as a glass or
cup against the contact switch or
press the sensor on the Water dis-
penser.
Remove the vessel as soon as the de-
sired dispensing quantity is reached.
As soon as you stop dispensing water
from the Water dispenser, you will see
the quantity of water dispensed on the
display.
Touch Save if you want to set this
dispensing quantity as a favorite.
On the display, select the appropriate
vessel and your chosen color for the
favorite.
You can set a maximum of 4favorites
for each vessel size by assigning differ-
ent colors.
Your set favorite appears on the display
with your chosen vessel size and color.
59
Operation
You can now select your set favorite
the next time you wish to dispense
water. For each favorite, the chosen
quantity is dispensed and dispensing
stops automatically.
Deleting favorites for the Water dis-
penser
Touch the symbol for the Water dis-
penser in the display.
Your set favorites are displayed.
Select the favorite that you want to
delete.
Touch Delete on the display.
After a favorite is deleted, it is removed
from the selection of favorites.
Locking the Water dispenser
Touch the symbol for the Water dis-
penser in the display.
Press and hold the Locksensor for
4seconds.
The Water dispenser is now locked and
out of use.
Unlocking the Water dispenser
Touch the symbol for the Water dis-
penser in the display.
Press and hold the Unlocksensor for
4seconds.
The Water dispenser is now unlocked
and ready to use.
Ice maker
Risk of injury due to incorrect op-
eration.
Rotating parts in the ice maker may
cause injuries.
Never reach under or into the ice
maker.
Risk of damage due to blocking
of the ice maker.
The ice maker can become blocked
and sustain damage as a result.
Do not place food or any other items
in the ice cube container.
Empty the ice cube container at regu-
lar intervals, or at least if you have
not produced any ice for more than a
week. This will ensure that you al-
ways have fresh ice and the ice
cubes will not form a clump.
Turning on the ice maker
Risk to health due to contami-
nated water.
Bacteria can develop in water that
has been sitting in the water supply
lines for too long. This poses a risk to
your health.
Dispose of ice cubes made during
the first 24hours after the IceMaker
is started up, as the water will have
been used for the initial rinsing of the
water supply line.
This applies to the initial commis-
sioning as well as when using the ice
maker again after it has been
switched off for an extended period
of time (more than around 5days) or
when no ice cubes have been pro-
duced for an extended period of time.
Make sure that the water inlet is se-
cured to the plumbed water connec-
tion.
Close the top freezer drawer with the
ice cube container.
60
Operation
Ice cube production does not stop
when the ice cube container has
been removed. Ice cubes can drop
into the freezer drawer underneath.
Only remove the ice cube container
for the shortest possible time or
switch off the ice maker before re-
moving it.
Select IceMaker on the display.
Select Ice cubes.
Select the QuickIce function if you
wish to speed up ice cube production.
Confirm your selection with OK.
Once the set temperature has been
reached in the freezer zone, it might
take up to 4hours until the first ice
cubes are produced.
It can take up to 48hours for the ice
cube container to fill up.
The ice-cube maker can make up to
approx. 4.9lb (2.2kg) of ice cubes in
24hours.
The amount of ice cubes made by the
appliance depends on the temperature
in the freezer zone. The lower the
temperature, the more ice cubes are
produced in a certain period of time.
Only make normal domestic quantities
of ice cubes with the ice maker.
Ice cube production is halted automati-
cally as soon as the ice cube container
is full.
Turning off the ice maker
The ice maker can be turned off inde-
pendently of the freezer zone if you do
not want to make any ice cubes.
Close the ball valve in the water sup-
ply line (approximately 3hours before
switching off the refrigeration appli-
ance to avoid the build-up of bacteria
caused by stagnant water).
Select IceMaker on the display.
Switch off the settings for the ice
cubes.
Confirm your selection with OK.
Tip: Empty the ice cube container at
regular intervals, or at least if you have
not produced any ice for more than a
week. This will ensure that you always
have fresh ice and the ice cubes will not
form a clump.
Tip: If you do not wish to produce ice
cubes for a longer period, you should
switch off the ice maker completely.
61

Customizing settings
Opening the Settings menu
Select Menu.
Select Settings.
Settings: Overview
General
Language & Region
Language
Units
Celsius
Fahrenheit
Date & Time
Clock format
12 hours
24 hours
Set time of day
Set the date
Display brightness
Automatic
Sounds
Keypad tones
Buzzer tones
Security
Sensor lock
Demo mode
Factory default settings
Delete settings
Networking
Notifications
Reset appliance
Networking
Wi-Fi
Connection
Wi-Fi
Home network
Signal strengh
IP address
Miele Cloud Service
Reset
Appliance function
Cameras
Interior lighting
Automatic
Brightness
Dark
Medium
Bright
Filter management
Water filter
Filter type
Active charcoal filter
Mesh filter
AirClean System
Automatic SuperFrost
62
Customizing settings
Information
Data plate
Mod
SN
Software
Appliance version
Software version
User Interface
Legal Information
Open source licenses
External
Miele
Written offer
Camera
Privacy policy
Miele@home
Service
Service Access Point
Extended view
General
You can find this under Set-
tings General.
Display brightness
You can find this under Set-
tingsGeneralDisplay brightness.
You can switch off the automatic Dis-
play brightness completely and adjust it
manually to the lighting conditions in
the room.
Sounds
You can find this under Set-
tingsGeneralSounds.
Alternatively, you can switch the Keypad
tones and the Buzzer tones (e.g., the
alarm when the appliance door is open)
off if you find them annoying.
Security
Sensor lock
You can find this under Set-
tings GeneralSecuritySensor lock.
You can use the Sensor lock to protect
the refrigeration appliance from being
adjusted unintentionally via the dis-
play.
Switch the Sensor lock on or off via
the pull-down menu or in the Set-
tings.
Close the upper appliance door.
Opening the appliance door again locks
the display.
To unlock the display temporarily,
touch it for approx. 4seconds.
Networking
You can find this under Set-
tings Networking.
Networking allows you to operate your
appliance using the Miele app or exter-
nal voice assistant, as well as to update
the software.
Wi-Fi
You can find this under Set-
tings Networking.
You can only connect to your home net-
work if the Wi-Fi setting is activated.
Connection
You can find this under Set-
tings Networking Connection.
You can view information about your
home network.
63

Customizing settings
- Home network
You can view the quality of the con-
nection to your home network.
- Signal strengh
The signal strength of the Wi-Fi signal
received is displayed.
- IP address
The IP address is displayed.
- Reset
If you reset the network data, you will
no longer be able to operate your ap-
pliance via the Miele app or update
the software. You will need to recon-
nect to your home network.
Appliance function
You can find this under Set-
tings Appliance function.
Here you can make various settings for
your refrigeration appliance.
Cameras
You can find this under Set-
tingsAppliance functionCameras.
You can switch the cameras on and off
here.
Interior lighting
You can find this under Set-
tingsAppliance functionInterior
lighting.
You can switch off the automatic Inte-
rior lighting completely and adjust it
manually to the lighting conditions in
the room.
Filter management
You can find this under Set-
tingsAppliance functionFilter man-
agement.
In Filter management, you can access
the following information about your fil-
ters:
- Water filter
Here you can view the current usage
status of your water filter and reset
the water filter after it has been
changed or cleaned.
- Filter type
Here you can select which water filter
(Active charcoal filter or Mesh filter) is
installed in your refrigeration appli-
ance.
- AirClean System
Here you can view the current usage
status of your charcoal filter and reset
the charcoal filter after it has been
changed or reactivated.
Automatic SuperFrost
You can find this under Set-
tingsAppliance functionAutomatic
SuperFrost.
The Automatic SuperFrost function is
activated by default and can be deacti-
vated at any time.
64

Customizing settings
Information
You can find this under Set-
tings Information.
Data plate
You can find this under Set-
tings Information Data plate.
Here you can find information from your
data plate.
Software
You can find this under Set-
tings Information Software.
Here you can find information about the
software installed.
Legal Information
You can find this under Set-
tings Information Legal Information.
For example, you can request the data
privacy statement for the cameras or
query which integrated open source
components are used in the software.
Service
You can find this under Set-
tings Service.
- Service Access Point
Miele Service can access the software
remotely for servicing.
- Extended view
For Miele service only; not for private
use.
65
Cleaning and care
WARNING! DANGER of electric
shock!
Unplug the appliance or trip the cir-
cuit breaker.
WARNING! Fire hazard!
Do not damage the coolant pipework.
The data plate located inside the inte-
rior cabinet of the refrigeration appli-
ance must not be removed. It contains
information which is required in the
event of a service call.
Do not let water get into the elec-
tronic or the lighting.
Risk of damage due to moisture
penetration.
The steam from a steam cleaner can
damage plastic and electrical compo-
nents.
Do not use a steam cleaner to clean
the refrigeration appliance.
Cleaning agents
Cleaning and care products used in
the interior cabinet of the refrigera-
tion appliance must be food safe.
To avoid damaging the surfaces of your
appliance, do not use the following:
- cleaning agents containing soda, am-
monia, acids, or chloride
- cleaning agents containing limescale
remover
- abrasive cleaning agents, such as
scouring powder, scouring liquid, or
pumice stones
- cleaning agents containing solvents
- stainless steel cleaners
- dishwasher cleaning agents
- oven sprays
- glass cleaners
- hard, abrasive sponges and brushes,
such as pot scrubbers
- eraser sponges
- sharp metal scrapers
We recommend using a clean sponge,
lukewarm water with a little liquid dish
soap to clean the surfaces of the appli-
ance.
Preparing the refrigeration ap-
pliance for cleaning
Switch the refrigeration appliance off.
Unplug the appliance or trip the cir-
cuit breaker.
Take any food out of the refrigeration
appliance and store it in a cool place.
If necessary, take out all removable
parts for cleaning (see “Familiarization
– Setting up the interior”).
66
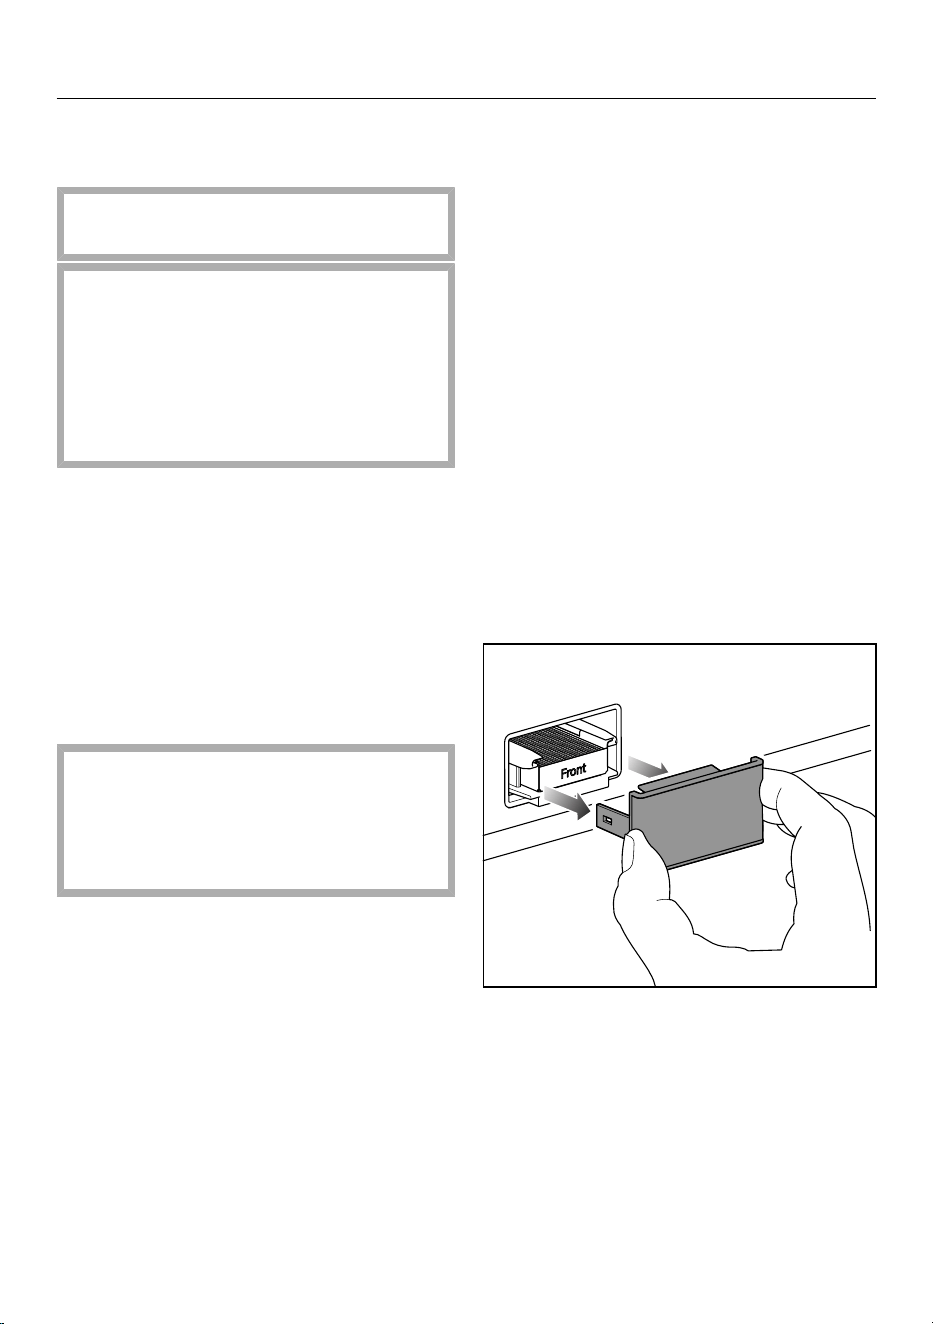
Cleaning and care
Cleaning the interior of the ap-
pliance
Clean the appliance regularly, or at
least once a month.
If soiling is left on for any length of
time, it may become impossible to
remove under certain circumstances.
Surfaces may become discolored or
damaged.
It is therefore best to remove any
soiling immediately.
Clean the interior with a clean
sponge, lukewarm water, and a little
liquid dish soap.
Treat the stainless steel surfaces in-
side the appliance with a suitable
stainless steel care product.
Always wipe in the direction of the
structure of the stainless steel sur-
face. This will avoid unwanted
scratches.
Use a suitable stainless steel care
product for the stainless steel sur-
faces inside the appliance.
We recommend the Miele ceramic
and stainless steel cleaner.
Rinse all parts by hand. Do not wash
in a dishwasher.
Clean the ice cube container regularly.
Clean the ice cube container before
switching off the ice maker for an ex-
tended period of time.
Regularly remove ice and water
residues from the ice cube container.
After cleaning, wipe with clean water
and dry with an all-purpose cloth.
Leave the door open to air the refrig-
eration appliance sufficiently for a
short while and to prevent odor build-
up.
Cleaning the camera
The camera lenses may become misty
due to the increased humidity in the re-
frigeration appliance.
Clean the camera lenses using a mi-
crofiber cloth and a waterproof clean-
ing agent.
Clean the camera housings with a mi-
crofiber cloth.
Reactivating the charcoal filter
(AirClean system) in the oven
Remove the cover from each charcoal
filter.
67
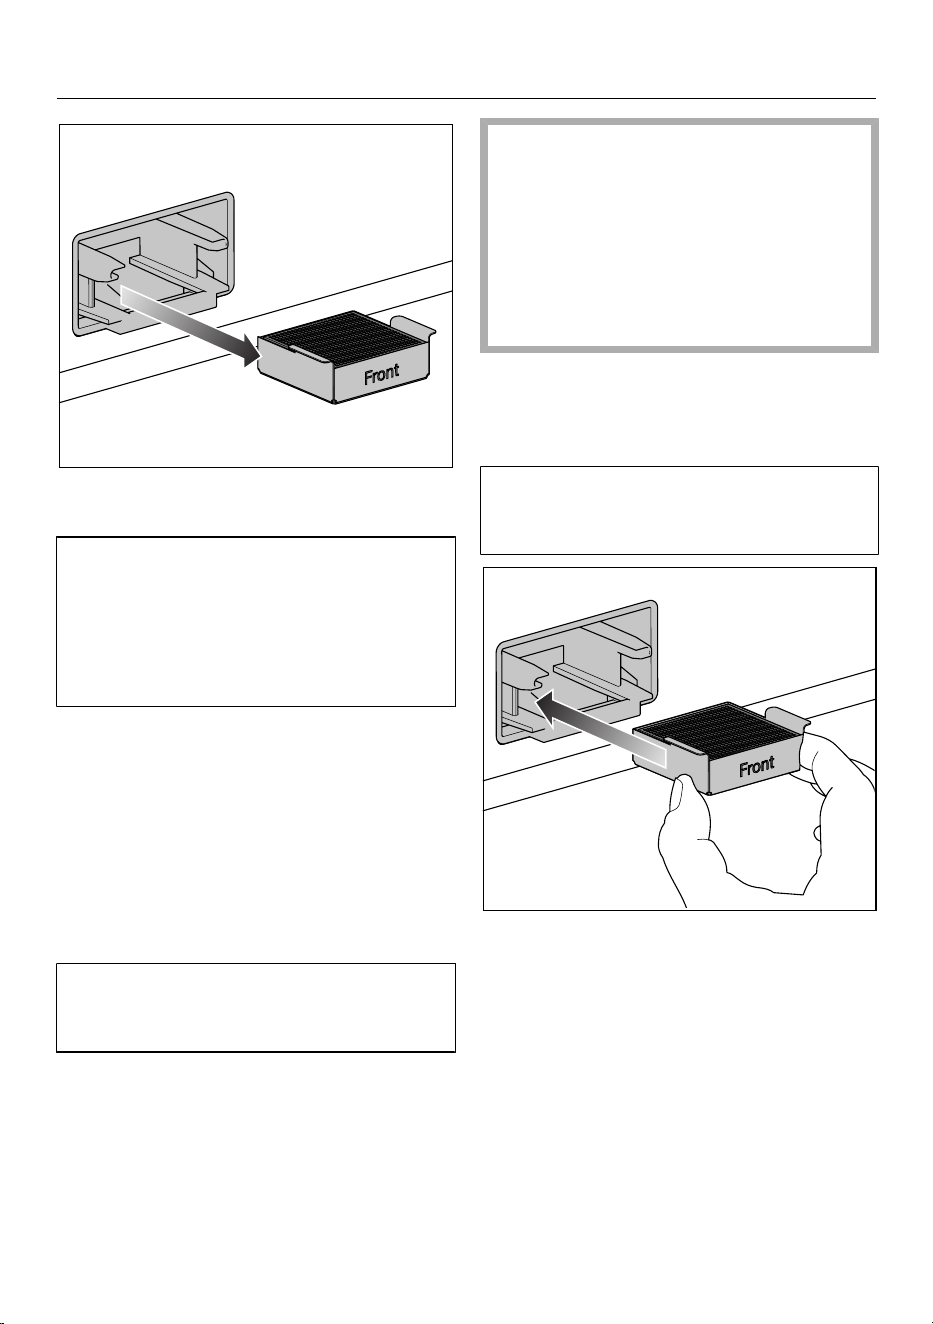
Cleaning and care
Pull the used charcoal filters and their
retainer out of the holder.
If your oven has a removable grease fil-
ter in the rear panel of the oven com-
partment, remove it temporarily.
See the operating instructions sup-
plied with the oven for information on
how to do this.
Do not pre-heat the oven compart-
ment.
Place the charcoal filters in the re-
tainer on a baking tray in the middle
of the oven compartment.
Switch on the oven or oven function.
Select the operating mode Convec-
tion Bake (recirculation), 400°F
(200°C).
During the reactivation process, odors
may be given off. Reactivation must
take place in a well-ventilated room.
Reactivation duration: 90minutes.
After this, switch off the oven or oven
function.
Risk of damage due to hot char-
coal filter.
Heat-sensitive surfaces can be dam-
aged.
Do not take the hot charcoal filter in
the retainer out of the oven prema-
turely and do not place it on heat-
sensitive surfaces while it is hot.
Wait until the charcoal filters have
cooled down fully before removing the
charcoal filters and retainer from the
oven compartment.
Before using the charcoal filter again,
check it for any visible damage. Never
use a damaged charcoal filter.
Insert each of the reactivated char-
coal filters and retainer into the
holder.
Clean the cover by hand with a damp
hand towel, not in the dishwasher.
68
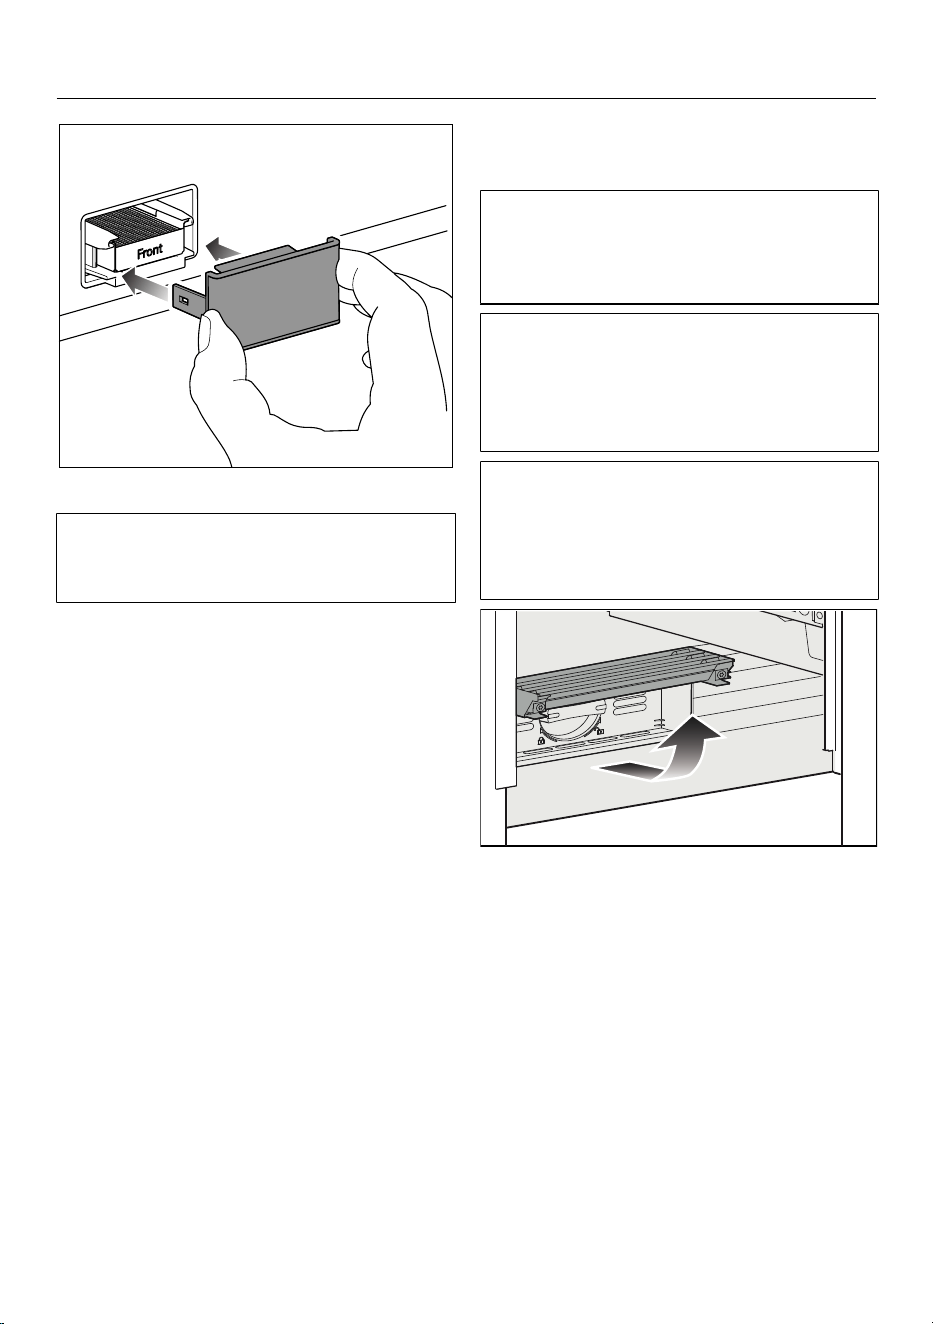
Cleaning and care
Place the cover on the retainer.
The charcoal filters in the AirClean sys-
tem contain active charcoal. Active
charcoal can leave significant marks.
Wash your hands with soap and water
after inserting the charcoal filter.
Once the charcoal filters have been re-
activated in the oven or the charcoal fil-
ters have been replaced, the filter dis-
play needs to be reset. A notification on
the display will remind you to do so.
Cleaning the water filter (mesh
filter, spare part)
(You can buy the mesh filter as a spare
part from Miele Service, your Miele
dealer, or via the Internet; it is not sup-
plied with the refrigeration appliance.)
Depending on the quantity of water
dispensed or ice cubes produced, the
mesh filter must be cleaned approx.
every 36months. A notification on the
display will remind you to do so.
If you have not used the refrigeration
appliance, the water dispenser, or the
ice maker much in the last few weeks
or months, or if the ice cubes smell un-
pleasant, clean the mesh filter early.
Fold up the cover at the bottom of the
refrigeration appliance.
69
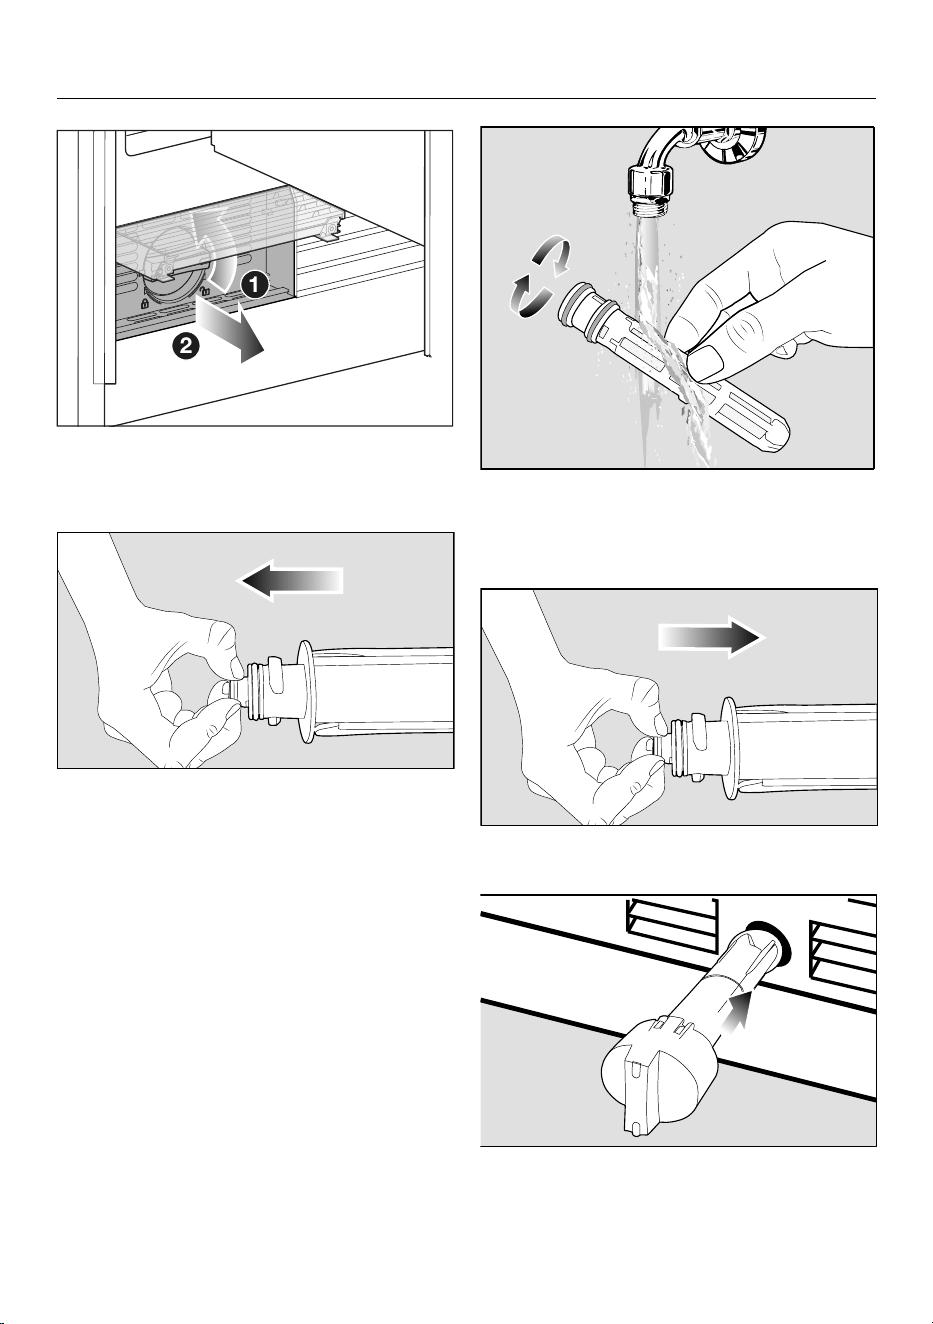
Cleaning and care
2
1
Turn the filter cartridge 90° counter-
clockwise until it is in the vertical po-
sition and slide it out.
Pull the mesh filter out of the filter
cartridge.
Rinse the mesh filter under running
lukewarm water. Turn the mesh filter
over under the running water to clean
it on all sides.
Reinsert the mesh filter into the filter
cartridge.
Slide the filter cartridge into the filter
opening, making sure the cap is verti-
cal.
70
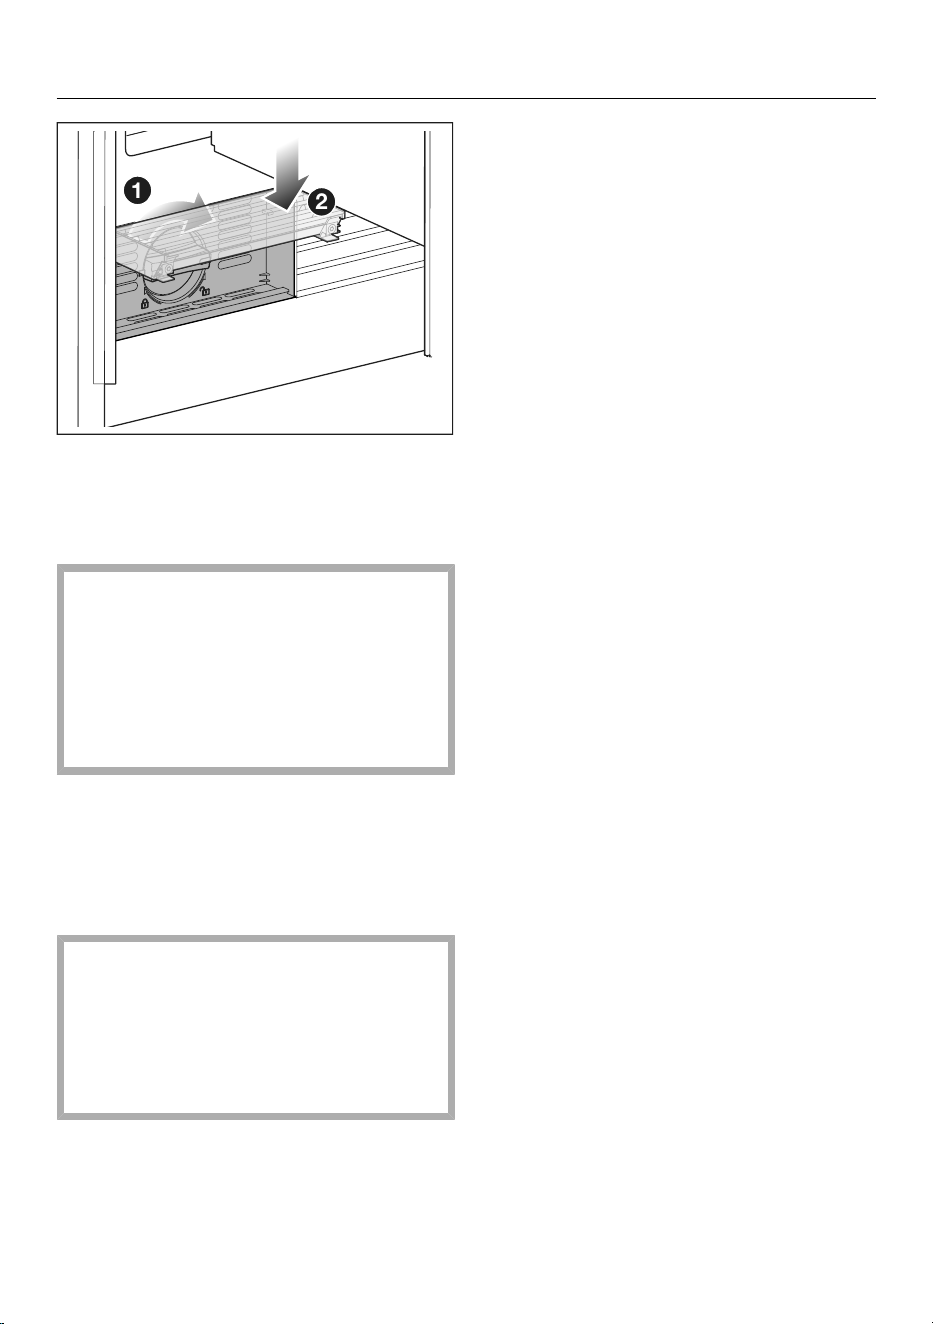
Cleaning and care
2
1
Turn the filter cartridge clockwise 90°
as far as it will go until it is in the hori-
zontal position.
Fold the cover back down.
Risk of damage caused by water
running out.
If the filter cartridge is not inserted
correctly, there is a risk of water leak-
ing out of the refrigeration appliance.
When inserting the filter cartridge, be
sure to turn it as far as the marker.
Once the IntensiveClear mesh filter has
been cleaned, the filter display must be
reset. A notification on the display will
remind you to do so.
Cleaning the door seal
Risk of damage as a result of in-
correct cleaning.
If you treat the door seal with oils or
grease, it can become porous.
Do not use any oils or grease on the
door seal.
The door seals should be cleaned reg-
ularly with clean water, and then
wiped dry with a soft cloth.
Cleaning the ventilation open-
ings
The ventilation openings should be
cleaned on a regular basis with a
feather duster or vacuum cleaner (you
could use a Miele vacuum cleaner
dusting brush, for example).
After cleaning
Connect the refrigeration appliance.
Place all shelves and accessories
back in the refrigeration appliance.
Switch the refrigeration appliance
back on.
Switch the SuperFreezefunction
on for a while so that the freezer zone
can cool down quickly.
Switch on the SuperCool&Air-
Cleanfunction for a while so that
the fridge zone can cool down quickly.
Put food back into the refrigeration
appliance as soon as the tempera-
tures inside the fridge and freezer
zones reach the required coldness.
Switch off the SuperFreezefunc-
tion as soon as the temperature in
the freezer zone is a constant 0°F
(-18°C) or colder.
Close the appliance doors.
Defrosting
Fridge zone and
MasterFresh Pro drawer
The fridge zone and the
MasterFresh Pro drawer defrost auto-
matically.
Freezer zone
The refrigeration appliance is equipped
with a NoFrost system that defrosts the
freezer zone automatically.
71
Frequently asked questions
Many malfunctions and faults can be easily remedied. You can save time and
money in many cases, as you do not need to contact Miele Service.
More information to help you rectify faults yourself can be found at
https://www.mieleusa.com/support/customer-assistance.
To prevent cold from escaping, open the appliance doors as little as possible until
the fault has been corrected.
Problem Possible cause and solution
The refrigeration appli-
ance is not cooling.
The refrigeration appliance has not been turned on.
Turn the refrigeration appliance on.
The electrical plug is not inserted in the socket cor-
rectly or the plug connector is not inserted into the
socket at the back of the machine correctly.
Insert the electrical plug into the socket and the plug
connector into the machine socket.
The circuit breaker has tripped. There could be a fault
with the refrigeration appliance, the household electri-
cal wiring, or another appliance.
Contact a qualified electrician or Miele Service.
72
Frequently asked questions
Problem Possible cause and solution
The temperature in the
refrigeration appliance is
too low.
The temperature setting in the refrigeration appliance
is too low.
Correct the temperature setting.
The SuperCool&AirCleanfunction is still switched
on.
To save energy, you can turn SuperCool&Air-
Clean off early yourself.
The SuperFreezefunction is still switched on.
To save energy, you can turn SuperFreeze off early
yourself.
The QuickIce function is still switched on.
To save energy, you can turn QuickIce off early your-
self.
The Automatic SuperFrost function is still switched
on.
The appliance is supplied with the Automatic Super-
Frost function switched on as standard. Switch off
the Automatic SuperFrost function.
The temperature in the
refrigeration appliance is
too high. The frozen food
(depending on the
model) could defrost.
This is not a fault. The temperature setting is too high.
Correct the temperature setting.
Check the temperature again after 24hours.
The ambient temperature is too low for this refrigera-
tion appliance. If the ambient temperature is too low,
the compressor will run less frequently. The tempera-
ture in the refrigeration appliance rises.
See the information in “Installation – Installation
site”.
Increase the ambient temperature.
The temperature in the
refrigeration appliance
differs greatly from the
set temperature.
This can be caused by many factors.
Turn the refrigeration appliance off.
Switch the refrigeration appliance back on after ap-
prox. 5minutes.
If the temperature is too high, check it again after a
few hours.
If the temperature is too low, check it again the next
day.
73
Frequently asked questions
Other problems
Problem Possible cause and solution
Food has frozen together
or to the wall.
The food packaging was not dry when loaded in the
freezer.
Use a blunt instrument (such as a spoon handle) to
carefully pry them apart.
No alarm sounds despite
the appliance door being
open.
You have switched off the audible door alarm.
Switch the Buzzer tones back on: Set-
tingsGeneralSoundsBuzzer tones.
The Sabbath mode function is switched on. The
symbol lights up in the display.
Touch the display for 4seconds.
The Sabbath modefunction switches off and the main
menu appears in the display.
The temperature in the
freezer zone cannot be
adjusted.
The QuickIce function is switched on.
Select IceMaker on the display.
Switch off the QuickIce function.
The camera images are
blurred or poor quality.
The upper appliance door was closed too quickly.
Close the appliance door slowly so that the camera
can take high-quality photos.
The camera lenses are misty. This happens if the tem-
perature and humidity in the fridge zone change.
Do not leave the appliance door open for longer than
necessary.
Clean the camera lenses (see “Cleaning and care”).
The anti-fogging film is damaged.
Contact Miele Service.
The interior lighting in the fridge zone is too dark.
Switch off the automatic interior lighting:
SettingsAppliance functionInterior light-
ingAutomatic
Then set the interior lighting to the maximum
brightness manually via the controller.
The interior lighting in the fridge zone is covered, e.g.,
by food.
Make sure that the interior lighting in the fridge zone
is not blocked by food.
The camera is covered, e.g., by food.
74
Frequently asked questions
Problem Possible cause and solution
Make sure that the camera in the fridge zone is not
blocked by food. The food must also not extend be-
yond the edge of the shelves.
The camera(s) in the appliance door(s) need to be put
back into operation.
Switch the refrigeration appliance off by pressing
the On/Off switch.
Unplug the appliance or trip the circuit breaker.
Wait 5minutes and reconnect the refrigeration ap-
pliance to the power supply.
Turn the refrigeration appliance on.
Close the appliance door(s) and wait for 3minutes.
The refrigeration appliance will power up slowly.
Keep the appliance door(s) closed during the
process.
The cameras can now be used again.
The camera does not
take any photos and no
photos are displayed.
Sabbath mode is switched on.
Switch off Sabbath mode on the display under .
The cameras are not switched on.
Switch on the cameras via the display: Set-
tingsAppliance functionCameras.
The refrigeration appliance is not networked or there is
a poor Wi-Fi connection.
Network the refrigeration appliance or check the Wi-
Fi connection.
The camera is only taking photos of the food in the
MasterFreshPro drawer if the drawer has first been
opened as far as it will go.
Always open the MasterFreshPro drawer as far as it
will go whenever you are placing food in it or taking
food out of it.
The camera is only taking photos of the fridge zone if
the appliance door has first been opened as far as it
will go.
75
Frequently asked questions
Problem Possible cause and solution
Always open the appliance door as far as it will go
whenever you are placing food in the fridge zone or
taking food out of it.
The camera in the appliance door needs to be put
back into operation.
Switch the refrigeration appliance off by pressing
the On/Off switch.
Unplug the electrical plug or trip the circuit breaker.
Wait 5minutes and reconnect the refrigeration ap-
pliance to the power supply.
Turn the refrigeration appliance on.
Close the appliance door and wait for 3minutes.
The refrigeration appliance will power up slowly.
Keep the appliance doors closed during the process.
The cameras can now be used again.
The cameras make click-
ing noises.
This is not a fault. The cameras are coming out of
Standby mode.
Only a small amount of
ice cubes are being pro-
duced or the ice maker
is not working.
This can be caused by many factors.
Switch the refrigeration appliance off by pressing
the On/Off switch.
Unplug the electrical plug or trip the circuit breaker.
Wait 5minutes and reconnect the refrigeration ap-
pliance to the power supply.
Turn the refrigeration appliance on.
If the fault persists, contact Miele Service.
The charcoal filter is
coming into contact with
liquid.
The charcoal filter is coming into contact with liquid
when food is being placed into or moved around inside
the fridge zone.
Remove the charcoal filter from the fridge zone and
dispose of it with normal household waste.
Dispose of unsealed food that has been stored un-
derneath the charcoal filter.
Clean the cover of the charcoal filter, the filter re-
tainer, and its holder in the fridge zone with a clean
sponge cloth and lukewarm water.
If necessary, clean the surface underneath the char-
coal filter.
Replace the charcoal filter with a new one.
76
Frequently asked questions
Messages in the display
Message Possible cause and solution
The Demo mode active
message appears on the
display; the refrigeration
appliance does not get
cold even though the
controls and the interior
lighting are working.
The Demo mode has been switched on.
Close and open the appliance door.
Demo mode is shown on the display.
Select Operation.
Switch off Demo mode in the Settings :
SettingsGeneralSecurityDemo mode.
After Demo mode has been switched off, the refrigera-
tion appliance shuts down and must be switched on
again.
The symbol lights up in
the display and the mes-
sage Sabbath mode ac-
tive is displayed.
The Sabbath modefunction is switched on. The inte-
rior lighting is switched off and the refrigeration appli-
ance is cooling down.
Touch the display for 4seconds.
The Sabbath modefunction switches off and the main
menu appears in the display.
The symbol lights up
in the display and the
message Unlock opera-
tion is displayed. The re-
frigeration appliance
cannot be operated.
The Sensor lock is switched on. The Sensor lock dis-
ables operation of the appliance every time the door is
closed.
To switch off the Sensor lock temporarily, touch the
display for approx. 4seconds.
You can also switch off the Sensor lock completely
via the pull-down menu or in the Settings:
SettingsGeneralSecuritySensor lock.
77
Frequently asked questions
Interior lighting
Problem Possible cause and solution
The interior lighting is
not working or is too
dark.
The refrigeration appliance has not been turned on.
Turn the refrigeration appliance on.
The Sabbath mode function is switched on: lights
up in the display.
Touch the display for approx. 4seconds.
The Sabbath modefunction switches off and the main
menu appears in the display.
The interior lighting is set to Automatic or Bright-
nessDark.
Adjust the settings for the interior lighting in the dis-
play: SettingsAppliance functionInterior
lighting.
Risk of electric shock due to exposed, live electrical components.
When removing the lighting cover, there is a risk of coming into contact with
live electrical components.
Do not remove the lighting cover. The LED lighting may only be repaired or re-
placed by Customer Service.
Risk of injury from LED lighting.
This lighting corresponds to risk group RG2. If the cover is defective, there is a
risk of eye injury.
If the lighting cover is defective, do not look from a close range directly into the
lighting with optical instruments (e.g., magnifying glass or similar).
78
Customer Service
Information to help you rectify faults
yourself and about Miele spare parts
can be found at www.miele.com/ser-
vice.
Contact in the event of a fault
In the event of a fault which you cannot
remedy yourself, please contact your
Miele dealer or Miele Customer Service.
You can book a Miele Service Call on-
line at www.miele.com/service.
Contact information for Miele Cus-
tomer Service can be found at the end
of this document.
Please quote the model identifier and
serial number of your appliance (SN)
when contacting Miele Customer Ser-
vice. Both pieces of information can be
found on the data plate.
You will find the data plate inside your
appliance.
Appliance warranty and product
registration
You can register your product and/or
view the manufacturer´s warranty terms
and conditions for Miele appliances and
vacuum cleaners at www.mieleusa.com.
79

Information
Declaration of conformity
Frequency range 2.412 GHz – 2.462 GHz
Maximum transmitting power < 100 mW
80


9 Independence Way
Princeton, NJ 08540
www.mieleusa.com
U.S.A.
Miele, Inc.
National Headquarters
Please have the model and serial number
of your appliance available when
contacting Customer Service.
Canada
Importer
Miele Limited
Headquarters and Miele Centre
Customer Support
Phone: 888-99-MIELE (64353)
161 Four Valley Drive
Vaughan, ON L4K 4V8
www.miele.ca
Customer Care Centre
Phone:
1-800-565-6435
905-532-2272
International Headquarters
Miele & Cie. KG
Carl-Miele-Straße 29
33332 Gütersloh
Germany

M.-Nr. 12 616 180 / 04 / 002en-US, CA
KFMC 3836 ...
