CANDY HOOVER GROUP Via Comolli 16 Brugherio – Italy
User Instructions
Mode d’emploi
Bedienungsanleitung
Istruzioni per l’uso
OVENS
FOURS
ÖFEN
FORNI
2
15
41
28
EN
FR
DE
IT

EN 2
Safety Indications
General Instructions
Product description
Display description
Cooking Modes
General notes on cleaning
Maintenance
Troubleshooting
Installation
Summary
3
7
9
10
12
13
13
14
54

EN 3
• During cooking, moisture may condense inside the oven cavity
or on the glass of the door. This is a normal condition. To reduce
this eect, wait 10-15 minutes after turning on the power be-
fore putting food inside the oven. ln any case, the condensation
disappears when the oven reaches the cooking temperature.
• Cook the vegetables in a container with a lid instead of an open
tray.
• Avoid leaving food inside the oven after cooking for more than
15/20 minutes.
• WARNING: the accessible parts can become hot when the oven
is in use. Young children should be kept at a safe distance.
• WARNING: the accessible parts can become hot when the grill
is in use. Children should be kept at a safe distance.
• Disconnect the appliance from the mains electricity supply be-
fore carrying out any work or maintenance.
• WARNING: in order to avoid any danger caused by the acciden-
tal resetting of the thermal interruption device, the appliance
should not be powered by an external switching device, such as
a timer, or be connected to a circuit that is regularly switched on
and o.
• Children under 8 should be kept at a safe distance from the ap-
pliance if not continuously supervised.
• Children should not play with the appliance.
• The appliance can be used by those aged 8 or over and by those
with limited physical, sensorial or mental capacities, without
experience or knowledge of the product, only if supervised or
provided with instruction as to the operation of the appliance,
in a safe way with awareness of the possible risks.
• Cleaning and maintenance should not be carried out by unsu-
pervised children.
• Do not use rough or abrasive materials or sharp metal scrapers
to clean the oven door glasses, as they can scratch the surface
Safety Indications

EN 4
and cause the glass to shatter.
• The oven must be switched o before removing the removable
parts. After cleaning, reassemble them according the instruc-
tions.
• Only use the meat probe recommended for this oven.
• Do not use a steam cleaner or high pressure spray for cleaning
operations.
• WARNING: the appliance and accessible parts become hot
during use. Be careful not to touch any hot parts.
• WARNING: ensure that the appliance is switched o before re-
placing the bulb, to avoid the possibility of electric shocks.
• IF THE OVEN IS PROVIDED BY THE MANUFACTURER WITH-
OUT PLUG:
THE APPLIANCE MUST NOT BE CONNECTED TO THE POW-
ER SOURCE USING PLUG OR SOCKETS, BUT MUST BE DI-
RECTLY CONNECTED TO THE SUPPLY MAINS. The con-
nection to the power source must be carried out by a suitably
qualied professional. In order to have an installation compliant
to the current safety legislation the oven must be connect-
ed only placing an omnipolar breaker, with contact separation
compliant to the requirements for overvoltage category III,
between the appliance and the power source. The omnipolar
breaker must bear the maximum connected load and must be
in line with current legislation. The yellow-green earth cable
should not be interrupted by the breaker. The omnipolar break-
er used for the connection must be easily accessible when the
appliance is installed.
The connection to the power source must be carried out by a
suitably qualied professional considering the polarity of the
oven and of the power source.
The disconnection must be achieved incorporating a switch in
the xed wiring in accordance with the wiring rules
• IF THE OVEN IS PROVI ED BY THE MANUFACTURER WITH
PLUG:

EN 5
The socket must be suitable for the load indicated on the tag
and must have ground contact connected and in operation.
The earth conductor is yellow-green in colour. This operation
should be carried out by a suitably qualied professional. ln case
of incompatibility between the socket and the appliance plug,
ask a qualied electrician to substitute the socket with another
suitable type. The plug and the socket must be conformed to
the current norms of the installation country. Connection to the
power source can also be made by placing an omnipolar break-
er, with contact separation compliant to the requirements for
overvoltage category III, between the appliance and the pow-
er source that can bear the maximum connected load and that
is in line with current legislation. The yellow-green earth cable
should not be interrupted by the breaker. The socket or omnip-
olar breaker used for the connection should be easily accessi-
ble when the appliance is installed.
The disconnection may be achieved by having the plug accessi-
ble or by incorporating a switch in the xed wiring in accordance
with the wiring rules.
• lf the power cable is damaged, it should be substituted with a
cable or special bundle available from the manufacturer or by
contacting the customer service department. The type of pow-
er cable must be H05V2V2-F. This operation should be carried
out by a suitably qualied professional. The earth conductor
(yellow-green) must be approximately 10 mm longer than the
other conductors. For any repairs, refer only to the Customer
Care Department and request the use of original spare parts.
• Failure to comply with the above can compromise the safety of
the appliance and invalidate the guarantee.
• Any excess of spilled material should be removed before clean-
ing.
• A long power supply failure during an occurring cooking phase
may cause a malfunction of the monitor. ln this case contact
customer service.

EN 6
• The appliance must not be installed behind a decorative door in
order to avoid overheating.
• When you place the shelf inside, make sure that the stop is di-
rected upwards and in the back of the cavity. The shelf must be
inserted completely into the cavity.
• When inserting the grid tray pay attention that the anti-slide
edge is positioned rearwards and upwards.
• WARNING: Do not line the oven walls with aluminium foil or sin-
gle-use protection available from stores. Aluminium foil or any
other protection, in direct contact with the hot enamel, risk
melting and deteriorating the enamel of the insides.
• WARNING: Never remove the oven door seal.
• CAUTION: Do not rell the cavity bottom with water during
cooking or when the oven is hot.
• No additional operation/setting is required in order to operate
the appliance at the rated frequencies.
• The oven can be located high in a column or under a worktop.
Before xing, you must ensure good ventilation in the oven
space to allow proper circulation of the fresh air required for
cooling and protecting the internal parts. Make the openings
specied on last page according to the type of tting.
• Oven trays and grids are not suitable for direct contact with
food. Please use suitable cookware or baking paper.

EN 7
General Instructions
Safety Indications
We thank you for choosing one of our products. For the best results with your oven, you should
read this manual carefully and retain it for future reference. Before installing the oven, take note
of the serial number so that you can give it to customer service sta if any repairs are required.
Having removed the oven from its packaging, check that it has not been damaged during trans-
portation. If you have doubts, do not use the oven and refer to a qualied technician for advice.
Keep all of the packaging material (plastic bags, polystyrene, nails) out of the reach of children.
When the oven is switched on for the rst time, strong smelling smoke can develop, which is
caused by the glue on the insulation panels surrounding the oven heating for the rst time. This
is absolutely normal and, if it occurs, you should wait for the smoke to dissipate before putting
food in the oven. The manufacturer accepts no responsibility in cases where the instructions
contained in this document are not observed.
NOTE: the oven functions, properties and accessories cited in this manual will vary, depending
on the model you have purchased.
Only use the oven for its intended purpose, that is only for the cooking of foods; any other use, for
example as a heat source, is considered improper and therefore dangerous. The manufacturer
cannot be held responsible for any damage resulting from improper, incorrect or unreasonable
usage.
The use of any electrical appliance implies the observance of some fundamental rules:
- do not pull on the power cable to disconnect the plug from the socket;
- do not touch the appliance with wet or damp hands or feet;
- in general the use of adaptors, multiple sockets and extension cables is not recommended;
- in case of malfunction and/or poor operation, switch o the appliance and do not tamper with it.
Electrical Safety
ENSURE THAT AN ELECTRICIAN OR QUALIFIED TECHNICIAN MAKES THE ELECTRICAL
CONNECTIONS. The power supply to which the oven is connected must conform with the
laws in force in the country of installation. The manufacturer accepts no responsibility for any
damage caused by the failure to observe these instructions. The oven must be connected to
an electrical supply with an earthed wall outlet or a disconnector with multiple poles, depending
on the laws in force in the country of installation. The electrical supply should be protected with
suitable fuses and the cables used must have a transverse section that can ensure correct sup-
ply to the oven.
CONNECTION
The oven is supplied with a power cable that should only be connected to an electrical supply
with 220-240 Vac power between the phases or between the phase and neutral. Before the oven
is connected to the electrical supply, it is important to check:
- power voltage indicated on the gauge;
- the setting of the disconnector.

EN 8
The grounding wire connected to the oven’s earth terminal must be connected to the earth ter-
minal of the power supply.
WARNING
Before connecting the oven to the power supply, ask a qualied electrician to check the conti-
nuity of the power supply’s earth terminal. The manufacturer accepts no responsibility for any
accidents or other problems caused by failure to connect the oven to the earth terminal or by an
earth connection that has defective continuity.
NOTE: as the oven could require maintenance work, it is advisable to keep another wall socket
available so that the oven can be connected to this if it is removed from the space in which it is
installed. The power cable must only be substituted by technical service sta or by technicians
with equivalent qualications.
A low light around the central main switch could be present when the oven is o. This is a normal
behavior. I can be removed just turning the plug upside down or swapping the supply terminals.
Recommendations
Installation
After each use of the oven, a minimum of cleaning will help keep the oven perfectly clean.
Do not line the oven walls with aluminium foil or single-use protection available from stores. Al-
uminium foil or any other protection, in direct contact with the hot enamel, risks melting and de-
teriorating the enamel of the insides. In order to prevent excessive dirtying of your oven and the
resulting strong smokey smells, we recommend not using the oven at very high temperature. It
is better to extend the cooking time and lower the temperature a little. In addition to the acces-
sories supplied with the oven, we advise you only use dishes and baking moulds resistant to very
high temperatures.
The manufacturers have no obligation to carry this out. If the assistance of the manufacturer is
required to rectify faults arising from incorrect installation, this assistance is not covered by the
guarantee. The installation instructions for professionally qualied personnel must be followed.
Incorrect installation may cause harm or injury to people, animals or belongings. The manufac-
turer cannot be held responsible for such harm or injury.
The oven can be located high in a column or under a worktop. Before xing, you must ensure good
ventilation in the oven space to allow proper circulation of the fresh air required for cooling and
protecting the internal parts. Make the openings specied on last page according to the type of
tting.
EN 9
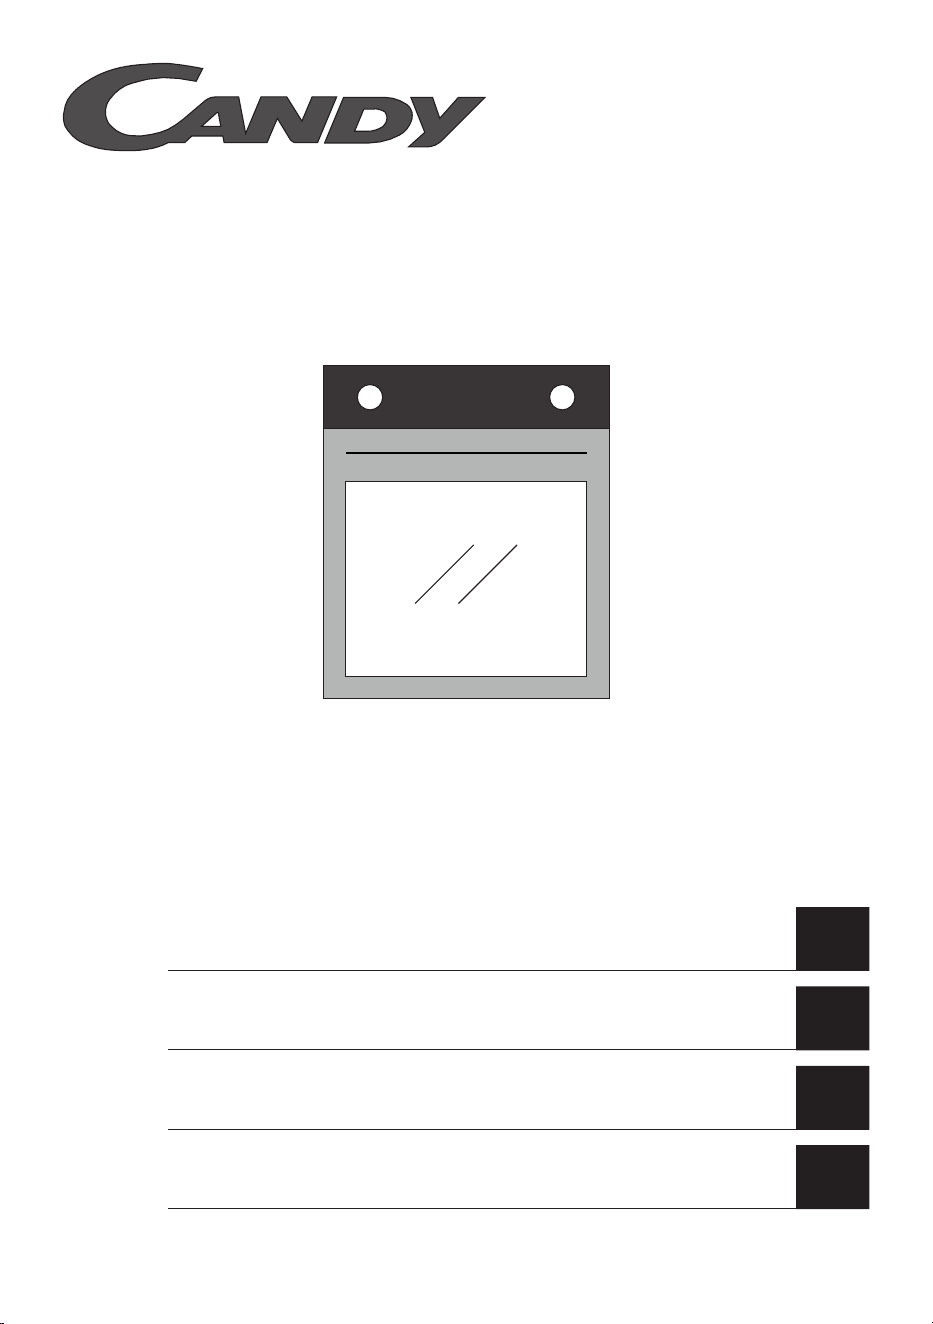
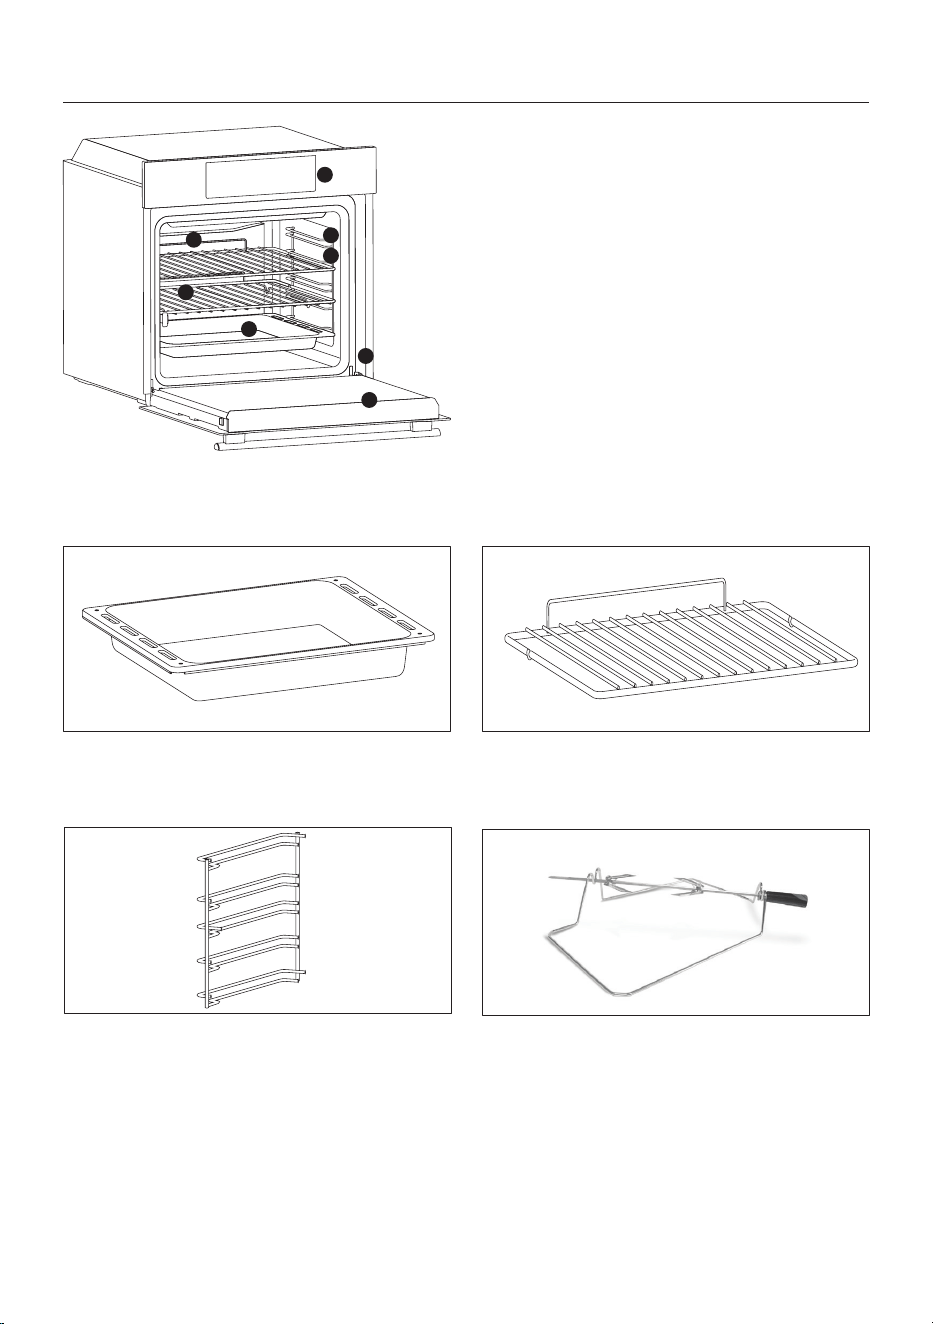
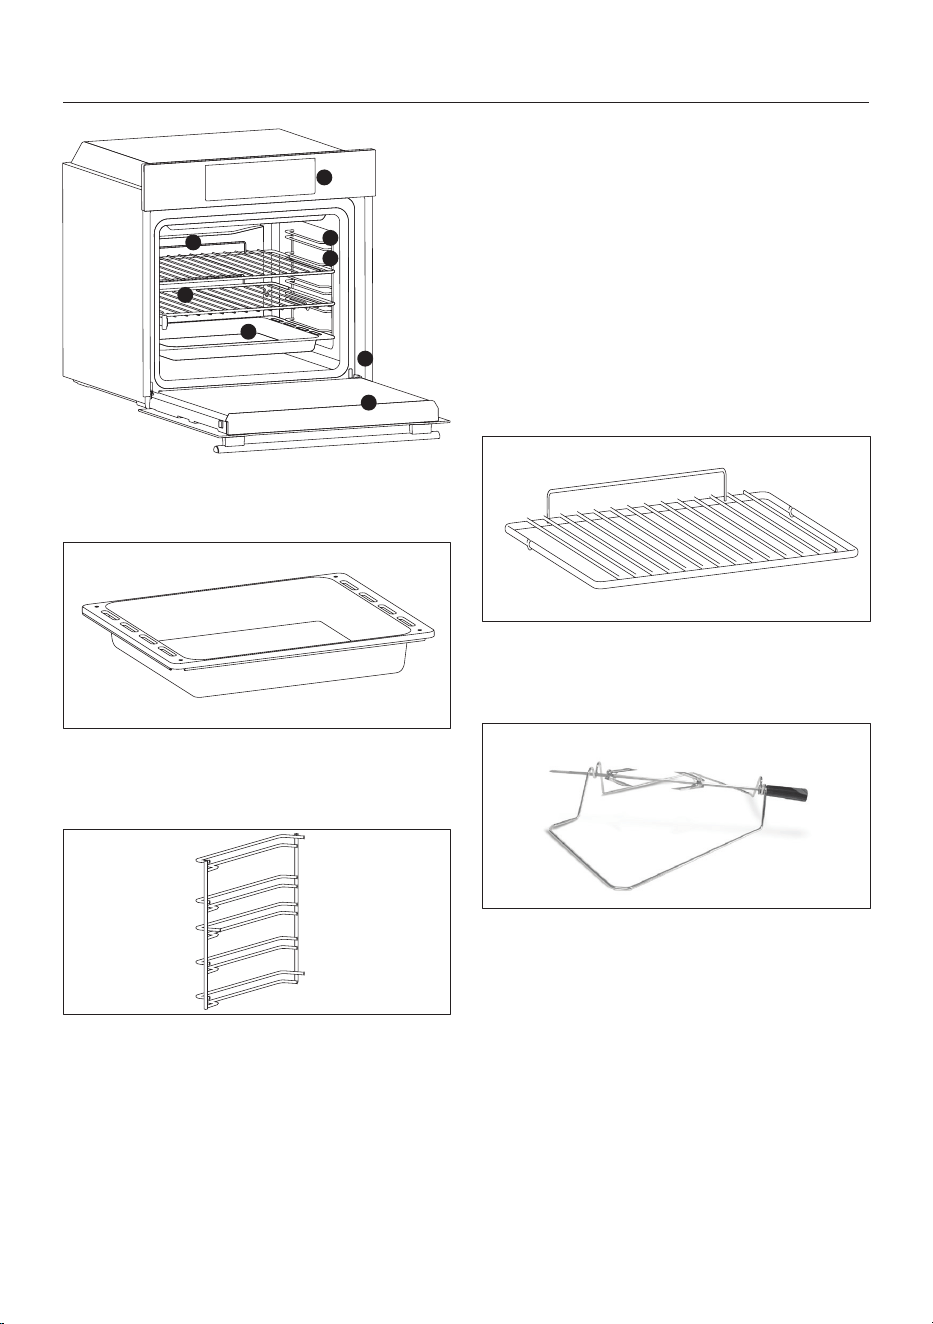
1. Control panel
2. Shelf positions (lateral wire
grid if included)
3. Grids
4. Trays
5. Fan (if present)
6. Oven door
7. Lateral wire grids (if present:
only for at cavity)
8. Serial number
Product description
ACCESSORIES
Drip tray
Metal grid
Collects residues that drip when cooking food
on the grills.
Holds baking trays and plates.
Lateral wire grids (only if present)
Rotisserie (only if present)
Located on both sides of the oven cavity, holds
metal grills and drip pans.
No pre-heating is required for rotisserie cooking.
Cooking with the door closed.
The energy consumption is 90-95% less than tradi-
tional system.
• Unscrew the hooks
• Insert the spit into the meat to be cooked
• Secure the meat with the hooks
• Tighten the screws
• Insert the spindle into the hole where the motor is
located.
• Remove the handle
NOTE: Oven trays and grids are not suitable for direct contact with food. Please use suitable cookware or baking
paper.
1
2
7
3
8
4
6
5

EN 10
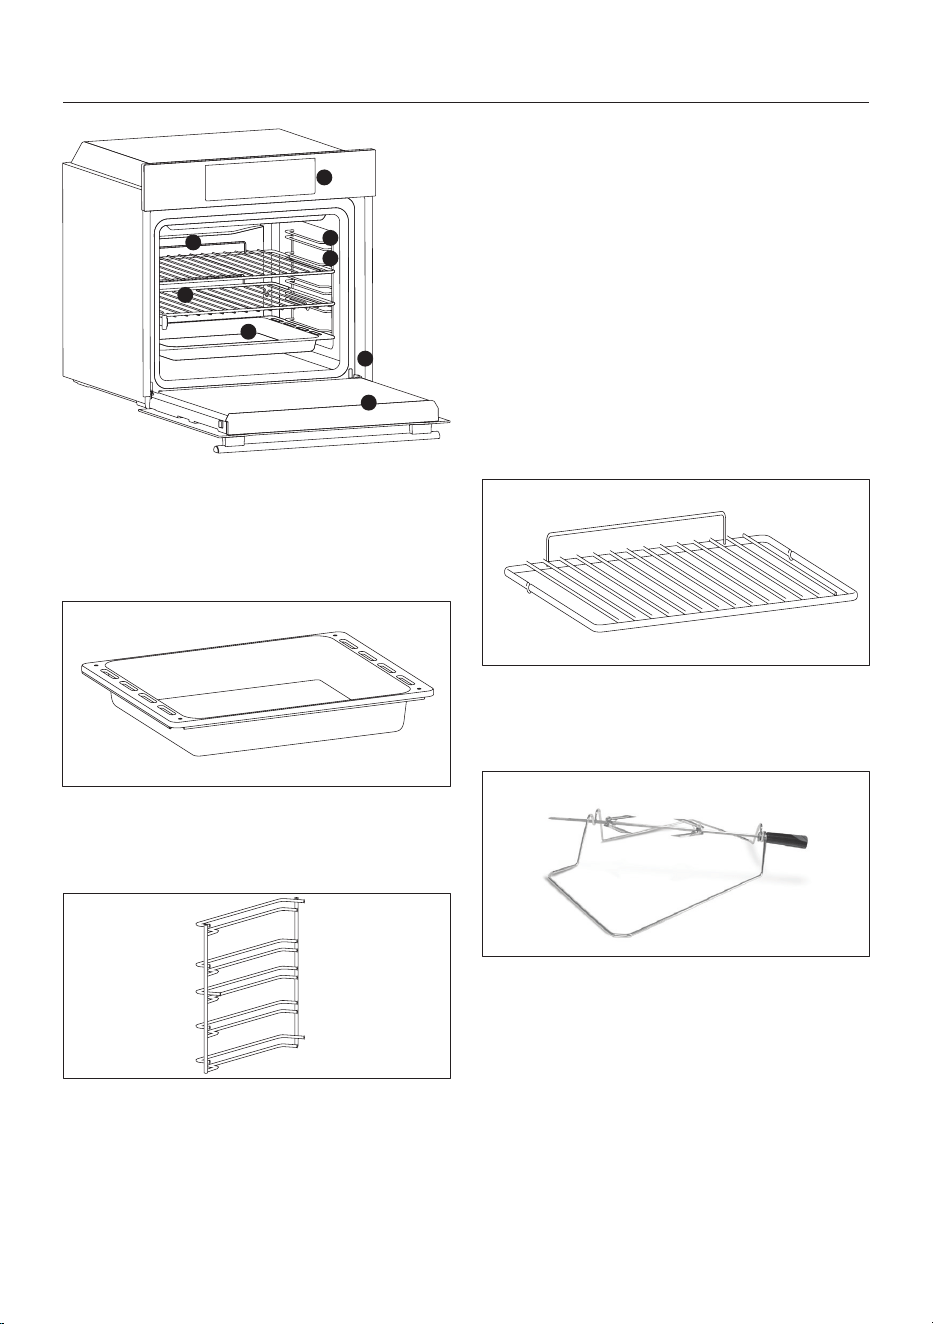
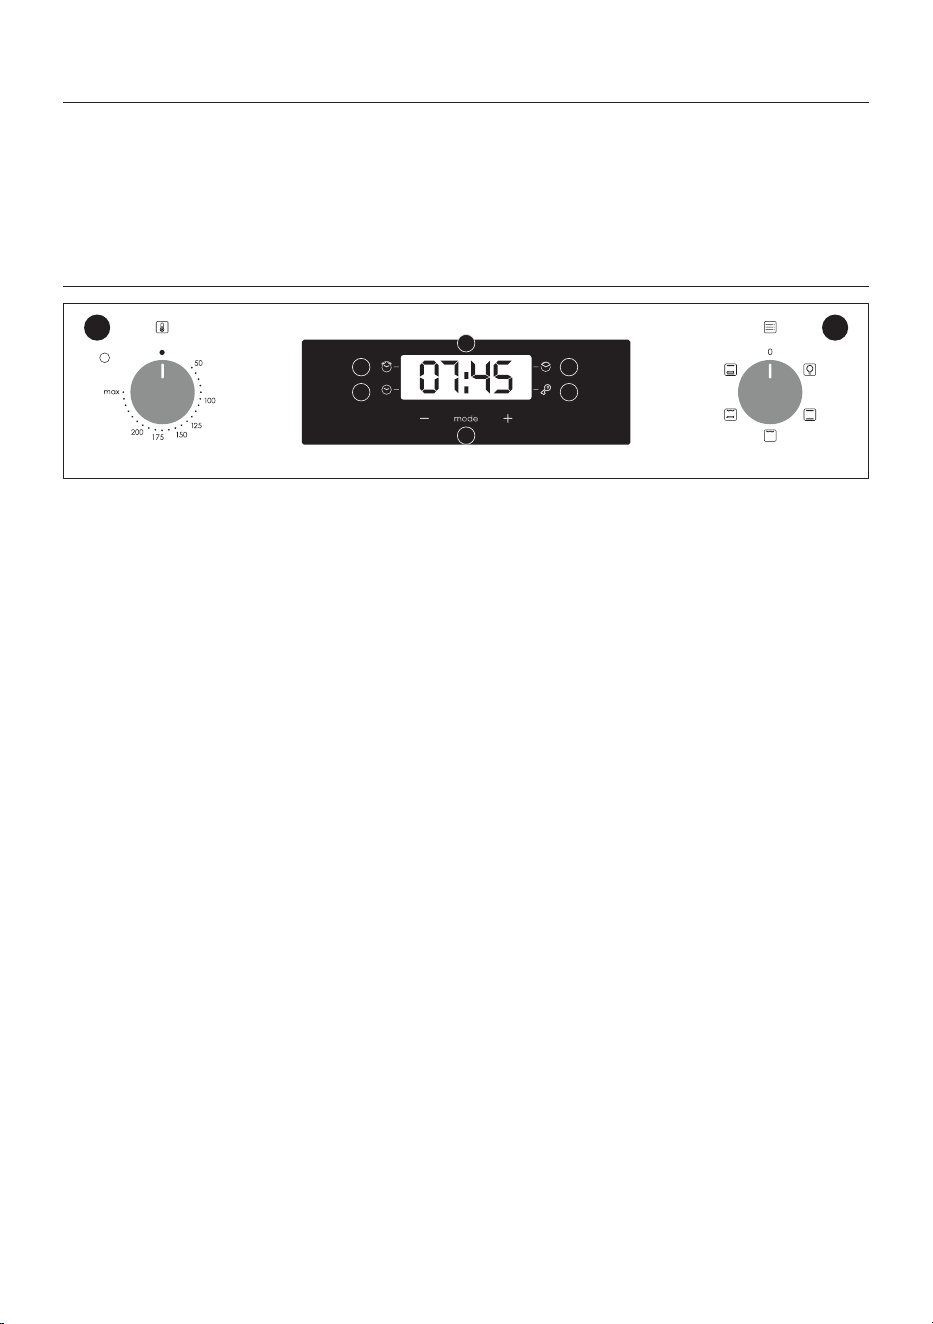
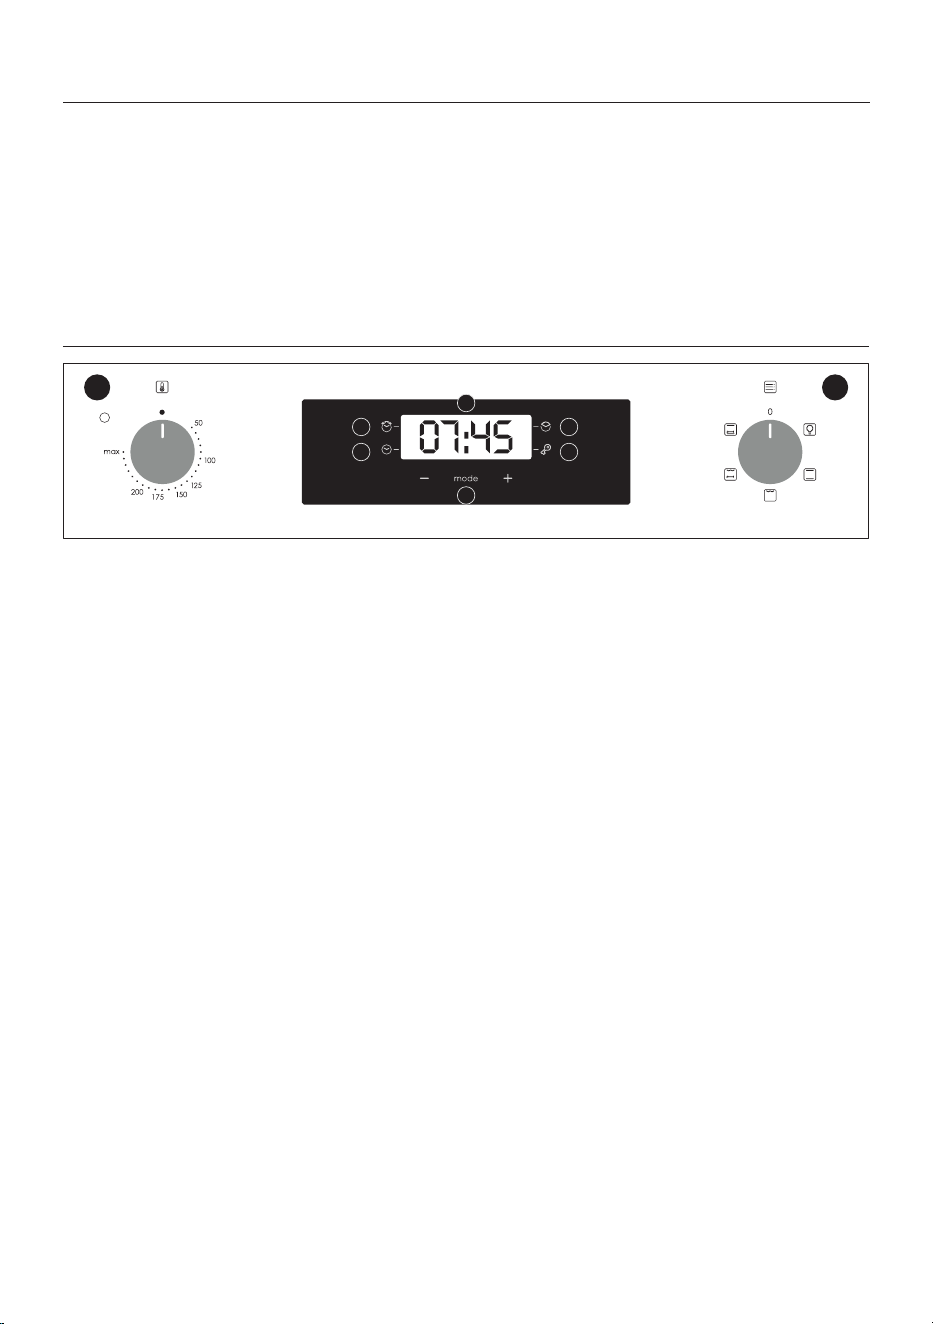
Display description
1. Minute minder
2. Clock setting
3. Cooking time
4. Child Lock
5. Temperature or clock display
6. LCD display adjustment controls
7. Thermostat selector knob
8. Function selector knob
WARNING: the rst operation to carry out
after the oven has been installed or following
the interruption of power supply (this is re-
cognizable the display pulsating and showing
12:00 ) is setting the correct time. This is achie-
ved as follows.
•Push the central button 4 times
•Set time with “-” “+” buttons.
•Release all buttons.
ATTENTION: The oven will only operate pro-
viding the clock is set.
87
1 3
5
6
2 4
First Use
PRELIMINARY CLEANING; Clean the oven before using for the rst time. Wipe over external surfaces
with a damp soft cloth. Wash all accessories and wipe inside the oven with a solution of hot water and
washing up liquid. Set the empty oven to the maximum temperature and leave on for about 1 hour, this
will remove any lingering smells of newness.
EN 11
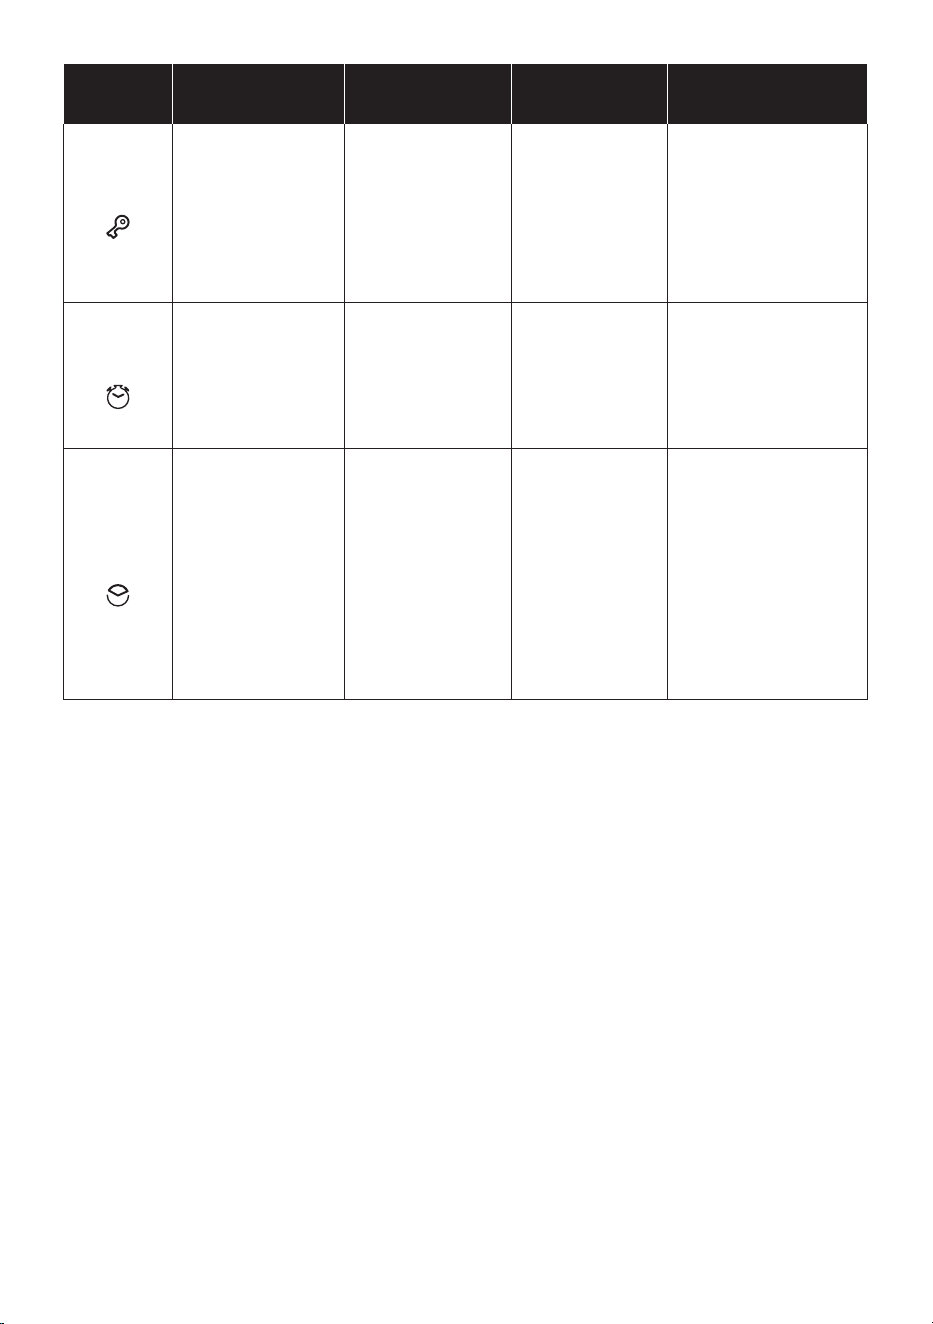
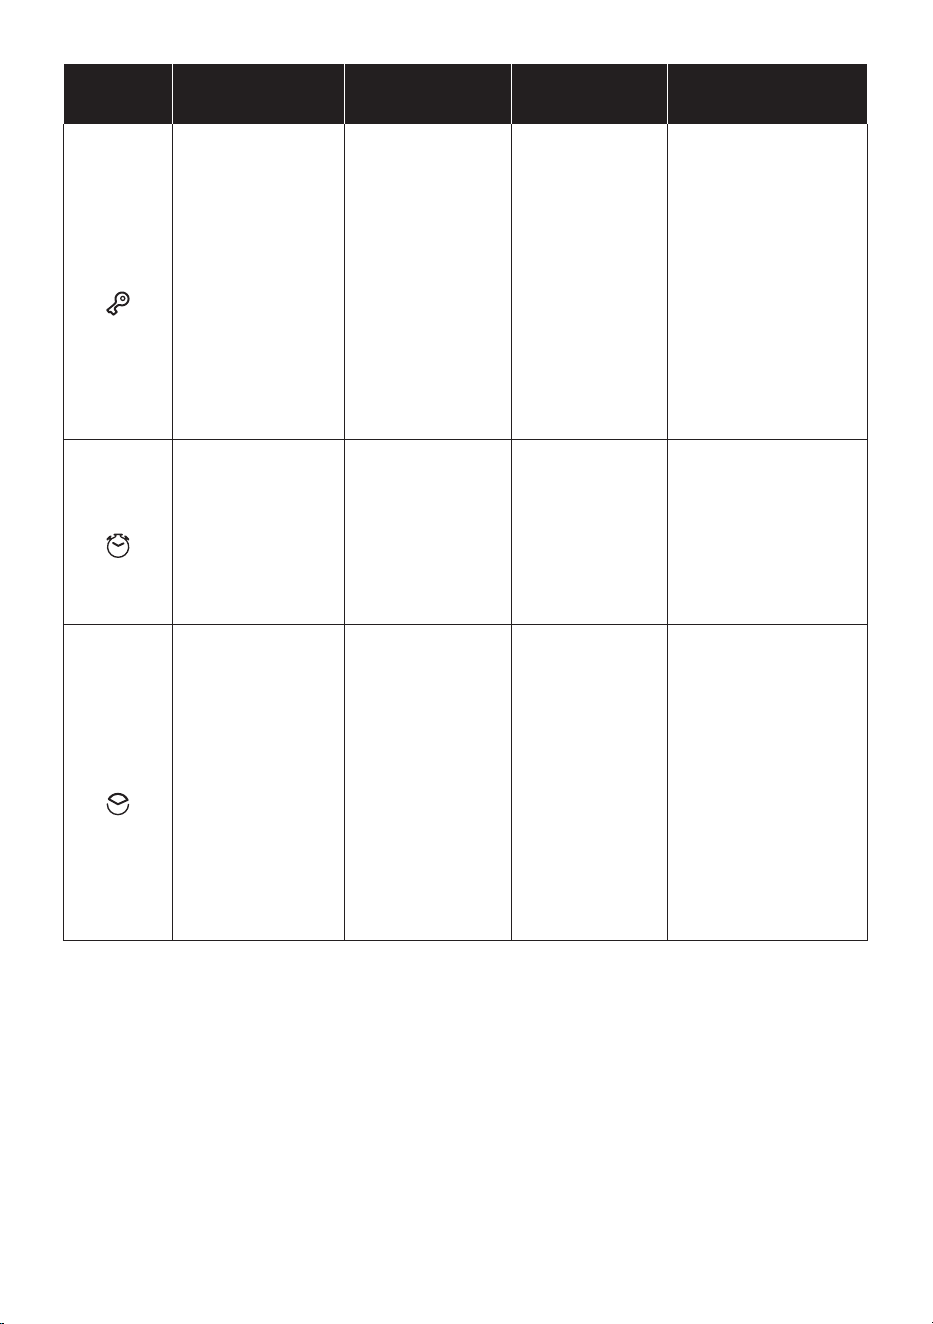
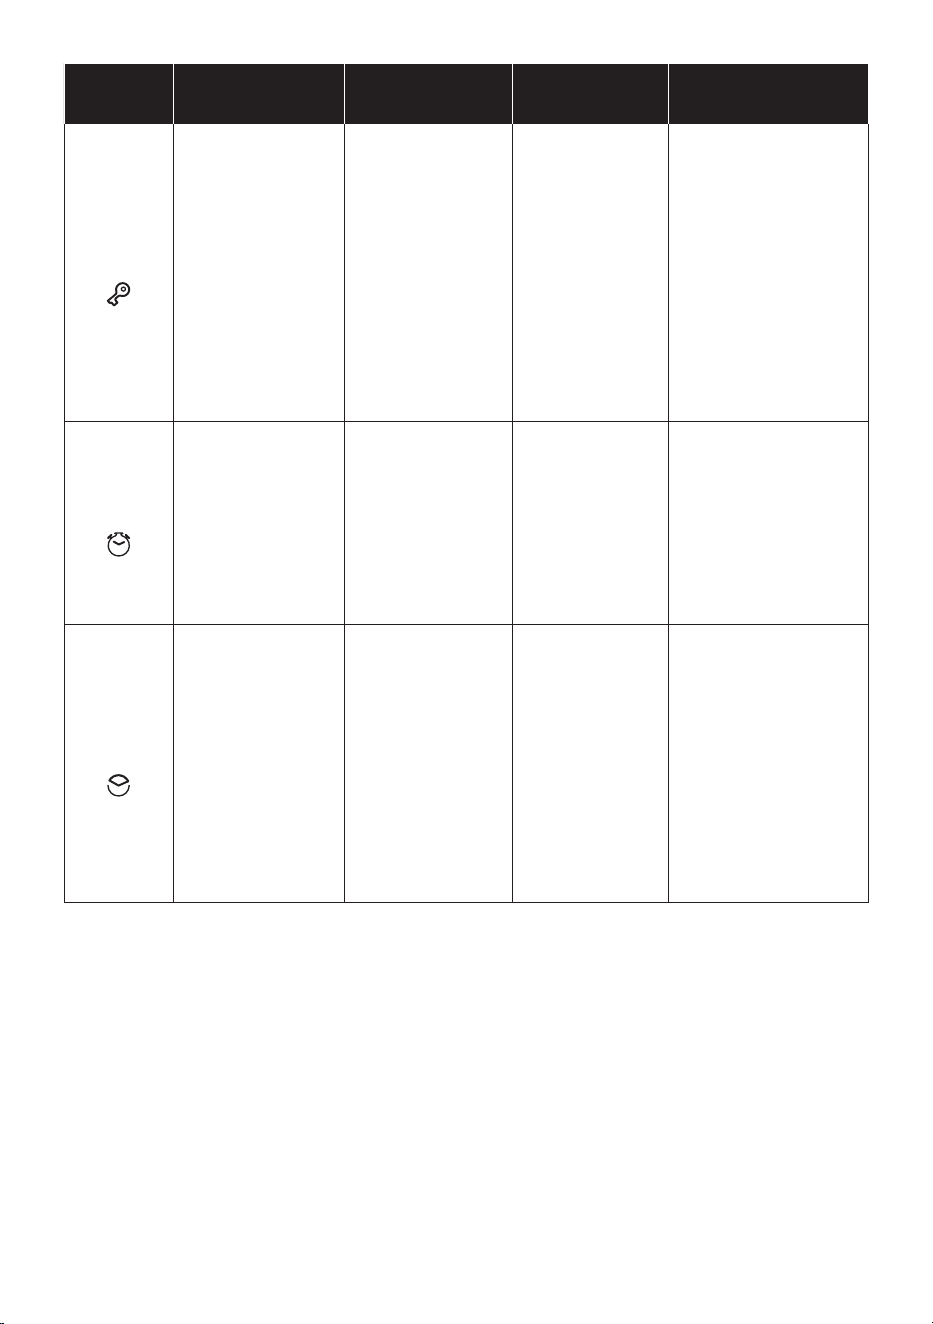
FUNCTION HOW TO ACTIVATE
HOW TO
DEACTIVATE
WHAT IT DOES WHY IT IS NEEDED
KEY LOCK
Child Lock function is
activated by touching
Set (+) for a minimum
of 5 seconds. From this
moment on all other
functions are locked,
LED of child lock turn
on, the display will ash
STOP and present time
intermittently
Child Lock function is
deactivated by touching
touchpad Set (+) again
for a minimum of 5
seconds. From this mo-
ment LED of child lock
turn o and all functions
are selectable again.
MINUTE
MINDER
Push the central button
1 times
Press the buttons “-”
“+” to set the required
time
Release all the buttons
When the set time
as elapsed an audible
alarm is activated (this
alarm will stop on its
own, however it can be
stopped immediately
by pressing the button)
SELECT.
Sounds an alarm at the
end of the set time.
During the process,
the display shows the
remaining time.
Allows to use the oven as
alarm clock (could be activa-
ted either with operating the
oven or with out operating
the oven)
COOKING
TIME
Push the central button
2 times
Press the buttons “-” or
“+”to set the lenght of
cooking required
Release all buttons
Set the cooking
function with the oven
function selector
Push any button to stop
the signal. Push the
central button to return
to the clock
function.
It allows to preset the
cooking time required
for the recipe chosen.
To check how long is
left to run press the
SELECT button 2
times.
To alter/change the
preset time press
SELECT and “-” “+”
buttons.
When the time is elapsed the
oven will switch o automa-
tically.
Should you wish to stop
cooking earlier either turn the
function selector to 0, or set
time to 0:00
(SELECT and “-” “+” buttons)
EN 12
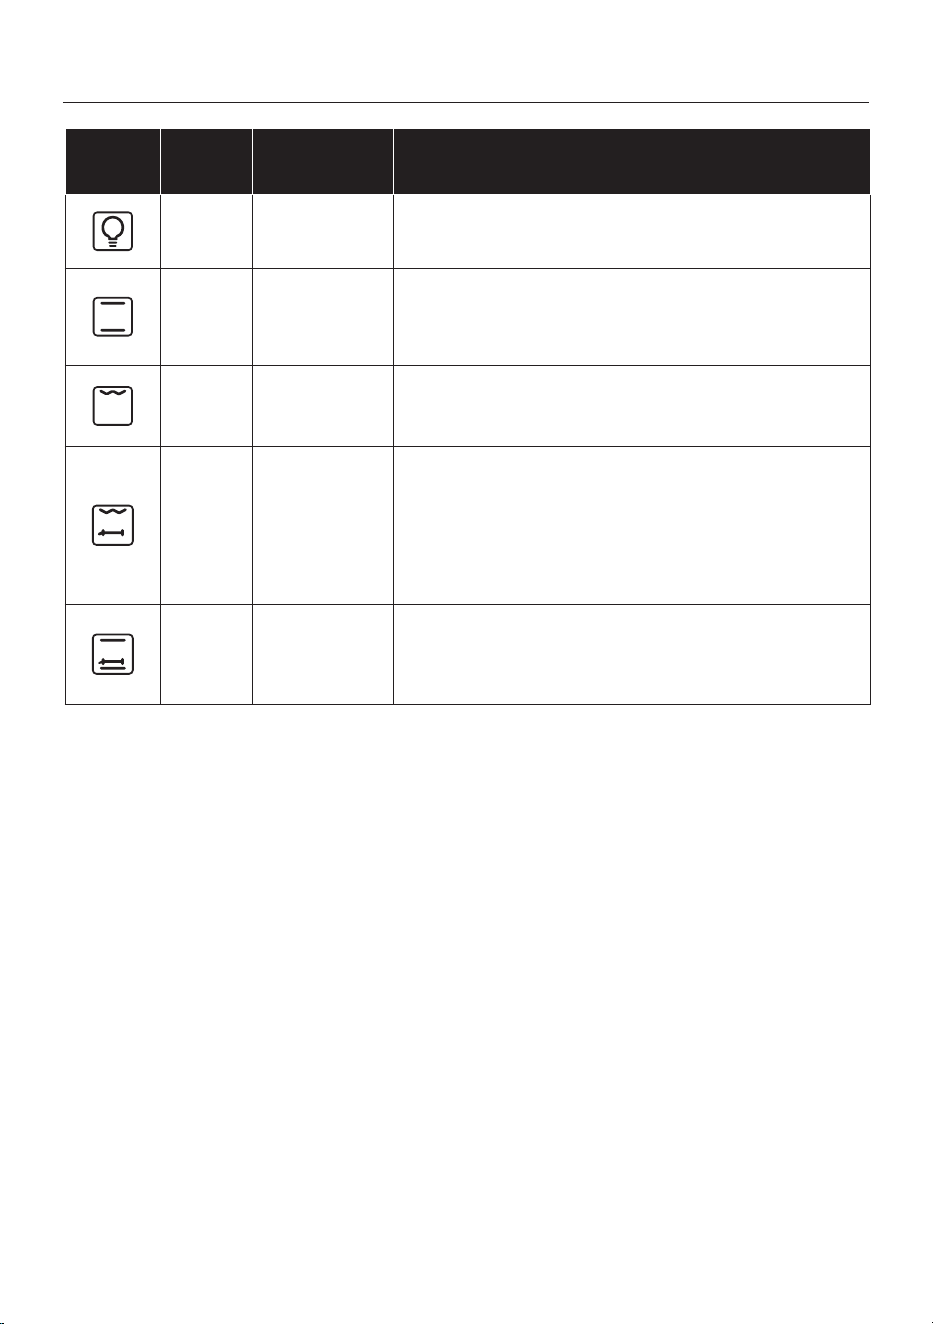
Cooking Modes
* Tested in accordance with the EN 60350-1 for the purpose of energy consumption declaration and energy class.
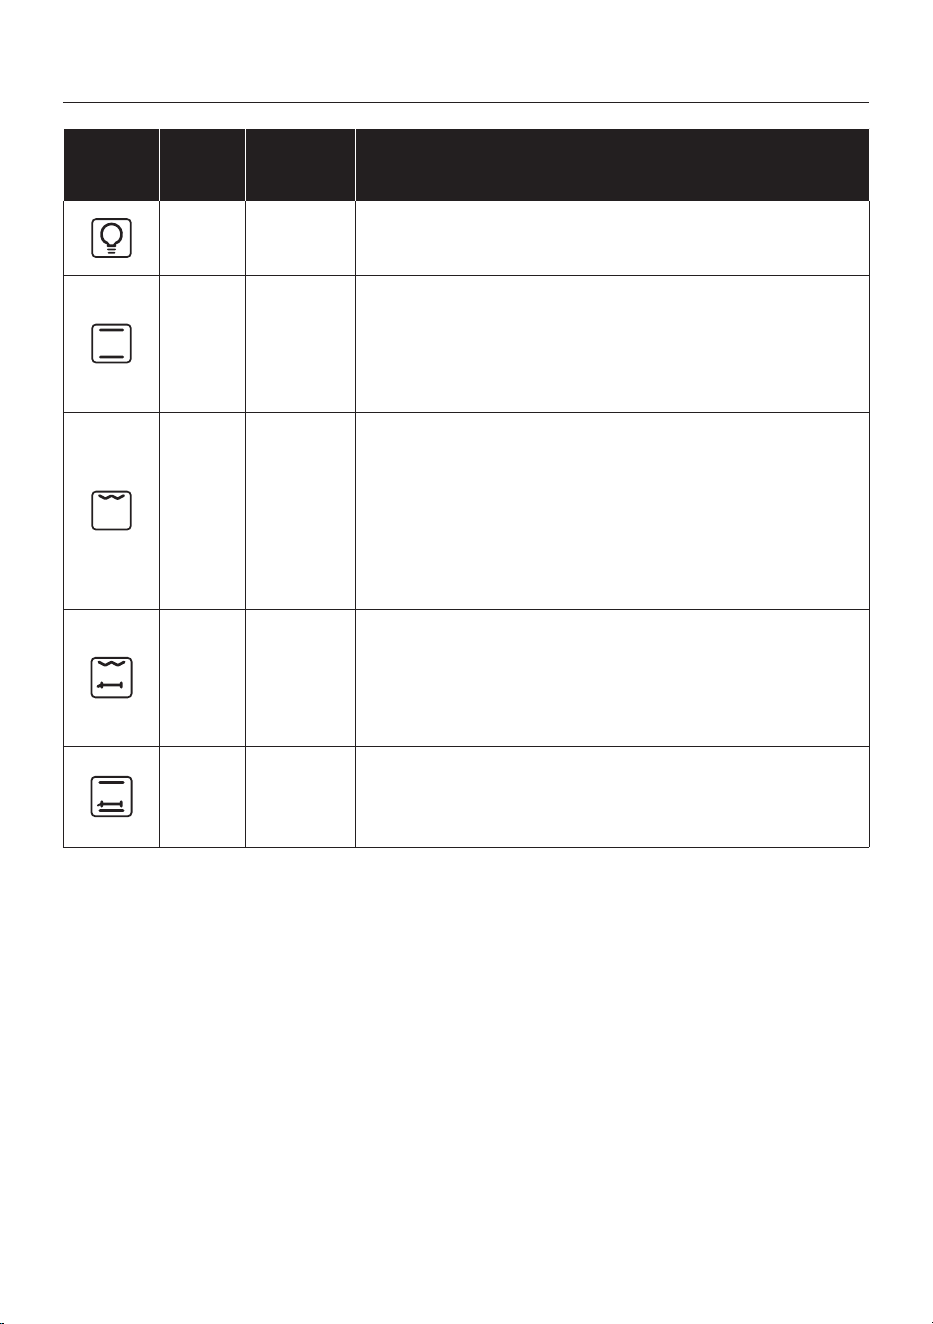
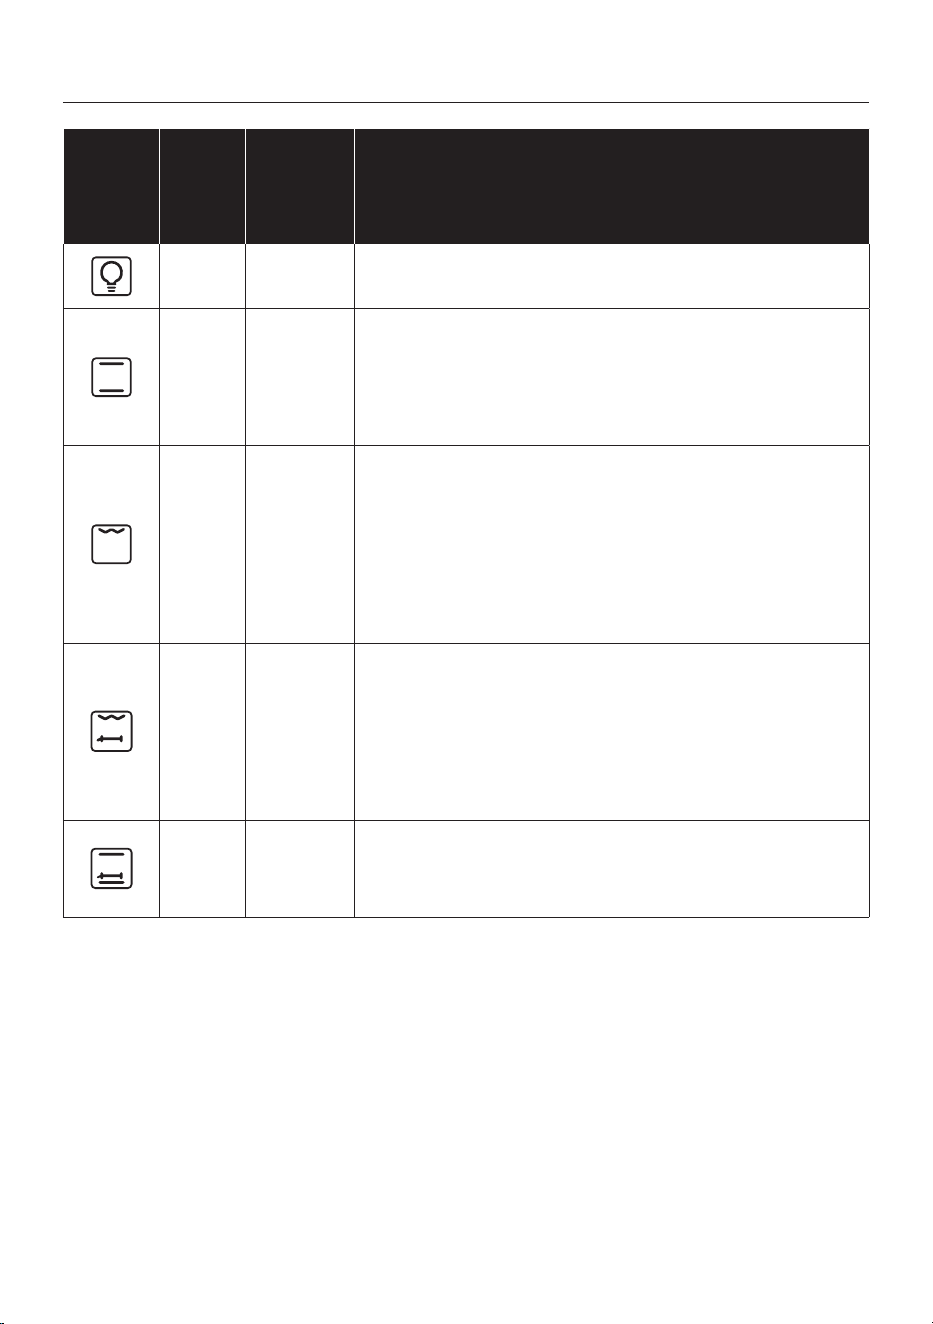
Symbol
T °C
de-
fault
T °C
range
Function
LAMP: Turns on the oven light.
220 50 ÷ MAX
* CONVENTIONAL : Both top and bottom heating elements are
used. Preheat the oven for about ten minutes. This method is
ideal for all traditional roasting and baking. For seizing red meats,
roast beef, leg of lamb, game, bread, foil wrapped food (papil-
lotes), aky pastry. Place the food and its dish on a shelf in mid
position.
200 50 ÷ MAX
GRILL : use the grill with the door closed.
The top heating element is used alone and you can adjust the tem-
perature. Five minutes preheating is required to get the elements
red-hot. Success is guaranteed for grills, kebabs and gratin dishes.
White meats should be put at a distance from the grill; the cooking
time is longer, but the meat will be tastier. You can put red meats
and sh llets on the shelf with the drip tray underneath.
200 50 ÷ MAX
ROTISSERIE: the rotisserie is used with the door closed.
The heating temperature can be modied as needed. It is best to
cook only medium-sized pieces on the rotisserie, and to cook large
pieces in the oven with the Turbo-Grill, they will only be better. Ideal
for rediscovering all the avors of old-fashioned rotisserie. Prehea-
ting is not done for rotisserie cooking.
200 50 ÷ MAX
NATURAL CONVECTION WITH ROTISSERIE : The bottom and top
heaters of the oven are in operation. It’s cooking traditional suitable
for roasts and poultry, and not requiring the addition of fat.

EN 13
The lifecycle of the appliance can be extended
through regular cleaning. Wait for the oven to
cool before carrying out manual cleaning op
-
erations. Never use abrasive detergents, steel
wool or sharp objects for cleaning, so as to not
irreparably damage the enamelled parts. Use
only water, soap or bleach-based detergents
(ammonia).
GLASS PARTS
It is advisable to clean the glass window with
absorbent kitchen towel after every use of
the oven. To remove more obstinate stains,
you can use a detergent-soaked sponge, well
wrung out, and then rinse with water.
OVEN WINDOW SEAL
If dirty, the seal can be cleaned with a slightly
General notes on cleaning
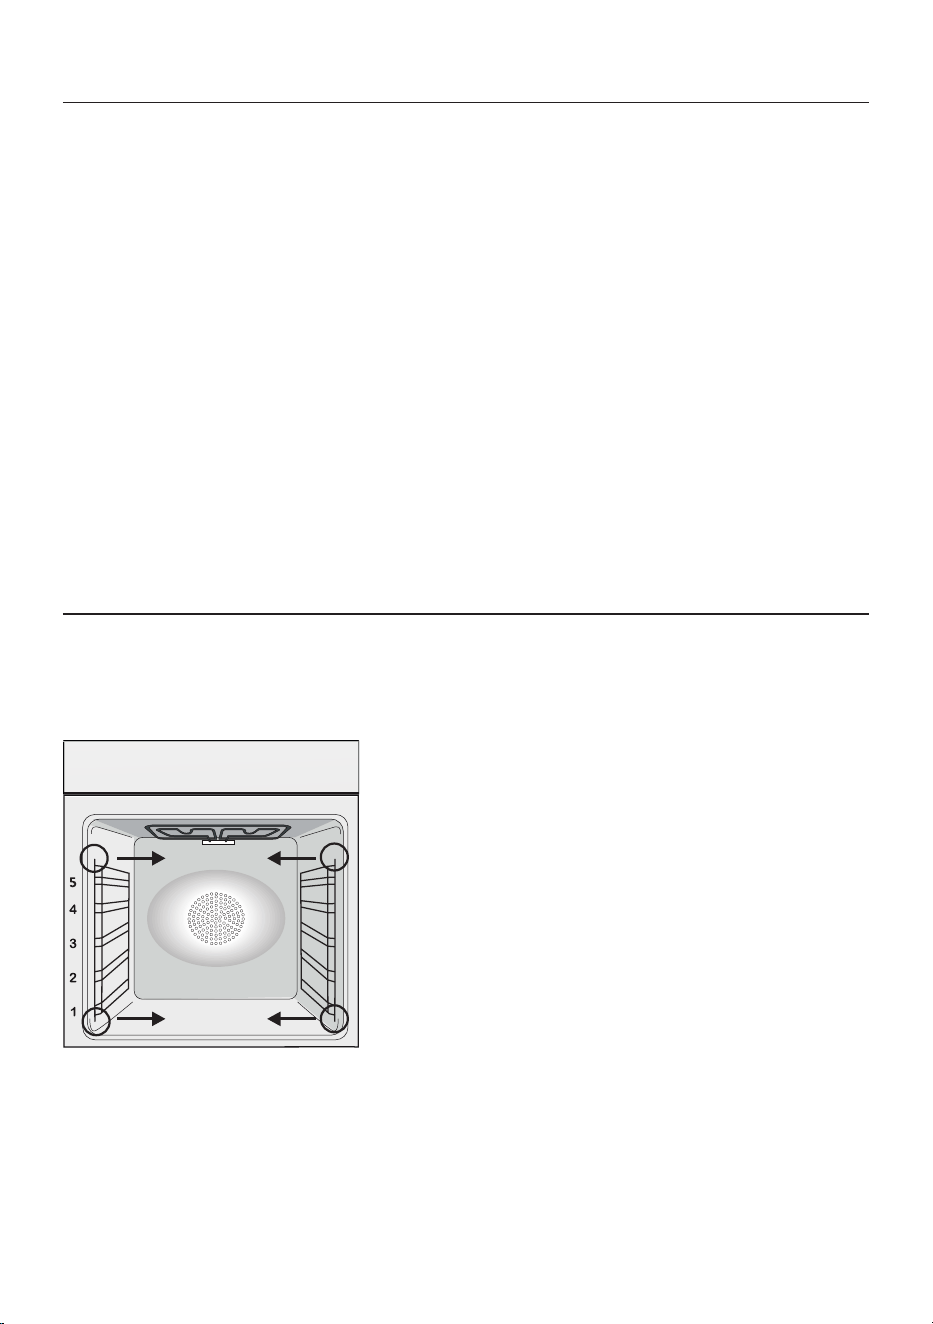
REMOVAL AND CLEANING OF THE SIDE RACKS
1. Remove the wire racks by pulling them in the direction of the arrows (see below)
2. To clean the wire racks either put them in the dishwasher or use a wet sponge, ensuring that they
are dried afterwards.
3. After the cleaning process install the wire racks in reverse order.”
Maintenance
damp sponge.
ACCESSORIES
Clean accessories with a wet, soapy sponge
before rinsing and drying them: avoid using
abrasive detergents.
DRIP PAN
After using the grill, remove the pan from the
oven. Pour the hot fat into a container and
wash the pan in hot water, using a sponge and
washing-up liquid.
If greasy residues remain, immerse the pan in
water and detergent. Alternatively, you can
wash the pan in the dishwasher or use a com
-
mercial oven detergent. Never put a dirty pan
back into the oven.
CHANGING THE BULB
1. Disconnect the oven from the mains supply.
2. Undo the glass cover, unscrew the bulb and replace it with a new bulb of the same type.
3. Once the defective bulb is replaced, replace the glass cover.
This product contains one or more light sources of energy eciency class G (Lamp) /F (10 Led).

EN 14
Waste management and environmental protection
This appliance is labelled in
accordance with European Di-
rective 2012/19/EU regarding
electric and electronic appli-
ances (WEEE). The WEEE con-
tain both polluting substances
(that can have a negative ef-
fect on the environment) and base elements
(that can be reused). It is important that the
WEEE undergo specic treatments to cor-
rectly remove and dispose of the pollutants
and recover all the materials. Individuals can
play an important role in ensuring that the
WEEE do not become an environmental prob-
lem; it is essential to follow a few basic rules:
- the WEEE should not be treated as domestic
waste;
- the WEEE should be taken to dedicated col-
lection areas managed by the town council or a
registered company.
In many countries, domestic collections may
be available for large WEEEs. When you buy a
new appliance, the old one can be returned to
the vendor who must accept it free of charge
as a one-o, as long as the appliance is of an
equivalent type and has the same functions as
the purchased appliance.
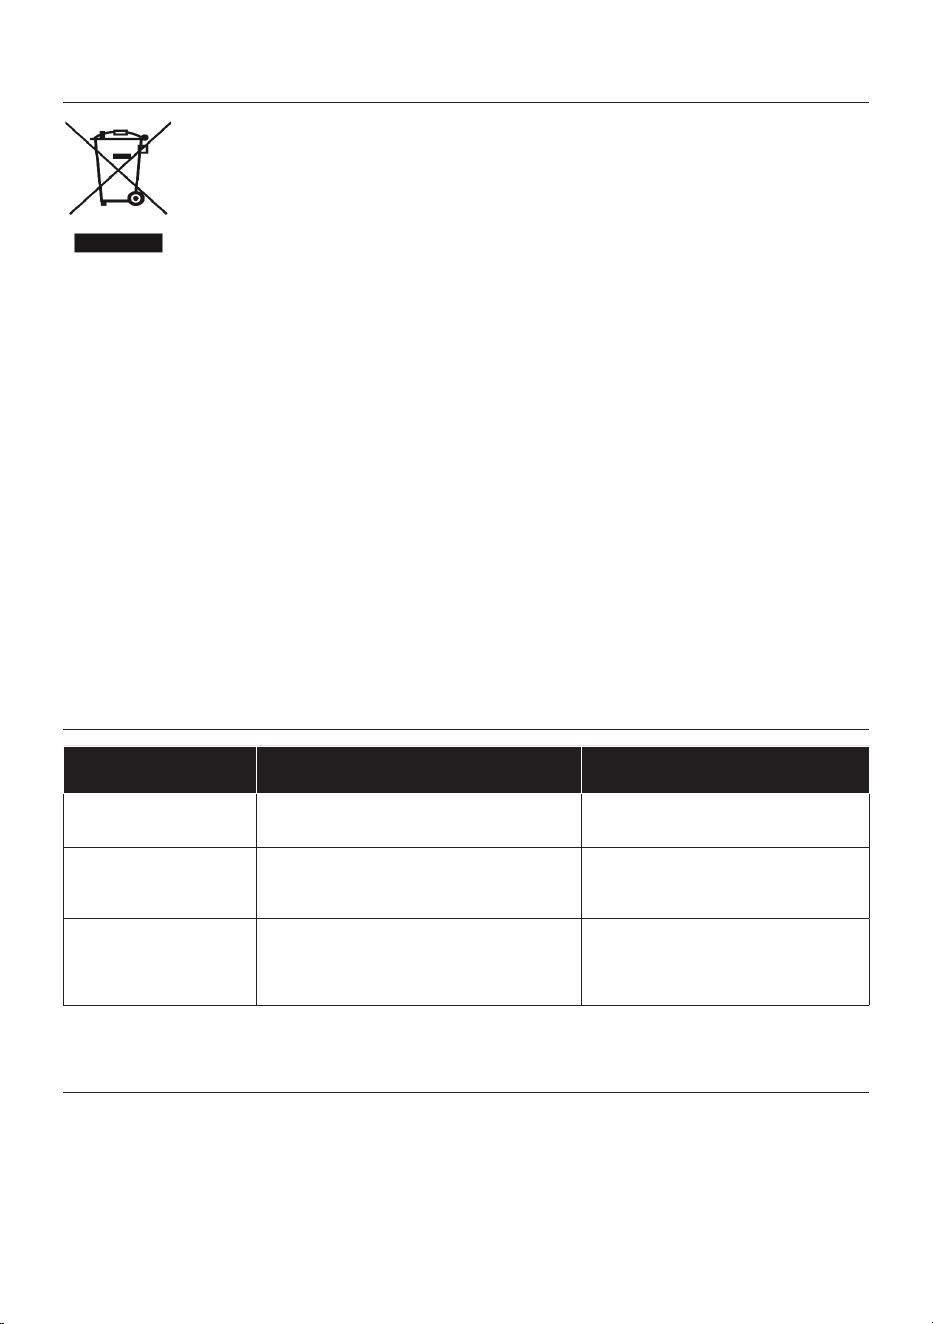
Troubleshooting
Problem Possible cause Solution
the oven does not heat
up
The clock is not set Set the clock
The oven does not
heat up
A cooking function and temperature has
not been set
Ensure that the necessary settings
are correct
No reaction of the
touch user interface
Steam and condensation on the user in-
terface panel
Clean with a microber cloth the
user interface panel to remove the
condensation layer
SAVING AND RESPECTING THE ENVIRON-
MENT
Where possible, avoid pre-heating the oven
and always try to ll it. Open the oven door as
infrequently as possible, because heat from
the cavity disperses every time it is opened.
For a signicant energy saving, switch o the
oven between 5 and 10 minutes before the
planned end of the cooking time, and use the
residual heat that the oven continues to gen-
erate. Keep the seals clean and in order, to
avoid any heat dispersal outside of the cavity.
If you have an electric contract with an hour-
ly tari, the “delayed cooking” programme
makes energy saving more simple, moving the
cooking process to start at the reduced tari
time slot.

FR 15
Sommaire
Conseils De Sécurité
Instructions Générales
Description du produit
Description de l’achage
Mode de cuisson
Nettoyage du four et maintenance
Entretien
Dépannage
Installation
16
20
22
23
25
26
26
27
54

FR 16
• Pendant la cuisson, de l’humidité peut se condenser à l’intérieur
de la cavité ou sur la vitre de la porte. Il s’agit d’un phénomène
normal. Pour réduire cet eet, attendez 10-15 minutes après
avoir allumé l’appareil avant de mettre les aliments au four. La
condensation disparaîtra de toutes façons dès que le four aura
atteint la température de cuisson.
• Cuisez les légumes dans un récipient avec couvercle plutôt que
dans un ustensile ouvert.
• Évitez de laisser des aliments à l’intérieur du four plus de 15-20
minutes après cuisson.
• AVERTISSEMENT : L’appareil et ses parties accessibles
chauent pendant l’utilisation. Faites attention à ne pas touch-
er les parties chaudes.
• • AVERTISSEMENT : les parties accessibles peuvent devenir
chaudes lorsque le four est utilisé. Les enfants doivent rester à
une distance de sécurité.
• Débrancher l’appareil du secteur avant d’eectuer tout travail
ou opération d’entretien.
• AVERTISSEMENT : An d’éviter tout risque lié à la réinitialisa-
tion accidentelle de l’interrupteur thermique, l’appareil ne doit
pas être alimenté par un dispositif de commutation externe, tel
qu’une minuterie, ou relié à un circuit régulièrement allumé et
éteint.
• Les enfants de moins de 8 ans doivent rester à une distance de
sécurité de l’appareil s’ils ne sont pas surveillés en permanence.
• Les enfants ne doivent pas jouer avec l’appareil.
L’appareil peut être utilisé par des enfants de plus de 8 ans et
par des personnes dont les capacités physiques, sensorielles
ou mentales sont limitées, sans expérience ni connaissance du
produit, uniquement s’ils sont surveillés ou s’ils ont été informés
de la manière d’utiliser l’appareil, en toute sécurité et qu’ils com-
prennent les risques possibles.
Conseils De Sécurité

FR 17
• Le nettoyage et l’entretien ne doivent pas être eectués par
des enfants sans surveillance.
• N’utilisez pas de matériaux rugueux ou abrasifs ou de racloirs
métalliques acérés pour nettoyer les vitres des portes des
fours, car cela pourrait rayer la surface et provoquer la rupture
de la vitre.
• Coupez le four avant de retirer les pièces amovibles.
• Après le nettoyage, remontez-les selon les instructions.
• Utilisez uniquement la sonde à viande recommandée pour ce
four.
• Ne pas utiliser de nettoyeur vapeur ou de vaporisateur à haute
pression pour les opérations de nettoyage.
• SI LE FOUR EST FOURNI PAR LE FABRICANT SANS BOU-
CHON:
L’APPAREIL NE DOIT PAS ÊTRE CONNECTÉ À LA SOURCE
D’ALIMENTATION À L’AIDE DE FICHES OU DE PRISES, MAIS
DOIT ÊTRE DIRECTEMENT CONNECTÉ AU SECTEUR. Le
raccordement à la source d’alimentation doit être eectué
par un professionnel dûment qualié. An d’avoir une instal-
lation conforme à la législation de sécurité en vigueur, le four
doit être connecté en ne plaçant qu’un disjoncteur omnipo-
laire, avec séparation des contacts conforme aux exigences
de la catégorie de surtension III, entre l’appareil et la source
d’énergie. Le disjoncteur omnipolaire doit supporter la charge
maximale connectée et doit être conforme à la législation en
vigueur. Le conducteur jaune et vert de mise à la terre ne doit
pas être bloqué par le disjoncteur. Le disjoncteur omnipolaire
utilisé pour la connexion doit être facilement accessible lorsque
l’appareil est installé.
Le raccordement à la source d’alimentation doit être eectué
par un professionnel qualié en tenant compte de la polarité du
four et de la source d’alimentation.
La déconnexion doit être réalisée en incorporant un interrup-
teur dans le câblage xe conformément aux règles de câblage

FR 18
• SI LE FOUR EST FOURNI PAR LE FABRICANT AVEC FICHE:
La prise doit être adaptée à la charge indiquée sur l’étiquette et
doit avoir un contact de terre connecté et en fonctionnement.
Le conducteur de mise à la terre est jaune et vert. Cette opéra-
tion doit être eectuée par un professionnel qualié. En cas d’in-
compatibilité entre la prise et la che de l’appareil, demandez à
un électricien qualié de remplacer la prise par un autre type ap-
proprié. La che du câble d’alimentation et la prise d’alimenta-
tion doivent être conformes aux normes en vigueur dans le pays
d’installation. La connexion à la source d’énergie peut également
être réalisée en plaçant un disjoncteur omnipolaire, avec sépa-
ration des contacts conforme aux exigences de la catégorie
de surtension III, entre l’appareil et la source d’énergie pouvant
supporter la charge maximale connectée et conforme à la lég-
islation en vigueur. Le conducteur jaune et vert de mise à la terre
ne doit pas être bloqué par le disjoncteur. La prise d’alimentation
ou le disjoncteur multipolaire utilisé pour le branchement doit
rester à tout moment accessible après installation de l’appareil.
Le débranchement doit se faire en accédant à la prise d’alimen-
tation ou en prévoyant un interrupteur sur le circuit électrique
xe, conforme aux normes électriques.
• Si le câble d’alimentation est endommagé, il doit être remplacé
par un câble ou un faisceau de câbles spécial disponible auprès
du fabricant ou du service après-vente.
• Le câble d’alimentation requis est le H05V2V2-F.
• Cette opération doit être exécutée par le personnel qualié. Le
conducteur de mise à la terre (jaune et vert) doit être environ 10
mm plus long que les autres conducteurs. Pour toutes répara-
tions, contactez le service après-vente en insistant sur l’utilisa-
tion de pièces de rechange d’origine.
• Le non-respect des consignes ci-dessus peut compromettre
la sécurité de l’appareil et annuler la garantie.
• Éliminez les éclaboussures importantes avant de procéder au
nettoyage.

FR 19
• Une coupure de courant prolongée durant une phase de cui-
sson peut engendrer un dysfonctionnement de l’écran. Dans
ce cas, veuillez contacter le service après-vente.
• L’appareil ne doit pas être installé derrière une porte décorative,
pour éviter la surchaue.
• Lors de l’insertion de la grille, faites attention à ce que le bord
antidérapant soit positionné vers l’arrière et vers le haut.
• Pour introduire la grille dans le four, vériez que le butoir est di-
rigé vers le haut et au fond de la cavité. La grille doit être com-
plètement insérée dans la cavité.
• AVERTISSEMENT : Ne recouvrez pas les parois du four avec du
papier aluminium ou une protection jetable disponible dans les
magasins. Le papier d’aluminium ou toute autre protection, en
contact direct avec l’émail chaud, risque de fondre et de détéri-
orer l’émail de la cavité intérieure.
• AVERTISSEMENT : N’enlevez jamais le joint de la porte du four.
• PRUDENCE : Ne remplissez pas le fond de la cavité avec de l’eau
pendant la cuisson ou lorsque le four est chaud.
• Aucune autre opération ni aucun autre réglage ne sont requis
pour faire fonctionner l’appareil aux fréquences nominales.
• Le four peut être placé en hauteur dans une colonne ou sous un
plan de travail. Avant de le xer, vous devez garantir une bonne
ventilation dans l’espace du four pour permettre une circulation
correcte de l’air frais requis pour refroidir et protéger les parties
situées à l’intérieur. Réalisez les ouvertures spéciées à la dern-
ière page en fonction du type de xation.
• Pour une utilisation correcte du four, il est recommandé de ne
pas mettre les aliments en contact direct avec les grilles et les
plateaux, mais d’utiliser des papiers de cuisson et/ou des récip-
ients spéciaux.

FR 20
Instructions Générales
Indications de sécurité
Nous vous remercions d’avoir choisi un de nos produits. Pour obtenir les meilleurs résultats avec
votre four, vous devez lire attentivement ce manuel et le conserver pour toute consultation ul-
térieure. Avant d’installer le four, notez le numéro de série, il vous sera demandé par le support
technique si des réparations sont nécessaires. Après avoir enlevé le four de son emballage, véri-
ez qu’il n’a pas été endommagé pendant le transport. Si vous avez des doutes, ne pas utiliser le
four et se référer à un technicien qualié pour obtenir des conseils. Conservez tous les matér-
iaux d’emballage (sacs en plastique, polystyrène, clous) hors de la portée des enfants.Lors de la
première utilisation du four, il peut se produire un dégagement de fumée âcre provoqué par le
premier échauement de la colle des panneaux d’isolation enveloppant le four. Ce phénomène
est normal. Attendez que la fumée cesse avant de cuire des aliments. Le fabricant décline toute
responsabilité dans les cas où les instructions contenues dans le présent document ne sont pas
respectées.
REMARQUE: les fonctions du four, les propriétés et les accessoires cités dans ce manuel peu-
vent varier selon les modèles.
Utilisez uniquement le four à sa destination, qui est seulement pour la cuisson des aliments; toute
autre utilisation, par exemple comme une source de chaleur, est considérée comme inappropriée
et donc dangereuse. Le fabricant ne peut être tenu responsable de tout dommage lié à une mau-
vaise utilisation ou à des modications techniques du produit.
L’utilisation de tout appareil électrique implique le respect de certaines règles fondamentales:
- Ne tirez pas sur le câble d’alimentation pour déconnecter le produit de la source d’alimentation
- Ne pas toucher l’appareil avec les mains ou les pieds mouillés ou humides;
- En général l’utilisation d’adaptateurs, de prises multiples et de rallonges est déconseillée;
- En cas de dysfonctionnement et / ou de mauvais fonctionnement, éteindre l’appareil et ne pas
y toucher.
Sécurité électrique
LE BRANCHEMENT ELECTRIQUE DOIT ÊTRE REALISE PAR UN INSTALLATEUR AGREE OU
UN TECHNICIEN DE QUALIFICATION SIMILAIRE.
L’alimentation électrique à laquelle le four est connecté doit être conforme aux lois en vigueur
dans le pays d’installation. Le fabricant décline toute responsabilité pour tout dommage causé
par le non respect de ces instructions. Le four doit être raccordé à l’alimentation électrique avec
une prise murale reliée à la terre ou par l’intermédiaire d’un dispositif à coupure omnipolaire, se-
lon les lois en vigueur dans le pays d’installation. L’alimentation électrique doit être protégée par
des fusibles appropriés et les câbles utilisés doivent avoir une section transversale qui peut as-
surer une alimentation normale du four.
CONNEXION
Le four est livré avec un câble d’alimentation permettant le raccordement sous une tension
électrique de 220-240 V entre les phases ou entre phase et neutre. Le raccordement devra être
eectué après avoir vérié:
- La tension d’alimentation indiquée sur le compteur;
- Le réglage du dijoncteur.

FR 21
Le l de protection du cordon (vert/jaune) relié à la Borne Terre de l’appareil doit être relié à la
Borne Terre de l’installation.
ATTENTION
Faire vérier la continuité de la terre de l’installation avant de procéder au raccordement. Le
fabricant décline toute responsabilité en cas d’accidents ou d’autres problèmes qui pourraient
survenir à l’usage d’un appareil non relié à la terre, ou relié à une terre dont la continuité serait
défectueuse.
REMARQUE: Le four peut nécessiter une opération de S.A.V. Aussi, placez la prise de courant
de façon à pouvoir brancher le four une fois sorti de sa niche. Câble d’alimentation: si le change-
ment du câble d’alimentation s’avère nécessaire, nous vous demandons de faire réaliser cette
opération par le service après-vente ou une personne de qualication similaire.
Recommandations
Installation
Après chaque utilisation du four, réaliser un petit entretien qui favorisera le nettoyage parfait du
four. Ne pas tapisser les parois du four avec des feuilles en aluminium ou des protections jetables
du commerce. La feuille d’aluminium ou toute autre protection, en contact direct avec l’émail
chaué, risque de fondre et de détériorer l’émail du moue. Avant installation de l’appareil, il faut
relever le numéro de série et le noter ci-dessous en cas d’éventuelle demande d’intervention.
An d’éviter les salissures excessives de votre four ainsi que les fortes odeurs de fumée pouvant
en résulter, nous recommandons de ne pas utiliser le four à trop forte température. Il est préféra-
ble de
rallonger le temps de cuisson et de baisser la température. Nous vous conseillons de n’utiliser que
des plats, des moules à pâtisserie résistants à de très hautes températures.
La mise en service de l’appareil est à la charge de l’acheteur, le constructeur est dégagé de ce
service. Les pannes liées à une mauvaise installation ne seront pas couvertes par la garantie. Une
mauvaise installation peut provoquer des dommages aux personnes, aux animaux domestiques;
dans ce cas la responsabilité du constructeur ne peut être engagée. L’installation du four doit être
réalisée par un installateur agréé ou un technicien de qualication similaire.
Le four peut être placé en hauteur dans une colonne ou enchâssé sous un plan de travail. Avant
sa xation: il est indispensable d’assurer une bonne aération dans la niche d’encastrement an de
permettre la bonne circulation de
l’air frais nécessaire au refroidissement et à la protection des organes intérieurs. Pour cela, réalis-
er les ouvertures spéciées selon le type d’encastrement (dernière page).
FR 22
1. Panneau de commande
2. Positions de la grille (grille
métallique latérale si celle-ci
est incluse)
3. Grilles
4. Plateaux
5. Ventilateur (si présent)
6. Porte du four
7. Grilles latérales (si présent:
uniquement pour cavité
plate)
8. Numéro de série
Description du produit
1
2
7
3
8
4
6
5
ACCESSOIRES
Bac de récupération de l’eau
Grille métallique
Collecte les résidus qui s’égouttent lors de la
cuisson des aliments sur les grilles.
Maintient les plaques de cuisson et les plats.
Grilles latérales (si présentes)
Situés des deux côtés de la cavité du four, les
grilles métalliques et le lèchefrite.
Tournebroche (si présentes)
Le préchauage n’est pas nécessaire pour les cui-
ssons au tournebroche. Les cuissons au tournebro-
che se font porte fermée. Le gain d’énérgie est de
90-95% par rapport au système tradionnel.
• Dévisser les crochets
• Insérer la broche dans la viande à cuire
• Fixer la viande grâce aux crochets
• Serrer les vis
• Insérer la broche dans le trou où se trouve le mo
-
teur
• Enlever le poignée
FR 23
Première Utilisation
UN PREMIER NETTOYAGE doit être réalisé avant la première utilisation passer un chion doux et humi-
de sur les surfaces extérieures de l’appareil. Nettoyer avec une éponge additionnée de produit lessiviel,
les accessoires et l’intérieur du four. Rincer et sécher. Faire chauer le four à vide une bonne heure à la
température maximale pour faire disparaître l’odeur du neuf. Pendant cette opération, bien aérer la pièce.
Description de l’achage
1- Minuteur
2- Reglage de l’heure
3- Durèe de cuisson
4- Sécurité enfant
5- Display température ou horloge
6- Boutons de réglage
7- Manette de température
8- Manette des fonctions
ATTENTION: la première opération à exécut-
er après l’installation ou après une coupure
de courant (de telles situations se reconnais-
sent parce que le atticheur est sur 12:00 et
clignote)est réglage de l’heure, comme décrit
ci-dessus.
•Appuyer 1 foi sur la touche centrale.
•Régler l’heure à l’aide des boutons “-” “+” .
•Relâcher les touches.
ATTENTION: Le four fonctionne uniquement
si l’horloge est réglée.
87
1 3
5
6
2 4
FR 24
FON-
CTIONS
COMMENT L’ACTIVER
COMMENT LE
DESACTIVER
A QUOI CA SERT POURQUOI EST-CE UTILE
MISE À
L’HEURE
Régler la manette
du programmateur
sur la position Mise à
l’heure.
À partir de ce
moment-là, toutes
les autres fonctions
sont verrouillées,
la LED de sécurité
enfant s’allume tan-
dis que l’indication
STOP et le temps
prédéni clignoter-
ont de manière
intermittente
Tourner la manette
sur la position o.
À partir de ce
moment, la LED
de sécurité enfant
s’éteint et toutes
les fonctions sont à
nouveau sélectionn-
ables.
MINUTERIE
Régler la manette du
programmateur
sur la position Mi-
nuterie.
Régler le temps de
cuis- son en utilisant
les touches central-
es + et - .
Régler le temps sur
00:00, en plaçant
la manette du pro-
gramma- teur sur la
position Minuterie,
et en utilisant la
touche “ - ” .
Emet un signal
sonore à la n d’un
temps programmé.
Pendant le
fonctionnement,
l’écran ache le
temps restant.
Utile comme “aide mé-
moire”, l’alarme sonore
fonctionne indépend-
amment du four, même si
celui-ci est éteint.
FIN DE LA
CUISSON
Sélectionner une
fonction de cuisson
Régler la manette du
programmateur sur
la position Durée de
cuisson.
Régler le temps de
cuisson en utilisant
les touches central-
es + et -.
Le voyant Auto
s’ache.
Une fois le temps
écoulé, le four est
automatiquement
mis hors fonction.
Pour arrêter la cuis-
son avant, il faut po-
sitionner la manette
des fonctions sur o,
ou régler le temps de
cuisson sur 00:00, en
plaçant la manette
sur la position Durée
de cuisson, et en
utilisant la touche
“ - ” .
Permet de régler un
temps de cuisson.
Quand le temps de
cuisson est réglé,
positionner la ma-
nette sur o pour
repasser à l’heure
du jour.
Pour visualiser le
temps de cuisson
sélectionné, tour-
ner la manette sur
la position Durée
de cuisson.
Quand le temps de cuis-
son est écoulé, la cuisson
s’arrête automatique-
ment et l’alarme sonne
quelques secondes.
FR 25
Mode de cuisson
* Testé conformément à la norme EN 60350-1 pour les besoins de la déclaration de la consommation d’énergie et de la classe
énergétique
Bouton
de
sél-
ection
T °C
par
défaut
T°C
intervalle
Fonction
L’AMPOULE: Allumage de l’éclairage du four
220 50 ÷ MAX
* CONVECTION NATURELLE: utilisation simultanée de la ré-
sistance de sole et de voûte.
Préchauer le four une dizaine de minutes. Idéale pour toutes les
cuissons à l’ancienne, pour saisir les viandes rouges, les rosbifs,
gigots, gibiers, le pain, les papillotes, les feuilletages. Placer le
mets à cuire à un niveau de gradin moyen.
200 50 ÷ MAX
GRIL: l’utilisation du grilloir se fait porte fermée. Un préchauage
de 5 mins est nécessaire pour le rougissement de la résistance.
Succès assuré pour les grillades, les brochettes et les gratins. Les
viandes blanches doivent être écartées du grilloir ; le temps de cu-
isson sera alors plus long, mais la viande sera plus savoureuse. Les
viandes rouges et lets de poissons peuvent être placés sur la
grille avec le plat récolte sauce glissé dessous.
200 50 ÷ MAX
TOURNEBROCHE: l’utilisation du tournebroche se fait porte fer-
mée.
La température de chaue peut être modiée suivant le besoin. Il
est préférable de ne cuire que des pièces de taille moyenne au tour-
nebroche et de cuire les grosses pièces au four avec le Turbo-Gril,
elles n’en seront que meilleures. Idéal pour retrouver toutes les sa-
veurs de la rôtisserie à l’ancienne. On ne fait pas de préchauage
pour les cuissons au tournebroche.
200 50 ÷ MAX
CONVECTION NATURELLE AVEC TOURNEBROCHE : Les résis-
tances de sole et supérieure du four sont en fonctionnement. C’est
la cuisson traditionnelle adaptée aux rôtis et volailles, et ne nécess-
itant pas d’ajout de matières grasses.

FR 26
Le cycle de vie de l’appareil peut être éten-
du grâce à un nettoyage régulier. Attendez le
refroidissement du four avant de procéder à
des opérations de nettoyage manuel. Ne ja
-
mais utiliser de détergents abrasifs, de laine
d’acier ou d’objets pointus pour le nettoyage,
l’émail serait irrémédiablement abîmé. Utilisez
uniquement de l’eau, du savon ou des déter
-
gents à base d’eau de Javel (ammoniac).
PARTIE VITREE
Il est conseillé de nettoyer la vitre avec du papi
-
er absorbant après chaque utilisation du four.
Pour enlever les taches plus tenaces, vous
pouvez utiliser une éponge imbibée de déter
-
gent, puis rincer à l’eau.
JOINT DE LA PORTE
Si elle est sale, le joint peut être nettoyé avec
Nettoyage du four et maintenance
RETRAIT ET NETTOYAGE DES GRILLES LATÉRALES
1- Retirez les grilles en les tirant dans le sens des èches (voir ci-dessous).
2- Pour nettoyer les grilles, passez-les en lave-vaisselle ou utilisez une éponge humide en veillant
à bien les sécher ensuite.
3- Quand les grilles sont nettoyées, remettez-les en place en suivant les instructions dans l’ordre
inverse.”
Entretien
une éponge légèrement humide.
ACCESSOIRES
Nettoyer les accessoires avec une éponge et
de l’eau savonneuse puis rincer. Eviter d’utiliser
des détergents abrasifs.
LECHEFRITE
Après l’utilisation de la grille, retirez le lêche
-
frite du four. Prendre soin de reverser les
graisses (tièdes) dans l’évier. Laver et rincer le
plat récolte-sauce dans de l’eau chaude, avec
une éponge imbibée de produit lessiviel. Si les
résidus restent collés, le faire tremper dans de
l’eau et un produit détergent. Il peut aussi être
nettoyé dans un lave-vaisselle ou avec un pro
-
duit du commerce.
Ne jamais replacer le plat récolte-sauce en
-
crassé dans un four.
REMPLACEMENT DE L’AMPOULE
1. Débranchez le four de la prise.
2. Défaire le couvercle en verre, dévisser l’ampoule et la remplacer par une ampoule du même
modèle.
3. Une fois l’ampoule remplacée, remettre le couvercle en verre.
Ce produit contient une ou plusieurs sources lumineuses de classe d’ecacité énergétique G (Lam-
pe)/F(10 Led).

FR 27
La gestion des déchets et la protection de vironnement
Le présent appareil est marqué
conformément à la direc-
tive 2012/19/UE relative aux
déchets d’équipements élec-
triques et électroniques
(DEEE). Les DEEE contiennent
à la fois des substances poll-
uantes (qui peuvent avoir des conséquences
négatives sur l’environnement) et des élé-
ments de base (réutilisables). Il est important
de soumettre les DEEE à des traitements
spéciques, en vue d’extraire et d’éliminer de
façon appropriée toutes les substances poll-
uantes, puis de récupérer et recycler tous les
matériaux.
Chacun peut jouer un rôle important quant à
la protection de l’environnement contre les
DEEE. Pour atteindre cet objectif, il est im-
pératif de suivre quelques règles élémentaires
:
• Les DEEE ne doivent pas être traités comme
des déchets ménagers.
• Ils doivent être remis aux points de collecte
appropriés gérés par la municipalité ou par des
sociétés immatriculées. Dans plusieurs pays,
il est possible de collecter à domicile les DEEE
volumineux.
Dépannage
Problemes Cause possible Solution
le four ne chaue pas L’horloge n’est pas réglée Réglez l’horloge
Le four ne chaue pas
La sécurité enfant est
activée
Désactiver la sécurité enfant
Le four ne chaue pas
Les réglages nécessaires
ne sont pas imposés
Assurez-vous que les
paramètres nécessaires
sont corrects
• Lorsque vous achetez un nouvel appareil,
vous devez retourner l’ancien au vendeur qui le
récupère gratuitement, au cas par cas, à con-
dition que l’équipement soit de type équiva-
lent et possède les mêmes fonctions que celui
fourni.
ÉCONOMIE ET RESPECT DE L’ENVIRONNE-
MENT
Lorsque cela est possible, éviter le
préchauage du four et éviter de le faire tourn-
er à vide. N’ouvrez la porte du four que lorsque
cela est nécessaire, car il y a des déperditions
de chaleur à chaque fois qu’il est ouvert. Pour
une économie d’énergie signicative, étein-
dre le four entre 5 et 10 minutes avant la n de
cuisson prévue, et utiliser la chaleur que le four
continue de générer. Gardez les joints propres
et en bon état, pour éviter toute déperdition
d’énergie. Si vous avez un contrat électrique
avec un tarif heure creuse, le programme
“cuisson diérée” peut vous faire réaliser des
économies d’énergie en déplaçant le début
du programme à un intervalle de temps à tarif
réduit.

IT 28
Indicazioni di Sicurezza
Avvertenze Generali
Descrizione del Prodotto
Descrizione del display
Modalità di cottura
Pulizia e manutenzione del forno
Manutenzione
Risoluzione dei Problemi
Garanzie
Installation
Sommario
29
33
35
36
38
39
39
40
40
54

IT 29
• Durante la cottura, l’umidità può condensarsi all’interno del
vano cottura o sul vetro della porta. Questa è una condizione
normale. Per ridurre questo eetto, attendere 10-15 minuti
dopo l’accensione prima di mettere gli alimenti all’interno del
forno. In ogni caso, la condensa scompare quando il forno rag-
giunge la temperatura di cottura.
• Cuocere le verdure in un contenitore con coperchio invece che
in un vassoio aperto.
• Evitare di lasciare gli alimenti all’interno del forno dopo la cottu-
ra per più di 15/20 minuti.
• AVVERTENZA: l’elettrodomestico e le sue parti accessibili
diventano calde durante l’uso. Fare attenzione a non entrare in
contatto con componenti surriscaldati.
• AVVERTENZA: i componenti accessibili diventano caldi quando
si utilizza il forno. Tenere i bambini a distanza di sicurezza.
• AVVERTENZA: Scollegare l’elettrodomestico dalla rete elettri-
ca prima di eettuare operazioni di manutenzione o altre attiv-
ità simili.
• AVVERTENZA: per evitare rischi causati da un involon-
tario ripristino dell’interruttore automatico, l’elettro-
domestico non deve essere alimentato da un dispos-
itivo di commutazione esterno, quale ad esempio un
contaminuti, oppure essere collegato ad un circuito che viene
regolarmente acceso e spento.
• Mantenere lontano dall’elettrodomestico i bambini di età infe-
riore agli 8 anni, a meno che non siano continuamente supervi-
sionati.
• I bambini non devono giocare con l’elettrodomestico. L’elettro-
domestico può essere utilizzato da bambini di età superiore a 8
anni e da persone con ridotte capacità siche, sensoriali o men-
tali, oppure prive di esperienza e conoscenza, che siano state
supervisionate o istruite riguardo all’uso dell’elettrodomestico
Indicazioni di Sicurezza

IT 30
in sicurezza, comprendendo i rischi che derivano dall’uso dello
stesso.
• Le operazioni di pulizia e manutenzione non devono essere ef-
fettuate dai bambini senza sorveglianza.
• Non utilizzare materiali ruvidi, abrasivi o raschietti metallici a-
lati per pulire le porte in vetro del forno, dato che possono graf-
are la supercie e causare la frantumazione del vetro.
• Il forno deve essere spento prima di rimuovere le parti rimovibili.
• Dopo la pulizia, rimontarle secondo le istruzioni.
• Utilizzare solo la sonda carne consigliata per questo forno.
• Non utilizzare pulitori a vapore o spruzzatori ad alta pressione
per le operazioni di pulizia.
• SE IL FORNO È FORNITO DAL PRODUTTORE SENZA SPINA:
L’APPARECCHIO NON DEVE ESSERE COLLEGATO ALLA
FONTE DI ALIMENTAZIONE TRAMITE SPINA O PRESE, MA
DEVE ESSERE COLLEGATO DIRETTAMENTE ALLA RETE DI
ALIMENTAZIONE. Il collegamento alla fonte di alimentazione
deve essere eettuato da un professionista adeguatamente
qualicato. Per avere un’installazione conforme alla normativa
vigente in materia di sicurezza il forno deve essere collegato
solo posizionando un interruttore omnipolare, con separazione
dei contatti conforme ai requisiti per la categoria di sovraten-
sione III, tra l’apparecchio e la fonte di alimentazione. L’interrut-
tore omnipolare deve sopportare il carico massimo collegato e
deve essere in linea con la normativa vigente. Il cavo di terra gial-
lo-verde non deve essere interrotto dall’interruttore automati-
co. L’interruttore omnipolare utilizzato per il collegamento deve
essere facilmente accessibile quando l’apparecchio è installato.
Il collegamento alla fonte di alimentazione deve essere eet-
tuato da un professionista adeguatamente qualicato con-
siderando la polarità del forno e della fonte di alimentazione.
La disconnessione deve essere realizzata incorporando un in-
terruttore nel cablaggio sso secondo le regole di cablaggio
• SE IL FORNO è FORNITO DAL PRODUTTORE CON SPINA:

IT 31
La presa deve essere adatta al carico indicato sulla targhetta e
deve avere il contatto di terra collegato e in funzione. Il condut-
tore di terra è giallo-verde. Questa operazione deve essere ese-
guita da un professionista adeguatamente qualicato. In caso di
incompatibilità tra la presa e la spina dell’apparecchio, chiedere
a un elettricista qualicato di sostituire la presa con un altro tipo
adatto. La spina e la presa devono essere conformi alle norma-
tive attuali del paese di installazione. Il collegamento alla fonte
di alimentazione può essere eettuato anche posizionando
un interruttore omnipolare, con separazione dei contatti con-
forme ai requisiti per la categoria di sovratensione III, tra l’appar-
ecchio e la fonte di alimentazione che può sopportare il carico
massimo collegato e che è in linea con la legislazione vigente. Il
cavo di terra giallo-verde non deve essere interrotto dall’inter-
ruttore automatico. La presa o l’interruttore automatico on-
nipolare utilizzati per il collegamento devono essere facilmente
accessibili al momento del montaggio dell’elettrodomestico.
La disconnessione può essere eseguita con la spina accessibile
o aggiungendo un interruttore sul cablaggio sso, nel rispetto
delle normative relative ai cablaggi.
• Se il cavo di alimentazione si danneggia, deve essere sostitui-
to con un cavo o uno speciale fascio di cavi disponibile presso il
produttore o contattando il reparto assistenza al cliente.
• Il cavo di alimentazione deve essere di tipo H05V2V2-F.
• Questa operazione deve essere eseguita solo da un tecnico
adeguatamente addestrato. Il conduttore di terra (giallo-verde)
deve essere circa 10 mm più lungo degli altri conduttori. Per
qualsiasi tipo di riparazione, fare riferimento unicamente al
Reparto di Assistenza Cliente e richiedere l’utilizzo di ricambi
originali.
• Il mancato rispetto di quanto indicato sopra può compromet-
tere la sicurezza dell’elettrodomestico e rendere nulla la garan-
zia.
• Qualsiasi materiale fuoriuscito in eccesso deve essere tolto pri-

IT 32
ma della pulizia.
• L’interruzione prolungata dell’alimentazione durante una fase
di cottura potrebbe causare un guasto del monitor. In tal caso
contattare il servizio clienti.
• L’elettrodomestico non deve essere installato dietro a una por-
ta a scopo ornamentale per evitarne il surriscaldamento.
• Quando si posiziona uno scaale all’interno, accertarsi che il
blocco sia rivolto verso l’alto e nella parte posteriore della guida.
Lo scaale deve essere inserito completamente nella guida
• Quando si inserisce il vassoio della griglia, accertarsi che il bordo
antiscivolo sia orientato verso il fondo e verso l’alto.
• AVVERTENZA: Non rivestire le pareti del forno con fogli di al-
luminio o protezioni monouso disponibili nei negozi. I fogli di
alluminio o qualsiasi altra protezione, a diretto contatto con lo
smalto caldo, rischiano di fondere e deteriorare lo smalto degli
interni.
• AVVERTENZA: Non togliere mai la guarnizione della porta del
forno.
• ATTENZIONE: Non riempire il fondo della cavità con acqua du-
rante la cottura o quando il forno è caldo.
• Per far funzionare l’apparecchio alle frequenze nominali non
sono necessarie ulteriori operazioni o regolazioni.
• Il forno può essere collocato in alto, in colonna, o sotto un piano
di lavoro. Prima di ssare il forno, accertarsi che la ventilazione
sia suciente per consentire la corretta circolazione dell’ar-
ia fresca necessaria per il rareddamento e la salvaguardia dei
componenti interni. In base al tipo di sistemazione, praticare le
aperture specicate sull’ultima pagina.
• I vassoi e le griglie a corredo del forno non sono indicati per il
contatto diretto con alimenti. Utilizzare sempre carta forno e/o
apposite teglie o pirole per cibo.

IT 33
Avvertenze Generali
Suggerimenti sulla Sicurezza
Vi ringraziamo per aver scelto uno dei nostri prodotti. Per utilizzare il forno in modo ottimale è
consigliabile leggere con attenzione questo manuale e conservarlo con cura per ogni ulteriore
consultazione. Prima di installare il forno, prendere nota del numero di serie in modo da poterlo
comunicare al personale del servizio di assistenza in caso di richiesta di intervento. Dopo aver
rimosso il forno dall’imballaggio, verificare che non abbia subito danni durante il trasporto. In
caso di dubbi, non utilizzare il forno e richiedere l’assistenza di un tecnico qualificato. Tenere
tutto il materiale da imballaggio (sacchetti di plastica, polistirolo, chiodi) fuori dalla portata dei
bambini. Alla prima accensione del forno può svilupparsi fumo di odore acre, causato dal primo
riscaldamento del collante dei pannelli d’isolamento avvolgenti il forno: si tratta di un fenomeno
assolutamente normale e, in caso si verificasse, occorre attendere la cessazione del fumo prima
di introdurre le vivande. Il produttore declina ogni responsabilità in caso di mancata osservanza
delle istruzioni contenute in questo documento.
NOTA: le funzioni, le proprietà e gli accessori dei forni citati in questo manuale possono variare
a seconda dei modelli.
Utilizzare il forno solo per lo scopo per cui è stato progettato, ossia solo per la cottura di alimenti;
qualsiasi altro utilizzo, ad esempio come fonte di riscaldamento, è considerato improprio e quindi
pericoloso. Il costruttore non può essere considerato responsabile per eventuali danni derivanti
da usi impropri, erronei ed irragionevoli.
L’uso di un qualsiasi apparecchio elettrico comporta l’osservanza di alcune regole fondamentali:
- non tirare il cavo di alimentazione per staccare la spina della presa di corrente;
- non toccare l’apparecchio con mani o piedi bagnati o umidi;
- in generale è sconsigliabile l’uso di adattatori, prese multiple e prolunghe;
- in caso di guasto e/o cattivo funzionamento dell’apparecchio, spegnerlo e non manometterlo.
Sicurezza Elettrica
FARE EFFETTUARE I COLLEGAMENTI ELETTRICI AD UN’ELETTRICISTA O TECNICO
QUALIFICATO.
La rete di alimentazione a cui viene collegato il forno deve essere conforme con le normative
in vigore nel paese di installazione. Il produttore declina ogni responsabilità per eventuali dan-
ni derivanti dalla mancata osservanza di tali disposizioni. Il forno deve essere collegato alla rete
elettrica tramite una presa a muro con messa a terra o tramite un sezionatore con più poli, a
seconda delle disposizioni in vigore nel paese di installazione. La rete elettrica deve essere pro-
tetta mediante fusibili idonei e devono essere utilizzati cavi con una sezione trasversale idonea
a garantire una corretta alimentazione del forno.
COLLEGAMENTO
Il forno viene fornito con un cavo di alimentazione che deve essere collegato solo a una rete elet-
trica con una tensione di 220-240 VCA tra le fasi o tra la fase e il neutro. Prima di collegare il forno
alla rete elettrica, è indispensabile controllare:
- la tensione di alimentazione indicata sul misuratore;
- l’impostazione del sezionatore.
Il filo di messa a terra collegato al morsetto di terra del forno deve essere collegato al morsetto

IT 34
di terra della rete elettrica.
ATTENZIONE
Prima di collegare il forno alla rete elettrica, far controllare la continuità della messa a terra della
rete elettrica ad un elettricista qualificato. Il produttore declina ogni responsabilità per eventuali
incidenti o altri problemi derivanti dal mancato collegamento a terra del forno o dal suo collega-
mento ad una messa a terra con una continuità difettosa.
NOTA: poiché il forno potrebbe richiedere interventi di assistenza, è consigliabile prevedere la
disponibilità di un’ulteriore presa a muro a cui collegare il forno dopo che è stato rimosso dallo
spazio in cui è stato installato. Il cavo di alimentazione deve essere sostituito solo dal personale
dell’assistenza tecnica o da tecnici con qualifiche analoghe.
Raccomandazioni
Installazione
Dopo l’uso sono sucienti alcune semplici operazioni di pulizia per mantenere il forno perfet-
tamente pulito. Non rivestire le pareti del forno con fogli d’alluminio da cucina o fogli monouso
commerciali, perché potrebbero fondersi a contatto con le superfici in smalto caldo e danneg-
giare le superfici in smalto all’interno del forno. Per evitare di sporcare eccessivamente il forno e
prevenire la diusione di fumo maleodorante, è consigliabile non utilizzare il forno a temperature
molto alte. E’ generalmente preferibile imposta- re un tempo di cottura più lungo e utilizzare una
temperatura più bassa. Oltre agli accessori forniti con il forno, è consigliabile utilizzare piatti e teg-
lie resistenti alle alte temperature.
Il produttore non è obbligato ad occuparsi dell’installazione. Gli eventuali interventi di assistenza,
necessari per correggere problemi dovuti ad un’errata installazione, non sono coperti da garan-
zia. L’installazione deve essere eettuata da un tecnico qualificato e in conformità con queste
istruzio- ni. Un’installazione impropria potrebbe causare infortuni alle persone, agli animali do-
mestici o danni alle attrezzature. Il produttore declina ogni responsabilità per eventuali lesioni o
danni dovuti ad un’errata installazione.
Il forno può essere installato in una colonna o sotto a un piano di lavoro. Prima di fissare in po-
sizione il forno, verificare che lo spazio attorno allo stesso sia suciente a garantire la circolazione
del flusso di aria fresco necessario a garantire il rareddamento del forno e la sicurezza dei com-
ponenti interni. Realizzare le aperture indicate nell’ultima pagina del manuale, a seconda del tipo
di installazione.
IT 35
1. Pannello di controllo
2. Posizioni dei ripiani (griglia metallica laterale
se inclusa)
3. Griglie
4. Vassoi
5. Ventola (se presente)
6. Sportello del forno
7. Griglie metalliche laterali (se presenti: solo
per cavità piane)
8. Numero di serie
Descrizione del Prodotto
1
2
7
3
8
4
6
5
ACCESSORI
Vassoio di gocciolamento
Griglia metallica
Raccoglie i residui del gocciolamento durante
la cottura degli alimenti sulle griglie.
Sostiene piastre e vassoi di cottura
Griglie metalliche laterali (solo se presenti)
Collocate su entrambi i lati della cavità del forno,
sostengono le griglie metalliche e i vassoi di goc
-
ciolamento.
NOTA: I vassoi e le griglie a corredo del forno non sono indicati per il contatto diretto con alimenti. Uti
-
lizzare sempre carta forno e/o apposite teglie o pirole per cibo.
Funzione girarrosto (solo se presenti)
Per arrostire non è richiesto il pre riscaldamento del
forno. Eettuare la cottura con la porta forno chiusa.
Il consumo di energia è inferiore del 90-95% rispetto
al metodo tradizionale;
• Dévisser les crochets
• Svitare i ganci
• Inlare lo spiedo all’interno della carne
• Bloccare la carne con i ganci
• Stringere le viti dei ganci
• Inserire lo spiedo all’interno
della cavità del forno
• Smontare l’impugnatura prima di iniziare la cottura
IT 36
Primo utilizzo
PULIZIA PRELIMINARE
Pulire sempre il forno prima di utilizzarlo per la prima volta. Pulire le superfici esterne con un panno mor-
bido leggermente inumidito.
Lavare tutti gli accessori e pulire l’interno del forno con del detergente per piatti ed acqua calda. Verificare
che il forno sia vuoto, impostare la temperatura massima e lasciarlo acceso per almeno 1 ora, così da
rimuovere tutti gli odori normalmente presenti nei forni nuovi.
Descrizione del display
1. Timer/Modalità automatica
2. Impostazione dell’ora
3. Tempo di cottura
4. Sicurezza bambini
5. Visualizza la temperatura o l’orologio
6. Pulsanti di regolazione
7. Manopola della temperatura
8. Manopola delle funzioni
ATTENZIONE: la prima operazione da esegui-
re dopo l’installazione o dopo una interruzione
di corrente (tali situazioni si riconoscono per-
chè sul dispay lampeggia l’ora 12:00 ) è la rego-
lazione dell’ora, come di seguito descritto.
•Premere il tasto centrale 4 volte.
•Imposta l’ora con i tasti “- “ “+”.
•Lasciare i tasti.
ATTENZIONE: Il forno funziona solo se impo-
stato in modalità manuale o cottura program-
mata.
87
1 3
5
6
2 4
IT 37
FUNZIONE COME SI ATTIVA COME SI DISATTIVA COSA FA A COSA SERVE
BLOCCO
BAMBINO
Tenere premuto per
5 secondi il tasto (+),
Da questo momento
lo schermo visualizza
alternativamente
“STOP” e il tempo
preimpostato. Da
questo momento
tutte le altre funzioni
sono bloccate, il LED
Sicurezza bambini
si accende, sul
display lampeggia la
scritta STOP e l’ora
corrente.
Tenere premuto per
5 secondi il tasto (+).
Da questo momento
tutle le funzioni sono
riabilitate. Da questo
momento il LED
Sicurezza bambini
si spegne ed è nuo-
vamente possibile
selezionare tutte le
funzioni.
CONTA-
MINUTI
Premere il tasto
centrale 1 volta.
Premere i tasti “- “
“+” per regolare la
durata
Lasciare i tasti
Al termine della
durata impostata la
funzione si spegne
da sola ed avvisa con
un segnale sonoro
(il segnale sonoro
si ferma da solo;
per fermarlo subito
premere il tasto)
SELECT.
Da un segnale so-
noro al termine di
un tempo stabilito
Durante il funzio-
namento il display
visualizza il tempo
rimanente.
Permette di utilizzare il
programmatore del forno
come una sveglia (può
essere usato con forno
funzionante o spento.
DURATA
COTTURA
Premere il tasto
centrale 2 volte
Premere i tasti “- “
“+”per regolare la
durata ,
Lasciare i tasti
Selezionare la fun-
zione di cottura con
la manopola commu-
tatore.
Al termine della dura-
ta impostata il forno
si spegne da solo; se
deve essere fermato
prima si deve portare
la manopola
commutatore in
posizione O oppure
portare a 0:00 la
durata della cottura
(tasti SELECT e “- “
“+”)
Permette di impo-
stare la durata della
cottura del cibo
inserito nel forno
Per visualizzare il
tempo rimanente
premere il tasto
SELECT.
Per modicare il
tempo rimanente
premere tasto
SELECT +”- “ “+”
Per interrompere il
segnale premere un tasto
qualsiasi. Premere il tasto
centrale per tornare alla
funzione orologio.
IT 38
Modalità di cottura
*Testato in conformità con la norma EN 60350-1 relativa alla dichiarazione sui consumi energetici e la classe energetica
Manopola
commu-
tatore
T°
preim-
postata
Intervallo
di T°
Funzione
LAMPADA: accende la luce interna.
220 50 ÷ MAX
* STATICO: sono in funzione le resistenze superiore e infe-
riore. È la cottura tradizionale, ottima per arrostire cosciotti,
selvaggina, ideale per biscotti, mele al forno e per rendere i
cibi molto croccanti.
230 50 ÷ MAX
GRILL: Grigliatura tradizionale a porta chiusa: con questa fun-
zione viene inserita la resistenza del grill. Ottima nella cottura
di carni di medio e piccolo spessore (salsicce, costine, bacon).
200 50 ÷ MAX
GIRARROSTO: il girarrosto si utilizza con la porta chiusa.
La temperatura di riscaldamento può essere modicata se-
condo necessità. È meglio cuocere solo pezzi di media gran-
dezza sul girarrosto, e cuocere pezzi di grandi dimensioni
in forno con il Turbo-Grill, saranno solo più buoni. Ideale per
riscoprire tutti i sapori della rosticceria di una volta. Il preriscal-
damento non viene eseguito per la cottura al girarrosto.
200 50 ÷ MAX
CONVEZIONE NATURALE CON GIRARROSTO: I riscaldatori
inferiore e superiore del forno sono in funzione. Si tratta di una
cottura tradizionale adatta ad arrosti e pollame, e non richiede
l’aggiunta di grassi.
IT 39
La vita di servizio dell’apparecchio si allunga se
questo viene pulito ad intervalli regolari. Atten-
dere che il forno si rareddi prima di eettuare
le operazioni di pulizia manuali. Non utilizzare
mai detergenti abrasivi, pagliette di ferro o og-
getti appuntiti per lapulizia, per non danneggiare
in modo irreparabile le parti smaltate.Utilizzare
solo acqua, sapone o detergenti a base di can-
deggina (ammoniaca).
PARTI IN VETRO
E’ consigliabile pulire lo sportello in vetro con
carta assorbente da cucina dopo ogni utilizzo
del forno. Per rimuovere le macchie più ostinate,
è possibile anche utilizzare una spugna imbevu-
ta di detergente ben strizzata e sciacquare con
acqua.
GUARNIZIONE DELLO SPORTELLO DEL FOR-
NO
Pulizia e manutenzione del forno
RIMOZIONE E PULIZIA DELLE SCAFFALATURE A FILO
1- Rimuovere le griglie a rete tirandole in direzione delle frecce (vedi sotto)
2- Per pulire le griglie a rete, metterle in lavastoviglie o utilizzare una spugna umida, assicurandosi
che siano successivamente asciugate.
3- Dopo la pulizia, installarle in ordine inverso.”
Manutenzione
Se sporca, la guarnizione può essere pulita con
una spugna leggermente inumidita.
ACCESSORI
Pulire gli accessori con una spugna imbevuta con
acqua e sapone, sciacquarli e asciugarli : evitare
di usare detergenti abrasivi.
VASCHETTA DI GOCCIOLAMENTO
Dopo l’uso del grill, rimuovere la vaschetta dal
forno. Versare il grasso caldo in un contenitore
e lavare la vaschetta in acqua calda, utilizzando
una spugna e del detergente per piatti.
Se rimangono dei residui di grasso, immergere
la vaschetta in acqua e detergente. In alterna-
tiva, è possibile anche lavare la vaschetta nella
lavastoviglie oppure utilizzare un detergente per
forni di tipo commerciale. Non reinserire mai una
vaschetta sporca nel forno.
SOSTITUZIONE DELLA LAMPADINA
1. Scollegare il forno alla rete.
2. Allentare la copertura in vetro, svitare la lampadina e sostituirla con una nuova dello stesso
modello.
3. Una volta sostituita la lampadina difettosa, riavvitare la copertura in vetro.
Questo prodotto contiene una o più sorgenti luminose con ecienza energetica di classe G (lampa-
dina)/F (10 LED).
IT 40
Gestione dei riuti e rispetto dell’ambiente
Questo apparecchio è con-
trassegnato in conformità alla
Direttiva europea 2012/19/EU
sulle apparecchiature elettriche
ed elettroniche (WEEE). I WEEE
contengono sia sostanze in-
quinanti (che possono provo-
care conseguenze negative
sull’ambiente) che componenti di base (che pos-
sono essere riutilizzati). E’ importante che i WEEE
siano soggetti a trattamenti specifici per rimuo-
vere e smaltire correttamente tutti gli inquinanti
e recuperare tutti i materiali. I singoli possono
giocare un ruolo importante nell’assicurare che i
WEEE non diventino un problema ambientale; è
essenziale seguire alcune regole di base:
- i WEEE non devono essere trattati come rifiuti
domestici;
- i WEEE devono essere portati ai punti di racco-
lta appositi gestiti dal comune o da società reg-
istrate.
In molti paesi, per i WEEE di grandi dimensioni,
potrebbe essere presente la raccolta domestica.
Il prodotto è garantito, oltre che ai sensi di legge, alle condizioni e nei termini riportati sul certicato
di garanzia convenzionale inserito nel prodotto. Il certicato dovrà essere conservato e mostrato al
nostro Centro di Assistenza Tecnica Autorizzato, in caso di necessità, insieme allo scontrino compro-
vante l’acquisto dell’elettrodomestico. Puoi consultare le condizioni di garanzia anche sul nostro sito
internet. Per ottenere assistenza compila l’apposito form on-line oppure contattaci al numero che tro-
vi indicato nella pagina di assistenza del nostro sito internet.
Risoluzione dei Problemi
Garanzie
PROBLEMA POSSIBILE CAUSA SOLUZIONE
Il forno non si scalda L’orologio non è impostato Impostare l’orologio
Il forno non si scalda Il blocco bambini è attivo Disattivare il blocco bambini
Il forno non si scalda
Le regolazioni necessarie non sono im-
postate
Assicurarsi che le impostazioni
necessarie siano corrette
Quando si acquista un nuovo apparecchio, quel-
lo vecchio potrebbe essere restituito al rivendi-
tore che deve acquisirlo gratuitamente su base
singola, sempre che l’apparecchio sia del tipo
equivalente e abbia le stesse funzioni di quello
acquistato.
RISPARMIARE E RISPETTARE L’AMBIENTE
Ove possibile, evitare di pre-riscaldare il forno e
cercare sempre di riempirlo. Aprire la porta del
forno quanto necessario, perché vi sono disper-
sioni di calore ogni volta che viene aperta. Per ris-
parmiare molta energia sarà suciente spegnere
il forno dai 5 ai 10 minuti prima della fine del tem-
po di cottura pianificato, e servirsi del calore che
il forno continua a generare. Tenere le guarnizioni
pulite e in ordine, per evitare eventuali dispersioni
di energia. Se si dispone di un contratto di ener-
gia elettrica a taria oraria, il programma “cottura
ritardata” renderà più semplice il risparmio spo-
stando l’avvio del programma negli orari a taria
ridotta.

DE 41
Sicherheitshinweise
Allgemeine Anweisungen
Produktbeschreibung
Betrieb des Backofens
Kochmodi
Reinigung und Wartung des Backofens
Allgemeine Reinigungshinweise
Häug gestellte fragen
Installation
Zusammenfassung
41
46
48
49
51
52
52
53
54
• Während des Garvorgangs kann Feuchtigkeit im Ofenraum oder
auf dem Glas der Tür kondensieren. Dies ist ein normaler Zustand.
Um diesen Eekt zu verringern, warten Sie 10-15 Minuten nach
dem Einschalten des Geräts, bevor Sie die Speisen in den Ofen
stellen. In jedem Fall verschwindet das Kondensat, wenn der
Ofen die Gartemperatur erreicht hat.
• Das Gemüse in einem Behälter mit Deckel anstelle einer o-
enen Schale kochen.
• Vermeiden Sie es, Speisen nach dem Garvorgang länger als
15/20 Minuten im Ofen zu lassen.
• WARNUNG: Während des Gebrauchs werden das Gerät und
dessen zugänglichen Teile heiß. Achten Sie darauf, dass Sie
keine heißen Teile berühren.
• WARNUNG: Der Ofen und zugängliche Teile können während
Sicherheitshinweise

DE 42
des Betriebs heiß werden. Kleine Kinder nicht in die Nähe des
Geräts gelangen lassen.
• WARNUNG: Trennen Sie das Gerät von der Stromversorgung,
bevor Sie Arbeiten oder Wartung daran vornehmen.
• WARNUNG: Um eine Gefährdung durch das versehentliche
Zurücksetzen des Überhitzungsschutzes zu vermeiden, darf
dieses Gerät nicht durch eine externes Schaltgerät, z. B. einen
Timer, betrieben werden oder an einen Schaltkreis angeschlos-
sen werden, der regelmäßig einund ausgeschaltet wird.
• Kinder unter 8 Jahren sollten in sicherem Abstand vom Gerät
gehalten werden, wenn sie nicht ständig überwacht werden.
• Kinder dürfen keinesfalls mit dem Gerät spielen. Das Gerät darf
von Personen ab 8 Jahren und von Personen mit eingeschränk-
ten körperlichen, sensorischen oder geistigen Fähigkeiten,
ohne Erfahrung oder Kenntnis des Produkts nur dann benutzt
werden, wenn sie beaufsichtigt oder mit Anweisungen zur Be-
dienung des Geräts ausgestattet werden, und zwar auf sichere
Weise und im Bewusstsein der möglichen Risiken.
• Die Reinigung und Wartung darf nicht von unbeaufsichtigten
Kindern durchgeführt werden.
• Verwenden Sie keine rauen oder abrasiven Materialien oder
scharfen Metallabstreifer zur Reinigung der Ofentürscheiben,
da diese die Oberäche zerkratzen und das Glas zerbrechen
können.
• Der Ofen muss ausgeschaltet werden, bevor die herausnehm-
baren Teile entfernt werden.
• Montieren Sie diese nach der Reinigung wieder gemäß den An-
weisungen.
• Verwenden Sie nur den für diesen Ofen empfohlenen Kern-
temperaturfühler.
• Verwenden Sie keinen Dampfreiniger oder Hochdruckspray für
die reinigung.
• Wenn der Bakofen vom Herstel er ohne Stecker ausgelief-
ert wird: DAS GERÄT DARF NICHT ÜBER STECKER ODER

DE 43
STECKDOSEN MIT DER STROMQUELLE VERBUNDEN
WERDEN, SONDERN MUSS DIREKT AN DAS STROMNETZ
ANGESCHLOSSEN WERDEN. Der Anschluss an die Strom-
quelle muss von einem entsprechend qualizierten Fachmann
vorgenommen werden. Damit der Anschluss den geltenden
Sicherheitsvorschriften entspricht, darf er nur mittels eines
allpoligen Schalters erfolgen, mit Unterbrechung der Kontakte
gemäß Überspannungskategorie III zwischen Gerät und Strom-
quelle. Der allpolige Schalter muss die gesetzlich zugelassenen
maximalen Anschlusswerte tragen. Das gelb/grüne Erdungsk-
abel darf nicht vom Schalter unterbrochen werden. Bei der In-
stallation des Geräts darauf achten, dass der für den Anschluss
verwendete allpolige Schalter gut zugänglich ist. Der Anschluss
an die Stromquelle muss von einem entsprechend qualizierten
Fachmann unter Berücksichtigung der Polarität des Ofens und
der Stromquelle vorgenommen werden. Die Trennung von der
Stromversorgung muss durch einen Poltrenner erfolgen, der
gemäß den geltenden VDE-Vorschriften an den Stromkreis an-
geschlossen wird.
• Wenn der Backofen vom Hersteller mit Stecker geliefert wird:
Die Steckdose muss der auf dem Schild angegebenen Last
entsprechen, funktionsfähig und geerdet sein. Der Erdleiter ist
gelb-grün. Dieser Vorgang darf nur durch einen geschulten Ele-
ktriker ausgeführt werden. Passen Steckdose und Stecker nicht
zueinander, muss die Steckdose durch einen qualizierten El-
ektriker gegen eine geeignete ausgetauscht werden. Stecker
und Steckdose müssen den aktuellen Gesetzgebungen des
Landes entsprechen. Der Anschluss an die Stromversorgung
kann auch mittels eines allpoligen Schalters, der die gesetzlich
zugelassenen maximalen Anschlusswerte tragen kann, mit Un-
terbrechung der Kontakte gemäß Überspannungskategorie III
zwischen Gerät und Stromquelle erfolgen. Das gelb/grüne Er-
dungskabel darf nicht vom Schalter unterbrochen werden. Bei
der Installation des Geräts darauf achten, dass die für den An-

DE 44
schluss verwendete Steckdose oder der allpolige Schalter gut
zugänglich ist. Die Trennung von der Stromversorgung kann
entweder durch einen zugänglichen Stecker oder durch einen
Poltrenner erfolgen, der gemäß den geltenden VDE-Vorschrif-
ten an den Stromkreis angeschlossen wird.
• Wenn das Netzkabel beschädigt ist, sollte es durch ein Kabel
oder ein spezielles Bündel ersetzt werden, das beim Hersteller
oder beim Kundendienst erhältlich ist.
• Das Stromkabel muss vom Typ H05V2V2-F sein.
• Diese Arbeit darf nur von qualiziertem Personal durchgeführt
werden. Der Schutzleiter /gelb-grün) muss ca. 10 mm länger
sein als die anderen Leiter. Wenden Sie sich bei Reparaturen
nur an den Kundendienst und fordern Sie die Verwendung von
Original- Ersatzteilen an.
• Die Nichteinhaltung der oben genannten Bestimmungen kann
die Sicherheit des Gerätes beeinträchtigen und zum Erlöschen
der Garantie führen.
• Überschüssiges Verschüttungsmaterial sollte vor der Reini-
gung entfernt werden.
• Ein längerer Stromausfall während des Kochbetriebs kann zu
einer Fehlfunktion des Geräts führen. Wenden Sie sich in die-
sem Fall an den Kundendienst.
• Das Gerät darf nicht hinter einer dekorativen Tür installiert
werden, um eine Überhitzung zu vermeiden.
• Wenn Sie den Einlegeboden innen platzieren, achten Sie darauf,
dass der Anschlag nach oben und in die Rückseite des Hohl-
raums gerichtet ist. Der Einlegeboden muss vollständig in den
Hohlraum eingesetzt werden
• Achten Sie beim Einsetzen des Gitterrosts darauf, dass die
Gleitschutzkante nach hinten und oben gerichtet positioniert
ist.
• WARNUNG: Decken Sie die Backofenwände nicht mit Alumin-
iumfolie oder anderem Einwegschutz ab, der in direkten Kon-
takt mit der heißen Emaille kommt. Dies kann Schmelzen und

DE 45
Verschleiß des Emailles an den Innenseiten verursachen.
• WARNUNG: Niemals die Türdichtung des Ofens entfernen.
• VORSICHT: Füllen Sie den Hohlraumboden während des Ga-
rens oder bei heißem Backofen nicht wieder mit Wasser auf.
• Für den Betrieb des Gerätes mit den Nennfrequenzen ist keine
zusätzliche Bedienung/Einstellung erforderlich.
• Der Backofen kann oben in einem Einbauschrank oder unter
der Arbeitsäche eingebaut werden. Vor dem Fixieren muss
gewährleistet sein, dass im Backofenraum genügend Frischluft
zirkulieren kann, um die Kühlung und den Schutz der innen-
liegenden Teile zu gewährleisten. Je nach Einbauart die auf der
letzten Seite angegebenen Önungen vornehmen.
• Für eine korrekte Verwendung des Backofens sollten die Leb-
ensmittel nicht in direkten Kontakt mit den Einschubleisten und
Blechen kommen, sondern auf Backpapier bzw. in ofenfeste
Behälter gelegt werden.

DE 46
Allgemeine Anweisungen
Sicherheitshinweise
Vielen Dank, dass Sie sich für eins unserer Produkte entschieden haben. Damit Sie lange Freude
mit Ihrem Backofen haben, sollten Sie diese Bedienungsanleitung sorgfältig durchlesen und
zum Nachschlagen in der Zukunft aufbewahren. Notieren Sie sich vor dem Anschließen des
Backofens die Seriennummer, sodass Sie diese im Reparaturfall an den Kundendienst weiterge-
ben können. Den Backofen nach dem Auspacken auf mögliche Transportschäden überprüfen.
Im Zweifelsfall den Ofen nicht in Betrieb nehmen und einen qualizierten Servicetechniker kon-
sultieren. Verpackungsmaterial (Plastiktüten, Styropor, Nägel usw.) außerhalb der Reichweite
von Kindern aufbewahren. Beim ersten Einschalten des Backofens kann ein streng riechender
Rauch entstehen.
Dieser kann beim ersten Erhitzen durch den Kleber auf den Dämmplatten hervorgerufen
werden. Dies ist bei der ersten Inbetriebnahme ein normaler Vorgang; es sollte jedoch abgew-
artet werden, bis der Rauch sich verzogen hat, bis Lebensmittel in den Ofen geschoben werden.
Der Hersteller übernimmt keine Verantwortung in Fällen, wo die in diesem Dokument enthalte-
nen Anweisungen nicht beachtet werden.
HINWEIS: Die in diesem Handbuch erwähnten Funktionen, Eigenschaften und Zubehörteile
können je nach gekauftem Modell variieren.
Den Backofen nur zum vorbestimmten Zweck, das heißt, für das Garen von Lebensmitteln ein-
setzen. Alle anderen Verwendungsmöglichkeiten wie beispielsweise als Heizungsquelle gelten als
unsachgemäß und sind daher gefährlich. Der Hersteller übernimmt keine Haftung für Schäden,
die aus einer falschen, unsachgemäßen oder unverständlichen Verwendung hervorgehen.
Der Betrieb elektrischer Geräte erfordert die Einhaltung einiger Grundregeln:
- Das Gerät nicht am Stromkabel aus der Steckdose ziehen.
- Gerät nicht mit nassen oder feuchten Händen oder Füßen berühren.
- Die Verwendung von Adaptern, Mehrfachsteckern und Verlängerungskabeln wird nicht emp-
fohlen.
- Bei einer Fehlfunktion beziehungsweise bei unzulänglichem Betrieb Gerät ausschalten und
nicht önen.
Elektrische Sicherheit
DER ANSCHLUSS AN DIE STROMQUELLE DARF NUR DURCH EINEN ELEKTRIKER ODER
QUALIFIZIERTEN TECHNIKER ERFOLGEN.
Die Stromquelle, an die der Backofen angeschlossen wird, muss den gesetzlichen Voraussetzu-
ngen des
Landes entsprechen. Der Hersteller übernimmt keine Haftung für Schäden, die aus der Nicht-
befolgung dieser Anweisungen entstehen. Der Backofen muss entsprechend der geltenden
Gesetzgebung des Landes an eine geerdete Wandsteckdose oder an einen allpoligen Trenn-
schalter angeschlossen werden. Die Stromquelle sollte durch entsprechende Sicherungen
geschützt sein und die verwendeten Kabel müssen einen Querschnitt aufweisen, der eine ord-
nungsgemäße Stromversorgung des Backofens gewährleistet.
ANSCHLUSS
Der Backofen wird mit einem Stromkabel geliefert, das an eine Stromquelle mit 220- 240 Vac

DE 47
angeschlossen werden kann. Bevor der Backofen an die Stromquelle angeschlossen wird, muss
Folgendes überprüft werden:
- Spannung des Stromnetzes mit dem Messgerät;
- Beschaenheit und Umfeld des Trennschalters.
Die mit der Erdungsklemme des Backofens verbundene Schutzleitung muss mit der Erdungsk-
lemme der Stromquelle verbunden werden.
WARNUNG
Vor dem Anschließen des Backofens an die Stromquelle einen qualizierten Elektriker darum
bitten, die Kontinuität der Erdungsklemme an der Stromquelle zu überprüfen. Der Hersteller
übernimmt keine Verantwortung für Unfälle oder sonstige Probleme, die aus einem nicht sach-
gemäßen Anschluss des Backofens an die Erdungsklemme oder an einen geerdeten Anschluss
mit defekter Kontinuität entstehen können.
HINWEIS: Für eine eventuelle Wartung des Ofens ist die Zugänglichkeit einer zweiten Wand-
steckdose von Vorteil, sodass er an diese angeschlossen werden kann, wenn er ausgebaut
werden muss. Das Stromkabel
darf nur von qualizierten Kundendiensttechnikern oder Elektrikern ausgetauscht werden.
Empfehlungen
Einbau und Installation
Es empehlt sich, den Backofen nach jeder Verwendung grob zu reinigen.
Die Ofenwände nicht mit Aluminiumfolie oder sonstiger im Handel erhältlicher Einmalschutzfolie
auskleiden.
Gerät die Aluminiumfolie oder sonstige Schutzfolie mit der heißen Emaille in Berührung, so
kann sie schmelzen und die Qualität der Backofenbeschichtung beeinträchtigen. Es wird emp-
fohlen, den Backofen nicht bei sehr hohen Temperaturen zu betreiben, um eine übermäßige Ver-
schmutzung und unangenehme Rauch- und Geruchsentwicklung zu vermeiden. Es ist besser, bei
niedrigerer Temperatur die Garzeit zu erhöhen. Zusätzlich zum mitgelieferten Zubehör sollten
nur temperatur- und hitzebeständige Backformen und ofenfestes Geschirr verwendet werden.
Der Hersteller ist nicht zur Installation verpichtet. Wird das Eingreifen des Hersteller erforder-
lich, um Fehler zu beheben, die aus einer falschen Installation hervorgehen, so erfolgt dieses nicht
im Rahmen der Gewährleistungsgarantie. Die Installationsanweisungen für qualiziertes Fach-
personal müssen befolgt werden. Eine falsche Installation kann Personen- oder Sachschäden
hervorrufen. Für derartige Schäden oder Verletzungen übernimmt der Hersteller keine Haftung.
Der Backofen kann oben in einem Einbauschrank oder unter der Arbeitsäche eingebaut werden.
Vor dem Fixieren muss gewährleistet sein, dass im Backofenraum genügend Fischluft zirkulieren
kann, um die Kühlung und den Schutz der innenliegenden Teile zu gewährleisten. Je nach Ein-
bauart die auf der letzten Seite angegebenen Önungen vornehmen.
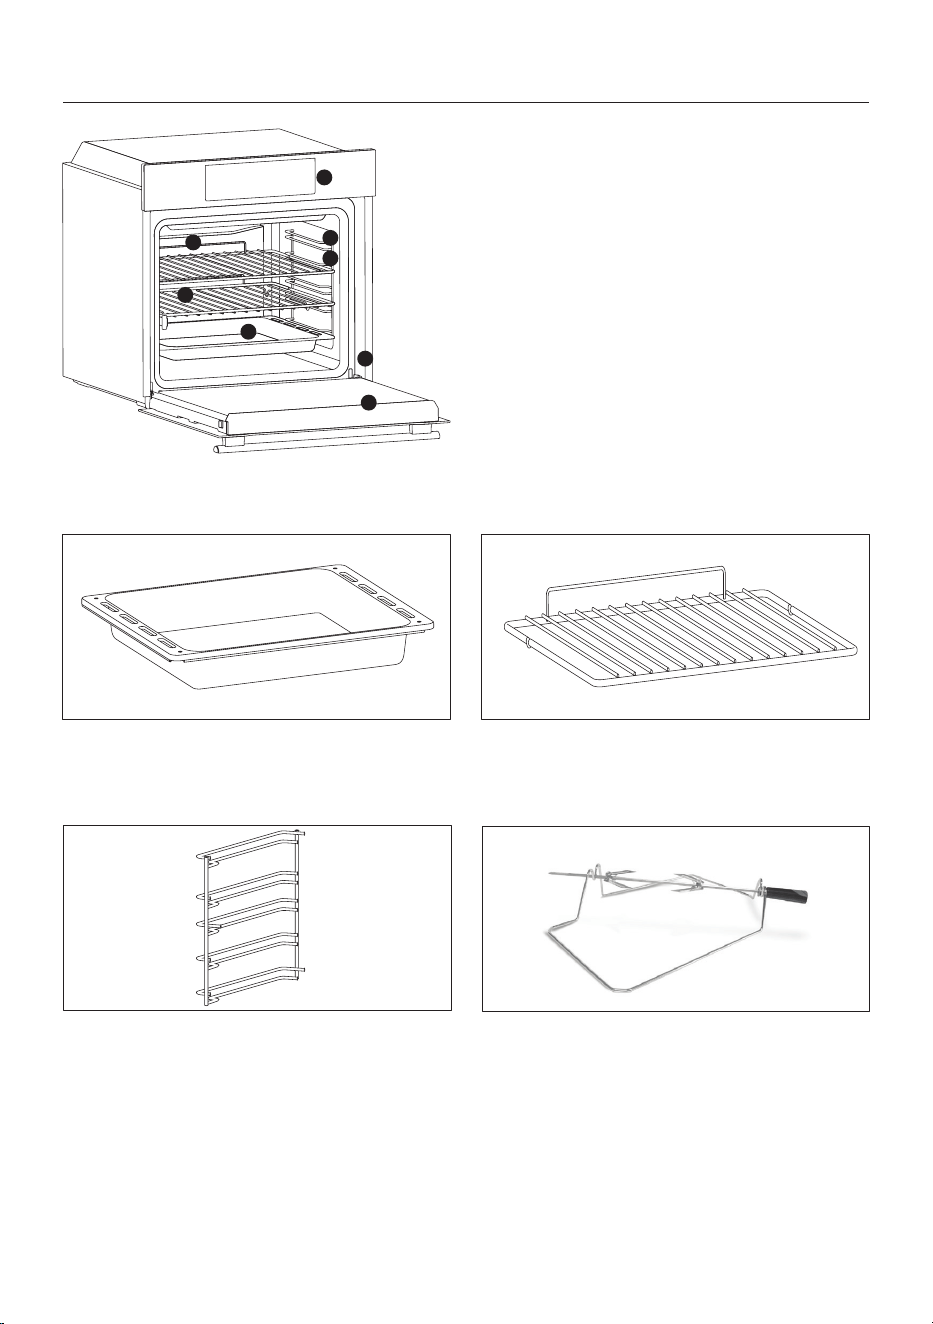
DE 48
1
2
7
3
8
4
6
5
1. Bedienfeld
2. Einschubpositionen (Seitengitter falls en
-
thalten)
3. Gitter
4. Bleche
5. Ventilator (falls vorhanden)
6. Backofentür
7. Seitengitter (sofern vorhanden: nur für
Öfen mit achem Innenraum)
8. Seriennummer
Produktbeschreibung
ZUBEHÖR
Fettpfanne
Metallrost
Fängt die beim Grillen von Lebensmitteln aus
-
tretende Flüssigkeit auf.
Hält Auauf- und Backformen.
Seitliche Drahtgitter (nur falls vorhanden)
Bendet sich an beiden Seiten des Ofens und
hält Metallroste und Fettpfannen.
Grillspieß (nur falls vorhanden)
Für das Benutzen des Grillspießes, ist das Vorheizen
nicht notwendig. Das Grillen nur mit geschlossen-
er Backofentür. Bei Verwendung des Grillspießes ist
der Energieverbrauch 90-95% geringer als bei her-
kömmlichen Systemen.
• Lösen Sie die Schrauben vom Haken
• Setzen Sie den Spieß in das Fleisch
• Fixieren Sie das Fleisch mit den Haken
• Ziehen Sie die Schrauben zu
• Legen Sie den Spieß in den Ofen
• Demontieren Sie den Gri
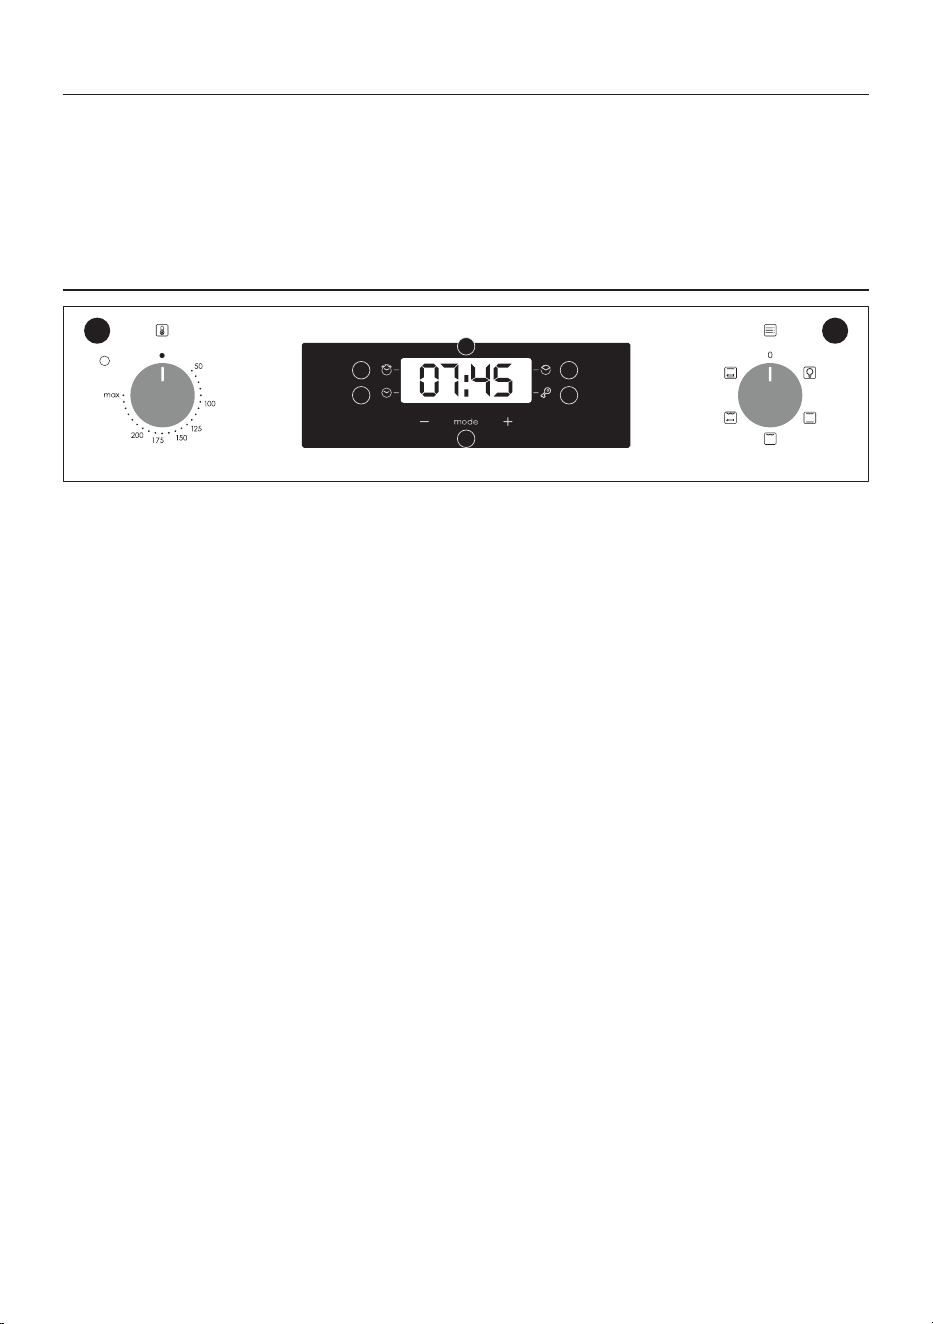
DE 49
Erste Inbetriebnahme
ERSTE REINIGUNG
Den Backofen vor der ersten Inbetriebnahme reinigen. Die Außenächen mit einem feuchten, weichen
Tuch abwischen. Alle Zubehörteile spülen und den Backofen innen mit warmem Spülwasser auswischen.
Den leeren Backofen auf die Höchsttemperatur einstellen und etwa eine Stunde lang anlassen, damit der
neue Geruch veriegt.
Betrieb des Backofens
1- Timer
2- Uhr einstellen
3- Garzeit
4. Kindersicherung
5- Anzeige für Temperatur bzw. Uhrzeit
6- Einstelltasten
7- Wahlschalter für Temperatur
8- Wahlschalter für Betriebsarten
WARNUNG: Der erste Vorgang, der nach der
Installation des Ofens oder nach einer Unter-
brechung der Stromversorgung ausgeführt
wird (dies ist erkennbar, wenn die Anzeige pul-
siert und 12:00 anzeigt), stellt die richtige Zeit
ein. Dies wird wie folgt erreicht.
• Drücken Sie die mittlere Taste viermal
• Stellen Sie die Zeit mit den Tasten “-” “+” ein.
• Lassen Sie alle Tasten los.
ACHTUNG: Der Ofen funktioniert nur, wenn
die Uhr eingestellt ist.
87
1 3
5
6
2 4
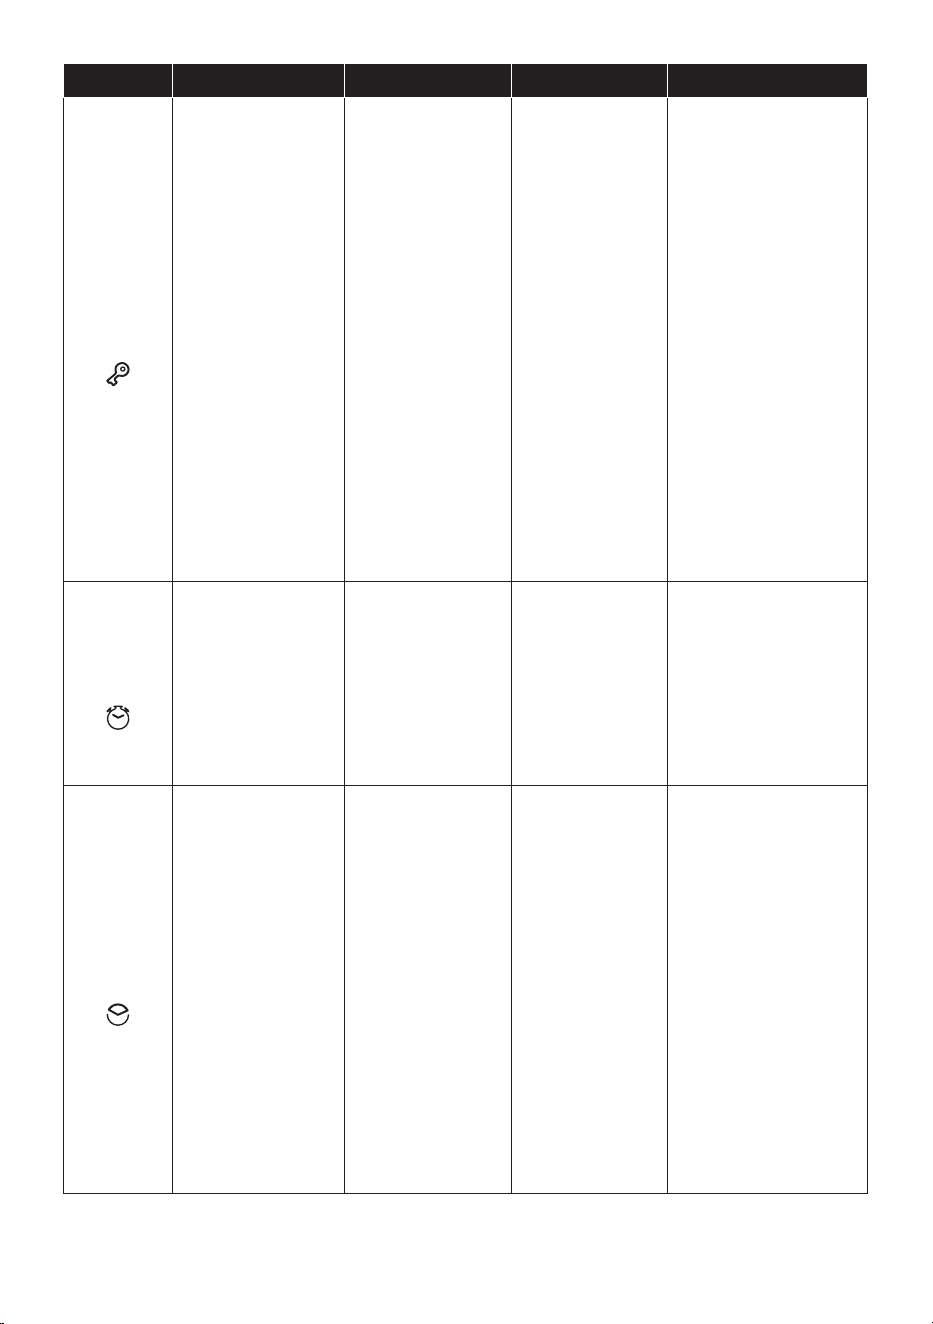
DE 50
FUNKTION EINSCHALTEN AUSSCHALTEN WAS ES MACHT NÜTZLICH FÜR
KINDER-
SICHE-
RUNG
Die Kindersicherung
wird aktiviert wenn
Sie mindestens 5
Sekunden lang die
Taste Set (+) der
Kindersicherung
auf dem Display
erscheint. Von
diesem Moment an
ist die Bedienung
aller anderen
Funktionen gesperrt
Display zeigt STOP
und die alternativ
voreingestellte
Zeit. Ab diesem
Moment sind alle
anderen Funktionen
gesperrt. Die LED
der Kindersicherung
geht an und auf
dem Display blinken
STOP und die
voreingestellte Zeit
abwechselnd.
Die Kindersicherung
wird deaktiviert
wenn Sie mindestens
5 Sekunden lang die
Taste Set (+) ge-
drückt halten und bis
das auf dem Display
erlischt. Von diesem
Moment an ist die
Bedienung aller
anderen Funktionen
aktiv. Nun geht die
LED der Kindersi-
cherung aus und alle
Funktionen können
wieder ausgewählt
werden.
MANUEL-
LER
BETRIEB
Drücken Sie den mit-
tleren Knopf einmal
Die Knöpfe “-” “+”
drücken, um die er-
forderliche Backzeit
einzustellen.
Alle Knöpfe loslas-
sen.
Wenn die eingestellte
Backzeit abgelaufen
ist, wird ein akusti-
sches Signal aktiviert
(dieser Alarm hört
von alleine auf, nach
er kann jedoch sofort
Bausgeschaltet wer-
den, wenn man auf
SELECT drückt).
Aktiviert einen
Alarm am Ende
der eingestellten
Backzeit.
Während dessen
zeigt das Display
die verbleibende
Zeit an.
Es ermöglicht Ihnen, das
Signal als Erinnerungsfun-
ktion zu benutzen (auch
wenn den Ofen nicht zum
Backen verwendet wird)
BACKDAU-
ER
Drücken Sie den mit-
tleren Knopf zweimal
•Die Knöpfe “-” “+”
drücken, um die er-
forderliche Backzeit
einzustellen.
Alle Knöpfe loslas-
sen.
Stellen Sie die Back-
funktion mit dem
entsprechenden
Kontrollknebelfür
die Backfunktion.
Drücken Sie einen
Knopf, um das Signal
zu beenden.
Drücken Sie den
mittleren Knopf, um
zur Uhr- unktion zu
gelangen.
Es ermöglicht
Ihnen,die für das
gewählte Rezept
erforderl iche
Backzeit vorzu-
programmieren.
Um die Restzei t zu
erfahren drücken
Sie den Knopf SE-
LECT ZWEIMAL.
Um die eingestellte
Zeit zu ändern,
drücken Sie den
Knopf TIMER und
nehmen Sie die
neue Einstellung
durch Betätigung
der Knöpfe “-”
“+” vor.
Wenn die eingestellte Zeit
abgelaufen ist, schaltet
sich der Ofen automa-
tisch ab.Wenn Sie den
Backvorgang vorzeitig
ab-bzw.unterbrechen
möchten, drehen Sie den
Knebel zum
Auswählen der Ofen-
funktion bis zur Position
O oder stellen Sie die
programmierte Zeit auf
0.00 (Knöpfe SELECT und
“-” “+”
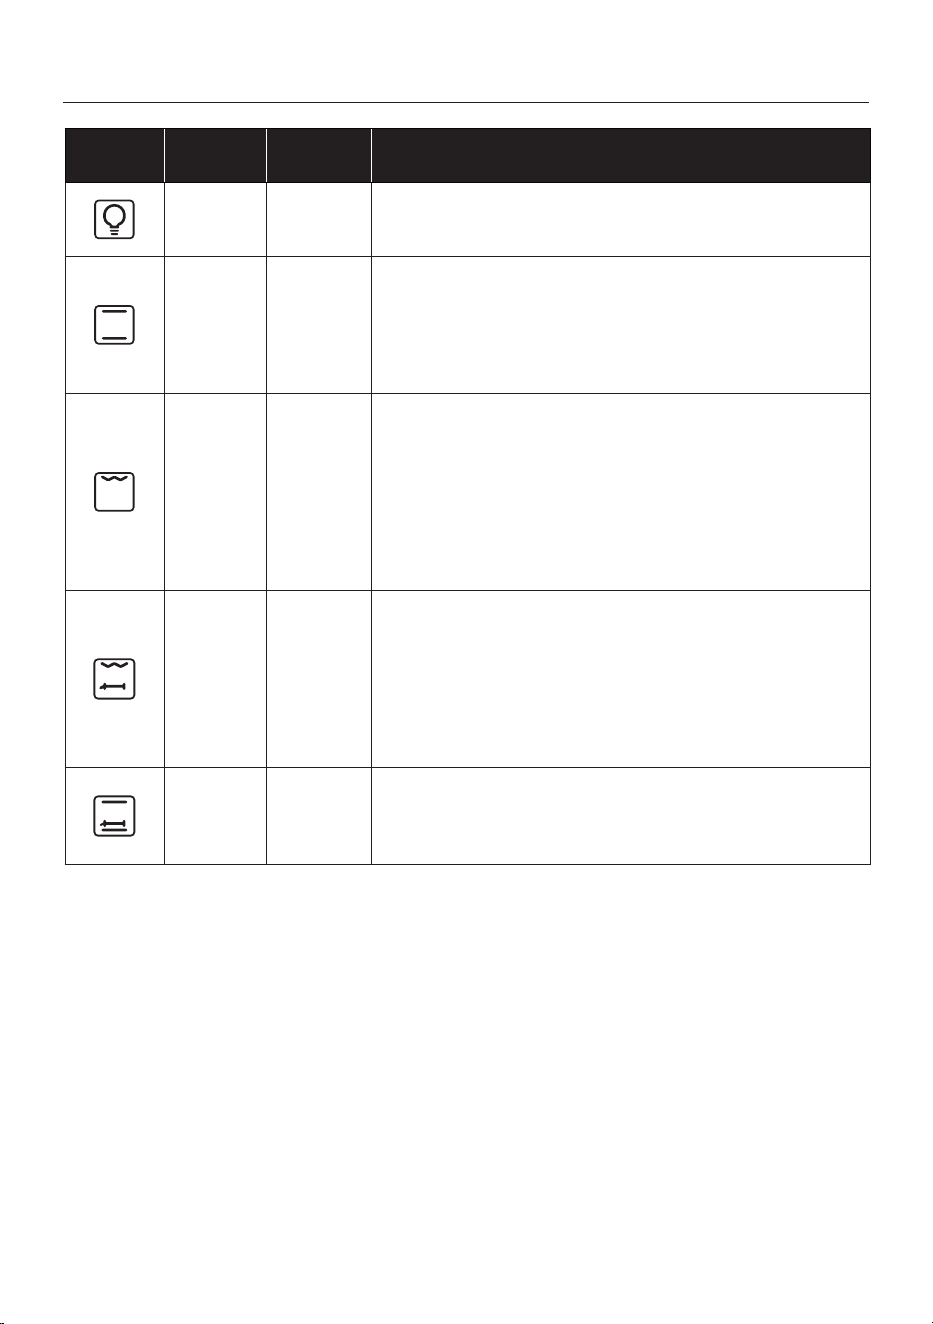
DE 51
Kochmodi
*Geprüft nach der EN 60350-1 für die Erklärung über den Energieverbrauch und die Angabe der Energieklasse
Funktion
T °C
standard
T °C
Bereich
Function
LAMPE: Schaltet das Licht im Backofen an.
220 50 ÷ MAX
* NATÜRLICHE KONVEKTION: Es kommt das obere und
untere Heizelement zum Einsatz. Den Backofen etwa zehn
Minuten lang vorheizen. Diese Methode eignet sich für alle
herkömmlichen Brat- und Backrezepte. Für rotes Fleisch,
Roastbeef, Lammkeulen, Wild, Folienrezepte, Blätterteig. Leb-
ensmittel in feuerfestem Geschirr auf mittlerer Schiene garen.
200 50 ÷ MAX
GRILL: Grill mit geschlossener Tür verwenden. Es wird nur das
obere Heizelement verwendet und die Temperatur kann ein-
gestellt werden. Damit die Heizelemente rot glühen ist eine
Vorheizdauer von fünf Minuten erforderlich. Grillgerichte, Kebab
und Gratin gelingen garantiert. Weißes Fleisch sollte mit Abstand
zum Grill gegart werden; die Garzeit ist dann zwar länger, aber
das Fleisch bleibt schön saftig. Rotes Fleisch und Fischlet kann
auf dem Rost mit der Fettpfanne darunter gegart werden.
200 50 ÷ MAX
ROTISSERIE: der Drehspieß wird bei geschlossener Tür verwen-
det.
Die Heiztemperatur kann nach Bedarf geändert werden. Garen
Sie am besten nur mittelgroße Stücke auf dem Drehspieß und
garen Sie große Stücke im Backofen mit dem Turbo-Grill, sie
werden nur besser. Ideal, um alle Aromen der altmodischen Ro-
tisserie neu zu entdecken. Beim Grillen wird kein Vorheizen dur-
chgeführt.
200 50 ÷ MAX
NATÜRLICHE KONVEKTION MIT ROTISSERIE : Die Unter- und
Oberhitze des Backofens sind in Betrieb. Dies ist eine traditio-
nelle Küche, die für Braten und Geügel geeignet ist und keine
Zugabe von Fett erfordert.
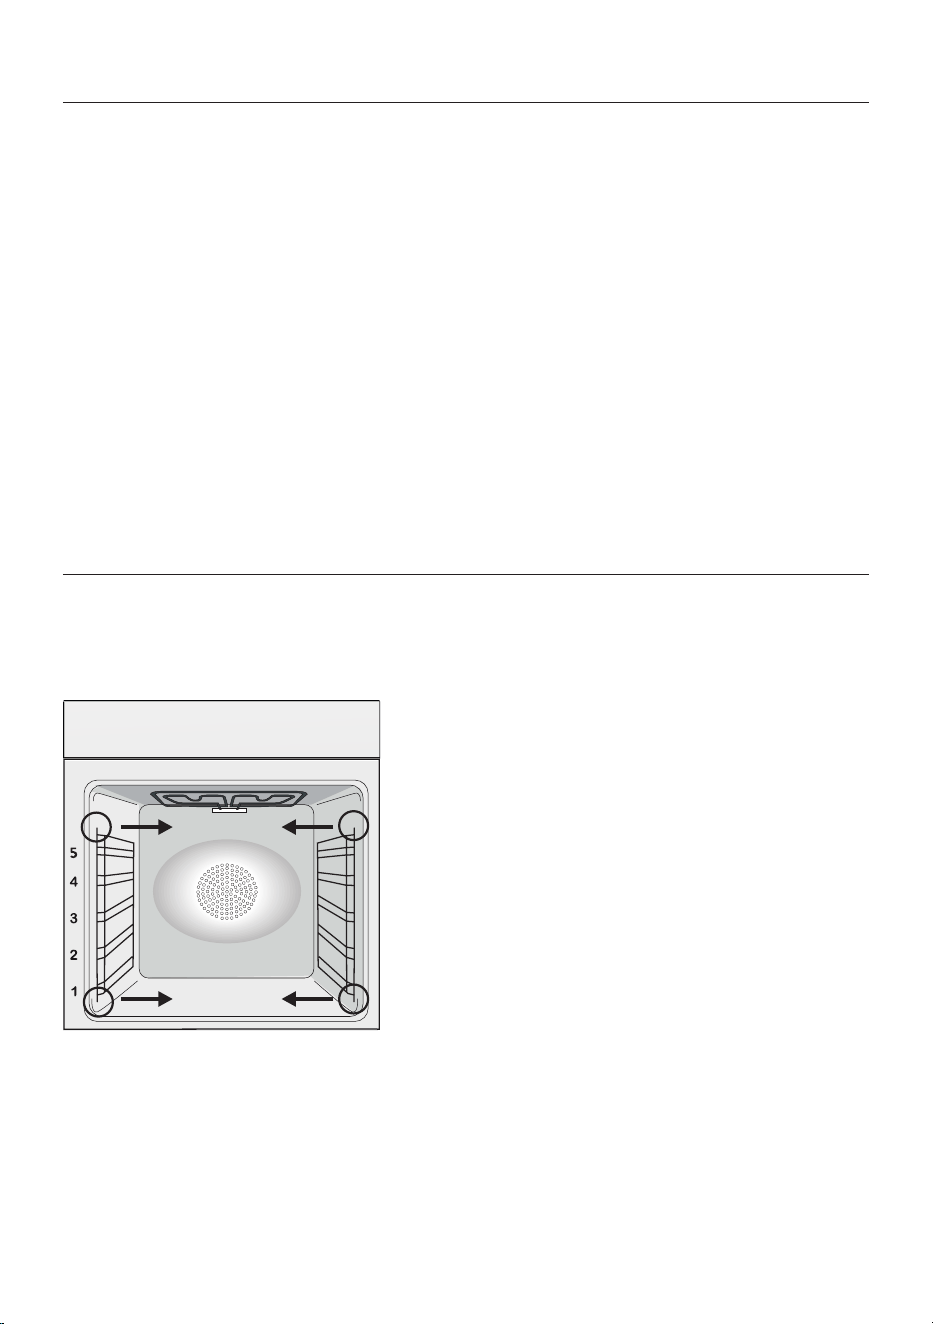
DE 52
Die Lebensdauer des Geräts lässt sich durch
eine regelmäßige Reinigung verlängern. Den
Ofen vor der Reinigung abkühlen lassen. Keine
Scheuermittel, Stahlwolle oder scharfkantige
Gegenstände für die Reinigung verwenden,
um die Emaillebeschichtung nicht zu beschä
-
digen. Nur Wasser, Spülmittel oder Reinigung-
smittel mit Bleiche (Ammoniak) verwenden.
BESTANDTEILE AUS GLAS
Es empehlt sich, die Glastür nach jeder Ver
-
wendung des Backofens mit einem saugfähi-
gen Küchentuch zu reinigen.
Hartnäckige Flecken können mit einem in Rein
-
igungsmittel getränkten Schwamm gesäubert
und mit klarem Wasser abgewaschen werden.
DICHTUNG OFENTÜR
Reinigung und Wartung des Backofens
Drahtgestelle entfernen und reinigen
1- Entfernen Sie die Drahtgitter durch Ziehen in Pfeilrichtung (siehe unten).
2- Um die Drahtgitter zu reinigen, geben Sie sie entweder in die Geschirrspülmaschine oder ver
-
wenden Sie einen nassen Schwamm und trocknen Sie die Gitter anschließend gründlich ab.
3- Bringen Sie die Drahtgitter nach dem Reinigungsvorgang in umgekehrter Reihenfolge wieder an.
Allgemeine Reinigungshinweise
Schmutzige Dichtungen mit einem leicht an-
gefeuchteten Schwamm reinigen.
ZUBEHÖR
Zubehörteile mit einem feuchten Reini
-
gungsschwamm säubern, abwaschen und ab-
trocknen. Keine Scheuermittel verwenden.
FETTPFANNE
Fettpfanne nach der Verwendung des Grills
aus dem Ofen nehmen. Das heiße Fett ab
-
schütten (nicht in den Abuss) und Fettpfanne
mit heißem Wasser und Spülmittel reinigen.
Hartnäckige Fettreste durch Einweichen in
Spülwasser reinigen. Alternativ lässt sich die
Fettpfanne auch in der Spülmaschine oder mit
einem herkömmlichen Backofenreiniger säu
-
bern. Schmutzige Fettpfanne nicht wieder zu-
rück in den Backofen schieben.
WECHSELN DER GLÜHBIRNE
1. Den Backofen von der Stromversorgung trennen.
2. Glasabdeckung abnehmen, Glühbirne herausschrauben und durch eine neue vom selben Typ
ersetzen.
3. Nach dem Austausch der kaputten Glühbirne die Glasabdeckung wieder aufsetzen.
Dieses Produkt enthält eine oder mehrere Lichtquellen der Energieezienzklasse G (Lampe) /F
(10 LED).
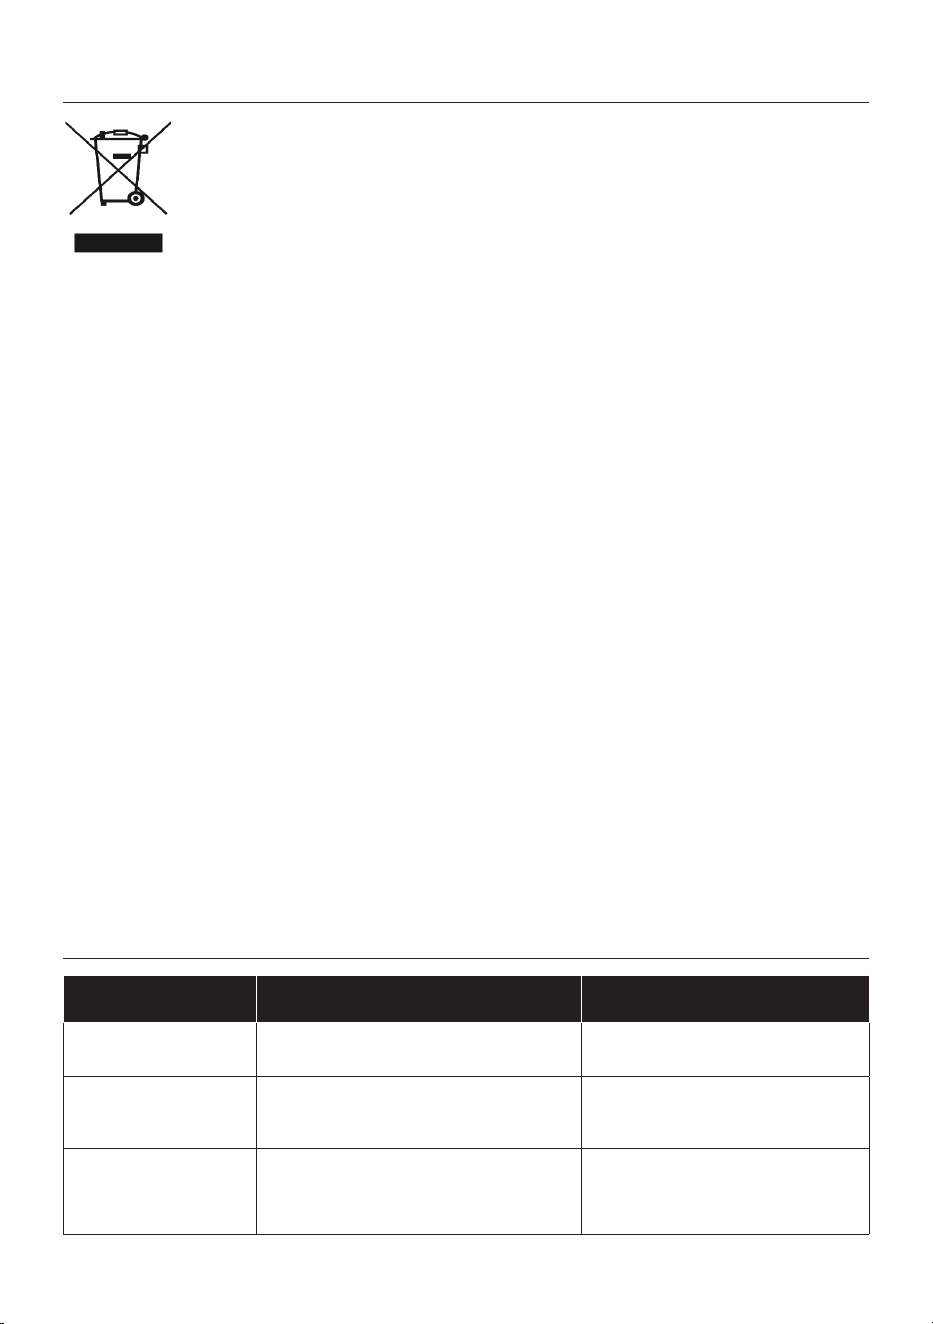
DE 53
Entsorgung und umweltschutz
Dieses Elektrohaushalts-
gerät ist in Einklang mit der
EU-Richtlinie 2012/19/EU
über Elektro- und Elektron-
ik-Altgeräte (WEEE) geken-
nzeichnet. Elektro- und Ele-
ktronik-Altgeräte enthalten
umweltschädigende Substanzen, aber auch
Grundkomponenten, die wiederverwendet
werden können. Daher ist es wichtig, Elek-
tro- und Elektronik-Altgeräte spezisch zu
entsorgen, um alle schädlichen Substanzen
zu entfernen und wiederverwendbare Teile zu
recyceln. Verbraucher leisten einen wichtigen
Beitrag zur Gewährleistung, dass Elektro- und
Elektronik-Altgeräte nicht zu einem Umwelt-
problem werden. Halten Sie sich daher bitte an
die folgenden Grundregeln:
- Elektro- und Elektronik-Altgeräte dürfen
nicht mit dem normalen Hausmüll entsorgt
werden.
- Elektro-und Elektronik-Altgeräte müssen
bei zugelassenen Sammelstellen abgegeben
werden, die von der Stadtverwaltung oder an-
deren zuständigen Stellen verwaltet werden.
In vielen Ländern wird für die Entsorgung
großer Elektro- und Elektronik-Altgeräte ein
Abholservice angeboten. Beim Kauf eines
Häug gestellte fragen
Störung Mögliche ursache Lösung
der Backofen wird
nicht heiß.
Die Uhr ist nicht eingestellt. Uhr einstellen.
Der Backofen wird
nicht heiß.
Die Kindersicherung ist eingeschaltet. Kindersicherung deaktivieren.
Der Backofen wird
nicht heiß.
Garfunktion und Temperatur wurden
nicht eingestellt.
Prüfen, ob die nötigen Einstellun-
gen richtig sind.
neuen Geräts wird das alte möglicherweise
vom Händler zurückgenommen, der es kos-
tenfrei entsorgt, sofern das neue Gerät von ei-
nem ähnlichen Typ ist und die gleiche Funktion
erfüllt wie das Altgerät.
MASSNAHMEN ZUM STROMSPAREN UND
UMWELTSCHUTZ
Sofern möglich, das Vorheizen des Backofens
vermeiden und seine Kapazität voll ausnutzen.
Die Backofentür so selten wie möglich önen,
weil die Hitze aus dem Innenraum bei jedem
Önen verloren geht.
Für eine deutliche Energieersparnis den Back-
ofen 5-10 Minuten vor dem Ende der Garzeit
ausschalten und mit der Restwärme zu Ende
garen. Die Dichtungen sollten sauber und un-
versehrt bleiben, damit keine Hitze
aus dem Inneren verloren geht. Falls Sie einen
Stromversorgungsvertrag mit wechselndem
Stundentarif haben, erleichtert das Programm
der „verzögerten Startzeit“ das Stromsparen,
indem der Anfang des Garvorgangs in die Zeit
verschoben wird, wo der günstigere Stromtarif
gilt.
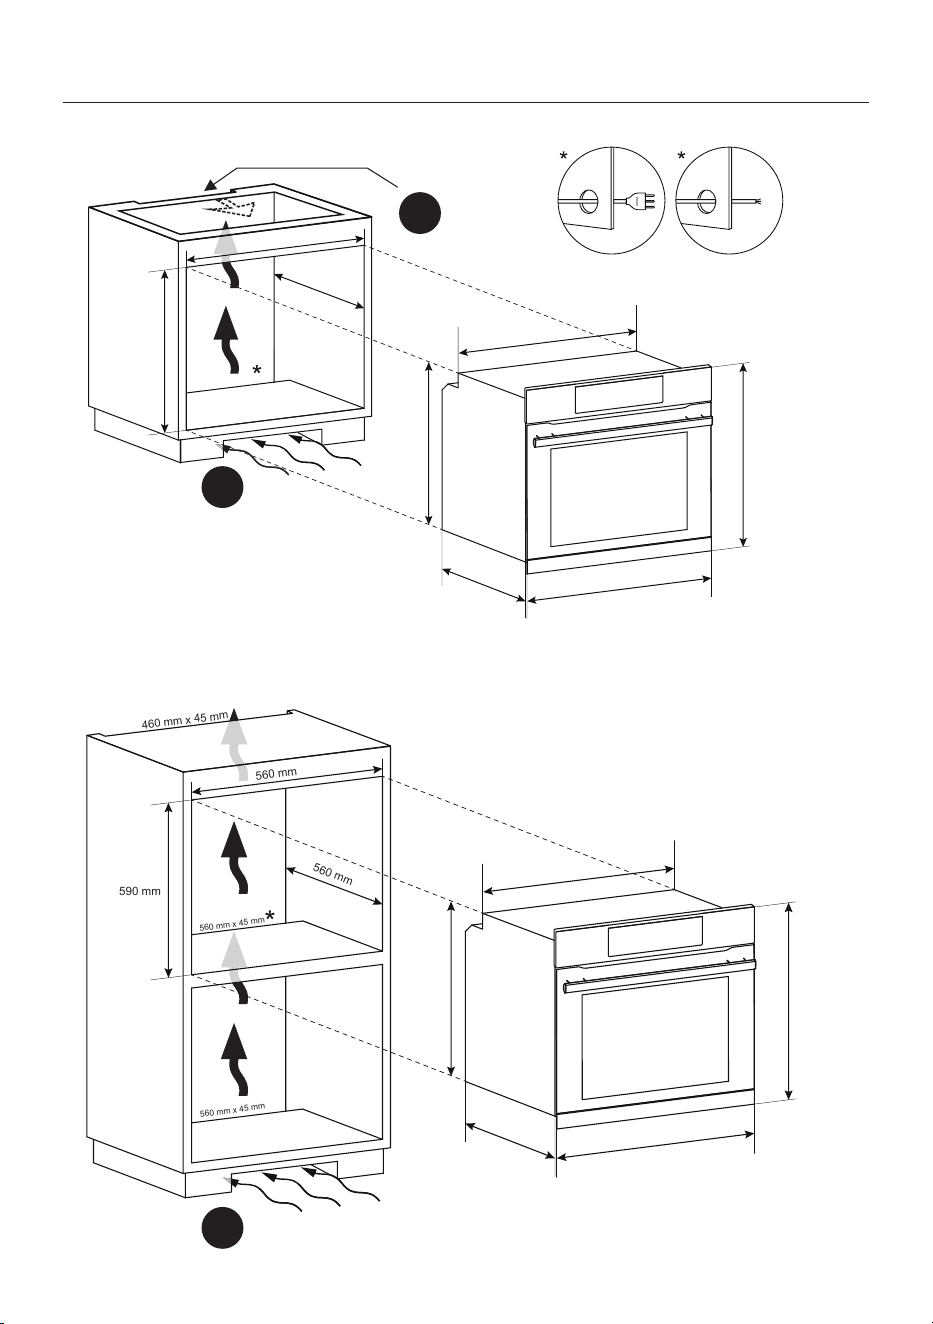
INSTALLATION 54
Installation
A
A
B
560 mm
560 mm
600 mm
560 mm x 45 mm
595 mm
560 mm
548,5 mm
595 mm
577,5 mm
20 mm
560 mm
560 mm
590 mm
560 mm x 45 mm
560 mm x 45 mm
460 mm x 45 mm
595 mm
560 mm
548,5 mm
595 mm
577,5 mm
20 mm

INSTALLATION 55
A
B
EN If the mounting of the plinth does not al-
low air circulation, it is necessary to create an
opening of 500x10 mm or the same surface in
5000 mm
2
.
EN If the furniture is coverage with a bottom at
the back part, provide an opening for the power
supply cable.
FR Si le montage de la plinthe ne permet pas la
circulation de l’air, il est nécessaire de créer une
ouverture de 500x10 mm ou de la même sur
-
face dans 5000 mm
2
.
FR Si le fond du meuble est doté d’un panneau
de fermeture, prévoyez un orice pour le pas
-
sage du câble d’alimentation..
IT Se la zoccolatura non consente la circolazi
-
one dell’aria, è necessario creare un’apertura
di500×10 mm o 5000 mm
2
.
IT Se il mobile ha un fondo posteriore, praticare
un foro per il passaggio del cavo di alimentazi
-
one.
DE Wenn das Gerät mit einer Abdeckung auf
der Rückseite ausgestattet ist, sorgen Sie für
eine Önung für das Stromversorgungskabel.
DE Wenn die Montage des Sockels keine
Luftzirkulation zulässt, ist es notwendig, um
eine maximale Leistung des Ofens zu erre
-
ichen, eine Önung von 500x10 mm oder die
gleiche Oberäche in 5.000 mm
2
zu schaen.
EN If the oven does not have a cooling fan, cre
-
ate an opening 460 mm x 15 mm
FR Si le four n’a pas de ventilateur de refroidisse
-
ment, créer une ouverture 460 mm x 15 mm
IT Se il forno non dispone di una ventola di raf
-
freddamento, lasciare uno spazio 460 mm x 15
mm.
DE Schaen Sie eine Önung, wenn der Ofen
über keinen Lüfter verfügt 460 mm x 15 mm
EN The manufacturer will not be responsible for any inaccuracy resulting from printing or transcript errors
contained in this brochure. We reserve the right to carry out modications to products as required, includ-
ing the interests of consumption, without prejudice to the characteristics relating tosafety or function.
FR Le constructeur décline toute responsabilité concernant d’éventuelles inexacitudes imputables à des
erreurs d’impression ou de transcription contenue dans cette notice. Le constructeur se réserve le droit
de modier les produits en cas de nécessité, même dans l’intérêt de l’utilisation, sans causer de préjudices
aux caractéristiques de fonctionnement de sécurité des appareils.
IT Il produttore declina ogni responsabilità per inesattezze contenute nel documento stampato o per er-
rori di trascrizione contenuti in questa brochure. Inoltre, si riserva il diritto di apportare modiche al prodot-
to, nell’interesse dei consumatori, senza alcun pregiudizio per la sua sicurezza o funzionalità.
DE Der Hersteller übernimmt keine Haftung für eventuelle Druck- oder Übersetzungsfehler dieser Be-
dienungsanleitung. Der Hersteller behält sich vor technische Änderungen zurVerbesserung der Produk-
tqualität im Interesse des Endverbrauchers vorzunehmen..

70009911 • REV.B • 11.2022
