
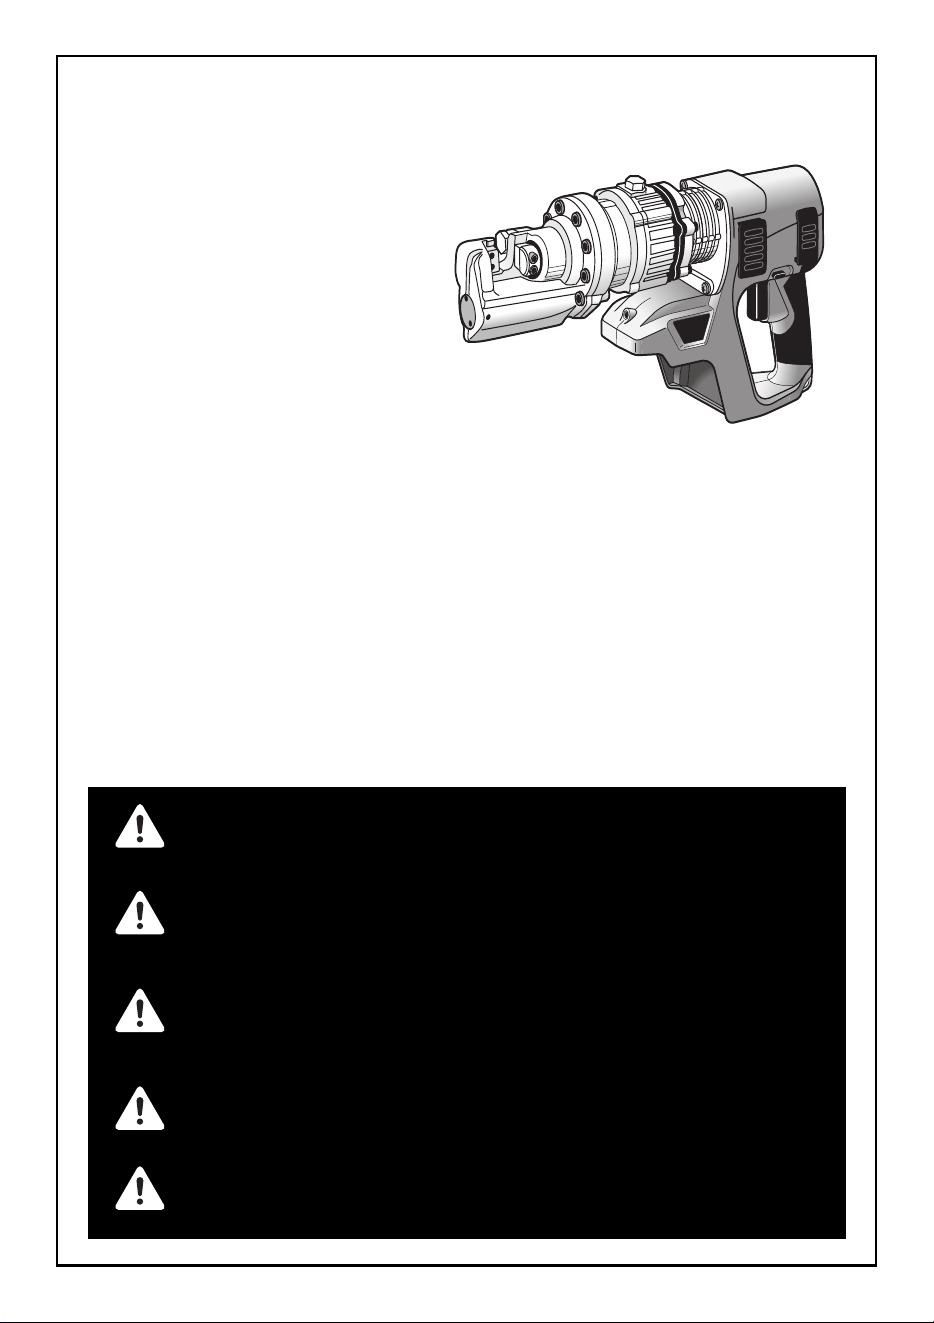
PJRC160(CE)
OPERATING AND MAINTENANCE MANUAL
BETRIEBSANLEITUNG
MANUEL D'UTILISATION ET D'ENTRETIEN
MANUALE DI FUNZIONAMENTO E MANUTENZIONE
MANUAL DE FUNCIONAMIENTO Y MANTENIMIENTO
CORDLESS RE-BAR CUTTER
AKKU-BEWEHRUNGSSCHNEIDER
COUPE-BARRE D'ARMATURE SANS FIL
TAGLIATONDINI A BATTERIA
CORTADOR DE BARRAS DE ACERO
CORRUGADO INALÁMBRICO
BEFORE USING THIS TOOL, STUDY THIS MANUAL TO ENSURE SAFETY WARNING
AND INSTRUCTIONS.
KEEP THESE INSTRUCTIONS WITH THE TOOL FOR FUTURE REFERENCE.
LESEN SIE VOR INBETRIEBNAHME DES GERÄTES DIE GEBRAUCHS- UND SICHER-
HEITSHINWEISE.BITTE BEWAHREN SIE DIE GEBRAUCHS- UND SICHERHEITSHIN-
WEISE AUF, DAMIT SIE AUCH SPÄTER EINGESEHEN WERDEN KÖNNEN.
AVANT D’UTILISER CET OUTIL, LIRE CE MANUEL ET LES CONSIGNES DE SÉCURITÉ AFIN DE
GARANTIR UN FONCTIONNEMENT SÛR.
CONSERVER CE MANUEL EN LIEU SÛR AVEC L’OUTIL AFIN DE POUVOIR LE CONSULTER
ULTÉRIEUREMENT.
PRIMA DI USARE QUESTA MACCHINA, STUDIARE IL MANUALE PER PRENDERE ATTO DEGLI
AVVERTIMENTI E DELLE ISTRUZIONIPER LA SICUREZZA.
TENERE QUESTE ISTRUZIONI INSIEME ALLO STRUMENTO PER CONSULTAZIONI FUTURE.
ANTES DE UTILIZAR ESTA HERRAMIENTA, LEA DETENIDAMENTE ESTE MANUAL PARA
FAMILIARIZARSE CON LAS ADVERTENCIAS E INSTRUCCIONES DE SEGURIDAD.
CONSERVE ESTAS INSTRUCCIONES JUNTO CON LA HERRAMIENTA PARA FUTURAS CONSULTAS.
WARNING
WARNUNG
AVERTISSEMENT
ATTENZIONE
ADVERTENCIA

2
INDEX INHALTSVERZEICHNIS TABLE DES MATIÈRES INDICE ÍNDICE
ENGLISH Page 5 to 16
DEUTSCH Page 17 to 28
FRANÇAIS Page 29 to 40
ITALIANO Page 41 to 52
ESPAÑOL Page 53 to 64
EC DECLARATION OF CONFORMITY Page 71
www.max-europe.com
DEFINITIONS OF SIGNAL WORDS
WARNING: Indicates a hazardous situation which, if not avoided, could result in death or serious
injury.
CAUTION: Indicates a hazardous situation which, if not avoided, could result in minor or moderate
injury.
NOTICE: Indicates a property damage message.
DEFINITIONEN DER HINWEISBEZEICHNUNGEN
WARNUNG: Zeigt eine eventuell gefährliche Situation an, die den Tod oder schwere
Verletzungen zur Folge haben könnte, wenn sie nicht vermieden wird.
VORSICHT: Zeigt eine eventuell gefährliche Situation an, die leichte oder mittelschwere
Verletzungen zur Folge haben könnte, wenn sie nicht vermieden wird.
HINWEIS: Weist auf Sachschäden hin.
DÉFINITIONS DES DIFFÉRENTS DEGRÉS D’ AVERTISSEMENTS
AVERTISSEMENT: indique une situation dangerereuse qui, s'il elle n'est pas contournée pourrait
provoquer la mort ou des blessures sérieuses.
ATTENTION:
indique une situation dangereuse qui, si elle n'est pas contournée pourrait provoquer
des blessures légères à moyennement sérieuses.
REMARQUE: indique un message concernant des dommages matériels.
DEFINIZIONE DELLE INDICAZIONI DI AVVERTIMENTO
ATTENZIONE: Indica una situazione pericolosa, la quale se non viene evitata, può risultare letale
o provocare gravi lesioni.
AVVERTENZA: Indica una situazione pericolosa, la quale se non viene evitata, può provocare
lesioni di lieve o media entità.
NOTA: Indica un messsaggio di danni a materiali.
DEFINICIÓN DE LAS INDICACIONES DE ADVERTENCIA
ADVERTENCIA: Indica una situación potencialmente peligrosa que, si no se evitase, podría
resultar en muerte o lesiones graves.
PRECAUCIÓN: Indica una situación potencialmente peligrosa que, si no se evitase, podría
resultar en lesiones menores o moderadas.
AVISO: Indica un mensaje de daños a la propiedad.
3
1
4
5
12
10 11
9
8
7
6
3
2
14
13
15
16
17
19
18
20
21
Fig.A
Abb.A
Fig.D / Abb.DFig.C / Abb.CFig.B / Abb.B
Fig.G / Abb.GFig.F / Abb.FFig.E / Abb.E
Fig.J / Abb.JFig.I / Abb.IFig.H / Abb.H
18
5
30
333231
3534
4
Fig.L / Abb.LFig.K / Abb.K
Fig.M / Abb.M

5
INDEX
1. NAME OF PARTS ..............................................................5
2. GENERAL POWER TOOL SAFETY WARNINGS.............6
3. REBAR CUTTER SAFETY WARNINGS............................8
4. TECHNICAL DATA ..........................................................11
5. BATTERY INSTRUCTIONS .............................................13
6. OPERATING INSTRUCTIONS.........................................15
7. MAINTENANCE................................................................16
8. STORAGE ........................................................................16
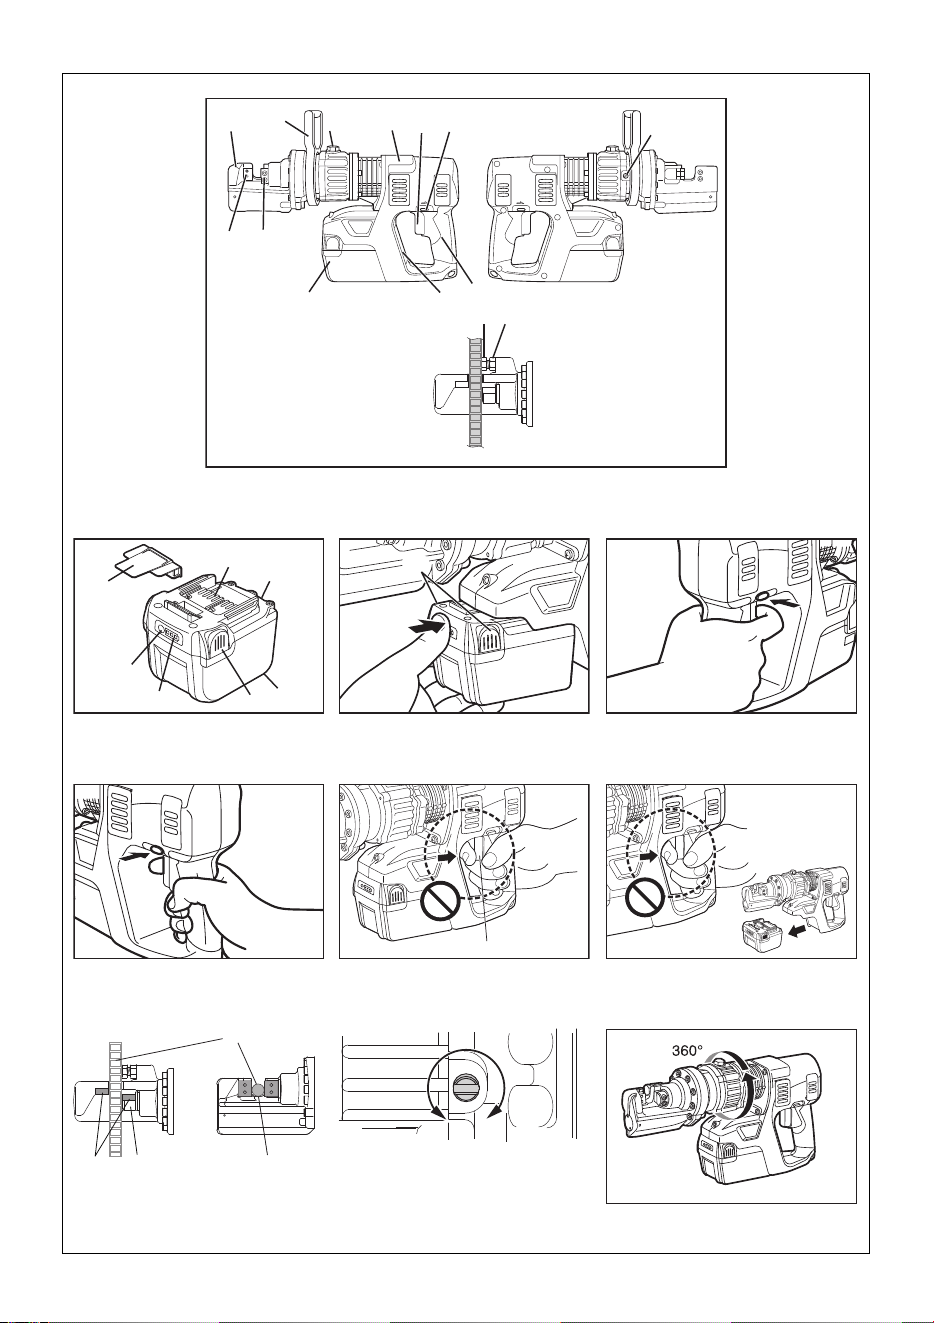
1. NAME OF PARTS
(See Fig. A and B)
ENGLISH
OPERATING AND MAINTENANCE MANUAL
Fig. A
1HEAD
2BLADE
3 CUTTER ROD
4 OILING BOLT
5 TRIGGER SWITCH
6MOTOR
7 BATTERY PACK JPL92530A
8 SAFETY LOCK SWITCH
9 VALVE BOLT
10 ADJUST BOLT
11 LOCK NUT
12 SPECIFICATION LABEL
13 GRIP
14 SIDE HANDLE
Fig. B
15 PACK CAP
16 TERMINAL
17 VENTILATION WINDOW
18 LATCH
19 SPECIFICATION LABEL
20 BATTERY LEVEL GAUGE
21 BATTERY LEVEL CHECK BUTTON
Original instruction
6
2. GENERAL POWER TOOL
SAFETY WARNINGS
1. WORK AREA SAFETY
• Keep work area clean and well lit. Clut-
tered or dark areas invite accidents.
• Do not operate power tools in explo-
sive atmospheres, such as in the pres-
ence of flammable liquids, gases or
dust. Power tools create sparks which
may ignite the dust or fumes.
• Keep children and bystanders away
while operating a power tool. Distrac-
tions can cause you to lose control.
2. ELECTRICAL SAFETY
• Power tool plugs must match the out-
let. Never modify the plug in any way.
Do not use any adapter plugs with
earthed (grounded) power tools. Un-
modified plugs and matching outlets will
reduce risk of electric shock.
• Avoid body contact with earthed or
grounded surfaces, such as pipes, ra-
diators, ranges and refrigerators.
There is an increased risk of electric
shock if your body is earthed or grounded.
• Do not expose power tools to rain or
wet conditions. Water entering a power
tool will increase the risk of electric shock.
• Do not abuse the cord. Never use the
cord for carrying, pulling or unplug-
ging the power tool. Keep cord away
from heat, oil, sharp edges or moving
parts. Damaged or entangled cords in-
crease the risk of electric shock.
•
When operating a power tool outdoors,
use an extension cord suitable for out-
door use.
Use of a cord suitable for out-
door use reduces the risk of electric shock.
•
If operating a power tool in a damp loca-
tion is unavoidable, use a residual cur-
rent device (RCD) protected supply.
Use of an RCD reduces the risk of electric
shock.
• Do not use the power tool in the rain,
where water is splashing, in a wet
place, or in a damp place. Using the tool
in these or similar conditions will increase
the risk of electric shock, dangerous mal-
function, and overheating.
3. PERSONAL SAFETY
•
Stay alert, watch what you are doing and
use common sense when operating a
power tool. Do not use a power tool while
you are tired or under the influence of
drugs, alcohol or medication.
A moment
of inattention while operating power tools
may result in serious personal injury.
•
Use personal protective equipment.
Always wear eye protection.
Protective
equipment such as dust mask, non-skid
safety shoes, hard hat or hearing protection
used for appropriate conditions will reduce
personal injuries.
• Prevent unintentional starting. Ensure
the switch is in the off-position before
connecting to power source and/or
battery pack, picking up or carrying
the tool. Carrying power tools with your
finger on the switch or energizing power
tools that have the switch on invites acci-
dents.
• Remove any adjusting key or wrench
before turning the power tool on.
A wrench or a key left attached to a rotat-
ing part of the power tool may result in
personal injury.
• Do not overreach. Keep proper footing
and balance at all times. This enables
better control of the power tool in unex-
pected situations.
• Dress properly. Do not wear loose
clothing or jewellery. Keep your hair
and clothing away from moving parts.
Read all safety warnings, instructions, il-
lustrations and specifications provided
with this power tool.
Failure to follow all instructions listed below
may result in electric shock, fire and/or seri-
ous injury. Save all warnings and instruc-
tions for future reference. The term "power
tool" in the warnings refers to your mains-op-
erated (corded) power tool or battery-operat-
ed (cordless) power tool.
WARNING
7
Loose clothes, jewellery or long hair can
be caught in moving parts.
• If devices are provided for the connec-
tion of dust extraction and collection
facilities, ensure these are connected
and properly used. Use of dust collec-
tion can reduce dust-related hazards.
•
Do not let familiarity gained from fre-
quent use of tools allow you to become
complacent and ignore tool safety
principles. A careless action can cause
severe injury within a fraction of a second.
4. POWER TOOL USE AND CARE
• Do not force the power tool. Use the
correct power tool for your applica-
tion. The correct power tool will do the job
better and safer at the rate for which it
was designed.
• Do not use the power tool if the switch
does not turn it on and off. Any power
tool that cannot be controlled with the
switch is dangerous and must be re-
paired.
• Disconnect the plug from the power
source and/or the battery pack, if de-
tachable, from the power tool before
making any adjustments, changing ac-
cessories, or storing power tools. Such
preventive safety measures reduce the
risk of starting the power tool accidentally.
• Store idle power tools out of the reach
of children and do not allow persons
unfamiliar with the power tool or these
instructions to operate the power tool.
Power tools are dangerous in the hands
of untrained users.
• Maintain power tools and accessories.
Check for misalignment or binding of
moving parts, breakage of parts and
any other condition that may affect the
power tool's operation. If damaged,
have the power tool repaired before
use. Many accidents are caused by poor-
ly maintained power tools.
• Keep cutting tools sharp and clean.
Properly maintained cutting tools with
sharp cutting edges are less likely to bind
and are easier to control.
• Use the power tool, accessories and
tool bits etc. in accordance with these
instructions, taking into account the
working conditions and the work to be
performed. Use of the power tool for op-
erations different from those intended
could result in a hazardous situation.
• Keep handles and grasping surfaces
dry, clean and free from oil and grease.
Slippery handles and grasping surfaces
do not allow for safe handling and control
of the tool in unexpected situations.
5. Battery tool use and care
• Recharge only with the charger speci-
fied by the manufacturer. A charger that
is suitable for one type of battery pack may
create a risk of fire when used with another
battery pack.
• Use power tools only with specifically
designated battery packs. Use of any
other battery packs may create a risk of in-
jury and fire.
• When battery pack is not in use, keep it
away from other metal objects, like pa-
per clips, coins, keys, nails, screws or
other small metal objects, that can
make a connection from one terminal to
another. Shorting the battery terminals to-
gether may cause burns or a fire.
• Under abusive conditions, liquid may
be ejected from the battery; avoid con-
tact. If contact accidentally occurs,
flush with water. If liquid contacts eyes,
additionally seek medical help. Liquid
ejected from the battery may cause irrita-
tion or burns.
• Do not use a battery pack or tool that is
damaged or modified. Damaged or mod-
ified batteries may exhibit unpredictable
behaviour resulting in fire, explosion or risk
of injury.
• Do not expose a battery pack or tool to
fire or excessive temperature.
Exposure
to fire or temperature above 130 °C may
cause explosion.

8
• Follow all charging instructions and do
not charge the battery pack or tool out-
side the temperature range specified in
the instructions. Charging improperly or
at temperatures outside the specified
range may damage the battery and in-
crease the risk of fire.
• Lithium-ion batteries have shipping re-
strictions. For transportation, please con-
tact the transportation company or airline
in advance.
6. SERVICE
• Have your power tool serviced by a
qualified repair person using only
identical replacement parts. This will
ensure that the safety of the power tool is
maintained.
• Never service damaged battery packs.
Service of battery packs should only be
performed by the manufacturer or author-
ized service providers.
3. REBAR CUTTER SAFETY
WARNINGS
1. KEEP HANDS AWAY FROM MOVING
PARTS
2. BE SURE TO KEEP HANDS AWAY FROM
THE TRIGGER SWITCH AND DETACH
THE BATTERY PACK WHEN REPLACING
THE BLADE, WHEN ABNORMALITIES
OCCUR, AND WHEN THE EQUIPMENT IS
NOT BEING USED
Leaving the Battery pack installed in these sit-
uations may cause breakdowns or damage.
3. NEVER MODIFY THE TOOL
Modifying the tool will impair performance and
operating safety. Any modification may lead to
serious injury and void the tool warranty.
4. MAINTAIN THE TOOL IN GOOD OPERAT-
ING CONDITION
(CHECK TIGHTNESS OF SCREWS BE-
FORE OPERATION)
To secure operating safety and ensure top
performance, keep the tool free of wear and
damage.
Under normal operation, the tool is designed
to produce vibration. Due to the vibration, the
screws can come loose, causing damage to
the tool or serious injury.
Also keep the tool's hand grip dry and clean,
especially free of oil and grease.
5. LET THE TOOL WARM UP FOR SEVERAL
MINUTES BEFORE USE
In cold weather or when the tool has not been
used for a long period of time, the internal lu-
brication in the tool might not be insufficient.
In such cases, let the tool warm up for several
minutes by operating it with no load. Lacking
sufficient internal lubrication, the tool might
not operate at full performance.
6. MAKE SURE THERE IS NO ONE BELOW
WHEN USING THE TOOL IN HIGH LOCA-
TIONS
Failure to do so may lead to serious injury of
the person below.

9
7. HOLD THE TOOL FIRMLY WITH BOTH
HANDS
Failure to do so may lead to serious injury.
8. DO NOT LEAVE THE TOOL RUNNING
Operate the tool only when hand-held.
9. USE ONLY THE AUTHORIZED BATTERY
PACK
Use only MAX JPL92530A battery pack. If the
tool is connected to a power supply other than
the authorized pack, such as a rechargeable
battery, a dry cell, or a storage battery for use
in automobiles, the tool may be damaged,
break down, overheat, or even catch on fire.
Do not connect this tool to any power supply
except the MAX JPL92530A battery pack.
10. TO ENSURE MAXIMUM PERFORMANCE,
FULLY CHARGE THE BATTERY BEFORE
USE
A new battery pack or one not used for ex-
tended periods may have self-discharged
and thus may need recharging to restore it to
a fully charged condition. Before operating
the tool, make sure to charge the Battery
pack with specified battery charger.
11. DO NOT BLOCK THE VENTILATION
HOLE OF THE TOOL. DO NOT PUT ANY-
THING INTO THE VENTILATION HOLE.
The tool may heat up, emit smoke or break
down.
It is very dangerous because foreign matter
may be thrown from the tool.
12. DO NOT CONTINUOUSLY USE OF THE
TOOL FOR EXTENDED PERIODS OF TIME.
The motor temperature and oil temperature
will rise to the point that the tool cannot pro-
vide sufficient performance.
13. DO NOT DROP THE TOOL.
This may cause damage or malfunction.
When working in high locations, use due
caution for the operating environment or sur-
rounding persons.
14. USE ONLY THE SPECIFIED BLADES AND
ACCESSORIES.
Unspecified blades and accessories may not
only cause equipment trouble but also injury
or accident.
15. USE ONLY THE SPECIFIED HYDRAULIC
OIL.
Unspecified oil may cause equipment trou-
ble and inadequate power, and adversely af-
fect the tool.
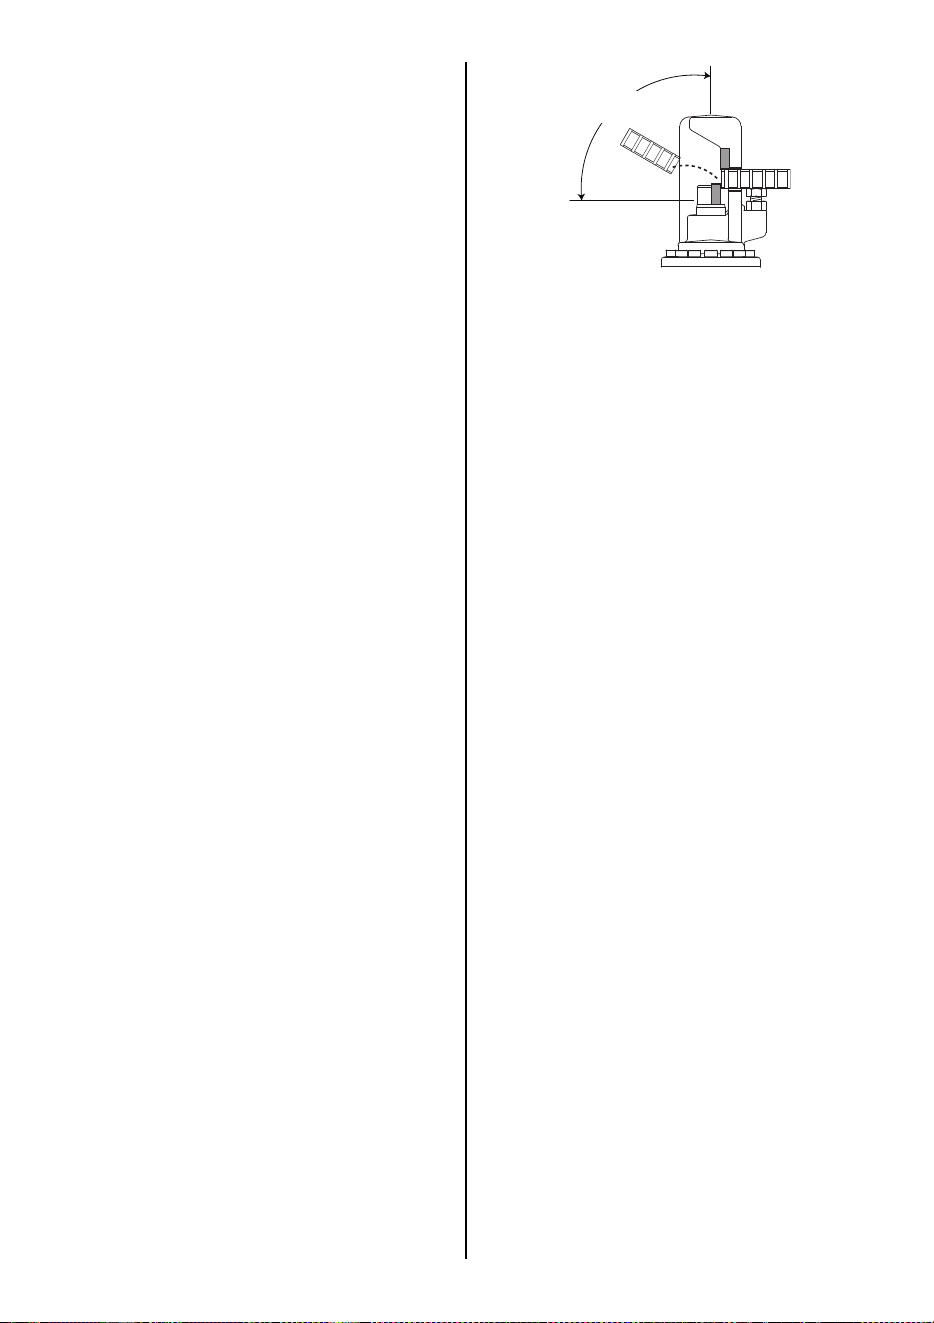
16. WHEN YOU CUT REBAR SHORT, THE
CUT PIECE MAY BE THROWN AS
SHOWN AT TOP, THEREFORE MAKE
SURE THE AREA AROUND YOU IS SAFE
BEFORE CUTTING THE REBAR.
17. BATTERY CHARGING PRECAUTION
1 Use only specified battery charger and
Battery Pack
Failure to do so may cause the Battery to over-
heat or catch fire leading to serious injury.
2 Charge the Battery at the specified
voltage
Failure to do so may result in overheating,
or inadequate charging possibly causing
serious injury.
3 Never use a transformer
4 Never connect the Battery charger to
an engine generator direct-current
power supply
The charger will break down or be dam-
aged from burning.
5 Avoid charging the Battery pack in the
rain, in a damp place, or where water is
splashing
The Battery charger is for indoor use.
Charging a damp or wet Battery pack will
cause an electric shock or a short circuit
that may lead to damage from burning
and even the tool catching on fire.
6 Do not touch the power cord or plug
with a wet hand or glove
This may cause injury from electric shock.
7 Do not put a cloth or any other cover
on the Battery charger while the Bat-
tery pack is being charged
This will cause overheating and damage
from burning, or the Charger may even
catch fire.
8 Keep the Battery pack and Battery
charger away from heat and flames
9 Do not charge the Battery pack near
flammable materials
Dangerous area

10
10Charge the Battery pack in a well ven-
tilated place
Avoid charging the Battery pack where it
will be in direct sunlight.
11Avoid continual use of the Battery
charger
Rest the Charger for 15 minutes between
charges to avoid functional trouble with
the unit.
12Any objects that block the ventilation
holes or Battery pack receptacle may
cause electric shock or functional
troubles
Operate the charger free of dust or other
foreign materials.
13Handle the power cord carefully
Do not carry the Battery charger by its
power cord. Do not use the power cord to
disconnect it from a wall socket; this will
damage the cord and break the wires or
cause a short circuit. Do not let the power
cord contact sharp edged tools, hot mate-
rials, oil, or grease. A damaged cord must
be repaired or replaced.
14Do not charge non rechargeable bat-
teries with this charger.
15This charger is not intended for use by
children or disabled persons without
supervisor.
16Children should be supervised to en-
sure that they do not play with the
charger.
17Put a pack cap on the terminal of the
Battery pack
When the Battery pack is not in use, put a
pack cap on its terminal to prevent short
circuits.
Keep it away from other metal objects,
such as clips, coins, keys, nails, screws or
other small metal objects, that can make a
connection from one terminal to another.
18Do not leave or store the tool in a vehi-
cle or in direct sunlight during sum-
mer. Leaving the tool in high
temperature conditions may cause the
battery pack to deteriorate.
19Do not store a fully discharged battery
pack. If a fully discharged battery pack
is removed from the system and left for
a long period of time, it may become
damaged. Recharge the battery imme-
diately when it has been discharged.
20Use personal protective equipment
Protective equipment such as hand pro-
tector used for appropriate conditions will
reduce personal injuries.

11
4. TECHNICAL DATA
<Battery pack>
Sold separately
* Lithium-ion batteries with more than 100Wh of electric energy are classified as dangerous goods.
For transportation, please contact the transportation company or airline in advance.
The electric energy of the Max Lithium Ion Battery Pack is printed on the battery pack nameplate.
JPL92550A is classified as dangerous goods with an electric energy of 123.5Wh.
<Battery charger> Sold separately
PRODUCT NAME Lithium ion battery pack
PRODUCT NO. JPL92550A
BATTERY TYPE Lithium ion battery
NOMINAL VOLTAGE DC25.2 V
NOMINAL CAPACITY 4.9Ah(4,900mAh)
CHARGING TIME
(USE WITH JC925A(CE))
Approximately 80 minutes (Approx. 80% of capacity)
Full charging - Approximately 100 minutes (Approx. 100% of capacity)
ACCESSORIES Pack cap (For preventing short circuit)
WEIGHT 0.9 kg (2.4lbs.)
CHARGING TEMPERATURE 5°C to 40°C (41°F to 104°F)
OPERATING TEMPERATURE 0°C to 40°C (32°F to 104°F)
OPERATING HUMIDITY 80% RH or less
PRODUCT NAME Lithium ion battery charger
PRODUCT NO. JC925A(CE)
INPUT AC100V-240V 50/60Hz 2.2A
OUTPUT DC14.4V:4.0A, DC18V:4.0A, 25.2V:2.8A
WEIGHT 0.7kg (1.7lbs.)
OPERATING TEMPERATURE 5°C to 40°C (41°F to 104°F)
OPERATING HUMIDITY 80% RH or less
1. TOOL SPECIFICATIONS
PRODUCT NO. PJRC160
WEIGHT
7.6kg(16.8lbs.)(Battery included)
HEIGHT 228mm (9")
WIDTH 100mm (4")
LENGTH 389mm (15-3/8")
HYDRAULIC OIL EXXON MOBIL SHC524
VOLTAGE / BAT-
TERY
25.2V,
Li-ion Battery pack
MAXIMUM CUT-
TING DIAMATER
φ16mm (#5)
MOTOR Brushless DC Motor
OPERATING TEM-
PERATURE
-5°C to 40°C (14°F to 104°F)
OPERATING HU-
MIDITY
80% RH or less
ACCESORRIES PJRC160
Carrying case
Side handle
HEX. BAR WRENCH 4
SPANNER 17
SCREW DRIVER
OIL SHC524
12
2. TECHNICAL DATA
1 NOISE
The typical A-weighted noise level deter-
mined according to EN62841:
• Sound pressure level (L
pA
): 91dB (A)
• Sound power level (L
WA
): 80dB (A)
• Uncertainty (K): 3dB (A)
2 VIBRATION
The vibration total value (tri-axial vector
sum) determined according to EN62841:
• Vibration emission: (a
h
,
HD
): ≤2.5m/s
2
• Uncertainty (K): 1.5m/s
2
Information:
- that the declared vibration total value(s)
and the declared noise emission value(s)
may also be used in a preliminary assess-
ment of exposure.
Warning:
- that the vibration and noise emissions dur-
ing actual use of the power tool can differ
from the declared values depending on the
ways in which the tool is used especially
what kind of workpiece is processed;
and
- of the need to identify safety measures to
protect the operator that the based on an
estimation of exposure in the actual condi-
tions of use (taking account of all parts of
the operating cycle such as the times when
the tool is switched off and when it is run-
ning idle in addition to the trigger time).
3 RADIATED EMISSION 30-1000 MHZ
Class B
4 Overvoltage category
5 Pollution degree
Pollution degree : degree 4 according to IEC
60664-1 (Both of PJRC160 and JC925A(CE)).
3. APPLICATIONS
Cutting of the following materials
• Rebar
• Bolt
• Mesh Wire
4. ABOUT PRODUCTION YEAR
This product bears production number in the
body. The two digits of the number from left
indicates the production year.
PRODUCT Overvoltage category
PJRC160 CORDLESS
RE-BAR CUTTER
Battery
according to
IEC 60664-1
JPL92530A BATTERY
PACK
Category I according
to IEC 60664-1
JC925A(CE)
BATTERY CHARGER
Category II
according to
IEC 60664-1
Wear ear protection
(Example)
1 9 8 2 6 0 3 5 D
Year 2019

13
5. BATTERY INSTRUCTIONS
1. CHARGING
BATTERY PACK BREAKDOWNS
If the following conditions occur, bring the Bat-
tery and Charger to your dealer.
• The red charging lamp does not flash when the
charger plug is inserted into main power
source outlet (When the Battery pack is not in-
serted in the charger.)
• Neither the red charging lamp nor the orange
standby lamp lights or flashes when the Bat-
tery pack is inserted in the charger.
• The orange standby lamp does not change to
the red charging lamp even after more than 1
hour. (except at low temperatures)
• The red charging lamp does not change from
constant to flashing light even after more than
90 minutes.
SERVICE LIFE OF BATTERY PACK
If any condition described below is observed, the
battery pack is at the end of its service life. Re-
place it with a new one.
• Although the battery pack has been properly
charged (fully charged), a great drop in operat-
ing time has been noticed.
NOTICE:
• Charge the battery pack when the motor's ro-
tational speed slows down (the Capacity of the
battery pack is considered to be nearly run
out). Using the tool more will cause it to over-
discharge, resulting in a shortened service life
of the battery pack and also in functional trou-
ble of the tool's main body.
• Do not use a battery pack when its service life
is finished.
This will cause functional trouble in the tool's
main body. Also charging a battery pack that is
out of service life will lead to functional trouble
in the battery charger.
RECYCLING A LI-ION BATTERY
The MAX battery pack uses a Li-ion battery, it
may be illegal to dispose of this battery into the
municipal waste system. Check with your local
solid waste officials for details in your area for re-
cycling options or proper disposal.
When disposing of the battery pack, make
sure to put a pack cap on its terminal (with in-
sulating tape securing it) to prevent short cir-
cuits.
CAUTION
14
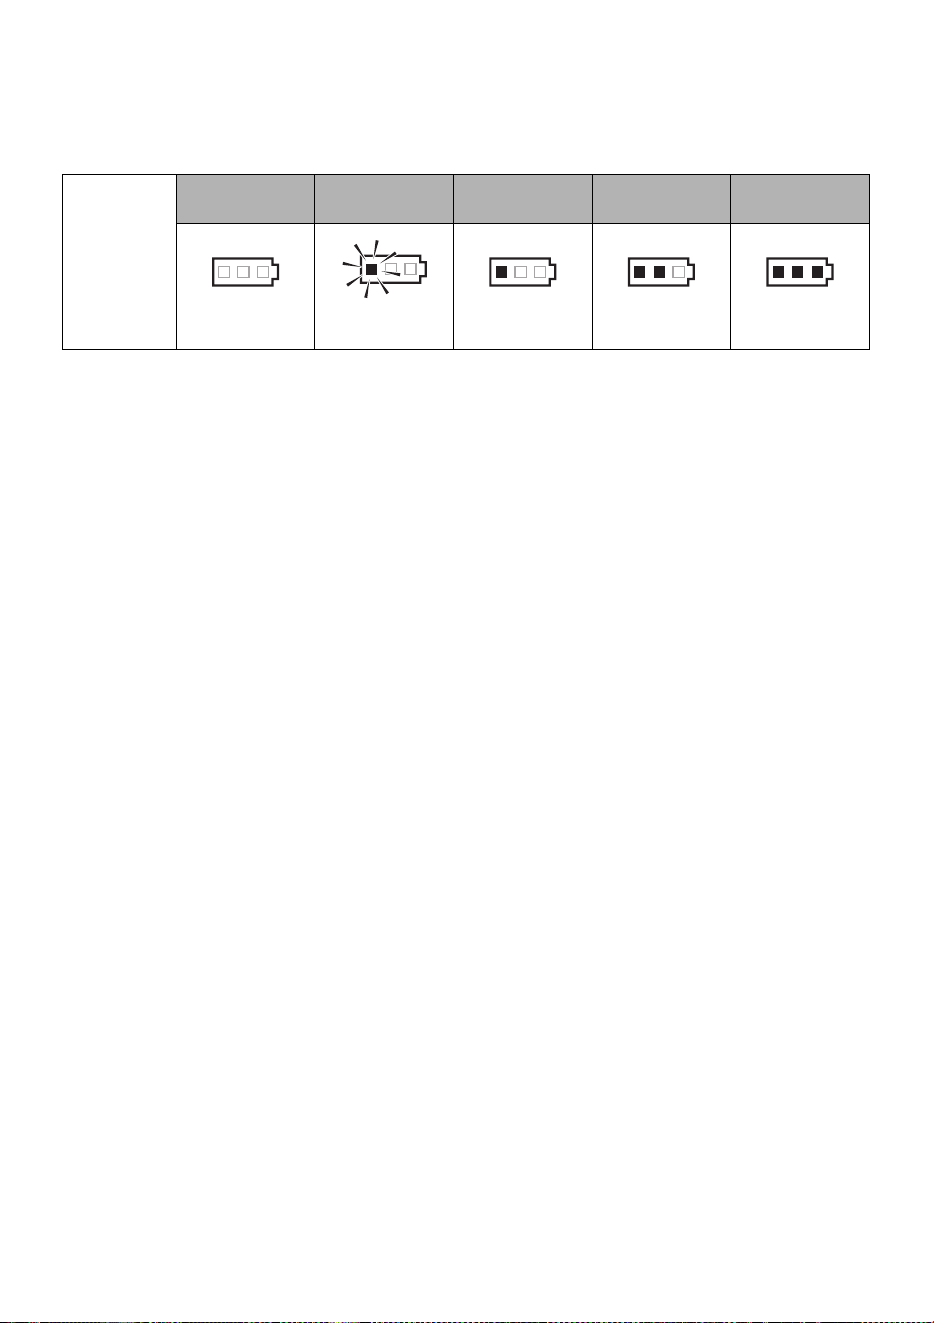
ABOUT THE BATTERY LEVEL INDICATOR
1 To check the battery level (excluding while charging or while operating the charging tool),
press the battery level check button.
2 The battery level gauge lights up according the then battery level.
Battery level
indication
Battery level:
0%
Battery level:
about 0 to 10%
Battery level:
about 10 to 40%
Battery level:
about 40 to 70%
Battery level:
about 70 to 100%
All indicators
OFF
One red
indicator blinks
One red
indicator ON
Two red
indicators ON
Three red
indicators ON

15
6. OPERATING
INSTRUCTIONS
1. HOW TO MOUNT / REMOVE THE
BATTERY PACK
• Before mounting / removing the Battery
pack from the tool, press the Safety lock
switch as shown in the Fig.E, and keep
hands away from the Trigger switch(Fig.F).
• Before operation, make sure to check the
Battery pack is securely set in the tool.
Failure to do so may cause serious injury.
1
(Fig.C) When mounting the Battery pack, in-
sert the Battery pack in the tool so that the
rails of the Battery and the tool fit each oth-
er. Slide the Battery pack to the end, until
the click is heard. The Latches(Fig.C 16)
must be returned to the original position.
2 When removing the Battery pack, remove
it from the tool by pushing on its latches
from both sides while firmly holding the
grip of the tool.
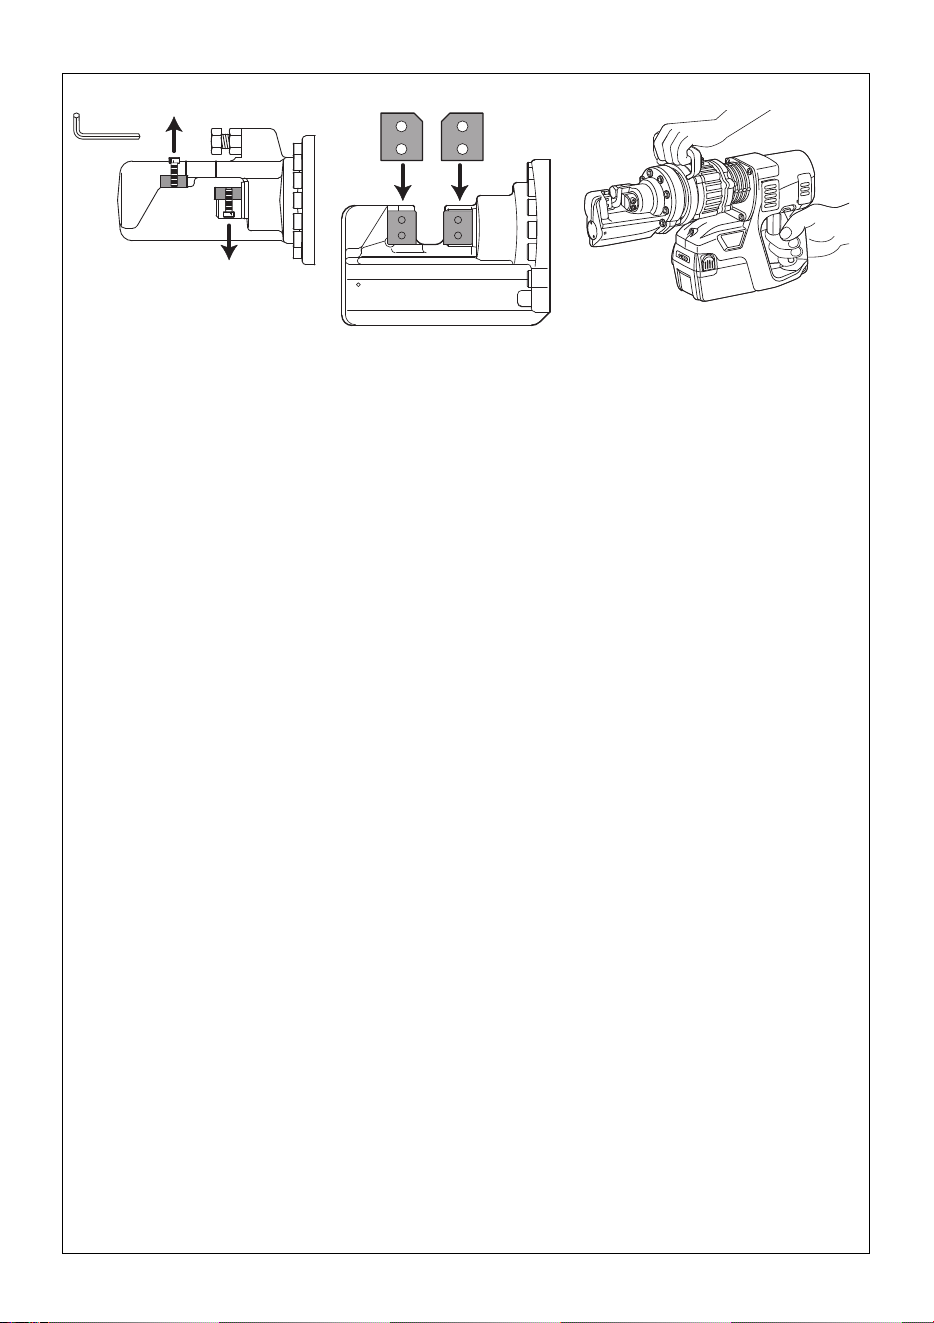
2. HOW TO CUT THE MATERIAL
• Keep hands away from moving parts.
•
When you cut rebar short, the cut piece may
be thrown, therefore make sure the area
around you is safe before cutting the rebar.
• If oil or grease gets on the grip, wipe it off
completely.
If oil or grease is left on the grip, your hand may
slip and the tool will fall.
•
Insert the rebar (Fig.H 28) between the blades
until it touches the bottom (Fig.H 31) and cut
the rebar.
• If the trigger is left engaged after operation,
the Cutter Rod restarts after cutting
through the rebar. Therefore, release the
trigger after cutting the rebar.
1 Loosen the lock nut with the included
wrench. (Fig.A 11)
2 Use the adjusting bolt so that the rebar is
set at a right angle to the tool. (Fig.A 10)
3 Tighten the lock nut with the wrench.
4 Insert the rebar (Fig.H 28) to be cut be-
tween the blades. (Fig.H 29)
5 Set the rebar at the position you want to
cut, pull the trigger and operate the Cut-
ter Rod (Fig.H 30). Keep the trigger pulled
until cutting is complete. The Cutter Rod
automatically returns to the start position
when the Cutter Rod cuts the rebar and
arrives at the stroke end.
6 Release the switch to remove the rod bar.
3. HOW TO USE THE VALVE BOLT
NOTICE:
Do not turn the Valve Bolt more than necessary.
Excessive turning may cause oil to leak or parts
to go missing.
1 To withdraw the Cutter Rod halfway through
cutting, loosen the Valve Bolt. (Fig.I)
Loosening the bolt by about one turn in the
counterclockwise direction (Fig.I 32) with a
coin or screwdriver returns the Cutter Rod to
the start position.
2 To resume cutting, securely tighten the bolt
in the clockwise direction (Fig.I 33). If the bolt
is loose, the rebar cannot be cut.
4. ROTATION MECHANISM OF THE
HEAD
• When turning the head, keep your fingers
off the trigger. The Cutter Rod may operate,
causing injury or accident. (Fig.F)
1
The head can be rotated by 360° (Fig.J)
5. HOW TO LIFT AND CARRY
• Hold the grip and side handle firmly and
keep your fingers off the trigger when lift-
ing and transporting. (Fig.M)
WARNING
WARNING
CAUTION
WARNING
16
6. HOW TO CHANGE THE BLADES
• To change the blades, be sure to remove
the battery from the tool.
• Use due caution when handling the blades
because they are sharp.
• Pay attention to the direction in which the
blades are installed. (Fig.L)
• Securely tighten the hexagon bolts that
lock the blade in place. (Fig.K)
1 Loosen the hexagon bolts (2 for each
blade) that lock the blade in place with
the hexagon wrench #4 and remove the
old blade.
2 Set the new blade as shown in the Fig.L
and securely tighten the hexagon bolts.
7. MAINTENANCE
• Before inspecting the tool, make sure that
the Battery pack is not set in the tool.
Failure to do so may cause serious injury.
• Before inspecting the Battery charger,
make sure that the Charger is disconnected
from the power supply.
1 Regularly inspect the tool
In order to maintain the performance of the
tool, periodically clean up and inspect the
tool.
Examine the screws regularly to make sure
they are securely tightened.
Incomplete tightening may result in an acci-
dent or breakage. If a screw is loose, retight-
en it completely.
2 Do not lubricate the equipment
Absolutely do not lubricate this equipment.
Applying lubrication will remove the grease
inside of the tool, and cause problem on the
tool.
3 Do not soak the tool to any liquids. Do not
put any liquid except the specified oil in
the tool.
8. STORAGE
Do not store the tool in a cold weather environ-
ment. Keep the tool in a warm area.
When not in use, the tool should be stored in a
warm and dry place. Keep out of reach of chil-
dren. All quality tools will eventually require serv-
icing or replacement of parts because of wear
from normal use.
STORE THE TOOL
When you have finished using the tool or when
the tool will not be used for a while, remove the
battery pack from the tool. Tool, attachments and
accessories should be stored in a well-ventilated
dry place where the temperature will not exceed
40°C (104°F) and not become less than -20°C
(-4°F).
The battery pack, with a pack cap installed on
the pack's terminal to prevent short circuits,
should be stored in a well-ventilated dry place
where the temperature will not exceed 30°C
(86°F) and not become less than -20°C (-4°F).
WHEN STORING THE BATTERY PACK FOR A
LONGER TIME THAN 6 MONTHS WITHOUT
USE,
TO KEEP THE PERFORMANCE OF THE BAT-
TERY PACK, FOLLOW THESE INSTRUC-
TIONS ;
• Fully recharge before storage.
• Put a Pack cap on the Battery pack’s termi-
nal to prevent short circuits.
• Store the Battery pack in a well-ventilated
dry place where the temperature will not be
less than -20°C(-4°F) and will not exceed
30°C (86°F).
• Do not store the Battery pack in a place
where is under direct sunshine.
CAUTION
WARNING
CAUTION
17
INHALTSVERZEICHNIS
1.
BEZEICHNUNG DER TEILE
..............................................17
2. ALLGEMEINE SICHERHEITSHINWEISE FÜR DAS
ELEKTROGERÄT ............................................................18
3.
SICHERHEITSHINWEISE FÜR BAUSTAHLSCHNEIDER
....20
4. TECHNISCHE DATEN .....................................................23
5. VERWENDUNG DES AKKUS..........................................25
6. BETRIEBS- ANLEITUNG.................................................27
7. WARTUNG .......................................................................28
8. LAGERUNG......................................................................28
1. BEZEICHNUNG DER TEILE
(siehe Abb. A und B)
DEUTSCH
BETRIEBSANLEITUNG
Abb. A
1KOPF
2 MESSER
3 SCHERKOLBEN
4 ÖLSCHRAUBE
5 BETÄTIGUNGSSCHALTER
6MOTOR
7 AKKU JPL92530A
8 SICHERHEITSSPERRSCHALTER
9 VENTILSCHRAUBE
10 EINSTELLSCHRAUBE
11 SICHERUNGSMUTTER
12 TYPENAUFKLEBER
13 GRIFF
14 SEITENGRIFF
Abb. B
15 SCHUTZKAPPE
16 ANSCHLUSS
17 LÜFTUNGSÖFFNUNG
18 VERRIEGELUNG
19 TYPENAUFKLEBER
20 AKKULADESTAND-ANZEIGE
21 AKKULADESTAND-PRÜFTASTE
Übersetzung der Originalanleitung

18
2. ALLGEMEINE
SICHERHEITSHINWEISE
FÜR DAS ELEKTROGERÄT
1. SICHERHEIT IM ARBEITSBEREICH
•
Der Arbeitsbereich muss sauber
gehalten werden und beleuchtet sein.
In unordentlichen oder dunklen
Arbeitsbereichen besteht die Gefahr von
Unfällen.
•
Elektrogeräte sollten nicht in einer
explosionsfähigen Atmosphäre wie z.
B. in der in Nähe von brennbaren
Flüssigkeiten, Gasen oder Staub
betrieben werden. Elektrogeräte
erzeugen Funken, die den Staub oder die
Dämpfe entzünden können.
•
Während des Betriebs von
Elektrogeräten sollten Kinder und
andere Personen ferngehalten werden.
Ablenkungen zum Verlust der Kontrolle
über das Gerät führen.
2. ELEKTRISCHE SICHERHEIT
•
Die Stecker des Elektrogeräts müssen
zu den Steckdosen passen. Der
Stecker darf niemals verändert
werden. Verwenden Sie für geerdete
Elektrogeräte niemals Adapterstecker.
Unveränderte Stecker und passende
Steckdosen verringern das Risiko von
Stromschlägen.
• Vermeiden Sie Körperkontakt mit
geerdeten Oberflächen wie z. B. von
Leitungen, Heizkörpern, Öfen und
Kühlschränken. Wenn Ihr Körper
geerdet ist, besteht ein erhöhtes Risiko
elektrischer Schläge.
•
Setzen Sie Elektrogeräte niemals Regen
oder feuchten Umweltbedingungen aus.
Das Eindringen von Wasser in Elektrogeräte
erhöht das Risiko elektrischer Schläge.
• Das Kabel darf nicht missbräuchlich
verwendet werden. Verwenden Sie das
Kabel niemals zum Tragen, Ziehen
oder Ausschalten des Elektrogeräts.
Halten Sie das Kabel von Hitze,
Ö
l,
scharfen Kanten oder beweglichen
Teilen fern. Beschädigte oder
verwickelte Kabel erhöhen das Risiko von
elektrischen Schlägen.
•
Beim Außenbetrieb eines Elektrogeräts
müssen hierfür geeignete
Verlängerungskabel verwendet
werden.
Verwenden Sie ein für den
Außenbetrieb geeignetes
Verlängerungskabel, um das Risiko von
elektrischen Schlägen zu verringern.
• Wenn das Elektroger
ä
t an einem
feuchten Ort eingesetzt werden muss,
verwenden Sie eine
Fehlerstromschutzvorrichtung.
Dadurch wird das Risiko von elektrischen
Schl
ä
gen verringert.
•
Das Werkzeug darf nicht bei Regen, in
der Nähe von Spritzwasser oder an
einem nassen oder feuchten Ort
verwendet werden. Die Verwendung
des Werkzeugs unter den genannten
oder ähnlichen Bedingungen erhöht das
Risiko von elektrischen Schlägen,
gefährlichen Fehlfunktionen und
Überhitzung.
3. SICHERHEIT VON PERSONEN
•
Seien Sie beim Betrieb eines
Elektrogeräts wachsam, und gehen
Sie umsichtig und vernünftig vor.
Verwenden Sie keine Elektrogeräte,
wenn Sie müde sind oder unter dem
Einfluss von Drogen, Alkohol oder
Medikamenten stehen. Eine kurze
Unaufmerksamkeit kann beim Betrieb
von Elektrogeräten zu schweren
Verletzungen führen.
• Verwenden Sie eine Schutzausrüstung.
Tragen Sie stets einen Augenschutz.
Mithilfe einer den Bedingungen
angepassten Schutzausrüstung (z.B.
Staubschutzmasken, rutschfesten
Sicherheitsschuhen, Schutzhelmen oder
einem Gehörschutz) können Sie das
Risiko von Verletzungen verringern.
Lesen Sie alle Sicherheitswarnungen,
Anweisungen, Darstellungen und
Spezifikationen, die mit diesem
Elektrowerkzeug mitgeliefert werden.
Werden nicht alle der folgenden Anweisungen
beachtet kann dies zu elektrischen Schlägen,
Bränden und/oder schweren Verletzungen
f
ü
hren.
Bewahren Sie alle Warnungen und
Anweisungen auf, damit diese später
eingesehen werden können.
Der Begriff
„Elektrogerät“ bezieht sich in den Warnungen
auf Ihr netz- (kabelgebundenes) oder
batteriebetriebenes (kabelloses) Elektrogerät.
WARNUNG

19
•
Vermeiden Sie einen versehentlichen
Gerätestart. Stellen Sie vor dem
Anschließen an die Stromquelle und/oder
den Akku, dem Aufnehmen oder dem
Transportieren des Gerätes sicher, dass
sich der Schalter in der Stellung OFF
befindet.
Wenn Sie beim Tragen des Geräts
einen Finger an den Schalter legen oder
dieses in eingeschaltetem Zustand mit Strom
versorgen, besteht das Risiko von Unfällen.
• Entfernen Sie vor dem Einschalten des
Elektrogeräts alle Einstellschlüssel
vom Elektrogerät.
Ein an einem Drehteil des Elektrogeräts
verbliebener Schlüssel kann zu
Verletzungen führen.
• Wählen Sie keinen zu großen
Arbeitsradius. Achten Sie stets auf
ausreichenden Halt und Ihr
Gleichgewicht. Auf diese Weise können
Sie das Elektrogerät in unerwarteten
Situationen besser kontrollieren.
•
Tragen Sie angemessene Kleidung.
Tragen Sie keine offenen Kleidungsstücke
oder Schmuck.
Halten Sie Ihre Haare und
Kleidungsstücke von beweglichen Teilen
fern.
Offene Kleidungsstücke, Schmuck oder
lange Haare können sich in beweglichen
Teilen verfangen.
•
Wenn Geräte für den Anschluss von
Entstaubungs- oder
Sammelvorrichtungen vorhanden sind,
müssen diese ordnungsgemäß
angeschlossen und verwendet werden.
Durch eine Entstaubung können vom Staub
ausgehende Gefahren verringert werden.
•
Fühlen Sie sich nicht durch die
Vertrautheit aufgrund der häufigen
Verwendung der Werkzeuge zu sicher und
ignorieren Sie nicht die
Sicherheitsanweisungen zu den Geräten.
Fahrlässiges Handeln kann innerhalb von
Sekunden zu schweren Verletzungen führen.
4. VERWENDUNG UND PFLEGE DES
ELEKTROGERÄTS
•
Gehen Sie bei der Verwendung des
Elektrogeräts nicht gewaltsam vor.
Verwenden Sie das für Ihr Vorhaben
geeignete Elektrogerät.
Mit einem
geeigneten Elektrogerät können Sie Ihre
Aufgabe besser, sicherer und in der
gewünschten Geschwindigkeit ausführen.
• Verwenden Sie das Elektrogerät nicht,
wenn es sich nicht mit dem Schalter
ein- und ausschalten lässt.
Elektrogeräte, die nicht über den Schalter
gesteuert werden können, sind gefährlich
und müssen repariert werden.
•
Trennen Sie vor dem Durchf
ü
hren von
Anpassungen, dem Wechseln von
Zubeh
ö
r oder dem Einlagern des Ger
ä
ts
den Stecker von der Stromquelle und/
oder dem Akku, falls herausnehmbar.
Durch diese Vorsichtsmaßnahme
verringern Sie das Risiko eines
versehentlichen Gerätestarts.
•
Bewahren Sie nicht verwendete
Elektrogeräte außerhalb der Reichweite von
Kindern auf. Gestatten Sie Personen, die das
Gerät oder diese Anweisungen nicht kennen
niemals den Betrieb des Elektrogeräts.
Von
ungeschulten Personen verwendete
Elektrogeräte können gefährlich sein.
•
Warten Sie Ihre Elektrowerkzeuge und
das Zubeh
ö
r. Prüfen Sie die
beweglichen Teile auf
Ausrichtungsfehler, Bindungen oder
Brüche sowie auf jegliche anderen
Umstände, die den Betrieb des
Elektrogeräts beeinflussen können.
Lassen Sie das Gerät bei
Beschädigungen vor der Inbetriebnahme
reparieren.
Viele Unfälle entstehen
aufgrund schlecht gewarteter Elektrogeräte.
• Halten Sie die Schneidwerkzeuge
scharf und sauber. Ordnungsgemäß
gewartete Schneidwerkzeuge mit scharfen
Schnittkanten bleiben seltener stecken
und lassen sich einfacher steuern.
•
Verwenden Sie das Elektrogerät, das
Zubehör, die Werkzeugeinsätze usw. im
Rahmen dieser Anweisungen, und
berücksichtigen Sie die
Arbeitsbedingungen und die ausführende
Arbeit.
Wenn das Elektrogerät für
unangemessene Arbeiten eingesetzt wird,
kann dies zu gefährlichen Situationen führen.
•
Griffe und Fassflächen müssen trocken,
sauber und öl- und schmutzfrei bleiben.
Rutschige Griffe und Fassflächen
garantieren keine sichere Bedienung und
Steuerung des Werkzeugs, wenn
unerwartete Situationen eintreten.

20
5. Verwendung und Pflege von batteriebe-
triebenen Werkzeugen
•
Laden Sie Akkus nur mit dem vom Hers-
teller angegebenen Ladegerät auf.
Ein für
einen bestimmten Akkutyp geeignetes La-
degerät kann bei der Verwendung mit einem
anderen Akku zu einem Brandrisiko führen.
•
Verwenden Sie Elektrowerkzeuge auss-
chließlich mit den dafür vorgesehenen
Akkus.
Die Verwendung anderer Akkus
kann zu Verletzungen oder Bränden führen.
•
Halten Sie nicht verwendete Akkus fern
von anderen Metallgegenständen wie z.B.
Büroklammern, Münzen, Schlüsseln,
Nägeln, Schrauben oder anderen kleinen
Metallgegenständen, die eine Verbindung
zwischen den Klemmen herstellen kön-
nen.
Kurzschlüsse der Akkuklemmen können
Verbrennungen oder Brände verursachen.
• Bei ungeeigneten Bedingungen kann
Flüssigkeit aus dem Akku austreten.
Vermeiden Sie den direkten Kontakt.
Waschen Sie die Flüssigkeit bei verse-
hentlichem Kontakt ab. Wenn die Flüs-
sigkeit in die Augen gelangt, wenden Sie
sich zudem an einen Arzt. Die aus dem
Akku ausgetretene Flüssigkeit kann zu Rei-
zungen oder Verbrennungen führen.
•
Verwenden Sie keinen Akku und kein Gerät,
das beschädigt oder verändert ist.
Be-
schädigte oder veränderte Akkus können durch
unerwartetes Verhalten zu Bränden, Explosio-
nen und einem Verletzungsrisiko führen.
•
Setzen Sie Akkus und Werkzeuge nicht
Feuer oder hohen Temperaturen aus.
Die
Belastung durch Feuer oder Temperaturen
über 130 °C können zu einer Explosion führen.
•
Befolgen Sie die Ladeanweisungen und laden
Sie den Akku oder das Werkzeug nicht außer-
halb des in der Anleitung angegebenen Tem-
peraturbereichs auf.
Unsachgemäßes Aufladen
und Aufladen bei Temperaturen außerhalb des
angegebenen Temperaturbereichs können den
Akku beschädigen und erhöhen das Brandrisiko.
•
Lithium-Ionen-Akkus unterliegen Versandbe-
schränkungen.
F
ü
r den Transport wenden Sie
sich bitte im Voraus an das Transportunterneh-
men oder die Fluggesellschaft.
6. WARTUNG
•
Lassen Sie Ihr Elektrogerät von einem
qualifizierten Reparaturfachmann unter
Verwendung identischer Ersatzteile
warten.
Dadurch wird die dauerhafte
Sicherheit Ihres Elektrogeräts gewährleistet.
• Warten Sie niemals beschädigte
Akkus. Das Warten von Akkus sollte nur
durch den Hersteller oder autorisierte
Dienstleister durchgeführt werden.
3. SICHERHEITSHINWEISE FÜR
BAUSTAHLSCHNEIDER
1. DIE HÄNDE VON BEWEGLICHEN TEILEN
FERNHALTEN
2. UNBEDINGT DIE HÄNDE VOM
BETÄTIGUNGSSCHALTER FERNHALTEN
UND DEN AKKU ABNEHMEN, WENN DAS
MESSER AUSGETAUSCHT WIRD, WENN
UNREGELMÄSSIGKEITEN AUFTRETEN
ODER WENN DAS GERÄT NICHT
VERWENDET WERDEN SOLL
Wenn der Akku in den genannten Situationen
nicht abgenommen wird, können Ausfälle oder
Schäden verursacht werden.
3. DAS WERKZEUG DARF NIEMALS
VERÄNDERT WERDEN
Durch Verändern des Werkzeugs werden die
Leistung und die Betriebssicherheit
beeinträchtigt. Jegliche Veränderung kann zu
schweren Verletzungen führen und macht die
Garantie ungültig.
4. DAS WERKZEUG IMMER IN EINEM GUTEN
BETRIEBSZUSTAND HALTEN
(VOR DER VERWENDUNG DIE FESTIGKEIT
DER SCHRAUBEN PRÜFEN)
Das Werkzeug muss frei von Verschleiß und
Schäden gehalten werden, um einen sicheren
Betrieb und eine optimale Leistung zu gewährleisten.
Bei normalem Betrieb erzeugt das Werkzeug
Schwingungen. Durch die Schwingungen können
sich Schrauben lösen, wodurch Schäden am
Werkzeug oder schwere Verletzungen verursacht
werden können.
Der Handgriff des Werkzeugs muss trocken und
sauber und insbesondere frei von Öl und Fett
gehalten werden.
5. VOR DER VERWENDUNG DAS WERKZEUG
EINIGE MINUTEN WARMLAUFEN LASSEN
In kalter Umgebung oder wenn das Werkzeug
längere Zeit nicht verwendet wurde, ist die interne
Schmierung des Werkzeugs möglicherweise
unzureichend. In solchen Fällen das Werkzeug
zum Aufwärmen einige Minuten lang ohne
Belastung betreiben. Bei unzureichender interner
Schmierung erreicht das Werkzeug
möglicherweise nicht seine volle Leistung.
6. BEI VERWENDUNG DES WERKZEUGS AN
ERHÖHTEN STELLEN DARF SICH NIEMAND
DARUNTER AUFHALTEN
Anderenfalls können schwere Verletzungen der sich
darunter befindlichen Personen verursacht werden.
21
7. DAS WERKZEUG MIT BEIDEN HÄNDEN
SICHER FESTHALTEN
Anderenfalls können schwere Verletzungen
verursacht werden.
8. DAS WERKZEUG NICHT LAUFEN LASSEN
Das Werkzeug nur in Betrieb setzen, wenn es in
der Hand gehalten wird.
9. NUR DEN ZUGELASSENEN AKKU
VERWENDEN
Nur den Akku MAX JPL92530A verwenden.
Wenn das Werkzeug an eine andere
Spannungsversorgung als den zugelassenen
Akku angeschlossen wird, wie einen
Standardakku, eine Trockenzelle oder eine
Starterbatterie für den Kfz-Einsatz, kann das
Werkzeug beschädigt werden, ausfallen, sich
überhitzen oder sogar Feuer fangen. Für dieses
Werkzeug keine andere Spannungsversorgung
als den Akku MAX JPL92530A verwenden.
10. DEN AKKU VOR DER VERWENDUNG VOLL
AUFLADEN, UM DIE MAXIMALE LEISTUNG
ZU GEWÄHRLEISTEN
Ein neuer oder lange nicht verwendeter Akku
kann sich entladen haben und muss dann wieder
vollständig aufgeladen werden. Vor der
Verwendung des Werkzeugs unbedingt den Akku
mit dem zugelassenen Ladegerät aufladen.
11. DIE LÜFTUNGSÖFFNUNG DES WERKZEUGS
NICHT VERSPERREN. DIE LÜFTUNGSÖFFNUNG
UNBEDINGT VON GEGENSTÄNDEN FREIHALTEN.
Das Werkzeug kann sich sonst übermäßig
erhitzen, schmoren oder ausfallen.
Fremdgegenstände könnten aus dem Werkzeug
ausgeworfen werden und Personen gefährden.
12. DAS WERKZEUG NICHT ÜBER LÄNGERE
ZEIT UNUNTERBROCHEN VERWENDEN.
Die Motortemperatur und die Öltemperatur
können dann so stark ansteigen, dass das
Werkzeug keine ausreichende Leistung mehr
erbringt.
13. DAS WERKZEUG NICHT FALLEN LASSEN.
Dies kann Beschädigungen oder Fehlfunktionen
verursachen.
Bei Arbeiten in der Höhe besonders auf die
Arbeitsumgebung und umstehende Personen achten.
14. NUR VORGESCHRIEBENE MESSER UND
ZUBEHÖRTEILE VERWENDEN.
Nicht freigegebene Messer und Zubehörteile können
nicht nur Funktionsstörungen verursachen, sondern
auch zu Verletzungen oder Unfällen führen.
15. NUR DAS VORGESCHRIEBENE
HYDRAULIKÖL VERWENDEN.
Nicht freigegebenes Öl kann zu Funktionsstörungen
und Leistungsminderungen führen und das
Werkzeug beeinträchtigen.
16. BEIM SCHNEIDEN VON BAUSTAHL WIRD
DAS ABGETRENNTE STÜCK
MÖGLICHERWEISE, WIE OBEN GEZEIGT,
AUSGEWORFEN. ES IST DAHER VOR DEM
SCHNEIDEN DARAUF ZU ACHTEN, DASS
DER UMGEBUNGSBEREICH GESICHERT IST.
17. VORSICHTSMASSNAHMEN BEIM AUFLADEN
DES AKKUS
1 Nur zugelassene Ladegeräte und Akkus
verwenden.
Anderenfalls kann der Akku überhitzt werden
oder Feuer fangen, was zu schweren
Verletzungen führen kann.
2 Den Akku mit der vorgeschriebenen
Spannung aufladen.
Anderenfalls besteht die Gefahr der
Überhitzung oder unsachgemäßen Aufladung,
was zu Verletzungen führen kann.
3 Niemals einen Transformator verwenden
4 Das Ladegerät niemals an den
Gleichstromanschluss eines Stromerzeugers
anschließen
Das Ladegerät wird beschädigt werden oder
durchbrennen.
5 Den Akku niemals im Regen, an einem
feuchten Platz oder unter Einwirkung von
Spritzwasser aufladen
Das Ladegerät ist für den Gebrauch in
Innenräumen vorgesehen. Durch Aufladen
eines feuchten oder nassen Akkus werden
elektrische Schläge oder Kurzschlüsse
verursacht, was zu Schäden durch
Durchbrennen führen kann, wobei das
Werkzeug sogar Feuer fangen kann.
6 Das Netzkabel und den Stecker nicht mit
nassen Händen oder Handschuhen berühren
Dadurch können Verletzungen durch
elektrische Schläge verursacht werden.
7 Das Ladegerät nicht mit einem Tuch oder
anderen Gegenständen abdecken,
während der Akku aufgeladen wird
Das Ladegerät würde überhitzen und
durchbrennen oder könnte sogar Feuer fangen.
8 Den Akku und das Ladegerät von
Wärmequellen und offenem Feuer fernhalten
9 Den Akku nicht in der Nähe von
brennbaren Materialien aufladen
Gefährlicher Bereich

22
10 Den Akku an einem gut belüfteten Ort
aufladen
Den Akku nicht unter direkter
Sonneneinstrahlung aufladen.
11 Dauerbetrieb des Ladegeräts vermeiden
Das Ladegerät zwischen Aufladungen 15
Minuten abkühlen lassen, um Störungen des
Geräts zu vermeiden.
12 Gegenstände, die die Lüftungsöffnungen
oder den Akku-Steckplatz abdecken,
können elektrische Schläge oder
Betriebsstörungen verursachen
Das Ladegerät nicht unter Einwirkung von
Staub oder anderen Fremdkörpern betreiben.
13 Das Netzkabel sorgfältig handhaben
Das Ladegerät niemals am Netzkabel tragen.
Niemals am Netzkabel ziehen, um den
Netzstecker aus der Netzsteckdose zu ziehen,
weil dadurch das Kabel beschädigt wird oder
ein Kurzschluss verursacht werden kann. Das
Netzkabel vor Kontakt mit scharfen Kanten,
heißen Gegenständen sowie Öl und Fett
schützen. Ein beschädigtes Kabel muss
repariert oder ersetzt werden.
14 Mit diesem Ladegerät dürfen keine (nicht
wiederaufladbaren) Batterien aufgeladen
werden.
15 Dieses Ladegerät ist nicht für den
Gebrauch durch Kinder oder Personen mit
Behinderungen ohne Beaufsichtigung
vorgesehen.
16 Kinder müssen beaufsichtigt werden, um
zu gewährleisten, dass sie nicht mit dem
Ladegerät spielen.
17 Den Akku-Anschluss mit einer
Schutzkappe abdecken
Wenn der Akku nicht verwendet wird, den
Anschluss mit einer Schutzkappe abdecken,
um Kurzschlüsse zu vermeiden.
Akkus müssen von Metallgegenständen wie
Klammern, Münzen, Schlüsseln, Nägeln,
Schrauben und Ähnlichem ferngehalten
werden, da die Anschlussklemmen dadurch
kurzgeschlossen werden können.
18 Das Werkzeug im Sommer nicht in einem
Fahrzeug oder unter direkter
Sonneneinstrahlung liegen lassen oder
verstauen. Wenn das Werkzeug hohen
Temperaturen ausgesetzt wird, kann der
Akku Schaden nehmen.
19 Einen vollständig entladenen Akku nicht
lagern. Wenn ein vollständig entladener
Akku abgenommen und längere Zeit nicht
verwendet wird, kann er dadurch Schaden
nehmen. Einen entladenen Akku
unverzüglich aufladen.
20Verwenden Sie eine Schutzausrüstung
Mithilfe einer den Bedingungen
angepassten Schutzausrüstung wie
einem Handschutz können Sie das Risiko
von Verletzungen verringern.

23
4. TECHNISCHE DATEN
<Akku> Separat erhältlich
* Lithium-Ionen-Akkus mit mehr als 100 Wh elektrischer Energie sind als Gefahrgut eingestuft.
Für den Transport kontaktieren Sie bitte das Transportunternehmen oder die Fluggesellschaft im Voraus.
Die elektrische Energie des Max Lithium-Ionen-Akkus ist auf dem Typenschild des Akkus aufgedruckt.
Der JPL92550A ist als als Gefahrgut mit einer elektrischen Energie von 123,5 Wh eingestuft.
<Akku-Ladegerät> Separat erhältlich
PRODUKTBEZEICHNUNG Lithium-Ionen-Akku
PRODUKT-NR. JPL92550A
AKKUTYP Lithium-Ionen-Akku
NENNSPANNUNG 25,2 V Gleichspannung
NENNKAPAZITÄT 4,9 Ah (4.900 mAh)
LADEDAUER
(MIT JC925A(CE))
Ca. 80 Minuten (ca. 80 % der Kapazität)
Vollladung – ca. 100 Minuten (ca. 100 % der Kapazität)
ZUBEHÖR Schutzkappe (zum Verhindern von Kurzschlüssen)
GEWICHT 0,9 kg (2,4 lbs.)
LADETEMPERATUR 5 °C bis 40 °C (41 °F bis 104 °F)
BETRIEBSTEMPERATUR 0 °C bis 40 °C (32 °F bis 104 °F)
BETRIEBSFEUCHTIGKEIT 80 % relative Feuchtigkeit oder weniger
PRODUKTBEZEICHNUNG Lithium-Ionen-Akku-Ladegerät
PRODUKT-NR. JC925A(CE)
EINGANG 100 - 240 V Wechselstrom, 50/60 Hz, 2,2 A
AUSGANG 14,4 V Gleichstrom, 4,0 A; 18 V Gleichstrom, 4,0 A; 25,2 V Gleichstrom, 2,8 A
GEWICHT 0,7 kg (1,7 lbs.)
BETRIEBSTEMPERATUR 5 °C bis 40 °C (41 °F bis 104 °F)
BETRIEBSFEUCHTIGKEIT 80 % relative Feuchtigkeit oder weniger
1. TECHNISCHE DATEN DES WERKZEUGS
PRODUKT-NR. PJRC160
GEWICHT 7,6kg (16,8 lbs.) (inkl. Akku)
HÖHE 228 mm (9")
BREITE 100 mm (4")
LÄNGE 389 mm (15-3/8")
HYDRAULIKÖL EXXON MOBIL SHC524
SPANNUNG / AKKU
25,2 V,
Lithium-Ionen-Akku
MAXIMALER
SCHNEIDDURCHMESSER
φ16 mm (#5)
MOTOR Bürstenloser Gleichstrommotor
BETRIEBSTEMPERATUR
-5 °C bis 40 °C (14 °F bis 104 °F)
BETRIEBSFEUCHTIGKEIT
80 % relative Feuchtigkeit oder
weniger
ZUBEHOR PJRC160
Tragekoffer
Seitengriff
SECHSKANTSTIFTSCHLÜSSEL 4
SCHRAUBENSCHLÜSSEL 17
SCHRAUBENDREHER
ÖL SHC524

24
2. TECHNISCHE DATEN
1 GERÄUSCHPEGEL
Typischer A-bewerteter Geräuschpegel,
ermittelt gemäß EN62841:
• Schalldruckpegel (L
pA
):91dB (A)
• Schallleistungspegel (L
WA
):80dB (A)
• Messunsicherheit (K):3dB (A)
2 SCHWINGUNGEN
Schwingungsgesamtwert (dreiaxiale
Vektorsumme), ermittelt gemäß EN62841:
• Schwingungsemission: (a
h
,
HD
):≤2,5 m/
s
2
• Messunsicherheit (K):1,5 m/s
2
Information:
- dass die angegebenen Vibrationsgesamt-
werte und die angegebenen Geräusche-
missionswerte auch in einer vorläufigen
Expositionsbewertung verwendet werden
können.
Warnung:
- dass die Vibrations- und Geräuschemis-
sion während der tatsächlichen Nutzung
des Elektrowerkzeugs je nach Verwend-
ungsart des Werkzeugs und insbesondere
der Art des verarbeiteten Werkstücks von
den angegebenen Werten abweichen kön-
nen
und
- dass unbedingt Sicherheitsmaßnahmen
zum Schutz des Anwenders bestimmt wer-
den müssen, die auf einer Schätzung der
Exposition unter tatsächlichen Nutzungs-
bedingungen basieren (unter Berücksichti-
gung aller Abschnitte des Betriebszyklus,
wie etwa der Zeiten, zu denen das
Werkzeug ausgeschaltet oder im Leerlauf
ist, zusätzlich zur Auslösezeit).
3 STRAHLENEMISSION 30 – 1.000 MHz
Klasse B
4 Überspannungskategorie
5 Verunreinigungsgrad
Verunreinigungsgrad: Grad 4 gemäß IEC
60664-1 (sowohl PJRC160 als auch
JC925A(CE)).
3. EINSATZGEBIETE
Schneiden folgender Materialien
• Baustahl
• Bolzen
• Stahlmatten
4. PRODUKTIONSJAHR
Dieses Produkt trägt die
Produktionsnummer am Gehäuse. Die zwei
Ziffern ganz links geben das Produktionsjahr
an.
Gehörschutz tragen
PRODUKT
Überspannungskategorie
PJRC160 AKKU-
BEWEHRUNGSSCHNEIDER
Batterie
gemäß
IEC 60664-1
JPL92530A
AKKU
Kategorie I
gemäß
IEC 60664-1
JC925A(CE)
AKKU-LADEGERÄT
Kategorie II
gemäß
IEC 60664-1
(Beispiel)
1 9 8 2 6 0 3 5 D
Jahr 2019

25
5. VERWENDUNG DES AKKUS
STÖRUNGEN DER AKKUS
Wenden Sie sich in den folgenden Fällen mit
dem Akku und Ladegerät an Ihren Händler.
• Die rote Ladelampe blinkt nicht, wenn der
Netzstecker des Ladegeräts an eine
Netzsteckdose angeschlossen ist (wenn kein
Akku im Ladegerät eingesetzt ist).
• Weder die rote Ladelampe noch die
orangefarbene Bereitschaftslampe leuchtet
oder blinkt, wenn der Akku in das Ladegerät
eingesetzt wird.
• Nach mehr als 1 Stunde schaltet die
orangefarbene Bereitschaftslampe nicht auf
die rote Ladelampe um (außer bei niedrigen
Temperaturen).
• Nach mehr als 90 Minuten wechselt die rote
Ladelampe nicht von konstantem Leuchten zu
Blinken.
LEBENSDAUER DES AKKUS
Wenn der nachstehend beschriebene Zustand
eintritt, ist die Lebensdauer des Akkus
abgelaufen. Ersetzen Sie ihn durch einen neuen.
• Obwohl der Akku einwandfrei aufgeladen
wurde (voll aufgeladen), ist die Betriebsdauer
beträchtlich verkürzt.
HINWEIS:
• Laden Sie den Akku, wenn die Drehzahl des
Motors abnimmt (der Akku ist dann fast
entladen). Wenn das Werkzeug bei fast
entladenem Akku weiterverwendet wird,
wird der Akku zu sehr entladen, was zu
einer Verkürzung der Lebensdauer des
Akkus und auch zu Störungen des
Werkzeugs führen kann.
• Verwenden Sie keinen Akku, dessen
Lebensdauer abgelaufen ist.
Ansonsten können Störungen des
Werkzeugs verursacht werden. Aufladen
eines Akkus, dessen Lebensdauer
abgelaufen ist, kann außerdem zu
Störungen des Ladegeräts führen.
RECYCLING EINES LI-ION-AKKUS
Der MAX Akku ist ein Li-Ion-Akku, dessen
Entsorgung über den Hausmüll untersagt ist.
Erkundigen Sie sich bei den zuständigen
Entsorgungsdiensten über Recycling-
Möglichkeiten oder eine ordnungsgemäße
Entsorgung.
Setzen Sie vor der Entsorgung des Akkus die
Schutzkappe auf den Anschluss (und
befestigen Sie sie mit Klebeband), um
Kurzschlüsse zu verhindern.
VORSICHT

26
INFORMATIONEN ZUR ANZEIGE DES AKKULADEZUSTANDS
1 Um den Ladezustand des Akkus zu prüfen, drücken Sie die Akku-Ladezustandsprüftaste
(funktioniert nicht während des Ladevorgangs).
2 Die Akku-Ladezustandsanzeige leuchtet entsprechend dem Ladezustand des Akkus auf.
Anzeige des
Akku-Lade-
zustands
Akku-Ladezustand:
0 %
Akku-Ladezustand:
etwa 0 bis 10 %
Akku-Ladezustand:
etwa 10 bis 40 %
Akku-Ladezustand:
etwa 40 bis 70 %
Akku-Ladezustand:
etwa 70 bis 100 %
Alle Anzeigen
AUS
Eine rote Anzei-
ge blinkt
Eine rote Anzei-
ge EIN
Zwei rote Anzei-
gen EIN
Drei rote Anzei-
gen EIN

27
6. BETRIEBS- ANLEITUNG
1. ANBRINGEN / ABNEHMEN DES
AKKUS
• Vor dem Anbringen / Abnehmen des Akkus
an bzw. vom Werkzeug den
Sicherheitssperrschalter, wie in Abb.E
gezeigt, drücken und die Hände vom
Betätigungsschalter (Abb.F) fernhalten.
•
Vor der Verwendung sicherstellen, dass der
Akku richtig am Werkzeug angebracht ist.
Anderenfalls können schwere Verletzungen
verursacht werden.
1
(Abb.C) Zum Anbringen den Akku so in das
Werkzeug einsetzen, dass die Schienen des
Akkus und des Werkzeugs zusammenpassen.
Den Akku bis zum Anschlag schieben, sodass
er hörbar einrastet. Die Verriegelungen
(Abb.C 16) müssen in ihre ursprünglichen
Positionen zurückkehren.
2 Zum Abnehmen des Akkus vom
Werkzeug an beiden Seiten auf die
Verriegelung drücken und dabei den
Werkzeuggriff gut halten.
2. SCHNEIDEN DES MATERIALS
•
Die Hände von beweglichen Teilen fernhalten.
•
Beim Schneiden von Baustahl wird das
abgetrennte Stück möglicherweise ausgeworfen.
Es ist daher vor dem Schneiden darauf zu achten,
dass der Umgebungsbereich gesichert ist.
• Falls der Griff ölig oder fettig ist, den Griff
gut abwischen.
Das Werkzeug könnte bei einem öligen oder
fettigen Griff aus der Hand fallen.
•
Die Baustahlstange (Abb.H 28) zwischen die
Messer bis zum Boden führen (Abb.H 31) und
die Baustahlstange abschneiden.
• Falls der Betätigungsschalter nach dem
Betrieb weiter betätigt wird, läuft der
Scherkolben nach dem Schneiden der
Baustahlstange wieder an. Den
Betätigungsschalter nach Schneiden der
Baustahlstange daher loslassen.
1
Die Sicherungsmutter mit dem beiliegenden
Schlüssel lösen. (Abb.A 11)
2
Die Einstellschraube so drehen, dass die
Baustahlstange im richtigen Winkel zum
Werkzeug angeordnet ist. (Abb.A 10)
3
Die Sicherungsmutter mit dem Schlüssel
anziehen.
4
Die zu schneidende Baustahlstange (Abb.H
26) zwischen die Messer führen. (Abb.H 29)
5
Das Werkzeug an der Stelle platzieren, an der
die Baustahlstange geschnitten werden soll,
und den Betätigungsschalter ziehen, um den
Scherkolben in Gang zu setzen (Abb.H 30).
Den Betätigungsschalter so lange ziehen, bis
der Schneidvorgang abgeschlossen ist. Der
Scherkolben kehrt automatisch in die
Ausgangsstellung zurück, wenn der
Scherkolben die Baustahlstange durchtrennt
hat und am Hubende angekommen ist.
6
Den Schalter loslassen, um die
Baustahlstange zu entnehmen.
3. EINSTELLEN DER VENTILSCHRAUBE
HINWEIS:
Die Ventilschraube nicht weiter als notwendig
drehen. Durch übermäßiges Drehen kann Öl
austreten oder Teile können verloren gehen.
1
Die Ventilschraube lösen, um den
Scherkolben herauszuziehen, wenn der
Schneidvorgang nicht zu Ende geführt
worden ist. (Abb.I)
Um den Scherkolben in seine
Ausgangsstellung zu bringen, die Schraube
mit einer Münze oder einem Schraubendreher
um eine Umdrehung im Gegenuhrzeigersinn
lösen (Abb.I 32).
2
Die Schraube im Uhrzeigersinn fest anziehen
(Abb.I 33), um den Schneidvorgang
fortzusetzen. Eine Baustahlstange kann bei
gelöster Schraube nicht geschnitten werden.
4. DREHMECHANISMUS DES KOPFES
•
Beim Drehen des Kopfes die Finger vom
Betätigungsschalter nehmen. Der Scherkolben
könnte sich in Gang setzen und Verletzungen
oder einen Unfall verursachen. (Abb.F)
1
Der Kopf lässt sich um 360° drehen. (Abb.J)
5. HEBEN UND TRAGEN
• Halten Sie den Griff und den Seitengriff fest
und nehmen Sie Ihre Finger vom Auslöser,
WARNUNG
WARNUNG
VORSICHT
WARNUNG
28
wenn das Werkzeug angehoben und
transportiert wird. (Abb.M)
6. WECHSELN DER MESSER
•
Vor dem Wechseln der Messer den Akku vom
Werkzeug abnehmen.
•
Die Messer vorsichtig anfassen, da sie sehr
scharf sind.
•
Auf die richtige Einbaulage der Messer achten.
(Abb.L)
•
Die Innensechskantschrauben fest anziehen,
mit denen die Messer gesichert werden. (Abb.K)
1
Die Innensechskantschrauben (2 für jedes
Messer), mit denen das Messer befestigt ist,
mit einem Innensechskantschlüssel der
Größe 4 lösen und das alte Messer
herausnehmen.
2
Das neue Messer, wie in Abb.L gezeigt,
einsetzen und die Innensechskantschrauben
fest anziehen.
7. WARTUNG
• Vor Überprüfung des Werkzeugs
sicherstellen, dass der Akku nicht am
Werkzeug angebracht ist.
Anderenfalls können schwere Verletzungen
verursacht werden.
• Vor Überprüfung des Akku-Ladegeräts
sicherstellen, dass das Ladegerät von der
Netzsteckdose getrennt ist.
1 Das Werkzeug regelmäßig überprüfen
Das Werkzeug muss regelmäßig gereinigt
und überprüft werden, um die Leistung
aufrechtzuerhalten.
Regelmäßig die Schrauben daraufhin
prüfen, dass sie fest angezogen sind.
Nicht richtig angezogene Schrauben können
Unfälle oder Beschädigungen herbeiführen.
Lose Schrauben fest anziehen.
2 Das Gerät nicht schmieren
Dieses Gerät darf auf keinen Fall geschmiert
werden. Durch Schmieren wird das Fett aus
dem Werkzeug entfernt, wodurch Störungen
verursacht werden.
3 Das Gerät nicht in Flüssigkeit
eintauchen. Darauf achten, dass
abgesehen von dem vorgeschriebenen
Öl keine Flüssigkeit in das Gerät gelangt.
8. LAGERUNG
Das Werkzeug nicht in einer kalten Umgebung
aufbewahren. Das Werkzeug in einem warmen
Bereich aufbewahren.
Wenn das Werkzeug nicht verwendet wird, muss
es an einem warmen und trockenen Ort
aufbewahrt werden. Von Kindern fernhalten. An
allen Qualitätswerkzeugen müssen nach
gewisser Zeit Teile verschleißbedingt
ausgewechselt werden und das Werkzeug muss
einer Wartung unterzogen werden.
LAGERUNG DES WERKZEUGS
Nach dem Arbeiten mit dem Werkzeug oder
wenn das Werkzeug für längere Zeit nicht
verwendet werden soll, den Akku vom Werkzeug
abnehmen. Das Werkzeug, Zusätze und
Zubehör sollten an einem gut belüfteten,
trockenen Platz aufbewahrt werden, an dem die
Temperatur 40 °C (104 °F) nicht überschreitet
und nicht unter -20 °C (-4 °F) abfällt.
Der Akku, der zur Vermeidung von
Kurzschlüssen mit der Schutzkappe zu
versehen ist, sollte an einem gut belüfteten,
trockenen Platz aufbewahrt werden, an dem die
Temperatur 30 °C (86 °F) nicht überschreitet und
nicht unter -20 °C (-4 °F) abfällt.
WENN DER AKKU LÄNGER ALS 6 MONATE
OHNE NUTZUNG GELAGERT WERDEN SOLL,
DIE NACHSTEHENDEN HINWEISE
BEFOLGEN, UM DIE LEISTUNG DES AKKUS
ZU ERHALTEN:
• Vor der Lagerung voll aufladen.
• Eine Schutzkappe auf den Akku-Anschluss
setzen, um Kurzschlüsse zu verhindern.
• Den Akku an einem gut belüfteten,
trockenen Platz aufbewahren, an dem die
Temperatur nicht unter -20 °C (-4 °F) abfällt
und 30 °C (86 °F) nicht überschreitet.
• Den Akku nicht an einem Platz mit direkter
Sonneneinstrahlung aufbewahren.
VORSICHT
WARNUNG
VORSICHT
29
TABLE DES MATIÈRES
1.
NOM DES PIÈCES
.............................................................29
2. AVERTISSEMENTS DE SÉCURITÉ GÉNÉRAUX
RELATIFS AUX OUTILS ÉLECTRIQUES .......................30
3.
CONSIGNES DE SÉCURITÉ POUR LE COUPE-BARRE
...33
4. CARACTÉRISTIQUES TECHNIQUES.............................35
5. INSTRUCTIONS RELATIVES À LA BATTERIE..............37
6. INSTRUCTIONS D'UTILISATION ....................................39
7. ENTRETIEN......................................................................40
8. ENTREPOSAGE...............................................................40
1. NOM DES PIÈCES
(voir les figures A et B)
FRANÇAIS
MANUEL D’UTILISATION ET D’ENTRETIEN
Fig. A
1TÊTE
2LAME
3TIGE
4 VIS DE GRAISSAGE
5 GÂCHETTE
6MOTEUR
7 BLOC-BATTERIE JPL92530A
8 VERROU DE SÉCURITÉ
9 VIS DE VANNE
10 VIS DE RÉGLAGE
11 ÉCROU DE SERRAGE
12
ÉTIQUETTE DE
CARACTÉRISTIQUES TECHNIQUES
13 POIGNÉE
14 POIGNÉE LATÉRALE
Fig. B
15 CAPOT DE BATTERIE
16 BORNE
17 FENTE D'AÉRATION
18 TAQUET
19
ÉTIQUETTE DE
CARACTÉRISTIQUES TECHNIQUES
20 JAUGE DE NIVEAU DE LA BATTERIE
21
BOUTON DE VERIFICATION DU
NIVEAU DE LA BATTERIE
Traduction des instructions originales
30
2. AVERTISSEMENTS DE
SÉCURITÉ GÉNÉRAUX
RELATIFS AUX OUTILS
ÉLECTRIQUES
1. SÉCURITÉ DE LA ZONE DE TRAVAIL
• Maintenez la zone de travail propre et
bien éclairée. Des zones en désordre ou
sombres entraînent des accidents.
• N'utilisez pas les outils électriques
dans des atmosphères explosives,
telles qu'en présence de liquides, gaz
ou poussière inflammables. Les outils
électriques créent des étincelles qui
enflamment la poussière ou les vapeurs.
•
Tenez les enfants ou les personnes qui
vous entourent à distance lorsque vous
utilisez un outil électrique.
Des distractions
peuvent vous faire perdre le contrôle de l'outil.
2. SÉCURITÉ ÉLECTRIQUE
•
Les fiches des outils électriques doivent
s'adapter à la prise. Ne modifiez jamais en
aucune manière la fiche d'un outil. N'utilisez
aucune fiche d'adaptateur avec des outils
électriques mis à la terre (masse).
Des fiches
non modifiées et des prises adaptées réduiront
le risque de choc électrique.
• Évitez tout contact corporel avec les
surfaces mises à la terre ou à la masse,
telles que des tuyaux, des radiateurs,
des cuisinières et des réfrigérateurs.
Le risque de choc électrique est accru si
votre corps est mis à la terre ou la masse.
• N'exposez pas les outils électriques à
la pluie ou l'humidité. La pénétration
d'eau dans un outil électrique augmente
le risque de choc électrique.
• Ne détériorez pas le cordon. N'utilisez
jamais le cordon pour porter, tirer ou
débrancher l'outil électrique.
Maintenez le cordon à distance de la
chaleur, de l'huile, de bords tranchants
ou de pièces mobiles. Des cordons
endommagés ou emmêlés augmentent le
risque de choc électrique.
•
Lorsque vous utilisez un outil
électrique à l'extérieur, utilisez une
rallonge adaptée.
L'utilisation d'une
rallonge adaptée à une utilisation à
l'extérieur réduit le risque de choc
électrique.
•
Si vous êtes obligé d'utiliser un outil
électrique dans un endroit humide,
utilisez une alimentation électrique
protégée par un dispositif différentiel à
courant résiduel (DDR).
L'utilisation d'un
DDR réduit le risque de choc électrique.
• N'utilisez pas l'outil électrique sous la
pluie, près de projections d'eau, dans
un endroit mouillé ou humide.
L'utilisation de l'outil dans ces conditions
ou des conditions similaires augmente le
risque de choc électrique, de
dysfonctionnement dangereux et de
surchauffe.
3. SÉCURITÉ PERSONNELLE
• Restez vigilant, regardez ce que vous
faites et faites preuve de bon sens
lorsque vous utilisez un outil
électrique. N'utilisez pas un outil
électrique lorsque vous êtes fatigué ou
sous l'influence de drogues, alcool ou
médicaments. Un moment d'inattention
lorsque vous utilisez des outils
électriques peut entraîner des dommages
corporels graves.
• Utilisez un équipement de protection
individuel. Portez toujours une
protection oculaire. L'équipement de
protection tel qu'un masque
antipoussière, des chaussures de
sécurité antidérapantes, un casque ou
une protection auditive, utilisé dans des
conditions appropriées réduira les
dommages corporels.
Lisez tous les avertissements de sécurité
et toutes les consignes, les illustrations et
les spécifications fournies avec cet outil
électrique.
Un non-respect d'une des consignes ci-dessous
peut entraîner une électrocution, un
incendie et/ou
des blessures graves.
Conserver tous les
avertissements et consignes pour une
consultation ultérieure.
Le terme "outil
électrique" dans les avertissements fait référence
à votre outil électrique raccordé au secteur (cordon
d'alimentation) ou fonctionnant avec une batterie
(sans fil).
AVERTISSEMENT

31
• Évitez tout démarrage involontaire.
Vérifiez que l'interrupteur est en
position Arrêt avant de brancher la
source électrique et/ou le bloc batterie,
de ramasser ou transporter l'outil. Le
transport d'outils électriques avec votre
doigt sur l'interrupteur ou la mise sous
tension d'outils électriques dont
l'interrupteur est en position Marche
entraîne des accidents.
• Retirez toute clé ou clavette de calage
avant de mettre l'appareil électrique
sous tension.
Une clé ou une clavette toujours fixée sur
une pièce rotative de l'outil électrique peut
entraîner des dommages corporels.
• Ne tendez pas le bras trop loin. Restez
bien en équilibre sur vos pieds en
permanence. Ceci permet un meilleur
contrôle de l'outil électrique dans des
situations inattendues.
• Portez une tenue appropriée. Ne
portez pas de vêtements amples ni de
bijoux. Tenez vos cheveux et
vêtements à distance des pièces
mobiles. Des vêtements amples, des
bijoux ou des cheveux longs peuvent se
coincer dans les pièces mobiles.
• Si des appareils sont fournis pour le
raccordement aux dispositifs de
récupération et d'extraction de la
poussière, vérifiez qu'ils sont
raccordés et correctement utilisés.
L'utilisation d'un dispositif de récupération
de la poussière peut réduire les risques
liés à la poussière.
• La connaissance des outils, acquise
par l'usage fréquent de ces derniers,
ne doit pas vous dispenser d'être
prudent et d'appliquer les principes de
sécurité. Une action inconsidérée peut
provoquer de graves blessures en une
fraction de seconde.
4. UTILISATION ET ENTRETIEN D'UN OUTIL
ÉLECTRIQUE
• N'exercez aucune force sur l'outil.
Utilisez l'outil électrique adapté à votre
application. L'outil électrique adapté
exécutera le travail d'une manière plus
correcte et plus sûre à la vitesse pour
laquelle il est conçu.
• N'utilisez pas l'outil électrique si
l'interrupteur ne fonctionne pas
correctement. Un outil électrique qui ne
peut pas être commandé à l'aide de
l'interrupteur est dangereux et doit être
réparé.
• Débranchez la fiche de l’alimentation
électrique et/ou le bloc batterie de
l’outil électrique, s’il est amovible,
avant d’effectuer un quelconque
réglage, de changer d’accessoire ou
de ranger l’outil électrique. Ces
mesures préventives réduisent le risque
d'un démarrage accidentel de l'outil
électrique.
• Rangez des outils électriques à l'arrêt
hors de portée des enfants et ne
laissez pas des personnes non
familiarisées avec l'outil électrique ou
ces consignes utiliser cet outil. Les
outils électriques sont dangereux dans
les mains d'utilisateurs non formés.
• Entretenez les outils électriques et les
accessoires. Vérifiez que des pièces
mobiles ne sont pas désalignées ou
coincées, que des pièces ne sont pas
cassées ou vérifiez tout autre état qui
pourrait gêner le fonctionnement de
l'outil électrique. Si l'outil électrique
est endommagé, faites réparer l'outil
électrique avant de l'utiliser. Un grand

32
nombre d'accidents sont causés par des
outils électriques mal entretenus.
• Maintenez les outils de coupe affûtés
et propres. Des outils de coupe
correctement entretenus avec des bords
tranchants affûtés risquent moins de se
coincer et sont plus faciles à contrôler.
• Utilisez l'outil électrique, les
accessoires et les embouts, etc.
conformément à ces consignes, en
prenant en compte les conditions de
travail et le travail à réaliser. L'utilisation
de l'outil électrique pour des opérations
différentes de celles pour lesquelles il est
prévu peut entraîner une situation
dangereuse.
• Les poignées et les surfaces de
maintien doivent toujours être
propres, sèches et sans traces d’huile
ni de graisse. Les poignées et surfaces
de maintien glissantes empêchent de
manipuler et de contrôler l’outil en toute
sécurité dans des situations imprévues.
5. Utilisation et entretien d’un outil à bat-
terie
• Rechargez uniquement à l’aide du
chargeur spécifié par le fabricant. Un
chargeur adapté à un type de bloc batterie
peut entraîner un risque d’incendie lor-
squ’il est utilisé avec un autre type de bloc
batterie.
• Utilisez les outils électriques unique-
ment avec les blocs batteries spécifiés.
L’utilisation d’autres blocs batteries peut
entraîner un risque de blessure et d’in-
cendie.
• Lorsque le bloc batterie n’est pas uti-
lisé, tenez-le à distance d’autres objets
métalliques, tels que des trombones,
pièces, clés, clous, vis ou autres petits
objets métalliques, qui peuvent créer
un contact entre les deux bornes. Un
court-circuit des bornes de la batterie peut
entraîner des brûlures ou un incendie.
• En cas d’utilisation incorrecte, du liq-
uide peut être éjecté de la batterie ;
évitez tout contact avec ce liquide. En
cas de contact accidentel, rincez avec de
l’eau. Si du liquide entre en contact avec
les yeux, consultez immédiatement un mé-
decin. Le liquide éjecté de la batterie peut
entraîner une irritation ou des brûlures.
• N’utilisez pas un bloc batterie ou un
outil endommagé ou modifié. Les batter-
ies endommagées ou modifiées peuvent
présenter un comportement imprévisible
susceptible de provoquer un incendie, une
explosion ou un risque de blessure.
• N’exposez pas un bloc batterie ou un
outil au feu ou à des températures trop
élevées. L’exposition au feu ou à des tem-
pératures supérieures à 130 °C peut
provoquer une explosion.
• Respectez toutes les instructions de
charge et ne chargez pas le bloc bat-
terie ou l’outil en dehors de la plage de
température spécifiée dans les instruc-
tions. Ne pas charger la batterie correcte-
ment ou la charger à des températures
hors de la plage spécifiée peut endom-
mager la batterie et augmenter le risque
d’incendie.
• Les batteries lithium-ion ont des re-
strictions d'expédition. Pour le transport,
veuillez contacter la compagnie de trans-
port ou la compagnie aérienne à l'avance.
6. RÉPARATION
• Faites réparer votre outil électrique par
un réparateur qualifié qui n'utilise que
des pièces de rechange d'origine. Ceci
garantit le maintien de la sécurité de l'outil
électrique.
• N’entretenez jamais des blocs
batteries endommagés. L’entretien des
blocs batteries doit être effectué
uniquement par le fabricant ou par les
fournisseurs de services autorisés.

33
3. CONSIGNES DE SÉCURITÉ
POUR LE COUPE-BARRE
1. TENEZ VOS MAINS À L'ÉCART DES
PIÈCES MOBILES
2. VEILLEZ À TENIR VOS MAINS À L'ÉCART
DE LA GÂCHETTE ET À RETIRER LA
BATTERIE LORSQUE VOUS
REMPLACEZ OU AJUSTEZ LA LAME, EN
CAS D'ANOMALIES ET LORSQUE VOUS
N'UTILISEZ PAS L'APPAREIL
Le fait de laisser la batterie installée dans ces cas
peut entraîner des défaillances ou une
détérioration.
3. NE MODIFIEZ JAMAIS L'OUTIL
Une modification de l'outil affecte les
performances et la sécurité. Toute modification
peut entraîner des blessures graves et annule la
garantie de l'outil.
4. MAINTENEZ L'OUTIL EN BON ÉTAT DE
FONCTIONNEMENT
(VÉRIFIEZ LE SERRAGE DES VIS AVANT
TOUTE OPÉRATION)
Pour sécuriser l'utilisateur et garantir des
performances optimales, recherchez toute trace
d'usure et de détérioration sur l'outil.
Dans des conditions d'utilisation normales, l'outil
génère des vibrations. Ces vibrations peuvent
entraîner un relâchement des vis, et donc une
détérioration de l'outil ou des blessures graves.
Faites également en sorte que la poignée de
l'outil soit propre et sèche et notamment qu'elle ne
porte pas de traces d'huile et de graisse.
5. LAISSEZ L'OUTIL PRÉCHAUFFER
PENDANT PLUSIEURS MINUTES AVANT
DE L'UTILISER
Par temps froid ou lorsque l'outil n'a pas été utilisé
pendant une longue période, la lubrification des
parties internes de l'outil peut ne pas être
suffisante. Dans ce cas, laissez l'outil préchauffer
pendant plusieurs minutes en l'utilisant sans
charge. Sans lubrification interne suffisante, l'outil
ne peut pas être pleinement performant.
6. VÉRIFIEZ L'ABSENCE DE PERSONNES
EN DESSOUS DE VOUS LORSQUE VOUS
UTILISEZ L'OUTIL EN HAUTEUR
Le non-respect de cette consigne peut entraîner
des blessures graves de la personne située en
contrebas.
7. TENEZ FERMEMENT L'OUTIL À DEUX MAINS
Le non-respect de cette consigne peut entraîner
des blessures graves.
8. NE LAISSEZ PAS L'OUTIL EN MARCHE
N'utilisez l'outil que si vous le tenez.
9. N'UTILISEZ QUE LA BATTERIE AUTORISÉE
Utilisez exclusivement la batterie MAX
JPL92530A. Si l'outil est relié à une alimentation
autre que la batterie autorisée, une batterie
rechargeable, une pile sèche ou une batterie
d'accumulateurs utilisée dans les automobiles par
exemple, l'outil peut être endommagé, défaillant,
en surchauffe, voire provoquer un incendie. Ne
reliez cet outil à aucune autre alimentation
électrique que la batterie MAX JPL92530A.
10. POUR GARANTIR DES PERFORMANCES
OPTIMALES, RECHARGEZ COMPLÈTEMENT
LA BATTERIE AVANT UTILISATION
Une batterie neuve ou une batterie non utilisée
sur une période prolongée peut être déchargée et
doit donc être rechargée pour retrouver une
condition de recharge complète. Avant de faire
fonctionner l'outil, assurez-vous que la batterie
est chargée en utilisant le chargeur de batterie
spécifié.
11. NE COUVREZ PAS L'ORIFICE DE
VENTILATION LIBRE. NE METTEZ RIEN
DANS L'ORIFICE DE VENTILATION.
L'outil pourrait surchauffer, dégager de la fumée
ou tomber en panne.
Une telle situation s'avère très dangereuse car
des corps étrangers pourraient s'échapper de
l'outil.
12. ÉVITEZ TOUTE UTILISATION
PROLONGÉE DE L'OUTIL.
La température du moteur et de l'huile
augmenteront jusqu'à ce que l'outil ne puisse plus
fournir les performances suffisantes.
13. NE LAISSEZ PAS L'OUTIL TOMBER.
Cela pourrait provoquer des dégâts ou un
dysfonctionnement.
Lorsque vous travaillez en hauteur, faites preuve
de prudence vis-à-vis de votre environnement et
des personnes à proximité.
14. N'UTILISEZ QUE LES LAMES ET LES
ACCESSOIRES INDIQUÉS DANS CE
MANUEL.
Les autres lames et accessoires pourraient
provoquer des pannes, des blessures ou des
accidents.
15. N'UTILISEZ QUE L'HUILE HYDRAULIQUE
INDIQUÉE.
Toute autre huile pourrait provoquer des pannes
ou générer une puissance inadaptée, ce qui
porterait préjudice à l'outil.
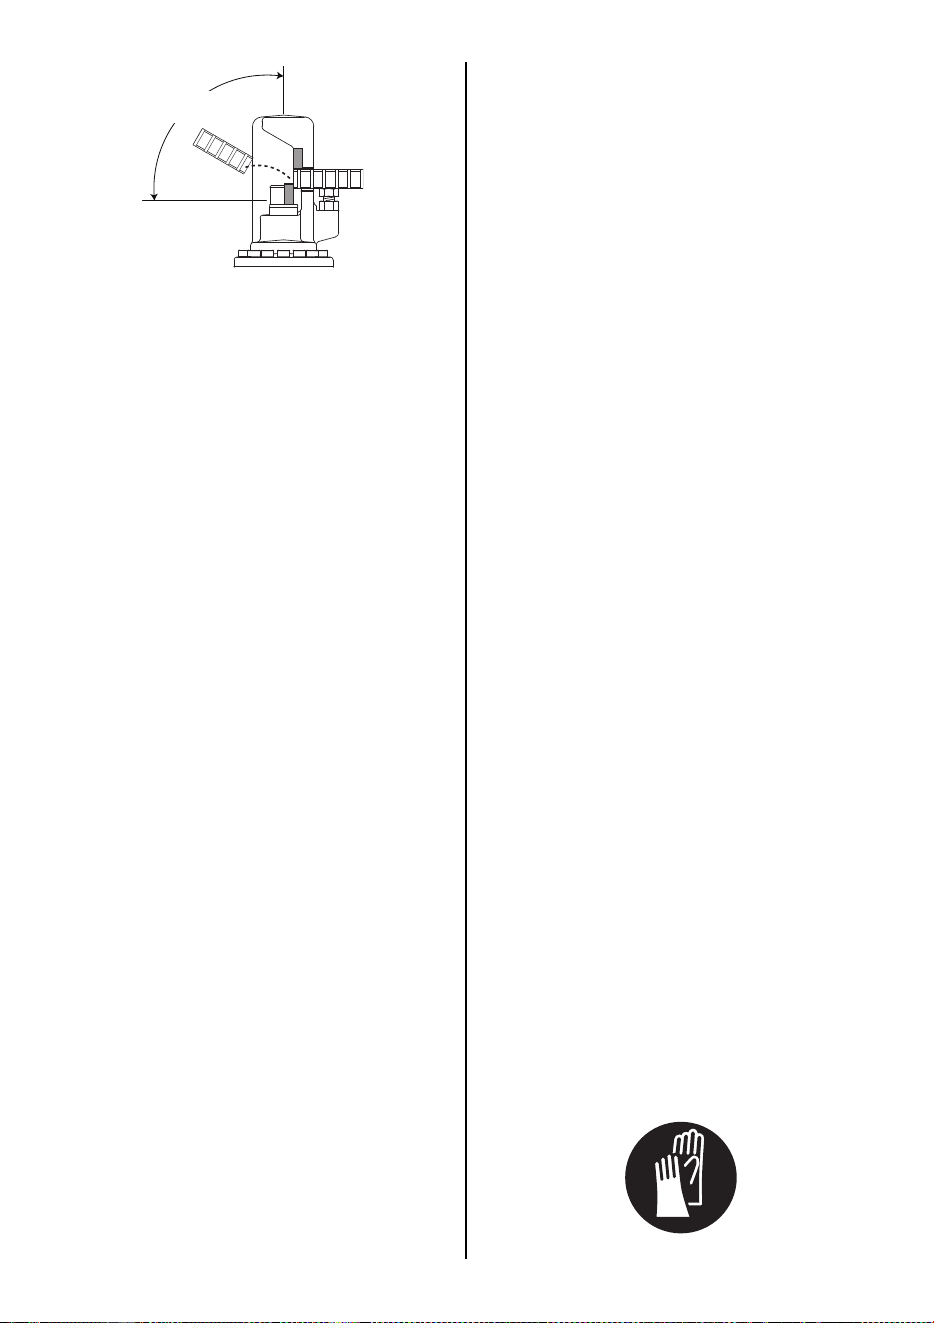
34
16. LORSQUE VOUS COUPEZ UNE BARRE, LA
DÉCOUPE PEUT ÊTRE PROJETÉE COMME LE
MONTRE L'ILLUSTRATION CI-DESSUS. VEILLEZ
À CE QUE VOTRE ESPACE DE TRAVAIL SOIT
DÉGAGÉ AVANT DE COUPER LA BARRE.
17. PRÉCAUTIONS RELATIVES À LA RECHARGE
DE LA BATTERIE
1 N'utilisez que le chargeur de batterie et la
batterie spécifiés.
Le non-respect de cette consigne peut entraîner
une surchauffe de la batterie ou un incendie
pouvant provoquer des blessures graves.
2 Chargez la batterie à la tension spécifiée.
Le non-respect de cette consigne peut
entraîner une surchauffe ou une recharge
inappropriée pouvant provoquer des
blessures graves.
3 N'utilisez jamais de transformateur
4 Ne reliez jamais la batterie à un générateur
de courant continu
Le chargeur tomberait en panne ou risquerait
de brûler.
5 Évitez de recharger la batterie sous la
pluie, dans un endroit humide ou
présentant des risques d'éclaboussures
Le chargeur de batterie est prévu pour une
utilisation en intérieur. La recharge d'une
batterie humide ou mouillée peut entraîner
une électrocution ou un court-circuit pouvant
entraîner une brûlure, voire un incendie.
6 Ne touchez pas le cordon ou la fiche
d'alimentation avec une main mouillée ou
un gant mouillé
Ceci peut entraîner une blessure due à une
électrocution.
7 Ne recouvrez pas le chargeur de batterie d'un
tissu ou autre pendant la recharge de la batterie
Ceci entraînerait une surchauffe et une
détérioration due à une brûlure, voire un
incendie du chargeur.
8 Tenez la batterie et le chargeur à l'écart de
toute source de chaleur ou de flammes
9 Ne rechargez pas la batterie à proximité de
matériaux inflammables
10 Chargez la batterie dans un endroit bien
ventilé
Évitez de recharger la batterie sous les rayons
du soleil.
11 Évitez d'utiliser le chargeur de batterie de
manière continue
Laissez le chargeur au repos pendant 15
minutes entre chaque recharge pour éviter
tout dysfonctionnement.
12 Tout objet obstruant les trous d'aération ou le
connecteur de la batterie peut entraîner une
électrocution ou des dysfonctionnements
Utilisez le chargeur à l'abri de la poussière ou
d'autres corps étrangers.
13 Manipulez le cordon d'alimentation avec
précaution
Ne transportez pas le chargeur de batterie par son
cordon d'alimentation. N'utilisez pas le cordon
d'alimentation pour le débrancher de la prise
murale. Ceci endommage le cordon en étirant ses
câbles internes ou provoque un court-circuit. Ne
mettez pas le cordon d'alimentation en contact
avec des outils à bords pointus, des matériaux
chauds, de l'huile ou de la graisse. Un cordon
endommagé doit être réparé ou remplacé.
14 Ne rechargez pas des batteries non
rechargeables avec ce chargeur.
15 Ce chargeur ne doit pas être utilisé par des
enfants ou des personnes handicapées
sans surveillance.
16 Surveillez les enfants afin qu'ils ne jouent
pas avec le chargeur.
17 Placez un capot sur la borne de la batterie
Lorsque vous n'utilisez pas la batterie, placez un
capot sur sa borne pour éviter tout court-circuit.
Tenez la batterie à distance de tout autre objet
métallique (trombones, pièces de monnaie, clés,
clous, vis ou autres petits objets métalliques) qui
peuvent créer un contact entre deux bornes.
18 Ne laissez pas l'outil dans une voiture et
évitez de l'exposer aux rayons du soleil l'été.
Le fait d'exposer l'outil à des températures
élevées peut endommager la batterie.
19 Ne rangez pas une batterie complètement
déchargée. Une batterie peut être
endommagée si, une fois complètement
déchargée, vous la retirez du système et ne
l'utilisez pas pendant une période
prolongée. Rechargez la batterie
immédiatement lorsqu'elle est déchargée.
20 Utilisez un équipement de protection
individuel
Un équipement de protection tel que des
protections pour les mains utilisé dans
des conditions appropriées réduira les
dommages corporels.
Zone dangereuse

35
4. CARACTÉRISTIQUES TECHNIQUES
<Batterie> Vendu séparément
*
Les batteries au lithium-ion avec plus de 100 Wh d'énergie électrique sont classées parmi les marchan-
dises dangereuses.
Pour le transport, veuillez contacter la compagnie de transport ou la compagnie aérienne à l'avance.
L'énergie électrique du bloc batterie au lithium-ion Max est imprimée sur la plaque signalétique du bloc
batterie.
JPL92550A est classé parmi les marchandises dangereuses, avec une énergie électrique de 123,5 Wh.
<Chargeur de batterie> Vendu s
é
par
é
ment
NOM DU PRODUIT Batterie au lithium-ion
Nº PRODUIT JPL92550A
TYPE DE BATTERIE Batterie au lithium-ion
TENSION NOMINALE 25,2 V CC
CAPACITÉ NOMINALE 4,9 Ah (4900 mAh)
DURÉE DE RECHARGE
(AVEC JC925A(CE))
Environ 80 minutes (Env. 80 % de capacité)
Pleine charge - Environ 100 minutes (Env. 100 % de capacité)
ACCESSOIRES Capot de batterie (pour éviter un court-circuit)
POIDS 0,9 kg (2,4 lbs.)
TEMPÉRATURE DE RECHARGE 5 à 40 °C (41 à 104 °F)
TEMPÉRATURE DE FONCTIONNEMENT
0 à 40 °C (32 à 104 °F)
HUMIDITÉ DE FONCTIONNEMENT
80 % d'humidité relative max.
NOM DU PRODUIT Chargeur de batterie lithium-ion
Nº PRODUIT JC925A(CE)
ENTRÉE 100-240 V CA 50/60 Hz 2,2 A
SORTIE 14,4 V CC : 4,0 A, 18 V CC : 4,0 A, 25,2 V CC : 2,8 A
POIDS 0,7 kg (1,7 lbs.)
TEMPÉRATURE DE FONCTIONNEMENT
5 °C à 40 °C (41 °F à 104 °F)
HUMIDITÉ DE FONCTIONNEMENT
80 % d'humidité relative max.
1. CARACTÉRISTIQUES TECHNIQUES DE L'OUTIL
Nº PRODUIT PJRC160
POIDS
7,6kg (16,8 lbs.) (Batterie comprise)
HAUTEUR 228 mm (9")
LARGEUR 100 mm (4")
LONGUEUR 389 mm (15-3/8")
HUILE HYDRAULIQUE
EXXON MOBIL SHC524
TENSION/
BATTERIE
25,2 V,
Bloc-batterie au Li-ion
DIAMÈTRE DE
COUPE MAXIMAL
φ16 mm (#5)
MOTEUR Moteur CC sans charbon
TEMPÉRATURE DE
FONCTIONNEMENT
-5 à 40 °C (14 à 104 °F)
HUMIDITÉ DE
FONCTIONNEMENT
80 % d'humidité relative max.
ACCESSOIRES PJRC160
Valise de transport Crochet de
ceinture
Poignée latérale
CLE HEXAGONALE 4
CLE DE SERRAGE 17
TOURNEVIS
HUILE SHC524

36
2. CARACTÉRISTIQUES TECHNIQUES
1 BRUIT
Niveau sonore pondéré A type déterminé
conformément à la norme EN62841 :
• Niveau de pression sonore (L
pA
):91dB (A)
•
Niveau de puissance sonore (L
WA
):
80dB (A)
• Incertitude (K) : 3dB (A)
2 VIBRATIONS
Valeur totale de vibrations (somme du
vecteur triaxial) déterminé conformément à
la norme EN62841 :
•
Émission de vibrations : (a
h
,
HD
):
≤2,5 m/s
2
• Incertitude (K) : 1,5 m/s
2
Informations :
- la ou les valeurs totales de vibrations dé-
clarées et la ou les valeurs d’émission de
bruit déclarées peuvent également être uti-
lisées dans le cadre d’une évaluation
préliminaire de l’exposition.
Avertissement :
- l’émission de vibrations et de bruit pendant
l’utilisation réelle de l’outil électrique peut
être différente des valeurs déclarées en
fonction de la manière dont l’outil est utilisé
et en particulier du type de pièce à usiner ;
et
- nécessité d’identifier des mesures de sécu-
rité visant à protéger l’utilisateur et basées
sur une estimation de l’exposition dans les
conditions réelles d’utilisation (en prenant
en compte toutes les parties du cycle d’uti-
lisation, notamment le nombre de fois où
l’outil est mis hors tension et lorsqu’il fonc-
tionne au ralenti en plus de la durée d’utili-
sation du déclencheur).
3 ÉMISSION RAYONNÉE 30-1000 MHZ
Classe B
4 Catégorie de surtension
5 Degré de pollution
Degré de pollution : 4 conformément à CEI
60664-1 (PJRC160 et JC925A(CE)).
3. APPLICATIONS
Découpe des éléments suivants
• Barre
• Vis
• Treillis
4. À PROPOS DE L’ANNÉE DE
PRODUCTION
Le numéro de production de ce produit est
indiqué sur son boîtier. Le deux premiers
chiffres du numéro indiquent l'année de
production.
Portez des protections auditives
PRODUIT
Catégorie de surtension
PJRC160 COUPE-
BARRE D'ARMATURE
SANS FIL
Batterie conforme à
CEI 60664-1
JPL92530A
BATTERIE
Catégorie I
conforme à
CEI 60664-1
JC925A(CE)
CHARGEUR DE
BATTERIE
Catégorie II
conforme à
CEI 60664-1
(Exemple)
1 9 8 2 6 0 3 5 D
Année 2019

37
5. INSTRUCTIONS RELATIVES
À LA BATTERIE
DÉFAILLANCES DE LA BATTERIE
Si vous rencontrez les cas ci-dessous, rapportez
la batterie et le chargeur à votre distributeur.
• Le voyant rouge ne clignote pas lorsque la
fiche du chargeur est reliée à une prise murale
(la batterie n'est pas installée sur le chargeur).
• Ni le voyant de recharge rouge, ni le voyant
d'attente orange ne s'allume ou ne clignote
lorsque la batterie est installée sur le chargeur.
•
Le voyant d'attente orange ne passe pas au rouge
au bout d'une heure (sauf à basse température).
• Le voyant de recharge rouge ne change pas
(allumé - clignotement) au bout de 90 minutes.
DURÉE DE VIE DE LA BATTERIE
Si vous rencontrez l'une des situations ci-
dessous, cela signifie que la durée de vie de la
batterie est altérée. Remplacez-la par une neuve.
• Une réduction significative de la durée
d'utilisation est constatée alors que la batterie
a été rechargée correctement (complètement).
REMARQUE :
• Chargez la batterie lorsque la vitesse de
rotation de l'outil ralentit (la puissance de la
batterie est quasiment épuisée). Arrêtez
d'utiliser l'outil pour éviter de trop le
décharger, ce qui réduirait la durée de vie
de la batterie ou entraînerait un
dysfonctionnement de l'outil.
• N'utilisez pas une batterie si sa durée de vie
est atteinte.
Ceci pourrait entraîner un
dysfonctionnement de l'outil. La recharge
d'une batterie arrivée en fin de vie pourrait
également entraîner un dysfonctionnement
du chargeur.
RECYCLAGE D'UNE BATTERIE AU LI-ION
La batterie MAX utilise une batterie au Li-ion que
vous ne pouvez pas mettre au rebut avec vos
déchets ménagers. Pour plus d'informations sur
les options de recyclage ou de mise au rebut
appropriées, contactez votre service de
traitement des déchets.
Lors de la mise au rebut de la batterie, veillez
à remettre un capot sur la borne (en le fixant à
l'aide d'un ruban isolant) pour éviter un court-
circuit.
ATTENTION

38
INFORMATION SUR L'INDICATEUR DU NIVEAU DE BATTERIE
1 Pour vérifier le niveau de batterie (en dehors de la période de charge ou d'utilisation de l'outil
de charge), appuyez sur le bouton de vérification du niveau de batterie.
2 La jauge de niveau de batterie s'allume en fonction du niveau de batterie.
Indication du
niveau de
batterie
Niveau de batterie :
0 %
Niveau de batterie :
entre 0 et 10 % environ
Niveau de batterie :
entre 10 et 40 % environ
Niveau de batterie :
entre 40 et 70 % environ
Niveau de batterie : entre
70 et 100 % environ
Tous les témoins
sont éteints
Un témoin rouge
clignote
Un témoin rouge
est allumé
Deux témoins rou-
ges sont allumés
Trois témoins rou-
ges sont allumés

39
6. INSTRUCTIONS
D'UTILISATION
1. INSTALLATION ET RETRAIT DE
LA BATTERIE
• Avant d'installer ou retirer la batterie de
l'outil, appuyez sur le verrou de sécurité
indiqué dans la Fig.E et éloignez les mains
de la gâchette (Fig.F).
• Avant l'utilisation, vérifiez que la batterie
est correctement installée dans l'outil.
Le non-respect de cette consigne peut
entraîner des blessures graves.
1
(Fig.C) Pour installer la batterie, insérez-la
dans l'outil de telle sorte que les rails de la
batterie et de l'outil soient alignés. Faites
glisser complètement la batterie jusqu'à
entendre un déclic. Les taquets (Fig.C 16)
doivent revenir dans leur position d'origine.
2
Pour retirer la batterie, retirez-la de l'outil en
appuyant sur les taquets des deux côtés
tout en tenant fermement la poignée de
l'outil.
2. COMMENT DÉCOUPER LE
MATÉRIAU
•
Placez vos mains à l'écart des pièces mobiles.
•
Lorsque vous coupez une barre, la découpe
peut être projetée comme le montre
l'illustration ci-dessus. Veillez à ce que votre
espace de travail soit dégagé avant de
couper la barre.
• En présence d'huile ou de graisse sur la
poignée, nettoyez-la complètement.
Si de l'huile ou de la graisse se trouve sur la
poignée, votre main pourrait glisser et l'outil tomber.
•
Insérez la barre (Fig.H 28) entre les lames
jusqu'à ce qu'elle touche le fond (Fig.H 31) et
coupez-la.
• Si la gâchette reste engagée au terme de
l'opération, la tige de découpe redémarre
après avoir coupé la barre. Relâchez la
gâchette après la découpe.
1
Desserrez l'écrou de serrage avec la clé
fournie. (Fig.A 11)
2
Utilisez la vis de réglage de sorte que la
barre soit correctement inclinée. (Fig.A 10)
3
Serrez l'écrou avec la clé.
4
Insérez la barre (Fig.H 28) à découper entre
les lames. (Fig.H 29)
5
Placez la barre à la position souhaitée pour
la découpe. Appuyez sur la gâchette et
manipulez la tige de découpe (Fig.H 30).
Maintenez la gâchette enfoncée jusqu'au
terme de la découpe. La tige de découpe
revient automatiquement en position de
départ au terme de l'opération.
6 Relâchez le bouton pour retirer la barre.
3. UTILISATION DE LA VIS DE
VANNE
REMARQUE :
Ne forcez pas la vis de vanne, car cela
pourrait provoquer une fuite d'huile ou la
disparition de certaines pièces.
1 Desserrez la vis de vanne pour retirer la
tige de découpe à mi-course. (Fig.I)
Desserrez la vis d'un tour dans le sens
contraire des aiguilles d'une montre
(Fig.I 32) avec une pièce ou un tournevis
pour ramener la tige de découpe en
position de départ.
2 Pour relancer la découpe, serrez la vis
dans le sens des aiguilles d'une montre
(Fig.I 33). Si la vis est lâche, la barre ne
pourra pas être découpée.
4. MÉCANISME DE ROTATION DE
LA TÊTE
• Lorsque vous faites pivoter la tête, éloignez
vos doigts de la gâchette. Dans le cas
contraire, la tige de découpe pourrait
s'enclencher et provoquer des blessures
ou un accident (Fig.F).
1
La tête peut être pivotée à 360° (Fig.J)
AVERTISSEMENT
AVERTISSEMENT
ATTENTION
AVERTISSEMENT
40
5. COMMENT SOULEVER ET
TRANSPORTER
• Tenez fermement la poignée et la poignée
latérale et ne posez pas les doigts sur le
déclencheur lorsque vous soulevez et
transportez. (Fig.M)
6. COMMENT CHANGER LES LAMES
• Avant de changer les lames, veillez à retirer
la batterie de l'outil.
• Soyez très prudent lorsque vous manipulez
les lames car elles sont tranchantes.
• Faites attention au sens dans lequel les
lames sont installées (Fig.L).
• Serrez bien les vis hexagonales qui
maintiennent la lame en place. (Fig.K)
1 Desserrez les vis hexagonales (2 pour
chaque lame) qui maintiennent la lame en
place à l'aide d'une clé hexagonale n° 4 et
retirez l'ancienne lame.
2 Placez la nouvelle lame comme le montre
la Fig.L et serrez les vis hexagonales.
7. ENTRETIEN
• Avant d'inspecter l'outil, vérifiez que la
batterie est retirée de l'outil.
Le non-respect de cette consigne peut
entraîner des blessures graves.
• Avant d'inspecter le chargeur de batterie,
vérifiez que le chargeur n'est pas relié à
l'alimentation électrique.
1 Inspectez régulièrement l'outil
Pour préserver les performances de l'outil,
nettoyez-le et inspectez-le régulièrement.
Inspectez régulièrement les vis pour vérifier
qu'elles sont vissées correctement.
Un serrage inapproprié peut provoquer un
accident ou endommager l'outil. Si une vis
est desserrée, resserrez-la complètement.
2 Ne lubrifiez pas l'appareil
Ne lubrifiez en aucun cas cet appareil. Une
lubrification retirerait la graisse située à
l'intérieur de l'outil et entraînerait un
dysfonctionnement de l'outil.
3 N'immergez l'outil dans aucun liquide.
N'introduisez aucun liquide dans l'outil
hormis l'huile prévue à cet effet.
8. ENTREPOSAGE
N'entreposez pas l’outil dans un endroit exposé
au froid. Conservez-le dans un endroit chaud.
Si l’outil reste inutilisé, il faut le conserver dans
un endroit chaud et sec. Mettez-le hors de portée
des enfants. Même les outils de qualité peuvent
éventuellement nécessiter des mesures
d’entretien ou le remplacement de pièces en
raison de l’usure normale.
RANGEMENT DE L'OUTIL
Lorsque vous avez terminé votre travail ou si
vous n'utilisez pas l'outil pendant une période
prolongée, retirez la batterie de l'outil. L'outil, les
éléments fixés et les accessoires doivent être
rangés dans un endroit sec et bien ventilé où la
température est comprise entre -20 °C (-4 °F) et
40 °C (104 °F).
La batterie (avec un capot placé sur la borne
pour éviter un court-circuit) doit être rangée dans
un endroit sec et bien ventilé où la température
est comprise entre -20 °C (-4 °F) et 30 °C (86 °F).
LORSQUE VOUS RANGEZ LA BATTERIE
PENDANT PLUS DE 6 MOIS SANS L'UTILISER,
ET POUR PRÉSERVER SES
PERFORMANCES, SUIVEZ LES
INSTRUCTIONS CI-DESSOUS :
• Rechargez-la complètement avant de la
ranger.
• Placez un capot sur la borne de la batterie
pour éviter tout court-circuit.
• Rangez la batterie dans un endroit sec et
bien ventilé où la température est comprise
entre -20 °C (-4 °F) et 30 °C (86 °F).
• Ne rangez pas la batterie dans un endroit
exposé aux rayons du soleil.
ATTENTION
AVERTISSEMENT
ATTENTION
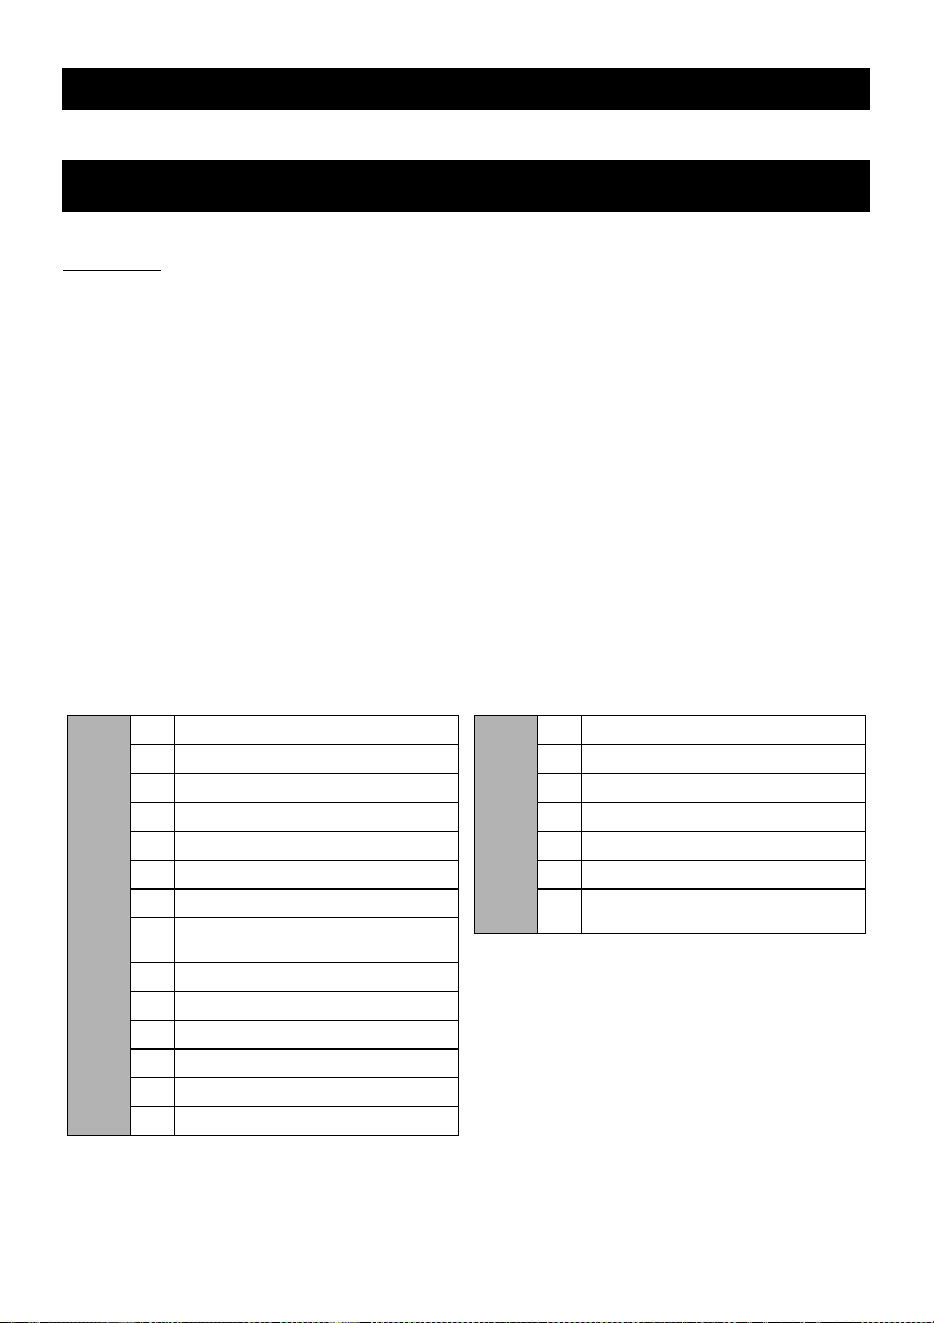
41
INDICE
1. DENOMINAZIONE DEI COMPONENTI ...........................41
2. AVVERTENZE DI SICUREZZA GENERALI PER GLI
UTENSILI ELETTRICI ......................................................42
3. AVVERTENZE DI SICUREZZA RELATIVE AL
TAGLIATONDINI..............................................................44
4. CARATTERISTICHE TECNICHE.....................................47
5. ISTRUZIONI PER LE BATTERIE.....................................49
6. ISTRUZIONI PER L'USO..................................................51
7. MANUTENZIONE .............................................................52
8. IMMAGAZZINAGGIO .......................................................52
1. DENOMINAZIONE DEI COMPONENTI
(vedere le Fig. A e B)
ITALIANO
MANUALE DI FUNZIONAMENTO E MANUTENZIONE
Fig. A
1TESTA
2LAMA
3 ASTA DI TAGLIO
4 BULLONE DI LUBRIFICAZIONE
5 PULSANTE DI AZIONAMENTO
6MOTORE
7 BATTERIA JPL92530A
8
INTERRUTTORE DI BLOCCAGGIO DI
SICUREZZA
9 BULLONE VALVOLA
10 BULLONE DI REGOLAZIONE
11 DADO DI BLOCCAGGIO
12 ETICHETTA CARATTERISTICHE
13 IMPUGNATURA
14 MANIGLIA LATERALE
Fig. B
15 COPERCHIETTO
16 MORSETTO
17 FINESTRELLA DI VENTILAZIONE
18 ELEMENTO DI BLOCCAGGIO
19 ETICHETTA CARATTERISTICHE
20 MISURATORE LIVELLO BATTERIA
21
PULSANTE DI CONTROLLO LIVELLO
BATTERIA
Traduzione delle istruzioni originali

42
2. AVVERTENZE DI
SICUREZZA GENERALI PER
GLI UTENSILI ELETTRICI
1. SICUREZZA DELL'AREA DI LAVORO
• Mantenere l'area di lavoro pulita e ben
illuminata. Aree disordinate o non
adeguatamente illuminate favoriscono gli
incidenti.
• Non usare gli utensili elettrici in
ambienti esplosivi, come ad esempio
in presenza di gas, polvere o liquidi
infiammabili. Gli utensili elettrici
generano scintille che possono
incendiare la polvere o le esalazioni
volatili.
• Durante l'uso degli utensili elettrici
non consentire a bambini e altre
persone di avvicinarsi. Eventuali
distrazioni possono provocare la perdita
del controllo dell'utensile.
2. SICUREZZA ELETTRICA
•
Le spine degli utensili elettrici devono
essere conformi alla relativa presa. Non
modificare la spina in alcun modo. Non
usare adattatori elettrici con gli utensili
elettrici collegati a terra.
L'impiego di
spine non modificate e di prese conformi
limita il rischio di scosse elettriche.
• Evitare il contatto del corpo con
superfici collegate a terra, quali
tubazioni, radiatori e celle frigorifere.
Se il corpo viene collegato a terra c'è il
rischio di scosse elettriche.
• Non esporre gli utensili elettrici a
pioggia o umidità. L'ingresso di acqua
negli utensili elettrici aumenta il rischio di
scosse elettriche.
• Non manomettere il cavo di
alimentazione. Non usare il cavo per
trasportare, tirare o scollegare
l'utensile elettrico. Non avvicinare il
cavo a fonti di calore, olio, bordi affilati
o organi in movimento. Cavi di
alimentazione danneggiati o impigliati
aumentano il rischio di scosse elettriche.
•
Quando si utilizza l'utensile elettrico
all'esterno, usare una prolunga adatta
per l'uso all'esterno.
L'impiego di un cavo
di alimentazione da esterni riduce il rischio
di scosse elettriche.
•
Se è indispensabile utilizzare un
utensile elettrico in luoghi umidi,
servirsi di un'alimentazione protetta da
un interruttore differenziale (RCD).
L'impiego di un interruttore differenziale
(RCD) riduce il rischio di scosse elettriche.
• Non usare l'utensile elettrico sotto la
pioggia, in luoghi esposti a spruzzi
d'acqua o in luoghi bagnati o umidi.
L'uso dell'utensile in queste condizioni o
in condizioni analoghe aumenta il rischio
di scosse elettriche, di malfunzionamenti
pericolosi e di surriscaldamento.
3. SICUREZZA PERSONALE
•
Quando si utilizza un utensile elettrico
prestare la massima attenzione e usare il
buon senso. Non usare un utensile
elettrico se si è stanchi o sotto
l'influenza di droghe, alcool o farmaci.
Una minima disattenzione durante l'uso
degli utensili elettrici può causare gravi
lesioni personali.
• Indossare dispositivi di protezione
personale. Indossare sempre
opportune protezioni per gli occhi.
Dispositivi di protezione quali mascherina
antipolvere, calzature di sicurezza
antiscivolamento, caschi rigidi o protezioni
per l'udito correttamente impiegati limitano
il pericolo di lesioni personali.
• Adottare opportune precauzioni per
impedire l'avviamento accidentale.
Prima di collegare l'utensile
all'alimentazione e/o alla batteria, o di
prenderlo e trasportarlo accertarsi che
l'interruttore sia disinserito. Il trasporto
Leggere tutte le avvertenze, le istruzioni,
le illustrazioni e le specifiche di sicurezza
fornite con questo utensile elettrico.
L'inosservanza di tutte le istruzioni elencate di
seguito
può causare scosse elettriche, incendi
e/o gravi
lesioni.
Conservare tutte le
avvertenze e istruzioni per la futura
consultazione.
Il termine "utensile elettrico"
nelle avvertenze si riferisce all'utensile elettrico
alimentato dalla rete (con cavo) o all'utensile
elettrico alimentato a batteria (senza fili).
ATTENZIONE
43
degli utensili elettrici con il dito appoggiato
all'interruttore o l'alimentazione degli
utensili con l'interruttore inserito,
favorisce gli incidenti.
• Rimuovere eventuali chiavi di
registrazione prima di accendere
l'utensile elettrico.
Una chiave o una chiavetta lasciate
inserite su un componente rotante
dell'utensile elettrico possono causare
lesioni personali.
• Non sporgersi eccessivamente.
Tenere i pieni ben appoggiati e
mantenere sempre un buon equilibrio.
Questo consente un migliore controllo
dell'utensile elettrico in situazioni
impreviste.
• Indossare indumenti idonei. Non
indossare indumenti laschi o gioielli.
Non avvicinare capelli e indumenti alle
parti in movimento. Indumenti laschi,
gioielli o capelli lunghi potrebbero rimanere
impigliati nelle parti in movimento.
• Se sono previsti dei dispositivi per il
collegamento di dispositivi di
smaltimento e raccolta polveri,
accertarsi che vengano collegati ed
utilizzati correttamente. L'uso di
dispositivi di raccolta polveri può ridurre i
pericoli conseguenti al deposito delle
polveri.
•
Non lasciare che la familiarità
conseguita grazie al frequente utilizzo
degli strumenti faccia abbassare la
guardia e ignorare i principi di
sicurezza degli strumenti. Un'azione
poco accurata può causare gravi lesioni in
una frazione di secondo.
4. USO E CURA DEGLI UTENSILI
ELETTRICI
• Non forzare l'utensile elettrico.
Utilizzare l'utensile elettrico adatto alla
specifica applicazione. Un utensile
elettrico idoneo eseguirà il lavoro meglio e
con maggiore sicurezza, alla velocità per
la quale è stato progettato.
• Non usare l'utensile elettrico se
l'interruttore non si inserisce e
disinserisce correttamente. Eventuali
utensili elettrici non controllabili
dall'interruttore sono pericolosi e devono
essere riparati.
• Scollegare la spina dall'alimentazione
e/o la batteria se staccabile
dall'utensile elettrico prima di
procedere a regolazioni, sostituzione
di accessori o al ritiro dell'utensile.
Queste precauzioni di sicurezza riducono
il rischio di avviamento accidentale
dell'utensile elettrico.
• Conservare gli utensili elettrici fuori
dalla portata dei bambini e non
consentirne l'azionamento a persone
che non conoscano l'utensile o queste
istruzioni. Gli utensili elettrici, quando
sono nelle mani di utenti non
adeguatamente addestrati, diventano
pericolosi.
• Eseguire la corretta manutenzione
degli utensili elettrici e degli accessori.
Verificare l'eventuale disallineamento
o impuntamento delle parti mobili,
rottura di componenti ed eventuali
altre condizioni che possano
compromettere il funzionamento
dell'utensile elettrico. Se danneggiato,
far riparare l'utensile elettrico prima
dell'uso. Numerosi incidenti sono dovuti
ad una manutenzione inadeguata degli
utensili elettrici.
• Mantenere gli utensili di taglio affilati e
puliti. Il corretto mantenimento degli
utensili di taglio con i taglienti ben affilati
diminuisce le possibilità di impuntamento
e agevola il controllo.
• Utilizzare l'utensile elettrico, gli
accessori, le punte, ecc. in conformità
a queste istruzioni tenendo conto delle
condizioni di lavoro e del lavoro da
svolgere. L'impiego dell'utensile elettrico
per operazioni diverse da quelle per le
quali è stato progettato può dar luogo a
situazioni pericolose.
• Mantenere le maniglie e le superfici di
presa asciutte, pulite e prive di olio e
grasso. Maniglie e superfici di presa
scivolose non consentono di maneggiare
l'utensile in modo sicuro e di controllarlo
in situazioni impreviste.
5. Uso e cura dell’utensile a batteria
• Ricaricare soltanto con il caricatore in-
dicato dal costruttore. Un caricatore
adatto per un tipo di batteria può causare
rischi di incendio quando utilizzato su una
batteria di tipo diverso.

44
• Usare gli utensili elettrici esclusiva-
mente con le batterie prescritte. L'uso di
batterie di tipo diverso può causare il ris-
chio di lesioni e incendio.
•
Quando non si utilizza la batteria, tener-
la a distanza di sicurezza da altri oggetti
metallici, quali graffette, monete, chiavi,
spilli, viti o altri piccoli oggetti metallici
che possono collegare fra loro i morset-
ti.
La messa in corto dei morsetti della bat-
teria può essere causa di ustioni o incendio.
• In condizioni di uso scorretto, si
potrebbero verificare fuoriuscite di liq-
uido dalla batteria, evitare il contatto. In
caso di contatto accidentale, lavare con
acqua. In caso di contatto del liquido con
gli occhi, rivolgersi a un medico. Il liquido
espulso dalla batteria può essere causa di
irritazione o ustioni.
• Non utilizzare una batteria o un utensile
danneggiati o modificati. Le batterie
danneggiate o modificate possono pre-
sentare un comportamento imprevedibile
che può causare incendi, esplosioni o ris-
chi di lesioni.
• Non esporre una batteria o un utensile
al fuoco o a temperature eccessive.
L’esposizione al fuoco o a temperature su-
periori a 130 °C può causare esplosioni.
•
Seguire tutte le istruzioni di carica e non
caricare la batteria o l’utensile al di fuori
dell’intervallo di temperatura specificato
nelle istruzioni.
Un caricamento improprio
o a temperature al di fuori dell’intervallo
specificato può danneggiare la batteria e
aumentare il rischio di incendio.
•
Alle batterie agli ioni di litio si applicano
restrizioni sulle spedizioni.
Per il traspor-
to, contattare previamente la società di
trasporti o la compagnia aerea.
6. MANUTENZIONE
•
Far eseguire la manutenzione del
proprio utensile elettrico da un tecnico
qualificato che utilizzi esclusivamente
ricambi originali. Questo preserva la
sicurezza dell'utensile elettrico.
• Non eseguire mai la manutenzione di
batterie danneggiate. La manutenzione
delle batterie deve essere eseguita solo
dal produttore o da fornitori autorizzati di
servizi di assistenza.
3. AVVERTENZE DI
SICUREZZA RELATIVE AL
TAGLIATONDINI
1. NON AVVICINARE LE MANI AD ORGANI IN
MOVIMENTO
2. NON AVVICINARE LE MANI AL PULSANTE DI
AZIONAMENTO E SCOLLEGARE LA
BATTERIA QUANDO SI SOSTITUISCE LA
LAMA, QUANDO SI VERIFICANO ANOMALIE
E QUANDO L'UTENSILE NON VIENE USATO
La mancata rimozione della batteria in queste
condizioni può essere causa di anomalie o danni.
3. NON MODIFICARE L'UTENSILE
Eventuali modifiche all'utensile ne
compromettono le prestazioni e la sicurezza di
funzionamento. Eventuali modifiche possono
causare gravi lesioni e la perdita di validità della
garanzia dell'utensile.
4. MANTENERE L'UTENSILE IN BUONE
CONDIZIONI DI FUNZIONAMENTO
(PRIMA DELL'USO CONTROLLARE IL
SERRAGGIO DELLE VITI)
Per garantire la sicurezza di funzionamento ed
assicurare prestazioni ottimali, proteggere
l'utensile da usura e danni.
In condizioni di funzionamento normale, l'utensile
è progettato per produrre vibrazioni. Tali
vibrazioni possono provocare l'allentamento delle
viti e potenziali danni all'utensile o lesioni
personali.
Tenere inoltre pulita e asciutta l'impugnatura
dell'utensile, evitandone in particolare la
contaminazione da olio e grasso.
5. LASCIARE RISCALDARE L'UTENSILE PER
ALCUNI MINUTI PRIMA DELL'USO
Alle basse temperature o quando l'utensile non è
stato utilizzato per un lungo periodo di tempo, la
lubrificazione interna all'utensile potrebbe essere
insufficiente. In questi casi, lasciare riscaldare
l'utensile per diversi minuti azionandolo a vuoto.
L'insufficiente lubrificazione interna potrebbe
compromettere la piena efficienza dell'utensile.
6. ACCERTARSI CHE QUANDO SI USA
L'UTENSILE IN POSIZIONE SOPRAELEVATA
NON VI SIANO ALTRE PERSONE SOTTO
L'inosservanza di questa indicazione può essere
causa di gravi lesioni alle persone sottostanti.
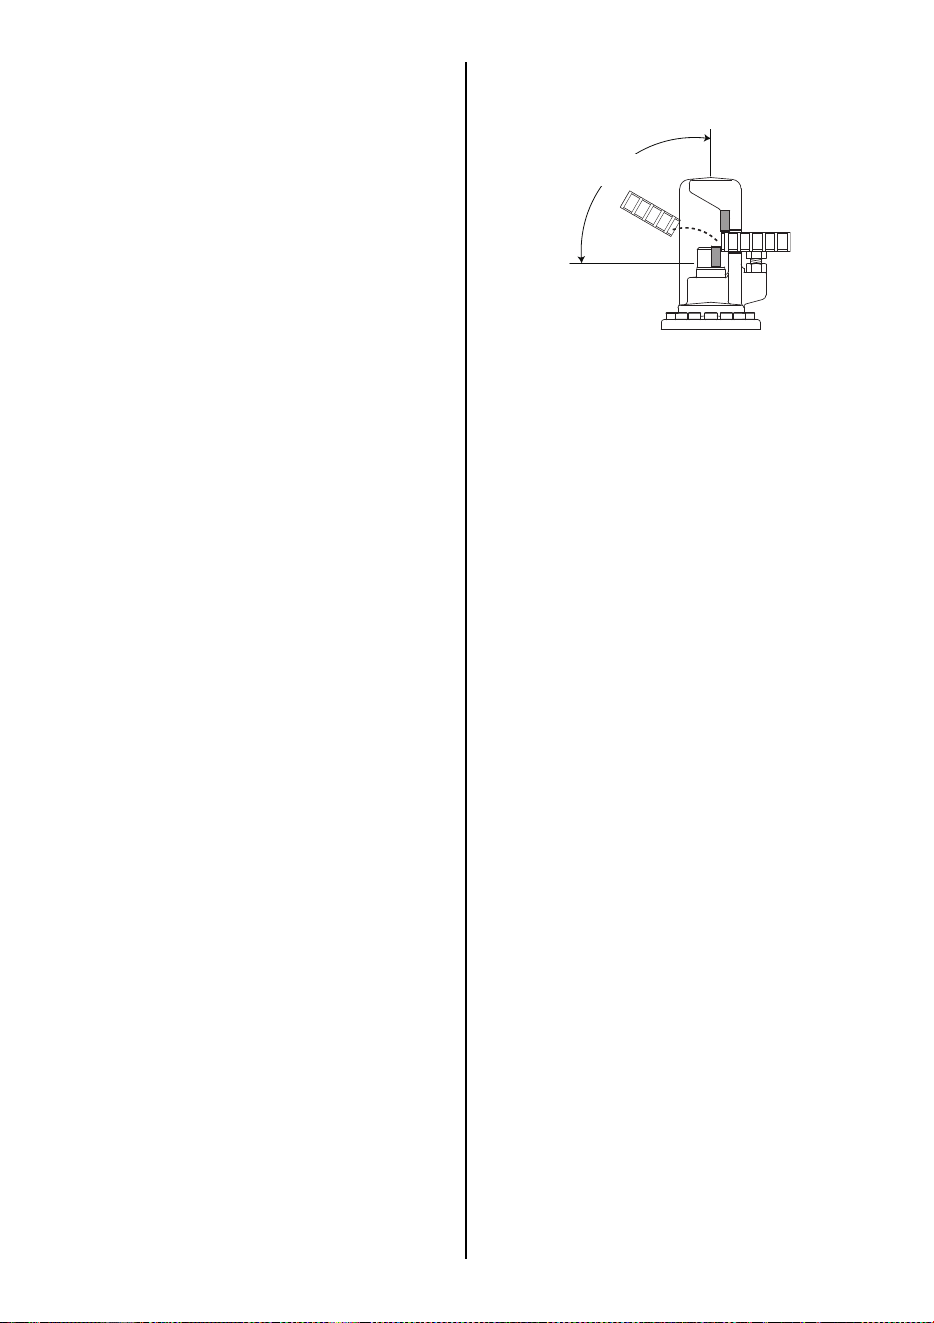
45
7. TENERE SALDAMENTE L'UTENSILE CON
ENTRAMBE LE MANI
L'inosservanza di questa indicazione può essere
causa di gravi lesioni.
8. NON LASCIARE L'UTENSILE IN FUNZIONE
QUANDO LO SI APPOGGIA
Azionare l'utensile soltanto quando lo si afferra
saldamente.
9. USARE SOLTANTO LA BATTERIA
AUTORIZZATA
Utilizzare soltanto la batteria MAX JPL92530A. Se
viene collegato ad un'alimentazione diversa da
quella autorizzata, come ad esempio una batteria
ricaricabile, una pila a secco o un accumulatore
destinato all'uso sulle autovetture, l'utensile
potrebbe danneggiarsi, rompersi, surriscaldarsi o
anche incendiarsi. Non collegare questo utensile ad
alimentazioni diverse dalla batteria MAX
JPL92530A.
10. PER GARANTIRE PRESTAZIONI OTTIMALI,
CARICARE COMPLETAMENTE LA BATTERIA
PRIMA DELL'USO
Una batteria nuova o una batteria rimasta a lungo
inutilizzata potrebbe essersi scaricata
spontaneamente e potrebbe essere necessario
ricaricarla per ripristinare la piena carica. Prima di
azionare l'attrezzo, assicurarsi di ricaricare il
pacco batteria con il caricabatterie specificato.
11. NON OSTRUIRE IL FORO DI VENTILAZIONE
DELL'UTENSILE E NON INSERIRE ALCUN
OGGETTO AL SUO INTERNO.
L'utensile potrebbe surriscaldarsi, emettere fumo
o rompersi.
Questa condizione è molto pericolosa, perché
corpi estranei potrebbero essere proiettati
all'esterno dell'utensile.
12. NON UTILIZZARE L'UTENSILE
ININTERROTTAMENTE PER PROLUNGATI
PERIODI DI TEMPO.
Le temperature del motore e dell'olio
aumenterebbero fino a compromettere le
prestazioni dell'utensile.
13. NON FAR CADERE L'UTENSILE.
Potrebbe verificarsi danni o malfunzionamenti
dell'utensile.
Quando si lavora in posizioni sopraelevate,
prestare la massima attenzione all'ambiente e
alle persone circostanti.
14. UTILIZZARE SOLTANTO LE LAME E GLI
ACCESSORI SPECIFICATI.
L'uso di lame e accessori diversi da quelli
specificati potrebbe provocare lesioni o incidenti
oltre al guasto dell'utensile.
15. UTILIZZARE SOLTANTO L'OLIO IDRAULICO
PRESCRITTO.
L'uso di olio di tipo non prescritto può causare
anomalie all'utensile e potenza insufficiente,
pregiudicando le prestazioni dell'utensile.
16. QUANDO SI TAGLIANO TONDINI CORTI, I
PEZZI TAGLIATI POTREBBERO VENIRE
PROIETTATI COME INDICATO SOPRA,
ACCERTARSI QUINDI CHE L'AREA
CIRCOSTANTE SIA SGOMBRA PRIMA DI
TAGLIARE IL TONDINO.
17. PRECAUZIONI PER LA RICARICA DELLE
BATTERIE
1 Usare esclusivamente il caricabatterie e il
pacco batteria specificati
L'inosservanza di questa indicazione può
causare il surriscaldamento della batteria o
l'incendio della stessa con conseguenti gravi
lesioni.
2 Ricaricare la batteria alla tensione
specificata
L'inosservanza di questa indicazione può
causare surriscaldamento o ricariche
inadeguate con conseguenti possibili gravi
lesioni.
3 Non usare un trasformatore
4 Non collegare il caricabatterie
all'alimentazione a corrente continua di un
generatore a motore.
Il caricabatterie potrebbe rompersi o bruciarsi.
5 Evitare di ricaricare la batteria alla pioggia,
in luoghi umidi o esposti a spruzzi d'acqua
Il caricabatterie è destinato ad uso interno.
L'eventuale ricarica di una batteria umida o
bagnata causa una folgorazione elettrica o un
cortocircuito che possono danneggiare
irrimediabilmente l'utensile o provocarne
addirittura l'incendio.
6 Non toccare il cavo o la spina di
alimentazione con mani o guanti bagnati
Potrebbero derivarne lesioni da scosse elettriche.
7 Non appoggiare un panno o un'altra
copertura sul caricabatterie durante la
ricarica della batteria
Questo provocherebbe il surriscaldamento, la
bruciatura o l'incendio del caricabatterie.
8 Non avvicinare la batteria e il relativo
caricatore a fonti di calore o fiamme
Area pericolosa

46
9 Non caricare la batteria in prossimità di
materiali infiammabili
10 Caricare la batteria in un luogo ben
ventilato
Evitare di caricare la batteria esposta alla luce
diretta del sole.
11 Evitare l'uso ininterrotto del caricabatterie
Tra una ricarica e l'altra spegnere il
caricabatterie per 15 minuti per preservarne
l'efficienza.
12 Eventuali oggetti che ostruiscano i fori di
ventilazione o la sede per la batteria
possono causare folgorazioni elettriche o
malfunzionamenti
Prima di usare il caricabatterie, pulirlo da
polvere o altri corpi estranei.
13 Utilizzare correttamente il cavo di
alimentazione
Non trasportare il caricabatterie tenendolo per
il cavo di alimentazione. Non tirare il cavo per
scollegarlo dalla presa; questa operazione
provoca il danneggiamento del cavo e la
rottura dei conduttori oppure può essere
causa di cortocircuito. Evitare il contatto del
cavo di alimentazione con attrezzi con bordi
acuminati, materiali caldi o grasso. Riparare o
sostituire il cavo di alimentazione, se
danneggiato.
14 Non utilizzare questo caricatore per
caricare batterie non ricaricabili.
15 Questo caricatore non è destinato all'uso da
parte di bambini o disabili non controllati.
16 Accertarsi che i bambini non giochino con
il caricabatterie.
17 Applicare un coperchietto sul morsetto
della batteria
Quando non si utilizza la batteria, applicare un
coperchietto sul suo morsetto per evitare
cortocircuiti.
Conservarla lontana da altri oggetti metallici,
quali fermagli metallici, monete, chiavi, aghi,
viti e altri attrezzi metallici di piccoli dimensioni
che possono mettere i morsetti in
collegamento fra loro.
18 Non lasciare o conservare l'utensile sul
veicolo o esposto direttamente alla luce
solare in estate. La conservazione
dell'utensile in luoghi caratterizzati da
temperature elevate può causare danni alla
batteria.
19 Non ritirare batterie completamente scariche.
Se una batteria completamente scarica viene
rimossa dal sistema e conservata per un
lungo periodo in tali condizioni, potrebbe
danneggiarsi. Ricaricare immediatamente la
batteria quando è scarica.
20 Utilizzare dispositivi di protezione
individuale
I dispositivi di protezione, come ad esempio i
guanti utilizzati per condizioni appropriate,
ridurranno le lesioni personali.

47
4. CARATTERISTICHE TECNICHE
<Batteria> Venduta separatamente
* Le batterie agli ioni di litio con oltre 100 Wh di energia elettrica sono classificate come merci pericolose.
Per il trasporto, contattare previamente la società di trasporti o la compagnia aerea.
L'energia elettrica della batteria agli ioni di litio Max è stampata sulla targhetta della batteria.
La batteria JPL92550A ha un'energia elettrica di 123,5 Wh ed è pertanto classificata come merce
pericolosa.
<Caricabatterie> Venduto separatamente
DENOMINAZIONE PRODOTTO Batteria agli ioni di litio
N. PRODOTTO JPL92550A
TIPO DI BATTERIA Batteria agli ioni di litio
TENSIONE NOMINALE 25,2 V C.C.
CAPACITÀ NOMINALE 4,9 Ah (4.900 mAh)
TEMPO DI RICARICA
[UTILIZZARE CON JC925A(CE)]
Circa 80 minuti (circa il 80% della capacità)
Ricarica completa: circa 100 minuti (circa il 100% della capacità)
ACCESSORI Coperchietto (contro i cortocircuiti)
PESO 0,9 kg (2,4 lbs.)
TEMPERATURA DI RICARICA Da 5°C a 40°C (41°F - 104°F)
TEMPERATURA DI ESERCIZIO Da 0°C a 40°C (32°F - 104°F)
UMIDITÀ DI ESERCIZIO 80% max. di U.R.
DENOMINAZIONE PRODOTTO Caricatore per batterie agli ioni di litio
N. PRODOTTO JC925A(CE)
INGRESSO 100-240 V c.a. 50/60 Hz 2,2 A
USCITA 14,4 V c.c. - 4,0 A, 18 V c.c. - 4,0 A 25,2 V c.c. - 2,8 A
PESO 0,7 kg (1,7 lbs.)
TEMPERATURA DI ESERCIZIO Da 5°C a 40°C (41°F - 104°F)
UMIDITÀ DI ESERCIZIO 80% max. di U.R.
1. SPECIFICHE DELL'UTENSILE
N. PRODOTTO PJRC160
PESO
7,6 kg (16,8 lbs.) (Compresa batteria)
ALTEZZA 228 mm (9")
LARGHEZZA 100 mm (4")
LUNGHEZZA 389 mm (15-3/8")
OLIO IDRAULICO EXXON MOBIL SHC524
TENSIONE /
BATTERIA
25,2 V,
Batteria agli ioni di litio
DIAMETRO MAX. DI
TAGLIO
φ16 mm (N. 5)
MOTORE Motore Brushless CC
TEMPERATURA DI
ESERCIZIO
Da -5°C a 40°C (14°F - 104°F)
UMIDITÀ DI ESERCIZIO
80% max. di U.R.
ACCESSORI PJRC160
Valigetta
Impugnatura laterale
CHIAVE ESAGONALE 4
CHAVE 17
CACCIAVITE
OLIO SHC524
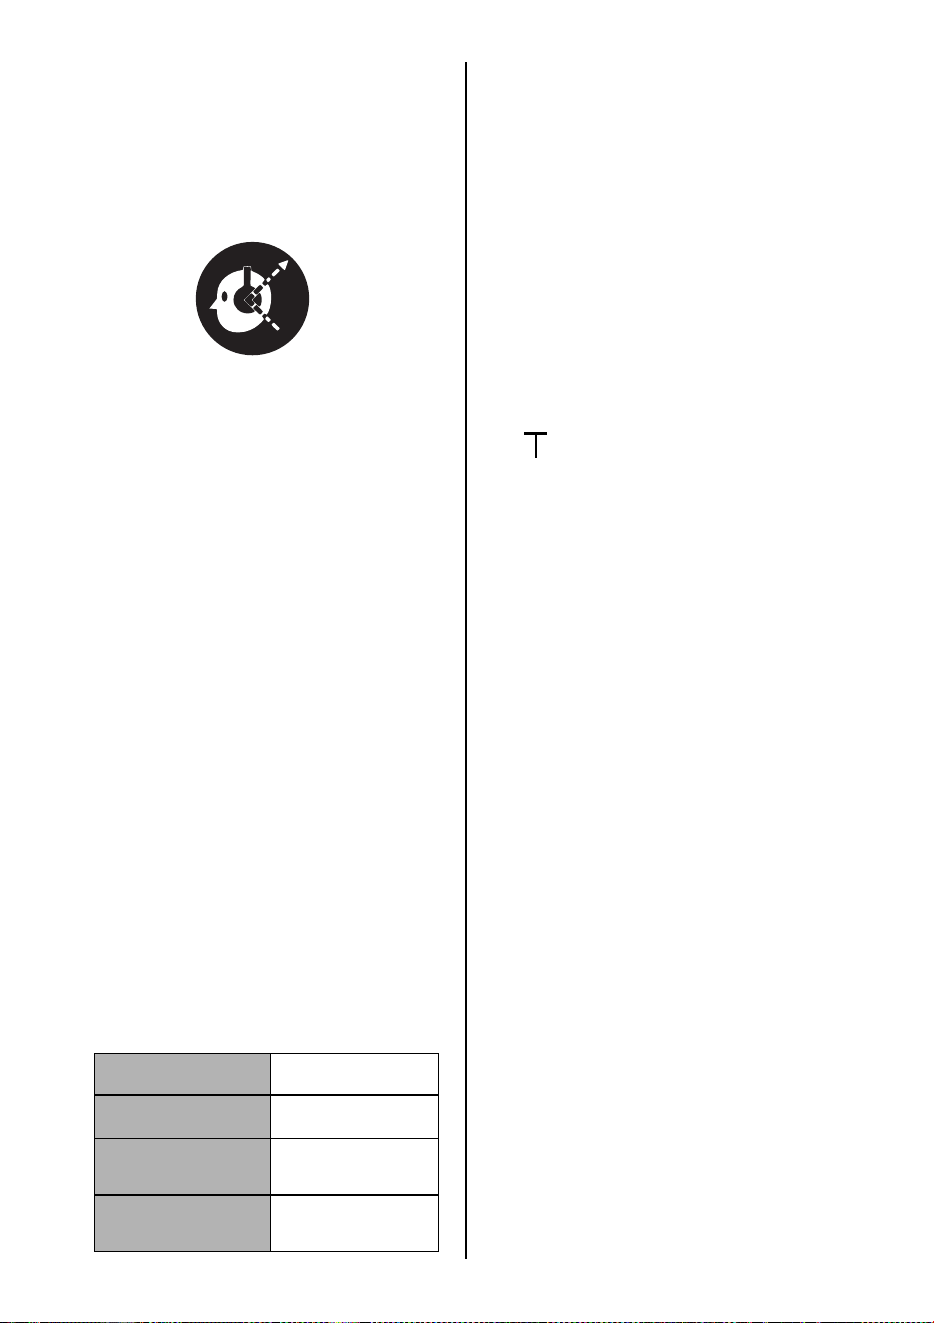
48
2. CARATTERISTICHE TECNICHE
1 LIVELLO DI RUMOROSITÀ
Tipico livello di rumorosità ponderato A
determinato in base alla norma
EN62841:
• Livello di pressione sonora (L
pA
):91dB (A)
• Livello di potenza sonora (L
WA
): 80dB (A)
• Incertezza (K): 3dB (A)
2 VIBRAZIONI
Il valore complessivo delle vibrazioni
(somma vettoriale triassiale) determinato in
basse alla norma EN62841:
• Vibrazioni emesse: (a
h
,
HD
): ≤2,5m/s
2
• Incertezza (K): 1,5m/s
2
Informazioni:
- i valori totali di vibrazione dichiarati e i valori
di emissione acustica dichiarati possono
essere utilizzati anche in una valutazione
preliminare dell’esposizione.
Attenzione:
- le vibrazioni e le emissioni di rumore du-
rante l’uso effettivo dell’utensile elettrico
possono differire dai valori dichiarati a sec-
onda del modo in cui l’utensile è utilizzato,
soprattutto per quanto riguarda il tipo di
pezzo da lavorare;
inoltre
- è necessario identificare misure di sicurez-
za per la protezione dell’operatore, che si
basino su una stima dell’esposizione nelle
effettive condizioni d’uso (tenendo conto di
tutte le parti del ciclo operativo come i tempi
di spegnimento dell’utensile e quando è in-
attivo oltre al tempo di attivazione).
3 EMISSIONI RADIATE 30-1000 MHZ
Classe B
4 Categoria sovratensione
5 Livello di inquinamento
Livello di inquinamento: livello 4 in
conformità a IEC 60664-1 (sia per PJRC160
che JC925A(CE)).
3. CAMPI DI APPLICAZIONE
Tagli dei seguenti materiali
• Tondino
• Bullone
• Rete metallica
4. CIRCA L’ANNO DI PRODUZIONE
Il numero di produzione del prodotto è
indicato sul corpo dell'utensile. Le prime due
cifre del numero a partire da sinistra indicano
l'anno di produzione.
PRODOTTO Categoria
sovratensione
TAGLIATONDINI A
BATTERIA PJRC160
Batteria conforme a
IEC 60664-1
JPL92530A
BATTERIA
Categoria I
in conformità a
IEC 60664-1
JC925A(CE)
CARICABATTERIE
Categoria II
in conformità a
IEC 60664-1
Indossare protezioni per l'udito
(Esempio)
1 9 8 2 6 0 3 5 D
Anno 2019

49
5. ISTRUZIONI PER LE
BATTERIE
ANOMALIE DELLA BATTERIA
Se si verificano le seguenti condizioni, portare la
batteria e il caricatore dal proprio concessionario.
• La spia di ricarica rossa non lampeggia
quando la spina del caricatore è collegata alla
presa di corrente (con la batteria non inserita
nel caricatore).
• Né la spia di ricarica rossa né quella di standby
arancione si accendono o lampeggiano
quando la batteria è inserita nel caricatore.
• La spia di standby arancione non commuta
alla spia di ricarica rossa anche dopo che è
trascorsa più di 1 ora (tranne che alle basse
temperature).
• La spia di ricarica rossa non passa dalla
condizione di accensione a luce fissa a quella
di lampeggio anche dopo che sono trascorsi
più di 90 minuti.
DURATA UTILE DELLA BATTERIA
In presenza di una delle condizioni descritte di
seguito, significa che la batteria ha esaurito la
sua durata utile. Sostituirla con una nuova.
• Anche se la batteria è stata caricata
correttamente (completamente carica), si è
registrata una notevole diminuzione del tempo
di funzionamento.
NOTA:
•
Caricare la batteria quando la velocità di
rotazione del motore rallenta (questo indica
che la capacità della batteria è pressoché
esaurita). Se si continua ad utilizzare
l'utensile, lo si scaricherà completamente,
riducendo la durata utile della batteria e
causando anche un malfunzionamento
all'utensile principale.
•
Non usare una batteria la cui durata utile sia
esaurita.
Si verificherebbe un malfunzionamento
all'utensile principale. Inoltre la ricarica di una
batteria la cui durata utile è esaurita determina
il malfunzionamento del caricatore.
RICICLAGGIO DELLA BATTERIA
AGLI IONI DI LITIO
La batteria MAX è del tipo agli ioni di litio, per cui
potrebbe essere illegale smaltirla con i normali
rifiuti urbani. Per i dettagli relativi alle eventuali
possibilità di riciclo disponibili nella propria zona
per il corretto smaltimento, rivolgersi ai
responsabili locali dello smaltimento dei rifiuti
solidi.
Quando si smaltisce la batteria, applicare un
coperchietto sul suo morsetto (fissandolo con
il nastro adesivo) per evitare cortocircuiti.
AVVERTENZA

50
INFORMAZIONI SULL'INDICATORE DI LIVELLO DELLA CARICA DELLA BATTERIA
1 Per controllare il livello di carica della batteria (tranne che durante la carica o durante il
funzionamento del caricatore), premere il pulsante di controllo livello di carica batteria.
2 L'indicatore livello di carica si illumina in base al livello di carica della batteria.
Indicazione
livello di cari-
ca batteria
Livello batteria:
0%
Livello batteria:
da 0 a 10%
Livello batteria:
da 10 a 40%
Livello batteria:
da 40 a 70%
Livello batteria:
da 70 a 100%
Tutte le spie
spente
Una spia rossa
lampeggia
Una spia rossa ac-
cesa a luce fissa
Due spie rosse ac-
cese a luce fissa
Tre spie rosse ac-
cese a luce fissa

51
6. ISTRUZIONI
PER L'USO
1. MODALITÀ DI INSTALLAZIONE /
RIMOZIONE DELLA BATTERIA
• Prima di installare/rimuovere la batteria
dall'utensile, premere l'interruttore di
bloccaggio di sicurezza come indicato
nella figura E e non avvicinare le mani al
pulsante di azionamento (Fig.F).
• Prima dell'uso, controllare che la batteria
sia saldamente inserita sull'utensile.
L'inosservanza di questa indicazione può
essere causa di gravi lesioni.
1
(Fig.C) Al montaggio della batteria, inserire
la batteria nell'utensile in modo che le guide
della batteria e dell'utensile si impegnino
fra loro. Far scorrere la batteria a fine corsa,
fino ad avvertire uno scatto. Gli elementi di
bloccaggio (Fig.C 16) devono essere
riportati nella loro posizione originaria.
2 Per rimuovere la batteria, sfilarla
dall'utensile premendo gli elementi di
bloccaggio da entrambi i lati mentre si
afferra saldamente l'utensile.
2. MODALITÀ DI TAGLIO DEL
MATERIALE
• Non avvicinare le mani agli organi in
movimento.
•
Quando si tagliano tondini corti, i pezzi
tagliati potrebbero venire proiettati,
accertarsi quindi che l'area circostante sia
sgombra prima di tagliare il tondino.
•
In caso di contaminazione dell'impugnatura con
olio o grasso, pulirla accuratamente.
Se l'olio o il grasso non vengono rimossi, la mano
potrebbe scivolare provocando la caduta dell'utensile.
•
Inserire il tondino (Fig.H 28) tra le lame fino a
portarlo a contatto del lato inferiore (Fig.H
31) e tagliare il tondino.
•
Se dopo l'operazione si lascia il pulsante di
azionamento inserito, l'asta di taglio si riavvia
dopo il taglio del tondino. Al termine del taglio,
rilasciare quindi il pulsante di azionamento.
1
Allentare il dado di bloccaggio con la chiave
fornita in dotazione. (Fig.A 11)
2
Utilizzare il bullone di regolazione in modo da
disporre il tondino ad angolo retto rispetto
all'utensile. (Fig.A 10)
3
Serrare il dado di bloccaggio con la chiave.
4
Inserire il tondino (Fig.H 28) da tagliare tra le
lame (Fig.H 29).
5
Sistemare il tondino nella posizione di taglio
desiderata, tirare il pulsante e azionare l'asta
di taglio (Fig.H 30). Tenere il pulsante tirato
fino al termine del taglio. L'asta di taglio, dopo
aver tagliato il tondino ed essere giunta a
fondo corsa, si riporta automaticamente nella
posizione iniziale.
6
Rilasciare l'interruttore per estrarre il tondino.
3. MODALITÀ DI UTILIZZO DEL
BULLONE VALVOLA
NOTA:
Non ruotare il bullone valvola più del
necessario. L'eccessiva rotazione può
causare perdite d'olio o la perdita di
componenti.
1 Per ritrarre parzialmente l'asta di taglio
durante l'operazione di taglio, allentare il
bullone valvola. (Fig.I)
Allentando il bullone di circa un giro in
senso antiorario (Fig.I 32) con una
moneta o un cacciavite, l'asta di taglio
ritorno alla posizione iniziale.
2 Per riprendere il taglio, serrare
saldamente il bullone in senso orario
(Fig.I 33). Se il bullone è allentato, non è
possibile tagliare il tondino.
4. MECCANISMO DI ROTAZIONE
DELLA TESTA
• Durante la rotazione della testa, non
appoggiare le dita sul pulsante di
azionamento. L'asta di tagli potrebbe
attivarsi con conseguente lesione o
incidente. (Fig.F)
1
La testa può essere ruotata di 360° (Fig.J)
ATTENZIONE
ATTENZIONE
AVVERTENZA
ATTENZIONE

52
5. MODALITÀ DI SOLLEVAMENTO E
DI TRASPORTO
• Tenere saldamente l’impugnatura e la
maniglia laterale e tenere le dita lontano dal
grilletto durante le operazioni di
sollevamento e di trasporto. (Fig.M)
6. MODALITÀ DI SOSTITUZIONE
DELLE LAME
• Prima di sostituire le lame, rimuovere la
batteria dall'utensile.
• Prestare la dovuta attenzione nel
maneggiare le lame, perchè sono affilate.
• Prestare attenzione al senso di
orientamento delle lame. (Fig.L)
• Serrare saldamente i bulloni a testa
esagonale che bloccano le lame in
posizione. (Fig.K)
1 Con la chiave esagonale N. 4 allentare i
bulloni a testa esagonale (2 per ciascuna
lama) che bloccano le lame in posizione
ed estrarre la vecchia lama.
2 Posizionare la nuova lama come indicato
nella figura L e serrare saldamente i
bulloni esagonali.
7. MANUTENZIONE
• Prima di procedere al controllo
dell'utensile, verificare che la batteria non
sia inserita sull'utensile.
L'inosservanza di questa indicazione può
essere causa di gravi lesioni.
•
Prima di procedere al controllo del
caricabatterie, verificare che il caricatore sia
scollegato dall'alimentazione.
1 Controllare regolarmente l'utensile
Per salvaguardare le prestazioni
dell'utensile, pulire e controllare
regolarmente l'utensile.
Esaminare regolarmente le viti per verificare
che siano saldamente serrate.
Il serraggio incompleto può causare incidenti
o rotture. Nel caso in cui una vite sia
allentata, riserrarla saldamente.
2 Non lubrificare l'utensile
Non lubrificare l'utensile per nessun motivo.
L'eventuale lubrificazione rimuove il grasso
presente all'interno dell'utensile e causa
problemi all'utensile.
3 Non immergere l'utensile in liquidi. Non
versare liquidi, ad eccezione dell'olio
prescritto, nell'utensile.
8. IMMAGAZZINAGGIO
Non conservare l’utensile a temperature ridotte,
bensì in luoghi caldi.
Quando l’utensile non viene utilizzato,
conservarlo in luoghi caldi e asciutti. Non tenere
l’utensile alla portata dei bambini. L’usura
determinata dal normale impiego di un qualsiasi
utensile di qualità rende sempre necessaria
l’esecuzione della manutenzione o la
sostituzione di componenti.
RITIRO DELL'UTENSILE
Dopo aver usato l'utensile o quando si prevede
di non utilizzarlo per un certo periodo, rimuovere
la batteria dall'utensile. L'utensile e i relativi
accessori devono essere conservati in un luogo
asciutto e ben ventilato dove la temperatura non
superi i 40°C (104°F) e non scenda al di sotto di
-20°C (-4°F).
La batteria, con il coperchietto installato sul
morsetto per evitare cortocircuiti, deve essere
conservata in un luogo asciutto e ben ventilato
dove la temperatura non superi i 30°C (86°F) e
non scenda al di sotto di -20°C (-4°F).
IN CASO DI INUTILIZZO DELLA BATTERIA
PER UN PERIODO SUPERIORE A 6 MESI,
PER CONSERVARE LE PRESTAZIONI DELLA
BATTERIA, OSSERVARE LE SEGUENTI
ISTRUZIONI;
• Ricaricarla completamente prima di
ritirarla.
• Applicare un coperchietto sul morsetto
della batteria per evitare cortocircuiti.
• Ritirare la batteria in un luogo asciutto e
ben ventilato dove la temperatura non
scenda al di sotto di -20°C (-4°F) e non
superi i 30°C (86°F).
• Non conservare la batteria in luoghi esposti
alla diretta luce del sole.
AVVERTENZA
ATTENZIONE
AVVERTENZA
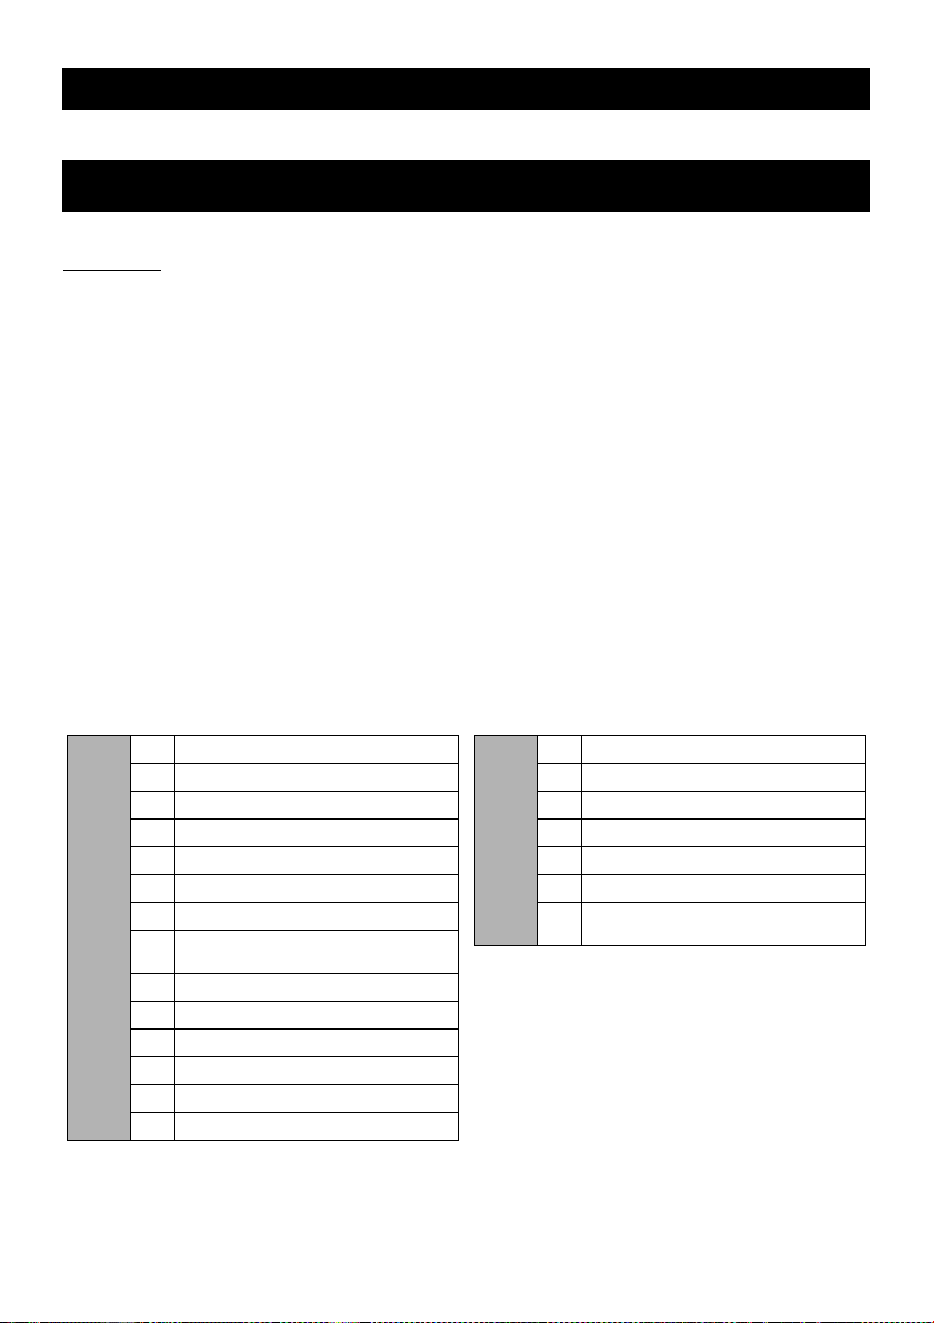
53
ÍNDICE
1. NOMBRE DE LAS PIEZAS ..............................................53
2. ADVERTENCIAS GENERALES DE SEGURIDAD SOBRE
LA HERRAMIENTA ELÉCTRICA ....................................54
3. ADVERTENCIAS DE SEGURIDAD SOBRE LA
CORTADORA DE BARRAS DE REFUERZO..................56
4. DATOS TÉCNICOS ..........................................................59
5. INSTRUCCIONES DE LA BATERÍA................................61
6. FUNCIONAMIENTO INSTRUCCIONES ..........................63
7. MANTENIMIENTO............................................................64
8. ALMACENAMIENTO........................................................64
1. NOMBRE DE LAS PIEZAS
(Véanse Fig. A y B)
ESPAÑOL
MANUAL DE FUNCIONAMIENTO Y MANTENIMIENTO
Fig. A
1 CABEZAL
2 BROCA
3 VÁSTAGO DEL CORTADOR
4 PERNO DE ENGRASE
5 GATILLO
6MOTOR
7 PAQUETE DE BATERÍA JPL92530A
8 INTERRUPTOR DEL BLOQUEO DE
SEGURIDAD
9 PERNO DE LA VÁLVULA
10 PERNO DE AJUSTE
11 TUERCA DE RETENCIÓN
12 ETIQUETA DE ESPECIFICACIONES
13 EMPUÑADURA
14 ASA LATERAL
Fig. B
15 TAPA DE LA BATERÍA
16 TERMINAL
17 VENTANA DE VENTILACIÓN
18 PESTILLO
19 ETIQUETA DE ESPECIFICACIONES
20
INDICADOR DE NIVEL DE LA BATERÍA
21
BOTÓN DE COMPROBACIÓN DEL
NIVEL DE LA BATERÍA
Traducción de las instrucciones
originales

54
2. ADVERTENCIAS GENERALES
DE SEGURIDAD SOBRE LA
HERRAMIENTA ELÉCTRICA
1. SEGURIDAD EN LA ZONA DE TRABAJO
• Mantenga la zona de trabajo limpia y
bien iluminada. Las zonas de trabajo
abarrotadas u oscuras propician los
accidentes.
• No utilice la herramienta eléctrica en
atmósferas explosivas, como por
ejemplo en presencia de líquidos
inflamables, gases o polvo. Las
herramientas eléctricas generan chispas
que pueden prender fuego al polvo o a los
humos.
• Mantenga alejados a los niños y a los
curiosos mientras utiliza la
herramienta eléctrica. Las distracciones
pueden hacerle perder el control.
2. SEGURIDAD ELÉCTRICA
• Los enchufes de las herramienta
eléctricas deben guardar
correspondencia con la toma de
corriente. Nunca modifique el enchufe
de ninguna manera. No utilice ningún
enchufe adaptador con las
herramientas eléctricas conectadas a
tierra. Los enchufes sin modificaciones y
en correspondencia con las tomas de
corriente reducirán el riesgo de descarga
eléctrica.
•
Evite el contacto corporal con las
superficies conectadas a tierra, como
tuberías, radiadores, estufas y neveras.
Si su cuerpo está conectado a tierra el
riesgo de descarga eléctrica es mayor.
• No exponga las herramientas
eléctricas a la lluvia o la humedad. La
entrada de agua a una herramienta
eléctrica aumentará el riesgo de
descarga eléctrica.
• Trate el cable con cuidado. No lo use
nunca para trasladar, arrastrar o
desenchufar la herramienta eléctrica.
Mantenga el cable alejado del calor, el
aceite, los bordes cortantes o las
piezas móviles. Los cables dañados o
enredados aumentan el riesgo de
descarga eléctrica.
•
Cuando use una herramienta eléctrica
en el exterior, hágalo utilizando un
cable de extensión adecuado.
El uso de
un cable adecuado para utilización en el
exterior reduce el riesgo de descarga
eléctrica.
•
Si la utilización de una herramienta
eléctrica en un lugar mojado es
inevitable, use un dispositivo de
corriente residual (RCD) con
suministro protegido.
La utilización de
un RCD reduce el riesgo de descarga
eléctrica.
•
No use la herramienta eléctrica bajo la
lluvia, donde haya salpicaduras de agua,
o en un lugar húmedo o mojado.
La
utilización de la herramienta en esas
condiciones o similares aumentará el riesgo
de descarga eléctrica, avería peligrosa y
recalentamiento.
3. SEGURIDAD PERSONAL
•
Cuanto utilice una herramienta eléctrica
permanezca alerta, preste atención a lo
que hace y aplique el sentido común. No
utilice una herramienta eléctrica si está
cansado o bajo los efectos de drogas,
bebidas alcohólicas o medicamentos.
Un
instante de descuido durante la utilización
de herramientas eléctricas puede provocar
graves lesiones personales.
•
Use equipo de protección personal. Use
siempre protección ocular.
El equipo de
protección, como máscara antipolvo,
zapatos de seguridad antideslizantes,
casco protector o protección auditiva,
utilizado en las condiciones apropiadas
reducirá el riesgo de lesiones personales.
•
Prevenga la puesta en marcha
accidental. Antes de conectar la
Lea todas las instrucciones, advertencias
de seguridad, ilustraciones y
especificaciones proporcionadas con
esta herramienta eléctrica.
Si no respeta todas las instrucciones listadas a
continuación, pueden producirse descargas
eléctricas, incendios y/o lesiones graves.
Conserve
todas las advertencias e instrucciones
para futuras consultas.
El término "herramienta
eléctrica" en las advertencias se refiere a la
herramienta conectada (mediante cables) a la red
eléctrica o accionada por batería (inalámbrica).
ADVERTENCIA
55
herramienta a la red de alimentación
eléctrica y/o al paquete de baterías,
recogerla o trasladarla, asegúrese de que
el interruptor esté en la posición "off".
El
traslado de las herramientas eléctricas con
el dedo en el interruptor o con el interruptor
en la posición "on" propicia los accidentes.
• Antes de poner en marcha la
herramienta retire de la misma toda
llave de ajuste o llave inglesa.
Una llave inglesa o llave de ajuste sujeta a
una pieza giratoria de la herramienta eléctrica
puede provocar lesiones personales.
• Utilice la herramienta sin extralimitarse.
Manténgase en todo momento en
equilibrio, con los pies bien apoyados
en el suelo. De este modo podrá controlar
mejor la herramienta eléctrica en
situaciones imprevistas.
• Vístase adecuadamente. No use ropas
sueltas ni joyas. Mantenga el cabello y
la ropa alejados de las piezas móviles.
Las prendas sueltas, las joyas o el cabello
largo pueden quedar atrapados en las
piezas móviles.
•
Si la herramienta tiene dispositivos para
recogida y extracción de polvo, asegúrese
de que están conectados y se utilizan
adecuadamente.
El uso del dispositivo de
recogida de polvo puede reducir los peligros
relacionados con el mismo.
•
No deje que la familiaridad adquirida por
el uso frecuente de herramientas le haga
bajar la guardia e ignorar los principios
de seguridad de la herramienta.
Un
descuido puede provocar lesiones graves
en una fracción de segundo.
4. UTILIZACIÓN Y CUIDADO DE LA
HERRAMIENTA ELÉCTRICA
• No fuerce la herramienta eléctrica. Use
la herramienta eléctrica adecuada a
sus necesidades. La herramienta
eléctrica adecuada hará mejor el trabajo y
de manera más segura a la velocidad
para la que fue diseñada.
•
No use la herramienta eléctrica si el
interruptor no conmuta entre las
posiciones "on" y "off".
Toda herramienta
eléctrica que no puede controlarse con el
interruptor es peligrosa y debe repararse.
• Si es desconectable, desconecte de la
herramienta eléctrica el enchufe de la
red eléctrica y/o del paquete de baterías
antes de guardarla o de realizar ajustes
o cambios de accesorios. Estas
medidas de seguridad preventivas
reducen el riesgo de puesta en marcha
accidental de la herramienta eléctrica.
• Guarde las herramientas eléctricas
fuera de uso alejadas del alcance de
los niños y no deje que las utilicen
personas no familiarizadas con las
mismas o con estas instrucciones. El
uso de herramientas eléctricas por
personas que carecen de la formación
necesaria resulta peligroso.
•
Realice el mantenimiento de las
herramientas eléctricas y de sus
accesorios. Compruebe que las piezas
móviles estén bien alineadas y sujetas, y
que ninguna pieza esté dañada o en un
estado que pueda afectar al funcionamiento
de la herramienta eléctrica. Si detecta
alguna avería, haga reparar la herramienta
eléctrica antes de usarla.
El mantenimiento
deficiente de las herramientas eléctricas
provoca muchos accidentes.
• Mantenga las herramientas de corte
afiladas y limpias. Las herramientas de
corte adecuadamente mantenidas con
los bordes afilados tienen menos
probabilidades de atascarse y son más
fáciles de controlar.
• Use la herramienta eléctrica, los
accesorios, las piezas, etc. de acuerdo
con estas instrucciones, teniendo en
cuenta las condiciones de trabajo y la
tarea que debe realizar. El uso de la
herramienta eléctrica para trabajos que
no sean los previstos podría provocar una
situación peligrosa.
•
Mantenga las empuñaduras y las
superficies de agarre secas, limpias y
libres de aceite y grasa.
Las empuñaduras
y superficies de agarre resbaladizas impiden
manipular y controlar la herramienta con
seguridad en situaciones imprevistas.
5. Utilización y cuidado de la batería de la
herramienta
• Recargue la batería únicamente con el
cargador especificado por el fabri-
cante. Un cargador apto para un determi-
nado tipo de paquete de baterías puede
provocar riesgo de incendio si se utiliza
con otro tipo de paquete de baterías.

56
• Use las herramientas eléctricas sólo
con los paquetes de baterías designa-
dos específicamente. El uso de cualquier
otro paquete de baterías puede provocar
riesgo de lesiones e incendio.
• Cuando el paquete de baterías esté
fuera de uso, manténgalo alejado de
otros objetos metálicos, como clips
para papeles, monedas, llaves, clavos,
tornillos u otros objetos metálicos
pequeños que pueden establecer una
conexión de un terminal a otro. La unión
de terminales de baterías puede causar
quemaduras o provocar un incendio.
• En condiciones de uso inadecuadas la
batería puede proyectar líquido, cuyo
contacto es necesario evitar. Si acci-
dentalmente entra en contacto con di-
cho líquido, lávese bien con agua. Si el
líquido entra en contacto con los ojos,
lávese con agua y acuda al médico. El
líquido proyectado por la batería puede
causar irritación o quemaduras.
• No utilice una herramienta o un
paquete de baterías que estén dañados
o hayan sido modificados. Las baterías
dañadas o modificadas pueden presentar
un comportamiento impredecible y provo-
car un incendio, una explosión o lesiones.
• No exponga el paquete de baterías ni la
herramienta al fuego o a una temperat-
ura excesiva. La exposición al fuego o a
temperaturas superiores a 130 °C puede
provocar una explosión.
•
Siga todas las instrucciones de carga y
no cargue el paquete de baterías ni la her-
ramienta fuera del intervalo de temperat-
ura especificado en las instrucciones.
Una carga realizada de forma inadecuada o
a una temperatura fuera del intervalo especi-
ficado puede producir daños en la batería y
aumentar el riesgo de incendio.
•
Las baterías de iones de litio están suje-
tas a restricciones de envío.
Para el trans-
porte, póngase en contacto previamente con
la aerolínea o empresa de transporte.
6. REPARACIÓN
• La reparación de la herramienta
eléctrica debe confiarse a un técnico
cualificado que utilice únicamente las
piezas de recambio originales. De esta
manera se garantizará la seguridad de la
herramienta eléctrica.
• Nunca repare un paquete de baterías
dañado. La reparación de un paquete de
baterías sólo puede ser realizada por el
fabricante o por proveedores autorizados
de servicio técnico.
3. ADVERTENCIAS DE
SEGURIDAD SOBRE LA
CORTADORA DE BARRAS
DE REFUERZO
1. MANTENGA LAS MANOS ALEJADAS DE LAS
PIEZAS MÓVILES
2. MANTENGA LAS MANOS ALEJADAS DEL
GATILLO Y EXTRAIGA EL PAQUETE DE
BATERÍA CUANDO PROCEDA A CAMBIAR LA
BROCA, SI SE PRODUCE ALGUNA ANOMALÍA
Y CUANDO EL EQUIPO NO SE UTILICE
Si deja el paquete de baterías puesto en estas
situaciones, pueden provocarse averías o daños.
3. NUNCA MODIFIQUE LA HERRAMIENTA
La modificación de la herramienta afectará
negativamente al funcionamiento y la seguridad.
Cualquier modificación puede provocar lesiones
graves y anulará la garantía de la herramienta.
4. MANTENGA LA HERRAMIENTA EN BUEN
ESTADO DE FUNCIONAMIENTO
(ANTES DE LA PUESTA EN
FUNCIONAMIENTO COMPRUEBE QUE LOS
TORNILLOS ESTÉN BIEN AJUSTADOS)
Para garantizar un funcionamiento seguro y un
rendimiento óptimo, mantenga la herramienta sin
desgaste ni daños.
En condiciones de funcionamiento normales, la
herramienta está diseñada para producir
vibración. Debido a dicha vibración, los tornillos
pueden aflojarse, provocando daños en la
herramienta o lesiones graves.
Además, mantenga la empuñadura de la
herramienta limpia y seca, sin rastros de
aceite ni grasa.
5. ESPERE UNOS MINUTOS HASTA QUE LA
HERRAMIENTA SE CALIENTE ANTES DE
USARLA
Con bajas temperaturas o cuando la herramienta no
se ha usado durante un tiempo prolongado, la
lubricación interna podría ser insuficiente. En esos
casos, espere varios minutos hasta que la
herramienta se caliente funcionando sin carga. Si la
lubricación interna es insuficiente, la herramienta
podría no funcionar a pleno rendimiento.
6. ASEGÚRESE DE QUE NO HAYA NADIE
DEBAJO CUANDO UTILICE LA
HERRAMIENTA EN LUGARES ELEVADOS
De no respetarse esta indicación podrían provocarse
lesiones graves a la persona que está debajo.

57
7. SUJETE FIRMEMENTE LA HERRAMIENTA
CON AMBAS MANOS
De no respetarse esta indicación, podrían
provocarse lesiones graves.
8. NO DEJE LA HERRAMIENTA EN
FUNCIONAMIENTO
Ponga en funcionamiento la herramienta solo
cuando la tenga sujeta con las manos.
9. UTILICE ÚNICAMENTE EL PAQUETE DE
BATERÍA AUTORIZADO
Utilice solo el paquete de batería MAX
JPL92530A. Si la herramienta está conectada a
una fuente de alimentación que no es la batería
autorizada, como una batería recargable, una pila
seca o una batería de acumuladores de uso en
automóviles, puede sufrir daños, averiarse,
recalentarse o incluso incendiarse. No conecte
esta herramienta a ninguna fuente de
alimentación que no sea el paquete de la batería
MAX JPL92530A.
10. PARA GARANTIZAR EL MÁXIMO
RENDIMIENTO, CARGUE TOTALMENTE LA
BATERÍA ANTES DE USARLA
Un paquete de batería nuevo o no utilizado
durante períodos prolongados puede haberse
descargado, por lo que será necesario recargarlo
para devolverlo a su estado de carga completa.
Antes de utilizarla herramienta, cerciórese de
cargar la batería con el cargador de batería
especificado.
11. NO BLOQUEE EL ORIFICIO DE VENTILACIÓN
DE LA HERRAMIENTA. NO PONGA NADA EN
EL ORIFICIO DE VENTILACIÓN.
La herramienta puede recalentarse, desprender
humo o averiarse.
Esto es muy peligroso porque la herramienta
puede proyectar materiales extraños.
12. NO USE CONTINUAMENTE LA
HERRAMIENTA DURANTE PERÍODOS DE
TIEMPO PROLONGADOS.
La temperatura del motor y del aceite aumentará
hasta llegar a reducir el rendimiento de la
herramienta.
13. NO DEJE CAER LA HERRAMIENTA.
Una caída puede provocarle daños a averías.
Cuando trabaje en lugares elevados tome
precauciones para proteger el entorno o a las
personas cercanas.
14. USE ÚNICAMENTE LAS BROCAS Y LOS
ACCESORIOS ESPECIFICADOS.
Las brocas y los accesorios no especificados no
solo pueden provocar daños al equipo, sino
también lesiones o accidentes.
15. USE ÚNICAMENTE EL ACEITE HIDRÁULICO
ESPECIFICADO.
Un aceite no especificado puede provocar daños
al equipo y una potencia deficiente, lo cual
afectará negativamente a la herramienta.
16. CUANDO CORTE BARRAS DE REFUERZO
PEQUEÑAS, LA PIEZA PUEDE SALIR
PROYECTADA, COMO SE MUESTRA EN LA
FIGURA. POR LO TANTO, ANTES DE
CORTAR LA BARRA DE REFUERZO
ASEGÚRESE DE QUE LA ZONA DE TRABAJO
ESTÁ DESPEJADA.
17. PRECAUCIÓN AL CARGAR LA BATERÍA
1 Utilice solamente el cargador de batería
especificado.
De no respetarse esta indicación la batería
puede recalentarse o incendiarse, provocando
lesiones graves.
2 Cargue la batería con el voltaje especificado.
El incumplimiento de esta indicación puede
dar lugar a recalentamiento o carga
inadecuada, con la posibilidad de provocar
lesiones graves.
3 Nunca utilice un transformador
4 Nunca conecte el cargador de la batería a
una fuente de alimentación de corriente
continua
El cargador se averiará o se quemará.
5 Evite cargar el paquete de batería bajo la
lluvia, en lugares húmedos o en zonas con
salpicaduras de agua
El cargador de la batería está previsto para
uso en el interior. La carga de un paquete de
batería húmedo o mojado provocará una
descarga eléctrica o un cortocircuito que
puede causar quemaduras e incluso incendiar
la herramienta.
6 No toque el cable de alimentación ni el
enchufe con las manos o los guantes
húmedos
Podría sufrir lesiones por descarga eléctrica.
7 No cubra el cargador de la batería mientras
la batería se esté cargando
Esto provocará recalentamiento y
quemaduras, y el cargador podría incluso
incendiarse.
8 Mantenga el paquete de batería y el
cargador alejados del calor y de las llamas
Zona peligrosa

58
9 No cargue el paquete de batería cerca de
materiales inflamables
10 Cargue el paquete de batería en un lugar
bien ventilado
Evite cargar el paquete de batería bajo la luz
solar directa.
11 Evite el uso continuado del cargador de la
batería
Deje que el cargador descanse durante 15
minutos entre cargas para evitar problemas
con la unidad.
12 Todos los objetos que bloqueen los
orificios de ventilación o el receptáculo del
paquete de batería pueden provocar
descarga eléctrica o problemas de
funcionamiento
Utilice el cargador en lugares sin polvo y otros
materiales extraños.
13 Manipule el cable de alimentación con
cuidado
No transporte el cargador tirando del cable de
alimentación. No utilice el cable de
alimentación para desconectar el cargador de
la toma mural, ya que dañará el cable y
romperá los hilos o provocará un cortocircuito.
No deje el cable de alimentación en contacto
con herramientas afiladas, materiales
calientes, aceite o grasa. Un cable dañado
debe repararse o reemplazarse.
14 No cargue baterías no recargables con
este cargador.
15 Este cargador no está concebido para ser
utilizado por niños o personas
discapacitadas sin supervisión.
16 Vigile a los niños para asegurarse de que
no jueguen con el cargador.
17 Coloque una tapa sobre el terminal del
paquete de batería
Cuando no utilice el paquete de batería,
coloque una tapa sobre su terminal para evitar
cortocircuitos.
Manténgalo alejado de otros objetos
metálicos, como clips, monedas, llaves,
clavos, tornillos u otros objetos metálicos
pequeños que puedan provocar una conexión
entre los terminales.
18 No deje ni guarde la herramienta en un
vehículo o bajo la luz solar directa durante
el verano. Si deja la herramienta en lugares
con altas temperaturas, el paquete de
batería podría deteriorarse.
19 No guarde el paquete de batería totalmente
descargado. Si extrae de la herramienta
una batería totalmente descargada y la
deja sin cargar durante mucho tiempo,
puede estropearse. Recargue la batería
inmediatamente después de su descarga.
20 Utilice un equipo de protección individual
El equipo de protección, como guantes de
protección, utilizado en las condiciones
apropiadas reducirá el riesgo de lesiones
personales.

59
4. DATOS TÉCNICOS
<Paquete de batería> Se vende por separado
* Las baterías de iones de litio con más de 100 Wh de energía eléctrica están clasificados como
productos peligrosos.
Para el transporte, póngase en contacto previamente con la aerolínea o empresa de transporte.
La energía eléctrica del paquete de baterías de iones de litio de Max está estampada en la placa de
identificación del paquete de baterías.
El JPL92550A está clasificado como producto peligroso, pues su energía eléctrica es de 123,5 Wh.
<Cargador de batería> Se vende por separado
NOMBRE DEL PRODUCTO Paquete de batería de iones de litio
N.° DE PRODUCTO JPL92550A
TIPO DE BATERÍA Batería de iones de litio
TENSIÓN NOMINAL 25,2 V CC
CAPACIDAD NOMINAL 4,9 Ah (4.900 mAh)
TIEMPO DE CARGA
(USAR CON JC925A(CE))
Aproximadamente 80 minutos (Aprox. 80% de capacidad)
Carga completa - Aproximadamente 100 minutos (Aprox. 100% de capacidad)
ACCESORIOS Tapa de batería (para evitar cortocircuitos)
PESO 0,9 kg (2,4 lbs.)
TEMPERATURA DE CARGA 5 °C a 40 °C (41° F a 104 °F)
TEMPERATURA DE FUNCIONAMIENTO
0 °C a 40 °C (32° F a 104 °F)
HUMEDAD DE FUNCIONAMIENTO
80% HR o menos
NOMBRE DEL PRODUCTO Cargador de baterías de iones de litio
N.° DE PRODUCTO JC925A(CE)
ENTRADA 100-240 V CA 50/60 Hz 2,2 A
SALIDA 14,4 V CC : 4,0 A, 18 V CC : 4,0 A, 25,2 V CC : 2,8 A
PESO 0,7 kg (1,7 lbs.)
TEMPERATURA DE FUNCIONAMIENTO
5 °C a 40 °C (41 °F a 104 °F)
HUMEDAD DE FUNCIONAMIENTO
80% HR o menos
1. ESPECIFICACIONES DE LA HERRAMIENTA
N.° DE PRODUCTO PJRC160
PESO
7,6kg (16,8lbs.) (incluida la batería)
ALTURA 228 mm (9")
ANCHURA 100 mm (4")
LONGITUD 389 mm (15-3/8")
ACEITE HIDRÁULICO
EXXON MOBIL SHC524
VOLTAJE / BATERÍA
25,2 V,
Paquete de batería de ión litio
DIÁMETRO DE
CORTE MÁXIMO
φ16 mm
MOTOR Motor CC sin escobillas
TEMPERATURA DE
FUNCIONAMIENTO
-5° C a 40 °C (14° F a 104 °F)
HUMEDAD DE
FUNCIONAMIENTO
80% HR o menos
ACCESORIOS PJRC160
Caja para transporte
Empuñadura lateral
LLAVE DE BARRA HEX. 4
LLAVE INGLESA 17
DESTORNILLADOR
ACEITE SHC524

60
2. DATOS TÉCNICOS
1 NIVEL DE RUIDO
Nivel de ruido típico con ponderación A
determinado según EN62841:
• Nivel de presión sonora (L
pA
): 91dB (A)
• Nivel de potencia sonora (L
WA
): 80dB (A)
• Incertidumbre (K): 3dB (A)
2 VIBRACIONES
El valor total de vibración (suma vectorial
triaxial) determinado según EN62841:
• Emisión de vibración: (a
h
,
HD
): ≤2,5m/s
2
• Incertidumbre (K): 1,5m/s
2
Información:
- Los valores totales de vibración declarados
y los valores de emisión de ruido declara-
dos pueden usarse también en una eval-
uación preliminar de la exposición.
Advertencias:
- Las emisiones de ruido y vibración durante
el uso real de la herramienta eléctrica
pueden diferir de los valores declarados
dependiendo del modo en que se utilice la
herramienta, y en especial del tipo de pieza
de trabajo procesada.
- Es necesario establecer medidas de segu-
ridad para proteger al operador, basán-
dose en una estimación de la exposición
en las condiciones reales de uso (teniendo
en cuenta todas las partes del ciclo opera-
tivo, como el tiempo que la herramienta
está apagada y el tiempo que está en re-
poso, además del tiempo que está accion-
ada).
3 EMISIÓN RADIADA 30-1.000 MHZ
Clase B
4 Categoría de sobretensión
5 Grado de contaminación
Grado de contaminación: grado 4 según IEC
60664-1 (tanto de PJRC160 como de
JC925A(CE)).
3. CAMPOS DE APLICACIÓN
Corte de los siguientes materiales:
• Barra de refuerzo
• Perno
• Tela metálica
4. ACERCA DEL AÑO DE PRODUCCIÓN
Este producto lleva el número de producción en
el cuerpo principal. Los dos dígitos a la izquierda
del número indican el año de producción.
Use protección auditiva
PRODUCTO Categoría de
sobretensión
CORTADOR DE
BARRAS DE ACERO
CORRUGADO
INALÁMBRICO
PJRC160
Batería de acuerdo con
IEC 60664-1
JPL92530A
PAQUETE DE
BATERÍA
Categoría I
según
IEC 60664-1
CARGADOR DE
BATERÍA
JC925A (CE)
Categoría II
según
IEC 60664-1
(Ejemplo)
1 9 8 2 6 0 3 5 D
Año 2019

61
5. INSTRUCCIONES DE LA
BATERÍA
AVERÍAS DE LA BATERÍA
Si se produce alguna de las siguientes
situaciones, lleve la batería y el cargador al
establecimiento distribuidor.
• La luz de carga roja no se enciende cuando el
enchufe del cargador se enchufa en la toma de
corriente (cuando el paquete de batería no
está insertado en el cargador).
•
La luz de carga roja y la luz "en espera" naranja
no se encienden ni parpadean cuando el
paquete de batería se inserta en el cargador.
• La luz "en espera" naranja no cambia a luz de
carga roja ni después de haber transcurrido
más de 1 hora. (excepto a baja temperatura)
• La luz de carga roja no cambia de fija a
parpadeante ni habiendo transcurrido más de
90 minutos.
VIDA ÚTIL DEL PAQUETE DE BATERÍA
Si se produce alguna de las situaciones arriba
descritas, el paquete de batería está llegando al fin
de su ciclo de vida. Sustitúyalo por uno nuevo.
• Aunque el paquete de batería se ha cargado
correctamente (totalmente cargada), se ha
notado una gran reducción del tiempo de
funcionamiento.
AVISO:
• Cargue el paquete de batería cuando la
velocidad de giro del motor disminuya (la
capacidad del paquete de batería se
considera próxima a agotarse). Si sigue
utilizando la herramienta, el paquete de
batería llegará a agotarse, lo cual reducirá
la vida útil de la batería y provocará
problemas funcionales del cuerpo
principal de la herramienta.
• No utilice un paquete de batería más allá de
su vida útil.
Provocará problemas de funcionamiento
en el cuerpo principal de la herramienta.
Además, si carga un paquete de batería
más allá de su vida útil podría ocasionar
problemas de funcionamiento en el
cargador.
RECICLAJE DE UNA BATERÍA DE
IONES DE LITIO
El paquete de batería MAX es de iones de litio;
podría ser ilegal desecharlo en el sistema de
basuras municipal. Consulte las opciones de
reciclaje o eliminación de este tipo de baterías
disponibles en su zona.
Cuando deseche el paquete de batería,
asegúrese de colocar una tapa en su terminal
(con cinta aislante para asegurarlo) para
evitar cortocircuitos.
PRECAUCIÓN

62
ACERCA DEL INDICADOR DE NIVEL DE LA BATERÍA
1 Para comprobar el nivel de la batería (excepto mientras está cargando o funcionando con la
herramienta de carga), pulse el botón de comprobación del nivel de la batería.
2 El indicador de nivel de la batería se ilumina según el nivel de la batería.
Indicación
del nivel de
la batería
Nivel de la batería:
0%
Nivel de la batería:
aprox. 0 a 10%
Nivel de la batería:
aprox. 10 a 40%
Nivel de la batería:
aprox. 40 a 70%
Nivel de la batería:
aprox. 70 a 100%
Todos los indi-
cadores OFF
Una luz indicado-
ra roja parpadea
Una luz indica-
dora roja ON
Dos luces indica-
doras rojas ON
Tres luces indi-
cadoras rojas ON

63
6. FUNCIONAMIENTO
INSTRUCCIONES
1. CÓMO INSERTAR/EXTRAER EL
PAQUETE DE BATERÍA
•
Antes de insertar / extraer el paquete de batería de
la herramienta, presione el interruptor del bloqueo
de seguridad como se muestra en la Fig.E y
mantenga las manos alejadas del gatillo (Fig.F).
•
Antes de accionar la herramienta, compruebe
que el paquete de batería está bien insertado en
la herramienta.
De no respetarse esta indicación, podrían
provocarse lesiones graves.
1
(Fig.C) Al insertar el paquete de batería en la
herramienta, hágalo de manera que los
carriles de la batería y de la herramienta
coincidan. Deslice el paquete de batería hasta
que llegue al tope y oiga un clic. Los pestillos
(Fig.C 16) deben volver a la posición original.
2
Cuando extraiga el paquete de batería,
sáquelo de la herramienta presionando los
pestillos situados a ambos lados mientras
sujeta firmemente la empuñadura de la
herramienta.
2. CÓMO CORTAR EL MATERIAL
•
Mantenga las manos alejadas de las piezas móviles.
•
Cuando corte una barra de refuerzo pequeña, la
pieza de corte puede resultar proyectada. Por lo
tanto, antes de cortar la barra de refuerzo
compruebe la seguridad de la zona circundante.
•
Si la empuñadura se ensucia con aceite o grasa,
proceda a limpiarla a fondo.
Si la empuñadura está sucia de aceite o grasa la
herramienta puede resbalársele de las manos y caerse.
•
Introduzca la barra de refuerzo (Fig.H 28) entre
las brocas hasta que toque el fondo (Fig.H 31) y
corte la barra de refuerzo.
•
Si el gatillo queda presionado después de la
operación, el vástago del cortador vuelve a
ponerse en marcha después de cortar la barra
de refuerzo. Por lo tanto, suelte el gatillo
después de cortar la barra de refuerzo.
1
Afloje la tuerca de retención con la llave
incluida en el suministro. (Fig.A 11)
2
Use el perno de ajuste de manera que la barra
de refuerzo quede en ángulo recto respecto
de la herramienta. (Fig.A 10)
3
Ajuste la tuerca de retención con la llave.
4
Introduzca la barra de refuerzo (Fig.H 28) que
debe cortar entre las brocas. (Fig.H 29)
5
Coloque la barra de refuerzo en la posición de
corte que desea, active el gatillo y ponga en
funcionamiento el vástago del cortador (Fig.H
30). Mantenga activado el gatillo hasta que
finalice el corte. El vástago del cortador
vuelve automáticamente a la posición inicial
después de cortar la barra de refuerzo y llegar
al extremo final.
6
Suelte el interruptor para sacar la barra.
3. CÓMO USAR EL PERNO DE LA
VÁLVULA
AVISO:
No gire el perno de la válvula más de lo
necesario. Si gira excesivamente puede hacer
que el aceite gotee o que no llegue a algunas
piezas.
1
Para sacar el vástago del cortador en mitad de
un corte, afloje el perno de la válvula. (Fig.I)
Aflojando el perno aproximadamente una
vuelta en sentido contrario a las agujas del
reloj (Fig.I 32) con una moneda o un
destornillador el vástago del cortador vuelve
a la posición inicial.
2
Para reanudar el corte, apriete bien el perno
en sentido de las agujas del reloj (Fig.I 33). Si
el perno está flojo no es posible cortar la barra
de refuerzo.
4. MECANISMO DE ROTACIÓN DEL
CABEZAL
• Cuando gire el cabezal, mantenga los
dedos alejados del gatillo porque podría
activarse el vástago del cortador
provocando lesiones o accidentes. (Fig.F)
1
El cabezal puede girarse 360° (Fig.J)
ADVERTENCIA
ADVERTENCIA
PRECAUCIÓN
ADVERTENCIA

64
5. CÓMO LEVANTAR Y
TRANSPORTAR LA
HERRAMIENTA
• Sujete firmemente la empuñadura y el asa
lateral y mantenga los dedos alejados del
gatillo cuando levante y transporte la
herramienta. (Fig. M)
6. CÓMO CAMBIAR LAS BROCAS
•
Para cambiar las brocas, asegúrese de sacar la
batería de la herramienta.
•
Manipule las brocas con cuidado porque son
muy afiladas.
•
Preste atención al sentido de colocación de las
brocas. (Fig.L)
•
Ajuste bien los pernos hexagonales que
bloquean la broca en su sitio. (Fig.K)
1
Con la llave hexagonal N.º 4, afloje los pernos
hexagonales (2 para cada broca) que
bloquean la broca en su sitio y saque la broca
usada.
2
Coloque la broca nueva como se muestra en
la Fig.L y ajústela bien con los pernos
hexagonales.
7. MANTENIMIENTO
•
Antes de inspeccionar la herramienta,
compruebe que el paquete de la batería no está
insertado.
De no respetarse esta indicación, podrían
provocarse lesiones graves.
•
Antes de inspeccionar el cargador de batería,
compruebe que el cargador está desconectado
de la fuente de alimentación.
1
Inspeccione la herramienta con regularidad.
Para mantener la herramienta en estado óptimo,
límpiela e inspecciónela periódicamente.
Examine los tornillos regularmente para
asegurarse de que están bien apretados.
Si los tornillos no están bien ajustados podrían
producirse accidentes o roturas. Si un tornillo se
afloja, vuelva a apretarlo completamente.
2
No lubrique la herramienta
No lubrique esta herramienta bajo ningún
concepto. La aplicación de lubricante eliminará la
grasa del interior de la herramienta y provocará
problemas.
3
No sumerja la herramienta en ningún líquido.
No ponga en la herramienta ningún líquido,
excepto el aceite especificado.
8. ALMACENAMIENTO
No guarde la herramienta a temperaturas bajas.
Guarde la herramienta en un lugar templado.
Cuando no la utilice, guárdela en un lugar
templado y seco. Mantenga la herramienta fuera
del alcance de los niños. Todas las herramientas
de calidad requieren el mantenimiento o la
sustitución de las piezas gastadas por el uso
normal.
ALMACENAMIENTO DE LA
HERRAMIENTA
Cuando haya finalizado de usar la herramienta o
cuando deje de utilizarla durante un tiempo,
saque el paquete de batería. La herramienta y
los accesorios deben guardarse en un lugar
seco y bien ventilado donde la temperatura no
sea superior a 40 °C (104 °F) ni inferior a -20 °C
(-4 °F).
El paquete de batería, con una tapa de batería
colocada sobre el terminal para evitar
cortocircuitos, debe guardarse en una lugar seco
y bien ventilado con temperaturas no superiores
a 30 °C (86 °F) ni inferiores a -20 °C (-4 °F).
SI GUARDA EL PAQUETE DE BATERÍA
DURANTE MÁS DE 6 MESES SIN USAR,
PARA CONSERVAR EL RENDIMIENTO DE
ESTA SIGA ESTAS INSTRUCCIONES:
• Recargue la batería completamente antes
de guardarla.
• Coloque una tapa sobre el terminal del
paquete de batería para evitar
cortocircuitos.
• Guarde el paquete de batería en un lugar
seco y bien ventilado con una temperatura
no inferior a -20 °C (-4 °F) ni superior a
30 °C (86 °F).
• No guarde el paquete de batería en un lugar
expuesto a la luz solar directa.
PRECAUCIÓN
ADVERTENCIA
PRECAUCIÓN
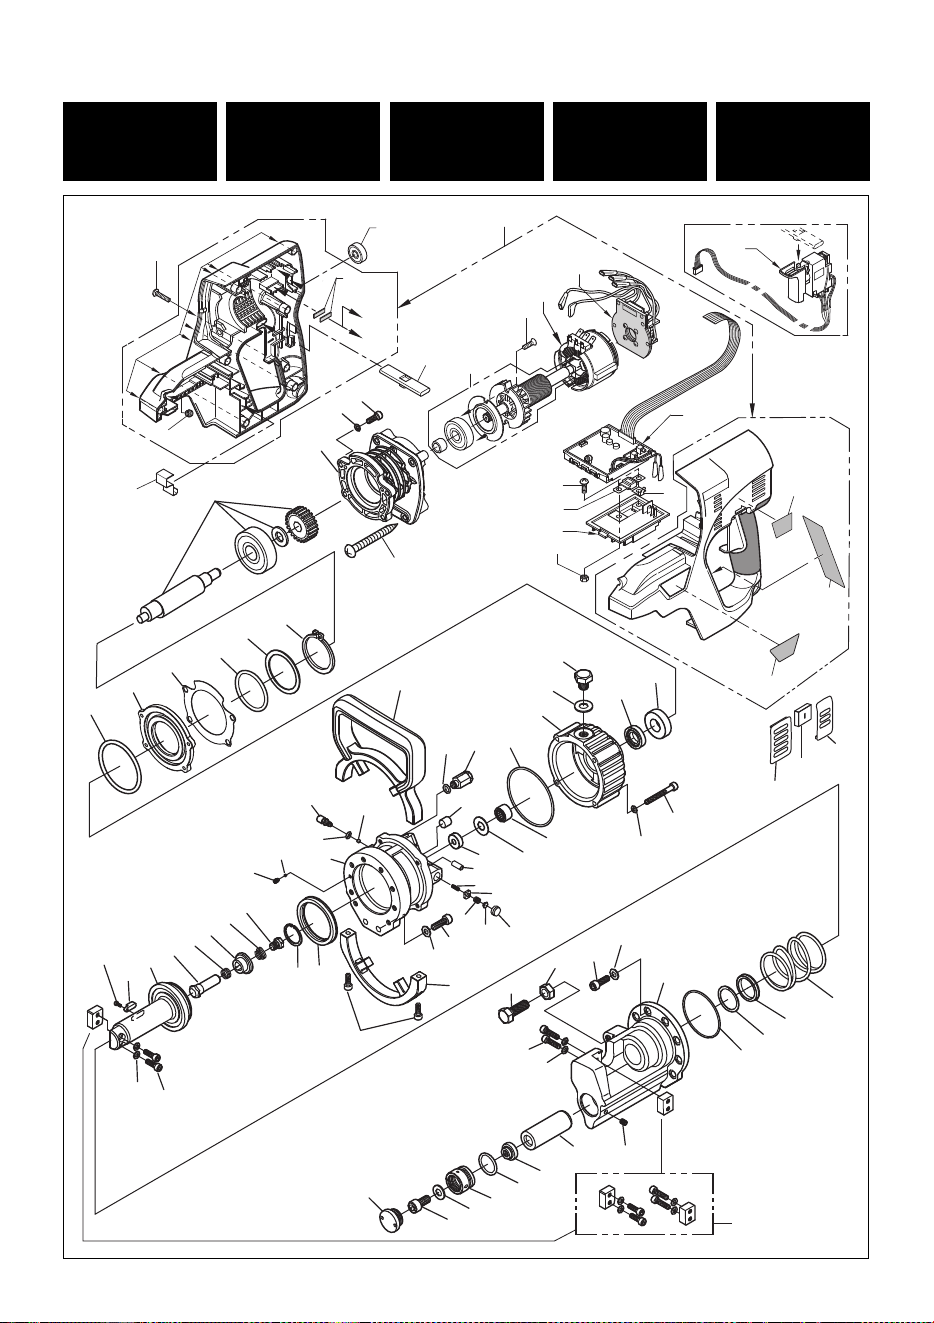
65
PJRC160(CE)
EXPLODED
VIEW AND SPARE
PARTS LIST
EINZELTEILDAR-
STELLUNG UND
ERSATZEILLISTE
SCHEMA ECLATE ET
LISTE DES PIECES
DE RECHANGE
ESPLOSO DEI
COMPONENTI DE
ELENCO DELLE
PARTI DI RICAMBIO
DESPIECE DE LA
MAQUINA Y LISTA
DE RECAMBIOS
82
19
16
12
35
34
33
32
29
28
27
10
11
9
23
21
24
25
1
2
7
3
4
5
6
31
26
17
55
51
51
49
53
54
65
8
18
22
22
22
22
30
66
56
64
67
20
43
36
37
39
41
40-1
40-4
40-5
40-3
40-2
42
38
44
50
46
47
48
45
57
52
52
58
59
60
63
61
62
70
73
71
72
13
14
68
74
69
15
21
75
76
77
78
79
80
81
83
83
84
86
87
85

66
PJRC160(CE)
ESPAÑOLITALIANOFRANÇAISENGLISHMATERIAL DEUTSCH
ITEM
NO.
PART
NO.
1
2
3
4
5
6
7
8
9
10
11
12
13
14
15
16
17
18
19
20
21
22
23
24
25
26
27
28
29
30
31
32
33
34
35
36
37
38
39
40
40-1
40-2
40-3
40-4
40-5
41
42
43
44
45
46
47
48
49
50
51
52
53
54
PJ70381
AA05590
PJ10922
LL11730
PJ10948
PJ10910
PJ10921
PJ70077
PJ13144
PJ13143
PJ70359
PJ70084
AA21176
YU39103
CC41101
PJ70086
PJ70087
PJ70095
AA22105
PJ13142
PJ13877
PJ13718
PJ13716
PJ70350
PJ13726
PJ13725
PJ13724
PJ13722
PJ13713
PJ13723
PJ13728
PJ13729
PJ13727
PJ13730
PJ13731
PJ13732
PJ13734
PJ13735
PJ13736
PJ70366
PJ70367
PJ13843
PJ13737
PJ13738
PJ13739
PJ13740
PJ13841
PJ13844
PJ13845
PJ13846
PJ13862
PJ13863
AA35601
PJ13856
MOTOR HOUSING SET (L&R) (CE)
TAP TIGHT(B)4X20 CF (PAN-HEAD)
LED LENS
BALL BEARING 608DD
SPONGE SEAL
CHANGE LEVER
SPRING
TRIGGER SW
SPECIFICATION LABEL(CE)
PANEL LABEL(CE)
MAIN CIRCUIT BOARD UNIT
BATTERY CONNECTOR UNIT
PHILLIPS PAN HEAD SCREW 5X8 MEC
FUSE 31500001 RT0
HEX NUT 1-5
POWER CIRCUIT BOARD UNIT
STATOR UNIT
ROTOR ASSY
OVAL COUNTER-SUNK SCREW 4X10
LOCK LABEL(CE)
HEXAGON SOCKET HEAD CAP SCREW M5X15
CONICAL SPRING WASHER D5
JOINT
SHAFT UNIT
RETAINING RING (INTERNAL) D42
WASHER 10635-SC19L
O-RING P42
PACKING
BRACKET
O-RING V56
BALL BEARING 6002ZZ
OIL SEAL AD15257
PUMP CASE
OILING BOLT M10X12
STEEL BALL 4MM
HEXAGON SOCKET HEAD CAP SCREW M5X12
O-RING S67
MACHINED RING NEEDLE ROLLER BEARING
NEEDLE ROLLER BACKUP
CYLINDER ASSY
CYLINDER
PLUNGER
BALL BEARING 606ZZ
HEXAGON SOCKET SET SCREW M4X6
STEEL BALL 3MM
PRESSURE CONTROL VALVE
O-RING P7
PISTON RETURN SPRING
CHECK VALVE
CHECK VALVE SPRING
SPRING BACKUP 110014
CAP-TYPE PACKING
VALVE BOLT
O-RING P5
STEEL BALL 4MM
HEXAGON SOCKET HEAD CAP SCREW M6X18
CONICAL SPRING WASHER D6
CROSS RECESSED TRUSS SCREW 1,5X50 CF
PISTON SEAL
MOTORGEHÄUSESATZ (L/R) (CE)
SCHNEIDSCHRAUBE(B)4X20 CF (FLACHKOPF)
LED-OBJEKTIV
KUGELLAGER 608DD
SCHAUMSTOFFDICHTUNG
UMSCHALTHEBEL
FEDER
EINSCHALTHEBEL
TYPENSCHILD (CE)
PANEL-AUFKLEBER (CE)
HAUPTLEITERPLATTE
BATTERIEANSCHLUSSEINHEIT
KREUZSCHLITZSCHRAUBE 5X8 MEC
SICHERUNG 31500001 RT0
SECHSKANTMUTTER 1-5
HAUPTLEITERPLATTENEINHEIT
STATOREINHEIT
ROTORBAUGRUPPE
OVALE SENKSCHRAUBE 4×10
VERRIEGELUNGSAUFKLEBER (CE)
INNENSECHSKANT-KOPFSCHRAUBE M5X15
TELLERFÖRMIGE FEDERSCHEIBE D5
VERBINDUNG
WELLENEINHEIT
HALTERING (INNEN) D42
UNTERLEGSCHEIBE 10635-SC19L
O-RING P42
DICHTUNG
HALTER
O-RING V56
KUGELLAGER 6002ZZ
ÖLDICHTUNG AD15257
PUMPENGEHÄUSE
ÖLSCHRAUBE M10X12
STAHLKUGEL 4 MM
INNENSECHSKANT-KOPFSCHRAUBE M5X12
O-RING S67
RING-NADELLAGER
NADELLAGERSTÜTZE
ZYLINDERBAUGRUPPE
ZYLINDER
KOLBEN
KUGELLAGER 606ZZ
INNENSECHSKANT-GEWINDESTIFT M4X6
STAHLKUGEL 3 MM
DRUCKBEGRENZUNGSVENTIL
O-RING P7
KOLBENRÜCKHOLFEDER
RÜCKSCHLAGVENTIL
RÜCKSCHLAGVENTILFEDER
FEDERSTÜTZE 110014
KAPPENDICHTUNG
VENTILSCHRAUBE
O-RING P5
STAHLKUGEL 4 MM
INNENSECHSKANT-KOPFSCHRAUBE M6X18
TELLERFÖRMIGE FEDERSCHEIBE D6
KREUZSCHLITZ-GERÜSTSCHRAUBE 1, 5X50 CF
KOLBENDICHTUNG
JEU CARTER MOTEUR (G ET D) (CE)
TARAUD ÉTANCHE (B) 4X20 CF (TÊTE CYLINDRIQUE LARGE)
OBJECTIF DEL
ROULEMENTS À BILLES 608DD
JOINT EN MOUSSE
LEVIER DE COMMANDE
RESSORT
LEVIER À GâCHETTE
ÉTIQUETTE DE CARACTÉRISTIQUES TECHNIQUES (CE)
ÉTIQUETTE DU PANNEAU (CE)
CIRCUIT ÉLECTRONIQUE PRINCIPAL
CONNECTEUR DE BATTERIE
VIS À TÊTE CYLINDRIQUE LARGE CRUCIFORME 5X8 MéC
FUSIBLE 31500001 RT0
ÉCROU HEXAGONAL 1-5
CARTE DE CIRCUIT IMPRIMé PRINCIPAL
STATOR
ENSEMBLE ROTOR
VIS OVALE À TÊTE FRAISéE PLATE 4×10
ÉTIQUETTE VERROU (CE)
VIS À TÊTE HEXAGONALE M5X15
RONDELLE DE RESSORT CONIQUE D5
ARTICULATION
AXE
BAGUE DE MAINTIEN (INTERNE) D42
RONDELLE 10635-SC19L
JOINT TORIQUE P42
JOINT D'ÉTANCHÉITÉ
SUPPORT
JOINT TORIQUE V56
ROULEMENTS À BILLES 6002ZZ
JOINT D'HUILE AD15257
CORPS DE POMPE
ÉCROU DE GRAISSAGE M10X12
BILLE EN ACIER 4MM
VIS À TÊTE HEXAGONALE M5X12
JOINT TORIQUE S67
ROULEMENT À AIGUILLE USINE
ROULEMENT À AIGUILLE DE RECHANGE
ENSEMBLE CYLINDRE
CYLINDRE
PISTON PLONGEUR
ROULEMENTS À BILLES 606ZZ
VIS À TÊTE HEXAGONALE M4X6
BILLE EN ACIER 3MM
VANNE DE CONTRÔLE DE PRESSION
JOINT TORIQUE P7
RESSORT DE RAPPEL DE PISTON
CLAPET ANTI-RETOUR
RESSORT DE LA VANNE DE CONTRÔLE
RESSORT DE RECHANGE 110014
JOINT À BOUCHON
ÉCROU DE VANNE
JOINT TORIQUE P5
BILLE D'ACIER 4MM
VIS À TÊTE HEXAGONALE M6X18
RONDELLE DE RESSORT CONIQUE D6
VIS A TÊTE BOMBÉE ET EMPREINTE CRUCIFORME 1, 5X50 CF
JOINT DU PISTON
ALLOGGIAMENTO MOTORE (SX E DX) (CE)
MASCHIO SERRATO (B)4X20 CF (A TESTA CILINDRICA PIANA)
OBIETTIVO LED
CUSCINETTO A SFERE 608DD
GUARNIZIONE IN ESPANSO
LEVA DI COMMUTAZIONE
MOLLA
LEVA PULSANTE DI AZIONAMENTO
ETICHETTA CARATTERISTICHE(CE)
ETICHETTA QUADRO(CE)
CIRCUITO STAMPATO PRINCIPALE
CONNETTORE BATTERIA
VITE A TESTA CILINDRICA PIANA A CROCE 5X8 MEC
FUSIBILE 31500001 RT0
DADO ESAGONALE 1-5
CIRCUITO STAMPATO PRINCIPALE
GRUPPO STATORE
GRUPPO ROTORE
VITE OVALE A TESTA CONICA 4×10
ETICHETTA BLOCCO(CE)
VITE A TESTA AD ESAGONO INCASSATO M5X15
RONDELLA ELASTICA CONICA D5
GIUNTO
ALBERO
ANELLO DI RITEGNO (INTERNO) D42
RONDELLA 10635-SC19L
O-RING P42
GUARNIZIONE
STAFFA
O-RING V56
CUSCINETTO A SFERE 6002ZZ
PARAOLIO AD15257
CORPO POMPA
BULLONE DI LUBRIFICAZIONE M10X12
SFERA D'ACCIAIO 4 MM
VITE A TESTA AD ESAGONO INCASSATO M5X12
O-RING S67
CUSCINETTO AD AGHI CON ANELLO LAVORATO
SPALLAMENTO PER CUSCINETTO AD AGHI
GRUPPO CILINDRO
CILINDRO
STANTUFFO
CUSCINETTO A SFERE 606ZZ
VITE A TESTA AD ESAGONO INCASSATO M4X6
SFERA D'ACCIAIO 3 MM
REGOLATORE DI PRESSIONE
O-RING P7
MOLLA RICHIAMO PISTONE
VALVOLA DI RITEGNO
MOLLA VALVOLA DI RITEGNO
SOSTEGNO MOLLA 110014
GUARNIZIONE A CAPPUCCIO
BULLONE VALVOLA
O-RING P5
SFERA D'ACCIAIO 4 MM
VITE A TESTA AD ESAGONO INCASSATO M6X18
RONDELLA ELASTICA CONICA D6
VITE DI ANCORAGGIO CON INTAGLIO A CROCE 1, 5X50 CF
GUARNIZIONE PISTONE
CONJUNTO DE ALOJAMIENTO DEL MOTOR (L& R) (CE)
TORNILLO ROSCADO (B) 4X20 CF (CABEZA PLANA)
LENTE LED
COJINETE DE BOLA 608DD
JUNTA DE ESPONJA
PALANCA DE CAMBIO
MUELLE
INTERRUPTOR DE LA PALANCA DEL GATILLO
ETIQUETA DE ESPECIFICACIONES (CE)
ETIQUETA DEL PANEL (CE)
UNIDAD DEL TABLERO DEL CIRCUITO PRINCIPAL
UNIDAD DEL CONECTOR DE LA BATERíA
TORNILLO PHILLIPS DE CABEZA PLANA 5X8 MECANIZADO
FUSIBLE 31500001 RT0
TUERCA HEXAGONAL 1-5
UNIDAD DE TARJETA DE CIRCUITO IMPRESO PRINCIPAL
UNIDAD DEL ESTÁTOR
CONJUNTO DEL ROTOR
TORNILLO OVAL AVELLANADO 4×10
ETIQUETA DE BLOQUEO (CE)
TORNILLO DE CABEZA HUECA HEXAGONAL M5X15
ARANDELA ELÁSTICA CÓNICA D5
JUNTA
UNIDAD DEL EJE
ARO DE RETENCIÓN (INTERNO) D42
ARANDELA 10635-SC19L
ANILLO TÓRICO P42
EMPAQUETADURA
ABRAZADERA
JUNTA TÓRICA V56
COJINETE DE BOLA 6002ZZ
OLIEAFDICHTING 15257
CUERPO DE LA BOMBA
PERNO DE ENGRASE M10X12
BOLA DE ACERO 4 MM
TORNILLO DE CABEZA HUECA HEXAGONAL M5X12
JUNTA TÓRICA S67
RODAMIENTO DE AGUJAS CON ARO MECANIZADO
SOPORTE DEL RODAMIENTO DE AGUJAS
UNIDAD DEL CILINDRO
CILINDRO
PISTÓN
COJINETE DE BOLA 606ZZ
TORNILLO PRISIONERO DE CABEZA HEXAGONAL M4X6
BOLA DE ACERO 3 MM
VÁLVULA DE CONTROL DE LA PRESIÓN
JUNTA TÓRICA P7
MUELLE DE RETORNO DEL PISTÓN
VÁLVULA DE CONTROL
MUELLE DE LA VÁLVULA DE CONTROL
SOPORTE DEL MUELLE 110014
EMBAQUETADURA TIPO TAPA
PERNO DE LA VÁLVULA
JUNTA TÓRICA P5
BOLA DE ACERO 4 MM
TORNILLO DE CABEZA HUECA HEXAGONAL M6X18
ARANDELA ELÁSTICA CÓNICA D6
TORNILLO DE REFUERZO RANURADO EN CRUZ 1, 5X50 CF
JUNTA DEL PISTÓN
PC
Steel
Rubber
ABS
Steel
PET
PET
PBT+BRASS
Steel
Steel
Steel+Copper
Steel+Magnet
Steel
PET
Steel
Steel
Aluminum
Steel
Steel
Steel
Rubber
Fiber
Steel
Rubber
Steel
Rubber+Steel
Aluminum
Steel
Steel+Rubber
Steel
Rubber
Steel
Steel
Steel
Steel
Steel
Steel
Steel
Steel
Steel
Rubber
Steel
Steel
Steel
Steel
PP
Steel
Rubber
Steel
Steel
Steel
Steel
Rubber

67
ESPAÑOLITALIANOFRANÇAISENGLISHMATERIAL DEUTSCH
ITEM
NO.
PART
NO.
55
56
57
58
59
60
61
62
63
64
65
66
67
68
69
70
71
72
73
74
75
76
77
78
79
80
81
82
83
84
85
86
87
PJ13855
PJ13854
PJ13853
PJ13852
PJ13851
PJ13850
PJ13847
PJ13849
PJ13848
PJ13857
PJ13858
PJ13859
PJ13860
PJ10907
PJ13861
PJ13872
PJ13873
PJ13871
PJ13870
PJ13869
PJ13868
PJ13867
PJ13866
PJ13865
PJ13864
PJ13711
PJ13712
PJ13717
PJ13876
PJ13842
PJ15108
PJ15106
PJ15107
PJ70509
PJ14262
PJ13719
PJ13720
RETAINING RING (INTERNAL) D24
SPRING BACKUP
FLOAT SPRING
STOPPER
KICK SPRING
VALVE SHAFT
CUTTER ROD
KEY
KEY LOCK BOLT
RETURN SPRING
ROD SEAL
BACKUP SPRING 25X33X2
O-RING S56
RELAY TERMINAL
CUTTER HEAD
ADJUST BOLT M10X30
LOCK NUT M10
HEXAGON SOCKET SET SCREW M5X6
AIR PACK
NUT 10288-BP18
O-RING P21
AIR PACK HOLDER
CONICAL SPRING WASHER D8
SOCKET HEAD CAP SCREW 10167-BP18
CAP 10226-SC16L
SIDE HANDLE
SIDE HANDLE MOUNT
BLADE
HEXAGON SOCKET HEAD CAP SCREW M5X12
MAGNET
INHALATION FILTER
COVER A
COVER B
OIL SHC 524
SCREW DRIVER
SPANNER 17
HEX. BAR WRENCH 4
HALTERING (INNEN) D24
FEDERSTÜTZE
SCHWIMMFEDER
ANSCHLAG
KICKFEDER
VENTILSCHAFT
SCHERKOLBEN
SCHLÜSEL
VERRIEGELUNGSSCHRAUBE
RÜCKHOLFEDER
STABDICHTUNG
STÜTZFEDER 25X33X2
O-RING S56
RELAISKLEMME
SCHERKOPF
EINSTELLSCHRAUBE M10X30
VERRIEGELUNGSMUTTER M10
INNENSECHSKANT-GEWINDESTIFT M5X6
LUFTPACK
MUTTER 10288-BP18
O-RING P21
LUFTPACKHALTER
TELLERFÖRMIGE FEDERSCHEIBE D8
INNENSECHSKANTSCHRAUBE 10167-BP18
KLAPPE 10226-SC 16L
SEITENGRIFF
SEITENGRIFFBEFESTIGUNG
MESSER
INNENSECHSKANT-KOPFSCHRAUBE M5X12
MAGNET
INHALATIONSFILTER
ABDECKUNG A
ABDECKUNG B
ÖL SHC524
SCHRAUBENDREHER
SCHRAUBENSCHLÜSSEL 17
SECHSKANTSTIFTSCHLÜSSEL 4
BAGUE DE SUPPORT D24
RESSORT DE RECHANGE
FLOTTEUR À RESSORT
BUTÉE
RESSORT DE DÉMARRAGE
AXE DE VANNE
TIGE DE DÉCOUPE
CLAVETTE
BOULON DE VERROUILLAGE DE LA CLAVETTE
RESSORT DE RENVOI
JOINT DE TIGE
RESSORT DE RECHANGE 25X33X2
JOINT TORIQUE S56
BORNE DE RELAIS
TÊTE DE DÉCOUPE
BOULON DE RÉGLAGE M10X30
ÉCROU DE SERRAGE M10
VIS À TÊTE HEXAGONALE M5X6
VENTILATION
ÉCROU 10288-BP18
JOINT TORIQUE P21
SUPPORT VENTILATION
RONDELLE DE RESSORT CONIQUE D8
VIS À TÊTE HEXAGONALE 10167-BP18
COUVERCLE 10226-SC16L
POIGNÉE LATÉRALE
SUPPORT DE POIGNÉE LATÉRALE
LAME
VIS À TÊTE HEXAGONALE M5X12
AIMANT
FILTRE D'INHALATION
HOUSSE A
HOUSSE B
HUILE SHC524
TOURNEVIS
CLE DE SERRAGE 17
CLE HEXAGONALE 4
ANELLO DI RITEGNO (INTERNO) D24
SOSTEGNO MOLLA
MOLLA GALLEGGIANTE
ARRESTO
MOLLA DI SPINTA
ALBERINO VALVOLA
ASTA DI TAGLIO
CHIAVETTA
BULLONE BLOCCO CHIAVETTA
MOLLA DI RICHIAMO
GUARNIZIONE ASTA
MOLLA DI SOSTEGNO 25X33X2
O-RING S56
TERMINALE RELÈ
TESTA DI TAGLIO
BULLONE DI REGISTRO M10X30
DADO DI BLOCCAGGIO M10
VITE A TESTA AD ESAGONO INCASSATO M5X6
GRUPPO PNEUMATICO
DADO 10288-BP18
O-RING P21
SUPPORTO GRUPPO PNEUMATICO
RONDELLA ELASTICA CONICA D8
VITE A TESTA CAVA 10167-BP18
COPERCHIETTO 10226-SC16L
IMPUGNATURA LATERALE
ATTACCO IMPUGNATURA LATERALE
LAMA
VITE A TESTA AD ESAGONO INCASSATO M5X12
MAGNETE
FILTRO DI INALAZIONE
COPERTURA A
COPERTURA B
OLIO SHC524
CACCIAVITE
CHAVE 17
CHIAVE ESAGONALE 4
ARO DE RETENCIÓN (INTERNO) D24
SOPORTE DEL MUELLE
MUELLE FLOTANTE
TAPÓN
MUELLE DE EMPUJE
EJE DE LA VÁLVULA
VÁSTAGO DE LA CORTADORA
CHAVETA
PERNO DE BLOQUEO DE LA LLAVE
MUELLE DE RETORNO
JUNTA DEL VÁSTAGO
MUELLE DE RETROCESO 25X33X2
JUNTA TÓRICA S56
TERMINAL DE RELÉ
CABEZAL DE LA CORTADORA
PERNO DE AJUSTE M10X30
TUERCA DE BLOQUEO M10
TORNILLO PRISIONERO DE CABEZA HEXAGONAL M5X6
EMPAQUETADURA ENTRADA AIRE
TUERCA 10288-BP18
JUNTA TÓRICA P21
SOPORTE EMPAQUETADURA ENTRADA AIRE
ARANDELA ELÁSTICA CÓNICA D8
TORNILLO DE CABEZA HUECA HEXAGONAL 10167-BP18
TAPA 10226-SC16L
EMPUÑADURA LATERAL
SOPORTE DE LA EMPUÑADURA LATERAL
CUCHILLA
TORNILLO DE CABEZA HUECA HEXAGONAL M5X12
IMÁN
FILTRO DE ASPIRACIÓN
CUBIERTA A
CUBIERTA B
ACEITE SHC524
DESTORNILLADOR
LLAVE INGLESA 17
LLAVE DE BARRA HEX. 4
Steel
Steel
Steel
Steel
Steel
Steel
Steel
Steel
Steel
Steel
Rubber
Steel
Rubber
Phosphor Bronze
Steel
Steel
Steel
Steel
Rubber
Steel
Rubber
Steel
Steel
Steel
Steel
Aluminum
Aluminum
Steel
Steel
Magnet
Polyester+Polychlal
PA
PA

68

69

EC DECLARATION OF CONFORMITY
We hereby declare that the product titled in this instruction manual conforms to the
essential health and safety requirements of EC Directives as below.
Directive :Machinery Directive 2006/42/EC
EMC Directive
Manufacturer :MAX CO., LTD.
1848, Kawai, Tamamura-machi, Sawa-gun,
Gunma, 370-1117 Japan
This product has been evaluated for conformity with the above directives using the
following European standards.
Machinery Directive:
EN ISO 12100-1:2003 + A1:2009, EN ISO 12100-2:2003 + A1:2009,
EN ISO 14121-1:2007, EN62841-2-8:2016, EN62841-1:2015
EMC Directive:
Title :General Manager, Quality Assurance Department
Address :1848, Kawai, Tamamura-machi, Sawa-gun,
Gunma, 370-1117 Japan
Authorized complier :MAX EUROPE BV / President in the community
Camerastraat 19,1322 BB Almere,
The Netherlands
EG KONFORMITÄTSERKLÄRUNG
Wir erklären hiermit, dass das in dieser Bedienungsanleitung beschriebene Produkt
mit den maßgeblichen Gesundheits- und Sicherheitsvorschriften der EG-Richtlinien
konform ist, wie nachstehend beschrieben.
Richtlinie :Maschinenrichtlinie 2006/42/EC
EMC-Richtlinie
Hersteller :MAX CO., LTD.
1848, Kawai, Tamamura-machi, Sawa-gun,
Gunma, 370-1117 Japan
Dieses Produkt wurde auf Konformität mit den obigen Richtlinien unter Einhaltung
der folgenden europäischen Normen geprüft.
Maschinenrichtlinie:
EN ISO 12100-1:2003 + A1:2009, EN ISO 12100-2:2003 + A1:2009,
EN ISO 14121-1:2007, EN62841-2-8:2016, EN62841-1:2015
EMC-Richtlinie:
Position :Generaldirektor,Abteilung für Qualitätssicherung
Adresse :1848, Kawai, Tamamura-machi, Sawa-gun,
Gunma, 370-1117 Japan
Autorisierter Entsorger: MAX.EUROPE BV/Präsident in der Gemeinschaft
Camerastraat 19, 1322 BB Almere, Holland
DÉCLARATION DE CONFORMITÉ CE
Nous déclarons par la présente que le produit du titre de ce manuel d’ instructions
est conforme aux exigences essentielles de santé et de sécurité des Directives CE
décrites ci-dessous.
Directive :Directive de Mécanique 2006/42/CE
Directive EMC
Fabricant :MAX CO., LTD.
1848, Kawai, Tamamura-machi, Sawa-gun,
Gunma, 370-1117 Japan
Ce produit a été évalué pour sa conformité aux directives ci-dessus en utilisant les
standards Européens suivants.
Directive de Mécanique:
EN ISO 12100-1:2003 + A1:2009, EN ISO 12100-2:2003 + A1:2009,
EN ISO 14121-1:2007, EN62841-2-8:2016, EN62841-1:2015
Directive EMC:
Titre :Directeur Général, Département Assurance de Qualité
Adresse :1848, Kawai, Tamamura-machi, Sawa-gun,
Gunma, 370-1117 Japan
Agent de conformité agréé:MAXEUROPE BV/Président dans la communauté
Camerastraat 19, 1322 BB Almere, Pays-Bas
DICHIARAZIONE DI CONFORMITÀ CE
Si dichiara qui che il prodotto riferito in questo manuale di istruzioni risulta
conforme ai requisiti di base concernenti la salute e la sicurezza, espressi dalle
direttive CE, come riportato di seguito.
Direttiva :Direttiva Macchine 2006/42/CE
Direttiva EMC
Produttore :MAX CO., LTD.
1848, Kawai, Tamamura-machi, Sawa-gun,
Gunma, 370-1117 Japan
Questo prodotto è stato valutato per la conformità con le succitate direttive,
secondo i seguenti standard europei.
Direttiva Macchine:
EN ISO 12100-1:2003 + A1:2009, EN ISO 12100-2:2003 + A1:2009,
EN ISO 14121-1:2007, EN62841-2-8:2016, EN62841-1:2015
Direttiva EMC:
Titolo :Direttore generale,Dipartimento controllo qualità
Indirizzo :1848, Kawai, Tamamura-machi, Sawa-gun,
Gunma, 370-1117 Giappone
Sede in Europa :MAX.EUROPE BV/Presidente della società MAX.EUROPE
Camerastraat 19,1322 BB Almere, Oland
DECLARACIÓN EC DE CONFORMIDAD
Por este medio declaramos que el producto mencionado en este manual de
instrucciones se encuentra en conformidad con los requerimientos de salud y de
seguridad esenciales de las Directivas CE.
Directiva : Directiva sobre Maquinaria 2006/42/CE
Directiva EMC
Fabricante :MAX CO., LTD.
1848, Kawai, Tamamura-machi, Sawa-gun,
Gunma, 370-1117 Japan
Este producto ha sido evaluado en conformidad con las directivas antes
mencionadas usando los estándares de Europa.
Directiva sobre maquinaria:
EN ISO 12100-1:2003 + A1:2009, EN ISO 12100-2:2003 + A1:2009,
EN ISO 14121-1:2007, EN62841-2-8:2016, EN62841-1:2015
Directiva EMC:
Título :Gerente general,Departamento de aseguramiento de calidad
Dirección:1848, Kawai, Tamamura-machi, Sawa-gun,
Gunma, 370-1117 Japan
Complier autorizado:MAX.EUROPE BV/Presidente de la comunidad
Camerastraat 19,1322 BB Almere, Holanda
PJRC160

UK DECLARATION OF CONFORMITY
We hereby declare that our products are compliant with the protection of human
health and safety and the protection of the environment. The object of declaration
described above is in conformity with the UK legislation below.
UK legislation : The Supply of Machinery (Safety) Regulations 2008
Manufacturer : MAX CO., LTD.
1848, Kawai, Tamamura-machi, Sawa-gun, Gunma,
370-1117 Japan
This declaration of conformity is issued under the sole responsibility of the above
manufacturer. This product has been evaluated for conformity with the above UK
legislation using the following standards
Applicable standards : BS EN ISO 12100 : 2010
BS EN792-13 :2000+A1 :2008
BS EN ISO11148-13 :2018(ISO11148-13:2017)
Title : Environment and Quality Assurance Dept.
Senior Manager, MAX CO., LTD.
Address : 1848, Kawai, Tamamura-machi, Sawa-gun, Gunma,
370-1117 JAPAN
PJRC160

• The content of this manual might be changed without notice for improvement.
• Änderungen der Betriebsanleitung zum Zwecke der Verbesserung ohne Ankündigung vorbehalten.
• Le contenu de ce manuel est sujet à modification sans préavis à des fins d'amélioration.
• Il contenuto di questo manuale è soggetto a variazioni senza preavviso nell'ambito della politica di
miglioramento del prodotto.
• El contenido de este manual se puede modificar sin previo aviso para su mejora.
4102929
210726-00/00
Antennestraat 45,
1322 AH, Almere, The Netherlands
Phone: +31-36-546-9669
FAX: +31-36-536-3985
www.max-europe.com (EUROPE Site)
www.maxusacorp.com (USA Site)
wis.max-ltd.co.jp/int/ (GLOBAL Site)
205 Express Street
TEL: 1-800-223-4293
FAX: (516)741-3272
Plainview, NY 11803, U.S.A.