M
ITEM NO.: CM8057-SILVER
ODEL NO.: CM5712-UL
Thank you for purchasing this product! Please read this manual thoroughly
before using and save it for future reference. If you have any question about the
product, please contact us via our customer service number:


1
IMPORTANT SAFEGUARDS
Before using the electrical appliance, the following basic precautions should always be
followed including the following:
1. Read all instructions.
2. Before using, check that the voltage of wall outlet corresponds to rated voltage marked on the
rating plate.
3. This appliance has been incorporated with a grounded plug. Please ensure the wall outlet in your
house is well earthed.
4. To protect against fire, electric shock and injury to persons, do
not immerse cord or plug in water
or other liquid.
5. Remove plug from wall outlet before cleaning and when not in use. Allow appliance cool down
completely before taking off, attaching components or before cleaning.
6. Do not operate any appliance with a damaged cord or plug or after the appliance malfunctions, or
is dropped or damaged in any manner. Return appliance to the nearest authorized service facility for
examination, repair or electrical or mechanical adjustment
.
7. The use of accessory attachments not recommended by the appliance manufacturer may result in
fire, electric shock or injury to persons.
8. Place appliance on flat surface or table, do not hang power cord over the edge of table or counter.
9. Ensure the power cord do not touch hot surface of appliance.
10. Do not place the coffee maker on hot surface or beside fire in order to avoid to being damaged.
11. To disconnect, remove plug from wall outlet. Always hold the plug. But never
pull the cord.
12. Do not use appliance for other than intended use and place it in a dry environment.
13. Close supervision is necessary when your appliance is being used near children.
14. Be careful not to get scalded by the steam.
15. Do not touch the hot surface of appliance (such as steam wand, and the filter just boiling). Use
handle or knobs.
16. Do not let the coffee maker operate without water.
17. Do not use the water tank at temperatures higher than 158℉ or use the tank to store
food.
18. Do not remove the metal funnel when appliance is brewing coffee or making steam.
19. Connect plug to wall outlet before using and turn any switch off before plug is removed from
wall outlet.
20. This appliance is not intended for use by persons (including children) with reduced physical,
sensory or mental capabilities, or lack of experience and knowledge, unless they have been given
supervision or instruction concerning use of the appliances by a person responsib
le for their safety.
21. Children should be supervised to ensure that they do not play with the appliance.
22. This appliance is intended to be used in household and similar applications such as:
– staff kitchen areas in shops, offices and other working environments;
– farm houses;
– by clients in hotels, motels and other residential type environments;
– bed and breakfast type environments.
SAVE THESE INSTRUCTIONS
2
23. Do not use outdoors.
24. Save these instructions.
25. If you do not use the product for a long time, you need to turn on the power and then release
steam for 3 minutes before leaving this product.
26. If you cut off power during steam release, residual heat will make product continue to release
steam for a length of time, the product will stop releasing steam immediately once you turn off
steam knob.
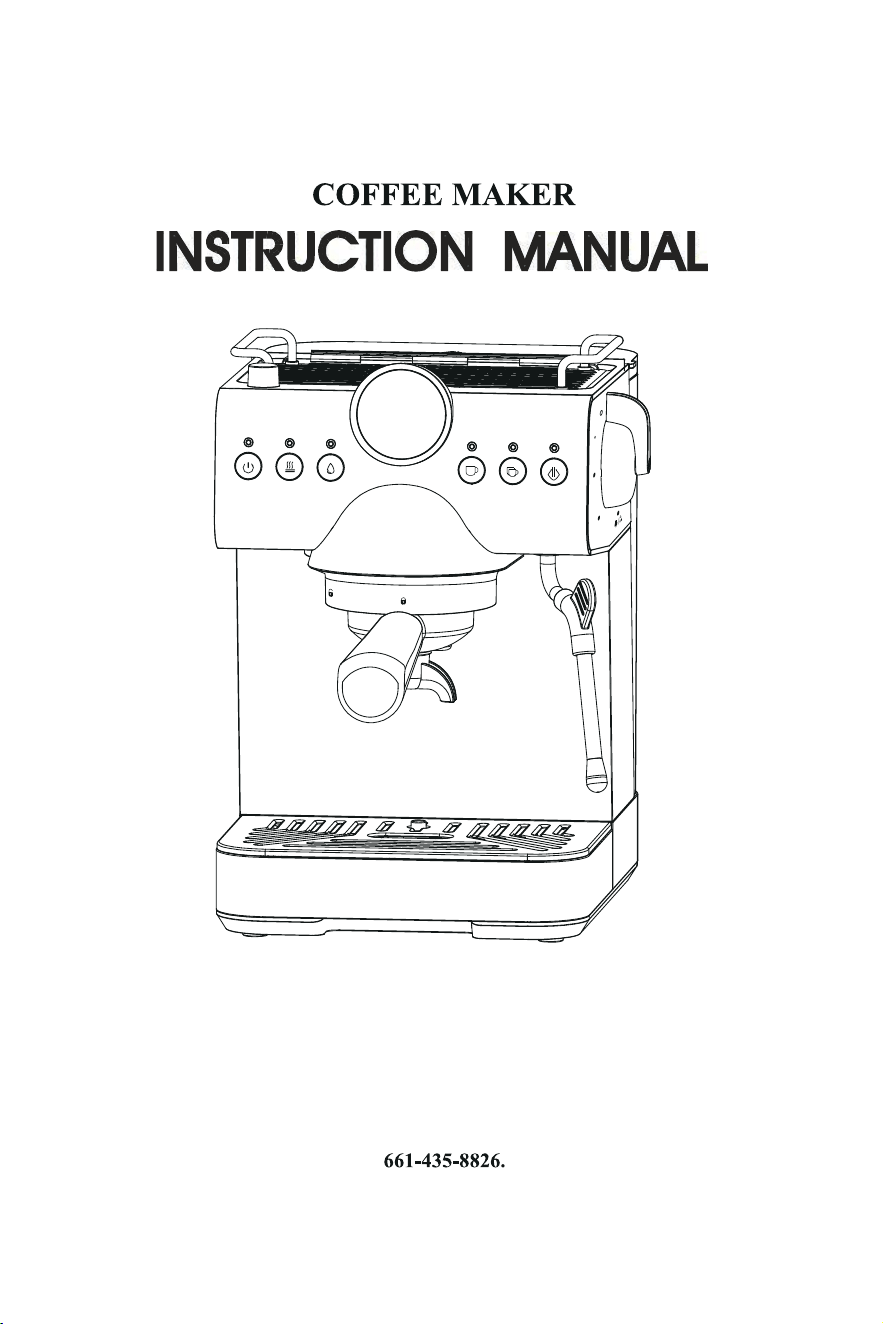
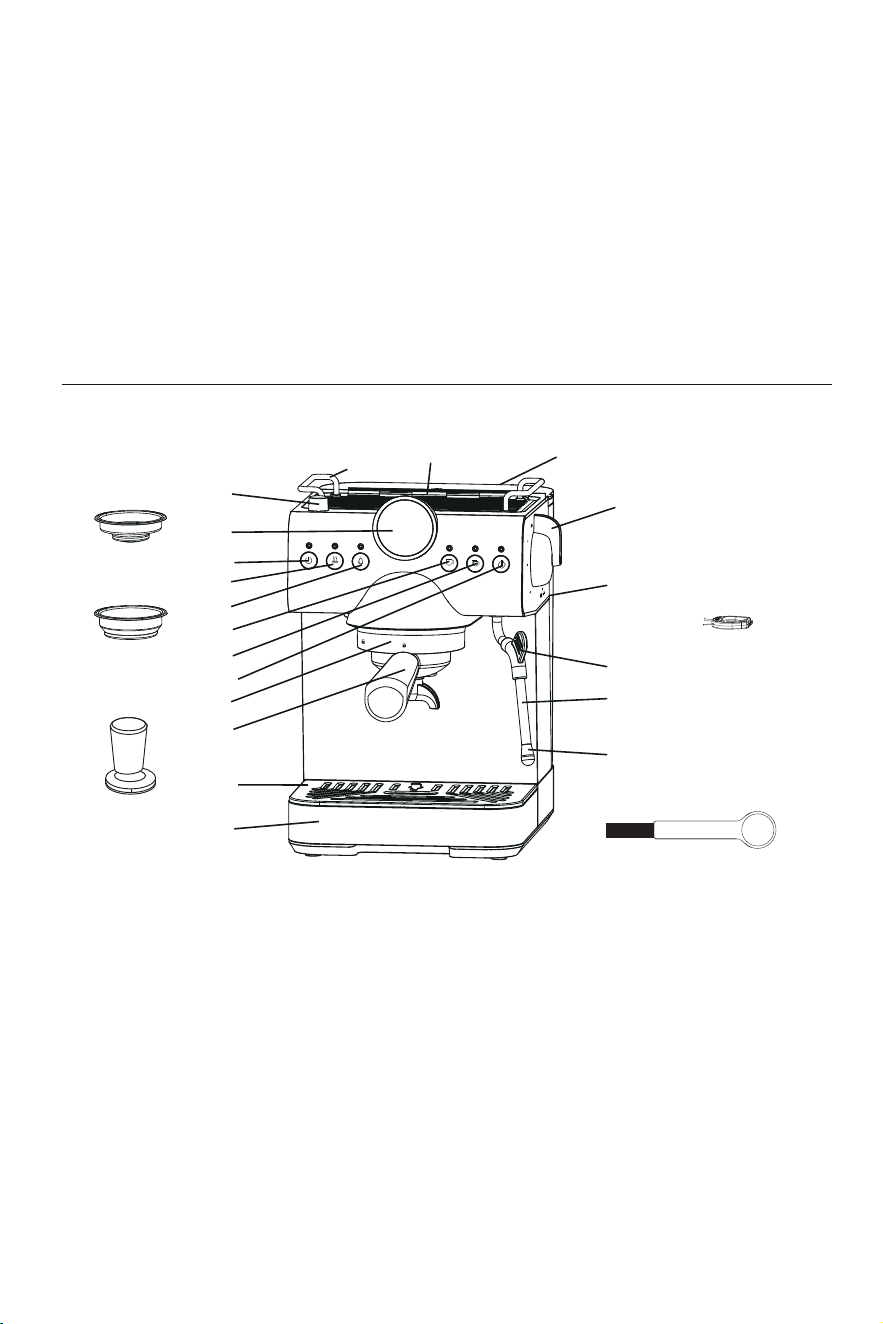
KNOW YOUR COFFEE MAKER (The product is subject to change without prior notice)
�
��
��
��
��
��
��
��
��
�
��
��
��
��
��
�
�
�
�
�
�
�
��
��
��
�.Indicator light
�.Power button
�.Cold brew button
�.Double cup button
�.Funnel bracket
��.Drip plate
��.Handle
��.Water tank cover
��.Steam/Hot water knob
��.Steam tube
��.Single cup filter
��.Tamper
��.Cleaning brush
�.Digital tube display
�.Coffee button
�.Single cup button
�.Steam button
��.Funnel
��.Drip tray
��.Top tray (warm and place the parts)
��.Water tank
��.Steam tube handle
��.Steam tube nozzle
��.Double cup filter
��.Cleaning probe

3
Digital Tube Display Instructions
a. Brew coffee time
b. System pressure (pressure value flashes when water shortage occurs)
c. Brew coffee volume
d. System temperature
e. Single-cup coffee
f. Double-cup coffee
g. Brewing coffee process
BEFORE THE FIRST USE
To ensure the first cup of coffee tastes excellent, you should rinse the coffee maker with warm water
as follows:
1. Remove the rubber plug from the bottom of the water tank.
2. Pour water into water tank, the water level
should not exceed the “MAX” mark in the tank.
NOTE: The appliance is supplied with a detachable tank for easy cleaning, you can fill the tank
with water firstly, and then put the tank back into the appliance.
3. Put the single or double cup filter into the funnel (no coffee contained). According to the
corresponding grooves of the funnel bracket, insert the funnel into it at the unlocking icon position,
then fix it into coffee maker firmly through turn it anticlockwise until it i
s at the locking icon
position.
4. Place a jug on the drip plate. Make sure the knob is at the
“OFF”
position.
5. Connect to power supply, press the power button once, the power indicator illuminates and the
machine turns on and enters standby mode.
6. Press the coffee button once, the coffee indicator flashes, the indicator light on the top of the
appliance illuminates orange and the appliance enters preheat mode. The preheating is finished
when the coffee indicator turns solid.
7.
Press the double cup button once, the double cup indicator lights on and water flows out from the
funnel outlet after a while. When the appliance automatically stops pumping water and the double
cup indicator lights off, you can clean the accessories and then pour out the wastewater.
MAKE COFFEE INSTRUCTIONS
1. Preparation
Remove the detachable tank to fill it with desired water volume ,the water level should not
exceed the
“MAX” mark in the tank. Then place the tank into the applia
nce properly.
Put the desired filter into the funnel (no coffee contained), insert the funnel into the funnel bracket
and fix it.
2. Preheating & Cup-Warming
To make a cup of good hot Espresso coffee, we recommend you to preheat the appliance before making
coffee, including the filter, funnel and cup, so that the coffee flavour can not be influenced by the cold
parts.
Plug the machine and press the power button once to turn on and enter standby mode. Make sure the
knob is at the “OFF” position.
Press the coffee button once to enter preheat mode. You can place the cup on the machine top to warm
it when the machine is in preheat mode. When the coffee indicator stays solid, the preheating is finished.

4
For the better extraction effect, put the cup under the brewing head, then press the single or double
cup button to brew hot water.
After about 10 seconds, press the single or double cup button again to terminate the brewing. Pour
the water out and place the warmed espresso cup back on the drip plate for the followed coffee
extraction.
Turn the funnel clockwise to remove it from the appliance. Use a clean cloth to dry the filter.
3. Espresso Extraction
A cup of good coffee should keep the balance of acidity, aroma, concentration, and bitterness. And a
cup of quality espresso requires appropriate coffee powder coarseness and tampering force.
After drying the filter, you can pour the freshly ground coffee powder into the filter
and use the
tamper to tamp the powder gently to make it flat.
NOTE: It is recommended to add 12g powder for single-cup coffee, and 16g for double-cup coffee.
The funnel filled with excess
ive powder will fail to be installed to the appliance, and the coffee flow
rate will be slowed, affecting coffee taste and causing large water content in the coffee grounds.
Wipe off the excess coffee powder from the edges of the funnel and filter, then insert the funnel
into the funnel bracket and fix it.
4. Brewing
After preheating, press single-cup or double-cup button once, coffee will flow out from the outlet.
The digital tube display will show brewing time, set brewing volume (The set outflow in single cup
mode is 40ml, and the set outflow in double cup mode is 80ml. But the actual volume of coffee may
vary.), system pressure, brewing time (in the form of a circular indicator bar) and water temperature.
NOTE: That turning the knob when the machine is brewing or preheating will cause the pump to
stop working, and the steam indicator will quickly flash for alarm.
When the machine is brewing, you can press single-cup or double-cup button to stop the
brewing any time.
WARNING: Do not leave the coffee maker unatt
ended during the coffee brewing, as you need to
operate manually sometimes.
When the set coffee volume is reached, the appliance stops automatically and the coffee
production is finished.
NOTE: The optimal brewing pressure for espresso is 8-13 bar. A cup of good coffee can be made
when the digital tube display shows the optimal pressure range. If the current pressure is above or
below the standard, please adjust the powder coarseness or powder tampering pressure.
NOTE: When water shortage occurs, the system pressure value flashes after one brewing cycle.
Refill the tank and press the single-cup or double-cup button to restart the brewing.
Wait for a moment after coffee production, and turn the funnel clockwise to remove it from the
appliance, pour out the coffee grounds.
Allow the funnel and filter to cool sufficiently, then rinse thoroughly with clean water.

WARNING: Remember to cool down the heated filter to avoid scalds.
NOTE: If you want to make cold drinks only, notice that cold water of about 50-59℉ needs to be
added to the tank. The cold brew mode does not require preheating or cup-warming. Press the cold
brew button directly after turning on the machine, the cold brew indicator stays solid and the
indicator light on the top turns to be blue. Then press the single-cup or double-cup button to brew
cold water.
MAKE CAPPUCCINO / FROTH MILK INSTRUCTIONS
You will get a cup of cappuccino when you top up a cup of espresso with frothed milk.
5
1. Prepare a milk cup.
2.
When the machine is in standby mode, press the steam button once to start the steam preheat, the
steam and coffee indicators start to flash. After a while, the coffee indicator will stay solid and the
steam indicator keeps flashing. When the steam indicator stays solid, the coffee indicator will go out,
meaning that the steam preheat is completed.
3. Before milk frothing, use an extra empty cup and turn the knob to “ ” to collect the steam for
10s until the steam dispensing becomes stable.
4. Prepare about 150ml refrigerated whole milk (temperature of 5-10℃ recommended) and add in
the latte art pitcher.
5. Extend the steam tube into milk. Turn the knob to “ ”, and the steam is emitted from the
steam tu
be. Move the steam tube to the position close to the surface of the milk, and tilt the steam
tube at a certain angle with the milk to allow air enter to the liquid and start frothing.
W
NOTE:
ARNING: C
When the steam tube is brewing (including in the cold brew mode), if the water shortage occurs,
the other 5 indicators except the power indicator quickly flash for alarm. After resetting the knob, the unit
will return to the standby mode and the alarm canceled.
NOTE
:
In the process, when water shortage occurs, the other 5 indicators except the power indicator
will flash quickly for alarm. When the knob is turned off, the alarm is canceled and the machine return
to standby mode.
lean the steam tube nozzle in time with a damp cloth after steam dispensing, be
careful of scalds!
7. P
6. Notice that the maximum steam release time is 180 seconds, otherwise the steam indicator will flash
quickly for alarm. When you get the desired foam, turn the knob back to “OFF” position.
our the milk and foam into the prepared espresso to make a Cappuccino. You can also add an
a
After preheating, turn the knob to “ ” position, the coffee indicator and the indicator light on the top
of the machine are off and the steam indicator flashes, the hot water will dispense from steam tube. As
for cold water, directly turn the knob to “ ” position in the cold brew mode, the cold water will
dispense from steam tube.
When desired amount of water is got, turn the knob off. Notice that when hot/cold water release for over
60 seconds, the steam tube will automatically stop dispensing and the steam indicator will flash quickly
for alarm.
ppropriate amount of sugar or sprinkle some cocoa powder on top according to your
taste.
STOP / SLEEP FUNCTION
HOT/ COLD WATER FUNCTION
1. In any state after the machine is powered on, if there is no operation within 25 minutes, the
machine will enter sleep mode. At this time, all indicators will be extinguished, the heating element
will not be heated, and the whole machine will be powered off. Press any button to exit the sleep
mode and restart the machine.

CLEANING AND MAINTENANCE
1. Unplug and cool down the machine completely before cleaning.
2. Wash the body of the coffee maker with a moisture-proof sponge, and regularly clean and dry the
water tank, drip tray, and drip plate.
NOTE: Do not use alcohol-based or solvent-based cleaners for cleaning. Do not immerse the main
unit in water.
3. Remove the funnel and pour out the coffee grounds. Clean the funnel and filter with cleaning
solution and cotton cloth, and rinse the parts.
4. Use the cleaning brush to clean the inside of the funnel bracket.
5. Clean the steam tube nozzle and the hole of filter with cleaning probe on a regular base.
6. Rinse all the acce
Descaling Reminder
ssories under water and dry thoroughly.
DESCALING - CLEANING MINERAL DEPOSITS
·
1. When the cumulative water consumption of coffee, steam, and hot water functions exceeds 30L, all
indicators will flash 5 times at the same time after each power on to indicate the need for descaling,
and then return to normal.
2. If you do not manually cancel the reminder after it appearing 3 times, the reminder will be
automatically removed.
3. To manually cancel the descaling reminder and clear the cumulative water consumption, please long
press the power button and steam button at the same time for 3s, all indicators quickly flash for 3 times.
Manual Descaling
·
1. Add an appropriate amount of descaling agent to the water tank, and long press the steam button and
double cup button at the same time for 3s after each power on. The power, steam and double cup
indicators light up and the unit enters descaling mode.
2. If the preheating has been completed, the machine starts pumping water. After about 13 minutes, the
water pump completes totally 3 rounds of brewing hot water (each lasting 45 seconds) and 2 rounds of
shutdown (each lasting 5 minutes).
3. During the descaling process, it is ineffective pressing the steam or double cup buttons, you can
press the power button to stop descaling.But the descaling reminder will occur again the next time you turn
the machine on.
4. If you turn the knob to “ ” during the process, all indicators alert and the descaling process stops.
After the knob is reset, the descaling process continues.
5. At the end of the process, the double cup and single cup indicators flash quickly. Please turn the knob to
“ ”, the two indicators flash slowly, the steam tube starts dispensing hot water.
6.Turn off the knob within 1 minute, otherwise all the indicators will flash quickly. The indicators flash for
5 times, indicating that the descaling is completed, the cumulative water consumption is cleared, and return
to standby mode.
7.It is recommended to fill the water tank with clean water to the MAX level and repeat the above steps
twice to remove residual detergent and odors.
6
7
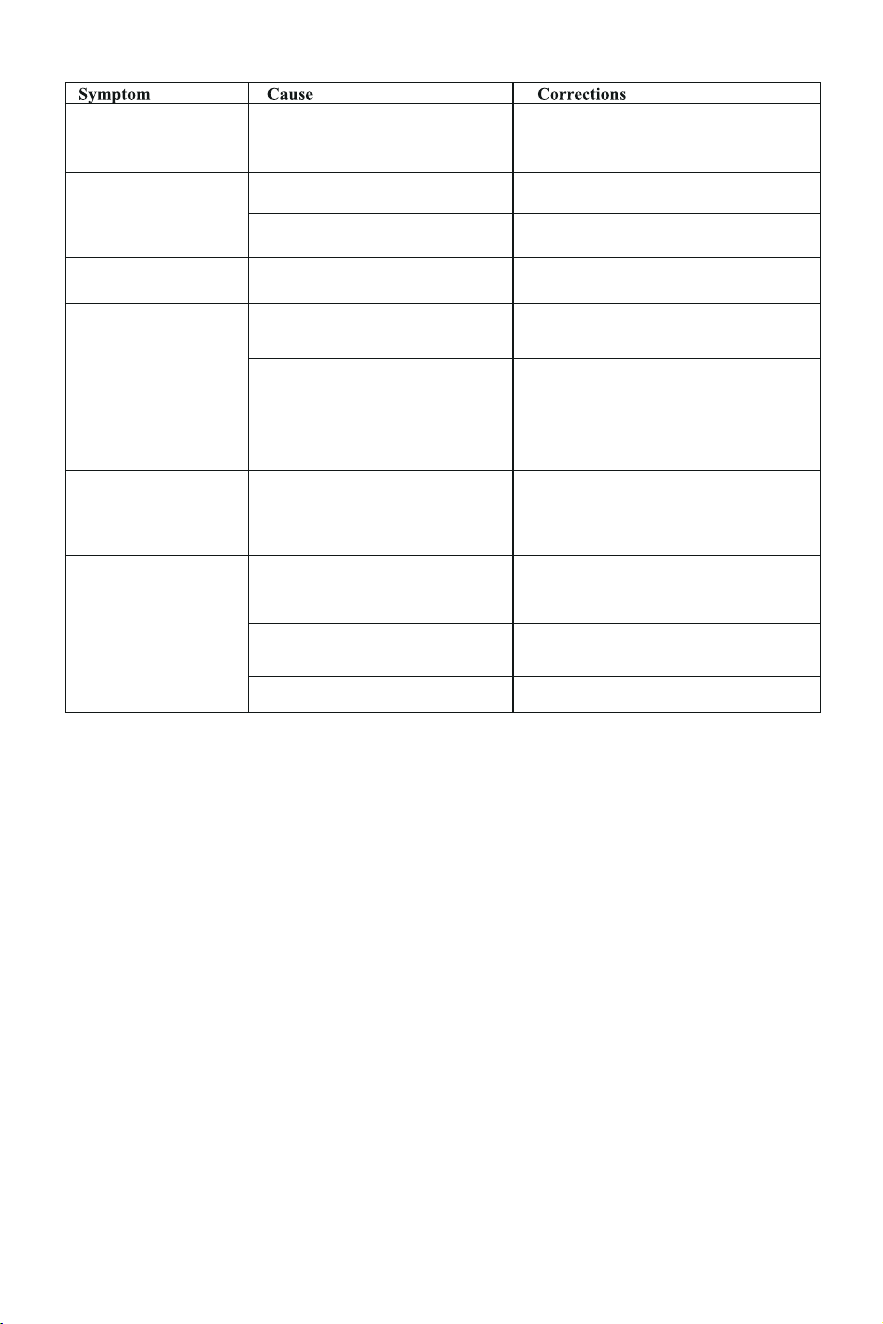
TROUBLE SHOOTING
Do not take apart the appliance by yourself if the cause of failure is not found, you had better
contact certified serving center.
Water leaks from the
bottom of coffee
maker.
Water leaks out of
outer side of filter.
Acid (vinegar) taste
exists in Espresso
coffee.
The coffee maker
cannot work any more.
The steam cannot
froth.
The metal parts in the
tank have rust.
The detergent is not recommended
type. It may corrode the metal
parts in the tank.
Use the detergent recommended by
manufacturer.
Please clean the drip tray.
Please contact with the authorized
service facility for repairing.
Get rid of them.
Clean coffee maker as “BEFORE THE
FIRST USE” for several times.
Please use fresh coffee powder, or store
unused coffee powder in a cool, dry
place. After opening a package of coffee
powder, reseal it tightly and store it in a
refrigerator to maintain its freshness.
Plug the power cord into a wall outlet
correctly, if the appliance still does not
work, please contact with the authorized
service facility for repairing.
Only after the steam ready indicator is
illuminated, the steam can be used to
froth.
Use high and narrow cup.
Use whole milk or half-skimmed milk
There is much water in the drip
tray.
The coffee maker is malfunction.
There is some coffee powder on
filter edge.
No clean correctly after cleaning
mineral deposits.
The coffee powder is stored in a
hot, wet place for a long time. The
coffee powder turns bad.
The power outlet is not plugged
well.
The steam ready indicator is not
illuminated.
The container is too big or the
shape is not fit.
You have used skimmed milk.

Environment friendly disposal
You can help protect the environment!
Please remember to respect the local
regulations: hand in the non-working
electrical equipment to an appropriate waste
disposal center.
8
661-435-8826.
661-435-8826
661-435-8826
661-435-8826

