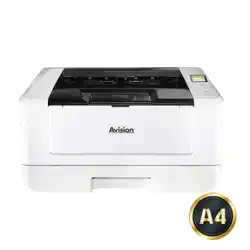
A4 Printer
User's Guide
Regulat ory m odel no.: AP40 Plus、AP4020n Plus、AP4021n Plus、AP4022n Plus、AP4020w Plus、
AP4021w Plus、AP4022w Plus、AP40 Plus Series、AP43 Plus、AP4320n Plus、
AP4321n Plus、AP4322n Plus、AP4320w Plus、AP4321w Plus、AP4322w Plus、AP43 Plus Series
Avision I nc.

Use r ’s Guide
ii
Copyr ight s and Tra dem a rks
Ethernet is a registered t radem ark of Xerox Corporat ion.
Windows 7, 8, 10, 11 are registered t radem arks of Microsoft Corporation in t he Unit ed St at es
and/ or ot her count ries.
Ot her product nam es used herein are for ident ificat ion purposes only and m ay be t radem arks of
their respective com panies. We disclaim any and all right s t o t hose m arks.
W arr a nt y
The inform at ion cont ained in this docum ent ( s) is subj ect t o change wit hout not ice.
The m anufact urer m akes no warrant y of any kind with regard t o t his m aterial, including, but not
lim it ed t o, t he im plied warrant ies of fit ness for a part icular purpose.
The m anufacturer shall not be liable for errors cont ained herein or for incident al or consequent ial
dam ages in connect ion wit h t he furnishing, perform ance, or use of this m at erial.
Europe a n Union Re gulat ory N ot ice
Product s bearing t he CE m arking com ply w it h t he following EU Directives:
Low Voltage Direct ive 2014/ 35/ EC
EMC Directive 2014/ 30/ EC
Rest riction of t he use of cert ain hazardous substances ( RoHS) Directive 2011/ 65/ EU
RED ( Radio Equipm ent Directive) ( 2014/ 53/ EC)
This product satisfies t he Class B lim it s of EN55032, EN55035, and safet y requirem ent s of
EN62368- 1.
* This m achine is cert ified as Class 1 LED product.
W hen t his PRI N TER ha s no oper at ion for a n ex te nde d per iod of t im e
N ot e: I f t he PRI N TER is idle for a pe riod of t im e ( for e xa m ple,
over n ight ) , t urn off t he PRI NTER w it h t he pow e r sw it ch. I f t he PRI N TER
is idle for a longe r per iod of t im e ( such as holida ys) , unplug t he pow e r
cor d fr om t he elect rica l out let t o pre vent da nge r.
Tak e care t o rem ove t he paper from t he pa pe r t ray and store it in t h e w ra pper t o
pr event t he pa pe r from get t ing w et .

iii
Feder a l Com m unicat ions Com m ission ( FCC) com plia nce inform at ion
st a t e m ent
Par t 1 5
This equipm ent has been t ested and found t o com ply wit h t he lim it s for a Class B digit al device,
pursuant t o Part 15 of t he FCC Rules. These lim its are designed t o provide reasonable prot ect ion
against harm ful int erference in a resident ial inst allat ion. This equipm ent generat es, uses and can
radiate radio frequency energy and, if not installed and used in accordance wit h t he instructions,
m ay cause harm ful int erference t o radio com m unications.
However, t here is no guarant ee t hat int erference w ill not occur in a part icular installat ion. I f t his
equipm ent does cause harm ful int erference t o radio or t elevision recept ion, which can be
det erm ined by t urning t he equipm ent off and on, t he user is encouraged t o t ry t o correct t he
int erference by one of the following m easures:
Reorient or relocate t he receiving ant enna.
I ncrease t he separation bet ween t he equipm ent and receiver.
Connect t he equipm ent into an out let on a circuit different from t hat to which the receiver
is connect ed.
Consult t he dealer or an experienced radio/ TV t echnician for help.
This device com plies wit h Part 15 of t he FCC Rules. Operat ion is subj ect t o t he follow ing t wo
condit ions: ( 1) This device m ay not cause harm ful int erference, and ( 2) this device m ust accept
any interference received, including int erference t hat m ay cause undesired operat ion.

Use r ’s Guide
iv
Sa fet y I nform at ion
When using t his equipm ent , t he follow ing safet y precaut ions should always be followed.
Safe t y D ur ing Ope r at ion
I n t his m anual, the following im port ant sym bols are used:
W ARN I N G:
I ndicates pot ent ially hazardous sit uat ions, which if instruct ions are not
followed, could result in deat h or serious inj ury.
CAU TI ON :
I ndicates a pot ent ially hazardous sit uat ion which, if instructions are not
followed, m ay result in m inor or m oderat e inj ury or dam age t o property.
I m port ant :
I ndicates operat ional requirem ent s and rest rictions. Please read and follow these instructions t o
ensure a proper operat ion and t o avoid dam age t o t he m achine.
N ot e:
I ndicates further explanat ion or clarification. Reading t his is highly recom m ended.
The follow ing sym bols indicate t hat t he relat ed sect ion includes safety warnings. Specific point s of
att ent ion are indicated inside t he sym bol.
[ General warning]
[ Warning of high t em perat ure]
[ Warning of danger of elect rical shock]
The follow ing sym bols indicate t hat t he relat ed sect ion includes inform at ion on prohibit ed act ions.
Specifics of t he prohibit ed action are indicated inside t he sym bol.
[ Warning of prohibit ed action]
[ Disassem bly prohibit ed]
v
The following sym bols indicat e t hat t he relat ed section includes inform at ion on actions which m ust
be perform ed. Specifics of t he required action are indicated inside t he sym bol.
[ Alert of required action]
[ Rem ove the power plug from t he out let ]
I nstallat ion a nd t he Oper a t ing Environ m ent
W a rning
Do not install t he equipm ent near direct sun light, heat ing or air condit ioning
unit s.
Direct sunlight or high t em perat ure m ay dam age t he m achine.
Do not install t he equipm ent in a hum id or dust y place. I f dust or dust adheres
to the power plug, clean t he plug to avoid fire or elect ric shock.
Keep t he vent hole on the back of the PRI NTER at least 10 cm away from t he
wall t o avoid overheat ing and fire.
Do not place or st ore t he device:
Out doors
Near excessive dirt or dust, wat er, or heat sources
I n locations subj ect to shocks, vibrat ions, high t em perat ure or hum idity,
direct sunlight, strong light sources, or rapid changes in t em perat ure or
hum idit y
Place t he equipm ent securely on an even, flat surface. Tilted or uneven surfaces
m ay cause m echanical or paper- feeding problem s.
Do not locate t he device on rackety or aslope t ables. Do not locate t he device on
unstable surface. The device m ay fall down and t his m ay result in inj ury.
Place t he device close enough to t he com put er so that t he interface cable can
easily reach between t he device and the com put er.
Do not place a coffee cup, vase, or ot her liquid- filled cont ainer on t he m achine.
Spillage can dam age t he m achine’s elect rical part s and insulat ion.
Make good use of t he recycled paper while print ing.
Use r ’s Guide
vi
Caut ion
Place t he device in an independent , well- vent ilat ed area.
Place t he device in a place wit h good environm ent al condit ions. Operat ing t he
m achine beyond t he recom m ended t em perat ure and hum idit y m ay cause an
elect rical fire.
Do not place heavy obj ect s on t he unit . I t m ay cause unbalance and t he device
m ay fall down. This m ay result in inj ury.
Do not place t he device in any posit ion that m ay obstruct t he out put of t he unit ,
as it m ay cause paper j am s.
Safet y I nfor m a t ion D uring Operpa t ion
W a rning
To prevent fires, do not use flam m able sprays near t he m achine.
Never at tem pt t o open any fixed cover. Ot herwise t here is danger of elect ric
shock, fire and laser beam and m ay cause blindness.
Never disassem ble, m odify, or at tem pt t o repair t he device or device opt ion by
yourself, except as specifically explained in the device's docum ent at ion. This could
cause fire, elect rical shock, or inj ury.
Do not at tem pt t o alter t he m achine or it s part s. Avoid contact wit h the internal
high volt age part or t he laser light beam , it m ay cause elect ric shock or blindness.
I f t his product becom es inordinat ely hot or em it s sm oke, or unusual odor or noise,
im m ediat ely turn OFF t he power switch, unplug t he power cord from t he power
out let , and t hen call your aut horized service representat ive. I f you keep on using it
as is, a fire or electrical shock could result .
Take care not t o drop paper clips, st aples, or any ot her m et al obj ect s into t he
m achine.
The inside of t his product has areas subj ect t o high t em perature, which m ay cause
burns. When checking t he inside of t he unit for m alfunct ions such as paper
m is-feed, do not touch the locat ions ( around the fusing unit , etc.) which are
indicated by a “ Caution! Hot Surface” caut ion label.
Under norm al condit ions the sm all quant it ies of ozone gas produced by t he
m achine are harm less. However, if t he m achine is used for an ext ended period or
wit hin a sm all room , you should m ake sure that t he area is adequat ely vent ilat ed.
Also ventilat e t he room if you not ice t he m achine sm ells aft er a period of frequent
or ext ended use.
vii
Do not at tem pt t o rem ove t he covers and panels w hich have been fixed t o t he
product . Som e product s have a high- voltage part or a LSU beam source inside
that could cause an electrical shock or blindness.
Do not modify this product, as a fire, electrical shock, or breakdown could result.
I f t he product em ploys a LSU print head, t he LSU beam source could cause
blindness.
I f t his product has been dropped or it s cover dam aged, im m ediately turn OFF t he
power switch, unplug t he power cord from the power outlet, and then call your
aut horized service represent at ive. I f you k eep on using it as is, a fire or electrical
shock could result .
Take appropriat e em ergency m easures when the following condit ions occur
When toner get s into your eyes, wash it off wit h wat er unt il your eyes are not
painful. I f t he situat ion is serious, ask a doct or for t reatm ent .
When the toner get s on your skin, wash it off with soap and rinse it off.
When you are in t he t oner inlet , leave the dust location im m ediately and rinse
with plent y of wat er.
When t he t oner is in t he abdom en, spit it out and consult a doct or.
Do not use t he device wit h wet hands.
Unplug t he device and t he USB cable, and refer servicing t o qualified service
personnel under t he following condit ions:
Liquid has ent ered t he device.
Obj ect has ent ered t he device.
The device has been dropped, or t he case has been dam aged.
The device does not operate norm ally ( i.e. appearance of sm oke, st range
sm ell, odd noise, et c.) , or exhibit s a dist inct change in perform ance.
。
Caut ion
When t here is paper j am inside t he m achine, be sure t o rem ove it thoroughly. The
rem aining paper in t he m achine m ay cause a fire. When the paper is at t ached t o
an invisible or difficult - t o- see area, do not rem ove it by force t o avoid inj ury and
cont act t he service personnel or dealer for help.
The t em perat ure inside of t he m achine m ay be very hot . When t he paper j am is
released, not e any warning labels and do not t ouch it t o avoid burns. I t is
recom m ended t o clear t he j am after t he m achine has cooled down.
When clearing paper j am s, refer t o t he instructions in t his m anual.
When using a large num ber of copies of t he m achine for a long t im e, keep t he
indoor air flow. Ot herwise you m ay feel a headache.
Unplug t he device’s power cord and USB cable before cleaning.
Use r ’s Guide
viii
About t he Con sum able s
W a r ning
Do not unpack t he consum ables and store t he m achine’s consum ables in any
of t hese locations:
Out doors
Near excessive dirt or dust, wat er, or heat sources
I n locations subj ect to shocks, vibrat ions, high t em perat ure or hum idity,
direct sunlight, strong light sources, or rapid changes in t em perat ure or
hum idit y
Do not t hrow t he t oner cart ridge int o t he fire. Aft er t he t oner rem aining in t he
crucible com es int o cont act wit h t he fire, t he powder m ay explode and cause
personal inj ury.
Caut ion
Do not discard t he discarded t oner cartridges. Please put t he used waste t oner
cart ridges in t he supplied plastic bags and return t hem to t he dealer or service
personnel. ( For t he cust om er service locations around t he com pany, please refer
t o our website.) . The lat t er will recycle the used t oner cart ridge in accordance w it h
relevant regulat ions.
The used consum ables m ust be disposed of properly and in accordance w it h local
environm ental regulations, or disposed of by t he com pany's designat ed dealer.
Safet y I nfor m a t ion W he n using pow er cord a nd t he USB ca ble
W a r ning
Plug t he power cord securely int o the out let. Do not t ouch t he pins of the power
cord plug wit h any m et al obj ect s as t hey m ay t ouch dangerous volt age points or
short circuit . This can cause fire, electric shock or inj ury. Failure t o do so m ay
result in a fire or electric shock.
Before disconnecting t he plug, turn the m achine off. Make sure your hands are
dry. Hold t he plug it self, not it s cord, when disconnect ing it from the recept acle.
Do not share t he power wit h ot her high- powered devices, as t his m ay result in fire
or elect ric shock.
Do not use extension cords as t his m ay result in fire or elect ric shock.
Alw ays use t he correct AC power source. For fut ure t ransport ation and handling,
please keep all packaging m at erials for t his product.
Use only the USB cable t hat cam e with your device and avoid abrasions, cut s,
fraying, crim ping, and kinking. Using any ot her USB cable could cause fire,
elect rical shock, or inj ury.
ix
Do not store t he cables in t he following locat ions:
Out doors
Near excessive dirt or dust, wat er, or heat sources
I n locations subj ect to shocks, vibrat ions, high t em perat ure or hum idity,
direct sunlight, strong light sources, or rapid changes in t em perat ure or
hum idit y
Keep t he supplied USB cable, etc., in a location t hat is out of reach of children t o
avoid t he risk of inj ury.
Please put the packaging m aterials such as t he supplied plast ic bags in a place
that children cannot obt ain or discard t hem t o avoid t he risk of suffocation.
Caut ion
I f you are not using t he device for a long t im e, rem ove t he USB cable from t he
connector.
This product has a power- saving m ode and a standby m ode. The zero- energy
st at e can be achieved only when t he product is connected wit hout any ext ernal
input power.
At least every year, please disconnect t he power cord from t he wall out let t o
check whet her t he power cord is exposed, dam aged, cracked, dent , hot, pin
deform at ion or any burnt m arks. I f t hese condit ions exist, please do not use t he
power cord again and cont act t he authorized service personnel or dealer.
Make sure t he power cord is plugged int o a grounded elect rical out let, ot herwise it
m ay cause a fire or electric shock.
Be sure t o fully plug t he power cord int o a wall out let . Failure t o com plet ely insert
m ay cause unst able connections and heat build- up, creat ing an unsafe condit ion.
When disconnecting t he power cord from t he wall out let , be sure t o pull t he plug,
not t he power cord, as t his m ay dam age the power cord and cause a fire or
elect ric shock.
To repair t he m achine, be sure t o disconnect t he power cord from t he wall out let .
Make sure t he power cord is firm ly secure and w ill not t rip over.
SAFETY I NSTRUCTI ON
This print er is an A4 page print er which is operat ed by m eans of a LPH ( LED Print Head) . There is
no possibilit y of danger from t he LPH, provided t he print er is operat ed according t o t he
instruct ions in t his m anual. Since radiat ion em it t ed by t he laser beam is com plet ely confined
within protective housings and ext ernal covers, t he laser beam s cannot escape from t he m achine
during any phase of user operation.
1
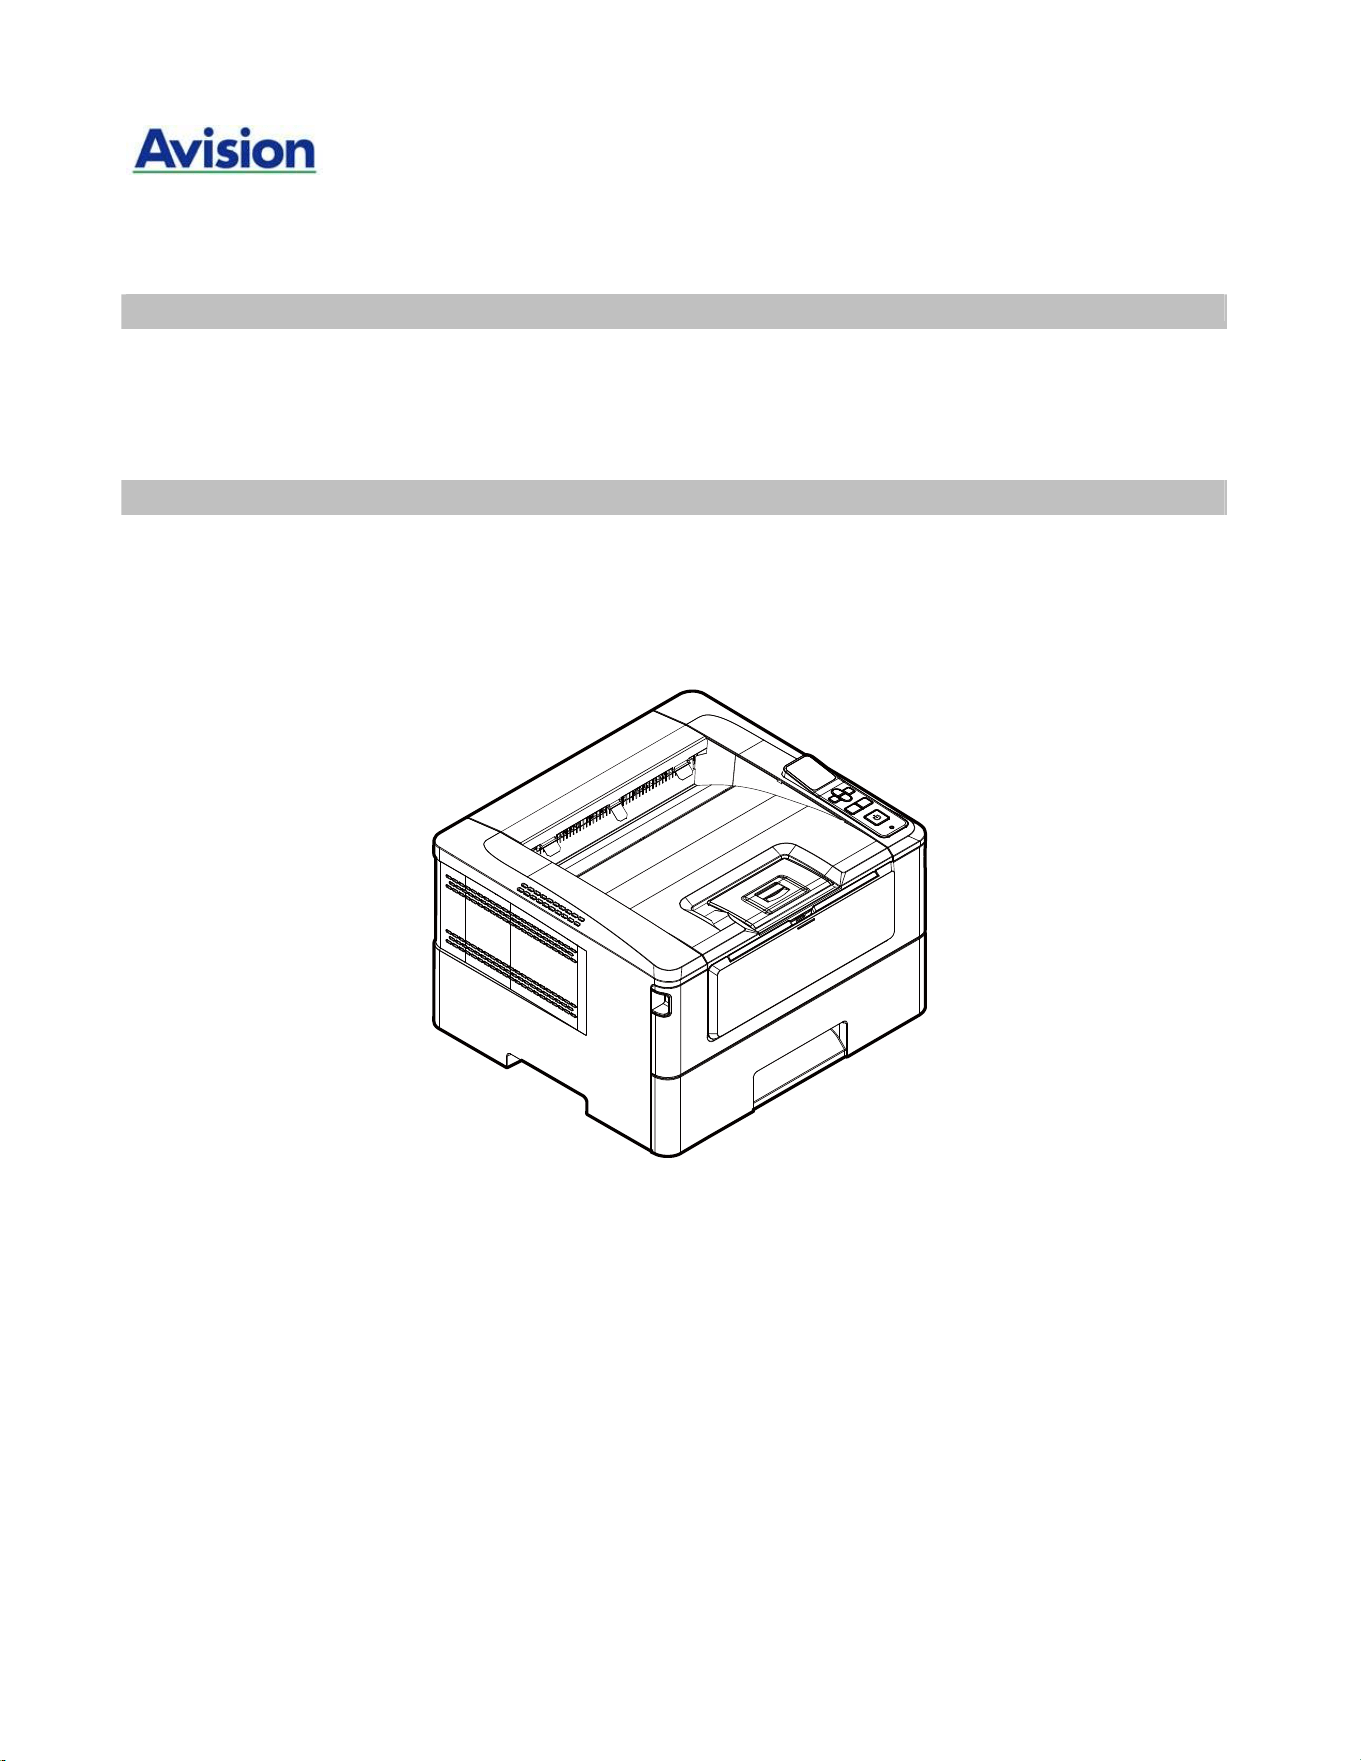
1 . Overview
I nt roduct ion
Thank you for choosing Avision’s stat e- of- t he- art print er which can be used for local and
network print ing up to A4 size. Through t he clear LCD display and control panel,
operat ion becom es sim ple and easy.
Feat ures
This product provides t he following features t o m ake your print out m ore efficient and
effect ive.
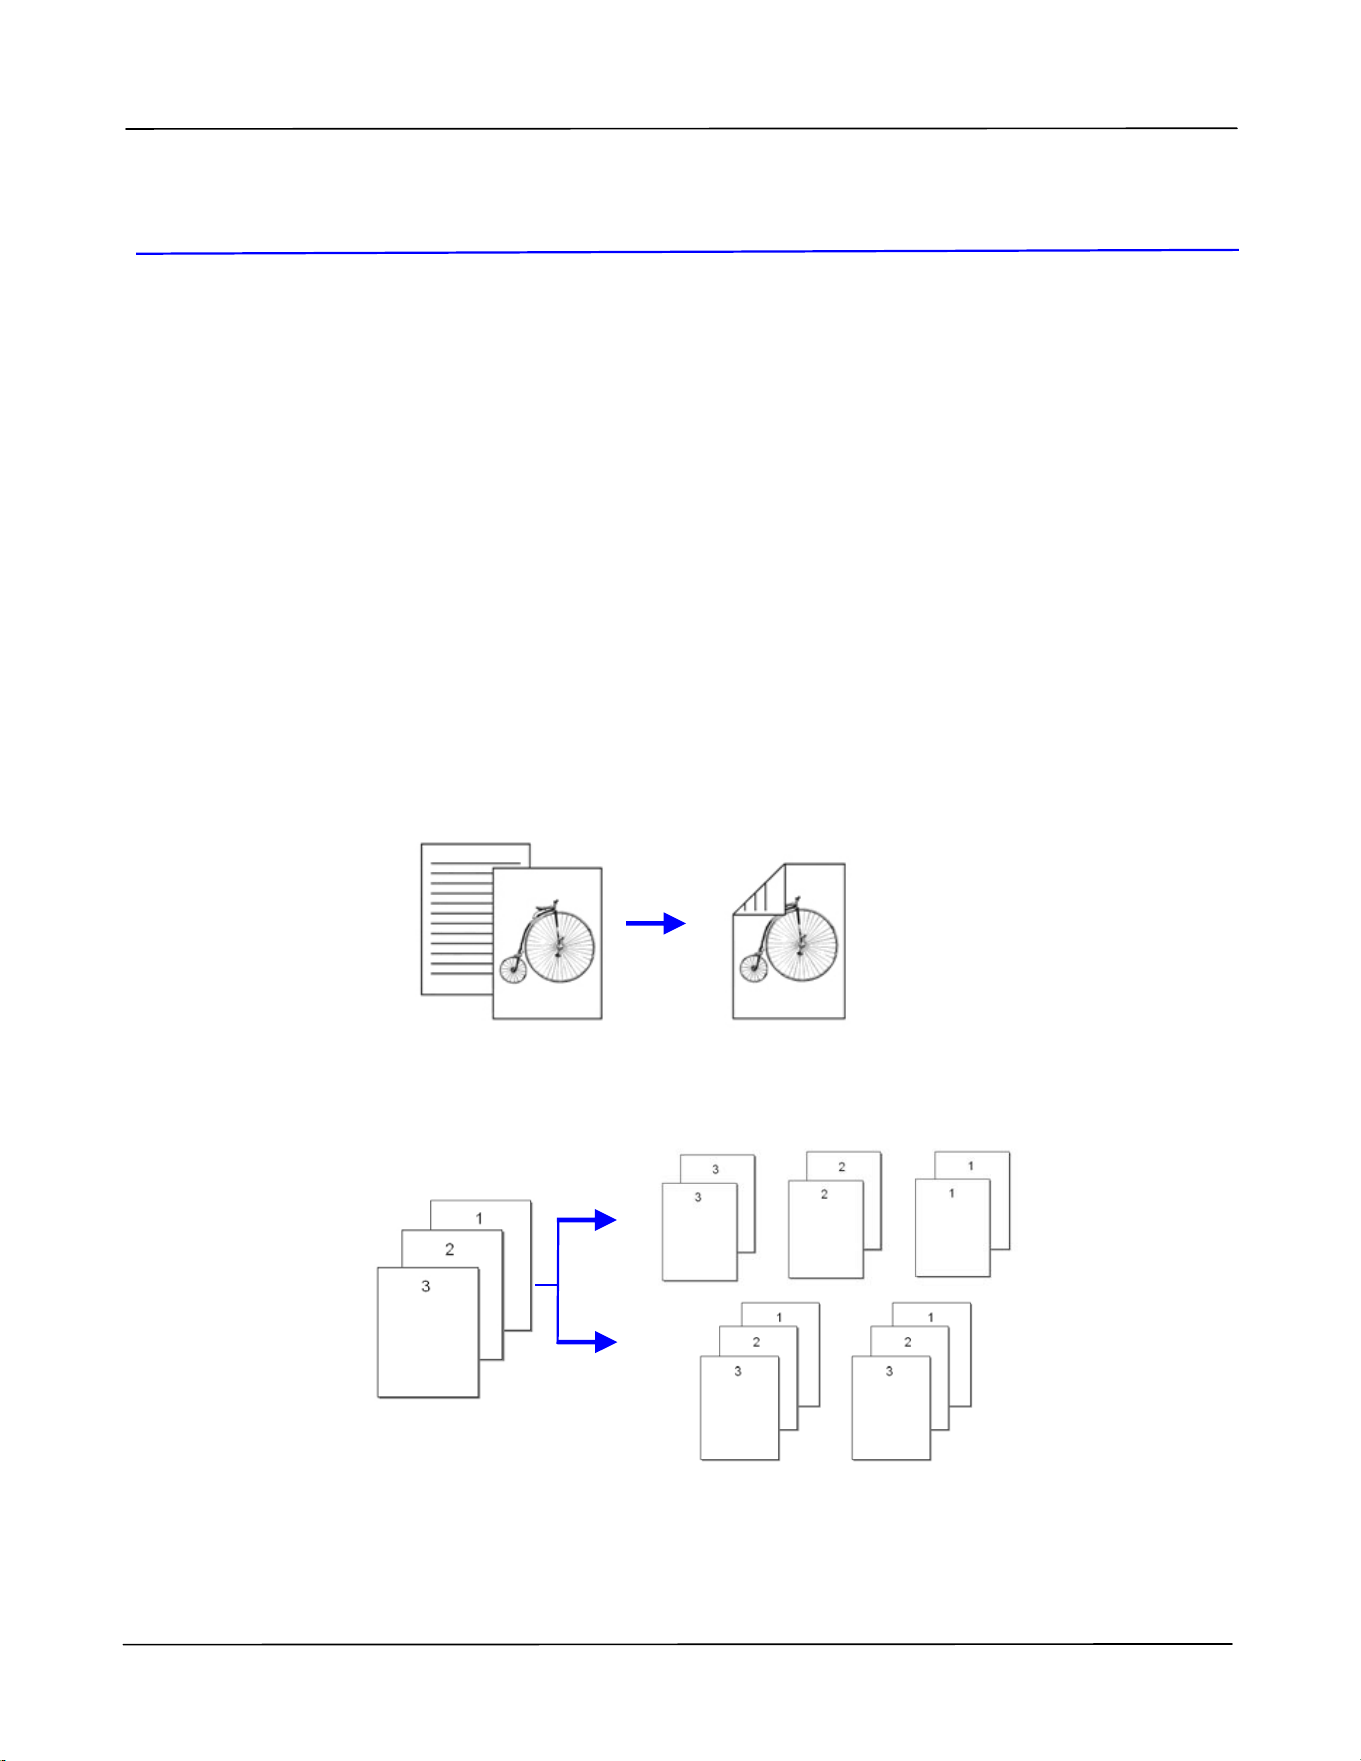
Pr in t on Bot h Sides: Print s t w o pages ( one on each side) on a single sheet of
paper.
Colla t e : Print s m ult iple copies at one t im e and sort s t he print ed pages.
2
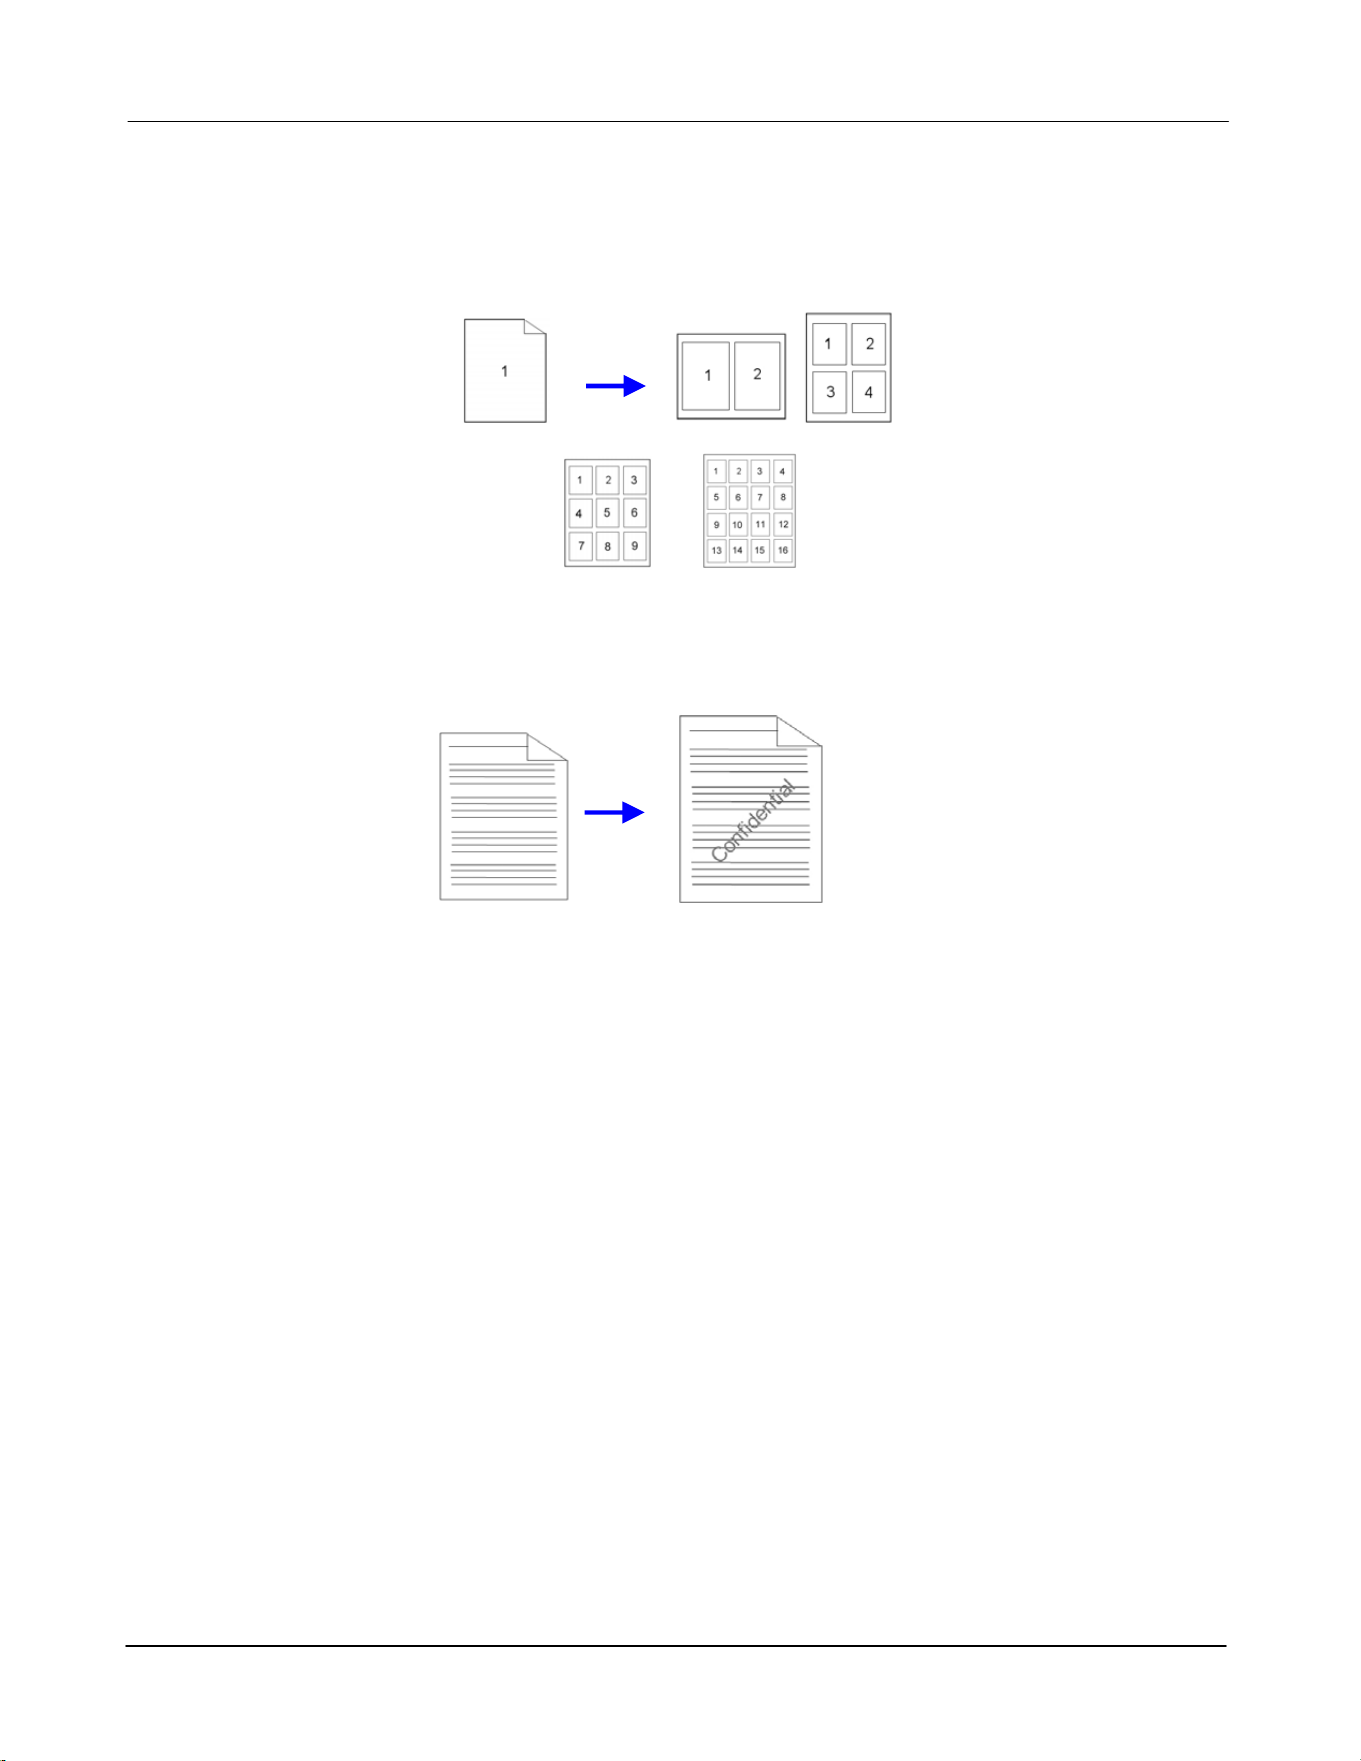
Pr in t M ult iple Pa ge s on a Sin gle She et : Print s t wo or four pages of the original
on a single sheet of paper. A m axim um of 16 pages can be print ed on a single
sheet of paper.
Pr in t W a t erm a r k : Print t ext such as confident ial, im port ant cont ent or im age in
the background.
3
Ext ernal View
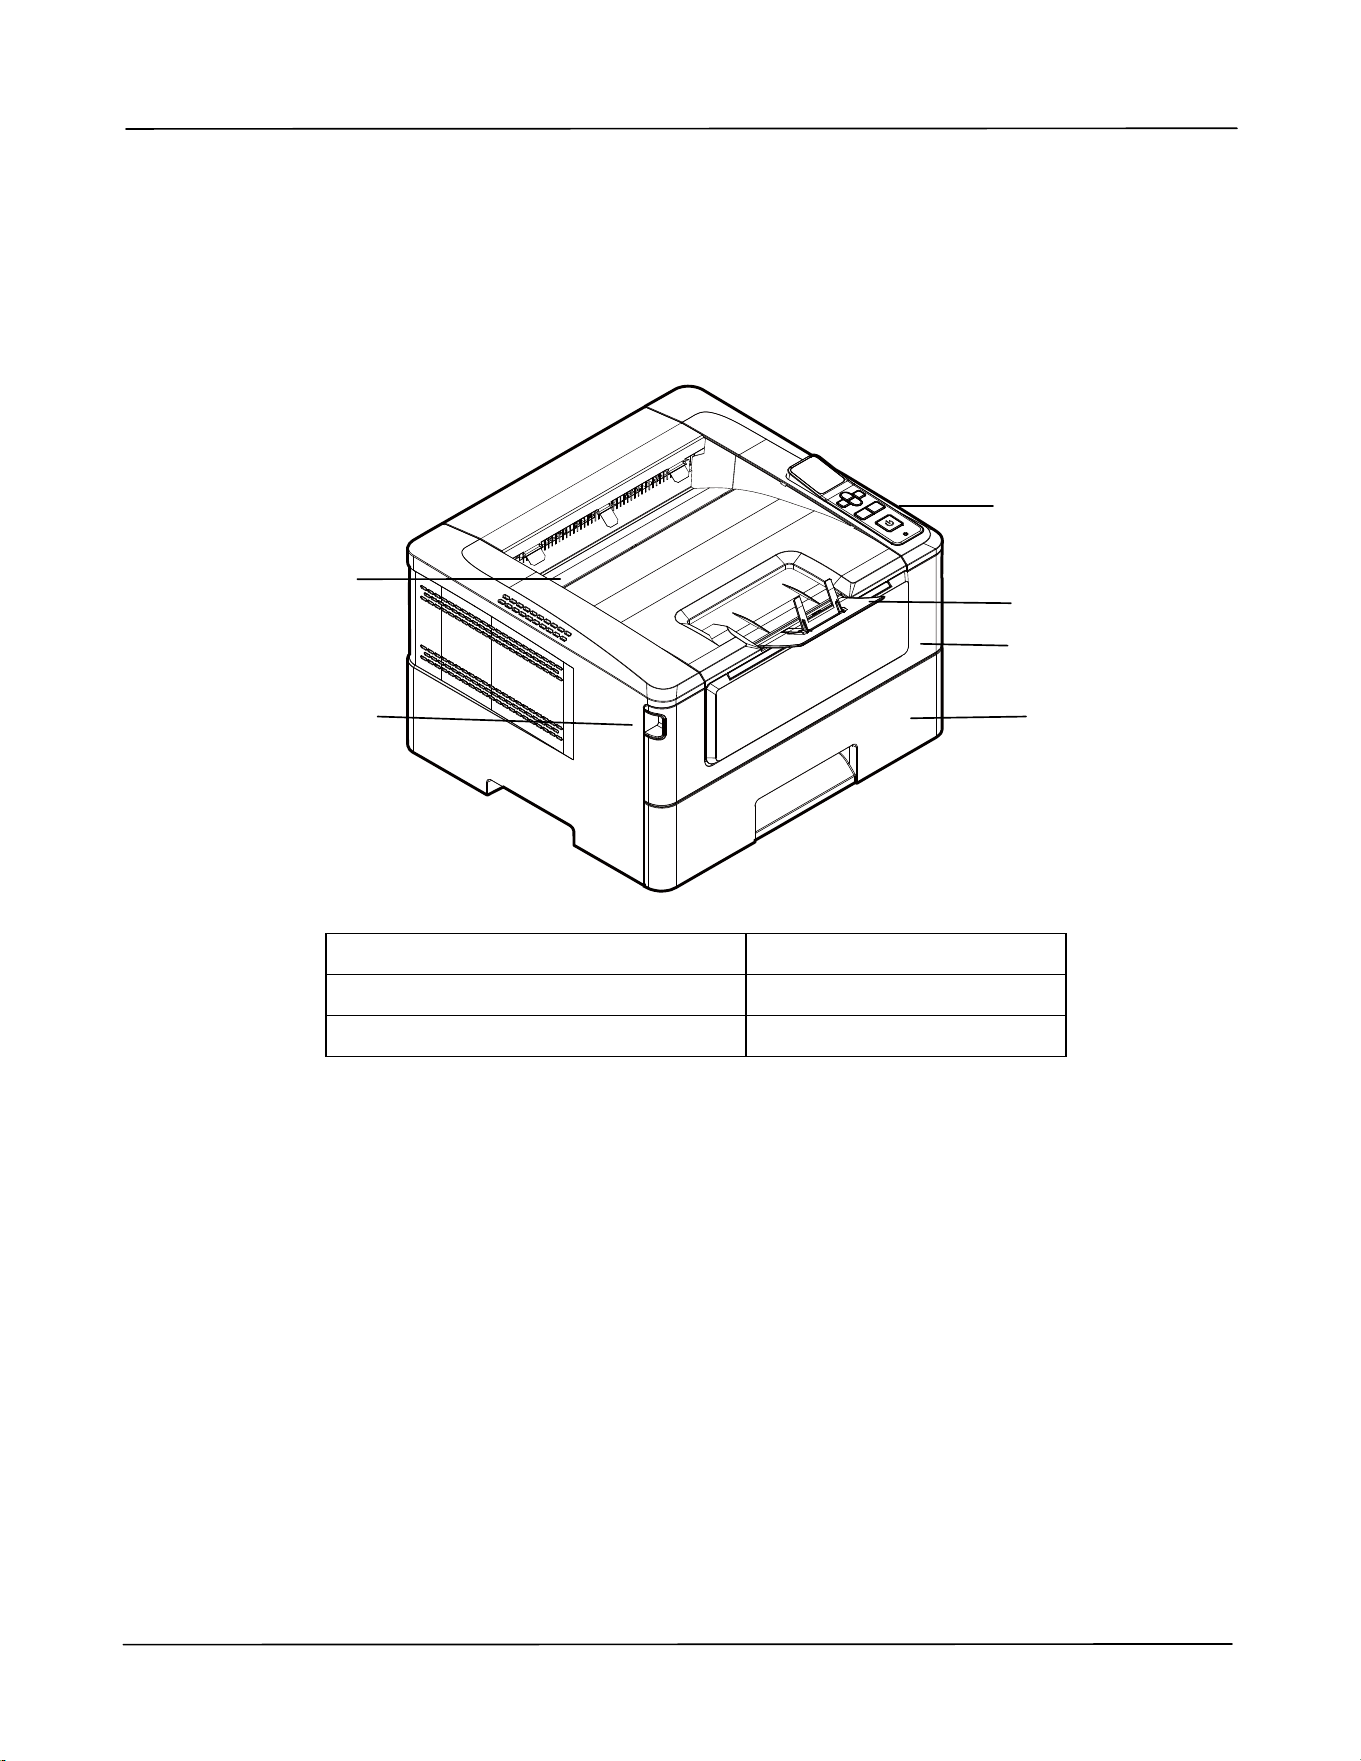
The Front View
1. Out put Tray 4. Front Cover
2. Handle of t he Front Cover 5. Paper St opper
3. Main Paper Tray 6. Cont rol Panel
6
5
1
2
4
3
4
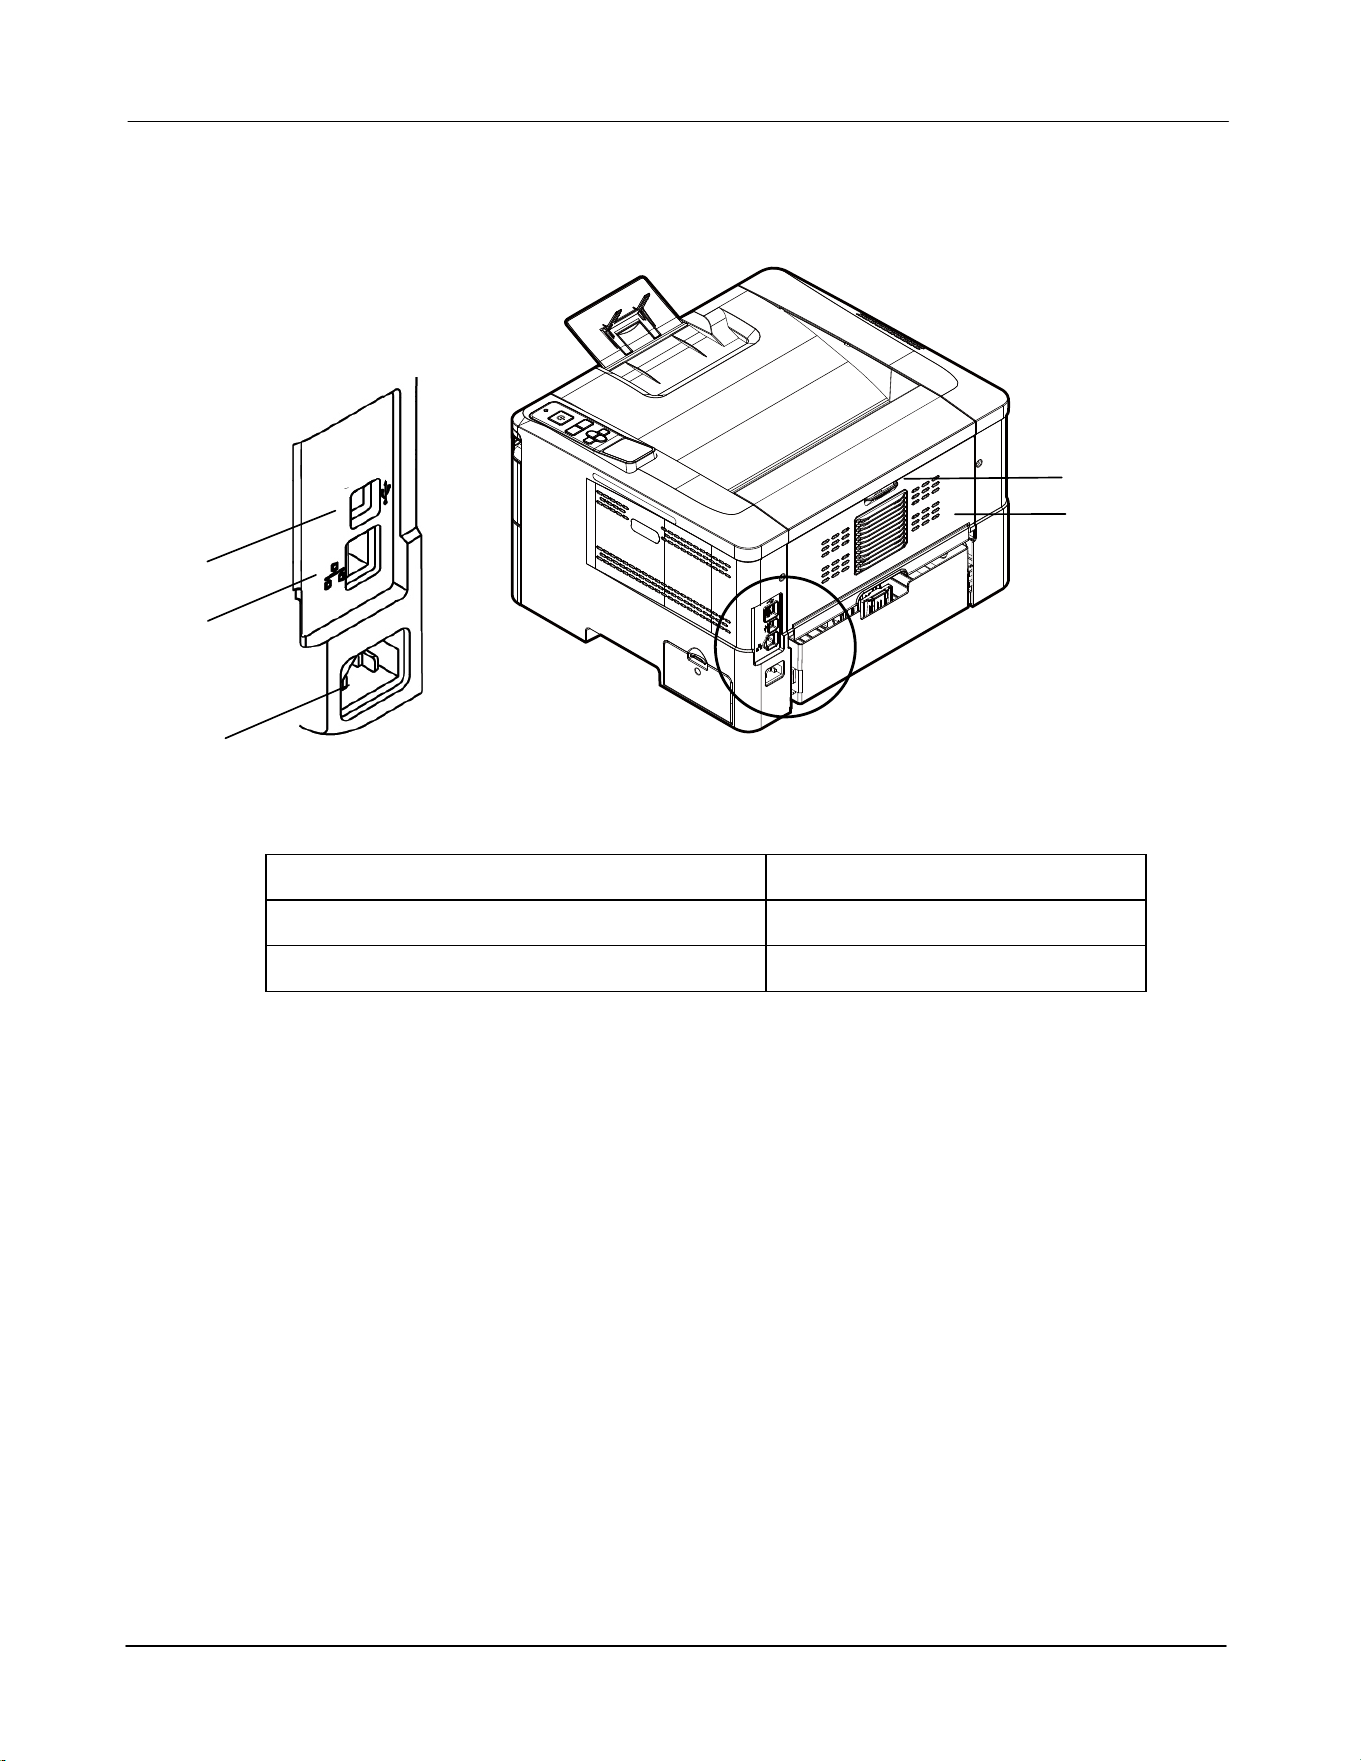
The Rear View
1. USB Port ( Type B, to PC) 4. Rear cover
2. LAN Port 5. Handle of the Rear Cover
3. Power Receptacle
4
5
1
2
3
5
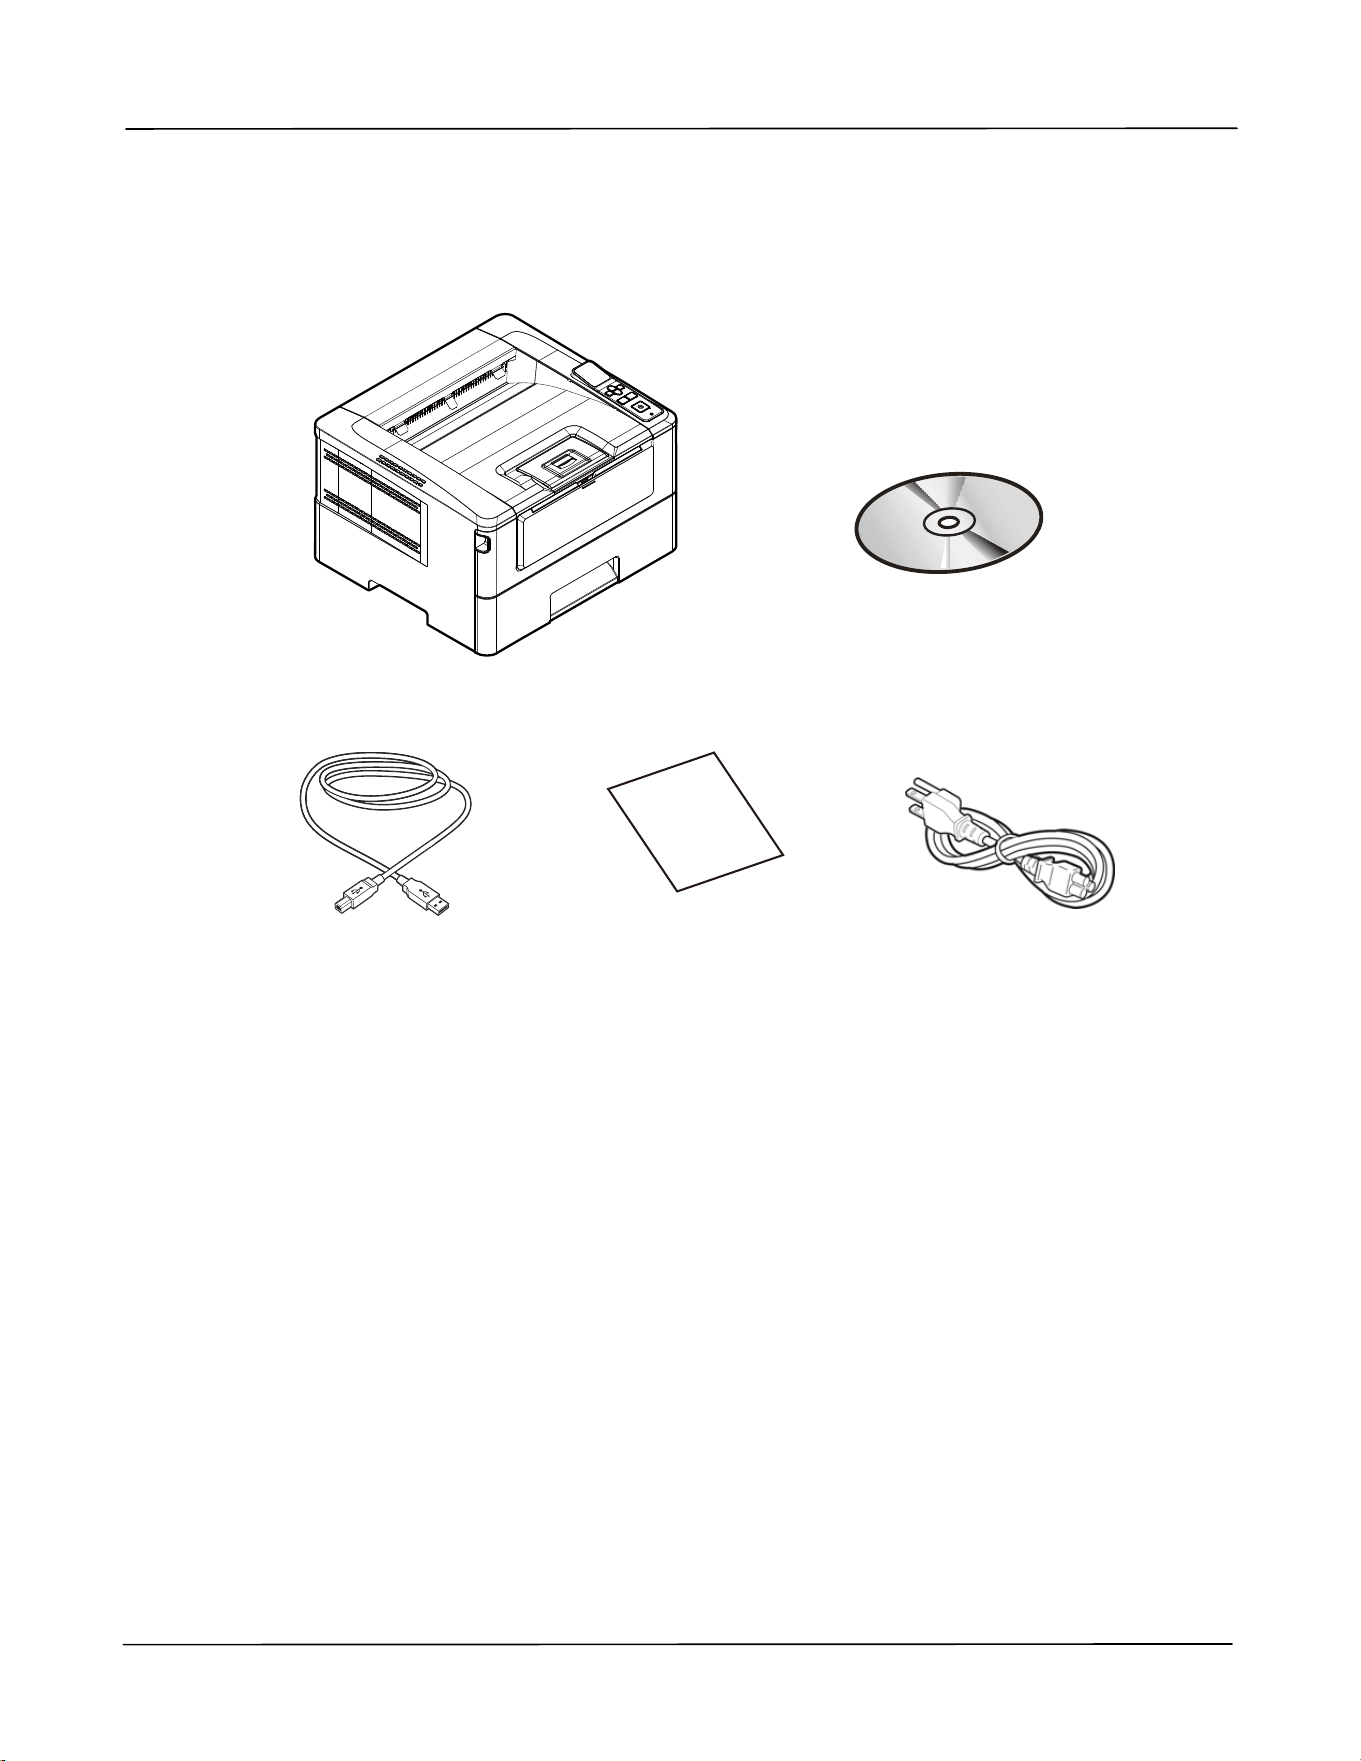
Pa ck age Cont ent s
Main unit
Software CD ( * Print er Driver,
User Manual)
USB Cable
Quick Guide
Power Cable
* You m ay also download t he driver and m anual at www.avision.com / download.
6
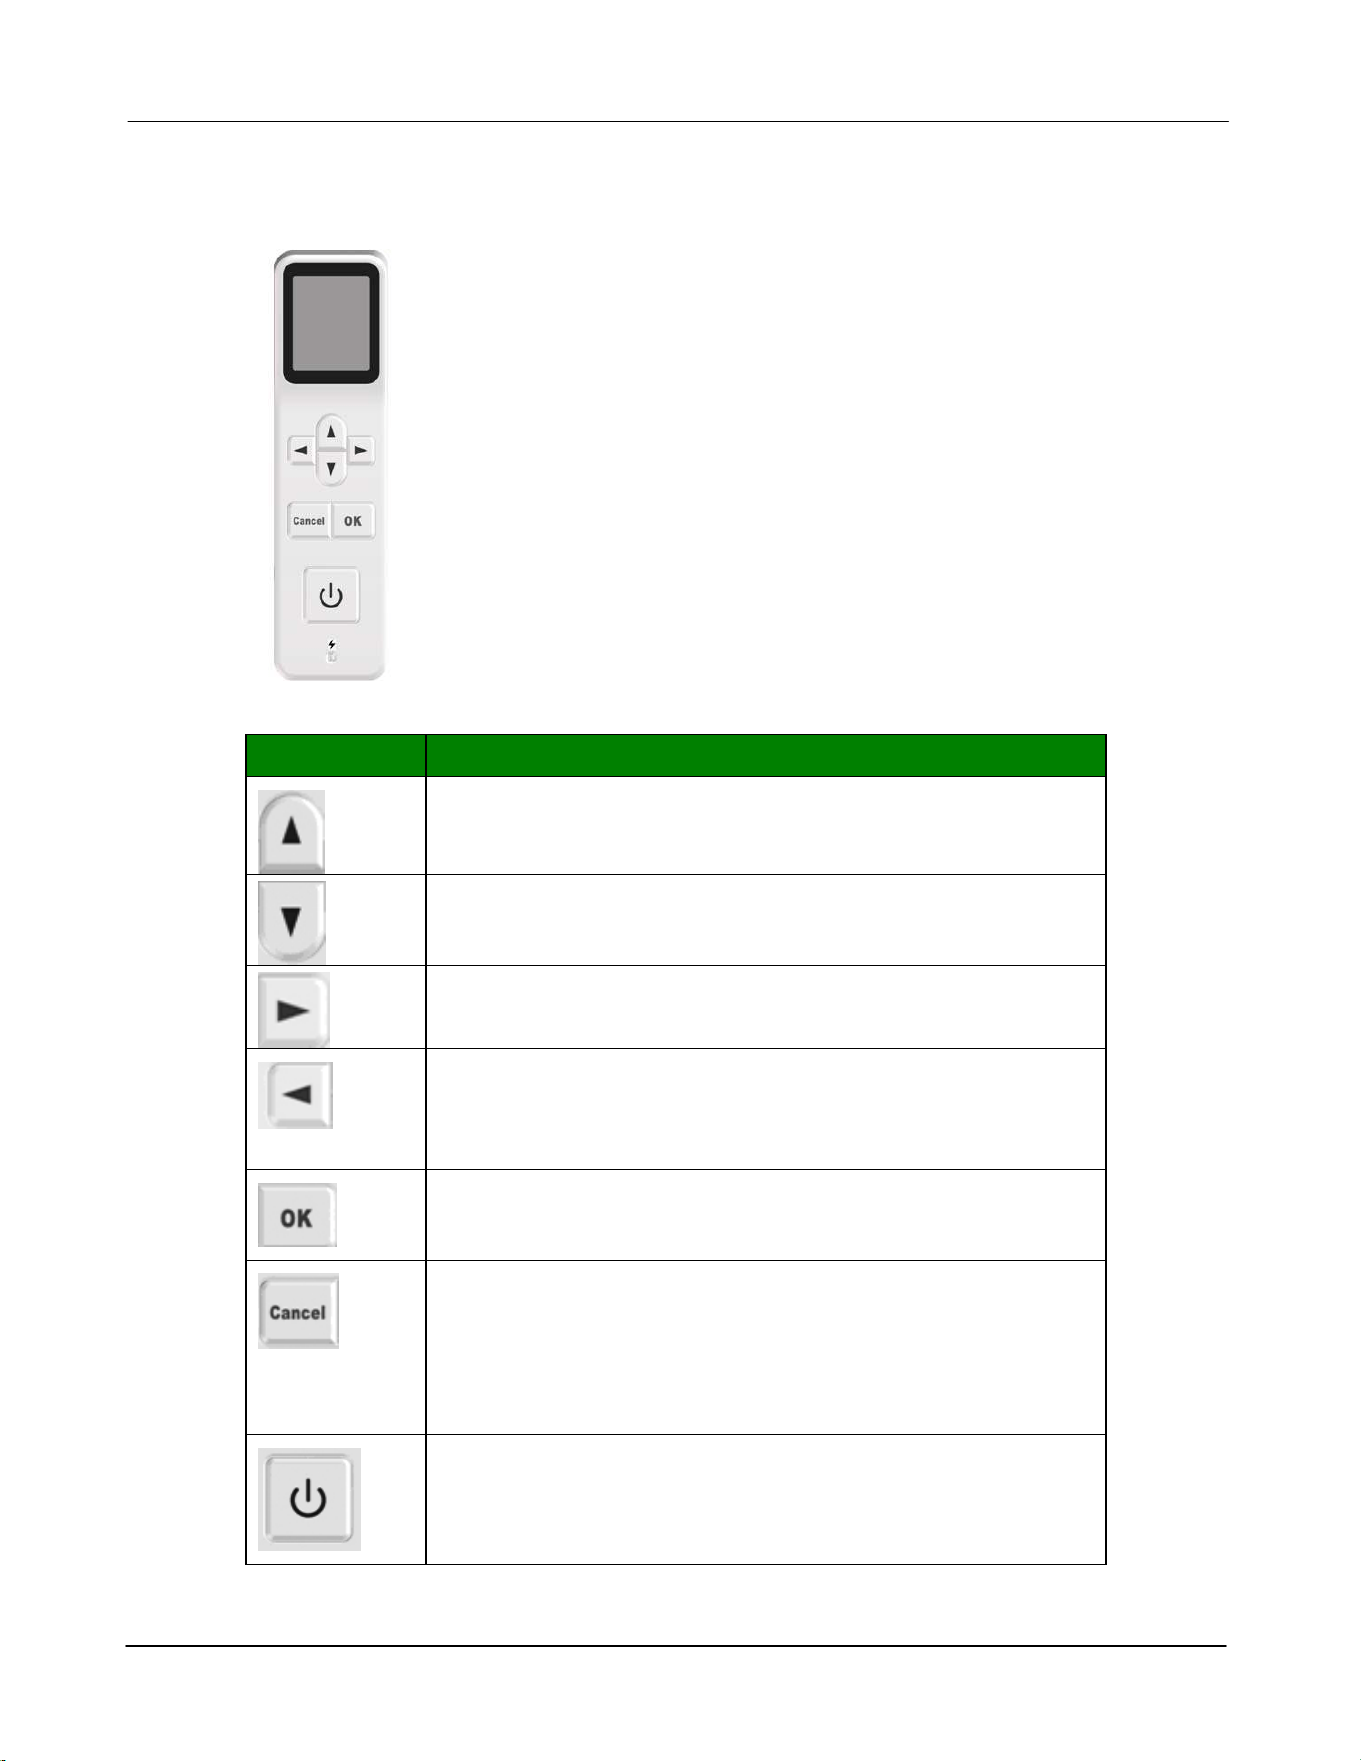
The Cont rol Panel
But t on Descript ion
Used t o display or select an opt ion.
Used t o scroll forwards t hrough m enu select ion.
Used t o display or select an opt ion.
Used t o scroll backwards t hrough m enu select ion.
When ent ering the digit s, m ove one position to the right .
When ent ering the digit s, m ove one position to t he
left .
Used t o go back t o t he previous level.
Used t o ent er t he Menu m ode.
Used t o confirm a select ion in Menu m ode.
Press to cancel a current j ob.
Used t o exit the Menu opt ion.
Long press for 5 seconds t o print t he usage report .
( Available only in ready stat us)
Short press to turn on t he power.
Long press for 5 seconds t o t urn off t he power.
7
N am e of LED Descript ion
Pow e r
St eady green light: I ndicate power has been t urned
on.
Green light ext inguished: I ndicat e power has been
turned off.
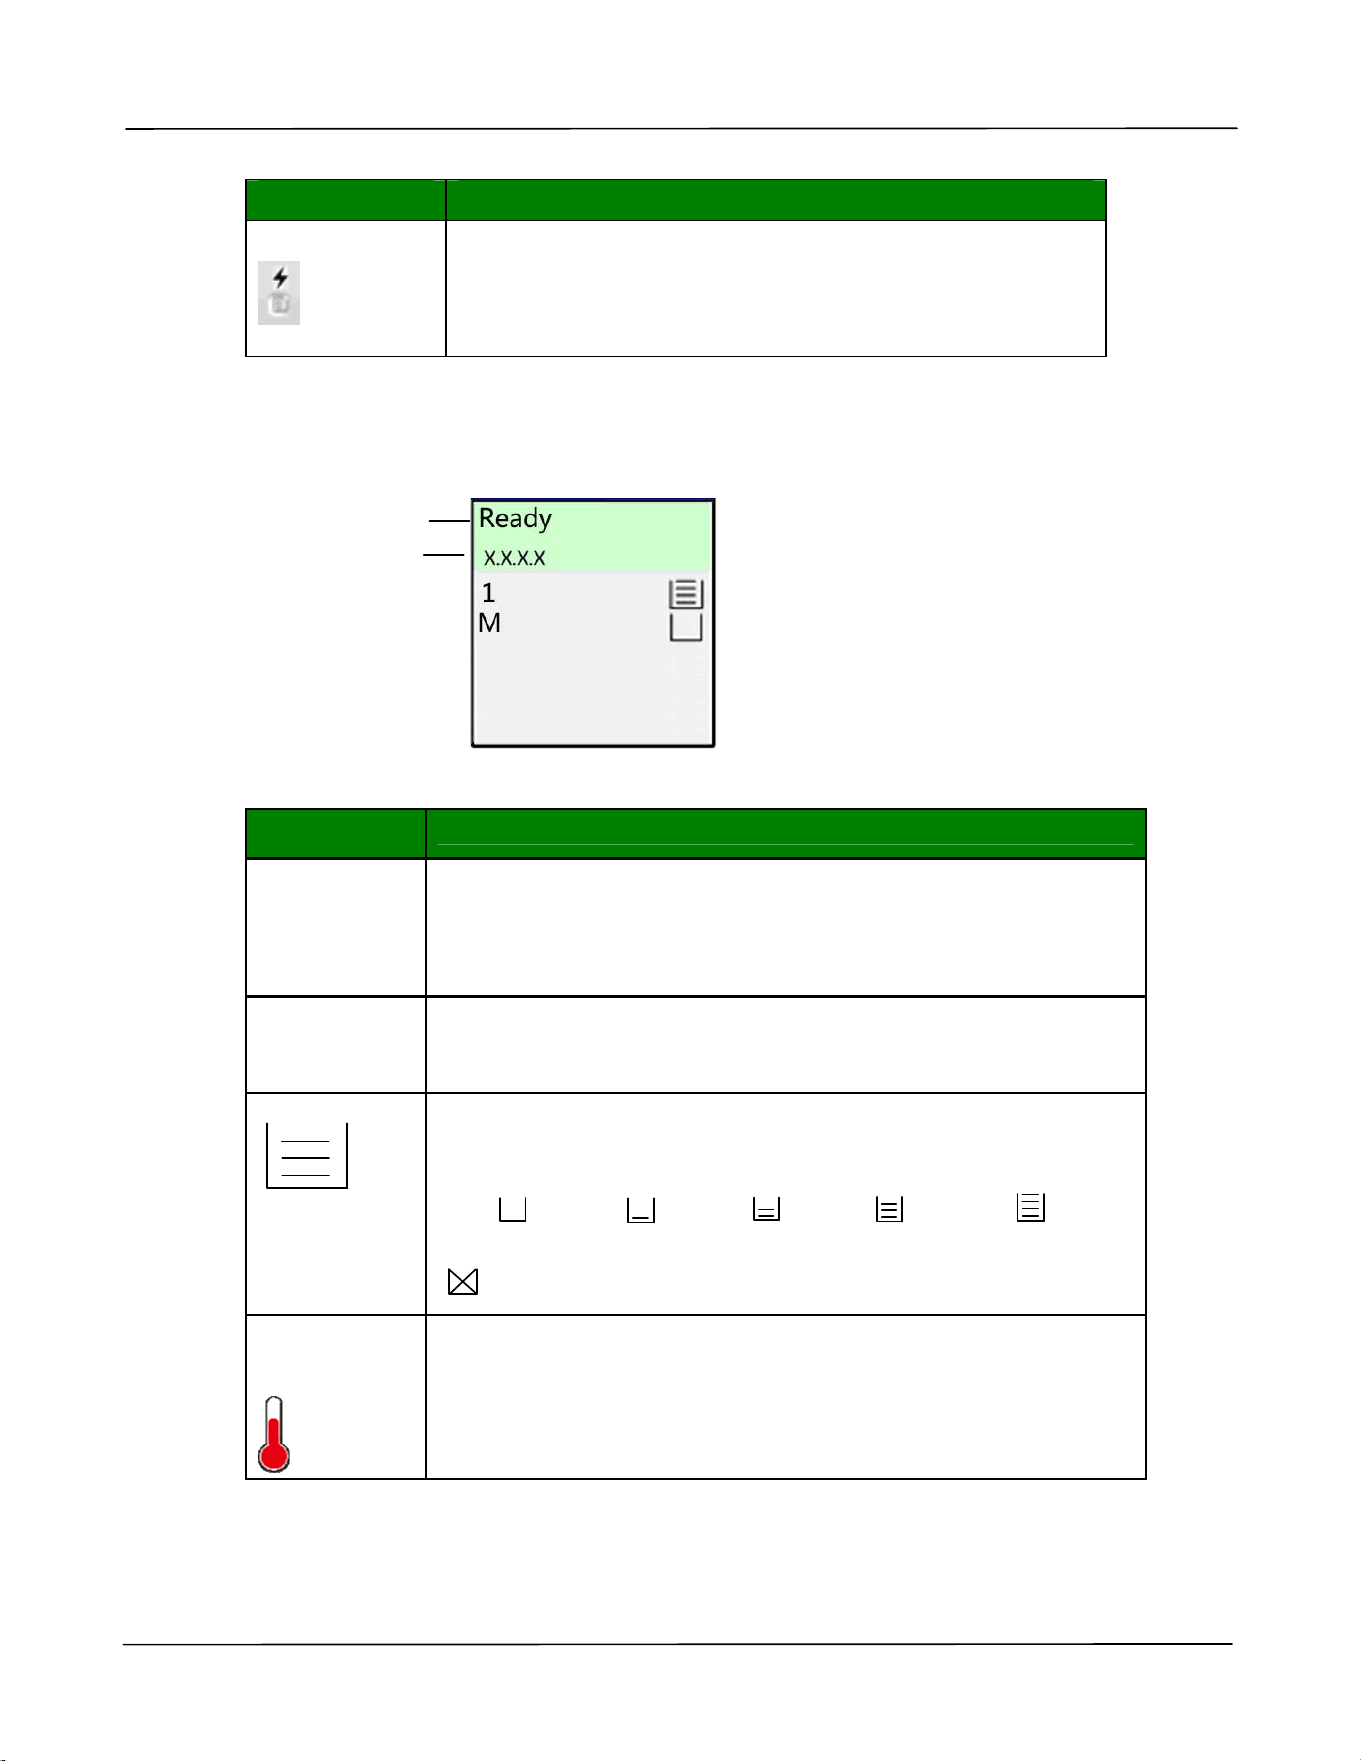
LCD Screen
St a t us Ba r
I te m Descript ion
Rea dy
I P Addr ess
Connect t he network cable and obt ain an I P address
successfully.
I f t he net work cable is not connect ed or t he I P cannot be
obt ained from t he DHCP Server, it w ill display 0.0.0.0
1
M
1: I ndicate Tray 1.
M: I ndicat e Manual Tray.
Displays t he percentage of paper capacity in t he paper t ray
( 0% 、25% 、50% 、75% 、100% ) .
0% : / 25% : / 50% : / 75% : / 100% :
Manual Tray: 100% - wit h paper, 0% - no paper.
: This indicat es t he paper can not be used.
Slow dow n
indicat or
The t em perat ure inside the printer is t oo high. The Backside
print ing for duplex print ing will pause for 6 seconds
tem porarily. Aft er t he m achine has been idle for a few
m inut es and t he t em perat ure has been lowered to norm al
t em perat ure, t he [ Slow down indicator] icon will disappear.
St at us I ndicat ion
I P Address
Use r ’s Guide
8
2 . I nst allat ion
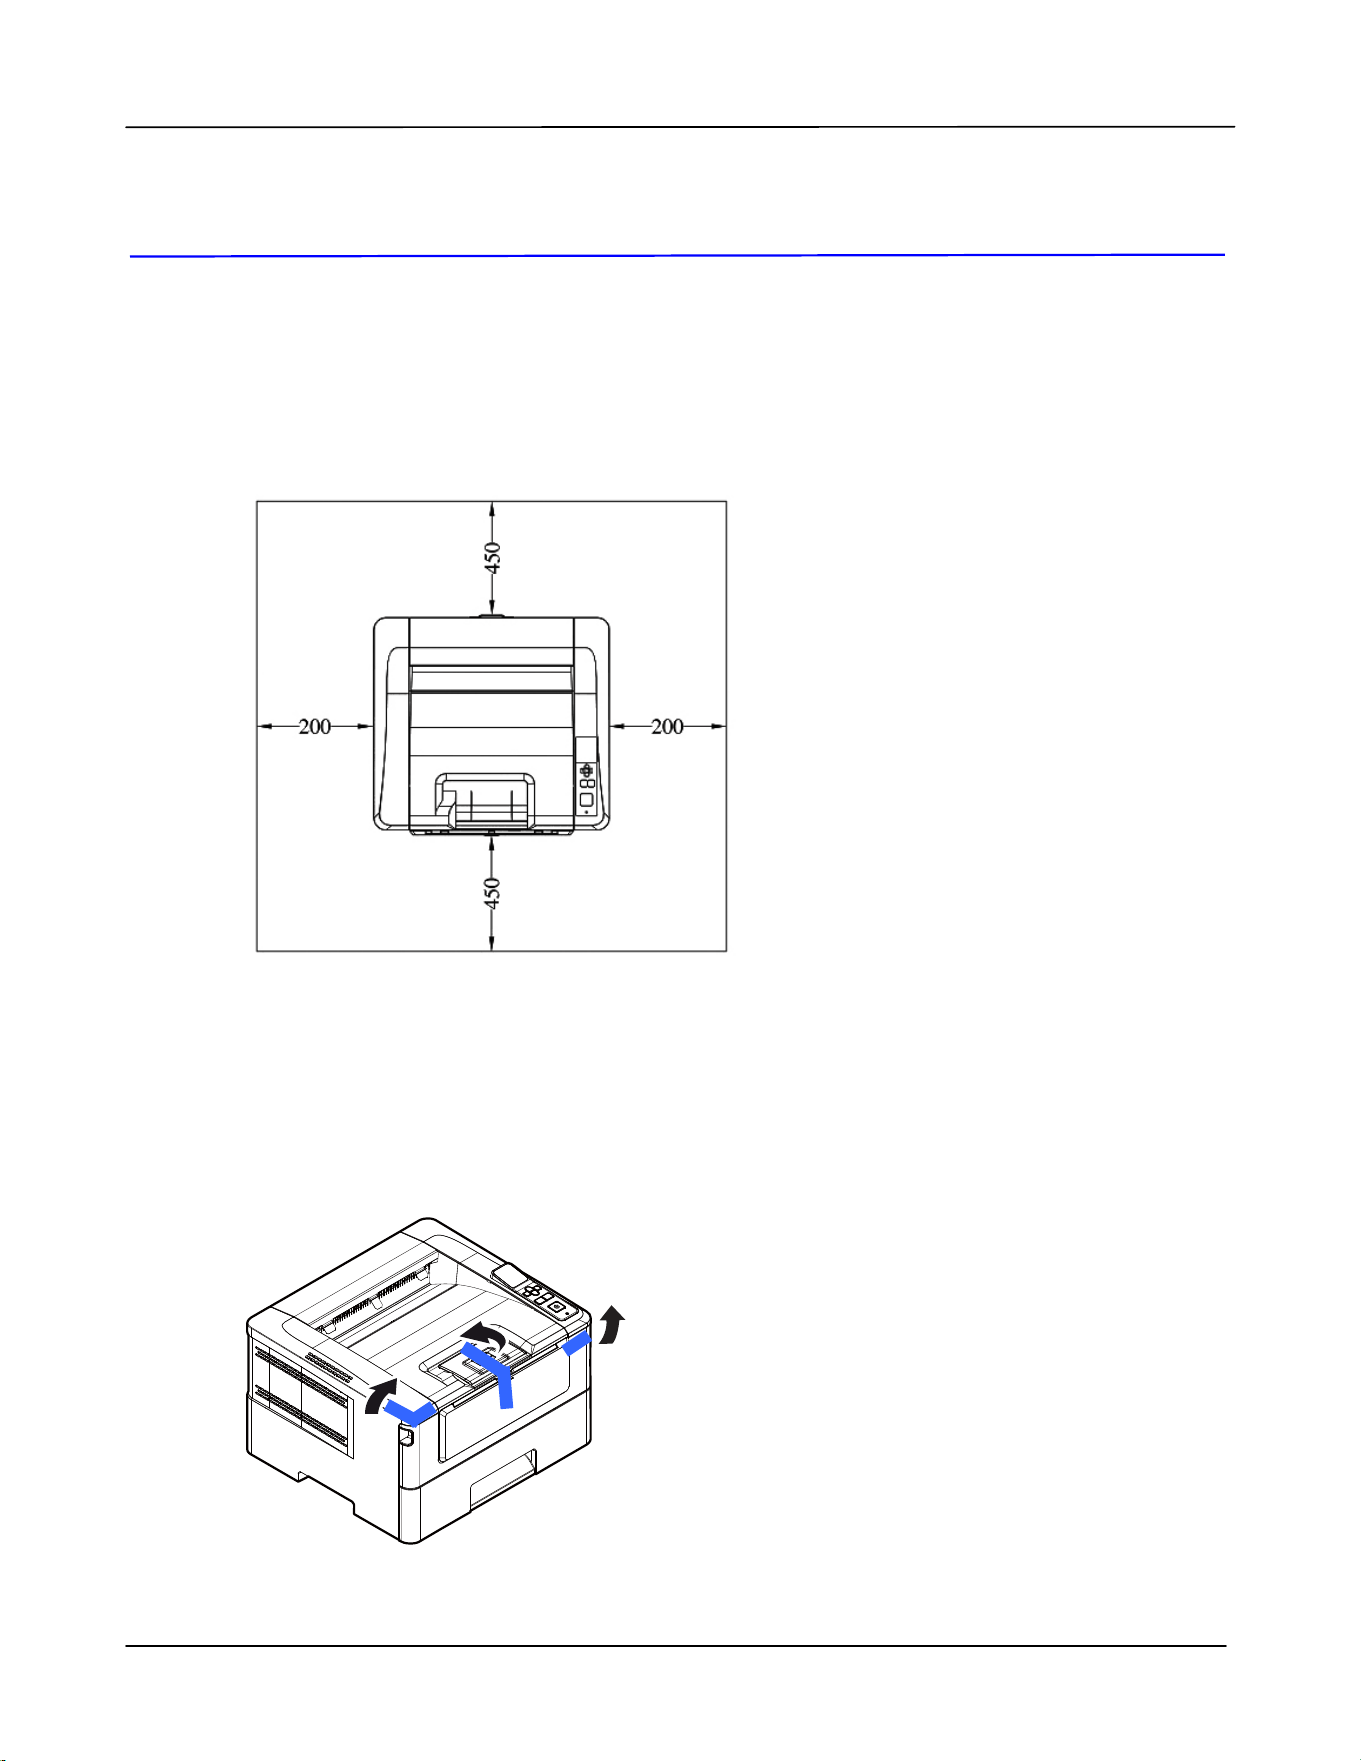
Operat ion Spa ce
Please reser ve t he following operat ion space.
Machine dim ension: 402 x 380 x 258 m m ( WxDxH)
Rem oving t he Ta pes and t he Cushion
Rem ove t he packing m at erial and t apes of t he product.
Measur ing unit : m m
I nst a llat ion
9
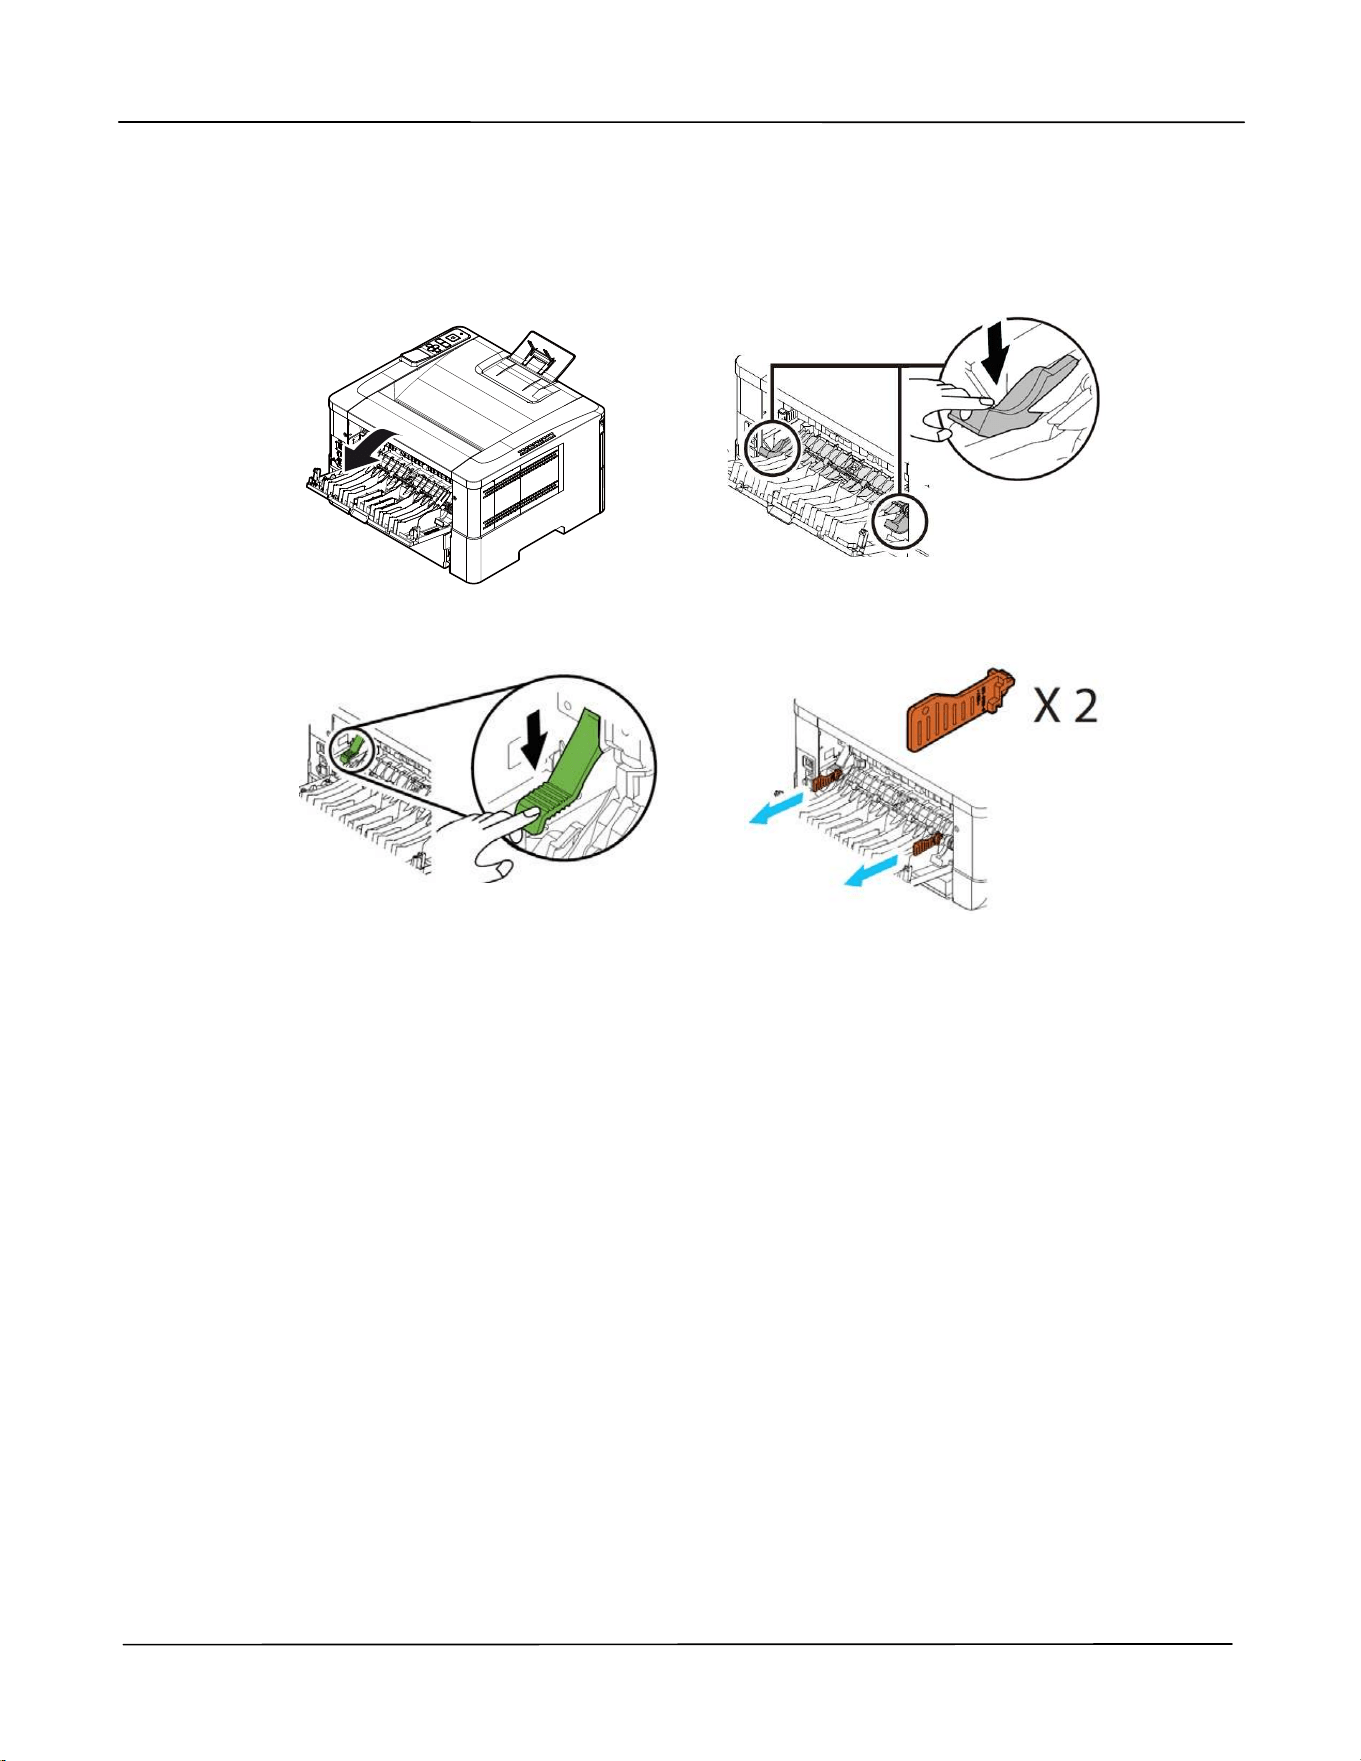
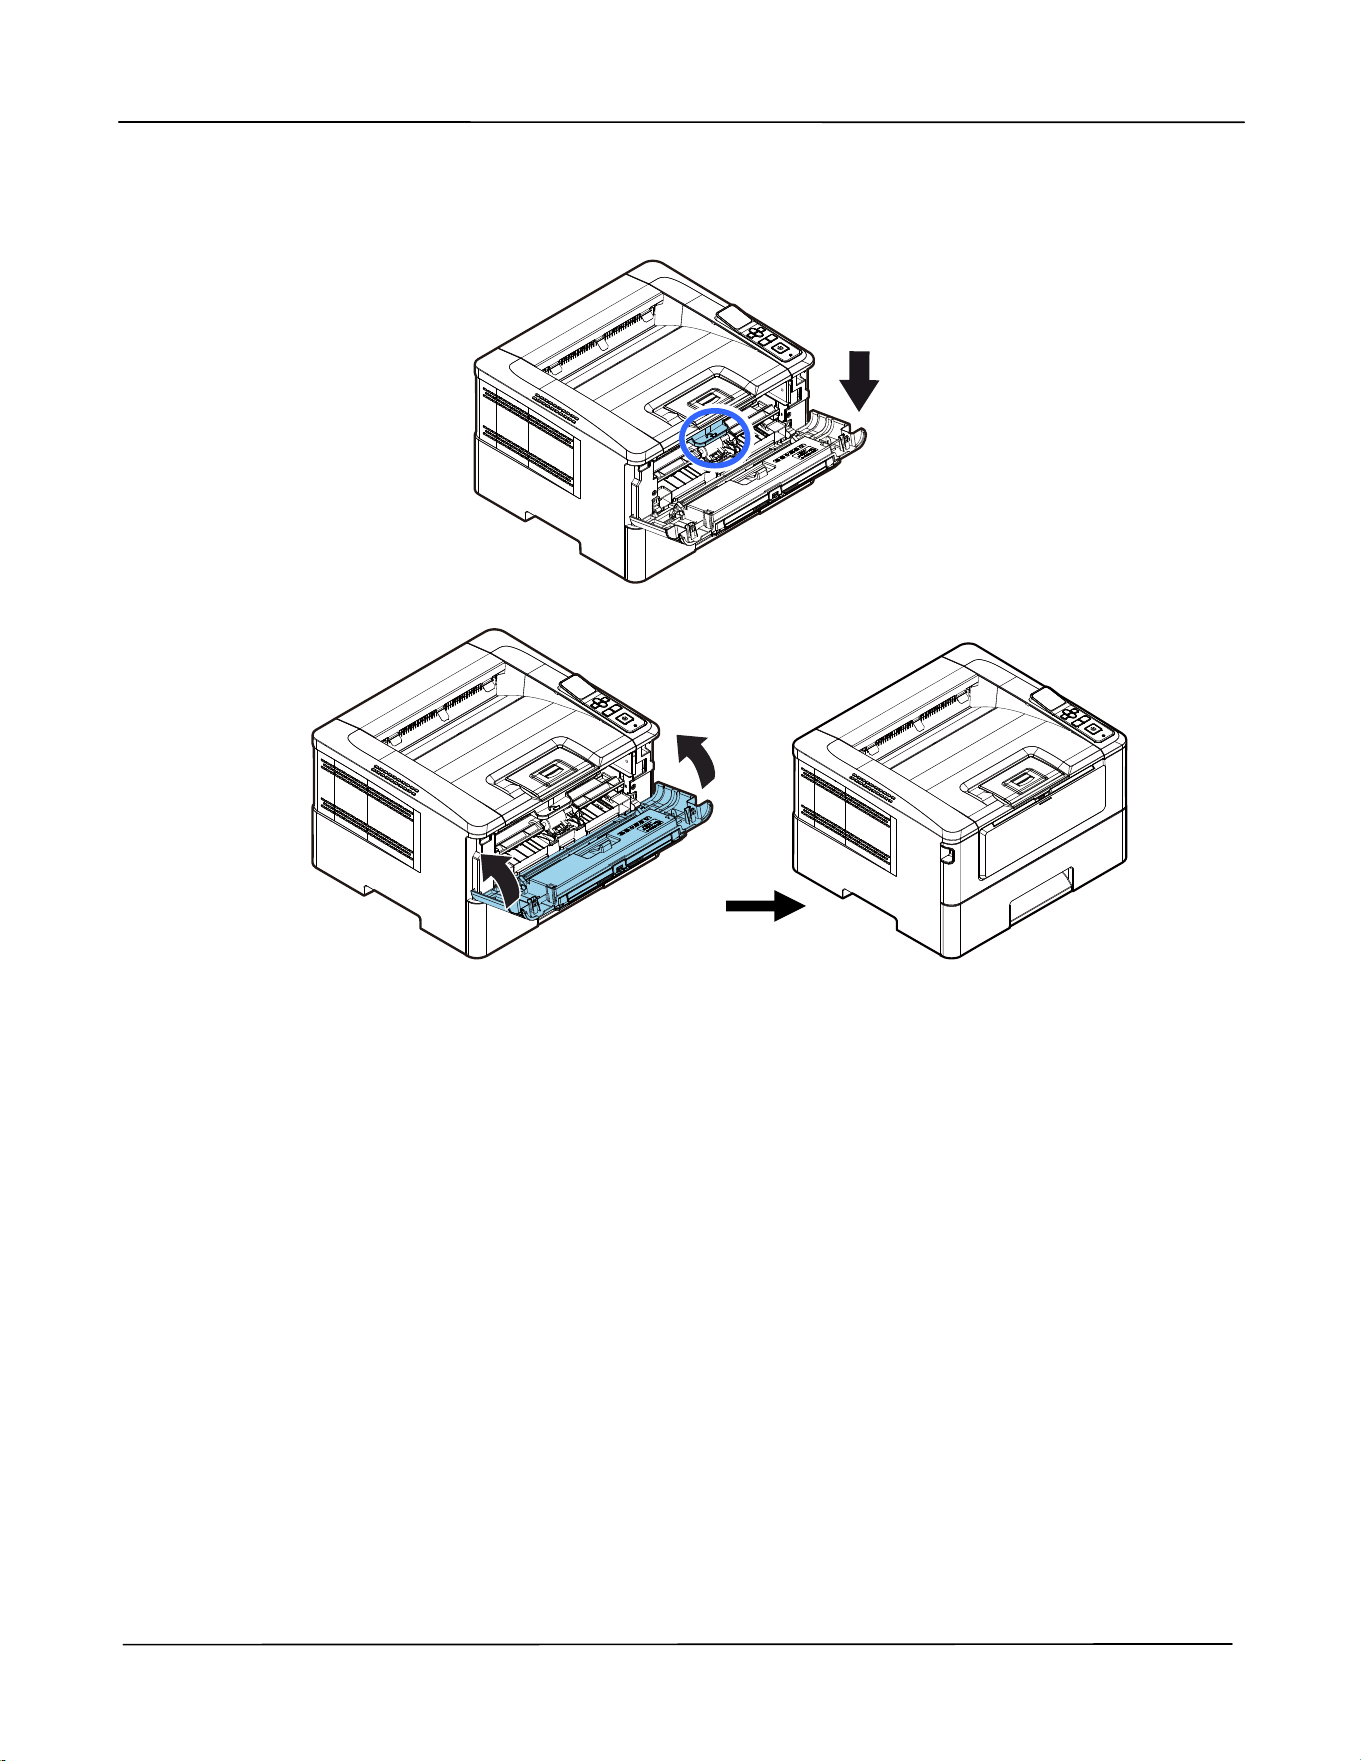
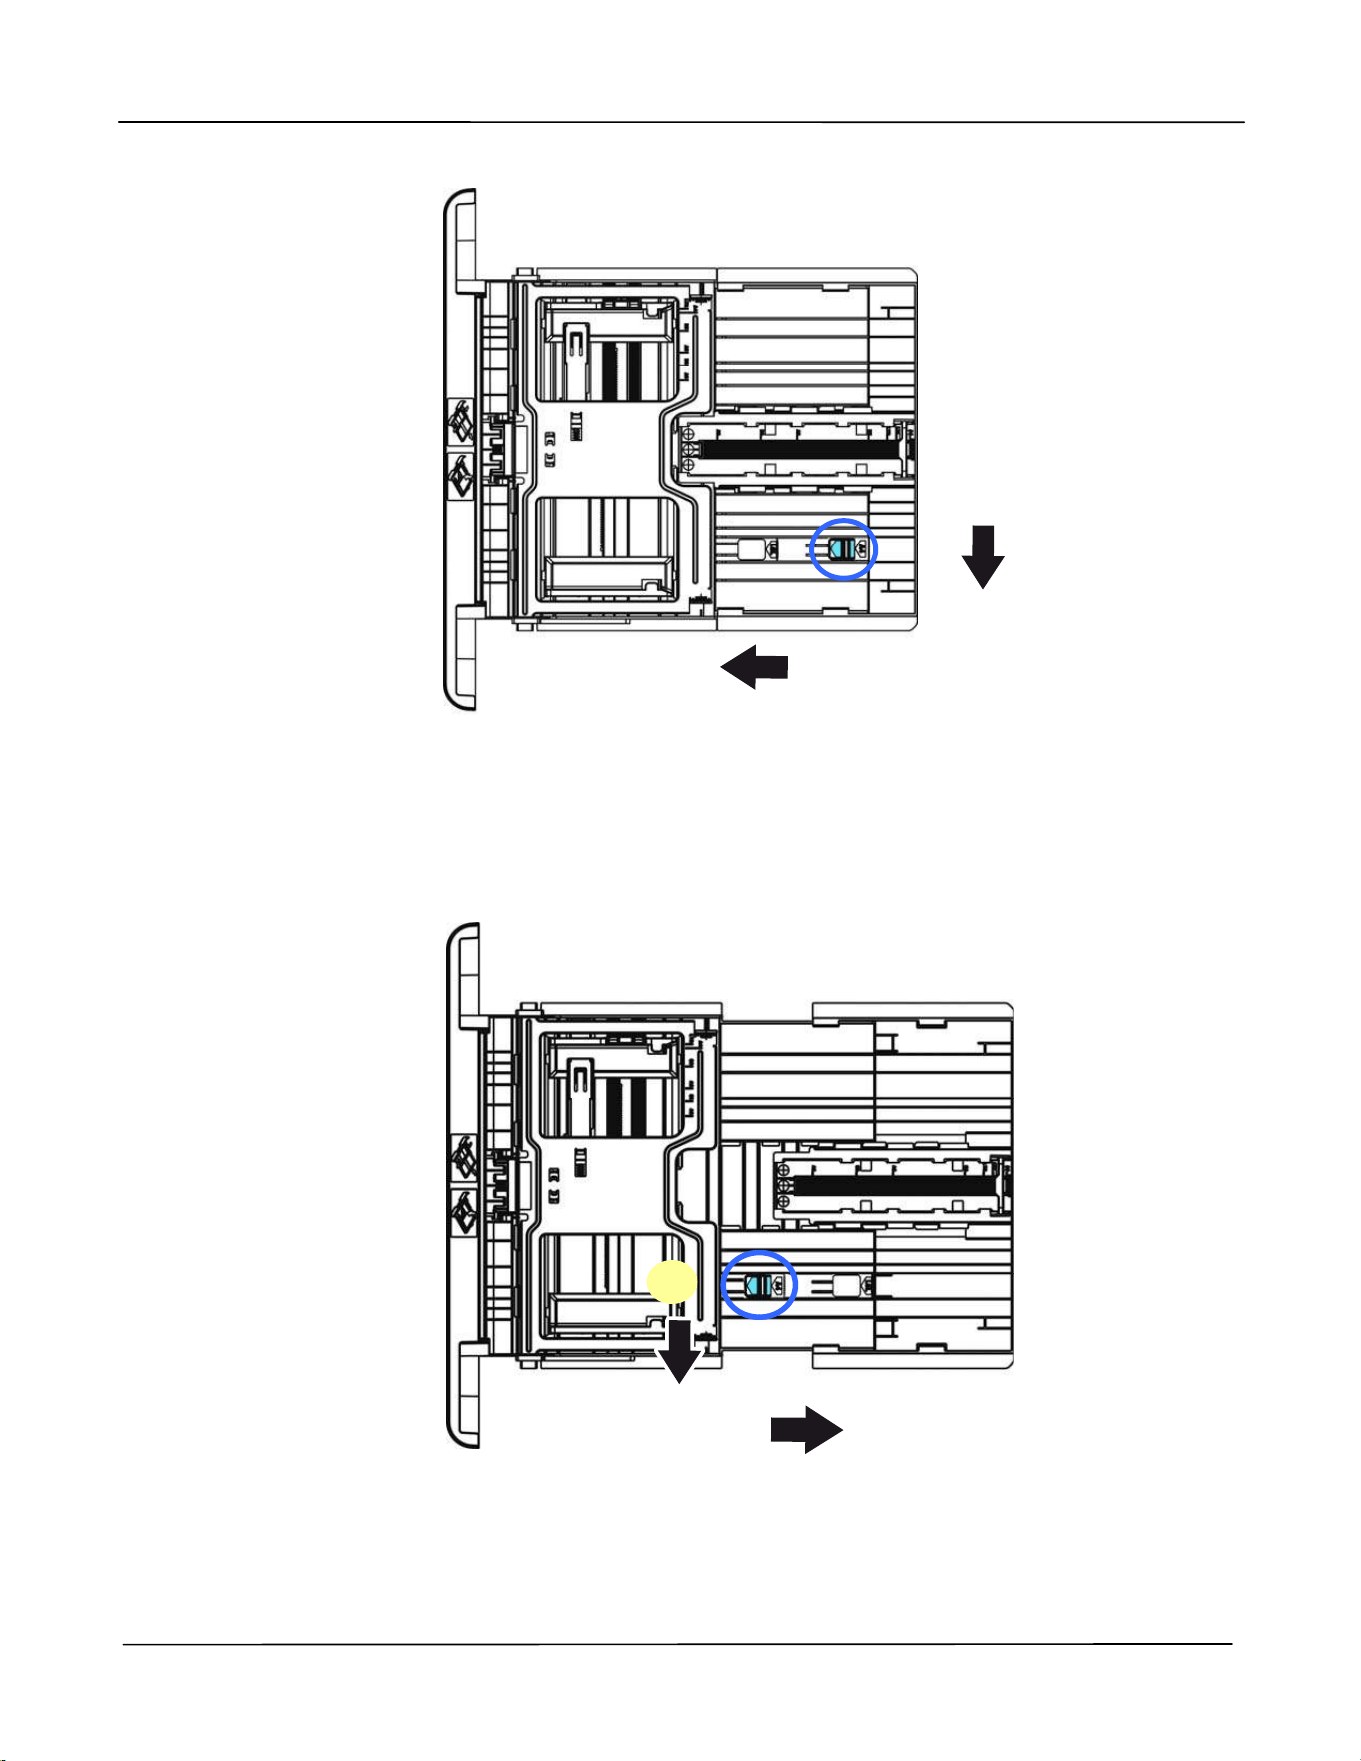
Rem ove t he Spa cers
1 . Open t he rear cover by pulling
the handle of the rear cover.
2 . Pull down t wo ends of t he paper
pat h.
3 . Pull down t he green release
arm s as indicated.
4 . Rem ove t he spacers on bot h sides
as illust rat ed.
Use r ’s Guide
10
Rem oving t he Ta pes, Prot ect ive Sheet , a nd
Sea l on t he Dr um and Toner Ca rt ridge
Assem bly
W ARN I N G!
Be careful not t o inhale t oner.
To avoid print qualit y problem s, DO NOT t ouch t he t oner rollers.
I f t oner get s on your clothing or ot her fabric, wipe off t he t oner wit h
a dry clot h. Wash the it em s in cold wat er and dry t hem in t he
shade.
To prevent t he toner cart ridge from dam age, do not expose it m ore
than several m inut es.
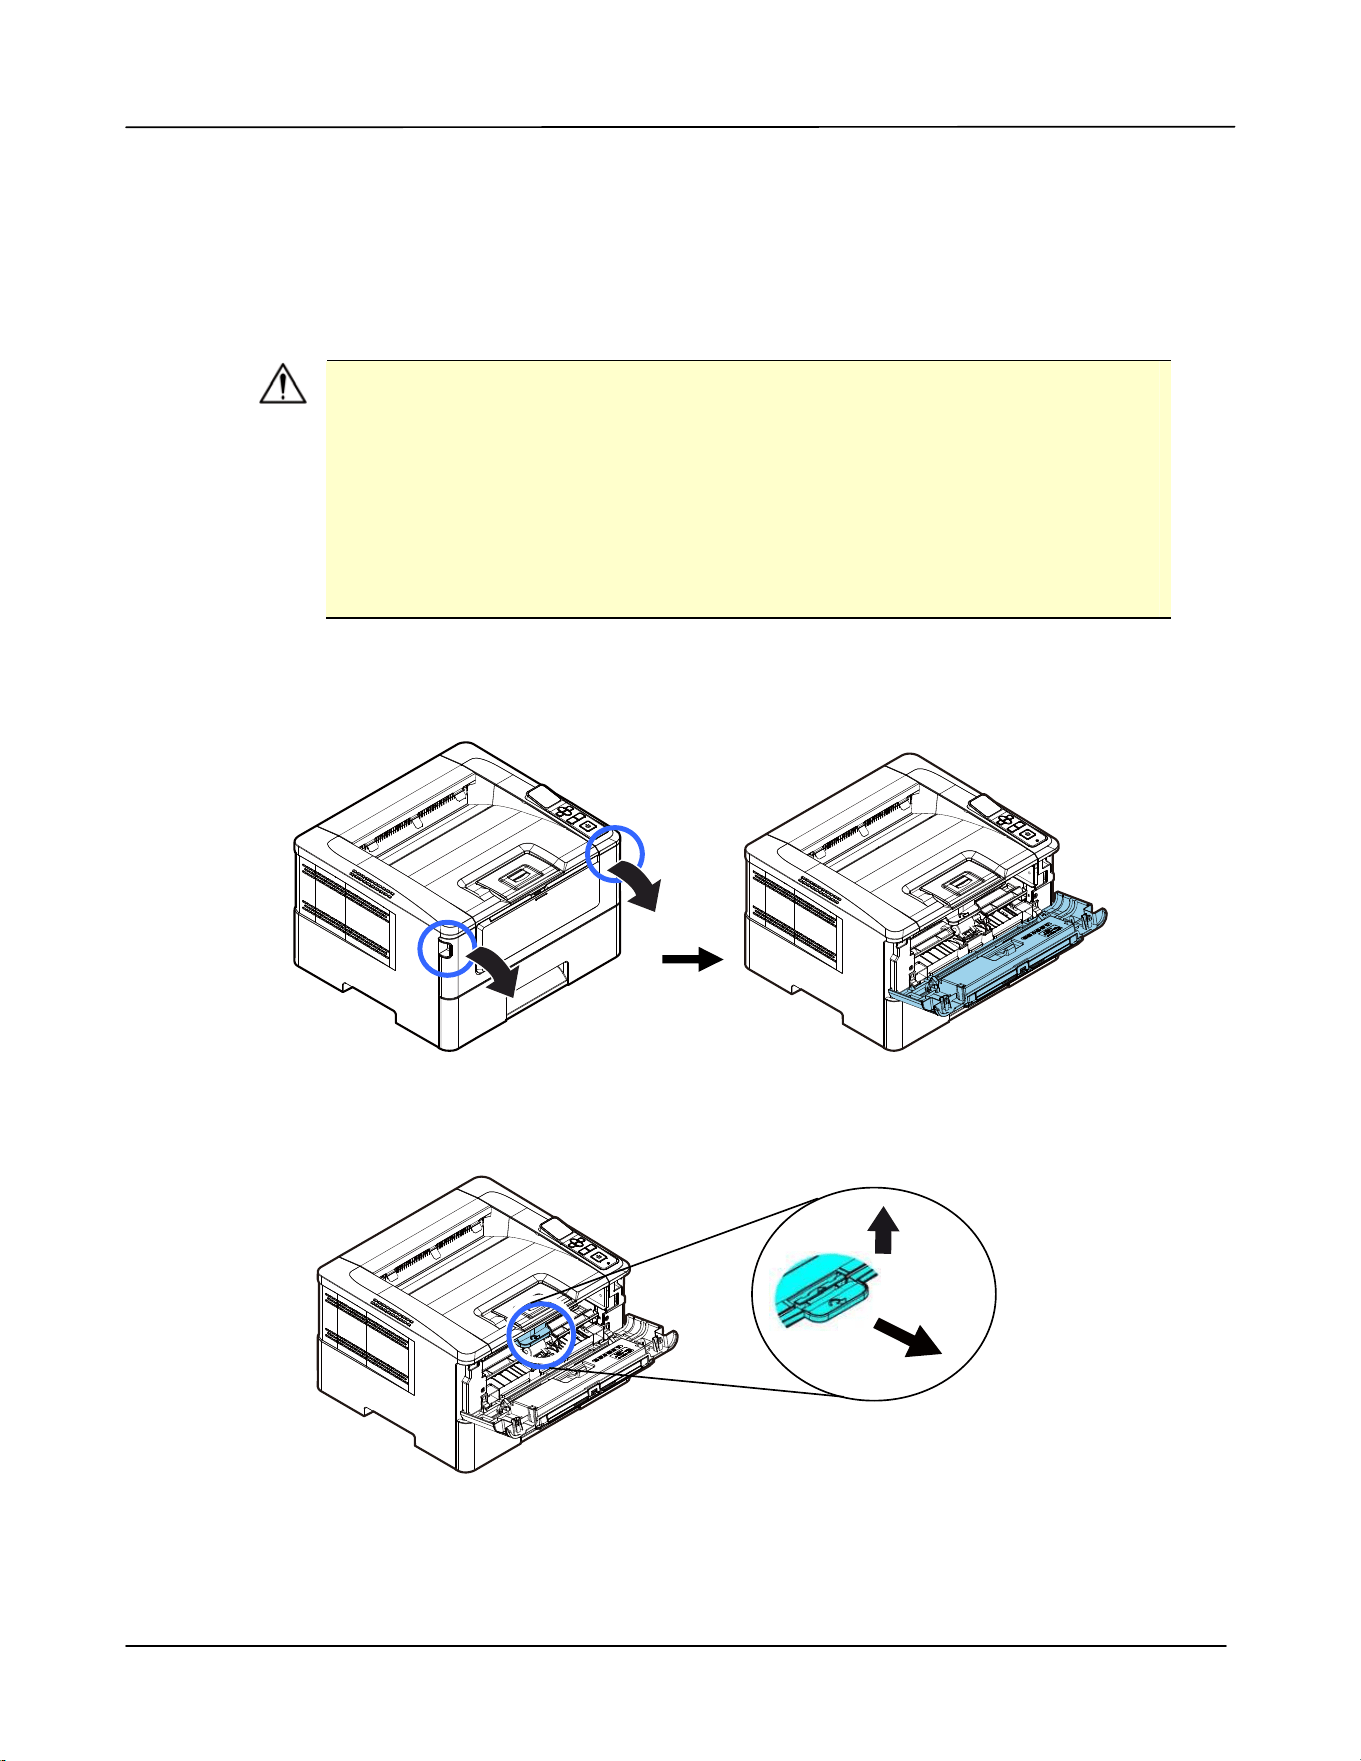
1 . Open t he front door by pulling t he handles on bot h sides as shown.
2 . Lift the handle of t he drum unit up and t hen pull it out as shown.
I nst a llat ion
11
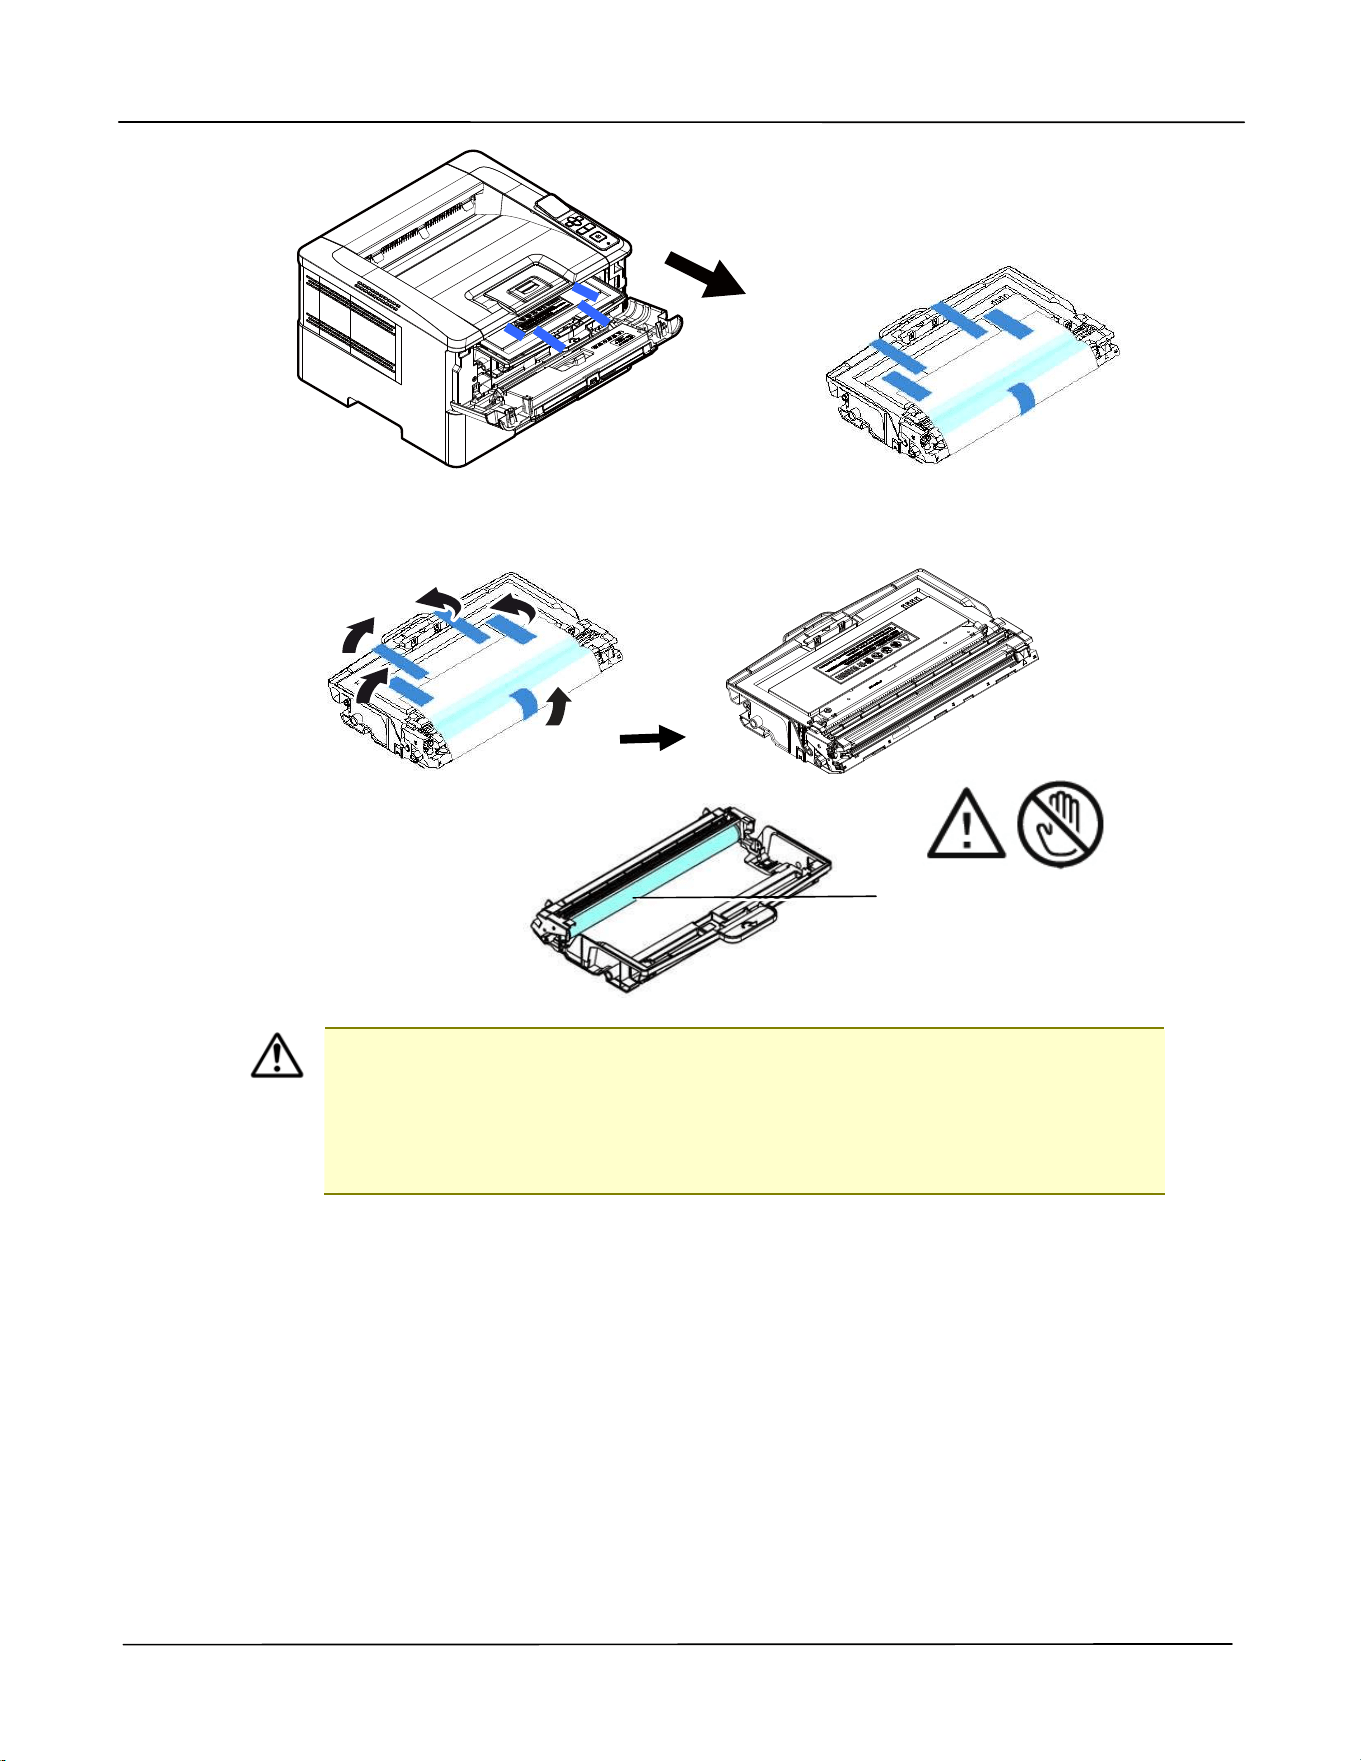
3 . Rem ove all t he tapes, protective sheet s on t he drum and t oner cart ridge assem bly.
I m port ant !
DO NOT t ouch the drum surface since t he fingerprint s or ot her
m arks m ay affect t he print qualit y.
DO NOT expose t he drum unit under light for a few m inut es.
I nst all t he drum unit as soon as t he package is opened.
DO NOT t ouch t he drum
surface.
Use r ’s Guide
12
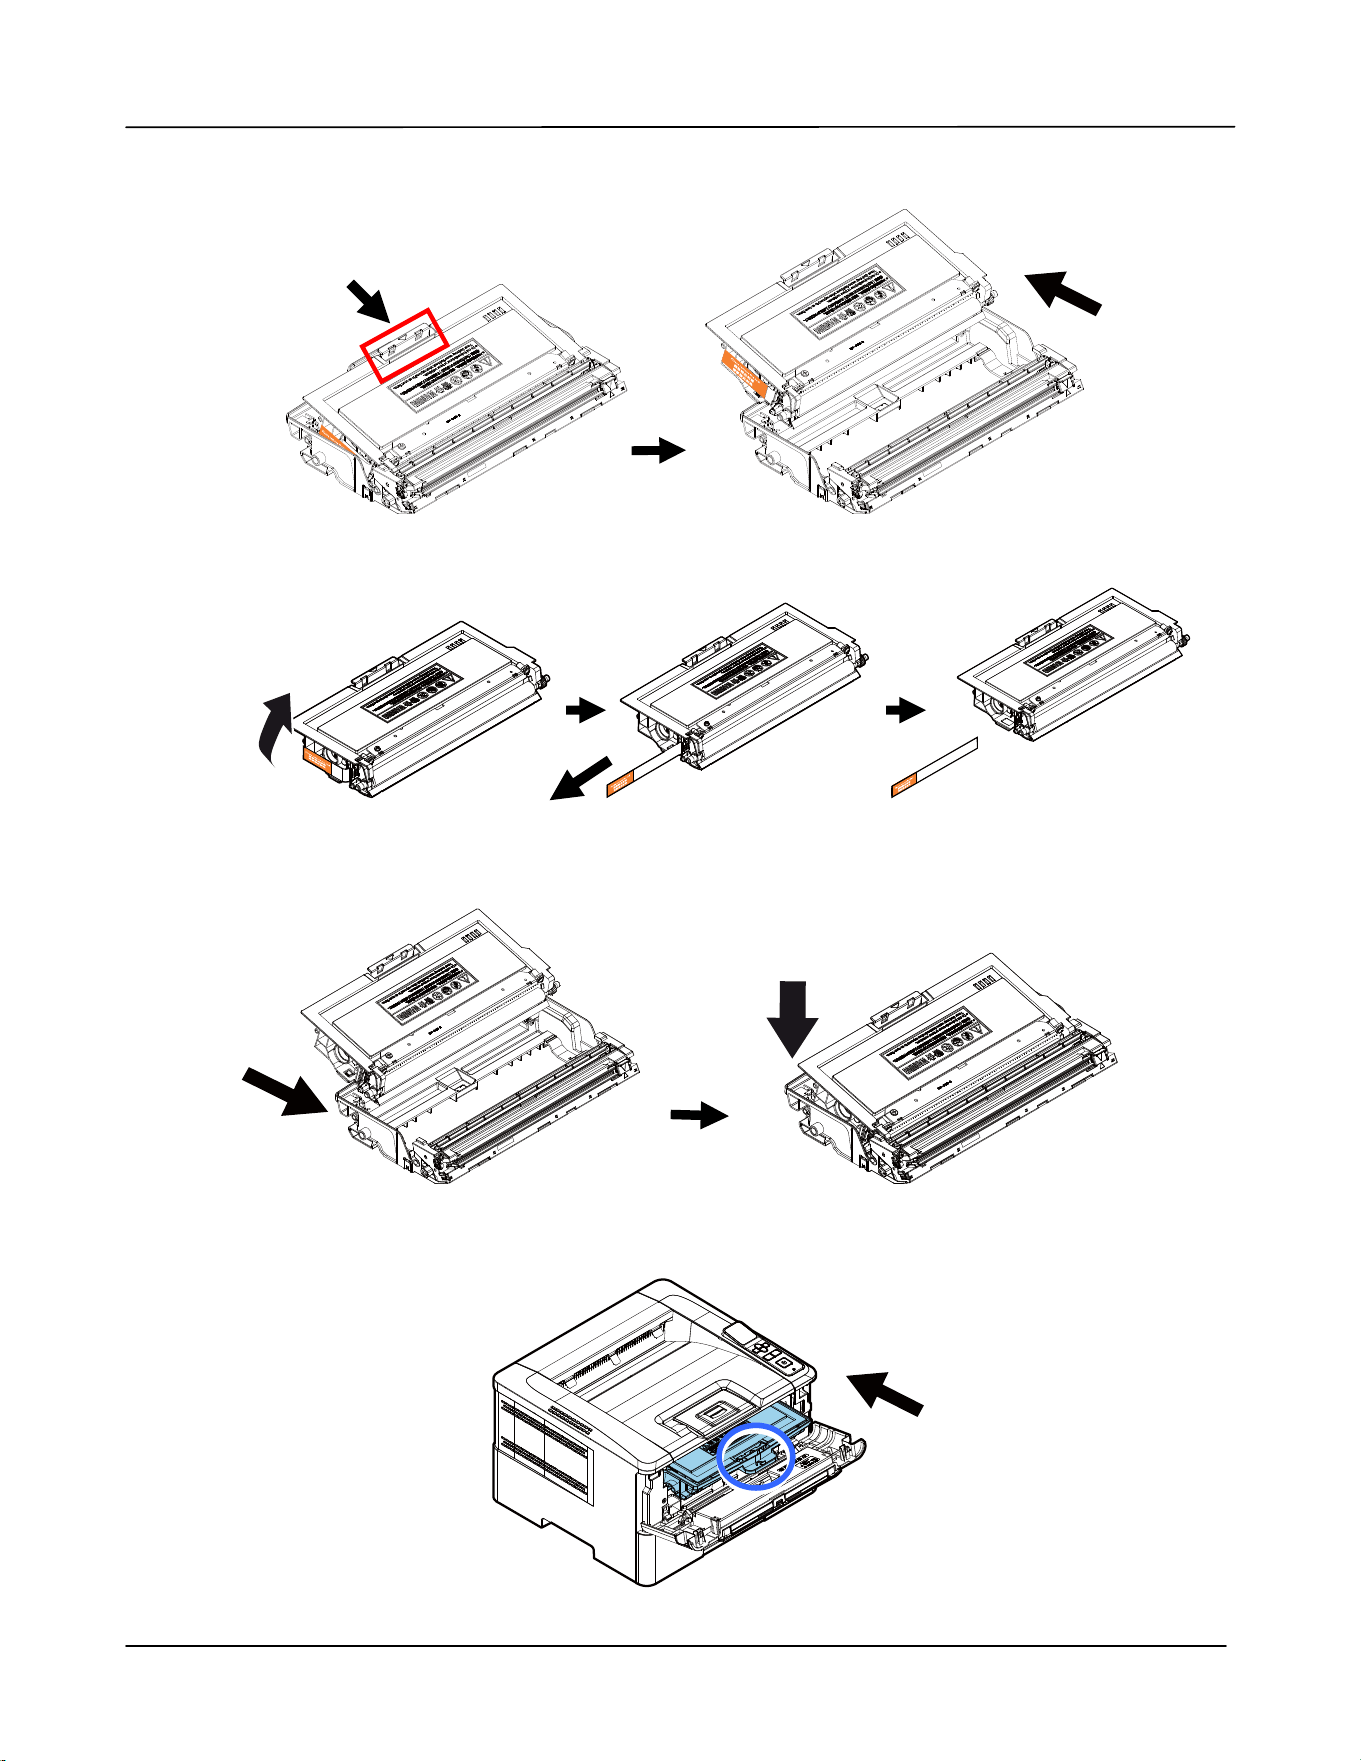
4 . Push the lat ch in t he m iddle of t he t oner cart ridge forw ard in the direction of t he
arrow to separate t he t oner cart ridge from t he drum .
5 . Pull out the prot ective seal of t he t oner cart ridge unt il it is com plet ely rem oved.
6 .
I nst all t he t oner cart ridge t o t he drum unit until you hear it lock int o place.
7 . Hold t he handle of t he drum and t oner cart ridge assem bly and insert t he
assem bly t o it s original place.
I nst a llat ion
13
8 .
Press dow n t he handle of the t oner cart ridge t o fix t he t oner cart ridge.
9 .
Close t he front cover.
Use r ’s Guide
14
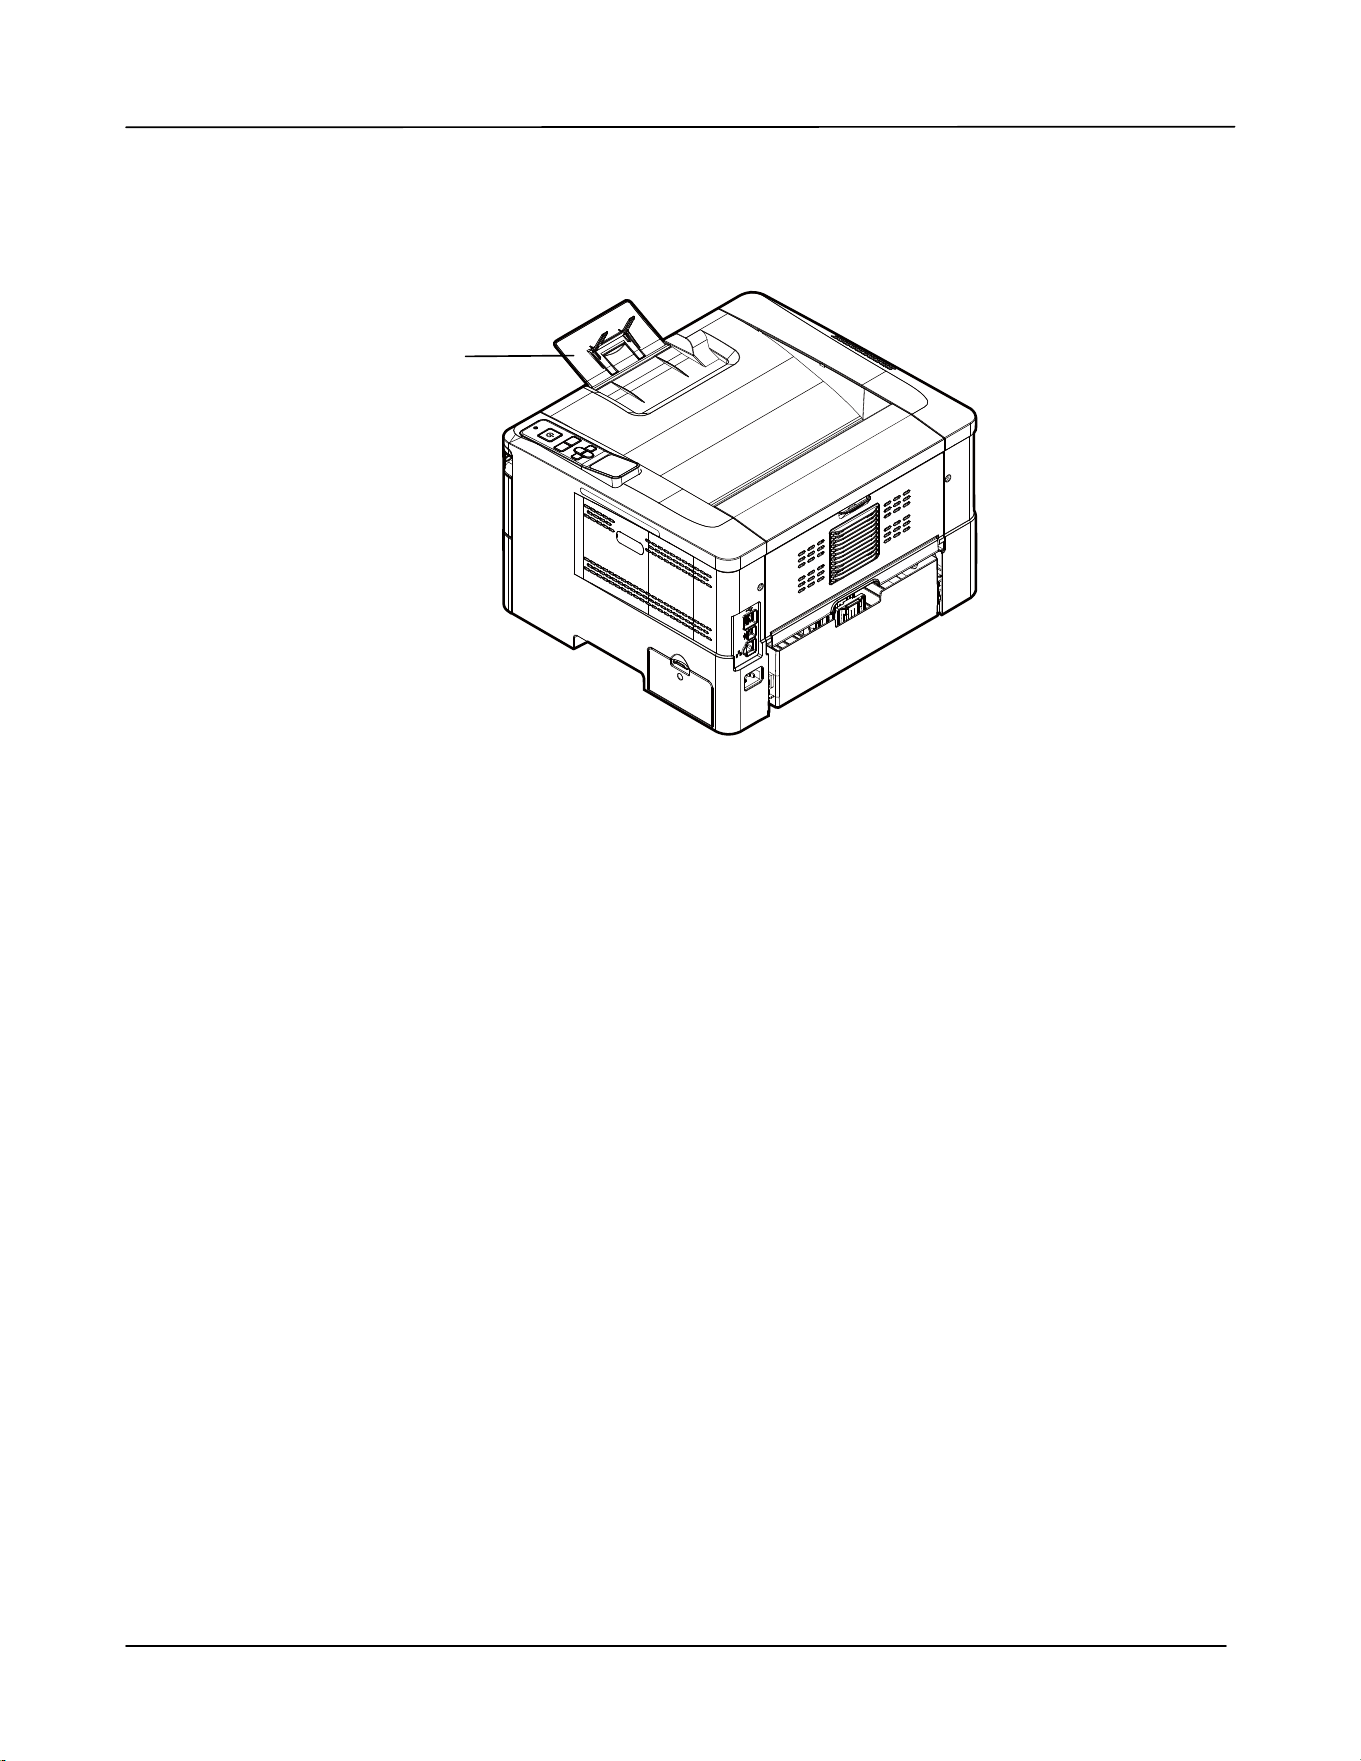
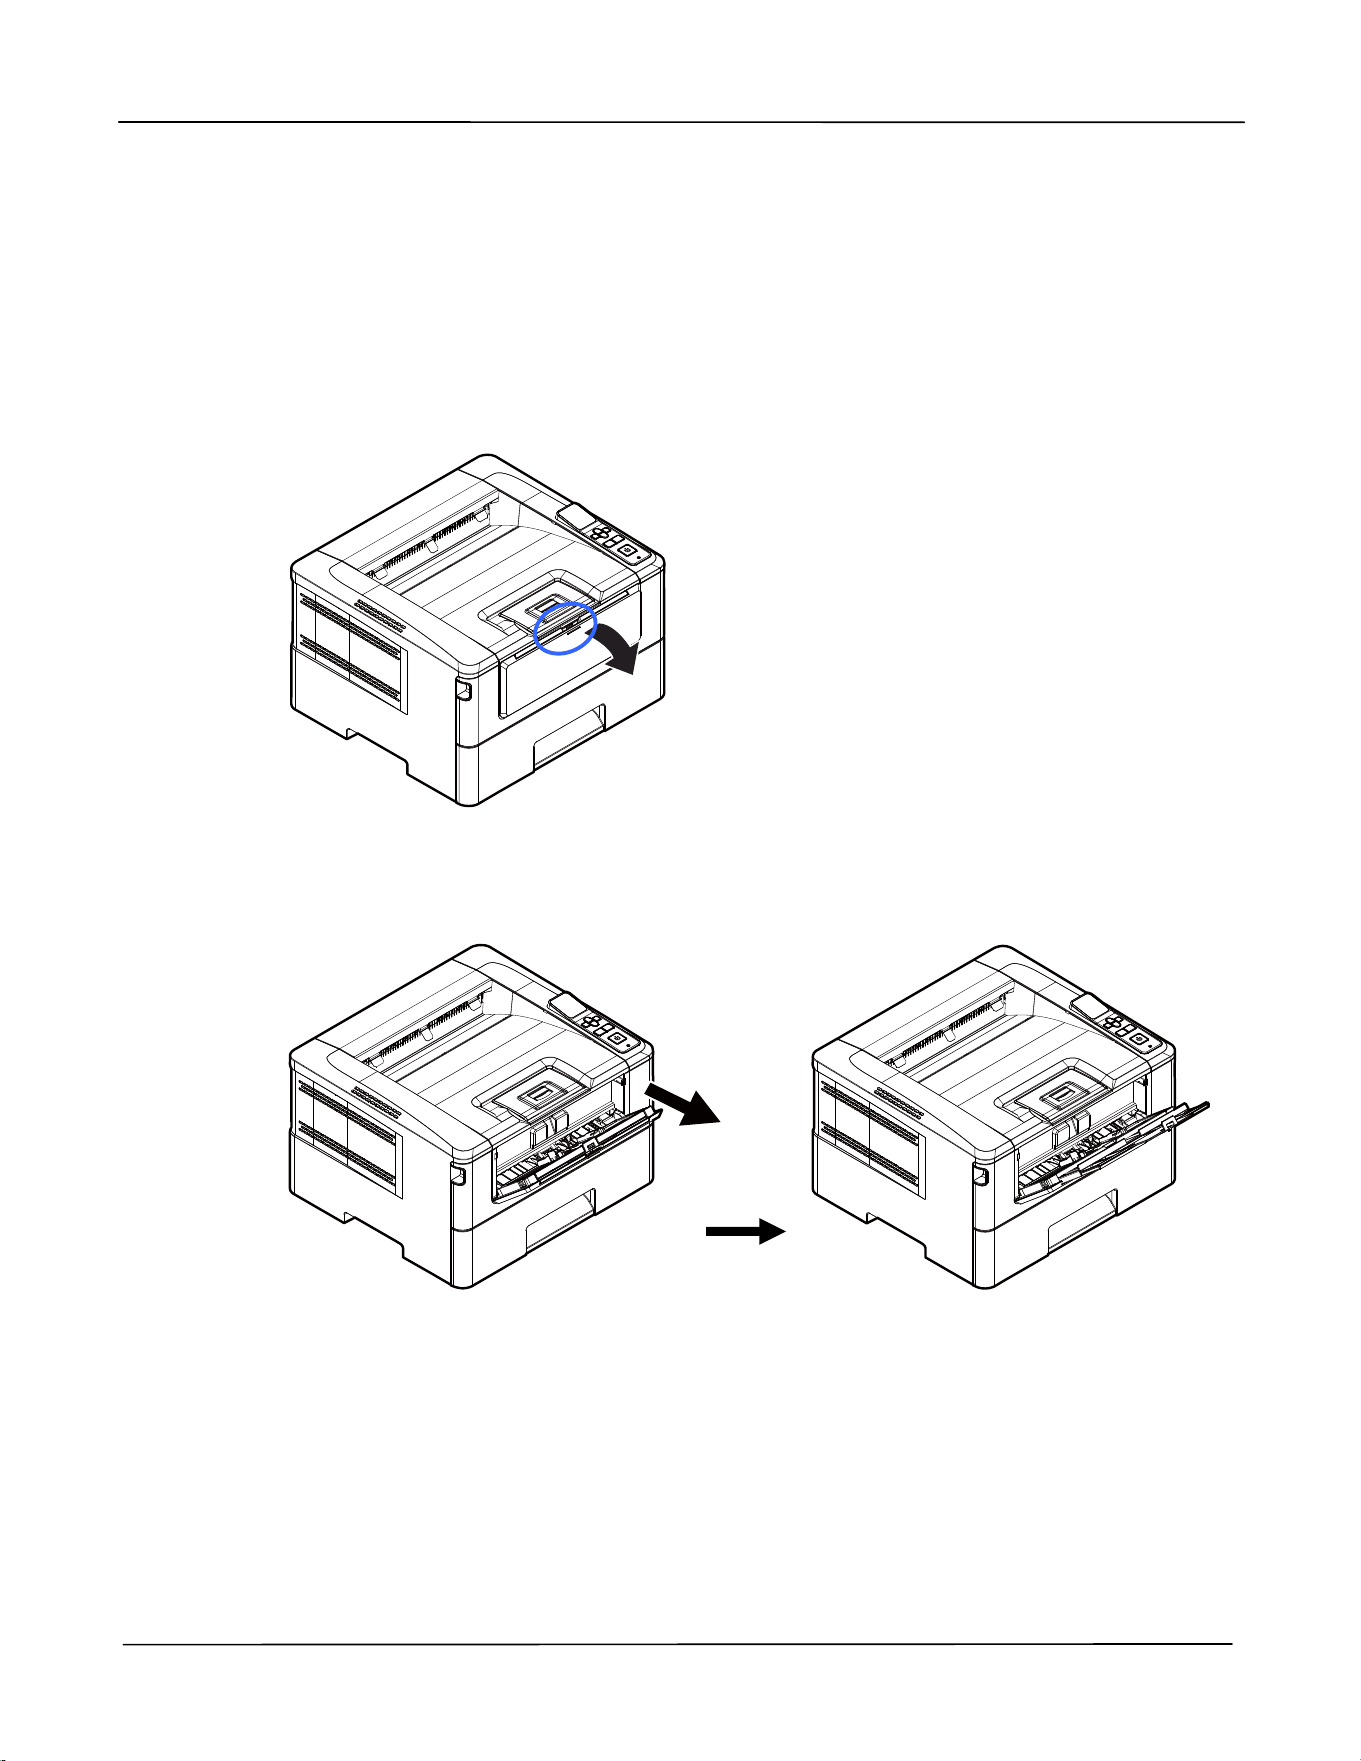
Lift ing Up t he Paper St opper
Gent ly lift the paper stopper and it s ext ension t o collect the paper.
Paper St opper
I nst a llat ion
15
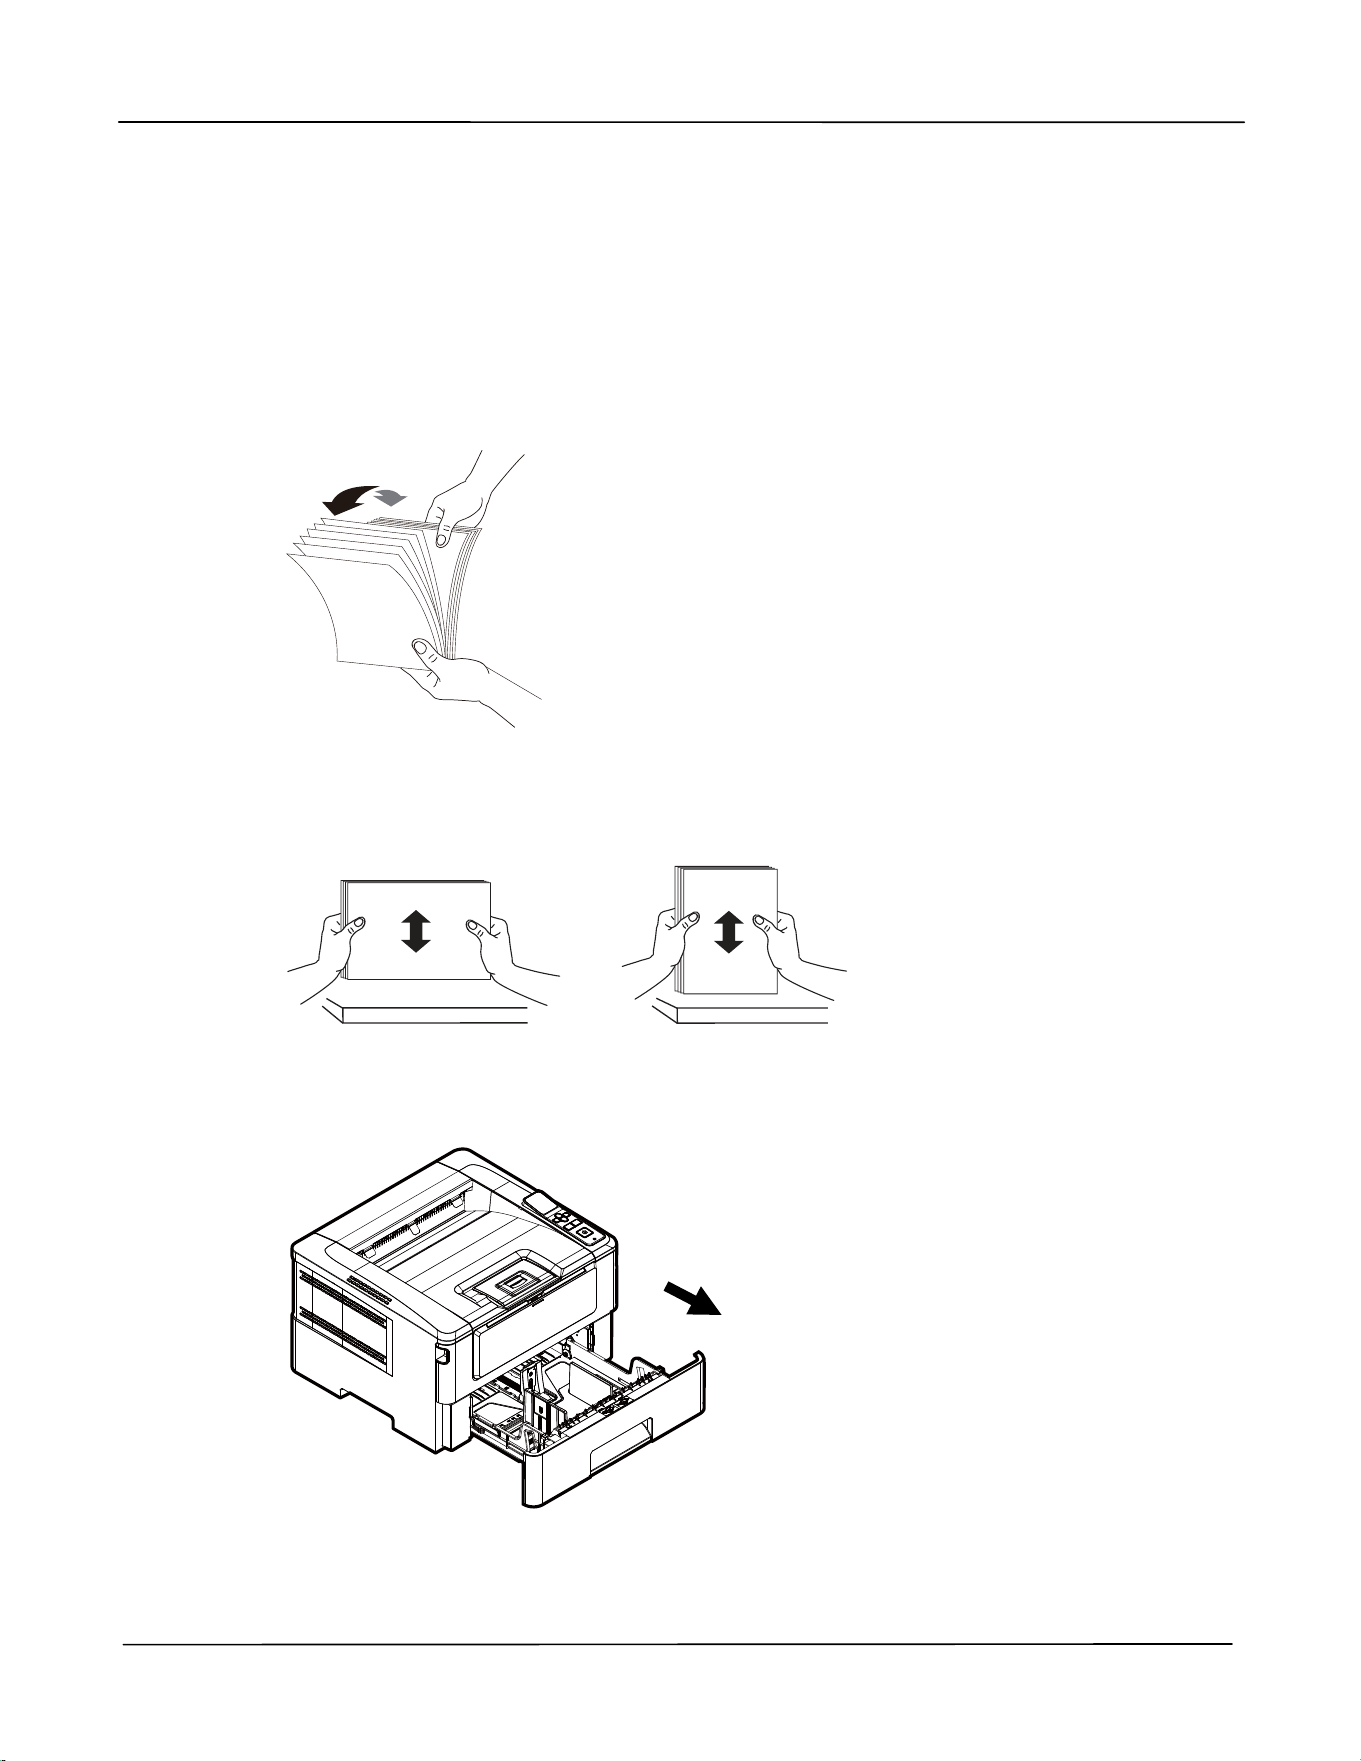
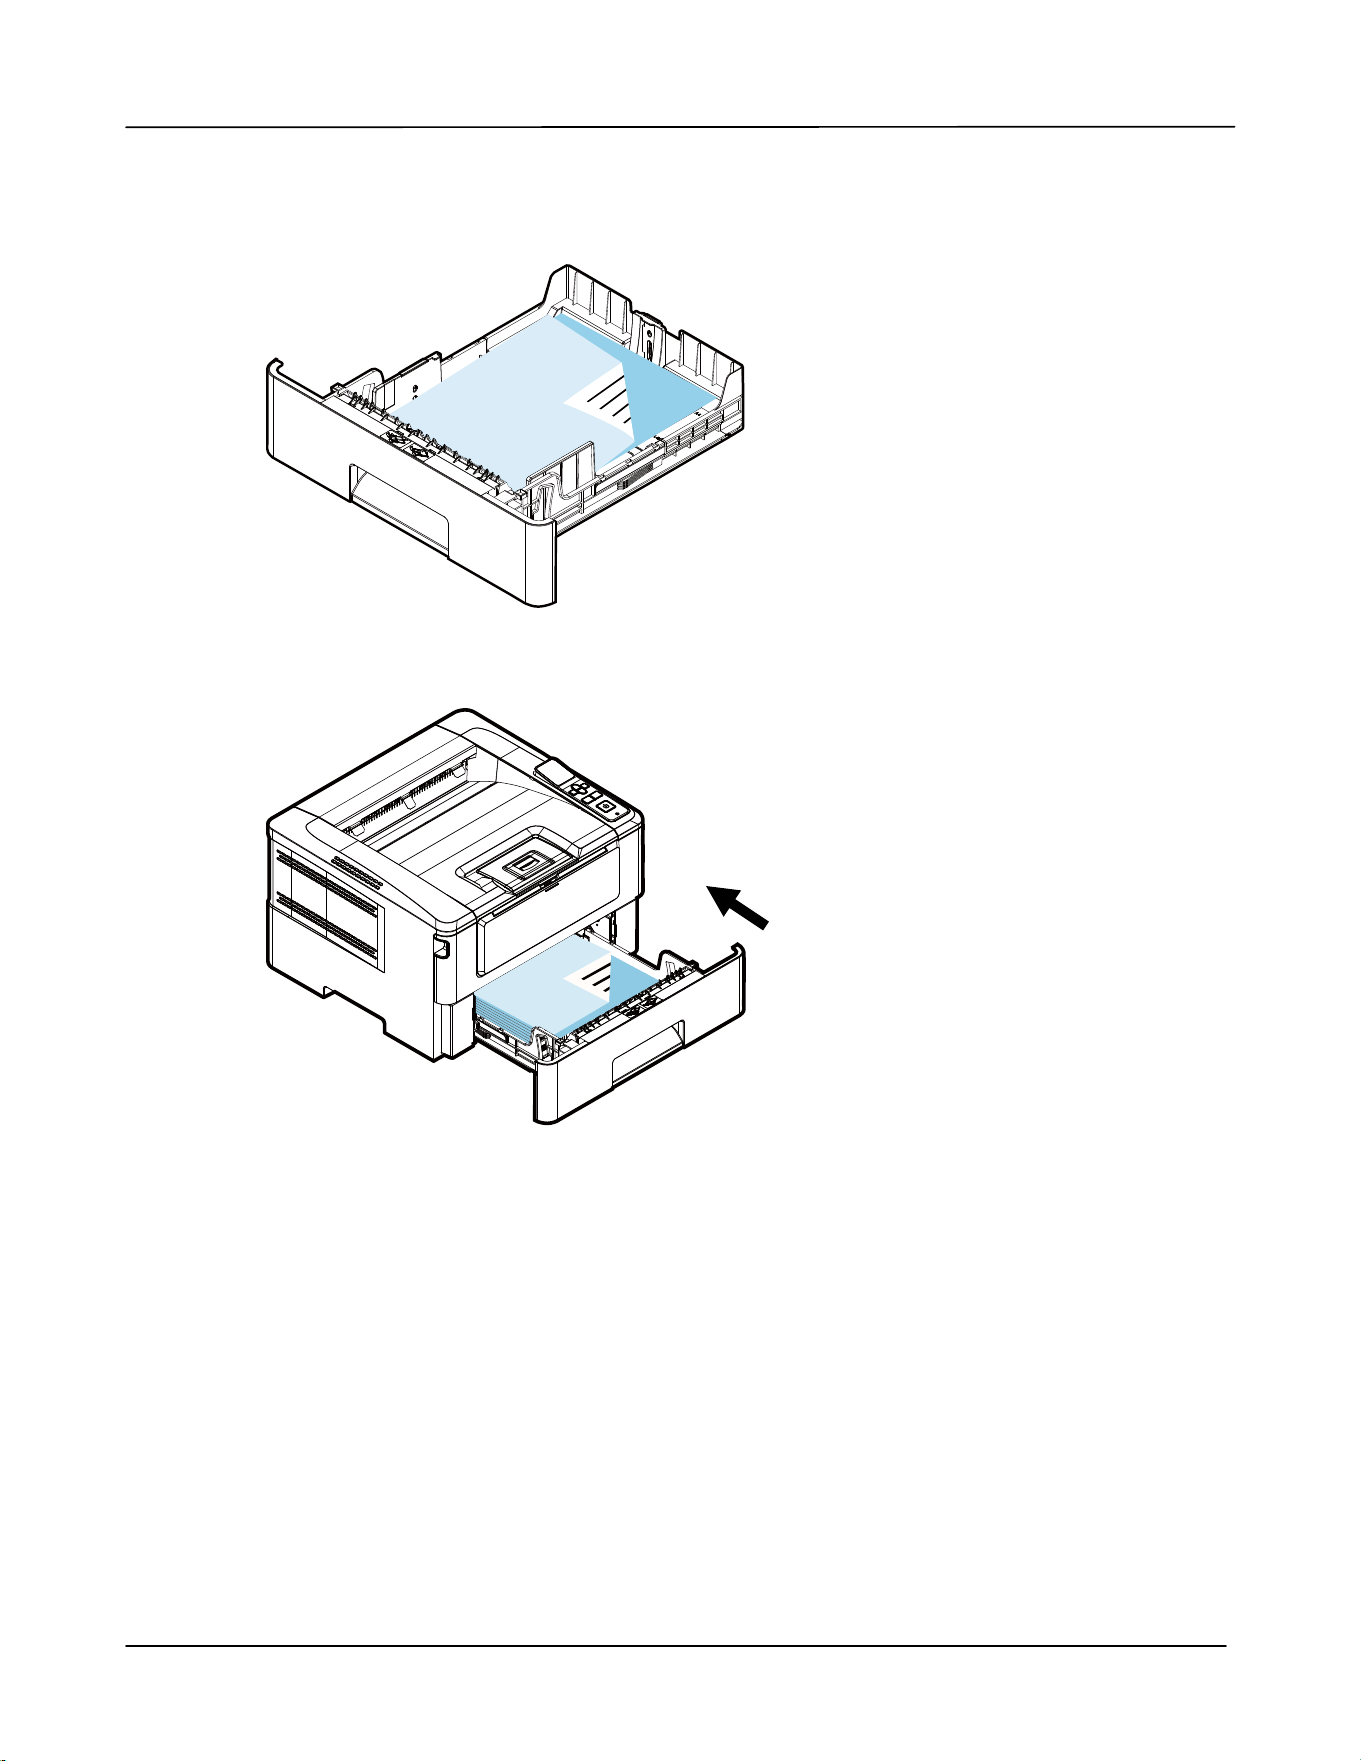
Loading Paper int o The M ain Tray
To insert paper t o t he m ain paper t ray,
1 . Fan your paper first t o ensure t hat t he pages do not stick t ogether.
2 . Align t he edges of t he docum ents by t apping t he bott om of t he st ack against t he
table t op. Rotat e t he st ack 90 degrees and repeat.
3 . Lift t he handle of t he m ain paper t ray and t hen pull out t he m ain t ray.
Use r ’s Guide
16
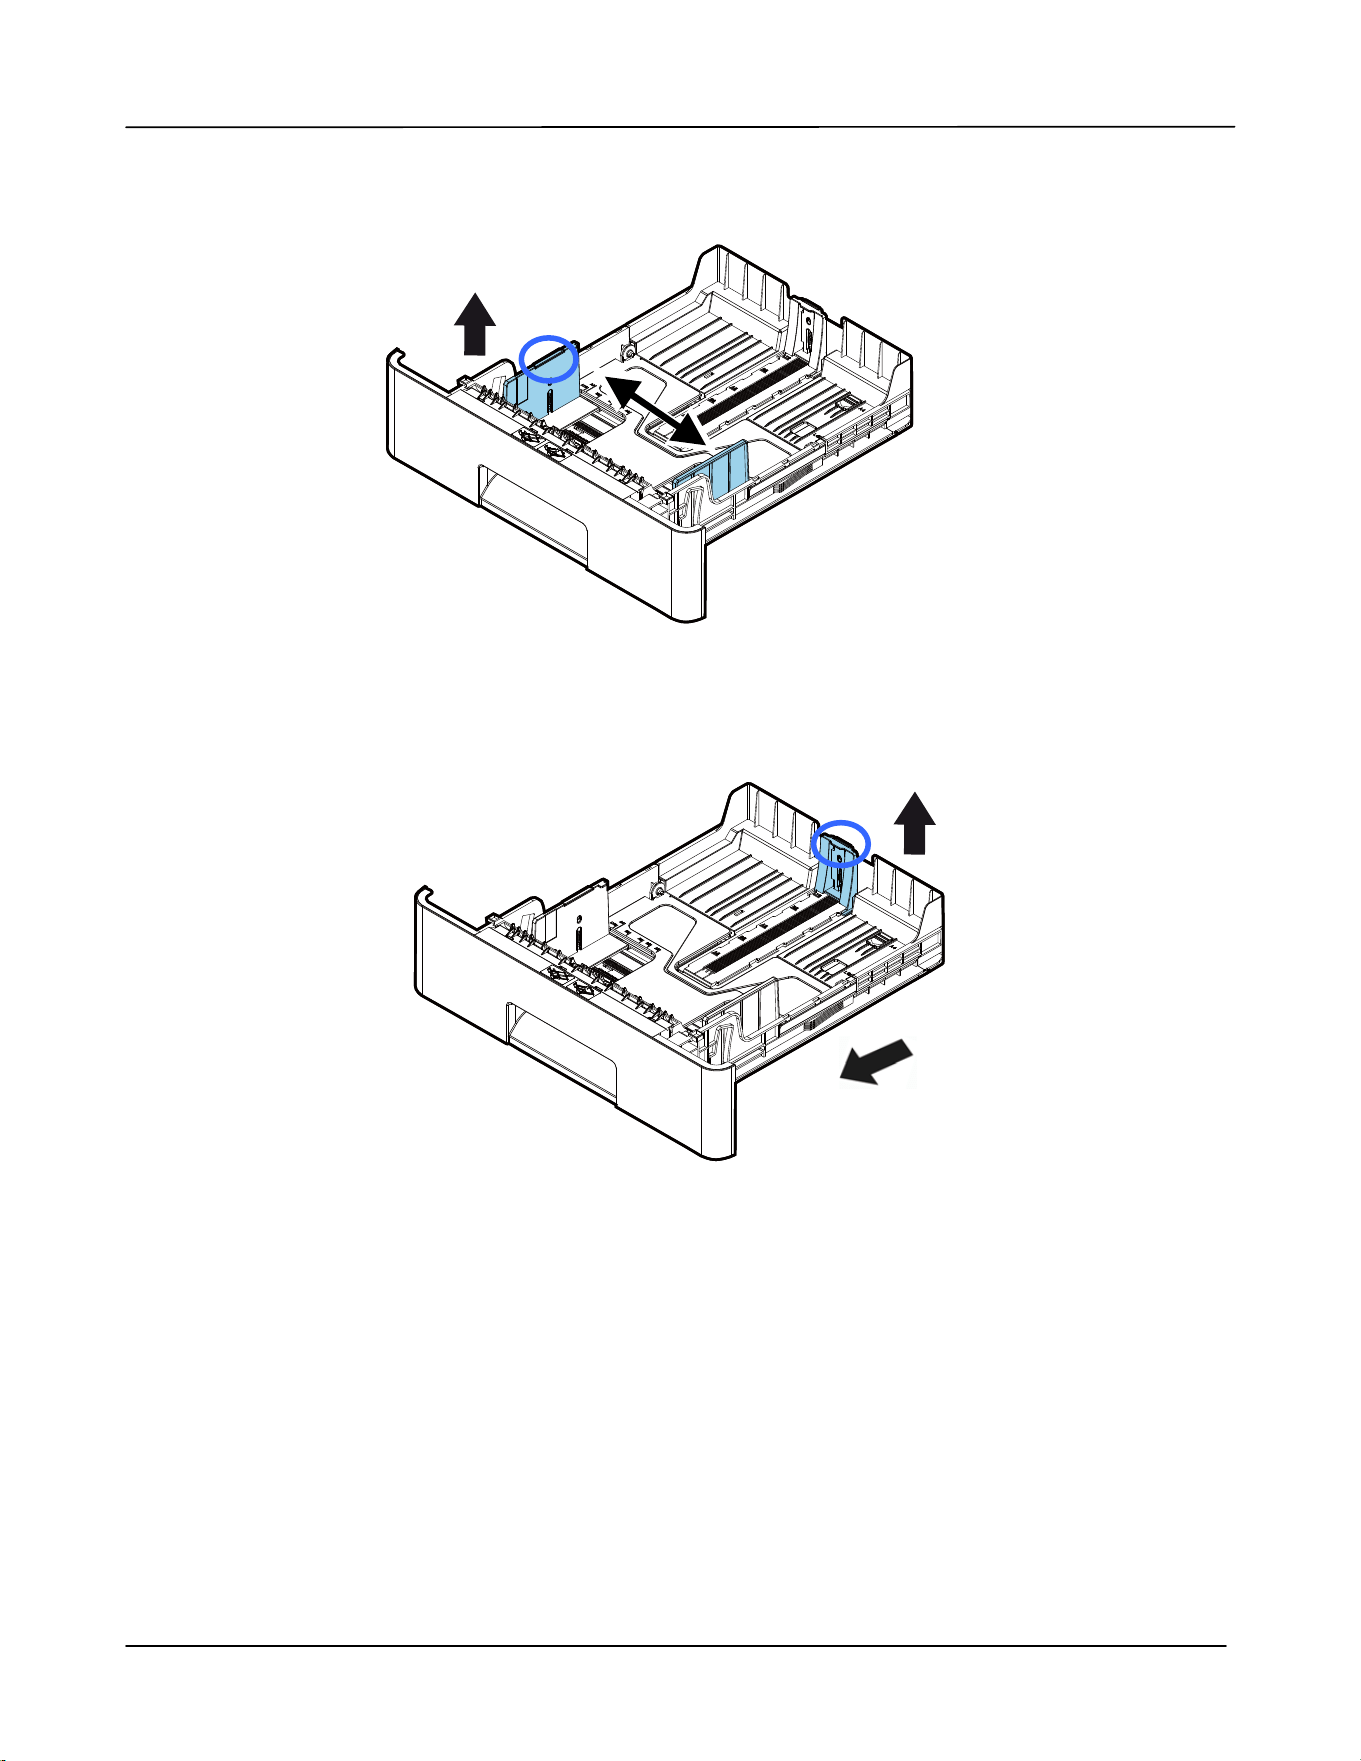
4 . Lift t he cent er of t he widt h guide t ab ( ), and m ove t he widt h guide ( ) to t he
correct position for t he paper size being loaded.
5 . Lift the cent er of t he lengt h guide ( ), and slide t he guide ( ) to the correct
position for t he paper size being loaded.
6 .
I f you want t o load a sheet of paper larger t han t he lengt h of A4, press down t he
lengt h adj ustm ent lat ch (
) , and at the sam e tim e slide t he m anual t ray t o t he left
(
) unt il it reaches the paper size you want .
I nst a llat ion
17
To m ove t he t ray back t o t he original A4 lengt h, press down t he lengt h
adj ustm ent lat ch
(
) , and at t he sam e t im e slide the m anual tray t o the right
(
) .
Use r ’s Guide
18
7 .
Load t he paper stack wit h the Pr int ing Side Fa cing Dow n as illust rat ed.
8 .
I nsert t he t ray t o t he print er.
I nst a llat ion
19
Pa pe r size s a nd w eight s used for M ain pa pe r t ra y
Pa pe r capacit y
550 pages(70 g/ m ² plain paper)
Pa per size A4 ( 210 x 297 m m )
A5 ( 148 x 210 m m )
A6 ( 105 x 148 m m )
B6 ( JI S) ( 125 x 176 m m )
B5 ( JI S) ( 176 x 250 m m )
Lett er ( 216 x 279 m m )
Legal ( 216 x 356 m m )
Custom Size: 76 x 127 m m ~ 216 x 356 m m
Pa per w eigh t 60 ~ 120 g/ m ²
* Duplex print ing is available only for paper in A4, B5 ( JI S), Let t er.
N ot e:
To ensure the best qualit y print ing and copying, please use t he paper or
m edia which we have recom m ended.
Make sure t o fan your paper before loading it t o t he paper t ray.
I f t here are instructions about t he print ing side on the package of your
paper, please follow t he instruct ions t o load your paper properly w it h
the correct print ing side to the paper t ray.
I f t he print ing qualit y is not satisfactory or paper j am s are easily t o
occur, t urn over t he paper stack so t hat t he top page is now on bott om
and t hen reload it t o t he paper t ray.
Pack and seal the rem aining paper with t he original packaging and store
the paper in a dark and dry location away from t he sunshine. Paper
which collect s m uch m oisture is easy t o cause j am during print ing.
Use r ’s Guide
20
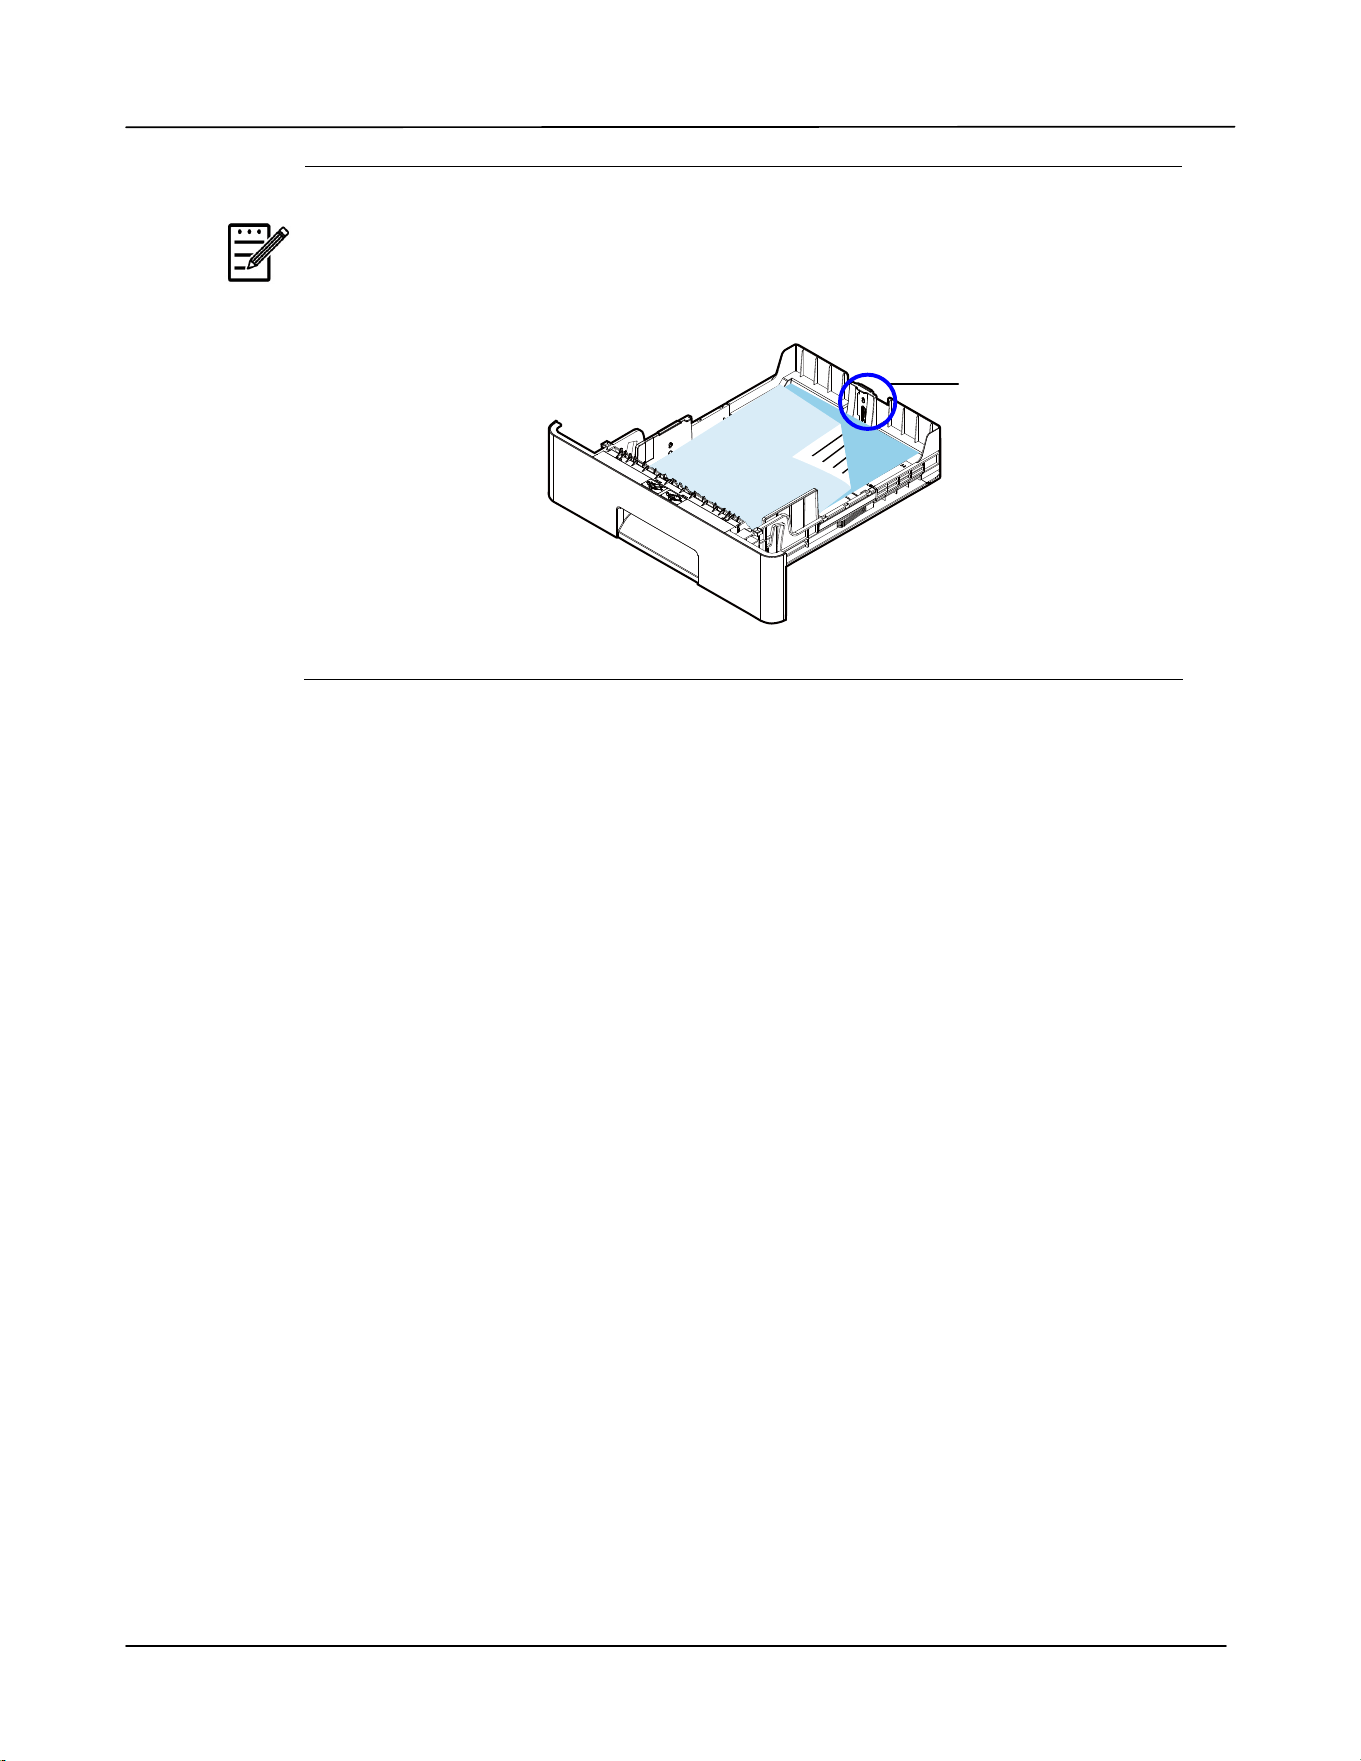
I m port ant :
To avoid t he chance of m iss- fed, m ake sure t he lengt h guide tab and
lengt h slider are installed in t heir proper posit ions.
Make sure t he end of your paper slightly t ouch t he lengt h guide as
indicated in below.
Lengt h
Guide Tab
I nst a llat ion
21
Loading t he M anua l Tray
To insert paper t o t he m anual t ray,
1 . Hold t he handle of t he m anual t ray, and pull it down t o open t he m anual t ray.
2 .
Pull out t he t ray ext ension t o fit your desired paper lengt h.
Use r ’s Guide
22
3 . Fan your paper first t o ensure t hat t he pages do not st ick t ogether.
4 . Align t he edges of t he docum ent s by tapping the bot t om of the st ack against the
table t op. Rotat e t he st ack 90 degrees and repeat.
5 . Load t he paper stack w it h t he print side Facing UP as illusrat ed.
6 . Slide t he paper guides so t hat t hey light ly t ouch t he paper stack.
I nst a llat ion
23
Pa pe r size and w e ight s used for M anua l Tra y
Pa pe r capacit y
10 page(70 g/ m ² plain paper)
Pa per size
A4 ( 210 x 297 m m )
A6 ( 105 x 148 m m )
A5 ( 148 x 210 m m )
B6 ( JI S) ( 125 x 176 m m )
B5 ( JI S) ( 176 x 250 m m )
Lett er ( 216 x 279 m m )
Legal ( 216 x 356 m m )
Custom Size: 76 x 127 m m ~ 216 x 356 m m
Pa per w eigh t
60 ~ 163 g/ m ²
* Duplex print ing is available only for paper in A4, B5 ( JI S), Let t er.
N ot e:
To ensure the best qualit y print ing and copying, please use t he paper or
m edia which we have recom m ended.
Make sure t o fan your paper before loading it t o t he paper t ray.
I f t here are instructions about t he print ing side on the package of your
paper, please follow t he instruct ions t o load your paper properly w it h
the correct print ing side to the paper t ray.
I f t he print ing qualit y is not satisfactory or paper j am s are easily t o
occur, t urn over t he paper stack so t hat t he top page is now on bott om
and t hen reload it t o t he paper t ray.
Pack and seal the rem aining paper with t he original packaging and store
the paper in a dark and dry location away from t he sunshine. Paper
which collect s m uch m oisture is easy t o cause j am during print ing.
Use r ’s Guide
24
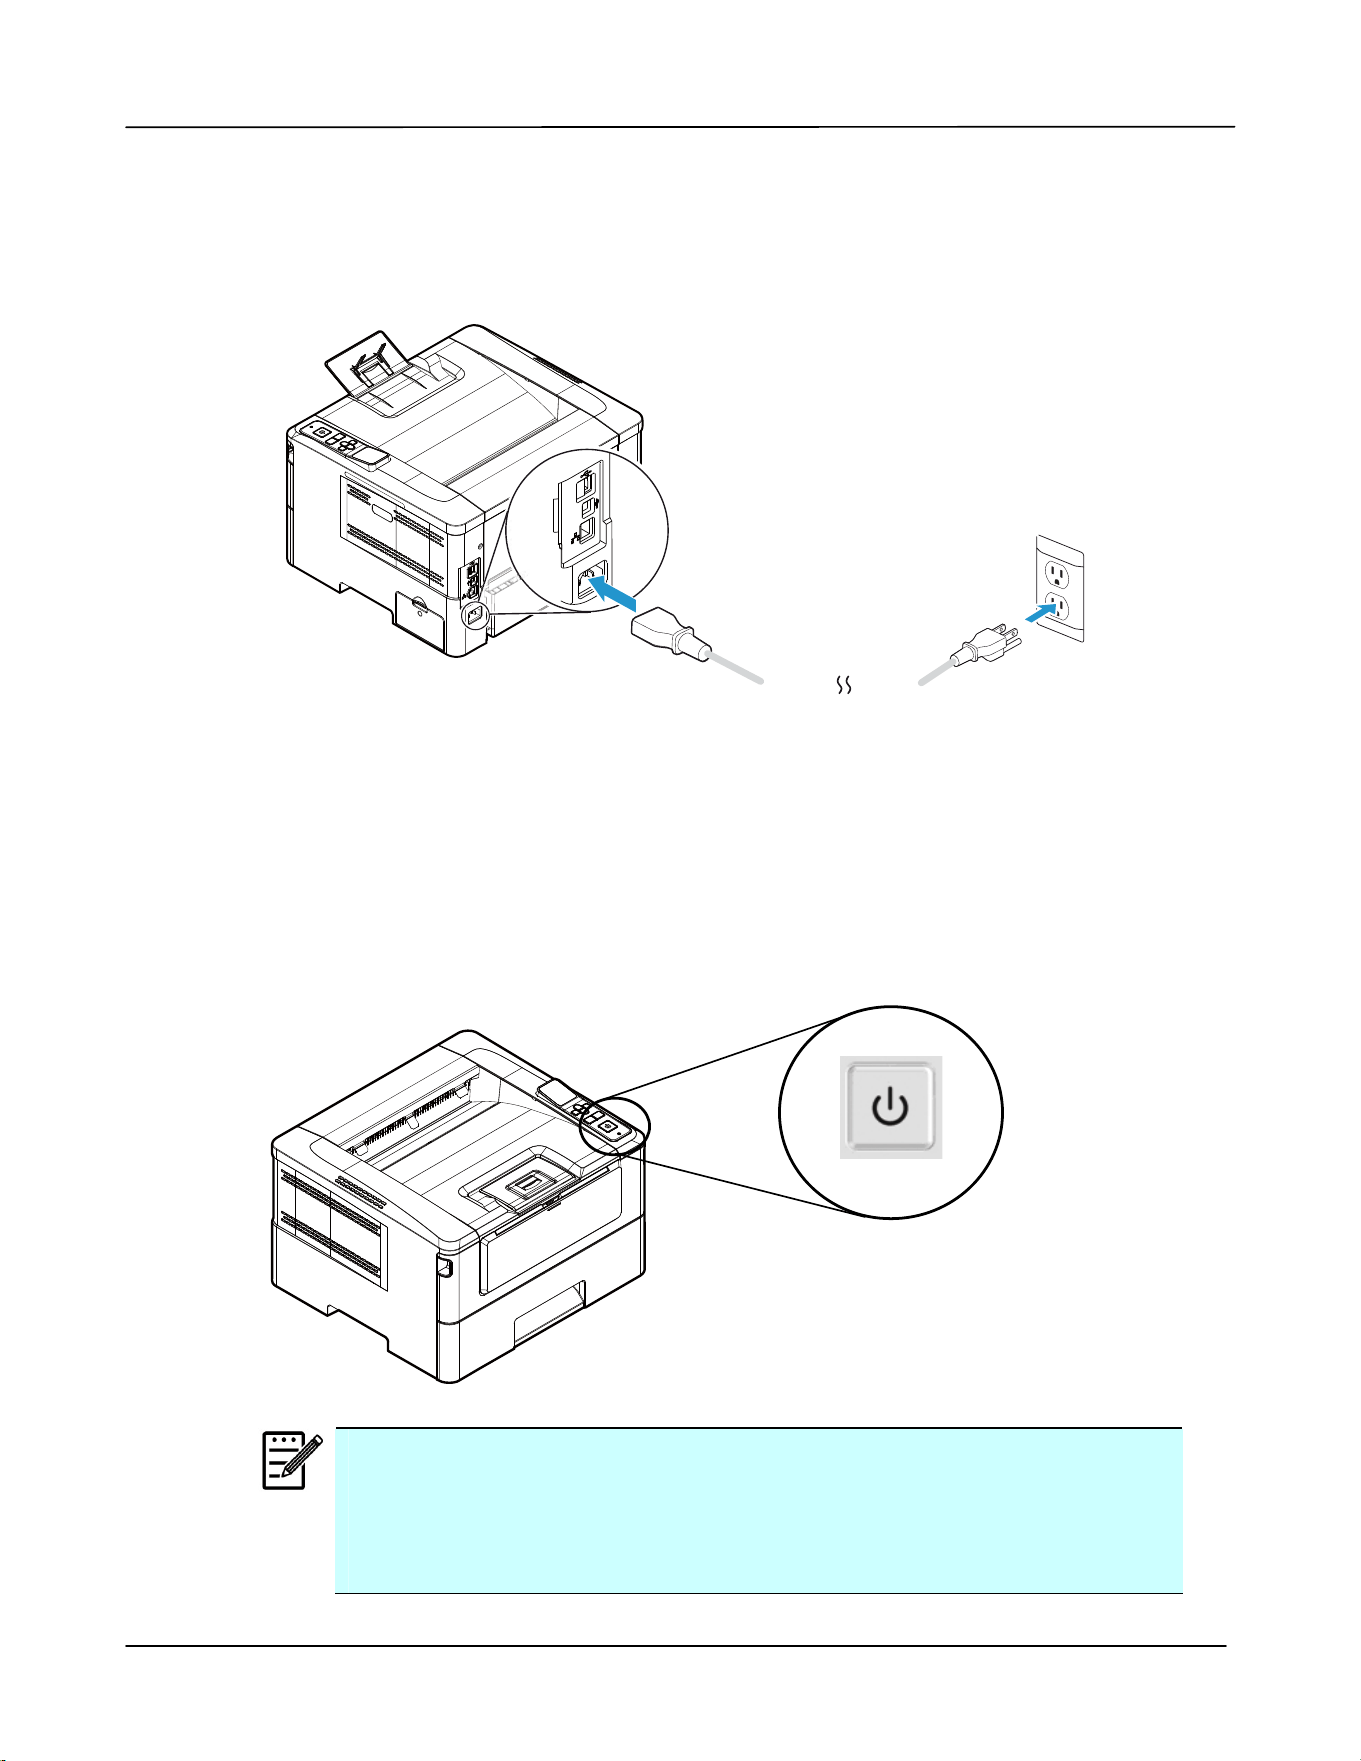
Connect ing t o Pow er
1 . Connect t he of t he power cable t o t he power j ack of your product.
2 . Connect t he ot her end t o an appropriat e power out let .
Turning On The Print er
To t urn on the PRI NTER, press t he power but ton located on t he cont rol panel. Ready
LED will be lit .
N ot e:
When the product is not in use, please long press the power butt on for 5
seconds until t he Ready LED is t urned off t o get a zero power
consum pt ion stat e.
I nst a llat ion
25
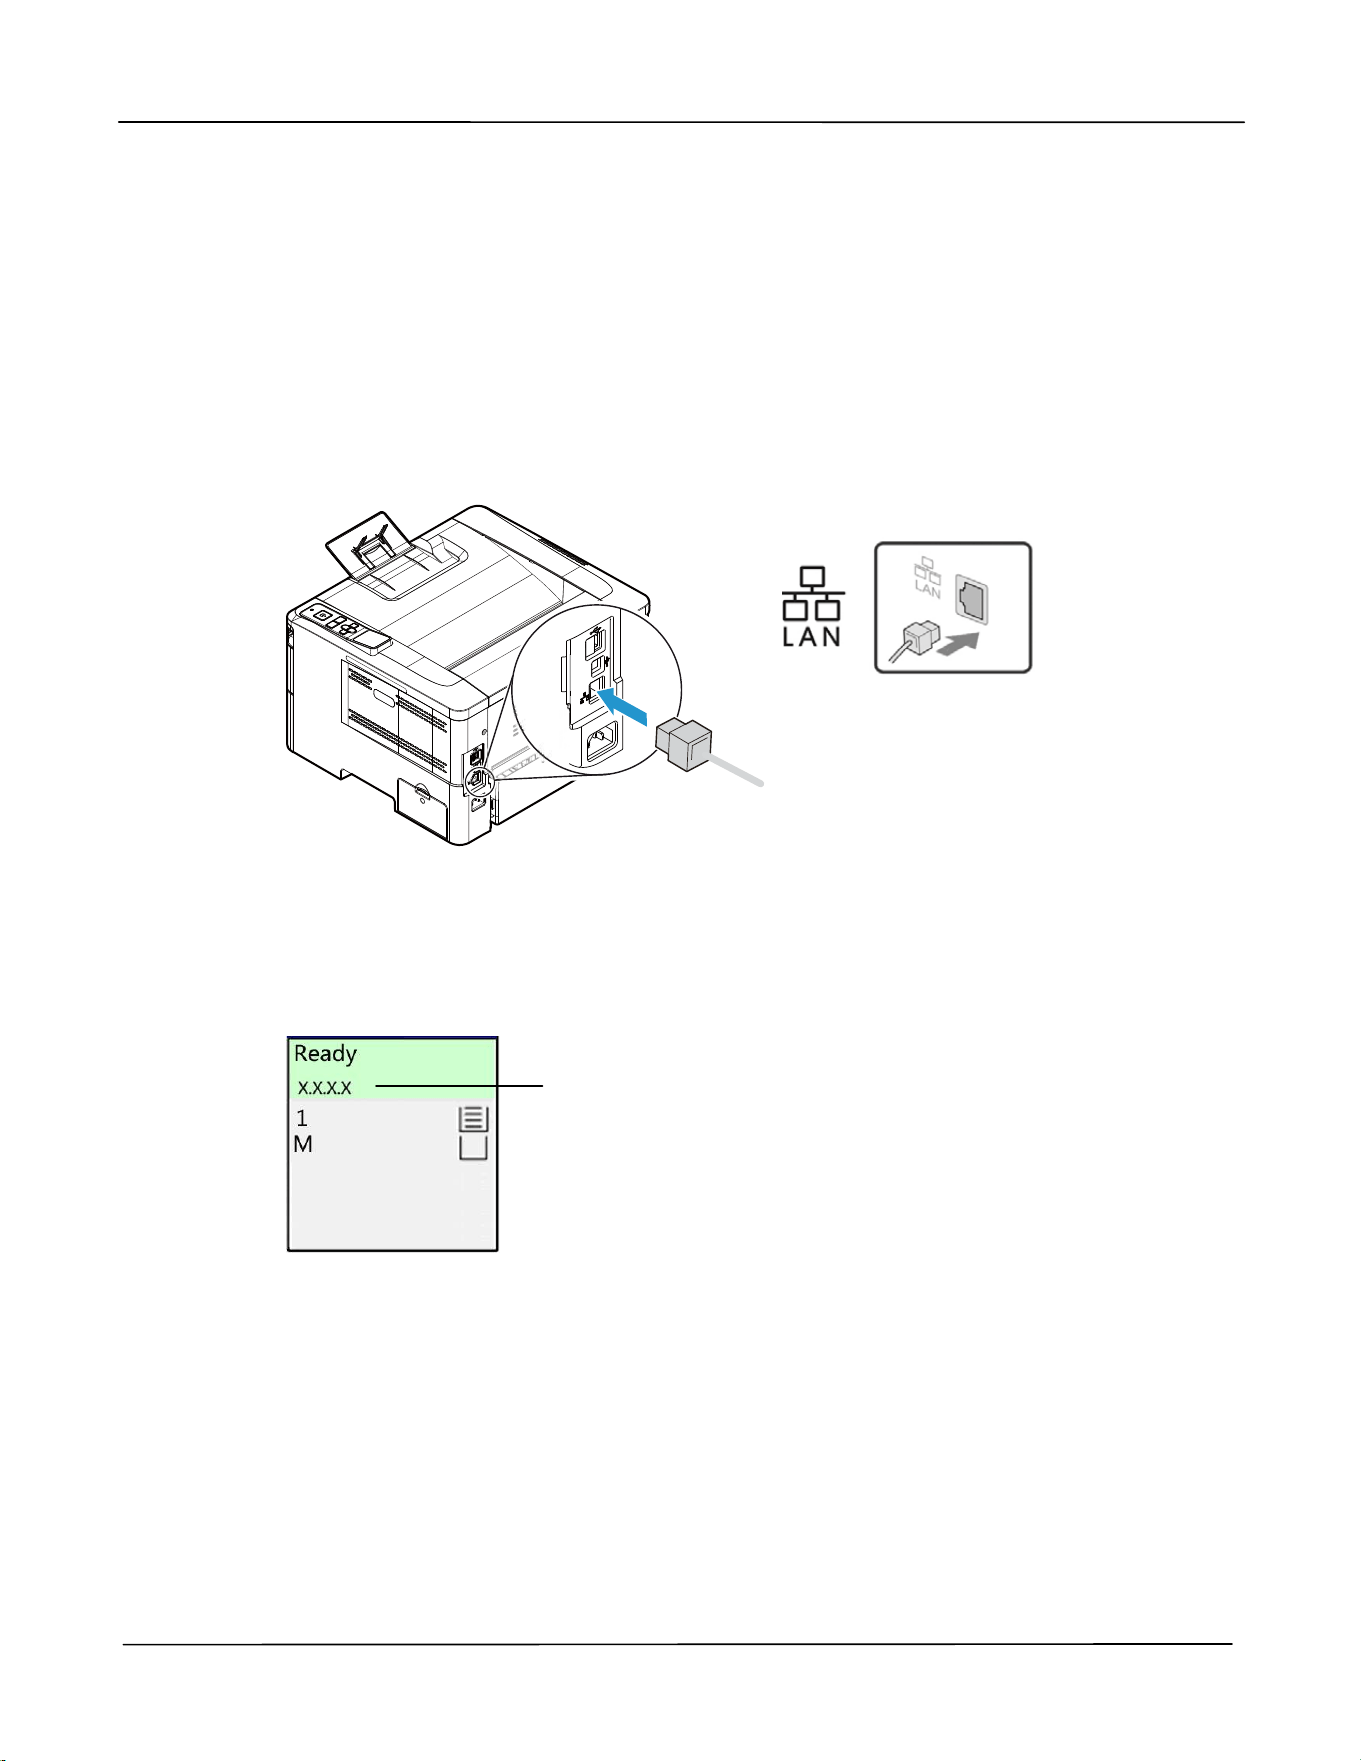
Connect ing t o t he N et w ork
Connect t he PRI NTER t o t he network t o use t he net work printing funct ion.
1 . Connect one end of your net work cable to an available port of your Ethernet Hub.
2 . Connect the ot her end t o t he LAN port at t he back of t he product as shown.
Aft er t he network cable is connected and t he I P address is successfully obt ained
from the DHCP server, t he LCD screen w ill display t he I P address, as shown in
below.
I P Address

Use r ’s Guide
26
Set t ing t he Product ’s Dat e a nd Tim e
When using t his product for t he first t im e, t he LCD screen will display t he set t ing of
[ Date and Tim e] aft er t urning on the product. Please follow the steps below t o
com plet e t he setting of the dat e and tim e of t his product. Otherw ise t he product
cannot be operat ed.
1. Ent er t he current dat e. For exam ple: input t he current dat e as [ 2015- 01- 01]
( year- m onth- day) , use t he left and right keys t o m ove the cursor to t he position
you need t o ent er, and t hen press t he Up and Down keys t o increase or decrease
t he num ber, and finally press "OK" t o save t he sett ing.
2 . I f t he form at is correct, t he screen will display [ Se t t ing OK] .
3 . Press the Down key t o scroll down t o t he tim e set t ing. Ent er t he current t im e as
[ 08: 25] ( hour: m inut e). Use t he left and right keys to m ove t he cursor t o t he
position you need t o ent er. Then press t he Up and Down keys to increase or
decrease t he num ber. Finally press the "OK" key t o save t he set t ings.
4.
I f t he form at is correct, t he screen will display [ Se t t ing OK] .
Da te
2 0 1 5 - 0 1 - 0 1
Date
2 0 2 2 - 0 4 - 0 4
Set t ing OK
Time
0 0 :0 0
Tim e
1 4 :0 4
Set t ing OK
I nst a llat ion
27
I nst alling t he Dr iver ( W indow s)
Syst e m Requ ir em e nt
Windows 7, Windows 8, Windows 10, Windows 11
For USB I nt erfa ce Use rs
Please follow t hese st eps to install the PRI NTER driver if t his m achine is connected t o
your com puter via a USB cable. * You m ay also download t he driver and m anual at
www.avision.com / download.
I m port ant !
DO NOT connect t he USB cable before installing t he PRI NTER’s driver.
You m ay also download the driver and m anual at our web site
www.avision.com / download.
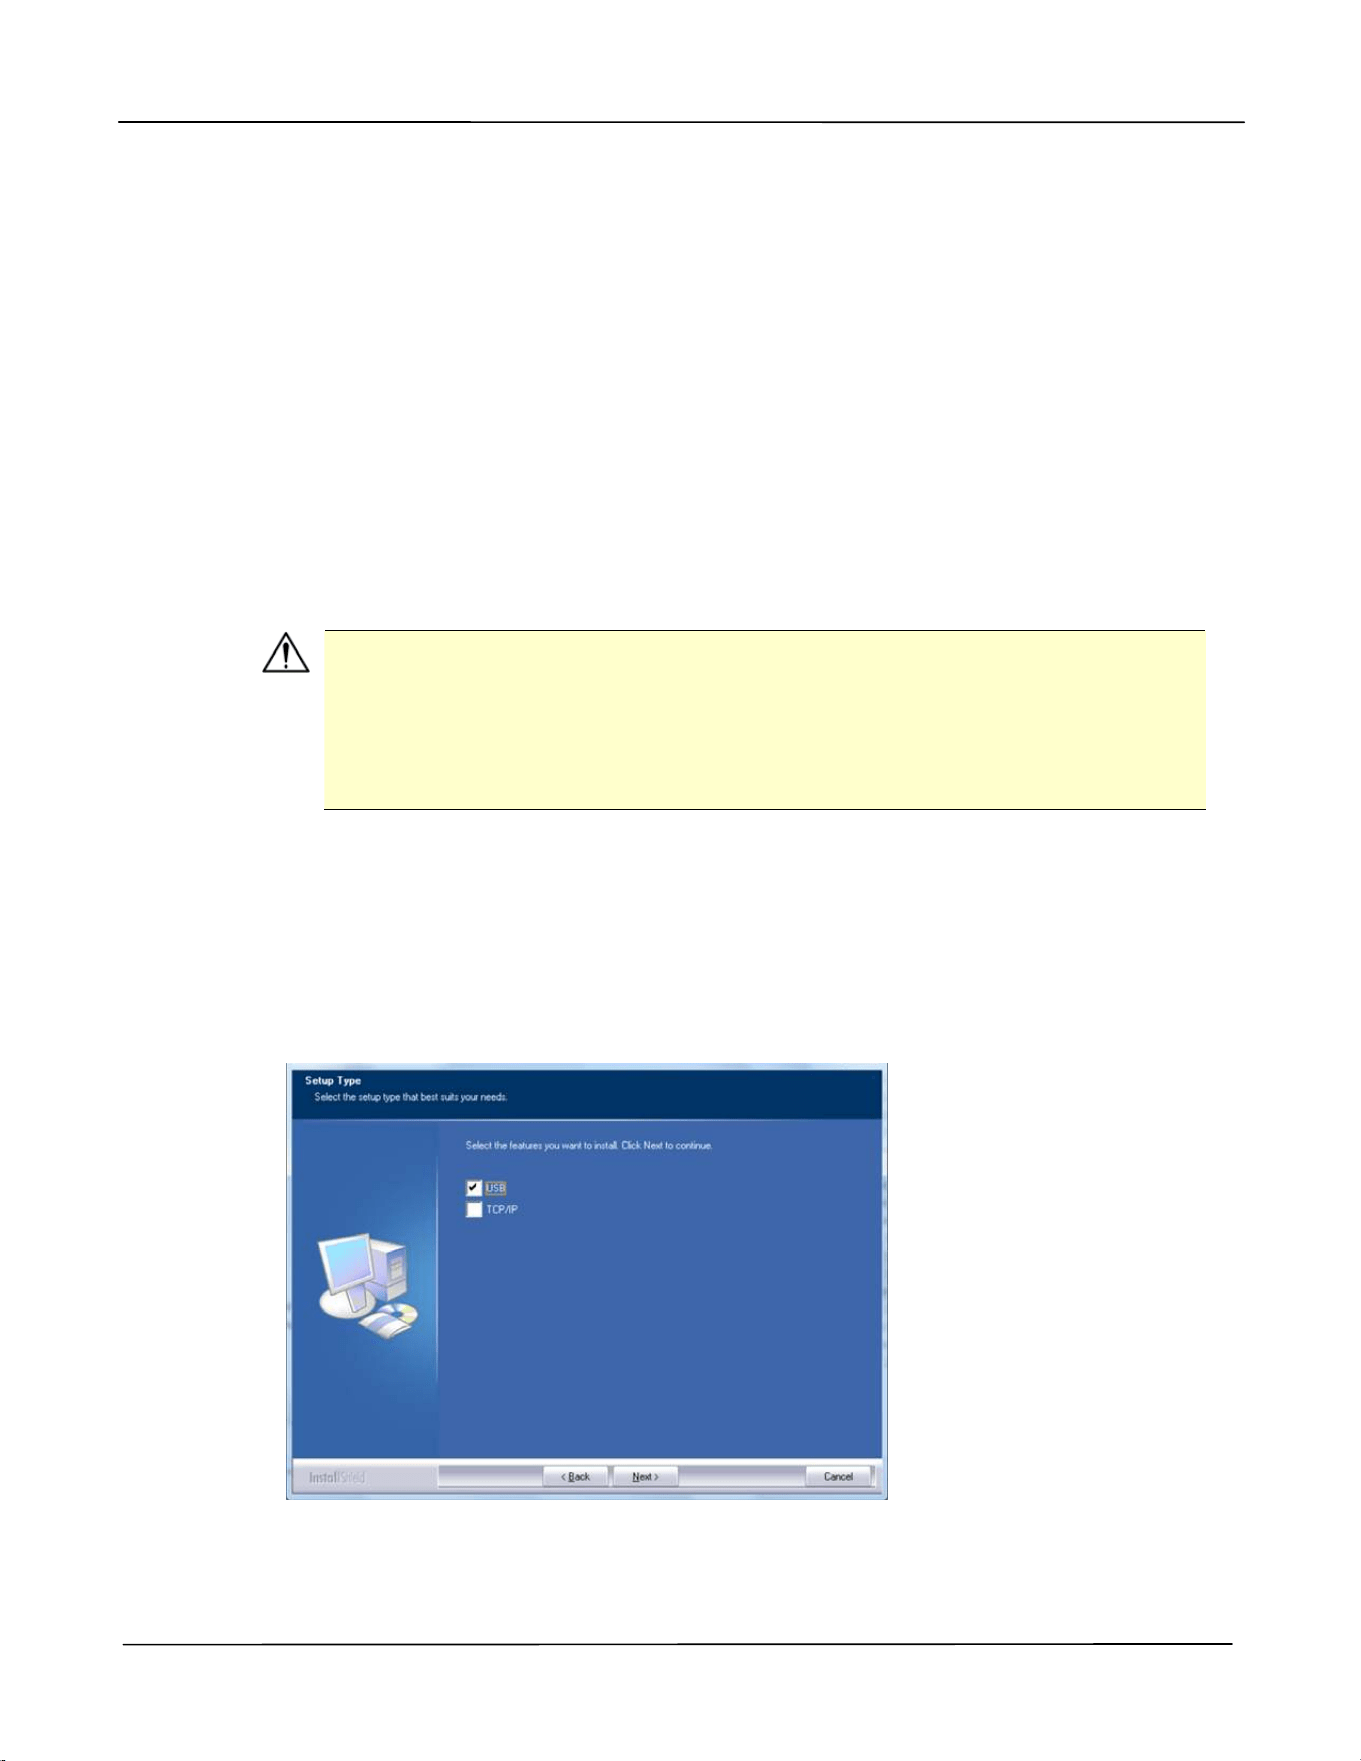
1 . I nsert t he supplied CD int o your CD- ROM drive. The installat ion m enu appears, as
shown below.
2 . Click “I nst a ll Dr ive r ” and follow the on- screen instructions t o install t he program .
3 . When t he Set up Type dialog box appears, select USB.
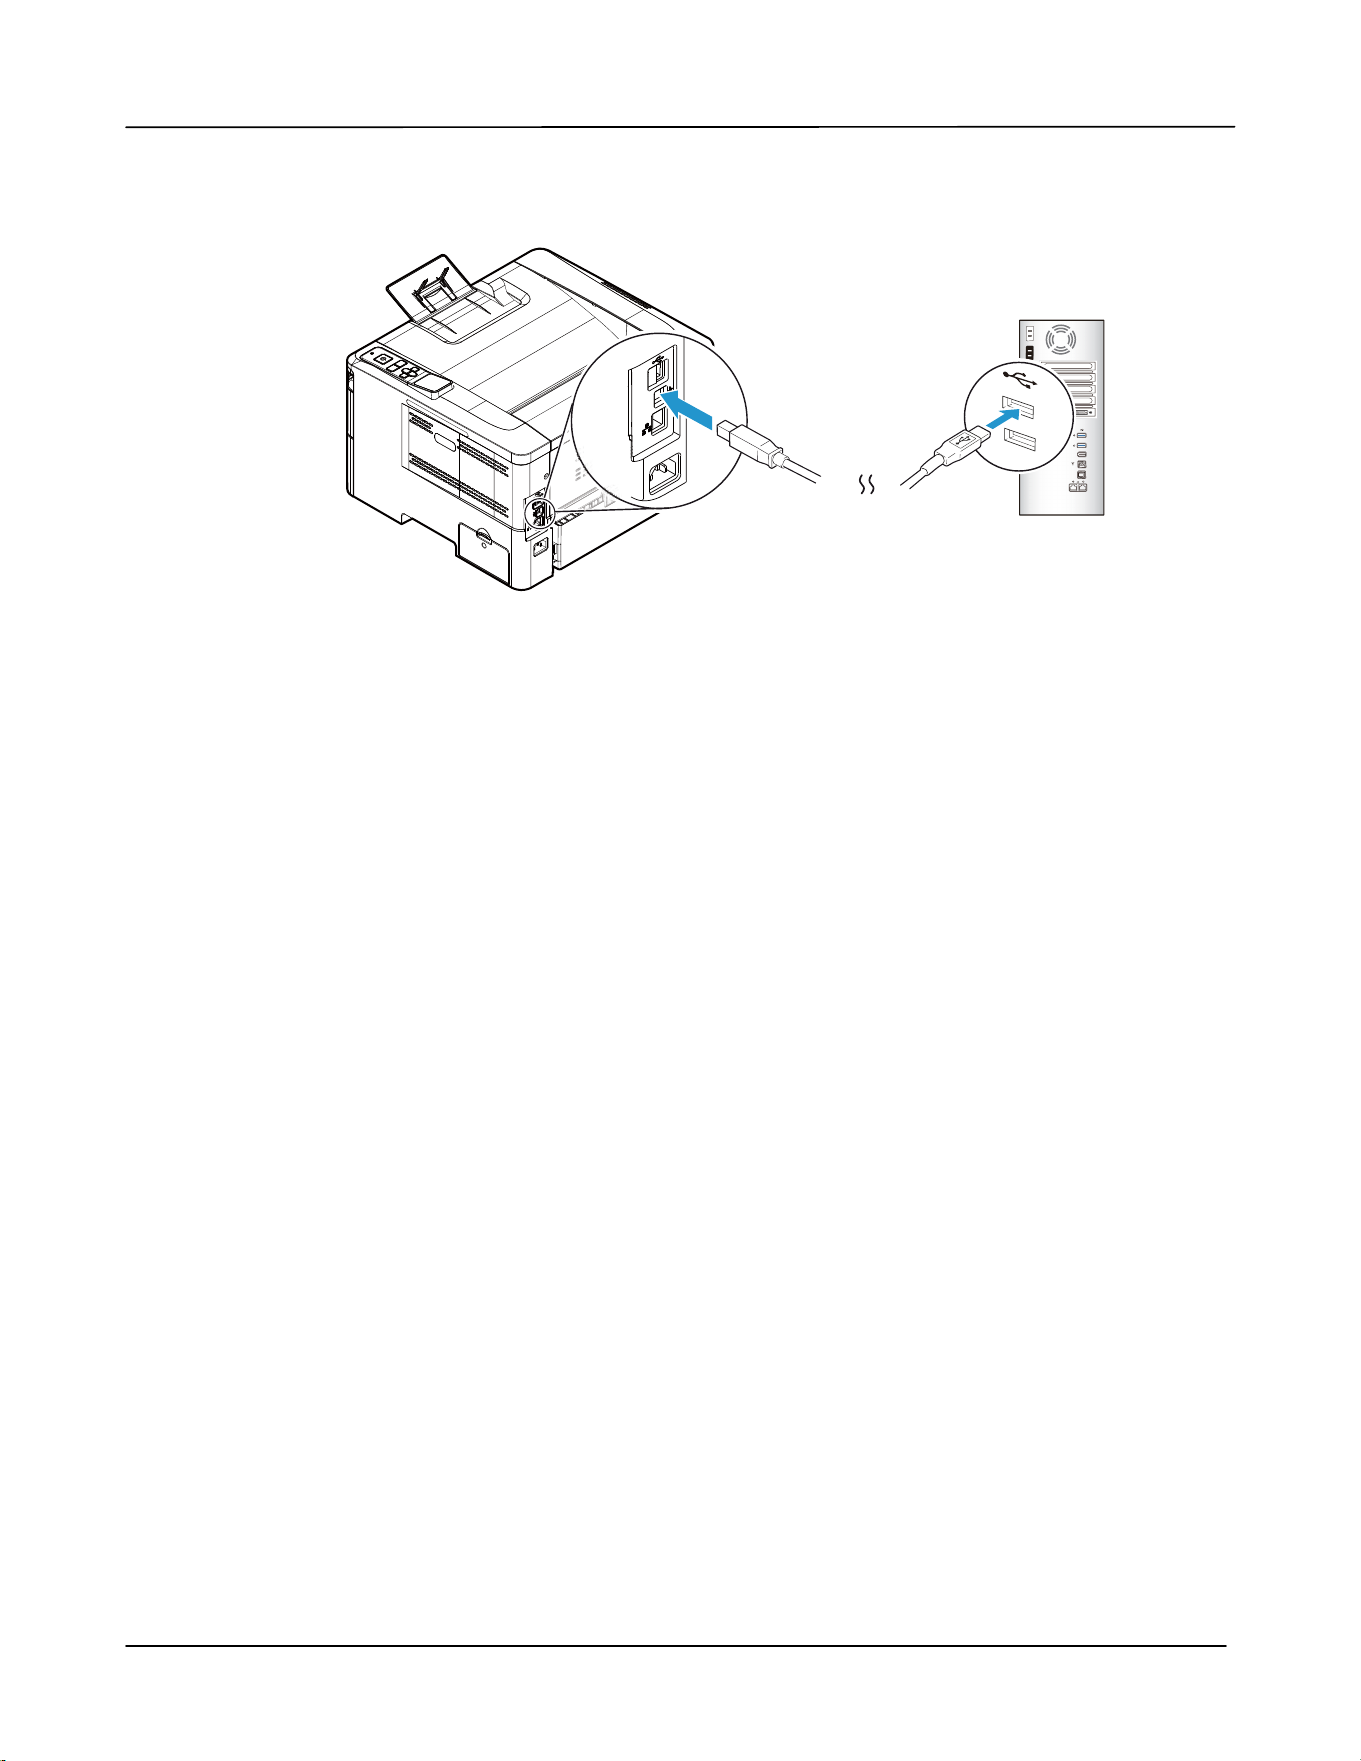
4 . During installat ion, t he USB Connection dialog box will be prom pt ed t o inst ruct you
to connect t he m achine t o your com put er w it h a USB cable.
Use r ’s Guide
28
a. Connect one end of t he USB cable t o your com put er.
b. Connect t he ot her end t o t he USB port of your product.
5 . When the “ Found New Hardware” screen appears, click N e x t and follow t he
on- screen instruct ion to com plet e t he installat ion.
6 . When t he Finish dialog box appears, click Finish t o com plete.
I f you have successfully installed the driver, you will find “ Avision AP4XXX Print er” has
been added in t he “ Print ers and Faxes” opt ion from t he Control Panel.
Uninst allin g t he Print e r Driver
1 . Make sure your USB cable is connect ed to your product.
2 . From t he “ Start ” m enu, select All Program s> Avision AP4XXX Print er> Uninstall
Driver in succession t o rem ove the driver.
I nst a llat ion
29
For N et w ork I nt e r face Users
Please follow t hese st eps to install the scanner, print er drivers if t his m achine is
connected t o your com put er via a net work. You m ay also download the driver and
m anual at our web site www.avision.com .
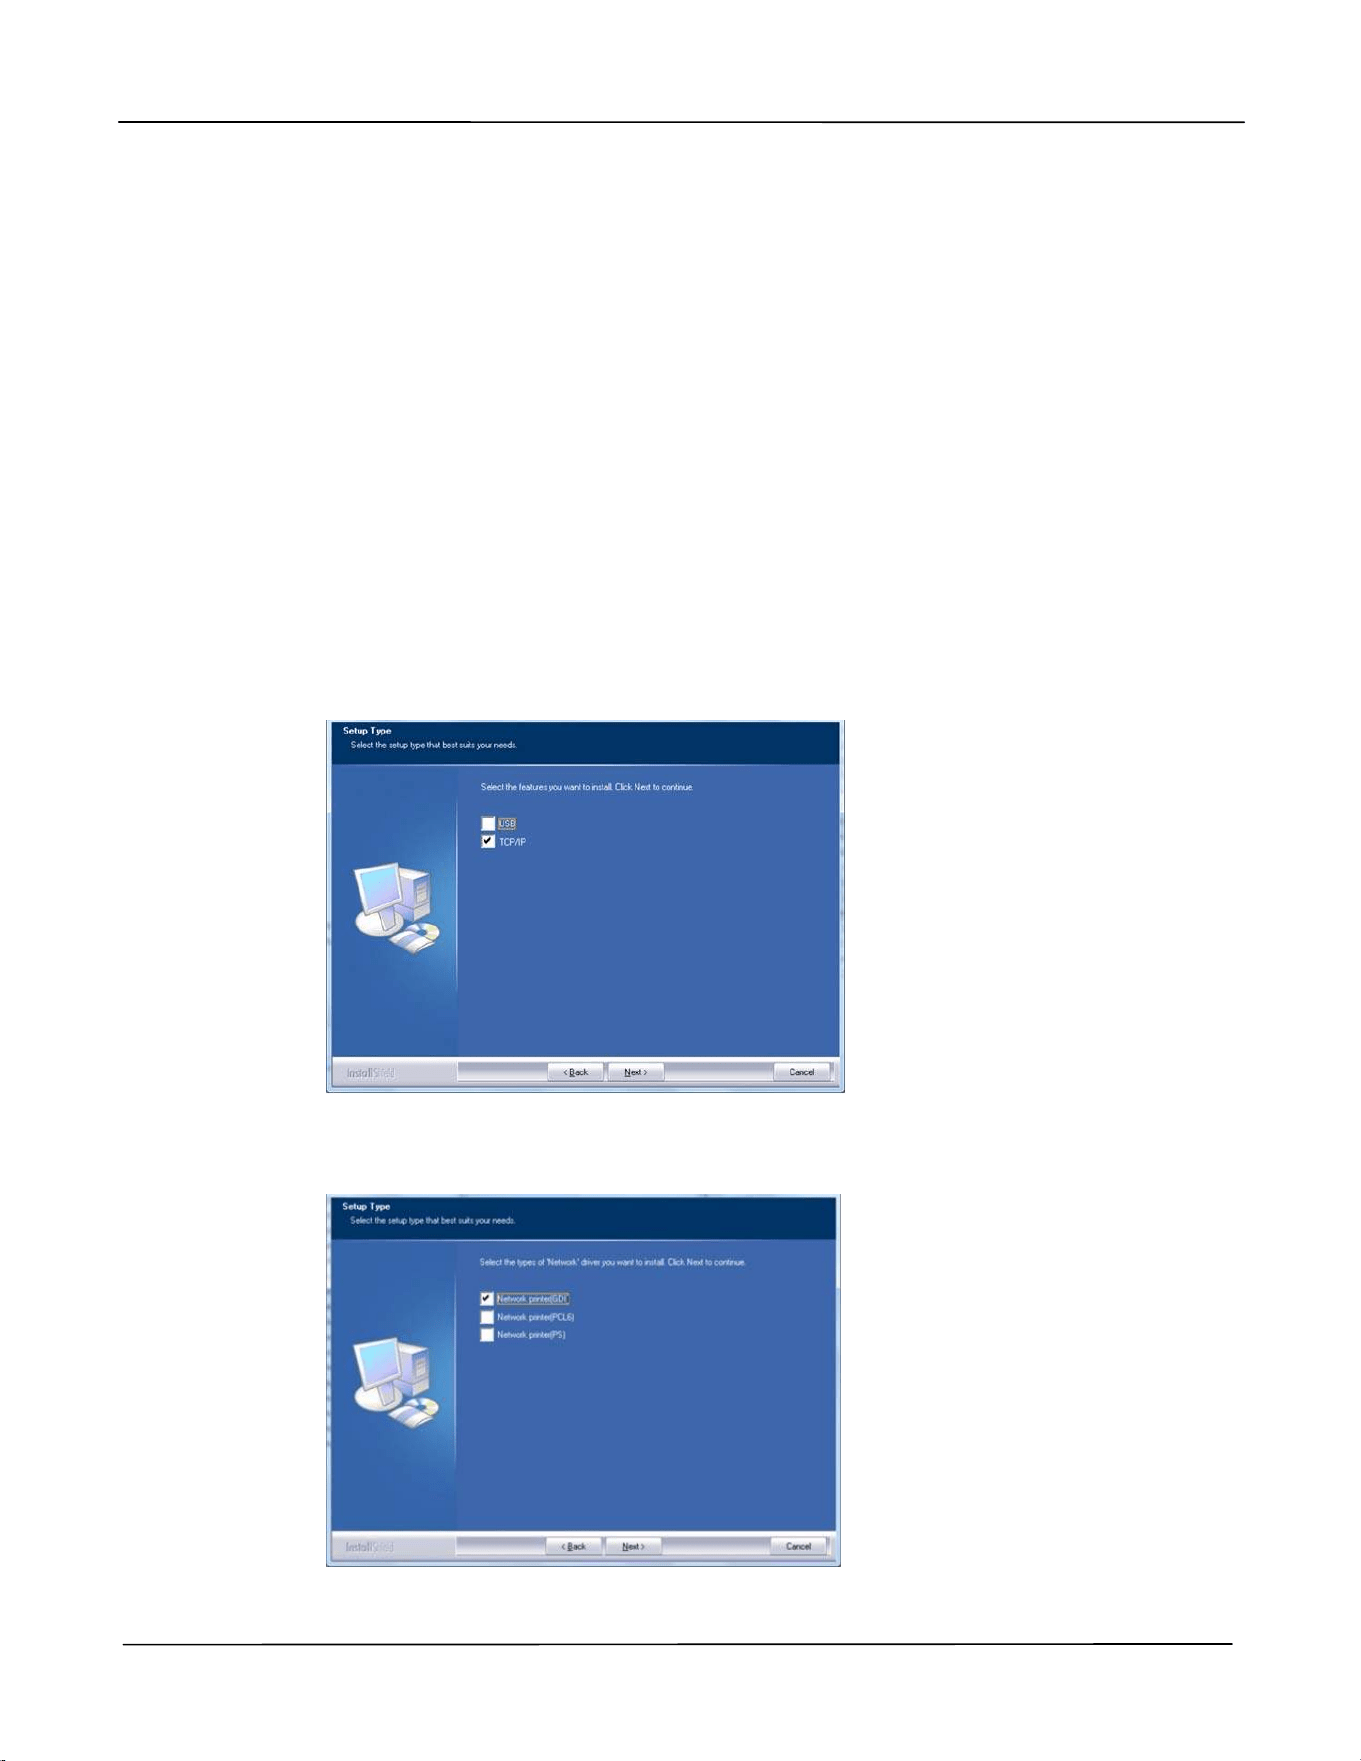
1 . I nsert t he supplied CD int o y our CD-ROM drive. The installat ion m enu wil be
displayed.
2 . To install t he scanner driver and PRI NTER driver:
Click
「I nst all D river」and follow t he on- screen inst ructions t o com plet e t he
installat ion of t he program .
3 . When t he Set up Type dialog box appears, check [ TCP/ I P] and click [ N e xt ] t o
cont inue.
4 . Select your desired printer language. ( For m odel AP4XXX6 only)
Use r ’s Guide
30
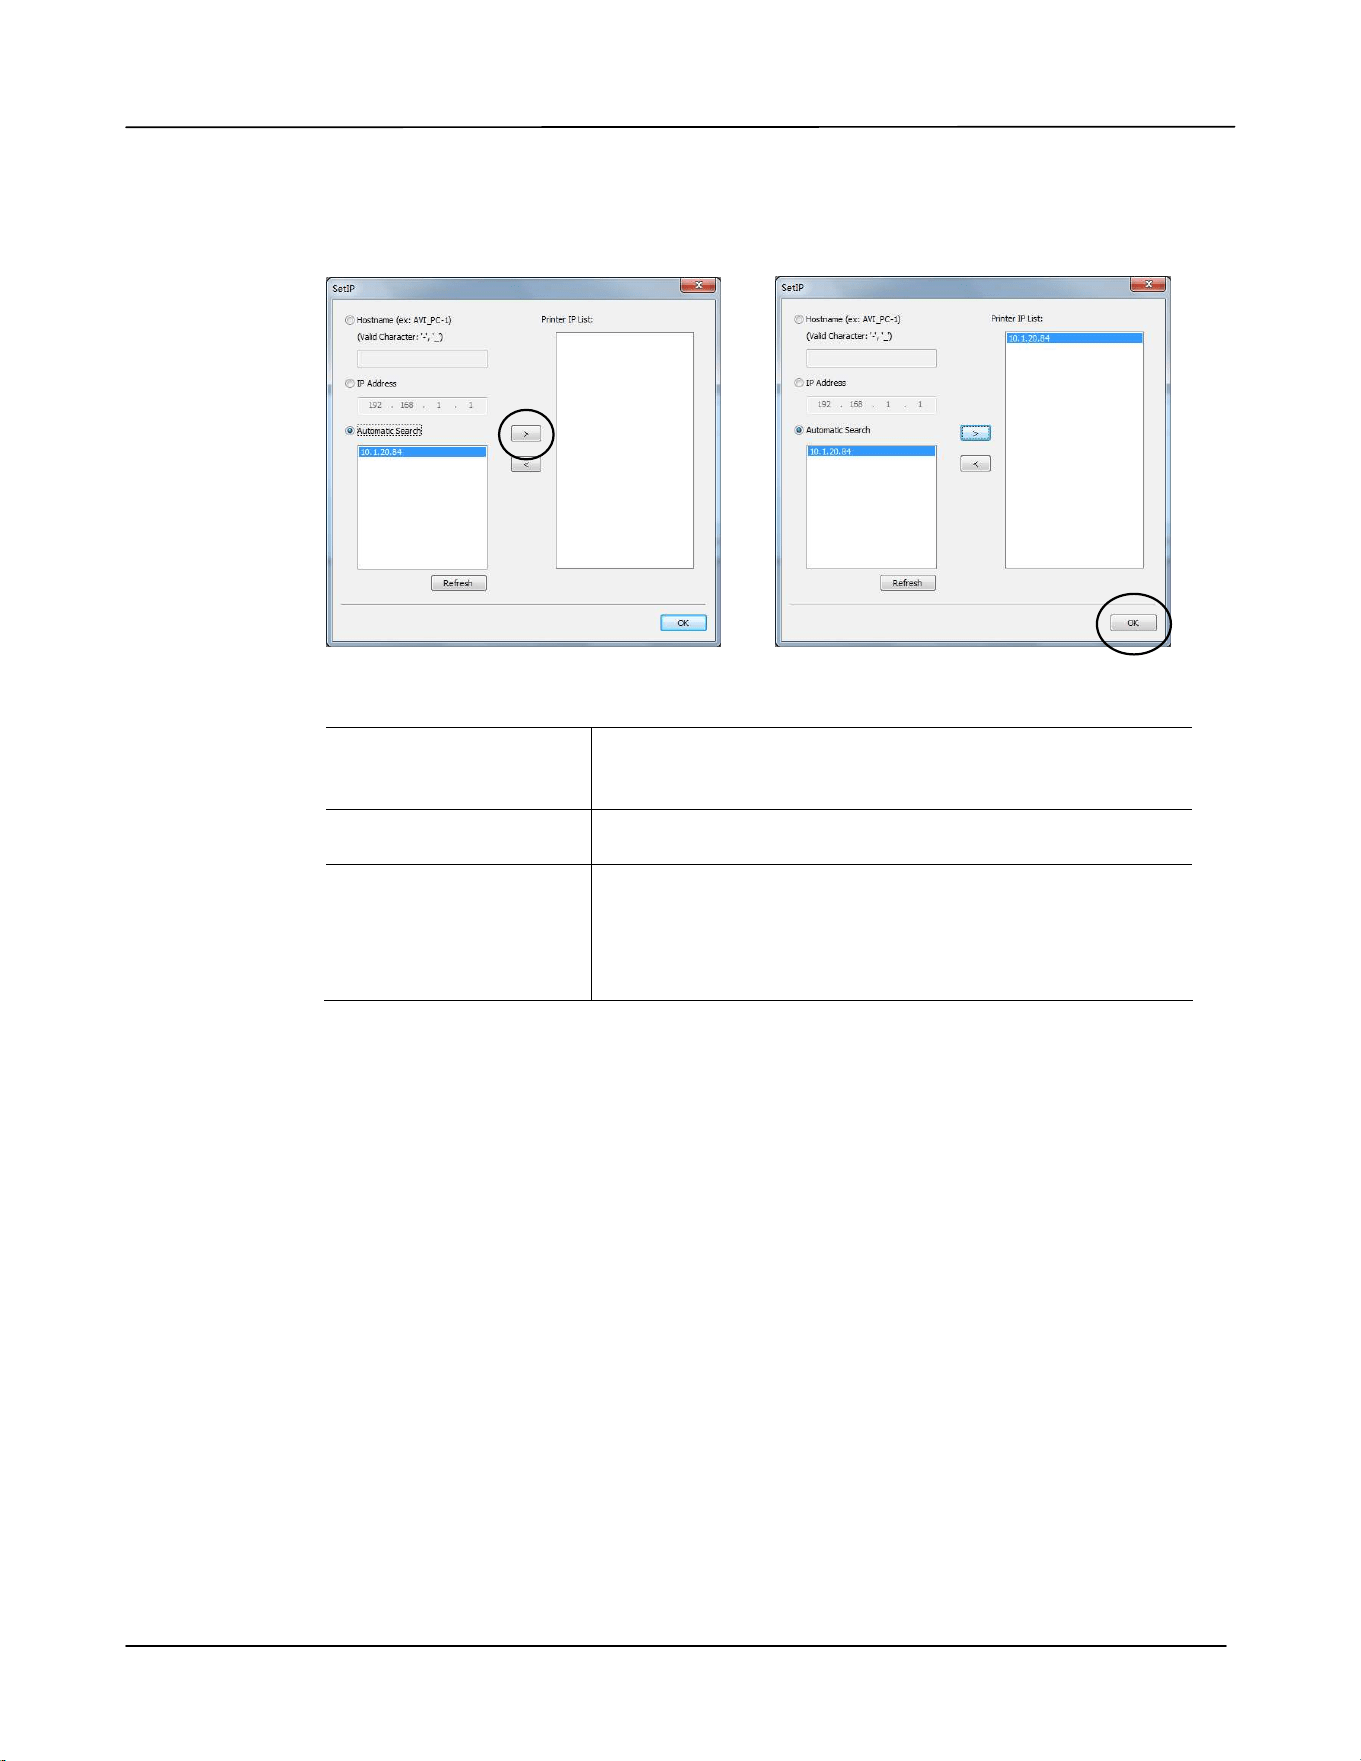
5 . When t he following Se t I P dialog box appears, choose one of t he following
options and click [ > ] t o add t o t he PRI NTER list . When the desired opt ion
set t ing is com plet ed, click [ OK] . ( Follow t he preceding section – Checking t he
Product’s Default I P Address t o obt ain t he product’s default I P address.
Host N a m e
Ent er t he product’s host nam e t o be connect ed in
the blank box of t he Host Nam e opt ion.
I P Addr ess Ent er t he product’s I P address t o be connected in
the blank box of t he I P Address option.
Aut om a t ic Sear ch
Searches t he product’s Print ers autom at ically, and
all t he product ’s host nam es found in t he net work
will be displayed in t he box of t he Aut om at ic
Search. Use your m ouse t o choose your desired
host nam e t o be connect ed.
6 . When the Finish dialog box appears, choose 「Finish」t o com plet e.
I f you have successfully installed t he print er’s driver, you will find「Avision
AP4XXX Net Work」, has been added in t he 「Print ers and Faxes」option from t he
Cont rol Panel.
I nst a llat ion
31
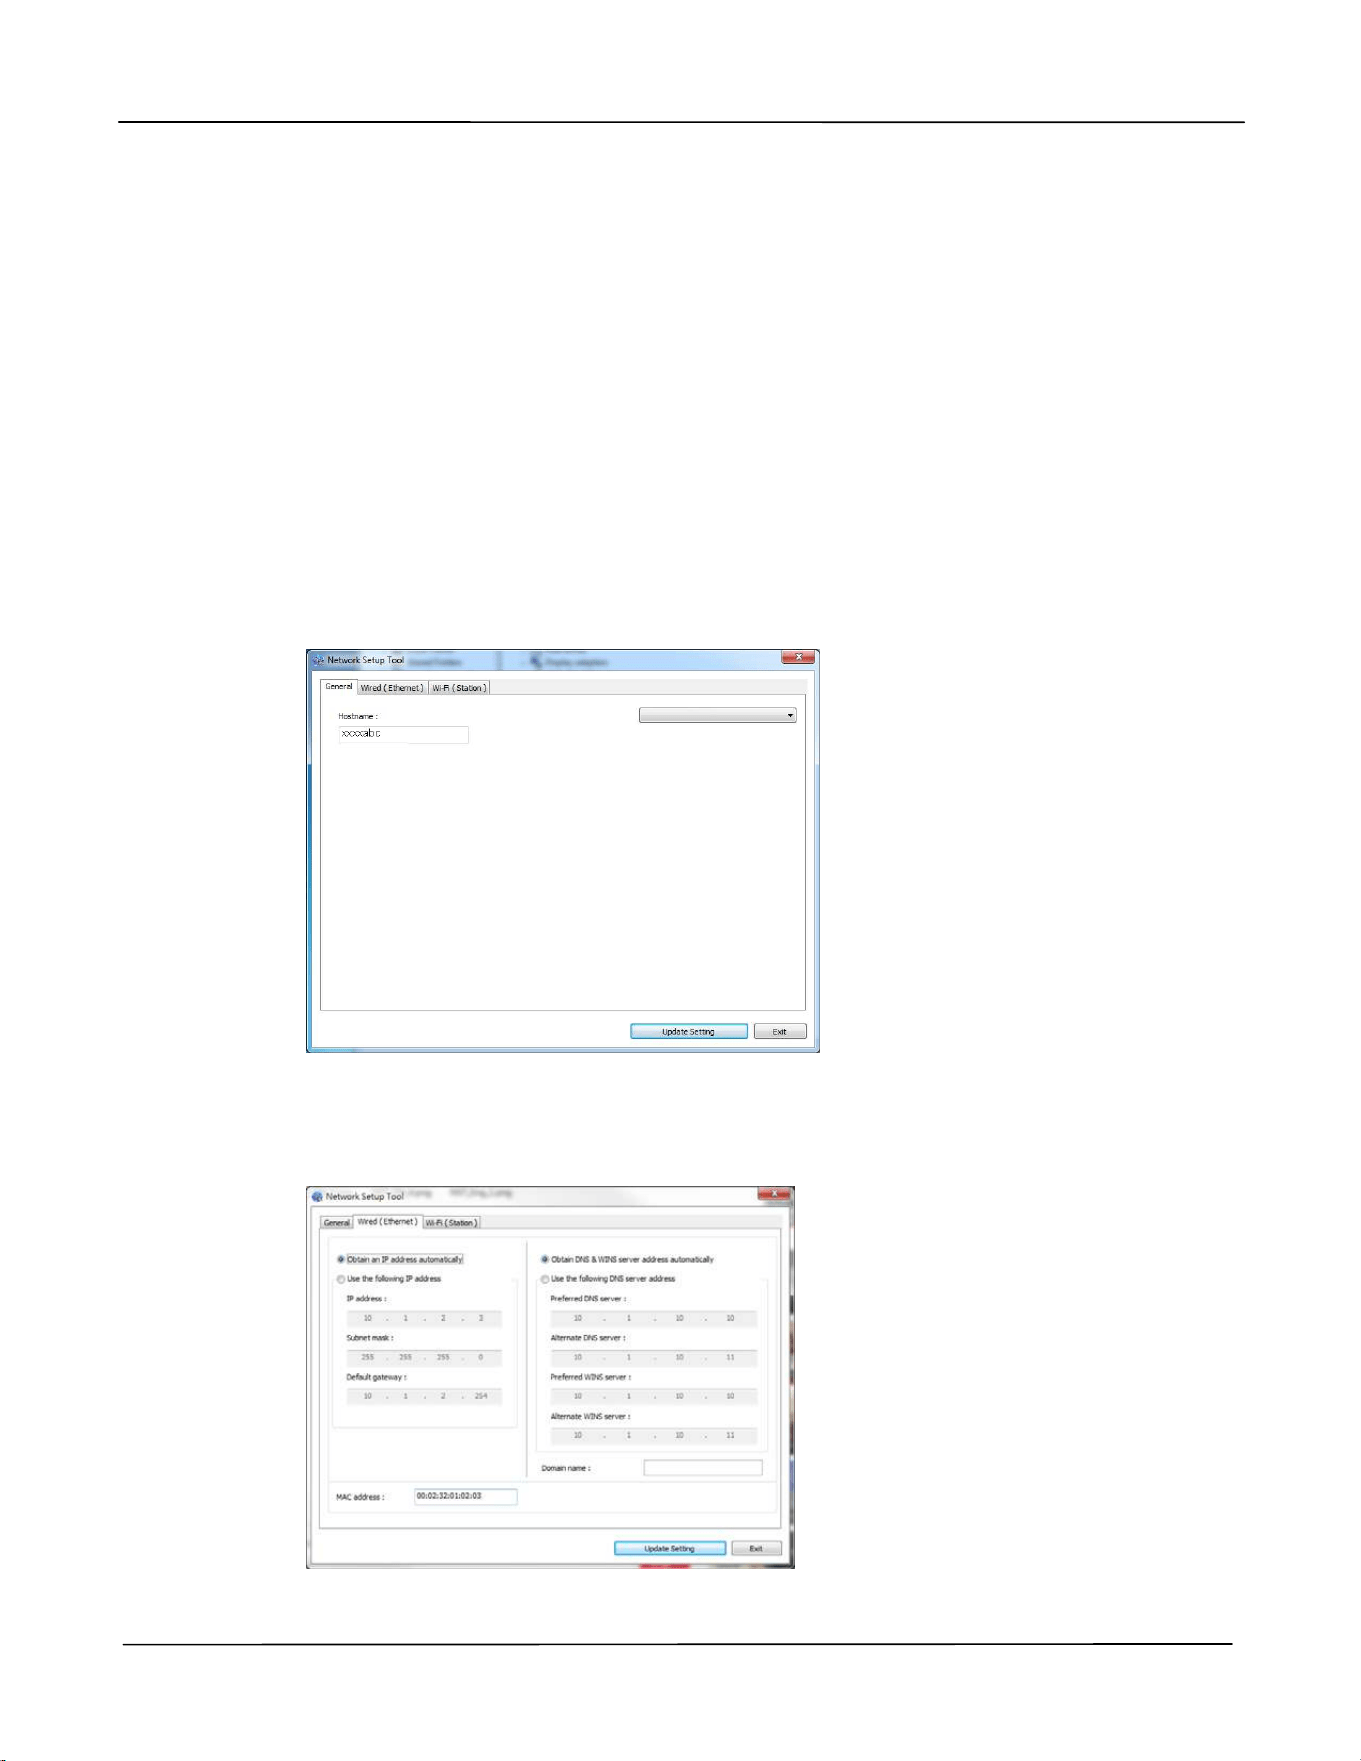
Changing t he Product ’s I P Address in a W ir e d N et w or k
To change t he product ’s I P address, you need t o install t he N e t w ork Se t up Tool. The
N et w ork Se t up Tool is included in t he USB PRI NTER driver. Aft er t he inst allat ion of
the USB PRI NTER driver is com plet ed, t he N et w ork Set up Tool is aut om at ically
installed ont o your com put er. Follow these steps to updat e t he I P address t o t he
product in a wired net work.
1 . Make sure t he product is connected t o your com puter via a USB cable.
2 . St art N e t w or k Set up Tool by choosing t he St a rt but t on and t hen select All
Pr ogr am s> Avision AP4 XX X Print er > N et w or k Set up Tool in succession. The
following Net work Setup Tool screen will be prom pt ed.
3 . On t he [ Gene r a l] page, check [ W ir ed ( Ethe rnet ) ] Network.
4 . Click the [ W ir ed ( Ether net ) ] t ab to prom pt the Wired ( Ethernet ) page.
AP4XXX Printer

Use r ’s Guide
32
5 . Check [ Obt a in a n I P a ddre ss aut om at ically] t o obtain t he I P address directly
from t he DHCP server or you m ay ent er your stat ic I P on the [ I P Addr ess] ,
[ Subnet Ma sk] , and [ Gat ew ay] field respectively.
6 . I f you have assigned a specific I P, ent er your dom ain nam e server and WI NS
server as well and t hen click [ Upda te Se t t ing] to updat e the I P inform at ion t o
the product.
7 . I f update is successful, an [ Updat e D evice Successfu lly] m essage will be
displayed and the Network Set up Tool will be aut om atically closed.
I nst a llat ion
33
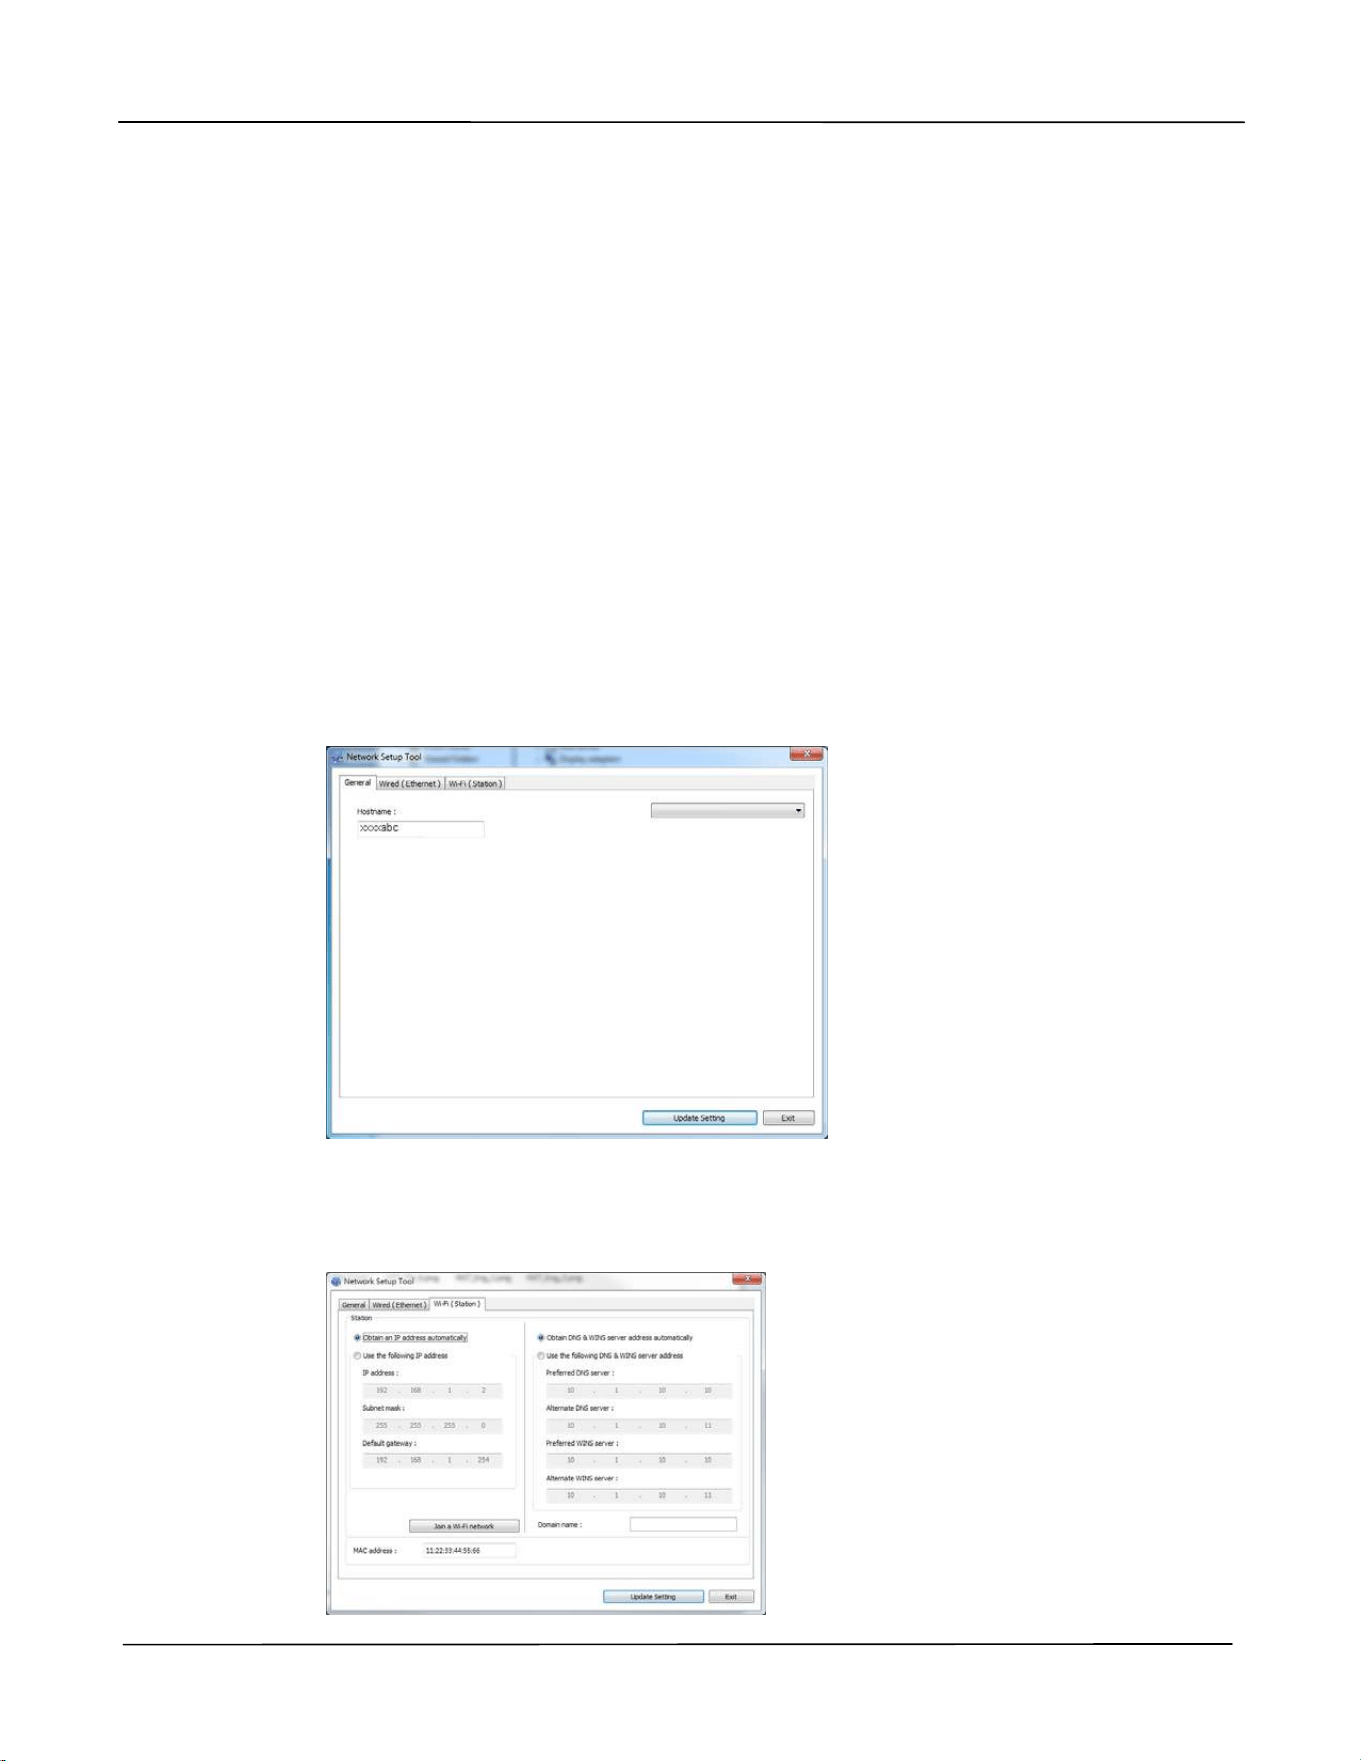
Set t ing t he Pr odu ct ’s I P Addr e ss in a W ireless N e t w ork
To set an I P address t o t he product , you need to install t he N et w ork Se t up Tool. The
N et w ork Se t up Tool is included in t he USB PRI NTER driver. Aft er t he inst allat ion of
the USB PRI NTER driver is com plet ed, t he N et w ork Set up Tool is aut om at ically
installed ont o your com put er. Follow these steps to set and updat e t he I P address t o
t he product in a w ireless net work:
* I t is only available for t he m odel which is built - in wit h a Wi- Fi dongle t hat is able t o
connect t o a wireless network.
1 . Make sure t he product is connected t o your com puter via a USB cable.
2 . St art the N e t w or k Set up Tool by choosing the St art but t on and t hen select All
Pr ogr am s> Avision AP4 XX X Print er > N et w or k Set up Tool in succession. The
following Net work Setup Tool screen will be prom pt ed.
3 . On t he [ Gener al] page, check [ W i- Fi ( St a t ion) ] .
4 . Click t he [ W i- Fi ( St a t ion ) ] t ab to prom pt t he [ W i- Fi ( St at ion) ] page.
AP4XXX Printer
Use r ’s Guide
34
5 . Check [ Obt ain a n I P address a ut om at ically] to obt ain t he I P address directly
from t he DHCP server or you m ay ent er your stat ic I P on the [ I P Addr ess] ,
[ Subnet Ma sk] , and [ Gat ew ay] field respectively.
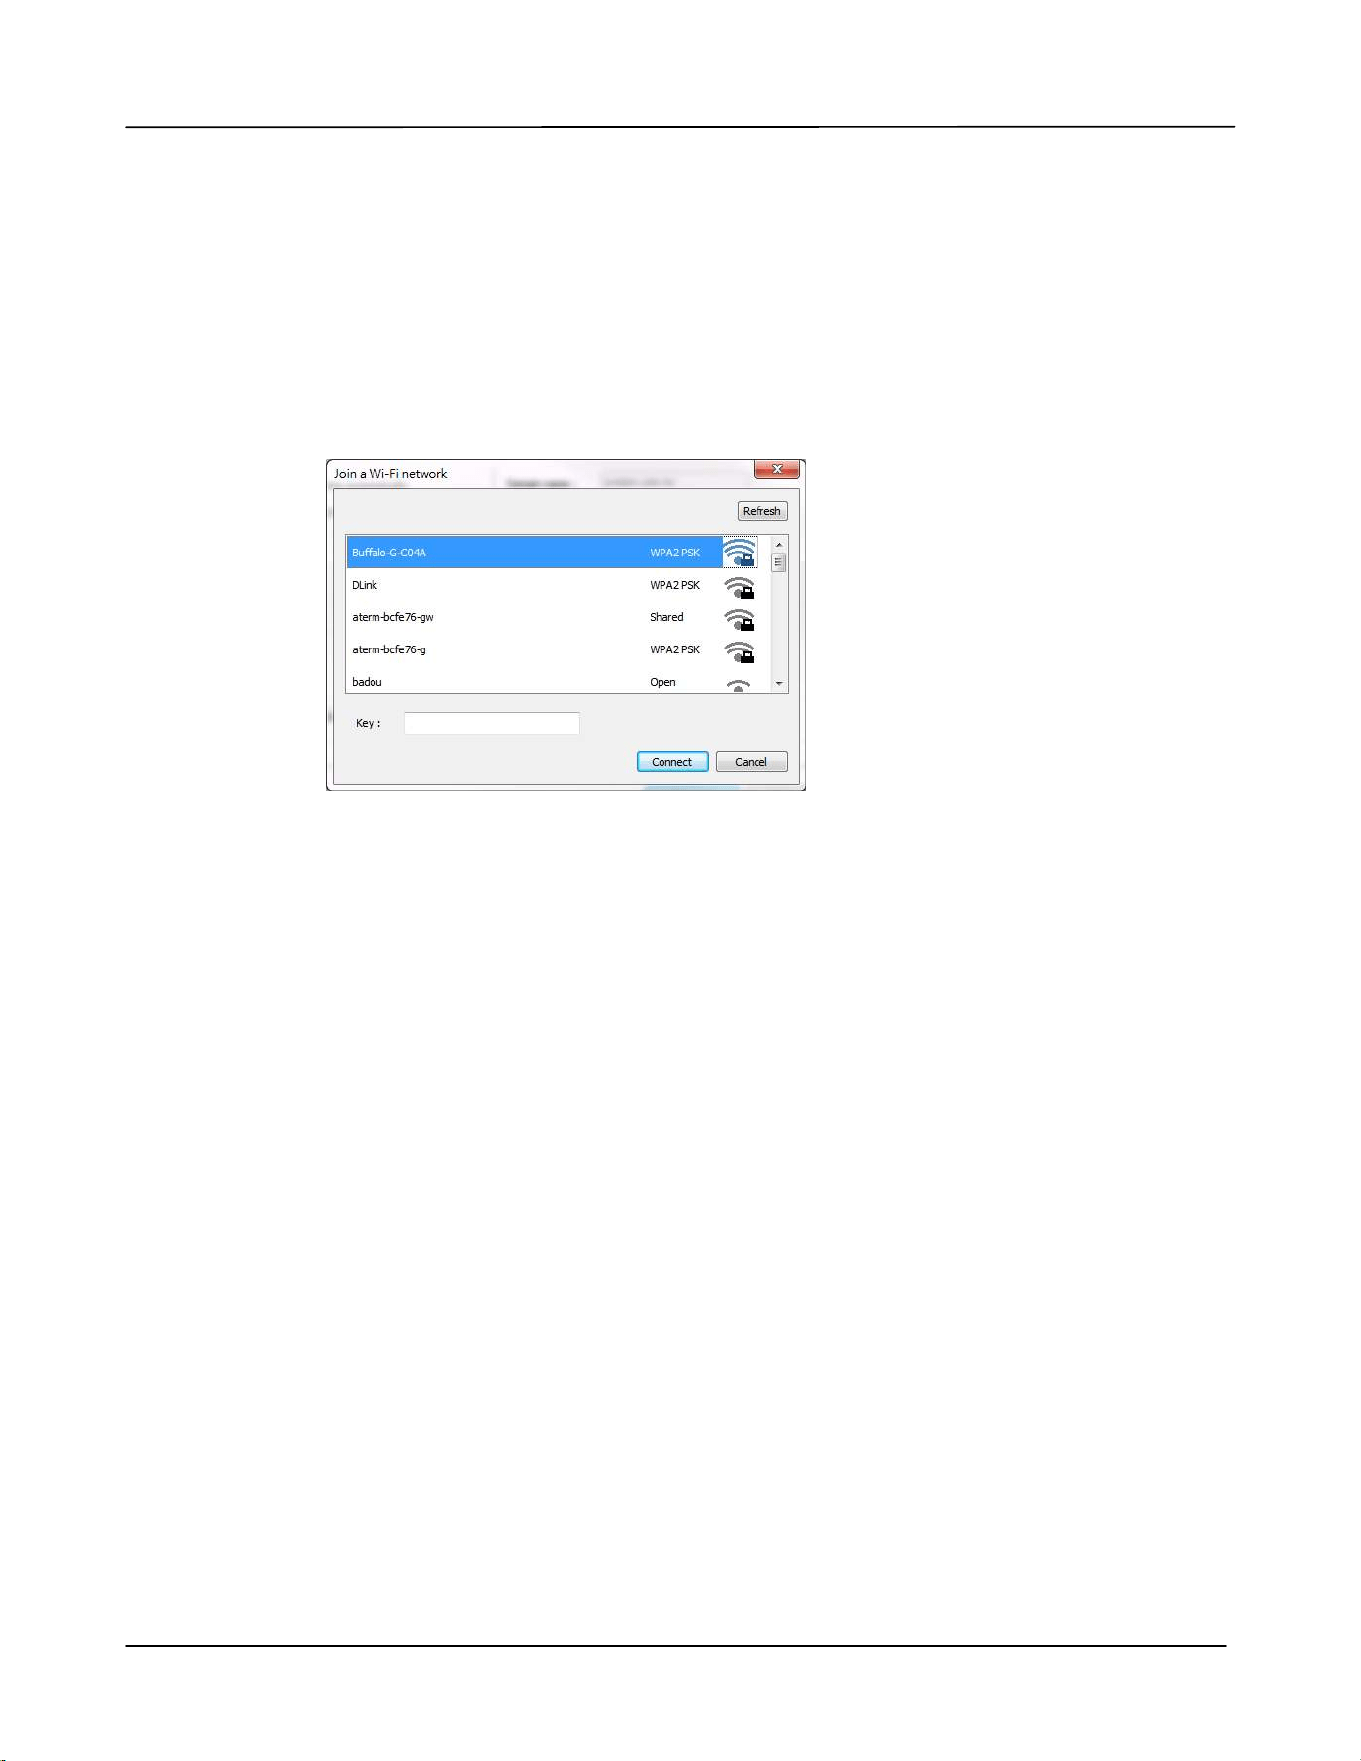
6 . Click [ Join a W i- Fi ne t w ork ] and t he current ly connected w ireless net works will
be displayed. Select t he wireless net work you w ant t o connect and t hen enter
the securit y key if required.
7 . Click [ Conne ct] t o st art connecting t he SSI D ( wireless net work nam e) and t hen
updat e t he I P inform ation to t he product.
8 . I f updat e is successfully, an [ Upda t e Device Su cce ssfully] m essage w ill be
displayed and the Network Set up Tool will be aut om atically closed.

I nst a llat ion
35
Uninst a lling t he Driver
1 . From t he 「St art 」m enu, select 「All Pr ogr a m s」, 「Avision AP4 XX X Print e r」,
and t hen 「Un inst all D river」.
Or from the 「St ar t 」m enu, select 「Cont rol Pane l」, 「Add or Re m ove
Pr ogr am s」, 「Avision AP4 XXX Pr in t e r」, and then 「Rem ove」.
2 . Follow t he inst ructions on t he screen to com plet e rem oving t he scanner driver
and t he PRI NTER driver.

3 . Cust om izing t he Product ’s
Set tings
This chapt er is specifically t arget ed t o t he persons who are responsible for t he
adm inistrat ion of t he product. I t is recom m ended t hat the adm inistrat or read t his
chapt er before inst alling t he m achine. The product’s set t ings can be cust om ized via t he
cont rol panel or t he product’s em bedded web page. How t o cust om ize the product’s
set t ings via t hese t wo m et hods w ill be described in t he following sect ions.
N ot e:
When installing t he product for t he first t im e, it is recom m ended t hat t he
Adm inistrator ret ain t he default system sett ings. The set t ings can be
custom ized at a lat er dat e once you are fam iliar wit h t he operat ion and
funct ionalit y.
Cust om izing Syst e m ’s Set t ings via t he Cont r ol Pa nel
To change t he default set tings on t he control panel, press t he “ OK” but t on on t he
cont rol panel. The m enu inform ation w ill be displayed. To navigat e the m enu it em s,
the OK/ En t er , Up, D ow n, and Back but t ons are provided on t he control panel. You
can adj ust set t ings or view inform ation ( e.g. I P address, firm ware version) .
Typical steps in using t he m enus are as follow s:
1 . Press t he OK but t on t o access t he m enu it em s.
2 . Press t he Up or D ow n but t on repeatedly unt il t he desired m enu it em is
highlight ed in t he displayed list .
3 . Press t he [ OK] but ton t o select t his it em .
4 . Press t he but t on t o go back to the previous screen.
5 . Press t he Ca ncel but ton to leave t he m enu it em .

Cust om izing t he Product ’s Set t in gs
37
Set t ing I t e m s t o be Cust om ize d on t h e LCD Scree n
N e t w ork
* Fact ory Default
I te m Descript ion Choice
N et w or k
W i- Fi: Choose t o t urn on or off Wi- Fi
connection. Choice: W i- Fi/ Net w ork
Filt er / N et w ork Spee d
W i- Fi: Choice: * On/ Off
Turn on Wi- Fi and ent er Wi- Fi St at ion Mode.
Please go t o t he product’s web page t o select
a wireless network ( SSI D) .
N et w or k Filt e r: Specify if you w ish t o
enable or disable t he Network filt er
configurat ion. Once enabled, your can specify
the filt er m ode to allow som e I Ps t o access
the device or deny som e I Ps from accesing
the device via t he product’s em bedded web
page. Choice: Enable/ * Disable
N et w ork Spe e d: Specify network speed.
Choice: 10M/ * 100M
10M/ 100M/ 1G
Wi- Fi/
Network Filter

Use r ’s Guide
3 8
Syst e m
* Fact ory Default
I te m Descript ion Opt ion
Lan gua ge The language displayed on
the LCD screen
* English / 繁體中文/ 简体中文
/ Deutsch/ Spanish/ Russian
( Opt ion varies according to your
m odel)
Sle ep M ode Choose how long t o enter
the energy saving m ode
after your last action.
5Min/ * ECO m ode/ 15Min/
30Min/ 1Hr
Aut o Off Choose how long t o shut
down t he product
aut om at ically aft er your last
act ion.
* Off/ 5Min/ 15Min/ 30Min/ 1Hr/ 2Hr/
4Hr
Ma na ge m en t
Factory De f. Reset all set t ings t o fact ory
default values.
Re set Count Choose t o reset count for
roller or pad aft er
replacem ent . Click
[ im m ediat e] to reset count .
Tray 1 Pad/ Manual Tray Pad
V- M ag
Adj ust m e nt
Choose t o adj ust the
vert ical m agnification rat e
of t he PRI NTER.
Choice:
- 0.4% / - 0.2% / * 0% / + 0.2% / + 0.4
%
Cle an Buffe r Press t o clean t he but ter. Reset: Press OK, Cancel: Press
Back
Cle an Print er Press t o clean t he print er’s
paper pat h.
Report
I te m Descript ion
Usage
Click t o print a usage report including t he num ber of
print s, toner and drum rem ain inform at ion, storage list ,
dem o page. ( * available only in ready stat us.)
St orage List
Click t o print t he list of st orage print j ob.
Dem o Pa ge
Click t o print a dem o page.
Cust om izing t he Product ’s Set t in gs
39
St or a ge Print
I te m Descript ion
Job List
Click t o check t he print propert ies of a j ob.
Opt ion : Tray, Sim plex/ Duplex/ Copies/ St art
Tray : Choice : Tray 1, Manual Tray
Sim plex/ Duplex : Choose Sim plex or Duplex.
Copoies : Choose copy count . Choice : 1, 1~ 999
St art : Click t o start print ing t he j ob.
I nfor m a t ion
I te m Descript ion
Host N a m e Display t he m achine’s host nam e.
I P Addr ess
Display t he m achine’s current I P address.
LAN M ac
Display t he m achine’s LAN Mac address.
Syst em Ve r .
Display t he m achine’s system firm ware version.
Ma chine SN
Display t he m achine’s serial num ber.
* W i- Fi Ma c Addr ess
Displays t he product’s Wi- Fi Mac address.
* W i- Fi Addr ess
Displays t he product’s Wi- Fi address.
* W i- Fi SSI D
Displays t he product’s SSI D nam e.
* AP Mode I P
Displays t he I P address in AP Mode.
* AP Mode SSI D
Displays t he SSI D nam e in AP Mode.
* For m odels wit h Wi- Fi m odule only
Use r ’s Guide
4 0
Cust om ize System ’s Set t ings via t he Em be dded W e b Pa ge
Note: Any updat e of t he web page requires adm inistrat or’s login.
1 . Refer t o t he preceding section t o setup t he product’s network set t ings.
2 . Open your browser and t ype t he product’s I P address on t he URL address, for
exam ple, ht t p: / / 10.1.21.46 and press Ent er. I n a second, t he em bed
ded web page
will be displayed.
3 .
Ent er your desired setting on your select ed it em s.

Cust om izing t he Product ’s Set t in gs
41
Set t ing I t em s t o be Cust om ize d on t h e w ebpage
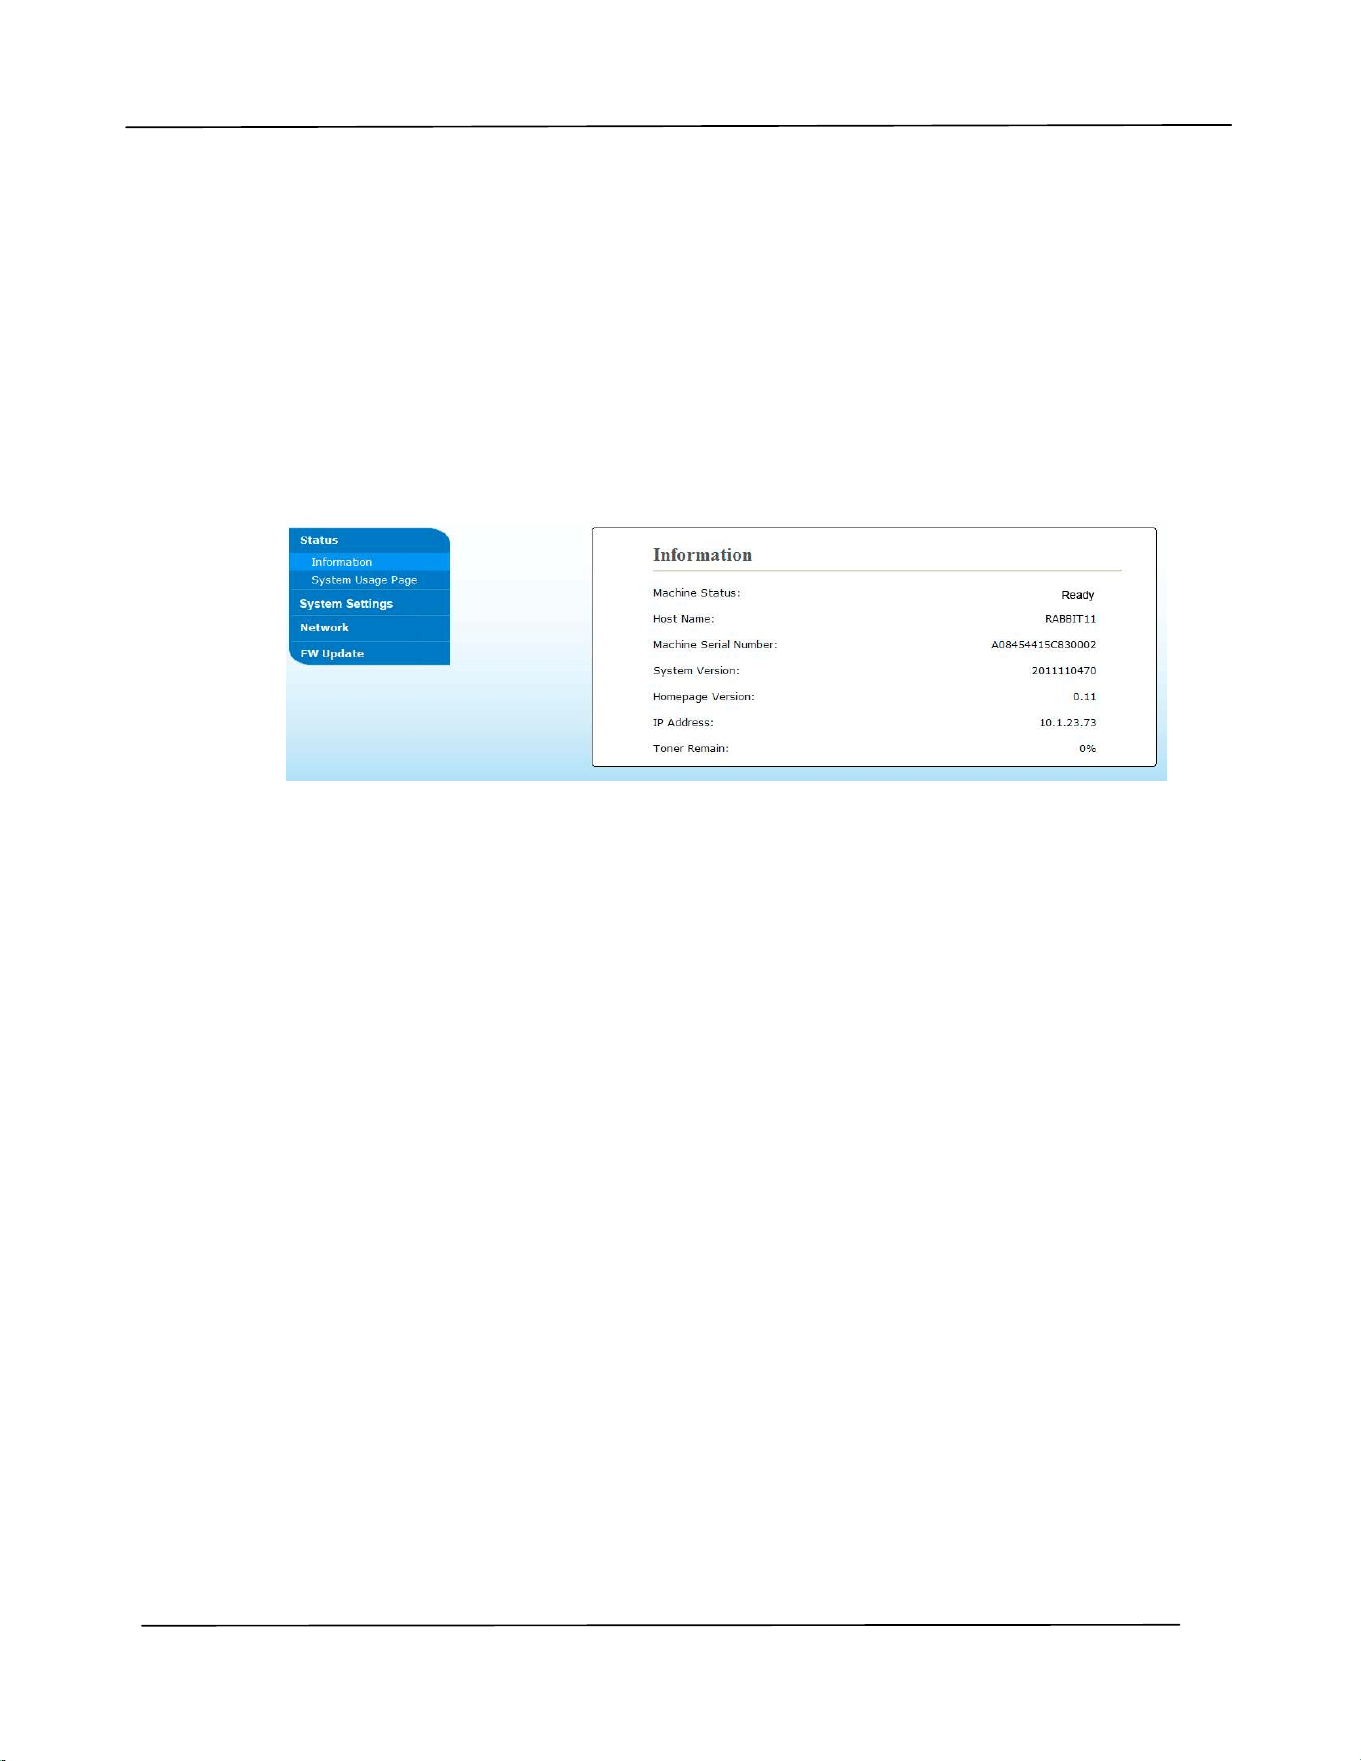
St at us
Displays t he stat us and basic inform at ion of t he product.
* Fact ory Default
I te m D escript ion
I nfor m a t ion Display t he follow ing basic inform at ion of t he product.
Machine St at us Displays t he m achine stat us.
Host Nam e Displays the host nam e.
Machine Serial
Num ber
Displays t he m achine’s series num ber.
System Version Displays t he firm ware version.
Hom epage
Version
Displays t he version of t he em bedded web page.
I P Address Displays t he I P address.
Mac Address Displays t he Mac address.
* * Wi- Fi I P Displays t he Wi- Fi I P address.
* * Wi- Fi MAC Displays the Wi- Fi Mac address.
* * Wi- Fi SSI D Displays t he Wi- Fi SSI D nam e.
* * AP Mode I P Displays t he I P address in AP Mode.
* * AP Mode SSI D Displays the SSI D nam e in AP Mode.
Toner Rem ain Displays the t oner rem aining percent age.
Syst em Usage
Pa ge
Clicks [ Download] t o download an im age cont aining t he
system usage inform at ion and syst em sett ings.
* * These it em s will only be available for t he m odel w it h a Wi- Fi m odule.

Use r ’s Guide
4 2
Syst e m Se t t ings
* Fact ory Default
I te m Descript ion Opt ion
Lan gua ge
The language displayed on t he web
page.
The displayed language
varies depending on
your operating system
Sle ep M ode
Choose if you wish to ent er energy
saving m ode and how long t o enter
the energy saving m ode aft er your
last action.
* ECO m ode/
5Min/ 15Min/ 30Min/ 1Hr
Aut o Off
Choose how long t o shut down t he
product aut om at ically aft er your last
act ion.
* Off/ 5Min/ 15Min/ 30Min
/ 1Hr/ 2Hr/ 4Hr
Ma na ge m en t
Factory De f. Reset all set t ings t o fact ory default
values.
Re set Count
Choose t o reset count for the pad or
roller aft er replacem ent . Click
[ im m ediat e] to reset count .
Manual Tray Pad, Tray 1
pad
V- M ag
Adj ust m n et
Choose t o adj ust the vertical
m agnification rat e of t he PRI NTER.
- 0.4% / - 0.2% / * 0% / + 0.
2% /
+ 0.4 %
Cle an Print er
Press to clean the printer’s paper
pat h.
Pa ssw ord Se t t ings ( I f t hese t wo fields are left blank, this m eans t he password
has not been changed.)
N ew
Pa ssw or d
Ent er a password t o enable m odifying t he web page.
Password should be 8~ 16 characters or digit s in lengt h.
Re type
Pa ssw or d
Retype new password.

Cust om izing t he Product ’s Set t in gs
43
N e t w ork
Displays the net work inform at ion of t he product .
* Factory Default
I te m Descript ion Opt ion
Host N a m e
Host N a m e Dipslay t he host nam e for the product.
I nt e rfa ce
* W i- Fi On/ Off
Et he rnet Set t ings
Obt ain an I P address
aut om at ically
* Off/ On
I P Address: Set up an I P
address.
I nput t he I P address of the product.
Subnet Mask I nput the subnet m ask num ber.
Gateway I nput t he gat eway for your I P.
Aut o- Obt ain WI NS/ DNS * Off/ On
Preferred DNS Server Set s up t he preferred DNS server address for t he
product .
Alt ernat e DNS Server Set s up t he alt ernat e DNS server address for t he
product .
Preferred WI NS Server Sets up t he preferred WI NS server address for t he
product .
Alt ernat e WI NS Server Set s up t he alt ernat e WI NS server address for t he
product .
Dom ain Nam e Set s up a dom ain nam e for t he product.
* W i- Fi Set t in gs
Search AP Click [ Sea rch AP] and t he current ly connect ed
wireless net works will be displayed. Select t he
wireless network you want t o connect and t hen
enter t he securit y key if required.
I P Set t ings Obt ain t he I P address direct ly from t he DHCP server
or you m ay ent er your st at ic I P on t he [ I P
Addre ss] , [ Subne t M ask ] , and [ Gat ew a y] field
respectively.
N et w or k Se cur it y Se t u p
Securit y Configurat ion
Filt er
Specify if you wish t o
enable or disable t he filt er
configurat ion.
* Disable/ Enable
* Available only for m odels wit h Wi- Fi m odule
Use r ’s Guide
4 4
Filt er Mode
Specify your filt er m ode t o
allow som e I Ps t o access
the device or deny som e
I Ps from accessing t he
device.
Allow/ Deny
I P Address Filt er
Configurat ion
I P Addr ess Filt e r
Configura tion- Four t ypes
of Start I P and End I P can
be specified.
Ma c Addre ss Filt er
Configura tion- Up t o 10
Mac address can be
specified.
I P Address Filt er
Configurat ion/
Mac Address Filter
Configurat ion
SN MP
Enable SNMPv1/ v2
On/ Off
Com m unit y nam e
Define your com m unit y nam e.
Enable SNMPV3
On/ Off
User Nam e
Ent er your user nam e. ( 1~ 32 characters)
Aut hent ication Prot ocol
MD5/ SHA
I nvalid URL
Ent er your invaoid URL address. ( 8~ 32 characters)
Privacy Prot ocol
DES/ AES-128
Password
Ent er your password. ( 8~ 32 characters)
Cont ext Nam e
Ent er your cont ext nam e.
Et he rnet Speed
Choose your desired net work speed. Choice: 10M/ 100M, 10M/ 100M/ 1G
FW Upda t e
Update t he firm ware of t he product. Before updating the product’s firm ware, you need
to first download t he lat est firm ware from our web site at www.avision.com ont o your
com put er. On the webpage, choose [ Brow se] t o find t he firm ware file on your
com put er and then choose [ Upda t e ] to begin updat ing t he firm w are t o t he product.
A+ M anage r Se t t ings
Check [ Ena ble] and t hen ent er t he I P address of a specified server to send t he system
log file t o for quick t roubleshoot ing.
4 . Configuring t he Print er Driver
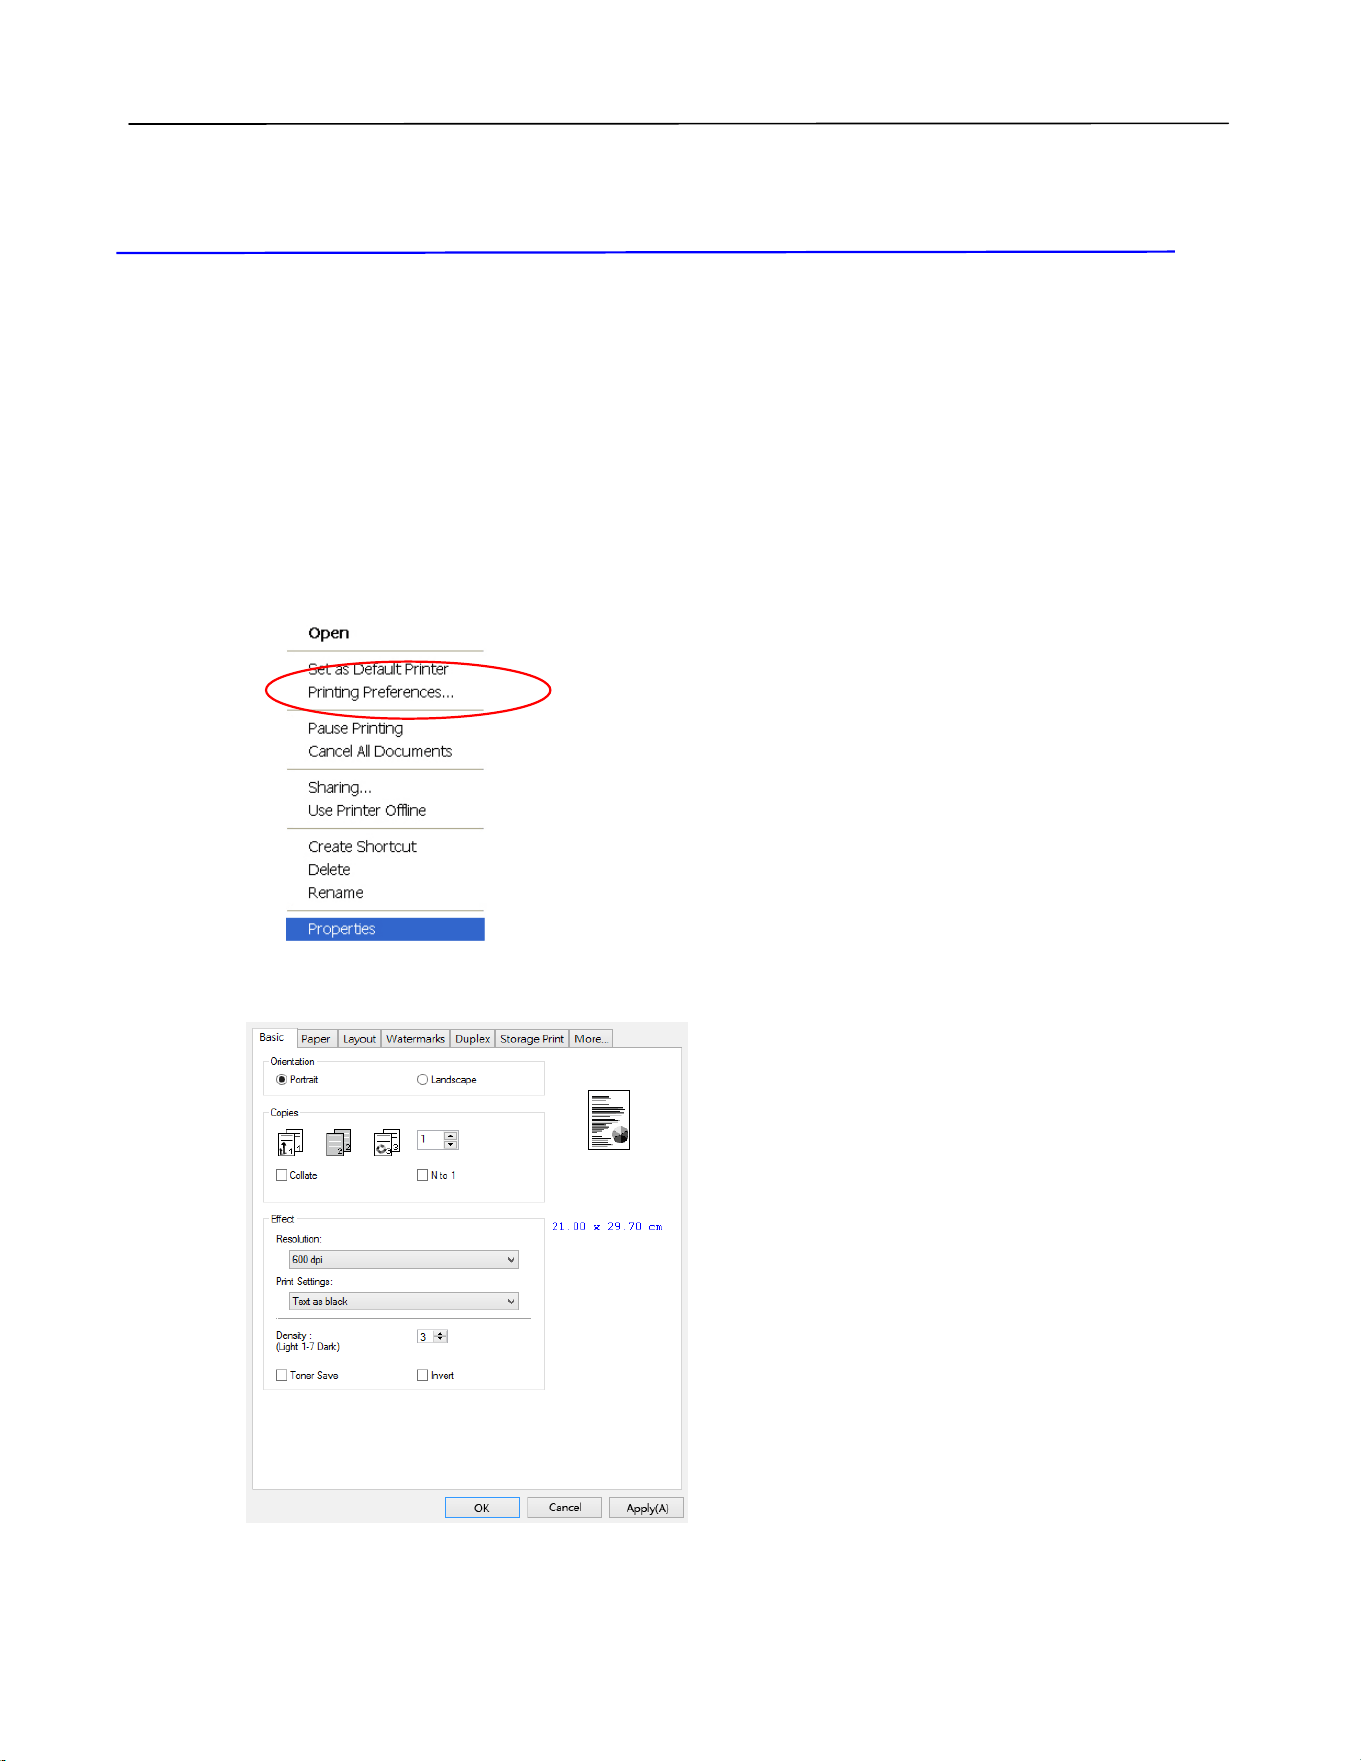
Displaying t he Print er Driver Propert ies
Dialog Box ( W indow s)
To display the Print er Driver Properties dialog box,
1 . Click St a rt on t he syst em t ray and choose Print er s a nd Fax es.
2 . Right -click t he product ’s print er nam e and choose Pr in t ing Pr efer ences.
3 . The Printing Preferences dialog box.
Use r ’s Guide
4 6
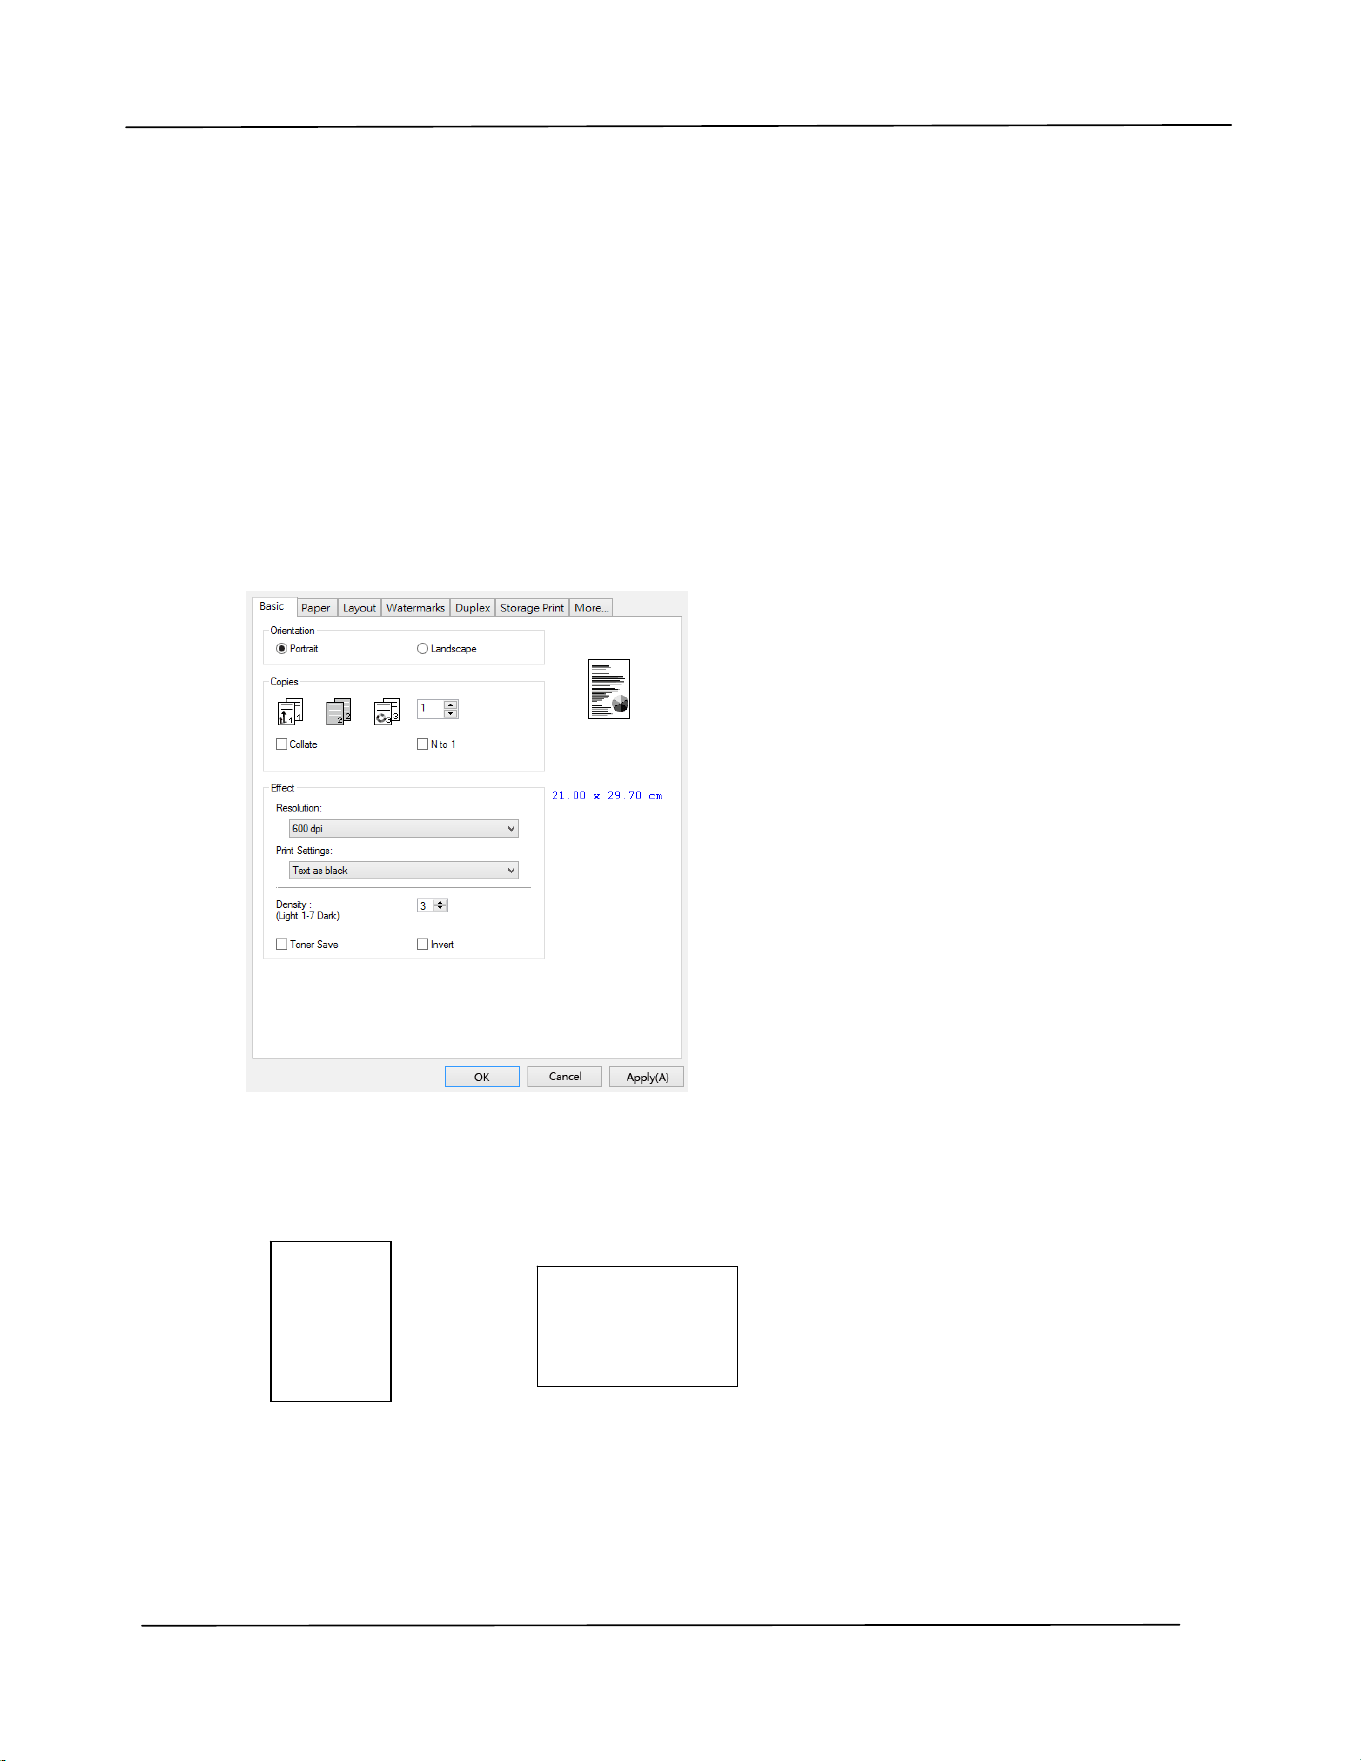
Configuring Print er Driver Set t ings
The Printing Preferences dialog box consist s of t he Basic t ab, t he Paper t ab, t he Layout
tab, the Waterm ark t ab, t he Duplex t ab, and t he More t ab. The cont ent s of each tab
will be explained in t he following sections.
The Ba sic Ta b
The Basic t ab cont ains sett ings for Orient ation, Copies, Effect, Density, Toner Save, and
I nvert .
Or ie nt a t ion
Choose your orientat ion. Choice: * Por t rait , Lan dscape
Port ra it
Landscape
* Fact ory Default
ABC
ABC
Configur in g t h e Pr in t er ’s D river
47
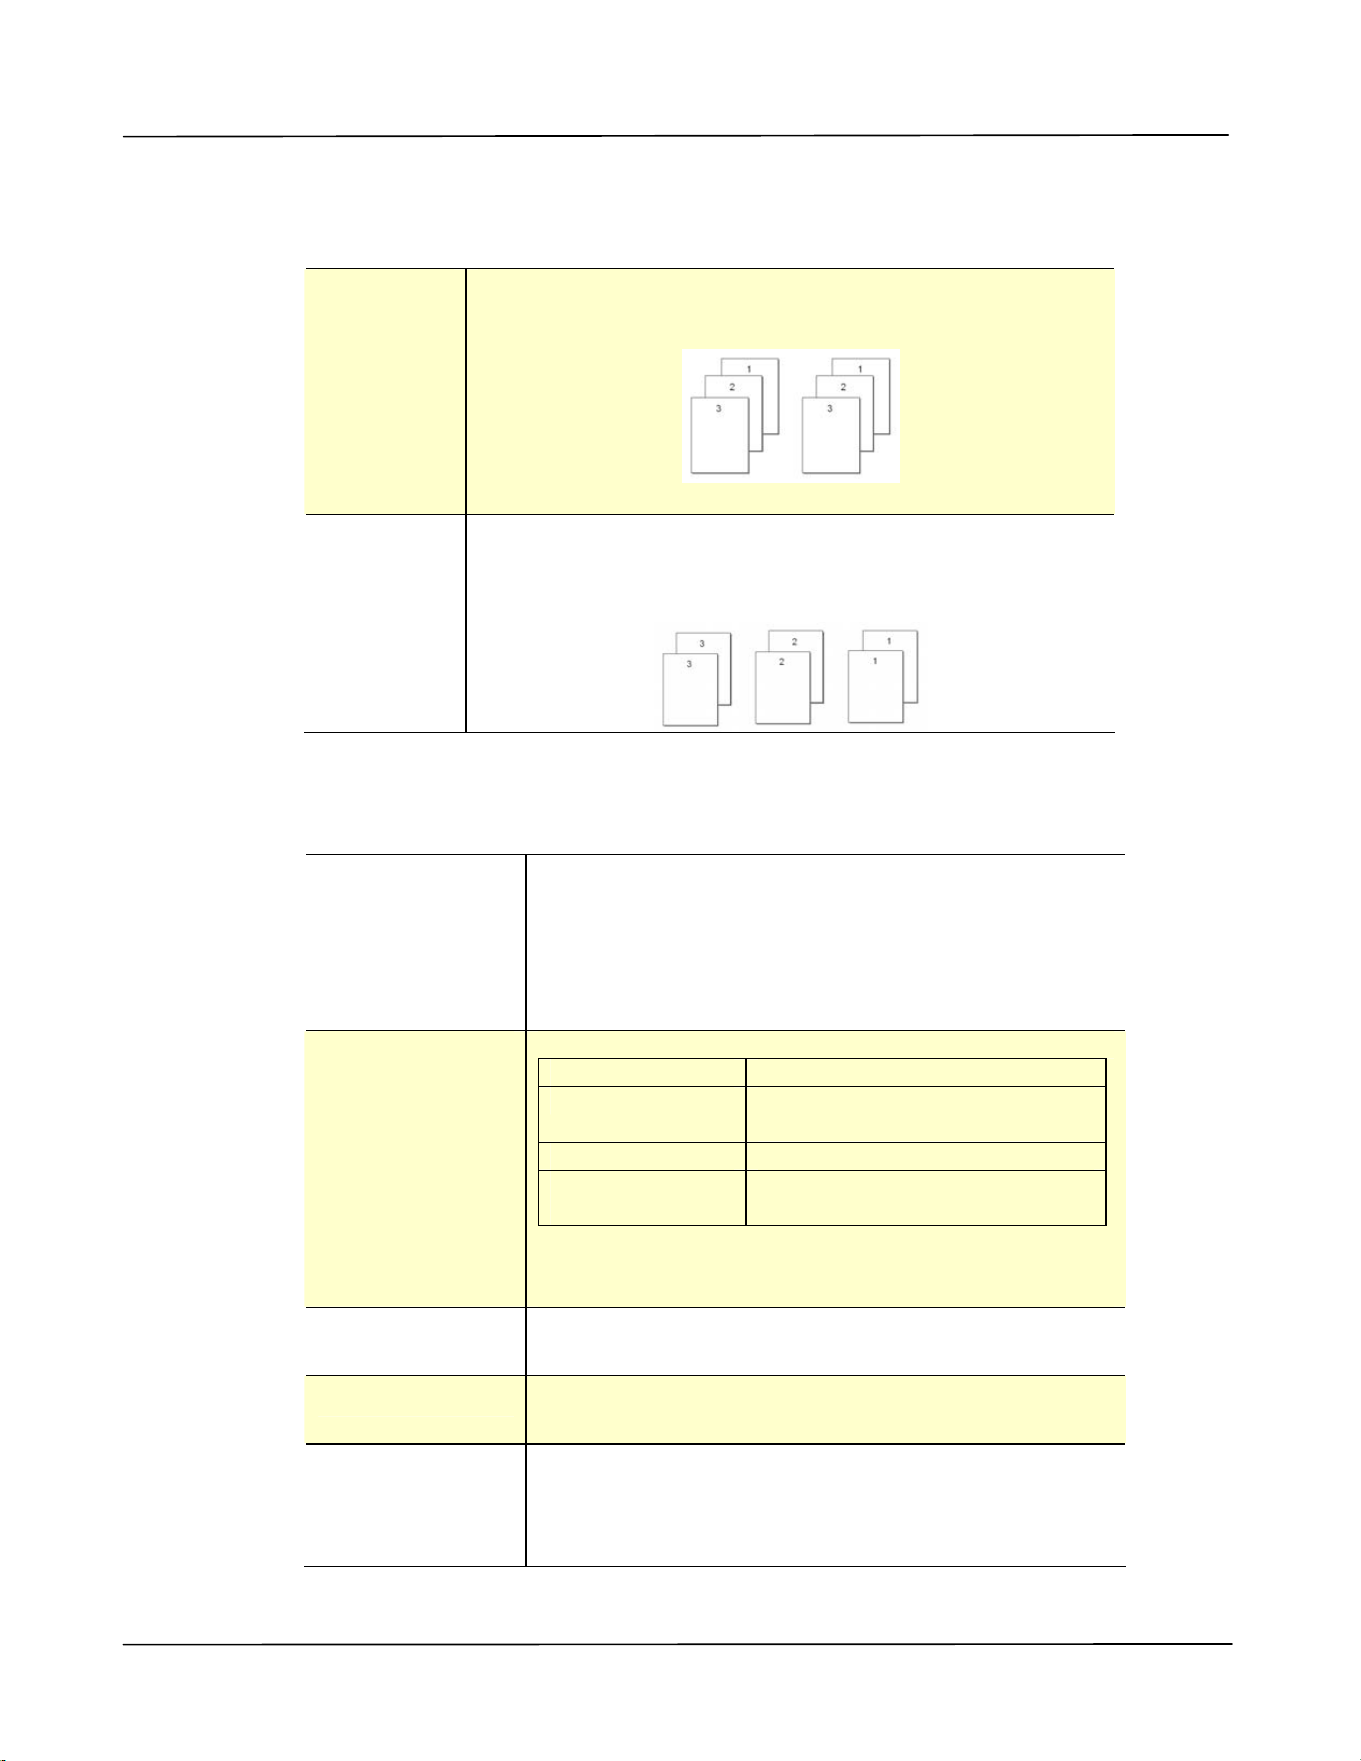
Copies
Choose t he num ber of copies t o be print ed. You can ent er up t o 999.
Colla t e : Click t o print your docum ent in t he page order such as
1/ 2/ 3, 1/ 2/ 3, 1/ 2/ 3.
N t o 1 : Click t o reverse t he print ing order of your docum ent .
As a result , t he last page of your docum ent will be
print ed first and vice versa.
Effect
Re solut ion:
Choice: * 6 0 0 dpi, 1 2 0 0 dpi HQ * Opt ion varies
due to your printer m ode.
600 dpi: for norm al docum ent .
1200 dpi/ 2400 dpi: Choose 1200 dpi/ 2400 dpi
St andard/ 2400 dpi Fine if you wish t o enhance t he
print qualit y.
Pr in t Se tt ings:
Norm al: Norm al m ode.
* * Picture Mode: Suit able for your docum ent
cont aining pict ures.
* Text as Black: Print color t ext in pure black.
* * Enhance
Text :
Make the t ext bold.
* * These fea t ur es a re only ava ilable for GDI
pr int e r la nguage.
Densit y: Click t o light en or darken your docum ent . Densit y
level ( 1~ 7) . Default: 3
Toner Sa ve : Allows you to print your docum ent using the t oner
saving m ode.
I nve rt : I nvert m akes each im age pixel inverted t o its
com plem ent ary color. For exam ple: t he original
black t ext on whit e background becom es white
text on black background.
* Fact ory Default
Use r ’s Guide
4 8
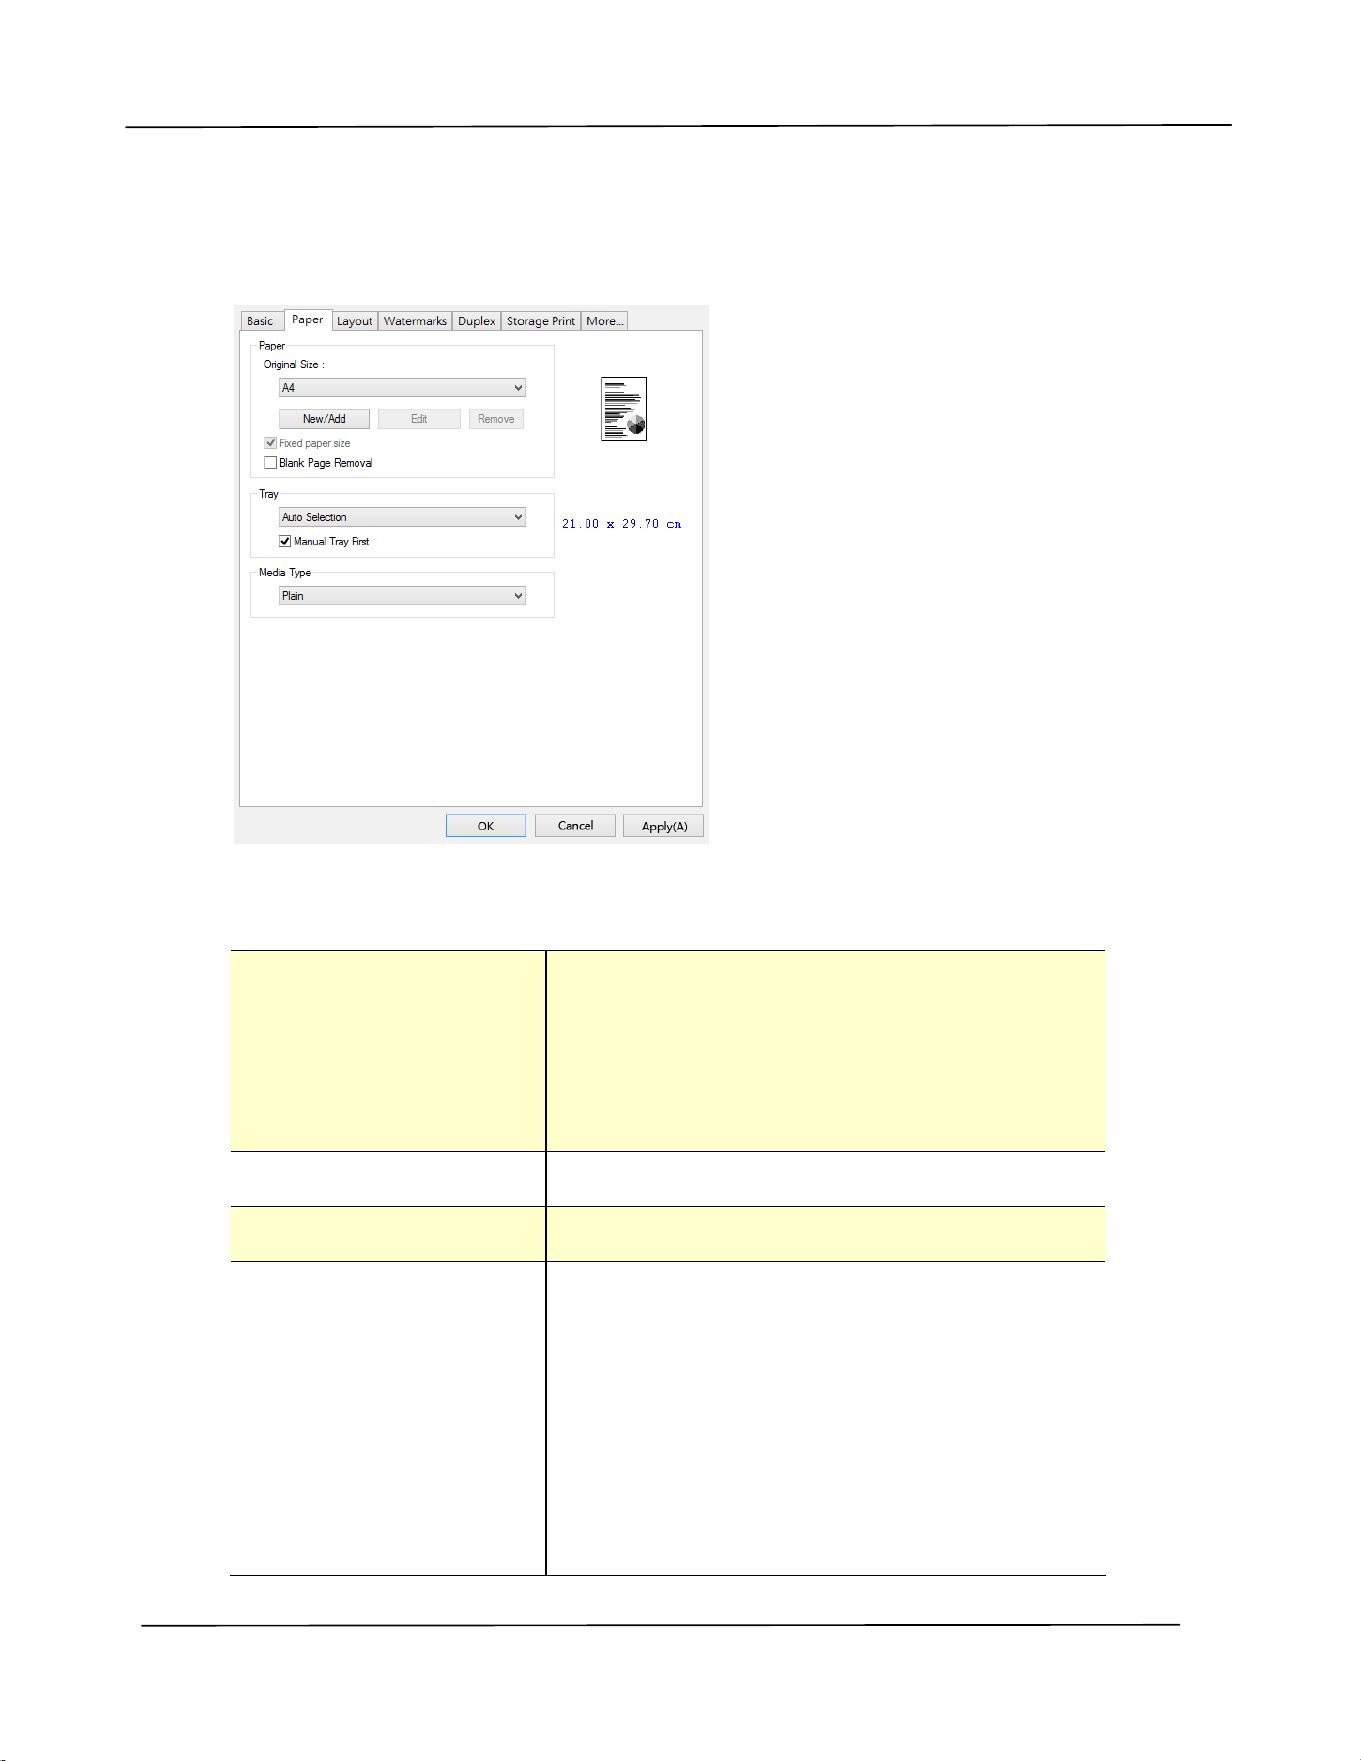
The Pape r Ta b
The Paper t ab cont ains sett ings for Original Size, Tray, and Media Type.
Pape r
Origina l Size : Choose t he size of paper loaded in t he
designated t ray.
Choice: * A4 , A5 , A6 , B5 ( JI S) , B6 ( JI S) ,
Lega l, Let t er , User D efine
Click [ Add/ New] t o creat e up t o 20 set s of
cust om sizes.
Fix e d Paper Size Click t o fix paper size.
Bla nk Page Rem oval Click to rem ove blank page.
Tra y: Choose t he t ray from which your paper should
be fed.
Choice: Aut o Se le ction, M anu al Tr ay, Tra y
1
* M anua l Tr ay Fir st: Aut om at ically select t he
paper t ray which is available ( priorit y : 1:
Manual Tray; 2: Tray 1) .
Aut o Selection : Aut om at ically select t he
paper t ray which is available ( priorit y: 1: Tray
1; 2: Manual Tray) .

Configur in g t h e Pr in t er ’s D river
49
Me dia Type: Choose t he t ype of m edia t o be used for
print ing.
Choice: * Plain, Th in, Thick, Laser , Ot her ,
* * Bond
* * : Only a va ilable in t he m anu a l t r ay for
one- side print ing
* Fact ory Default

Use r ’s Guide
5 0
The Layout Ta b
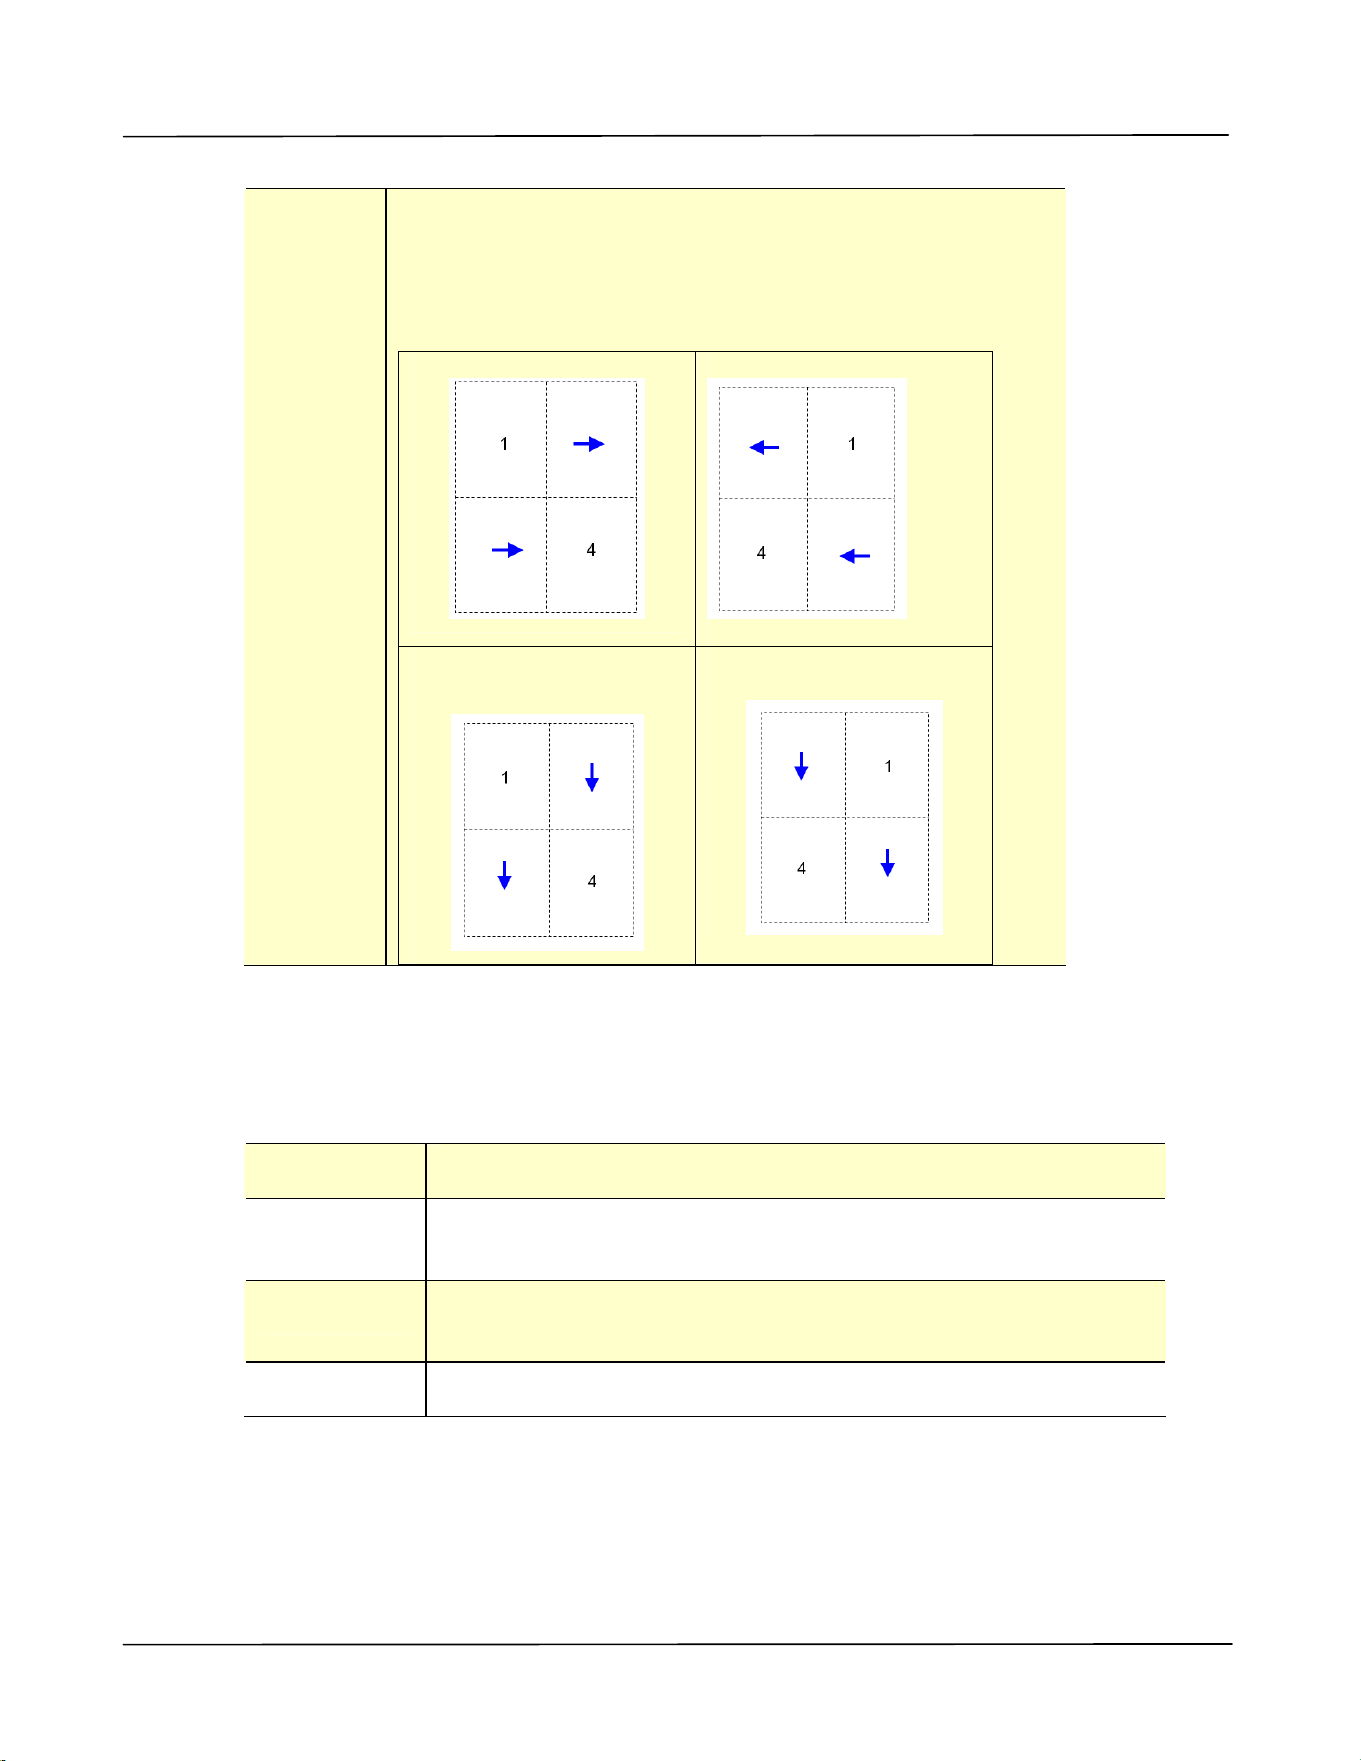
The Layout t ab cont ains sett ings for N- up, and Out put Paper Size.
N - up
N - u p: Choose num ber of pages t o be print ed on a single
sheet of paper.
Choice: * Off, 2 up( 2 - in- 1 ) , 4 - up( 4 - in- 1 ) ,
9 - u p( 9 - in- 1 ) , 1 6 - up( 1 6 - in- 1 )
Border : Choose if you wish t o add border around each page
when print ing m ore t han one page on a single sheet
of paper.
Choice: * N one , Border Line , Da she d Line
* Fact ory Default Sett ing
Configur in g t h e Pr in t er ’s D river
51
N - u p
St yle:
Choose t he style you want when print ing m ult i- page
docum ent on a single sheet .
Choice: * Right , t he n D ow n / D ow n , t hen Right / Left ,
t hen Dow n/ D ow n , the n Left
Right, t hen Down
Down, t hen Left
Down, t hen Right
Left, t hen Down
* Fact ory Default Sett ing
Out put Pa per Size
* Act ual Size Print t he actual size of your docum ent .
User D efine
Scale
You can reduce or enlarge your print ed im age using t he Slider
Bar. Scaling ra t e: 2 5 % ~ 4 0 0 % ( * 100% )
Fit t o Pa pe r Out put t he full page of t he select ed original including t he four
m argins.
Cent er Print your im age in t he cent er of t he out put paper.
* Fact ory Default Sett ing
Use r ’s Guide
5 2
The W a t e rm a rk Ta b
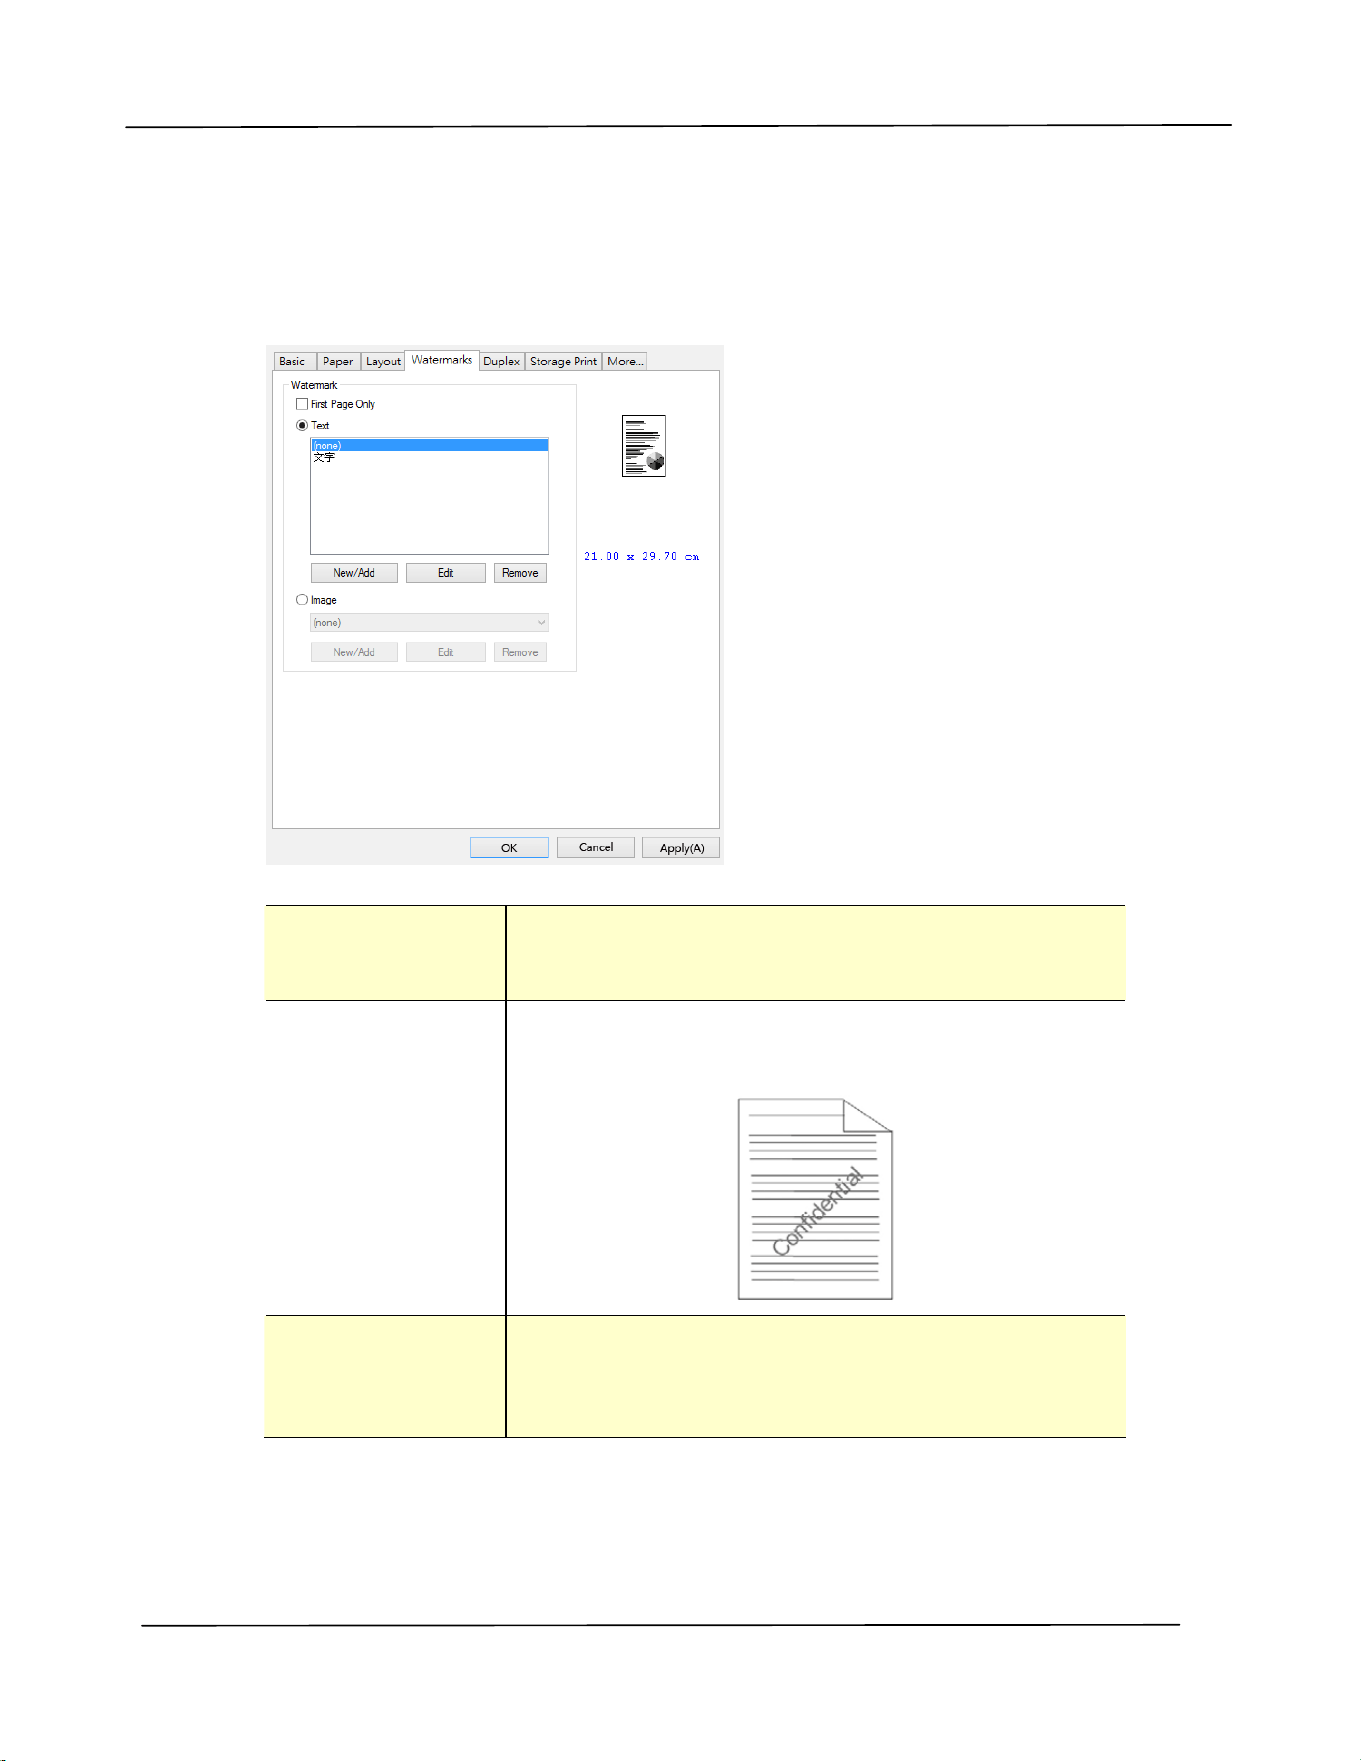
The Wat erm ark t ab allows you t o add som e text or im age ( such as CONFI DENTI AL,
I MPORTANT, DRAFT, et c) for your docum ent.
Fir st Pa ge on ly Check t o print wat erm ark only on t he first page.
Clear t he check box will print w aterm ark on all
pages.
Tex t Choose and click N ew / Add t o add new wat erm ark
text . Click the Edit but ton to change or t he
Rem ove butt on t o delet e.
I m age Choose and click New/ Add t o add waterm ark im age.
Click t he Edit but ton t o change or t he Re m ove
but t on t o delet e. You can choose your im age in file
form at such as BMP, TI FF, or JPEG.
Configur in g t h e Pr in t er ’s D river
53
Adding a n e w w a t e r k t e x t
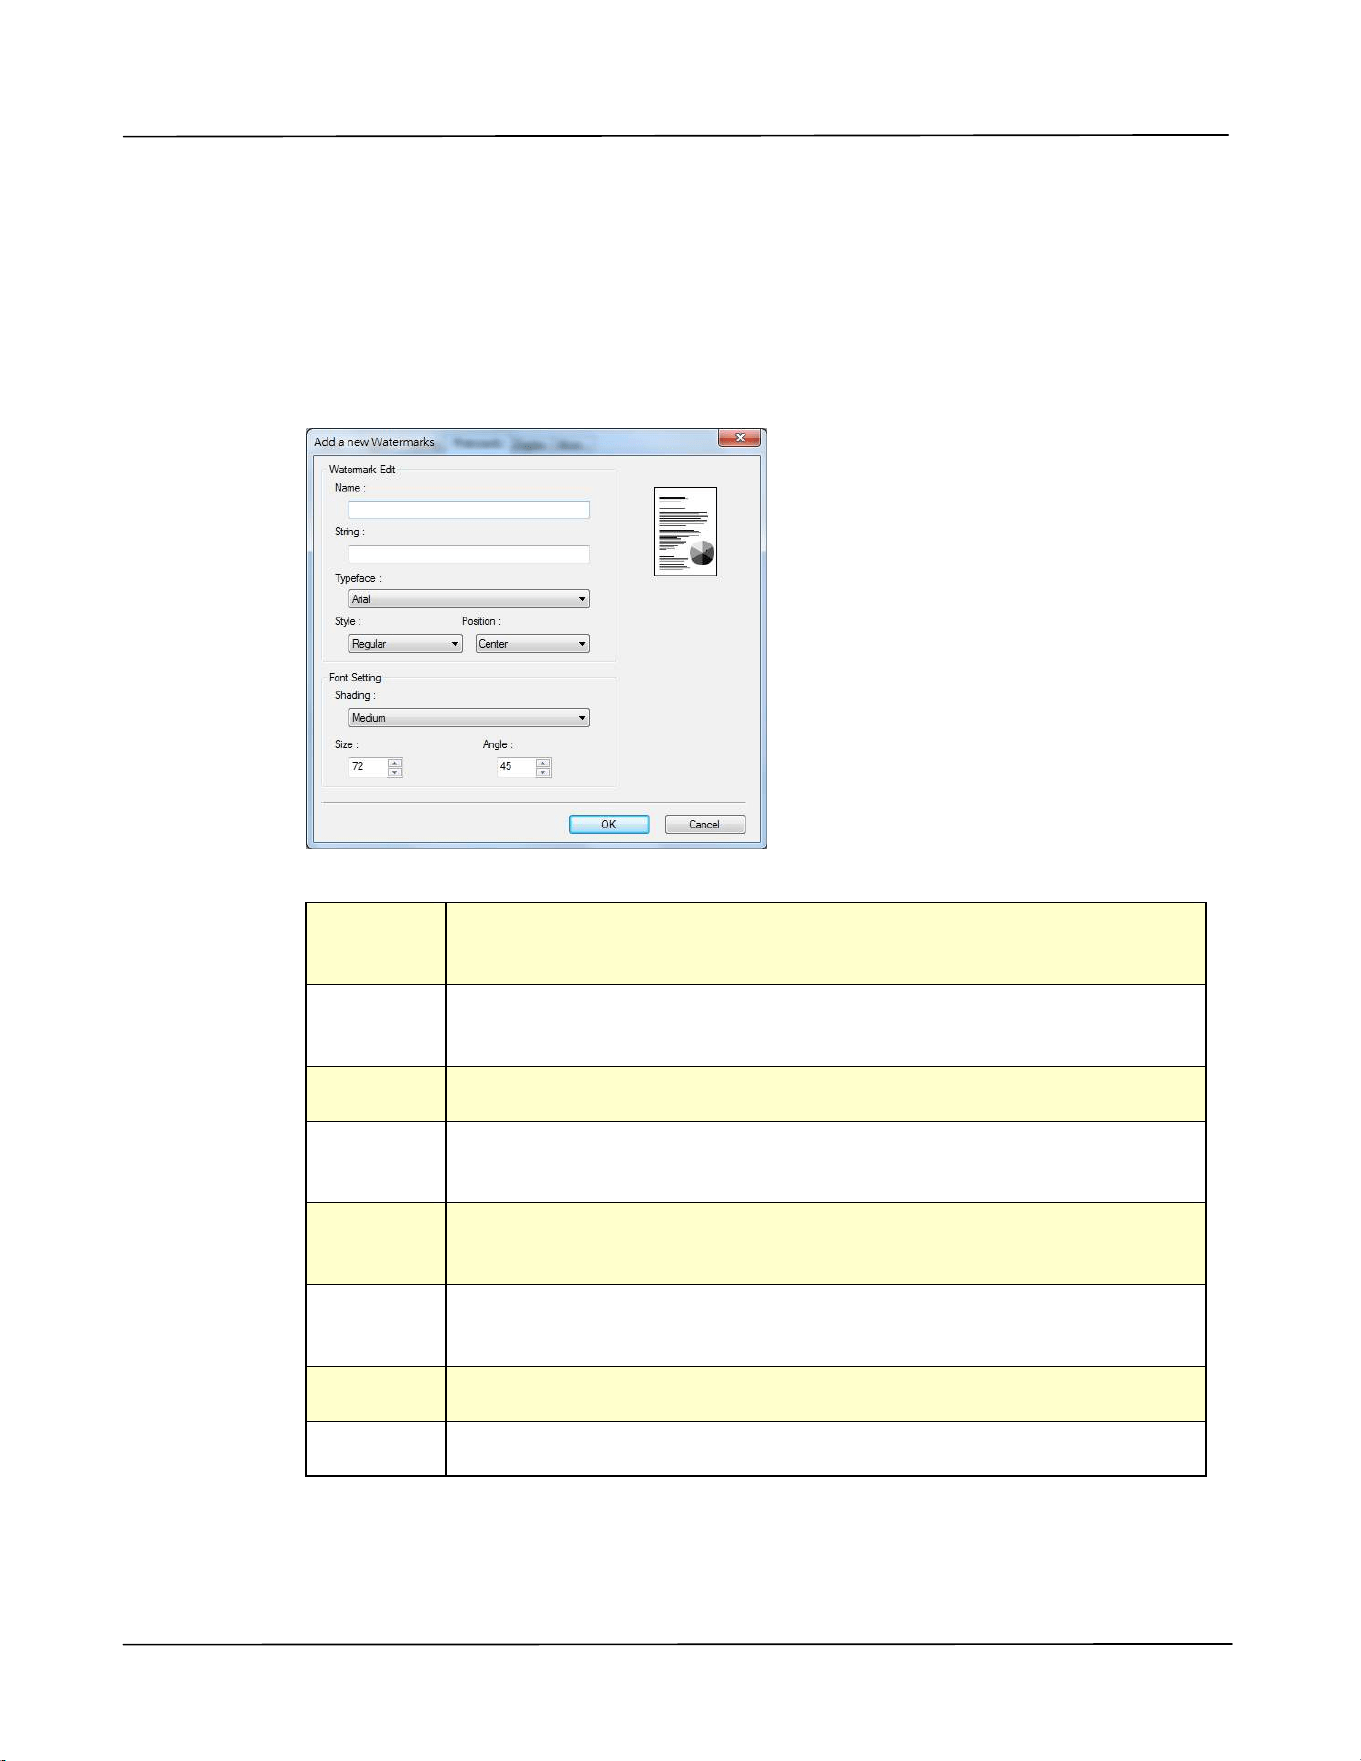
To add a
new wat erm ark t ext ,
1 . Choose Te xt and t hen click t he Add/ New but t on. The following Wat erm ark dialog
box appears.
N am e Nam e your wat erm ark t ext . This nam e will be shown in t he
Waterm ark t ext list.
St r ing Ent er your wat erm ark text , such as confident ial, im portant, and
so on.
Typefa ce Choose your font t ype for your wat erm ark t ext .
St yle Choose t he style of your wat erm ark t ext . Choice: * Re gu la r,
Bold, I t a lic, Bold I ta lic.
Posit ion Choose the posit ion of your wat erm ark t ext . Choice: * Ce nt er ,
Tile.
Sha ding Specify a relat ive density for the wat erm ark text . Choice:
Light e st, Light , * M edium , D ark , D ar k e st .
Size Specify t he size of your wat erm ark t ext from 1 t o 2 8 8 . ( * 72)
Angle Specify t he angle of t he wat erm ark t ext from 0 ° t o 3 6 0 ° ( * 45° )
* Fact ory Default Sett ing
2 . Click the OK butt on t o save the sett ings. I f t he new wat erm ark t ext is created
successfully, t he wat erm ark nam e will be shown in t he Text list.

Use r ’s Guide
5 4
Edit ing a curr ent w a t erm ar k t ex t
To edit a current water
m ark t ext ,
1 . Choose t he waternark nam e t hat you wish t o edit from the Text list.
2 . Click t he Edit butt on. The Wat erm ark Edit dialog box appears.
3 . Change your sett ings for t he selected wat erm ark text and choose OK to com plet e.
Rem oving a curre nt w a te rm a rk t e xt
To rem ove a current
wat erm ark t ext ,
1 . Choose t he wat ernark nam e t hat you wish t o rem ove from t he Text list.
2 . Click t he Rem ove butt on. The wat erm ark t ext will be rem oved.
Configur in g t h e Pr in t er ’s D river
55
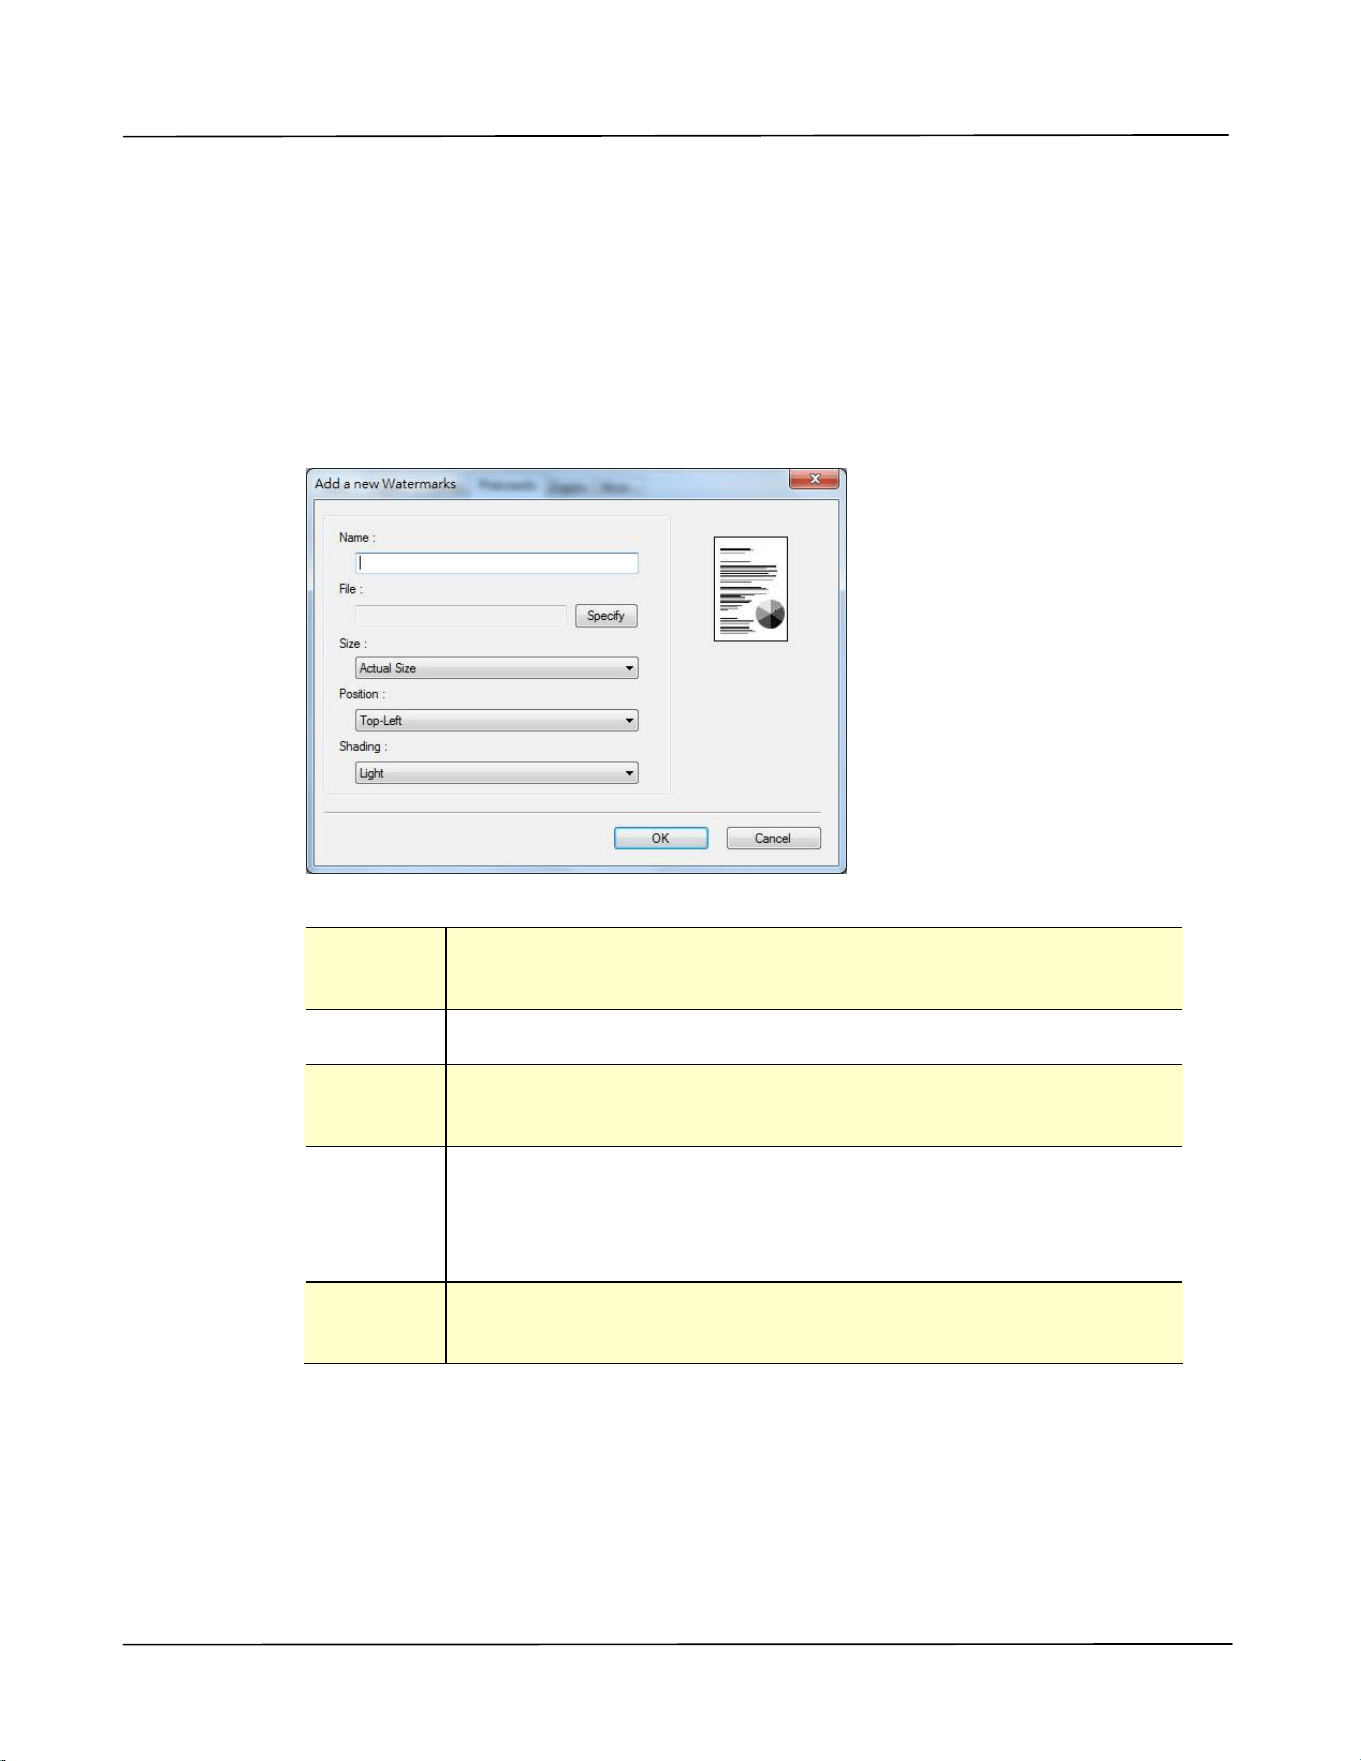
Adding a ne w w a t e r k im a ge
To add a
new wat erm ark im age,
1 . Choose I m a ge and t hen click t he Add/ Ne w but ton. The following Wat erm ark
dialog box appears.
N am e Nam e your wat erm ark im age. This nam e will be shown in t he
Wat erm ark im age list .
File Click the Brow se but t on t o locate your waterm ark im age.
Size Spe cify t he size of your w at erm ar k im a ge. Choice:
* Act ura l Siz e , Shr ink t o Pa ge , Tile .
Posit ion Choose the posit ion of your wat erm ark im age. Choice:
* Top- Left , Top- Cen t er, Top- Right , Ce nt er , Ce nt er - Left ,
Cent e r- Right , Bot t om - Cent e r , Bot t om - Right ,
Bot tom - Left .
Sha ding Specify a relat ive density for the wat erm ark text . Choice:
Light e st, * Ligh t , M e dium , Da rk , D ar ke st.
* Fact ory Default Sett ing
2 . Click t he OK butt on t o save the set t ings. I f t he new w at erm ark im age is creat ed
successfully, t he wat erm ark nam e will be shown in t he I m age list.

Use r ’s Guide
5 6
Edit ing a curr ent w a t erm ar k im a ge
To edit a current water
m ark im age,
1 . Choose t he wat ernark nam e that you wish to edit from t he I m age list.
2 . Click t he Edit but t on. The Waterm ark Edit dialog box appears.
3 . Change your set t ings for t he selected wat erm ark im age and choose OK t o
com plet e.
Rem oving a curre nt w a te rm a rk I m age
To rem ove a current
wat erm ark im age,
1 . Choose t he wat ernark nam e that you wish to rem ove from t he I m age list .
2 . Click t he Rem ove but t on. The w at erm ark im age will be rem oved.
Configur in g t h e Pr in t er ’s D river
57
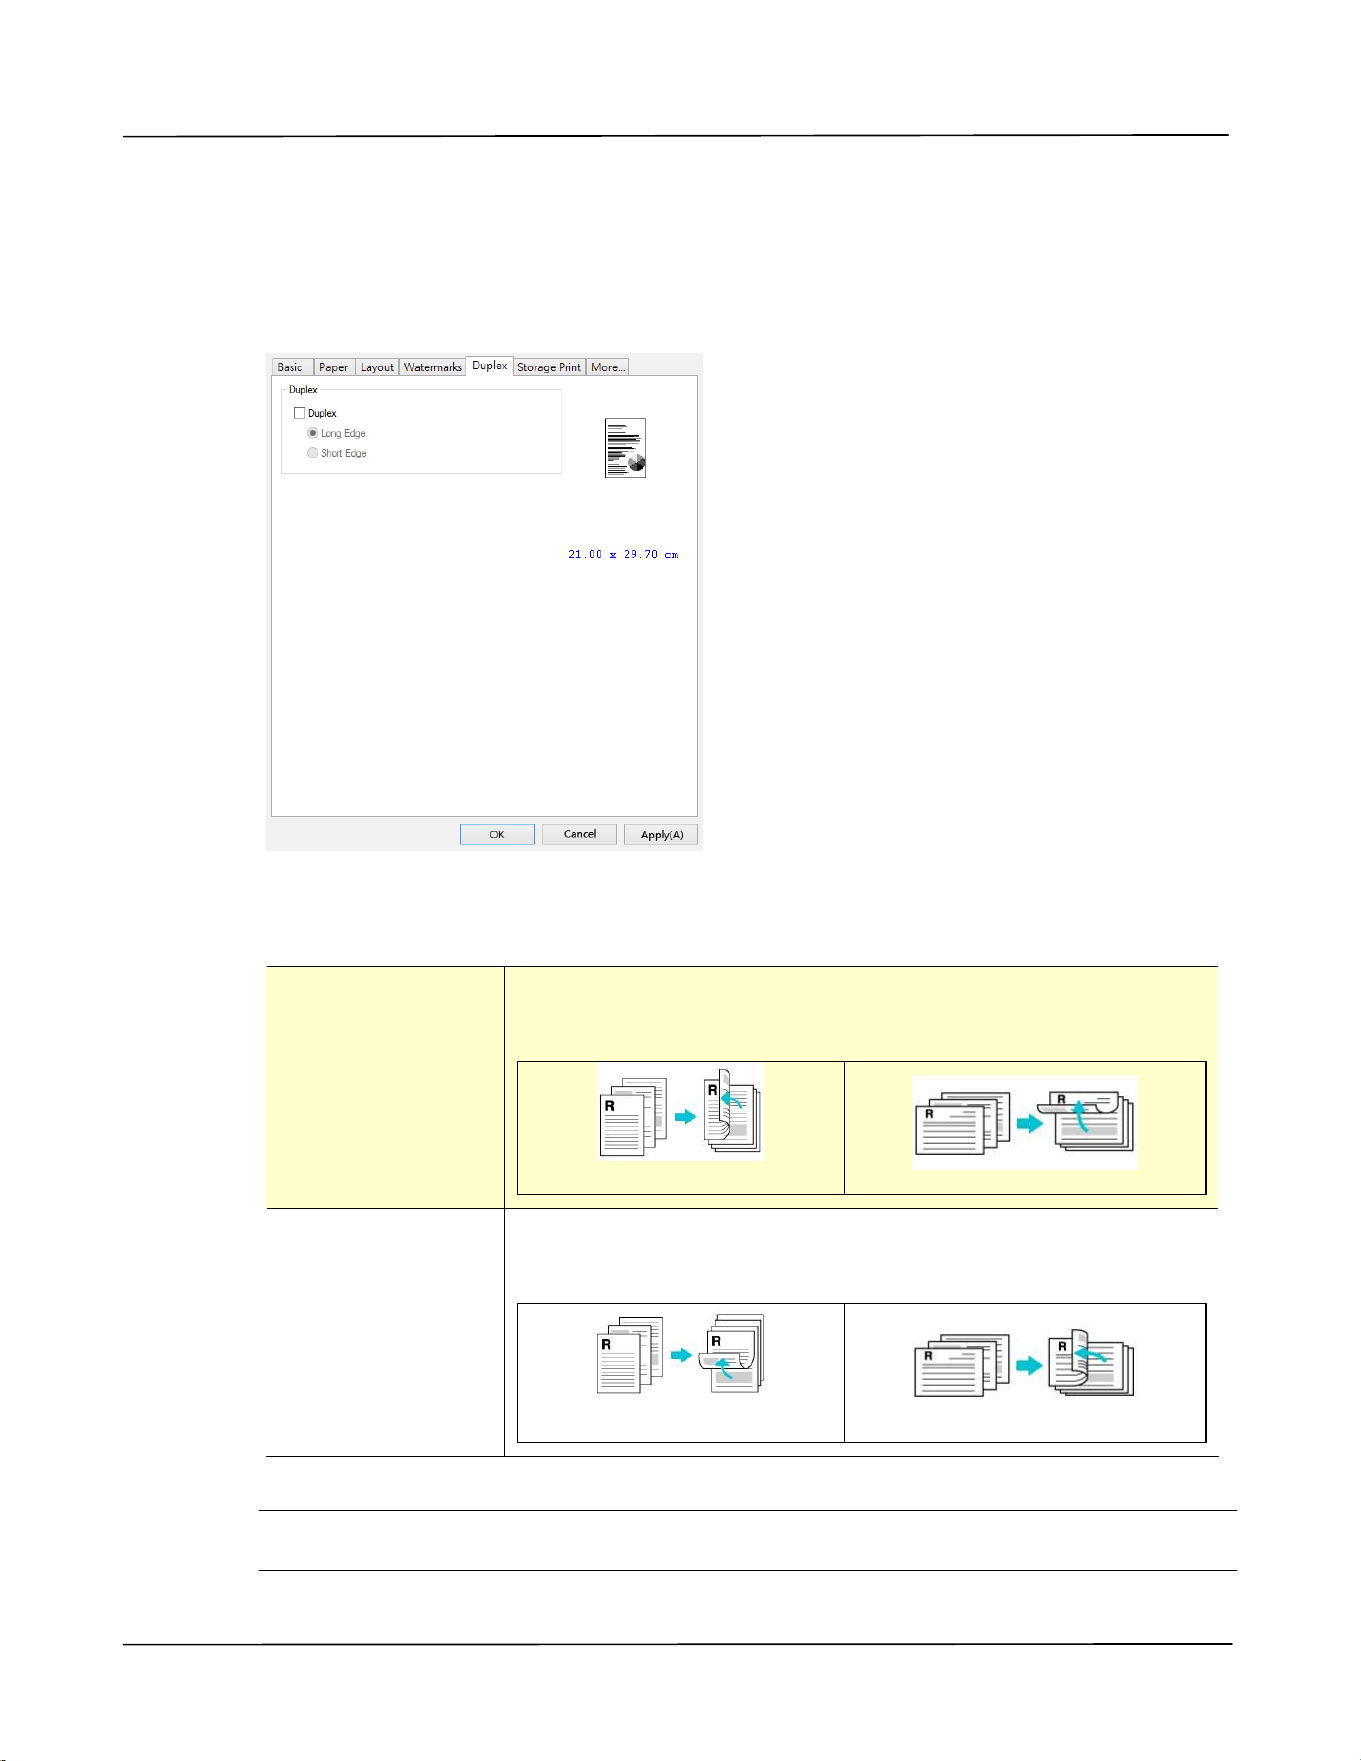
The D uplex Tab
The Duplex t ab allows you t o print your docum ent on t wo sides of t he paper. Choice:
Flip Horizont al, Flip Vert ical.
When using Tw o- Side d print ing, you can select whet her to bind copies on the
long- edge or short- edge.
Long Edge
( Binding)
Long- Edge binding ( Por t ra it ) w ill print t he pages so that
you flip t hem like you w ould do on a book.
Long- Edge binding ( Port rait)
Long- Edge binding ( Landscape)
Short Edge
( Binding)
Short - Edge binding ( Por t ra it ) print s them so that your
flip t hem like you would do on a calen da r.
Short- Edge binding ( Por t rait )
Short - Edge binding ( Landscape)
* Fact ory Default Sett ing
N ot e: The duplex feature support s only page sizes of Legal, A4, B5 ( JI S) , Let t er, and
cust om size ( larger t han B5) wit h paper weight bet ween 60g/ m
2
and 105g/ m
2
.
Use r ’s Guide
5 8
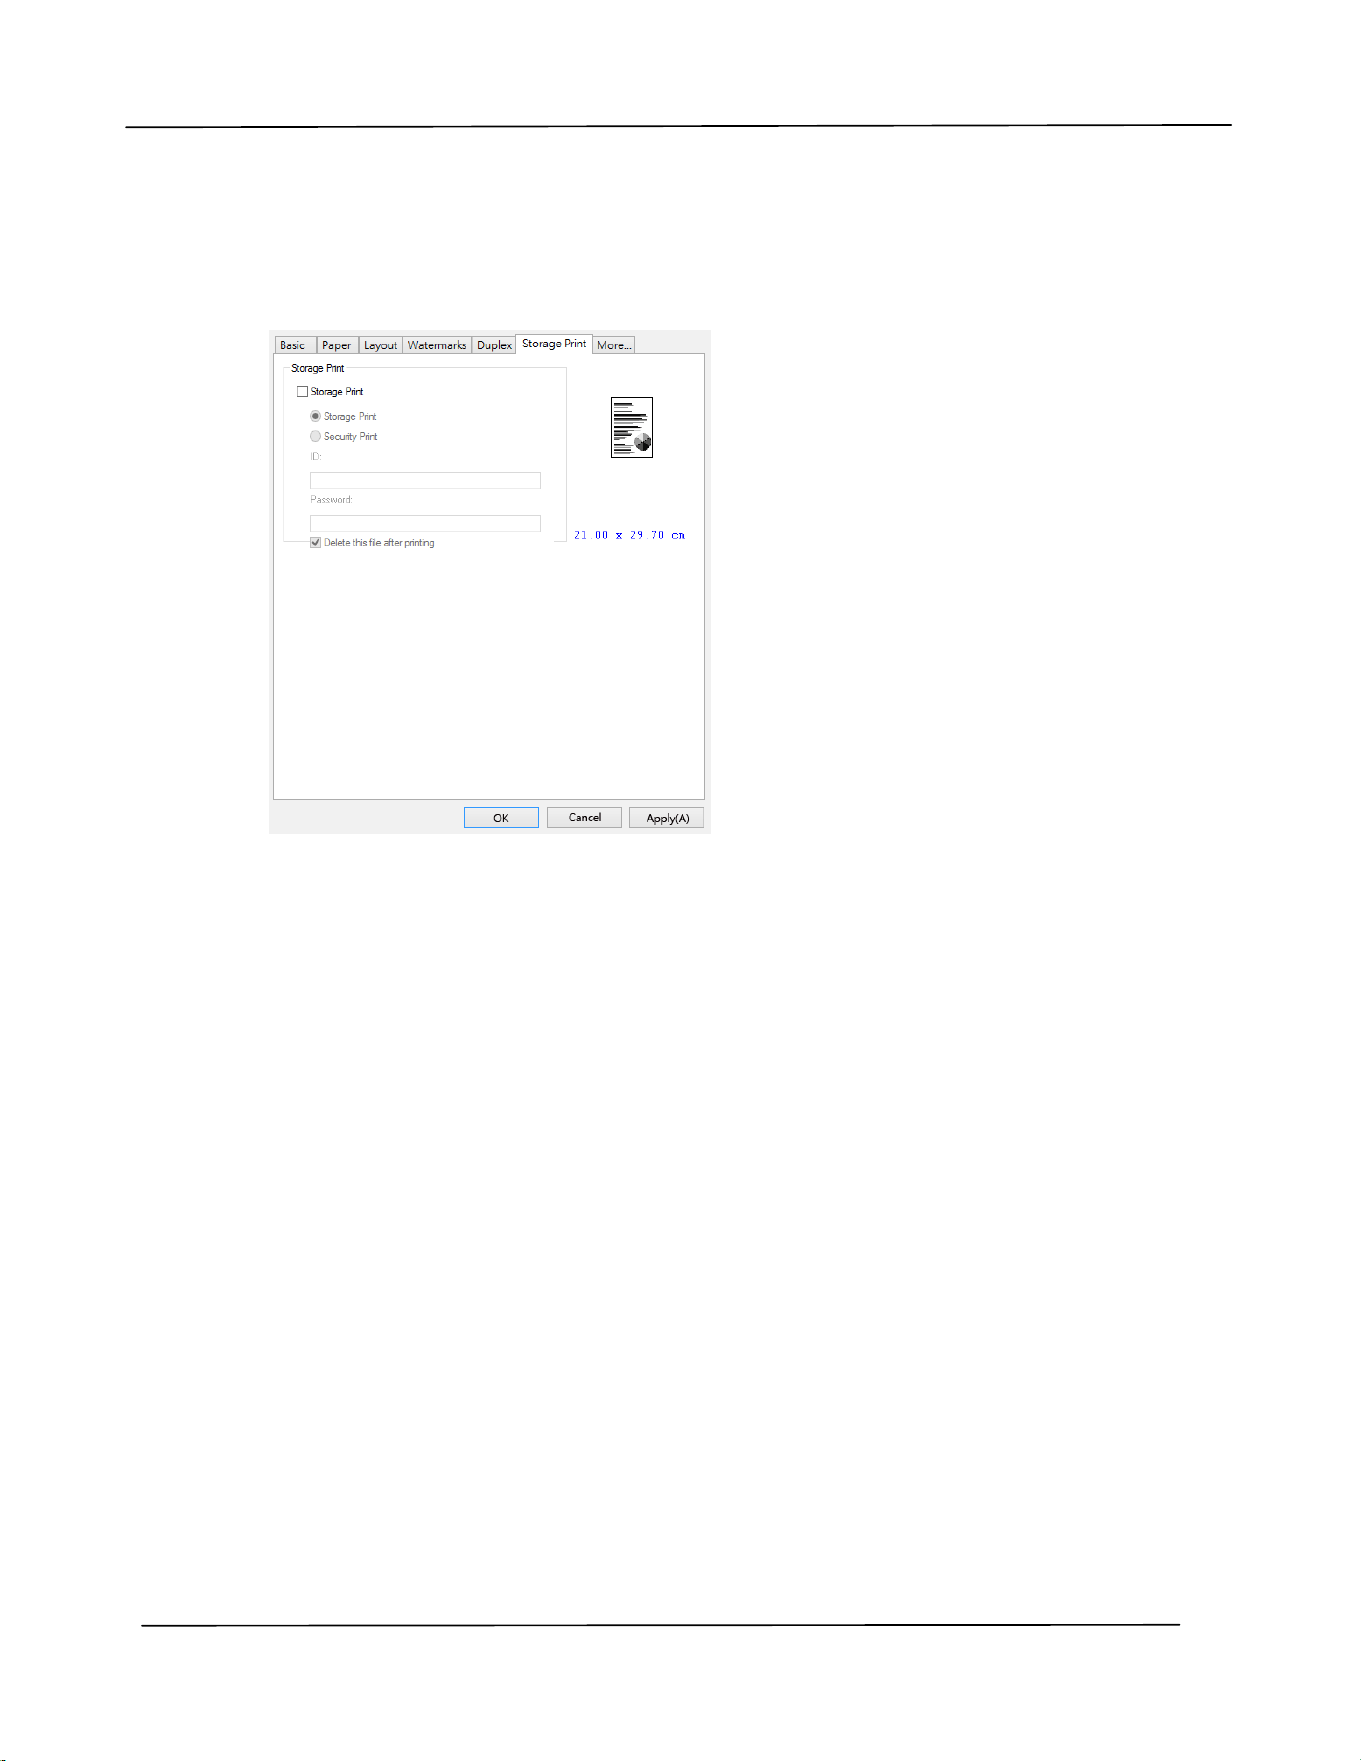
The St ora ge Pr int Ta b
The Storage Print tab allows you t o send t he frequently used form s t o t he product
and t hen print t he form direct ly from the product’s cont rl panel.
To send t he frequent ly used form s t o t he product,
1. Open your docum ent , for exam ple, travel form .
2. Press Print and choose t he print er.
3. Click [ Propert ies] t o prom pt the [ Print er Preferences] dialog box.
4. Click t he [ Storage Print ] t ab, and t hen check t he [ Storage Print] opt ion.
5. Ent er your job nam e from the I D box. For exam ple, Travel Form .
6. I f required, check [ Securit y Print ] and t hen ent er your specified password.
7. Click [ OK] to save t he set tings and t hen leave t he [ Print er Preferences] dialog
box. The specified j ob will be sent t o t he product and appear on t he j ob list as
shown in t he following figure.
8. To print t he t ravel form , sim ply choose [ OK] > [ Storage Print] and t hen choose
[ Travel Form ] from t he j ob list and press [ St art ] .

Configur in g t h e Pr in t er ’s D river
59
Checking "Se cur it y Prin t " will require you t o ent er a password for t he file you want
t o print so t hat only t he person who knows password can print t he file.
Checking "D e let e t his file aft er print ing" will delet e t he specified file aft er it is
print ed. Yet, the password is also required t o delet e t he files.
Use r ’s Guide
6 0
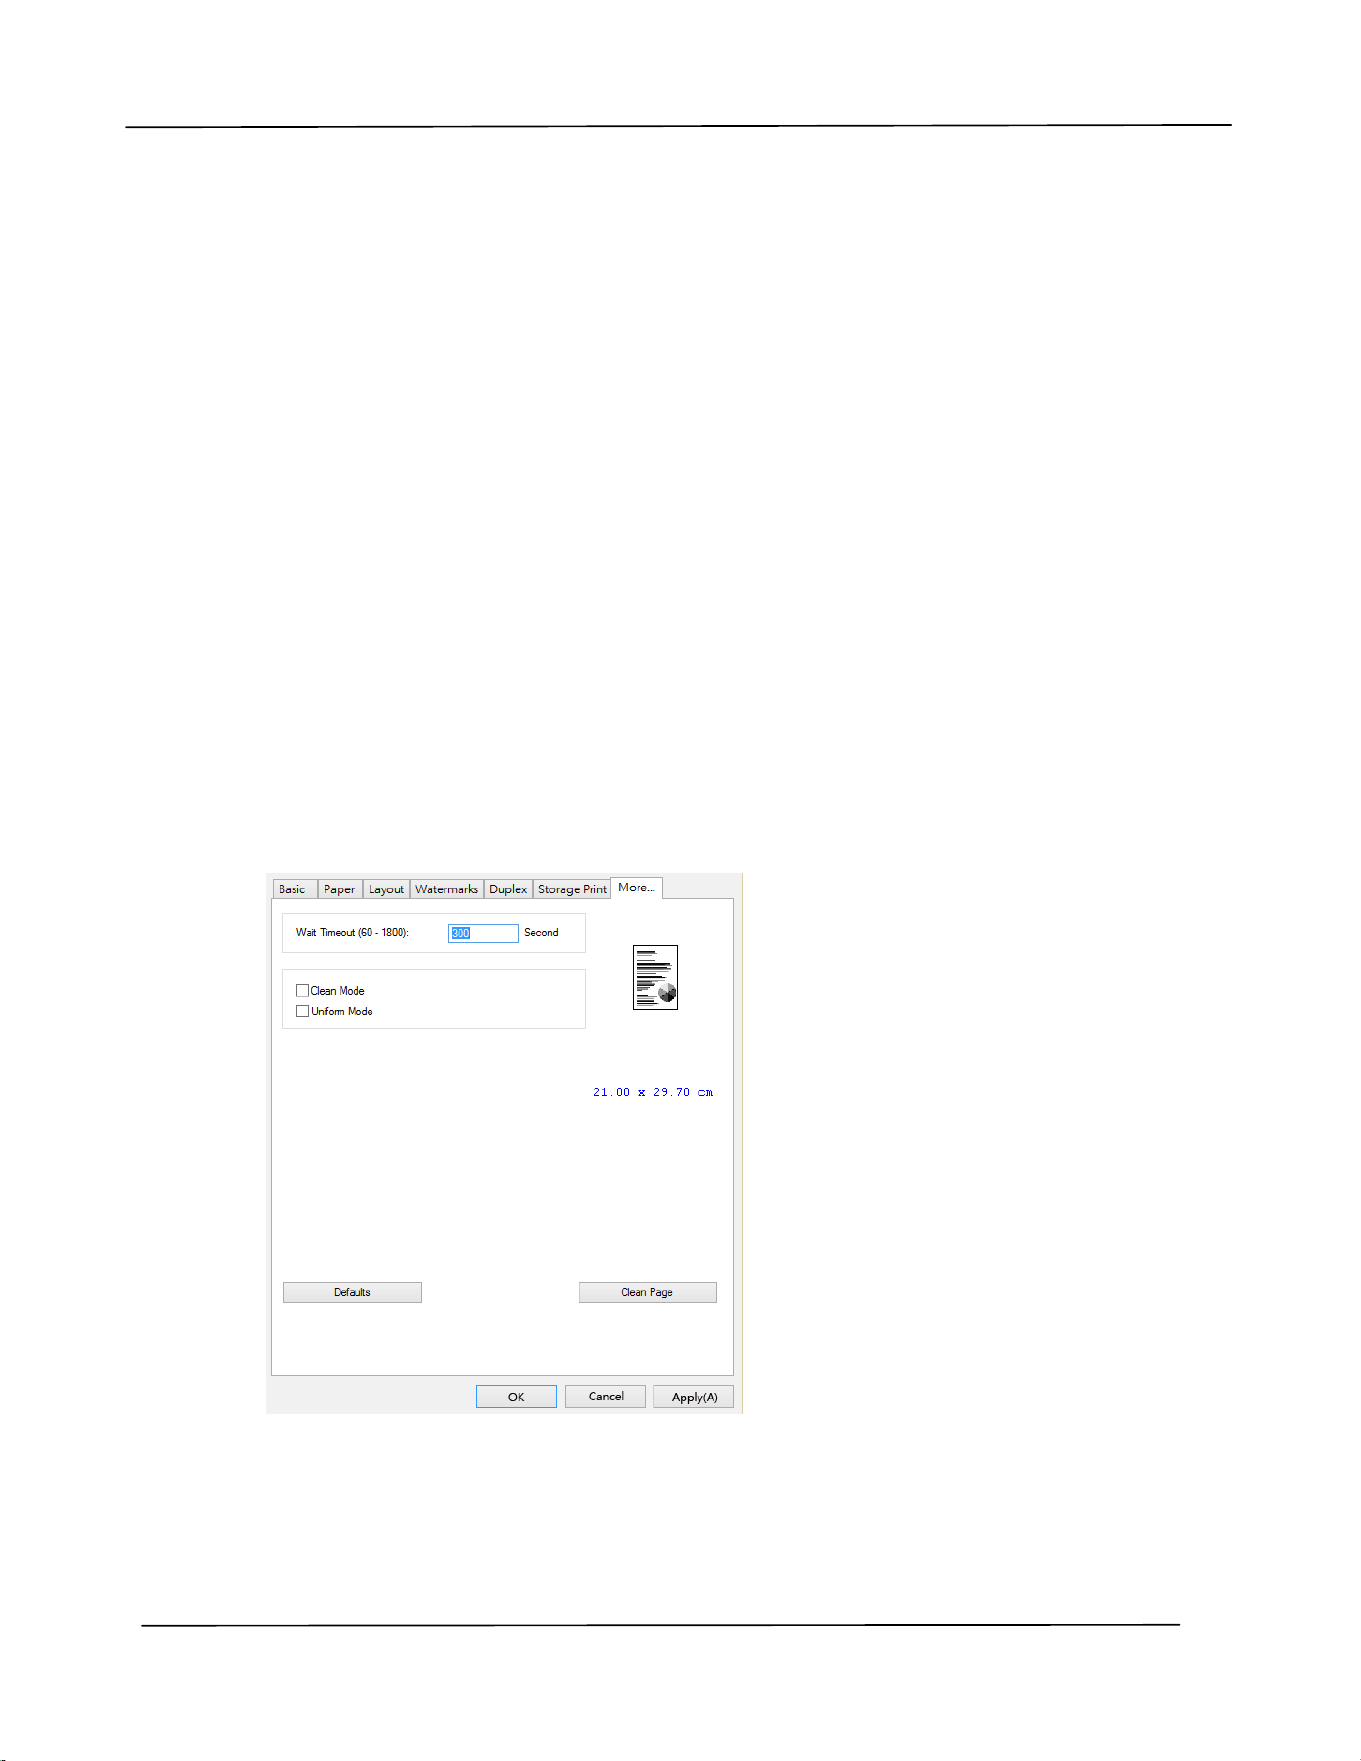
The M or e Ta b
On t he M ore t ab, a W ait Tim eout opt ion is provided t o set t he am ount of t im e t he
PRI NTER wait s for dat a to com e from com put er during a j ob. I f t he data stream
pauses for longer t han t he specified num ber of seconds, t he j ob is cancelled.
Perm it t ed t im eout values: 60~ 1800 seconds, default tim eout values: 300 seconds
Clean Mode: I f unwant ed im age appears in the blank space, you can check “ Clean
Mode” t o im prove t he print ing qualit y.
Uniform Mode: I f uneven shading appears in t he im age area, you can check “ Uniform
Mode” t o im prove t he print ing qualit y.
Default s: Press t o change all set t ing values back t o fact ory default.
Clean Page: Aft er pressing t he but t on, t he m achine w ill im m ediately print a cleaning
chart t o clean t he excessive t oner in t he print er.

5 . Print ing Docum ent s from a
Mobile Device
For t he m odel com es wit h a Wi- Fi m odule, t he product can be convert ed into a
wireless device and your m obile device is able t o print em ails and docum ent s by
sim ply t apping Print from t he m enu. ( The availabilit y of Wi- Fi function varied
according t o your m odel nam e.)
Ma king Preparat ion
To connect t he product t o a wireless LAN, prepare t he followings:
An environm ent in w hich a w ire less LAN is ava ilable
When connecting t he scanner to a wireless LAN, you m ay need inform at ion for a
wireless access point such as an SSI D ( net work nam e) and a securit y key ( password).
For det ails, cont act your Network Adm inistrat or or refer to the m anual for t he
wireless access point .
At t ent ion!
Do not place obstacles t hat block radio waves ( e.g. walls or m et al plates) or devices
that cause radio wave interference ( e.g. cordless phones) wit hin 100 m m of t he
product , or near your wireless access point .
Mopr ia Pr int Ser vice
The Mopria Print Service ( app) can be downloaded from the Google Play Store t o
enable print functionalit y on any Android phone or t ablet ( Android version 4.4 or
lat er) . Once installed, sim ply connect your device t o t he sam e network as t he
PRI NTER and your m obile print can be com plet ed.

Use r ’s Guide
6 2
Print via Soft w ar e Applicat ion ( de pe nding on your m obile phone)
You can also t urn on Wi- Fi on your m obile phone, connect it directly t o t he print er,
then open the docum ent on t he m obile phone, use t he software t hat opens t he
docum ent and select the print er t o print it out .
Connect ing t o a W ireless N et w ork via t he
N et w or k Set up Tool
* For t he product that com es wit h a Wi- Fi m odule, the Wi- Fi is autom at ically t urned on
when the product is t urned on, and the product work as an AP ( Access Point) by
default .
Before You Begin!
Make sure t he com put er has been connect ed t o t he product via t he USB cable.
Make sure t he power adapt er has been connect ed and the product has been t urned
on.
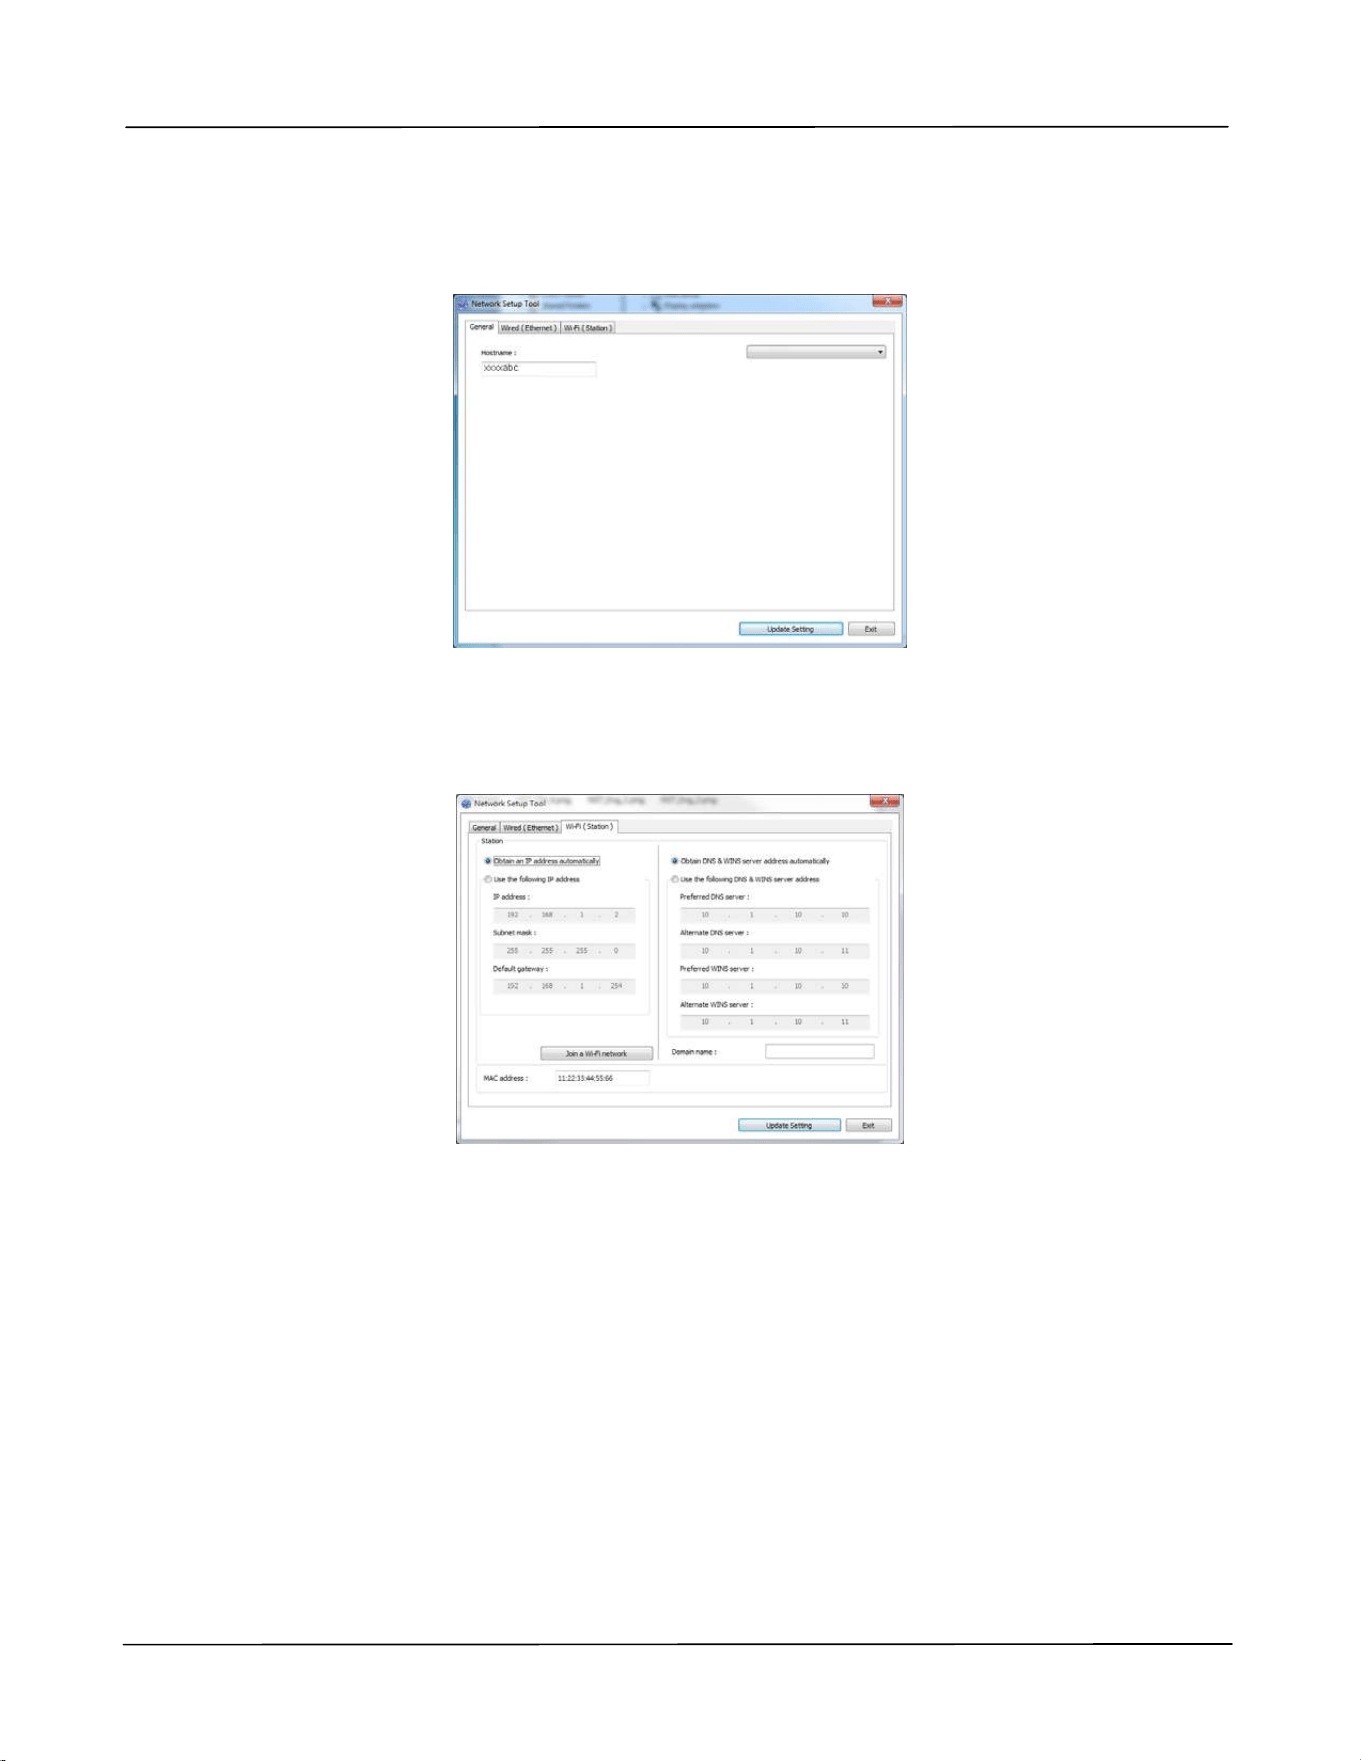
The N et w ork Se tup Tool is an application t o configure t he sett ings required for
connecting t he product via wireless LAN. The N et w ork Set up Tool can be used t o
configure the following wireless or wired set t ings:
Connecting t he product t o a wireless access point
Connect ing t he product t o a wired network
Set ting t he I P address for t he scanner
Pr in t ing Docum e nt fr om A M obile De vice
63
1 . Launch the program by clicking t he St ar t > All Pr ogr a m s> Avision AP4 XXX
Pr in t e r> N et w ork Set up Tool. The m ain window appears.
2 . On t he [ Gener al] page, check [ W i- Fi ( St a t ion) ] .
3 . Click t he [ W i- Fi ( St a t ion ) ] t ab to prom pt t he [ W i- Fi ( St at ion) ] page.
4 . Check [ D HCP] to obtain t he I P address directly from the DHCP server or you m ay
enter your stat ic I P on t he [ I P Addr ess] , [ Subn et Ma sk] , and [ Gat ew a y] field
respectively.
5 . Click [ Conne ct t o SSI D ] and t he current ly connected w ireless net works will be
displayed. Select t he wireless net work you want t o connect and then enter t he
securit y key if required.
AP4XXX Printer

Use r ’s Guide
6 4
6 . Click [ Conne ct] t o st art connecting t he SSI D ( wireless net work nam e) and t hen
updat e t he I P inform ation to t he product.
7 . I f updat e is successfully, an [ Upda t e Device Su cce ssfully] m essage w ill be
displayed and the Network Set up Tool will be aut om atically closed.
Pr in t ing Docum e nt fr om A M obile De vice
65
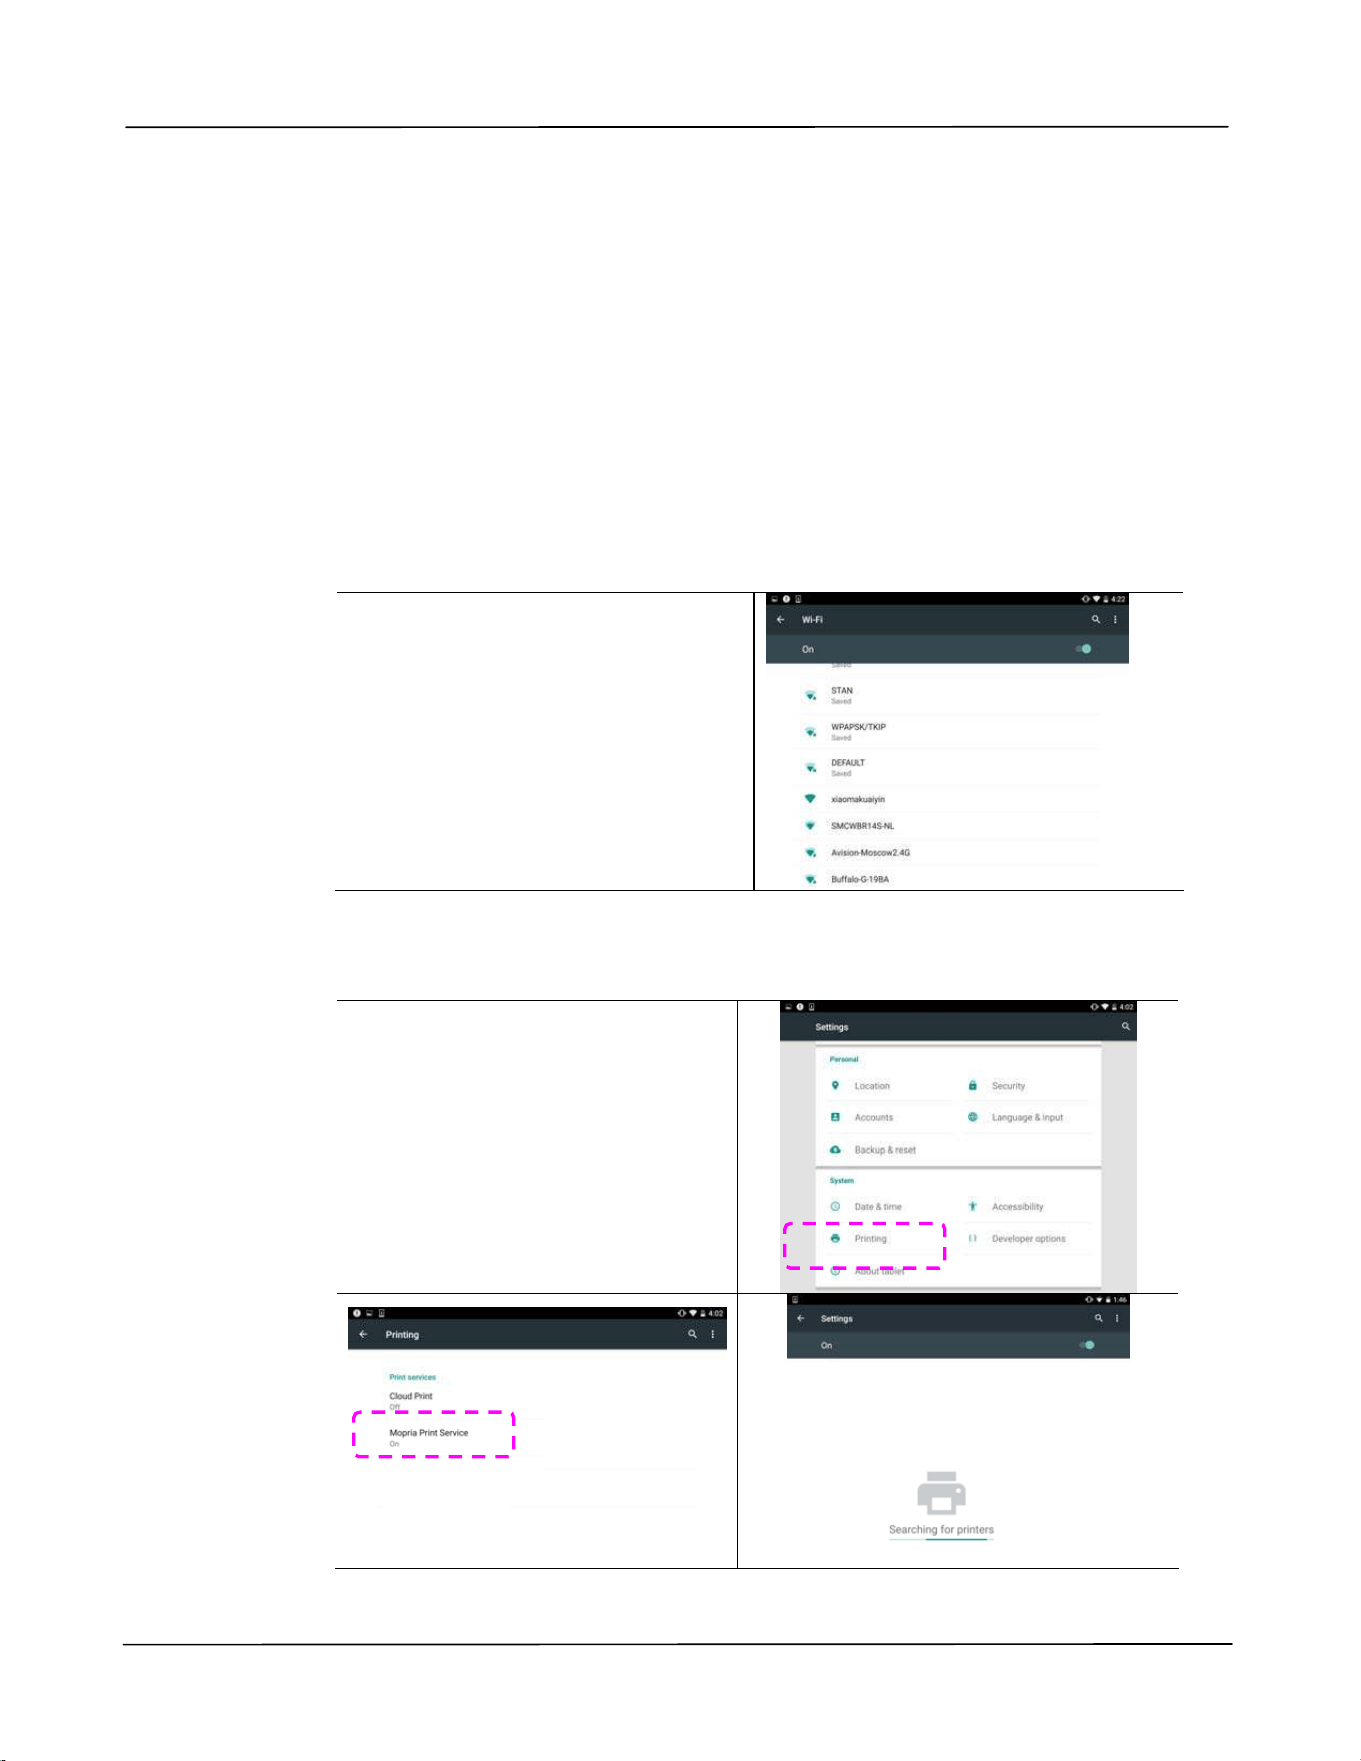
Print ing Your File from a Android Mobile
Device
Make sure t hat t he Mopria Print Service ( Print App) has been installed on your
Android m obile device. The M opr ia Pr int App can be purchased for free from an
application st ore such as Google Play.
1 . Select t he sam e wirelss network as your PRI NTER.
On your m obile device, t ap
Set t ings> W i- Fi and choose t he
sam e net w ork nam e ( SSI D) of
your PRI NTER.
2 . Tur n M opria Print Se rvice on. The device will search available PRI NTERs.
On your m obile device, t ap
Set t ings> Print ing> Mopr ia
Pr in t Se rvice t o t urn Mopria
Print Service on. The Device w ill
search for all available PRI NTERs.

Use r ’s Guide
6 6
3 . Select your PRI NTER.
Select [ XXX at XXX] from the
PRI NTER list.
( XXX= Modellnum m er)
4 . Open t he file which you want t o print .
Open t he file you w ant t o print.
5 . Choose [ Print ] from the m enu and select your PRI NTER.
xxx at xxx
Mopria Print Service
xxx at xxx
Mopria Print

Pr in t ing Docum e nt fr om A M obile De vice
67
6 . Choose print settings and print .
I f you do not need t o change
print options, t ap Pr int t o
send t he print j ob.
I f you need t o change print
options, cont inue t o t he next
section.
xxx at xxx
Mopria Print
Use r ’s Guide
6 8
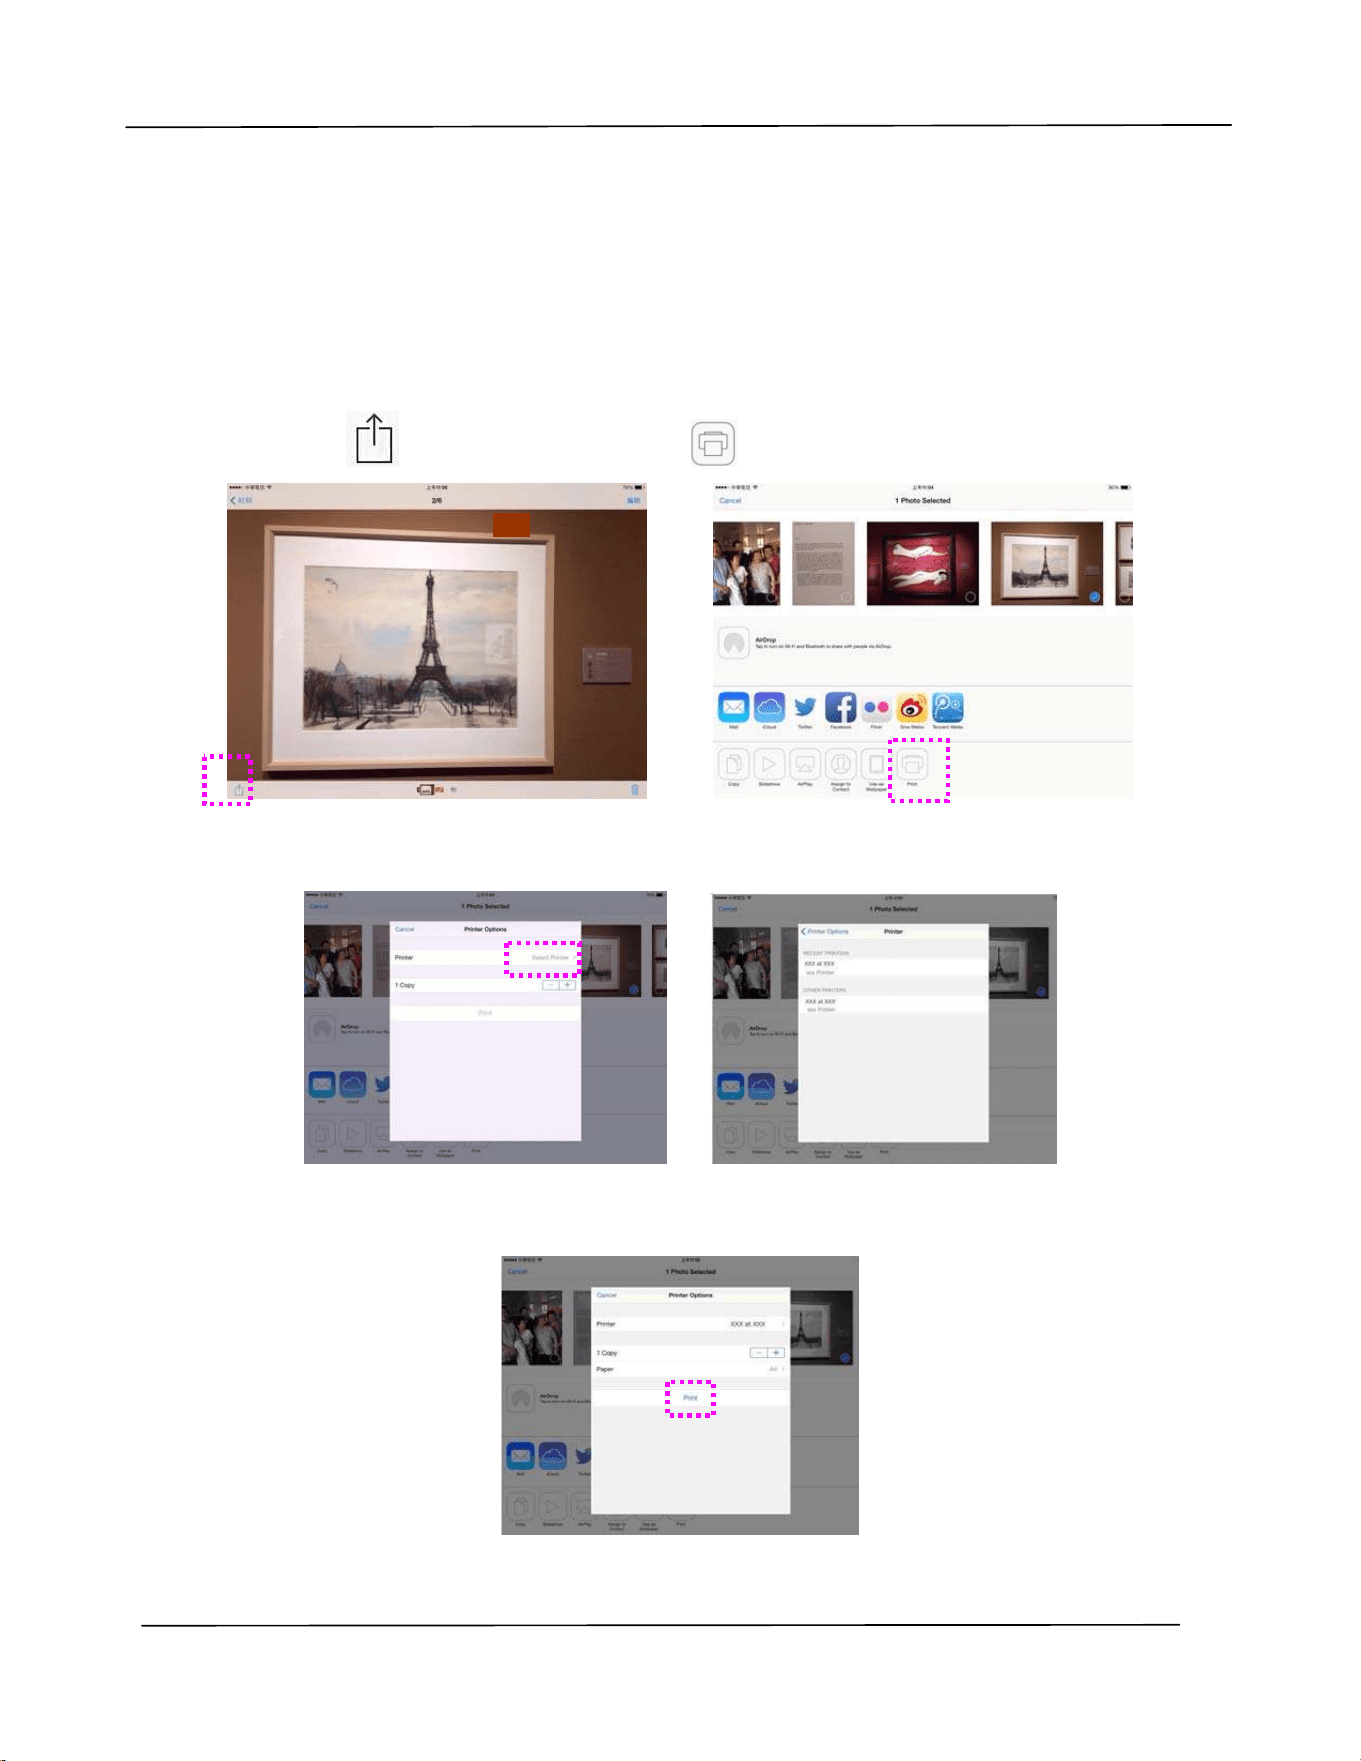
Print ing Your File from a iOS M obile Device
1 . Turn on your m obile devices such as iPhone or iPad.
2 . Tap 「Set t ings」 and t hen open Wi- Fi. Select t he network sam e wit h your
PRI NTER.
3 . Open t he picture or t he docum ent t hat you want t o print . Tape the Share icon
(
) and t hen the print icon ( ).
4. Tap [ Select PRI NTER] and choose your desired PRI NTER. (xxx= m odel nam e)
5. Tap [ Print ] t o start print ing.
Trouble shoot ing
69
6 . Troubleshoot ing
Monit oring Your Print er Using Print er
St at us M onit or
The PRI NTER Stat us Monitor allows you t o m onit or your PRI NTER’s stat us, get
inform ation on consum able part s, and alert s you when PRI NTER errors occur.
PRI NTER Stat us Monit or is available when t he PRI NTER is connected direct ly t o a
host com put er via t he USB port or a net work port .
PRI NTER Stat us Monit or is installed when you install t he PRI NTER driver as described
in t he preceding sect ion.
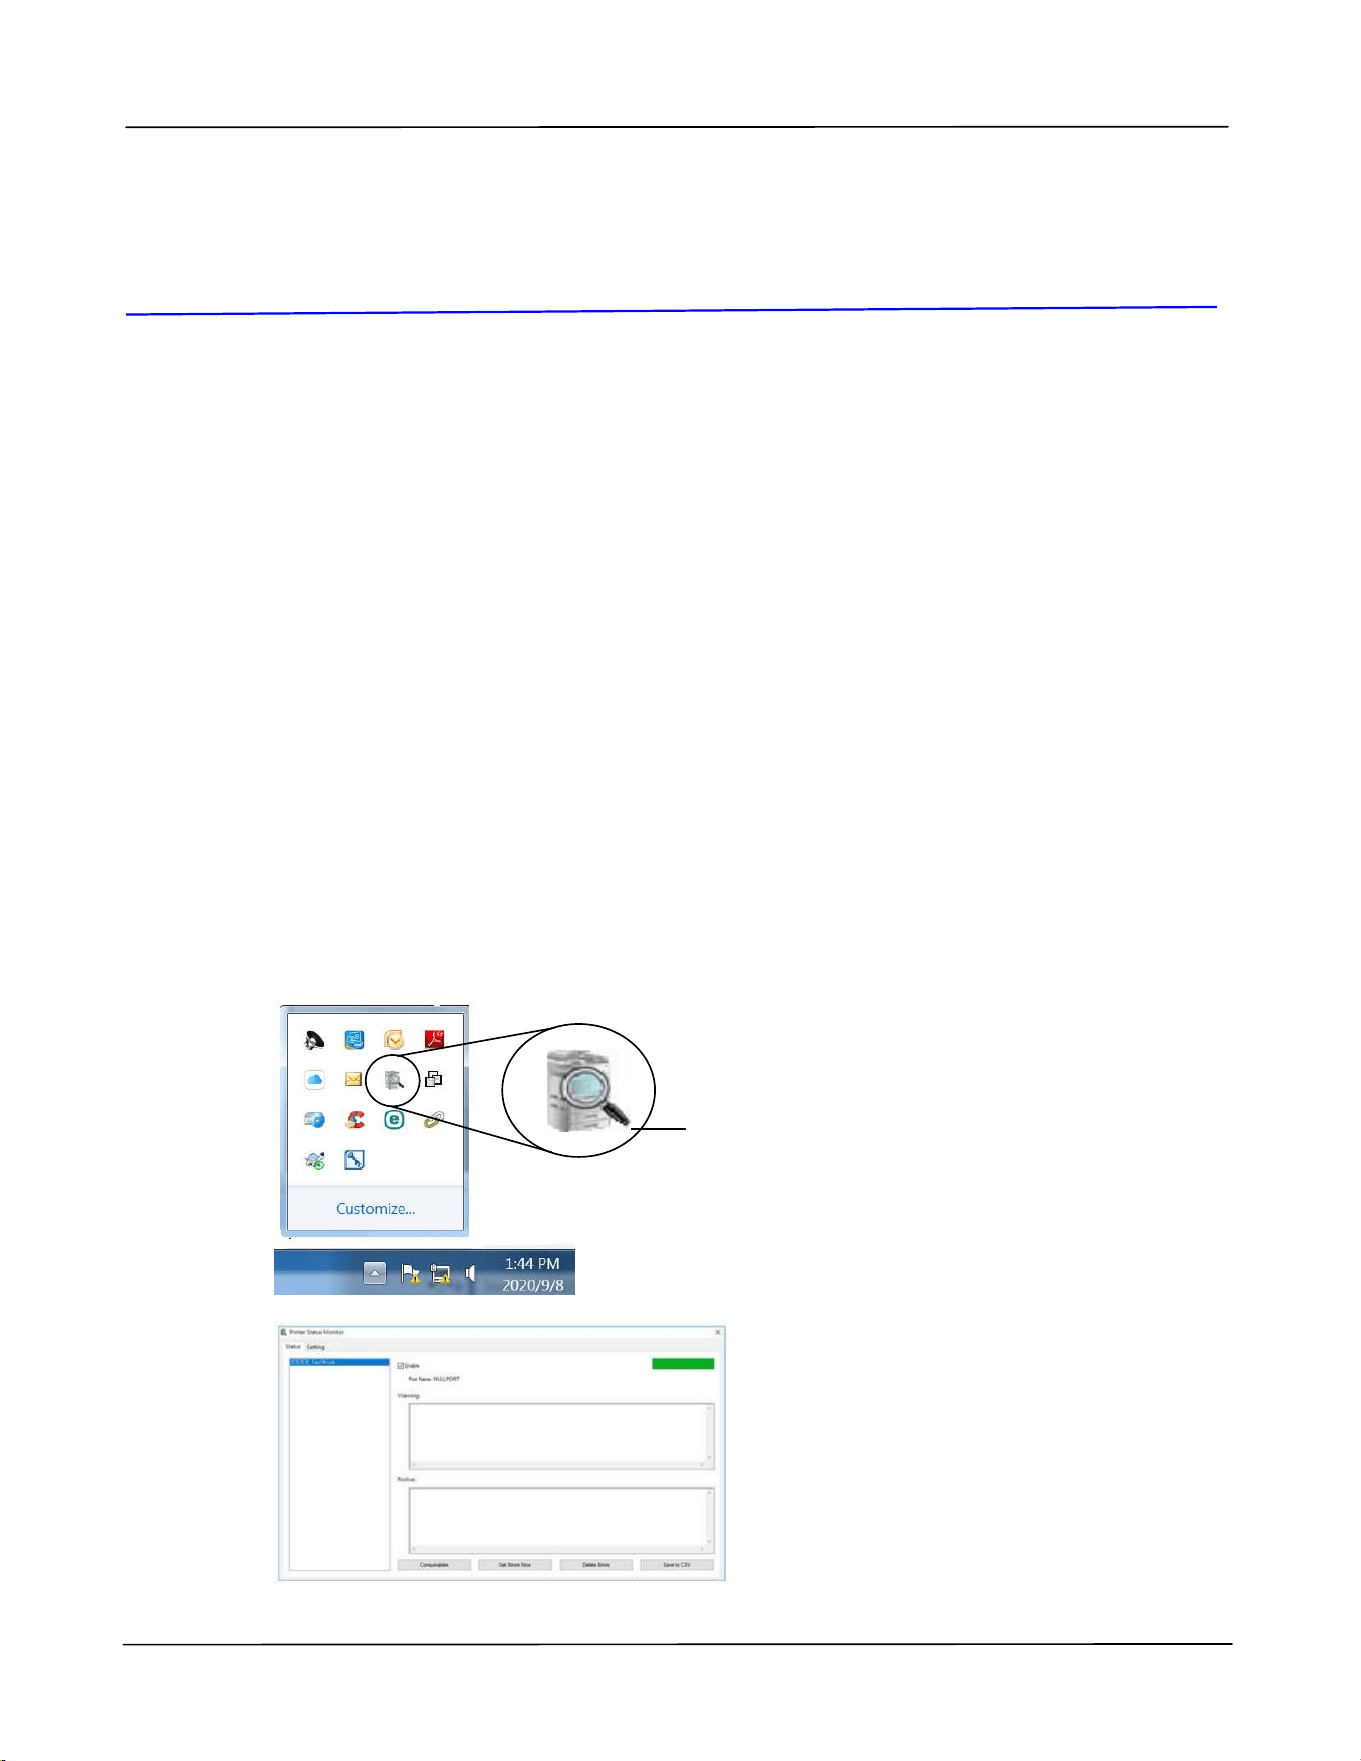
Accessing Print er St a t us M onit or
Double- click t he Pr int e r Sta t us M onit or icon on t he system t ray. The following
PRI NTER status window appears.
Pr in t e r St at us W indow
Pr in t e r St at us Mon it or icon
Use r ’s Guide
7 0
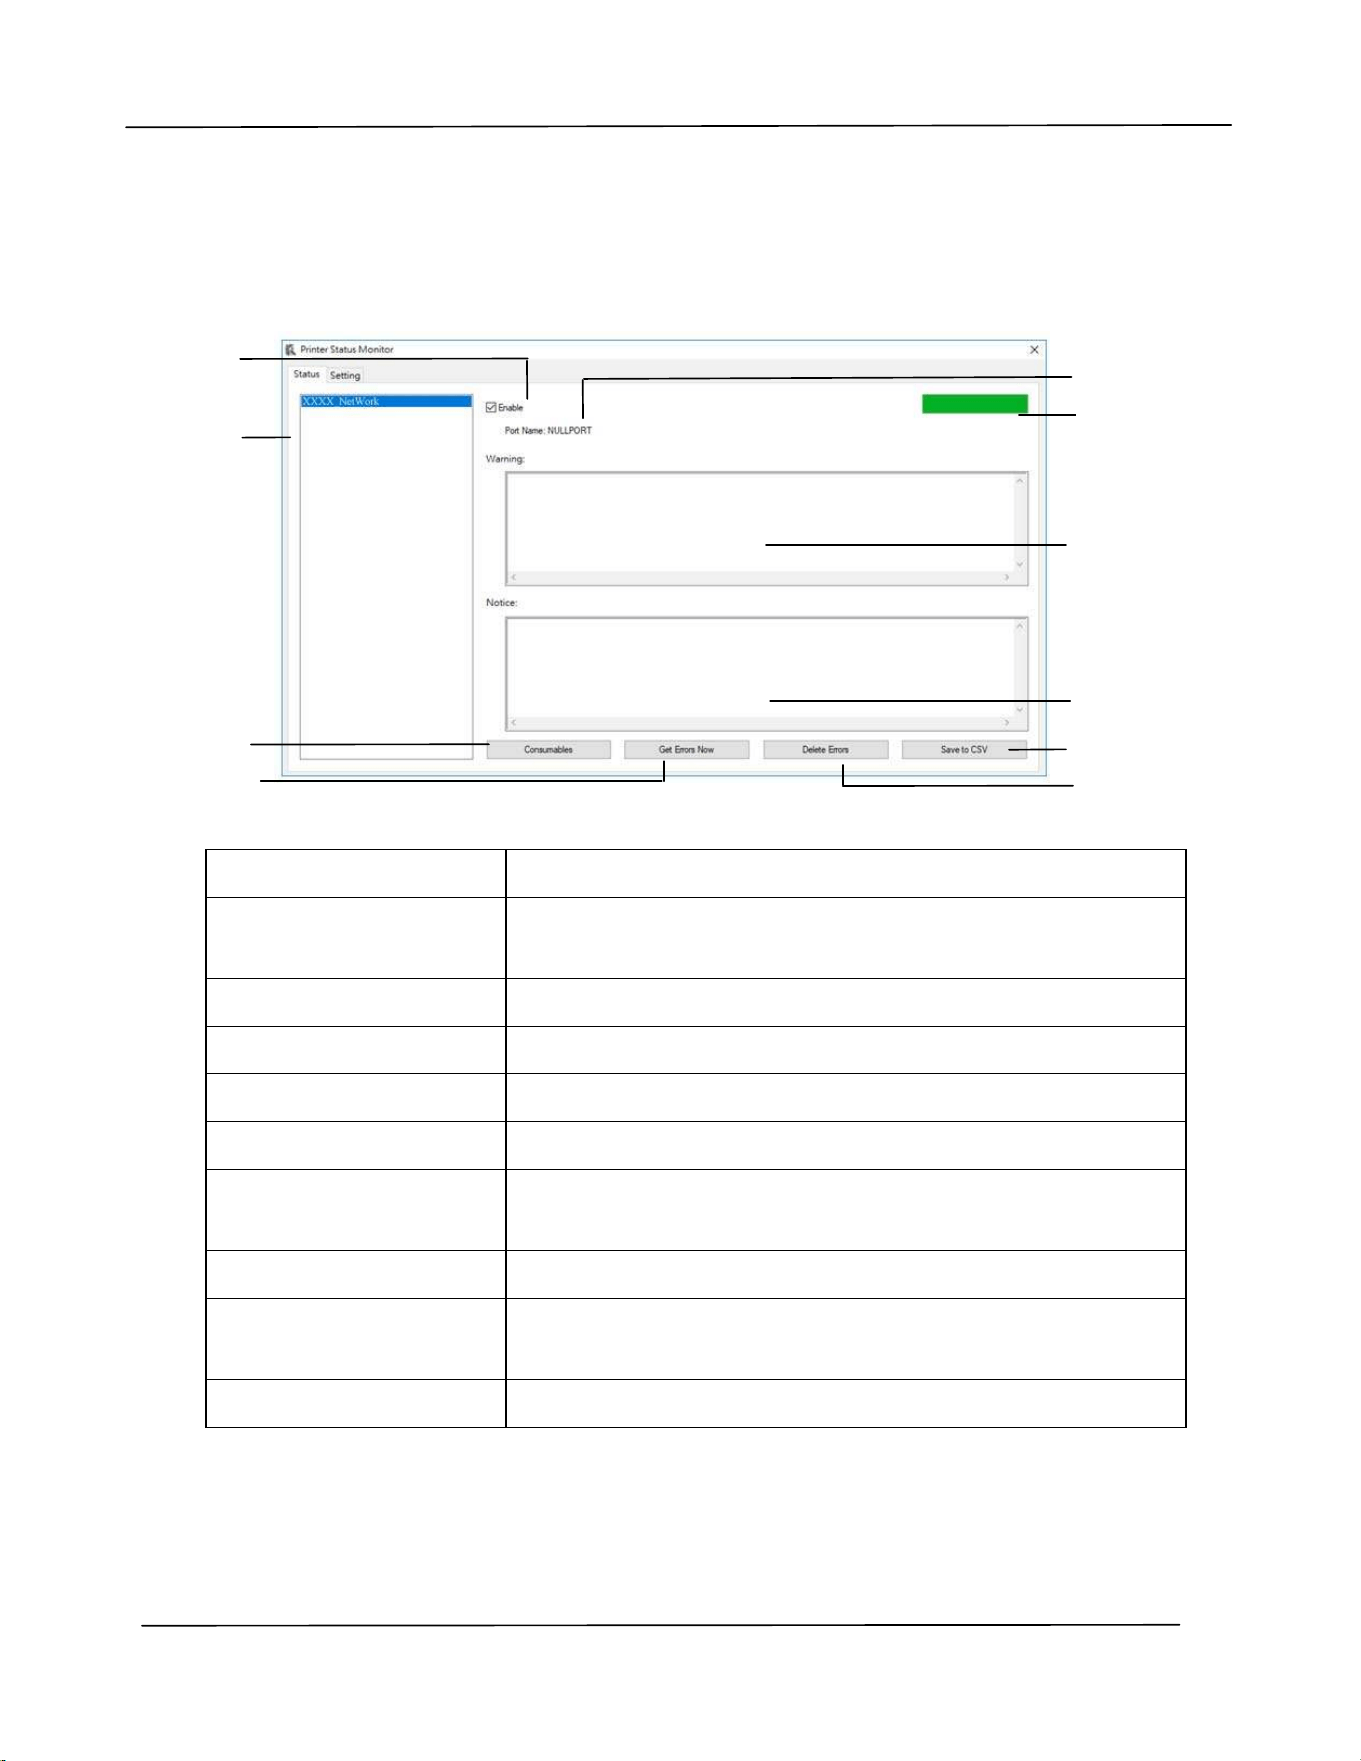
Get t ing Print er St a t us Det ails
You can m onitor printer status and get inform ation on consum able products using
the Print er Stat us Monit or dialog box.
a Port Na m e Port nam e for t he specified print er.
b Pr ogress Ba r The progress bar t o access t he lat est data of the specified
print er.
c Te x t Box Display t he warning m essage.
d Tex t Box Display t he not ice m essage.
e Sa ve Er ror s t o CSV Save error m essage t o a CSV file.
f De le te Er ror s Delet e all t he error m essages.
g Ena ble Check t he box t o enable accessing t he stat us of a
specified print er.
h Print e r Display connect ed print ers.
i Consum a bles Click t o show t he inform ation of t he paper t ray and t he
consum ables part s such as Drum ( EP) , Toner.
j Get Error s N ow Refresh the print er status now.
a
b
c
d
e
f
g
h
i
j
Trouble shoot ing
71
Set t ing M onit oring Preferences
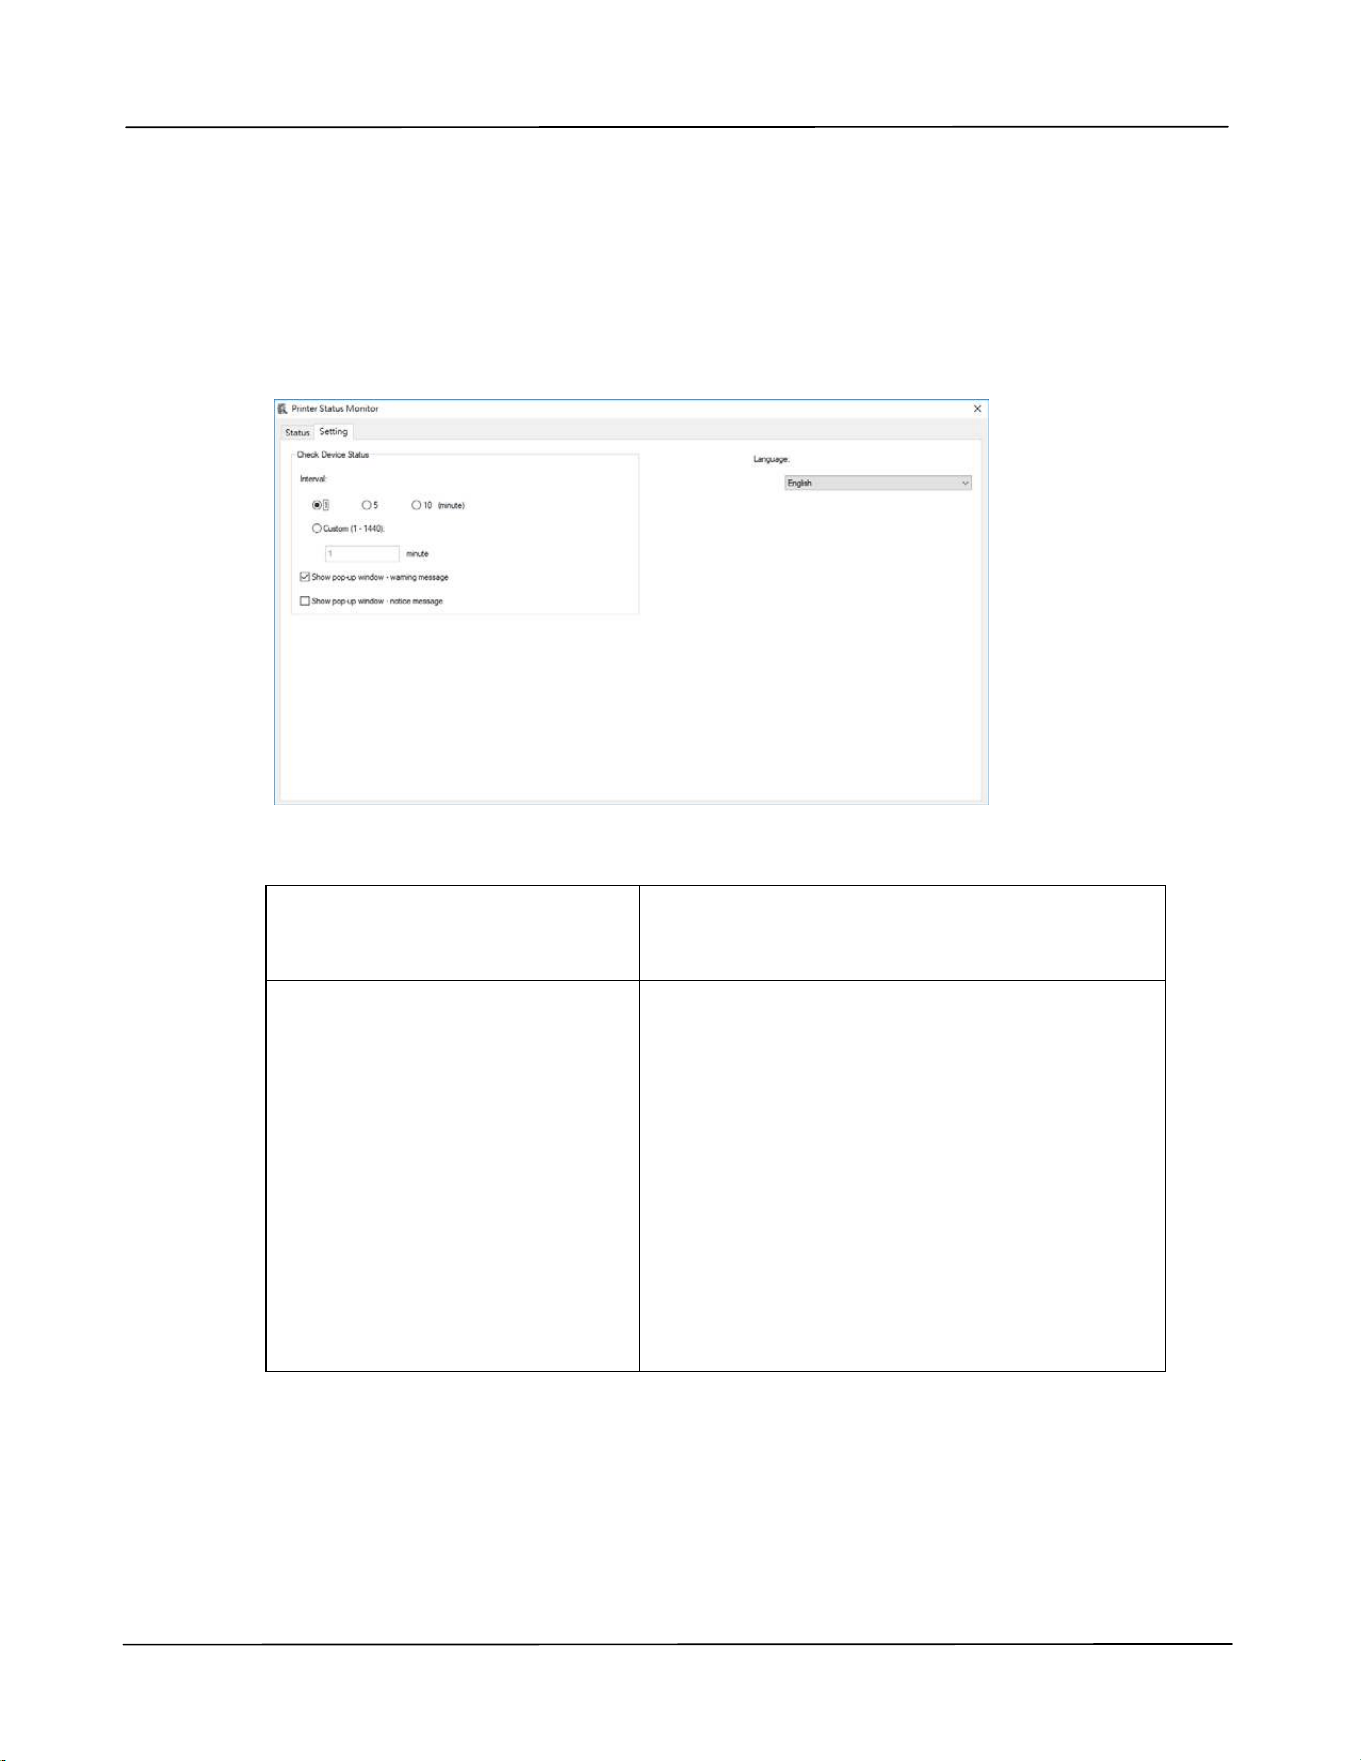
To m ake specific m onit oring sett ings, click t he Sett ing t ab on t he Avision Status
Monit or window.
Language
Displays t he language of t he window.
St at us Alert
Update Tim e
Show pop- up window –
warning m essage
Show pop- up window –
not ice m essage
Define the int erval t o refresh t he print er
error stat us.
Choice: 1, 5, 10 ( m inut e), Custom ( 1 ~
86400) second
Check t he box to autom at ically show the
warning m essage.
Check t he box to autom at ically show the
not ice m essage.

Use r ’s Guide
7 2
Clearing A W arning or An Error
I f a problem occurs during operat ion, t he Error LED will be flashing t o indicate a
warning or an error stat us. To solve t he problem , please refer the following t able for
m ore det ailed inform at ion.
W ar ning Message
Me ssage Descript ion or Solu t ion
Toner low
( 200032) .
Toner t hat rem ains is lower t han 10% . The m achine
can still perform print ing or copying funct ion yet wit h
poor qualit y.
Drum near end
( 200043) .
Drum t hat rem ains is lower t han 10% .
Call t he service personnel t o order and replace t he
drum .
Toner em pt y
( 200031)
Toner has run out .
Replace a new t oner cart ridge.
I nvalid t oner
200039
Toner cart ridge error. ( incorrect vendor nam e)
Please replace t he drum from t he original
m anufact urer.
No Drum ( 200041)
Please inst all drum and restart PRI NTER.
Drum life ends
( 200042)
Drum life has been exhausted.
Call t he service personnel t o order and replace t he
drum m odule.
Drum t ype not
support ( 200047)
Drum t ype not support . Relace the drum unit .
I nvalid drum unit
( 200044, 201504,
201514)
I nvalid drum unit . Please replace t he drum from t he
original m anufacturer.
I nvalid fuser
( 201502, 201512)
I nvalid fuser. Replace t he fuser.
Fuser t em perapt ure
is t oo low ( 200006)
Wait unt il t he tem perat ure rises t o t he required
degrees.
Drum unit changed
( 200046)
Drum unit has been upgraded. Replace drum unit .

Trouble shoot ing
73
Aut o t em p.
adj ustm ent
( 200004)
Tem perature inside the product is t oo high. Wait unt il
the t em perat ure rises to the required degrees.
Toner cart ridge
error.
( 200036, 201505,
201515
Please replace toner cart ridge from t he original
m anufact urer.
Er ror M essage
Er ror M essage a nd Code s
Possible Causes or Solut ion
Syst em e rror
I 2C error ( 100112)
Call service for furt her help.
PRI NTER m odule error.
Please restart PRI NTER or call
service ( 205000, 205001)
An unexpected error from PRI NTER parts
occurs.
Rest art PRI NTER or call service personnel t o
replace PRI NTER parts t hat fail.
Please clean the charger wire
( 205101) .
Please clean t he charger wire.
Fan fails ( 200090) .
Call service personnel t o replace t he fan.
Front cover opens ( 200051) .
Please close front cover.
Rear cover opens ( 200054) .
Please close rear cover.
Cont inue feed error ( 200000) .
Please open front cover t o clear t he paper
and load paper t o proper tray.
Fuser error ( 201600, 201604~ 5,
201613, 201615~ 201618,
201621~ 201623) ( 201626)
Please restart PRI NTER. I f the error persist s,
call service personnel for help.
Please load paper in m anual t ray
( 200080) .
Paper em pt y in t he m anual t ray.
Please load paper t o t ray1 ( 200081)
Tray 1 paper em pt y.
I P conflict ( 500000) .
Please check net work set t ings.
Check your net w ork sett ing.

Use r ’s Guide
7 4
DHCP no response ( 500002) .
Please check net work set t ings.
Check net work sett ings.
PRI NTER not ready.
Try again lat er.
PRI NTER is busy wit h current j ob. Wait unt il
current j ob is com plet ed.
Buffer full Job abort .
Mem ory is not enough t o process t he
scanned im ages.
Buffer full
Print scanned im ages:1
Cancel j ob:2
Mem ory is not enough t o process t he
scanned im ages. Press [ 1] t o print t he first
few im ages which have not exceeded the
m em ory lim it or press [ 2] t o cancel j ob.
Reset ting default settings fails.
Please try again lat er.
Reset ting default settings.
Scanner Calibrat ion fails.
Please try again lat er.
Please try again by pressing t he Menu but t on
and t hen choosing
System > Managem ent> Calibrat ion.
Reset count fail.
Please try again lat er.
Please try again by pressing t he Menu but t on
and t hen choosing
System > Managem ent> Reset count .
Set ting fails.
Please try again lat er.
Set ting the Menu opt ion fails. Check your
set t ing.

Trouble shoot ing
75
Full page not support N in 1
The Full page feat ure does not support N in 1
( 2 in 1 or 4 in 1) .
Custom zoom not support N in 1
The Custom Zoom feat ure does not support
N in 1 ( 2 in 1 or 4 in 1) .
Pa per Ja m
ADF paper jam ( 002013) .
1. Open ADF cover and clear paper.
2. Close ADF cover.
Paper feed failed ( 200301) . Please check m anual t ray.
Paper feed failed ( 200302) . Please open t ray 1 and rem ove t he paper.
Paper j am ( 200324) . Please open front cover and t ray 1 t o clear j am paper.
Paper j am ( 200325) . Please open front cover and pull drum unit out t o clear j am
paper.
Paper j am ( 200326) . Please open front cover and pull drum unit out t o clear j am
paper.
Paper j am ( 200327) . Please open front cover and pull drum unit out t o clear j am
paper.
Paper j am ( 200328) . Please open front cover and pull drum unit out t o clear j am
paper.
Paper j am ( 200329) . Please open front cover and pull drum unit out t o clear j am
paper.
Paper j am ( 200330) . Please open front cover and rear cover t o clear j am paper.
Paper j am ( 200331) . Please open front cover and rear cover t o clear j am paper.
Paper j am ( 200332) . Please open front cover and rear cover t o clear j am paper.
Paper j am ( 200333) . Please open front cover and rear cover t o clear j am paper.
Paper j am ( 200334) . Please check duplex t ray.
Paper j am ( 200335) . Please check duplex t ray.
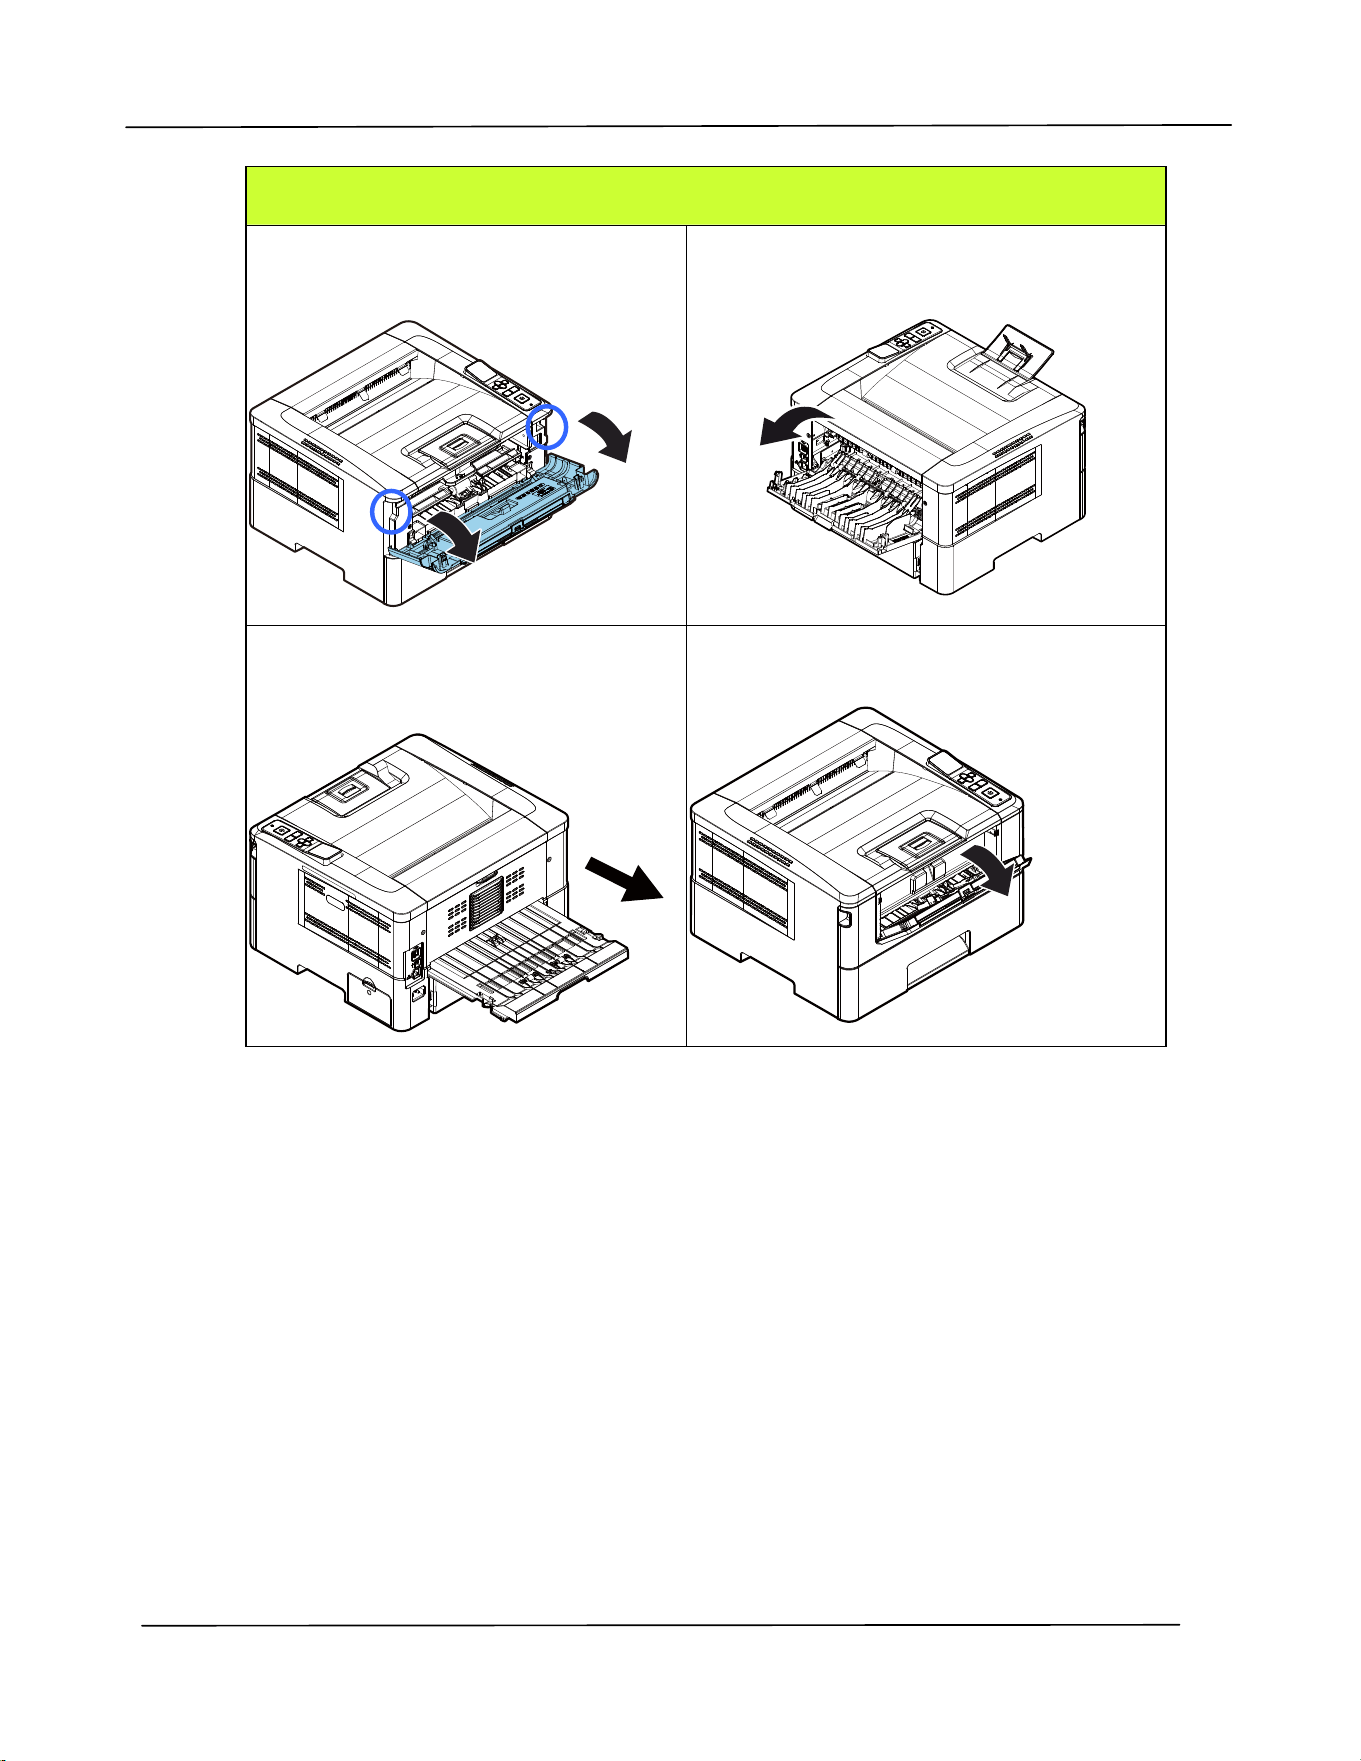
Use r ’s Guide
7 6
Locat ions of th e Jam m ed Pa pe r
Front Cove r: Open t he front cover
by pulling t he handles of t he front
cover on bot h sides as illustrat ed.
Rea r Cover: Open t he rear cover by
pulling t he handle of t he rear cover as
shown.
Duple x Tray: Pull t he duplex t ray
beneat h t he rear cover out of t he
m ain unit .
Ma nual Tray: Open t he m anual t ray by
grasping the handle and pull it down.
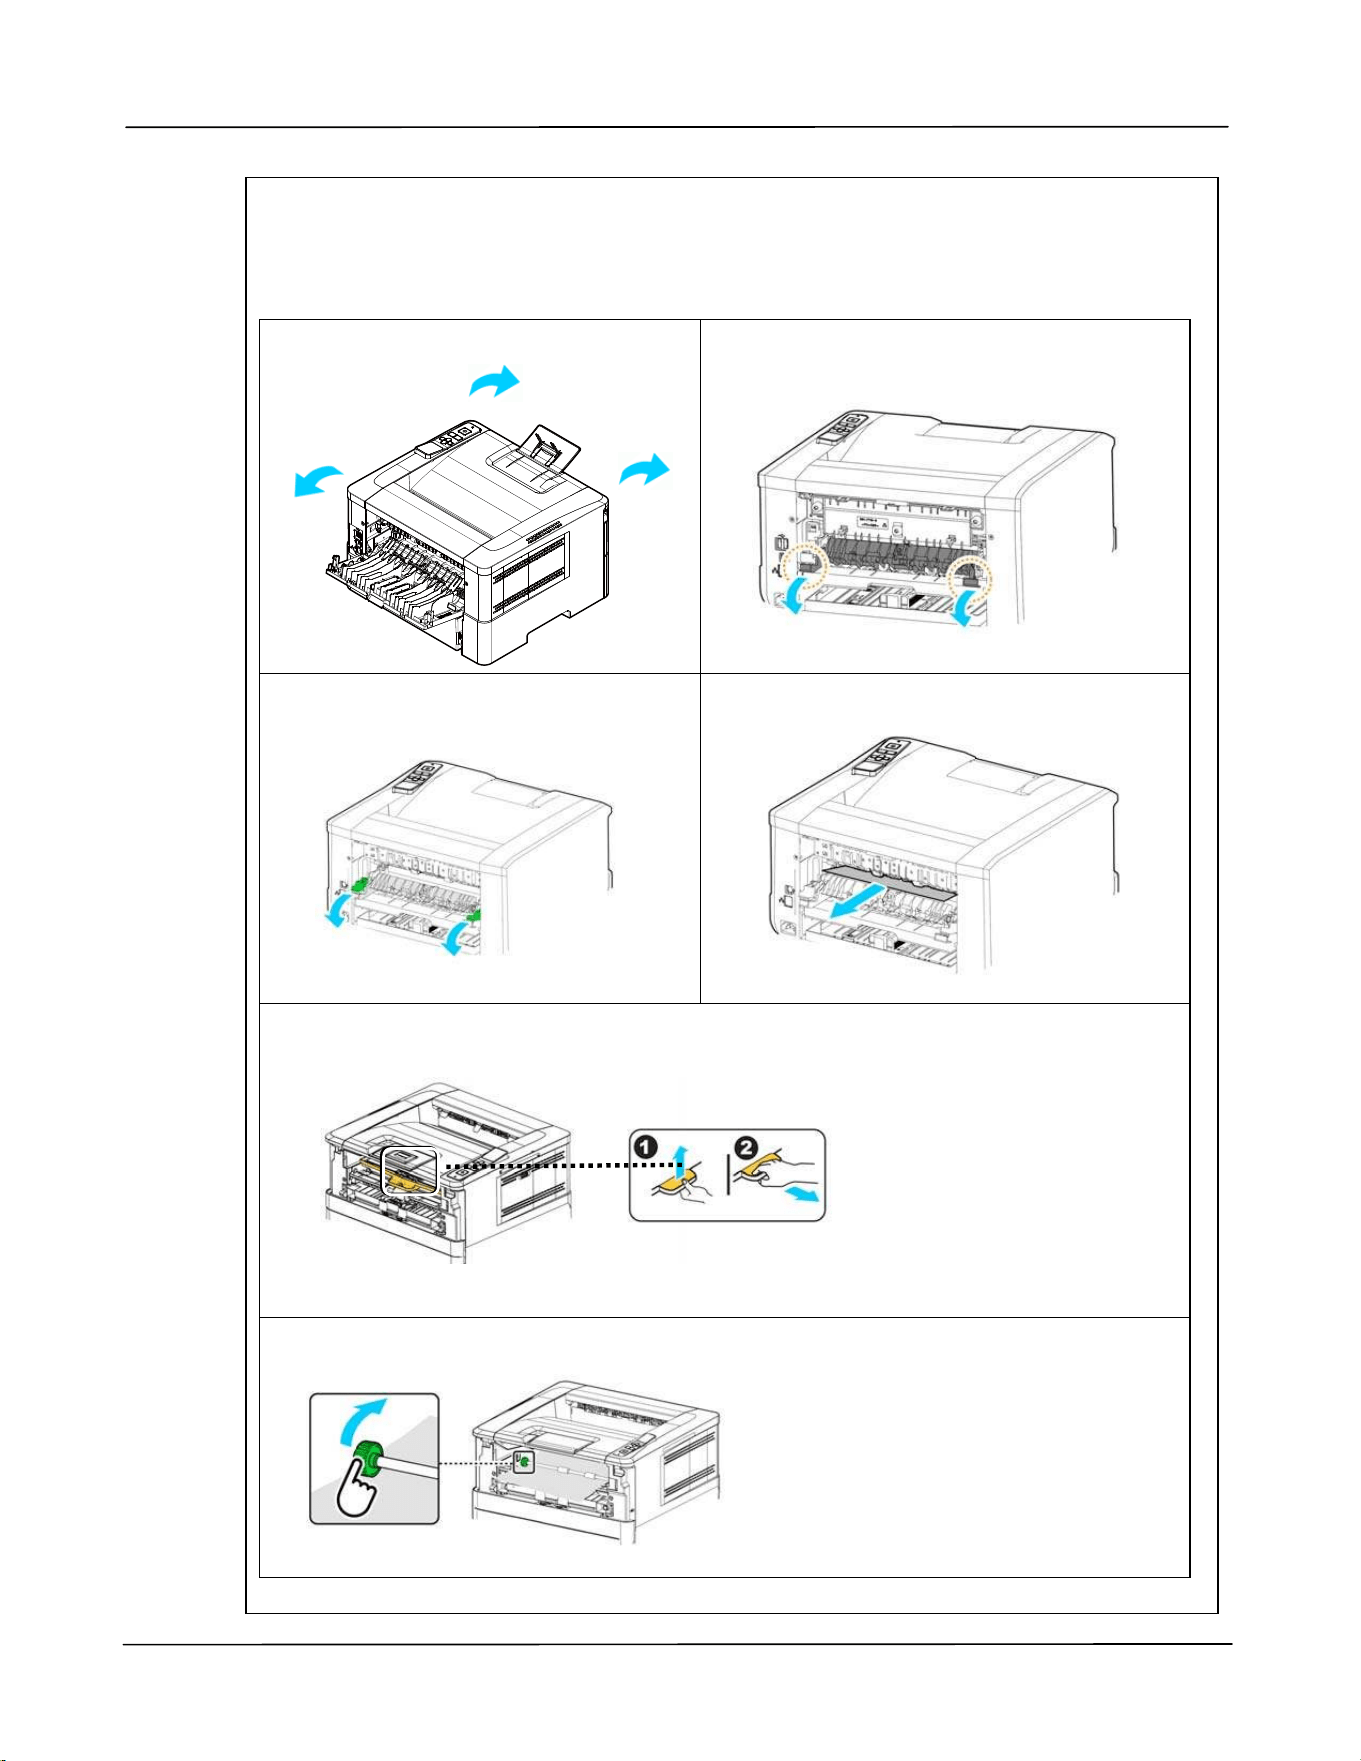
Trouble shoot ing
77
Fuser :
The area around t he fuser is hot . To avoid a burn inj ury, be careful not t o t ouch t he
fuser unt il it cools down and follow t hese steps t o rem ove t he j am m ed paper:
1 . Open t he Fron t Cover and t he
Rea r Cover.
2 . Pull down t he Fuser Pa t h as
indicated.
3 . Pull down t he Re le ase Arm on
both sides.
4 . Slowly rem ove the j am m ed paper.
5 . I f t here is difficult y t o pull off t he j am m ed paper, rem ove t he PRI NTER
cart ridge first.
6 . Rotat e t he Release Wheel to slowly pull out t he j am m ed paper.

Use r ’s Guide
7 8
Er ror M essage a nd Code s
Possible Causes or Solut ion
Runt im e e rror
Error ( Num ber) .
Rest art PRINTER. I f t his error persists, call service personnel
for help.
201516
Writ e Dat a Sm aller Error - Engine
201631
Black LPH Type Error
201632
Red LPH Type Error
201610
PRI NTER LPH Error,LPH cable connect ion fails.
201650 PRI NTER runt im e error.
201651 Firm ware error.
201701
PRI NTER MB NVRAM:reading error
201702
PRI NTER MB NVRAM:writ ing error
201703
PRI NTER MB NVRAM:reading error w hile com paring
201704
PRI NTER MB NVRAM:com paring error
201711
PRI NTER Drum Unit NVRAM:reading error
201712
PRI NTER Drum Unit NVRAM:writ ing error
201713
PRI NTER Drum Unit NVRAM:reading error
201714
PRI NTER Drum Unit NVRAM:com paring error
201721
PRI NTER Toner NVRAM:reading error
201722
PRI NTER Toner NVRAM:writ ing error
201723
PRI NTER Toner NVRAM:reading error while com paring
201724 PRI NTER Toner NVRAM:com paring error
201730 PRI NTER uses wrong NVRAM Address.
300100 PRI NTER API _NVRAM_RW_TEST_FAI L
300101 PRI NTER API _NVRAM_WRI TE_FAI L
300102 PRI NTER API _NVRAM_READ_FAI L
300200 PRI NTER Flash Error
300201 PRI NTER FLASH_BLOCK_ERASE_FAI LED
Trouble shoot ing
79
300202 PRI NTER FLASH_CHI P_ERASE_FAI LED
300203 PRI NTER FLASH_PROGRAM_FAI LED
302651 Network_I NI T_FAI L , network init ialization fails.
I m age Proble m Trouble shoot ing
Pr oble m I m a ge Exam ple Solut ion
Pa pe r cur ls
1. Use paper of standard weight : I f
you are using t hin paper, t ry t o use
paper of standard weight ( 70
g/ m
2
) .
2. Use paper wit h less m oisture: Load
the paper t o t he paper t ray
im m ediat ely aft er rem oving t hem
from t he packaging. Seal t he
rem aining paper w it h t he original
packaging t o keep from t he
m oist ure absorpt ion.
Light
pr int ( ent ire
pa ge )
1. Make sure t hat t he t oner cart ridge
is fully installed.
2. Make sure t hat t he Toner Save
set t ing is t urned off in t he PRI NTER
driver.
3. Try using a different t ype of paper.
4. The toner cart ridge m ight be
alm ost em pt y. Replace t he t oner
cart ridge.
Light
pr int ( pa rt ia l
pa ge )
1. Make sure t hat t he t oner cart ridge
is fully installed.
2. The t oner level m ight be low .
Replace t he t oner cart ridge.
3. The paper m ight not m eet t he
PRI NTER’s specifications ( for
exam ple, t he paper is too m oist or
too rough) .
Use r ’s Guide
8 0
Vert ical w hit e
line s
Call the service personnel for help.
Vert ical bla ck
line s
Please clean the EP charger according t o
t he procedure described in this m anual
( p. 102) .
Dirt y
ba ckground( pa
rt ial pa ge )
Check if t oner is not leaked from t he
toner cart ridge. I f so, replace t he t oner
cart ridge.
Dirt y
ba ckground
( ent ire pa ge )
1. The paper m ight not m eet t he
PRI NTER’s specifications ( for
exam ple, t he paper is too t hin) .
2. Check if t here is enough t oner in
the t oner cart ridge. I f not , please
replace t oner cart ridge.
3. Call t he service personnel for help.
Pr in t bla nk
pa ge
Check if t here is enough t oner in t he
toner cart ridge. I f not, please replace
the t oner cart ridge.
I f t his error happens again, call service
for help.
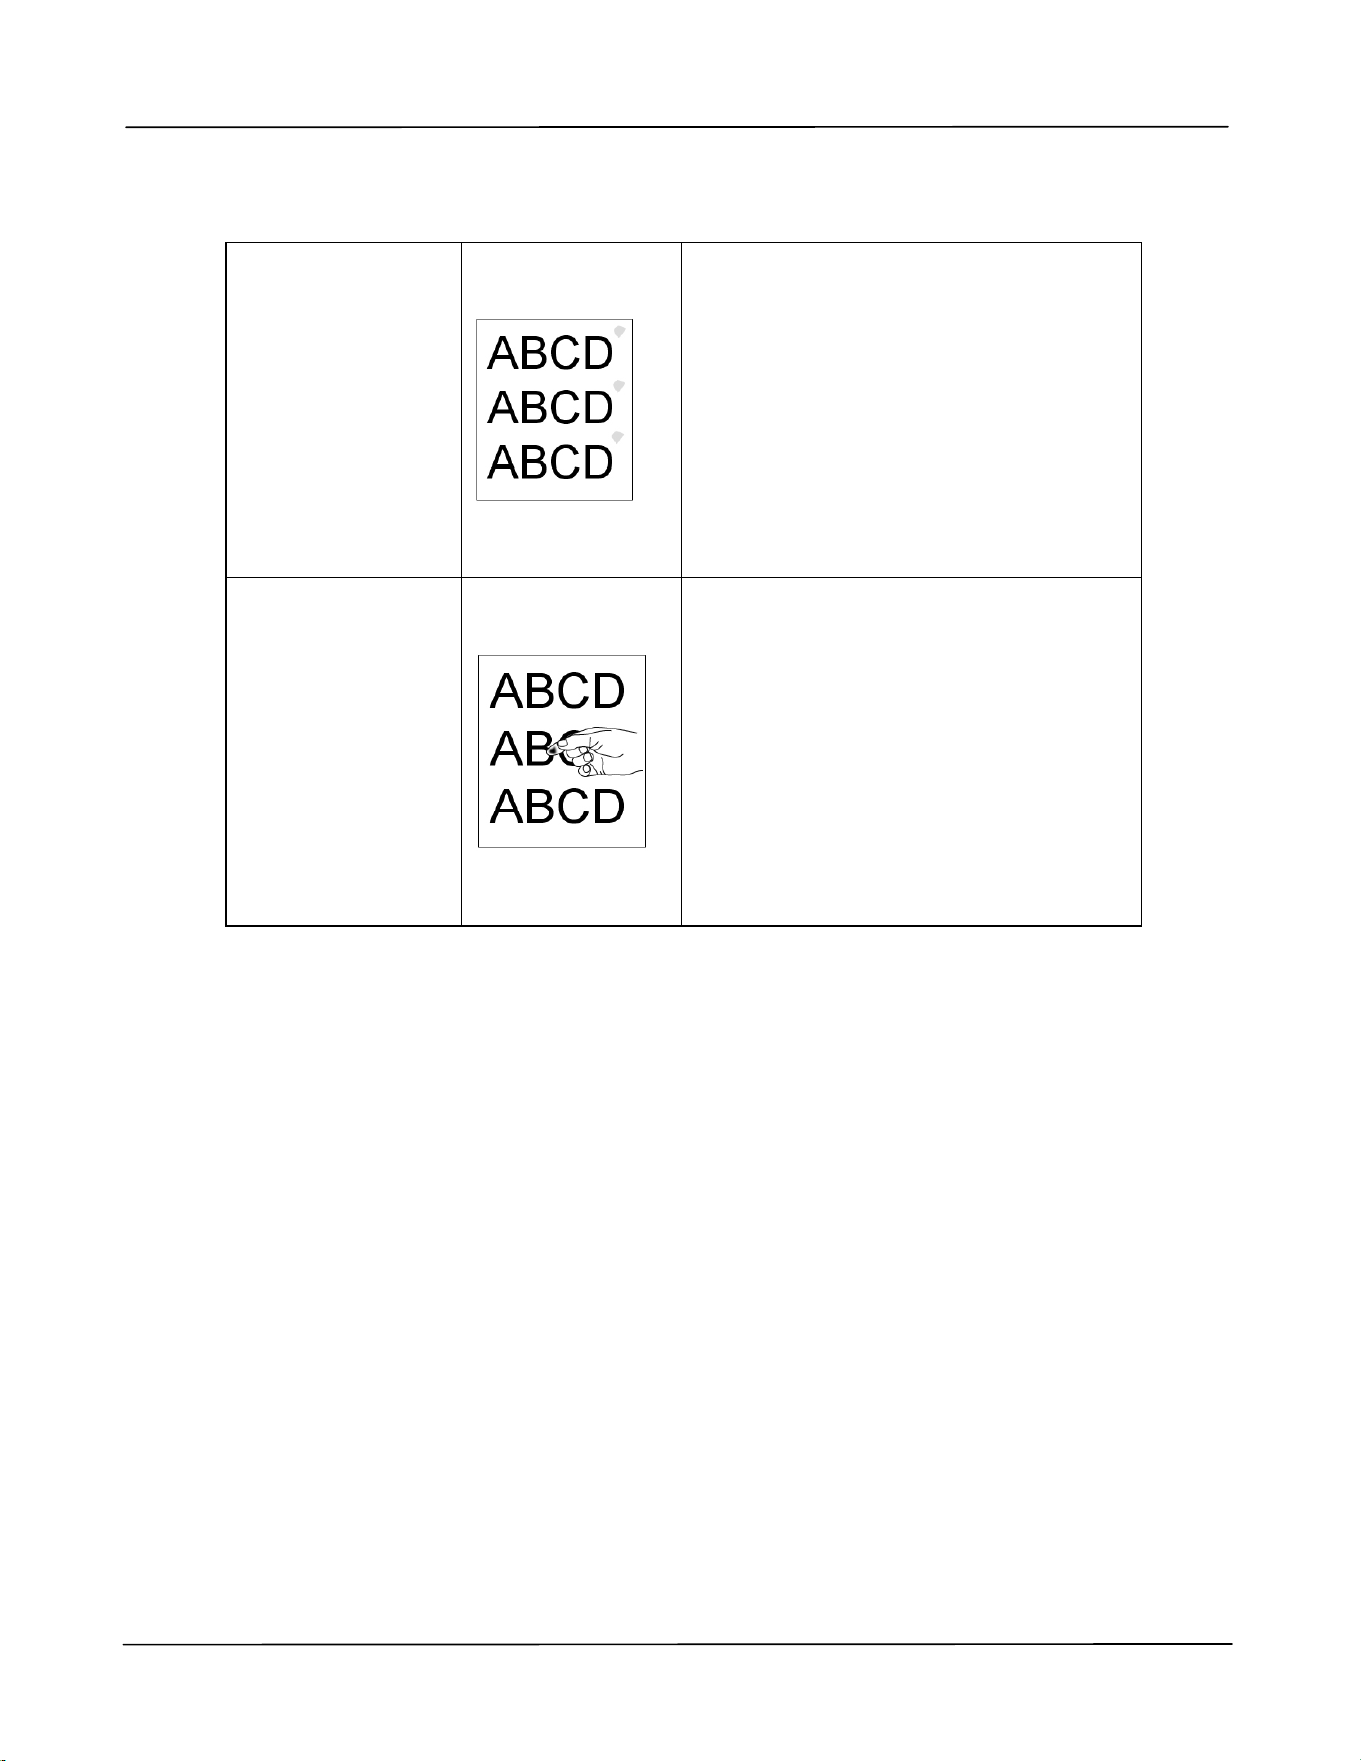
Trouble shoot ing
81
De fe ct ive im a ge
of re gula r
int e rval
1. Use a clean and soft cloth t o wipe
the off t he dust or part icle on t he
drum unit . ( See page 98)
2. I f t he error occurs again, contact
the service personnel.
Loose t oner
1. I f you have observed a rougher
text ure on one side of your
paper, try print ing on the
sm oot her side.
2. The paper m ight not m eet t he
PRI NTER’s specifications ( for
exam ple, t he paper surface is not
sm oot h or paper t oo t hick) .
3. Media type incorrect. Please
choose proper m edia t ype for
your paper.

Use r ’s Guide
8 2
TECHN I CAL SUPPORT
I f your problem st ill exist s aft er t rying t he above solut ion, please cont act our t echnical
support .
Hea dquar te r
Avision I nc.
No. 20, Creation Road I , Science-Based I ndustrial Park,
Hsinchu 300, Taiwan, ROC
TEL: + 886 ( 3) 578- 2388
FAX: + 886 ( 3) 577- 7017
Web Site: ht t p: / / www.avision.com .t w
US a nd Cana da Are a
Avision La bs, I nc.
6815 Mowry Ave., Newark CA 94560, USA
TEL: + 1 ( 510) 739- 2369
FAX: + 1 ( 510) 739- 6060
E-MAI L: support @avision- labs.com
Web Site:
ht t p: / / ww w.avision.com
China Are a
Sha ngha i Te chnical Suppor t Cent er
7A, No.1010, Kaixuan Road, Shanghai 200052 P.R.C.
TEL : + 86- 21- 62816680
FAX : + 86- 21- 62818856
E-MAI L : sales@avision.net.cn
Web Site: ht tp: / / www.avision.com .cn
Eur ope Area
Avision Eur ope Gm bH
Bischofstr. 101 D- 47809 Krefeld Germ any
TEL: + 49- 2151- 56981- 40
FAX: + 49- 2151- 56981- 42
E-MAI L: info@avision- europe.com
Web Site:
ht tp: / / ww w.avision.de
Espa ço Bra sil
Avision Brasil Lt da.
Avenida Jabaquara, 2958 – Cj . 75 – Mirandópolis
São Paulo / SP
TEL: + 55- 11- 2925- 5025
E-MAI L: suport e@avision.com .br
Web Site: ht t p: / / www.avision.com .br
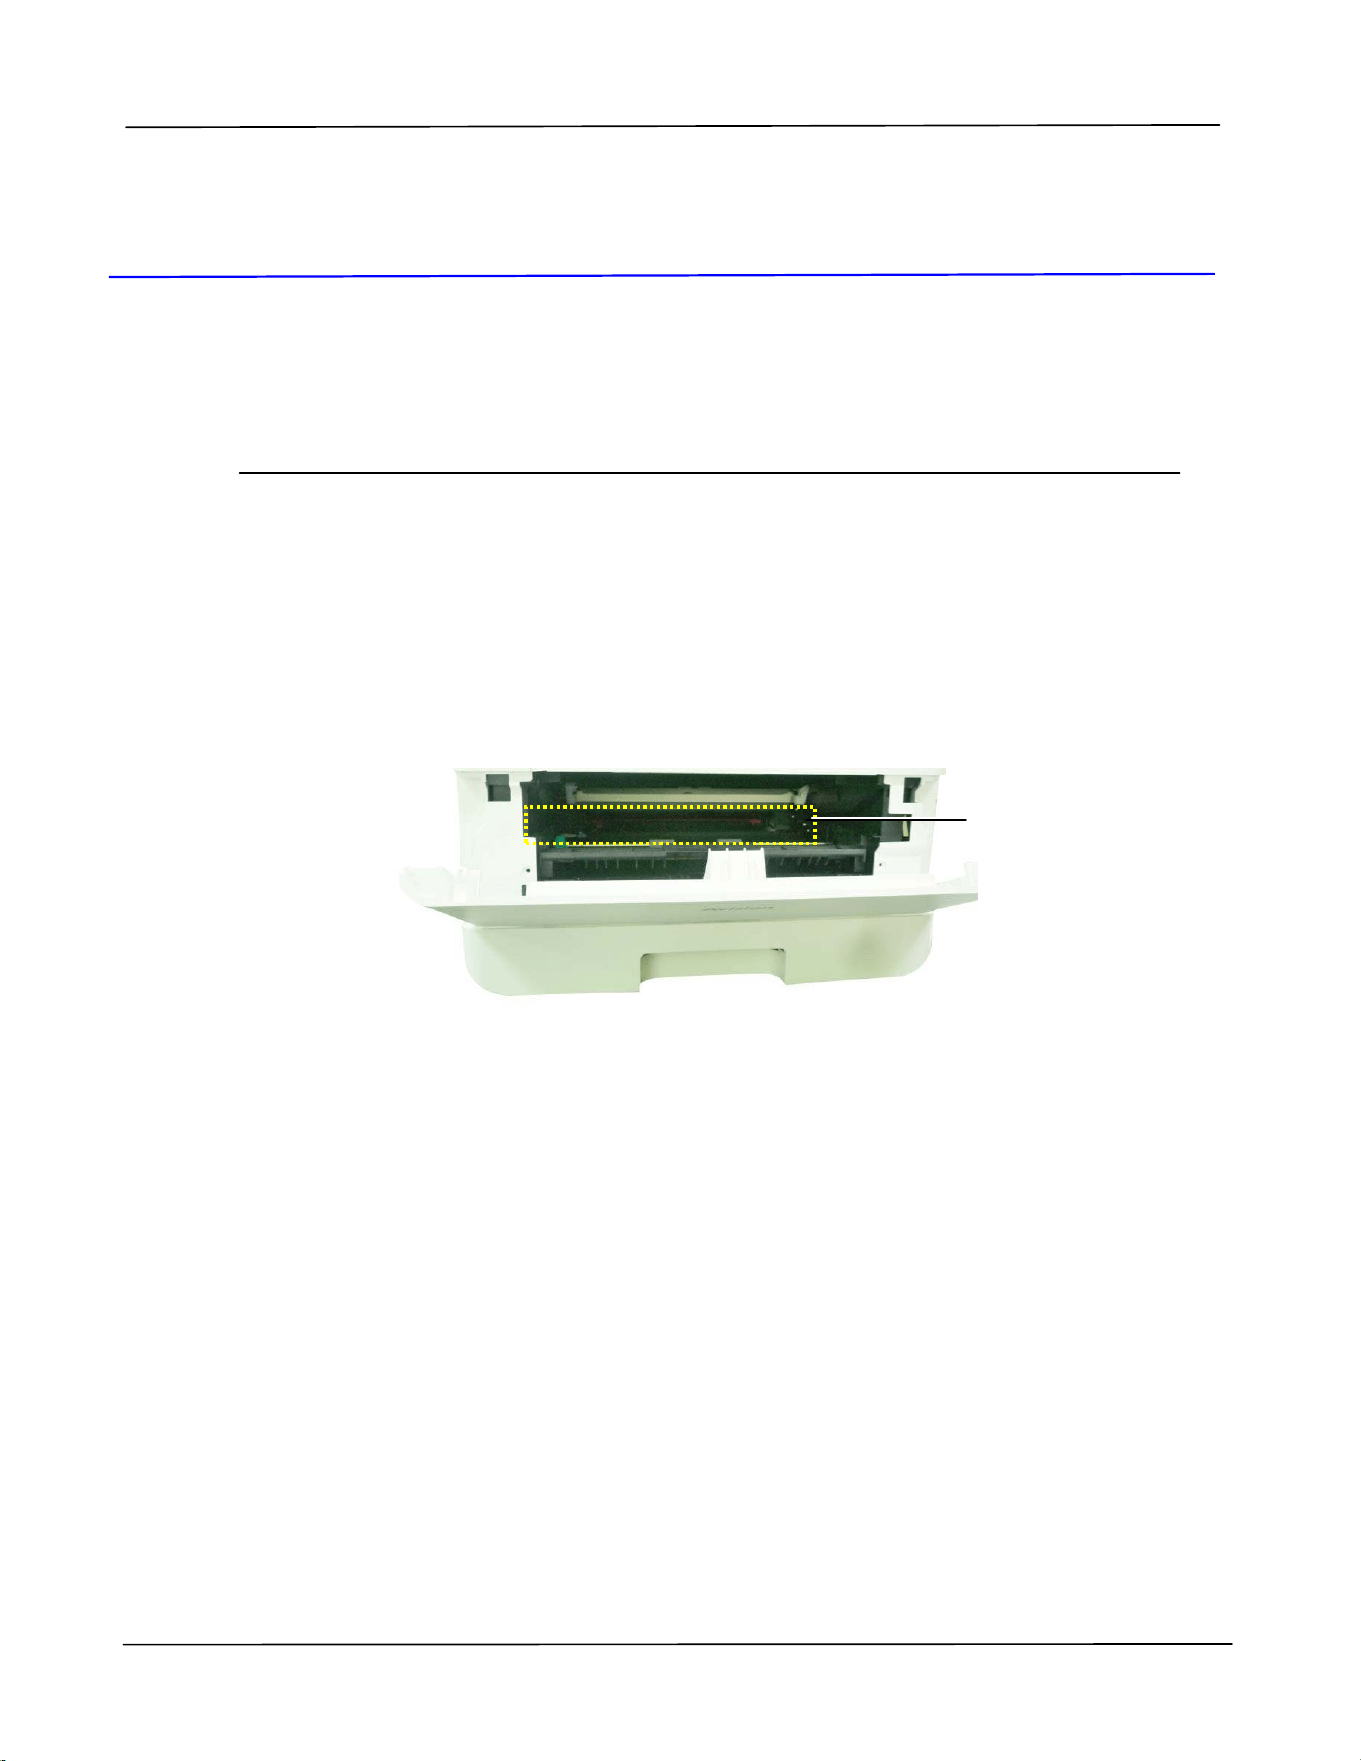
Ma in ta ining t he Product
83
7 . Ma int aining t he Product
Cle a ning t he Pa per Pa t h
1 . Refer t o t he preceding sect ion to rem ove t he Toner Cart ridge.
2 .
Check if there is paper dust on t he Paper Pat h. I f so, rem ove t he dust.
Paper Pat h
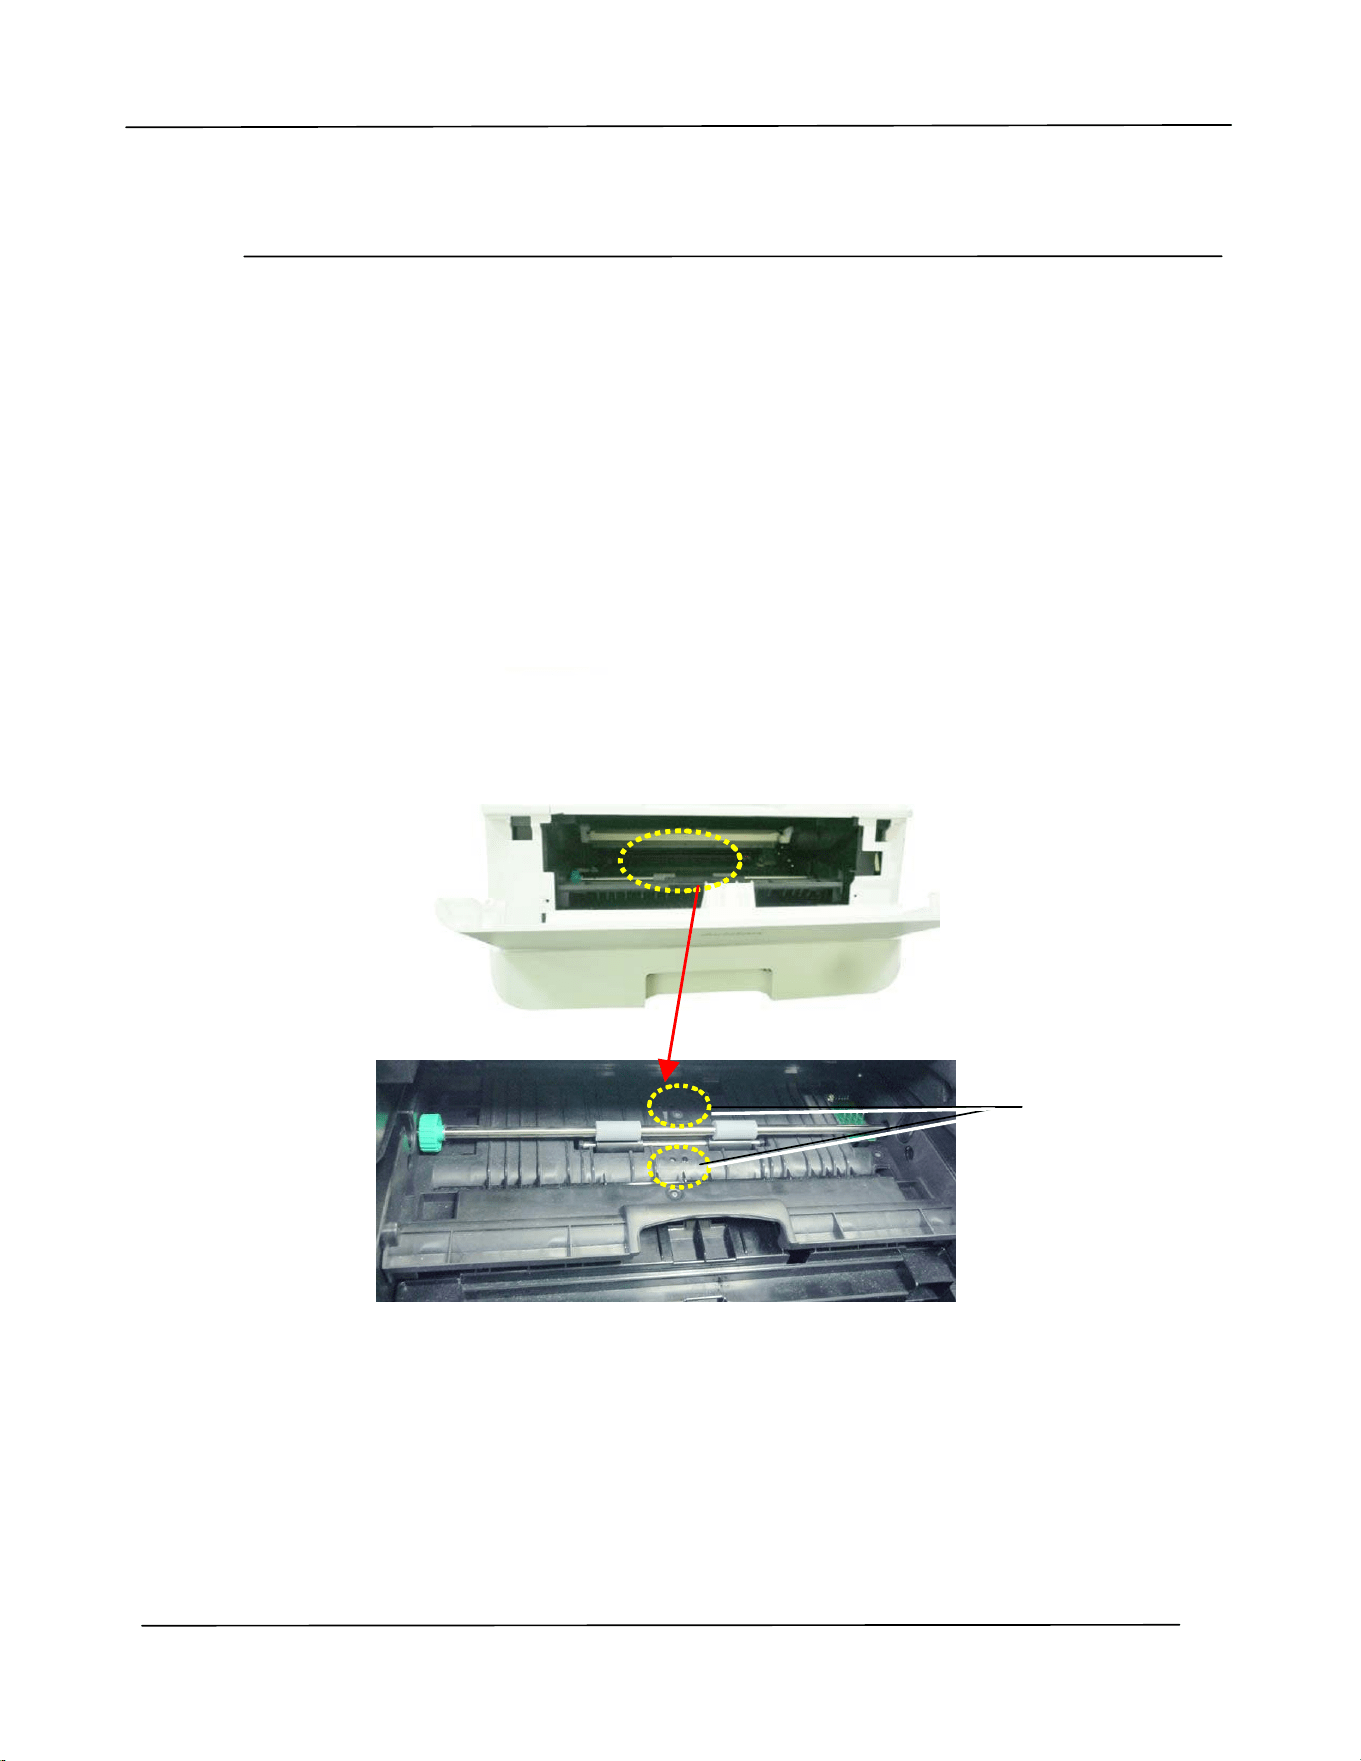
Use r ’s Guide
8 4
Cle a ning t he I R Se nsor s
If too m uch paper dust or dust accum ulat es on t he I R sensors, it m ay cause t he
m isjudgm ent of paper j am . For exam ple, t here is error code of paper j am occurs yet in
fact no j am m ed paper found inside t he PRI NTER. I n this case, please clean t he I R
sensor according to t he following steps. I f the problem persist s, t he sensors are
probably m alfunctioning. Please contact t he service personnel t o replace t he sensor.
1 . Refer t o t he preceding sect ion t o rem ove t he Toner Cart ridge.
2 . Moisten a clean, soft cloth with 95% alcohol.
3 .
Wipe the area near t he sensors as indicated.
I R Sensors
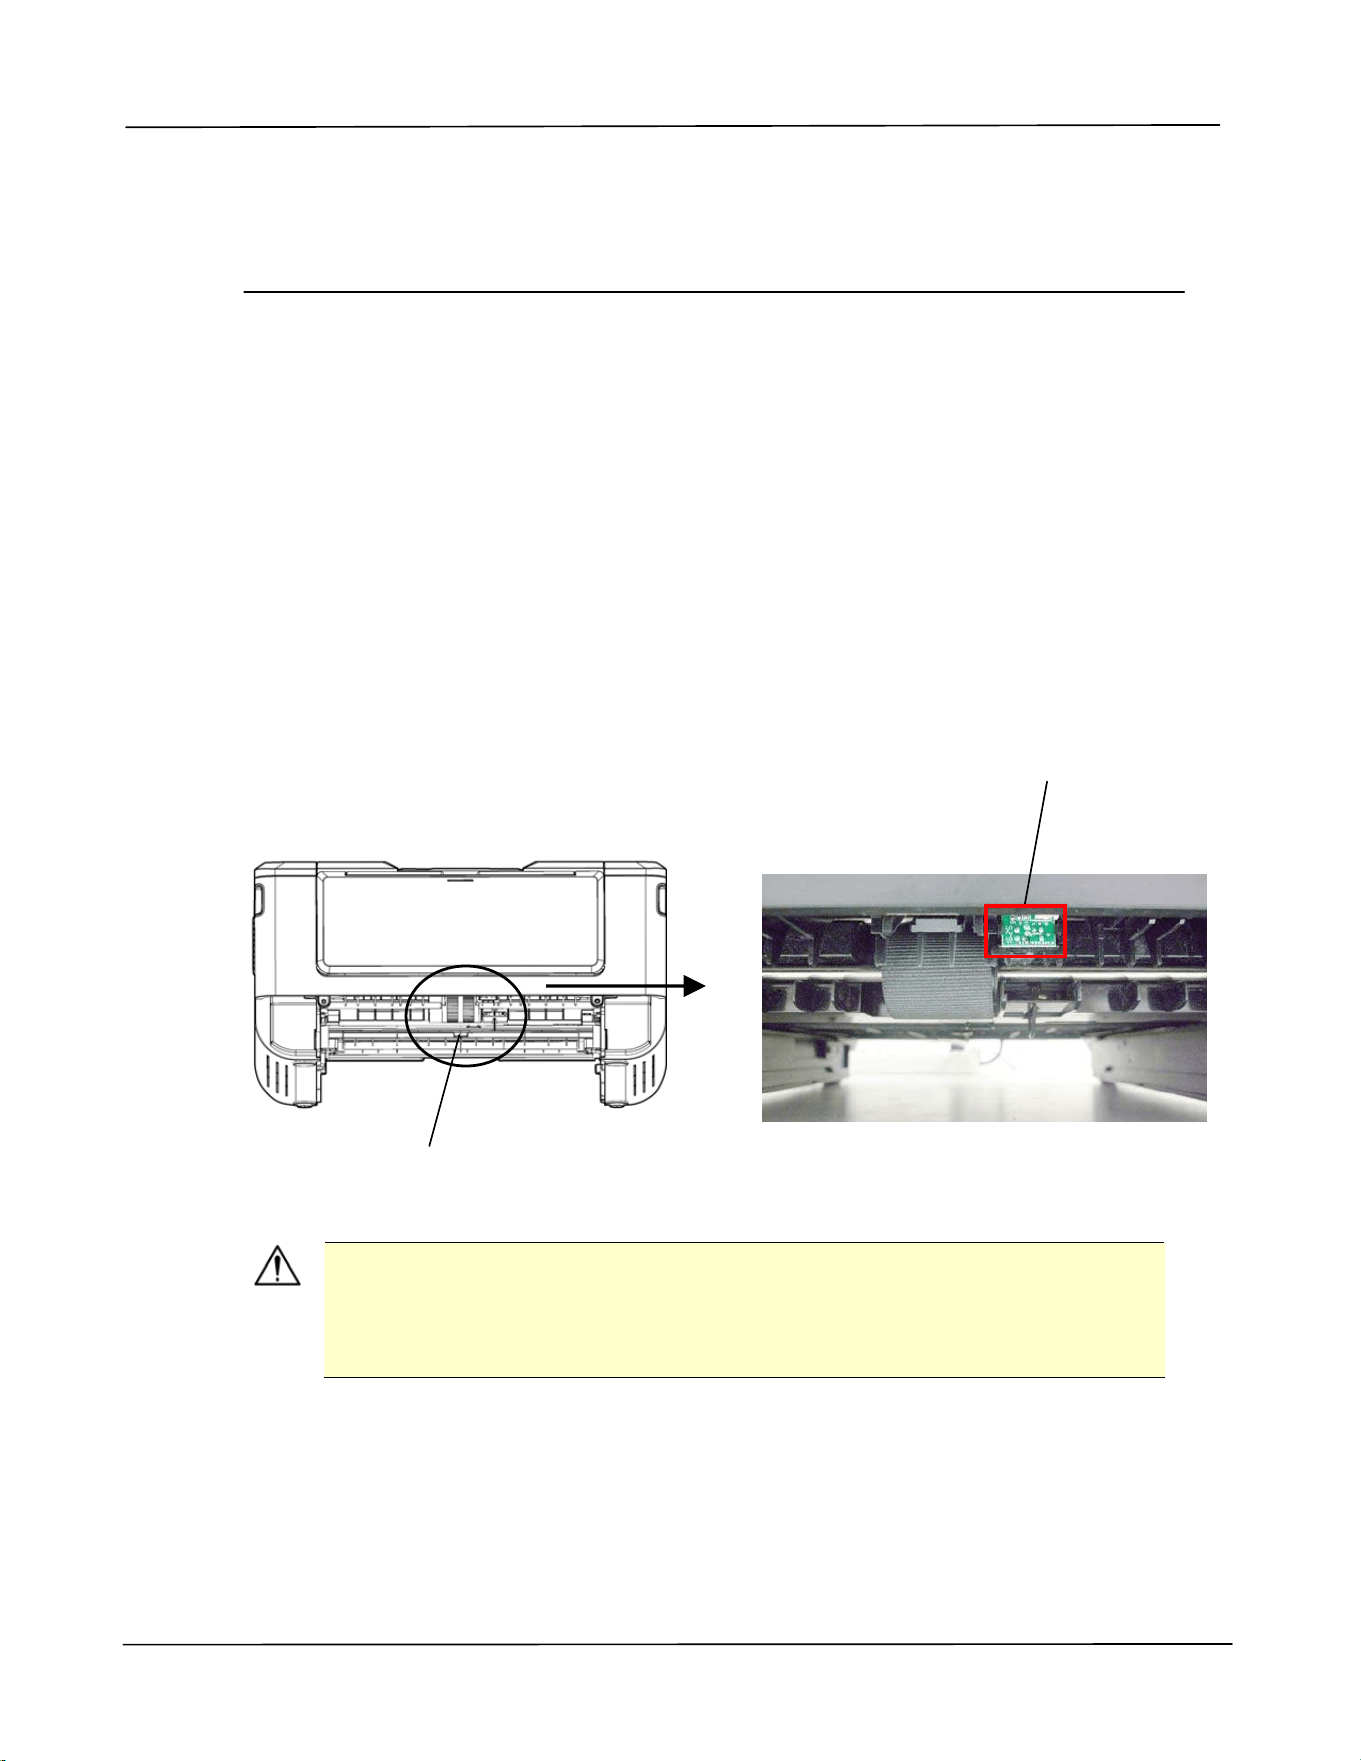
Ma in ta ining t he Product
85
Cle a ning t he Pa per- I n Sensors
If too m uch paper dust or dust accum ulat es on t he Paper- in sensors, it m ay cause t he
m isjudgm ent of paper j am . For exam ple, t here is error code of paper j am occurs yet in
fact no j am m ed paper found inside t he PRI NTER. I n t his case, please clean t he Paper- in
sensor according to t he following steps. I f the problem persist s, t he sensors are
probably m alfunctioning. Please contact t he service personnel t o replace t he sensor.
1 . Turn off t he power.
2 . Rem ove t he Paper Tray.
3 . Moisten a clean, soft cloth wit h 95% alcohol.
4 . Wipe the Back of t he sensor board as indicated.
I m port ant !
Before cleaning t he paper- in sensor, m ake sure t he power has been
turned off and avoid t ouching the sensor board in case the
com ponent s of t he circuit board m ay be dam aged.
Pickup Roller
Wipe the Back of
the sensor board
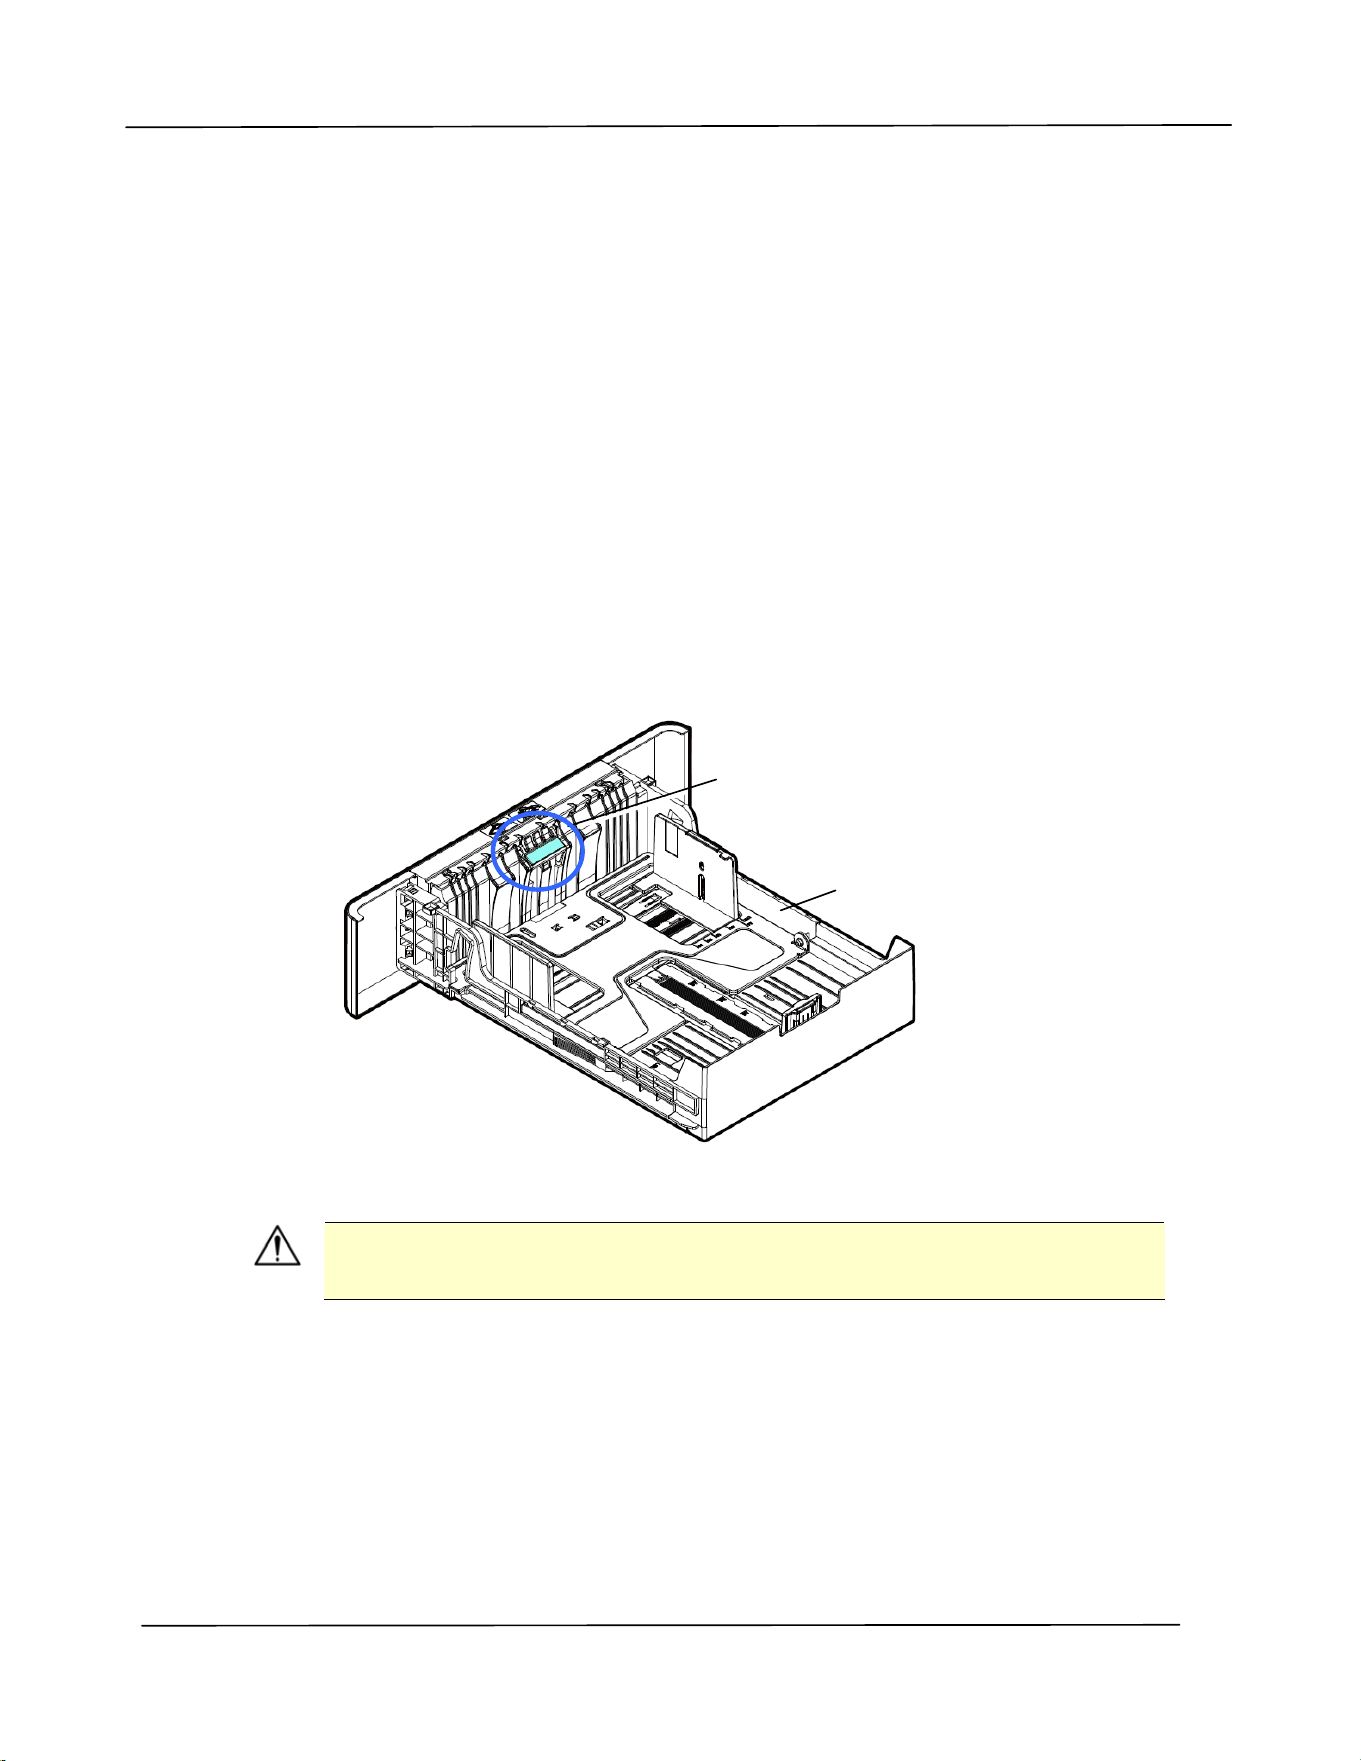
Use r ’s Guide
8 6
Cleaning t he Pa d in t he Cassett e
I f t he Pad in the Cassett e is sm eared wit h paper powder or dirt or every 30K copies,
paper m ay not feed sm oot hly or noise occurs during paper feeding. Follow t he
procedure below t o clean the Pad in t he Cassette.
You need t o prepare: cott on swab
1 . Rem ove all paper in t he casset t e.
2 . Moisten a cot t on swab wit h isopropyl alcohol ( 95% ) . I f accident ally use t oo m uch
alcohol, be sure t o wring out the dam p clot h
3 . Clean the rubber part of t he pad.
I m port ant :
Aft er cleaning the sm eared Pad, dry it com plet ely.
Casset te
Pad
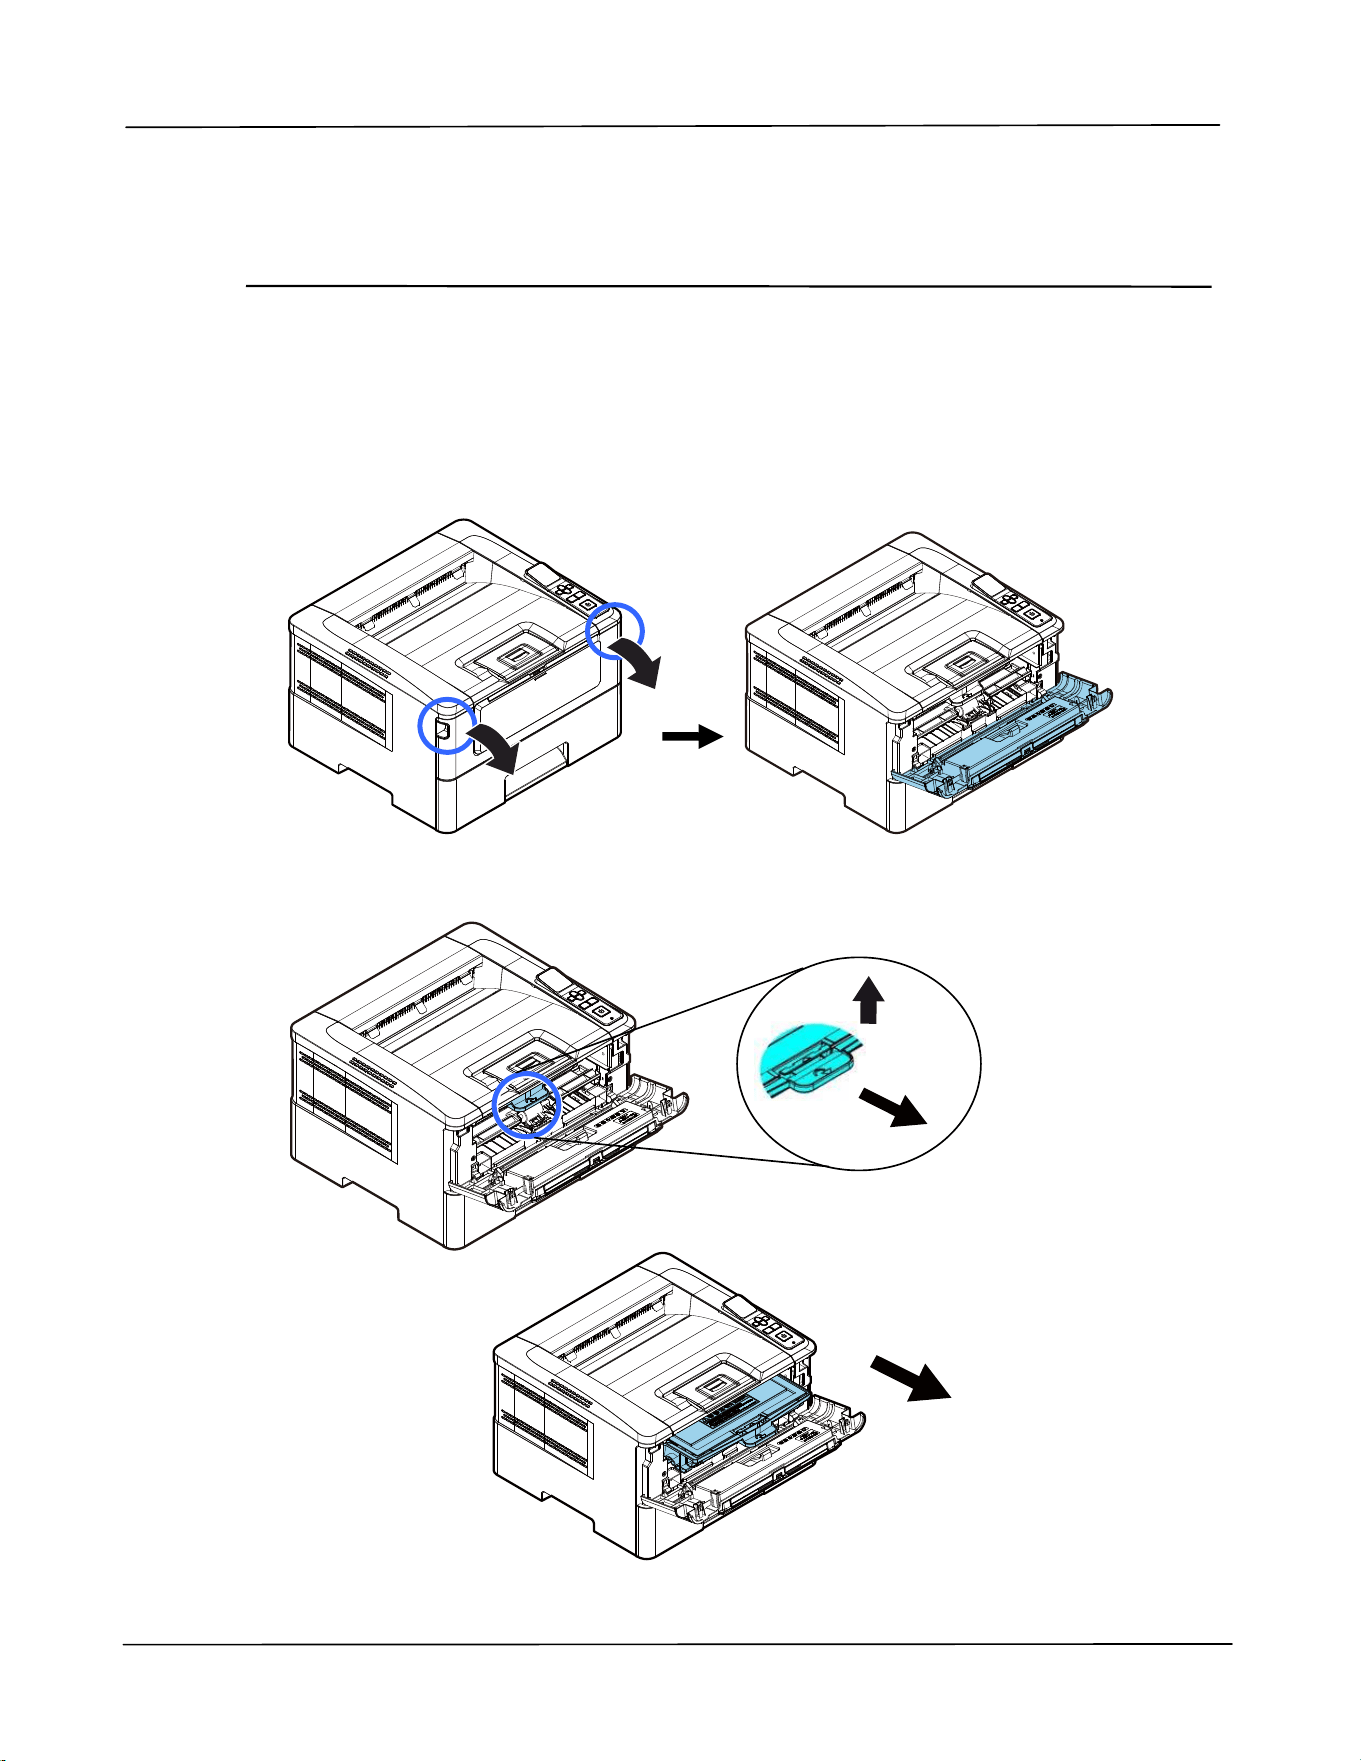
Ma in ta ining t he Product
87
Cleaning t he Drum Unit
I f t he drum unit is sm eared wit h paper powder or dirt , t he print out m ay appear
defective im age of regular int erval. Follow t he procedure below t o clean t he drum unit .
1 . Turn off t he power and rem ove t he pow er cord from t he power outlet.
2 . Open t he front cover by pulling t he handles on bot h sides as shown.
3 . Lift t he handle of t he drum unit and t oner cart ridge assem bly and gent ly rem ove
the assem bly.
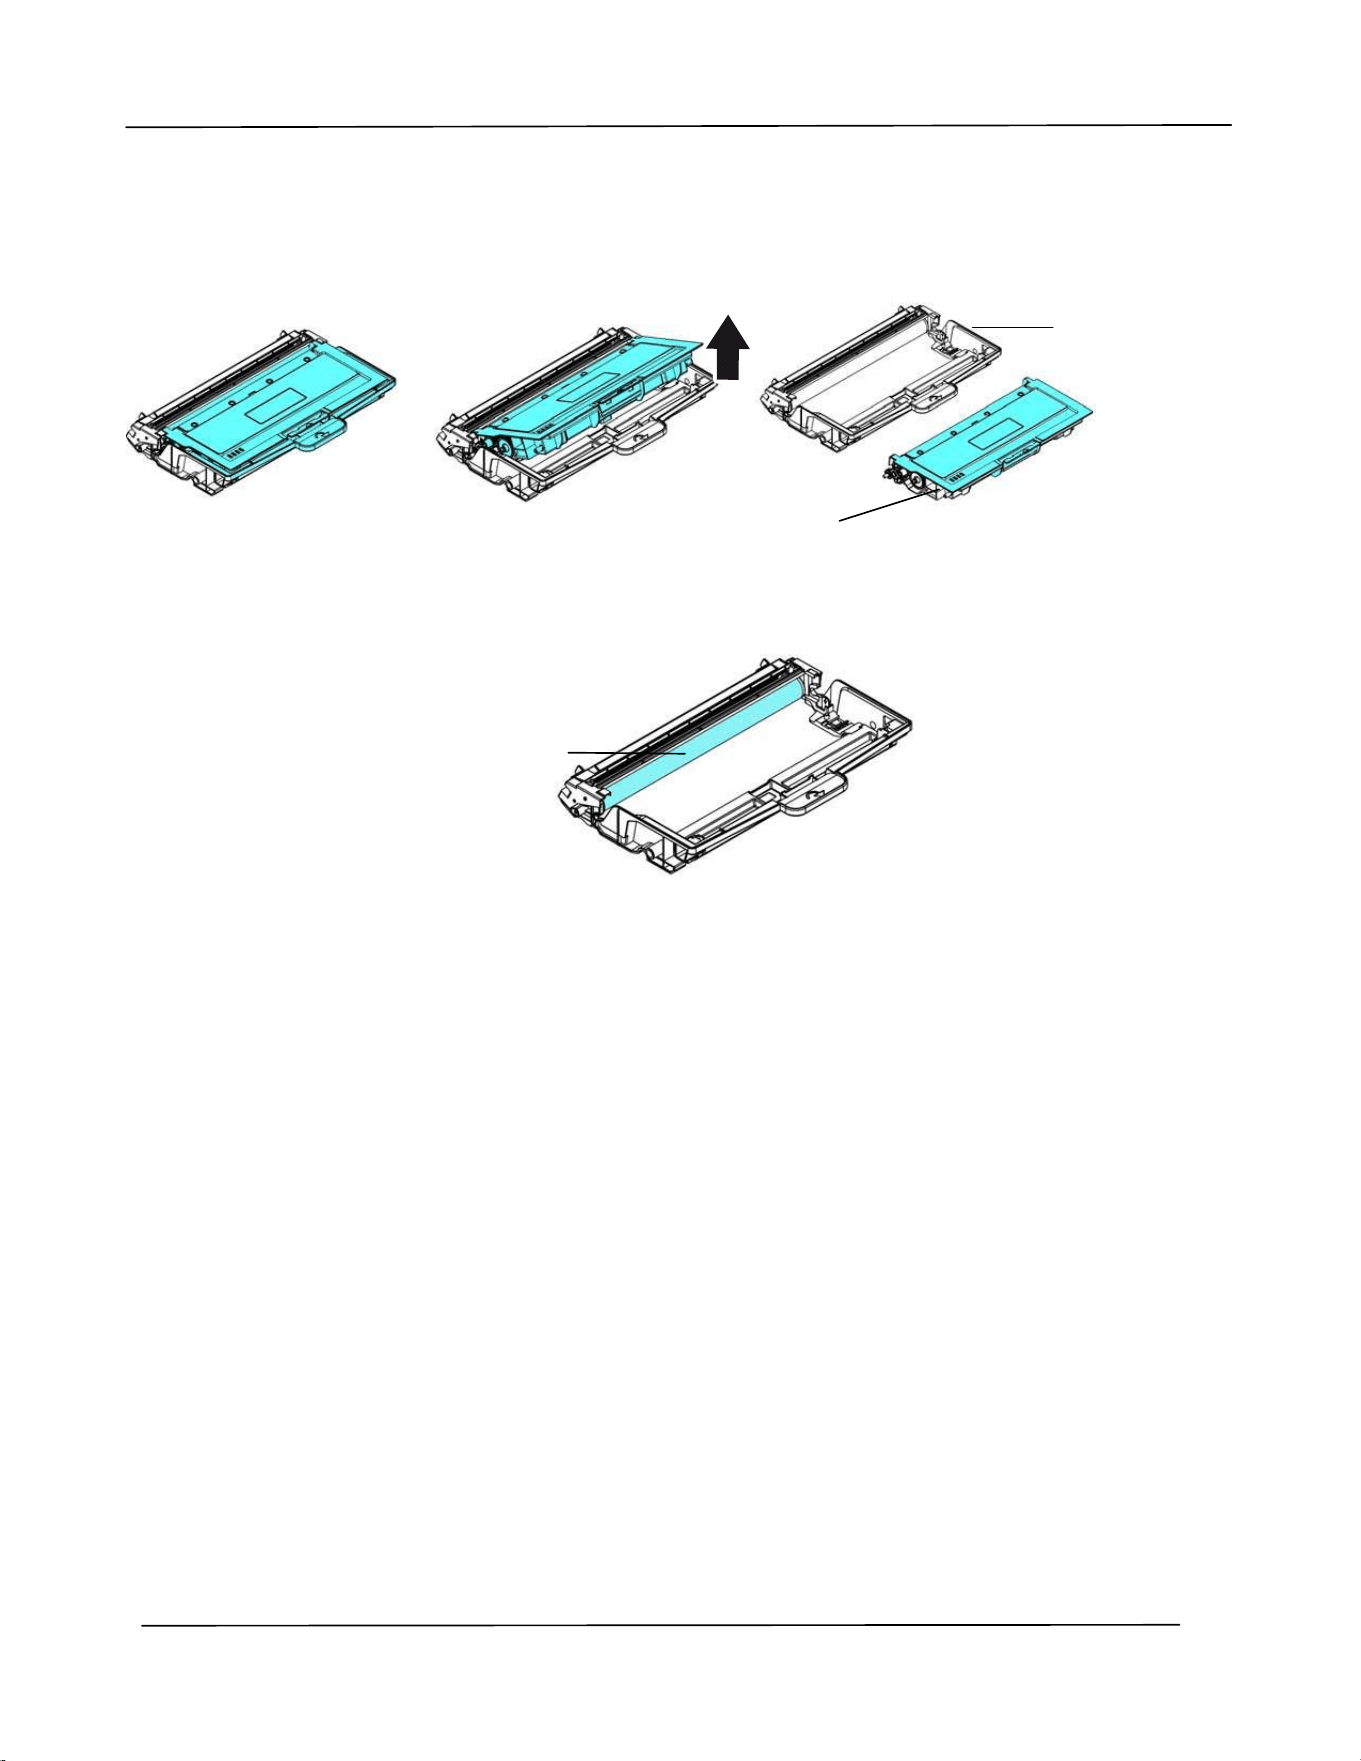
Use r ’s Guide
8 8
4 .
Rem ove t he toner cart ridge from t he drum unit as shown.
5 .
Clean the drum unit with a clean and soft clot h.
Drum unit
Toner
Cart ridge
Clean t his area.
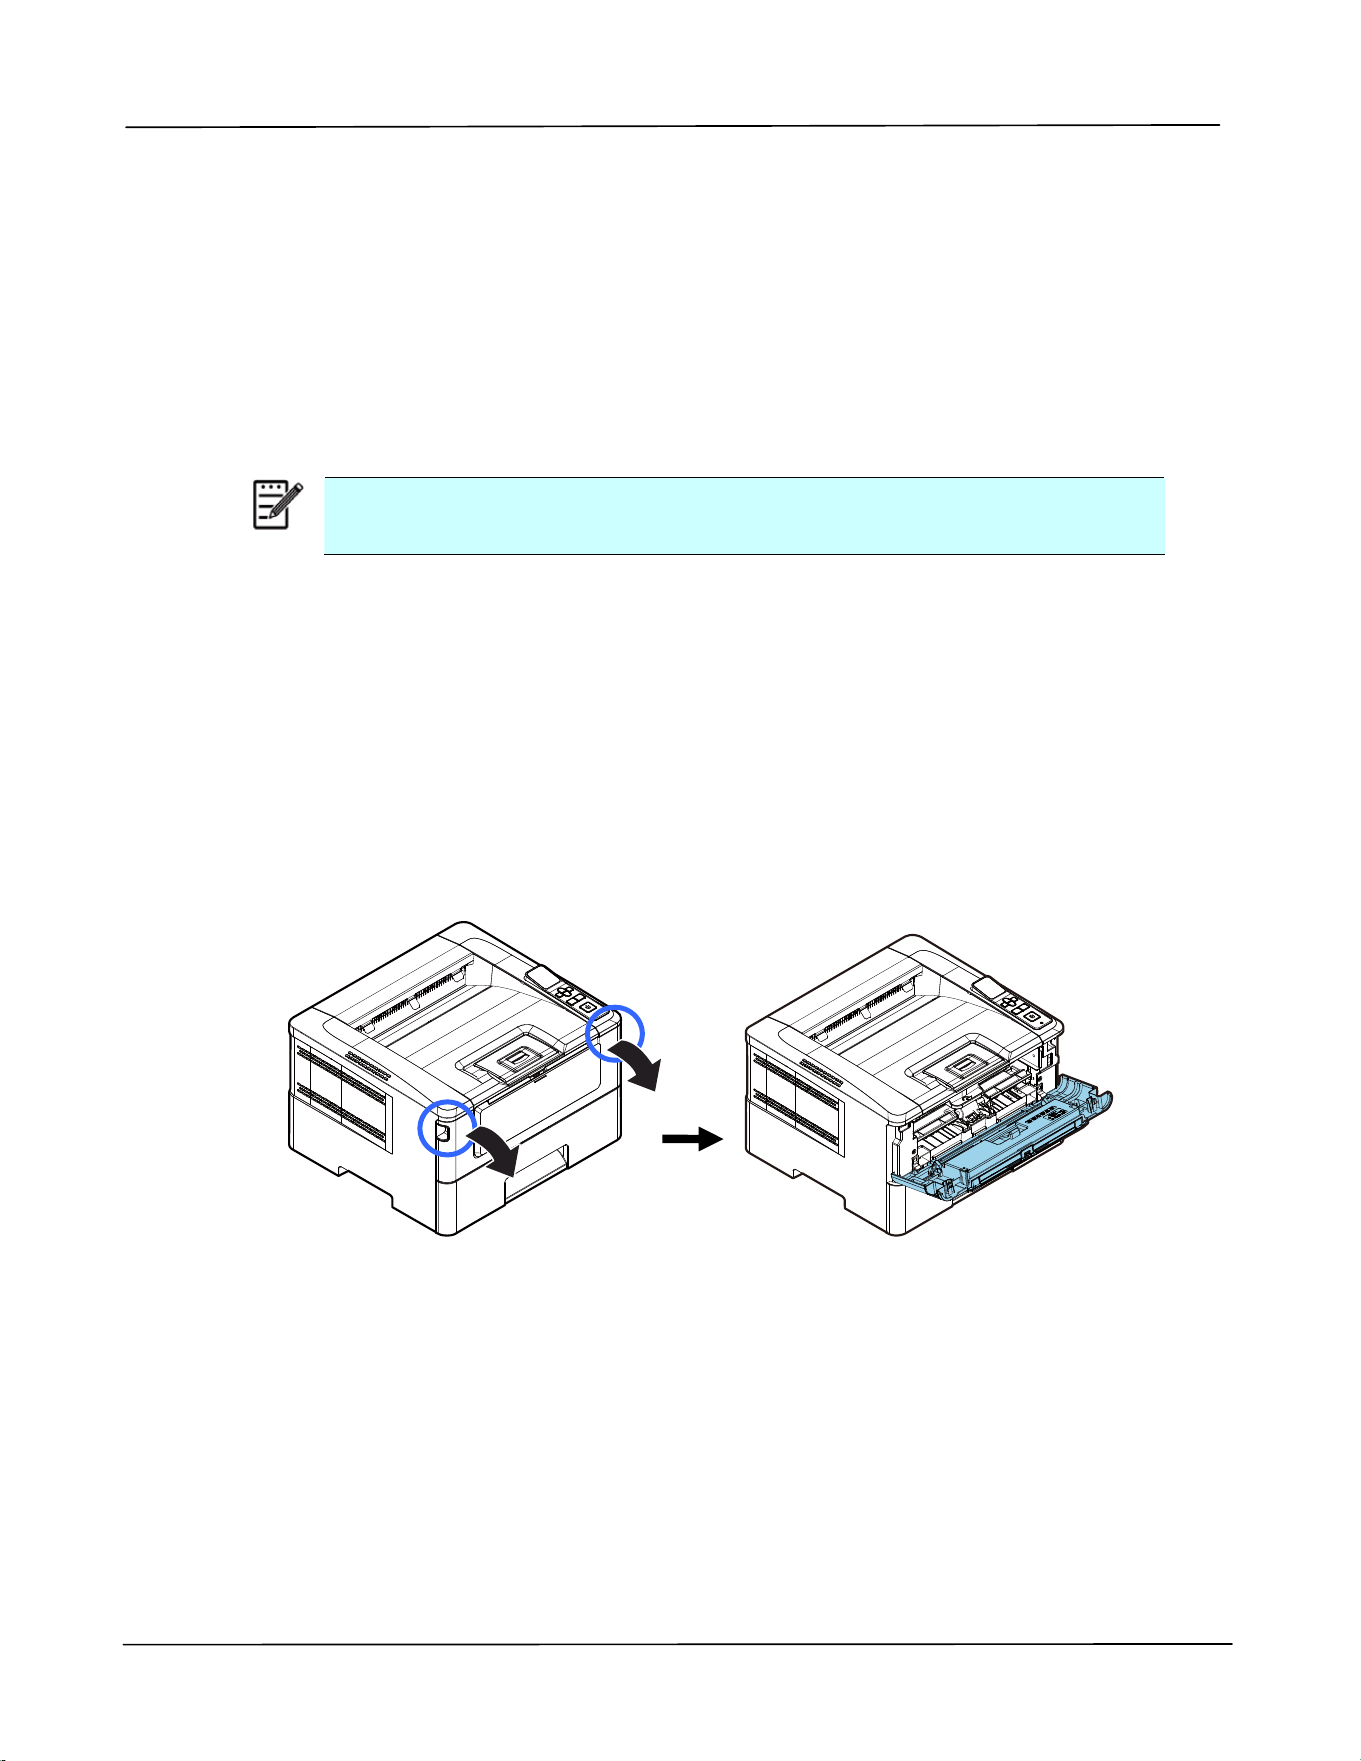
Ma in ta ining t he Product
89
Replacing t he Toner Ca rt ridge
The t oner cart ridge t hat com es wit h t he product needs t o be replaced aft er printing
approxim at ely 3,000 pages. When t he toner cart ridge is running low, you will be
prom pt ed wit h a [ Tone r Low ] m essage t hrough t he PRI NTER m onit oring program –
[ Avision St a t us M onit or] . Buy a new t oner cart ridge and have it ready before you
receive [ Repla ce Ton er] m essage.
N ot e:
The drum unit and t he t oner cart ridge are t wo separat e part s.
Follow t hese steps to replace t he t oner cart ridge:
Rem oving t he Toner Ca r t r idge
1 . Turn off t he power and rem ove t he power cord from t he power out let.
2 . Open the front cover by pulling t he handles on bot h sides as shown.
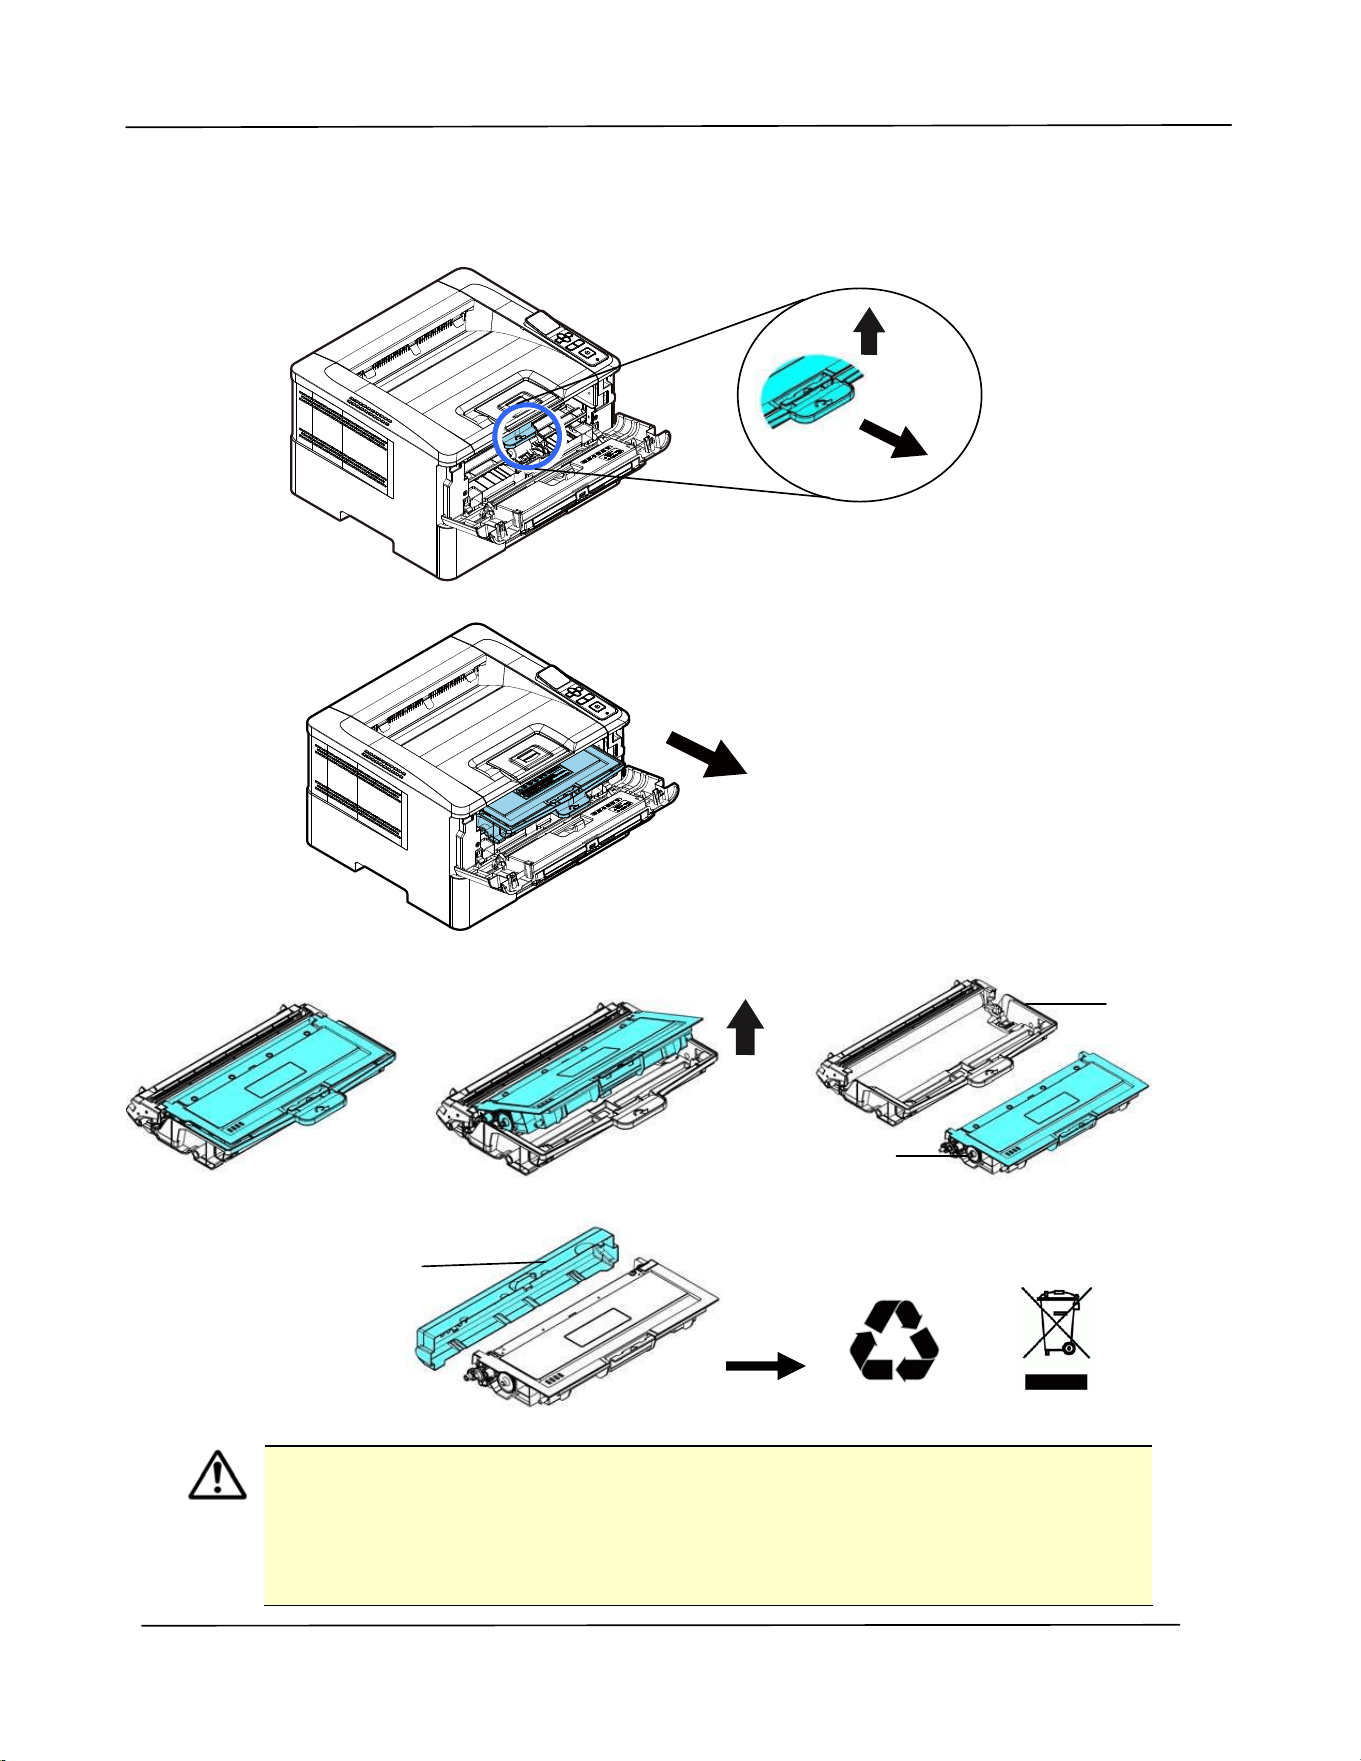
Use r ’s Guide
9 0
3 . Lift t he handle of t he drum unit and t oner cart ridge assem bly and gent ly rem ove
the assem bly.
4 . Rem ove t he t oner cart ridge from the drum unit as shown.
I m port ant !
Do not dispose of t he t oner cart ridge. Put t he used t oner cartridge int o t he
bundled plast ic bag, and then ret urn it t o a dealer or service
representat ive. The lat t er recycles or deals wit h t he collected toner
cart ridges in accordance w it h t he relevant regulations.
Drum
Toner
Cart ridge
Prot ect ive
Cover
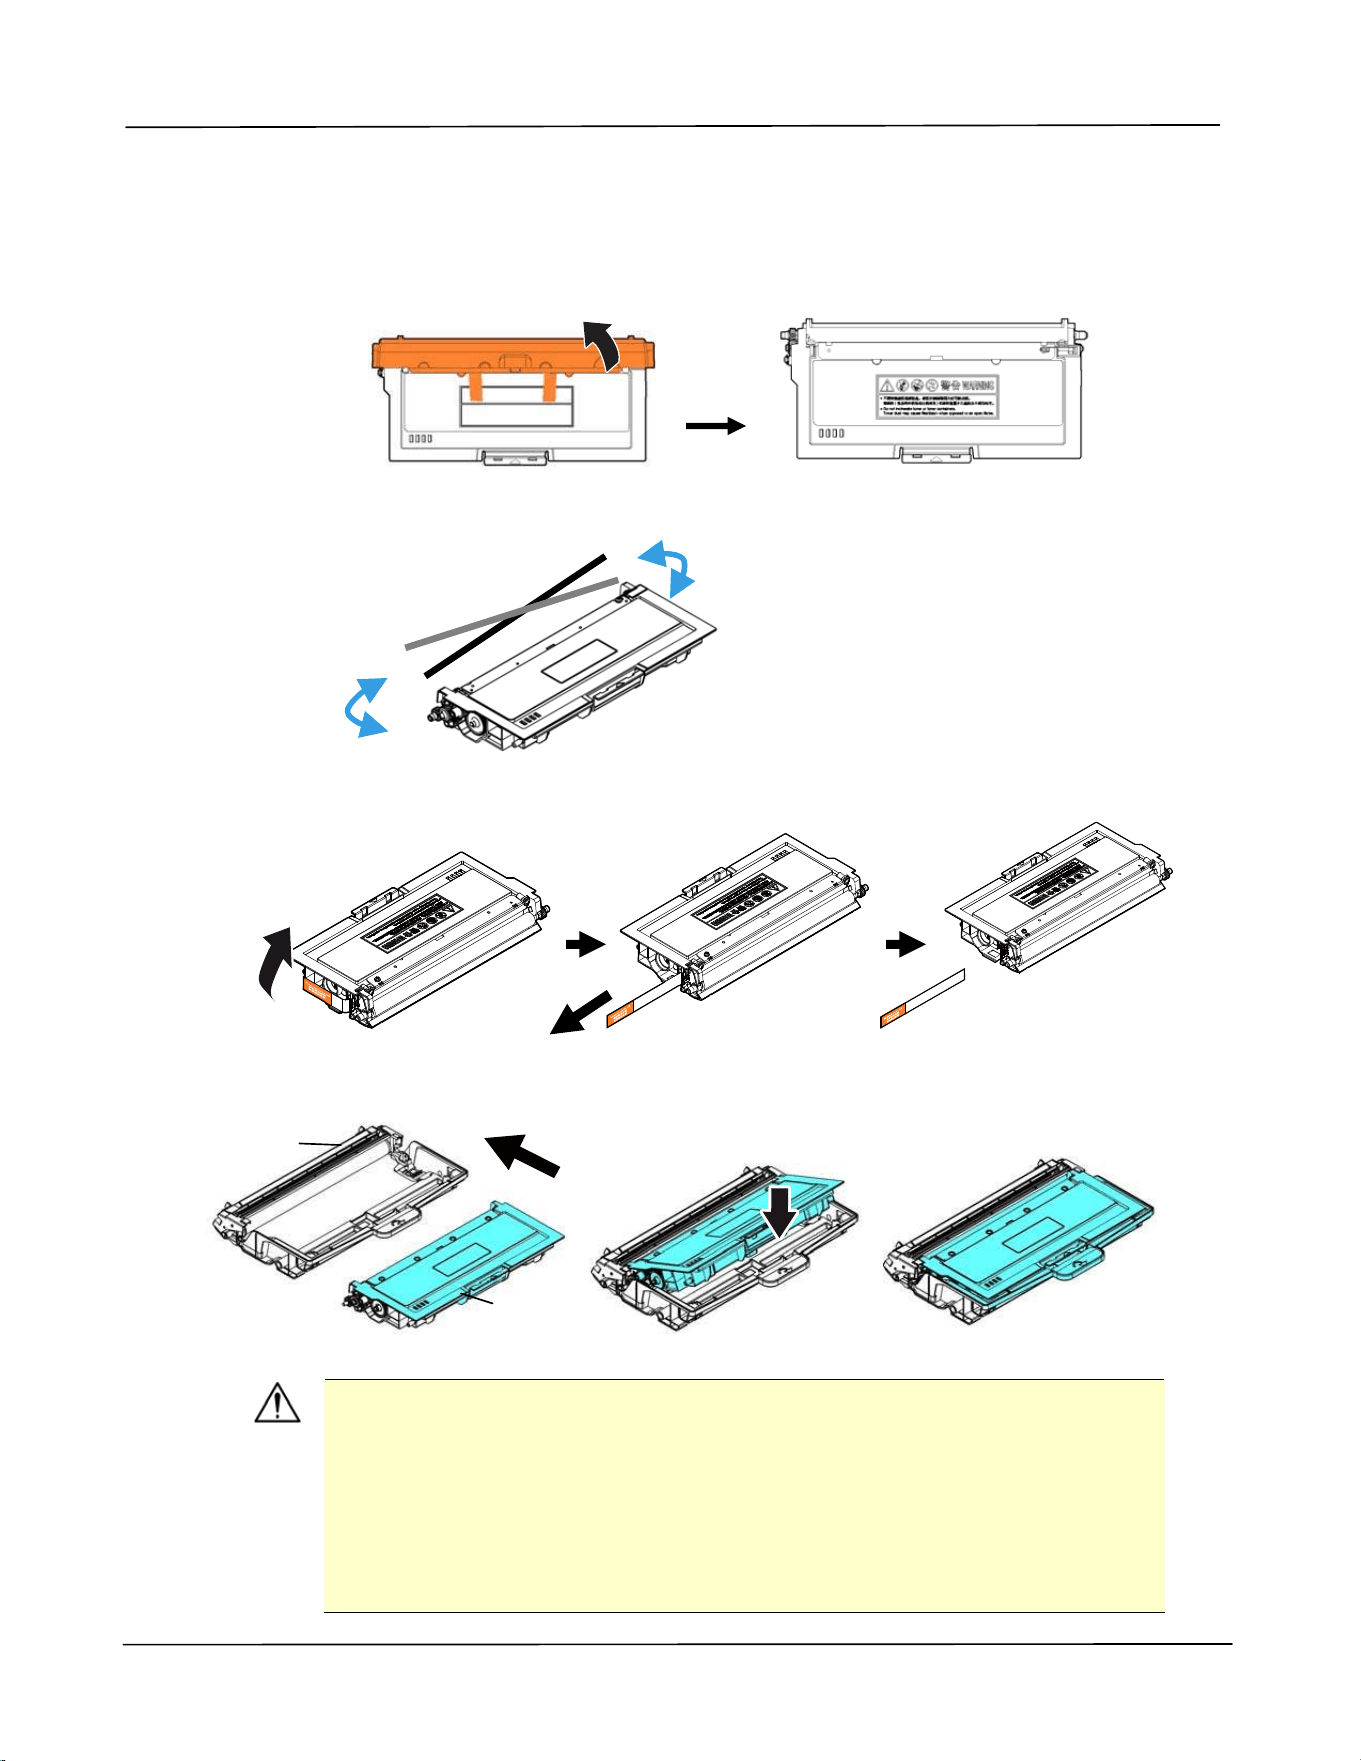
Ma in ta ining t he Product
91
I nst alling t he Toner Ca r t r idge
1 .
Unpack t he new t oner cart ridge、and rem ove t he prot ective cover.
2 . Tilt the new t oner cart ridge up and down and t hen right and left 10 t im es t o
dist ribut e t he toner evenly inside t he t oner cart ridge.
3 . Pull out t he prot ect ive seal of t he t oner cart ridge unt il it is com plet ely rem oved.
4 . I nstall t he new t oner cart ridge t o t he drum unit .
W ar ning!
Be careful not t o inhale t oner.
To avoid print qualit y problem s, DO NOT t ouch t he t oner rollers.
I f t oner get s on your clothing or ot her fabric, wipe off t he t oner
wit h a dry clot h. Wash t he it em s in cold wat er and air dry.
To prevent t he toner cart ridge from dam age, do not expose it
m ore t han several m inut es.
Drum unit
Toner
Cart ridge
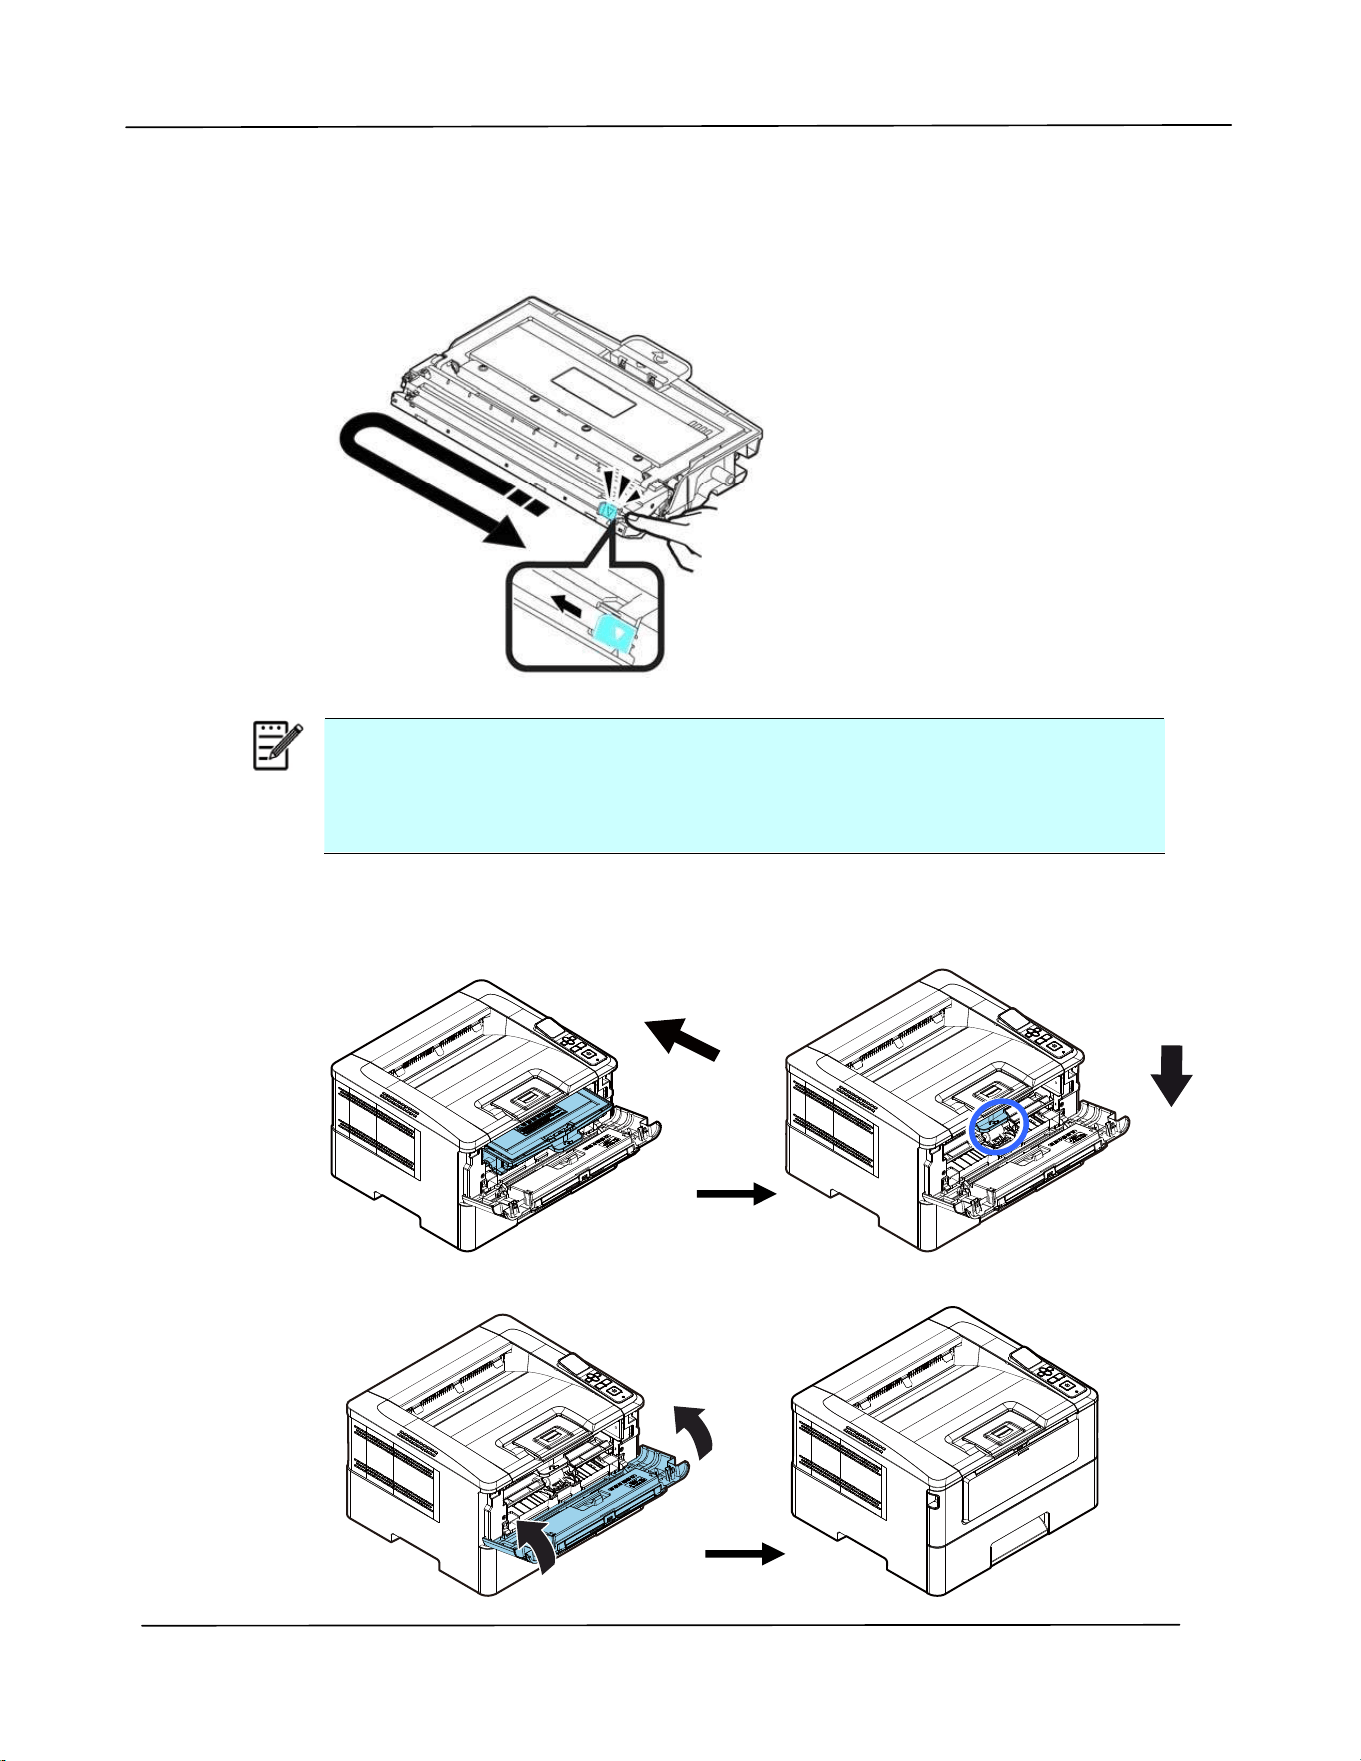
Use r ’s Guide
9 2
5 . Clean t he corona wire inside t he drum unit by gent ly sliding t he t ab from left t o
right and right t o left for several t im es. ( Aft er the t oner cart ridge has been
used for a period of t im e, som e am ounts of toner m ay rem ain on t he corona
wire.)
N ot e:
Be sure t o return the t ab to the Hom e position (▲) . The arrow on the
tab m ust be aligned wit h t he arrow on t he drum unit. I f it is not ,
print ed pages m ay have a vert ical st ripe.
6 . Hold the handle of the t oner cart ridge assem bly and insert the t oner cart ridge
assem bly t o it s original place. Press t he handle t o fix it firm ly in place.
7 .
Close t he front cover.
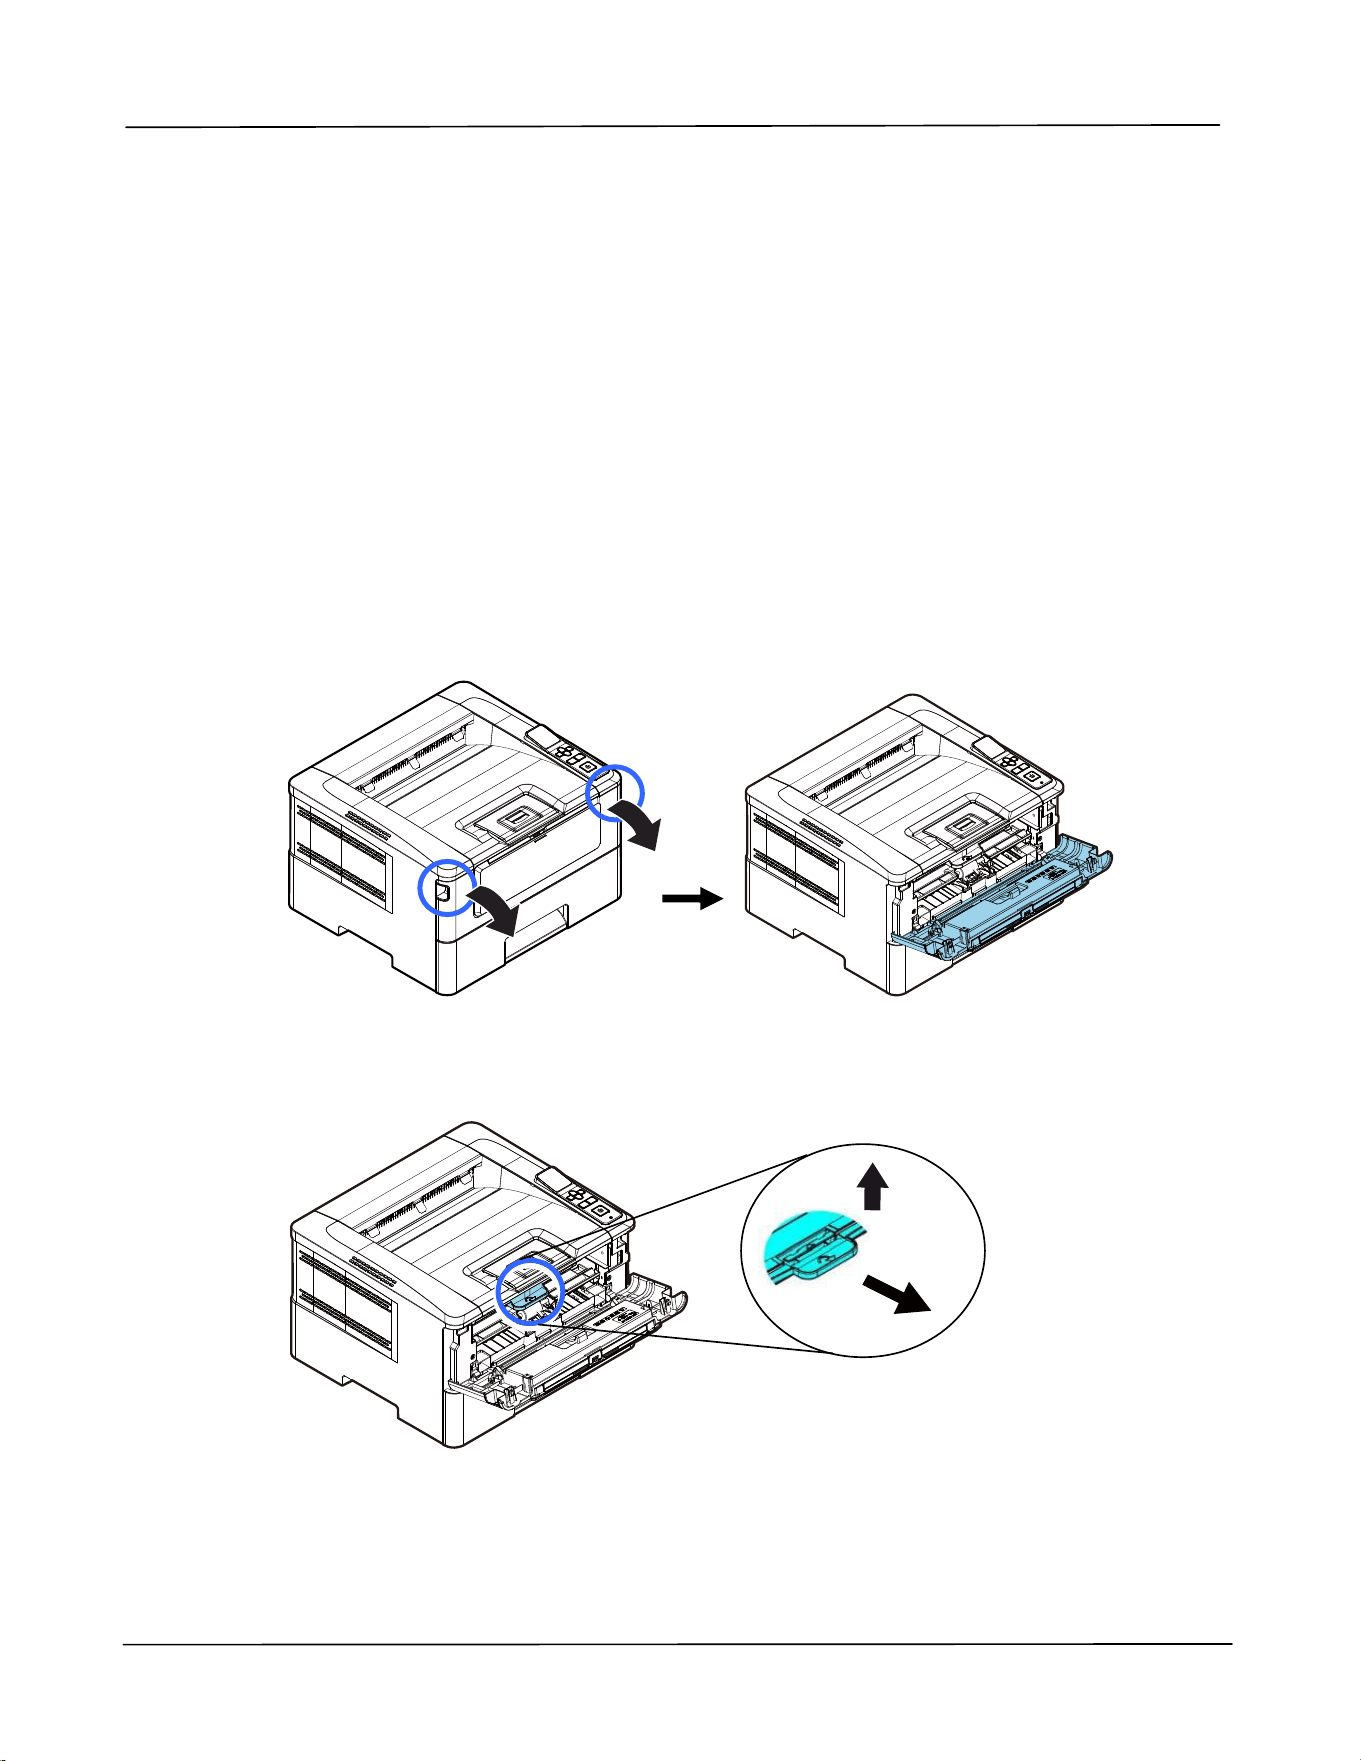
Ma in ta ining t he Product
93
Replacing t he Drum Unit
The drum unit t hat com es wit h t he product needs t o be replaced aft er printing
approxim at ely 30,000 pages. When t he drum unit is running low, you w ill be prom pt ed
with a [ Dr um Unit Low ] m essage t hrough t he PRI NTER m onit oring program –
[ Avision St a t us M onit or] . Buy a new t oner cart ridge and have it ready before you
receive [ Repla ce D rum Unit ] m essage.
Follow t hese steps to replace t he t oner cart ridge:
Rem oving t he D r um Unit a nd t he Toner Ca rt ridge Assem bly
1 . Turn off the power and rem ove t he power cord from t he power out let.
2 . Open the front cover by pulling t he handles on bot h sides as shown.
3 .
Lift the handle of the drum and the t oner cart ridge assem bly and gent ly rem ove
the assem bly.
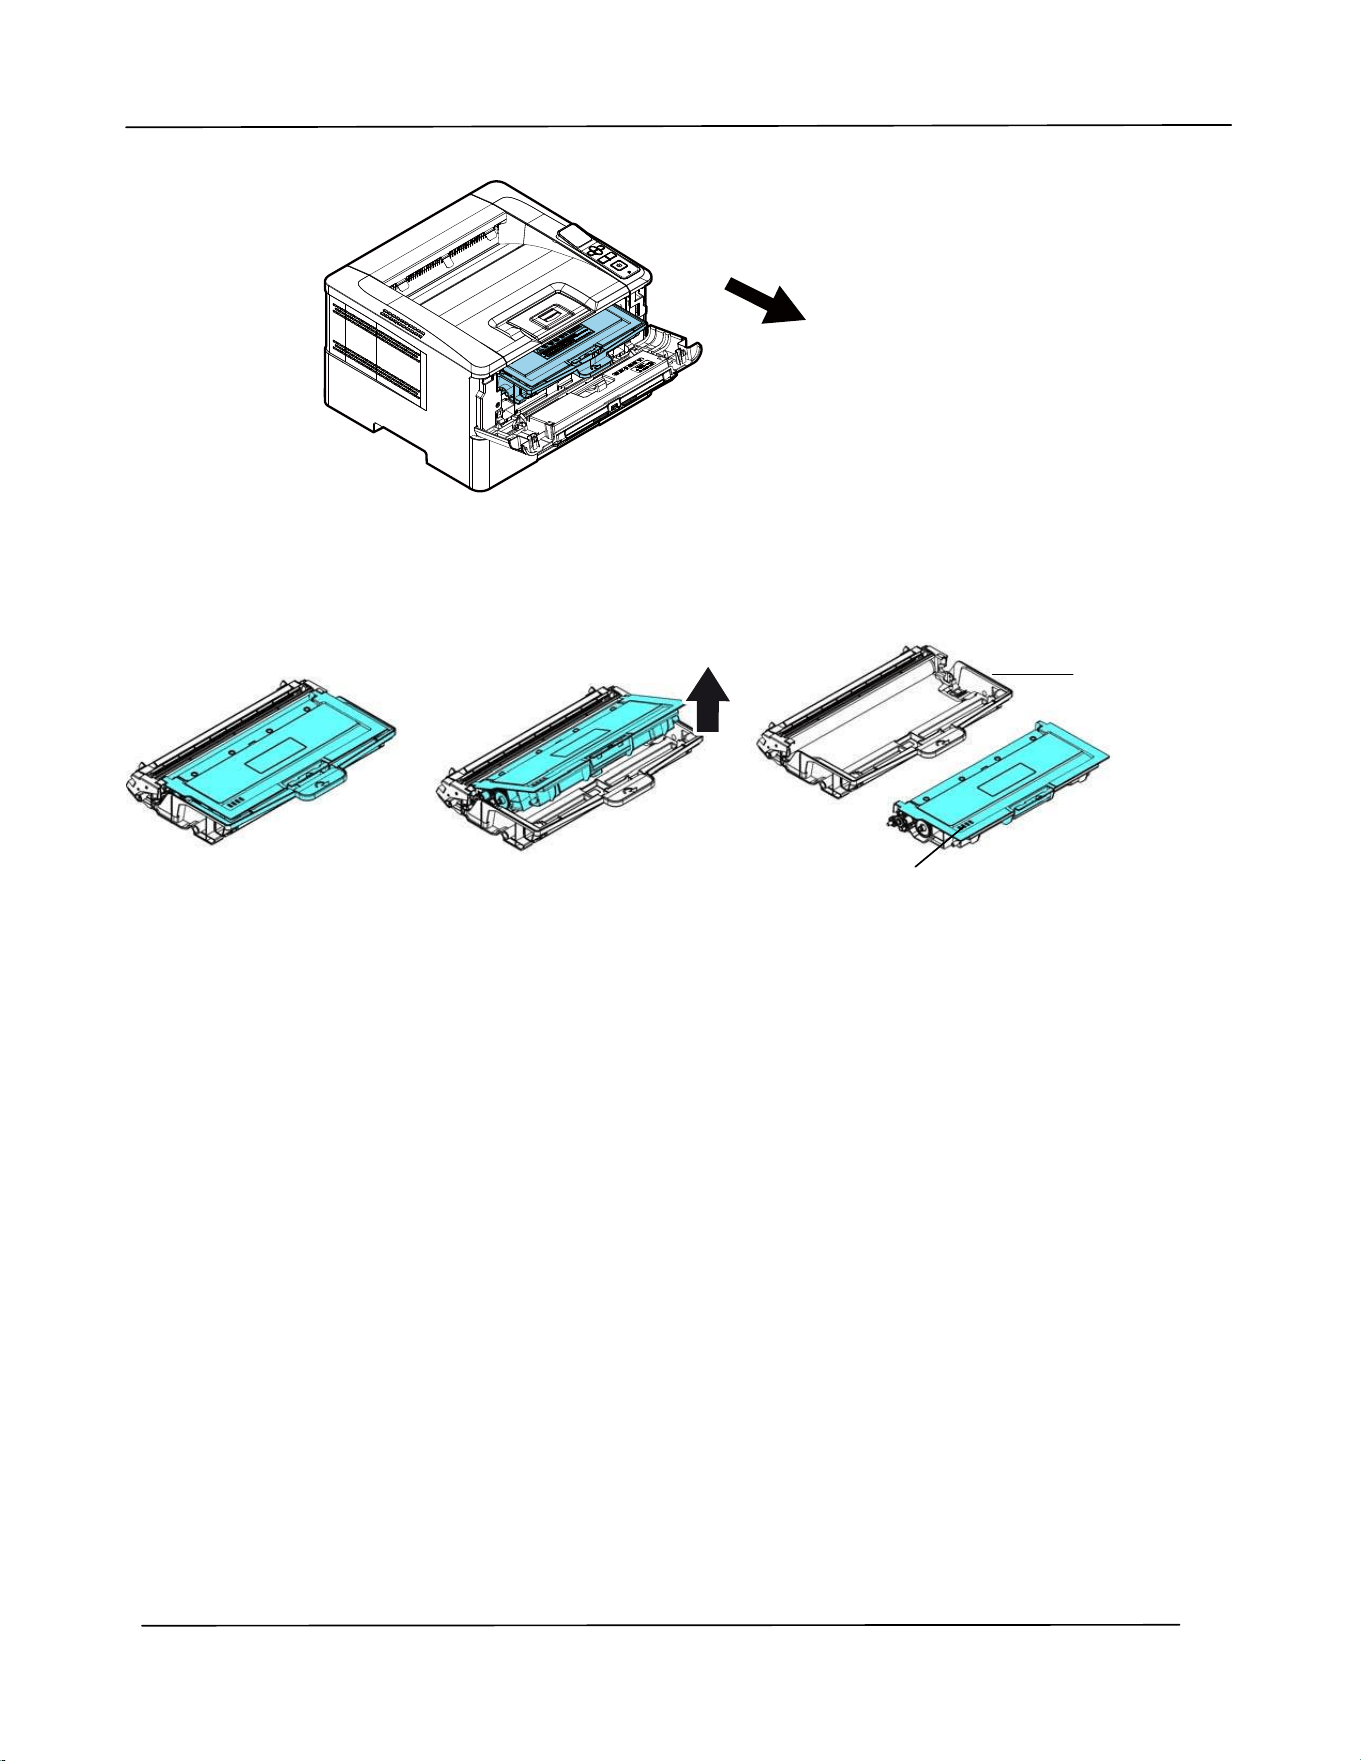
Use r ’s Guide
9 4
4 . Rem ove t he t oner cart ridge from t he drum unit as shown.
Drum unit
Toner
Cart ridge
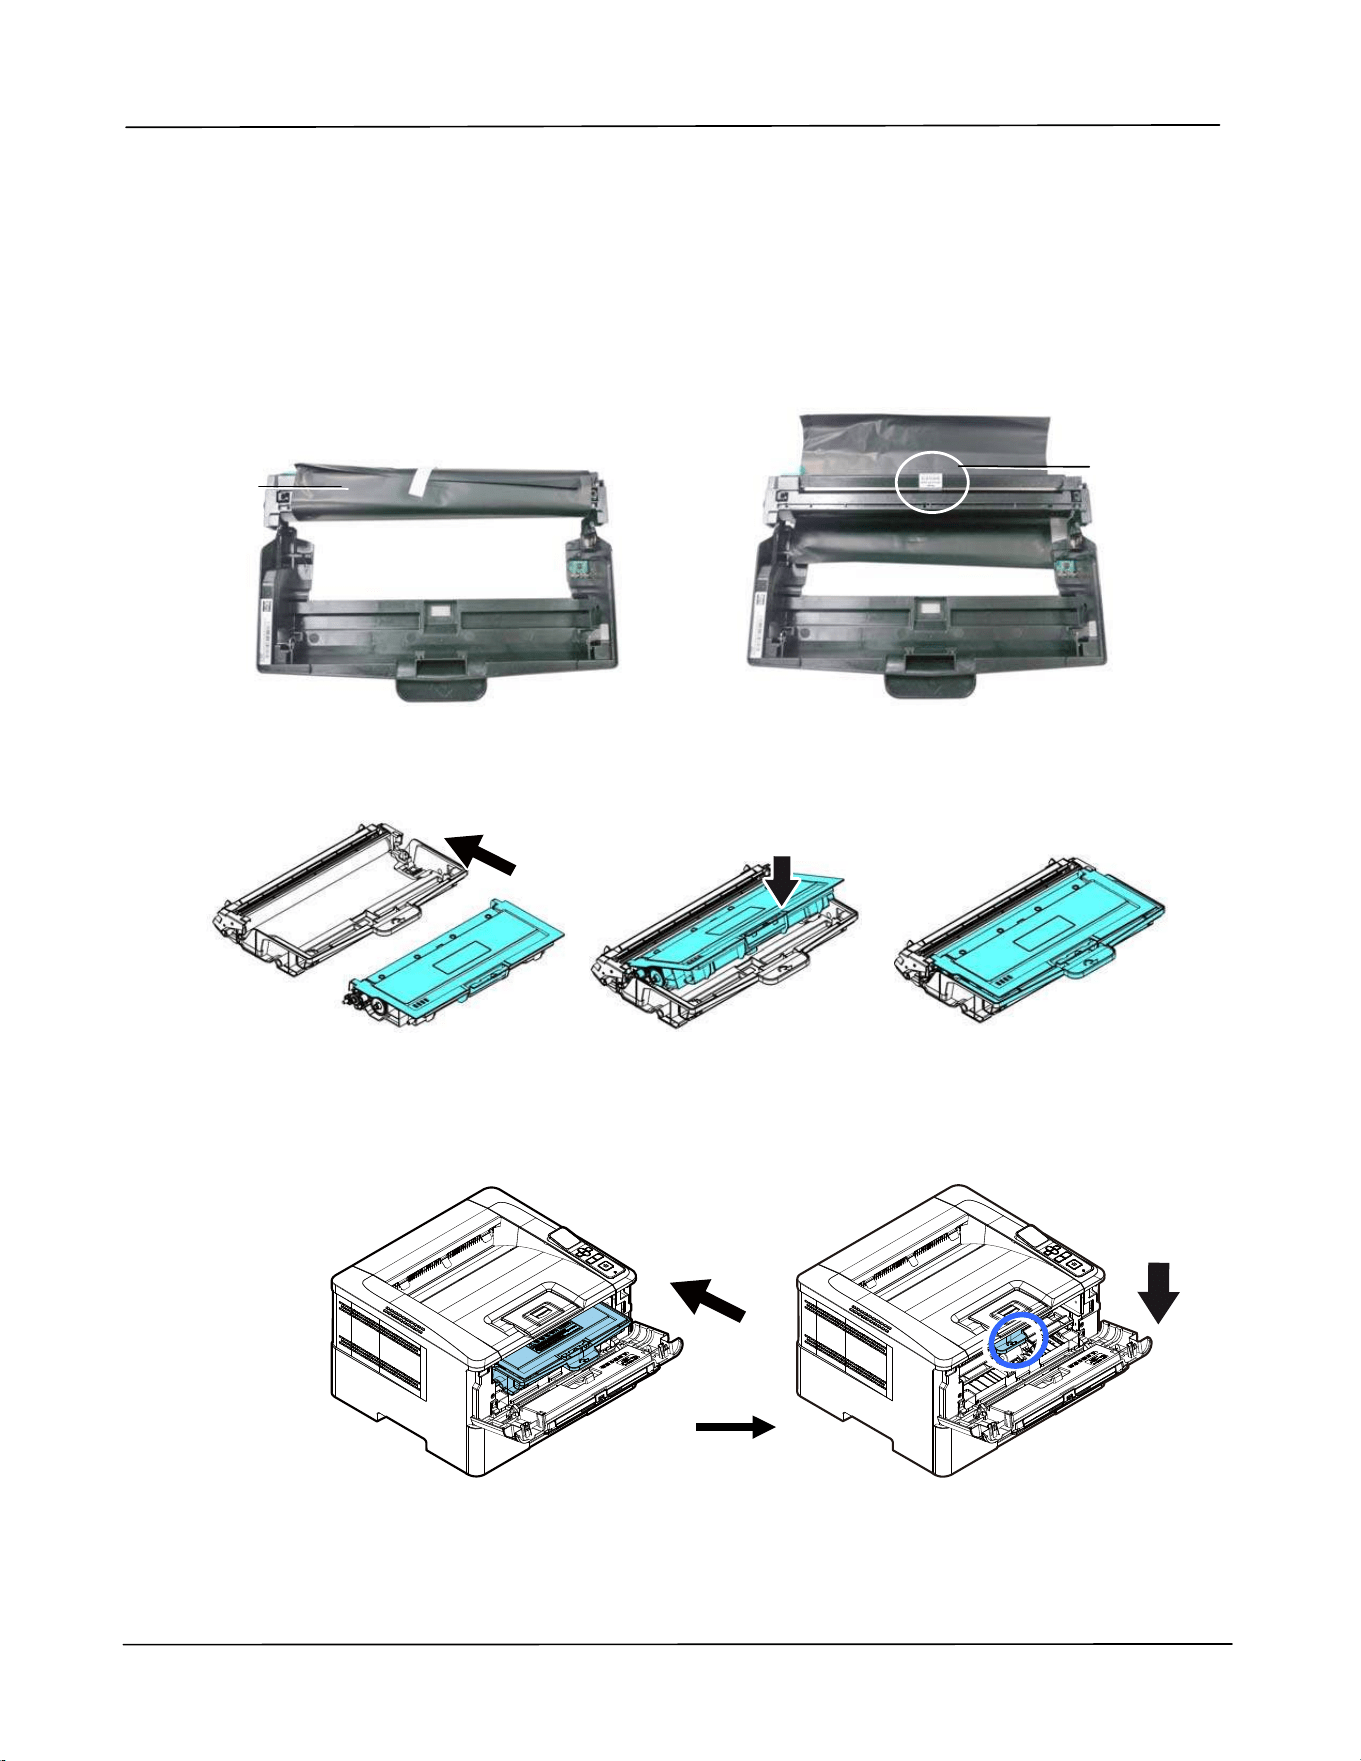
Ma in ta ining t he Product
95
I nst alling t he Drum Unit
1 . Rem ove the protective film and the label in t he cent er of t he drum unit . Be
sure not t o t ouch the drum during unpacking. Your finger print m ay affect t he
print qualit y.
2 . I nstall t he toner cart ridge t o t he new drum unit.
3 .
Hold t he handle of t he t oner cart ridge and insert the t oner cart ridge t o it s
original place. Press the handle t o fix it firm ly in place.
Label
Black Film
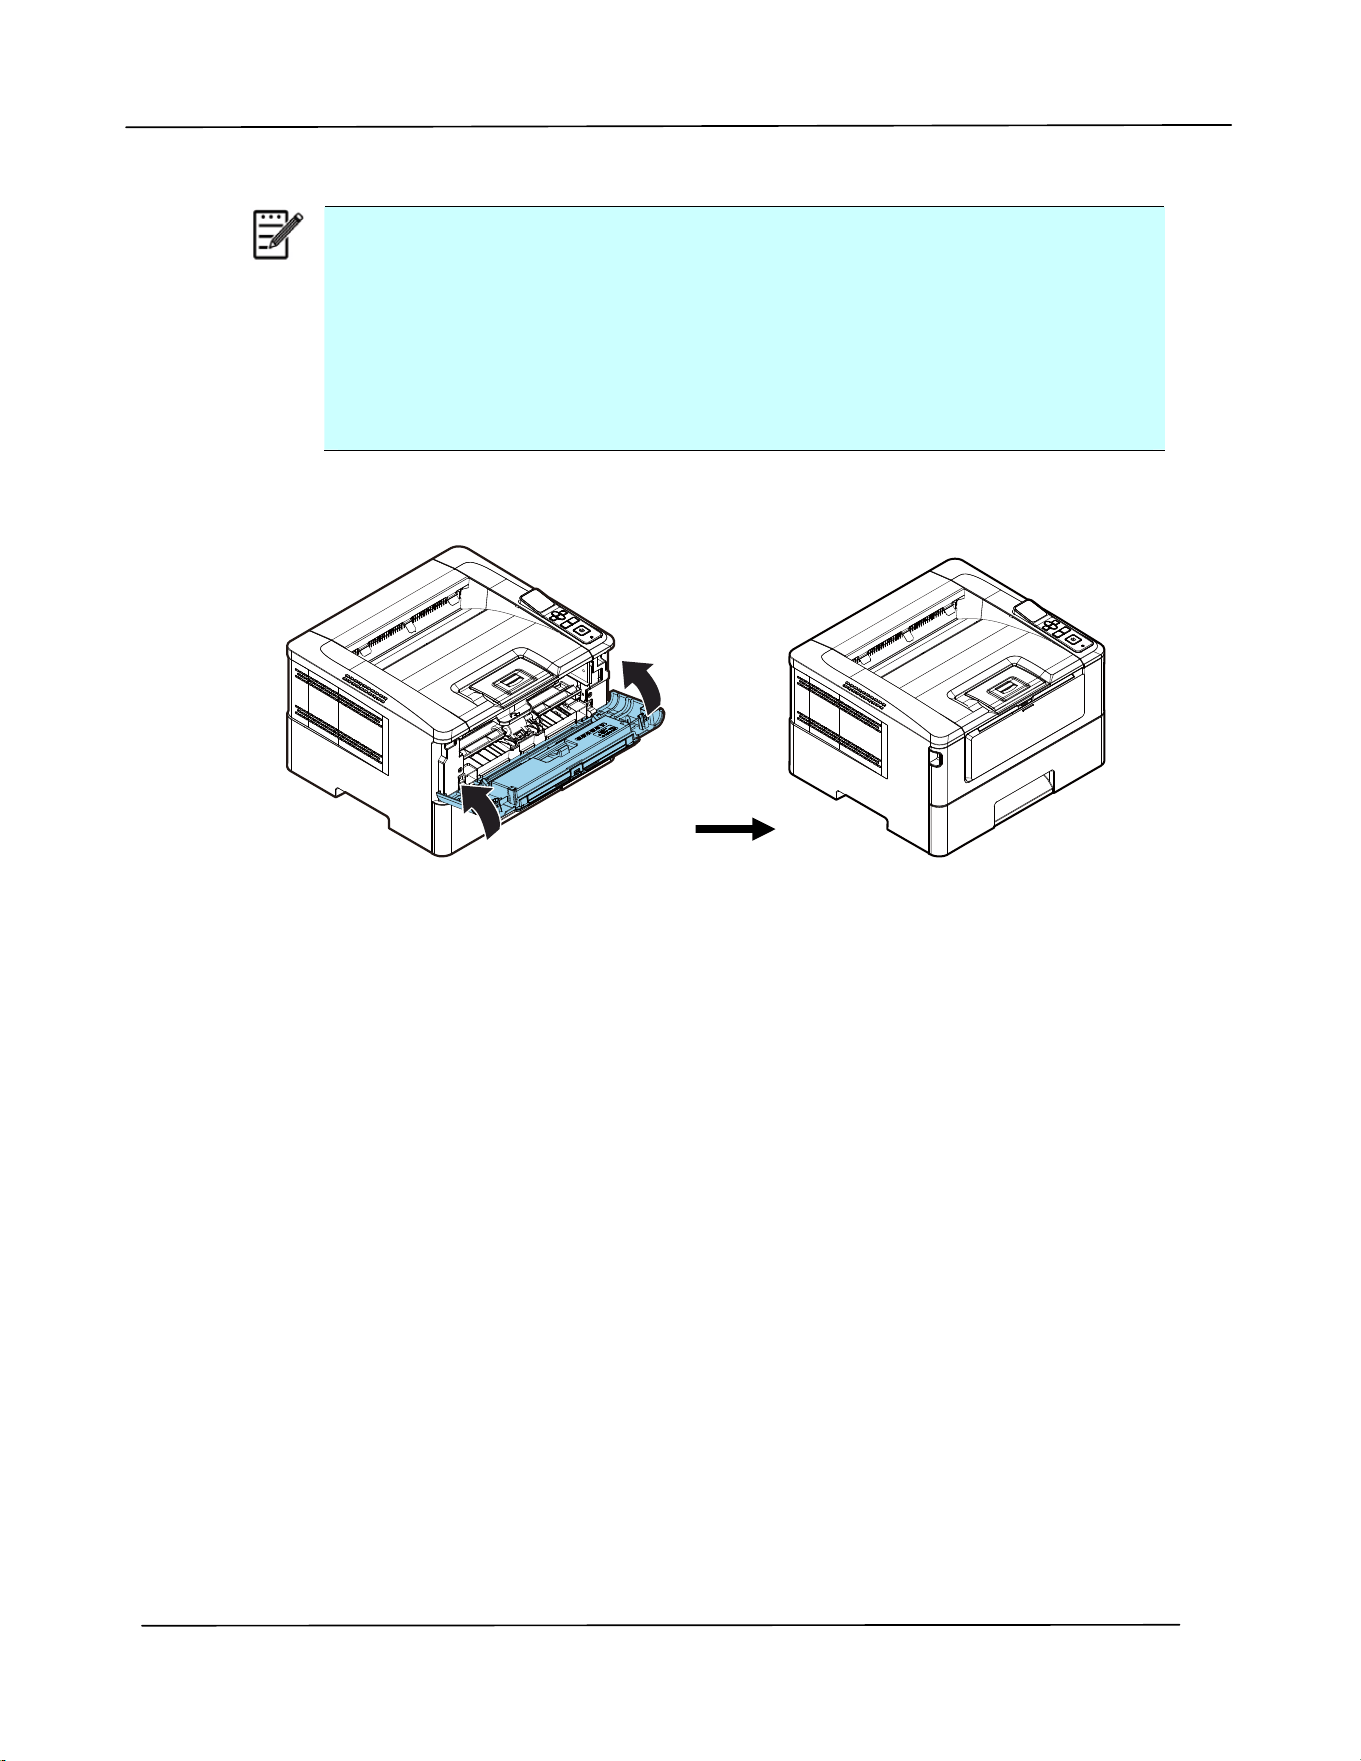
Use r ’s Guide
9 6
N ot e:
I f t oner get s on your clothing or ot her fabric, wipe off t he t oner
wit h a dry clot h. Wash t he it em s in cold wat er and air dry.
Do not dispose of t he t oner cart ridge. Put t he used t oner cart ridge
int o t he bundled plastic bag, and t hen ret urn it t o a dealer or
service represent at ive. The latt er recycles or deals w ith the
collected t oner cart ridges in accordance with the relevant
regulations.
4 .
Close t he front cover.

Spe cificat ion s
97
8 . Specificat ions
All specifications are subj ect t o change wit hout not ice.
Gen era l
Ma x m edia size Legal size
Re solut ion
1200 × 1200 dpi
Fir st pr in t ou t t im e
From Re ady M ode
< = 5.9 seconds ( A4 SEF)
Re com m ende d m on thly pr int
volum e
4,500 pages
Ma xim um m ont hly print dut y
cycle
60,000 pages
Pa pe r capacit y
10 page(70 g/ m ² plain paper)
Pa per size
A4, A5, A6, B5 ( JI S) , B6 ( JI S), Let ter, Legal,
cust om ized size: 76 x 127 ~ 216 x 356 m m
Ma nua l
t ra y
Pa per w eigh t 60~ 163 g/ m ²
Pa pe r capacit y
550 pages(70 g/ m ² plain paper)
Pa per size
A4, A5, A6, B5 ( JI S) , B6 ( JI S), Let ter, Legal,
cust om ized size: 76 x 127 ~ 216 x 356 m m
Tra y 1
Pa per w eigh t 60~ 120 g/ m ²
Pa per ou tput Top out put
Use r ’s Guide
9 8
Pa pe r out put capa cit y 150 pages
Duple x pr int ing unit Build- in
Pa per size
A4, Let ter, B5 ( JI S)
Duple x pr int
Pa per w eigh t 60~ 105 g/ m ² ( 16~ 28 lbs)
Connect ivit y USB2.0, 10/ 100/ 1000 Mbps Ethernet
Wi- Fi ( For t he m odel includes Wi- Fi m odule)
Pr in t e r la nguage GDI
Support ed oper at ion syst em
Windows 7, Windows 8, Windows 10,
Windows 11
Dim e m sion ( W xD xH ) 402 x 380 x 258 m m
W eigh t Approx. 8.7 kg
Pow e r source
110~ 127Vac,50/ 60Hz,9.0A
220- 240Vac, 50/ 60Hz, 4.5A
Pow e r consum pt ion < 1.02kw
Tem pe r at ure Ope rat ion
Environm en t
Hum idity
10° C~32° C
15% ~80% (no dew)
Pr odu ct Life cycle
Pr in t e r life 120,000 pages
Toner Ca rt ridge
3,000 pages
Drum Unit * 30,000 pages
* Drum yield is based on 3 pages per j ob [ let ter/ A4 sim plex] .
The num ber of pages m aybe affected due t o t he m edia t ype or paper size.

Spe cificat ion s
99
W i- Fi Specificat ion s:
The m odel ( CF-811AC/ CF- WU810N) of Wi- Fi m odule varies according t o countries/ regions.
Model: CF- 811AC
Main Chipset RTL8811CU
Host I nt erface USB 2.0
Frequency Range 2.4GHz/ 5.8GHz Dual- Channel
I EEE802.11a
I EEE802.11b
I EEE802.11g
I EEE802.11n
Wi- Fi St andard
I EEE802.11ac
11b:1/ 2/ 5.5/ 11Mbps
11g:6/ 9/ 12/ 18/ 24/ 36/ 48/ 54Mbps
11n:200Mbps
Transm it Speed
11ac:433Mbps
Tr a n s m i t Po w e r Ma x . 1 7 d B m
WPA- PSK/ WPA2- PSK
WPA/ WPA2
Securit y
WEP
Windows 7/ 8/ 8.1/ 10 ( 32/ 64 bit )/ 11
Operat ing System
MacOS10.6~ MacOS10.15
Use r ’s Guide
1 0 0
Model: CF- WU810N
Main Chipset RTL8188EUS
Host int erface USB 2.0
Frequency
Range
2.412~ 2.484 GHz
Wi- Fi St andard
I EEE 802.11b
I EEE 802.11g
I EEE 802.11n
Transm it Speed
11b: 1/ 2/ 5.5/ 11 Mbps
11g: 6/ 9/ 12/ 24/ 36/ 48/ 54 Mbps
11n: 150 Mbps
Transm it Power Max. 18 dBm
Securit y
WPA-PSK/ WPA2-PSK
WPA/ WPA2
WEP
Operat ing
System
Windows 7/ 8/ 8.1/ 10 ( 32/ 64 bit )/ 11
Max OS 10.6 ~ 10.11
Linux Kernel 2.6.18~ 3.10