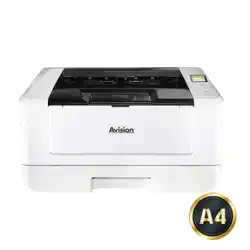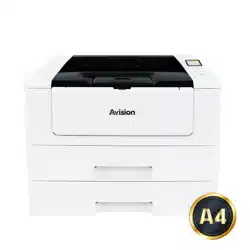

A4 Digit al Printer
AP3 0 Series User's Guide
Avision Inc.

User’s Gu ide
ii
Safet y I nfor m at ion
When using t his equipm ent , the following safety precautions should always be followed.
Sa fet y D uring Opera t ion
I n t his m anual, the follow ing im port ant sym bols are used:
W ARN I N G:
I ndicat es pot entially hazardous sit uat ions, w hich if inst ruct ions are not followed, could result
in deat h or serious injury.
CAU TI ON :
I ndicat es a pot ent ially hazardous sit uat ion which, if inst ruct ions are not followed, m ay result
in m inor or m oderat e inj ury or dam age t o propert y.
I m por ta nt :
I ndicat es operat ional requirem ent s and rest rictions. Please read and follow t hese
inst ruct ions t o ensure a proper operation and t o avoid dam age to t he m achine.
N ot e :
I ndicat es furt her explanat ion or clarificat ion. Reading this is highly recom m ended.
W ARN I N G:
To avoid hazardous elect ric shock or fire, do not rem ove any covers or screws ot her t han
t hose specified in t his m anual.
CAU TI ON :
To reduce the risk of fire, use only no.26AWG or larger t elecom m unicat ion line cord.
Disconnect t he power plug by pulling t he plug, not t he cable.
Do not t ouch the m et al fingers of the ADF pad m odule. The edges are sharp and
touching them m ay result in injury.

iii
SAFETY I N STRUCTI ON
This printer is a page printer which is operated by m eans of a LSU (Laser Scanning Unit )
printhead. There is no possibilit y of danger from t he LSU print head, provided t he printer is
operat ed according t o the inst ruct ions in t his m anual. Since radiat ion em it t ed by t he LSU
print head is com plet ely confined wit hin prot ective housings and ext ernal covers, t he LSU
beam s cannot escape from t he m achine during any phase of user operat ion.
Do not place a coffee cup, vase, or ot her liquid- filled container on the m achine.
Spillage can dam age t he m achine’s elect rical part s and insulat ion.
Take care not t o drop paper clips, staples, or any ot her m et al obj ect s int o t he m achine.
When clearing paper j am s, refer to t he inst ruct ions in t his m anual.
Before disconnect ing t he plug, t urn t he m achine off. Make sure your hands are dry.
Hold t he plug it self, not it s cord, when disconnecting it from t he recept acle.
Never at t em pt t o open any fixed cover.
Do not att em pt t o alt er t he m achine or its parts.
Under norm al condit ions t he sm all quant it ies of ozone gas produced by t he m achine are
harm less. However, if the m achine is used for an ext ended period or w it hin a sm all
room , you should m ak e sure t hat t he area is adequat ely ventilat ed. Also vent ilat e t he
room if you not ice t he m achine sm ells after a period of frequent or ext ended use.
Do not m odify this product , as a fire, elect rical shock, or breakdown could result . I f the
product em ploys a LSU printhead, t he LSU beam source could cause blindness.
Do not att em pt t o rem ove the covers and panels which have been fixed t o t he product .
Som e product s have a high-volt age part or a LSU beam source inside t hat could cause
an elect rical shock or blindness.
I f t his product becom es inordinat ely hot or em it s sm oke, or unusual odor or noise,
im m ediat ely t urn OFF the power swit ch, unplug t he power cord from the power outlet ,
and t hen call your aut horized service represent at ive. I f you keep on using it as is, a fire
or elect rical shock could result .
I f t his product has been dropped or it s cover dam aged, im m ediat ely t urn OFF t he power
swit ch, unplug the power cord from the pow er out let , and then call your authorized
service represent at ive. I f you keep on using it as is, a fire or elect rical shock could
result.
The inside of t his product has areas subj ect to high t em perature, which m ay cause
burns. When checking t he inside of the unit for m alfunctions such as paper m is- feed, do
not touch the locat ions (around t he fusing unit , etc.) which are indicat ed by a “ Caut ion!
Hot Surface” caut ion label.
Do not st ore the m achine’s consum ables in any of these locat ions:
Where t he t em perat ure or hum idit y m ay be excessively high.
Where flam m able it em s or liquids are st ored.
I n direct sunlight .
I n dusty condit ions.

User’s Gu ide
iv
Pr eca ut ions
Do not inst all t he equipm ent near heat ing or air condit ioning unit s.
Do not inst all t he equipm ent in a hum id or dust y place.
Place t he equipm ent securely on an even, flat surface. Tilt ed or uneven surfaces m ay
cause m echanical or paper- feeding problem s.
Ret ain t he box and packing m at erials for shipping purposes.
Copyr ight s a nd Tr a de m a rks
Et hernet is a regist ered t radem ark of Xerox Corporat ion.
Microsoft, Windows, Windows NT, Windows XP, Windows Vista, and Windows 7, 8, 9, 10 are
regist ered t radem arks of Microsoft Corporat ion in t he Unit ed St at es and/ or ot her count ries.
Ot her product nam es used herein are for ident ificat ion purposes only and m ay be
tradem arks of t heir respect ive com panies. We disclaim any and all right s to t hose m arks.
W ar rant y
The inform at ion contained in t his docum ent( s) is subj ect to change wit hout notice.
The m anufact urer m akes no warrant y of any kind with regard t o t his m aterial, including, but
not lim it ed to, t he im plied warranties of fit ness for a part icular purpose.
The m anufacturer shall not be liable for errors cont ained herein or for incidental or
consequent ial dam ages in connection wit h the furnishing, perform ance, or use of this
m aterial.

v
Federa l Com m unicat ions Com m ission ( FCC) com pliance inform at ion
st at e m e nt
Pa rt 1 5
This equipm ent has been test ed and found t o com ply wit h the lim it s for a Class B digit al
device, pursuant to Part 15 of t he FCC Rules. These lim it s are designed to provide
reasonable protect ion against harm ful interference in a resident ial inst allat ion. This
equipm ent generat es, uses and can radiat e radio frequency energy and, if not inst alled and
used in accordance wit h the inst ruct ions, m ay cause harm ful interference t o radio
com m unicat ions.
However, t here is no guarant ee t hat interference will not occur in a part icular inst allation. I f
this equipm ent does cause harm ful int erference t o radio or t elevision recept ion, which can
be determ ined by turning the equipm ent off and on, the user is encouraged to t ry t o correct
the interference by one of the following m easures:
Reorient or relocat e t he receiving ant enna.
I ncrease t he separat ion bet ween t he equipm ent and receiver.
Connect the equipm ent int o an out let on a circuit different from t hat to which t he
receiver is connect ed.
Consult the dealer or an experienced radio/ TV t echnician for help.
This device com plies wit h Part 15 of the FCC Rules. Operat ion is subj ect to t he following t wo
condit ions: ( 1) This device m ay not cause harm ful interference, and ( 2) t his device m ust
accept any interference received, including interference t hat m ay cause undesired operat ion.
Eur opean Union Regula t ory N ot ice
Product s bearing the CE m arking com ply wit h the follow ing EU Direct ives:
Low Volt age Directive 2014/ 35/ EC
EMC Direct ive 2014/ 30/ EC
Rest rict ion of t he use of cert ain hazardous subst ances ( RoHS) Direct ive 2011/ 65/ EU
RED ( Radio Equipm ent Directive) ( 2014/ 53/ EC)
This product sat isfies the Class B lim it s of EN55022, EN55024, safet y requirem ent s of EN
60950 and ROHS requirem ents of EN50581.
* This m achine is certified as Class 1 Laser product .

User’s Gu ide
vi
Produ ct Sa fet y Guide
Please clearly read all t hese inst ruct ions, and follow all instruct ions and warnings before
inst alling and using t he device.
The following indicat ions are used in t his docum ent to obviate any chance of accident or
dam age t o you and/ or t he device.
W ARN I N G I ndicat es pot ent ially hazardous situat ions, which if inst ruct ions
are not followed, could result in deat h or serious injury.
CAU TI ON I ndicat es a pot ent ially hazardous sit uat ion which, if inst ruct ions
are not follow ed, m ay result in m inor or m oderat e injury or
dam age t o property.
W ARN I N G
Use only t he USB cable that cam e with your device and avoid abrasions, cut s, fraying,
crim ping, and kinking. Using any ot her USB cable could cause fire, elect rical shock, or
inj ury.
Place t he device close enough to t he com put er so t hat t he int erface cable can easily
reach bet ween t he device and the com puter.
Do not place or st ore t he device:
Out doors
Near excessive dirt or dust, wat er, or heat sources
I n locat ions subj ect t o shocks, vibrations, high tem perat ure or hum idit y, direct
sunlight, st rong light sources, or rapid changes in tem perat ure or hum idit y
Do not use t he device wit h wet hands.
Never disassem ble, m odify, or att em pt to repair t he device or device option by yourself,
except as specifically explained in t he device's docum entat ion. This could cause fire,
electrical shock, or injury.
Unplug the device and the USB cable, and refer servicing t o qualified service personnel
under the following condit ions:
Liquid has entered the device.
Obj ect has entered the device.
The device has been dropped, or t he case has been dam aged.
The device does not operat e norm ally (i.e. appearance of sm oke, st range sm ell,
odd noise, et c.) , or exhibit s a dist inct change in perform ance.
Unplug t he device and the USB cable before cleaning.

vii
CAU TI ON :
Do not locat e t he device on rackety or aslope tables. Do not locat e the device on
unst able surface. The device m ay fall down and this m ay result in inj ury.
Do not place heavy objects on t he unit . I t m ay cause unbalance and the device m ay fall
dow n. This m ay result in inj ury.
St ore the AC Power cord/ USB cable bundled out of t he reach of children t o avoid the
risk of injury.
Keep plast ic bags bundled out of the reach of children t o avoid the danger of
suffocation.
I f you are not going t o use the device for a long period, unplug t he USB cable from t he
electrical out let.
Overvie w
1
1 . Overview
I nt r oduct ion
Thank you for choosing Avision’s st at e- of- t he- art printer which can be used for
local and net work printing up t o A4 size.
Feat ures
This product provides the follow ing feat ures t o m ake your print out m ore efficient
and effective.
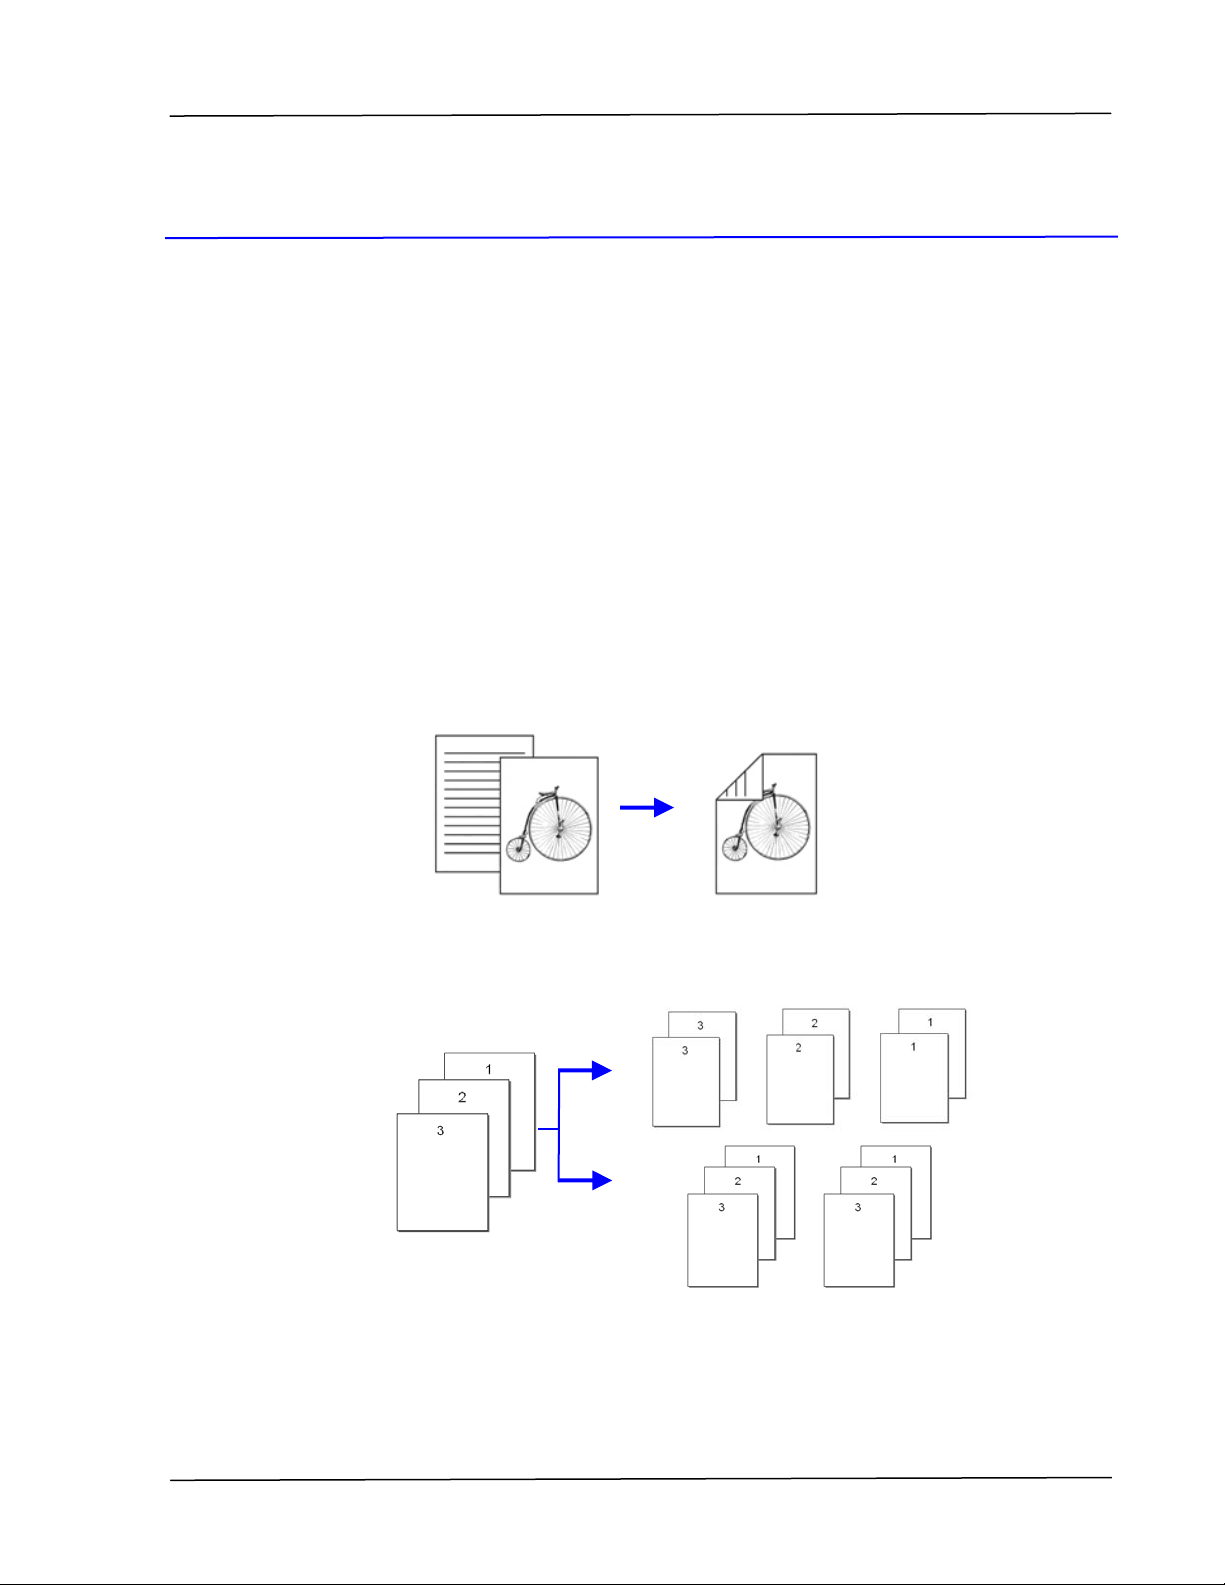
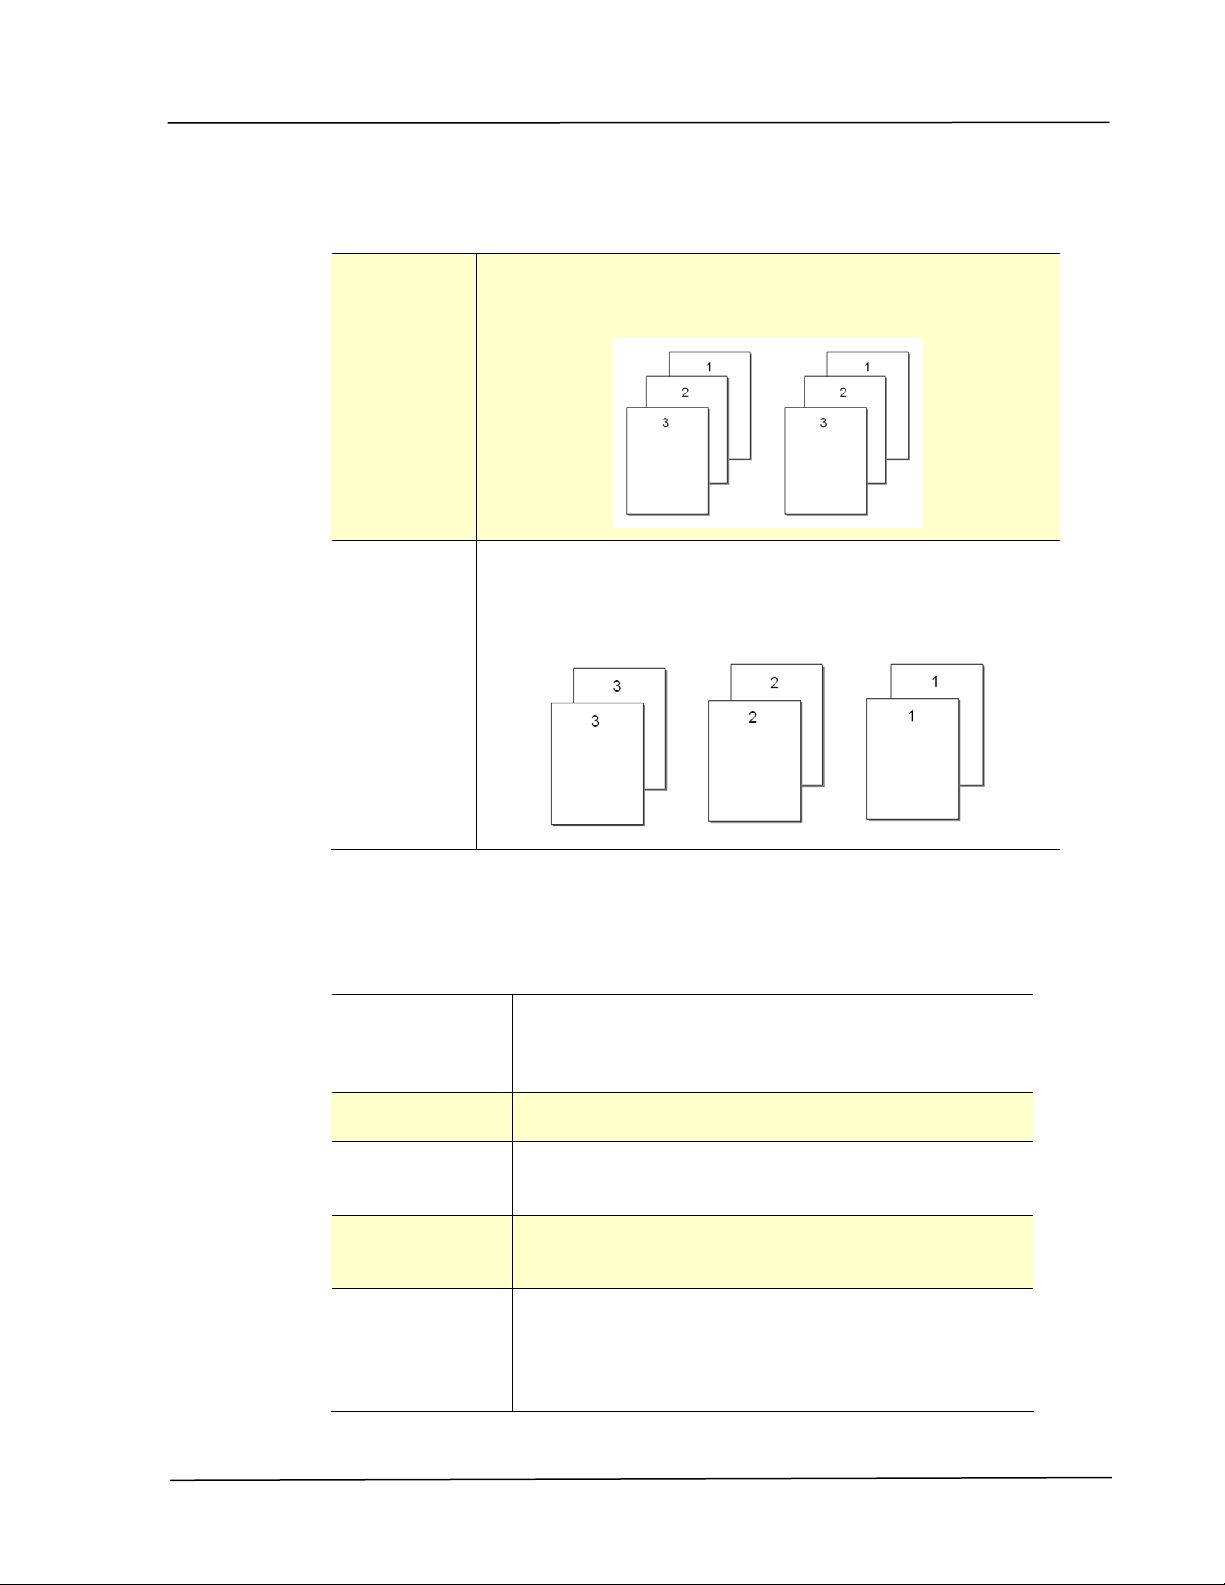
Print on Both Sides: Print s t wo pages (one on each side) on a single sheet
of paper.
Colla t e: Print s m ult iple copies at one t im e and sorts t he printed pages.
User’s Gu ide
2
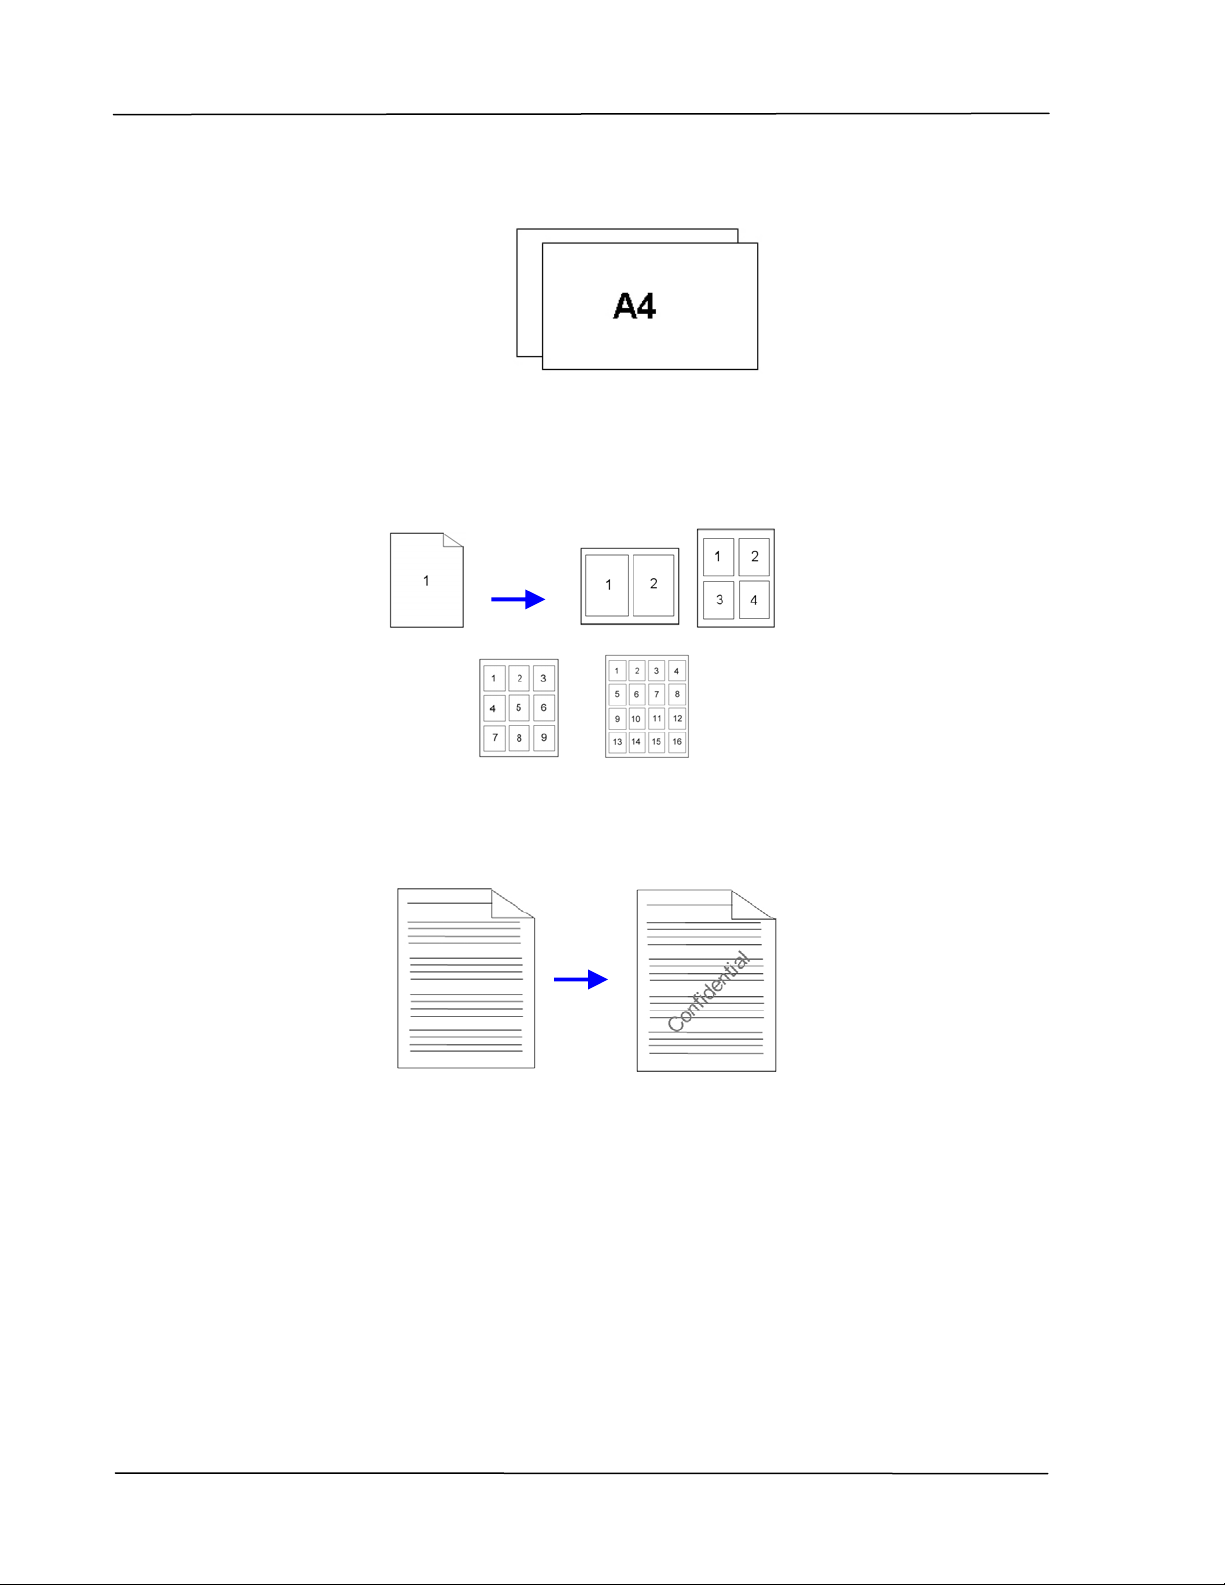
Support A4 size : The product allows you to print up t o A4 size.
Print Mult iple Pages on a Sin gle She e t : Print s t wo or four pages of t he
original on a single sheet of paper. A m axim um of 16 pages can be printed
on a single sheet of paper.
Print W at e rm ar k: Print text such as confidential, im portant content or
im age in the background.
Overvie w
3
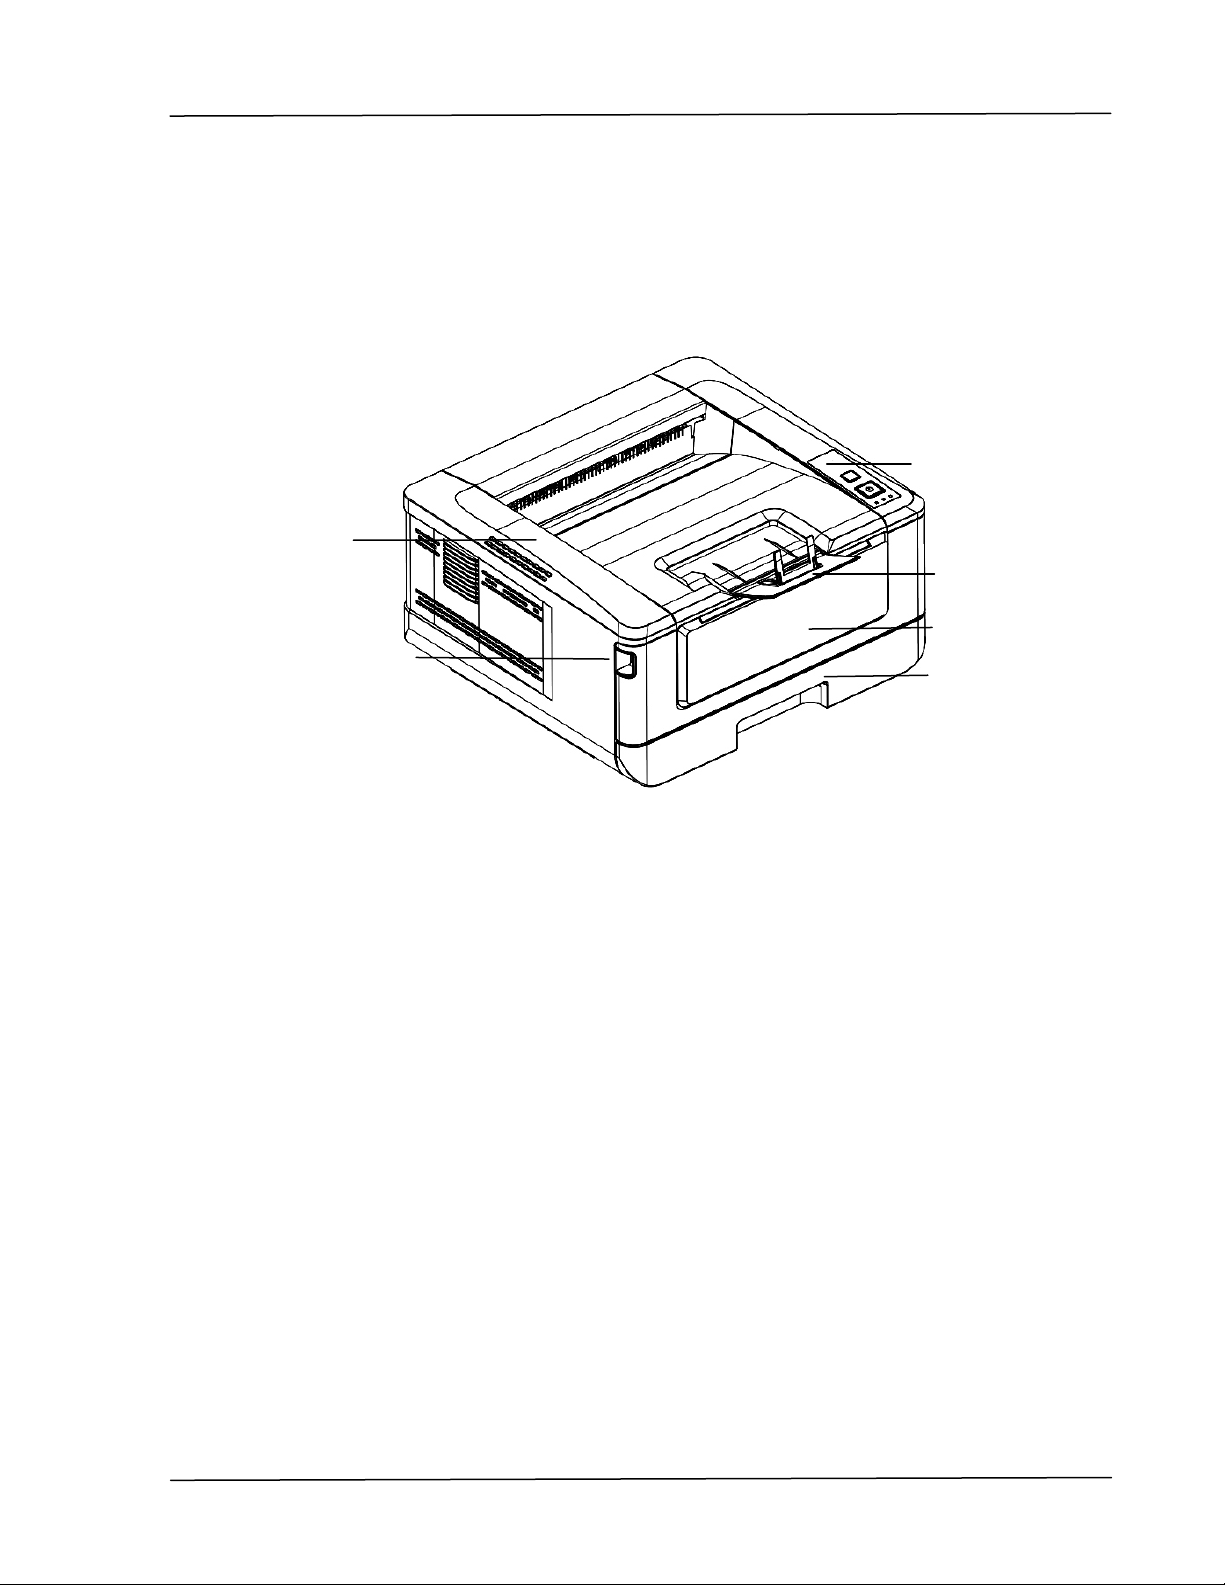
Ext er nal View
The Front View
1. Out put Tray 4. Front Cover
2. Handle of t he Front Cover 5. Paper Stopper
3. Main Paper Tray 6. Cont rol Panel
6
5
1
2
4
3
User’s Gu ide
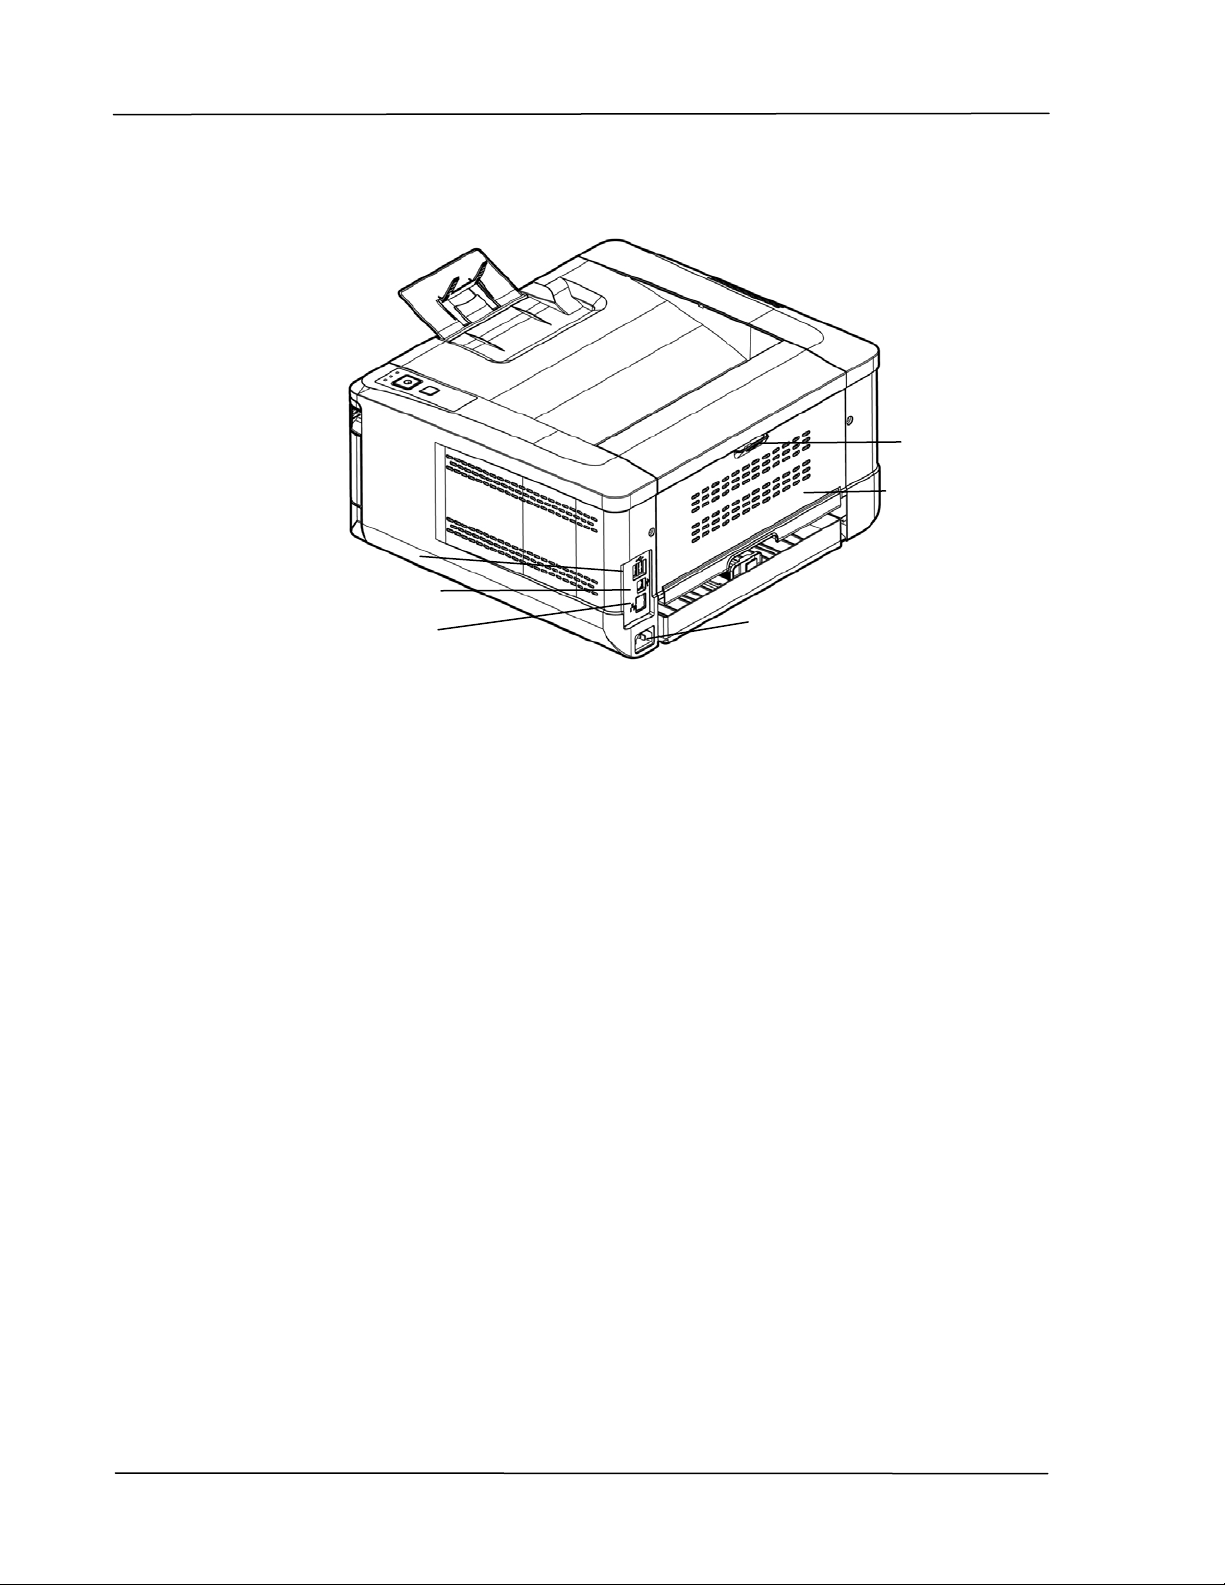
4
The Rear View
1. USB Port ( Type A, to USB flash disk) 4. Power Recept acle
2. USB Port ( Type B, t o PC) 5. Rear cover
3. LAN Port 6. Handle of the Rear Cover
5
1
6
2
3
4

Overvie w
5
Pa ckage Cont ent s
Main unit
Soft ware CD ( Print er Driver,
User Manual)
USB Cable
Toner Cart ridge
Pow er Cable
User’s Gu ide
6
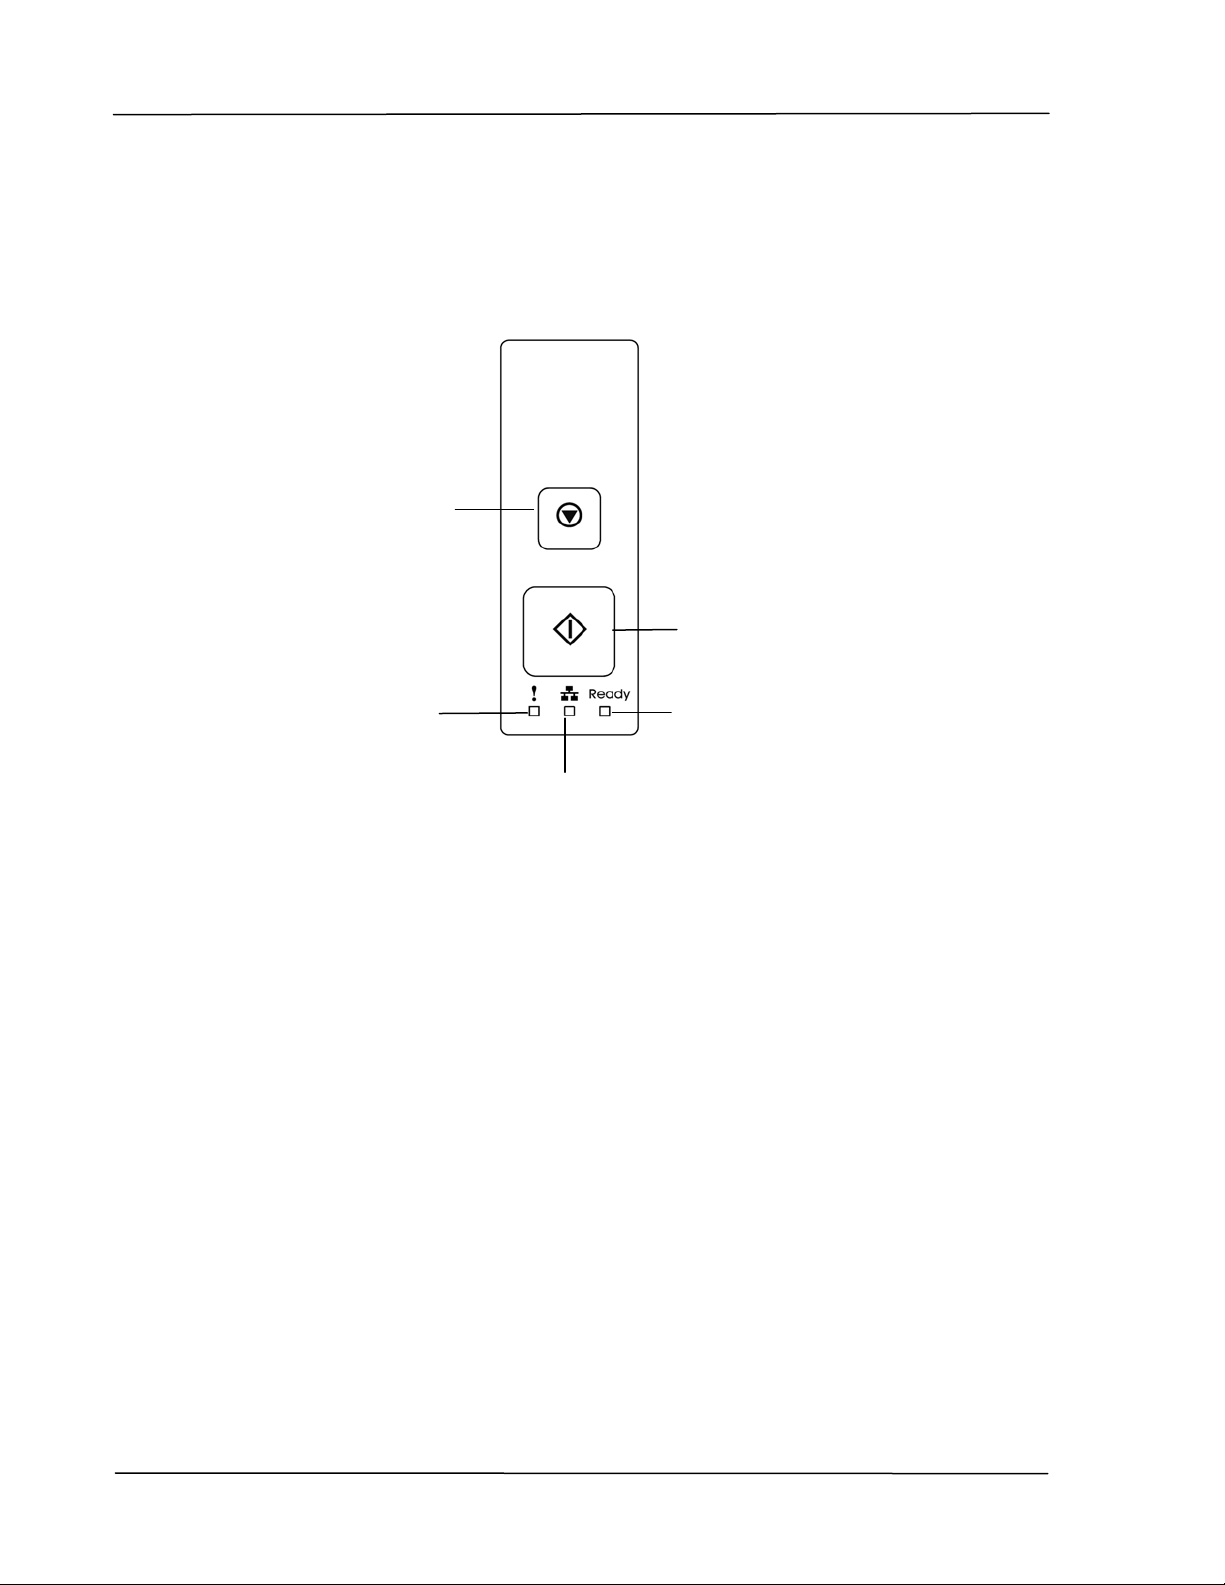
The Cont rol Pa nel
Ale rt LED:
Turn flashing to
indicat e an error.
LAN LED:
I ndicate LAN connection.
Pow er but t on :
Short press t o t urn on t he print er.
Long press t o t urn off the print er.
Pow er / Re ady LED :
Turn solidly on when the printer is
turned on.
Cancel Butt on:
Press to cancel a
printing j ob.
Press 3 seconds t o
Print the usage
report.
Overvie w
7
Preinstallat ion I nform ation
To use t he product as a net work device, the follow ing net work param et ers have
to be collect ed from your net work adm inist rat or. See t he next sect ion (using t he
Menu t o set t he networking param eters) to set the network param eters.
1 . DHCP Ena ble:
2. IP Address: . . .
3. Subnet mask: . . .
4. Gateway I P: . . .
Ex pla na t ion of cont e n t s:
1. * DHCP Enable: Choose Yes t o obt ain I P/ subnet/ gat eway addresses
autom atically from DHCP server.
2. * I P Address: The I nt ernet Prot ocol ( I P) address assigned t o your
m achine by your net work adm inistrat or or by DHCP Server.
3. Subnet Mask:
The net m ask address assigned by your net work
adm inistrat or or by DHCP Server.
4. Gateway I P: The gateway I P address assigned by your net work
adm inistrat or or by DHCP Server.
N ot e :
1 . DHCP server: Wit h DHCP ( Dynam ic Host Configurat ion
Prot ocol), a host can autom at ically be given a unique I P
address each tim e it connects t o a network- - m aking I P address
m anagem ent an easier task for net w ork adm inistrat ors. I f the
DHCP server is available from your net work, you do not need
to ent er TCP/ I P, subnet m ask, gateway, and DNS inform at ion.
I nstead, t his inform at ion will be aut om at ically given for the
product.
2 . I P Address: An I P (I nt ernet Prot ocol) address uniquely
ident ifies a host connection t o an I P net work. System
adm inistrat or or network designer assigns the I P address. The
I P address consist s of two parts, one identifying t he network
and t he one ident ifying your node.
3 . The I P address is usually w rit t en as four num bers separat ed by
periods. Each num ber can be zero to 255. For exam ple,
10.1.30.186 could be an I P address.

User’s Gu ide
8
2 . I nst alla t ion
Opera t ion Space
Please reserve t he following operat ion space.
Machine dimension: 404
x 380 x 205 m m (WxDxH)
Rem oving t he Pack ing M at er ia ls
Rem ove t he packing m at erials, including plast ic bags and tapes for product
prot ect ion.
Measuring unit: mm
I nst a lla t ion
9
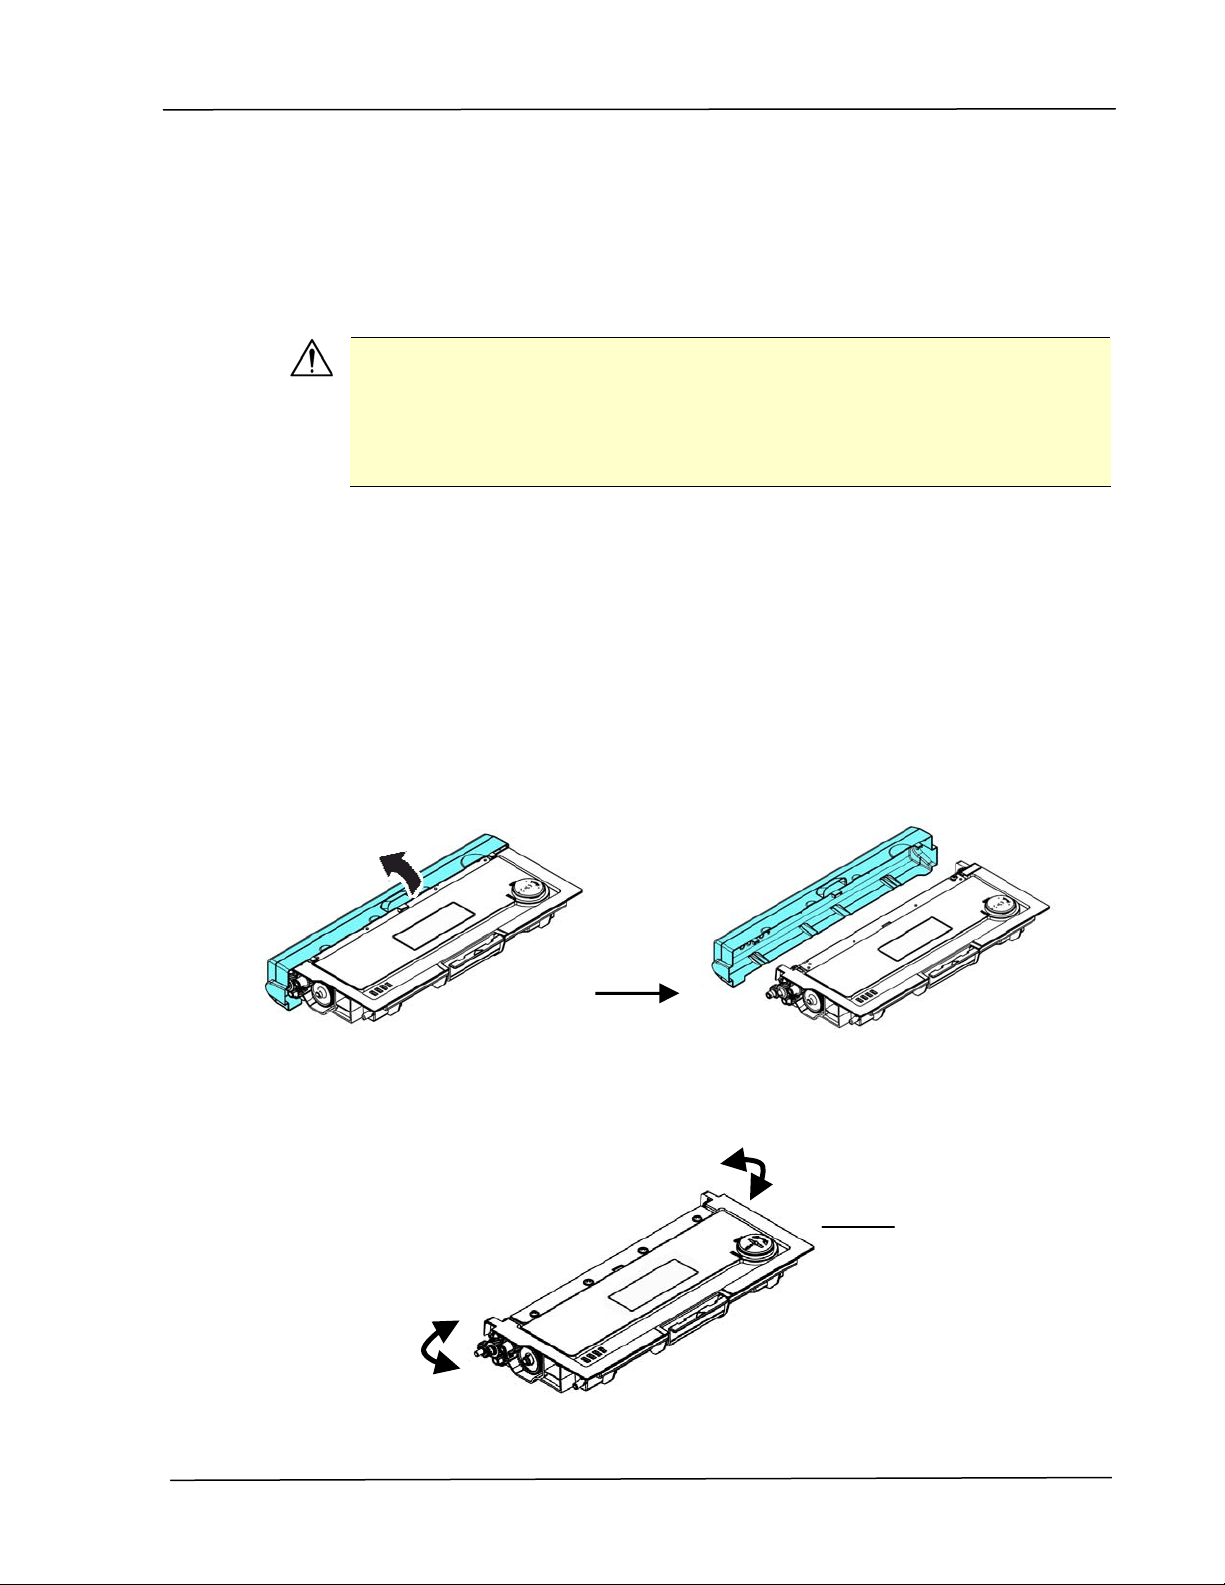
Rem oving t he Ta pes of t he Toner
Cart ridge
I m por ta nt !
When you unpack t he m achine, a toner cart ridge has been packed
separately besides the m achine. Please rem ove t he package cushion
and t apes on t he toner cart ridge before using it .
I nst alling t he Toner Ca rt ridge
Please follow t hese steps to inst all t he t oner cart ridge:
1 . Unpack the new t oner cart ridge.
2 . Rem ove t he prot ective cover.
3 . Tilt t he t oner cart ridge up and down and t hen right and left 10 tim es t o
dist ribute the t oner evenly inside t he t oner cartridge.
Toner
Cart ridge
User’s Gu ide
1 0
W ARN I NG!
Be careful not to inhale t oner.
To avoid print qualit y problem s, DO NOT t ouch the t oner rollers.
I f t oner gets on your clot hing or other fabric, wipe off t he toner wit h
a dry cloth. Wash the it em s in cold wat er and dry t hem in the
shade.
To prevent t he t oner cart ridge from dam age, do not expose it m ore
than several m inutes.
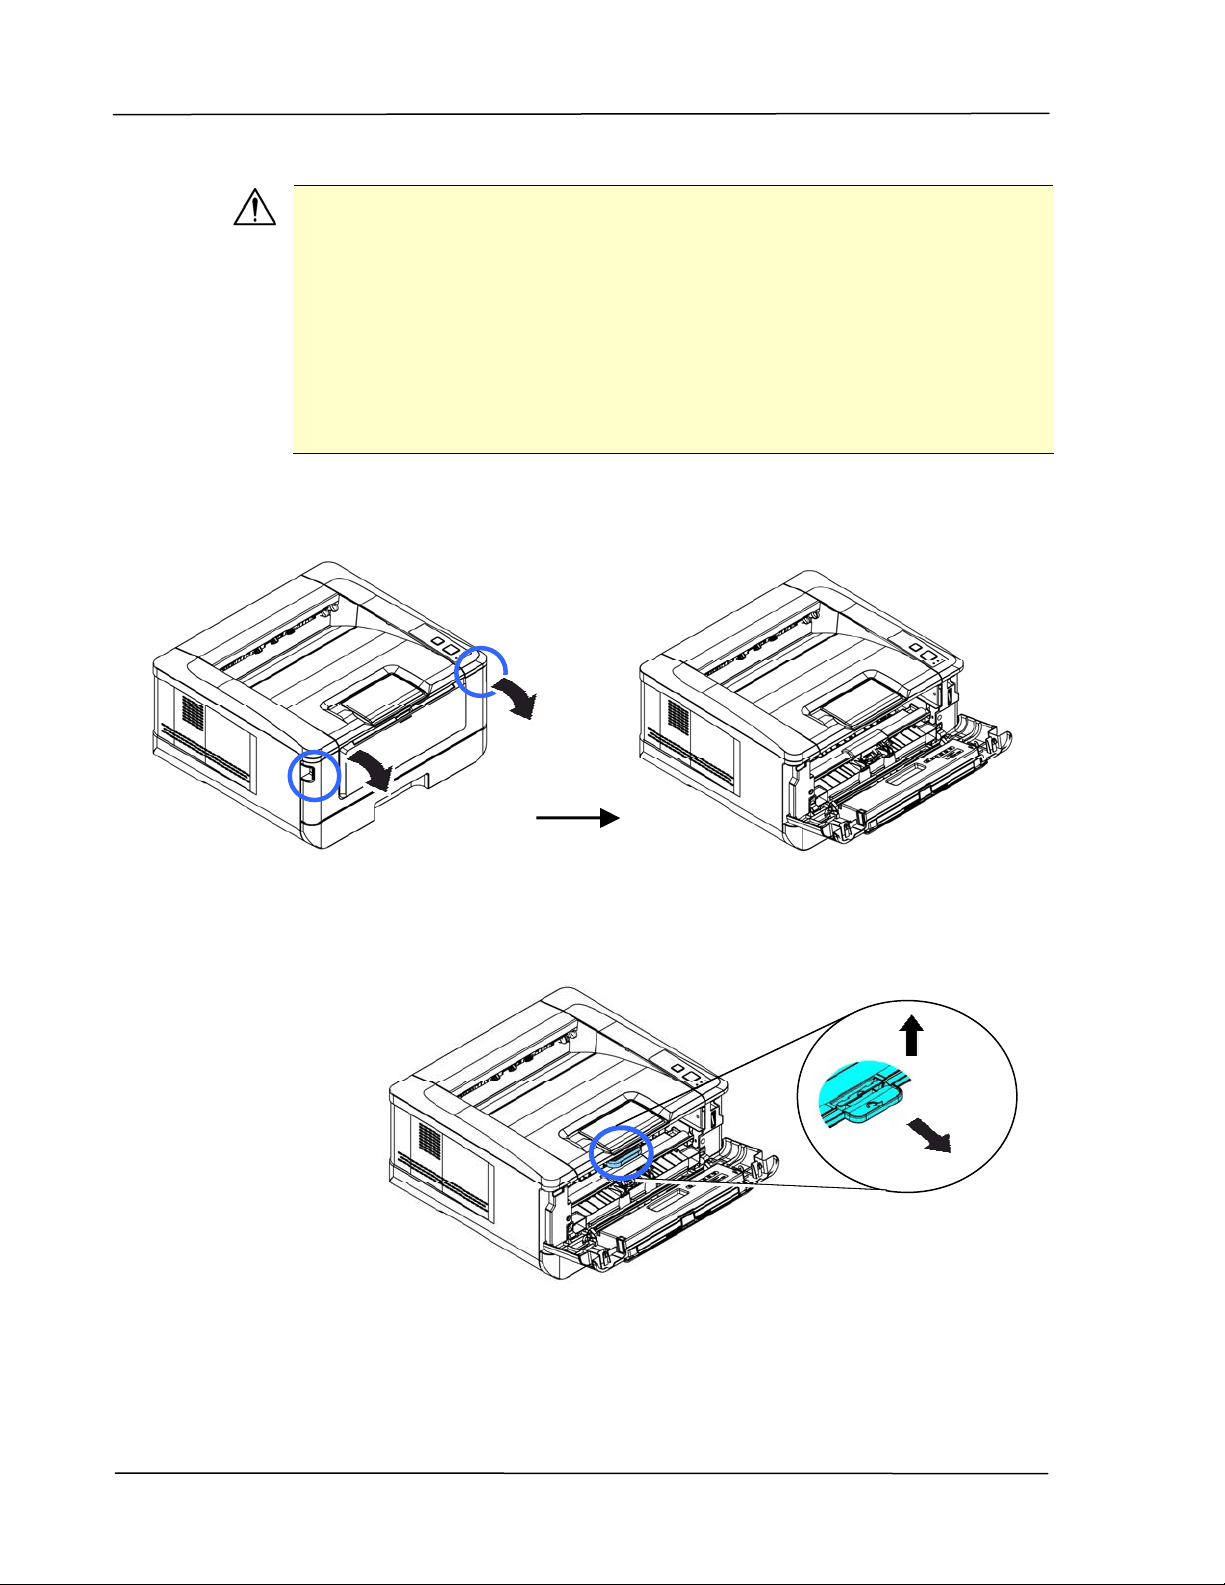
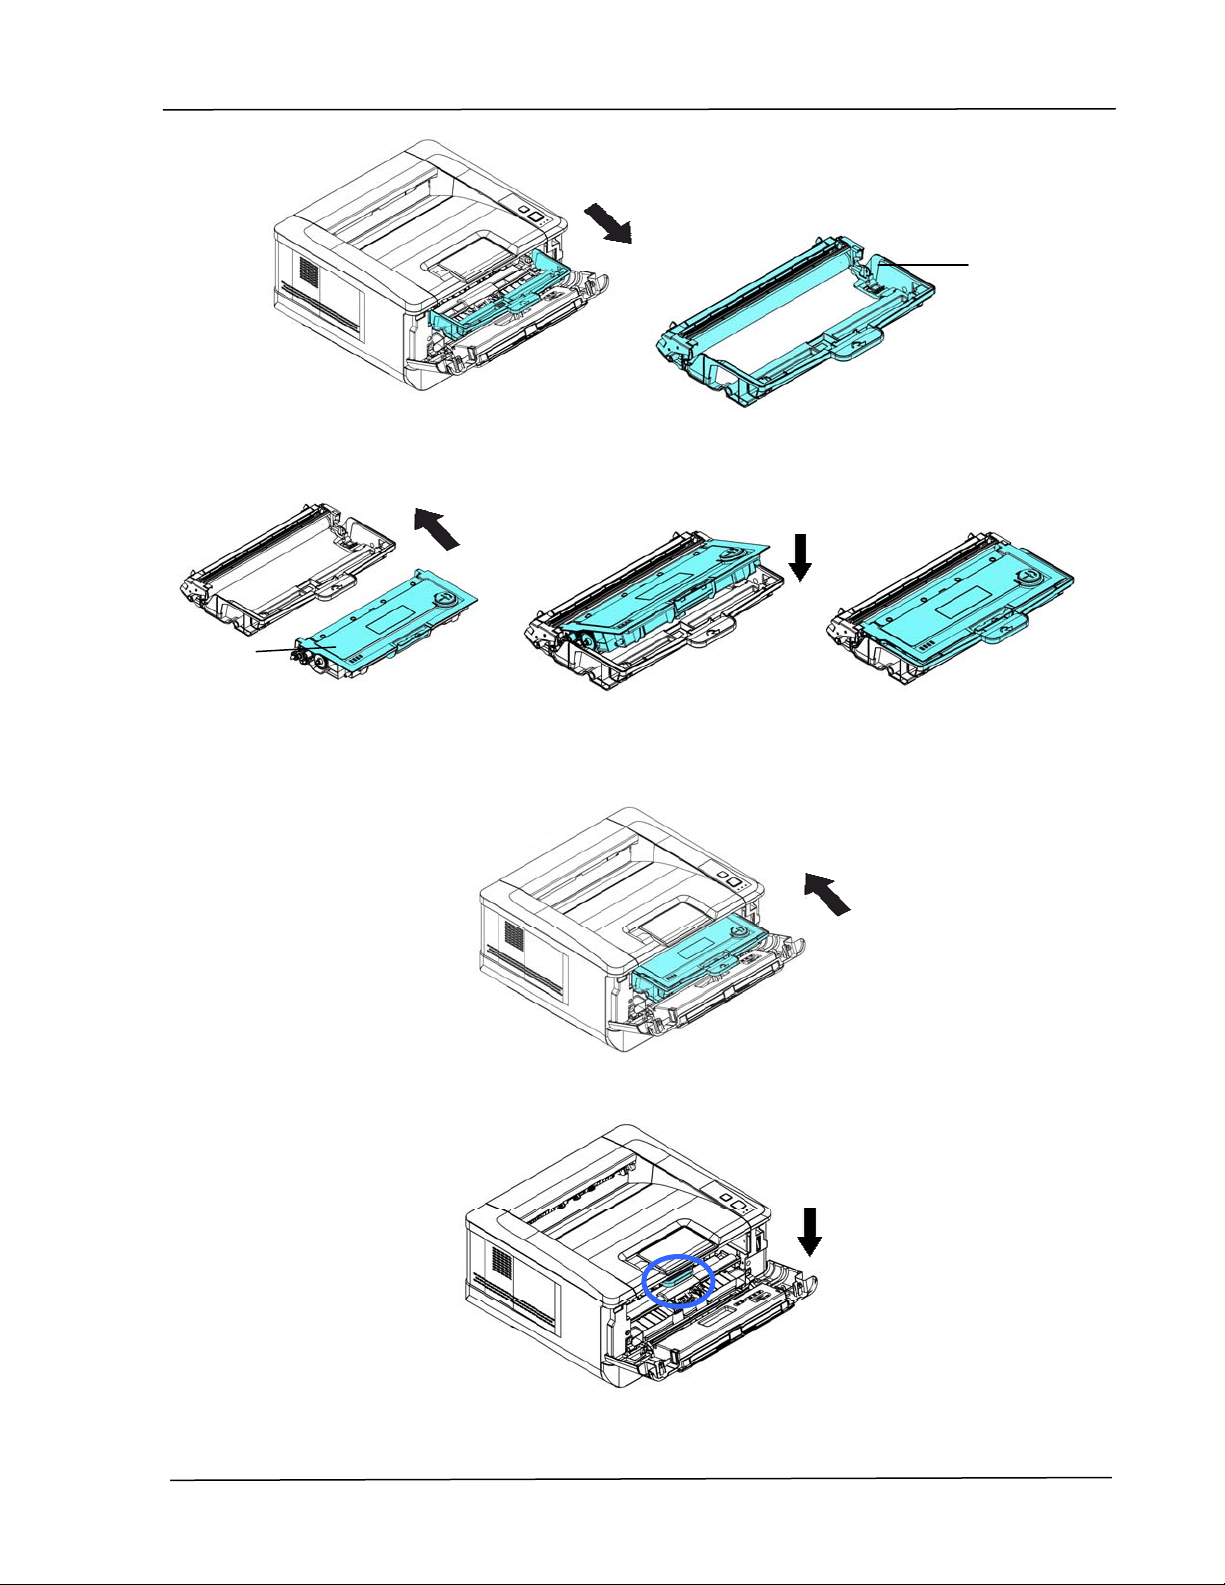
4 . Open t he front door by pulling t he handles on bot h sides as shown.
5 . Lift t he handle of the drum unit up and then pull it out as shown.
I nst a lla t ion
1 1
4 . I nst all t he t oner cartridge to t he drum unit until you hear it lock int o place.
5 . Hold t he handle of the drum and toner cartridge assem bly and insert t he
assem bly to it s original place.
6 . Press down t he handle of t he t oner cart ridge t o fix t he t oner cart ridge.
6 . Close t he rear cover。
Drum unit
Toner
Cart ridge
User’s Gu ide
1 2
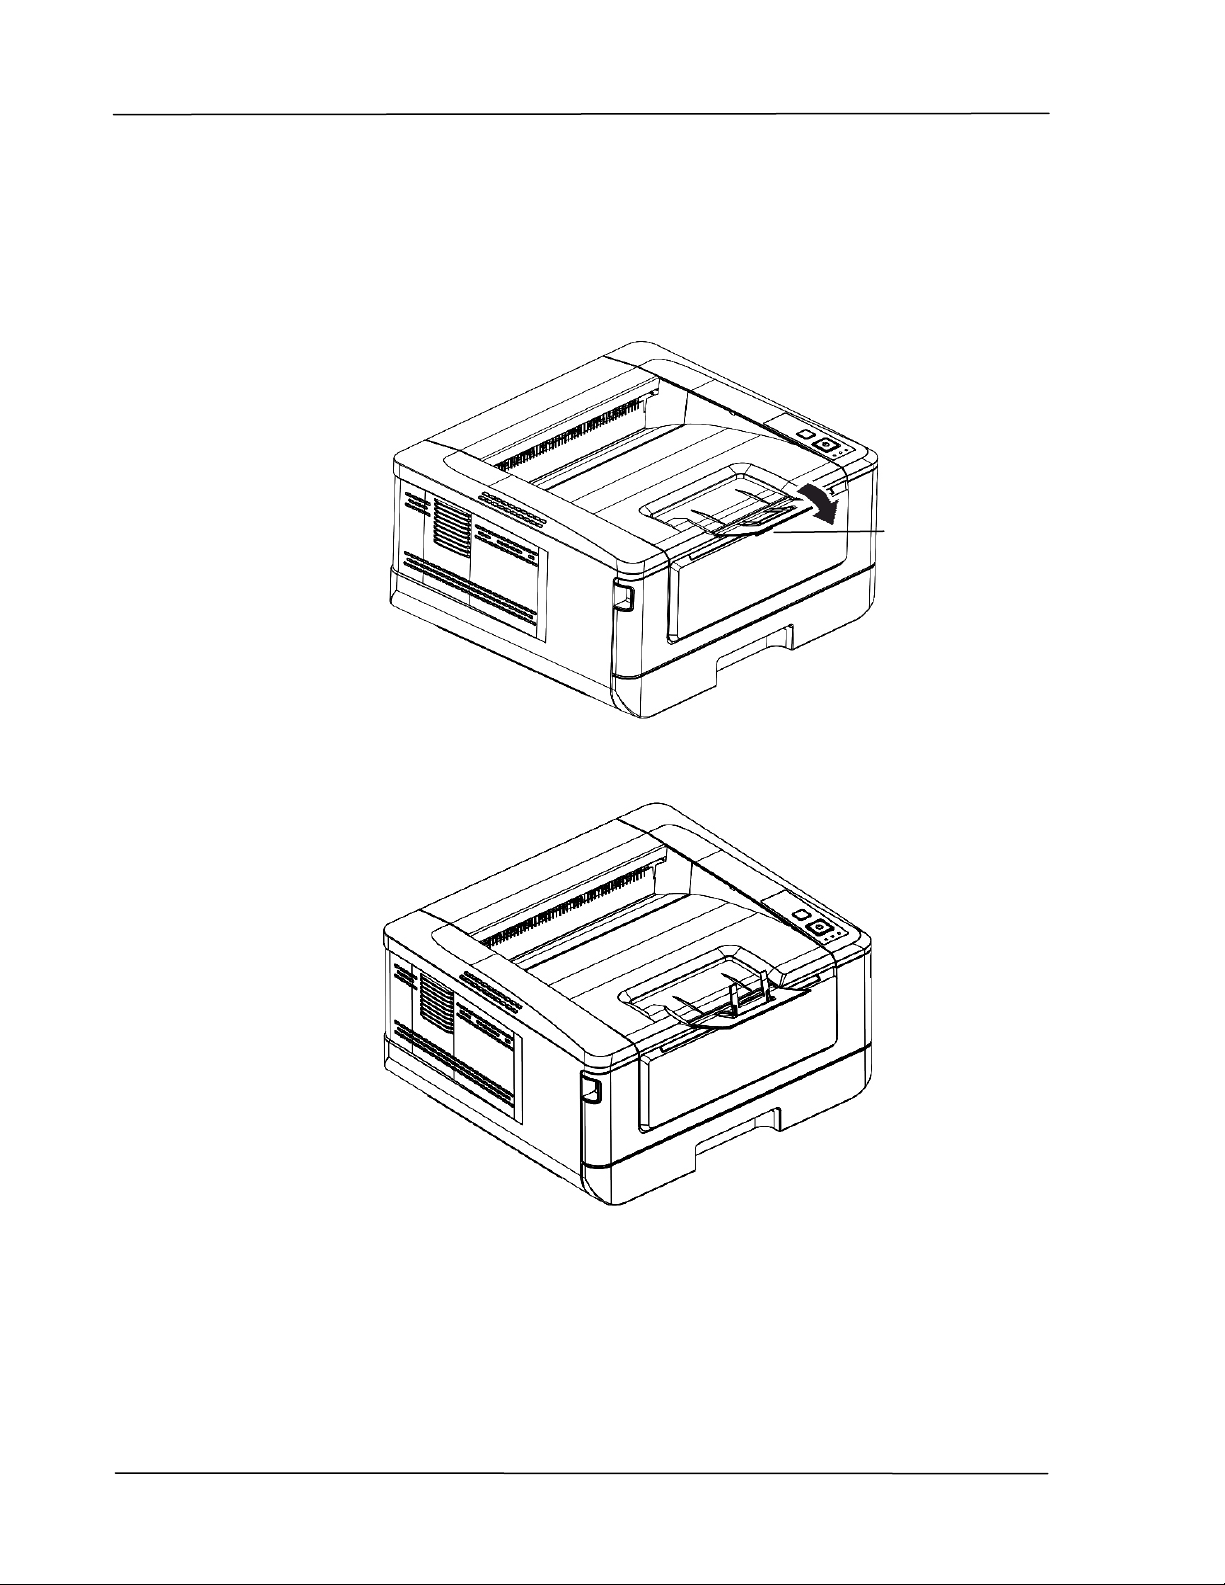
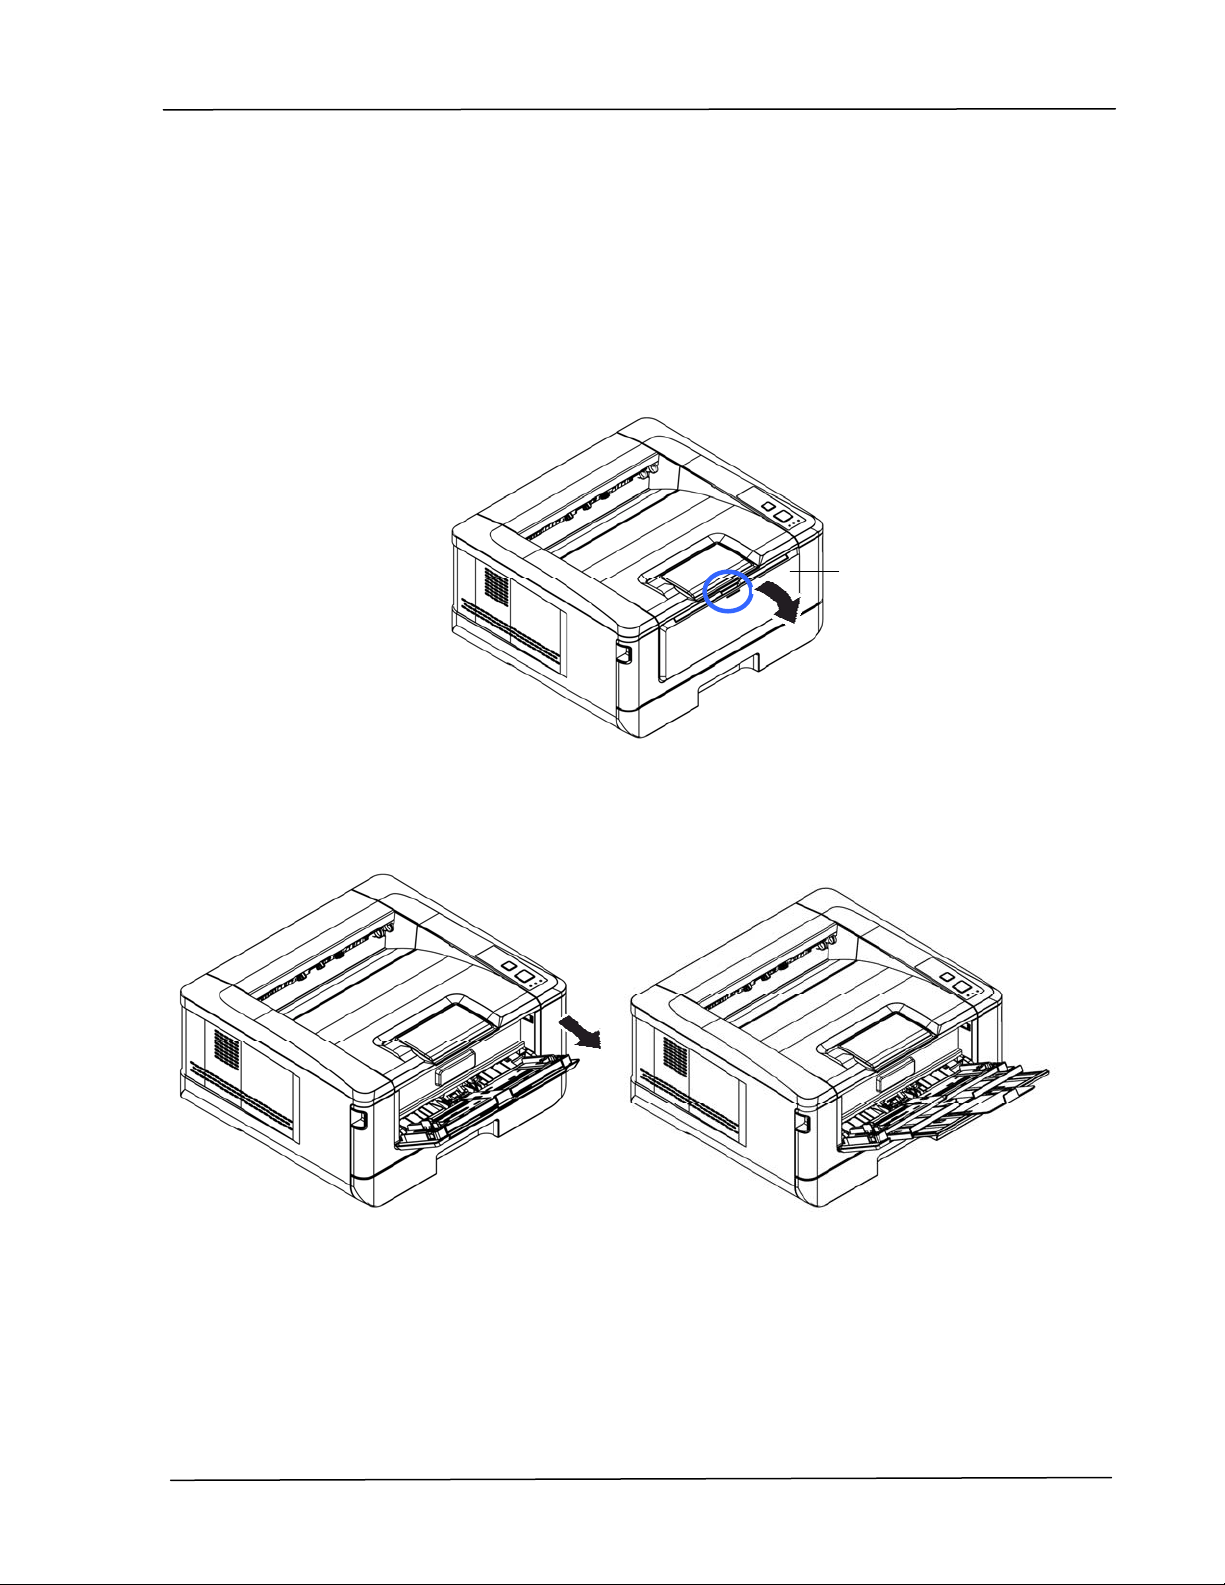
I nst alling t he Pa per Stopper
Gent ly lift the paper st opper and it s ext ension t o collect the paper.
Paper Stopper
I nst a lla t ion
1 3
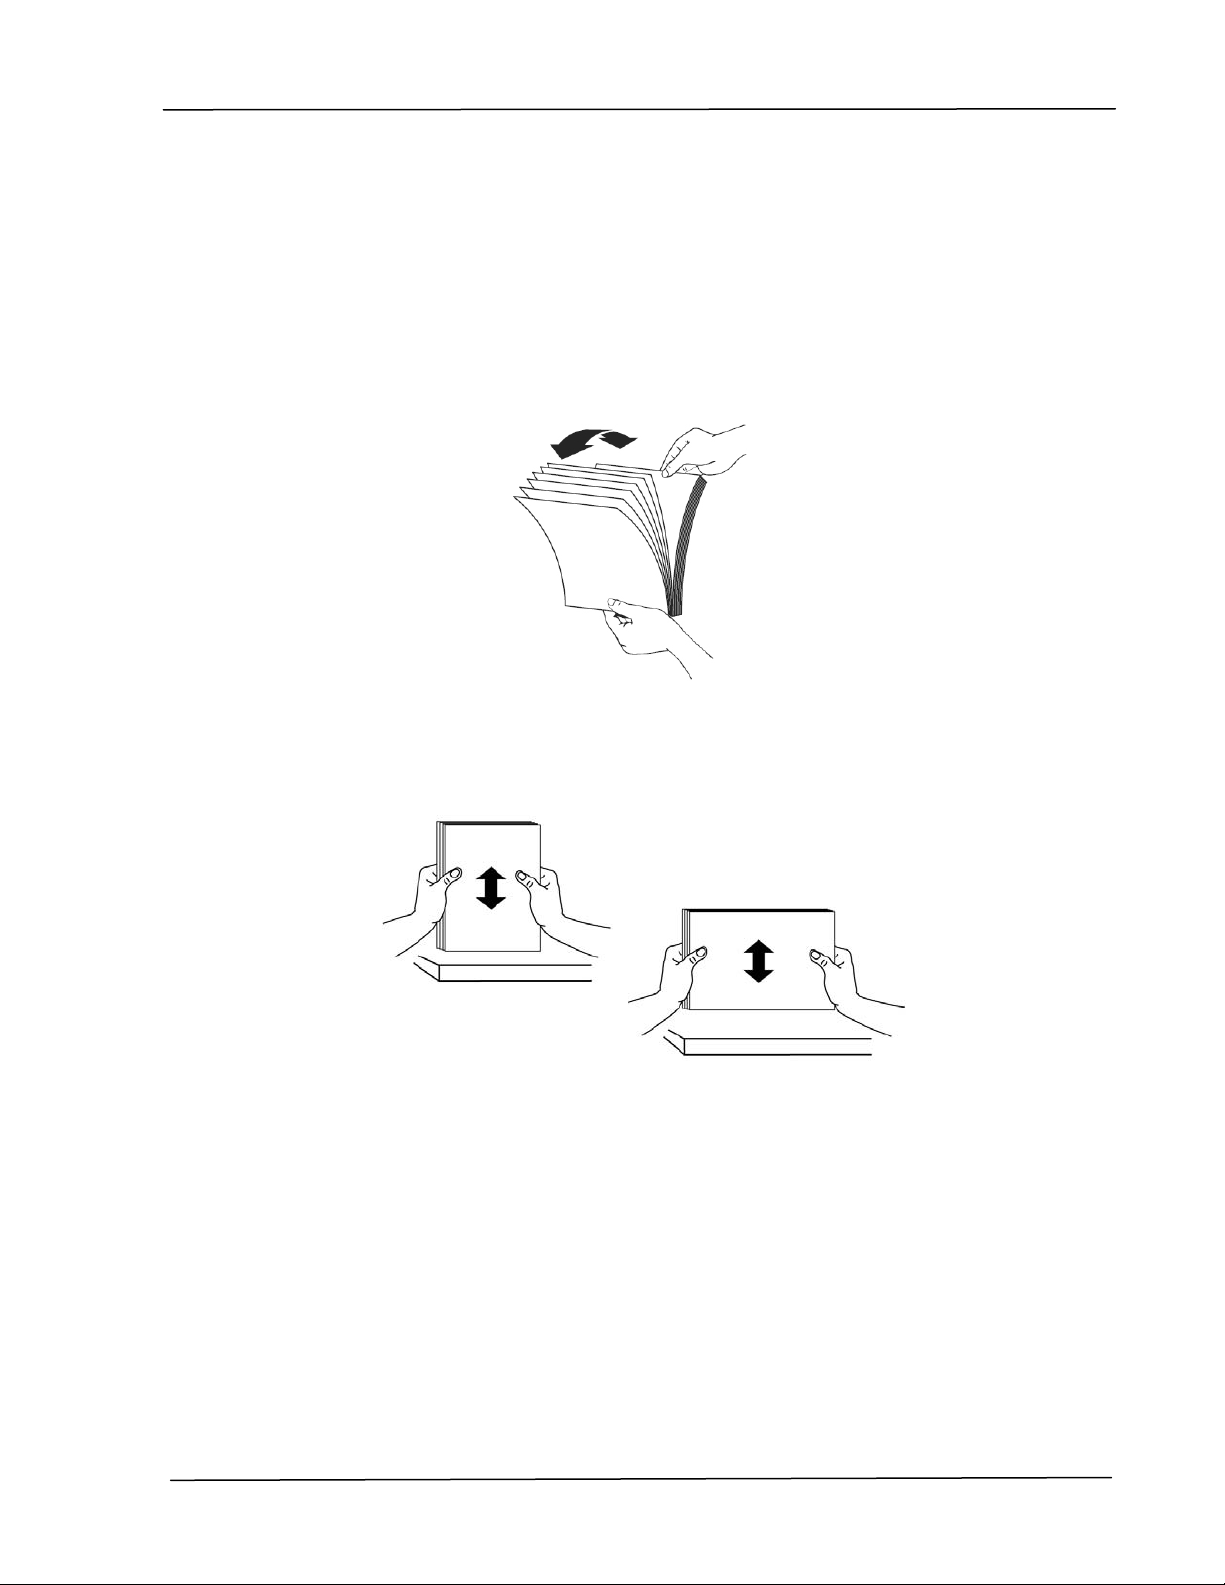
Loading The M ain pa pe r t r ay
To insert paper to t he m ain paper tray,
1 . Fan your paper first to ensure t hat t he pages do not st ick t oget her.
2 . Align t he edges of the docum ents by t apping the bot t om of the stack against
the t able top. Rotat e t he st ack 90 degrees and repeat .
User’s Gu ide
1 4
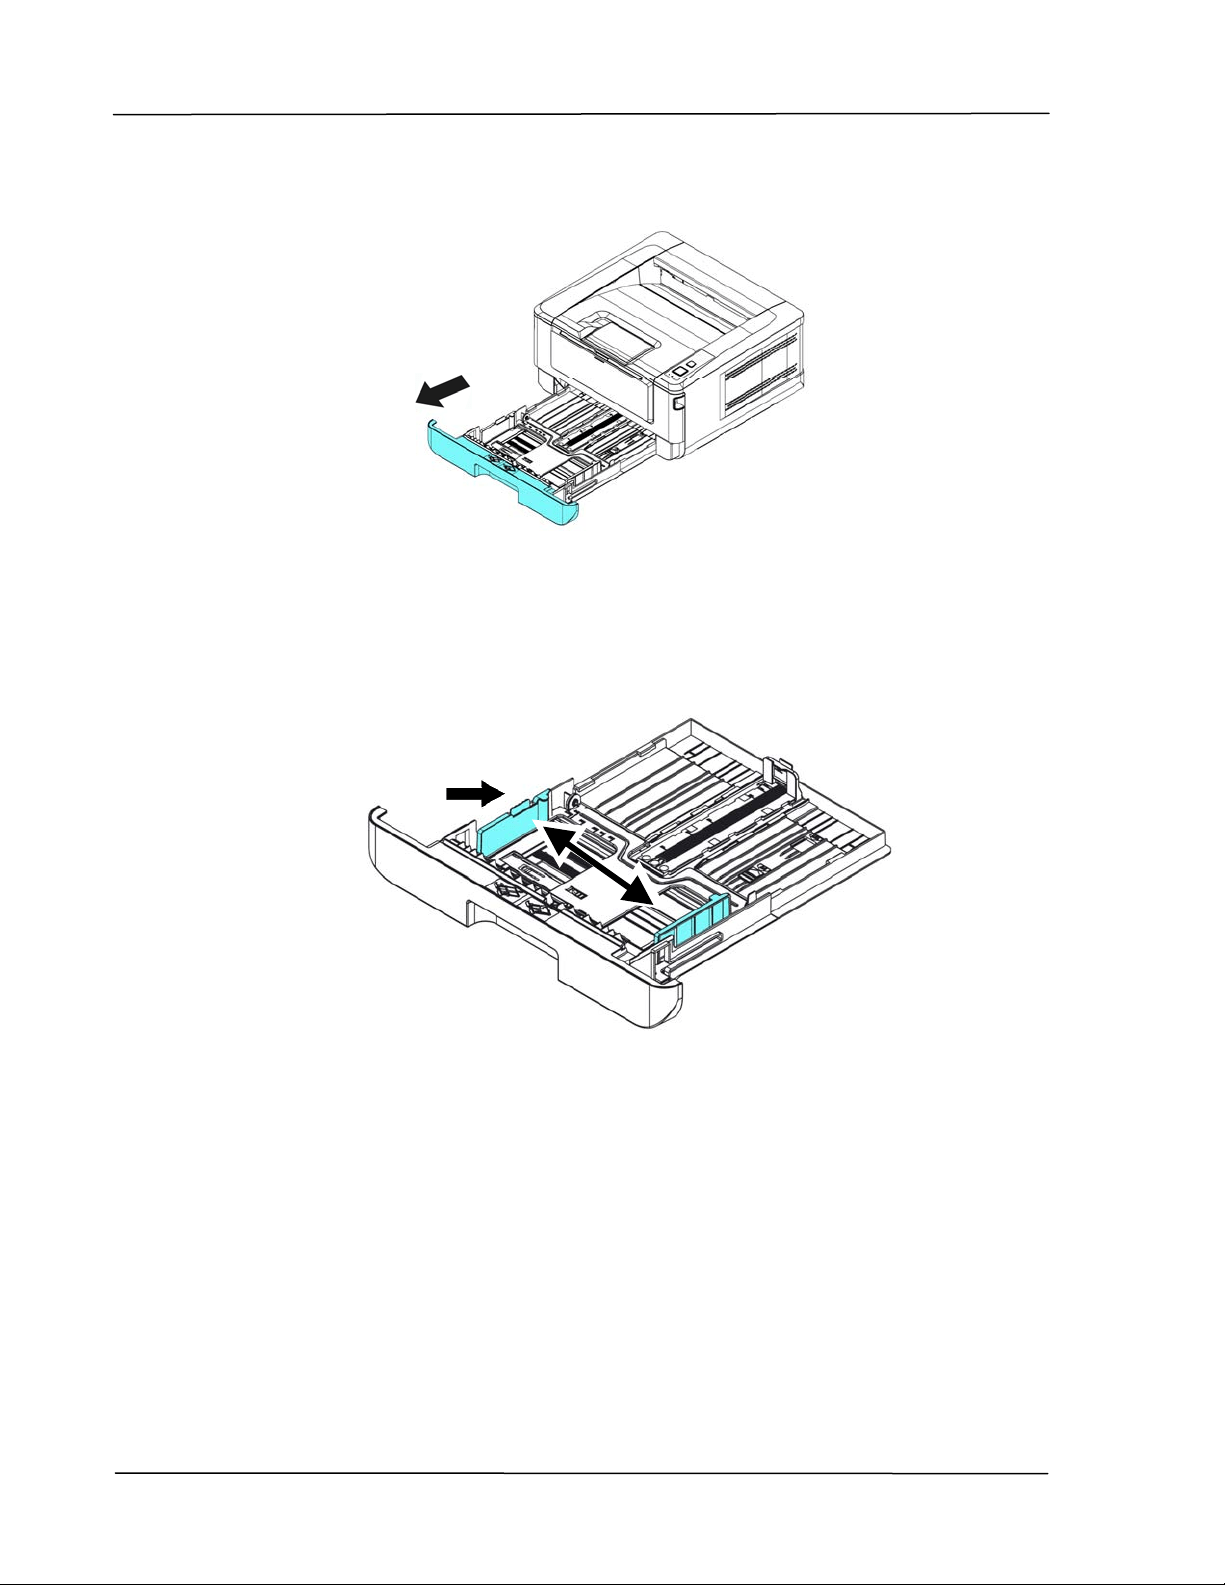
3 . Lift t he handle of t he m ain paper t ray and then pull out the m ain t ray.
4 . Push the widt h guide tab () , and m ove t he width guide () t o t he
correct position for the paper size being loaded.
I nst a lla t ion
1 5
5 . Push t he lengt h guide ( ) , and slide t he guide ( ) to t he correct position for
the paper size being loaded.
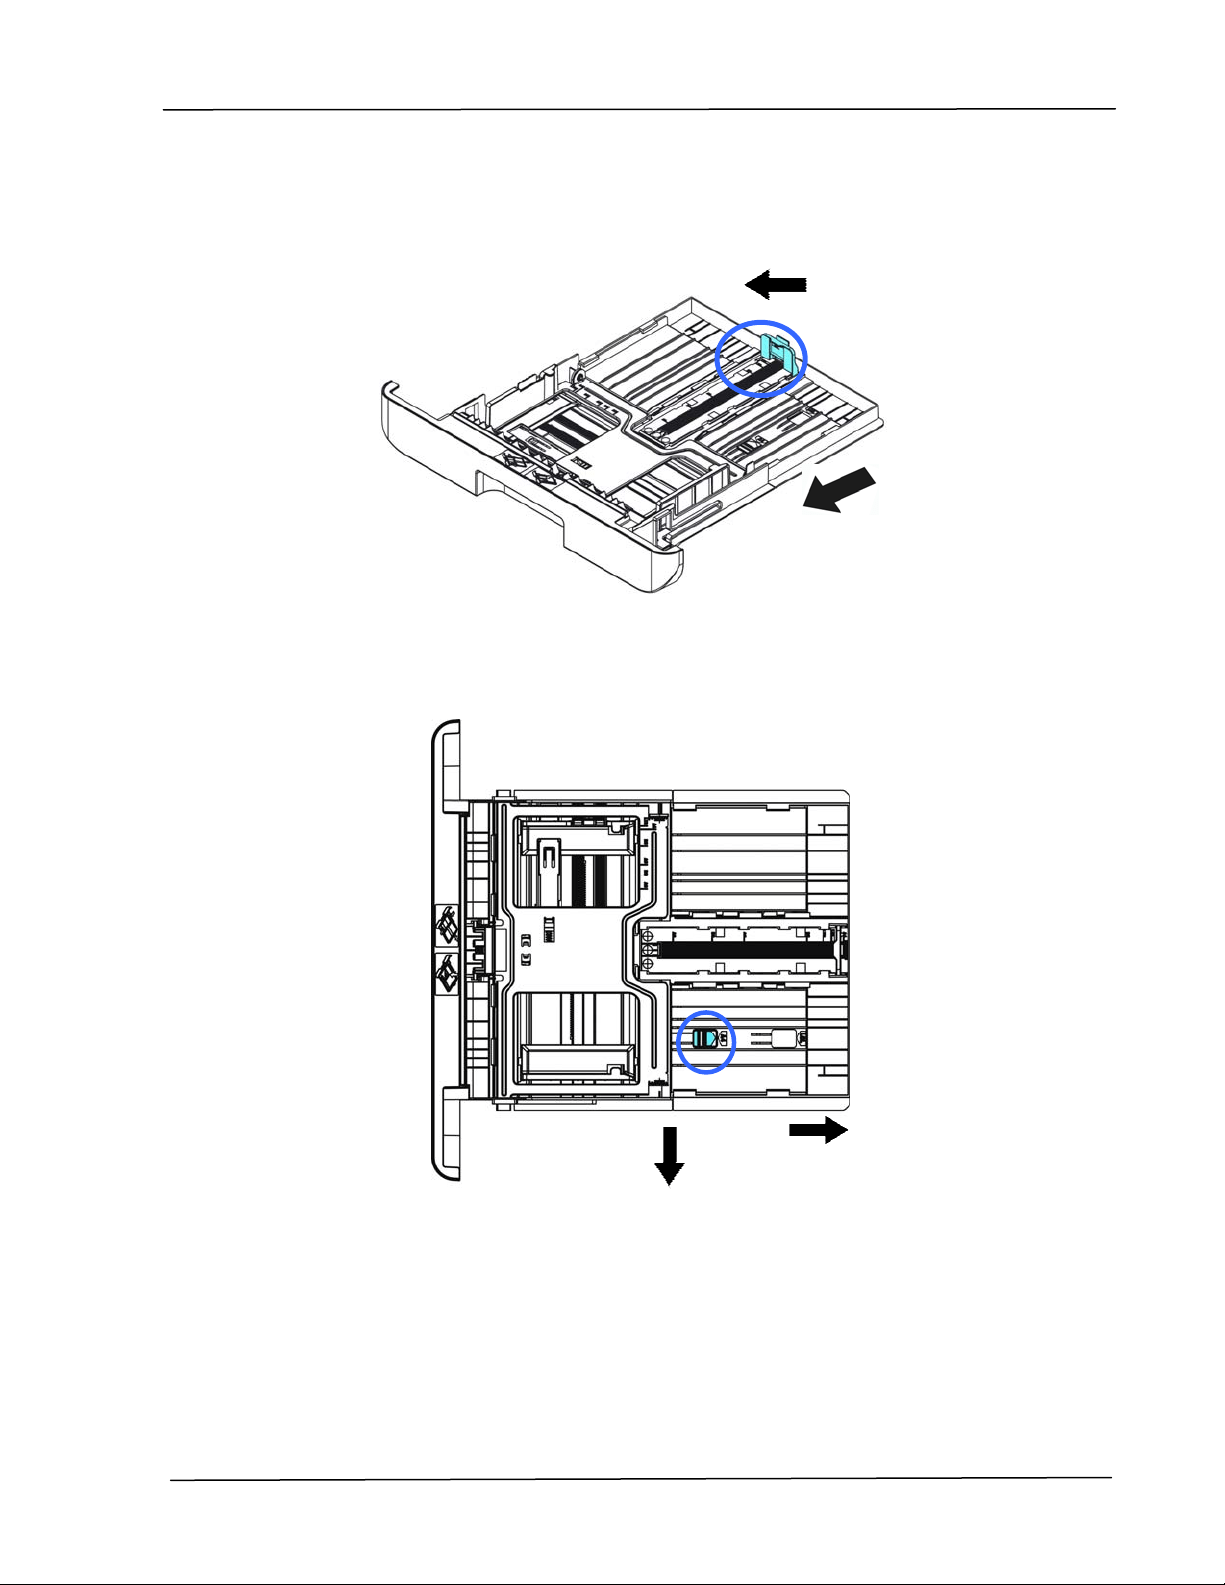
6 . I f you want t o load a sheet of paper larger t han the lengt h of A4, press down
the first lengt h adjust m ent lat ch (
) , and at the sam e tim e slide t he m anual
tray t o the right (
) unt il it reaches the paper size you want.
User’s Gu ide
1 6
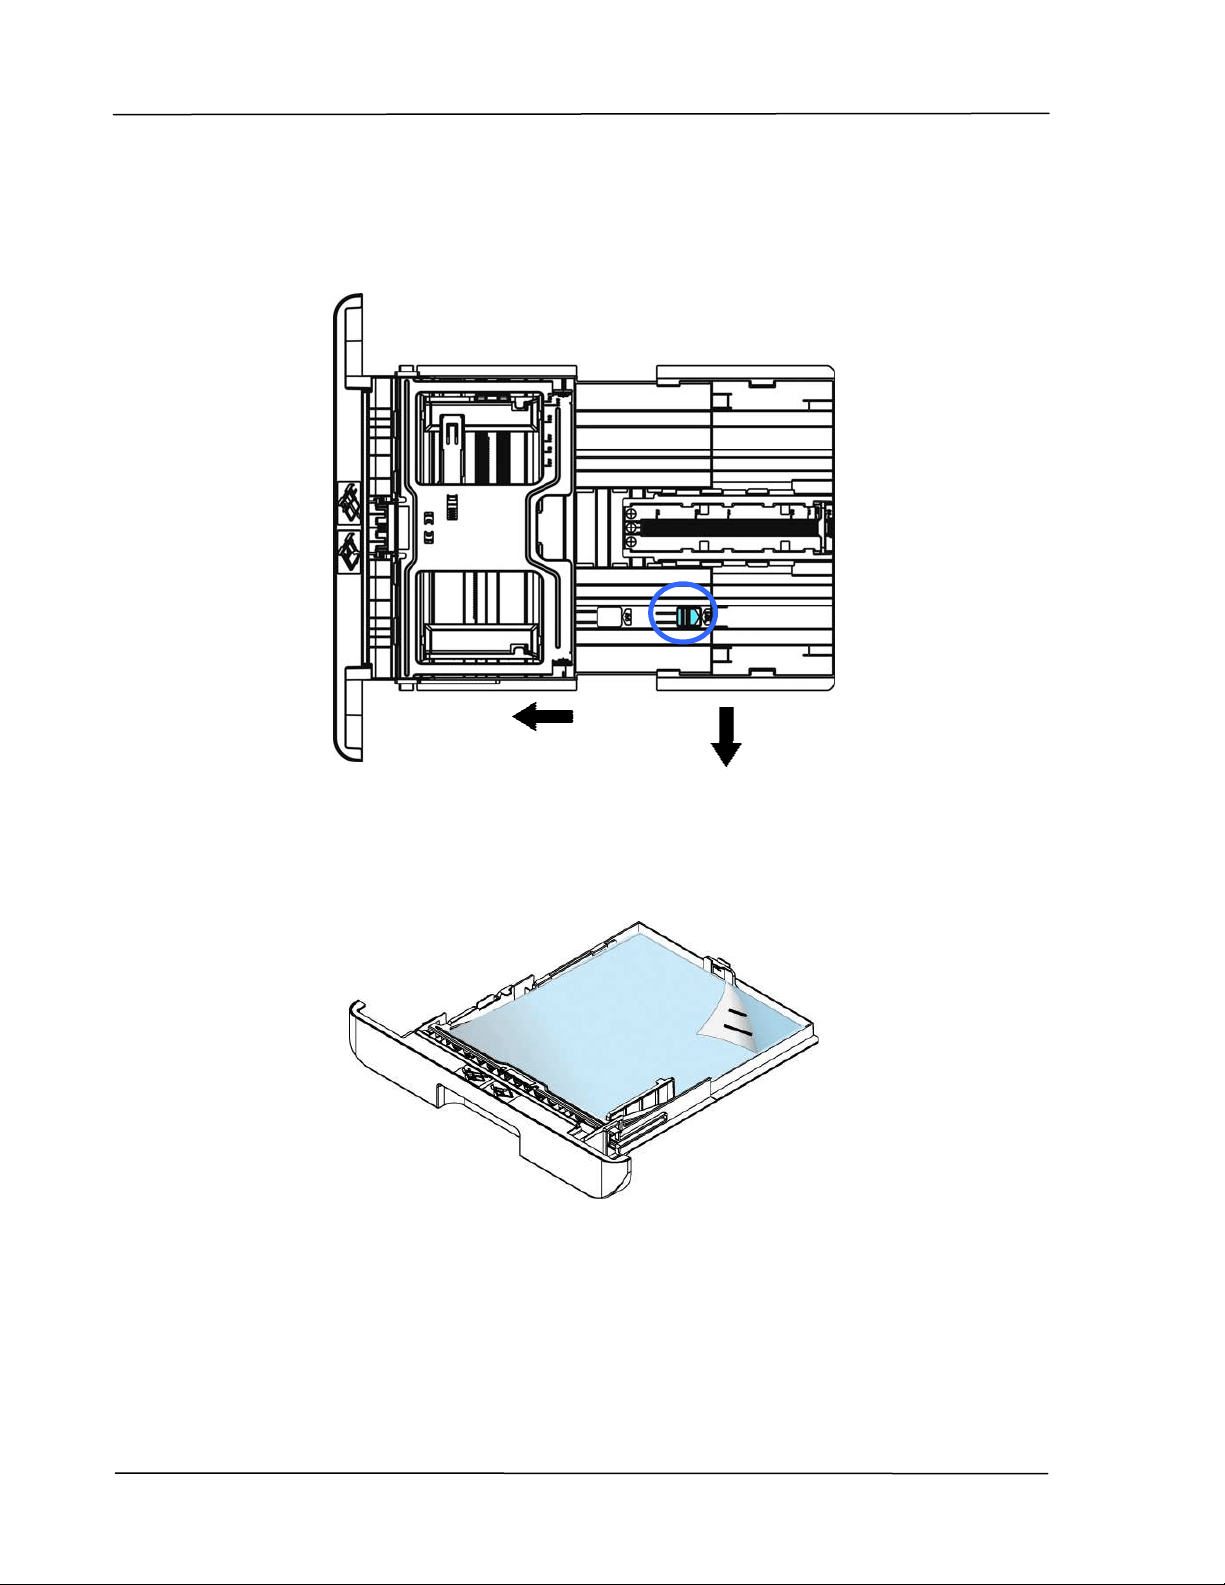
To m ove t he t ray back to t he original A4 lengt h, press down the second
length adj ust m ent lat ch
(
) , and at t he sam e t im e slide the m anual t ray
to t he left (
) .
7 . Load t he paper stack wit h the Pr in t ing Side Facing Dow n as illust rat ed.
I nst a lla t ion
1 7
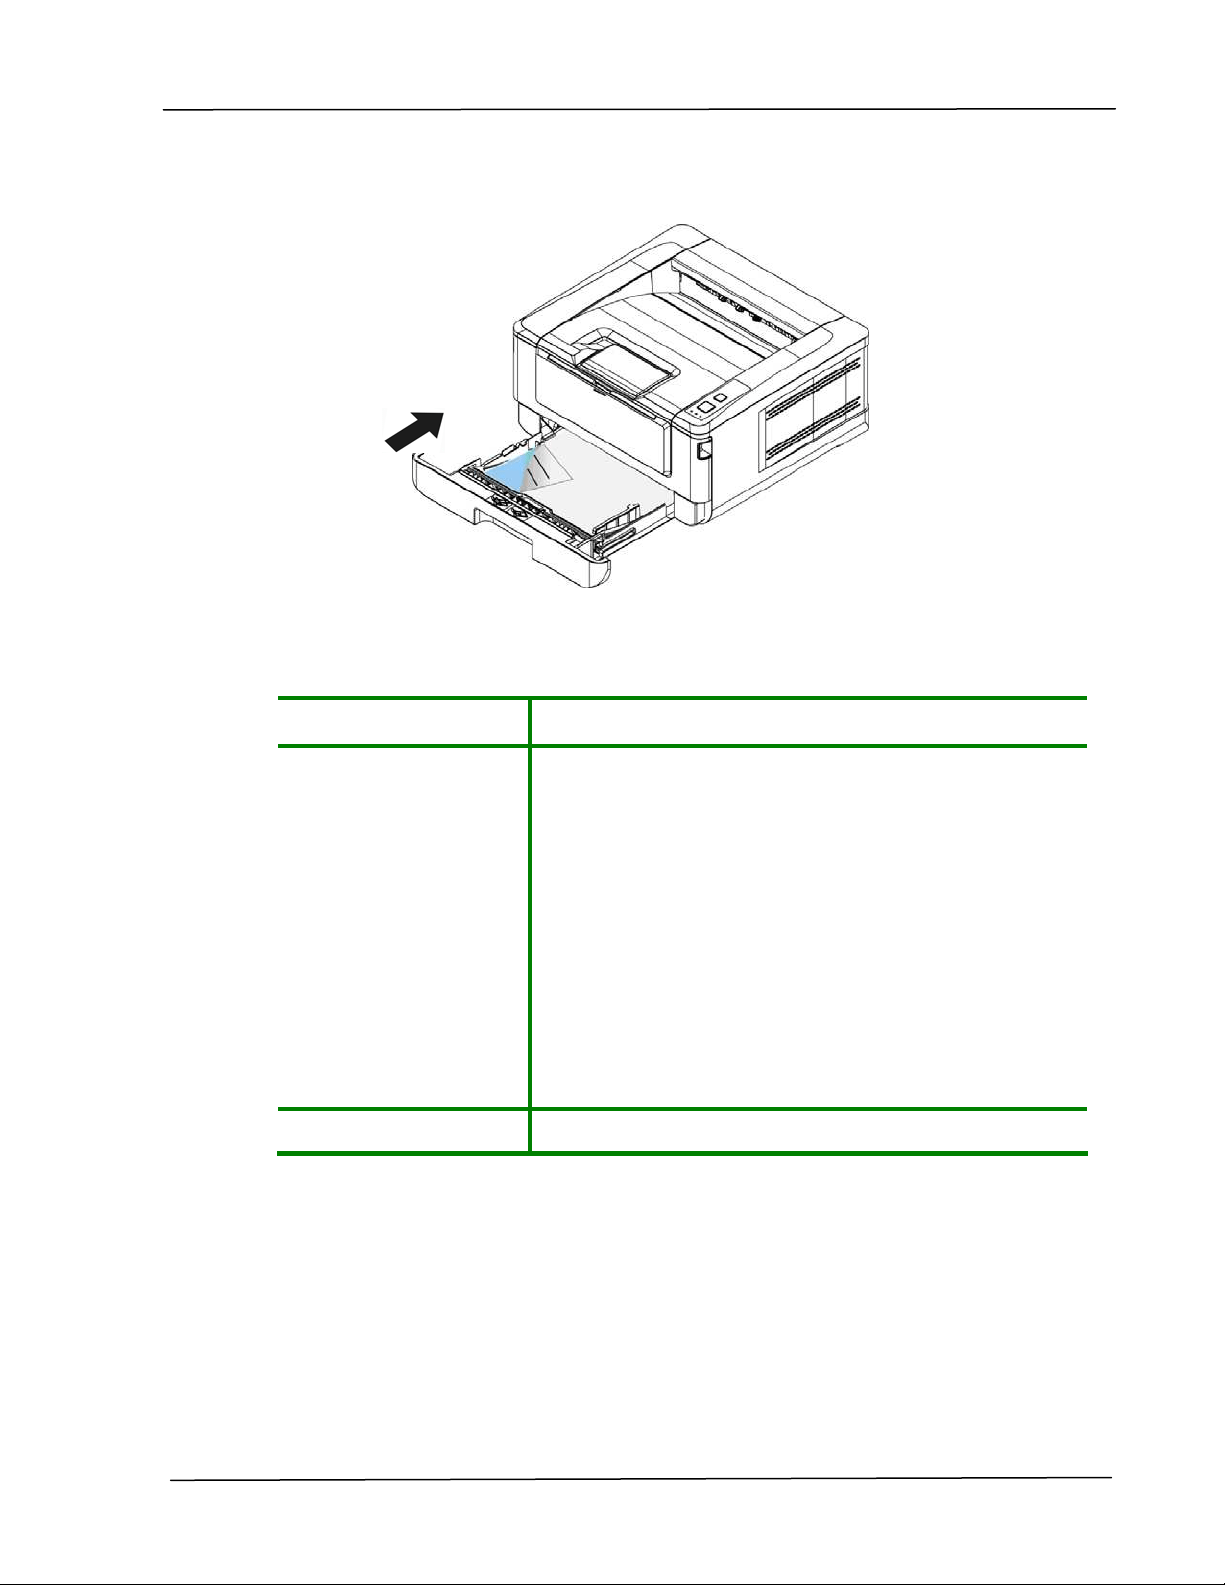
8 . I nsert the t ray t o t he printer.
Paper size s a nd w eight s u sed for M a in paper t ra y
Paper ca pa cit y
250 pages(70 g/ m ² plain paper)
Pa pe r size A4 ( 210 x 297 m m )
A6 ( 105 x 148 m m )
A5 ( 148 x 210 m m )
B6 ( 125 x 176 m m )
B5 ( 176 x 250 m m )
Let ter ( 216 x 279 m m )
Legal (216 x 356 m m )
Cust om Size: 76.2 x 127 m m ~ 216 x 356 m m
( 3 x 5 in. ~ 8.5 x 14 in.)
Pa pe r w eight 16 ~ 28 lbs ( 60 ~ 105 g/ m ² )
* Duplex print ing is available only for paper in A4, B5 or Lett er size.
User’s Gu ide
1 8
N ot e :
To ensure t he best qualit y printing and copying, please use the paper or
m edia which we have recom m ended.
Make sure t o fan your paper before loading it t o t he paper t ray.
I f t here are inst ructions about t he printing side on the package of your
paper, please follow the inst ruct ions t o load your paper properly wit h
the correct printing side t o t he paper t ray.
I f t he printing qualit y is not sat isfact ory or paper jam s are easily t o
occur, turn over t he paper st ack so t hat the t op page is now on bot t om
and t hen reload it to t he paper tray.
Pack and seal t he rem aining paper wit h t he original packaging and store
the paper in a dark and dry locat ion away from t he sunshine. Paper
which collect s m uch m oist ure is easy to cause j am during printing.
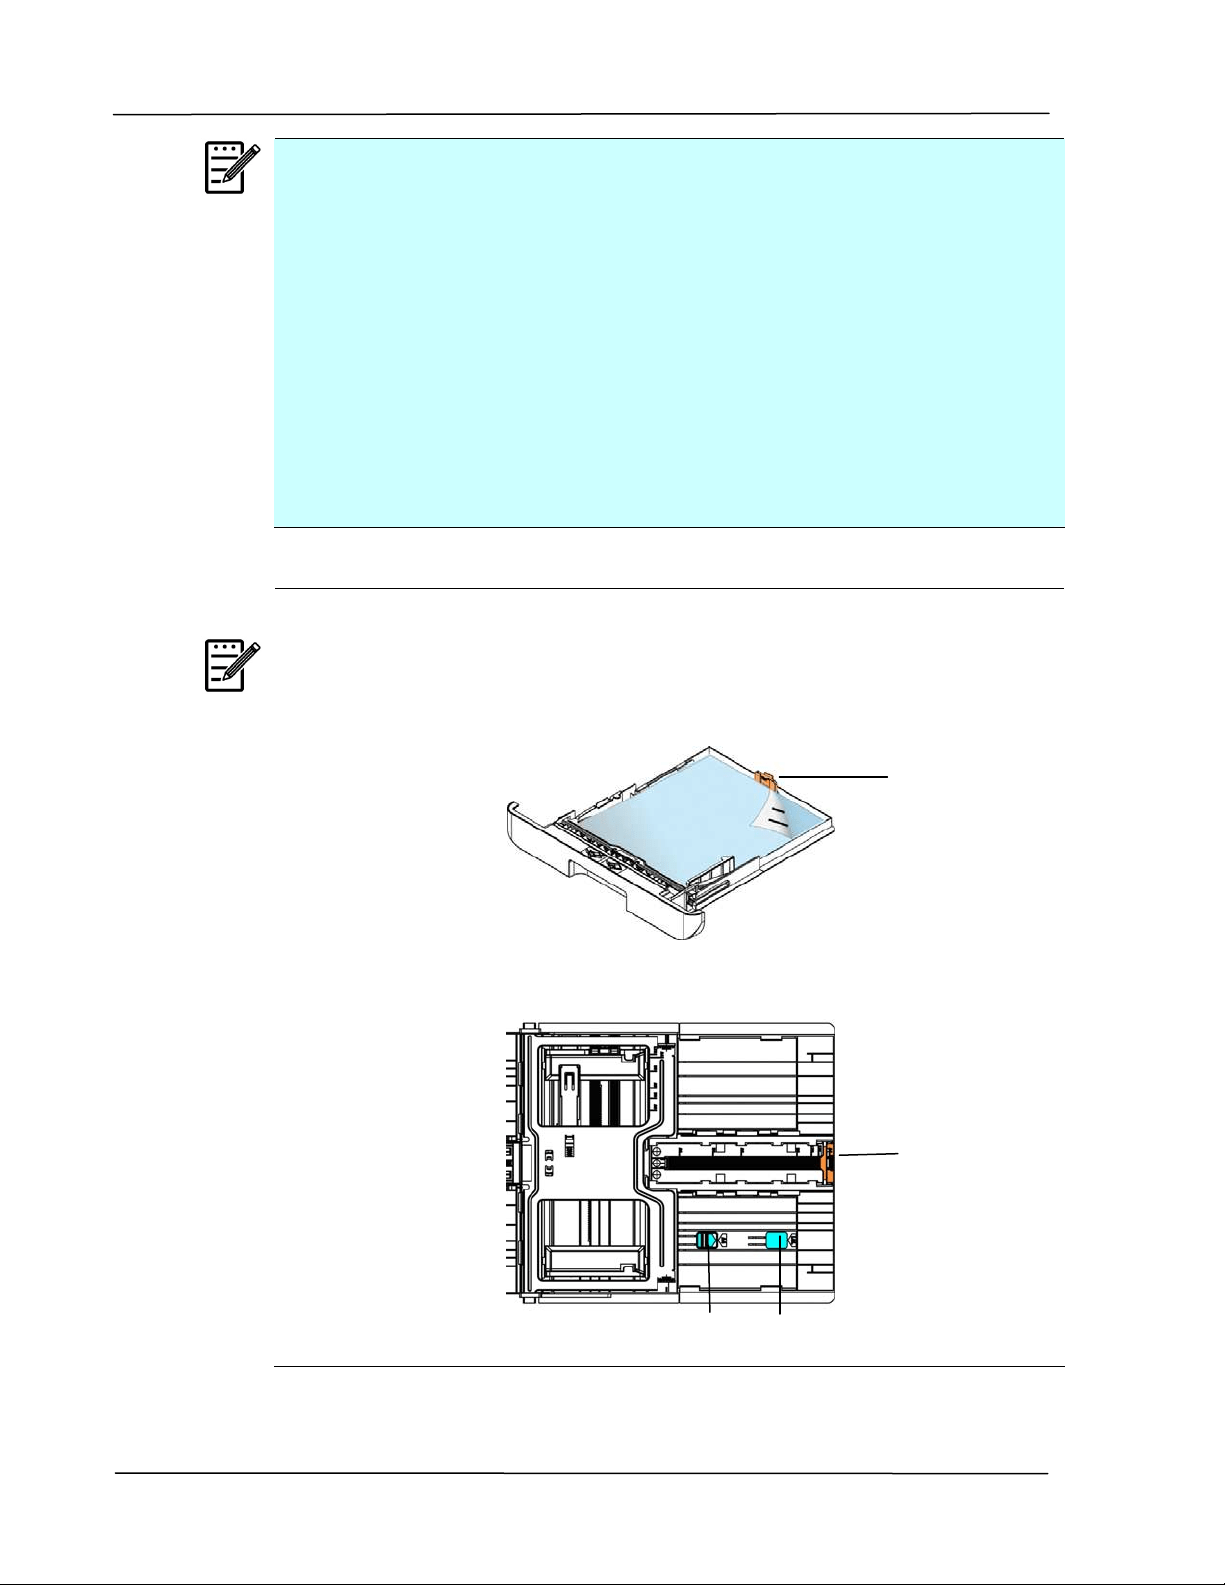
I m por ta nt :
To avoid the chance of m iss- fed, m ak e sure t he lengt h guide t ab and
length slider are inst alled in t heir proper posit ions.
Make sure t he end of your paper slight ly t ouch the lengt h guide as
indicat ed in below.
Make sure t he lengt h
slider is inst alled in t he specified locat ion in eit her
position A or B as shown in below.
Length
Guide Tab
Lengt h
Guide Ta b
Position A Position B
I nst a lla t ion
1 9
Loading t he Manual Tray
To insert paper to t he m anual t ray,
1 . Hold the handle of the m anual t ray, and pull it down to open t he m anual t ray.
2 . Pull out the t ray extension t o fit your desired paper lengt h.
Manual Tray

User’s Gu ide
2 0
3 . Fan your paper first t o ensure t hat t he pages do not st ick t oget her.
4 . Align t he edges of the docum ents by t apping the bot t om of the stack against
the t able top. Rotat e t he st ack 90 degrees and repeat .
5 . Load t he paper st ack wit h t he print side Facing UP as illusrat ed.
6 . Slide t he paper guides so t hat t hey light ly touch t he paper st ack.

I nst a lla t ion
2 1
Paper size a nd w eight s use d for Ma nua l Tray
Paper ca pa cit y
10 pages(70 g/ m ² plain paper)
Pa pe r size
A4 ( 210 x 297 m m )
A6 ( 105 x 148 m m )
A5 ( 148 x 210 m m )
B6 ( 125 x 176 m m )
B5 ( 176 x 250 m m )
Let ter ( 216 x 279 m m )
Legal (216 x 356 m m )
Cust om Size: 76.2 x 127 m m ~ 216 x 356 m m
( 3 x 5 in. ~ 8.5 x 14 in.)
Pa pe r w eight 16 ~ 43 lbs ( 60 ~ 163 g/ m ² )
* Duplex print ing is available only for paper in A4, B5, or Let t er size.
N ot e :
To ensure t he best qualit y printing and copying, please use the paper or
m edia which we have recom m ended.
Make sure t o fan your paper before loading it t o t he paper t ray.
I f t here are inst ructions about t he printing side on the package of your
paper, please follow the inst ruct ions t o load your paper properly wit h
the correct printing side t o t he paper t ray.
I f t he printing qualit y is not sat isfact ory or paper jam s are easily t o
occur, turn over t he paper st ack so t hat the t op page is now on bot t om
and t hen reload it to t he paper tray.
Pack and seal t he rem aining paper wit h t he original packaging and store
the paper in a dark and dry locat ion away from t he sunshine. Paper
which collect s m uch m oist ure is easy to cause j am during printing.
User’s Gu ide
2 2
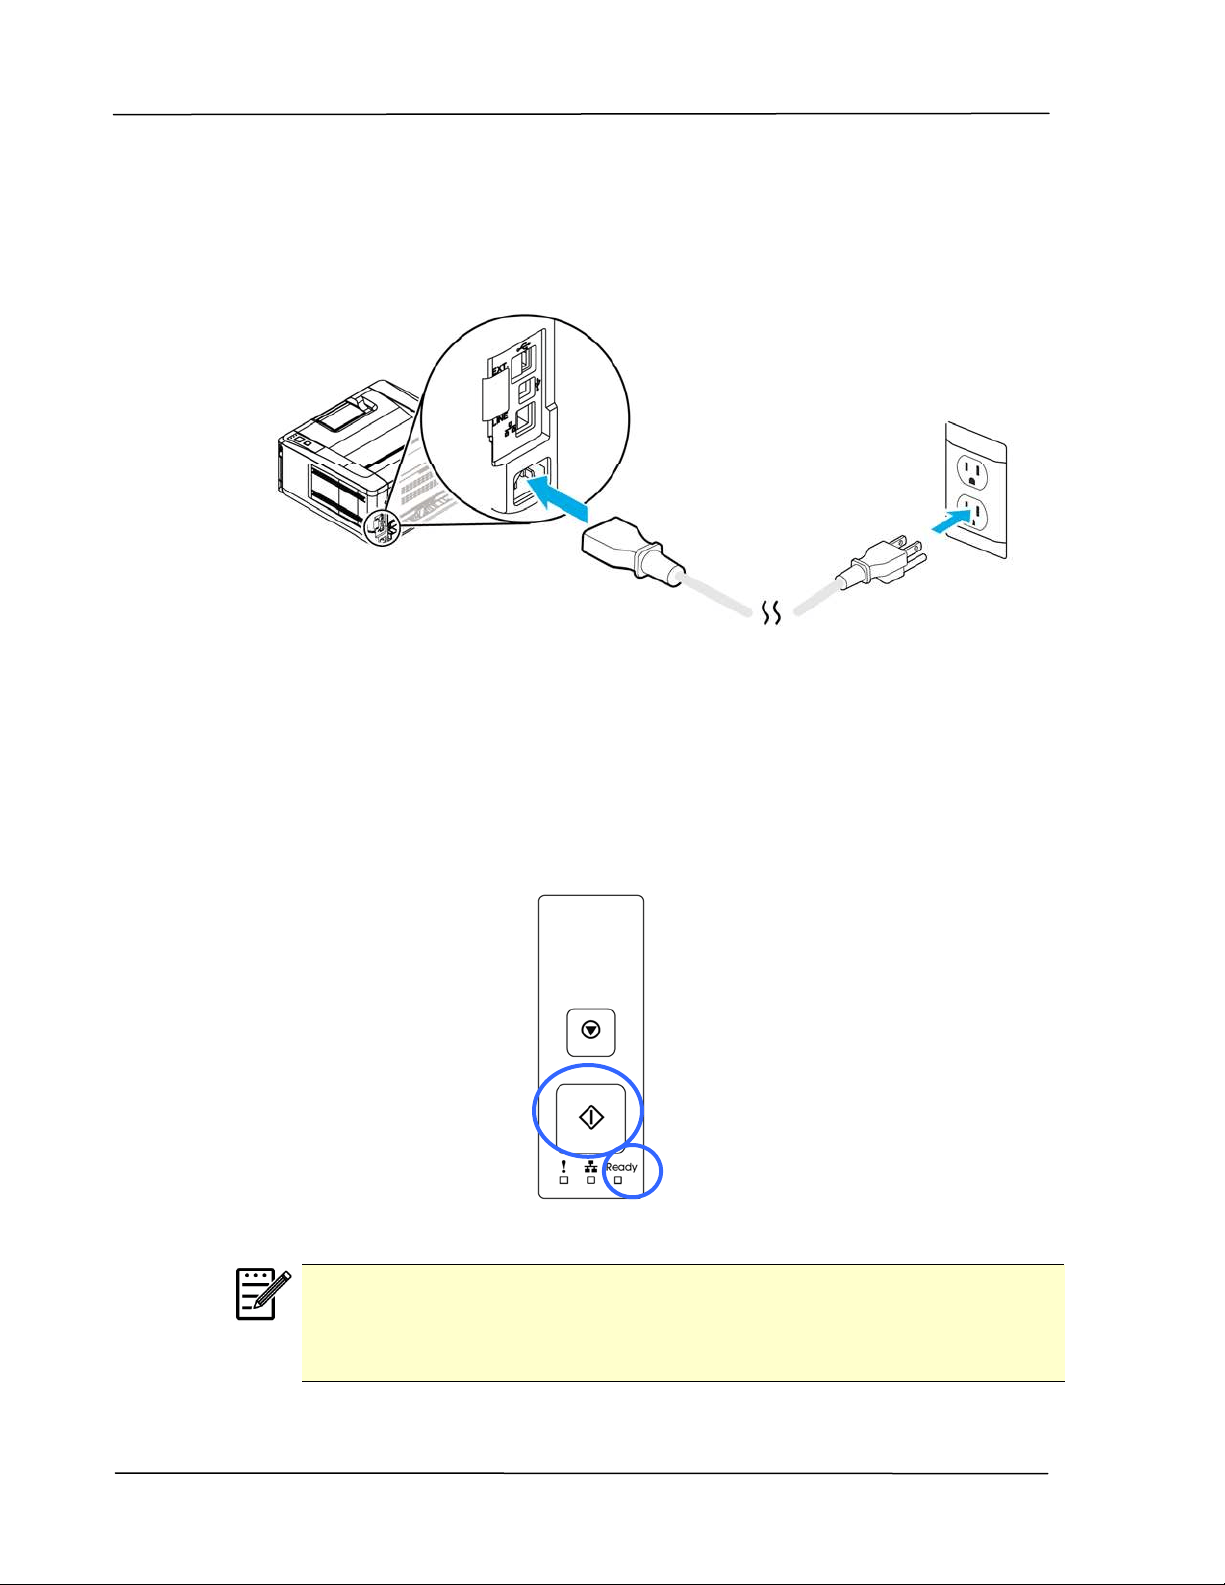
Connect ing t o Pow er
1 . Connect the of t he power cable to t he pow er j ack of your product .
2 . Connect the ot her end t o an appropriate pow er out let .
Turning On The Print e r
To turn on the print er, press t he power butt on locat ed on t he control panel.
Ready LED will be lit .
N ot e :
When t he product is not in use, please long press t he power butt on until
the Ready LED is t urned off t o get a zero power consum pt ion st at e.
I nst a lla t ion
2 3
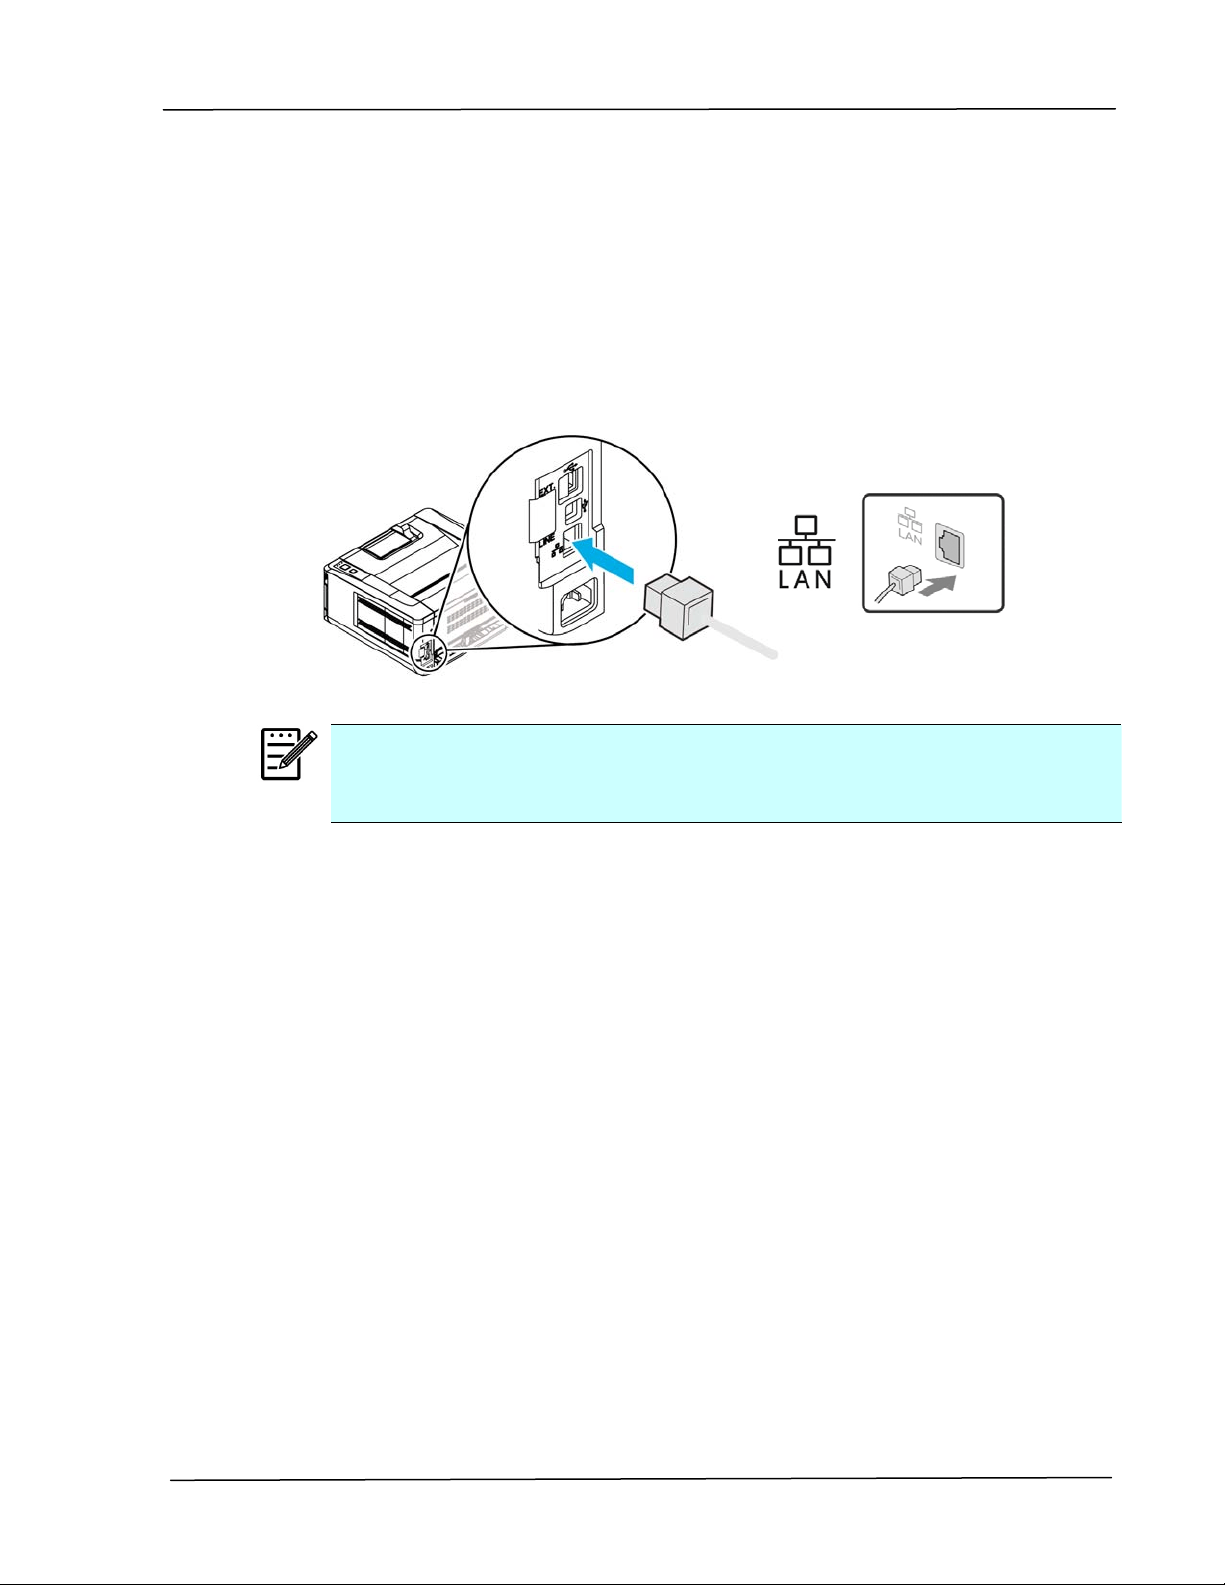
Connect ing t o t he N et w ork
Connect the printer to t he network to use t he net work print ing funct ion.
1 . Connect one end of your net work cable to an available port of your Ethernet
Hub
.
2 . Connect the ot her end t o t he LAN port at the back of the product as shown.
N ot e :
To obt ain t he I P address, press and hold t he Cancel but t on for 3 seconds. A
usage report cont aining t he I P inform at ion will be print ing.
User’s Gu ide
2 4
I nst alling t he Print er Driver ( W indow s)
Syst e m Re quir em ent
Windows XP, Windows Server 2003, Windows Vista, Windows 7 ~ 10
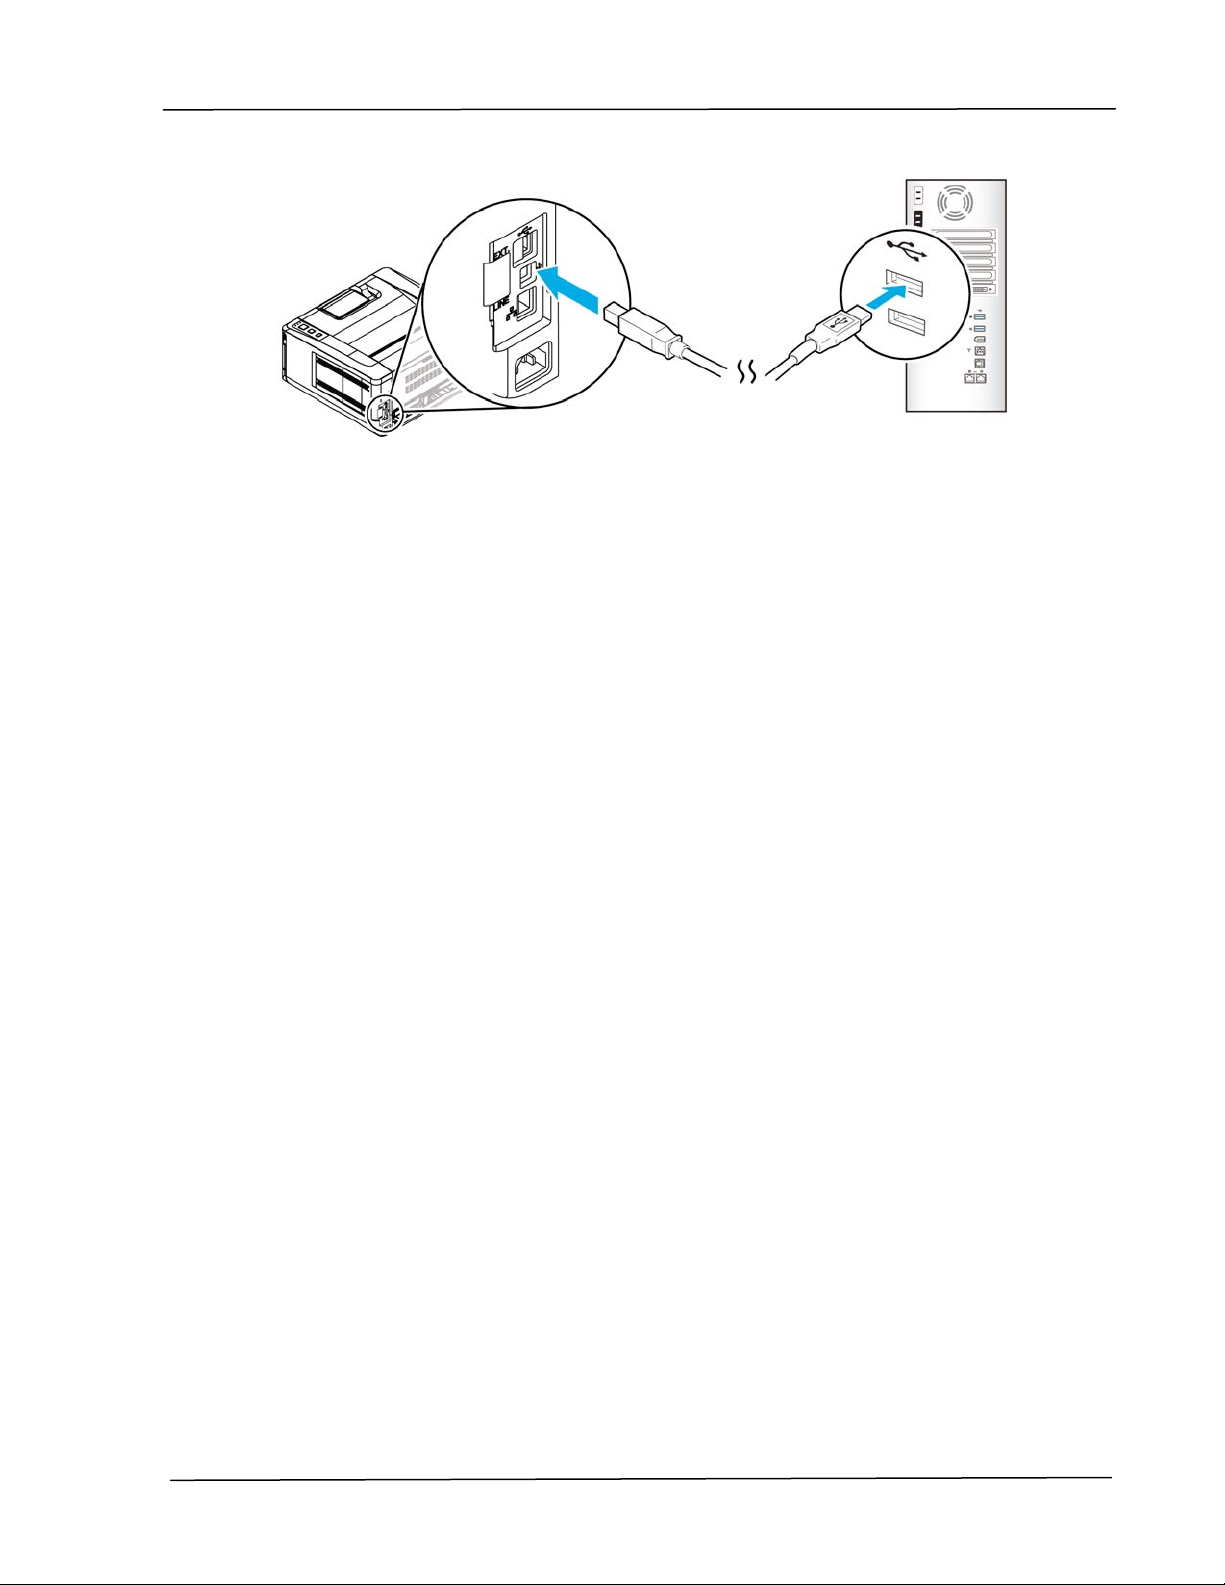
For USB I nt erfa ce User s
Please follow t hese st eps t o inst all t he printer driver if this m achine is connect ed
to your com put er via a USB cable.
I m por ta nt !
DO NOT connect t he USB cable before inst alling t he print er’s
driver.
1 . I nsert t he supplied CD int o your CD- ROM drive. The inst allat ion m enu appears,
as shown below.
2 . Click “I nsta ll Pr int e r D r iver ” and follow the on- screen inst ruct ions t o inst all
the program .
3 . When the Setup Type dialog box appears, select USB.
4 . During inst allat ion, the USB Connect ion dialog box will be prom pt ed to inst ruct
you t o connect the m achine t o your com put er with a USB cable.
a. Connect one end of t he USB cable t o your com put er.
b. Connect the ot her end t o t he USB port of your product .
I nst a lla t ion
2 5
5 . When t he “ Found New Hardware” screen appears, click N ex t and follow t he
on-screen inst ruct ion t o com plet e t he inst allat ion.
6 . When the Fin ish dialog box appears, click Finish t o com plet e.
I f you have successfully inst alled t he printer’s driver, you will find a print er
“ AP30XX” has been added in t he “ Printers and Faxes” opt ion from the Control
Panel.

User’s Gu ide
2 6
Uninst a lling t he Print e r Dr iver
1 . Make sure your USB cable is connected t o your product .
2 . From t he “ Start ” m enu, select “All Program s” , the product m odel, and t hen
“ uninst all Driver” .
For N e t w ork I nt e rface Users
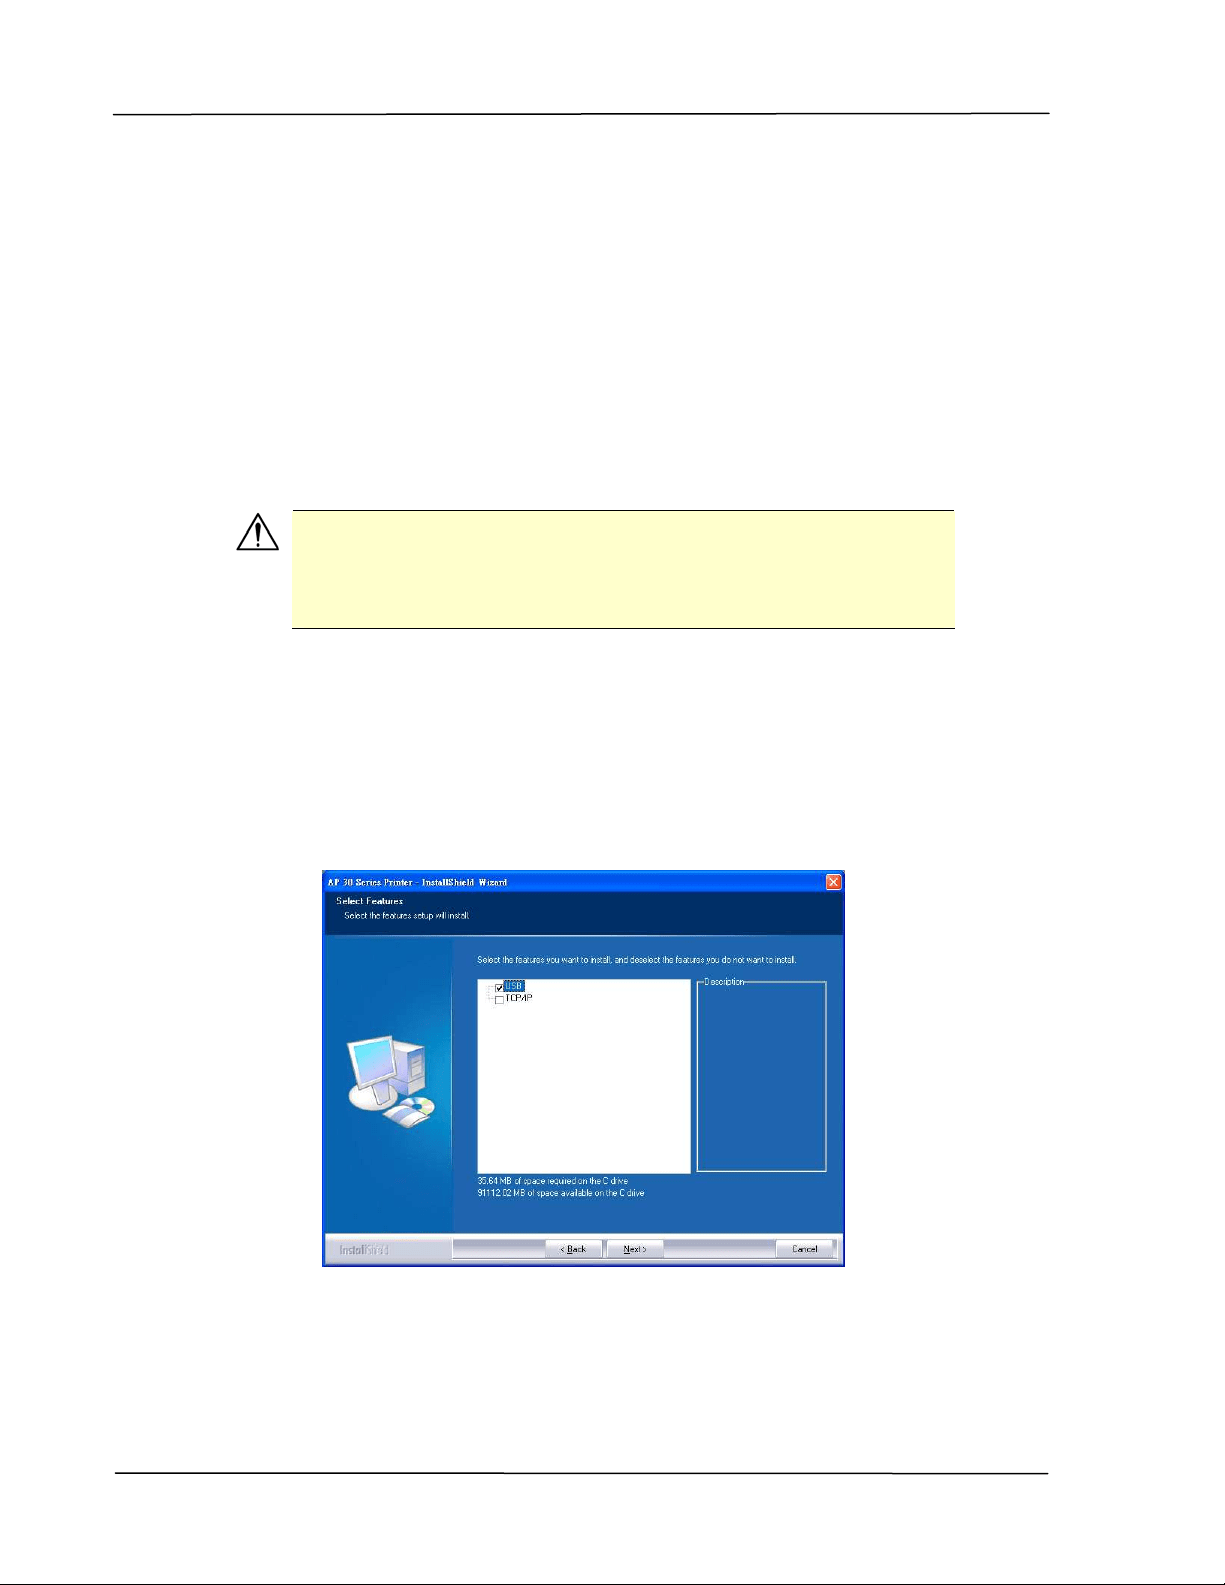
Please follow t hese steps to inst all the scanner, printer, and fax drivers if this
m achine is connected t o your com put er via a network.
1 . I nsert the supplied CD into your CD- ROM drive. The inst allat ion m enu wil
be displayed.
2 . To inst all t he scanner driver and print er driver:
Click
「I nsta ll Scanner Dr iver a nd Pr int er D rive r 」and follow t he
on- screen inst ruct ions t o com plet e t he inst allation of t he program .
3 . When the Se t up Type dialog box appears, check [ TCP/ I P] and click
[ N ex t ] t o cont inue. I f you need t o connect the product t o a wireless
net work, check [ USB] since the Net work Set up Tool is included in t he USB
driver and only available when t he product is connect ing t o your com puter
through t he USB cable.
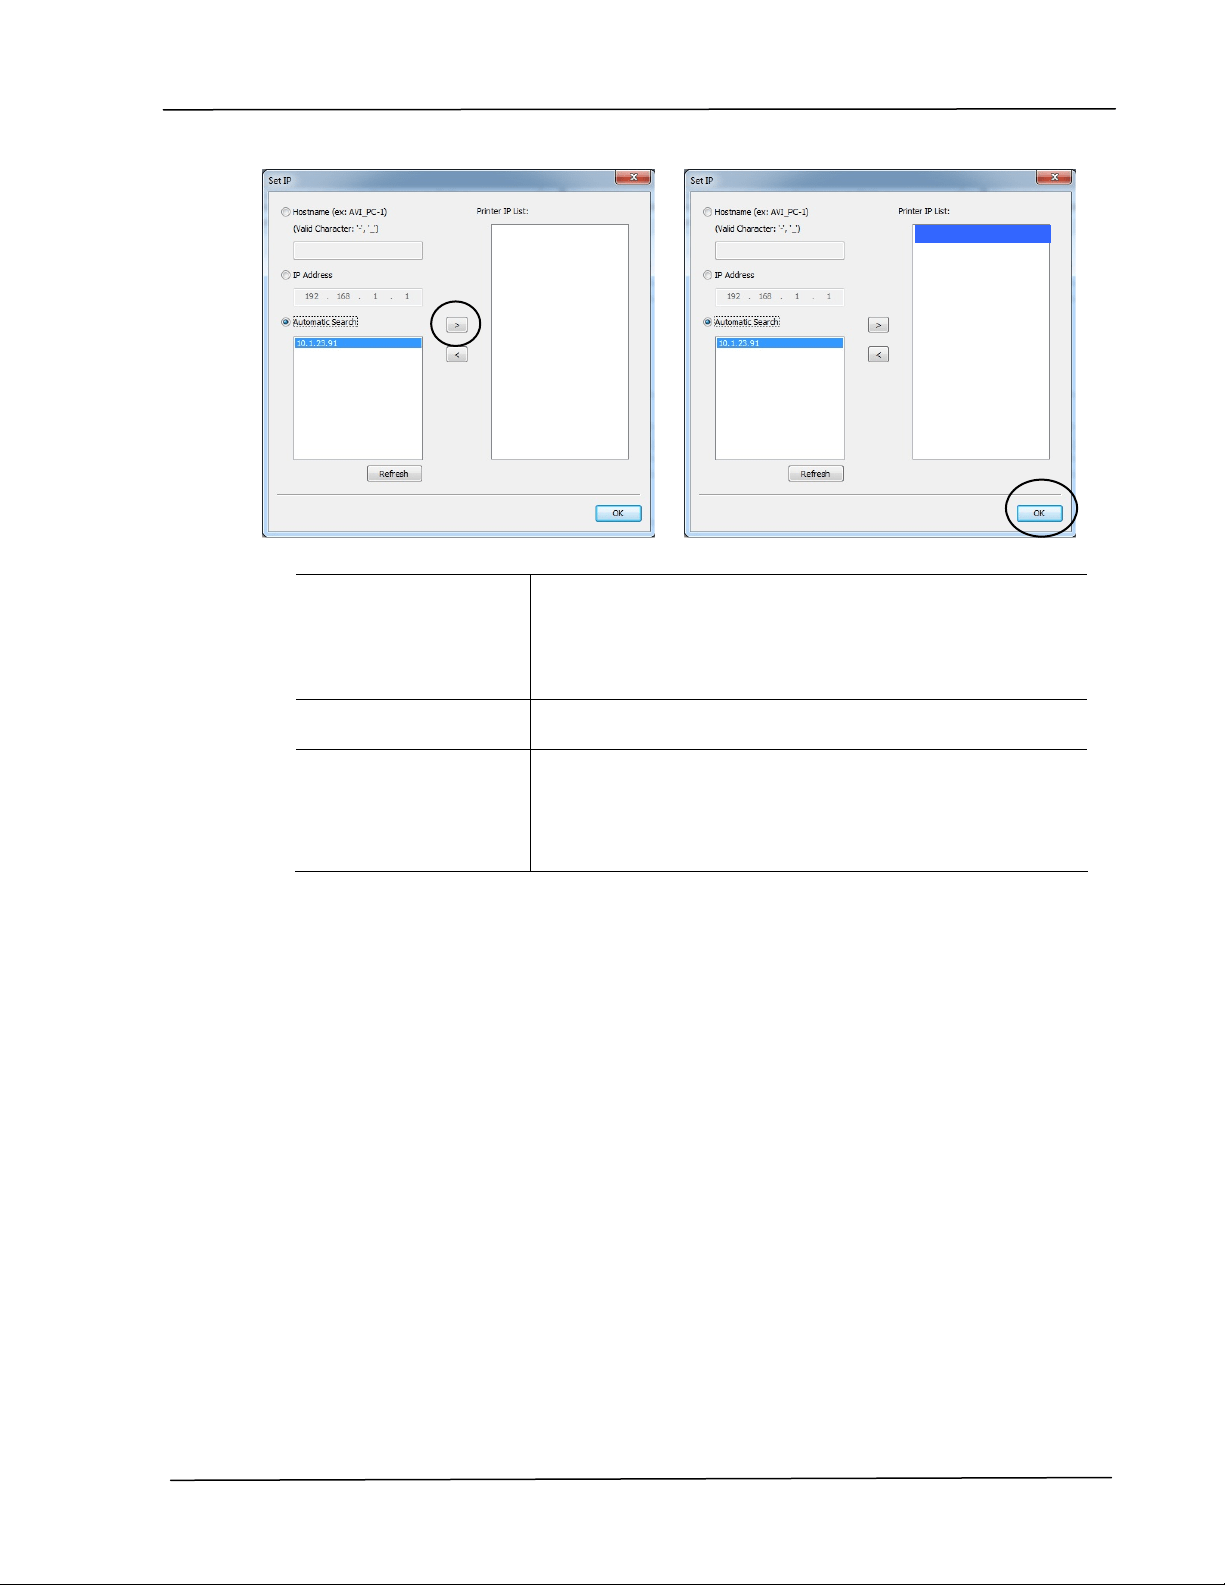
4 . When t he following Se t I P dialog box appears, choose one of the following
opt ions and click [ > ] to add to t he print er list . When t he desired option
sett ing is com plet ed, click [ OK] . ( Follow t he preceding sect ion –
Checking the Product ’s Default I P Address to obt ain the product ’s default
I P address.
I nst a lla t ion
2 7
Host N a m e
Ent er the product ’s host nam e t o be connected in
the blank box of the Host Nam e opt ion.
To add m ore host nam es if m ore than one AP30
Series are connected in t he net w ork, click 「M ore 」
next t o the Host Nam e box.
I P Address Ent er the product ’s I P address to be connected in
the blank box of the I P Address opt ion.
Au tom a t ic Se ar ch
Searches t he product ’s print ers aut om at ically, and
all t he product ’s host nam es found in the network
will be displayed in the box of the Aut om at ic Search.
Use your m ouse t o choose your desired host nam e
to be connect ed.
5 . During inst allat ion, the [ USB Con nect ion] dialog box will be prom pt ed to
inst ruct you t o t urn on the PRI NTER and t hen connect t he PRI NTER t o
your com puter wit h a USB cable.
6 . When t he Finish dialog box appears, choose 「Finish」t o com plet e.
I f you have successfully inst alled the printer’s driver, you will find a
printer,
「AP30 Series Net Work」, has been added in the 「Printers and
Faxes」opt ion from the Control Panel.
10.1.23.91
User’s Gu ide
2 8
Changing t he Product ’s I P Addr ess in a W ir ed N e t w ork
To change t he product ’s I P address, you need t o inst all t he N et w or k Set up Tool.
The N e t w ork Set up Tool is included in t he USB print er driver. Aft er the
inst allat ion of the USB print er driver is com pleted, t he N e t w ork Se t up Tool is
autom atically inst alled ont o your com put er. Follow these steps to updat e t he I P
address t o t he product in a wired net work.
You m ay also define your net work connection via t he web page. ( See m ore details
in t he subsequent section Custom ize Syst em ’s Set t ings via the Em bedded Web
Page in Chapt er 5.
1 . Make sure t he product is connected t o your com puter via a USB cable.
2 . St art N et w ork Se t up Tool by choosing the St a rt but t on and then select
All Program s> AP3 0 XX PRI N TER> Net w or k Set up Tool in succession.
The following Net work Set up Tool screen will be prom pt ed.
3 . On the [ Ge ner al] page, check [ W ir ed ( Et h erne t ) ] Net work.
4 . Click t he [ W ired ( Et he rne t ) ] tab t o prom pt t he Wired (Ethernet ) page.
AP30 Series Printer
I nst a lla t ion
2 9
5 . Check [ Obt ain a n I P a ddress a ut om a t ically] t o obt ain the I P address
direct ly from t he DHCP server or you m ay ent er your st at ic I P on t he [ I P
Address] , [ Subne t Ma sk ] , and [ Ga t e w ay] field respectively.
6 . I f you have assigned a specific I P, enter your dom ain nam e server and
WI NS server as w ell and t hen click [ Updat e Set t in g] to updat e the I P
inform ation t o the product .
7 . I f update is successfully, an [ Updat e D evice Succe ssfully] m essage will
be displayed and t he Net work Setup Tool will be aut om atically closed.
User’s Gu ide
3 0
Se t t ing t he Product ’s I P Addre ss in a W ire le ss N e t w ork
To set an I P address t o t he product , you need t o inst all the N et w or k Set up Tool.
The N e t w ork Set up Tool is included in t he USB print er driver. Aft er the
inst allat ion of the USB print er driver is com pleted, t he N e t w ork Se t up Tool is
autom atically inst alled ont o your com put er. Follow these steps to set and update
the I P address to t he product in a wireless net work:
You m ay also define your net work connection via t he web page. ( See m ore details
in t he subsequent section Custom ize Syst em ’s Set t ings via the Em bedded Web
Page in Chapt er 5.
To wirelessly connect the product t o a net work, you need t o inst all a Wi- Fi dongle
to t he product at the back of the USB port .
1 . Make sure t he product is connect ed t o your com puter via a USB cable.
2 . St art the N et w or k Se t up Tool by choosing t he St a rt but t on and t hen
select All Progra m s> AP3 0 X X Pr int e r > N et w or k Se t up Tool in
succession. The following Net work Set up Tool screen will be prom pt ed.
USB
port
AP30 Series Printer
I nst a lla t ion
3 1
3 . On the [ Ge ner a l] page, check [ W i- Fi ( Sta t ion) ] .
4 . Click t he [ W i- Fi ( St a t ion) ] tab to prom pt the [ W i- Fi ( Sta t ion) ] page.
5 . Check [ Obta in a n I P a ddress a ut om a t ically] t o obt ain the I P address
direct ly from t he DHCP server or you m ay ent er your st at ic I P on t he [ I P
Address] , [ Subne t Ma sk ] , and [ Ga t e w ay] field respectively.
6 . Click [ Join a W i- Fi net w or k] and the currently connect ed wireless
networks will be displayed. Select the wireless net w ork you want t o
connect and then ent er t he security key if required.
7 . Click [ Connect ] to start connect ing the SSI D (wireless network nam e) and
then updat e the I P inform at ion to t he product .
8 . I f update is successfully, an [ Updat e D evice Succe ssfully] m essage will
be displayed and t he Net work Setup Tool will be aut om atically closed.

User’s Gu ide
3 2
Uninst a lling t he Sca nner Drive r a nd Print e r Driver
1 . From the 「St ar t 」m enu, select 「All Pr ogra m s」, 「t he AP3 0 Se rie s
Print e r」, and then 「Uninst a ll D river 」.
Or from t he 「St ar t 」m enu, select 「Cont rol Pa ne l」, 「Add or Re m ove
Progr am s」, 「t he AP3 0 Ser ie s Pr int e r」, and t hen 「Re m ove 」.
2 . Follow t he inst ruct ions on t he screen t o com plet e rem oving t he scanner
driver and the printer driver.

I nst a lla t ion
3 3
I nst alling t he Print er Driver ( Mac OS)
Syst e m Re quir em ent
Opera t ing Syst em :
Mac OS X 10.11 or lat er
Com put e r:
Recom m ended: I ntel
®
Core
TM
Duo Processor 2.4 GHz or higher
Minim um : I ntel
®
Core
TM
Duo Processor 1.83 GHz
Pow erPC G5 1.6 GHz
Me m ory:
Recom m ended: 1 GB or m ore
Minim um : 512 MB
Tu r ning on t he Print e r
Press the Pow er but t on on t he front panel, the Pow er LED will flash. When it is
finished and ready t o scan, the LED indicat or will st op flashing and becom e
st eadily on. To t urn off the scanner, press t he Pow e r butt on for about 3
seconds, t he Pow er LED will be off.
I nst a lling t he Pr int er Driver
N OTE: The screens in this section are basically from Mac OS 10.11. The screens on
your Macintosh will vary depending on your operat ing system .
Follow t he procedure t o inst all Avision’s AP30 Series print er driver for Macint osh
com put er from t he CD-ROM supplied wit h t he print er.
1 . Turn your com put er on, and log in wit h an account that has adm in right s.
2 . I nsert the Soft ware CD- ROM int o t he CD- ROM drive. The printer program -
Avision AP30…pkg w ill be displayed.

User’s Gu ide
3 4
3 . Double- click t he [ Avision AP3 0 …] icon.
4 . Click t he [ Cont inue] but t on on the Welcom e window.
5 . I f you wish to change t he default inst allat ion disk, click [ Ch ange I nst a ll
Loca t ion …] or click the [ I nst all] but t on t o continue inst alling the program .
6 . Log in with a passw ord t hat has adm in right s and click t he [ I nst a ll Softw ar e]
but t on.
7 . The com puter begins inst alling t he software.
I nst a lla t ion
3 5
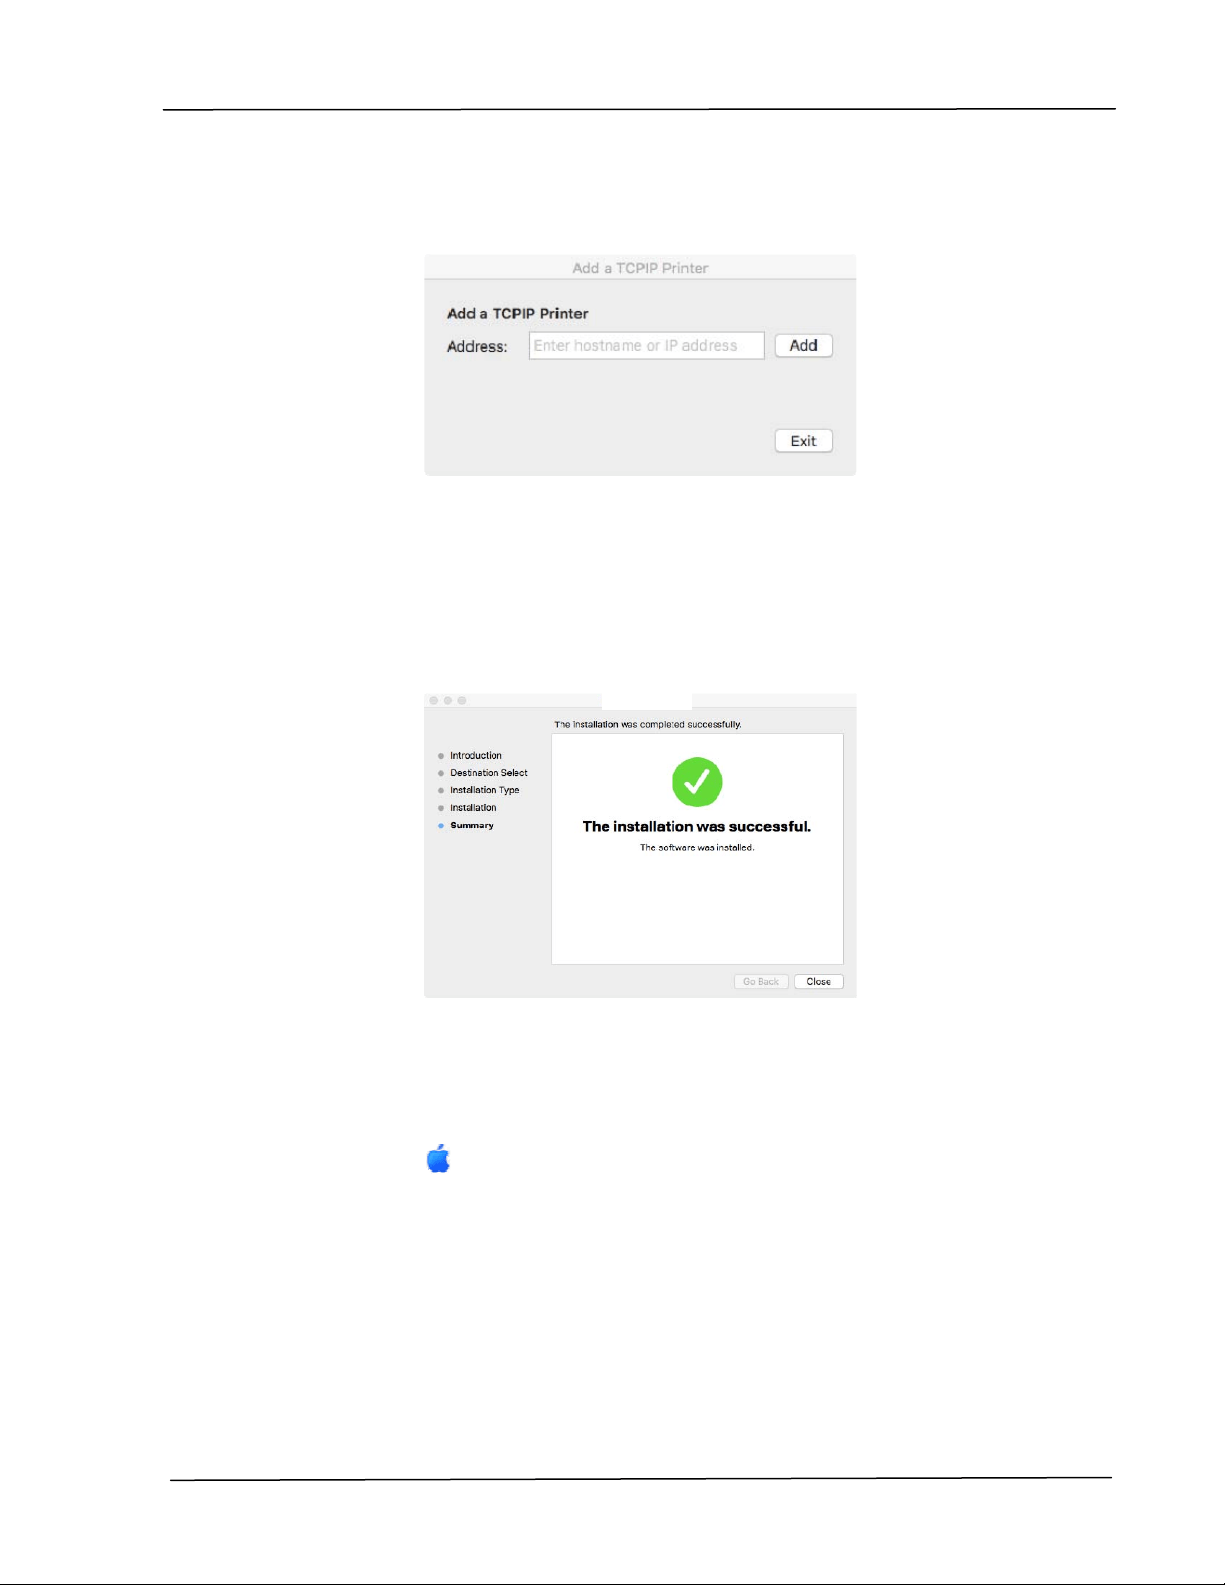
8 . When t he following screen is prom pt ed, enter t he I P address of the printer
and click [ Add] .
* I f you wish t o connect t he print er t o your com put er wit h a
USB cable, skip t he I P address and click [ Ex it ] to cont inue.
9 . When [ Add Pr int e r AP3 0 _ N e t Successfu l] m essage is displayed, click [ Exit ]
to cont inue. ( I f wish t o add m ore AP30 printer, enter t he I P address again and
t hen click [ Add] to cont inue.)
1 0 . When t he [ The inst a lla t ion w a s succe ssful] screen appears, click the
[ Close ] butt on t o close the inst allat ion.
1 1 . Rem ove t he Setup CD- ROM from t he CD- ROM drive. * I f you wish t o connect
the printer to your com put er wit h a USB cable, connect the printer with t he
USB cable now. I f you already did, unplug and replug t he USB connector
again.
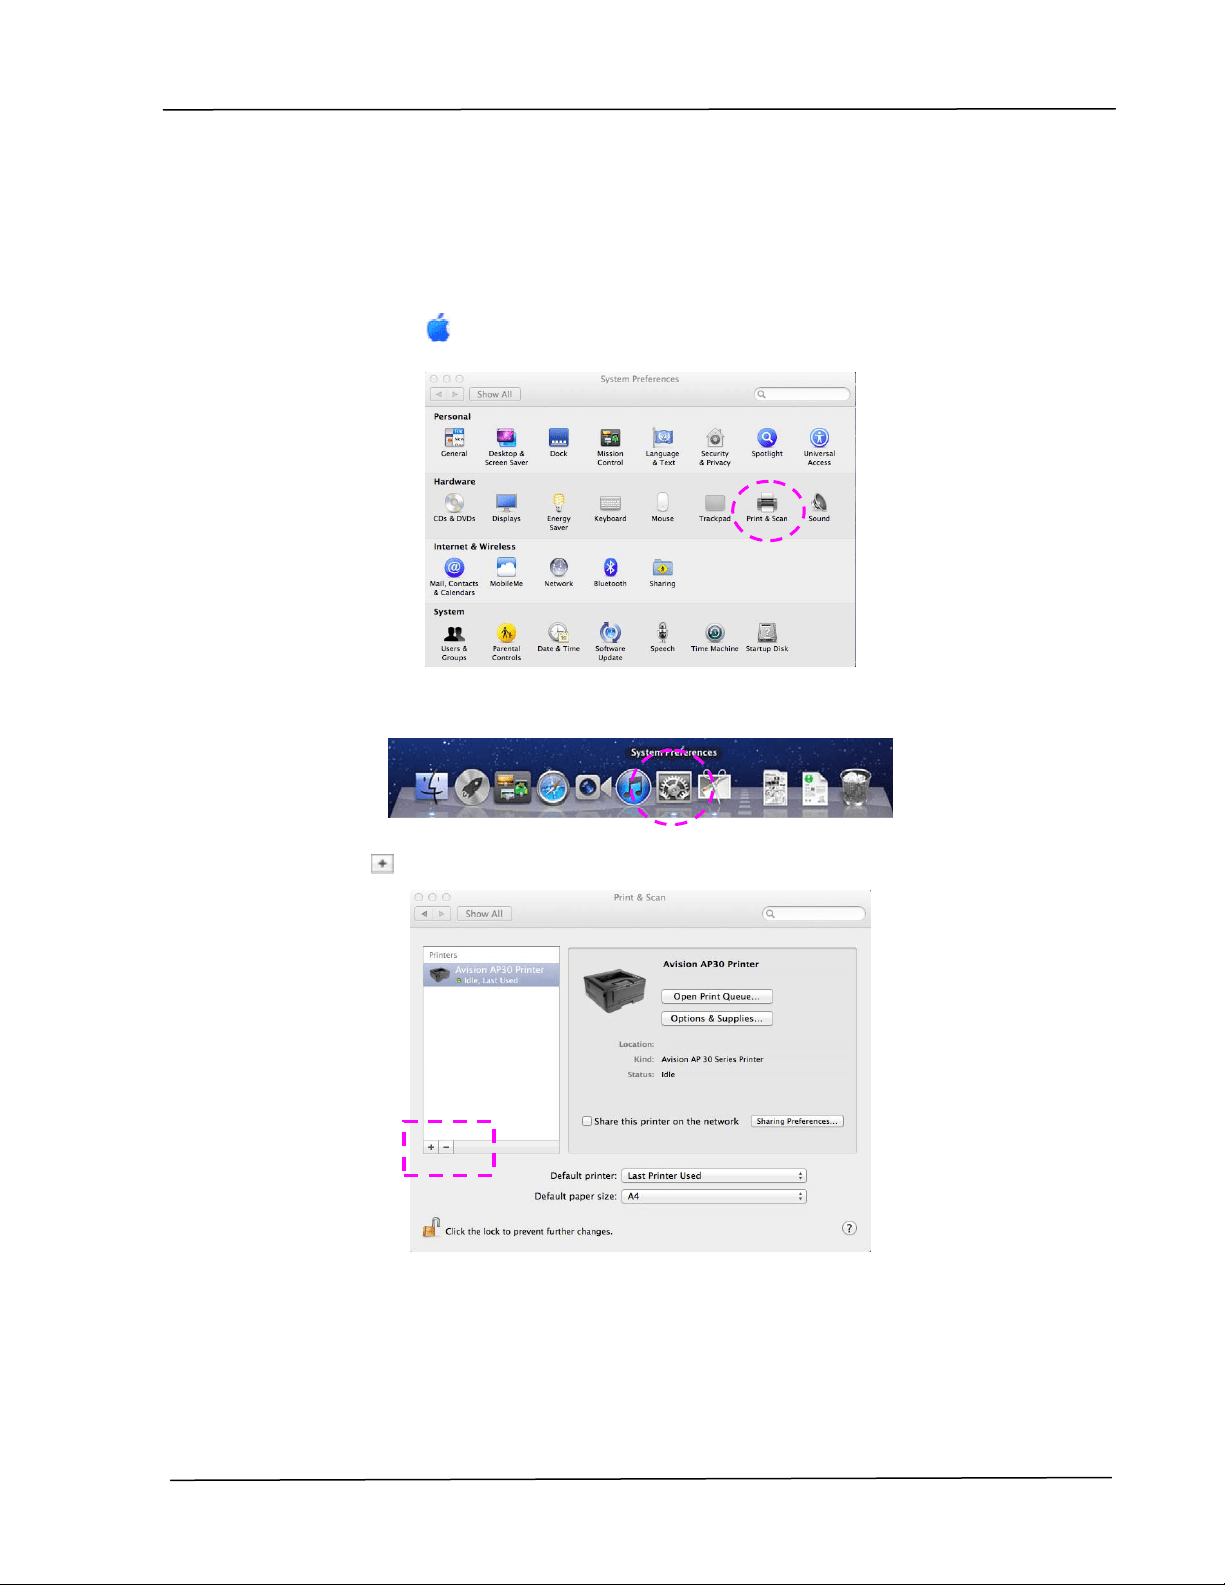
1 2 . Select the
Apple icon in the t op-left corner, t hen click [ Syst em
Pre feren ces] and then [ Pr int & Sca n] .

User’s Gu ide
3 6
Or click [ Syst e m Pre feren ces] icon on your dock, and then [ Pr int &
Scan ] .
1 3 . You can find an AP30 printer has been added in your printer list.
I nst a lla t ion
3 7
Adding a ne w Print er
To add a new printer, follow these steps:
1 . Select the
Apple icon in the t op-left corner, t hen click [ Syst em
Pre feren ces] and then [ Pr int & Sca n] .
Or click [ Syst e m Pre feren ces] icon on your dock, and then [ Pr int &
Scan ] .
2 . Click
and t hen [ Add Ot her Pr int er or Sca nner ] t o add the print er.
3 . A dialog appears list ing print ers on your local net work. I t m ay t ake a m inut e
or two for your print er to appear. Select your print er when it appears in t he
list.
User’s Gu ide
3 8
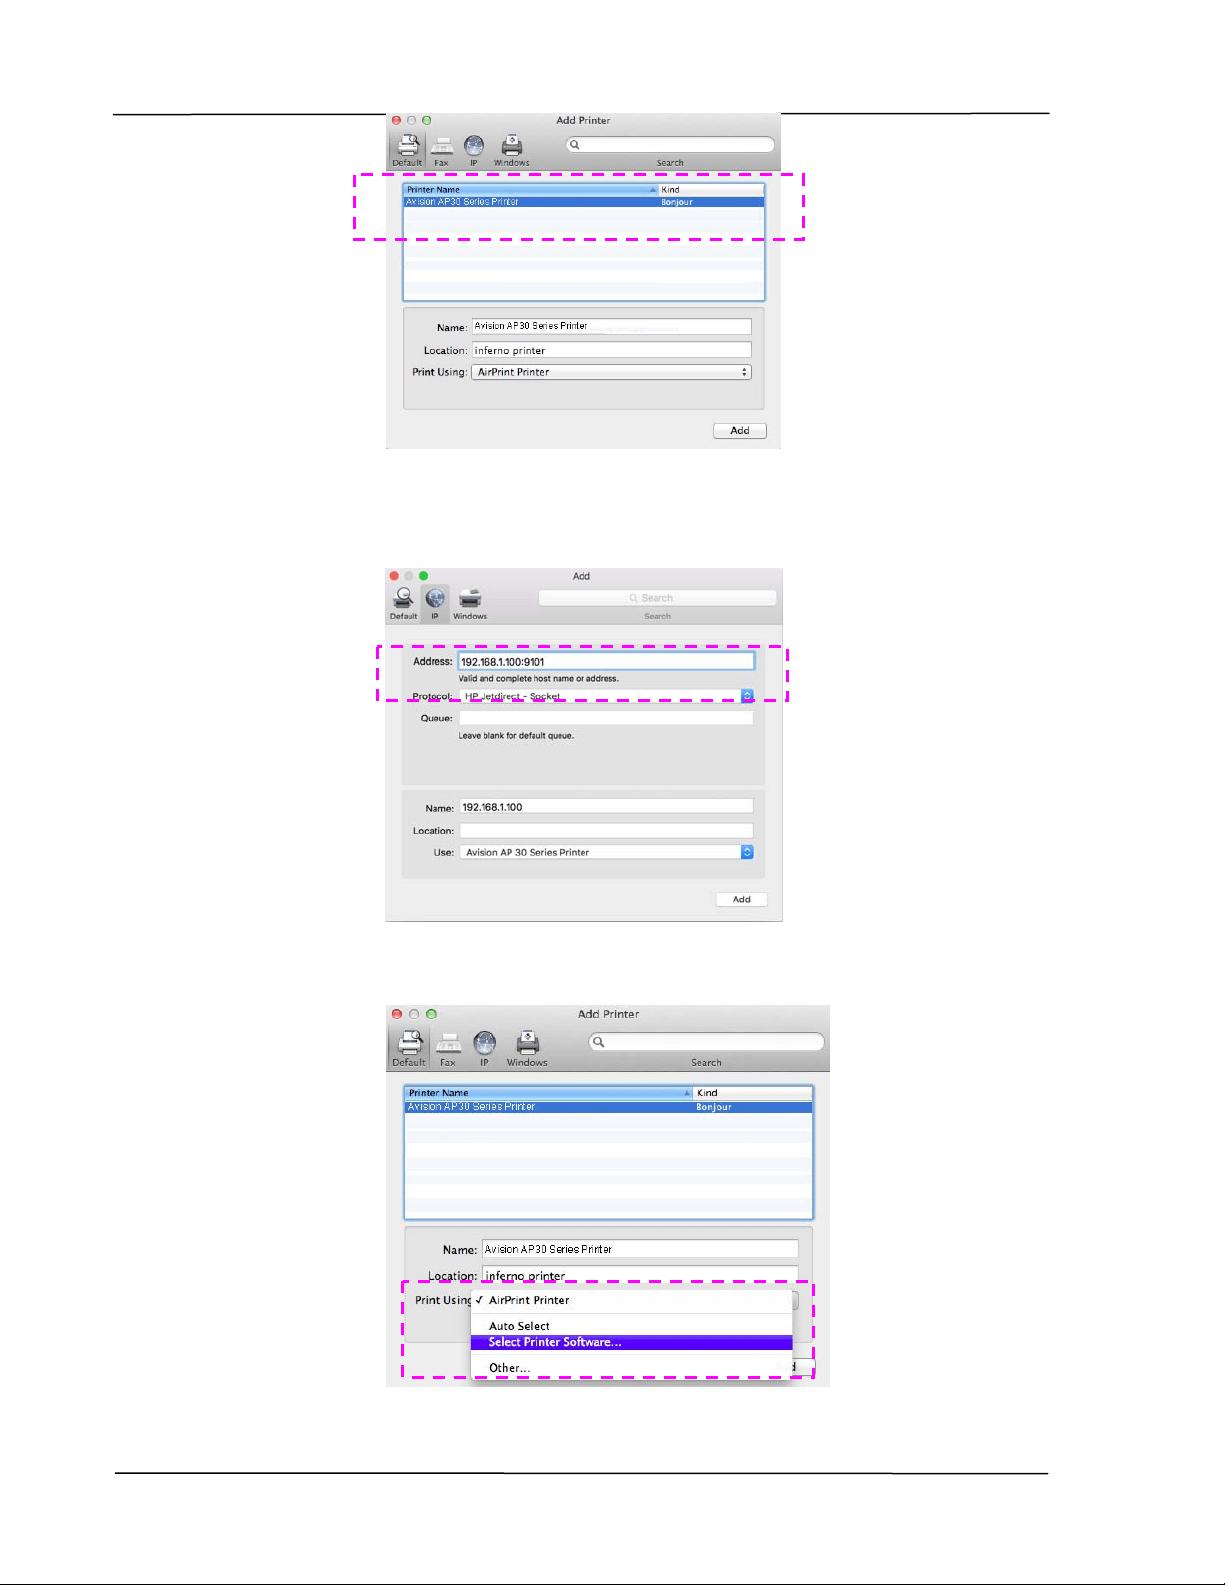
I f your printer still doesn’t appear in t he list , t ry adding t he print er by it s I P
address. While ent ering t he I P address by clicking t he I P icon, be sure t o
include t he address wit h [ : 9101] , for exam ple, 192.168.1.100: 9101.
4 . Locat e the print er driver by clicking the arrow but t on of the [ Print Using]
opt ion and t hen select [ Se lect Pr int er Soft w ar e] .
I nst a lla t ion
3 9
5 . A dialog appears list ing current printer drivers inst alled on your com puter.
Select your print er and click [ OK] . Your [ Pr int Using] opt ion will display the
printer you have select ed.
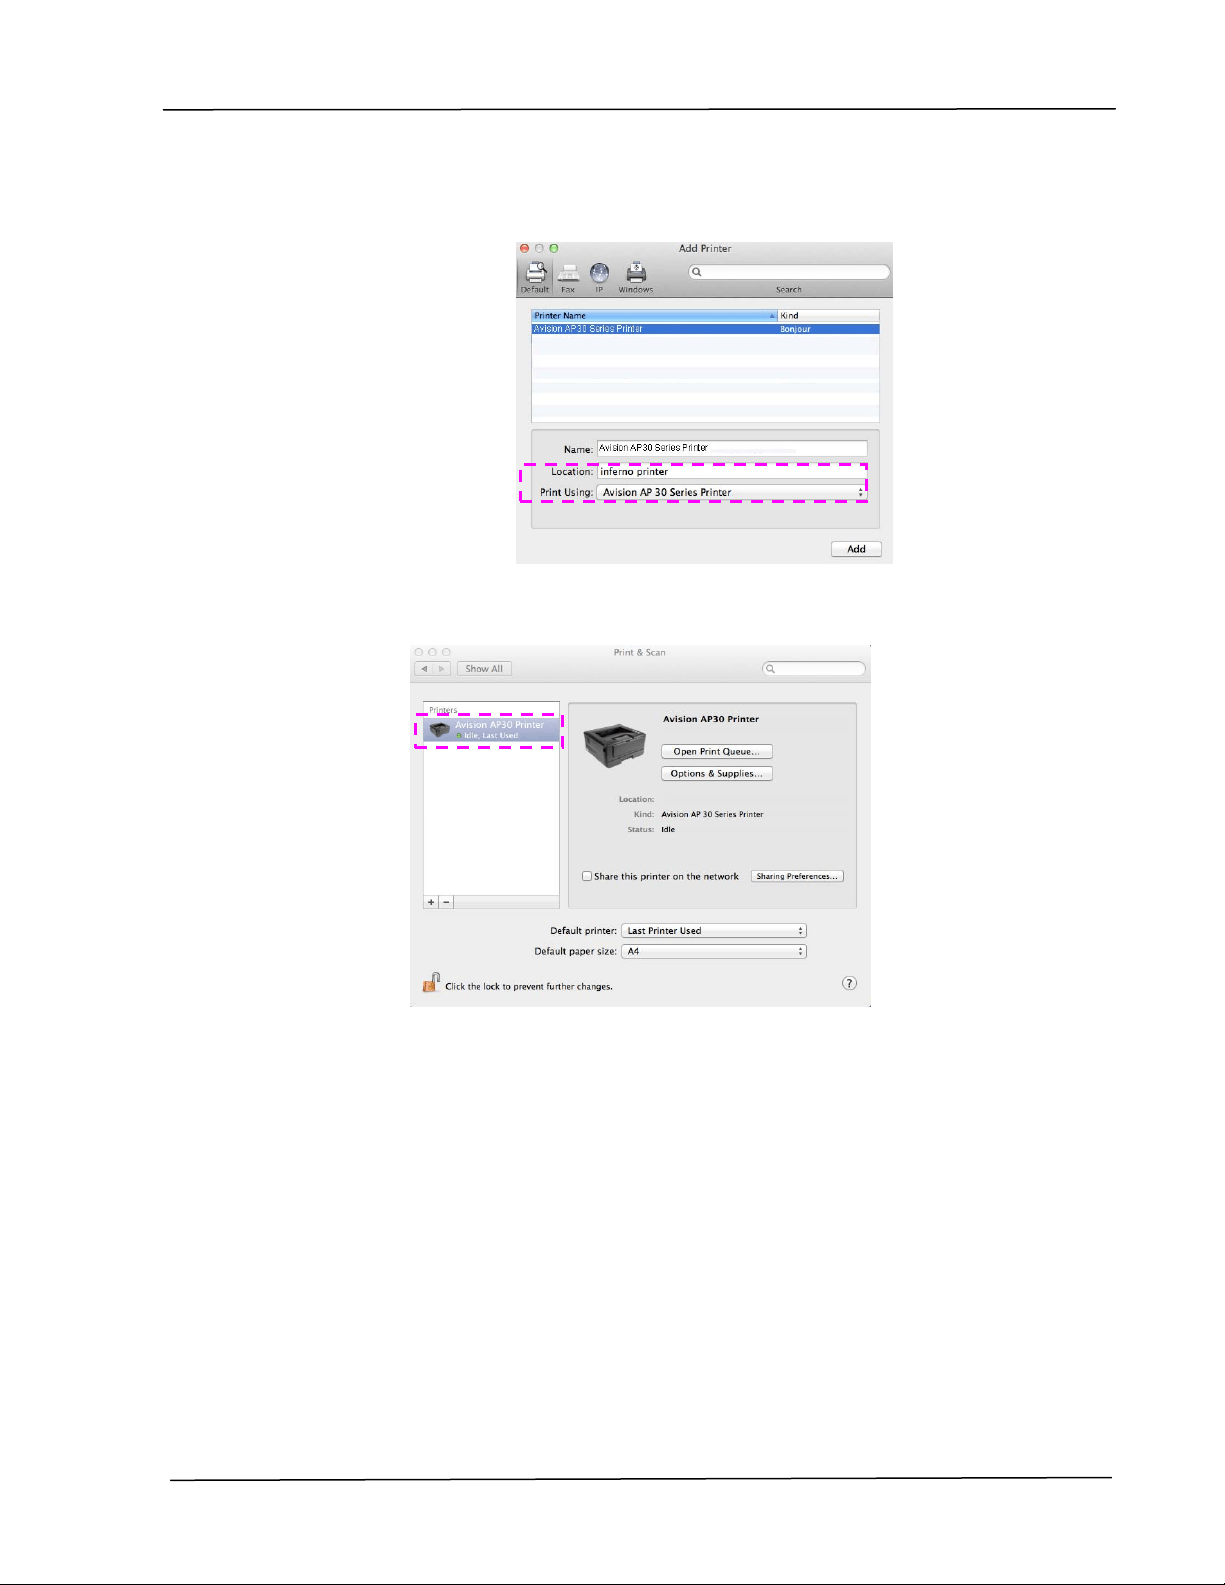
6 . Click the [ Add] but t on t o add the printer. Now your print er will be in the list
on t he upper- left corner as shown in below.
7 . Close the [ Pr int & Sca n] window.
User’s Gu ide
4 0
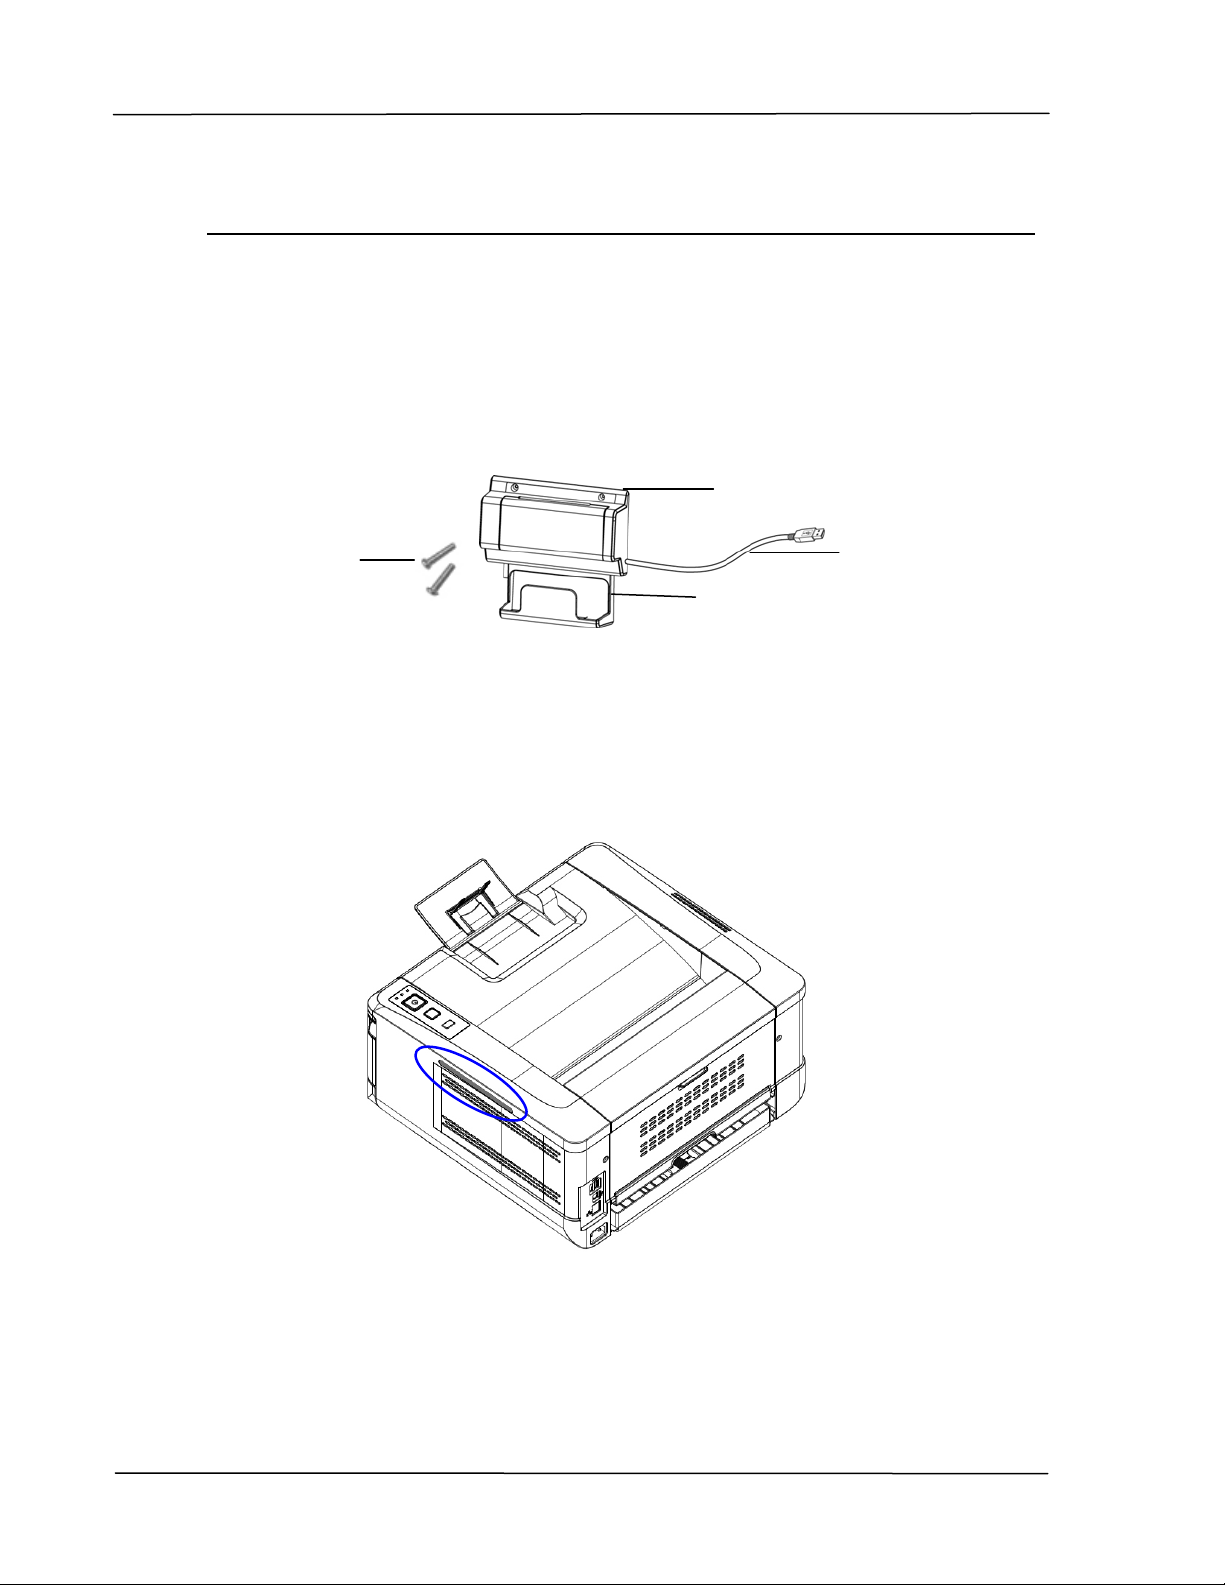
Using t he Opt iona l Scan Module ( CSA6 ) for I D Cards
Sim ply loading your I D card t o the scan m odule (CSA6) , t he copy can be started
and in a second t he front side and rear side of your I D card are print ed in one side
of a sheet .
Kn ow in g t he Sca n M odule :
Rem oving t h e Myla r
:
Locat e the m ylar for t he reserved holes on side cover as shown and rem ove it wit h
a box cut t er.
Out put Tray
Card Feeder
USB Cable
Fixing
Screws x 2
I nst a lla t ion
4 1
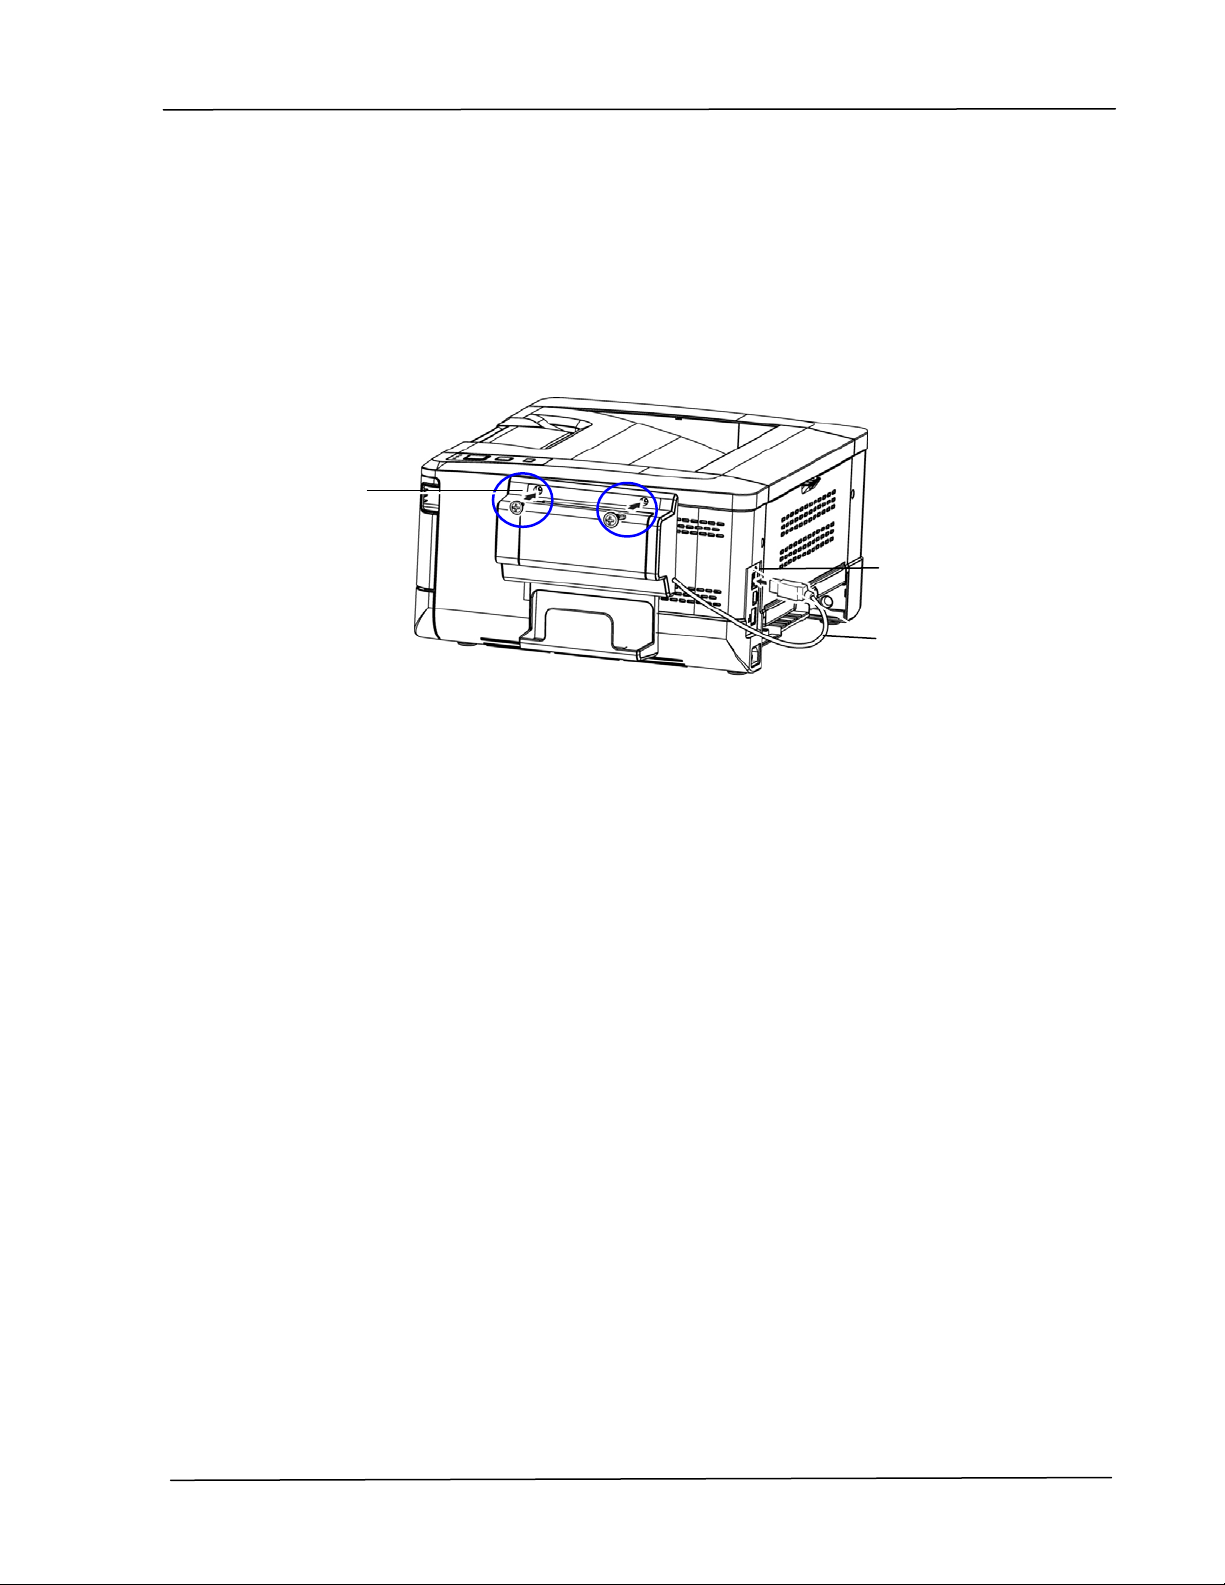
I nst alling t he Sca n M odule:
1. Not e t wo reserved holes on the side w all beneath t he operat ional panel and
fast en the scanning m odule wit h two fixing screws as shown.
2. Connect t he USB cable to t he USB port on rear side.
USB Port
Fixing
Screws
USB Cable
User’s Gu ide
4 2
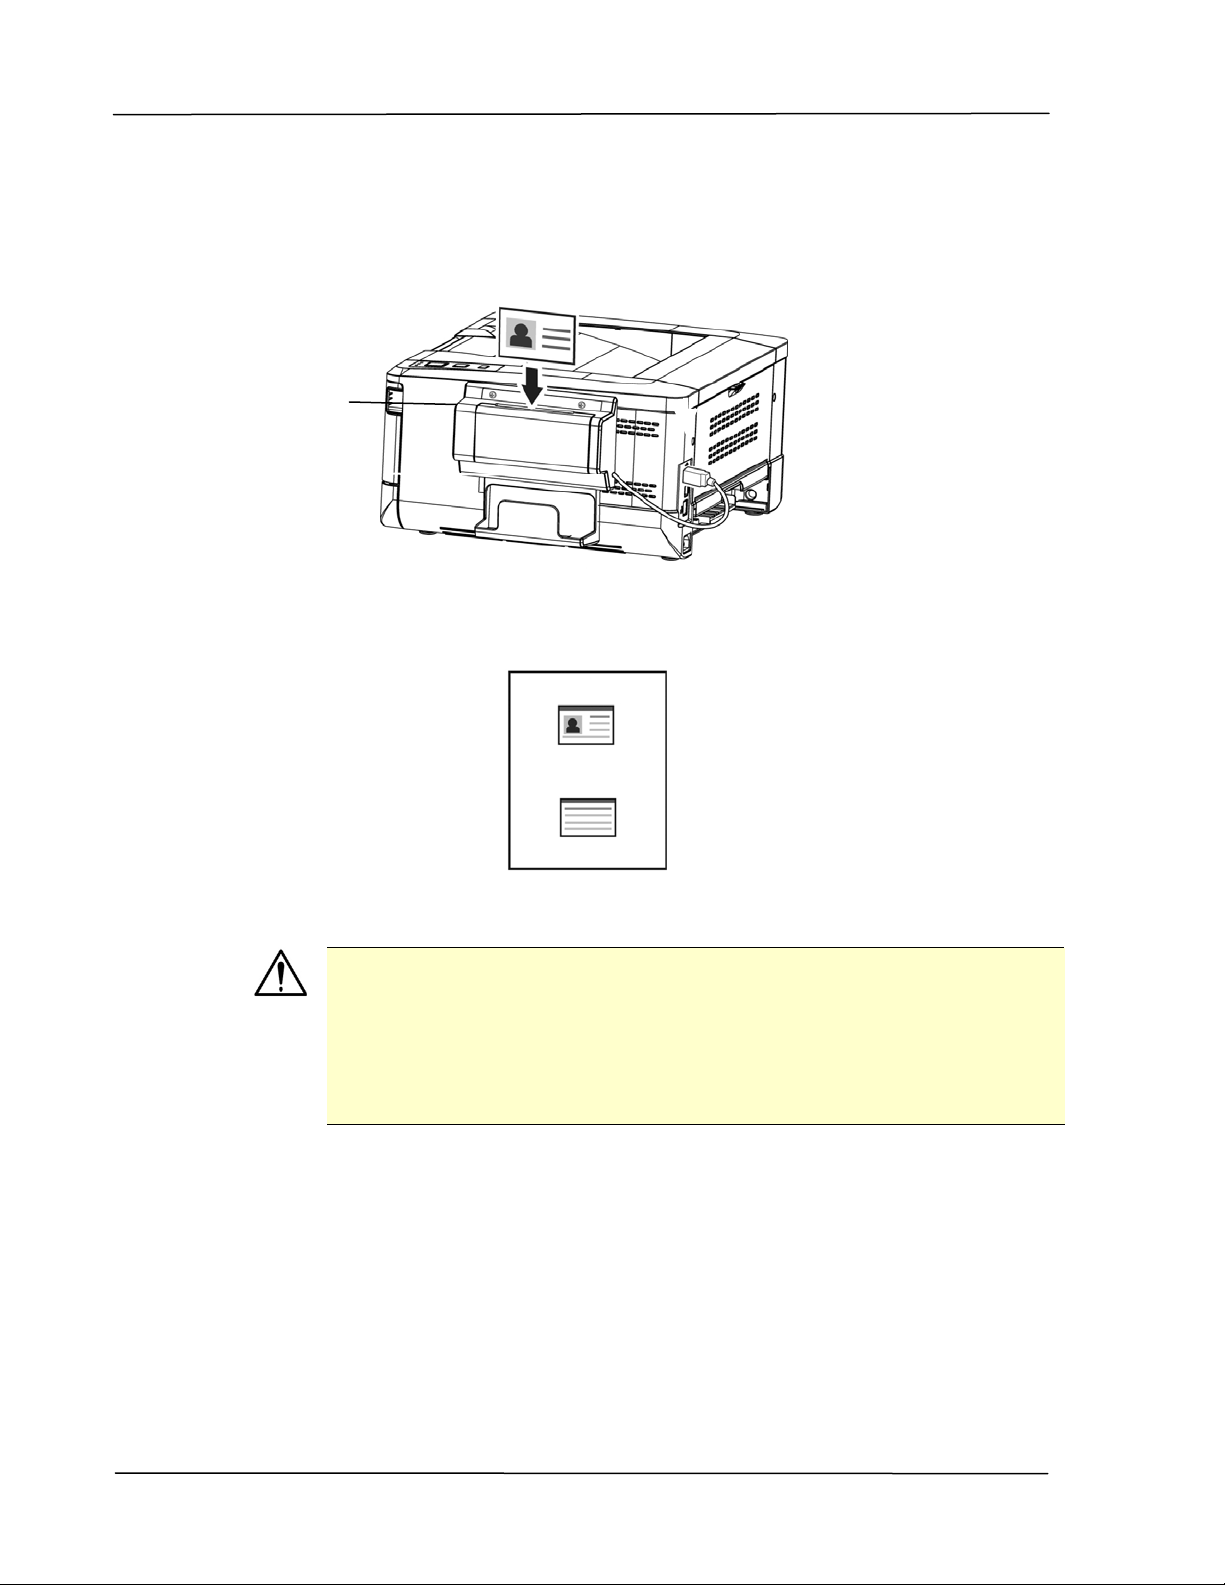
Making I D Car d Copy:
1. I nsert your card FACE OUTW ARD to t he card feeder and m ake sure t he
bot t om of card feeding first as illust rat ed.
2. I n a second, the front side and t he rear side of your I D card will be copied in
one side of a sheet.
N ot e :
Only one card can be insert ed at one t im e. The scan m odule does
not allow t o be fed m ore t han one card at a tim e.
To change t he default set t ings of t he opt ional scan m odule
( CSA6) for I D card, please go t o t he product ’s em bedded web
page as described on page 36.
Card
Feeder

3 . Cust om izing t he Product ’s
Set t ings
This chapt er is specifically t arget ed t o t he persons who are responsible for t he
adm inistrat ion of the product. I t is recom m ended that t he adm inist rat or read this
chapt er before inst alling the m achine.
The product ’s set t ings can be cust om ized via the product ’s em bedded web page.
How to cust om ize t he product’s sett ings via t hese t wo m et hods will be described
in t he follow ing sect ions.
N ot e :
When installing t he product for t he first tim e, it is recom m ended
that t he Adm inist rator ret ain t he default syst em set t ings. The
sett ings can be cust om ized at a lat er date once you are fam iliar
wit h the operat ion and functionalit y.
User’s Gu ide
4 4
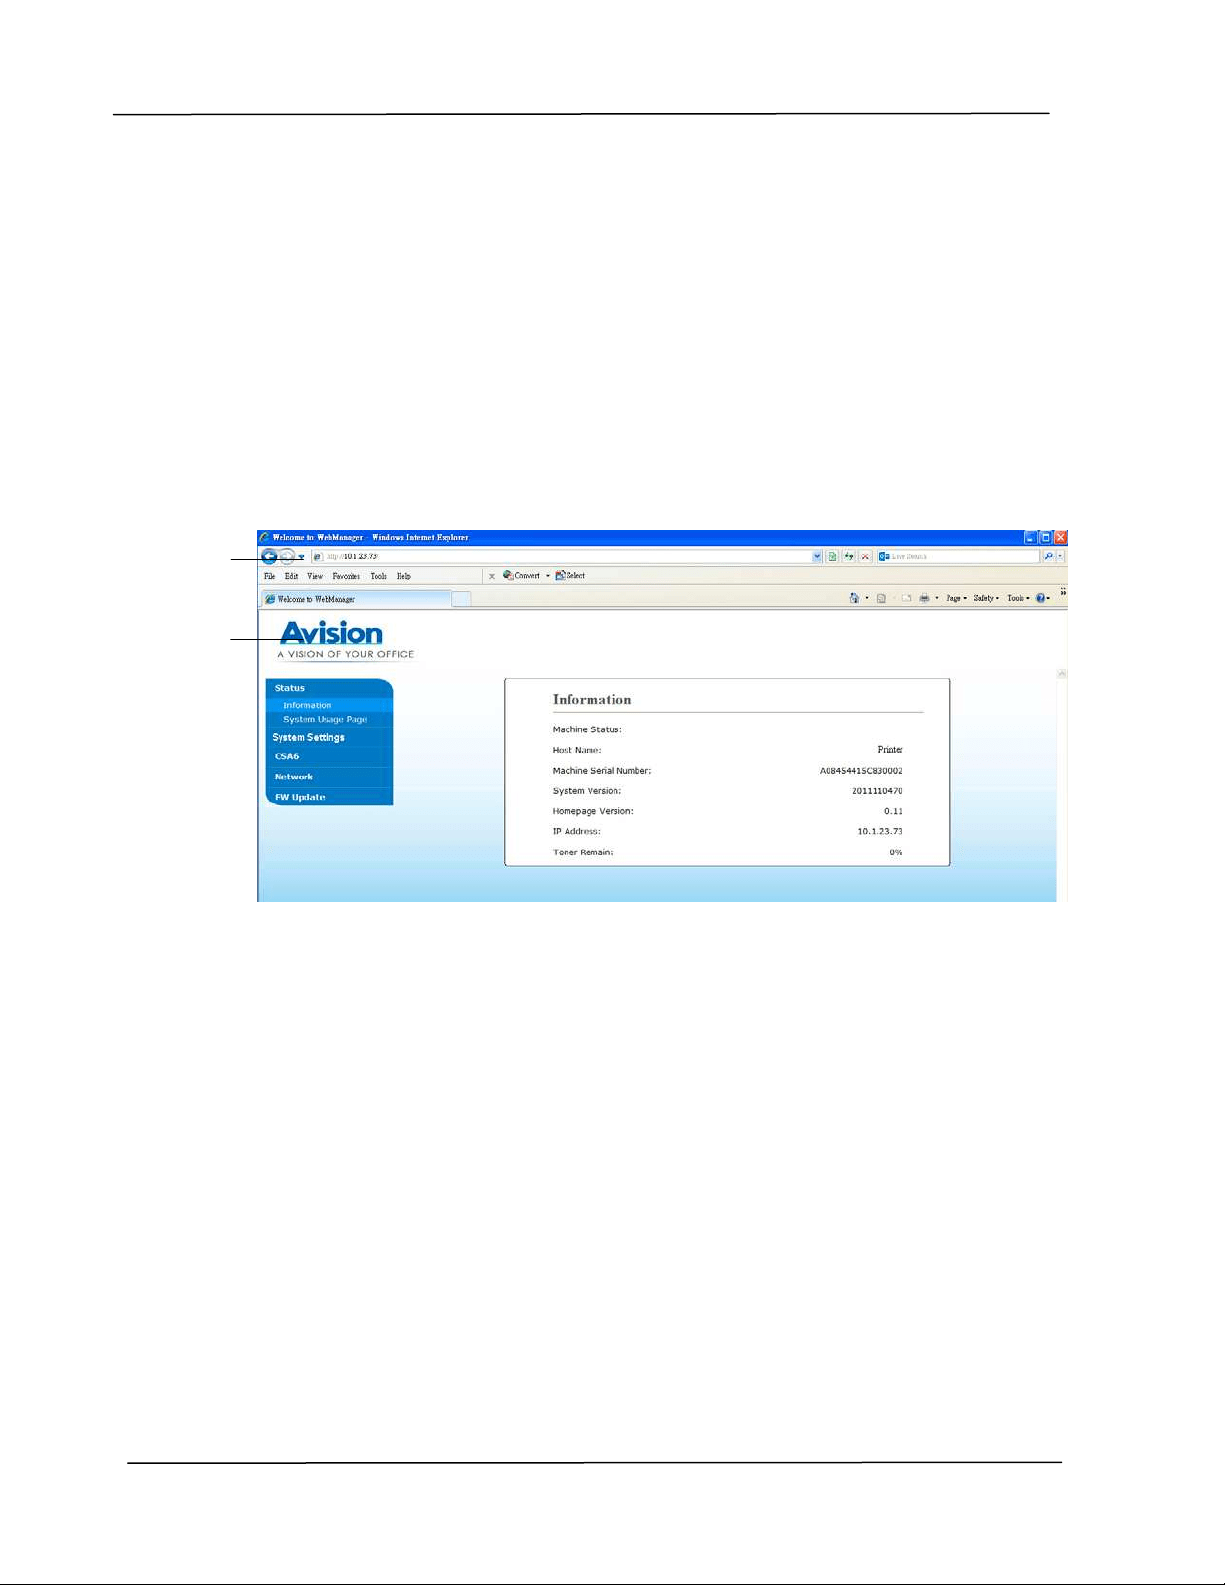
Cust om ize Syst em ’s Se t t ings via t he Em be dded W eb Pa ge
Not e: Any update of the web page requires adm inist rat or’s login.
You m ay also define your Wi- Fi connection t ype via t he web page.
1 . Refer t o t he preceding section t o set up the product ’s network sett ings.
2 . Open your browser and t ype t he product ’s I P address on t he URL address ,
for exam ple, htt p: / / 10.1.23.73 and press Enter
. I n a second, the em bedded
web page will be displayed
.
3 .
Ent er your desired set t ing on your select ed it em s.

Cust om izing t he Pr oduct ’s Set t ings
4 5
Se t t ing I t e m s t o be Cu st om ize d
St a t us
Displays the stat us and basic inform at ion of the product .
I te m Description
I nform at ion Display t he following basic inform at ion of the product .
Machine Stat us
Displays the m achine status.
Host Nam e Displays the host nam e.
Machine SN
Displays the m achine’s series num ber.
System Version
Displays the firm ware version.
Hom epage
Version
Displays t he version of the em bedded web page.
I P Address
Displays the I P address.
Mac Address
Displays the Mac address.
Wi- Fi I P
Displays the Wi- Fi I P address.
Wi- Fi Mac
Displays the Wi- Fi Mac address.
Wi- Fi SSI D
Displays t he Wi- Fi SSI D nam e.
Toner Rem ain
Displays t he t oner rem ain of t he toner cart ridge.
Syst em Usage
Page
Select s Download to download the syst em usage page to
your com put er to print t he usage report .
Syst e m Se t t ings
* Fact ory Default
I te m Description Opt ion
Language The language displayed on
the web page.
* English / 繁體中文/ 简体中文
/ Deutsch
Sle e p Mode Choose how long to ent er
the energy saving m ode
aft er your last action.
5Min/ * 15Min/ 30Min/ 1Hr/ 2Hr/ 4Hr
Au to Off Choose how long t o shut
down t he product
autom atically aft er your last
action.
* Off/ 5Min/ 15Min/ 30Min/ 1Hr/ 2Hr/
4Hr
Paper Size
Defua lt
Specify the default paper
size.
* A4/ LTR/ LGL
User’s Gu ide
4 6
N et w or k
W i- Fi: Choose t o t urn on or off Wi- Fi
connection. Choice : W i- Fi/ W i- Fi W PS
But t on/ Dire ct Link
On
Turn on Wi- Fi and ent er Wi- Fi
St at ion Mode. Please go t o
the product ’s web page t o
select a wireless net work
( SSI D) .
Dir e ct
Lin k
Turn on Wi- Fi and go t o Wi- Fi
AP ( Access Point m ode. The
product is now an Wi- Fi AP
it self.
W i- Fi W PS But t on: You m ay connect the
device t o a WPS com pat ible wireless access
point by select ing [ W i- Fi W PS but t on] . To
enable t he WPS connect ion of your access
point, please refer t o t he user’s guide of
your access point .
N et w or k Filt e r: Specify if you wish t o
enable or disable the Net work filt er
configurat ion. Once enabled, your can
specify t he filt er m ode to allow som e I Ps t o
access t he device or deny som e I Ps from
accesing t he device via t he product’s
em bedded web page. Choice:
Ena ble/ * Disable
Wi-Fi/ Wi- Fi WPS
Mode / Direct Link
Wi‐Fi(APmode)andLANmodecanbeusedatthesametime
Wi‐Fi(Stationmode)andLANmodecannotbeusedatthesametime
Mobile Device AP30 PC PC PC
Mobile Device AP30 PC PC PC

Cust om izing t he Pr oduct ’s Set t ings
4 7
W i- Fi Connect ion:
W ir ed LAN : I f the device is connect ed t o a wired LAN via an et hernet cable,
the Wi- Fi connect ion will aut om at ically set t o t o AP m ode. A wired LAN and a
wireless network can be working at t he sam e t im e.
W ir ele ss N e t w ork : I f SSI D has been connect ed successfully, t he wired LAN
will not be w orking. I f t he device fails to connect to a wireless net w ork ( SSI D) ,
the device w ill aut om at ically ent er Wi- Fi AP m ode (t he device it self is an AP) .
Ma na gem e nt
Fact ory D ef. Reset all set tings t o fact ory default
values.
Reset Count
Choose t o reset count for roller or pad
aft er replacem ent. Click [ im m ediat e] t o
reset count.
Tray 1 pad/
Manual Tray Pad
V- M a g
Adj ust m net
Choose t o adj ust t he vert ical
m agnificat ion rate of the printer.
- 0.4% / - 0.2% / *
0% / + 0.2% /
+ 0.4 %
W i- Fi Connect ion:
W ir ed LAN : I f the device is connect ed t o a wired LAN via an et hernet cable,
the Wi- Fi connect ion will aut om at ically set t o t o AP m ode. A wired LAN and a
wireless network can be working at t he sam e t im e.
W ir ele ss N e t w ork : I f SSI D has been connect ed successfully, t he wired LAN
will not be w orking. I f t he device fails to connect to a wireless net w ork ( SSI D) ,
the device w ill aut om at ically ent er Wi- Fi AP m ode (t he device it self is an AP) .
Passw or d Set t ings
N ew
Pa ssw ord
Enter a password t o enable
m odifying the web page.
Password should be 8~ 32
charact ers or digit s in
length.
Ret ype
Pa ssw ord
Ret ype new password.

User’s Gu ide
4 8
CSA6
Displays the default set t ings for CSA6 (opt ional) while printing the I D card or
nam e card.
I te m Description
Mode
Display t he default m ode. Choice: Up/ Down,
left / Right , Front / Rear
Densit y Display t he default densit y level. Default : 4
( range 1 ~ 7)
Position Adjustm en t
Vert ica l
Horizont a l
Adj ust t he print ing posit ion for your I D card.
Choice: Move Up, Move Down ( range: 0~ 177)
Choice: Move right, Move left ( range: 0~ 107)

Cust om izing t he Pr oduct ’s Set t ings
4 9
N et w ork
Displays t he net w ork inform at ion of t he product .
* Fact ory Default
I te m Description Opt ion
Host N a m e
Host N a m e Dipslay the host nam e for the product .
TCP/ I P Set t ings
Obt ain an I P address
autom atically
* Off/ On
I P Address: Set up an I P
address.
I nput the I P address of the product .
Subnet Mask I nput t he subnet m ask num ber.
Gat eway I nput t he gateway for your I P.
Auto- Obt ain WI NS/ DNS * Off/ On
Preferred DNS Server Sets up t he preferred DNS server address for t he
product.
Alt ernat e DNS Server Set s up t he alt ernate DNS server address for t he
product.
Preferred WI NS Server Set s up t he preferred WI NS server address for t he
product.
Alt ernat e WI NS Server Set s up t he alt ernate WI NS server address for t he
product.
Dom ain Nam e Set s up a dom ain nam e for t he product .
W i- Fi Set t ings
Sea rch AP Click [ Sea rch AP] and the currently connect ed
wireless netw orks will be displayed. Select the
wireless network you want to connect and then
ent er the securit y key if required.
I P Set t ings Obt ain the I P address direct ly from t he DHCP server
or you m ay enter your st at ic I P on the [ I P
Address] , [ Subne t Ma sk ] , and [ Ga t e w ay] field
respectively .

User’s Gu ide
5 0
N et w ork Se curity Se t up
Displays t he net w ork inform at ion of t he product .
* Fact ory Default
I te m Descr iption Option
Host N a m e
Host N a m e Dipslay the host nam e for the product .
Et he rne t Se t t ings
Obt ain an I P address
autom atically
* Off/ On
I P Address: Set up an I P
address.
I nput the I P address of the product .
Subnet Mask I nput the subnet m ask num ber.
Gat eway I nput t he gateway for your I P.
Auto- Obt ain WI NS/ DNS * Off/ On
Preferred DNS Server Set s up t he preferred DNS server address for t he
product.
Alt ernat e DNS Server Set s up t he alt ernate DNS server address for t he
product.
Preferred WI NS Server Set s up t he preferred WI NS server address for t he
product.
Alt ernat e WI NS Server Set s up t he alt ernate WI NS server address for t he
product.
Dom ain Nam e Sets up a dom ain nam e for t he product.
N et w or k Secur ity Set t ings
Secur it y
Configura tion
Filt e r
Specify if you wish t o enable
or disable t he filter
configurat ion.
* Disable/ Enable
Filt e r M ode
Specify your filt er m ode t o
allow som e I Ps t o access t he
device or deny som e I Ps
from accessing t he device.
Allow/ Deny
I P Address
Filt e r
Configura tion
I P Address Filt er
Configura tion- Four types
of St art I P and End I P can be
specified.
Ma c Addr ess Filt e r
Configura tion- Up t o 10
Mac address can be
specified.
I P Address Filt er Configurat ion/
Mac Address Filter
Configuration

Cust om izing t he Pr oduct ’s Set t ings
5 1
A
+
Ma na ger Set t ings
A
+
Ma na ger Set t ings
Enter the I P address of a specified server t o send
the syst em log file t o for quick troubleshooting.
N ot e :
1 . DHCP server: With DHCP ( Dynam ic Host Configurat ion Protocol) , a
host can autom at ically be given a unique I P address each tim e it
connect s t o a net work- - m ak ing I P address m anagem ent an easier
task for network adm inistrat ors. I f t he DHCP server is available from
your network, you do not need to enter TCP/ I P, subnet m ask,
gat ew ay, and DNS inform ation. I nst ead, t his inform at ion will be
autom atically given for t he product .
2 . IP Address: An I P (I nt ernet Prot ocol) address uniquely identifies a
host connect ion to an I P net work. Syst em adm inist rat or or net work
designer assigns the I P address. The I P address consist s of t wo
part s, one identifying the network and t he one ident ifying your node.
User’s Gu ide
5 2
Updat in g The Product ’s Fir m w are
Before updat ing t he product ’s firm ware, you need to first download the lat est
firm ware from our web sit e at www.avision.com onto your com puter.
To upda
te t he product ’s firm ware, follow t hese steps:
1 . Refer t o t he preceding section, Know ing t he Produ ct ’s D efa ult I P
Address, t o get the product ’s I P address from the DHCP server.
2 . Open your browser.
3 . Type the product ’s I P address on t he URL field of your browser. For exam ple,
10.1.23.73. The following em bedded w eb page will be displayed
4 . On the product ’s web page, choose [ FW Updat e] on t he left side. The [ FW
Updat e] page will be displayed.
5 . Choose [ Br ow se ] to find the firm ware file on your com put er.]
6 . Choose [ Upda t e ] t o begin updating the firm ware t o t he product.
4 . Configuring Print er Driver
Displa ying t he Print e r Driver Propert ies
Dialog Box ( W indow s)
To display the Print er Driver Propert ies dialog box,
1 . Click Sta rt on t he system t ray and choose Print e rs and Fax es.
2 . Right- click t he product ’s printer nam e and choose Print in g Pr efer ence s.
3 . The Print ing Preferences dialog box.
User’s Gu ide
5 4
Configuring Print er Driver Set t ings
The Print ing Preferences dialog box consist s of the Basic t ab, t he Paper t ab, t he
Layout t ab, t he Waterm ark tab, the Duplex t ab, and the More t ab. The contents
of each t ab will be explained in t he following sections.
Th e Basic Ta b
The Basic t ab cont ains set t ings for Orient ation, Copies, Effect , Densit y, Toner
Save, and I nvert .
Orient at ion
Choose your orientat ion. Choice : Port ra it , La ndscape
Por t ra it
Landsca pe
ABC
ABC
Picture Mode
Configur in g th e Pr in t e r ’s D r ive r
5 5
Copie s
Choose t he num ber of copies t o be print ed. You can enter up to 999.
Colla t e: Click t o print your docum ent in t he page order such as
1/ 2/ 3, 1/ 2/ 3, 1/ 2/ 3.
N t o 1 : Click t o reverse t he printing order of your docum ent.
As a result , t he last page of your docum ent will be
printed first and vice versa.
Effect
Pict ure M ode:
I f t he pict ure in your docum ent does not print
clearly, click Pict u re Mode t o im prove it s
qualit y.
Tex t a s Bla ck Print color t ext in pure black.
Density: Click to lighten or darken your docum ent.
Densit y level (1~ 7) . Default : 3
Ton e r Save : Allows you to print your docum ent using the
toner saving m ode.
I nvert : I nvert m akes each im age pixel inverted t o it s
com plem entary color. For exam ple: t he original
black t ext on white background becom es w hit e
text on black background.
User’s Gu ide
5 6
Th e Pape r Ta b
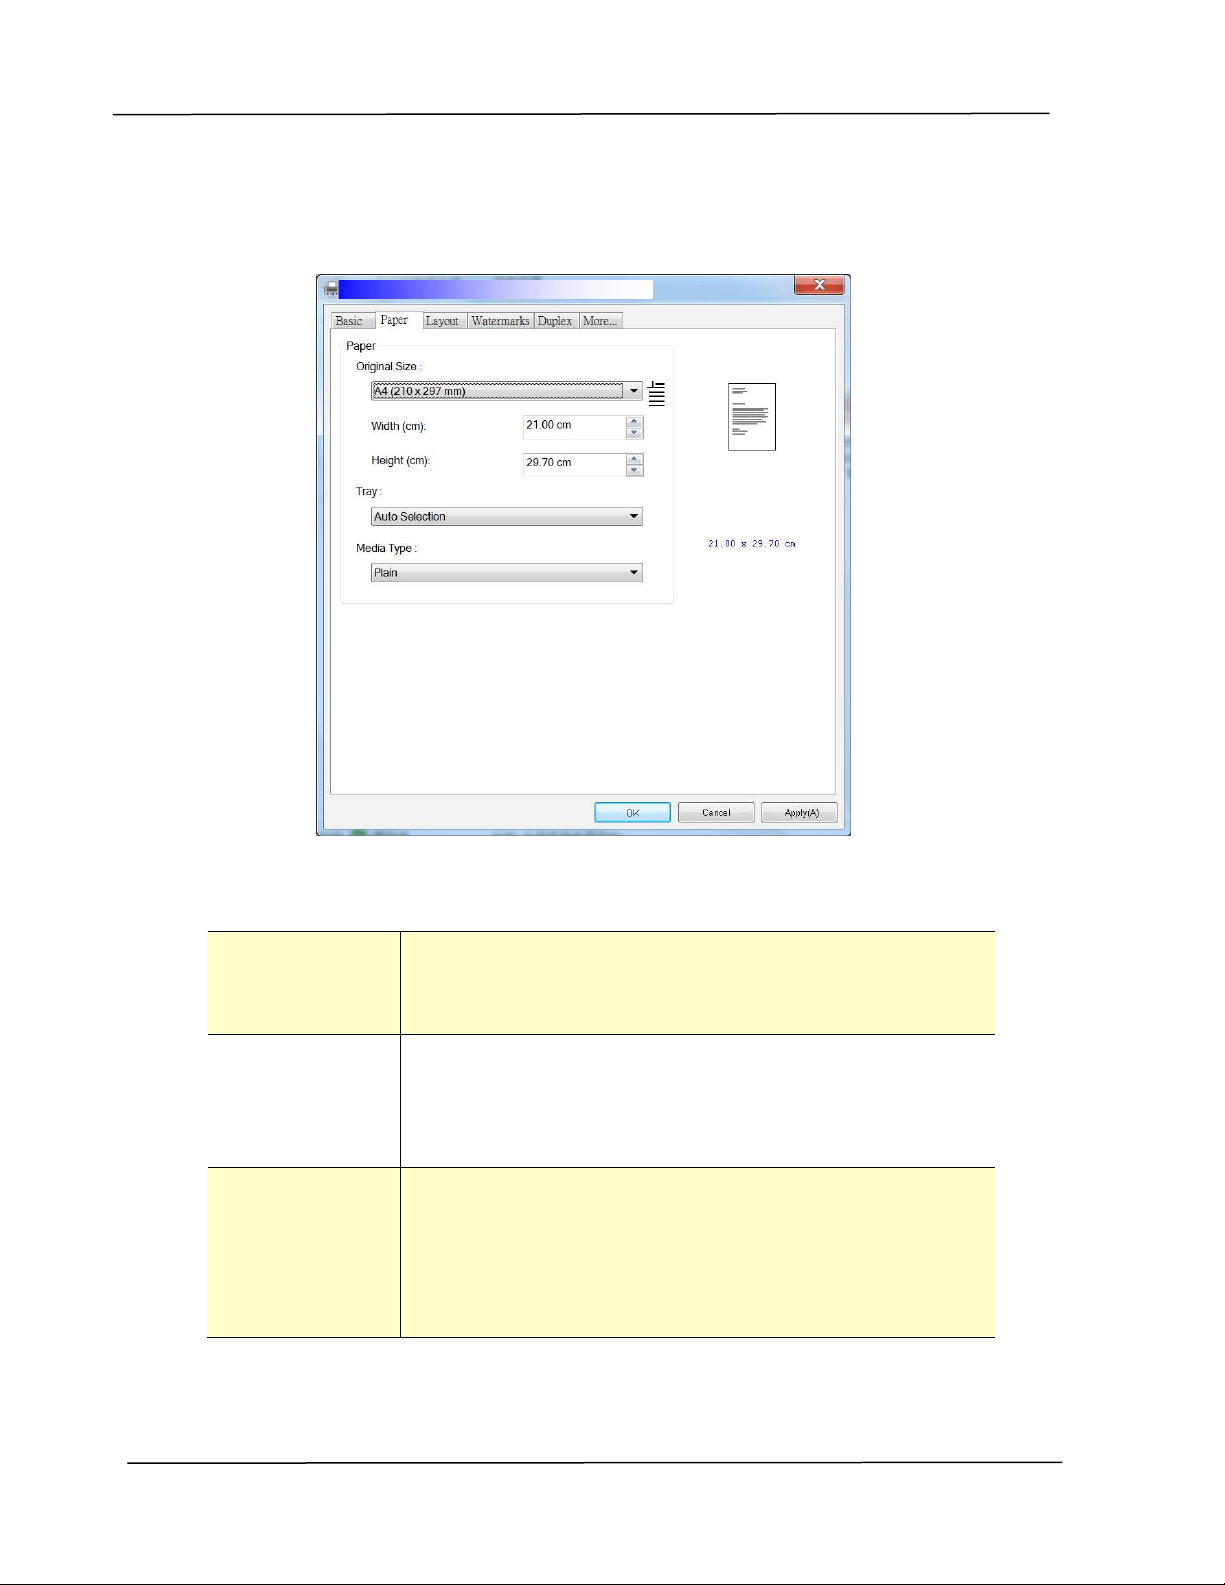
The Paper t ab contains set t ings for Original Size, Tray, and Media Type.
Pa per
Origina l Size : Choose t he size of paper loaded in t he designat ed tray.
Choice : A4 , A5 , A6 , B5 , B6 , Legal, Let t e r , Use r
Define
Tra y: Choose t he t ray from which your paper should be fed.
Choice : Aut o, M anua l Tr ay, M ain Tray
Auto m eans autom at ically select t he paper tray which is
available ( priority: 1: m anual tray; 2: m ain t ray).
Me dia Type : Choose the t ype of m edia t o be used for printing.
Choice : Pla in, Thin , Thick, Lase r Pa per, * Post card,
* Bond, * Enve lope
* : Only a va ila ble in t he m anua l t ra y for one- side
print ing
Configur in g th e Pr in t e r ’s D r ive r
5 7
Th e La yout Ta b
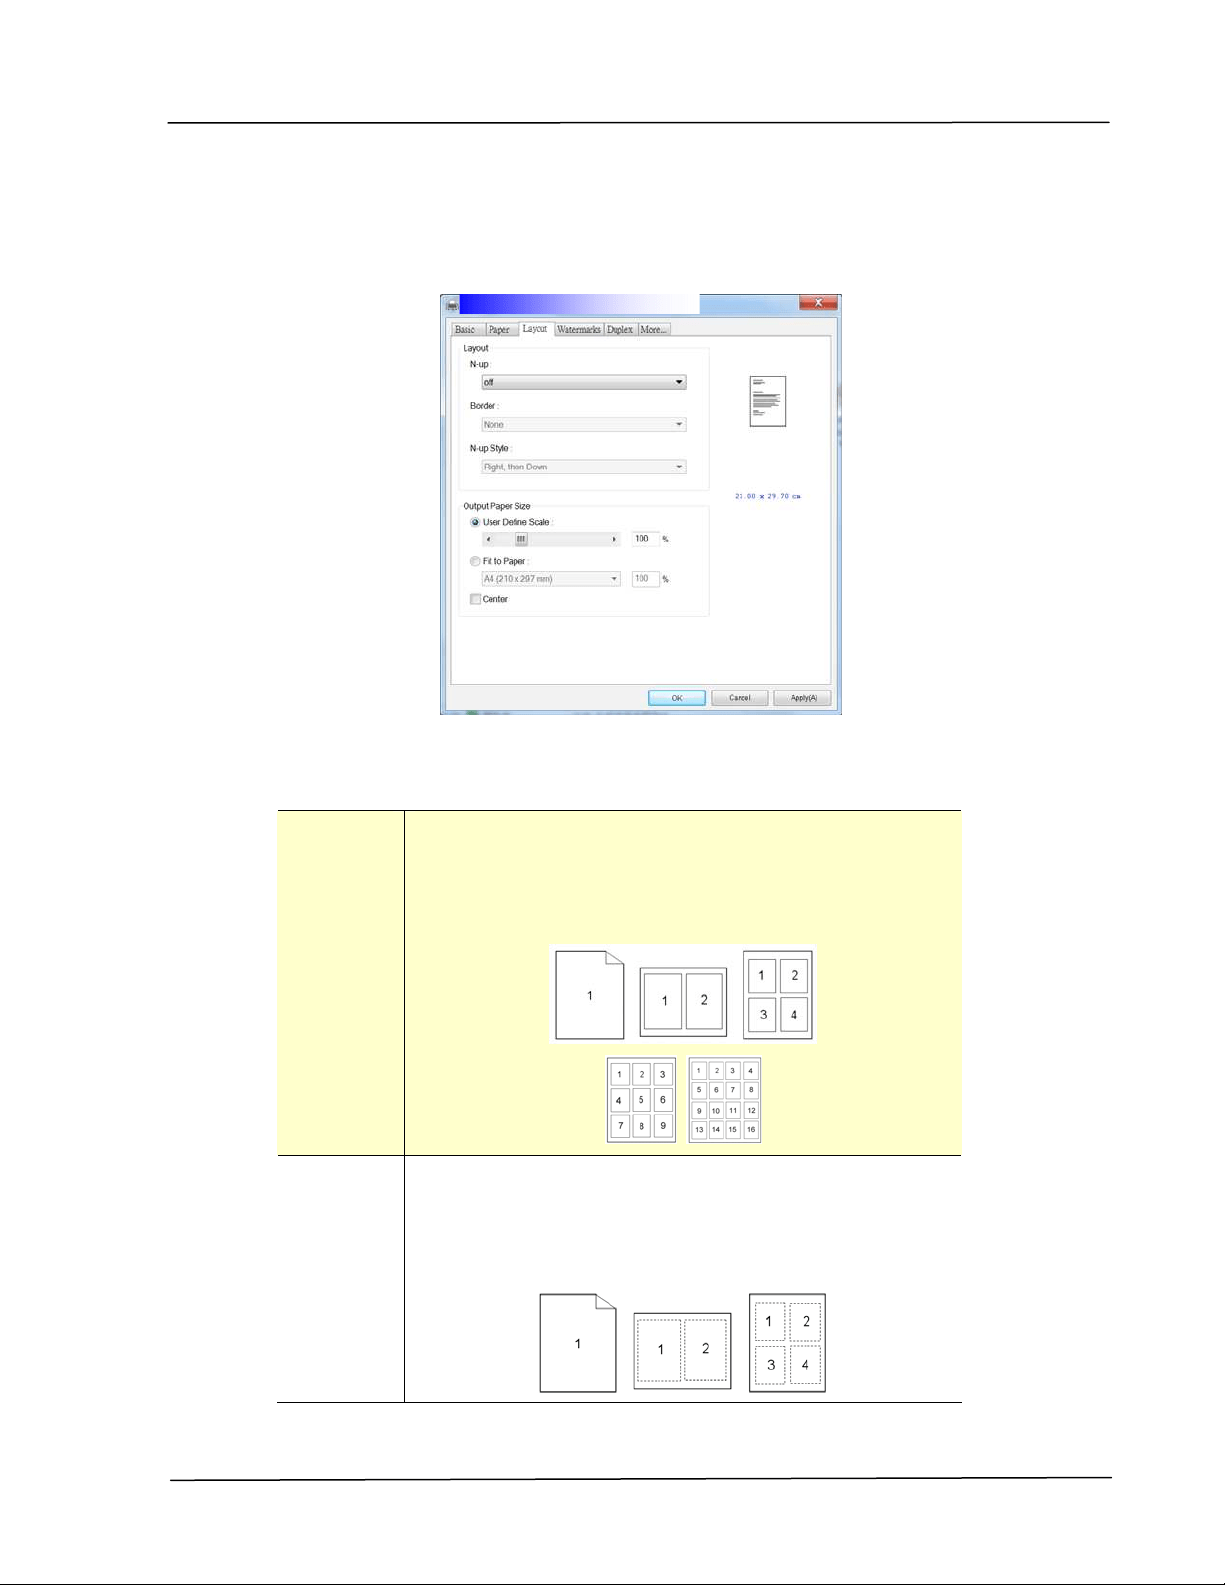
The Layout t ab contains set t ings for N- up, and Out put Paper Size.
N - up
N - up: Choose num ber of pages t o be printed on a single
sheet of paper.
Choice : Off, 2 up( 2 - in- 1 ) , 4 - up( 4 - in- 1 ) ,
9 - up( 9 - in- 1 ) , 1 6 - up( 1 6 - in- 1 )
Bor der: Choose if you wish t o add border around each page
when print ing m ore t han one page on a single sheet
of paper.
Choice : N one , Border Line, Da shed Line
User’s Gu ide
5 8
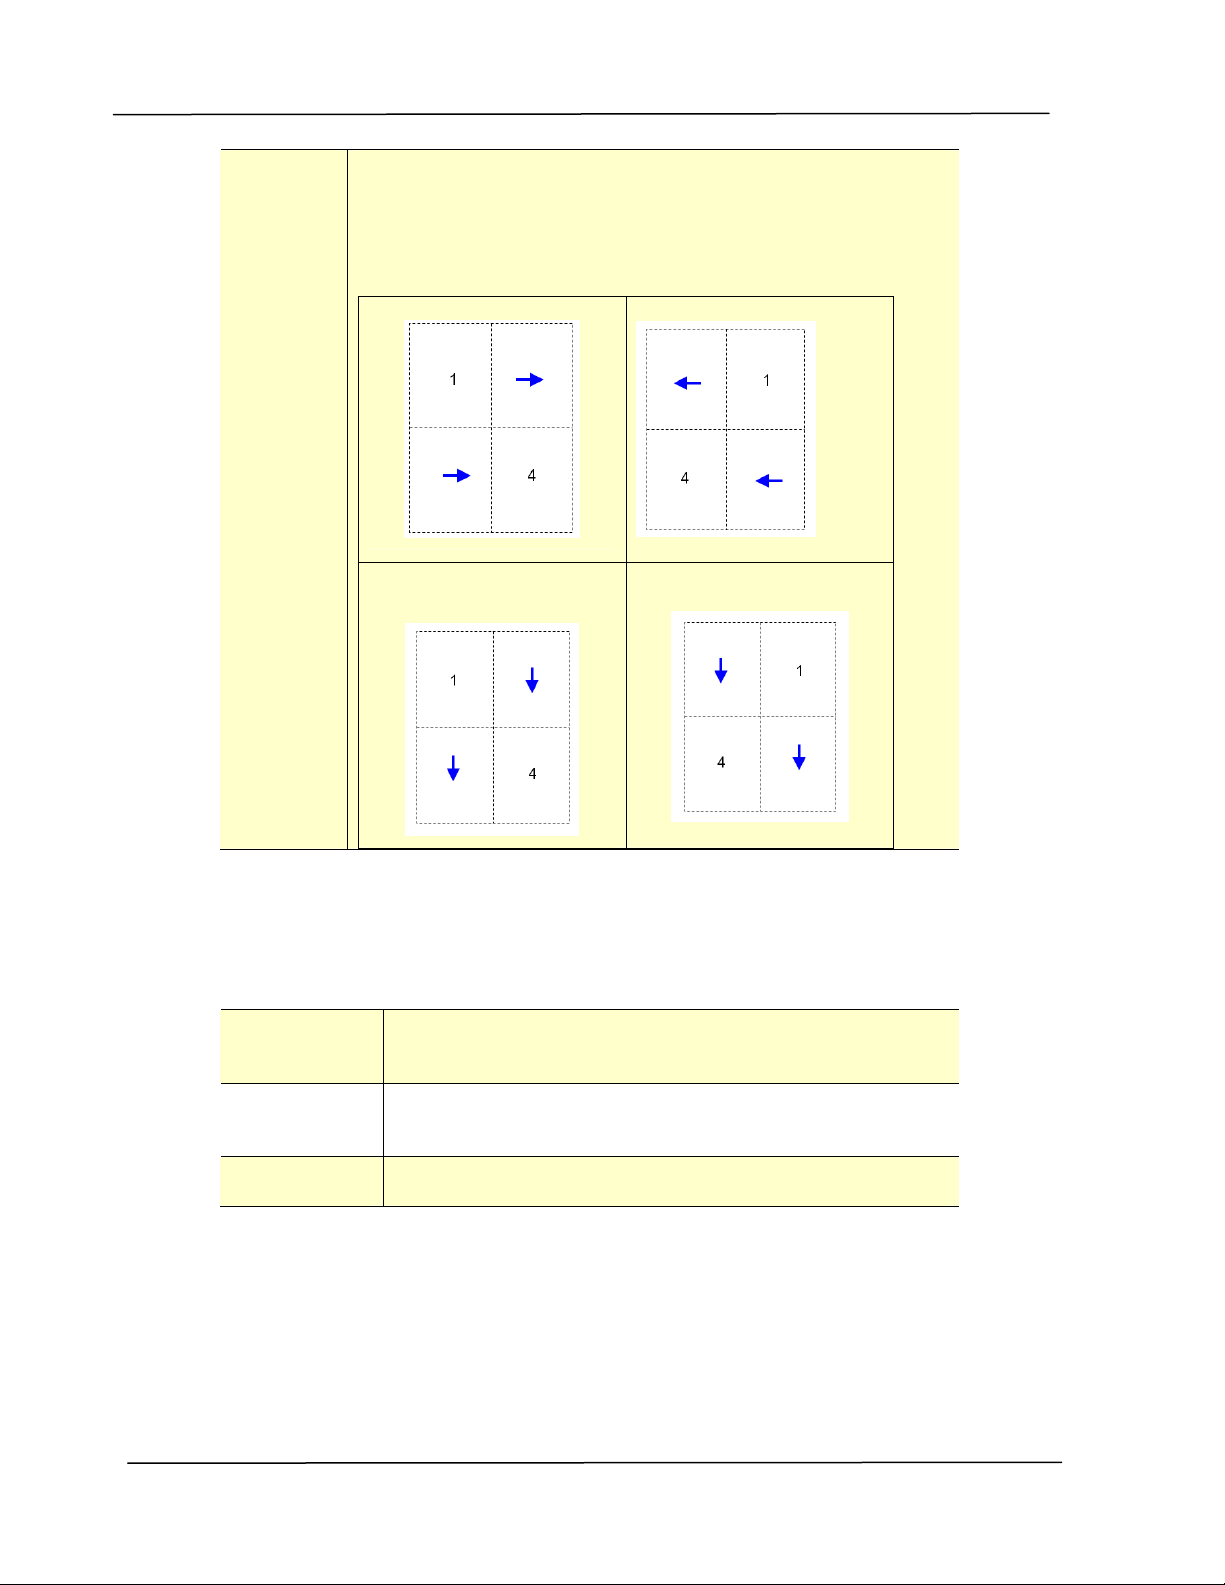
N - up
St yle:
Choose t he style you want when print ing m ult i- page
docum ent on a single sheet .
Choice : Right , t he n D ow n/ Dow n, t hen Right / Le ft ,
t hen D ow n/ D ow n, t hen Le ft
Right, t hen Down
Down, t hen Left
Down, t hen Right
Left , t hen Down
Out put Pa pe r Size
User D efine
Sca le
You can reduce or enlarge your print ed im age using
the Slider Bar. Sca ling ra t e: 2 5 % ~ 4 0 0 %
Fit t o Pa per Output the full page of t he select ed original including
the four m argins.
Cent er Print your im age in t he center of t he output paper.
Configur in g th e Pr in t e r ’s D r ive r
5 9
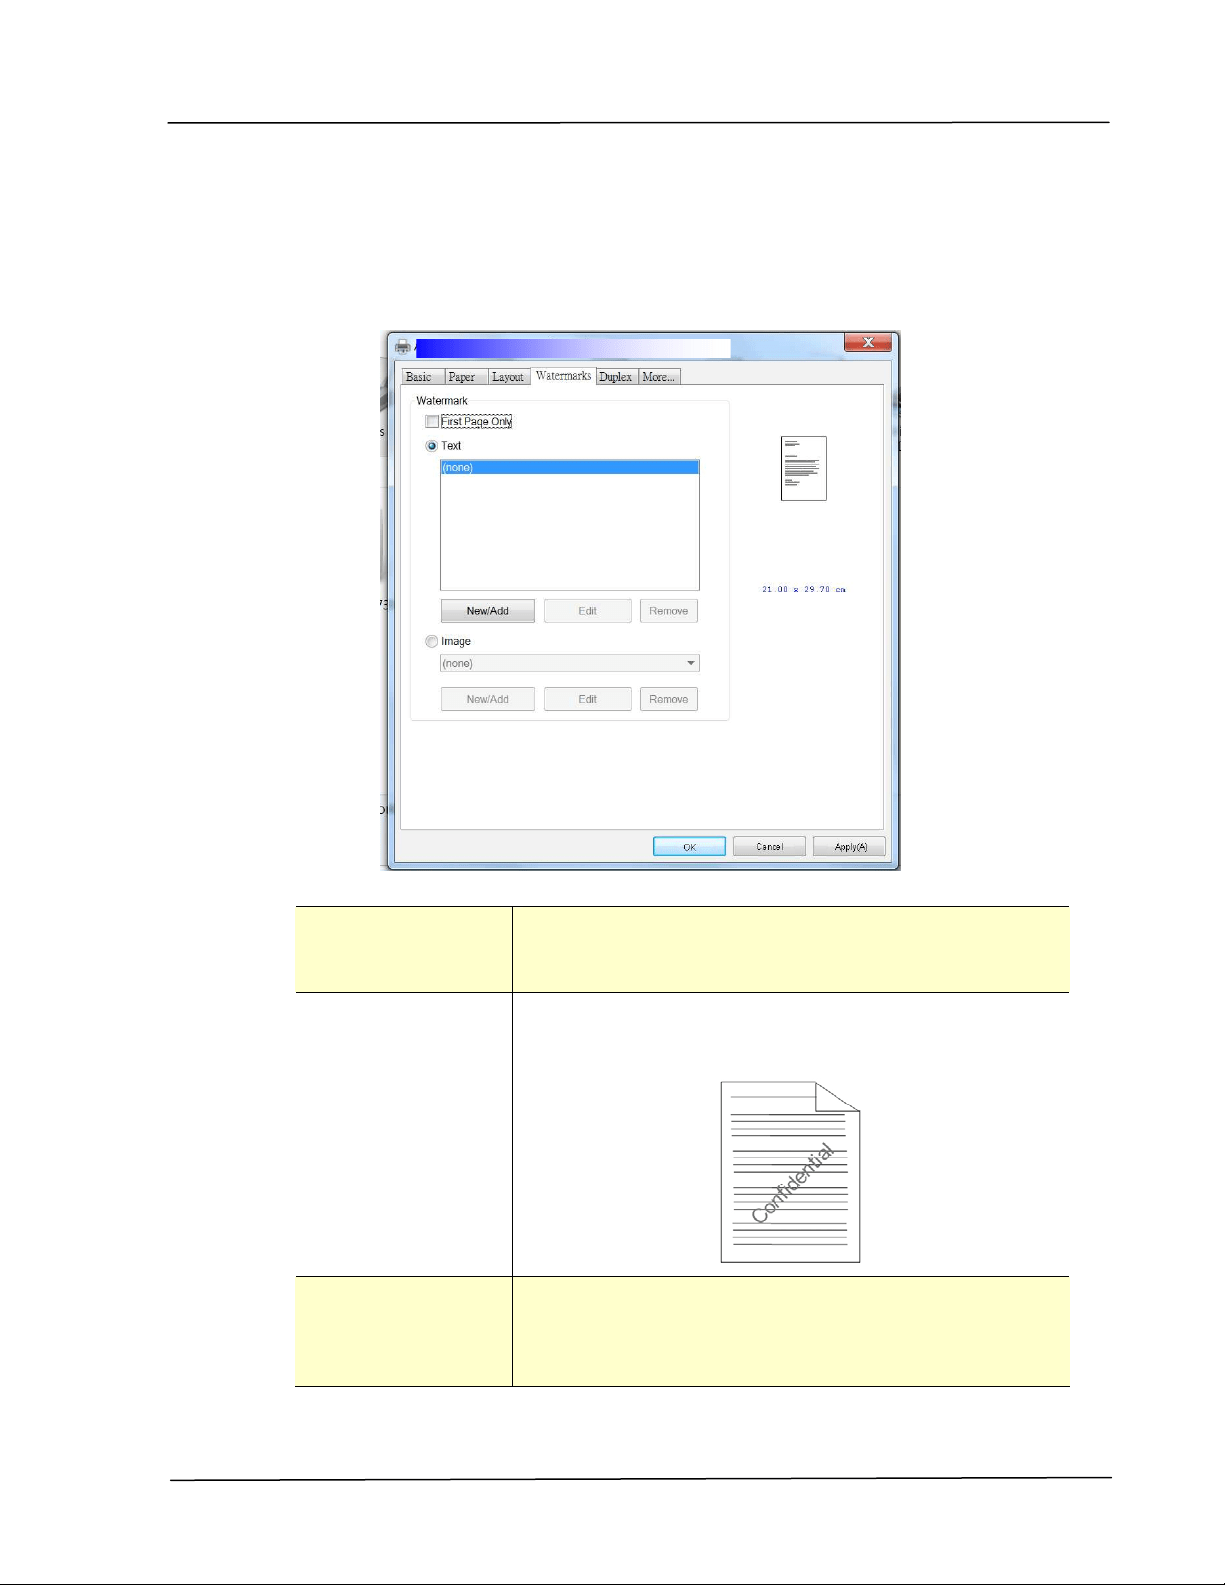
Th e W at er m a rk Ta b
The Wat erm ark t ab allow s you to add som e t ext or im age (such as
CONFI DENTI AL, I MPORTANT, DRAFT, et c) for your docum ent .
First Pa ge on ly Check t o print waterm ark only on the first page.
Clear the check box will print w at erm ark on all
pages.
Tex t Choose and click N e w / Add to add new wat erm ark
text. Click the Edit but t on t o change or t he
Rem ove butt on t o delete.
I m a ge Choose and click New/ Add to add wat erm ark im age.
Click t he Edit but t on t o change or t he Re m ove
butt on t o delet e. You can choose your im age in file
form at such as BMP, TI FF, or JPEG.
User’s Gu ide
6 0
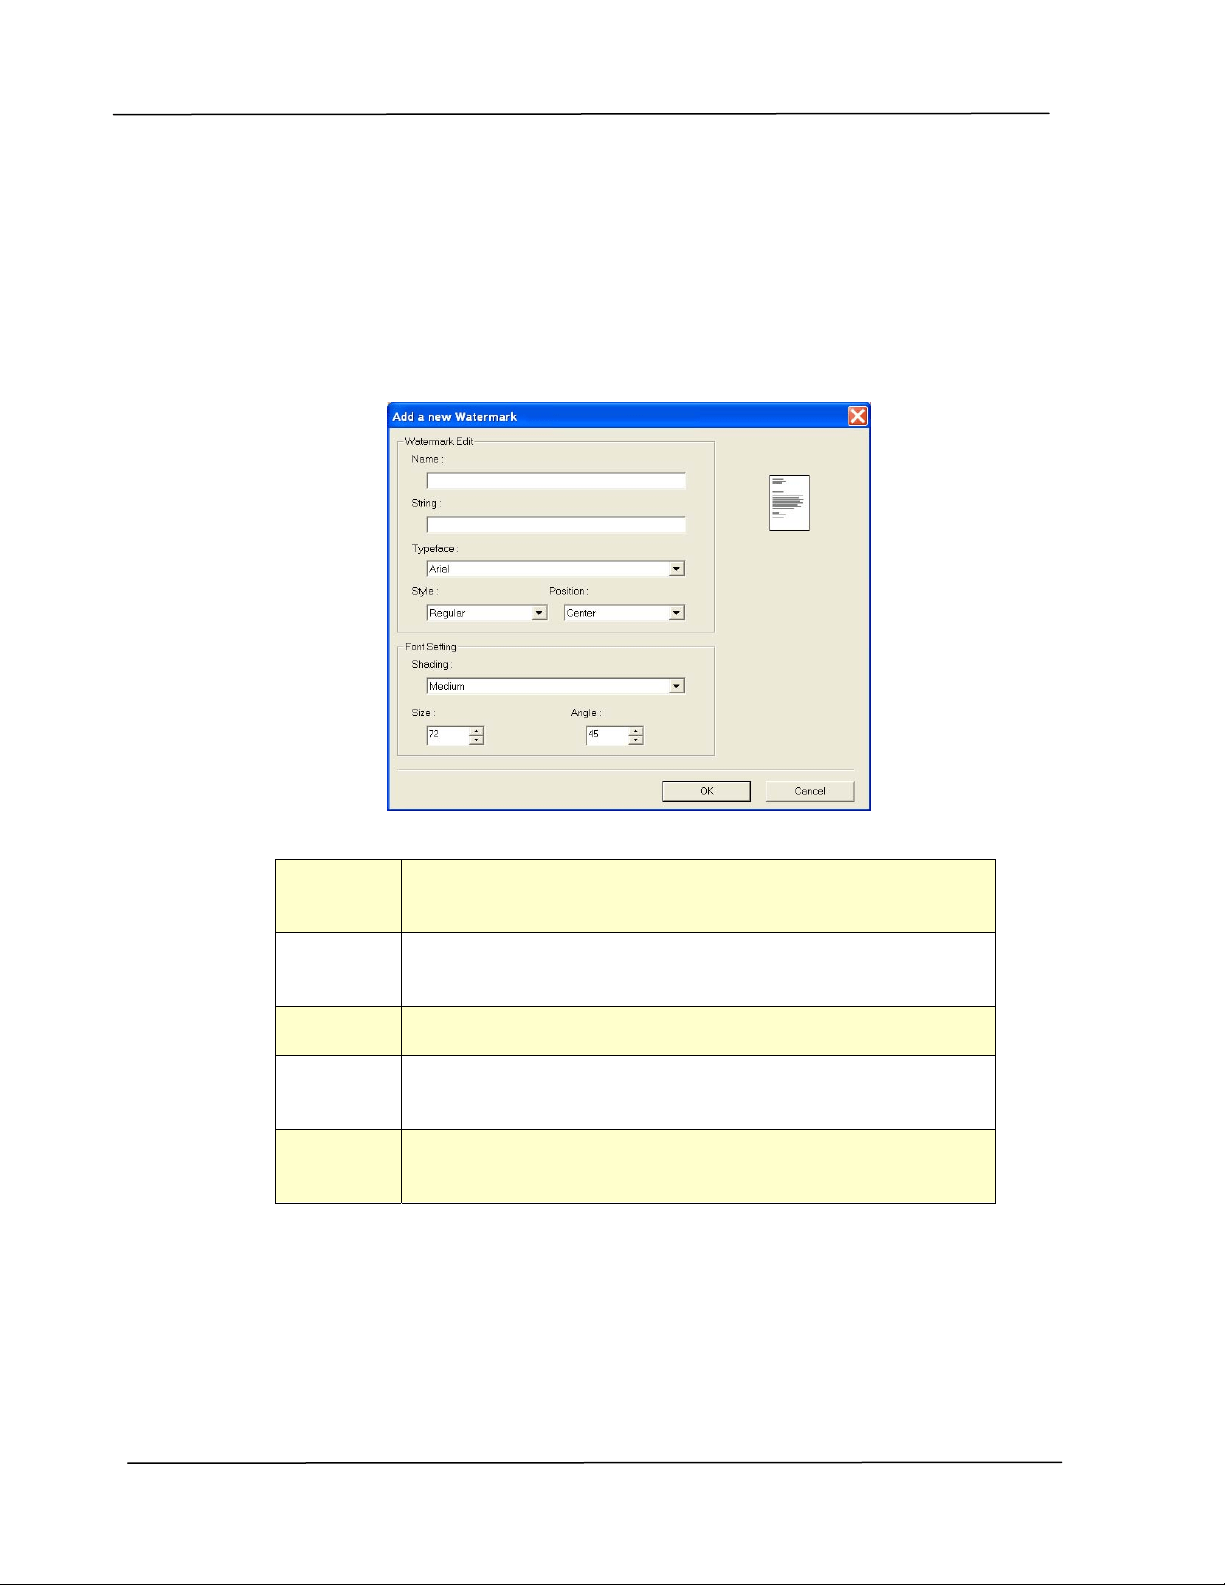
Adding a ne w w a t e rk te xt
To add a
new waterm ark t ext,
1 . Choose Tex t and then click t he Add/ N e w butt on. The following Wat erm ark
dialog box appears.
N am e Nam e your wat erm ark t ext . This nam e will be shown in
the Wat erm ark t ext list.
St ring Ent er your wat erm ark t ext , such as confidential,
im portant , and so on.
Typeface Choose your font t ype for your waterm ark t ext.
St yle Choose t he style of your wat erm ark t ext . Ch oice :
Regular , Bold, I t a lic, Bold I t alic.
Position Choose t he posit ion of your waterm ark text. Choice :
Cent e r , Tile.

Configur in g th e Pr in t e r ’s D r ive r
6 1
Angle Specify the angle of the wat erm ark t ext from 0° to 360°
Size Specify t he size of your wat erm ark t ext from 1 to 288.
Shading Specify a relat ive densit y for the wat erm ark t ext.
Choice : Light est , Light, M edium , D ar k , D a rk e st .
2 . Click t he OK but ton t o save the set t ings. I f the new wat erm ark t ext is
creat ed successfully, t he waterm ark nam e will be shown in the Text list.
Edit ing a cur re nt w at erm a rk t ex t
To edit a current w at er
m ark t ext,
1 . Choose t he wat ernark nam e t hat you wish to edit from t he Text list .
2 . Click t he Edit butt on. The Wat erm ark Edit dialog box appears.
3 . Change your set t ings for t he selected waterm ark text and choose OK t o
com plet e.
Rem oving a cur r ent w a t erm a rk t ex t
To rem ove a current
wat erm ark t ext ,
1 . Choose t he wat ernark nam e that you wish to rem ove from t he Text list .
2 . Click t he Re m ove but t on. The wat erm ark t ext w ill be rem oved.
User’s Gu ide
6 2
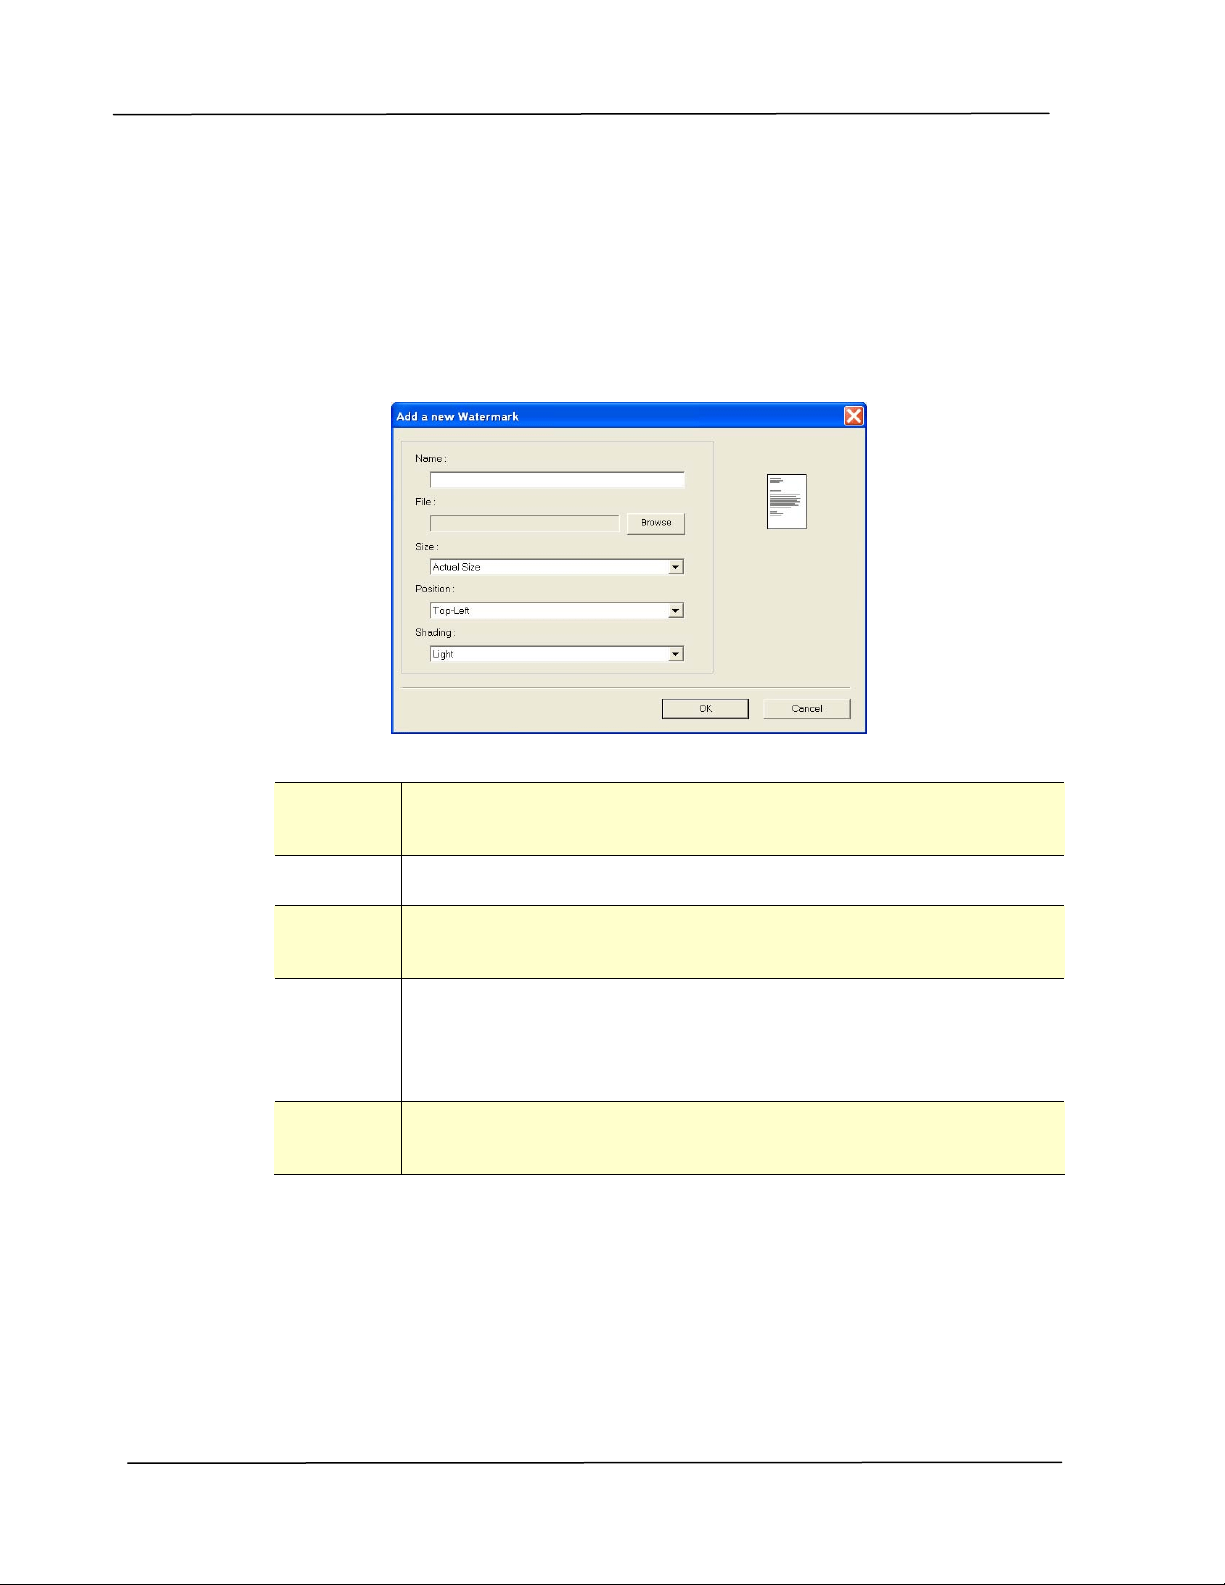
Adding a ne w w a t e rk im a ge
To add a
new waterm ark im age,
1 . Choose I m age and t hen click the Add/ N e w butt on. The following
Wat erm ark dialog box appears.
N am e Nam e your wat erm ark im age. This nam e will be shown in t he
Wat erm ark im age list .
File Click t he Brow se butt on to locat e your wat erm ark im age.
Size Specify t he size of you r w at e rm ar k im a ge . Choice:
Act u r al Size, Fit t o Pa ge, Tile .
Position Choose t he posit ion of your wat erm ark im age. Choice:
Top- Left , Top- Ce nt er , Top- Right, Cent e r, Cent e r- Left ,
Cent e r- Right , Bot t om - Cen t e r, Bott om - Right ,
Bot t om - Le ft .
Shading Specify a relat ive densit y for the wat erm ark text . Ch oice:
Light e st , Light , Me diu m , Da rk , D ar k est .
2 . Click t he OK but ton t o save the set t ings. I f t he new wat erm ark im age is
creat ed successfully, t he waterm ark nam e will be shown in t he I m age list .

Configur in g th e Pr in t e r ’s D r ive r
6 3
Edit ing a cur re nt w at erm a rk im a ge
To edit a current w at er
m ark im age,
1 . Choose t he wat ernark nam e that you wish to edit from the I m age list .
2 . Click t he Edit but ton. The Wat erm ark Edit dialog box appears.
3 . Change your sett ings for t he select ed wat erm ark im age and choose OK to
com plet e.
Rem oving a cur r ent w a t erm a rk I m age
To rem ove a current
wat erm ark im age,
1 . Choose the wat ernark nam e t hat you wish t o rem ove from the I m age list .
2 . Click the Rem ove but t on. The wat erm ark im age will be rem oved.
User’s Gu ide
6 4
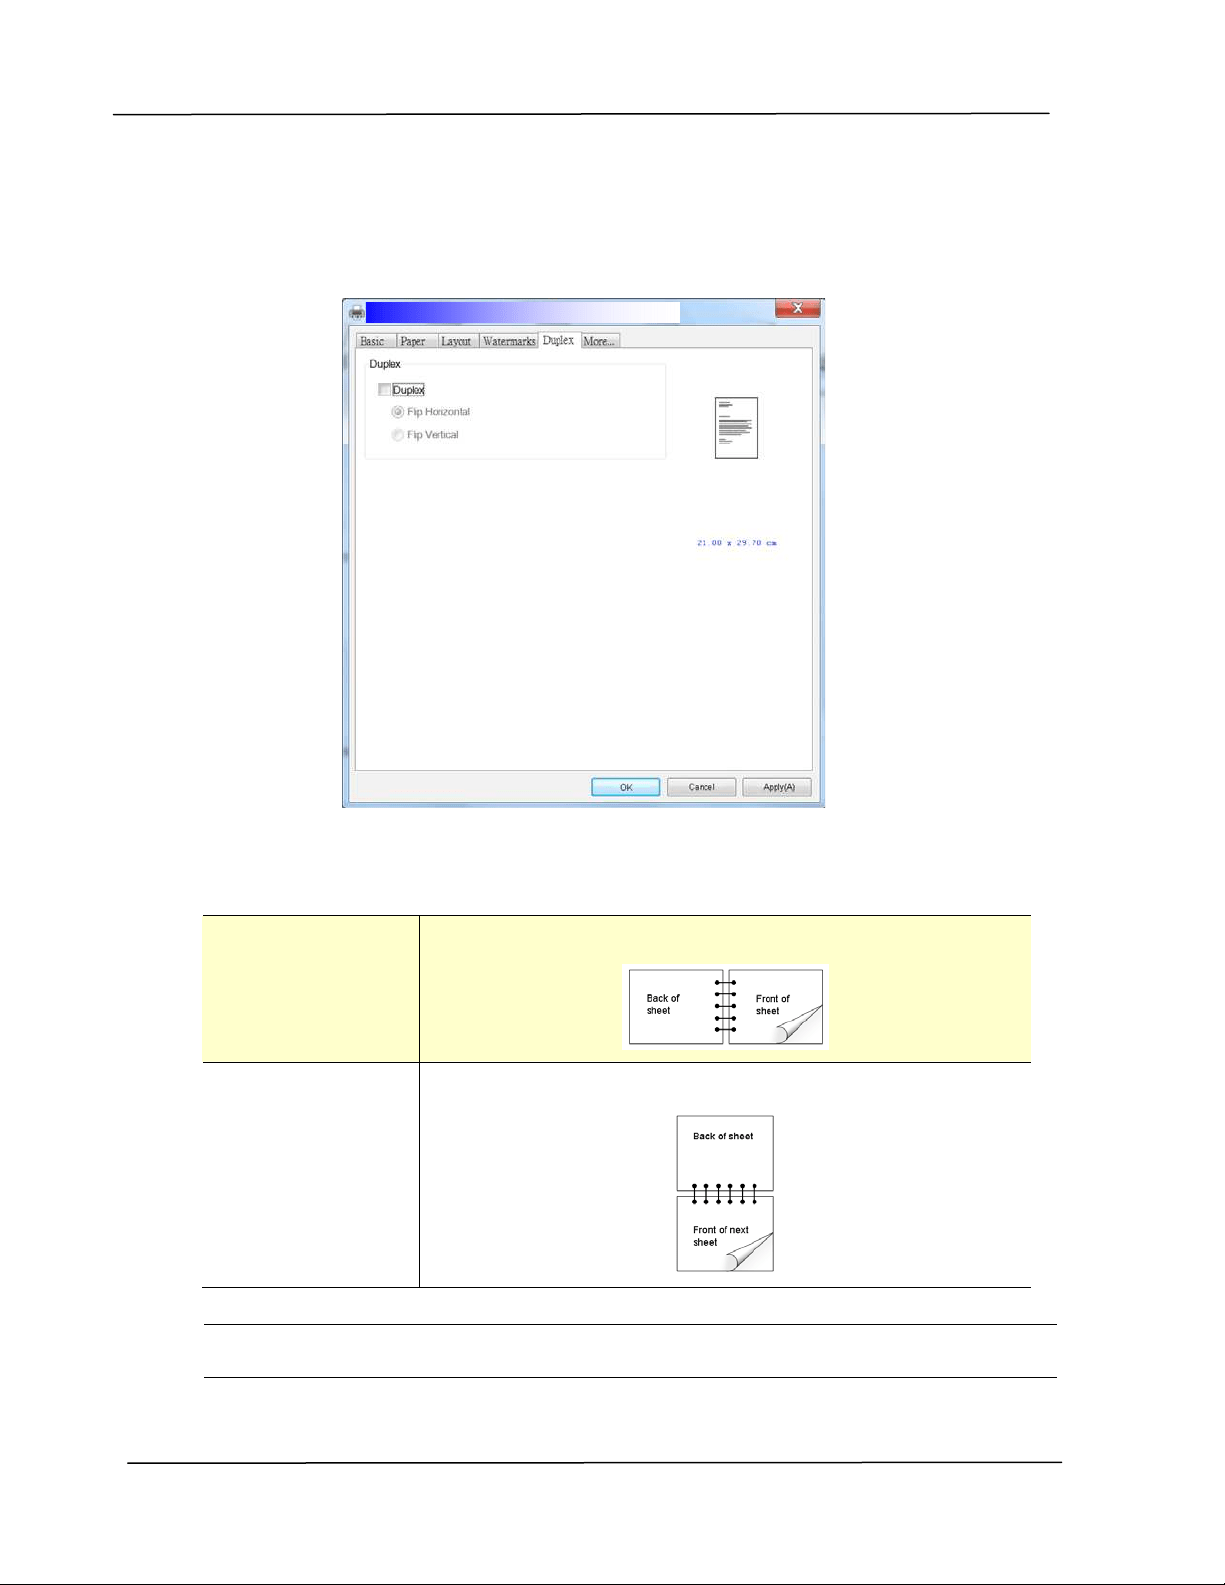
Th e D uple x Ta b
The Duplex t ab allows you t o print your docum ent on t wo sides of the paper.
Choice: Flip Horizontal, Flip Vert ical.
Duplex
Flip H orizon t al
Check to flip t he duplex docum ent on the left edge.
Flip Ver t ical Check to flip t he duplex docum ent on t he bot tom edge.
N ot e : The duplex feat ure support s only page sizes of A4, B5 and let t er wit h paper
weight between 60g/ m
2
and 105g/ m
2
.
Configur in g th e Pr in t e r ’s D r ive r
6 5
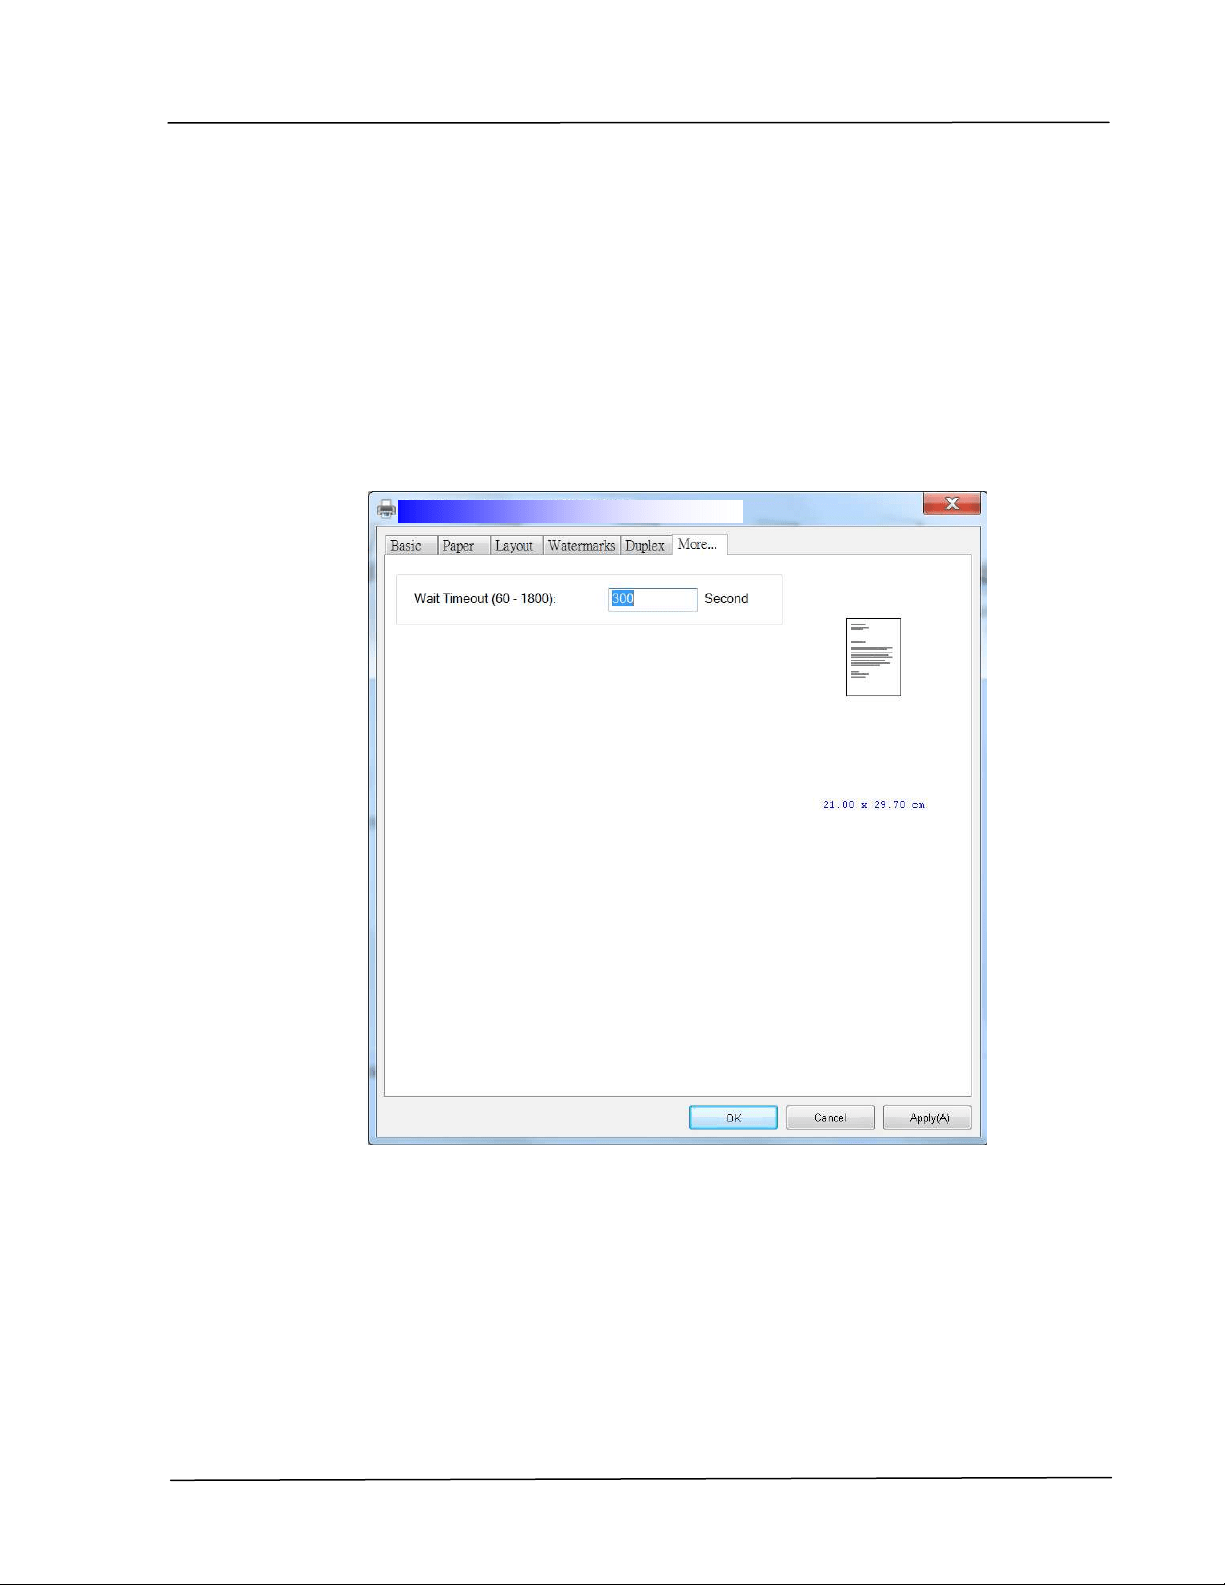
Th e M ore Ta b
On the M ore tab, a W a it Tim e out opt ion is provided to set t he am ount of tim e
the printer wait s for data t o com e from com put er during a j ob. I f the data
st ream pauses for longer t han the specified num ber of seconds, t he j ob is
cancelled.
Perm it t ed tim eout values: 60~ 1800 seconds, default t im eout values: 300
seconds
User’s Gu ide
6 6
Accessing the Feat ures of t he Printer Driver ( Mac OS)
The Avision AP30 Series Printer provides t he following print er feat ures. You can
change t he following print er sett ings when you print from your com puter.
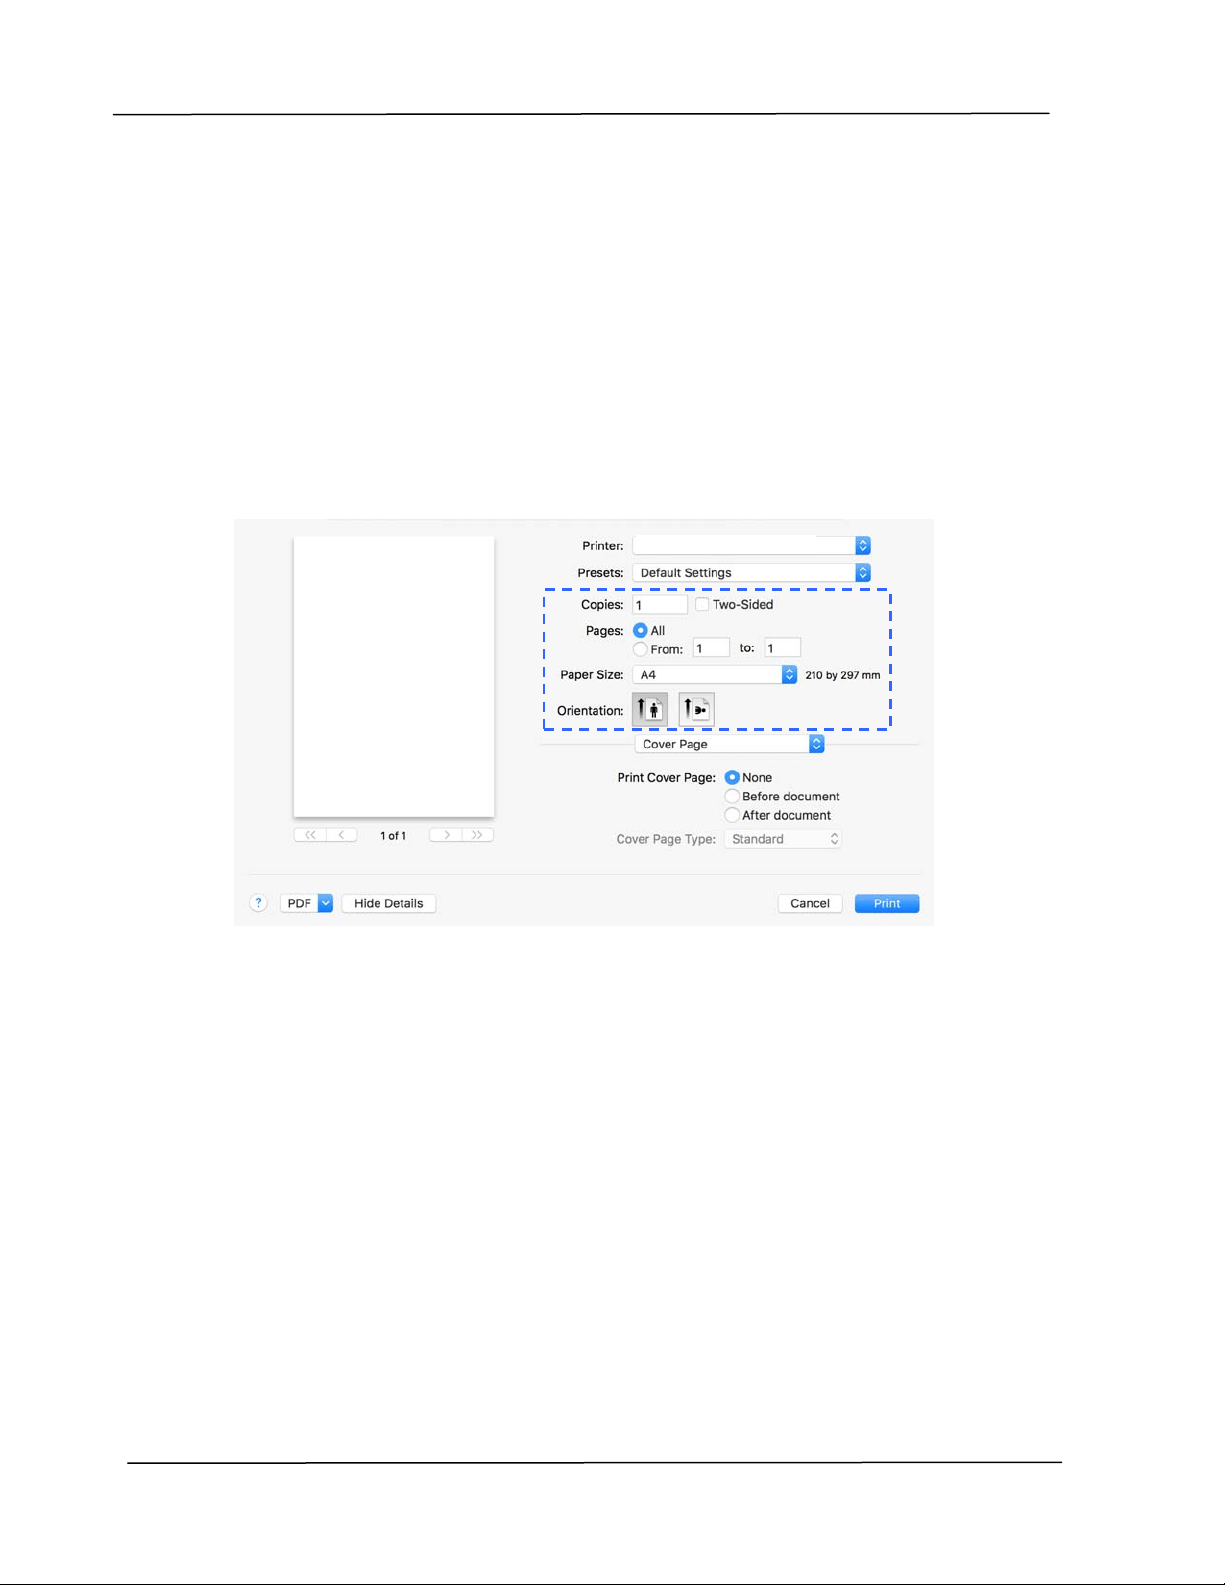
Choosing Page Set up Options
Open your docum ent and then click File, t hen Pa ge . Make sure Avision XXXX
Printer ( where XXXX is your m odel nam e) is chosen in the Pr inte r pop- up m enu.
You can change t he set tings for Copies, Tw o- Sided, Pa per Size , and
Orie nt a t ion.
AP30 Series Printer
Configur in g th e Pr in t e r ’s D r ive r
6 7
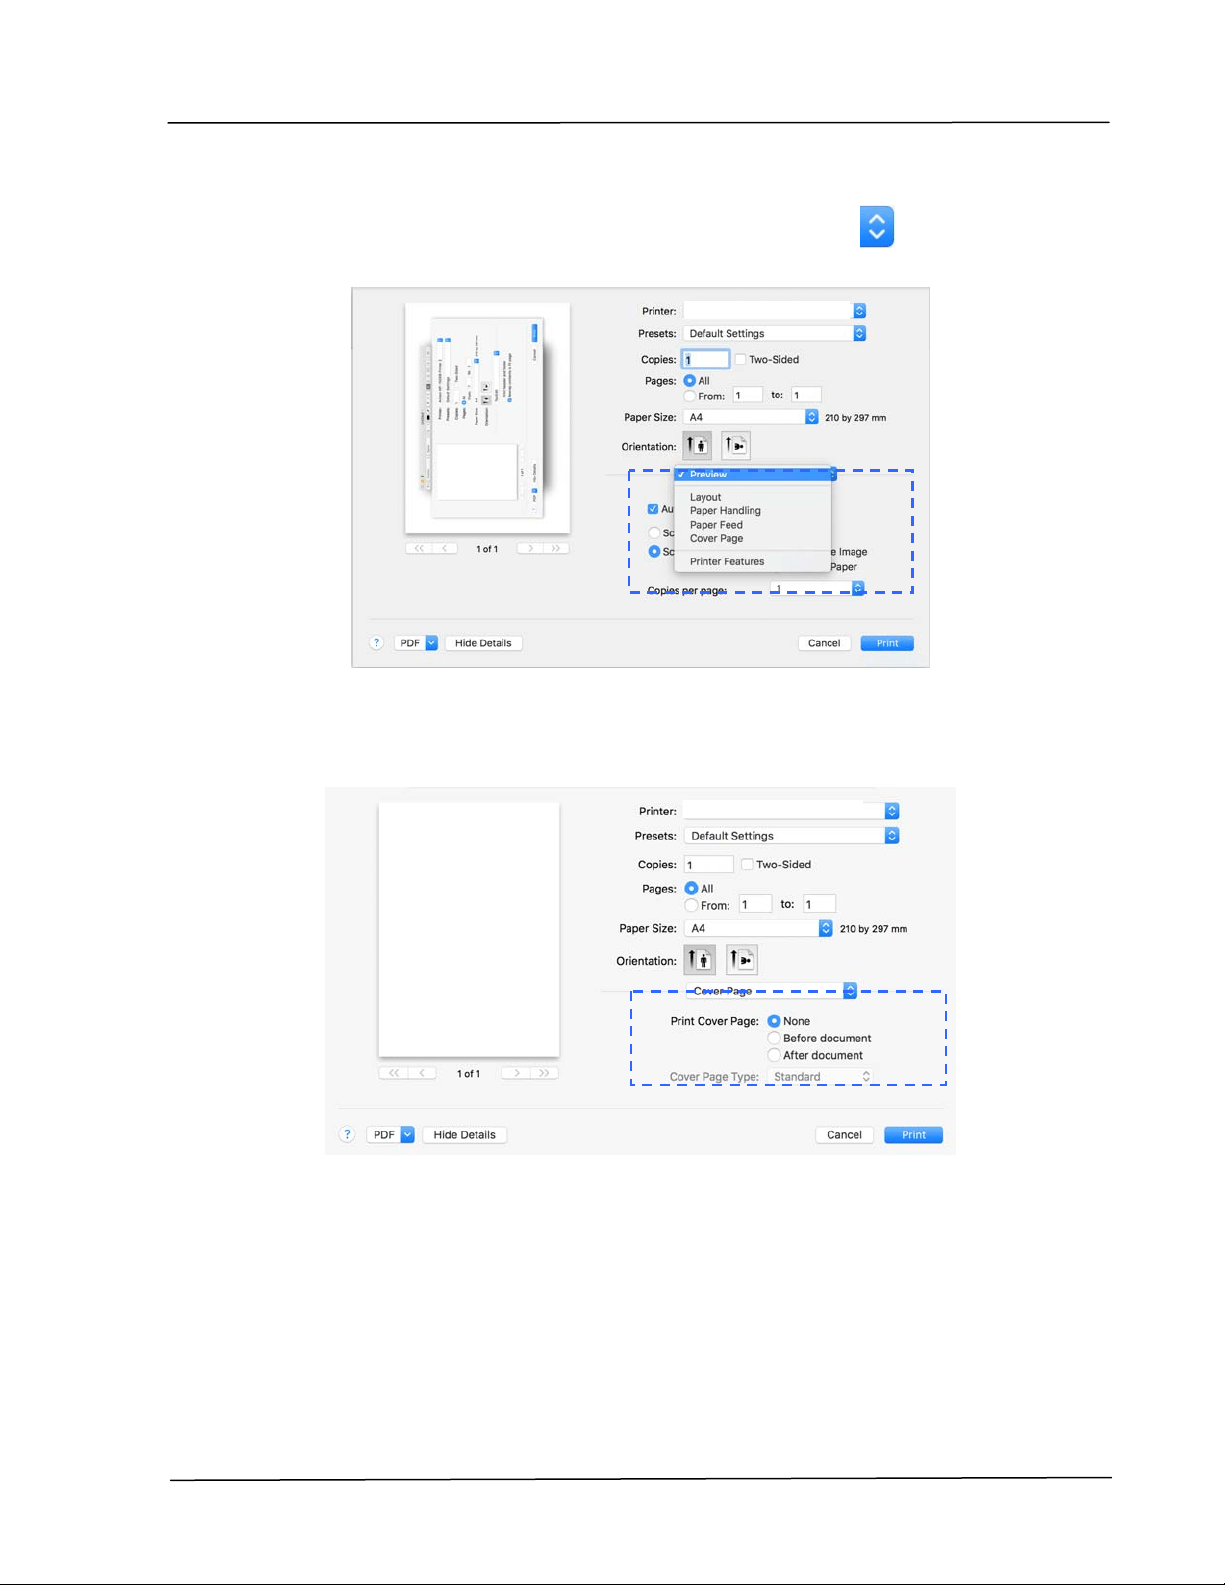
Choosing Pr int ing Options
For m ore page set up opt ions, click t he disclosure arrow (
) on t he print er
opt ions.
Cove r Pa ge
You can m ake the following cover page set t ings:
Pr int Cover pa ge:
I f you want to add a cover page to your docum ent , use
this function.
Choice : N on e , Before D ocu m en t , Aft er docum en t
AP30 Series Printer
AP30 Series Printer
User’s Gu ide
6 8
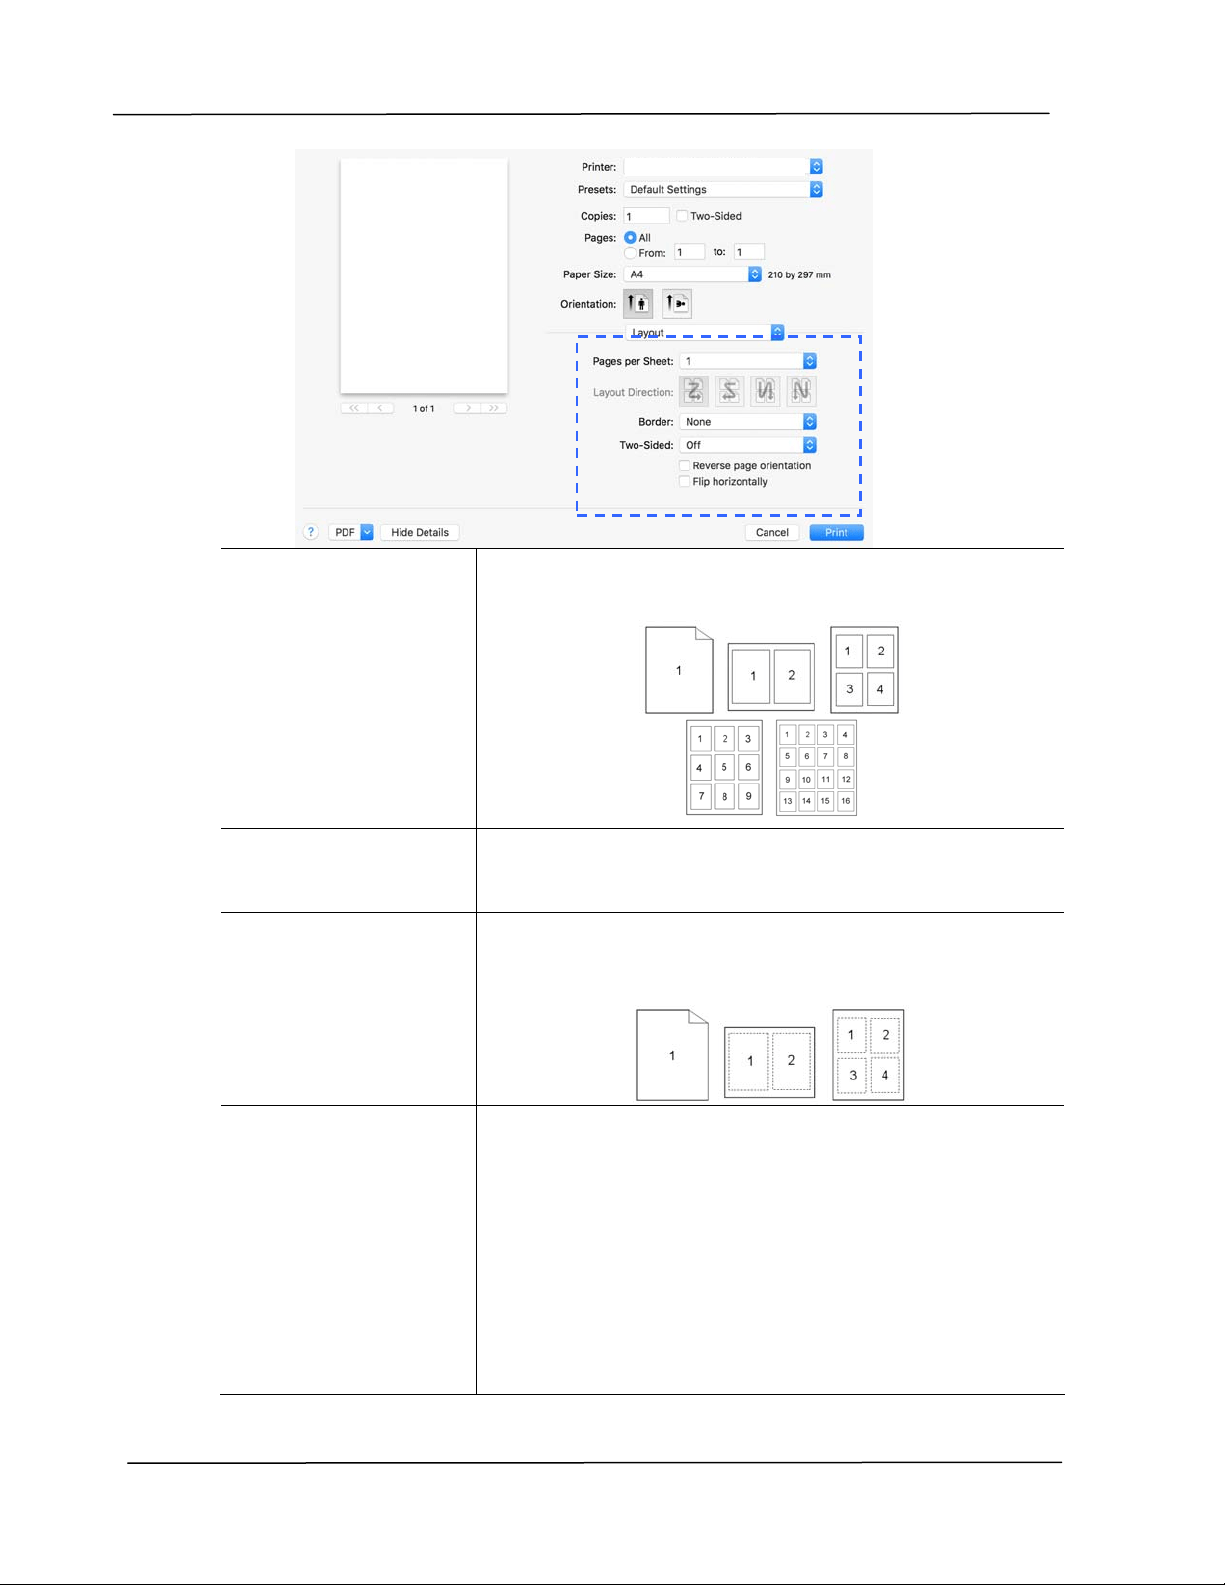
Layou t
Pa ges per Sheet :
Choose num ber of pages t o be printed on a single sheet
of paper. Choice : 1 , 2 ,4 , 6 , 9 , 1 6
La you t
Dir e ct ion :
When you specify the pages per sheet, you can also
specify the direction of the layout .
Borde r :
I f you want t o add a border, use this function.
Choice : N one , Single ha irline , Single Th in Line,
Double H a irlin e , Double Thin Line
Tw o- Sided:
Choice : Off, Long- Edge binding, Short - Edge
bin ding
When using Tw o- Sided printing, you can select
whet her t o bind copies on the long- edge or short - edge.
Long- Edge binding will print t he pages so that you
flip t hem lik e you would do on a book. Shor t - Edge
bin ding print s t hem so t hat your flip t hem like you
would do on a ca len dar.
AP30 Series Printer
Configur in g th e Pr in t e r ’s D r ive r
6 9
Long- Edge binding
( Portrait )
Long- Edge binding
( Landscape)
Short- Edge binding
( Portrait )
Short- Edge binding
( Landscape)
N ot e : The duplex feat ure supports only page sizes of
A4, B5, and let ter with paper weight bet ween 60g/ m
2
and 105g/ m
2
.
Reve rse Pa ge
Orie nt a t ion:
Check Reve r se Page Orient a t ion t o reverse t he data
from up to down.
Flip
Horizont a lly:
Check t o print t he pages so that you flip them like you
would do on a book.
User’s Gu ide
7 0
Pa pe r Fe ed
All pa ges Fr om :
Choose t he t ray from which your paper should be fed.
Choice : Aut o, M anua l Tr ay, M ain Tray
Auto m eans autom at ically select t he paper tray which
m atches the paper size of your docum ent.
Paper Ha ndling
Collat e pages:
Your print er can sort m ult iple copy j obs. For exam ple,
if you print t wo copies of a t hree- page docum ent and
you choose not t o collat e t hem , the pages print in t his
order: 1, 1, 2, 2, 3, 3. I f you choose t o collat e, t he
pages print in t his order: 1, 2, 3, 1, 2, 3.
AP30 Series Printer
A
P30 Series Printe
r
Configur in g th e Pr in t e r ’s D r ive r
7 1
Pa ges t o Print :
Select how m any pages you wish t o print.
Pa ge Order:
Choice : Aut om a t ic, N orm al, Reve r se
Scale t o fit pa pe r
size:
Output t he full page of the selected original including
the four m argins.
Print e r Fea t ures
Media Type:
Choose t he t ype of m edia to be used for print ing.
Choice : Pla in Pa per , Th in Pa per, Thick Pa per ,
Laser Pa per , * CardSt ock , * Bond, * Envelope
* : Only a va ila ble in t he m anua l t ra y for one- side
print ing
Tone r Sa ve:
Allows you to print your docum ent using the t oner
saving m ode.
Densit y Leve l
( Light 1 ~ 7 Dar k )
Click t o lighten or darken your docum ent. Choice:
1 ~ 7 . ( Defau lt : 3 )
I nve rt I m ages:
I nvert m akes each im age pixel inverted t o it s
com plem entary color. For exam ple: t he original black
text on whit e background becom es whit e t ext on black
background. Choice: * off/ On
AP30 Series Printer
User’s Gu ide
7 2
Tex t Edit
Pr int H ea der and
Foote r:
I f you wish to print header and foot er, use t his
funct ion.
Re w arp cont e nt s
t o fit page:
Adj ust content s t o fit your page.
AP30 Series Printer
Configur in g th e Pr in t e r ’s D r ive r
7 3
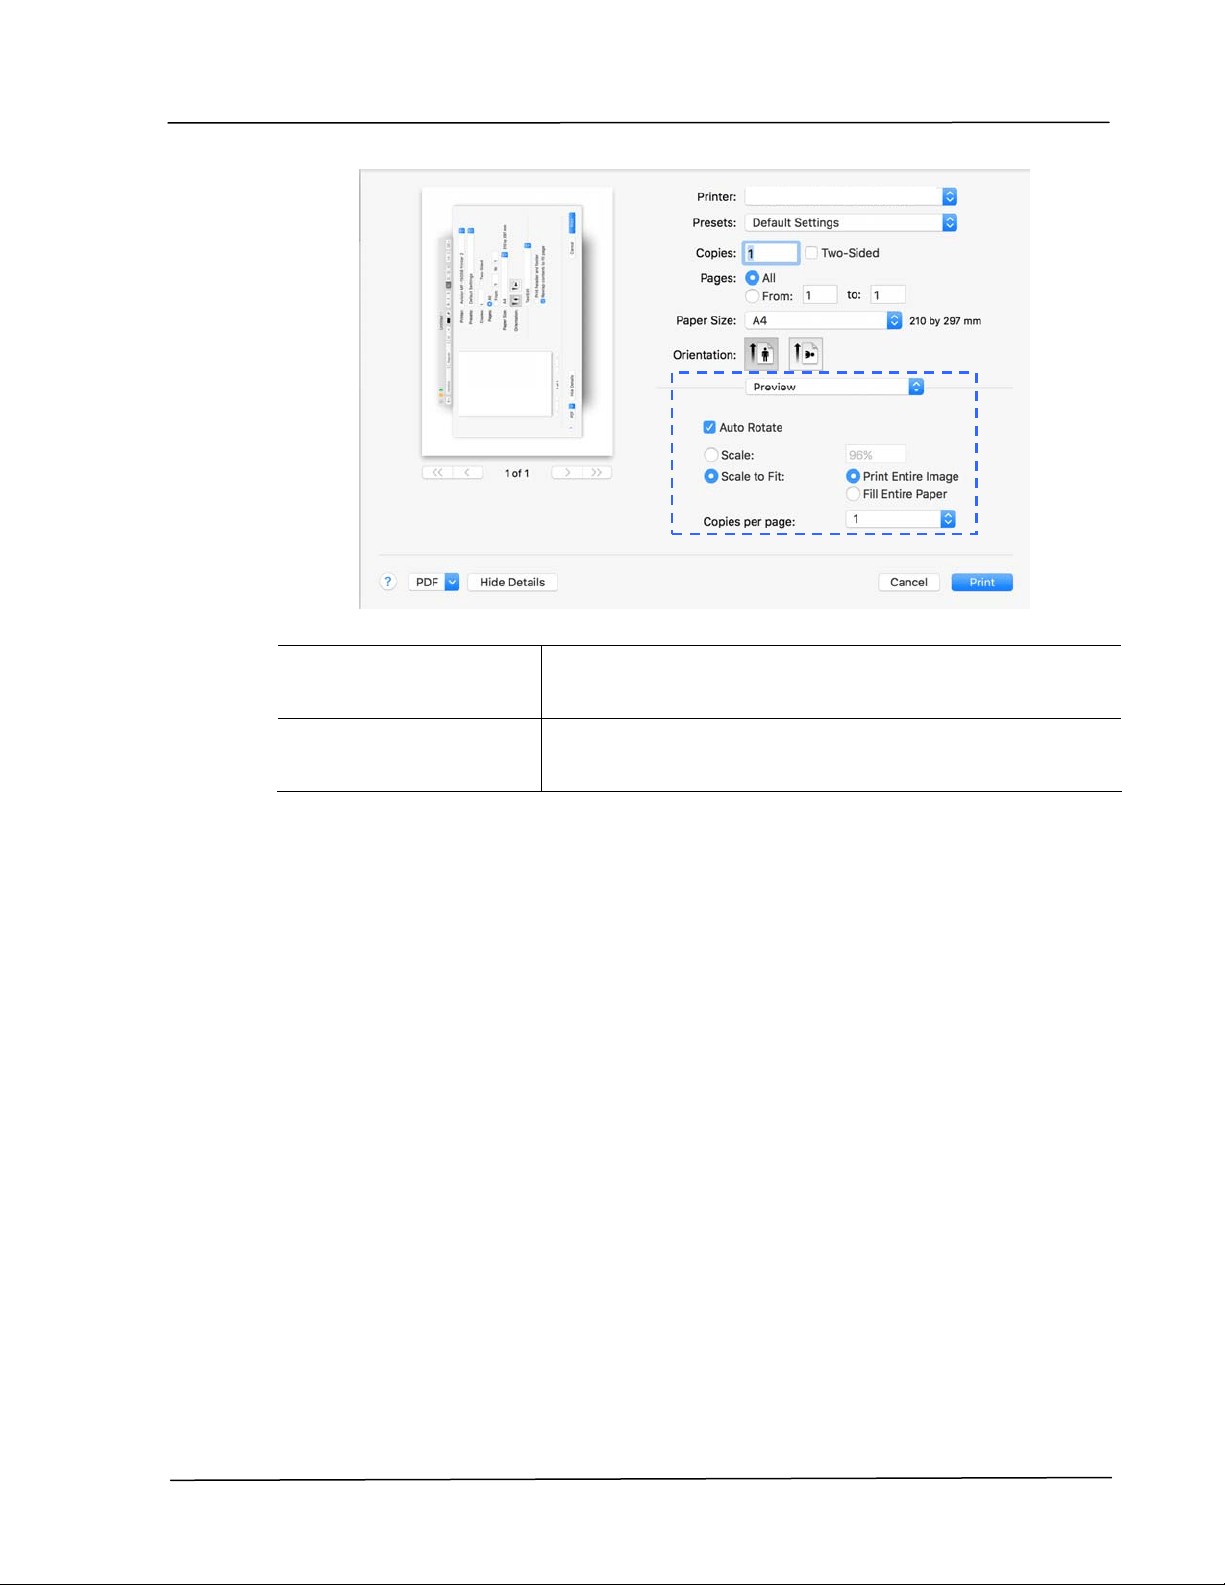
Pre view
Au t o Rot a t e :
Check t o autom at ically rot at e your im age to fit your
paper.
Scale:
Enlarge or reduce your im age.
Choice: Print Ent ire I m age, Fill Ent ire Paper
AP30 Series Printer

5 . Print ing
Cancelling a print j ob
You can st op a print request by using the control panel or by using t he software
program . For instruct ions about how t o stop a print request from a com puter on
a net work, see t he online Help for t he specific net work soft ware.
St opping t he current print j ob from t he
cont rol panel
Press the Cancel but t on on t he control panel.
St opping t he current print j ob from t he
soft w are pr ogra m
When you send the print j ob, a dialog box appears briefly on t he screen. You
can cancel t he print job from t he dialog box.
I f several request s have been sent to t he product t hrough your soft ware, they
m ight be waiting in a print queue ( for exam ple, in Windows Print Manager) . See
the soft ware docum entat ion for specific inst ruct ions about canceling a print
request from the com puter.
I f a print job is wait ing in a print queue or print spooler, delet e the print j ob
there.
1 . Windows XP and Windows Server 2003 ( using the default Start m enu
view) : Choose Sta rt > Pr inte rs a nd Fa x e s in succession.

Print ing
7 5
Or
Windows 2000, Windows XP, and Windows Server 2003 (using t he
Classic St art m enu view) : Choose St ar t > Se t t ings> Prin te rs in
succession.
Or
Windows Vista ( using the Classic Start m enu view) : Choose
St a rt > Set t ings> Pr inte rs in succession.
Or
Windows Vist a ( using t he default Start m enu view) : Choose
St a rt > Contr ol Panel> H a rdw are and Sound> Print er s in
succession.
Or
Windows 7: Choose St a rt > Cont rol Pa nel> Ha rdw a re and
Sou nd> De vices a nd Prin t er s in succession.
2 . I n t he list of print ers, double- click t he nam e of t his product to open
the print queue or spooler.
3 . Select the print j ob that you w ant to cancel, and then press De let e
from the Docu m ent m enu.

6 . Print ing Docum ent s from a
Mobile Device
By connecting an ext ernal USB dongle ( Wi- Fi m odule) to t he product and
inst alling the Mopria™ app on your Android m obile device, the product can be
converted int o a wireless device and your m obile device is able t o print em ails
and docum ent s by sim ply t apping Print from t he m enu,.
Mak ing Prepa rat ion
To connect the product t o a wireless LAN, prepare t he followings:
An en vir onm e nt in w hich a w ir e less LAN is a vaila ble
When connect ing t he scanner to a wireless LAN, you m ay need inform ation for a
wireless access point such as an SSI D ( network nam e) and a security key
( password) . For details, contact your Net work Adm inistrator or refer t o t he
m anual for t he wireless access point .
At t e nt ion!
Do not place obst acles that block radio waves (e.g. walls or m et al plat es) or
devices that cause radio wave interference (e.g. cordless phones) w it hin 100
m m of the product , or near your wireless access point .
Mpria Pr int Service
The Mopria Print Service ( app) can be downloaded from t he Google Play Store
to enable print funct ionalit y on any Android phone or t ablet ( Android version 4.4
or lat er) . Once inst alled, sim ply connect your device to t he sam e net work as
the printer and your m obile print can be com plet ed.
Print ing D ocum e n t s from a M obile De vice
7 7
Connect ing a USB dongle
I nsert the supplied USB dongle ( Wi- Fi Module) t o t he USB flash port at t he back
of t he product , and then t urn on t he product .
Connect ing t o a W ireless N etw ork via
t he N et w ork Set up Tool
Befor e You Be gin!
Make sure t he com puter has been connected to t he product via the USB cable.
Make sure t he power adapter has been connect ed and t he product has been
turned on.
The N e t w ork Set up Tool is an applicat ion t o configure t he set t ings required
for connect ing t he product via wireless LAN. The N e t w ork Set up Tool can be
used to configure t he following wireless or wired set t ings:
Connect ing the product t o a wireless access point
Connecting the product to a wired net work
Set t ing the I P address for t he scanner
USB
port
User ’s Guide
7 8
1 . Launch t he program by clicking t he St ar t > All Pr ogram s> Avision AP3 0
Ser ies Print er > Ne t w or k Set up Tool. The m ain window appears.
2 . Check [ W i- Fi ( st a t ion) ] .
3 . Ent er your st at ic I P on the [ I P Address] , [ Subnet M a sk ] , and [ Ga t e w a y]
field respectively or you m ay check [ DH CP] t o obt ain the I P address direct ly from
the DHCP server.
4 . Select t he wireless net work you want to connect from t he [ SSI D] box. Ent er
the securit y key if necessary.
5 . Click [ Updat e ] t o st art connect ing the SSI D (wireless netw ork nam e) and
then updat e the I P inform at ion to t he product .
6 . I f update is successfully, an [ Updat e D evice Successfully] m essage will be
displayed and t he Net work Set up Tool will be aut om atically closed.
AP30 Series Printer
Print ing D ocum e n t s from a M obile De vice
7 9
Printing Your File fr om a Android M obile
Device
Make sure t hat t he Mopria Print Service ( Print App) has been installed on your
Android m obile device. The M opria Pr int App can be purchased for free from
an applicat ion st ore such as Google Play.
1 . Sele ct sa m e w ire less net w ork a s your print e r.
On your m obile device, t ap
Set t ings> W i- Fi and choose t he
sam e network nam e ( SSI D) of
your printer.
2 . Tur n Mopr ia Pr int Se rvice on. The device will search available print ers.
On your m obile device, t ap
Set t ings> Prin t ing> M opr ia Pr int
Ser vice t o t urn Mopria Print
Service on. The Device w ill search
for all available print ers.
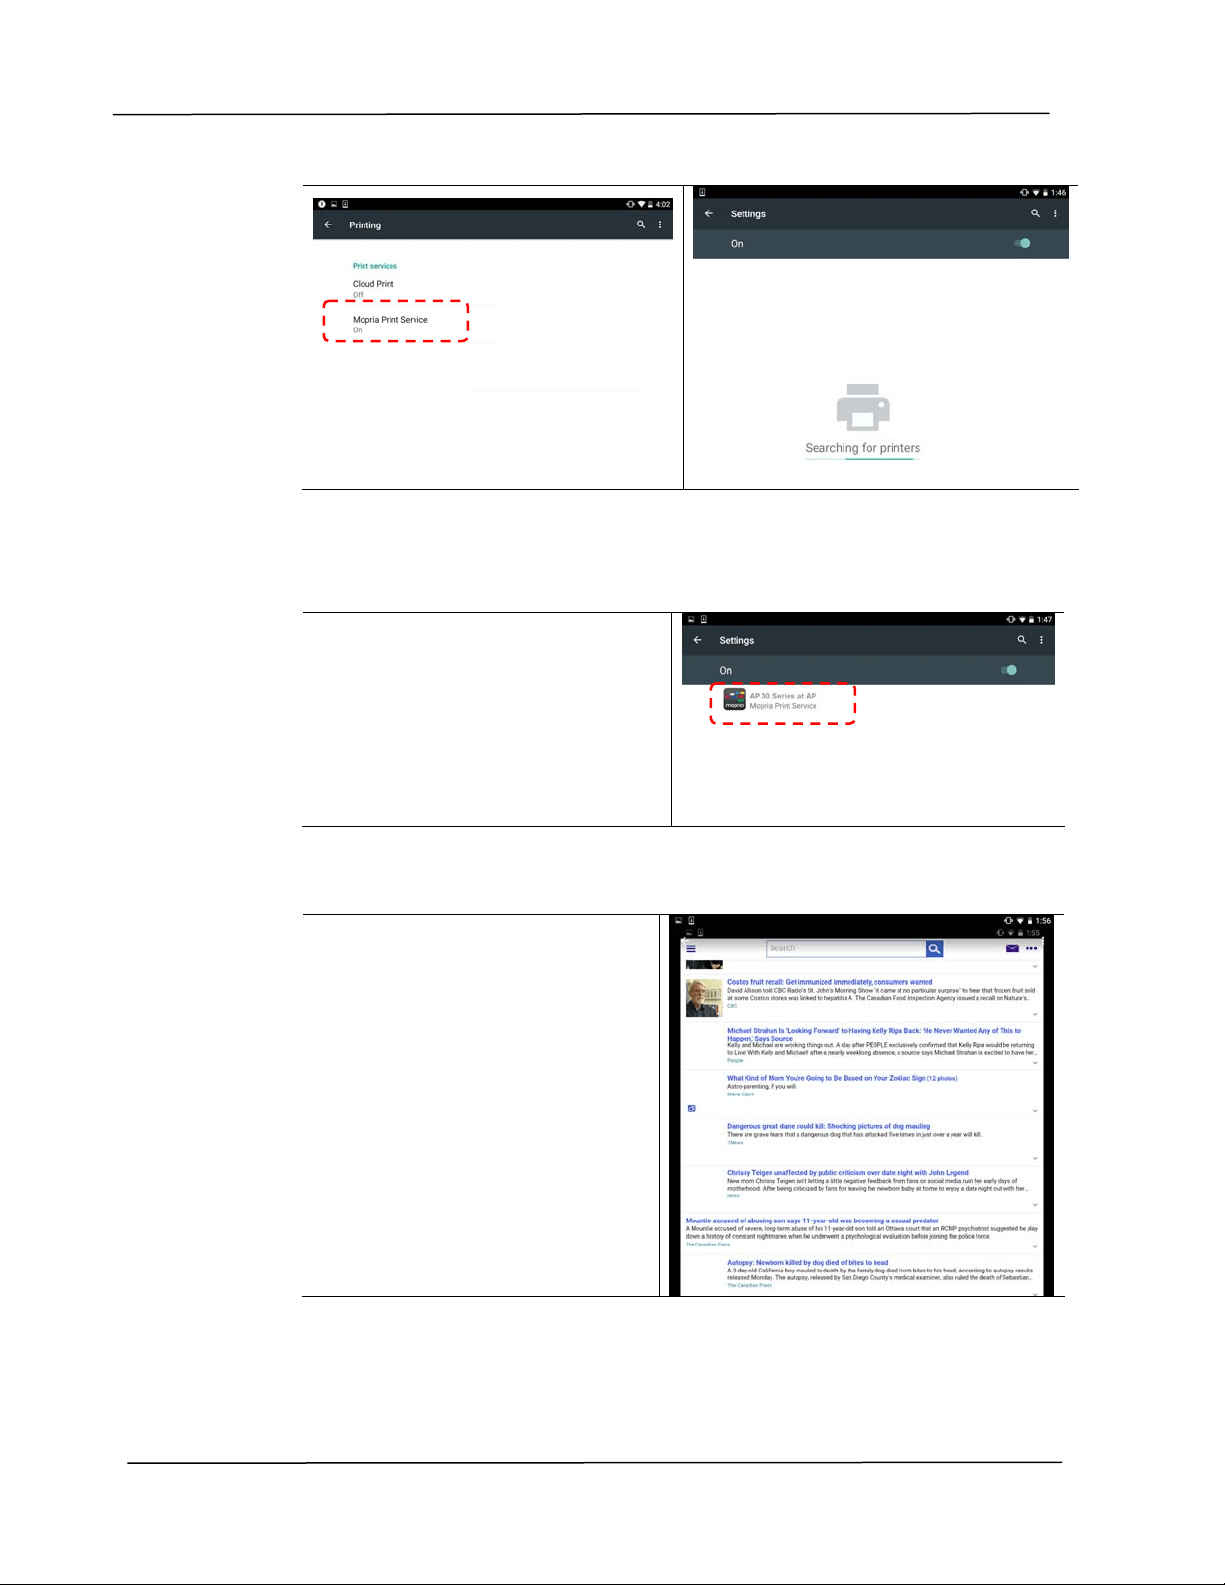
User ’s Guide
8 0
3 . Select your print er.
Select [ AP3 0 Series at AP3 0 ]
from the print er list .
4 . Open t he file which you want to print.
Open t he file you want t o print.
5 . Choose [ Pr int ] from t he m enu and select your printer.
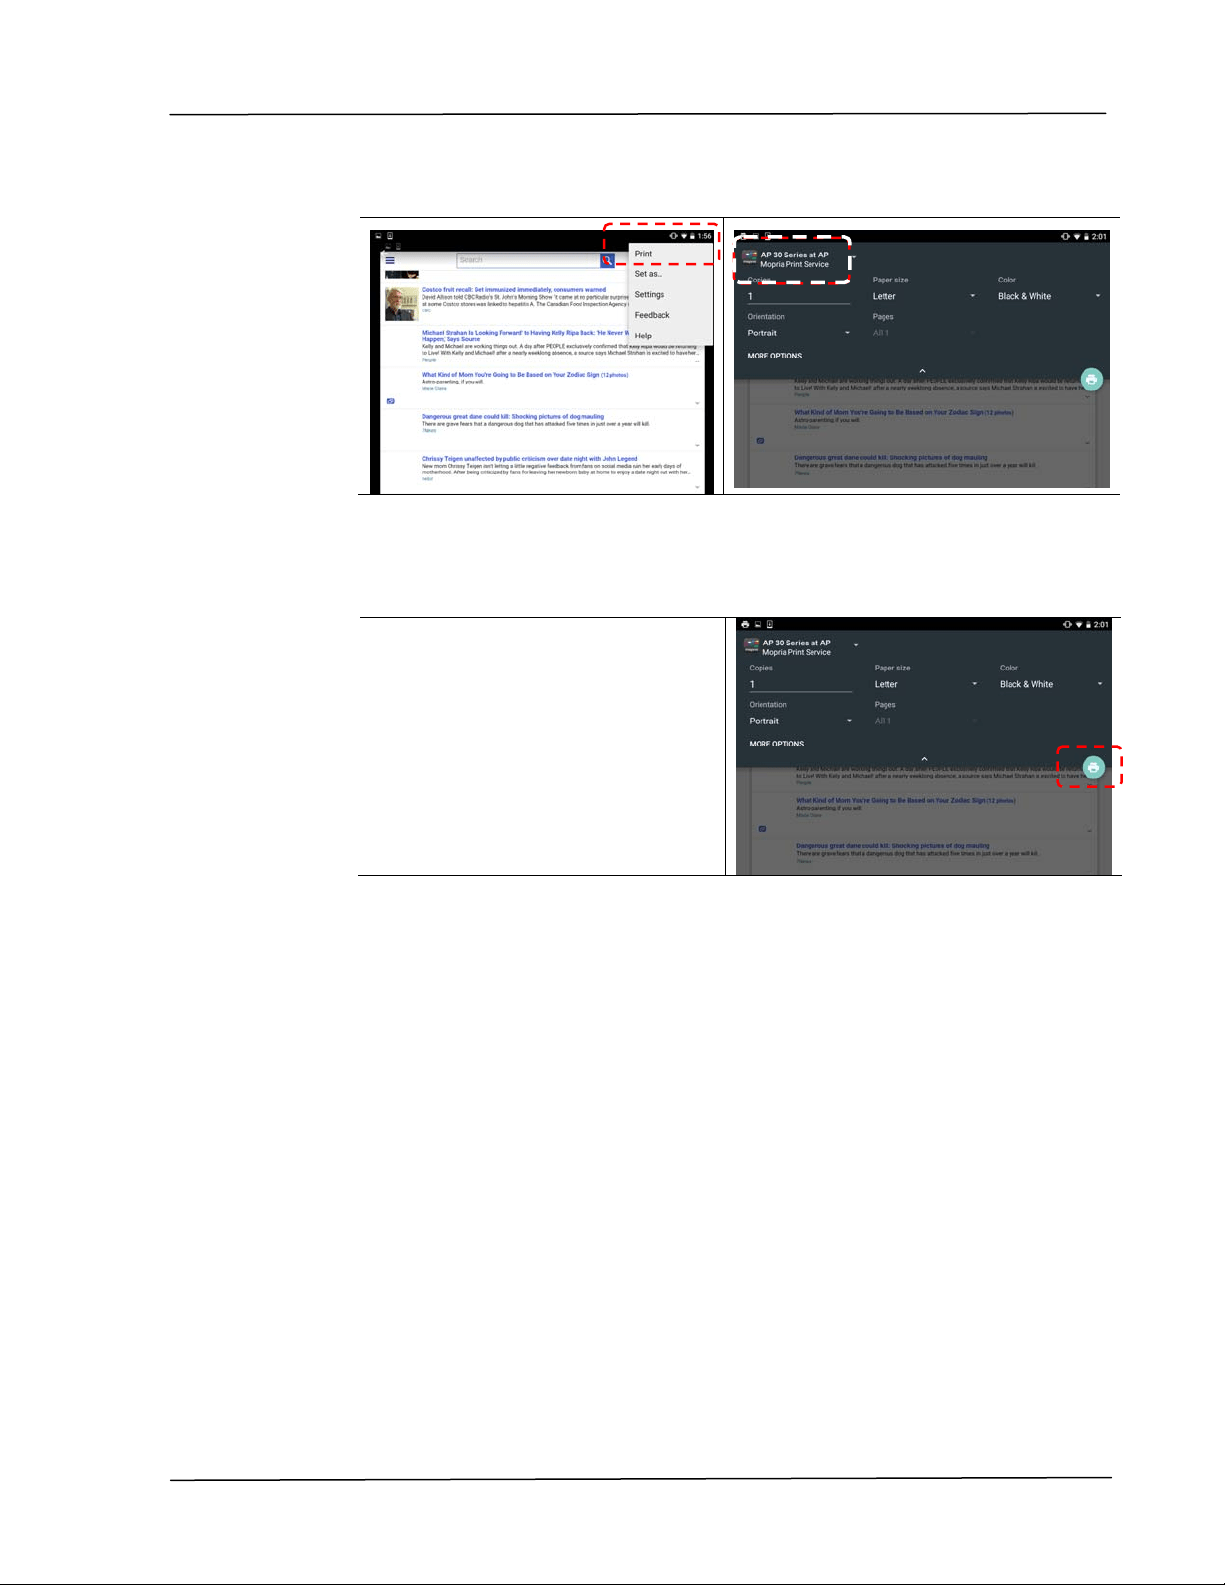
Print ing D ocum e n t s from a M obile De vice
8 1
6 . Choose print set t ings and print.
I f you do not need t o change
print opt ions, t ap Print to
send the print j ob.
I f you need t o change print
opt ions, cont inue t o the next
sect ion.
User ’s Guide
8 2
Change t he Pr int Set t ings
Mopria Print Service allows you t o print web pages, docum ents, em ails, phot os,
and content from apps t hat support Android print ing. Print set t ings m ay vary
depending on t he app and print er selected. The following print opt ions m ay
display:
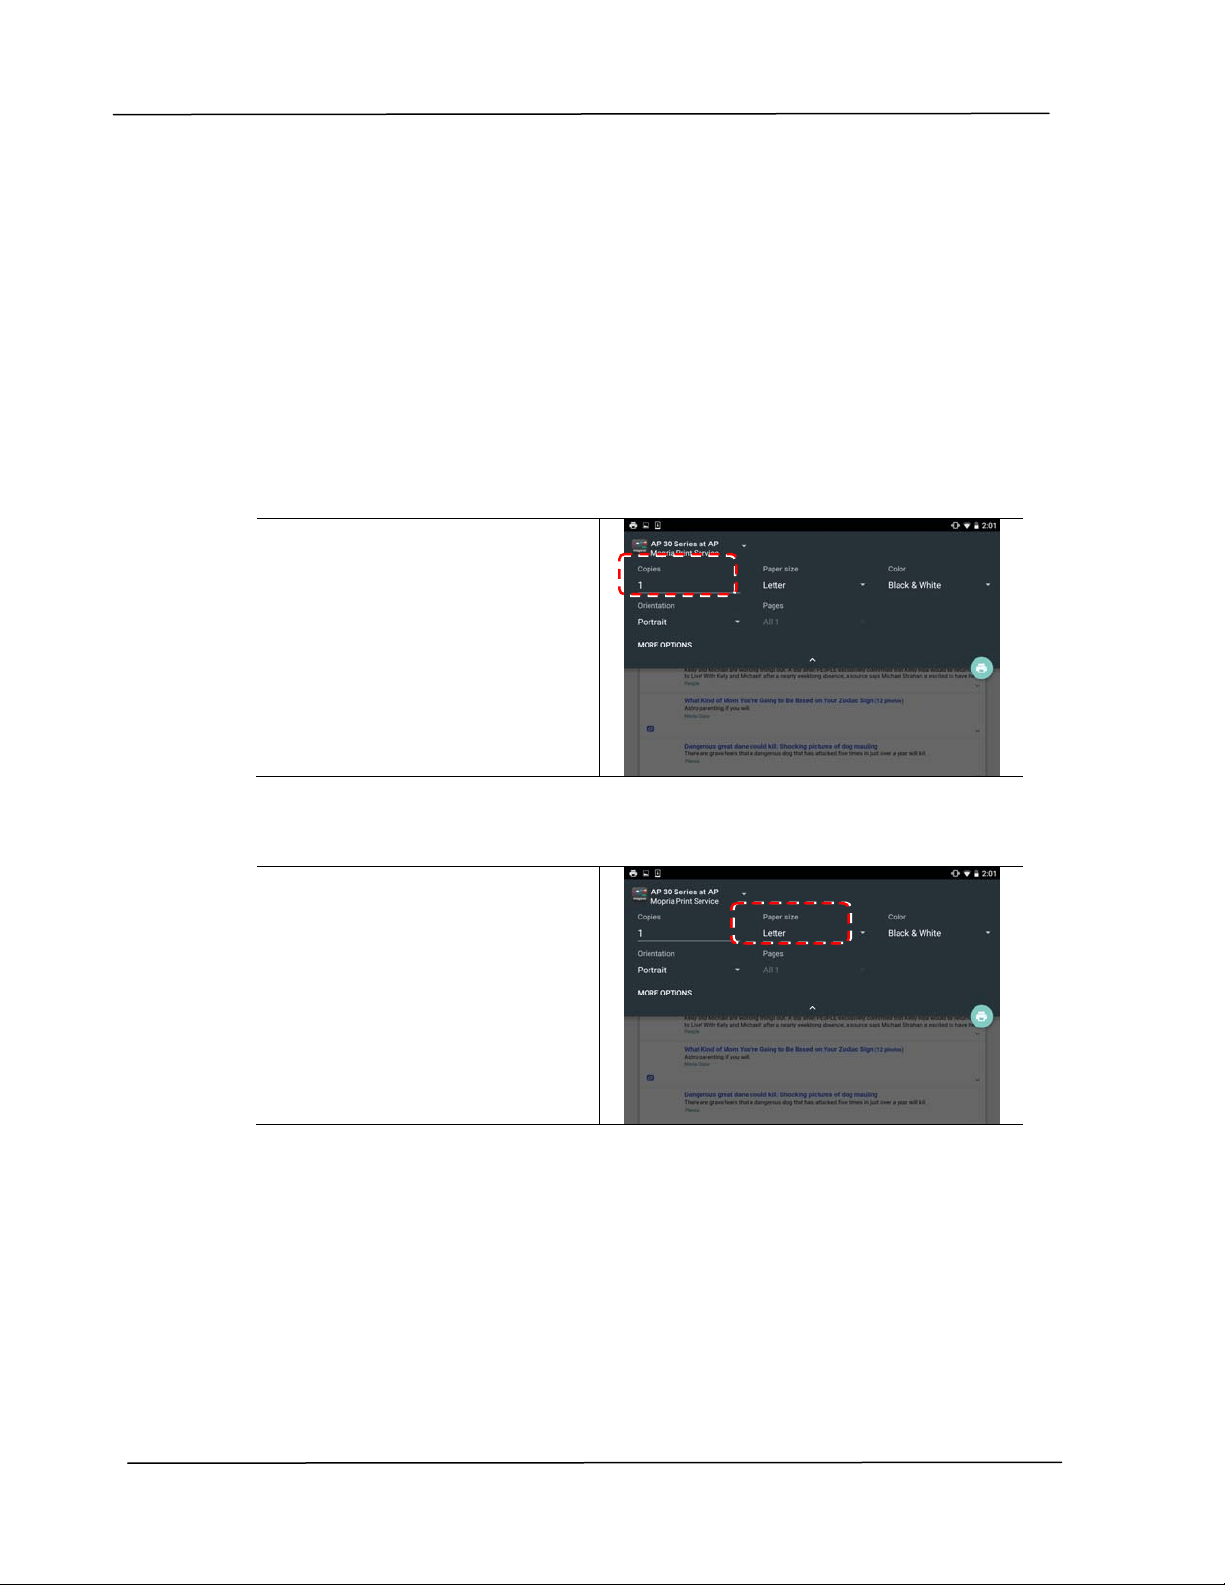
N um be r of Prin t e d Copie s
Tap [ Copies] t o enter your
desired copy count if you want
to print m ore t han one copy.
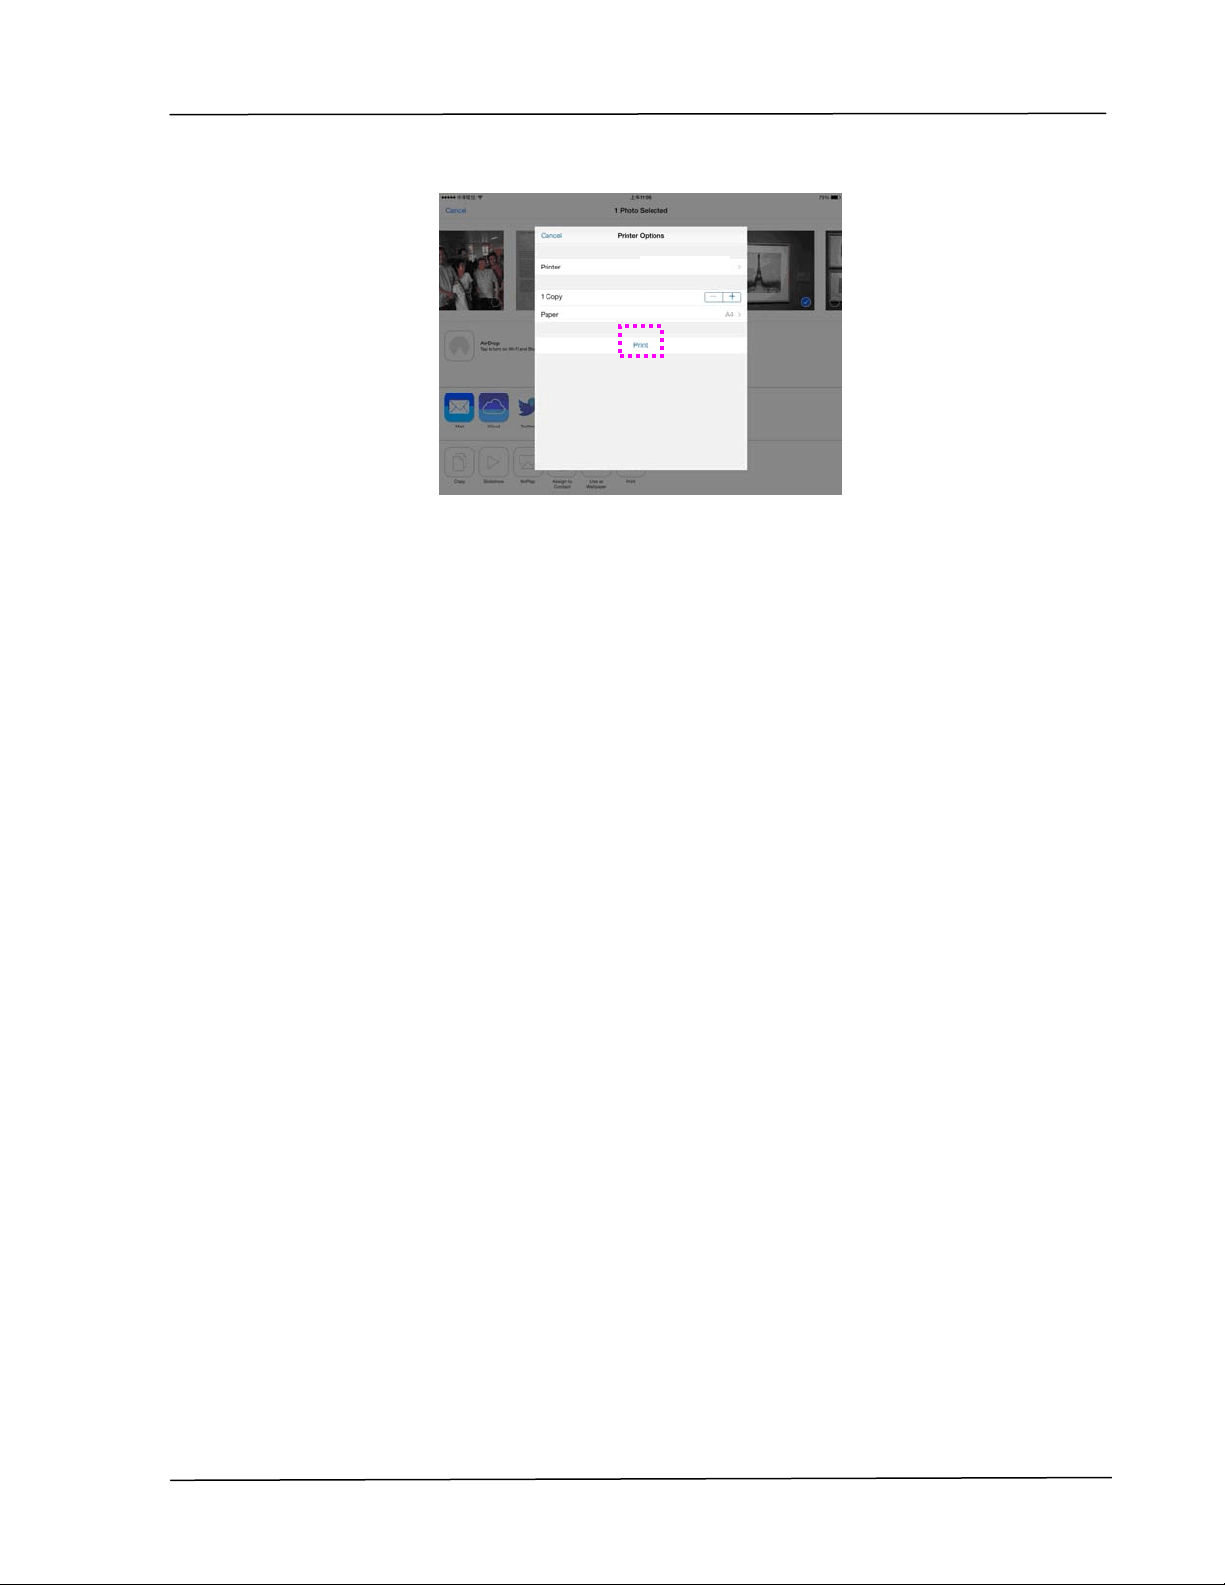
Changing t he Pape r Size
I n t he print set t ings m enu, t ap
[ Pa per siz e ] , t hen select the
[ paper size ] opt ion from the
m enu: Let t er, A4 m ay be
opt ions offered depending upon
the app or print er.

Print ing D ocum e n t s from a M obile De vice
8 3
Changing t he Orien t a t ion
I n t he print set t ings m enu, t ap
[ Orient a t ion ] , then select t he
opt ion you prefer. Port rait or
landscape m ay be opt ions
offered depending upon t he
app or printer.
Defining t he Pa ge Ra n ge
I n t he print set t ings m enu, t o
print m ult iple pages, tap
[ Pa ges] , and then select the
page range t hat you want to
print. NOTE: Pages will only
display wit h certain applicat ions
and file types, such as PDFs.

User ’s Guide
8 4
Printing Your File fr om a iOS M obile
Device
1. Turn on your m obile devices such as iPhone or iPad.
2. Tap 「Set t ings」 and then open Wi- Fi. Select t he network sam e
with your printer.
3. Open t he picture or t he docum ent that you want to print. Tape t he
Share icon (
) and then t he print icon ( )。
4. Tap [ Select Printer] and choose your desired printer.
5. Tap [ Print ] t o start print ing.
AP30 series at xxxx
AP30 series at xxxx
Print ing D ocum e n t s from a M obile De vice
8 5
AP30 series at xxxx
7 Troubleshoot ing
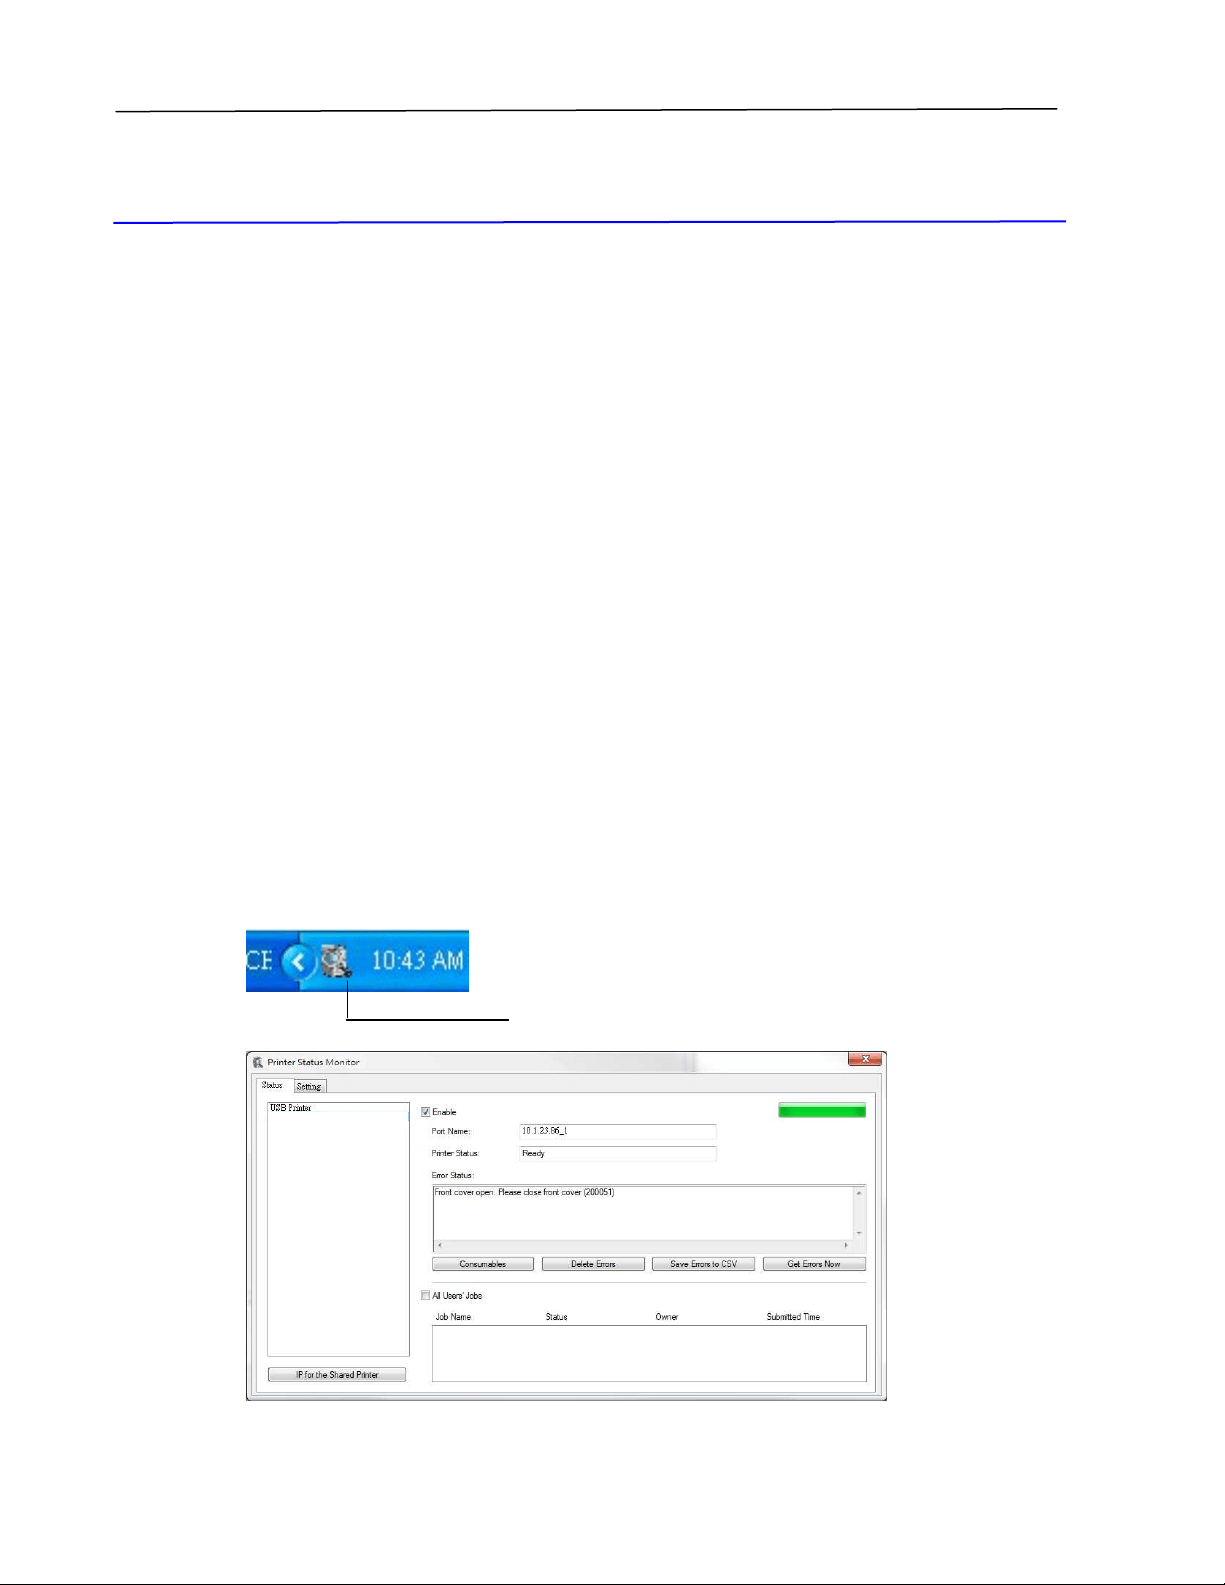
Monit oring Your Print er Using Print er
St at us Monit or
The Print er St at us Monitor allows you to m onit or your printer’s status, get
inform ation on consum able parts, and alert s you when print er errors occur.
Print er St atus Monit or is available w hen the printer is connect ed directly t o a
host com put er via t he USB port or a net work port .
Print er St at us Monit or is inst alled when you inst all t he printer driver as
described in t he preceding section.
Accessing Prin t e r St a t us M onit or
Double- click t he Pr int er St a t us Monit or icon on t he syst em tray. The
following print er status window appears.
Print e r St at u s W in dow
Print e r St at us Mon it or icon
Troubleshooting
8 7
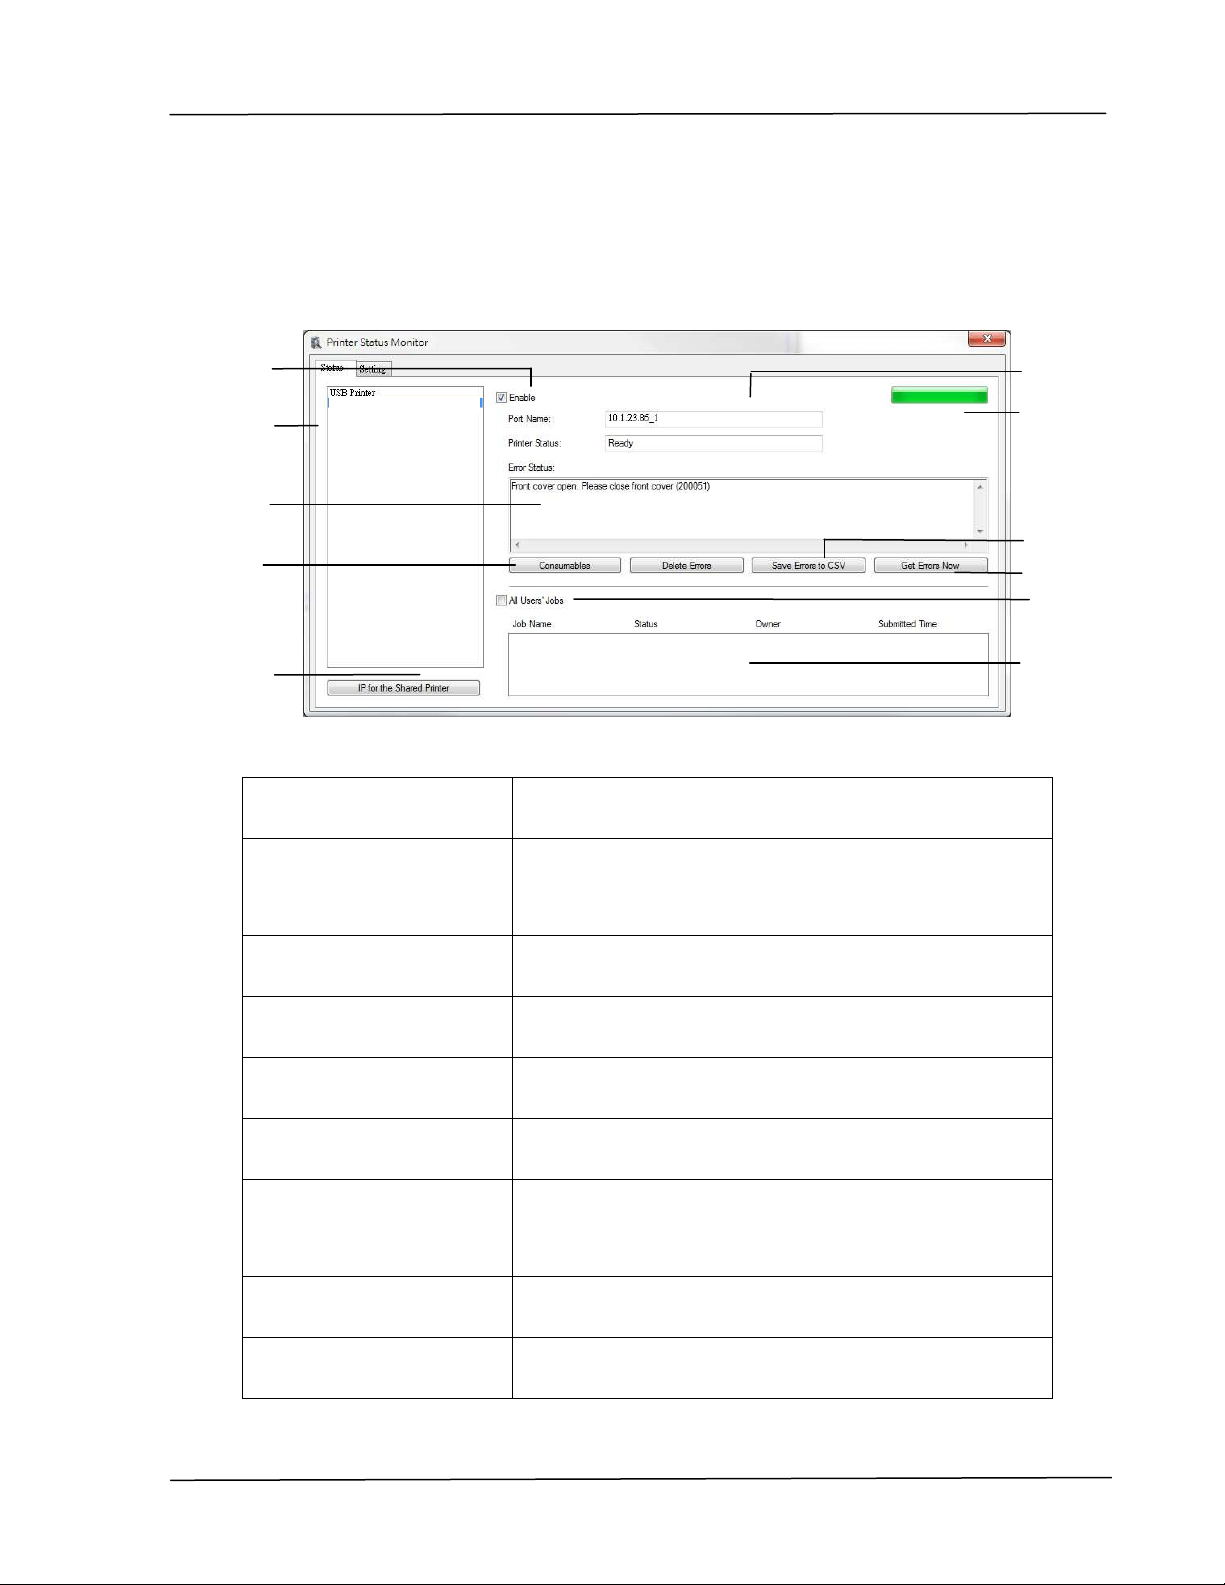
Get t in g Print er St at us D e t ails
You can m onit or print er status and get inform at ion on consum able products
using t he Printer Status Monit or dialog box.
a Port N am e Port nam e for the specified print er.
B Pr ogre ss Bar The progress bar t o access the lat est dat a of the
specified print er.
C De let e Errors Delete all t he error m essages.
D Sa ve Er rors t o CSV
Save error m essage to a CSV file.
E All Users’ Jobs Check the box t o show All users’ j obs.
F Job Box Show all the j obs in queue.
G En able Check t he box t o enable accessing t he st at us of a
specified print er.
h Pr int er Displays connected print ers.
I Tex t Box Displays t he current stat us of the print er.
a
b
c
d
e
f
g
h
i
j
k
User ’s Guide
8 8
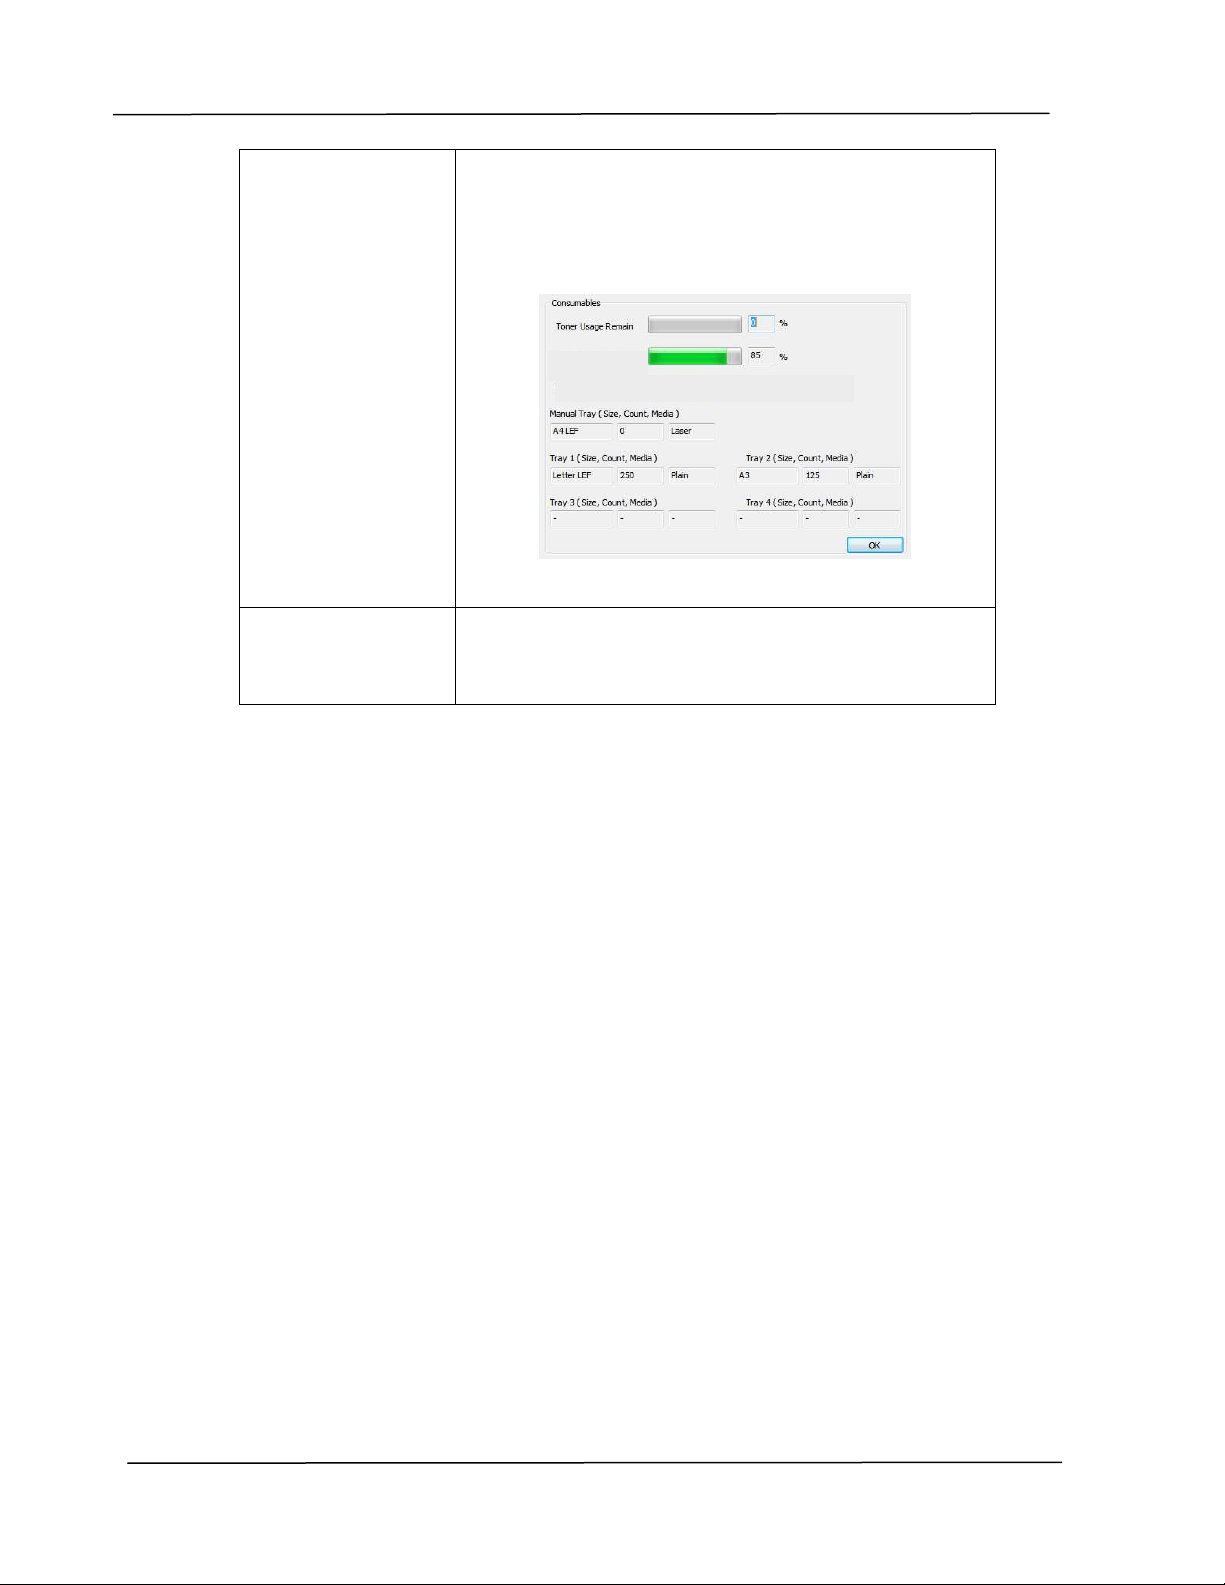
J Con sum a ble s Click to show the inform at ion of the paper tray and
the consum ables parts such as Drum Unit , Toner
Cart ridge.
The Consum ables w indow
k I P for a
Shar ed Pr int er
Click here t o enter the I P for a shared printer to
get t he print er st at us.
Drum Usa ge
Rem ain :
Troubleshooting
8 9
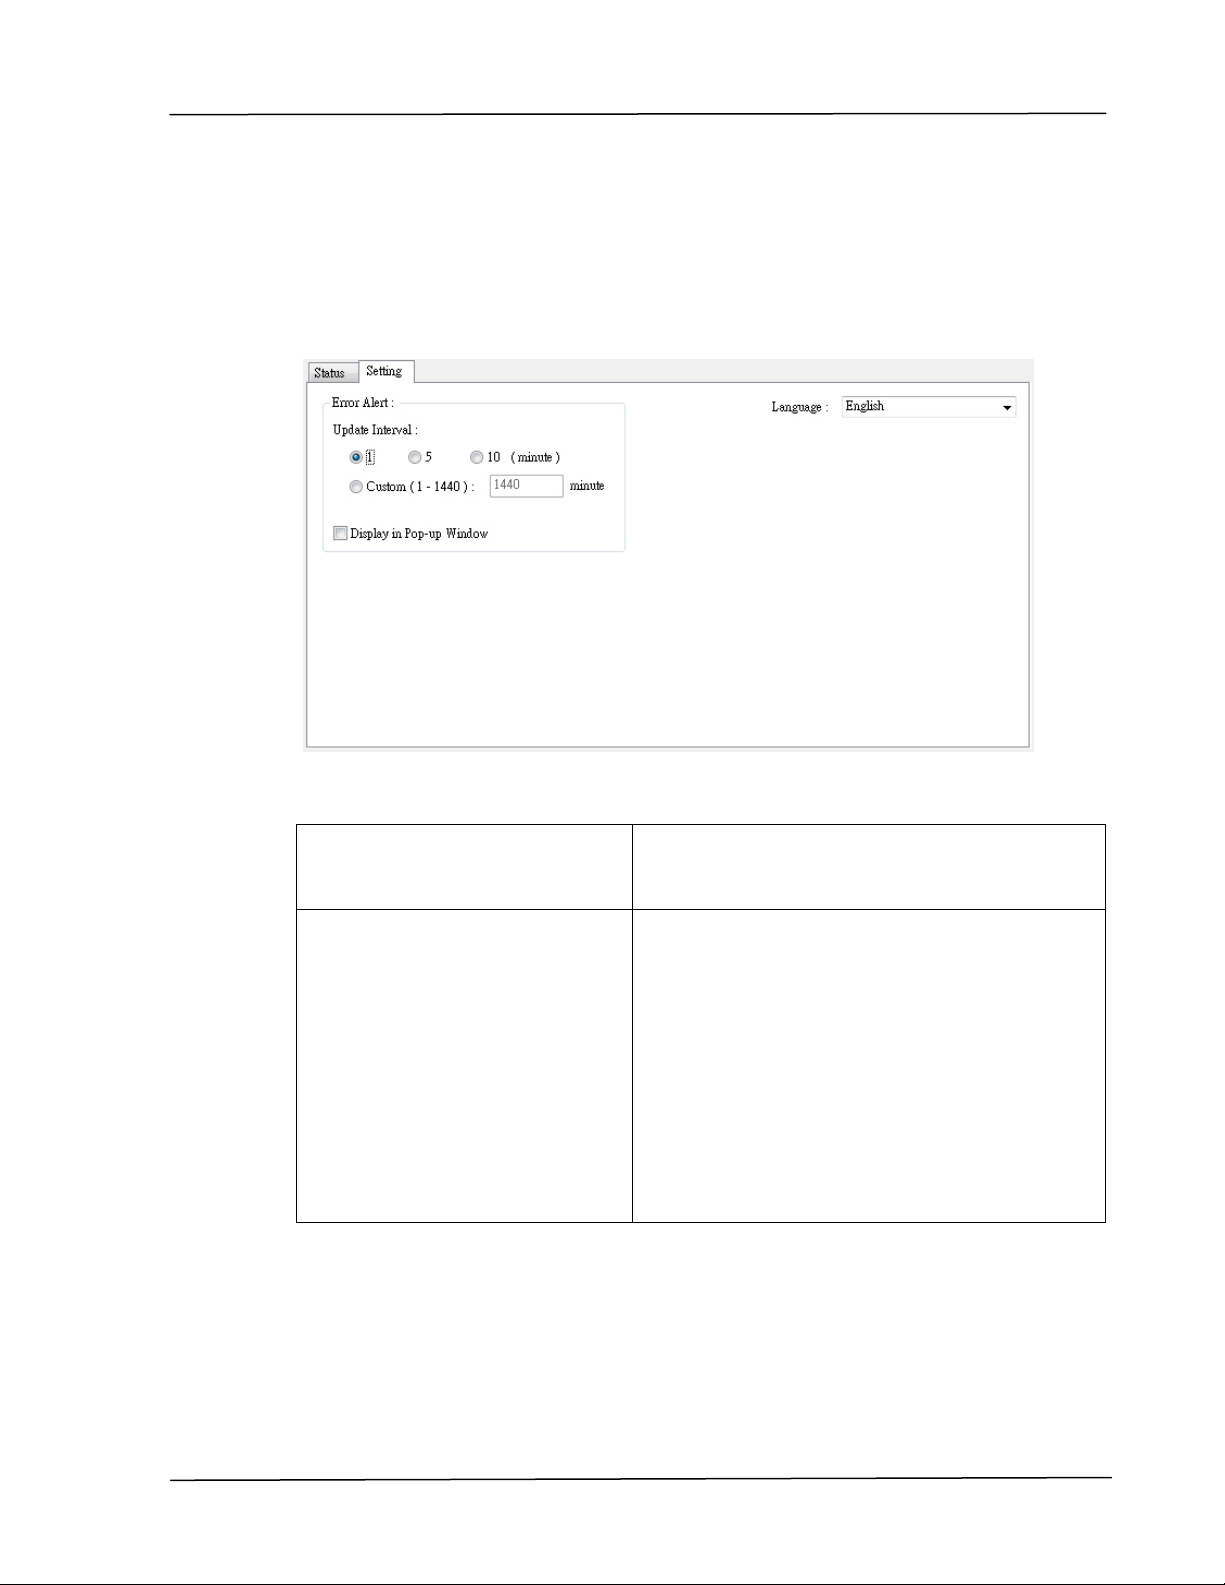
Se t t ing M onit or ing Pre fe r ences
To m ake specific m onit oring sett ings, click the Set ting t ab on the Avision Status
Monitor window.
Language
Displays t he language of t he window.
St at us Alert
Updat e Tim e
Display in Pop-up Window
Define t he int erval to refresh t he printer
error st at us.
Choice: 1, 5, 10 ( m inute) , Custom ( 1 ~
1400 m inute)
Check t he [ Pop- up Window] box t o
autom atically show t he error status in a
pop-up window on t he system tray.

User ’s Guide
9 0
Clearing A W a rning or An Error
I f a problem occurs during operat ion, t he Error LED will be flashing to indicat e a
warning or an error stat us. To solve t he problem , please refer t he following
table for m ore detailed inform ation.
W ar ning Me ssa ge
Me ssa ge Description or Solu t ion
Tone r low
( 2 0 0 0 3 2 ) .
Toner t hat rem ains is lower t han 10% . The m achine
can st ill perform print ing or copying funct ion yet wit h
poor quality.
Dr um ne a r end
( 2 0 0 0 4 3 ) .
Drum that rem ains is lower than 10% .
Call t he service personnel t o order and replace the
drum .
Tone r e m pt y
( 2 0 0 0 3 1 )
Toner has run out.
Replace a new toner cartridge.
N o D rum
( 2 0 0 0 4 1 )
Please inst all drum and rest art PRINTER.
Drum life e nds
( 2 0 0 0 4 2 )
Drum life has been exhaust ed.
Call t he service personnel t o order and replace the drum
m odule.

Troubleshooting
9 1
Er ror Me ssage
Er ror Me ssage a nd Code s
Possible Ca uses or Solut ion
Syst em e r ror
Service code: 100111
Rest art PRINTER. I f this error persists, call
service personnel for help.
Scan m odule error ( 000113)
Rest art PRINTER or call service.
An unexpect ed error from scanner parts
occurs.
Rest art PRINTER or call service t o replace
scanner part s that fail.
Printer m odule error.
Please rest art PRI NTER or call
service ( 205000, 205001, 205101).
An unexpect ed error from printer part s
occurs.
Rest art PRI NTER or call service personnel t o
replace printer part s that fail.
Fax m odule error (300000) .
Rest art PRINTER or call service
The fax board is not inst alled or dam aged.
Rest art PRINTER
or call service t o replace t he
fax board.
Motor error ( 000001) .
Press # but t on to erase or call
service.
When PRINTER is boot ed, t he scanner and
print er engine I nit ializat ion fail.
Rest art PRINTER.
Scanner lam p error (002007) .
Please close flat bed cover and Press
# but ton to erase or call service.
The CI S lam p is dam aged or not lit.
Call service personnel to replace the CI S unit .
Fan fails ( 200090) .
Call service personnel to replace t he fan.
Front cover opens (200051) .
Please close front cover.
Rear cover opens (200054) .
Please close rear cover.
Cont inue feed error ( 200000).
Please open front cover t o clear t he paper
and load paper to proper t ray.
Fuser error ( 201600, 201604~ 5,
201613, 201615~ 201618,
201621~ 201623)
Please rest art PRI NTER. I f the error persists,
call service personnel for help.

User ’s Guide
9 2
Please load paper in m anual t ray
( 200080).
Paper em pt y in the m anual tray.
Please check tray 1 ( 200003) .
Pick up error. Paper em pt y, paper j am , or
pickup failed in t ray 1.
Please load paper t o tray1 ( 200081)
Tray 1 paper em pty.
I P conflict ( 500000) .
Please check net work set t ings.
Check your net w ork set t ing.
DHCP no response (500002) .
Please check net work set t ings.
Check net work set tings.
USB flash disk not found.
I nsert USB flash drive t o the USB flash
port .
USB flash disk connection fails.
Job abort .
Check the connect ion of USB flash drive.
PRI NTER not ready.
Try again lat er.
PRI NTER is busy wit h current j ob. Wait unt il
current j ob is com plet ed.
Buffer full Job abort.
Mem ory is not enough to process t he
scanned im ages.
Buffer full
Print scanned im ages:1
Cancel job:2
Mem ory is not enough to process t he
scanned im ages. Press [ 1] t o print t he first
few im ages which have not exceeded the
m em ory lim it or press [ 2] to cancel job.
Reset t ing default set tings fails.
Please t ry again lat er.
Reset t ing default set tings.
Scanner Calibrat ion fails.
Please t ry again lat er.
Please t ry again by pressing the Menu
but t on and then choosing
System > Managem ent> Calibrat ion.
Reset count fail.
Please t ry again lat er.
Please t ry again by pressing the Menu
but t on and then choosing
System > Managem ent> Reset count.
Set t ing fails.
Please t ry again lat er.
Set t ing the Menu opt ion fails. Check your
sett ing.
Troubleshooting
9 3
Full page not support N in 1
The Full page feature does not support N in 1
( 2 in 1 or 4 in 1) .
Cust om zoom not support N in 1
The Custom Zoom feat ure does not support
N in 1 ( 2 in 1 or 4 in 1) .
Pa pe r Ja m
ADF paper jam (002013) .
1. Open ADF cover and clear paper.
2. Close ADF cover.
Paper j am (200301) . Please check m anual tray.
Paper j am (200302) . Please open front cover and tray 1 t o clear jam paper.
Paper j am (200324) . Please open front cover and tray 1 t o clear jam paper.
Paper j am (200325) . Please open front cover and pull drum unit out t o clear jam
paper.
Paper j am (200326) . Please open front cover and pull drum unit out t o clear jam
paper.
Paper j am (200327) . Please open front cover and pull drum unit out t o clear jam
paper.
Paper j am (200328) . Please open front cover and pull drum unit out t o clear jam
paper.
Paper j am (200329) . Please open front cover and pull drum unit out t o clear jam
paper.
Paper j am (200330) . Please open front cover and rear cover t o clear j am paper.
Paper j am (200331) . Please open front cover and rear cover t o clear j am paper.
Paper j am (200332) . Please open front cover and rear cover t o clear j am paper.
Paper j am (200333) . Please open front cover and rear cover t o clear j am paper.
Paper j am (200334) . Please check duplex t ray.
Paper j am (200335) . Please check duplex t ray.
User ’s Guide
9 4
Locat ions of t he Ja m m ed Pa per
Front Cover: Open t he front cover
by pulling t he handles of t he front
cover on bot h sides as illust rat ed.
Rear Cover : Open t he rear cover by
pulling t he handle of the rear cover as
shown.
Duplex Tra y: Pull the duplex t ray
beneat h the rear cover out of the
m ain unit .
Ma nua l Tray: Open t he m anual tray by
grasping the handle and pull it down.
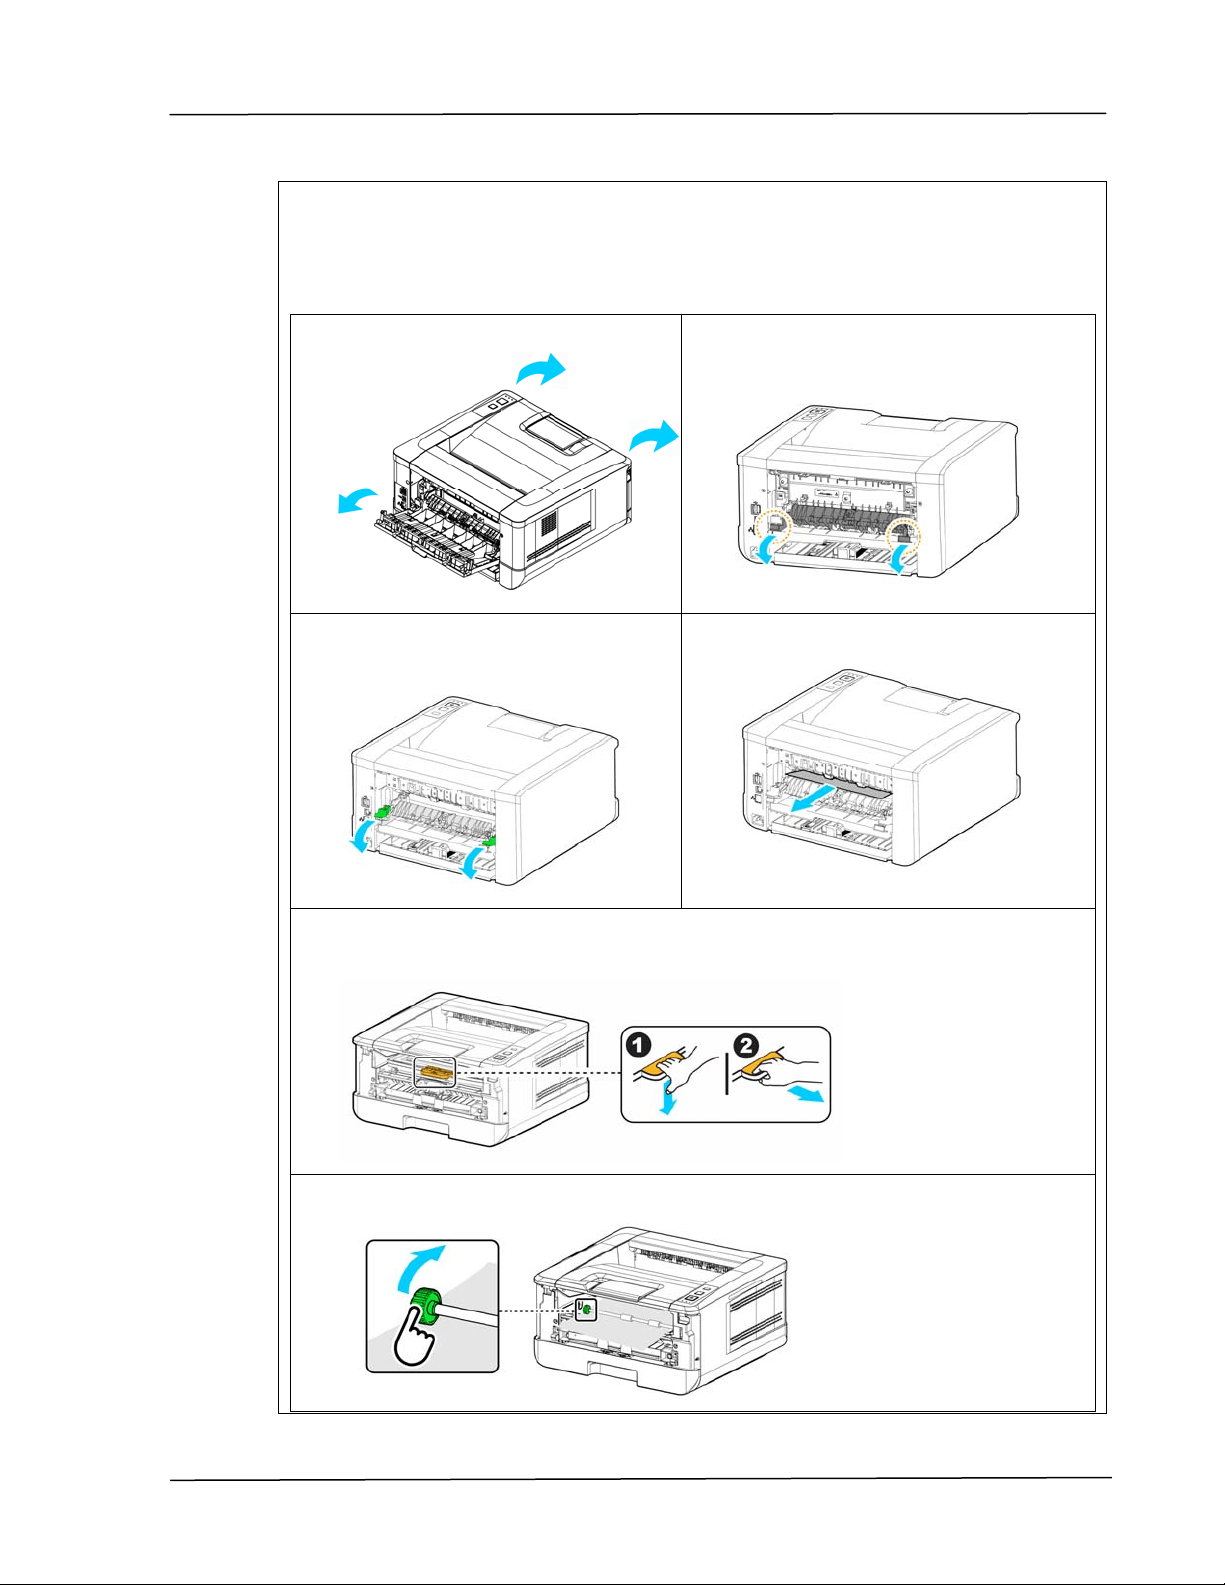
Troubleshooting
9 5
Fuser :
The area around the fuser is hot . To avoid a burn inj ury, be careful not t o t ouch
the fuser unt il it cools down and follow these st eps t o rem ove t he j am m ed
paper:
1 . Open t he Fron t Cover and the
Rear Cover .
2 . Pull dow n the Fuser Pa t h as
indicat ed.
3 . Pull down t he Re lea se Arm on
bot h sides.
4 . Slowly rem ove the j am m ed paper.
5 . I f there is difficult y to pull off t he j am m ed paper, rem ove the print er
cartridge first.
6 . Rot at e t he Release Wheel to slowly pull out the j am m ed paper.

User ’s Guide
9 6
Er ror Me ssage a nd Code s
Possible Ca uses or Solut ion
Syst em e r ror
Error (Num ber) .
Rest art PRI NTER. I f this error persists, call service personnel
for help.
300100 Print er API _NVRAM_RW_TEST_FAI L
300101 Printer API _NVRAM_WRI TE_FAI L
300102 Printer API _NVRAM_READ_FAI L
300200 Printer Flash Error
300201 Printer FLASH_BLOCK_ERASE_FAI LED
300202 Printer FLASH_CHI P_ERASE_FAI LED
300203 Print er FLASH_PROGRAM_FAI LED
201610
Printer LPH Error,LPH cable connection fails.
201650 Printer runtim e error.
201651 Firm ware error.
201701
Printer MB NVRAM:reading error
201702
Printer MB NVRAM:writ ing error
201703
Printer MB NVRAM:reading error while com paring
201704
Printer MB NVRAM:com paring error
201711
Print er Drum Unit NVRAM:reading error
201712
Print er Drum Unit NVRAM:writ ing error
201713
Print er Drum Unit NVRAM:reading error
201714
Print er Drum Unit NVRAM:com paring error
201721
Printer Toner NVRAM:reading error
201722
Printer Toner NVRAM:writing error
201723
Printer Toner NVRAM:reading error while com paring
201724 Printer Toner NVRAM:com paring error
201730 Printer uses wrong NVRAM Address.
302651 Net work_I NI T_FAI L , net work init ializat ion fails.
Troubleshooting
9 7
I m age Pr oblem Trouble shoot ing
Proble m I m a ge Ex a m ple
Solu t ion
Paper curls
1. Use paper of st andard weight : I f
you are using t hin paper, t ry t o use
paper of st andard weight (80
g/ m
2
) .
2. Use paper with less m oist ure: Load
the paper to t he paper t ray
im m ediat ely aft er rem oving t hem
from the packaging. Seal t he
rem aining paper w it h t he original
packaging to keep from t he
m oist ure absorption.
Light
print ( ent ir e
page)
1. Make sure t hat t he t oner cart ridge
is fully inst alled.
2. Make sure t hat t he Toner Save
sett ing is t urned off in t he print er
driver.
3. Try using a different t ype of paper.
4. The toner cart ridge m ight be
alm ost em pty. Replace the t oner
cartridge.
Light
prin t ( pa rt ia l
page)
1. Make sure t hat t he t oner cart ridge
is fully inst alled.
2. The toner level m ight be low.
Replace t he t oner cart ridge.
3. The paper m ight not m eet the
print er’s specificat ions ( for
exam ple, t he paper is t oo m oist or
too rough) .
Vert ica l w hit e
lines
Call t he service personnel for help.
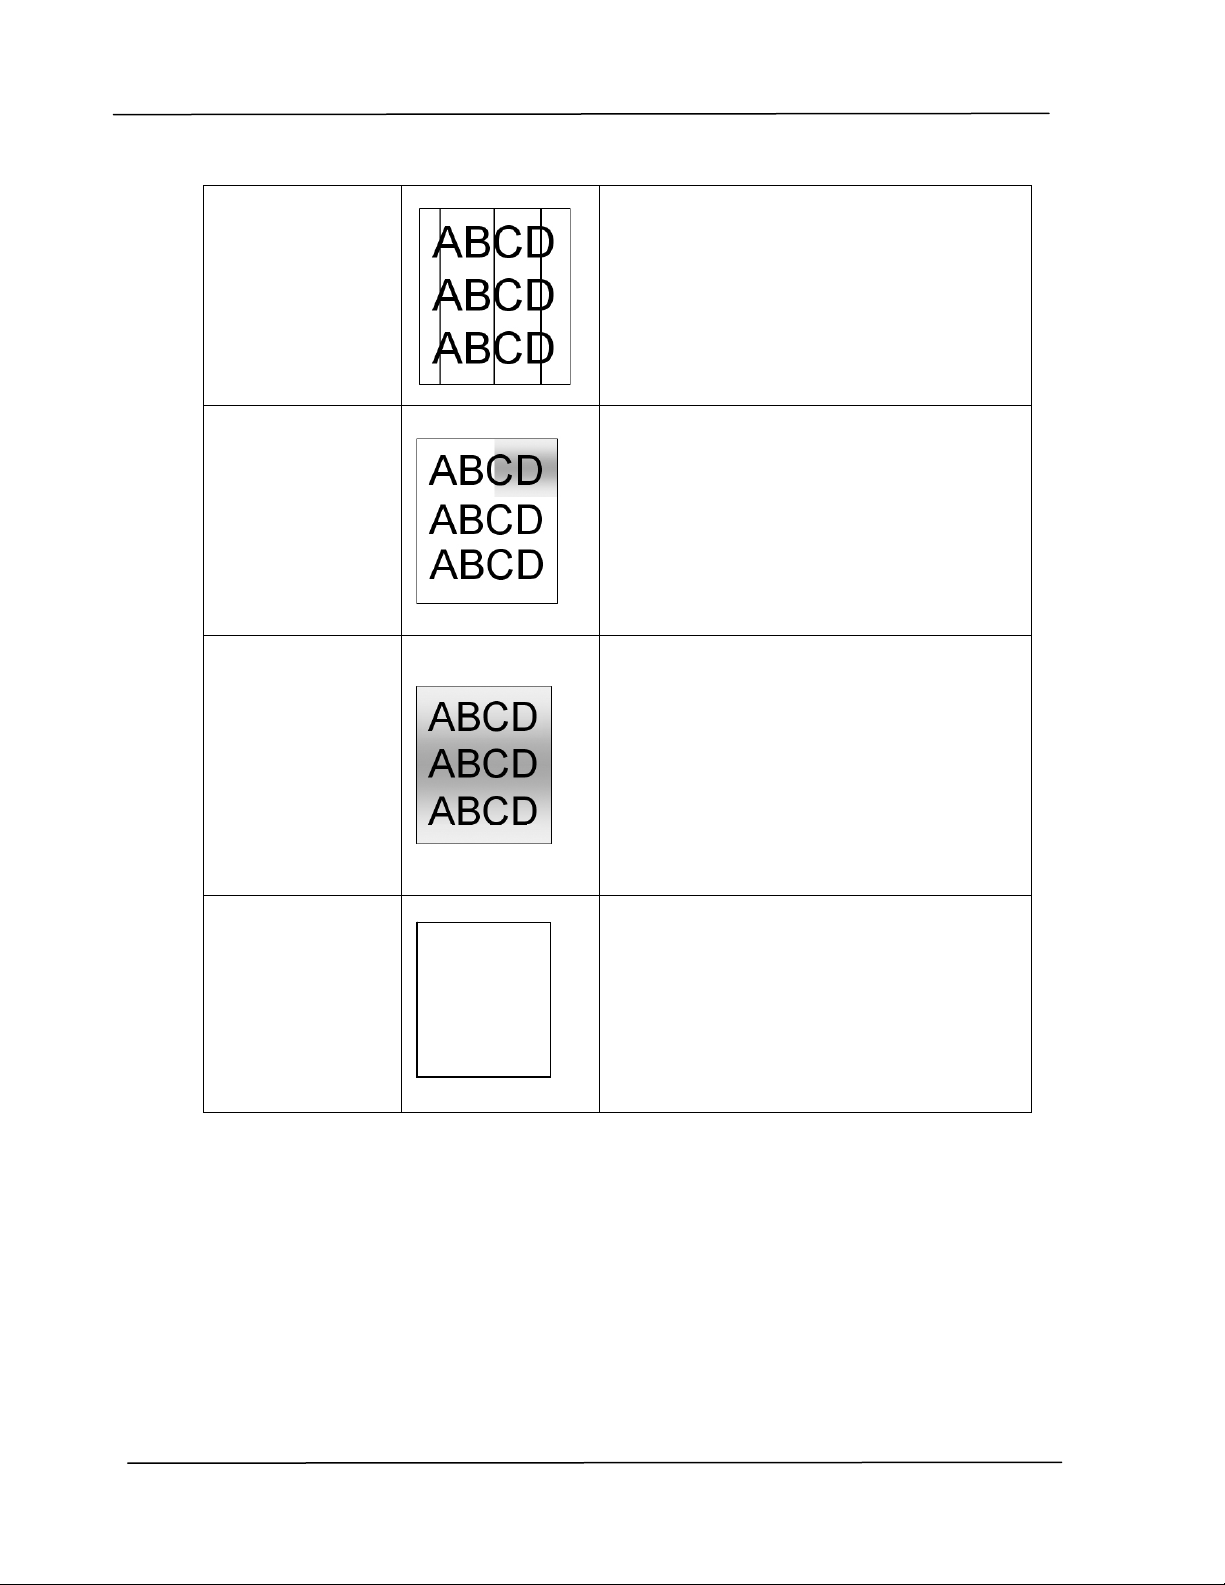
User ’s Guide
9 8
Vert ica l bla ck
lines
Please clean t he EP charger according t o
the procedure described in t his m anual
( p. 102) .
Dir t y
background( pa
rt ia l page)
Check if t oner is not leaked from the
toner cart ridge. I f so, replace the t oner
cartridge.
Dir t y
background
( ent ire page)
1. The paper m ight not m eet the
print er’s specificat ions ( for
exam ple, t he paper is t oo thin).
2. Check if t here is enough toner in
the t oner cart ridge. I f not , please
replace t oner cart ridge.
3. Call t he service personnel for help.
Print bla nk
page
Check if t here is enough toner in the
toner cart ridge. I f not , please replace
the t oner cart ridge.
I f t his error happens again, call ser vice
for help.
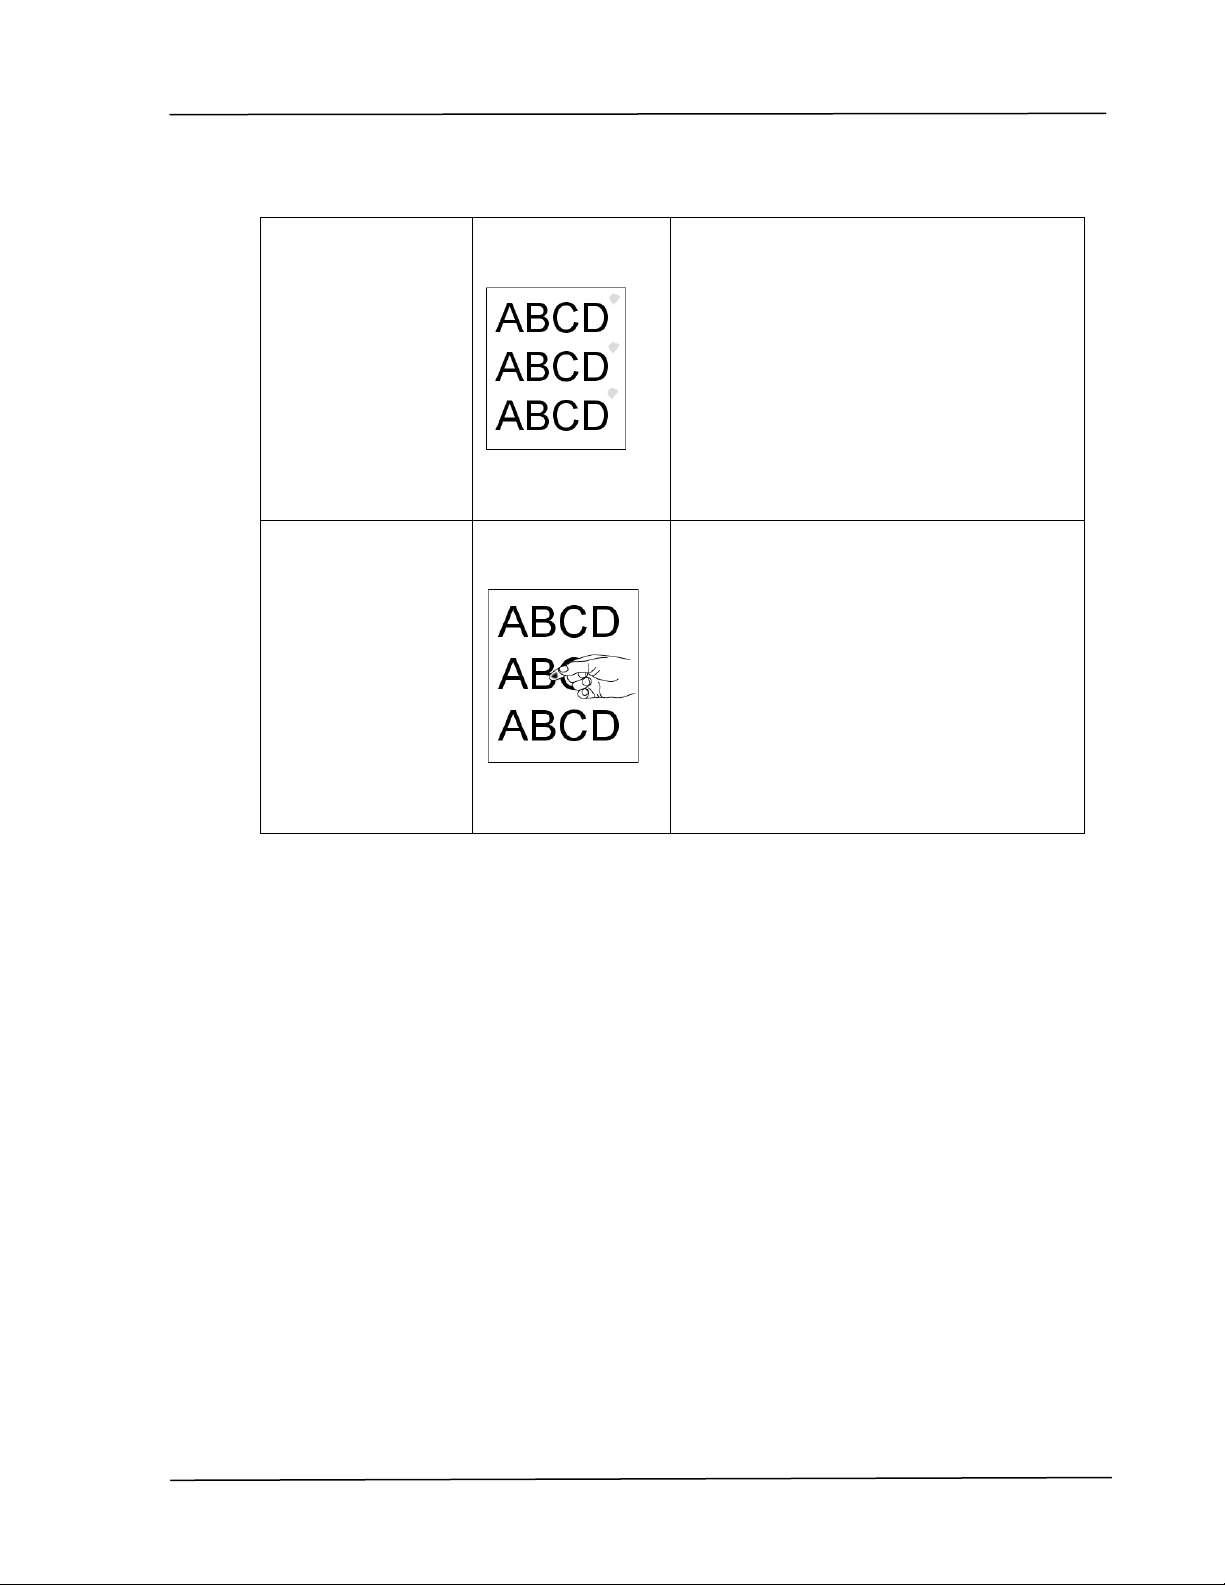
Troubleshooting
9 9
De fect iv e im a ge
of re gular
int er va l
1. Use a clean and soft clot h to wipe
the off t he dust or part icle on the
drum unit . ( See page 107)
2. I f the error occurs again, cont act
the service personnel.
Loose t one r
1. I f you have observed a rougher
texture on one side of your
paper, try print ing on t he
sm oot her side.
2. The paper m ight not m eet the
print er’s specificat ions ( for
exam ple, t he paper surface is not
sm oot h or paper t oo thick).
3. Media t ype incorrect . Please
choose proper m edia t ype for
your paper.

User ’s Guide
1 0 0
TECHN I CAL SUPPORT
I f your problem st ill ex ists aft er trying t he above solution, please contact our
technical support.
Hea dqua rt e r
Avision I nc.
No. 20, Creat ion Road I , Science- Based I ndust rial Park,
Hsinchu 300, Taiwan, ROC
TEL: + 886 ( 3) 578- 2388
FAX: + 886 (3) 577- 7017
Web Sit e: ht t p: / / www.avision.com .t w
US and Ca n ada Are a
Avision La bs, I nc.
6815 Mowry Ave., Newark CA 94560, USA
TEL: + 1 ( 510) 739- 2369
FAX: + 1 (510) 739- 6060
E- MAI L: support @avision- labs.com
Web Sit e:
ht t p: / / www.avision.com
China Ar ea
Shanghai Technica l Support Cent er
7A, No.1010, Kaixuan Road, Shanghai 200052 P.R.C.
TEL : + 86- 21- 62816680
FAX : + 86- 21-62818856
E- MAI L : sales@avision.net.cn
Web Sit e: htt p: / / www.avision.com .cn
Eur ope Are a
Avision Eur ope Gm bH
Bischofst r. 101 D- 47809 Krefeld Germ any
TEL: + 49- 2151- 56981-40
FAX: + 49- 2151- 56981- 42
E- MAI L: info@avision- europe.com
Web Sit e:
ht t p: / / www.avision.de
Espa ço Br asil
Avision Brasil Ltda.
Avenida Jabaquara, 2958 – Cj . 75 – Mirandópolis
São Paulo / SP
TEL: + 55- 11- 2925- 5025
E- MAI L: suport e@avision.com .br
Web Sit e: htt p: / / w ww.avision.com .br
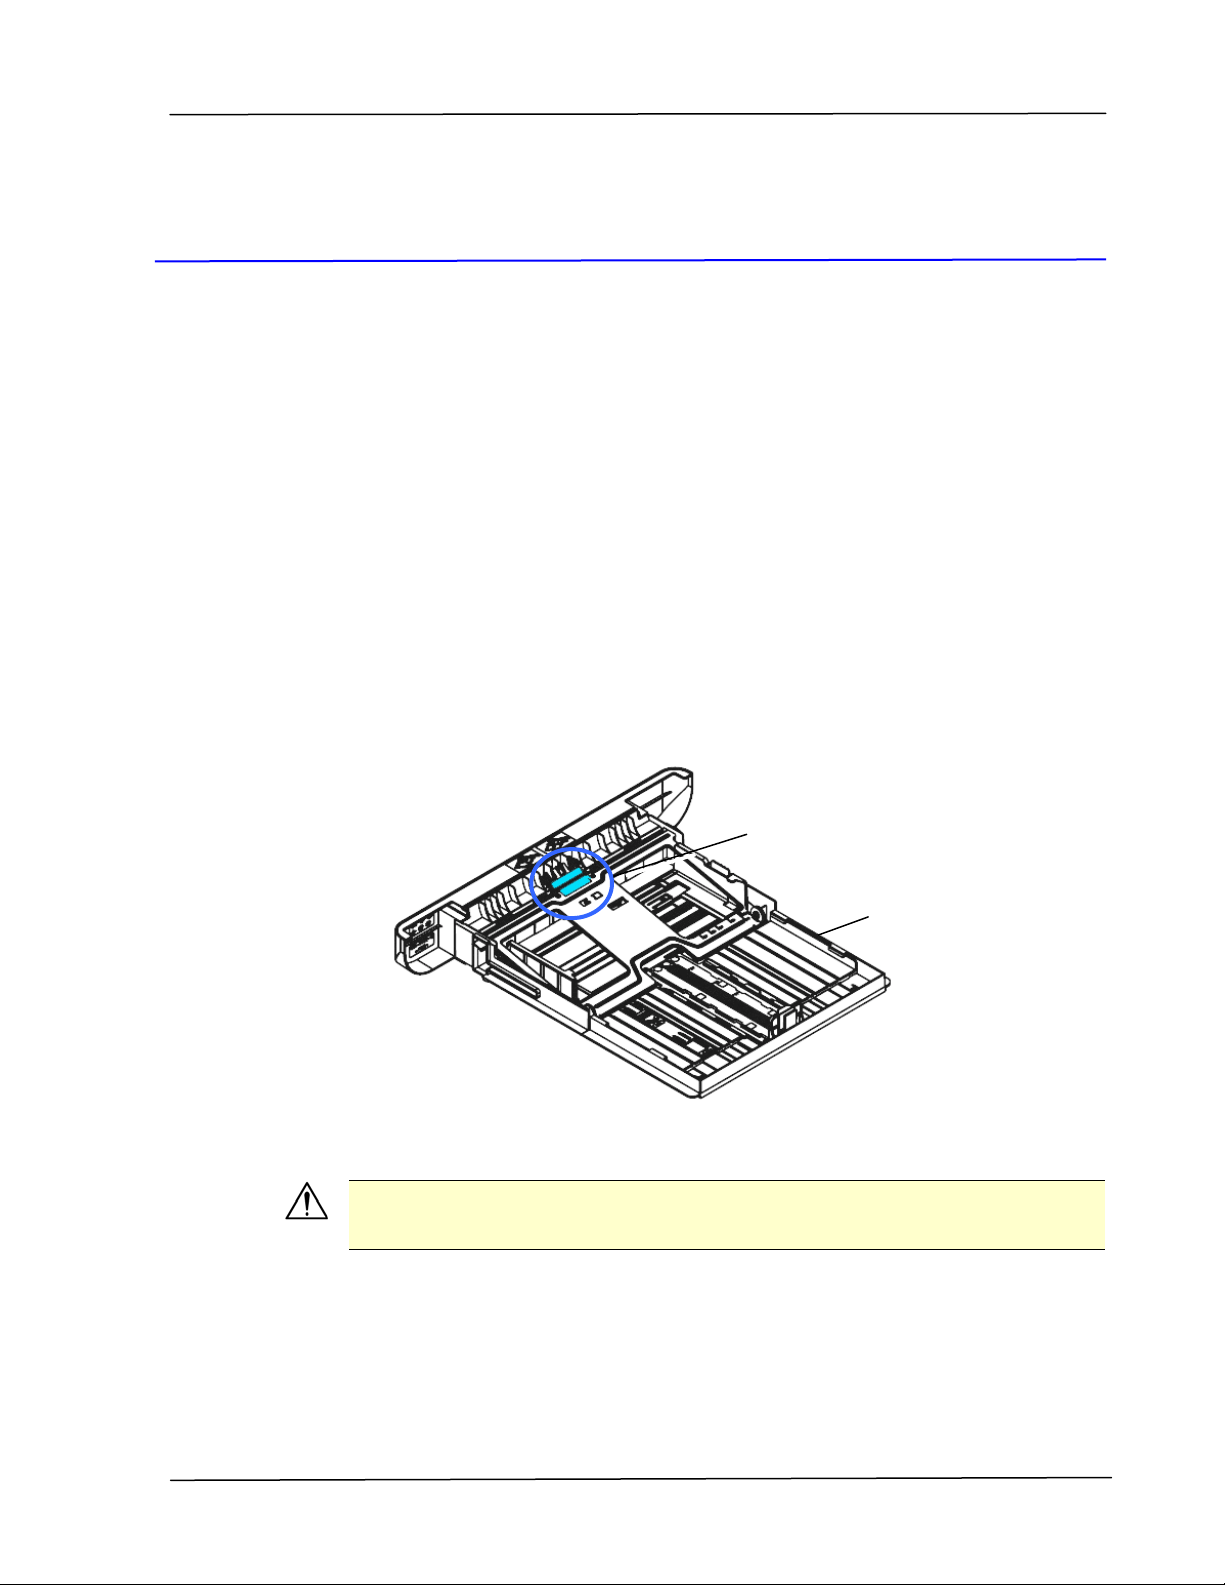
Ma int a ining t he Product
1 0 1
8 Maint aining t he Product
Cleaning t he Pad in t he Casset t e
I f t he Pad in t he Casset t e is sm eared with paper powder or dirt or every 30K
copies, paper m ay not feed sm oot hly or noise occurs during paper feeding.
Follow t he procedure below t o clean the Pad in t he Casset t e.
You need t o prepare: cot t on swab
1 . Rem ove all paper in the cassett e.
2 . Moist en a cot ton swab wit h isopropyl alcohol ( 95% ) .
3 . Clean t he rubber part of the pad.
I m por ta nt :
After cleaning t he sm eared Pad, dry it com plet ely.
Cassett e
Pad
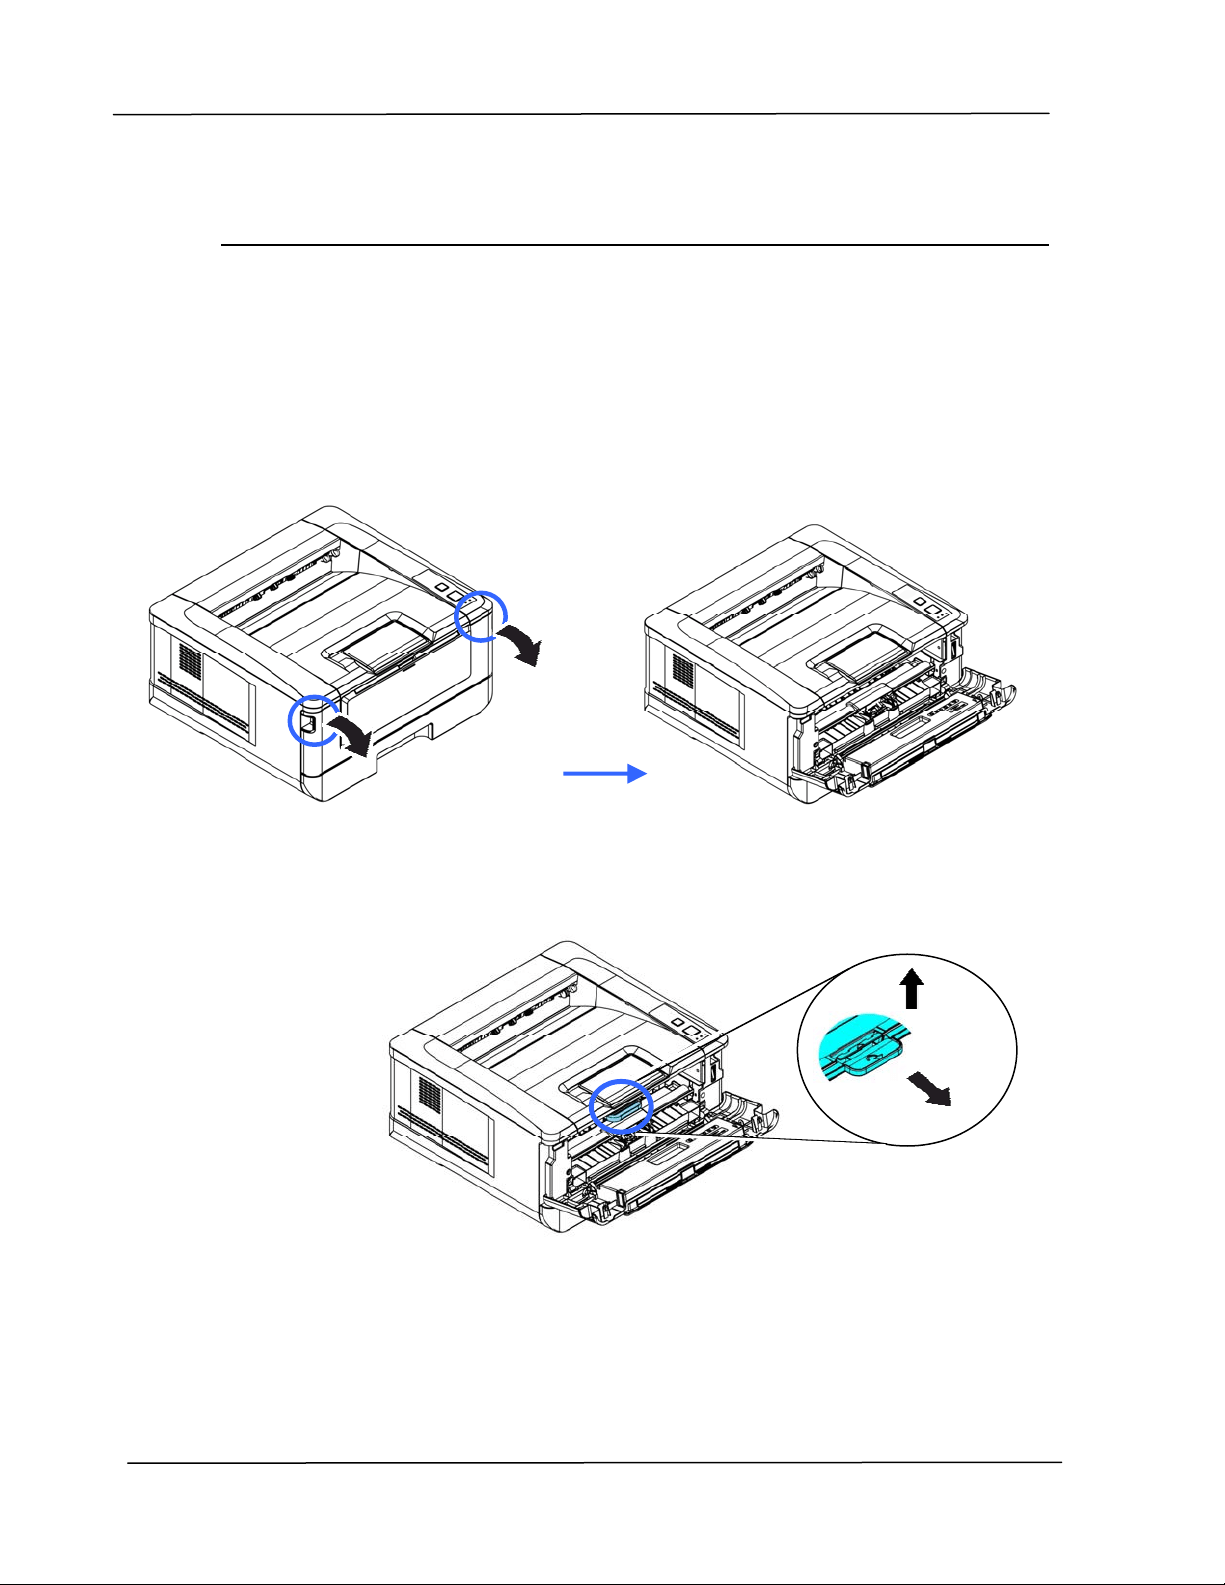
User ’s Guide
1 0 2
Cleaning t he Drum Unit
I f t he drum unit is sm eared wit h paper pow der or dirt , t he print out m ay appear
defect ive im age of regular int erval. Follow the procedure below t o clean the drum
unit .
1 . Turn off the power and rem ove t he power cord from t he power outlet .
2 . Open t he front cover by pulling t he handles on bot h sides as shown.
2 . Lift the handle of the drum unit and toner cart ridge assem bly and gently
rem ove the assem bly.
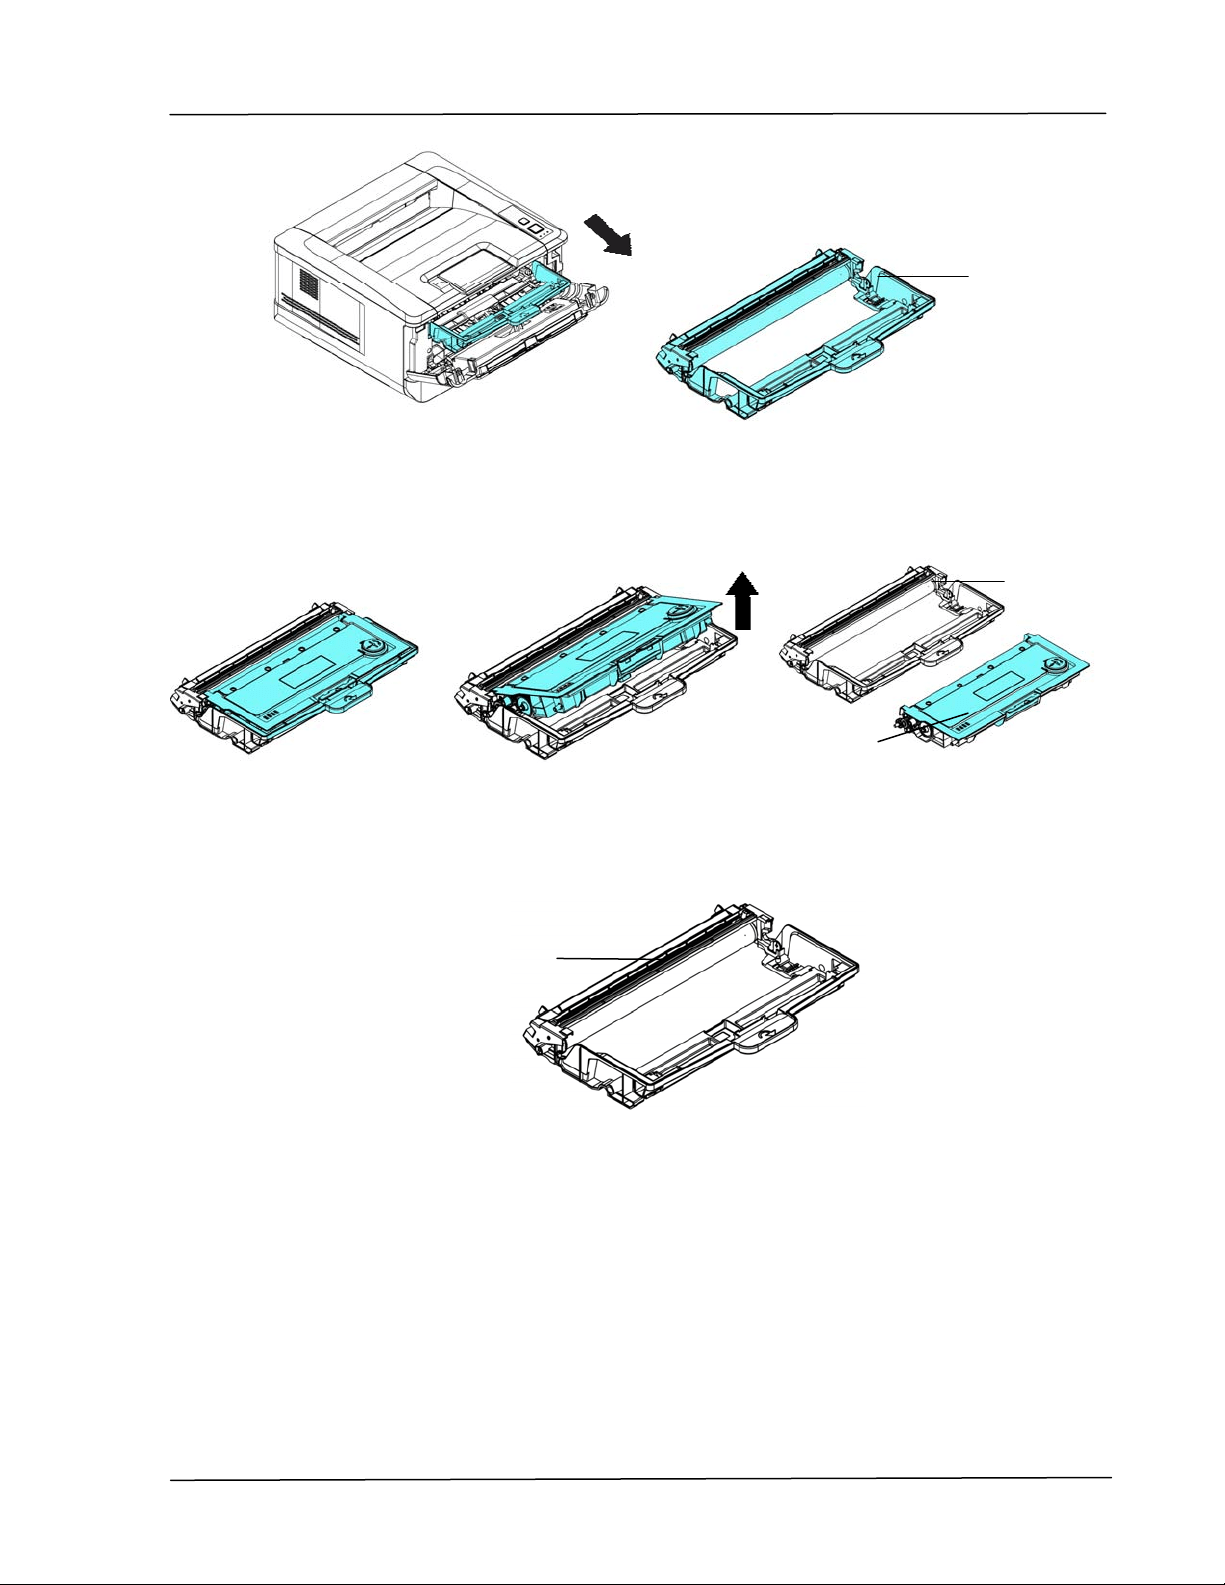
Ma int a ining t he Product
1 0 3
3 . Rem ove t he t oner cart ridge from t he drum unit as shown.
4 . Clean the drum unit wit h a clean and soft clot h.
Drum unit
Toner
Cart ridge
Drum unit
Clean t his area.
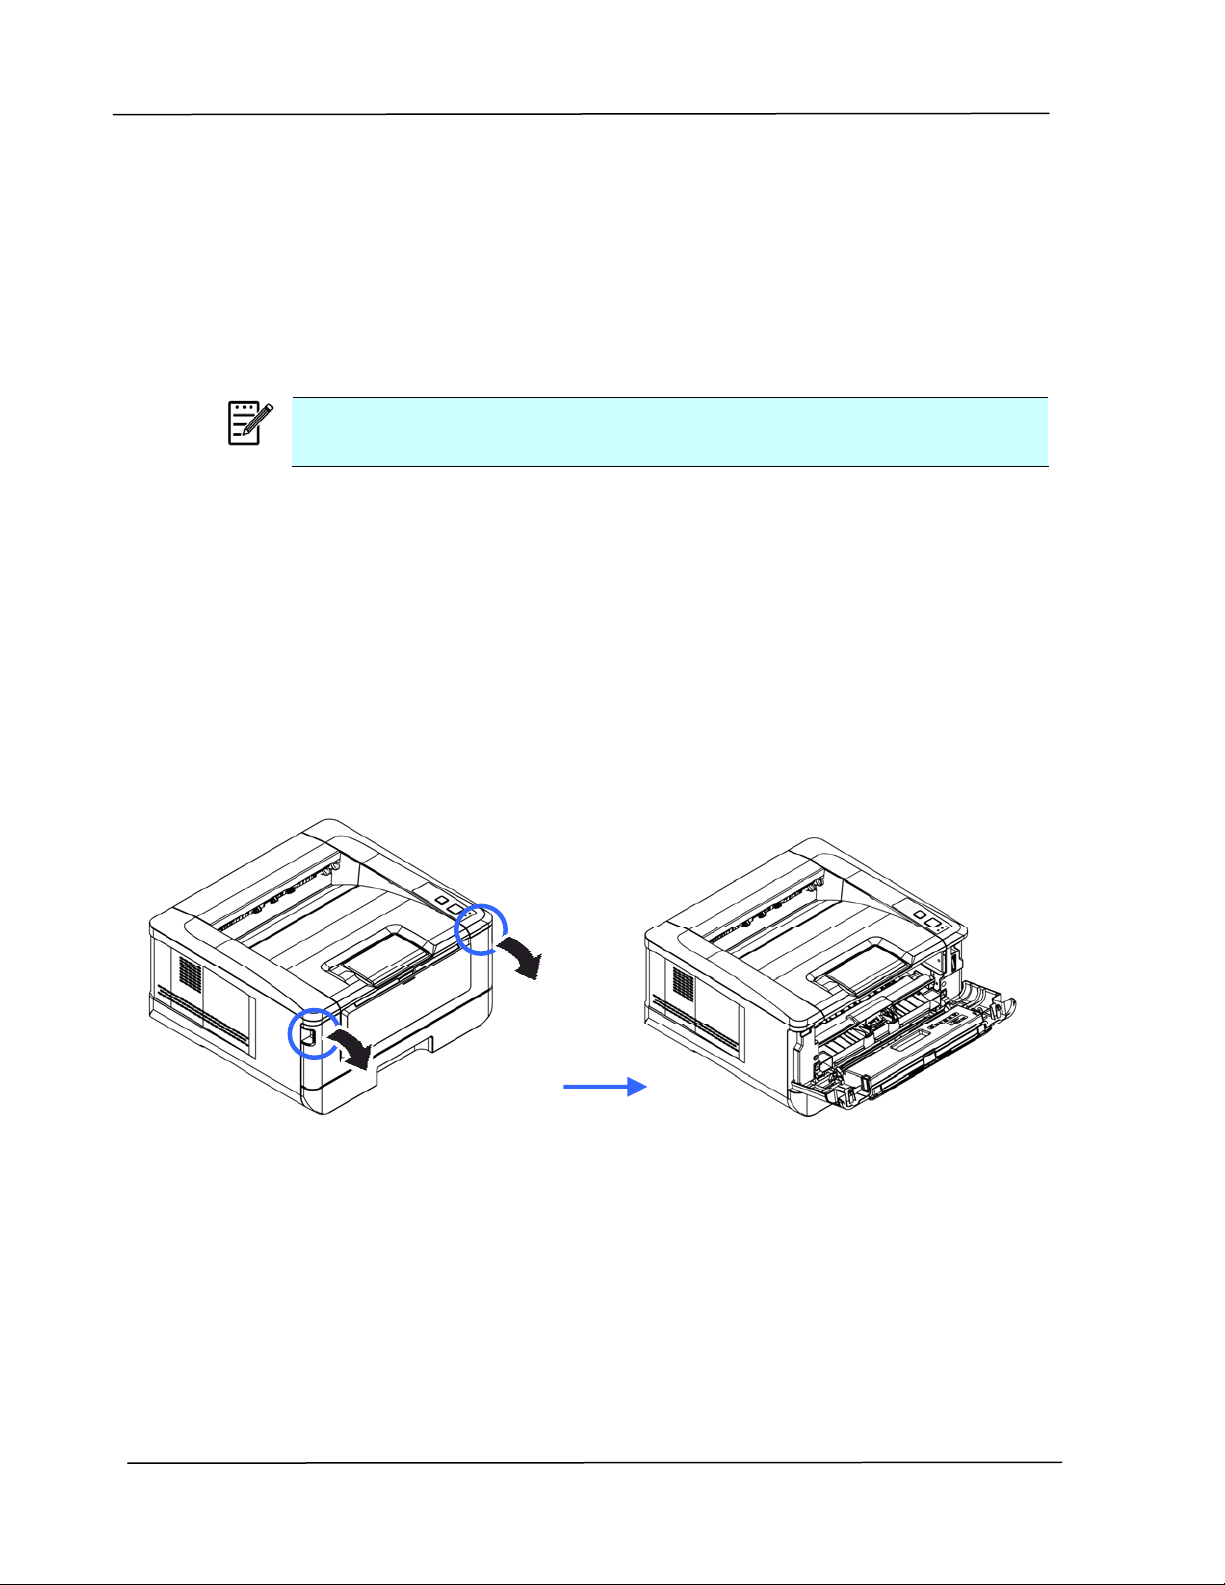
User ’s Guide
1 0 4
Replacing t he Toner Cart ridge
The t oner cartridge that com es with t he product needs t o be replaced aft er
printing approxim at ely 3,000 pages. When t he toner cartridge is running low, you
will be prom pt ed wit h a [ Ton e r Low ] m essage through t he printer m onit oring
program – [ Avision St a t us M on itor] . Buy a new t oner cart ridge and have it
ready before you receive [ Replace Tone r ] m essage.
N ot e :
The drum unit and t he toner cartridge are two separat e parts.
Follow t hese steps to replace t he t oner cart ridge:
Rem oving t he Tone r Ca rt ridge
3 . Turn off the power and rem ove t he power cord from t he power outlet .
4 . Open t he front cover by pulling t he handles on bot h sides as shown.
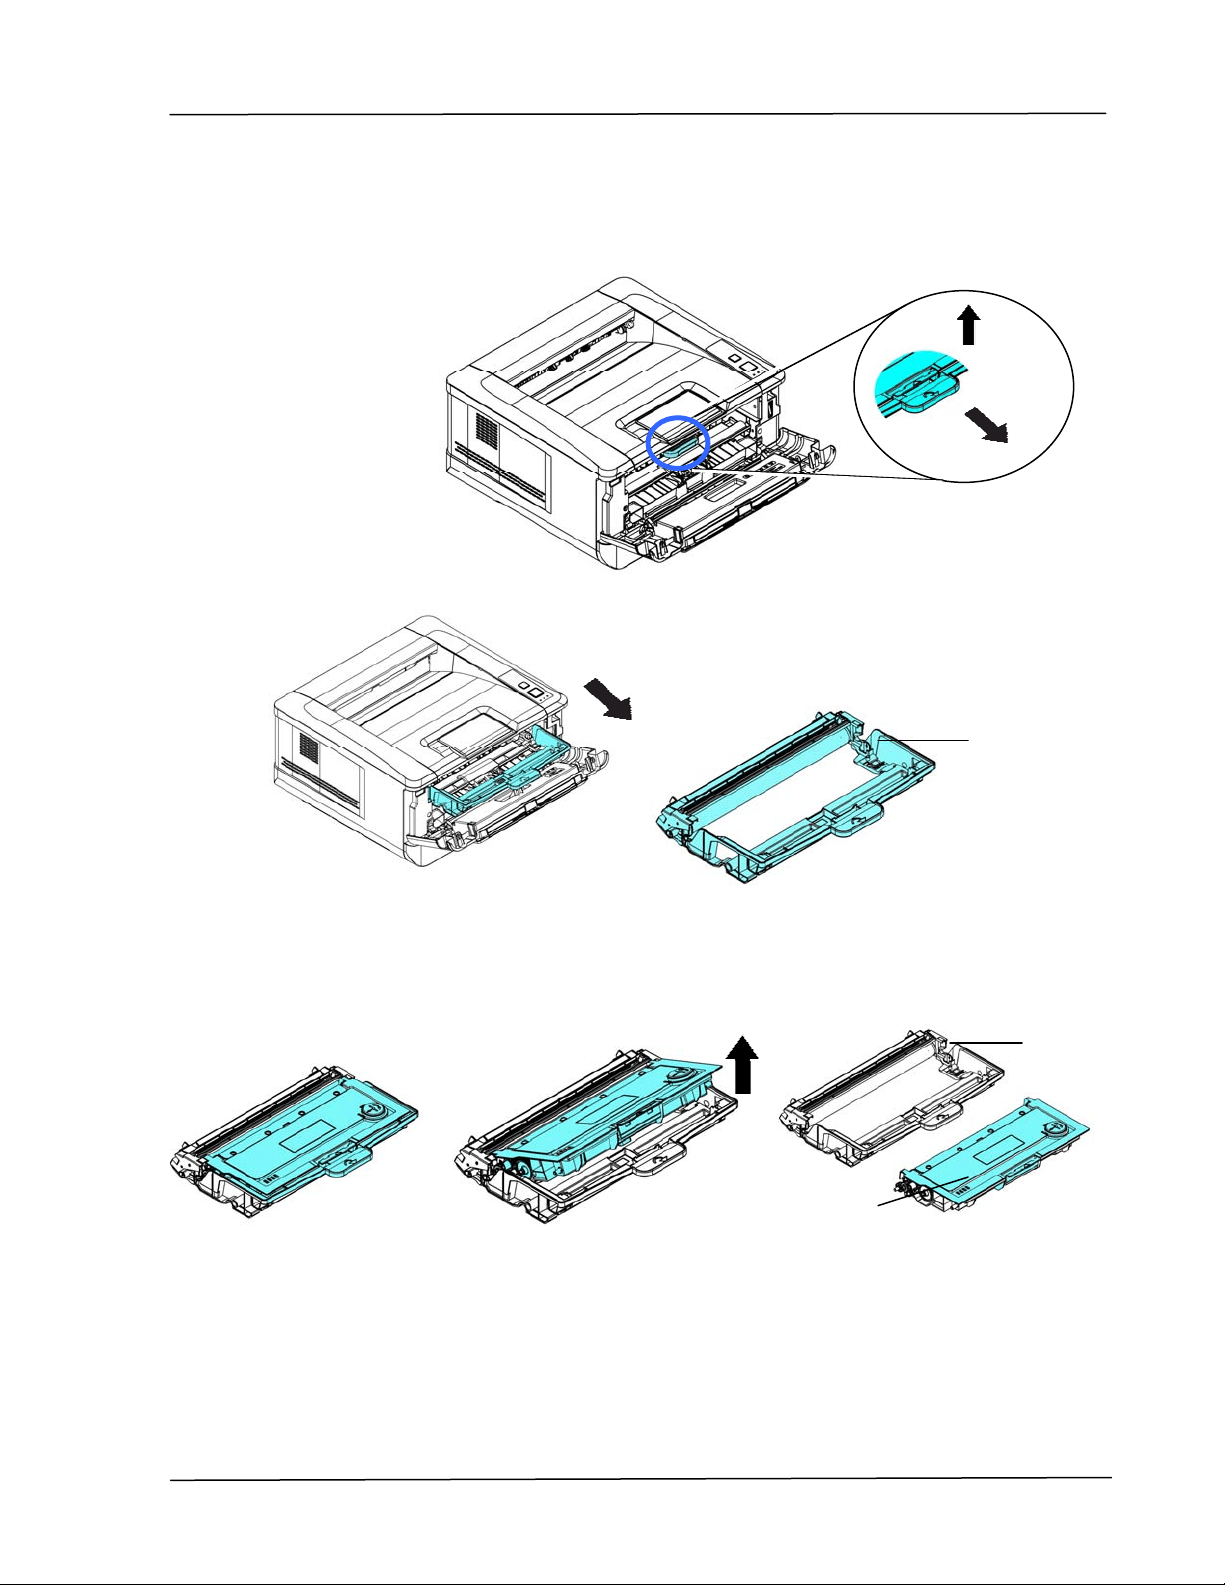
Ma int a ining t he Product
1 0 5
2 . Lift the handle of the drum unit and toner cart ridge assem bly and gently
rem ove the assem bly.
3 . Rem ove t he t oner cart ridge from t he drum unit as shown.
Drum unit
Toner
Cart ridge
Drum unit
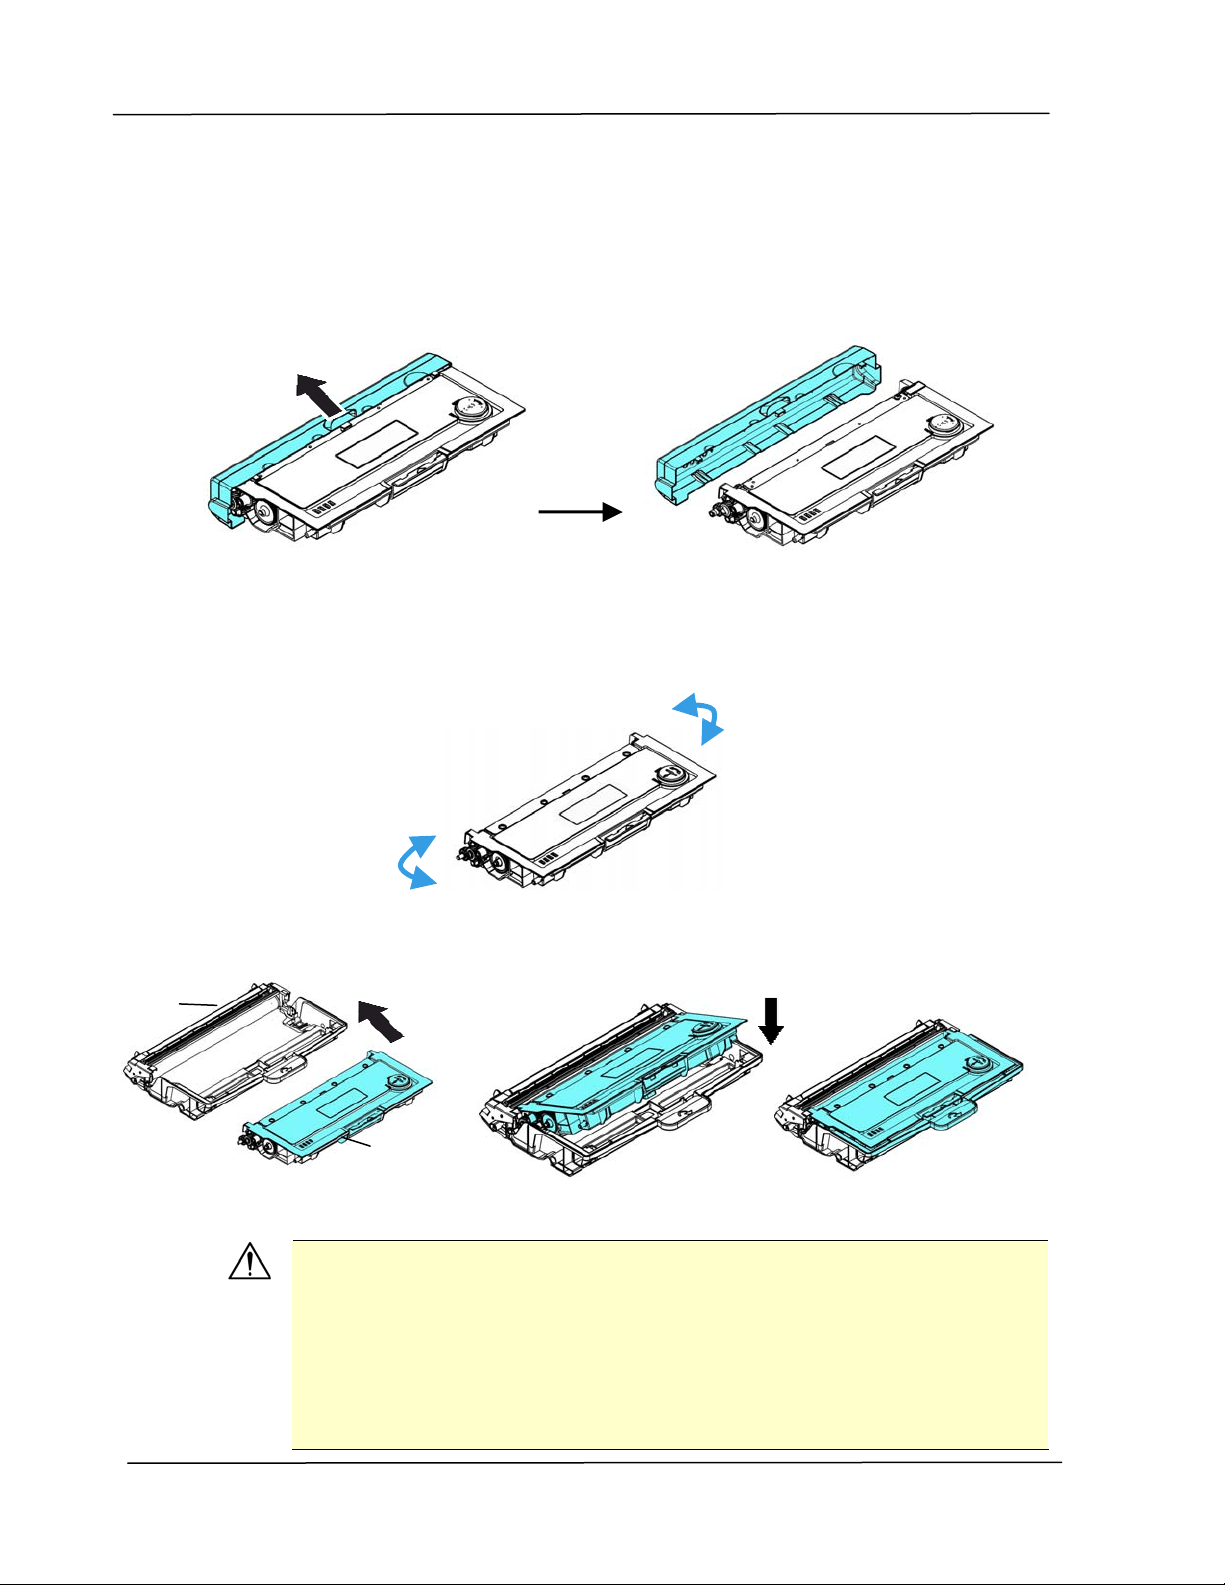
User ’s Guide
1 0 6
I nst a lling t he Toner Ca rt ridge
1 . Unpack the new t oner cart ridge.
2 . Rem ove the prot ective cover.
3 . Tilt the new t oner cartridge up and down and then right and left 10 tim es
to distribut e t he t oner evenly inside t he toner cartridge.
4 . I nst all the new t oner cart ridge t o the drum unit .
W a rnin g!
Be careful not to inhale t oner.
To avoid print qualit y problem s, DO NOT t ouch the t oner rollers.
I f toner gets on your clot hing or ot her fabric, wipe off the t oner
wit h a dry clot h. Wash the item s in cold wat er and air dry.
To prevent t he t oner cart ridge from dam age, do not expose it
m ore t han several m inutes.
Drum unit
Toner
Cart ridge
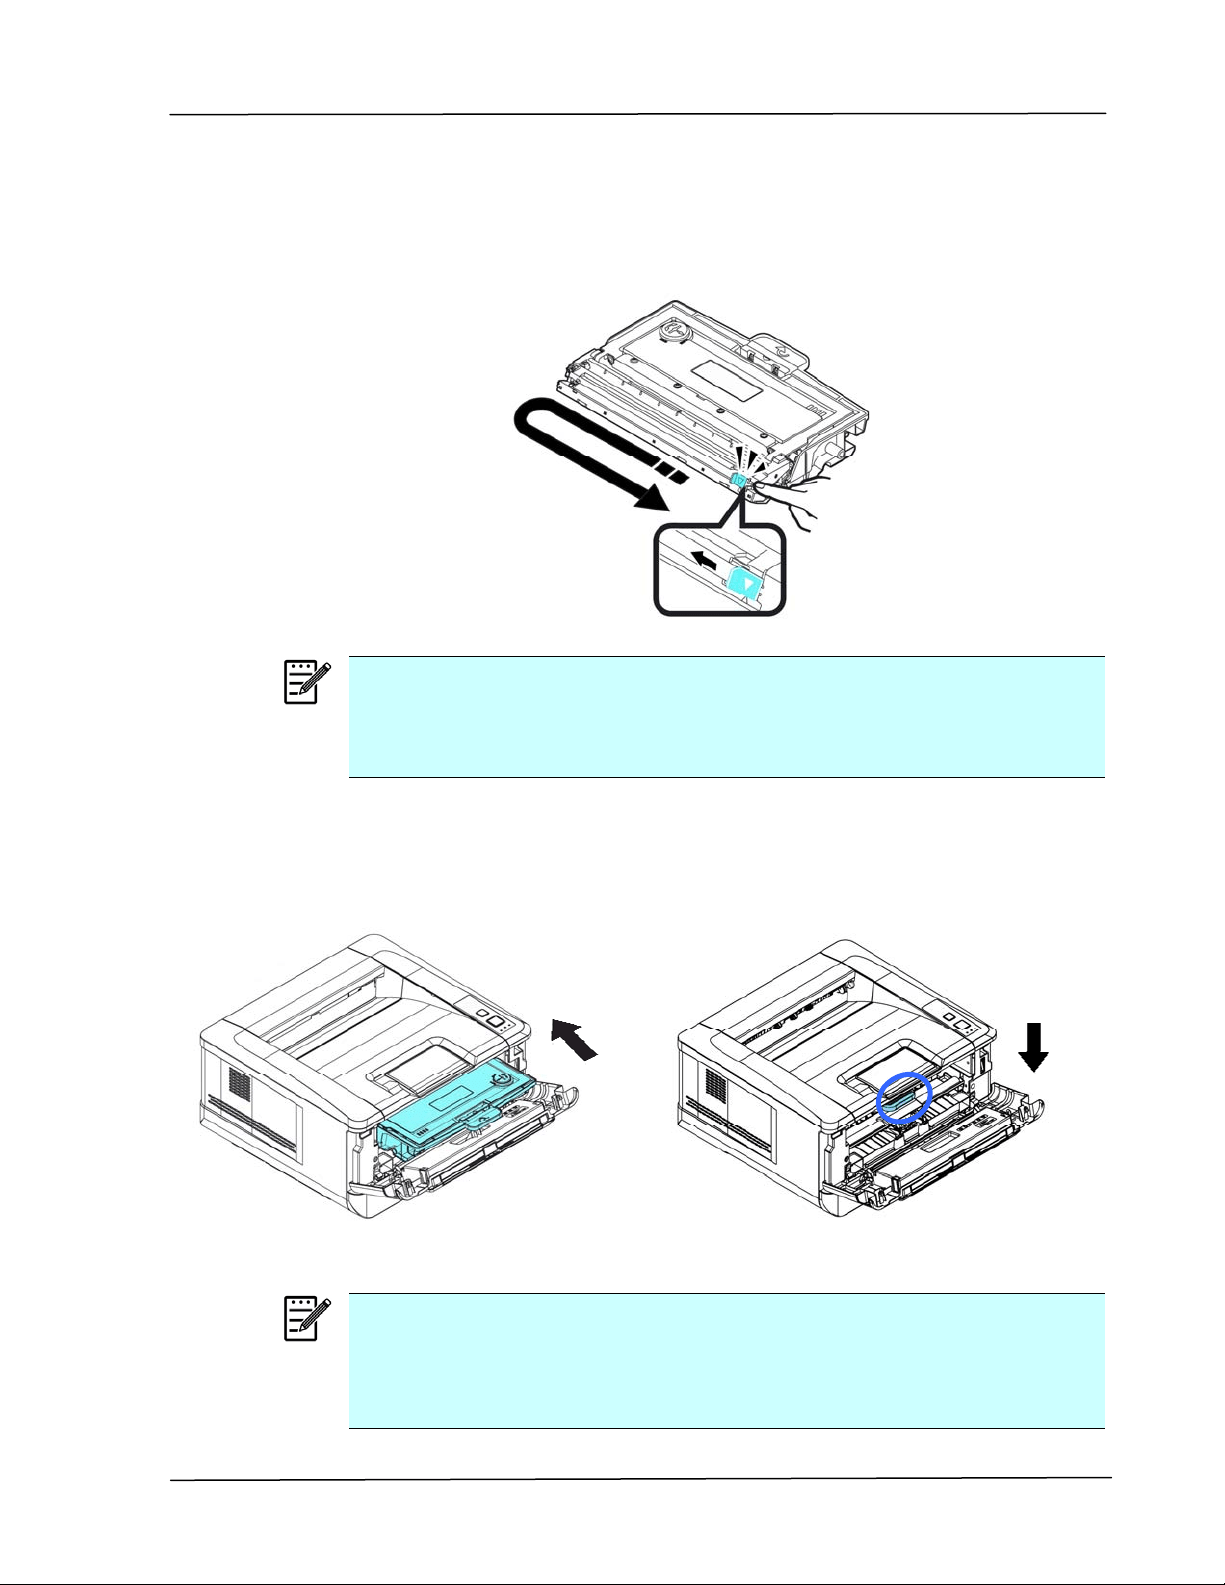
Ma int a ining t he Product
1 0 7
5 . Clean the corona wire inside t he drum unit by gent ly sliding the t ab from
left to right and right t o left for several t im es. (Aft er the t oner cart ridge
has been used for a period of t im e, som e am ount s of toner m ay rem ain
on t he corona wire.)
N ot e :
Be sure to ret urn t he tab t o the Hom e posit ion ( ▲) . The arrow on the
tab m ust be aligned wit h the arrow on the drum unit . I f it is not ,
printed pages m ay have a vert ical stripe.
6 . Hold t he handle of the t oner cart ridge assem bly and insert t he t oner
cart ridge assem bly t o it s original place. Press t he handle t o fix it firm ly in
place.
7 .
Close t he front cover.
N ot e :
Do not dispose of the t oner cart ridge. Put t he used toner cartridge into
the bundled plastic bag, and t hen ret urn it to a dealer or service
represent ative. The lat t er recycles or deals wit h t he collected t oner
cartridges in accordance wit h t he relevant regulat ions.
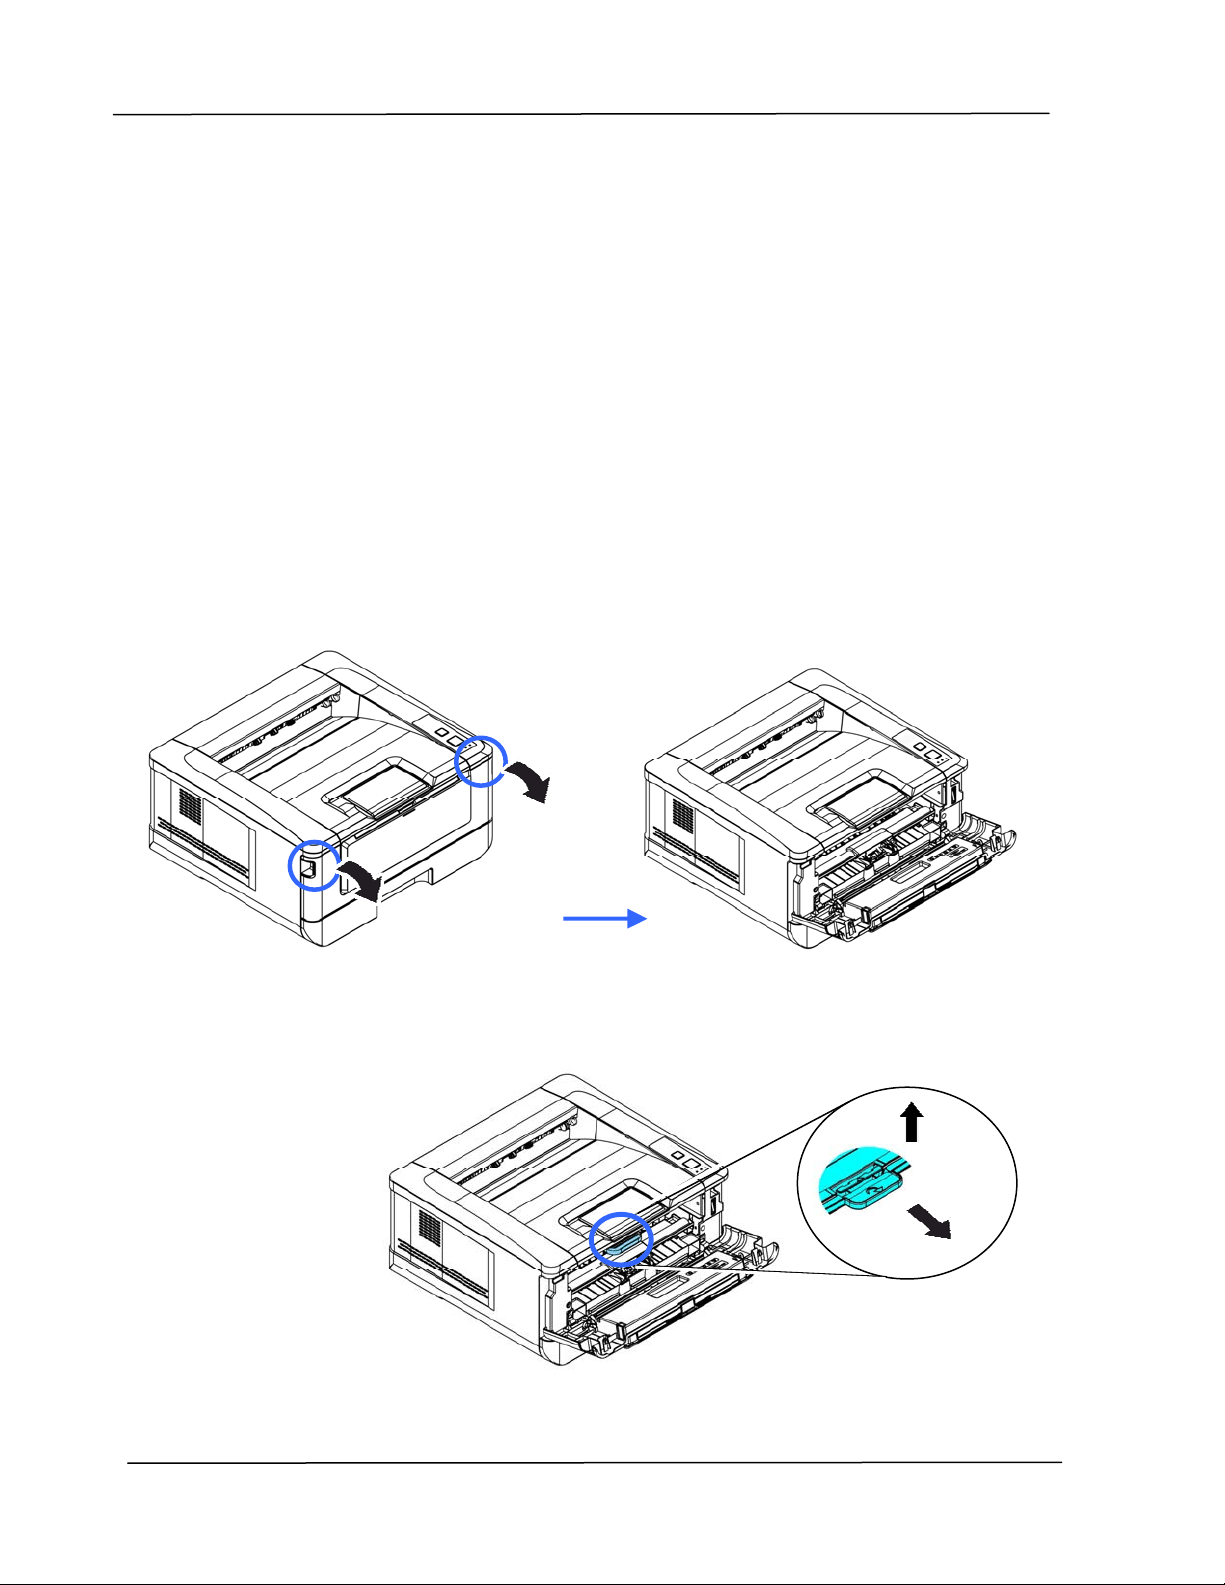
User ’s Guide
1 0 8
Replacing t he Drum Unit
The drum unit that com es with t he product needs t o be replaced aft er printing
approxim ately 12,000 pages. When the drum unit is running low, you will be
prom pt ed wit h a [ Dr um Unit Low ] m essage through t he print er m onit oring
program – [ Avision St a t us M on itor] . Buy a new t oner cart ridge and have it
ready before you receive [ Replace Dr um Unit ] m essage.
Follow t hese steps to replace t he t oner cart ridge:
Rem oving t he Drum Unit and t he Tone r Cart ridge Assem bly
4. Turn off t he power and rem ove t he power cord from the power out let .
5. Open t he front cover by pulling the handles on bot h sides as shown.
3 . Lift the handle of the drum and the toner cartridge assem bly and gent ly
rem ove the assem bly.
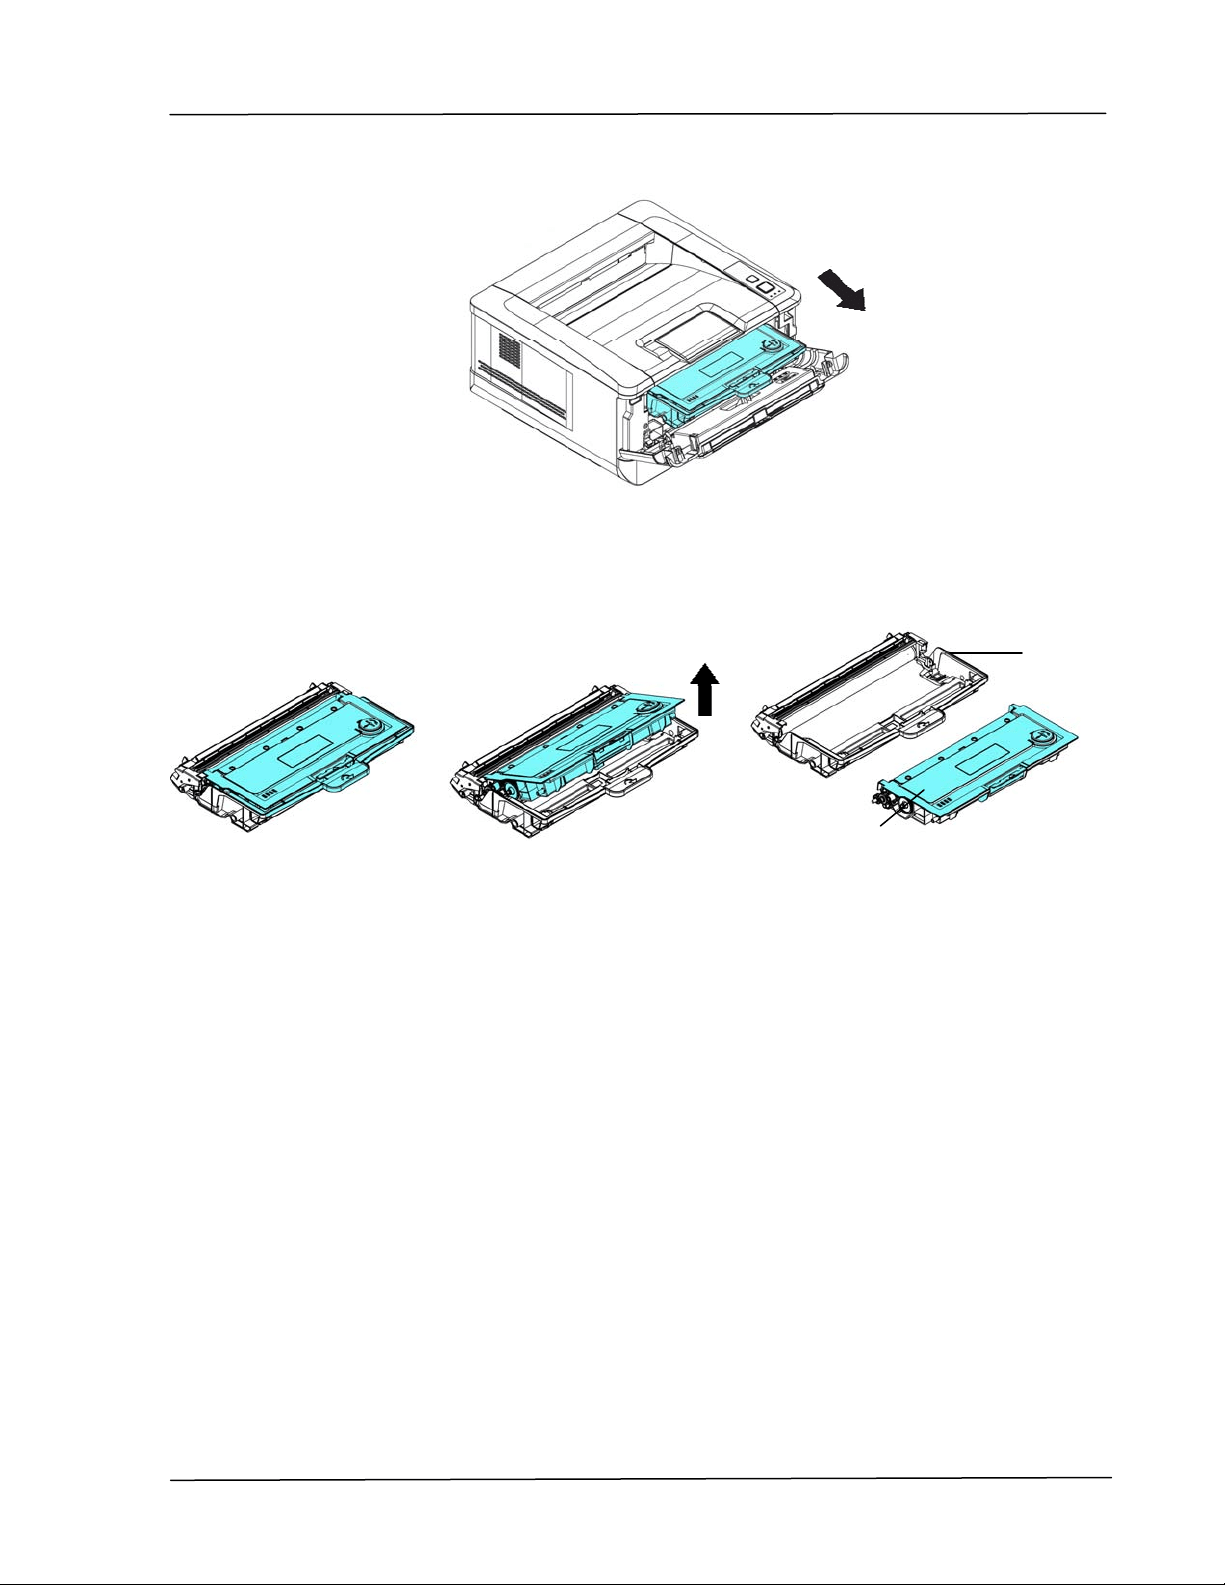
Ma int a ining t he Product
1 0 9
4 . Rem ove t he t oner cart ridge from t he drum unit as shown.
Drum unit
Toner
Cart ridge
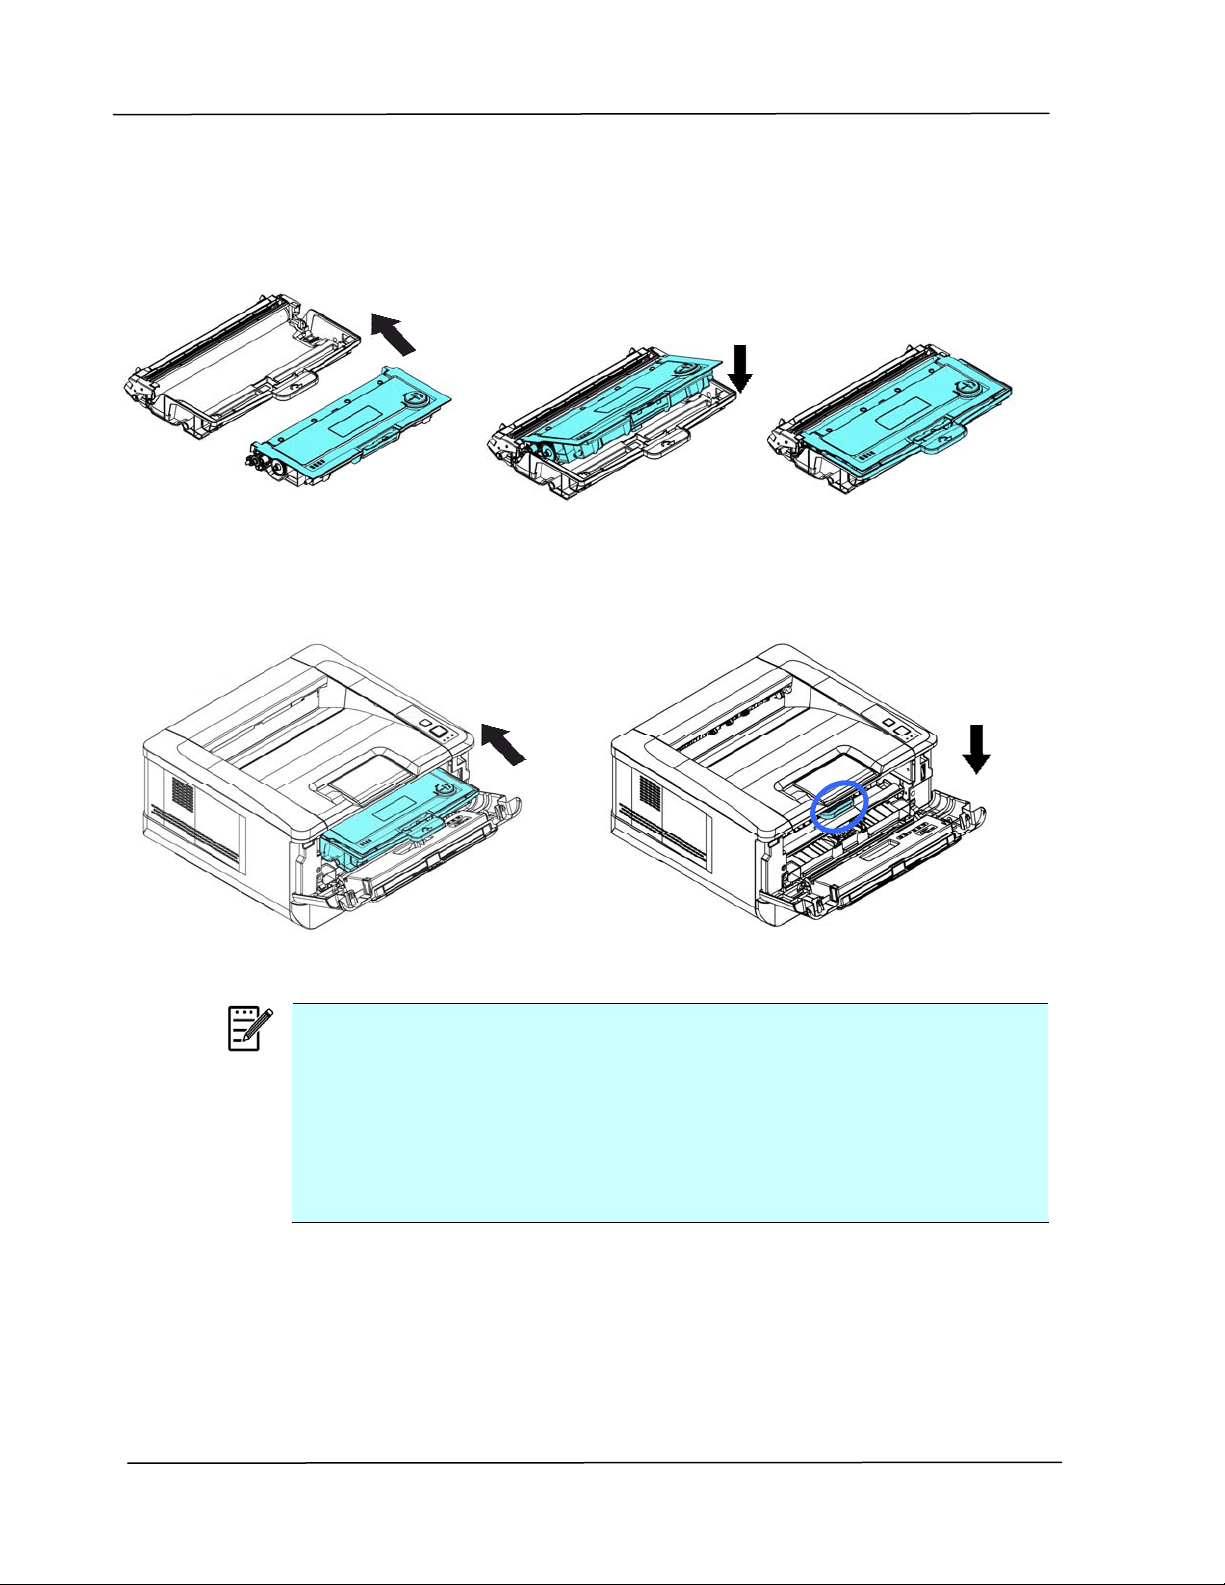
User ’s Guide
1 1 0
I nst a lling t he Drum Unit
1 . I nst all the t oner cart ridge t o the new drum unit.
2 .
Hold t he handle of t he t oner cartridge and insert t he t oner cart ridge to it s
original place. Press t he handle t o fix it firm ly in place.
N ot e :
I f toner get s on your clot hing or ot her fabric, wipe off t he toner
wit h a dry cloth. Wash t he item s in cold wat er and air dry.
Do not dispose of the t oner cart ridge. Put t he used toner cart ridge
into t he bundled plast ic bag, and then ret urn it to a dealer or
service represent at ive. The lat t er recycles or deals wit h t he
collect ed t oner cart ridges in accordance wit h the relevant
regulat ions.
4 .
Close t he front cover.

Specificat ions
1 1 1
9 Specifica t ions
All specificat ions are subj ect to change w it hout not ice.
Gene ra l
Regulat ory m odel nu m be r
AP30xyzzz( x= 0~ 9,A~ Z;
y= 1/ 2;
zzz= A/ D/ blank, P/ blank, F/ blank)
Processor 300MHz ARM9MP ( build in SOC)
Me m ory 128M DDR2 SDRAM
Ma x m edia size Legal size
Resolution 600 × 600 dpi
Print ing spee d 30 ppm
First pr int out t im e < 11 seconds
( A4 SEF, st andard tray)
W a rm up Tim e < 25 seconds
Recom m ended m onthly prin t
volum e
1,500 pages
Ma x im um m ont hly prin t du ty
cycle
15,000 pages
Paper ca pa cit y
10 pages(70 g/ m ² plain paper)
Pa pe r size
A4, A5, A6, B5, B6, Let ter, Legal
cust om ized size: 76.4 x 135 ~ 216 x 356 m m
Ma nua l
t ra y
Pa pe r w eight 60~ 163 g/ m ² ( 16~ 43 lbs)
Paper ca pa cit y
250 pages(70 g/ m ² plain paper)
Pa pe r size A4, A5, A6, B5, B6, Let ter, Legal
cust om ized size: 76.4 x 135 ~ 216 x 356 m m
Tra y 1
Pa pe r w eight 60~ 105 g/ m ² ( 16~ 28 lbs)
Pa pe r out put Top output
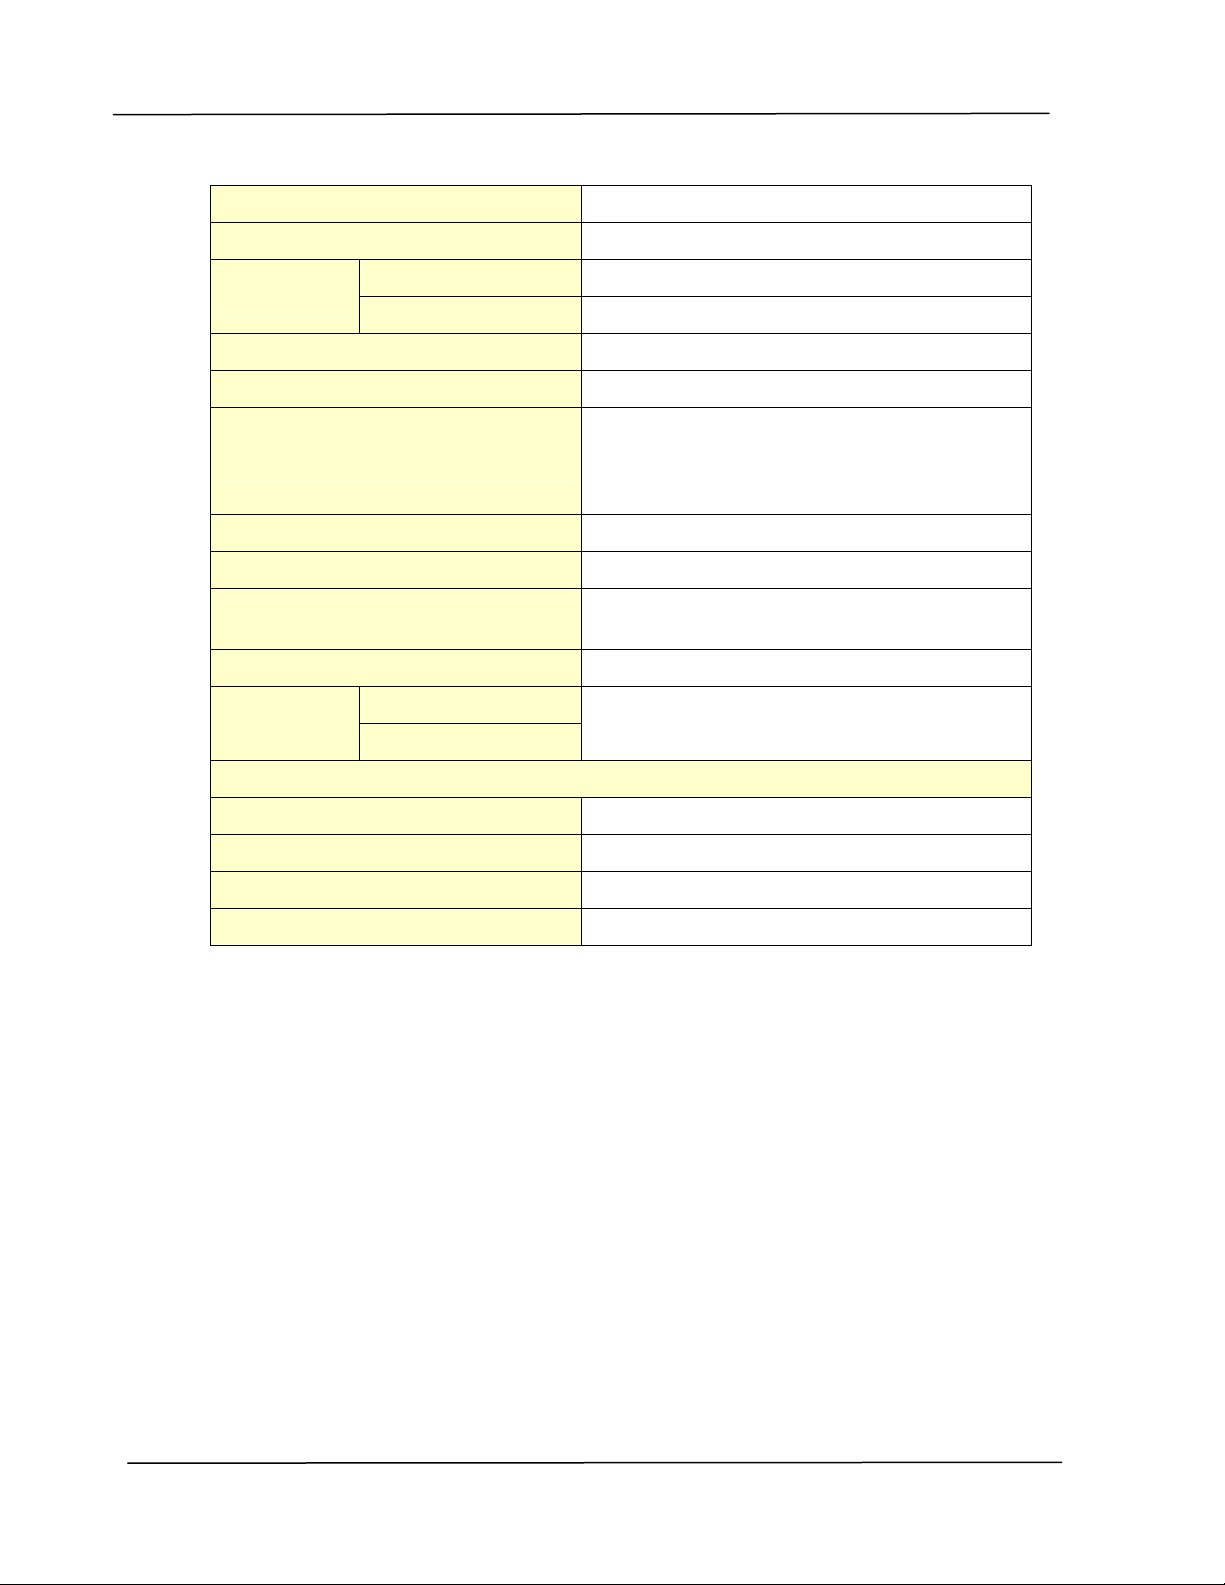
User ’s Guide
1 1 2
Paper output ca pa cit y 150 pages
Duplex print ing unit Build- in
Pa pe r size
A4, Let ter, B5
Duplex print
Pa pe r w eight 60~ 105 g/ m ² ( 16~ 28 lbs)
Conne ct ivit y
USB2.0,10/ 100Mbps Ethernet
Print e r la nguage GDI
Support ed ope ra t ion syst em
Windows XP, Windows 7, Windows 8,
Windows 10
Dim em sion ( W x Dx H ) 404 x 380 x 205 m m ( 15.9 x 14.9 x 8 in.)
W eight 8.5 kg ( 18.73 lb.)
Pow er source
100~ 120Vac, 60Hz,12A
Or 220~ 240Vac, 50/ 60Hz, 6.5A
Pow e r consum pt ion < 1.5kw
Tem pera t ure Opera t ion
Envir onm ent
Hum idit y
10° C~32° C
15% ~80% (no dew)
Produ ct Lifecycle
Print e r life 5 year or 60,000 pages
Tone r Cart r idge
3,000 pages(I SO19752)
Drum Unit 12,000 pages
Fuser 60,000 pages

Specificat ions
1 1 3
W i- Fi Spec.
Model: GWF- 7A05
St andard I EEE 802.11 b/ g/ n standards com pliant
Wireless LAN 1T1R Mode
Frequency Range
2.412 ~ 2.483GHz ( subject to local
regulat ions)
802.11n: 20MHz/ 40MHz
Num ber of Selectable
Channels
802.11b/ g: 13 channels
Data Rate
802.11n: up to 150Mbps
802.11b: DSSS 11Mbps
802.11g: OFDM 54Mbps
Transm it Power( EI RP)
802.11b: 18dBm + / - 1dB
802.11g: 15dBm + / - 1dB
802.11n: 14dBm + / - 1dB
Securit y
64/ 128- Bit WEP Key, WPA(TKI P wit h
I EEE802.1x), WPA2( AES wit h 802.1x) , AES