
Operating Instructions
(Household)
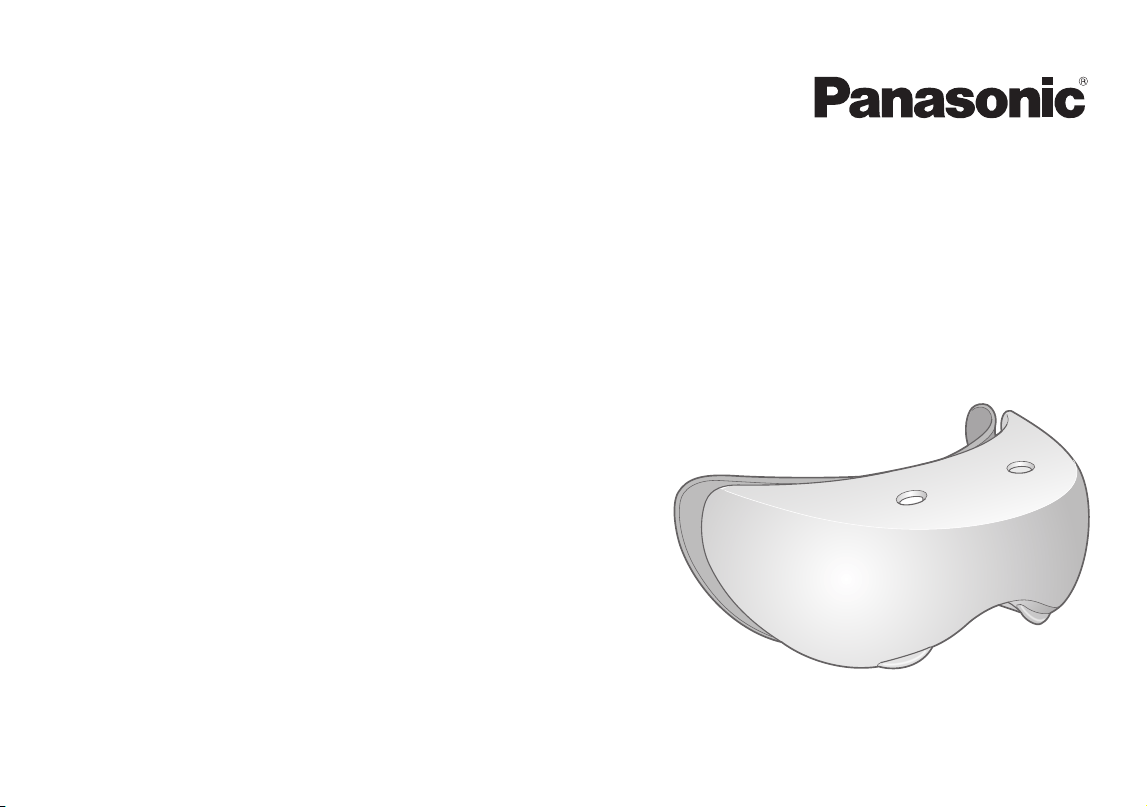
Eye warming massager
Model No.
EH‑SW50
English��������������������������������������������� 3
中文������������������������������������������������ 21

2
3
English
Operating Instructions
(Household)
Eye warming massager
Model No.
EH‑SW50
Thank you for purchasing this Panasonic product.
Before operating this unit, please read these instructions completely and save them for future use.
Safety precautions..................... 4
Beforeuse��������������������������������������������8
Partsidentication������������������������������9
Howtorecharge��������������������������������10
Howtouse����������������������������������������� 11
Howtoclean��������������������������������������15
Errordisplay��������������������������������������16
Troubleshooting��������������������������������17
Batterylife������������������������������������������19
Removingthebuilt‑inrechargeable
battery�������������������������������������������������19
Specications������������������������������������19
Contents
4
English
Safety precautions
To reduce the risk of injury, loss of life, electric shock, fire,
malfunction, and damage to equipment or property, always
observe the following safety precautions.
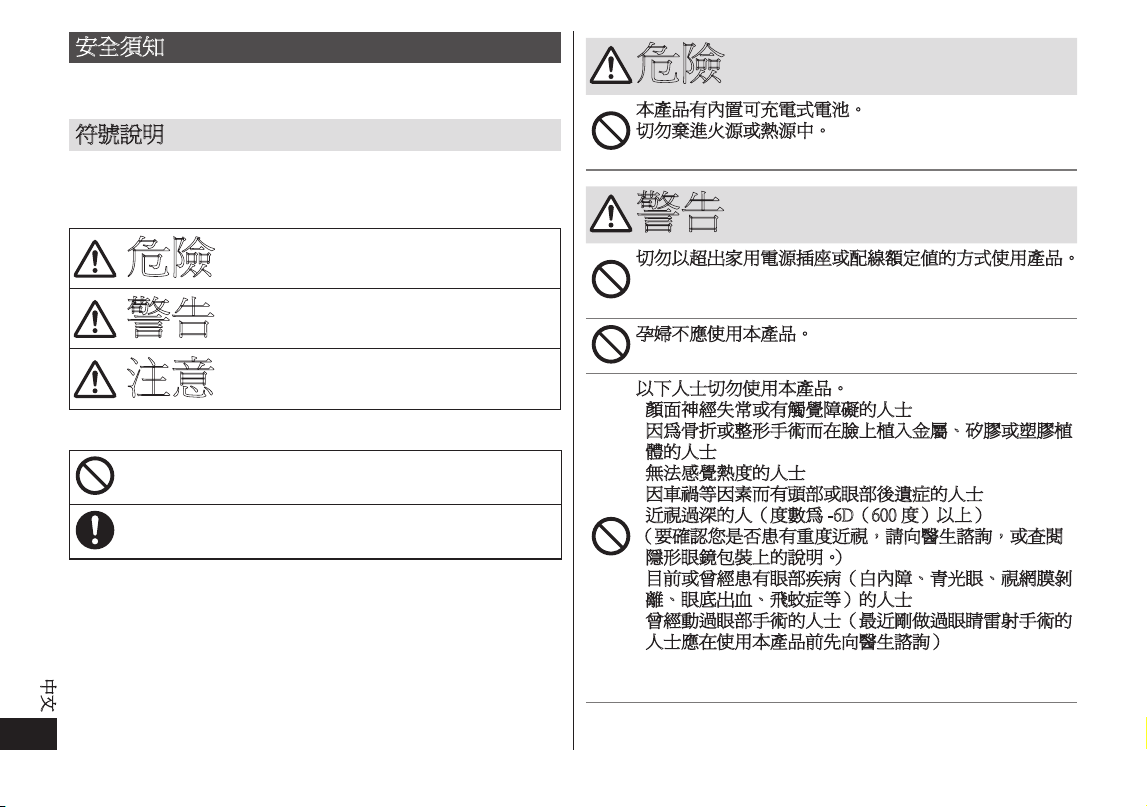
Explanation of symbols
The following symbols are used to classify and describe the
level of hazard, injury, and property damage caused when the
denotation is disregarded and improper use is performed.
DANGER
Denotes a potential
hazard that will result in
serious injury or death.
WARNING
Denotes a potential
hazard that could result
in serious injury or death.
CAUTION
Denotes a hazard that
could result in minor
injury.
The following symbols are used to classify and describe the
type of instructions to be observed.
This symbol is used to alert users to a specific
operating procedure that must not be performed.
This symbol is used to alert users to a specific
operating procedure that must be followed in order to
operate the unit safely.
DANGER
This product has a built-in rechargeable battery.
Do not throw into flame or heat.
-
Doing so may cause fluid leak, overheating, or explosion.
WARNING
Do not use in a way exceeding the rating of the
household outlet or the wiring.
-
Exceeding the rating by connecting too many plugs to
one household outlet may cause fire due to overheating.
Pregnant women should not use this appliance.
-Hormone imbalance may cause skin problems.
5
English
WARNING
The following people should never use this appliance.
•Persons with neurological disorders of the face or
esthesiodermia
•Persons who have metal, silicon, or plastic
implants in their face due to bone fractures or
plastic surgery
•Persons who cannot sense heat
•Persons suffering from head or eye aftereffects
due to traffic accidents, etc.
•Persons with strong myopia (over -6D)
(To check whether you have strong myopia,
consult your doctor or check the description on
the contact lens package.)
•Persons who suffer from or have suffered from eye
diseases (cataract, glaucoma, detached retina,
fundus hemorrhage, floaters, etc.)
•Persons who have undergone eye surgery
(persons who have recently undergone laser eye
surgery should consult with their doctor before
using this appliance)
-Doing so may cause accidents, problems, and
worsening of symptoms. In the worst case,blindness
may be led.
Do not use in following cases:
•When you feel sick or have a fever
•When your skin is injured or you have eczema or a
swelling
•When there are abnormalities on the skin such as
dermatitis or extreme sunburn
The following persons should not use this appliance:
•Persons with allergic diathesis
•Persons with skin diseases or atopic dermatitis
•Persons with sensitive skin
-Doing so may cause problems with the skin or body.
Do not store within the reach of children or infants.
In addition, do not allow them to touch or handle
this appliance.
-Doing so may cause burn, electric shock, or injury.
Never use the appliance if the AC adaptor is
damaged or if the power plug fits loosely in a
household outlet.
Do not damage or modify, or forcefully bend, pull, or
twist the cord.
Also, do not place anything heavy on or pinch the cord.
-Doing so may cause electric shock or fire due to a
short circuit.
Do not use anything other than the supplied AC
adaptor. Also, do not charge any other product with
the supplied AC adaptor.
-Doing so may cause burn or fire due to a short circuit.
Do not connect or disconnect the adaptor to a
household outlet or the main unit with wet hands.
-Doing so may cause electric shock or injury.
6
English
WARNING
Do not immerse the main unit and the AC adapter in
water or wash it with water.
-Doing so may cause electric shock or fire due to a
short circuit.
Never use the main unit and the AC adapter in a
bathroom or a shower stall.
-Doing so may cause electric shock or fire due to a
short circuit.
Do not modify or repair.
-Doing so may cause fire, electric shock, or injury.
Contact an authorized service center for repair (battery
change, etc.).
Never disassemble except when disposing of the
product.
-Doing so may cause fire, electric shock, or injury.
If you feel pain or feel odd on your skin or other part
of your body, immediately stop using this appliance.
-Failure to do so may lead to problems with the skin or
the body.
The following persons always have to consult a
doctor in advance.
•Persons who have had laser eye surgery
-Failure to do so may lead to problems.
Always ensure the appliance is operated on an
electric power source matched to the rated voltage
indicated on the AC adaptor.
Insert the adaptor and appliance plug all the way.
-Failure to do so may cause fire, electric shock, or burn.
Always unplug the adaptor from a household outlet
when cleaning.
-Failure to do so may cause electric shock or injury.
Immediately stop using and remove the adaptor if
there is an abnormality or failure.
-Using it in such conditions may cause electric shock,
injury or fire.
<Abnormality or failure cases>
•The main unit, adaptor, or cord is deformed or
abnormally hot.
•The main unit, adaptor, or cord smells of burning.
•There is abnormal sound during use or charging of
the main unit, adaptor, or cord.
-Immediately request inspection or repair at an
authorized service center.
This appliance is not intended for use by persons
(including children) with reduced physical, sensory
or mental capabilities, or lack of experience and
knowledge, unless they have been given
supervision or instruction concerning use of the
appliance by a person responsible for their safety.
Children should be supervised to ensure that they
do not play with the appliance.
-Failure to do so may cause an accident or injury.
7
English
WARNING
The supply cord cannot be replaced. If the cord is
damaged, the AC adaptor should be scrapped.
-Failure to do so may cause an accident or injury.
Regularly clean the power plug and the appliance
plug to prevent dust from accumulating.
-Failure to do so may cause fire due to insulation failure
caused by humidity.
Disconnect the adaptor and wipe with a dry cloth.
CAUTION
Do not wrap the cord tightly around the adaptor
when storing.
-Doing so may cause the wire in the cord to break with
the load, and may cause fire due to a short circuit.
Do not allow pins or trash to adhere to the power
plug or the appliance plug.
-Doing so may cause electric shock or fire due to a
short circuit.
Do not engage in any other activities while wearing
the main unit.
-Doing so may lead to unexpected accidents.
Do not drop or subject to shock.
-Doing so may cause injury.
Be sure to remove false eyelashes before using this
appliance.
-Failure to do so may lead to eye injury or inflammation.
Disconnect the adaptor from the household outlet
when not charging.
-Failure to do so may cause electric shock or fire due to
electrical leakage resulting from insulation
deterioration.
Disconnect the adaptor or the appliance plug by
holding onto the adaptor or appliance plug instead
of the cord.
-Disconnecting by holding onto the cord may cause
electric shock or injury.
The appliance should be cleaned to avoid the
accumulation of grease and other residues.
-
Failure to do so may result in problems with skin or body.
The appliance has a heated surface.
Persons insensitive to heat must be careful when
using the appliance.
-Failure to do so may cause an accident or injury.

8
English
Before use
•Excessive care of the skin is bad for your skin.
As a general rule, when first using this appliance, use only
two to three times per week with more than 24‑hour intervals.
After a month of use, use the appliance once each day as a
rough standard.
Check the skin condition and adjust the number of times
used and the amount of time for one session.
•It is recommended to start using this appliance from the
LOW mode.
•Close your eyes and relax while in use.
•When using eye drops, allow some time interval before using
this appliance.
•Do not use this appliance together with eye packs.
•If you feel too much heat on or around your eyes, stop using
the appliance immediately. Or when using the appliance in
the HIGH mode, switch to the LOW mode.
If you still feel heat even in the LOW mode, place cotton
between your skin and the main unit during use.
•If there is any problem with your skin or eyes during use,
stop using the appliance immediately and consult a doctor.
•While using this appliance, eyelash extensions may come off,
and contact lenses may slip out of place.
•While using this appliance, your eyes get warm and may
temporarily get redden. This does not indicate a problem.
If the symptoms do not improve, consult an eye doctor.
•When the area around eyes gets warm as a result of using
this appliance, your eyes may temporarily get redden. This
will fade in time and does not indicate a problem.
If this bothers you, place cotton between your skin and the
main unit.
•Please note that when wearing the band while going out or
shortly before going out, the main unit may leave a mark on
your face.
•Do not fall into a deep sleep while wearing this appliance.
•Your makeup may come off.
•If you use the band when it is wet, color staining may occur.
•If you feel the extreme heat, immediately stop using the
appliance.
9
English
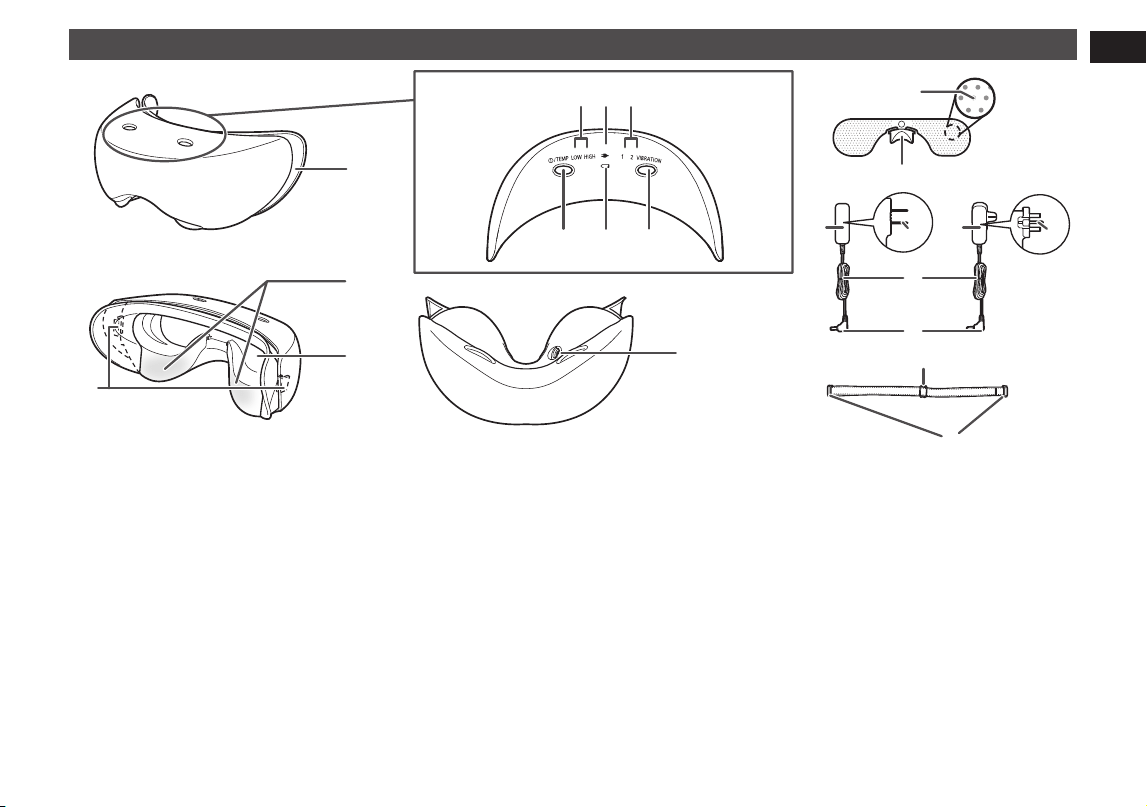
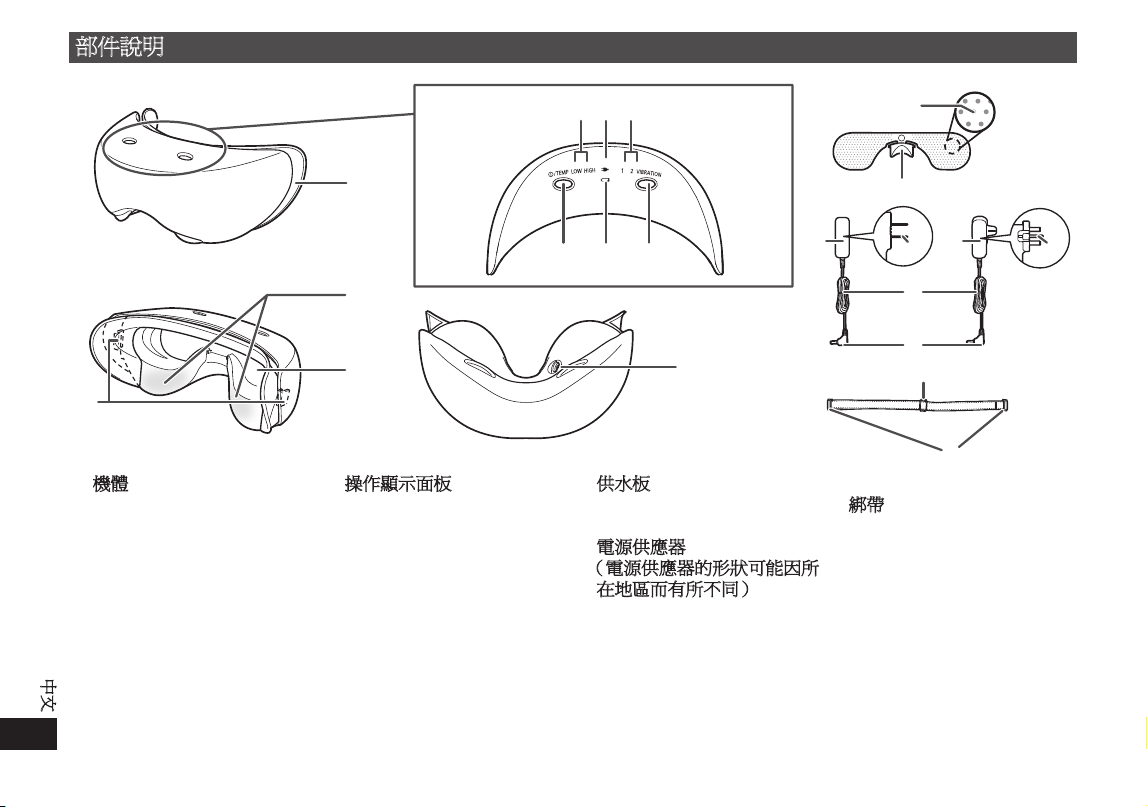
Parts identification
A Main unit
1 Silicon pad
2
Temperature sensitive area
3 Water supply plate mount
4 Band attachment hook
(one on each of right and
left side)
5 Appliance socket
B Operation display panel
6 Temperature indicator
lamp (green)
LOW: Approx. 38 °C
HIGH: Approx. 40 °C
7 Charging indicator lamp
(red)
8 Vibration indicator lamp
(green)
9 Power/temperature switch
: Battery empty indicator
lamp (red)
; Vibration switch
C Water supply plate
Mesh holes
Knob
D AC adaptor
(The shape of the AC
adaptor differs depending
on the area.)
Adaptor
Power plug
Cord
Appliance plug
Accessory
E Band
Size adjustment fitting
Main unit mount fitting
•When obtaining replacement silicon pads, bands, and water supply plates, consult the retailer where the appliance was
originally purchased.
•The band attachment hook is on the rear side of the silicon pad.
10
English
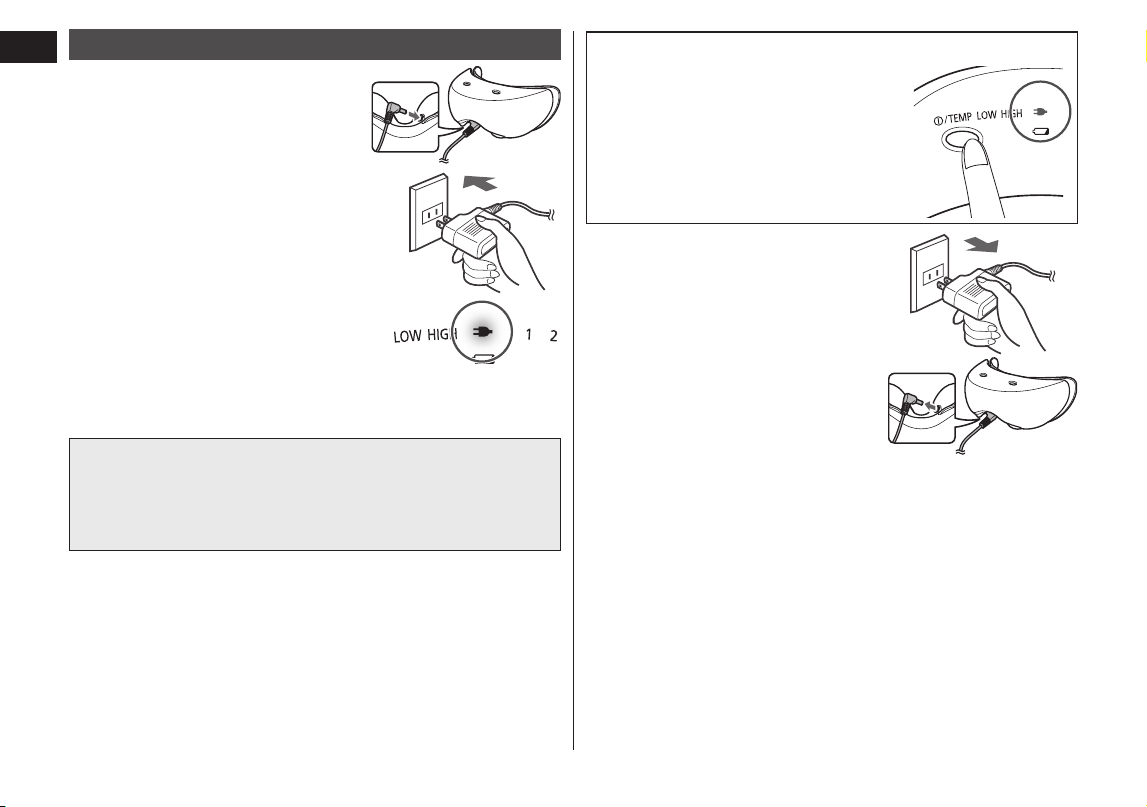
How to check the fully charged condition
Press the power/temperature switch
when the AC adaptor is connected.
The charging indicator lamp glows, and
after approximately 5 seconds, the
lamp turns off.
4
4
Remove the adaptor from
the household outlet and
the appliance plug from the
appliance socket.
How to recharge
1
1
Insert the appliance plug
into the appliance socket.
2
2
Insert the adaptor into the
household outlet.
3
3
Check the charging indicator
lamp.
•The charging indicator lamp glows
red.
•
If charging is tried during use, the
operation stops, and charging starts.
After approximate 1 hour, charging fully completes
•Charging time shortens if there is still some charge
remaining in the battery.
•The charging indicator lamp goes out when the appliance
is fully charged.
11
English
Notes
Due to the characteristics of battery, the battery may not
function to full capacity when it is used for the first time or
when used for the first time after an interval of six months or
longer. Also, the charging indicator lamp may not light for a
few minutes after charging begins, and the operable time of
the appliance may be shorter than normal. In this case,
charge the appliance for at least eight hours.
•The appliance can be used approximately twice (12
minutes per usage) with each charge of approximately one
hour.
You may not be able to use the appliance twice if the
temperature is low.
•
The recommended temperature range for charging is 0 °C to
35 °C. When the temperature is low or high, the battery may
not function properly, and charging may become impossible.
•If noise from the television or other device occurs while
charging, charge the appliance using a different household
outlet.
•This appliance contains a Nickel‑Metal Hydride battery.
•Please recycle the Nickel‑Metal Hydride battery when
disposing this appliance. (See page 19.)
•Charge the appliance when the battery empty indicator
lamp blinks.
How to use
•The appliance cannot be used when the main unit and AC
adaptor are connected to a household outlet.
•The recommended temperature range for use is 15 °C to
35 °C. The appliance may not function if used at a
temperature other than the recommended temperature
range.
1
1
Remove the water supply
plate from the main unit.
2
2
Wet the water supply plate
with clean tap water or
drinking water.
Hold the knob, lay the water
supply plate on its side, and
thoroughly wet both sides of the
plate with purified water or tap
water.
12
English
3
3
Hold the water
supply plate up and
let the excess water
runs off.
•Make sure the water
covers the mesh holes
completely. If there is
too much water and
large water drops form
on the water supply
plate, the water drops
may drip when the
appliance is attached
to the face. (See the
diagram on the right)
Mesh holes
Diagram showing the water
supply plate from the side.
Water
•Do not use face lotion, etc.
•
If the water supply plate is not wet, you will not feel steam.
•Do not wet the main unit itself with tap water.
4
4
Attach the water
supply plate to the
main unit.
1. Hold so that the
protruding part of the
knob is facing upward.
2. Set the water supply
plate under the water
supply plate
attachment clasps (2
pc) on the main unit.
3. Press down firmly on
the knob and attach
securely.
1
2
3
Protruding
part
Clasp
Snap
•
The water supply plate has front and rear sides. It cannot
be properly attached if it is attached to the wrong side.
•If there is a lot of water on the water supply plate, water
drops may splash when attached.
13
English
5
5
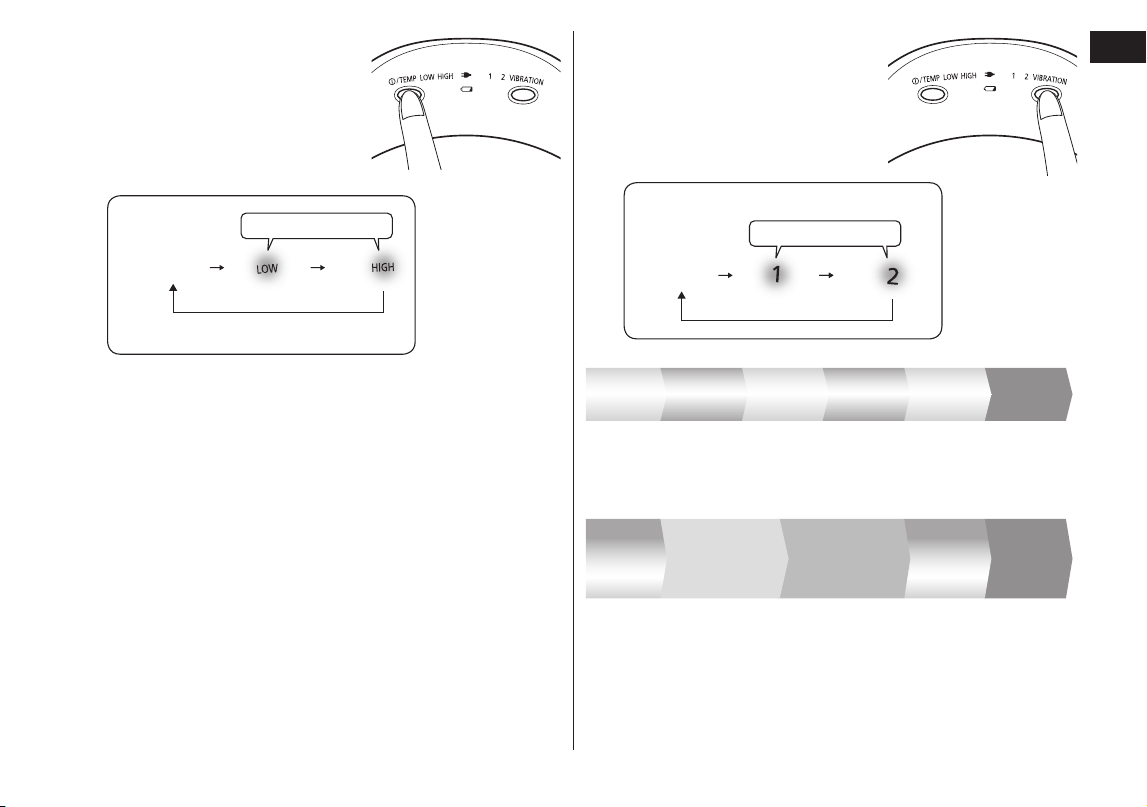
Press the power/
temperature switch and
select a temperature.
Temperature of the temperature
sensitive area.
LOW: Approx. 38 °C
HIGH: Approx. 40 °C
Glows green
Power
OFF
•Every time the power is turned on, it starts at the LOW
mode.
•The temperature may change accordingly to the
environment temperature.
(When the room temperature is 25 °C, it will take about
two minutes for you to feel heat.)
6
6
Press the vibration switch
and select the desired
vibration.
•The appliance can be used
even without any vibration.
Glows green
Vibration
OFF
Monotonous
vibration
Vibration 1: A loose and weak vibration
Two
minutes
Two
minutes
Vibration 2: A steady alternating strong and weak vibration
•The main unit makes a small sound (a clicking sound) when
in the vibration operation. This does not indicate a problem.
Very
slow
Slow
Very
slow
SlowVery slow
Two
minutes
Two
minutes
Two
minutes
Two
minutes
Monotonous
vibration
Two
minutes
Three
minutes
SlowSlow
Small difference
between strong
and weak
Large difference
between strong
and weak
Three
minutes
Two
minutes
Two
minutes

14
English
7
7
Attach the main unit.
•Close your eyes.
•Place the appliance so that the temperature sensitive
area (See page 9.) is at the position shown in the
illustration.
•There may be a gap between the main unit and your
nose. This will not affect the operation of the appliance.
When using while lying
face up
Place on eyes
When using while seated
Affix with the band
(When using while seated,
you must attach the band)
How to attach the band
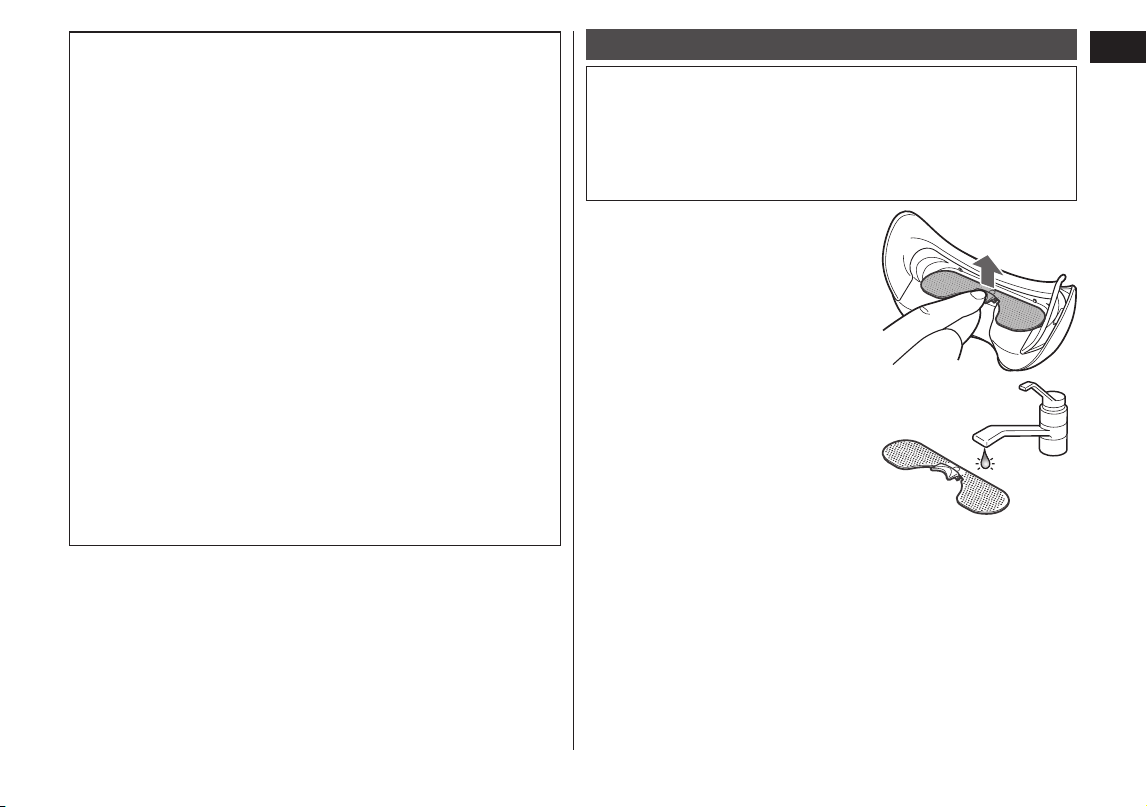
1. Peel off the silicon pad.
2. Attach the band fittings to
the band attachment
hooks, hold near the
rubber fittings, and pull
until you hear a click.
Snap
3. Repeat steps 1 to 2 and
attach the band fittings
on the other side.
4. Adjust the length of the
band.
•If the band is too
tight, the main unit
may leave a
temporary mark on
your face.
•When using the band, you may feel the heat and vibration
more intensely compared to when not using the band.
It automatically stops after approximately 12 minutes.
15
English
About the automatic power OFF and mode change
•After the power is turned on, it automatically stops in
approximately 12 minutes.
•When the temperature is switched from HIGH to LOW
during the use, the power turns off once. Thereafter, the
appliance operates for additional 12 minutes.
8
8
After use, dry the main
unit before storing.
•
Do not leave the appliance
in a place with high humidity.
Doing so may cause mold
and bacteria to grow.
•Wipe immediately if makeup gets on the main unit,
silicon pad, or band. If makeup is left on the silicon pad
and other components, they may deform or discolor.
How to clean
Clean when you feel cleaning is necessary.
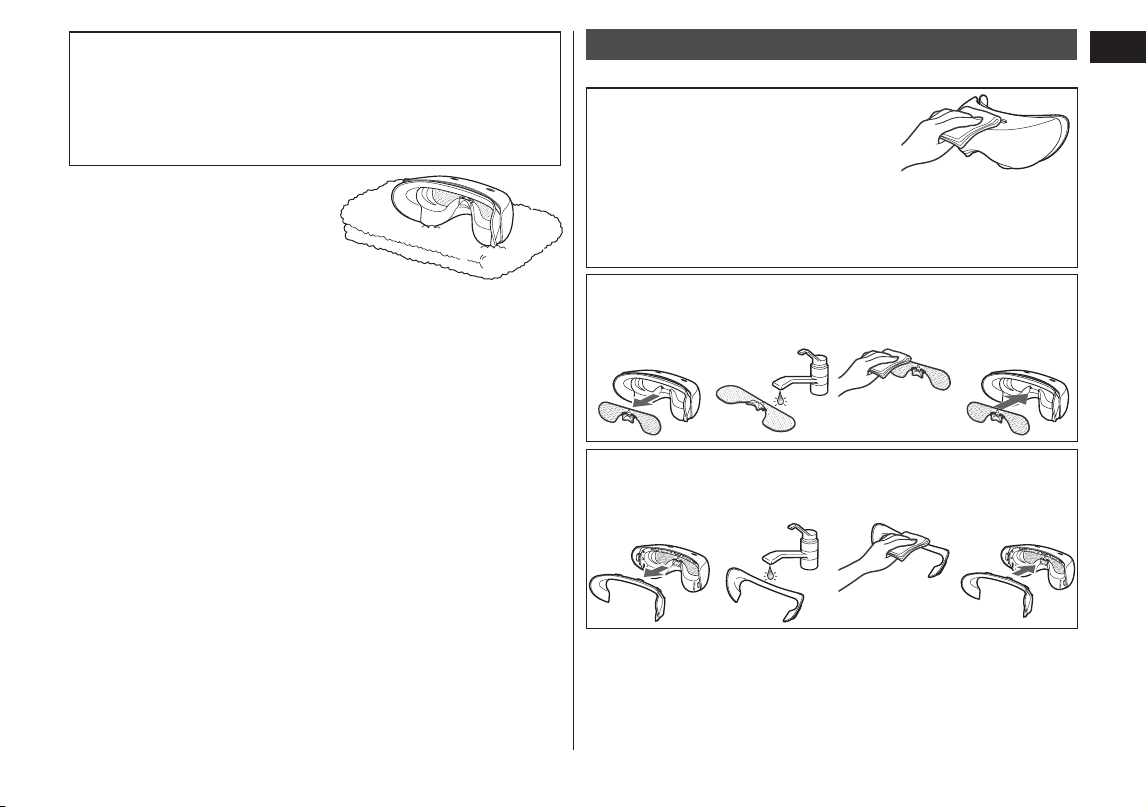
Cleaning the main unit
Wipe away dirt using a cloth that has
been moistened in water containing
dissolved bar soap. Wring out the
cloth before wiping.
•Do not use alcohol, paint thinner, benzine, or nail polish
remover. Using these may damage the appliance or cause
cracks or discoloration in the components.
Cleaning the water supply plate
1. Remove
from the
main unit.
2. Wash with
water.
3. Wipe with a
dry cloth.
4. Reattach
to the main
unit.
Cleaning the silicon pad
1. Remove
from the
main unit.
2. Wash with
water.
3. Wipe with a
dry cloth.
4. Reattach
to the main
unit.
16
English
How to attach the silicon pad
Insert the clasps of the silicon pad firmly all the way into the 7
attachment points (holes) in the main unit.
Error display
Lamp status Details of error
Fast
blinking
(green)
Abnormal stop
[Cause]
The self‑protection function inside
the main unit was tripped.
[Procedure]
Turn off the power and restart the
operation.
If the problem recurs, consult a
retailer or authorized service center.
Fast
blinking
(green)
17
English
Troubleshooting
Problem Possible cause Action
The appliance does not operate
even the power/temperature
switch is pressed.
The main unit and AC adaptor are connected
to a household outlet.
Remove the AC adaptor from the
main unit.
It is not charged
Recharge using the AC adaptor.
(See page 10.)
The power/temperature switch is not firmly
pressed.
Press the power/temperature switch
firmly until it goes all the way down.
The charging indicator lamp does
not go on/goes out.
The appliance is fully charged. This does not
indicate a problem.
(See page 10.)
The adaptor is not properly inserted into the
household outlet.
Properly insert the adaptor into the
household outlet.
The appliance plug is not firmly inserted into
the appliance socket.
Firmly insert the appliance plug into
the appliance socket.
The appliance can be used only
for a few minutes even after
charging it.
The life of the battery (approximately 5 years)
Consult a retailer or an authorized
service center.
(Do not change the battery yourself.
Doing so may damage the appliance.)
The adaptor is abnormally hot.
It is loosely inserted into the household outlet.
Use a household outlet that is not
loose.
No steam comes out from the
appliance after a few minutes
after pressing the power/
temperature switch.
•Steam is invisible.
The water supply plate is not wet.
Wet the water supply plate.
(See page 11.)
The water supply plate is not firmly attached.
Firmly attach it.
(See page 11.)
The main unit does not heat up.
The appliance may not function if used at a
temperature other than the recommended
temperature range.
Use at the recommended use
temperature of 15 °C ‑ 35 °C

18
English
Problem Possible cause Action
The appliance stops during use.
The battery is empty. Recharge using the AC adaptor.
The appliance automatically stops after
approximately 12 minutes.
This does not indicate a problem.
The temperature indicator lamp and
vibration indicator lamp are blinking
The self‑protection function inside the main
unit was tripped.
Turn off the power and restart the
operation.
(See page 16.)
Will the battery be exhausted
after a long period of disuse?
When the appliance is not used for 6 months or more, the battery will weaken (leak
battery fluid, etc.). Fully charge the battery once every 6 months.
(See page 11.)
Can the battery be charged
before every use?
Yes, but it is recommended that you charge the battery when it is empty. The life of the
battery will vary depending upon usage and storage conditions.
19
English
Battery life
The life of the battery is 5 years if charged approximately once
every week. The battery in this appliance is not intended to be
replaced by consumers. Have the battery replaced by an
authorized service center.
Removing the built-in rechargeable battery
Remove the built-in battery when disposing the appliance.
Please make sure that the battery is disposed of at an
officially designated location if there is one.
This figure must only be used when disposing the appliance,
and must not be used to repair it. If you dismantle the
appliance yourself, it may cause malfunction.
•Unplug the AC adaptor from the appliance before
disassembling it.
•Turn on the power and then keep the power on until the
battery is completely discharged.
Perform steps 1 to 2 and lift the battery, and then remove it.
•Please take care not to short‑circuit the battery.
For environmental protection and recycling of materials
This appliance contains a Nickel‑Metal Hydride battery.
Please make sure that the battery is disposed of at an
officially assigned location, if there is one in your country.
Specifications
Model No.: EH‑SW50
Power source
100‑240 V
50‑60 Hz
Power consumption 5 W
Charging time Approx. 1 hour
This product is intended for house‑hold use only.

20
21
中文
使用說明書
(家用)
眼部溫感按摩器
型號
EH‑SW50
感謝您購買本 Panasonic 產品。
使用本產品之前,請仔細閱讀本說明書,並妥善保存以供未來使用。
安全須知 ........................................................22
使用前請注意 ...............................................25
部件說明 ........................................................26
充電 ................................................................27
使用方法 ........................................................28
清潔 ................................................................32
錯誤顯示 ........................................................32
疑難排解 ........................................................33
電池壽命 ........................................................35
取出內置可充電式電池 ..............................35
產品規格 ........................................................35
目錄
22
中文
安全須知
為減低受傷,死亡、觸電、火警、故障、產品損壞及財物損失
的風險,請務必留意以下安全須知。
符號說明
以下符號用於為危險、傷害及財物損失的級別分類和作出解釋。
若不理會此等符號,不當使用本產品就可能會導致所述的危險、
人身傷害及財物損失。
危險
表示潛在的危險會導致嚴重受傷或致命。
警告
表示潛在的危險可能會導致嚴重受傷或致命。
注意
表示危險可導致輕微受傷。
以下符號用於分類和解釋必須留意的指示類型。
此符號用於提示用戶,不得執行某項特定的操作程序。
此符號用於提示用戶,必須遵從某項特定的操作程序,
藉以安全操作本產品。
危險
本產品有內置可充電式電池。
切勿棄進火源或熱源中。
-
否則可導致漏電、過熱或爆炸。
警告
切勿以超出家用電源插座或配線額定值的方式使用產品。
-
將太多插頭接駁至一個家用電源插座,以致超出額定值,
可能會因過熱而導致火警。
孕婦不應使用本產品。
-
賀爾蒙分泌不平衡可能導致皮膚問題。
以下人士切勿使用本產品。
•
顏面神經失常或有觸覺障礙的人士
•
因為骨折或整形手術而在臉上植入金屬、矽膠或塑膠植
體的人士
•
無法感覺熱度的人士
•
因車禍等因素而有頭部或眼部後遺症的人士
•
近視過深的人(度數為 -6D(600 度)以上)
(要確認您是否患有重度近視,請向醫生諮詢,或查閱
隱形眼鏡包裝上的說明。)
•
目前或曾經患有眼部疾病(白內障、青光眼、視網膜剝
離、眼底出血、飛蚊症等)的人士
•
曾經動過眼部手術的人士(最近剛做過眼睛雷射手術的
人士應在使用本產品前先向醫生諮詢)
-
否則可能導致意外、問題或使症狀惡化。嚴重情況或可
能會造成失明。

23
中文
警告
遇到下列情況時,切勿使用本產品:
•
當感覺生病或發燒時
•
當皮膚受傷或是有濕疹或腫塊時
•
皮膚出現異常,例如皮膚炎或嚴重曬傷
以下人士不宜使用本產品:
•
過敏體質的人士
•
患有皮膚病、異位性皮膚炎的人士
•
皮膚敏感的人士
-
這樣做可能導致皮膚或身體出現問題。
切勿將產品存放於兒童或幼童可觸摸的地方。
另外,請勿讓他們觸碰或拿取本產品。
-
否則可能導致灼傷、觸電或受傷。
如電源供應器損壞,或電源插頭未緊接家用電源插座上,
切勿使用本產品。
切勿破壞、改裝、用力彎曲、拉動或扭動電源線。
此外,切勿將重物放在電源線上或夾緊電源線。
-
否則可能會因短路而導致觸電或火警。
除了隨產品附上的電源供應器外,切勿使用其他電源供
應器。此外,切勿使用隨產品附上的電源供應器為任何
其他產品充電。
-
否則可能會因短路而導致灼傷或火警。
切勿在手濕時將轉接器插入家用電源插座或機體,或是
從插座或機體中拔除。
-
否則可導致觸電或受傷。
切勿將機體和電源供應器浸在水中或用水洗滌。
-
否則可能會因短路而導致觸電或火警。
切勿在浴室或淋浴間使用機體和電源供應器。
-
否則可能會因短路而導致觸電或火警。
切勿改裝或維修產品。
-
否則可導致火警、觸電或受傷。
請聯絡 Panasonic 直屬服務站進行維修(更換電池等)。
切勿拆卸本產品,棄置時除外。
-
否則可導致火警、觸電或受傷。
如果皮膚或身體其他部位感覺疼痛或有異狀,請立即停
止使用本產品。
-
否則可能導致皮膚或身體出現問題。
以下人士請務必事先向醫生諮詢。
•
曾經做過眼睛雷射手術的人士
-
否則可能導致出現問題。
請務必使用與電源供應器上標示之額定電壓相符的電源
進行操作。
將轉接器和電器插頭完全插入。
-
否則可導致火警、觸電或灼傷。
清潔產品時,必須從家用電源插座拔出轉接器。
-
否則可導致觸電或受傷。
若產品出現異常或故障情況,請立即停止使用產品及拔
除轉接器。
-
否則可導致觸電、受傷或火警。
< 異常或故障情況 >
•
主機、轉接器或電源線變形和異常灼熱。
•
主機、轉接器或電源線出現燒焦氣味。
•
主機、轉接器或電源線在使用或充電時出現異常聲響。
-
請立即將產品帶往 Panasonic 直屬服務站,以要求檢查
或維修。
24
中文
警告
患有體能、感官或智力減退,或缺乏經歷和知識之人士
(含小孩),在無人監護或未獲告知如何使用的情況下不
得使用本產品。小孩應予以監管,確保他們並無把玩本
產品。
-
否則可能導致意外或受傷。
電源線不可更換。若電源線損壞,電源供應器就應棄掉。
-
否則可能導致意外或受傷。
應定期清潔電源插頭和電器插頭,以防止塵埃積聚。
-
否則濕氣可令絕緣失效,導致火警。
拔除轉接器並用乾布抹拭。
注意
切勿在存放產品時將電源線圍繞轉接器纏緊。
-
否則可令電源線內的纏線因受壓而斷裂,並可因短路而
導致火警。
切勿讓別針或垃圾附在電源插頭或電器插頭上。
-
否則可能會因短路而導致觸電或火警。
配戴機體時請勿進行任何其他活動。
-
否則可能導致發生意外。
切勿掉下產品或使其受到撞擊。
-
否則可導致受傷。
使用本產品之前請務必取下假睫毛。
-
否則可能導致眼睛受傷或起火。
不充電時,應從家用電源插座拔出轉接器。
-
否則可因絕緣劣化造成漏電,導致觸電或火警。
拔出轉接器或電器插頭時,應握著該個部位而非電源線。
-
手持電源線拔出轉接器或電器插頭,可導致觸電或受傷。
應及時清潔,以避免油脂和其它殘渣的沈積。
-
否則可能會造成皮膚或身體的問題。
產品表面會發熱。
對熱度不敏感的人士請務必小心使用本產品。
-
否則可能導致意外或受傷。
25
中文
使用前請注意
•
過度保養皮膚對皮膚有害。
一般情況下,第一次使用本產品時,每週請只使用二或三次,
期間必須間隔 24 小時以上。使用一個月後,基本上可以每天
使用本產品一次。
請檢查皮膚狀況,然後調整使用次數與每次療程時間。
•
使用本產品時,建議從 LOW 模式開始。
•
使用本產品時,請閉上雙眼放鬆使用。
•
使用眼藥水時,請等待一段時間後再開始使用本產品。
•
請勿在帶眼罩時使用本產品。
•
如果眼睛或眼部四周感覺過熱,請立即停止使用本產品。或者
如果產品處於 HIGH 模式,請切換成 LOW 模式。
如果在 LOW 模式下仍感覺過熱,請在使用時在皮膚和機體之
間放些棉花隔開。
•
使用期間,如果皮膚或眼睛出現任何問題,請立即停止使用本
產品,並向醫生諮詢。
•
使用本產品時,嫁接睫毛可能會脫落,隱形眼鏡也可能移位。
•
使用本產品時,眼睛會受熱,並可能暫時發紅。這不代表有問
題。
如果症狀未改善,請向眼科醫生諮詢。
•
當眼部四周因為使用本產品而受熱時,眼睛可能會暫時發紅。
這種狀況會慢慢消退,不代表有問題。
如果這對您造成困擾,可在皮膚和機體之間放些棉花隔開。
•
請注意,若在外出時或準備外出前配戴本產品,機體綁帶可能
會在臉上留下印痕。
•
請勿在配戴本產品時熟睡。
•
您的彩妝可能會脫落。
•
如於綁帶未乾時使用,顏色可能會髒污。
•
如果感覺熱度極高,請立即停止使用本產品。
緊急處理方法:
使用中,本產品若有冒煙或火花情形時,請立即關閉電源及
拔掉插頭。並立即通知 Panasonic 直屬服務站處理,以便查明
原因。
26
中文
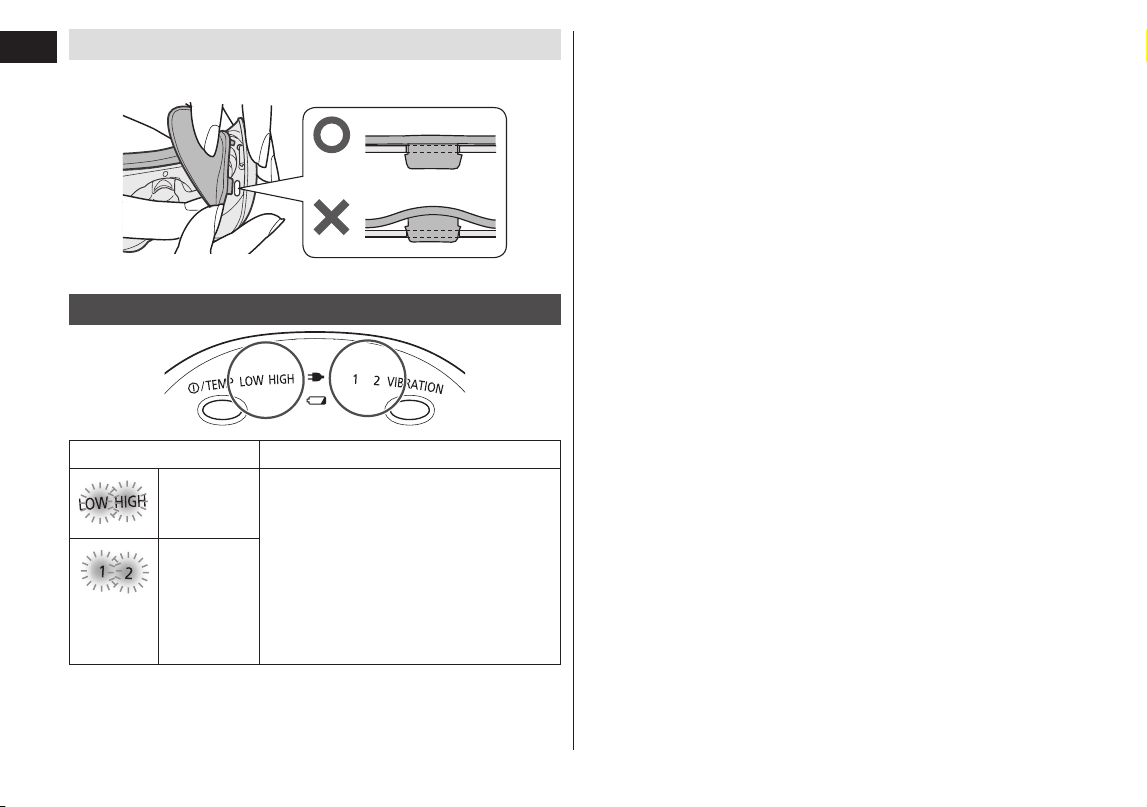
部件說明
A
機體
1
矽膠墊
2
溫度感應區
3
供水板裝載孔
4
綁帶連接鈎扣
(左右各一個)
5
機體插座
B
操作顯示面板
6
溫度指示燈(綠)
LOW:約 38 ℃
HIGH:約 40 ℃
7
充電指示燈(紅)
8
震動指示燈(綠)
9
電源 / 溫度開關
:
電池無電指示燈(紅)
;
VIBRATION(震動模式調
校)開關
C
供水板
網眼
鼻墊
D
電源供應器
(電源供應器的形狀可能因所
在地區而有所不同)
轉接器
電源插頭
電源線
電器插頭
配件
E
綁帶
尺寸調整扣
機體裝載扣
•
若要更換矽膠墊、綁帶和供水板,請向原先購買本產品的零售商諮詢。
•
綁帶連接鈎扣位於矽膠墊背面。
27
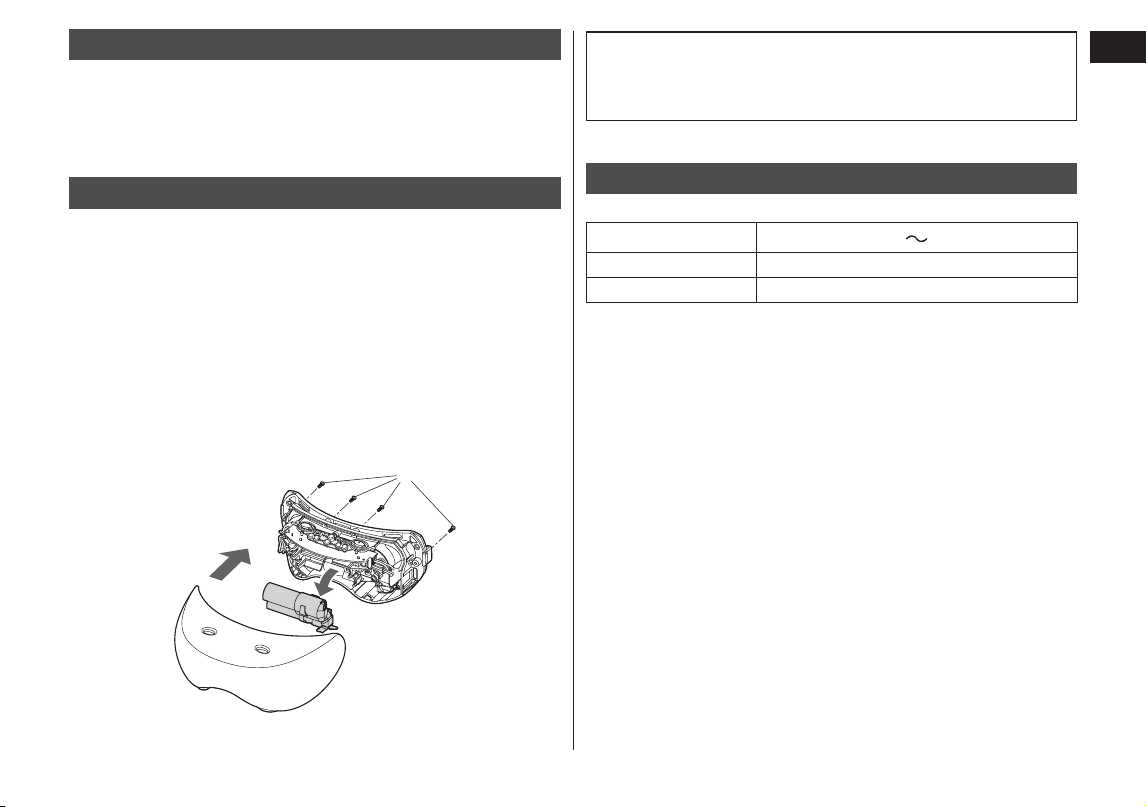
中文
4
4
從家用電源插座取下轉接器,
然後從機體插座拔除電器插頭。
註
基於電池特性,當第一次使用或相隔六個月以上後再次使用
時,電池可能無法以全滿電力運作。此外,充電指示燈可能
在開始充電後熄滅幾分鐘,產品的操作時間也會比正常情況
短。在此情況下,請讓產品充電至少八小時。
•
每充電約一小時,產品約可使用兩次(每次 12 分鐘)。
如果溫度較低,產品可能無法使用兩次。
•
建議的充電溫度範圍為 0 ℃到 35 ℃。當溫度太低或太高時,
電池可能無法正常運作與充電。
•
充電時,如果電視機或其他產品發出雜音,請使用另一個家
用電源插座為產品充電。
•
本產品含有鎳氫電池。
•
棄置本產品時,請回收鎳氫電池。(請參閱第 35 頁。)
•
當電池無電指示燈閃爍時,請為產品充電。
充電
1
1
將電器插頭插入機體插座。
2
2
將轉接器插入家用電源插座。
3
3
檢查充電指示燈。
•
充電指示燈會亮起紅燈。
•
若在使用期間嘗試充電,則操作將
停止並開始充電。
約 1 小時後,就會完全充電
•
當電池還剩一些電力時,充電時間會縮短。
•
當產品充飽電時,充電指示燈會熄滅。
如何檢查是否充飽電
在連接電源供應器時按下電源/溫度開關。
充電指示燈亮起,約 5 秒後,指示燈熄滅。
28
中文
使用方法
•
當機體和電源供應器連接到家用電源插座時,產品便無法使用。
•
建議的使用溫度範圍為 15 ℃到 35 ℃。如果在建議的溫度範
圍外使用,本產品可能無法運作。
1
1
從機體取下供水板。
2
2
以乾淨的自來水或飲用水濕
潤供水板。
握住鼻墊,側面放置供水板,然
後以過濾水或自來水徹底濕潤板
子兩面。
3
3
將供水板直立,使多
餘的水份流出。
•
確定水份完全蓋過網
眼。如果供水板上水份
過多或有大水滴,則將
產品貼近臉部時可能會
滴水。(請參閱右圖)
網眼
此圖顯示供水板的側面。
水
•
請勿使用臉部乳液等保養品。
•
如果供水板不夠濕,就無法感覺到蒸氣。
•
請勿用自來水弄濕機體本身。
29
中文
4
4
將供水板連接到機體。
1. 照此方式握拿,使鼻
墊突出處朝上。
2. 將供水板裝入機體上
的供水板連接卡榫(2
處)。
3. 確實壓下鼻墊,使其
連接牢固。
1
2
3
突出處
卡榫
輕壓
•
供水板有正反面之分。方向朝後將無法順利裝入。
•
如果供水板上有大量水份,裝入時會噴灑水滴。
5
5
按下電源 / 溫度開關,選擇所
需溫度。
溫度感應區的溫度。
LOW:約 38 ℃
HIGH:約 40 ℃
亮起綠燈
電源關閉
•
每次電源開啟時,都是從 LOW 模式啟動。
•
根據使用環境的不同,溫度可能會改變。
(當室溫 25 ℃時,約需兩分鐘才會感覺到熱度。)
30
中文
6
6
按下 VIBRATION(震動模式調
校)鈕,選擇所需的震動模式。
•
本產品可以在不震動的情況下使
用。
亮起綠燈
震動關閉
震動
震動 1:緩慢輕柔的震動
兩分鐘 兩分鐘
震動 2: 穩定變化強弱震動
•
處於震動模式時,機體可能發出輕微聲響(喀嚓聲)。這不代
表有問題。
非常慢慢非常慢慢非常慢
兩分鐘 兩分鐘 兩分鐘 兩分鐘
震動
兩分鐘 三分鐘
慢慢 強弱差異小 強弱差異大
三分鐘 兩分鐘 兩分鐘
7
7
連接機體。
•
閉上眼睛。
•
放好產品使溫度感應區位於圖示位置(請參閱第 26 頁)。
•
機體和您鼻子之間可能有空隙。這不會對本產品的功能
造成問題。
仰躺時使用
放在眼睛上方
坐著時使用
用綁帶固定
(
坐著使用時,您必須扣好綁帶
)
31
中文
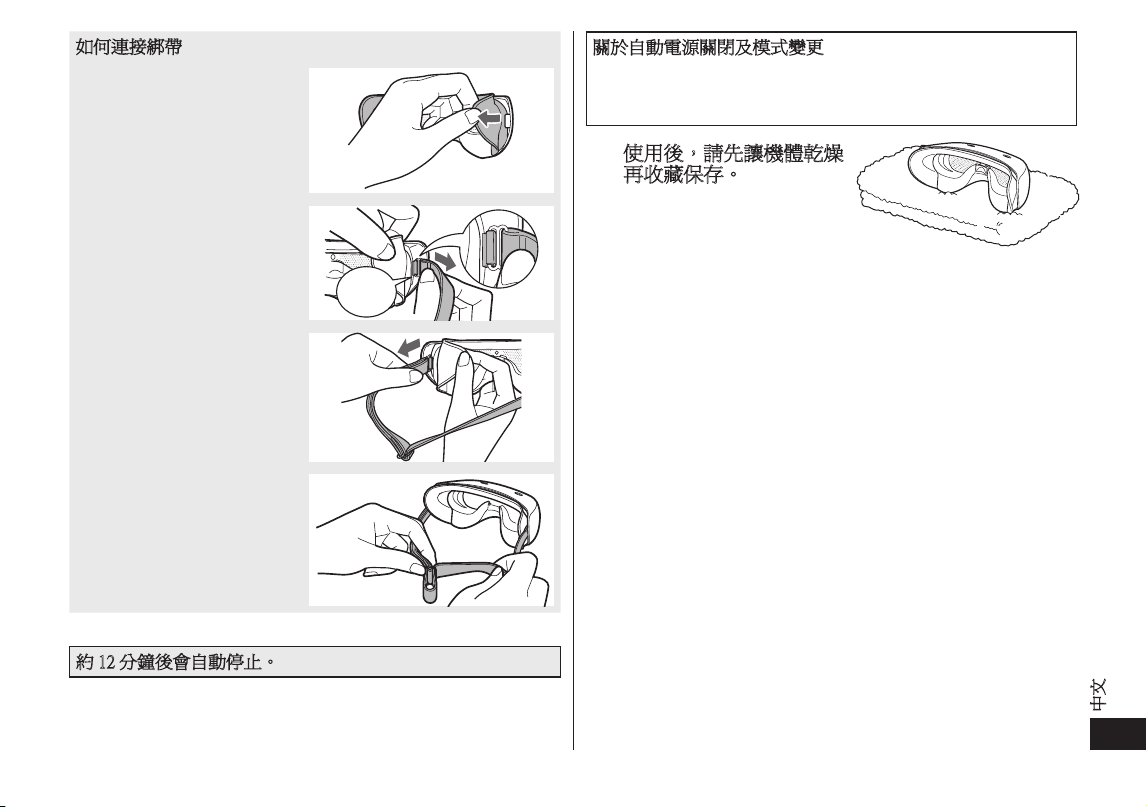
如何連接綁帶
1. 取下矽膠墊。
2. 將綁帶扣環連接到綁帶連
接勾扣,握住橡膠扣環附
近,輕拉直到聽見喀嚓聲。
輕壓
3. 重複步驟 1 到 2,連接另
一側的綁帶扣環。
4. 調整綁帶長度。
•
如果綁帶太緊,機體
可能會在臉上留下暫
時印痕。
•
使用綁帶時,對於熱度和震動的感覺可能比不使用綁帶時更強。
約 12 分鐘後會自動停止。
關於自動電源關閉及模式變更
•
電源開啟後,經過約 12 分鐘便會自動停止。
•
使用期間若將溫度從 HIGH 切換到 LOW,電源會關閉一次。
此時,產品會多運作 12 分鐘。
8
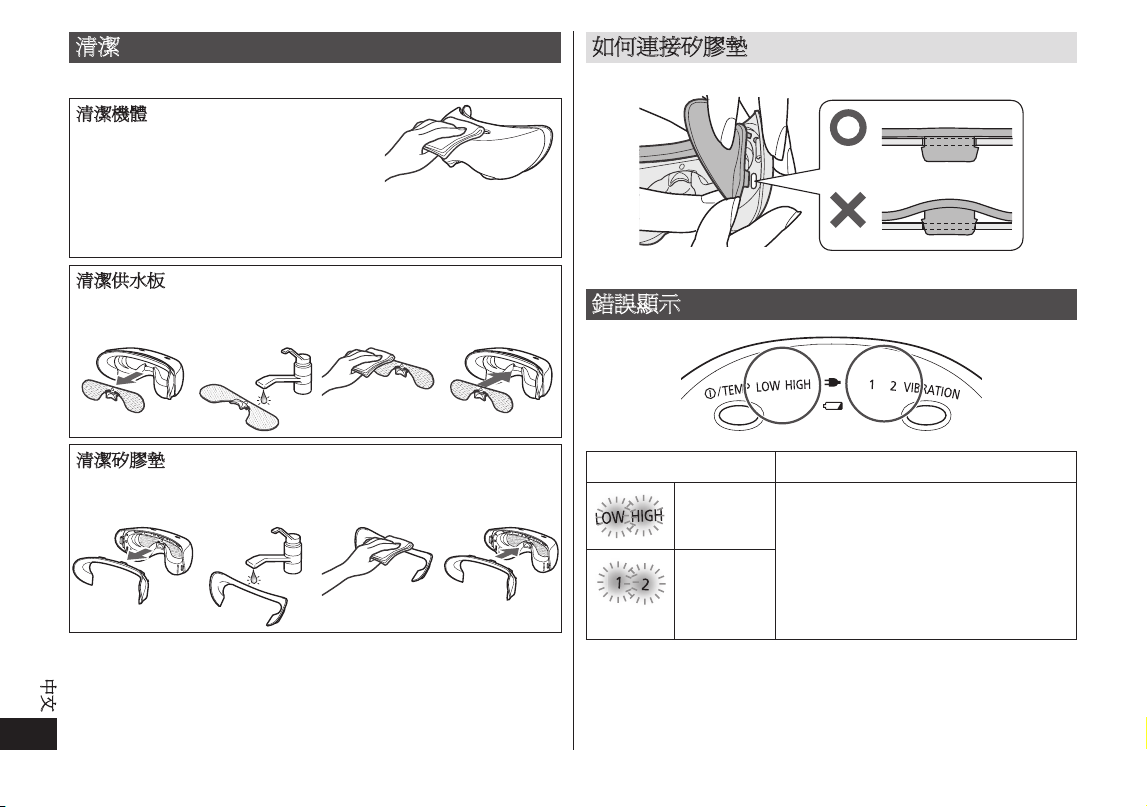
8
使用後,請先讓機體乾燥
再收藏保存。
•
請勿將本產品放在濕度很高
的地方。否則可能導致發霉
或滋生細菌。
•
如果彩妝沾到機體、矽膠墊或綁帶上,請立即擦拭乾淨。
將彩妝留在矽膠墊或其他元件上,可能導致變形或褪色。
32
中文
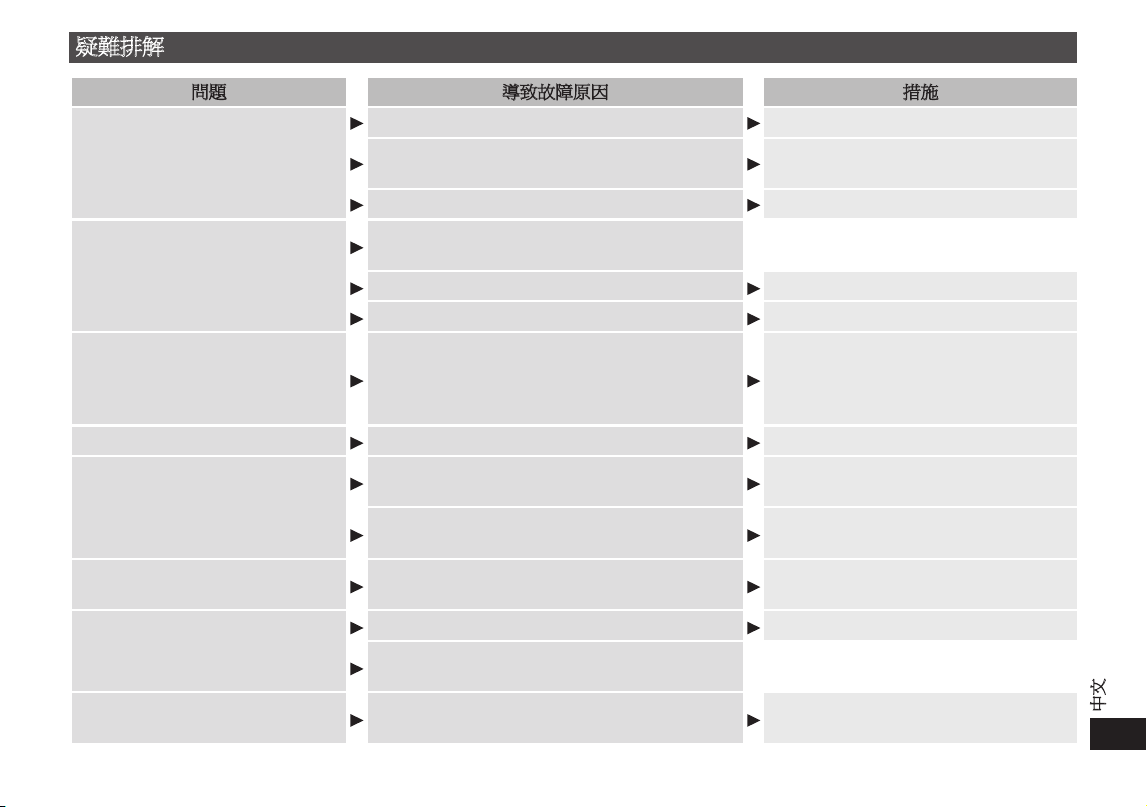
清潔
在您認為需要時隨時清潔。
清潔機體
以浸濕肥皂水的軟布擦拭灰塵。擦拭
前請將軟布擰乾。
•
請勿使用酒精、油漆稀釋劑、揮發油或去光水。使用這些溶
液可能會損壞產品,或導致元件龜裂或褪色。
清潔供水板
1. 從機體上取
下。
2.
以清水清
洗。
3.
以乾布擦
拭。
4. 重新連接
到機體。
清潔矽膠墊
1. 從機體上取
下。
2. 以清水清
洗。
3. 以乾布擦
拭。
4. 重新連接
到機體。
如何連接矽膠墊
確實將矽膠墊卡榫完全插入機體上的 7 個連接點(孔)。
錯誤顯示
指示燈狀態 錯誤細節
快閃
(綠)
不正常停止
[ 原因 ]
觸發機體內部的自我保護功能。
[ 程序 ]
關閉電源,然後重新開始操作。
如果問題重複發生,請向零售商或
Panasonic 直屬服務站諮詢。
快閃
(綠)
33
中文
疑難排解
問題 導致故障原因 措施
按下電源 / 溫度開關後產品不會運作。
機體和電源供應器已連接到家用電源插座。 從機體上取下電源供應器。
不能充電
使用電源供應器重新充電。
(請參閱第 27 頁。)
未確實壓下電源 / 溫度開關。
確實壓下電源 / 溫度開關,直到完全沒入。
充電指示燈未亮起 / 熄滅。
產品已完全充電。這不代表有問題。
(請參閱第 27 頁。)
未將轉接器妥善插入家用電源插座。 將轉接器妥善插入家用電源插座。
電器插頭未確實插入機體插座。 將電器插頭確實插入機體插座。
充電後,產品只能使用幾分鐘。
電池壽命(約 5 年)
請將產品帶往 Panasonic 直屬服務站,
要求維修。
(請勿自行更換電池。否則可能損壞本
產品。)
轉接器不正常發熱。
未完全插入家用電源插座。 請使用不會鬆脫的家用電源插座。
按下電源 / 溫度開關後數分鐘,本
產品仍未出現蒸氣。
•
看不到蒸氣。
供水板不夠濕。
濕潤供水板。
(請參閱第 28 頁。)
未確實連接供水板。
確實接好。
(請參閱第 28 頁。)
機體未加熱。
如果使用溫度不在建議溫度範圍內,本產品可
能無法運作。
請在15-35 ℃的建議使用溫度範圍內使用。
本產品在使用中途停止。
電池沒電。 使用電源供應器重新充電。
本產品在約 12 分鐘後自動停止。
這不代表有問題。
溫度指示燈與震動指示燈閃爍
觸發機體內部的自我保護功能。
關閉電源,然後重新開始操作。
(請參閱第 32 頁。)
34
中文
問題 導致故障原因 措施
電池若長時間未使用,電力是否
會耗盡?
若本產品經 6 個月以上未使用,電池效能將會衰退(發生電池漏液等)。每隔 6 個月請將
電池完全充電一次。
(請參閱第 27 頁。)
每次使用前是否可將電池充電?
可以,但建議您在電力用盡時再將電池充電。電池壽命將取決於使用及保存狀況。
35
中文
電池壽命
如果大約每週充電一次,電池使用壽命為約 5 年。使用者不應
更換本產品內的電池。應由 Panasonic 直屬服務站更換電池。
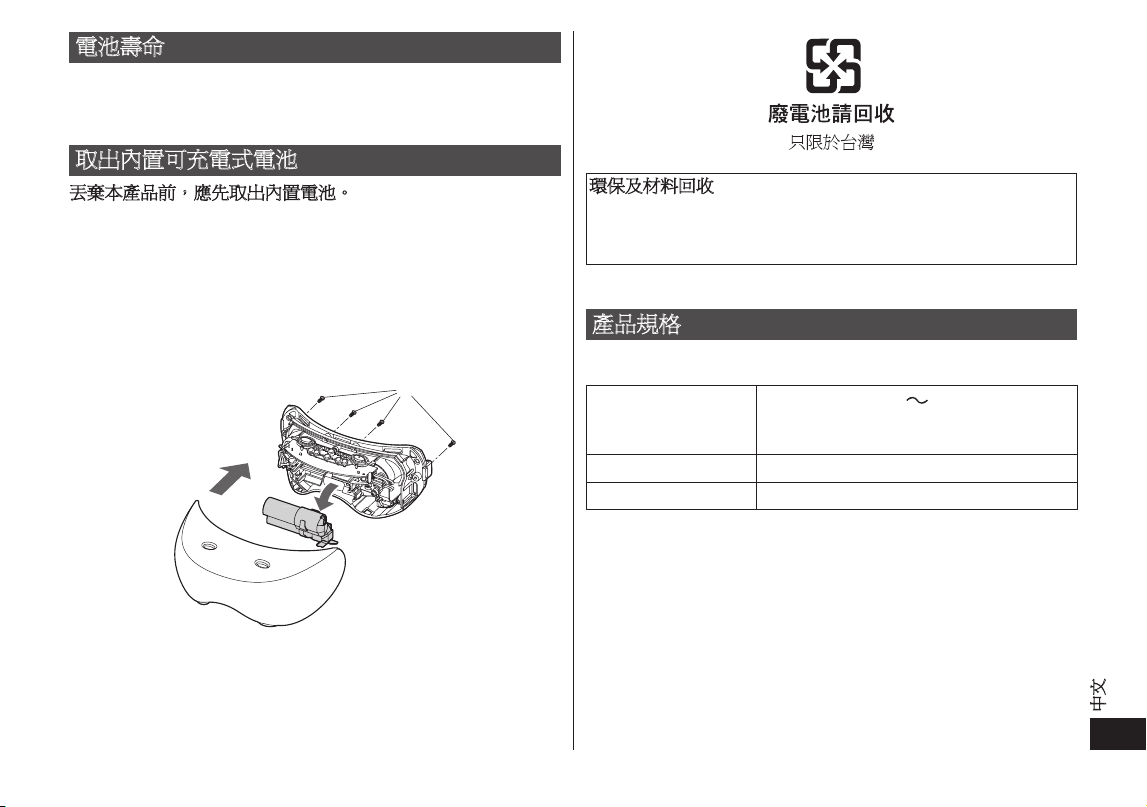
取出內置可充電式電池
丟棄本產品前,應先取出內置電池。
如您的國家/地區有指定認可棄置電池的地方,請確保將電池
棄置於這些地方。
下圖只能用於棄置本產品時,切勿使用下圖作維修之用。若您
自行拆解本產品,可能會導致產品損壞。
•
拆卸本產品前,須先將連接本產品的電源供應器拔出。
•
開啟電源,保持電源的開啟狀態直至電池完全放電。
根據下圖
1
至
2
的順序拉動電池,然後將其取出。
•
請注意不要令電池短路。
環保及材料回收
本產品含有鎳氫電池。
如您的國家有指定認可棄置電池的地方,請確保將電池棄置於
這些地方。
產品規格
型號:EH-SW50
電源
100-240 V
50-60 Hz
﹝僅限台灣110-240 V﹞
﹝自動變壓﹞
耗電量 5 W
充電時間 約一小時
此產品只適於家居內使用。
製 造 商:
Panasonic Corporation
生產國別:日本
進 口 商:台松電器販賣股份有限公司(僅限台灣)
公司地址:新北市中和區建六路 57 號
連絡地址:新北市中和區員山路 579 號
連絡電話:(02)2223-5121
網 址:http://panasonic.com.tw

F EN, TW
Printed in Japan
EH9710SW501N Y0813‑0
Panasonic Corporation
http://panasonic.net/
© Panasonic Corporation 2013
