POWERED EARWAX REMOVER
INSTRUCTIONS
©2024 Allstar Innovations
Wush is a trademark of Allstar Innovations
Distributed by Allstar Innovations
Black Wolf is a registered trademark of Black Wolf Opco, Inc.
Made in China | Patent Pending
Product Color and Appearance May Vary
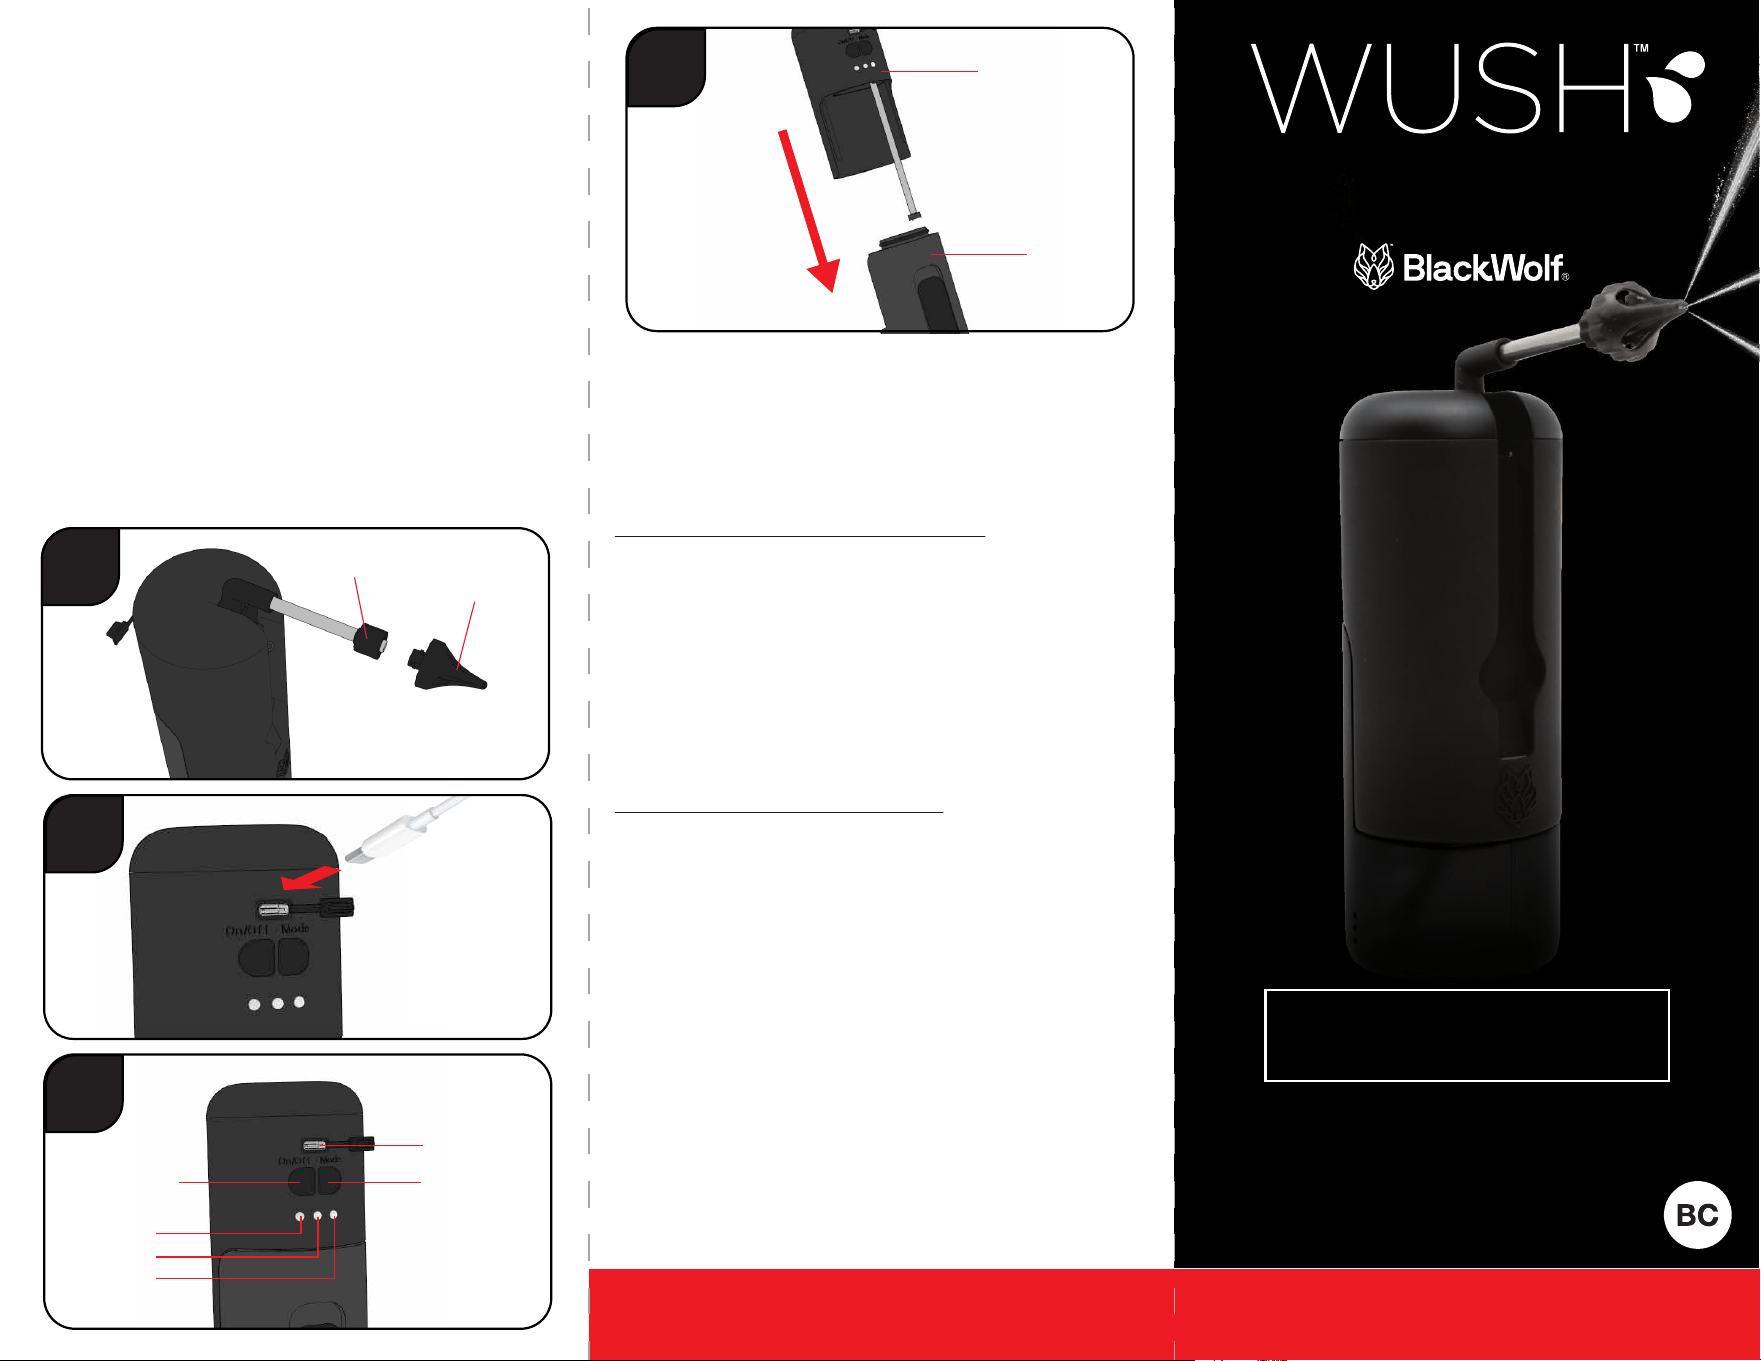
1. Inserting and Replacing Irrigation Tip
Insert irrigation tip onto arm. Hold irrigation tip and rotate the
connector clockwise to secure. (Diagram A)
2. Charging the Unit
Charge unit using USB-C port and included charging cable as
shown in image. During charging each LED will illuminate
indicating percentage of charge at each solid LED. When all
LED’s are solid the unit is fully charged. Low Battery Indicator
all 3 LED’s will flash at the same time indicating the battery is
low and the product needs to be charged. (Diagram B)
3. Pressure Settings
There are 3 mode pressure settings.
Low - Pressure level 1, Medium - Pressure level 2, and High -
Pressure level 3. (Diagram C)
4. Removing the Water Reservoir
Pull reservoir down from main unit. (Diagram D)
5. Cleaning the Water Reservoir
• Remove reservoir and wash the inside and outside of tank
with dishwashing solution and warm water.
• Dry exterior of tank with a dry cloth and allow inside to air dry.
Connector
Power Button
USB-C Port
Water
Reservoir
Main Unit
Mode Button
Low
Medium
High
Irrigation Tip
A
C
B
D
This device complies with part 18 of the FCC Rules. Operation is subject
to the following two conditions: (1) This device may not cause harmful
interference, and (2) this device must accept any interference received,
including interference that may cause undesired operation.
NOTE: This product has been tested and found to comply with the limits for a
Class B digital device, pursuant to Part 18 of the FCC Rules. These limits are
designed to provide reasonable protection against harmful interference in a
residential installation. This equipment generates, uses and can radiate radio
frequency energy and, if not installed and used in accordance with the instructions,
may cause harmful interference to radio communications. However, there is no
guarantee that interference will not occur in a particular installation. If this
equipment does cause harmful interference to radio or television reception, which
can be determined by turning the equipment off and on, the user is encouraged to
try to correct the interference by one or more of the following measures:
• Reorient or relocate the receiving antenna.
• Increase the separation between the equipment and receiver.
• Connect the equipment into an outlet on a circuit different from that to
which the receiver is connected.
• Consult the dealer or an experienced radio/TV technician for help.
Changes or modifications not expressly approved by the party responsible for
compliance could void the user’s authority to operate the equipment.
PLEASE VISIT BLACKWOLFNATION.COM FOR
MORE GREAT PRODUCTS & SPECIAL OFFERS
PLEASE VISIT BLACKWOLFNATION.COM FOR
MORE GREAT PRODUCTS & SPECIAL OFFERS
ENT Recommendations
Consult your physician before use if you have a pre-existing
condition.
Our triple spray irrigation tip design directs water to the sides
of the ear canal for gentle wax removal.
ALWAYS USE WARM WATER!!!
Start your ear irrigation on pressure level 1. Once you become
comfortable you can then move onto levels 2 and do the same
for level 3.
For general ear cleaning pressure level 1 is adequate and can
be used 2 times per week in the shower or over a sink.
Approximately 10-15 seconds is all it takes in most cases to
clear out wax.
When finished, to remove excess water from your ear canal,
tilt your head in the direction of ear to help any remaining
water drain. Pull gently on your earlobe to help straighten
your ear canal allowing water to flow. Use a soft towel to dry
your ear.
For impacted or ears with built up wax it could take a few tanks
of water in each ear at levels 2 and 3. If needed you can use a
softening agent before use to help soften ear wax. Allow the
solution to sit in the ear canal 20-30 minutes prior to irrigation.
Water not spraying? Consult
priming instructions inside.
Quick
Fill Access
Important safety instructions.
Please read all instructions before use.
Use this product only as indicated in
these instructions or as recommended
by your medical professional.
WARNING:
• Consult your physician before use if you
have a pre-existing ear condition.
• DO NOT USE if you have ear tubes (tympanostomy
tubes), have had ear surgery, if you suspect/have a
perforated eardrum, or have an ear infection. Please
consult your ENT doctor.
• Only use warm water for earwax removal (approximately
body temperature, 98º Fahrenheit). Do Not use cold
water or hot water as it may cause dizziness.
• Using saline or sterile water is not required
• Discontinue use immediately if irritation,
bleeding, or other trauma to the ear canal occurs.
• You may experience loud sounds and pressure during
use. This is to be expected and normal. If at any point
during use you feel pain, please stop immediately, and
consult a physician.
• Water Resistant IPX 5 – can be used in the shower.
• Do not use on children under the age of 15.
CHOKING HAZARD:
Keep out of reach of children. Do not allow children to
play with or near this item. This is not a toy for children.
If product becomes damaged,
please discard immediately.
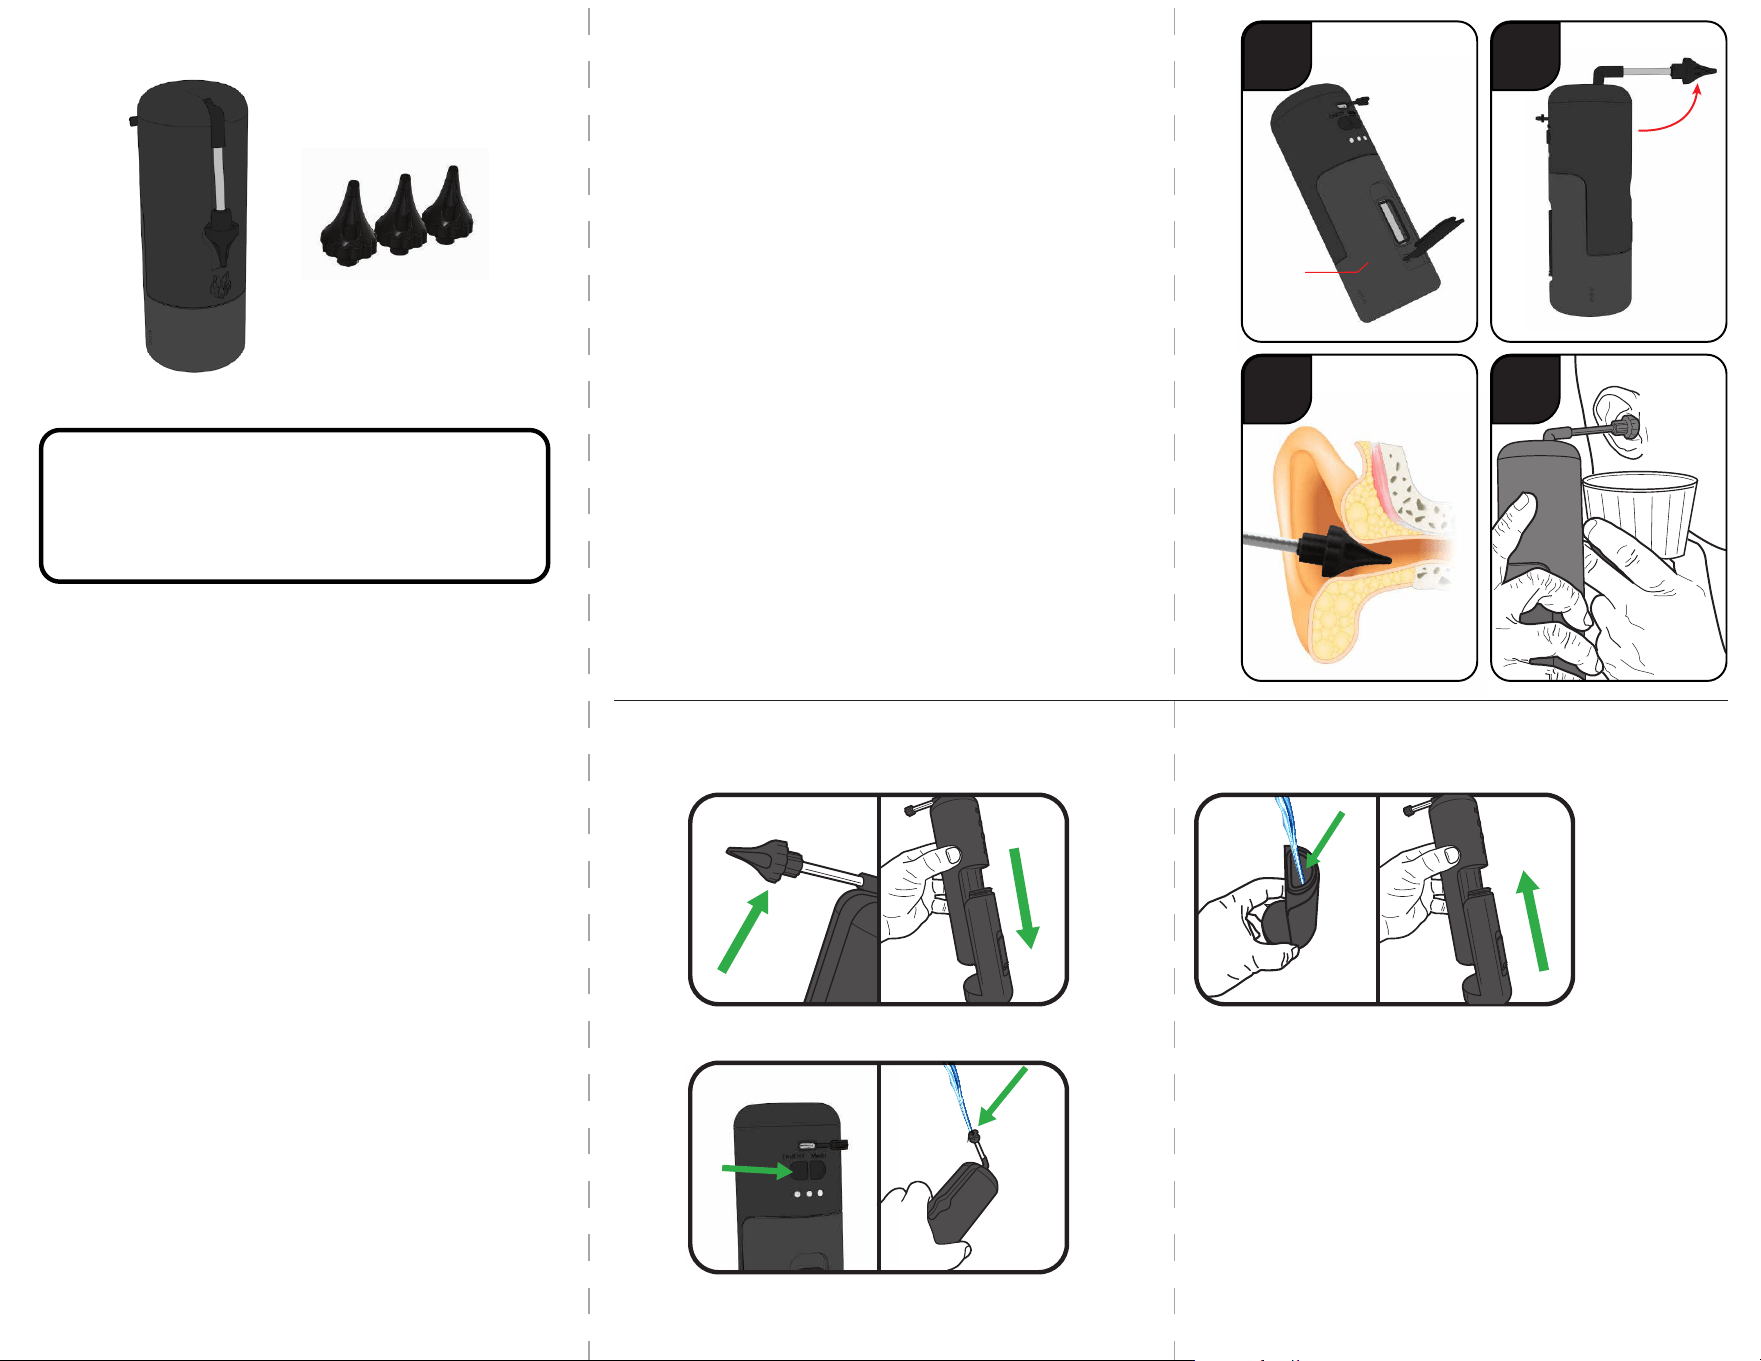
Get Started
Read all instructions before first use.
• Before using the device for the first time rinse and
allow the water reservoir tank to air dry.
• Charge unit using USB-C cable
• Fill water reservoir. USE WARM WATER ONLY!!!
Open the quick access door and fill with warm
water (approximately body temperature of
98 F degrees). (Diagram E)
• Lift arm. (Diagram F)
• Set pressure (recommend starting on the
low setting for first use).
• Gently insert the irrigation tip into the ear canal.
(Diagram G)
• Press power button to start the water pump. When
WUSHing your right ear, tilt your head to the right, so
water and wax flow out. When WUSHing your left ear, tilt
your head to the left, so water and wax flow out.
• Use in shower, over a sink, or place a cup underneath
ear to capture draining water. (Diagram H)
• When finished, turn o the unit and empty any
remaining water in the water reservoir.
Product name: WUSH Powered Earwax Remover Rechargeable
Model No.: WUSH1112
Brand name: BlackWolf
Power input: USB DC 5V 1A
IM2
E F
G H
WUSH™ Ear Cleaner
3 Irrigation Tips
Components
IM3
1. Remove the water reservoir and ear tip
2. Fill the water reservoir and reinstall
back onto device
3. Power on the device then fill the metal tube with
low pressure running water for 15-20 seconds.
NOTE: If the device is still not
spraying water, repeat step 3.
Priming The Pump:
Water not spraying? Consult priming instructions below.
