VSB2G Manual
Installation, Operation, Maintenance Instructions & Parts List
For Outdoor Use Only

Safety
3
3
3
4
5
6
6
7
7
8
Safety Instructions
Assembly
Battery Installation
Additional Safety Practices & Precautions
Conversion Kit
Liquid Propane Gas Connection
Natural Gas Connection
To Light
Match Lighting
Burners
9
7
Appliance Cutout Dimensions
Wiring Diagram
Parts Breakdown
Warranty
10
Table of Contents
Congratulations on the purchase of your high quality, high performance grill.
Read this manual carefully to understand all the instructions about how to
install, operate and maintain for optimum performance and longevity. Keep
this manual in a safe place for future reference. For any assistance, contact us.
Make sure to provide the Model Number and Serial Number of the grill. Thank
you for buying our grill. We wish you years of cooking pleasure.
Message
to
the
Proud
Owner........
12

3
Safety Instructions
WARNING! Read this manual carefully and completely before
using your side burner to reduce risk of fire, burn hazard or other
injury. Make sure all installation and service guidelines are
followed.
Do not store or use gasoline or other flammable liquids or vapors
near this or any other appliance.
Do not store unconnected LP cylinders in the vicinity of this or
any other appliance.
FOR OUTDOOR USE ONLY!
If stored indoors, detach and leave any fuel cylinders outdoors.
Assembly
Remove all packing materials.
Ensure that the burners are positioned securely.
Place grates in the proper location over burners.
Connect gas using proper gas regulator.
Battery Installation
Igniter module is located behind front panel.
Remove drip tray and unscrew round black cap.
Install new 9V battery into cap.
Screw the cap onto igniter module, tightening completely.
Replace drip tray.

4
Additional Safety Practices & Precautions
Have an ABC Fire Extinguisher readily accessible. Never attempt to
extinguish a grease fire with water or other liquids.
Keep electrical supply cords and fuel supply hoses away from heated
surfaces.
Do not heat unopened food containers as they may explode.
Never store additional or empty fuel cylinders in the side burner cabinet or
near the side burner. Do not store cylinders indoors or on their sides. Never
use dented, rusty or damaged cylinders.
After the side burner is installed by a professional technician be sure they
show you where your gas supply shut-off valve is located. All gas lines
must have a shut-off that is easily accessible. If you ever smell gas, check
for leaks IMMEDIATELY. Never check for gas leaks with an open
flame.
Never operate side burner in a windy area. If windy conditions exist, install
a suitable windbreak.
Damage caused by leaving operating burner unattended is not covered under
the terms and conditions of the Vintage Warranty. Never leave open flame
unattended.
Never use side burner without drip pan in place. Make sure drip pan is
properly and fully inserted. Failure to do so may allow hot grease or boil-
overs to become a fire or explosion hazard.
Do not repair or replace any part of the side burner unless specifically
recommended by this manual. A qualified technician should perform all
other necessary service.

5
Safety Practices & Precautions continued:
Gas side burners are not designed/certified for and are therefore not to be
installed in or on recreational vehicles, portable trailers, boats or any other
mobile vehicle.
Children should never be left alone or unattended in an area where a side
burner is located. Install your side burner well away from areas where
children play. Do not store items that may draw the interest of children in or
around the side burner, island or masonry enclosure. When in use and
immediately after, areas of the side burner are hot enough to cause
severe burns!
Avoid wearing loose-fitting, long sleeves or flammable garments when
using the side burner. Never touch cooking grates, side burner top or
surrounding metal surfaces with your bare hands as these areas become
extremely hot during use and could cause severe burns. Use an insulated
glove or mitt when attempting to handle parts of the side burner.
Never lean over or look directly over the cooking surface when attempting
to light.
The side burner cover must be completely removed before lighting and
during operation.
Do not replace side burner cover until the cooking surface has completely
cooled down.
Never connect any unregulated gas supply to the side burner. Supplied
regulator must remain attached in order to validate Warranty.
Conversion Kit
Vintage has provided a conversion kit for in field conversion of your side
burners in the packing materials. Conversion between fuel types should
always be performed by a knowledgeable installation or service technician.

6
Liquid Propane Gas Connection
Only a standard 20lb liquid propane gas cylinder should be used.
Cylinder should maintain an upright position at all times.
Never use a dented or rusty cylinder or a cylinder with a damaged valve.
Your Vintage side burners come equipped with a convertible gas pressure
regulator that must not be removed!
A standard LP hose and regulator assembly must be used to connect cylinder
to the side burners.
To connect hose, first screw brass fitting to the 90 degree elbow on the
convertible gas regulator at the back of your side burners then attach the
regulator end of the hose assembly to your LP cylinder.
Natural Gas Connection
Make sure pipe supplying side burners with natural gas is fitted with a shut
off valve that is easily accessible in case of emergency.
Your Vintage side burners come equipped with a convertible gas pressure
regulator that must not be removed!
Use natural gas flex hose to connect gas line to the 90 degree elbow on
convertible gas regulator at the back of your side burners.
Flexible hose connecting appliance to gas line must not be more than 48” in
length.

7
Burners
To light:
Turn on gas supply to the side burner.
Turn burner knob to “High” then push and hold the ignition button for 5
seconds. You should hear a rhythmic “clicking” sound. If you do not, turn
all knobs to “Off”, check ignition battery and ensure the burner base and
burner cap are properly positioned.
If burners do not light after 5 seconds, turn knobs to off and wait 5 minutes
before retrying. This will prevent any flare-ups over cooking surface, which
can result in injury.
Match lighting:
If ignition fails to light burners after several attempts or if the igniter battery
dies and you do not have a ready replacement, burners may be carefully
match-lit.
If match-lighting after a failed ignition attempt, wait 5 minutes before
attempting to light with a match.
Make sure knobs are in “Off” position. Light a long-stemmed match and
place over the burner. Keeping your face away from cooking surface, push
and turn control knob to “High”. If burner does not light in 5 seconds turn
knob to “Off” and wait 5 minutes before trying again.
Always wait 5 minutes before re-lighting a hot burner!
Note:
Improper lighting procedures can cause the flow control to activate, resulting
in reduced heat output. If this is suspected, shut off all burner controls and
cylinder valve. Wait 30 seconds, then very slowly re-open cylinder valve.
Wait an additional 5 seconds before turning burner control knob and
attempting to light.
8
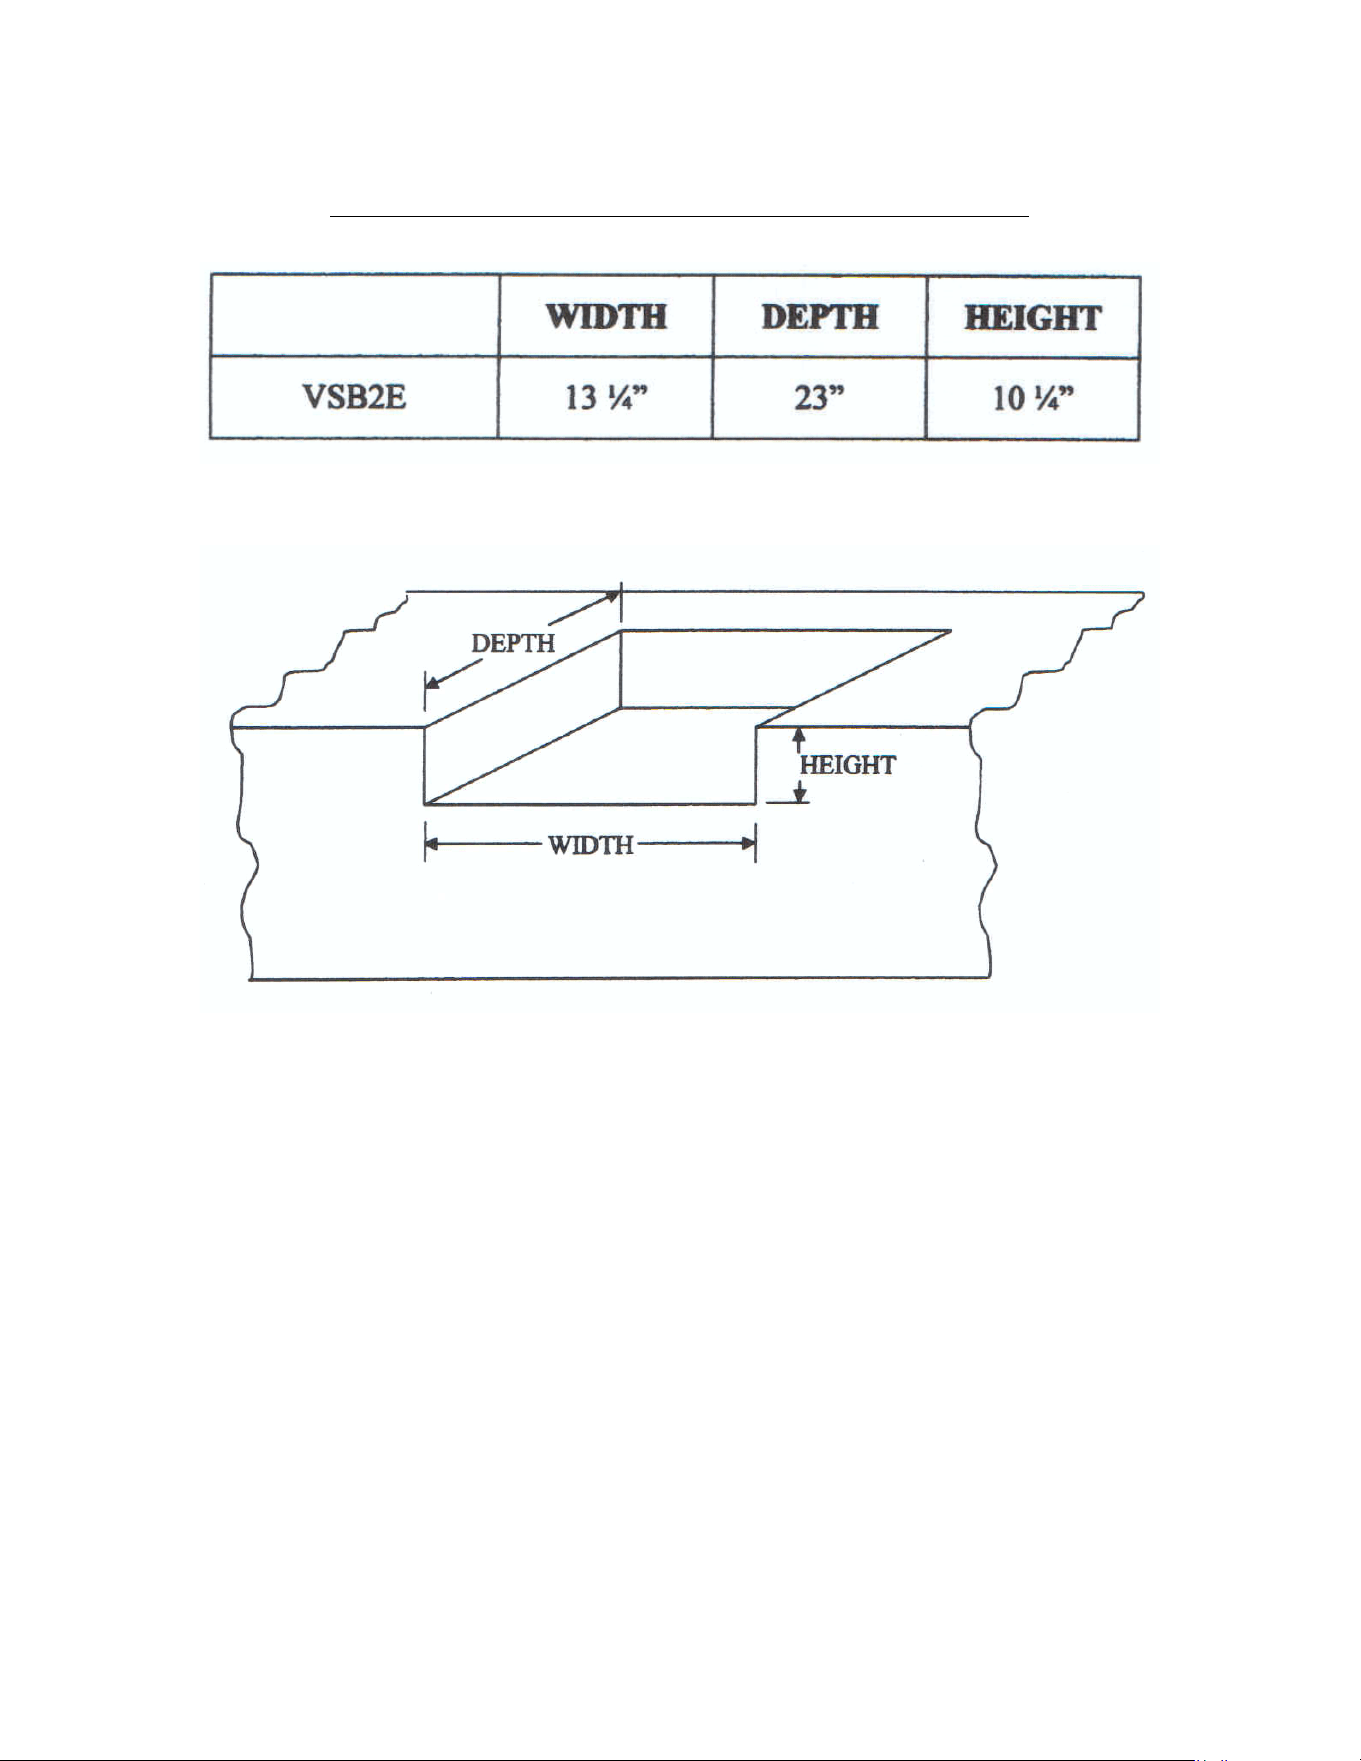
Appliance Cut-out Dimensions
IMPORTANT: Please verify dimensions by measuring actual
appliance from the box. Remember, measure twice and cut
once!
9
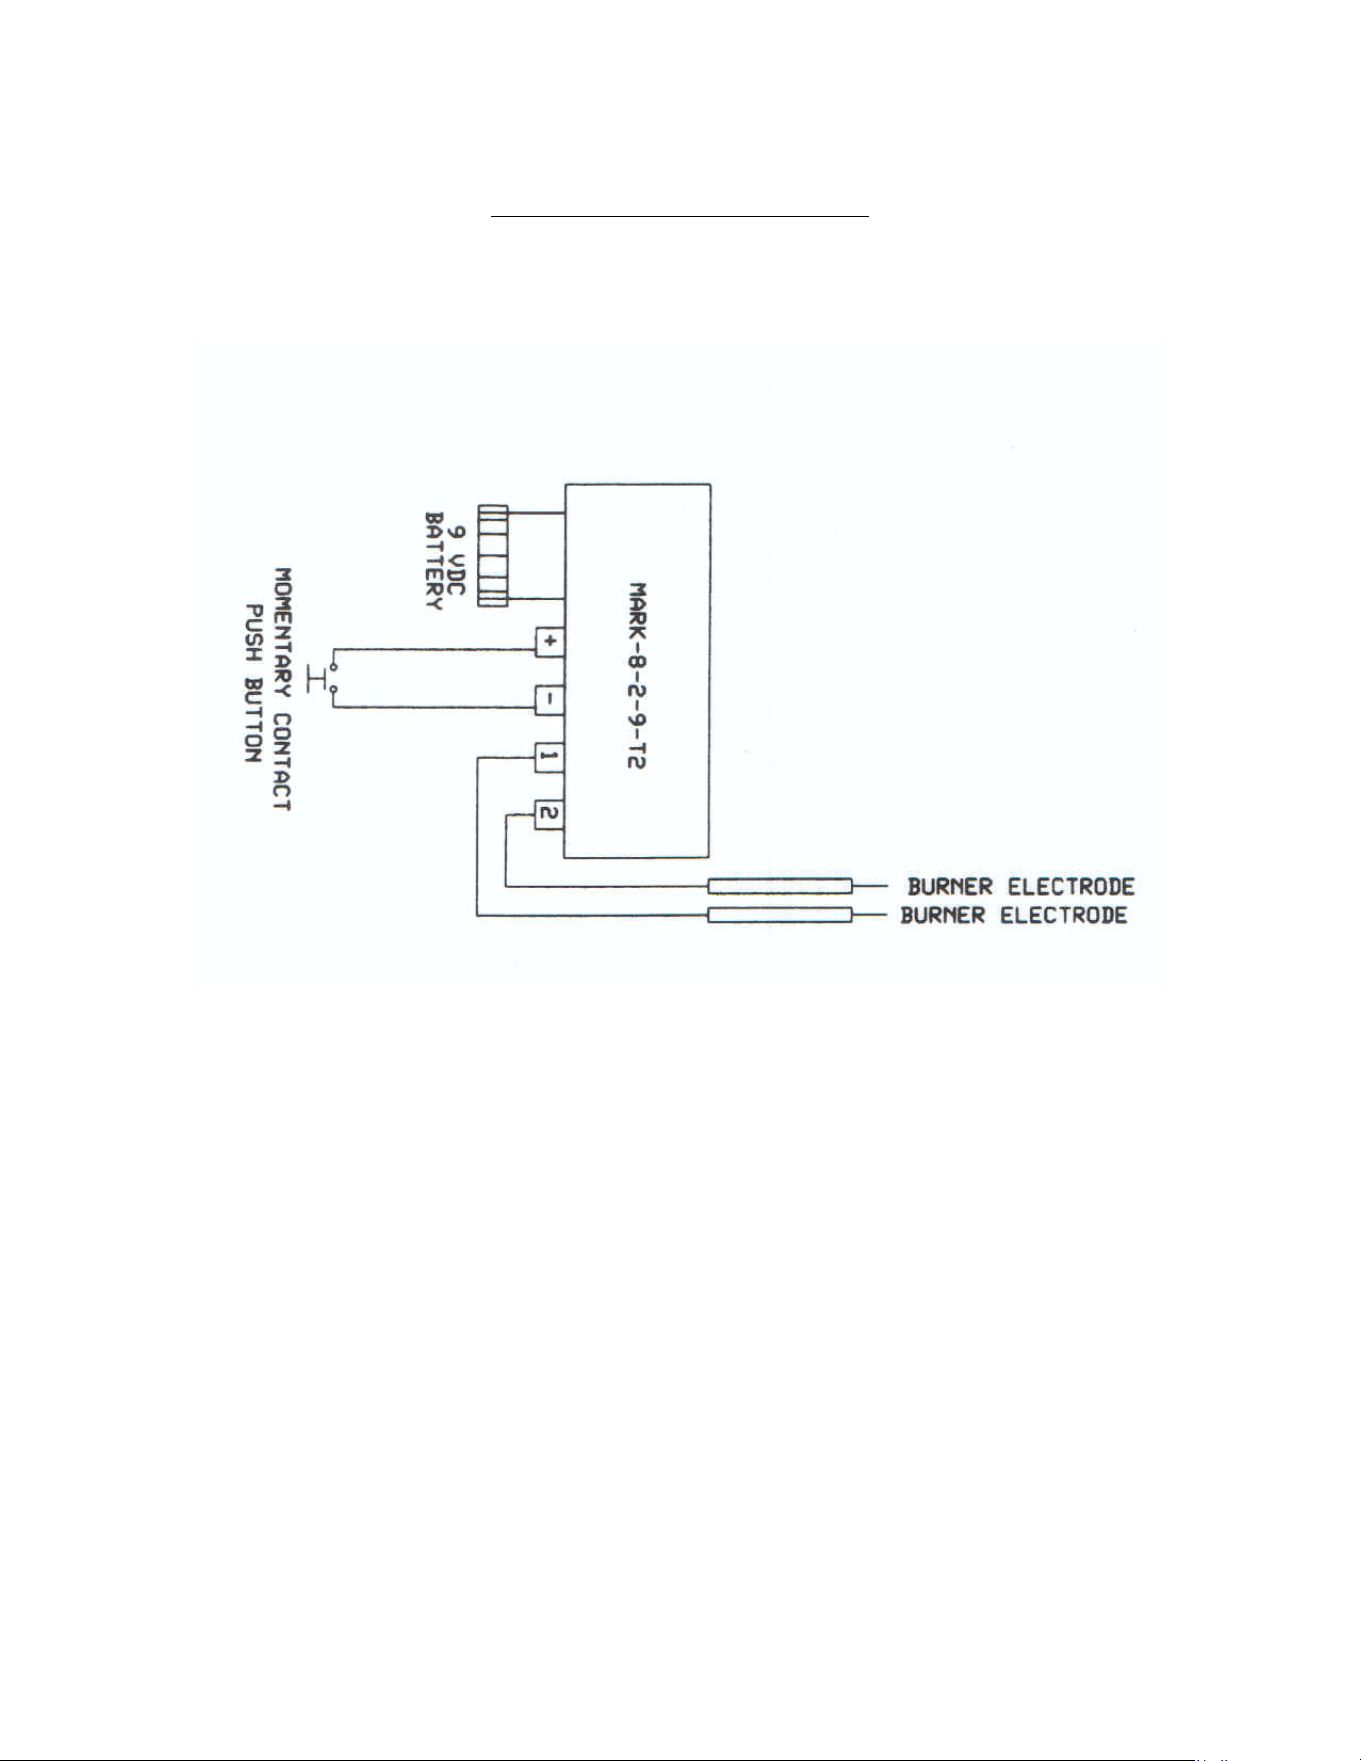
Wiring Diagram
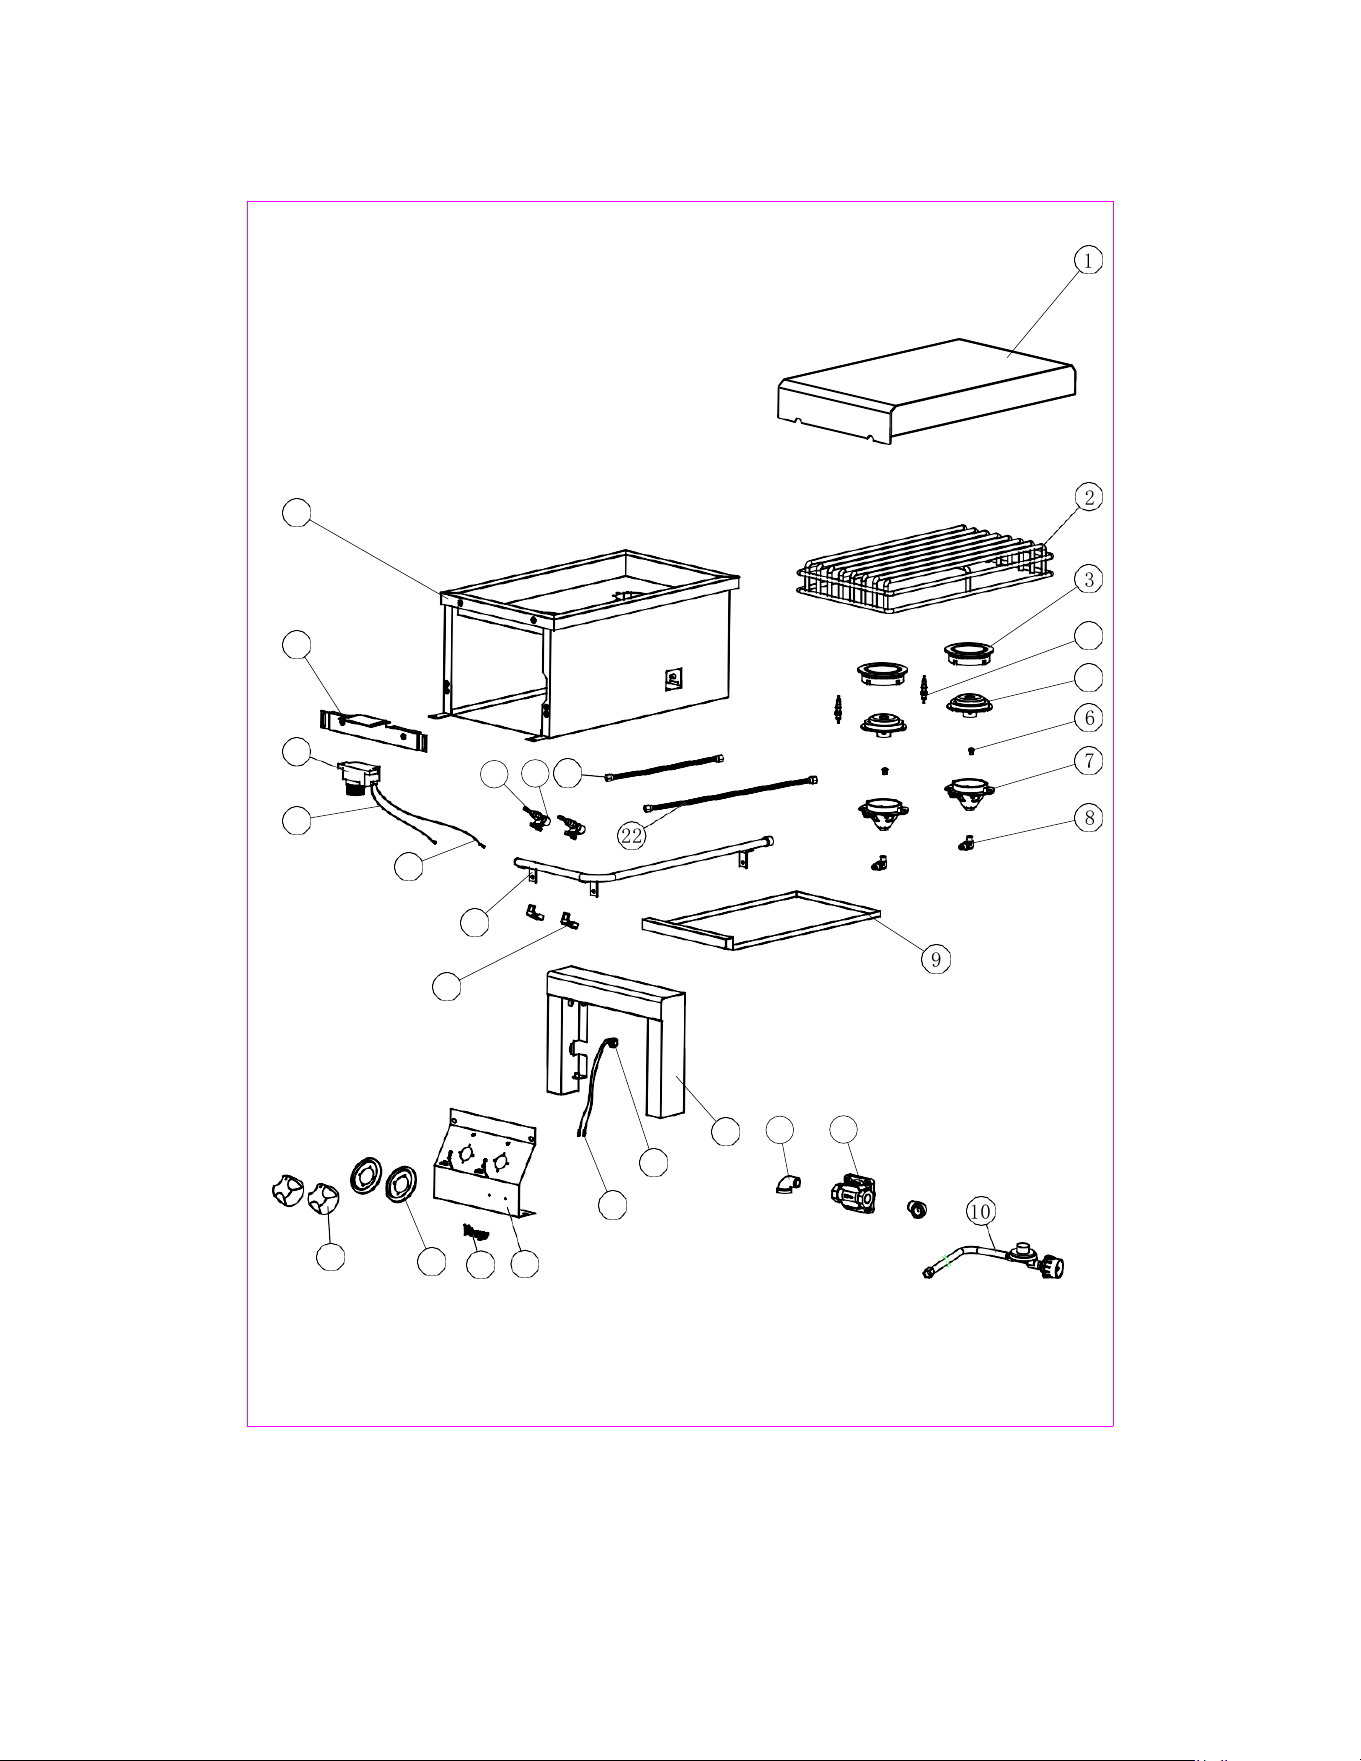
VSB2G - Parts Breakdown
1
2
3
4
5
6
7
8
22
9
15
20
19
10
13
12
11
14
26
21
27
29
25
24 23
28
18
17
16
30
10
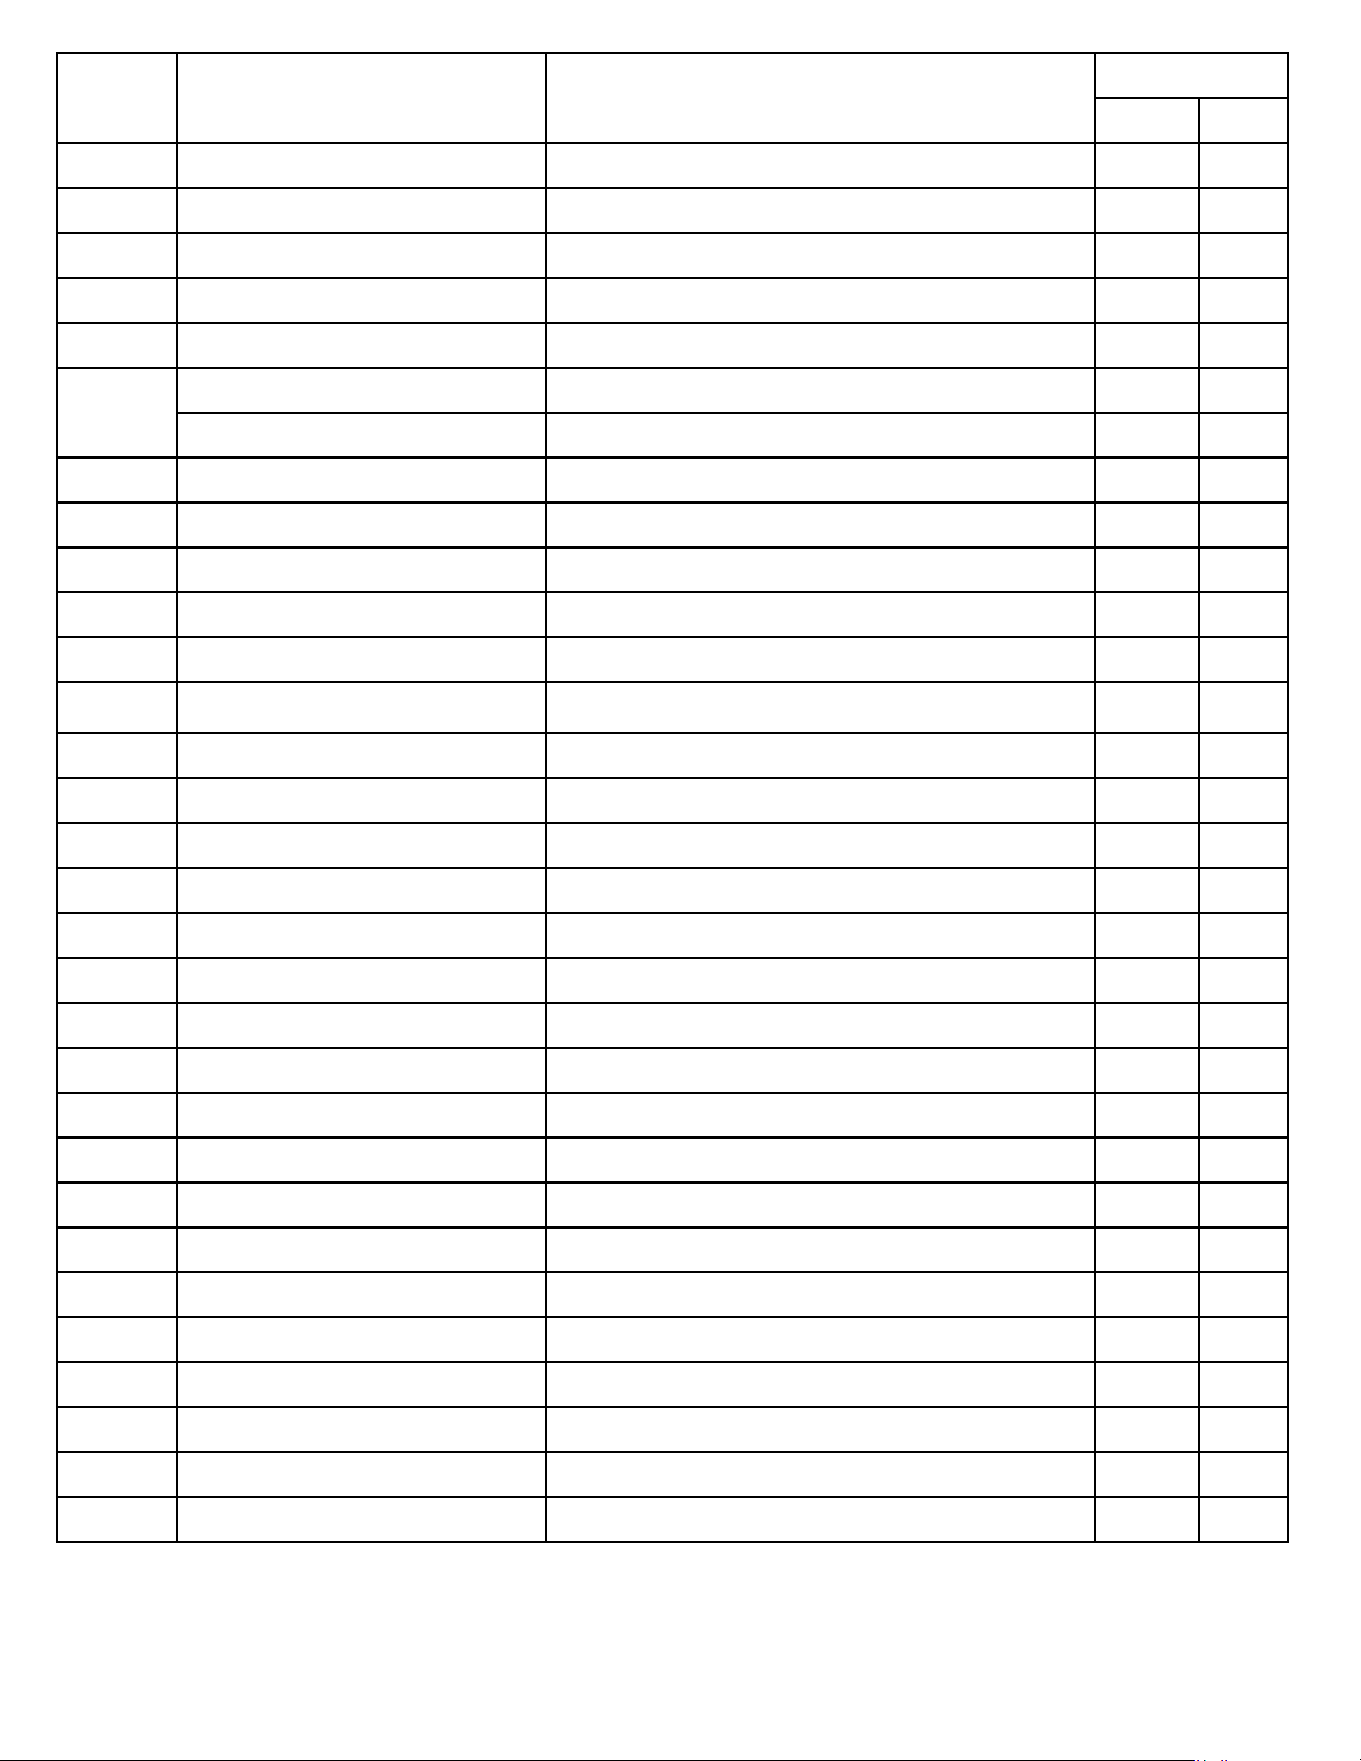
S/N Part # Components
Qty
LP NG
1 VSB-2G-01 Hood plate 1 1
2 VSB-2G-02 Grate 1 1
3 VSB-2G-03 Fire lid 1 1
4 VSB-2G-04 Igniter pin 2 2
5 VSB-2G-05 Fire lid base 2 2
6
VSB-2G-06L Orifice 2
VSB-2G-06N Orifice 2
7 VSB-2G-07 Burner base 2 2
8 VSB-2G-08 Right angle joint 2 2
9 VSB-2G-09 Drip tray 1 1
10 VSB-2G-10 LP Regulator 1 1
11 VSB-2G-11 Regulator (RV48) 1 1
12 VSB-2G-12 1/2" Internal & External threaded elbow
2 2
13 VSB-2G-13 Front frame assembly 1 1
14 VSB-2G-14 Igniter switch 1 1
15 VSB-2G-15 Igniter switch conduct wire 2 2
16 VSB-2G-16 Control panel 1 1
17 VSB-2G-17 Logo 1 1
18 VSB-2G-18 Bezel 2 2
19 VSB-2G-19 VBQ knob (new) 2 2
20 VSB-2G-20 Valve buckle 2 2
21 VSB-2G-21 Airway tube welded assembly 1 1
22 VSB-2G-22 Ripple tube 590mm 1 1
23 VSB-2G-23 Ripple tube 325mm 1 1
24 VSB-2G-24 Right angle joint 2 2
25 VSB-2G-25 Back burner valve assembly 2 2
26 VSB-2G-26 Ignition wire 445mm 1 1
27 VSB-2G-27 Ignition wire 735mm 1 1
28 VSB-2G-28 Igniter 1 1
29 VSB-2G-29 Airway tube holder 1 1
30 VSB-2G-30 Body assembly 1 1
9
11

VINTAGE GAS GRILL - OUTDOOR APPLIANCE
WARRANTY
(RESIDENTIAL USE ONLY)
LIMITED TWO-YEAR WARRANTY
Outdoor Gas Grills and all their component parts, except as detailed below “**” are warranted to be free from
defective materials or workmanship when subjected to normal domestic use for a period of twenty-four (24)
months from the date of original retail purchase. Vintage agrees to repair or replace, at its option, any part which
fails or is found to be defective during the warranty period. **: Any painted or cosmetic items are warranted to
be free of defective material or workmanship for a period of thirty (30) days from the date of the original retail
purchase, ANY DEFECTS MUST BE REPORTED WITHIN THIRTY (30) DAYS OF THE ORIGINAL
DATE OF THE RETAIL PURCHASE. Vintage uses the latest and most up to date processes and materials to
produce all the different items and parts on your Vintage product. There may however be slight variations
noticed, due to inherent differences as well as differences in lighting, product locations and other factors. Failure
to use the grill cover and proper maintenance may result in ineligibility for cosmetic part replacement.
LIMITED FIVE-YEAR WARRANTY
Infrared burners, stainless steel briquette trays and drip pans which fail due to defective materials or
workmanship when subjected to normal domestic use and service, will be repaired or replaced, free of charge for
the part itself, with the owner paying all other costs, including labor. Scratching, corrosion and discoloration due
to improper use and care of the outdoor product is excluded from this warranty.
LIMITED LIFETIME WARRANTY
U-Burners, grates and any stainless steel body housings or parts (with the exception of those mentioned above)
which rusts through due to defective materials or workmanship when subjected to normal domestic use during
the lifetime of the grill of the original purchaser, will be repaired or replaced free of charge for the part itself,
with the owner paying for all other costs. This warranty excludes surface scratches, discoloration and corrosion
which may occur during regular use.
This warranty is only applicable to products purchased in the United States and Canada, and is only available to
the original owner of the product and is not transferable. Product must be purchased in the country where service
is requested. Manufacture requires reasonable proof of your date of purchase; therefore, you should retain your
sales slip or invoice and return via mail the Product Registration information. If registration information is not
available, the proof of purchase will be required. Owner shall be liable for proper installation, providing normal
maintenance and care. Warranty shall not apply to damage resulting from abuse, natural disaster and improper
operation and installation by anyone other than an authorized Vintage Corporation service agency or
representative. If the product or one of its component parts contains a malfunction or defect during the warranty
period, after reasonable number of attempts by the warrantor to remedy the defects or malfunctions, the owner is
entitled to either a refund or replacement of the product or component part or parts. Warrantor’s liability on any
claim of any kind, with respect to the goods covered hereunder, shall in no case exceed the cost of the goods or
part thereof which gives rise to the claim.
Specifications are subject to change without notice.
For Parts & Service Please call 1-866-755-7981
EXCLUSIONS & LIMITATIONS:
• Warranty only applies to the original purchases and may not be transferred.
• Warranty shall not apply and Vintage is not responsible for damage resulting from abuse, alteration or tampering
with the grill, misuse, flare-up fires, improper installation and accidents.
• Installation, start-up damages or problems resulting from improper installation or use.
• Limited to the replacement of defective parts with the owner responsible for all other costs including labor.
• Service, damage or repair by an unauthorized service provider.
• Display models are generally sold “as is.” If you have purchased a display model, any missing components will be
replaced at consumer’s expense; major handling damage to manifold, valve and ignition system will be serviced at
consumer’s expense. All other standard warranty will remain in effect.
• For items deemed to be “customer replaceable” (such as light bulbs), no labor will be covered.
• If a grill requires service and the home is 50 miles or more away from the nearest servicer, an additional travel fee
may apply.
12