
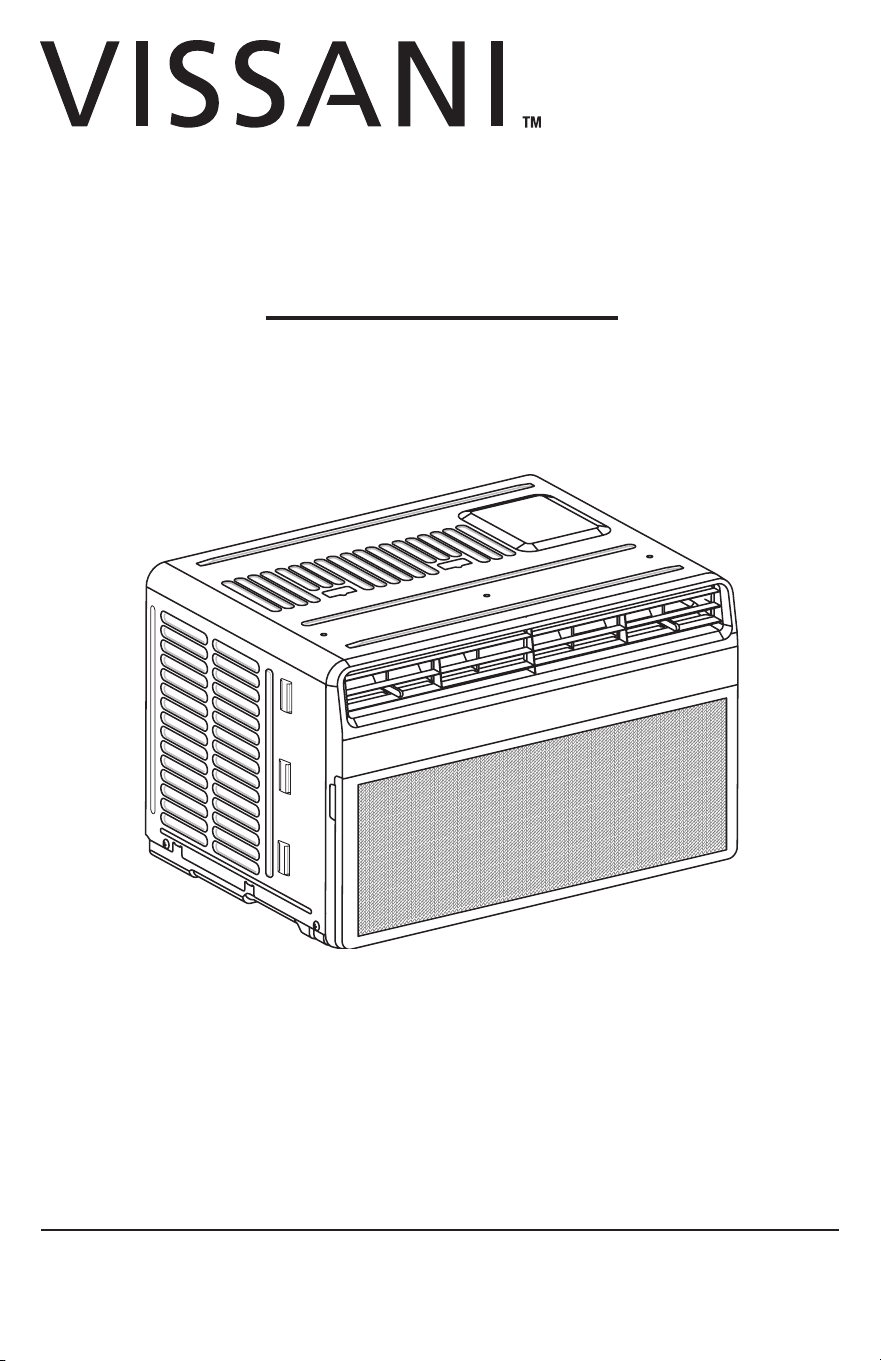
USE AND CARE GUIDE
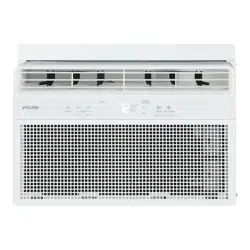
AIR CONDITIONER
Questions, problems, missing parts?
Before returning to the store, call Vissani Customer Service
8 a.m. - 7 p.m., EST, Monday - Friday, 9 a.m. - 6 p.m., EST, Saturday
1-855-VISSANI (1-855-847-7264)
HOMEDEPOT.COM
THANK YOU
We appreciate the trust and condence you have placed in Vissani through the purchase of this air conditioner.
We strive to continually create quality products designed to enhance your home. Visit us online to see our full line
of products available for your home improvement needs. Thank you for choosing Vissani!
Item #1012 472 487
1012 472 615
Model #VW5025R
VW6024R
2
Table of Contents
Safety Information .......................................................2
Important Safety Instructions ..................................2
Refrigerant (For R32 Only) .......................................5
Pre-Installation ............................................................5
Electrical Data ..........................................................5
Tools Required .........................................................6
Hardware Included ...................................................6
Package Contents ....................................................7
Exterior Parts ...........................................................7
Planning Installation ................................................8
Installation ...................................................................9
Operation..............................................................11-13
Maintenance ..............................................................14
Cleaning .................................................................14
Troubleshooting .........................................................15
Before Calling for Service ......................................15
Normal Sounds You May Hear ................................ 16
Safety Information
READ ALL INSTRUCTIONS BEFORE USE
Your safety and the safety of others are very important.
We have provided many important safety messages in
this manual and on your appliance. Always read and
follow all safety messages.
Notice the personal safety alert symbol used in this
manual to draw your attention to a WARNING given
along with the particular operating instruction. This
means that the operation requires special ATTENTION,
CAUTION, and AWARENESS.
WARNING: Indicates a potential hazard which could
result in being killed or seriously injured if you do not
follow instructions.
CAUTION: Indicates a potential hazard which you could
be injured or cause damage to the product if you do not
follow instructions
All safety messages will tell you what the potential
hazard is, tell you how to reduce the chance of injury,
and tell you what may happen if the instructions are not
followed.
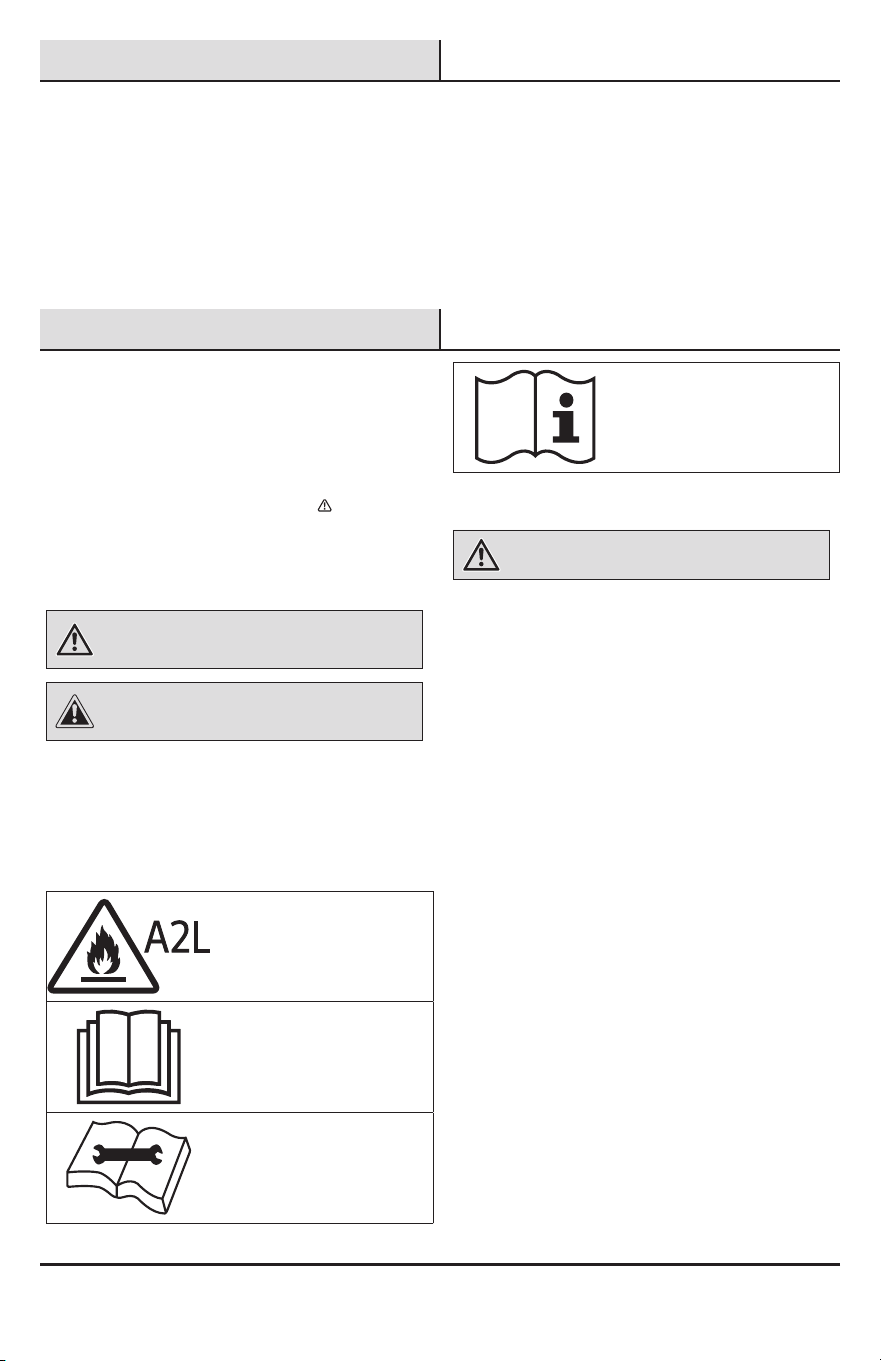
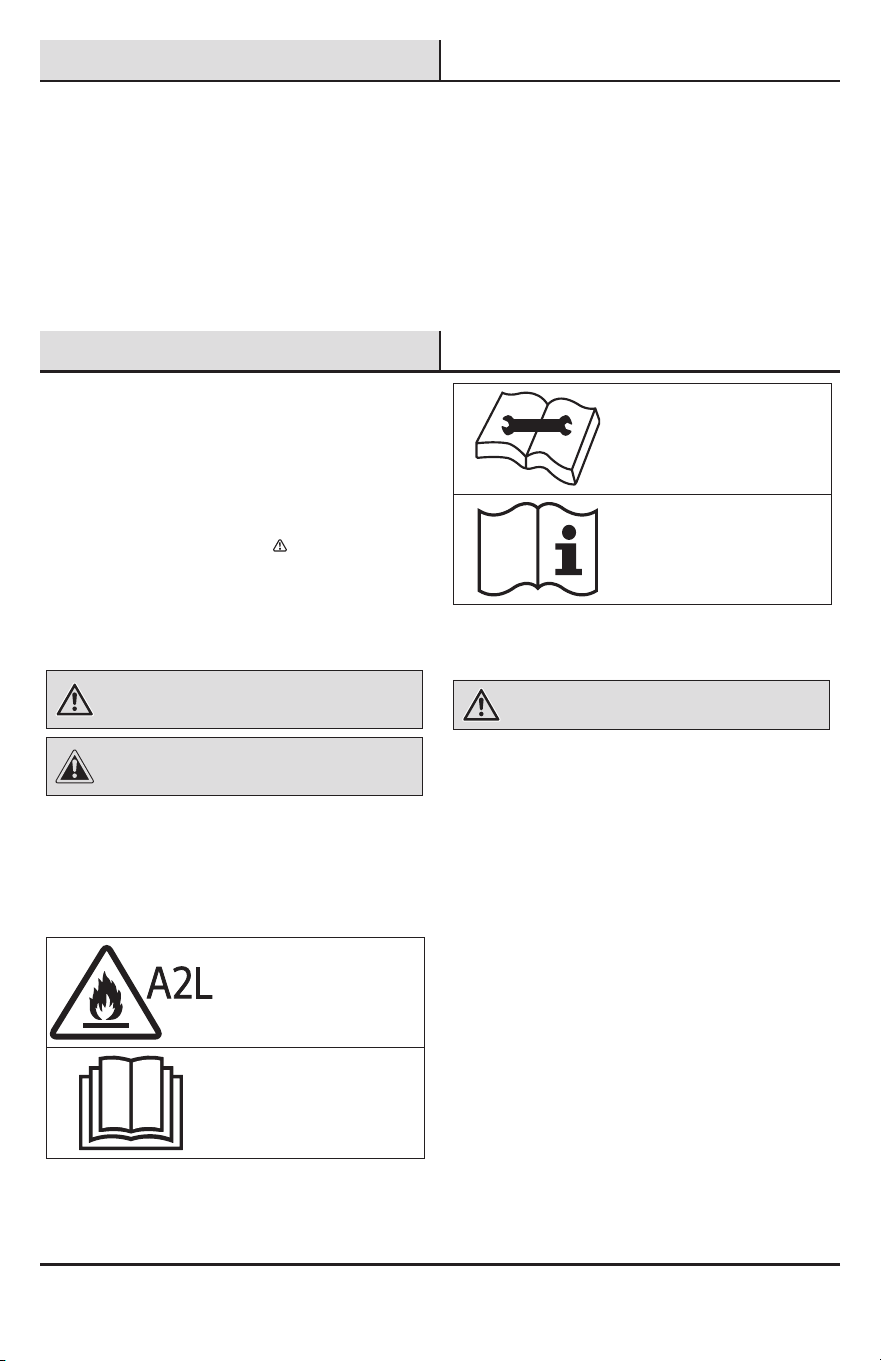
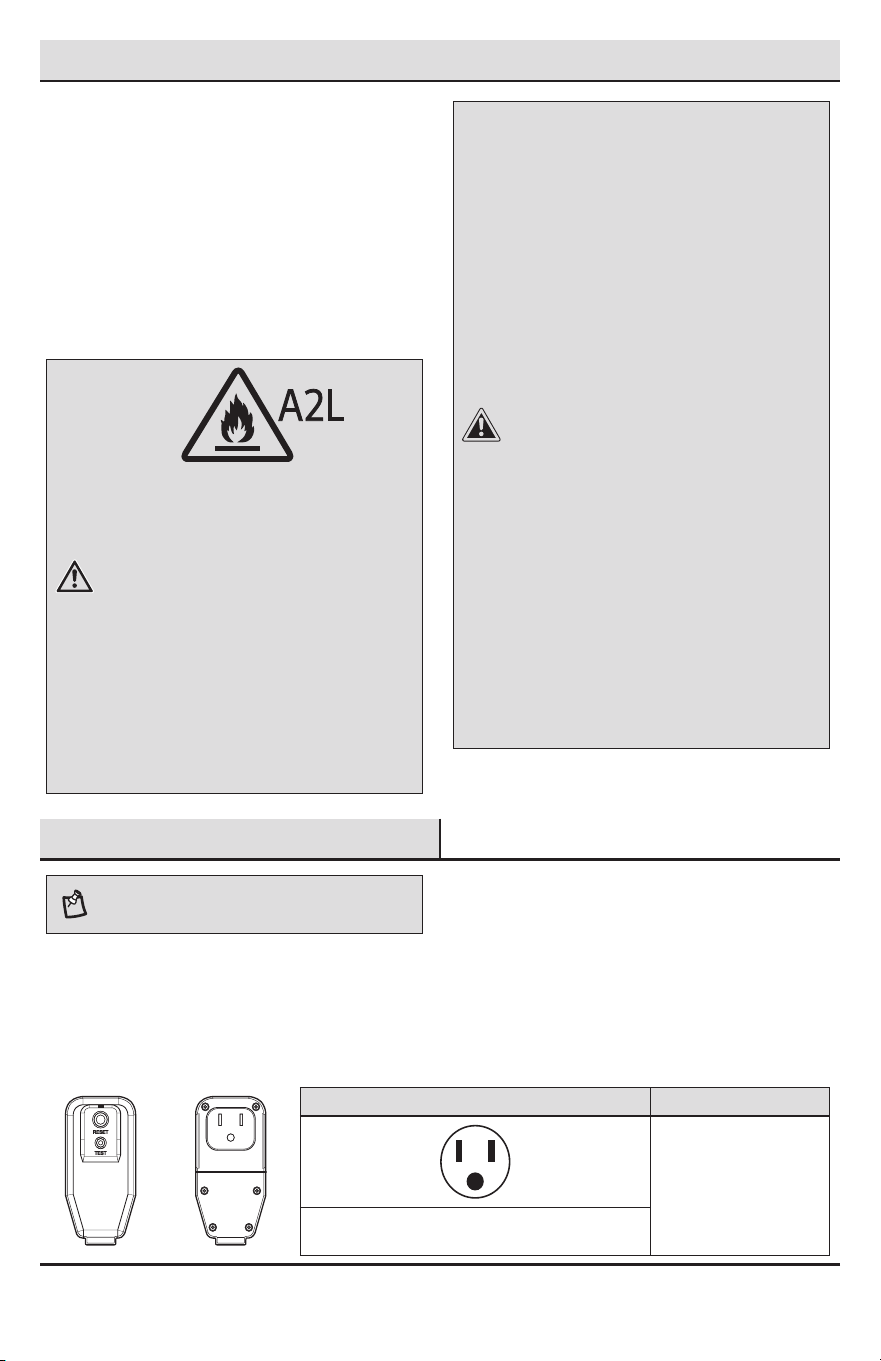
The following symbols are displayed on units:
This symbol indicates that this
appliance uses a ammable refrigerant.
If the refrigerant is leaked and exposure
to an external ignition source, there is
a risk of re.
This symbol indicates that the Operation
Manual should be read carefully.
This symbol indicates that a service
personnel should be handling this
equipment with reference to the
Installation Manual.
This symbol indicates that information
is available such as the Operating
Manual or Installation Manual.
IMPORTANT SAFETY INSTRUCTIONS
WARNING:
To reduce the risk of explosion, re, death, electric
shock, scalding or injury to persons when using
this product, follow basic precautions, including the
following:
INSTALLATION
□ Before use, the appliance must be properly
installed as described in this manual.
□ Contact the authorized service technician for
repair or maintenance of this unit.
□ Contact the installer for installation of this unit.
□ When the power cord is to be replaced,
replacement work shall be performed by
authorized personnel only using only genuine
replacement parts.
□ Installation work must be performed in
accordance with the National Electric Code by
qualied and authorized personnel only.
□ Connect to a properly rated, protected, and sized
power circuit to avoid electrical overload.
□ Always plug into a grounded outlet.
□ Do not under any circumstances, cut or remove
the third (ground) prong from the power cord.
□ When installing or moving the appliance, be careful
not to pinch, crush, or damage the power cord.
□ Plug in the power plug properly.

3 HOMEDEPOT.COM
Please contact 1-855-VISSANI (1-855-847-7264) for further assistance.
Safety Information (continued)
□ Do not modify or extend the power cord.
□ If the supply cord is damaged, it must be replaced
by the manufacturer, its service agent or similarly
qualied persons in order to avoid a hazard.
□ Use a dedicated circuit.
□ Do not disassemble or modify the product.
□ Adhere to all industry recommended safety
procedures including the use of long-sleeved
gloves and safety glasses.
□ Disconnect the power cord or circuit breaker
before installing or servicing the appliance.
□ Keep packaging materials out of the reach of
children. These materials can pose a suffocation
risk to children.
□ Store and install the product where it will not
be exposed to temperatures below freezing or
exposed to outdoor weather conditions.
□ Do not store or use gasoline or other ammable
vapors and liquids in the vicinity of this or any
other appliance.
□ Do not install the unit in potentially explosive
atmospheres.
□ Piping material, pipe routing, and installation
shall include protection from physical damage in
operation and service, and be in compliance with
national and local codes and standards, such as
ASHRAE 15, IAPMO Uniform Mechanical Code, ICC
International Mechanical Code, or CSA B52. All
eld joints shall be accessible for inspection prior
to being covered or enclosed.
□ In order to avoid a hazard due to inadvertent
resetting of the thermal cut-out, this appliance
must not be supplied through an external
switching device, such as a timer, or connected to
a circuit that is regularly switched on and off by
the utility.
OPERATION
□ Use this appliance only for its intended purpose.
□ Never attempt to operate this appliance if it is
damaged, malfunctioning, partially disassembled,
or has missing or broken parts, including a
damaged cord or plug.
□ Repair or immediately replace all power cords
that have become frayed or otherwise damaged.
Do not use a cord that shows cracks or abrasion
damage along its length or at either end.
□ Do not run cord under carpets or mats where it
could be stepped on and damaged.
□ Keep the cord out from under heavy objects like
tables or chairs.
□ Do not place the power cord near a heat source.
□ Do not use an adaptor or plug the product into a
shared outlet.
□ Do not tamper with controls.
□ If you detect a strange sound, a chemical or
burning smell, or smoke coming from the
appliance, unplug it immediately, and contact The
Home Depot Customer Information Center.
□ Never unplug the appliance by pulling on the
power cord. Always grip the plug rmly and pull
straight out from the outlet.
□ Do not grasp the power cord or touch the
appliance controls with wet hands.
□ If water enters the product, turn off the power at
the main circuit, then unplug the product and call
for service.
□ If the product has been submerged, contact The
Home Depot Customer Information Center for
instructions before resuming use.
□ Unplug the product when unused for long periods.
□ Unplug the product before cleaning.
□ In the event of a gas leak (propane gas, etc.) do
not operate this or any other appliance. Open a
window or door to ventilate the area immediately.
□ This appliance is not intended for use by persons
(including children) with reduced physical, sensory
or mental capabilities, or lack of experience
and knowledge, unless they have been given
supervision or instruction concerning the use of
the appliance by a person responsible for their
safety.
□ The interior of the product must only be cleaned
by an authorized service center or a dealer.
□ Do not use solvent-based detergent on the
product. Doing so can cause corrosion or damage,
product failure, electrical shock, or re.
□ Children should be supervised to ensure that they
do not play with the air conditioner.
□ Do not start/stop operation by plugging/
unplugging the power cord.
4
Safety Information (continued)
GROUNDING INSTRUCTIONS
□ The power cord of this appliance is equipped with
a three-prong (grounding) plug. Use this with a
standard three-slot (grounding) wall power outlet
to minimize the hazard of electric shock. The
customer should have the wall receptacle and
circuit checked by a qualied electrician to make
sure the receptacle is properly grounded. DO NOT
CUT OR REMOVE THE THIRD (GROUND) PRONG
FROM THE POWER PLUG.
□ Situations when the appliance will be
disconnected occasionally; Because of potential
safety hazards, we strongly discourage the use
of an adapter plug. However, if you wish to use
an adapter, a TEMPORARY CONNECTION may
be made. Use UL-listed adapter, available from
most local hardware stores. The large slot in the
adapter must be aligned with the large slot in the
receptacle to assure a proper polarity connection.
□ Attaching the adapter ground terminal to the
wall receptacle cover screw does not ground the
appliance unless the cover screw is metal, and
not insulated, and the wall receptacle is grounded
through the house wiring. The customer should
have the circuit checked by a qualied electrician
to make sure the receptacle is properly grounded.
□ Disconnect the power cord from the adapter, using
one hand on each. Otherwise, the adapter ground
terminal might break. Do not use the appliance
with a broken adapter plug.
□ Situations when the appliance will be
disconnected often; Do not use an adapter plug
in these situations. Unplugging the power cord
frequently can lead to an eventual breakage of the
ground terminal. The wall power outlet should be
replaced by a three-slot (grounding) outlet instead.
CAUTION:
To reduce the risk of minor or moderate injury to
persons, malfunction, or damage to the product
or property when using this product, follow basic
precautions, including the following:
INSTALLATION
□ Take care when installing the product that exhaust
or condensation does not damage nearby property.
□ Follow installation instructions exactly to avoid
excessive vibration or water leakage.
□ Wear gloves and use caution when unpacking and
installing the appliance. Screws or sharp edges
can cause injuries.
□ When installing or moving the appliance, be careful
not to pinch, crush, or damage the power cord.
□ The supply and return air openings in the
conditioned space may have the body of the
appliance may be installed in open areas such as
false ceilings not being used as return air plenums,
as long as the conditioned air does not directly
communicate with the air of the false ceiling.
OPERATION
□ This appliance is not intended for use as a
precision refrigeration system. Do not use it for
special purposes such as maintaining pets, food,
precision machinery, or art objects.
□ Make sure the air inlet and outlet are free from
obstructions.
□ Do not step on or place heavy objects on top of the
appliance.
□ Do not operate the appliance without the lter
securely installed.
□ Do not drink water drained from the appliance.
□ Be sure to ventilate sufciently when the air
conditioner and a heating appliance such as a
heater are used simultaneously.
□ Do not expose people, animals, or plants to the
cold or hot wind from the air conditioner for
extended periods of time.
□ Remove the batteries if the remote control is not
to be used for an extended period of time.
□ Never mix different types of batteries, or old and
new batteries for the remote control.
□ Stop using the remote control if there is a uid
leak in the battery. If your clothes or skin are
exposed to the leaking battery uid, wash off with
clean water.
□ If the leaking battery uid has been swallowed,
rinse the inside of the mouth thoroughly and
consult a doctor.
□ Do not recharge or disassemble the batteries.
MAINTENANCE
□ Clean the lter every two weeks.
□ Never touch the metal parts of the air conditioner
when removing the air lter.
□ Never use strong cleaning agents or solvents
when cleaning the air conditioner or spray water.
Use a smooth cloth.
□ Use a soft cloth to clean the appliance. Do not use
waxes, thinners, or harsh detergents.
5 HOMEDEPOT.COM
Please contact 1-855-VISSANI (1-855-847-7264) for further assistance.
Safety Information (continued)
REFRIGERANT (FOR R32 ONLY)
WARNING: Do not use means to accelerate the
defrosting process or to clean, other than those
recommended by the manufacturer.
□ The appliance shall be stored in a room without
continuously operating open ames (for example an
operating gas appliance) and ignition sources (for
example an operating electric heater).
□ Do not pierce or burn.
□ Be aware that ammable refrigerants may not contain
an odor.
□ The installation of pipe-work shall be kept to a
minimum.
□ National gas regulations shall be observed.
□ Mechanical connections shall be accessible for
maintenance purpose.
□ The appliance shall be stored in a well-ventilated area
where the room size corresponds to the room area as
specied for operation.
CAUTION: This unit contains ammable refrigerant and
has special safety precautions not normally associated
with older units. Please follow all precautions and
advisories.
□ Use caution while handling and prevent damage to
unit. Do not put any holes into product for any reason.
This can cause damage to product and prevent unit
from cooling.
□ Maintenance and cleaning of unit should be performed
by trained personnel. Failure to properly clean unit can
result in damage to the refrigeration system and or the
electrical system.
□ Keep any required ventilation openings clear of
obstruction.
□ Service should only be performed by technicians
properly trained and certied in the use of ammable
refrigerants. Any service performed by unauthorized
servicers/individuals will void all warranties.
□ When storing the appliance, do not put in a room with
any open ame appliance, such as gas water heaters
or furnaces. Also keep away from electric heaters.
Damaged units should be repaired before storage.
□ Any person who is involved with working on or
breaking into a refrigerant circuit should hold
a current valid certicate from an industry-
accredited assessment authority, which authorizes
their competence to handle refrigerants safely in
accordance with an industry recognized assessment
specication.
□ Servicing shall only be performed as recommended by
the equipment manufacturer. Maintenance and repair
requiring the assistance of other skilled personnel shall
be carried out under the supervision of the person
competent in the use of ammable refrigerants.
□ The appliance shall be stored so as to prevent
mechanical damage from occurring.
□ The refrigerant and insulation blowing gas used in the
appliance require special disposal procedures. Consult
a service agent or a similarly qualied person before
disposing of them.
Pre-Installation
NOTE: This manual may contain images or content that
may be different from the model you purchased. This
manual is subject to revision by the manufacturer.
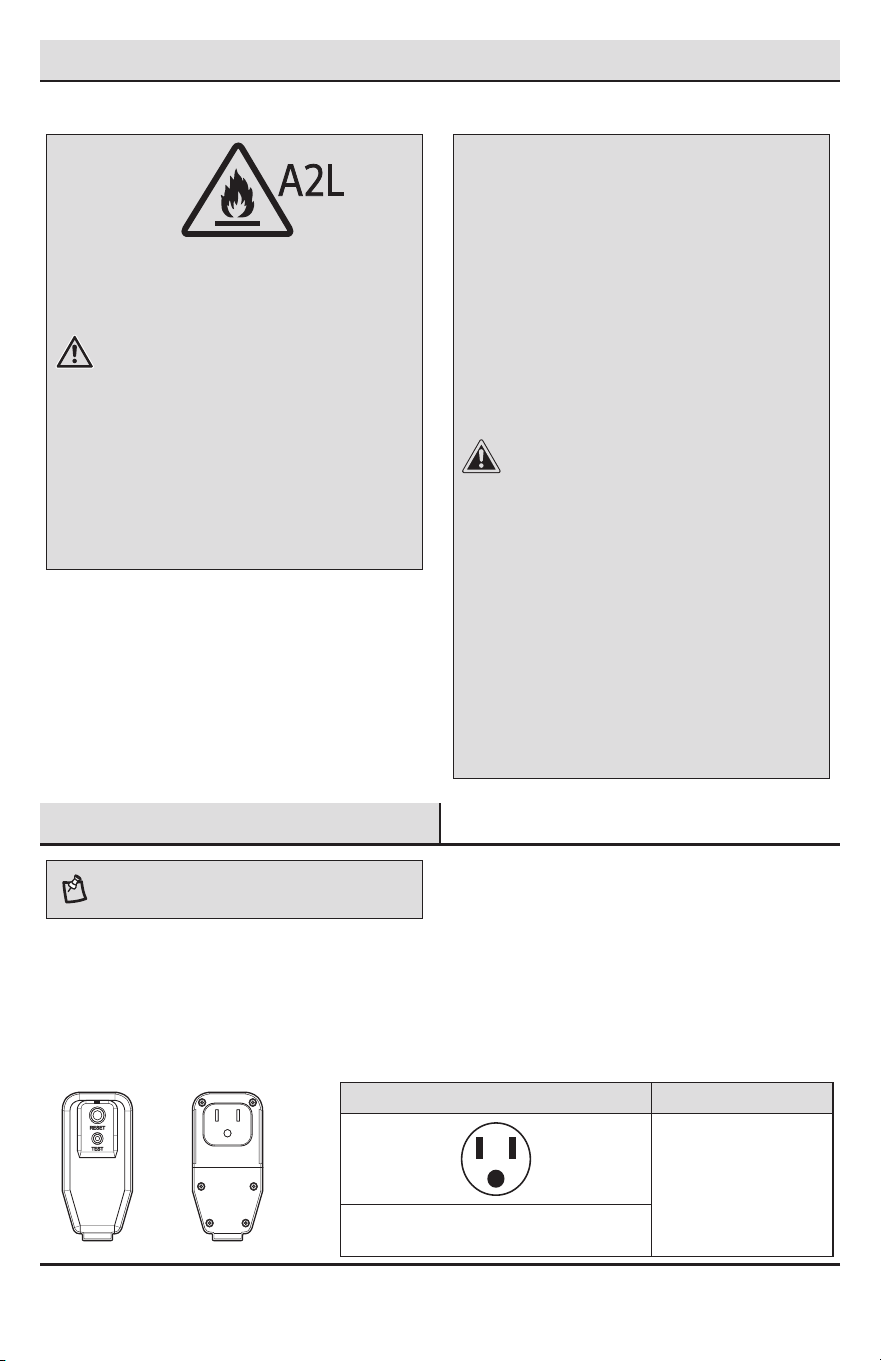
ELECTRICAL DATA
Power cord may include a current interrupter device. TEST and RESET buttons are provided on the plug case. The
device should be tested on a periodic basis by rst pressing the TEST button and then the RESET button. If the TEST
button does not trip or if the RESET button will not stay engaged, discontinue use of the air conditioner and contact
a qualied service technician.
FOR 120V
Use Wall Receptacle Power Supply
Use 15 A, time delay
fuse or 15 A, circuit
breaker.
Standard 120 V, 3-wire grounding
receptacle rated 15 A / 120 VAC / 60 Hz
6
Pre-Installation (continued)
WARNING:
□ This appliance should be installed in accordance with
the National Electrical Code.
□ Use of extension cords could cause serious injury or
death.
□ Do not use an extension cord with this window air
conditioner.
□ Do not use surge protectors or multi-outlet adapters
with this window air conditioner.
□ Never push the TEST button during operation.
□ Doing so can damage the plug.
□ Do not remove, modify, or immerse this plug. If this
device trips, the cause should be corrected before
further use.
CAUTION: The conductors inside this cord are
surrounded by shields, which monitor leakage current.
These shields are not grounded. Periodically examine
the cord for any damage. Do not use this product in the
event the shields become exposed. Avoid shock hazard.
This unit cannot be user-serviced. Do not open the tamper
resistant sealed portion. All warranties and performance
will be voided. This unit is not intended to be used as an
ON/OFF switch.
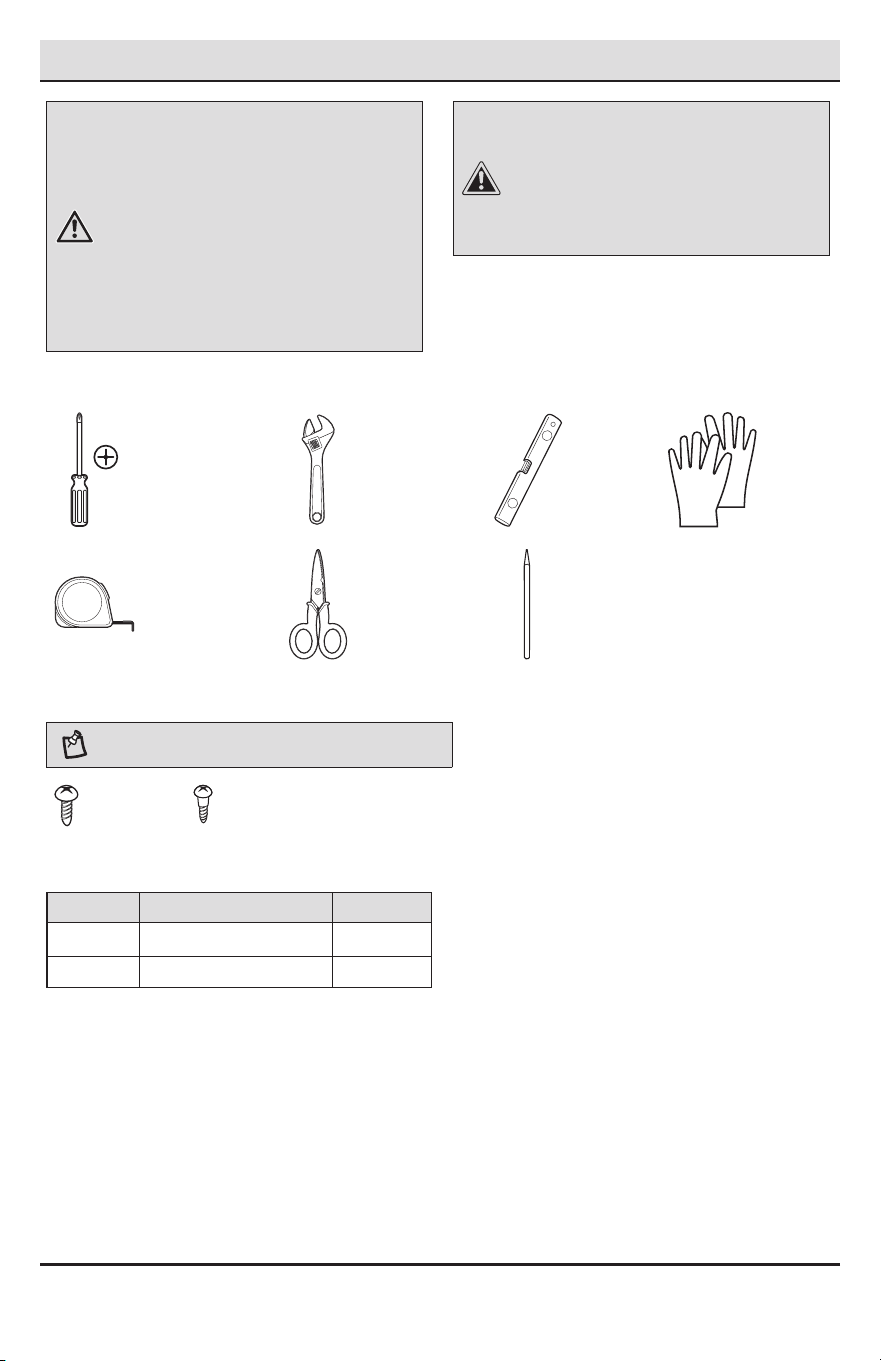
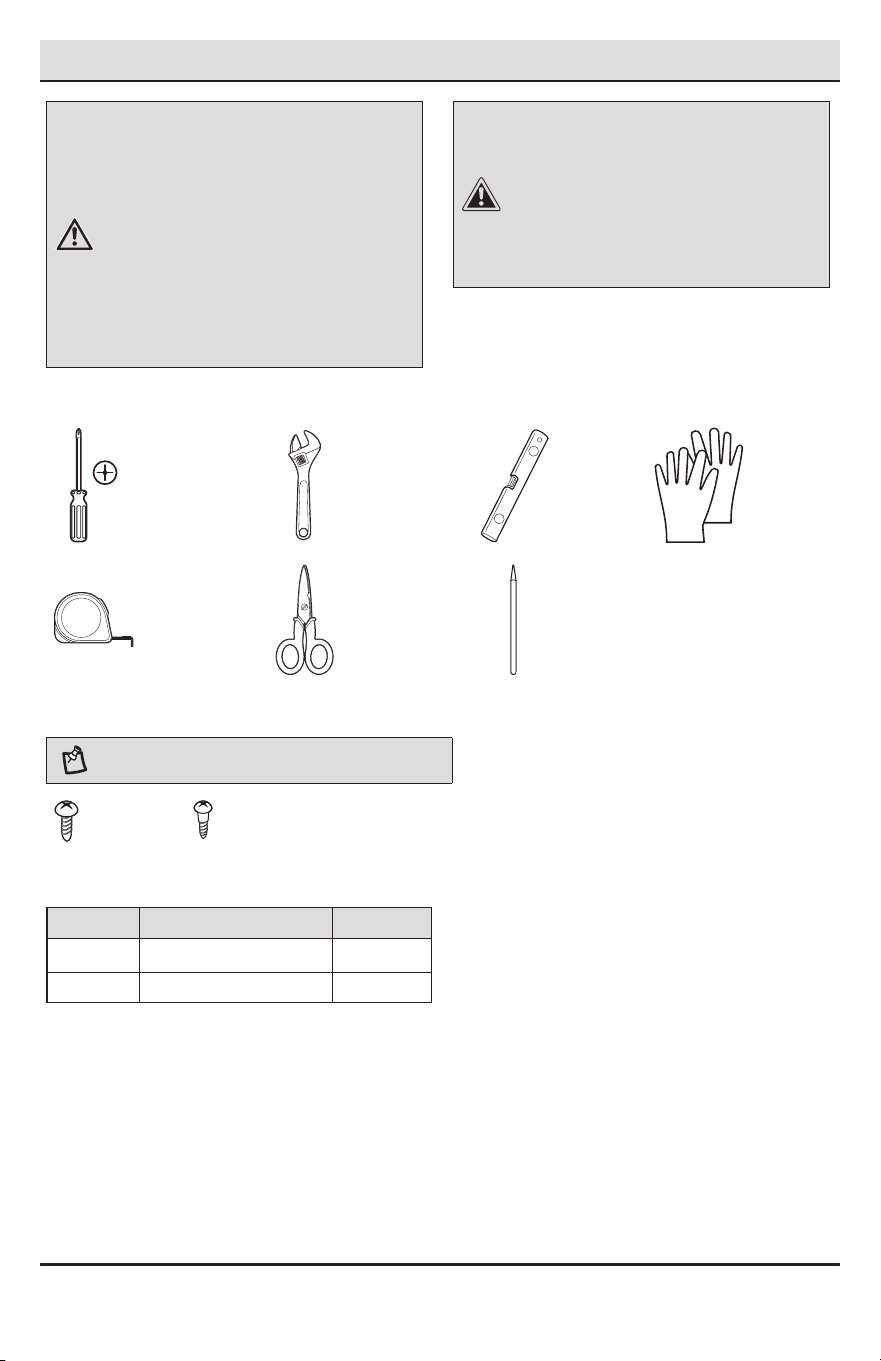
TOOLS REQUIRED
Phillips
screwdriver
Adjustable
wrench
Level Gloves
Tape
measure
Scissors or
Cutting knife
Pencil
HARDWARE INCLUDED
NOTE: Hardware not shown to actual size.
AA BB
Part Description Quantity
AA Type “A” screws 6
BB Type “B” screws 5
7 HOMEDEPOT.COM
Please contact 1-855-VISSANI (1-855-847-7264) for further assistance.
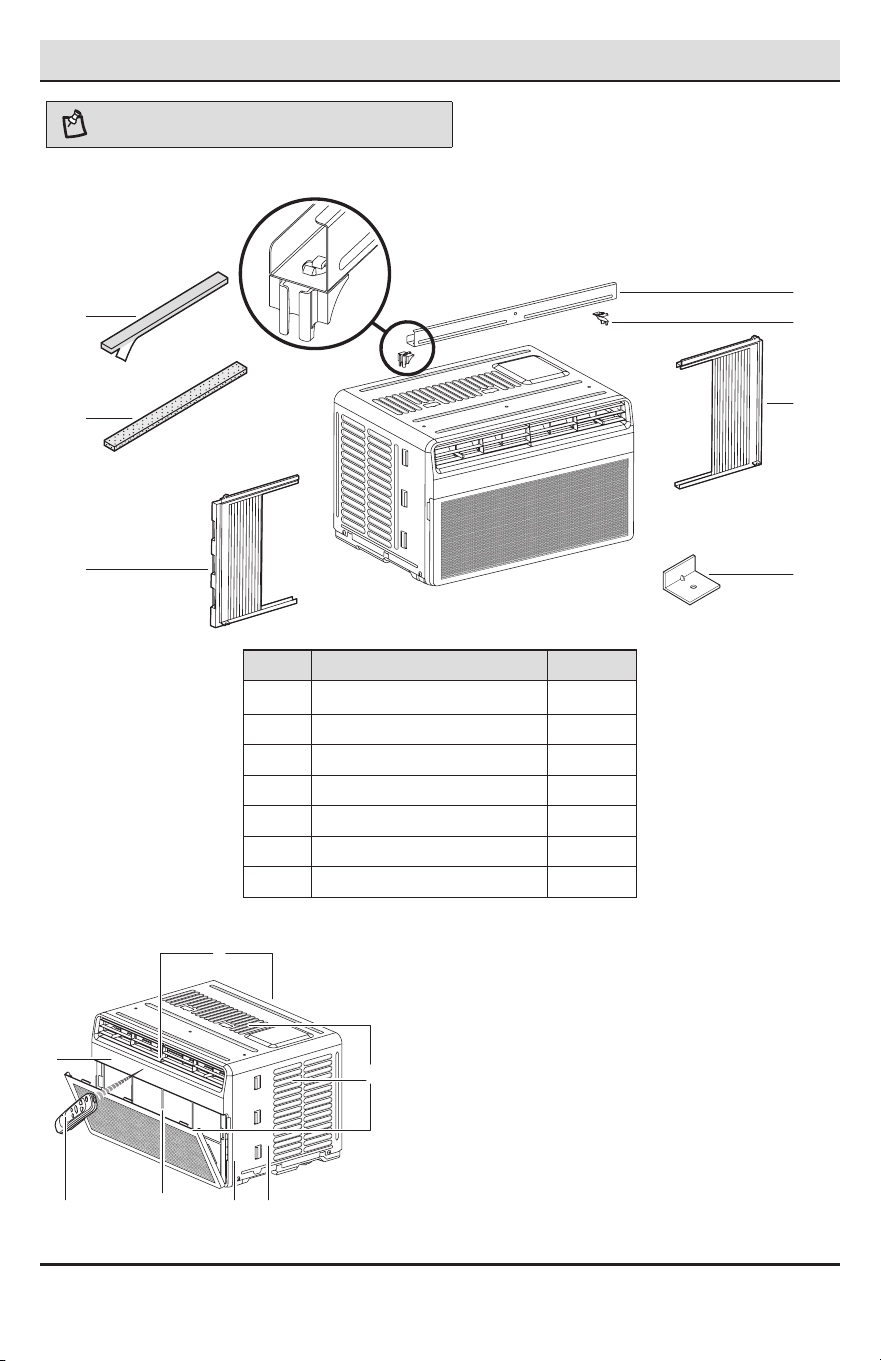
Pre-Installation (continued)
NOTE: The feature may be changed according to the type of
model.
PACKAGE CONTENTS
D
E
F
G
A
B
C
Part Description Quantity
A Foam-PE (Adhesive backed) 2
B Foam strip (Non-adhesive) 1
C Left curtain panel 1
D Upper guide 1
E Supporter 2
F Right curtain panel 1
G L bracket 3
EXTERIOR PARTS
1
3
2 4 5
6
7
1. Control Panel
2. Remote Control
3. Air Filter
4. Front Grille
5. Cabinet
6. Air Inlet
7. Air Outlet
8
Pre-Installation (continued)
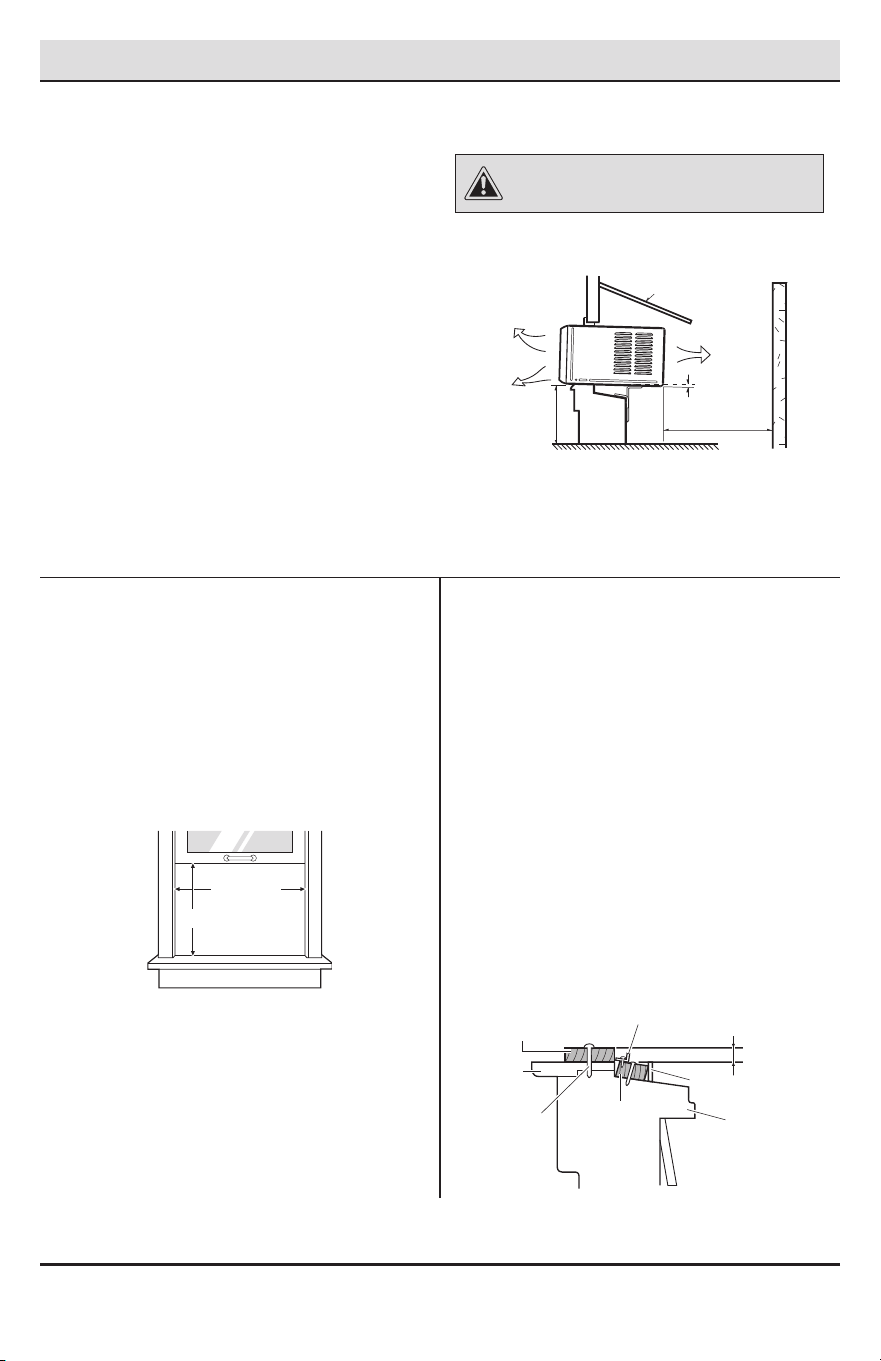
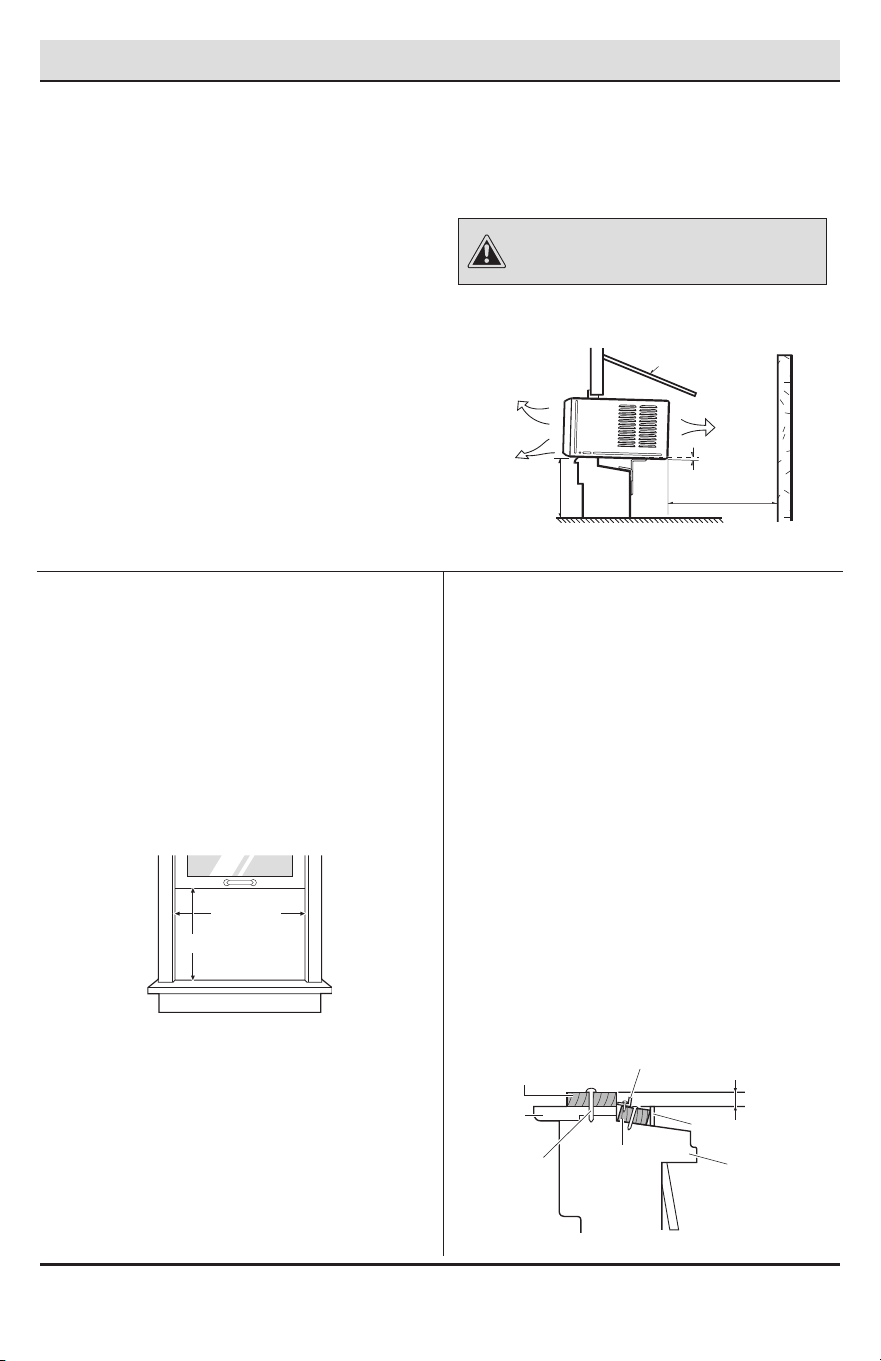
PLANNING INSTALLATION
1
How to install the unit
□ To prevent vibration and noise, make sure the
unit is installed securely and rmly.
□ Install the unit out of direct sunlight.
□ There should be no obstacles, such as a
fence or wall, within 20" from the back of the
cabinet because it will prevent heat radiation
of the condenser. Restriction of outside air will
greatly reduce the cooling efciency of the air
conditioner.
□ Install the unit slightly tilted so the back is
slightly lower than the front (about 1/4"). This
will force condensed water to ow to the
outside.
□ Install the unit with the bottom between
30"~ 60" above the oor level.
CAUTION: DO NOT cover or block any of the side and
top louvers. All side louvers of the cabinet must remain
exposed to the outside of the structure and unobstructed.
Cooled air
Awning
Fence
Heat
radiation
About 1/4"
Over 20"
30"~60"
2
Window requirements
□ This unit is designed for installation in
standard double hung windows with actual
opening widths from 21" to 35".
□ The top and bottom window sashes must open
sufciently to allow a clear vertical opening of
12" from the bottom of the upper sash to the
inside sill.
21" to 35"
12" min
3
Storm window requirements
□ Windows that include a storm window frame
may prevent the air conditioner from tilting
down toward the outside to drain properly.
For proper drainage, attach a 1" x 2" piece
of wood to the inner sill, trimmed to a length
which ts inside the window frame. The top
of the wood shim must be at least 3/4" higher
than the top of the storm window frame.
Attach the wood securely to the sill with nails
or screws.
□ If necessary, attach another 1" x 2" wood strip
ush against the back of the inner sill. This will
raise the L bracket, as shown in the drawing.
Wood Strip Mounted
On
Top of Inner Sill
L Bracket
3/4" higher than
storm window frame
Storm
Window Frame
Outer Sill
Outdoors
Indoors
Inner Sill
Wood Strip for
L bracket
Nail or screw
9 HOMEDEPOT.COM
Please contact 1-855-VISSANI (1-855-847-7264) for further assistance.
Installation
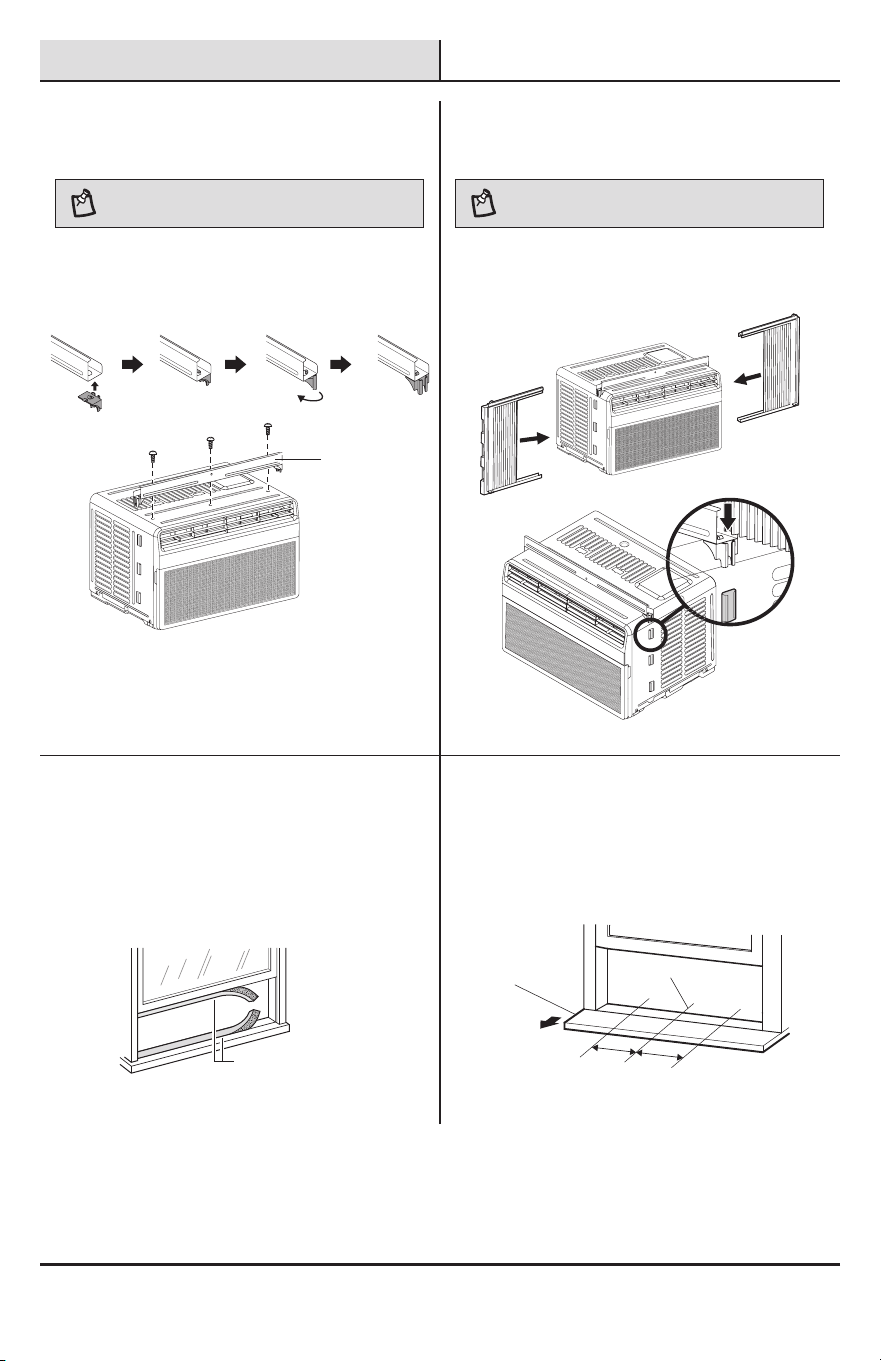
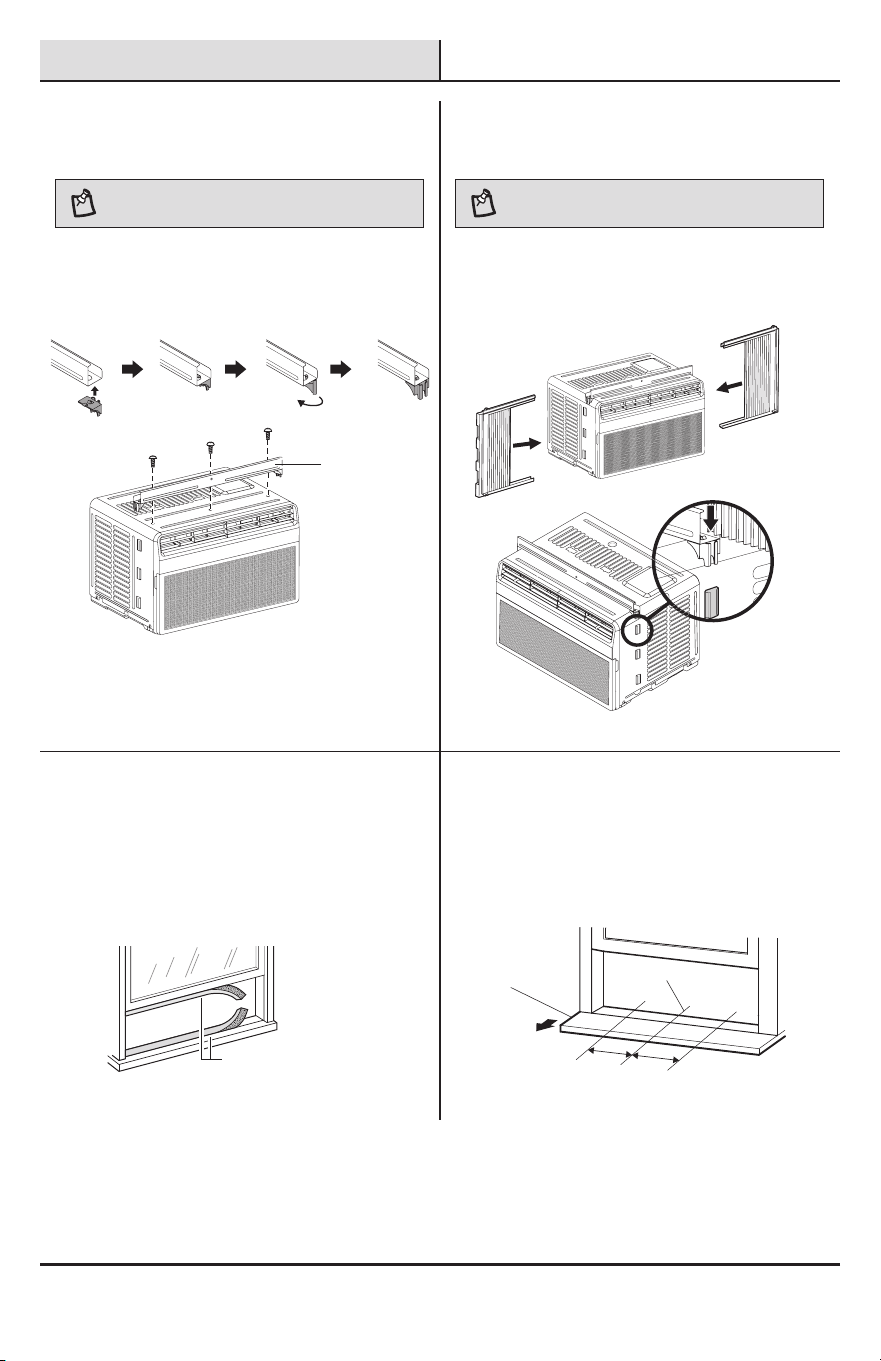
1
Preparation of the chassis
NOTE: The feature may be changed according to the
type of model.
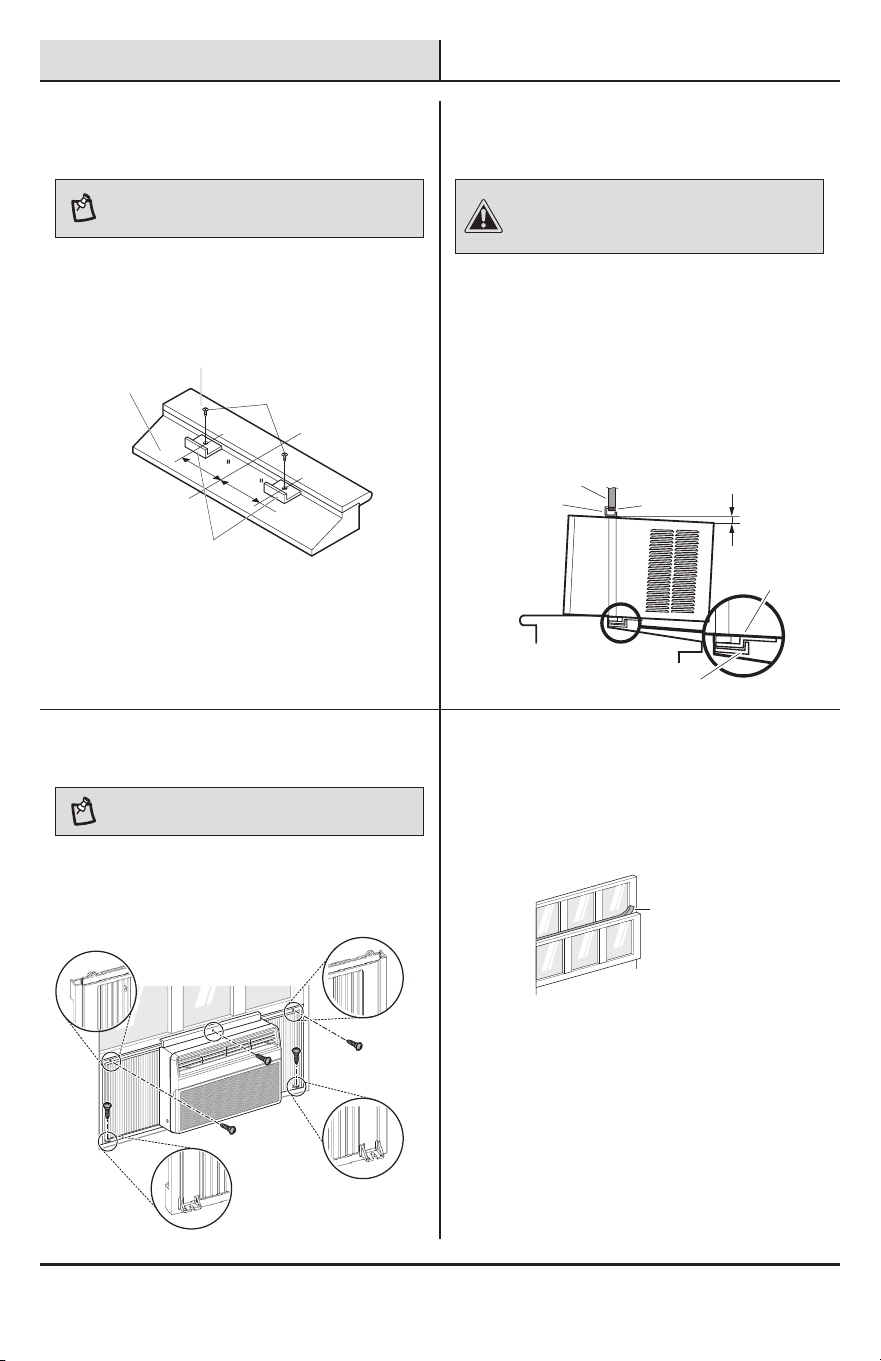
□ Assemble two supporters with upper guide.
Align holes between the upper guide and the
top of the cabinet and then install it with 3
type A screws.
Upper Guide
Screws (Type A)
2
Preparation of the chassis
NOTE: The feature may be changed according to the
type of model.
□ Slide the Side curtain directly into the cabinet.
Insert the top and bottom rails of the curtain
panels into the upper and lower panel guides.
Right
Curtain
Panel
Left
Curtain
Panel
3
Preparation of the chassis
□ Cut the window sash seals to the proper
length. Peel off the backing and attach the
adhesive-backed foam to the underside of the
window sash and bottom of window frame.
Foam-PE
(Adhesive backed)
4
Preparation of the chassis
□ Open the window and draw a center line on
the center of the inner sill. Then mark lines
7.5" to the left and right of the center line.
7.5"
7.5"
Center Line
Inner Sill
Room Side
10
Installation (continued)
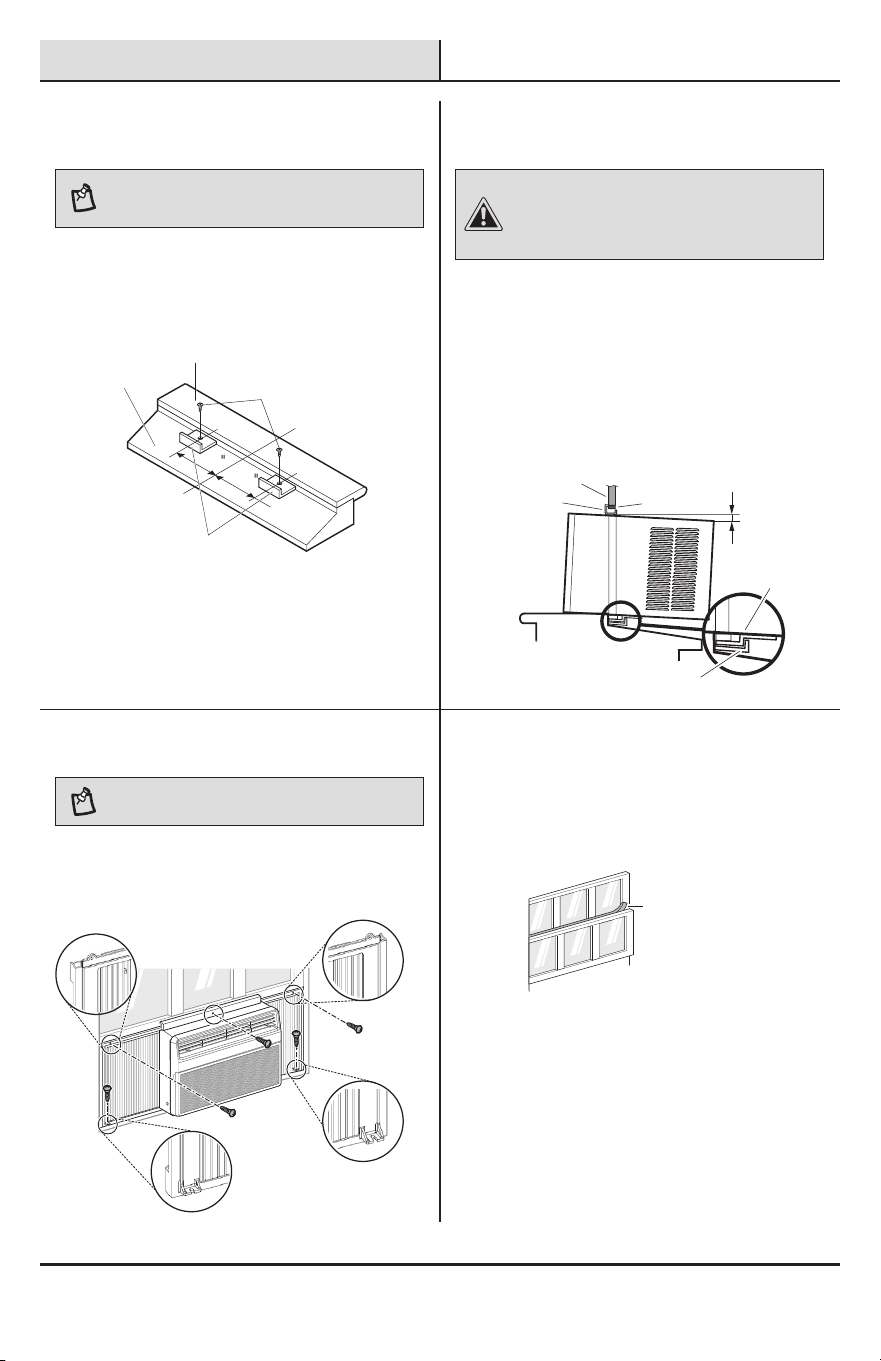
5
Preparation of the chassis
NOTE: The bracket helps to hold unit securely in place.
Be sure to place bracket edge ush against back of
inner sill.
□ Install the L bracket behind the inner window
sill, as shown. Use the 2 type A screws
provided.
7.5
7.5
Inner Sill
Outer
Sill
L Bracket
Center Line
Screws
(Type A)
6
Unit installation
CAUTION: During the following step, hold unit rmly
until window sash is lowered to top channel behind side
panel frames. Personal injury or property damage may
result if unit falls from window.
□ Set the air conditioner in the window so that is
centered. Place the air conditioner so that front
edge of the bottom guide is against the back
edge of the sill.
□ Bring the window down so that the front edge
of the upper guide is in front of the window.
Make sure that air conditioner is level or tilting
slightly to the outside.
Window Frame
Upper Guide
Seal
About 1/4
"
Bottom Guide
L Bracket
7
Unit installation
NOTE: The feature may be changed according to the
type of model.
□ Extend the guide panels to ll the window
opening and use 5 type B screws to secure
them to the window.
Screws
(Type B)
8
Unit installation
□ Cut the non-adhesive foam strip to the proper
length and insert it between the upper window
sash and the lower window sash.
Foam Strip
(no adhesive)
11 HOMEDEPOT.COM
Please contact 1-855-VISSANI (1-855-847-7264) for further assistance.
Installation (continued)
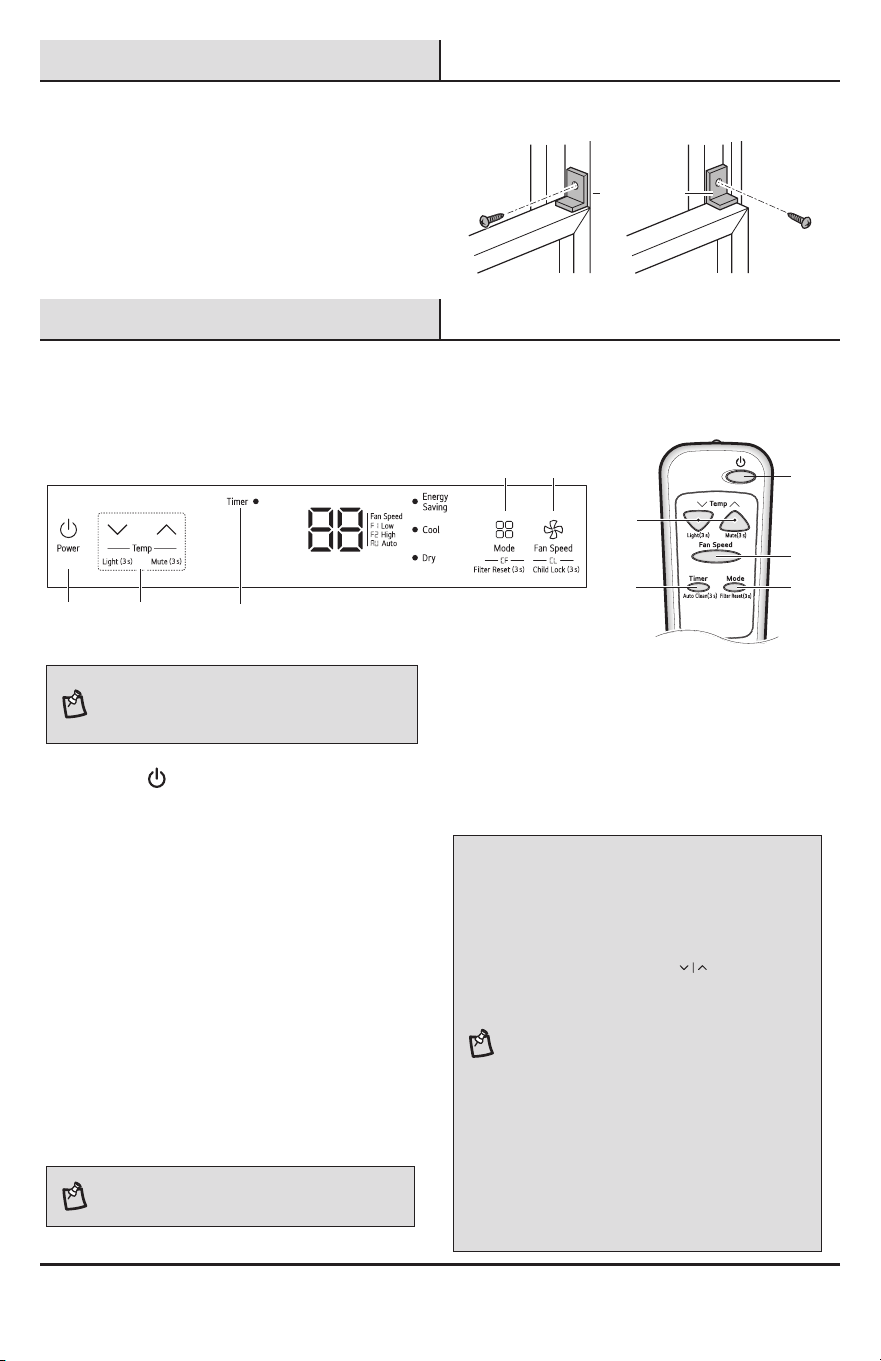
9
Unit installation
□ To prevent broken glass or damage to
windows, on vinyl or other similarly
constructed windows, attach the L bracket
with a type A screw.
Vinyl
Screws
(
Type A)
Screws
(Type
A)
L Bracket
Wood
Operation
1
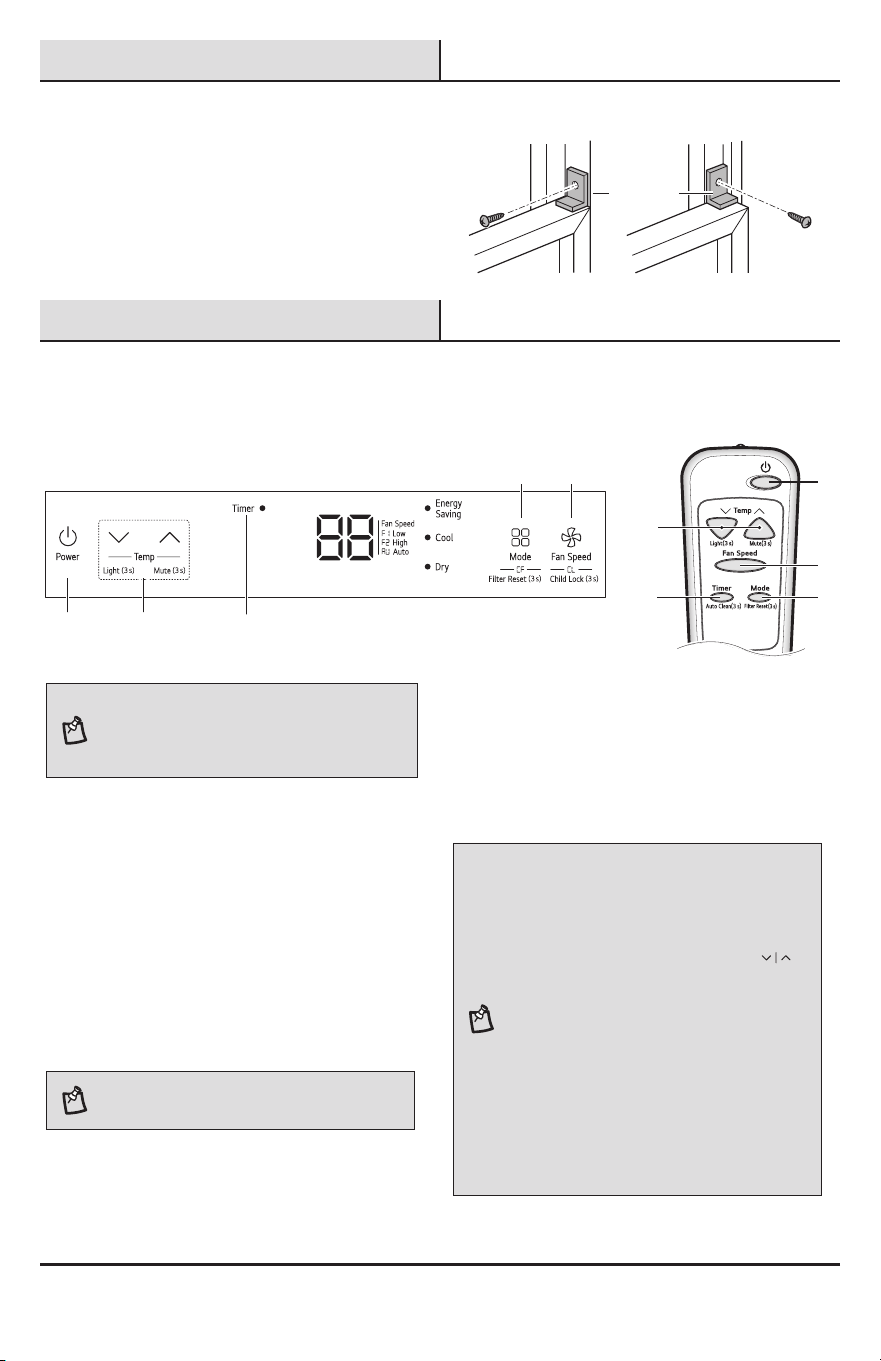
Control panel
1
2
4
5
3
Control Panel Remote Control
1 5
4 2
3
NOTE:
□ The feature may be changed according to the type
of model.
□ On control panel surface have protection lm, Please
remove lm before use.
1. Power
Press to turn the air conditioner ON or OFF.
2. Fan Speed
Press to set the Fan Speed to Auto (AU), Low
(F1) or High (F2).
3. Delay ON/OFF Timer
Delay ON - When the air conditioner is off, set it
to automatically turn on from 1 to 24 hours later,
at its previous mode and fan settings.
Delay OFF - When the air conditioner is on, set
it to automatically turn off from 1 to 24 hours later.
NOTE: Each press of the Timer button advances the
timer by 1 hour. After the last press the display returns to
the temperature setting.
4. Operation Mode
Press the Mode button to cycle between 4 types
of air conditioner operation: Energy Saving / Cool
/ Dry / Fan.
Energy Saving - This mode increases the
temperature to the optimal level for minimizing
power consumption.
NOTE:
□ The temperature automatically sets to 72 °F if set
temperature is below 72 °F.
□ The temperature automatically increases to 78 °F if
set temperature is below 78 °F.
□ Cool - This mode is ideal on hot days to cool and
dehumidify the room quickly. Use the Temp
| buttons to set the desired room temperature and
use the Fan Speed button to set the desired fan
circulation speed.
□ Dry - This mode is ideal for rainy and damp days
to dehumidify the room rather than cooling it
signicantly. Humidity is removed from the room by
the combination of compressor operation and the
fan speed xed at Low. The compressor and fan turn
off once the set temperature is reached. Fan speed
cannot be adjusted in Dry mode.
□ Fan - In this mode the fan circulates air but the
compressor does not run. Use the Fan Speed button
to set fan speed to Auto (AU), Low (F1) or High (F2).
In this mode, you cannot adjust the set temperature.
12
Operation (continued)
5. Temperature Control
The thermostat monitors room temperature to
maintain the desired temperature. The thermostat
can be set between 16 °C – 30 °C (60 °F – 86 °F).
Press or arrows to increase or decrease
temperature setting.
NOTE:
□ Auto Restart : If the air conditioner turns off due to
a power outage, it will restart automatically once the
power is restored, with the same settings as were set
before the unit turned off.
□ The remote control will not function properly if the AC
infrared sensor is exposed to direct light or if there
are obstacles between the remote controller and the
air conditioner.
USING THE LIGHT OFF FUNCTION
You can set the brightness of the control panel,
□ Press button on the control panel for 3 seconds, or
□ Press button on the remote control for 3 seconds.
NOTE:
□ If the brightness of an indoor appliance’s display is
set to OFF, pressing a button on the remote control
automatically turns the display on for 5 seconds.
□ This function may operate differently, depending on
the model.
USING THE MUTE FUNCTION
You can turn on/off the unit’s buzzer sound,
□ Press button on the control panel for 3 seconds, or
□ Press button on the remote control for 3 seconds.
USING THE AUTO CLEAN FUNCTION
In the Cooling and Dry Mode, Moisture is generated
inside the indoor unit. This function removes such
moisture.
□ Press Timer button on the remote control for 3
seconds.
□ is displayed on the display screen.
NOTE:
□ When using the product for the rst time, the Auto
Clean function is not set.
□ If you turn off the unit, the fan continues to run for
10-20 minutes and cleans inside of the indoor unit.
USING THE CHILD LOCK FUNCTION
You can set the lock function to prevent children from
operating the product’s control panel. Use the Child Lock
function to prevent unintended operation or damage.
□ Press Fan speed button 3 seconds to turn the
Child Lock function on or off.
□ is displayed on the display screen.
NOTE: The remote control operates normally even
when the lock function is enabled.
USING THE CLEAN FILTER FUNCTION
The LED light up to notify you that the lter needs
to be cleaned. After cleaning the lter, press the Mode
button on the control panel or remote control 3 seconds
to turn off the light.
NOTE: This feature is a reminder to clean the air lter
for more efcient operation. The LED light turns on after
250 hours of operation.
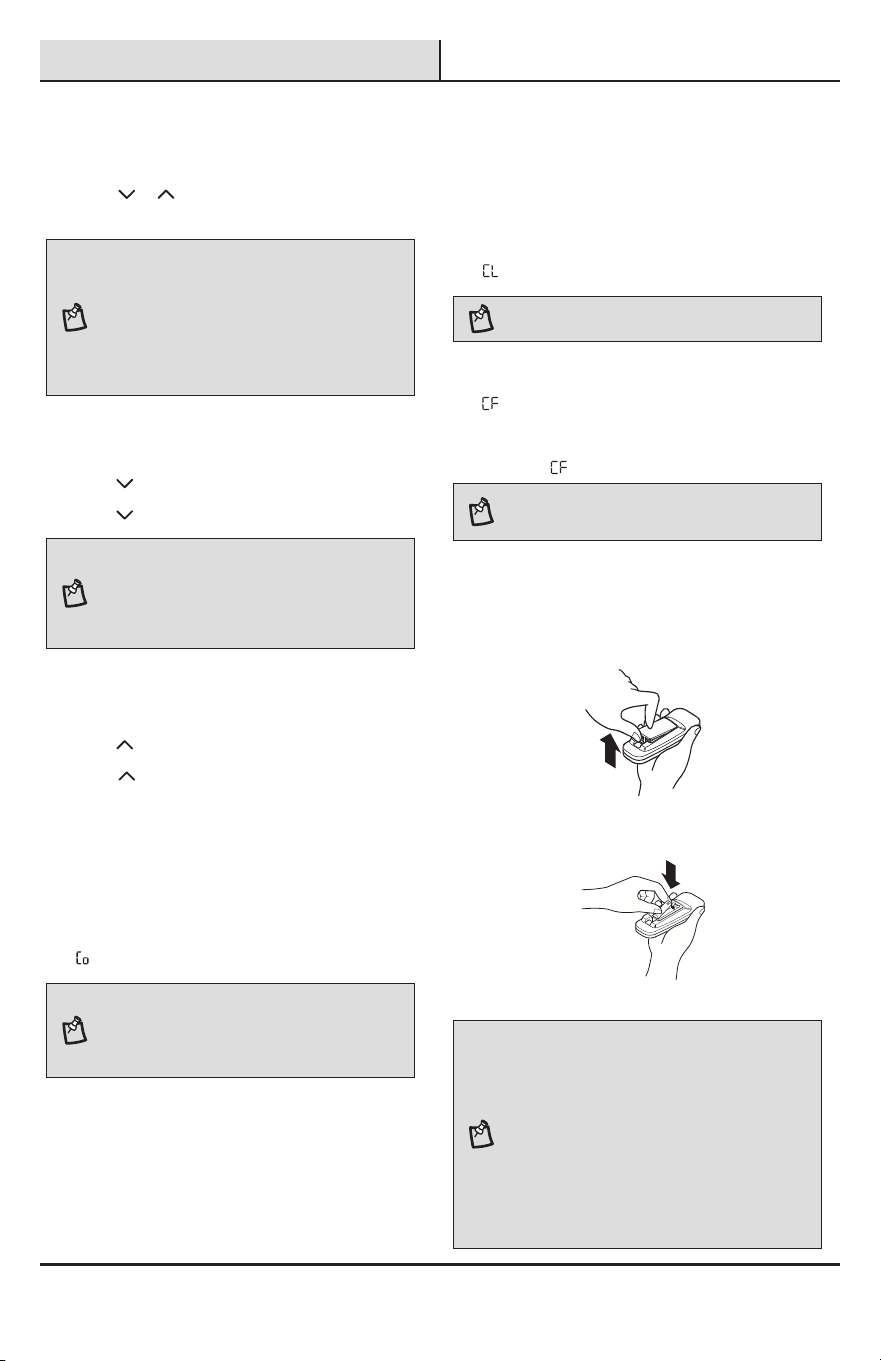
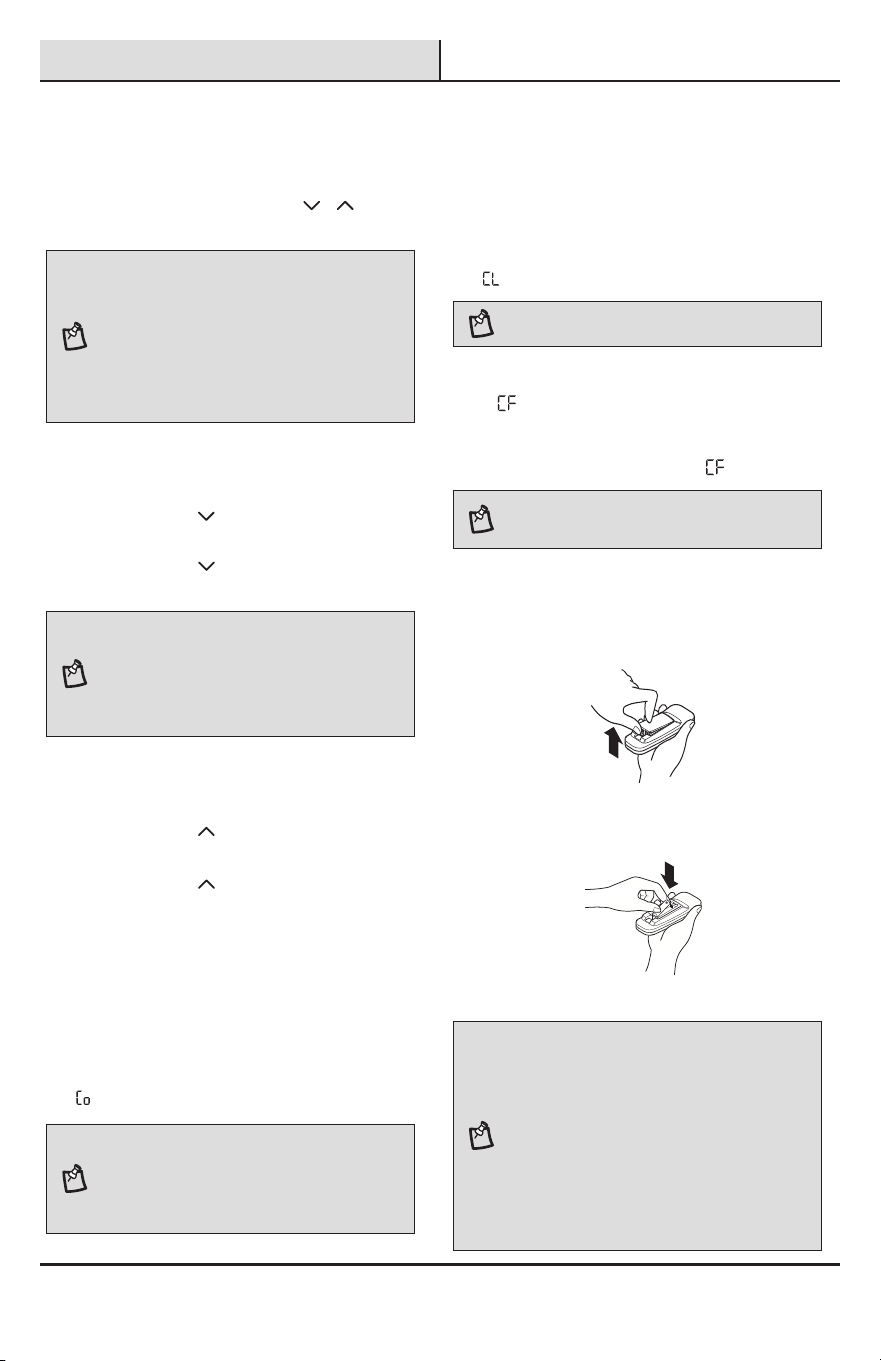
WIRELESS REMOTE CONTROL
INSERTING BATTERIES
1. Push out the cover on the back of the remote
control with your thumb.
2. With the plus and minus poles facing as marked,
and insert two new AAA 1.5 V batteries.
3. Reattach the cover.
NOTE:
□ Two new batteries are supplied with the air
conditioner for use in the remote control.
□ Do not use a rechargeable battery. Make sure that the
battery is new.
□ In order to prevent discharge, remove the battery
from the remote control if the air conditioner is not
going to be used for an extended period of time.
□ Keep the remote control away from extremely hot or
humid places.
□ To maintain optimal operation of the remote control,
the remote sensor should not be exposed to direct
sunlight.

13 HOMEDEPOT.COM
Please contact 1-855-VISSANI (1-855-847-7264) for further assistance.
Operation (continued)
2
Air direction
□ Airow can be adjusted by changing the
direction of the air conditioner’s louvers.
□ Adjusting Horizontal Airow Direction -
The horizontal airow is adjusted by moving the
levers of the vertical louvers to the left or right.
NOTE:
□ The feature may be changed according to the type
of model.
□ When the weather is extremely hot, the unit may turn
off automatically to protect the compressor.
14
Maintenance
WARNING: Before cleaning or performing maintenance,
disconnect the power supply and wait until the fan stops.
CLEANING
□ Check the air lter at least twice a month to see
if cleaning is necessary. Trapped particles in the
lter can build up and block the airow, reducing
cooling capacity and causing an accumulation of
frost on the evaporator.
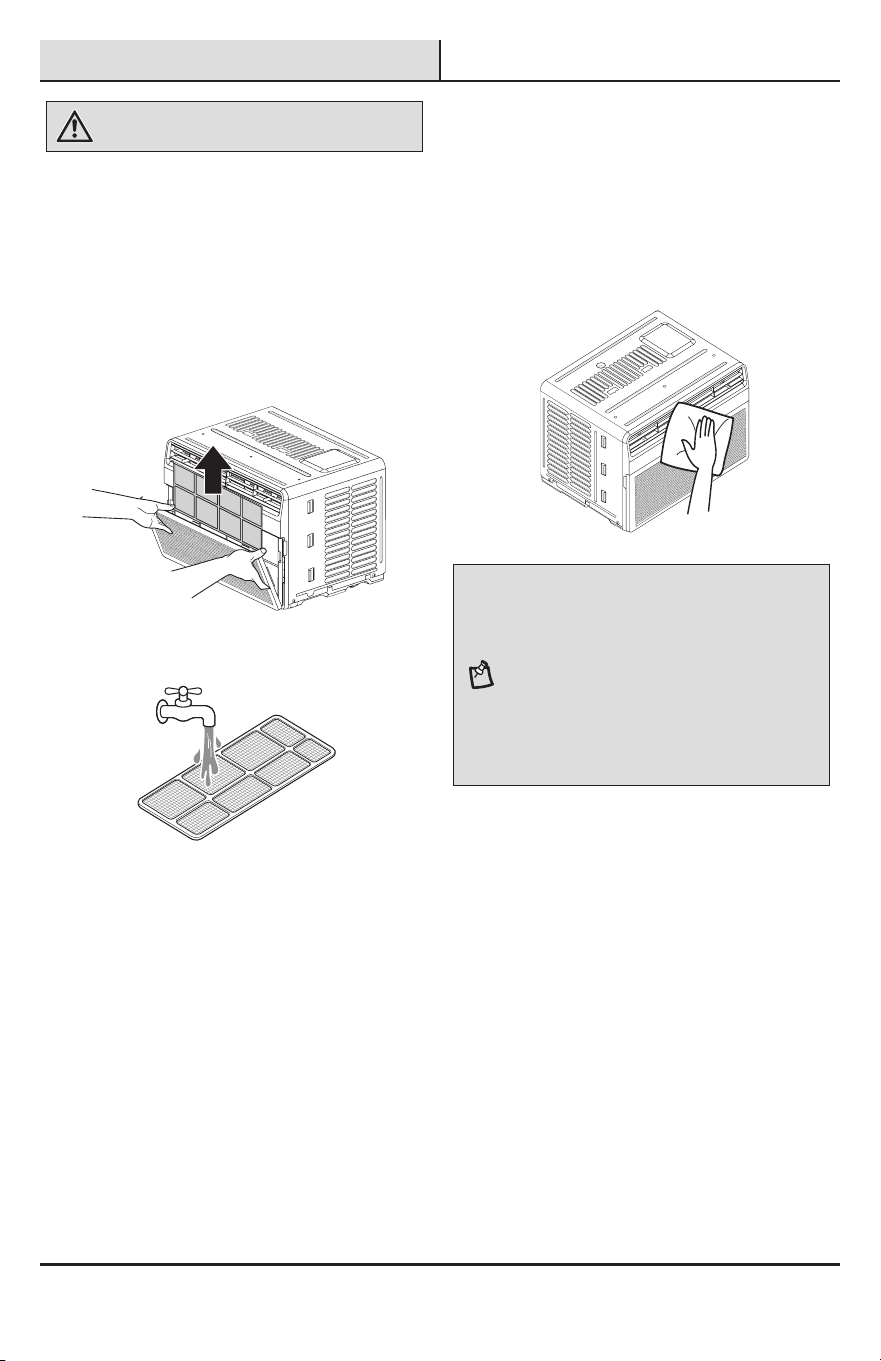
Cleaning the Air Filter:
□ Remove the air lter from the front grille by pulling
the lter forward and then up slightly.
□ Wash the lter using lukewarm water below
40 °C (104 °F).
□ Gently shake the excess water from the lter
and replace.
Cleaning the Air Conditioner:
□ Remove dust from the air inlet and outlet using a
vacuum cleaner.
□ Wipe the front grille and inlet grille with a cloth
dampened in a mild detergent solution.
□ Wash the cabinet with mild soap or detergent and
lukewarm water, then polish using liquid appliance
wax.
NOTE:
□ To ensure continued peak efciency, the condenser
coils (outside of unit) should be checked periodically
and cleaned if clogged with soot or dirt from outside
air.
□ For repair and maintenance, contact an Authorized
Service Center. See the warranty page for details
or call 1-855-VISSANI (1-855-847-7264). Have your
model number and serial number available. They can
be found on the side of the cabinet. Record them for
future reference.
□ The feature may be changed according to the type
of model.

15 HOMEDEPOT.COM
Please contact 1-855-VISSANI (1-855-847-7264) for further assistance.
Troubleshooting
BEFORE CALLING FOR SERVICE
The appliance is equipped with an automatic error-monitoring system to detect and diagnose problems at an early
stage. If the appliance does not function properly or does not function at all, check the following before you call for
service.
NORMAL SOUNDS YOU MAY HEAR
1
3
4
5
2
1
3
4
5
2
NOTE: The feature may be changed according to the
type of model.
1. High Pitched Chatter
Today’s high efciency compressors may have a
high pitched chatter during the cooling cycle.
2. Sound of Rushing Air
At the front of the unit, you may hear the sound of
rushing air being moved by the fan.
3. Gurgle/Hiss
Gurgling or hissing noise may be heard due to
refrigerant passing through evaporator during
normal operation.
4. Vibration
Unit may vibrate and make noise because of
poor wall or window construction or incorrect
installation.
5. Pinging or Swishing
Droplets of water hitting condenser during normal
operation may cause pinging or swishing sounds.
16
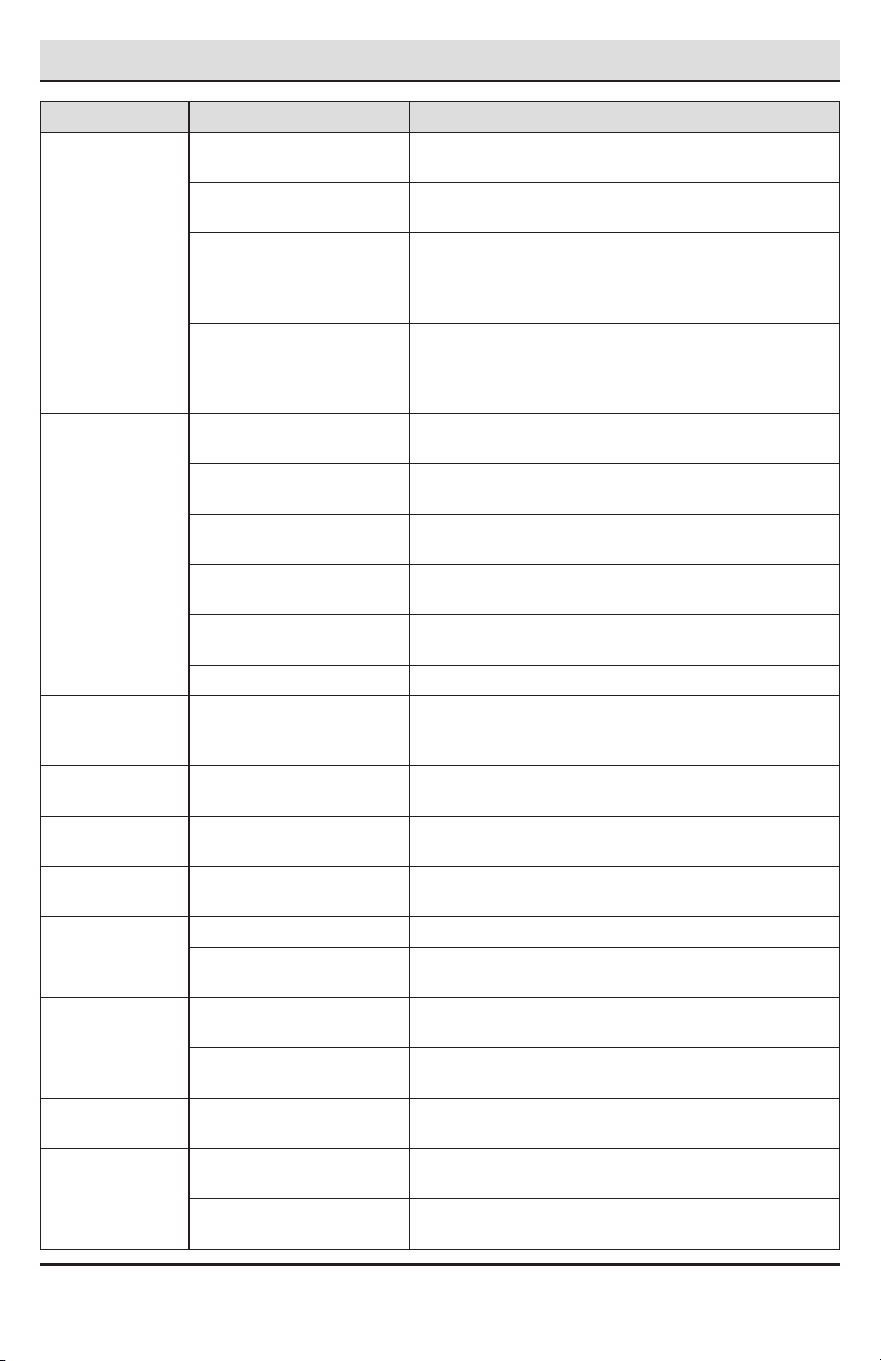
Troubleshooting (continued)
Problem Possible Cause Solution
Air conditioner
does not start.
The air conditioner is
unplugged.
□ Make sure the air conditioner plug is pushed completely
into the outlet.
The fuse is blown/circuit
breaker is tripped.
□ Check the house fuse/circuit breaker box and replace
the fuse or reset the breaker.
Power failure.
□ If power failure occurs, turn the mode control to off.
When power is restored, wait 3 minutes to restart the
air conditioner to prevent tripping of the compressor
overload.
The current interrupter device
is tripped.
□ Press the RESET button located on the power cord plug.
If the RESET button will not stay engaged, discontinue
use of the air conditioner and contact a qualied service
technician.
Air conditioner
does not cool as it
should.
Airow is restricted.
□ Make sure there are no curtains, blinds, or furniture
blocking the front of the air conditioner.
The temp control may not be
set correctly.
□ Turn the knob toward the Max area for the indoor air to
become cooler.
The air lter is dirty.
□ Clean the lter at least every 2 weeks. See the
‘MAINTENANCE’ section.
The room may have been hot.
□ When the air conditioner is rst turned on, you need to
allow time for the room to cool down.
Cold air is escaping.
□ Check for open furnace oor registers and cold air
returns.
Cooling coils have iced up. □ See ‘Air conditioner freezing up’ below.
Air conditioner
freezing up.
The cooling coils are iced
over.
□ Ice may block the air ow and obstruct the air
conditioner from properly cooling the room. Set the
mode control at High Fan or High Cool.
Water drips
outside.
Hot, humid weather. □ This is normal.
Water drips
Indoors.
The air conditioner is not
tilted to the outside.
□ For proper water disposal, make sure the air conditioner
slants slightly from the cabinet front to the rear.
Water collects in
base pan.
Moisture removed from air
and drains into base pan.
□ This is normal for a short period in areas with little
humidity; normal for a longer period in very humid areas.
Air conditioner
turns on and off
rapidly.
Dirty air lter - air restricted. □ Clean air lter.
Outside temperature
extremely hot.
□ Refer to installation instructions or check with installer.
Noise when unit is
cooling.
Air movement sound.
□ This is normal. If too loud, set to lower Fan Speed
Setting.
Window vibration - poor
installation.
□ Refer to installation instructions or check with installer.
Room too cold.
The temp control may not be
set correctly.
□ Turn the knob toward the Cool area for the indoor air to
become warmer.
Remote sensing
deactivating
prematurely.
Remote control not located
within range.
□ Place remote control within 20 feet & 120° radius of the
front of the unit.
Remote control signal
obstructed.
□ Remove obstruction.
17 HOMEDEPOT.COM
Please contact 1-855-VISSANI (1-855-847-7264) for further assistance.
Warranty
WINDOW AIR CONDITIONER LIMITED
WARRANTY
Your product is protected by this Limited Warranty:
□ Warranty service must be obtained from VISSANI
Consumer Services or an authorized VISSANI
servicer.
Warranty:
□ Two year Limited Warranty from original purchase
date.
VISSANI, through its authorized servicers will:
□ Pay all costs for repairing or replacing parts of this
appliance which prove to be defective in materials
or workmanship.
Consumer will be responsible for:
□ Diagnostics, removal, transportation and
reinstallation cost required because of service.
□ Costs of service calls that are a result of items
listed under NORMAL RESPONSIBILITIES OF THE
CONSUMER**
VISSANI replacement parts shall be used and will be
warranted only for the period remaining on the original
warranty.
NORMAL RESPONSIBILITIES OF THE
CONSUMER**
This warranty applies only to products in ordinary
household use, and the consumer is responsible for the
items listed below:
1. Proper use of the appliance in accordance with
instructions provided with the product.
2. Routine maintenance and cleaning necessary to
keep the good working condition.
3. Proper installation by an authorized service
professional in accordance with instructions
provided with the appliance and in accordance
with all local plumbing, electrical and / or das
codes.
4. Proper connection to a grounded power supply
of sufcient voltage, replacement of blown fuses,
repair of loosened connections or detects in
mouse wiring.
5. Expenses for making the appliance accessible for
servicing.
6. Damages to nish after installation.
EXCLUSIONS
This warranty does not cover the following:
1. Failure caused by damage to the unit while in our
possession (other than damage caused by defect
or malfunction). by its improper installation, or by
unreasonable use of the product, including without
limitation, failure to provide reasonable and
necessary maintenance or to follow the written
Installation and Operating Instructions.
2. Products purchased “as-is” or refurbished are not
covered by this warranty.
3. Product that has been transferred from its original
owner.
4. Interior or exterior rust on the unit.
5. Damages caused by services performed by
persons other than authorized VISSANI servicers;
use of parts other than VISSANI replacement parts;
obtained from persons other than such VISSANI
customer service: or external causes such as
abuse, misuse, inadequate power supply or acts
of God.
6. Service calls resulting from improper installation
of your product.
7. Service calls to instruct you on the use of your
product.
8. Surcharges including, but not limited to, any after
hour, weekend, or holiday service calls, tolls, ferry
trip charges, or mileage expense for service calls
to remote areas, including the state of Alaska.
9. If the unit is put to commercial, business, rental, or
other use or application other than for consumer
use. We make no warranties, express or implied,
including but not limited to, any implied warranty
of merchantability or tness for particular use or
purpose.
10. Product that has been removed outside the USA
or Canada.
11. Products without original serial numbers or
products that have serial numbers which have
been altered or cannot be readily determined.
NOTE: Some states do not allow the exclusion or
limitation of incidental or consequential damages. So this
limitation or exclusion may not apply to you.
IF YOU NEED SERVICE
Keep your bill of sale, delivery slip, or some other
appropriate payment record. Should service be required,
the date on the bill establishes the warranty period
commencement date.
If service is performed, it is in your best interest to
obtain and keep all receipts.
This written warranty gives you specic legal rights. You
may also have other rights that vary from state to state.
Service under this warranty must be obtained by:
Contact the Customer Service Team at 1-855-817-7264.

Questions, problems, missing parts?
Before returning to the store, call Vissani Customer Service
8 a.m. - 7 p.m., EST, Monday-Friday, 9 a.m. - 6 p.m., EST, Saturday
1-855-VISSANI (1-855-847-7264)
HOMEDEPOT.COM
Retain this manual for future use.
GUÍA DE USO Y MANTENIMIENTO
AIRE ACONDICIONADO
¿Preguntas, problemas o piezas faltantes? Antes de devolver a la tienda,
llama al Servicio al Cliente de Vissani, de lunes a viernes de
8 a.m. a 7 p.m. (hora del Este) y sábados de 9 a.m. a 6 p.m. (hora del Este).
1-855-VISSANI (1-855-847-7264)
HOMEDEPOT.COM
GRACIAS
Agradecemos la conanza que has depositado en Vissani al comprar este aire acondicionado. Nos esforzamos en crear
continuamente productos de calidad diseñados para mejorar tu hogar. Visítanos por Internet para ver nuestra línea completa
de productos disponibles a n de satisfacer tus necesidades de mejoras del hogar. ¡Gracias por elegir Vissani!
Artículo #1012 472 487
1012 472 615
Modelo #VW5025R
VW6024R
20
Tabla de contenido
Información de seguridad .........................................20
Instrucciones de seguridad importantes ...............20
Refrigerante (Sólo Para R32) .................................23
Preinstalación ............................................................23
Datos eléctricos .....................................................23
Herramientas necesarias .......................................24
Herrajes incluidos ..................................................24
Contenido del paquete ...........................................25
Piezas exteriores ....................................................25
Cómo planicar la instalación ................................26
Instalación .................................................................27
Uso .............................................................................29
Mantenimiento ...........................................................32
Limpieza.................................................................32
Solución de problemas ..............................................33
Antes de llamar a servicio .....................................33
Sonidos normales que puedes escuchar ...............34
Información de seguridad
LEER TODAS LAS INSTRUCCIONES ANTES DE USAR
Tu seguridad y la seguridad de los demás son muy
importantes.
Hemos proporcionado muchos mensajes importantes
de seguridad en este manual y en tu electrodoméstico.
Siempre lee y sigue todos los mensajes de seguridad.
Nota el símbolo de alerta personal de seguridad
usado en este manual para llamar tu atención sobre
una ADVERTENCIA dada junto con las instrucciones
de funcionamiento particulares. Esto signica que el
uso requiere ATENCIÓN, CUIDADO y CONCIENTIZACIÓN
especiales.
ADVERTENCIA: Indica un peligro potencial que podría
resultar en muerte o lesiones graves si no sigues las
instrucciones.
CUIDADO: Indica un peligro potencial en el que podrías
resultar lesionado o causarle daño al producto si no sigues
las instrucciones
Todos los mensajes de seguridad te dirán cuál es el
peligro potencial, cómo reducir la posibilidad de lesiones
y qué puede suceder si no sigues las instrucciones.
En las unidades se muestran los siguientes
símbolos:
Este símbolo indica que este
electrodoméstico usa un refrigerante
inamable. Si el refrigerante se fuga
y se expone a una fuente de ignición
externa, existe el riesgo de incendio.
Este símbolo indica que el Manual de
uso debe leerse cuidadosamente.
Este símbolo indica que un personal
de servicio debe manipular este
equipo consultando el Manual de
instalación.
Este símbolo indica que hay
información disponible, como el
Manual de operación o el Manual de
instalación.
INSTRUCCIONES DE SEGURIDAD
IMPORTANTES
ADVERTENCIA:
Para reducir el riesgo de explosión, incendio, muerte,
descarga eléctrica, quemaduras o lesiones físicas al
usar este producto, sigue las precauciones básicas,
incluyendo las siguientes:
INSTALACIÓN
□ Antes de usar, el electrodoméstico debe estar
correctamente instalado como se describe en este
manual.
□ Comunícate con el técnico de servicio autorizado
para la reparación o mantenimiento de esta unidad.
□ Comunícate con el instalador para instalar esta
unidad.
□ Cuando se deba reemplazar el cable eléctrico,
el trabajo de reemplazo será realizado sólo por
personal autorizado usando piezas originales de
reemplazo.
□ La instalación debe realizarse de acuerdo con
el Código Eléctrico Nacional sólo por personal
calicado y autorizado.
□ Conéctalo a un circuito de corriente debidamente
clasicado, protegido y dimensionado para evitar
una sobrecarga eléctrica.

21 HOMEDEPOT.COM
Para obtener asistencia, llama al 1-855-VISSANI (1-855-847-7264).
Información de seguridad (continuación)
□ Conecta siempre a un tomacorrientes con
conexión a tierra.
□ No cortes ni retires bajo ninguna circunstancia
la tercera clavija (conexión a tierra) del cable de
alimentación.
□ Al instalar o mover el electrodoméstico, ten
cuidado de no pellizcar, aplastar o dañar el cable
de alimentación.
□ Conecta el enchufe de alimentación
correctamente.
□ No modiques ni prolongues el cable de
alimentación.
□ Si el cable de alimentación está dañado, debe
ser reemplazado por el fabricante, un agente
de servicio u otra persona con las mismas
calicaciones para prevenir los accidentes.
□ Usa un circuito exclusivo.
□ No desarmes ni modiques el producto.
□ Cumple con todos los procedimientos de
seguridad recomendados por la industria,
incluyendo el uso de guantes de manga larga y
gafas de seguridad.
□ Desconecta el cable eléctrico o el cortacircuitos
antes de instalar o dar mantenimiento al
electrodoméstico.
□ Mantén los materiales de empaque fuera del
alcance de los niños. Estos materiales pueden
representar un riesgo de asxia para los niños.
□ Almacena e instala el producto donde no esté
expuesto a temperaturas por debajo del punto
de congelación ni a condiciones climáticas en
exteriores.
□ No almacenar gasolina ni otro líquido o vapor
inamable cerca de este u otro equipo similar.
□ No instales la unidad en ambientes
potencialmente explosivos.
□ El material de la tubería, el recorrido de la tubería
y la instalación incluirán protección contra daños
físicos durante el uso y el servicio, y cumplirán con
los códigos y normas nacionales y locales, tales
como ASHRAE 15, Código Mecánico Uniforme IAPMO,
Código Mecánico Internacional ICC, o CSA B52. Todas
las juntas de campo deben estar accesibles para
inspección antes de ser cubiertas o cerradas.
□ Para evitar un riesgo debido a un reinicio
involuntario del corte térmico, este electrodoméstico
no debe operarse a través de un dispositivo de
desconexión externo, como un temporizador, ni
conectarse a un circuito que sea enciendido y
apagado por la compañía de servicios públicos.
USO
□ Usa este electrodoméstico sólo para su propósito
establecido.
□ Nunca intentes operar este electrodoméstico si
está dañado, si funciona mal, está parcialmente
desarmado, o si tiene partes faltantes o rotas,
incluyendo un cable o enchufe dañado.
□ Repara o reemplaza inmediatamente todos los
cables eléctricos que se hayan deshilachado o
dañado de otro modo. No uses un cable si tiene
grietas o daños de abrasión a todo lo largo o en
sus extremos.
□ No coloques el cable debajo de alfombras o
tapetes donde pueda pisarse y dañarse.
□ Mantén el cable fuera de la parte inferior de
objetos pesados como mesas o sillas.
□ No coloques el cable de alimentación cerca de
una fuente de calor.
□ No uses un adaptador ni enchufes el producto en
un tomacorrientes compartido.
□ No manipular indebidamente los controles.
□ Si detectas un sonido extraño, un olor químico
o a quemado, o humo que proviene del
electrodoméstico, desconéctalo inmediatamente
y comunícate con el Centro de Información del
Cliente de The Home Depot.
□ Nunca desenchufes el electrodoméstico tirando
del cable de alimentación. Siempre sujeta el
enchufe con rmeza y tira en línea recta para
desconectarlo del tomacorrientes.
□ No agarres el cable eléctrico ni toques los controles
del electrodoméstico con las manos húmedas.
□ Si entra agua en el producto, apaga la electricidad
en el circuito principal, luego desconecta el
producto y llama para solicitar servicio.
□ Si el producto ha sido sumergido, contacta al Centro
de Información del Cliente de The Home Depot para
recibir instrucciones antes de volver a usarlo.
□ Desconecta el producto cuando no se use durante
largos períodos de tiempo.
□ Desconecta el producto antes de limpiarlo.
□ En caso de fuga de gas (gas propano, etc.) no
operes este ni ningún otro electrodoméstico.
Abre una ventana o puerta para ventilar el área
inmediatamente.
□ Este equipo no está diseñado para ser usado por
personas (incluyendo niños) con capacidades físicas,
sensoriales o mentales limitadas, o sin experiencia ni
conocimiento, a menos que hayan sido instruidas o
supervisadas sobre el uso del equipo por una persona
responsable de su seguridad.
□ El interior del producto sólo debe ser limpiado por
un centro de servicio autorizado o un distribuidor.
□ No uses detergentes a base de solventes en el
producto. Hacerlo puede causar corrosión o daño,
falla del producto, descarga eléctrica o incendio.
□ Debe vigilarse a los niños para garantizar que no
jueguen con el aire acondicionado.
□ No enciendas/apagues el equipo conectando/
desconectando el cable de alimentación.
22
Información de seguridad (continuación)
INSTRUCCIONES DE CONEXIÓN A TIERRA
□ El cable de alimentación de este electrodoméstico
está equipado con un enchufe de tres espigas (con
conexión a tierra). Usa esto con un tomacorrientes
estándar de pared de tres ranuras (con conexión
a tierra) para minimizar el riesgo de descarga
eléctrica. El cliente debe hacer que un electricista
calicado revise el receptáculo de pared y el
circuito para asegurarse de que el receptáculo
esté debidamente conectado a tierra. NO CORTES
NI RETIRES LA TERCERA CLAVIJA (TIERRA) DEL
ENCHUFE ELÉCTRICO.
□ Situaciones en que el electrodoméstico se
desconectará ocasionalmente: debido a riesgos
potenciales de seguridad, desalentamos
rmemente el uso de un enchufe adaptador.
Sin embargo, si deseas usar un adaptador,
puedes realizar una CONEXIÓN TEMPORAL. Usa
un adaptador aprobado por UL, disponible en
la mayoría de las ferreterías locales. La ranura
grande del adaptador debe estar alineada con la
ranura grande del receptáculo para asegurar una
conexión de polaridad correcta.
□ Conectar la terminal a tierra del adaptador al
tornillo de la cubierta del receptáculo en la pared
no conecta a tierra el electrodoméstico a menos
que el tornillo de la cubierta sea de metal y no
esté aislado, y el receptáculo en la pared esté
conectado a tierra a través del cableado de la
casa. Un electricista calicado debe vericar el
circuito del cliente para asegurarse de que el
receptáculo esté debidamente conectado a tierra.
□ Desconecta el cable de alimentación del adaptador
con una mano en cada uno. De lo contrario, la
terminal de conexión a tierra del adaptador se
podría romper. No uses el electrodoméstico con un
enchufe con adaptador roto.
□ Situaciones en las que el electrodoméstico se
desconectará con frecuencia: no usar un enchufe
adaptador en estas situaciones. Desenchufar
el cable de alimentación con frecuencia puede
provocar una rotura nal de la terminal de
conexión a tierra. En su lugar, el tomacorrientes de
pared debe ser reemplazado por un tomacorrientes
de tres ranuras (con conexión a tierra).
CUIDADO:
Para reducir el riesgo de lesiones menores o moderadas
a personas, mal funcionamiento o daños al producto
o a la propiedad al usar este producto, sigue las
precauciones básicas, incluyendo las siguientes:
INSTALACIÓN
□ Al instalar el producto, ten cuidado de que el escape
o la condensación no dañen la propiedad cercana.
□ Sigue las instrucciones de instalación exactamente
para evitar vibraciones excesivas o fugas de agua.
□ Usa guantes y ten cuidado al desempacar e
instalar el electrodoméstico. Los tornillos o bordes
alados pueden causar lesiones.
□ Al instalar o mover el electrodoméstico, ten
cuidado de no pellizcar, aplastar o dañar el cable
de alimentación.
□ Las aberturas de suministro y retorno de aire en el
espacio acondicionado que puede tener el cuerpo
del electrodoméstico pueden instalarse en áreas
abiertas tales como falsos techos que no se usan
como cámaras de aire de retorno, siempre que el
aire acondicionado no se comunique directamente
con el aire del falso techo.
USO
□ Este electrodoméstico no está diseñado para
ser usado como un sistema de refrigeración de
precisión. No lo uses con nes especiales, como
mantener mascotas, alimentos, maquinaria de
precisión u objetos de arte.
□ Asegúrate de que la entrada y salida de aire no
tengan obstrucciones.
□ No pisar ni colocar objetos pesados sobre el
electrodoméstico.
□ No operes el electrodoméstico sin el ltro
instalado de manera segura.
□ No bebas el agua drenada del electrodoméstico.
□ Asegúrate de ventilar lo suciente cuando
el aire acondicionado y un electrodoméstico
de calefacción, como un calefactor, se usen
simultáneamente.
□ No expongas a las personas, animales o plantas
al viento frío o caliente del aire acondicionado
durante largos períodos de tiempo.
□ Retira las baterías si el control remoto no va a
usarse por un período prolongado.
□ Nunca mezcles diferentes tipos de baterías ni
baterías viejas y nuevas para el control remoto.
□ Deja de usar el control remoto si hay una fuga
de uido en la batería. Si tu ropa o piel están
expuestas a la fuga de líquido de la batería, lávala
con agua limpia.
□ Si se ingirió el líquido que gotea la batería, enjuagar
bien el interior de la boca y consultar a un médico.
□ No recargues ni desarmes las baterías.
23 HOMEDEPOT.COM
Para obtener asistencia, llama al 1-855-VISSANI (1-855-847-7264).
Información de seguridad (continuación)
MANTENIMIENTO
□ Limpia el ltro cada dos semanas.
□ Nunca toques las partes metálicas del aire
acondicionado al quitar el ltro de aire.
□ Nunca uses solventes o agentes limpiadores
fuertes cuando limpies el aire acondicionado o
rocíes agua. Usa un paño suave.
□ Usa un paño suave para limpiar el
electrodoméstico. No uses ceras, diluyentes o
detergentes fuertes.
REFRIGERANTE (SÓLO PARA R32)
ADVERTENCIA: No utilices medios para acelerar el
proceso de descongelamiento ni para limpiarlo, excepto los
recomendados por el fabricante.
□ El electrodoméstico debe almacenarse en una
habitación sin llamas abiertas que funcionen
continuamente (por ejemplo, un electrodoméstico de
gas en funcionamiento) ni fuentes de ignición (por
ejemplo, un calefactor eléctrico en funcionamiento).
□ No perforar ni quemar.
□ Ten en cuenta que los refrigerantes inamables
pueden no desprender olor.
□ La instalación de tuberías deberá mantenerse al
mínimo.
□ Respeta la regulaciones nacionales de gas.
□ Las conexiones mecánicas deberán ser accesibles
para nes de mantenimiento.
□ El electrodoméstico se almacenará en un área
bien ventilada donde el tamaño de la habitación
corresponda al área de la habitación que se especica
para el uso.
CUIDADO: Esta unidad contiene refrigerante inamable
y muestra precauciones de seguridad especiales que
normalmente no están asociadas con las unidades más
viejas. Por favor, sigue todas las precauciones y advertencias.
□ Ten cuidado al manipularla y evita daños a la unidad. No
hagas ningún oricio en el producto por ninguna razón.
Esto puede causar daños al producto y evitar que la
unidad se enfríe.
□ El mantenimiento y la limpieza de la unidad deben
realizarse por personal capacitado. No limpiar
adecuadamente la unidad puede causar daños al sistema
de refrigeración y/o al sistema eléctrico.
□ Mantén todas las aberturas de ventilación necesarias
libres de obstrucciones.
□ El mantenimiento sólo debe ser realizado por técnicos
debidamente capacitados y certicados en el uso de
refrigerantes inamables. Cualquier servicio prestado
por personal/servicio no autorizado anulará todas las
garantías.
□ Al guardar el equipo, no lo coloques en una habitación
con ningún equipo con llama abierta, como calentadores
de agua de gas o calefactores. Mantenlo alejado también
de los calentadores eléctricos. Las unidades dañadas
deben repararse antes de su almacenaje.
□ Cualquier persona que esté involucrada en trabajar
o romper un circuito de refrigerante debe tener un
certicado válido actual de una autoridad de evaluación
acreditada por la industria, que autoriza su competencia
para manipular refrigerantes de manera segura de
acuerdo con una especicación de evaluación reconocida
por la industria.
□ El mantenimiento sólo se realizará según lo recomienda
el fabricante del equipo. El mantenimiento y la reparación
que requieran la ayuda de otro personal cualicado
se llevarán a cabo bajo la supervisión de la persona
competente en el uso de refrigerantes inamables.
□ El electrodoméstico se almacenará para evitar que se
produzcan daños mecánicos.
□ El refrigerante y el gas aislante utilizados en el
electrodoméstico requieren procedimientos especiales
de eliminación. Consulta a un agente de servicio o a una
persona igualmente calicada antes de desecharlos.
Preinstalación
NOTA: Este manual puede contener imágenes o
contenido que puede ser diferente del modelo adquirido.
Este manual está sujeto a revisión por el fabricante.
DATOS ELÉCTRICOS
El cable de alimentación puede incluir un dispositivo interruptor de corriente. Los botones TEST (PRUEBA) y RESET
(REINICIO) están incluidos en la caja del enchufe. El dispositivo debe probarse periódicamente presionando primero
el botón TEST y luego el botón RESET. Si el botón TEST no se activa o el botón RESET no se mantiene acoplado, deja
de usar el aire acondicionado y contacta a un técnico de servicio calicado.
PARA 120 V
Usa el receptáculo de pared Suministro de electricidad
Usa un fusible de retardo
de tiempo de 15 A o un
cortacircuitos de 15 A.
Receptáculo estándar de 3 cables y 120 V con conexión
a tierra y clasicación de 15 A / 120 VCA / 60 Hz
24
Preinstalación (continuación)
ADVERTENCIA:
□ Este electrodoméstico debe instalarse de acuerdo con
el Código Nacional de Electricidad.
□ El uso de extensiones eléctricas podría causar lesiones
graves o la muerte.
□ No uses una extensión eléctrica con este aire
acondicionado de ventana.
□ No uses protectores contra sobrecargas ni
adaptadores de múltiples tomacorrientes con este aire
acondicionado de ventana.
□ Nunca oprimas el botón TEST durante el uso.
□ Hacerlo puede dañar el enchufe.
□ No quites, modiques ni sumerjas este enchufe. Si este
dispositivo se activa, la causa debe corregirse antes de
continuar usando el equipo.
CUIDADO: Los conductores dentro de este cable
están rodeados por protectores que supervisan la
corriente de fuga. Estos protectores no están conectados
a tierra. Examina periódicamente el cable en busca
de cualquier daño. No uses este producto en caso de
que los protectores queden expuestos. Evita el riesgo
de descarga eléctrica. Esta unidad no puede recibir
mantenimiento del usuario. No abras la parte sellada a
prueba de manipulaciones. Se anularán todas las garantías
y rendimiento. Esta unidad no está diseñada para usarse
como interruptor de ENCENDIDO/APAGADO.
HERRAMIENTAS NECESARIAS
Destornillador
Phillips
Llave ajustable Nivel Guantes
Cinta
de medir
Tijeras o
cuchilla de
corte
Lápiz
HERRAJES INCLUIDOS
NOTA: No se muestra el tamaño real de los herrajes.
AA BB
Pieza Descripción Cantidad
AA Tornillos tipo “A” 6
BB Tornillos tipo “B” 5

25 HOMEDEPOT.COM
Para obtener asistencia, llama al 1-855-VISSANI (1-855-847-7264).
Preinstalación (continuación)
NOTA: Lo incluido puede cambiarse según el tipo de modelo.
CONTENIDO DEL PAQUETE
D
E
F
G
A
B
C
Pieza Descripción Cantidad
A Espuma-PE (con reverso adhesivo) 2
B Tira de espuma (no adhesiva) 1
C Panel izquierdo para cortinas 1
D Guía superior 1
E Soporte 2
F Panel derecho para cortinas 1
G Soporte en L 3
PIEZAS EXTERIORES
1
3
2 4 5
6
7
1. Panel de control
2. Mando a distancia
3. Filtro de aire
4. Rejilla delantera
5. Carcasa
6. Entrada de aire
7. Salida de aire
26
Preinstalación (continuación)
CÓMO PLANIFICAR LA INSTALACIÓN
1
Cómo instalar la unidad
□ Para evitar vibraciones y ruidos, asegúrate de
que la unidad esté instalada de forma segura
y rme.
□ Instala la unidad sin luz solar directa.
□ No debe haber obstáculos, como una cerca
o pared, a menos de 20" (50.8cm) de la
parte posterior del gabinete porque evitará
la radiación térmica del condensador. La
restricción del aire exterior reducirá en gran
medida la eciencia de enfriamiento del aire
acondicionado.
□ Instala la unidad ligeramente inclinada de
manera que la parte posterior esté ligeramente
más baja que el frente (alrededor de 1/4"
(0.6 cm)). Esto hará que el agua condensada
uya hacia el exterior.
□ Instala la unidad con la parte inferior de 30" a
60" (de 76.2cm a 152.4cm) sobre el nivel del
piso.
CUIDADO: NO cubras ni bloquees ninguna de las
celosías laterales y superiores. Todas las celosías
laterales del gabinete deben permanecer expuestas al
exterior de la estructura y sin obstrucciones.
Aire enfriado
Cubierta
Cerca
Radiación
de calor
Alrededor de 14"
Más de 20"
30"~60"
2
Requisitos de las ventanas
□ Esta unidad está diseñada para instalarse
en ventanas estándar de doble guillotina con
aberturas reales de 21" a 35" (de 53.3 cm a
88.9 cm)
□ Los marcos superior e inferior de la ventana
deben abrirse lo suciente para permitir una
apertura vertical despejada de 12" (30.5 cm)
desde la parte inferior del marco superior hasta
el alféizar interior.
21" to 35"
12" min
3
Requisitos de las
contraventanas
□ Las ventanas que incluyen el marco de una
contraventana pueden evitar que el aire
acondicionado se incline hacia abajo hacia el
exterior para drenar adecuadamente. Para un
drenaje adecuado, ja una pieza de madera
de 1" x 2" (2.5 cm x 5 cm) al alféizar interior,
recortada a una longitud que encaje dentro del
marco de la ventana. La parte superior de la
cuña de madera debe estar al menos 3/4"
(1.9 cm) más alta que la parte superior del
marco de la ventana de tormenta. Sujeta la
madera de manera segura al alféizar con
clavos o tornillos.
□ Si es necesario, coloca otra tira de madera de
1" x 2" (2.5 cm x 5 cm) al ras contra la parte
posterior del alféizar interior. Esto elevará el
soporte en L, como se muestra en el dibujo.
Montado en listones de madera
En la parte superior
del alféizar interior
Soporte en L
3/4" (1.9 cm) más
alto que el marco de
la contraventana
Marco de la ventana
para tormenta
Alféizar exterior
Exteriores
Interiores
Alféizar
interior
Listones de
madera para
soporte en L
Clavo o tornillo
27 HOMEDEPOT.COM
Para obtener asistencia, llama al 1-855-VISSANI (1-855-847-7264).
Instalación
1
Preparación del armazón
NOTA: La característica puede cambiarse según el tipo
de modelo.
□ Ensambla dos soportes con la guía superior.
Alinea los oricios entre la guía superior y la
parte superior del gabinete y luego instálala
con 3 tornillos tipo A.
Guía superior
Tornillos (Tipo A)
2
Preparación del armazón
NOTA: La característica puede cambiarse según el tipo
de modelo.
□ Desliza la cortina lateral directamente dentro
del gabinete. Inserta los rieles superior e
inferior de los paneles de cortinas en las guías
superior e inferior del panel.
Panel
derecho
para cortinas
Panel izquierdo
para
cortinas
3
Preparación del armazón
□ Corta los sellos de la hoja de la ventana al
largo adecuado. Despega la parte posterior y
ja la espuma con adhesivo a la parte inferior
del marco de la ventana y de la hoja de la
ventana.
Espuma-PE
(con reverso adhesivo)
4
Preparación del armazón
□ Abre la ventana y traza una línea central en
el centro del alféizar interior. Luego marca
las líneas a 7.5" (19 cm) a la izquierda y a la
derecha de la línea central.
7.5"
7.5"
Línea central
Alféizar
interior
Lado de la
habitación
28
Instalación (continuación)
5
Preparación del armazón
NOTA: El soporte ayuda a sujetar la unidad de manera
segura en su lugar. Asegúrate de colocar el borde del
soporte a ras contra la parte posterior del alféizar interior.
□ Instala el soporte en L detrás del alféizar
interior de la ventana, como se muestra.
Usa los 2 tornillos tipo A incluidos.
7.5
7.5
Alféizar
interior
Alféizar
exterior
Soporte en L
Línea central
Tornillos
(Tipo A)
6
Instalación de la unidad
CUIDADO: Durante el siguiente paso, sostén
rmemente la unidad hasta que la hoja de la ventana se
baje hasta el canal superior detrás de los marcos de los
paneles laterales. Si la unidad cae de la ventana, puede
ocasionar lesiones personales o daños a la propiedad.
□ Coloca el aire acondicionado en la ventana
de manera que quede centrado. Coloca el
aire acondicionado de manera que el borde
frontal de la guía inferior esté contra el borde
posterior del alféizar.
□ Baja la ventana de manera que el borde frontal
de la guía superior quede frente a la ventana.
Asegúrate de que el aire acondicionado esté
nivelado o inclinado ligeramente hacia el exterior.
Marco de la ventana
Guía superior
Sello
Alrededor
de 1/4"
Guía inferior
Soporte en L
7
Instalación de la unidad
NOTA: La característica puede cambiarse según el tipo
de modelo.
□ Extiende los paneles de guía para llenar la
abertura de la ventana y usa 5 tornillos tipo B
para asegurarlos a la ventana.
Tornillos
(Tipo B)
8
Instalación de la unidad
□ Corta la tira de espuma no adhesiva al largo
adecuado e insértala entre el marco superior
de la ventana y el marco inferior de la ventana.
Tira de espuma
(no adhesiva)
29 HOMEDEPOT.COM
Para obtener asistencia, llama al 1-855-VISSANI (1-855-847-7264).
Instalación (continuación)
9
Instalación de la unidad
□ Para evitar que se rompa el vidrio o se dañen
las ventanas, en ventanas de vinilo u otras
ventanas de construcción similar, ja el
soporte en L con un tornillo tipo A.
Vinilo
Tornillos
(Tipo A)
Tornillos
(Tipo A)
Soporte en L
Madera
Uso
1
Panel de control
1 5
4 2
1
2
4
5
3
3
Panel de control Contol remoto
NOTA:
□ La función puede cambiar según el tipo de modelo.
□ La supercie del panel de control tiene una película
protectora, retírela antes de usar.
1. Power ( )(Alimentación)
Pulse este botón para encender o apagar el
acondicionador de aire.
2. Fan Speed (Velocidad del ventilador)
Presione para establecer Fan Speed a Auto
(AU), Baja (F1) o Alta (F2).
3. Delay ON/OFF Timer (Temporizador
deretraso de encendido o apagado)
Delay ON (Retraso de encendido) -
cuando el acondicionador de aire esté
apago, congúrelo para que se encienda
automáticamente de 1 a 24 horas después,con los
ajustes previos de modo y ventilador.
Delay OFF (Retraso de apagado) -
cuando el acondicionador de aire esté encendido,
congúrelo para que se apague automáticamente
de 1 a 24 horas después.
NOTA: Cada vez que se pulsa el botón Timer,este
avanza 1 hora. Tras la última pulsación, la pantalla vuelve
al ajuste de temperatura.
4. Operation Mode(Modo de funcionamiento)
Pulse el botón Mode (modo) para ver sucesivamente
los 4 tipos de funcionamiento del acondicionador de
aire: Energy Saving (Ahorro de energía), Cool (Frío),
Dry (Secar) y Fan (Ventilador).
Energy Saving (Ahorro de energía) - Este
modo aumenta la temperatura hasta elnivel óptimo
para minimizar el consumo de energía.
NOTA:
□
La temperatura se ajusta automáticamente a 72 °F si la
temperaturaestablecida es inferior a 72 °F.
□
La temperatura aumenta automáticamente a 78 °F si la
temperaturaestablecida es inferior a 78 °F.
□
Cool (Frío) - este modo es ideal en días calurosos
para enfriar y deshumedecer la habitación rápidamente.
Utilice los botones Temp para establecer la
temperatura deseada para la habitación y el botón
Fan Speed para establecer la velocidad del ventilador
deseada.
□
Dry (Secar) - este modo es ideal en días lluviosos
y húmedos para deshumedecer la habitación en
lugar de enfriarla significativamente. La combinación
del funcionamiento del compresor y la velocidad del
ventijada en Low (baja) elimina la humedad de la
habitación. El compresor y el ventilador se desactivan
cuando se alcanza la temperatura establecida. En el
modo Dry (secar) no se puede ajustar la velocidad del
ventilador.
□
Fan (Ventilador) - en este modo, el ventilador hace
circular el aire, pero el compresor no funciona. Utilice
el botón Fan Speed para establecer la velocidad del
ventilador en Auto (AU), Baja (F1) o Alta (F2). En este
modo, no puede ajustar la temperatura establecida.
30
Uso (continuación)
5. Temperature Control (Control de
temperatura)
El termostato controla la temperatura de la
habitación para mantener la deseada.
El termostato puede ajustarse entre 60 °F–86 °F
(16 °C - 30 °C). Pulse las echas o para
aumentar o reducir el ajuste de temperatura.
NOTA:
□ Auto Restart (Reinicio automático): Si
el acondicionador de aire se apaga debido a una
interrupción del suministro eléctrico, se reiniciará
automáticamente cuando este se restablezca, con los
ajustes establecidos antes de que se apagara.
□ El control remoto no funcionará correctamente
si el sensor de infrarrojos de CA está expuesto
directamente a la luz o si hay algún obstáculo entre
el control remoto y el acondicionador de aire.
USO DE LA FUNCIÓN DE LUZ APAGADA
Puede ajustar el brillo del panel de control,
□ Pulse el botón de en el panel de control durante
3 segundos, o.
□ Pulse el botón de en el control remoto durante
3 segundos.
NOTA:
□ Si el brillo de la pantalla de un aparato interior está
apagado, al presionar un botón en el control remoto
se enciende automáticamente la pantalla durante 5
segundos.
□ Esta función puede operar de manera diferente,
dependiendo del modelo.
USO DE LA FUNCIÓN DE SILENCIO
Puede encender/apagar el sonido zumbador de la unidad,
□ Pulse el botón de en el panel de control durante
3 segundos, o
□ Pulse el botón de en el control remoto durante
3 segundos.
USO DE LA FUNCIÓN LIMPIEZA AUTOMÁTICA
En el modo de Refrigeración y Seco, se genera humedad
dentro de la unidad interior. Esta función elimina dicha
humedad.
□ Presione el botón Timer en el control remoto por
3 segundos.
□ aparece en la pantalla de visualización.
NOTA:
□ Cuando esa el producto por primera vez, la función
Auto Clean no se establece.
□ Si apaga la unidad, el ventilador continúa en
funcionamiento por 10-20 minutos y limpia el interior
de la unidad interior.
USO DE LA FUNCIÓN BLOQUEO INFANTIL
Puede establecer la función de bloqueo para prevenir
que los niños hagan funcionar el panel de control del
producto. Use la función Bloqueo infantil paraprevenir
un funcionamiento o daños accidentales.
□ Presione el botón Fan speed 3 segundos para
activar o desactivar la función Bloqueo infantil.
□ aparece en la pantalla de visualización.
NOTA: El control remoto funciona con normalidad
incluso cuando la función bloqueo está habilitada.
USO DE LA FUNCIÓN LIMPIEZA DE FILTRO
El LED Lse ilumina para noticarle que el ltro necesita
ser limpiado. Luego de limpiar el ltro, presione el botón
Mode en el panel de control durante o en el control remoto
durante 3 segundos para apagar la luz .
NOTA: Esta función es un recordatorio para limpiar el
ltro de aire y pader utillzar el aparato de un modo más
eciente. El led se enciende tras 250 horas de uso.
CONTROL REMOTO INALÁMBRICO
INSERCIÓN DE LAS BATERÍAS
1. Empuje hacia afuere con su pulgar la cubierta en
la parte posterior del control remoto.
2. Coloque las batería nuevas AAA 1,5V y
asegúrese de que los polos + y - estén ubicados
correctamente.
3. Vuelva a colocar la cubierta.
NOTA:
□ El acondicionador de aire incluye pilas nuevas para
el control remoto.
□ No utilice pilas recargables. Asegúrese de que las
pilas sean nuevas.
□ Para que no se descarguen, saque las pilas del
mando a distancia cuando el acondicionador de aire
vaya a estar un largo período sin utilizarse.
□ Mantenga el control remoto alejado de lugares
extremadamente cálidos o húmedos.
□ Para que el mando a distancia continúe funcionando
correctamente, el sensor remoto no debe exponerse
directamente a la luz del sol.

31 HOMEDEPOT.COM
Para obtener asistencia, llama al 1-855-VISSANI (1-855-847-7264).
Uso (continuación)
2
Dirección del aire
□ El ujo de aire puede ajustarse cambiando la
dirección de las rejillas del aire acondicionado.
□ Ajustar la dirección del ujo de aire
horizontal: El ujo de aire horizontal se
ajusta moviendo las palancas de las celosías
verticales hacia la izquierda o la derecha.
NOTA:
□ La característica puede cambiarse según el tipo de
modelo.
□ Cuando el clima está extremadamente caliente,
la unidad puede apagarse automáticamente para
proteger el compresor.
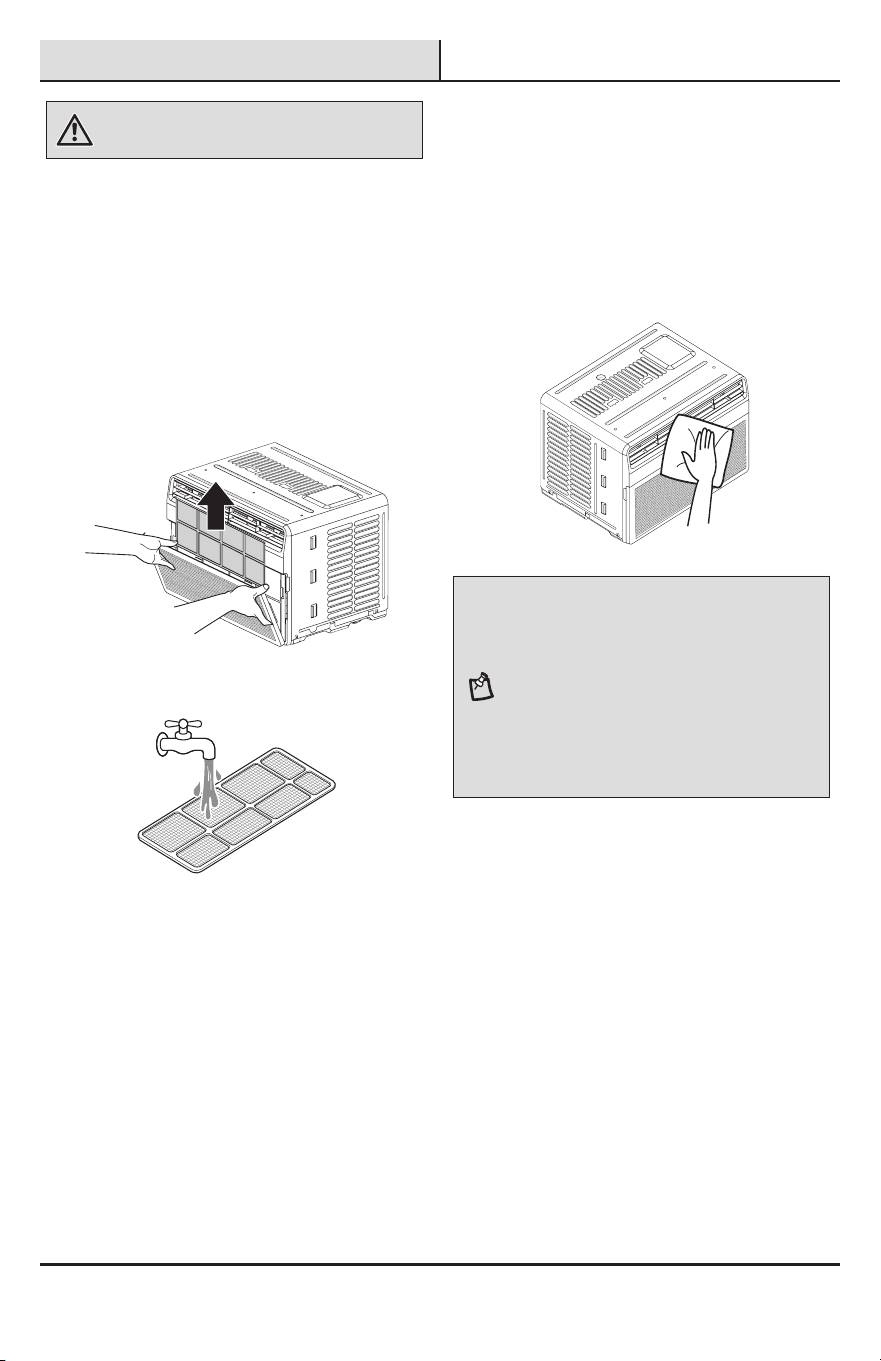
32
Mantenimiento
ADVERTENCIA: Antes de limpiar o realizar el
mantenimiento, desconecta el suministro de electricidad y
espera hasta que el ventilador se detenga.
LIMPIEZA
□ Revisa el ltro de aire al menos dos veces al mes
para ver si es necesario limpiarlo. Las partículas
atrapadas en el ltro pueden acumularse y
bloquear el ujo de aire, reduciendo la capacidad
de enfriamiento y provocando una acumulación de
escarcha en el evaporador.
Limpieza del ltro de aire:
□ Retira el ltro de aire de la rejilla frontal tirando
del ltro hacia adelante y luego hacia arriba
ligeramente.
□ Lava el ltro con agua tibia por
debajo de 40 °C (104 °F).
□ Sacuda suavemente el exceso de agua del ltro
y reemplácelo.
Limpieza del aire acondicionado:
□ Quita el polvo de la entrada y salida de aire
usando una aspiradora.
□ Limpia la rejilla frontal y la rejilla de entrada
con un paño humedecido en una solución de
detergente suave.
□ Lava el gabinete con jabón suave o detergente y
agua tibia, luego pule usando cera líquida para
electrodomésticos.
NOTA:
□ Para garantizar una eciencia máxima continua, los
serpentines del condensador (fuera de la unidad)
deben revisarse periódicamente y limpiarse si están
obstruidos con hollín o suciedad del aire exterior.
□ Para reparación y mantenimiento, comunícate con un
Centro de Servicio Autorizado. Consulta la página de
garantía para detalles o llama al 1-855-VISSANI
(1-855-847-7264). Ten disponibles el número de
modelo y número de serie. Los puedes encontrar en un
lado del gabinete. Regístralos para referencia futura.
□ La característica puede cambiarse según el tipo de
modelo.

33 HOMEDEPOT.COM
Para obtener asistencia, llama al 1-855-VISSANI (1-855-847-7264).
Solución de problemas
ANTES DE LLAMAR A SERVICIO
El electrodoméstico está equipado con un sistema automático de monitoreo de errores para detectar y diagnosticar
problemas en una etapa temprana. Si el electrodoméstico no funciona correctamente o no funciona en absoluto,
revisa lo siguiente antes de llamar al servicio.
SONIDOS NORMALES QUE PUEDES ESCUCHAR
1
3
4
5
2
1
3
4
5
2
NOTA: Lo incluido puede cambiarse según el tipo de
modelo.
1. Alta vibración
Los compresores de alta eciencia de hoy en día
pueden tener una vibración acentuada durante el
ciclo de enfriamiento.
2. Sonido de aire corriendo
En el frente de la unidad, puedes escuchar el
sonido de aire circulando movido por el ventilador.
3. Gorgoteo/silbido
Es posible que se escuche un gorgoteo o silbido
debido al paso del refrigerante a través del
evaporador durante el uso normal.
4. Vibración
La unidad puede vibrar y hacer ruido debido a una
construcción deciente de la pared o la ventana o
a una instalación incorrecta.
5. Golpeteo o zumbido
Las gotas de agua que chocan con el condensador
durante el uso normal pueden causar sonidos de
golpeteo o zumbido.
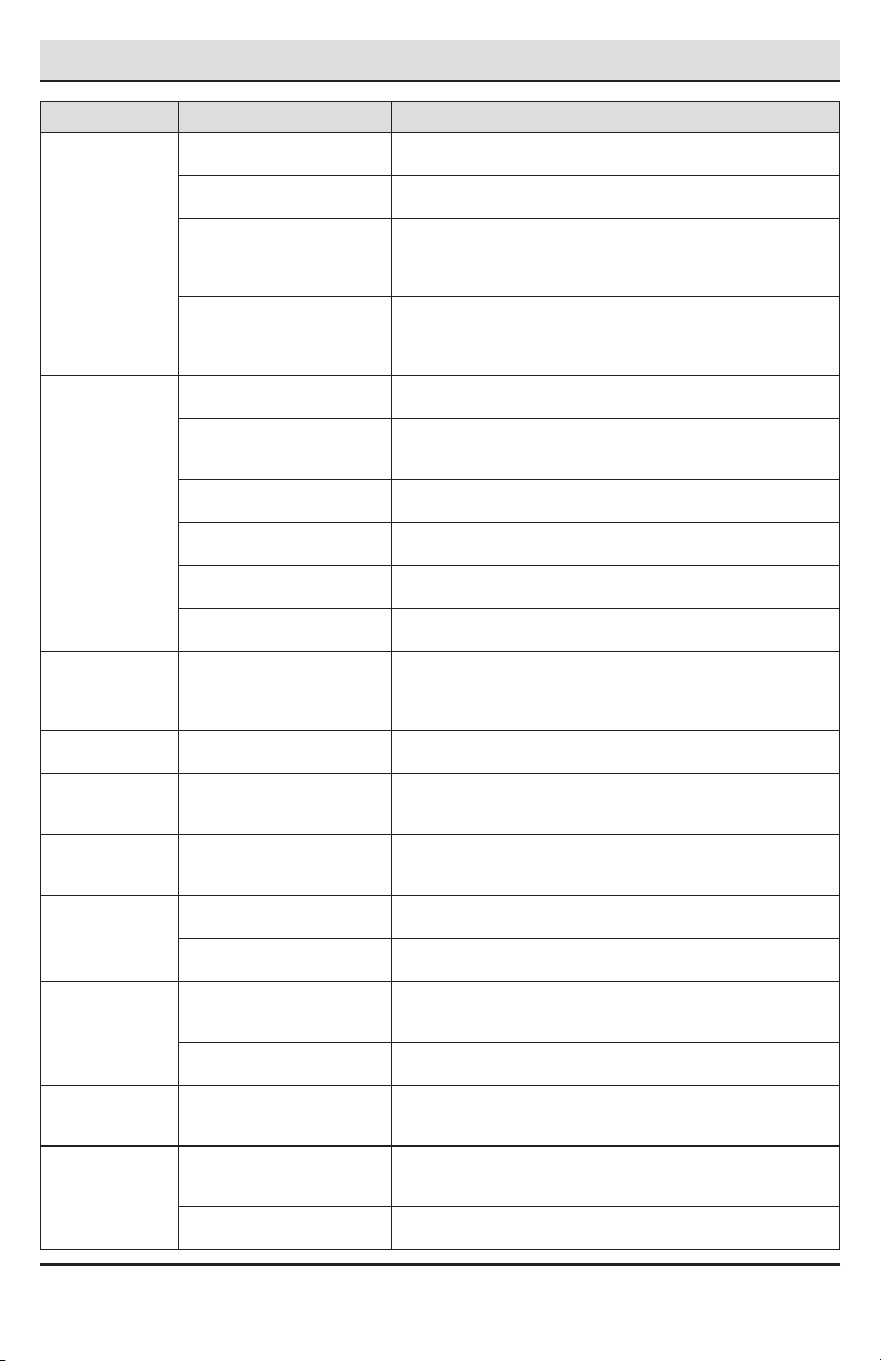
34
Solución de problemas (continuación)
Problema Causa posible Solución
El aire
acondicionado no
enciende.
El aire acondicionado está
desconectado.
□ Asegúrate de que el enchufe del aire acondicionado esté
completamente dentro del tomacorrientes.
El fusible se funde/el
cortacircuitos se dispara.
□ Revisa la caja de fusibles/cortacircuitos de la casa y
reemplaza el fusible o reinicia el cortacircuitos.
Fallo de energía.
□ Si se produce un corte de energía, cambia el modo a Off
(apagado). Cuando se restablezca la electricidad, espera 3
minutos para volver a encender el aire acondicionado para
evitar que se dispare la sobrecarga del compresor.
El dispositivo interruptor
actual está disparado.
□ Presiona el botón RESET ubicado en el enchufe del cable
de alimentación. Si el botón RESET no se mantiene
activado, deja de usar el aire acondicionado y contacta a
un técnico de servicio calicado.
El aire
acondicionado
no enfría como
debería.
El ujo de aire está
restringido.
□ Asegúrate de que no haya cortinas, persianas o muebles
que bloqueen la parte frontal del aire acondicionado.
El control de temperatura
puede no estar congurado
correctamente.
□ Gire el boton hacia Max para que el aire de interior se
enfrie mas.
El ltro de aire está sucio.
□ Limpia el ltro al menos cada 2 semanas. Consulta la
sección “MANTENIMIENTO”.
Es posible que la habitación
haya estado caliente.
□ Cuando el aire acondicionado se enciende por primera vez,
debes dejar tiempo para que la habitación se enfríe.
El aire frío está escapando.
□ Verica si hay salidas abiertas de vapor en el piso y
retornos de aire frío.
Los serpentines de
enfriamiento se congelaron.
□ Ver más abajo ‘Congelación del aire acondicionado’.
Congelación
del aire
acondicionado.
Los serpentines de
enfriamiento están
congelados.
□ El hielo puede bloquear el ujo de aire y evitar que el
aire acondicionado enfríe adecuadamente la habitación.
Congura el control de modo en High Fan (ventilador
alto) o o High Cool (enfriamiento alto).
El agua gotea
afuera.
Clima cálido y húmedo. □ Esto es normal.
El agua gotea en
interiores.
El aire acondicionado no está
inclinado hacia el exterior.
□ Para desechar el agua adecuadamente, asegúrate de que
el aire acondicionado se incline ligeramente desde el frente
del gabinete hasta la parte posterior.
El agua se
acumula en la
bandeja base.
La humedad que se retira del
aire se drena en la bandeja
base.
□ Esto es normal por un corto período en áreas con poca
humedad; es normal por un período más largo en áreas
muy húmedas.
El aire
acondicionado se
enciende y apaga
rápidamente.
Filtro de aire sucio; aire
restringido.
□ Limpia el ltro de aire.
Temperatura exterior
extremadamente caliente.
□ Consulta las instrucciones de instalación o consulta a un
instalador.
Ruido cuando la
unidad se está
enfriando.
Sonido de movimiento del
aire.
□ Esto es normal. Si es demasiado alto, ajusta la velocidad
del
Fan Speed a una menor.
Vibración de la ventana;
instalación deciente.
□ Consulta las instrucciones de instalación o consulta a un
instalador.
La habitación
está demasiado
fría.
El control de temperatura
puede no estar congurado
correctamente.
□ Gire el boton hacia Cool para que el aire de interior se
caliente mas.
El sensor remoto
se desactiva
prematuramente.
El mando a distancia no
tiene cobertura.
□ Utilice el mando a distancia a una distancia máxima de 20
pies (6,096 m) y en un radio de 120° respecto a la parte
delantera de la unidad.
Obstrucción de la señal del
mando a distancia.
□ Elimine la obstrucción.

35 HOMEDEPOT.COM
Para obtener asistencia, llama al 1-855-VISSANI (1-855-847-7264).
Garantía
GARANTÍA LIMITADA DEL AIRE
ACONDICIONADO DE VENTANA
Su producto está protegido por esta Garantía Limitada:
□ El servicio de garantía debe obtenerse de
Servicios del Consumidor de Vissani o de un
proveedor de servicio autorizado de Vissani.
Garantía:
□ Garantía limitada de dos años a partir de la fecha
de compra original.
VISSANI, a través de sus proveedores de servicios
autorizados:
□ Pagará todos los costos por reparar o reemplazar
piezas de este electrodoméstico que resulten
defectuosas en materiales o mano de obra.
El consumidor será responsable de:
□ Costos de diagnósticos, retiro, transporte y
reinstalación requeridos debido al servicio.
□ Costos de llamadas de servicio que son
resultado de artículos enumerados bajo
RESPONSABILIDADES NORMALES DEL
CONSUMIDOR**
Se utilizarán piezas de repuesto VISSANI y estarán
garantizadas únicamente por el período restante de la
garantía original.
RESPONSABILIDADES NORMALES DEL
CONSUMIDOR**
Esta garantía se aplica únicamente a productos de uso
doméstico normal y el consumidor es responsable de
los artículos que se enumeran a continuación:
1. Uso adecuado del electrodoméstico de acuerdo
con las instrucciones proporcionadas con el
producto.
2. Mantenimiento y limpieza rutinarios necesarios
para mantener las buenas condiciones de
funcionamiento.
3. Instalación adecuada por un profesional
de servicio autorizado de acuerdo con
las instrucciones proporcionadas con el
electrodoméstico y de acuerdo con todos los
códigos locales de plomería, electricidad y/o gas.
4. Conexión adecuada a una fuente de alimentación
con conexión a tierra de suciente voltaje,
reemplazo de fusibles quemados, reparación de
conexiones sueltas o defectos en el cableado de
la casa.
5. Gastos por hacer que el electrodoméstico sea
accesible para su mantenimiento.
6. Daños al acabado después de la instalación.
EXCLUSIONES
Esta garantía no cubre lo siguiente:
1. Fallas causadas por daños a la unidad mientras
está en tu posesión (que no sean daños causados
por defecto o mal funcionamiento), por su
instalación incorrecta o por el uso irrazonable
de la unidad, incluyendo, sin limitación, no
proporcionar el mantenimiento razonable y
necesario o no seguir las instrucciones escritas de
instalación y operación.
2. Los productos comprados “tal cual” o
reacondicionados no están cubiertos por esta
garantía.
3. Producto que ha sido transferido de su propietario
original.
4. Óxido interior o exterior de la unidad.
5. Daños causados por servicios realizados por
personas distintas a los reparadores autorizados
de VISSANI; uso de piezas distintas a las piezas de
repuesto VISSANI; obtenido de personas distintas
del servicio al cliente de VISSANI; o causas
externas como abuso, mal uso, suministro de
energía inadecuado o desastres naturales.
6. Llamadas de servicio resultantes de una
instalación incorrecta de su producto.
7. Llamadas de servicio para instruirle sobre el uso
de su producto.
8. Sobrecargos por, incluyendo pero no limitado a,
cualquier llamada después de horario laboral, en
nes de semanas, o días festivos, así como cargos
por peaje, viajes de transportación, o gastos de
kilometraje por llamadas de servicio a zonas
remotas, incluyendoi el estado de Alaska.
9. Si la unidad se destina a un uso comercial,
empresarial, de alquiler o cualquier otro uso o
aplicación que no sea para uso del consumidor, no
ofrecemos ninguna garantía, expresa o implícita,
incluida, entre otras, cualquier garantía implícita
de comerciabilidad o idoneidad para su uso o
nalidad particular.
10. Producto que ha sido retirado fuera de EE. UU. o
Canadá.
11. Productos sin números de serie originales o
productos con números de serie que hayan sido
alterados o no puedan determinarse fácilmente.
NOTA: Algunos estados no permiten las exclusiones o
limitación de daños indirectos o consecuentes. Por lo tanto,
esta limitación o exclusión puede no aplicarse a su caso.
SI NECESITAS ASISTENCIA
Mantén tu recibo de venta, tu recibo de entrega o algún
otro registro de pago apropiado. Si se requiere servicio,
la fecha en la factura establece la fecha de inicio del
período de garantía.
Si se realiza algún servicio, te conviene obtener y
conservar todos los recibos.
Esta garantía te otorga derechos legales especícos.
El cliente pudiera gozar de otros derechos que varían de
estado a estado.
El servicio bajo esta garantía debe obtenerse siguiendo
estos pasos: Comunícate con el equipo de servicio al
cliente llamando al 1-855-817-7264.

¿Preguntas, problemas o piezas faltantes?
Antes de devolver a la tienda, llama al Servicio al Cliente de Vissani, de lunes a viernes de
8 a.m. a 7 p.m. (hora del Este) y sábados de 9 a.m. a 6 p.m. (hora del Este).
1-855-VISSANI (1-855-847-7264)
HOMEDEPOT.COM
Conserva este manual para referencias futuras.
Documento #: [Introduce el número de documento]
