6
3
Meet your new BISSELL® product!
Go online for a comprehensive walkthrough of your new purchase,
including videos, tips, support, and more. Want to get started
right away? This guide has all the information you need to set up
your new product. Let’s take a look…
Important Safety Instructions ................................ 2
What’s in the Box? .........................................................3
Assembly .............................................................................. 3
Filling the Clean Water Tank....................................3
Controls and Display ..................................................... 4
Steam Cleaning & Sanitizing ..................................5
Storing Your Machine ...................................................6
Troubleshooting ...............................................................7
Limited Warranty ............................................................ 7
SPINWAVE® SMARTSTEAM
™
SCRUBBING AND SANITIZING STEAM MOP
MODEL 3712, 3897 SERIES
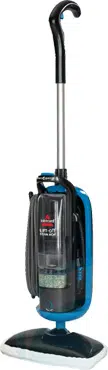
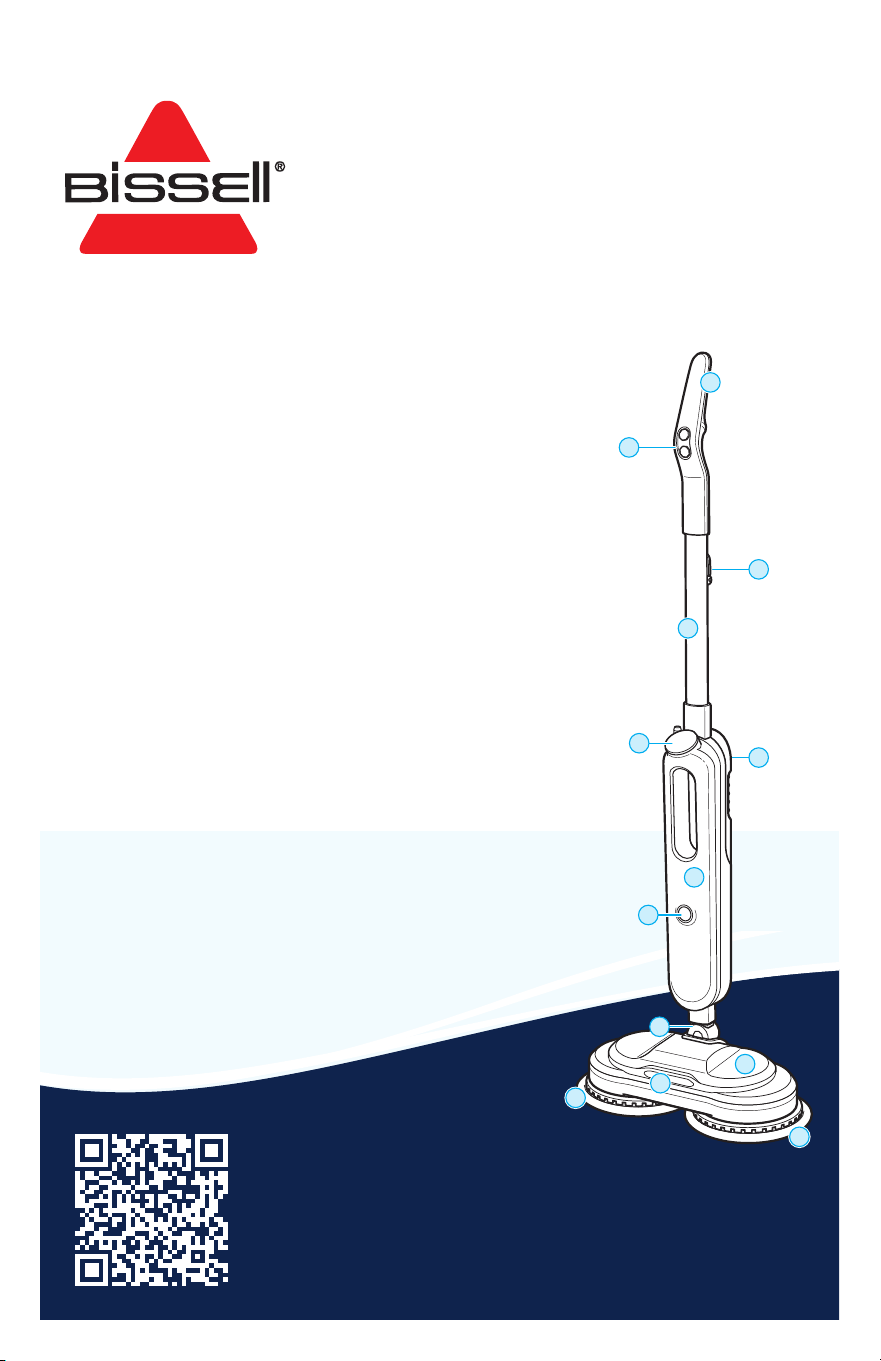
Product Overview
1. Handle
2. Mode Buttons
3. Upper Cord Wrap
4. Handle Tube
5. LED Display
6. Water Tank
7. Body
8. Power Button
9. Mop Head Spindle
10. Foot
11. LED Lights (certain models only)
12. Mop Pads
1
12
12
2
5
8
7
9
4
11
10
2 BISSELL.com
IMPORTANT SAFETY INSTRUCTIONS
WARNING
TO REDUCE THE RISK OF FIRE, ELECTRIC SHOCK OR INJURY:
• This appliance can be used by children 8 years old and above, and
persons with reduced physical, sensory and mental capabilities or
lack of experience and knowledge if they have been given supervision
or instruction concerning use of the appliance in a safe way and
understand the hazards involved. Cleaning and user maintenance shall
not be made by children without supervision.
• Do not allow to be used as a toy. Close attention is necessary when
used by or near children. WARNING: CHOKING HAZARD – Includes small
parts. Not for children under 3 yrs.
• If the cord is damaged, it must be replaced by the manufacturer, its
service agent or similarly qualified persons in order to avoid a hazard.
• Use extra care when cleaning on stairs.
• Do not use with damaged cord or plug.
• Do not expose this product to rain or moisture. Store indoors when
not in use.
• Always turn OFF this appliance before connecting or disconnecting the
nozzle. Do not direct steam at people, animals, or at electrical outlets.
• Unplug from outlet when not in use and before conducting
maintenance or troubleshooting.
• Do not leave steam cleaner unattended.
• Do not expose hair, loose clothing, fingers or body parts to openings
or moving parts.
• Do not service steam cleaner when it is plugged in.
• Do not handle steam cleaner with wet hands.
• Do not use steam cleaner if it has been dropped, damaged, left
outdoors or dropped into water, return it to a service center.
• Do not pull or carry by cord, use cord as a handle, close door on cord,
pull cord around sharp corners or edges, or expose cord to heated
surfaces.
• Do not unplug by pulling on cord.
• Do not use appliance in an enclosed space filled with vapor given off
by oil-based paint, paint thinner, some moth-proofing substances,
flammable dust, or other explosive or toxic vapors.
• Do not allow to be used as a toy.
• Do not use on leather, wax polished furniture or floors, synthetic
fabrics, velvet or other delicate, steam-sensitive materials.
• Do not immerse in water or liquid.
• Not for space heating purposes.
• Do not use for any purpose other than described in this user guide.
• Use only manufacturer’s recommended attachments – use of
attachments not provided or sold by BISSELL® may cause fire, electric
shock or injury.
• Never put descaling, aromatic, alcoholic, detergent or vinegar products
into the steam cleaner, as this may damage it or make it unsafe for use.
• Unplug by grasping the plug, not the cord.
• Close attention is necessary when used by or near children.
• Keep the appliance out of reach of children when it is energized or
cooling down.
• The foot surfaces are liable to get hot during use.
• Do not open the aperture during use.
• The longer cord should be arranged so that it will not drape over the
countertop or tabletop where it can be tripped over, snagged, or pulled
on unintentionally (especially by children).
• Plastic film can be dangerous. To avoid danger of suffocation,
keep away from children.
• To reduce the risk of a leaking condition, do not store where freezing
may occur. Damage to internal components may result.
• Keep appliance on a level surface.
• Surface may be hot. Avoid contact.
• Do not use for any purpose other than described in this user guide.
• Use only manufacturer’s recommended pads.
• Close attention is necessary when used near children and pets.
• Avoid exerting excessive pressure on mop pole as breaking may occur.
• CAUTION – to reduce the risk of injury from moving parts – unplug
before servicing.
• Do not use outdoors.
SAVE THESE INSTRUCTIONS
THIS MODEL IS FOR HOUSEHOLD USE ONLY.
COMMERCIAL USE OF THIS UNIT VOIDS THE MANUFACTURER’S WARRANTY.
READ ALL INSTRUCTIONS BEFORE USING YOUR APPLIANCE.
When using an electrical appliance, basic precautions should be observed, including the following:
THIS APPLIANCE HAS A POLARIZED PLUG
To reduce the risk of electric shock, this appliance has a polarized plug (one blade is wider than the other). This plug will fit in a polarized outlet only
one way. If the plug does not fit fully in the outlet, reverse the plug. If it still does not fit, contact a qualified electrician to install a proper outlet.
Do not change the plug in any way.
BISSELL.com 3
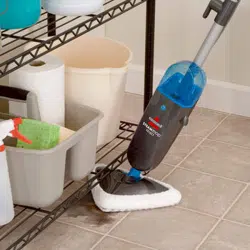
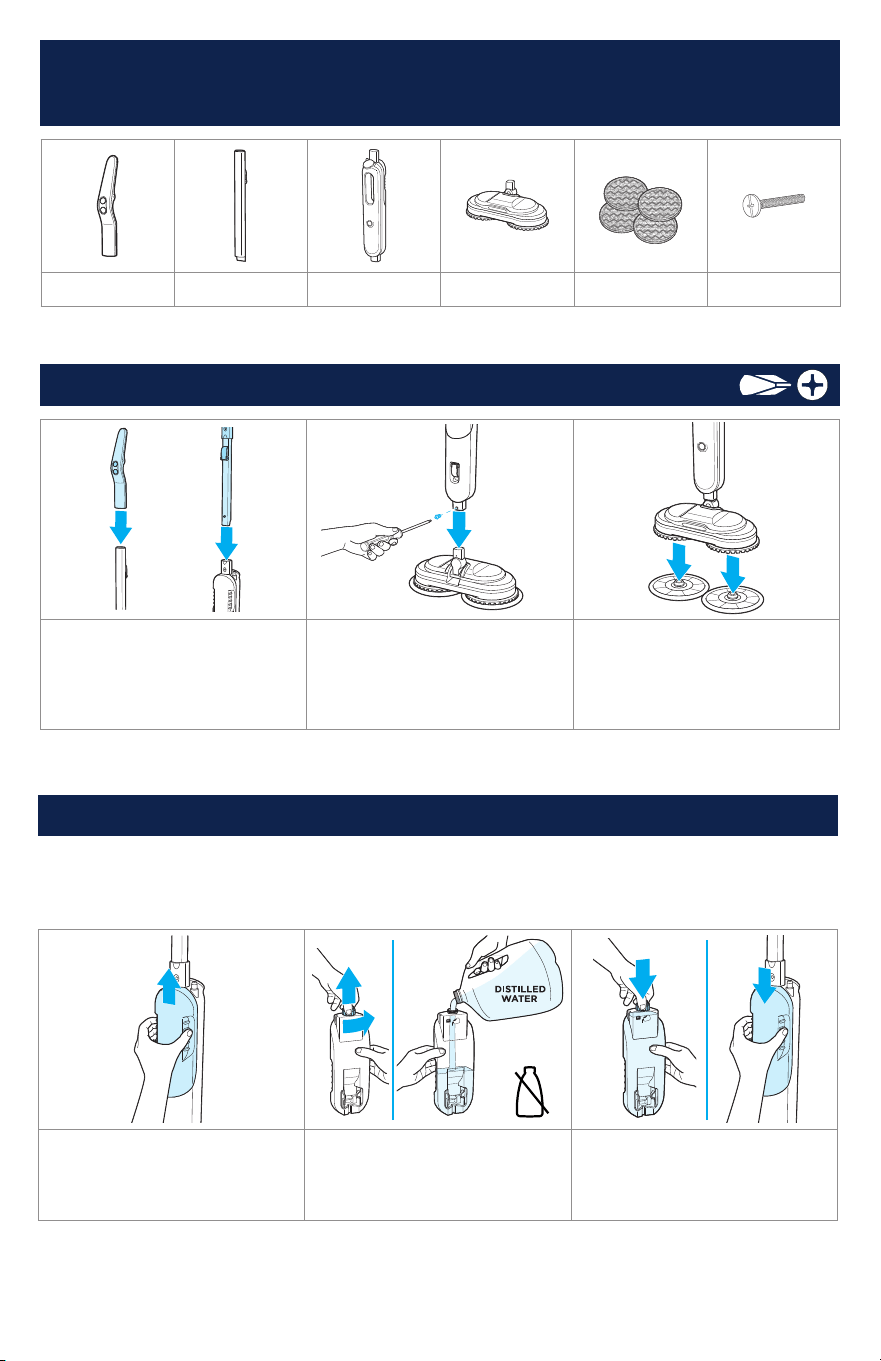
What’s in the Box?
Standard accessories may vary by model.To identify what should be included with your purchase,
please refer to the “Carton Contents” list located on the carton top flap.
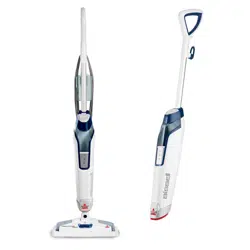
Assembly
Handle Handle Tube Body
Mop Head
Mop Pads Screw
1. Slide handle into handle
tube until it clicks into place.
Slide handle tube with handle
installed to body until it clicks
into place.
2. Insert body into steam mop
head until screw holes align.
Tighten screw with Phillips-head
screw driver.
3. Position steam mop directly
over mop pads and align
center plastic piece on mop
pads with center of steam mop
head. Press down firmly.
Filling the Clean Water Tank
1. Slide water tank upward to
remove.
2. Unscrew water tank cap
to open and fill with water.
Do not use formula. (Distilled
water is recommended)
3. Screw and tighten cap.
Reinstall water tank, sliding
down tank until it clicks into
place.
Note: Use of distilled water in place of tap water is recommended for optimal steam performance
and to prolong the life of your steamer. To add a fresh scent as you clean, try BISSELL® Demineralized
Waters in scents like Citrus, Eucalyptus Mint and Spring Breeze. Do not use chemicals in the water
tank of your machine. Other solutions may harm the machine.
Required for Assembly
4 BISSELL.com
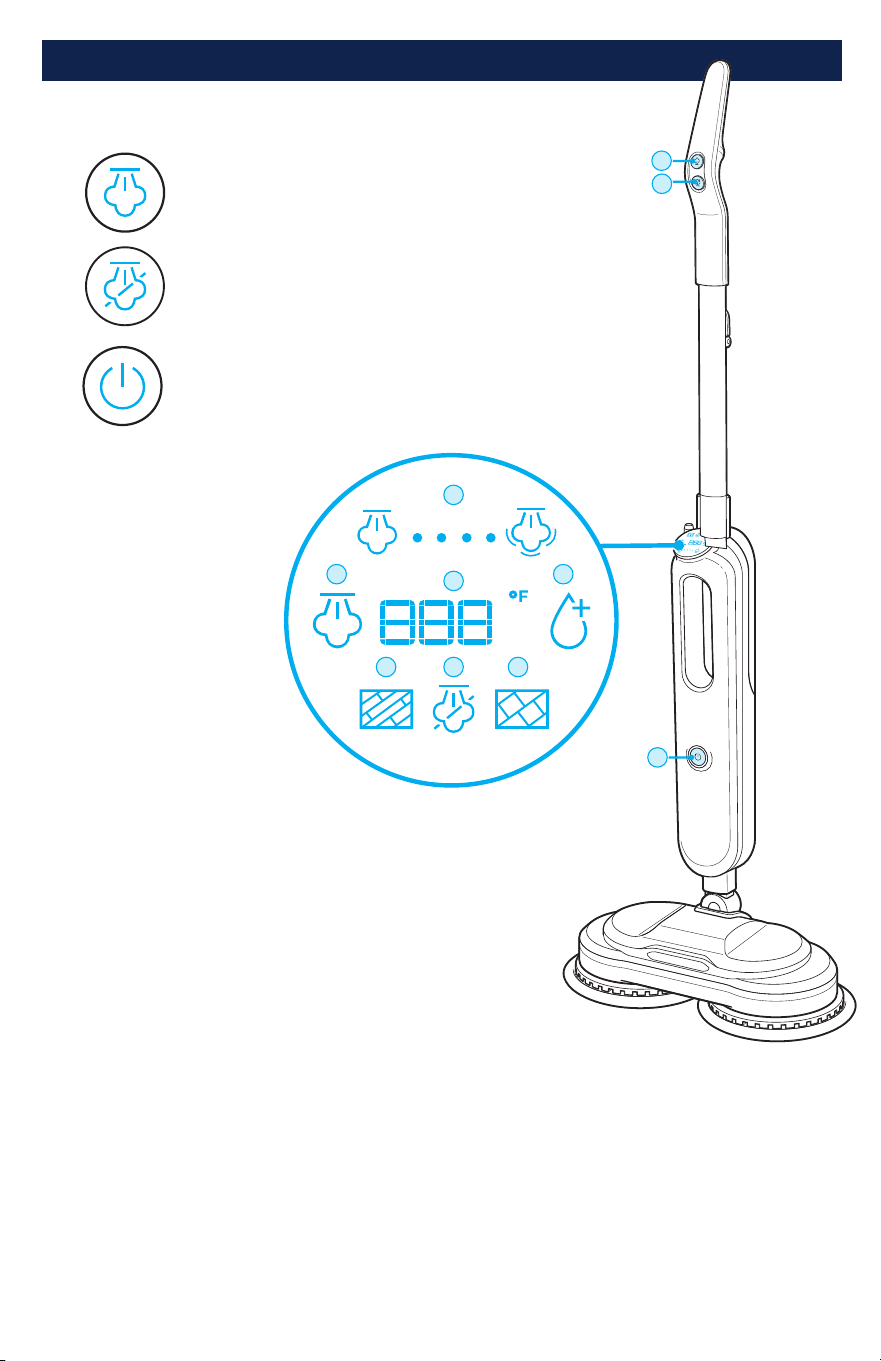
Controls and Display
LED Display
1. Steam Level
(Low or High)
2. Steam Readiness
3. Temperature*
4. Add Water
5. Hard Floor Mode
6. No Steam Mode
7. Tile Mode
*Represents temperature
inside the tank. Temperature
may be higher inside tank to
maintain steam during use.
Controls
Steam Mode
No Steam Mode
Power ON/OFF
1
3
75
6
2
4
A
B
C
A
B
C
BISSELL.com 5
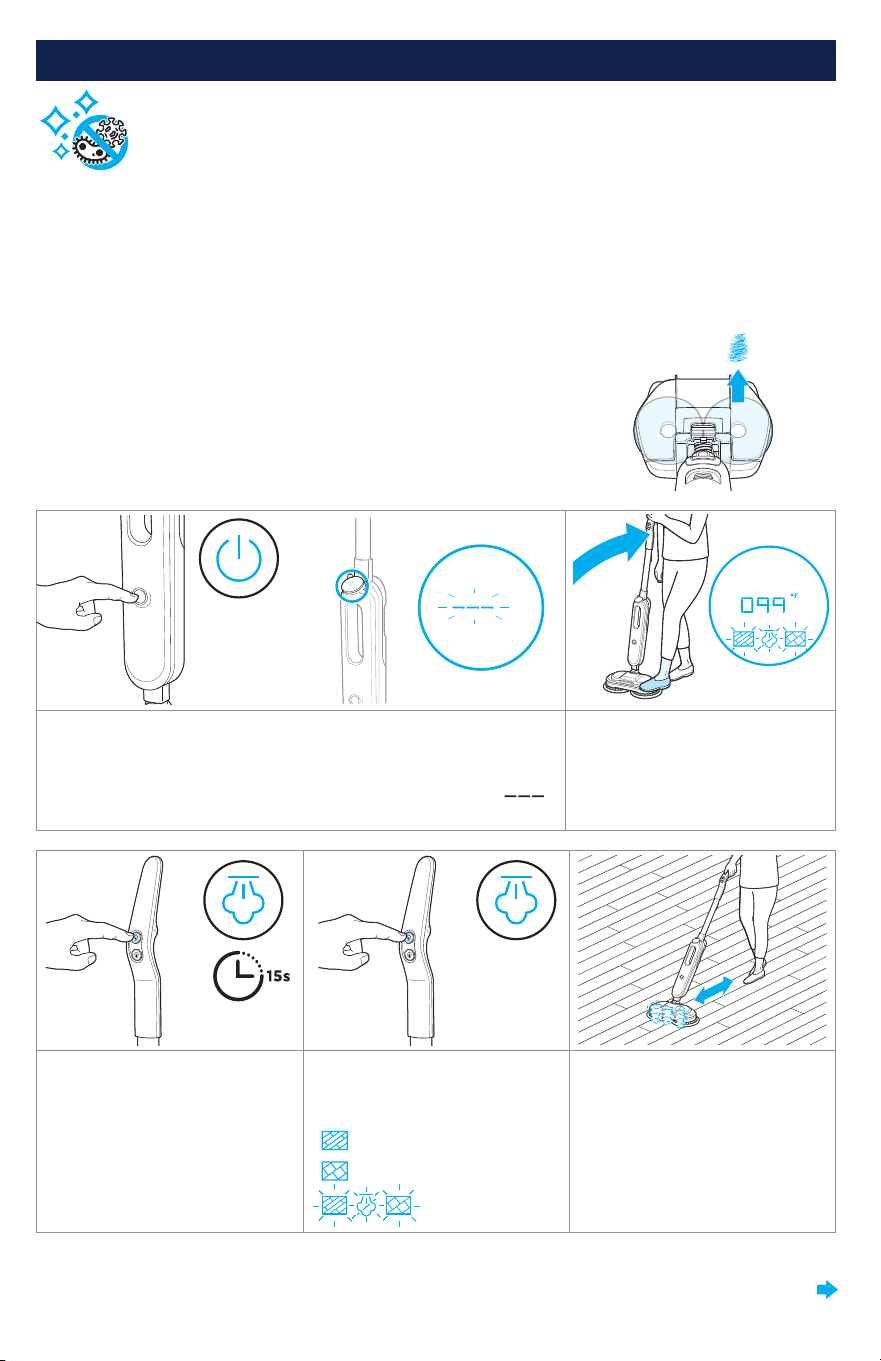
Steam Cleaning & Sanitizing*
Your steam cleaner was tested by third-party laboratories under controlled conditions
to ensure it sanitizes and kills 99.9% of germs, bacteria and viruses*, including
Coronavirus and Influenza viruses. Please use as directed; your results may vary.
Cleaning Tips
• Before using your steam mop to clean and sanitize*, thoroughly sweep or vacuum floor.
• Your steam mop is designed to clean hard flooring such as ceramic tile, laminate, marble, stone,
and sealed hardwood floors. Use of your steam mop on waxed or some unwaxed floors may result
in a diminished glossiness. The steam mop is not for use on unsealed floors. For best results,
test in an inconspicuous area and check the care instructions from your flooring manufacturer.
Tough Messes
For difficult, stuck-on messes, aim center of mop pad on stain.
Steam comes through center of each mop pad.
Seeing a dry path on the floor where the pads touch?
Slow down for even cleaning. Aim for 8 inches per second.
Your foot may be a helpful reference as you move the machine along.
1. Plug machine into an outlet.
Press power button to turn
machine ON.
The display screen will light
and blink.
Note: When upright, mop
heads will not spin and ( )
will show on display screen.
2. Recline machine. The display
screen will light in standby
mode.
3. Press steam mode button
to heat. Mop pads will begin
to spin. Temperature will be
displayed and rise as machine
heats up. Wait 15 seconds until
blinking amber light turns off
and steam level appears.
4. Press the steam mode
button again to select your
desired floor type setting.
Hard Floor
Tile
Standby
5. To steam clean, move the
machine slowly and evenly,
back and forth over your floors
*Kills 99.9% of Human Coronavirus (Strain 229E), Influenza A (H1N1) virus, Staphylococcus aureus, Klebsiella aerogenes, and Trichophyton interdigitale when
used as directed. Testing conducted in a third-party laboratory under controlled conditions. Results may vary.
CONTINUED ON NEXT PAGE
6 BISSELL.com
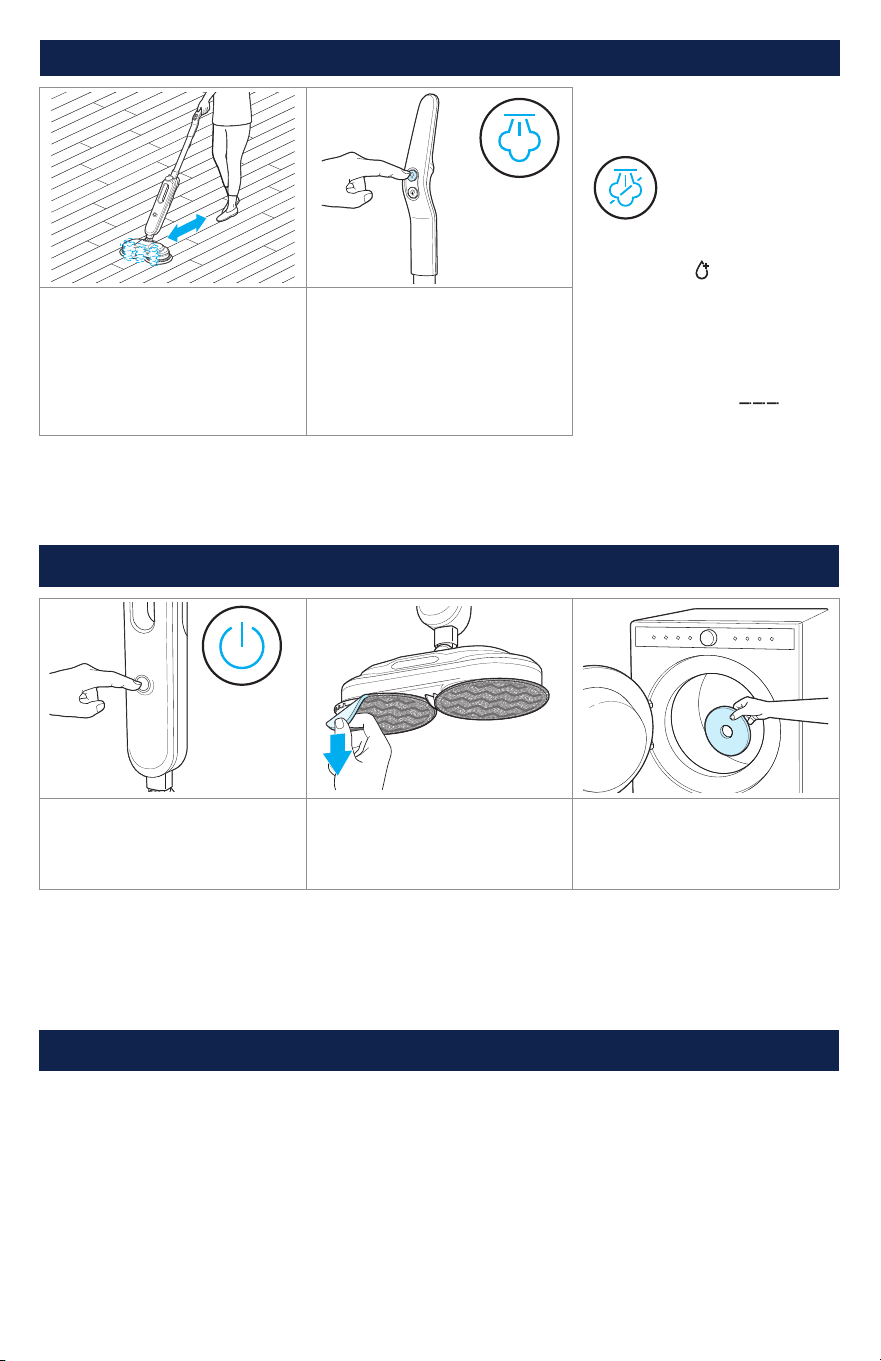
1. Press power button to turn
OFF. Unplug the machine.
2. Carefully remove mop pads.
Note: Mop pad and foot may
be hot.
3. Mop pads may be machine**
or hand washed. Let mop
pads dry completely before
reattaching.
**Machine wash warm. Use only liquid detergents. Do not use bleach or fabric softener. Tumble dry on low. Do not iron or dry clean.
Note: Any other maintenance or servicing not included in this manual should be performed by an
authorized service representative.
After-Cleaning Care
Storing Your Machine
When finished using the product, wrap cord around cord wrap for storage. Store machine indoors in
a dry location in an area where the product is not likely to get damaged.
Steam Cleaning & Sanitizing* (continued)
More Tips
Press the no steam
mode button to
scrub without
steam if desired.
When water is depleted
during use, ( ) symbol will
appear to notify that water
tank needs to be filled.
When machine is standing
upright, it will stop spinning
and producing steam.
Display will blink ( ).
6. To sanitize* an area of your
floor after cleaning, ensure
your machine is in tile mode
for 3 minutes, then slowly and
evenly move machine back and
forth at least 5 times over the
area using continuous steam.
7. Press steam mode button
to stop pads and steam.
Note: Allow floor to dry for
5 minutes before returning
to use.
Caution: To prevent damage to machine, do not step on foot of machine during use.
*Kills 99.9% of Human Coronavirus (Strain 229E), Influenza A (H1N1) virus, Staphylococcus aureus, Klebsiella aerogenes, and Trichophyton interdigitale when
used as directed. Testing conducted in a third-party laboratory under controlled conditions. Results may vary.
x5x5

BISSELL.com 7
WARNING To reduce the risk of fire, electric shock or injury, turn power OFF and disconnect plug from
electrical outlet before performing maintenance or troubleshooting.
Problem Possible Cause Remedies
Reduced steam
or no steam
Water tank empty. Refill tank.
Steam mode not selected.
Select steam mode by pressing steam
mode button on handle.
Mineral deposits from hard water
caused clog.
Contact BISSELL Consumer Care.
Mop pads are
not spinning
Machine is upright. Recline machine.
Mop pads are
wobbling
Mop pads are not installed properly.
Turn Power OFF. Turn machine upside
down to see pad installation. Ensure
pads are aligned to center circles on foot
and secured tightly.
Streaking
Dirty mop pad.
Remove and wash pad per instructions
on page 6.
Use on waxed or oiled floor.
If you have used floor polishes or wax
on your floors, steam products may
decrease glossiness. Refer to wax or
polish manufacturer. If you don’t wax
or polish your floors, check floorcare
instructions from your flooring
manufacturer.
Machine is
leaking
Cap of clean water tank is not closed
properly.
Remove clean water tank and reinstall
cap. See instructions on page 3.
Clean water tank is not seated
properly.
Reinstall clean water tank.
See instructions on page 3.
Troubleshooting
Below are some of the issues you may run into. If you don’t see the issue you’re experiencing
below, visit support.BISSELL.com.
Limited Warranty
Limited 2-year warranty, may vary by state. Visit support.BISSELL.com or call 1-800-237-7691 for
complete warranty information.

But wait, there’s more!
Join us online for a complete guide to your new product, including
troubleshooting, product registration, parts, and more.
Go to support.BISSELL.com.
VIDEOSINFOREGISTER PARTS SUPPORT
We’re Waggin’ Our Tails!
BISSELL proudly supports BISSELL Pet Foundation® and its mission to
help save homeless pets. When you buy a BISSELL® product, you help
save pets, too. We’re proud to design products that help make pet
messes, odors and pet homelessness disappear.
Visit BISSELLsavespets.com to learn more.
©2023 BISSELL Inc. All rights reserved.
Part Number 1639768 10/23 v5