
© Samsung
Samsung owns the copyright for this manual. Use or reproduction of this manual in parts or entirety without the authorization of Samsung is prohibited.
Trademarks other than Samsung are property of their respective owners.
User Manual
WA65D WA75D WA86D
The color and the appearance may differ depending on the product, and the content in the
manual is subject to change without prior notice to improve the performance.
Recommended hours of use per day of this product is under 12 hours. If the product is used
for longer than 12 hours a day, the warranty may be void.
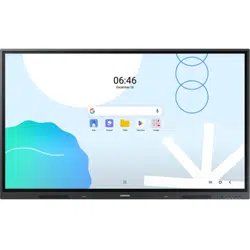
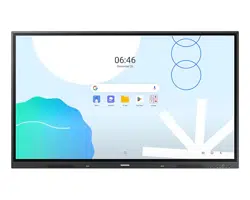
Interactive Display

2
Table of contents
Before using the product
Safety precautions 4
Safety symbols 4
Storage 5
Electricity and safety 5
Installation 5
Operation 6
Precautions for use 8
Preparations
Checking the components 9
Parts 10
Ports 11
Before installing the product (Installation
guide) 13
Installing the Wi-Fi dongle (Model: SI07B) 14
Installing the wall mount 14
Using the wall mount kit 14
Wall mount kit specications (VESA) 15
Connecting to a network 16
Network settings (Wired) 16
Network settings (Wireless) 18
General Features
Launcher 20
Launcher menu 20
Editing the launcher 21
App drawer 22
Control Center 23
Notication center 25
System navigation 26
Writing
Writing 28
Extended pen functions 28
Erasing 28
Note Menu 29
Settings 30
Entering Palette 36
Exit 36
UI Elements 37
Settings
Settings 38
Entering Settings 38
System Settings 39
Accessibility 52
Google 59
System 65
Troubleshooting guide
Problems and solutions 70
Specications
General 76
Preset timing modes 78
Appendix
Responsibility for the pay service (Cost to
customers) 79
Not a product defect 79
A product damage caused by customer’s
fault 79
Others 79
Prevention of afterimage burn-in 80
What is afterimage burn-in? 80
Recommended prevention practices 80
HDMI License notice 80
Low Blue Light 81
Tips for eye health 81
ENERGY STAR 81
3
Chapter 01
Before using the product
Safety precautions
The following safety instructions are to ensure your personal safety and prevent property
damage. Please read the following to ensure the proper use of the product.
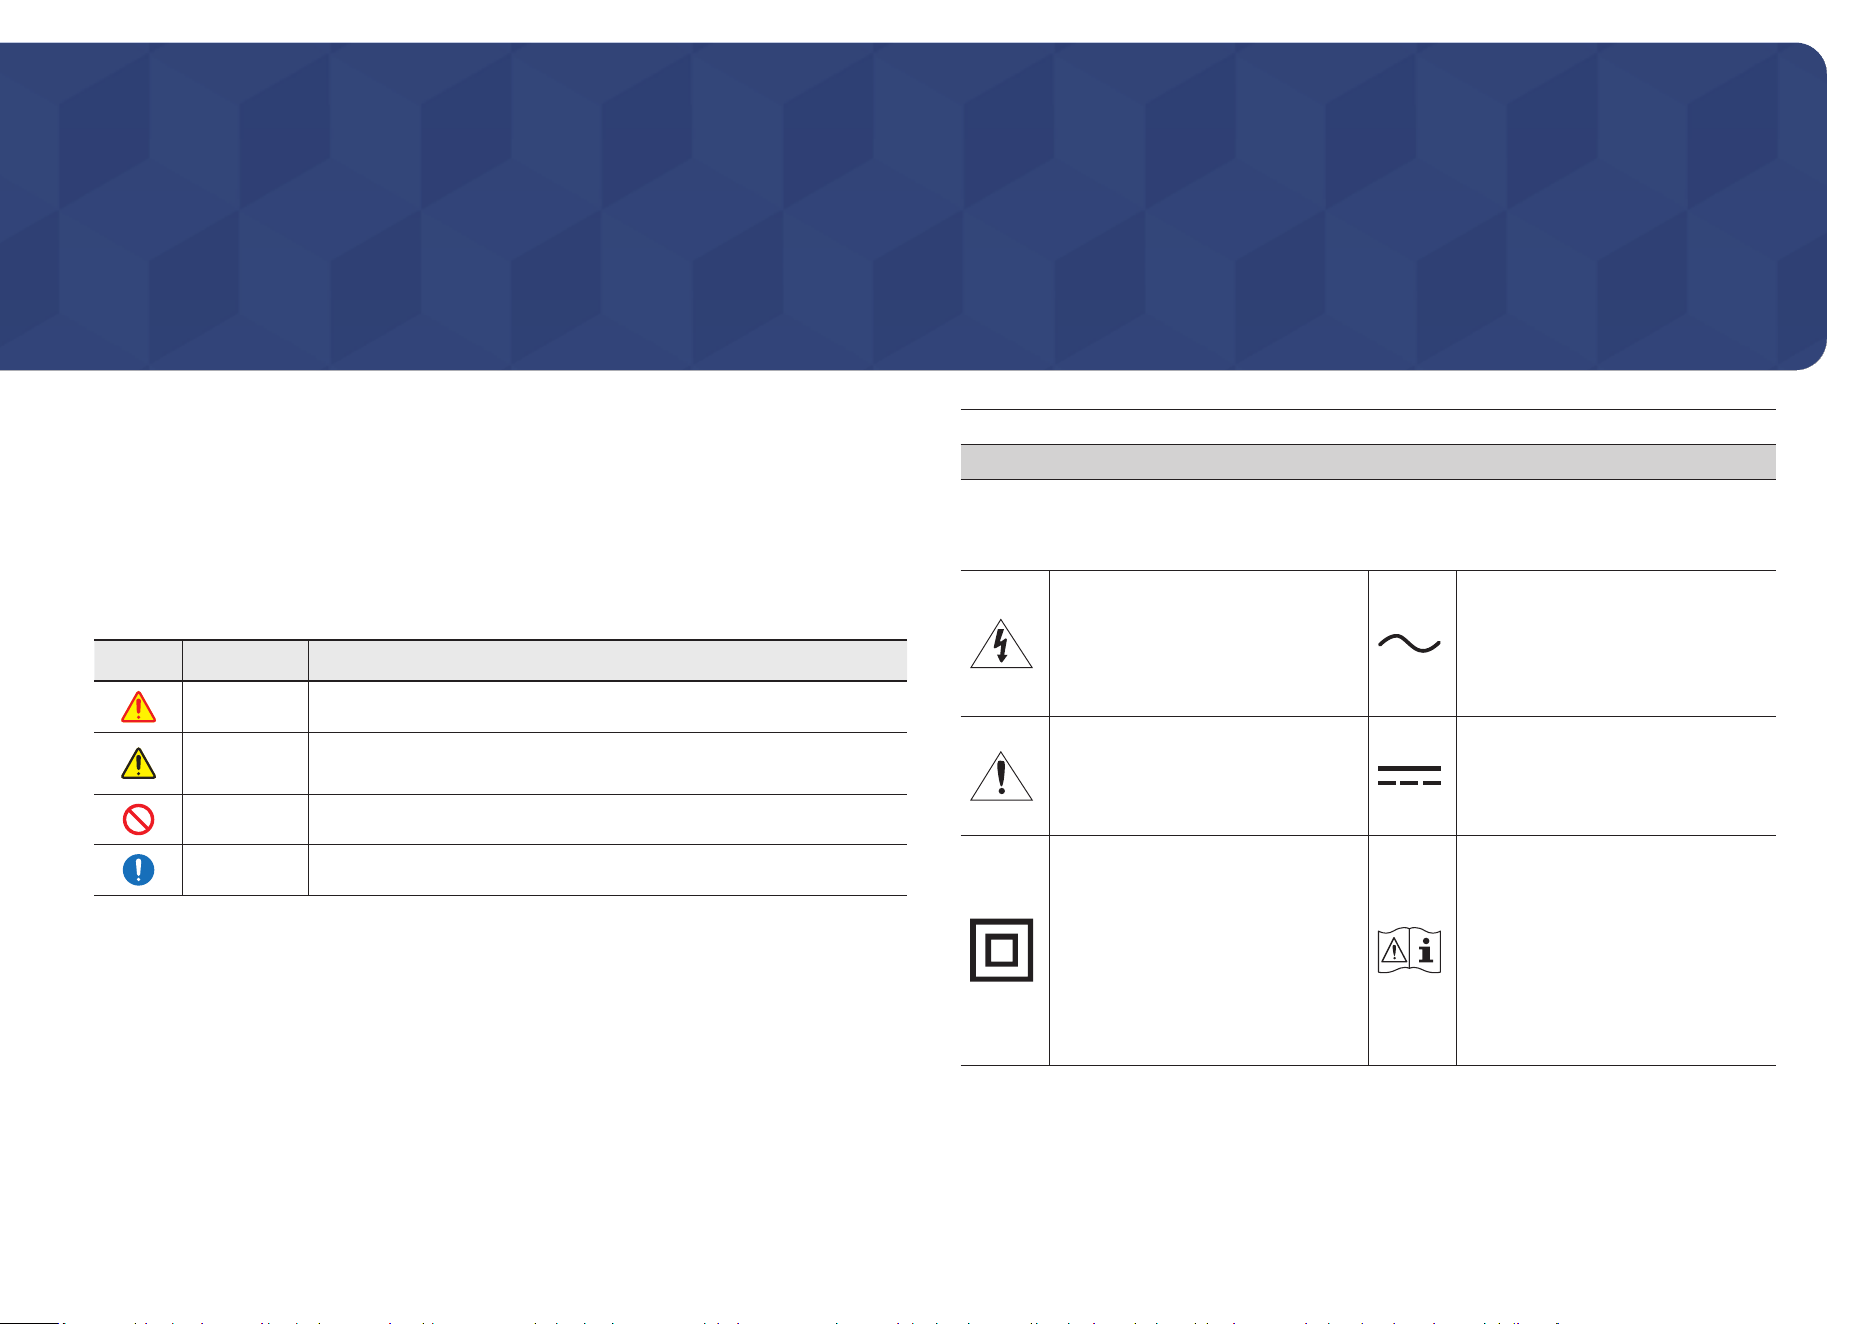
Safety symbols
Symbol Name Meaning
Warning A serious or fatal injury may result if instructions are not followed.
Caution
Personal injury or damage to properties may result if instructions
are not followed.
Prohibition Do NOT attempt.
Instruction Follow directions.
CAUTION
RISK OF ELECTRIC SHOCK. DO NOT OPEN.
CAUTION: TO REDUCE THE RISK OF ELECTRIC SHOCK, DO NOT REMOVE COVER (OR BACK).
THERE ARE NO USER SERVICEABLE PARTS INSIDE. REFER ALL SERVICING TO QUALIFIED
PERSONNEL.
This symbol indicates that high
voltage is present inside. It is
dangerous to make any kind of
contact with any internal part of
this product.
AC voltage: Rated voltage marked
with this symbol is AC voltage.
This symbol indicates that this
product has included important
literature concerning operation
and maintenance.
DC voltage: Rated voltage marked
with this symbol is DC voltage.
Class II product: This symbol
indicates that a safety connection
to electrical earth (ground) is
not required. If this symbol is not
present on a product with a mains
lead, the product MUST have a
reliable connection to protective
earth (ground).
Caution. Consult instructions
for use: This symbol instructs
the user to consult the user
manual for further safety related
information.
4
Storage
Due to the characteristics of high-glossy products, using a UV humidier nearby may create
white-colored stains on the product.
" Contact Customer Service Centre if the inside of the product needs cleaning (service fee
will be charged).
Electricity and safety
Warning
Do not use a damaged power cord or plug, or a loose power socket.
An electric shock or re may result.
Do not use multiple products with a single power socket.
Overheated power sockets may cause a re.
Do not touch the power plug with wet hands. Otherwise, an electric shock may
result.
Do not bend or pull the power cord with force. Be careful not to leave the power
cord under a heavy object.
Damage to the cord may result in a re or electric shock.
Do not place the power cord or product near heat sources.
A re or electric shock may result.
Insert the power plug all the way in so it is not loose.
An unsecure connection may cause a re.
Connect the power plug to a grounded power socket (type 1 insulated devices
only).
An electric shock or injury may result.
Clean any dust around the pins of the power plug or the power socket with a dry
cloth.
A re may result.
Caution
Do not disconnect the power cord while the product is being used.
The product may become damaged by an electric shock.
Only use the power cord provided with your product by Samsung. Do not use the
power cord with other products.
A re or electric shock may result.
Keep the power socket where the power cord is connected unobstructed.
The power cord must be disconnected to cut off power to the product when an
issue occurs.
Hold the plug when disconnecting the power cord from the power socket.
An electric shock or re may result.
Installation
Warning
DO NOT PLACE CANDLES, INSECT REPELLANTS OR CIGARETTES ON TOP OF THE
PRODUCT. DO NOT INSTALL THE PRODUCT NEAR HEAT SOURCES.
A re may result.
Do not install the product in poorly ventilated spaces such as a bookcase or closet.
An increased internal temperature may cause a re.
Do not install the product on an unstable or vibrating surface (insecure shelf,
sloped surface, etc.)
• The product may fall and become damaged and/or cause an injury.
• Using the product in an area with excess vibration may damage the product or
cause a re.
Do not expose the product to direct sunlight, heat, or a hot object such as a stove.
The product lifespan may be reduced or a re may result.

5
Do not install the product within the reach of young children.
• The product may fall and injure children.
• As the front is heavy, install the product on a at and stable surface.
Edible oil, such as soybean oil, can damage or deform the product. Do not install
the product in a kitchen or near a kitchen counter.
Have a technician install the wall-mount hanger.
• Installation by an unqualied person can result in an injury.
• Only use approved cabinets.
Install the product at least 10 cm away from the wall to allow ventilation.
An increased internal temperature may cause a re.
Keep the plastic packaging out of the reach of children.
Children may suffocate.
Do not install the product in a vehicle or a place exposed to dust, moisture (water
drips, etc.), oil, or smoke.
A re or electric shock may result.
Caution
Do not set down the product on its front.
The screen may become damaged.
Do not drop the product while moving.
Product failure or personal injury may result.
Set down the product gently.
Product failure or personal injury may result.
Installing the product in an unusual place (a place exposed to a lot of ne dust,
chemical substances, extreme temperatures or a signicant presence of moisture,
or a place where the product will operate continuously for an extended period of
time) may seriously affect its performance.
Be sure to consult Samsung Customer Service Centre if you want to install the
product at such a place.
Operation
Warning
There is a high voltage inside the product. Never disassemble, repair or modify the
product yourself.
• A re or electric shock may result.
• Contact Samsung Customer Service Centre for repairs.
Do not let children hang from the product or climb on top of it.
Children may become injured or seriously harmed.
If the product is dropped or the outer case is damaged, turn off the power switch
and disconnect the power cord. Then contact Samsung Customer Service Centre.
Continued use can result in a re or electric shock.
Do not leave heavy objects or items that children like (toys, sweets, etc.) on top of
the product.
The product or heavy objects may fall as children try to reach for the toys or sweets
resulting in a serious injury.
Do not move the product by pulling the power cord or any cable.
Product failure, an electric shock or re may result from a damaged cable.
Do not lift or move the product by pulling the power cord or any cable.
Product failure, an electric shock or re may result from a damaged cable.
Ensure the vents are not blocked by tablecloths or curtains.
An increased internal temperature may cause a re.
Do not insert metallic objects (chopsticks, coins, hairpins, etc) or objects that burn
easily (paper, matches, etc) into the product (via the vent or input/output ports,
etc).
• Be sure to power off the product and disconnect the power cord when water
or other foreign substances have entered the product. Then contact Samsung
Customer Service Centre.
• Product failure, an electric shock or re may result.
6
Do not place objects containing liquid (vases, pots, bottles, etc) or metallic objects
on top of the product.
• Be sure to power off the product and disconnect the power cord when water
or other foreign substances have entered the product. Then contact Samsung
Customer Service Centre.
• Product failure, an electric shock or re may result.
Before moving the product, turn off the power switch and disconnect the power
cable and all other connected cables.
Damage to the cord may result in a re or electric shock.
If the product generates abnormal sounds, a burning smell or smoke, disconnect
the power cord immediately and contact Samsung Customer Service Centre.
An electric shock or re may result.
During a lightning or thunderstorm, power off the product and remove the power
cable.
A re or electric shock may result.
Do not drop objects on the product or apply impact.
A re or electric shock may result.
If a gas leakage is found, do not touch the product or power plug. Also, ventilate
the area immediately.
Sparks can cause an explosion or re.
Do not use or keep combustible spray or an inammable substance near the
product.
An explosion or re may result.
Caution
Do not use humidiers or stoves around the product.
A re or electric shock may result.
Do not touch the screen when the product has been turned on for an extended
period of time as it will become hot.
Do not place heavy objects on the product.
Product failure or personal injury may result.
Leaving the screen xed on a stationary image for an extended period of time may
cause afterimage burn-in or defective pixels.
Activate power-saving mode or a moving-picture screen saver if you will not be
using the product for an extended period of time.
Disconnect the power cord from the power socket if you do not plan on using the
product for an extended period of time (vacation, etc).
Dust accumulation combined with heat can cause a re, electric shock or electric
leakage.
Use the product at the recommended resolution and frequency.
Your eyesight may deteriorate.
Looking at the screen too close for an extended period of time can deteriorate your
eyesight.
Rest your eyes for more than 5 minutes for every 1 hour of product use.
Eye fatigue will be relieved.
Store small accessories out of the reach of children.
7
Precautions for use
Be careful that if you use the supplied pen with a load exceeding 2.5 kg, scratches may occur
on the protective glass.
If you use a ballpoint pen other than the supplied pen, be careful that the screen may be
stained with ink or damaged.
Do not use a dirty brush to avoid screen damage.
" We recommend that you use the supplied pen. Do not use sharp, pointed objects other
than the pen.
" If dust or dirt from the supplied pen remains on the protective glass, clean it referring to
the instructions below.
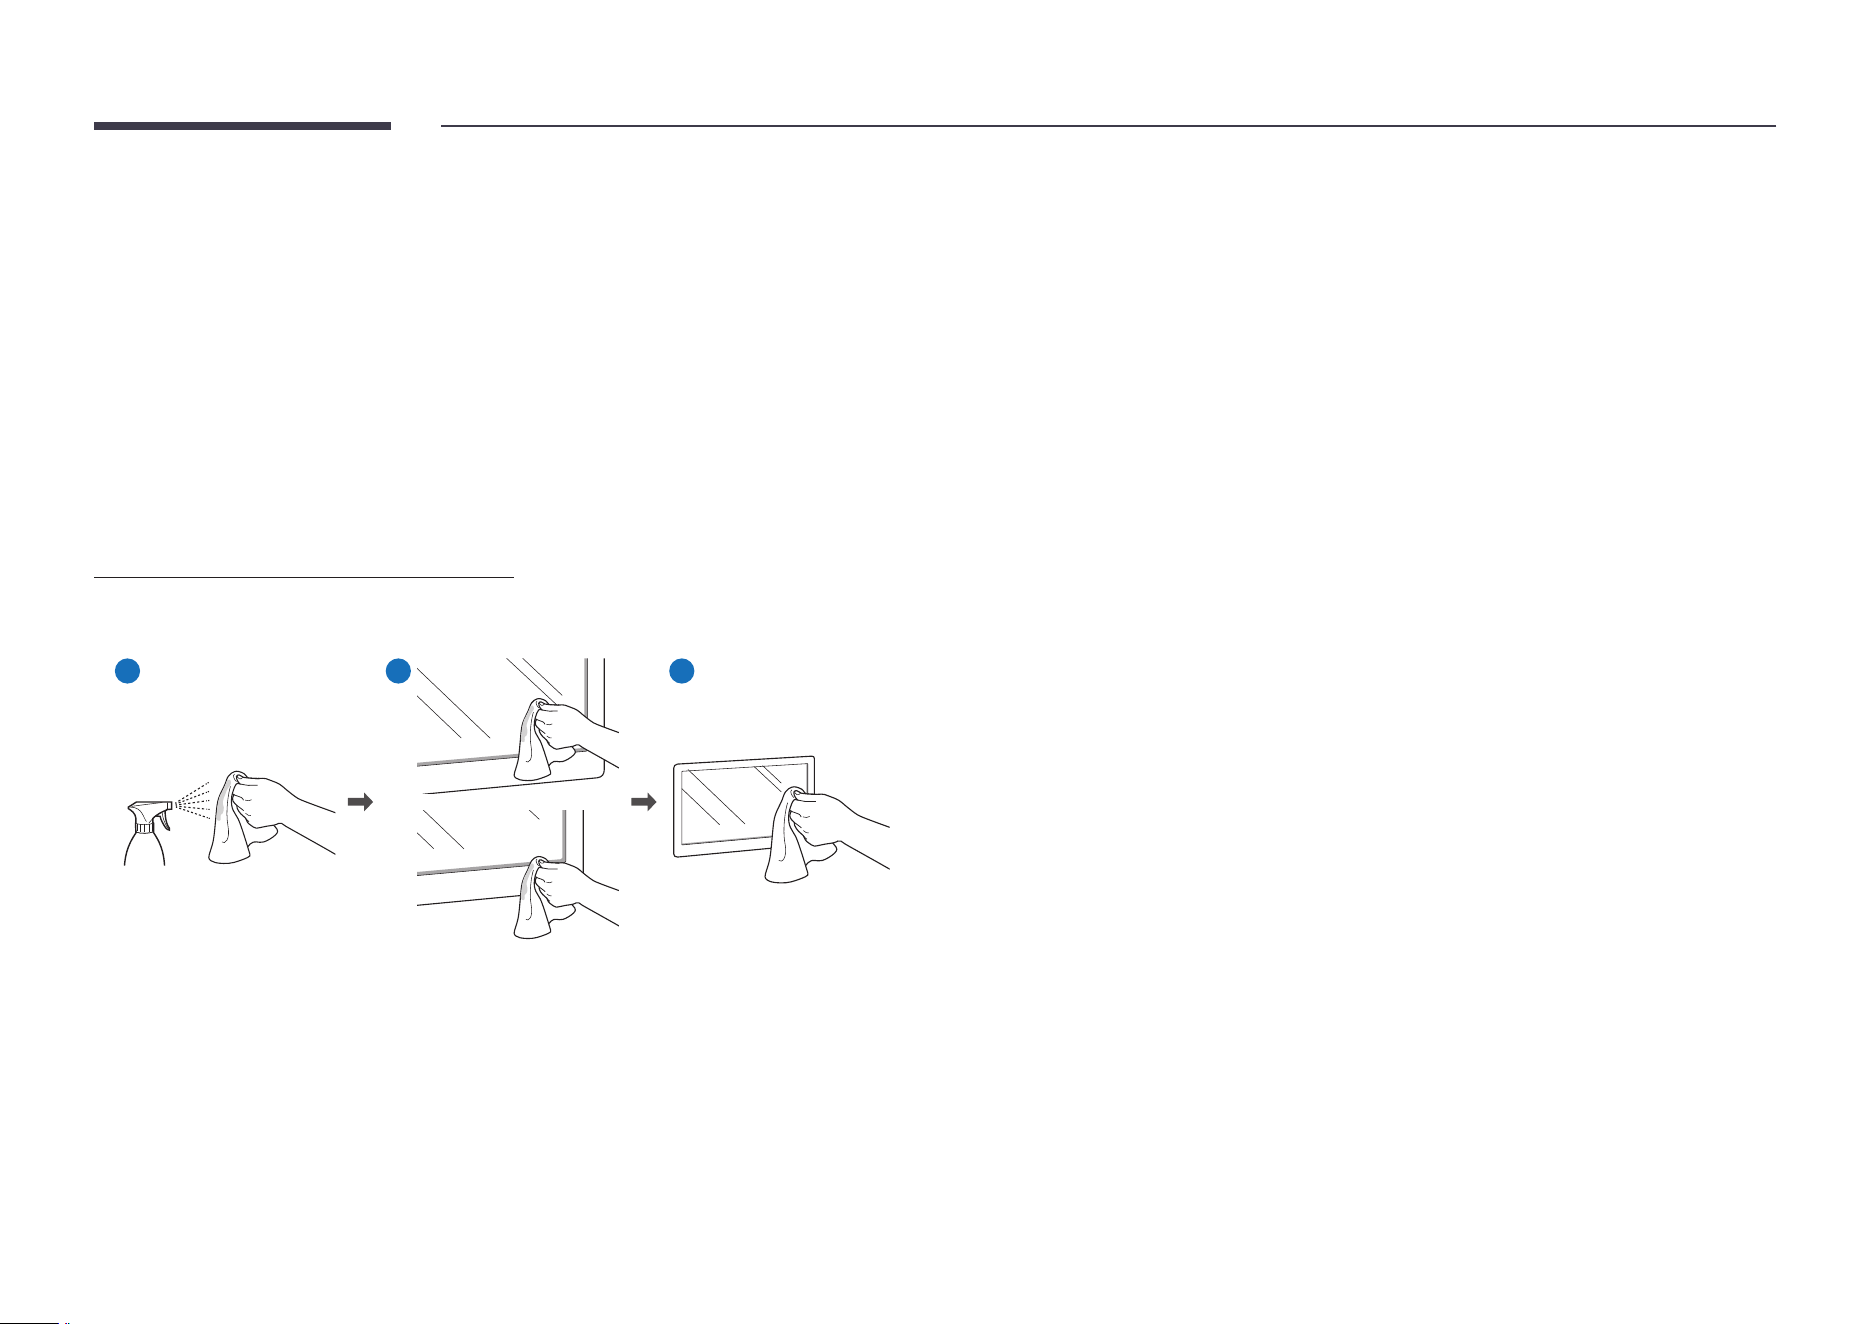
Cleaning the exterior and display
Wipe the surface with a slightly wet, soft cloth, and then wipe with a dry cloth.
1 2 3
8
Chapter 02
Preparations
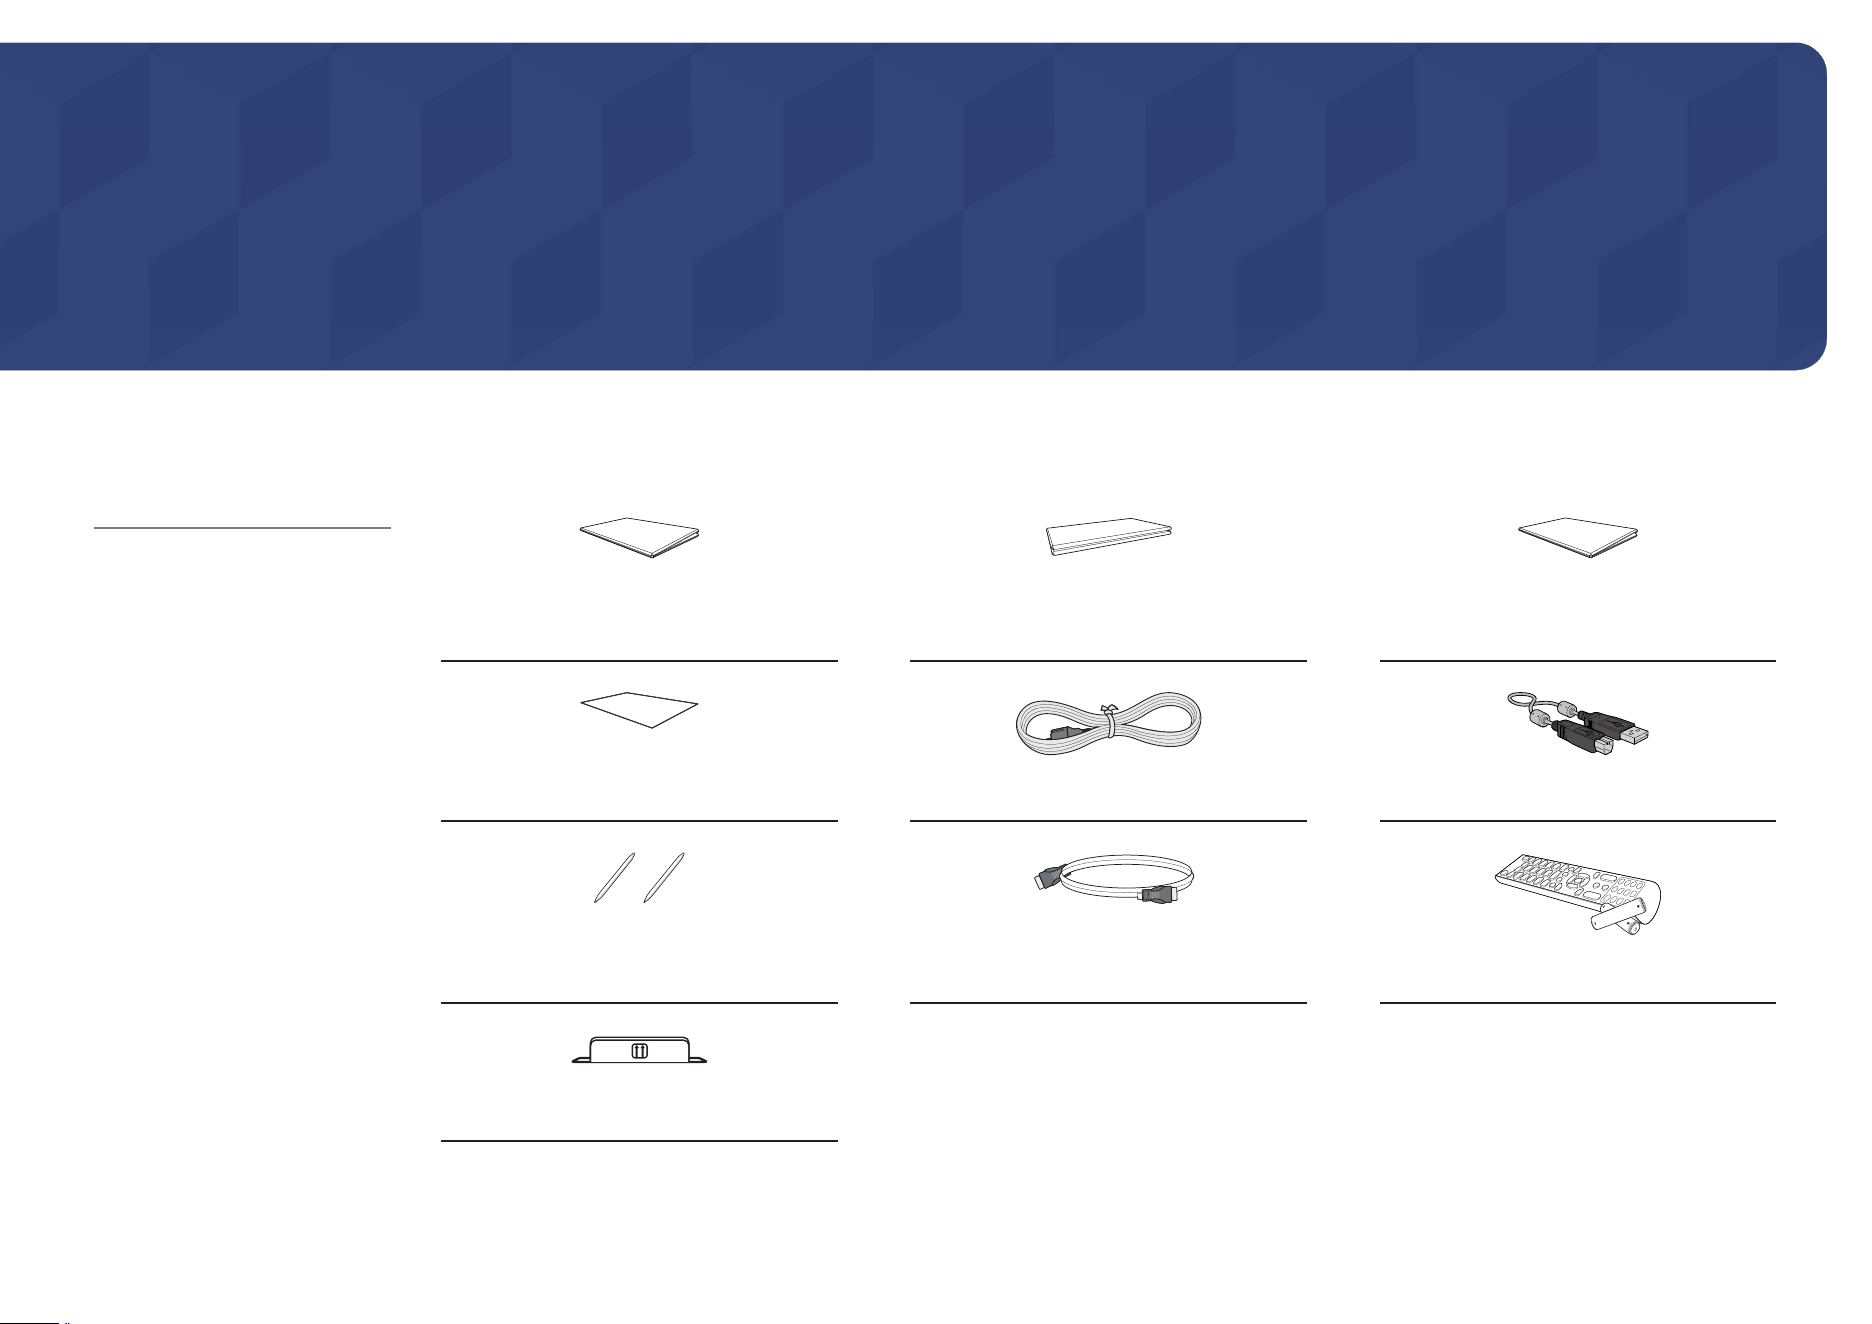
Checking the components
Quick Setup Guide Warranty card
(Not available in some locations)
Regulatory guide
Waste Electical & Electronic Equipment Power cord USB cable
Touch pen x 2 HDMI cable Remote Control (batteries x 2 included)
WiFi dongle
$ Contact the vendor where you
purchased the product if any
components are missing.
$ The appearance of the
components may differ from the
images shown.
$ Refer to the installation guide
for the WAD stand or wall mount
(available for optional purchase).
9
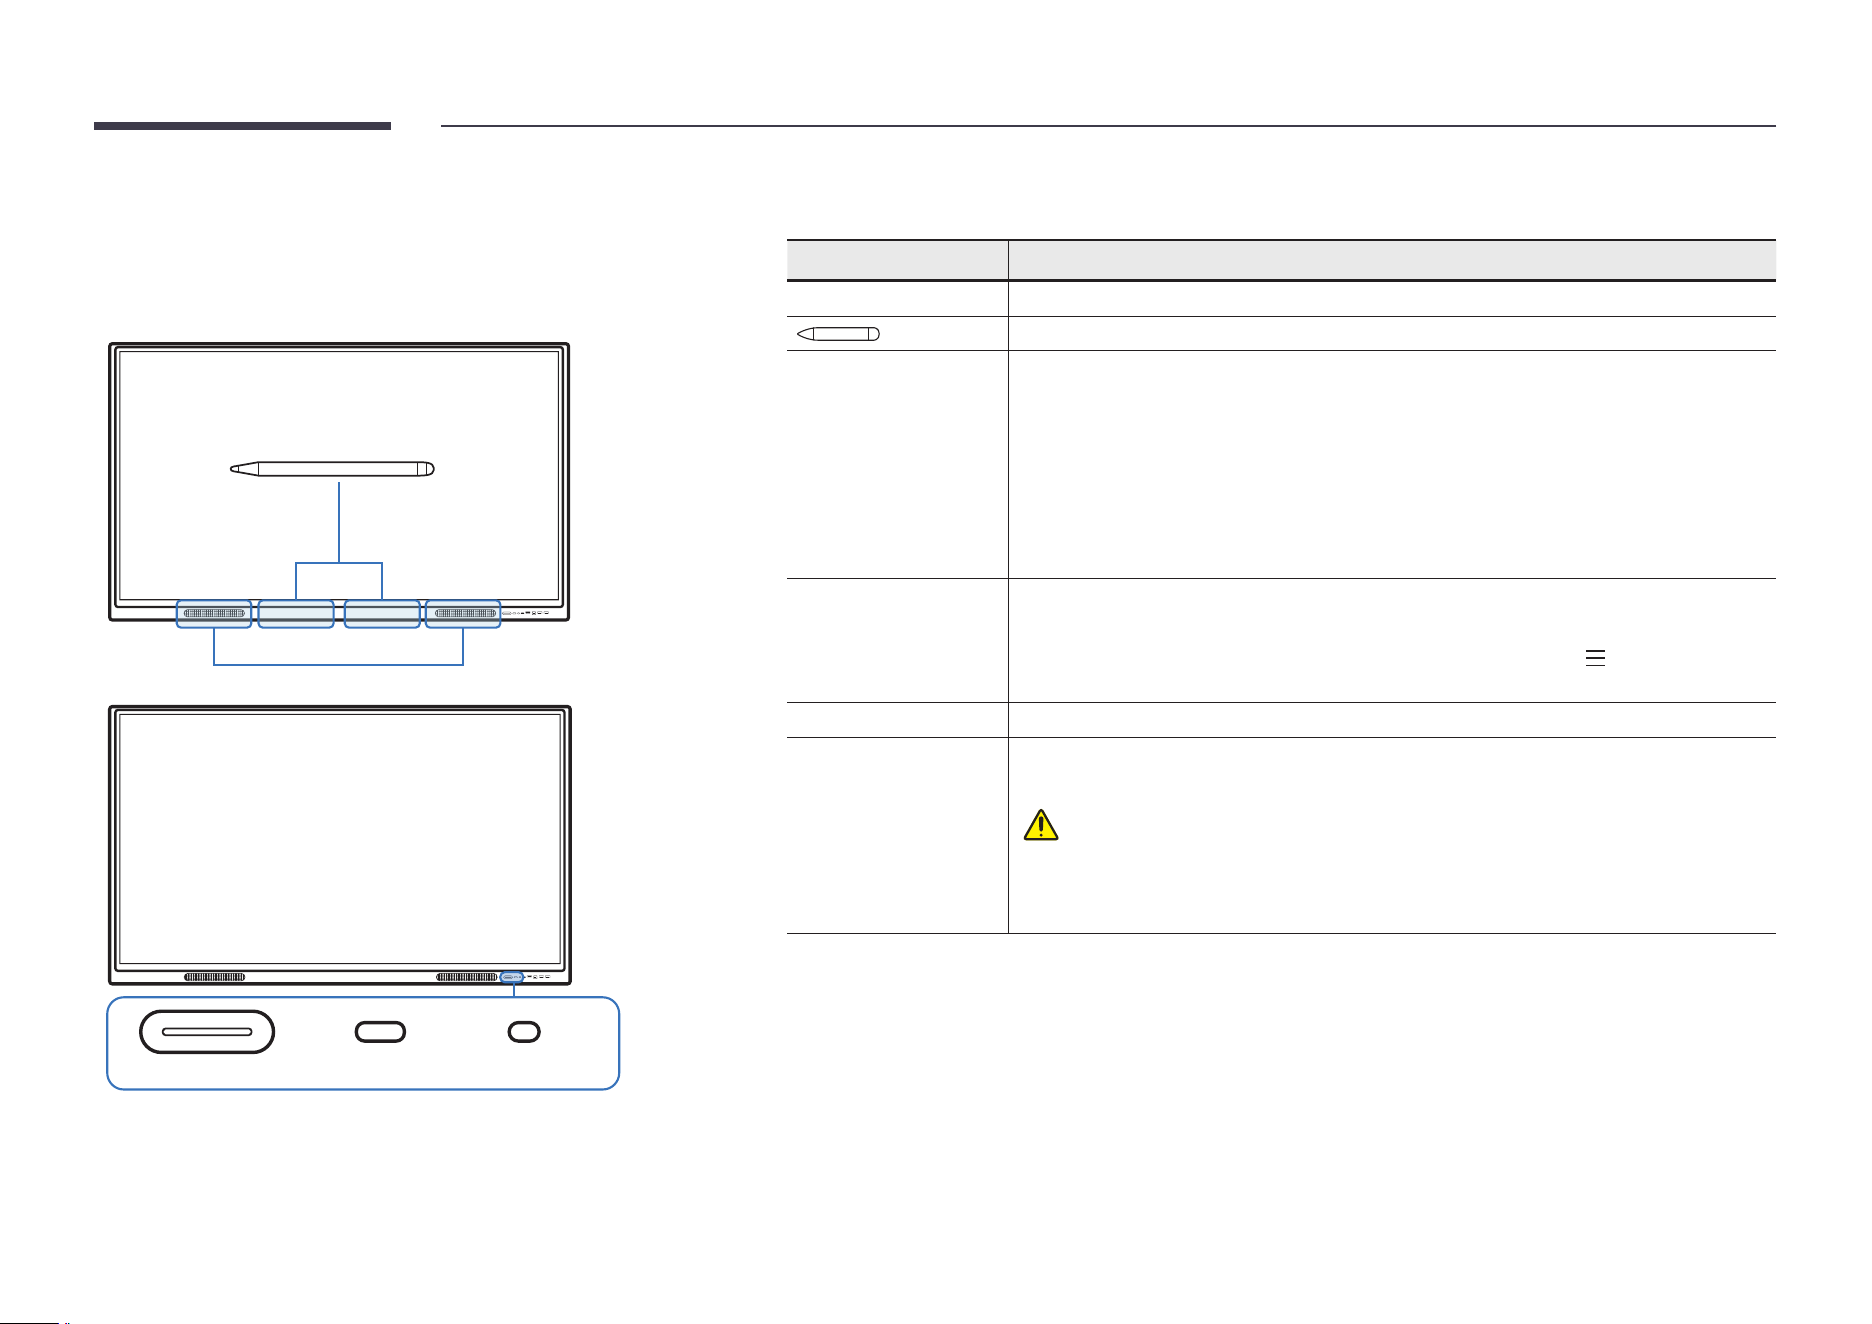
Parts
WA65D/WA75D/WA86D
Speaker
Power button & indicator IR receive Light sensor
" The color and shape of parts may differ from what is shown. Specications are subject to change without
notice to improve quality.
Parts Description
Speaker Speaker output
The pen is magnetic. Keep it by attaching to the marked location.
Power button &
indicator
Press the button to turn on the product and press and hold the button to turn off the
product.
" The power indicator turns white when the product is turned on.
" The power indicator turns red when the product is turned off.
In writing mode, lightly press the Power button to switch to the screen saver mode.
In case the PIP screen is in Full Screen mode, press the Power button to display the
adjustment menu. Press again to hide.
Light sensor The light sensor is used to detect ambient light for the Brightness Optimization
function.
• You can turn on or off the Brightness Optimization function at
Menu → SETTINGS
→ System → Advanced Settings → Brightness Optimization.
IR receive Remote controller infrared receiver
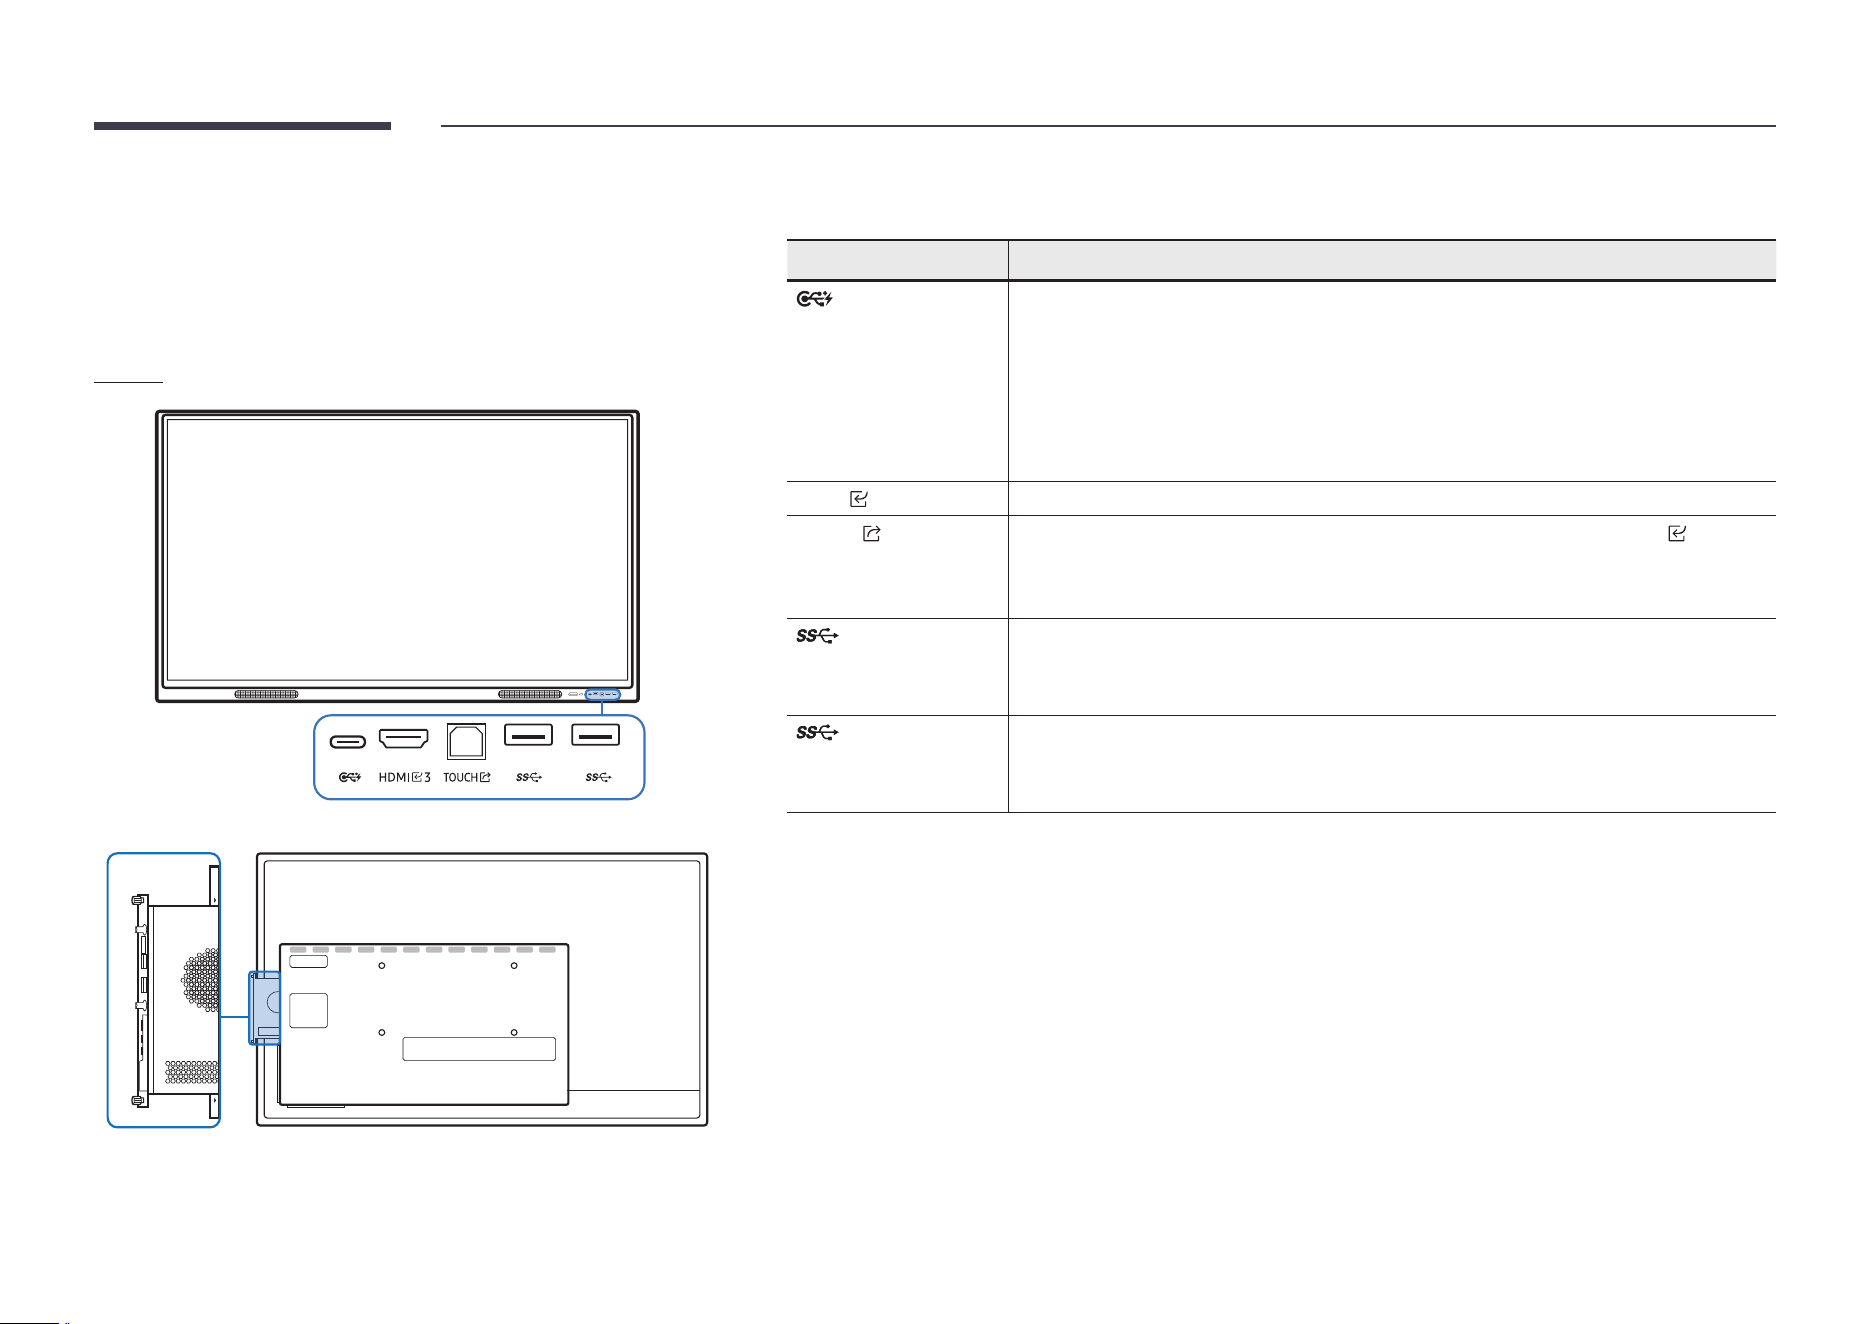
OPS case (Sold
separately)
Connect the OPS case to the product and insert the standard OPS module into the
case. OPS case and module are sold separately.
Before inserting the OPS module, make sure to remove the power cable from
the product to completely cut off the power supply.
" OPS refers to the Intel Open Pluggable Specication.
" OPS power supply: 18 V/3.5 A
10
Ports
WA65D/WA75D/WA86D
Front
" The color and shape of parts may differ from what is shown. Specications are subject to change without
notice to improve quality.
Ports Description
You can connect a device using a USB-C cable.
• USB-C connection allows video output and touch-based control of the device.
" You must use a USB-C cable with DP ALT Mode support for video transmission.
" Use a USB-C cable that is 1 m or shorter in length.
" Charging is supported up to 65 W. Charging with USB-C cable is only available
when the product is on.
HDMI
3 An HDMI port for displaying input from an external source.
TOUCH
Allows touch-based control of the PC screen connected through the HDMI 3 port .
Use the supplied USB cable to connect between the TOUCH port on the front of the
product and the PC.
Connect a USB protocol device.
" The USB ports on the product provide a maximum constant current of 1.0 A. If the
maximum value is exceeded, USB ports may not work.
Connect a USB protocol device.
" The USB ports on the product provide a maximum constant current of 1.0 A. If the
maximum value is exceeded, USB ports may not work.
11
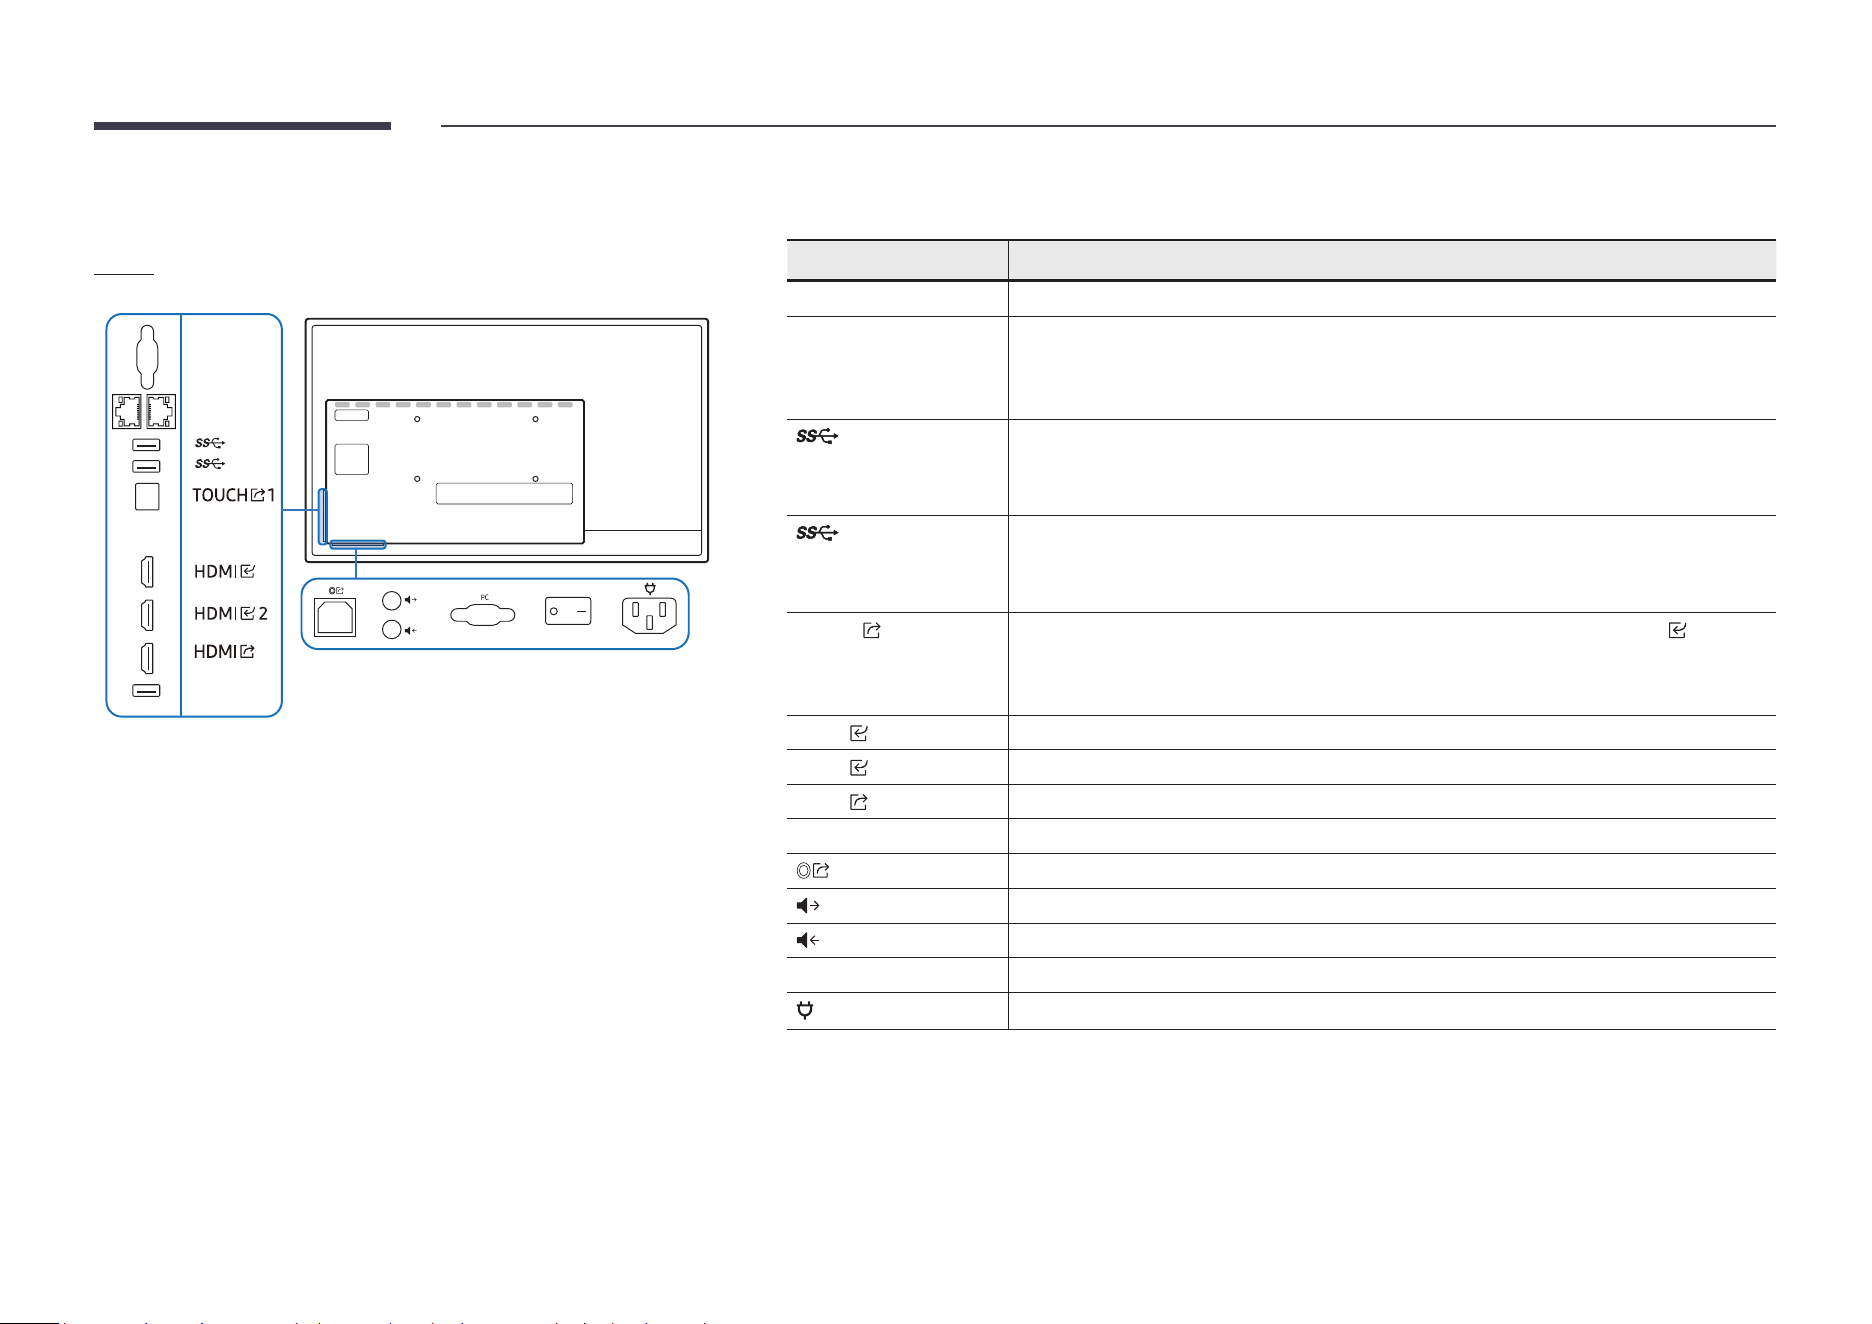
WA65D/WA75D/WA86D
Rear
RS232C
SERVICE
TOUCH
LAN
1
1
" The color and shape of parts may differ from what is shown. Specications are subject to change without
notice to improve quality.
Ports Description
RS232C Serial Interface for debug only.
LAN Connects to a network using a LAN cable. (1000 Mbps)
• Below port: Connect RJ45 output terminal
• Above port: Connect RJ45 input terminal
Connect a USB protocol device.
" The USB ports on the product provide a maximum constant current of 1.0 A. If the
maximum value is exceeded, USB ports may not work.
Connect a USB protocol device.
" The USB ports on the product provide a maximum constant current of 1.0 A. If the
maximum value is exceeded, USB ports may not work.
TOUCH
1 Allows touch-based control of the PC screen connected through the HDMI 1 port.
Use the supplied USB cable to connect between the TOUCH port on the rear of the
product and the PC.
HDMI
1 Connects to a source device using a HDMI cable.
HDMI
2 Connects to a source device using a HDMI cable.
HDMI
Connects to a sink device using a HDMI cable.
SERVICE Used for updating OS Firmware
Optical audio port for multichannel audio.
Audio output to the external speaker.
Microphone audio input.
PC VGA input port.
Power interface
12
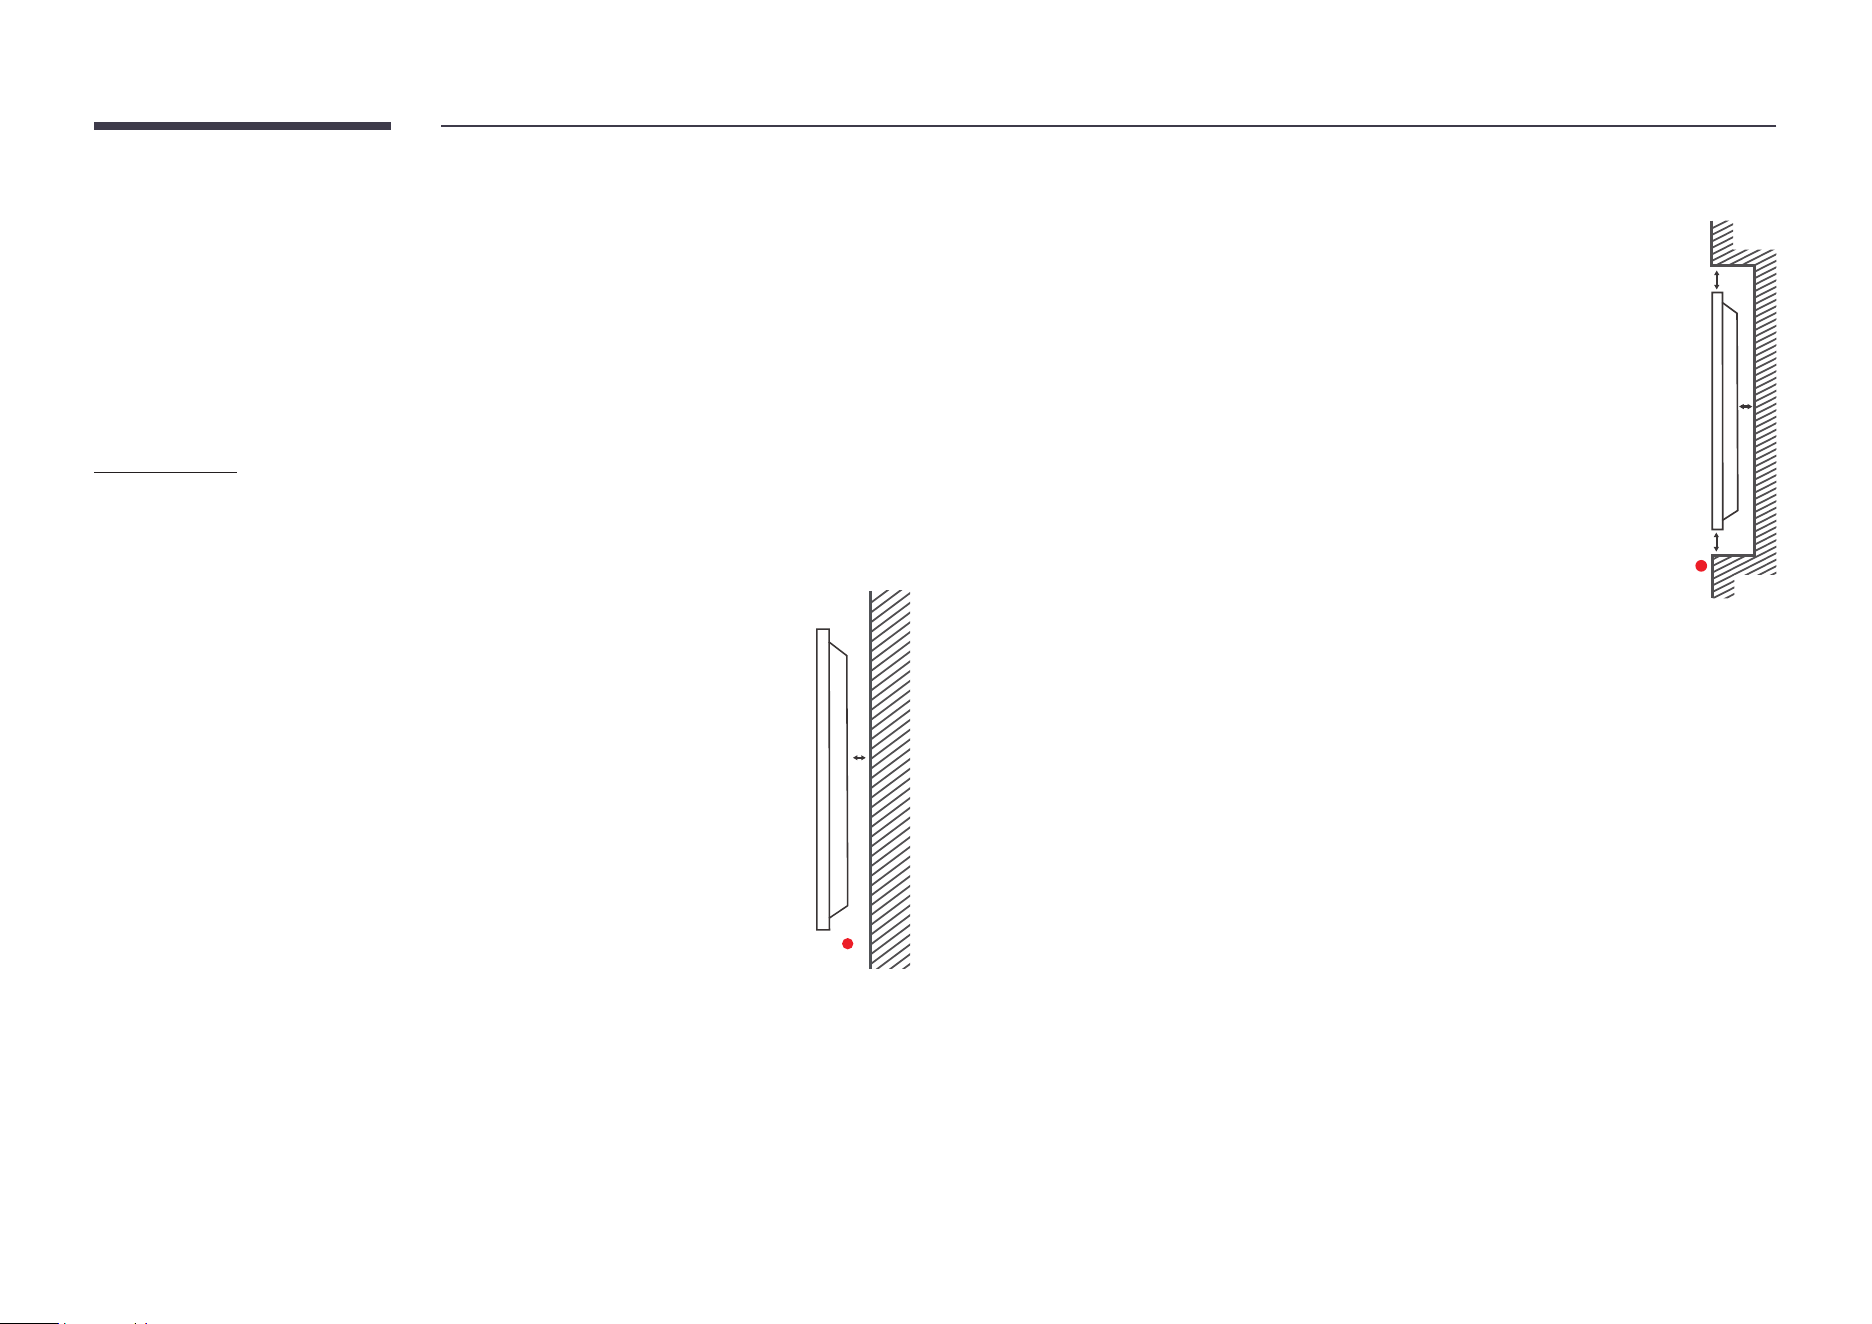
Before installing the product (Installation
guide)
This product can be wall-mounted. The wall mount are available for optional purchase.
WA65D/WA75D/WA86D
Ventilation
" Contact Samsung Customer Service Center for further details.
Installation on a perpendicular wall
A Minimum 30 mm
B Ambient temperature: 35 °C or less
A
B
Installation on an indented wall
A Minimum 30 mm
B Minimum 25 mm
C Ambient temperature: 35 °C or less
" When installing the product on an indented wall, allow at least the space
specied above between the product and wall for ventilation and ensure
that the ambient temperature is kept below 35 °C.
B
B
C
A
13
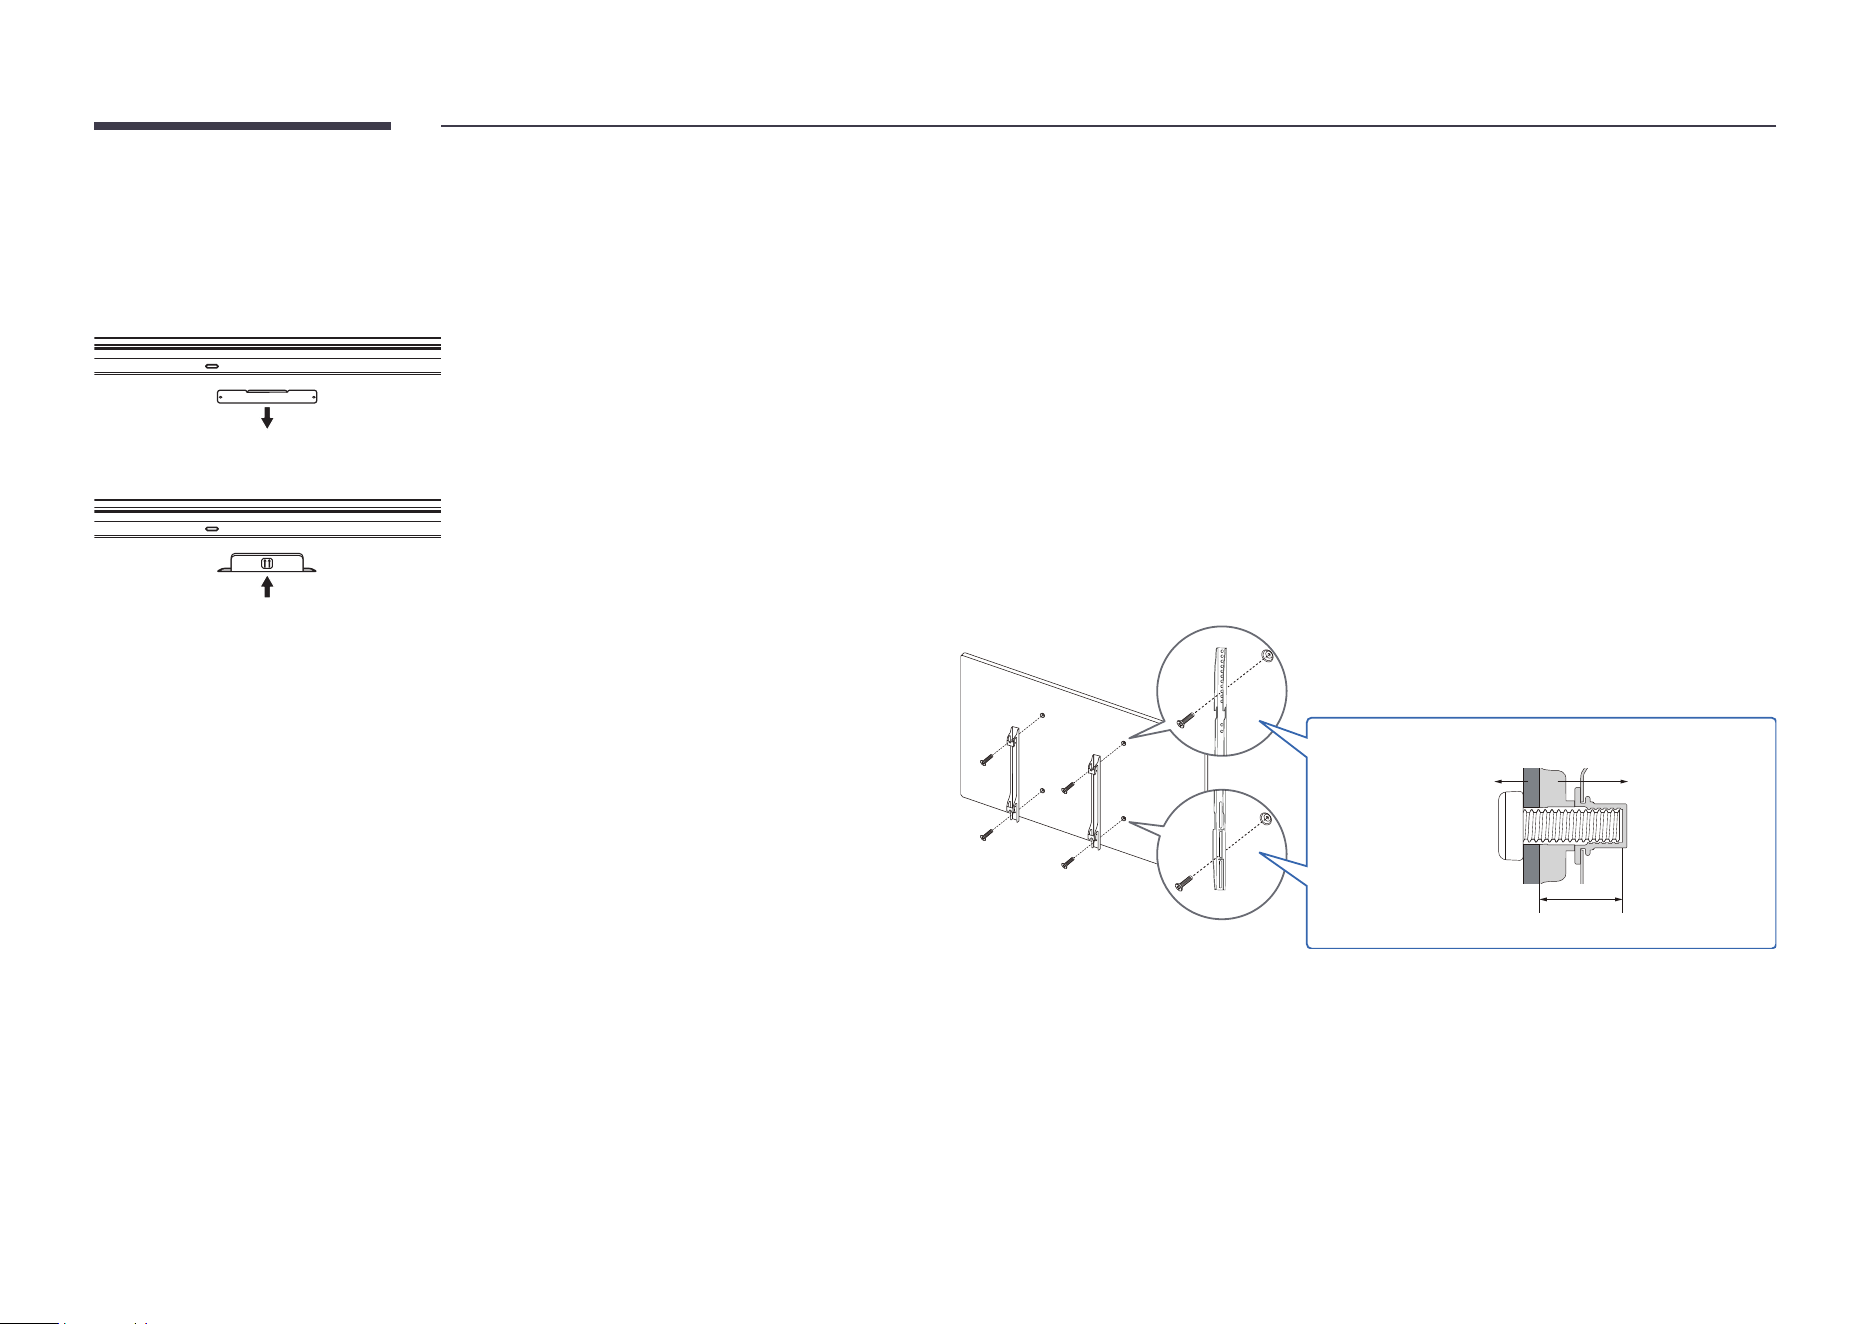
Installing the Wi-Fi dongle (Model: SI07B)
Warning: Disconnect the product’s power cord before the installation.
1
Remove the Wi-Fi slot’s cover.
2
Fully insert the Wi-Fi dongle into the slot.
• The Wi-Fi dongle only works when it is properly inserted into the designated slot in the
product.
Installing the wall mount
" This product can be wall-mounted. Some tiles support expanded operations by
longpressing on it.
Using the wall mount kit
• The wall mount kit allows you to mount the product on the wall.
• For detailed information on installing the wall mount, see the instructions provided with
the wall mount.
• We recommend you contact a technician for assistance when installing the wall mount
bracket.
• Samsung is not responsible for any damage to the product or injury to yourself or others
if you select to install the wall mount on your own.
Wall mount
bracket
Product
C
14
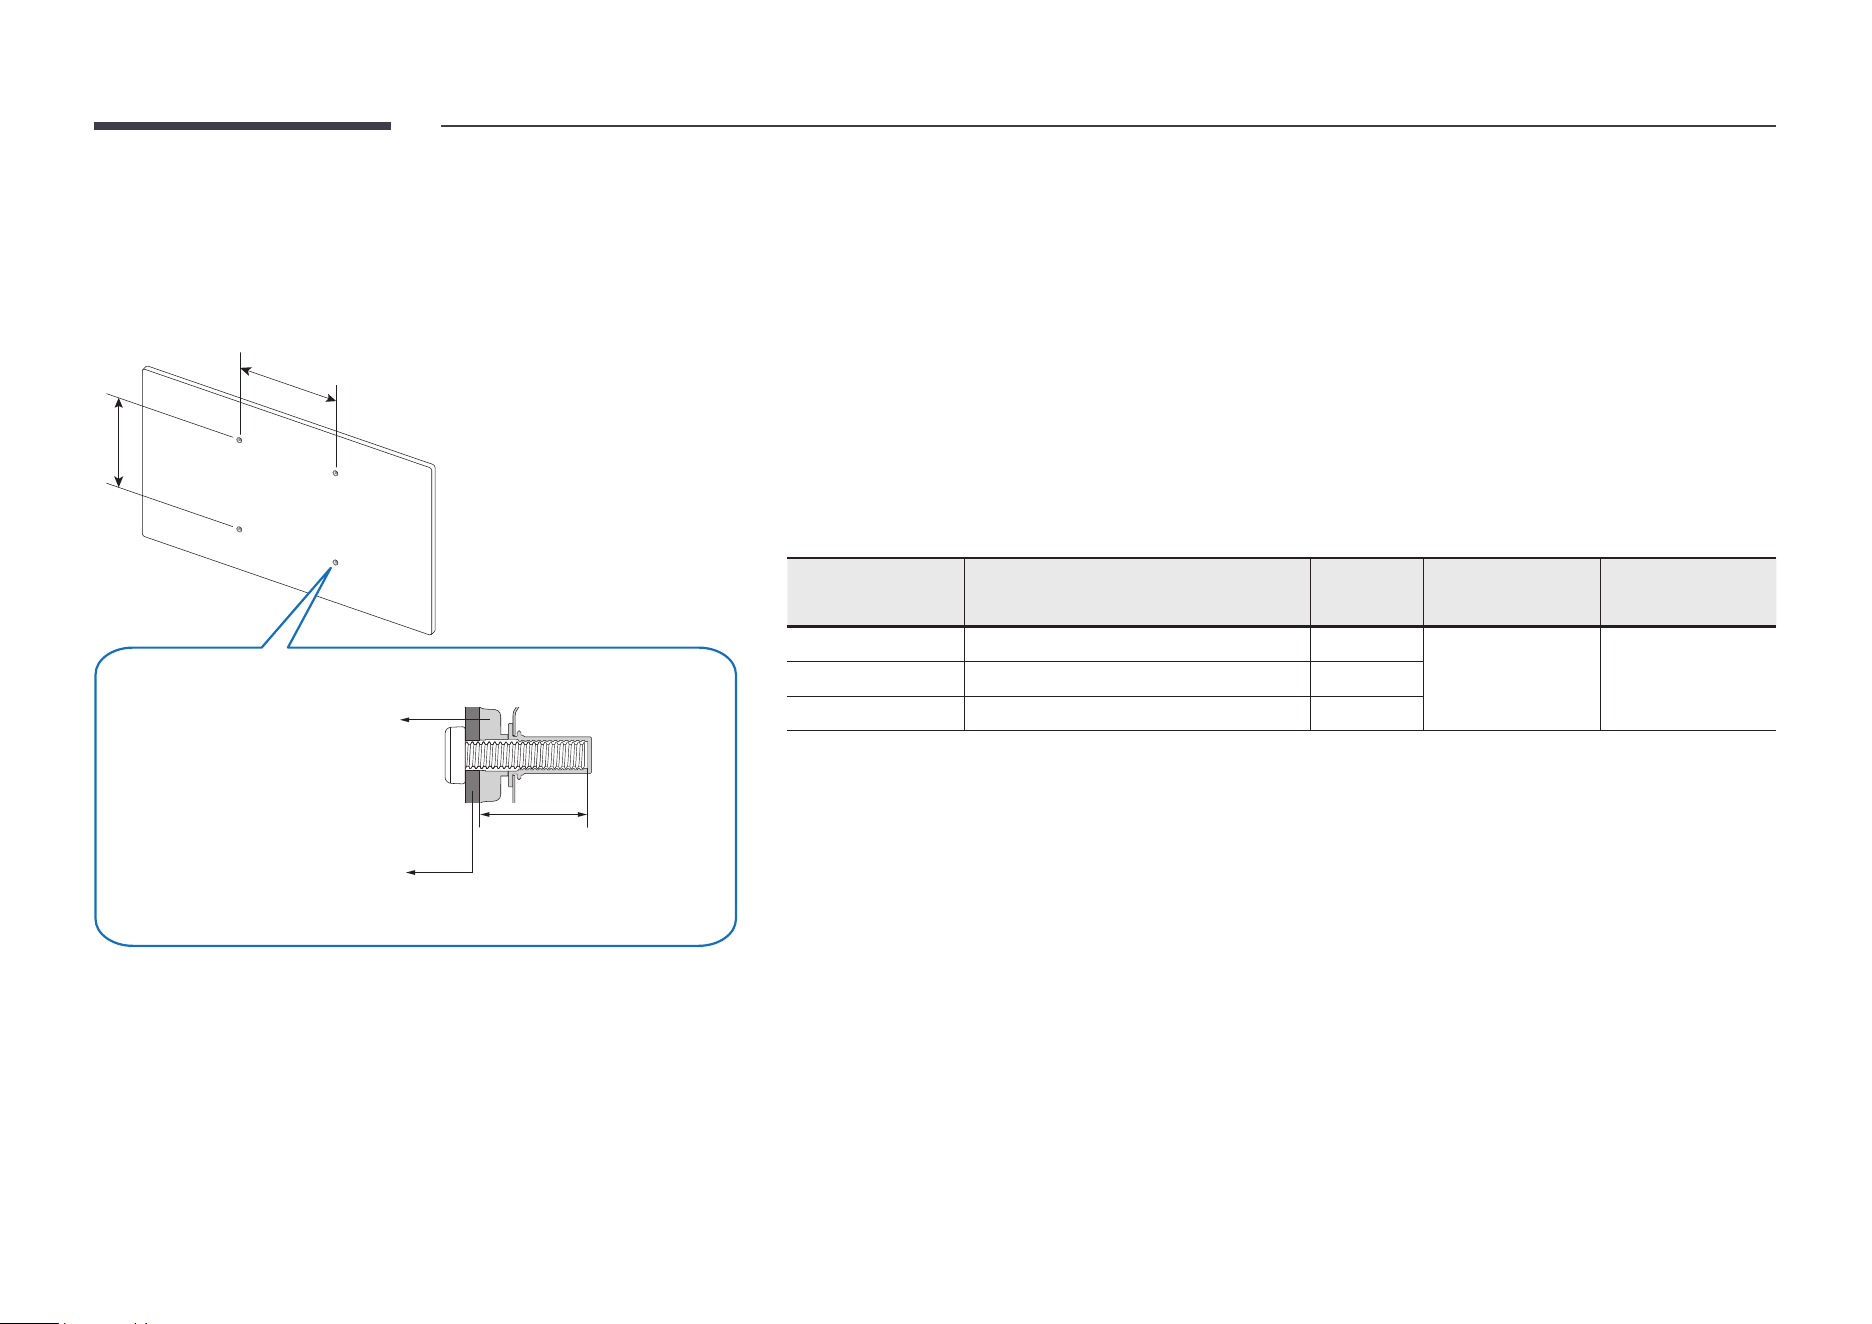
Wall mount kit specications (VESA)
" Install your wall mount on a solid wall perpendicular to the oor. To
install the product on the other wall area, contact the nearest agency.
If you install the product on a slanted wall, it may fall and result in
severe personal injury.
Product
Wall mount bracket
A
C
B
• Samsung wall mount kits contain a detailed installation manual and all parts necessary for assembly are
provided.
• Do not use screws that are longer than the standard length or do not comply with the VESA standard screw
specications. Screws that are too long may cause damage to the inside of the product.
• For wall mounts that do not comply with the VESA standard screw specications, the length of the screws
may differ depending on the wall mount specications.
• Do not fasten the screws too rmly. This may damage the product or cause the product to fall, leading to
personal injury. Samsung is not liable for these kinds of accidents.
• Samsung is not liable for product damage or personal injury when a non-VESA or non-specied wall mount is
used or the consumer fails to follow the product installation instructions.
• Always have at least two people mount the product on a wall.
• Standard dimensions for wall mount kits are shown in the table below.
Model name
VESA screw hole specs (A x B) in
millimetres
C (mm) Standard screw Quantity
WA65D 600 x 400 28.3 - 30.3 M8 4
WA75D 800 x 400 28.3 - 30.3
WA86D 800 x 600 28.3 - 30.3
" Do not install your Wall Mount Kit while your product is turned on. It may result in personal injury due to
electric shock.
15
Connecting to a network
" Connecting parts may differ in different products.
Network settings (Wired)
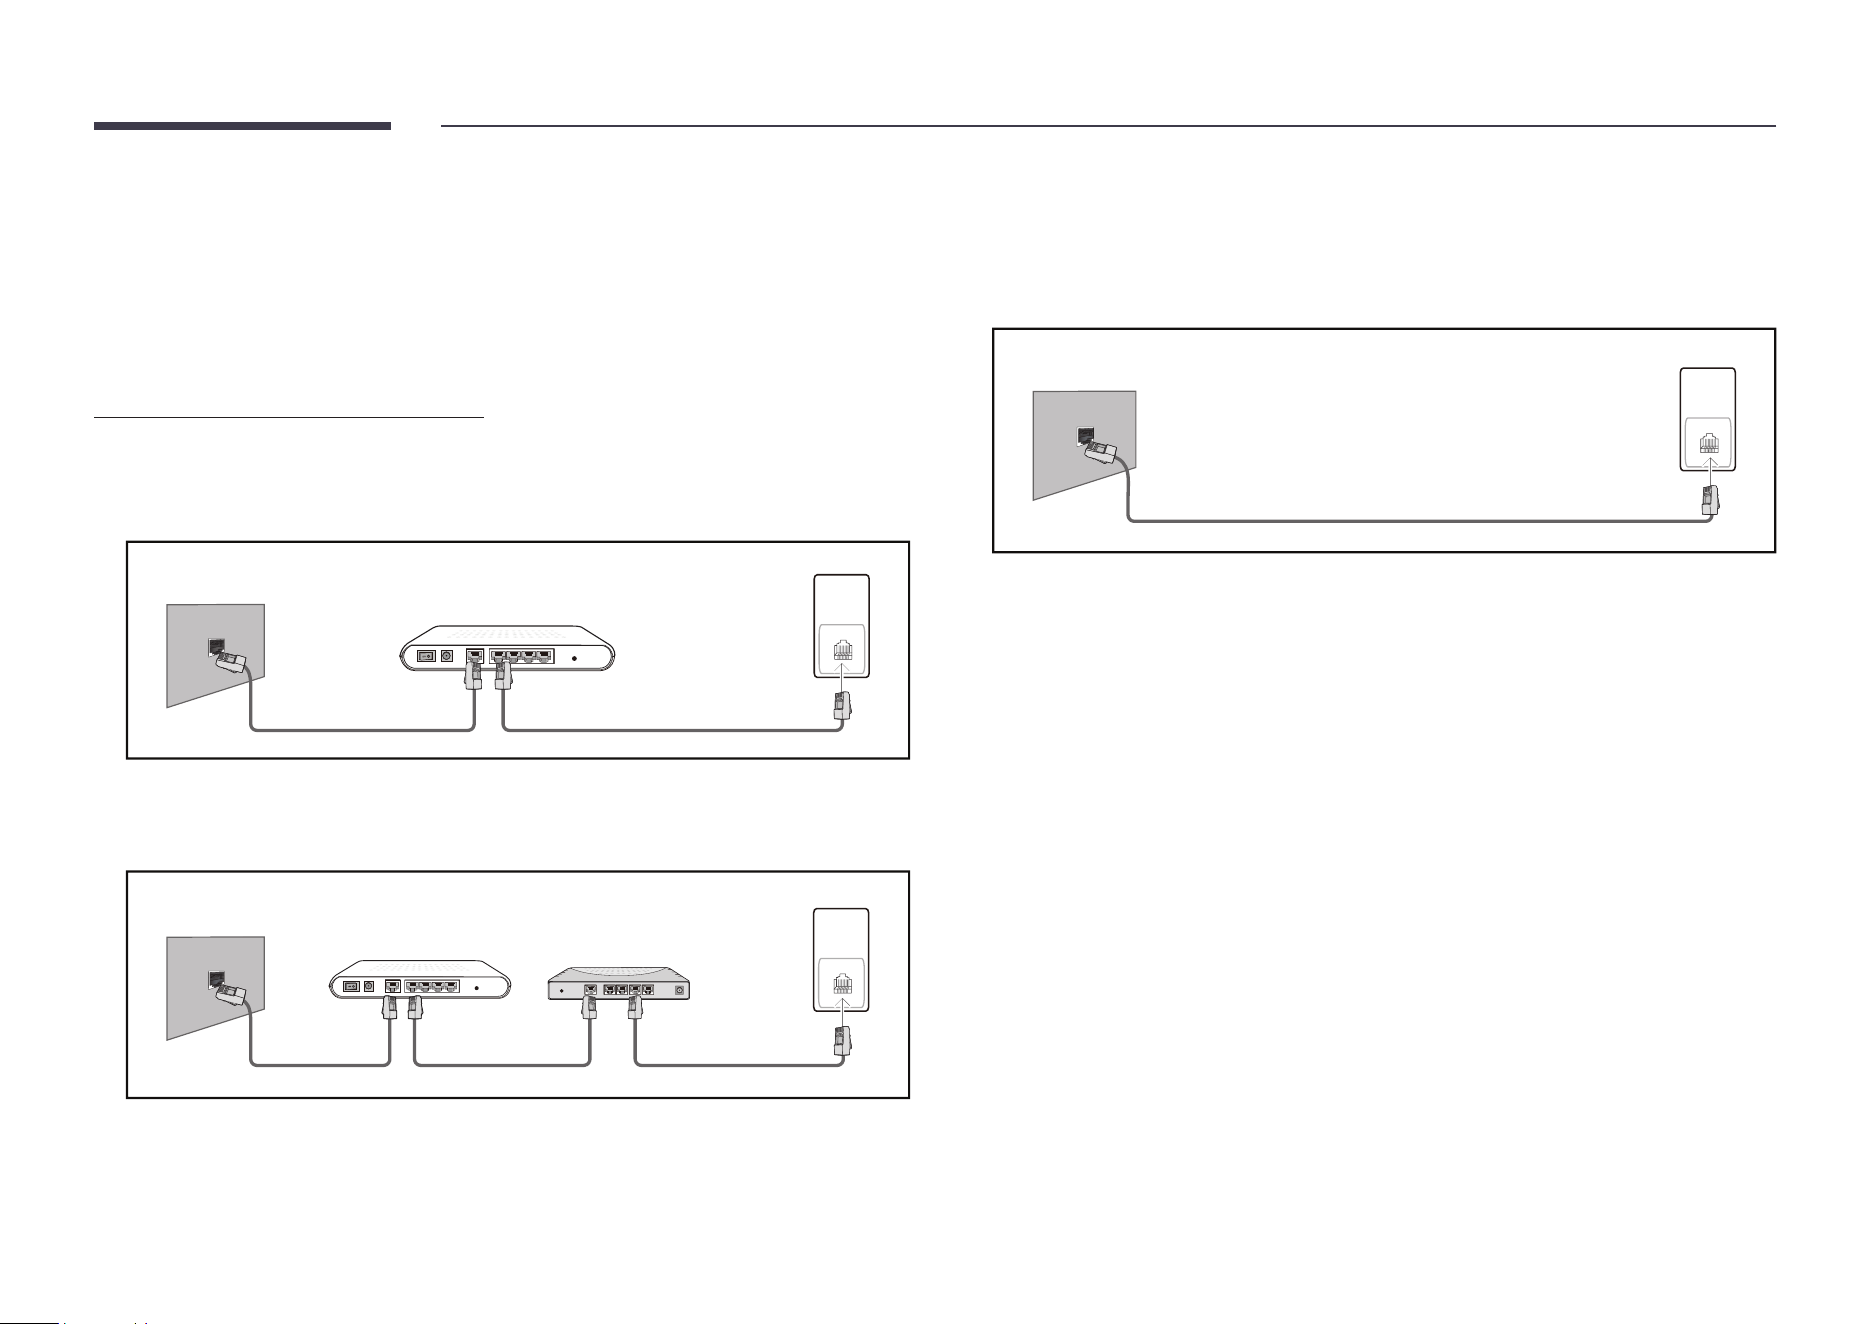
Connecting to a wired network
There are three ways to attach your product to your LAN using cable.
• You can attach your product to your LAN by connecting the LAN port on the back of your
product to an external modem using a LAN cable. See the diagram below.
External modem (Fiber/Cable/DSL)
The modem port on the
wall
LAN
LAN
Modem cable LAN cable
• You can attach your product to your LAN by connecting the LAN port on the back of your
product to an IP sharer which is connected to an external modem. Use LAN cable for the
connection. See the diagram below.
LAN
LAN
The modem port on the
wall
External modem
(ADSL/VDSL)
Router
(having DHCP server)
Modem cable LAN cableLAN cable
• Depending on how your network is congured, you may be able to attach your product to
your LAN by connecting the LAN port on the back of your product directly to a network
wall outlet using a LAN cable.
See the diagram below. Note that the wall outlet is attached to a modem or router
elsewhere in your house.
LAN
LAN
The modem port on the
wall
LAN cable
If you have a Dynamic Network, you should use an ADSL modem or router that supports
the Dynamic Host Conguration Protocol (DHCP). Modems and routers that support DHCP
automatically provide the IP address, subnet mask, gateway, and DNS values your product
needs to access the Internet so you do not have to enter them manually. Most home
networks are Dynamic Networks.
Some networks require a Static IP address. If your network requires a Static IP address, you
must enter the IP address, subnet mask, gateway, and DNS values manually on your product
Cable Setup Screen when you set up the network connection. To get the IP address, subnet
mask, gateway, and DNS values, contact your Internet Service Provider (ISP).
If you have a Windows computer, you can also get these values through your computer.
" You can use ADSL modems that support DHCP if your network requires a Static IP
address.
" ADSL modems that support DHCP also let you use Static IP addresses.

16
Set the network connection to use Internet services such as perform software upgrades.
Automatic Open Network Settings (Wired)
Connect to the network using a LAN cable.
Make sure a LAN cable is connected rst.
How to set up automatically
1
Set Network Type to Wired from the Open Network Settings page.
2
The network connection screen appears, and the verication process starts.
3
When the connection has been veried, the OK button appears on the bottom of the
screen.
4
Tap OK.
" If the connection process fails, check the LAN port connection.
" If the automatic process cannot nd the network connection values or if you want to
set the connection manually, go to the next section, “Manual Open Network Settings
(Wired)”.
Manual Open Network Settings (Wired)
Ofces may use static IP addresses.
If this is the case, ask the network administrator for the IP address, subnet mask, gateway
and DNS server address. Enter these values manually.
Getting the network connection values
To view the Network connection values on most Windows computers, follow these steps.
1
Right click the Network icon on the bottom right of the screen.
2
In the pop-up menu that appears, click Status.
3
On the dialog that appears, click the Support tab.
4
On the Support tab, click the Details button. The Network connection values are
displayed.
How to set up manually
1
Set Network Type to Wired from the Open Network Settings page.
2
The network connection screen appears, and the verication process starts.
3
Select Cancel while network connections are being attempted. This will stop the
connection.
4
Select IP Settings on network connection screen. The IP Settings screen appears.
5
Select the eld at the top and then set IP Settings to Enter manually.
" Setting IP setting to Enter manually automatically changes DNS setting to
Enter manually.
6
Enter the IP Address, Subnet mask, Gateway, and DNS Server values manually.
7
When done, select OK at the bottom of the page. The network test screen appears and
the verication process starts.
8
When the connection has been veried, the OK button appears on the bottom of the
screen.
9
Tap OK to complete the setting.
17
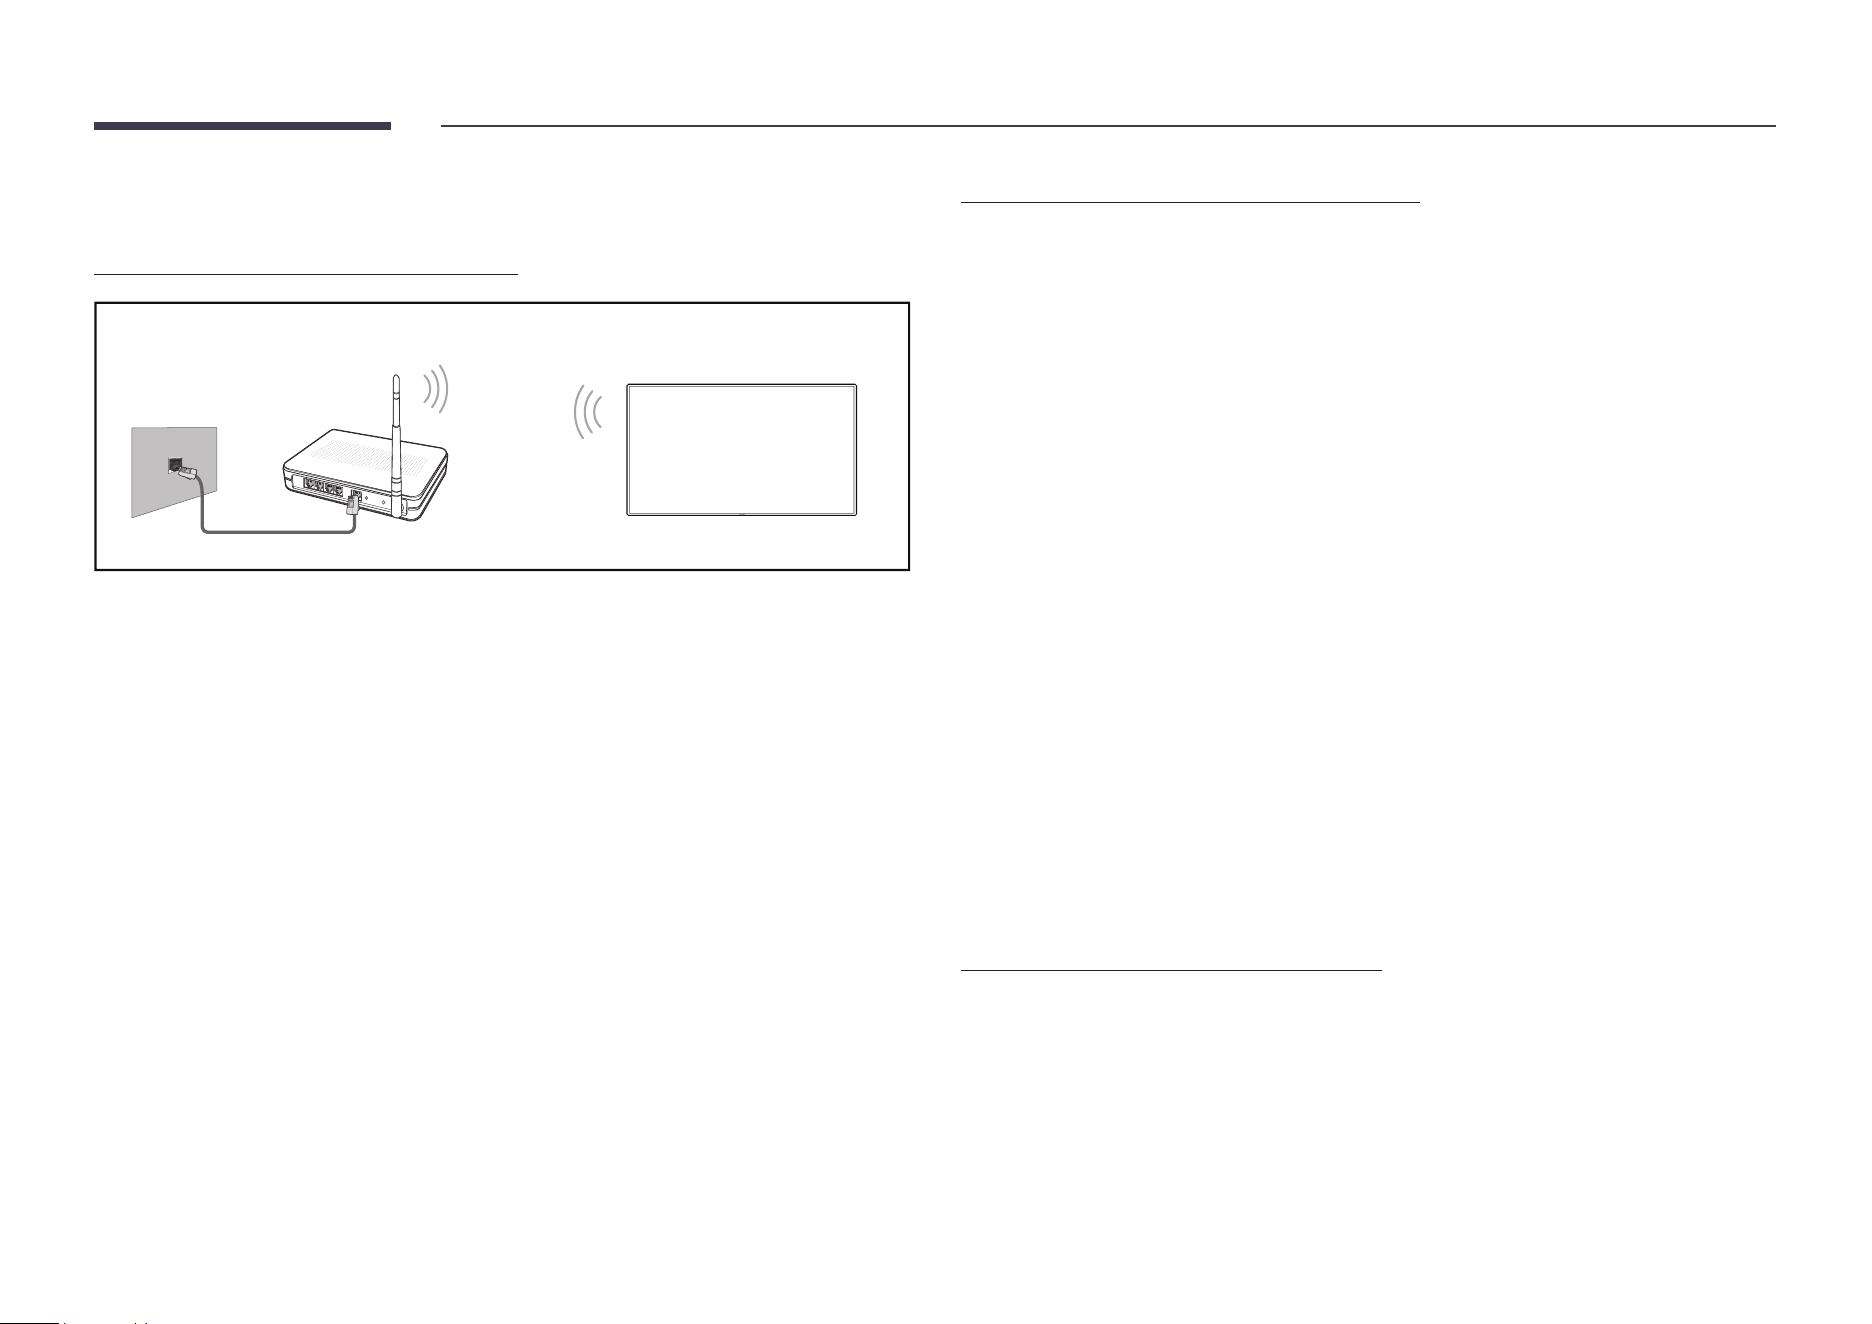
Network settings (Wireless)
Connecting to a wireless network
Wireless IP sharer
(router having DHCP server)
The LAN port on the wall
LAN cable
Samsung recommends using IEEE 802.11n. When you play video over a network connection,
the video may not play smoothly.
" Select a channel for the wireless IP sharer that is not currently being used. If the channel
set for the wireless IP sharer is currently being used by another device nearby, this will
result in interference and communication failure.
" Your product supports only the following wireless network security protocols.
If you select the Pure High-throughput (Greeneld) 802.11n mode and the encryption
type is set to WEP, TKIP or TKIP AES (WPS2Mixed) on your AP or wireless router, Samsung
products will not support a connection in compliance with new Wi-Fi certication
specications.
" If your wireless router supports WPS (Wi-Fi Protected Setup), you can connect to the
network via PBC (Push Button Conguration) or PIN (Personal Identication Number).
WPS will automatically congure the SSID and WPA key in either mode.
" Connection methods: You can setup the wireless network connection in three ways. Auto
Setup (Using the Auto Network Search function), Manual Setup, Use WPS
" This product supports Enterprise WPA2 (TLS/TTLS/PEAP).
Automatic network setup (Wireless)
Most wireless networks have an optional security system that requires devices that access
the network to transmit an encrypted security code called an Access or Security Key. The
Security Key is based on a Pass Phrase, typically a word or a series of letters and numbers of a
specied length you were asked to enter when you set up security for your wireless network.
If you use this method of setting up the network connection, and have a Security Key for your
wireless network, you will have to enter the Pass Phrase during the automatic or manual
setup process.
How to set up automatically
1
Set Network Type to Wireless from the Open Network Settings page.
2
The product searches for available wireless networks. When done, it displays a list of the
available networks.
3
In the list of networks, select a network.
" If the desired wireless router does not appear, select Refresh to search again.
" If the router cannot be found after retrying, select Add Network.
4
If you selected a password-protected network, enter the password, and tap Go.
" You may skip this step if you selected an open network.
5
The network connection screen appears, and the verication process starts.
6
When the connection has been veried, the OK button appears on the bottom of the
screen.
7
Tap OK.
Manual network setup (Wireless)
Ofces may use static IP addresses.
If this is the case, ask the network administrator for the IP address, subnet mask, gateway
and DNS server address. Enter these values manually.
Getting the network connection values
To view the network connection values on most Windows computers, follow these steps.

18
1
Right click the Network icon on the bottom right of the screen.
2
In the pop-up menu that appears, click Status.
3
On the dialog that appears, click the Support tab.
4
On the Support tab, click the Details button. The Network connection values are
displayed.
How to set up manually
1
Set Network Type to Wireless from the Open Network Settings page.
2
The product searches for available wireless networks. When done, it displays a list of the
available networks.
3
In the list of networks, select a network.
" If the desired wireless router does not appear, select Refresh to search again.
" If the router cannot be found after retrying, select Add Network.
4
If you selected a password-protected network, enter the password, and tap Go.
" You may skip this step if you selected an open network.
5
The network connection screen appears, and the verication process starts.
6
Select Cancel while network connections are being attempted. This will stop the
connection.
7
Select IP Settings on network connection screen. The IP Settings screen appears.
8
Select the eld at the top and then set IP setting to Enter manually.
" Changing IP setting to Enter manually automatically changes DNS setting to
Enter manually.
9
Enter the IP Address, Subnet mask, Gateway, and DNS Server values manually.
10
When done, select OK at the bottom of the page. The network test screen appears, and
the verication process starts.
11
When the connection has been veried, the OK button appears on the bottom of the
screen.
12
Tap OK to complete the setting.
How to set up using the WPS button
If your router has a WPS button, follow these steps.
1
Set Network Type to Wireless from the Open Network Settings page.
2
Select Use WPS.
3
Press the WPS or PBC button on your wireless router within the next two minutes. Your
product automatically acquires all the network setting values it needs and connects to
your network.
4
The network connection screen appears, and network setup is done.
19
Chapter 03
General Features
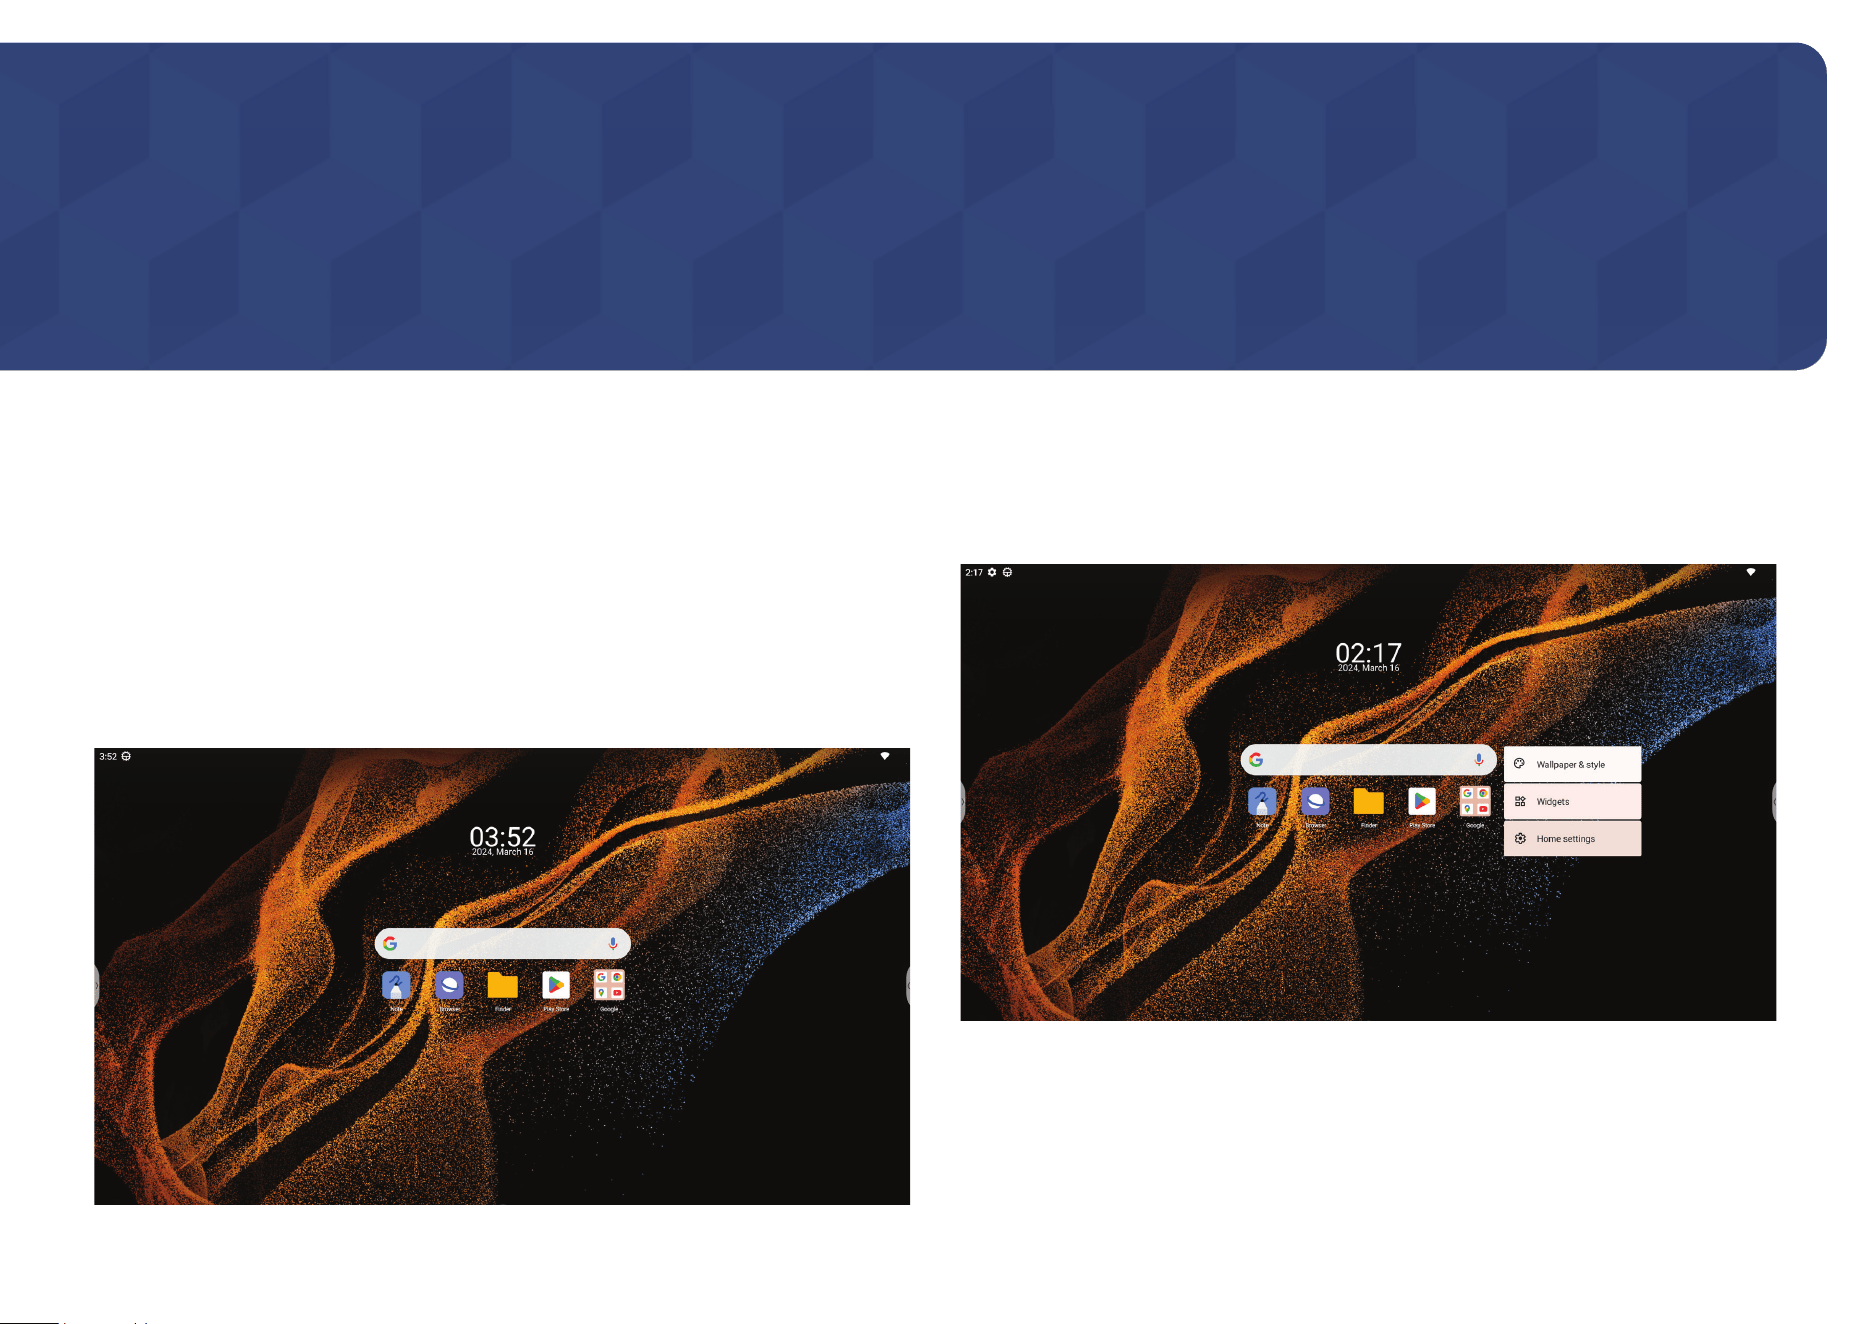
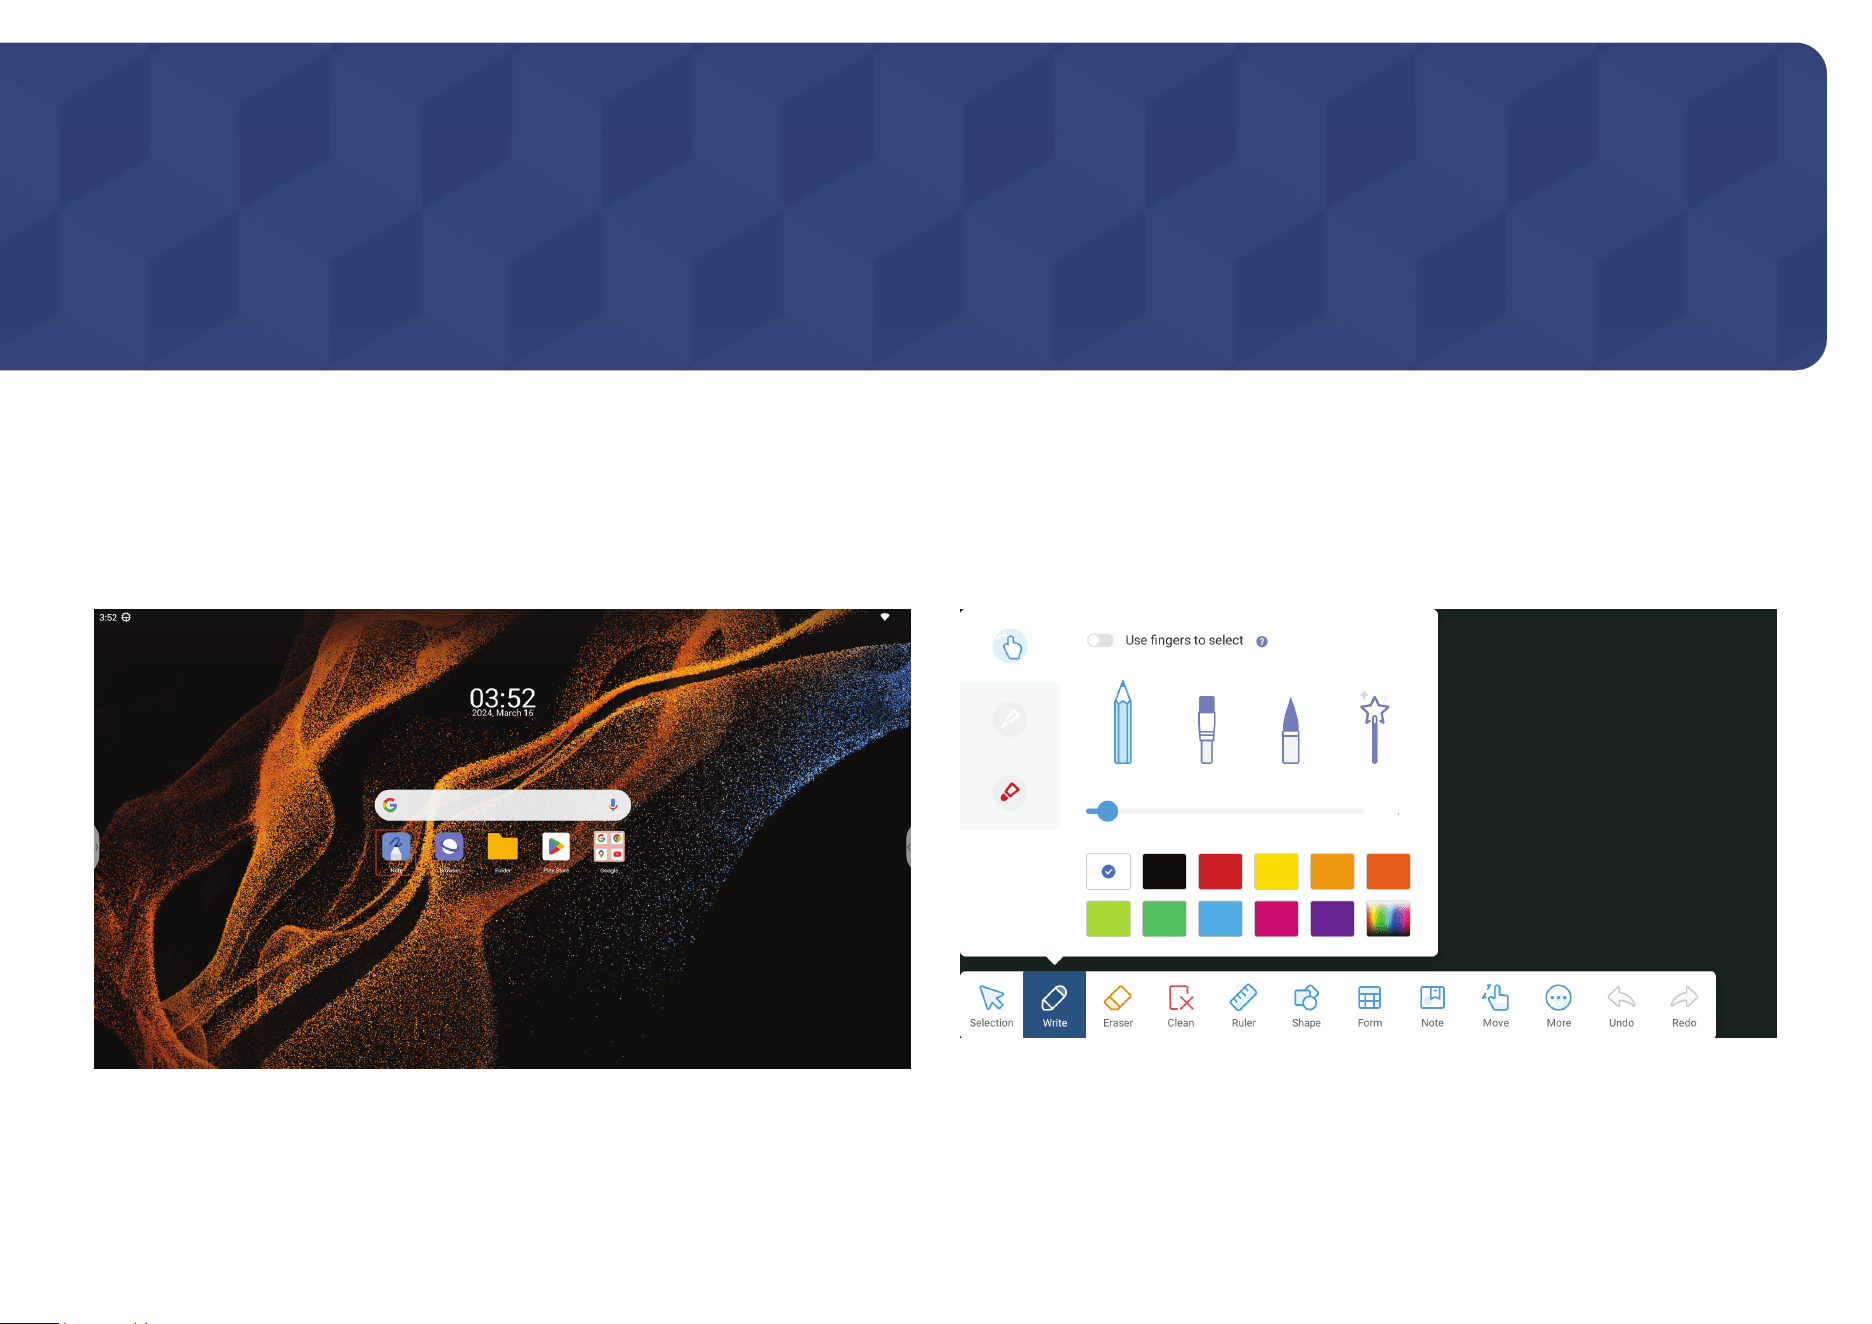
Launcher
After nishing the setup wizard, you will be presented with the brand new Samsung OS EDLA
launcher. The new launcher contains the following elements by default:
• Status bar on top, containing time, app notication icons and basic status icons such as
Wi-Fi.
• Time and date widget
• Google search widget
• Samsung native apps: Note, Browser, Finder
• Google Play Store and Google apps folder
Launcher menu
Long press and hold on a blank space on the home screen to call up the launcher menu.
" You can change Wallpaper & style, add Widgets and change Home settings from this
menu.

20
Editing the launcher
Customize the launcher to your needs by relocating the widgets and icons.
• Create a new page by long pressing and dragging a widget or an icon to another page.
• Remove an app icon or widget from the launcher by long pressing and dragging it to the Remove button.
21
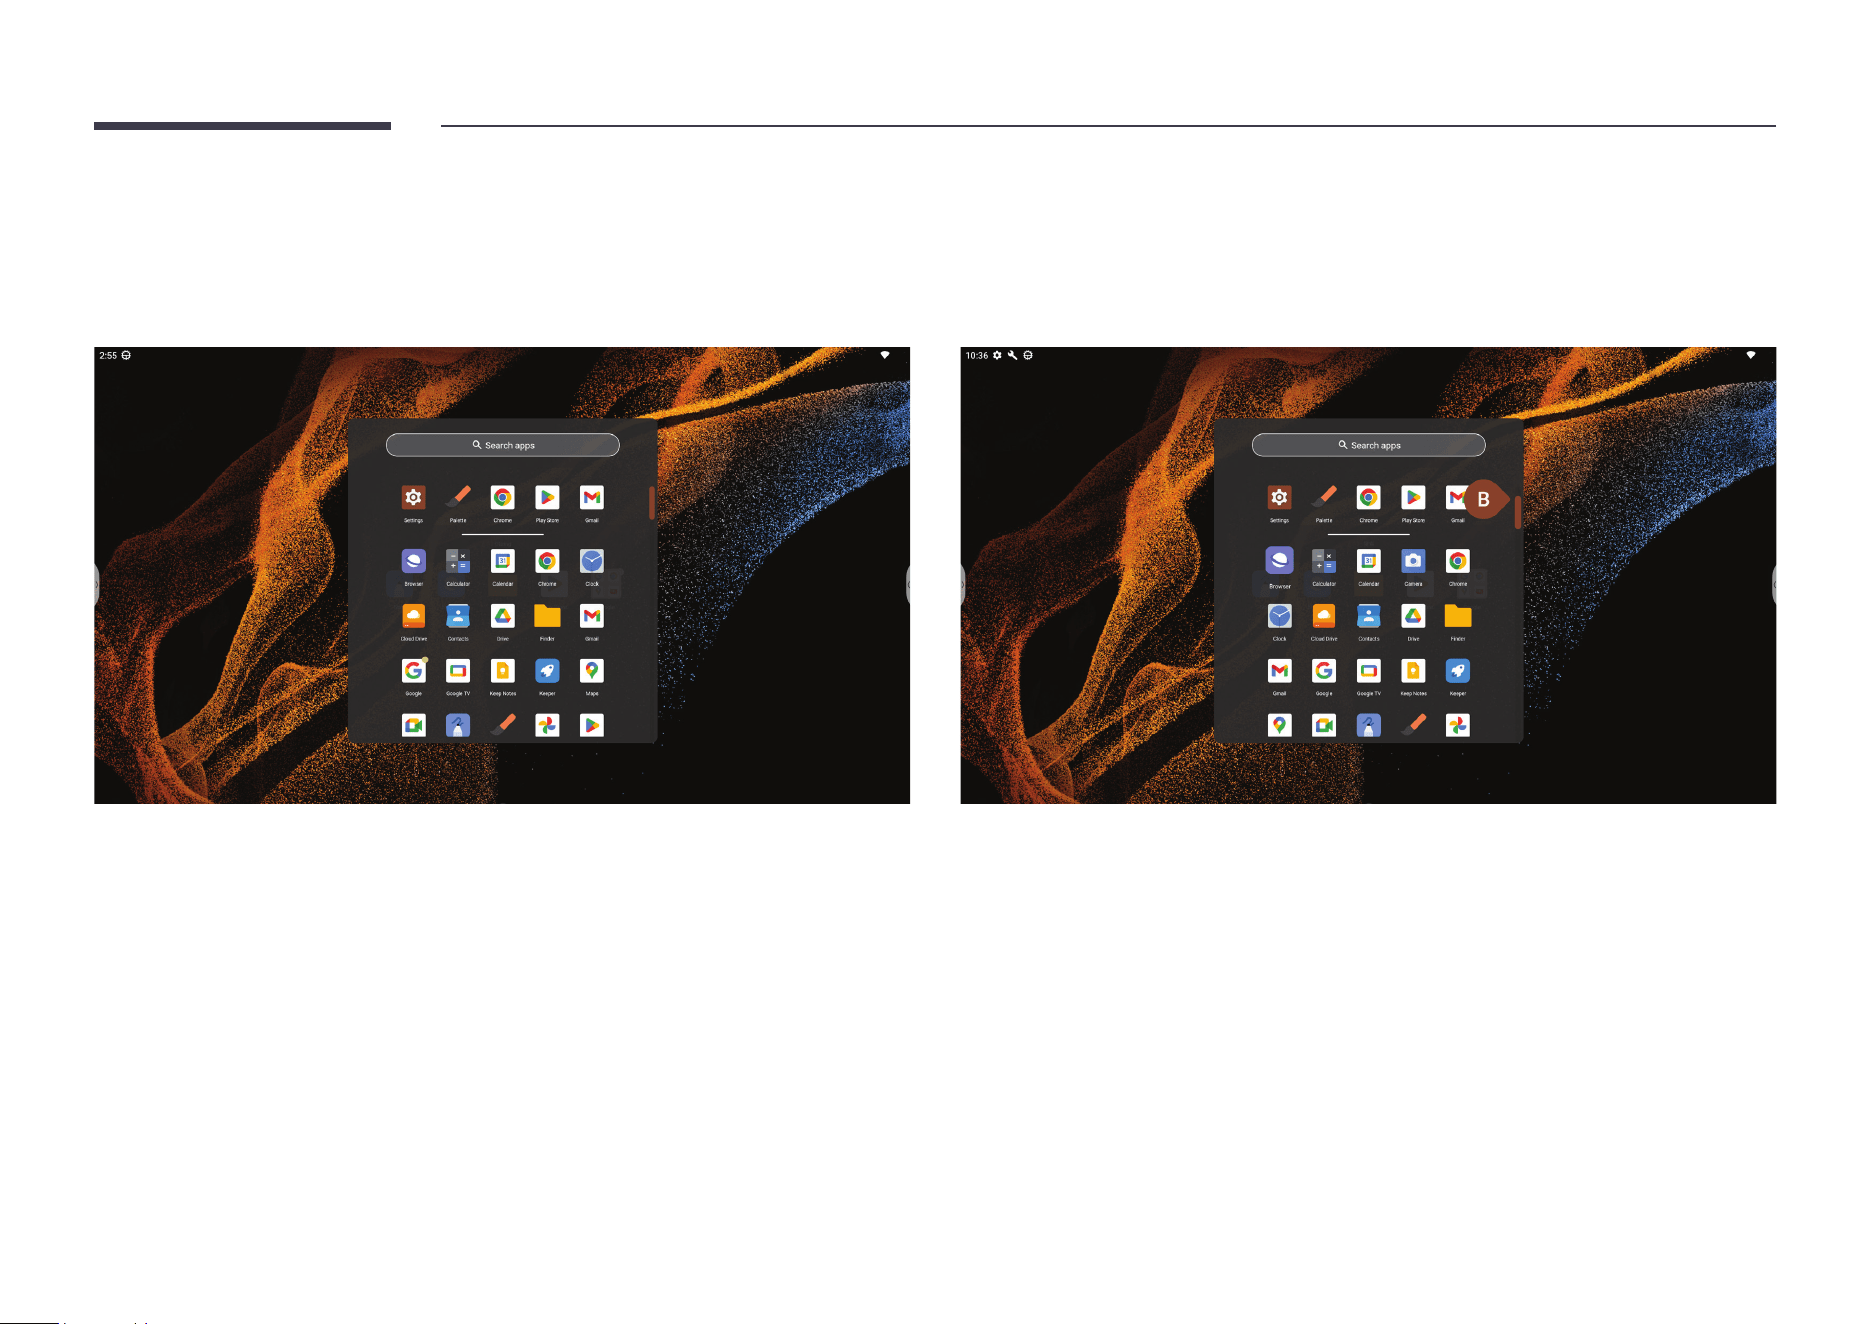
App drawer
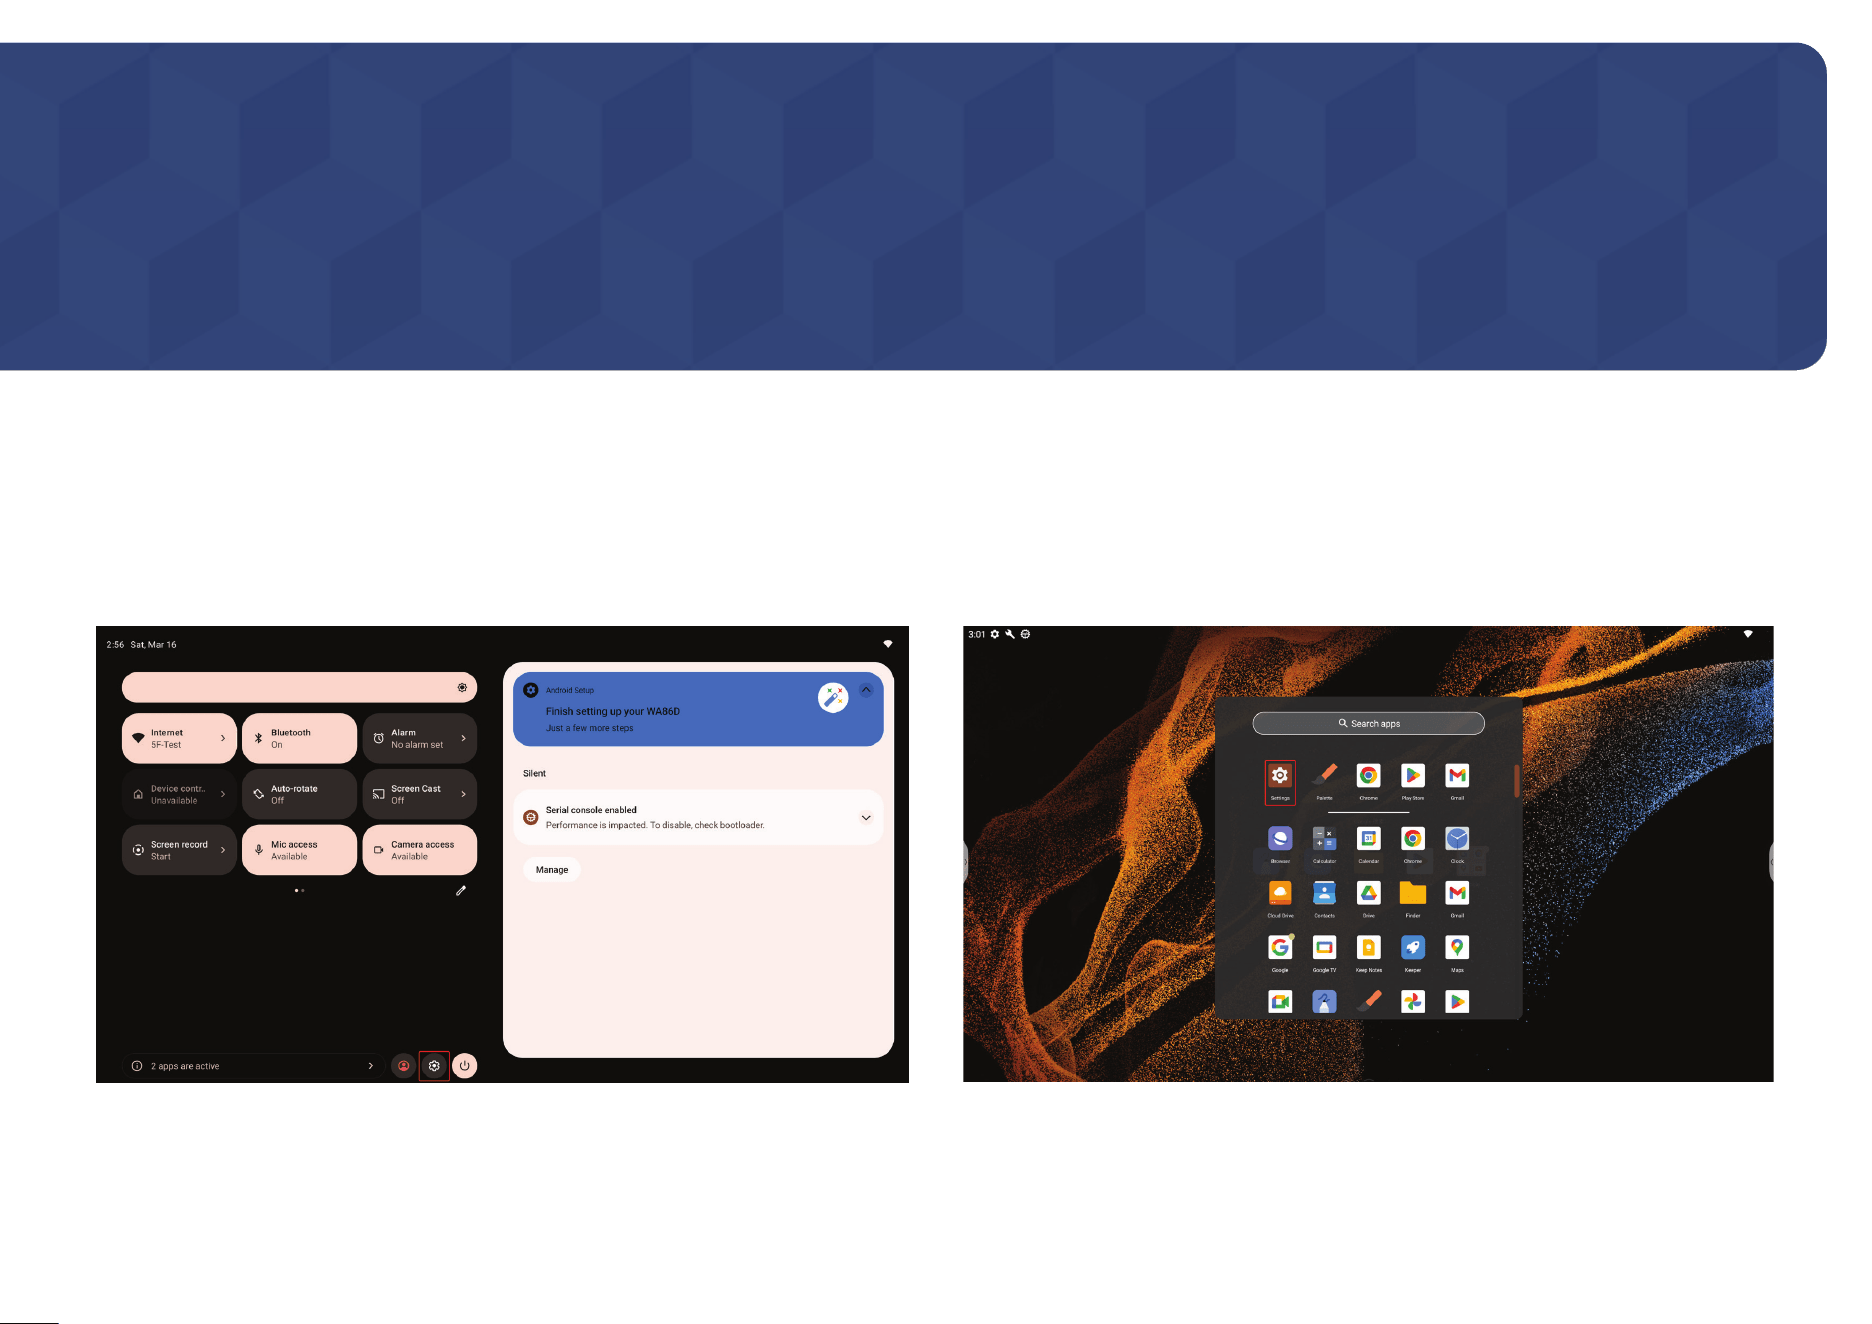
Swipe up from anywhere on the home screen to bring up the App drawer.
• You can view and open any app installed on this device from here.
• Navigate through all apps by scrolling the navigation bar on the right edge of the drawer.
22
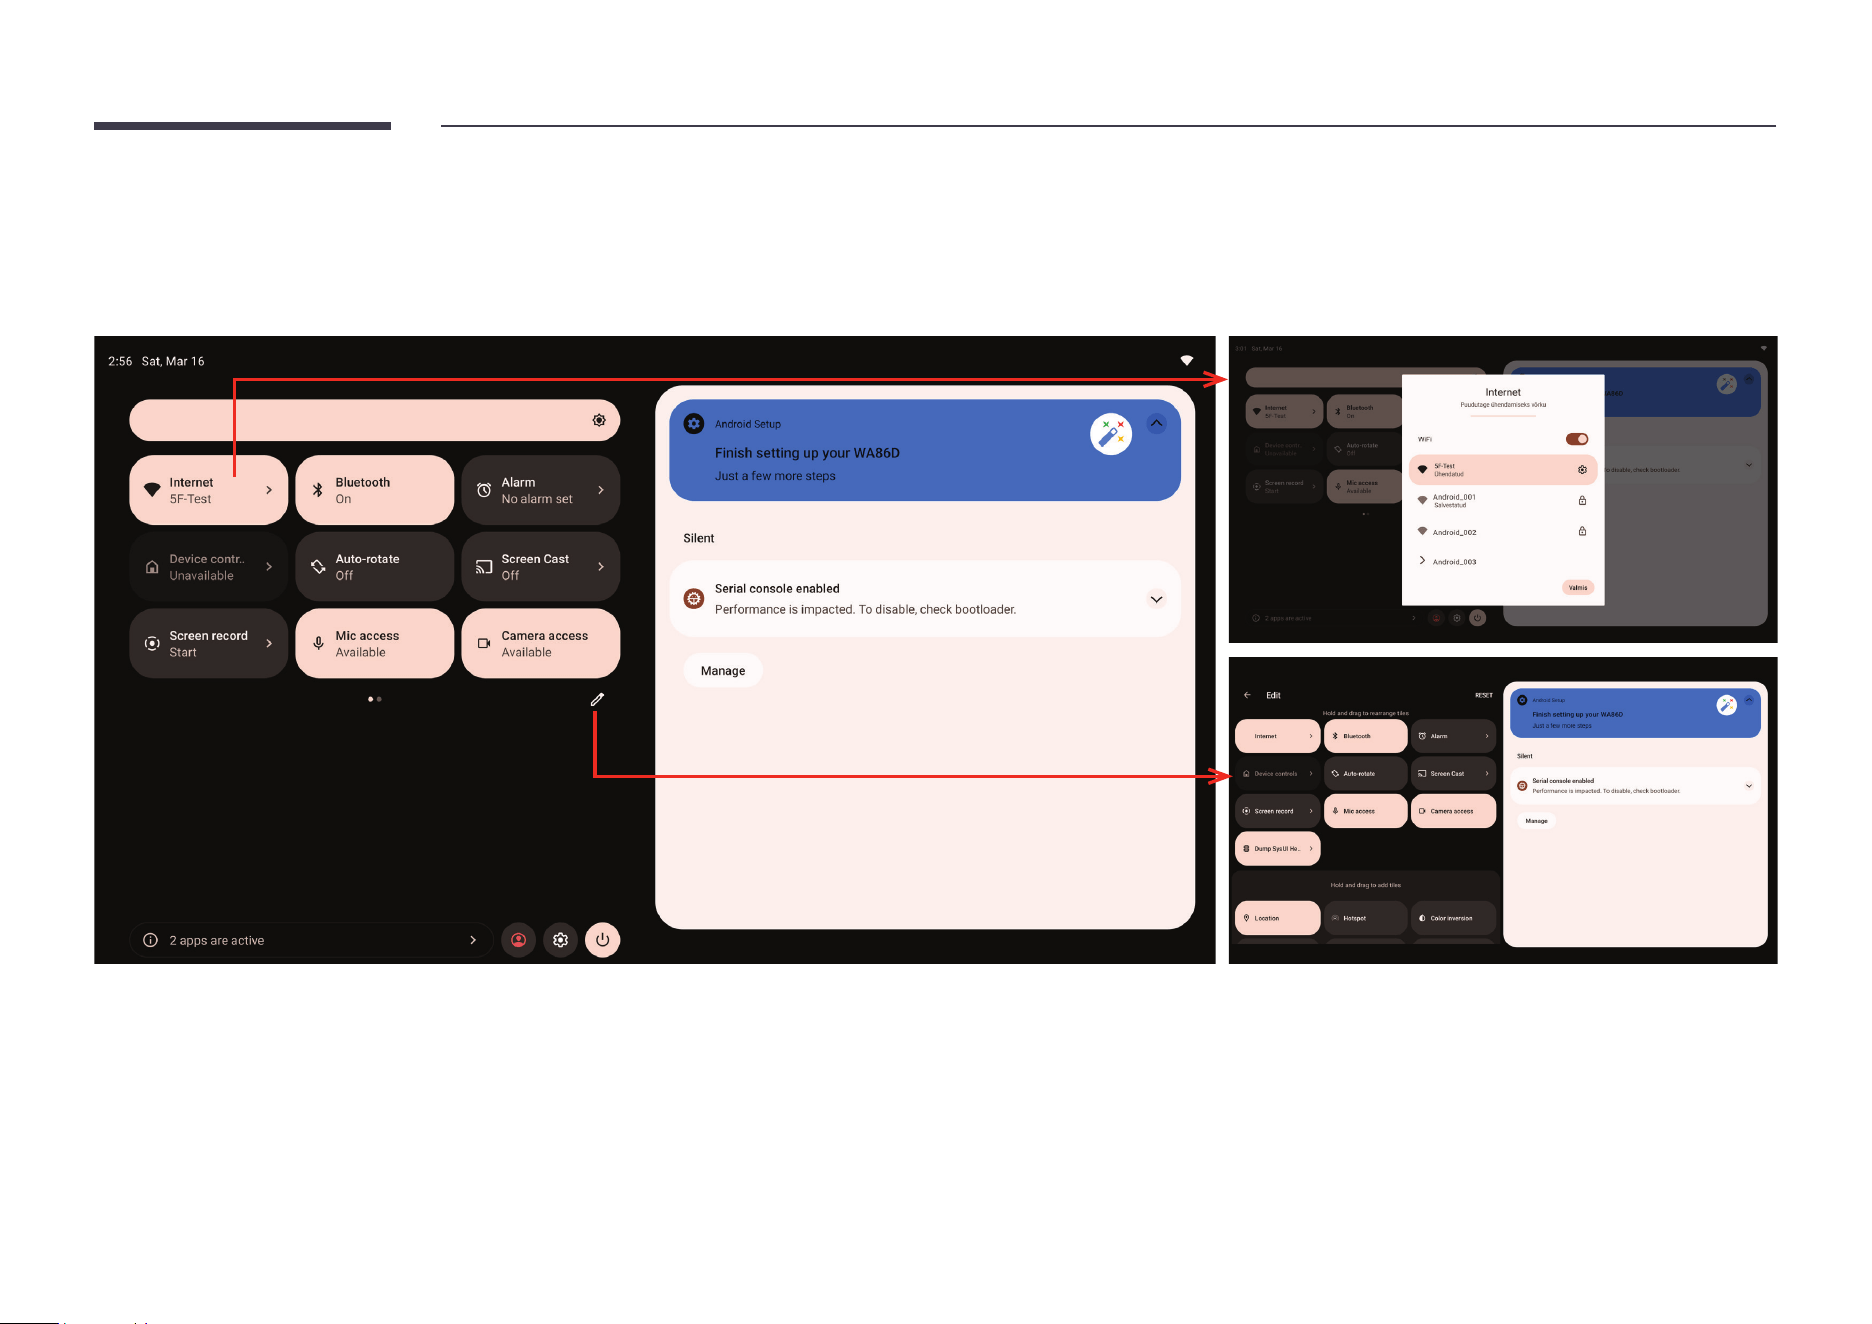
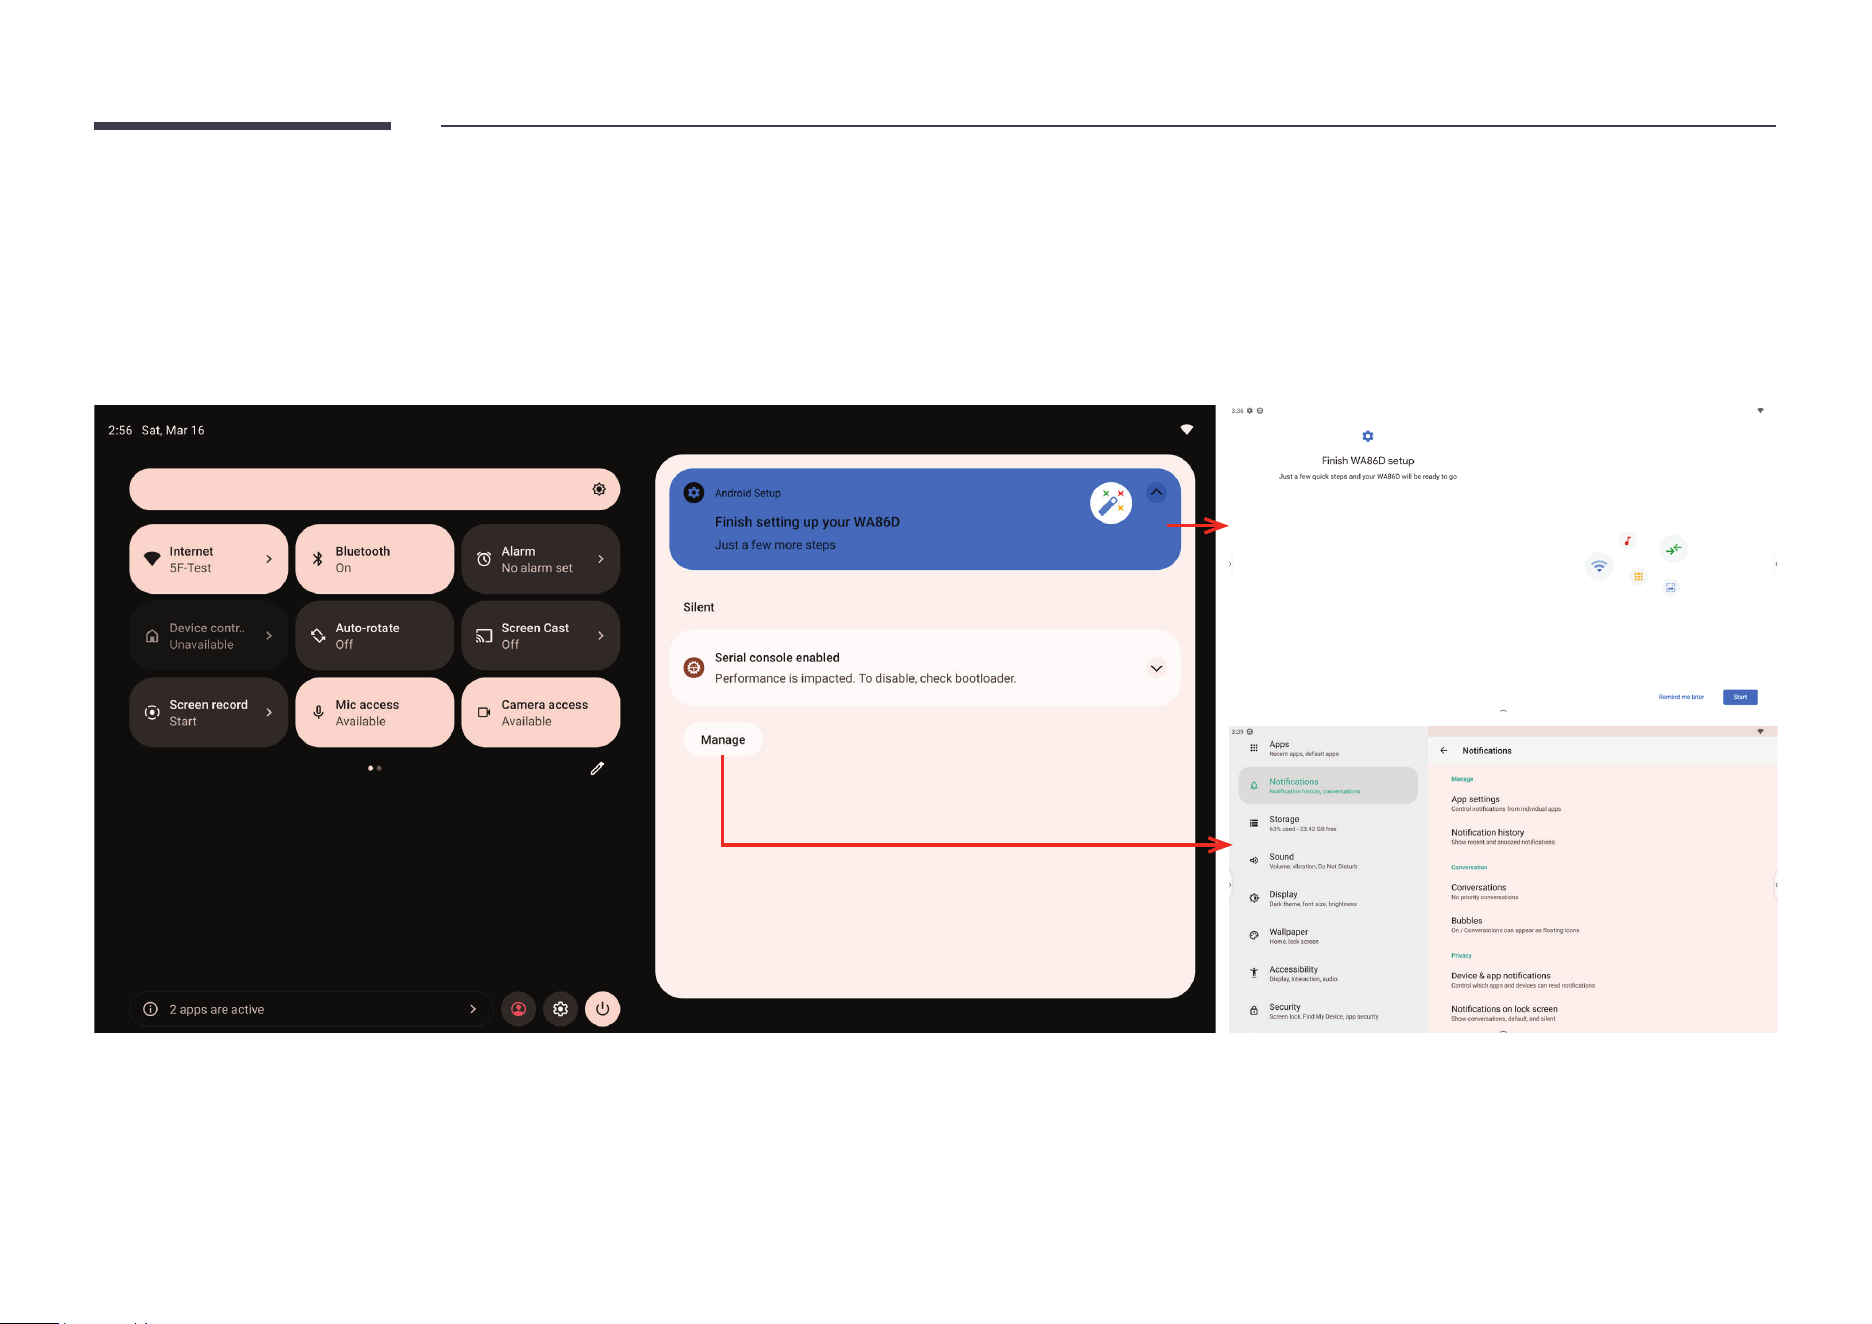
Control Center
Swipe down from anywhere in the launcher to bring up the control & notication center.
• You can change brightness and quickly adjust other controls by clicking on the tiles in the Control Center.
• Some tiles also support expanded operations when you click on them.
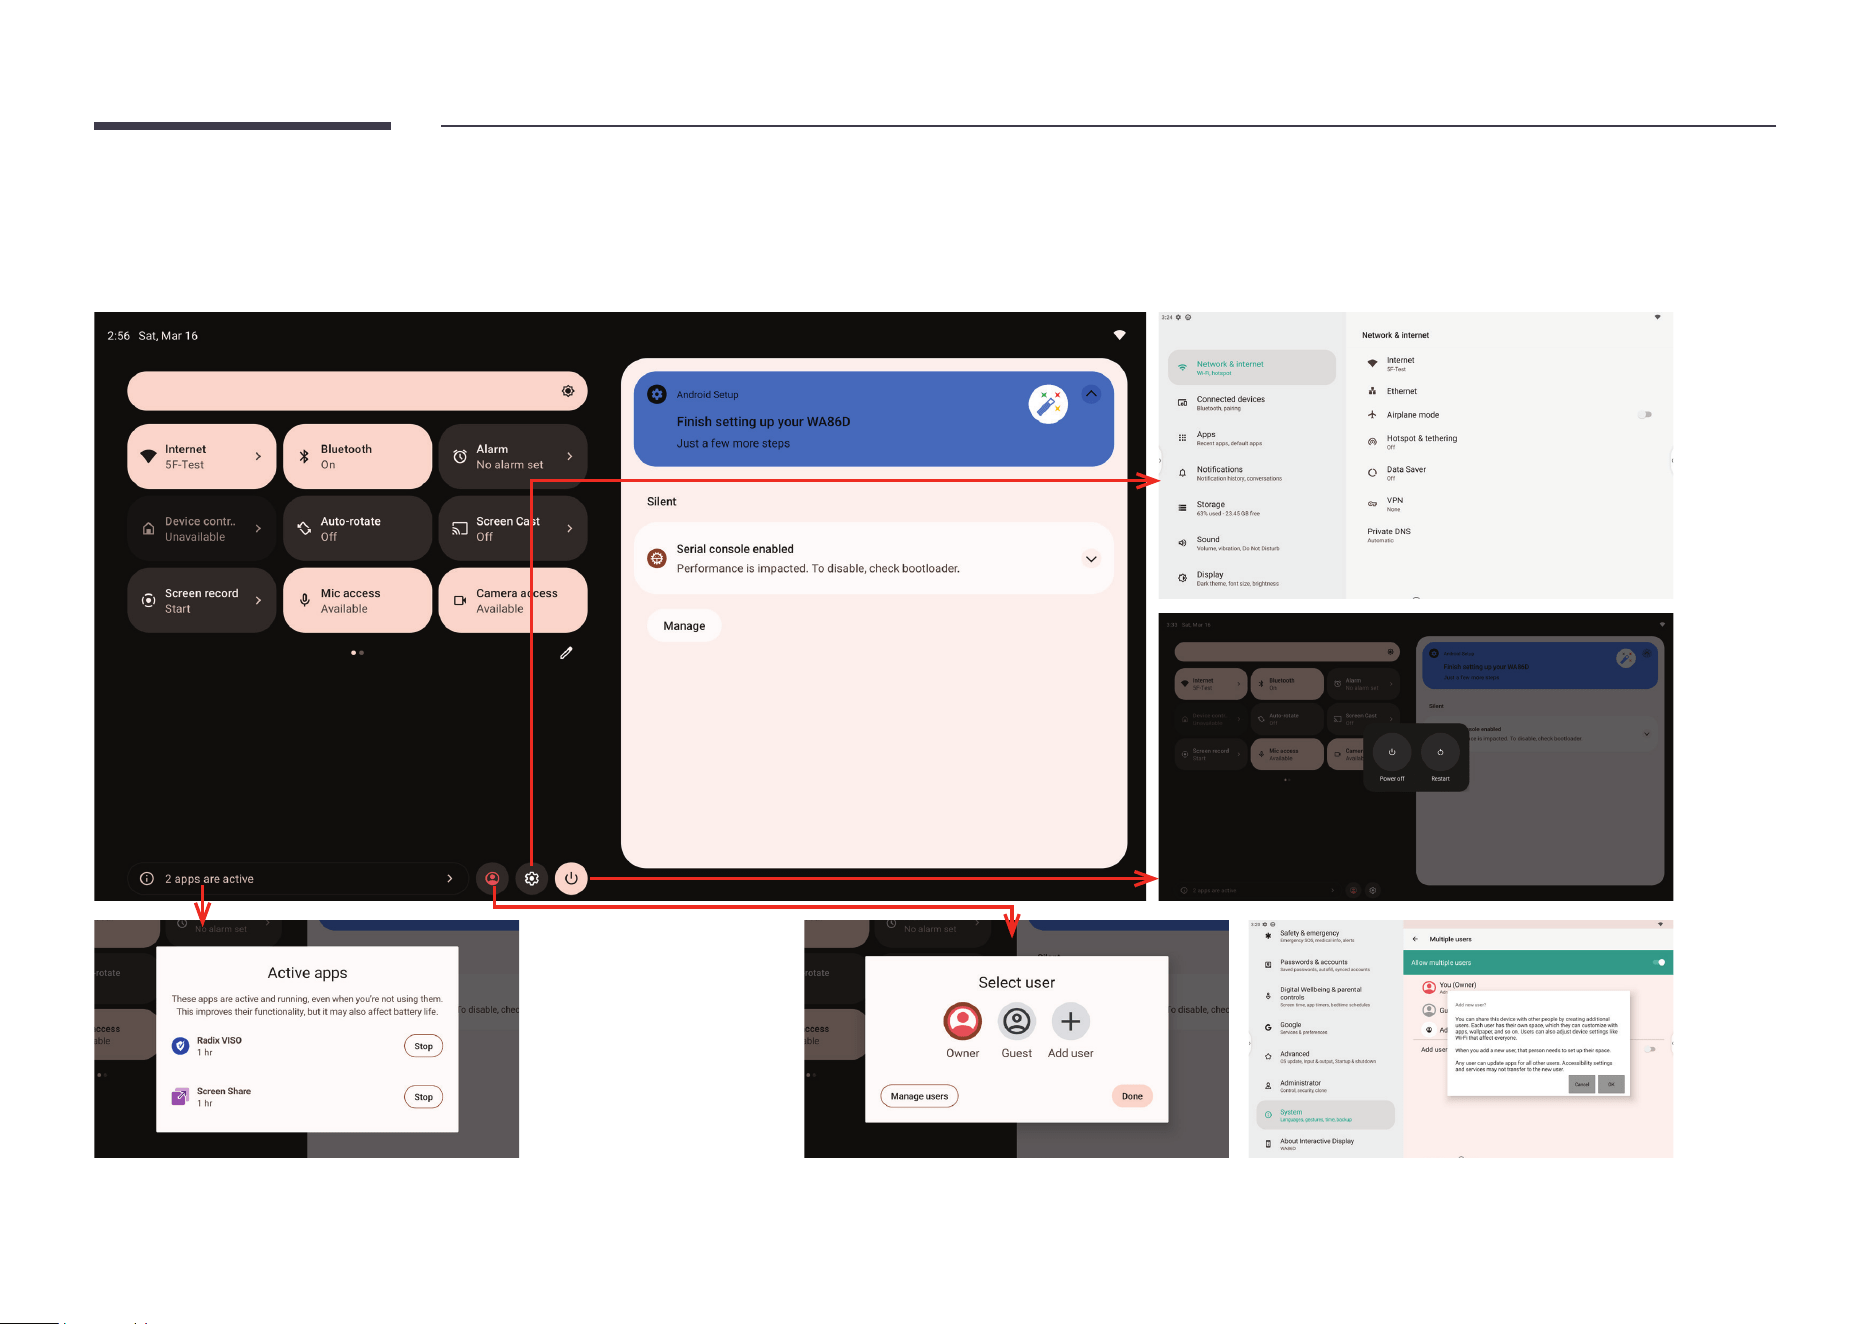
23
• Tap Active apps to bring up the active apps page, where you can view all the apps that are active and running. Tap Stop to stop a running app.
• Tap the Users icon to see all the users on this device. You can manage users by tapping the Manage users button on this page.
• Tap the Settings icon to open system settings.
• Tap the Power icon to open the power menu, where you can choose to lock, power off or restart the device.
24
Notication center
All app notications will be displayed in the notication center.
• Click on a notication to enter the app interface.
• You can also click the arrow in a notication to expand or collapse it.
• Click the Manage button to enter notication settings.
• If there are too many notications, you can click Clear all to clear all clearable notications.
25
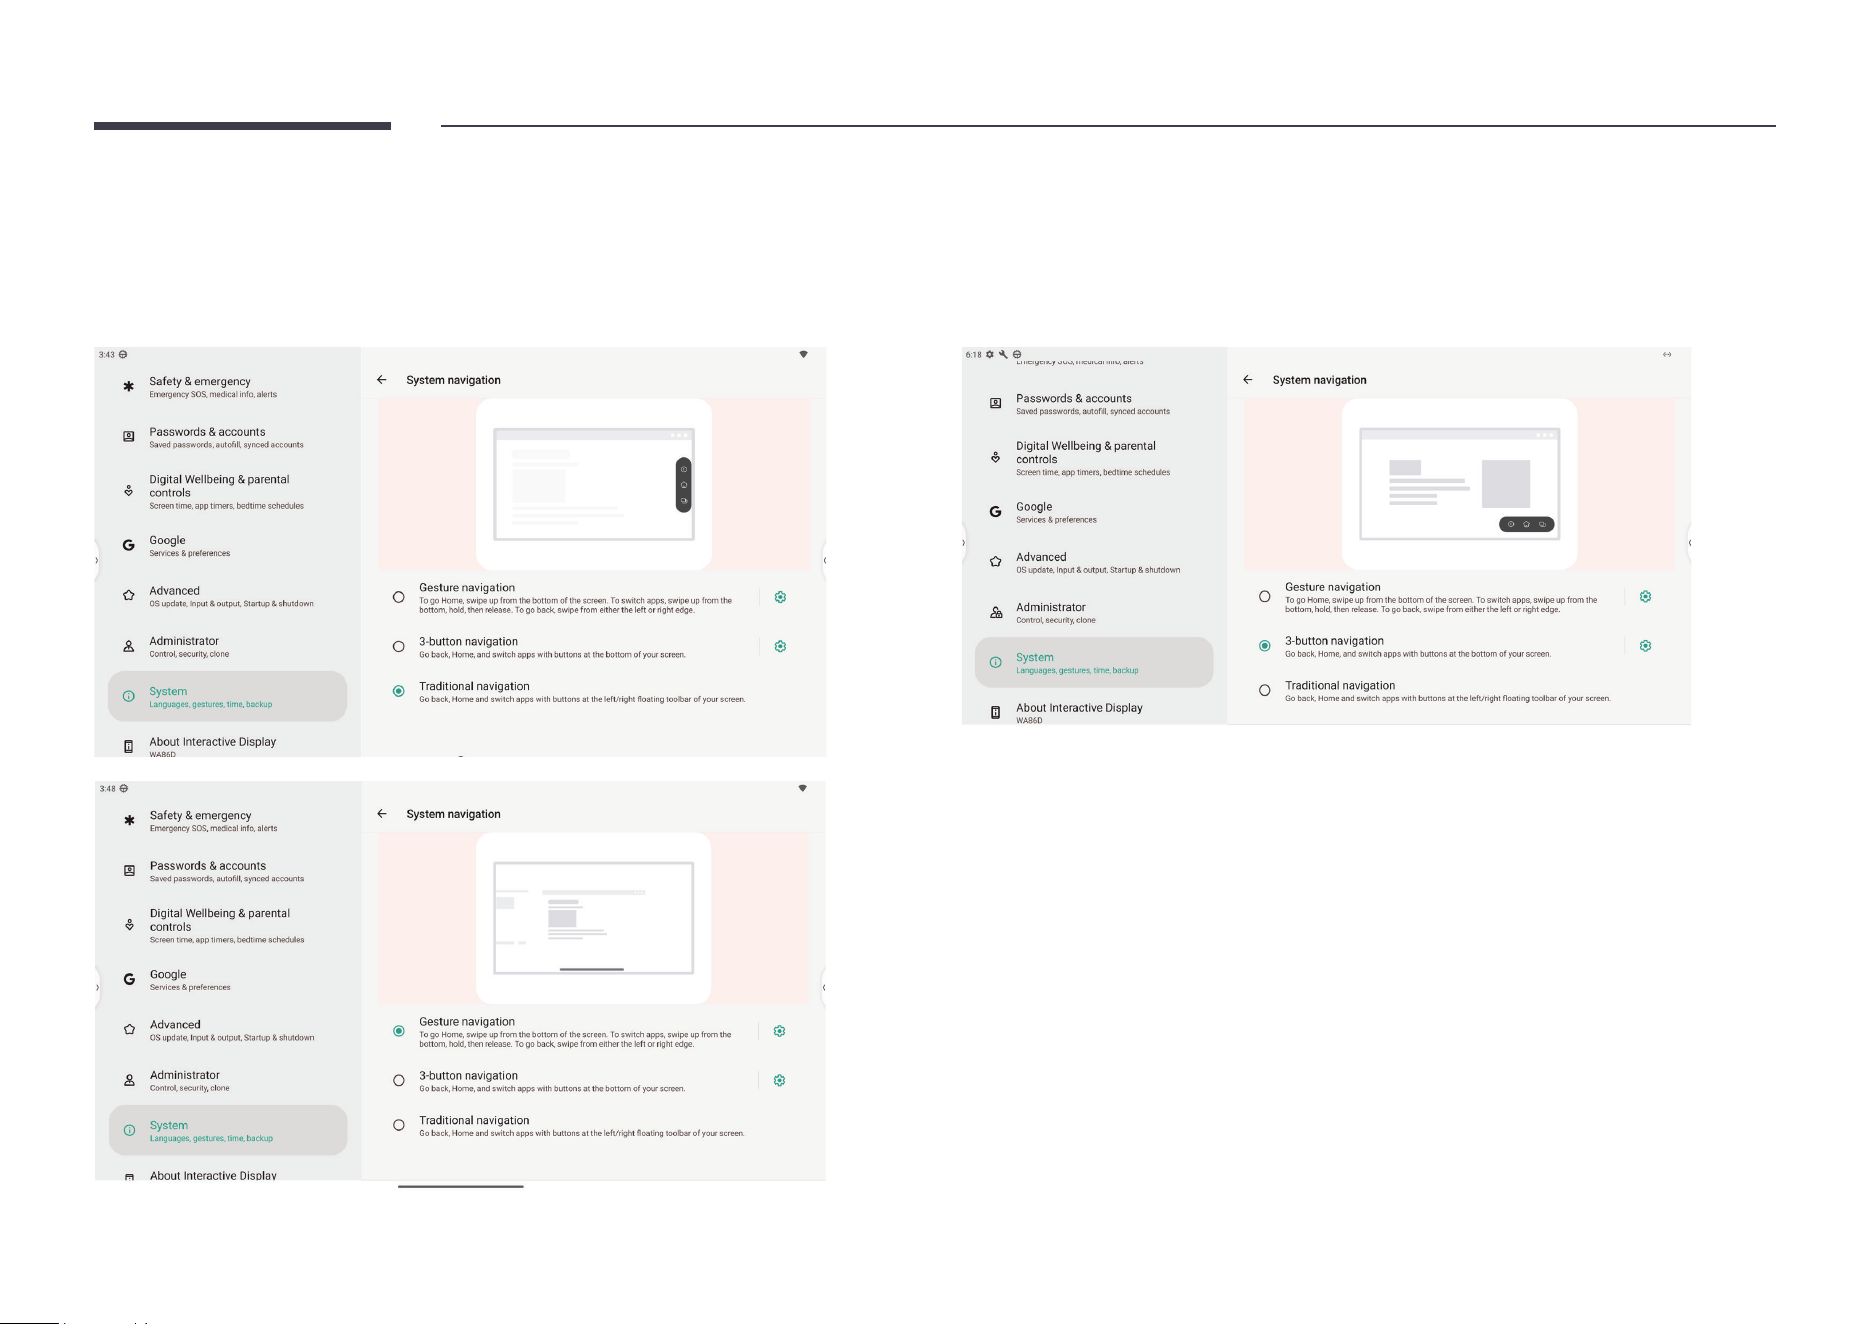
System navigation
WAD provides two types of system navigation methods.
• 3-button navigation: always shows the navigation bar at the bottom of the screen with the Back/Home/Recent buttons inside it.
• Gesture navigation: same as Android mobile phones, swipe from one of the screen edges to trigger Back/Home/Recent.
26
Chapter 04
Writing
Note
Opening Note
Tap Note on the home screen to open Note. " In Note, you can change pen/brush types, thickness and colors.
27
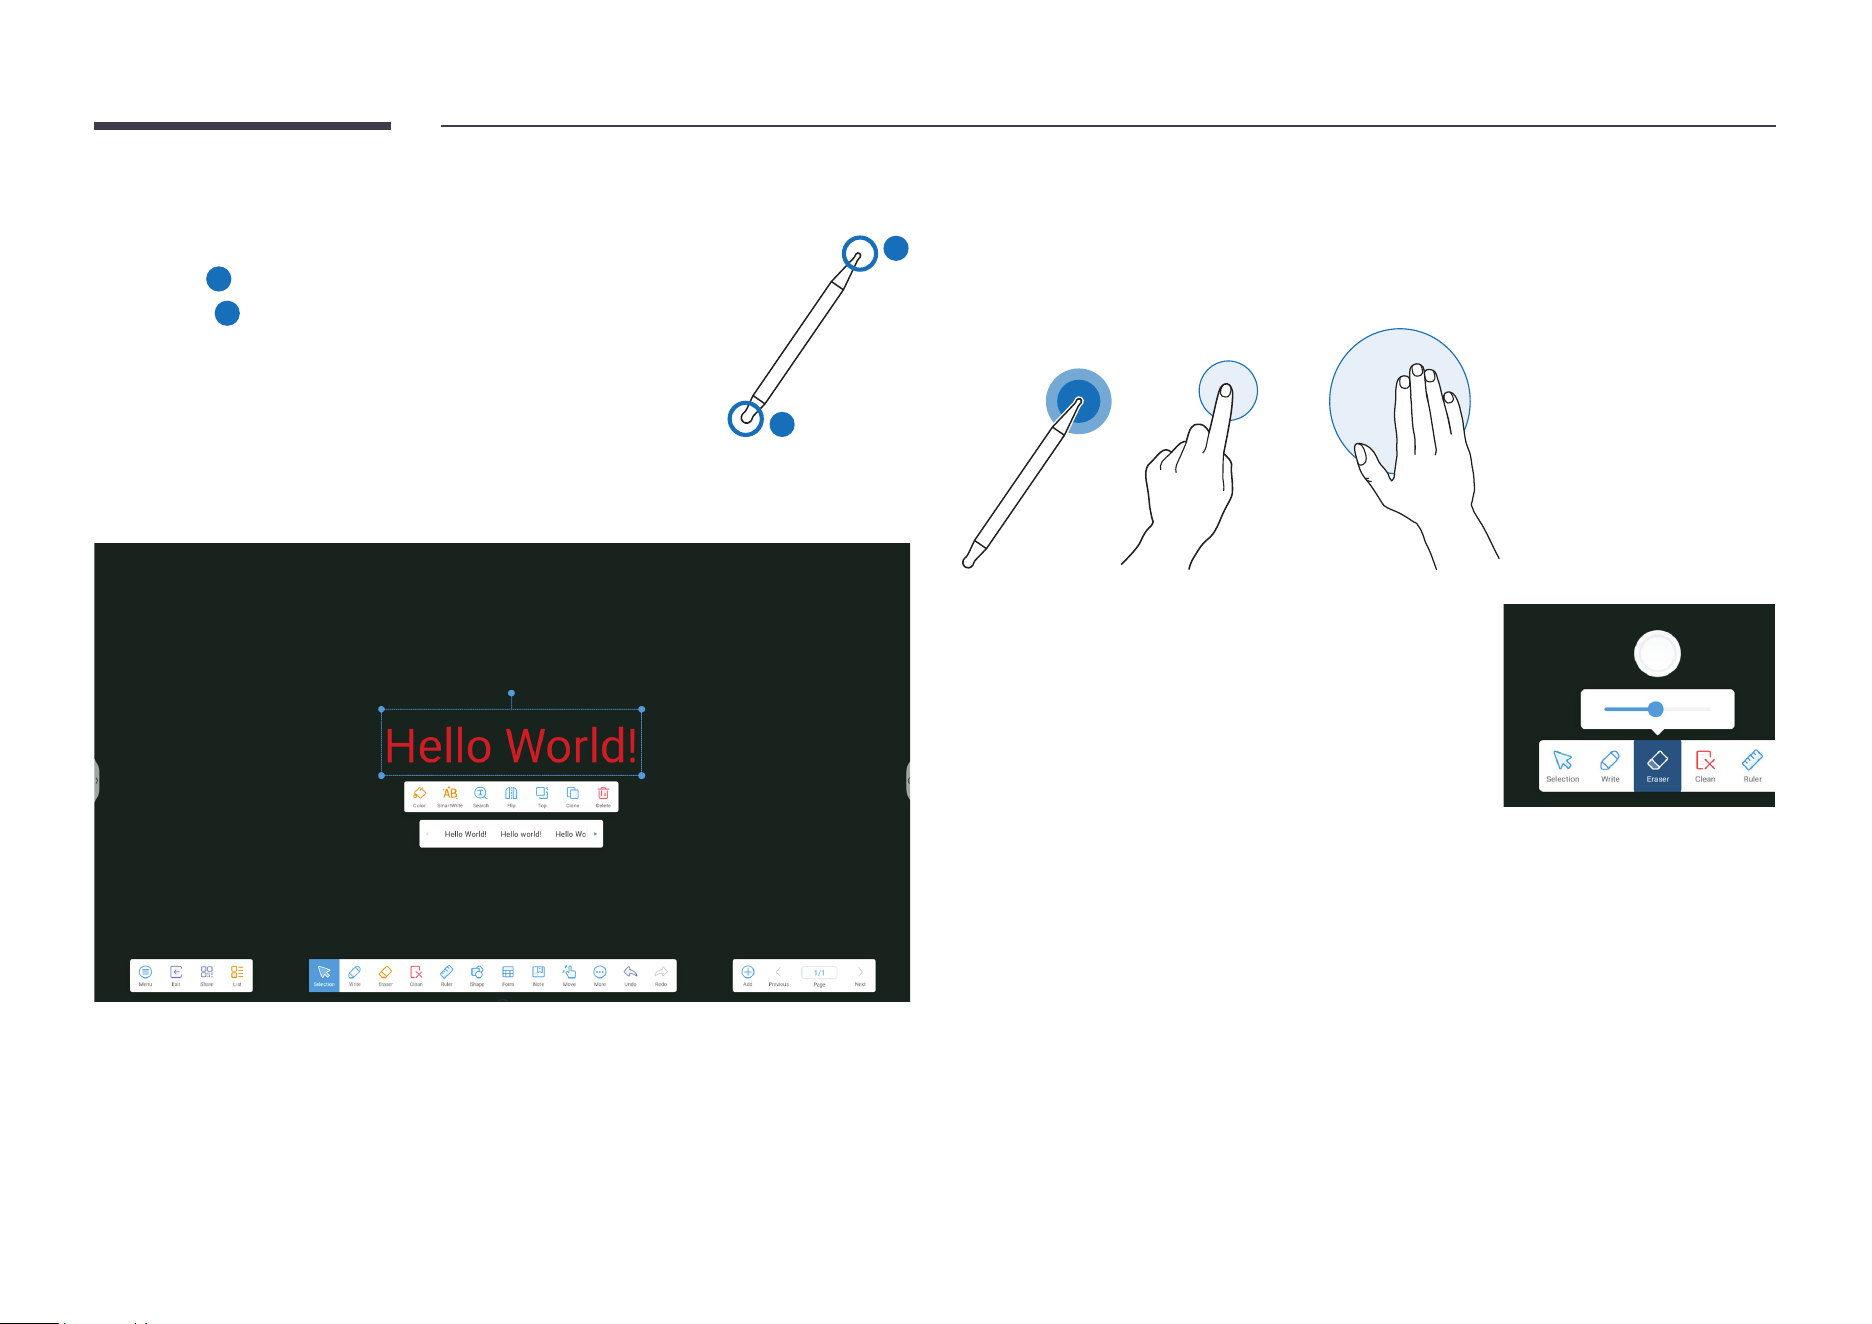
Writing
Use the supplied pen to write on the display.
• Thin Tip (
A
): Pen
• Thick Tip (
B
): Highlighter Type
A
B
Extended pen functions
After writing, you can select the handwriting by using the selection tool and use the
SmartWrite tool to quickly convert the content into calligraphic fonts.
Erasing
Select Eraser the erase the written content with either end of the pen or your nger. You can
use your palm to erase the content in a large area on the screen. You can also tap Clean to
quickly clear all content written on the current screen.
Tap Eraser and tap it again to set the eraser size.
You can also select Eraser mode in Settings. If you select
Erase selection, the selection-based eraser mode applies. In
this mode, any selected content is erased.
28
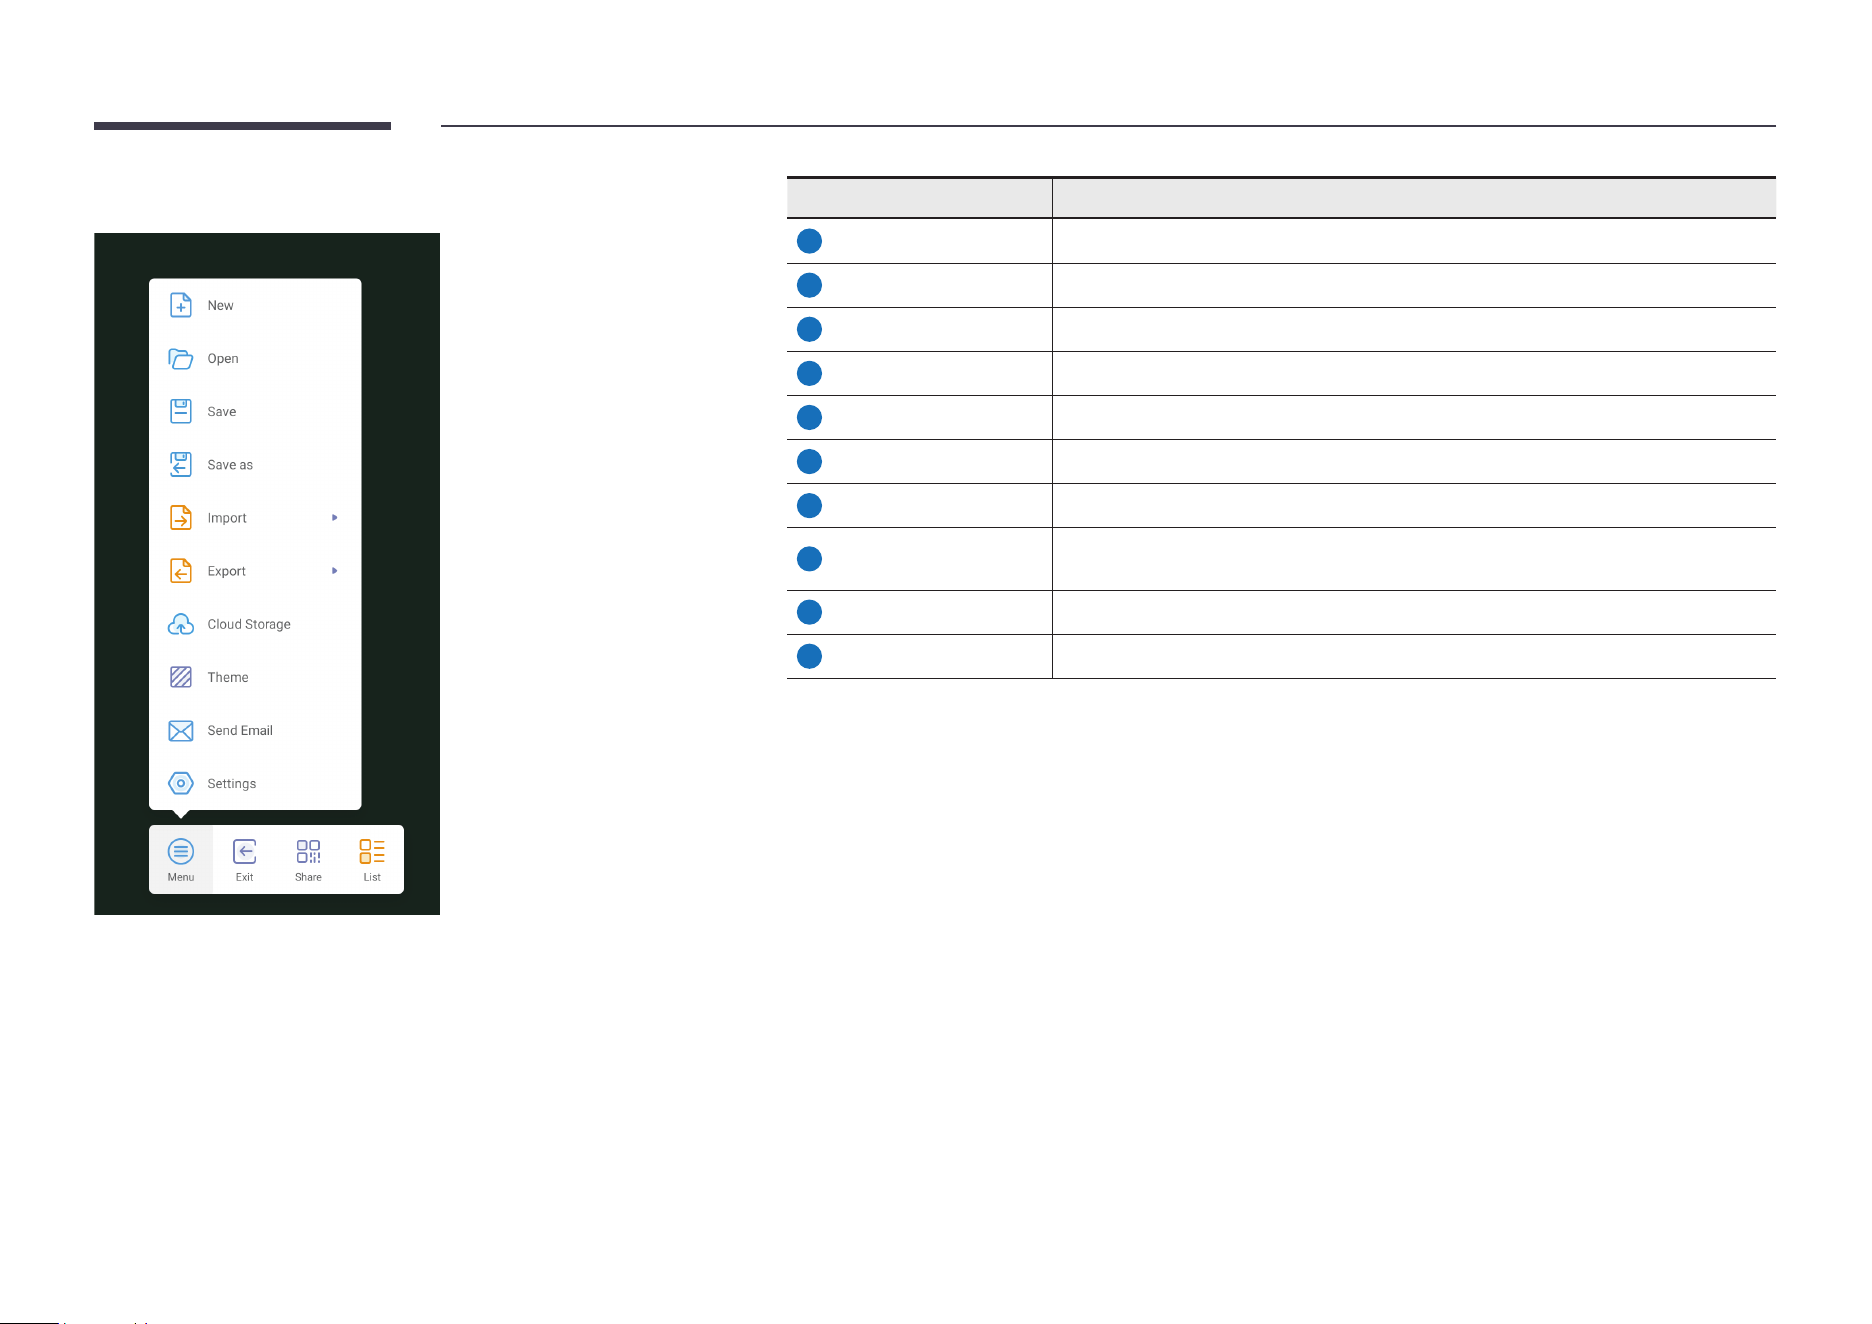
Note Menu
Item Description
1
New Create a note.
2
Open Open an existing note.
3
Save Save the current note.
4
Save as Save the current note in the desired format.
5
Import Import a note in the IMG, PDF, SVG, or IWB format.
6
Export Export a note in the IMG, PDF, SVG, or IWB format.
7
Cloud Storage Upload a note to cloud storage.
8
Theme
Specify the background theme of the canvas. A color or preset template is
supported.
9
Send Email Send the current note via email.
10
Settings Change or apply settings in Note
29
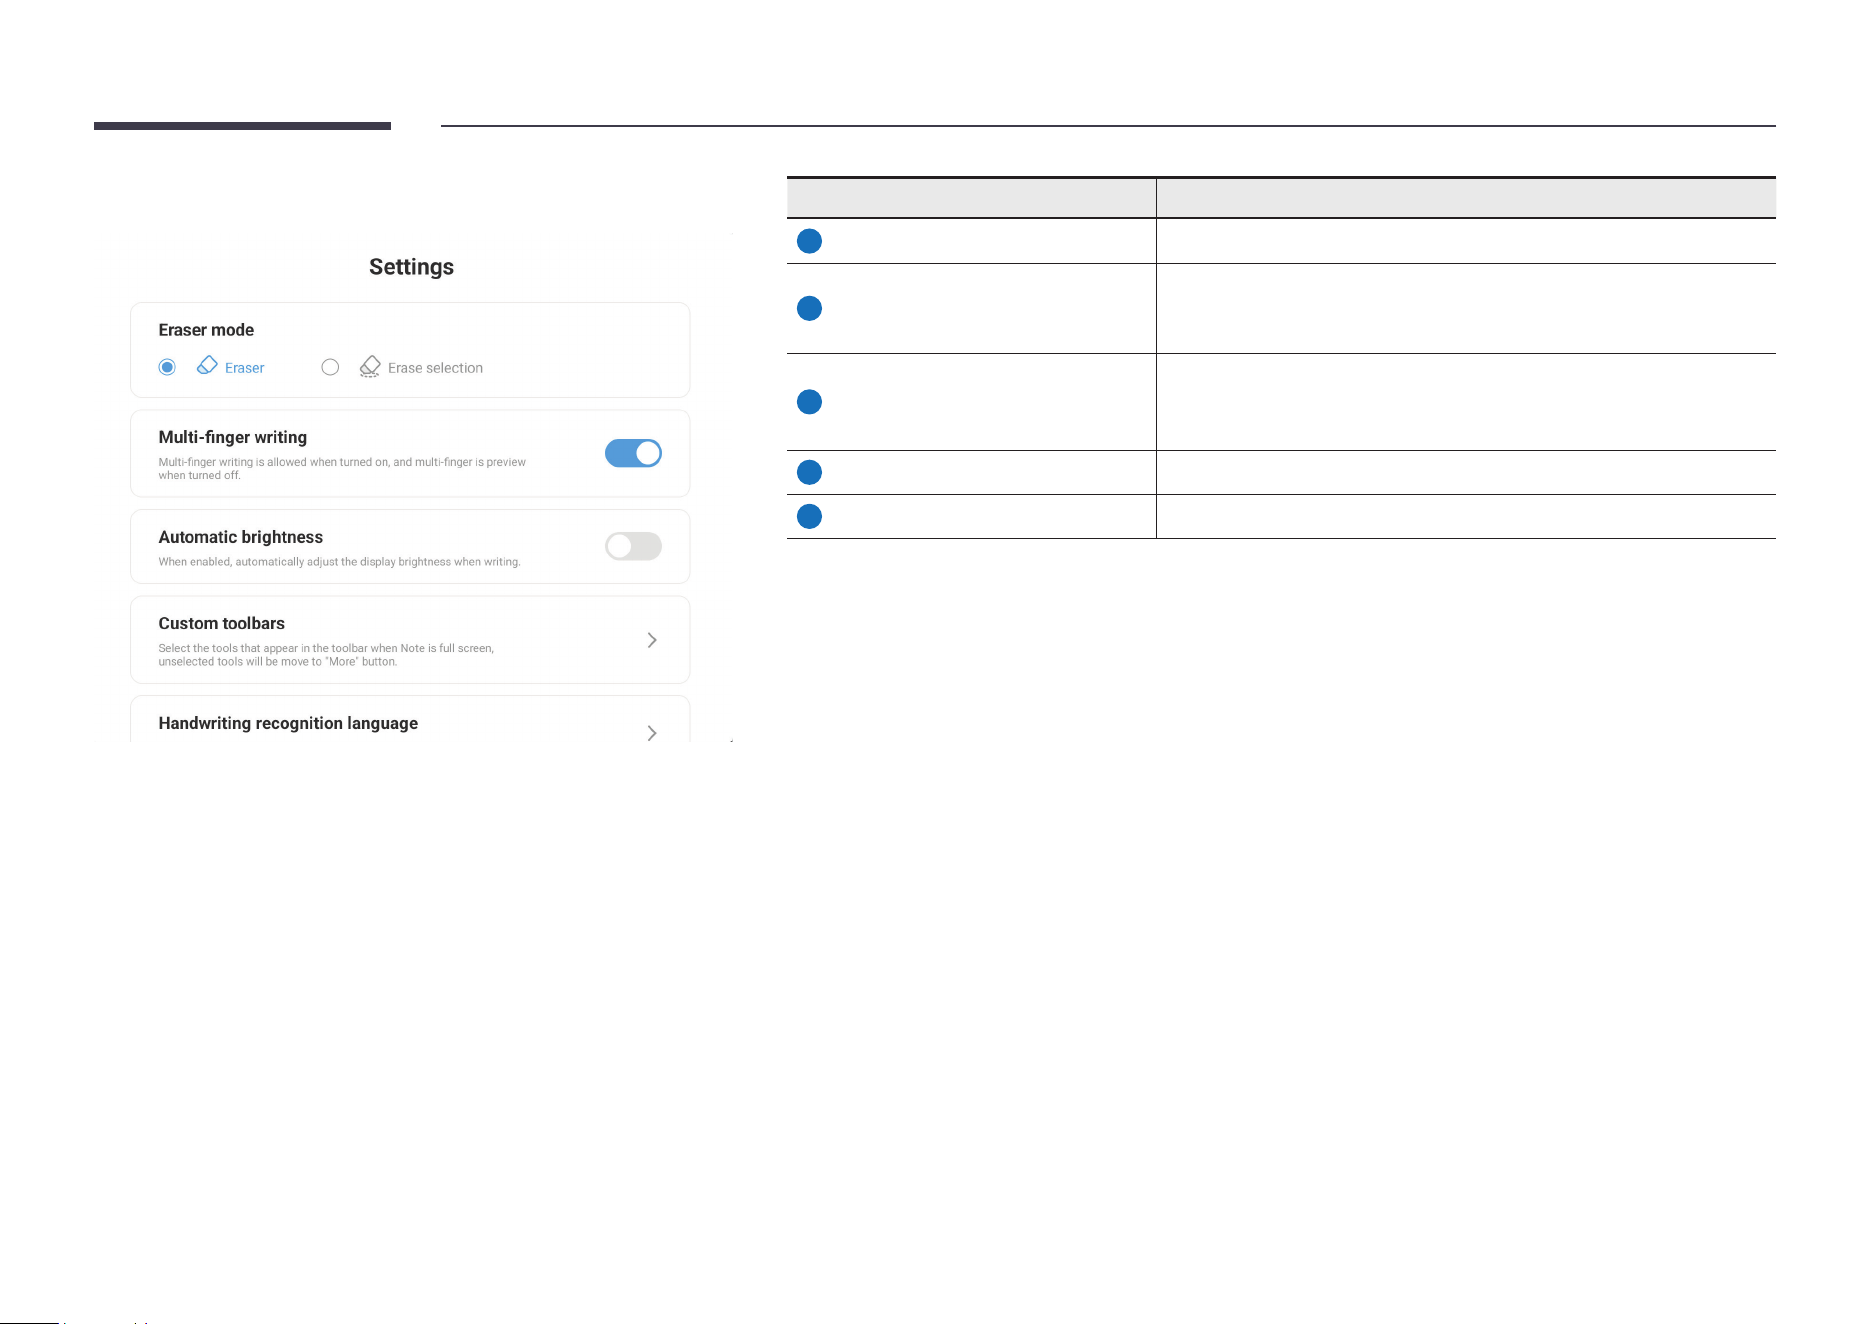
Settings
Item Description
1
Eraser mode Set Eraser mode to Eraser or Erase selection.
2
Multi-nger writing
Swiping with multiple ngers allows you to write by using multiple
ngers when this option is toggled on or drag the canvas when this
option is toggled off.
3
Automatic brightness
When this option is toggled on, the screen automatically dims when
you write or
erase a content and brightens after the action is done.
4
Custom toolbars Customize the Note toolbars based on your requirements.
5
Handwriting recognition language Specify the handwriting recognition language.
30
Note Functions
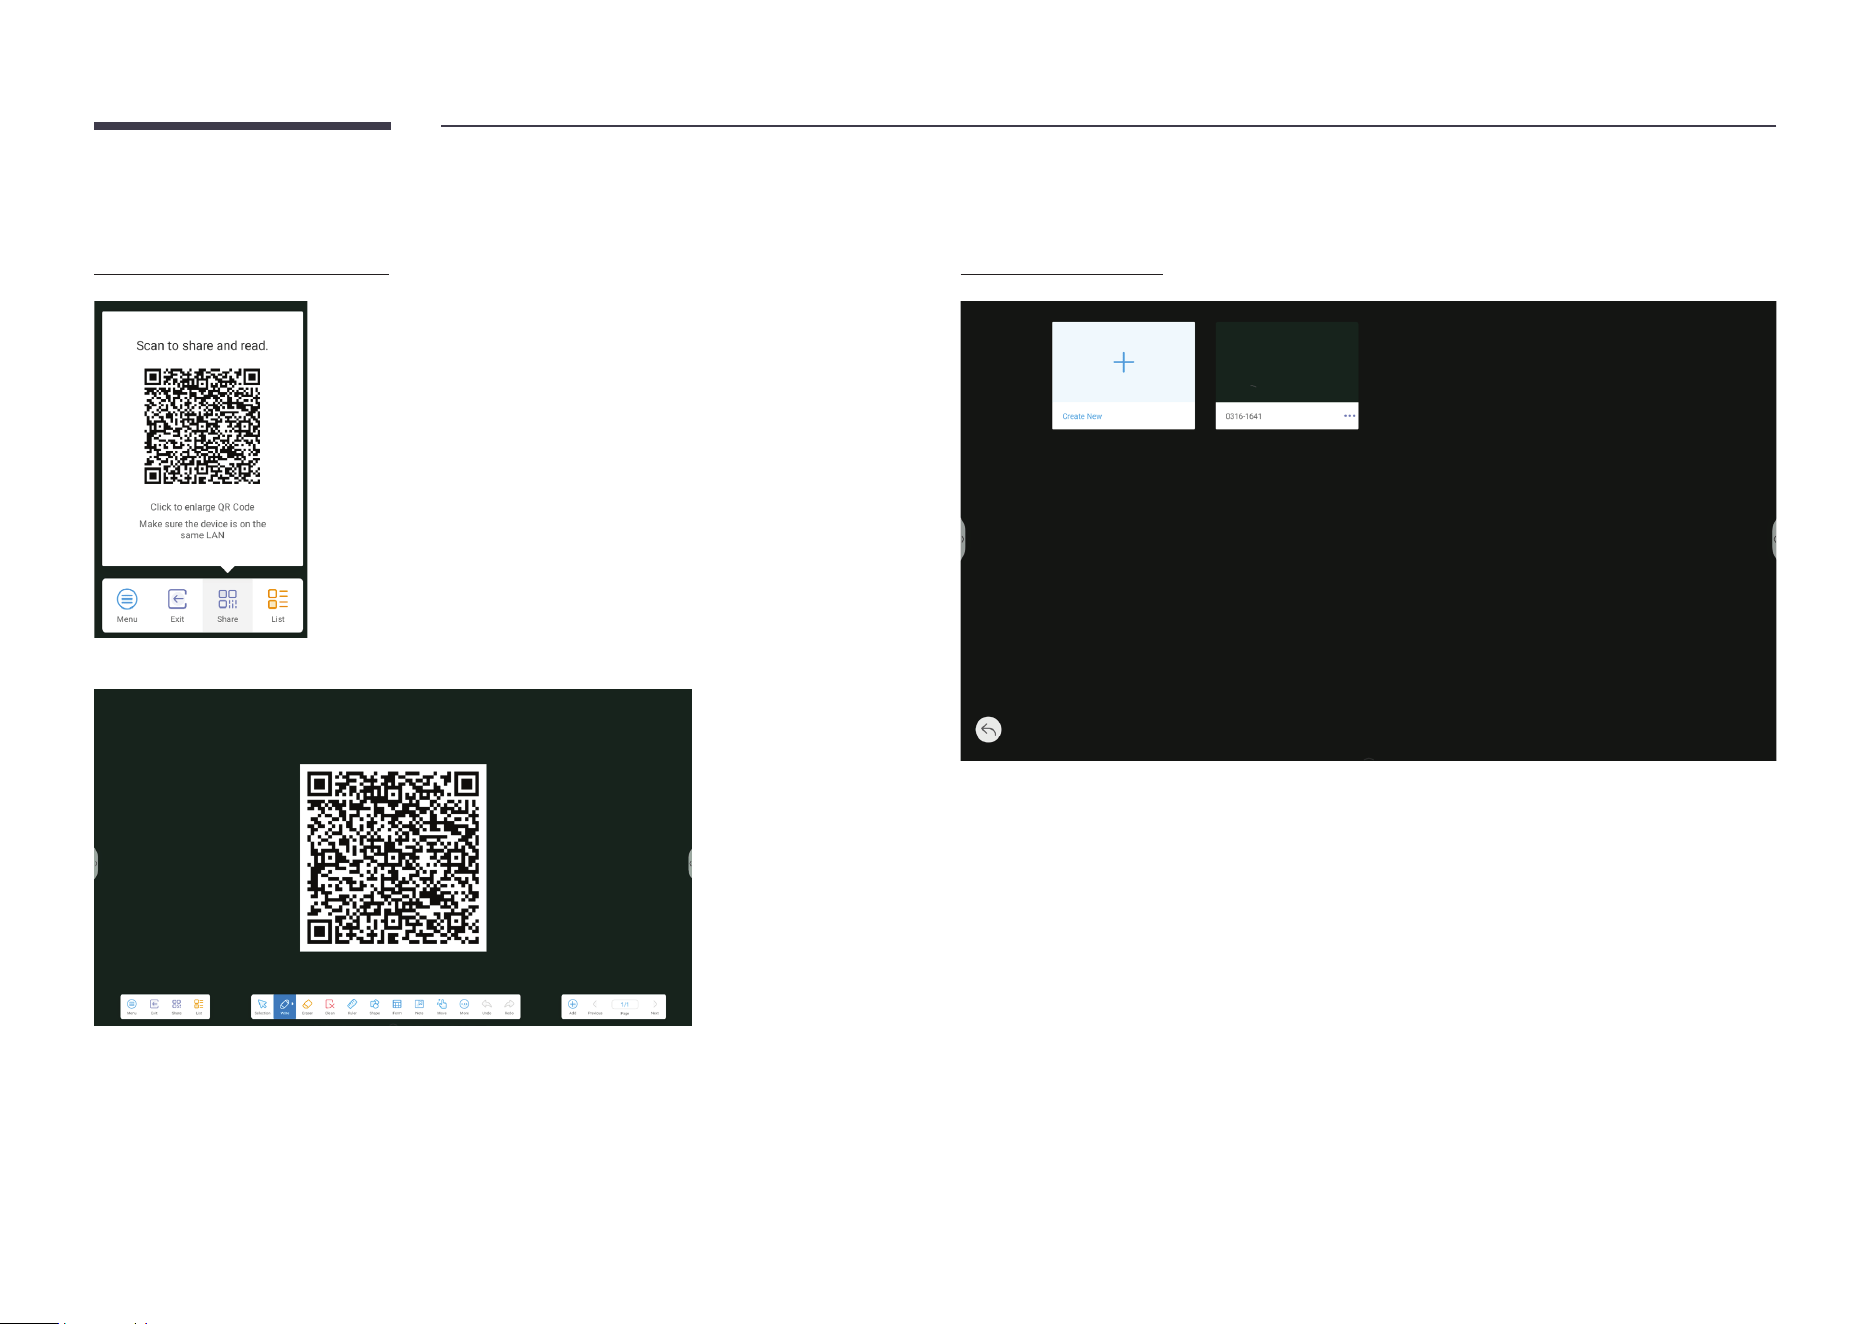
QR code-based sharing
Tap the QR code to enlarge it.
Note canvas list
31
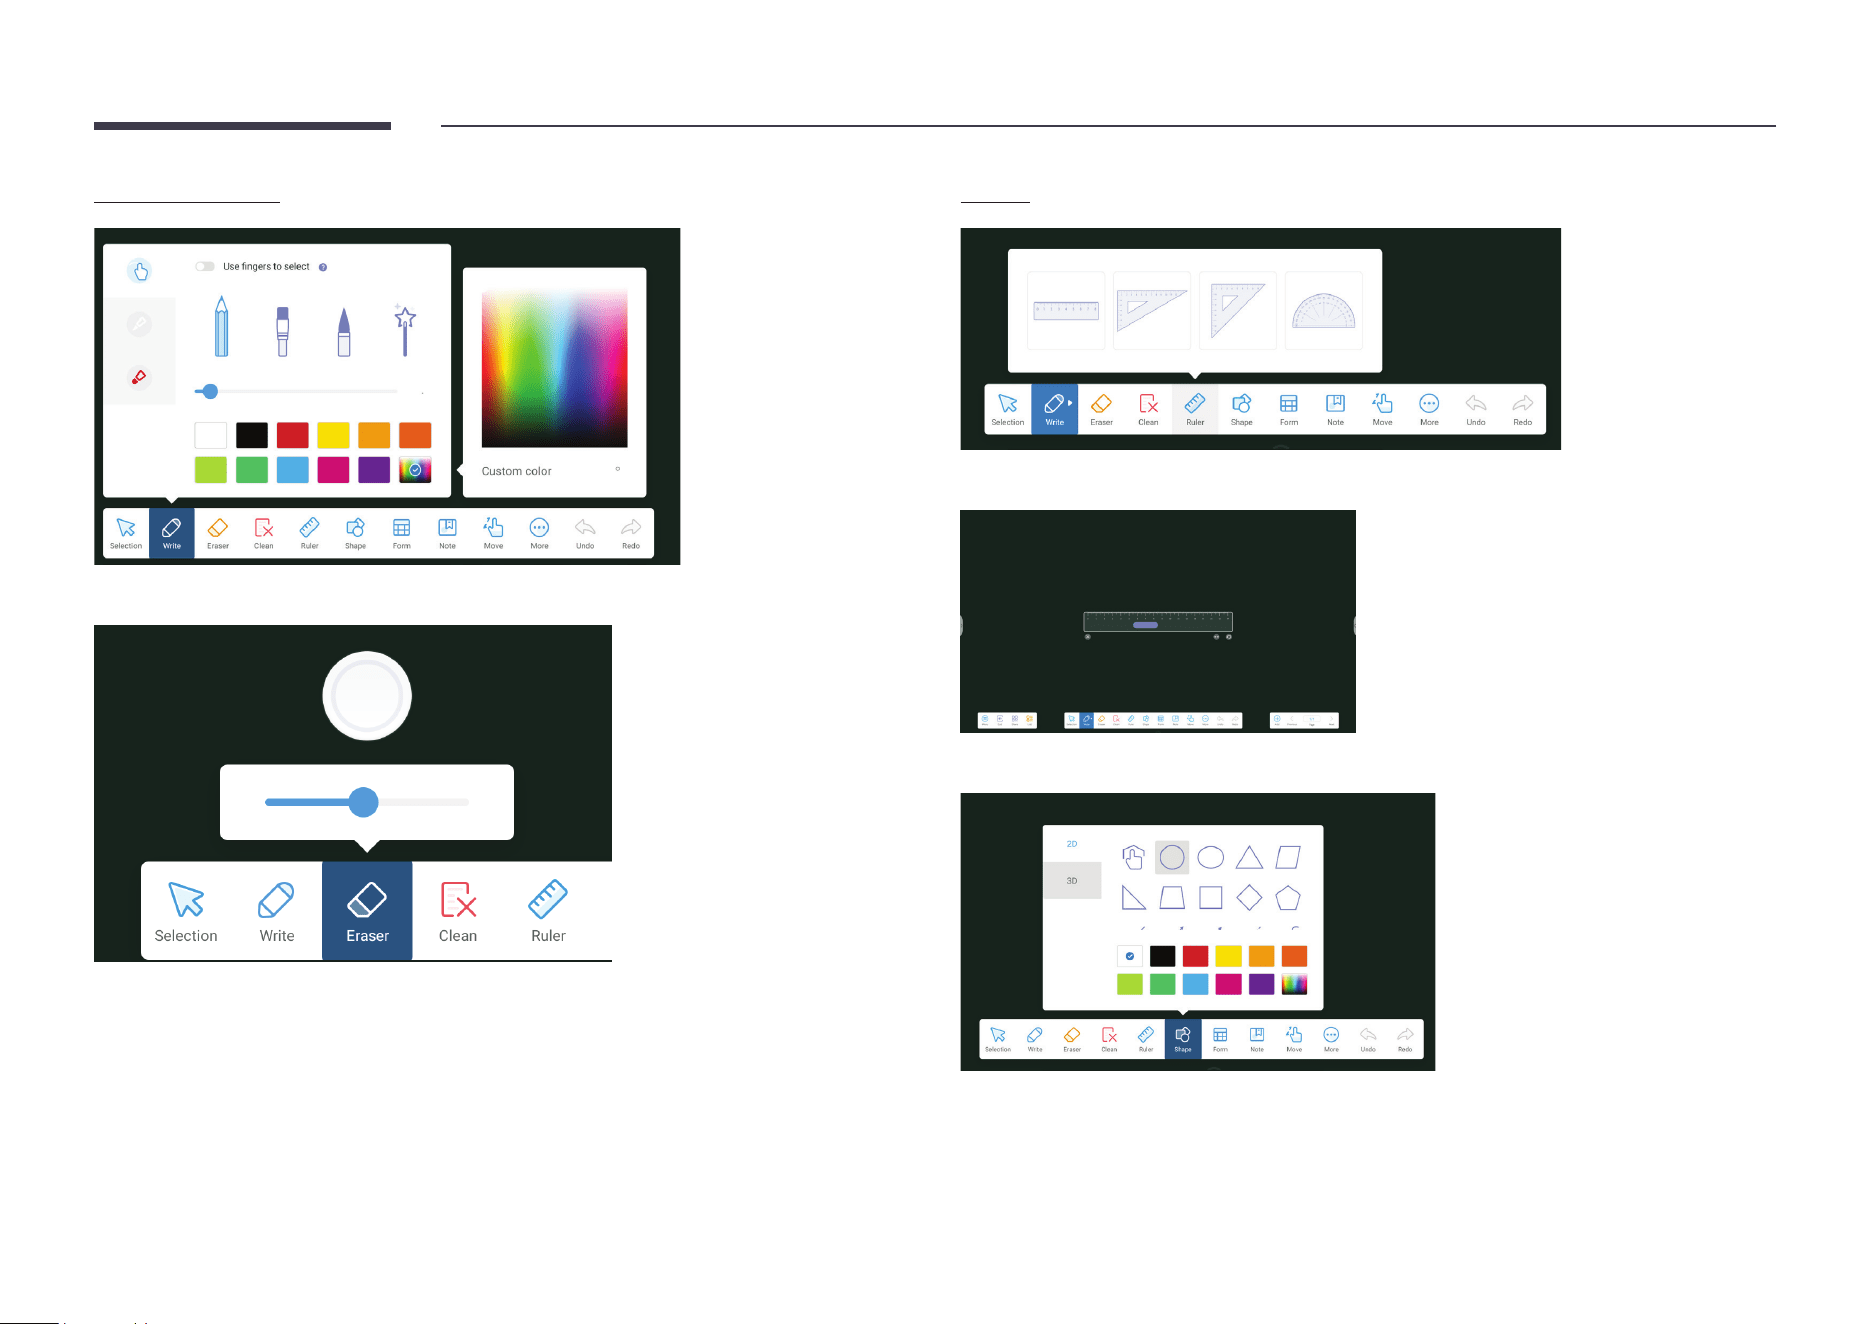
Brush settings
Adjust the eraser size.
Ruler
Select the ruler type to use.
Selected ruler is activated for use.
You can insert a 3D shape and preset its color.
32
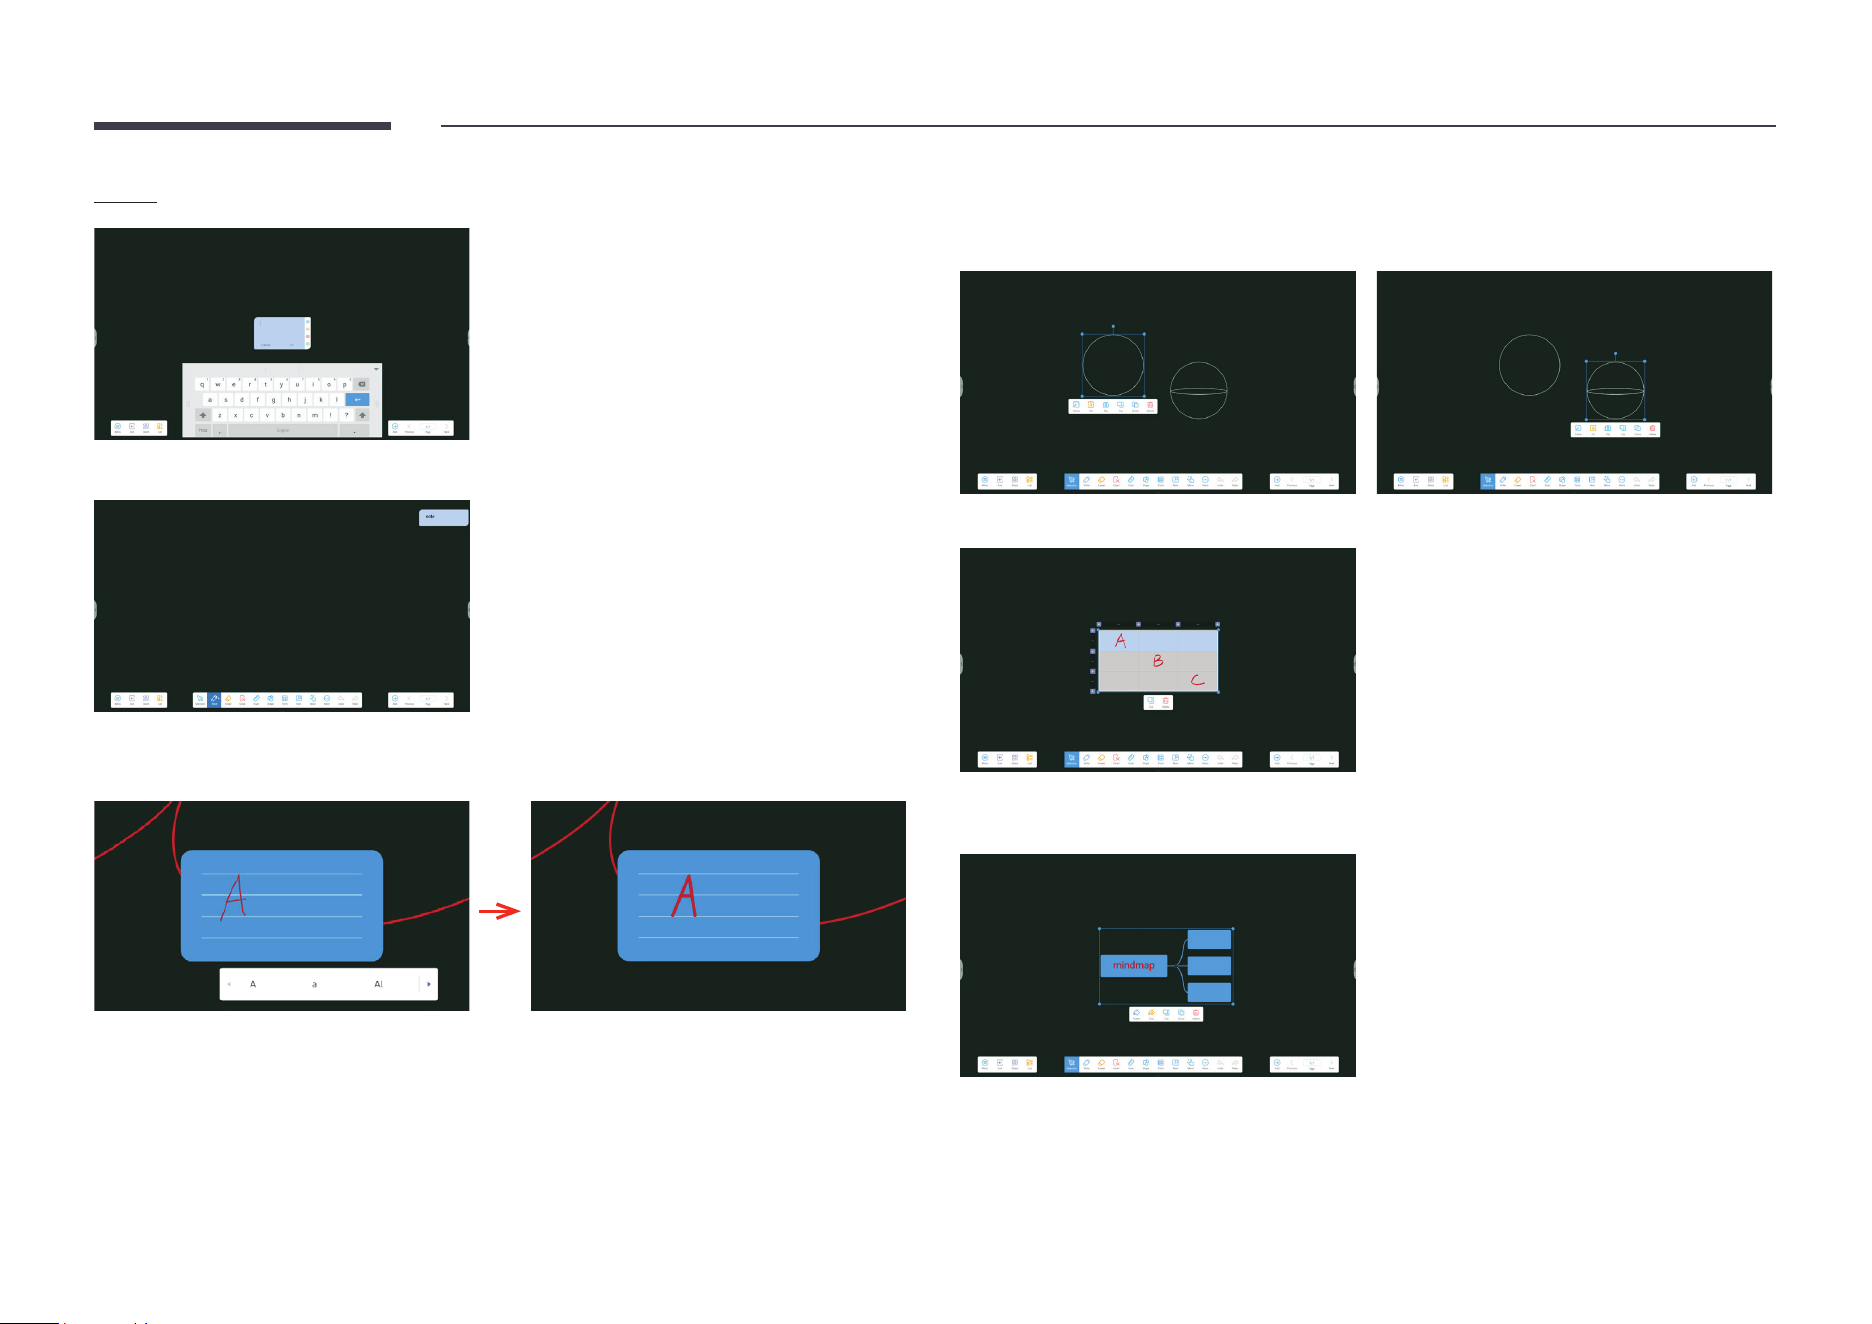
Form
A form is inserted as shown.
The cells in the form automatically adapt to the handwriting size.
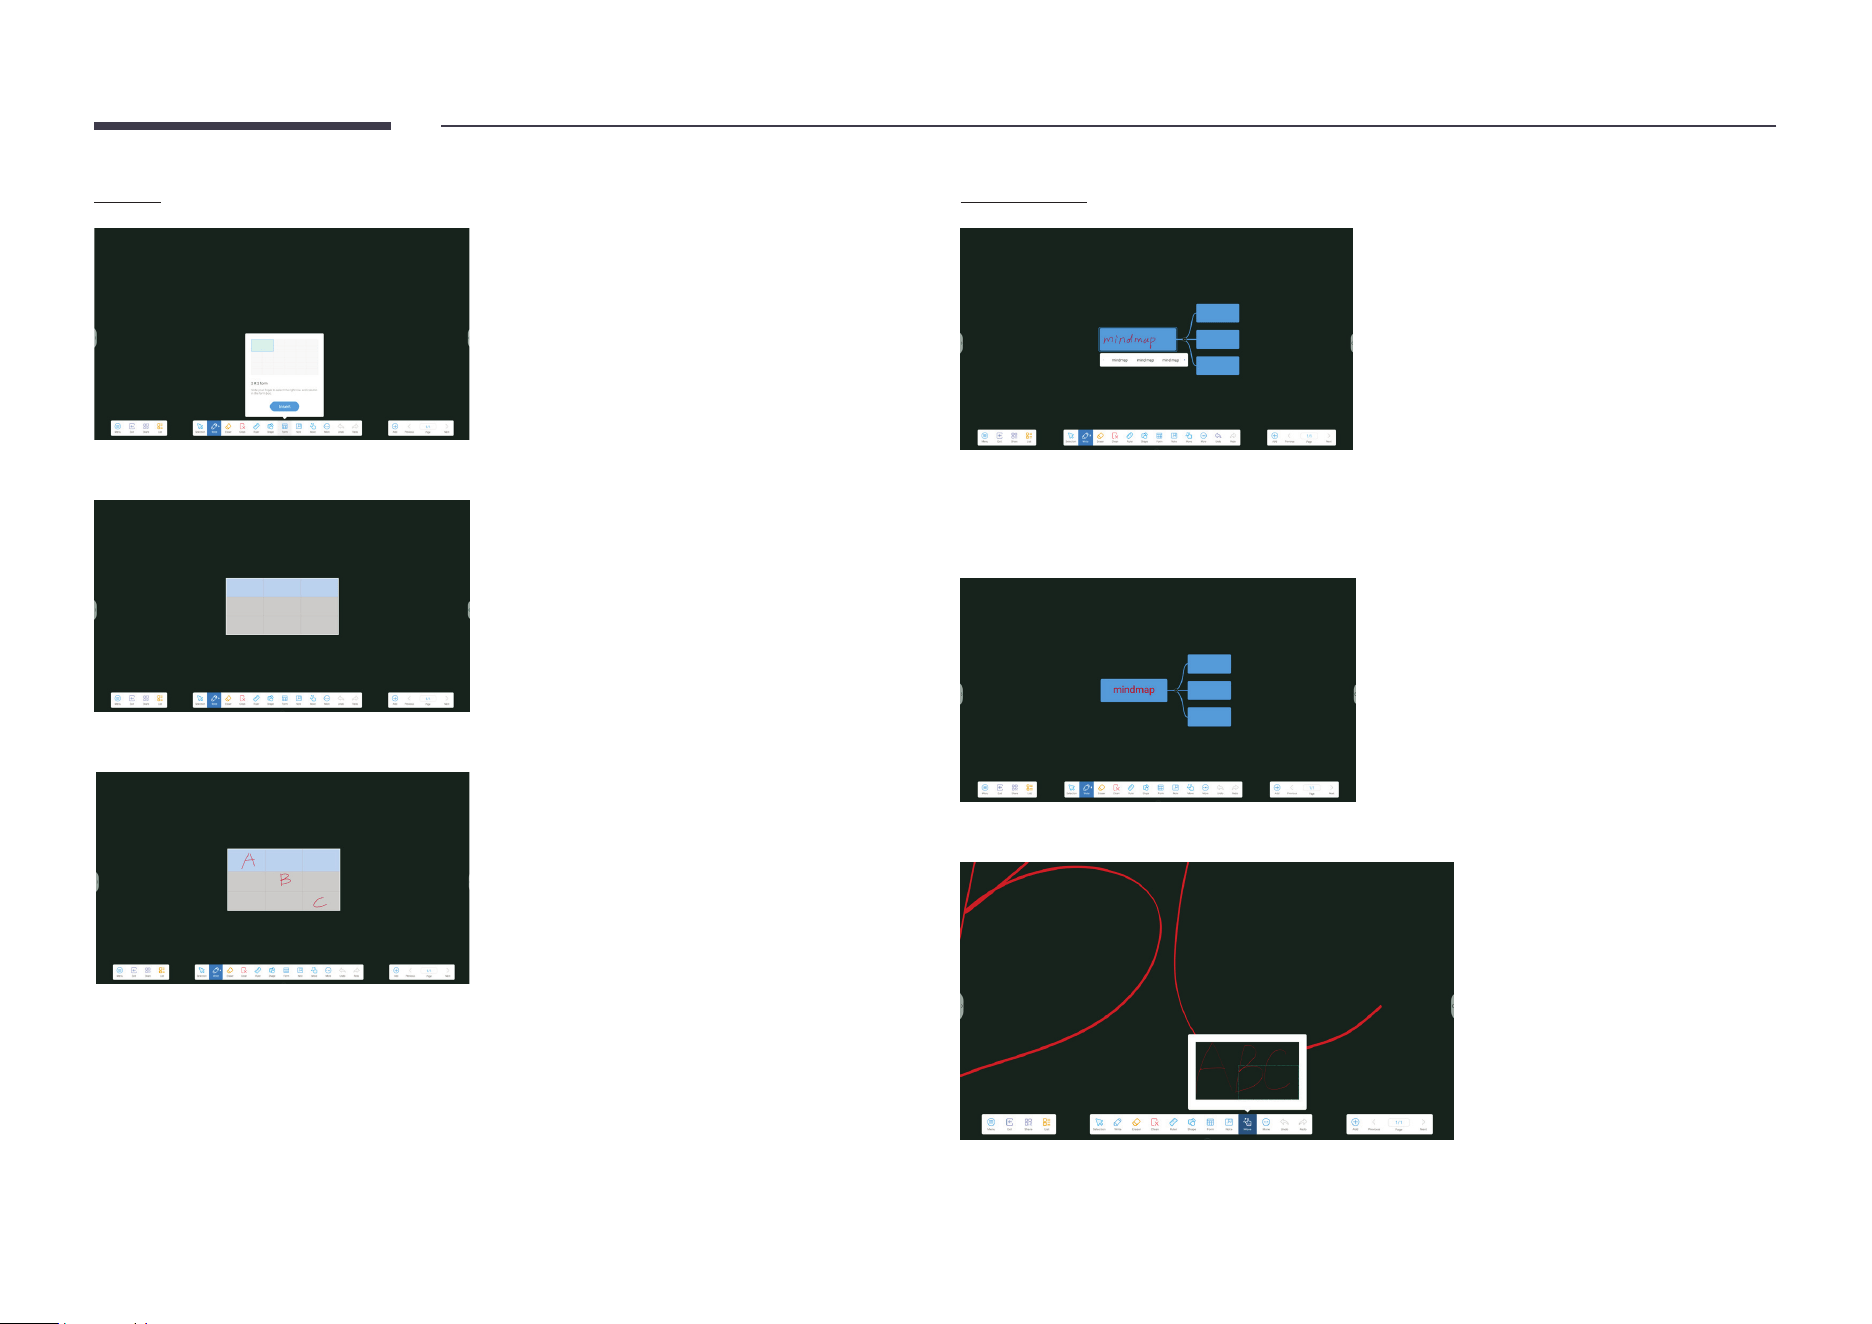
Mind map
The system automatically recognizes handwriting and generates potential text.
After potential text is selected, the handwriting is automatically converted to a standard
font.
Write outside of a canvas (available after the zoom scale exceeds 100%).
33
Note
A note inserted as shown is placed automatically in the top right corner.
The system automatically recognizes the handwriting in the grid, generates potential text,
and converts the handwriting into standard fonts after potential text is selected.
• Selection: Different functions are available for different content. Below are examples.
• Shape: After selecting a shape, you can change the frame/ll color of the shape and ip,
pin to top, clone, or delete it.
• Form: After selecting a form, you can pin to top or delete the form.
• Mind map: After selecting a mind map, you can change the color or text color of the mind
map and pin to top, clone, or delete it.
34
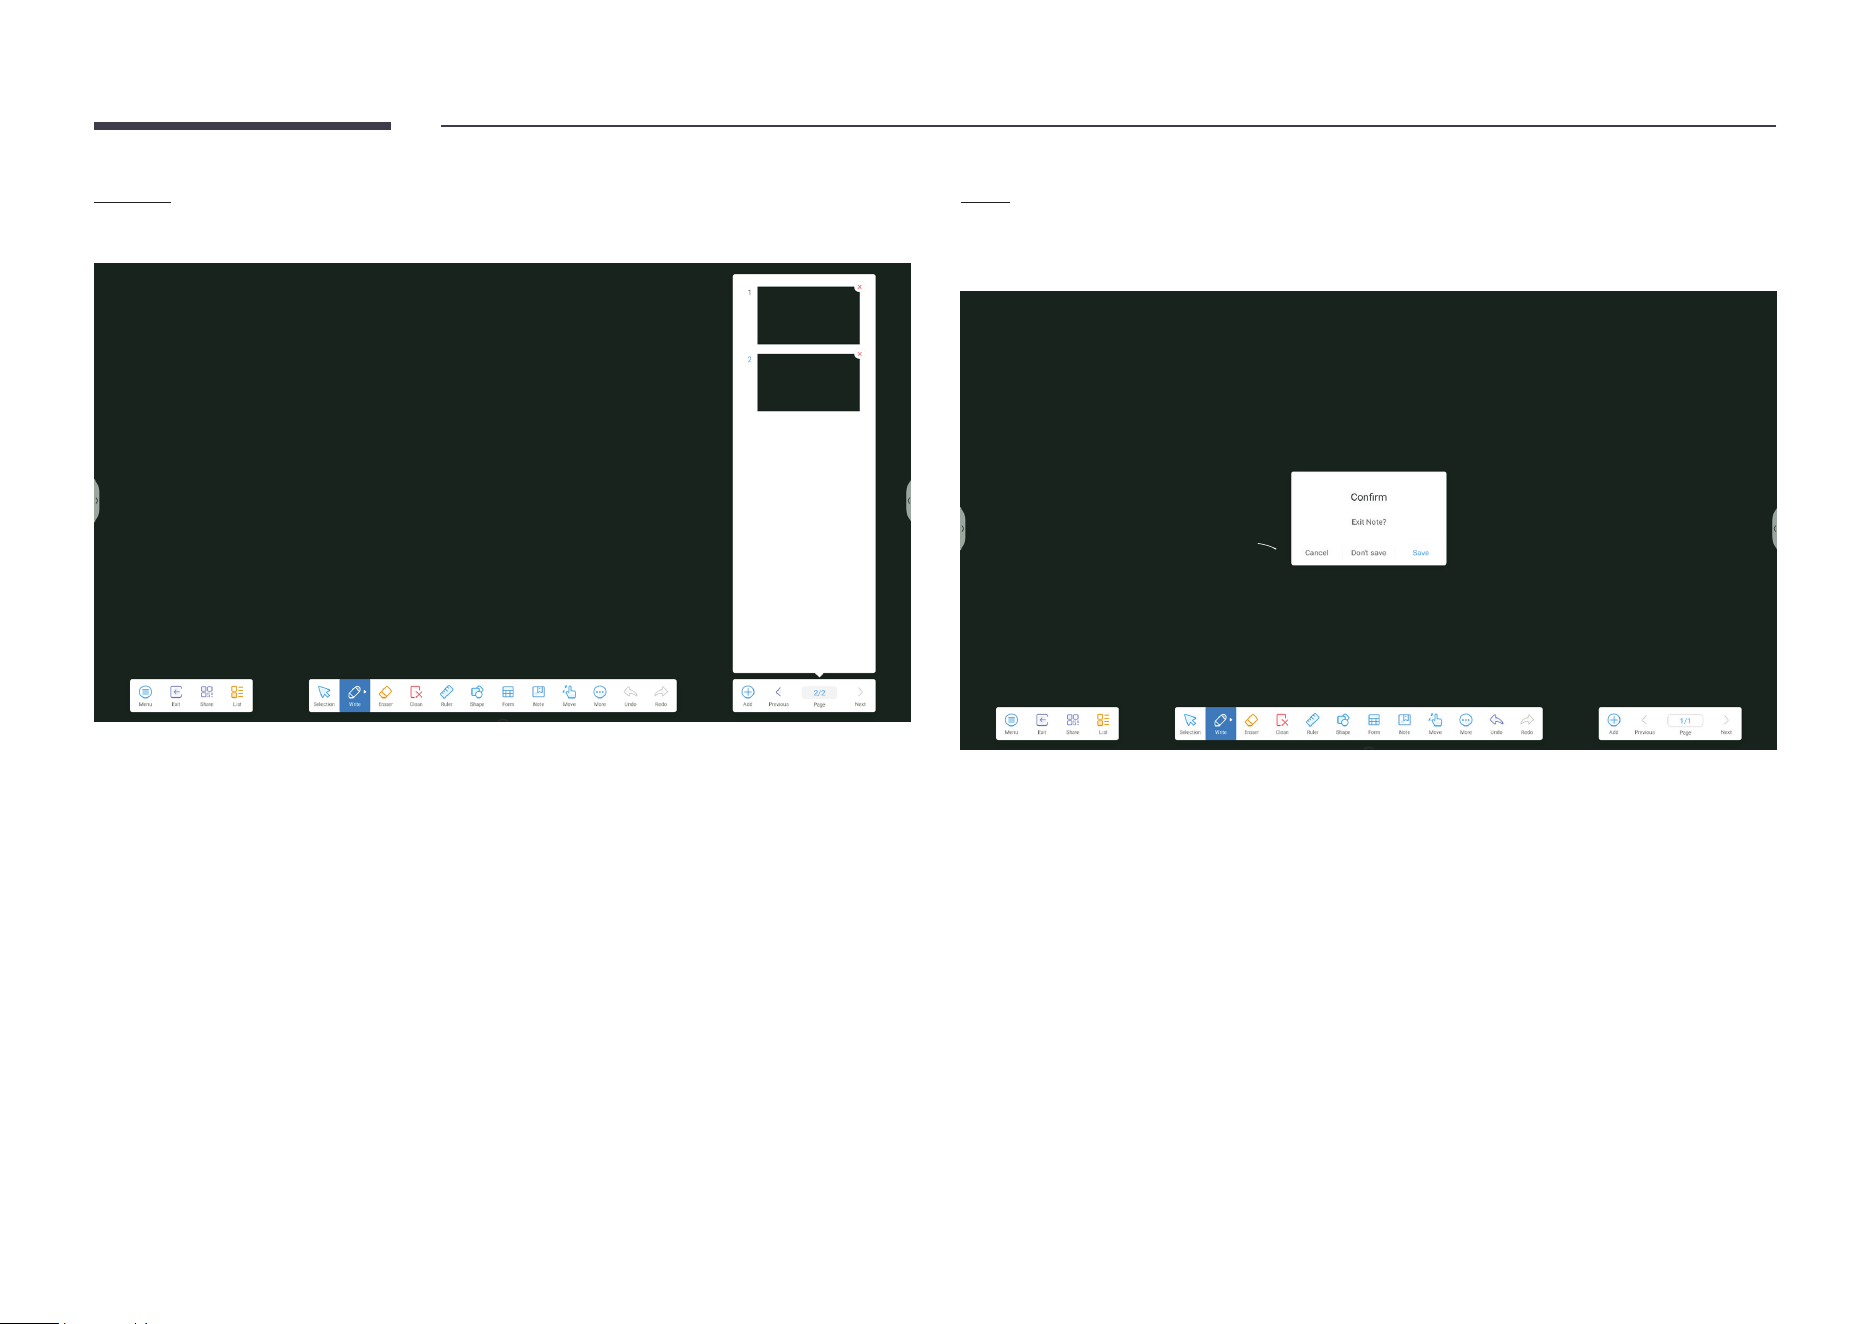
Pages
Tap Page to view, select, or delete all pages that are added to the note.
Exit
Tap Exit. You are prompted whether to save the note. You can save the note and exit or exit
without saving.
35
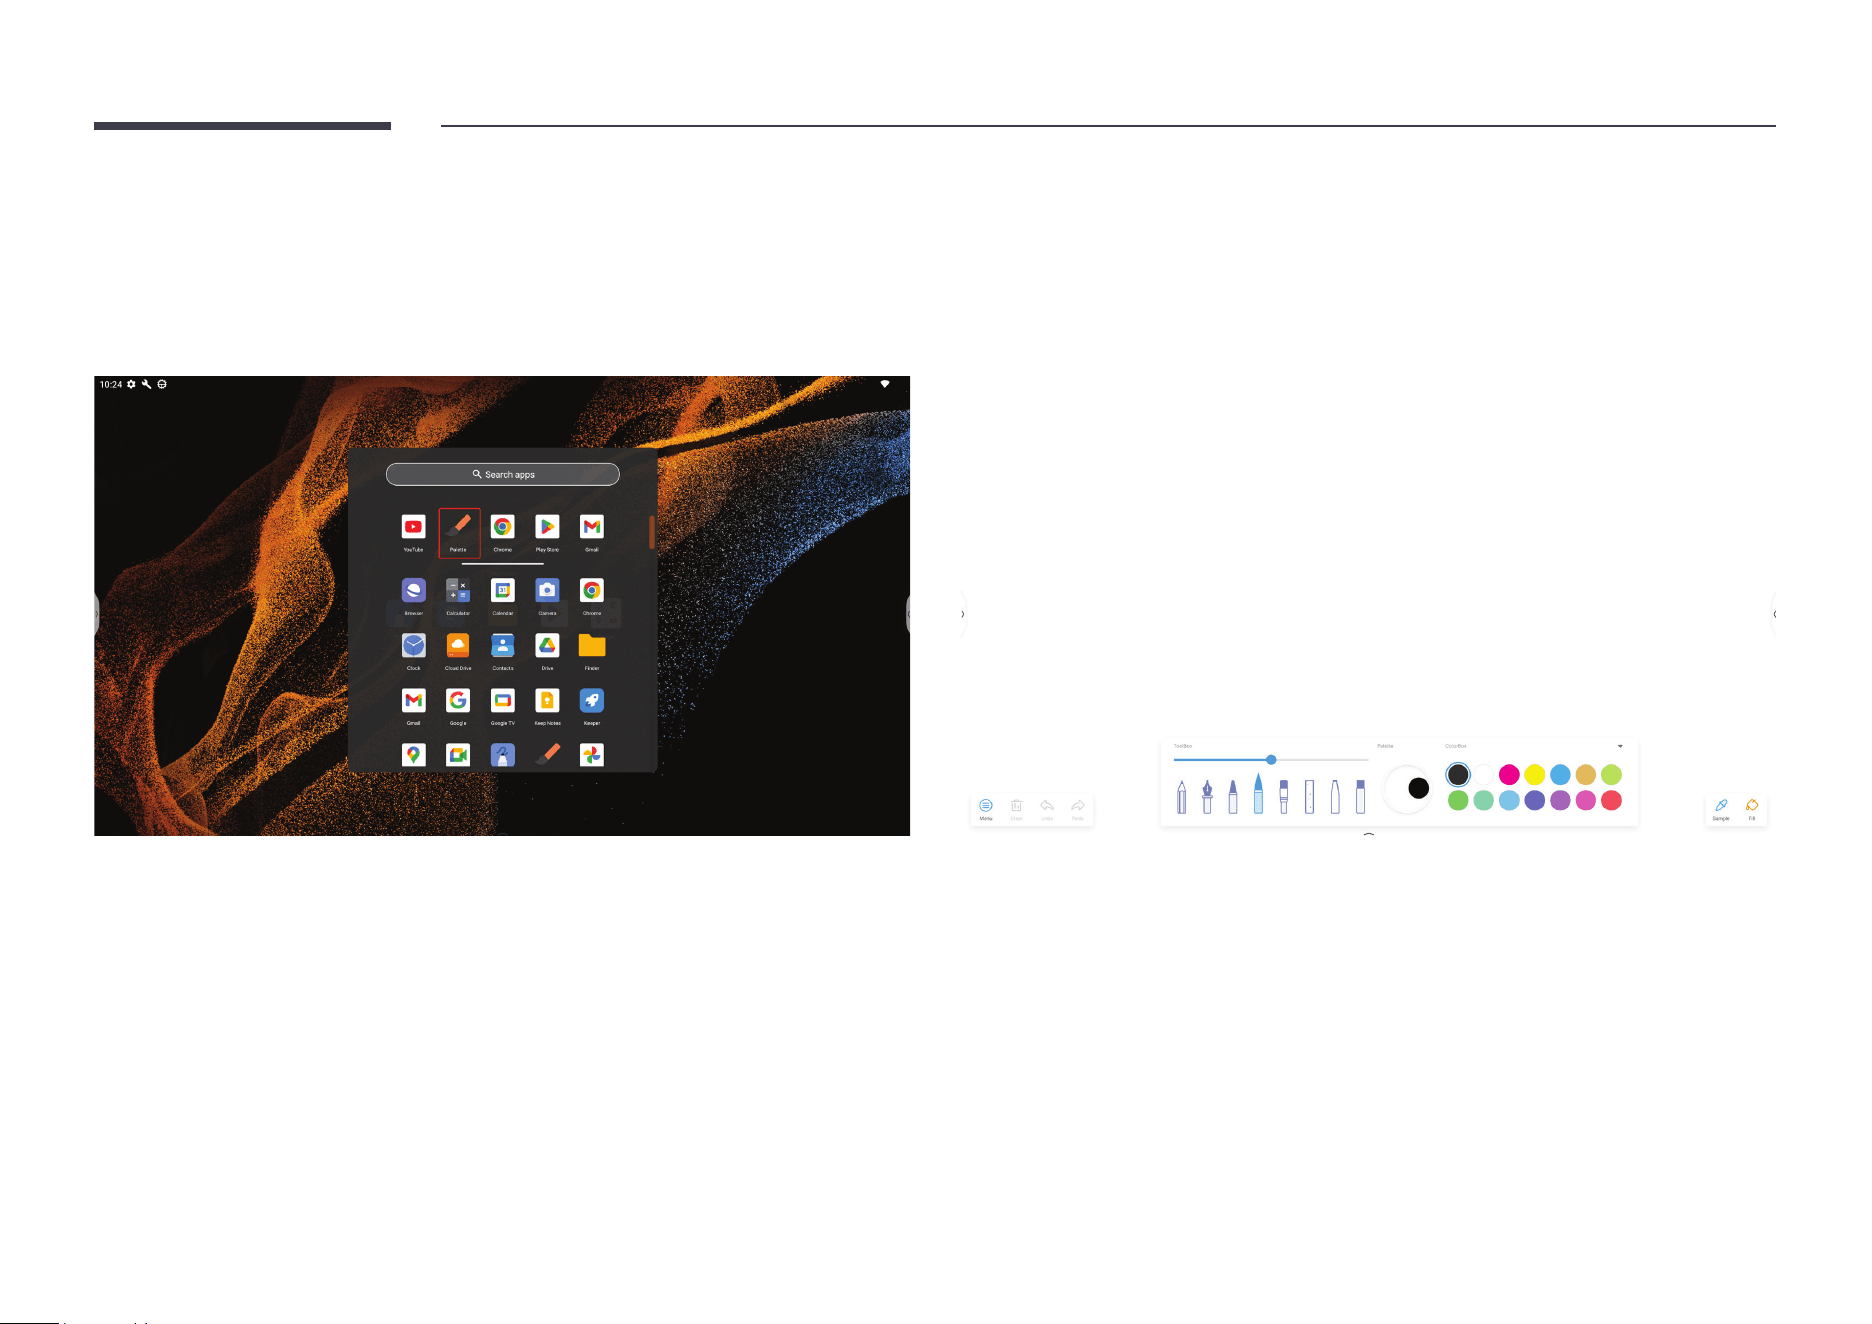
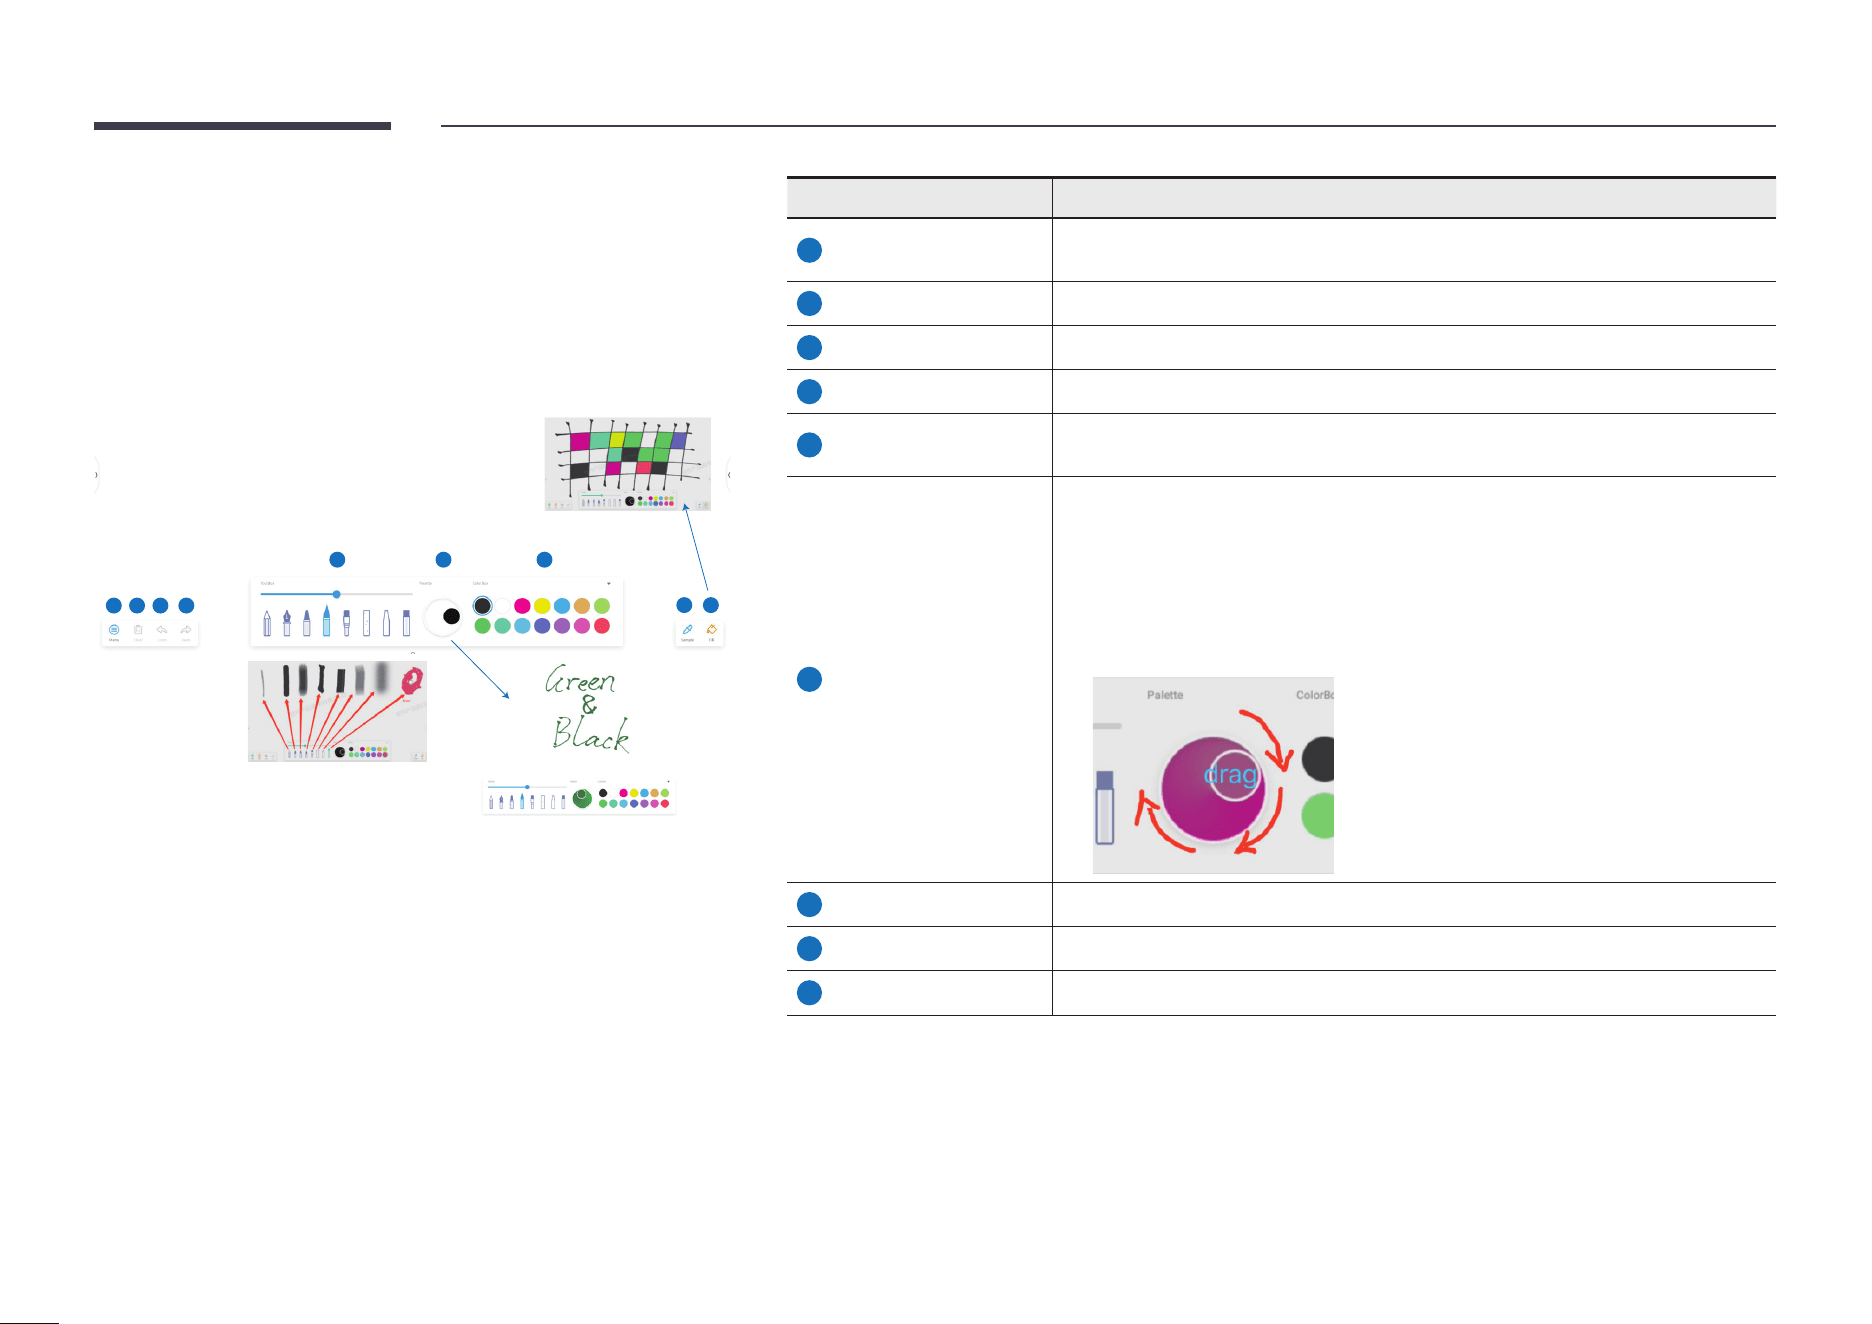
Palette
Entering Palette
Tap Palette in the list of all apps to open Palette.
Exit
Palette's home screen shows Toolbox and ColorBox options by default for quick selection.
36
UI Elements
The palette allows you to explore and use more artistic functions in your
creation.
1 2 3 4
5 6 7
8 9
Item Description
1
Menu
The menu allows you to perform operations such as saving, importing, sharing,
and exiting.
2
Clear Tap to clear a canvas.
3
Undo Undo the current operation.
4
Redo Redo the undone operation.
5
ToolBox
Seven brushes and one eraser (rightmost) are available. You can specify the
brush thickness and eraser size.
6
Palette
Mix colors to get a unique color for your brush:
1
Select a color from ColorBox.
2
Drag the wheel in the palette. The palette turns into the corresponding color.
3
Select another color from ColorBox.
4
Drag the wheel in the palette again to mix the two colors.
7
ColorBox Select the desired color for drawing or mixing from ColorBox.
8
Sample Pick a color at any position on the current page for your brush.
9
Fill Fill any enclosed area on a canvas with a specied color.
37
Chapter 05
Settings
Settings
Entering Settings
You can access Settings from the Control Center or App drawer.
38
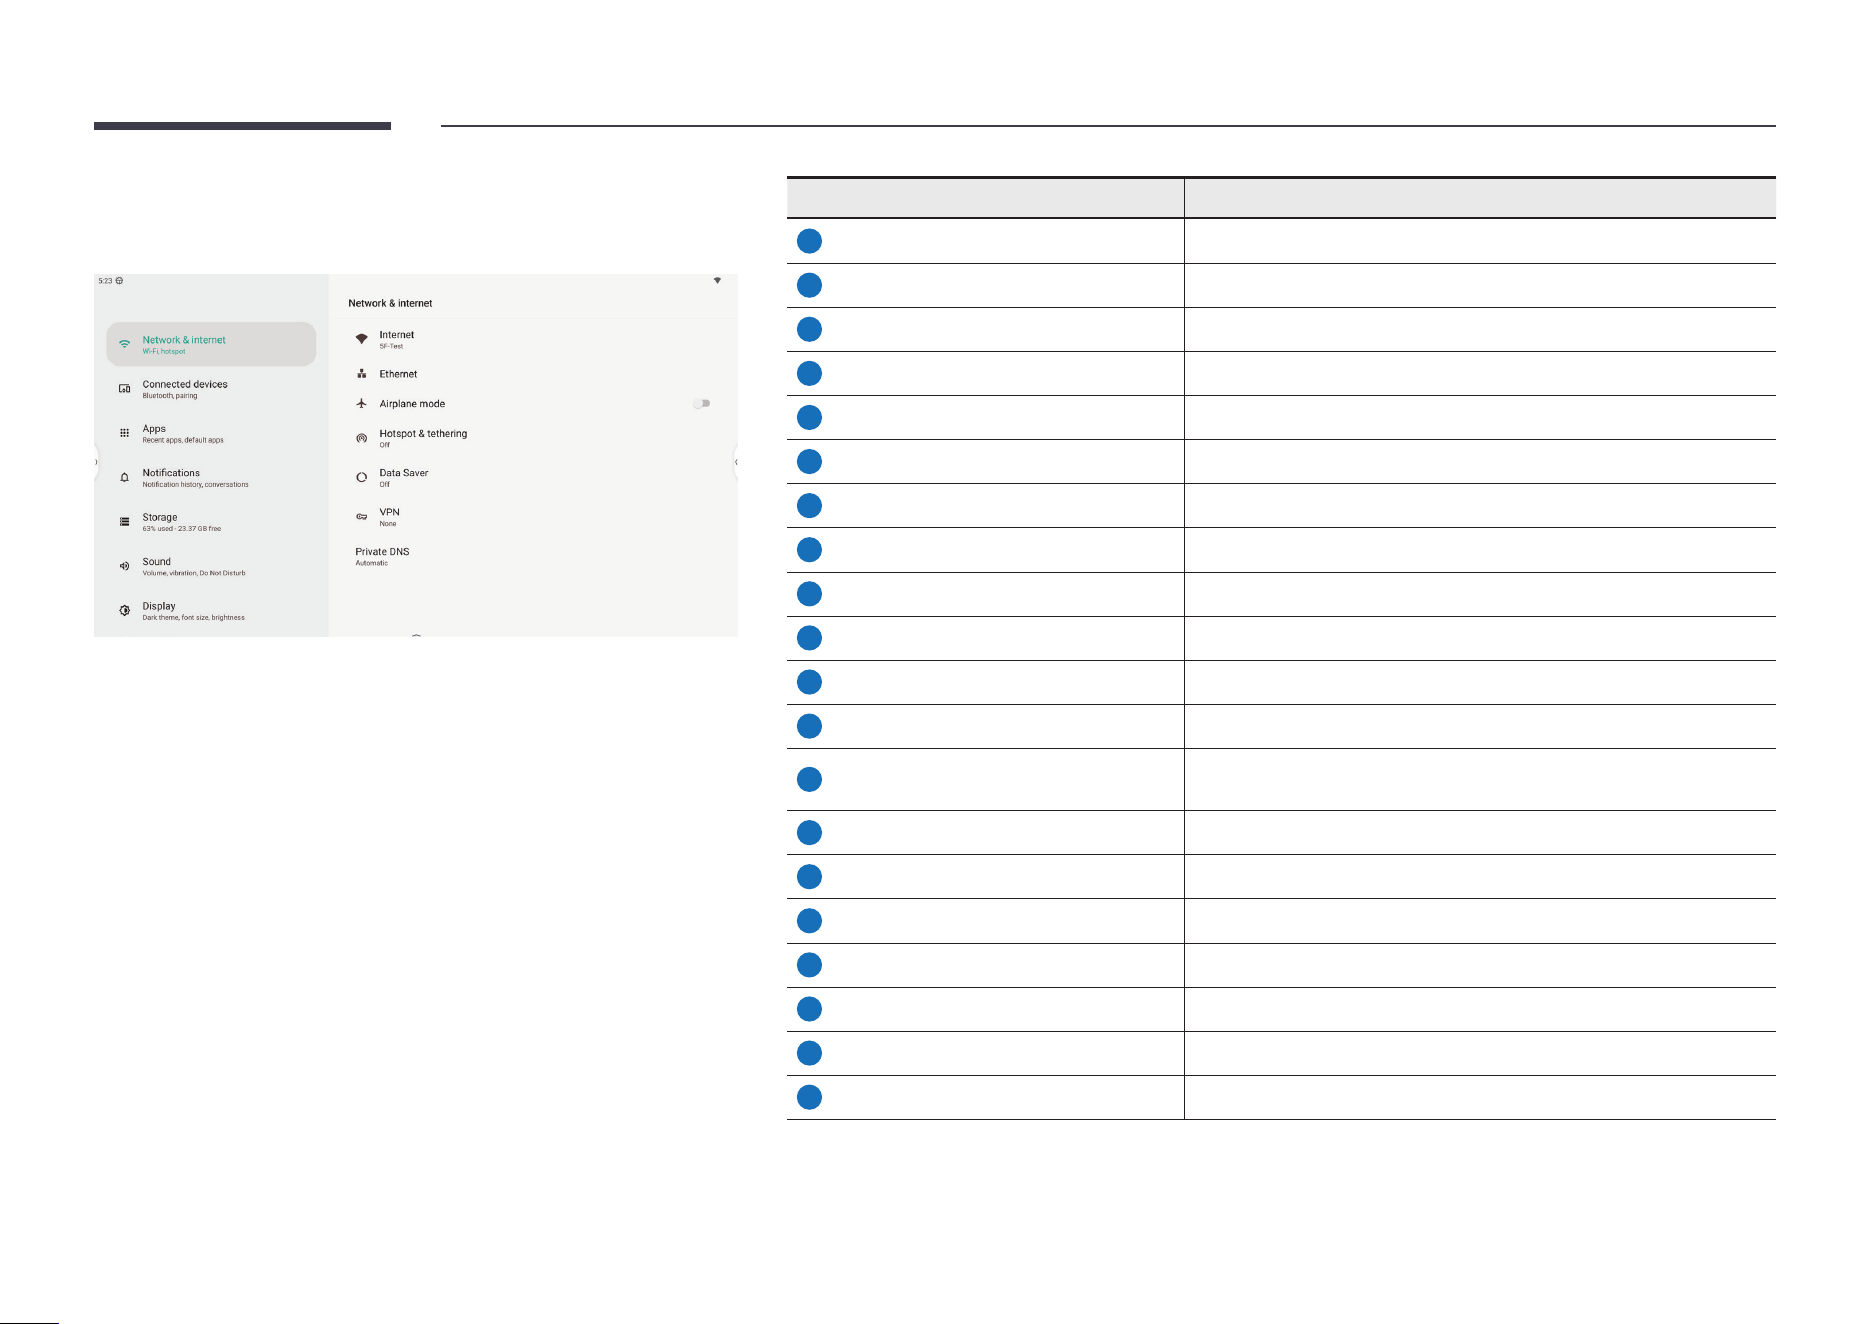
System Settings
From system settings, various settings can be managed.
Item Description
1
Network & Internet Manage network settings
2
Connected devices Connect to devices and change settings of connected devices
3
Apps Check apps on this device and adjust app settings
4
Notications Manage system notication settings
5
Storage Check device storage occupation and empty trash
6
Sound Manage system sound settings
7
Display Manage system display settings
8
Wallpaper Manage system wallpaper and theme
9
Accessibility Manage accessibility settings
10
Security Manage security settings
11
Privacy Check privacy dashboard and apply privacy settings
12
Location Check apps using location and manage location permissions
13
Safety & emergency
Set personal medical & emergency information, manage alert
settings
14
Passwords & accounts See all accounts on this device and manage account settings
15
Digital Wellbeing & parental controls Check device usage dashboard and manage wellbeing schedules
16
Google Google account and service settings
17
Advanced Manage OS update, input & output, startup & shutdown settings
18
Administrator Manage Administrator settings
19
System Manage languages, system navigation, local users settings
20
About Interactivedisplay Information about the interactive display
39
Network & Internet
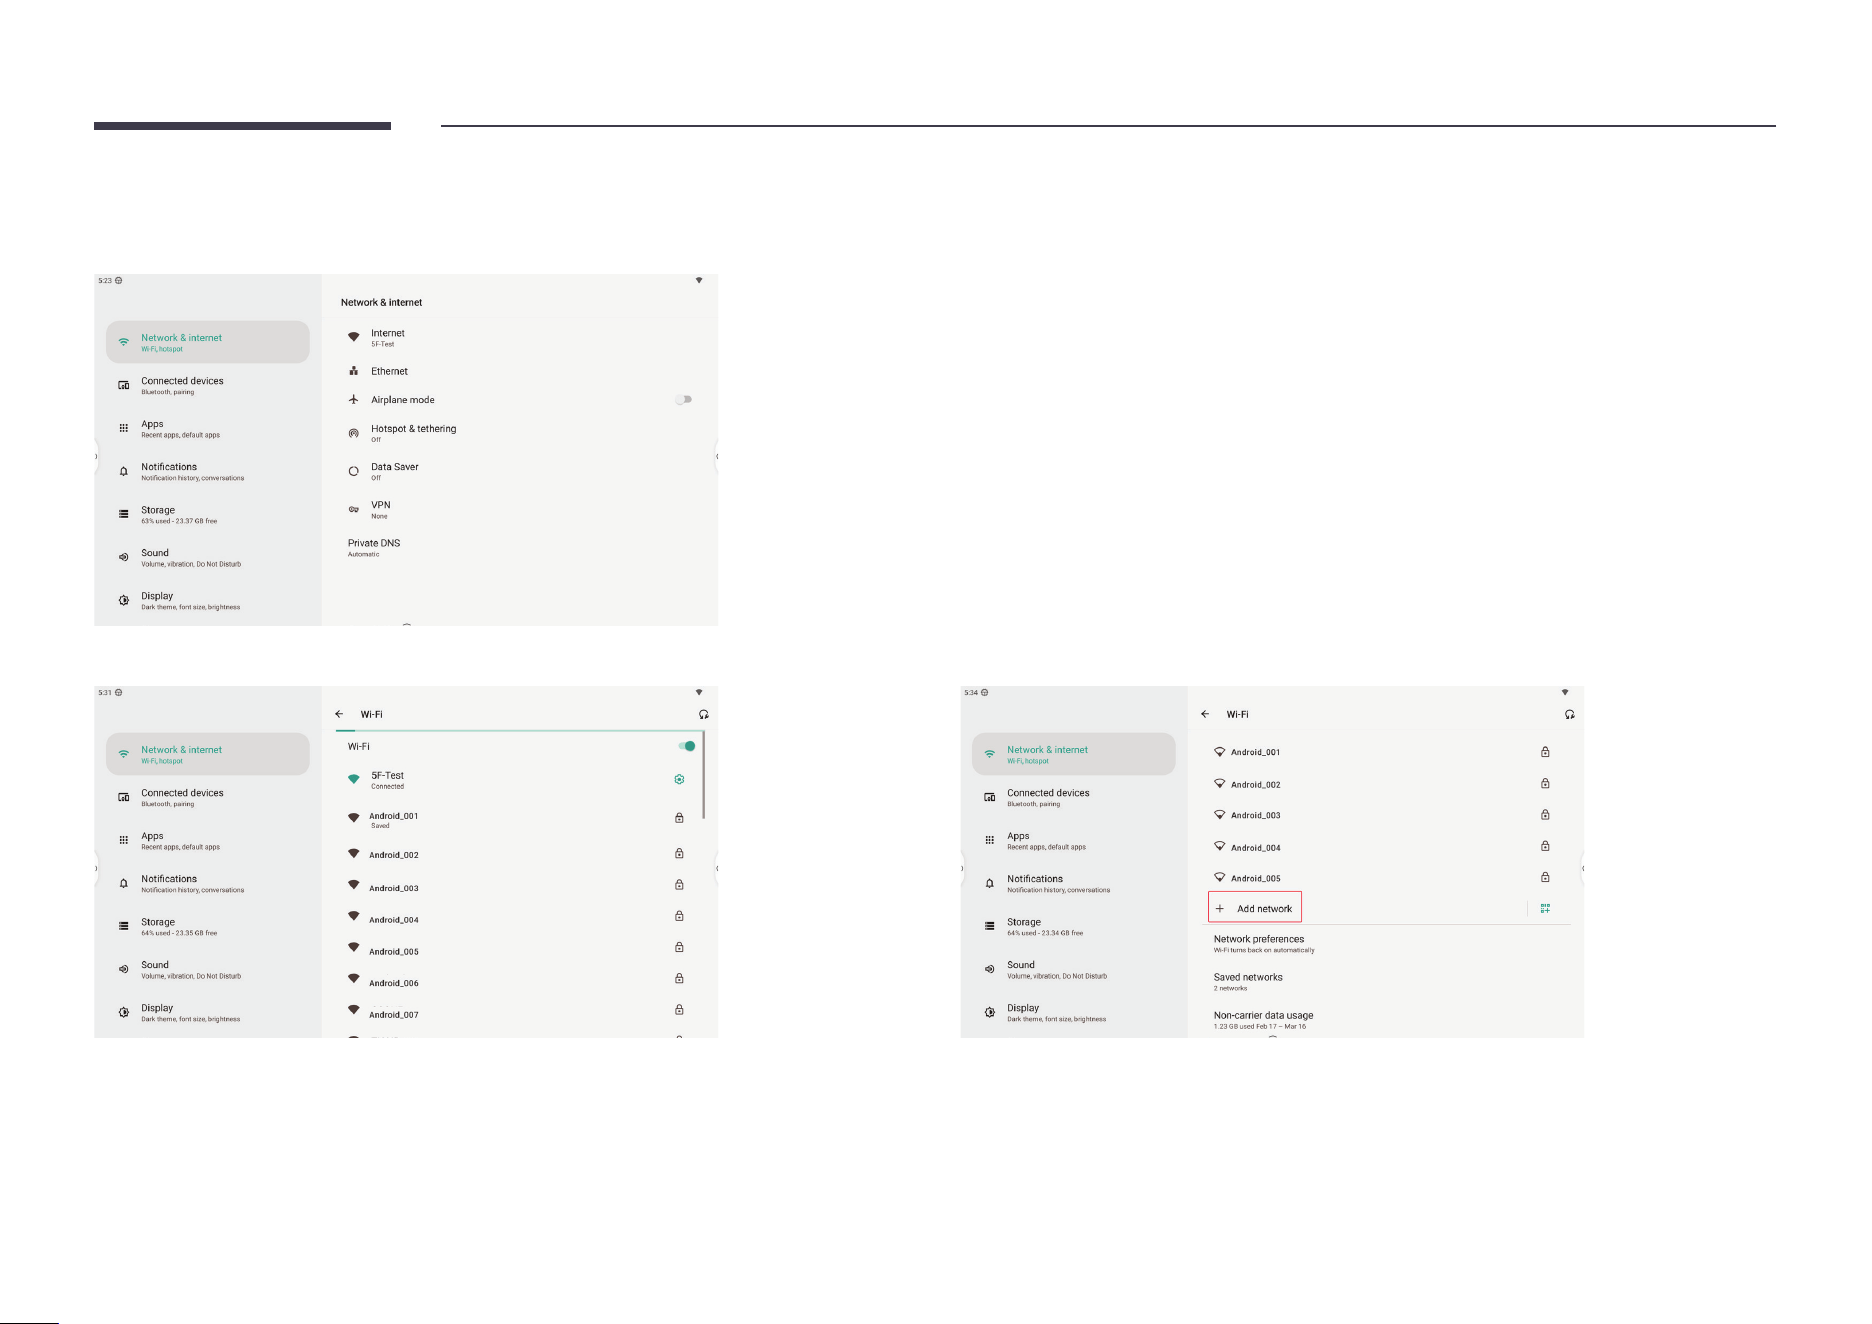
You can manage all network settings in Network & Internet settings.
Go to the Internet page to see all available networks.
Click on a connected network to see detailed information.
You can also tap the + icon to add a network
40
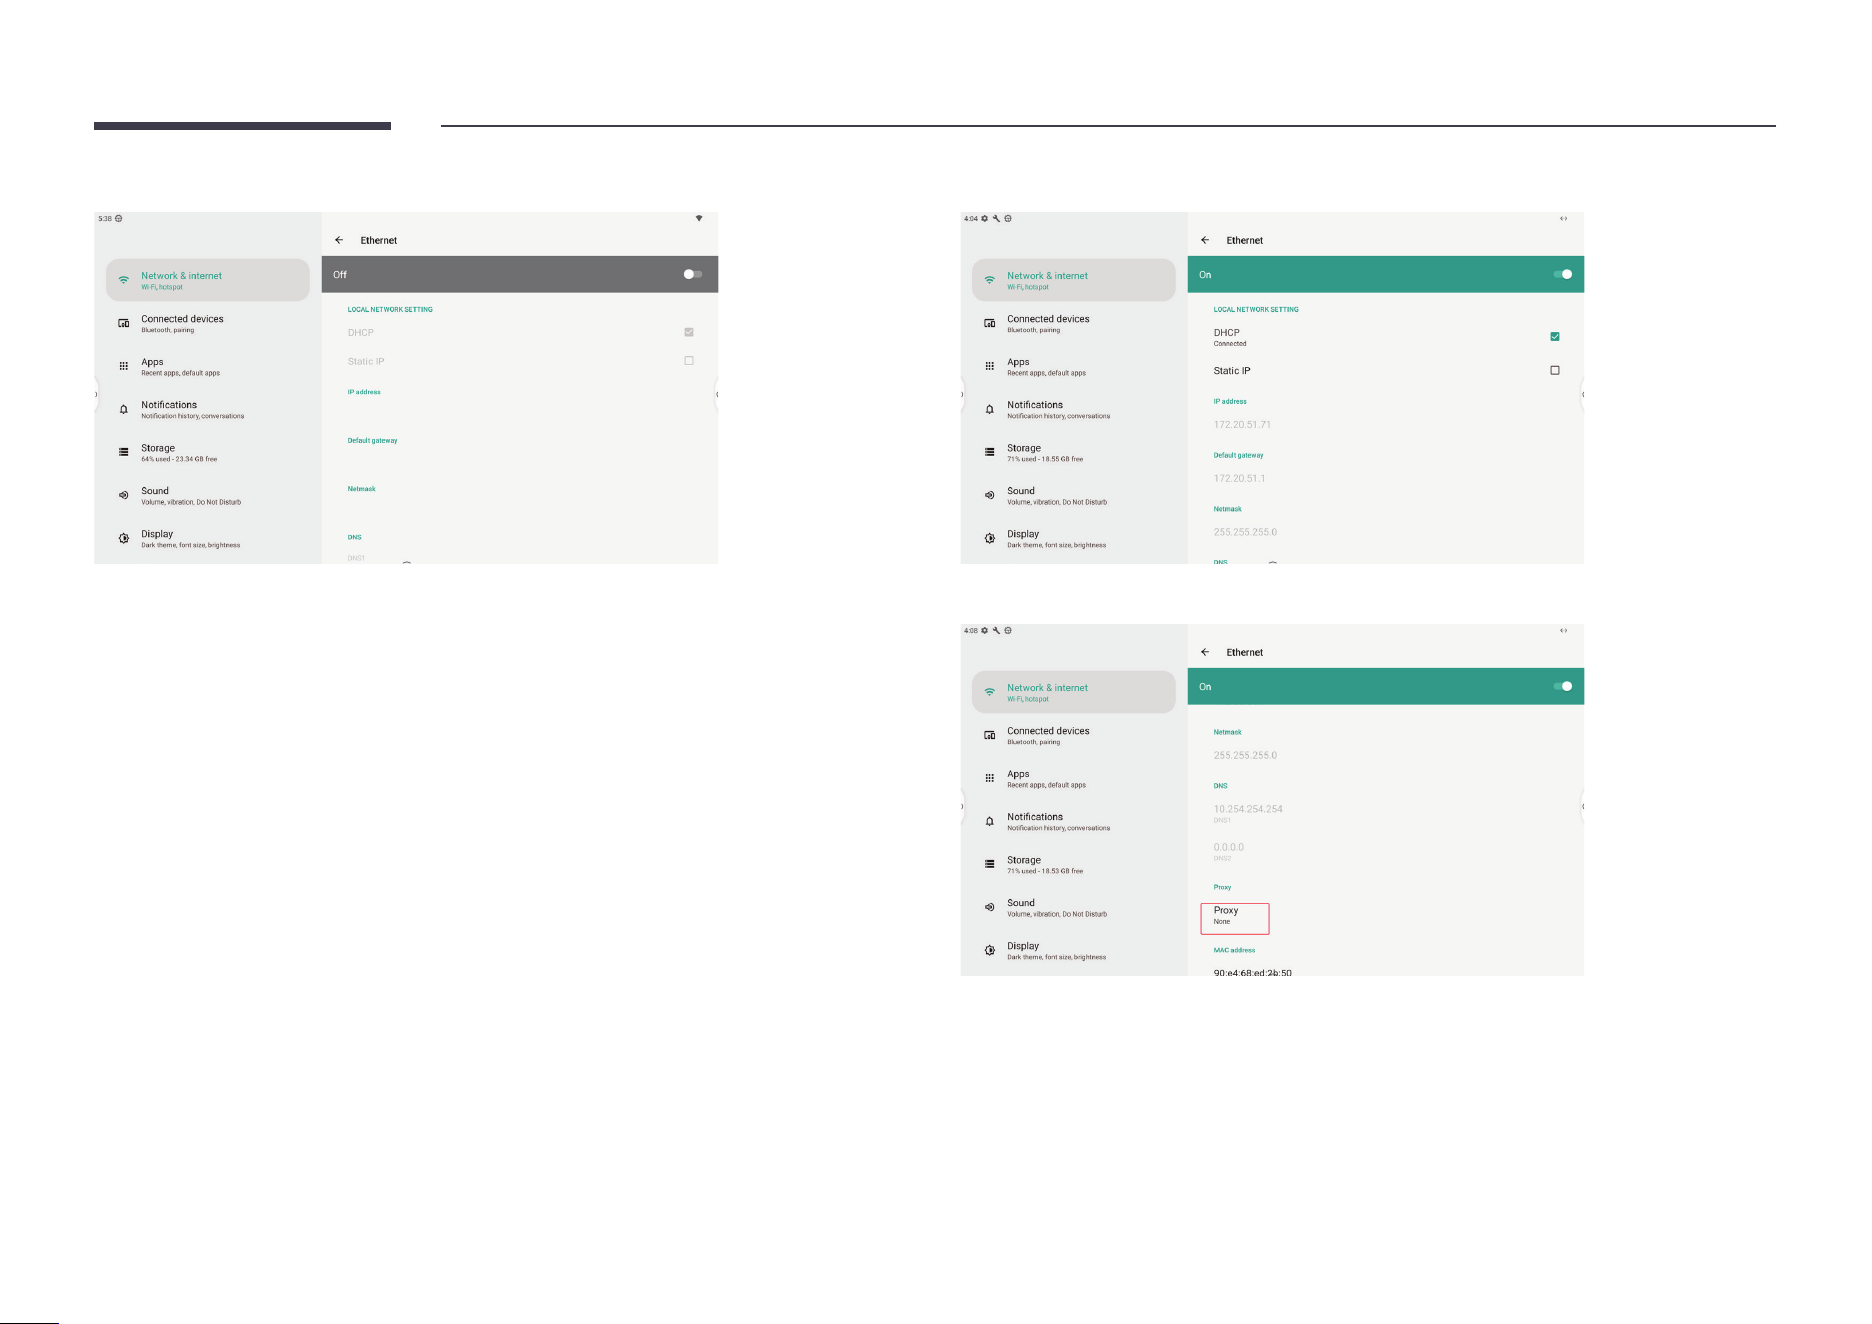
Turn on Ethernet to enable ethernet connection.
*Note: once ethernet is connected, all data will be transmitted via ethernet.
Change to static IP to congure ethernet manually.
You can change proxy settings under Proxy.
41
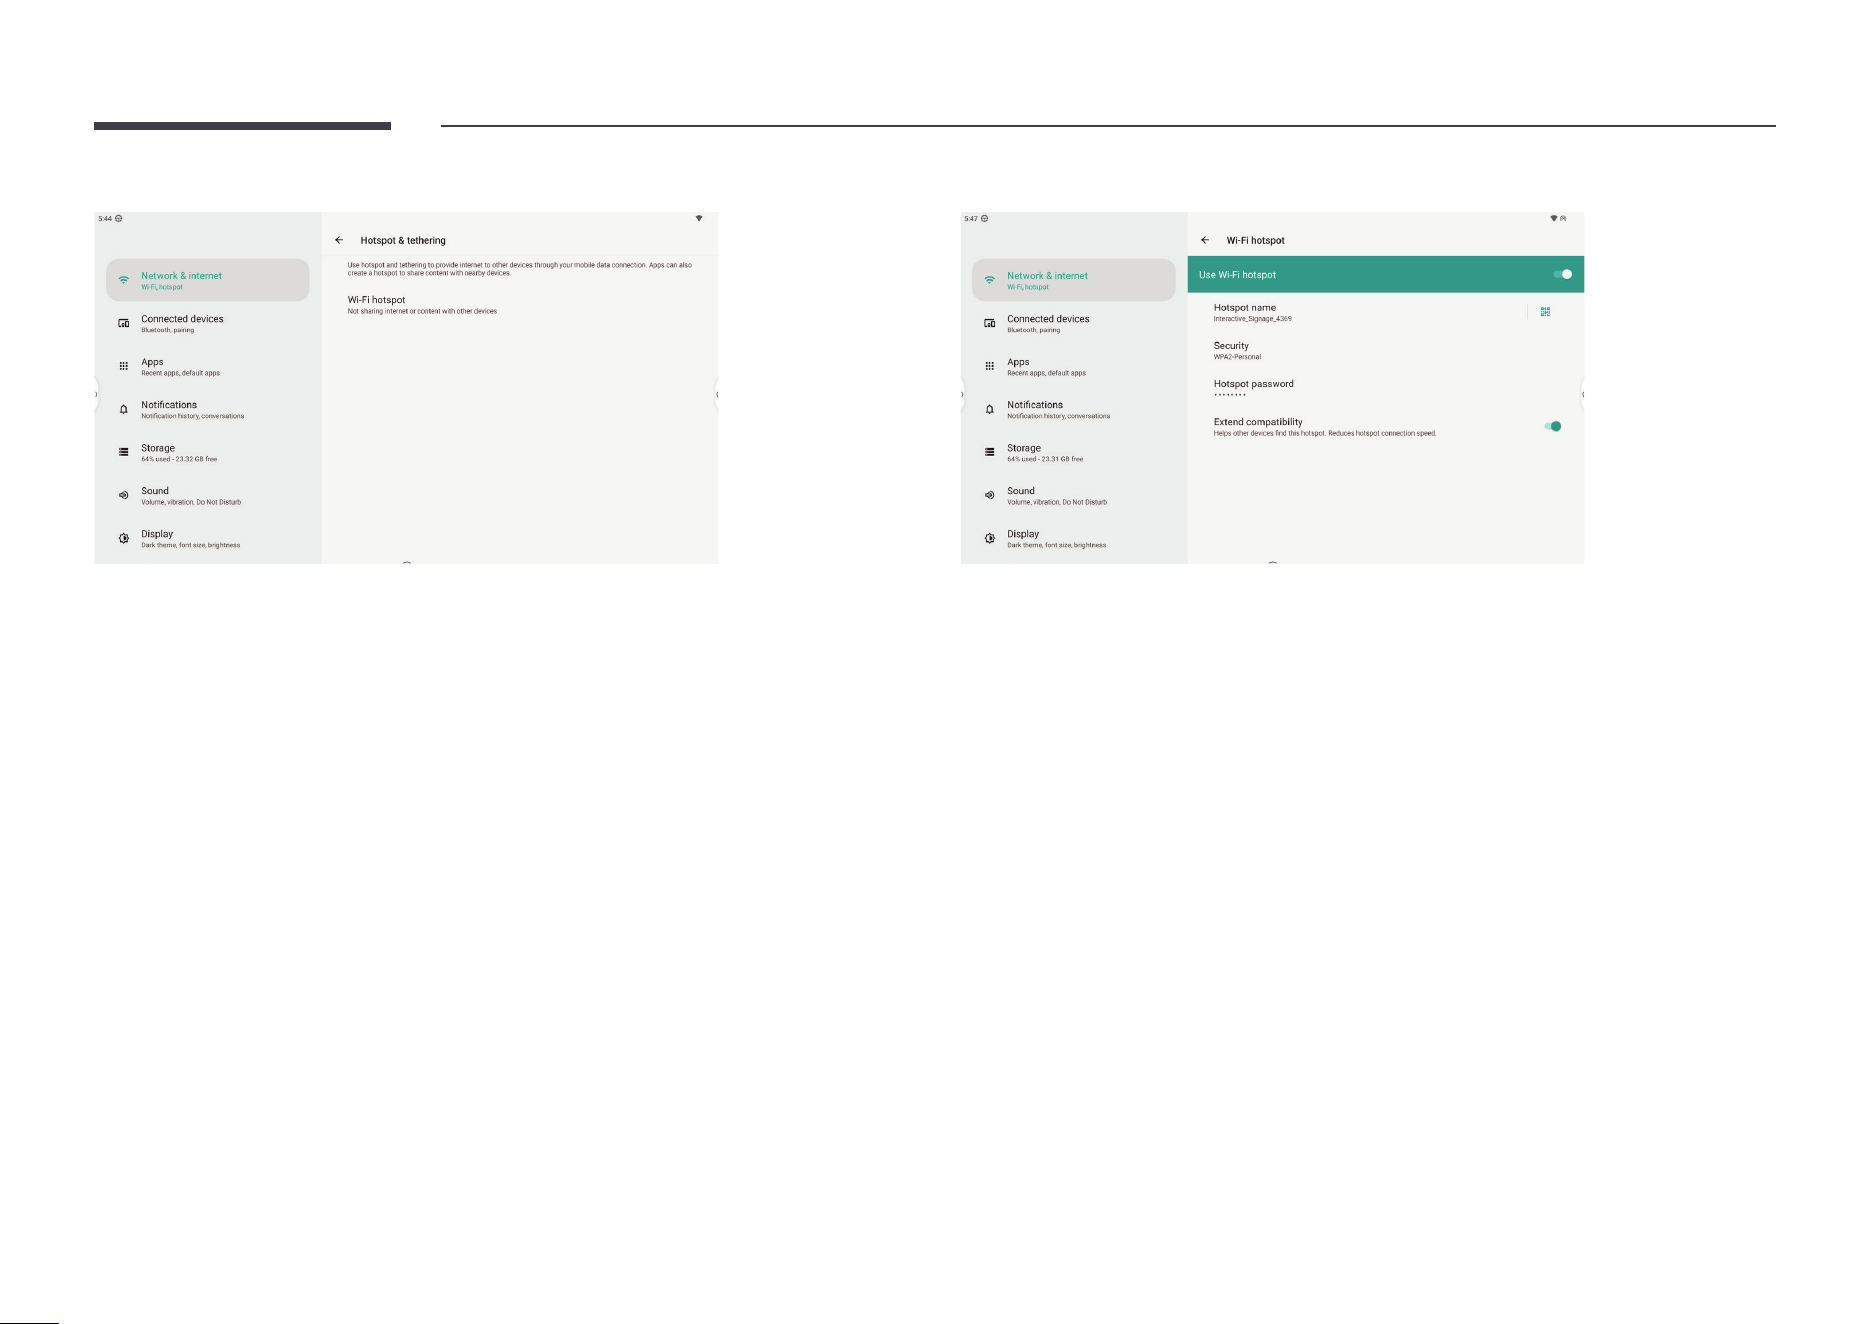
Turn on the Wi-Fi hotspot to share Internet from the IFP to other devices. You can change hotspot settings including security type and password.
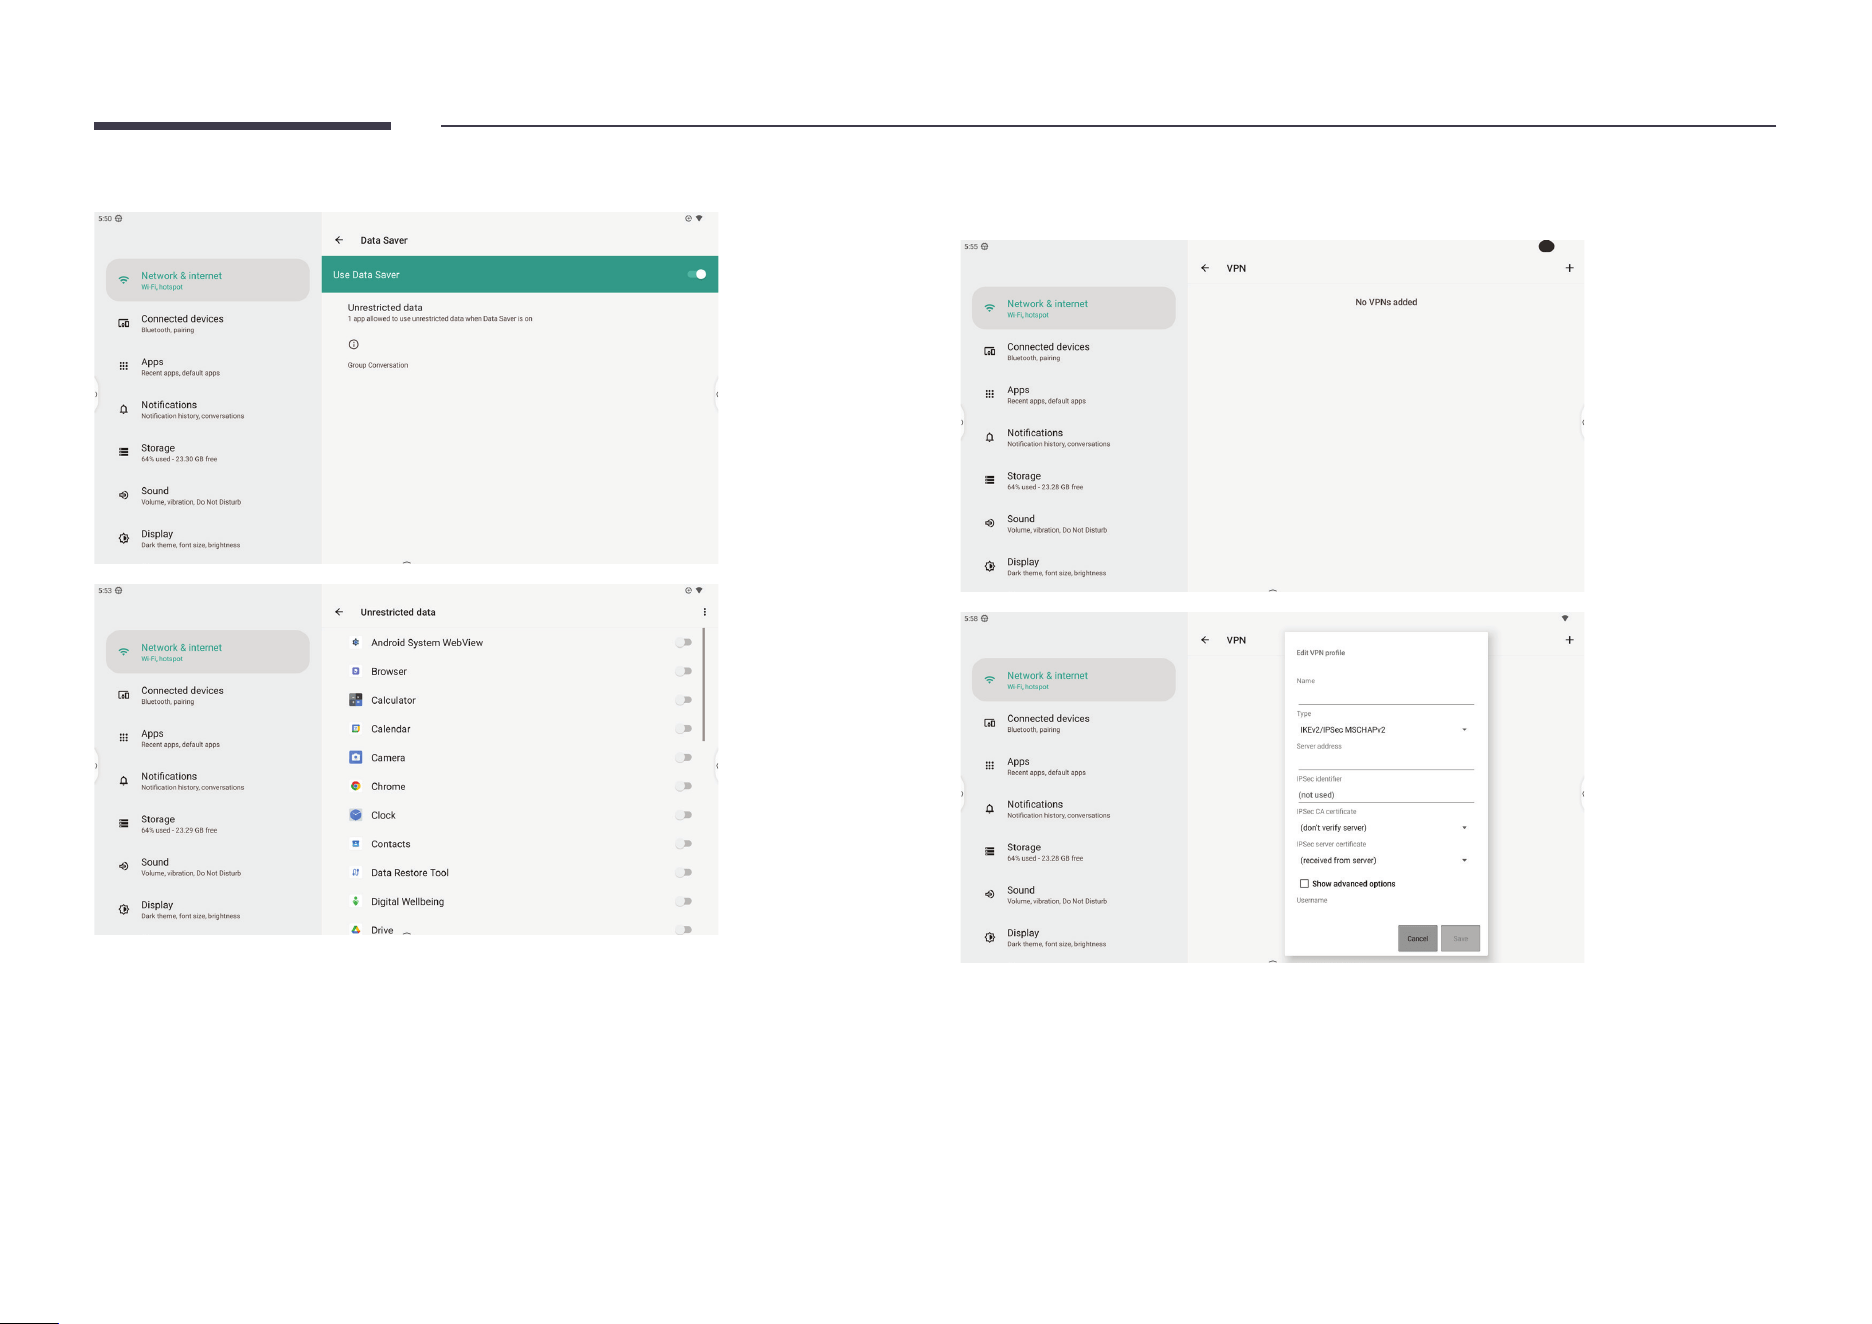
42
Turn on Data Saver to prevent apps from using unrestricted data, to avoid data usage limits. You can congure the system VPN in VPN settings. Click the + icon to add a VPN
conguration.
43
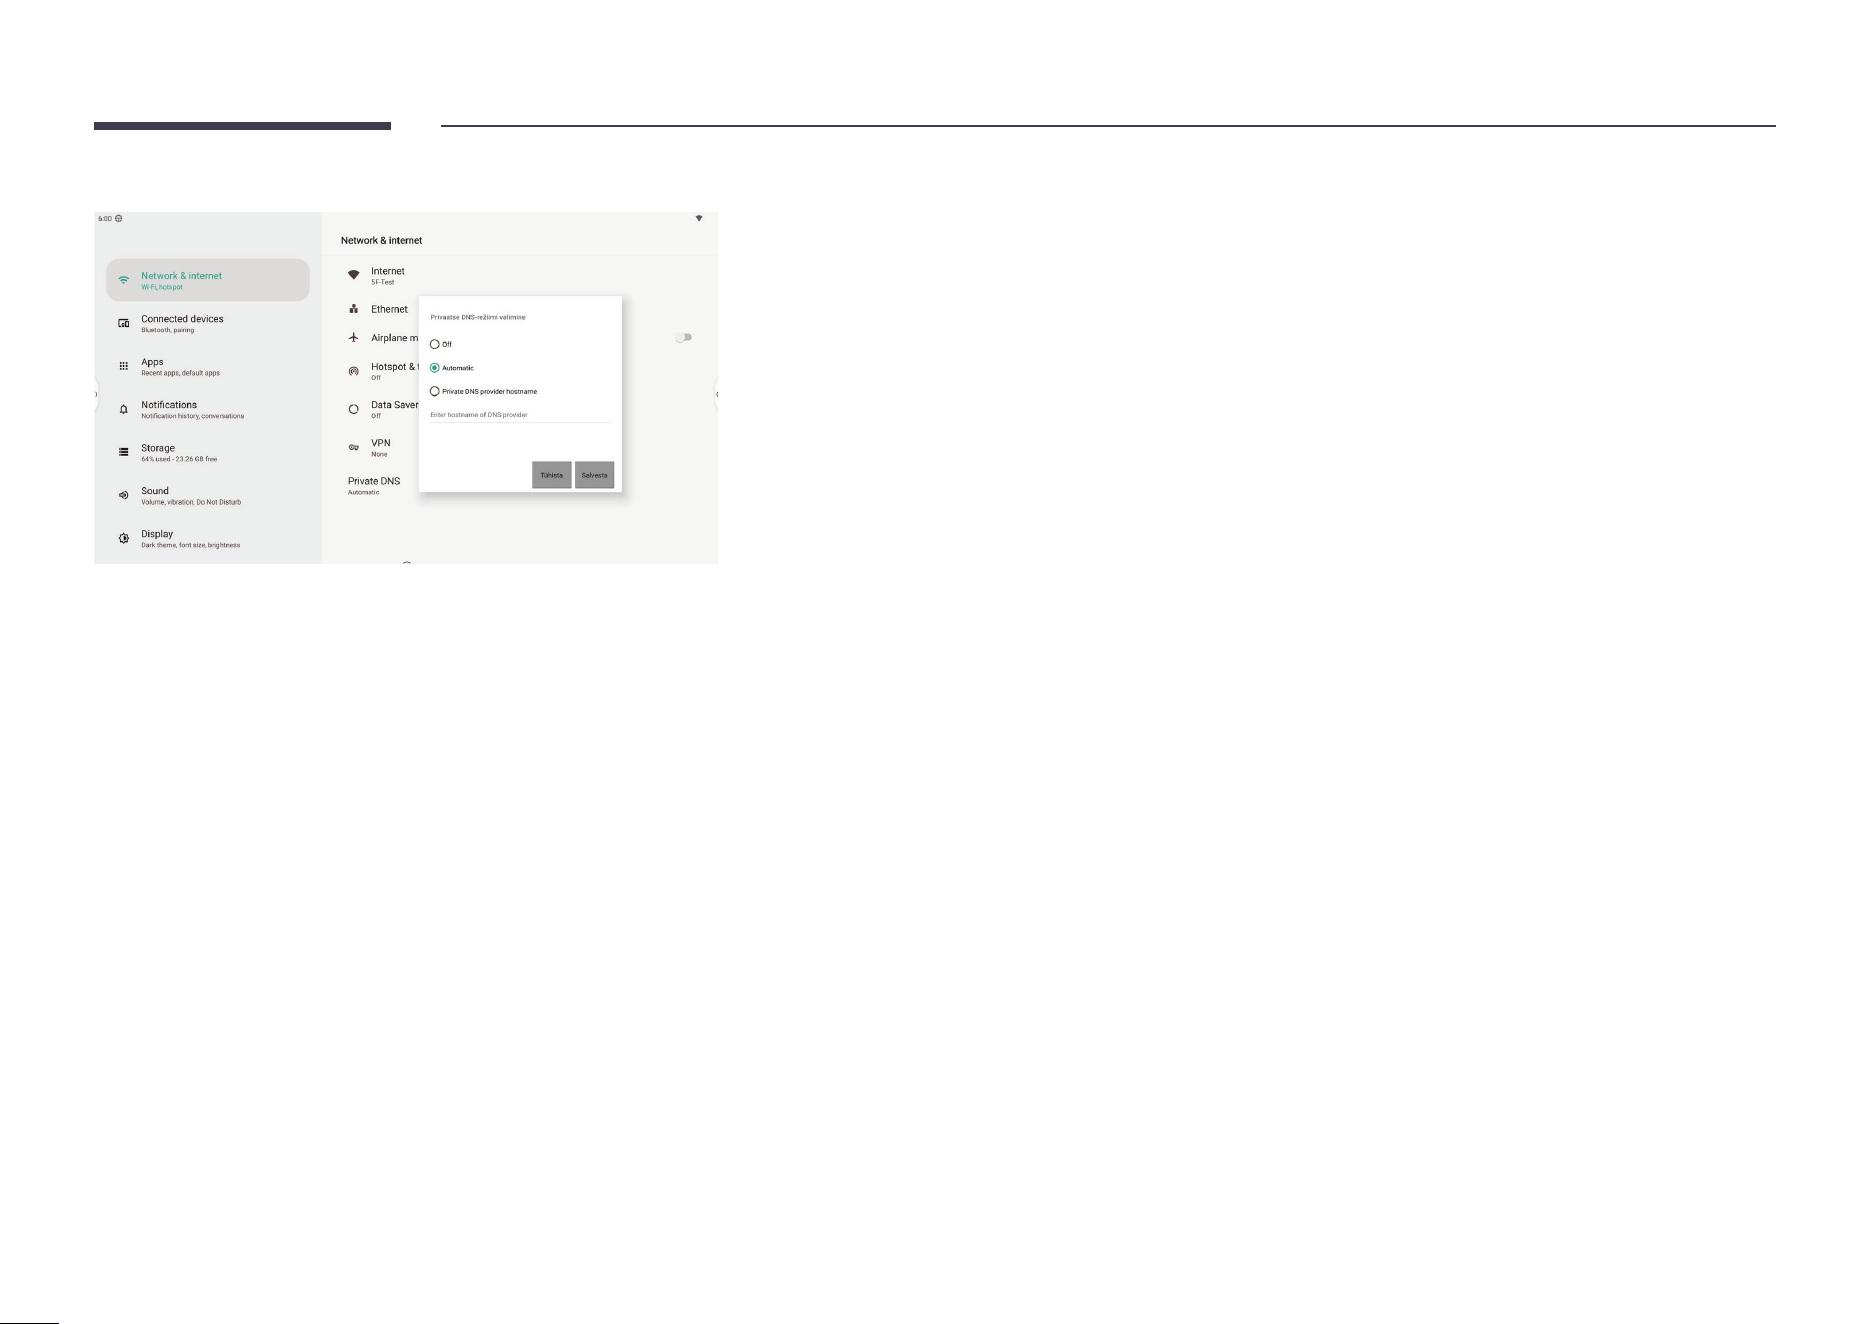
You can congure DNS settings on the Private DNS page.
44
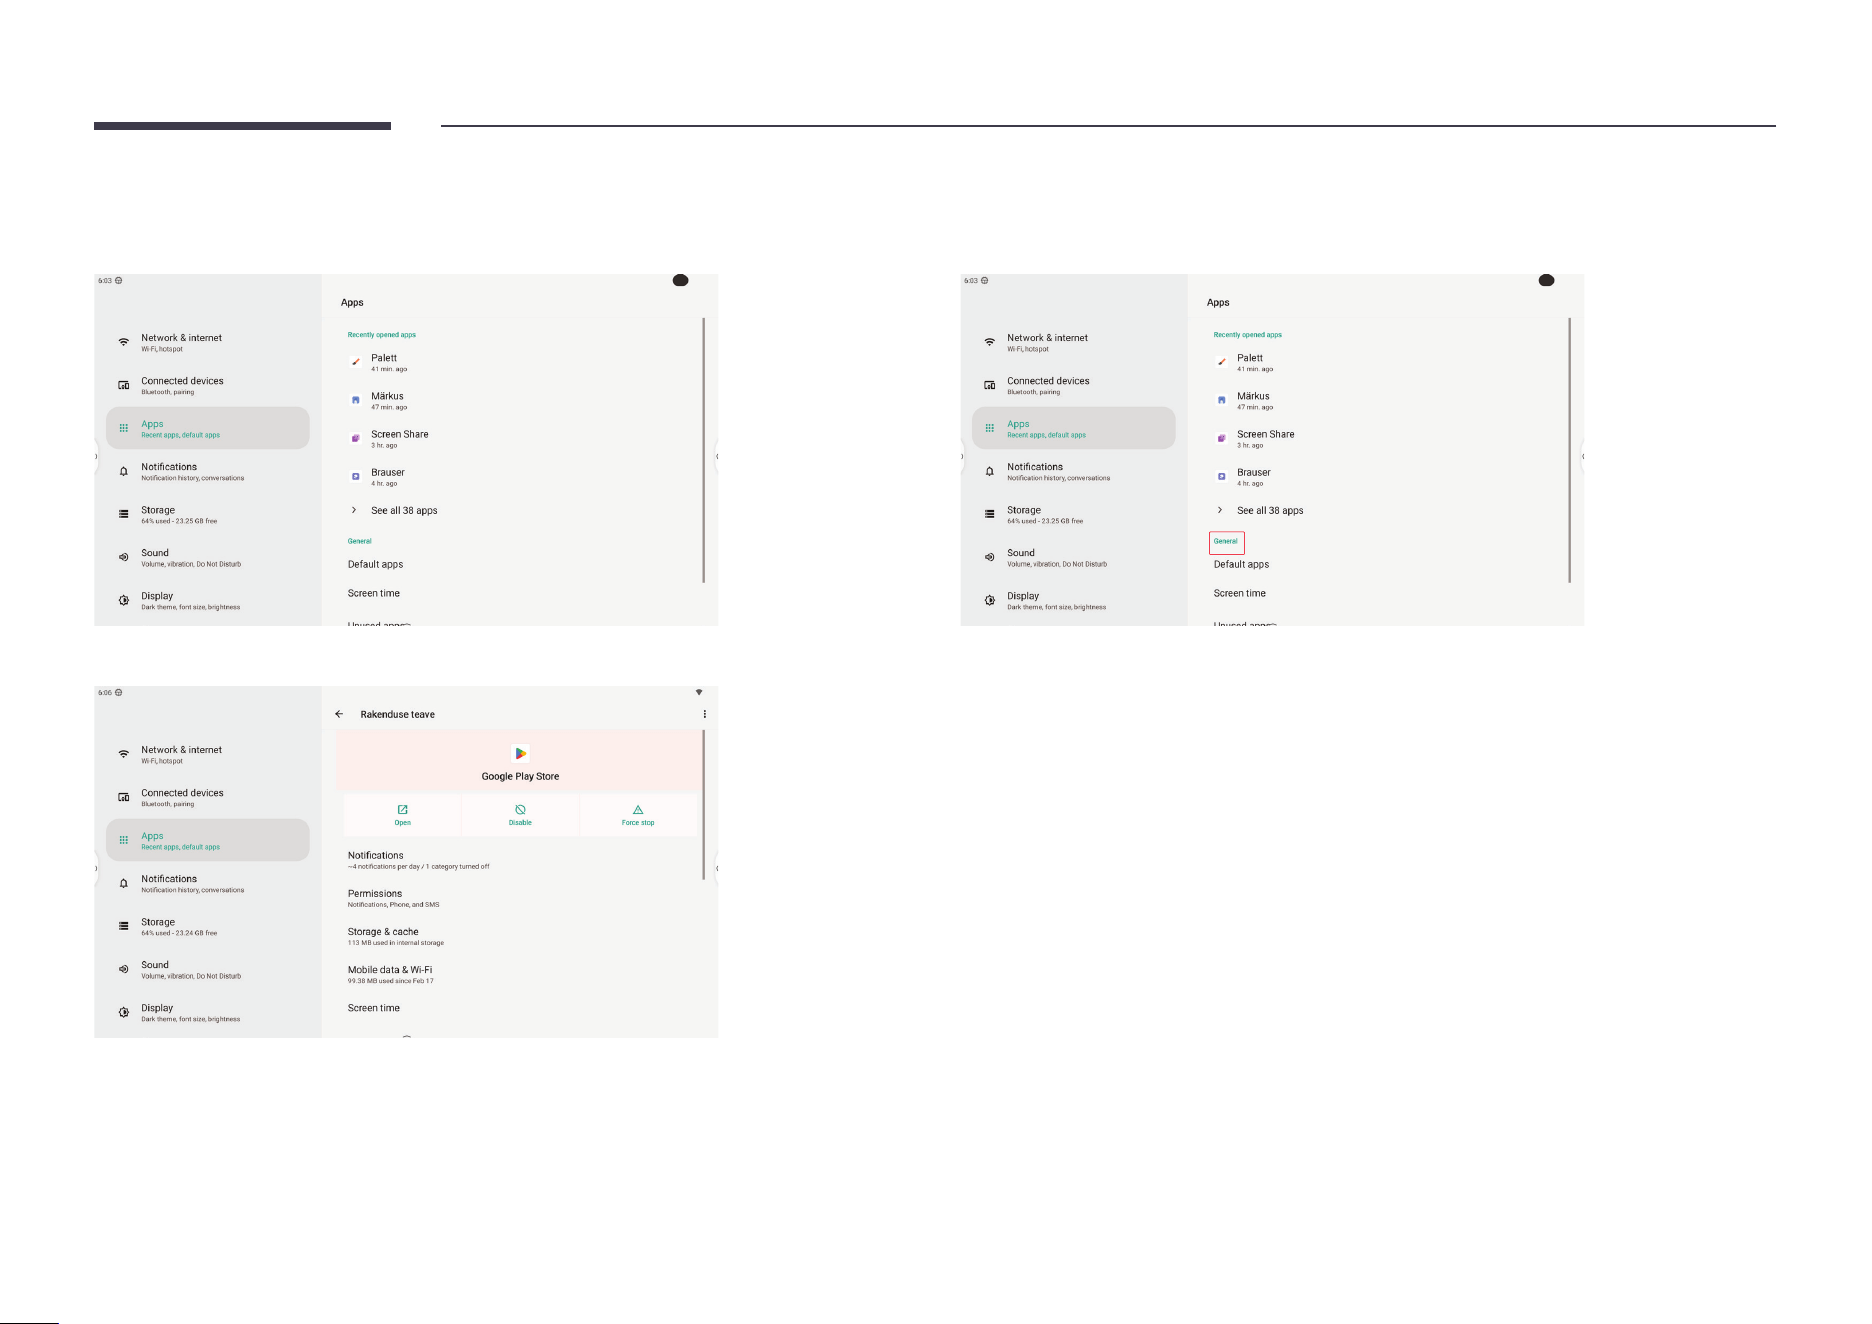
Apps
Manage app settings in Apps.
Select an app to view and change settings for that app.
Change general settings for apps under General.
45
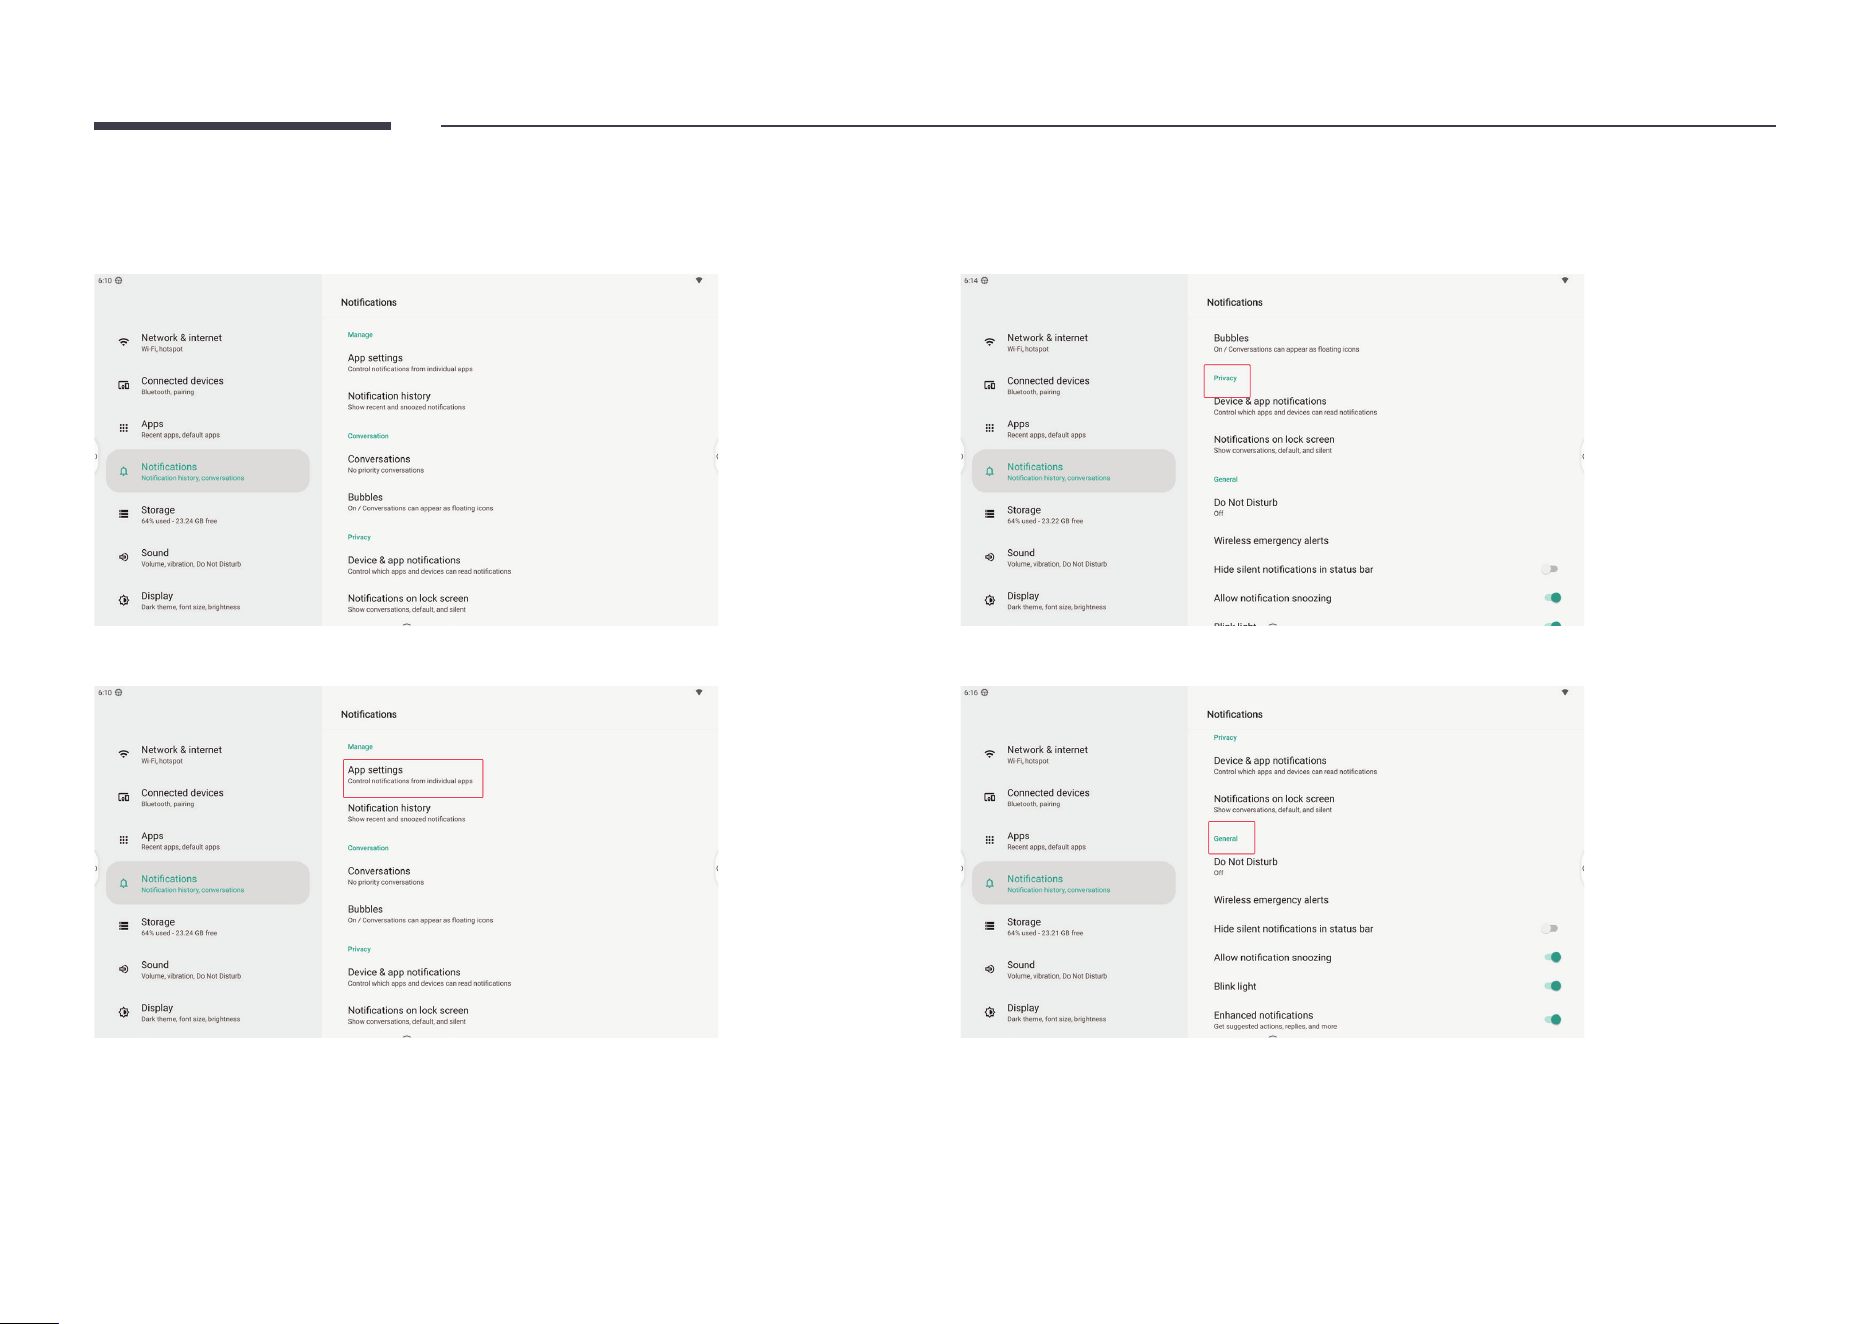
Notications
You can manage app notications and system notications in Notications.
Manage notications for each app in App settings.
Manage Privacy settings to protect your personal privacy.
Manage general system notication settings in General.
46
Storage
See the total/free space on your device and manage the storage space in Storage.
Turn on Storage Manager to allow auto clearing photos and videos regularly.
Go to Free up space to check removable items and clear unused les.
View how much storage each type of le takes in the list.
Click on an item to see that type and decide which to delete.
47
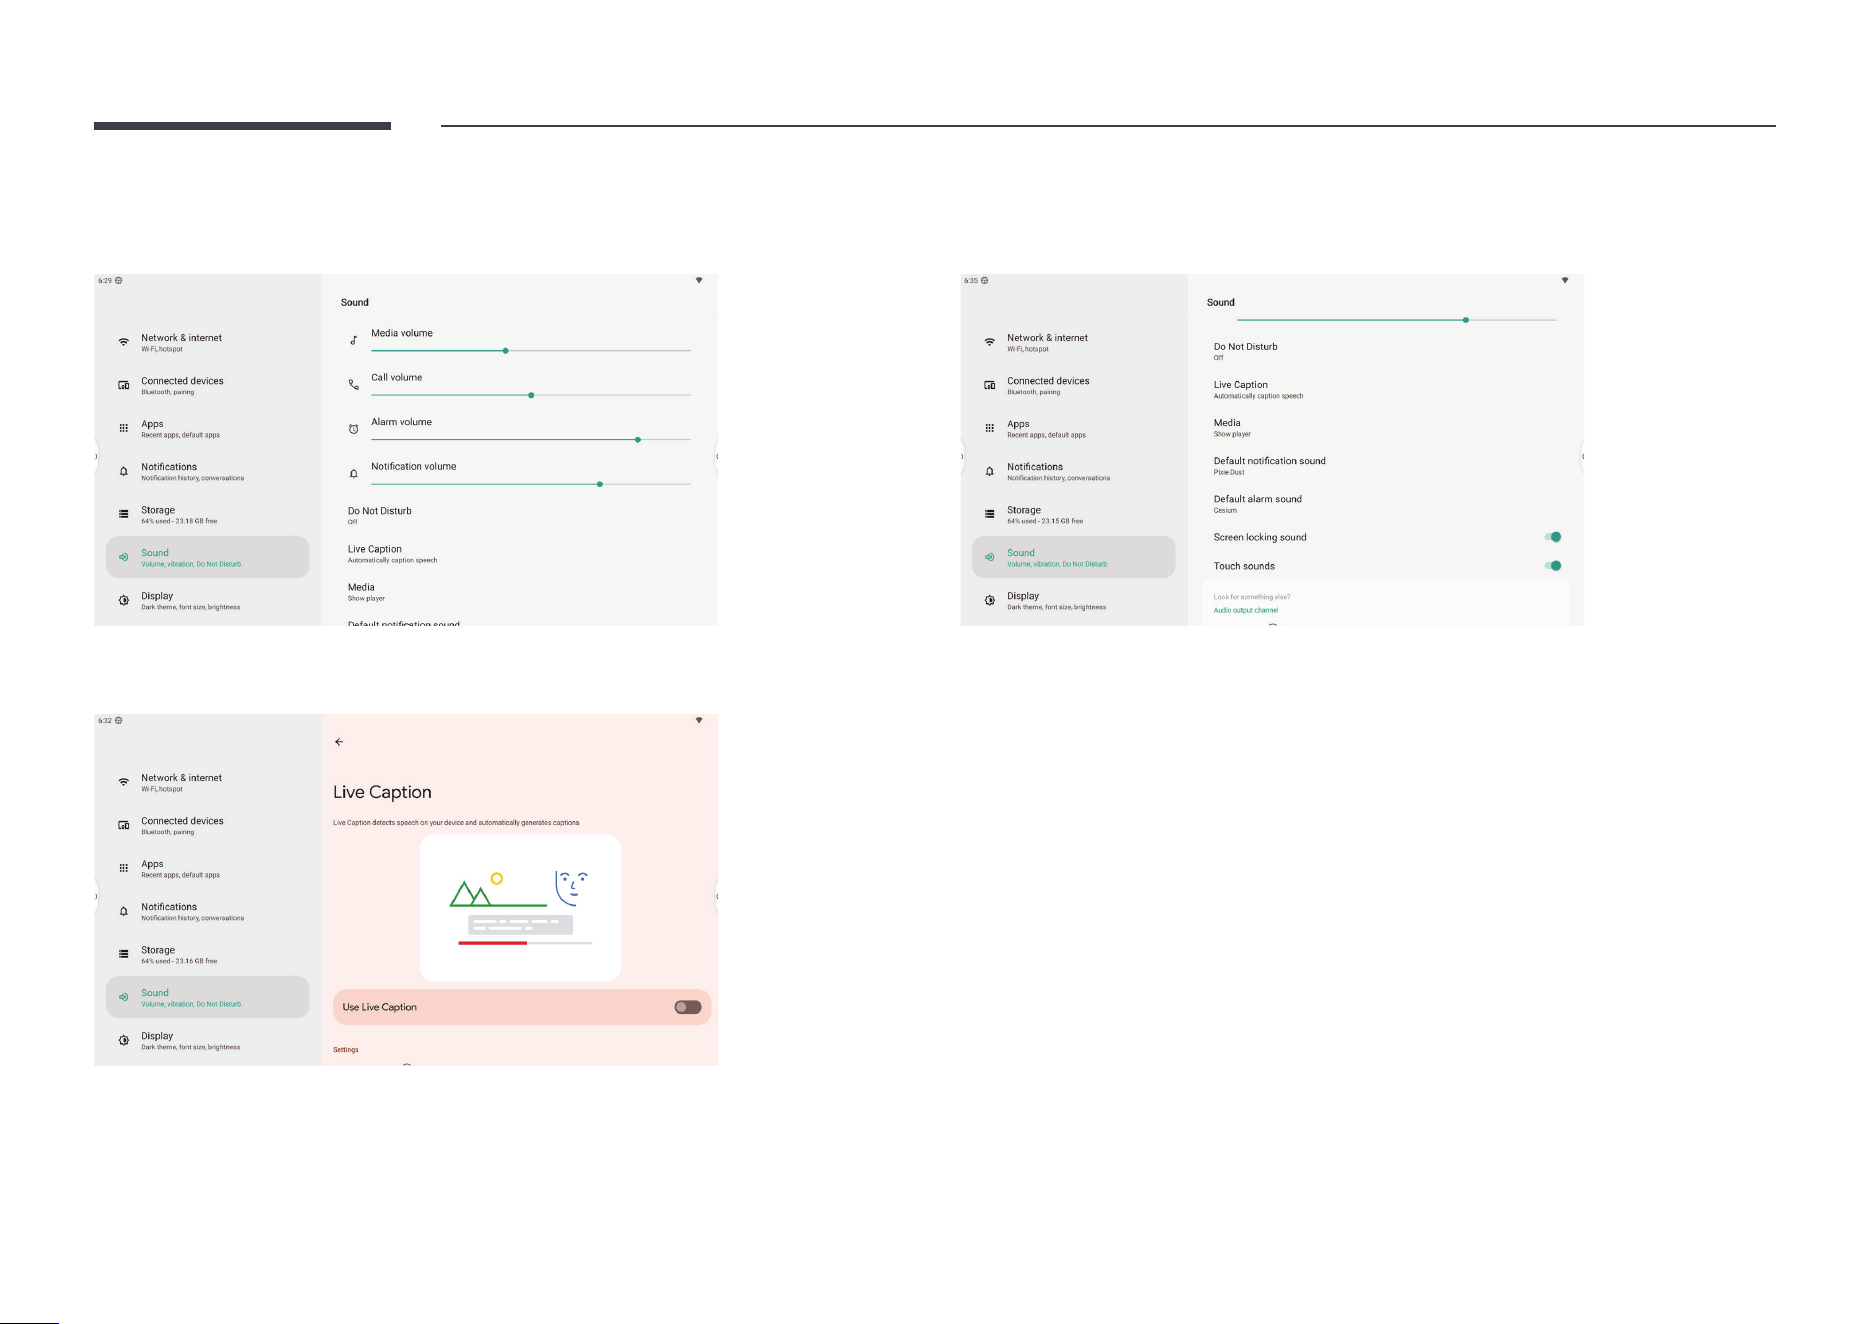
Sound
Adjust volume and change other audio settings in Sound.
You can enable Live Caption by Google, which helps generate captions when speech is
detected.
You can change other sound preference settings in the list.
48
Display
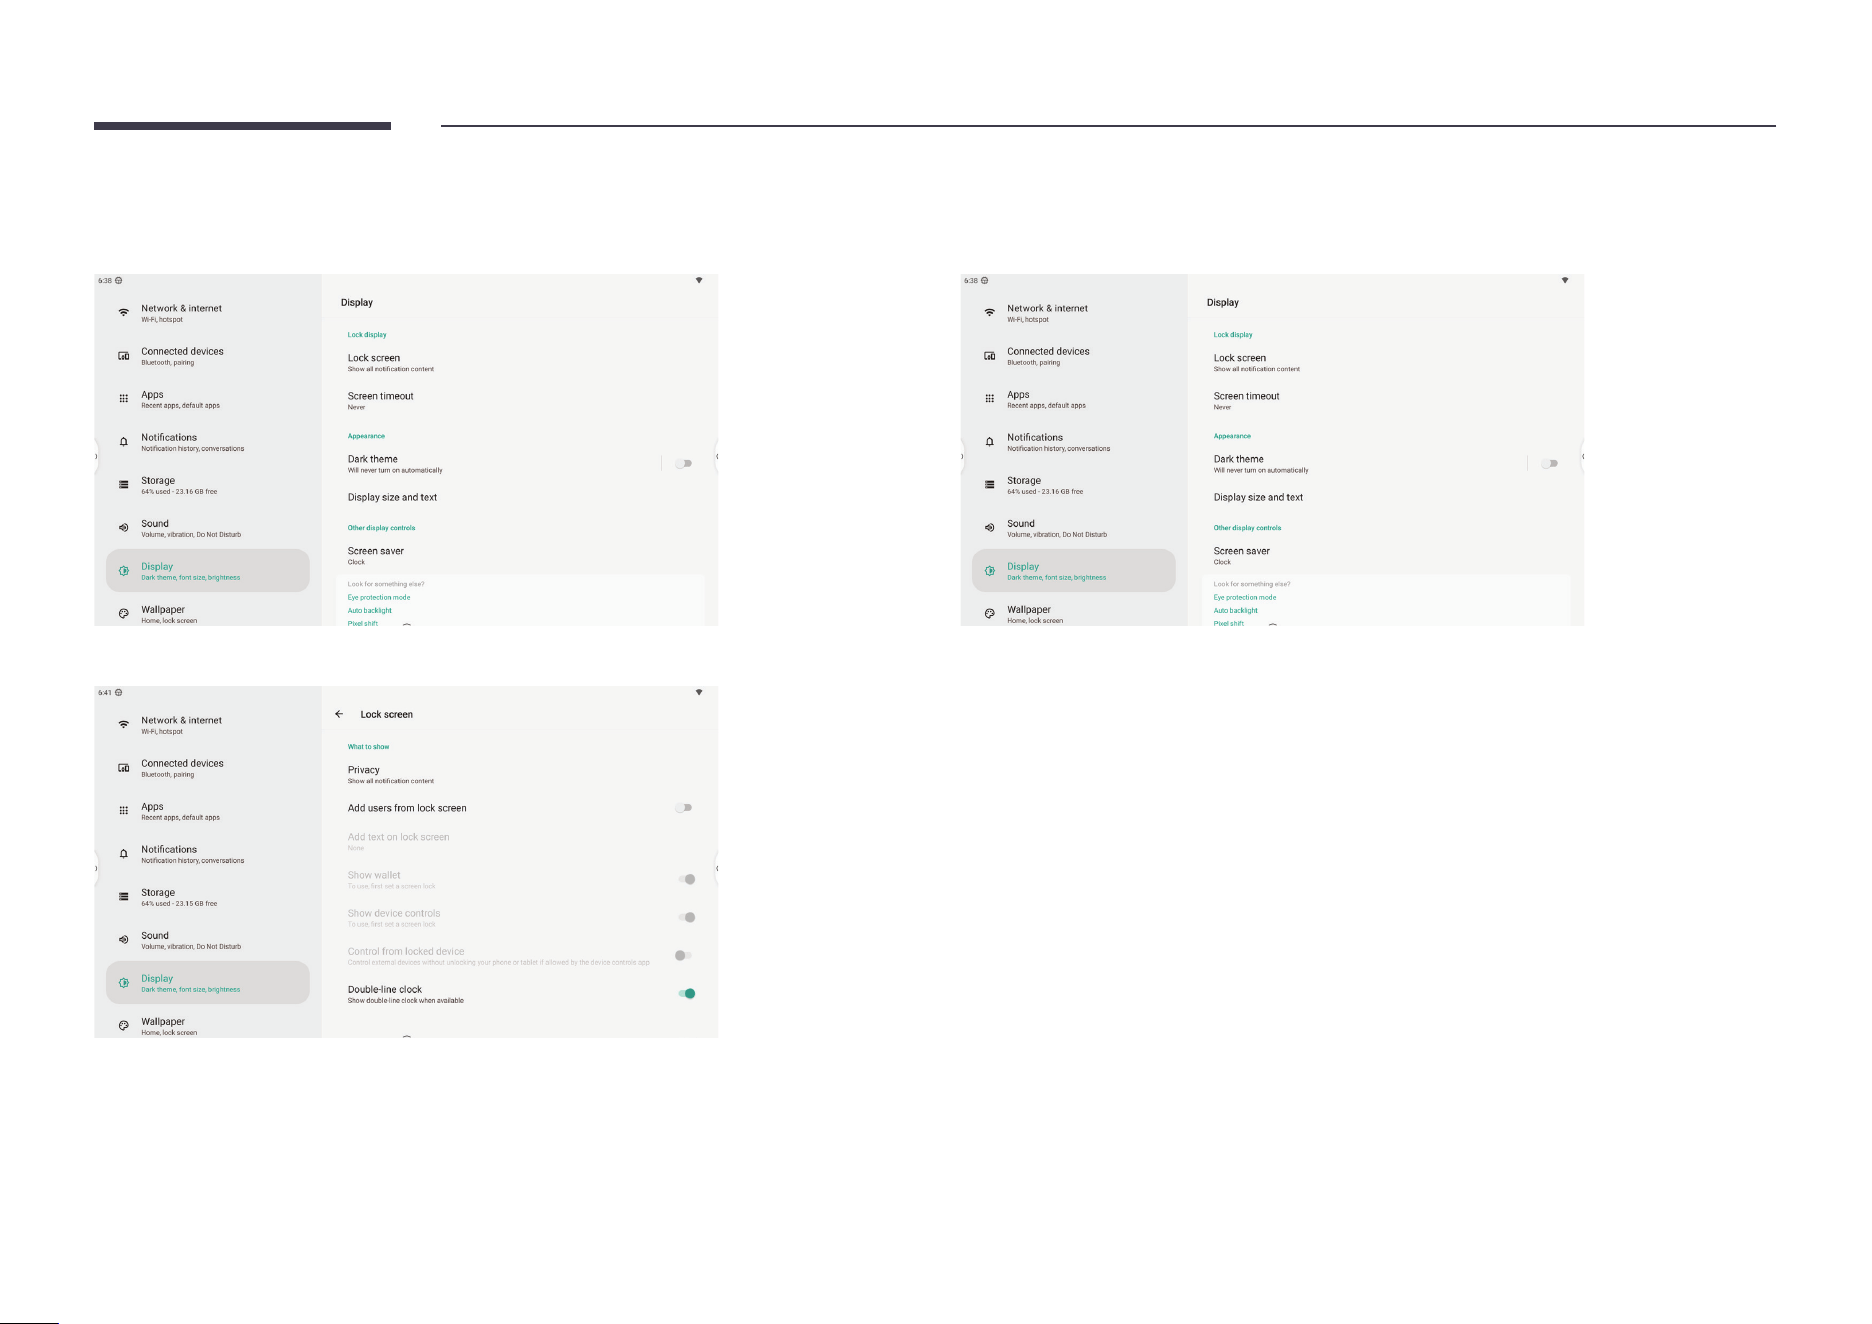
You can change display settings in Display.
Choose what to show on the lock screen in Lock screen.
Decide when to turn off the device screen while inactive in Screen timeout.
49
Change the system UI to dark mode by opening Dark theme.
You can also set the schedule to turn on dark mode.
Change the display size and font size to suit your preferences.
Set screen saver type and activation timing in Screen Saver.
The screen saver will be activated when the system is locked.
50
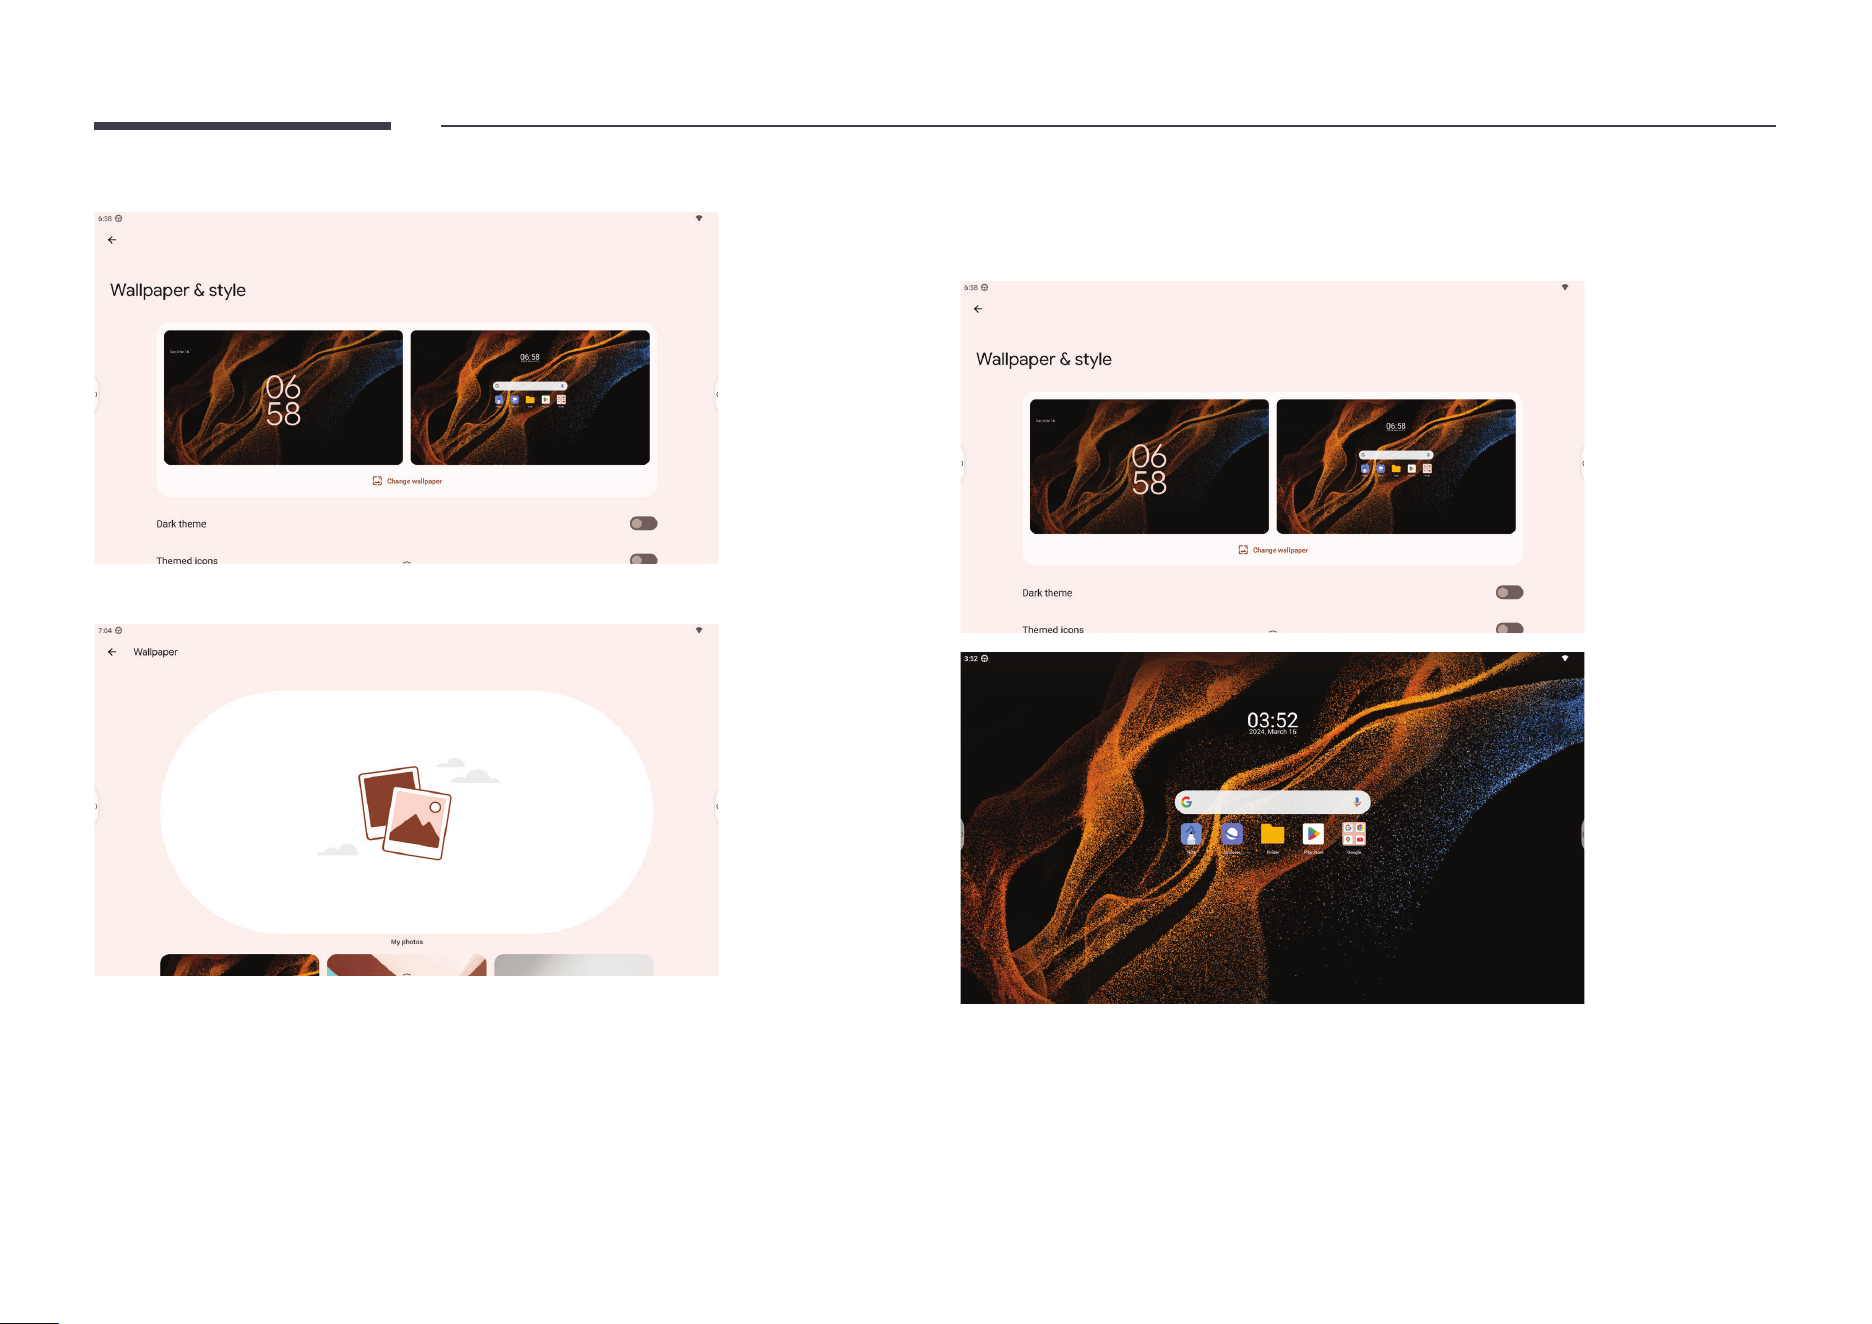
Set your favorite wallpaper in Wallpaper.
You can set different wallpapers for the home screen and lock screen.
You can also enable dark mode here.
Themed icons is a beta feature by Google. When it is enabled, all Google apps will have the
same color.
51
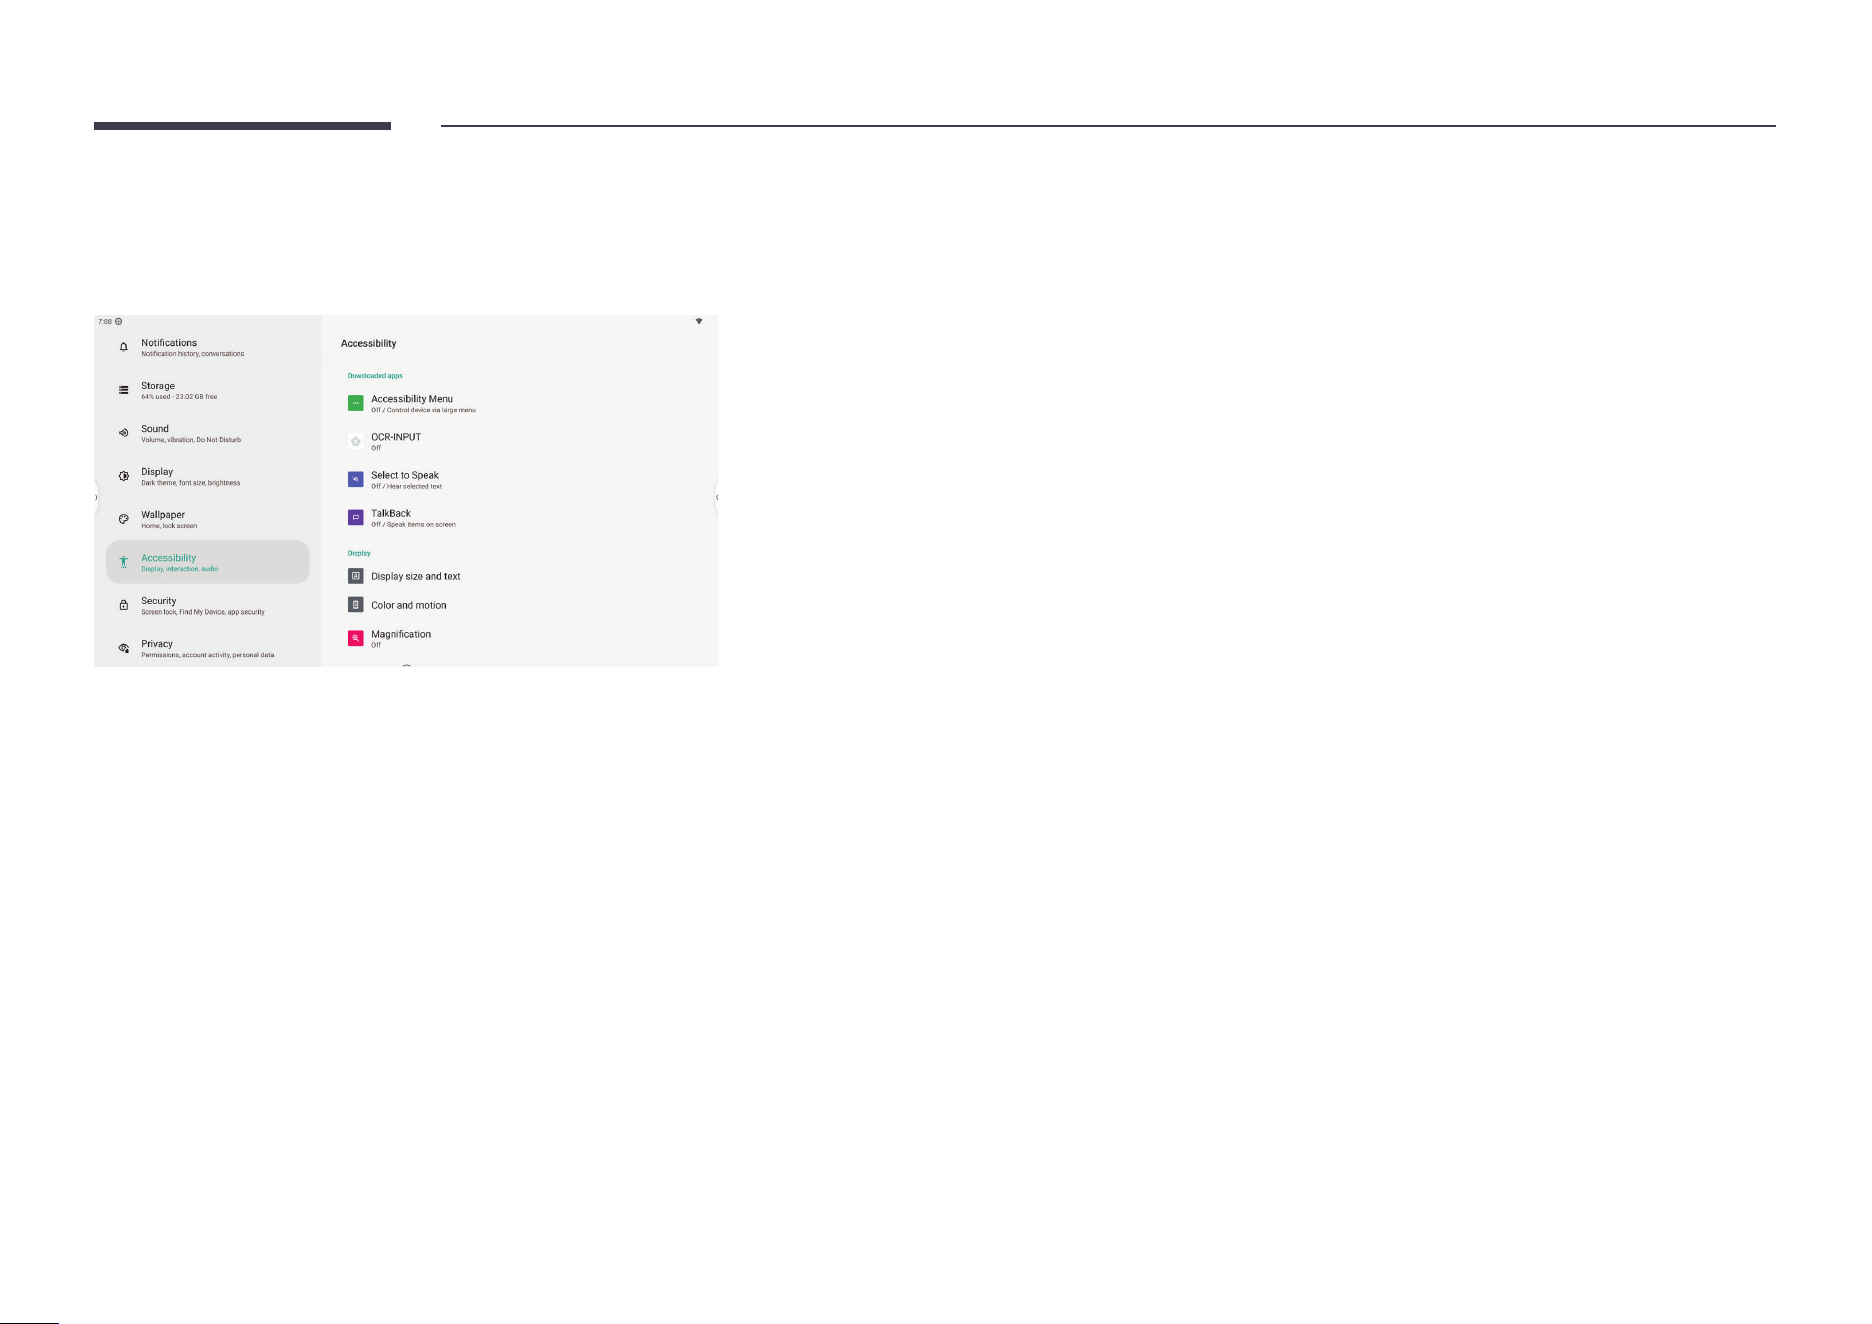
Accessibility
Manage all auxiliary functions for disabled users in Accessibility.
Accessibility features from installed apps will be shown rst.
52
Security
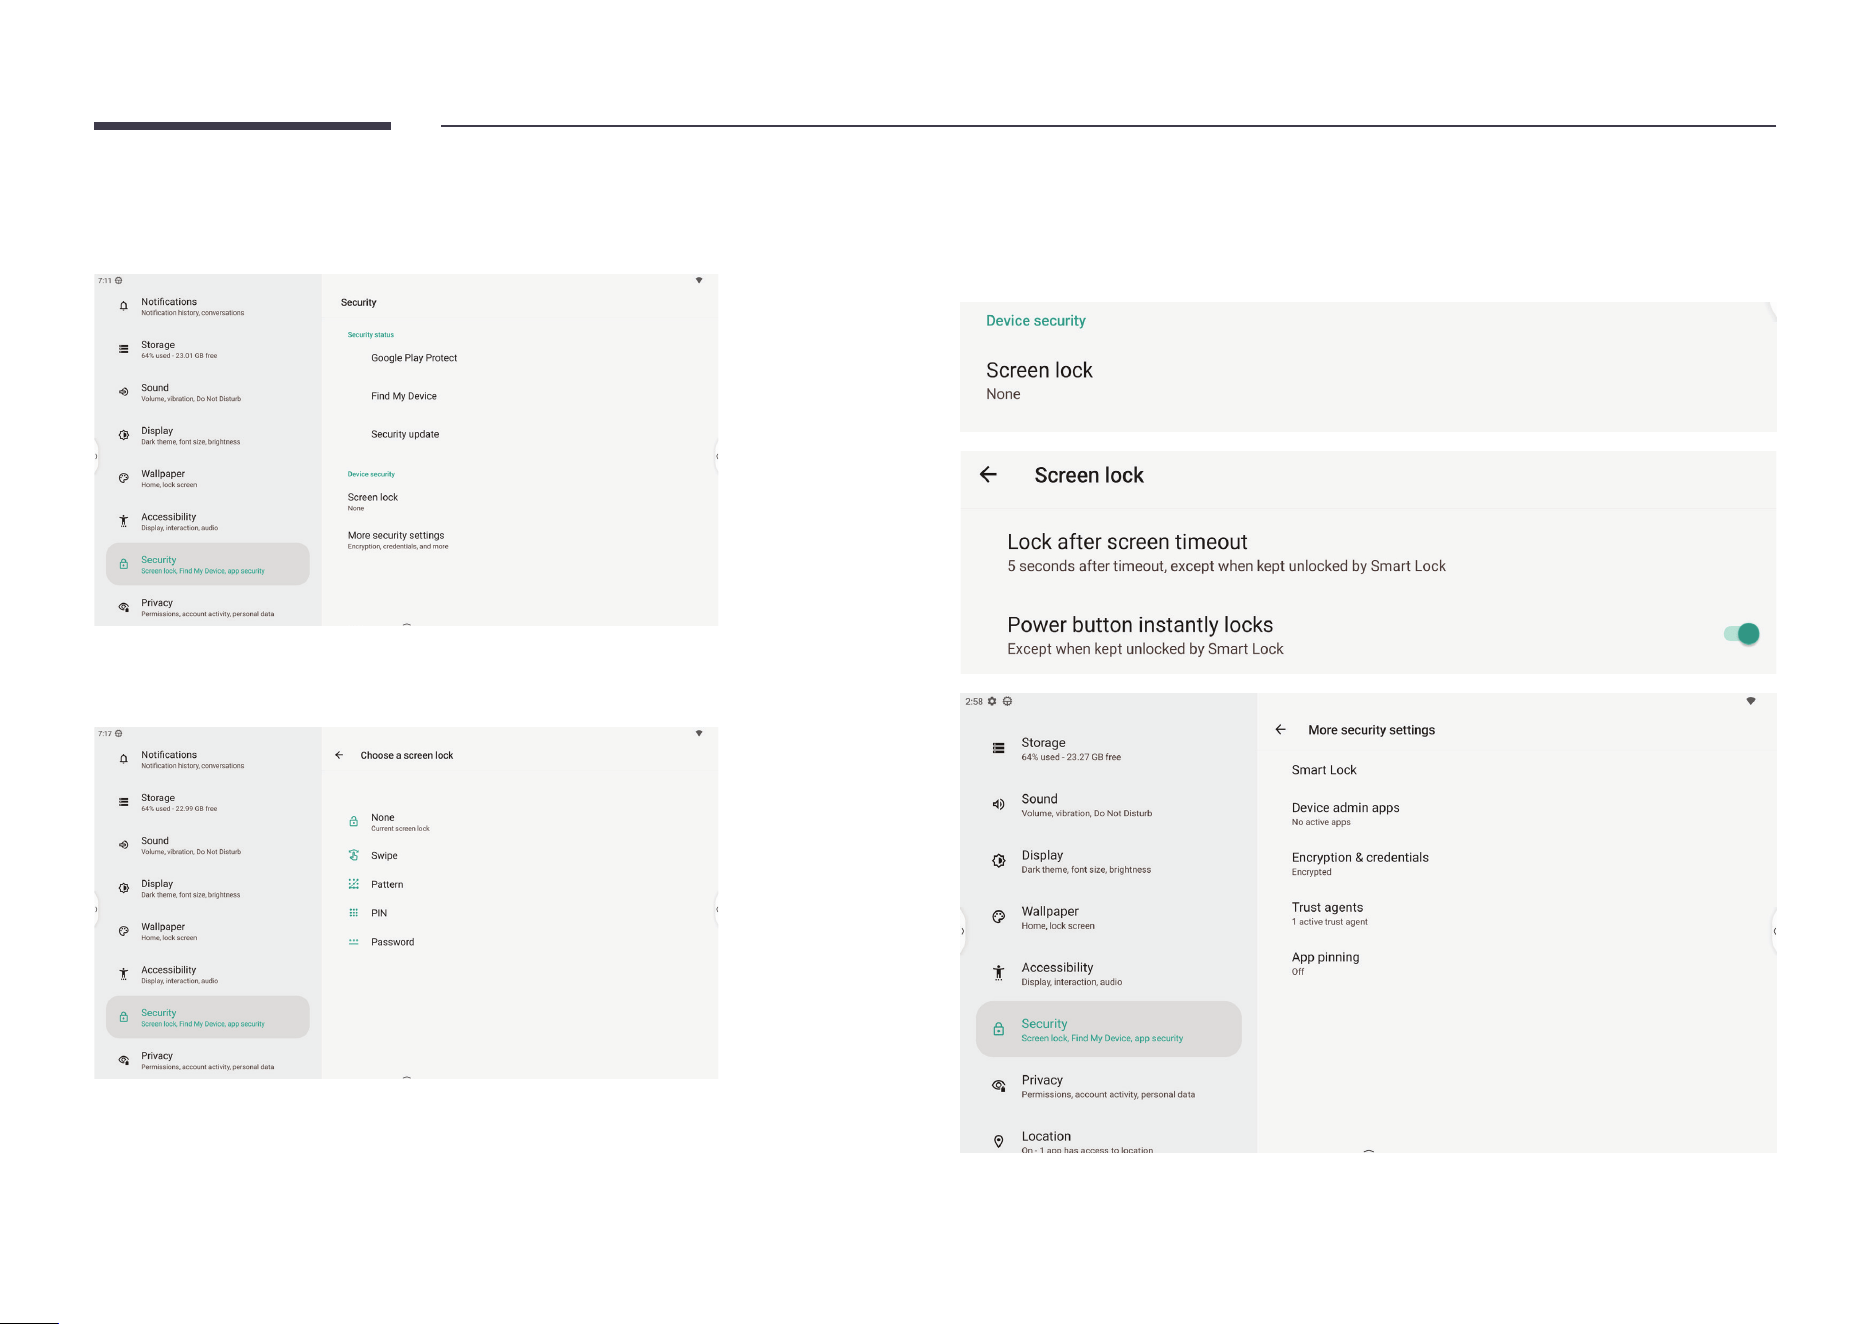
Manage all security settings in Security.
Set system screen lock in Screen Lock.
You can set different types of screen lock: swipe/pattern/PIN/password
You can also change screen lock timing and power button behavior by clicking the gear icon
beside this setting item.
53
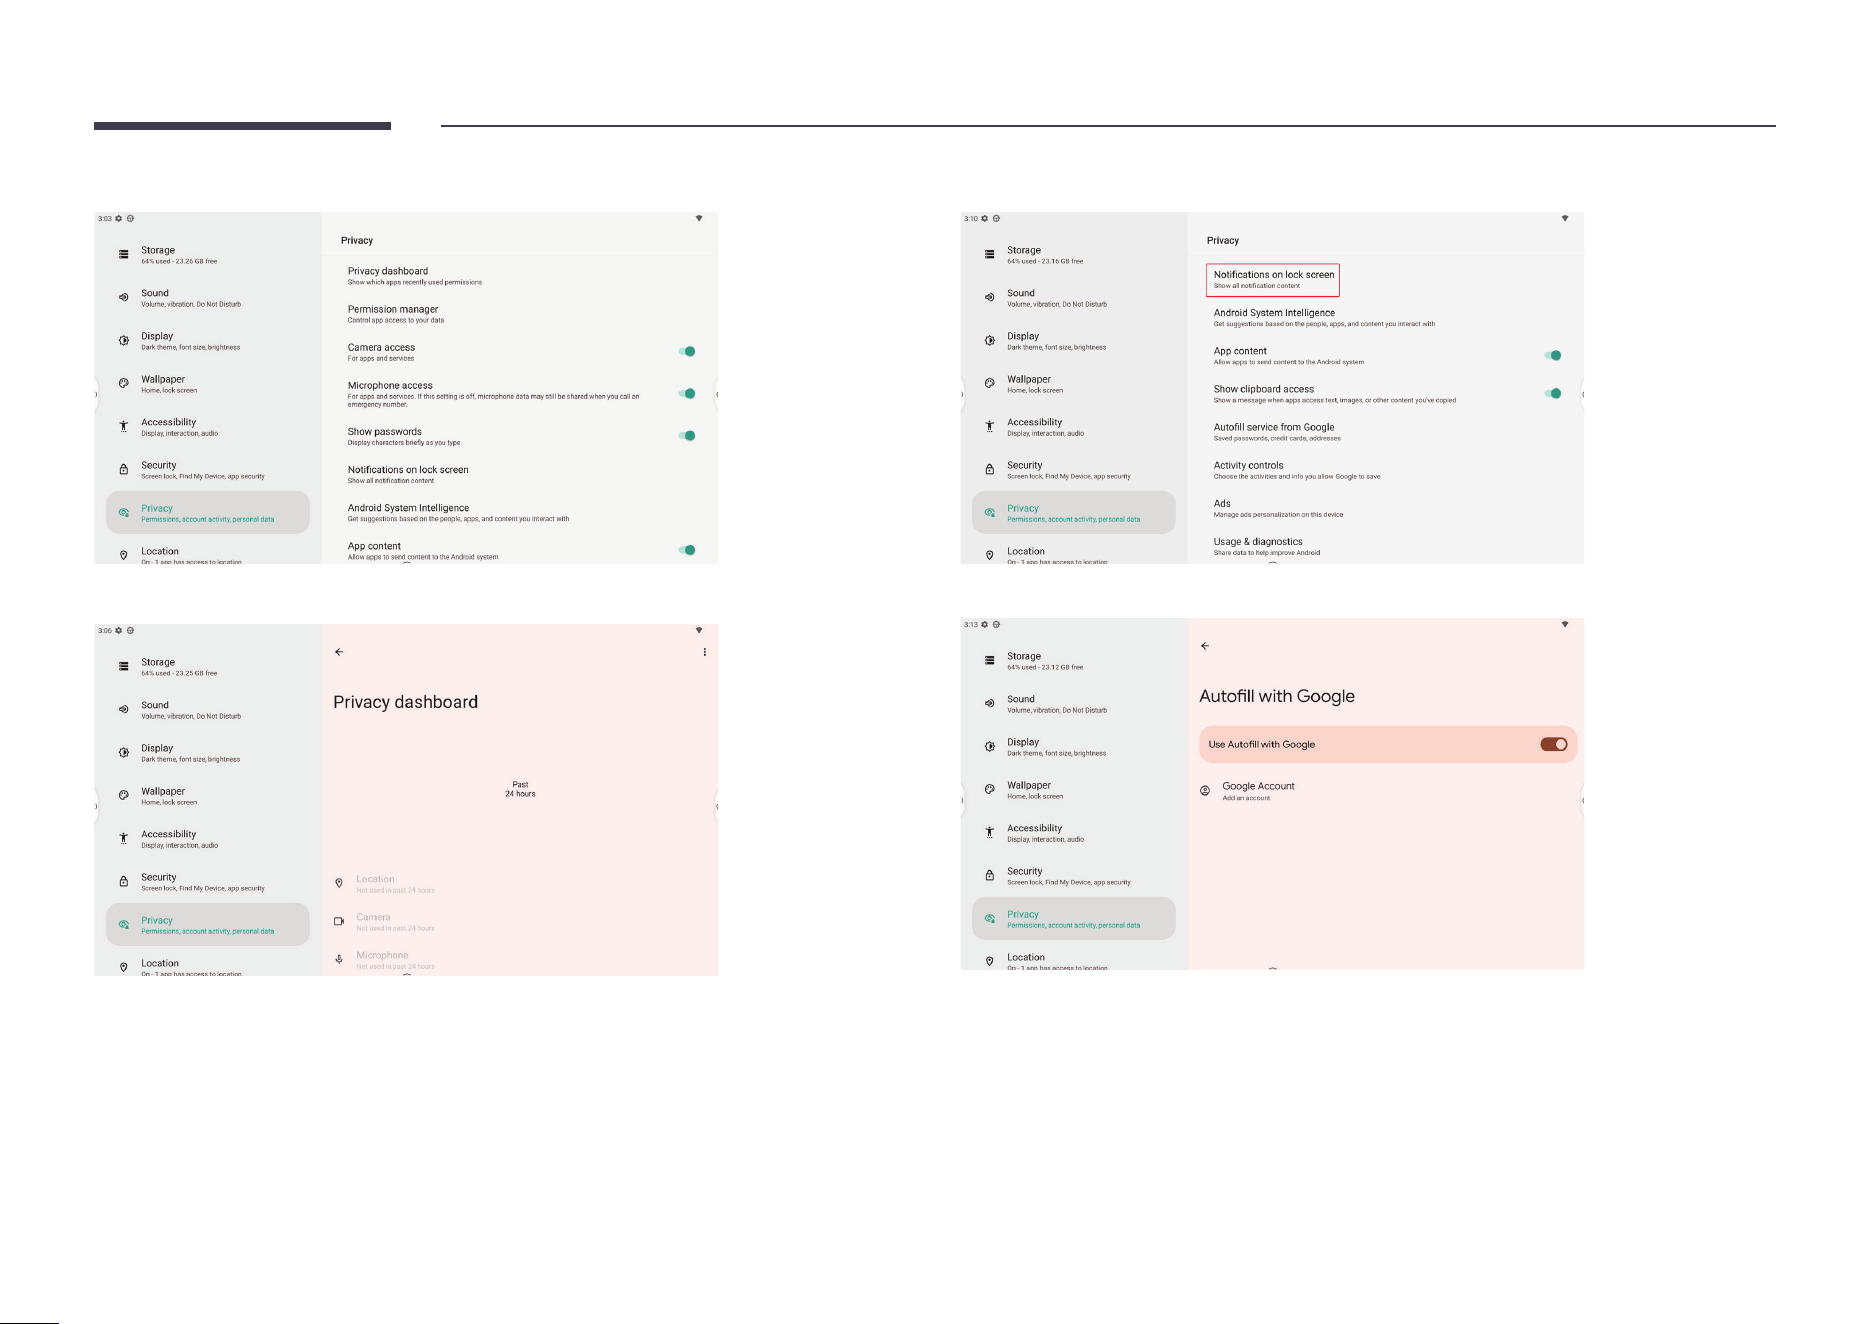
Check privacy usage and manage privacy settings in Privacy.
You can view all privacy You can view all privacy permissions in the Privacy dashboard.
Modify whether to show Notications on the lock screen:
View and manage all Google account autoll services.
54
Location
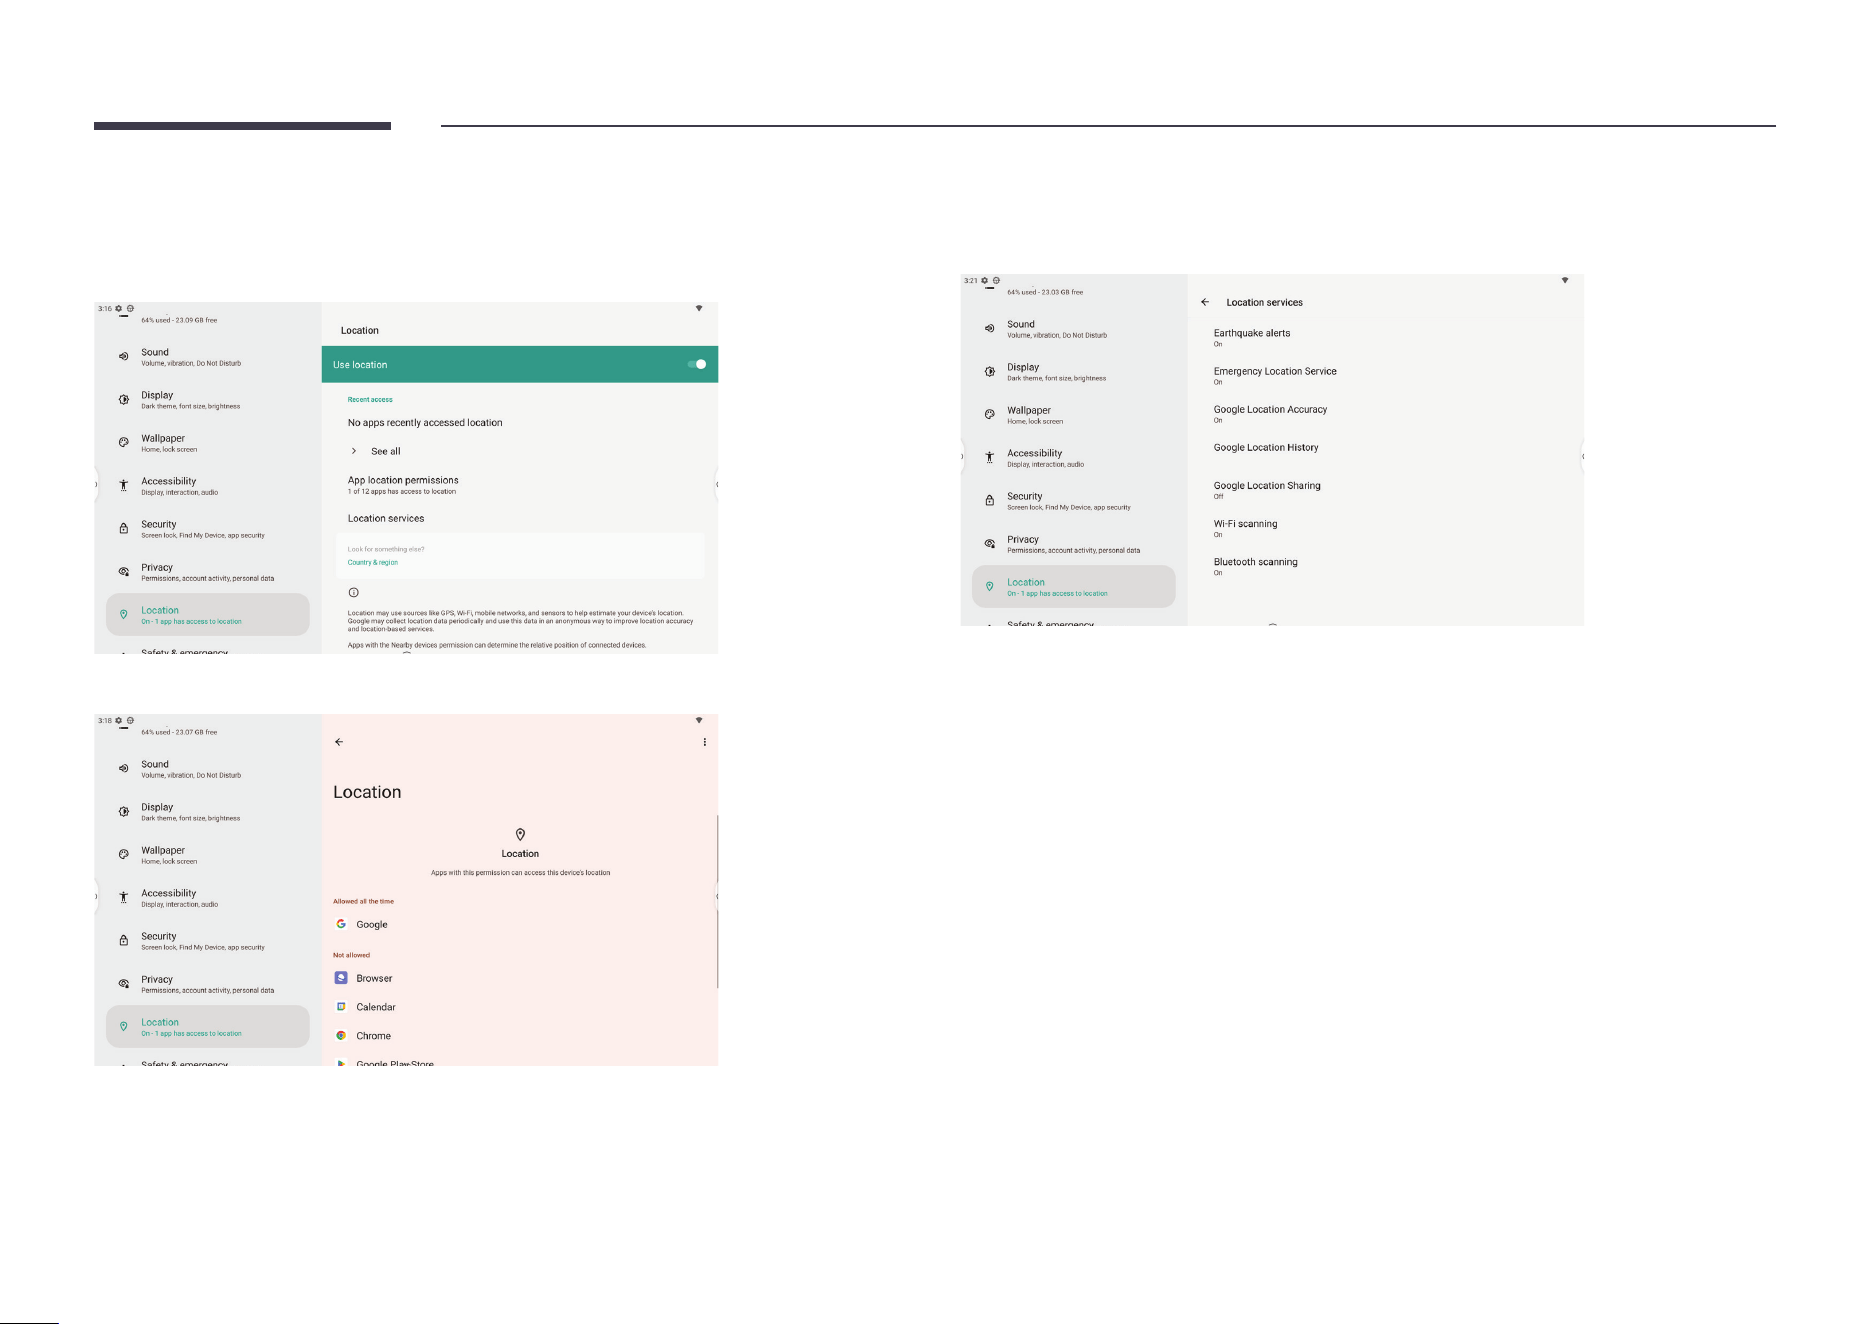
See location information usage by apps and manage location permissions in Location. Apps
using location recently will be shown rst.
You can also manage location permission for all apps.
You can manage how location information is obtained in Location services.
55
Safety & emergency
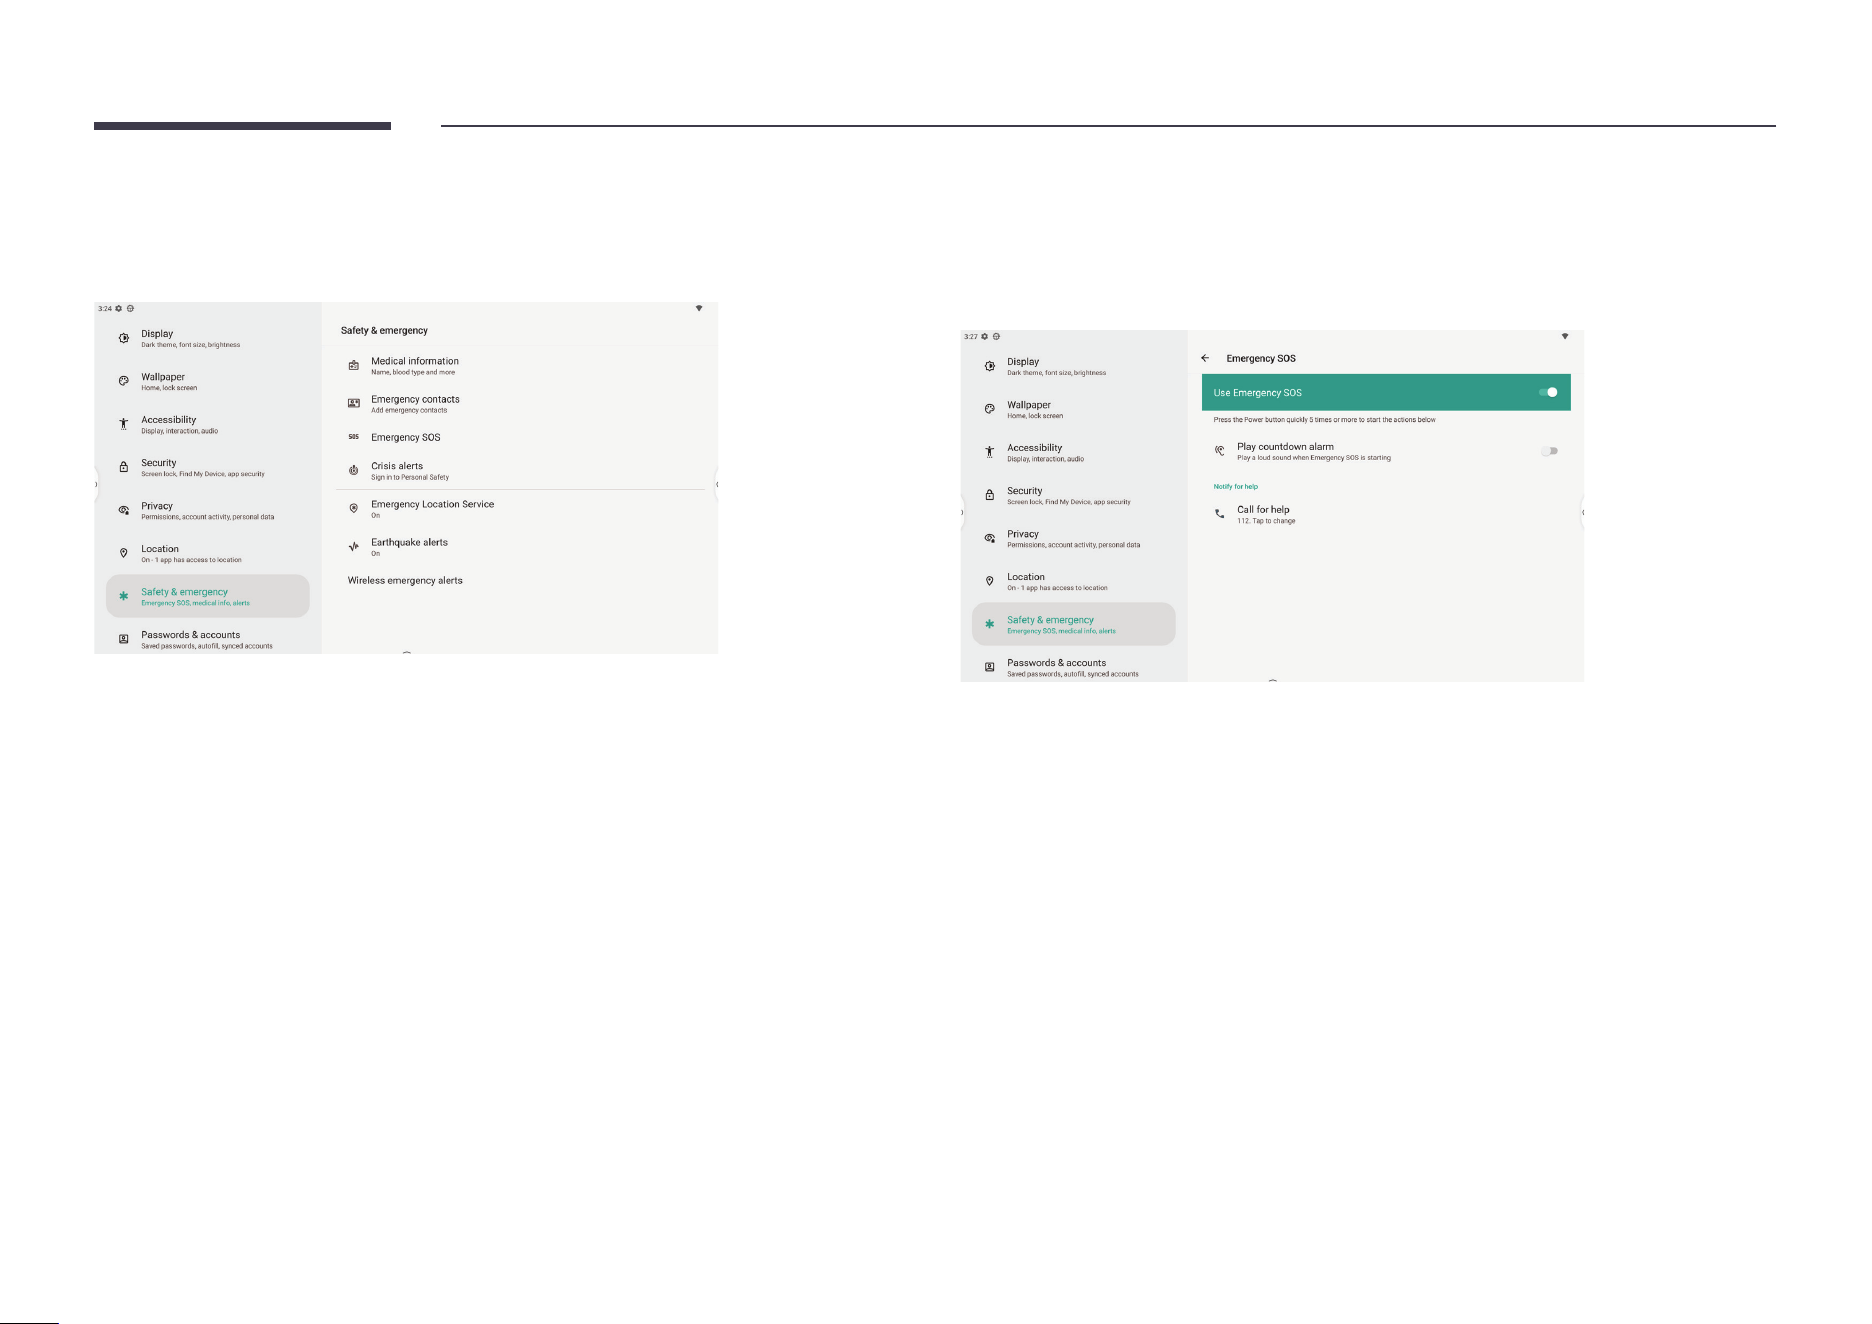
Check and manage personal information for medical and emergency uses in
Safety & emergency.
It supports setting up emergency SOS calls, crisis & earthquake alerts and wireless
emergency alerts. Your device will play alerts when emergency broadcasts or messages are
received.
56
Passwords & accounts
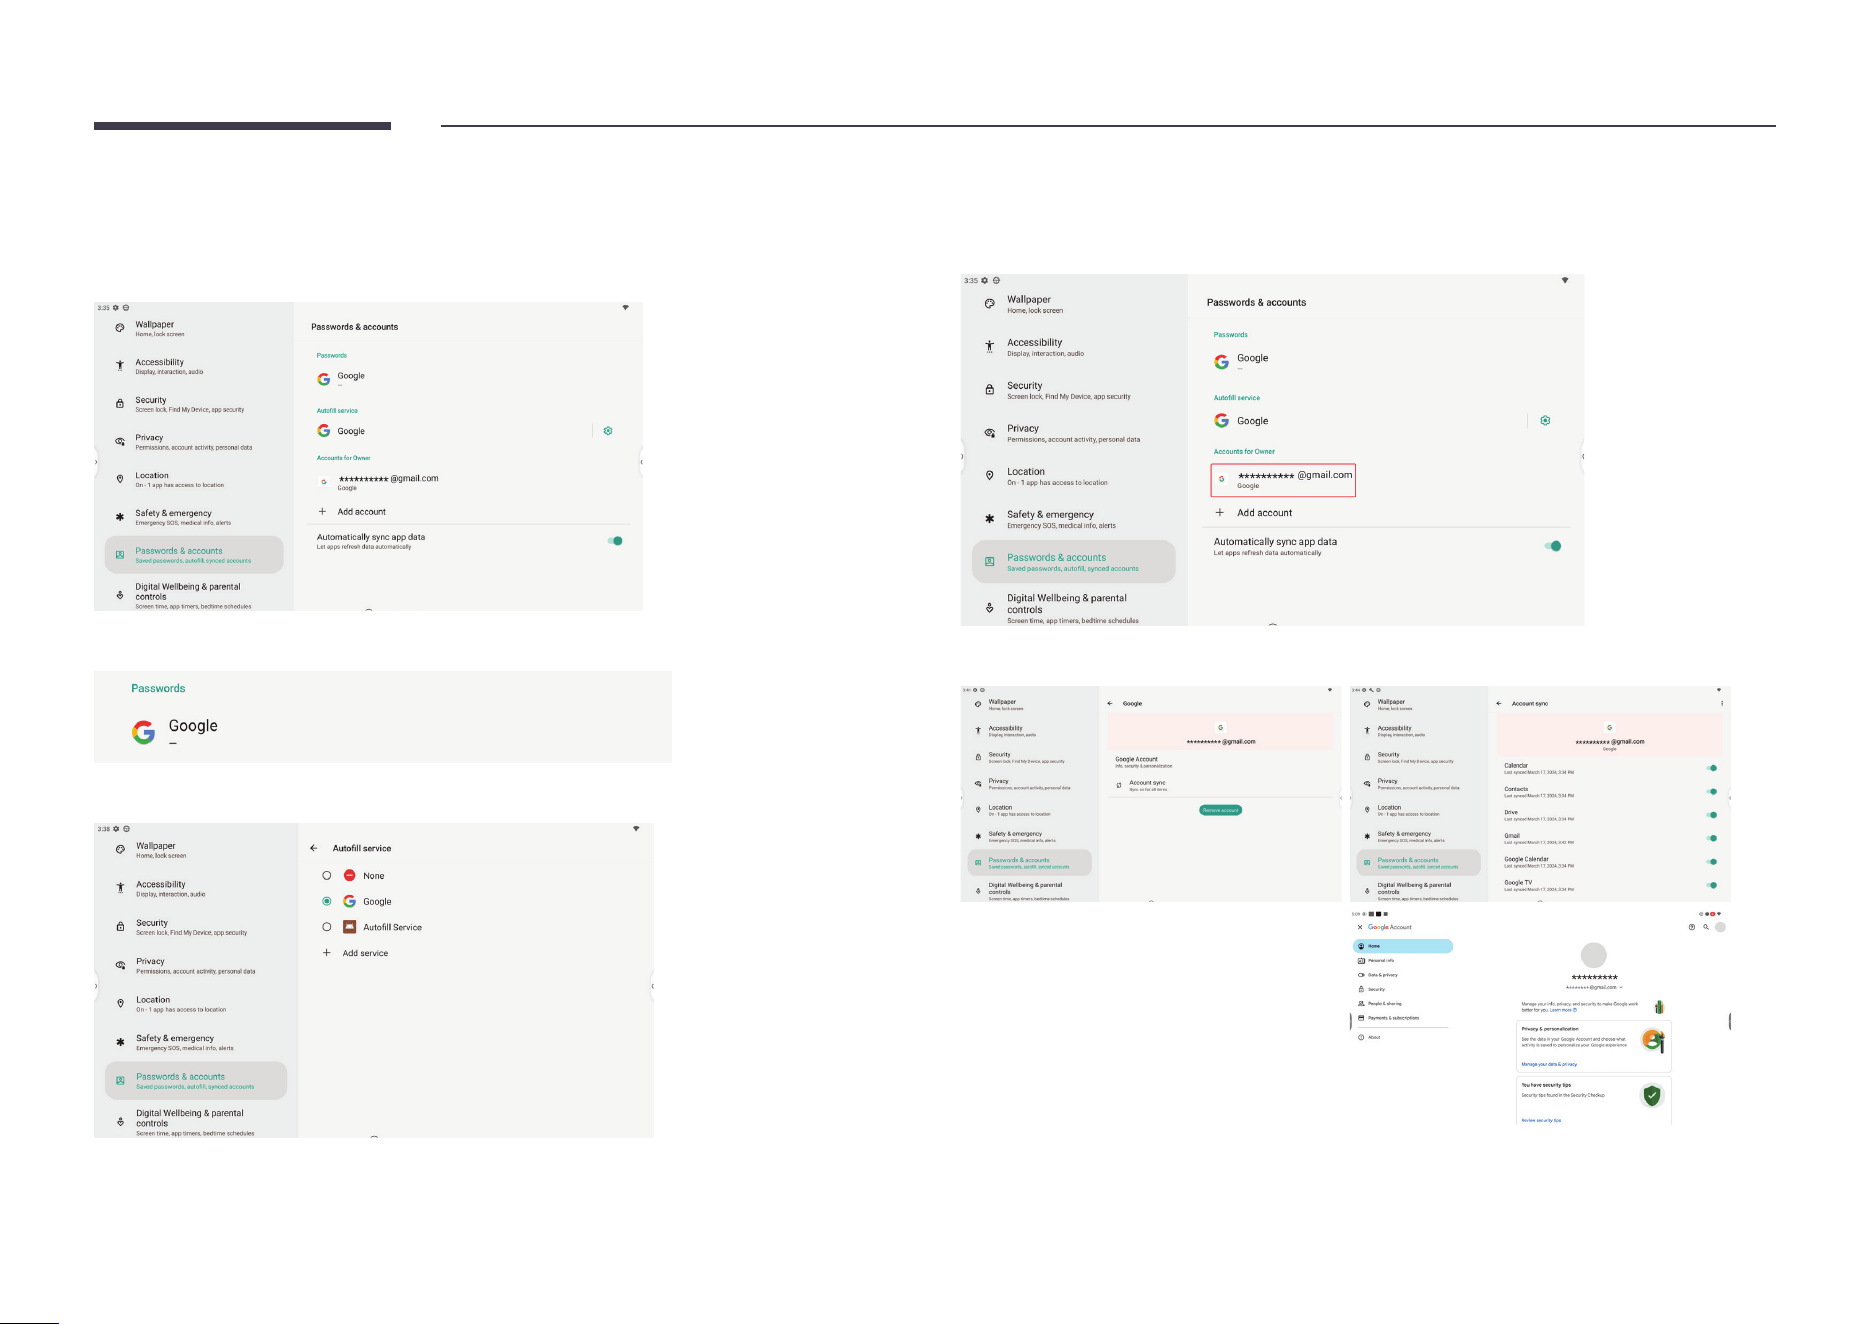
You can manage all passwords and accounts registered on this device in
Passwords & accounts.
Click Passwords to see all passwords stored on this device.
See available autoll services and switch or add services in Autoll services.
Check accounts registered by apps or services on this device in Accounts for Owner.
Select an account to see detailed settings for that account.
57
Digital Wellbeing & parental controls
Check device & app usage in Digital Wellbeing & parental controls.
You can set the timing for automatic behaviors on this device, such as pausing apps and
activating Bedtime mode/Focus mode.
Set up device behavior to reduce interruptions by managing which notications to show on
screen and setting up Do Not Disturb mode or Heads Up notications.
58
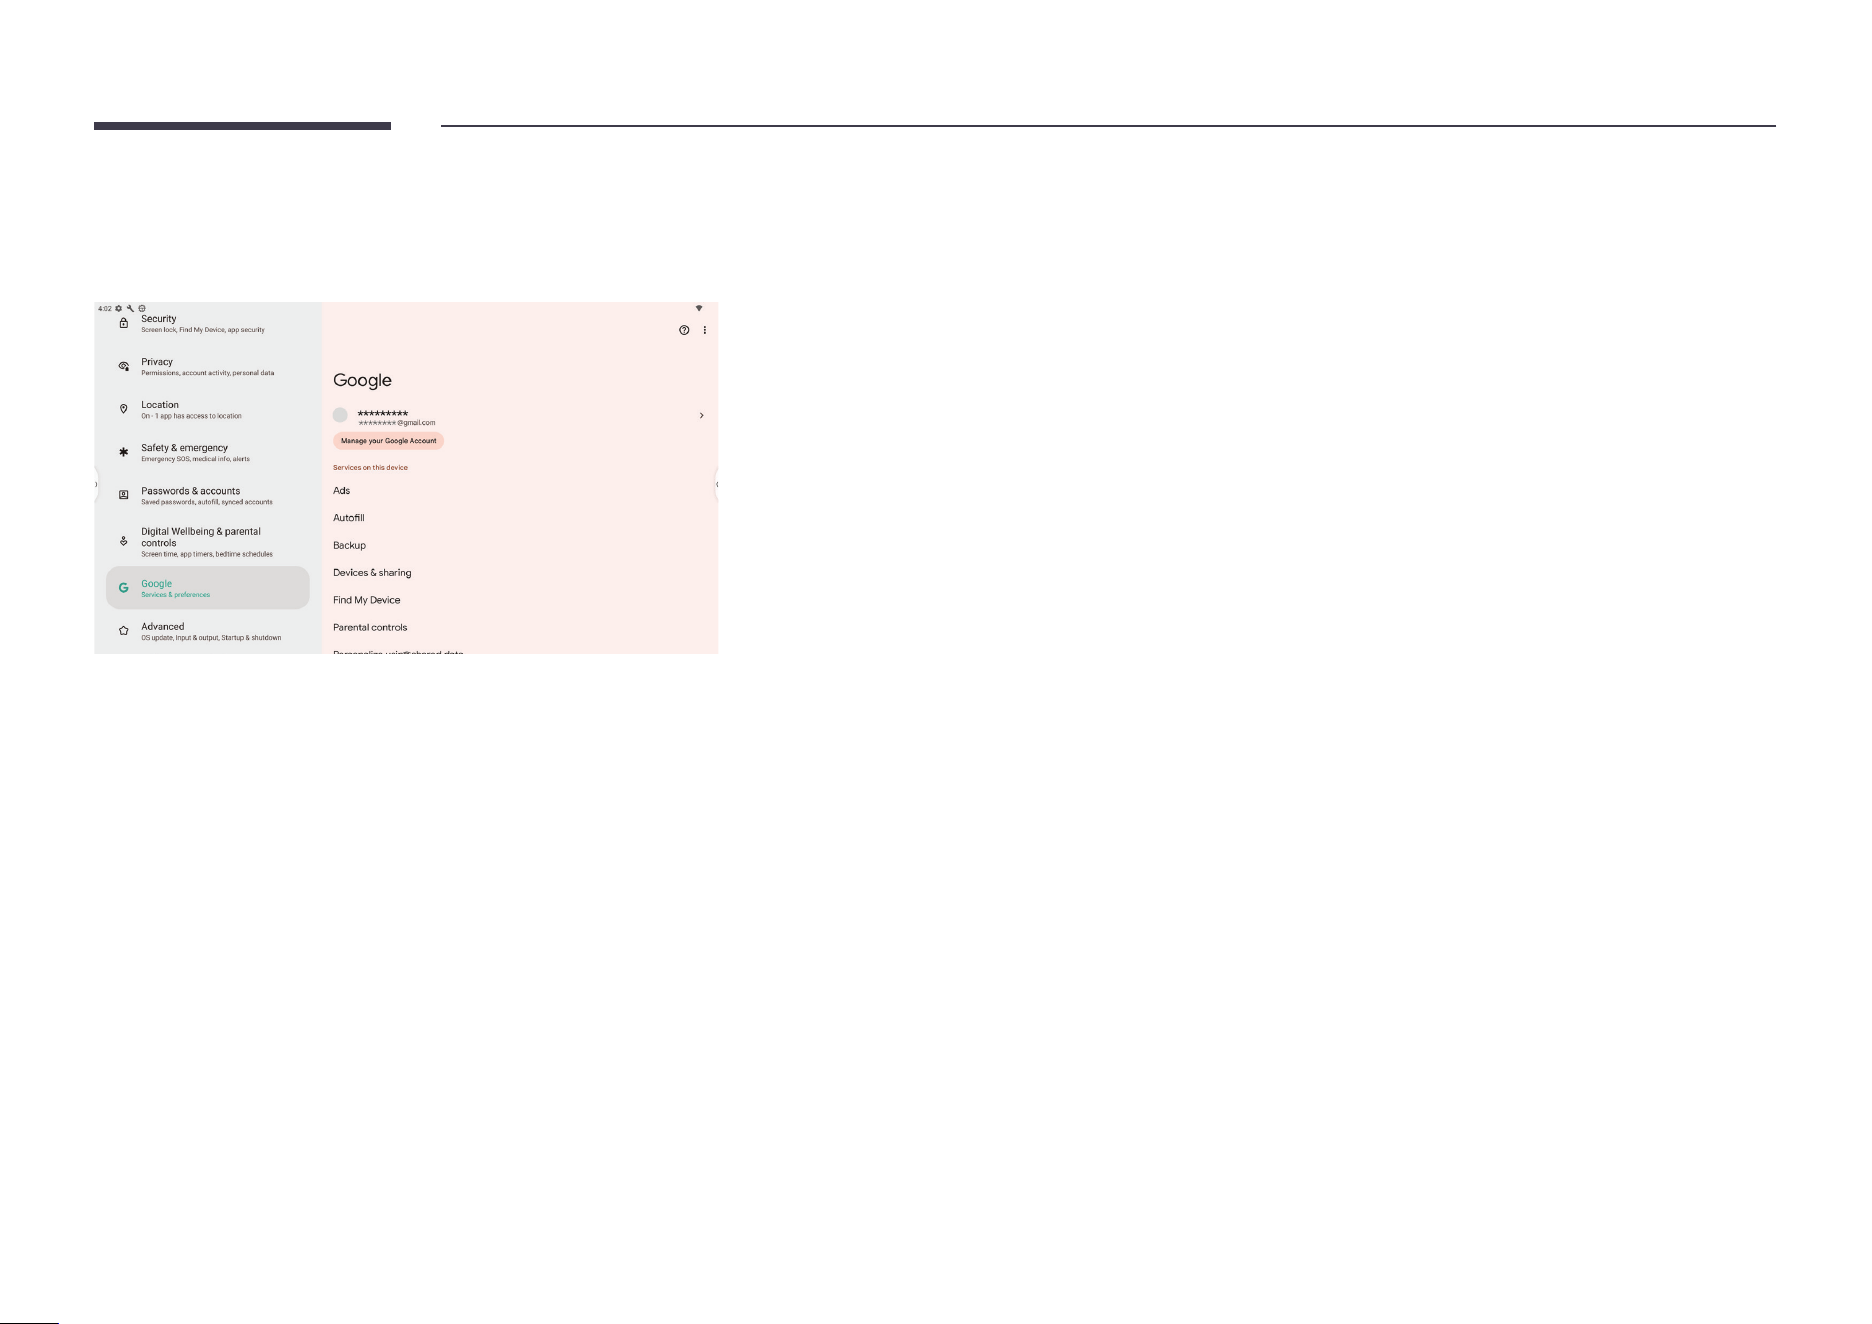
Google
Once you have logged in to a Google account on your IFP, you can manage that Google
account in detail under Google.

59
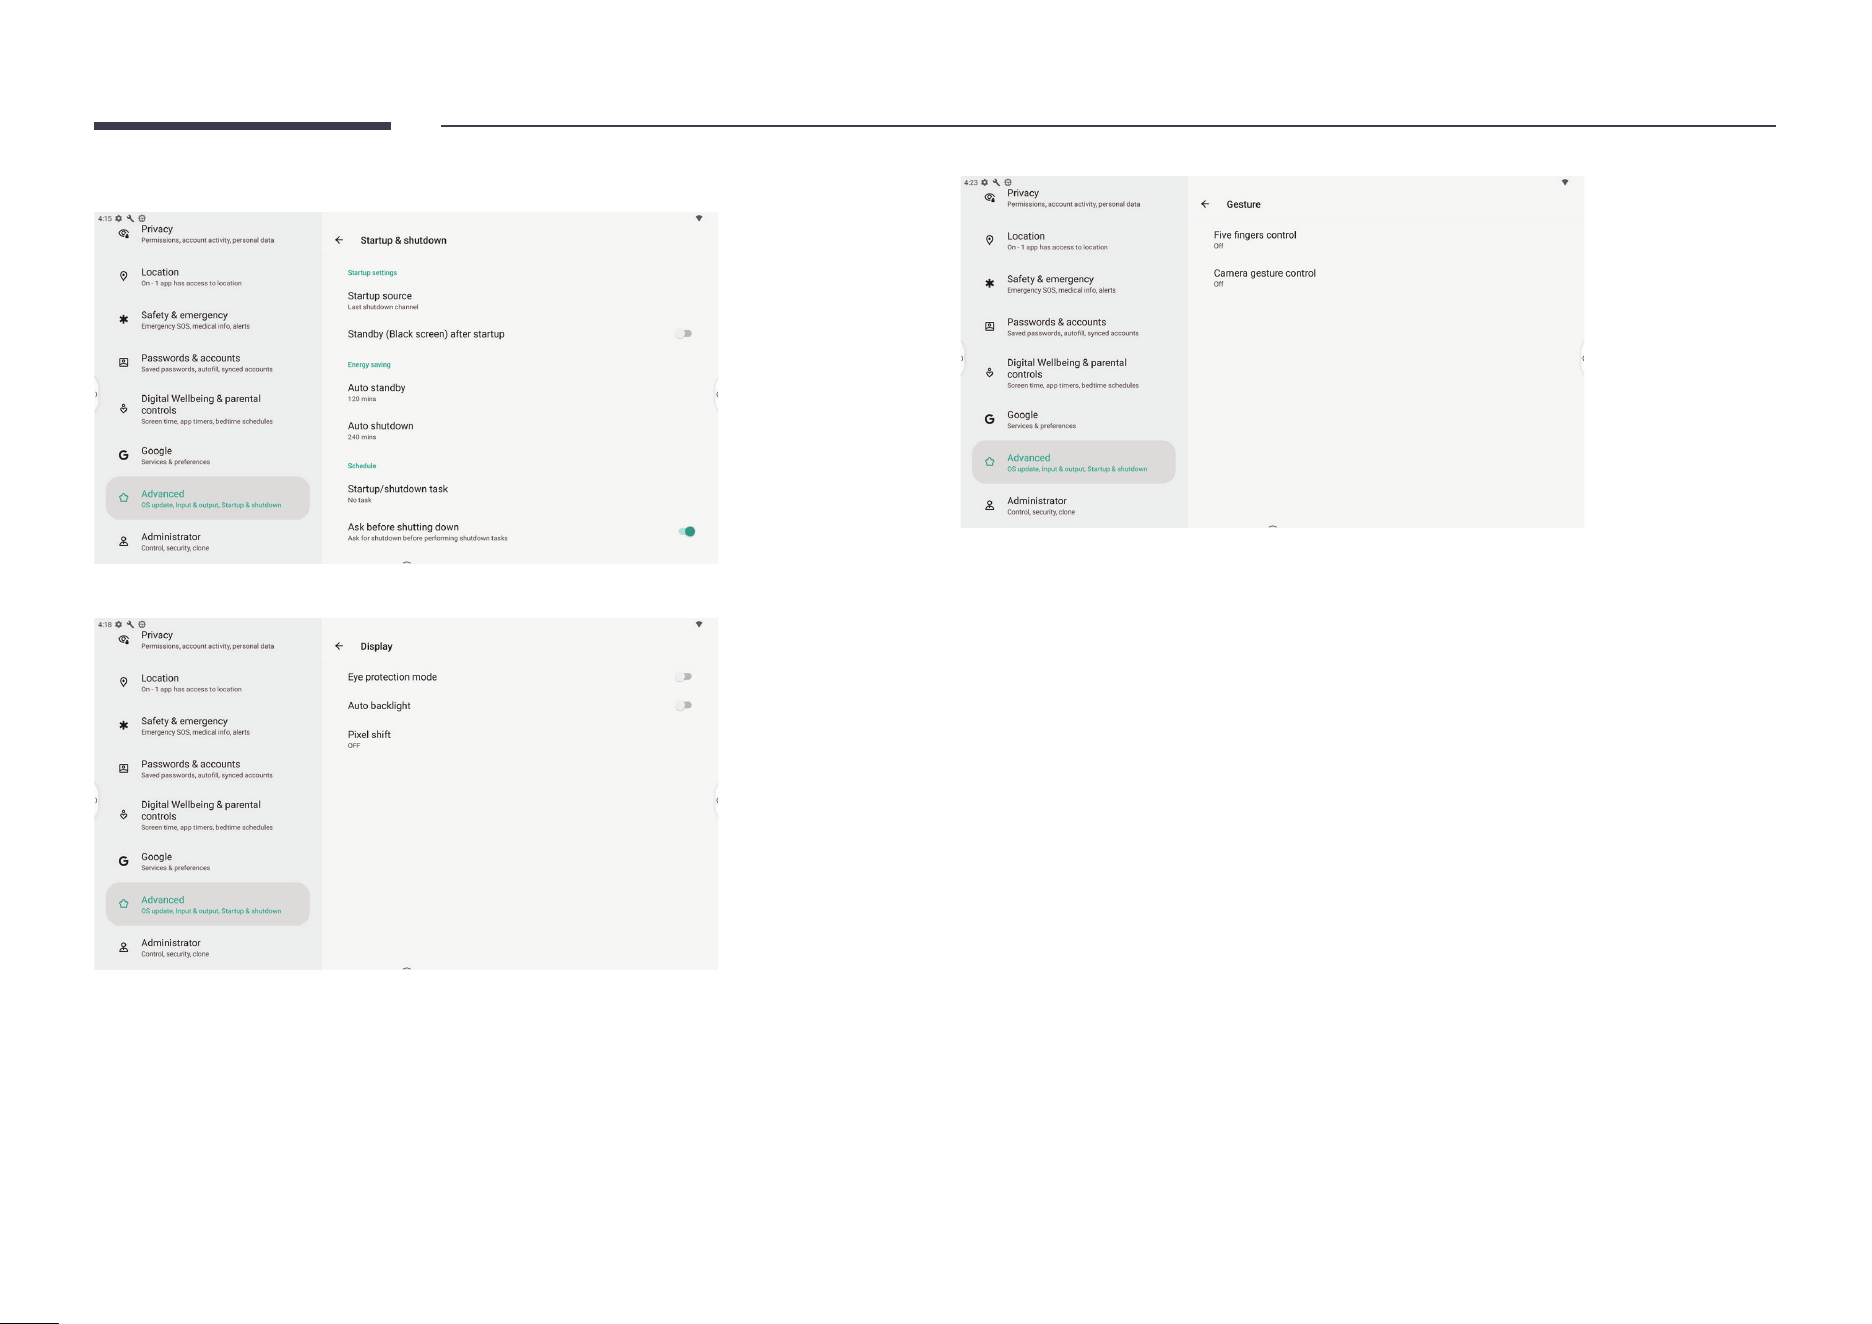
Advanced
All original Samsung settings are integrated into Advanced.
Set general information about this device, including basic system settings, in
System general.
Android Status Bar can be enabled or disabled by toggling the switch.
Manage audio output channel and external source settings in Input & output.
Check for system updates in OS update.
60
Manage the device power schedule in Startup & shutdown.
Manage advanced system display settings in Display.
61
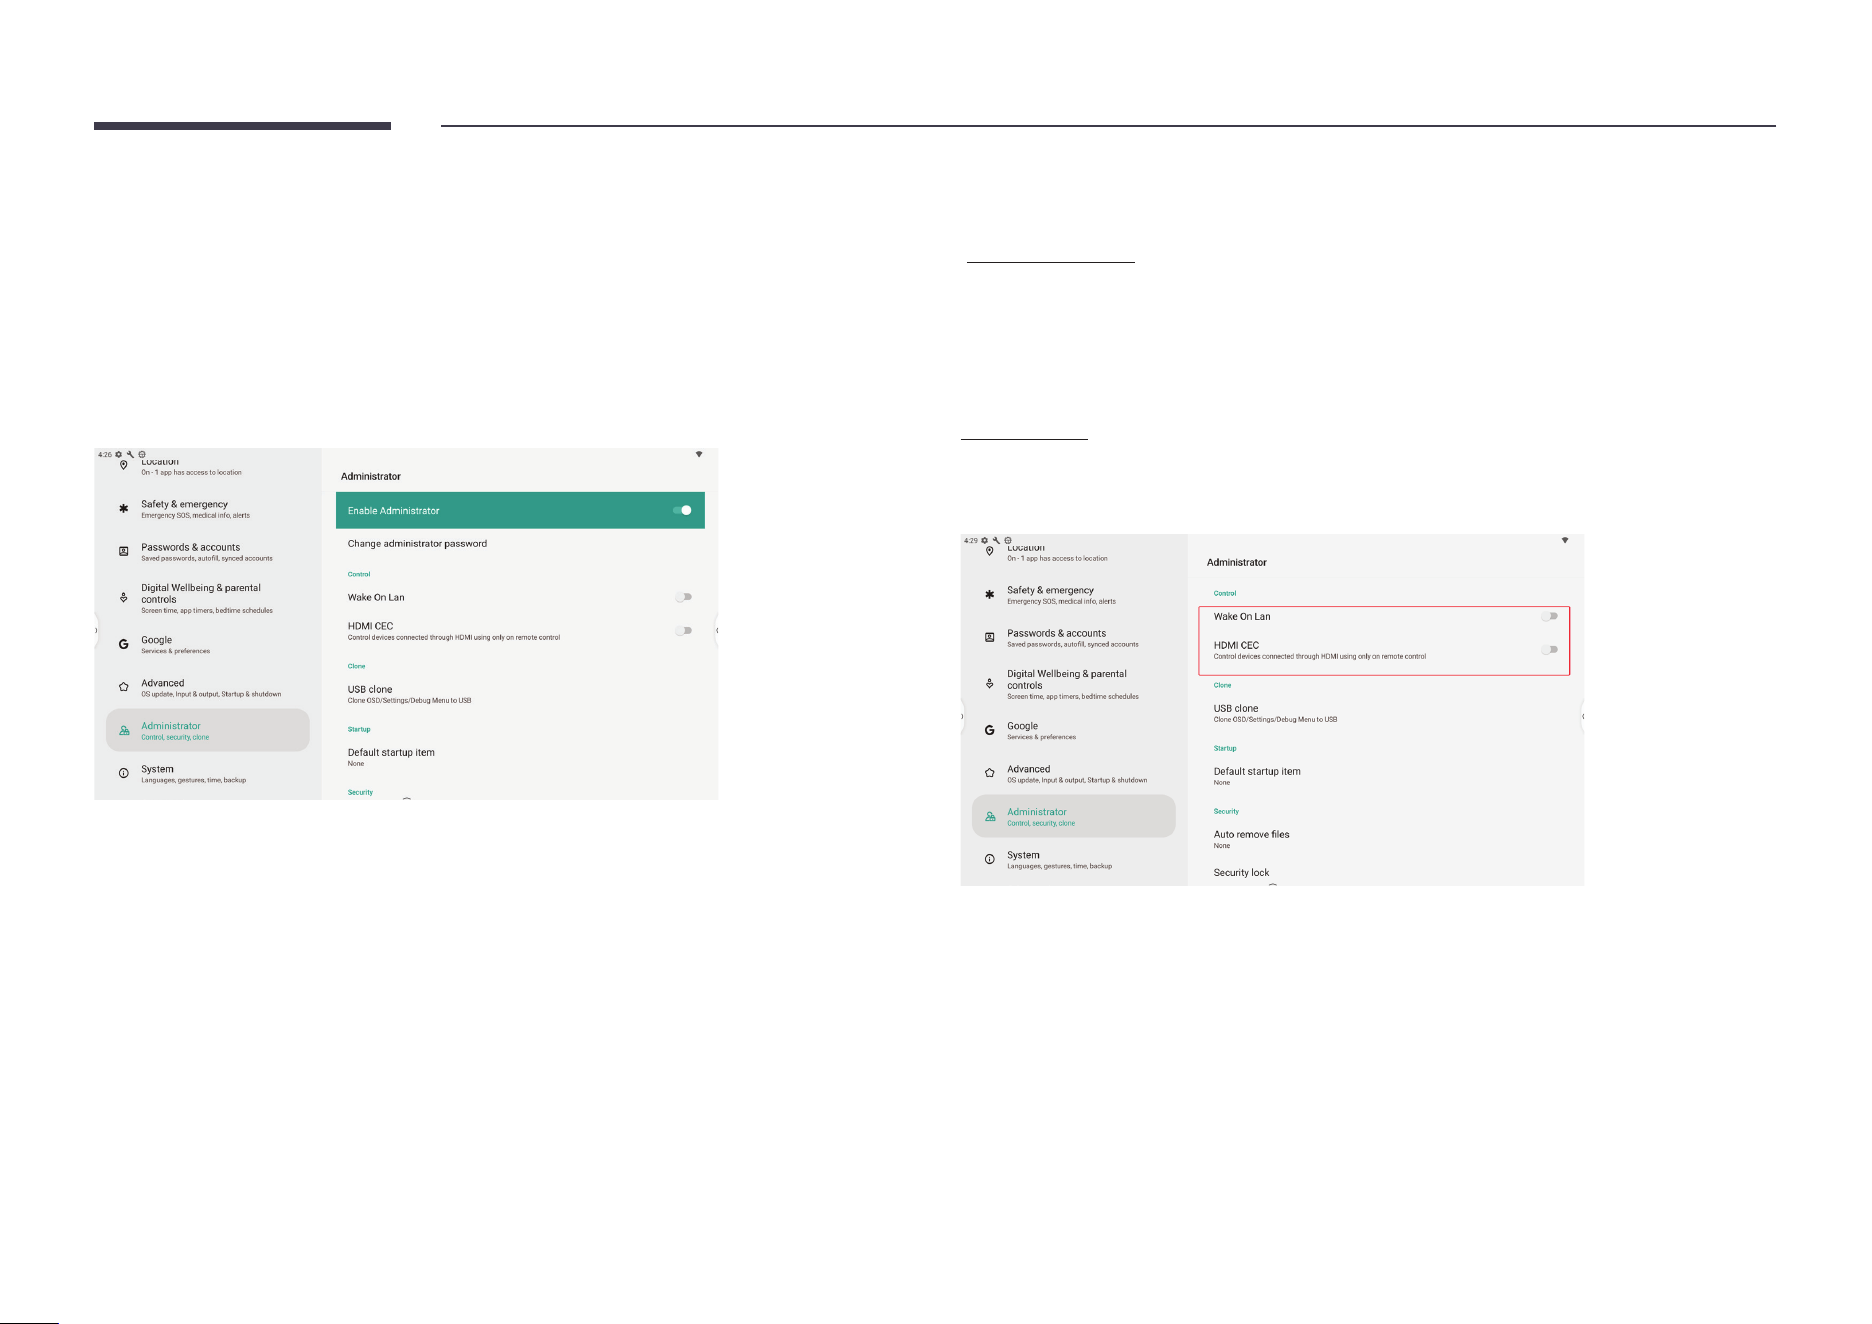
Administrator
The administrator settings are used by device administrators to provide device control
functions at a higher level.
To modify these settings, you need to specify an administrator password. Otherwise, all
administrator settings become unavailable. Specifying an administrator password prevents
ordinary users from modifying the options on this page without permission.
If the administrator password is lost, press Input > Up > Down > Back on the remote control to
reset the administrator password.
Wake on LAN
If Wake on LAN is toggled on and the device is connected to a network cable, IFD can be
remotely turned on through through the network.
HDMI CEC
If HDMI-CEC is enabled and IFD is connected to a device that supports CEC protocol through
an HDMI cable, then IFD can be controlled through the device's remote control.
62
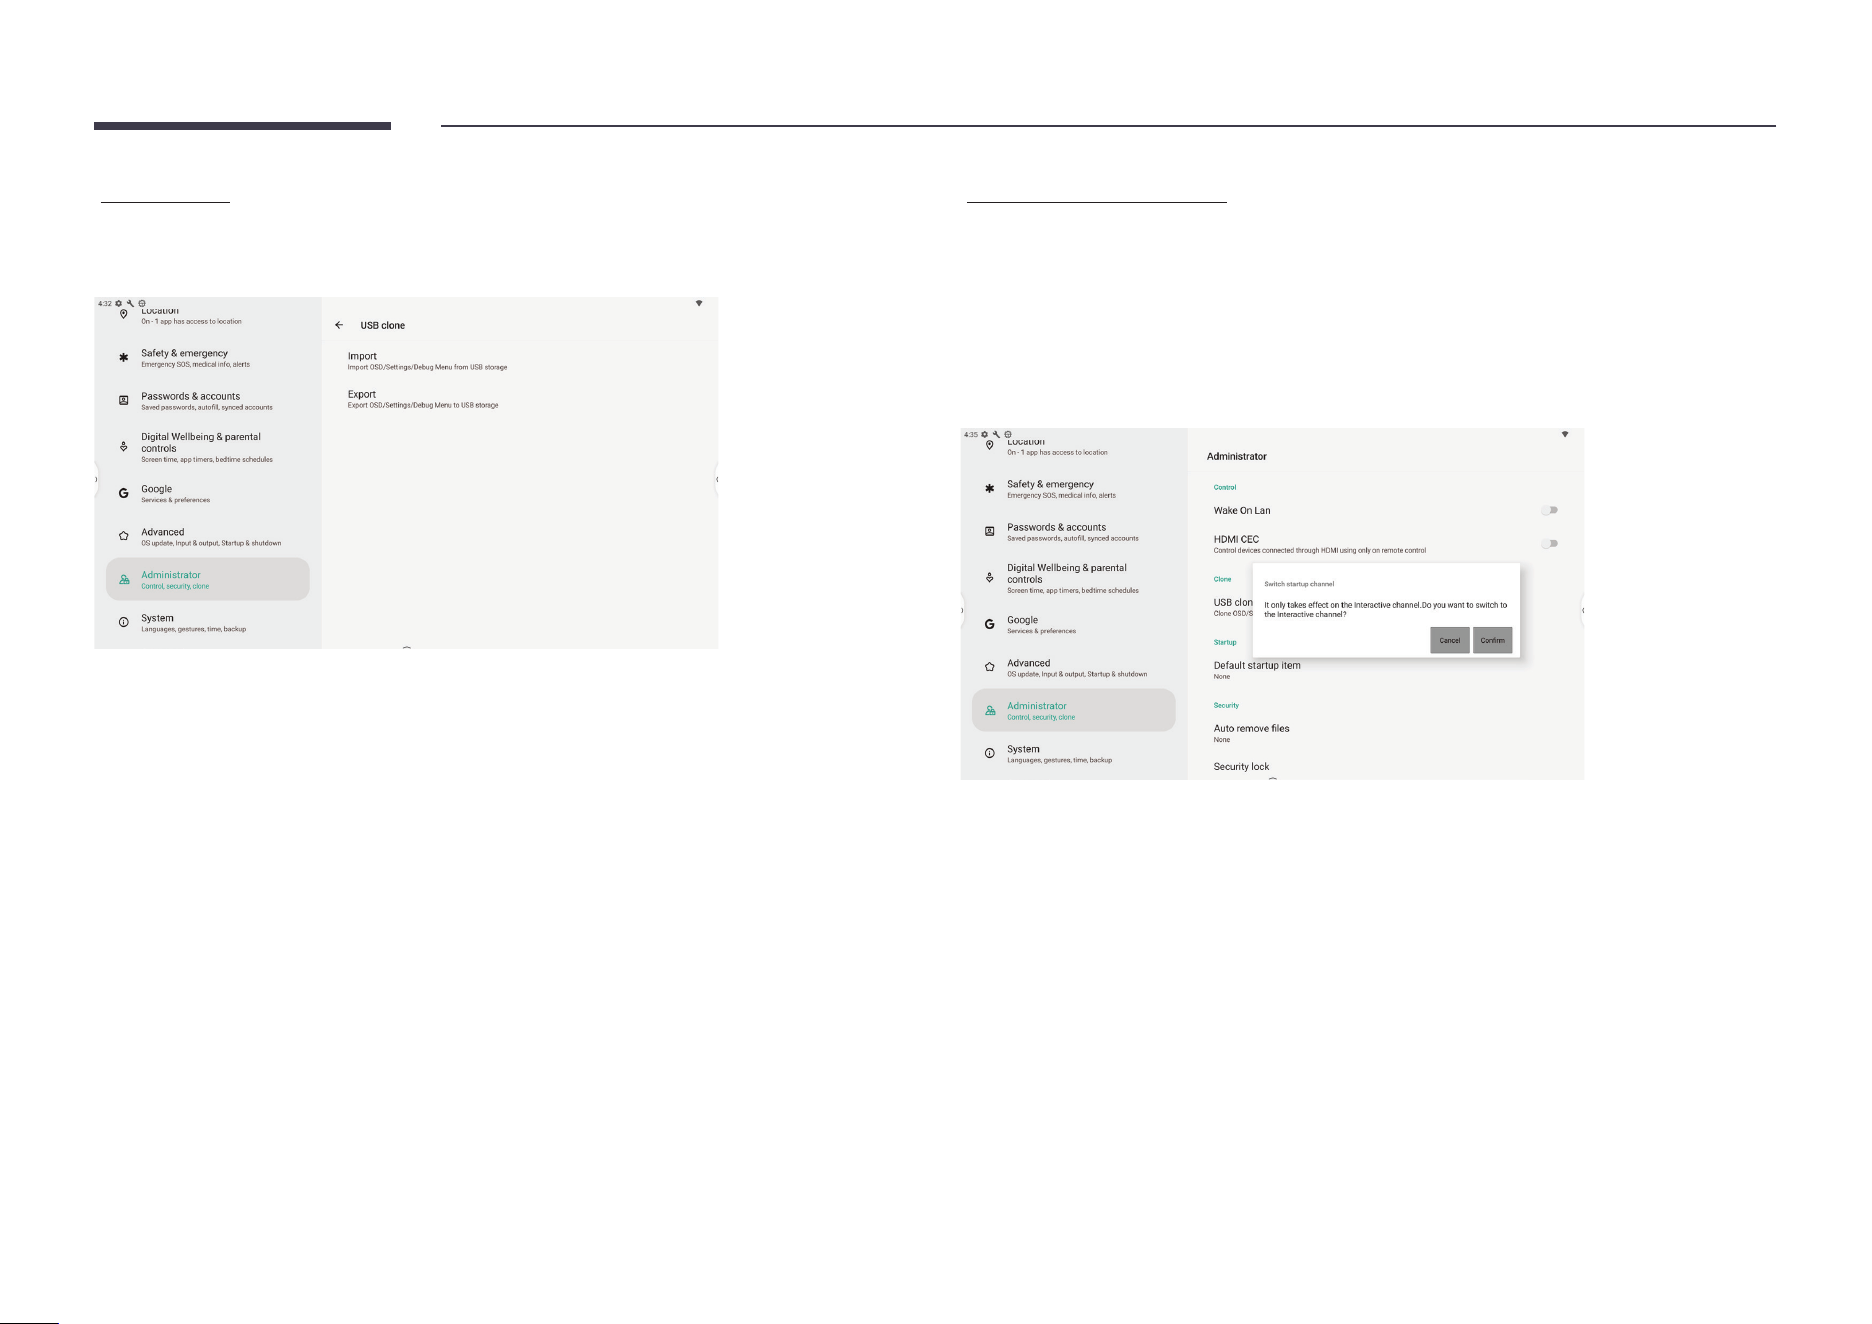
USB clone
The USB clone function allows you to quickly export the system and on-screen display
(OSD) settings from one Interactive Display to another.
Default startup item
If the default startup item is specied, the corresponding app/web page/document is
automatically launched after startup.
The following options are supported:
• URL Browser
• Note
• Palette
63
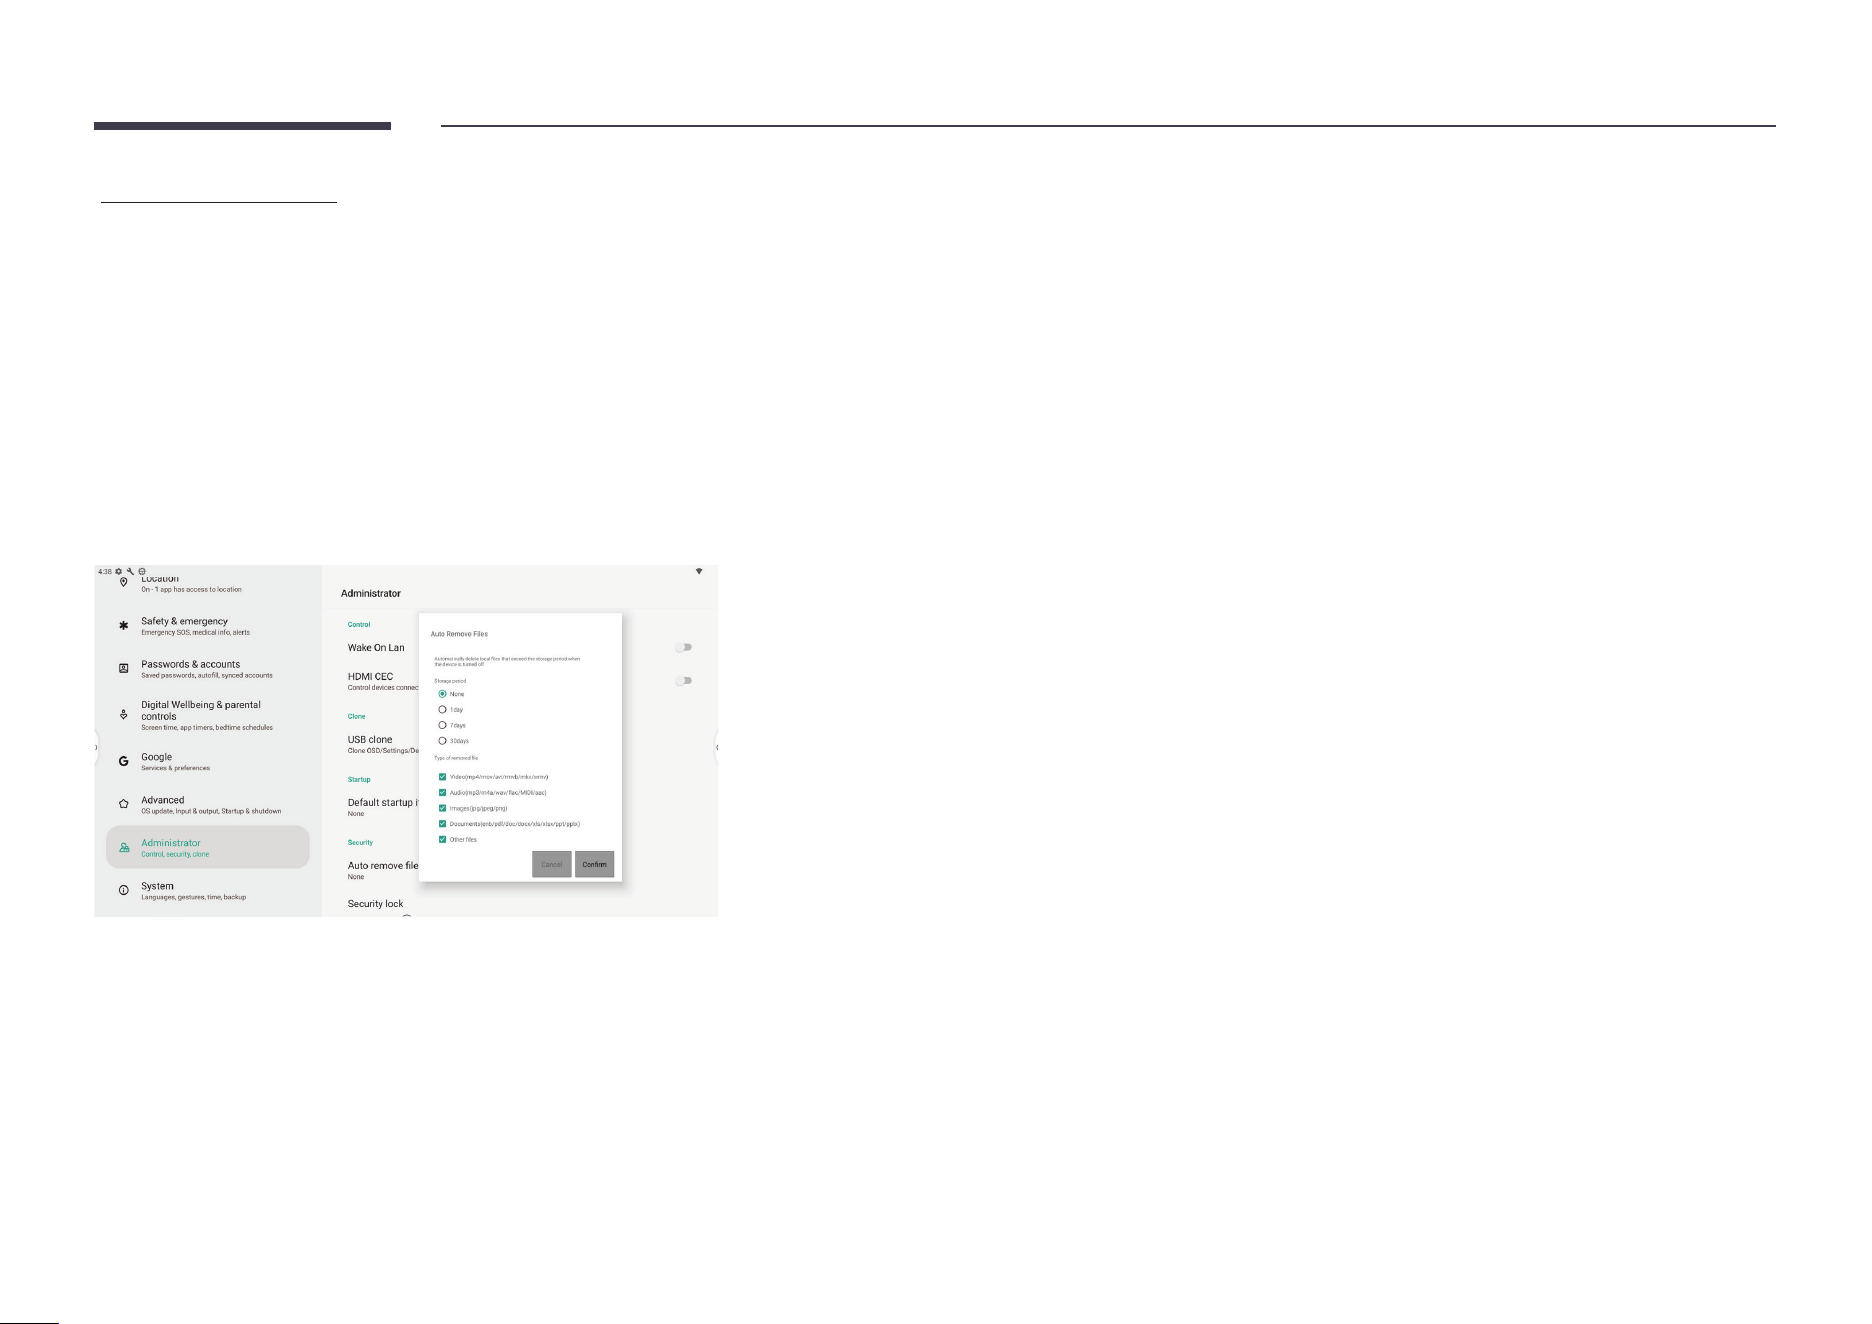
Auto Remove Files
Set Auto Remove Files to prevent the Interactive Display from occupying a large amount of
storage space.
The storage period can be set to one of the following:
None, 1 day, 7 days, or 30 days
The following le types can be removed:
• Video
• Audio
• Image
• Document
• Other
64
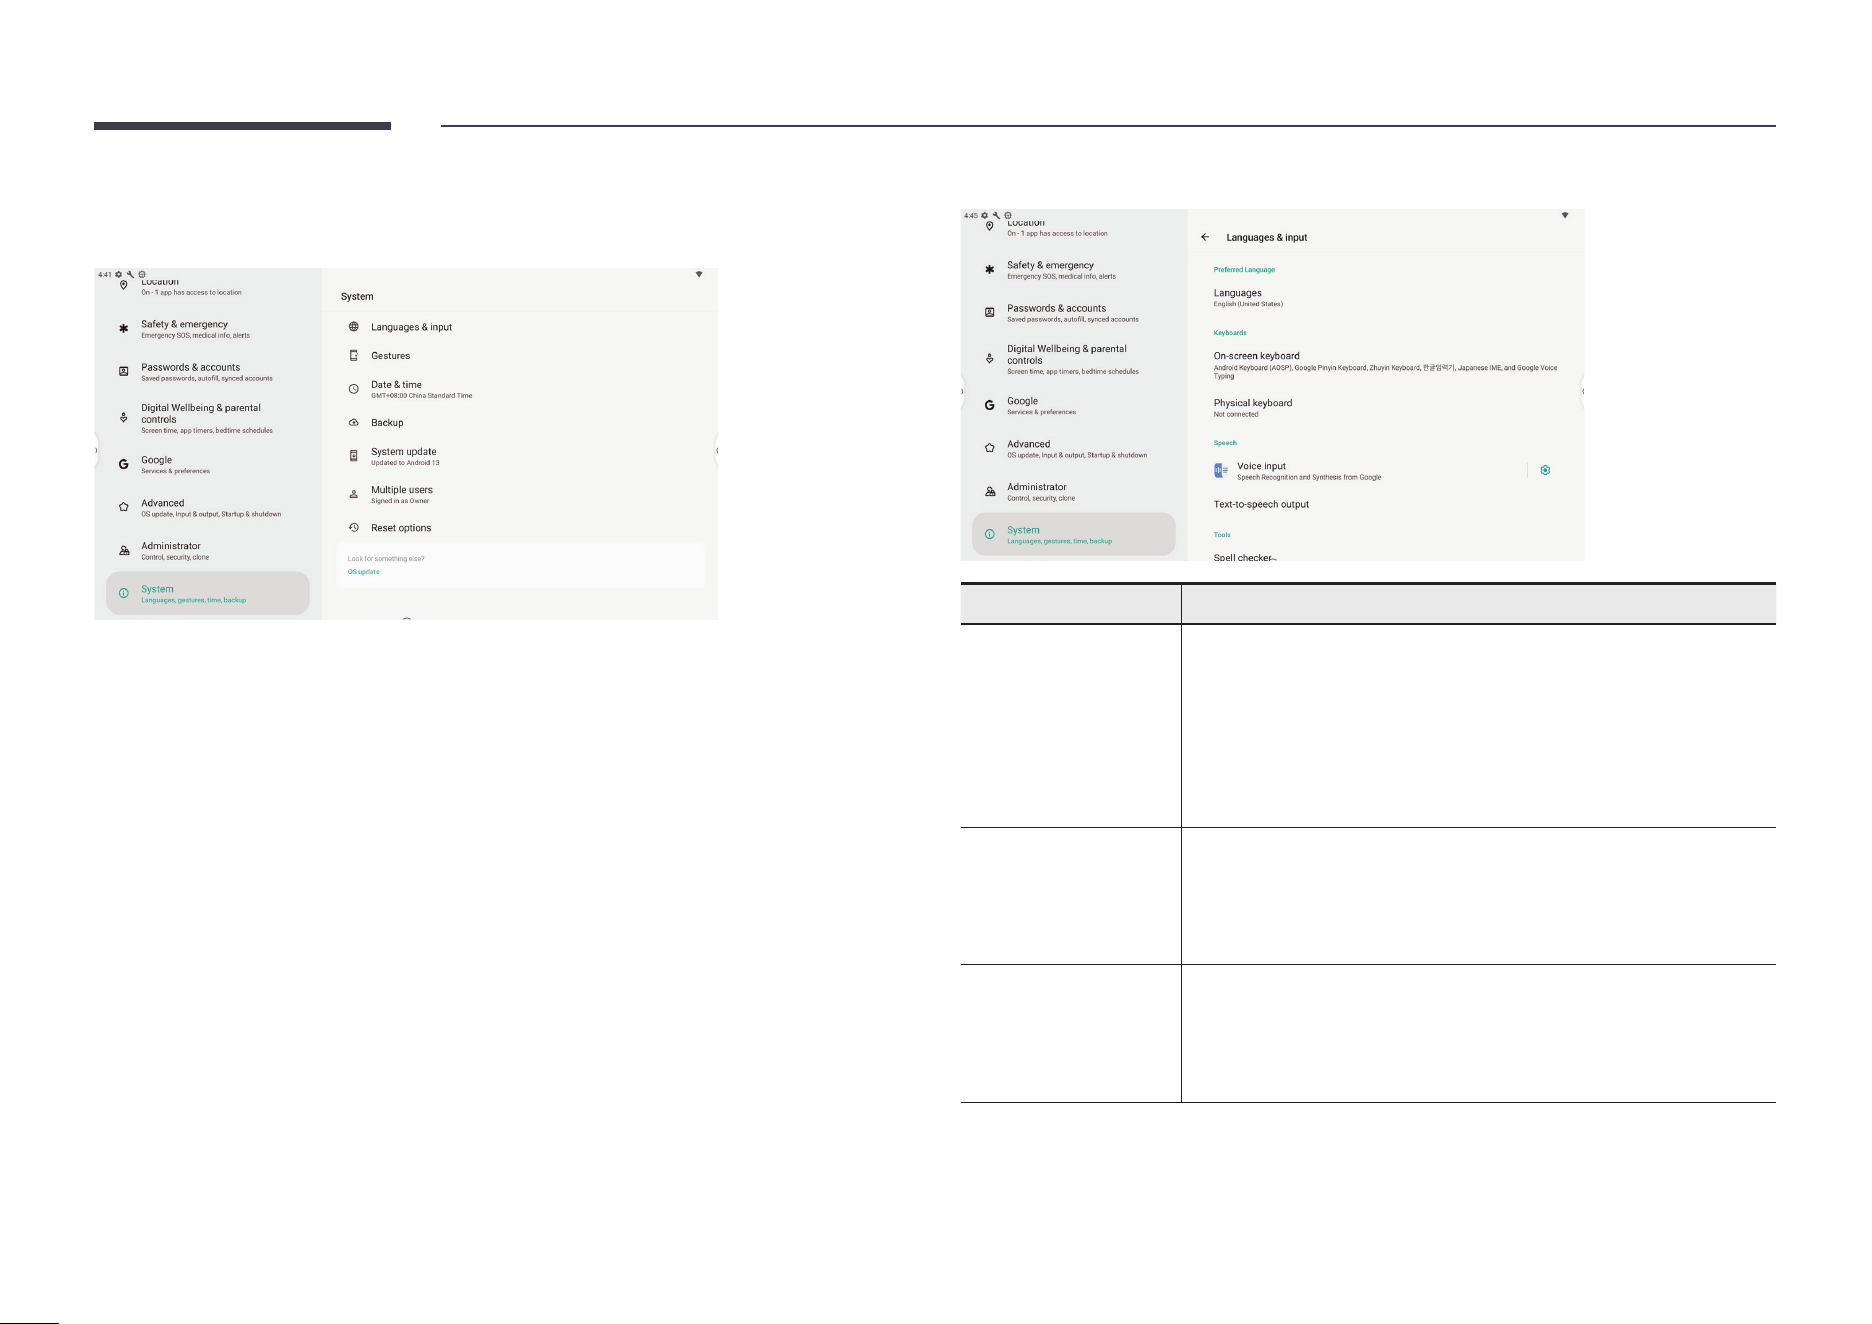
System
You can change general system settings in System.
You can congure system language, input method and speech settings.
Item Description
Languages
English, French, German, Italian, Polish, Portuguese, Russian,
Spanish, Swedish, Greek, Cheskry, Slovak, Hungarian, Finnish,
Turkish, South Arabic Language, Hebrew, Chinese (Traditional/
Simplied), Japanese, Korean, Romania, Croatia, Lithuania,
Serbian, Latin, Norway, Denmark, Vietnam, Indonesia, Thailand,
Kazakh (Cyrillic), Ukrainian, Bulgarian, Slovenian, Dutch, Latvia,
Estonia, Hindi
Virtual Keyboard
• Android Keyboard (ASOP)
• Google Pinyin Keyboard
• Japaniese IME
• Korean IME
Physical Keyboard
• Android Keyboard (ASOP) - English US
• Google Pinyin Keyboard - Chinese
• Japanese IME - Japanese
• Korean IME - Korean
65
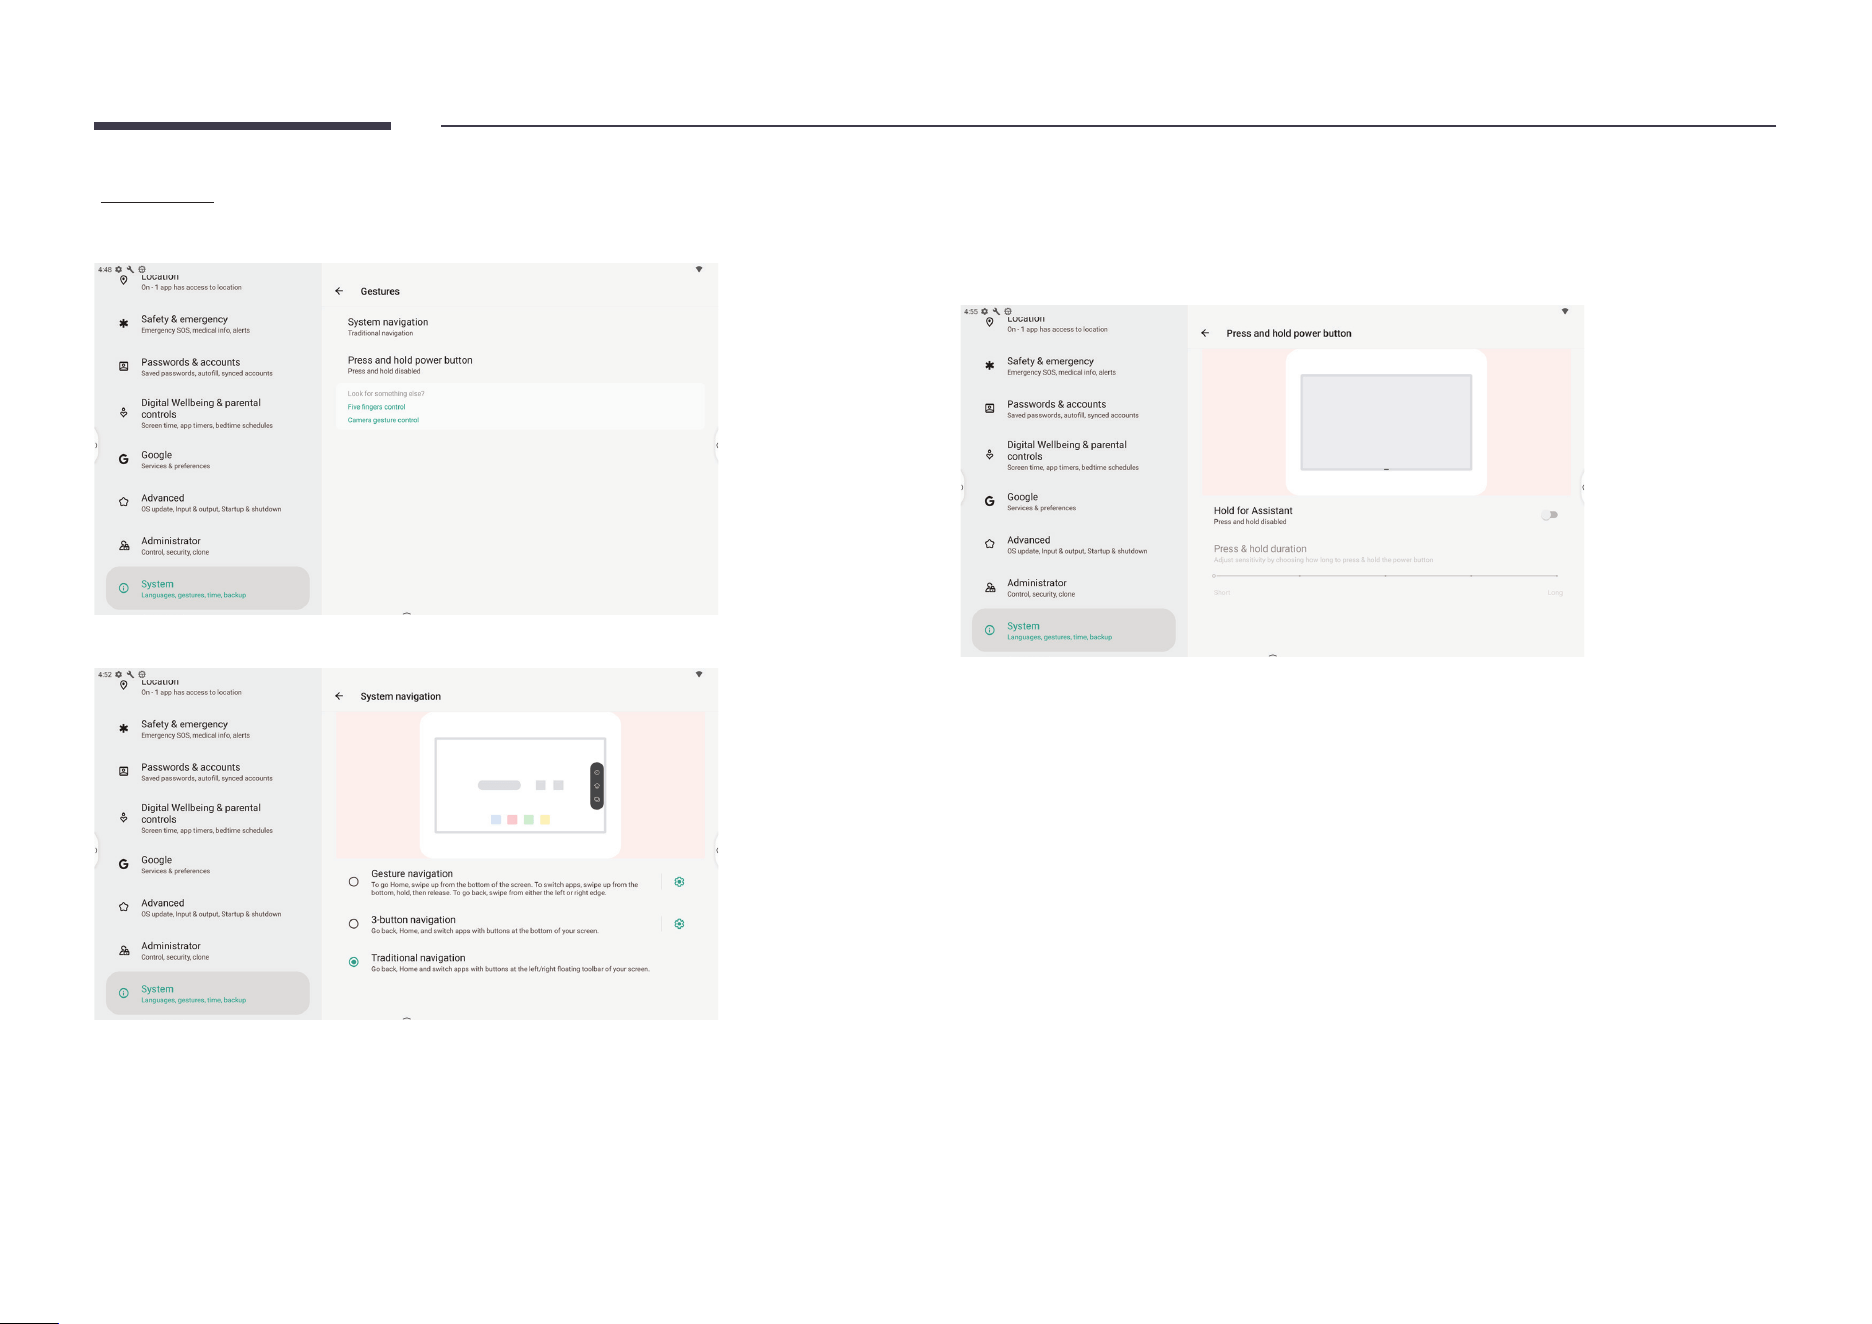
Gestures
Change system navigation and modify what happens when you long press a button.
Selectable navigation mode: gesture/3-button/traditional
Long press and hold the power button: set what happens when you long press and hold the
power button.
• Default: the IFP is powered off.
• Available option: launch Google Assistant.
66
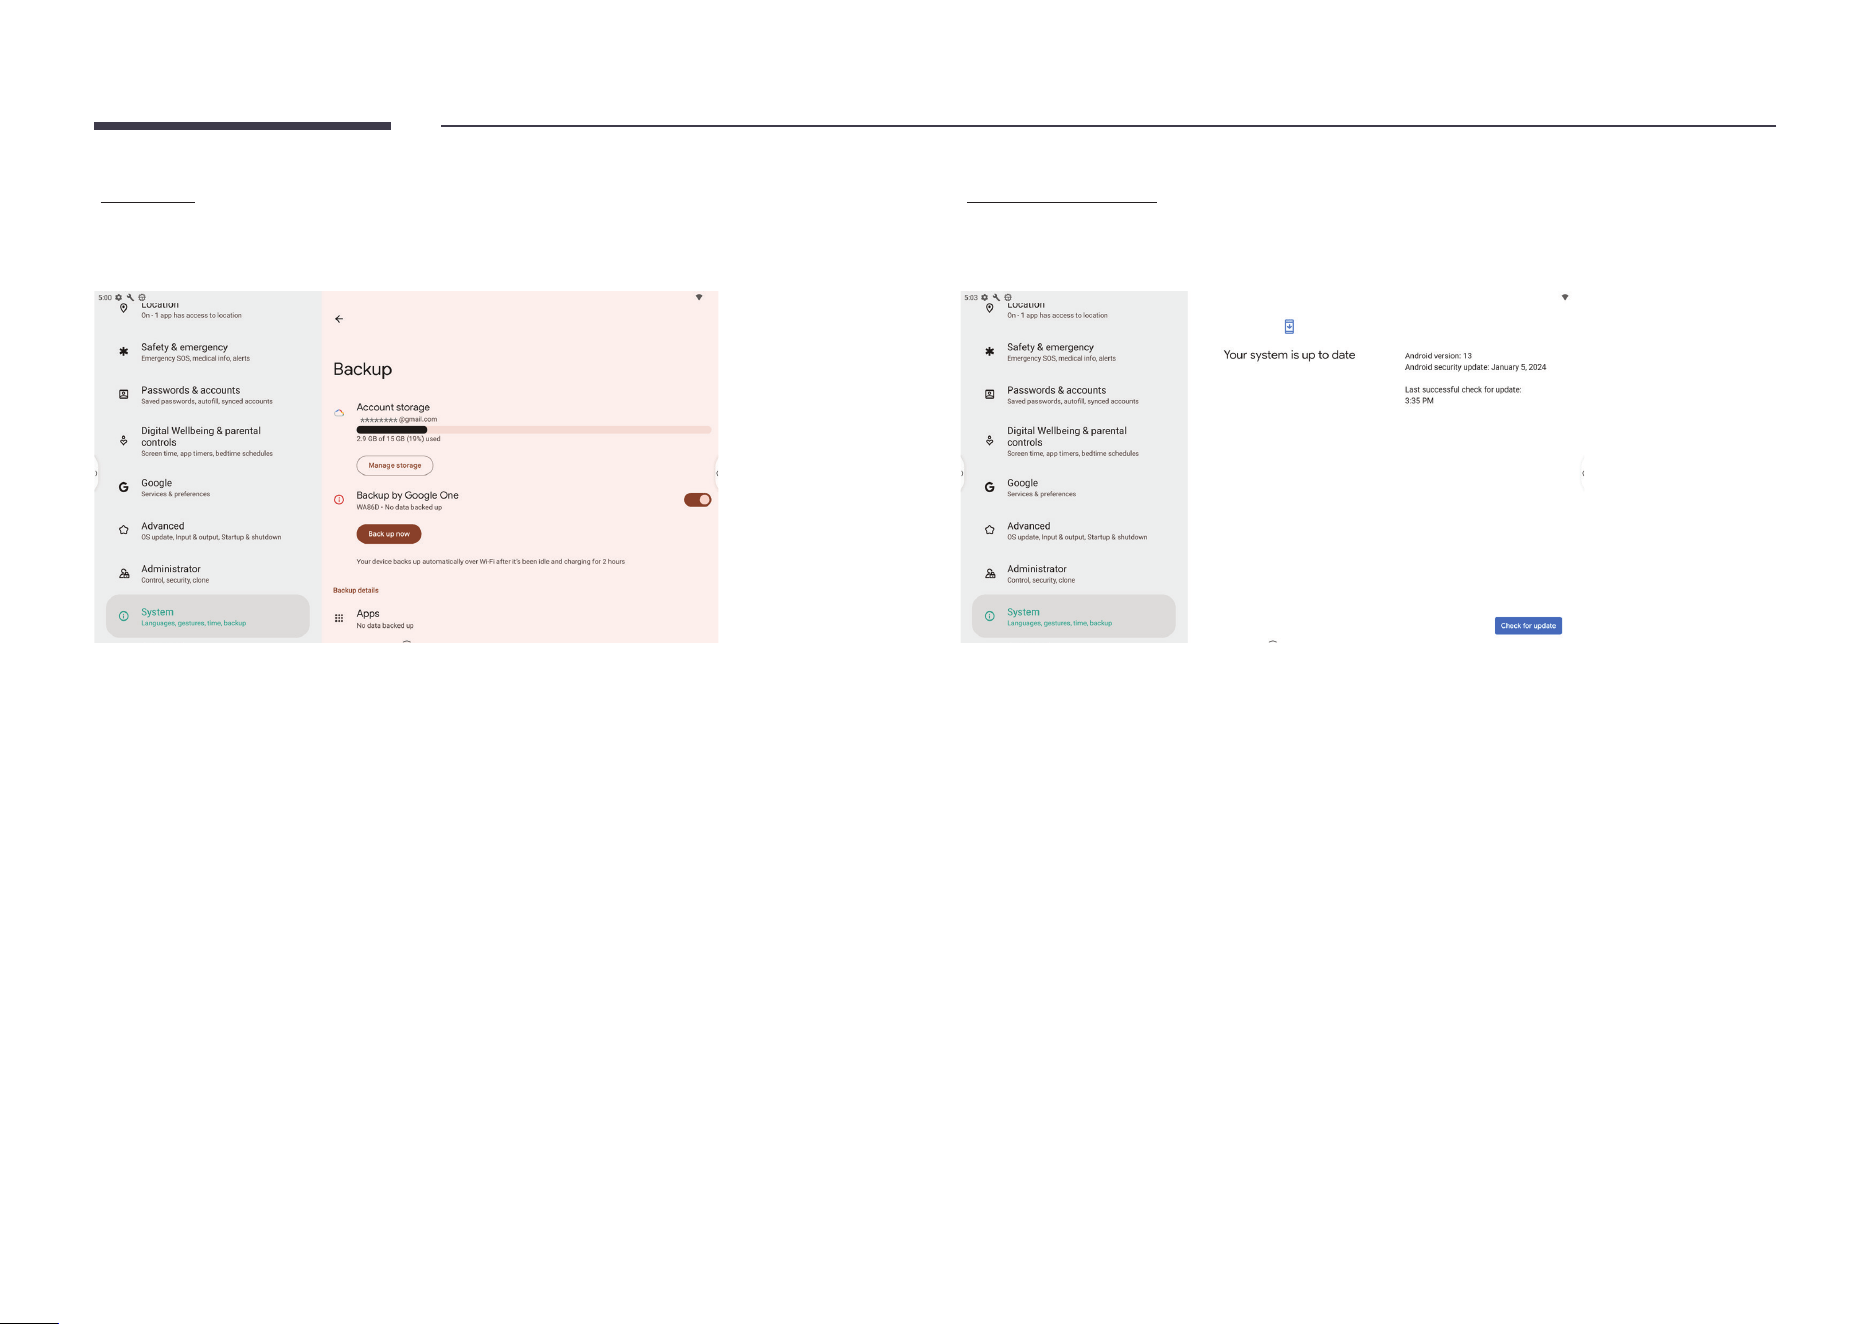
Backup
After logging in to your Google account, you can manage backup services provided by Google.
Click Backup to manage backup items and settings.
System update
Click System update to check Google system and security patch updates. If any update is
available, it can be downloaded and installed from this menu.
67
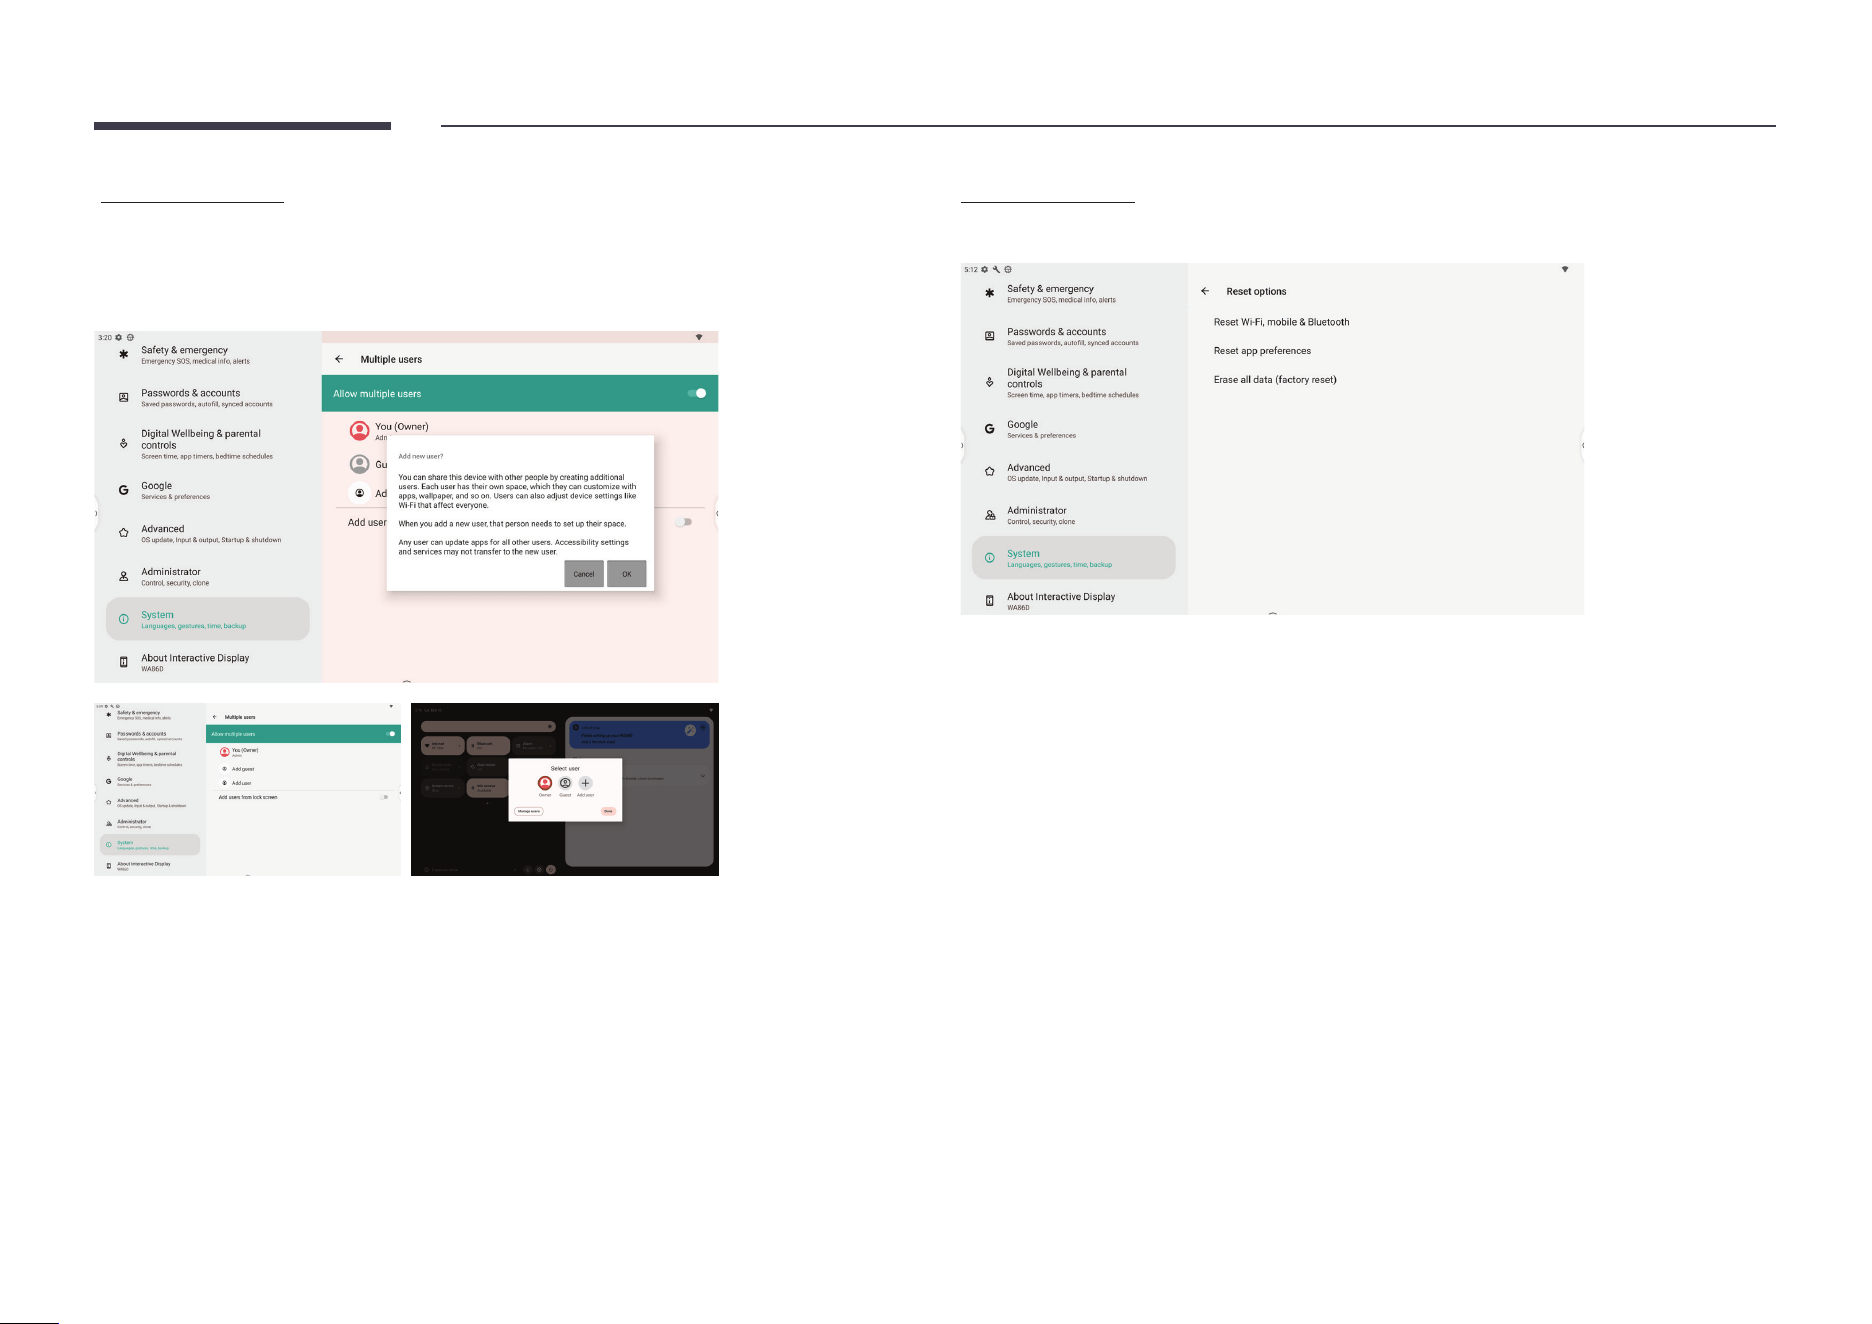
Multiple users
You can add local users and guests in Multiple users.
The system will create an individual space for each user.
Switching to a newly added user will require going through the setup wizard.
Reset options
Reset system settings or erase all data by selecting different system reset options.
68
About
view basic system information.
Item Description
Legal Information
• Third-party licenses
• Open source licenses 2
• System Webview licenses
Model Number Displays the model number of the device.
Android Version Displays the Android version.
Kernel Version Displays the system kernel version.
Serial Number Displays the serial number of the device.
Software Verion Displays the software version of the device.
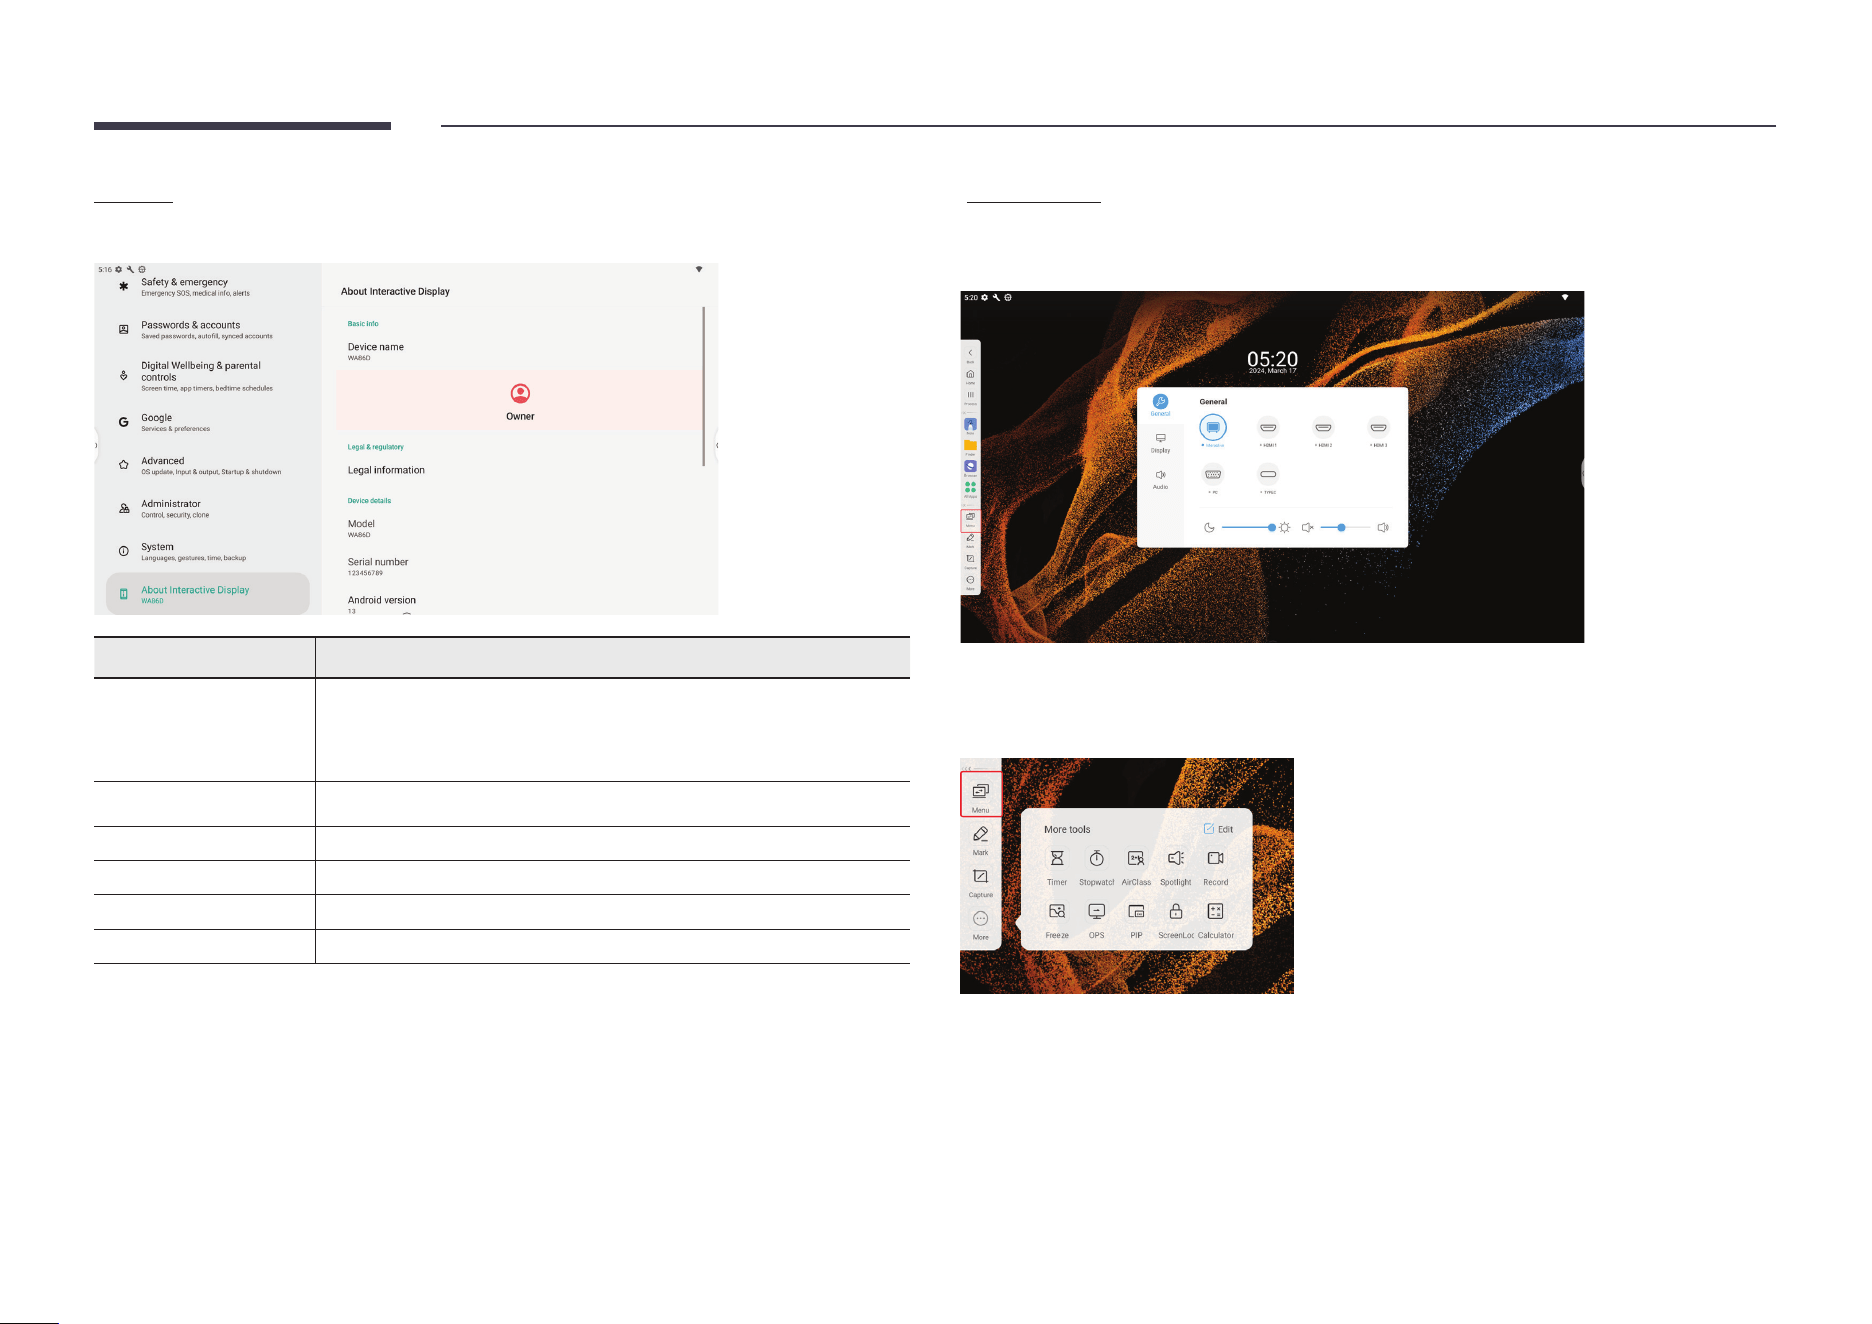
OSD menu
The OSD menu allows you to view and congure external signal sources, image display, and
system sounds.
You can open the OSD menu by using one of the following methods:
Button on the sidebar:

69
Chapter 06
Troubleshooting guide
Problems and solutions
Source window (HDMI) issue
Blank spaces are found on all four sides of the screen
when an HDMI cable is connected to the product and
PC.
The blank spaces are not caused by the product.
Blank spaces on the screen are caused by the PC or graphics card. To resolve the problem,
adjust the screen size in the HDMI settings for the graphics card.
If the graphics card settings menu does not have an option to adjust the screen size, update
the graphics card driver to the latest version.
(Please contact the graphics card or computer manufacturer for further details about how to
adjust the screen settings.)
The images on the screen look distorted. Check the connected cable. Compatibility is not guaranteed if you use a cable that has not
been supplied by Samsung.
The screen is not clear. The screen is blurry. Set the resolution and frequency to the recommended level.
The screen appears unstable and shaky. Check that the resolution and frequency of the PC and graphics card are set within a range
compatible with the product. Then, change the screen settings if required by referring to
'Preset timing modes'.
There are shadows or ghost images left on the screen.
The product will turn off automatically. Make sure the power cable is connected properly to the product and power outlet.
The screen display does not look normal. Encoded video content may cause the display to appear corrupted in scenes featuring fast
moving objects such as in a sports event or action video.
Low signal level or low picture quality may cause the display to appear corrupted. This does
not mean the product is defective.
A mobile device within a distance of one-meter radius may cause static on analogue and
digital products.
$ Test your product as follows before
calling Samsung Customer Service
Centre. If the problem persists,
contact Samsung Customer
Service Centre.
70
Source window (HDMI) issue
The brightness and color do not look normal. From the menu, select
Menu → Brightness or Menu → Display → Color Temperature
to try resetting the screen.
The display looks unstable and then freezes. The screen may freeze when a resolution other than the recommended resolution is used or
if the signal is not stable. To resolve the issue, change the PC resolution to the recommended
resolution.
The screen cannot be displayed in full screen. If the source window is set to full screen mode while in portrait orientation, a black bar
appears at both the top and bottom.
Change to landscape orientation, and then switch the Source window to full screen mode.
71
Sound issue
There is no sound. Check the volume.
The volume is too low. Adjust the volume.
If the volume is still low after turning it up to the maximum level, adjust the volume on your
PC sound card or software programme.
Video is available but there is no sound. If a HDMI cable is connected, check the audio output settings on the PC.
If a source device is used
• Check the audio output settings for the source device.
(For example, if your monitor is connected to HDMI, you may need to change the audio
option of your video output device to HDMI.)
Reconnect the power cable to the device and then reboot the device.
There is static coming from the speakers. Low signal level can cause corrupted sound.
There is audible sound when the volume is muted. Audio settings for main speakers are separate from the internal speakers on the product.
Changing or muting the volume on the product does not affect an external
amplier(decoder).

72
Touch function issues
The icons can be selected but does not allow drawing. Use the provided product-specic pen.
Touching does not work when HDMI connection is
used.
Check whether the TOUCH
port on the product is connected to a USB port on the PC using
the supplied USB cable.
• WA65D/WA75D/WA86D
" HDMI
1 or 2 → TOUCH 1 on the rear of the product
" HDMI
3 → TOUCH on the front of the product
When two pens are used, display has difculty
recognizing them.
Make sure that there is enough space between the two pens at multi-touching.
There is a screen touch malfunction such as slow or
inaccurate responding.
Make sure that there are no foreign substances on the screen surface.
Check whether the screen is broken.
Make sure that the product is not exposed to direct sunlight.
When the product is turned on after turning off, do not tap the screen because touch
calibration is performed for 5 seconds.
73
HDMI-CEC issues
HDMI-CEC does not work. Check if the device is an Anynet+ device. The Anynet+ system supports Anynet+ devices only.
Check if the Anynet+ device power cord is properly connected.
Check the Anynet+ device’s Video/Audio/HDMI cable connections.
Check whether Anynet+ (HDMI-CEC) is set to On in
Setting → Administative → Control
Check whether the remote control is Anynet+ compatible.
Anynet+ doesn’t work in certain situations. (initial setup)
If you have removed and then reconnected the HDMI cable, please make sure to search
devices again or turn your product off and on again.
Check if the Anynet+ function of the Anynet device turns on.
I want to start Anynet+. Check if the Anynet+ device is properly connected to the product and check if Anynet+
(HDMI-CEC) is set to On in
Menu → SETTINGS → External Device Manager.
I want to exit Anynet+. Press the SOURCE button on the product remote control and select a non-Anynet+ device.
The message “Disconnecting Anynet+ device...”
appears on the screen.
You cannot use the remote control when you are conguring Anynet+ or switching to a view
mode.
Use the remote control after the product has completed Anynet+ conguration or has
nished switching to Anynet+.
The Anynet+ device does not play. You cannot use the play function when initial setup is in progress.

74
HDMI-CEC issues
The connected device is not displayed. Check whether or not the device supports Anynet+ functions.
Check whether or not the HDMI cable is properly connected.
Check whether Anynet+ (HDMI-CEC) is set to On in
Menu → SETTINGS →
External Device Manager.
Search Anynet+ devices again.
Anynet+ requires an HDMI connection. Make sure the device is connected to your product
with an HDMI cable.
Some HDMI cables may not support Anynet+ functions.
If the connection is terminated because there has been a power failure or the HDMI cable has
been disconnected, please repeat the device scan.
Other issue
The product smells like plastic. The plastic smell is normal and disappears over time.
Small particles are found on the edges of the product. The particles are part of the product design. The product is not defective.
When I try to change the PC resolution, a message
"The dened resolution is not currently supported."
appears.
The message "The dened resolution is not currently supported." appears if the input source
resolution exceeds the maximum resolution of the product.
To resolve the issue, change the PC resolution to a resolution supported on the product.
There is no sound from the speakers in HDMI mode
when a DVI-HDMI cable is connected.
DVI cables do not transmit sound data.
There is no sound in HDMI mode. Displayed picture colours may not look normal. Video or sound may not be available. This
can occur if a source device that only supports an older version of the HDMI standard is
connected to the product.
75
Chapter 07
Specications
General
Model Name WA65D WA75D WA86D
Panel Size 65 CLASS (64.5 inches / 163.9 cm) 75 CLASS (74.5 inches / 189.3cm) 86 CLASS (85.6 inches /217.4cm)
Display area 1428.48 mm (H) x 803.52 mm (V) 1649.664 mm (H) x 927.936 mm
(V)
1895.04 mm (H) x 1065.96 mm (V)
Synchronization
(Panel Spec)
Horizontal Frequency 135 kHz
Vertical Frequency 60 Hz
Resolution Optimum resolution 3840 x 2160
Maximum resolution
Power Supply AC100-240V~ 50/60Hz
Refer to the label at the back of the product as the standard voltage can vary in different countries.
Environmental
considerations
Operating Temperature : 32 °F – 104 °F (0 °C – 40 °C)
* For installing the enclosure, keep the internal temperature at 104 °F (40 °C) or below.
Humidity : 10% – 80%, non-condensing
Storage Temperature : -4 °F – 113 °F (-20 °C – 45 °C)
Humidity : 5% – 95%, non-condensing
* Applicable before the product package is unpacked.
$ Horizontal Frequency:
The time required to scan a single
line from the left to the right side
of the screen is called a horizontal
cycle. The reciprocal number
of a horizontal cycle is called
horizontal frequency. Horizontal
frequency is measured in kHz.
$ Vertical Frequency:
The product displays a single
image multiple times per second
(like a uorescent light) to display
what the viewer sees. The rate of
a single image being displayed
repeatedly per second is called
vertical frequency or refresh rate.
Vertical frequency is measured
in Hz.

76
" Due to the nature of the manufacturing of this product, approximately 1 pixel per million (1 ppm) may appear brighter or darker on the panel. This
does not affect product performance.
" This product can be set to only one resolution for each screen size to obtain the optimum picture quality due to the nature of the panel. Using
a resolution other than the specied resolution may degrade the picture quality. To avoid this, it is recommended that you select the optimum
resolution specied for your product.
" For detailed device specications, visit the Samsung website.
• Europe only (WA65D/WA75D/WA86D only)
To access energy labelling information about this product on the European Product Registry for Energy Labelling (EPREL), go to https://eprel.
ec.europa.eu/qr/****** where ****** is the product’s EPREL registration number. You can nd the registration number on the rating label of your
product.
• Türkiye only
To access the energy labelling information of the model: WA65D, WA75D, WA86D
(1) Go to https://www.samsung.com/global/ecodesign_energy
(2) Get the model identier from the energy label of the product and type it in the search box
(3) Energy labelling information can be found
77
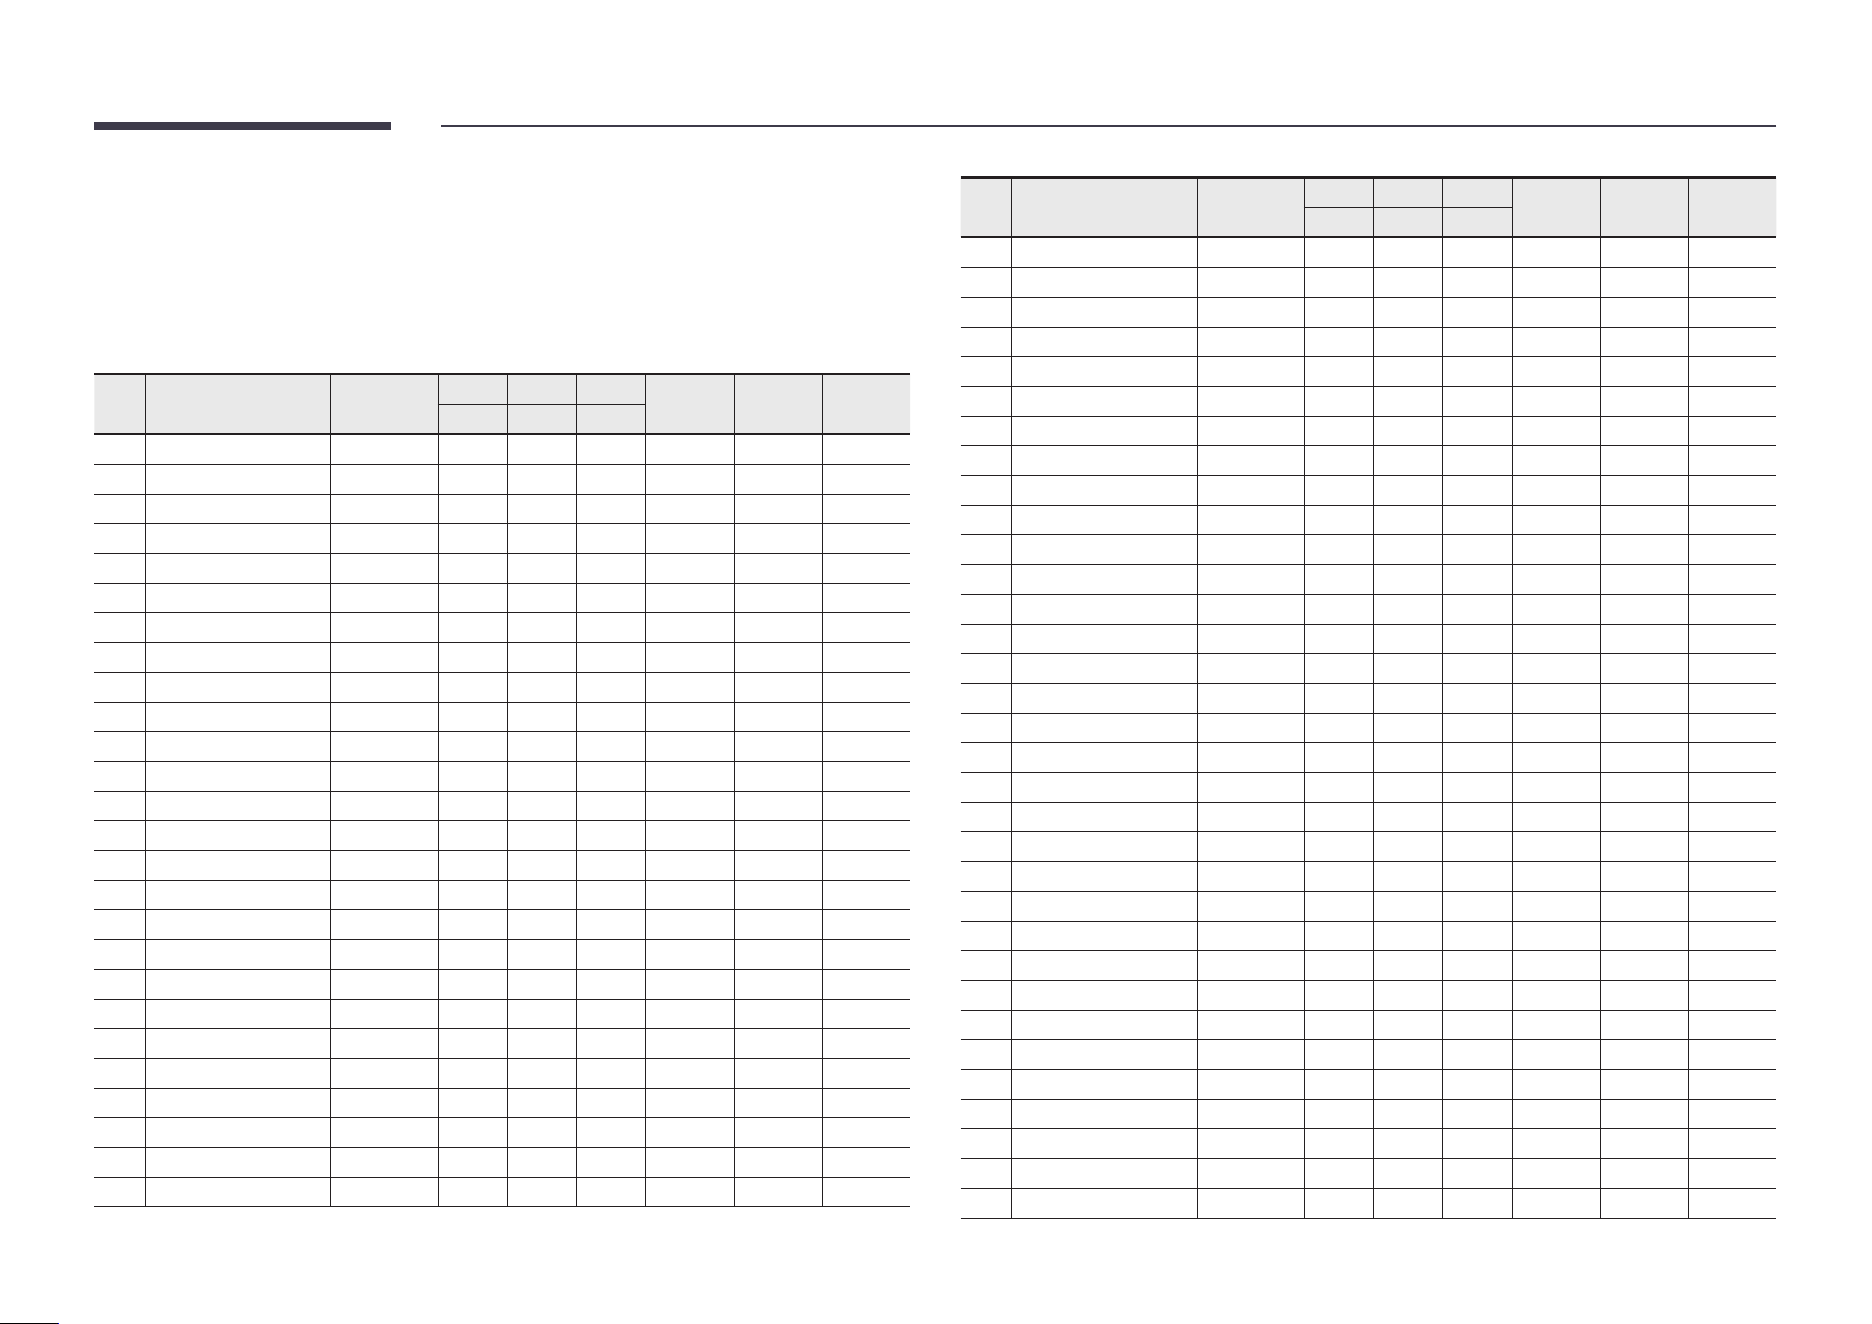
Preset timing modes
The screen will automatically be adjusted if a signal that belongs to the following standard
signal modes is transmitted from your PC. If the signals transmitted from the PC differ from
the standard mode, the screen may not be displayed. In such a case, change the settings as
shown in the following table by referring to the graphics card user manual.
No. Signal timing name Reference
clock Hf Vf
HDMI VGA TypeC
[MHz] [KHz] [Hz]
1 720*400 @70Hz IBM 28.322 31.788 70 / Y /
2 640*480 @60Hz VESA 25.18 31.469 59.94 Y Y Y
3 800*600 @56Hz VESA 36 35.156 56.25 / Y Y
4 800*600 @60Hz VESA 40 37.879 60.317 Y Y Y
5 1024*768 @60Hz VESA 65 48.363 60.004 Y Y Y
6 1280*768 @60Hz(RB) CVTRB 68.25 47.396 59.995 Y Y Y
7 1280*768 @60Hz VESA 79.5 47.776 59.87 Y Y Y
8 1280*800 @60Hz VESA 83.5 49.702 59.81 Y Y Y
9 1280*960 @60.000Hz VESA 108 60 60 Y Y Y
10 1280*1024 @60Hz VESA 108 63.981 60.002 Y Y Y
11 1360*768 @60Hz VESA 85.5 47.712 60.015 Y Y Y
12 1440*900 @60Hz(RB) CVTRB 88.75 55.469 59.901 Y Y Y
13 1440*900 @60Hz CVT 106.5 55.935 59.887 Y Y Y
14 1680*1050 60Hz VESA 146.25 65.29 59.954 Y Y Y
15 1920*1080 60Hz CEA 148.5 67. 5 60 Y Y Y
16 640*480P594:3 CEA 25.175 31.469 59.94 / / Y
17 640*480P604:3 CEA 25.2 31.5 60 / / Y
18 720*480P604:3 CEA 27.027 31.5 60 / / Y
19 720*480P6016:9 CEA 27.027 31.5 60 / / Y
20 1280*720P5916:9 CEA 74.175 44.955 59.939 / / Y
21 1280*720P6016:9 CEA 74.25 45 60 / / Y
22 1440*480P604:3 CEA 54.054 31.5 60 / / Y
23 1440*480P5916:9 CEA 54 31.469 59.94 / / Y
24 1440*480P6016:9 CEA 54.054 31.5 60 / / Y
25 1920*1080P5916:9 CEA 148.35 67.432 59.939 / / Y
26 1920*1080P6016:9 CEA 148.5 6 7.5 60 / / Y
No. Signal timing name Reference
clock Hf Vf
HDMI VGA TypeC
[MHz] [KHz] [Hz]
27 720*576P504:3 CEA 27 31.25 50 / / Y
28 720*576P5016:9 CEA 27 31.25 50 / / Y
29 1280*720P5016:9 CEA 74.25 37. 5 50 / / Y
30 1440*576P5016:9 CEA 54 31.25 50 / / Y
31 1920*1080P5016:9 CEA 148.5 56.25 50 / / Y
32 1920*1080P2316:9 CEA 74.175 26.973 23.976 / / Y
33 1920*1080P2416:9 CEA 74.25 27 24 / / Y
34 1920*1080P2516:9 CEA 74.25 28.125 25 / / Y
35 1920*1080P2916:9 CEA 74.175 33.716 29.97 / / Y
36 1920*1080P3016:9 CEA 74.25 33.75 30 / / Y
37 720(1440)*480i CEA 27 15.734 59.939 Y / /
38 480p 59Hz CEA 27 31.469 59.94 Y / /
39 480p 60Hz CEA 27.027 31.5 60 Y / /
40 720(1440)*576i CEA 27 15.625 50 Y / /
41 576p 50Hz CEA 27 31.25 50 Y / /
42 720p 60Hz CEA 74.25 45 60 Y / /
43 720p 59Hz CEA 74.176 44.955 59.94 Y / /
44 720p 50Hz CEA 74.25 37. 5 50 Y / /
45 1080i 60Hz CEA 74.25 33.75 60 Y / /
46 1080i 59Hz CEA 74.176 33.716 59.94 Y / /
47 1080i 50Hz CEA 74.25 28.125 50 Y / /
48 1080p 60Hz CEA 148.5 67. 5 60 Y / /
49 1080p 50Hz CEA 148.5 56.25 50 Y / /
50 1080p 30Hz CEA 74.25 33.75 30 Y / /
51 1080p 29Hz CEA 74.176 33.716 29.97 Y / /
52 1080p 25Hz CEA 74.25 28.125 25 Y / /
53 1080p 24Hz CEA 74.25 27 24 Y / /
54 1080p 23Hz CEA 74.176 26.973 23.976 Y / /
55 3840*2160 60Hz CEA 594 135 60 Y / Y
56 3840*2160 50Hz CEA 594 112.5 50 Y / Y
57 3840*2160 30Hz CEA 297 6 7.5 29.97 Y / Y
58 3840*2160 25Hz CEA 297 56 25 25 Y / Y
59 3840*2160 24Hz CEA 297 54 23.982 Y / Y

78
Chapter 08
Appendix
Responsibility for the pay service (Cost to
customers)
" When the service is requested, in spite of in warranty, we may charge you for a visit from a
service technician in the following cases.
Not a product defect
Cleaning of the product, Adjustment, Explanation, Re-installation and etc.
• If a service technician is requested to give instructions on how to use product or simply
adjusts options without disassembling product.
• If a defect is caused by external environmental factors (Internet, Antenna, Wired Signal,
etc.)
• If a product is reinstalled or devices are connected additionally after installing the
purchased product for the rst time.
• If a product is reinstalled to move to a different spot or to move to a different house.
• If the customer requests instructions on how to use another company’s product.
• If customer requests instructions on how to use the network or another company’s
programme.
• If customer requests software installation and setup for the product.
• If a service technician removes/cleans dusts or foreign materials inside of the product.
• If customer requests an installation additionally after purchasing a product through
home-shopping or online.
A product damage caused by customer’s fault
Product damage caused by customer’s mishandling or wrong repair
If a product damage is caused by;
• External impact or drop.
• Use of supplies or separately sold product unspecied by Samsung.
• Repair from a person besides an engineer of outsourcing service company or partner of
Samsung Electronics Co., Ltd.
• Remodeling or repairing the product by customer.
• Using it with incorrect voltage or non-authorised electrical connections.
• Not following the “cautions” in User Manual.
Others
• If product fails by natural disaster. (lightning, re, earthquake, ood damage, etc)
• If consumable components are all used up. (Battery, Toner, Fluorescent lights, Head,
Vibrator, Lamp, Filter, Ribbon, etc.)
" If customer requests a service in case the product has no defect, service fee may be
charged. So please read User Manual rst.
79
Prevention of afterimage burn-in
What is afterimage burn-in?
Afterimage burn-in should not occur when the panel is operating normally. Normal operation
refers to a continuously changing video pattern. If the panel displays a xed pattern for an
extended period of time a slight voltage difference may occur between the electrodes in
pixels that control the liquid crystals.
Such a voltage difference between electrodes increases with time and makes the liquid
crystals thinner. When this occurs, a previous image can remain on the screen when the
pattern changes.
This information is a guide to prevent afterimage burn-in. Viewing a xed screen
for an extended period of time may cause afterimage burn-in. This problem is not
included in warranty.
Recommended prevention practices
Viewing a xed screen for an extended period of time may cause afterimage burn-ins or
smudges. Turn off the product when it is not used for a long time, activate the Power Saving
mode, or run a moving screen saver.
HDMI License notice
The terms HDMI and HDMI High-Denition Multimedia Interface, and
the HDMI Logo are trademarks or registered trademarks of HDMI
Licensing Administrator, Inc. in the United States and other countries.
Open Source Licence Notice
Open Source used in this product can be found on the following webpage
(https://opensource.samsung.com).
80
Low Blue Light
Low Blue Light (software solution) lters out blue light to protect your eyes by adjusting how
much blue light is shown:
1
To open blue light settings: on the device home screen, swipe up from the bottom
2
The low blue light function is in the middle of General Settings and is called Eye Care.
3
Tap Eye Care to enable/disable low blue light.
Tips for eye health
Eye exercises can help minimize eye strain. Slowly roll your eyes up, down, left and right.
Repeat as many times as needed.
When viewing screens for extended periods, it is recommended to take periodic breaks
from viewing. Short breaks of at least 10 minutes are recommended after one (1) hour of
continuous viewing.
While taking breaks, users can further reduce eye strain and dryness by focusing on objects
that are further away from them for 10-15 seconds, then gazing at something up close for 10-
15 seconds. Repeat this up to 10 times.
This exercise reduces the risk of your eyes "locking up" from focusing after prolonged
computer work.
ENERGY STAR
ENERGY STAR is a U.S. Environmental Protection Agency voluntary program that helps
businesses and individuals save money and protect our climate through superior energy
efciency. Products that earn the ENERGY STAR prevent greenhouse gas emissions by
meeting strict energy efciency criteria or requirements set by the U.S. Environmental
Protection Agency. The following logo appears on all ENERGY STAR-certied models:
This product qualies for ENERGY STAR in the “Standard mode” setting and this is the setting
in which power savings will be achieved. Changing the Standard mode picture settings
or enabling other features will increase power consumption that could exceed the limits
necessary to qualify for ENERGY STAR rating. Refer to EnergyStar.gov for more information
on