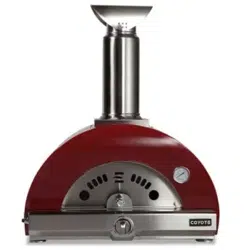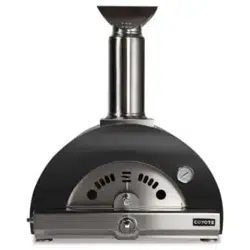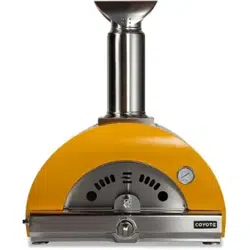

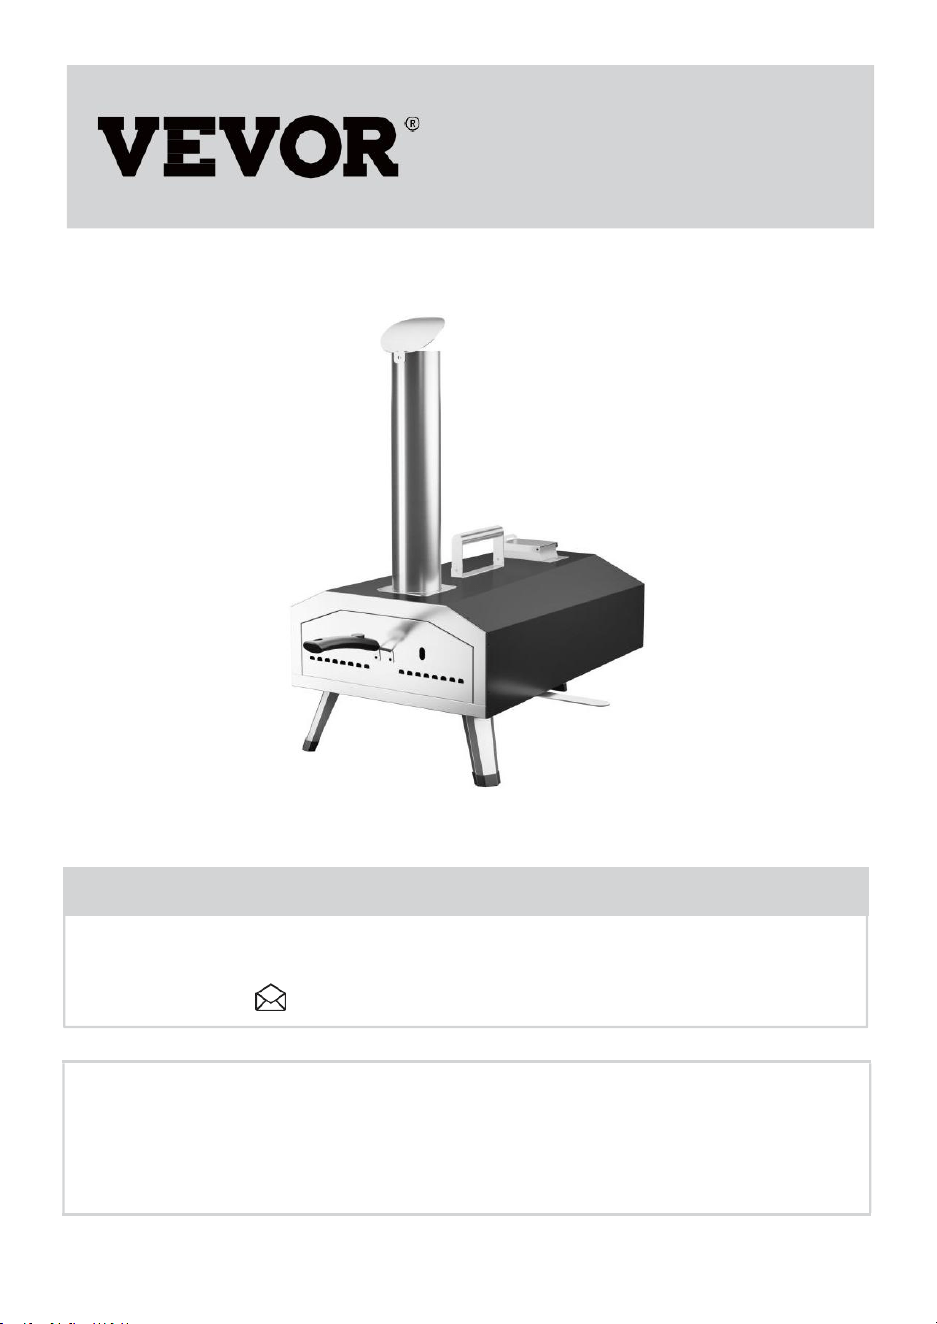
Pizza oven
Instruction Manual
We continue to be committed to provide you tools with competitive price.
"Save Half", "Half Price" or any other similar expressions used by us only
represents an estimate of savings you might benefit from buying certain tools
with us compared to the major top brands and doses not necessarily mean to
cover all categories of tools offered by us. You are kindly reminded to verify
carefully when you are placing an order with us if you are actually saving half
in comparison with the top major brands.

- 1 -
Have product questions? Need technical support? Please feel free to
contact us:
CustomerService@vevor.com
NEED HELP? CONTACT US!
This is the original instruction, please read all manual instructions
carefully before operating. VEVOR reserves a clear interpretation of our
user manual. The appearance of the product shall be subject to the
product you received. Please forgive us that we won't inform you again if
there are any technology or software updates on our product.
Pizza oven
GB-GO12A-R

- 2 -
CSA-EN
WARNINGS
WARNING
To reduce the risk of fire, burn hazard or other injury, read this safety
manual carefully and completely before using this appliance.
WARNING
Before cleaning, make sure the gas supply and control knob is in the OFF
position and that the burner and oven has cooled.
DANGER
Never operate this appliance unattended. If a fire should occur, keep away
from the appliance and immediately call your fire department. Do not
attempt to extinguish an oil or a grease fire with water.
DANGER
If you smell gas:
• Shut off gas from the appliance
• Extinguish any open flame
• If odor continues, keep away from the appliance and immediately call
your gas supplier or your fire department.
Failure to follow these instructions could result in fire, explosion or burn
hazard which could cause property damage, personal injury or death.
WARNING
FOR OUTDOOR USE ONLY.
WARNING
a.Keep the fuel supply hose away from any heated surface(s).
b.The use of alcohol, prescription or non-prescription drugs may impair the
consumer’s ability to properly assemble or safely operate the appliance.
c.Keep children and pets away from the appliance at all times.
d.Do not move the appliance when in use.
e.This appliance is not intended for and should never be used as a heater.
WARNING
Spiders and insects can nest inside the burner of the appliance and
disrupt gas flow. Inspect the burner at least once a year.
- 3 -
WARNING
When using a match to light the appliance, make sure to use the included
matchstick holder.
WARNING
Do not store this appliance indoors unless the gas cylinder is
disconnected.
WARNING
Do not store gas cylinder in a building, garage or any other enclosed area
and keep out of reach of children at all times.
WARNING
This appliance is not intended to be installed in or on recreational vehicles
and/or boats.
WARNING
Before each use, check all air supply connections for leaks. Do not use
the appliance until all connections have been checked and there are no
leaks.
WARNING
Do not smoke while leak testing. Never use an open flame for the leak test.
WARNING
When lighting, keep your face and hands as far away from the appliance
as possible.
WARNING
Minimum clearance from sides of unit to combustible construction is
914mm (36 inches).
Minimum clearance from back of unit to combustible construction is
914mm (36 inches).
WARNING
This instruction manual contains important information required for the
proper assembly and safe use of the appliance. Read and follow all
warnings and instructions before assembling and using the appliance.
Follow all warnings and instructions when using the appliance.
Keep this manual for future reference.
- 4 -
WARNING
This manual states that an oven, fryer or broiler shall not be used on or
under any apartment or condominium balcony or deck.
WARNING
This appliance is not intended to be installed in or on a boat. This
appliance is not intended to be installed in or on a recreational vehicle.
WARNING
Keep the fuel supply hose away from any heated surface(s).
WARNING
This manual contains instructions for cleaning and inspecting the hoses
before each use of the appliance. If there is evidence of abrasion, wear,
cuts, or leaks, the hose must be replaced prior to the appliance being put
into operation. The replacement hose assembly shall be that specified by
the manufacturer.
WARNING
This appliance shall be used only outdoors, and shall not be used in a
building, garage, or any other enclosed area.
WARNING
This manual includes a list of required parts necessary for the safe
operation of the appliance, directions for proper assembly and for
assembly of installed parts and accessories supplied with the appliance,
and proper procedures for gas leak testing.
WARNING
The appliance should not be located or used under overhead unprotected
flammable building materials or surfaces. For grills, fryers or griddles, the
minimum clearance to any structure or combustible material should be at
least 10 feet (3 metres).

- 5 -
NOMINAL HOURLY GAS CONSUMPTION
GB-GO13A - Outdoor Use Gas Grill
Gas
Type
Number of
Burners
Injector
Size Main
Burner
Total Gas
Consumption
BTU
Gas
Pressure
KPa
Propane
1
0.78
13600
2.74
BEFORE LIGHTING
Inspect the gas supply hose prior to turning on the gas. If there is
evidence of cut, wear or abrasion, it must be replaced prior to use.
Screw the regulator onto the gas cylinder. Check the hose and regulator
connections for leaks with a soap and water solution before igniting the
appliance. Use only the pressure regulator and gas hose assemblies
provided with this equipment.
LP GAS CYLINDER WARNING
1.Do not store spare liquid propane gas cylinder under or near this
appliance.
2.Never fill the cylinder beyond 80 percent capacity.
3.Liquid propane cylinder must be fitted with an OVERFILL PROTECTION
DEVICE (OPD).
4.If the above information is not strictly adhered to, a fire may occur
resulting in death or serious injury.
5.This manual states that the installation must conform to local codes or,
in the absence of local codes, to the National Fuel Gas Code, ANSI
Z223.1/NFPA 54, Storage and Handling of Liquefied Petroleum Gases,
ANSI/NFPA 58; or Natural Gas and Propane Installation Code, CSA
B149.1; Propane Storage and Handling, CSA B149.2
SAFETY PRACTICES TO AVOID INJURY
When properly cared for, your oven will provide safe, reliable service for
many years. However, extra care must be taken as the heat generated by
the oven can increase the risk of accidents.
When using this oven basic practices must be followed, including
but not limited to following:
•Do not repair or replace any part of the oven unless specifically
recommended in this manual. All other service should be referred to a

- 6 -
qualified technician.
•Children should not be left alone or unattended in an area where the
oven is being used. Do not allow children to sit, stand or play around the
oven at any time.
•Never let clothing or other flammables come in contact with or too close
to any burner or hot surface until it has cooled. Fabrics can catch fire and
cause serious personal injury.
•For personal safety, wear proper apparel. Loose fittings garments or
sleeves should never be worn while using the oven. Some synthetic
fabrics are highly flammable and should not be worn while cooking.
•Do not heat unopened food containers as a build-up of pressure may
cause the containers to burst. When lighting the burner, always pay close
attention to what you are doing.
•When using the oven, do not touch the outer shell, stone baking board or
immediate surroundings as these areas become extremely hot and could
cause burns.
•Do not use the oven to cook extremely fatty meats or other products
which increase flare-up.
•Keep the area surroundings the oven free from combustible material
including fluids, trash and vapours such as gasoline or charcoal lighter
fluid.
•Do not obstruct the flow of combustion and ventilation air.
•Never use the oven in extremely windy conditions.
•The temperature under the oven is high. Do not place the oven on a table
with flammable table clothes, plastic or any other inflammable materials.
the appliance is not intended for commercial use
1.In the event of an oil or grease fire, do not attempt to extinguish the fire
with water. Call the fire service immediately. In some cases, type BC or
ABC extinguishers may suppress the fire.
2.If it rains, snows, hails, sleet or other forms of precipitation, turn off the
appliance burner and gas supply. Do not attempt to move the appliance or
cooking vessel.
3. When cooking, the appliance fryer or boiler must be located on a
horizontal, stable, non-combustible surface and free from combustible
materials. For this reason, asphalt surfaces (tarred surfaces) may not be
acceptable.
Do not move the appliance when in use. Allow the cooking vessel to cool
to 115°F(45℃) before moving or storing.
This appliance will be hot during and after use. Use insulated oven mitts or
gloves for protection from hot surfaces or splatter from cooking liquids.
- 7 -
Avoid bumping of or impact with the appliance.
LPG cylinders used must be manufactured and marked in accordance
with the specifications for LP gas cylinders,U.S.Department of
Transportation (DOT)or the Standard for Cylinders,Spheres and Tubes for
the Transportation of Dangerous Goods,CAN/CSA-B339;
Cylinders must be stored outdoors out of the reach of children and shall
not be stored in a building,garage,or any other enclosed area;
the pressure regulator and hose assembly supplied with the appliance
must be used. Replacement pressure regulators and hose assemblies
shall be those specified by the appliance manufacturer.
the cylinder supply system must be arranged for vapor withdrawal;
xii
)
a statement:
1.do not store a spare LP gas cylinder under or near this appliance;
2.never fill the cylinder beyond 80 percent full;and
3.if the instructions in(b)(xii)(1)and(b)(xii)(2)are not followed exactly, a fire
causing death or serious injury may occur.
"Install dust caps on the cylinder valve outlet when the cylinder is not in
use. Install only the type of dust cap on the cylinder valve outlet of the
cylinder valve. Other types of dust caps or plugs may cause propane to
leak."
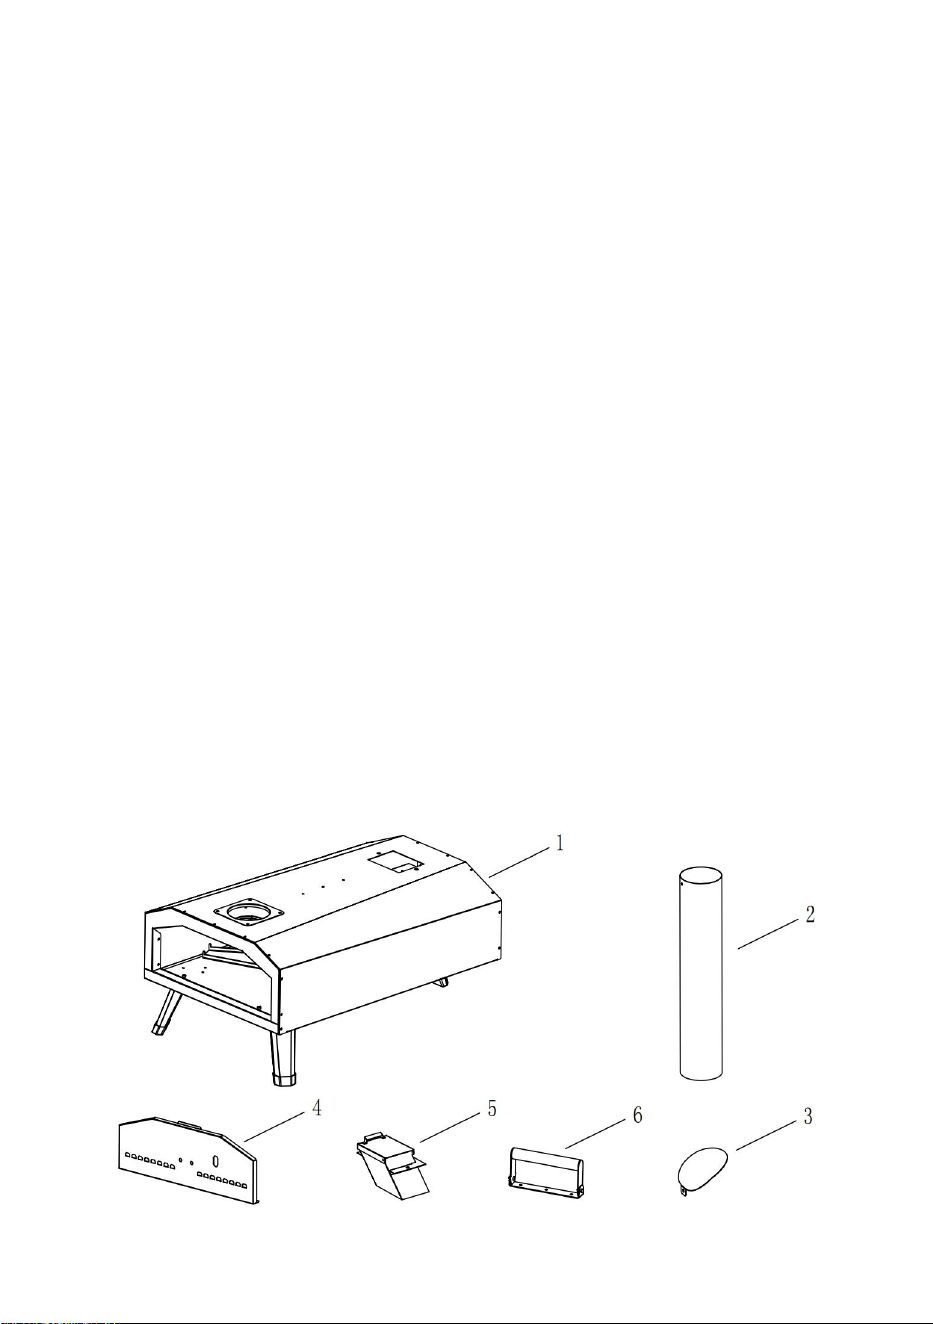
PARTS LIST
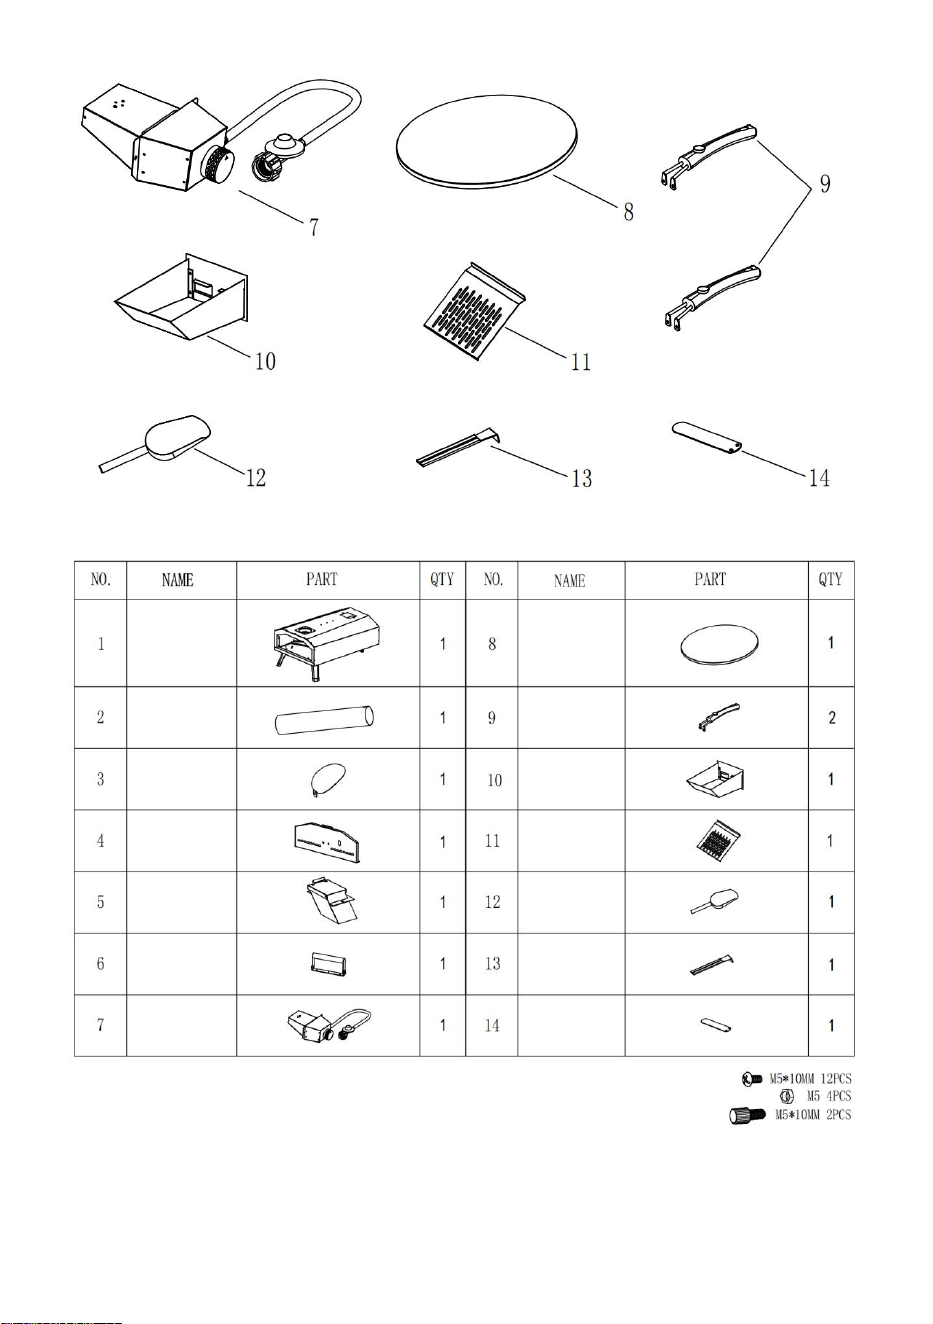
- 8 -
ASSEMBLY
Before assembly, make sure all parts are present. If any part is missing or
damaged, do not attempt to assemble the appliance. Contact customer
service for replacement parts.
- 9 -
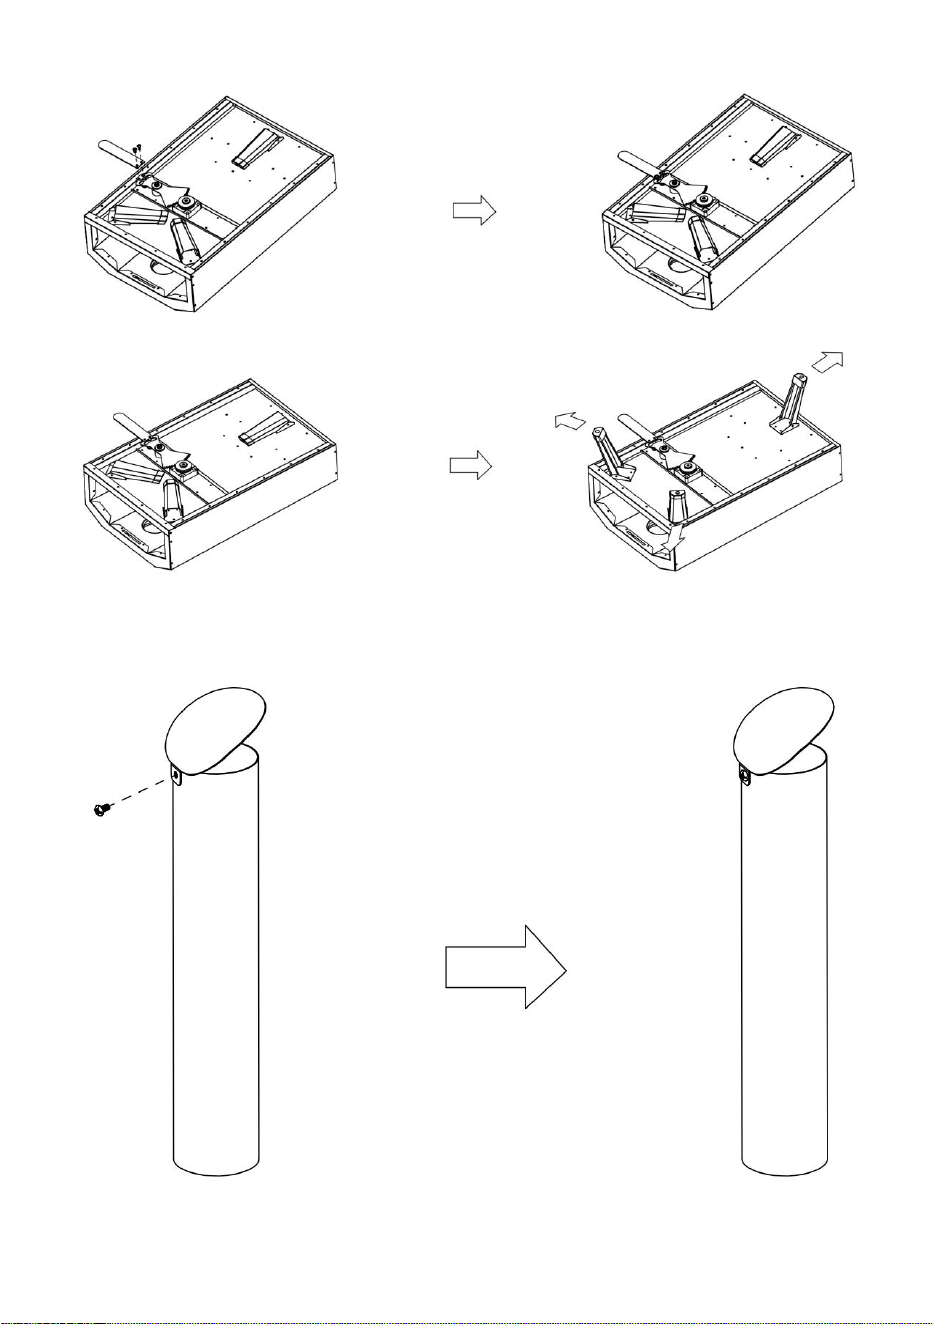
1.Install the handle of rotating base.
2.Unfold legs.
3.Install the chimney top.
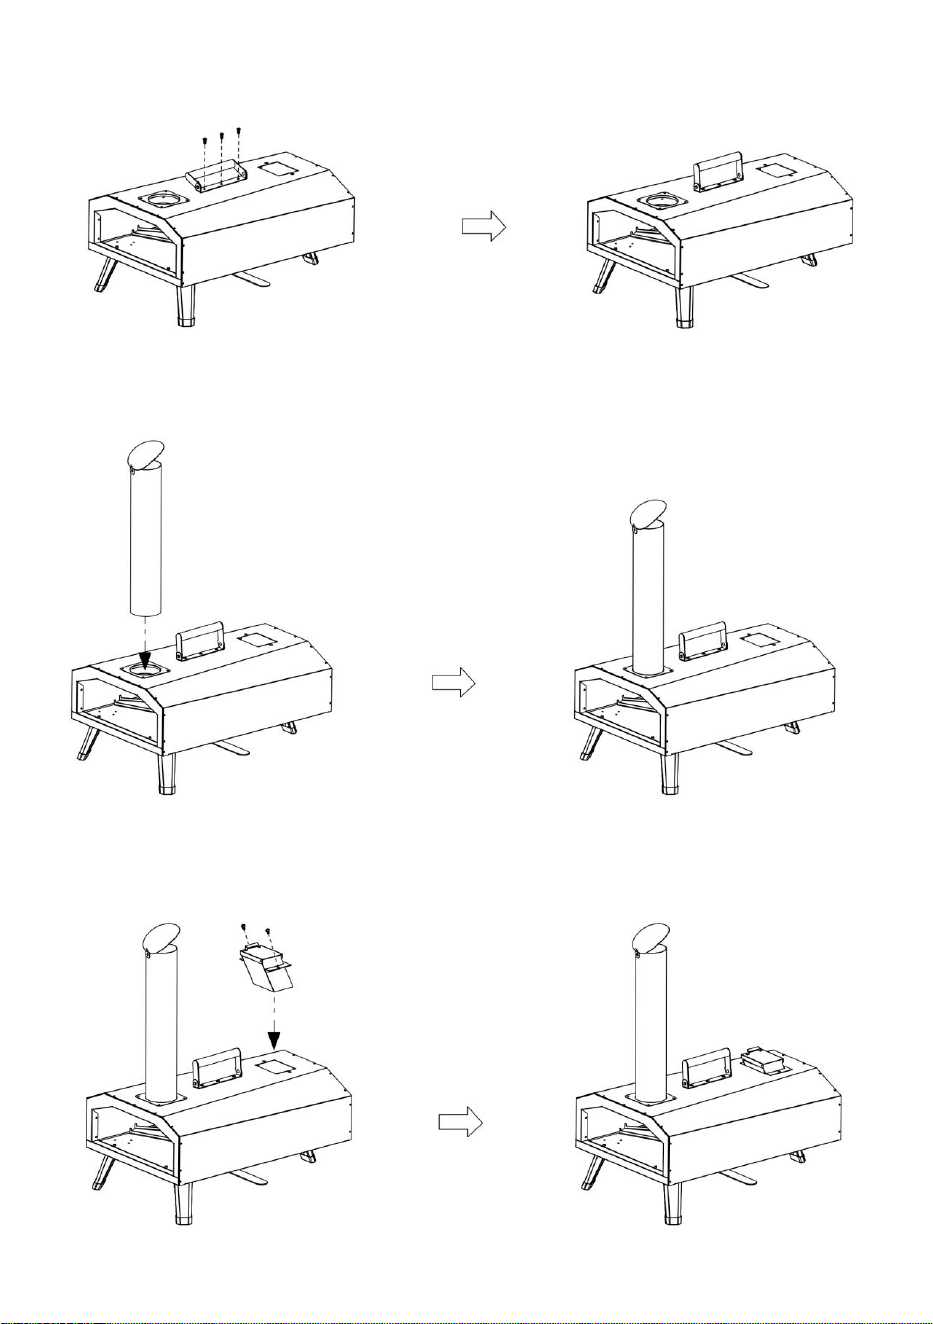
- 10 -
4.Insert the the carry handle.
5.Install the chimney.
6.Install the channel.
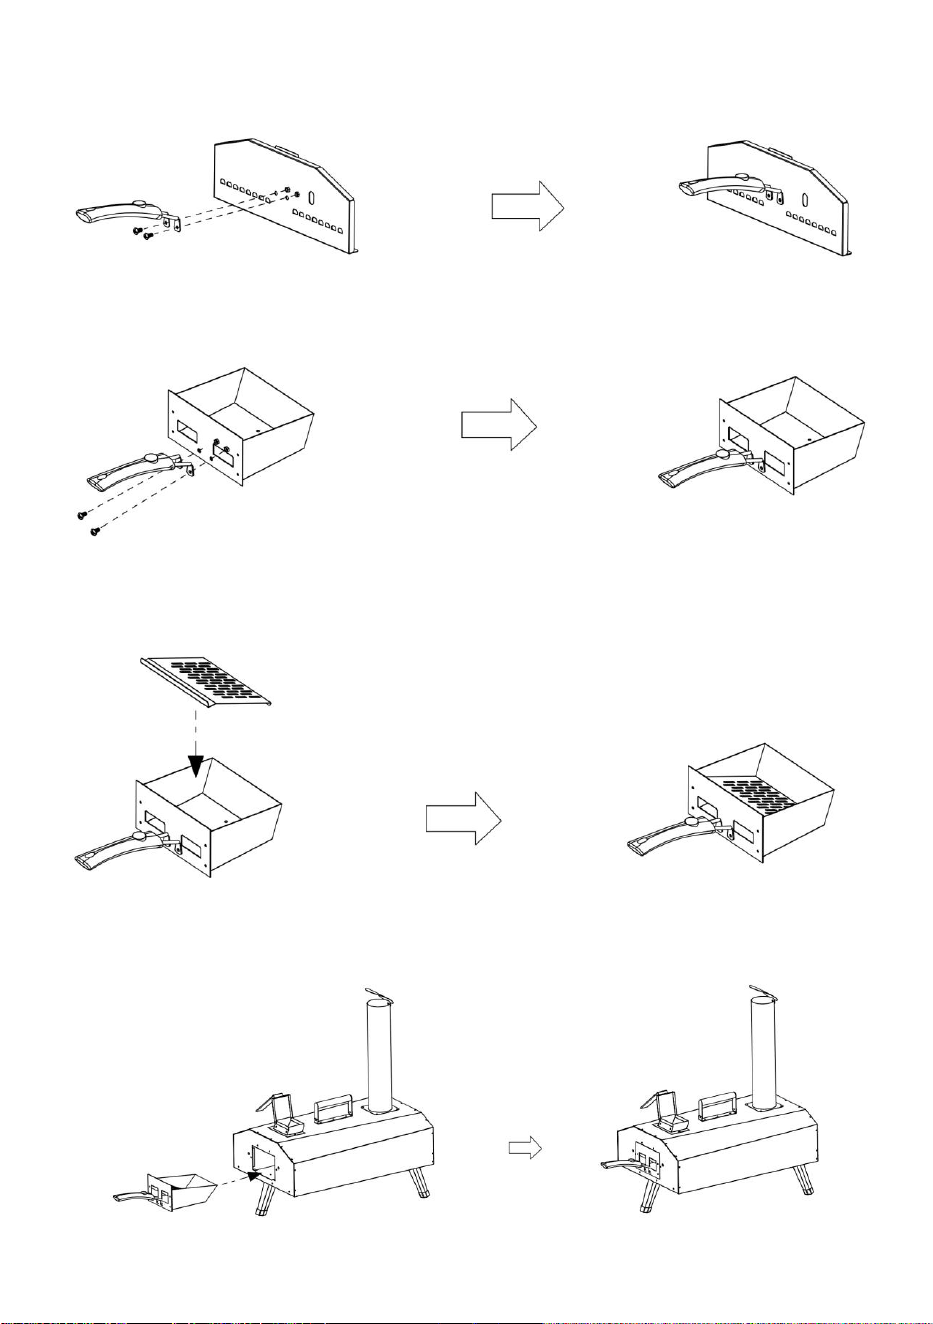
- 11 -
7.Install the handle of door.
8.Install the handle of fuel box.
9.Install the hopper of fuel box.
10.Attach the fuel box to the body.
- 12 -
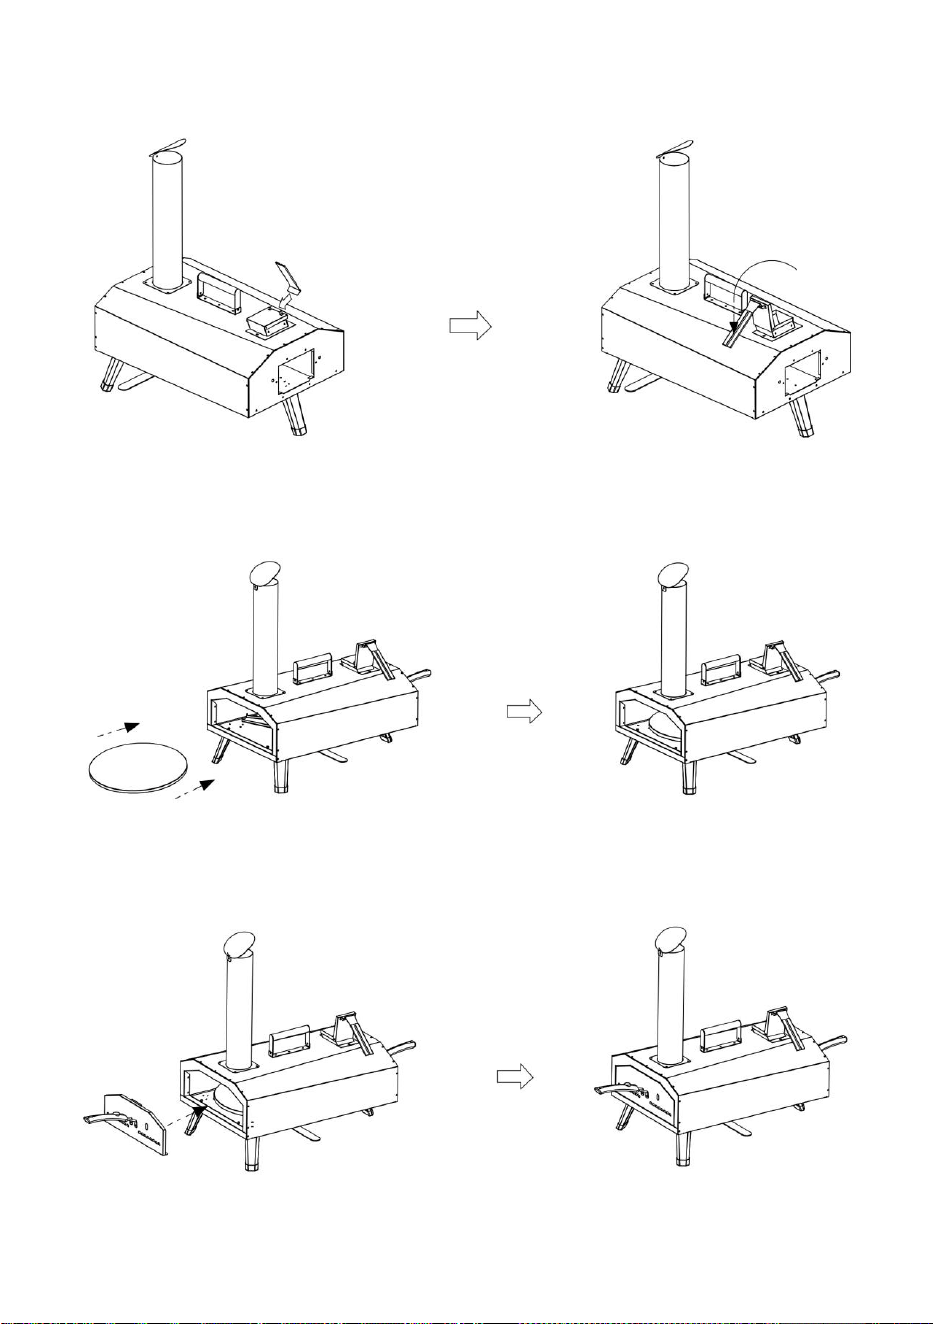
11.How to add pellet.
12.Put in the pizza stone.
13.How to attach the door.
- 13 -
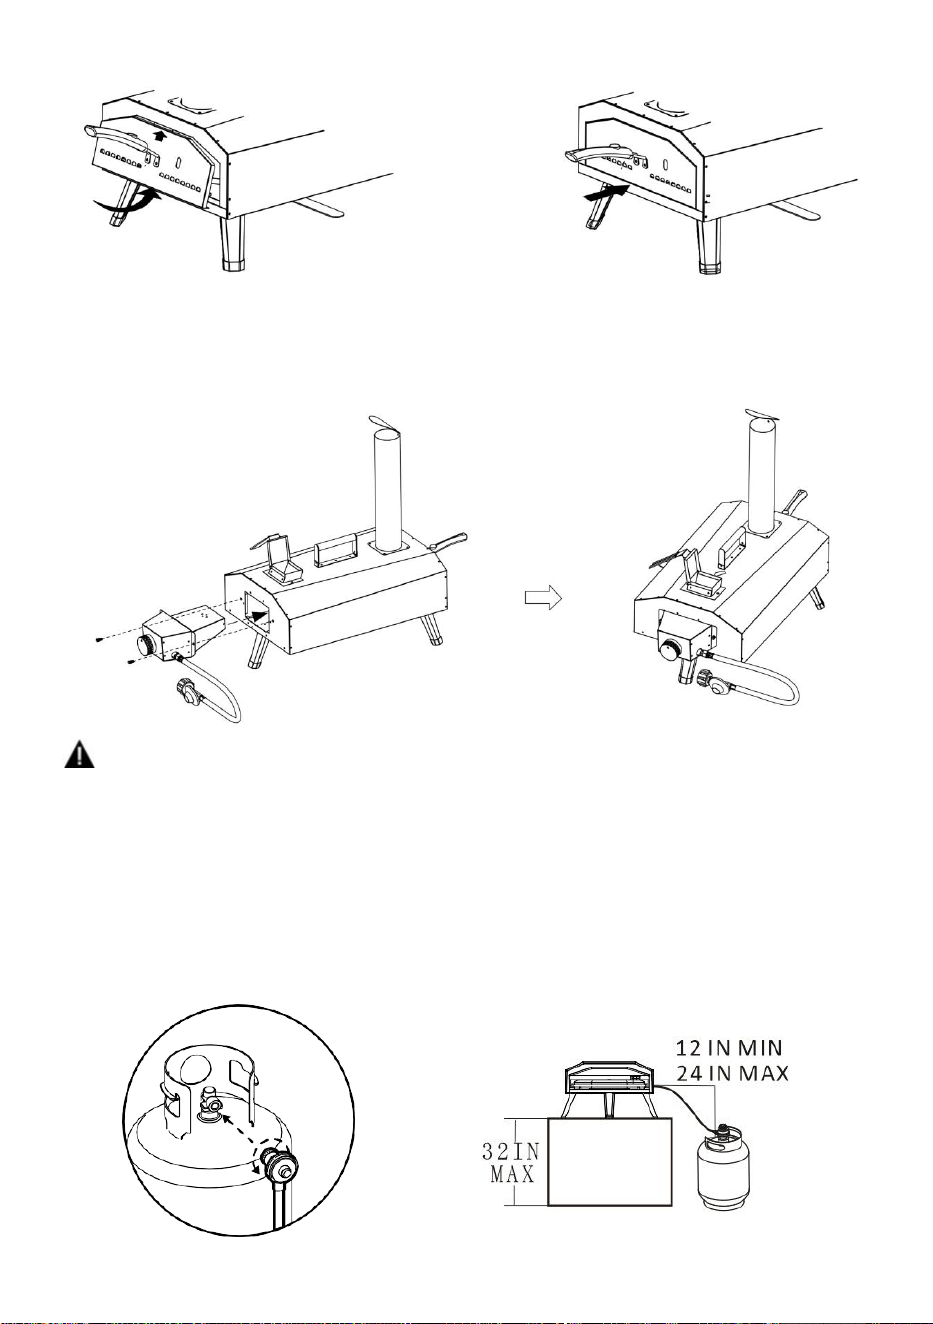
14.How to transfer the gas burner and connect the hose and
regulator.
WARNING
Keep the fuel supply hose away from any heated surface(s).
• Please always keep the gas bottle in upright position.
• The 20 lb LPG cylinder measures 12.2 inches in diameter and 17.9
inches high .
• If the appliance is not in use, the gas must be turned off at the supply
cylinder.
• The cylinder used must include a collar to protect the cylinder valve.
• The minimum distance for the appliance and the 20lb gas tank is 40 inc.

- 14 -
GAS REGULATOR
This gas fitting is clockwise. Make sure that the tank is completely
switched off and screw the regulator as far as possible into the gas tank
valve.
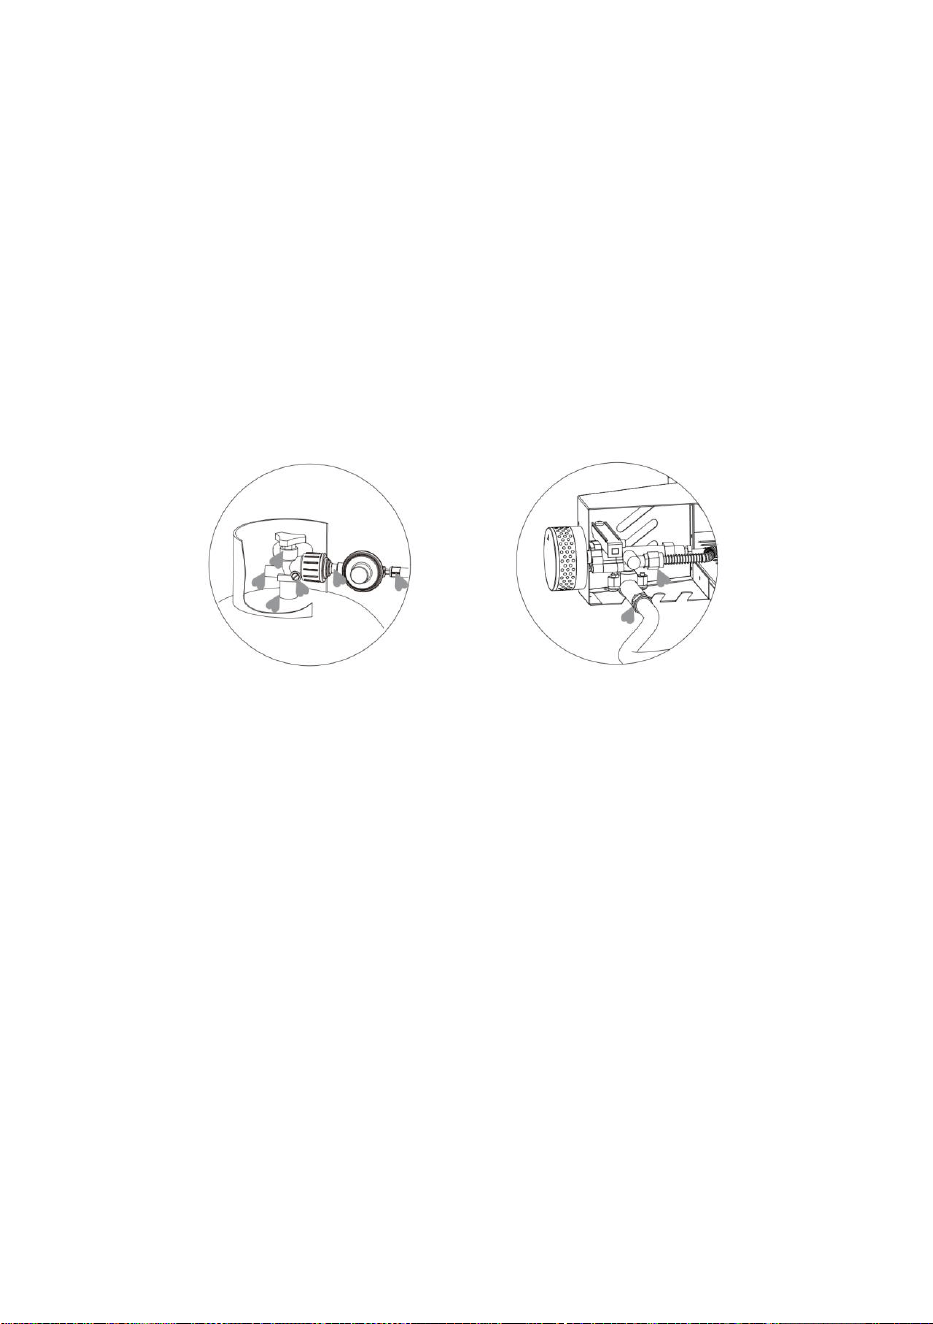
CONNECTING THE LIQUID PROPANE GAS CYLINDER
1.To connect the liquid propane gas cylinder:
2.The cylinder valve should be in OFF position.
3.Make sure the burner valve is in OFF position.
4.Inspect the valve connections, port and regulator assembly. Remove
debris and inspect the hose for damage.
5.When connecting the regulator assembly to the valve, tighten the nut
clockwise by hand until it stops.Use of a wrench could damage the quick
coupling nut and result in a hazardous situation.
6.Open the cylinder valve fully by turning the valve counterclockwise.
7.Before lighting the oven, use a soap and water solution to check all
connections for leaks.
8.If a leak is found, turn the cylinder valve OFF, and do not use the oven
until local liquid propane dealer can make repairs.
CONNECTING THE LIQUID PROPANE GAS CYLINDER
1.Turn the oven burner valve OFF and make sure the oven is cool.
2.Turn the liquid propane cylinder valve OFF by turning clockwise until it
stops.
3.Detach the regulator assembly from the cylinder valve by turning the
quick coupling nut counterclockwise.
4.Place dust cap for cylinder valve outlet whenever the cylinder is not in
use.
LEAK TESTING
GENERAL
Although the gas connections of the appliance are leak tested prior to
packing and shipment, a complete test must be performed at the
installation site.
Before each use, check all the gas connections for leak testing using the
procedure listed below. If the smell of gas is detected at any time, you
should immediately stop using and check the entire system for leaks.
BEFORE TESTING
Make sure all packing material has been removed from the appliance.
Make a solution of one part liquid detergent and one part water. You will
- 15 -
need a spray bottle, brush or rag to apply the solution to the fittings.
TO TEST
1.Turn the burner valve OFF.
2.Turn the liquid propane cylinder valve on counterclockwise to open the
valve.
3.Apply the soap solution to all gas fittings. Soap bubbles would appear
where a leak is present.
4.If a leak is present, immediately turn the gas supply OFF and tighten
leaky fittings.
5.Turn the gas back ON and recheck.
6.Should the gas continue to leak from any of the fittings, turn the gas
supply OFF and contact customer service.
OPERATING INSTRUCTIONS
USING THE OVEN
Each burner is rated at 13600 BTU/Hr.
To begin:
1.Make sure the oven has been leak tested and properly placed.
2.Remove any remaining packing material.
3.Light the burner using the LIGHTING INSTRUCTIONS below
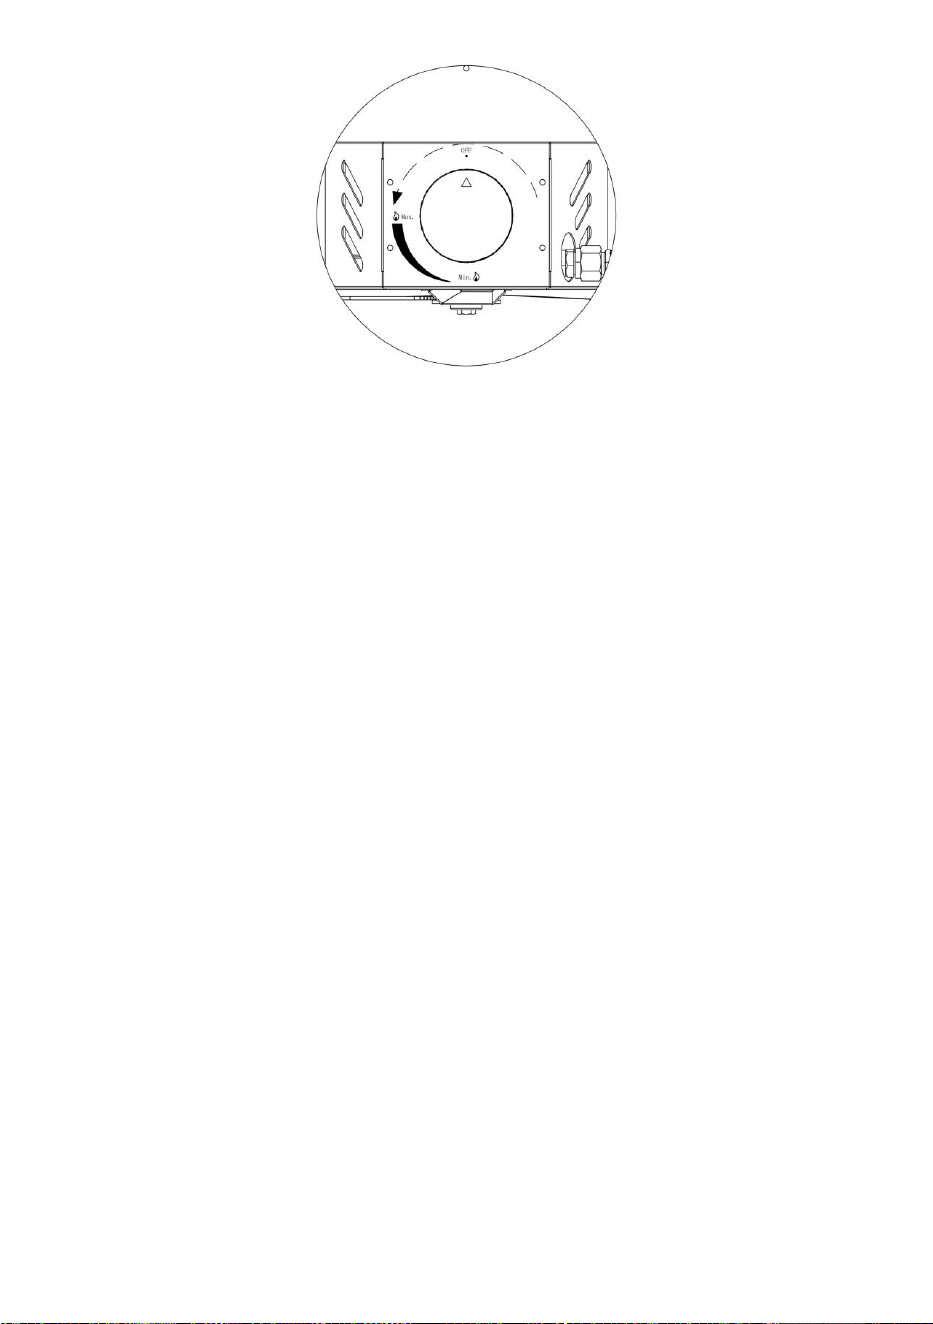
LIGHTING INSTRUCTION
TO LIGHT THE BURNER
1.Make sure the control knob is in OFF position, and then turn the liquid
propane cylinder valve ON by slowly turning counterclockwise.
2.Push in and slowly turn the control knob anticlockwise until you hear a
click and the burner ignites.
3.If burner doesn't light, turn the knob OFF, wait 5 minutes and repeat the
lighting.
- 16 -
TO LIGHT WITH A MATCH
1.If burner will not light after several attempts using the control knob, the
burner may be lit with a match.
2.If you have already attempted to light the burner using the control knob,
wait 5 minutes for any gas to dissipate.
3 Insert a match into the matchstick holder, ignite the match and insert
through the oven opening to the burner.
4.Push and turn the control knob to HI slowly, the burner should ignite
immediately.
5.If the burner does not light within seconds, turn the control knob OFF
and wait 5 minutes and try again.
CARE AND MAINTENANCE
When storing GB-GO13A, avoid direct sunlight if possible and store
indoors for long-term storage. GB-GO13A should not be exposed to harsh
weather conditions such as snow, heavy rain and strong winds.
Wait for GB-GO13A to cool completely before moving
The outer shell of GB-GO13A may fade over time and through use. This
will not affect performance.
PIZZA STONE BOARD
1.DO NOT use the stone over an open flame.
2.Avoid extreme temperature change to the stone. DO NOT place frozen
foods on a hot stone.
3.The stone is fragile and can break if bumped or dropped.
4.The stone is very hot during use and stays hot for a long time after use.
5.DO NOT cool the stone with water when the stone is hot.
6.After cleaning the stone with water, please dry the stone before use.
This can be done in a conventional oven at 60°C (140°F) for 2 hours.
CHOICE OF FIREWOOD PELLETS
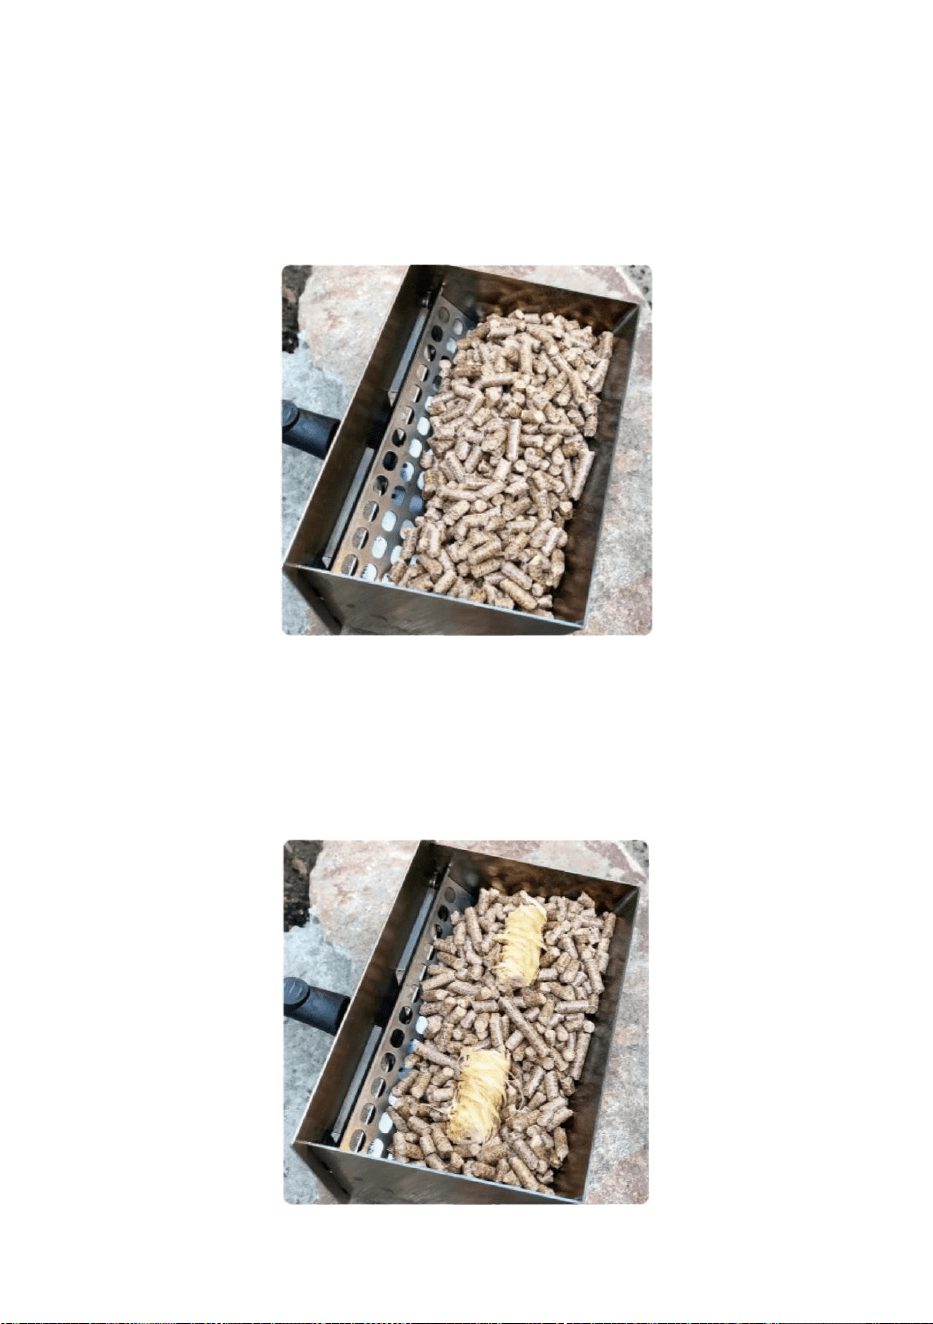
- 17 -
1.Recommended length of firewood pellets: It is recommended that the
length of firewood pellets should not exceed 1.25 inches (3 cm).
2.Use only firewood pellets suitable for cooking, do not use pellets from
animal bedding and heating pellets, which contain chemicals.
3.Make sure the wood pellets are dry, not wet.
4.Please choose 100% hardwood pellets, softwood pellets may not burn
fully.
HOW TO IGNITE FIREWOOD PELLETS?
It will be difficult to ignite the firewood pellets for the first time. You
can refer to the method in the manual or choose the combustible
material to fully burn the firewood pellets. It is more difficult to directly
ignite the firewood pellets.
1.Some accessories that may need to be prepared.
- 18 -
a.100% Hardwood Pellets
b.Fire Starter
c.Blo
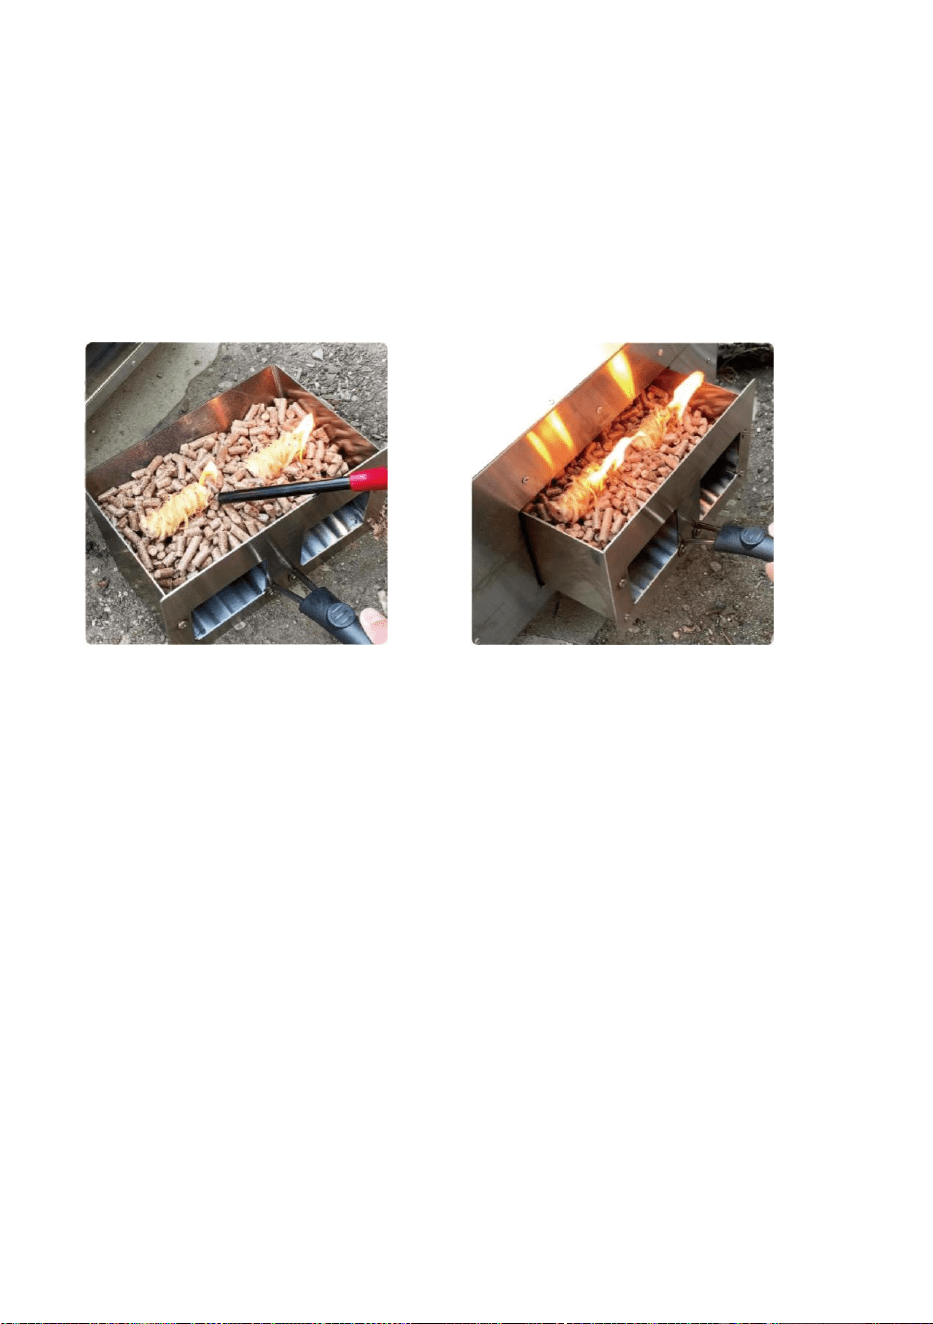
2.Ignite step
a.Fill 50% of the burner grates with hardwood pellets, about 1.8 lbs,
7-8 scoops.
b.Place a natural fire starter on the edge of the burner grate.
c. Light the fire with a igniter and slide the burner grate into the pizza oven.
d.You may want to refill with firewood pellets to maintain a certain
temperature. When you need to refill the firewood pellets, slide out the
grate, fill the grate with a small amount of firewood pellets, and slide the
grate back into the pizza oven.
HOW TO BAKE PIZZA?
PREPARING TO BAKE PIZZA
1. Pizza Oven
2. Pizza Stone
3. Thermometer Gun (you need to buy it yourself)
4. Pizza Spatula (you need to buy it yourself)
1.After the firewood pellets start to burn, close the door and let the oven
preheat for 15 minutes so that the temperature reaches the right
temperature for baking, which is expected to be around 750°F-860°F. (If
there is a temperature measuring gun, the second step can be performed
when the test reaches 750°F.)
2.When the temperature is right, open the oven door and place the pizza

- 19 -
inside, then close the door.
3.Wait about 15 seconds, open the door, rotate the pizza 180° with the
pizza spatula, and close the door again.
4.And then wait about 15 seconds, open the door, turn the pizza 90° and
close the door, continue this step 4 times.
5.Finally take out the pizza and finish baking.
Note: The time of each step is not fixed, it is related to the temperature. If
you want a softer pizza, you can shorten the time appropriately to ensure
the freshness of the pizza.
PRECAUTIONS AFTER BAKING
When you're done baking pizza, let the pizza oven cool for 60 minutes
before cleaning it up and then dumping the ashes in the trash.
Note: Please do not use water or other substances to lower the
temperature of the oven, it may be dangerous.
TROUBLESHOOTING
Problem
Possible Cause
Prevention/Solution
Burner will
not light
1.No gas flow.
2.Coupling nut and
regulator not fully
connected.
3.Obstruction of
gas flow.
4.Disengagement
of burner to valve.
5.Incorrect
assembly.
1.Check to see if propane tank is
empty.
2.Turn the coupling nut about one-
half to three quarters additional
turn until solid stop. Tighten by
hand only - do not use tools.
3.Clear burner tube.
4.Reengage burner and valve.
5.Check steps in assembly
instructions.

- 20 -
Sudden drop
in gas flow or
low flame
1. Out of gas.
1.Check for gas in propane tank.
2.Turn off gas control knob, wait
30 seconds and light oven. If
flames are still low, turn off gas
control knob and propane tank
valve. Disconnect regulator.
Reconnect regulator and leak test.
Turn on propane tank valve, wait
30 seconds and then light oven.
Flames blow
out
1.High or gusting
winds.
2.Low on propane
gas".
1.Turn front of oven away from
wind.
2.Refill propane tank.
3.Refer to Sudden drop in gas flow
above.
Flare-up
1.Grease build up.
2.Excessive fat in
meat.
3.Excessive
cooking
temperature.
4.Excess flour on
the cooking
surface.
1.Clean oven.
2.Trim fats from meat before
cooking.
3.Adjust (lower) temperature
accordingly.
4.Brush remnant flour from
cooking surface.
Flashback
(fire in
burner tube,
roaring
sound from
burner)
1.Burner and/or
burner tubes are
blocked.
2.Pressure drop
during ingition.
1.Turn gas control knob off. Clean
burner and/or burner tubes.
2.Turn off oven, ensure the tank
valve is fully open (if applicable)
and relight.
Manufacturer: Guangdong Sheng Bao Industry Co.,Ltd
Address: Floor 4, Floor 6, Building 27,Shunde Zhifu garden, No.8, 2nd
Ring Road, Gaozan village, Xingtan town, Shunde District, Foshan City,
Guangdong Province, China
Made In China