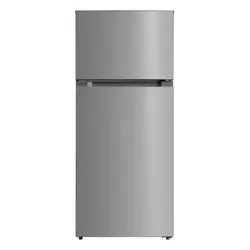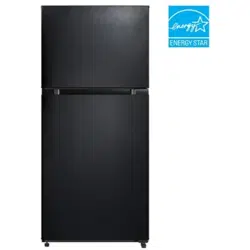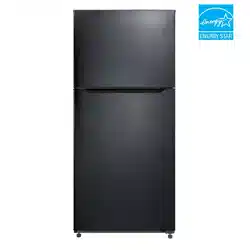
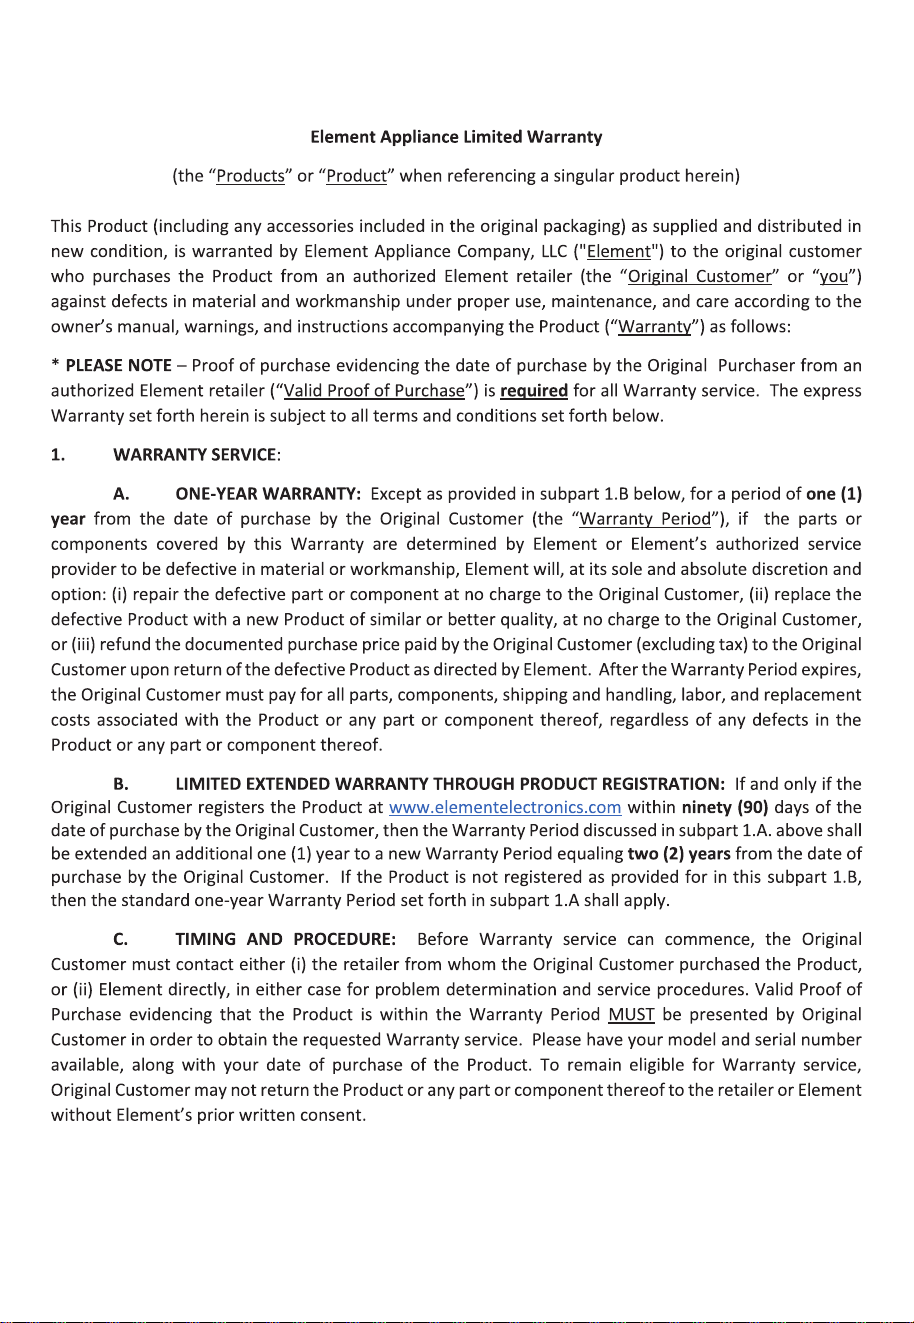
20.5 cu.ft. Top Freezer Refrigerator
ERT21CSCW
ERT21CSCB
ERT21CSCS
Product may vary. Refer to the actual product


E
CONTENTS
SAFETY INSTRUCTIONS
--------------------------------------- 04
SPECIFICATIONS
------------------------------------------------ 10
PRODUCT OVERVIEW
----------------------------------------- 11
PRODUCT INSTALLATION
------------------------------------ 12
OPERATION INSTRUCTIONS
--------------------------------- 20
CLEANING AND MAINTENANCE
---------------------------- 23
TROUBLESHOOTING
------------------------------------------- 25
DISPOSAL AND RECYCLING
---------------------------------- 27
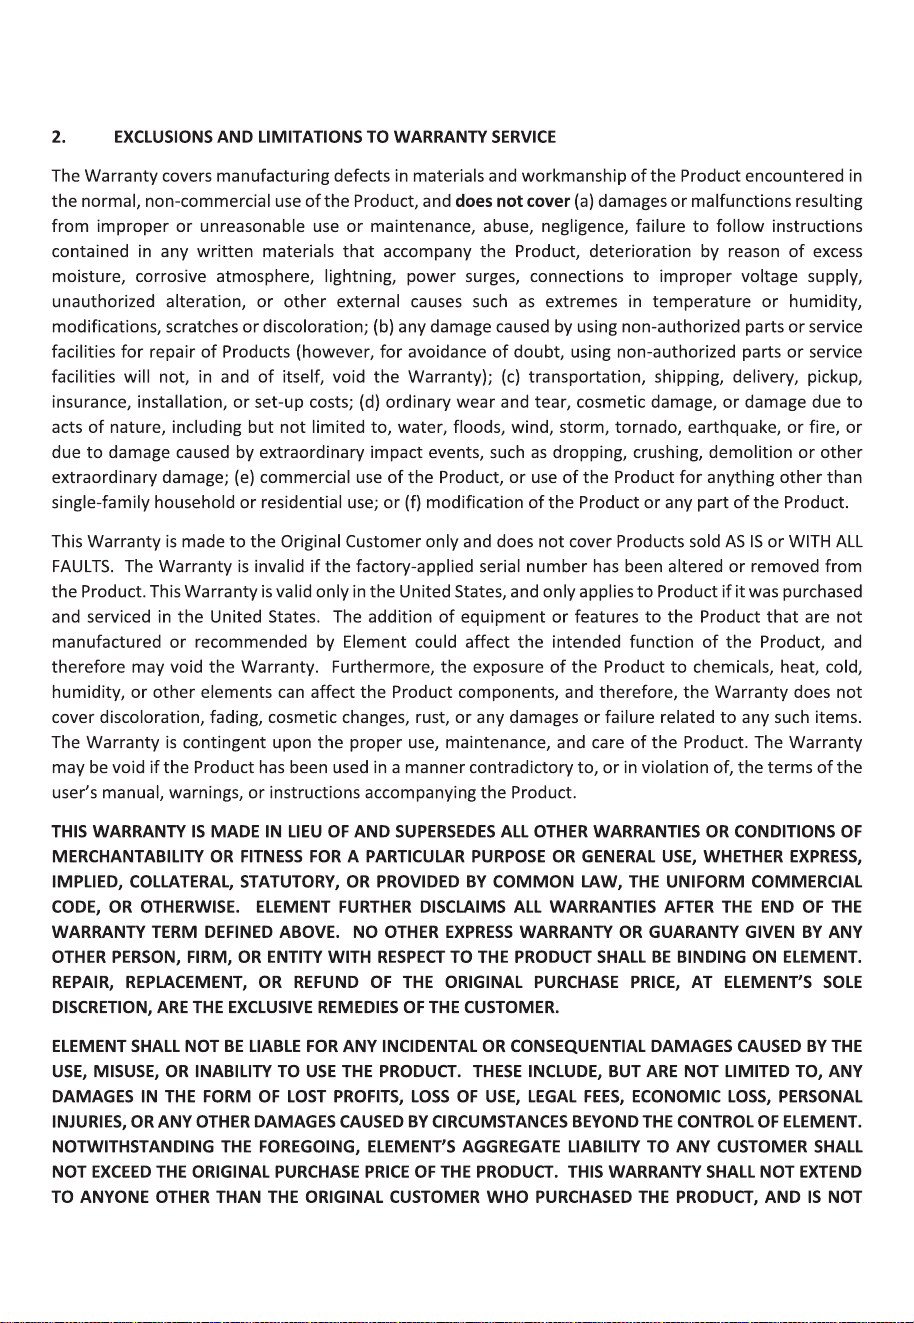
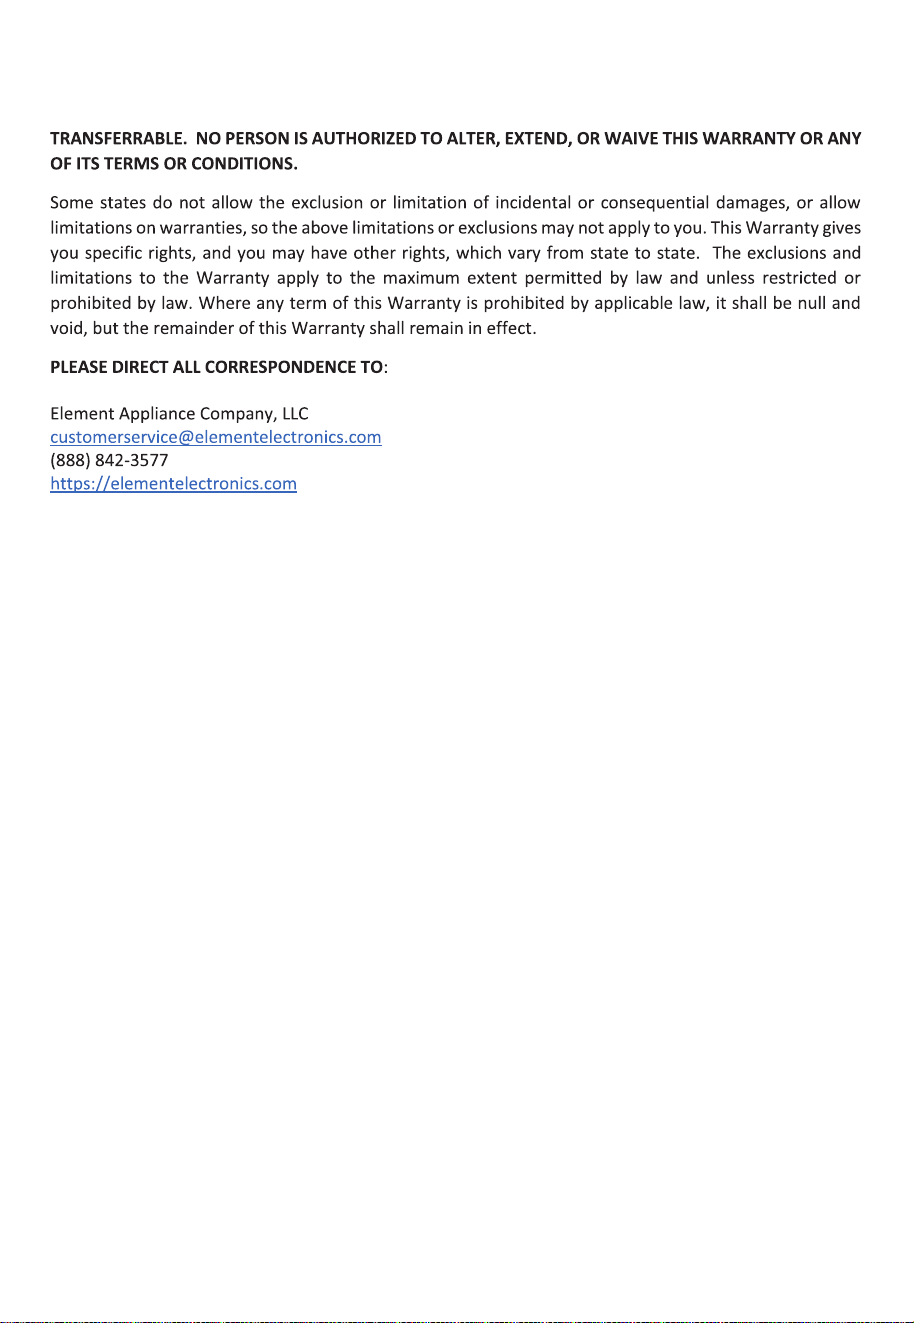
WARRANTY
-------------------------------------------------------- 28
3
E
SAFETY INSTRUCTIONS
Intended Use
Before switching on the appliance for the first time read the following
safety hints!
This appliance is intended to be used in household and similar applications such
houses and by clients in hotels, motels and other residential type environments;
bed and breakfast type environments; catering and similar non-retail applications.
If the appliance is used commercially or for purposes other than cooling food,
please note that the manufacturer cannot accept any liability for any damage.
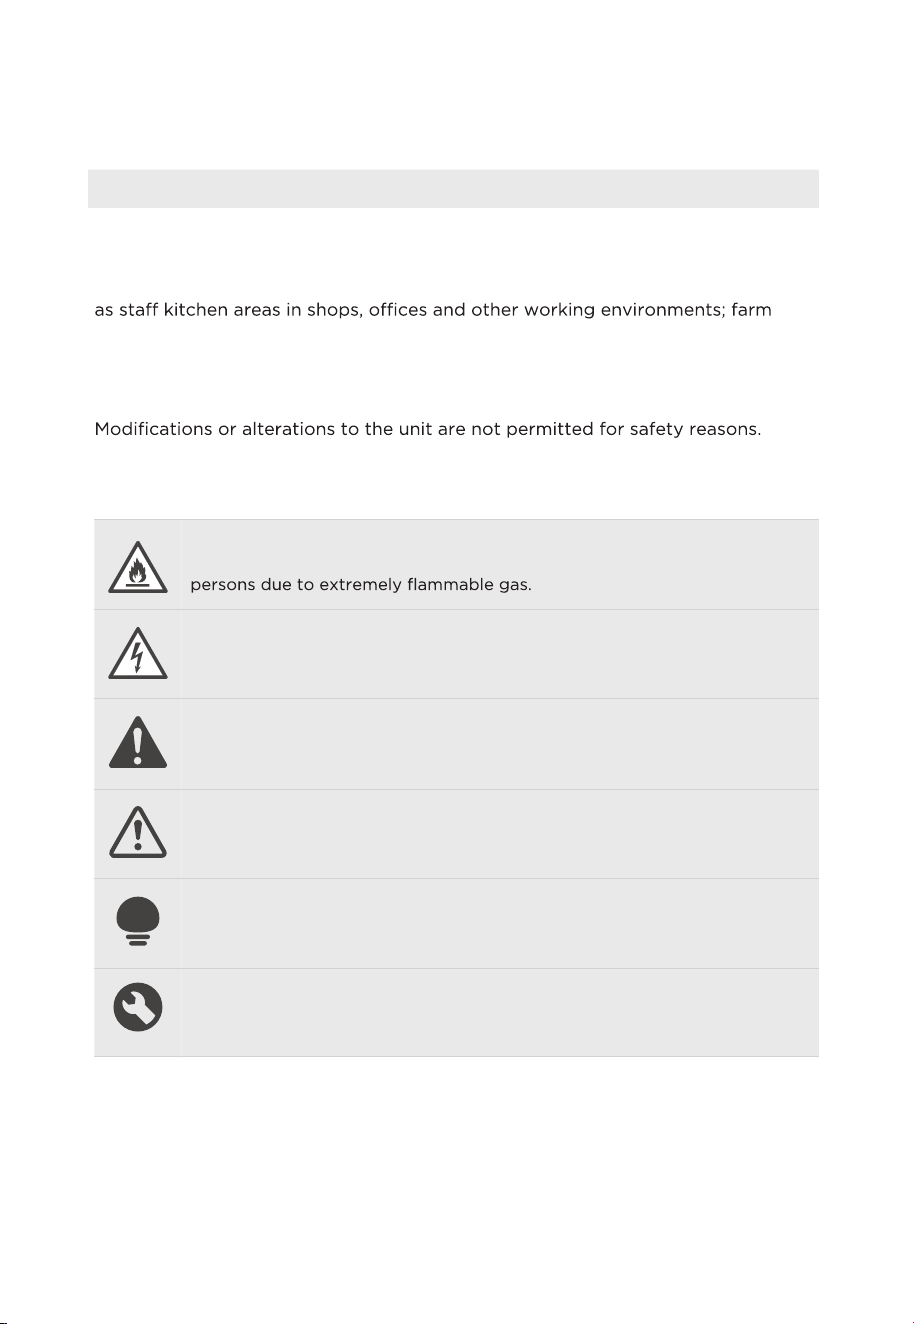
Explanation of symbols
Danger
This symbol indicates that there are dangers to the life and health of
Warning of electrical voltage
This symbol indicates that there is a danger to life and health of persons
due to voltage.
Warning
The signal word indicates a hazard with a medium level of risk which, if
not avoided, may result in death or serious injury.
Caution
The signal word indicates a hazard with a low degree of risk which, if not
avoided, may result in minor or moderate injury.
Attention
The signal word indicates important information (e.g. damage to
property), but not danger.
Observe instructions
This symbol indicates that a service technician should only operate and
maintain this appliance in accordance with the operating instructions.
Read these operating instructions carefully and attentively before using/
commissioning the unit and keep them in the immediate vicinity of the installation
site or unit for later use!
4
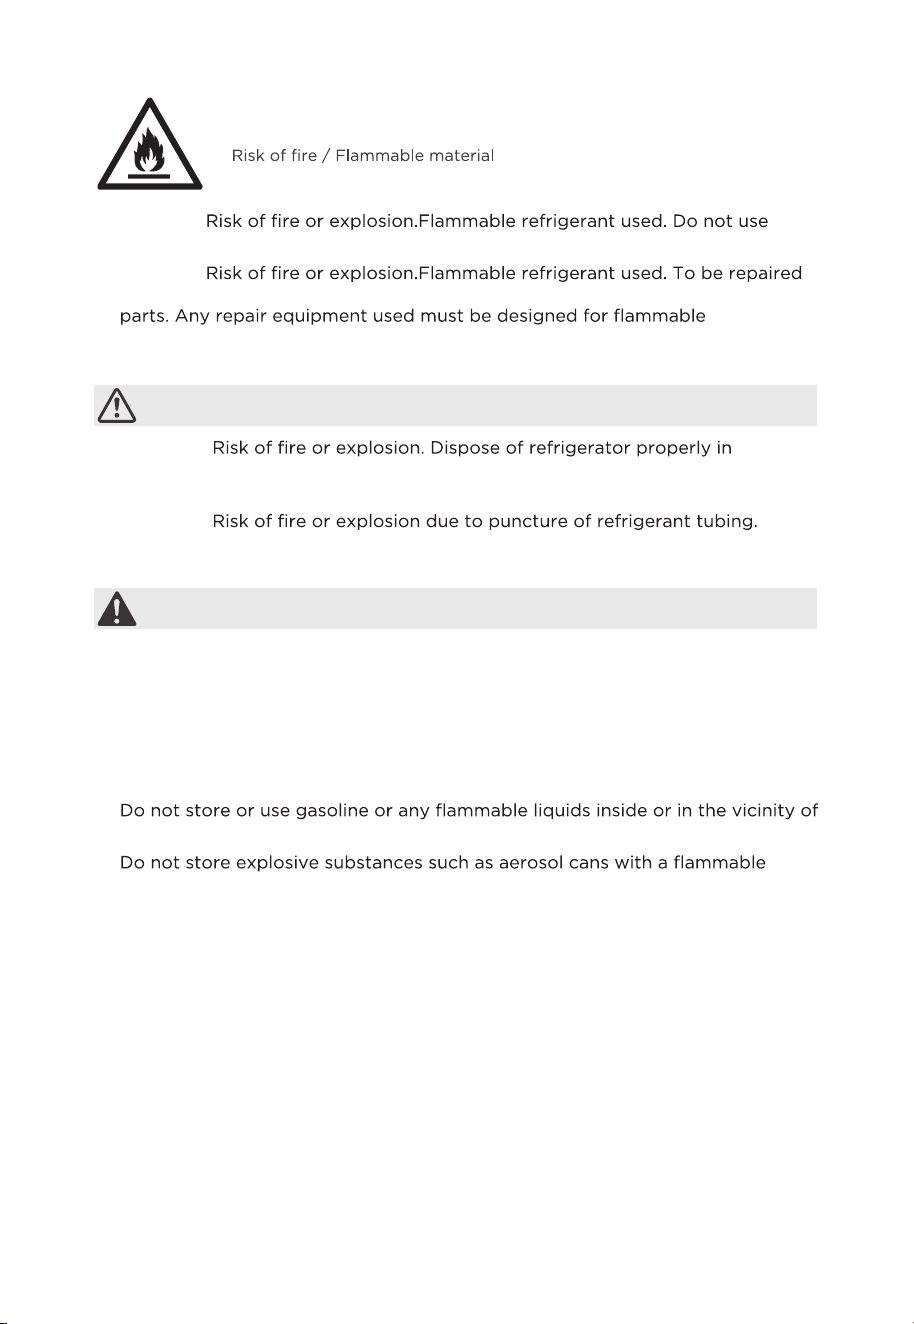
WARNING
• DANGER
mechanical devices to defrost refrigerator.Do not puncture refrigerant tubing.
• DANGER
only by trained service personnel. Use only manufacturer authorized service
refrigerants.
Follow all manufacturer repair instructions. Do not puncture refrigerant tubing.
CAUTION
• CAUTION
accordance with the applicable federal or local regulations. Flammable
refrigerant used.
• CAUTION
Follow handling instructions carefully. Flammable refrigerant used.
WARNING
General Safety
• Install in accordance with the manufacturer’s instructions.
• This product should not be recessed or built in an enclosed cabinet. It is
designed for freestanding installation only.
• WARNING - Keep ventilation openings, in the product, clear of obstruction.
• Do not install near any heat sources, such as radiators, heat registers, stoves,
other cooking appliances or in direct sunlight.
•
this refrigerator.
•
propellant in this appliance.
• Do not use electrical appliances inside the food storage compartments of the
appliance, unless they are of the type recommended by the manufacturer.
• Do not use mechanical devices or other means to accelerate the defrosting
process, other than those recommended by the manufacturer.
• This appliance is not intended for use by persons (including children) with
• Do not damage the refrigerator circuit.
reduced physical, sensory or mental capabilities, or lack of experience and
knowledge, unless they have been given supervision or instruction concerning
use of the appliance by a person responsible for their safety.
5
E
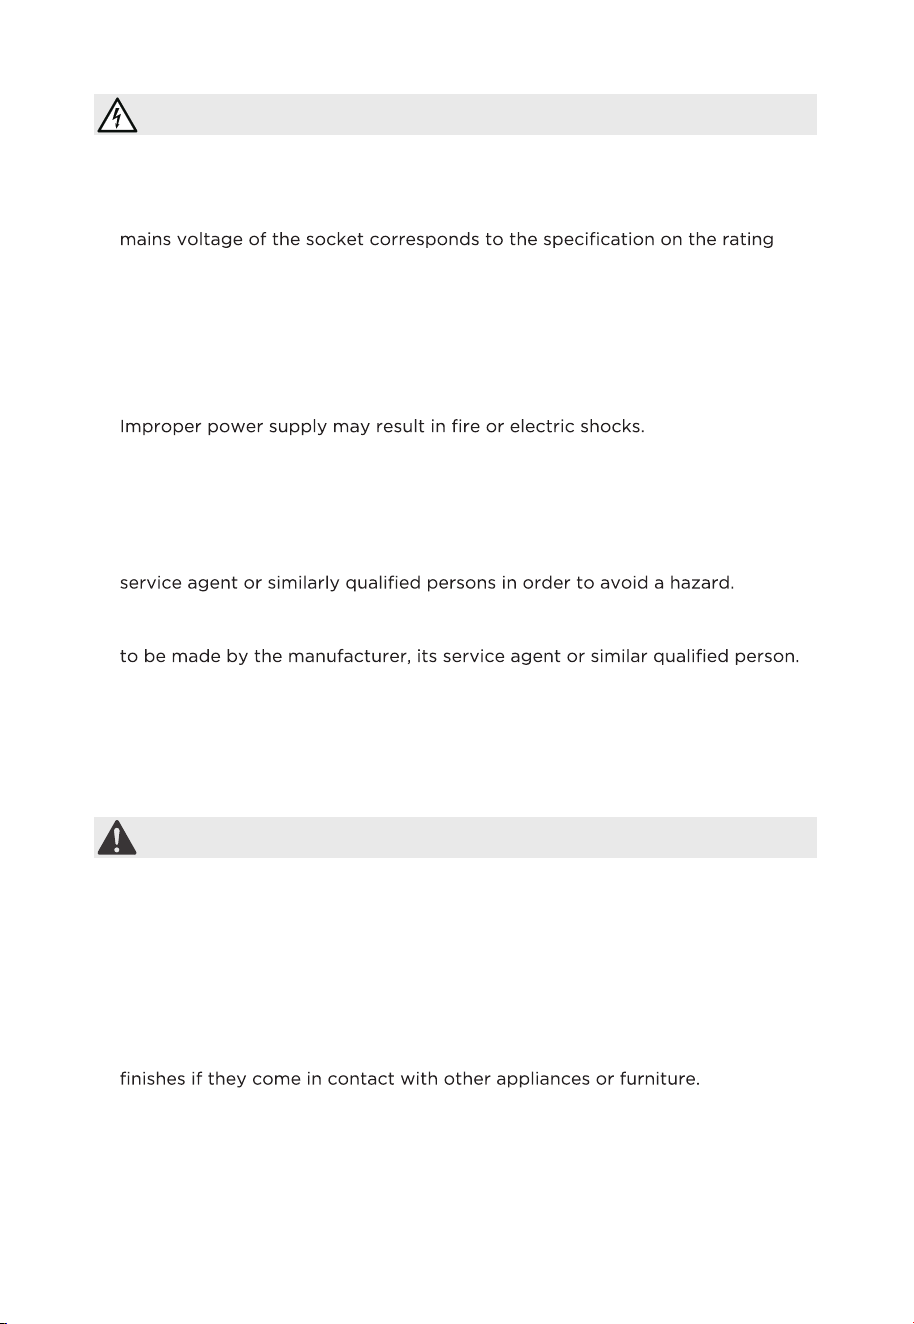
WARNING
Electrical Safety
Incorrect electrical installation or excessive mains voltage can lead to
electric shocks!
• Only connect your fridge-freezer to a properly installed earthed socket if the
label*.
• Do not use extension cords or ungrounded (two-pin) adapters.
• Make sure that all electrical cables outside the appliance are protected from
damage (e.g. by animals or sharp edges).
• Do not locate multiple portable socket outlets or portable power supplies at
the rear of the appliance.
•
• Avoid electrical overload. Disconnect the mains plug from the mains socket
before carrying out care, maintenance and repair work on the unit.
• Switch off the unit and disconnect the mains plug from the mains socket when
you are not using the unit.
• If the supply cord is damaged, it must be replaced by the manufacturer, its
• If the products are equipped with LEDs, do not remove the lighting cover and
LED yourself. Any replacement or maintenance of the LED lights is intended
This product is not recommended for use with sockets or main switch with the
A/GFCI function, otherwise it may cause false tripping.
1. It’s not pose a safety risk when tripped.
2. If tripping persists, it is recommended to replace the sockets or main switch without
a/gfci function.
WARNING
Child Safety
• Children should be supervised to ensure that they do not play with the
appliance.
• Destroy carton, plastic bags, and any exterior wrapping material immediately
after the product is unpacked.
• Children should never use these items to play. Cartons covered with rugs,
bedspreads, plastic sheets or stretch wrap may become airtight chambers, and
can quickly cause suffocation.
• Remove all staples from the carton. Staples can cause severe cuts, and destroy
Risk of child entrapment. Before you throw away your old refrigerator
or freezer:
• Take off the doors.
• Leave the shelves in place so that children may not easily climb inside.
6

CAUTION
Risk of Injury and Damage!
• Never put frozen food in your mouth immediately after taking it out of the
freezer.
• Avoid prolonged skin contact with frozen food, ice and the pipes in the freezer
propellant in this appliance. Do not place flammable products near the product.
compartment.
•
• Do not store beer, drinks or other liquids in bottles or tightly closed containers
in the freezer compartment!
WARNING
State of California Proposition 65 Warnings:
•
CAUTION
To avoid food contamination, following the instructions below:
•
temperature in the appliance.
• Regularly clean surfaces that can come in contact with food and accessible
drainage systems.
•
connected to a water supply if water has not been drawn for 5 days. (Note1)(*)
• WARNING: Fill with potable water only.(*)
• WARNING: Connect to potable water supply only. (Suitable for ice making
machine)(*)
ATTENTION
(*): This feature varies depending on the model purchased. Plea
is applicable according to your product.
7
WARNING: This product can expose you to chemicals including styrene, which
is known to the State of California to cause cancer and Bisphenol A (BPA),
which is known to the State of California to cause birth defects or other
reproductive harm. For more information, go to www.P65Warnings.ca.gov.
E
Before the First Use
The packaging must be undamaged. Check the device for transport damage.
Do not connect a damaged device under any circumstances. In case of damage,
please contact the supplier.
Remove transport cover
The unit and parts of the interior are protected for transport. You can remove
all adhesive tapes on the right and left side of the device door as well as
any adhesive residues with cleaning solvent. Remove all adhesive tapes and
packaging parts from the interior of the device as well.
After transport, the device should stand for 12 hours to allow the coolant to
collect in the compressor. Non-observance could damage the compressor and
thus lead to failure of the device.
CAUTION
Risk of Damage!
Set up device
• The ambient temperature affects the power consumption and proper
functioning of the device. Therefore, the device should be placed in a well-
ventilated and dry room with an ambient temperature corresponding to the
climate class for which the device is designed.
• Do not place the device outdoors (e.g. balcony, terrace, garden shed, etc.).
Do not use sharp knives or pointed objects when opening the device.
Please observe the notes when setting up: “Tips for energy saving”
Remove the doors
•
unscrewed.
ATTENTION
The unscrewing of the unit doors may only be carried out by the customer service.
8

E
CAUTION
Notes for Cleaning
Disconnect the appliance from the power supply before cleaning.
•
cooling effect and energy saving.
• Check the door gasket regularly to make sure there is no debris. Clean the
door gasket with a soft cloth dampened with soapy water or diluted detergent.
• The interior of the product should be cleaned regularly to avoid odors.
• Turn the power off before cleaning the interior; remove all foods, drinks,
shelves, drawers, etc.
• Use a soft cloth or sponge to clean the inside of the refrigerator, with two
tablespoons of baking soda and a quart of warm water. Then, rinse with water
and wipe clean. After cleaning, open the door and let it dry naturally before
turning on the power.
•
gaps or corners), we recommend to wipe them regularly with a soft rag, soft
For areas that are difficult to clean inside the refrigerator (such as narrow places.
brush, etc. and when necessary, with some tools (such as thin sticks) to ensure
no contaminants or bacteria accumulates in these areas.
• Do not use soap, detergent, scrub powder, spray cleaner, etc., as these may
cause odors inside the product or contaminate food.
• Clean the door tray, shelves and drawers with a soft cloth dampened with
soapy water or diluted detergent. Dry with a soft cloth or dry naturally.
• Wipe the outer surface with a soft cloth dampened with soapy water,
detergent, etc., and then wipe dry.
• Do not use hard brushes, scouring pads, wire brushes, abrasives (such as
toothpaste), organic solvents (such as alcohol, acetone, banana oil, etc.),
boiling water, acid or alkaline items, which may damage the fridge surface and
interior. Boiling water and organic solvents such as benzene may deform or
damage plastic parts.
• Do not rinse directly with water or other liquids during cleaning to avoid short
circuit or affect electrical insulation after immersion.
9

SPECIFICATIONS
Product model
ERT21CS**
Total Storage Volume
20.5 cu.ft.
Rated Voltage 115V~/60Hz
Rated Current 2A
Overall Dimension (H x W x D)
1692mm x 755mm x 830mm
66.6″x 29.7″x 32.7″
10
11
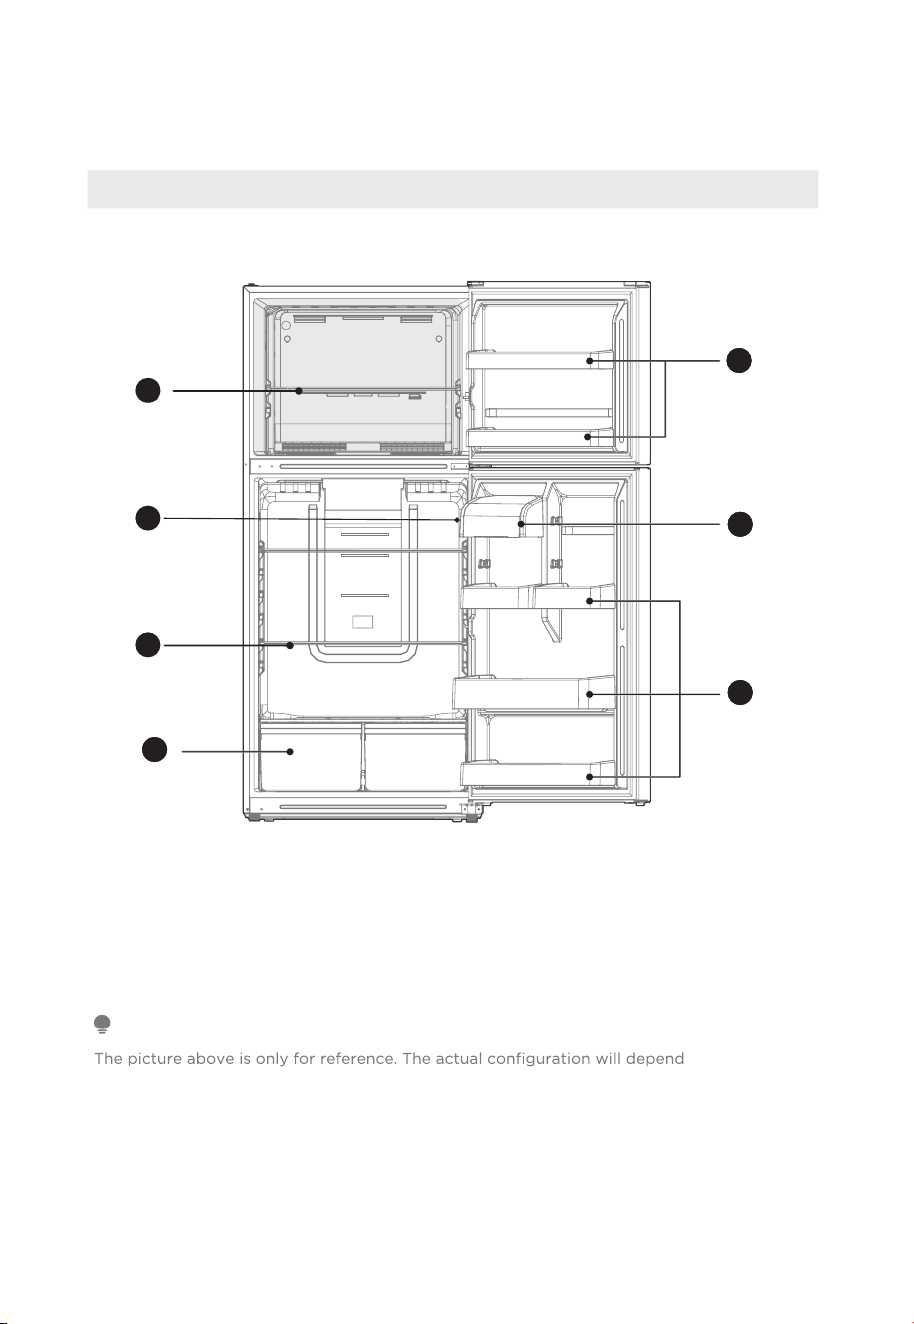
PRODUCT OVERVIEW
Names of Components
Display panel on the side
1
Freezer glass shelf
5
Freezer door tray
2
Display control
6
Storage box
3
Refrigerator shelf
7
Refrigerator door tray
4
Fruits and vegetables box
on the physical
product or statement by the distributor.
When the refrigerator is powered on for the initial time, storing too much food may adversely
affect the cooling effect of the refrigerator.
Do not block the air outlet during food storage, which may adversely affect the cooling effect.
If the temperature in fridge compartment is cold, please adjust the switcher to the weaker
position.If the temperature in fridge compartment is not cold enough, please adjust the
switcher to the strong position.
ATTENTION
1
2
3
22
4
22
5
22
6
22
7
12
PRODUCT INSTALLATION
Installation Instruction
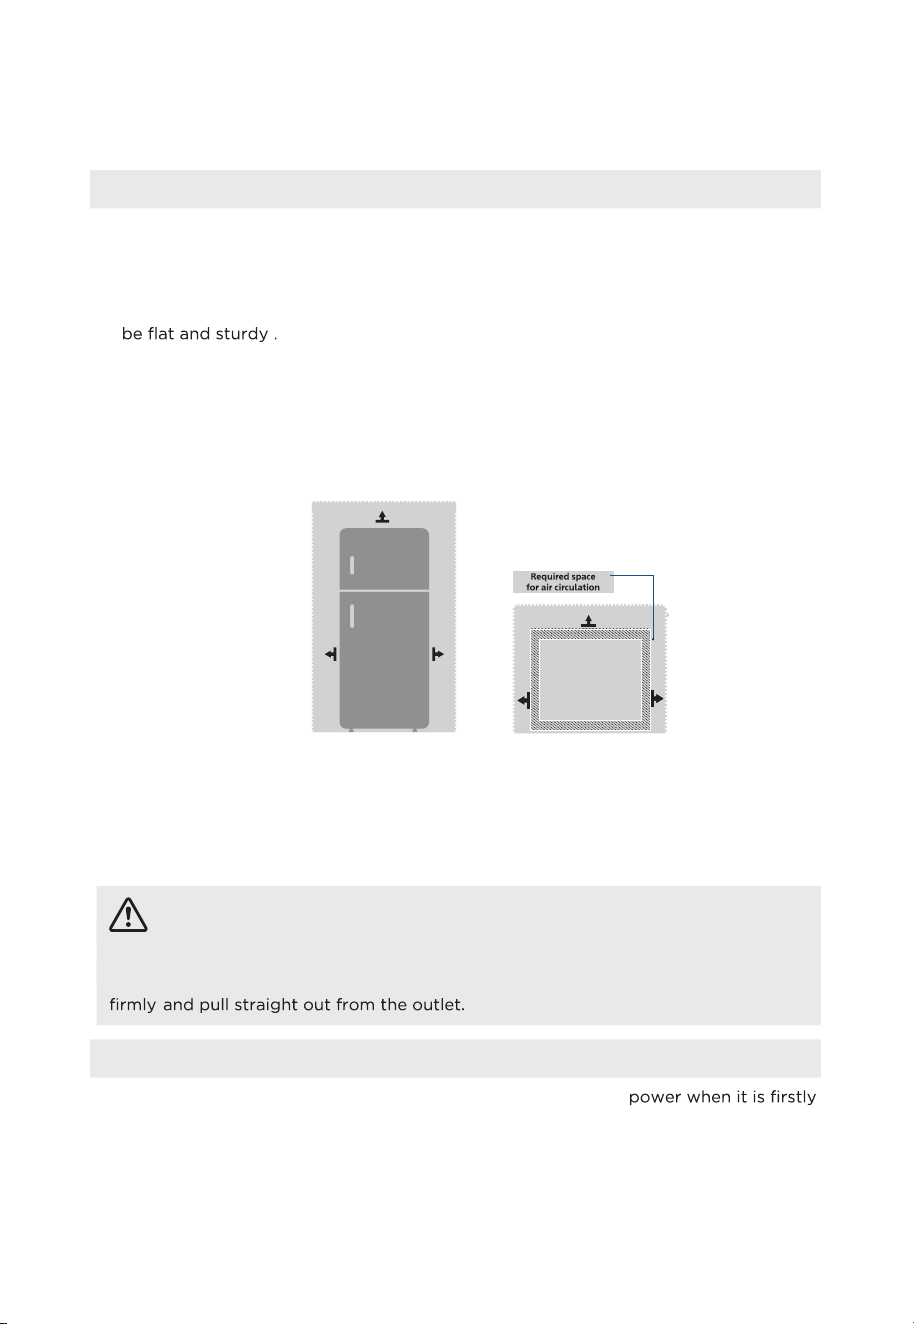
Finding a suitable location
• This refrigerator is designed to be free standing only, and should not be recessed or
built-in.
• The refrigerator should be placed in a well-ventilated indoor place; the ground should
• Keep away from heat and avoid direct sunlight. Do not place the refrigerator in
moist or watery places to prevent rust or reduction of insulating effect.
Dimensions and Clearances
• Too small of a distance from adjacent items may result in the degradation of
freezing capability and increased electricity costs. Allow over 100 mm of clearance
from each adjacent wall when installing the appliance.
Providing a proper power supply
• Check your local power source. This refrigerator requires a
AC115 V, 60 Hz
power
supply.
• Use a receptacle that accepts the grounding prong. The power cord is equipped
with a 3-prong (grounding) plug which mates with a standard 3-prong (grounding)
wall outlet to minimize the possibility of electric shock hazard from this refrigerator.
CAUTION
The refrigerator should always be plugged into its own individual electrical outlet
which has a voltage rating that matches the rating plate.
Never unplug your refrigerator by pulling on the power cord. Always grip the plug
Start to Use
• The refrigerator should sit for half an hour before connecting
started.
• The refrigerator should fun for 2 to 3 hours before loading fresh or frozen food. Due
to high ambient temperatures in the summer, the refrigerator should run for more
than 4 hours in advance.
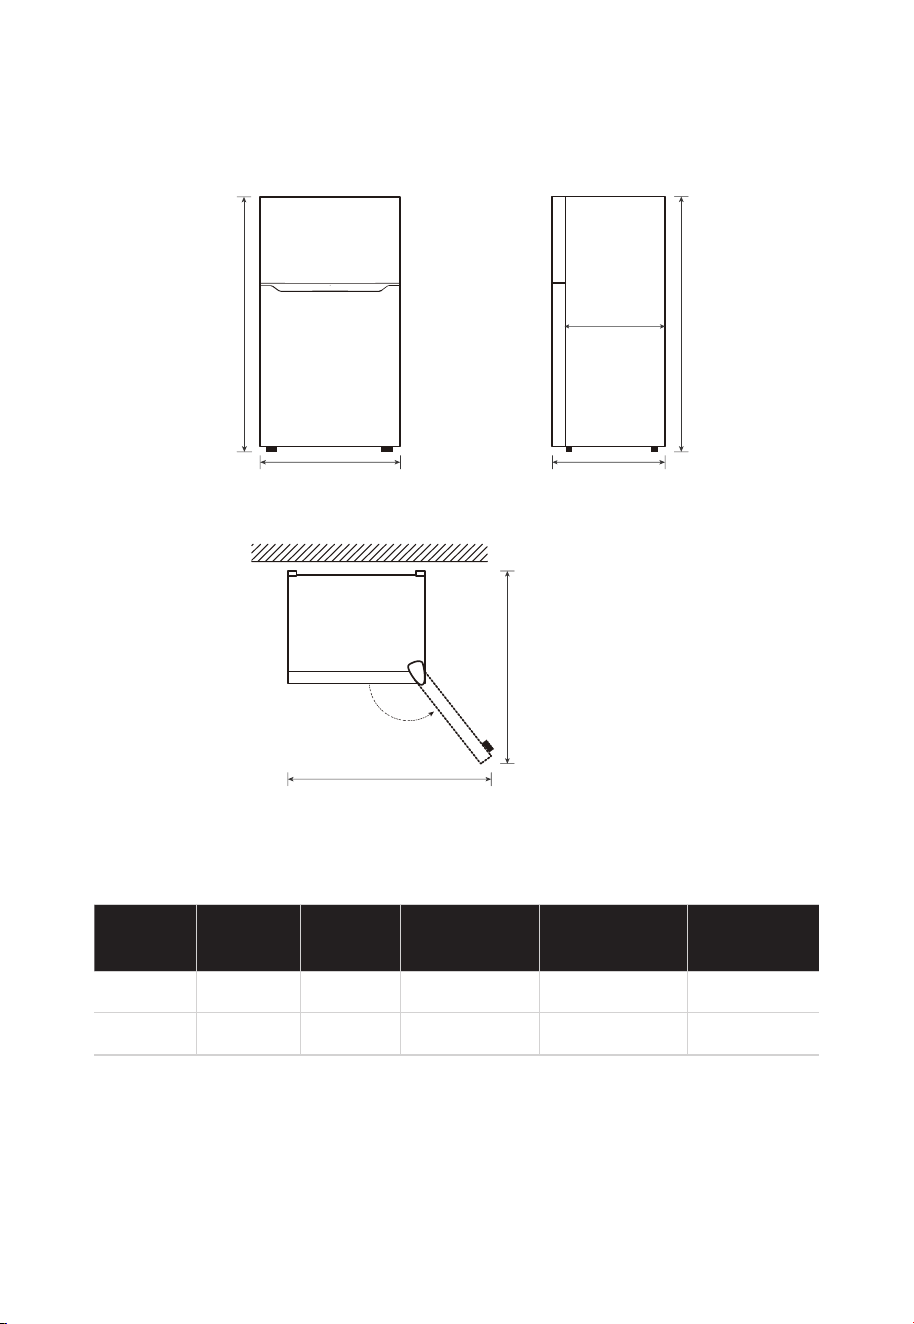
Top View
>100mm
>100mm
>100mm
Top View
>10mm
>10mm
>10mm
>100mm
>100mm
>100mm
4"
4"
4"
4"
4"
4"
E
Space requirement diagram (when the door is open and when the door is closed)
Width
Overall
Height
Depth
Depth
Only Cabinet
o o
A B C C1 D E
755mm / 29.7" 1692mm / 66.6" 830mm / 32.7" 734mm / 28.9" 1275mm / 50.2" 1395mm / 54.9"
Notice: All dimensions in mm & inches
B
A
C
D
E
135 °
C1
C
13
Width
doors open
135
Depth
doors open
135
B
14
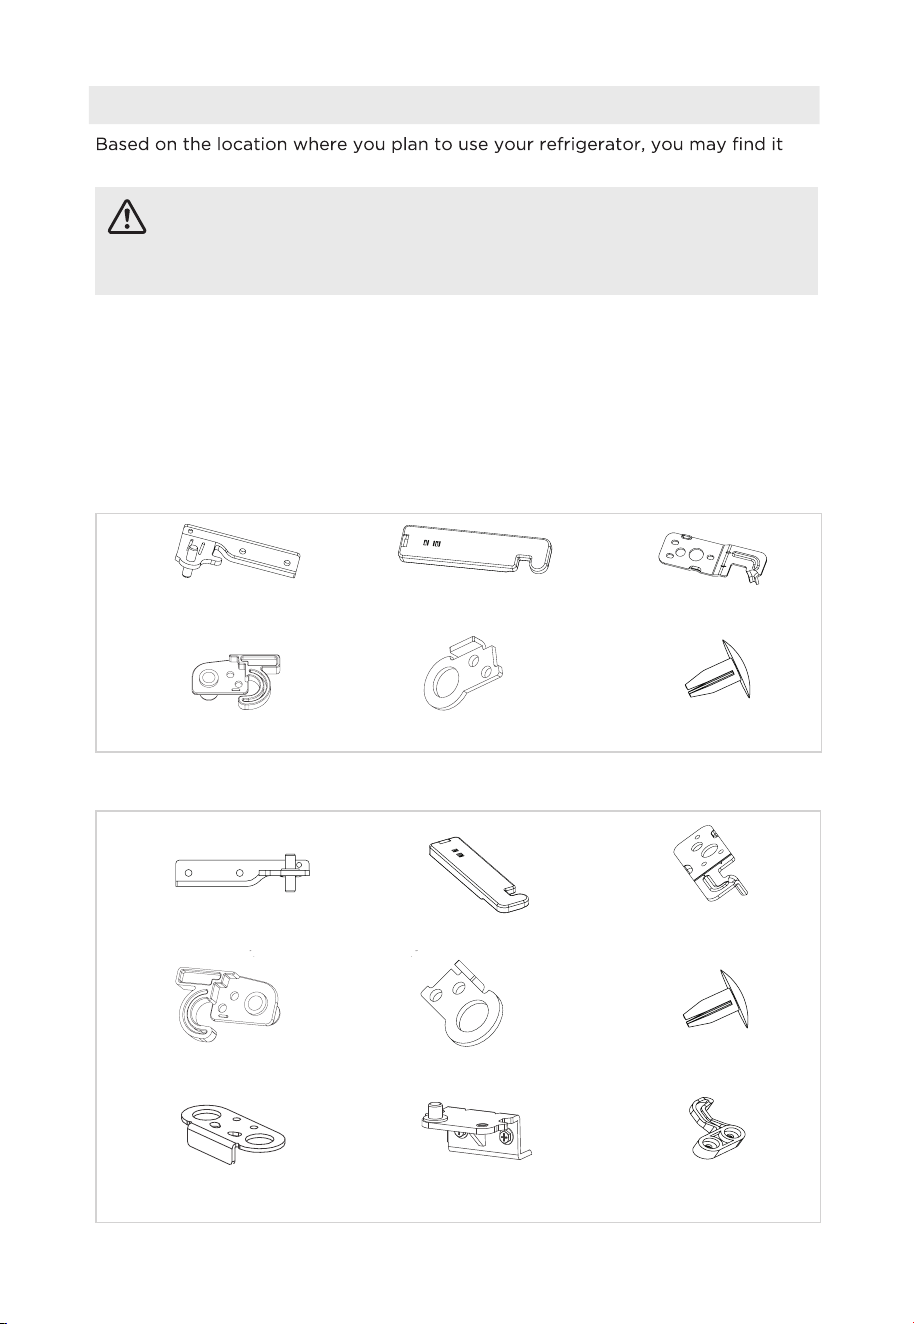
Door Right - Left Change
more convenient to reverse the position of the door.
CAUTION
CAUTION: To avoid injury to yourself or your property, we recommend that
someone assist you during the door reversal process.
Preparing to reverse the door position
You will need: A standard screwdriver, a Phillips screwdriver, and the included Allen
wrench.
• Make sure that your refrigerator is unplugged and empty.
• Have someone available to assist you in the process.
• Keep all of the parts you remove to reuse them later.
Parts included with the hinge kit:
Parts already mounted on the door (as shipped):
Center right hinge Right top hinge cover
Right door-open stopper Upper door self-locking block
Top right hinge
Bottom hinge
Door block
Hole caps
Lower door
self-locking block
Center left hinge Left top hinge cover
L
eft door-o
p
en sto
pp
er U
pp
er door self-lockin
g
block
Top left hing
e
Hole caps
E
15
Steps:
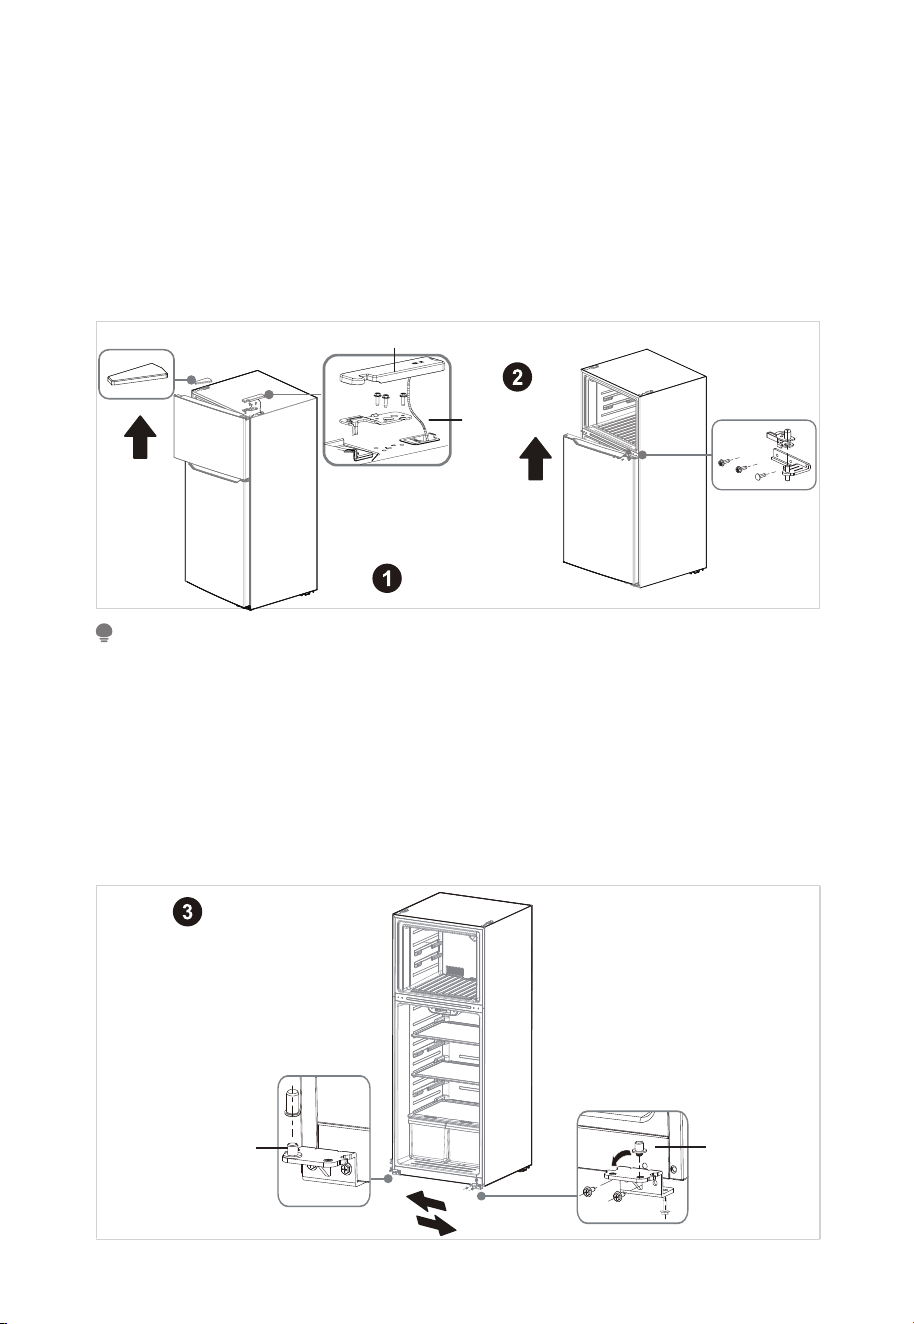
1. Unplug your refrigerator and remove all food from the doors and shelves.
2. Remove the cover plate and the top hinge cover, then unscrew and remove the top
hinge. Keep the screws to reuse.
3. When the user removes the top hinge cover, note that the hinge cover cannot be
directly removed. There is a sensor wiring harness connected to the box on the inside
side of the hinge cover, it needs to be slowly dismantled, and then taken out of the
sensor wiring harness from the inside of the hinge cover. Finally, attach the cover
back on.
ATTENTION
Images show a refrigerator that opens on the left side. Your refrigerator may open on the
right side.
When you remove the cover plate, be careful not to damage the ambient temperature sensor
located under the plate. Remove it from the cover pin and leave it in position.
4. Lift the freezer door up and away from your refrigerator.
5. Unscrew the three screws holding the center hinge, remove the hinge, then lift the
refrigerator door up and away from your refrigerator. Save the screws to reuse and
store the hinge in a safe place in case you need to reverse the door position again.
6. Remove the adjusting foot and screw installed on the bottom hinge before
removing the bottom hinge.
Center hinge
Top hinge cover
Cover plate
Top hinge cover
Ambient
temperatur
e
sensor
Remove the bottom hinge
Reattach the bottom hinge
Hinge pi
n
Hinge pin
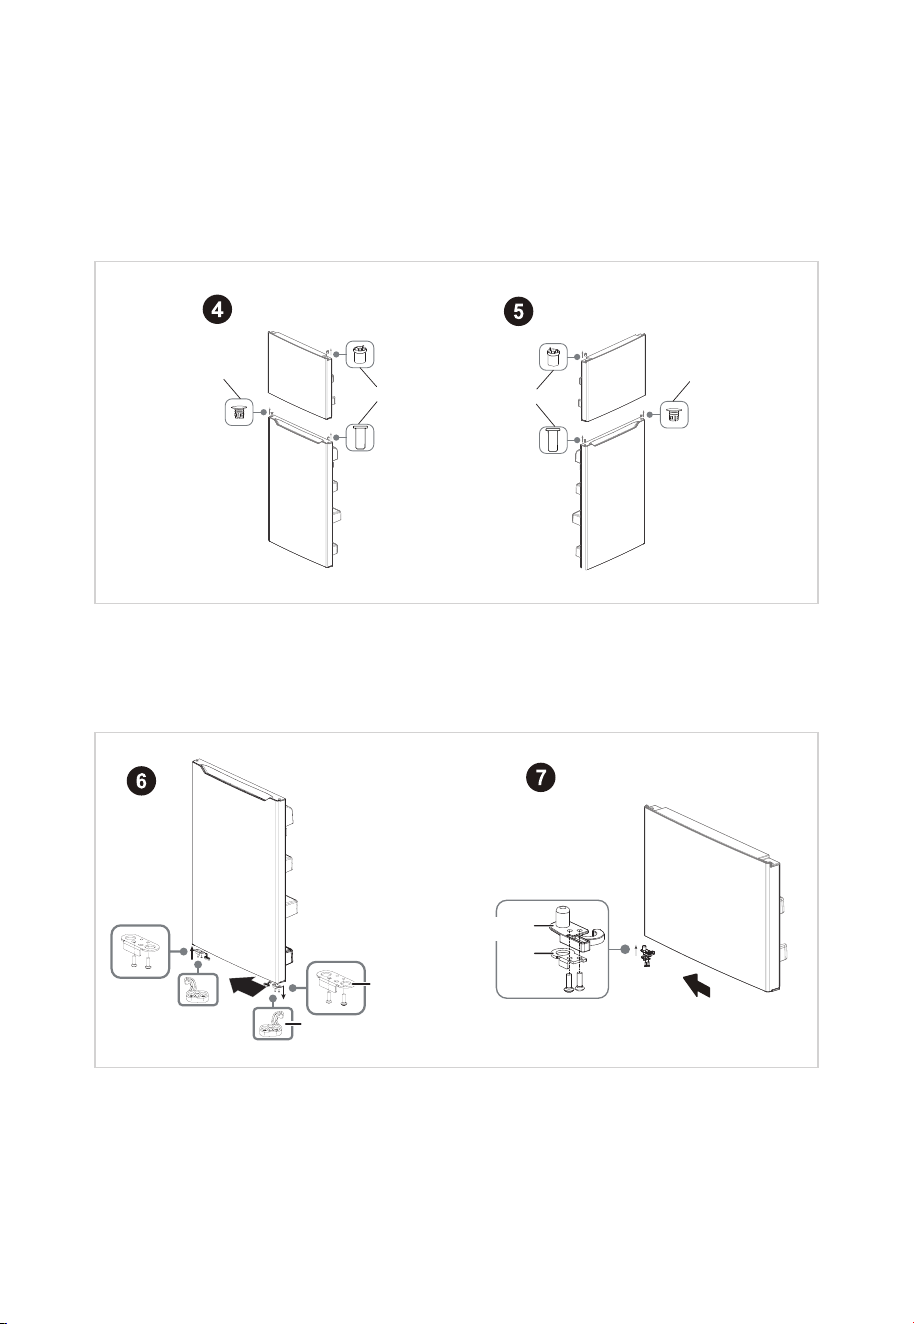
8. Unscrew the hinge pin from the bottom hinge and reattach it to the other
hole
in the hinge pin. Then, secure the bottom hinge to the opposite side of the
refrigerator using the screws you removed previously. Remove the hole caps
and plastic bushings from the top of the freezer and refrigerator doors. Save
them for the next step.
9. Insert the hole caps and plastic bushings into the opposite sides (from where
you removed them) of the freezer and refrigerator doors.
H
ole caps
Plastic bushings
Hole cap
s
Plastic bushings
10. Remove the door block from the bottom of the refrigerator door and attach it
to the other side.
11. Attach the upper door self-locking block and the door-open stopper to the
side of the freezer door where the hinge will be. Use the parts from the hinge
kit.
12. Remove the old upper door self-locking block and the door-open stopper (do
not remove the parts attached in step 10). Store in a safe place in case you
need to reverse the door position again.
16
Lower door
self -locking block
Upper door
self-locking block
Door-open stopper
Door block
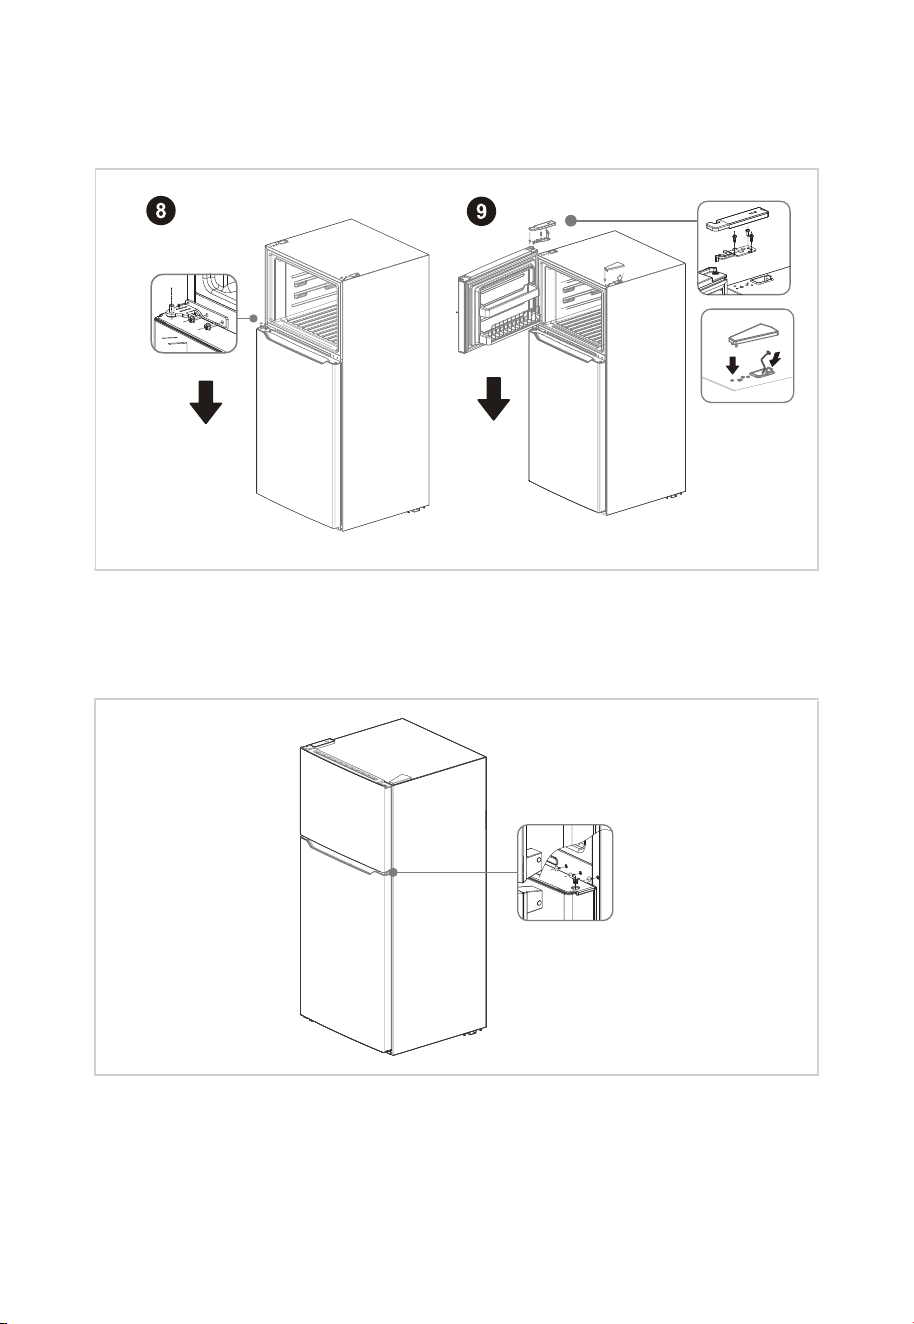
13. Attach the refrigerator door to the bottom hinge, then attach the center hinge
to the refrigerator. Use the center hinge from the hinge kit (not the piece
hinge kit) to the top of refrigerator. Cover the hinge with the top hinge cover
removed in step 4).
14. Put the freezer door onto the center hinge, then attach the top hinge (from the
(from the hinge kit) and cover the screw holes on the top with the cover plate
you previously removed.
15. Add covers to the screw holes and hinge pivot.
17
Attach the top hinge
Attach the center hinge
N
Leveling Feet
To avoid vibration, the unit must be leveled.
The front should be slightly higher than the rear to aid in door closing.
Leveling screws can be turned easily by tipping the cabinet slightly.
Turn the leveling screws counterclockwise
to raise the unit, clockwise to
lower it.
Moving the Appliance
1. Remove all food from inside the refrigerator.
2.
on top of the appliance.
3. Tape parts such as shelves and the door handle to prevent from falling off
while moving the appliance.
4. Carefully, move the refrigerator with more than two people. When transporting
the refrigerator over a long distance, keep the appliance upright.
5. After installing the refrigerator, connect the power plug into a socket outlet to
switch on the refrigerator.
ATTENTION
Precautions before operation:
Before making changes the refrigerator must be disconnected from power.
precautions should be taken to prevent any personal injury.
Changing the Light
• Any replacement or maintenance of the LED lights is intended to be made by
Connecting the Appliance
After installing the refrigerator, connect the power plug into a socket outlet.
ATTENTION
After connecting the power supply cord (or plug) to the outlet, wait 2 or 3 hours before you
put food into the appliance. If you add food before the appliance has cooled completely, your
food may spoil.
18
•
•
•
•
•
Installing an Optional Ice Maker
Ice maker type:
• This refrigerator is compatible with Element brand ice maker EAIMM19.
Ice maker installation:
•
If the refrigerator can be installed with an ice maker, please refer to the ice maker
installation instructions provided separately for the installation method of the ice maker.
The ice maker is installed by the customer.
EN
Tips for Energy Saving
• Do not place the appliance near cookers, radiators or other heat sources. If the
ambient temperature is high, the compressor will run more frequently and for
longer, resulting in increased energy consumption.
•
of the appliance and at the back of the appliance. Never cover ventilation openings.
• See the spacing dimensions in the chapter “Installation”.
• The arrangement of drawers, shelves and racks as shown in the illustration offers the
and shelves should remain in the appliance to keep the temperature stable
and save energy.
• To obtain a larger storage space (e.g. for large refrigerated/frozen goods), the
middle drawers can be removed. The top and bottom drawers and shelves should
be removed last if necessary.
•
use. Therefore, avoid empty or half-empty compartments.
• Allow warm food to cool before placing it in the refrigerator/freezer. Food that has
• Allow frozen food to defrost in the refrigerator. The coldness of the frozen food
Open the door only as briefly as necessary to minimize cold loss. Opening the door
briefly and closing it properly reduces energy consumption.
reduces the energy consumption in the refrigerator compartment and thus increases
•
• The door seals of your refrigerator must be perfectly intact so that the doors close
properly and energy consumption is not increased unnecessarily.
19
OPERATION INSTRUCTIONS
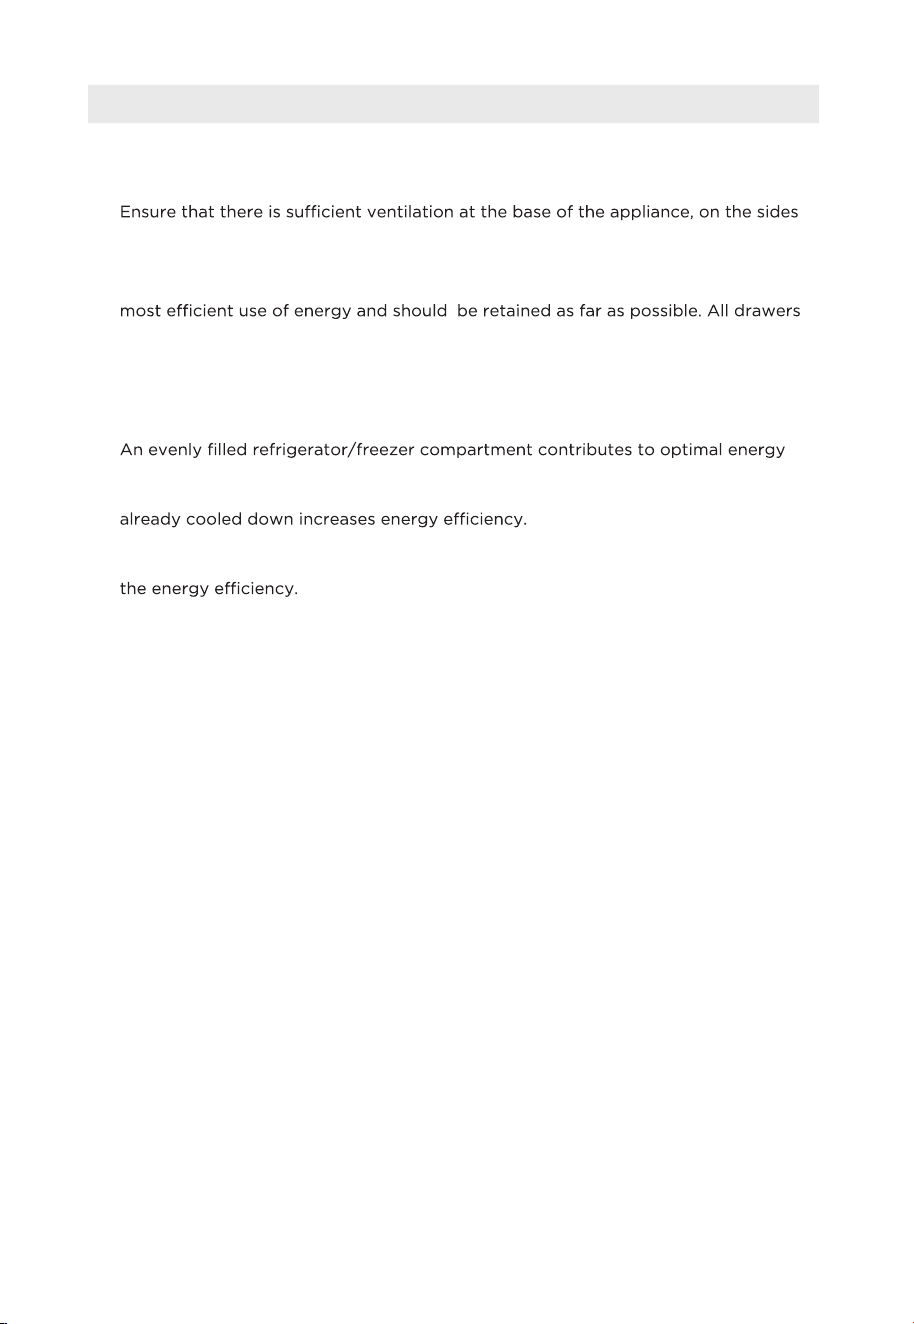
Control Panel
Display panel on the side
Key
A
Setting Button
Display
temperature can be adjusted.
The actual control panel may differ from model to model.
ATTENTION
20
N
Operating Instructions
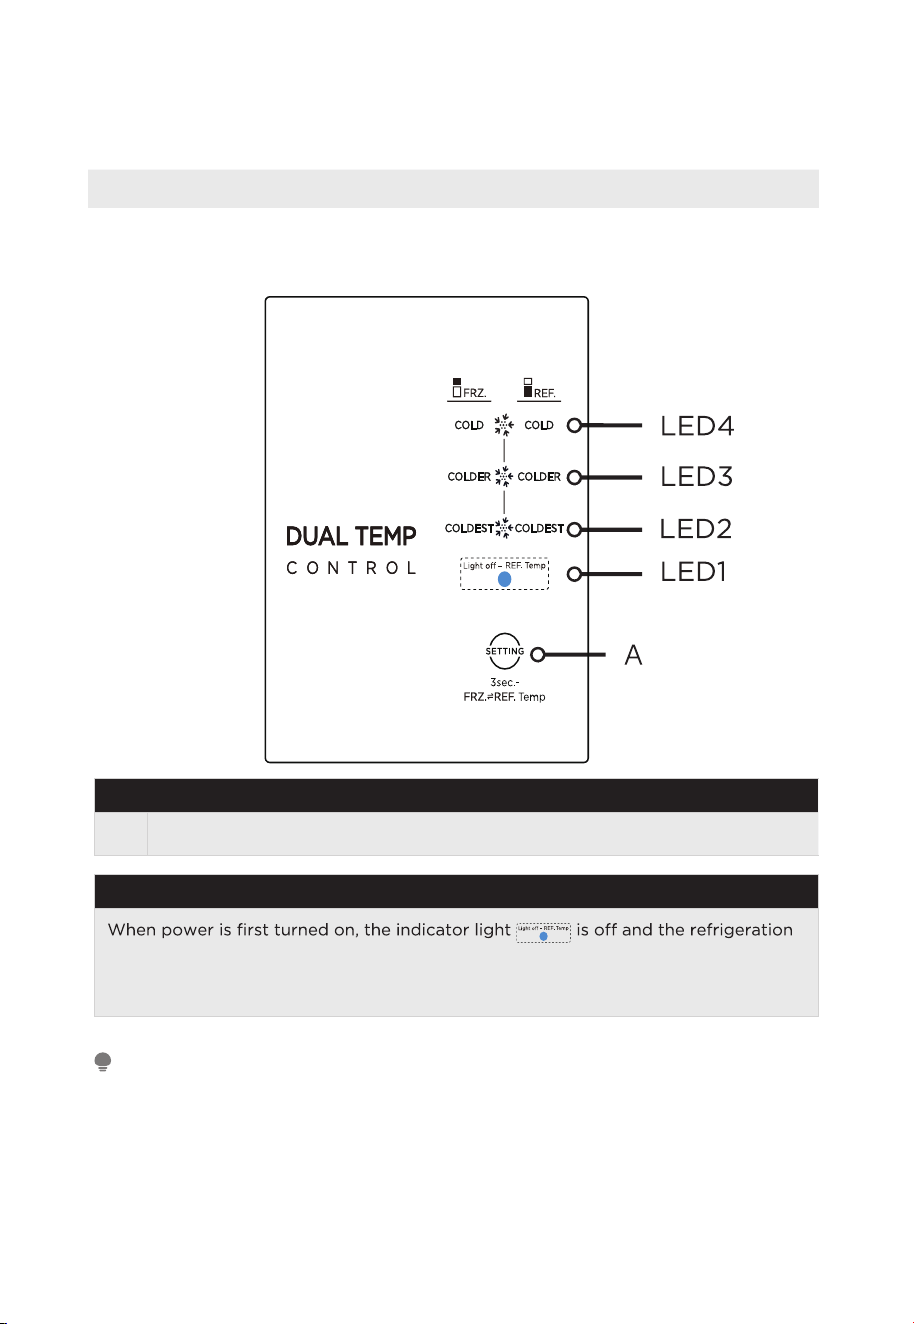
Refrigerator and Freezer setting
• Press
and hold the temperature setting button for 3 seconds, when the
freezer compartment indicator light is on, the freezer temperature can be adjusted.
• Press and hold the temperature setting button again for 3 seconds to switch to
the refrigeration compartment.
• Each time the temperature setting button A is pressed once,the temperature setting
changes one time.
• After the temperature setting has been completed, the refrigerator will run
according to the set value after 15s.the order is as follows:
Note: The temperature of each gear is within 35°Fof the set temperature, and the actual
situation is slightly different according to the load situation.
Fault indication
• The following warnings appearing on the display indicate corresponding faults
of the refrigerator. Though the refrigerator may still have refrigerator and freezing
function with the following faults, the user should contact maintenance specialist for
maintenance, so as to ensure normal use of the refrigerator.
Fault Code Fault Description
Refrigerator temperature sensor faults
Freezing frost sensor faults
Ambient temperature sensor faults
Freezer temperature sensor faults
21
E
Shelf humidity control
• The movement of the paddle to the middle is wet, and the movement of the
paddle to both sides is dry.
Display fault code in the event of a failure (Loop display); display the set gear of the
refrigeration room in the event of trouble-free.
Under normal circumstances, the current set gear is displayed, and when a “fault
code visible” class failure occurs, the fault code is displayed.
22
Tips on Storing Food
Freezer compartment
• The freezer is designated for the storage of food frozen at very low temperature,
long-term storage of frozen food, and for the production of ice.
• Only use the shelves in the door of the freezer to store frozen food, not for storing
hot food designated for freezing.
• Do not put fresh and frozen food next to each other. The frozen food may thaw.
•
ut them into parts
that can be used at the same time.
• Storing frozen food: instructions are usually stated on the packages, which must be
followed. If there is no information on the packaging, food should not be stored for
longer than three months from the date of purchase.
• When purchasing frozen food, make sure that it was frozen at a suitable
temperature and that the packaging is not damaged.
• Frozen food should be kept in suitable packages to retain the quality and should be
returned to the freezer compartment as soon as possible.
• If a package of frozen food shows moisture or abnormal bulging, it is probable that
it was stored at the wrong temperature and the content is spoiled.
• The storage period for frozen food depends on the room temperature, the
thermostat setting, the frequency of opening the door of the freezer, the type of
food and the time of transporting the product from the shop to the household.
Always follow the instructions printed on the packaging and never exceed the
maximum storage time stated on the package.
Refrigerating compartment
• To reduce moisture and subsequent ice build-up, never put liquid into the
refrigerator in unsealed containers. Frost tends to concentrate in the coolest parts
of the evaporator. Storing uncovered liquids results in a more frequent need for
defrosting.
•
ool down at room
temperature and then be placed so as to ensure adequate air circulation in the
refrigerator.
• Foods or food containers should not touch the back wall of the refrigerator because
they could freeze to the wall. Do not keep regularly opening the door of the
refrigerator.
•
refrigerator, which can be used in 1–2 days.
• Fruit and vegetables without packaging can be placed in the part designated for
fresh fruit and vegetables.
ATTENTION
The optimal temperature setting of each compartment depends on the ambient temperature.
Above optimal temperature is based on the ambient temperature of 77 °F.
E
CLEANING AND MAINTENANCE
Defrosting
• The refrigerator is made based on the air-cooling principle and thus has
automatic defrosting function. Frost formed due to change of season or
temperature may also be manually removed by disconnection of the appliance
from power supply or by wiping with a dry towel.
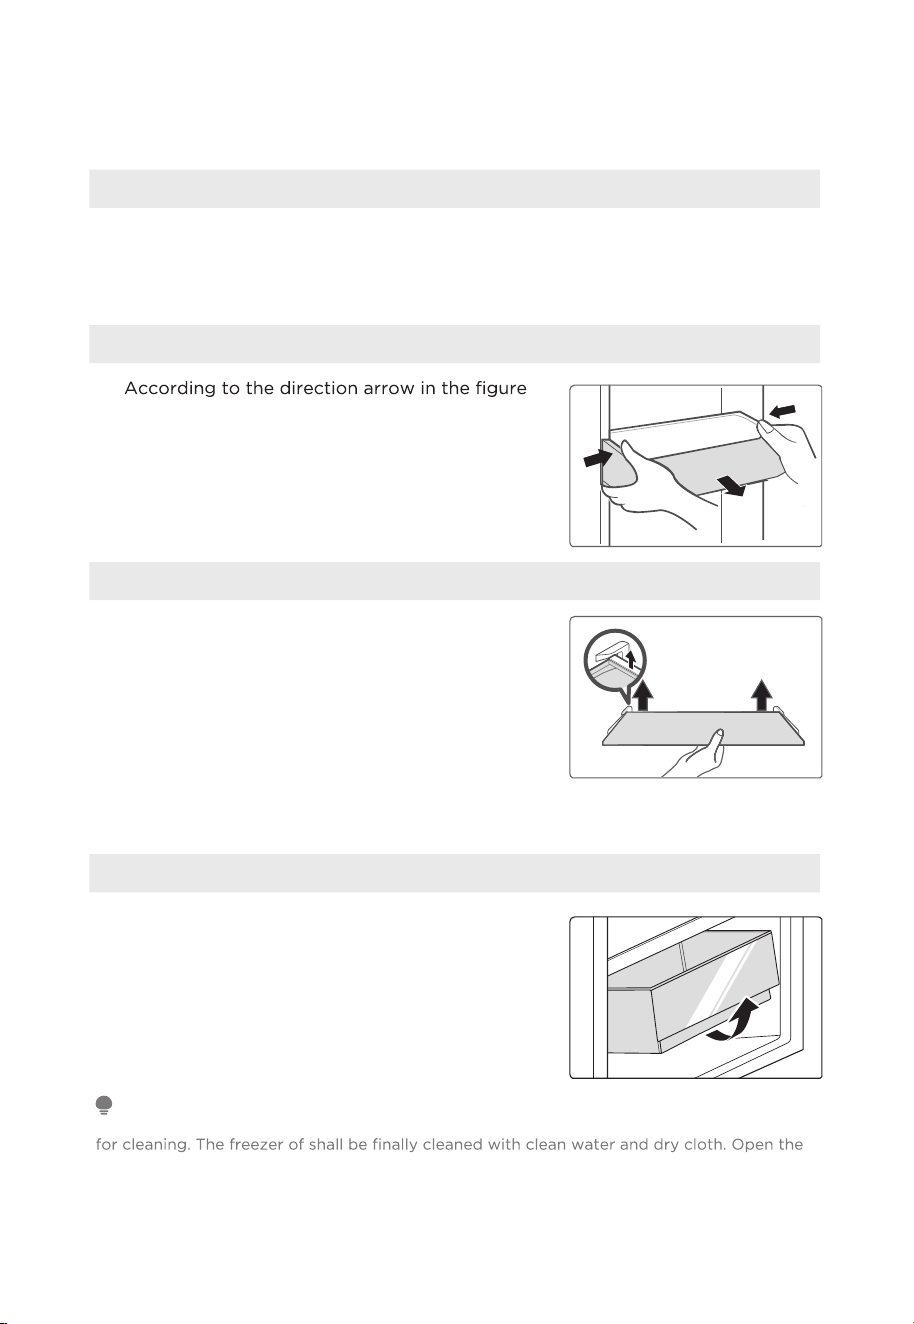
Cleaning Door Trays
•
below, use both hands to squeeze the tray, and
push it upward, then you can take it out.
• After taking the tray out and washing it, you can
adjust its installing height according to your
requirement.
Cleaning Glass Shelves
• As the innermost part of the refrigerator liner
where contacting the shelves has a backstop,
raise the shelves upward, then you can be
able to take it out.
• Adjust or clean the shelves according to your
requirement.
Cleaning the Vegetable Drawer
1. Remove the contents of the drawer. Hold the
handle of the vegetable drawer and pull it out
completely until it stops.
2. Lift the vegetable drawer up and remove it by
pulling it out.
ATTENTION
Soft towels or sponge dipped in water and non-corrosive neutral detergents are suggested
door for natural drying before the power is turned on. Do not use hard brushes, clean steel
balls, wire brushes, abrasives, such as toothpastes, organic solvents (such as alcohol, acetone,
banana oil, etc.), boiling water, acid or alkaline items clean refrigerator considering that this
may damage the fridge surface and interior.
23

Stop Using
Power failure:
In case of power failure, even if it is in summer, food inside the refrigerator can be
kept for several hours. During the power failure, the times of door opening should
be reduced, and no more fresh food should be put into the appliance.
Long-time nonuse:
The refrigerator should be unplugged and then cleaned; then the doors are left open
to prevent odor.
Moving:
vegetable holder, freezing chamber drawers and etc. with tape, and tighten the
leveling feet; close the doors and seal them with tape. During moving, the
appliance should not be laid upside down or horizontally, or be vibrated; the
inclination during movement should be no more than 45°.
ATTENTION
The appliance should run continuously once it is started. Generally, the operation of the
appliance should not be interrupted; otherwise the service life may be impaired.
Food can be preserved for a couple of hours even in summer in case of power failure; it is
recommended to reduce the frequency of opening door.
24
TROUBLESHOOTING
The following simple issues can be handled by the user. Please call the after-sale
service department if the issues are not solved.
Problem Possible reason
Failed operation
• Check whether the appliance is connected to power or
whether the plug is in well contact
• Check whether the voltage is too low
• Check whether there is a power failure or partial circuits have
tripped
Odor
• Odorous foods should be tightly wrapped
• Check whether there is any rotten food
• Clean the inside of the refrigerator
Long-time operation
of the compressor
• Long operation of the refrigerator is normal in summer
• When the ambient temperature is high it is not suggestible
having too much food in the appliance at the same time
• Food should cool before being put into the appliance
• The doors are opened too frequently
Light fails to get lit
• Check whether the refrigerator is connected to power supply
and whether the illuminating light is damaged
• Have the light replaced by a specialist
Door can not be
properly closed
• The door is stuck by food packages
• The refrigerator is tilted
Loud noises
•
is placed stably
• Check whether accessories are placed at proper locations
25
Problem Possible reason
Door seal fails to be
tight
• Remove foreign matters on the door seal
• Heat the door seal and then cool it for restoration (or blow it
with an electrical drier or use a hot towel for heating)
• There is too much food in the chamber or food stored
contains too much water,resulting in heavy defrosting
• The doors are not closed properly, resulting in frosting due to
entry of air and increased water due to defrosting
Hot housing
• Heat dissipation of the built-in condenser via the housing,
which is normal when housing becomes hot due to high
ambient temperature, storage of too much food or shutdown
of the compressor is shut down, provide sound ventilation to
facilitate heat dissipation
Surface
condensation
• Condensation on the exterior surface and door seals of the
refrigerator is normal when the ambient humidity is too high.
Just wipe the condensate with a clean towel
Abnormal noise
• Buzz: The compressor may produce buzzes during operation,
and the buzzes are loud particularly upon start or stop. This is
normal
•
produce creak, which is normal
26
27
E
DISPOSAL AND RECYCLING
Important Instructions for Environment
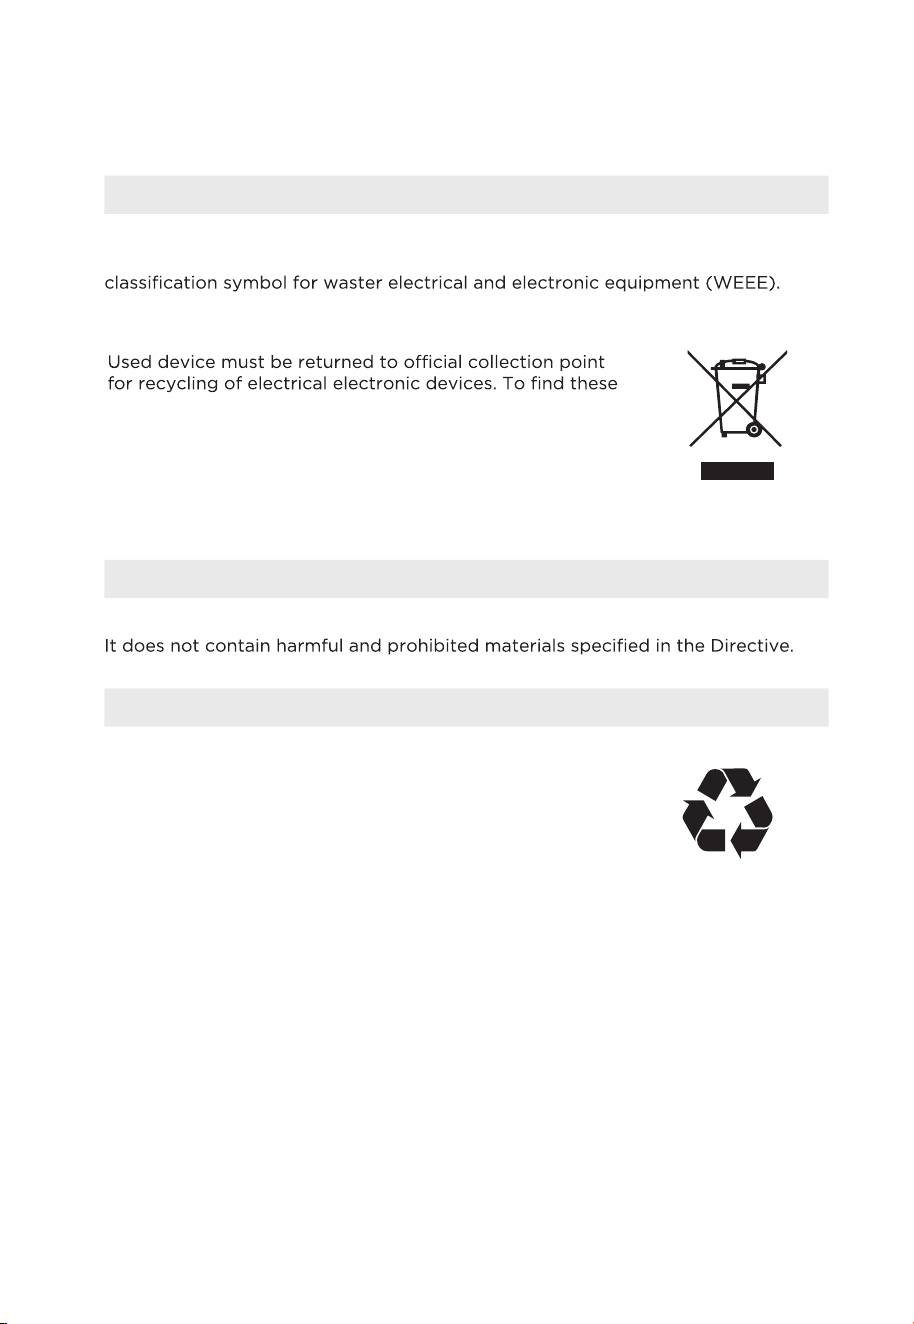
Compliance with the WEEE Directive and Disposing of the Waster Product: This
product complies with EU WEEE Directive (2012/19/EU). This product bears a
This symbol indicates that this product shall not be disposed
with other household wastes at the end of its service life.
collection systems please contact to your local authorities or
retailer where the product was purchased. Each household
performs important role in recovering and recycling of
old appliance. Appropriate disposal of used appliance
helps prevent potential negative consequences for the
environment and human health.
Compliance with RoHS Directive
The product you have purchased complies with EU RoHS Directive (2011/65/EU).
Package Information
Packaging materials of the product are manufactured
from recyclable materials in accordance with our National
Environment Regulations. Do not dispose of the packaging
materials together with the domestic or other wastes. Take
them to the packaging material collection points designated
by the local authorities.
28
WARRANTY
29
30