1.
The
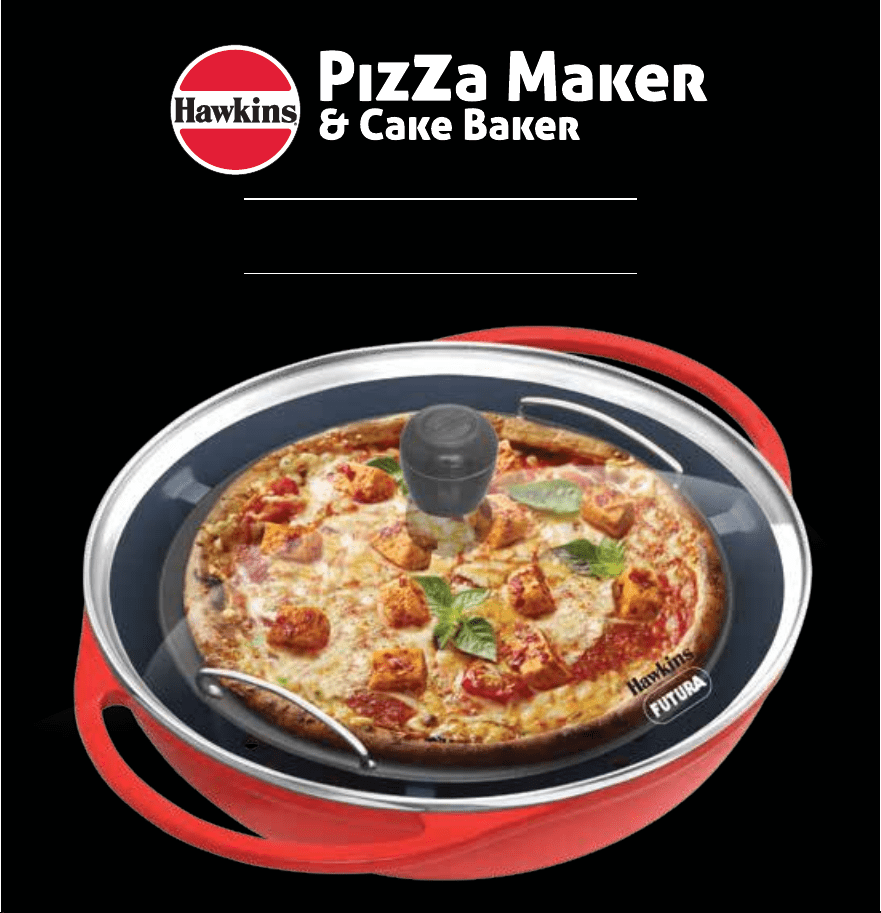
Hawkins Die-Cast Pizza Maker & Cake
Baker is guaranteed
against defects in material
and workmanship for a period of 2 years from
the date of first purchase by the user. 2. Fair
wear and tear is not a defect. The plastic knob is
not covered under this guarantee. The ceramic
coating may scratch or chip during use – these
are not defects and are not guaranteed; this will
not affect the functioning of the pan. 3. The
pan must be used and maintained properly in
accordance with the printed instructions
contained in the Instruction Manual and the
Caution alongside. 4.
Damage caused by
misuse/abuse, accident, dropping or hitting are
not covered under this guarantee.
5. Genuine
parts of our supply must be used at all times.
6. The pan must not be damaged or weakened
by any repair by an unauthorised person. 7. The
complete cookware under complaint must be
returned to us or our Authorised Service Centre
at the user’s cost and this Guarantee Card and
the Cash Memo must be produced along with
the pan. The number given alongside must
match the serial number on the bottom of the
pan. 8. Subject to the above mentioned terms
and conditions, we shall repair or replace free of
cost any defective part or parts or the whole
cookware at our option.
CAUTION
1. Do not use on chulha, industrial burners
or any heat source which cannot be
regulated to low and medium heat.
2. Do not touch hot surfaces or handles
with bare hands – use cloth or oven mitts.
3. Do not cook in the pan/mold directly as
they may warp or bulge. 4. Use the Hawkins
wooden spatula provided; do not use a
metal or sharp spatula which may scratch
and damage the nonstick. 5. Do not drop,
hit, bang, rub, cut or chop on/in the pan or
scrape with metal or any sharp edged
object. 6. Do not scrape product across or
bang product down on pan supports.
Doing so will damage the ceramic coating.
7.
Do not put lid in an oven or under a grill.
8. Clean thoroughly after each use in hot
water with a mild soap or detergent and a
dishcloth or sponge. Do not put the hot
product, glass lid or pan/mold in water.
9. Do not put the product, glass lid or
pan/mold in the dishwasher. 10.
To avoid
“misting” caused by moisture, store the
glass lid in a place with good
air circulation/a well-ventilated place and
not in its original packing.
SOLD BY
Name & Address
of the dealer
& stamp
Date of Purchase:
Scan to register guarantee
and get more recipes at
www.hawkins.in/recipes
TERMS AND CONDITIONS
Year
Guarantee
2
with Glass Lid
|
29 cm
Pressure Die-Cast
Pizza Maker & Cake Baker - Instruction Manual
Back Cover
Closed Size: 140mm x 145mm Open Size: 280mm x 145mm
Paneer Tikka Feast
Pizza
5 Pizza recipes | 4 Cake recipes
INSTRUCTION MANUAL
WITH GUARANTEE CARD
with Glass Lid
|
29 cm
Pressure Die-Cast
IM 173
GUARANTEE
NO.
For more recipes and cookbooks in other languages download the Hawkins Kitchen App
Inside BackInside Front
1
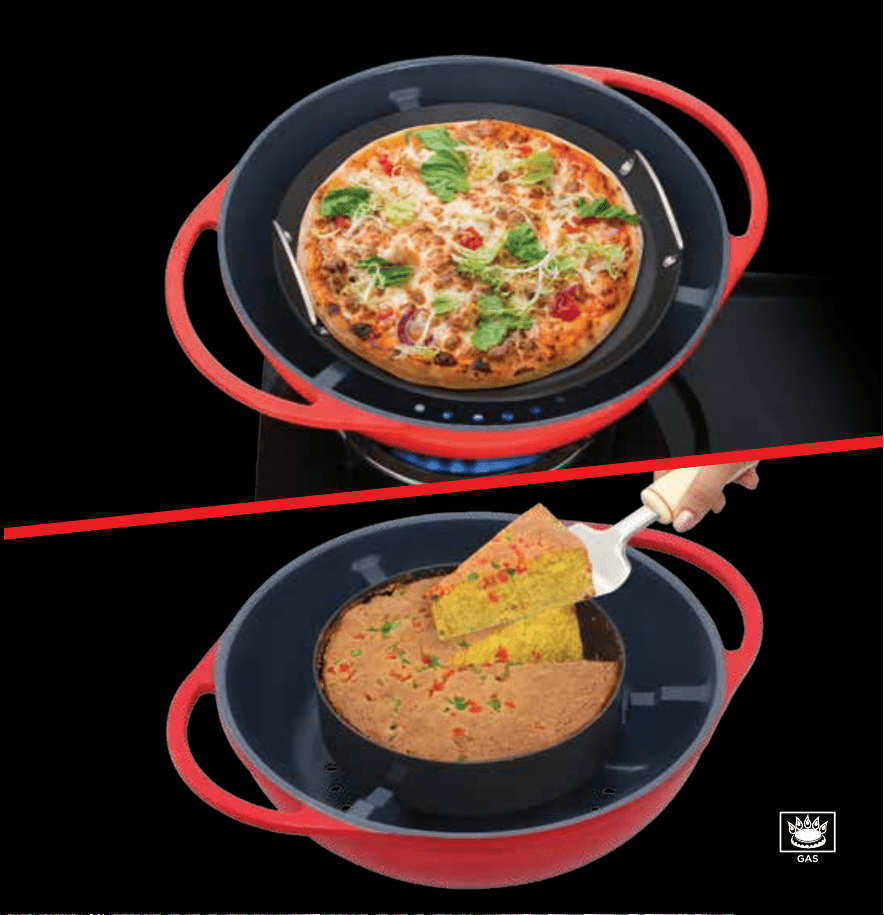
Home-cooked, 5 star food with fresh, hand-picked
ingredients at a fraction of the cost and time!
Tutti Frutti Cake
Farm Fresh Pizza
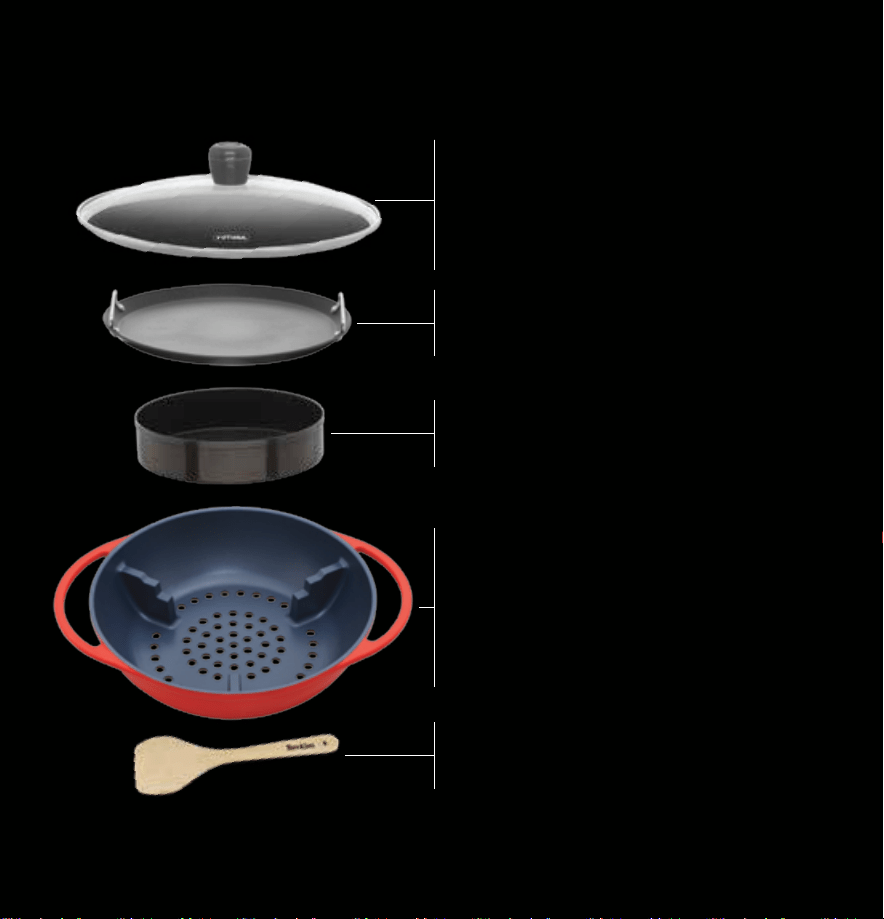
Pizza Maker & Cake Baker
Features & Benefits
Extra-Thick Die-Cast
Ceramic Coated Body
● Precisely designed for placing
the pizza pan and cake mold
at the correct height
● Holes on the base of the body
for uniform heating
Wooden Spatula
Specially designed to scoop pizza
from pan & protect pan surface
Toughened 4 mm thick heat-resistant
glass lid
● Traps the heat inside, creating
an oven-like chamber.
● See food being cooked/baked
without lifting the lid
Pizza Pan
9” diameter, heats well and bakes
pizza crust evenly
Cake Mold
7” diameter, 1¾ inch height —
bakes delicious ½ kg cakes
Pizza Maker & Cake Baker - Instruction Manual Closed Size: 140mm x 145mm Open Size: 280mm x 145mm

Contents
Page
Features and Benefits 1
Important Safeguards 3
The Widest Range of High-Quality Cookware 4
Hawkins Die-Cast Cookware 5
How to Use 6
How to Clean 8
General Cooking Tips 9
Pizza Recipes
Pizza Dough 10
Pizza Sauce 11
Margherita Pizza 12
Paneer Tikka Feast Pizza 13
Farm Fresh Pizza 15
Zesty Chicken Tikka Pizza 16
Chicken Bonanza Pizza 18
Cake Recipes
Healthy Whole Wheat Almond Cake (Eggless) 20
Coconut Lemon Rava Cake (Eggless) 21
Choco Walnut Fudge Brownies 23
Tutti Frutti Cake 24
Guarantee Card back cover
© 2025 and All Rights Reserved. 'Hawkins' is the Registered Trademark of Hawkins Cookers Limited in
India and in various other countries throughout the world. CIN: L28997MH1959PLC011304.
Any Questions or Comments? Contact:
2
Hawkins Cookers Limited
Udyog Mandir 2, Pitamber Lane, Mahim, MUMBAI 400 016, INDIA
TEL (91 22) 2444 0807 FAX (91 22) 2444 9152
EMAIL: [email protected]
WEBSITE: www.hawkinscookers.com

Important Safeguards
1. This Pizza Maker and Cake Baker is specially designed for use on a domestic gas stove.
Do not use on chulha, industrial burners or any heat source which cannot be regulated to low
and medium heat or whose flame spreads beyond its base.
2. The
Pizza Maker
needs to be pre-heated before baking, which will make it very hot
to touch. Do not touch hot surfaces/handles with bare hands – use cloth or oven mitts.
Reduce heat to low, carefully place pizza pan/cake tin with the food and then bake at the
heat setting stated in the recipe.
3. Place on stove with the handles parallel to the kitchen counter – not sticking out.
4. Do not cook in the pan or tin directly on heat, as they may warp or bulge. They are
specially designed for use in the Hawkins Pizza Maker and Cake Baker.
5. Do not drop, hit, bang, rub, cut or chop on/in the product with a metal spatula or any
sharp edged object.
6. Do not scrape pan across or bang down on pan supports – doing so will damage the
ceramic coating. Lift and place on the pan supports, so that the product is seated securely
with no possibility of it slipping or tipping.
7. Do not put the hot product, glass lid or the pan/tin in water. Allow to cool first.
8. Do not wash the product, glass lid or pan/tin in a dishwasher. Hand wash.
9. Read and follow the instructions in this Manual.
3

The Widest Range of High-Quality Cookware
Hawkins and Futura Cookware offer over 314 models of pots and pans made from carefully
selected, high quality metals, designed with the best technology and craftsmanship, to give
you the best possible cooking results. Choose from a variety of different materials and finishes
selected for durability, utility and thermal efficiency, such as hard anodised, nonstick,
ceramic nonstick, stainless steel and cast iron. You can also choose from models with glass
or metal lid, and with or without induction compatibility. Choose your ideal pot or pan based
upon your needs, your cooking style and the heat source in your kitchen. Hawkins and Futura
Cookware are generally made from the following metals unless otherwise specified:
Wrought Aluminium Cookware
•
Body (Ceramic-coated): Aluminium 40800 grade (EN Aluminium 8011 grade)
•
Body (others): Aluminium 31000 grade (EN Aluminium 3003 grade)
Die-Cast Aluminium Cookware
•
Body: Die-Cast Aluminium AlSi10Mg(b) grade (EN Aluminium 43100 grade), food-compatible
Stainless Steel Sandwich Bottom Cookware
•
Body: Stainless Steel AISI 304 grade (also known as 18/8 Stainless Steel)
•
Core: As per IS:21 standard Heavy gauge Aluminium (19500 grade)
•
Base: Stainless Steel AISI 430 grade (magnetic, induction compatible)
Stainless Steel Tri-Ply Cookware
•
Cooking (Inner) Surface: Stainless Steel AISI 304 grade (18/8 Stainless Steel)
•
Core: As per IS:21 standard Heavy gauge Aluminium (19500 grade)
•
Base: Stainless Steel AISI 430 grade (magnetic, induction compatible)
Metal Lids
•
Stainless Steel: AISI 304 grade (18/8 Stainless Steel)
•
Wrought Aluminium: Aluminium 31000 grade (EN Aluminium 3003 grade)
•
Die-cast Aluminium: Die-cast Aluminium AlSi10Mg(b) grade (EN Aluminium 43100 grade),
food-compatible
Stainless Steel Induction Base Plate
•
Stainless Steel AISI 430 grade (magnetic, induction compatible).
4

Hawkins Die-Cast Cookware
What is Die Casting?
Die casting is a metal casting process whereby metal is heated to a very high temperature
and poured under high pressure into a mold cavity. The molten metal takes the shape of
the mold and hardens; once opened, it is finished with durable ceramic inside and outside.
The result is a precisely designed pot or pan which adds metal where it is needed, building
strength and functionality.
Hawkins Die-Cast Pizza Maker and Cake Baker
Now get home-cooked, 5 star snacks for your loved ones, with fresh, hand-picked
ingredients, your chosen flavours and recipes – at a fraction of the cost + time!
•
Unique Design: The Pizza Maker and Cake Baker and glass lid form the ideal chamber
for baking pizzas or cakes on your gas stove at home. The elegant, strong, non-toxic,
stain-resistant, ceramic coated metal body and glass lid withstand high temperatures to
give you excellent results every time. The inner walls have been precisely engineered to
place the pizza pan and cake tin at the correct height required for baking cakes or pizza.
The metallic integrated handles will never loosen and are designed for better balance.
The handles get hot
-
handle with care. Do not touch with bare hands, use cloth or
oven mitts.
•
Pizza Pan: 9 inch diameter, 2.6 mm thick with PFOA-free nonstick; heats well and bakes
pizza crust evenly. Easy to clean. The strong riveted stainless steel handles help in easy
placing and removal of freshly baked pizzas. The pizza pan handles get hot
-
use cloth
or oven mitts.
•
Cake Tin: hard anodised, 7 inch diameter and about 1
3
/4 inch height, bakes about
1
/2 kg delicious cakes. Non-toxic, easy to clean.
•
Toughened 4 mm thick Heat Proof Glass Lid: traps the heat inside, creating an
oven-like heated chamber. See the progress of the food being baked without lifting the
lid.
5

How to Use
Your Pizza Maker & Cake Baker will give you years of easy, great-tasting food and easy
clean-up if you carefully follow the instructions given in the Important Safeguards on
page 3.
Before First Use
Remove sticker/label. Hand wash in warm soapy water, rinse and wipe dry.
Suitable Heat Sources
The Pizza Maker & Cake Baker is specially designed to work as an oven on a domestic
gas stove. Do not use on a coal fire or industrial burner or any heat source that cannot
be regulated to low and medium heat. Use a burner to suit the size of your product – gas
flames should not lick the sides of the product.
Limit Pre-heating of Pizza Maker & Cake Baker
This product conducts and transfers heat through convection, indirectly heating and
cooking the contents of the pizza pan/cake tin. We recommend pre-heating the cold
empty product on High heat of a Big burner of a Gas stove before placing the pizza pan/
cake tin with food in it.
The actual time required for pre-heating given in the recipes may vary depending on
the food being baked and your burner. For baking, use low to medium heat only. High
heat may result in the food burning at the base.
Avoid Scratching, Damage, Breakage
Do not drop the product, lid or its accessories, or bang it with hard or sharp objects.
To protect the ceramic coating from chipping and scratching, do not bang it down on pan
supports. Lift, do not drag it across pan supports or other surfaces. Do not stack other
utensils on the product without protecting it.
6

During use, the ceramic coating may scratch or chip and faint scratches or marks may
appear.
These are not defects, but marks of normal wear and tear and do not affect the
functioning of the product.
Use the specially designed wooden spatula to lift the cooked pizza off the pan, or any
other suitable wooden or silicone spatula. Metal utensils will scratch the nonstick coating
of the pizza pan. Do not cut or chop on/in the pizza pan or cake tin or hit it with a knife,
or other sharp instrument. Remove the pizza/cake from the pan/tin and then cut it.
Do not use the pizza pan/cake tin on direct heat. The thickness of the pan/tin has been
carefully calibrated to transmit heat quickly during indirect heating, it may warp or bulge if
used directly on heat.
The glass lid is liable to break under a sharp or forceful blow. Turning the knob clockwise
will tighten it and turning it anti-clockwise will loosen it. Do not over-tighten. Handle and
store the glass lid with appropriate care.
Saving Energy
The Hawkins Pizza Maker & Cake Baker will save energy and produce tasty food while
optimising fuel consumption if you regulate the heat as given in the instructions.
7

How to Clean
1. DO NOT WASH PAN/LID AND ANY OF ITS ACCESSORIES IN A DISHWASHER. We
recommend hand washing. Dishwashing detergents may contain harsh chemicals or
abrasive substances which may damage the pan and dull any bare metal or hard anodised
surfaces, glass lid and knob.
2. Allow the product to cool before washing. Always wash all surfaces thoroughly after
every use in hot water with a mild, liquid utensil soap and a non-abrasive sponge. For
stubborn spots, soak in hot water for about 10 minutes and rub with a non-abrasive plastic
scrubber – never use steel wool, coarse or metallic scouring pads or abrasive detergents.
When cleaning, ensure that the coating is not gouged or rubbed against any hard or sharp
surface – keep a folded kitchen cloth, rubber or sponge underneath to avoid damaging the
product. Wipe dry.
3. Wash wooden spatula in hot water with a mild soap or detergent, rinse, and dry
immediately – do not soak.
How to Avoid "Baked-On" Food/Stains and Deal with Them
1. If the product is not cleaned thoroughly after each use, a thin layer of food or grease
may remain, when heated next, this food/grease becomes "baked-on" and very difficult
to remove. "Baked-on" food and the stains from "baked-on" food may be impossible to
remove without damaging the product.
2. To avoid "baked-on" stains: wipe off any fat or grease while it is still fresh, also ensure
that the stove surface in contact with the product is free of fat drippings.
3. If you do get "baked-on" stains, you may try the following methods (knowing that
the product surface may get damaged):
Wash with a mild liquid utensil soap or detergent and a non-abrasive plastic scrubber,
removing all superficial food, and dry. Make a paste with equal parts of baking soda
and warm water and apply it to the area of the ceramic coating with the stain. Wait
5-10 minutes. Rub paste with a non-abrasive plastic scrubber using a circular motion until
stains are removed. Wash product in hot soapy water and wipe dry.
8

General Cooking Tips
1. Time and heat settings in the recipes refer to the big burner of a domestic gas stove.
You may have to adjust these times and settings to suit your stove.
2. Always pre-heat the Pizza Maker and Cake Baker for the required time as stated in the
recipe for different foods.
3. To check the doneness of the cake: The cake is ready when it leaves the sides of the
cake tin and is springy to touch. If you still want to confirm the doneness, insert a toothpick
or a pointed edge of a knife near the centre of the cake – the cake is done if the toothpick/
knife comes out clean without any batter sticking to it.
4. The flour should be sifted before measuring and then again sifted with the raising agent
(baking powder or baking soda).
5. The liquid to be used for yeast to rise must be warm; but not at boiling point, if too
hot, the raising agent is destroyed, if too cold, dough will take longer to rise.
6. The pizza dough should be greased on all sides before being left to rise.
7. Abbreviations used:
Abbreviation Equivalent
tsp teaspoon
tbsp tablespoon
g gram
oz ounce
ml millilitre
mm millimetre
cm centimetre
Measurement Equivalent
1 teaspoon 5 ml
1 tablespoon 3 tsp
/
15 ml
1
/4 cup 4 tbsp
/
60 ml
1
/2 cup 8 tbsp
/
120 ml
3
/4 cup 12 tbsp
/
180 ml
1 cup 16 tbsp
/
240 ml
8. Measurements: All measurements
are level, not heaped.
9

Recipes
The recipe section features 9 recipes, five Pizza and four Cake recipes. To give you an
idea, we recommend the recipes we have actually tried and tested in our Test Kitchen. Using
these as a base, you can easily adapt your own favourite recipes.
Pizza Recipes
The recipes ingredients and method used for making pizza dough and pizza sauce are
same for all pizzas, and are given herein below:
Pizza Dough
Yield: 2 pizzas
1 tsp
/
5 ml dry yeast
1
1
/2 tsp
/
7.5 ml sugar
1
/2 cup + 2 tbsp
/
150 ml lukewarm water
2 cups
/
240 g
sifted refined flour (maida)
3
/4 tsp
/
3.8 ml salt
3 tbsp
/
45 ml vegetable oil
1. In a bowl, stir yeast, sugar and
1
/4 cup + 2 tbsp
/
90 ml lukewarm water till sugar dissolves.
Cover and keep in a warm place and allow yeast to proof until it resembles a creamy foam
about (10 minutes).
2. Put flour in a bowl. Make a depression in the centre. Add yeast mixture, salt and
vegetable oil. Mix. Add remaining water (
1
/4 cup
/
60 ml), a little at a time and knead till
dough is smooth and elastic (about 5 minutes). Apply a little oil all over the dough. Keep
covered with a damp cloth till dough has doubled in size (about 1 hour).
3. With oiled hands, knead and divide dough into 2 equal parts, roll out one part into a
flat round about 8
1
/4 inch
/
21 cm in diameter. Keep covered.
•
10

Pizza Sauce
Yield: 10 tbsp
1 tbsp
/
15 ml vegetable oil
5 small cloves garlic crushed
1
/3 cup
/
40 g chopped onion
1 cup
/
190 g chopped tomatoes
3
/4 tsp
/
3.8 ml salt
1
/4 tsp
/
1.3 ml sugar
1
/4 tsp
/
1.3 ml dried oregano leaves
1
/4 tsp
/
1.3 ml dried basil leaves
1
/4 tsp
/
1.3 ml chilli flakes
1
/4 tsp
/
1.3 ml pepper
3 tbsp
/
45 ml water
1. Heat oil in a frying pan on medium heat about 1 minute. Add garlic. Stir fry about
2 minutes. Add onion. Stir fry till onion is transparent (about 3 minutes). Add tomatoes
and all other ingredients. Mix. Reduce heat to low. Cover and cook about 5 minutes.
2. Remove pan from heat. Allow to cool 10 minutes.
3. Grind tomato-onion mixture into a paste. Add ground paste in the pan.
4. Place pan with paste on medium heat. Cook till sauce thickens (about 3 minutes), stirring
constantly. Remove pan from heat.
•
11

Margherita Pizza
Pizza dough and pizza sauce: see recipes on pages 10 and 11.
For Margherita topping
2 cups
/
200 g mozzarella and cheddar cheese (mix)
grated
14 fresh basil leaves torn into pieces
1. Pre-heat the Pizza Maker with lid closed on high heat of a big burner of gas stove about
5 minutes.
2. Meanwhile, place round on pizza pan. Spread half of the pizza sauce evenly over the
round. Sprinkle half of the cheese on sauce over round. Arrange half of the fresh basil
leaves over cheese.
3. Reduce heat to low. Wearing oven mitts or using sufficient cloth, carefully uncover Pizza
Maker. Place pizza pan with round in Pizza Maker. Increase heat to medium. Cover and
cook about 15 minutes*. Meanwhile, roll out remaining dough into a flat round in the
same way as in step 3, page 10. Keep covered.
4. Reduce heat to low. Uncover Pizza Maker. Remove pan with pizza. Lift pizza with
wooden spatula provided and place on to a plate. Cut and serve hot.
5. Make remaining pizza in the same way as in steps 2 to 4 above, increasing heat to
medium after placing pizza pan with round in Pizza Maker.
•
*12 minutes, using readymade pizza base.
12

Paneer Tikka Feast Pizza
Pizza dough and pizza sauce: see recipes on pages 10 and 11.
For Paneer Tikka topping
1
/3 cup
/
80 ml curd
1 x
1
/4 inch
/
6 mm piece (
1
/12 oz
/
3 g) fresh ginger
3 small cloves garlic
1
/2 tsp
/
2.5 ml lemon juice
1
/2 tsp
/
2.5 ml red chilli powder
1
/4 tsp
/
1.3 ml garam masala powder
1
/2 tsp
/
2.5 ml rock salt
1
/4 tsp
/
1.3 ml kasoori methi crushed
1
1
/2 tsp
/
7.5 ml mustard oil
7 oz
/
200 g paneer cut into
1
/2 inch
/
1.3 cm cubes
1. Place a muslin cloth over a bowl. Pour curd on the muslin cloth and strain. Gather
up corners of muslin and tie a knot above curds to make a bag. Hang this bag about
30 minutes. Untie bag. Measure
1
/4 cup
/
60 ml of curd. Keep aside.
2. Grind into a paste ginger, garlic and lemon juice.
3. In a bowl, mix curd, ginger-garlic paste and all other ingredients except paneer. Add
paneer. Gently coat paneer with curd-masala mixture. Cover and keep aside 1 hour.
4. Divide paneer into batches. Sauté each batch in a frying pan about 3 minutes on each
side. Remove. Keep aside.
13

. For Pizza
1 small (2 oz
/
60 g) onion cut into
3
/4 inch
/
2 cm cubes
and separated
1 medium (2
2
/3 oz
/
80 g) capsicum cut into
3
/4 inch
/
2 cm cubes
1
1
/2 tsp
/
7.5 ml chilli flakes
2 cups
/
200 g mozzarella and cheddar cheese (mix)
grated
1. Pre-heat the Pizza Maker with lid closed on high heat of a big burner of gas stove about
5 minutes.
2. Meanwhile, place round on pizza pan. Spread half of the pizza sauce evenly over the
round. Arrange half quantity of paneer, half of the onion and capsicum over round. Sprinkle
half each of chilli flakes and cheese.
3. Reduce heat to low. Wearing oven mitts or using sufficient cloth, carefully uncover Pizza
Maker. Place pizza pan with round in Pizza Maker. Increase heat to medium. Cover and
cook about 15 minutes*. Meanwhile, roll out remaining dough into a flat round in the
same way as in step 3, page 10. Keep covered.
4. Reduce heat to low. Uncover Pizza Maker. Remove pan with pizza. Lift pizza with
wooden spatula provided and place on to a plate. Cut and serve hot.
5. Make remaining pizza in the same way as in steps 2 to 4 above, increasing heat to
medium after placing pizza pan with round in Pizza Maker.
•
*12 minutes, using readymade pizza base.
14

Farm Fresh Pizza
Pizza dough and pizza sauce: see recipes on pages 10 and 11.
For Farm Fresh topping
3 (2 oz
/
60 g) babycorns cut diagonally into
1
/4 inch
/
6 mm slices
1 medium (2
2
/3 oz
/
80 g) capsicum de-seeded, cut into
3
/4 inch
/
2 cm cubes
1 medium (2
2
/3 oz
/
80 g) onion thinly sliced
4 (2
2
/3 oz
/
80 g) mushrooms cut into slices
6 deseeded olives (black) sliced
1
/4 cup (40 g) pickled jalapeno peppers (optional),
sliced
1
1
/2 tsp
/
7.5 ml dried oregano/pizza seasoning
2 cups
/
200 g mozzarella and cheddar cheese (mix)
grated
1. Divide each of the above vegetables for pizza separately into two portions. Keep aside.
2. Pre-heat the Pizza Maker with lid closed on high heat of a big burner of gas stove about
5 minutes.
3. Meanwhile, place round on pizza pan. Spread half of the pizza sauce evenly over the
round. Arrange one portion of each vegetable all over the round. Sprinkle half each of
oregano and cheese.
4. Reduce heat to low. Wearing oven mitts or using sufficient cloth, carefully uncover Pizza
Maker. Place pizza pan with round in Pizza Maker. Increase heat to medium. Cover and
cook about 15 minutes*. Meanwhile, roll out remaining dough into a flat round in the
same way as in step 3, page 10. Keep covered.
15

5. Reduce heat to low. Uncover Pizza Maker. Remove pan with pizza. Lift pizza with
wooden spatula provided and place on to a plate. Cut and serve hot.
6. Make remaining pizza in the same way as in steps 3 to 5 above, increasing heat to
medium after placing pizza pan with round in Pizza Maker.
•
*12 minutes, using readymade pizza base.
Zesty Chicken Tikka Pizza
Pizza dough and pizza sauce: see recipes on pages 10 and 11.
For Chicken Tikka topping
1
/3 cup
/
80 ml curd
1 x
1
/4 inch
/
6 mm piece (
1
/12 oz
/
3 g) fresh ginger
3 small cloves garlic
1
/2 tsp
/
2.5 ml lemon juice
1
/2 tsp
/
2.5 ml red chilli powder
1
/4 tsp
/
1.3 ml garam masala powder
1
/2 +
1
/8 tsp
/
3.1 ml rock salt
1
/2 tsp
/
2.5 ml kasoori methi crushed
2 tsp
/
10 ml mustard oil
7 oz
/
200 g boneless chicken cut into
1
/2 inch
/
1.3 cm cubes, wash and pat dry
1. Place a muslin cloth over a bowl. Pour curd into muslin and strain. Gather up corners of
muslin and tie a knot above curds to make a bag. Hang this bag about 30 minutes. Untie
bag. Measure
1
/4 cup
/
60 ml of curd. Keep aside.
2. Grind into a paste ginger, garlic and lemon juice.
16

3. In a bowl, mix curd, ginger-garlic paste and all other ingredients except chicken. Add
chicken. Rub mixture all over chicken. Cover and keep aside 4 hours or in a refrigerator
overnight.
4. In a nonstick frying pan, place chicken with the curd mixture in a single layer. Cook both
sides till chicken is tender and liquid evaporates. Remove and keep aside.
For Pizza
1 small (2 oz
/
60 g) onion cut into
3
/4 inch
/
2 cm cubes
and separated
1 small (2 oz
/
60 g) capsicum cut into
3
/4 inch
/
2 cm cubes
1
1
/2 tsp
/
7.5 ml chilli flakes
2 cups
/
200 g mozzarella and cheddar cheese (mix)
grated
1. Pre-heat the Pizza Maker with lid closed on high heat of a big burner of gas stove about
5 minutes.
2. Meanwhile, place round on pizza pan. Spread half of the pizza sauce evenly over the
round. Arrange one portion of chicken and half of the onion and capsicum. Sprinkle half
each of chilli flakes and cheese.
3. Reduce heat to low. Wearing oven mitts or using sufficient cloth, carefully uncover Pizza
Maker. Place pizza pan with round in Pizza Maker. Increase heat to medium. Cover and
cook about 15 minutes*. Meanwhile, roll out remaining dough into a flat round in the
same way as in step 3, page 10. Keep covered.
4. Reduce heat to low. Uncover Pizza Maker. Remove pan with pizza. Lift pizza with
wooden spatula provided and place on to a plate. Cut and serve hot.
5. Make remaining pizza in the same way as in steps 2 to 4 above, increasing heat to
medium after placing pizza pan with round in Pizza Maker.
•
*12 minutes, using readymade pizza base.
17

Chicken Bonanza Pizza
Pizza dough and pizza sauce: see recipes on pages 10 and 11.
For Chicken Bonanza topping
2 tsp
/
10 ml vegetable oil
7 oz
/
200 g spicy chicken sausages
4 medium (2
2
/3 oz
/
80 g) mushrooms sliced
1 small (2 oz
/
60 g) onion cut into
3
/4 inch
/
2 cm cubes
1 small (2
2
/3 oz
/
80 g) red bell peppers cut into
3
/4 inch
/
2 cm cubes
1
/4 cup
/
40 g pickled jalapeno peppers (optional),
sliced
2 tsp
/
10 ml dried mixed herbs/pizza seasoning
2 cups
/
200 g mozzarella and cheddar cheese (mix)
grated
1. Heat oil in frying pan on medium heat about 2 minutes. Add sausages. Stir fry about
1 minute. Reduce heat to low. Cover and cook about 2 minutes. Uncover pan. Remove
sausages on a plate. Divide into 2 portions. When cool, cut into
1
/4 inch
/
6 mm thick slices.
Keep aside.
2. Separately divide all vegetables for pizza into two portions. Keep aside.
3. Pre-heat the Pizza Maker with lid closed on high heat of a big burner of gas stove about
5 minutes.
4. Meanwhile, place round on pizza pan. Spread half of the pizza sauce evenly over the
round. Arrange one portion of the sausages all over the round. Arrange half of the vegetables
on the round. Sprinkle half each of mixed herbs seasoning and cheese.
5. Reduce heat to low. Wearing oven mitts or using sufficient cloth, carefully uncover Pizza
Maker. Place pizza pan with round in Pizza Maker. Increase heat to medium. Cover and
18

cook about 15 minutes*. Meanwhile, roll out remaining dough into a flat round in the
same way as in step 3, page 10. Keep covered.
6. Reduce heat to low. Uncover Pizza Maker. Remove pan with pizza. Lift pizza with
wooden spatula provided and place on to a plate. Cut and serve hot.
7. Make remaining pizza in the same way as in steps 4 to 6 above, increasing heat to
medium after placing pizza pan with round in Pizza Maker.
•
*12 minutes, using readymade pizza base.
19

Cake Recipes
Healthy Whole Wheat Almond Cake (Eggless)
Yield: 1 cake (450 g)
1 cup + 1 tbsp
/
130 g sifted whole wheat flour (atta)
2 tbsp
/
30 ml milk powder
1 tsp
/
5 ml baking powder
1
/2 tsp
/
2.5 ml baking soda
1
/4 cup
/
60 ml vegetable oil
3
/4 cup
/
100 g powdered sugar
1 tsp
/
5 ml vanilla essence
3
/4
cup
/
180 ml buttermilk
30 almonds slivered
For greasing the tin
1
/2 tsp
/
2.5 ml vegetable oil
1 tsp
/
5 ml whole wheat flour (atta)
1. Sift together flour, milk powder, baking powder and baking soda, three times.
2. In a bowl, mix oil and sugar. Add essence and half of the buttermilk. Mix till sugar is
dissolved completely. Add flour-milk powder mixture. Mix. Add the remaining buttermilk
(
1
/4 cup + 2 tbsp
/
90 ml), a little at a time, stirring constantly to make a smooth batter. Add
two-thirds the quantity of almonds. Mix lightly with a fork.
3. Grease the cake tin with oil, sprinkle flour and swirl till coated. Invert the tin and dust
off excess flour. Spoon and level batter evenly in the tin. Sprinkle remaining almonds on
top of the batter.
20

4. Pre-heat the Cake Baker with lid closed on high heat of a big burner of a gas stove about
5 minutes.
5. Reduce heat to low. Wearing oven mitts or using sufficient cloth, carefully uncover Cake
Baker. Place the tin with batter in the Cake Baker. Cover and bake till cake leaves the sides
of the tin and centre springs back when pressed lightly (about 30 minutes). To check for
doneness, insert a toothpick or a pointed edge of a knife through centre of cake and check.
The toothpick/knife should come out clean.
6. Remove from heat. Uncover Cake Baker. Take out tin. Allow to cool 20 minutes. Run
a knife around the edges of the cake. Place a plate on top of tin and invert. Tap and shake
gently to release cake. Remove tin. Serve cake at room temperature.
•
Coconut Lemon Rava Cake (Eggless)
Yeild:1 cake (660 g)
1
/4 cup
/
60 ml vegetable oil
1
/4 cup
/
60 ml curd
3
/4 cup
/
100 g powdered sugar
1
/2 cup + 2 tbsp
/
150 ml milk
1 cup
/
175 g rava/sooji (semolina) lightly roasted
and powdered
2 tbsp
/
30 ml milk powder
1
/2 cup
/
40 g desiccated coconut
1 tsp
/
5 ml lemon juice
1 tsp
/
5 ml lemon zest
1
/2 tsp
/
2.5 ml baking powder
1
/4 tsp
/
1.3 ml baking soda
21

For greasing the tin
1
/2 tsp
/
2.5 ml vegetable oil
1
/2 tsp
/
2.5 ml flour
1. In a bowl, beat oil, curd and sugar together till sugar dissolves. Add
1
/2 cup
/
120 ml
milk. Mix. Add rava and milk powder. Mix to make a smooth batter. Cover and keep aside
10 minutes to rest.
2. To the batter, add coconut, lemon juice, lemon zest, baking powder, baking soda and
remaining milk (2 tbsp
/
30 ml). Mix till combined.
3. Grease the cake tin with oil. Sprinkle flour and swirl till coated. Invert the tin and dust
off excess flour. Spoon and level batter evenly in the tin.
4. Pre-heat the Cake Baker with lid closed on high heat of a big burner of gas stove about
5 minutes.
5. Reduce heat to low. Wearing oven mitts or using sufficient cloth, carefully uncover Cake
Baker. Place the tin with batter in Cake Baker. Cover and bake till the cake leaves the sides
of the tin and centre springs back when pressed lightly (about 30 minutes). To check for
doneness, insert a toothpick or a pointed edge of a knife through centre of cake and check.
The toothpick/knife should come out clean.
6. Remove from heat. Uncover Cake Baker. Take out cake tin. Allow to cool 20 minutes.
Run a knife around the edges of the cake. Place a plate on top of cake tin and invert. Tap
and shake gently to release cake. Remove tin. Serve at room temperature.
•
22

Choco Walnut Fudge Brownies
Yield: 8 pieces (total wt. 425 g)
1 cup
/
120 g sifted refined flour (maida)
2 tbsp
/
30 ml cocoa powder
1
/4 tsp
/
1.3 ml baking powder
2
/3 cup
/
100 g dark chocolate
1
/4 cup
/
55 g butter
3
/4 cup
/
150 g castor sugar
2 eggs
1
/4 cup
/
25 g walnuts chopped
For lining the tin
1 sheet butter paper cut in a circle of 7 inch
/
18 cm
diameter to fit inside base of cake tin
1. Sift together flour, cocoa powder and baking powder.
2. In a bowl, melt chocolate and butter using double boiler*. Keep aside to cool.
3. In a separate bowl, add sugar and one egg. Beat lightly. Add the remaining egg and
beat till the mixture turns pale yellow in colour (about 3 minutes). Add the chocolate-butter
mixture. Mix. Gently fold in flour-cocoa mixture to make the batter. Add walnuts. Gently
mix in the batter.
4. Line the cake tin with butter paper. Spoon and level batter evenly in the tin.
5. Pre-heat the Cake Baker with lid closed on high heat of a big burner of gas stove about
5 minutes.
* A utensil consisting of two pots fitting together so that the contents of the upper pot can
be cooked or heated by steam from boiling water in the lower pot.
23

6. Reduce heat to low. Wearing oven mitts or using sufficient cloth, carefully uncover Cake
Baker. Place the tin with batter. Cover and bake till the cake leaves the sides of the tin and
centre springs back when pressed lightly (about 25 minutes).
7. Remove from heat. Allow the brownies to sit in the Cake Baker 15 minutes. Uncover
Cake Baker. Take out cake tin. Allow brownies to cool 20 minutes. Run a knife around the
edges of the brownies. Place a plate on top of cake tin and invert. Tap and shake gently
to release the brownies. Remove tin. Remove the butter paper. Cut and serve brownies at
room temperature or warmed, with ice cream.
•
Tutti Frutti Cake
Yield: 1 cake (450 g)
1 cup
/
120 g sifted refined flour (maida)
1
1
/2 tsp
/
7.5 ml baking powder
1
/2 cup
/
110 g butter
3
/4 cup
/
100 g powdered sugar
2 eggs
1
/2 tsp
/
2.5 ml vanilla essence
2 tbsp
/
30 ml milk
1
/3 cup
/
55 g tutti frutti (candied mixed fruit)
coarsely chopped
For greasing the tin
1
/4 tsp
/
1.3 ml butter
1 tsp
/
5 ml flour
24

1. Sift together flour and baking powder, three times.
2. In a bowl, mix butter and sugar. Beat till light and fluffy. Add eggs. Beat till thoroughly
combined. Add vanilla essence. Mix. Add
1
/4 cup flour-baking powder mixture. Stir till
batter is smooth. Add remaining flour-baking powder mixture in the same way, blending
after each addition. Add milk and tutti frutti. Gently mix.
3. Grease the cake tin with butter. Sprinkle flour and swirl till coated. Invert the tin and
dust off excess flour. Spoon batter and spread evenly in the cake tin.
4. Pre-heat Cake Baker with lid closed on high heat of big burner of a gas stove about
5 minutes.
5. Reduce heat to low. Wearing oven mitts or using sufficient cloth, carefully uncover Cake
Baker. Place the tin with batter. Cover and bake till the cake leaves the sides of the tin and
centre springs back when pressed lightly (about 30 minutes). To check for doneness, insert
a toothpick or a pointed edge of a knife through centre of cake and check. The toothpick/
knife should come out clean.
6. Remove from heat. Uncover Cake Baker. Take out cake tin. Allow to cool 10 minutes.
Run a knife around the edges of the cake. Place a plate on top of cake tin and invert it. Tap
and shake gently to release cake. Serve at room temperature.
•
25
Inside BackInside Front
1
Home-cooked, 5 star food with fresh, hand-picked
ingredients at a fraction of the cost and time!
Tutti Frutti Cake
Farm Fresh Pizza
Pizza Maker & Cake Baker
Features & Benefits
Extra-Thick Die-Cast
Ceramic Coated Body
● Precisely designed for placing
the pizza pan and cake mold
at the correct height
● Holes on the base of the body
for uniform heating
Wooden Spatula
Specially designed to scoop pizza
from pan & protect pan surface
Toughened 4 mm thick heat-resistant
glass lid
● Traps the heat inside, creating
an oven-like chamber.
● See food being cooked/baked
without lifting the lid
Pizza Pan
9” diameter, heats well and bakes
pizza crust evenly
Cake Mold
7” diameter, 1¾ inch height —
bakes delicious ½ kg cakes
Pizza Maker & Cake Baker - Instruction Manual Closed Size: 140mm x 145mm Open Size: 280mm x 145mm
1.
The
Hawkins Die-Cast Pizza Maker & Cake
Baker is guaranteed
against defects in material
and workmanship for a period of 2 years from
the date of first purchase by the user. 2. Fair
wear and tear is not a defect. The plastic knob is
not covered under this guarantee. The ceramic
coating may scratch or chip during use – these
are not defects and are not guaranteed; this will
not affect the functioning of the pan. 3. The
pan must be used and maintained properly in
accordance with the printed instructions
contained in the Instruction Manual and the
Caution alongside. 4.
Damage caused by
misuse/abuse, accident, dropping or hitting are
not covered under this guarantee.
5. Genuine
parts of our supply must be used at all times.
6. The pan must not be damaged or weakened
by any repair by an unauthorised person. 7. The
complete cookware under complaint must be
returned to us or our Authorised Service Centre
at the user’s cost and this Guarantee Card and
the Cash Memo must be produced along with
the pan. The number given alongside must
match the serial number on the bottom of the
pan. 8. Subject to the above mentioned terms
and conditions, we shall repair or replace free of
cost any defective part or parts or the whole
cookware at our option.
CAUTION
1. Do not use on chulha, industrial burners
or any heat source which cannot be
regulated to low and medium heat.
2. Do not touch hot surfaces or handles
with bare hands – use cloth or oven mitts.
3. Do not cook in the pan/mold directly as
they may warp or bulge. 4. Use the Hawkins
wooden spatula provided; do not use a
metal or sharp spatula which may scratch
and damage the nonstick. 5. Do not drop,
hit, bang, rub, cut or chop on/in the pan or
scrape with metal or any sharp edged
object. 6. Do not scrape product across or
bang product down on pan supports.
Doing so will damage the ceramic coating.
7.
Do not put lid in an oven or under a grill.
8. Clean thoroughly after each use in hot
water with a mild soap or detergent and a
dishcloth or sponge. Do not put the hot
product, glass lid or pan/mold in water.
9. Do not put the product, glass lid or
pan/mold in the dishwasher. 10.
To avoid
“misting” caused by moisture, store the
glass lid in a place with good
air circulation/a well-ventilated place and
not in its original packing.
SOLD BY
Name & Address
of the dealer
& stamp
Date of Purchase:
Scan to register guarantee
and get more recipes at
www.hawkins.in/recipes
TERMS AND CONDITIONS
Year
Guarantee
2
with Glass Lid
|
29 cm
Pressure Die-Cast
Pizza Maker & Cake Baker - Instruction Manual
Back Cover
Closed Size: 140mm x 145mm Open Size: 280mm x 145mm
Paneer Tikka Feast
Pizza
5 Pizza recipes | 4 Cake recipes
INSTRUCTION MANUAL
WITH GUARANTEE CARD
with Glass Lid
|
29 cm
Pressure Die-Cast
IM 173
GUARANTEE
NO.
For more recipes and cookbooks in other languages download the Hawkins Kitchen App