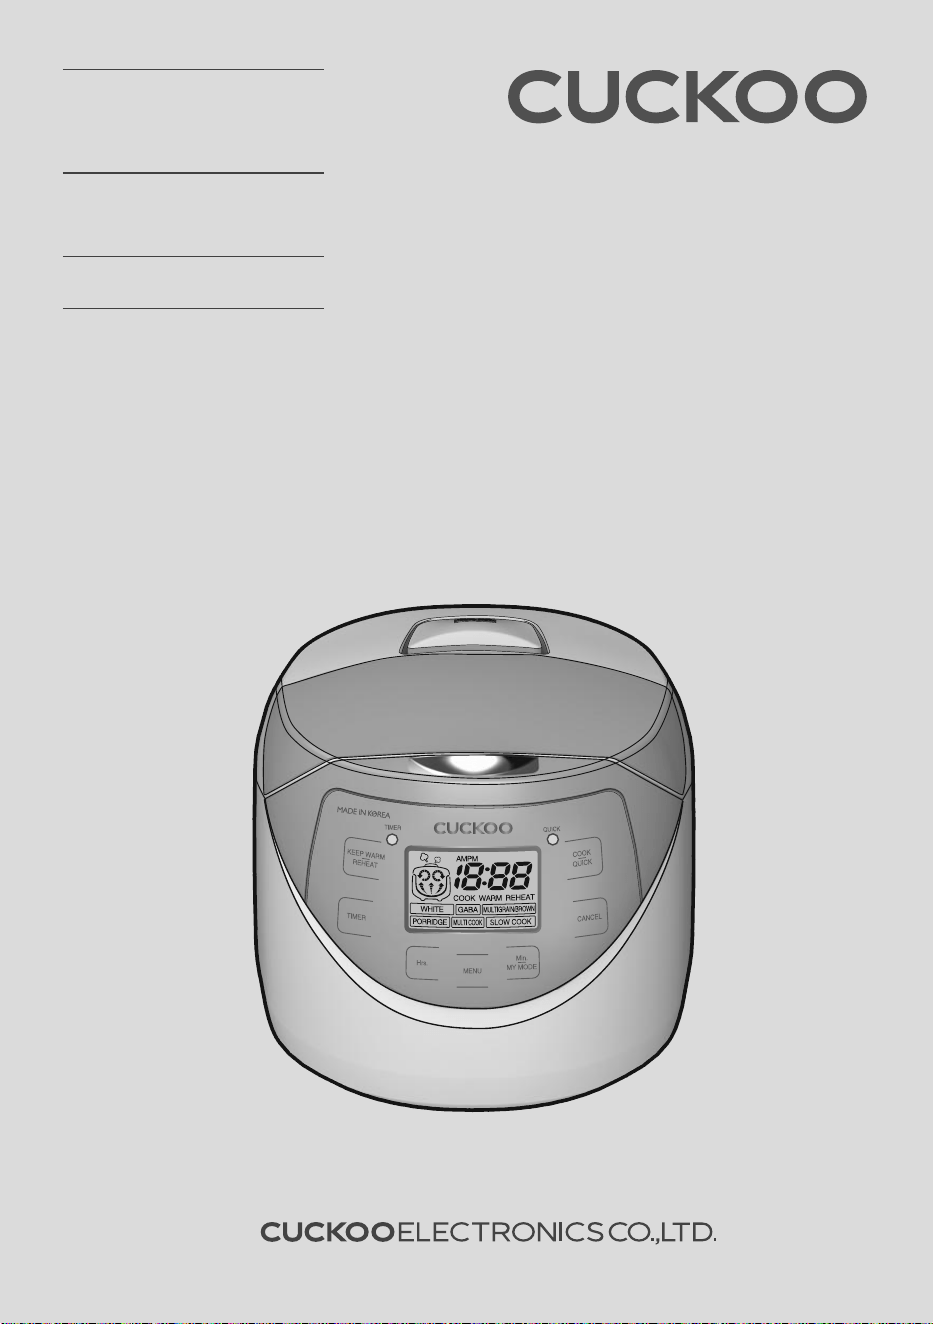
전기보온밥솥
Multifunctional Electric Rice
Cooker and Warmer
사용설명서
User Manual
CR-063F SERIES

2
Contents
before using
IMPORTANT SAFEGUARDS
............................................
3
SPECIFICATIONS
..............................................................
5
CAUTION FOR SAFETY
...............................................
6~7
CLEANING AND MAINTENANCE
..................................
10
NAME OF EACH PART
....................................................
11
CONTROL PANEL DETAILS
..........................................
12
When using
HOW TO SET THE TIME
.................................................
13
BEFORE USING YOUR MACHINE
...............................
14
FOR TASTY RICE
............................................................
15
HOW TO COOK
.........................................................
16~17
HOW TO USE “MY MODE”
.......................................
18~19
CUSTOMIZED TEMPERATURE CONTROL
................
20
HOW TO USE “GABA”
...............................................
21~22
HOW TO USE “MULTI COOK”
........................................
23
HOW TO USE “SLOW COOK”
..................................
24~25
HOW TO SET THE TIMER
.......................................
26~27
TO KEEP RICE WARM AND TASTY
......................
28~30
‘KEEP WARM’ TIPS
........................................................
31
before AsKing for serviCe
PLEASE REVIEW THE MANUAL
..............................
32~33
Contents
목차
사용하기전에
Important safeguards
........................................................
3
제품규격
...........................................................................
5
안전을 위한 주의 사항
..................................................
34~36
제품 손질 방법
.................................................................
37
각 부분의 이름
.................................................................
38
기능 조작부의 설명
...........................................................
39
사용할 때
현재시각의 설정
...............................................................
40
취사전 준비사항
...............................................................
41
맛있는 밥을 드시려면
........................................................
42
취사는 이렇게 하십시오
..............................................
43~44
쿠쿠 맞춤밥맛 기능은 이렇게 하십시오
...............................
45
맞춤취사 기능은 이렇게 하십시오
.......................................
46
현미발아는 이렇게 하십시오
........................................
47~48
찜은 이렇게 하십시오
........................................................
49
웰빙쿡은 이렇게 하십시오
...........................................
50~51
예약 취사는 이렇게 하십시오
.......................................
52~53
밥을 맛있게 보온하려면
..............................................
54~57
고장 신고 전에
고장신고 전에 확인 하십시오
........................................
58~59
저희 쿠쿠 보온밥솥을 애용해 주셔서 대단히 감사 드립니다.
이 사용설명서는 잘 보관하여 주십시오.
사용 중에 모르는 사항이 있을 때나 기능이 제대로
발휘되지
않을 때 많은 도움이 될 것입니다.
thank you for purchasing “CuCKoo”
electric rice cooker/warmer
Please read the instructions before using.
nous vous remercions pour votre achat du cuiseur à
riz/ réchauffeur de riz "CuCKoo"
Lire attentivement les instructions avant d'utiliser cet appareil.
Veuillez conserver ces instructions à titre de référence ultérieure.
tAble des mAtières
AvAnt l'utilisAtion
MESURES DE PROTECTION IMPORTANTES
...............
4
SPÉCIFICATIONS
...............................................................
5
MESURES DE SÉCURITÉ
............................................
8~9

3
www.cuckooworld.com
▶ Read all instructions.
▶ Do not touch hot surfaces. Use handles or knobs.
▶ To protect against electrical shock do not immerse cord, plugs, or (state specific part
or parts in question) in water or other liquid.
▶ Close supervision is necessary when any appliance is used by or near children.
▶ Unplug from outlet when not in use and before cleaning. Allow to cool before putting
on or taking off parts.
▶ Do not operate any appliance with a damaged cord or plug or after the appliance
malfunctions or has been damaged in any manner. Return appliance to the nearest
authorized service facility for examination, repair, or adjustment.
▶ The use of accessory attachments not recommended by the appliance manufacturer
may cause injuries.
▶ Do not use outdoors (this item may be omitted if the product is specifically intended
for outdoor use).
▶ Do not let cord hang over edge of table or counter, or touch hot surfaces.
▶ Do not place on or near a hot gas or electric burner, or in a heated oven.
▶ Extreme caution must be used when moving an appliance containing hot oil or other
hot liquids.
▶ Always attach plug to appliance first, then plug cord into the wall outlet. To
disconnect, turn any control to "off", then remove plug from wall outlet.
▶ Do not use appliance for other than intended use.
▶ Save these Instructions.
▶ Do not immerse in water.
▶ Risk of electric shock.
▶ Cook only removable container.
imPortAnt sAfeguArds

4
▶ Lisez toutes les instructions avant d'utiliser cet appareil.
▶ Ne touchez pas les surfaces chaudes. Utilisez les poignées ou les boutons.
▶ Afin de se protéger contre les chocs électriques, ne pas plonger le cordon, la fiche
ou (la partie spécifique ou tout autre parties considérées) dans de l'eau ou dans tout
autre liquide.
▶ Une surveillance étroite est nécessaire quand cet appareil est utilisé par des enfants
ou qu'il se situe à leur portée.
▶ Débranchez le cordon de la prise lorsque vous ne vous servez pas de l'appareil et
avant de le nettoyer. Laissez l'appareil refroidir avant de remettre en place ou de
retirer des pièces, et avant de le nettoyer.
▶ N'utilisez aucun appareil si le cordon ou la fiche est endommagé, s'il ne fonctionne
pas correctement ou s'il est endommagé de quelque façon que ce soit. Renvoyez
l'appareil à un centre technique agréé le plus proche pour le faire examiner, réparer
ou régler.
▶ L'utilisation d'accessoires non recommandés par le fabricant peut causer un
incendie, un choc électrique et/ou des blessures.
▶ N'utilisez pas l'appareil à l'extérieur (cet élément pourrait aussi bien être omis si
l'appareil est spécialement conçu pour un usage en extérieur).
▶ Ne laissez pas le cordon pendre d'une table ou d'un comptoir. Ne le laissez pas non
plus en contact avec une surface chaude.
▶ Ne placez pas l'appareil au-dessus ou près d'un brûleur à gaz, sur une plaque
électrique ou dans un four chaud.
▶ Une prudence extrême est requise lorsque vous déplacez l'appareil contenant de
l'huile chaude ou tout autre liquide chaud.
▶ Branchez toujours la fiche sur l'appareil en premier, puis branchez le cordon dans la
prise murale. Pour débrancher, ou désactiver toutes les commandes, retirez la fiche
de la prise murale.
▶ N'utilisez pas cet appareil à des fins autres que celles pour lesquelles il a été conçu.
▶ Veuillez conserver ces instructions.
▶ Ne pas immerger.
▶ Risque de choc electrique.
▶ Cuire seulement dans le conteneuramovible.
mesures de ProteCtion imPortAntes
5
www.cuckooworld.com
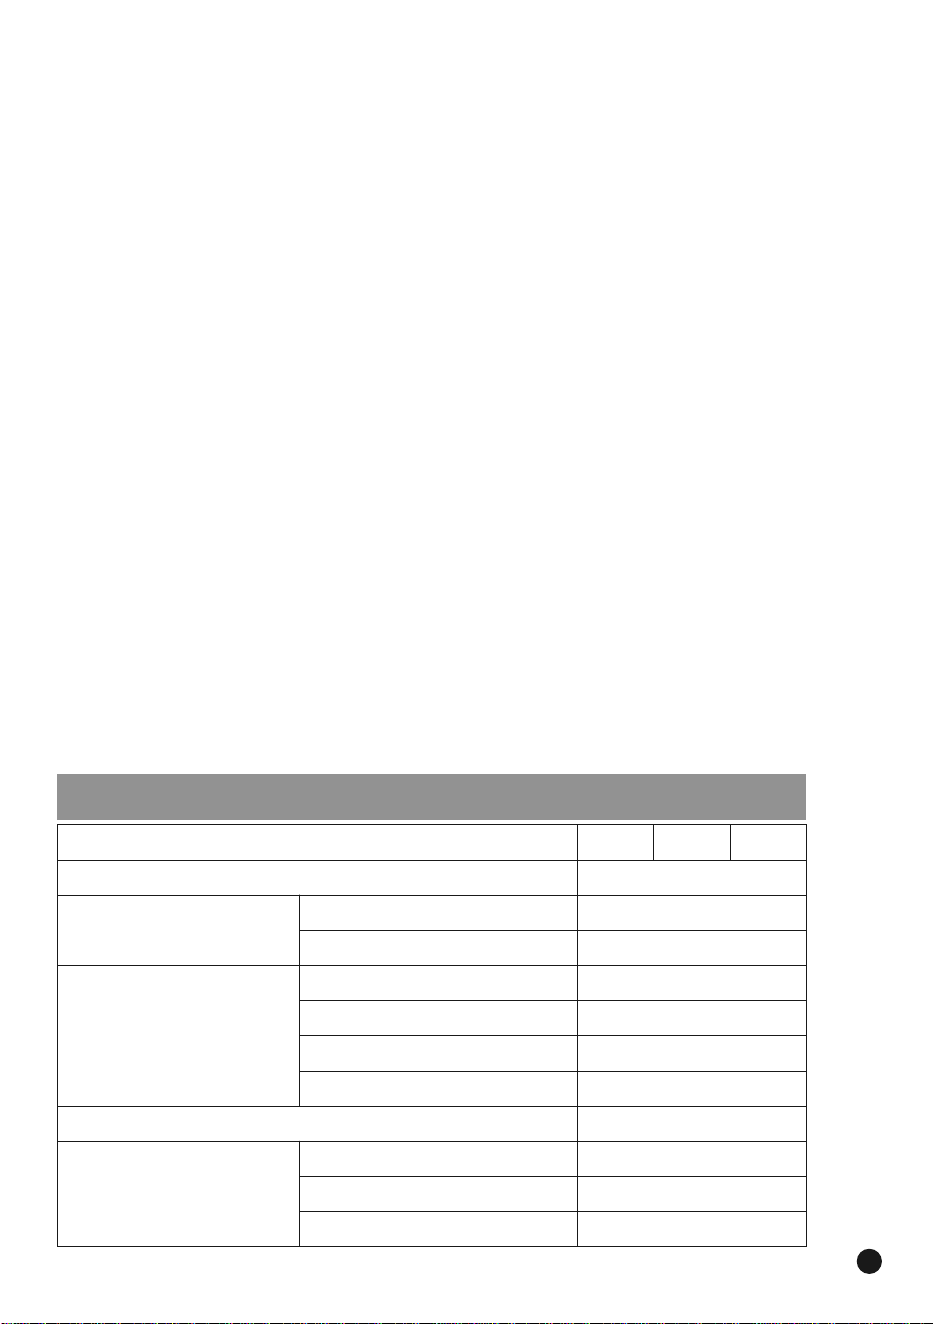
SPECIFICATIONS /
제품규격
/ SPÉCIFICATIONS
Model Name / NOM DU MODÈLE (모델명)
CR-0631F
CR-0632F CR-0633F
Power Supply / CORDON D'ALIMENTATION(전원) AC 120V(AC Only), 60Hz
Power Consumption /
CONSOMMATION D'ÉNERGIE
(소비전력)
Cook(취사) 580W
Warm(보온) 80W
Cooking Capacity/
CAPACITÉ DE CUISSON
(취사용량)
White(백미) 2~6 cups
GABA(현미발아)
2~4 cups
Multigrain/Brown(잡곡/현미) 2~4 cups
Porridge(죽) 1~1.5 cups
Power Cord Length/LONGUEUR DU CORDON D'ALIMENTATION(전원 코드 길이)
3.9 ft
Dimension/DIMENSION(치수)
Width/LARGEUR(폭) 9.25 in
Length/LONGUEUR(길이) 12.5 in
Height/HAUTEUR(높이) 8.38 in

CAUTION FOR SAFETY
6
use a single socket with the
rated current above 15A.
•Using several lines in one socket
can cause overheating resulting
in fire.
•Use the extension cord with the rated current above
15A.
do not use damaged power
cord, plug or loose socket.
•It can cause an electric shock,
short circuit or fire.
•If the plug were damaged, contact dealer
or a service center.
•
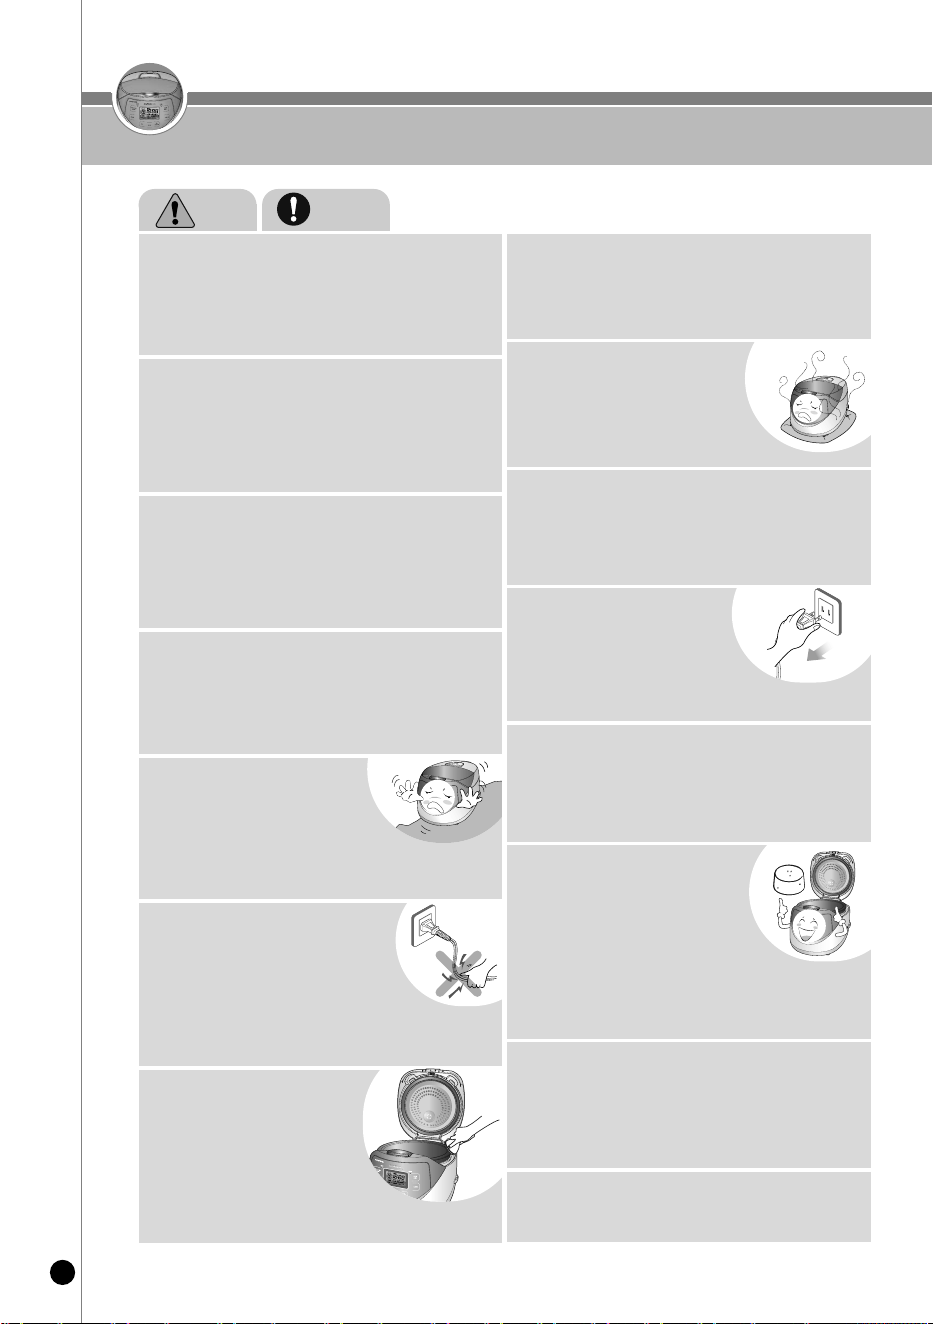
This sign is for reminding something may cause problems
under the certain situation.
•
Please read and follow the instruction to avoid any harmful
situation.
•
Indicates a prohibition
This means is that the action it describes may
result may result in death or severe injury.
This means that the action it describes may result
in injury or property damage.
•
Indicates an instruction
The following must be observed to use the product safely and correctly to prevent accident and dangerous situations.
‘Warning’ and ‘Caution’ are different as follows.
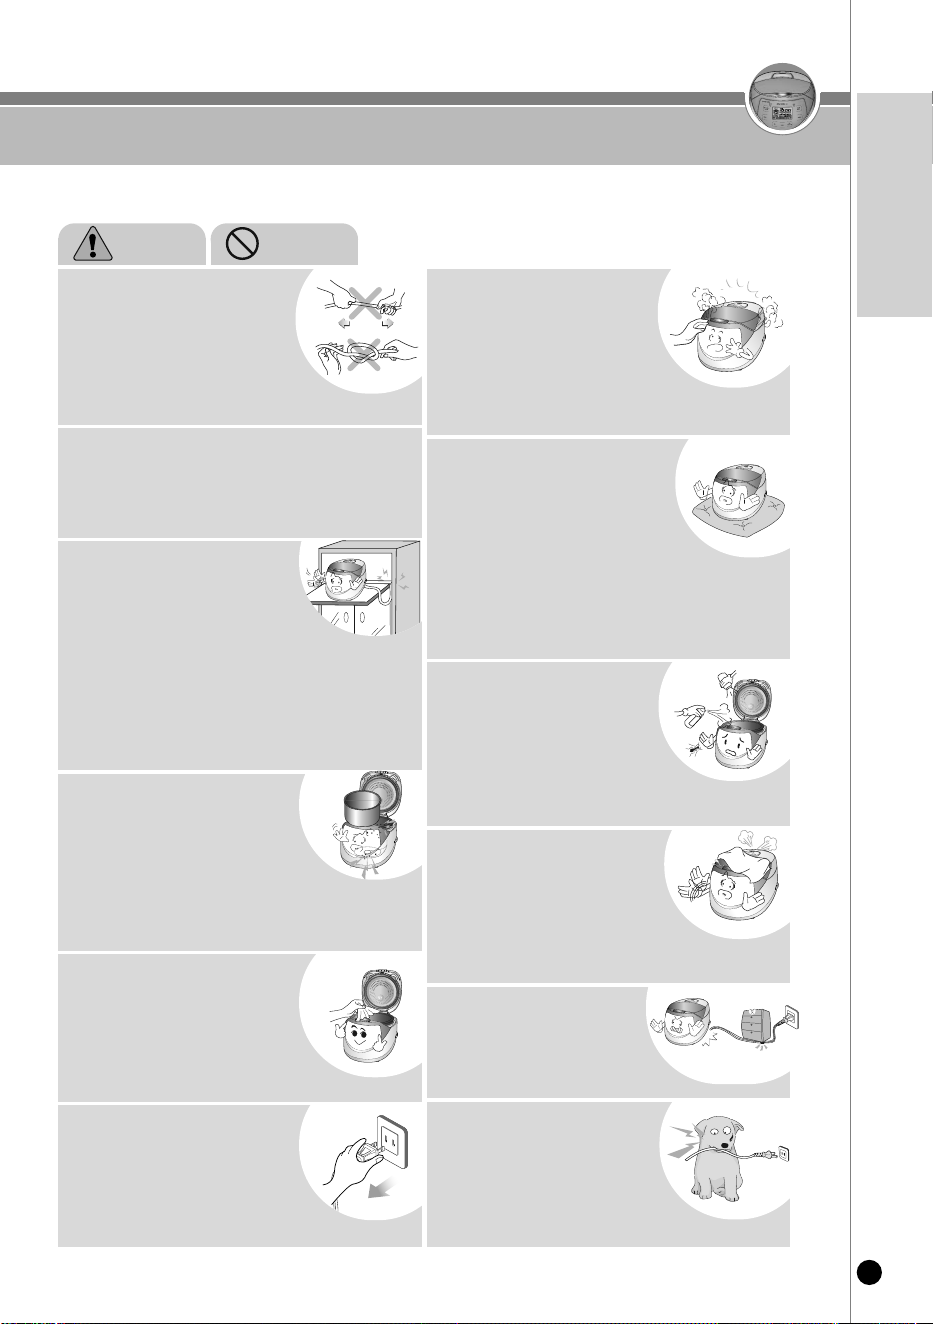
Warning
Caution
do not plug or pull the
power cord with wet hands.
•It can cause an electric shock.
do not cover the automatic
steam outlet or pressure
weight with your hand or
face.
•It can cause burns.
•Especially be careful to keep it out of reach
of children.
Keep the cooker out of
reach of children.
•It can cause burns, electric shock
or injury.
do not use the cooker near
hot things such as stove, gas
stove or direct ray of light.
•It can cause an electric shock, fire,
transformation ordiscoloration.
Please pay careful attention
against water and
chemicals.
•It can cause an electric shock or fire.
do not let the cooker
contact any water by
sprinkling water on the
cooker.
•It can cause an electric shock or fire.
•If it contacts water, please separate power cord and
contact dealer or service center.
Warning do not
When you pull out the power plug, don’t pull
the power cord. Please, surely pull out the
power plug.
•It can cause an electric shock.
7
www.cuckooworld.com
english
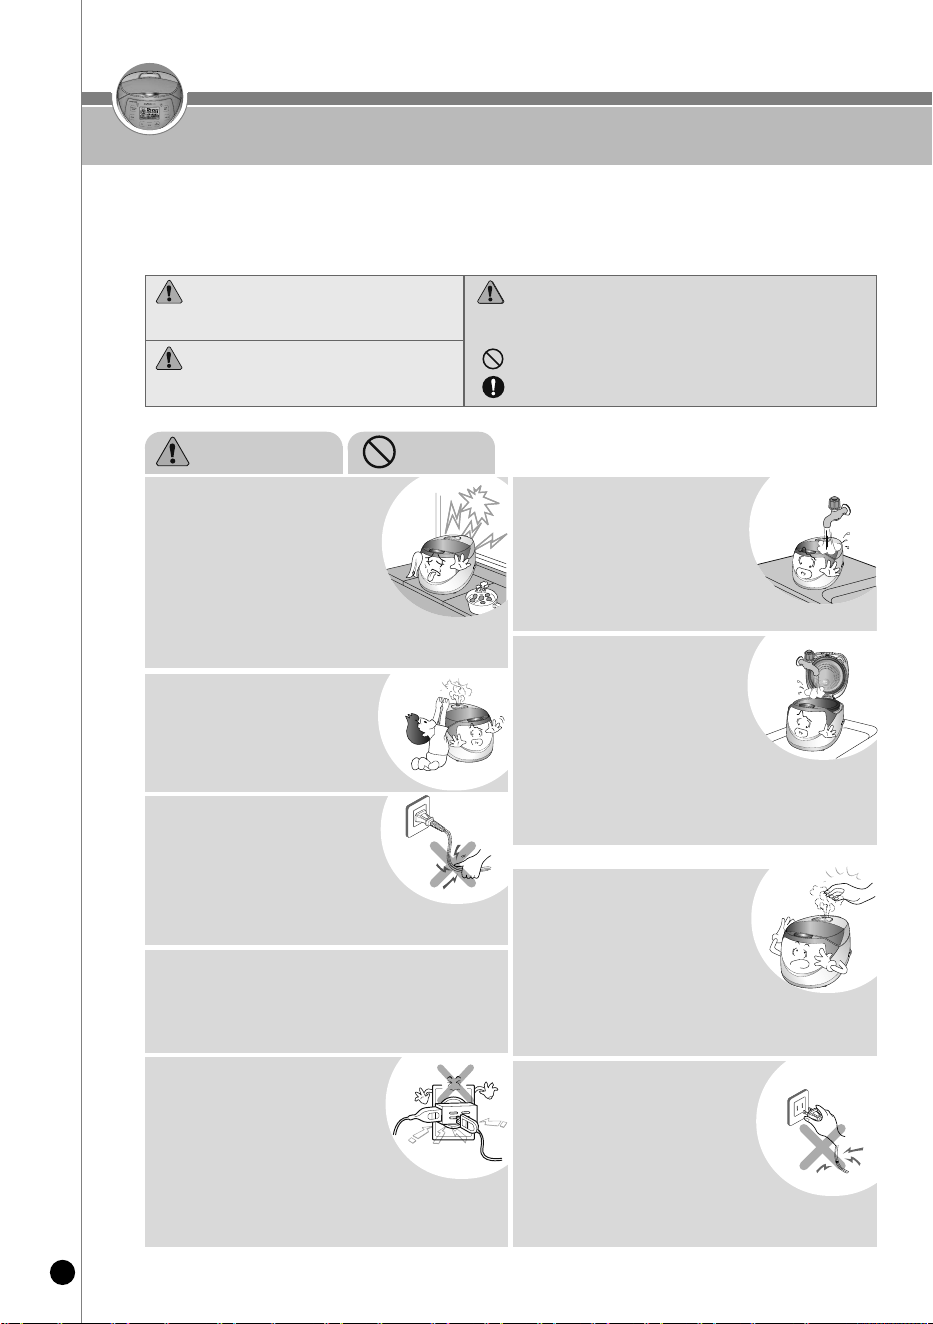
CAUTION FOR SAFETY
Please surely pull out the
plug when not in use.
•
It can cause an electric shocks or fire.
•
Use AC 120V only.
•Damages by impact can cause an
electric shock or fire.
Please clean the body and
other parts after cooking.
•It can cause the transformation
or smell.
do not press heavy
things on the power cord.
•It can cause an electric shock
or fire.
Clean any dust or alien
substance off the
temperature sensor, heating
plate and inner pot.
•It can cause a system problem or fire.
do not cover the automatic
steam outlet or pressure
weight with a duster,
a towel or apron, etc.
•It can cause a transformation or a breakdown.
•It can cause an explosion by pressure.
be careful both plug and
power cord not to be
shocked by animal attack or
sharp metal materials.
do not use on a rice chest
or a shelf.
•Do not press the power code
between furniture.
It can cause an electric shock resulting in fire.
•When use on furniture automatic steam releasing
can cause damage, fire and an electric shock.
remove an alien substance on plug with
the clean cloth.
•It can cause fire.
do not bend, tie or pull the
power cord by force.
•It can cause an electric shock
or short circuit resulting in fire.
don’t spray or put any
insecticide and chemicals.
•
It can cause an electric shock or fire.
•In case cockroach or any insects
get inside of the cooker please call a
dealer or a service center.
use product at the flat place.
do not use on the cushion.
Please avoid using it on an
unstable location easy to be
fallen down
•It can cause a transformation or a fire.
•It can cause burns or breakdowns.
•Be careful to install the power cord which does not
disturb to pass.
do not open the top cover
while in heating and
cooking.
•It can cause burns.
•If you need to open the lid while cooking,
keep pressing the cancel button for 2 seconds and
confirm internal steam released
Warning do not
MESURES DE SÉCURITÉ
8
utilisez une prise individuelle
avec un courant nominal
supérieur à 15A.
•L'utilisation de plusieurs lignes sur une
seule prise peut provoquer une surchauffe ou
un incendie.
•Veuillez vérifier fréquemment le cordon d'alimentation et la prise.
•Utilisez une rallonge avec un courant nominal supérieur à 15A.
n'utilisez pas un cordon
d'alimentation endommagé,
une fiche ou une prise mal fixée.
•euillez vérifier régulièrement si le cordon
d'alimentation est endommagé.
•Des dégâts importants peuvent entraîner un
choc électrique ou un incendie.
•Si la fiche est endommagée, contactez le
revendeur ou un centre technique.
•
Ce symbole vise à rappeler et à alerter que quelque chose
peut entraîner des problèmes dans la situation donnée.
•
Veuillez lire et respecter l'instruction afin d'éviter toute
situation dangereuse.
•
Indique une interdiction.
Cela signifie que l'action qui est décrite peut
entraîner la mort ou une blessure grave.
Cela signifie que l'action décrite peut entraîner
des blessures ou des dégâts matériels.
•
Indique une instruction..
Lisez attentivement le guide de sécurité du produit qui suit afin d'éviter les accidents et/ou les dangers graves.
« Avertissement » et « Attention » diffèrent comme suit :
Avertissement
Attention
lorsque vous retirez la fiche
d'alimentation, ne tirez pas sur le
cordon d'alimentation. veuillez retirer
en toute sécurité la fiche d'alimentation.
•Si vous faites prendre un impact au cordon
d'alimentation, cela peut entraîner un choc électrique ou un
incendie.
ne recouvrez pas la sortie de
vapeur automatique ou le poids
de pression de pression avec un
chiffon, une serviette ou un tablier
etc.
•Cela peut entraîner une déformation ou une panne.
•Cela peut entraîner une explosion due à la pression.
gardez le cuiseur hors de
portée des enfants.
•Cela peut provoquer des brûlures, un
choc électrique ou des blessures.
n'utilisez pas le cuiseur près de
ce qui est chaud comme une
cuisinière, une cuisinière à gaz
ou la lumière directe du soleil.
•Cela peut causer un choc électrique, un
incendie, une déformation, un
dysfonctionnement ou une décoloration.
Veuillez vérifier régulièrement le cordon
d'alimentation et la prise.
soyez particulièrement
attentifs à l'eau ou aux
produits chimiques.
•Cela peut causer un choc électrique
ou un incendie.
ne nettoyez pas le produit avec
de l'eau ni ne versez de l'eau
dans le produit.
•Cela peut entraîner un choc électrique ou
un incendie.
•Si le produit est en contact avec de l'eau, veuillez séparer le
cordon d'alimentation et contactez le revendeur et le centre
technique.
Avertissement ne pas
When you pull out the power plug, don’t pull
the power cord. Please, surely pull out the
power plug.
•It can cause an electric shock.
9
www.cuckooworld.com
frenCh
MESURES DE SÉCURITÉ
veuillez vous assurer de
débrancher la prise lorsque
l'appareil n'est pas utilisé.
•
Cela peut provoquer des chocs
électriques ou un incendie.
•
Utilisez du courant 120V uniquement.
•Les dégâts dûs à des impacts peuvent provoquer un
choc électrique ou un incendie. Veuillez vérifier fréquemment le cordon
d'alimentation et la prise.
veuillez nettoyer le corps ainsi
que les autres parties après la
cuisson.
•Cela peut entraîner une altération ou des
odeurs.
ne placez pas de choses
lourdes sur le cordon
d'alimentation.
•Cela peut entraîner un choc électrique
ou un incendie.
•Veuillez vérifier fréquemment le cordon d'alimentation et la fiche.
nettoyez la poussière ou toute
substance étrangère sur le
capteur de température et la
cuve de cuisson.
•Cela peut provoquer un
dysfonctionnement du système ou un incendie.
ne recouvrez pas la sortie de vapeur
automatique ou le poids de pression
de pression avec un chiffon, une
serviette ou un tablier etc.
•Cela peut entraîner une déformation ou une panne.
•Cela peut entraîner une explosion due à la pression.
faites attention à ce que la fiche et le
cordon d'alimentation ne soient pas
entrechoqués par des attaques
d'animaux ou par des matériaux
métalliques tranchants.
n'utilisez pas l'appareil sur un
coffre à riz ou une étagère.
•Ne placez pas le cordon d'alimentation entre
des meubles. Cela peut provoquer un choc électrique
entraînant un incendie.
•Veuillez vérifier fréquemment le cordon d'alimentation et
la prise.
• En cas d'utilisation sur du mobilier, faites attention à
l'évacuation de la vapeur car cela peut provoquer des
dégâts, un incendie et/ou un choc électrique.
retirer toute substances étrangères présente
sur la prise à l'aide d'un chiffon propre.
•Cela peut provoquer un incendie.
ne pliez pas, n'attachez pas et
ne tirez pas le cordon
d'alimentation de force.
•Cela peut provoquer un choc électrique
ou un courtcircuit entraînant un incendie.
Veuillez vérifier fréquemment le cordon
d'alimentation et la prise.
ne vaporisez pas et n'utilisez
pas d'insecticides ou de
produits chimiques.
•Cela peut entraîner un choc électrique ou un
incendie.
•Si des cafards ou d'autres insectes pénètrent dans le cuiseur, veuillez
contacter un revendeur ou un centre technique.
mettez l'appareil sur une table ou une
surface plate. ne déposez pas l'appareil
sur un coussin. ne pas poser l'appareil sur
une surface ou un support instable qui
peuvent engendrer la chute de l'appareil.
•Ceci pourrait en effet altérer l'appareil ou
provoquer un incendie.
•Cela peut causer des brûlures ou la panne du produit.
•Placerle câble loin de lieux de passage et à un endroit où il ne
risque pas d’être accidentellement
débranché.
n'ouvrez pas le couvercle
supérieur lors de la phase de
chauffage et de la cuisson.
•Cela peut entraîner des brûlures.
•Si vous avez besoin d'ouvrir le couvercle
ors de la cuisson, maintenez appuyé le bouton cancel
(annuler) pendant deux secondes et vérifiez que la vapeur interne
s'est complètement évacuée en retournant le poids de pression.
Avertissement ne pas
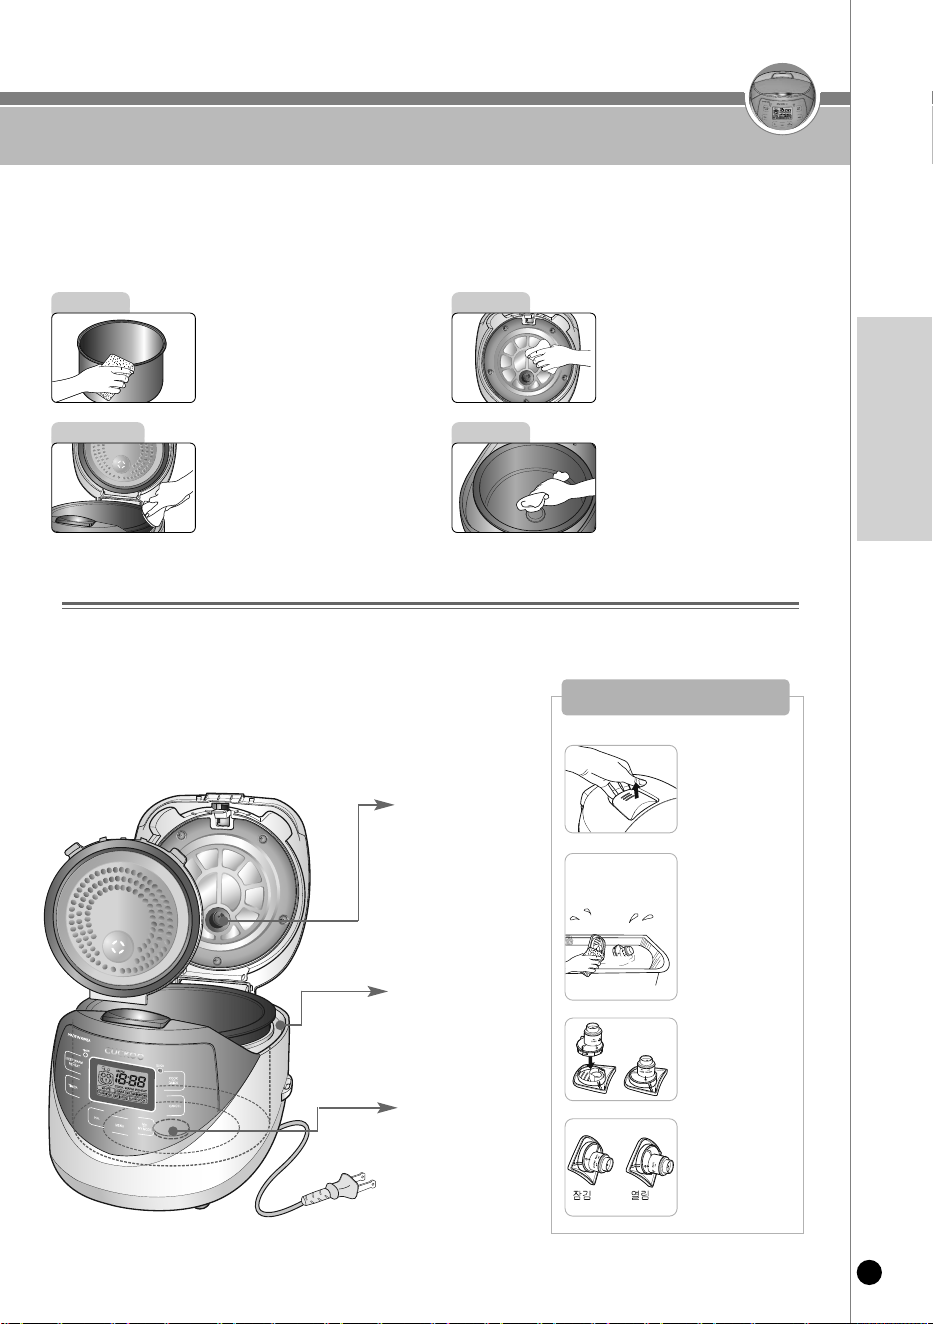
CLEANING AND MAINTENANCE
10
- Not cleaning your rice cooker frequently can cause bad odors. Please clean your rice cooker
frequently.
(Make sure the rice cooker is unplugged and wait until the unit cools down.)
- Wipe the main body and the lid with a dry dishcloth. Do not use benzene or thinners.
- Liquid left in the inner lid or in the inner pot may form a starch film but it is harmless.
Wipe any materials and moisture from the
outer and the bottom of the inner pot.
Using a rough sponge, brush or abrasive
may result in peeling of the coating.
Use dishwashing detergent and a soft
cloth or sponge.
If moisture remains on the inner lid, wipe
the lid with a dry dishcloth.
Since the edge of the lid is made of
metal, clean it with care.
Inner Lid
Inner Pot
Moisture generated while cooking is
designed to be collected in the dew
dish.
After cooking, clean it with a dry
dishcloth.
If any material sticks to the temperature
detector, remove the material without
damaging the metal plate.
Wipe materials or moisture from the
thermal plate.
Inside the main body
Pot Water Groove
After cooking,
wipe the water
with a wet cloth
to avoid odor
build up.
▶ Never use hazardous chemicals.
(ex : benzene, varnish and so on)
Before cleaning,
remove the
steam cap.
If there are any
substances on the
temperature sensor
carefully wipe it
without dampening
the metal plate.
1. Remove the
steam cap by
simply pulling it
off from the lid
after every use.
2. Separate the
steam cap into
2 parts and
soak them in
lukewarm
water. Wash
with a sponge
or a soft cloth.
3. Assemble the
2 parts by
snapping them
together.
4. Attach the
steam cap
firmly to the lid
and rotate in
both directions
to ensure that
it is locked
properly.
lock unlock
how to clean
The steam cap
11
www.cuckooworld.com
english
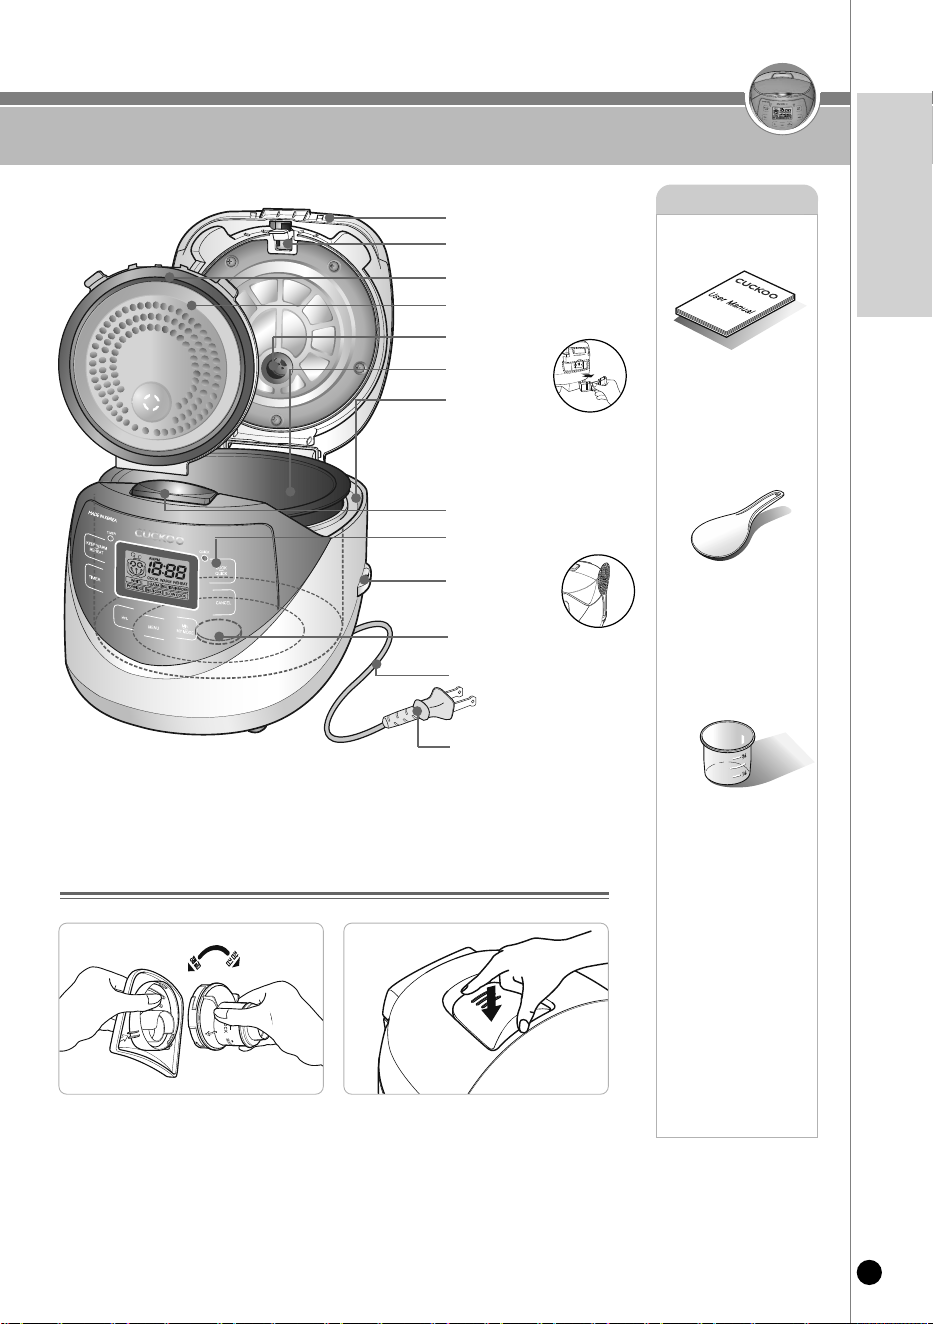
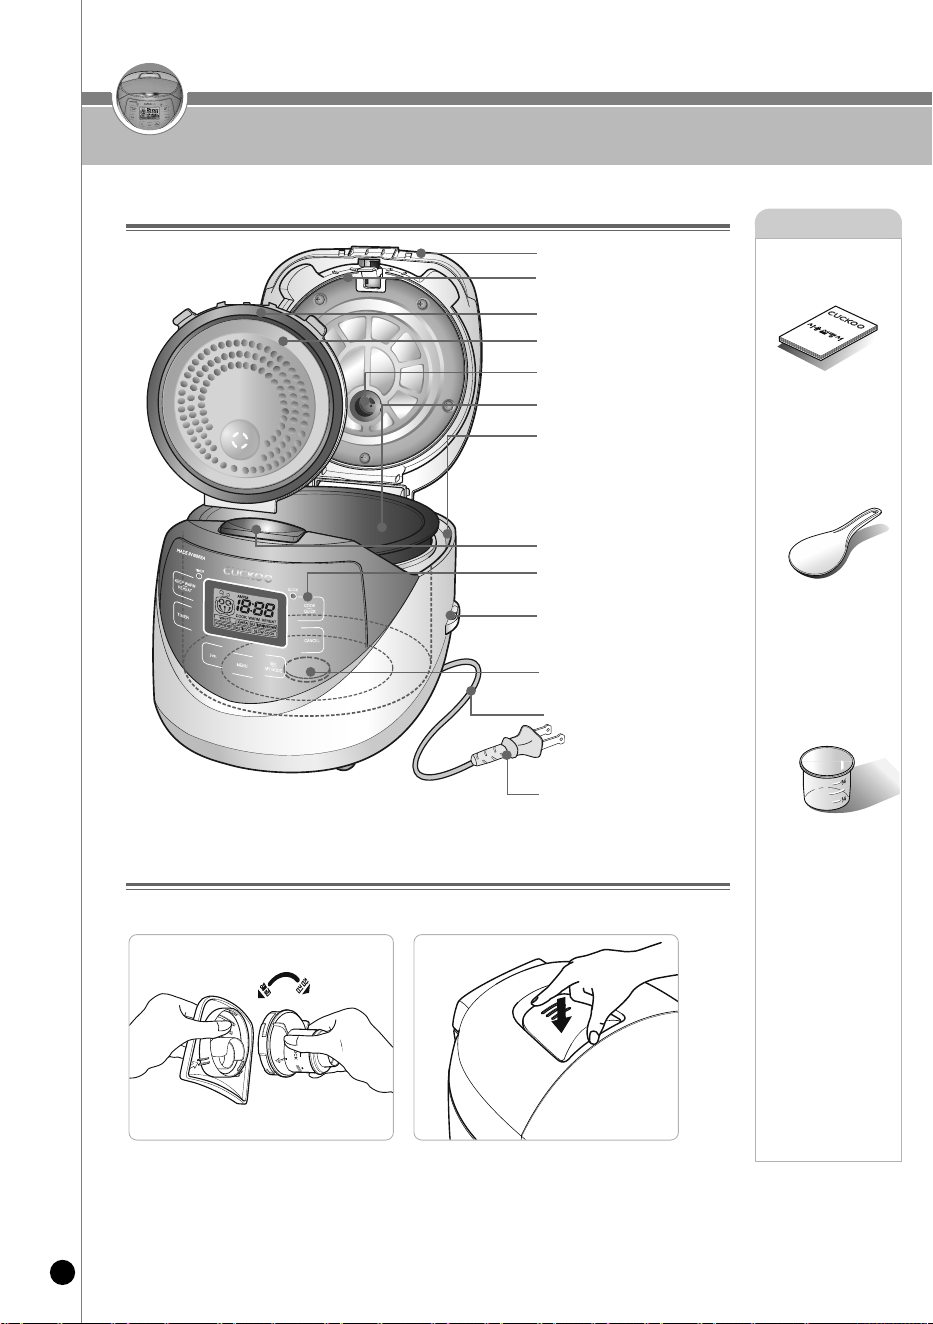
NAME OF EACh PART
User Manual
Rice scoop
Rice measuring cup
lid
removable lid lever
gasket
removable cover
dew dish
lid opener
steam cap
inner pot
Control panel
temperature sensor
Power cord
Power plug
rice scoop
holder
UN
L
OCK
L
O
C
K
▶ To reassemble your steam cap, hold the
steam cap as shown in the image above
and follow the arrows to lock it.
▶ After assembling the steam cap, place it
back on top of the lid as seen in the image
above.
Accessories
how to assemble the steam cap
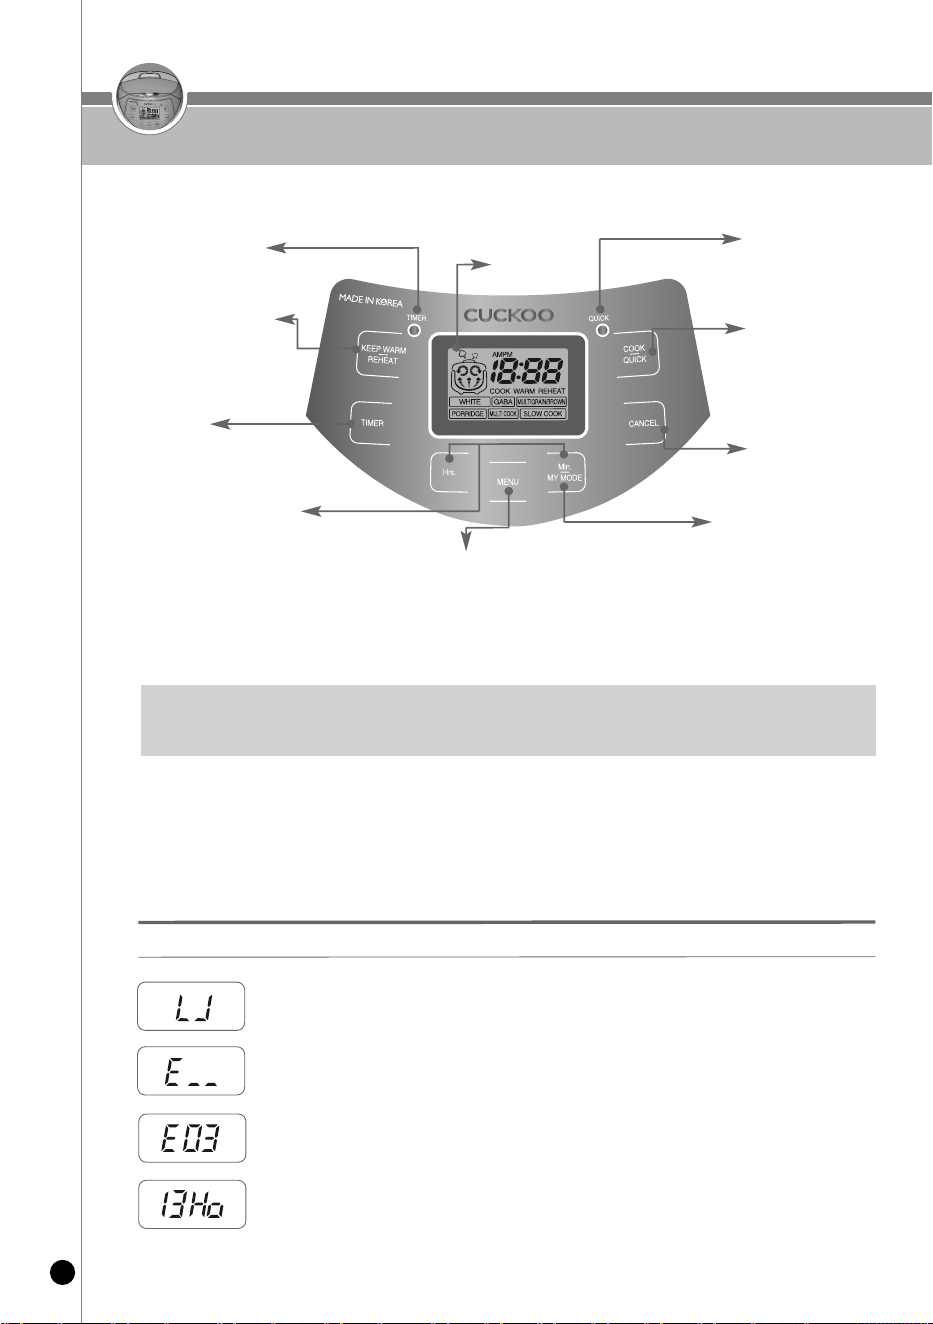
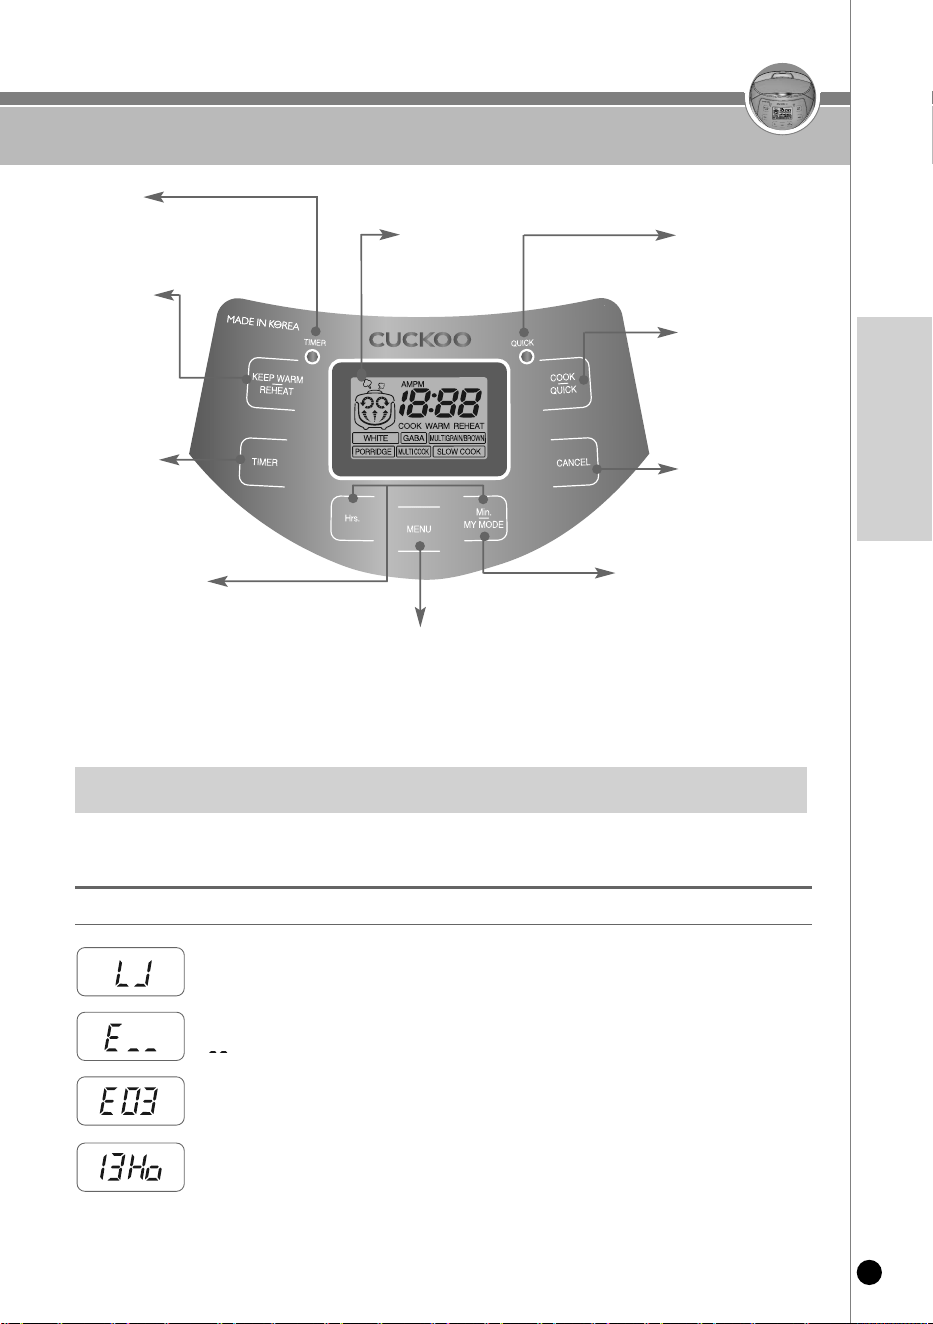
CONTROL PANEL DETAILS
12
There may be a slight difference in appearance between The device and the picture (Default Panel image is for CR-0632F).
Press the buttons until you hear a buzzer sound. The design of this template may differ from the actual product.
Error alert will appear if your rice cooker encounters a problem.
Temperature sensor problem.
(Contact our service center or dealer)
When the inner pot is not placed correctly into the unit.
This occurs when the timer has been set for longer than 13 hours. Please keep
the preset time within 13 hours.
When the cooking cycle takes longer than expected.
(Contact our service center or dealer)
Quick light
The quick light turns
on when quick rice is
in use.
Cancel
Use this to stop the
cooking cycle.
Keep Warm /
reheat
Use this to warm or
reheat your food.
Cook / Quick
Use this to start
cooking your food.
For CR-0631F
model, Cook/Turbo
button is applied.
error Alerts
timer
Use this to delay the
start of your
cooking.
timer light
The timer light turns on when the
timer is in use.
display
menu
Use this to select WHITE, GABA,
MULTIGRAIN/BROWN, PORRIDGE,
MULTI COOK, SLOW COOK, etc.
my mode
-Use this to set up your
custom made rice taste
function.
-Use this to customize
warming and cooking
functions.
hrs / min buttons
-Use these buttons to adjust your delay
timer settings.
-Use these buttons to customize your rice
taste, warming, and cooking function.
-Use these buttons to set the clock.
13
www.cuckooworld.com
english
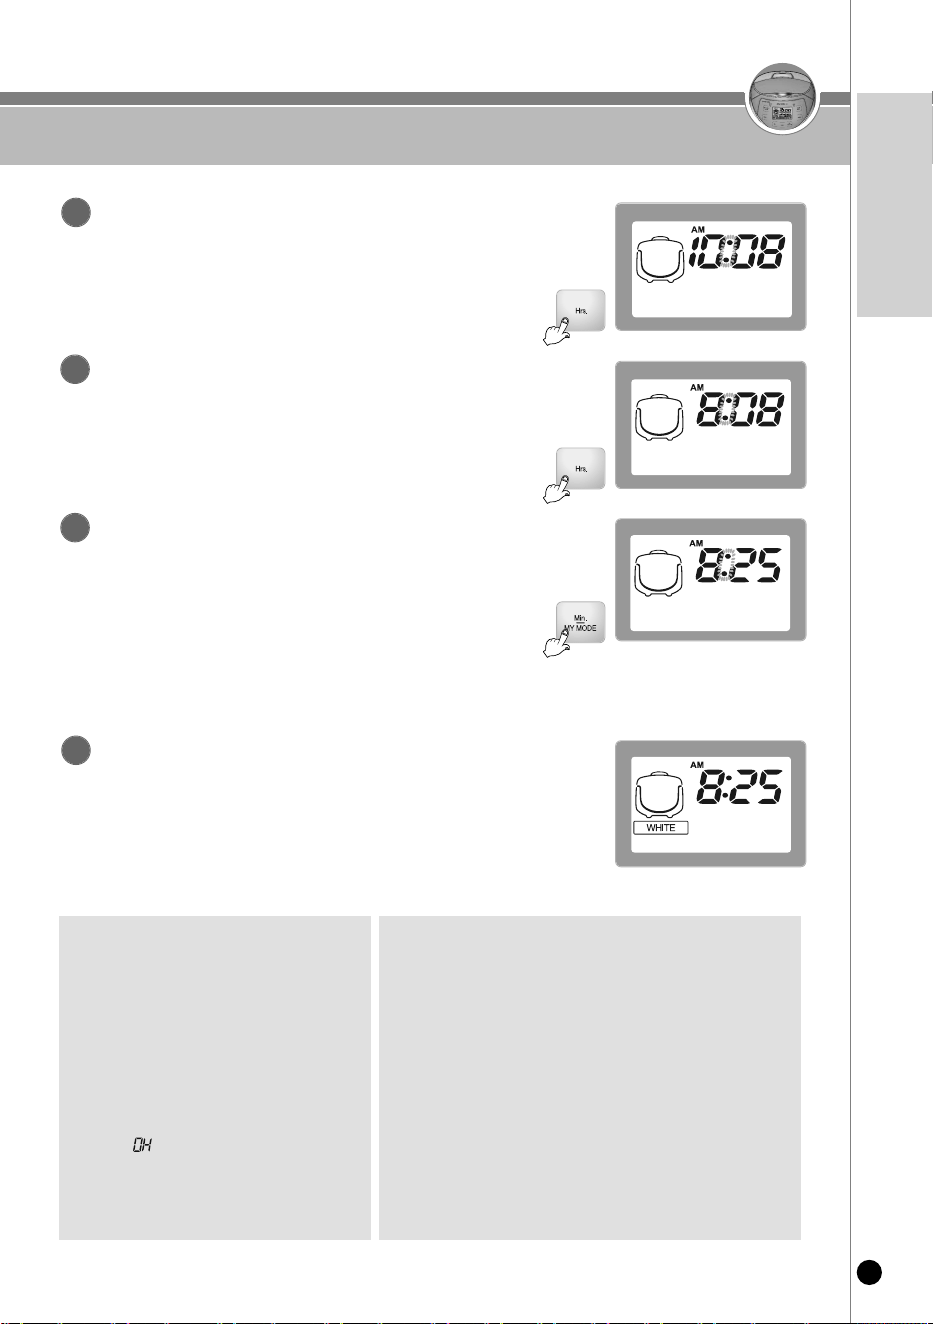
hOW TO SET ThE TIME
Connect the power plug.
1
Press the “hrs”, “min/my mode” button for more
than 1 second.
2
set the curr ent time using the “hrs”, “min/my mode”
button. Press the button longer than 1 second.
▶ Each time you press “Hrs” button, the time increases in 1
hour increments.
▶
Each time you press “Min/My Mode” button, the time
increases in 1 minute increments.
▶ In case of 12:00 at noon, it will be displayed 12:00 P.M.
▶Once time is set, the colon (:) will stop blinking and a buzzer
will go off.
3
the time will automatically be set after 7 seconds.
4
■About lithium battery
1. This product contains lithium battery for improving
blackout compensation and time. Lithium battery lasts
for about 3 years depending on the use of the unit.
2. When the current time is no longer being displayed on
the screen, the battery may be depleted.
■What is blackout compensation
1. This product recognizes the condition of the unit.
After blackout, it will operate immediately.
2. If blackout happens during cooking, the cooking time will
be delayed depending on blackout time.
3. If the rice became cold because of blackout, warming
will be cancelled.
■ how to set up the current
time during
‘
Keep Warm
’
1. If you want to change the current
time during ‘Keep Warm’, press
“Cancel” button and then set up the
current time.
2. When finish setting the current time,
press “Heat/Reheat” button. At the
time ‘ ’sign is displayed.
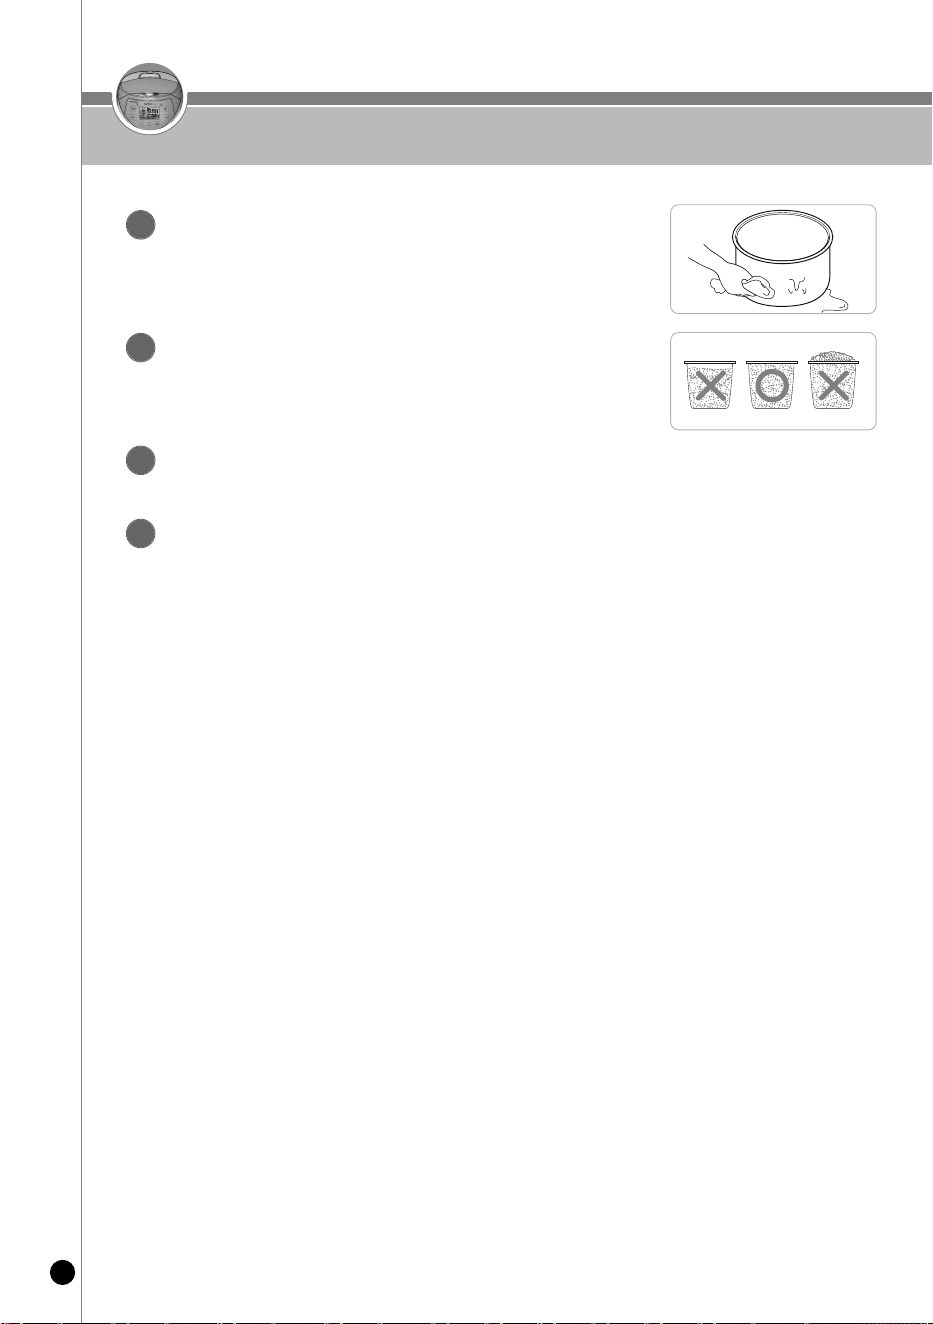
BEFORE USING YOUR MAChINE
14
Clean the inner pot and remove any moisture.
▶ Clean the inner pot with a dishcloth.
▶ Using a rough sponge to clean the inner pot may cause the non-stick
coating to peel. Please use a non-abrasive material to clean the inner pot.
1
measure the rice correctly with a measuring cup.
▶ Rice filled to the top of the cup is considered one serving.
(Example: 3 persons for 3 cups, 6 persons for 6 cups)
2
Clean the rice thoroughly in a separate container and rinse until the rice water
is clear.
3
Adjust the water amount in accor dance with the menu selected.
▶ Place the inner pot on a flat surface and adjust the water amount up to the water level line.
▶ The water level line is marked on the inside of the inner pot.
▶ Adjustment of water height
•White : Adjust water based on ‘White’ water level line.
Max.6 persons for White are available
•Multigrain/Brown, GABA: Adjust water base on “Multigrain/Brown, GABA” water level line.
Max.4 persons for Multigrain/Brown and GABA are available
•Porridge: Adjust water base on “Porridge” water level line.
Max. 1.5 persons for porridge are available
4
15
www.cuckooworld.com
english
FOR TASTY RICE
▶ Read the following instructions for tasty rice:
How to Cook Tasty Rice
Store rice correctly.
Always clean the
cooker.
•
Always measure rice correctly with the
measuring cup. (The rice amount measured
by a commercial rice container may vary
depending on products.)
•
Adjust water amount to the water level line
after placing the inner pot on a flat surface.
•
Purchase the appropriate amount of rice
and avoid direct sunlight or hot and humid
places to prevent rice moisture from being
dried.
•
For dried rice unpacked for a long time,
it is better to cook with more water
(about a half water level line).
•
Clean the cooker frequently.
In particular, wipe alien materials from the
lid frequently.
If rice is dried out, it may be hard in
texture and the rice may result in
being undercooked.
Make sure to clean the rice cooker
often to prevent bad odors from
forming.
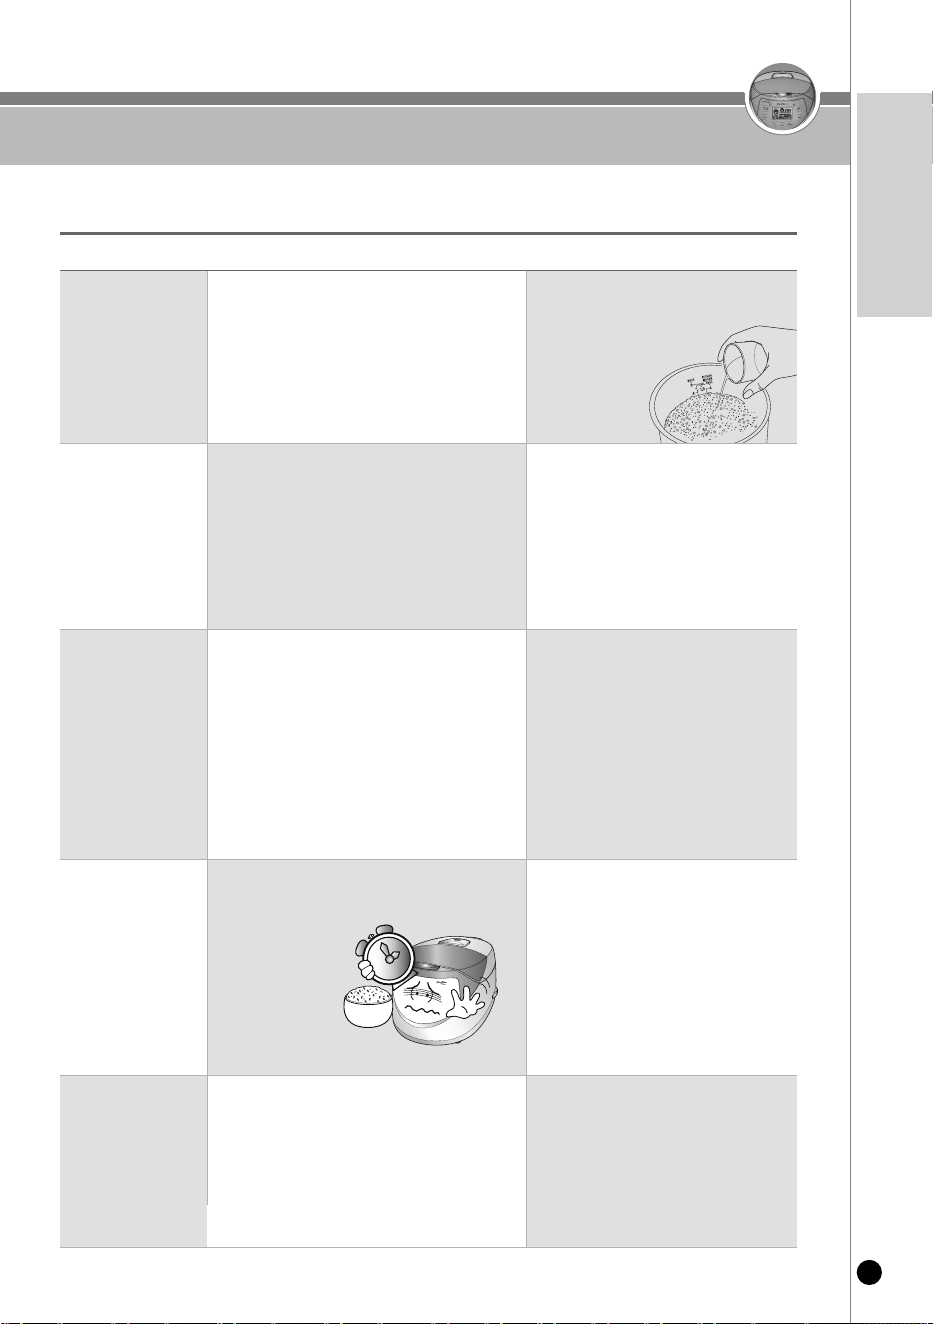
Measure rice with a
measuring cup.
Pour water up to
the water level line
of the inner pot.
Keeping rice warm for a long time
may cause it to be discolored or de-
velop an odor.
'Keep Warm' Tip
If the amount of water is incorrect for
the rice amount, the rice may be
undercooked or
overcooked.
It’s better to set
the preset time
short.
•
When using the timer, try not to use old,
dry rice. If that is all that is available, add
more water.
•
It is recommended to keep rice warm for
less than 12 hours.
•
If "Preset" is used for over 10 hours
the rice texture can be dried and
crispy.
•
If the preset time is longer,
the melanoizing effect could be
increased.
How to cook
16
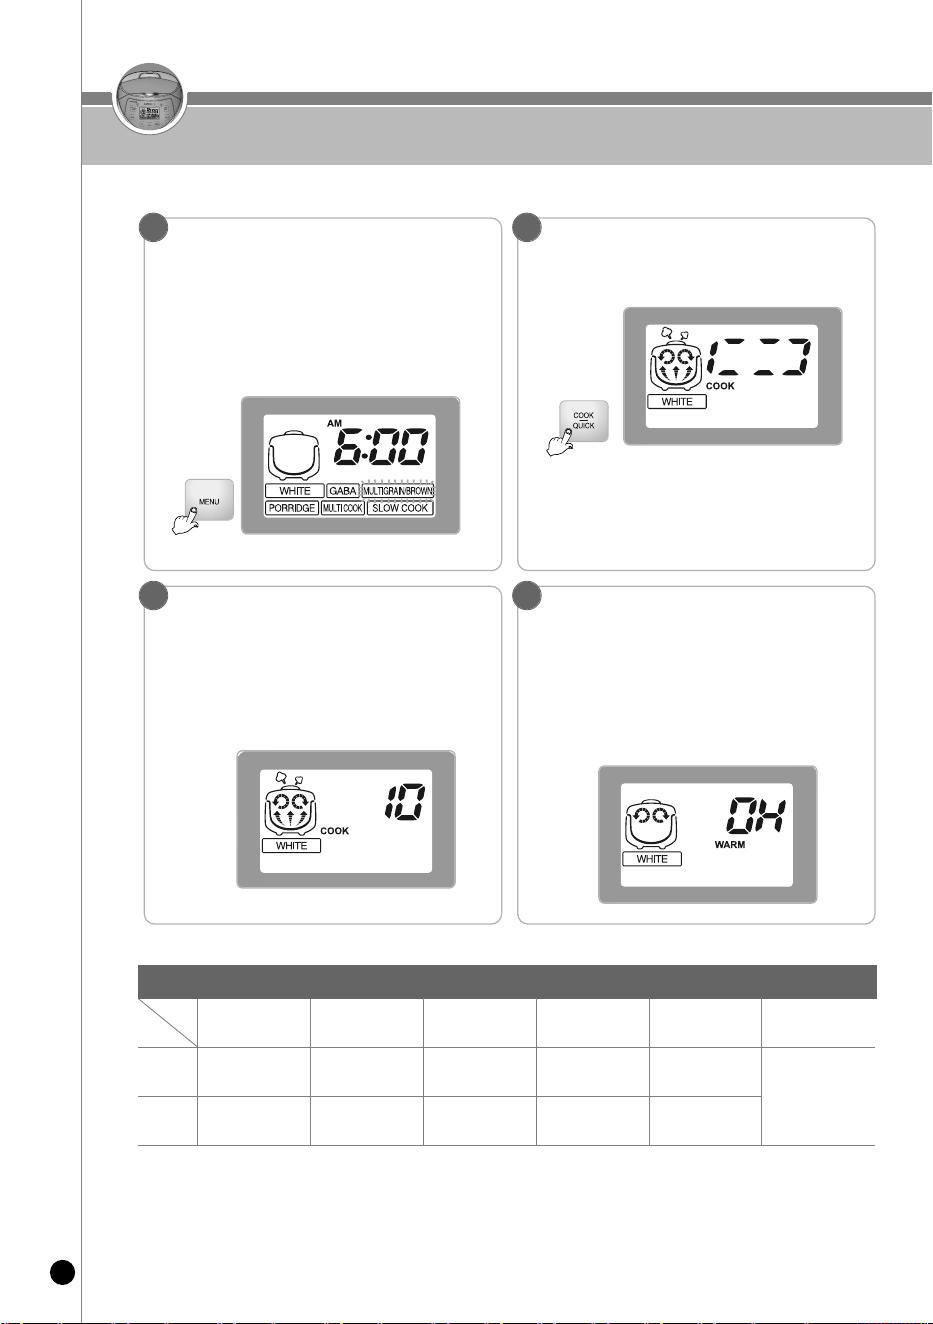
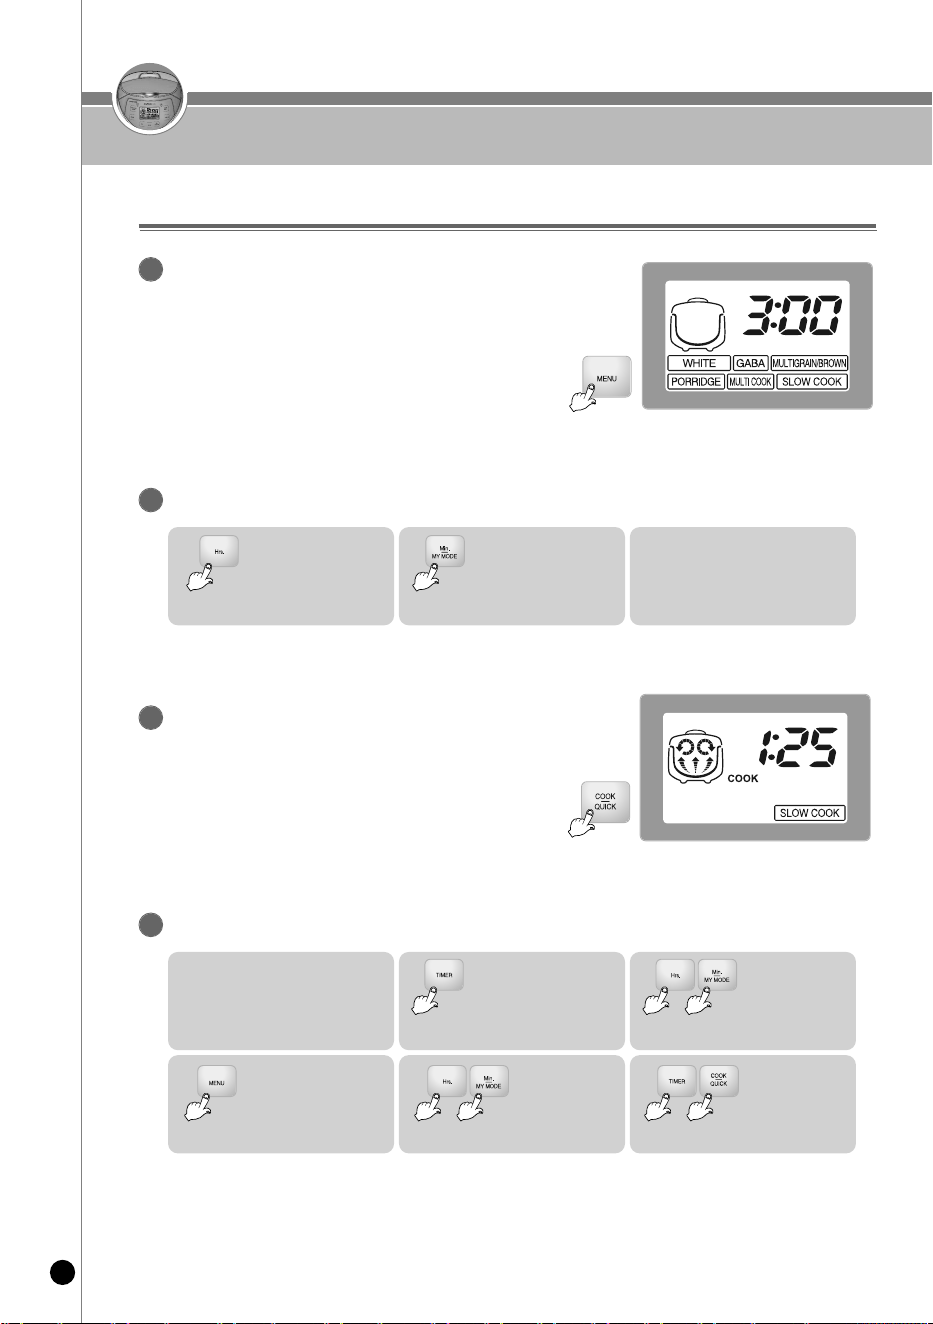
Press the MENU button continuously to
select your desired menu option
Press the COOK/QUICK button to start
cooking.
•
When pressing the “Menu” button, the menu is changed in
sequence From White, GABA, Multigrain/Brown, Porridge, Multi
Cook, Slow cook.
1 2
Completion
•
When the cooking is completed, a beeping sound will turn on and
the Keep Warm function will start.
•
When rice is cooked, quickly stir the rice.
•
Do not press the “CANCEL” when cooking finishes or the KEEP
WARM function will be canceled.
4
Steaming and remaining time
•When a number appears on the display, that is the remaining
time left in the cooking cycle. If you are cooking rice it means
your rice is in the steaming process.
3
Ca
tegory
Menu
Cooking
Quantity
Cooking
Time
▶ If you cook rice after using the MULTI COOK menu option, an odor may develop.
(Clean the lid referring to Page 10.)
▶ The cooking time by menu may vary depending on the operating environment.
Cooking Time by Menu
White
2~6 persons
36~53 min.
Quick
2~4 persons
33~41 min.
GABA
2~4 persons
80~88 min.
Multigrain/
Brown
Slow cook
Porridge
2~4 persons
52~63 min.
1~1.5 persons
90 min.
Refer to
Page 25.
• For CR-0631F model, Cook/Turbo button is applied

17
www.cuckooworld.com
ENGLISH
How to cook
Please note that your rice can become light yellow at the bottom of the inner pot sometimes.
This is due to the maillard reaction and is completely safe to consume.
Some settings may cause this to occur more often than others.
Maillard Reaction
White
For White Rice
Multigrain/
Brown
Quick
function
For Brown Rice, Mixed Rice, Long
Grain Rice, Quinoa, and other grains.
Use this option if you want to cook your rice quickly. * To use, select the WHITE menu
option and then press the COOK/QUICK button twice to switch to quick cooking.
Rice should take about 31-36 minutes.*
Porridge
Use this setting to turn your rice into porridge.
*Please follow instructions carefully*
Multi Cook
Cook your favorite meats, soups, stews, etc.
Menu Descriptions
GABA
For GABA Rice, which is a
germinated brown rice. *Refer to
page 21 get more information about
GABA Rice and germination*
Slow cook
Use this menu option like you would a
traditional slow cooker - enjoy meats, soups,
sauces, teas, etc.
hOW TO USE “MY MODE”
18
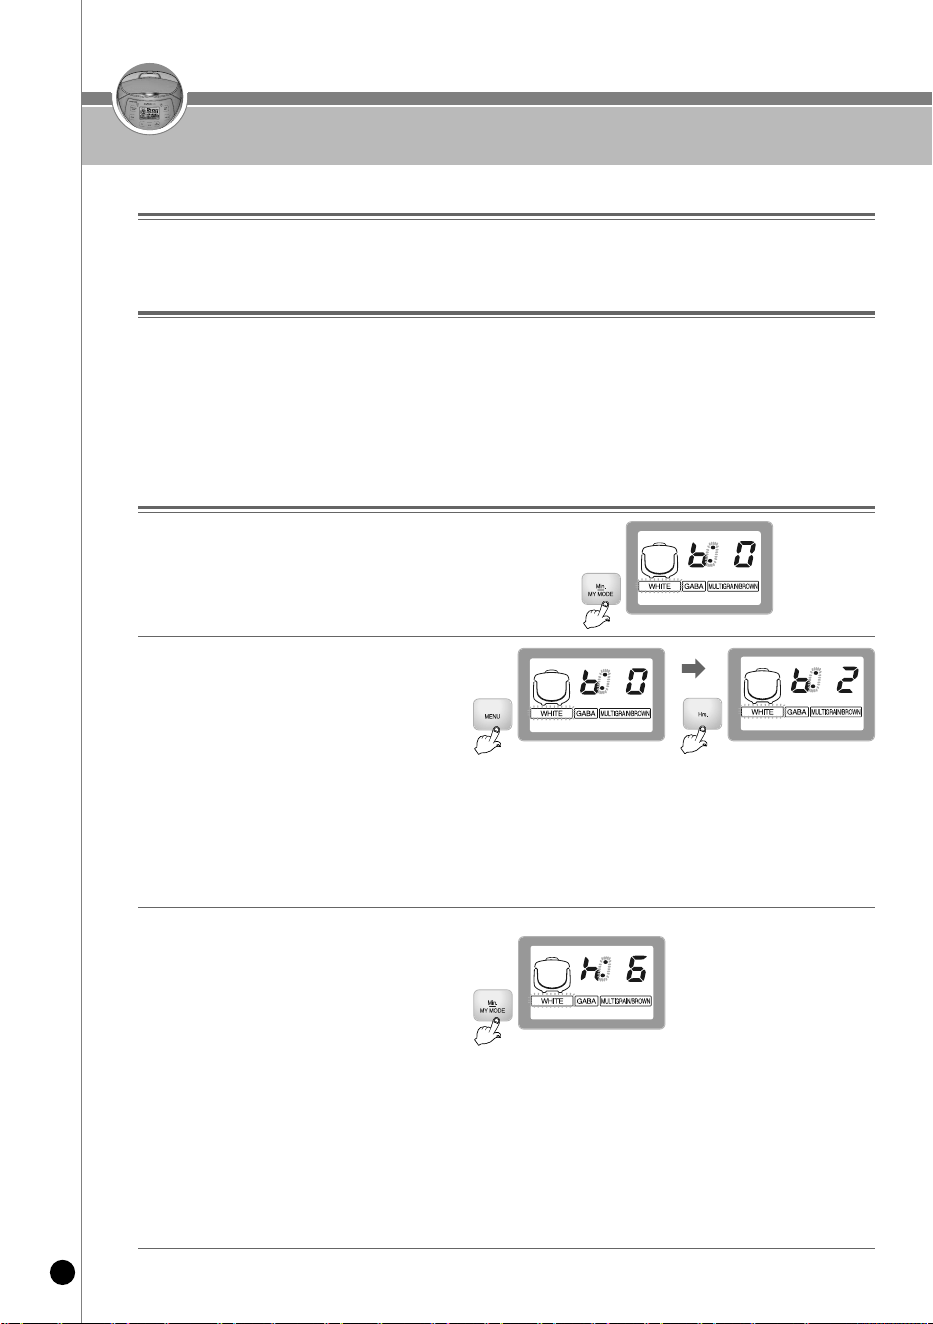
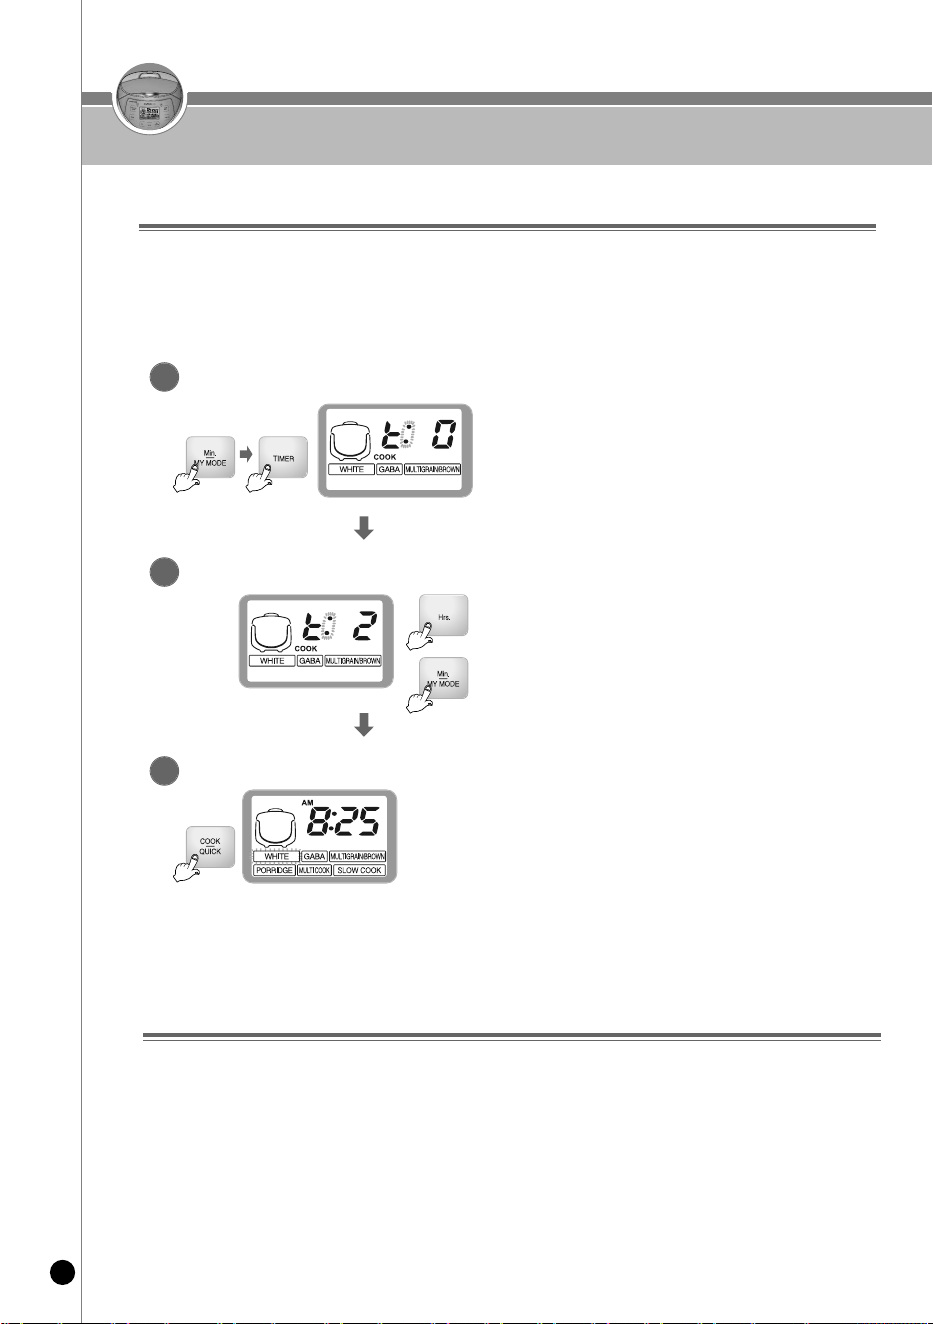
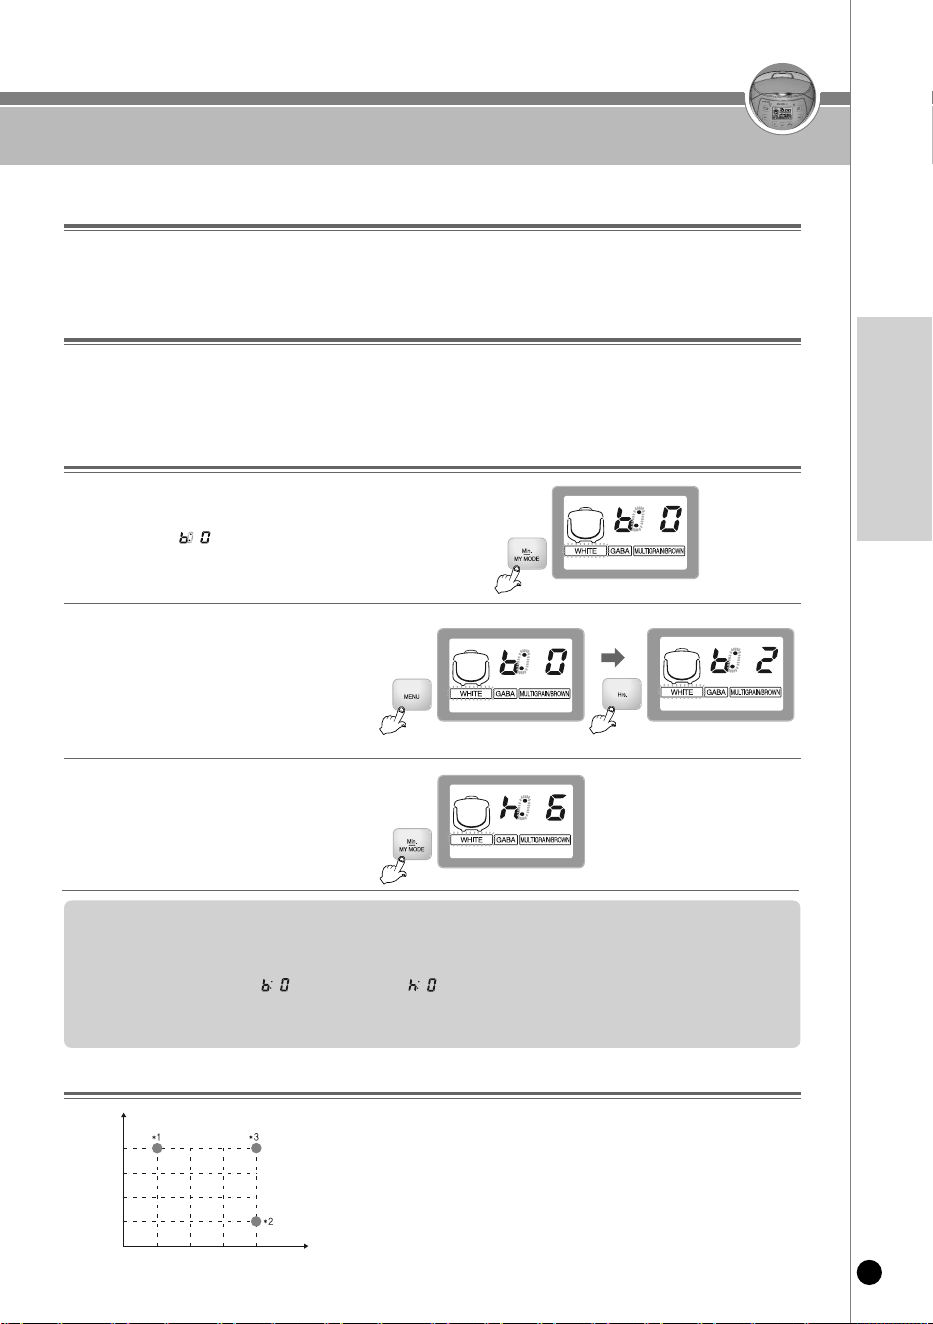
❶
When the rice cooker is in standby mode, press the
"Min./MY MODE" button to enter into MY MODE. Once the
rice cooker enters MY MODE, the screen should look like
the image on the right.
❷
Adjusting the soaking time in MY MODE.
▶ First, select the menu option you would like
to use. Choose between WHITE, GABA,
MULTIGRAIN/BROWN.
▶ To adjust the soaking time, press the Hrs.
button repeatedly until desired soaking time
appears. The default soaking times are 0, 2,
4, and 6. 6 being the longest soaking time.
* Please note that soaking times are levels not
minutes.
※
Soaking refers to the time rice is soaking without any
additional heat.
❸
Adjusting the heating time in MY MODE.
▶ To adjust the heating time, press the
Min./MY MODE button repeatedly until
desired heating time appears. Default
heating times are 0, 6, 8, and10. 10 being
the longest heating time.
* Please note that heating times are levels not
minutes.
▶ After selecting your desired heating and
soaking times, press the COOK/QUICK
button to save your settings and then press
the COOK/QUICK button again to start
cooking.
※ Heating refers to the length of the cooking process.
With My Mode, you can customize the texture and flavor of your rice to make the perfect rice for you and your
family.
What is “mY mode”?
SOAKING: Soaking controls the rice's texture. The longer the soak time, the softer and stickier your rice will
become. There are 4 levels of soaking for you to choose from.
HEATING: Heat determines the rice's flavor. The longer the heating time, the more developed your rice
flavor will become.
There are 4 levels of heating for you to choose from. *Please note that the Maillard reaction may occur
during this process*
※ Both HEATING and SOAKING can be selected individually or in tandem.
mY mode function
how to use “mY mode”
19
www.cuckooworld.com
english
hOW TO USE “MY MODE”
1. MY MODE may change the quality of the rice and may cause scorching.
* Default settings for both SOAK and HEAT are 0.
2. Using MY MODE may cause longer cooking times depending on settings selected.
3. By increasing the HEAT, scorching may occur at the bottom on the inner pot.
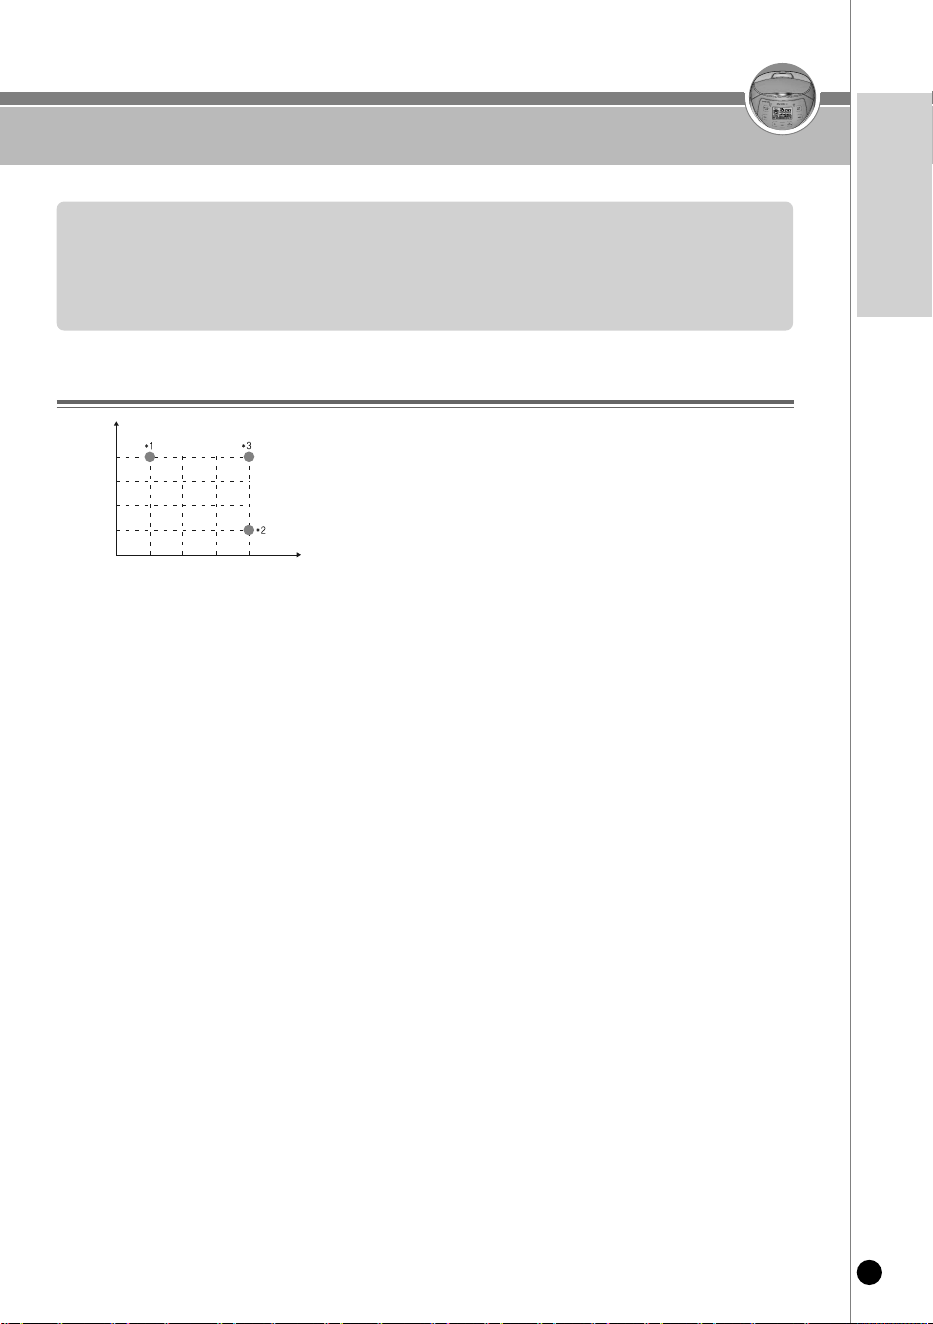
insight
*
1. The rice becomes firm and sticky.
*
2. The rice becomes soft and mild.
*
3. The rice becomes soft and sticky.
hEAT
4step
3step
2step
1step
SOAk
1step 2step 3step 4step
16 different flavor and texture combinations with mY mode.
CUSTOMIzED TEMPERATURE CONTROL
20
While the rice cooker is in standby mode, press the
Min./MY MODE button and then the TIMER button
to enter into temperature control.
Entering into temperature control
1
After selecting your desired temperature level,
press the Cook/Quick button to save you
temperature setting.
Saving your Temperature Level
3
Press the Hrs button to increase temperature level.
*Please note that maximum temperature level is 2.
Press the Min./MY MODE button to decrease the
temperature level.
*Please note that minimum temperature level is -2.
Adjusting the Temperature Level
2
reset function (Customization/function)
1. This function is used to reset all setting values such as customized rice taste, customized cooking,
customized warming and keep warm during sleep.
2. Press the Cancel button for 5 seconds in standby mode.
3. The current time is initialized at 12:00. For the setting of the current time, refer to Page 13.
▶ You can adjust the cooking temperature level on your rice cooker according to your preference.
- High Temperature Levels : for cereals, old rice and soft-boiled rice.
- Low Temperature Levels : for newly harvested rice.
▶ To adjust the temperature level, please follow the steps below:
Customized temperature Control
21
www.cuckooworld.com
english
hOW TO USE “GABA”
원산지 : 경기 용인
품 목 : 추청
단 위 : 1.5kg
생산년도 : ××××년산
도정일자 : ××××년 ××월 ××일
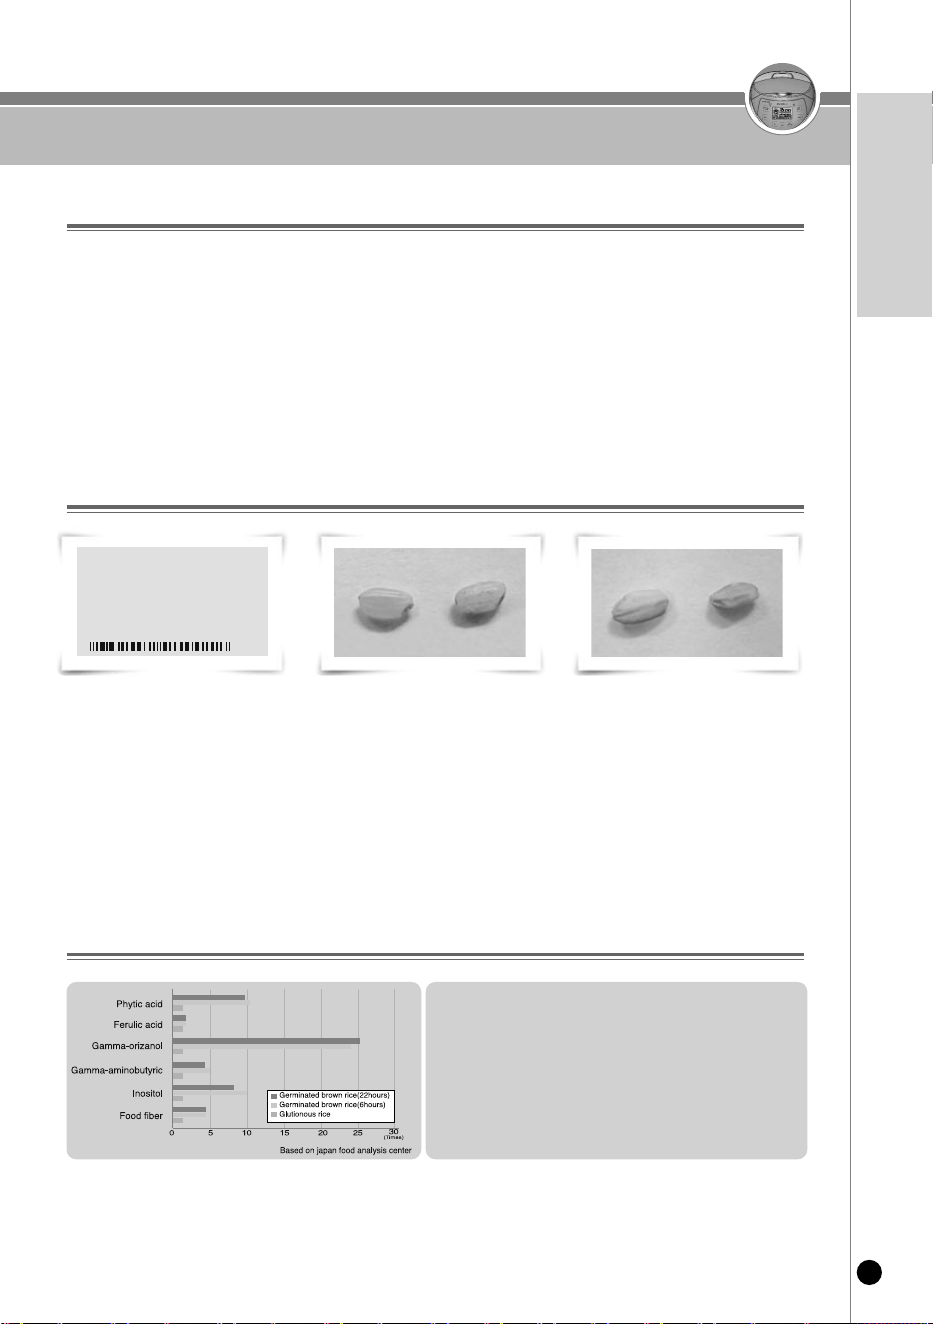
Check the dates of harvest and pounding.
▶ The dates should be within 1year of harvest, 3 months from pounding.
Check your rice.
•Check if the embryo is alive
•Rice surface should be light yellow and glazing. Whitely stirred up surface, or darkish colored Brown rice
is not suitable for a germination
(Regular brown rice)
(Poor brown rice-Missing embryo)
<Comparison of germinated brown rice
nutrition and White rice (6 hours) nutrition>
▶
Phytic acid 10.3 Times
▶
Ferulic acid 1.4 Times
▶
Gamma-orizanol
23.9 Time
▶
Gamma-aminobutyric
5 Times
▶
Inositol 10 Times
▶
Food fiber 4.3 Times
▶ GABA is a nickname given to the amino acid found in brown rice called gamma-aminobutyric acid. This amino
acid is said to have a range of health benefits – it said to promote the metabolism in your brain cells, liver and
kidneys, suppress neutral fats, and lower blood pressure.
Germinated Brown Rice differs from regular brown rice in that it still has the germ attached to the brown rice
and has more of this amino acid present.
Cuckoo's GABA rice menu option helps boost the amino acid (GABA) found in brown rice by cooking it at a
lower temperature for a longer period of time - making it more digestible and healthier to eat.
What is gAbA rice?
features of germinated brown rice
tips to buy Quality brown rice
(Poor brown rice- Empty ear and
nit fullycorned brown rice)
hOW TO USE “GABA”
22
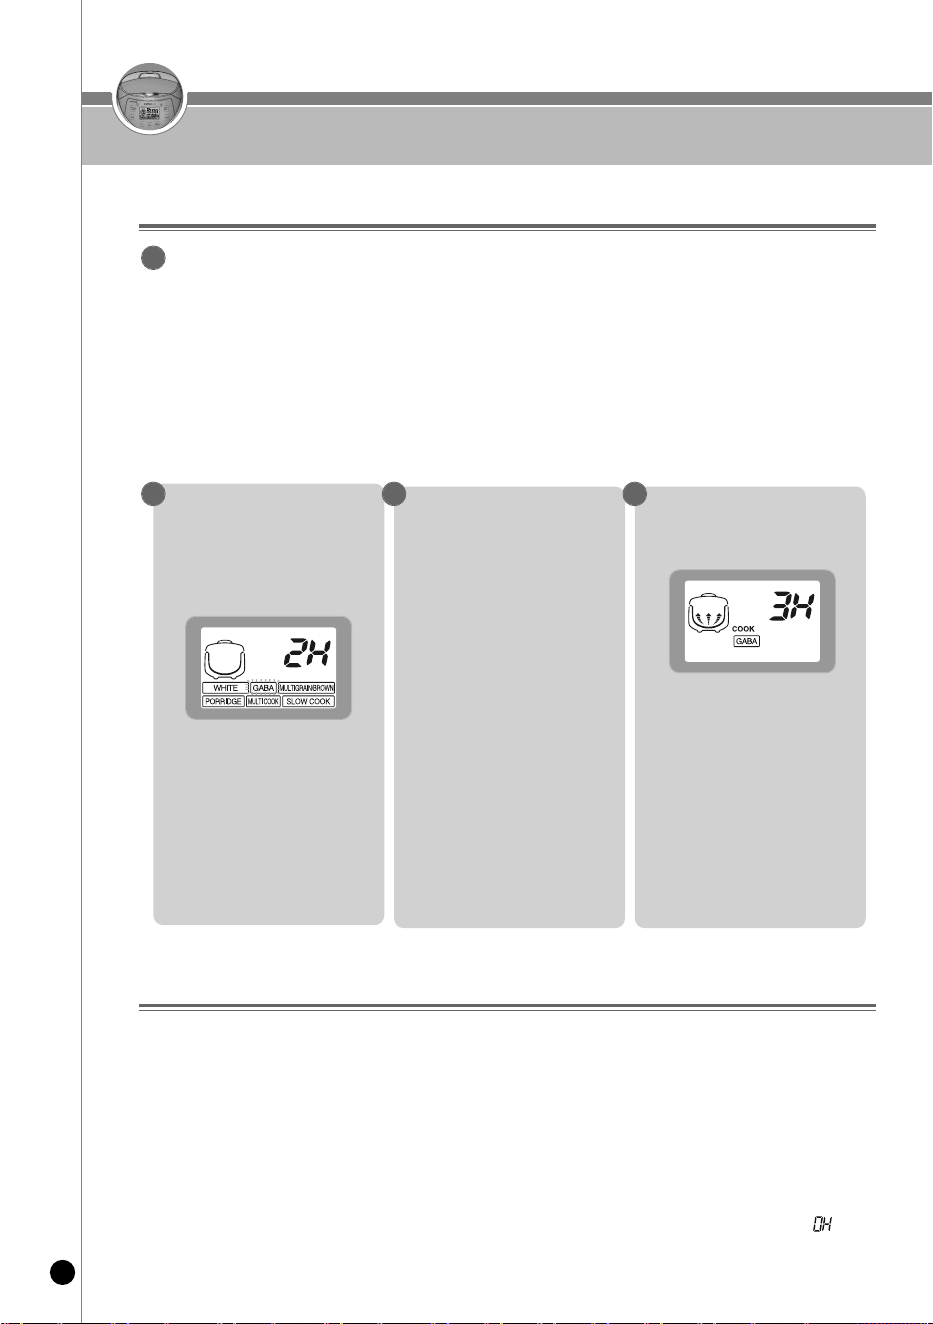
Default setting: 2 Hours
using “gAbA” menu
Precautions for “gAbA” Cooking (no cooking presset time allowed)
▶If smaller germination is preferred, omit pre-germination process. Select “GABA” menu, set-up appropriate
germination time, and start cooking (nutrient ingredients do not vary significantly by the size of germ).
▶GABA function cooks for up to 6 people.
▶Tap water can be used for germination. However, spring water is recommended. Germination may not be
properly performed in hot or boiled water even after cooling.
▶Germination rate, germ growth may differ by the Brown rice type, condition or period of storing, etc.
- Germinated brown rice is sprouted brown rice. Germination rate and growth may differ by the
brown rice brand.
The brown rice should be within 1 year from harvest.
▶In GABA mode, preset on 4H, 5H, 6H may not be possible. If you want to preset the GABA, set up “ ”
In order to promote germination, we recommend soaking brown rice
for 16 hours in water.
Method of Pre-germination
▶ Put washed brown rice in an appropriate container, pour sufficient water to soak the rice.
▶ Pre-germination should not exceed 16 hours. Make sure to wash rice clean with flowing water
before using “GABA” menu. Be careful not to over wash the rice because it may destroy the
embryos which generates the germination.
▶ When pre-germination has been completed, wash the rice and put in the inner pot.
Pour appropriate amount of water, and use “GABA” menu.
1
Press “Menu” button to
select “GABA”.
▶ When the “GABA” is
selected,“2H” it is indicated on
the display.
2
Press “Hrs and
Min/My Mode
“buttons to set time.
▶Pressing “Hrs” button
increases germination time by
2 hour.
▶Pressing “Min/My Mode” button
decreases germination time by 2
hour.
▶“GABA”time can be set-up by
0, 2, 4, 6 hours.
☞If “GABA” time is set “0” hours,
pressing Pressure Cook/Quick
button will start cooking
immediately.
To cook without germination or
cooking germinated Brown rice,
set the time at “0”.
3
3 more hours for germination
Press Pressure
“Cook/Quick” button.
▶Pressing Pressure
“Cook/Quick” button will
begin the “GABA”
process immediately.
▶During “GABA” mode,
“Cook” indicator will be lit
together with the germination
time.
4
23
www.cuckooworld.com
english
hOW TO USE “MULTI COOk”
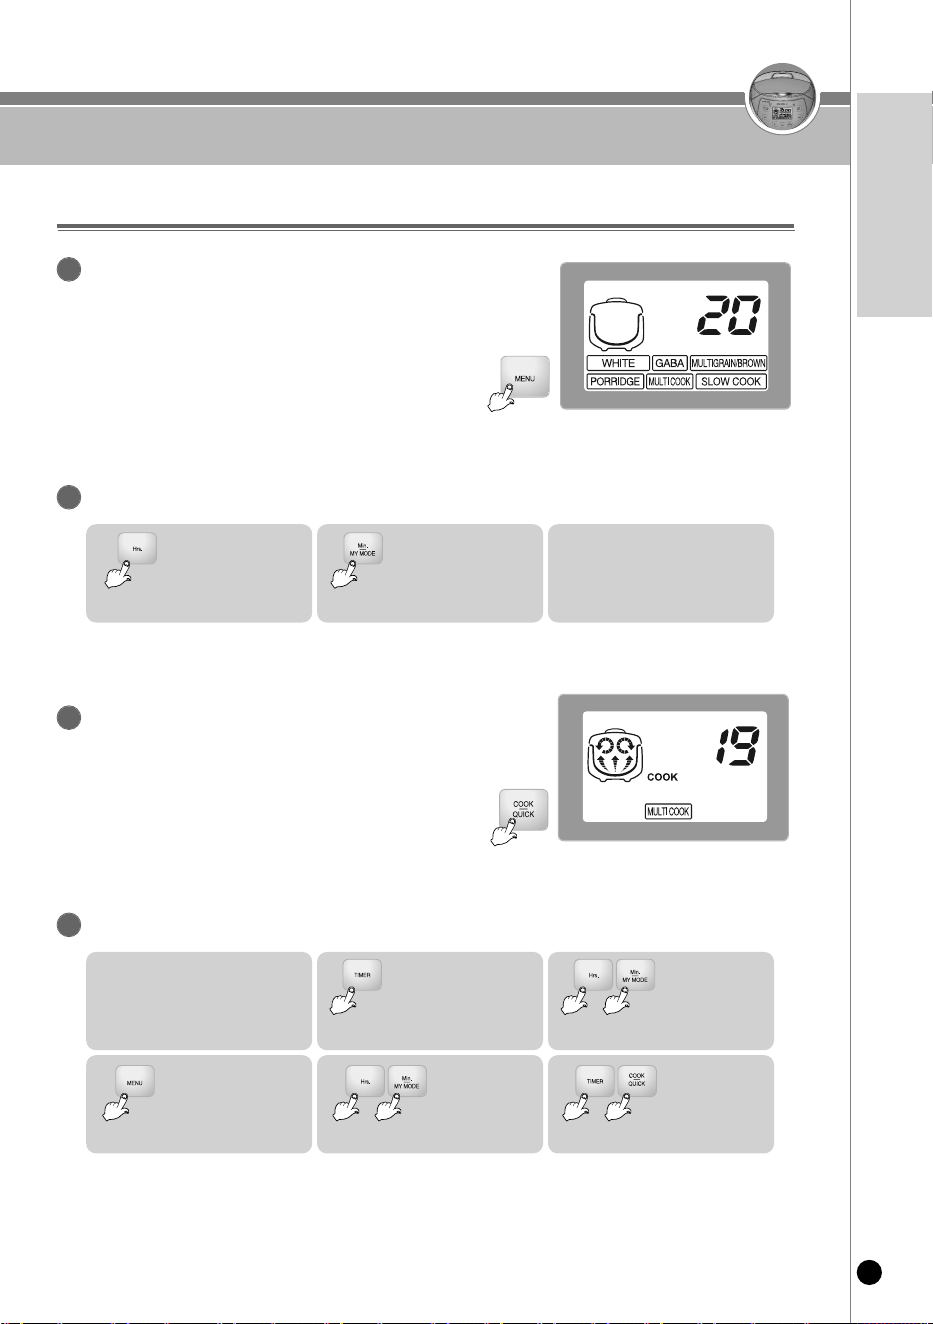
how to use the multi CooK menu and timer
Press the “Menu” button and select Multi Cook menu.
1
▶ If the MULTI COOK menu is selected, the display shows ‘20
min’.
Press the “Hrs” and “Min/My mode” buttons to set the desired time.
2
1.
If you press the “Hrs”
button, the MULTI
COOK time increases
by 5 minutes.
2.
If you press the “Min/My
mode” button, the MULTI
COOK time reduces
by 5 minutes.
3. The MULTI COOK time can
be configured up to 10 ~ 60
minutes.
Press the “Cook/Quick” button to start the
Multi Cook menu.
3
▶ If the MULTI COOK function starts, the cooking
status is marked and the remaining time is
shown on the display.
How to preset the MULTI COOK function
4
1. Check if the current time is
correct.
2.
Press the “Timer”
button.
3.
Set the Preset
time by pressing
the “Hr/Min”
buttons.
4.
Press the “Menu”
button to select the
Multi Cook menu.
5.
Press the
“Hr/Min” buttons
to set the MULTI
COOK time.
6.
Press the “Timer
button” or the
“Cook/Quick”
button.
• For CR-0631F model, Cook/Turbo button is applied
hOW TO USE “SLOW COOk”
24
how to use slow cook function and preset time
Press the “Menu” button and select Slow cook menu.
1
▶ If the Slow cook menu is selected, the display shows ‘3
hours’.
Press the “Hrs” and “Min/My mode” buttons to set the desired time.
2
1.
If you press the “Hrs”
button, the Slow cook
time increases by
1 hour.
2.
If you press the “Min/My
mode” button, the Slow
cook time reduces
by 10 minutes.
3. The Slow cook time can be
configured up to 1 ~ 10
hours.
Press the “Cook/Quick” button to start the Slow cook
menu.
3
▶ If the Slow cook function starts, the cooking status is
marked and the remaining time is shown on the display.
How to preset the Slow cook function
4
1. Check if the current time is
correct.
2.
Press the “Timer
“button.
3.
Set the Preset
time by pressing
the “Hr/Min”
buttons.
4.
Press the “Menu”
button to select the
Slow cook menu.
5.
Press the
“Hr/Min”
buttons to set
the Slow cook
time.
6.
Press the “Timer”
button or the
“Cook/Quick”
button.
• For CR-0631F model, Cook/Turbo button is applied

25
www.cuckooworld.com
english
hOW TO USE “SLOW COOk”
Rice of 1 person, 50g carrots
50g onions, 30g green onions
a teaspoon of salt,
a teaspoon of pepper
30g carrots, 30g onions, 30g
potatoes
30g Mushrooms, 20g sirloins
100g vichyssoise
1 tablespoon olive oil, a tea
spoon of salt
180g jujubes, ½grain of
gingers, a teaspoon of honey
1. Carrots, onions and green onions cut into thin
slices.
2. Put 1 portion of rice, julienne Carrots, onions, green
onions into the inner pot. Then pour 2
½
cups of
water into the inner pot.
3. Close the lid and select [SLOW COOK] by pressing
the “menu” button. Set the Slow cook time to 5
hours. And Press the “Cook/Quick” button.
4. When finishing the slow cook, put some salt and
pepper as taste.
1. Onions, potatoes and carrots cut into thin slices.
2. Chop mushrooms as regular size.
3.
Fry the chopped ingredients with 1 tablespoon olive
oil.
4. Close the lid and Pour 3 cups of water and put
powder of cream soup into the inner pot. Put the
roasted ingredients then close the lid.
5. After Slow cooking, grind it using a sieve or a
blender then put some sugar and salt as your taste.
1. Clean and peel the gingers. then cut into thin slices
2. Put jujube, gingers peeled Into the inner pot.
And pour the water up to water level 4 for White.
3. Look the inner lid and select [SLOW COOK] by
pressing the “menu” button. Set the Slow cook time
to 8 hours.
And Press the “Cook/Quick” button.
4. After Slow cooking Put some honey as your taste.
And stir the food.
Vegetable
porridge
Vegetable
soup
Jujube Tea
500g pumpkins peeled
100g White rice flour
a teaspoon of sugar,
a teaspoon of salt
1. Pumpkins peeled cut into thin slices.
2. Pour 3 cups of water and White rice flour Into the
inner pot.
3. Put the sliced pumpkins into the inner pot and
select [SLOW COOK] by pressing the “menu”
button.
Set the Slow cook time to 3 hours.
And Press the “Cook/Quick” button.
4. After Slow cooking, grind it using a sieve or a
blender then put some sugar and salt as your taste.
Preparations Procedurefood
Pumpkin
Porridge
Slow
cook
menu
how to use slow cook

hOW TO SET ThE TIMER
26
Check if the current time and the menu are correct.
▶
Refer to page 10 for the time setting method.
▶
If the current time is not set correctly, the preset time may also be
incorrect.(Make sure not to change A.M. and P.M.)
▶
If the menu is incorrect, press the “Menu” button and select the
desired menu.
1
Press the “Timer” button.
2
Set the preset time.
▶ Set the preset time with the “Hrs” and “Min/My mode” button.
※ If the preset time is already correct, you do not need to
set the time again.
example) When you want to eat rice at 7:30A.m. Press the “timer” but-
ton and then press the “min/my mode” button, set time at 7
hours. And press the “min/my mode” button, set time at 30
minutes. (the unit for the “hrs” button is 1 hour and the unit for
the “min/my mode” button is 1 minute.)
3
Press the “Timer” button.
▶
When preset is set completely, the time lamp will be on.
▶
The preset time will be stored.If you want to cook the rice to the
preset time previously entered, press the “Timer” button
4
how to use
▶ The default for set time is 6: 30 A.M.
▶ If you press “Timer” button, the previous inputted preset time is
displayed and the timer lamp will be on.
▶ By using “Hrs”, “Min/My mode” buttons, set the cooking end time.
※ Set the preset time within 7 seconds after pressing Timer button.
27
www.cuckooworld.com
english
hOW TO SET ThE TIMER
▶ Preset time will be changed automatically and displays “ ” when setup time exceeds 13hours.
Ex) If you want to finish cooking at 7AM, 14 hours after from now, the finishing cooking time will be
changed to 6AM, 13 hours after from now. At this time, “ ” sign is displayed.
※
If you want to finish cooking at 12:00 at noon, set time 12:00 PM.
※
Use preset mode to finish cooking from 1 hour later to 13 hours later.
※
If you want to check current time, press Hrs or Min button. Current time will be displayed for 2
seconds.
Precautions for preset cooking
If you want to change the preset time
▶ If you want to change the preset time, press cancel button and start over.
1
If setup time is shorter than the preset time
▶ If setup time is shorter than preset time, the cooking starts immediately.
2
If setup time exceeds 13 hours
3
using range of time cook for each menu
using
range of
preset
timer
WHITE
menu
Category
From 53min
(+My mode) to
13 hours
MULTIGRAIN/
BROWN
From 63min
(+My mode) to
13 hours
GABA
From 88min
(+My mode) to
13 hours
Porridge
From 90min to
13 hours
MULTI COOK
From setting
time + 1min to
13 hours
Slow cook
From setting
time + 1min to
13 hours
TO kEEP RICE WARM AND TASTY
28
※ Once the display status is set, the status is memorized until it is changed. Therefore, you may not set the
status at every warming.
※ After cooking, the temperature of the cooked rice may be higher than the configured warming temperature.
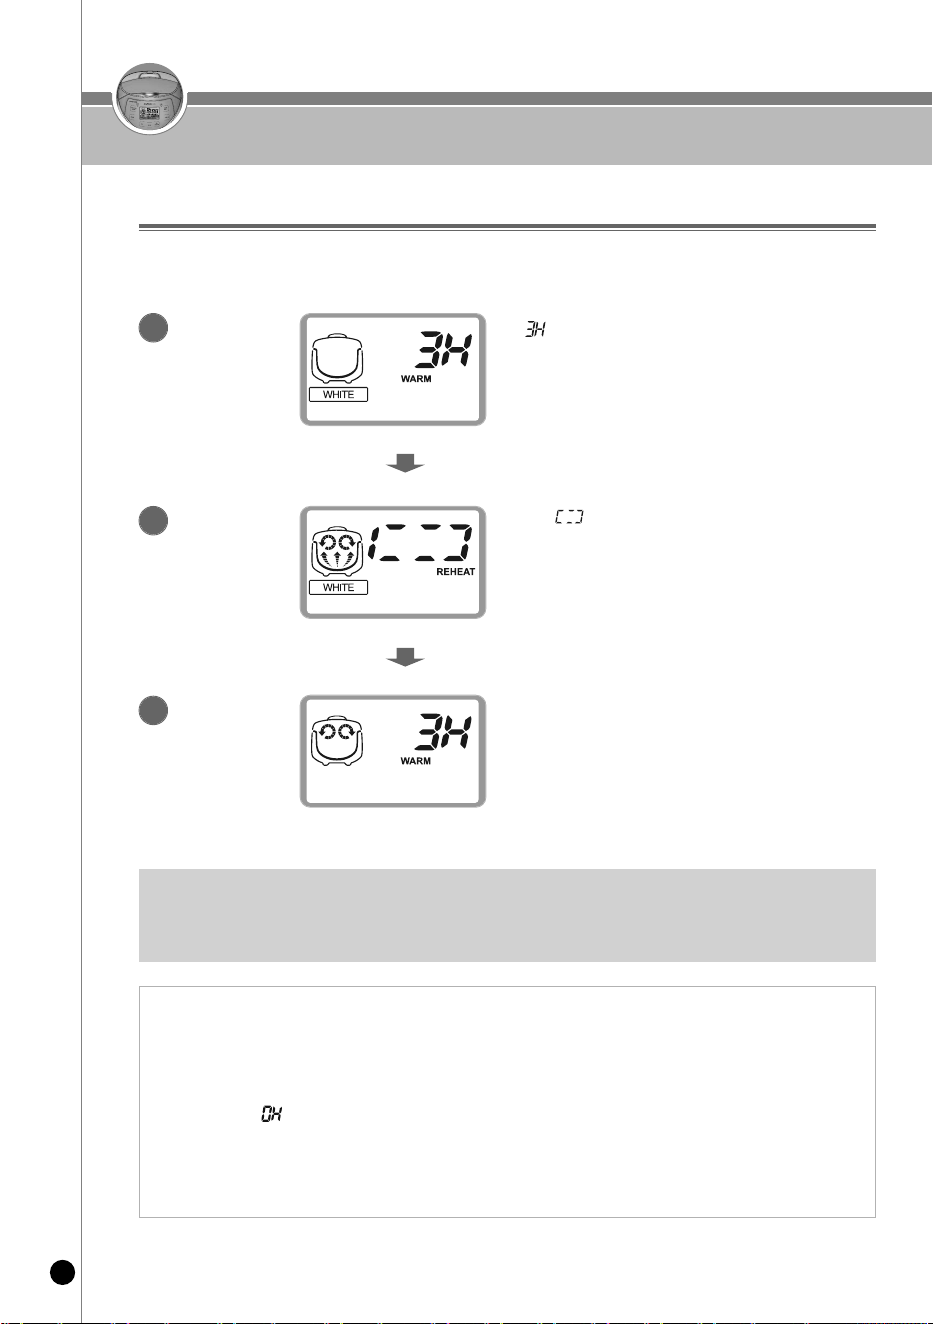
‘ ’ on the display indicates that the cooked
rice is kept warm for 3 hours.
If you press the Hr. button while keeping rice
warm, the elapsed time is shown on the display.
pressing the “Min/My mode” button, the current
time is displayed.
The ‘ ’ mark turns round and round
while reheating.
After reheating, the Keep Warm function
restarts and the elapsed warm time is
displayed.
for a meal
▶ If you want to warm the rice, press the Keep “Warm/Reheat” button to start the reheating
process. After 9 minutes, the rice should taste fresh.
▶
The frequent use of the Reheat function may cause the cooked rice to be discolored or dried. Use it once
or twice per day.
▶
If a separate heating appliance or gas burner is used to cook rice, put the cooked rice into the cooker
and press the “Warm/Reheat” button to keep the rice warm.
At this time, ' ' is shown on the display. (Like this, transferring hot rice to a cold cooker may cause the
rice to be discolored or develop an odor.
▶
24 hours after keeping the cooked rice warm, the passed time blinks on the display to give the long time
warning.
On Keeping
Warm
1
On Reheating
2
Completion of
Reheating
3

29
www.cuckooworld.com
english
TO kEEP RICE WARM AND TASTY
❷-❷ Press the “Min” button to
change the display in turn of
❶ Press the “Keep Warm” button in
Keep Warm or Standby mode at
length over 5 sec. The display will
change and a buzzer will sound as
shown in the above figure. In the
figure, means the current
warm temperature.
❷-❶ Press the “Hrs” button to change
the display part in turn of
how to Adjust the Warm temperature
▶ Odor may develop from water drops or discolored rice from frequent use.
The warm temperature may be incorrect. Adjust the temperature.
❸ After setting the desired temperature,
press the “Cook, Keep Warm” and
“Timer” buttons to automatically enter
the value. At this time a buzzer sounds.
If you press the Cancel button or
7 seconds flow with no input, the
function is cancelled and the mode
returns to Standby mode.
❷-❷ Press the “Min/My mode” button to
change the display part in turn of
❶ Press the “Keep Warm/Reheat”
button in My mode.
The display part is changed and a
buzzer sounds as shown in the
above figure. In the figure, ‘ ’
means default value.
❸ After setting the desired value,
press the “Cook/Quick” button to
automatically enter the value. At
this time a buzzer will sound.
If you press the “Cancel” button or
7 seconds pass with no input, the
function is cancelled and the
mode returns to Standby.
❷-❶ Press the “Hrs” button to change
the display part in turn of
how to adjust the Customized Warm function
This function is used in case the water runs when you open the inner lid while keeping warm or the cooked rice is
swelled.
To adjust the warm temperature while keeping rice warm, press the “Keep Warm” button for over 5 seconds and adjust the warm
temperature.
1. A stale smell develops and water drops are formed: The warm temperature is low. Raise the temperature by 1 ~ 2℃.
2. The cooked rice turns yellow, the rice gets dry and an odor develops: The warm temperature is too high.
Lower the temperature by 1 ~ 2℃.
※
The factory setting temperature may be different from the manual.
1. If water runs out when you open the lid: Press the “Hrs” button to raise the setting mode by 1 or 2 stages.
2. If the cooked rice is swollen around the edge of the rice: Press the “Min/My mode” button to lower the setting mode by 1 or 2 stages.
TO kEEP RICE WARM AND TASTY
30
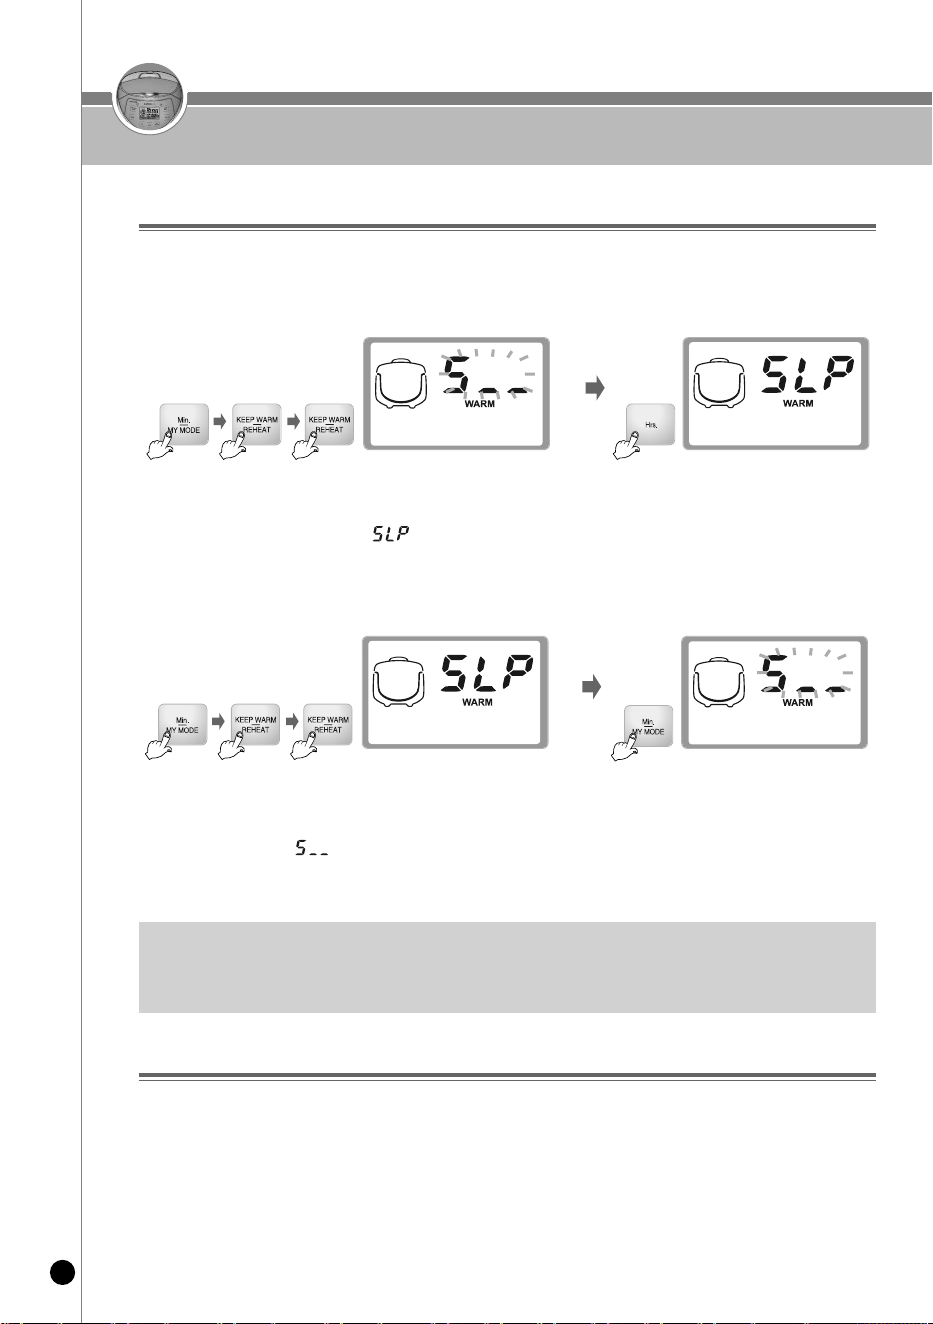
1. Press the “Keep Warm” button twice in My mode to enter 'Keep Warm during Sleep' mode.
2. Press the “Hrs” button in the 'Keep Warm during Sleep' mode and press the “Cook” button
to set the function when the ' ' letters are fixed on the display.
3. If you press the “Cancel” button or 7 seconds pass with no input in 'Keep Warm during
Sleep' mode, the function is cancelled and the mode returns to Standby mode.
▶ How to Cancel
1. Press the “Keep Warm” button twice in Customized Rice Taste mode to enter 'Keep Warm during Sleep'
mode.
2. Press the “Min” button in the 'Keep Warm during Sleep' mode and press the “Cook” button to cancel the
function when the ' ' letters blink on the display.
3. If you press the “Cancel” button or 7 seconds pass with no input in 'Keep Warm during Sleep' mode ,
the function is cancelled and the mode returns to Standby mode.
▶If this function is set, the warm temperature is kept at a low temperature in sleep mode. If you want to keep
warm, do not activate this function.
In summer, cooked rice may be discolored or develop an odor. Do not activate the 'Keep Warm during Sleep'
mode if possible.
how to set Keep Warm mode during sleep mode
▶ When cooked rice is kept warm for a long time, the rice quality deteriorates (discoloration, drying and odor).
To prevent deterioration, set the warm temperature as low temperature during sleeping time
( 10:00pm ~ 04:00am) as needs arise.
▶ How to Set
odor develops While Keeping Warm
▶ Clean the cooker frequently. Not cleaning the lid may develop an odor while keeping warm because bacteria could
develop.
▶ Even though the product is clean, bacteria can be present. If strong odors develop, boil water to sterilize.
Fill water up to the plain rice water level line for 2 persons and add a big spoonful of ginger. After that, close the lid and
press the Cook/Quick button to boil the water.
Press the Cancel button 30 ~ 40 minutes after boiling. After boiling, always clean the inner pot.
▶ If you keep the cooked rice warm without cleaning the inner pot after steaming food, an odor may penetrate the rice.

'kEEP WARM' TIPS
31
www.cuckooworld.com
english
It is recommended to evenly stir the
cooked rice after cooking. The rice taste
will improved.
(For a small quantity of rice, pile up the
rice in the center area of the inner pot to
keep warm)
Do not keep the rice scoop in the inner
pot while keeping the cooked rice warm.
Do not mix small quantity of rice or
leftovers with the rice under keeping warm.
Doing so may develop an odor.
(Use a microwave oven for the cold rice.)
Keeping rice warm for a long time may cause the
rice to be discolored or develop an odor. So, it is
recommended to keep warm for less than 12
hours.
24 hours after keeping the cooked rice warm, the
passed time will blink on the display.
For MULTIGRAIN/BROWN rice we recommend
not warming.
The rice on the edge of the inner pot or the bottom
of the steam outlet may turn plain and swollen. In
this case, stir and mix the rice.
Cautions for Keeping Warm
32
Please review the manual
▼ If there is a problem with your cooker, check the following details before requesting service to your dealer.
Sometimes the cooker may not operate as desired if used incorrectly.
Case
When the rice is not well
cooked.
beans and other grains half
cooked?
rice is too watery or stiff.
When the water overflow.
When you smell something
while warming.
“ ”sign is appeared.
Check points
•
Did you use the measuring cup to
measure your rice?
•
Did you measure the water properly?
•
Did you clean the rice before cooking?
•
Was the rice sitting in water for a long
time?
•
Is the rice old or dry?
•
Is the bean (other grains) too dry?
•Did you select the correct menu?
•
Did you measure the water properly?
•
Did you open the top cover before
cooking was finished?
•
Did you use the measuring cup?
•
Did you measure the water properly?
•
Did you open the top cover before
cooking was finished?
•
Did you close the top cover.
•
Please check if the power cord is
inserted properly.
•
Did it warm over 12 hours?
•
Is there any other substances in the
unit?
•
The temperature sensor may have a
problem
during warm, “time”display
shine
•
Did “Warm” time spend over 24hrs?
do the following
•
“Cook/Quick”button is pressed?
•
Is there power cut while in cooking?
When the rice is not
cooked.
•
The shining display announces that
“Warm”time is over 24hrs.
•
Please contact to dealer or service center.
•
Close the top cover perfectly.
•
Alway be keep the power on while warming.
•
As possible as warming time is within 12
hours.
•
Don’t warm rice with other substance.
•
Refer to page 14~15.
•
Selected the correct menu.
•
Measure the proper water.
•
Open the top cover after cooking finished.
•
Beans should be soaked for-to-minutes or
steamed for-to-minutes prior to cooking,
depending on your taste.
•
Refer to page 14~15.
•
Insert some more water (about half of 1 level)
•
Press the “Cook/Quick”button once. And
check “ ”sign on the display.
•
Re-press the “Cook/Quick”button
during warm, rice is cold
or wet
•
Did you set “sleep warm” mode?
•
You can change the mode or set the warm
temperature.
33
www.cuckooworld.com
▼ If there is a problem with your cooker, check the following details before requesting service to your dealer.
Sometimes the cooker may not operate as desired if used incorrectly.
Case
When the time cannot be
preset.
When you smell after and
before cooking?
Check points
• Is the current time correct?
• Is it right A.M. or P.M.?
•
Did you set the reservation time over
13 hours?
•
Did you clean it after cooking?
do the following
rice is too watery or
stiff.
• Did you select the menu correctly?
• Did you measure the water properly?
• Select the correct menu.
• Measure the proper water.
•
Please clean it after cooking.
When the button cannot
operate with “ ”
• Is the inner pot inserted correctly?
• Do you use 220V?
• Please insert inner pot.
• This product only uses 120V.
When “tick, tick”sounds
occurs while cooking and
warming.
•
Is it the sound of cooking relay?
•
Did you wipe the moisture of bottom
of inner pot?
•
Is your voltage 220V?
•
It is normal that the “tick, tick”sound of relay
is an on and off operation.
•
The moisture of the bottom of the inner pot
may cause “tick, tick” sound.
Please wipe the moisture.
•
This product have to use 120V.
•
Consult the service center and dealer.
When the operation don’t
finish for a long time and
“ ”display
• Set the current time.(refer to page 13)
• Check the A.M., P.M.
• Maximum reservation time is 13 hours.
Please review the manual
34
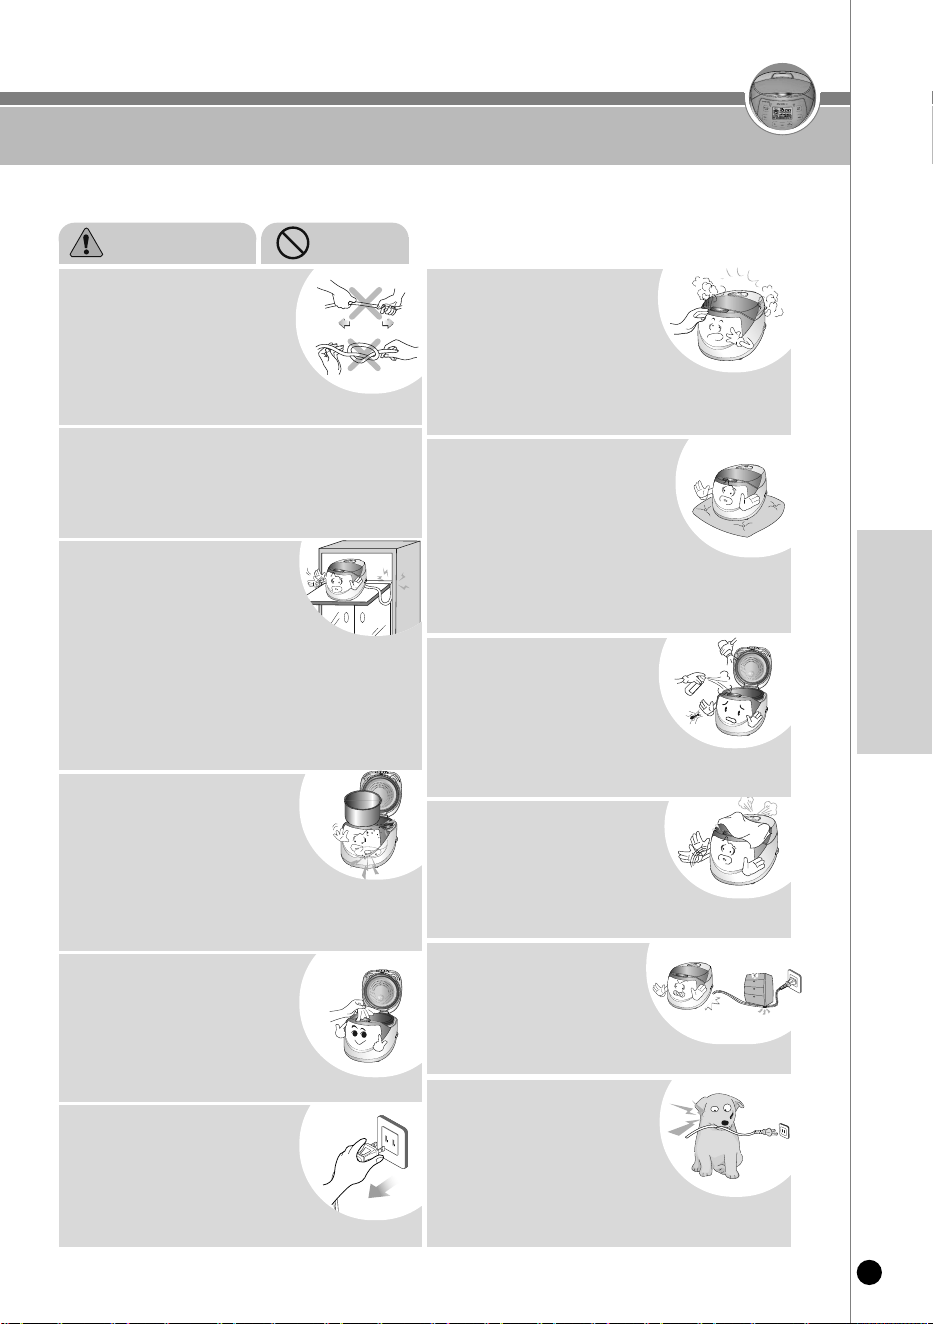
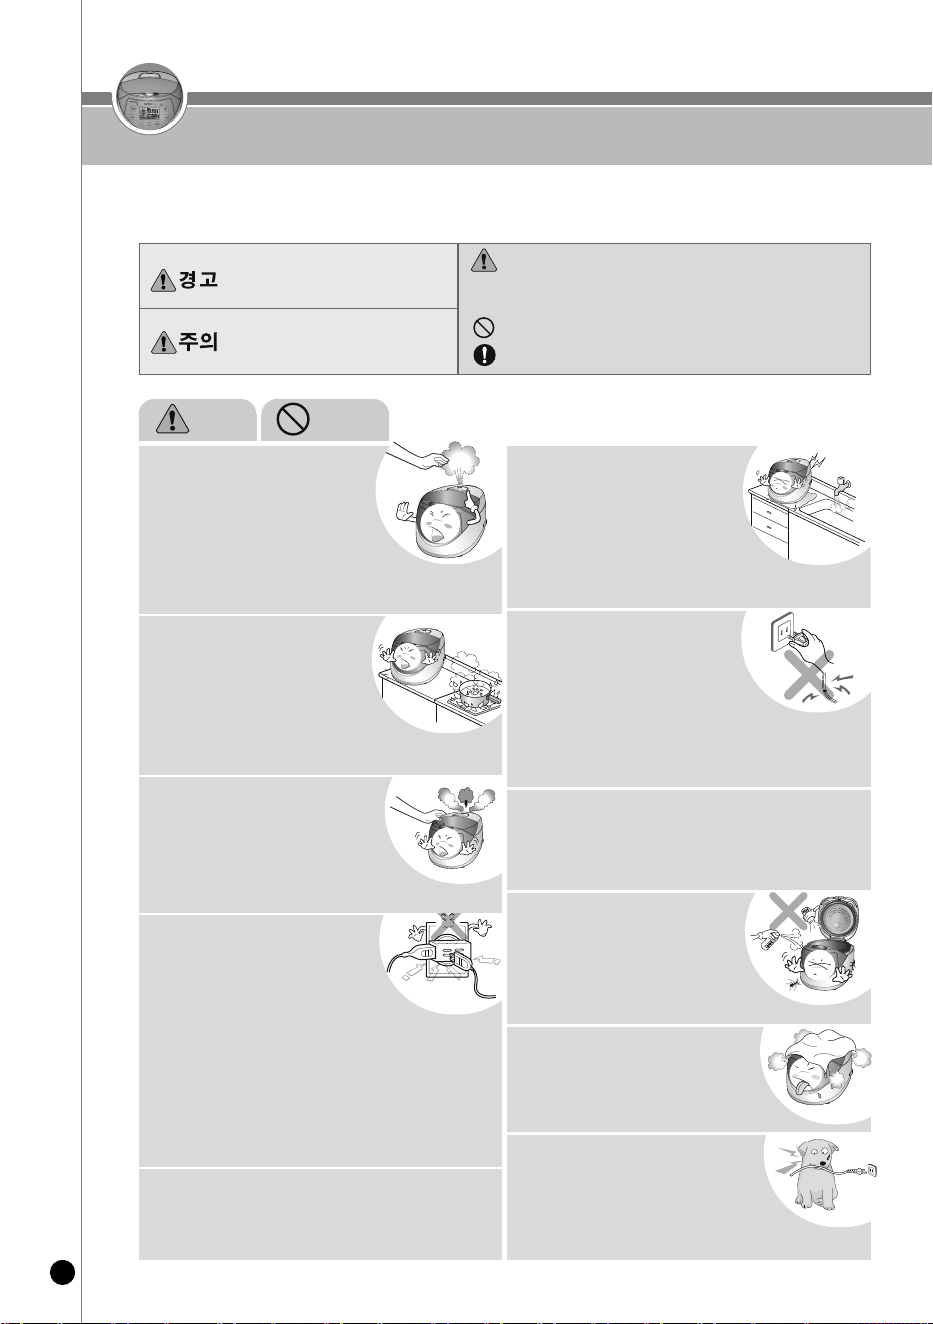
안전을 위한 주의사항
플러그 및 전원 코드부를 동물이
물어 뜯거나 못과 같이 날카로운
금속 물체로부터 충격을 받지 않도록
주의하여 주십시오.
•충격으로 인한 파손은 합선, 감전, 화재 등의 원인이 됩니다.
반드시 정격 15A 이상의 접지
단자가 있는 교류 120V 전용
콘센트에서만 사용해 주시고
한 콘센트에 여러 제품의 전원플러
그를 동시에 꽂아 사용하지 마십시오.
•여러 제품과 함께 사용하거나, 다른 기구에 사용하면 발열 및 발화,
감전의 원인이 됩니다.
•전원플러그에 이물질이나 물기가 묻어있는 경우에는 잘 닦은 다음
사용하십시오.
•연장코드도 15A이상의 것을 사용하여 주십시오.
증기배출구를 막거나 증기구에
행주나 장식용 덮개, 기타물건을
올린 채 사용하지 마십시오.
•본체의 변형, 변색 및 고장의 원인이 됩니다.
취사가 진행 중에 있을 때,
뚜껑을 열지 마십시오.
•밥이 끓거나 뜸이 진행중일 때 뚜껑을
열면 증기에 의한 화상의 원인이 됩니다.
•취사 후 뚜겅을 열 때 증기에 의한 화상의
위험이 있으므로, 주의를 요합니다.
제품내에 살충제나 화학물질 등을
뿌리거나 투입하지 마십시오
•화재 발생의 우려가 있습니다.
•제품내 바퀴벌레나 벌레 등이
들어갔을 경우는 The service center and
dealer로 문의해 주십시오
제품을 직사광선이 쬐는 곳, 가스
레인지, 전열기구 등의 가까이에서
사용하지 마십시오.
•전기누전 및 감전, 변형 및 변색의
원인이 됩니다.
•전원코드를 열기구 가까이 두지 마십시오.
코드피복이 녹아 화재, 감전의 원인이 됩니다.
사용중 증기 배출구에는 손과
얼굴을 가까이 하지 마십시오.
•화상의 우려가 있습니다. 취사중 나오는 증기는
매우 뜨거우므로 손이나 얼굴을 가까이 하지 마십시오.
•특히 어린이의 접근을 막아 주십시오.
씽크대, 목욕탕 등 제품에 물이
들어 갈 수 있는 곳이나, 비나, 눈을
맞을 수 있는 실외에서 사용하지
마십시오.
•전기 누전 및 감전의 위험이 있습니다.
•제품에 물이 들어 갔을 경우에는 The servic cemter and
dealer로 꼭 문의 하십시오.
전원코드나 전원플러그가 파손
되었거나 콘센트가 흔들릴 때는
사용을 중지하고, 객상담실로
문의 바랍니다.
•전원코드나 전원플러그가 파손된 경우에는 위험이 생기지
않도록 하기 위하여 제조자나 그 판매점 또는 유자격 기술자(서비스
기사)에 의해 코드 교환을 하십시오.
•반드시 지정된 서비스 센터에서 수리하시기 바랍니다.
흡•배기구 또는 틈 사이에 바늘, 금속물 등
이물질이 들어가거나 막히지 않도록 하십시오.
•감전 및 화재의 원인이 됩니다.
경고 (금지)
•이 기호는 특정조건하에서 위험을 끼칠 우려가 있는 사항에
대하여 주의를 환기시키는 표시입니다.
•
위험 발생을 피하기 위해 주의깊게 읽고 지시에 따라 사용하십시오.
•이 기호는 어떤 행위를 ‘금지’하는 표시입니다.
피하지 않을 경우 사망이나 중상을
초래할 수 있는 잠재적인 위험상황
피하지 않을 경우 경상을 초래할 수
있는 잠재적인 위험상황
•이 기호는 어떤 행위를 ‘지시’하는 표시입니다.
‘안전상의 경고’는 제품을 안전하고 올바르게 사용하여 사고나 위험을 미리 막기 위한 것이므로 반드시 지켜 주십시오.
‘안전상의 경고’는 ‘경고’와 ‘주의’의 두가지로 구분되어 있으며 ‘경고’와 ‘주의’의 의미는 다음과 같습니다.
먼지가 많은 곳이나 화학성 물질이 있는 곳에서는
사용하지 마십시오.
•제품 근처에서 가연성 가스나 인화성 물질 등을 사용하지 마십시오.
•폭발 및 화재의 원인이 됩니다.
35
www.cuckooworld.com
KoreAn
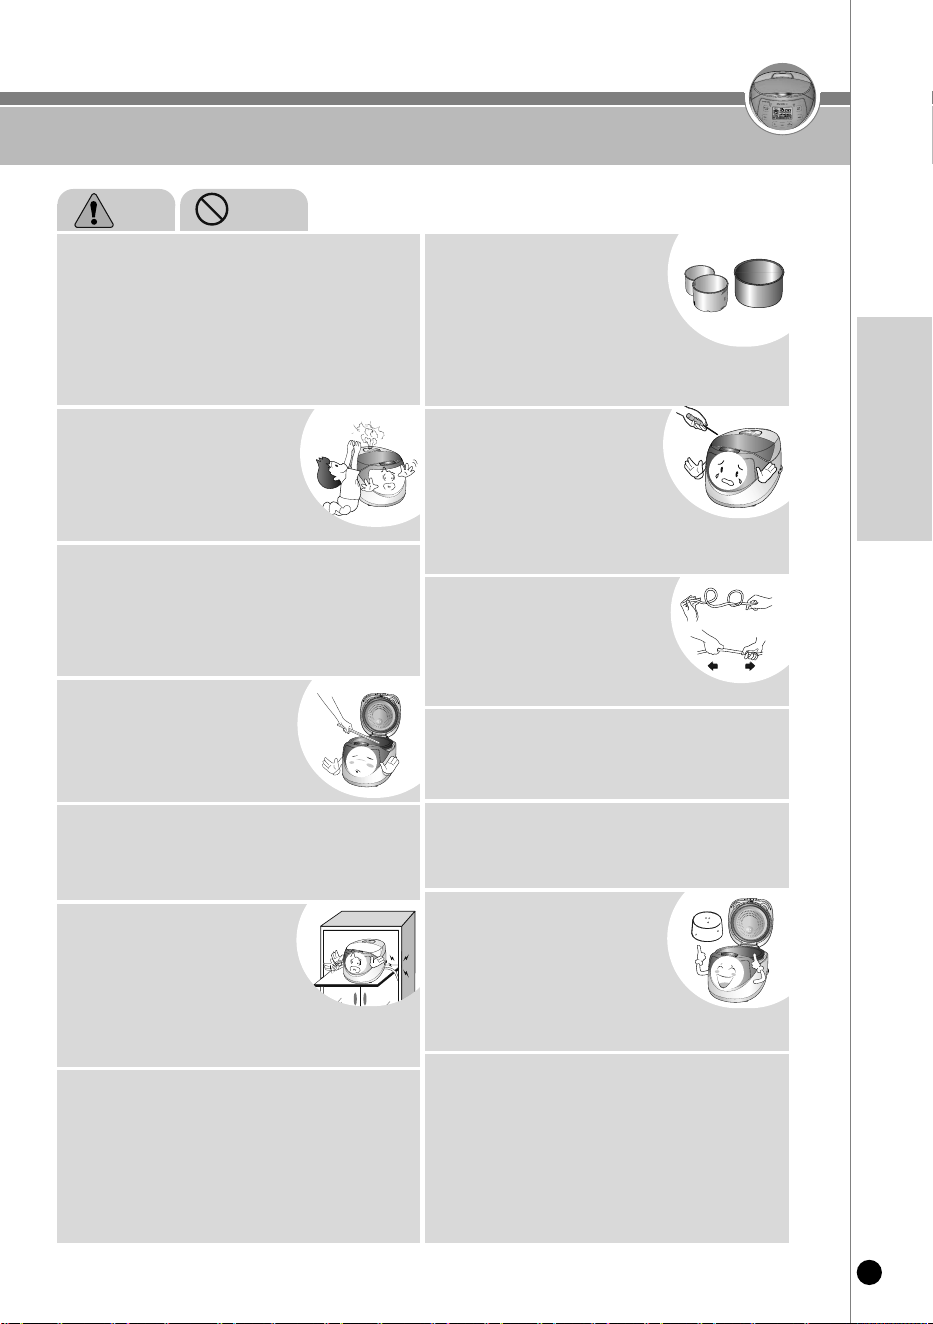
안전을 위한 주의사항
쌀통 및 다용도 선반 등에
제품을 놓고 사용하지 마십시오.
•
전원코드가 틈새에 눌러져 화재 및
감전의 원인이 됩니다.
•
취사 중 증기가 배출될 때 쌀통 및 다용도 선반에 의해
제품의 손상, 화재, 감전의 원인이 됩니다.
제품 내부에 금속막대기 등
이물질을 절대 넣지 마십시오.
(특히, 어린이 주의)
•
감전 및 화재의 원인이 됩니다.
전원코드를 무리하게 구부리거나,
묶거나, 잡아당기지 마십시오.
•
감전이나 쇼트로 인해 화재의
원인이 될 수 있습니다.
어린이 혼자 사용하거나 어린이가
만질수 있는 장소에 제품을 두지
마십시오.
•
고열에 화상을 입거나 감전이 될 수 있습니다.
제품을 분해하거나 개조하지
마십시오.
•화재 및 감전의 원인이 됩니다.
•
서비스기사 이외의 사람이 분해하거나
수리하지 마십시오. 수리 및 고장 상담은 The service oenter
and dealer로 문의하여 주십시오.
경고 (금지)
제품을 씽크대에 넣고 닦거나 제품 내부에
물을 넣지 마십시오.
•
전기 누전 및 감전, 화재의 원인이 됩니다.
•
제품에 물이 들어간 경우에는 사용을 중지하고 전원플러그를 뽑은
다음
The service center and dealer로 문의하여 주십시오.
변형된 내솥이나 전용 내솥이
아닌 것은 사용하지 마십시오.
•
내솥이 가열되어 이상작동 및 화재의
원인이 됩니다.
•
내솥을 떨어뜨렸거나 변형된 경우에는
The service center and dealer 로 문의하여 주십시오.
전원코드 위에 무거운 물건을 올려 놓거나 코드가
제품바닥에 눌러지지 않도록 주의해 주십시오.
•
전원코드가 틈새에 눌러져 화재 및 감전의 원인이 됩니다.
•
취사 중 증기가 배출될 때 쌀통 및 다용도 선반에 의해
제품의 손상, 화재, 감전의 원인이 됩니다.
전원플러그에 묻은 이물질은 물기가 없는 천으로
깨끗이 제거하여 주
십시오.
•
화재의 원인이 됩니다.
내솥 없이 사용을 하지 마십시오.
•
감전 및 고장의 원인이 됩니다.
•
내솥이 없는 상태에서 쌀이나 물을 넣지 마십시오.
•
쌀이나 물이 들어갔을 경우에는
The service center and
dealer
로 꼭 문의 하십시오.
온도감지기, 열판 및 내부 또는 내솥
주위의 이물질은 반드시 제거한 후
에 사용하십시오.
•
온도감지를 정확히 못하게 되므로 내솥이
가열되어 이상작동 및 화재의 원인이 됩니다.
전원플러그를 콘센트에서 꽂거나 뺄때는 손의 물기를
반드시 제거한 후 전원플러그를 잡고 꽂거나 빼어
주십시오
•
젖은 손으로 전원플러그를 뽑으면 감전의 원인이 될 수 있습니다.
•
무리하게 당겨 뽑으면 전원코드에 이상이 발생되어 누전 및 감전이
될 수 있습니다.
전원플러그를 반복하여 뺐다 꽂았다하지 마십시오.
•
감전 및 화재의 위험이 있습니다.
전원코드를 임의로 연장하거나 연결하는 등
가공하여 사용하지 마십시오.
•
쇼트로 인한 화재의 원인이 될 수 있습니다.
36
안전을 위한 주의사항
취사가 끝난 뒤에는 반드시
본체에 고인물을 닦아 주십시오.
•
이상한 냄새 및 변색의 원인이 됩니다.
•
본체의 물받이에 고인 물을 닦아 주십시오.
전원플러그를 뽑을때는 전원코드를
잡지 마시고 꼭 전원플러그를 잡고
뽑아 주십시오.
•
전원코드에 충격이 가면 감전 및
화재의 원인이 될 수 있습니다.
경사진 곳이나 울퉁불퉁한
곳에서는 사용하지 마십시오.
•
화상 및 제품 고장의 원인이 됩니다.
•
전원코드에 손이나 발, 기타 물체가 걸려
제품이 떨어지지 않도록 주의 하십시오.
사용하지 않을 때는
전원플러그를 콘센트에서
뽑아 주십시오.
취사, 보온, 지정된 메뉴 이외의 물끓임, 식혜,
미역국, 카레, 기름으로 튀기는 요리 등 다른
용도로 사용하지 마십시오.
•
고장 및 냄새의 원인이 됩니다.
제품에 심한 충격을 주거나 떨어뜨리지 마십시오.
•
제품 고장 및 안전상의 문제가 발생할 수 있습니다.
최대 용량 이상으로 내용물을 넣고 사용하지 마십시오
•
밥물 넘침이나 취사 불량 등 고장의 원인이 됩니다.
•
죽은 지정된 용량 이상은 사용하지 마십시오.
제품 밑에 깔판, 방석, 전기장판 등
을 놓고 사용하지 마십시오.
•
화재 및 변형의 원인이 됩니다.
경고 (주의)
사용 중에 이상한 소리나 냄새 또는 연기가 나면
즉시 전원플러그를 뽑고
The service center
and dealer
로 문의해 주십시오.
사용 중이거나 사용직후에는 내솥, 내부, 열판 등은
뜨거우므로 만지지 마십시오.
•
고열에 의해 화상을 입을 수 있습니다.
교류 120V 이외에는 사용하지 마십시오.
•
감전, 화재의 원인이 될 수 있습니다.
•
제품이 정상적으로 작동을 하지 않습니다.
•
220V 전원에서 강압용 트랜스를 120V로 강압해서 사용하지마십시오.
내솥 코팅이 벗겨질 경우에는
The service center and dealer
로 문의해주십시오.
•
제품을 장기간 사용할 경우 내솥 코팅이
벗겨질 수 있습니다.
•
거친 수세미나 금속성 수세미로 내솥을 씻을 경우 코팅이 벗겨질
수 있으니 반드시 주방용 중성세제와 스폰지로 씻어 주십시오.
요리 후에는 반드시 청소해 주십시오.
•
찜 요리 후 취사 및 보온을 하게되면 밥에 냄새가 배어들 수도있습니다.
•
37쪽을 참조하여 깨끗이 닦아낸 후 사용하십시오.
•
절연 성능 저하로 인해 감전, 누전, 화재의
원인이 될 수 있습니다.
내솥을 다른 용도로 사용하거나 불위에 올리지
마십시오.
•
내솥의 변형 및 코팅이 벗겨져 제품에 이상이 발생할 수 있습니다
취사 직후, 제품 내부의 증기 및 고열로 인한 화상의
우려가 있으므로 주의를 요합니다.
37
www.cuckooworld.com
KoreAn
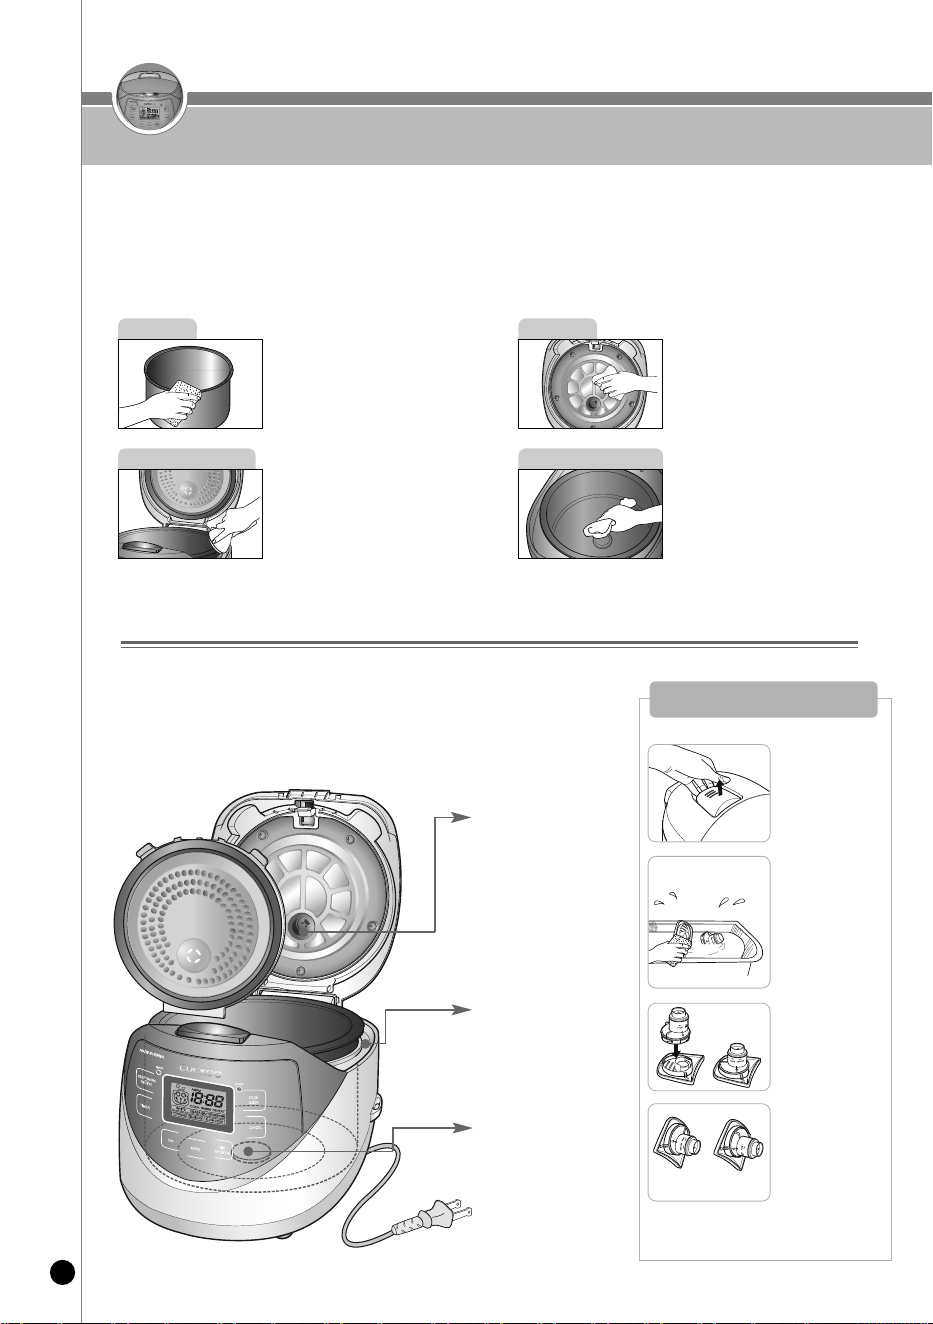
제품 손질 방법
스팀캡 분리
·
결합 및 청소법
- 청소를 잘하지 않으면 보온 중 냄새가 나는 원인이 됩니다. 특히 뚜껑부는 자주 청소해 주십시오.
(전원플러그를 뽑고 본체의 열이 식고 난 후 손질하십시오.)
- 본체·뚜껑은 물기를 제거한 행주로 닦아 주십시오. 벤젠, 신나 등은 사용하지 마십시오.
- 사용중 내솥뚜껑이나 내솥내부에 밥물이 묻어 전분막이 생기는 수가 있으나, 위생상 아무런 영향이 없습니다.
내솥의 바깥면이나 밑면의 이물질 및 물기를
깨끗이 닦아 주십시오.
거친 수세미, 솔, 연마제 등은 코팅이 벗겨질
수 있으므로 주방용 세제와 부드러운 천,
스폰지로 닦아 주십시오.
내솥의 뚜껑에 밥물이 묻어 있는 경우
물기를 제거한 행주로 닦아 주십시오.
뚜껑의 가장자리 부분은 금속으로 되어
있으므로 청소할 때 주의 하십시오.
내솥뚜껑
내 솥
취사시 발생하는 밥물은 이곳에 고일수
있도록 설계되어 있으므로 취사 완료후
물기를 제거한 행주로 깨끗이 닦아
주십시오.
온도감지기에 이물질이 눌러 붙어 있는
경우는 금속판이 손상되지 않게 제거
하십시오.
열판에 이물질이나 물기를 깨끗이 닦아
주십시오.
본체내부
본체 물고임부
취사완료 후 밥물이
고여 있으면
냄새의 원인이 됨으로
항상 깨끗이
닦아 주십시오.
■ 밥알이 달라붙는 것을 방지하기 위하여 내솥 내면에 불소 코팅을 하였습니다.
- 반드시 부속품의 주걱을 사용해 주십시오.
- 금속성 스푼이나 식기류를 넣지 마십시오.
- 벤젠, 신나 등은 사용하지 마십시오.
- 조미료 사용시에는 곧바로 씻어 주십시오.
- 사용중 얼룩이 생기는 수가 있으나 이는 위생상에는 아무런 영향이 없습니다.
스팀캡을 분리 후
깨끗이 씻은 후
사용하십시오.
온도감지기 및 손집방법
밥알이 눌어 붙어 있을
경우에는 온도 감지기나
열판이 손상되지 않게
제거하십시오.
1.
매번 사용 후에는
스팀캡을 뚜껑으로
부터 분리 시키십
시오.
2. 스팀캡을 그림과
같이 분리하신 후
미지근한 물에
담구어 부드러운
행주나 스폰지로
씻은 후, 물기를
제거해 주십시오.
3. 2개를 조립
하십시오.
4. 스팀캡을 뚜껑에
꽉 맞도록 붙여
돌려 주십시오.
제품 내부 손질 방법
38
각 부분의 이름
뚜껑
분리형커버 레버
분리형커버 패킹
분리형커버
조작 및 기능 표시부
뚜껑열림버튼
스팀캡
내솥
물받이
자동온도 감지기
전원코드
전원 플러그
주걱꽂이
UN
L
OCK
L
O
C
K
▶스팀캡을 잡고 그림과 같이 두 부품의 화살표방향
이 일치되게 하여 결합하시고 “LOCK(잠김)” 쪽으로
돌려 채결하십시오.
<스팀캡 착탈 방법> <스팀캡 조립 방법>
▶스팀캡을 확실히 조립한 후에 밥솥에 결합
하십시오.
보온이나 취사 조리후에는 항상 물받
이에 있는 물을 버려주세요. 물받이에
밥물이 고여 있을 경우 냄새의 원인이
됩니다.
본체
스팀캡 착탈·조립 방법
사용설명서
주 걱
계량컵
부 속 품
39
www.cuckooworld.com
KoreAn
기능 조작부의 이름과 역할 / 기능 표시부의 이상점검 기능
※
설명서에 적용된 이미지는 실제 제품과 다를 수 있습니다.(설명서에 기재된 사진은 CR-0632F 모델입니다)
※
버튼은 부저음이 날 때까지 확실히 눌러 주시고 본 명판의 디자인은 실물과 다를 수 있습니다.
온도 감지기에 이상이 있을 때 나타납니다.
(“ ”표시가 깜박거립니다.) → The service center and dealer로 문의하십시오.
내솥이 없을 때 나타납니다. 1
예약 시간이 13시간을 초과한 경우에 나타납니다.
13시간 이내로 예약을 하십시오.
제품에 이상이 생겨(히터단선, 열량부족 등) 장시간 밥이 완료되지 않을 때 나타납니다.
전원을 차단 후 The service center and dealer로 문의하십시오.
사용방법이 올바르지 않거나 제품에 이상이 생겼을 때 아래와 같은 표시가 나타나 경보를 하여 줍니다.
기능 표시부의 이상점검 기능
백미쾌속 램프
백미쾌속취사를 선택했을 때
불이 들어 옵니다.
취소 버튼
선택한 기능을 취소 할 경우 사용
보온/재가열
버튼
보온을 할 경우나
식사 직전 밥을
따뜻하게 데울 경우 사용
취사 버튼
취사를 시작 할 경우 사용
CR-0631F
모델경우,
요리 / 터보 버튼이 적용되어
있습니다.
예약 버튼
예약취사를 할 경우
사용
예약 램프
예약취사를 선택시
불이 들어옵니다.
기능표시부
메뉴 선택 버튼
백미, 현미발아, 잡곡/현미, 죽, 찜,
웰빙쿡 등의 메뉴를 선택할 경우 사용
맞춤밥맛 버튼
쿠쿠 맞춤밥맛 기능’, ‘맞춤 취사 기능’
을 설정할 경우 사용
‘
맞춤보온, 취침보온 기능’을 설정 할
경우 사용
시, 분 버튼
현재 시각을 맞추거나 예약 시각을
변경 할 경우 사용
찜 시간을 선택할 경우 사용
쿠쿠 맞춤밥맛 또는 맞춤보온,
취침보온 단계를 선택할 경우 사용
40
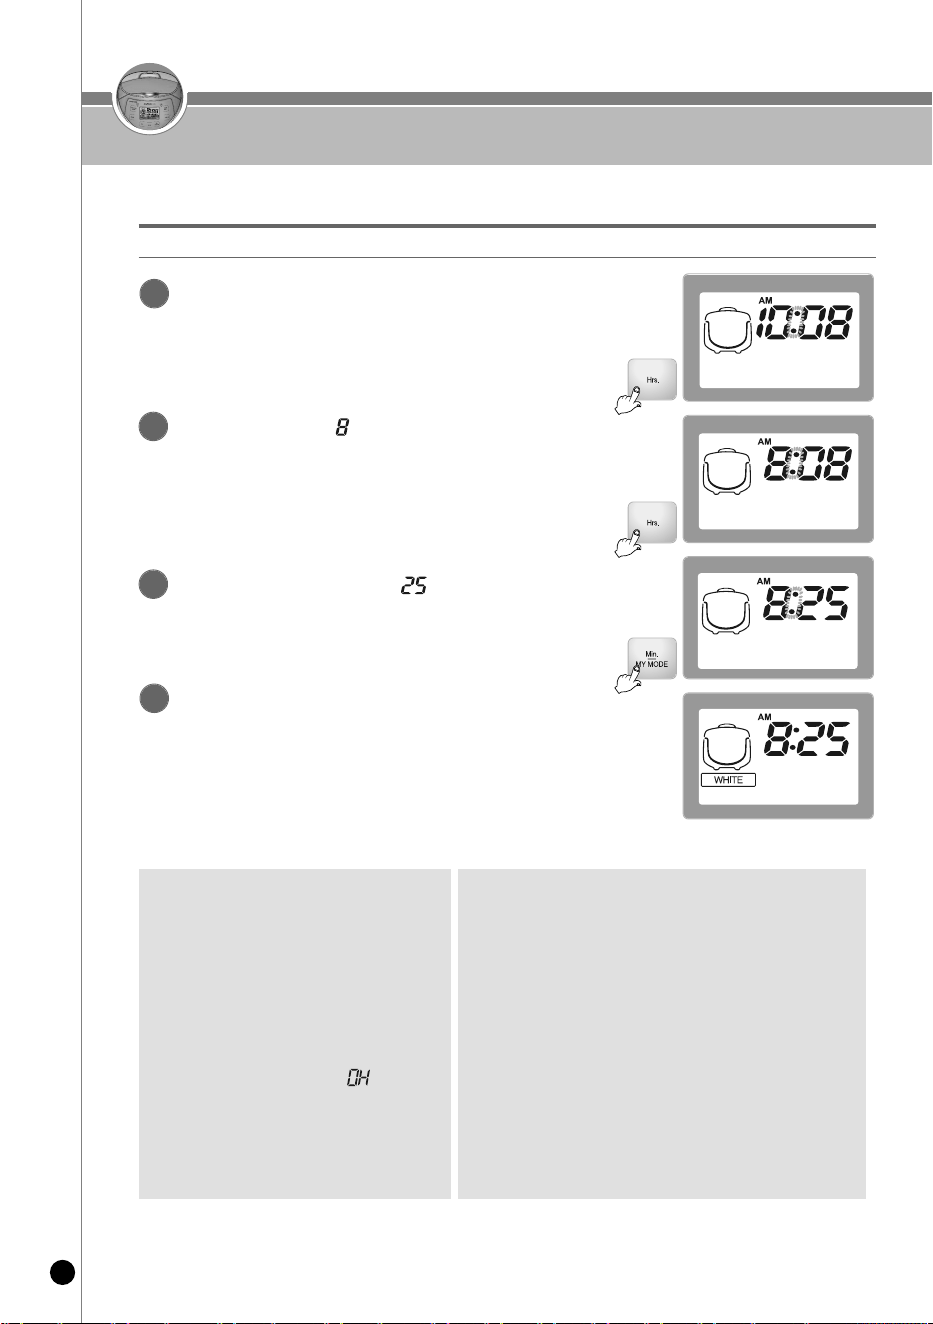
현재시각의 설정
현재시각을 맞추려면 다음 사항을 꼭 알아두십시오.
예) 현재 시각이 오전 8시 25분일 경우
현재시각은 이렇게 맞추십시오.
전원플러그를 꽂은 후 “시” 버튼을
1초이상 누릅니다.
▶ 1초 주기로 표시부의 콜론(:)이 깜박거립니다
1
“시” 버튼을 눌러 시를 “ ”에 맞춥니다.
▶ 누를때 마다 1시간 단위로 변합니다.
▶ 계속 누르고 있으면 연속으로 변합니다.
▶ 오전, 오후가 뒤바뀌지 않도록 주의하여 맞춥니다.
▶ 낮 12:00의 경우는 오후 12:00로 표시됩니다.
2
“분/맞춤밥맛” 버튼을 눌러 분을 “ ”에 맞춥니다.
▶ 누를 때마다 1분 단위로 변합니다.
▶ 계속 누르고 있으면 연속으로 변합니다.
3
7초 후 변경된 시각으로 자동 입력됩니다.
▶ 시각설정이 완료되면 표시부의 콜론(:)이 깜박이지 않고 정지되며
변경된 현재 시각이 표시됩니다. (부저음 1회 발생)
▶ “시”, “분/맞춤밥맛” 버튼 및 “취소” 버튼을 제외한 다른 버튼을 눌러도
설정된 시각이 입력됩니다.
4
■리튬 밧데리에 대하여
•본 제품에는 정전보상 기능 및 시계 기능을 위하여 리듐 밧데리가 내장되어 있으며
밧데리의 수명은 약 3년 정도이나 성능에 따라서 차이가 날 수 있습니다.
•전원플러그를 꽂지 않았을 때 표시부에 현재시각이 나타나지 않으면 밧데리가 완전
소모된 경우이므로 The serice center and dealer로 문의하여 지정된 서비스센터에서
밧데리를 교환한 후 사용하십시오.
■정전 보상기능이란?
•본 제품은 정전이 되어도 정전 이전의 상태를 기억하게 되어 있어 정전 후, 다시 전기가
들어오면 정상적으로 작동하게 됩니다.
•취사 중에 정전이 되면, 정전된 시간만큼 취사시간이 늦어지며 정전시간에 따라 취사
상태가 다소 차이가 날 수도 있습니다.
•보온 중 정전이 되어 밥이 식었을 때는 보온이 취소됩니다.
■ 보온 중 일 때 현재시각 설정은
이렇게 하세요.
1. 보온중일 때 현재시각을 변경할 경우에는 취소 버튼을
눌러 보온을 취소한 후 “시” 버튼으로 현재시각을 설정
합니다.
2. 현재시각 설정이 끝나면 “보온/재가열” 버튼을 1회
눌러 보온합니다. 이때 표시부에는 “ ”가
표시됩니다.
41
www.cuckooworld.com
KoreAn
취사 전 준비사항
내솥은 깨끗이 씻은 후 물기를 닦습니다.
▶ 내솥을 씻을 때는 부드러운 행주를 사용하여 주십시오.
▶ 강한 수세미를 사용하면 내솥 안쪽 표면이 벗겨지는 경우가 있습니다.
1
계량컵을 사용하여 쌀을 인분수 만큼 내솥에 담습니다.
▶ 쌀을 계량컵의 윗면 기준하여 평평하게 맞추면 1인분에 해당됩니다.
(예 : 3인분일 경우 → 3컵, 6인분일 경우 → 6컵)
2
별도의 용기에 맑은 물이 나올 때까지 깨끗이 씻습니다.
3
내솥을 본체에 넣고 뚜껑을 닫아 주십시오.
▶내솥을 넣을 때 본체에 완전히 들어가도록 주의하여 넣습니다.
▶내솥의 바닥면에 쌀 등의 이물질이 붙어 있으면 취사가 잘 되지 않거나 고장의 우려가 있습니다.
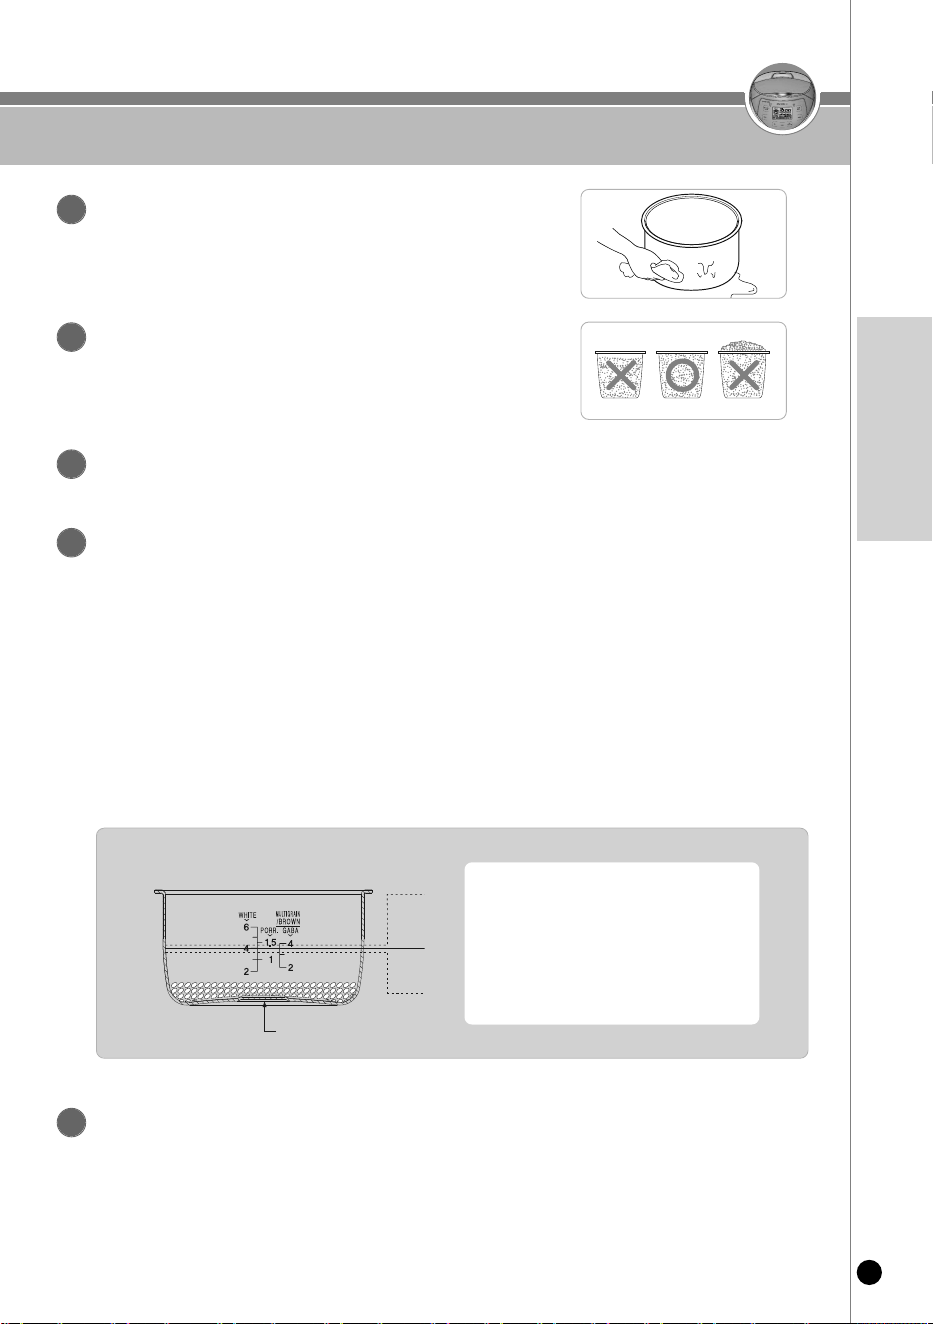
5
❷ 쌀 4인분의 경우 (계량컵 4컵) 내솥의 ‘백미’ 눈금 4에
물을 맞춥니다.
❸ 쌀을 충분히 불렸을 때 또는 된밥을 원할 때 :
물을 규정량보다 적게 부어 주십시오.
❶ 묵은쌀로 밥을 지을때나 진밥을 원할때 :
물을 규정량보다 많이 부어 주십시오.
메뉴에 따라 물의 양을 조절합니다.
▶ 바닥이 평탄한 곳에 내솥을 올려 놓고 내솥에 표시된 눈금에 맞춰 물의 양을 조절합니다.
▶ 내솥에 표시된 눈금은 쌀과 물을 함께 부었을 때의 물눈금을 표시합니다.
▶ 물 높이 조절에 대하여
• 백미 : ‘백미’ 물눈금 기준으로 물을 맞춥니다.
백미는 최대 6인분까지 취사 가능합니다.
• 잡곡/현미, 현미발아 : ‘잡곡/현미, 현미발아’ 물눈금 기준으로 물을 맞춥니다.
잡곡/현미, 현미발아는 최대 4인분까지 취사 가능합니다.
• 죽 : ‘죽’ 물눈금 기준으로 물을 맞춥니다.
죽은 최대 1.5인분까지 취사가능합니다.
4
● 6인분 (1.08L) 제품
❶
❷
❸
쌀4인분(계랑컵4컵)
42
맛있는 밥을 드시려면
쌀은 보관
방법이 중요!
제품은 깨끗하게!
•
쌀은 반드시 계량컵을 사용하여 정확히 계량합니다.
(시중에 유통되고 있는 쌀통은 제품에 따라
쌀의 양이 다소 차이가 날 수도 있습니다.)
•물의 양은 내솥을 평평한 곳에 놓고 내솥의 물(水)
높이에 맞춥니다.
• 쌀은 가급적이면 소량으로 구입하여 통풍이 잘되고
직사광선이 없는 서늘한 곳에 쌀의
수분이 잘 증발되지 않도록 보관합니다.
• 쌀이 개봉한 지 오래되어 말라 있는 경우는 물을
반눈금 정도 더 넣고 취사를 하면 좋습니다.
• 청소를 자주 하십시오.
특히, 뚜껑부에 이물질이 묻어 있지 않도록
자주 닦아주십시오.
쌀이 많이 말라 있는 경우는
계량을 정확히 하더라도 밥이
퍼석할 수가 있습니다.
청소를 자주 하지 않으면 세균이
번식하여 보온시 밥에서 냄새가
날 수 있습니다.
맛있는 밥을 드시려면 다음 사항을 꼭 알아두십시오.
밥솥으로 맛있는 밥 짓기
쌀은 계량컵으로!
물은 내솥눈금
으로 정확히!
장시간 보온을 하게되면 밥색깔이
변하거나 밥에서 냄새가 날 수도
있습니다.
보온시간은 짧을
수록 좋습니다!
쌀의 양과 물의 양이 맞지
않으면 밥이 퍼석하거나
설익거나 질게 될수가
있습니다.
예약 취사 시간은
짧을수록 좋습니다!
• 쌀이 많이 말라 있는 경우는 가급적 예약취사를
피하시고 물을 반눈금 정도 더 넣고 취사합니다.
• 보온은 12시간 이내로 하는 것이 좋습니다.
10시간 이상 예약취사하거나 말라
있는 쌀을 예약취사할 경우는 밥이
퍼석하거나 설익을 수가 있으며
심한 경우는 층밥이 될 수도
있습니다.
43
www.cuckooworld.com
KOREAN
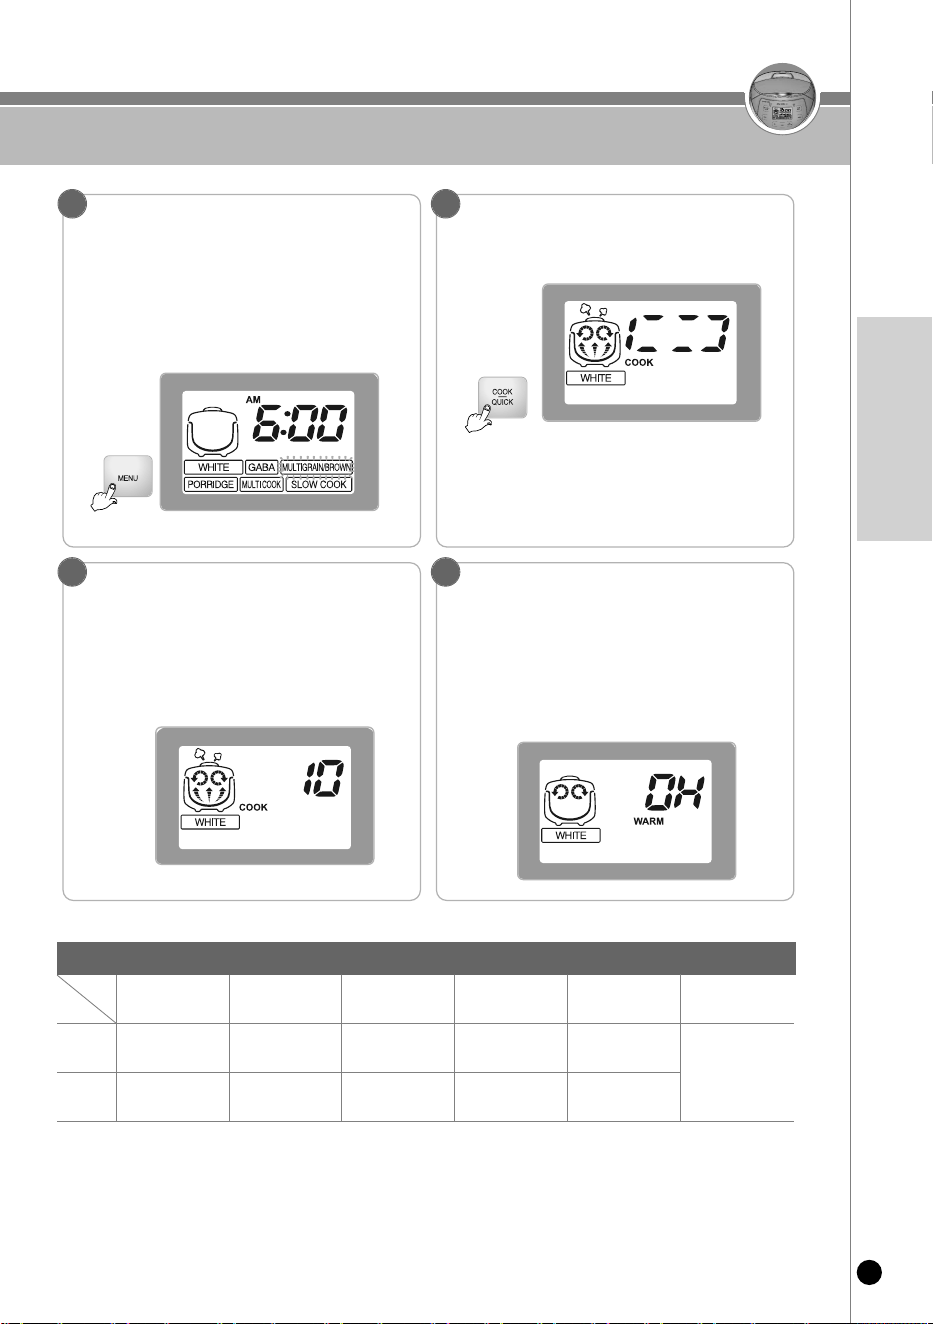
취사는 이렇게 하십시오
“메뉴”버튼을 눌러 원하시는 메뉴를 선택하세요.
“취사/백미쾌속” 버튼을 눌러 취사를 시작합니다.
• “메뉴” 버튼을 누를 때마다 백미 →현미발아 →잡곡/현미 →죽→찜 →
웰빙쿡 순으로 반복 선택됩니다.
•백미, 현미발아, 잡곡/현미는 한번 취사가 완료되고 나면 메뉴가
기억되므로 동일 메뉴를 연속 사용할 경우는 메뉴 선택을 하지
않아도 됩니다.
1 2
취사완료
•
취사가 끝날때 완료음이 울리면 보온 기능을 시작합니다.
•
취사가 끝나면 즉시 밥을 골고루 잘 섞어 주십시오.
섞지 않고 그냥두면 밥이 굳고 변색되어 냄새가 발생합니다.
•
취사중에는 “취소” 버튼을 누르지 마십시오. 취사가 취소됩니다.
4
뜸들이기
(예 : 백미)
•
뜸 진행 부터는 표시부에 남은 취사시간을 표시합니다.
메뉴에 따라 남은 시간 은 차이가 있습니다.
3
구분
메뉴
취사량
취사시간
▶찜등의 요리 후 취사하게 되면 냄새가 배어들 수도 있습니다.
(분리형 커버 및 뚜껑부위를 깨끗하게 닦아낸 후 사용하여 주십시오.)
▶메뉴별 취사시간은 제품의 사용환경에 따라 다소 차이가 날 수도 있습니다.
예) 잡곡/현미를 선택 할 경우
예) 백미를 취사 할 경우
메뉴별 취사시간
백 미
2인분~6인분
약36분~약53분
백미쾌속
2인분~4인분
약33분~약41분
현미발아
2인분~4인분
약80분~약88분
잡곡/현미 웰빙쿡
죽
2인분~4인분
약52분~약63분
1인분~1.5인분
약90분
51쪽을
참조하여
주십시오.
• CR-0631F 모델경우, 요리 / 터보 버튼이 적용되어 있습니다.
44
취사는 이렇게 하십시오
이 밥솥은 밥의 밑면에 엷은 누런 빛깔이 나타나는데, 이는 밥이 잔여수분을 밥 내부로 흡수시켜
밥 특유의 구수한 향기와 맛을 내는 멜라노이징 현상을 일으켜 맛있는 밥이 되도록 설계되어 있기 때문입니다.
특히 “예약취사”와 같이 쌀알이 오랜 시간 침전되면 내솥 바닥에 미세 전분이 가라앉아 “일반 취사”보다
멜라노이징(미세 밥 눌음)현상이 심하게 나타날 수도 있습니다.
멜라노이징(미세 밥 눌음) 현상
백미
백미를 취사할 때 사용합니다
잡곡
/현미
백미
쾌속
백미에 현미를 섞어서 취사할 경우 사용합니다.
•“백미” 메뉴를 선택한 후 “취사/백미쾌속” 버튼을 두번 누르면 백미쾌속 취사로 동작하여
밥짓는 시간이 단축됩니다. (백미 2인분 기준 약31~36분 정도 걸림)
•취사전 쌀을 20분 정도 불린 다음 백미쾌속으로 취사하시면 밥맛이 더욱 좋아집니다.
•백미쾌속 취사는 예약이 되지 않습니다.
죽
된죽을 끓이는 기능입니다.
찜
수동으로 찜시간을 설정해서 요리합니다.
취사메뉴 사용법
현미
발아
현미를 발아시켜 발아현미 밥을 드시고자 할때
사용합니다.
웰빙쿡
저온 조리기능으로 죽이나 스프, 건강차 등의
요리가 가능합니다.
45
www.cuckooworld.com
KoreAn
쿠쿠 맞춤밥맛 기능은 이렇게 하십시오
❶ 메뉴 설정 화면
▶ 대기상태에서 “분/맞춤밥맛”버튼을 누르면 부저음과 함께표시부에
그림과 같이 “ ”(불림시간 조정모드)과 나타납니다.
※ 그림은 백미 메뉴 기준입니다.
❷ 맞춤밥맛 모드 설정 및 불림 연장 구간 설정
▶ 메뉴 버튼을 눌러 원하시는 메뉴를 선택하시면
표시부에 선택된 메뉴가 깜빡입니다.
(백미 → 현미발아 → 잡곡/현미 순으로 반복)
▶ “시”버튼을 눌러 불림시간을 설정합니다.
❸ 가열유지 구간 설정 및 완료
▶
“분”버튼을 눌러 가열유지구간을 설정합니다.
▶ “취사/백미쾌속”버튼을 눌러 설정을
저장하고 다시 한번 “취사/백미쾌속”
버튼을 눌러 취사 단계로 진행합니다.
▶ “취소” 버튼을 누르거나
입력없이 7초가 경과하면
기능이 취소되고 대기상태로
돌아갑니다.
1. ‘쿠쿠 맞춤밥맛’ 기능을 사용시 눌음현상 발생과 취반상태 등에 영향을 줄 수 있습니다.
어린이의 조작 등으로 인해 시간이 임의로 변경되지 않도록 주의하여 주십시오.
※ 초기 설정치는 불림시간 0분(“ ”), 가열유지시간 0분(“ ”)으로 설정되어 있습니다.
2. ‘쿠쿠 맞춤밥맛’기능을 사용하게 되면 설정된 시간만큼 취사시간이 다소 길어질 수 있습니다.
3. 가열유지시간을 길게 설정하면, 눌음현상이 나타날 수 있습니다.
주의사항
*
1. 쌀이 단단하고 찰기가 있는 밥맛이 됩니다.
*
2. 쌀이 부드럽고 잘 부풀어 오른 밥맛이 됩니다.
*
3. 쌀이 부드럽고 찰기가 있는 밥맛이 됩니다.
가열(구수한밥)
4단계
3단계
2단계
1단계
불림
1단계 2단계 3단계 4단계
세계 최초로 쿠쿠만의 가변밥맛 기술을 개발하여 밥의 “부드러운 정도”와 “차지고 구수한 정도”를 자신의 기호에 맞게
선택하여 취사하는 기능으로 소비자가 원하는 밥맛으로 취사할 수 있는 쿠쿠만의 특허 기술입니다.
쿠쿠 맞춤밥맛이란
“불림시간”을 길게 선택하면 : 밥맛이 부드러워집니다. (불림시간 4단계 선택가능)
“가열유지시간”을 길게 선택하면 : 밥맛이 더 구수해집니다. 멜라노이징이 발생 할 수 있습니다. (가열유지시간 4단계 선택가능)
※ 기호에 따라 불림시간, 가열유지시간을 각각 선택하셔도 되고 두 기능을 동시에 선택하셔도 됩니다.
쿠쿠 맞춤밥맛기능
쿠쿠 맞춤밥맛 사용방법
쿠쿠 맞춤밥맛의 16가지 밥맛 그래프

46
맞춤취사 기능은 이렇게 하십시오
맞춤밥맛 설정모드에서 “예약” 버튼을
누르면 맞춤취사 설정모드로 진입합니다.
쿠쿠 맞춤 취사 설정 화면
1
“취사/백미쾌속” 버튼을 누르면
설정된 온도가 부저음과 함께 자동으로
입력됩니다.
쿠쿠 맞춤 취사 설정 화면
3
“시” 버튼을 눌러 표시부가
0 1 2 -2 -1 0 과
같이 변하도록 합니다.
“분/맞춤밥맛” 버튼을 눌러
표시부가 0 -1 -2 2
1 0 과
같이 변하도록 합니다.
-❶ 2단계 설정 모드
2
-❷ 2단계 설정 모드
2
1. ‘쿠쿠 맞춤밥맛’ 기능은 백미, 백미 쾌속, 현미발아, 잡곡/현미 메뉴에 일괄 적용됩니다.
2. ‘ ’일때를 기준으로 하여 기호에 따라 취사온도 단계를 설정하여 주십시오. 취사단계가 높은 경우 눌음현상이
발생할 수 있습니다.
3. 단계별 설정후 취사시 쌀의 상태 및 함수율에 따라서 취반상태에서 차이가 있을 수 있습니다.
(맞춤/기능) 설정값 초기화 기능
1. 맞춤밥맛, 맞춤취사, 맞춤보온, 취침보온 등 사용자가 변경한 모든 설정값들을 초기상태로 되돌릴 경우 사용합니다.
2. 대기 상태에서 “취소” 버튼을 5초간 누르고 있으면 됩니다.
3. 이 때, 현재 시각은 12:00으로 초기화됩니다. 현재 시각 설정은 40쪽을 참고하시길 바랍니다.
취사시 가열완료온도도 단계를 소비자가 원하는 기호에 맞게 조절(온도의 높고, 낮음)하여 취사할 수 있는
쿠쿠만의 기술입니다.
맞춤밥맛 설정모드에서 “예약” 버튼을 누르면 부저음과 함께 표시부에 그림과 같이 맞춤취사 설정모드가 나타납니다.
맞춤취사 기능
• CR-0631F 모델경우, 요리 / 터보 버튼이 적용되어 있습니다.
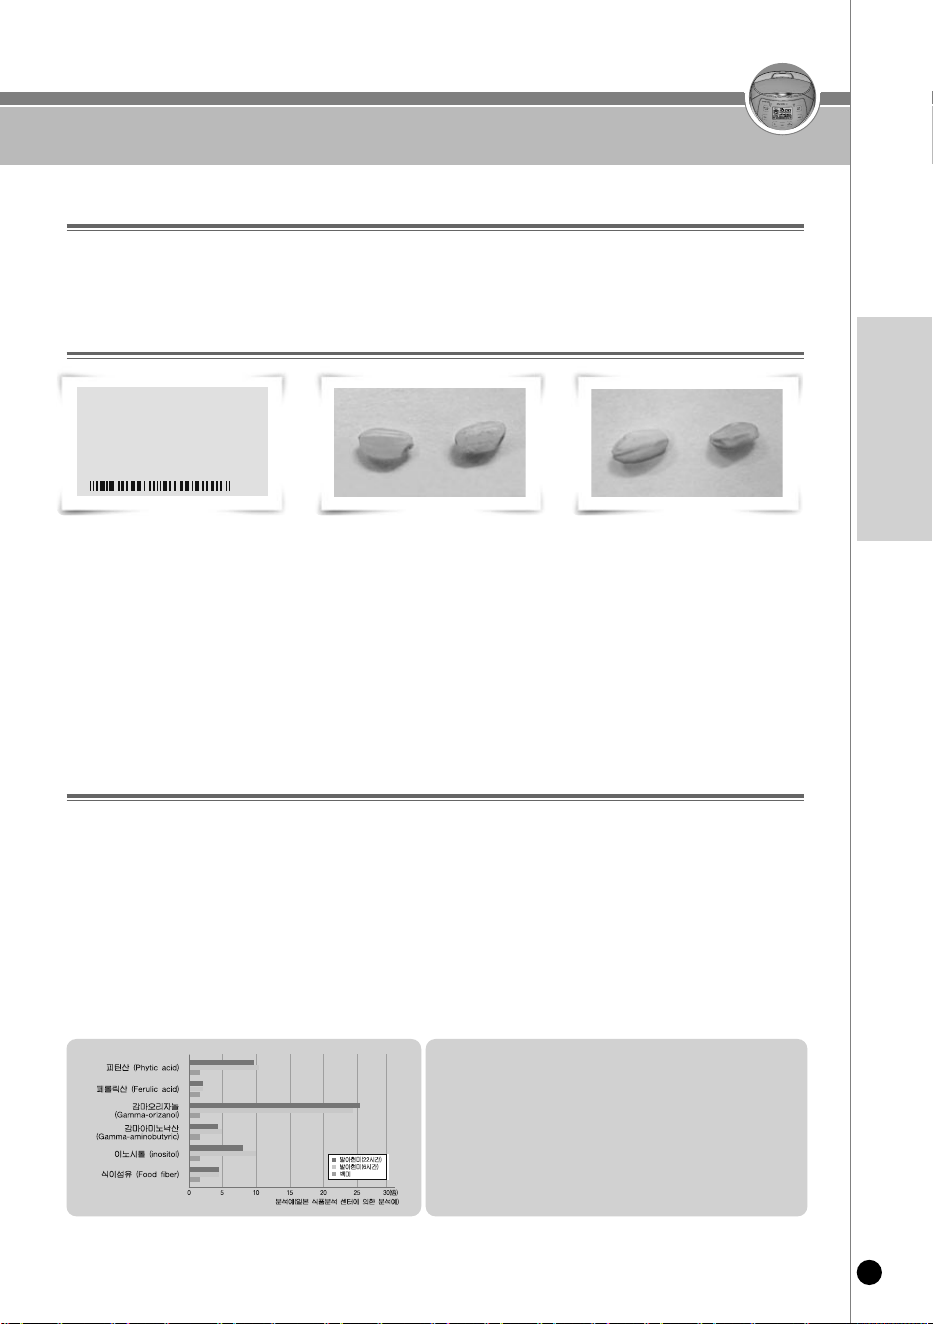
47
www.cuckooworld.com
KoreAn
현미발아는 이렇게 하십시오
원산지 : 경기 용인
품 목 : 추청
단 위 : 1.5kg
생산년도 : ××××년산
도정일자 : ××××년 ××월 ××일
먼저 생산일자와 도정일자를 확인 하십시오.
▶
수확한지 1년 이내 그리고 도정일자로부터 3개월 이내의 현미를 사용하십시오.
(현미의 경우 수확년도와 도정날짜가 표시되어 있습니다.)
눈으로 현미를 직접 확인하십시오.
▶ 시중에서 판매하는 현미의 대부분은 내부를 볼 수 있도록 되어 있습니다.
•씨눈이 살아 있는지 먼저 확인하십시오.
•쌀 표면이 밝은 황색을 띄고 표면에 윤기가 흐르면 좋은 현미이고 표면이 하얗게 일어나거나 색이 검은 기운을 띄면
발아에 적합하지 않은 현미입니다.
•조각나거나 덜 여문 현미는 피하시고 쭉정이가 없는 현미를 고르세요.
쭉정이는 발아 중 썩어 냄새를 유발하고 푸르스름한 색을 띄는 덜 여문 현미는 발아가 되지 않습니다.
(정상현미) (불량 현미 - 씨눈 소실)
발아현미(6시간)와 백미의 영양 비교
발아현미는 백미에 비해 높은 영양소를 가집니다.
피틴산 10.3배
페롤릭산 1.4배
감마오리자놀 23.9배
감마아미노낙산 5배
이노시톨 10배
식이섬유 4.3배
▶
현미는 백미에 비교 영양가가 높은 식품이지만 먹었을 때 거칠고 딱딱하며, 소화하기 힘들다는 단점이 있으나
아주 조금만발아시켜도 잠자고 있던 효소가 활성화되어 영양성분이 보다 풍부하게 되고 소화 흡수가 훨씬
수월한 형태로 변화됩니다.
발아현미란
발아현미는 영양가 높은 현미를 발아 시켜 영양소를 더욱 증가시키고 현미의 단점인 거친 밥맛이 개선된
소화가 잘되는 훌륭한 영양원입니다.
▶ 현미보다 부드러운 밥맛을 즐기실 수 있습니다.
▶ 소화가 잘되고 영양소가 풍부합니다 - 발아과정에서 당화호르몬이 분비되어 소화흡수가 잘됩니다.
▶ 어린이나 수험생의 영양 건강식으로 좋습니다 - 식이섬유가 풍부합니다.
▶ 발아현미에는 GABA(감마아미노낙산)가 다량 함유되어 있습니다. GABA는 간장과 신장의 신진대사를 촉진하며 중성지방
증가 억제 작용, 혈압상승 방지효과, 뇌세포 대사 촉진 등 우리몸에 좋은 효과가 있음이 의학적으로 확인되었습니다.
발아현미의 특징
현미구입방법
(불량 현미 - 쭉정이와 덜 여문 현미)
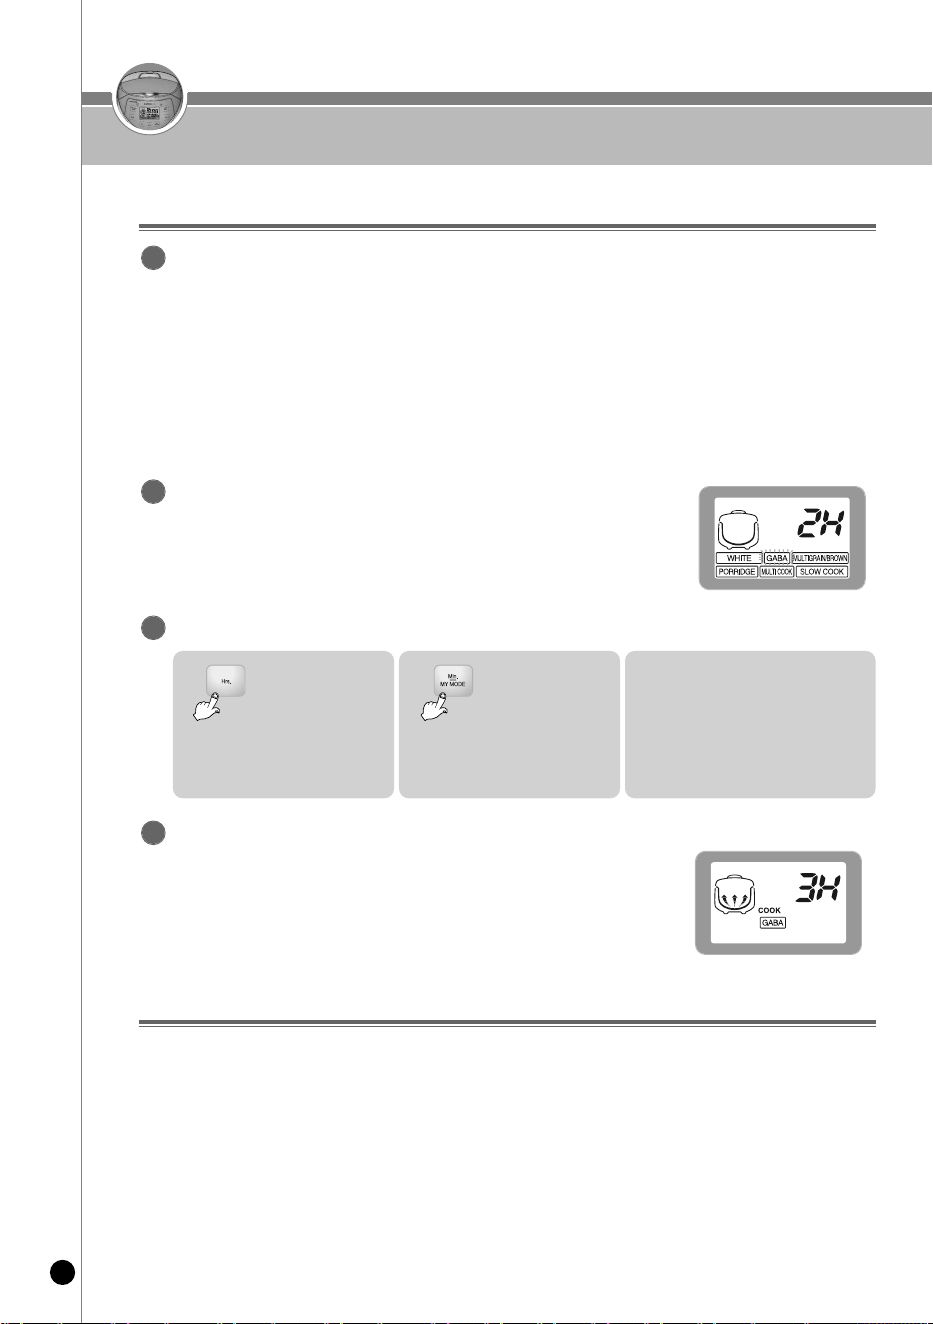
48
현미발아는 이렇게 하십시오
※발아 잔여시간이 3시간 남아있을때
※초기설정 2H(2시간)
현미/발아 메뉴의 조작방법
발아를 더욱 촉진 시키기 위해 현미를 미리 16시간 이내로 침수하여 예비발아를 해주십시오.
예비발아방법
▶일반적으로 가정에서 사용하시는 용기에 씻은 현미를 넣은 뒤, 최대한 물을 충분히 넣고 침수시킨 후 예비발아하여 주십시오.
▶예비발아는 16시간 이내로 하여 주시고 현미발아 메뉴 사용 전에는 반드시 흐르는 물에 세척하신 후 사용하여 주십시오.
지나치게 세게 문질러 세척하면 쌀눈(배아)이 떨어져 발아되지 않을 수 있습니다.
▶예비발아하실 때 침수시간에 따라 특유의 냄새가 날 수 있습니다.
▶예비발아가 완료된 현미는 씻은 후에 내솥에 넣고 취사량에 따라 물높이를 맞추신 후 현미발아 메뉴를 사용하여 주십시오.
▶기온이 높은 여름이나 보관온도 등에 따라 예비발아시에는 냄새가 날 수 있으니 가급적 예비발아시간을 줄여 주시고
더 주의해서 깨끗이 잘 씻어 주십시오.
▶
현미발아 메뉴가 선택되었을 때는 표시부에 2H 표시됩니다.
1
“메뉴” 버튼을 눌러 현미발아를 선택합니다.
2
“시”, “분/맞춤밥맛” 버튼을 눌러 시간을 설정합니다.
3
1. 버튼을 누르면 현미발아
시간이 2시간씩 증가
합니다.
2. 버튼을 누르면 현미발아
시간이 2시간씩 감소
합니다.
3. 현미/발아 시간은 0, 2, 4, 6시간까지 설정
가능합니다.
현미발아 ‘0’시간으로 설정 후 압력취사/백미쾌속
버튼 입력시 즉시 취사가 진행됩니다. 현미를 발아
시키지 않고 취사할 경우 또는 이미 발아가 되어있는
현미로 취사할 경우에는 ‘0’시간으로 설정하십시오.
▶ “
취사/백미쾌속” 버튼을 누르면 설정된 시간만큼 현미발아를 시작하고,
발아 완료 후 즉시 취사가 시작됩니다.
▶
현미/발아 중에는‘취사’표시가 나타나며 남은 시간이 표시됩니다.
“취사/백미쾌속” 버튼을 누릅니다.
4
현미/발아 메뉴의 조작방법
❶ 발아된 싹의 크기를 키우지 않고 좀 더 빨리 드시고 싶으면 예비발아를 하지않고 현미발아를 선택하여 원하는 발아시간을
설정 하신 후 “취사” 버튼을 눌러 취사하십시오. (싹의 크기에 따른 영양분의 차이는 크지 않습니다.)
❷ 기온이 높을때 오랜시간 발아시키면 냄새가 날 경우가 있습니다. 그 경우에는 발아 설정시간을 단축하여 짧게 설정하여 주십시오.
❸ 현미발아 메뉴로 취사하실 경우에는 최대 4인분 이하로 하여 주십시오.
❹ 물은 수돗물을 사용하셔도 무방하나 생수를 이용하시면 더욱 좋습니다. 단, 뜨거운 물, 끓인 물은 식힌 경우라 하더라도
발아가 되지 않을수 있으니 사용을 피해주십시오.
❺ 현미의 발아율이나 싹의 길이 등의 발아상태는 현미의 종자와 보관상태, 보관기간에 따라 차이가 있을 수 있습니다.
- 발아현미는 현미를 싹틔운 것으로, 현미의 종자에 따라 발아율 및 발아된 후의 싹의 길이에 차이가 있을 수 있습니다.
발아시킬 현미는 반드시 수확후 1년 미만의 것을 사용해 주시고, 도정후 보관기간이 가급적 짧은 것을 이용해 주십시오.
❻ 현미의 종류에 따라 멜라노이징 또는 밥상태의 차이가 나타날 수 있습니다.
기호에 맞게 물량을 가감하거나 맞춤밥맛 기능을 이용해 주십시오.(45~46쪽 참조)

49
www.cuckooworld.com
KoreAn
찜은 이렇게 하십시오
찜 사용 및 예약방법
“메뉴” 버튼을 눌러 찜을 선택합니다.
1
▶
찜 메뉴가 선택되었을 때는
표시부에 20분이 표시됩니다.
“시”, “분” 버튼을 눌러 시간을 설정합니다.
2
1.
“시” 버튼을 누르면
찜 시간이 5분씩
증가합니다.
2. “분” 버튼을 누르면
찜 시간이 5분씩 감소
합니다.
3. 찜 시간은 10분~60분까지
설정 가능합니다.
“취사/백미쾌속” 버튼을 누르면 찜 메뉴가 시작됩니다.
3
▶
찜 취사가 시작되면 취사중 표시가 나타나며 남은 시간이 표시됩니다.
찜 예약은 이렇게 하십시오.
4
1. 현재 시각이 맞는지 확인합니다. 2. “예약” 버튼을 누릅니다. 3. “
시”, “분” 버튼을
눌러 예약시각을
설정 합니다.
4. “메뉴” 버튼을 눌러
찜을 선택합니다.
5.
“시”, “분” 버튼을눌러
눌러 찜 요리
시간을 설정합니다.
6.
“예약” 버튼 또는
“취사/백미쾌속”
버튼을 누릅니다.
• CR-0631F 모델경우, 요리 / 터보 버튼이 적용되어 있습니다.

50
웰빙쿡은 이렇게 하십시오.
웰빙쿡 사용 및 예약방법
메뉴 버튼을 눌러 웰빙쿡을 선택합니다.
1
▶
웰빙쿡 메뉴가 선택되었을 때는 표시부에 3시간이 표시됩니다.
“시”, “분” 버튼을 눌러 시간을 설정합니다.
2
1. “시” 버튼을 누르면
웰빙쿡 시간이 1시간씩
증가합니다.
2. “분” 버튼을 누르면
웰빙쿡 시간이
10분씩 증가합니다.
3. 웰빙쿡 시간은 1시간~10시간까지
설정 가능합니다.
“취사/백미쾌속” 버튼을 누르면 웰빙쿡 메뉴가 시작됩니다.
3
▶
웰빙쿡 취사가 시작되면 취사중 표시가 나타나며 남은 시간이
표시됩니다.
웰빙쿡 예약은 이렇게 하십시오.
4
1. 현재 시각이 맞는지 확인합니다. 2. “예약” 버튼을 누릅니다. 3. “
시”, “분” 버튼을
눌러 예약시각을
설정 합니다.
4.
“메뉴” 버튼을 눌러
웰빙쿡을 선택합니다.
5.
“시”, “분” 버튼을
눌러눌러 웰빙쿡
요리시간을 설정
합니다.
6.
“예약” 버튼 또는
“취사/백미쾌속”
버튼을 누릅니다.
• CR-0631F 모델경우, 요리 / 터보 버튼이 적용되어 있습니다.

51
www.cuckooworld.com
KoreAn
웰빙쿡은 이렇게 하십시오.
남은 밥 1인분, 당근 50g,
양파 50g, 쪽파 30g,
소금 약간, 후추 약간
당근 30g, 양파 30g, 감자 30g,
양송이 30g, 쇠고기등심 20g,
크림 스프 가루 100g
올리브오일 1큰술, 소금 약간
대추 180g, 생강 ½톨, 꿀 약간
1. 당근, 양파, 쪽파는 깨끗이 씻어 잘게 다져 준비해
두십시오.
2. 내솥에 준비해둔 밥 1인분과 잘게 다져놓은 당근,
양파, 쪽파를 넣고, 물 2½컵을 부어 주십시오.
3. 뚜껑을 닫고 메뉴 버튼을 눌러 「웰빙쿡」을 선택한 후
웰빙쿡 시간을 5시간으로 설정한 뒤 취사/백미쾌속
버튼을 눌러 주십시오.
4. 요리가 완료되면 기호에 맞게 소금, 후추를 넣고 가볍
게 저어 주십시오.
1. 깨끗하게 씻은 양파, 감자, 당근, 쇠고기등심은 잘게 다져
주십시오.
2. 양송이는 모양대로 편을 내어 썰어 준비해 주십시오.
3. 썰어둔 재료는 올리브오일 1큰술과 소금 약간을 넣고
볶아 주십시오.
4. 내솥에 크림스프가루와 물3컵을 넣고 잘 풀어준 뒤 볶아
둔 재료들을 넣어 뚜껑을 닫고, 메뉴 버튼을 눌러 「웰빙
쿡」을 선택한 후 웰빙쿡 시간을 5시간으로 설정한 뒤
취사/백미쾌속 버튼을 눌러 주십시오.
5. 요리가 완료되면 기호에 맞게 소금, 후추를 넣고 가볍게
저어 주십시오.
1. 생강은 깨끗이 씻어 껍질을 벗기고, 얇게 썰어 준비해
주십시오.
2. 내솥에 준비해 둔 대추와 썰어 둔 생강을 함께 넣고,
물을 백미 물눈금 4까지 부어 주십시오.
3. 뚜껑을 닫고, 메뉴 버튼을 눌러「웰빙쿡」을 선택한 후,
웰빙쿡 시간을 8시간으로 설정한 뒤 취사/백미쾌속
버튼을 눌러 주십시오.
4. 잘 우러난 대추차에 기호에 맞게 꿀을 넣어 주십시오.
야채죽
야채스프
대추차
껍질 벗긴 호박 500g,
찹쌀가루 100g,
설탕 약간, 소금 약간
1. 껍질을 벗긴 호박은 얇게 썰어 준비해 주십시오.
2. 내솥에 찹쌀가루와 물3컵(계량컵 기준)을 넣고 잘 풀어
주십시오.
3. 내솥에 얇게 썰어둔 호박을 넣고, 뚜껑을 닫아 메뉴
버튼을 눌러「웰빙쿡」을 선택한 후 웰빙쿡 시간을 3시간
으로 설정한 뒤 취사/백미쾌속 버튼을 눌러 주십시오.
4. 취사가 완료되면 체에 내려 으깨거나 믹서기로 갈아
기호에 맞게 설탕과 소금을 넣어 주십시오.
준비할 재료 이렇게 만드세요요리종류
호박죽
웰빙쿡
메뉴선택
웰빙쿡 방법
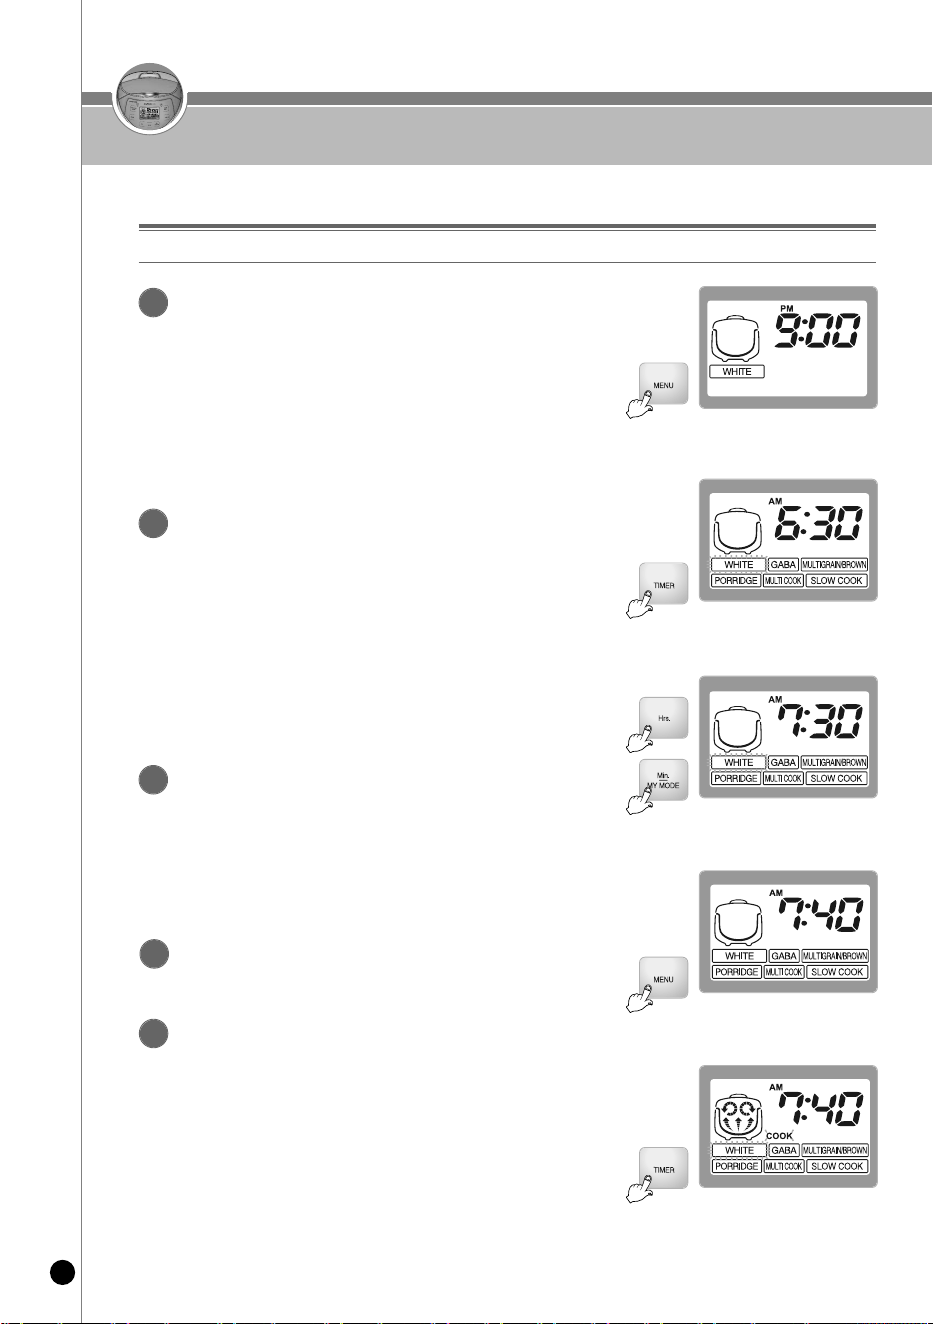
52
예약취사는 이렇게 하십시오
“예약” 버튼을 누릅니다.
▶ 예약 취사 설정이 완료되면, 예약 LED부가 3회 깜빡인후 점등됩니다.
▶ 예약 설정된 시각에 예약 취사가 완료됩니다.
(취사량 및 사용조건에 따라 완료시각이 다소 차이가 날 수도 있습니다.)
▶ “예약” 버튼 대신 “취사/백미쾌속” 버튼을 눌러도 되며,
버튼을 누르지 않으면 7초 후 설정된 시각이 자동 입력됩니다.
▶ 한 번 설정되어 취사가 완료된 예약 시각은 항상 기억되므로
예약 시각을 맞출 필요없이 “예약” 버튼만 누르면 됩니다.
※ 예약 취사 시간은 메뉴별 최대인분 기준으로 설정되어 있으므로
소량 취사시 예약시각보다 일찍 취사가 완료될 수 있습니다.
5
현재 시각이 맞는지 확인합니다
▶ 현재 시각을 맞추는 방법은 40쪽을 참조하십시오.
▶ 현재 시각이 맞지 않을 경우 예약취사 시각이 맞지 않으므로
현재 시각으로 정확히 맞춥니다.
▶ 오전, 오후가 바뀌지 않도록 주의합니다.
1
예약 버튼을 누릅니다.
2
“시”, “분” 버튼을 눌러 예약 시각을 설정합니다.
▶ “시” 버튼을 눌러 ‘오전 7시’에 맞춥니다.
누를 때마다 1시간 단위로 변합니다. 계속 누르고 있으면 연속으로 변합니다.
※ 오전/오후가 바뀌지 않도록 주의하십시오.
▶ “분” 버튼을 눌러 분을 ‘40’에 맞춥니다. 누를 때마다 1분 단위로 변합니다.
3
“메뉴” 버튼을 눌러 원하는 메뉴를 선택합니다.
4
▶ 예약 시각은 제품 출하시 ‘오전 6:30’에 맞추어져 있으므로 이 시각에
예약 취사를 원하시는 분은 예약시각 설정을 하지 않아도 됩니다.
▶ “예약” 버튼을 누르면 그림과 같이 기존에 설정되어 있는 예약시각 표시가
나타나고, 예약 LED가 깜박거립니다.
“시”, “분/맞춤밥맛” 버튼으로 취사완료 시각을 설정 합니다.
▶ “예약” 버튼을 누른 후 7초이내에 예약 시각설정을 시작해 주십시오.
※ 보온중일때 예약 취사를 설정하실 경우 취소버튼을 눌러 보온을 취소한후
예약시각을 설정해 주십시오.
예약 취사하는 방법
현재 시각이 오후 9시이고 다음날 오전 7시 40분에 식사를 하고 싶을 경우
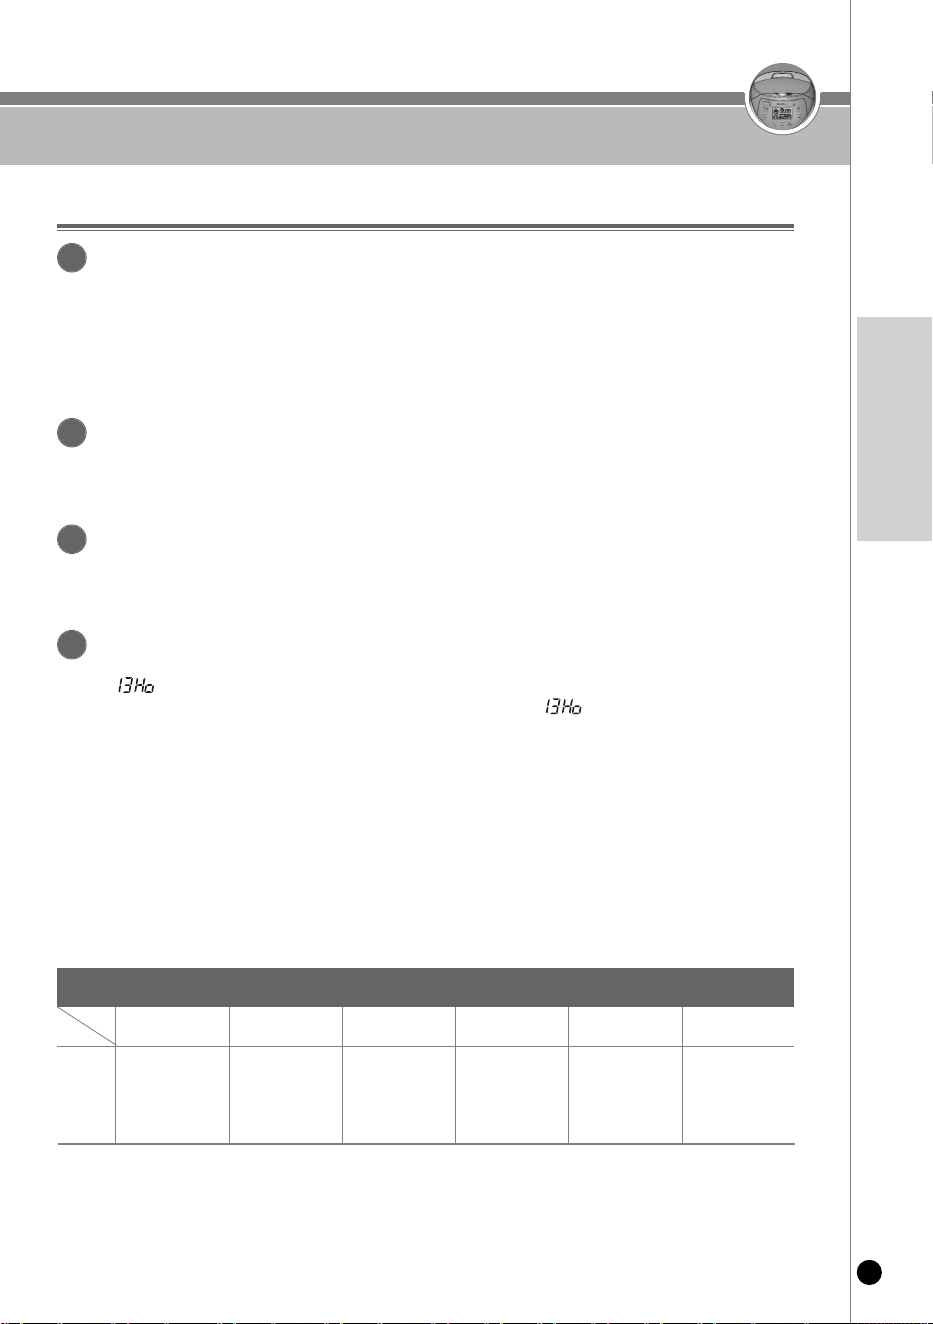
53
www.cuckooworld.com
KoreAn
예약취사는 이렇게 하십시오
▶ “ ”가 표시되고 예약 시간은 자동적으로 13시간으로 변경됩니다.
예) 오후 5시에 내일 오전 7시 취사 완료를 예약하면(설정시간 14시간이 됨) “ ”가 표시되고
예약 시각이 오전 6시로 자동 변경됩니다. (설정시간 13시간)
※ 예약시간이 13시간을 초과할 경우 냄새 및 변색의 원인이 되고,
여름철에는 쌀이 쉬기 때문에 13시간 이하로 예약설정 가능시간을 설정하였습니다.
※ 낮 12시에 예약취사 완료를 원하실 경우 오후 12:00로 설정해 주십시오.
※ 예약취사 기능은 현재시각 기준 1시간 후에서 13시간 이내로 취사완료를 원하실때 사용해 주십시오.
※ 예약취사 진행중에 현재 시각을 확인하려면 시 또는 분/맞춤밥맛 버튼을 누르면 현재 시각이 약 2초간
나타납니다.
예약 취사시 유의사항
예약 취사를 할 경우
▶ 쌀이 개봉된 지 오래되어 매우 말라버린 경우에는 층밥이 되는 수도 있습니다.
▶ 예약취사 설정시간 또는 주변 환경조건에 따라서 밥이 되거나 질어질 수 있으므로
내솥표시의 물(水)높이 기준에서 가감하여 물량을 조절해 주십시오.
▶ 예약설정시간에 따라서 멜라노이징 현상이 나타날 수 있습니다.
1
예약 시각 변경
▶ 예약시각을 변경할 경우는 “취소” 버튼을 취소시킨 후 다시 시작하십시오.
2
예약 설정 가능 시간을 벗어난 경우
▶ 설정 시간이 예약 설정 가능 시간보다 짧았을 경우 즉시 취사를 시작합니다.
3
설정시간이 13시간을 초과할 경우
4
메뉴별 예약 설정 가능시간
예약설정
기능시간
백 미
메뉴
구분
53분
(+맞춤 밥맛시간)
~13시간
잡곡/현미
63분
(+맞춤 밥맛시간)
~13시간
현미발아
88분
(+맞춤 밥맛시간)
~13시간
죽
90분~13시간
찜
찜
설정시간+1분
~13시간
웰빙쿡
웰빙쿡
설정시간+1분
~13시간
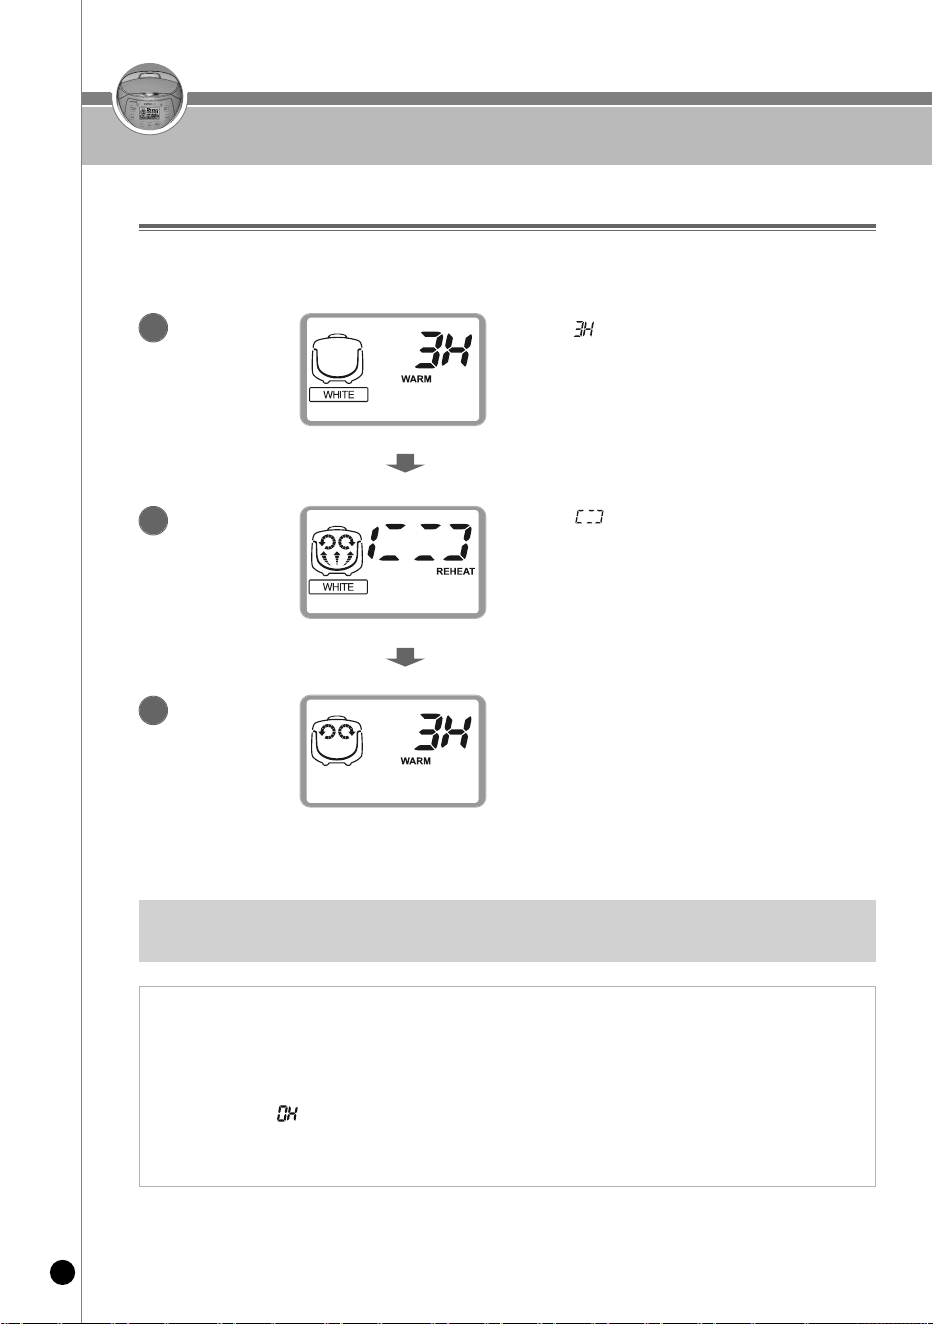
54
밥을 맛있게 보온하려면
※ 설정된 표시상태는 다시 변경하기 전까지 계속 기억되므로 매번 보온 시마다 맞출 필요가 없습니다.
※ 취사 후에는 밥이 뜨거우므로 설정된 보온온도보다 온도가 높을 수 있습니다.
표시부의 “ ”는 보온경과 시간이 3시간임
을 의미합니다.
보온 중 시 버튼을 누르면 보온 경과 시간
이 표시되고, 분 버튼을 누르면 현재 시간
이 표시됩니다
표시부의 “ ”표시가 빙글빙글
돌아가며 재가열을 합니다.
재가열이 끝나면 다시 보온을 진행하며
보온경과 시간이 표시됩니다.
식사하실 때
▶ 보온중 식사를 하실 때 따끈따끈한 밥을 원하시면, 보온/재가열 버튼을 누르면 보온재가열이 시작되고 9분 후 밥을 드시면
금방 지은 밥처럼 따끈따끈한 밥을 드실 수 있습니다.
※ 보온중 일 때 현재시각을 변경할 경우에는 40쪽을 참조하여 주십시오.
▶ 재가열 기능을 너무 자주 사용하시면 밥이 변색되거나 마르는 경우가 있습니다. 1일 1~2회만 사용하세요.
▶ 별도의 전열기구나 가스불로 밥을 지은 경우는 밥을 밥솥에 담은 후 보온/재가열 버튼을 1회 눌러 보온을 합니다.
이때, 표시부에는 “ ”가 표시됩니다.
(이와 같이 차가운 밥솥에 뜨거운 밥을 옮겨 담아 보온할 경우 냄새나 변색이
있을 수 있습니다.)
▶ 보온 24시간 경과 이후부터 보온 경과시간을 깜빡이게 표시하여 보온이 장시간 경과 되었음을 알립니다.
보온 중
1
재가열 중
2
재가열 완료
3
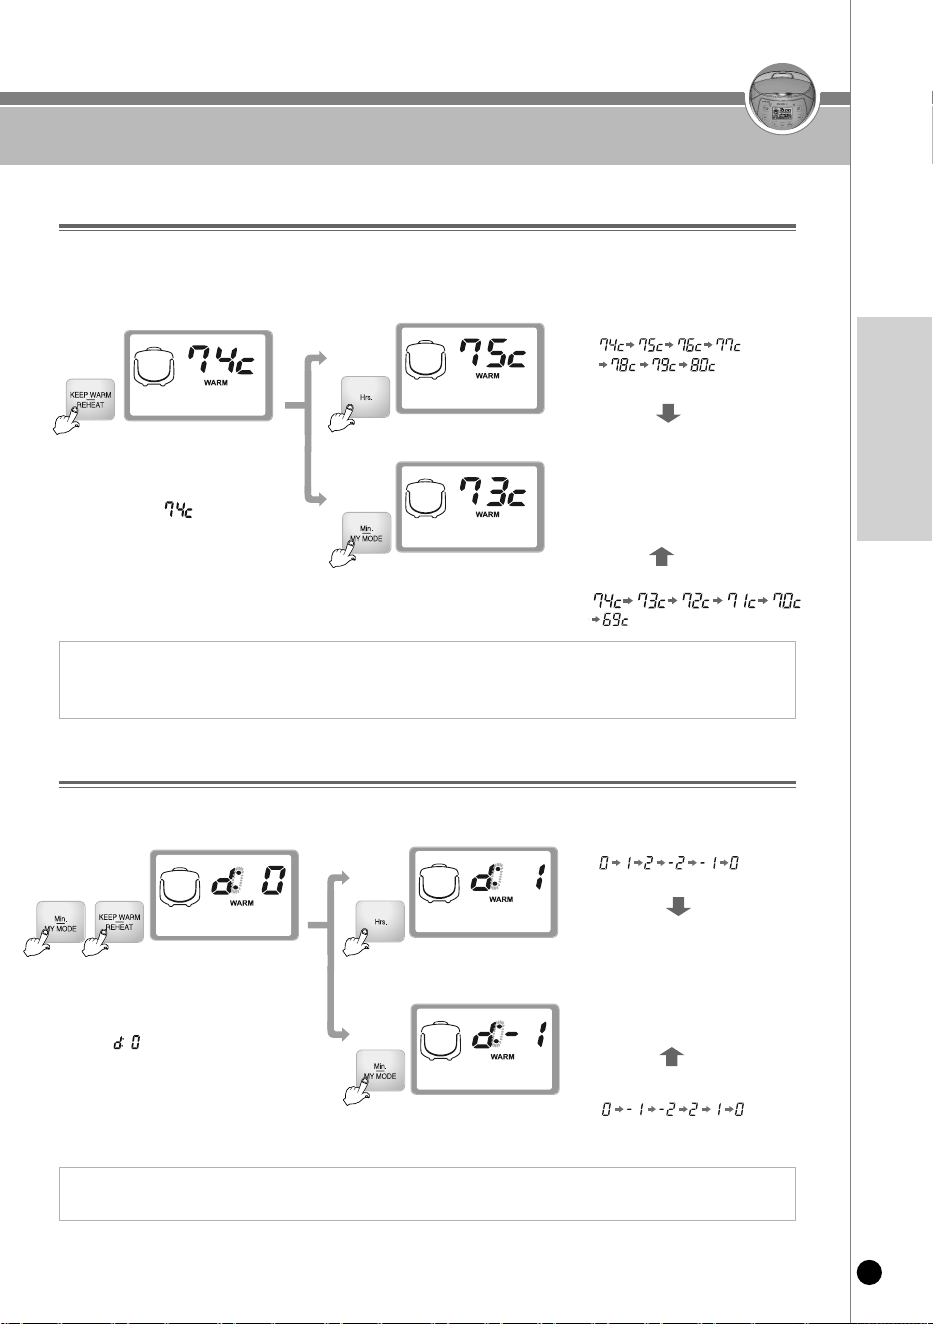
55
www.cuckooworld.com
KoreAn
밥을 맛있게 보온하려면
❷-❷ 분 버튼을 눌러 표시부가
와 같이 변하도록 합니다.
❶ 보온 또는 대기 중에 보온 버튼을
5초 이상 누릅니다.
표시부가 부저음과 함께 그림과 같이
바뀝니다. 이때 는 현재 보온
온도를 나타냅니다.
❷-❶ 시 버튼을 눌러 표시부가
와 같이
변하도록 합니다.
보온온도 조정방법
▶
청소를 자주하고 물을 끓여 소독을 하였는데도 냄새가 나고 물이 맺히거나 색깔이 변하는 경우는 보온 온도가 맞지 않은 경우이므로
보온 온도를 조정합니다.
보온 온도를 조정하고자 하실 때는 고객상담실(국번없이 1588-8899)로 문의 하시면 상세히 안내해 드리겠습니다.
❸ 원하는 온도를 설정한 후 취사, 보온,
예약 버튼을 누르면 설정된 온도가
부저음과 함께 자동으로 입력됩니다.
(취소버튼을 누르거나 입력없이 7초가
경과하면 기능이 취소되고 대기상태로
돌아갑니다.)
❷-❷ 분/맞춤밥맛 버튼을 눌러 표시부가
과
같이 변하도록 합니다.
❶ 맞춤밥맛 설정모드에서 보온/재가열
버튼을 누릅니다.
표시부가 부저음과 함께 그림과
같이 바뀝니다.
‘ ’은 초기값을 나타냅니다.
❸원하는 값을 설정한 후 취사/백미쾌속
버튼을 누르면 설정된 값이 부저음과
함께 자동으로 입력됩니다.
(취소버튼을 누르거나 입력없이 7초가
경과하면 기능이 취소되고 대기상태로
돌아갑니다.)
❷-❶ 시 버튼을 눌러 표시부가
과
같이 변하도록 합니다.
맞춤보온 기능 조정방법
보온시 뚜껑을 열 때 물이 많이 흐를 경우나 밥 가장자리에 밥 퍼짐 현상이 생길 경우에 사용합니다.
보온중 보온온도를 조정하실 때에는 보온 버튼을 5초 이상 누른 후 보온 온도를 조정하십시오.
1. 쉰 냄새가 많이 나고 물이 많이 맺히는(밥이 삭는)경우 : 보온 온도가 낮은 경우 입니다. 보온 온도를 1~2°C정도 높여 줍니다.
2. 밥 색깔이 심하게 누렇고 밥이 마르면서 냄새가 날 경우 : 보온 온도가 높은 경우 입니다. 보온 온도를 1~2°C정도 낮춰 줍니다.
※제품 출고시 설정된 기준 온도는 설명서와 다를 수 있습니다.
1. 뚜껑이 열때 물이 많이 흐를 경우 : 시 버튼을 눌러 설정모드를 1, 2단계 정도 높여 줍니다.
2. 밥 가장자리에 밥퍼짐 현상이 생기는 경우 : 분/맞춤밥맛 버튼을 눌러 설정모드를 -1, -2단계 정도 낮춰 줍니다.
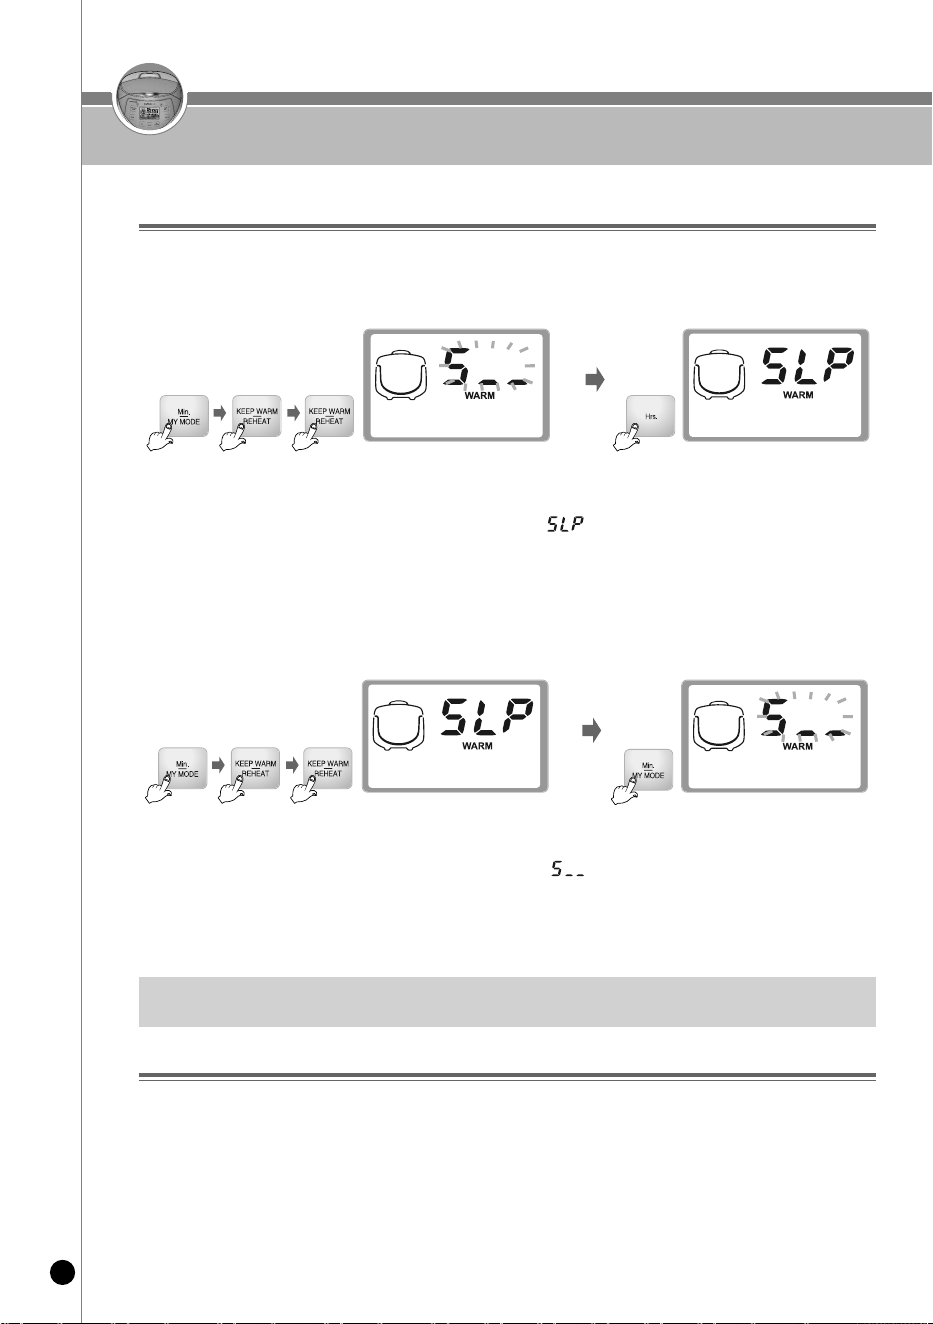
56
밥을 맛있게 보온하려면
1. 맞춤밥맛 설정모드에서 보온 버튼을 2회 입력시 “취침보온” 모드로 진입합니다.
표시부에 그림과 같이 나타납니다.
2. “취침보온” 설정모드로 들어왔을 때 시 버튼을 누르면 표시부와 같이 “ ” 문자가 고정되며 취사
버튼을 눌러 설정합니다.
3. “취침보온” 설정모드 진입 후 아무런 버튼 입력없이 7초가 지나거나 취소 버튼을 누르면 기능이 설정되지 않고
취소되며 대기 상태로 돌아갑니다.
4. 본 기능은 제품 출하시 해제상태로 되어 있으니 필요에 따라 설정해주십시오.
▶ 해제방법
1. 맞춤밥맛 설정모드에서 보온 버튼을 2회 입력시 “취침보온” 모드로 진입합니다.
표시부에 그림과 같이 나타납니다.
2. “ 취침보온 ” 설정모드로 들어왔을 때 분 버튼을 누르면 표시부와 같이 “ ” 문자가 깜박이며
취사 버튼을 누르면 설정이 해제됩니다.
3. “ 취침보온 ” 설정모드 진입 후 아무런 버튼 입력없이 7초가 지나거나 “취소” 버튼을 누르면 기능이 설정되지 않고 취소되며
대기 상태로 돌아갑니다.
▶
본 기능을 설정시 취침시간 동안 보온온도가 저온상태로 유지되오니 취침시간 동안 보온이 필요하신 분은 설정하지 마십시오.
기온이 높은 여름철에는 밥이 상해서 변색되거나 냄새가 날 수 있습니다. 여름철에는 “취침보온”모드 설정을 가급적 하지 마십시오.
취침보온 모드 설정방법
▶ 장시간 보온을 유지할 시 밥품질(변색, 마름, 냄새등)의 저하예방을 위해 취침시간(P.M. 10 : 00 ~ A.M. 04 : 00)동안
보온모드를 저온상태로 유지하는 기능으로 필요에 따라 설정해 주십시오.
▶ 설정방법
보온시 냄새가 날 때
▶ 청소를 자주 해 주십시오. 특히, 뚜껑부의 청소상태가 나쁘면 세균이 번식하여 보온시 냄새가 날 수 있습니다.
▶ 외관상 깨끗하더라도 곳곳에 세균이 서식하여 보온시 냄새를 발생시킬 수 있으므로 냄새가 많이 날 경우는
물을 끓여 소독을 합니다.
물을 내솥의 백미 눈금 2인분 정도에 맞추고 식초를 1큰술 넣은 후 뚜껑을 닫고 “취사/백미쾌속” 버튼을 눌러 물을 끓입니다.
30~40분 정도 끓인 후 취소 버튼을 눌러 줍니다. 물을 끓인 후 내솥을 반드시 깨끗이 씻어 냅니다.
▶ 찜 등의 요리를 한 후 깨끗이 씻어내지 않고 보온하면 밥에 냄새가 배어들 수 있습니다.

밥을 맛있게 보온하려면
57
www.cuckooworld.com
KoreAn
취사 완료 후 밥을 밑면까지 골고루 섞어
보온하면 밥상태가 좋습니다.
(적은 밥은 내솥의 중앙에 불룩하게 모아서
보온하십시오.)
주걱을 넣어 둔 채로 보온하지 마십시오.
특히, 나무주걱 등은 세균을 발생시켜
냄새의 원인이 됩니다.
너무 적은 밥을 보온하거나 먹다 남은 밥이나
찬밥을 보온 중인 밥과 섞어서 보온하지 마십시오.
밥에서 냄새가 날 수 있습니다.
(찬밥은 전자레인지를 이용하십시오.)
장시간 보온하면 밥이 변색되고 냄새가 날 수
있으므로 보온은 12시간 이내로 하는 것이 좋습니다.
보온 24시간 경과 이후부터 보온 경과시간을
깜빡이며 표시합니다.
잡곡/현미는 백미보다 보온 상태가 좋지 않으므로
가급적 보온은 피하십시오.
보온중 내솥의 가장자리나 증기 배출구 하단부는
부분적으로 밥이 하얗게 변하고 부풀어 오를 수도
있습니다. 이럴 경우는 밥을 저어서 섞어 주십시오.
보온할 때 주의사항
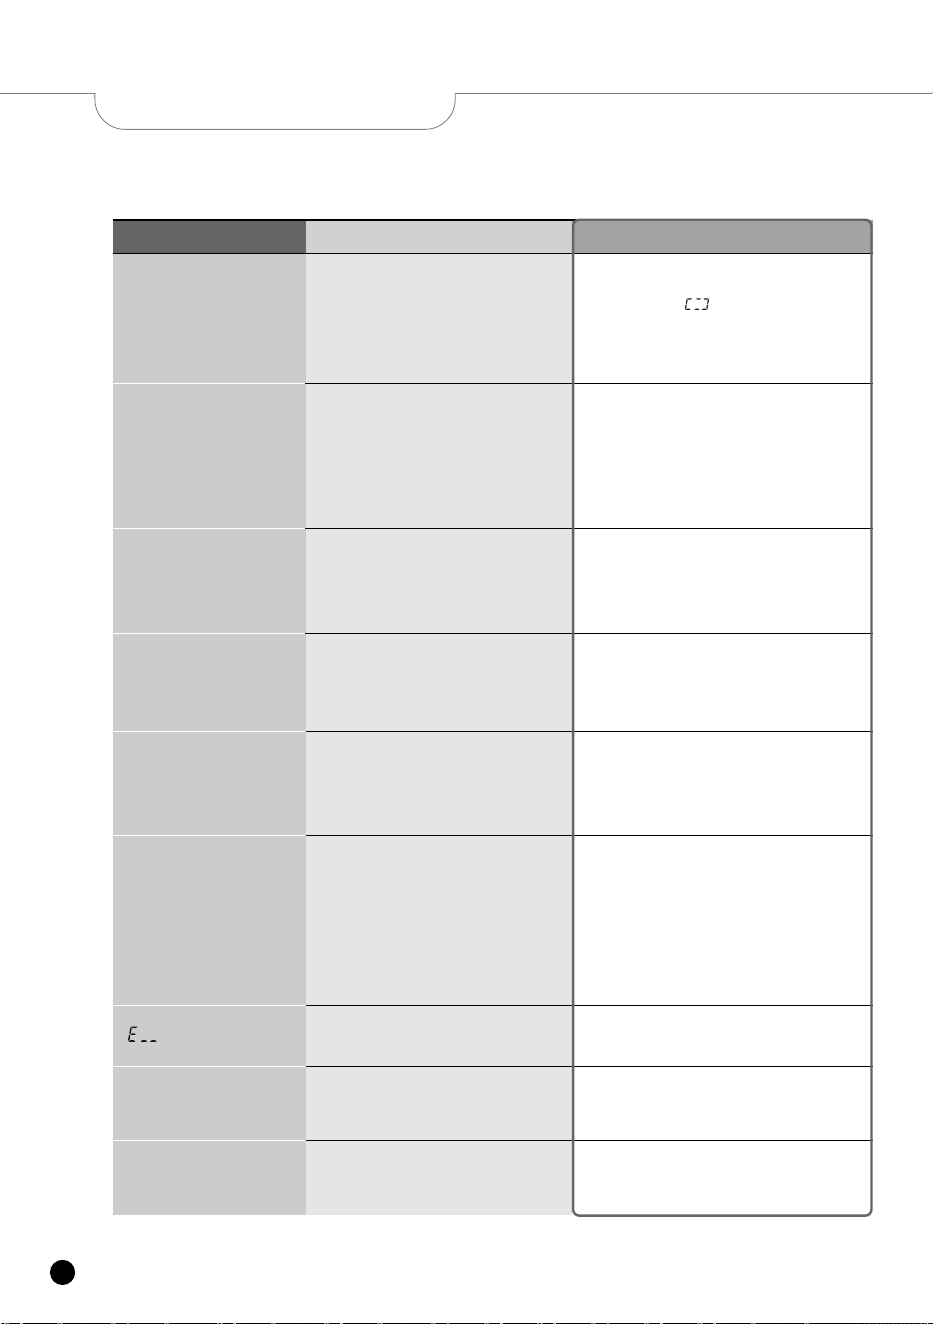
58
고장신고 전에 확인하십시오
▼제품에 이상이 생겼을 경우에는 고객상담실로 문의하시기 전에 아래 사항을 확인해 주십시오.
증 상
밥이 설익거나 퍼석할 때
또는 층밥이 될 때
콩(잡곡/현미)이 설익을 때
밥이 너무 질거나 된밥일 때
취사 도중 밥물이 넘칠 때
보온중 냄새가 날 때
“ ” 표시가 나타날때
확인사항
•계량컵을 사용하셨습니까?
•물 조절은 정확히 하셨습니까?
•쌀을 깨끗이 씻었습니까?
•쌀을 장시간 불린 후 취사하셨습니까?
•쌀을 개봉한지 오래되어 너무 말라있지 않습니까?
•콩(잡곡/현미)이 너무 마르지 않았습니까?
•메뉴 선택은 맞게 하셨습니까?
•물 조절은 정확히 하셨습니까?
•뜸을 들이는 상태에서 뚜껑을 열지는 않았습니까?
•계량컵을 사용하셨습니까?
•물 조절은 정확히 하셨습니까?
•메뉴 선택을 정확히 하셨습니까?
•뚜껑을 꼭 닫았습니까?
•보온중 전원플러그가 콘센트에서 빠지지
않았습니까?
•12시간 이상 보온하였거나 너무 적은 밥을 보온
하지 않았습니까?
•주걱이나 식은밥 혹은 다른 종류의 밥을 넣어서
보온하지 않았습니까?
•온도감지기에 이상이 있을 때 나타납니다.
보온중 보온경과시간 표시가
깜빡일때
•보온후 24시간이 경과하지 않으셨습니까?
조치사항
• “취사/백미쾌속” 버튼을 눌렀습니까?
밥이 되지 않을 때
보온중 밥이 많이 식었거나
물이 많이 흐를 때
•보온을 취침보온모드로 설정하지
않으셨습니까?
•원하는 메뉴선택 후 반드시 “취사/백미쾌속” 버튼을
1회 눌러 표시부에 “ ” 표시가 나타나는지
확인하십시오.
•41~42쪽을 참조하여 올바르게 사용하십시오.
•물을 반눈금 정도 더 넣고 취사하십시오.
•
콩(잡곡/현미)을 불리거나 삶아서 안남미/현미메뉴에서
취사를 하십시오. 잡곡의 종류에 따라 설익을 수도 있습니다.
•원하는 메뉴를 바르게 선택하십시오.
•물 조절을 정확히 하십시오.(41~42쪽 참조)
•취사 완료음이 울린 후 뚜껑을 열고 밥을 섞어주십시오.
•41~42쪽을 참조하여 올바르게 사용하십시오.
•뚜껑을 완전히 닫아주십시오.
•보온중 전원플러그를 항상 꽂아 주십시오.
•보온시간은 가능한 12시간 이내로 하십시오.
•백미 이외의 메뉴와 식은밥은 보온하지 마십시오.
•전원을 차단 후 The service center and dealer로
문의하십시오.
•보온 24시간이 경과하면 보온이 장시간 경과되었음을
알리는 기능입니다.
•필요에 따라 취침보온모드를 해제 또는
설정한 후 보온하여 주십시오.
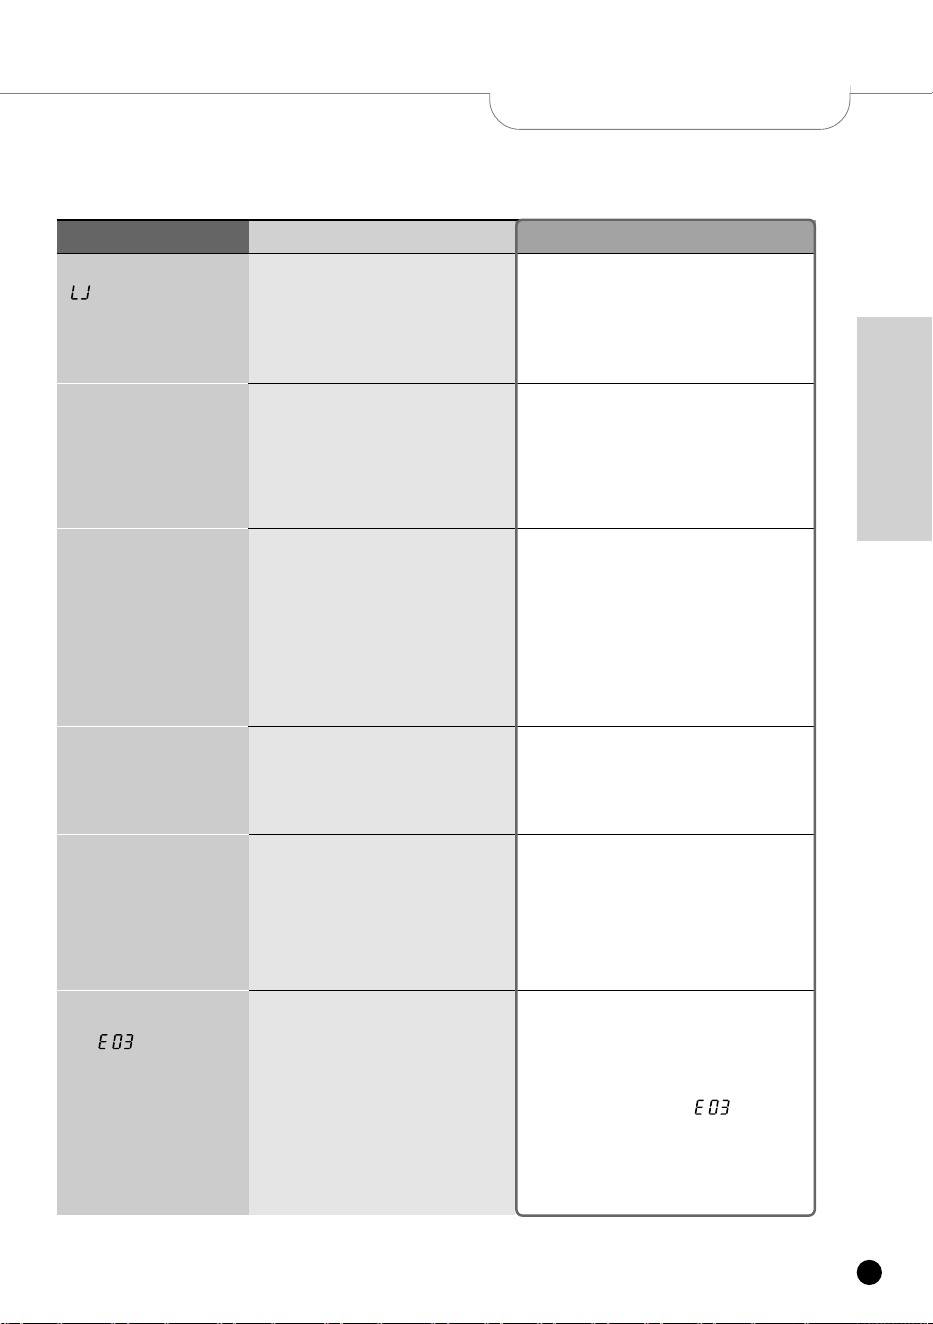
59
www.cuckooworld.com
KoreAn
▼제품에 이상이 생겼을 경우에는 고객상담실로 문의하시기 전에 아래 사항을 확인해 주십시오.
증 상
밥이 심하게 눌을 때
예약 취사 시각이
맞지 않을 때
취사 직후나 보온 중
밥에서 이상한 냄새가 날 때
취사, 보온 또는 보온
재가열중 “딱딱”소리가 날 때
장시간 동안 취사가 완료되지
않고 “ ” 표시가
나타날 때
확인사항
•온도감지기, 열판, 내솥외면에 밥알이 심하게
눌어 붙어 있거나 이물질이 있지는 않습니까?
•“쿠쿠 맞춤밥맛”, “쿠쿠 맞춤취사” 기능을
설정하지 않으셨습니까?
•현재 시각이 맞습니까?
•오전, 오후를 잘못 선택하지 않았습니까?
•예약시간을 13시간 이상으로 선택하지
않았습니까?
•찜 요리를 하신 후
청소를 깨끗이 하셨습니까?
•취사 릴레이 소리가 아닙니까?
•내솥 밑면의 물기는 닦았습니까?
•220V용(전원)에 사용하지 않았습니까?
조치사항
•내솥이 제품에 들어 있습니까?
•220V용(전원)에 사용하지 않았습니까?
“ ” 표시가 나타날 때
•내솥이 들어 있지 않은 상태에서는 버튼 조작이 되지
않습니다. 내솥을 넣어 주십시오.
•본 제품은 120V전용 제품입니다.
전원을 바르게 사용하십시오.
•온도감지기, 열판, 내솥외면의 이물질을 제거해 주십시오.
(37쪽 참조)
•필요에 따라 맞춤밥맛 또는 맞춤취사 기능을 해제 또는
설정한 후 취사하여 주십시오.
•현재시각을 맞추지 않으면 예약시각에 취사가 완료
되지 않습니다. 현재시각을 맞추십시오. (40쪽 참조)
•오전, 오후를 확인하십시오.
•최대 예약시간은 13시간입니다.
•뚜껑부 및 스팀캡을 깨끗이 닦아낸 후
사용하여 주십시오.
•릴레이의 “딱딱”소리는 켜짐, 꺼짐의 작동소리로서
정상입니다.
•내솥 밑면에 물기가 있으면 “딱딱”소리가 납니다.
다음부터는 물기를 닦은 후 내솥을 넣어 주십시오.
•제품에 이상이 생겨(히터 단선, 열량부족 등) 장시간 밥이
완료되지 않을때 나타나는 표시입니다.
전원을 차단 후 The service center and dealer로
문의하십시오.
•물만 넣고 장시간 가열한 경우에 “ ” 표시가
나타나는 것은 정상입니다.
•본 제품은 120V전용 제품입니다.
전원을 바르게 사용하십시오.
고장신고 전에 확인하십시오

100% Recycled paper
00383-0842L0 rev.26
CUCKOO ELECTRIC RICE COOKER/WARMER
LIMITED WARRANTY
KEY Company, P&K USA TRADING CORP and Cuckoo Trading Canada. will repair at its option replace,
without charge, your product which proves to be defective in material or workmanship under normal use, during
the warranty period listed below from the data of original purchase. This warranty is good only to the original
purchaser of the product during the warranty period. P&K USA TRADING CORP covers the east and the central
districts, KEY Company covers the west and the central districts, Cuckoo Trading Canada covers the whole
Canada.
WARRANTY PERIOD
MODEL# #LABOR PARTS HOW SERVICE IS HANDLED
CR-063F Series
1YEAR 1YEAR The East and the Central Districts.
Call: 718-888-9143, 718-888-9144
Address: 5-48 46th Rd. Long Island City, NY 11101
The West and the Central Districts.
Call: 323-780-8808 ext 114
Address: 1137 E. 1st St, Los Angeles CA 90033
Canada (TORONTO)
Call : 416 878 4561 / 905 707 8224
Address :
#D8-7398 Yonge Street
Thornhill Ontario Canada L4J 8J2
Canada (VANCOUVER)
Call : 604 540 1004 / 604 523 1004
Address :
945 Lougheed Hwy Coquitlam BC Canada V3K 3T4
No other express warranty is applicable to this product. THE DURATION OF ANY IMPLIED WARRANTIES,
INCLUDING THE IMPLIED WARRANTY OF MERCHANTABILITY, IS LIMITED TO THE DURATION OF
THE EXPRESS WARRANTY HEREIN. CUCKOO ELECTRONICS CO.,LTD, SHALL NOT BE LIABLE FOR
THE LOSS THE USE OF THE PRODUCT, INCONVENIENCE, LOSS OR ANY OTHER DAMAGES,
DIRECT OR CONSEQUENTIAL, ARISING OUT OF THE USE OF, OR INABILITY TO USE, THIS
PRODUCT OR FOR ANY BREACH OF ANY EXPRESS OR IMPLIED WARRANTY, INCLUDING THE
IMPLIED WARRANTY OF MERCHANTABILITY APPLICABLE TO THIS PRODUCT
.
Some states do not allow the exclusion or limitation of incidental or consequential damages or limitations on
how long an implied warranty lasts : so these limitations or exclusions may apply to you. This warranty gives
you specific legal rights and you may also have other rights which vary from state to state.
THE ABOVE WARRANTY DOES NOT APPLY IN THESE CASES:
✽ To damages problems which result from delivery or improper installation.
✽ To damages problems which result from misuse, abuse, accident, alteration,
or incorrect electrical current or voltage.
✽
To serve call which do not involve defective workmanship or material and explaining the operation of the unit.
Therefore, these costs are paid by the consumer. Customer assistance numbers :
To Prove warranty Coverage : ▶ Retain your Sales Receipt to prove data of purchase
▶ Copy of your Sales Receipt must submitted at the time
warranty service is provided.
To Obtain Product, Customer, or Service Assistance and Nearest Authorized service center,
Parts Distributor or Sales Dealer:
The West and the Central Districts.
Call : 323 780 8808
Toll Free : 877 481 9828
Address : 1137 E. 1st Street, L.A,
CA 90033, USA
Canada (Toronto)
Call : 416 878 4561 / 905 707 8224
Address : #D8-7398 Yonge Street
Thornhill Ontario Canada
L4J 8J2
Canada (Vancouver)
Call : 604 415 9858/604 524 8282
Address : 103-4501 North Road
Burnaby BC Canada
V3R 4R7
The East and the Central Districts
Call : 718 888 9144
Address :129-04 14th Avenue
College Point, NY 11356, USA