
: HB8010

2
3
English Manual 5
en Français 1
Gebrauchsanleitung auf Deutsch
Manual de Instrucciones en Español
In Italiano
Contents

4

5
English Manual
6
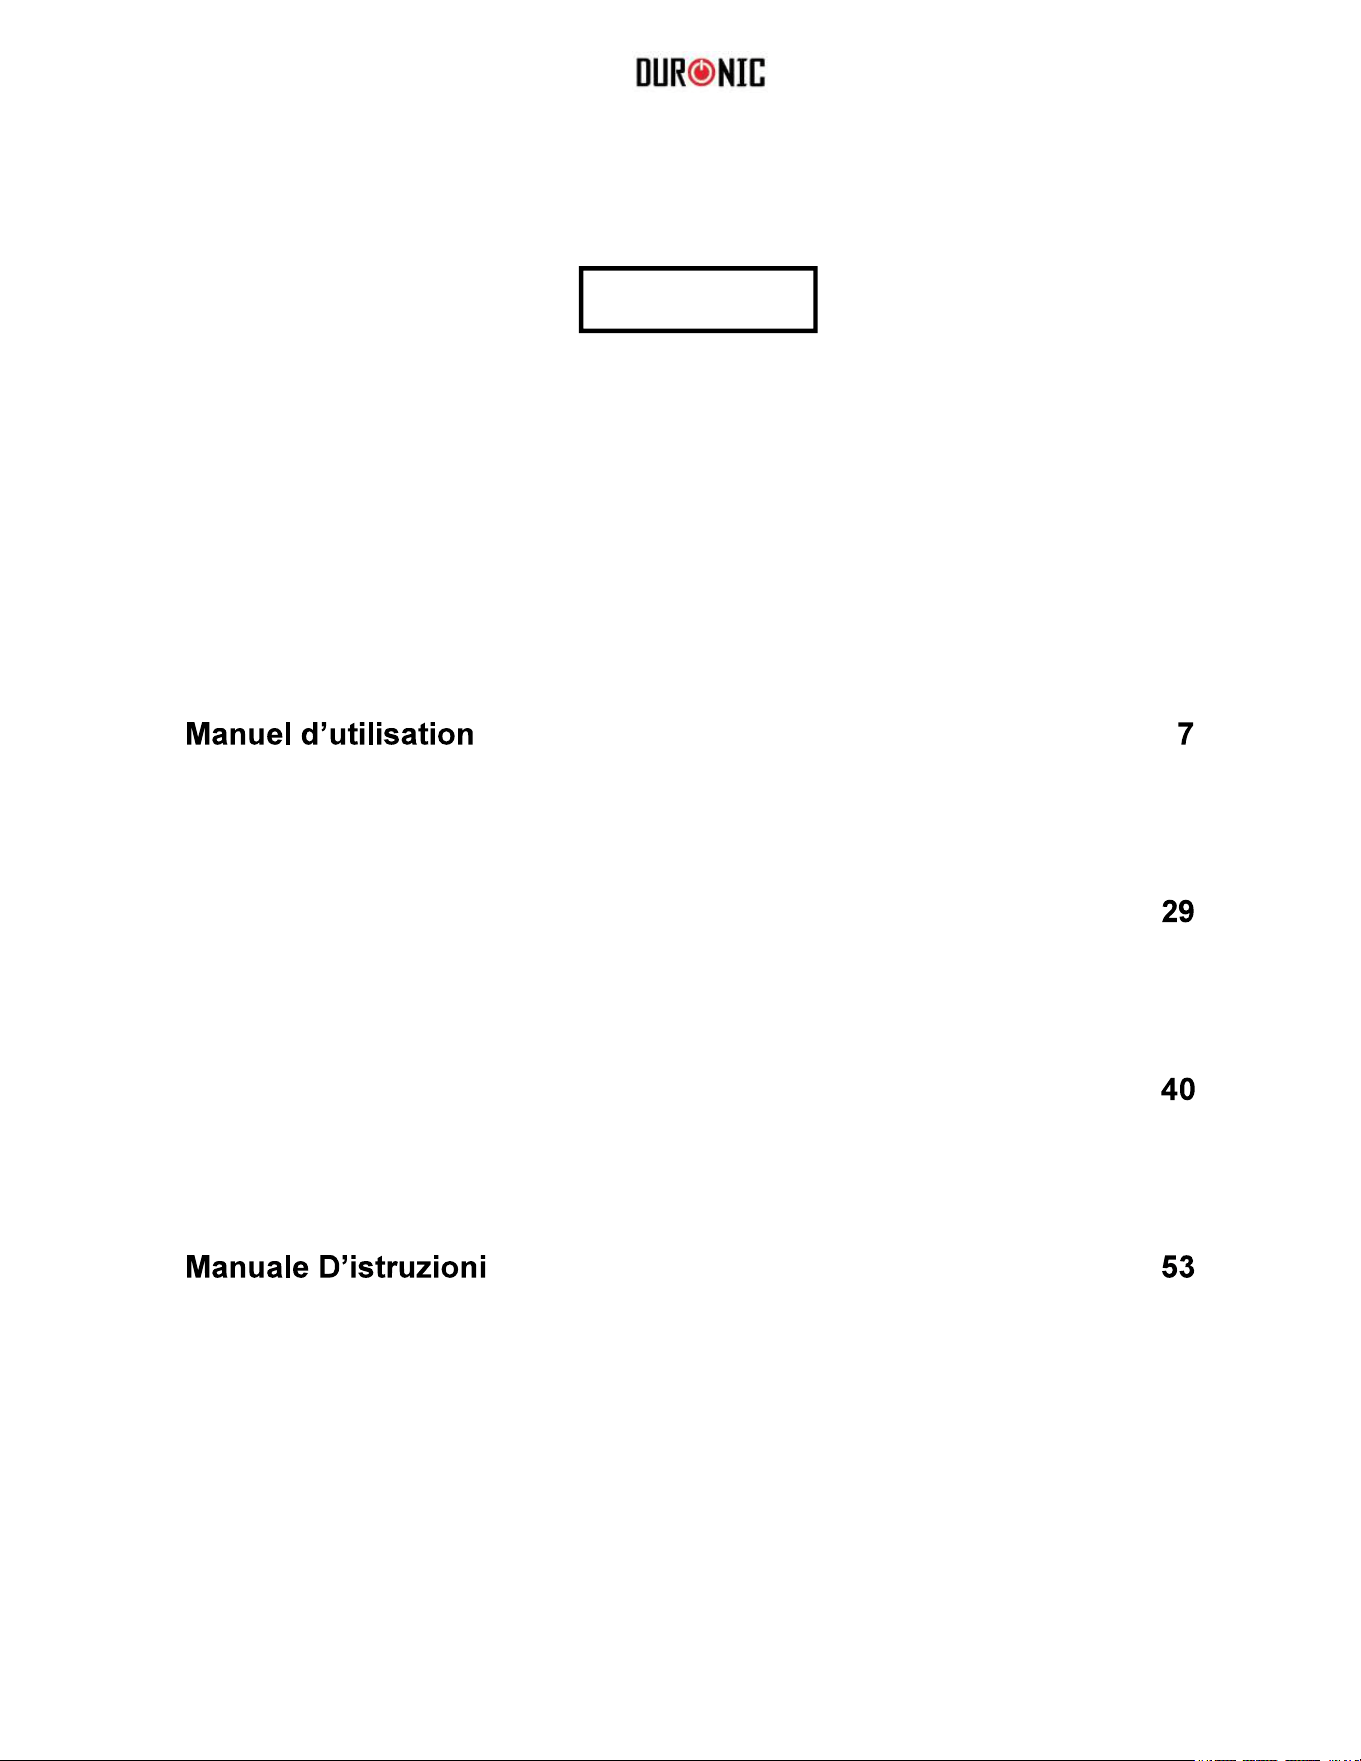
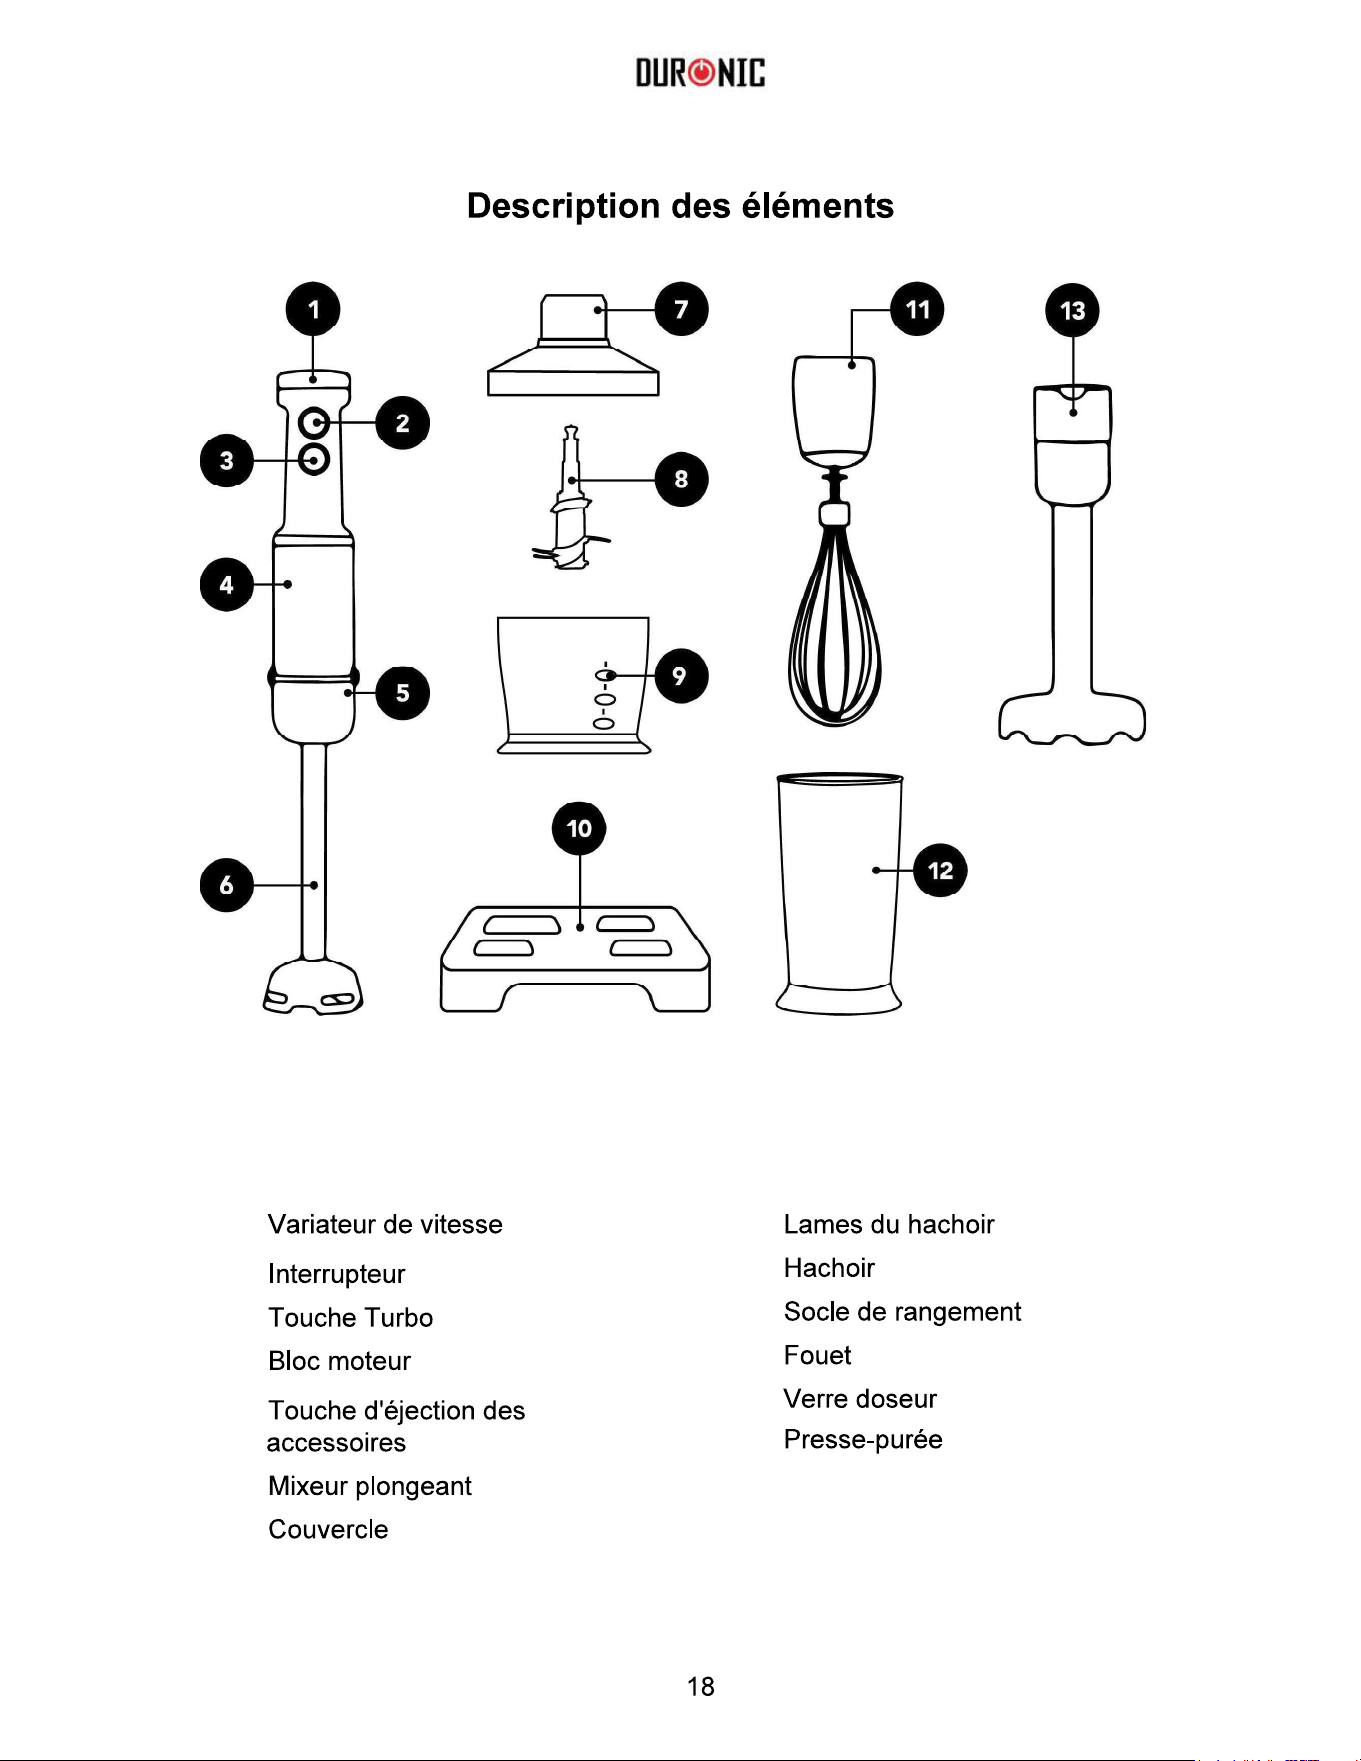
Main Parts
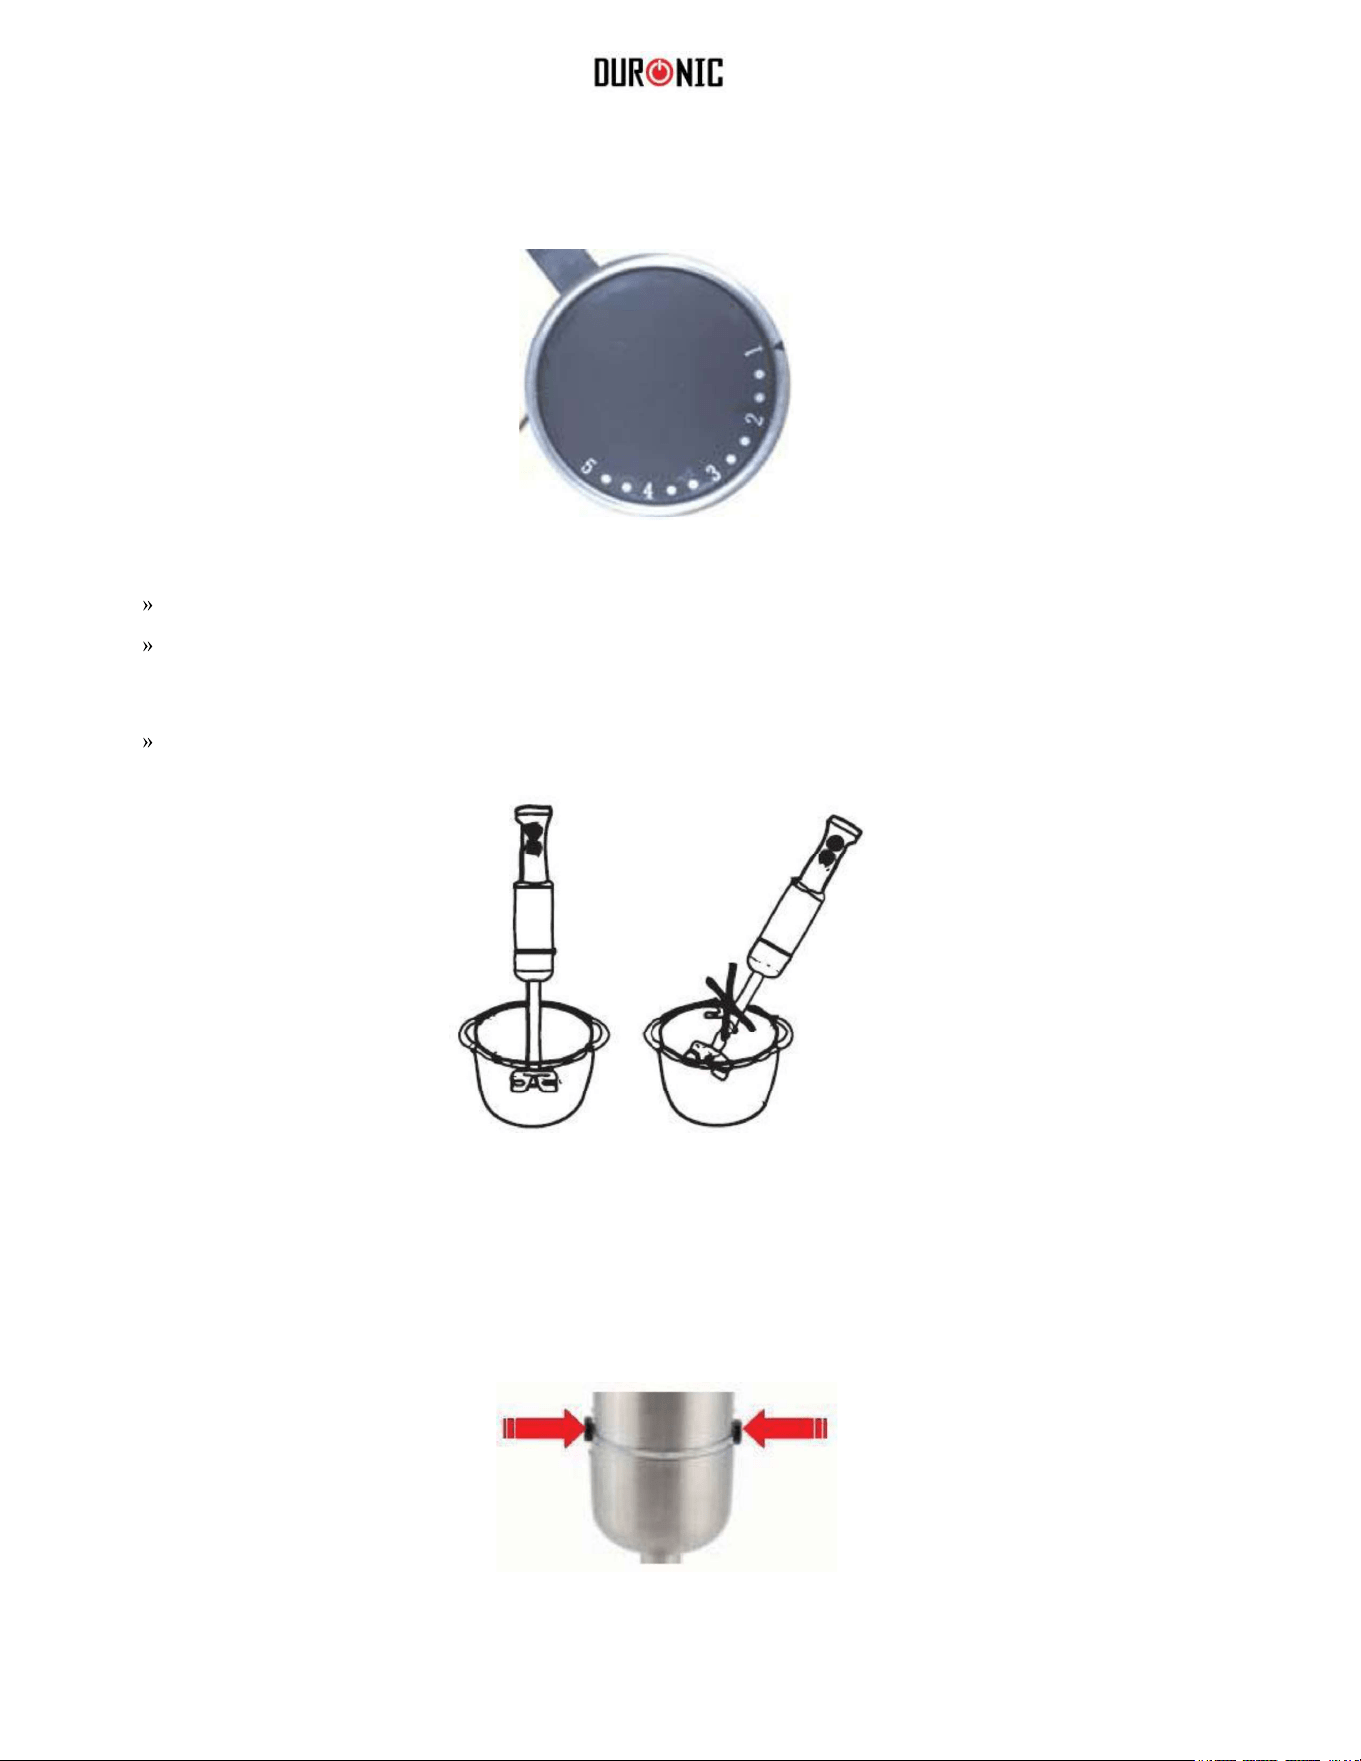
1. Variable speed dial
2. Speed button
3. Turbo button
4. Motor unit
5. Attachment release button
(on each side of the motor unit)
6. Removable blending attachment
7. Chopper bowl lid
Chopping blade
Chopper bowl
Whisk attachment
Measuring cup
(Allows for measuring and blending
in the same cup.)
Potato masher
7
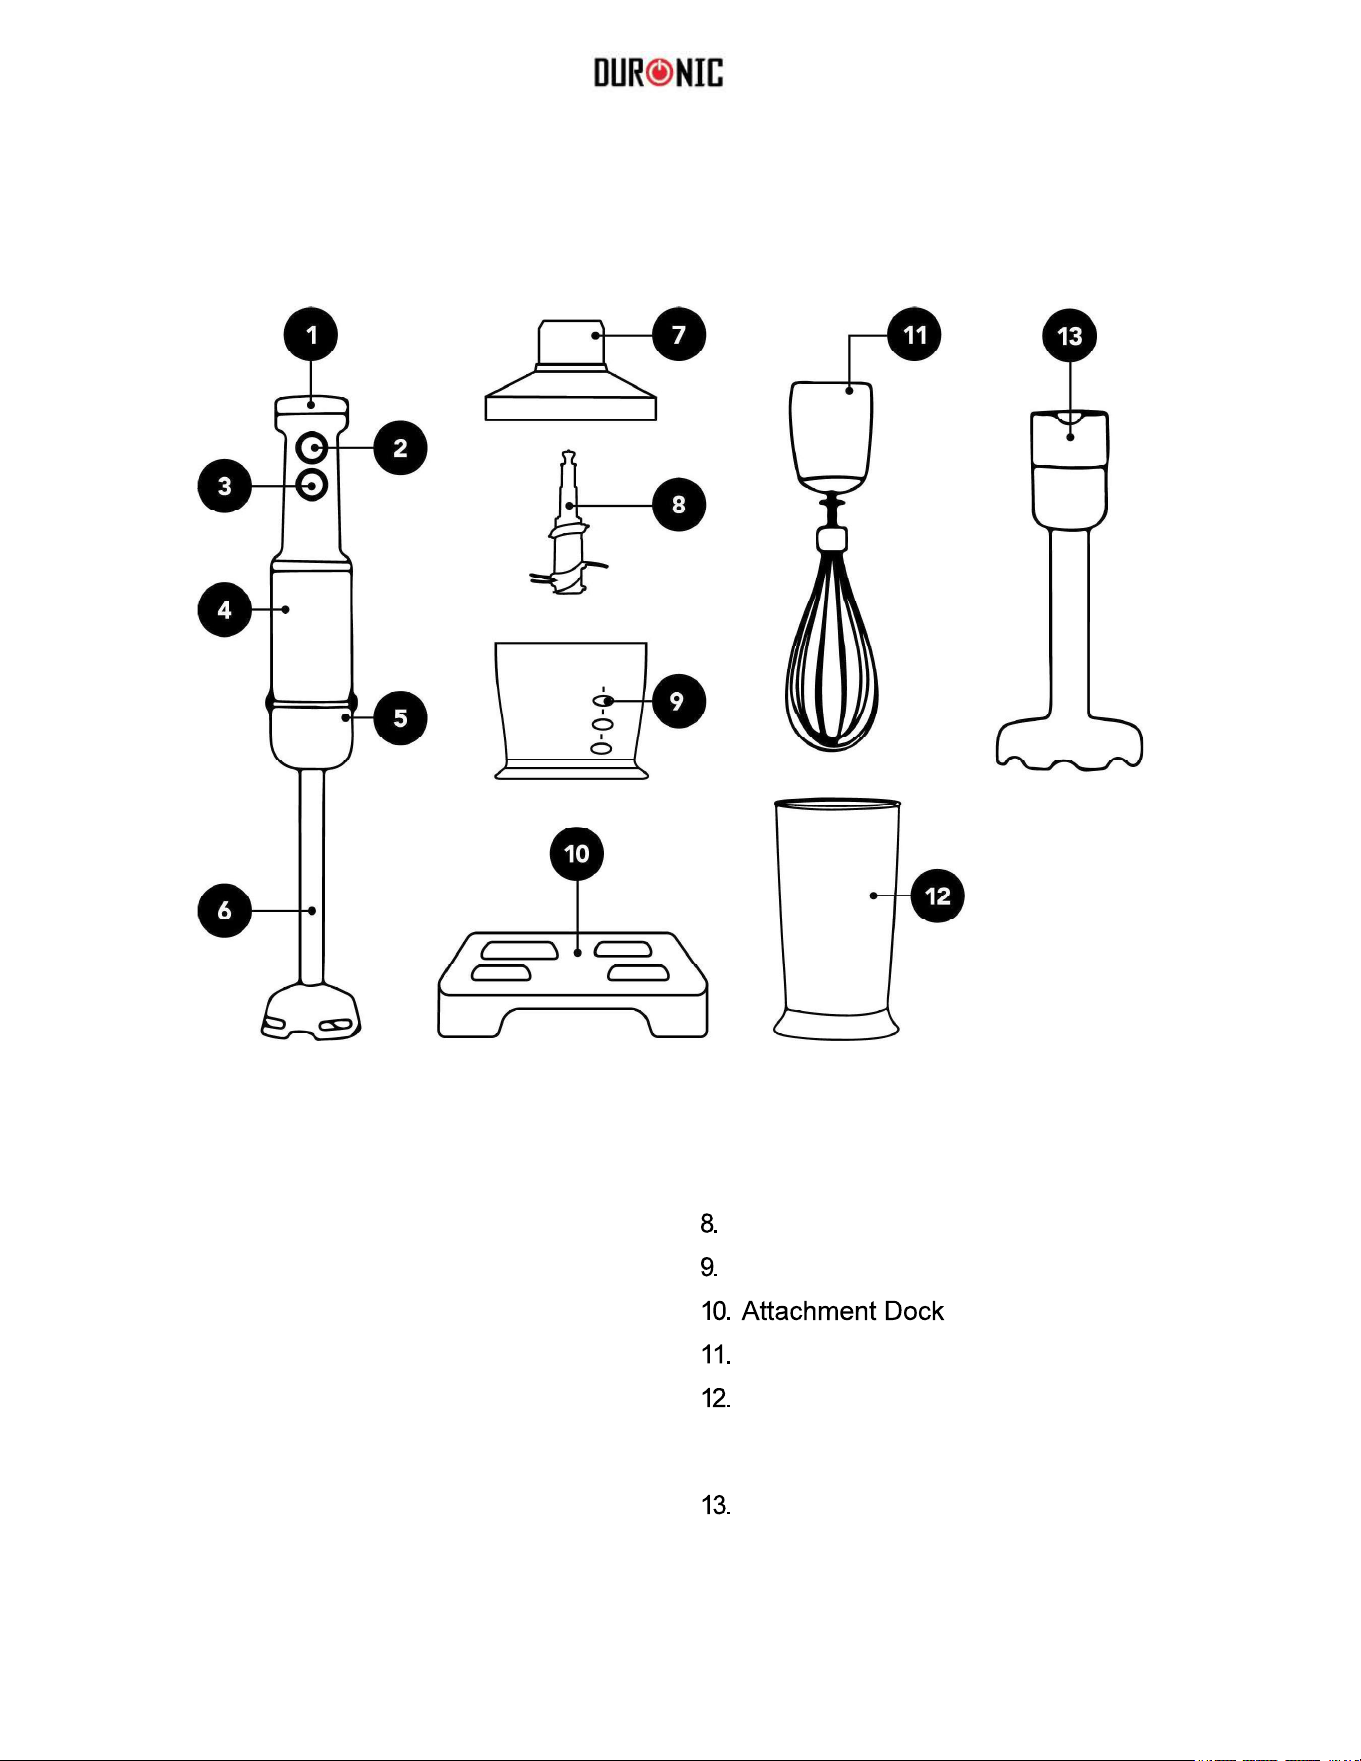
Safety Tips
This appliance is intended
If the supply cord is damaged, it must be replaced by the manufacturer,
its service agent or similarly qualified persons in order to avoid a hazard.
This appliance shall not be used by children. Keep the appliance
and its cord out of reach of children.
Regarding the operating times and
on pages 4-8 of the manual. Care shall be taken when handling the sharp cutting
blades, emptying the bowl and during cleaning.
Always disconnect the appliance from the supply if it is left unattended
and before assembling, disassembling or cleaning.
Regarding the instructions for cleaning surfaces in contact with food,
manual.
Switch off the appliance and disconnect from supply before changing
accessories or approaching parts that move in use.
Appliances can be used by persons with reduced physical, sensory or mental
capabilities or lack of experience and knowledge if they have been given
supervision or instruction concerning use of the appliance in a safe way
and if they understand the hazards involved.
Be careful if hot liquid is poured into the food processor or blender as it can
be ejected out of the appliance due to a sudden steaming.
WARNING:
THE BLADE IS VERY SHARP, TAKE GREAT CARE WHEN
HANDLING THIS HAND BLENDER AND ALWAYS UNPLUG FROM THE
MAINS SUPPLY BEFORE CLEANING.

8
Important Safety Instructions
Read these instructions carefully before using the appliance and keep them for future
reference.
Unplug the appliance from the mains socket when not in use,
before assembling or disassembling parts, and before cleaning.
Never use this appliance to mix or stir anything other thanfoods.
Avoid contacting moving parts.
The use of attachments not recommended by the manufacturer
may cause fire, electric shock or injury.
Always ensure that the attachments are securely fitted onto the
motor body before operation.
Never let the cord touch hot surfaces or hang down where a child can grabit.
Do not use outdoors.
Do not use the appliance for anything other than its intended purpose.
Do not blend hot liquids (hotoil).
Before First Use
Before using the appliance for the first time, wash the blending attachment, whisk
attachment, chopper attachment, potato masher and the measuring cup in warm soapy
water. Rinse and dry thoroughly. Wipe the motor unit with a slightly damp cloth.
Do not immerse it in water.
*BEWARE SHARP BLADES.*
Operation
The hand blender is suitable for preparing sauces, soups, mayonnaise or
mixing ingredients.
WARNING: Do not operate this appliance for more than 15 seconds without
interruption. Allow it to cool down to room temperature before continuing.

9
Using the Blending Attachment
The blending attachment is suitable for mixing drinks and milkshakes as
well as preparing dips, sauces, soups, mayonnaise and baby food.
1. Make sure the motor unit is u plugged.
2. Attach the motor unit to the blending attachment and push to lock into place.
3. Place ingredients into a tall container or the supplied measuring cup.
Make sure that the tall container or the measuring cup is placed on a stable, flat surface.
Cut solid ingredients into small pieces for easier blending.
4. Plug the motor unit into the mains socket.
5. Immerse the blending attachment into the tall container or the measuring cup.
Ensure that the depth of the ingredients will not exceed the top of the blending attachment.
10
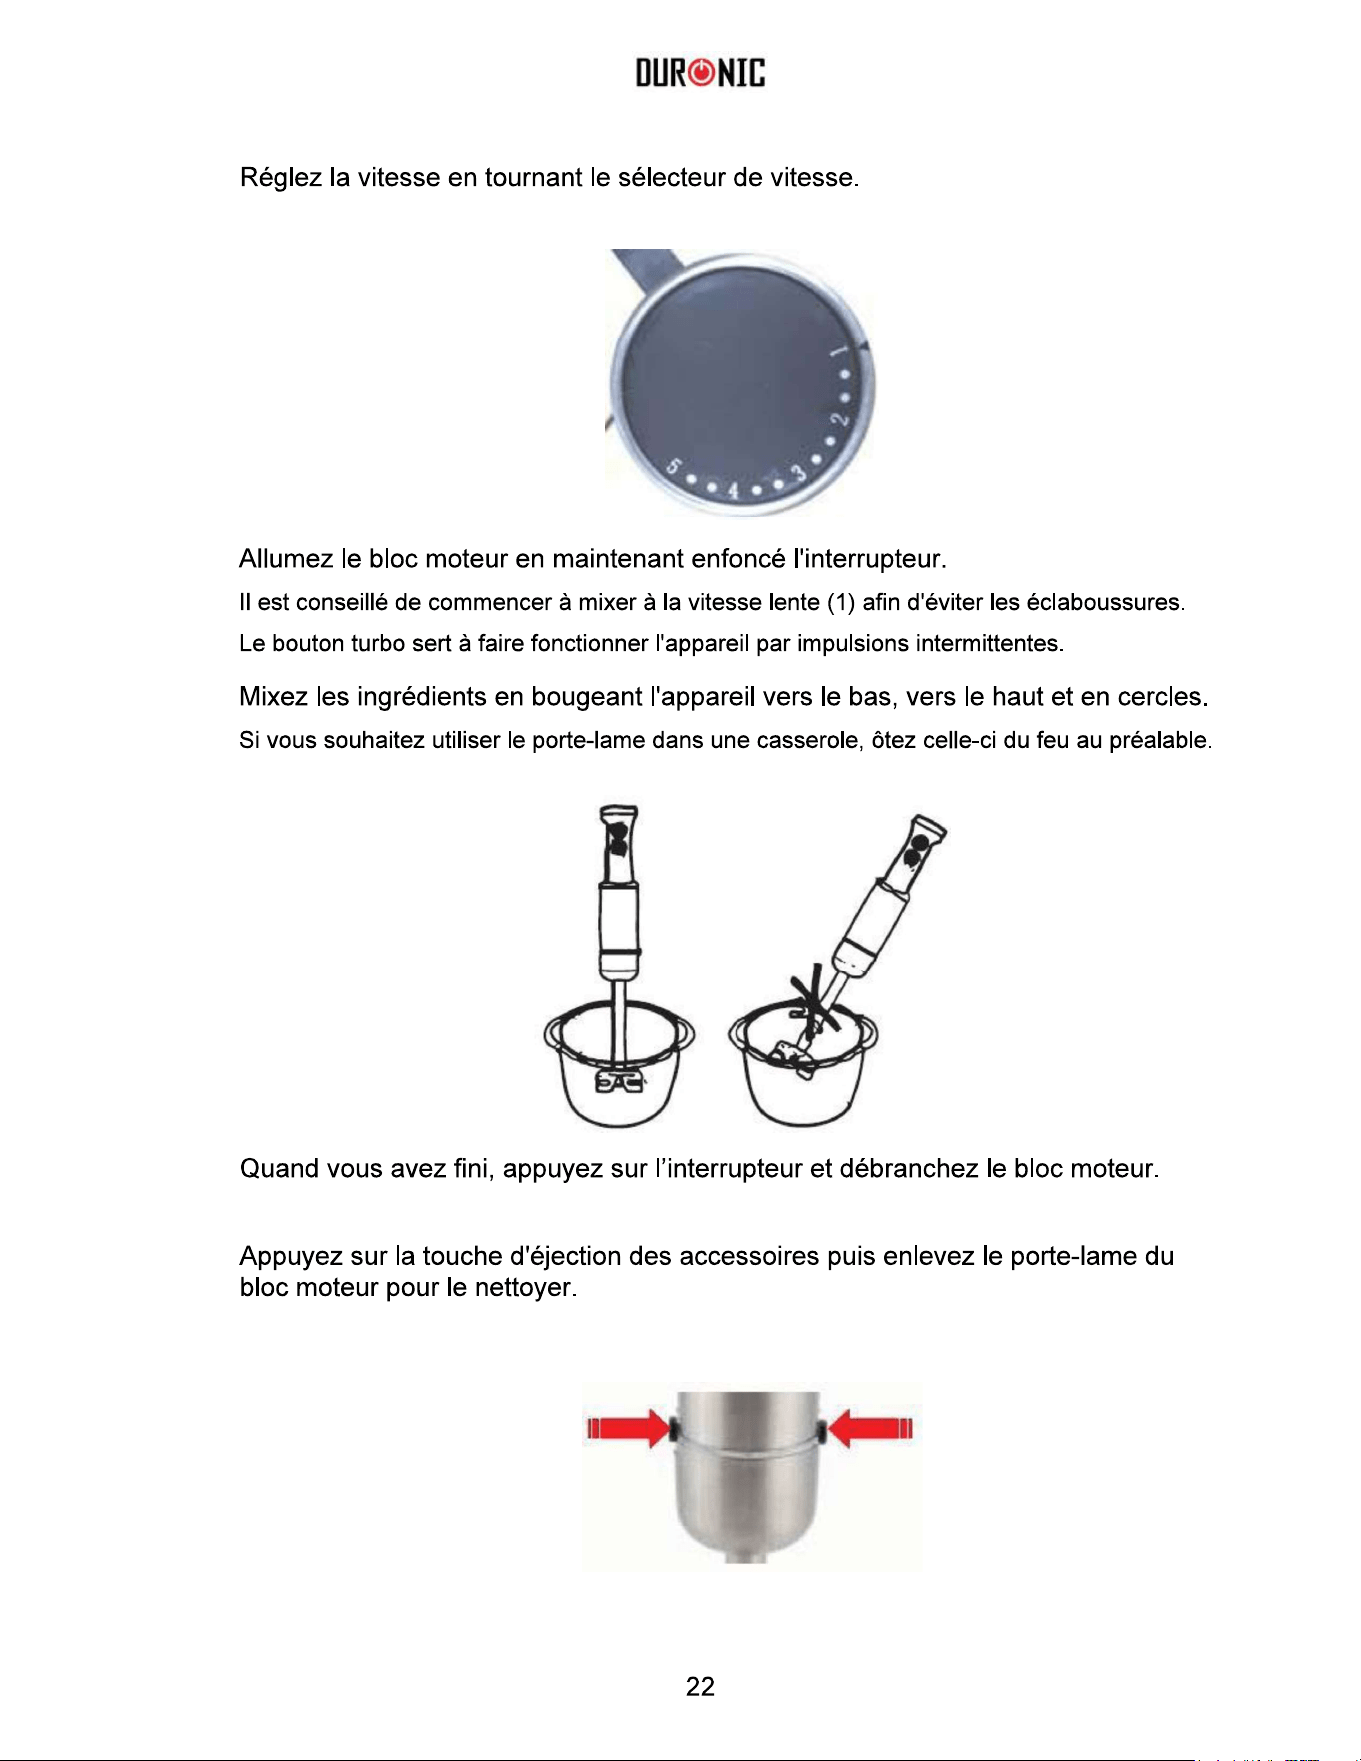
6. Select the desired speed by turning the variable speed dial.
7. Turn on the motor unit by keeping the speed button pressed.
It is recommended to start blending by using the low speed (1) to avoid splashing.
You can also press the Turbo button to run the appliance for intermittent bursts.
8. Blend the ingredients by moving the appliance slowly up and down and in circles.
To use the blending attachment in a saucepan, be sure to remove the pan from thestove.
9. After you have completed blending, release the speed button and unplug the motor
unit from the mains socket.
10. Press the attachment release buttons and remove the blending attachment from
the motor unit for cleaning.
11
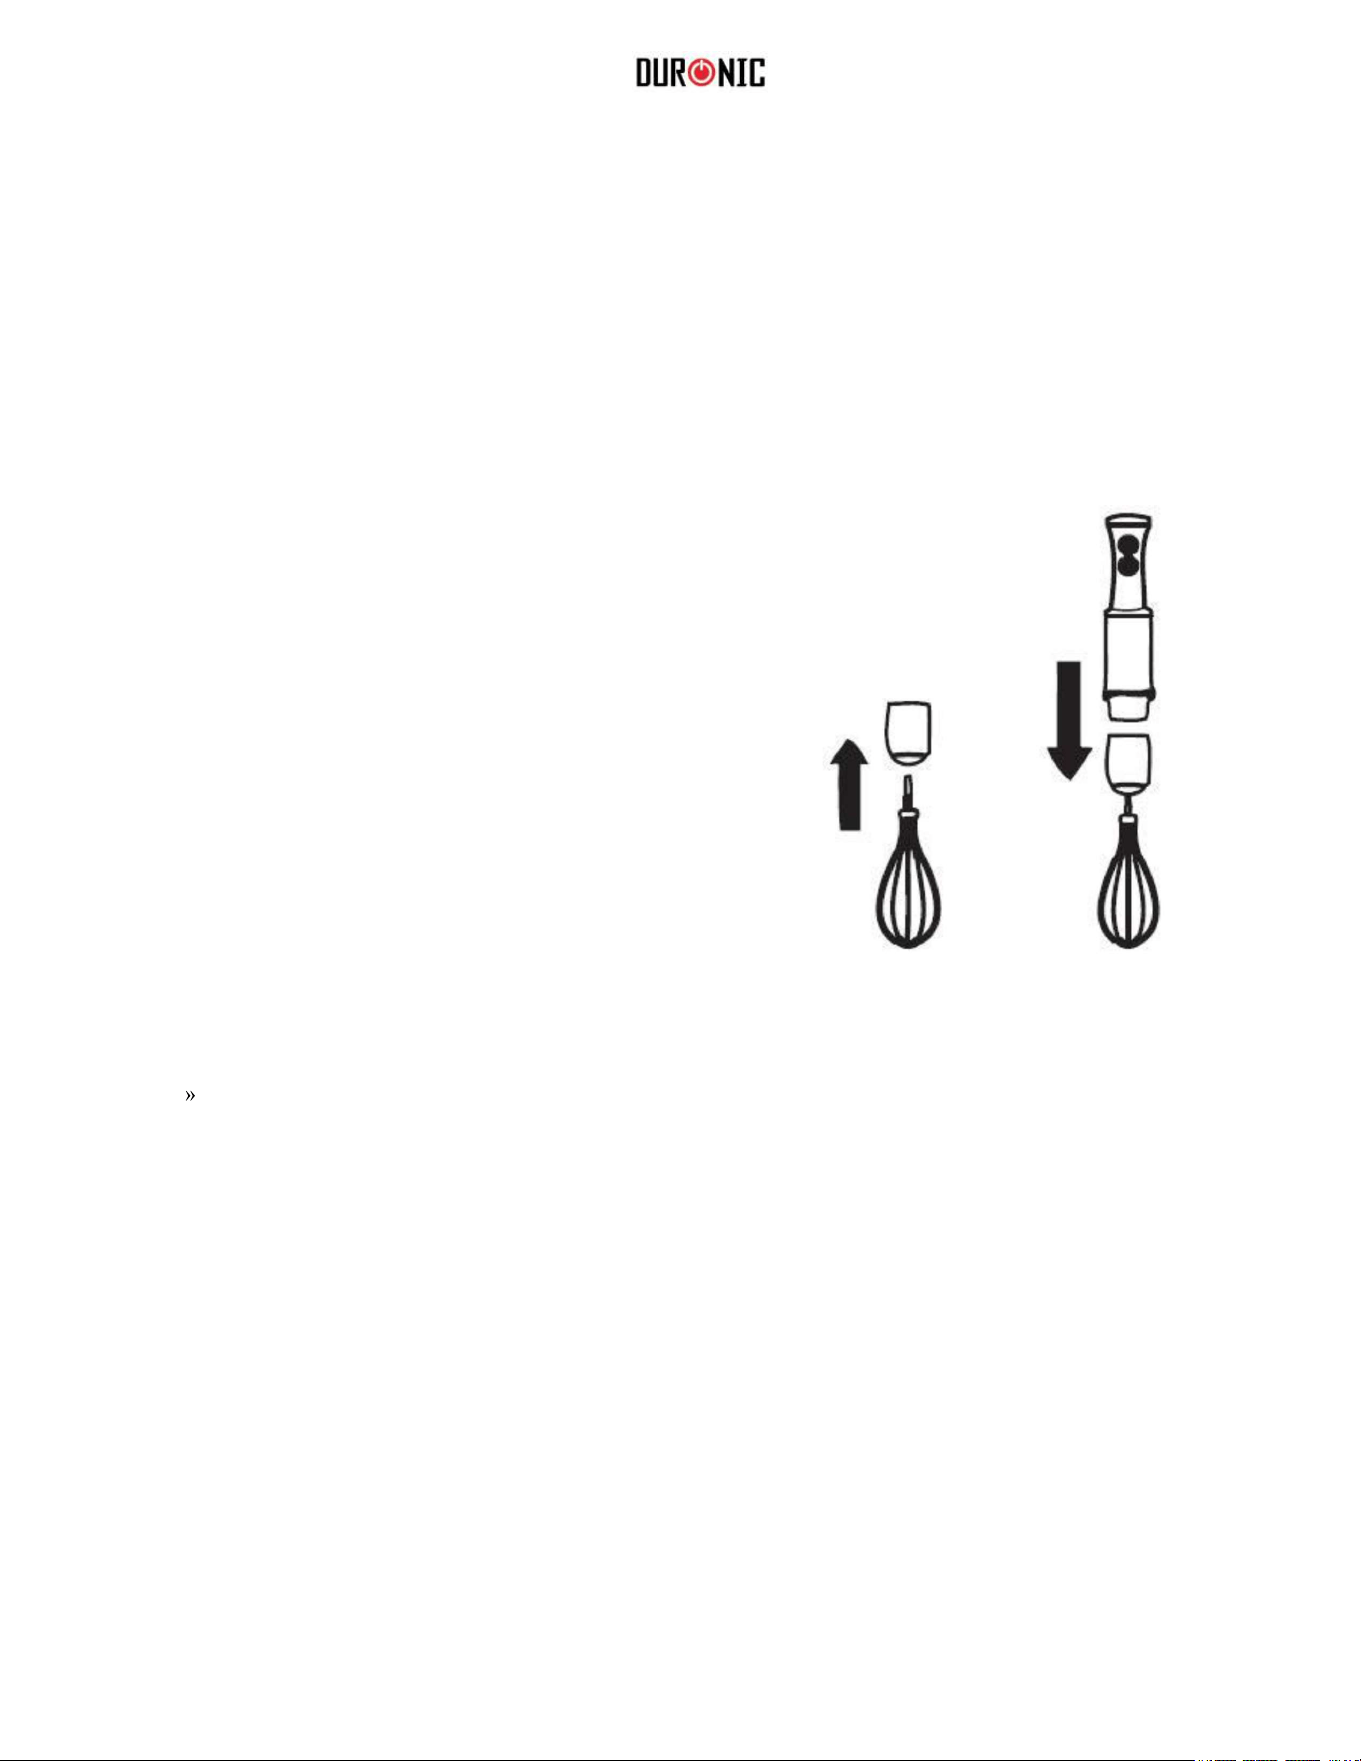
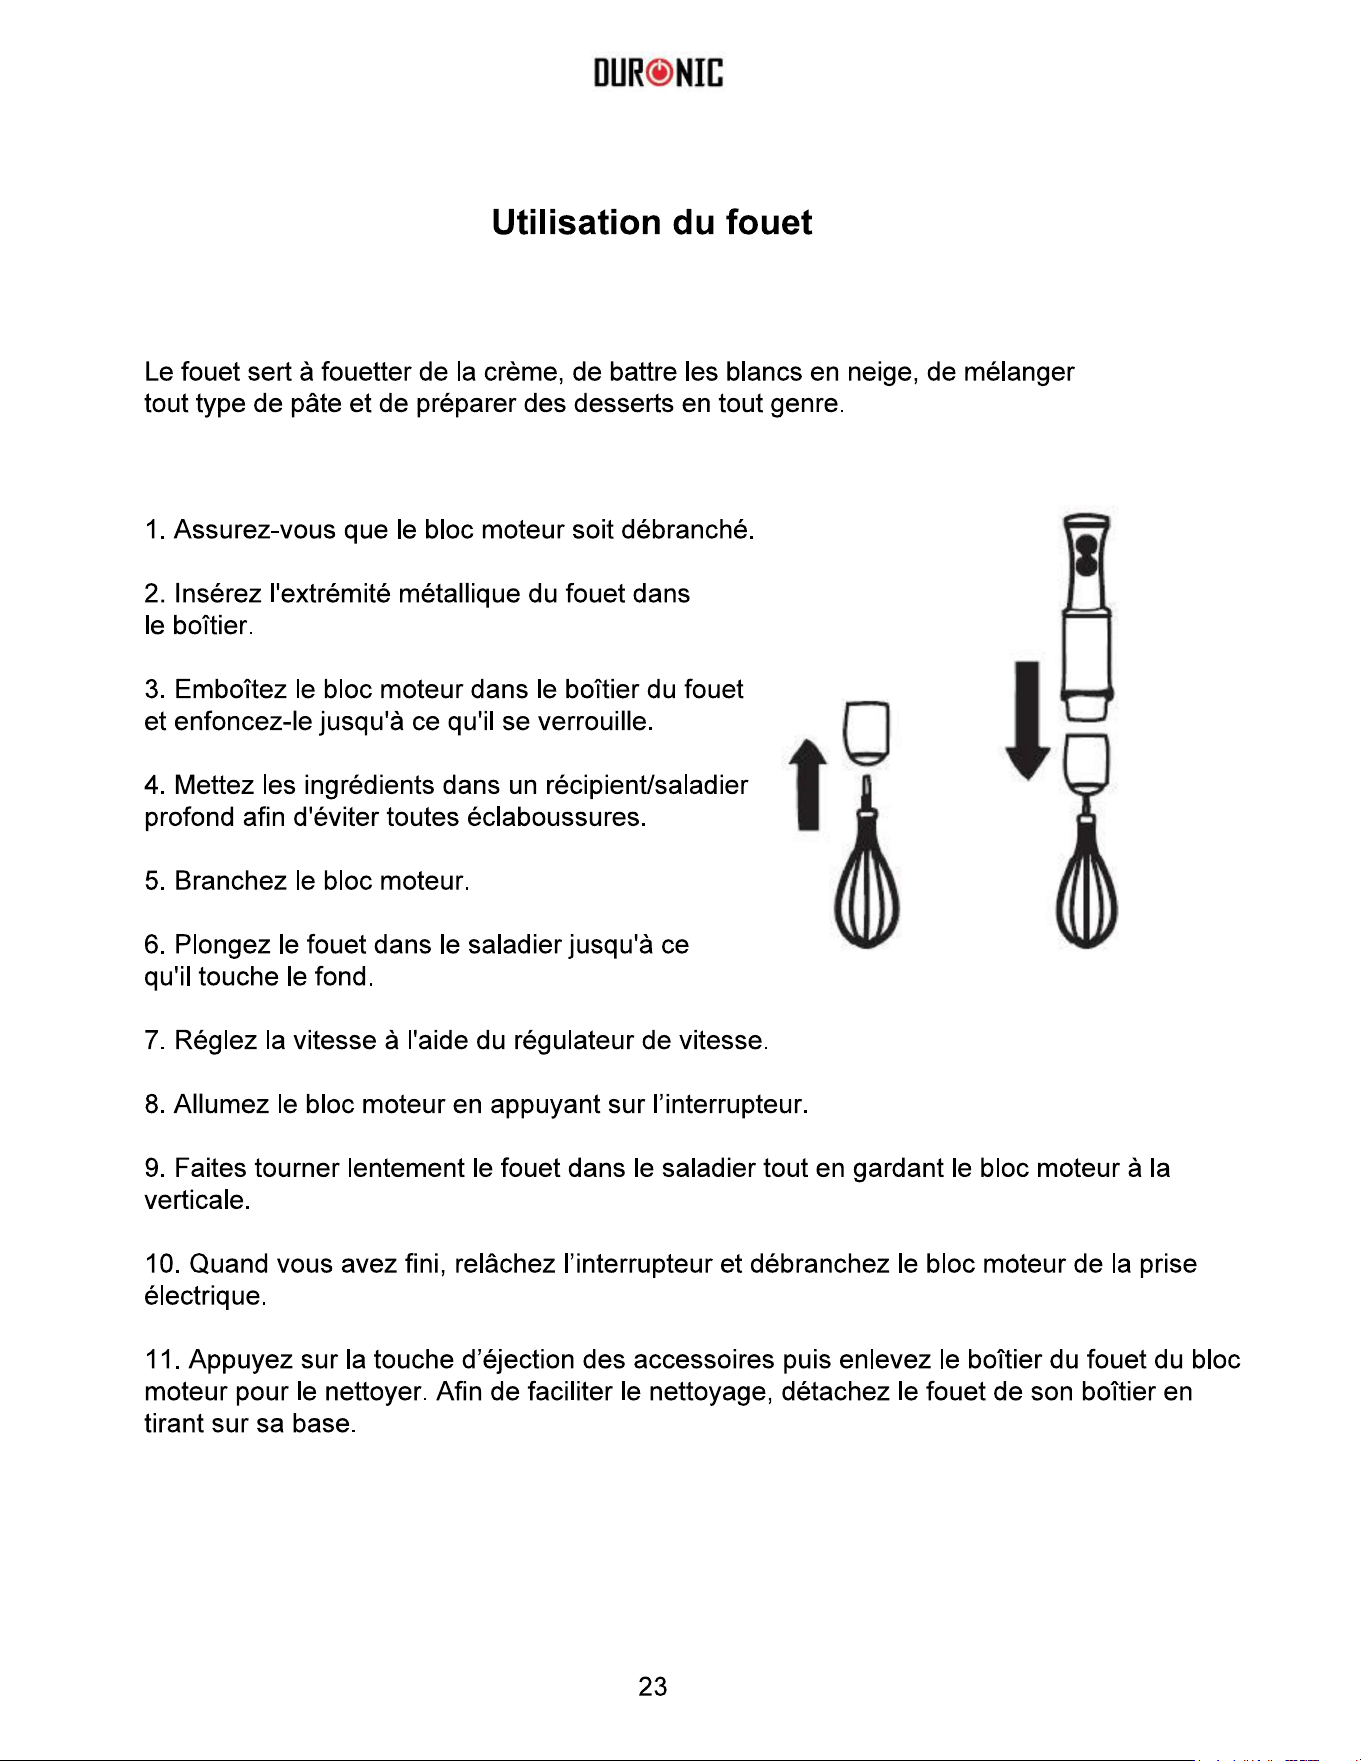
Using the Whisk Attachment
The whisk attachment is suitable for whipping cream, beating egg whites, mixing
sponges and ready-mix desserts.
1. Make sure the motor unit is unplugged.
2. Insert the metal end of the whisk into its
housing.
3. Attach the motor unit to the whisk housing
and push to lock into place.
4. Place ingredients into a deep mixing bowl
or container to prevent spattering.
5. Plug the motor unit into the mains socket.
6. Insert the whisk into the mixing bowl until
the whisk touches the bottom.
7. Turn the variable speed dial to set the
desired speed.
8. Turn on the motor unit by keeping the speed button pressed.
you can also press the Turbo button to run the appliance for intermittent bursts.
9. Keep the motor unit in the upright position and slowly circulate the whisk
around the mixing bowl.
10. After you have completed whisking, release the speed button and unplug
the motor unit from the mains socket.
11. Press the attachment release buttons and remove the whisk housing from
the motor unit. The whisk can be removed from its housing for cleaning
by pulling on the base of thewhisk.
12
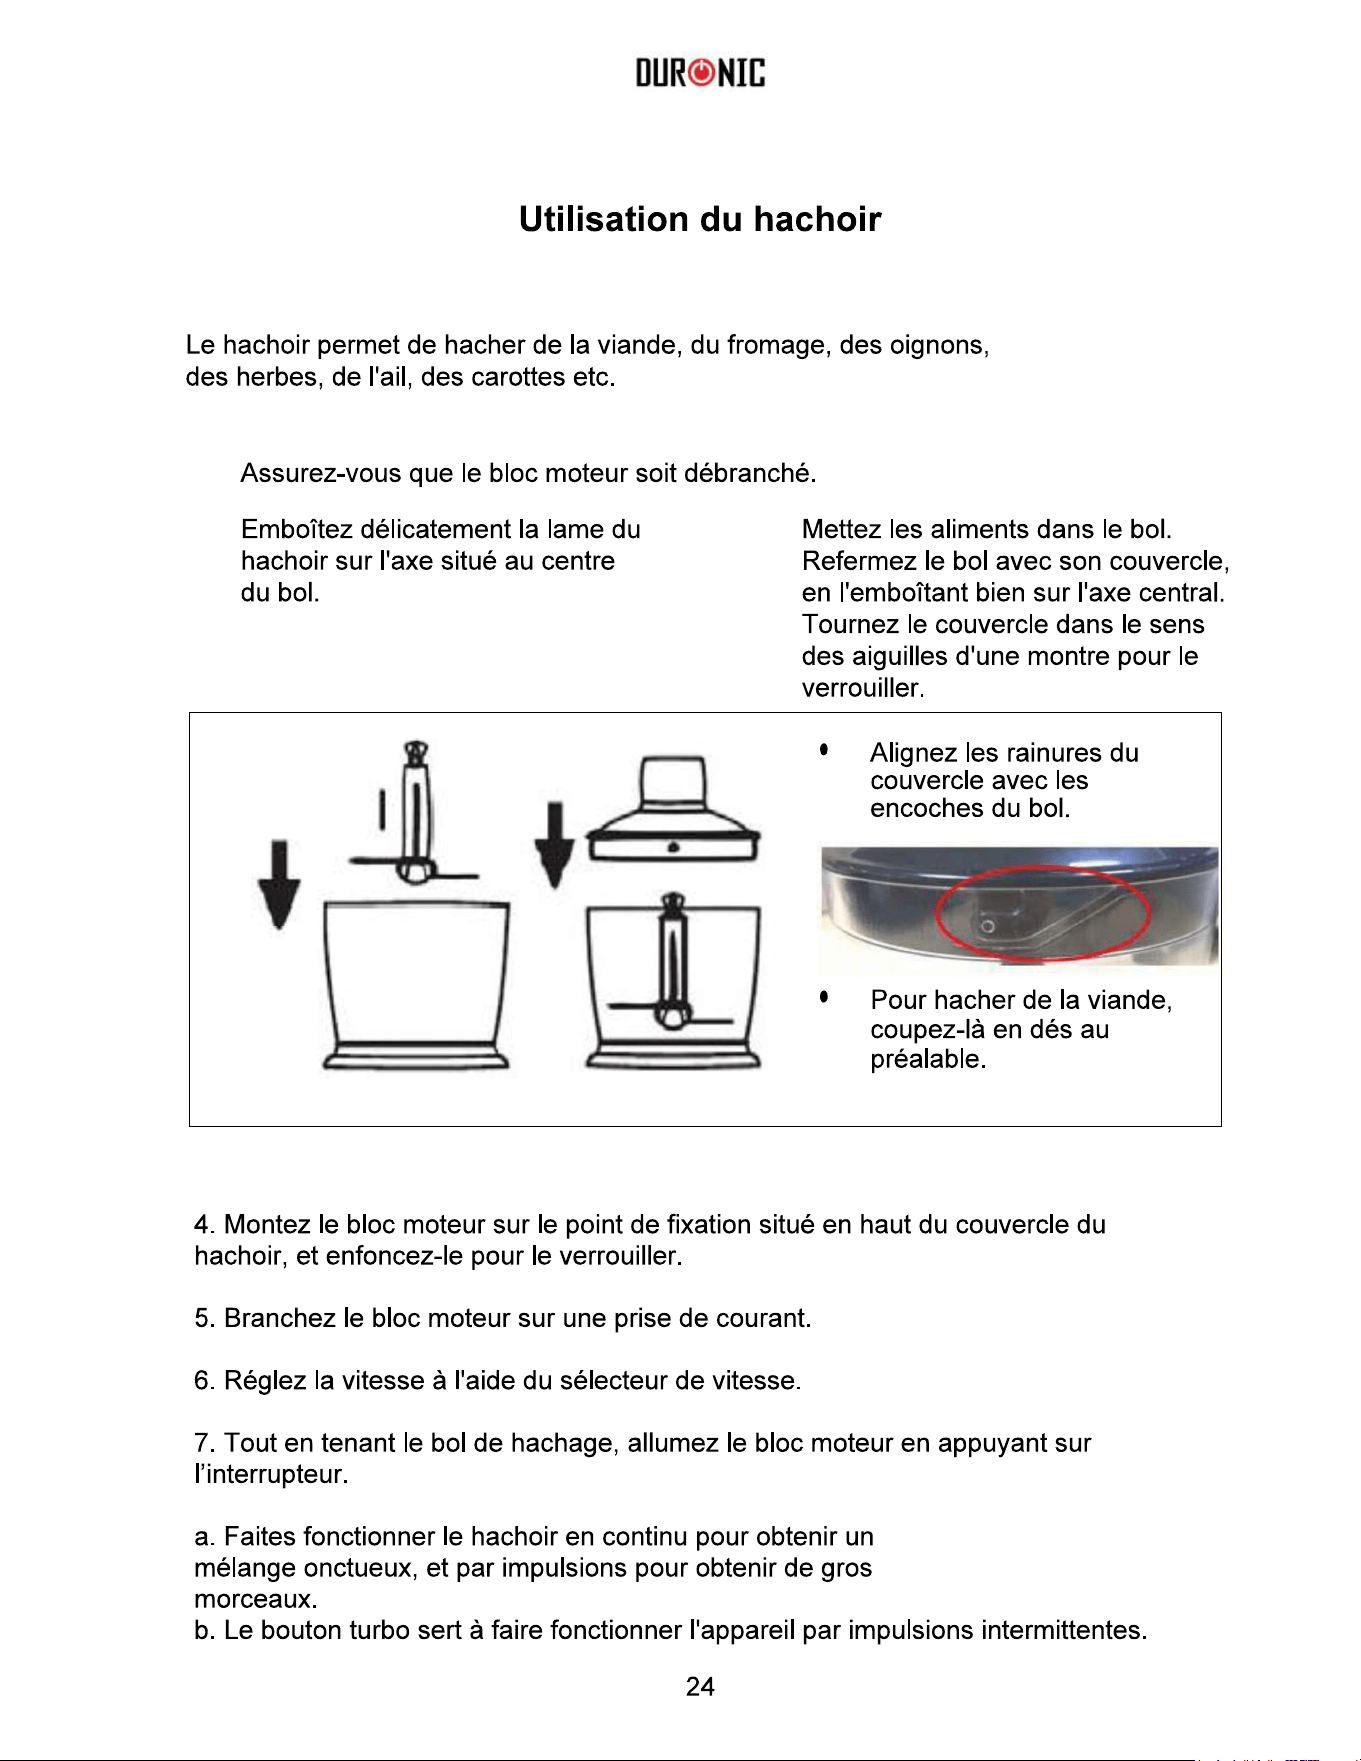
Using the Chopper Attachment
The chopper attachment is suitable for chopping meat, cheese, onions,
herbs, garlic, carrots, etc.
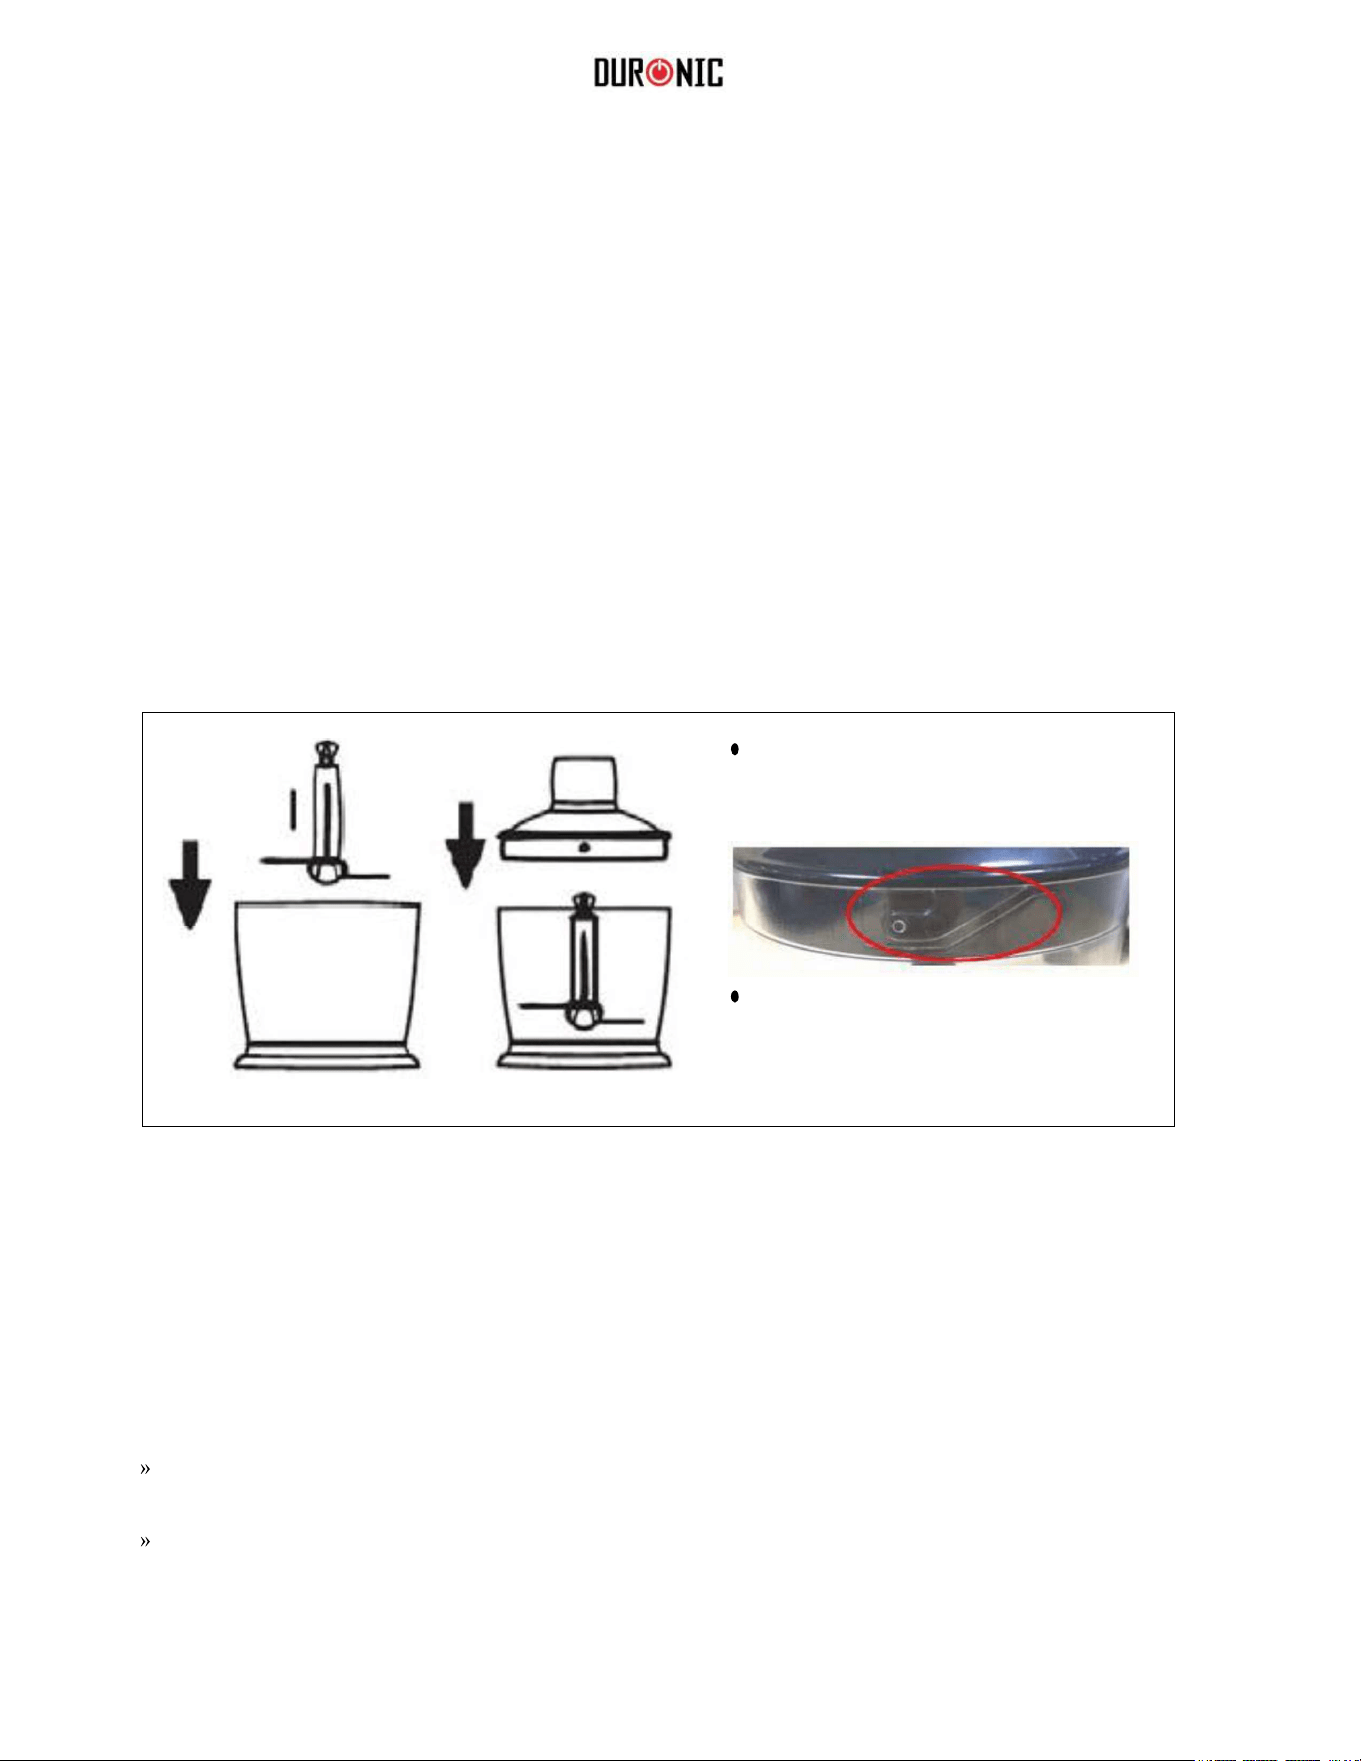
1. Make sure the motor unit is unplugged.
2. Carefully insert the chopper blade
over the pin at the centre of the
chopper bowl.
3. Put food into chopper bowl. Place lid
on chopper bowl, fitting securely over
pin at the centre. Turn the lid clock-
wise until it locks into place.
4. Attach the motor unit into the attachment point on top of the chopper lid and push
to lock into place.
5. Plug the motor unit into the mains socket.
6. Turn the variable speed dial to set the desired speed.
7. Hold the chopper bowl and turn on the motor unit by keeping the speed button
pressed.
Running the chopper continuously will yield smoother food consistency while
pulsing will yield chunkier results.
You can also press the Turbo button to run the appliance for intermittent bursts.
8. When the desired food consistency has been reached, release the speedbutton
Align the tabs on the lid and
notches on the bowl.
If chopping meat, cut it into
cubes before putting into
chopper bowl.

and unplug the motor unit from the
mains socket.
9. Press the attachment release buttons
and remove the chopper lid from the
motor unit.
10. Carefully lift out the chopper blade.
Remove the food contents from the
chopper bowl.
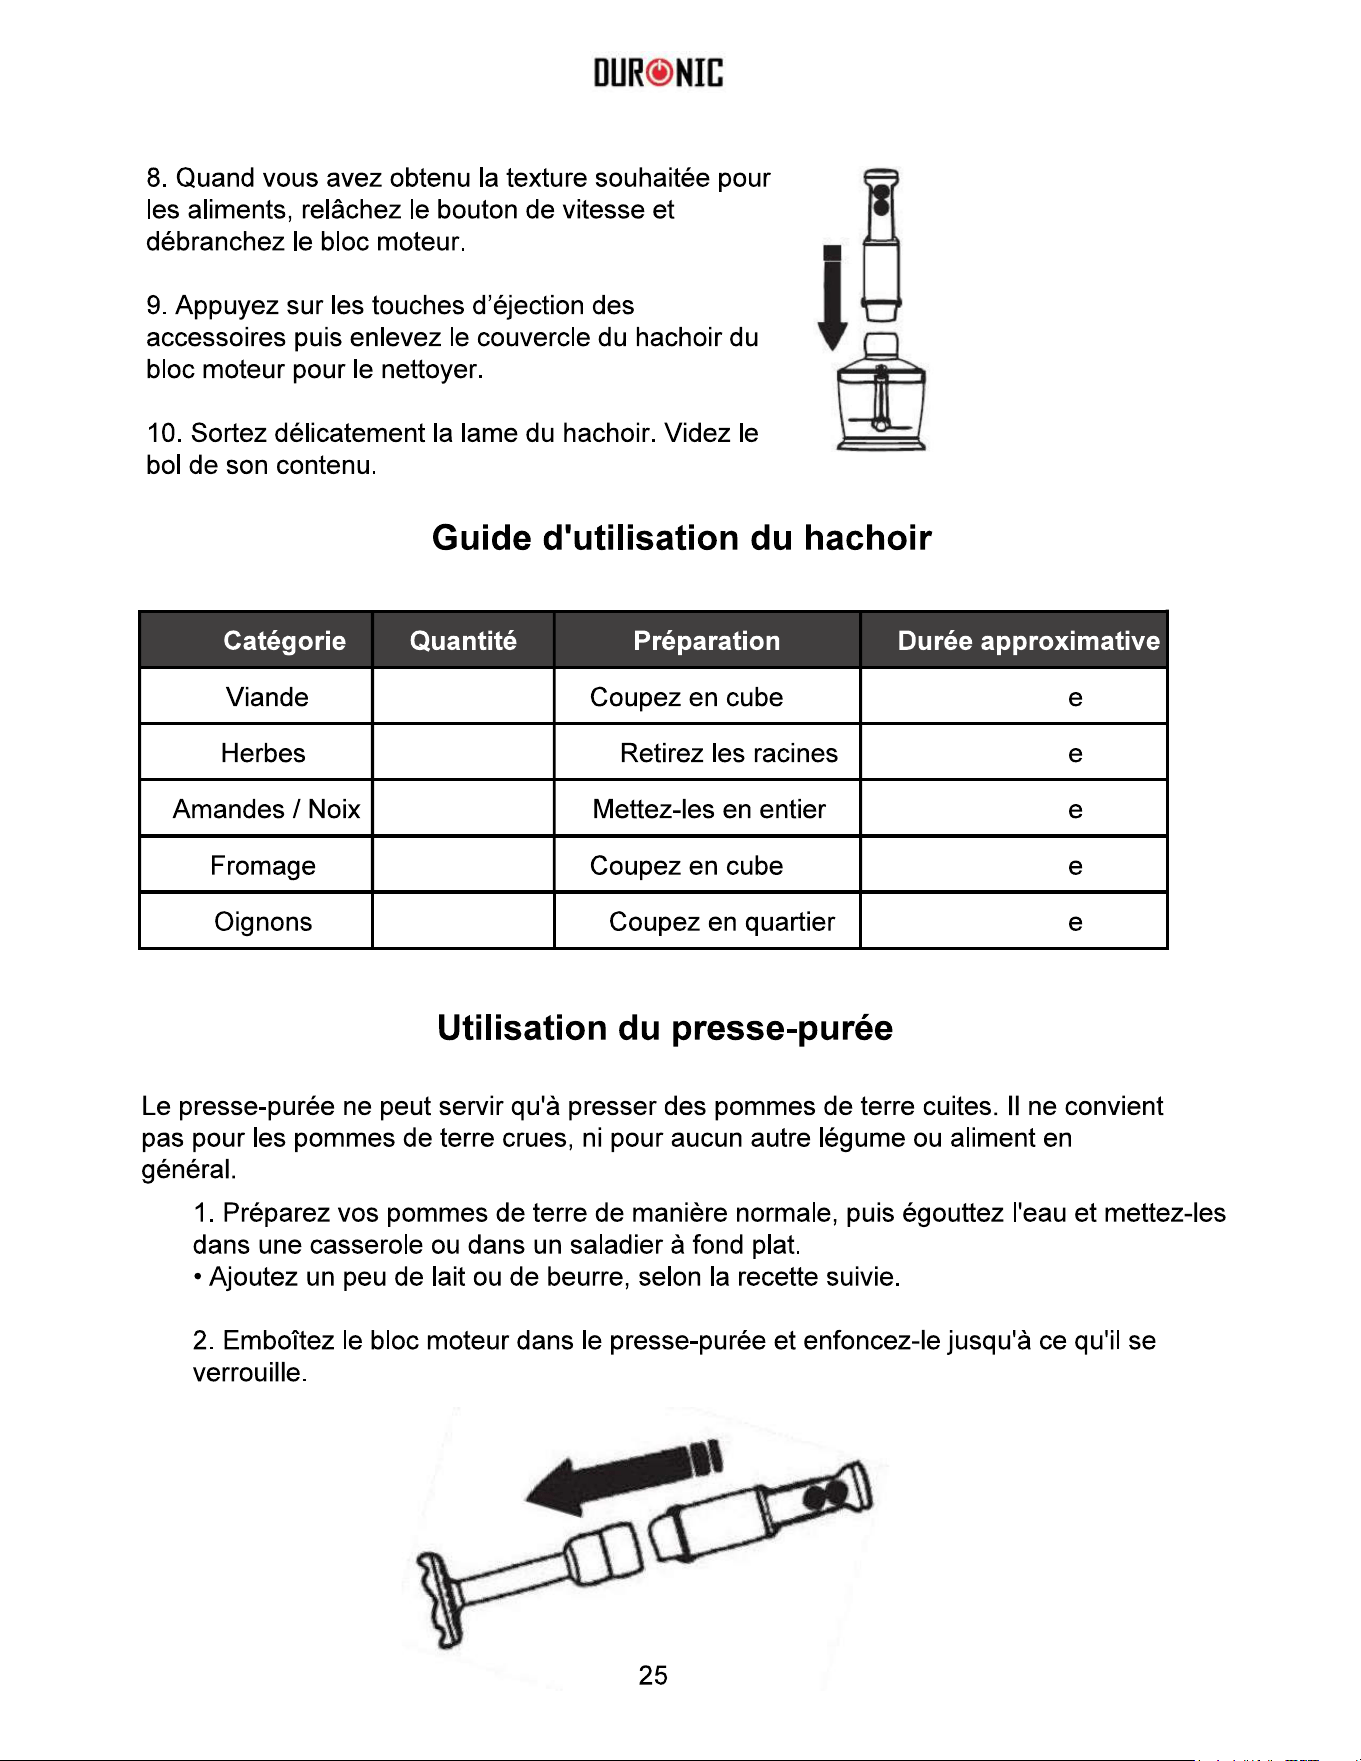
Chopper processing guide
Food Quantity Preparation Approximate Time
Meat 250g Cut into 2 cm cubes 15 seconds
Herbs 50 g Remove stalks 10 seconds
Almonds/Nuts 150g Place in whole nuts 15 seconds
Cheese 100 g Cut into 1 cm cubes 10 seconds
Onions 150g Cut into quarters 10 seconds
Using the Potato Smasher
The potato smasher is only suitable for mashing potatoes. It is not suitable for raw
potatoes or any other vegetables or foods.
1. Prepare your potatoes as normal, drain and place in a saucepan or flat bottom bowl.
Add small amount of milk or butter as required.
2. Attach the motor unit to the potato smasher and push to lock intoplace.
13

14
3. Plug the motor unit into the mains socket.
4. Turn the variable speed dial to set the desired speed.
5. Turn on the motor unit by keeping the speed button pressed.
You can also press the Turbo button to runthe appliance
for intermittent bursts.
6. Plunge the head of the potato masher into the potatoes.
Lift and repeat at a different place in thepan/bowl.
7. Continue until all the potatoes are mashed to your liking.
Then release the speed button and unplug the motor unit
from the mains socket.
8. Press the attachment release buttons and remove the potato
smasher from the motor unit.
Cleaning A Maintenance
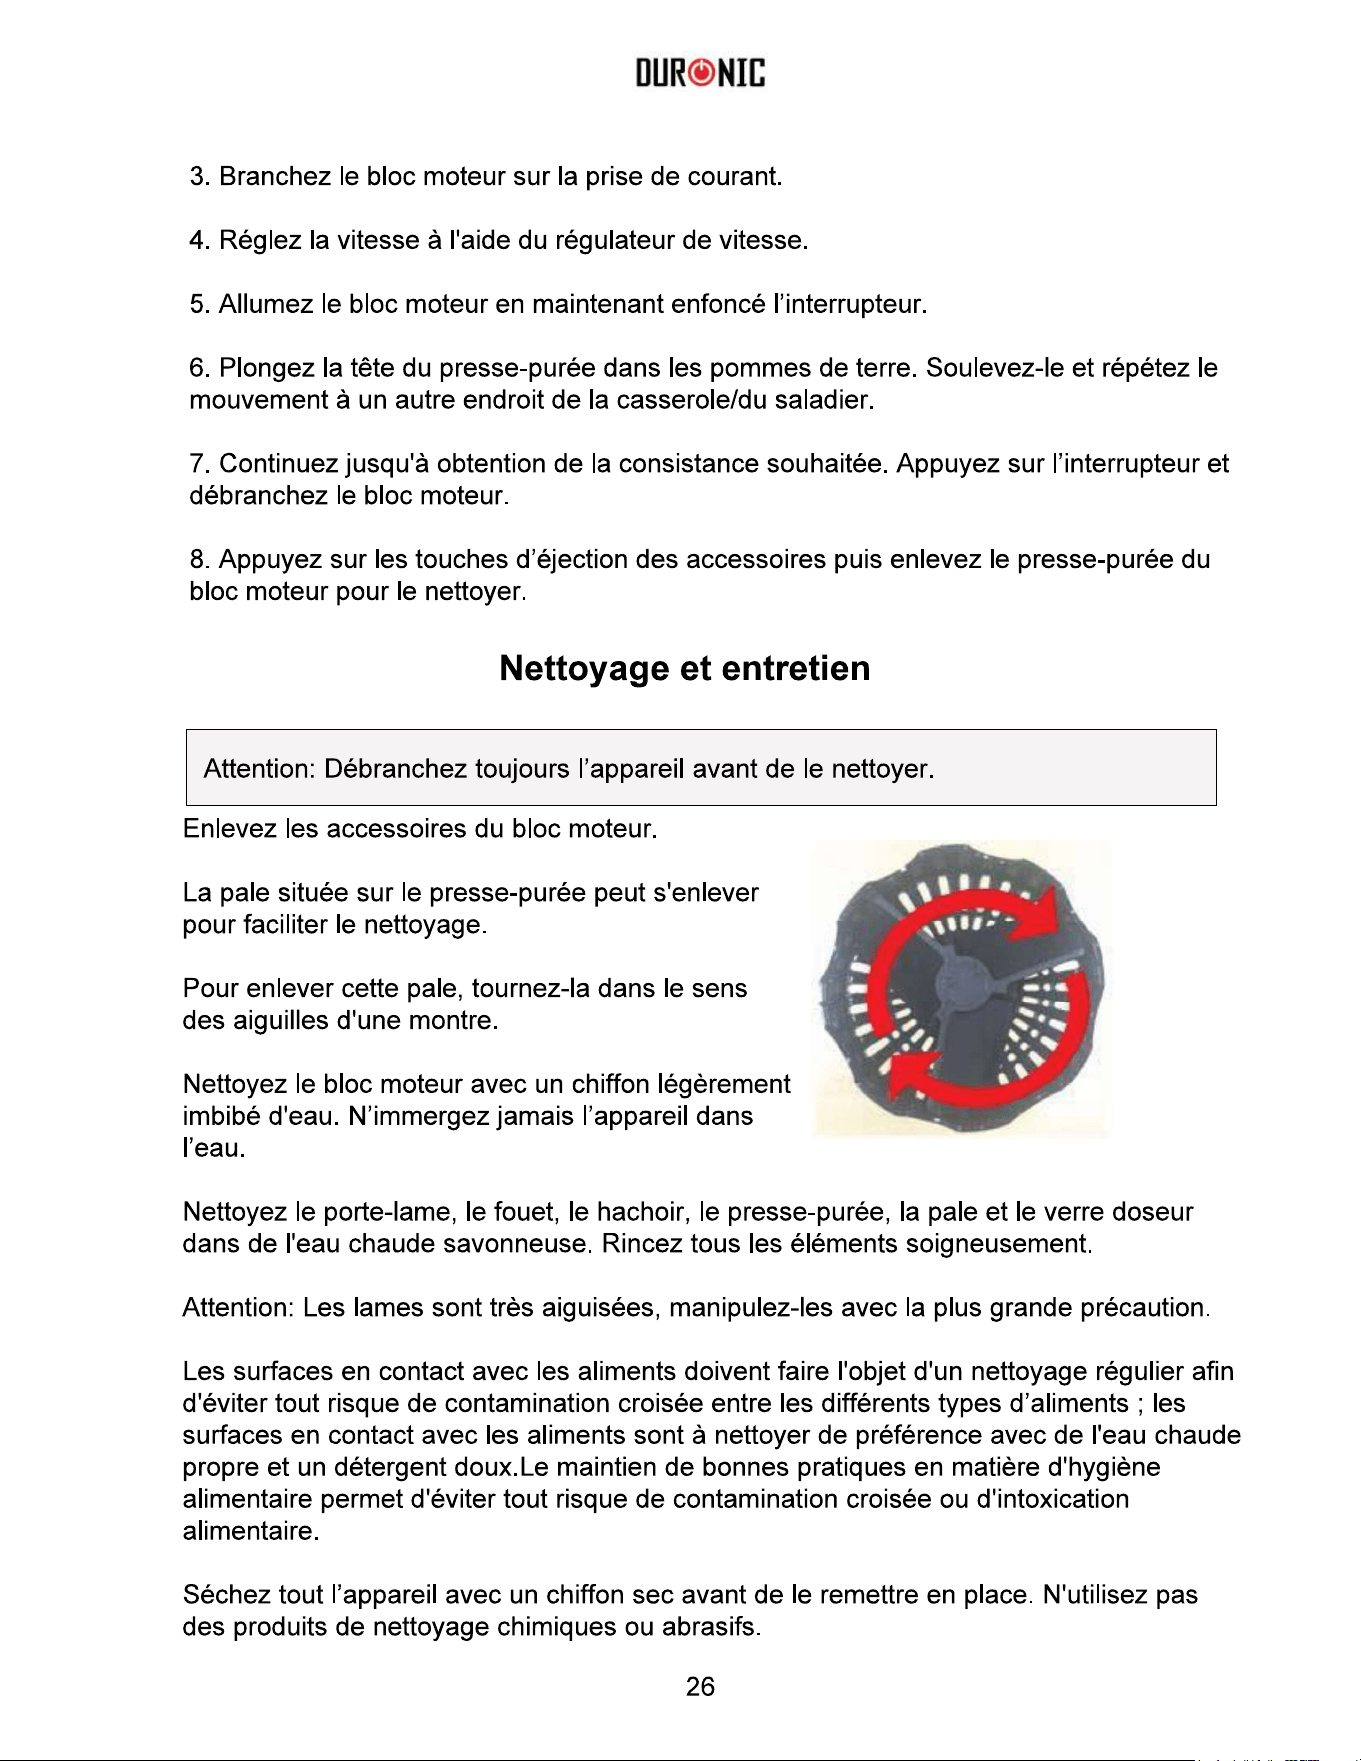
Remove the attachment from the motor unit.
The paddle on the potato smasher can
be removed for cleaning.
To remove the paddle, grip the paddle
and twist it clockwise.
Clean the motor unit with a slightly damp cloth.
Never immerse it in water.
Clean the blending attachment, whisk attachment, chopper attachment, potato smasher
with paddle and the measuring cup in warm soapy water. Rinse and dry thoroughly.
Caution: The blades are very sharp. Handle with extreme care.
Surfaces in contact with food should be cleaned regularly to avoid cross contamination
from different types of food, the use of warm clean water with a mild detergent is advis-
able when dealing with surfaces that come into contact with food.
Correct food hygiene practises should always be followed at all times to avoid
possibility of food poisoning/cross contamination.
Dry the entire appliance with a dry cloth before replacing.
Do not use chemical cleaners or abrasives product for cleaning.
WARNING: Always unplug the appliance before cleaning.
Warranty
1 Year Guarantee from Shine-Mart Ltd, Trademark owners of Duronic Products.
NOTE: THESE STATEMENTS DO NOT AFFECT YOUR STATUTORY RIGHTS AS A
CONSUMER
This product has been manufactured under the strictest or quality control procedures, and
using the highest quality of materials, to ensure excellent performance and reliability. It will
give very good and long lasting service, provided it is properly used and maintained. The
product is guaranteed for 1 years from the date of original purchase. If any defect arises due
to a faulty materials or poor workmanship, the faulty product must be returned to the original
place of purchase. Refund or replacement is at the discretion of that company.
Duronic Products are offered with a 1 year guarantee under the following conditions:
1. The product must be returned to the retailer with original proof of purchase.
2. The product must be installed and used in accordance with the instructions
contained in this operating manual.
3. It must be used only for domestic purposes.
4. It does not cover wear and tear, malicious damage, misuse, neglect,
inexpert repairs or consumable parts.
5. Shine-Mart Ltd has no responsibilities for accidental or consequential loss or damage.
6. Shine-Mart Ltd are not liable to carry out any type of servicing work,
under the guarantee
7. Valid in the UK only
This product is fitted with CE:1363 plug and fuse
Imported by Shine-Mart Ltd, RM3 8SB
Information on waste Disposal for Consumers of
Electrical & Electronic Equipment.
This mark on a product and/or accompanying documents indicates that when it
is to be disposed of, it must be treated as Waste
Electrical & Electronic Equipment, (WEEE).
Any WEEE marked products must not be mixed with general household waste,
but kept separate for the treatment, recovery and recycling of the materials used.
For proper treatment, recovery and recycling; please take all WEEE marked
waste to your Local Authority Civic waste site,
where it will be accepted free of charge.
If customers dispose of Waste Electrical & Electronic Equipment correctly, they
will be helping to save valuable resources and preventing any potential negative
effects upon human health and the environment, of any hazardous materials that
the waste may contain.


1.
2.
3.
4.
5.
6.
7.
8.
9.
10.
11.
12.
13.

1.
2.
3.
4.
5.
6.
7.
8.
9.
10.
1.
2. 3.
250g 15 second s
50 g 10 second s
150g 15 second s
100 g 10 second s
150g 10 second s


Gebrauchsanleitung auf Deutsch
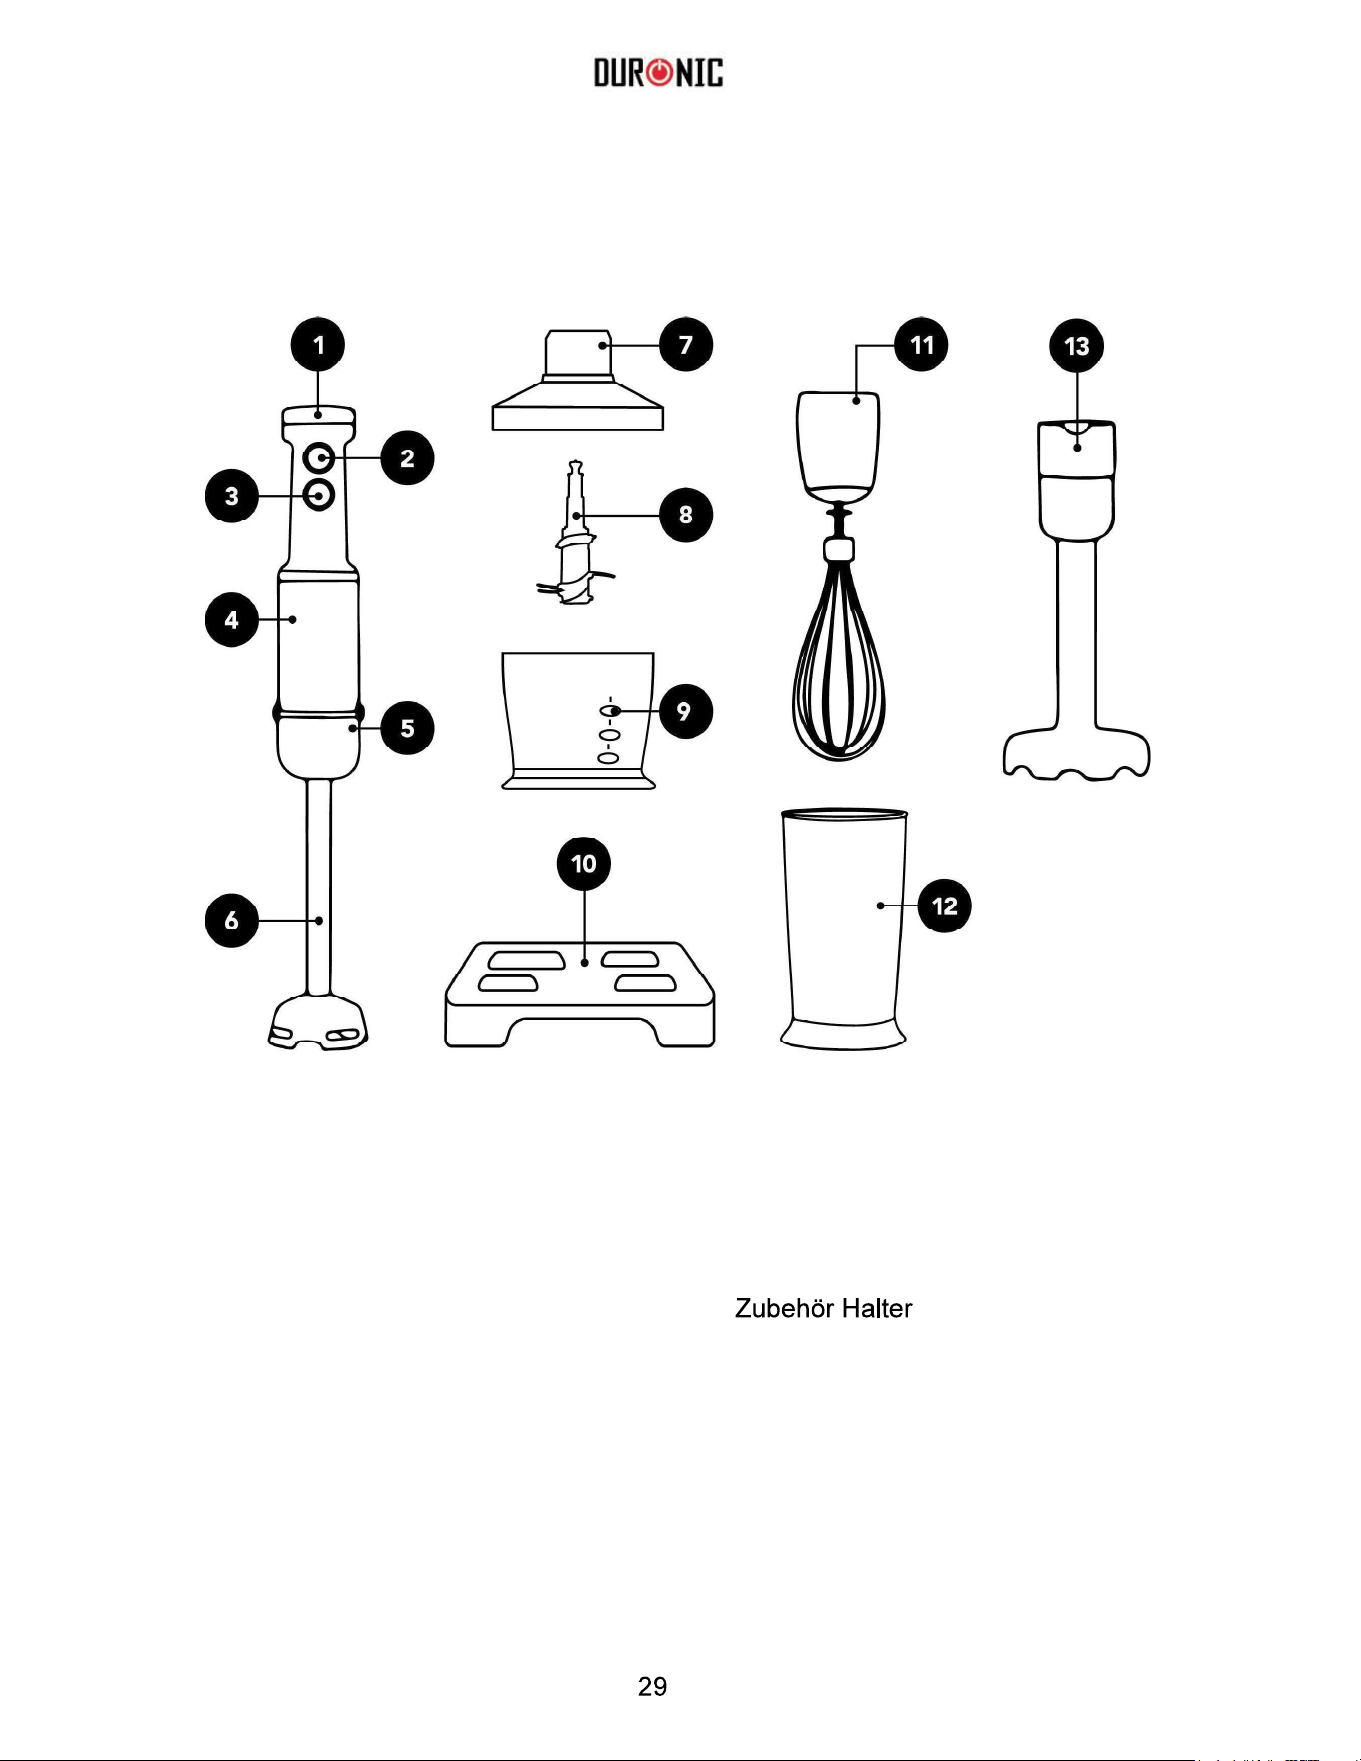
Bauteile
1.
Variable Geschwindigkeitsregelung
2.
Geschwindigkeitsschalter
3.
Turbo Schalter
4.
Motoreinheit
5.
Entriegelungsknöpfe
(auf beiden Seiten des Motors)
6.
Abnehmbarer Pürierstab
7. Mix Deckel
8.
Mix Deckel
9.
Zerkleinerer-Behälter
10.
11.
Schlagbesen
12. Messbecher
(erlaubt messen und pürieren/
mixen zur gleichen Zeit)
13. Püree Stampferaufsatz

Sicherheitstipps
1. Dieses Gerät ist für den Haushalt
2. Um Gefahren zu vermeiden, darf ein beschädigtes Kabel nur vom Hersteller, dessen
Kundenservice oder einer anderen ähnlich qualifizierten Person ausgetauscht werden.
3. Dieses Gerät darf nicht von Kindern benutzt werden. Bitte verstauen Sie das Gerät und
das dazugehörige Kabel aus der Reichweite von Kindern.
4. Betriebszeiten und Geschwindigkeitseinstellungen finden Sie unter der Rubrik
-8 dieser Gebrauchsanleitung. Bitte um Vorsicht, wenn Sie die
scharfen Messerklingen bedienen, die Schüssel entleeren oder bei der Reinigung.
5. Bitte schalten Sie das Gerät immer bei Verlassen des Gerätes/Montage/Demotage
oder Reinigung vom Stromnetz ab.
6. Näheres zu den allgemeinen Hygienestandards finden Sie auf Seite 8 dieser
Gebrauchsanleitung.
7. Schalten Sie das Gerät aus und stecken Sie es von der Steckdose ab bevor Sie
Zubehör wechseln oder Geräteteile welche in Bewegung sind berühren.
8. Das Gerät kann von Personen mit reduzierten physischen oder mentalen Fähigkeiten
oder Mangel an Erfahrungen benutzt werden, wenn sie beaufsichtigt oder bezüglich des
sicheren Gebrauchs des Gerätes aufgeklärt wurden und die Gefahren verstanden
wurden.
ACHTUNG: Bestehendes Risiko auf Verletzungen, wenn das Gerät nicht korrekt benutzt
wird. DIE MESSERKLINGE IST SEHR SCHARF, BENUTZEN SIE DIESEN STABMIXER
MIT GRÖßTER VORSICHT UND STECKEN SIE DAS KABEL AUS DER STECKDOE
VOR DER REINIGUNG.
Bei Verarbeitung von heißen Zutaten ist Vorsicht geboten, da es durch den plötzlichen
Dampf zu Spritzern kommen kann.

Wichtige Warn- und Sicherheitshinweise
Lesen Sie sich vor der Bedienung die Gebrauchsanleitung sorgfältig durch und
behalten Sie diese für den zukünftigen Gebrauch.
Trennen Sie den Mixer vom Strom bei Nichtbenutzung, Montage, Demontage sowie
Reinigung.
Benutzen Sie dieses Gerät nur für das Mixen vonLebensmitteln.
Vermeiden Sie die Berührung der bewegenden Geräteteile.
Der Gebrauch von Zubehör, welches nicht vom Herstelle empfohlen wurde kann zu
Feuer, elektrischen Schocks oder Verletzungen führen.
Bitte stellen Sie immer sicher, dass die Zubehörteile sicher an die Motoreinheit
montiert sind bevor Sie das Gerät einschalten.
Bitte lassen Sie das Kabel nicht auf heißen Oberflächen stehen oder von
Oberflächen hängen, da Kinder diese sonst leicht erreichenkönnen.
Nicht im Freien benutzen.
Verwenden Sie das Gerät nicht für andere Zwecke als diesebeschrieben.
Mixen Sie keine heißen Flüssigkeiten (heißes Öl).
Bevor der Inbetriebnahme
Waschen Sie Pürierstab, Schlagbesen, Messerklingen, Zerkleinerer-Topf, Messbecher, Püree
Stampferaufsatz in warmen Wasser mit Seife. Lassen Sie es gründlich trocknen. Wischen Sie die
Motoreinheit mit einem feuchten Tuche. Tauchen Sie das Gerät nicht ins Wasser. VORSICHT
SCHARFE KLINGEN
Betrieb
Dieser Stabmixer ist geeignet Saucen, Suppen, Mayonnaise zuzubereiten oder verschiedene
Zutaten zu mixen.
ACHTUNG: Verwenden Sie dieses Gerät nicht länger als 15 Sekunden ohne Unterbrechung.
Warten Sie bis das Gerät auf Raumtemperatur abgekühlt ist und fahren Sie dann erst fort.
Bedienungsanleitung Stabmixer
Der Pürierstab eignet sich zum Mischen von Getränken und Milchshakes als
auch Dips, Saucen, Mayonnaise sowie Babynahrung.
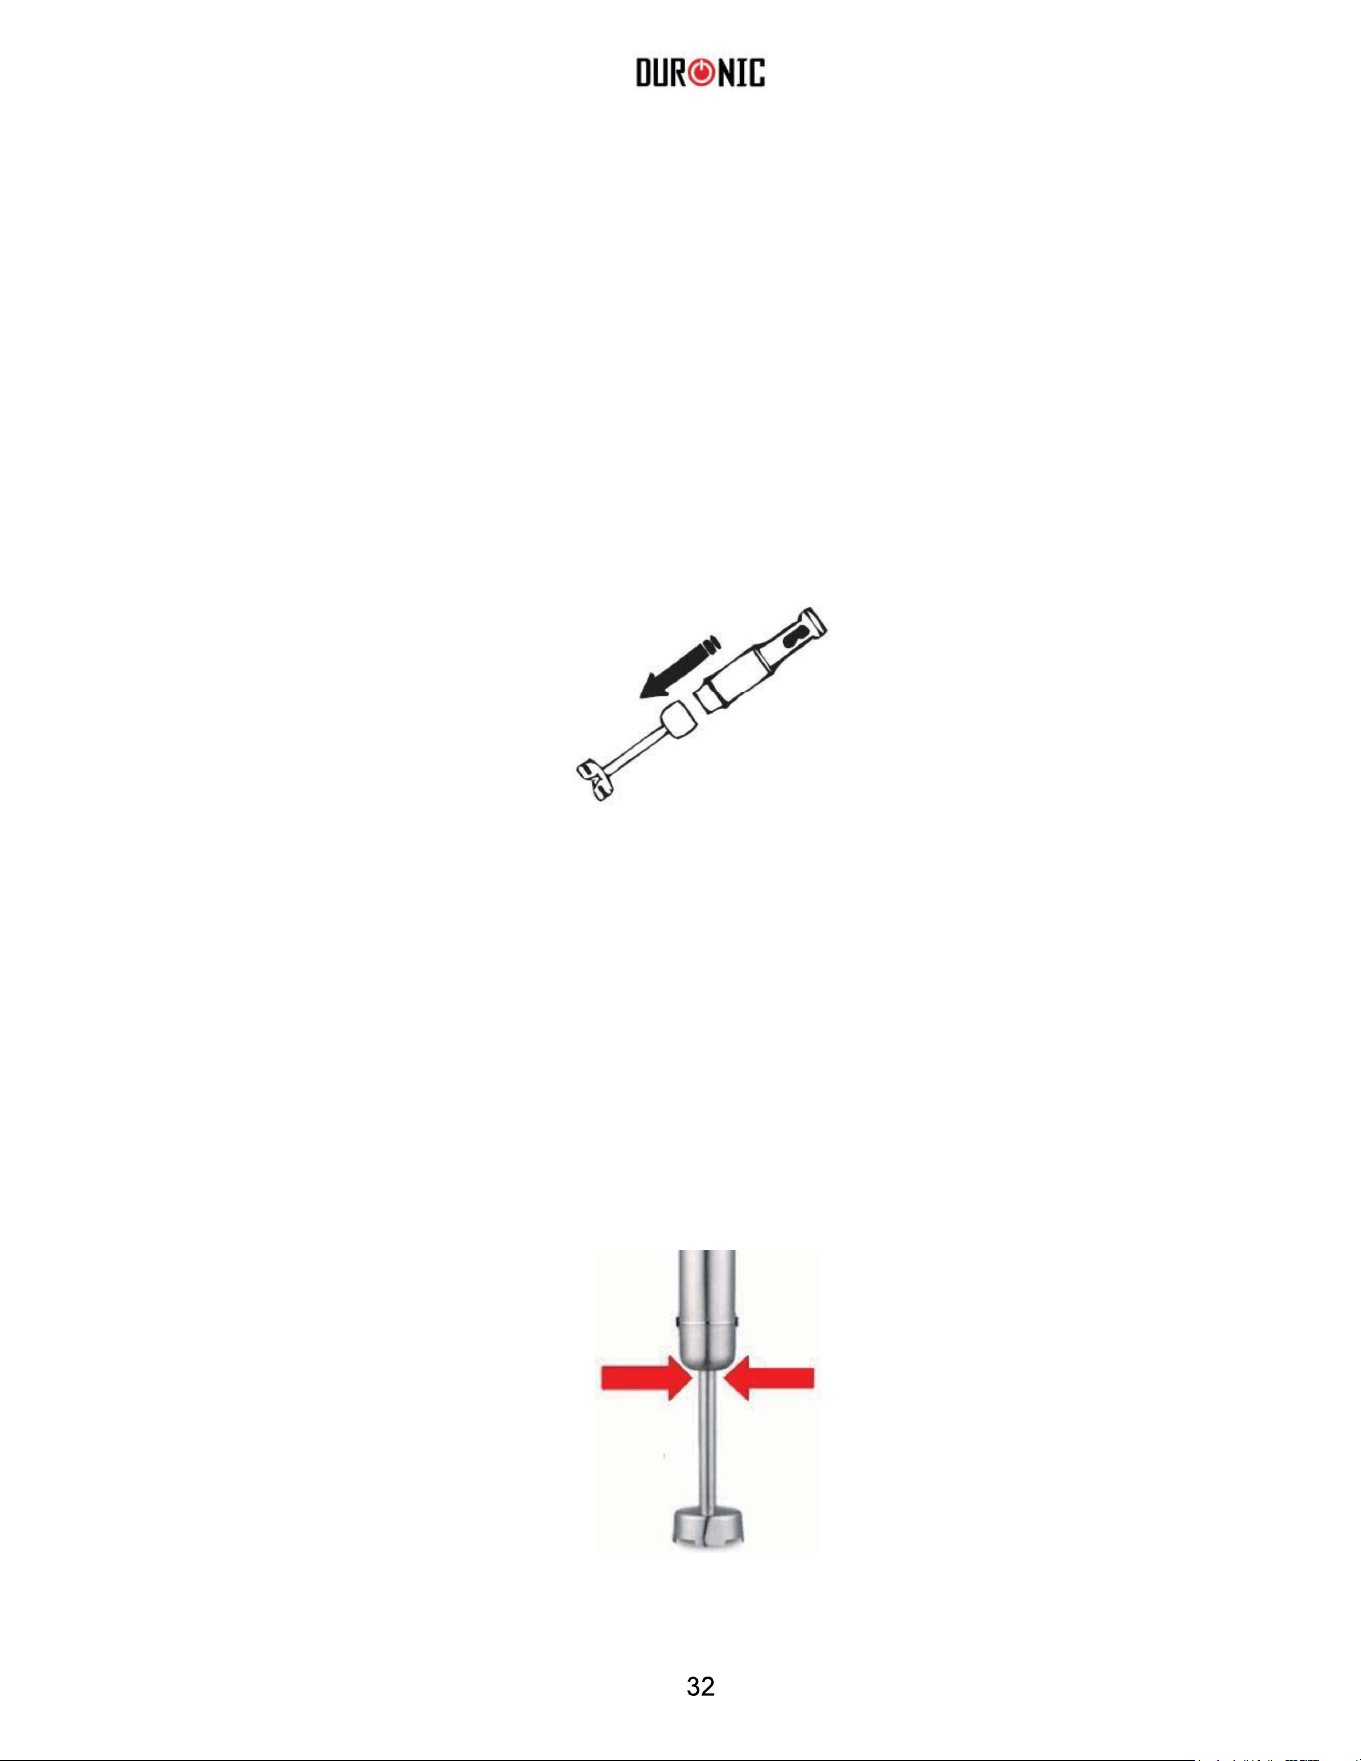
1. Stellen Sie sicher, dass die Motoreinheit ausgestecktist.
2. Befestigen Sie die Motoreinheit am Pürierstab und klicken Sie es in die
Verriegelung.
3. Geben Sie die Zutaten in einen großen Becher oder in den mitgelieferten
Messbecher.
a. Vergewissern Sie sich das der große Behälter oder der mitgelieferte
Messbecher auf einer stabilen, ebenen Fläche aufgestellt ist.
b. Schneiden Sie harte Zutaten in kleine Stücke um ein einfacheres Mischen zu
ermöglichen.
4. Stecken Sie die Motoreinheit in die Steckdose.
5. Tauchen Sie den Pürierstab in den großen Behälter oder den mitgelieferten
Messbecher ein.
a. Vergewissern Sie sich, dass die Tiefe der Zutaten die Außenseite des
Mischbehälters nichtüberschreitet.
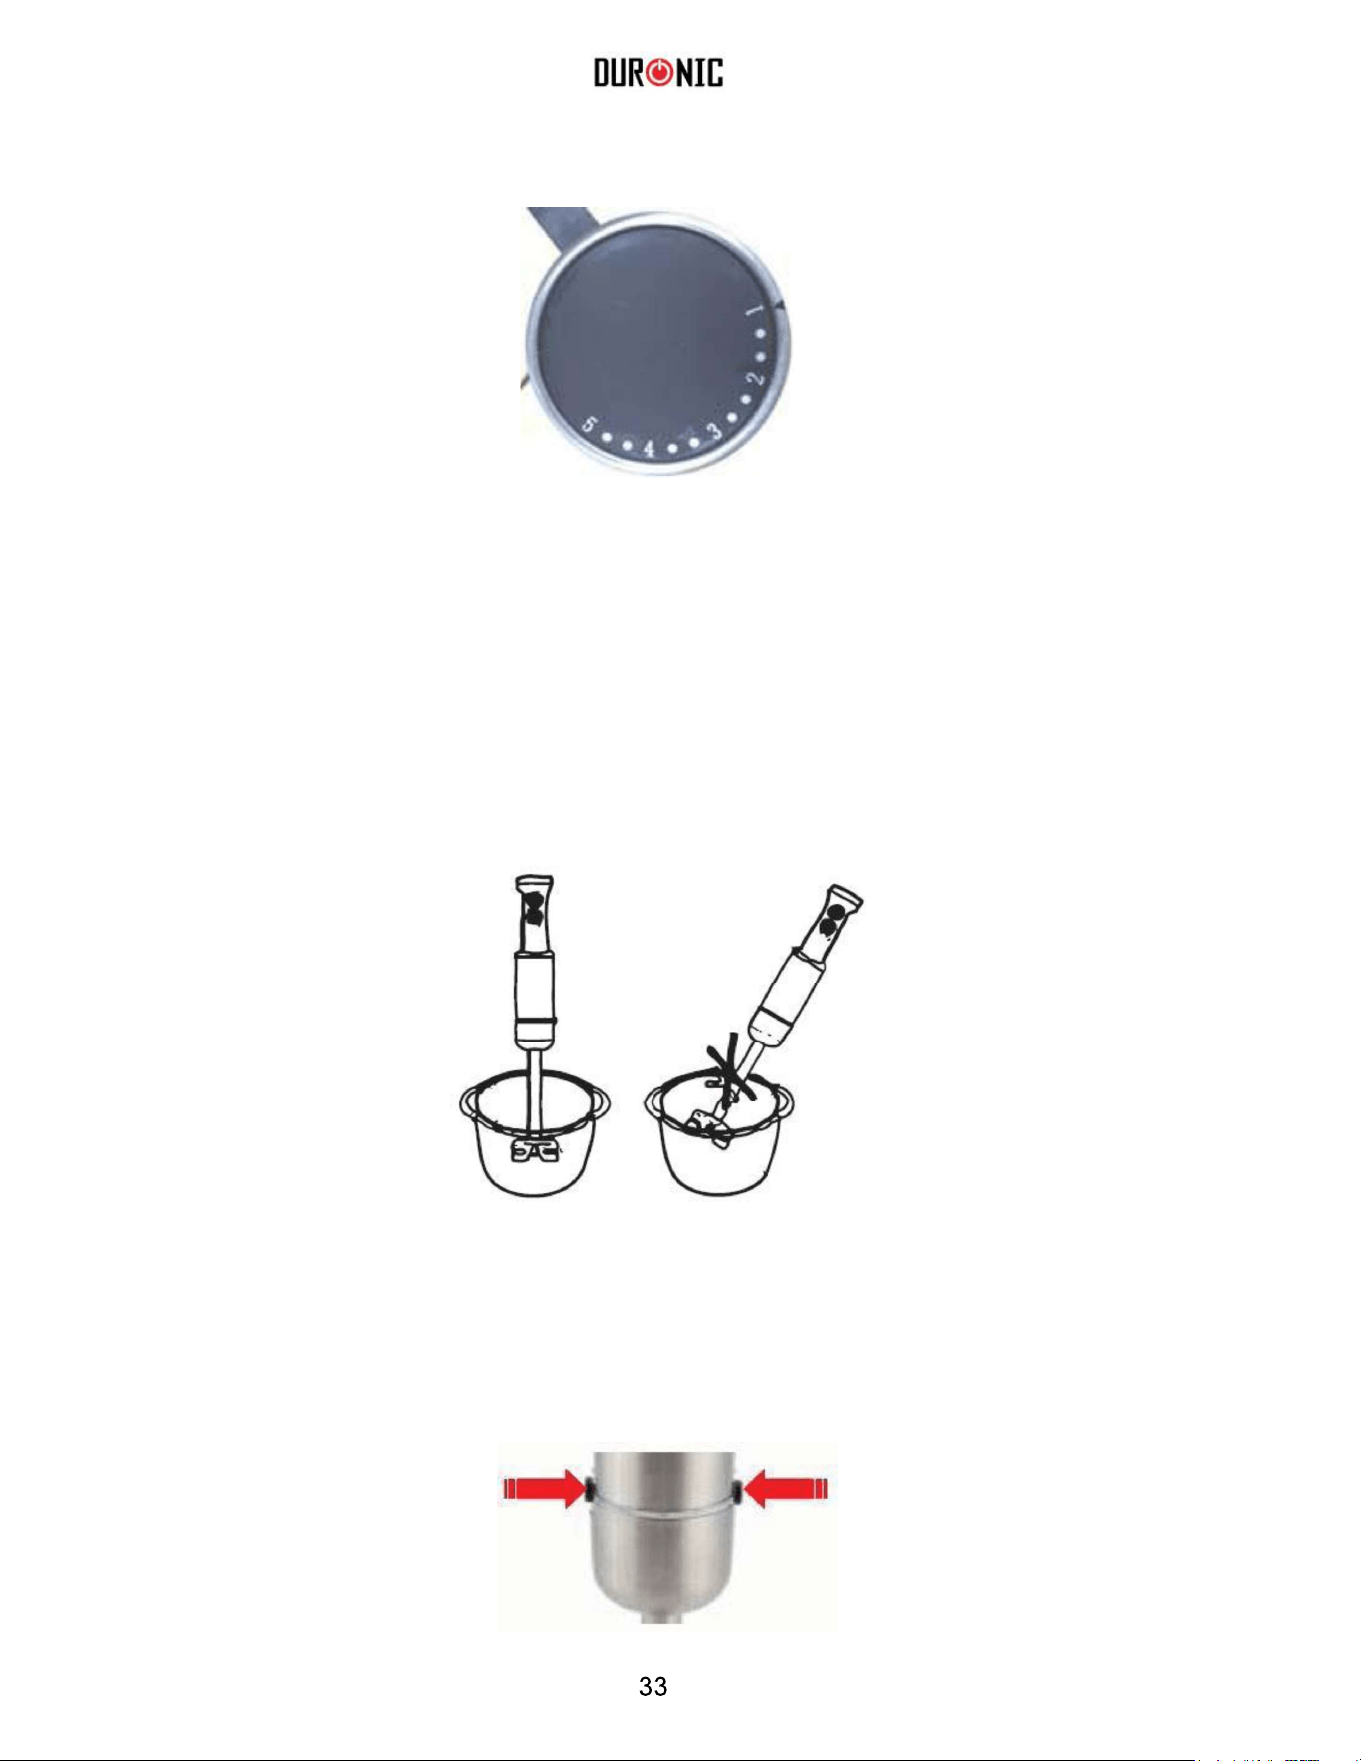
6. Wählen Sie die gewünschte Geschwindigkeit durch Drehen der variablen
Geschwindigkeitsregelung.
7. Schalten Sie die Motoreinheit ein, indem Sie die Geschwindigkeitstaste gedrückt
halten.
a. Es wird empfohlen, mit der niedrigsten Geschwindigkeitsstufe (1) zu starten, um
Spritzer zu vermeiden.
b. Sie können auch die Turbo-Taste drücken, um zeitweiligen Starkstromstöße
auszuführen
8. Mischen Sie die Zuaten, iindem Sie das Gerät langsam nach oben, unten und
kreisförmig bewegen.
a. Wenn Sie den Stabmixer in einem Topf verwenden möchten, stellen Sie sicher, dass
Sie den Topf vom Herd zuvor entfernen.
9. Sobald sie den Mischvorgang beendet haben, lassen Sie die
Geschwindigkeitstaste los und ziehen Sie den Motor aus der Steckdose.
10. Drücken Sie auf die Entriegelungsknöpfe und entfernen Sie den Pürierstab von
der Motoreinheit vor der Reinigung.
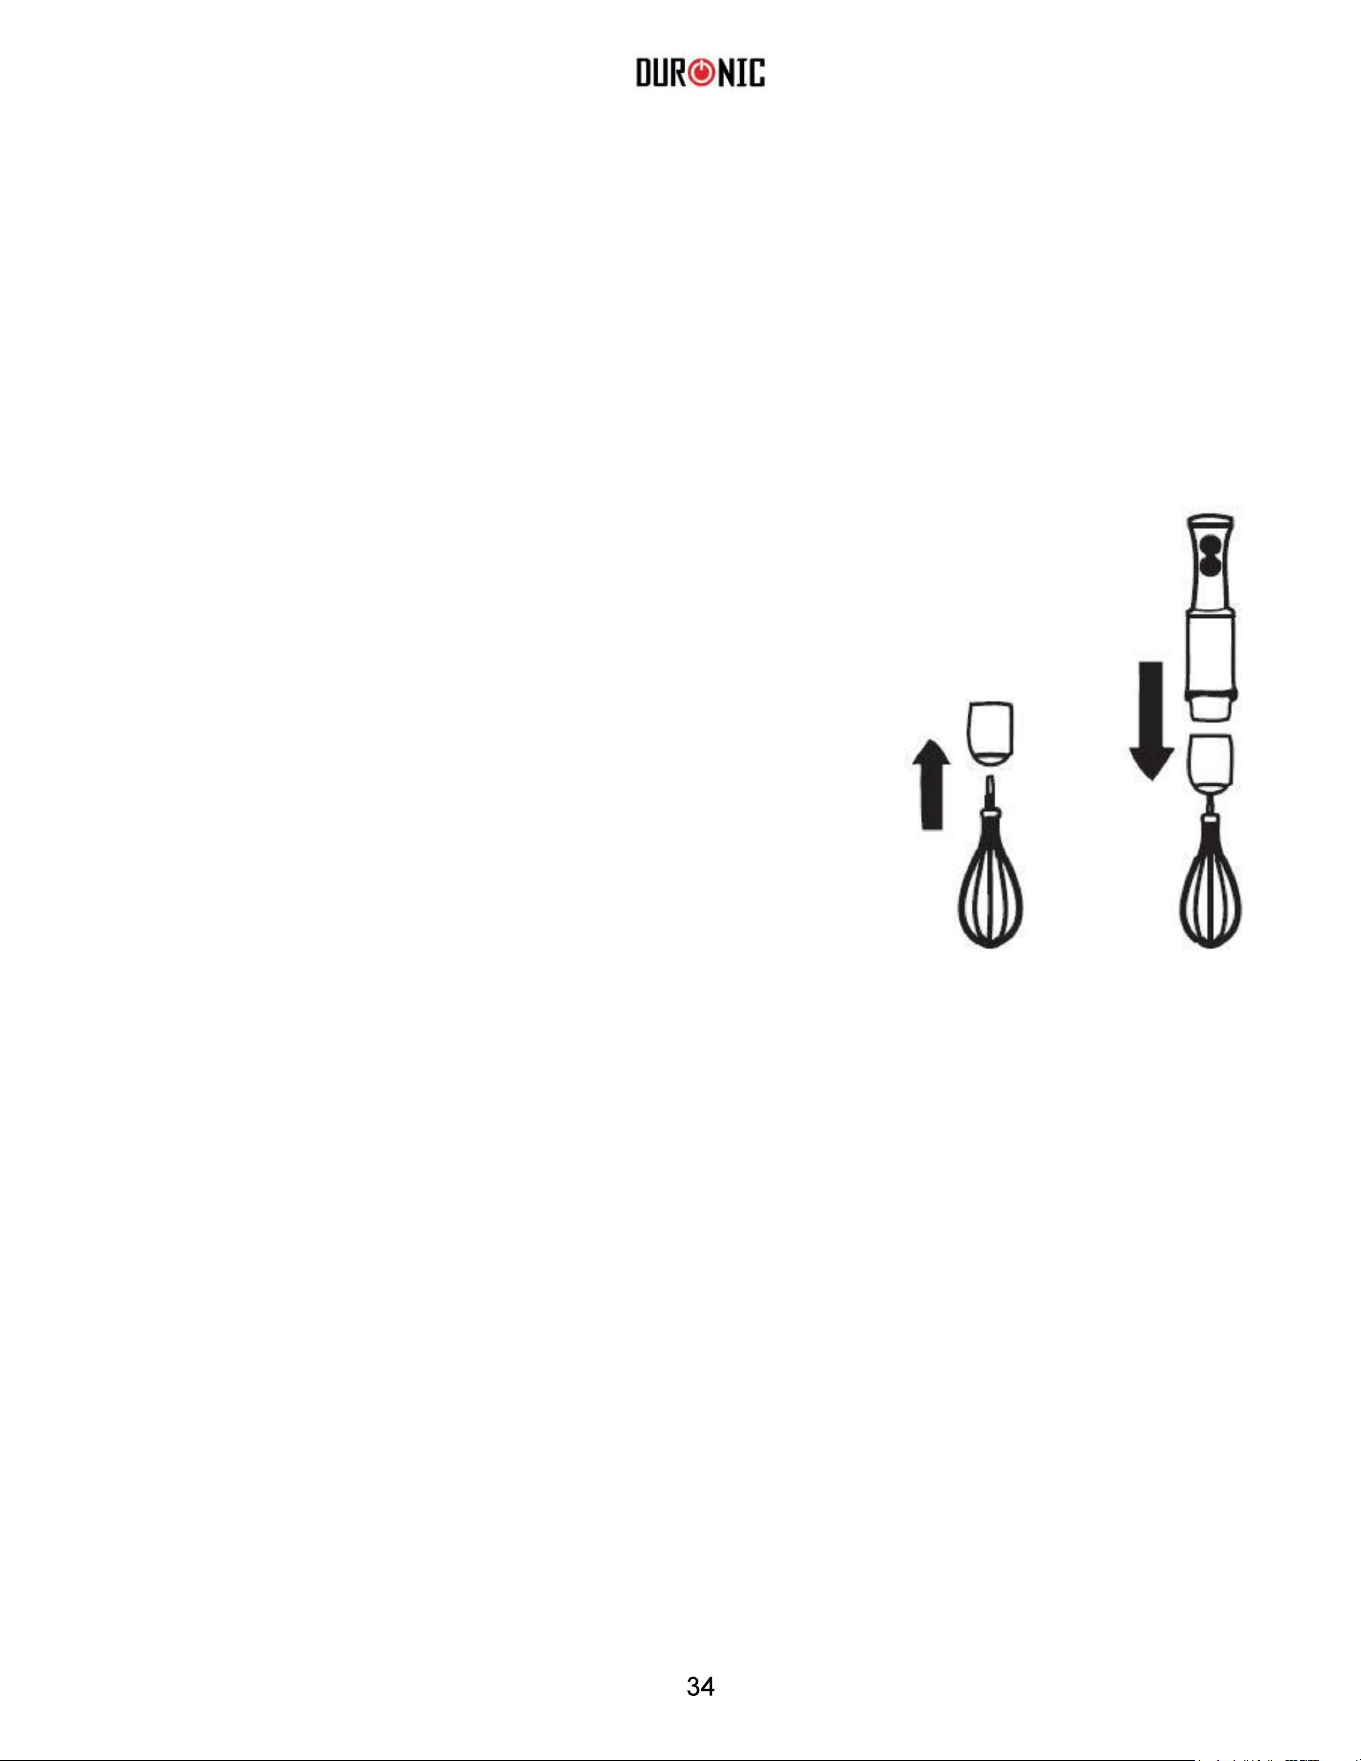
Bedienungsanleitung Schlagbesen
Benutzen Sie den Schlagbesen ausschließlich zum Schlagen von Sahne,
Eiweiß, Biskuitteig und Fertig-Desserts.
1. Vergewissern Sie sich das die Stromeinheit
ausgesteckt ist.
2. Stecken Sie den Schlagbesen in das Getriebeteil.
3. Klicken Sie dann das Motorteil auf das Getriebeteil.
4. Geben Sie alle Zutaten in eine tiefe Mischschale oder
einen Behälter, um ein Spritzen zu verhindern.
5. Stecken Sie die Motoreinheit in eine Steckdose.
6. Schlagbesen in eine Schüssel eintauchen bis man den
Boden erreicht.
7. Wählen Sie die gewünschte Geschwindigkeit durch
Drehen der variablen Geschwindigkeitsregelung.
8. Schalten Sie die Motoreinheit ein, indem Sie die
Geschwindigkeitstaste gedrückt halten.
a. Sie können auch die Turbo-Taste drücken, um
zeitweiligen Starkstromstöße auszuführen
9. Halten Sie die Motoreinheit in einer aufrechten
Position und drehen Sie langsam den Schneebesen in
der Rührschüssel.
10. Nach dem Sie den Schlagvorgang abgeschlossen
haben, lassen Sie die Geschwindigkeitstaste los und
ziehen Sie den Motor aus der Steckdose.
11. Drücken Sie die Entriegelungsknöpfe und entfernen
Sie den Schlagbesen von der Motoreinheit. Für die
Reinigung, kann Schlagbesen vom Gehäuse entfernt
werden, indem man an der Basis des Schlagbesens
zieht.
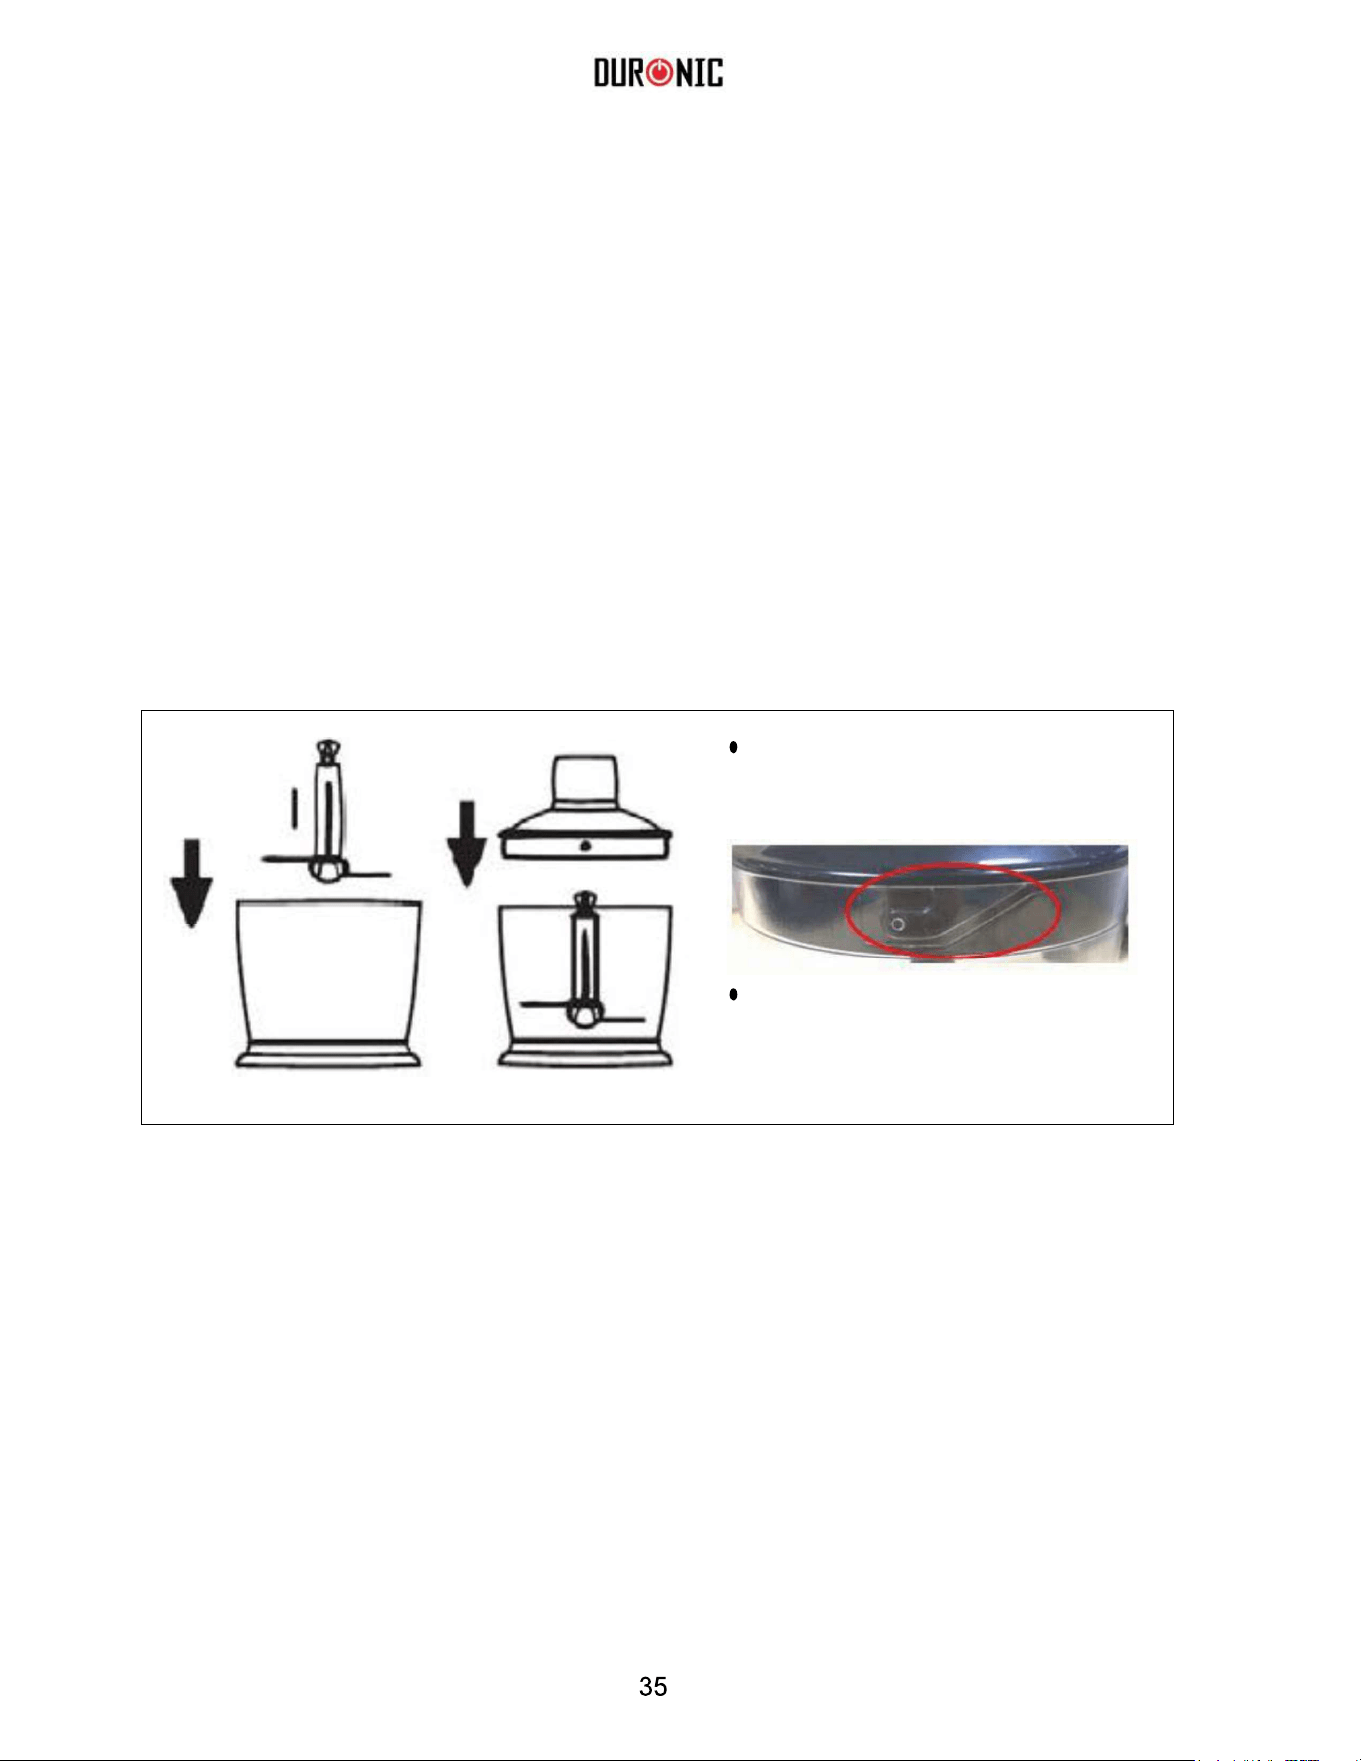
Bedienungsanleitung Zerkleinerer
Der Zerkleinerer eignet sich zum Zerkleinern von Fleisch, Hartkäse,
Zwiebeln, Kräutern, Knoblauch, Karotten, etc.
1. Vergewissern Sie sich das die Stromeinheit ausgesteckt ist.
2. Setzen Sie das Messer auf die Achse im Arbeitsbehälter.
3. Lebensmittel einführen und den Deckel aufsetzen. Platzieren Sie den Deckel sorgfältig in
der Mitte. Drehen Sie den Deckel im Uhrzeigersinn bis er einrastet.
a. Richten Sie die Lacshen auf dem Deckel und die Kerben auf der Schüssel aus.
b. Wenn Sie Fleisch hacken, schneiden Sie dieses vorher in Würfel, bevor Sie es in den
Zerkleinerer geben.
4. Die Motoreinheit auf den Deckel setzen und einrasten lassen.
5. Die Motoreinheit in die Steckdose stecken.
6. Wählen Sie die gewünschte Geschwindigkeit durch Drehen der variablen
Geschwindigkeitsregelung.
7. Halten Sie die Zerkleinerungsschüssel und schalten Sie die Motoreinheit ein,
indem Sie die Geschwindigkeitstaste gedrückt halten.
a. Bei kontinuierlicher Bedienung erreicht man bessere Nahrungsmittelkonsistenz als
beim Pulsieren.
b. Sie können auch die Turbo-Taste drücken, um zeitweiligen Starkstromstöße
auszuführen
8. Sobald die gewünschte Lebensmittelkonsistenz erreicht ist, lassen Sie die
Geschwindigkeitstaste los und ziehen Sie den Motor aus der Steckdose.
Align the tabs on the lid and
notches on the bowl.
If chopping meat, cut it into
cubes before putting into
chopper bowl.

9. Drücken Sie die Entriegelungsknöpfe und entfernen
Sie den Zerkleinerer von der Motoreinheit.
10. Nehmen Sie anschließend den Deckelab.
11. Ziehen Sie das Messer vorsichtig heraus, bevor Sie
den Arbeitsbehälter leeren.
Verarbeitungsleitfaden
Nahrung
Menge Verarbeitung Zeitaufwand
Fleisch
250g
in 2cm Würfel schneiden
15 Sekunden
Kräuter
50 g
Stiele entfernen
10 Sekunden
Mandeln/Nüsse
150g
Ganze Nüsse
15 Sekunden
Käse
100 g
in 1cm Würfel schneiden
10 Sekunden
Zwiebeln
150g
In Würfel schneiden
10 Sekunden
Bedienungsanleitung Stampfer
Der Kartoffelstampfer ist nur zum Stampfen von Kartoffeln geeignet. Er ist nicht
für rohe Kartoffeln, anderes Gemüse oder Nahrungsmittel geeignet.
1. Bereiten Sie Ihre Kartoffel so wie immer vor, tropfen Sie sie ab und platzieren Sie
diese in einen Topf oder flachen Schüssel.
a. Fügen Sie eine kleine Menge Butter oder Milch (je nach Bedarf) hinzu.
2. Setzen Sie die Motoreinheilt auf den Kartoffelstampfer und klicken Sie ihnein.
3. Stecken Sie die Motoreinheit in eine Steckdose.
4. Wählen Sie die gewünschte Geschwindigkeit durch Drehen der variablen
Geschwindigkeitsregelung.
5. Schalten Sie die Motoreinheit ein, indem Sie die Geschwindigkeitstaste gedrückt
halten.
a. Schalten Sie die Motoreinheit ein, indem Sie die Geschwindigkeitstaste gedrückt
halten.
6. Tauchen Sie den Kartoffelstampfer in die Kartoffeln. Bewegen Sie den
Kartoffelstampfer auf und ab in der gesamten Schüssel.
7. Wiederholen Sie das so oft bis die gewünschte Kartoffelkonsistenz erreicht ist. Lassen
Sie die Geschwindigkeitstaste los und ziehen Sie den Motor aus der Steckdose.
8. Drücken Sie die Entriegelungsknöpfe und entfernen Sie den Kartoffelstampfer von der
Motoreinheit.
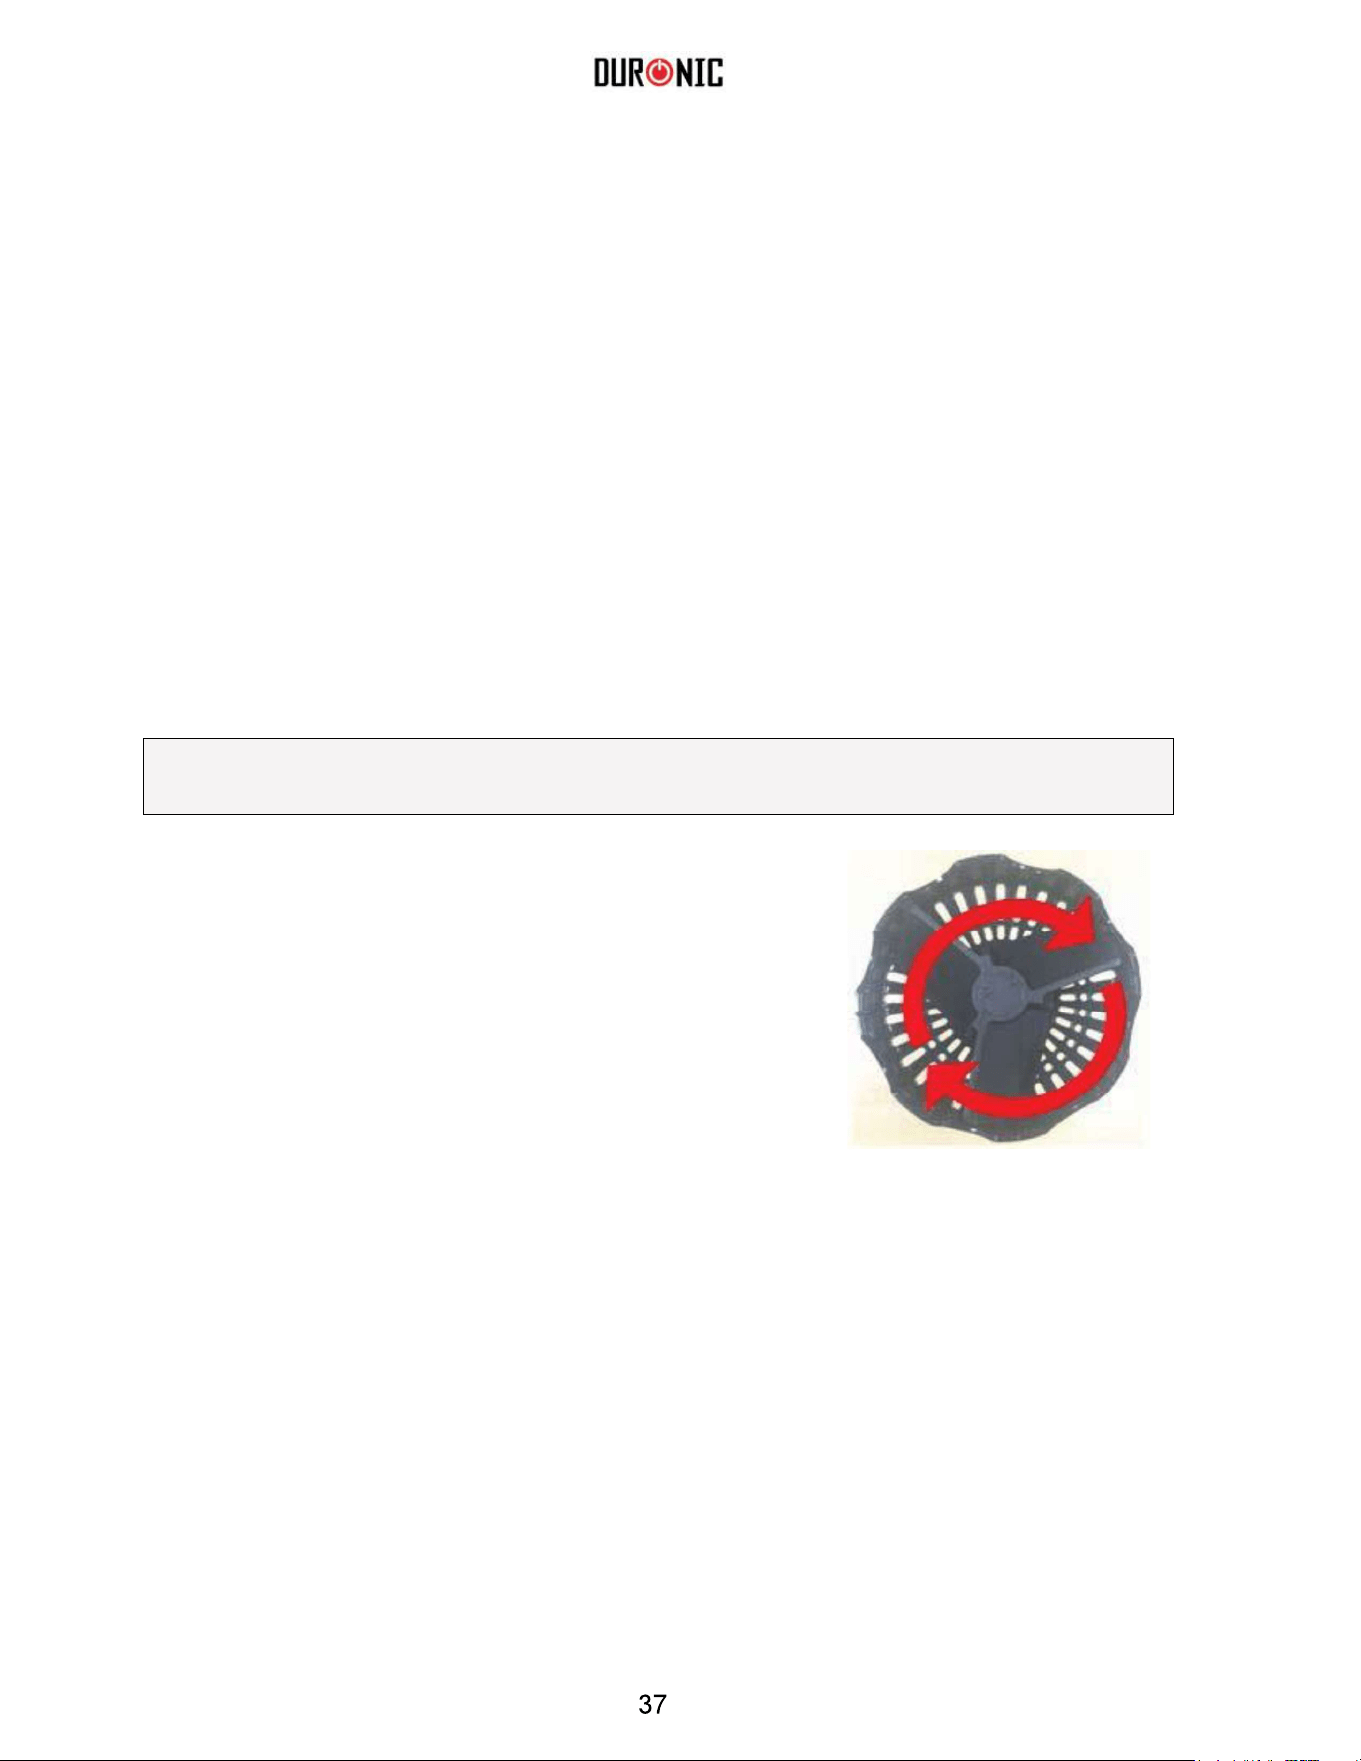
Reinigung und Wartung
Entfernen Sie den Kartoffelstampfer von der Motoreinheit.
Der Stampfereinsatz am Kartoffelstampfer kann zur
Reinigung entfernt werden.
Um den Stamfpereinsatz zu enterfernen, drehen Sie
diesen im Uhrzeigersinn.
Reinigen Sie die Motoreinheit mit einem
feuchten Tuch. Niemals ins Wasser tauchen.
Reinigen Sie den Stabmixer, Schlagbesen, Zerkleinerer, Kartoffelstampfer und den
Messbecher in warmen Seifenwasser. Ordentlich abspülen und trocknen lassen.
Achtung: Die Messer sind sehr scharf. Bedienung mit hoher Vorsicht.
Oberflächen, die mit Lebensmitteln in Berührung kommen, sollten regelmäßig gereinigt
werden, um eine Querverschmutzung von verschiedenen Lebensmitteln zu verhindern. Die
Verwendung von warmem Wasser mit einem milden Reinigungsmittel ist ratsam, wenn es
um Oberflächen geht, die mit Lebensmitteln in Berührungkommen.
Korrekte Lebensmittelhygienepraktiken sollten immer eingehalten werden, um eine
mögliche Lebensmittelvergiftung / Querverschmutzung zu vermeiden.
Trocknen sie das Gerät vor Austausch mit einem trockenen Tuch.
Verwenden Sie zum Reinigen keine chemischen Reinigungsmittel oder Scheuermittel.
ACHTUNG: Vor der Reinigung immer von der Steckdose abstecken.


Manual De Instrucciones En Español
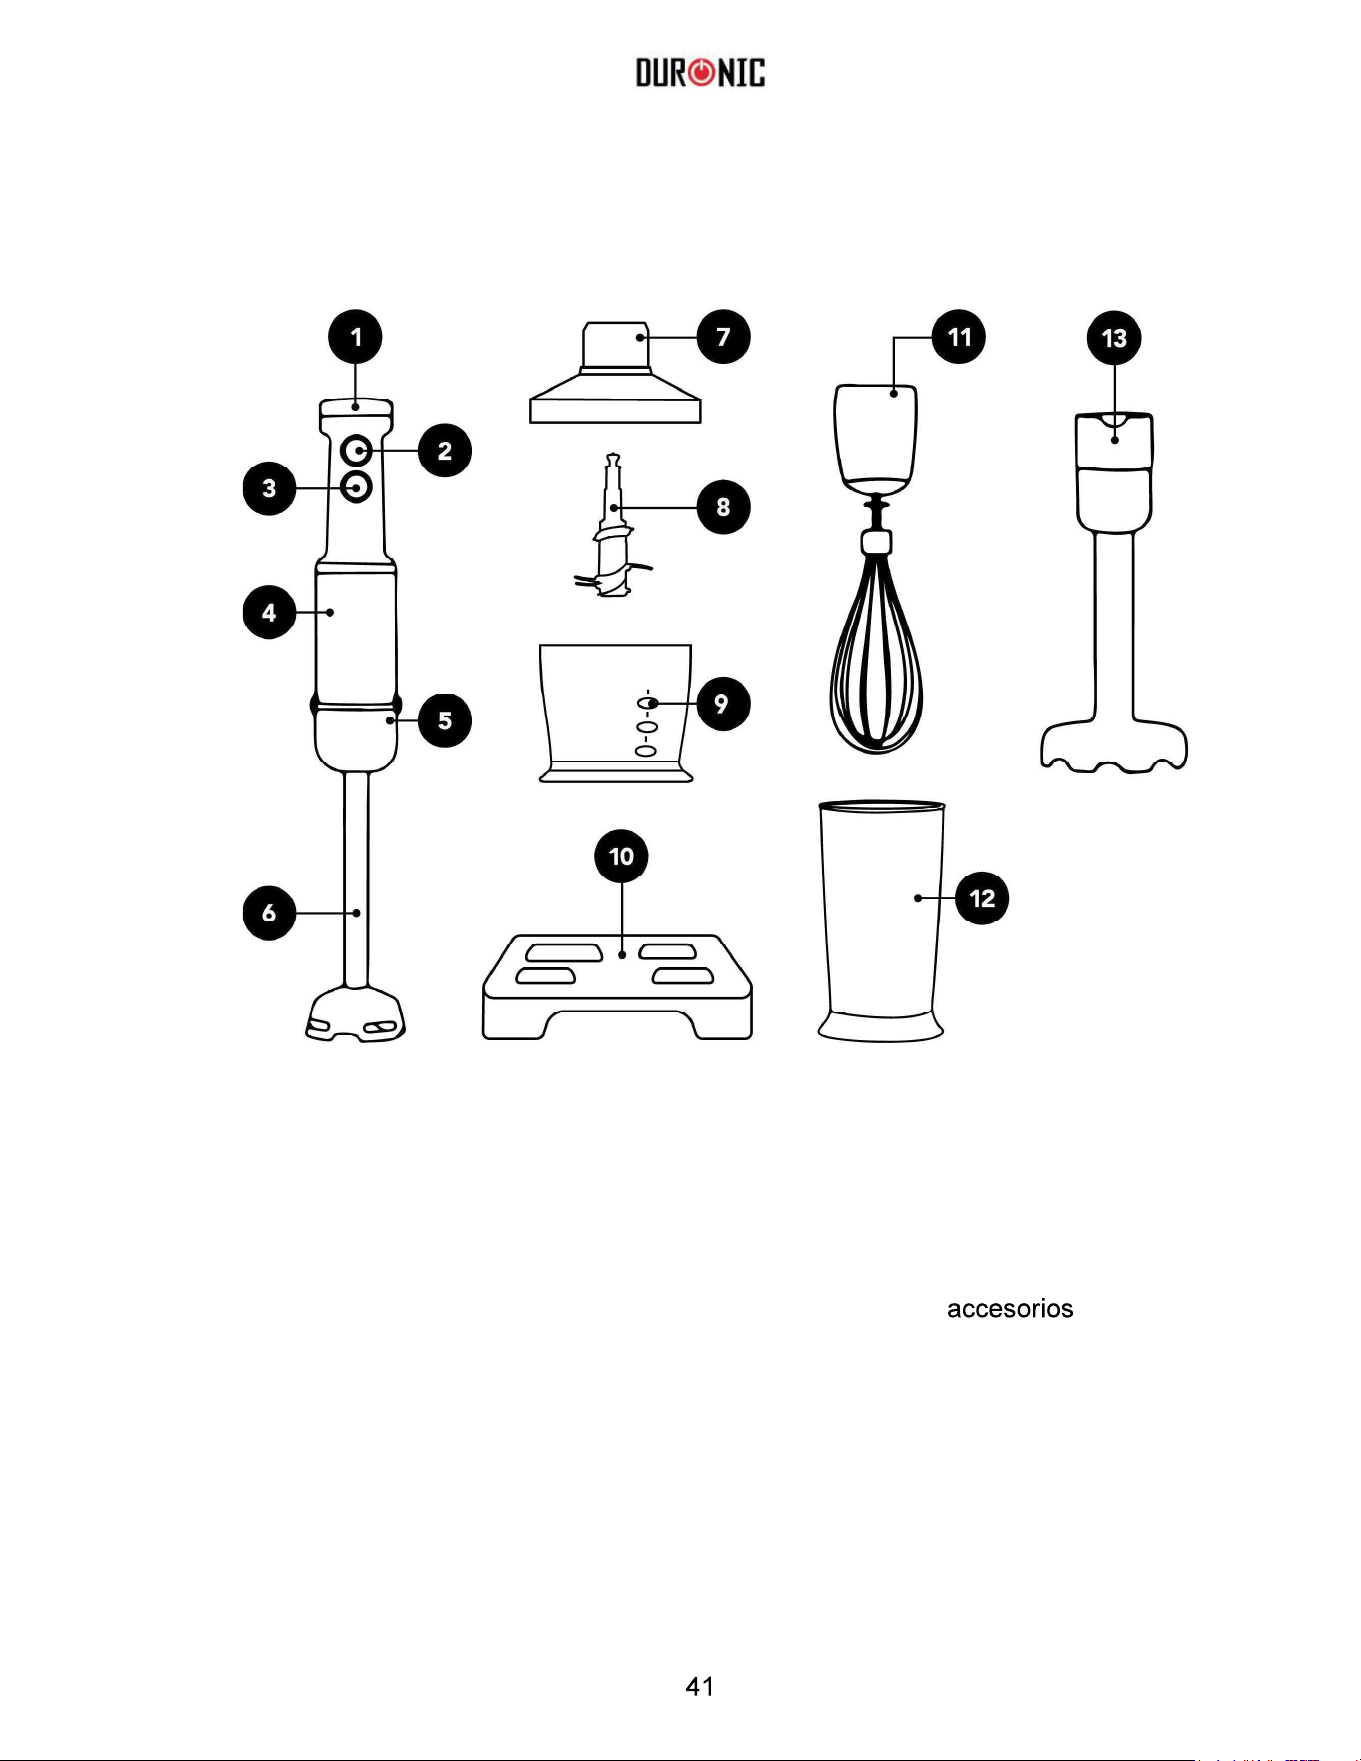
Descripción de las piezas y accesorios
1.
Dial de velocidad
2.
Interruptor de encendido
3.
Función Turbo
4.
Unidad de motor
5.
Botones de desbloqueo del
accesorio
6.
Brazo mezclador de acero inoxidable
7.
Tapa de la picadora
8.
Cuchilla de la picadora
9.
Bol de la picadora
10. Soporte para
11. Varilla
12. Vaso medidor
13. Brazo mezclador de plástico
para purés

Consejos de Seguridad
Este aparato está destinado para uso doméstico
Si el cable de alimentación resulta dañado, este debe ser reemplazado por el fabricante,
su centro de servicio autorizado o una persona cualificada.
Este aparato debe ser siempre manipulado por un adulto. Por favor, manténgalo fuera
del alcance de los niños.
Para más información sobre los tiempos de funcionamiento y el ajuste de la velocidad,
consulte la sección "Funcionamiento" en las páginas 47-49 del manual. Se recomienda
manipular las cuchillas con precaución durante el vaciado del bol y durante la limpieza del
mismo.
Desenchufe el aparato de la corriente si este va a quedar desatendido y antes de
montarlo y desmontarlo o durante la limpieza.
Diríjase a la sección de "Limpieza y Mantenimiento" en las páginas 53-54 del manual para
ver las recomendaciones de limpieza de superficies que se encuentran en contacto con la
comida.
Apague el aparato y desconéctelo de la corriente antes de cambiar el accesorio o
ajustarlo.
Este tipo de aparatos pueden ser utilizados por personas discapacitadas física o
mentalmente, así como por personas inexpertas, siempre y cuando estos sean conscientes
de los riesgos involucrados y sean supervisados o instruidos para manipular el aparato de
forma segura.
Tenga cuidado al verter líquidos calientes ya que estos pueden saltar disparados del vaso
o el bol debido al vapor.
ADVERTENCIA: existe riesgo de lesiones en caso de manipulación incorrecta.
LA CUCHILLA ES MUY AFILADA. TENGA CUIDADO AL MANIPULAR ESTE
APARATO Y DESCONÉCTELO SIEMPRE DE LA CORRIENTE ANTES DE
LIMPIARLO.

Medidas de seguridad importantes
Por favor, lea las siguientes instrucciones atentamente y consérvelas
para futuras referencias.
Apague el aparato y desconéctelo de la corriente siempre que no esté en uso,
antes de cambiar los accesorios o ajustarlos y durante su limpieza.
No utilice este aparato para mezclar o batir nada que no sean alimentos.
Evite el contacto con los accesorios de batido mientras el aparato está en
funcionamiento.
El uso de otros accesorios no suministrados por el fabricante puede causar
lesiones, incendios o descargas eléctricas.
Asegúrese siempre de que todos los accesorios estén correctamente
encajados antes de poner el aparato en funcionamiento.
Evite que el cable entre en contacto con superficies calientes y/o quede
colgado al alcance de los niños.
No utilice el aparato al aire libre.
No utilice el aparato para otra finalidad que no sea la especificada en este
manual.
No utilice este aparato para batir líquidos calientes (aceite caliente).
Antes del primer uso
Antes de utilizar el aparato por primera vez, lave todos los accesorios excepto la unidad de motor de
la batidora con agua caliente y jabón. Enjuague y seque cuidadosamente. Limpie la unidad de motor
con un trapo húmedo. No sumerja la unidad de motor en agua.
*TENGA PRECAUCIÓN CON LA CUCHILLA AFILADA*
Funcionamiento
Esta Batidora es apta para preparar salsas, sopas, mayonesas y masas.
ADVERTENCIA: No utilice este aparato durante más de 15 segundos sin
interrupción. Deje que el motor recupere la temperatura ambiente antes
de continuar.
Uso del brazo mezclador de acero inoxidable
Este accesorio es adecuado para mezclar bebidas y batidos, así como
para preparar salsas, sopas, mayonesa y papillas.
1.
Asegúrese de que la unidad de motor esté desenchufada.
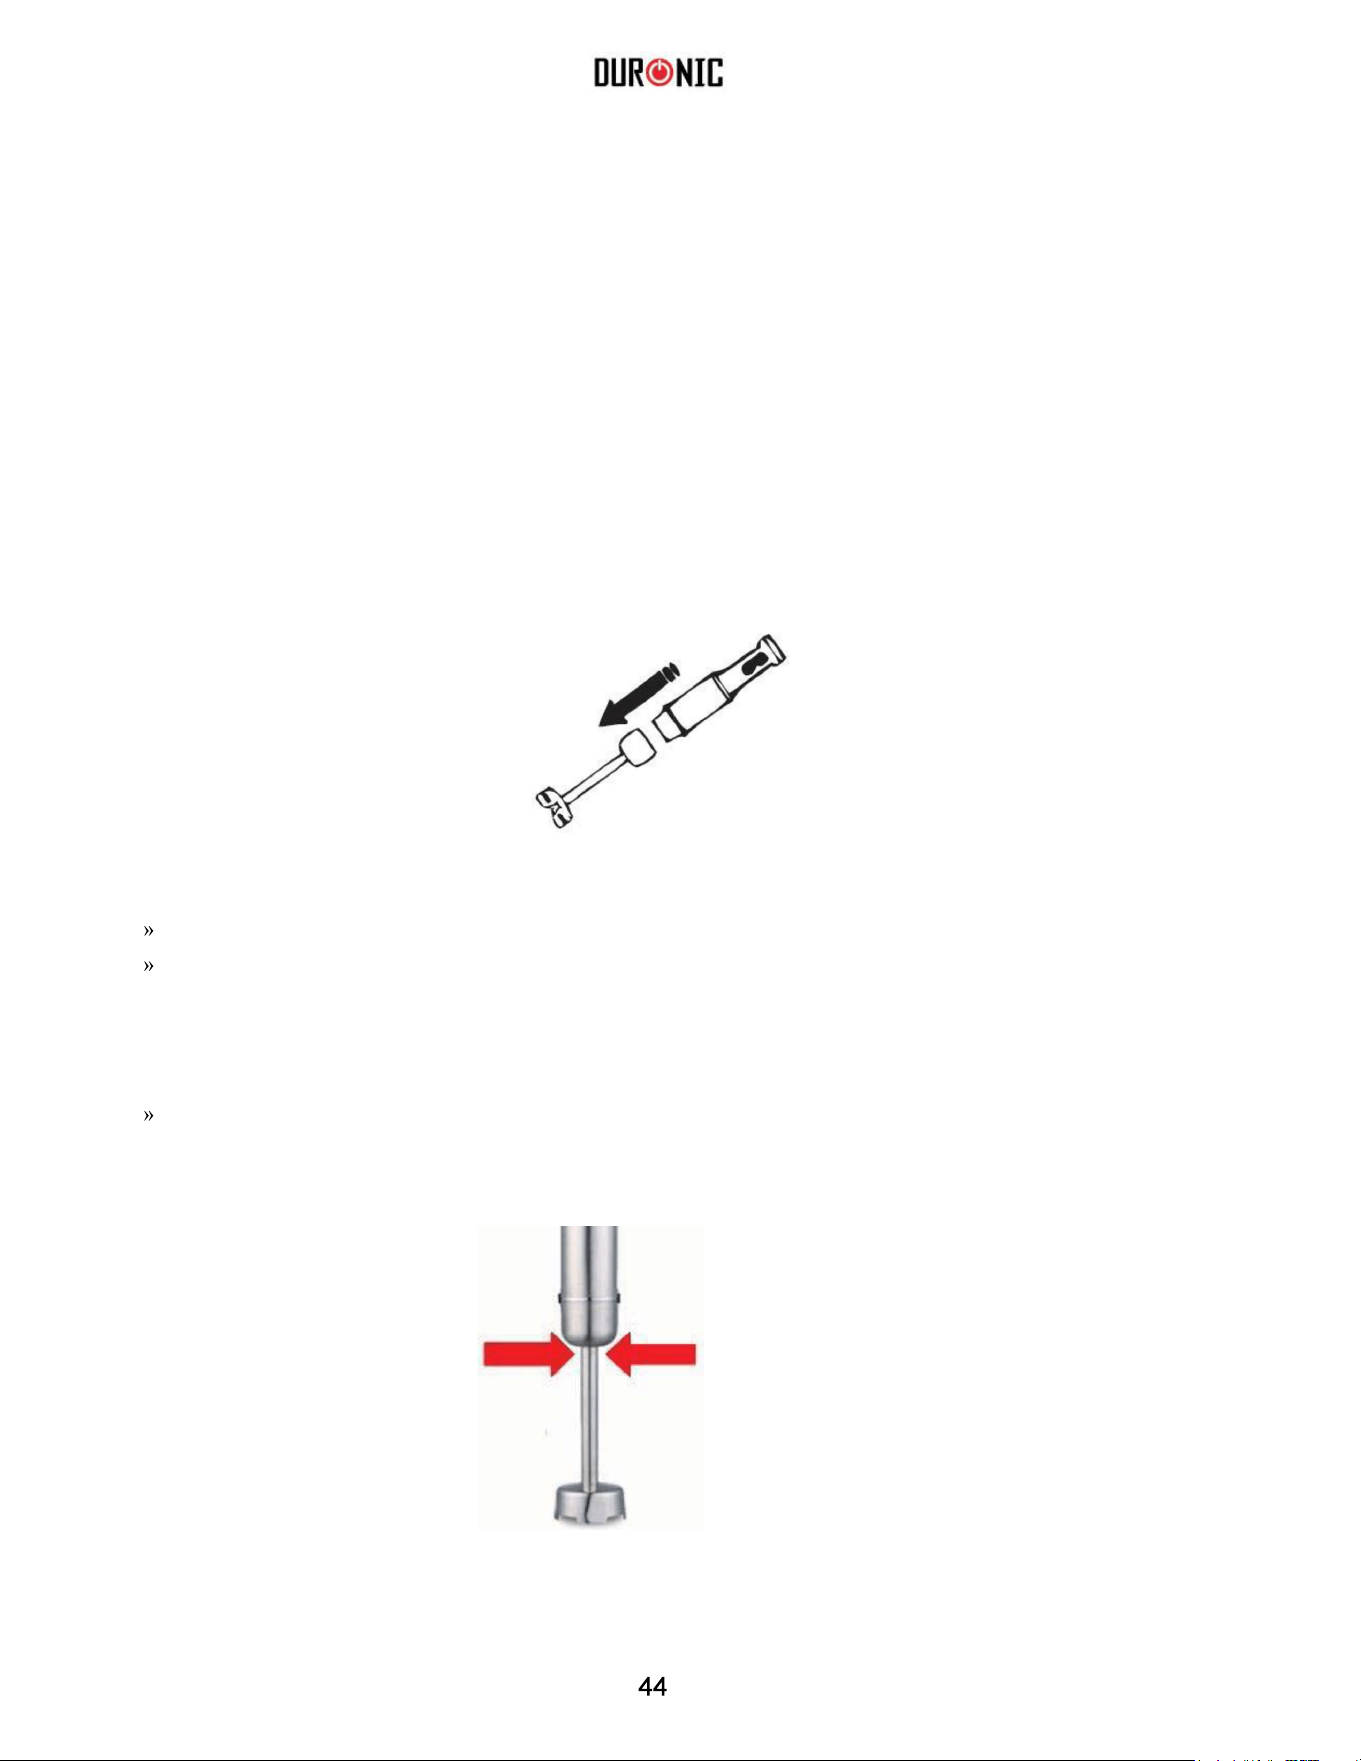
2.
Ajuste el brazo mezclador a la unidad de motor y presione hasta oír un clic, tal y
como indica la imagen.
3. Inserte los ingredientes en el vaso mezclador o en el bol de la picadora suministrado.
Asegúrese de colocar el vaso medidor sobre una superficie plana y estable.
Cortar los ingredientes más sólidos en pequeños pedazos para un mejor resultado.
4. Conecte el enchufe a una toma de corriente.
5. Inserte el brazo mezclador dentro del recipienteseleccionado.
Asegúrese que los alimentos no sobrepasen la parte superior del brazo mezclador.

6.
Seleccione la velocidad deseada girando el dial de velocidad variable.
7.
Presione el botón de encendido para activar la unidad de motor.
Se recomienda comenzar con la velocidad más baja (1) para evitar salpicaduras.
Presione el botón Turbo para activar la máxima velocidad de forma intermitente.
8.
Para un mejor resultado, mueva el brazo lentamente de arriba a abajo y en
círculos.
Si desea utilizar el aparato en una cacerola, asegúrese de retirarla del fuego previamente.
9.
Cuando termine, suelte el botón de encendido y desenchufe el aparato de la toma
corriente.
10. Para desanclar el brazo mezclador, presione los dos botones de desbloqueo a
ambos lados de la unidad de motor.

Uso de las varillas
Las varillas son adecuadas para montar cremas, batir claras de huevo y
elaborar masas para bizcochos y postres.
1.
Asegúrese de que el aparato estédesenchufado.
2.
Inserte la varilla en el soporte para
varilla.
3.
Proceda a encajar la varilla en
la unidad
de motor.
4.
Coloque los ingredientes en un bol
hondo
para prevenir salpicaduras.
5.
Conecte el enchufe a la corriente.
6.
Introduzca la varilla hasta el fondo del
bol.
7.
Seleccione la velocidad deseada.
8.
Mantenga presionando el botón de encendido para encender la unidad de motor.
Presione el botón Turbo para activar la función intermitente.
9.
Mantener la unidad de motor en posición recta y mover en círculos
lentamente alrededor del bol
.
10.
Cuando termine, desenchufe el aparato de lacorriente.
11.
Para desanclar la varilla, presione los dos botones de desbloqueo a
ambos lados de la unidad de
motor. Antes de limpiar la varilla, sepárela
del soporte tirando hacia abajo.
Uso de la picadora
El accesorio picador es adecuado para picar carne, queso, cebolla,
hierbas, ajo, zanahorias, patatas, etc.
1.
Asegúrese de que el aparato estédesenchufado.
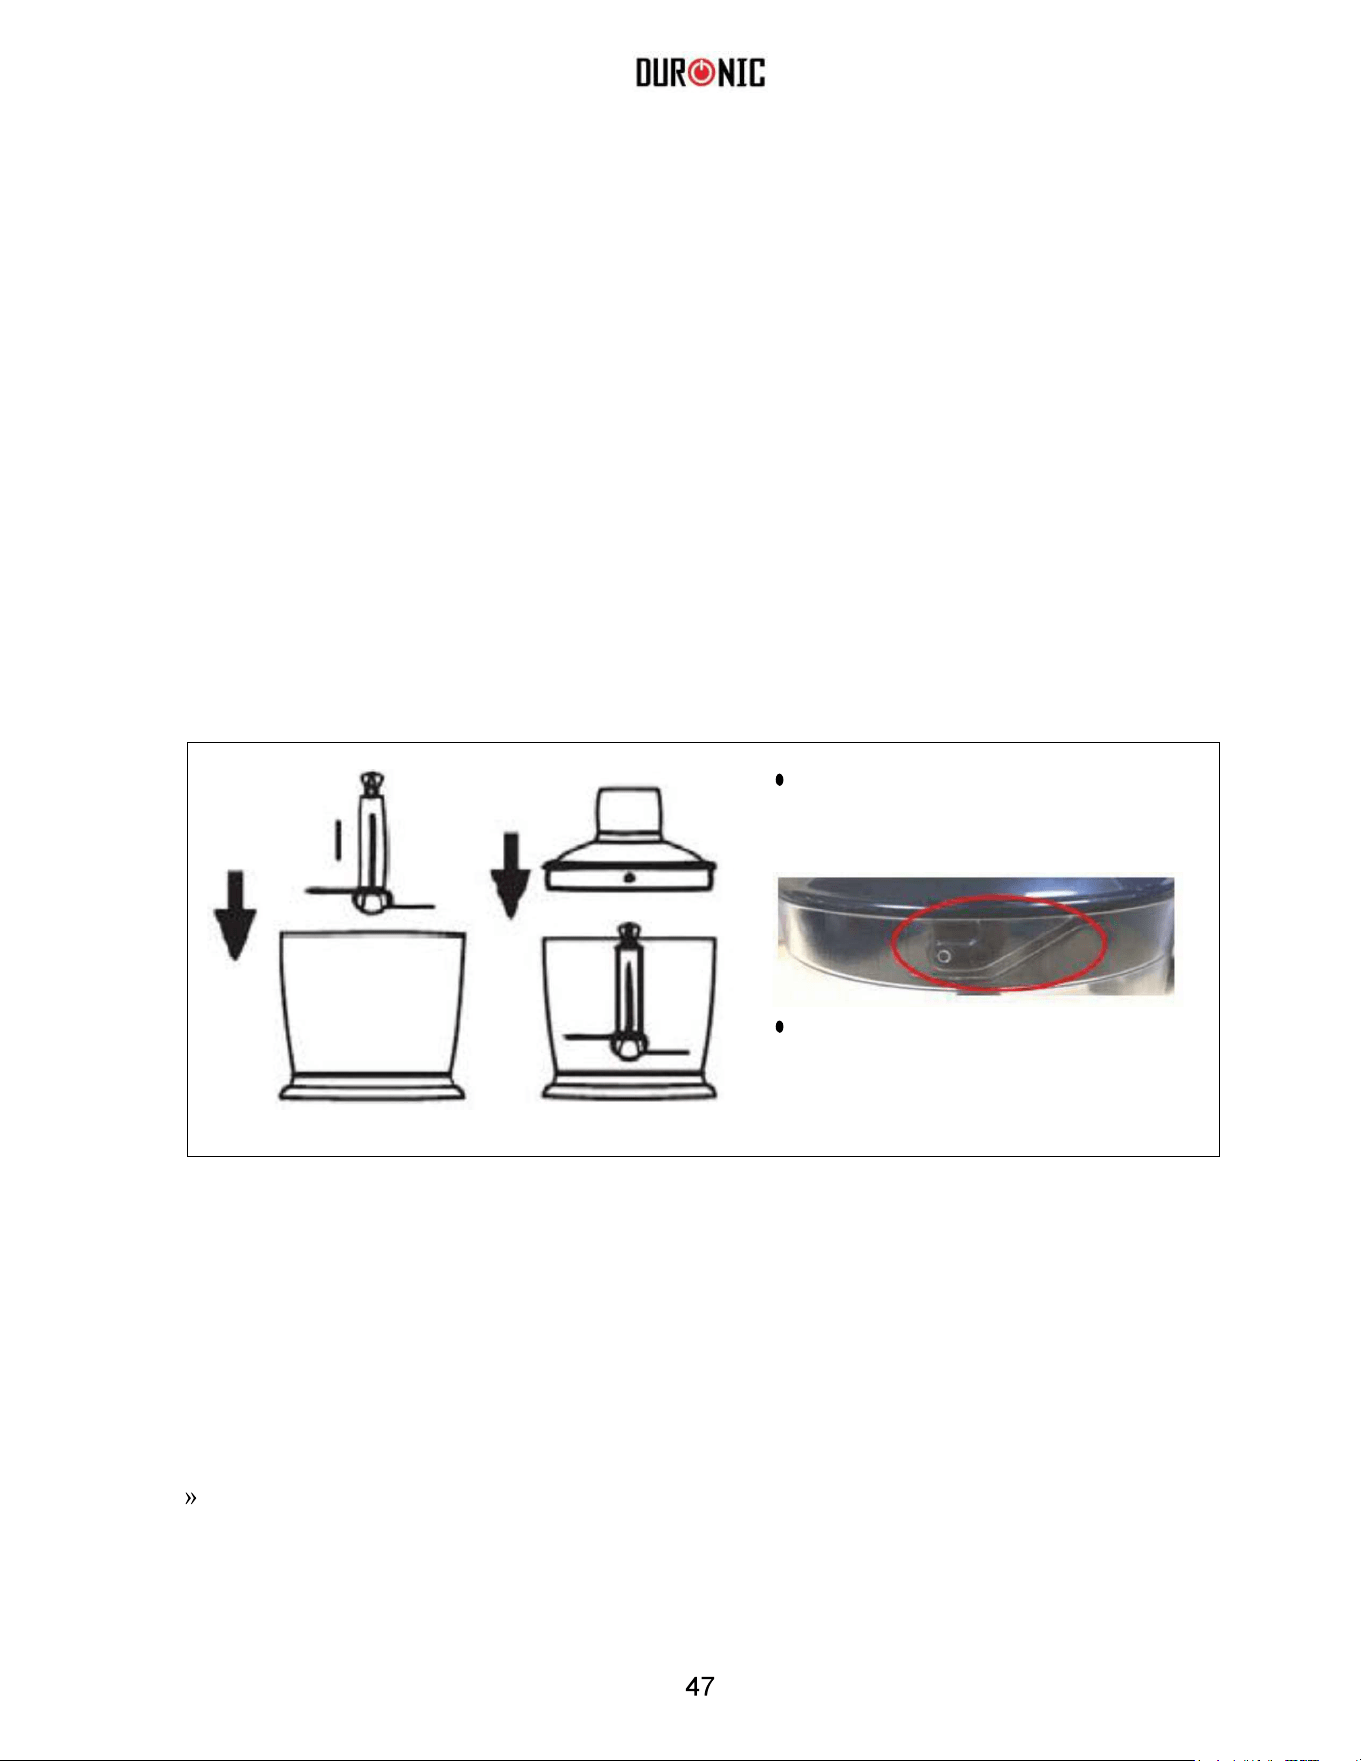
2. Coloque cuidadosamente las
cuchillas de la picadora en la
sujeción del centro del bol.
3. Introduzca los ingredientes en el bol.
Coloque la tapa y asegúrela a la
sujeción del centro. Gire la tapa
hasta que queje fijada con las
pestañas.
4. Fije la unidad de motor a la sujeción de la parte superior de la tapa y presione
para asegurarla.
5. Conecte la unidad de motor a la corriente.
6. Seleccione la velocidad deseada con el dial de velocidad variable.
7. Sujete el bol y encienda la unidad de motor manteniendo presionado el botón
de encendido.
Si mantiene la picadora encendida de forma continuada obtendrá una mezcla suave; mientras
que si utiliza la función intermitente la mezcla quedará con pequeños pedazos.
» Presione el botón Turbo para activar la picadora de forma intermitente.
8. Una vez alcanzada la consistencia deseada, suelte el botón de encendido
Alinee las pestañas con las
muescas de la tapa.
Para picar carne, córtela
en pequeños trozos antes
de introducirla en el bol.
y desenchufe la unidad de motor
de la corriente.
9. Presione los botones de desbloqueo
a ambos lados de la unidad de motor
y retire la unidad de motor de la tapa.
10. Retire la cuchilla con cuidado.
Saque los ingredientes del interior
del bol.
Guía de funcionamiento de la picadora
Ingrediente Cantidad Preparación Tiempo aprox.
Carne 250 g Cortar en pedazos de 2 cm 15 segundos
Hierbas 50 g Retirar el tallo 10 segundos
Frutos secos 150 g Enteros 15 segundos
Queso 100 g Cortar en pedazos de 1 cm 10 segundos
Cebolla 150 g Cortar en 4 pedazos 10 segundos
Uso del brazo mezclador de plástico para purés
El brazo mezclador de plástico tan solo es adecuado para purés.
1. Cueza las patatas con normalidad, escúrralas y colóquelas en una olla o en un bol
con el fondo plano.
Añada un poco de leche o mantequilla.
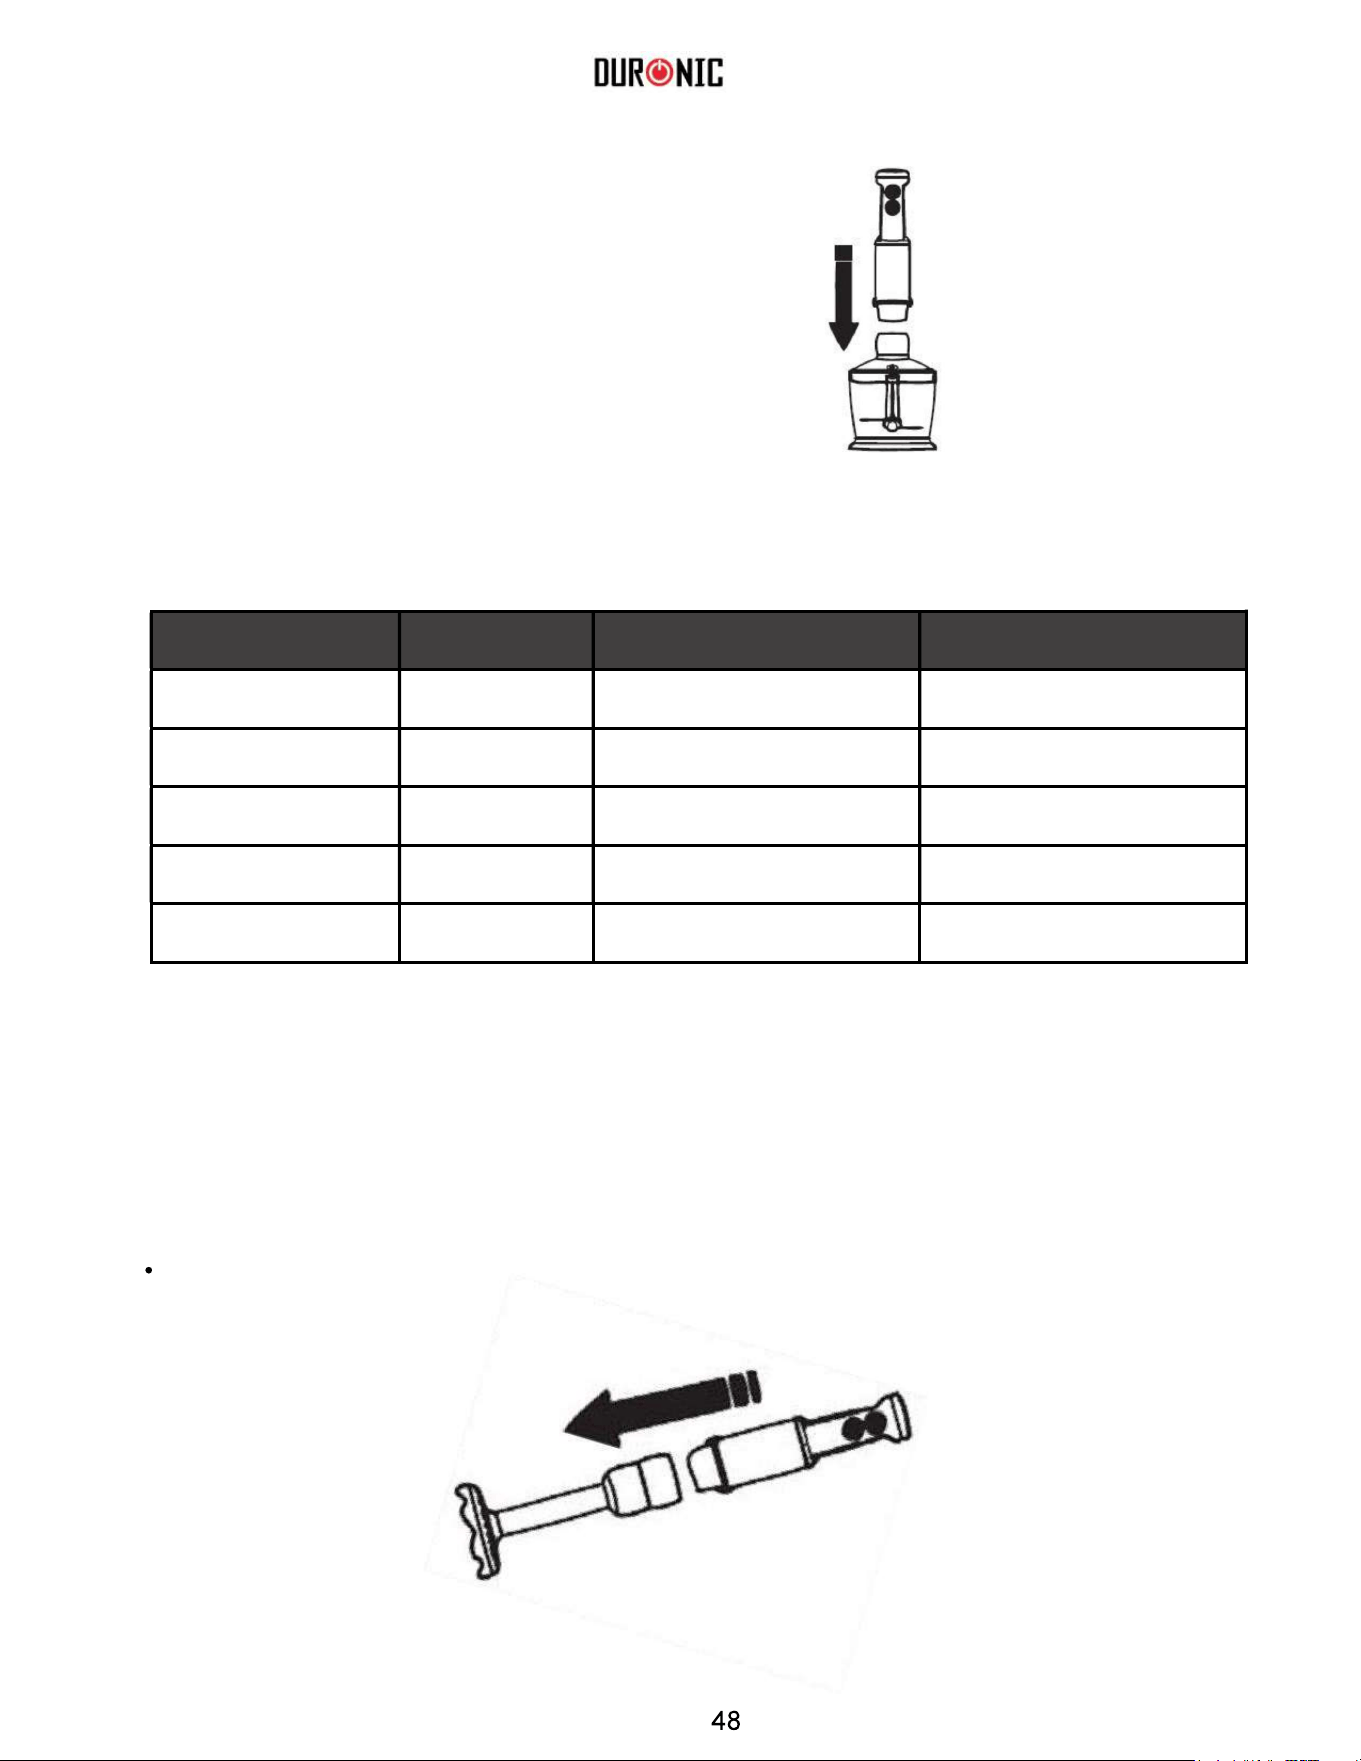
2. Fije la unidad de motor al brazo mezclador de plástico para purés y presione para
asegurarlo.
3. Conecte la unidad de motor a la toma de corriente.
4. Seleccione la velocidad deseada con el dial de velocidad variable.
5. Presione el botón de encendido para encender la unidad de motor.
Presione el botón Turbo para activar el aparato de forma
intermitente.
6. Introduzca el cabezal del brazo mezclador para purés
en la olla con las patatas. Levante la batidora y repita la
acción por toda la superficie de la olla.
7. Continúe hasta conseguir la textura deseada.
8. Presione los botones de desbloqueo a ambos lados de
la unidad de motor y retire el brazo mezclador de
plástico de la unidad de motor.
.
Limpieza y Mantenimiento
Retire el accesorio de la unidad de motor.
El aspa del brazo mezclador de
plástico se puede desmontar para su
limpieza.
Para desmontar el aspa, agarre el
aspa y gire en el sentido de las agujas
del reloj.
Limpie la unidad de motor con un trapo
ligeramente húmedo. NUNCA INTRODUZCA
LA UNIDAD DE MOTOR EN EL AGUA.
Lave todos los accesorios excepto la unidad de motor de la batidora con agua caliente y
jabón. Enjuague y seque cuidadosamente.
CUIDADO: Las cuchillas son muy afiladas. Manipular con extrema precaución.
Las superficies en contacto con los alimentos deben limpiarse regularmente
para evitar la contaminación cruzada de los diferentes tipos de ingredientes.
Para la limpieza de superficies en contacto con alimentos, se recomienda el
ADVERTENCIA: Desconecte siempre el aparato de la corriente antes de proceder a
su limpieza.

uso de agua caliente y un detergente suave.
Se recomienda llevar a cabo unas prácticas correctas de higiene para evitar
una posible contaminación cruzada y la intoxicación alimentaria en todo
momento.
Seque los accesorios cuidadosamente con un trapo seco antes de utilizarlos.
No utilice productos químicos o abrasivos para la limpieza del aparato.

Garantía
Este producto tiene 1 año de garantía del fabricante Duronic (Shine-Mart
Ltd).
ATENCIÓN: ESTAS PREVISIONES NO AFECTARÁN SUS DERECHOS ESTATUTARIOS
COMO CONSUMIDOR.
Este producto ha sido fabricado bajo los más estrictos controles de calidad y utilizando
materiales de alta calidad para asegurar su correcto funcionamiento y durabilidad. Este
producto tendrá una larga vida útil, siempre y cuando sea manipulado y mantenido de forma
adecuada.
Este producto cuenta con 1 año de garantía desde la fecha original de compra. En el caso de
que surja algún defecto debido a un error/defecto de fábrica o mano de obra, el producto
deberá ser devuelto al lugar de compra original. Reembolso o reemplazo a discreción de la
compañía.
Los productos Duronic cuentan con 1 año de garantía bajo las siguientes condiciones:
1. El producto debe ser devuelto al vendedor junto con el comprobante de compra original.
2. El producto debe ser instalado y manipulado según las
instrucciones recogidas en este manual.
3. Este aparato es apto únicamente para uso doméstico.
4. La garantía no cubre el desgaste, daño malicioso, uso indebido,
negligencia, reparaciones inexpertas o accesorios de repuesto.
5. Shine-Mart Ltd no se hace responsable ante pérdidas o daños
accidentales o indirectos.
6. Shine-Mart Ltd no se hace responsable de llevar a cabo cualquier
tipo de servicio, bajo la garantía.
7. Válido solamente dentro de la UE.
Este producto está equipado con enchufe/fusible Europeo
Importado por Shine-Mart Ltd, RM3 8SB
Síguenos
Información sobre la eliminación de residuos para los consumidores
de equipos eléctricos y electrónicos:
Si encuentra este símbolo en un producto y/o documentos adjuntos indica que una
vez finalizada la vida útil del producto, este debe ser tratado como residuo de
equipos eléctricos y electrónicos (RAEE).
Cualquier producto marcado (RAEE) no debe ser desechado junto con los residuos
domésticos, sino separado para el tratamiento, recuperación y reciclaje
de los materiales utilizados.
Para el correcto tratamiento, recuperación y reciclaje, por favor, separe todos los
productos (RAEE) y llévelos al punto limpio de su
autoridad local, donde podrá depositarlo de forma gratuita.
La correcta eliminación de residuos por parte de los consumidores ayuda a la
preservación de los recursos naturales y previene los efectos negativos que sus
materiales puedan tener sobre la salud humana y el medio ambiente.

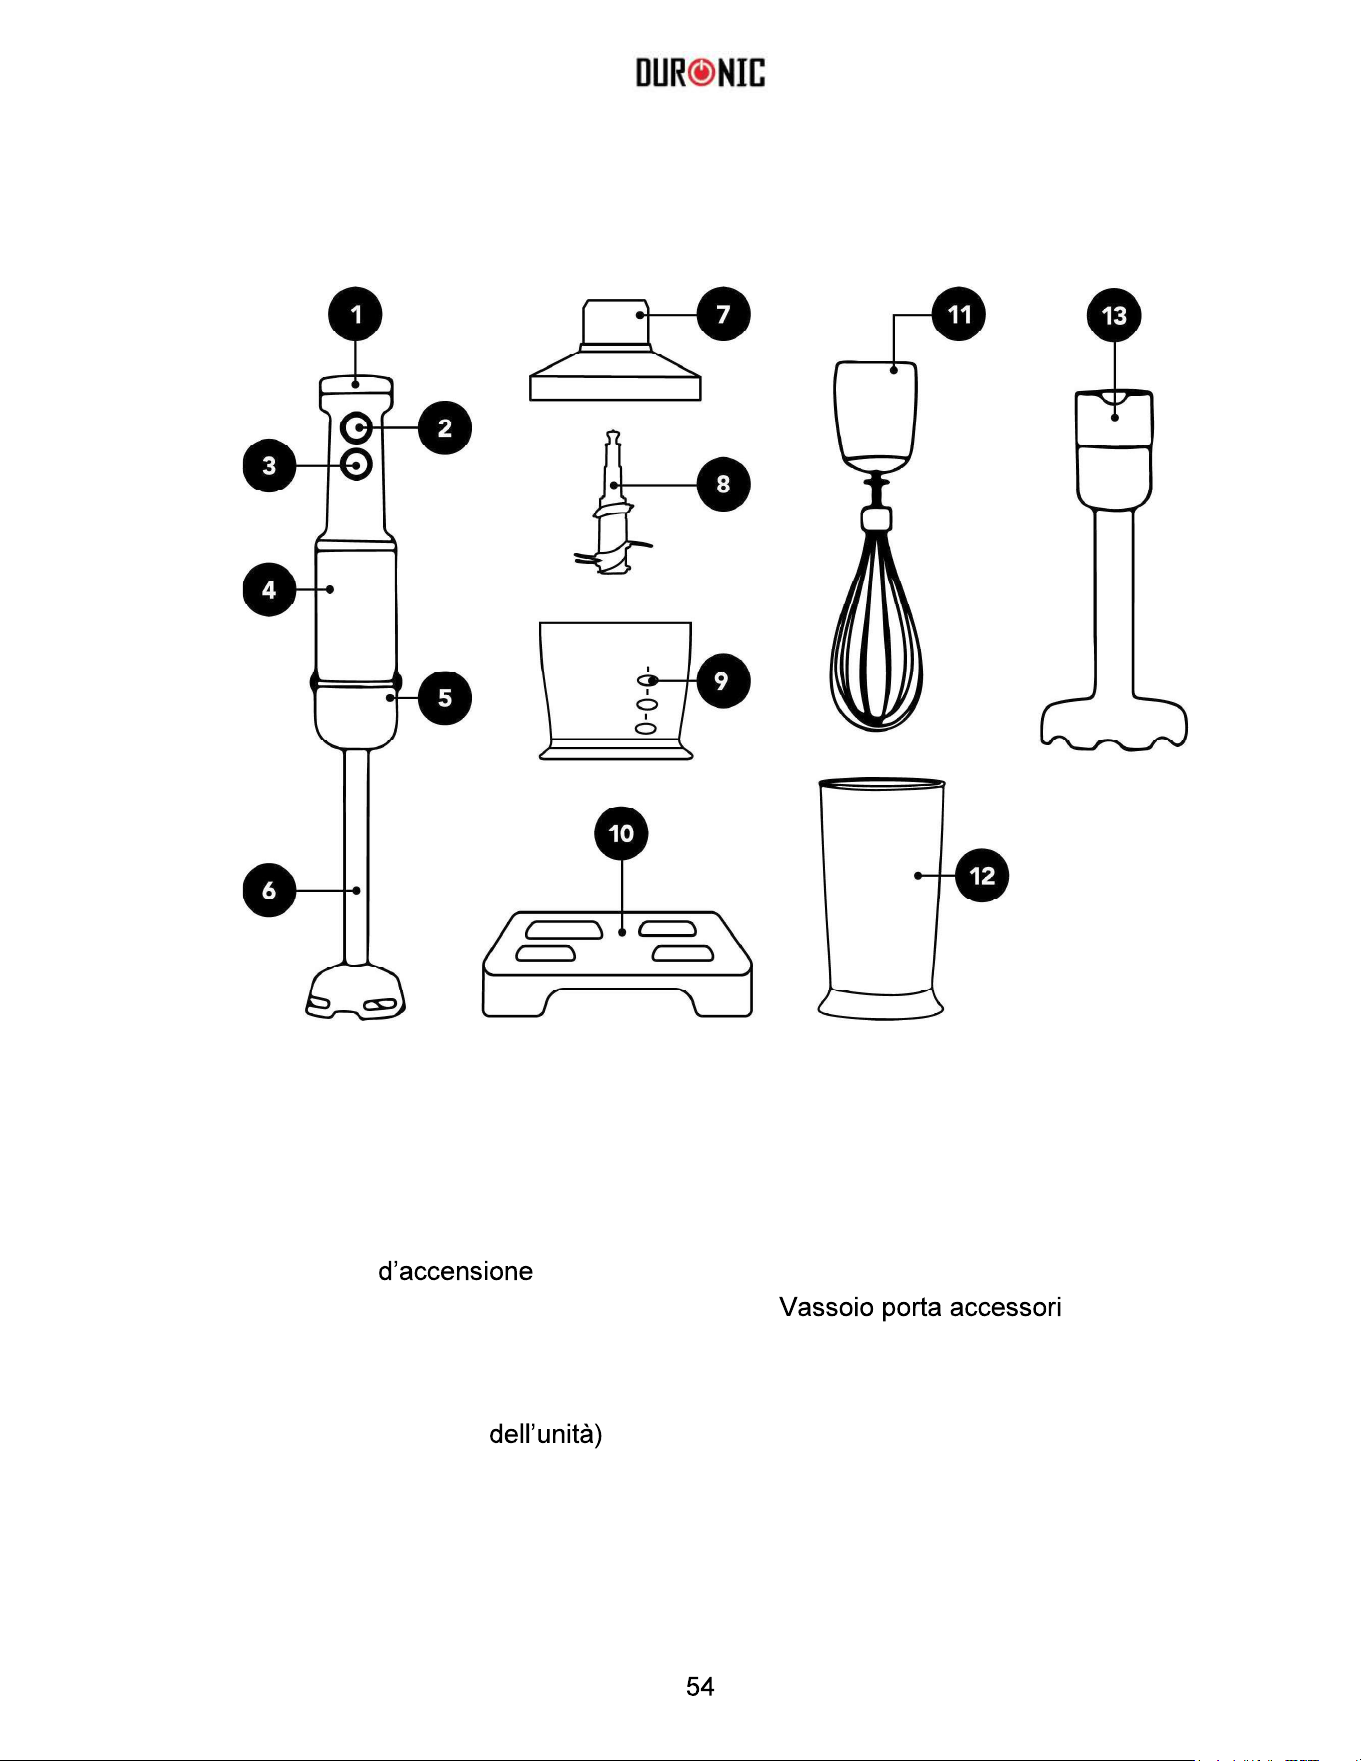
Componenti del prodotto
1.
Selettore della velocità
2.
Pulsante
3.
Pulsante turbo
4.
Unità motore
5.
Pulsante rilascio accessorio
(Su ambedue i lati
6.
Accessorio rimuovibile
7.
Coperchio della ciotola
8.
Lame
9.
Ciotola
10.
11.
Accessorio frusta
12.
Bicchiere graduato
(Permette di misurare e frullare gli
ingredienti nello stesso
contenitore)
13.
Accessorio schiaccia patate
Istruzioni di sicurezza
Questo apparecchio è inteso esclusivamente per utilizzo domestico o simili. Qualsiasi altro
utilizzo annulla di fatto la garanzia offerta dal produttore.
Se il cavo di alimentazione risulta danneggiato, deve essere sostituito dal produttore, un
suo rappresentante o una persona qualificata per evitare pericoli.
dalla portata dei bambini.
-63 del presente manuale. Fare estrema attenzione nel
maneggiare le lame del prodotto durante la pulizia e la manutenzione di
manutenzione.
manuale.
componente in movimento.
isiche, sensoriali,
mentali o mancanza di esperienza e conoscenza, in caso abbiano ricevuto supervisione o
che ne sono coinvolti.
ciotola per evitare il contatto con eventuali vapori emessi.
ATTENZIONE
LE LAME SONO MOLTO AFFILATE, FARE ESTREMA ATTENZIONE QUANDO
SI UTILIZZA QUESTO FRULLATORE; STACCARE SEMPRE LA PRESA DI
CORRENTE PRIMA DELLA PULIZIA.
Istruzioni di sicurezza
Leggere attentamente le seguenti istruzioni prima di utili
conservarle per riferimento fututro.
manutenzione.
Non utilizzare questo prodotto per mescolare nulla oltre a prodotti destinati al consumo.
Evitare il contatto con parti in movimento.
elettriche e/o danni gravi
Assicurarsi sempre che tutti gli accessori siano fissati in modo sicuro al corpo motore
prima
Mai lasciare che il cavo di alimentazione venga a contatto con superfici calde o
penzoli dal bordo di un tavolo
Non utilizzare il prodotto
Utilizzare questo apparecchio solo per lo scopo per il quale è inteso.
bollenti.
Prima del primo utilizzo
Prima di utilizzare questo apparecchio per la prima volta, lavare accuratamente tutti gli
accessori ed i contenitori con acqua tiepida e sapone. Risciacquare e asciugare prima
Non immergere il prodotto in
acqua.
ATTENZIONE ALLE LAME AFFILATE
Utilizzo
Il frullatore ad immersione è adatto per preparare salse, zuppe, e
mescolare gli ingredient.
ATTENZIONE: Non utilizzare questo apparecchio per più di 15 secondi in modo
continuo. Lasciare che il motore si raffreddi prima di riprendere il lavoro.
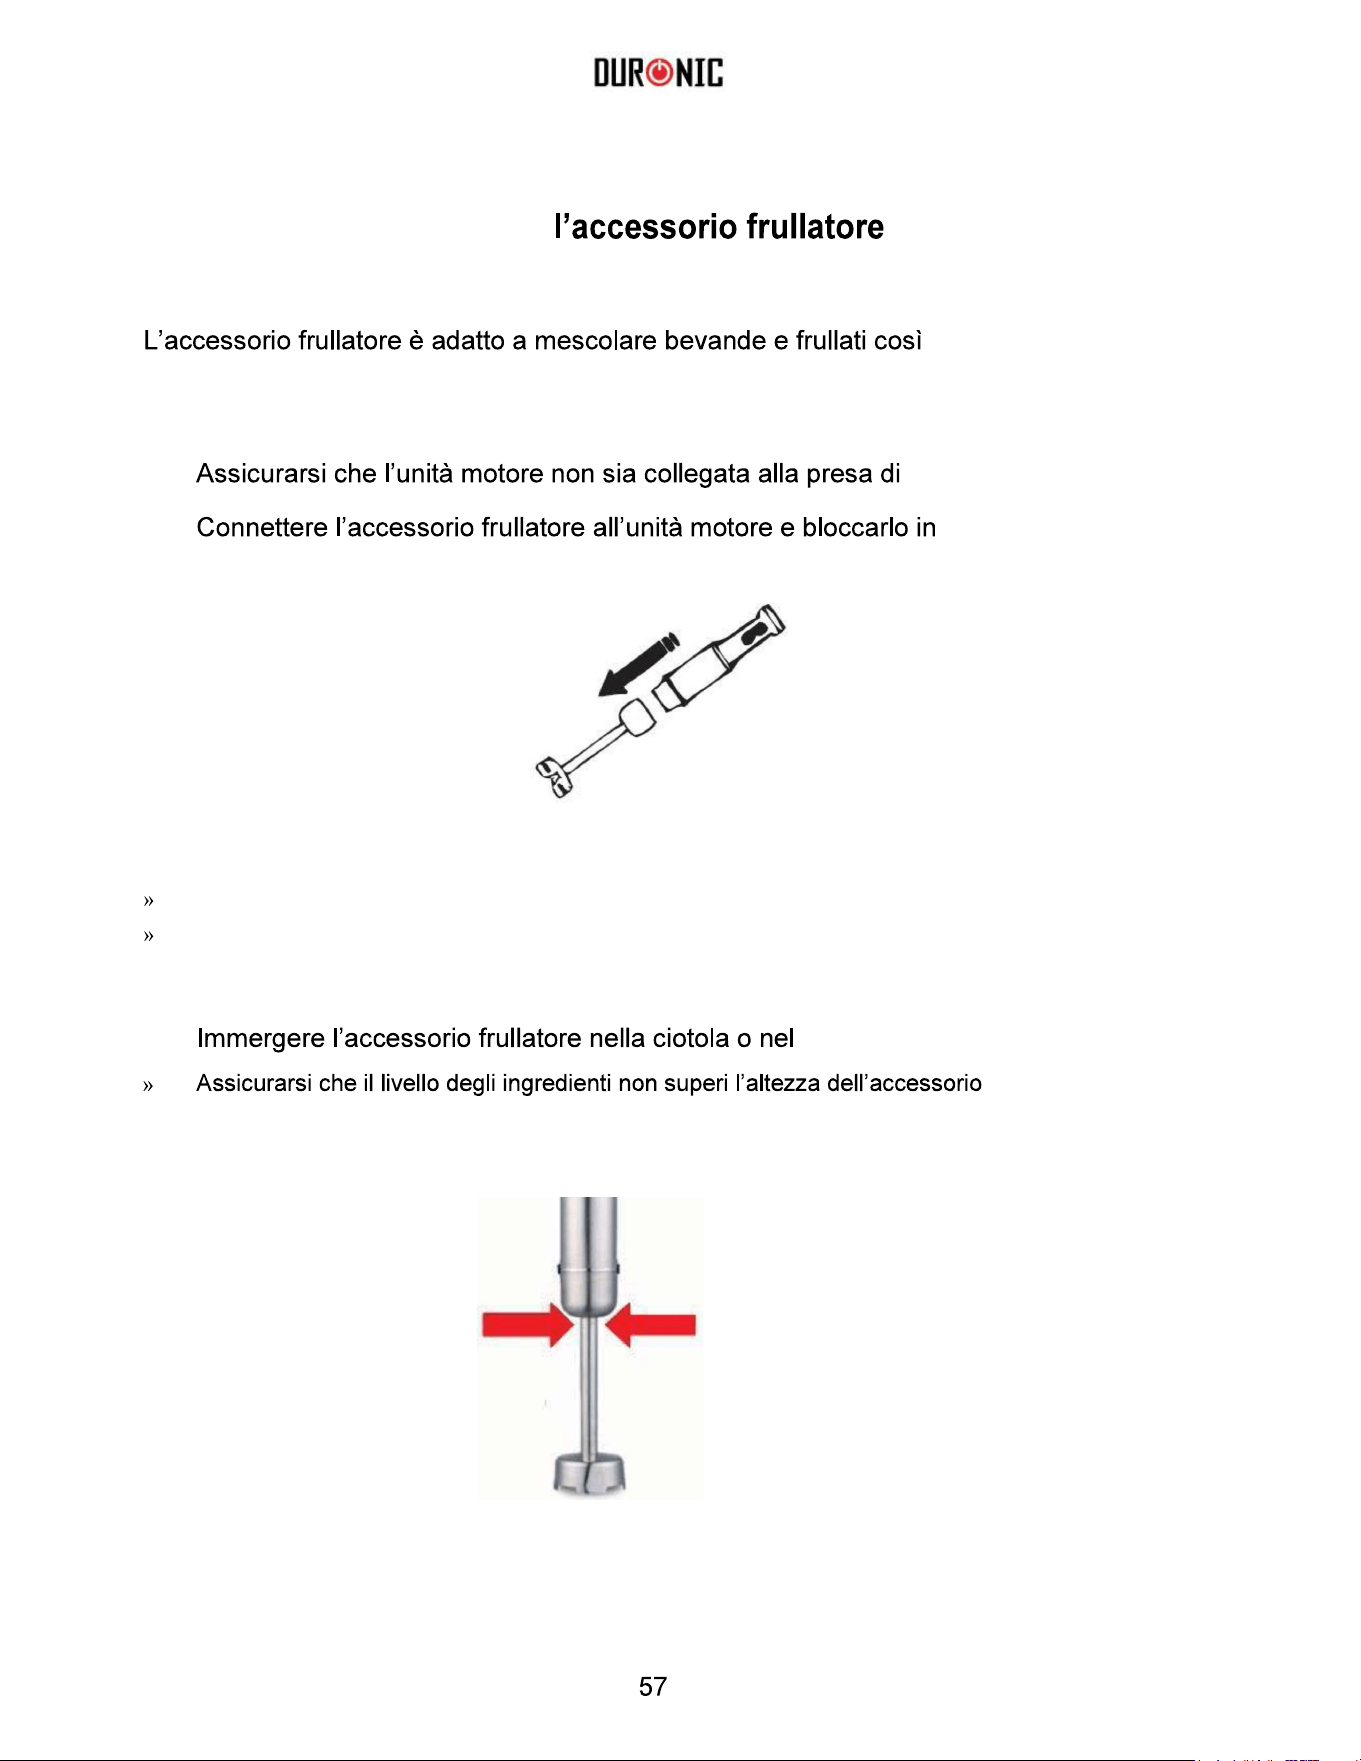
Utilizzare
come la preparazione di salse zuppe, e alimenti per neonati.
1.
corrente.
2.
posizione.
3.
Inserire gli ingredienti in una ciotola o nel bicchiere graduato.
Assicurarsi che la ciotola o il bicchiere siano posizionati su di una superfice piana e stabile.
Tagliare gli ingredienti in piccoli pezzi per un risultato migliore.
4.
Connettere la spina ad una presa di corrente.
5.
bicchiere
frullatore.
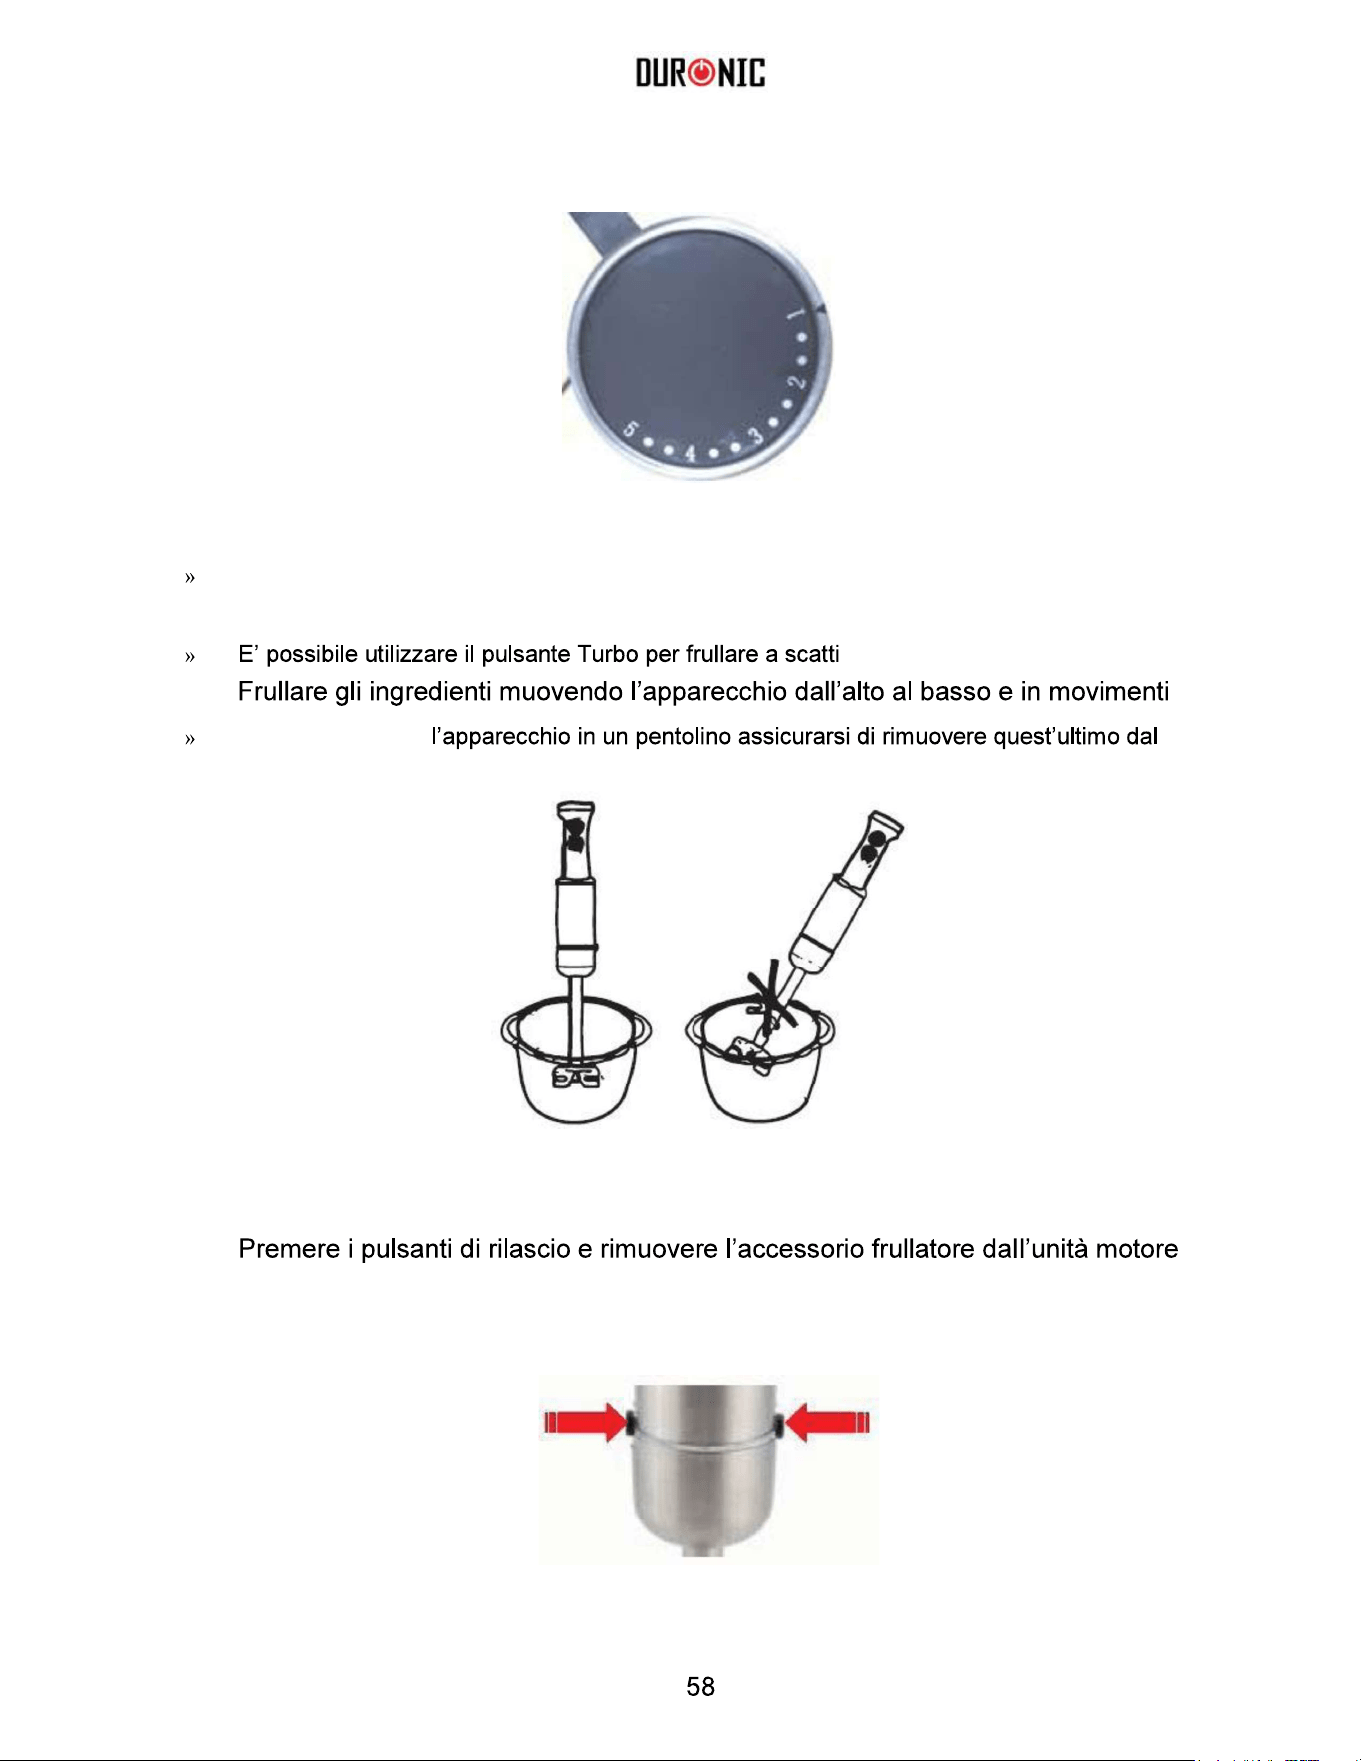
6.
Selezionare la velocità desiderata utilizzando il selettore della velocità
7.
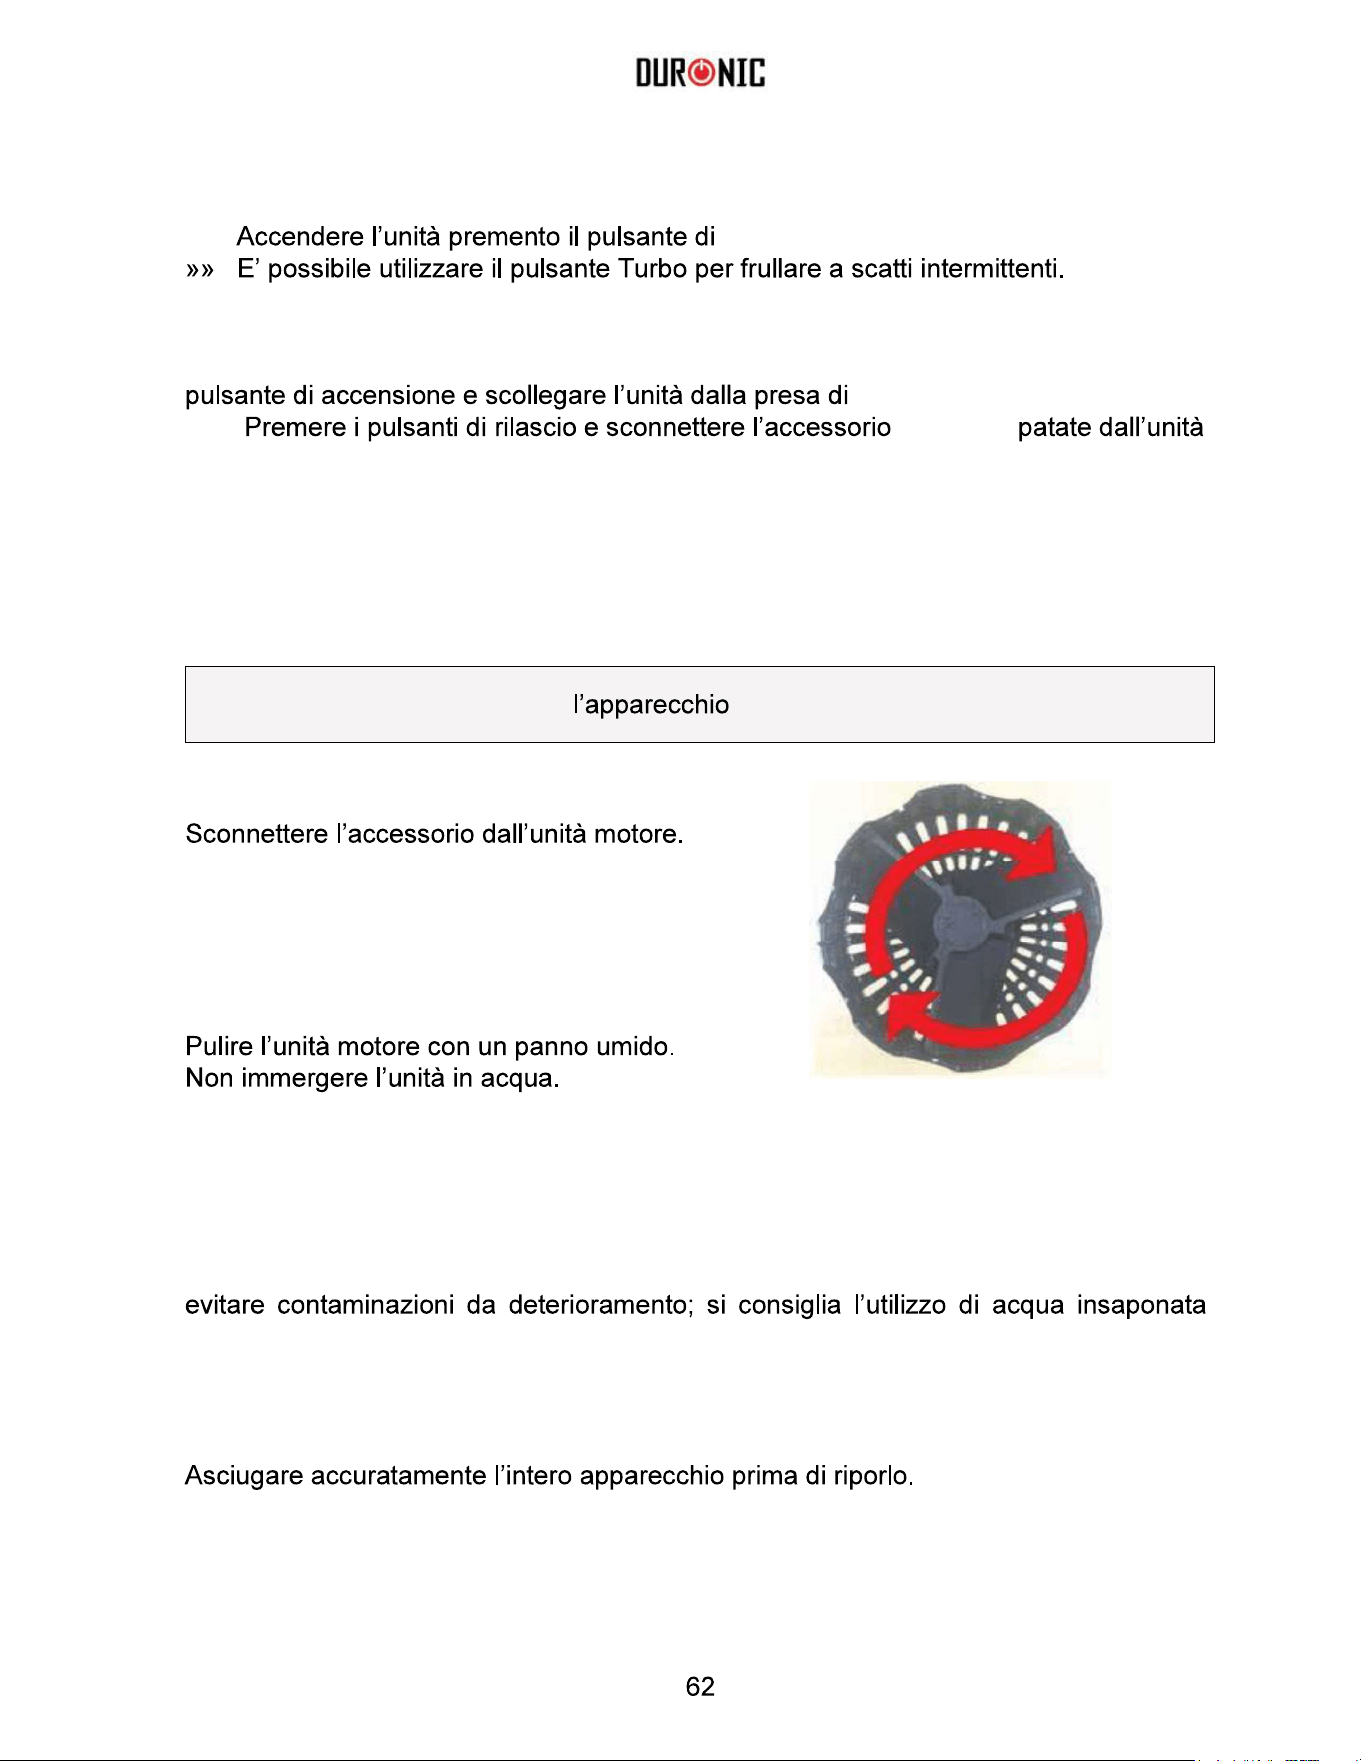
Accendere il frullatore tenendo premuto il pulsante di accensione.
Si consiglia di iniziare a frullare utilizzando la velocità più bassa (1) per evitare che il contenuto
si riversi al di fuori del contenitore.
intermittenti.
8.
circolari.
Prima di utilizzare fornello
9.
Dopo avere finito, rilasciare il pulsante della velocità e staccare la spina dalla presa
di corrente.
10.
per la pulizia.
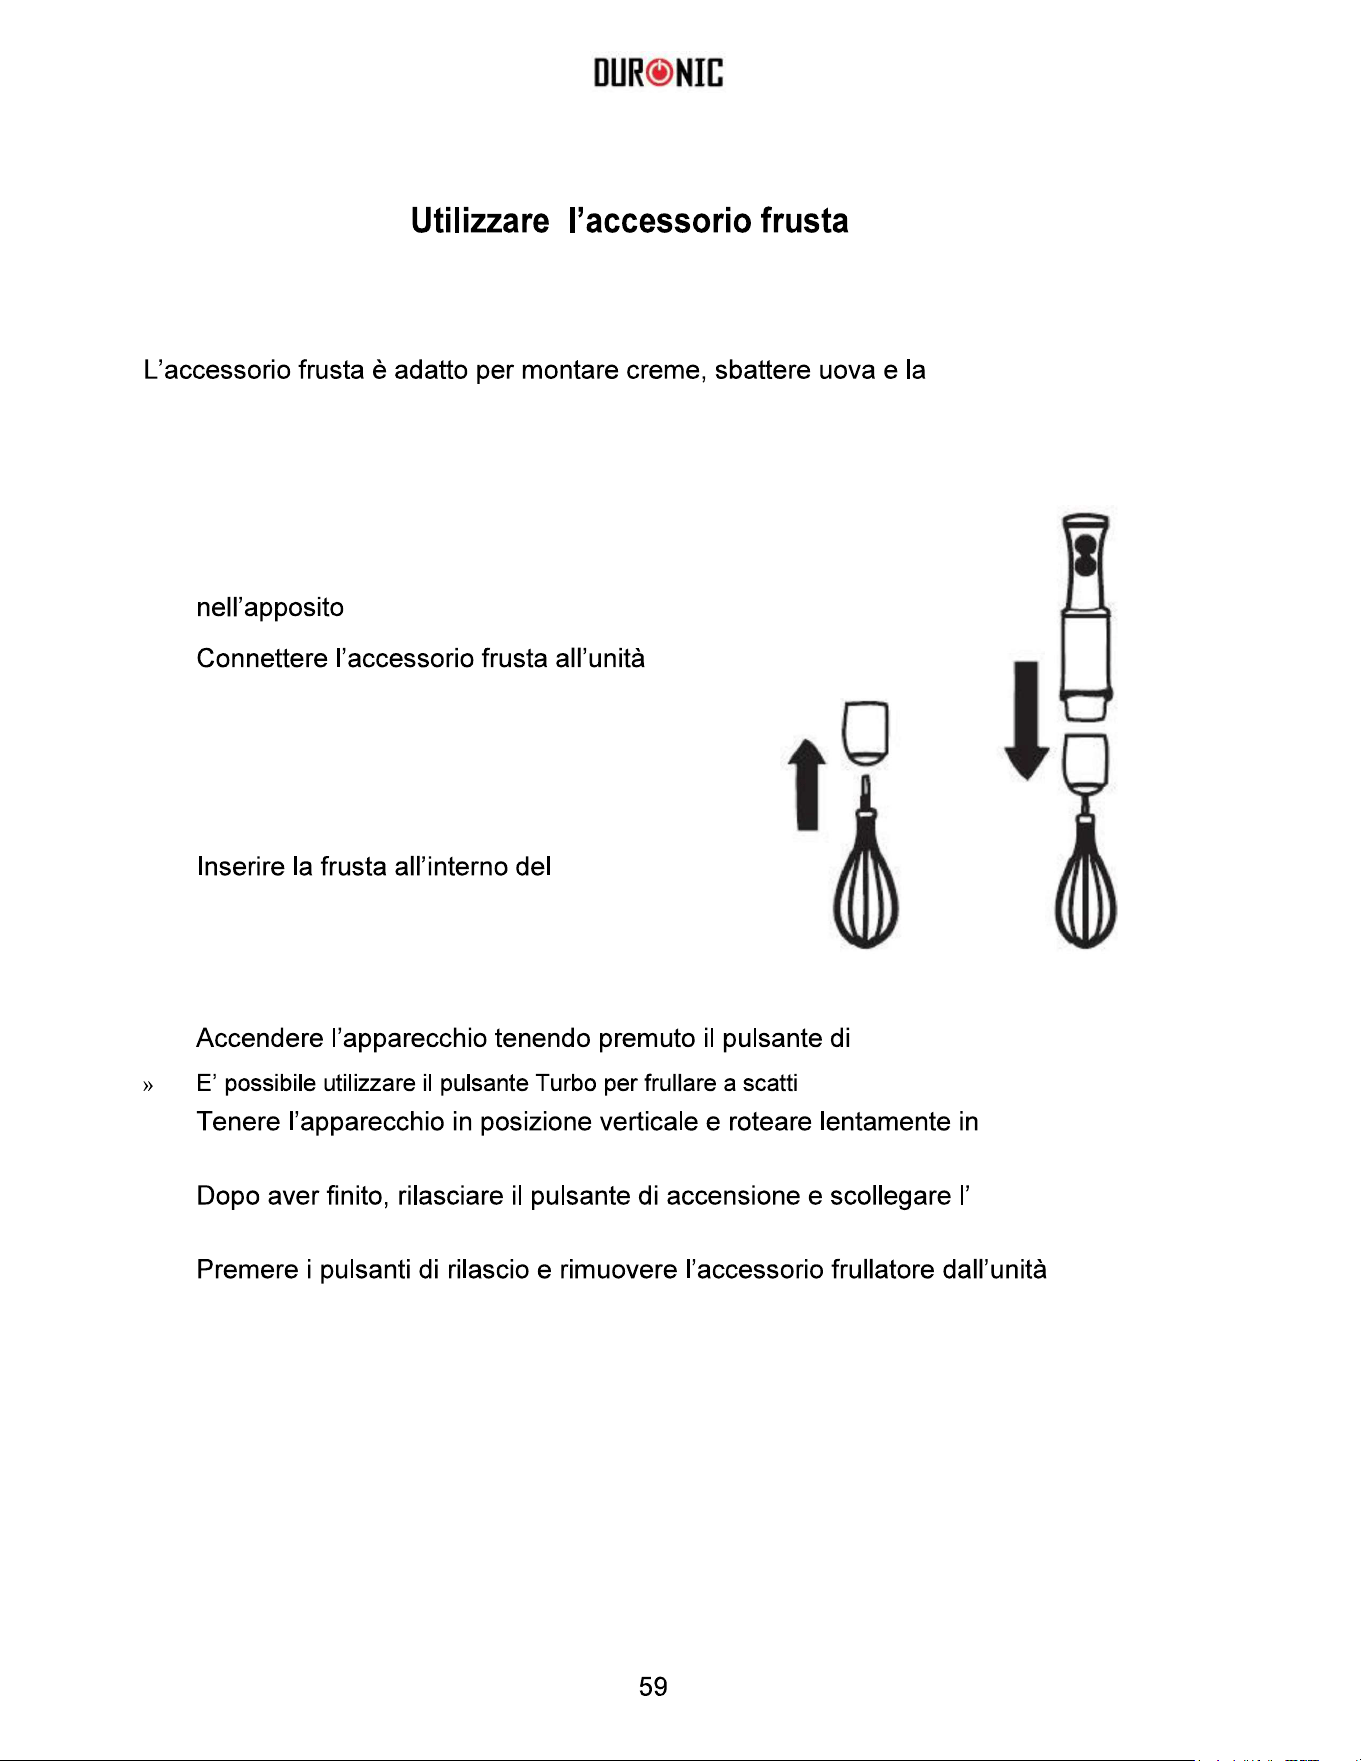
preparazione di impasti per dolci.
1.
Assicurarsi che la spina di corrente sia scollegata.
2.
Inserire la punta metallica della frusta
vano.
3.
motore e bloccarlo in posizione.
4.
Inserire gli ingredienti in una ciotola o nel
bicchiere graduato per evitare spruzzi
5.
Connettere la spina ad una presa di corrente.
6.
contenitore finchè non raggiunge il fondo.
7.
Utilizzare il selettore per selezionare
la velocità desiderata.
8.
accensione.
intermittenti.
9.
senso circolare intorno alla ciotola.
10.
unità
dalla presa di corrente.
11.
motore per la pulizia. La frusta può essere quindi rimossa per procedere
alla pulizia.

Utilizzare il tritatutto
Il tritatutto è adatto a tritare verdure, spezie e noci.
1.
Assicurarsi che la spina di corrente sia scollegata.
2.
Inserire con cautela le lame al
centro della ciotola.
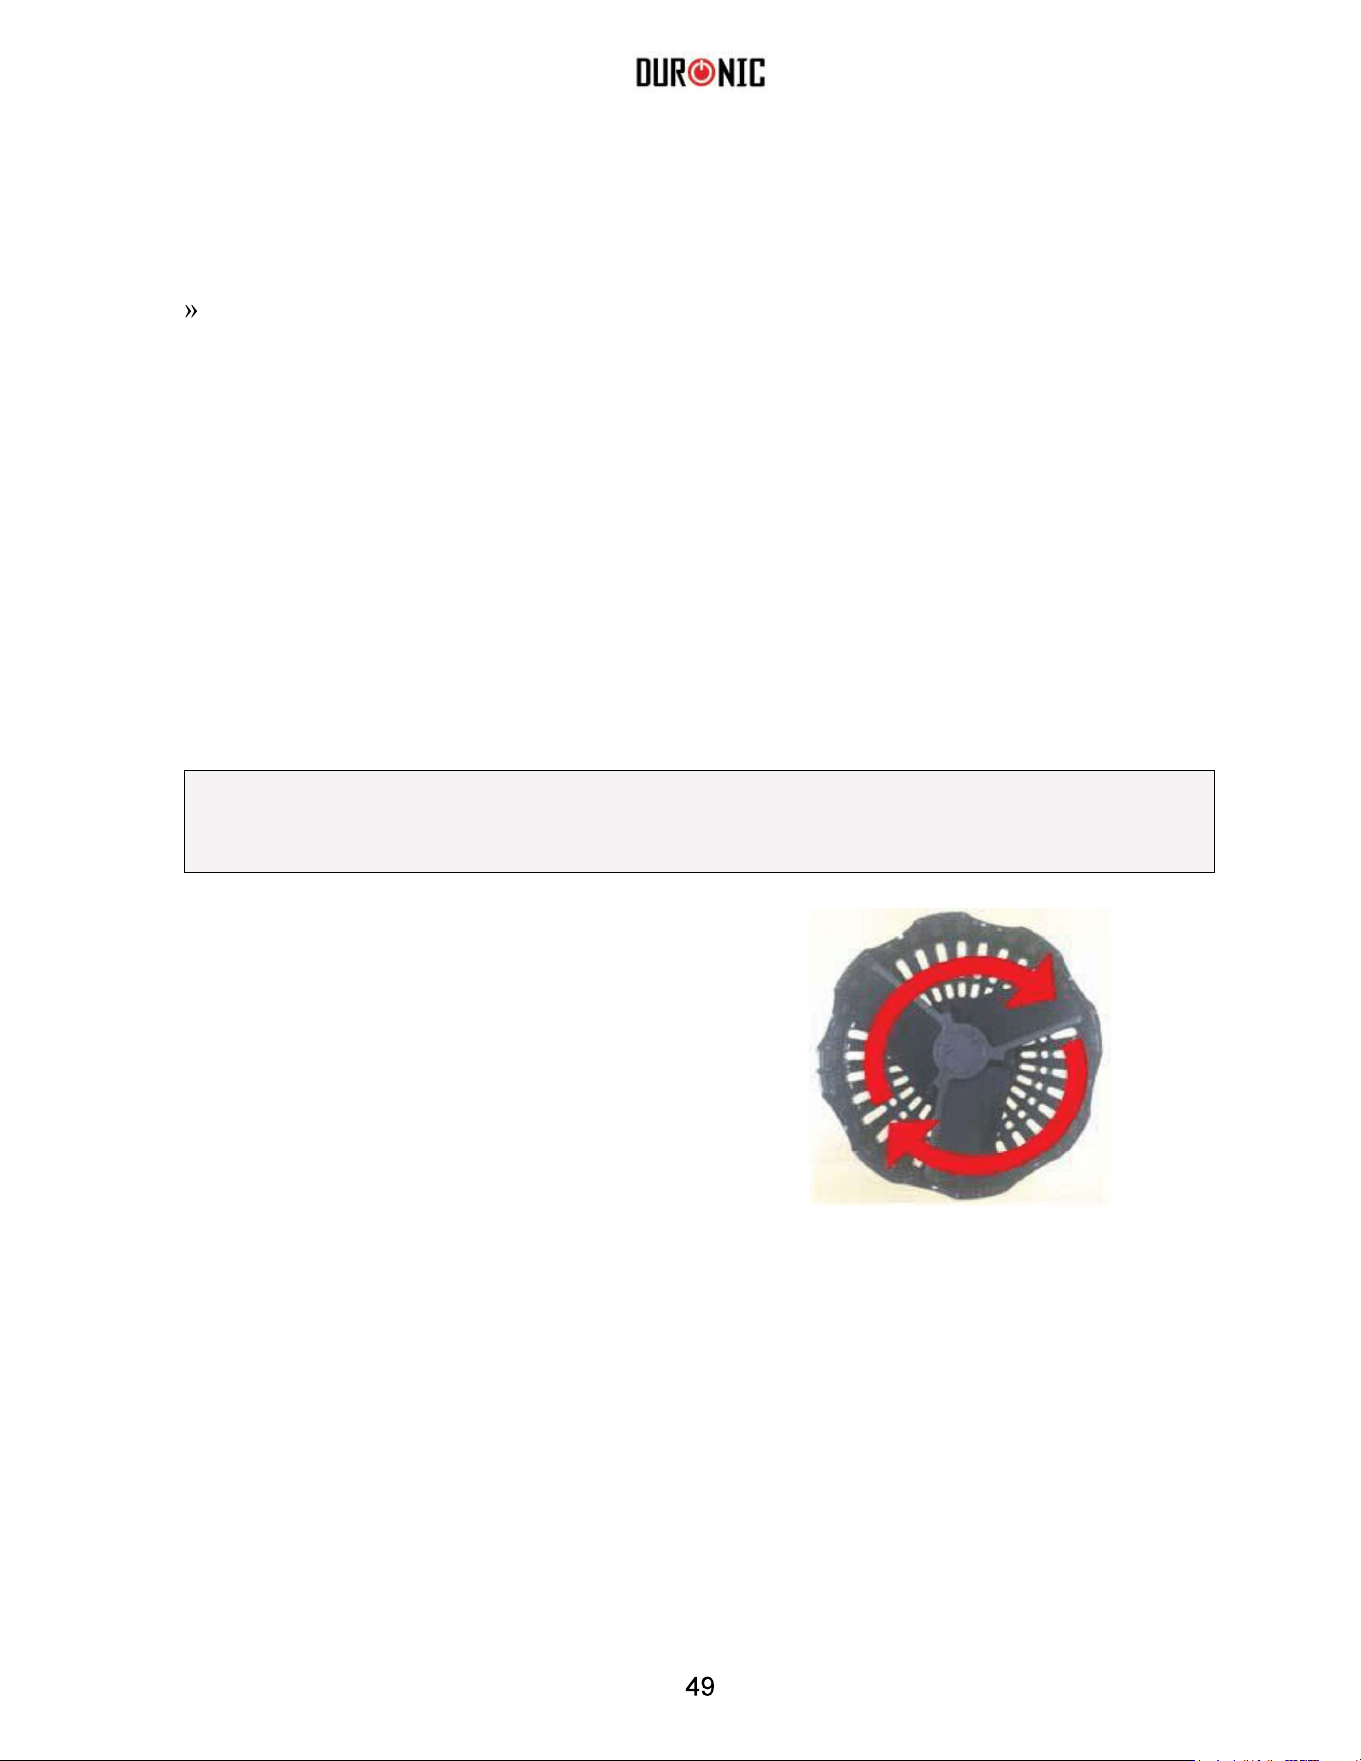
3.
ciotola. Posizionare il coperchio e
assicurarlo in posizione girandolo in
senso anti-orario
4.
posizione.
5.
Collegare la spina alla presa di corrente.
6.
Utilizzare il selettore per selezionare la velocità desiderata.
7.
accensione.
Utilizzare il pulsante in modo continuo per ottenere una purea mentre un utilizzo ad
intermittenza risulterà in un prodotto finale più grossolano.
possibile utilizzare il pulsante Turbo per frullare a scatti intermittenti.
8.
Quando gli ingredienti hanno raggiunto la consistenza desiderata, rilasciare il
corrente.
Allineare i tasselli del
coperchio con le
scanalature della ciotola.
Se si sta tritando carne,
tagliarla a piccolo pezzi
prima di inserirla nella
ciotola.
9.
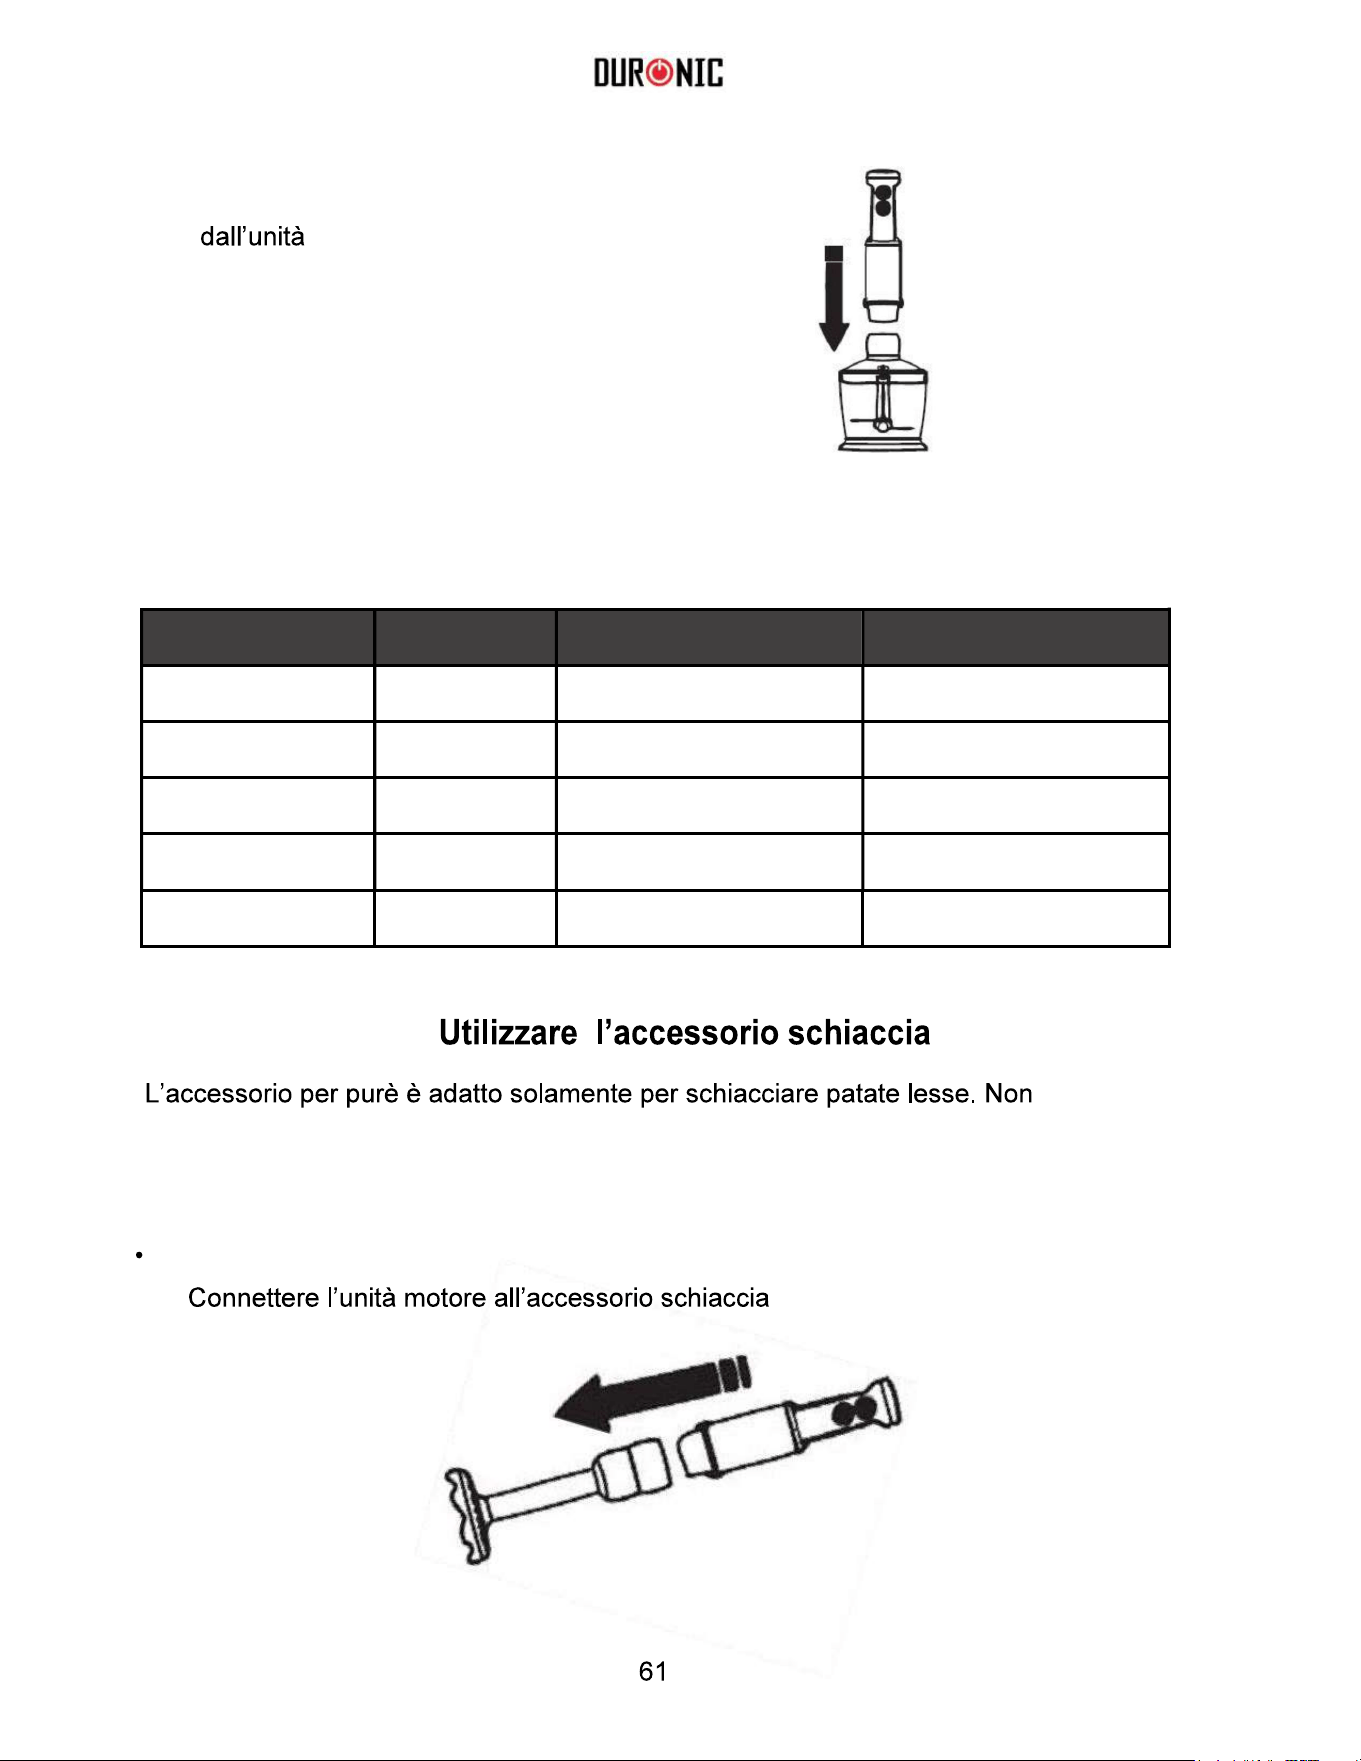
Premere i pulsanti di rilascio e
rimuovere il coperchio del tritatutto
motore.
10.
Sollevare con cautela le lame del
tritatutto e svuotare la ciotola.
Tabella preparazione ingredienti
Ingredienti
Quantità Preparazione Durata
Carne
250g
Tagliare a cubetti da 2cm
15 secondi
Erbe e spezie
50 g
Rimuovere i gambi
10 secondi
Noci
150g
Inserire intere
15 secondi
Formaggi
100 g
Tagliare a cubetti da
1cm
10 secondi
Cipolle
150g
Tagliare in 4 parti
10 secondi
-patate
utilizzarlo per
patate o altri ingredienti crudi.
1.
Lessare le patate e scolarle. Metterle dentro una ciotola o nel bicchiere in dotazione.
Aggiungere una piccolo quantità di latte o burro se necessario.
2.
-patate e bloccarlo in posizione.
Attenzione: Scollegare sempre dalla presa di corrente prima della pulizia
3.
Collegare la spina alla presa di corrente.
4.
Utilizzare il selettore per selezionare la velocità desiderata.
5.
accensione.
6.
Immergere lo schiaccia-patate dentro la ciotola con gli ingredienti. Effettuare
movimenti circolari per mescolare tutto il contenuto in modo omogeneo.
7.
Continuare finchè le patate non raggiungono la consistenza desiderata. rilasciare il
corrente.
8.
schiaccia-
motore.
Pulizia e manutenzione
.
Rimuovere la pala dallo schiaccia-
patate per una migliore pulizia.
Per rimuovere la pala, ruotare in
senso antiorario.
Lavare tutti gli accessori con abbondante acqua insaponata. Risciacquare e asciugare
accuratamente.
Attenzione: Le lame sono molto affiliate. Maneggiarle con cautela.
Superfici in contatto con ingredienti da consumo vanno puliti in modo regolare per
per la pulizia di tali superfici.
Una corretta igene alimentare è sempre necessaria per evitare possibili
avvelenamenti o contaminazioni da cibo.
Non utilizzare detergent chimici o abrasivi per la pulizia del
prodotto.
Garanzia
Questo prodotto è garantito per una durata determinata con il distributore a partire dalla data
di acquisto contro ogni difetto derivante da difetti di fabbricazione o dei materiali. Questa
garanzia non copre difetti o danni derivanti da installazione impropria, uso improprio o usura
anomala del prodotto.
ricevuta e deve essere stato utilizzato in modo corretto. È importante rispettare le istruzioni
recauzioni di sicurezza indicate di seguito. Inoltre, non possiamo garantire
1 anno di garanzia da Shine-Mart Ltd, proprietari del marchio commerciale Duronic.
NOTA: QUESTE DICHIARAZIONI NON INFLUISCONO SUI DIRITTI LEGALI DEL
CONSUMATORE
Questo prodotto è stato realizzato con le rigorose procedure del controllo qualità, e
utilizzando materiali di altissima qualità, per garantire affidabilità e prestazioni eccellenti.
Vi regalerà un servizio ottimo e a lungo termine, purchè venga opportunamente usata e
mantenuta. Il prodotto è garantito per 1 anno dalla data di acquisto. Se sorge qualche
difetto a causa di materiali difettosi o scarsa manodopera, il prodotto difettoso dovrà essere
restituito al luogo originale di acquisto. Il rimborso o la sostituzione sono a discrezione
1. Il prodotto deve essere restituito al rivenditore con la prova originale
2. Il prodotto deve essere installato e usato seguendo le istruzioni contenute nel manuale.
3. Il prodotto va utilizzato solo per scopi domestici. Non è da utilizzarsi per uso commerciale.
4. La garanzia non copre usura, danni volontari, abuso, negligenza, riparazioni
inesperte o consumo dei materiali.
5. Shine-Mart Ltd non è responsabile per Danni accidentali o consequenziali.
6. Shine-Mart Ltd non è tenuta a eseguire qualsiasi tipo di riparazione, ai sensi
della garanzia.
7.
condizioni Per parti di ricambio si prega di consultare il sito www.duronic.com
Corretto smaltimento del prodotto.
Qusto prodotto è inclusivo di spina certificata CE
importata da Shine-Mart Ltd, RM3 8SB
Seguici
Questo segno su un prodotto o su documenti indica che quando deve essere
smaltito, deve essere trattato come i rifiuti elettrici ed elettronici (WEEE) Tutti
I prodotti marcati WEEE non devono essere buttati nei rifiuti domenistici
generici, ma separati per il trattamento, il recupero
e il riciclaggio dei materiali utilizzati.
Per un corretto trattamento, recupero e riciclaggio; si prega di portare tutti I
prodotti marcati WEEE al Vostro centro smaltimenti rifiuti autorizzato, dove
saranno accettati gratuitamente.
Se i consumatori sono propensi allo smaltimento corretto di rifiuti elettrici ed
elettronici, aiuteranno a salvare risorse importanti e a prevenire i potenziali
che i rifiuti possono contenere.