
Technical Support and E-Warranty Certificate
www.vevor.com/support
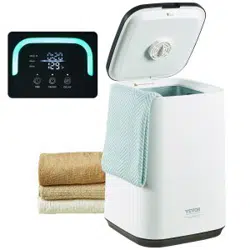
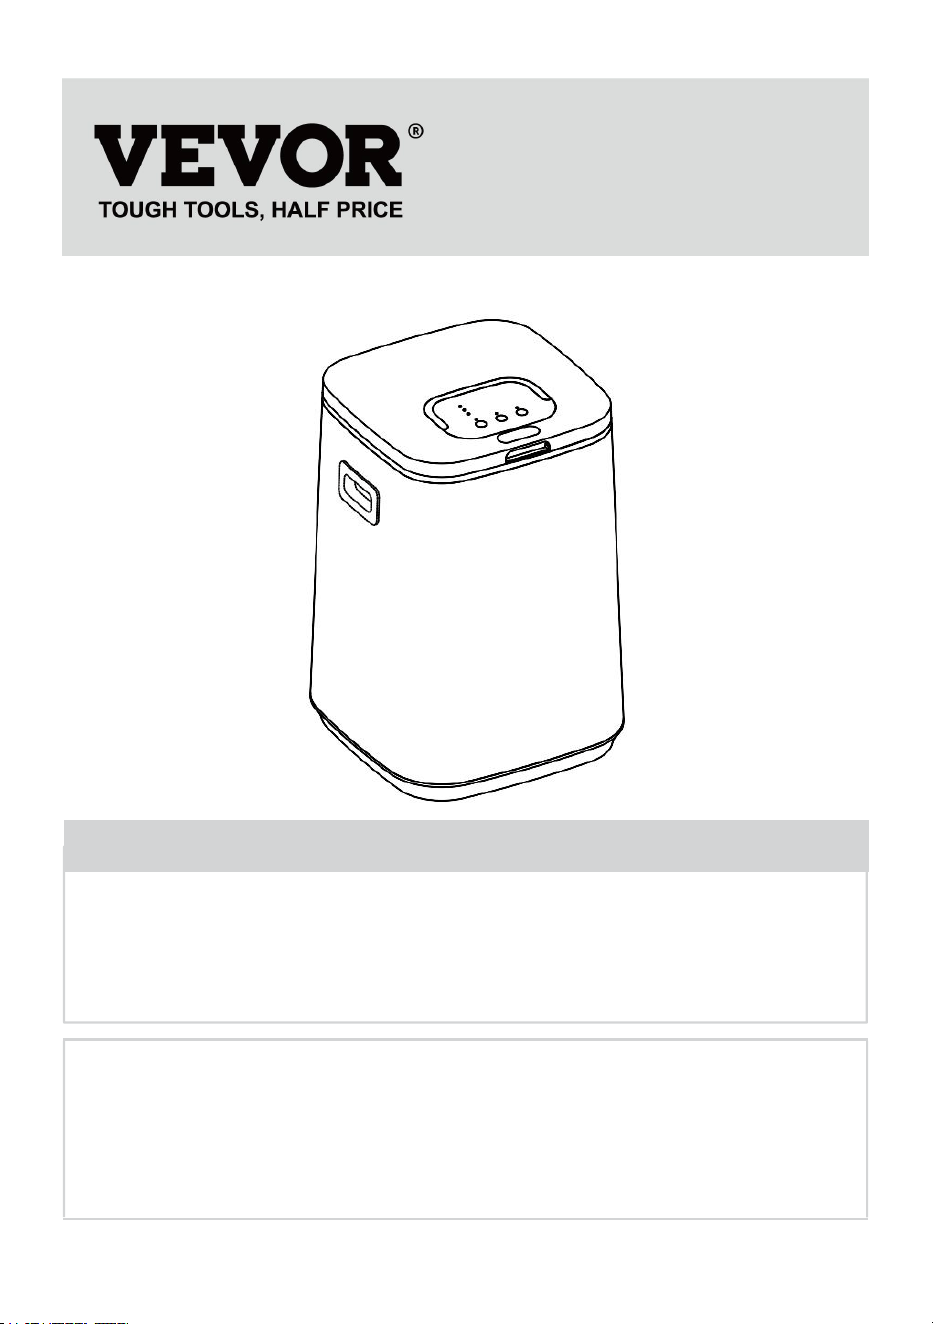
TOWEL WARMER BUCKETS
MODEL: HSTW-12
We continue to be committed to provide you tools with competitive price.
"Save Half", "Half Price" or any other similar expressions used by us only represents an
estimate of savings you might benefit from buying certain tools with us compared to the major
top brands and does not necessarily mean to cover all categories of tools offered by us. You
are kindly reminded to verify carefully when you are placing an order with us if you are
actually saving half in comparison with the top major brands.

- 1 -
MODEL: HSTW-12
Have product questions? Need technical support? Please feel free to
contact us:
Technical Support and E-Warranty Certificate
www.vevor.com/support
NEED HELP? CONTACT US!
This is the original instruction, please read all manual instructions
carefully before operating. VEVOR reserves a clear interpretation of our
user manual. The appearance of the product shall be subject to the
product you received. Please forgive us that we won't inform you again if
there are any technology or software updates on our product.
TOWEL WARMER BUCKETS
- 2 -
Warning-To reduce the risk of injury, user must read
instructions manual carefully.
READ ALL INSTRUCTIONS BEFORE USE
All the safety and operating instructions should be read,
adhered to and followed before the unit is operated.
This device complies with Part 15 of the FCC Rules. Operation
is subject to the following two conditions:(1) This device may
not cause harmful interference, and (2) this device must
accept any interference received, including interference that
may cause undesired operation.
This product is subject to the provision of European Directive
2012/19/EC. The symbol showing a wheelie bin crossed
through indicates that the product requires separate refuse
collection in the European Union. This applies to the product
and all accessories marked with this symbol. Products marked
as such may not be discarded with normal domestic waste, but
must be taken to a collection point for recycling electrical and
electronic devices
SAFETY & WARNINGS
WARNING: To reduce risk of electric shock, or serious injury to
persons when using the appliance, follow basic precautions
including the Read all instructions before using the appliance.
Read all instructions before using the appliance.
To reduce the risk of electric shock, burns, fire or injury:
Do not use this appliance for anything other than its intended use.
Do not place or store the unit where it can fall or be pulled into a tub or
sink.
Do not place in or drop into water or other liquid.
- 3 -
Do not reach for a unit that has fallen into water. Unplug it immediately.
Care should be taken so that objects do not fall into and liquids are not
spilled onto the unit.
Close supervision is necessary when this unit is used near children or
disabled persons.
Use this unit only for its intended use as described in this manual.
Never operate this unit if it has a damaged cord or plug, if it is not
working properly, or if it has been
dropped, damaged, or dropped in water.
Keep cords away from heated surfaces. Do not wrap the cord around
the exterior of the appliance or let
the cord hangs over table or counter edge.
Do not use outdoors.
Do not alter the safety plug or use an extension cord with this device.
Do not operate with a voltage converter.
Do not touch hot surfaces.
Do not use accessory attachments not recommended by the
manufacturer as this may cause injuries.
PRODUCT PARAMETER
Model
HSTW-12
District
North America
Europe
Australia
Voltage
AC 120V 60Hz
AC 230V 50/60HZ
Wattage
450W (+5%~-10%)
400W (+5%~-10%)
Capacity
20L
Net Weight
4.2kg
Product Size
320*320*470mm
- 4 -
PACKING LIST
NO.
ACCESSORY NAME
QUANTITY
1
Towel Warmer Buckets
1 pc
2
Hook
4 pcs
3
User Manual
1 pc
INSTRUCTION
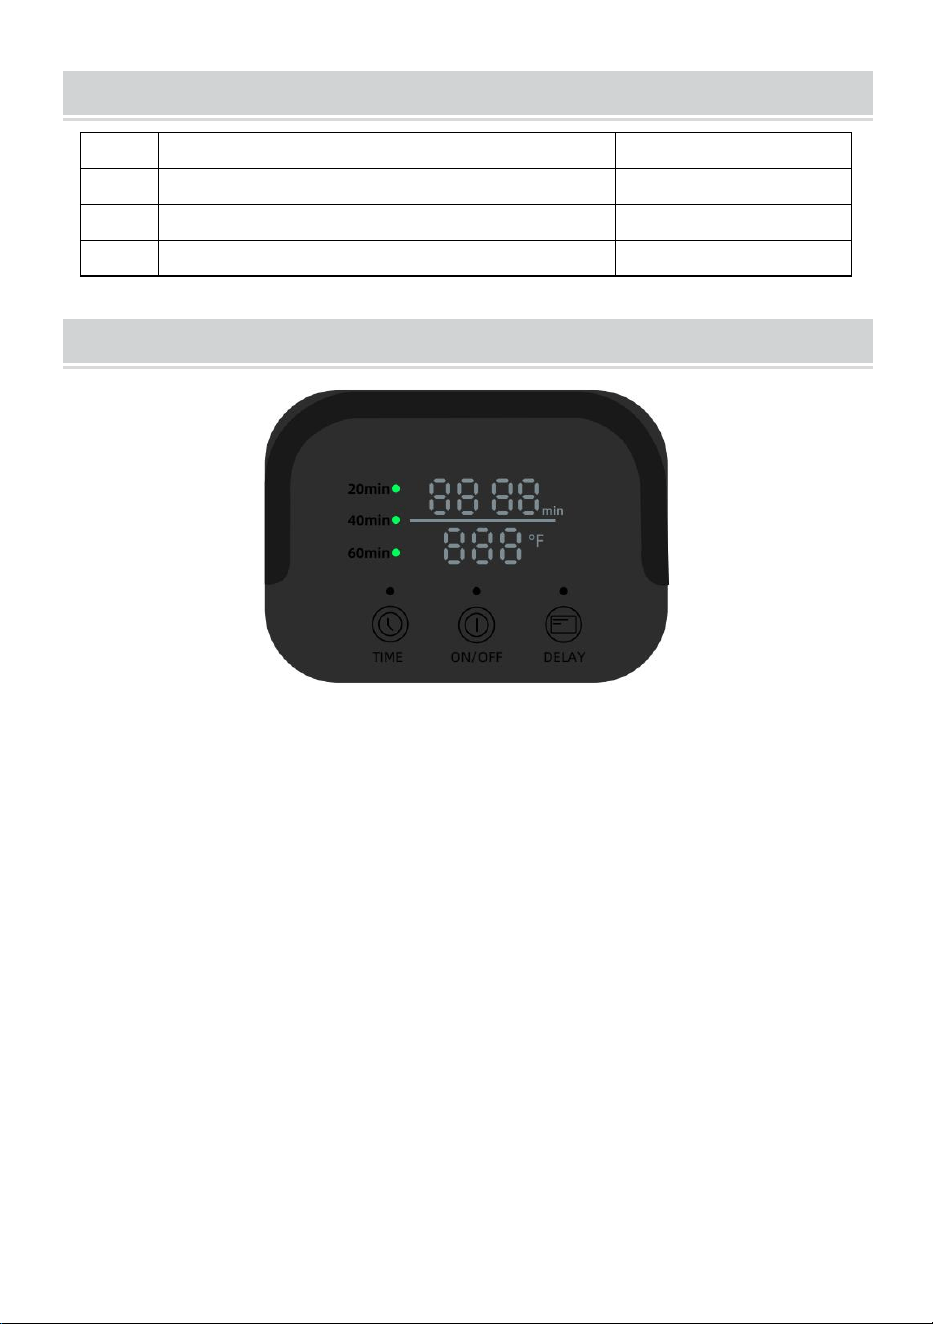
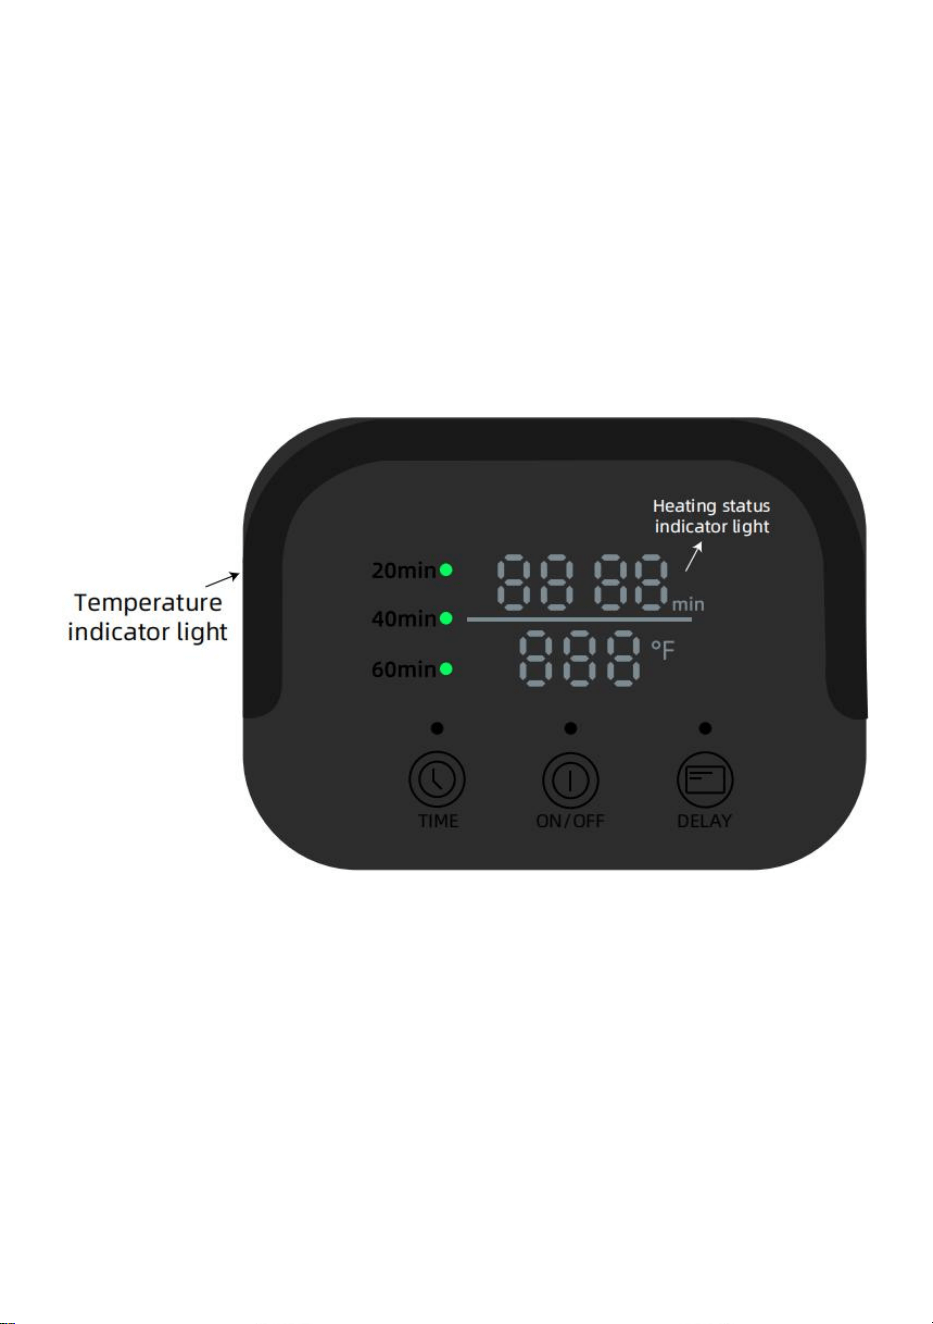
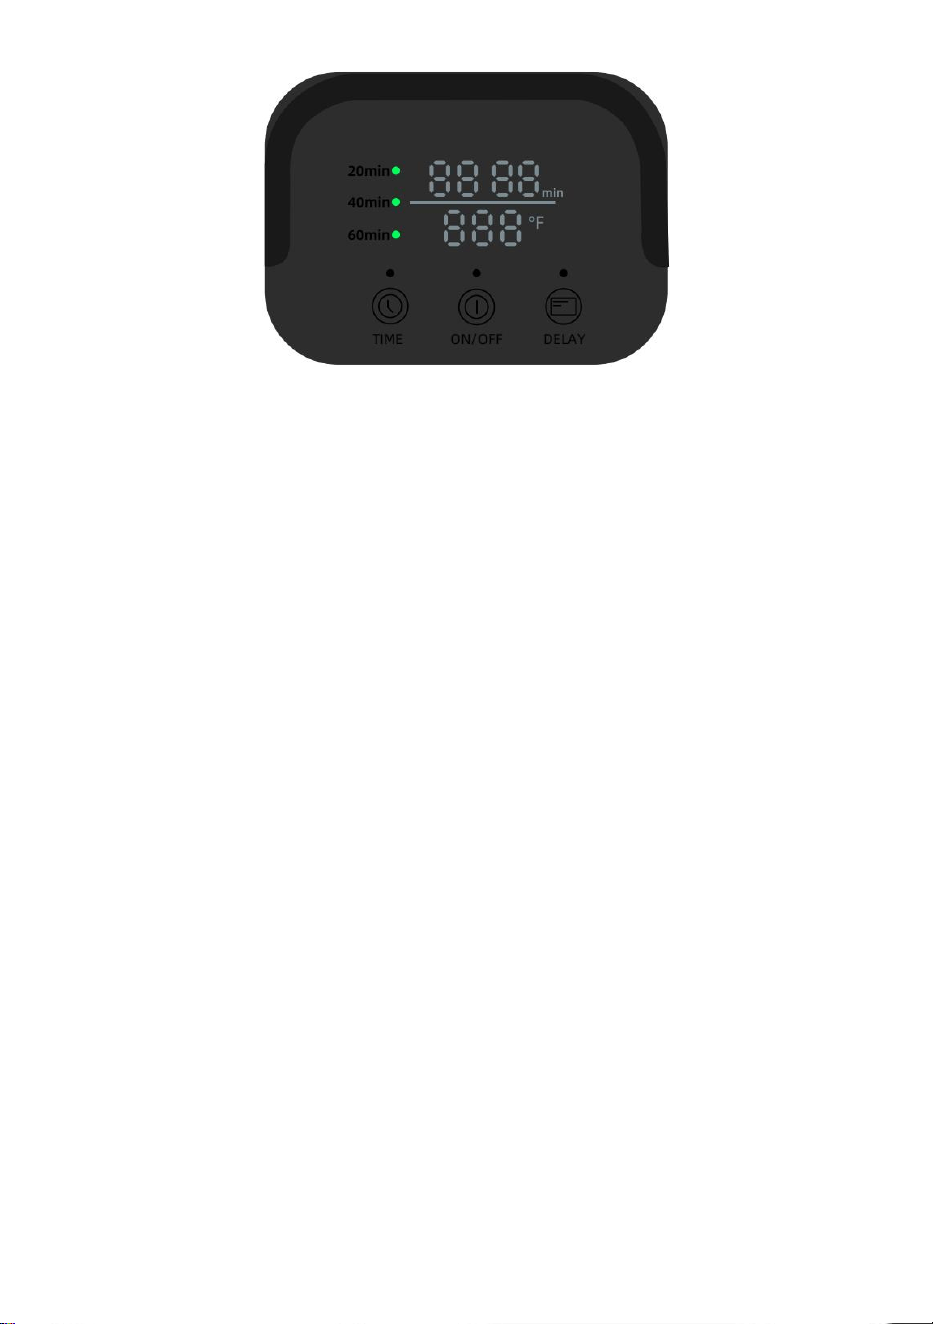
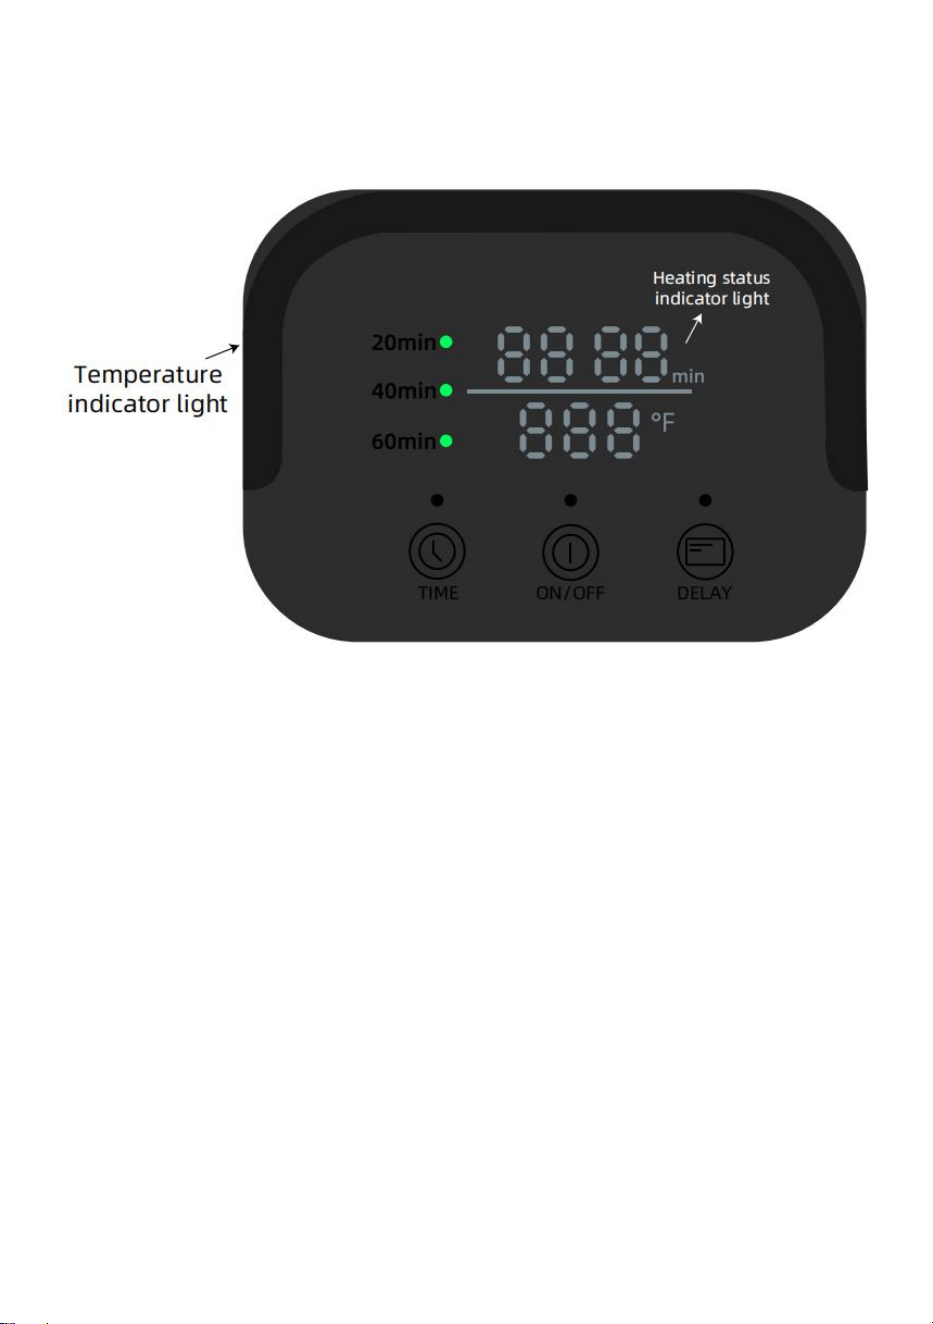
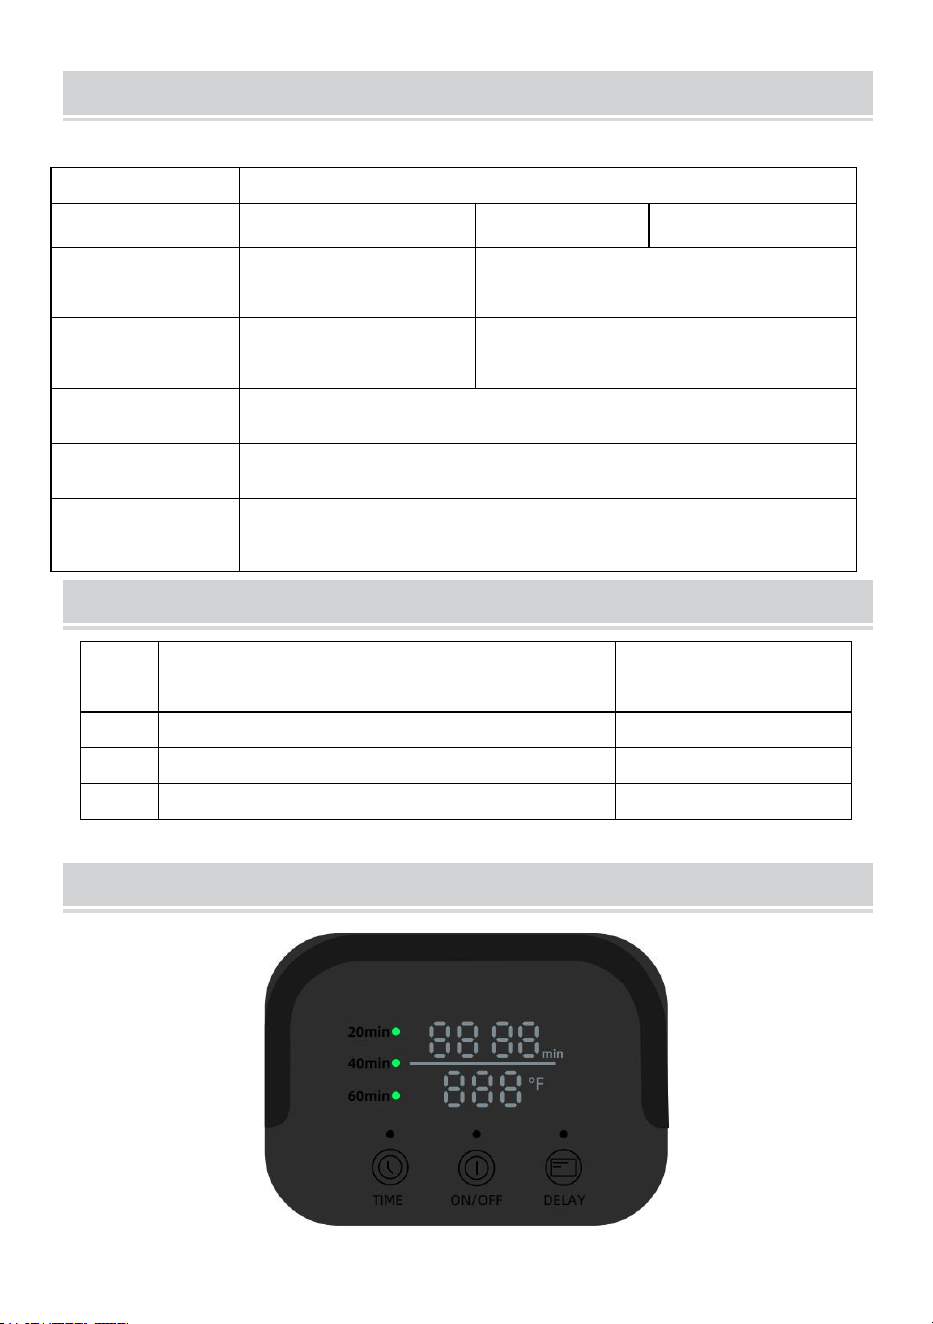
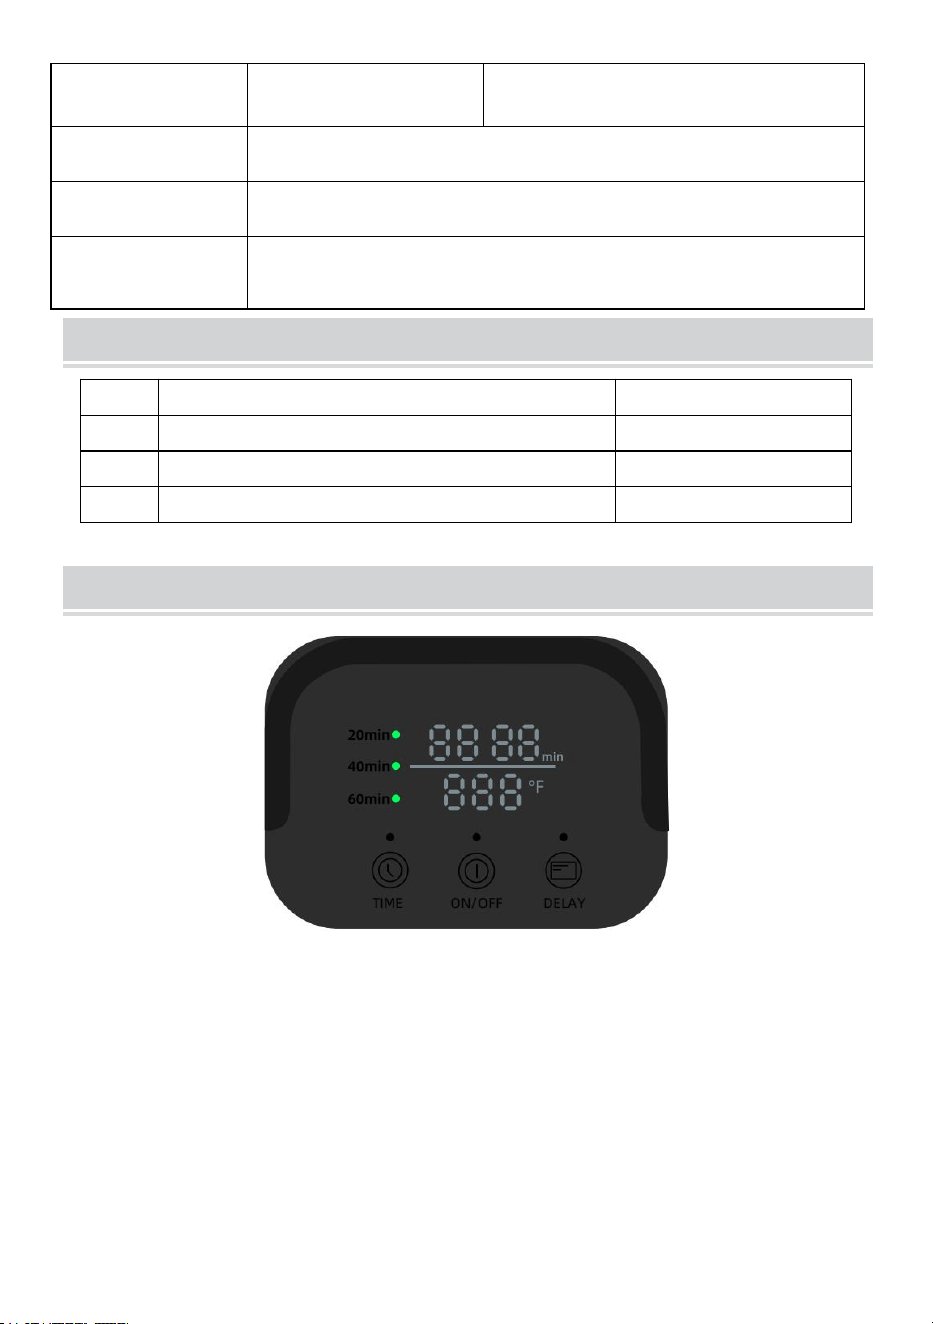
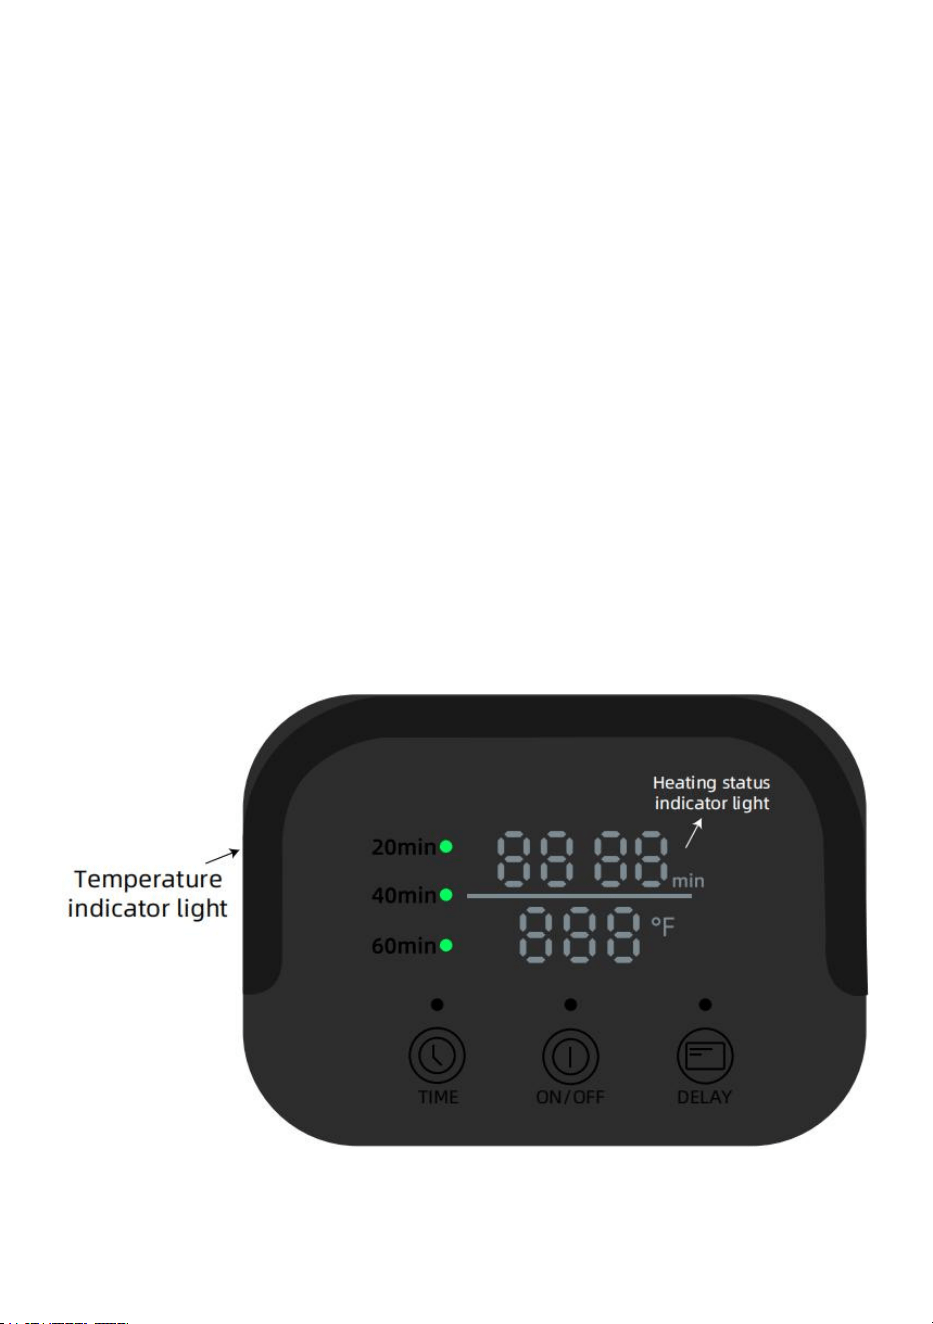
1. BUTTON CONTROL
1.1 Switch button: open and close the towel bucket
1.2 Time key: select heating timing time
1.3 Delay key: Delay time selection
2. DELAYED HEATING FUNCTION
1. Turning on the machine, press the delay button to enter the delay timing
mode. Press the delay button to adjust the delay time in steps of 30
minutes, up to a maximum of 24 hours.
2. When the delay button is pressed, the LED round light above the button
flashes.
3. At any time, if the delay reservation button is pressed, the reservation
time will be executed first, and then heating will be performed.
4. After the heating work is completed, reset the delay time and re-enter

- 5 -
the delay heating mode.
5. During the heating process, operate the delay function, execute the
delay first and then reheat.
6. When you press and hold without letting go, the reservation time will
change 2-3 times/s.
The time of the first long press will be accumulated, and the time of long
press will be decreased by releasing the hand again, and the time will be
accumulated again, etc.
3. HEATING COUNTDOWN FUNCTION
1. After the delay time is over, heat according to the set heating time or the
default 20 minutes;
2. Press the time key to enter the heating time setting mode. Press the time
key to adjust the delay time in steps of 20 minutes, with a maximum of 1H.
Step selection 20-40-60.
3. When the time button is pressed, the LED round light above the button
flashes. After flashing for 5 seconds without any operation, the option is
confirmed.
4. During the heating process, operate the time key to reset the heating
time.
5. At each operation time, the LED lights up corresponding to the time.
6. After starting heating, increase the temperature to 266 °F for the first 20
minutes and maintain the temperature at 215-266 °F.
7. If the timer is more than 20 minutes, after more than 20 minutes, it will
enter the heat preservation state and keep the temperature at 180-215 °F
until the timer expires.
4. ON/OFF KEY OPERATION
1. After power on, light up all LEDs for 3S self-test.
2. In standby mode, press the power button to wake up the CPU, and the
LED screen flashes waiting for input instructions.
- 6 -
Except for the rest of the standby state, press the power button and the
program will first detect the temperature. When the temperature is greater
than 60°, the real-time temperature will be displayed. When it is lower than
60°, the screen will turn off and enter standby.
5. Temperature display
After pressing the Power Button, the temperature is displayed in
Fahrenheit(℉)
6. Working LED indication
1: When the product is powered on and the temperature of the towel
bucket wall is lower than 60°, the green light appears;
2: If the temperature of the towel bucket wall is greater than 60°, the red
light will turn on;
3: When the heating time is over and the temperature in the barrel is lower
than 50°C, turn off the light;
4: There is a horizontal light between the time and temperature, which
flashes slowly when heating and stays on when not heating.

- 7 -
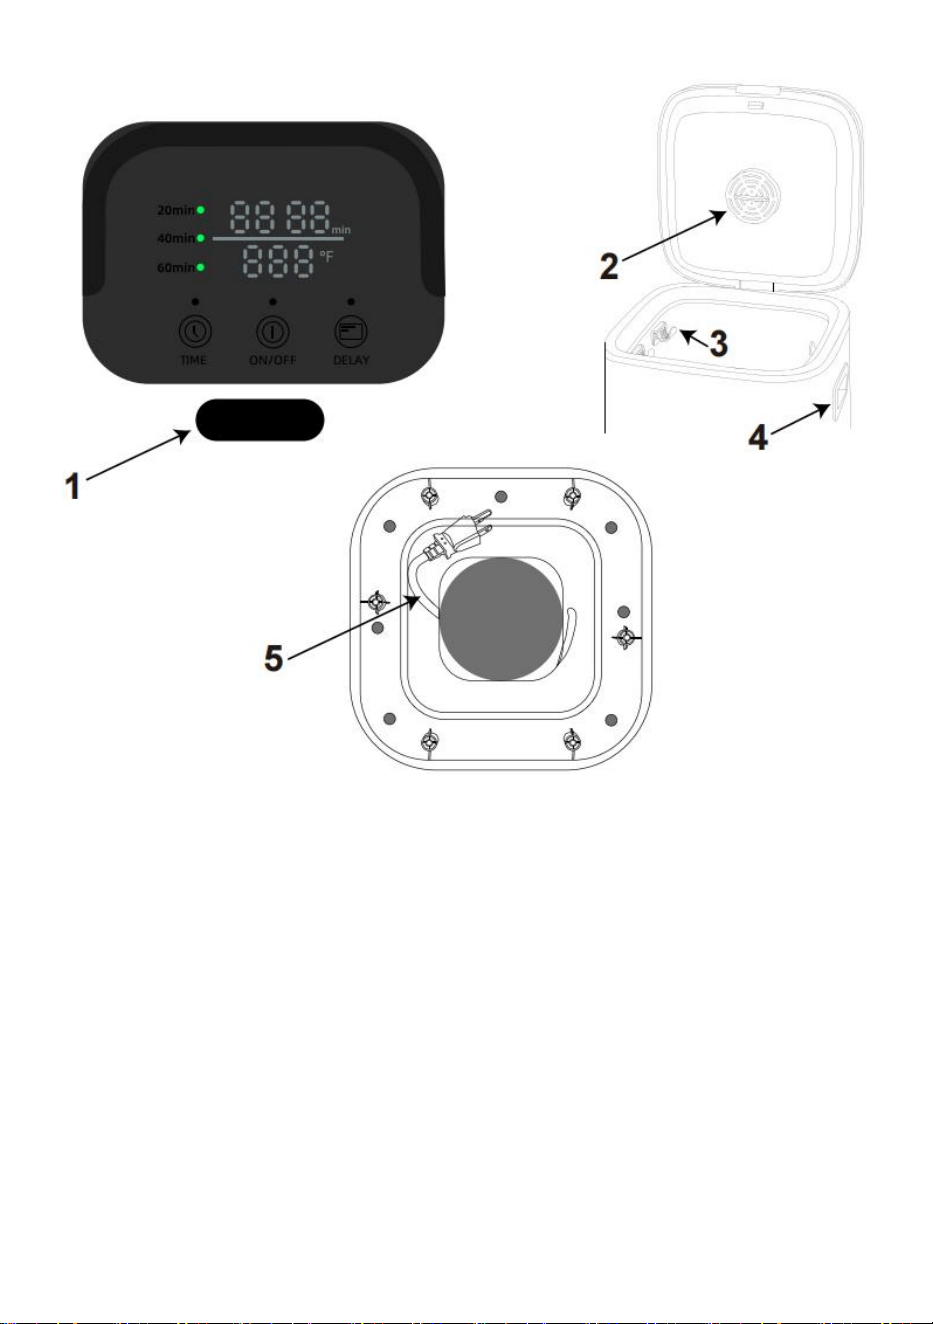
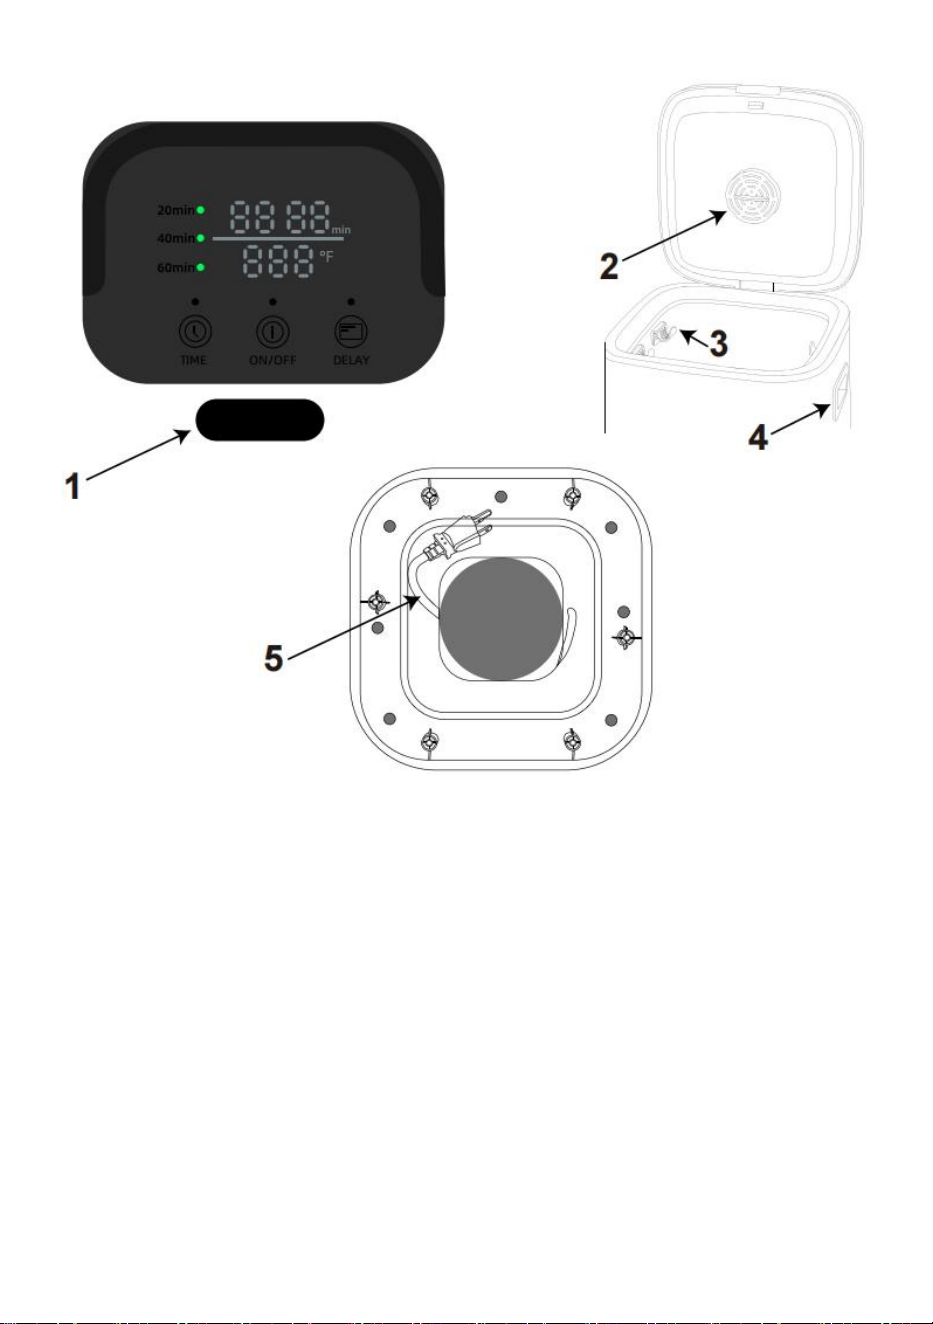
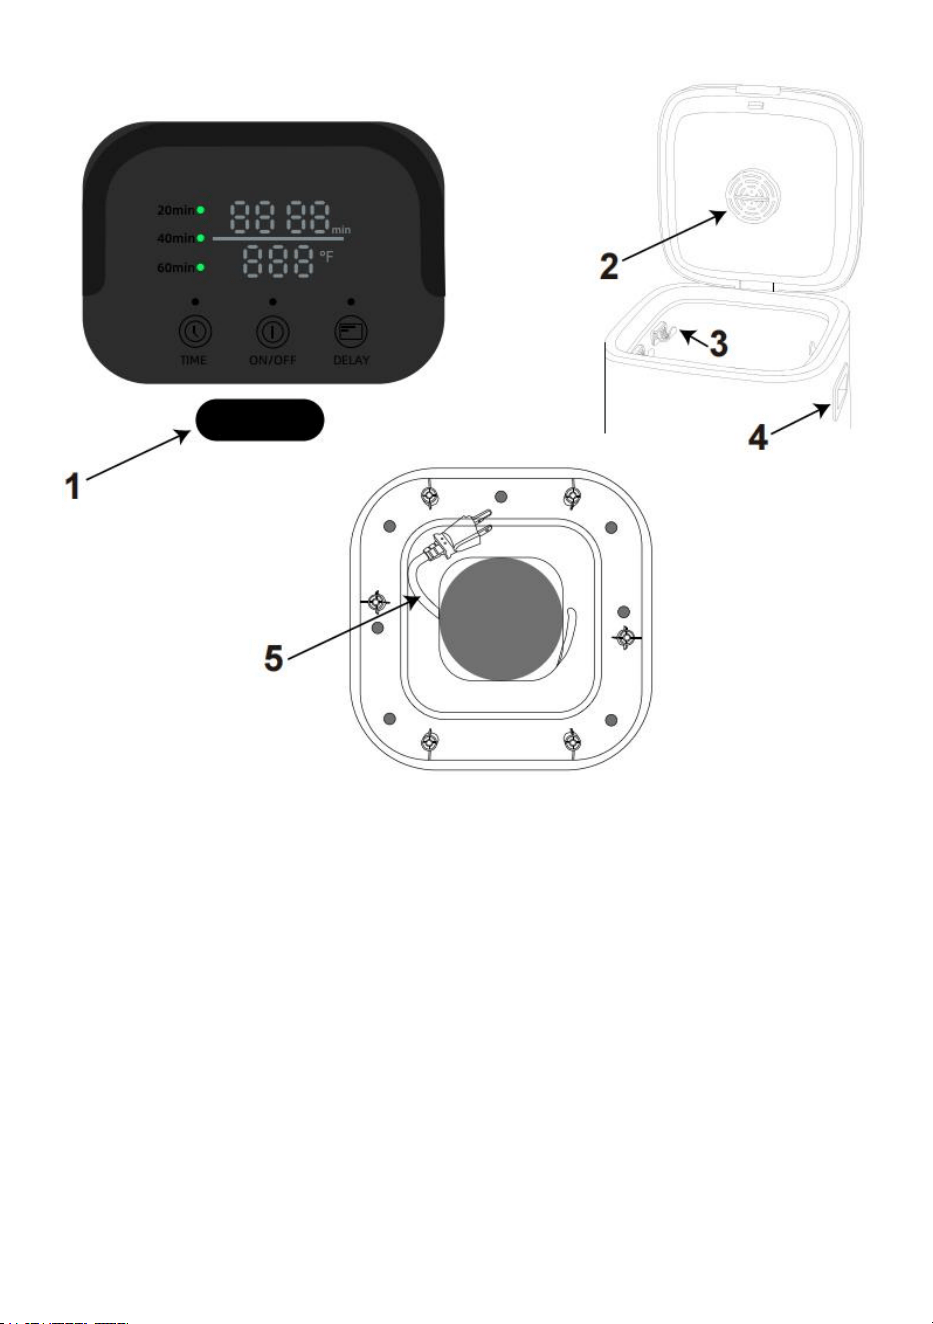
1.Press the child lock switch to open the flip cover.
2.Aromatherapy box :can be opened and removed by turning counterclockwise, and
installed by turning clockwise.
3.Removable hook.
4.Side handles.
5.The power cord case can be stored at the bottom.

- 8 -
FAILURE ANALYSIS
1. The NTC is open circuit. After turning on the heating for 1 minute, the
program is locked, the heating relay is disconnected, the fault code E01 is
displayed on the screen, and all LEDs flash, and the buttons do not
respond.
2. Without heating, the temperature does not change after 1 minute of
power on, the program is locked, the heating relay is disconnected, the
fault code E02 is displayed on the screen, and all LEDs flash, and the
buttons do not respond.
Measures: Unplug the plug, contact the dealer to return to the factory for
repair.
Do not disassemble parts by yourself.
3. Performance: The screen displays fault code E02, and all LEDs are
blinking, no response to touch.
Reason: The wire is not connected. After heating for 1 minute, the
temperature does not change.
Measures: Unplug the plug, contact the dealer to return to the factory for
repair.
Do not disassemble parts by yourself.
INSTALLATION AND MOVEMENT
The generous cavity has the capacity to hold two large bath towels or
one personal throw blanket. •The simple, single-touch controls provide
you with up to 60 minutes of warming.
Add a fresh, odor-neutralizing scent to your towels and blankets by
inserting the aromatherapy tablet into the disc holder.
The double walled insulated lid keeps heat in while remaining cool to
the touch.

- 9 -
POLARIZED PLUG
This appliance has a polarized plug (one blade is wider than the other).
This plug will fit in a polarized outlet only one way. If the plug does not fit
fully in the outlet, reverse the plug. If it still does not fit, contact a qualified
electrician to install the proper outlet. Do not change the plug in any way.
SET UP
1. Open the Lid and remove any packaging contents.
2. Place the Towel Warmer on a dry, level, hard surface.
3. Insert Plug into a standard outlet.
FCC INFORMATION
WARNING: Changes or modifications not expressly approved by the party
responsible for compliance could void the user’s authority to operate the
equipment.
NOTE: This equipment has been tested and found to comply with the limits
for a Class B digital device, pursuant to Part 15 of the FCC Rules. These
limits are designed to provide reasonable protection against harmful
interference in a residential installation. This unit generates, uses, and can
radiate radio frequency energy and if not installed and used in accordance
with the instructions, may cause harmful interference to radio
communications. However, there is no guarantee that interference will not
occur in a particular installation. If this equipment does cause harmful
interference to radio or television reception, which can be one or more of
the following measures:
• Reorient or relocate the receiving antenna.

- 10 -
• Increase the separation between the equipment and receiver.
• Connect the equipment to an outlet on a circuit different from that to
which the receiver is connected.
• Consult the dealer or an experienced radio/TV technician for help.
This device complies with Part 15 of the FCC Rules. Operation is subject to
the following two conditions:
1. This device may not cause harmful interference.
2. This device must accept any interference received including interference
that may cause undesired operation.
Manufacturer: Shanghaimuxinmuyeyouxiangongsi
Address: Shuangchenglu 803nong11hao1602A-1609shi, baoshanqu,
shanghai 200000 CN.
Imported to AUS: SIHAO PTY LTD. 1 ROKEVA STREETEASTWOOD
NSW 2122 Australia
Imported to USA: Sanven Technology Ltd. Suite 250, 9166 Anaheim
Place, Rancho Cucamonga, CA 91730
REP
EC
E-CrossStu GmbH
Mainzer Landstr.69, 60329 Frankfurt am Main.
REP
UK
YH CONSULTING LIMITED.
C/0 YH Consulting Limited Office 147, Centurion
House, London Road, Staines-upon-Thames,
Surrey, TW18 4AX


Techniczny Certyfikat wsparcia i e-gwarancji
www.vevor.com/support
WIADRA DO PODGRZEWANIA
RĘCZNIKÓW
MODEL: HSTW-12
We continue to be committed to provide you tools with competitive price.
"Save Half", "Half Price" or any other similar expressions used by us only represents an
estimate of savings you might benefit from buying certain tools with us compared to the major
top brands and does not necessarily mean to cover all categories of tools offered by us. You
are kindly reminded to verify carefully when you are placing an order with us if you are
actually saving half in comparison with the top major brands.

- 1 -
MODEL: HSTW-12
Have product questions? Need technical support? Please feel free to
contact us:
Technical Support and E-Warranty Certificate
www.vevor.com/support
NEED HELP? CONTACT US!
This is the original instruction, please read all manual instructions
carefully before operating. VEVOR reserves a clear interpretation of our
user manual. The appearance of the product shall be subject to the
product you received. Please forgive us that we won't inform you again if
there are any technology or software updates on our product.
TOWEL WARMER BUCKETS

- 2 -
Ostrzeżenie — aby zmniejszyć ryzyko obrażeń, użytkownik
musi uważnie przeczytać instrukcję obsługi.
PRZED UŻYCIEM PRZECZYTAJ WSZYSTKIE INSTRUKCJE
Należy zapoznać się ze wszystkimi instrukcjami bezpieczeństwa
i obsługi,
przestrzegane i przestrzegane przed uruchomieniem urządzenia.
To urządzenie jest zgodne z częścią 15 przepisów FCC.
Działanie podlega następującym dwóm warunkom: (1) to
urządzenie nie może powodować szkodliwych zakłóceń oraz
(2) to urządzenie musi akceptować wszelkie odbierane
zakłócenia, w tym zakłócenia, które mogą powodować
niepożądane działanie.
Ten produkt podlega przepisom Dyrektywy Europejskiej
2012/19/WE. Symbol przekreślonego kosza na śmieci
oznacza, że produkt wymaga selektywnej zbiórki śmieci na
terenie Unii Europejskiej. Dotyczy to produktu i wszystkich
akcesoriów oznaczonych tym symbolem. Produktów
oznaczonych jako takie nie można wyrzucać razem ze
zwykłymi odpadami domowymi, lecz należy je oddać do
punktu zbiórki w celu recyklingu urządzeń elektrycznych i
elektronicznych
SAFETY & WARNINGS
OSTRZEŻENIE : Aby zmniejszyć ryzyko porażenia prądem lub
poważnych obraże
ń
osób podczas korzystania z urządzenia,
należy przestrzegać podstawowych środków ostrożności, w tym
przeczytać wszystkie instrukcje przed użyciem urządzenia.
Przed użyciem urządzenia przeczytaj wszystkie instrukcje.
Aby zmniejszyć ryzyko porażenia prądem, oparzeń, pożaru lub

- 3 -
obrażeń:
Nie używaj tego urządzenia do celów innych niż jego przeznaczenie.
Nie umieszczaj ani nie przechowuj urządzenia w miejscu, w którym
może spaść lub zostać wciągnięte do wanny lub zlewu.
Nie wkładać ani nie wrzucać do wody lub innego płynu.
Nie sięgaj po urządzenie, które wpadło do wody. Odłącz go
natychmiast.
Należy zachować ostrożność, aby żadne przedmioty nie wpadły do
urządzenia ani nie rozlały na urządzenie żadnych płynów.
Jeśli urządzenie jest używane w pobliżu dzieci lub osób
niepełnosprawnych, konieczny jest ścisły nadzór.
Używaj tego urządzenia wyłącznie zgodnie z jego przeznaczeniem,
jak opisano w tej instrukcji.
Nigdy nie używaj urządzenia, jeśli ma uszkodzony przewód lub
wtyczkę, jeśli nie działa prawidłowo lub działało
upuszczony, uszkodzony lub zanurzony w wodzie.
Trzymaj przewody z dala od nagrzanych powierzchni. Nie owijaj
przewodu wokół zewnętrznej części urządzenia ani nie zostawiaj go
przewód wisi nad stołem lub krawędzią blatu.
Nie używać na zewnątrz.
Nie modyfikuj wtyczki zabezpieczającej ani nie używaj przedłużacza z
tym urządzeniem.
Nie pracować z przetwornicą napięcia.
Nie dotykaj gorących powierzchni.
Nie używaj akcesoriów niezalecanych przez producenta, ponieważ
może to spowodować obrażenia.

- 4 -
PRODUCT PARAMETER
Model
HSTW-12
Dzielnica
Ameryka północna
Europa
Australia
Napięcie
AC 1 2 0 V 60 Hz
AC 2 3 0 V 50/60 Hz
Moc W
4 50 W (+5% ~
-10% )
4 00 W (+5% ~ -10% )
Pojemność
20L
Waga netto
4,2 kg
Rozmiar
produktu
320*320*470mm
PACKING LIST
NIE.
NAZWA AKCESORIA
ILOŚĆ
1
Wiadra do podgrzewania ręczników
1 szt
2
Hak
4 szt
3
Instrukcja obsługi
1 szt
INSTRUCTION
1. STEROWANIE PRZYCISKAMI
1.1 Przycisk przełącznika: otwieranie i zamykanie wiadra na ręczniki

- 5 -
1.2 Przycisk czasu: wybierz czas ogrzewania
1.3 Klawisz opóźnienia: wybór czasu opóźnienia
2. FUNKCJA OPÓŹNIONEGO OGRZEWANIA
1. Włączając urządzenie, naciśnij przycisk opóźnienia, aby przejść do
trybu opóźnienia. Naciśnij przycisk opóźnienia, aby ustawić czas
opóźnienia w krokach co 30 minut, maksymalnie do 24 godzin.
2. Po naciśnięciu przycisku opóźnienia zacznie migać okrągła dioda LED
nad przyciskiem.
3. W każdym momencie naciśnięcia przycisku rezerwacji z opóźnieniem,
najpierw zostanie wykonany czas rezerwacji, a następnie rozpocznie się
grzanie.
4. Po zakończeniu prac grzewczych zresetuj czas opóźnienia i ponownie
wejdź w tryb opóźnionego ogrzewania.
5. Podczas procesu nagrzewania użyj funkcji opóźnienia, najpierw wykonaj
opóźnienie, a następnie rozgrzej ponownie.
6. Gdy naciśniesz i przytrzymasz bez puszczania, czas rezerwacji zmieni
się 2-3 razy/s.
Czas pierwszego długiego naciśnięcia zostanie naliczony, czas długiego
naciśnięcia zostanie zmniejszony po ponownym zwolnieniu ręki, czas
zostanie ponownie naliczony itd.
3. FUNKCJA ODLICZANIA OGRZEWANIA
1. Po upływie czasu opóźnienia ogrzewanie według ustawionego czasu
grzania lub domyślnych 20 minut;
2. Naciśnij przycisk czasu, aby wejść w tryb ustawiania czasu grzania.
Naciśnij przycisk czasu, aby ustawić czas opóźnienia w krokach co 20
minut, maksymalnie 1H. Wybór kroku 20-40-60 .
3. Po naciśnięciu przycisku czasu zacznie migać okrągła dioda LED nad
przyciskiem. Po miganiu przez 5 sekund bez żadnej operacji, opcja zostaje
zatwierdzona.

- 6 -
4. Podczas procesu nagrzewania naciśnij przycisk czasu, aby zresetować
czas nagrzewania.
5. Przy każdym czasie pracy dioda LED zapala się odpowiednio do czasu.
6. Po rozpoczęciu ogrzewania zwiększ temperaturę do 266°F na pierwsze
20 minut i utrzymuj temperaturę na poziomie 215-266°F.
7. Jeśli timer jest dłuższy niż 20 minut, po ponad 20 minutach przejdzie w
stan utrzymywania ciepła i będzie utrzymywał temperaturę na poziomie
180-215 °F aż do upłynięcia czasu timera.
4. KLUCZ WŁ./WYŁ
1. Po włączeniu zasilania zapal wszystkie diody LED w celu
przeprowadzenia autotestu 3S .
2. W trybie gotowości naciśnij przycisk zasilania, aby wybudzić procesor i
ekran LED miga w oczekiwaniu na instrukcje wprowadzania.
Z wyjątkiem pozostałej części stanu gotowości, naciśnij przycisk zasilania,
a program najpierw zmierzy temperaturę. Gdy temperatura przekroczy 60°,
wyświetli się temperatura w czasie rzeczywistym. Gdy będzie niższa niż
60°, ekran wyłączy się i przejdzie w tryb gotowości.
5. Wyświetlacz temperatury
Po naciśnięciu przycisku zasilania temperatura jest wyświetlana w
stopniach Fahrenheita (℉)

- 7 -
6. Wskazanie pracy LED
1: Gdy produkt jest włączony, a temperatura ścianki wiadra na ręczniki jest
niższa niż 60°, pojawia się zielone światło;
2: Jeśli temperatura ściany wiadra na ręczniki przekracza 60°, zaświeci się
czerwone światło;
3: Gdy czas nagrzewania dobiegnie końca, a temperatura w beczce
spadnie poniżej 50°C, wyłącz światło;
4: Pomiędzy czasem a temperaturą znajduje się pozioma kontrolka, która
miga powoli podczas ogrzewania i pozostaje zapalona, gdy urządzenie nie
nagrzewa się.

- 8 -
1. Naciśnij przełącznik zabezpieczenia przed dziećmi, aby otworzyć klapkę .
2. Pudełko do aromaterapii : można otworzyć i wyjąć, obracając w kierunku przeciwnym do
ruchu wskazówek zegara
zainstalować, obracając w kierunku zgodnym z ruchem wskazówek zegara.
3. Zdejmowany hak .
4.Uchwyty boczne .
5. Etui na przewód zasilający można przechowywać na dole .

- 9 -
FAILURE ANALYSIS
1. NTC to obwód otwarty. Po włączeniu ogrzewania na 1 minutę program
zostaje zablokowany, przekaźnik ogrzewania zostaje odłączony, na
ekranie pojawia się kod błędu E01, a wszystkie diody LED migają, i
przyciski nie reagują.
2. Bez ogrzewania temperatura nie zmienia się po 1 minucie od włączenia
zasilania, program zostaje zablokowany, przekaźnik ogrzewania zostaje
odłączony, na ekranie pojawia się kod błędu E02, wszystkie diody LED
migają, a przyciski nie reagują.
Środki zaradcze: Odłącz wtyczkę, skontaktuj się ze sprzedawcą, aby
wrócić do fabryki w celu naprawy.
Nie demontuj części samodzielnie.
3 . Wydajność: Na ekranie pojawia się kod błędu E02, wszystkie diody
LED migają, brak reakcji na dotyk.
Powód: Przewód nie jest podłączony. Po podgrzewaniu przez 1 minutę
temperatura nie ulega zmianie.
Środki zaradcze: Odłącz wtyczkę, skontaktuj się ze sprzedawcą, aby
wrócić do fabryki w celu naprawy.
Nie demontuj części samodzielnie.
INSTALLATION AND MOVEMENT
Obszerna komora pomieści dwa duże ręczniki kąpielowe lub jeden
kocyk osobisty. • Proste sterowanie obsługiwane jednym dotknięciem
zapewnia do 60 minut ogrzewania.
Dodaj świeży, neutralizujący zapach zapach do swoich ręczników i
koców, wkładając tabletkę do aromaterapii do uchwytu na dysk.
Izolowana pokrywa z podwójnymi ściankami utrzymuje ciepło,
pozostając jednocześnie chłodną w dotyku.

- 10 -
POLARIZED PLUG
To urządzenie posiada polaryzowaną wtyczkę (jeden bolec jest szerszy od
drugiego).
Ta wtyczka pasuje do spolaryzowanego gniazdka tylko w jeden sposób.
Jeśli wtyczka nie pasuje całkowicie do gniazdka, odwróć wtyczkę. Jeśli
nadal nie pasuje, skontaktuj się z wykwalifikowanym specjalistą
elektrykowi, aby zainstalował odpowiednie gniazdko. Nie zmieniaj wtyczki
w żaden sposób.
SET UP
1. Otwórz pokrywkę i usuń całą zawartość opakowania .
2. Umieść podgrzewacz do ręczników na suchej, równej i twardej
powierzchni.
3. Włóż wtyczkę do standardowego gniazdka.
FCC INFORMATION
OSTRZEŻENIE: Zmiany lub modyfikacje, które nie zostały wyraźnie
zatwierdzone przez stronę odpowiedzialną za zgodność, mogą unieważnić
uprawnienia użytkownika do obsługi sprzętu.
UWAGA: To urządzenie zostało przetestowane i uznane za zgodne z
ograniczeniami dla urządzeń cyfrowych klasy B, zgodnie z częścią 15
przepisów FCC. Ograniczenia te mają na celu zapewnienie rozsądnej
ochrony przed szkodliwymi zakłóceniami w instalacjach domowych. To
urządzenie generuje, wykorzystuje i może emitować energię o
częstotliwości radiowej, a jeśli nie zostanie zainstalowane i nie będzie
używane zgodnie z instrukcją, może powodować szkodliwe zakłócenia w
komunikacji radiowej. Nie ma jednak gwarancji, że w konkretnej instalacji

- 11 -
nie wystąpią zakłócenia. Jeśli to urządzenie powoduje szkodliwe
zakłócenia w odbiorze radia lub telewizji, można zastosować jeden lub
więcej z następujących środków:
• Zmień orientację lub położenie anteny odbiorczej.
• Zwiększ odległość między sprzętem a odbiornikiem.
• Podłącz urządzenie do gniazdka w innym obwodzie niż ten, do którego
podłączony jest odbiornik.
• Aby uzyskać pomoc, skonsultuj się ze sprzedawcą lub doświadczonym
technikiem radiowo-telewizyjnym.
To urządzenie jest zgodne z częścią 15 przepisów FCC. Działanie podlega
następującym dwóm warunkom:
1. To urządzenie nie może powodować szkodliwych zakłóceń.
2. To urządzenie musi akceptować wszelkie odbierane zakłócenia, w tym
zakłócenia, które mogą powodować niepożądane działanie.

- 12 -
Producent: Shanghaimuxinmuyeyouxiangongsi
Adres: Shuangchenglu 803nong11hao1602A-1609shi, baoshanqu,
szanghaj 200000 CN.
Import do Australii: SIHAO PTY LTD. 1 ROKEVA STREETEASTWOOD
NSW 2122 Australia
Import do USA: Sanven Technology Ltd. Suite 250, 9166 Anaheim Place,
Rancho Cucamonga, CA 91730
REP
EC
E-CrossStu GmbH
Mainzer Landstr.69, 60329 Frankfurt am Main.
REP
UK
YH CONSULTING LIMITED.
C/0 YH Consulting Limited Office 147, Centurion
House, London Road, Staines-upon-Thames,
Surrey, TW18 4AX


Technisch Support- und E-Garantiezertifikat
www.vevor.com/support
HANDTUCHWÄRMER-EIMER
MODELL: HSTW-12
We continue to be committed to provide you tools with competitive price.
"Save Half", "Half Price" or any other similar expressions used by us only represents an
estimate of savings you might benefit from buying certain tools with us compared to the major
top brands and does not necessarily mean to cover all categories of tools offered by us. You
are kindly reminded to verify carefully when you are placing an order with us if you are
actually saving half in comparison with the top major brands.

- 1 -
MODELL: HSTW-12
Have product questions? Need technical support? Please feel free to
contact us:
Technical Support and E-Warranty Certificate
www.vevor.com/support
NEED HELP? CONTACT US!
This is the original instruction, please read all manual instructions
carefully before operating. VEVOR reserves a clear interpretation of our
user manual. The appearance of the product shall be subject to the
product you received. Please forgive us that we won't inform you again if
there are any technology or software updates on our product.
TOWEL WARMER BUCKETS
- 2 -
Warnung: Um das Verletzungsrisiko zu verringern, muss der
Benutzer die Bedienungsanleitung sorgfältig lesen.
LESEN SIE VOR DER VERWENDUNG ALLE ANWEISUNGEN
Alle Sicherheits- und Bedienungsanleitungen sollten gelesen
werden,
vor Inbetriebnahme des Gerätes unbedingt beachtet und befolgt
werden.
Dieses Gerät entspricht Teil 15 der FCC-Bestimmungen. Der
Betrieb unterliegt den folgenden zwei Bedingungen: (1) Dieses
Gerät darf keine schädlichen Störungen verursachen und (2)
dieses Gerät muss alle empfangenen Störungen akzeptieren,
einschließlich Störungen, die einen unerwünschten Betrieb
verursachen können.
Dieses Produkt unterliegt den Bestimmungen der
europäischen Richtlinie 2012/19/EG. Das Symbol einer
durchgestrichenen Mülltonne weist darauf hin, dass das
Produkt in der Europäischen Union einer getrennten
Müllsammlung bedarf. Dies gilt für das Produkt und alle
Zubehörteile, die mit diesem Symbol gekennzeichnet sind. Als
solche gekennzeichnete Produkte dürfen nicht über den
normalen Hausmüll entsorgt werden, sondern müssen an
einer Sammelstelle für das Recycling von Elektro- und
Elektronikgeräten abgegeben werden
SAFETY & WARNINGS
WARNUNG : Um das Risiko eines Stromschlags oder schwerer
Verletzungen bei der Verwendung des Geräts zu verringern,
befolgen Sie die grundlegenden Vorsichtsmaßnahmen,
einschließlich des Lesens aller Anweisungen, bevor Sie das
Gerät verwenden.

- 3 -
Lesen Sie alle Anweisungen, bevor Sie das Gerät verwenden.
Um das Risiko von Stromschlägen, Verbrennungen, Bränden oder
Verletzungen zu verringern:
Benutzen Sie dieses Gerät nicht für andere als den vorgesehenen
Zweck.
Platzieren oder lagern Sie das Gerät nicht an einem Ort, an dem es
herunterfallen oder in eine Wanne oder ein Waschbecken gezogen
werden kann.
Nicht in Wasser oder andere Flüssigkeiten legen oder hineinfallen
lassen.
Greifen Sie nicht nach einem Gerät, das ins Wasser gefallen ist.
Ziehen Sie sofort den Netzstecker.
Es ist darauf zu achten, dass keine Gegenstände in das Gerät fallen
und keine Flüssigkeiten darauf verschüttet werden.
Wenn dieses Gerät in der Nähe von Kindern oder behinderten
Personen verwendet wird, ist eine strenge Aufsicht erforderlich.
Benutzen Sie dieses Gerät nur für den vorgesehenen Zweck, wie in
diesem Handbuch beschrieben.
Betreiben Sie dieses Gerät niemals, wenn das Kabel oder der Stecker
beschädigt ist, wenn es nicht ordnungsgemäß funktioniert oder wenn
dies der Fall war
heruntergefallen, beschädigt oder ins Wasser gefallen ist.
Halten Sie Kabel von heißen Oberflächen fern. Wickeln Sie das Kabel
nicht um die Außenseite des Geräts und lassen Sie es nicht
das Kabel hängt über die Tisch- oder Thekenkante.
Nicht im Freien verwenden.
Verändern Sie den Schutzkontaktstecker nicht und verwenden Sie bei
diesem Gerät kein Verlängerungskabel.
Nicht mit Spannungswandler betreiben.
Berühren Sie keine heißen Oberflächen.
Verwenden Sie kein Zubehör, das vom Hersteller nicht empfohlen wird,
da dies zu Verletzungen führen kann.
- 4 -
PRODUCT PARAMETER
Modell
HSTW-12
Bezirk
Nordamerika
Europa
Australien
Stromspannung
Wechselstrom 1 2
0 V 60 Hz
Wechselstrom 2 3 0 V 50 /
60HZ
Watt
4 50 W (+5 % ~
-10 % )
4,00 W (+5 % ~ -10 % )
Kapazität
20 Liter
Nettogewicht
4,2 kg
Produktgröße
320 x 320 x 470 mm
PACKING LIST
NEI
N.
ZUBEHÖRNAME
MENGE
1
Handtuchwärmer-Eimer
1 Stk
2
Haken
4 Stück
3
Benutzerhandbuch
1 Stk
INSTRUCTION
- 5 -
1. TASTENSTEUERUNG
1.1 Schalterknopf: Handtucheimer öffnen und schließen
1.2 Zeittaste: Heizzeit auswählen
1.3 Verzögerungstaste: Auswahl der Verzögerungszeit
2. VERZÖGERTE HEIZFUNKTION
1. Schalten Sie die Maschine ein und drücken Sie die Verzögerungstaste,
um in den Verzögerungszeitmodus zu gelangen. Drücken Sie die
Verzögerungstaste, um die Verzögerungszeit in Schritten von 30 Minuten
bis zu einem Maximum von 24 Stunden anzupassen.
2. Wenn die Verzögerungstaste gedrückt wird, blinkt das runde LED-Licht
über der Taste.
3. Wenn Sie jederzeit die Taste „Verzögerungsreservierung“ drücken, wird
zuerst die Reservierungszeit ausgeführt und dann wird geheizt.
4. Nachdem die Heizarbeiten abgeschlossen sind, setzen Sie die
Verzögerungszeit zurück und rufen Sie den Verzögerungsheizmodus
erneut auf.
5. Betätigen Sie während des Aufheizvorgangs die Verzögerungsfunktion,
führen Sie zuerst die Verzögerung aus und heizen Sie dann erneut auf.
6. Wenn Sie gedrückt halten, ohne loszulassen, ändert sich die
Reservierungszeit 2-3 Mal pro Sekunde.
Die Zeit des ersten langen Drückens wird akkumuliert, und die Zeit des
langen Drückens wird durch erneutes Loslassen des Zeigers verkürzt, und

- 6 -
die Zeit wird erneut akkumuliert usw.
3. HEIZ-COUNTDOWN-FUNKTION
1. Nach Ablauf der Verzögerungszeit gemäß der eingestellten Heizzeit
oder den standardmäßigen 20 Minuten erhitzen;
2. Drücken Sie die Zeittaste, um in den Heizzeit-Einstellmodus zu
gelangen. Drücken Sie die Zeittaste, um die Verzögerungszeit in Schritten
von 20 Minuten, maximal 1 Stunde, einzustellen. Schrittauswahl 20-40-60 .
3. Wenn die Zeittaste gedrückt wird, blinkt das runde LED-Licht über der
Taste. Nach 5 Sekunden Blinken ohne Betätigung wird die Option
bestätigt.
4. Betätigen Sie während des Heizvorgangs die Zeittaste, um die Heizzeit
zurückzusetzen.
5. Zu jeder Betriebszeit leuchtet die LED entsprechend der Uhrzeit auf.
6. Erhöhen Sie nach Beginn des Erhitzens die Temperatur in den ersten 20
Minuten auf 266 °F und halten Sie die Temperatur bei 215-266 °F.
7. Wenn der Timer mehr als 20 Minuten beträgt, wechselt er nach mehr als
20 Minuten in den Wärmeerhaltungszustand und hält die Temperatur bei
180–215 °F, bis der Timer abläuft.
4. BEDIENUNG DER EIN/AUS-TASTE
1. Nach dem Einschalten leuchten alle LEDs für den 3S-Selbsttest auf .
2. Drücken Sie im Standby-Modus den Netzschalter, um die CPU und den
LED-Bildschirm zu aktivieren blinkt und wartet auf Eingabeanweisungen.
Mit Ausnahme des restlichen Standby-Zustands drücken Sie die
Ein-/Aus-Taste und das Programm erkennt zunächst die Temperatur. Wenn
die Temperatur mehr als 60° beträgt, wird die Echtzeittemperatur angezeigt.
Wenn der Winkel weniger als 60° beträgt, schaltet sich der Bildschirm aus
und wechselt in den Standby-Modus.
5. Temperaturanzeige
- 7 -
Nach dem Drücken der Power-Taste wird die Temperatur in Fahrenheit (℉)
angezeigt.
6. Betriebs-LED-Anzeige
1: Wenn das Produkt eingeschaltet ist und die Temperatur der
Handtucheimerwand unter 60 °C liegt, erscheint das grüne Licht;
2: Wenn die Temperatur an der Wand des Handtucheimers mehr als 60 °C
beträgt, leuchtet das rote Licht auf;
3: Wenn die Aufheizzeit abgelaufen ist und die Temperatur im Fass unter
50 °C liegt, schalten Sie das Licht aus;
4: Zwischen Zeit und Temperatur befindet sich ein horizontales Licht, das
beim Erhitzen langsam blinkt und eingeschaltet bleibt, wenn nicht erhitzt
wird.
- 8 -
1. Drücken Sie den Kindersicherungsschalter, um die Klappabdeckung zu öffnen .
2.Aromatherapie-Box : kann durch Drehen gegen den Uhrzeigersinn geöffnet und entfernt
werden
durch Drehen im Uhrzeigersinn montiert werden.
3. Abnehmbarer Haken .
4. Seitliche Griffe .
5. Das Netzkabelgehäuse kann unten verstaut werden .

- 9 -
FAILURE ANALYSIS
1. Der NTC ist offen. Nach 1-minütigem Einschalten der Heizung wird das
Programm gesperrt, das Heizungsrelais wird abgeschaltet, der Fehlercode
E01 wird auf dem Bildschirm angezeigt und alle LEDs blinken, und die
Tasten reagieren nicht.
2. Ohne Heizung ändert sich die Temperatur nach 1 Minute Einschalten
nicht, das Programm ist gesperrt, das Heizrelais ist getrennt, der
Fehlercode E02 wird auf dem Bildschirm angezeigt, alle LEDs blinken und
die Tasten reagieren nicht.
Maßnahmen: Ziehen Sie den Stecker ab, wenden Sie sich an den Händler
und schicken Sie ihn zur Reparatur ins Werk.
Zerlegen Sie Teile nicht selbst.
3 . Leistung: Der Bildschirm zeigt den Fehlercode E02 an und alle LEDs
blinken, keine Reaktion auf Berührung.
Grund: Das Kabel ist nicht angeschlossen. Nach 1 Minute Erhitzen ändert
sich die Temperatur nicht.
Maßnahmen: Ziehen Sie den Stecker ab, wenden Sie sich an den Händler
und schicken Sie ihn zur Reparatur ins Werk.
Zerlegen Sie Teile nicht selbst.
INSTALLATION AND MOVEMENT
Der großzügige Hohlraum bietet Platz für zwei große Badetücher oder
eine persönliche Überwurfdecke. •Die einfache
Single-Touch-Steuerung sorgt für eine Aufwärmzeit von bis zu 60
Minuten.
Verleihen Sie Ihren Handtüchern und Decken einen frischen,
geruchsneutralisierenden Duft, indem Sie die Aromatherapie-Tablette
in den Scheibenhalter einsetzen.
Der doppelwandige, isolierte Deckel hält die Wärme drinnen und bleibt

- 10 -
gleichzeitig kühl.
POLARIZED PLUG
Dieses Gerät verfügt über einen polarisierten Stecker (ein Stecker ist
breiter als der andere).
Dieser Stecker passt nur in einer Richtung in eine polarisierte Steckdose.
Wenn Der Stecker passt nicht vollständig in die Steckdose. Drehen Sie
den Stecker um. Wenn es immer noch nicht passt, wenden Sie sich an
einen Fachmann Bitten Sie einen Elektriker, die richtige Steckdose zu
installieren. Verändern Sie den Stecker in keiner Weise.
SET UP
1. Öffnen Sie den Deckel und entnehmen Sie sämtlichen
Verpackungsinhalt .
2. Stellen Sie den Handtuchwärmer auf eine trockene, ebene und harte
Oberfläche.
3. Stecken Sie den Stecker in eine Standardsteckdose.
FCC INFORMATION
WARNUNG: Änderungen oder Modifikationen, die nicht ausdrücklich von
der für die Einhaltung verantwortlichen Partei genehmigt wurden, können
zum Erlöschen der Berechtigung des Benutzers zum Betrieb des Geräts
führen.
HINWEIS: Dieses Gerät wurde getestet und entspricht den Grenzwerten
für ein digitales Gerät der Klasse B gemäß Teil 15 der FCC-Bestimmungen.
Diese Grenzwerte sollen einen angemessenen Schutz vor schädlichen
Störungen in einer Wohnanlage bieten. Dieses Gerät erzeugt und
verwendet Hochfrequenzenergie und kann diese ausstrahlen. Wenn es

- 11 -
nicht gemäß den Anweisungen installiert und verwendet wird, kann es
schädliche Störungen der Funkkommunikation verursachen. Es gibt
jedoch keine Garantie dafür, dass bei einer bestimmten Installation keine
Störungen auftreten. Wenn dieses Gerät schädliche Störungen beim
Radio- oder Fernsehempfang verursacht, kann dies eine oder mehrere der
folgenden Maßnahmen sein:
• Richten Sie die Empfangsantenne neu aus oder platzieren Sie sie neu.
• Erhöhen Sie den Abstand zwischen Gerät und Empfänger.
• Schließen Sie das Gerät an eine Steckdose an, die zu einem anderen
Stromkreis gehört als der, an den der Empfänger angeschlossen ist.
• Bitten Sie Ihren Händler oder einen erfahrenen Radio-/TV-Techniker
um Hilfe.
Dieses Gerät entspricht Teil 15 der FCC-Bestimmungen. Der Betrieb
unterliegt den folgenden zwei Bedingungen:
1. Dieses Gerät darf keine schädlichen Störungen verursachen.
2. Dieses Gerät muss alle empfangenen Störungen akzeptieren,
einschließlich Störungen, die einen unerwünschten Betrieb verursachen
können.

- 12 -
Hersteller: Shanghaimuxinmuyeyouxiangongsi
Adresse: Shuangchenglu 803nong11hao1602A-1609shi, baoshanqu,
Shanghai 200000 CN.
Importiert nach AUS: SIHAO PTY LTD. 1 ROKEVA STREETEASTWOOD
NSW 2122 Australien
In die USA importiert: Sanven Technology Ltd. Suite 250, 9166 Anaheim
Place, Rancho Cucamonga, CA 91730
REP
EC
E-CrossStu GmbH
Mainzer Landstr.69, 60329 Frankfurt am Main.
REP
UK
YH CONSULTING LIMITED.
C/0 YH Consulting Limited Office 147, Centurion
House, London Road, Staines-upon-Thames,
Surrey, TW18 4AX


Technique Assistance et certificat de garantie électronique
www.vevor.com/support
SEAUX CHAUFFE-SERVIETTES
MODÈLE : HSTW-12
We continue to be committed to provide you tools with competitive price.
"Save Half", "Half Price" or any other similar expressions used by us only represents an
estimate of savings you might benefit from buying certain tools with us compared to the major
top brands and does not necessarily mean to cover all categories of tools offered by us. You
are kindly reminded to verify carefully when you are placing an order with us if you are
actually saving half in comparison with the top major brands.

- 1 -
MODÈLE : HSTW-12
Have product questions? Need technical support? Please feel free to
contact us:
Technical Support and E-Warranty Certificate
www.vevor.com/support
NEED HELP? CONTACT US!
This is the original instruction, please read all manual instructions
carefully before operating. VEVOR reserves a clear interpretation of our
user manual. The appearance of the product shall be subject to the
product you received. Please forgive us that we won't inform you again if
there are any technology or software updates on our product.
TOWEL WARMER BUCKETS
- 2 -
Avertissement - Pour réduire le risque de blessure, l'utilisateur
doit lire attentivement le manuel d'instructions.
LIRE TOUTES LES INSTRUCTIONS AVANT UTILISATION
Toutes les instructions de sécurité et d'utilisation doivent être
lues,
respectées et suivies avant la mise en service de l'appareil.
Cet appareil est conforme à la partie 15 des règles FCC. Son
fonctionnement est soumis aux deux conditions suivantes : (1)
cet appareil ne doit pas provoquer d'interférences nuisibles et
(2) cet appareil doit accepter toute interférence reçue, y
compris les interférences susceptibles de provoquer un
fonctionnement indésirable.
Ce produit est soumis aux dispositions de la directive
européenne 2012/19/CE. Le symbole représentant une
poubelle barrée indique que le produit nécessite une collecte
sélective des déchets dans l'Union européenne. Ceci
s'applique au produit et à tous les accessoires marqués de ce
symbole. Les produits marqués comme tels ne peuvent pas
être jetés avec les ordures ménagères normales, mais doivent
être déposés dans un point de collecte pour le recyclage des
appareils électriques et électroniques.
SAFETY & WARNINGS
AVERTISSEMENT : Pour réduire le risque de choc électrique ou
de blessures graves lors de l'utilisation de l'appareil, suivez les
précautions de base, y compris la lecture de toutes les
instructions avant d'utiliser l'appareil.
Lisez toutes les instructions avant d'utiliser l'appareil.
Pour réduire le risque de choc électrique, de brûlure, d'incendie ou de

- 3 -
blessure :
N'utilisez pas cet appareil pour autre chose que l'usage auquel il est
destiné.
Ne placez pas et ne rangez pas l'appareil là où il pourrait tomber ou
être tiré dans une baignoire ou un évier.
Ne pas placer ni laisser tomber dans l'eau ou tout autre liquide.
N'atteignez pas un appareil tombé dans l'eau. Débranchez-le
immédiatement.
Des précautions doivent être prises pour qu'aucun objet ne tombe et
que des liquides ne soient renversés sur l'appareil.
Une surveillance étroite est nécessaire lorsque cet appareil est utilisé
à proximité d'enfants ou de personnes handicapées.
Utilisez cet appareil uniquement pour l'usage auquel il est destiné,
comme décrit dans ce manuel.
N'utilisez jamais cet appareil si son cordon ou sa fiche est endommagé,
s'il ne fonctionne pas correctement ou s'il a été
tombé, endommagé ou tombé dans l'eau.
Gardez les cordons éloignés des surfaces chauffées. N'enroulez pas
le cordon autour de l'extérieur de l'appareil et ne le laissez pas
le cordon pend au-dessus de la table ou du bord du comptoir.
Ne pas utiliser à l'extérieur.
Ne modifiez pas la fiche de sécurité et n'utilisez pas de rallonge avec
cet appareil.
Ne pas utiliser avec un convertisseur de tension.
Ne touchez pas les surfaces chaudes.
N'utilisez pas d'accessoires non recommandés par le fabricant car
cela pourrait provoquer des blessures.
- 4 -
PRODUCT PARAMETER
Modèle
HSTW-12
District
Amérique du Nord
L'Europe
Australie
Tension
CA 1 2 0V 60Hz
CA 2 3 0V 50/60 Hz
Puissance
4 50 W (+5% ~
-10% )
4 00 W (+5% ~ -10% )
Capacité
20L
Poids net
4,2 kg
Taille du
produit
320*320*470mm
PACKING LIST
NO
N.
NOM DE L'ACCESSOIRE
QUANTITÉ
1
Seaux chauffe-serviettes
1 pc
2
Crochet
4 pièces
3
Manuel de l'Utilisateur
1 pc
INSTRUCTION
1. BOUTON DE COMMANDE

- 5 -
1.1 Bouton interrupteur : ouvrir et fermer le seau à serviettes
1.2 Touche Temps : sélectionner le temps de synchronisation du chauffage
1.3 Touche Delay : sélection du temps de retard
2. FONCTION DE CHAUFFAGE RETARDÉE
1. En allumant la machine, appuyez sur le bouton de retard pour accéder
au mode de synchronisation de retard. Appuyez sur le bouton de retard
pour régler le délai par étapes de 30 minutes, jusqu'à un maximum de 24
heures.
2. Lorsque vous appuyez sur le bouton de retard, la lumière ronde LED
au-dessus du bouton clignote.
3. À tout moment, si vous appuyez sur le bouton de réservation différée, le
temps de réservation sera exécuté en premier, puis le chauffage sera
effectué.
4. Une fois les travaux de chauffage terminés, réinitialisez le temps de
retard et revenez en mode de chauffage différé.
5. Pendant le processus de chauffage, utilisez la fonction de retard,
exécutez d'abord le retard, puis réchauffez.
6. Lorsque vous appuyez et maintenez sans lâcher prise, le temps de
réservation changera 2 à 3 fois/s.
Le temps de la première pression longue sera accumulé, et le temps de la
pression longue sera diminué en relâchant à nouveau la main, et le temps
sera à nouveau accumulé, etc.
3. FONCTION COMPTE À REBOURS DE CHAUFFAGE
1. Une fois le délai écoulé, chauffez selon le temps de chauffage réglé ou
les 20 minutes par défaut ;
2. Appuyez sur la touche time pour accéder au mode de réglage du temps
de chauffage. Appuyez sur la touche time pour régler le délai par pas de 20
minutes, avec un maximum de 1H. Sélection des étapes 20-40-60 .
3. Lorsque vous appuyez sur le bouton de temps, la lumière ronde LED

- 6 -
au-dessus du bouton clignote. Après un clignotement de 5 secondes sans
aucune opération, l'option est confirmée.
4. Pendant le processus de chauffage, appuyez sur la touche temps pour
réinitialiser le temps de chauffage.
5. A chaque heure de fonctionnement, la LED s'allume en fonction de
l'heure.
6. Après avoir commencé le chauffage, augmentez la température à
266 °F pendant les 20 premières minutes et maintenez la température
entre 215 et 266 °F.
7. Si la minuterie dure plus de 20 minutes, après plus de 20 minutes, elle
entrera dans l'état de conservation de la chaleur et maintiendra la
température à 180-215 °F jusqu'à l'expiration de la minuterie.
4. FONCTIONNEMENT DE LA TOUCHE MARCHE/ARRÊT
1. Après la mise sous tension, allumez toutes les LED pour un auto-test
3S .
2. En mode veille, appuyez sur le bouton d'alimentation pour réveiller le
processeur et l'écran LED. clignote en attendant les instructions de saisie.
Sauf pour le reste de l'état de veille, appuyez sur le bouton d'alimentation
et le programme détectera d'abord la température. Lorsque la température
est supérieure à 60°, la température en temps réel sera affichée. Lorsqu'il
est inférieur à 60°, l'écran s'éteint et passe en veille.
5. Affichage de la température
Après avoir appuyé sur le bouton d'alimentation, la température s'affiche
en Fahrenheit(℉)

- 7 -
6. Indication LED de fonctionnement
1 : Lorsque le produit est allumé et que la température de la paroi du seau
à serviettes est inférieure à 60°, le voyant vert apparaît ;
2 : Si la température de la paroi du seau à serviettes est supérieure à 60°,
le voyant rouge s'allumera ;
3 : Lorsque le temps de chauffage est terminé et que la température dans
le fût est inférieure à 50°C, éteignez la lumière ;
4 : Il y a une lumière horizontale entre l'heure et la température, qui
clignote lentement lors du chauffage et reste allumée lorsqu'il ne chauffe
pas.
- 8 -
1.Appuyez sur l'interrupteur de sécurité enfant pour ouvrir le couvercle rabattable .
2. Boîte d'aromathérapie : peut être ouverte et retirée en tournant dans le sens inverse des
aiguilles d'une montre, et
installé en tournant dans le sens des aiguilles d’une montre.
3. Crochet amovible .
4. Poignées latérales .
5. Le boîtier du cordon d'alimentation peut être rangé en bas .

- 9 -
FAILURE ANALYSIS
1. Le NTC est en circuit ouvert. Après avoir allumé le chauffage pendant 1
minute, le programme est verrouillé, le relais de chauffage est déconnecté,
le code défaut E01 s'affiche sur l'écran, et toutes les LED clignotent, et les
boutons ne répondent pas.
2. Sans chauffage, la température ne change pas après 1 minute de mise
sous tension, le programme est verrouillé, le relais de chauffage est
déconnecté, le code défaut E02 s'affiche à l'écran, et toutes les LED
clignotent, et les boutons ne répondent pas.
Mesures : Débranchez la fiche, contactez le revendeur pour le retourner à
l'usine pour réparation.
Ne démontez pas les pièces vous-même.
3 . Performances : l'écran affiche le code d'erreur E02 et toutes les LED
clignotent, aucune réponse au toucher.
Raison : Le fil n’est pas connecté. Après 1 minute de chauffage, la
température ne change pas.
Mesures : Débranchez la fiche, contactez le revendeur pour le retourner à
l'usine pour réparation.
Ne démontez pas les pièces vous-même.
INSTALLATION AND MOVEMENT
La cavité généreuse a la capacité de contenir deux grandes serviettes
de bain ou une couverture personnelle. •Les commandes simples à
une seule touche vous offrent jusqu'à 60 minutes de réchauffement.
Ajoutez un parfum frais et neutralisant les odeurs à vos serviettes et
couvertures en insérant la tablette d'aromathérapie dans le support de
disque.
Le couvercle isolé à double paroi conserve la chaleur tout en restant
frais au toucher.

Technisch Ondersteuning en e-garantiecertificaat
www.vevor.com/support
HANDDOEKVERWARMER-EMMERS
MODEL: HSTW-12
We continue to be committed to provide you tools with competitive price.
"Save Half", "Half Price" or any other similar expressions used by us only represents an
estimate of savings you might benefit from buying certain tools with us compared to the major
top brands and does not necessarily mean to cover all categories of tools offered by us. You
are kindly reminded to verify carefully when you are placing an order with us if you are
actually saving half in comparison with the top major brands.

- 1 -
MODEL: HSTW-12
Have product questions? Need technical support? Please feel free to
contact us:
Technical Support and E-Warranty Certificate
www.vevor.com/support
NEED HELP? CONTACT US!
This is the original instruction, please read all manual instructions
carefully before operating. VEVOR reserves a clear interpretation of our
user manual. The appearance of the product shall be subject to the
product you received. Please forgive us that we won't inform you again if
there are any technology or software updates on our product.
TOWEL WARMER BUCKETS

- 2 -
Waarschuwing-Om het risico op letsel te verminderen, moet
de gebruiker de gebruiksaanwijzing zorgvuldig lezen.
LEES ALLE INSTRUCTIES VOOR GEBRUIK
Alle veiligheids- en bedieningsinstructies moeten worden
gelezen,
nageleefd en gevolgd voordat het apparaat in gebruik wordt
genomen.
Dit apparaat voldoet aan Deel 15 van de FCC-regels. Het
gebruik is onderworpen aan de volgende twee
voorwaarden:(1) Dit apparaat mag geen schadelijke
interferentie veroorzaken, en (2) dit apparaat moet alle
ontvangen interferentie accepteren, inclusief interferentie die
een ongewenste werking kan veroorzaken.
Dit product valt onder de bepalingen van de Europese richtlijn
2012/19/EG. Het symbool met een doorgestreepte
afvalcontainer geeft aan dat het product in de Europese Unie
een aparte afvalinzameling vereist. Dit geldt voor het product
en alle accessoires die met dit symbool zijn gemarkeerd.
Producten die als zodanig gemarkeerd zijn, mogen niet bij het
normale huisvuil worden weggegooid, maar moeten naar een
inzamelpunt voor recycling van elektrische en elektronische
apparaten worden gebracht
SAFETY & WARNINGS
WAARSCHUWING : Om het risico op een elektrische schok of
ernstig letsel bij personen tijdens het gebruik van het apparaat te
verminderen, dient u de basisvoorzorgsmaatregelen te volgen,
inclusief de Lees alle instructies voordat u het apparaat gebruikt.
Lees alle instructies voordat u het apparaat gebruikt.

- 3 -
Om het risico op een elektrische schok, brandwonden, brand of letsel
te verminderen:
Gebruik dit apparaat niet voor iets anders dan waarvoor het bedoeld
is.
Plaats of bewaar het apparaat niet op een plek waar het kan vallen of
in een badkuip of gootsteen kan worden getrokken.
Niet in water of een andere vloeistof plaatsen of laten vallen.
Reik niet naar een apparaat dat in het water is gevallen. Haal de
stekker onmiddellijk uit het stopcontact.
Er moet op worden gelet dat er geen voorwerpen in vallen en dat er
geen vloeistoffen op het apparaat worden gemorst.
Strikt toezicht is noodzakelijk als dit apparaat in de buurt van kinderen
of gehandicapten wordt gebruikt.
Gebruik dit apparaat alleen voor het beoogde gebruik, zoals
beschreven in deze handleiding.
Gebruik dit apparaat nooit als het snoer of de stekker beschadigd is,
als het niet goed werkt of als dat al zo is geweest
gevallen, beschadigd of in water gevallen.
Houd snoeren uit de buurt van verwarmde oppervlakken. Wikkel het
snoer niet rond de buitenkant van het apparaat en laat het niet los
het snoer hangt over tafel of aanrechtrand.
Niet buitenshuis gebruiken.
Wijzig de veiligheidsstekker niet en gebruik geen verlengsnoer bij dit
apparaat.
Niet gebruiken met een spanningsomvormer.
Raak hete oppervlakken niet aan.
Gebruik geen accessoires die niet door de fabrikant worden
aanbevolen, aangezien dit letsel kan veroorzaken.
- 4 -
PRODUCT PARAMETER
Model
HSTW-12
Wijk
Noord Amerika
Europa
Australië
Spanning
Wisselstroom 1 2
0V 60 Hz
Wisselstroom 2 3 0V 50/60 Hz
Wattage
4 50 W (+5% ~
-10% )
4 00 W (+5% ~ -10% )
Capaciteit
20L
Netto gewicht
4,2 kg
Product
grootte
320*320*470mm
PACKING LIST
NEE
.
ACCESSOIRE NAAM
HOEVEELHEID
1
Handdoekverwarmer-emmers
1 st
2
Haak
4 stuks
3
Handleiding
1 st
INSTRUCTION

- 5 -
1. KNOPBEDIENING
1.1 Schakelknop: open en sluit de handdoekemmer
1.2 Tijdtoets: selecteer de verwarmingstijd
1.3 Vertragingstoets: Selectie van de vertragingstijd
2. VERTRAGDE VERWARMINGSFUNCTIE
1. Schakel de machine in en druk op de vertragingsknop om naar de
vertragingstijdmodus te gaan. Druk op de vertragingsknop om de
vertragingstijd in stappen van 30 minuten aan te passen, tot maximaal 24
uur.
2. Wanneer de vertragingsknop wordt ingedrukt, knippert het ronde
LED-lampje boven de knop.
3. Als u op de knop Vertragingsreservering drukt, wordt op elk moment
eerst de reserveringstijd uitgevoerd en vervolgens de verwarming.
4. Nadat de verwarmingswerkzaamheden zijn voltooid, stelt u de
vertragingstijd opnieuw in en gaat u opnieuw naar de vertraagde
verwarmingsmodus.
5. Bedien tijdens het opwarmproces de vertragingsfunctie, voer eerst de
vertraging uit en verwarm vervolgens opnieuw.
6. Als u ingedrukt houdt zonder los te laten, verandert de reserveringstijd
2-3 keer per seconde.
De tijd van de eerste keer lang indrukken wordt opgeteld, en de tijd van
lang indrukken wordt verkort door de hand weer los te laten, en de tijd
wordt weer opgeteld, enz.
3. AFTELFUNCTIE VERWARMING
1. Nadat de vertragingstijd voorbij is, verwarmt u volgens de ingestelde
verwarmingstijd of de standaard 20 minuten;
2. Druk op de tijdtoets om naar de instelmodus voor de verwarmingstijd te
gaan. Druk op de tijdtoets om de vertragingstijd in stappen van 20 minuten
aan te passen, met een maximum van 1 uur. Stapselectie 20-40-60 .

- 6 -
3. Wanneer de tijdknop wordt ingedrukt, knippert het ronde LED-lampje
boven de knop. Na 5 seconden knipperen zonder enige handeling is de
optie bevestigd.
4. Bedien tijdens het opwarmproces de tijdtoets om de opwarmtijd te
resetten.
5. Bij elke bedieningstijd licht de LED op overeenkomstig de tijd.
6. Nadat u met het verwarmen bent begonnen, verhoogt u de temperatuur
gedurende de eerste 20 minuten tot 266 °F en houdt u de temperatuur op
215-266 °F.
7. Als de timer langer dan 20 minuten duurt, zal deze na meer dan 20
minuten in de hittebehoudstatus gaan en de temperatuur op 180-215 °F
houden totdat de timer afloopt.
4. AAN/UIT-TOETSBEDIENING
1. Nadat het apparaat is ingeschakeld, lichten alle LED's op voor een
3S-zelftest .
2. Druk in de stand-bymodus op de aan/uit-knop om de CPU en het
LED-scherm te activeren knippert terwijl er op invoerinstructies wordt
gewacht.
Met uitzondering van de rest van de standby-status, drukt u op de
aan/uit-knop en het programma zal eerst de temperatuur detecteren.
Wanneer de temperatuur hoger is dan 60°, wordt de realtime temperatuur
weergegeven. Wanneer deze lager is dan 60°, wordt het scherm
uitgeschakeld en in stand-by gezet.
5. Temperatuurweergave
Nadat u op de aan/uit-knop hebt gedrukt, wordt de temperatuur
weergegeven in Fahrenheit(℉)

- 7 -
6. Werkende LED-indicatie
1: Wanneer het product is ingeschakeld en de temperatuur van de
handdoekemmerwand lager is dan 60°, verschijnt het groene lampje;
2: Als de temperatuur van de handdoekemmerwand hoger is dan 60°, gaat
het rode lampje branden;
3: Als de verwarmingstijd voorbij is en de temperatuur in het vat lager is
dan 50°C, doe dan het licht uit;
4: Er zit een horizontaal lampje tussen de tijd en de temperatuur, dat
langzaam knippert bij het verwarmen en blijft branden als het niet wordt
verwarmd.
- 8 -
1. Druk op de kinderslotschakelaar om de klep te openen .
2. Aromatherapiedoos : kan worden geopend en verwijderd door tegen de klok in te draaien,
en
geïnstalleerd door met de klok mee te draaien.
3. Afneembare haak .
4. Zijhandgrepen .
5. De behuizing van het netsnoer kan onderaan worden opgeborgen .

- 9 -
FAILURE ANALYSIS
1. De NTC is een open circuit. Nadat de verwarming gedurende 1 minuut is
ingeschakeld, wordt het programma vergrendeld, wordt het
verwarmingsrelais losgekoppeld, wordt de foutcode E01 op het scherm
weergegeven en knipperen alle LED's, en de knoppen reageren niet.
2. Zonder verwarming verandert de temperatuur niet na 1 minuut
inschakelen, is het programma vergrendeld, is het verwarmingsrelais
losgekoppeld, wordt de foutcode E02 op het scherm weergegeven en
knipperen alle LED's en reageren de knoppen niet.
Maatregelen: Trek de stekker uit het stopcontact, neem contact op met de
dealer om voor reparatie naar de fabriek terug te keren.
Demonteer de onderdelen niet zelf.
3 . Prestaties: Het scherm geeft foutcode E02 weer en alle LED's
knipperen, geen reactie op aanraking.
Reden: De draad is niet aangesloten. Na 1 minuut verwarmen verandert
de temperatuur niet.
Maatregelen: Trek de stekker uit het stopcontact, neem contact op met de
dealer om voor reparatie naar de fabriek terug te keren.
Demonteer de onderdelen niet zelf.
INSTALLATION AND MOVEMENT
De royale holte biedt ruimte voor twee grote badhanddoeken of een
persoonlijke deken. •De eenvoudige bediening met één druk op de
knop zorgt voor maximaal 60 minuten opwarming.
Voeg een frisse, geurneutraliserende geur toe aan uw handdoeken en
dekens door de aromatherapietablet in de schijfhouder te plaatsen.
Het dubbelwandige geïsoleerde deksel houdt de warmte binnen en
blijft koel aanvoelen.

- 10 -
POLARIZED PLUG
Dit apparaat heeft een gepolariseerde stekker (de ene pen is breder dan
de andere).
Deze stekker past slechts op één manier in een gepolariseerd stopcontact.
Als de stekker past niet volledig in het stopcontact, draai de stekker om.
Als het nog steeds niet past, neem dan contact op met een gekwalificeerde
elektricien om het juiste stopcontact te installeren. Verander de stekker op
geen enkele manier.
SET UP
1. Open het deksel en verwijder eventuele verpakkingsinhoud .
2. Plaats de Handdoekverwarmer op een droge, vlakke, harde
ondergrond.
3. Steek de stekker in een standaard stopcontact.
FCC INFORMATION
WAARSCHUWING: Wijzigingen of aanpassingen die niet uitdrukkelijk zijn
goedgekeurd door de partij die verantwoordelijk is voor naleving kunnen de
bevoegdheid van de gebruiker om de apparatuur te bedienen ongeldig
maken.
OPMERKING: Deze apparatuur is getest en voldoet aan de limieten voor
een digitaal apparaat van Klasse B, overeenkomstig Deel 15 van de
FCC-regels. Deze limieten zijn bedoeld om redelijke bescherming te
bieden tegen schadelijke interferentie in een residentiële installatie. Dit
apparaat genereert, gebruikt en kan radiofrequentie-energie uitstralen en
kan, als het niet volgens de instructies wordt geïnstalleerd en gebruikt,
schadelijke interferentie aan radiocommunicatie veroorzaken. Er is echter

- 11 -
geen garantie dat er geen interferentie zal optreden in een bepaalde
installatie. Als deze apparatuur schadelijke interferentie veroorzaakt aan
radio- of televisieontvangst, kan dit een of meer van de volgende
maatregelen zijn:
• Heroriënteer of verplaats de ontvangstantenne.
• Vergroot de afstand tussen de apparatuur en de ontvanger.
• Sluit de apparatuur aan op een stopcontact op een ander circuit dan
dat waarop de ontvanger is aangesloten.
• Raadpleeg de dealer of een ervaren radio-/tv-technicus voor hulp.
Dit apparaat voldoet aan Deel 15 van de FCC-regels. De werking is
onderworpen aan de volgende twee voorwaarden:
1. Dit apparaat mag geen schadelijke interferentie veroorzaken.
2. Dit apparaat moet alle ontvangen interferentie accepteren, inclusief
interferentie die een ongewenste werking kan veroorzaken.

- 12 -
Fabrikant: Shanghaimuxinmuyeyouxiangongsi
Adres: Shuangchenglu 803nong11hao1602A-1609shi, baoshanqu,
shanghai 200000 CN.
Geïmporteerd naar AUS: SIHAO PTY LTD. 1 ROKEVA
STREETEASTWOOD NSW 2122 Australië
Geïmporteerd naar de VS: Sanven Technology Ltd. Suite 250, 9166
Anaheim Place, Rancho Cucamonga, CA 91730
REP
EC
E-CrossStu GmbH
Mainzer Landstr.69, 60329 Frankfurt am Main.
REP
UK
YH CONSULTING LIMITED.
C/0 YH Consulting Limited Office 147, Centurion
House, London Road, Staines-upon-Thames,
Surrey, TW18 4AX


Teknisk Support och e-garanticertifikat
www.vevor.com/support
HANDDUKSVÄRMARE HINKAR
MODELL: HSTW-12
We continue to be committed to provide you tools with competitive price.
"Save Half", "Half Price" or any other similar expressions used by us only represents an
estimate of savings you might benefit from buying certain tools with us compared to the major
top brands and does not necessarily mean to cover all categories of tools offered by us. You
are kindly reminded to verify carefully when you are placing an order with us if you are
actually saving half in comparison with the top major brands.

- 1 -
MODELL: HSTW-12
Have product questions? Need technical support? Please feel free to
contact us:
Technical Support and E-Warranty Certificate
www.vevor.com/support
NEED HELP? CONTACT US!
This is the original instruction, please read all manual instructions
carefully before operating. VEVOR reserves a clear interpretation of our
user manual. The appearance of the product shall be subject to the
product you received. Please forgive us that we won't inform you again if
there are any technology or software updates on our product.
TOWEL WARMER BUCKETS

- 2 -
Varning - För att minska risken för skada måste användaren
läsa bruksanvisningen noggrant.
LÄS ALLA INSTRUKTIONER INNAN ANVÄNDNING
Alla säkerhets- och bruksanvisningar bör läsas,
följs och följs innan enheten tas i drift.
Denna enhet uppfyller del 15 av FCC-reglerna. Driften är
föremål för följande två villkor: (1) Denna enhet får inte orsaka
skadliga störningar, och (2) denna enhet måste acceptera alla
mottagna störningar, inklusive störningar som kan orsaka
oönskad funktion.
Denna produkt omfattas av bestämmelserna i det europeiska
direktivet 2012/19/EC. Symbolen som visar en soptunna
korsad anger att produkten kräver separat sophämtning i EU.
Detta gäller för produkten och alla tillbehör märkta med denna
symbol. Produkter märkta som sådana får inte slängas
tillsammans med vanligt hushållsavfall, utan måste lämnas till
en insamlingsplats för återvinning av elektriska och
elektroniska apparater
SAFETY & WARNINGS
VARNING : För att minska risken för elektriska stötar eller
allvarliga personskador när du använder apparaten, följ
grundläggande försiktighetsåtgärder inklusive Läs alla
instruktioner innan du använder apparaten.
Läs alla instruktioner innan du använder apparaten.
För att minska risken för elektriska stötar, brännskador, brand eller
skada:
Använd inte denna apparat för något annat än dess avsedda
användning.

- 3 -
Placera eller förvara inte enheten där den kan falla eller dras ner i ett
badkar eller handfat.
Lägg inte i eller släpp i vatten eller annan vätska.
Räck inte efter en enhet som har fallit i vatten. Koppla ur den
omedelbart.
Försiktighet bör iakttas så att föremål inte faller in i och vätskor inte
spills på enheten.
Noggrann övervakning är nödvändig när denna enhet används nära
barn eller funktionshindrade personer.
Använd endast denna enhet för dess avsedda användning enligt
beskrivningen i denna bruksanvisning.
Använd aldrig denna enhet om den har en skadad sladd eller kontakt,
om den inte fungerar korrekt eller om den har varit
tappade, skadade eller tappade i vatten.
Håll sladdar borta från uppvärmda ytor. Linda inte sladden runt
apparatens utsida eller låt den
sladden hänger över bord eller bänkkant.
Använd inte utomhus.
Ändra inte säkerhetskontakten och använd inte en förlängningssladd
med den här enheten.
Använd inte med en spänningsomvandlare.
Rör inte vid heta ytor.
Använd inte tillbehör som inte rekommenderas av tillverkaren eftersom
det kan orsaka skador.
PRODUCT PARAMETER
Modell
HSTW-12
D istrict
Nordamerika
Europa
Australien
Spänning
AC 1 2 0V 60 Hz
AC 2 3 0V 50 / 60HZ
W attage
4 50 W (+5 % ~
4 00 W (+5 % ~ -10 % )
- 4 -
-10 % )
Kapacitet
20L
Nettovikt
4,2 kg
Produktstorlek
320*320*470 mm
PACKING LIST
NEJ.
TILLBEHÖRENS NAMN
KVANTITET
1
Handduksvärmare hinkar
1 st
2
Krok
4 st
3
Användarmanual
1 st
INSTRUCTION
1. KNAPPKONTROLL
1.1 Brytarknapp: öppna och stäng handdukshinken
1.2 Tidsknapp: välj tid för uppvärmning
1.3 Fördröjningsknapp: Val av fördröjningstid
2. FÖRDRÖJD UPPVÄRMNINGSFUNKTION
1. Slå på maskinen och tryck på fördröjningsknappen för att gå in i läget för

- 5 -
fördröjningstid. Tryck på fördröjningsknappen för att justera
fördröjningstiden i steg om 30 minuter, upp till maximalt 24 timmar.
2. När fördröjningsknappen trycks in blinkar den runda LED-lampan
ovanför knappen.
3. När som helst, om fördröjningsbokningsknappen trycks in, kommer
bokningstiden att utföras först, och sedan kommer uppvärmning att
utföras.
4. När uppvärmningsarbetet är klart, återställ fördröjningstiden och återgå
till fördröjd uppvärmningsläge.
5. Under uppvärmningsprocessen, använd fördröjningsfunktionen, utför
fördröjningen först och värm sedan upp igen.
6. När du trycker och håller ned utan att släppa taget kommer
bokningstiden att ändras 2-3 gånger/s.
Tiden för det första långa trycket kommer att ackumuleras, och tiden för
långtrycket kommer att minska genom att släppa handen igen, och tiden
kommer att ackumuleras igen, etc.
3. UPPVÄRMNING NEDSÄKNINGSFUNKTION
1. När fördröjningstiden är över, värm enligt den inställda
uppvärmningstiden eller standard 20 minuter;
2. Tryck på tidsknappen för att gå till inställningsläget för uppvärmningstid.
Tryck på tidsknappen för att justera fördröjningstiden i steg om 20 minuter,
med maximalt 1H. Stegval 20-40-60 .
3. När tidsknappen trycks in blinkar den runda LED-lampan ovanför
knappen. Efter att ha blinkat i 5 sekunder utan någon åtgärd bekräftas
alternativet.
4. Under uppvärmningsprocessen, använd tidsknappen för att återställa
uppvärmningstiden.
5. Vid varje drifttillfälle tänds lysdioden motsvarande tiden.
6. Efter att ha startat uppvärmningen, höj temperaturen till 266 °F under de
första 20 minuterna och håll temperaturen vid 215-266 °F.
- 6 -
7. Om timern är mer än 20 minuter, kommer den efter mer än 20 minuter
att gå in i värmekonserveringsläge och hålla temperaturen på 180-215 °F
tills timern går ut.
4. PÅ/AV-KNAPPFUNKTION
1. När strömmen slagits på, tänd alla lysdioder för 3S självtest .
2. I standbyläge, tryck på strömknappen för att väcka CPU:n och
LED-skärmen blinkar i väntan på inmatningsinstruktioner.
Med undantag för resten av standby-läget, tryck på strömknappen och
programmet kommer först att känna av temperaturen. När temperaturen är
högre än 60° kommer realtidstemperaturen att visas. När den är lägre än
60° stängs skärmen av och går in i standbyläge.
5. Temperaturdisplay
Efter att ha tryckt på strömknappen visas temperaturen i Fahrenheit(℉)
6. Fungerande LED-indikering
1: När produkten är påslagen och temperaturen på handduksfackets vägg

- 7 -
är lägre än 60°, tänds den gröna lampan;
2: Om temperaturen på handdukshinkens vägg är högre än 60° kommer
den röda lampan att tändas;
3: När uppvärmningstiden är över och temperaturen i fatet är lägre än 50°C,
släck lampan;
4: Det finns ett horisontellt ljus mellan tid och temperatur, som blinkar
långsamt vid uppvärmning och lyser när det inte värmer.
1.Tryck på barnlåsknappen för att öppna luckan .
2.Aromaterapibox : kan öppnas och tas bort genom att vrida moturs, och
installeras genom att vrida medurs.
3. Avtagbar krok .
4.Sidohandtag .

- 8 -
5. Nätsladdfodralet kan förvaras i botten .
FAILURE ANALYSIS
1. NTC är öppen krets. Efter att ha slagit på värmen i 1 minut låses
programmet, värmereläet kopplas bort, felkoden E01 visas på skärmen
och alla lysdioder blinkar, och knapparna svarar inte.
2. Utan uppvärmning ändras inte temperaturen efter 1 minuts påslag,
programmet är låst, värmereläet är bortkopplat, felkoden E02 visas på
skärmen och alla lysdioder blinkar och knapparna reagerar inte.
Åtgärder: Dra ur kontakten, kontakta återförsäljaren för att återvända till
fabriken för reparation.
Ta inte isär delar själv.
3 . Prestanda: Skärmen visar felkod E02, och alla lysdioder blinkar, inget
svar på beröring.
Orsak: Ledningen är inte ansluten. Efter uppvärmning i 1 minut ändras inte
temperaturen.
Åtgärder: Dra ur kontakten, kontakta återförsäljaren för att återvända till
fabriken för reparation.
Ta inte isär delar själv.
INSTALLATION AND MOVEMENT
Den generösa håligheten har kapacitet att rymma två stora badlakan
eller en personlig täcke. •De enkla kontrollerna med en
knapptryckning ger dig upp till 60 minuters uppvärmning.

- 9 -
Lägg till en fräsch, luktneutraliserande doft till dina handdukar och filtar
genom att sätta in aromaterapitabletten i skivhållaren.
Det dubbelväggiga isolerade locket håller värmen inne samtidigt som
det förblir svalt vid beröring.
POLARIZED PLUG
Denna apparat har en polariserad kontakt (det ena bladet är bredare än
det andra).
Den här kontakten passar endast på ett sätt i ett polariserat uttag. Om
kontakten passar inte helt i uttaget, vänd på kontakten. Om det fortfarande
inte passar, kontakta en kvalificerad elektriker för att installera rätt uttag.
Byt inte kontakten på något sätt.
SET UP
1. Öppna locket och ta bort allt förpackningsinnehåll .
2. Placera handdukstorken på en torr, jämn, hård yta.
3. Sätt i kontakten i ett standarduttag.
FCC INFORMATION
VARNING: Ändringar eller modifieringar som inte uttryckligen godkänts av
den part som ansvarar för efterlevnaden kan ogiltigförklara användarens
behörighet att använda utrustningen.
OBS: Denna utrustning har testats och befunnits följa gränserna för en
digital enhet av klass B, i enlighet med del 15 av FCC-reglerna. Dessa
gränser är utformade för att ge rimligt skydd mot skadliga störningar i en
bostadsinstallation. Denna enhet genererar, använder och kan utstråla
radiofrekvensenergi och om den inte installeras och används i enlighet
med instruktionerna kan den orsaka skadliga störningar på

- 10 -
radiokommunikation. Det finns dock ingen garanti för att störningar inte
kommer att inträffa i en viss installation. Om denna utrustning orsakar
skadliga störningar på radio- eller tv-mottagning, kan det vara en eller flera
av följande åtgärder:
• Rikta om eller flytta mottagningsantennen.
• Öka avståndet mellan utrustningen och mottagaren.
• Anslut utrustningen till ett uttag på en annan krets än den som
mottagaren är ansluten till.
• Rådfråga återförsäljaren eller en erfaren radio/TV-tekniker för hjälp.
Denna enhet uppfyller del 15 av FCC-reglerna. Driften är föremål för
följande två villkor:
1. Denna enhet får inte orsaka skadliga störningar.
2. Denna enhet måste acceptera alla mottagna störningar, inklusive
störningar som kan orsaka oönskad funktion.
Tillverkare: Shanghaimuxinmuyeyouxiangongsi
Adress: Shuangchenglu 803nong11hao1602A-1609shi, baoshanqu,
shanghai 200000 CN.
Importerad till AUS: SIHAO PTY LTD. 1 ROKEVA STREETEASTWOOD
NSW 2122 Australien
Importerad till USA: Sanven Technology Ltd. Suite 250, 9166 Anaheim
Place, Rancho Cucamonga, CA 91730
REP
EC
E-CrossStu GmbH
Mainzer Landstr.69, 60329 Frankfurt am Main.
REP
UK
YH CONSULTING LIMITED.
C/0 YH Consulting Limited Office 147, Centurion
House, London Road, Staines-upon-Thames,

- 11 -


Técnico Certificado de soporte y garantía electrónica
www.vevor.com/support
CUBOS CALENTADORES DE TOALLAS
MODELO: HSTW-12
We continue to be committed to provide you tools with competitive price.
"Save Half", "Half Price" or any other similar expressions used by us only represents an
estimate of savings you might benefit from buying certain tools with us compared to the major
top brands and does not necessarily mean to cover all categories of tools offered by us. You
are kindly reminded to verify carefully when you are placing an order with us if you are
actually saving half in comparison with the top major brands.
- 1 -
MODELO: HSTW-12
Have product questions? Need technical support? Please feel free to
contact us:
Technical Support and E-Warranty Certificate
www.vevor.com/support
NEED HELP? CONTACT US!
This is the original instruction, please read all manual instructions
carefully before operating. VEVOR reserves a clear interpretation of our
user manual. The appearance of the product shall be subject to the
product you received. Please forgive us that we won't inform you again if
there are any technology or software updates on our product.
TOWEL WARMER BUCKETS
- 2 -
Advertencia: para reducir el riesgo de lesiones, el usuario
debe leer atentamente el manual de instrucciones.
LEA TODAS LAS INSTRUCCIONES ANTES DE USAR
Se deben leer todas las instrucciones de seguridad y
funcionamiento,
respetar y seguir antes de utilizar la unidad.
Este dispositivo cumple con la Parte 15 de las normas de la
FCC. El funcionamiento está sujeto a las dos condiciones
siguientes: (1) este dispositivo no puede causar interferencias
dañinas y (2) este dispositivo debe aceptar cualquier
interferencia recibida, incluidas las interferencias que puedan
causar un funcionamiento no deseado.
Este producto está sujeto a las disposiciones de la Directiva
Europea 2012/19/CE. El símbolo que muestra un contenedor
con ruedas tachado indica que el producto requiere recogida
selectiva de basura en la Unión Europea. Esto se aplica al
producto y a todos los accesorios marcados con este símbolo.
Los productos marcados como tales no podrán desecharse
con la basura doméstica normal, sino que deberán llevarse a
un punto de recogida para el reciclaje de aparatos eléctricos y
electrónicos.
SAFETY & WARNINGS
ADVERTENCIA : Para reducir el riesgo de descarga eléctrica o
lesiones graves a personas al usar el aparato, siga las
precauciones básicas, incluidas las Lea todas las instrucciones
antes de usar el aparato.
Lea todas las instrucciones antes de usar el aparato.
Para reducir el riesgo de descarga eléctrica, quemaduras, incendio o

- 3 -
lesiones:
No utilice este aparato para ningún otro uso que no sea el previsto.
No coloque ni guarde la unidad donde pueda caerse o ser arrastrada
a una bañera o fregadero.
No lo coloque ni lo deje caer en agua u otro líquido.
No intente alcanzar una unidad que se haya caído al agua.
Desconéctelo inmediatamente.
Se debe tener cuidado para que no caigan objetos ni se derramen
líquidos sobre la unidad.
Es necesaria una estrecha supervisión cuando esta unidad se utiliza
cerca de niños o personas discapacitadas.
Utilice esta unidad únicamente para el uso previsto como se describe
en este manual.
Nunca opere esta unidad si tiene un cable o enchufe dañado, si no
funciona correctamente o si ha sido
caído, dañado o caído al agua.
Mantenga los cables alejados de superficies calientes. No enrolle el
cable alrededor del exterior del aparato ni deje que
el cable cuelga sobre el borde de la mesa o del mostrador.
No utilizar al aire libre.
No altere el enchufe de seguridad ni utilice un cable de extensión con
este dispositivo.
No lo opere con un convertidor de voltaje.
No toque superficies calientes.
No utilice accesorios no recomendados por el fabricante, ya que esto
puede causar lesiones.
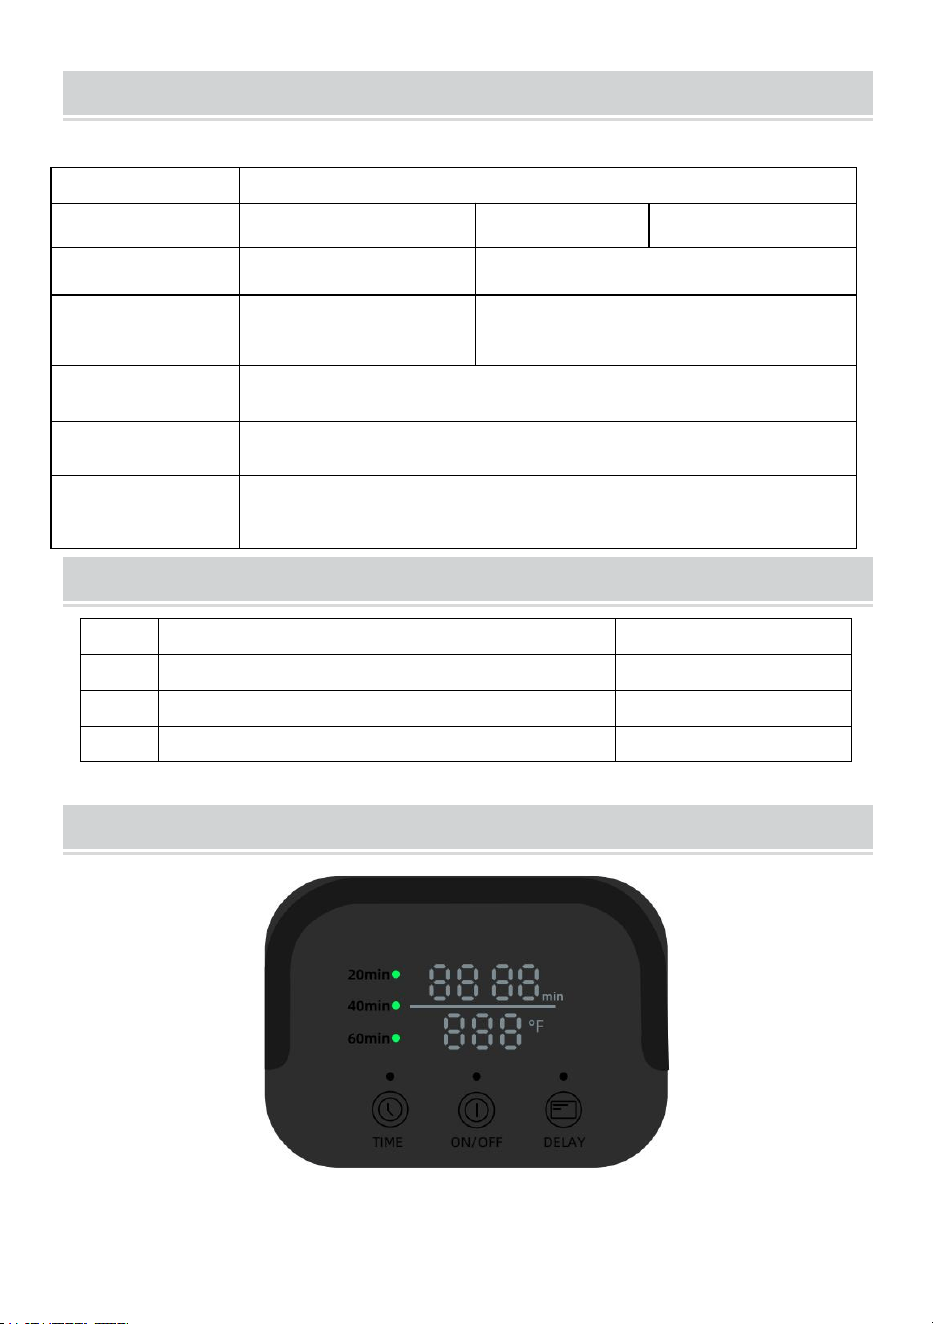
- 4 -
PRODUCT PARAMETER
Modelo
HSTW-12
Distrito
América del norte
Europa
Australia
Voltaje
CA 1 2 0V 60Hz
CA 2 3 0V 50 / 60HZ
Potencia
4 50W (+5% ~
-10% )
400W ( +5% ~ -10% )
Capacidad
20L
Peso neto
4,2 kilos
Tamaño del
producto
320*320*470mm
PACKING LIST
NO.
NOMBRE DEL ACCESORIO
CANTIDAD
1
Cubos calentadores de toallas
1 PC
2
Gancho
4 piezas
3
Manual de usuario
1 PC
INSTRUCTION
1. CONTROL DE BOTONES
1.1 Botón de interruptor: abre y cierra el cubo de toalla

- 5 -
1.2 Tecla de tiempo: seleccione el tiempo de sincronización de calefacción
1.3 Tecla de retardo: selección del tiempo de retardo
2. FUNCIÓN DE CALENTAMIENTO RETARDADO
1. Al encender la máquina, presione el botón de retardo para ingresar al
modo de sincronización de retardo. Presione el botón de retraso para
ajustar el tiempo de retraso en pasos de 30 minutos, hasta un máximo de
24 horas.
2. Cuando se presiona el botón de retardo, la luz LED redonda sobre el
botón parpadea.
3. En cualquier momento, si se presiona el botón de reserva de retraso,
primero se ejecutará el tiempo de reserva y luego se realizará el
calentamiento.
4. Una vez completado el trabajo de calefacción, restablezca el tiempo de
retardo y vuelva a ingresar al modo de calentamiento retardado.
5. Durante el proceso de calentamiento, opere la función de retardo,
ejecute el retardo primero y luego vuelva a calentar.
6. Cuando mantiene presionado sin soltarlo, el tiempo de reserva
cambiará 2-3 veces/s.
El tiempo de la primera pulsación larga se acumulará y el tiempo de la
pulsación larga disminuirá al soltar la manecilla nuevamente, y el tiempo
se acumulará nuevamente, etc.
3. FUNCIÓN DE CUENTA ATRÁS DE CALENTAMIENTO
1. Una vez finalizado el tiempo de retardo, caliente según el tiempo de
calentamiento establecido o los 20 minutos predeterminados;
2. Presione la tecla de tiempo para ingresar al modo de configuración del
tiempo de calefacción. Presione la tecla de tiempo para ajustar el tiempo
de retardo en pasos de 20 minutos, con un máximo de 1H. Selección de
paso 20-40-60 .
3. Cuando se presiona el botón de tiempo, la luz LED redonda sobre el

- 6 -
botón parpadea. Después de parpadear durante 5 segundos sin realizar
ninguna operación, se confirma la opción.
4. Durante el proceso de calentamiento, opere la tecla de tiempo para
restablecer el tiempo de calentamiento.
5. En cada hora de operación, el LED se enciende correspondiente a la
hora.
6. Después de comenzar a calentar, aumente la temperatura a 266 °F
durante los primeros 20 minutos y mantenga la temperatura a 215-266 °F.
7. Si el temporizador dura más de 20 minutos, después de más de 20
minutos, entrará en el estado de conservación del calor y mantendrá la
temperatura entre 180 y 215 °F hasta que expire el temporizador.
4. OPERACIÓN DE LA TECLA DE ENCENDIDO/APAGADO
1. Después del encendido, encienda todos los LED para la autoprueba
3S .
2. En modo de espera, presione el botón de encendido para activar la CPU
y la pantalla LED. parpadea esperando instrucciones de entrada.
Excepto por el resto del estado de espera, presione el botón de encendido
y el programa detectará primero la temperatura. Cuando la temperatura
sea superior a 60°, se mostrará la temperatura en tiempo real. Cuando sea
inferior a 60°, la pantalla se apagará y entrará en modo de espera.
5. Visualización de temperatura
Después de presionar el botón de encendido, la temperatura se muestra
en Fahrenheit (℉)
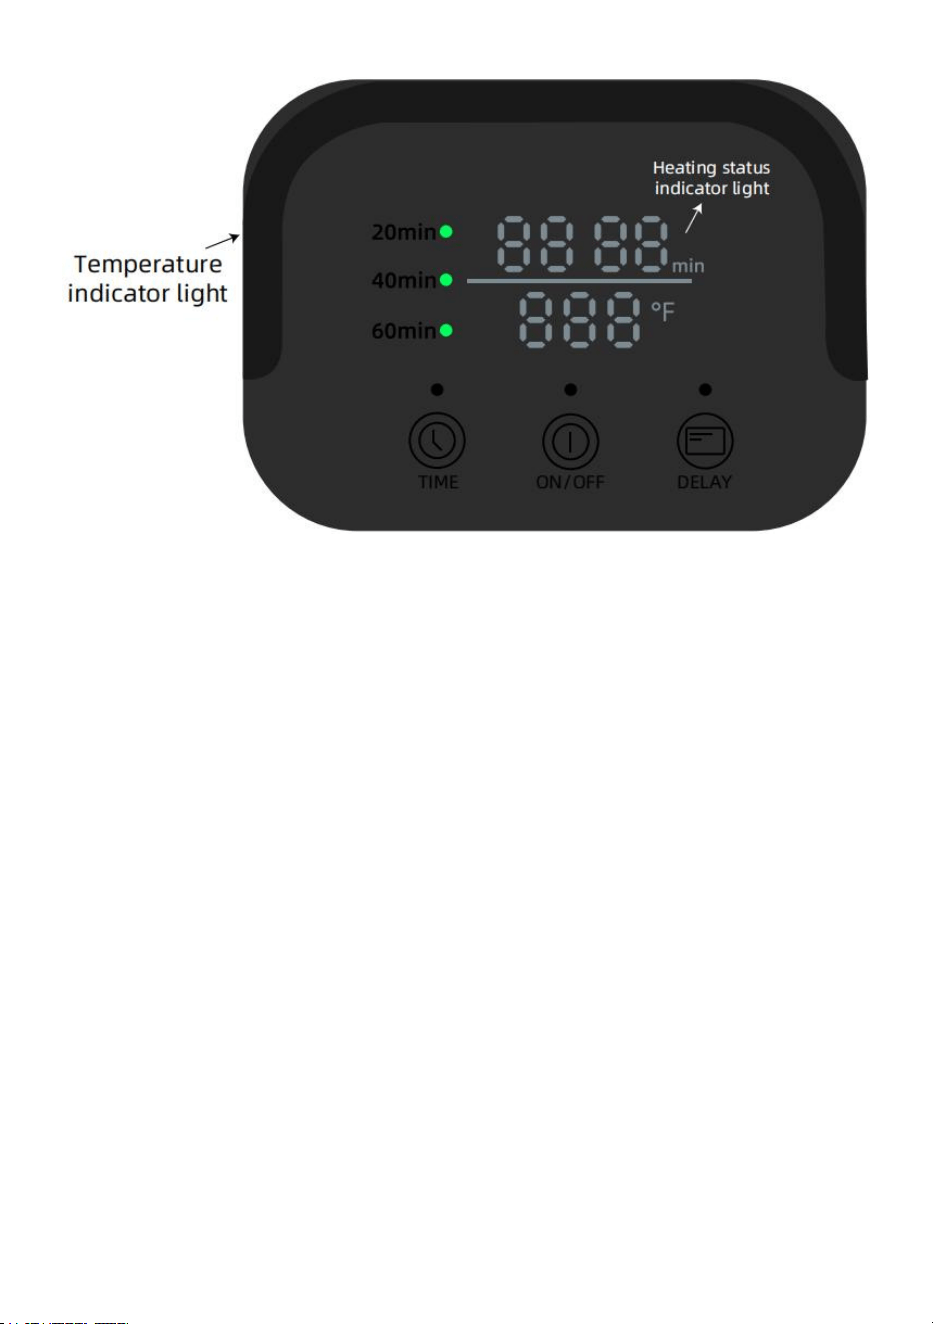
- 7 -
6. Indicación LED de trabajo
1: Cuando el producto está encendido y la temperatura de la pared del
toallero es inferior a 60°, aparece la luz verde;
2: Si la temperatura de la pared del toallero es superior a 60°, la luz roja se
encenderá;
3: Cuando finalice el tiempo de calentamiento y la temperatura en el barril
sea inferior a 50°C, apague la luz;
4: Hay una luz horizontal entre el tiempo y la temperatura, que parpadea
lentamente cuando se calienta y permanece encendida cuando no se
calienta.

- 8 -
1. Presione el interruptor de bloqueo para niños para abrir la tapa abatible .
2.Caja de aromaterapia : se puede abrir y quitar girándola en sentido antihorario y
instalado girándolo en el sentido de las agujas del reloj.
3. Gancho extraíble .
4.Asas laterales .
5.La caja del cable de alimentación se puede guardar en la parte inferior .

- 9 -
FAILURE ANALYSIS
1. El NTC está en circuito abierto. Después de encender la calefacción
durante 1 minuto, el programa se bloquea, el relé de calefacción se
desconecta, se muestra el código de error E01 en la pantalla y todos los
LED parpadean. y los botones no responden.
2. Sin calefacción, la temperatura no cambia después de 1 minuto de
encendido, el programa está bloqueado, el relé de calefacción está
desconectado, el código de falla E02 se muestra en la pantalla, todos los
LED parpadean y los botones no responden.
Medidas: Desenchufe el enchufe, comuníquese con el distribuidor para
regresar a la fábrica para su reparación.
No desmonte las piezas usted mismo.
3 . Rendimiento: La pantalla muestra el código de falla E02 y todos los
LED parpadean, no responde al tacto.
Motivo: El cable no está conectado. Después de calentar durante 1
minuto, la temperatura no cambia.
Medidas: Desenchufe el enchufe, comuníquese con el distribuidor para
regresar a la fábrica para su reparación.
No desmonte las piezas usted mismo.
INSTALLATION AND MOVEMENT
La generosa cavidad tiene capacidad para contener dos toallas de
baño grandes o una manta personal. •Los controles simples de un
solo toque le brindan hasta 60 minutos de calentamiento.
Agregue un aroma fresco que neutralice los olores a sus toallas y
mantas insertando la tableta de aromaterapia en el soporte del disco.
La tapa aislante de doble pared mantiene el calor mientras
permanece fría al tacto.

- 10 -
POLARIZED PLUG
Este aparato tiene un enchufe polarizado (una clavija es más ancha que la
otra).
Este enchufe encajará en un tomacorriente polarizado de una sola manera.
Si el enchufe no encaja completamente en el tomacorriente, invierta el
enchufe. Si aún así no encaja, comuníquese con un técnico calificado.
electricista para instalar el tomacorriente adecuado. No cambies el
enchufe de ninguna manera.
SET UP
1. Abra la tapa y retire el contenido del paquete .
2. Coloque el calentador de toallas sobre una superficie seca, nivelada y
dura.
3. Inserte el enchufe en un tomacorriente estándar.
FCC INFORMATION
ADVERTENCIA: Los cambios o modificaciones no aprobados
expresamente por la parte responsable del cumplimiento podrían anular la
autoridad del usuario para operar el equipo.
NOTA: Este equipo ha sido probado y cumple con los límites para un
dispositivo digital Clase B, de conformidad con la Parte 15 de las reglas de
la FCC. Estos límites están diseñados para proporcionar una protección
razonable contra interferencias dañinas en una instalación residencial.
Esta unidad genera, usa y puede irradiar energía de radiofrecuencia y, si
no se instala y usa de acuerdo con las instrucciones, puede causar
interferencias dañinas en las comunicaciones por radio. Sin embargo, no
hay garantía de que no se produzcan interferencias en una instalación en

- 11 -
particular. Si este equipo causa interferencias dañinas a la recepción de
radio o televisión, se pueden tomar una o más de las siguientes medidas:
• Reorientar o reubicar la antena receptora.
• Aumente la separación entre el equipo y el receptor.
• Conecte el equipo a una toma de corriente de un circuito diferente al
que está conectado el receptor.
• Consulte al distribuidor o a un técnico experimentado en radio/TV para
obtener ayuda.
Este dispositivo cumple con la Parte 15 de las normas de la FCC. La
operación está sujeta a las dos condiciones siguientes:
1. Este dispositivo no puede causar interferencias dañinas.
2. Este dispositivo debe aceptar cualquier interferencia recibida, incluidas
las interferencias que puedan provocar un funcionamiento no deseado.

- 12 -
Fabricante: Shanghaimuxinmuyeyouxiangongsi
Dirección: Shuangchenglu 803nong11hao1602A-1609shi, baoshanqu,
shanghai 200000 CN.
Importado a AUS: SIHAO PTY LTD. 1 ROKEVA STREET ASTWOOD NSW
2122 Australia
Importado a EE. UU.: Sanven Technology Ltd. Suite 250, 9166 Anaheim
Place, Rancho Cucamonga, CA 91730
REP
EC
E-CrossStu GmbH
Mainzer Landstr.69, 60329 Frankfurt am Main.
REP
UK
YH CONSULTING LIMITED.
C/0 YH Consulting Limited Office 147, Centurion
House, London Road, Staines-upon-Thames,
Surrey, TW18 4AX


Tecnico Supporto e certificato di garanzia elettronica
www.vevor.com/support
SECCHI SCALDASALVIETTE
MODELLO: HSTW-12
We continue to be committed to provide you tools with competitive price.
"Save Half", "Half Price" or any other similar expressions used by us only represents an
estimate of savings you might benefit from buying certain tools with us compared to the major
top brands and does not necessarily mean to cover all categories of tools offered by us. You
are kindly reminded to verify carefully when you are placing an order with us if you are
actually saving half in comparison with the top major brands.

- 1 -
MODELLO: HSTW-12
Have product questions? Need technical support? Please feel free to
contact us:
Technical Support and E-Warranty Certificate
www.vevor.com/support
NEED HELP? CONTACT US!
This is the original instruction, please read all manual instructions
carefully before operating. VEVOR reserves a clear interpretation of our
user manual. The appearance of the product shall be subject to the
product you received. Please forgive us that we won't inform you again if
there are any technology or software updates on our product.
TOWEL WARMER BUCKETS
- 2 -
Avvertenza: per ridurre il rischio di lesioni, l'utente deve
leggere attentamente il manuale di istruzioni.
LEGGERE TUTTE LE ISTRUZIONI PRIMA DELL'USO
È necessario leggere tutte le istruzioni di sicurezza e operative,
rispettate e seguite prima di utilizzare l'unità.
Questo dispositivo è conforme alla Parte 15 delle norme FCC.
Il funzionamento è soggetto alle seguenti due condizioni: (1)
questo dispositivo non può causare interferenze dannose e (2)
questo dispositivo deve accettare qualsiasi interferenza
ricevuta, comprese le interferenze che potrebbero causare un
funzionamento indesiderato.
Questo prodotto è soggetto alle disposizioni della Direttiva
Europea 2012/19/CE. Il simbolo del bidone della spazzatura
barrato indica che nell'Unione Europea il prodotto richiede la
raccolta differenziata dei rifiuti. Ciò vale per il prodotto e tutti gli
accessori contrassegnati da questo simbolo. I prodotti
contrassegnati come tali non possono essere smaltiti con i
normali rifiuti domestici, ma devono essere portati in un punto
di raccolta per il riciclaggio di dispositivi elettrici ed elettronici
SAFETY & WARNINGS
AVVERTENZA : per ridurre il rischio di scosse elettriche o lesioni
gravi alle persone durante l'utilizzo dell'apparecchio, seguire le
precauzioni di base, inclusa la Leggere tutte le istruzioni prima di
utilizzare l'apparecchio.
Leggere tutte le istruzioni prima di utilizzare l'apparecchio.
Per ridurre il rischio di scosse elettriche, ustioni, incendi o lesioni:
Non utilizzare questo apparecchio per scopi diversi da quello previsto.
Non posizionare o conservare l'unità in un punto in cui potrebbe

- 3 -
cadere o essere trascinata in una vasca o in un lavandino.
Non collocare né lasciar cadere nell'acqua o in altri liquidi.
Non prendere l'unità caduta in acqua. Scollegalo immediatamente.
È necessario prestare attenzione affinché non cadano oggetti e non
vengano versati liquidi sull'unità.
È necessaria una stretta supervisione quando questa unità viene
utilizzata vicino a bambini o persone disabili.
Utilizzare questa unità solo per l'uso previsto, come descritto in questo
manuale.
Non utilizzare mai questa unità se il cavo o la spina sono danneggiati,
se non funziona correttamente o se lo è stato
caduto, danneggiato o caduto in acqua.
Tenere i cavi lontani dalle superfici riscaldate. Non avvolgere il cavo
attorno all'esterno dell'apparecchio né lasciarlo
il cavo pende dal tavolo o dal bordo del bancone.
Non utilizzare all'aperto.
Non alterare la spina di sicurezza né utilizzare una prolunga con
questo dispositivo.
Non utilizzare con un convertitore di tensione.
Non toccare le superfici calde.
Non utilizzare accessori accessori non consigliati dal produttore
poiché ciò potrebbe causare lesioni.
PRODUCT PARAMETER
Modello
HSTW-12
Distretto
Nord America
Europa
Australia
Voltaggio
CA 1 2 0 V 60Hz
CA 2 3 0 V 50/60 Hz
Wattaggio
4 50 W (+5% ~
-10% )
4 00 W (+5% ~ -10% )
Capacità
20 litri
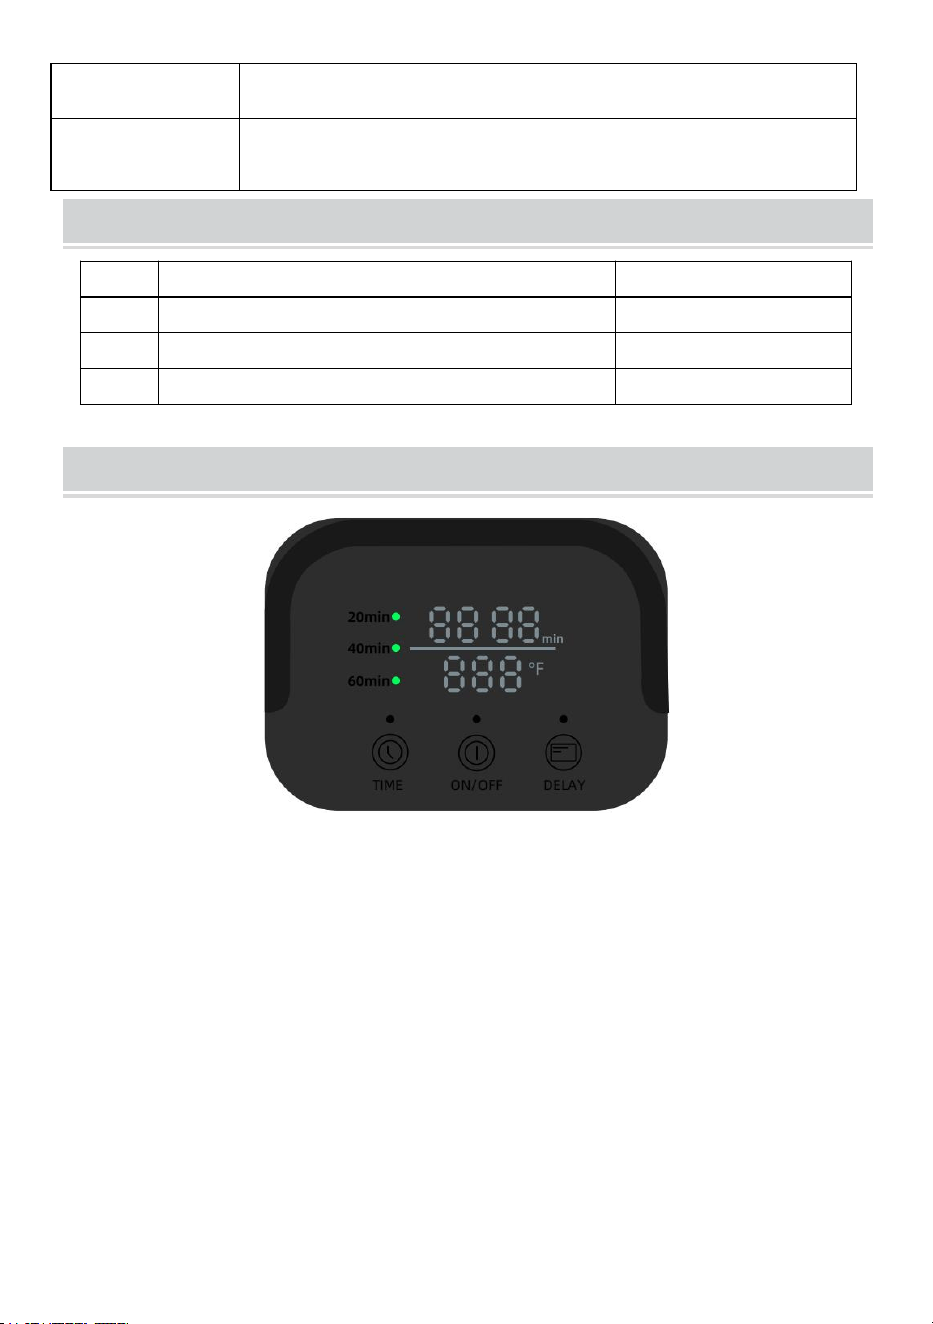
- 4 -
Peso netto
4,2 kg
Taglia del
prodotto
320*320*470mm
PACKING LIST
NO.
NOME DELL'ACCESSORIO
QUANTITÀ
1
Secchi scaldasalviette
1 pc
2
Gancio
4 pezzi
3
Manuale d'uso
1 pc
INSTRUCTION
1. CONTROLLO PULSANTI
1.1 Pulsante interruttore: apre e chiude il portasciugamani
1.2 Tasto Orario: seleziona l'orario di riscaldamento
1.3 Tasto Ritardo: selezione del tempo di ritardo
2. FUNZIONE RISCALDAMENTO RITARDATO
1. Accendendo la macchina, premere il pulsante di ritardo per accedere
alla modalità di temporizzazione del ritardo. Premere il pulsante di ritardo
per regolare il tempo di ritardo in incrementi di 30 minuti, fino a un massimo
di 24 ore.
2. Quando si preme il pulsante di ritardo, la luce rotonda a LED sopra il

- 5 -
pulsante lampeggia.
3. In qualsiasi momento, se viene premuto il pulsante di prenotazione del
ritardo, verrà eseguito prima il tempo di prenotazione, quindi verrà eseguito
il riscaldamento.
4. Una volta completato il lavoro di riscaldamento, reimpostare il tempo di
ritardo e accedere nuovamente alla modalità di riscaldamento ritardato.
5. Durante il processo di riscaldamento, azionare la funzione di ritardo,
eseguire prima il ritardo e poi riscaldare nuovamente.
6. Quando si tiene premuto senza rilasciare, il tempo di prenotazione
cambierà 2-3 volte/s.
Il tempo della prima pressione lunga verrà accumulato, il tempo della
pressione lunga verrà diminuito rilasciando nuovamente la lancetta, e il
tempo verrà nuovamente accumulato, ecc.
3. FUNZIONE CONTO ALLA ROVESCIA RISCALDAMENTO
1. Al termine del tempo di ritardo, riscaldare in base al tempo di
riscaldamento impostato o ai 20 minuti predefiniti;
2. Premere il tasto Orario per accedere alla modalità di impostazione
dell'ora di riscaldamento. Premere il tasto Time per regolare il tempo di
ritardo in incrementi di 20 minuti, con un massimo di 1 ora. Selezione dei
passi 20-40-60 .
3. Quando si preme il pulsante dell'ora, la luce rotonda a LED sopra il
pulsante lampeggia. Dopo aver lampeggiato per 5 secondi senza alcuna
operazione, l'opzione viene confermata.
4. Durante il processo di riscaldamento, utilizzare il tasto Time per
reimpostare il tempo di riscaldamento.
5. Ad ogni ora di funzionamento, il LED si accende in corrispondenza
dell'ora.
6. Dopo aver avviato il riscaldamento, aumentare la temperatura a 266 °F
per i primi 20 minuti e mantenere la temperatura a 215-266 °F.
7. Se il timer è superiore a 20 minuti, dopo più di 20 minuti entrerà nello

- 6 -
stato di conservazione del calore e manterrà la temperatura a 180-215 °F
fino alla scadenza del timer.
4. FUNZIONAMENTO DEI TASTI ON/OFF
1. Dopo l'accensione, accendere tutti i LED per l'autotest 3S .
2. In modalità standby, premere il pulsante di accensione per riattivare la
CPU e lo schermo LED lampeggia in attesa di istruzioni di input.
Ad eccezione del resto dello stato di standby, premere il pulsante di
accensione e il programma rileverà prima la temperatura. Quando la
temperatura è superiore a 60°, verrà visualizzata la temperatura in tempo
reale. Quando è inferiore a 60°, lo schermo si spegne ed entra in standby.
5. Visualizzazione della temperatura
Dopo aver premuto il pulsante di accensione, la temperatura viene
visualizzata in Fahrenheit(℉)
6. Indicazione LED funzionante
1: Quando il prodotto è acceso e la temperatura della parete del
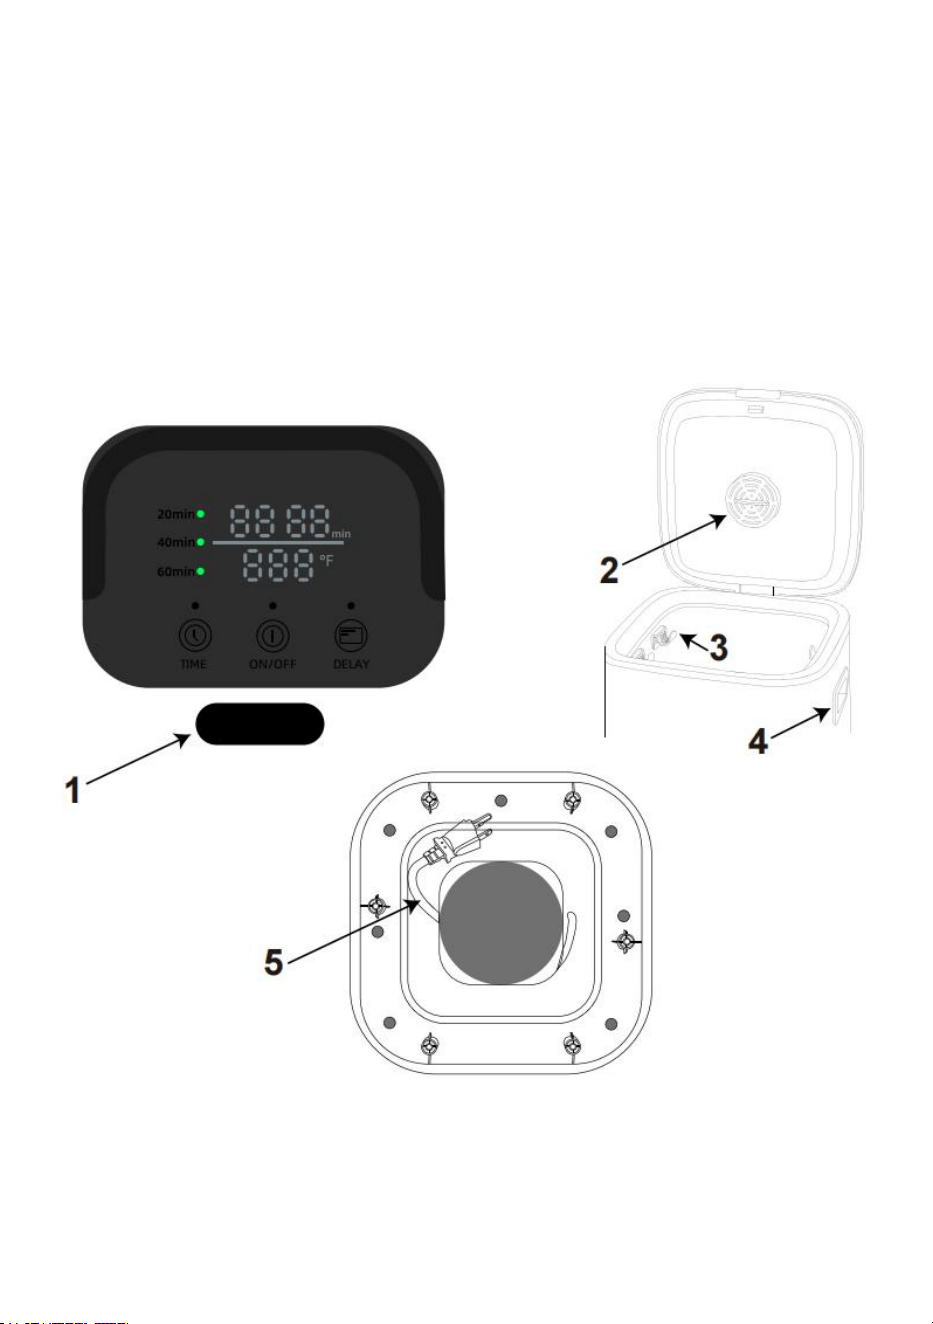
- 7 -
portasciugamani è inferiore a 60°, viene visualizzata la luce verde;
2: Se la temperatura della parete del portasciugamani è superiore a 60°, la
luce rossa si accenderà;
3: Quando il tempo di riscaldamento è terminato e la temperatura nella
botte è inferiore a 50°C, spegnere la luce;
4: C'è una luce orizzontale tra l'ora e la temperatura, che lampeggia
lentamente durante il riscaldamento e rimane accesa quando non si
riscalda.
1.Premere l'interruttore di blocco bambini per aprire il coperchio ribaltabile .
2. Scatola per aromaterapia : può essere aperta e rimossa ruotando in senso antiorario e
installato ruotando in senso orario.
3. Gancio rimovibile .

- 8 -
4.Maniglie laterali .
5.La custodia del cavo di alimentazione può essere riposta nella parte inferiore .
FAILURE ANALYSIS
1. L'NTC è a circuito aperto. Dopo aver acceso il riscaldamento per 1
minuto, il programma viene bloccato, il relè di riscaldamento viene
disconnesso, sullo schermo viene visualizzato il codice di errore E01 e tutti
i LED lampeggiano, e i pulsanti non rispondono.
2. Senza riscaldamento, la temperatura non cambia dopo 1 minuto
dall'accensione, il programma è bloccato, il relè di riscaldamento è
disconnesso, sullo schermo viene visualizzato il codice di errore E02, tutti i
LED lampeggiano e i pulsanti non rispondono.
Misure: scollegare la spina, contattare il rivenditore per tornare in fabbrica
per la riparazione.
Non smontare le parti da solo.
3 . Prestazioni: lo schermo visualizza il codice di errore E02 e tutti i LED
lampeggiano, nessuna risposta al tocco.
Motivo: il cavo non è collegato. Dopo il riscaldamento per 1 minuto, la
temperatura non cambia.
Misure: scollegare la spina, contattare il rivenditore per tornare in fabbrica
per la riparazione.
Non smontare le parti da solo.
INSTALLATION AND MOVEMENT

- 9 -
L'ampia cavità ha la capacità di contenere due grandi asciugamani da
bagno o una coperta personale. •I semplici controlli a tocco singolo
forniscono fino a 60 minuti di riscaldamento.
Aggiungi un profumo fresco e neutralizzante gli odori ai tuoi
asciugamani e coperte inserendo la tavoletta per aromaterapia nel
portadisco.
Il coperchio isolante a doppia parete mantiene il calore all'interno
rimanendo fresco al tatto.
POLARIZED PLUG
Questo apparecchio è dotato di una spina polarizzata (una lama è più larga
dell'altra).
Questa spina si inserisce in una presa polarizzata solo in un modo. Se la
spina non si inserisce completamente nella presa, invertire la spina. Se il
problema persiste, contattare un tecnico qualificato elettricista per
installare la presa adeguata. Non modificare in alcun modo la spina.
SET UP
1. Aprire il coperchio e rimuovere l'eventuale contenuto della confezione .
2. Posizionare lo scaldasalviette su una superficie asciutta, piana e dura.
3. Inserire la spina in una presa standard.
FCC INFORMATION
ATTENZIONE: Cambiamenti o modifiche non espressamente approvati
dalla parte responsabile della conformità potrebbero invalidare il diritto
dell'utente a utilizzare l'apparecchiatura.
NOTA: questa apparecchiatura è stata testata ed è risultata conforme ai
limiti dei dispositivi digitali di Classe B, ai sensi della Parte 15 delle norme

- 10 -
FCC. Questi limiti sono progettati per fornire una protezione ragionevole
contro interferenze dannose in un'installazione residenziale. Questa unità
genera, utilizza e può irradiare energia in radiofrequenza e, se non
installata e utilizzata in conformità con le istruzioni, può causare
interferenze dannose alle comunicazioni radio. Tuttavia, non vi è alcuna
garanzia che non si verifichino interferenze in una particolare installazione.
Se questa apparecchiatura causa interferenze dannose alla ricezione
radiofonica o televisiva, ciò può avvenire mediante una o più delle seguenti
misure:
• Riorientare o riposizionare l'antenna ricevente.
• Aumentare la separazione tra l'apparecchiatura e il ricevitore.
• Collegare l'apparecchiatura ad una presa su un circuito diverso da
quello a cui è collegato il ricevitore.
• Consultare il rivenditore o un tecnico radio/TV esperto per assistenza.
Questo dispositivo è conforme alla Parte 15 delle norme FCC. Il
funzionamento è soggetto alle seguenti due condizioni:
1. Questo dispositivo non può causare interferenze dannose.
2. Questo dispositivo deve accettare qualsiasi interferenza ricevuta,
comprese le interferenze che potrebbero causare un funzionamento
indesiderato.
Produttore: Shanghaimuxinmuyeyouxiangongsi
Indirizzo: Shuangchenglu 803nong11hao1602A-1609shi, baoshanqu,
shanghai 200000 CN.
Importato in Australia: SIHAO PTY LTD. 1 ROKEVA STREETEASTWOOD
NSW 2122 Australia
Importato negli Stati Uniti: Sanven Technology Ltd. Suite 250, 9166
Anaheim Place, Rancho Cucamonga, CA 91730

- 11 -
REP
EC
E-CrossStu GmbH
Mainzer Landstr.69, 60329 Frankfurt am Main.
REP
UK
YH CONSULTING LIMITED.
C/0 YH Consulting Limited Office 147, Centurion
House, London Road, Staines-upon-Thames,
Surrey, TW18 4AX

