ENGLISH
33 inch 18 CU.FT French Door No Frost Refrigerator
MODE
L NUMBER SERIES:
KLB33-1971DFFFF/THW33-1971DFFFF
INSTRUCTION MANUAL &
INSTALLATION GUIDE
Read these instructions carefully before using your appliance, and keep it carefully.
If you follow the instructions, your appliance will provide you with many years of good service.

2
3
Customer Care
Warning
Important Safety
Product Dimension
Cutout
Names of Parts and Accessories
Installations
Handle
Operating Instruction
Adjusting the Temperature Setting
Care and Maintenance
Cleaning your Refrigerator
Moving the Refrigerator
Racking Conguration
How to Remove a Sliding Shelf and Drawer
Troubleshooting
Wire Diagram
Warranty
4
5
6
7
8
9
10
10
10
11
11
12
12
12
12
13
14
15
TABLE OF CONTENTS
Customer Care
4
Thank you for purchasing a Forno product. Please read the entire instruction manual before operating your new appliance
for the first time. Whether you are an occasional user or an expert, it will be beneficial to familiarize yourself with the safety
practices, features, operation and care recommendations of your appliance.
Both the model and serial number are listed inside the product. For warranty purposes, you will also need the date of
purchase .
Record this information below for future referenc
Services in Canada and Untied States
Keep the instruction manual handy to answer your questions. If you don’t understand something or need more assistance,
please visit our website for fast support. Please provide us your name, number, address,serial number of the product that
troubleshooting, proof of purchase, and a short description of the issue. A customer service representative will contact you
as soon as possible. All warranty work needs to be authorized by FORNO customer service. All our authorized service
providers are carefully selected and rigorously trained by us.
Product Information
Model Number : __________________________________________
Serial Number :
Date of Purchase : ________________________________________
Purchase Address And Phone :
_______________________________________________________
_____________________________________________________________
Service Information
Use these numbers in any correspondence
or services calls concerning your product.
If you received a damaged product, immedi-
ately contact Forno.
To save time and money, before you call for
serviced, check the troubleshooting guide. It
listed the causes of minor operation prob-
lems that you can correct yourself.
“Need some quick help? Simply scan the qr code and get access to our
fast support form. We’re always here to assist you with any questions or
concerns you may have. So, don’t hesitate to reach out!”
5
WARNING
FOR YOUR SAFETY
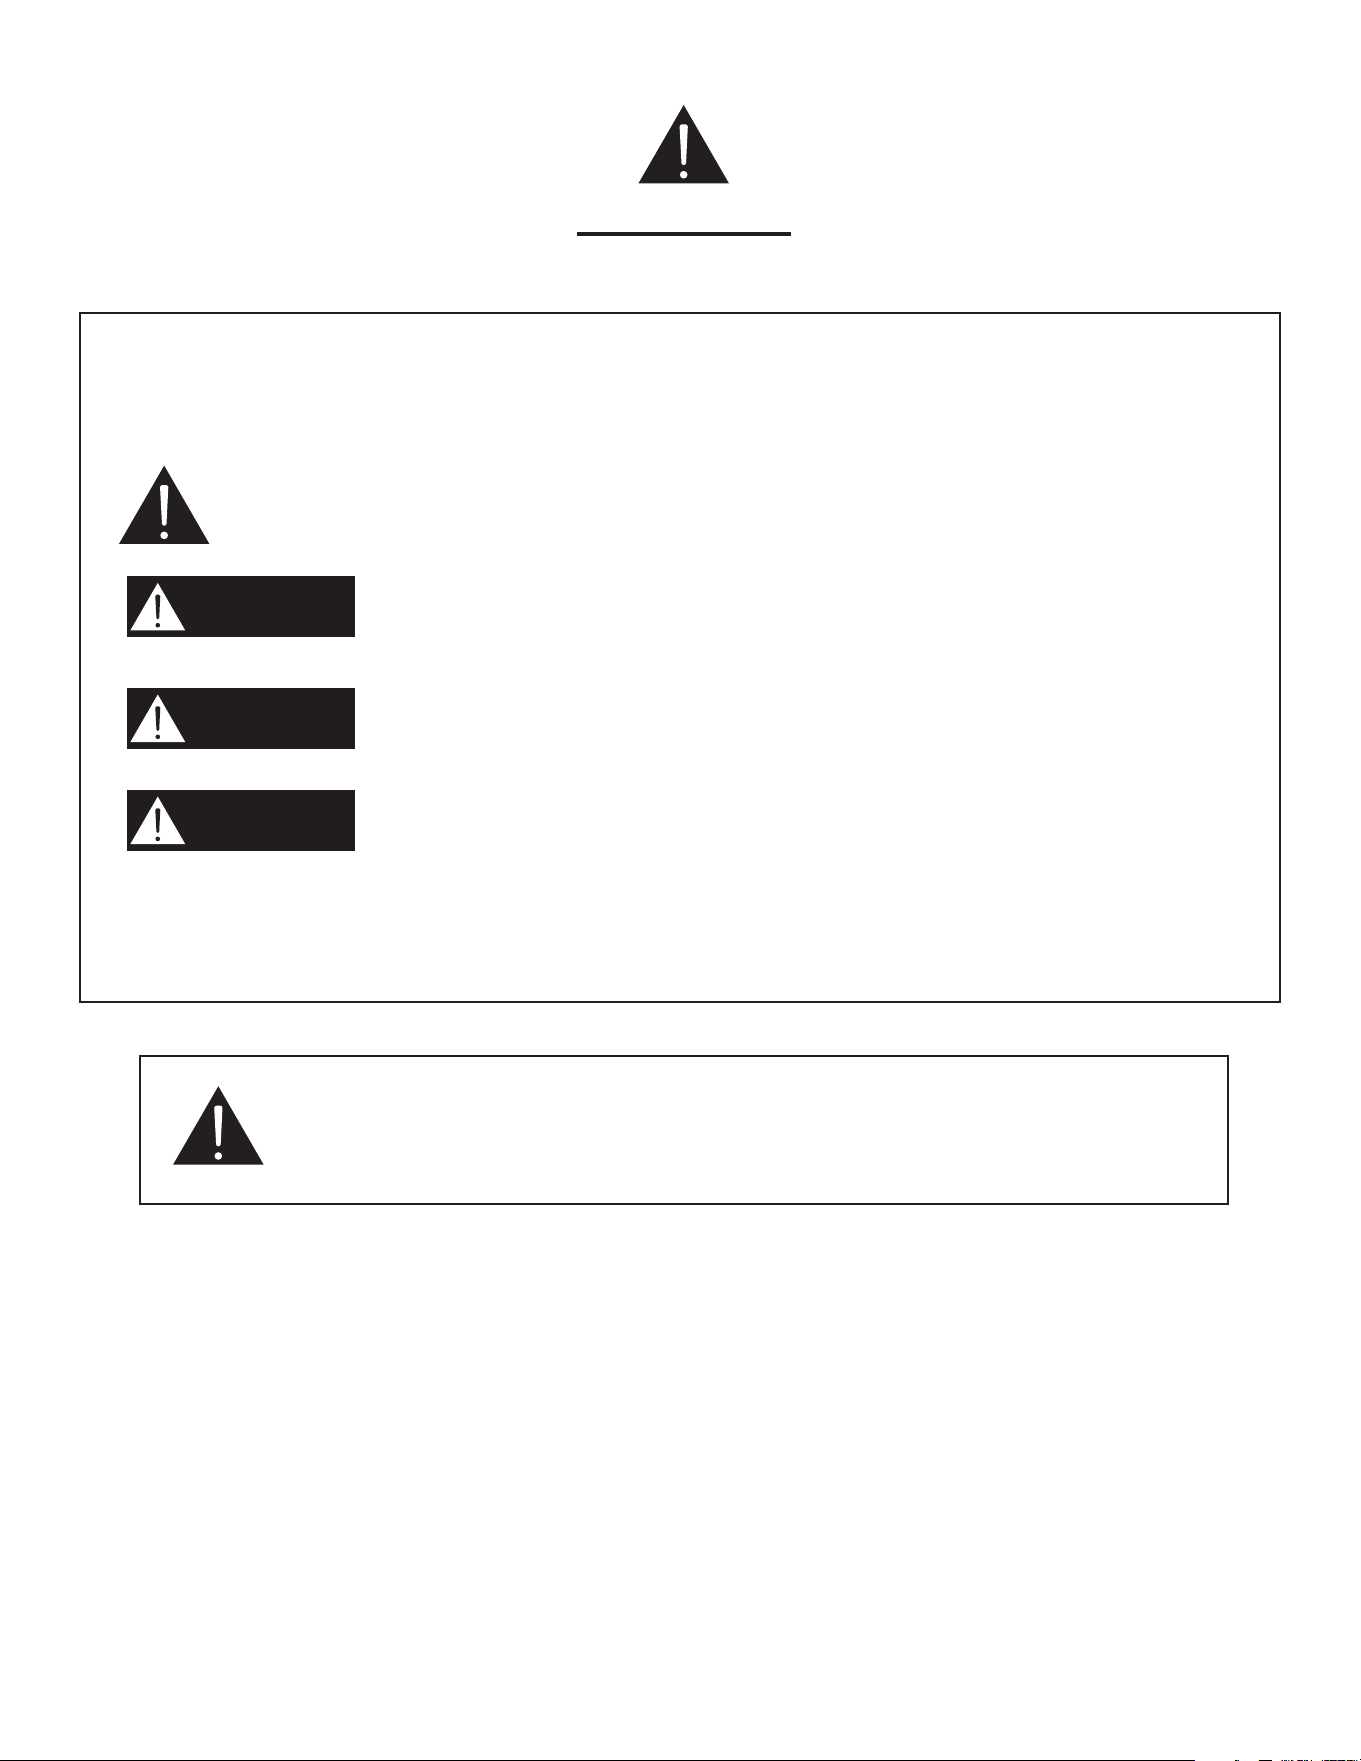
DANGER
WARNING
CAUTION
We have provided many important safety messages in this manual and on your appliance. Always read and obey all
safety messages
All safety messages will tell you what the potential hazard is, tell you how to reduce the chance of injury, and tell you
what can happen if the instructions are not followed.
• You can be killed or seriously injured if you don’t immediately follow instructions.
• You can be killed or seriously injured if you don’t follow instructions.
• A potentially hazardous situation which, if not avoided, could result in minor or
moderate injury.
This is the safety alert symbol. This symbol alerts you to potential hazards that can kill or hurt you
and others. Al l safety messages will follow the safety alert symbol and either the word “DANGER,”
“WARNING” or “CAUTION.” These words mean:
WARNING : This product can expose you to chemicals including [Lead, lead and lead
compound, which is [are] known to the state of California to cause cancer and birth defects
or other reproductive harm. For more information go to www.P65Warning.ca.gov.
Tip Over Hazard
• A child or adult can tip the cellar and be killed.
• Install anti-tip bracket to floor per installation instructions.
• Slide cellar back so rear is engaged in the slot of the anti-tip bracket.
• Re-engage the anti-tip bracket if cellar is moved.
• Do not operate the cellar without anti-tip bracket installed and engaged.
• Failure to follow these instructions can result in death or serious injuries to children and adults.
Important Safety Instructions
6
• The appliance is intended to be used exclusively for storage of wine and beverage.
• Make sure the voltage/current marked on the rating label corresponds with your supply voltage. Plug into a grounded
3-pin outlet, do not remove grounding pin, do not use an adapter, and do not use an extension cord.
• Do not connect or disconnect the electric plug when your hands are wet.
• Ensure enough peoples to move and install the appliance to avoid any damage to the appliance or injury to the
peoples.
• To ensure proper ventilation for the appliance, the front of the unit must be completely unobstructed. Locate the unit
away from direct sunlight and sources of heat (stove, heater, radiator, etc.).
• This appliance is not intended for use by young children.
• Do not use this appliance for other than its intended purpose.
• The use of attachments not recommended by the manufacturer may be hazardous.
• The symbol on the product or its packaging indicates that this product is not to be handled as normal household
waste and it is to be taken to a recycling collection point for electrical and electronic goods.
• Component parts shall be replaced with like components and that servicing shall be done by factory authorized
service personnel.
IMPORTANT SAFETY INFORMATION - DANGER! RISK OF CHILD ENTRAPMENT
Before you throw away your old appliance:
Take off the doors.
Leave the shelves in place so that children may not easily climb inside.
Make sure the coolant circuit, particularly the heat exchanger at the back/bottom of the unit not be damaged.
CAUTION
To prevent a child from being entrapped, keep out of reach of children and not in the vicinity or appliance.
Refrigerants:
R600a is a kind of high performance green refrigerants, derived from natural ingredients, does not damage the ozone
layer, without the greenhouse effect. Its characteristic is the strong cooling performance, low power consumption. All
refrigeration products contain refrigerants, which under federal law must be removed prior to product disposal. If you are
getting rid of an old refrigeration product, check with a qualified disposal company for instructions.
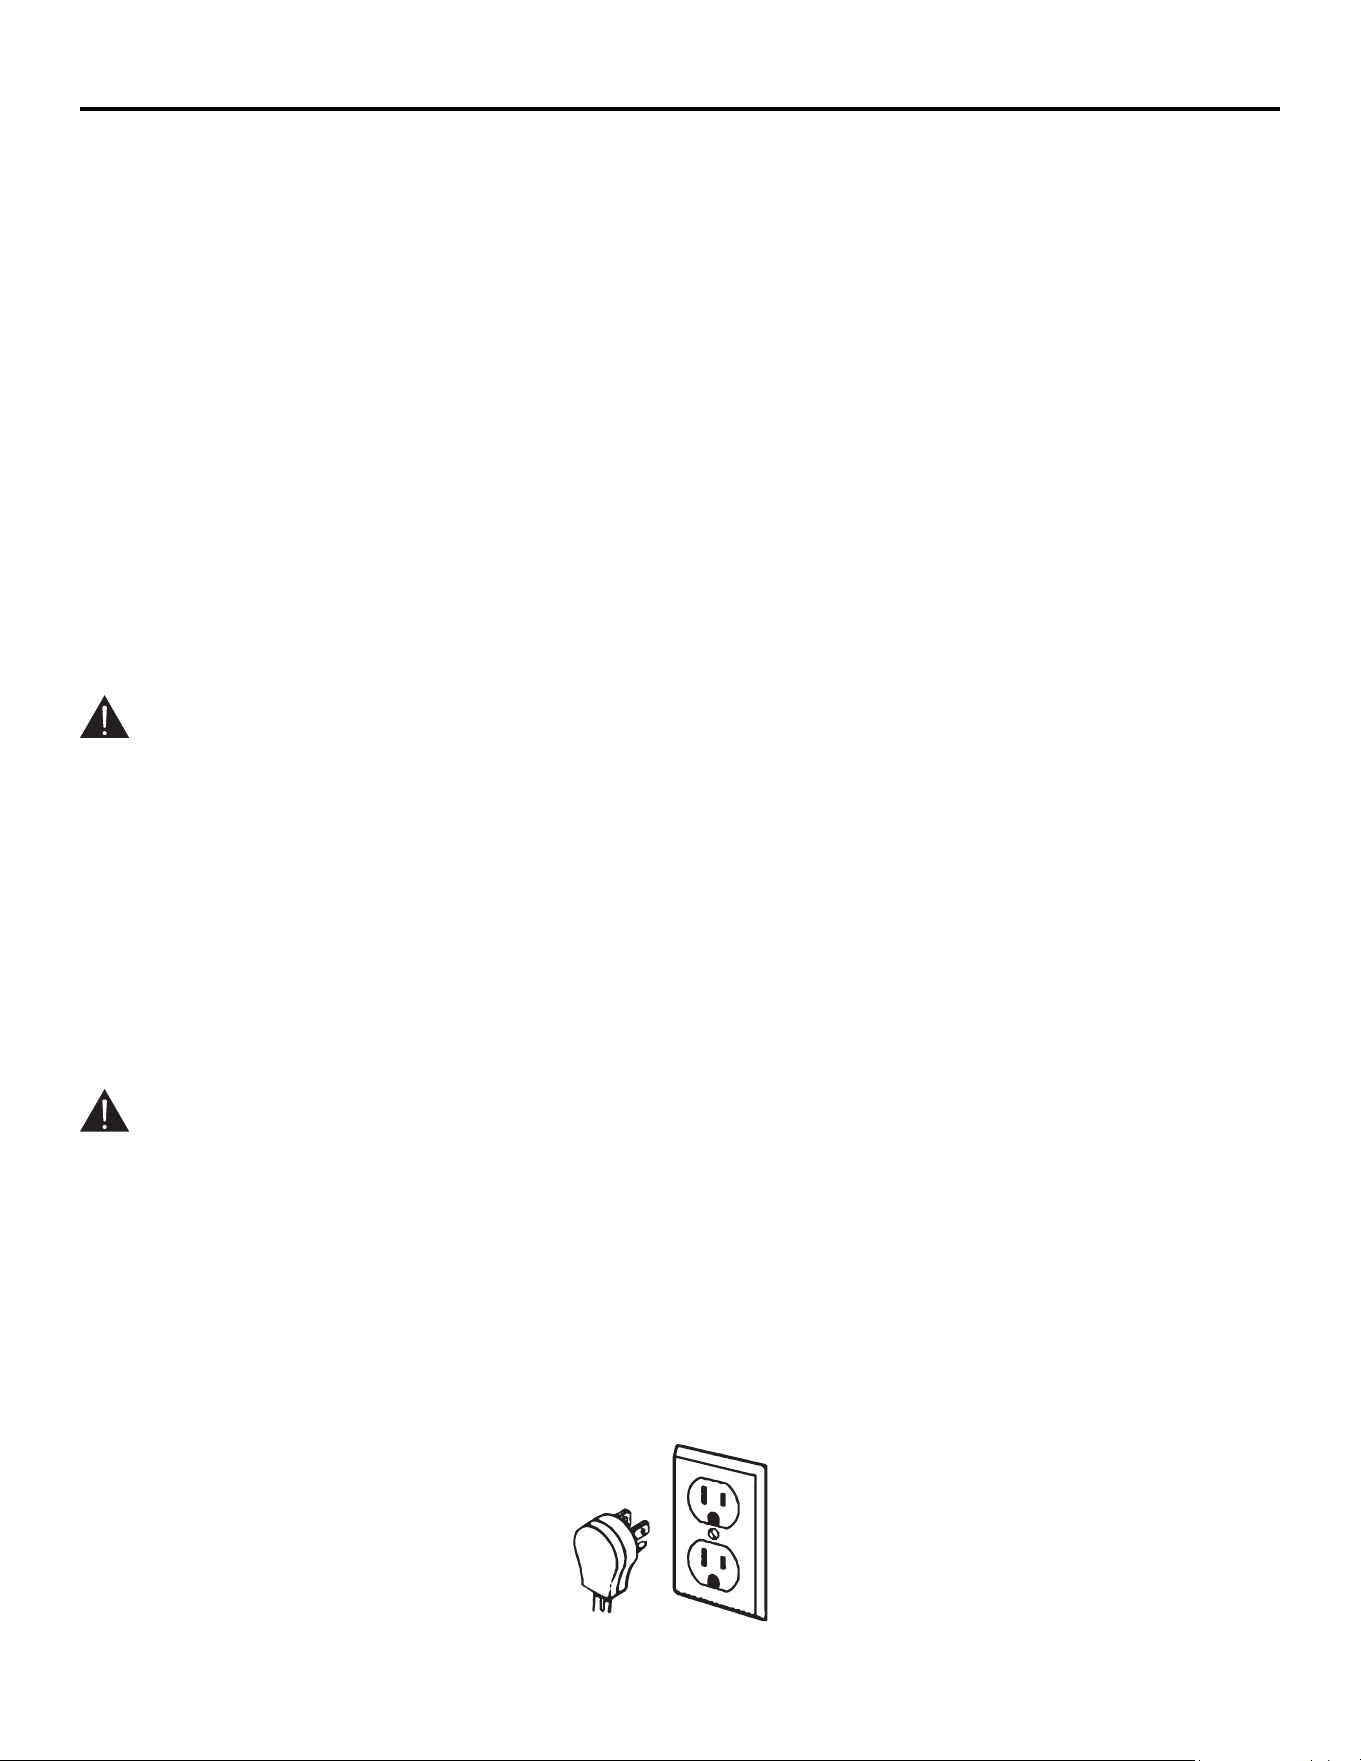
This appliance must be grounded. In the event of an electrical short circuit, grounding reduces the risk of electric shock
by providing an escape wire for the electric current. This appliance is equipped with a cord having a grounding wire with a
grounding plug. The plug must be plugged into an outlet that is properly installed and grounded.
WARNING:
Improper use of grounding can result in a risk of electric shock.
1. Consult a qualified electrician or serviceman if the grounding instructions are not completely understood or if doubt
exists as to whether the appliance is properly grounded.
2. If it is necessary to use an extension cord, use only a 3-wire extension cord that has a 3-blade grounding plug, and a
3- slot receptacle that will accept the plug on the appliance. The marked electrical rating of the extension cord s
Properly polarized and grounded outlet
Three-pronged (grounding plug)
7
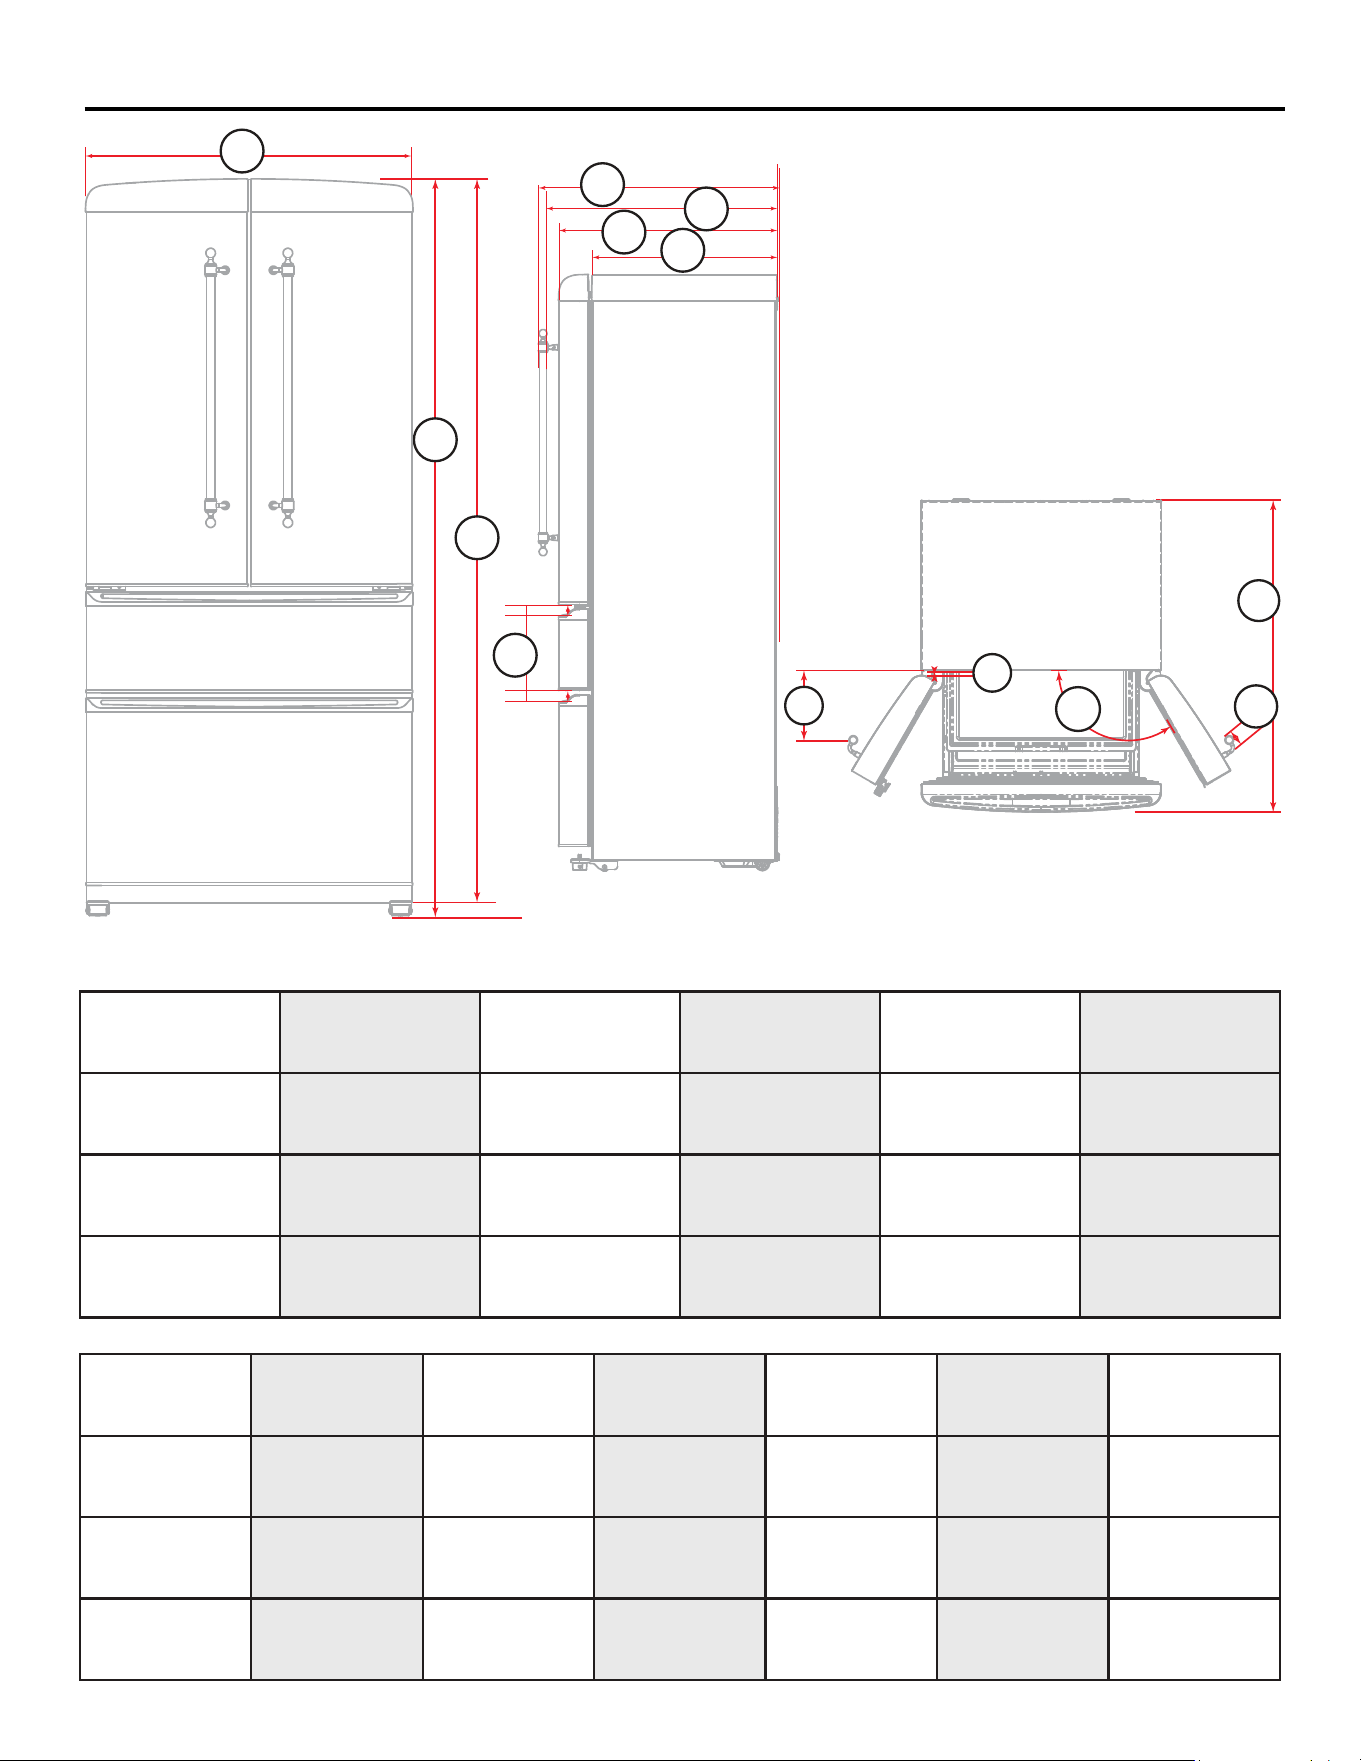
Product Dimension
A
A
B C D
Height to top Hing
to top foot
(on minimum )
E F
Overall Width
Gap
Overall Height top
Hing to bottom foot
(on maximum)
Overall Depth
Handle to complete
back
Depth Handle to
back
32
7/8
”
1
7/16
”
74” 71
1/4
” 29
1/16
” 29
15/16
”
83.5cm 3.6cm 188cm 180.34cm 73.66cm 76cm
G H I J K L
Depth Door to
back
Depth Without
door to back
Depth Box frame
to handle
(Open door)
Width Handle Opening
(Fully open door)
Gap
Open door
27
3/8
” 23
1/16
” 8
15/16”
2
5/16”
120°
3/4”
69.5cm 58.5cm 25.3cm 5.8cm 2cm
M
Overall Depth
Fully open door
42
1/16
”
107.5cm
C
D
H
F
E
G
A
B
M
K
I
L
J
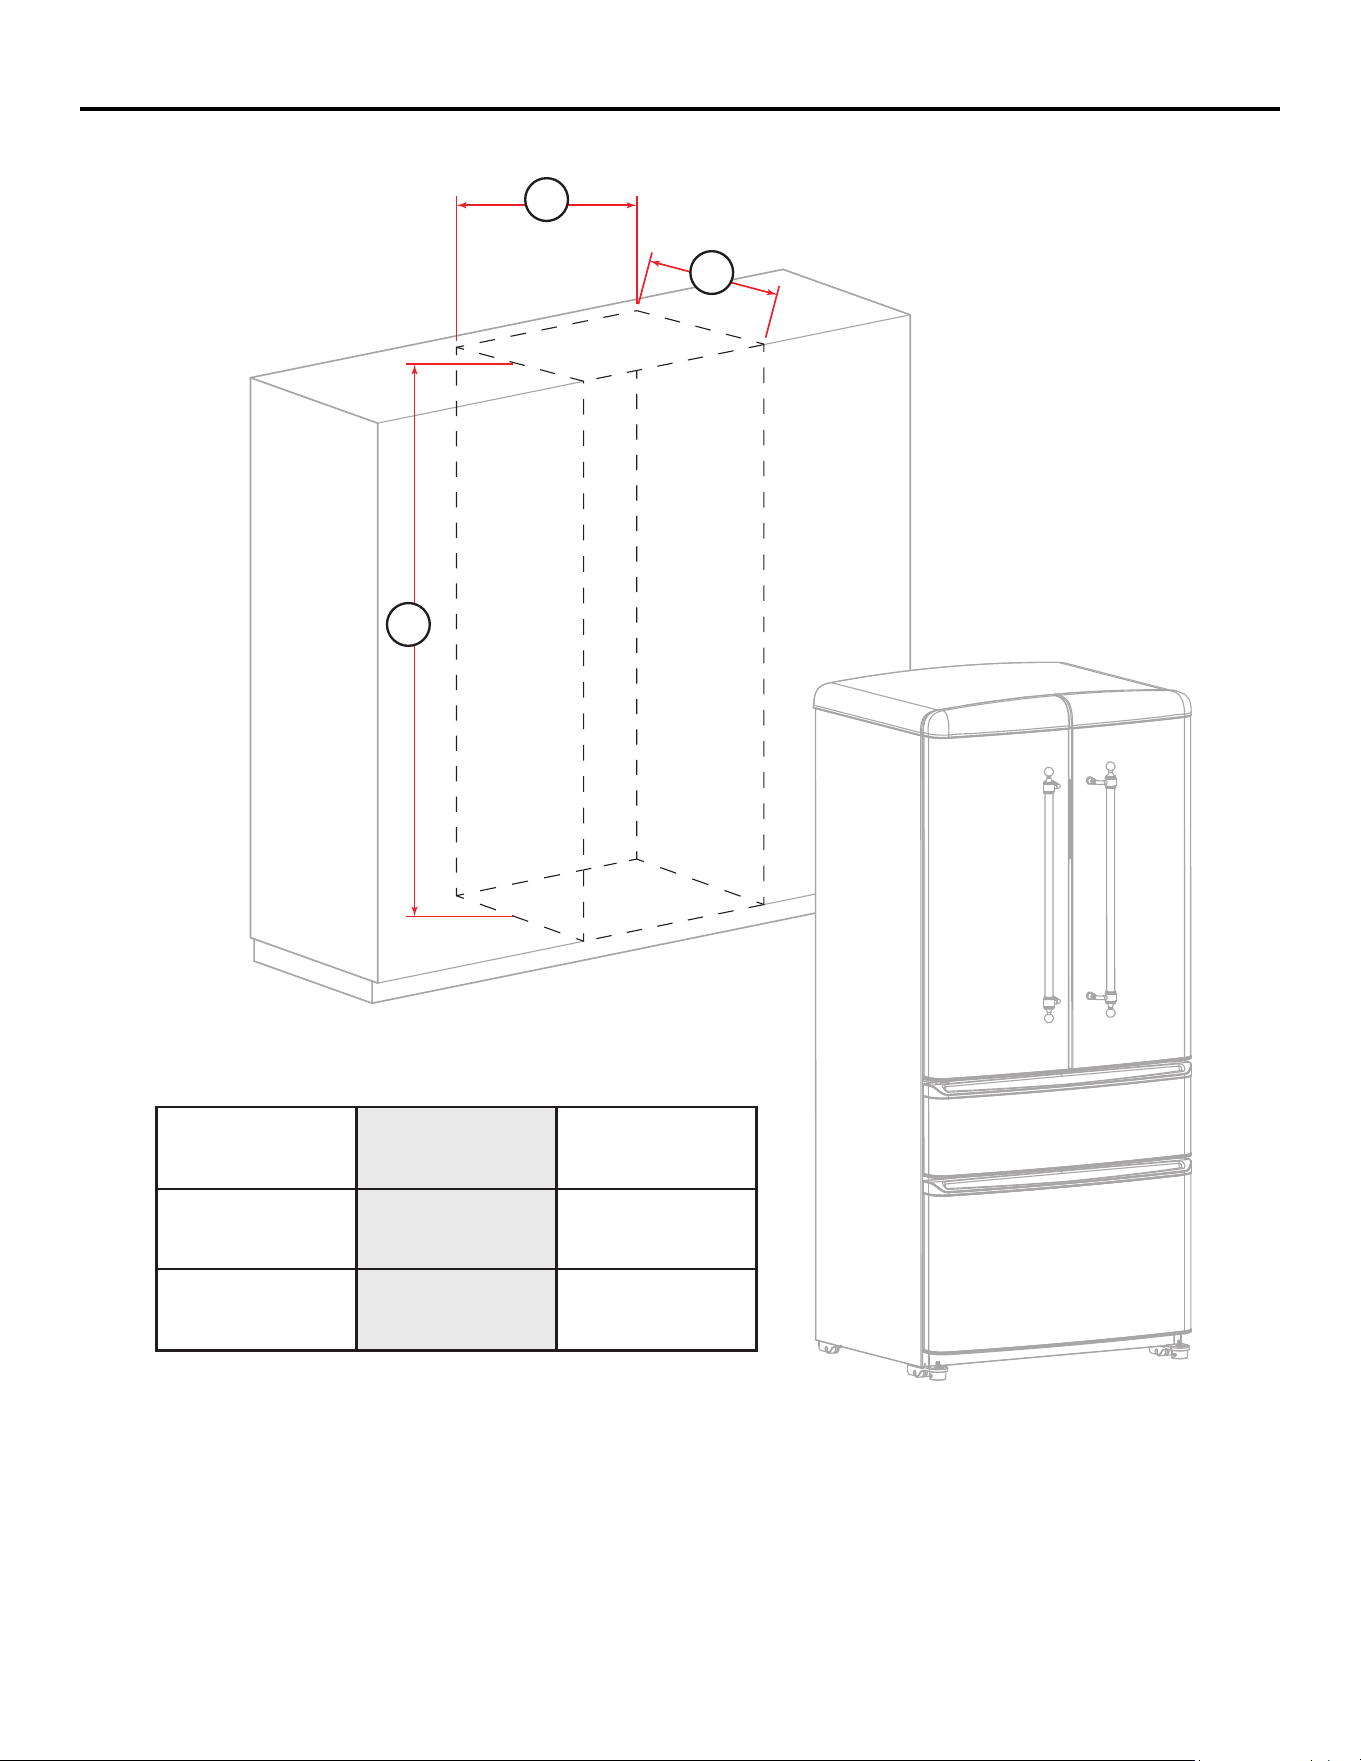
Cutout
8
A B C
40
3/4
’’ 31
5/16
’’77
15/16
’’
198cm 103.5cm 79.5cm
B
A
C

Name of Parts and Accessories
9
14
15
16
12
12
11
2
10
1
2
3
4
5
9
8
7
6
13
LED Lamp of Fridge
Door Rack
Glass Shelf
Moisture Retaining Cover
Crisper
LED Lamp of Freezer
Upper Freezer
Bottom Freezer
1
2
3
4
5
6
7
8
Adjustable Feet
Lamp Switch of Fridge
Control Panel
Sub-compartment of Fridge
Handle of Fridge
Upper Freezer Drawer
Bottom Freezer Tray
Bottom Freezer Drawer
9
10
11
12
13
14
15
16
B
e
f
o
r
e us
i
n
g
,
p
l
ease
r
e
m
o
v
e
t
h
e
f
oa
min
g
a
n
d
t
a
pe
s
w
h
i
c
h
u
s
e
d
f
o
r
fixin
g
d
r
a
w
e
r
s
,
g
l
ass
s
h
e
lv
es a
n
d o
t
h
e
r
p
a
r
t
s
.
Installation
10
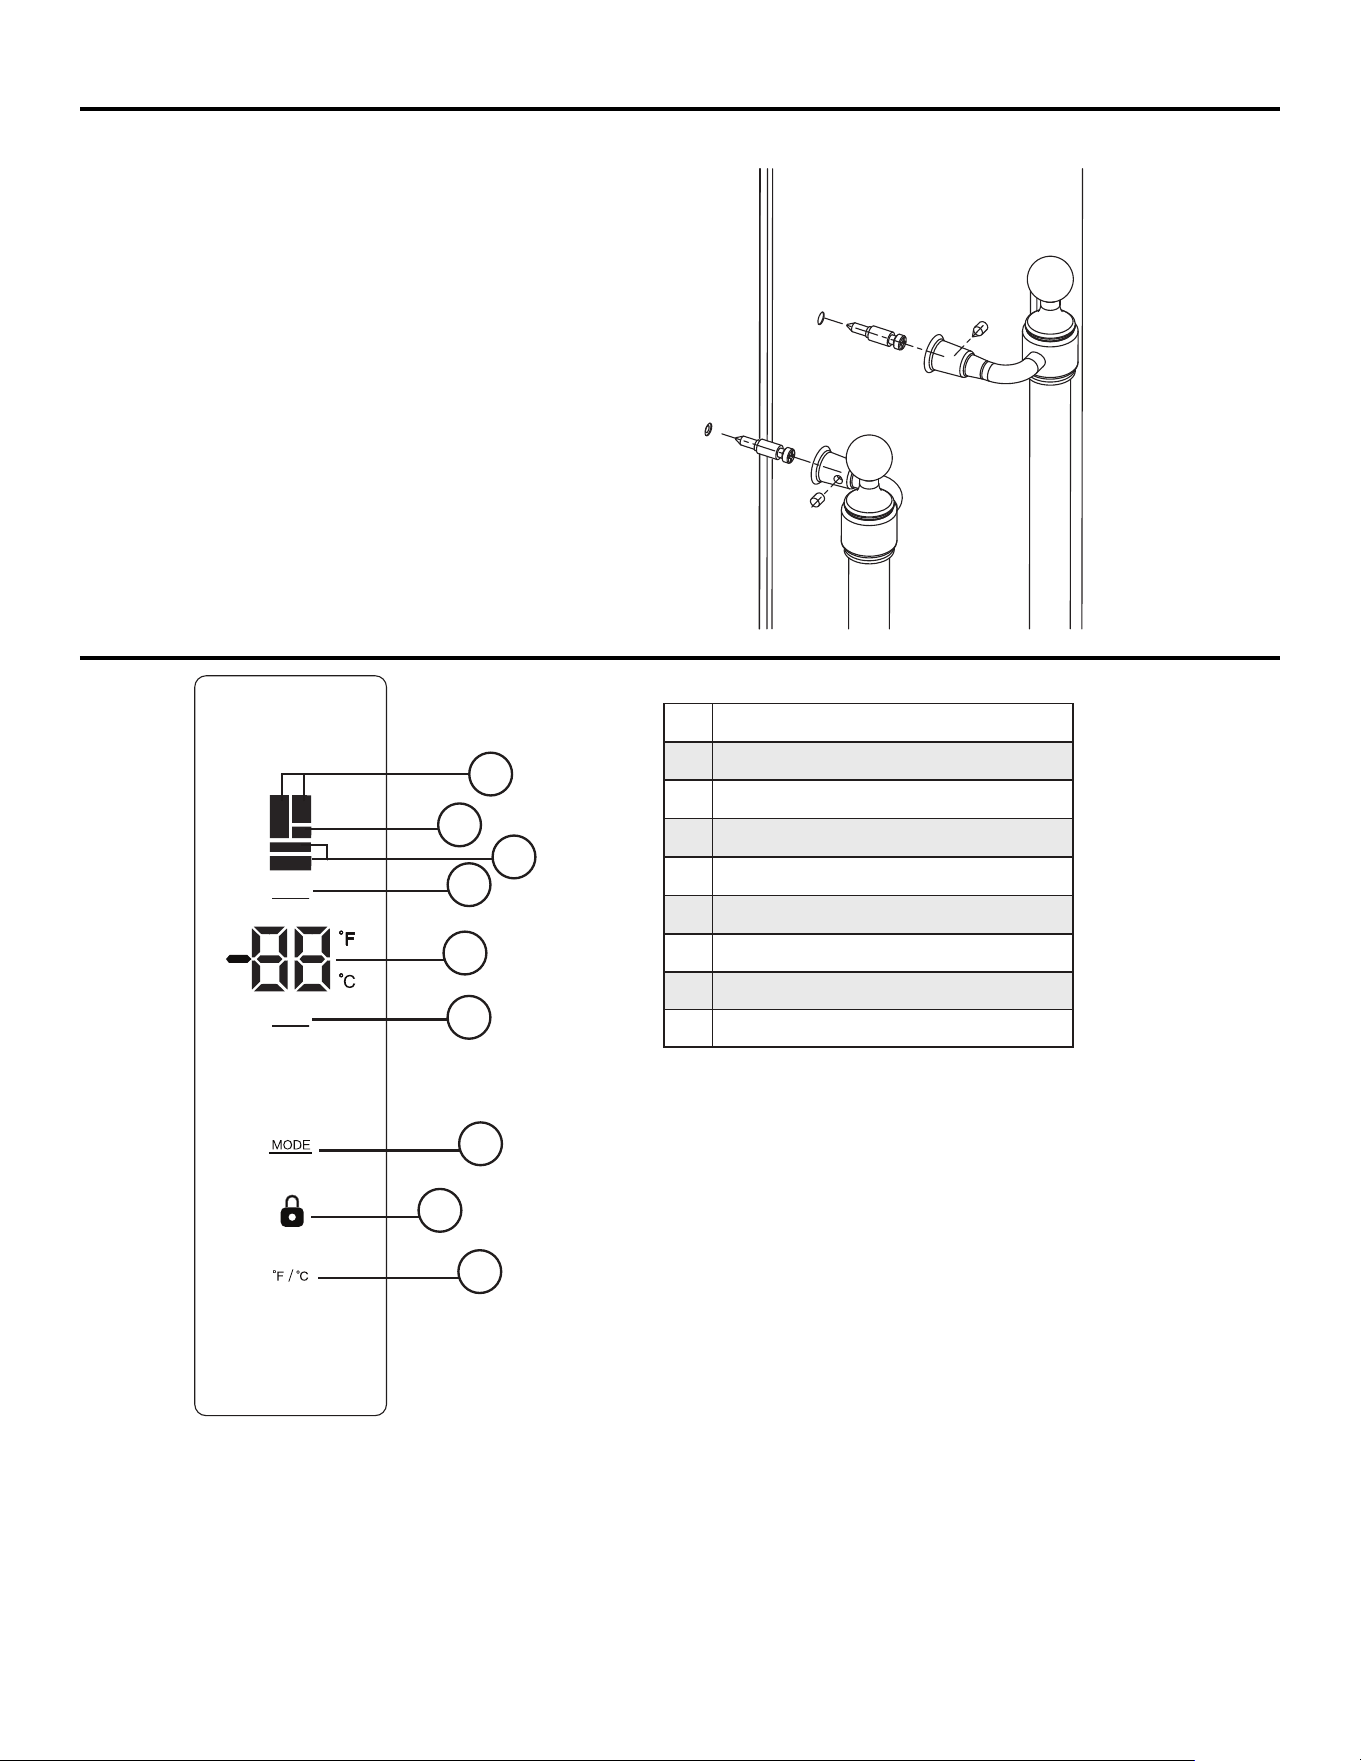
Installing The Handle
1. Locate the handle over the pins on the door panel.
2. Fix the handle by tighten the screw
.
Operating Instruction
Fridge
Sub-compartment
Freezer
Zone Temperature Setting
Temperature Display
Temperature Up and Down Buton
Mode Botton
Lock Icon
˚F/˚C Set Button
1
2
3
4
5
6
7
8
9
Quick
Cooling
Quick
Freezing
ECO Vacation
Press 3s to unlock
ZONE
TEMP
1
4
3
2
6
5
7
9
8
This is an energy saving no-frost refrigerator which
applies intelligent control system. Plugin, it will
access to optimized working performance. You can
also set temperature according to your requirement.
Notes
I Buttons will be all invalid if there is any fault on the
control system.
II LED will turn off with no operation for 1 minute.
Press any button to wake up the display panel.
6°C→-2°C. Freezer temperature range:-14°C → -15°C→ -16°C → -17°C
→-14°C.
→ -18°C→ -19°C → -20°C → -21°C→ -22°C
Tem
perature Setting
Press button 1 to choose fridge, variable temp zone or freezer”. During the chosen zone is flashing, press button 2 to
adjust temperature settings. 1°C for each press. Fridge temperature setting-range: 1°C →2°C→°C→ 3°C→4°C→5°C
→1°C→2°C→3°C→4°C→ →5°C→6°C→7°C→1°C. Sub-compartment temperature setting-range:-2°C -1°C→0°C
→
When desired temperature is selected, the number will flash 5 times to confirm. If you press “Mode” or other butto
during the flashing period, setting will take effect i
mmediately.
11
MODE
Press button3to select your desired mode. Available special modes are: Quick Cooling, Quick Freezing,
ECO and Vacation . Each press, the modes will cycle according to: Quick Cooling →Quick Cooling+
Quick Freezing → Quick Freezing → ECO →Vacation → Quick Cooling.
During mode switching, each related icon will flash5times to confirm. The set will be valid.
- Under “Quick Cooling” mode, the fridge will automatically work at 2 ℃ for 12hrs. This mode will be
disabled if you change to another mode or s
et fridge temperature.
- Under “Quick Freezing” mode, the freezer will automatically work at -22 ℃ for 24hrs. This mode will be
disabled if you change to another mode or set freezer temperature.
- Under “Quick Cooling + Quick Freezing” mode, the fridge will automatically work at 2℃ for 12hrs and
the freezer will automatically work at -22℃ for 24hrs. This mode will be disabled if you change to another
mode or set fridge and freezer temperature.
- Under “ ECO ” mode, the temperature of fridge compartment and
variable temp zone are 5°C and the
freezer compartment is -18°C. This mode will be disabled if you change to another mode or set fridge or
freezer temperature
- Under “ Vacation ” mode, the temperature of fridge compartment will turn off, and the freezer
compartment will run normally, and you can change freezer temperature setting as your requirement.
Temperature display will show “oF” for fridge compartment and sub-compartment. This mode will be
disabled if you change to another mode or set fridge temperatu
re.
Function
- Short press button 4 to switch between Fahrenheit and centigrade, and meanwhile the icon °F or ℃ will be lit.
- Long press button 4 until the lock icon is lit. The display panel will be deactivated to avoid
unguarded operation. To activate the display panel, long press the button 4 again until the lock icon
is
off.
- Memory function: the setting status can be memorized even the power is failure. When power switches
on again, the refrigerator will work according to the last t
emperature or mode setting.
- Alarm function: the refrigerator has door-open alarm function. When any door keeps open over 3
minutes, the alarm sounds and the screen shows “Ed” until the door is closed correctly.
The refrigerator has fault alarm function, if the display shows special error code, like “E1, E2, E3, E4, E5,
E6, EC”, please contact the after-sales service.
Operating Instruction (continued)
Care & Maintenance
CLEANING
Ensure the appliance is unplugged before cleaning. To clean the inside of the appliance, use a soft cloth and a solution of
one tablespoon of baking soda to one quart of water or some mild detergent. Wash removable shelves in a mild detergent
solution, then dry and wipe with a soft cloth. Clean the outside with a soft, damp cloth and
some mild detergent. It is important to kep the area clean where the door seals against the cabinet. Clean this area
with a soapy cloth. Rinse with a damp cloth and let dry.
Note: Do not use cleaners containing ammonia or alcohol on the appliance Ammonia or alcohol can damage the
appearance of the appliance. Ne'er use any commercial or abrasive cleaners or sharp objects on any part of the
appliance.
POWER FAILURE
Most power failures are corrected within a few hours and should not affect the temperature of your
appliance if you minimize the number of times the door is opened. If the power is going to be off for
a longer period of time, take the pmper steps to protect your contents.
Note: Wait 3 to 5 minutes before attempting to restart the refrigerator ifoperation has been
interrupted
12
Care & Maintenance (continued)
MOVING
VACATION
•
Short vacations: Leave the appliance operating during vacations of less than three weeks.
•
Long vacations: If the appliance will not be used for several months, remove all items and turn Off the appliance.
Clean and dry the Interior thoroughly. To prevent odor and mold growth, leave the door open slightly, blocking it open
if necessary.
•
Taking out and putting in the shelves
Tilt the rear part higher to slide the shelf out, then slide it in as much as possible so that its clamp could fit the guide
groove.
Taking out and putting in the door rack
the left fridge door
Lift up the two sides of door rack, remove it upward. To put it back from the top into its required position.
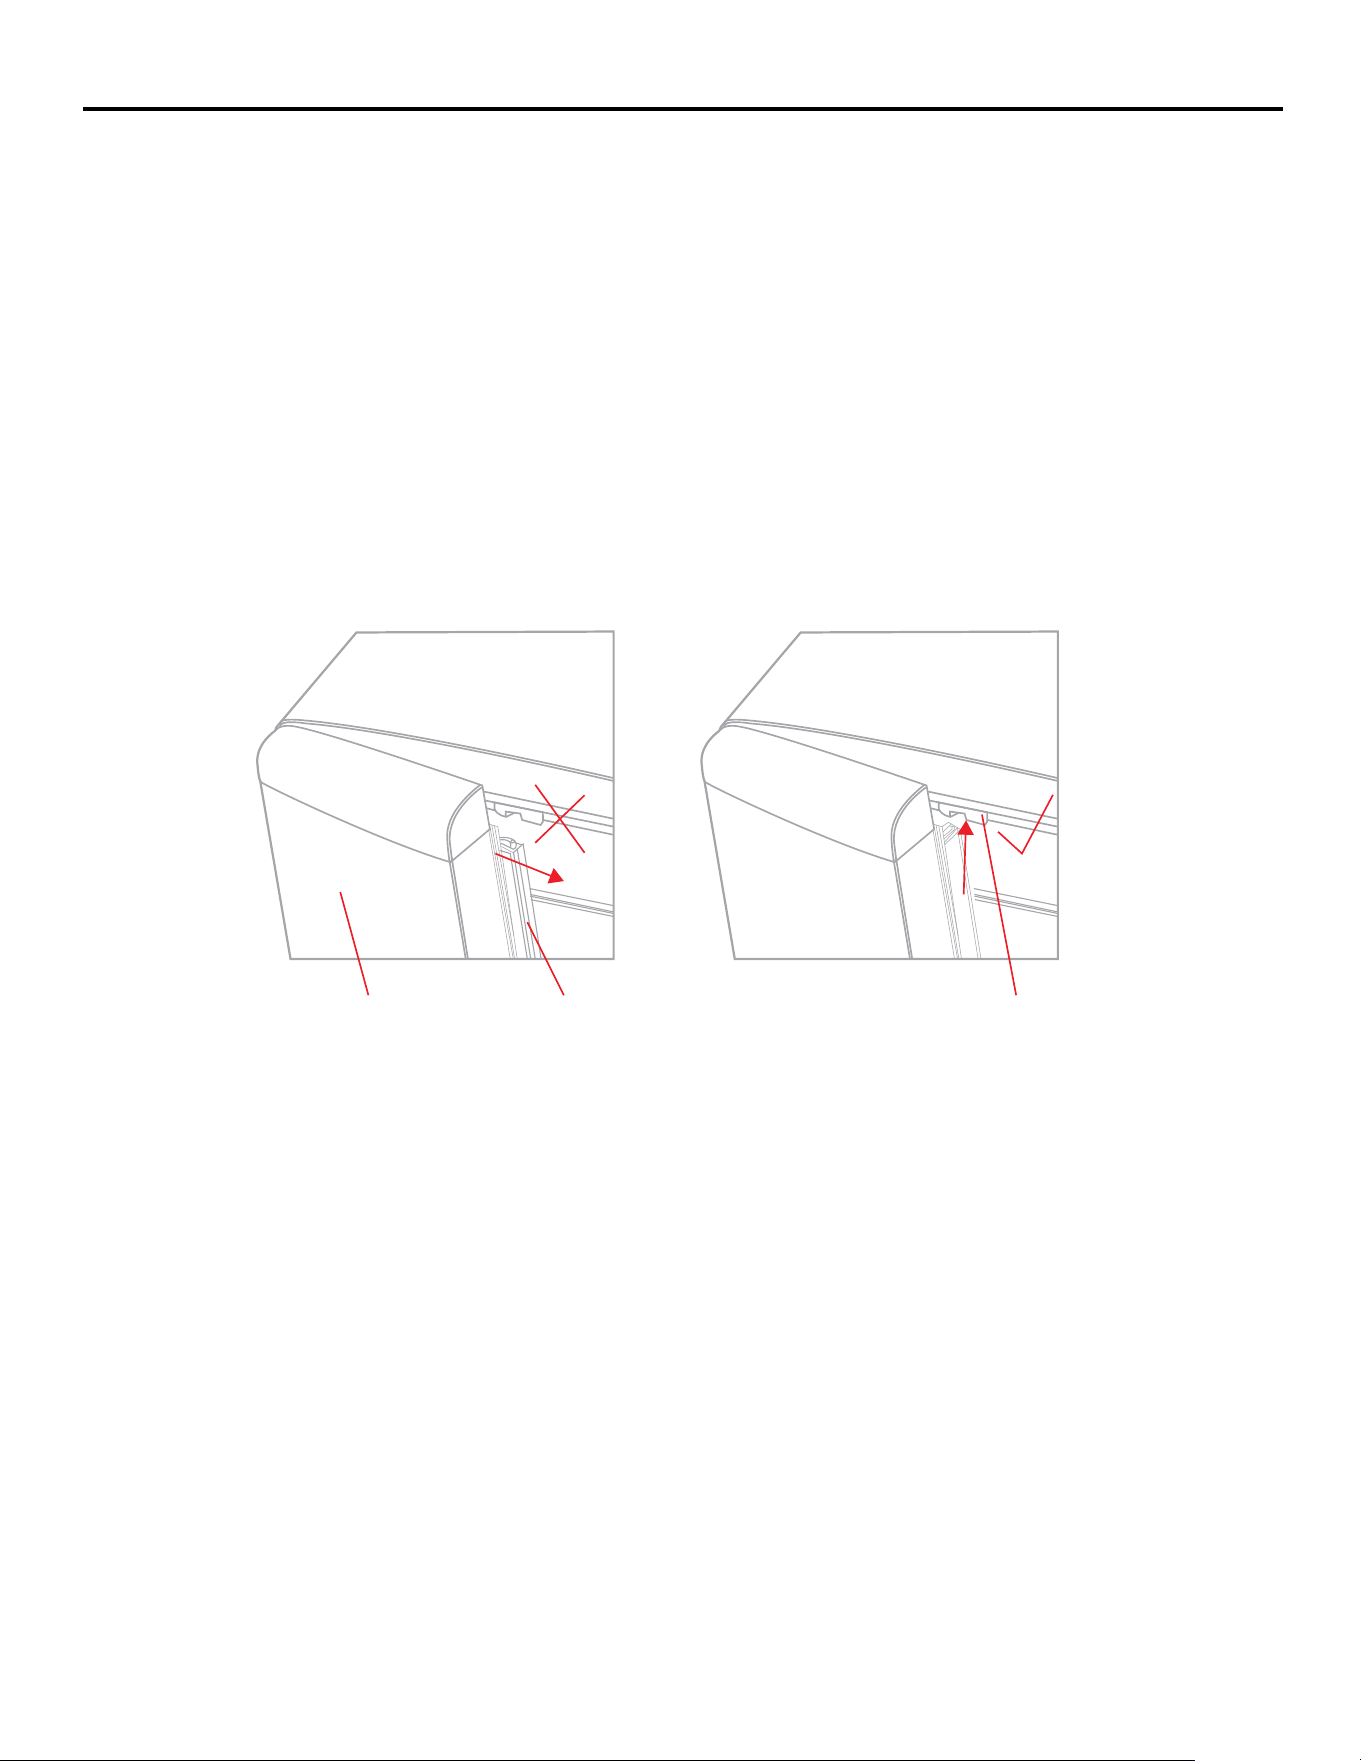
Note:
When closing the left fridge door, pay attention to the angle of the vertical beam, as shown in the diagram,close it
along the cabinet limit structure, otherwise it may cause damage to the vertical beam. After the door is closed in place,
ensure that the vertical beam is closed in place, otherwise it will cause the interior temperature to rise for a long time.
the vertical beam
the cabinet limit structure

13
Troubleshooting
No power
Internal temperature not cold enough
• A fuse may be blown or the circuit breaker tripped
• Plug not fully inserted into the wall outlet
Refrigerator runs continuously
• Temperature setting is tCM) warm
• The door or lid is not shut properly or opened excessively
• Recently added a large quantity of warm food to the cabinet
• Close proximity to heat source or direct sunlight
• Ambient temperature or humidity is very high
Refrigerator makes a gurgling noise when operating
• Temperature setting is too cold
• The door or lid is not shut properly or opened excessively
• Recently added a large quantity of warm food to the cabinet
• Close proximity to heat source or direct sunli ht
• Ambient temperature or humidity is very hid
• This noise is completely normal. The refrigerant inside the appliance will make a gurgling noise as it changes from a
liquid to a gas and back again.
14
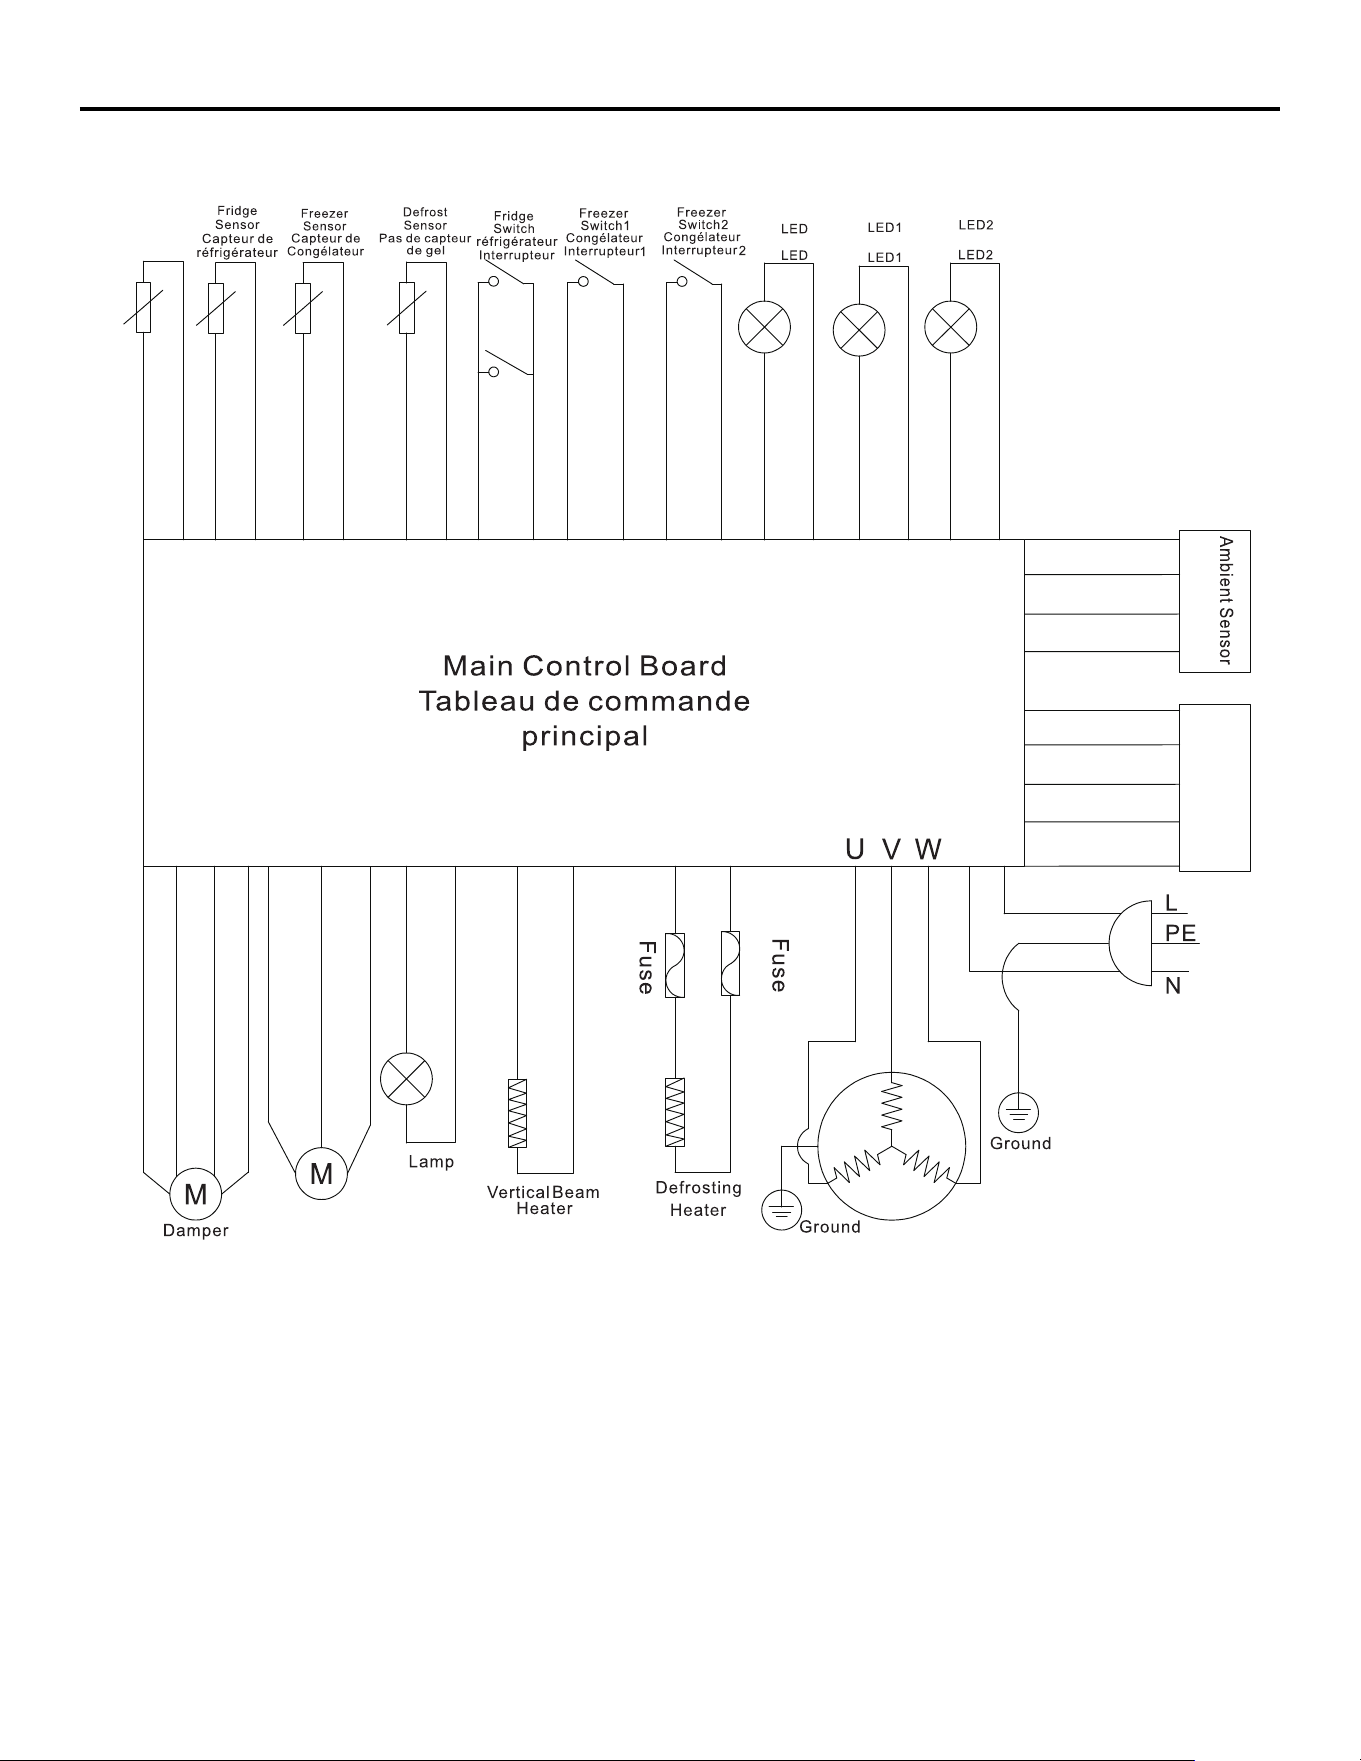
Wire Diagram
Fan
Ventilateur
Display Panel
La terre
Panneau d’affichage
Fusible
Amortisseur
Fusible
Frigde
Réfrigérateur
Freezer
Congélateur
Freezer
Congélateur
Sub-comp
artment
Sensor
Capteur de
sous-comp
artiment
La terre
Capteur ambiant
Lampe
Appareil de
dégivrage
Radiateur à
faisceau
Vertical

15
Warranty
What this limited warranty covers:
The Warranty coverage provided by Forno Appliances in
this statement applies exclusively to the original Forno
appliance (“Product”) sold to the consumer (“Purchaser”) by
an authorized Forno dealer/distributor/retailer, purchased
and installed in the United States or Canada, and which has
always remained within the original country of purchase (the
United States or Canada). Warranty coverage is activated
on the date of the Product’s original retail purchase and has
a duration of two (2) years.
Warranty coverage is non-transferable. In the event
of replacement of parts or of the entire product, the
replacement Product (or parts) shall assume the remaining
original Warranty activated with the original retail purchase
document. This Warranty shall not be extended with respect
to such replacement. Forno Appliances will repair or replace
any component/part which fails or proves defective due to
materials and/or workmanship within 2 years of the date of
the original retail purchase and under conditions of ordinary
residential, non-commercial use. Repair or replacement
will be free of charge, including labor at standard rates and
shipping expenses. Purchaser is responsible for making the
Product reasonably accessible for service. Repair service
must be performed by a Forno Authorized Service company
during normal working hours.
Important
Retain proof of original purchase to establish warranty period.
Forno’s liability on any claim of any kind, with respect to the
goods and/or services provided, shall in no event exceed the
value of the goods or service or part there of which has given
rise to the claim.
30-Day Cosmetic Warranty
The Purchaser must inspect the product at the time of
delivery. Forno warrants that the Product is free from
manufacturing defects in materials and workmanship for
a period of thirty (30) days from date of the original retail
purchase of the Product.
This coverage includes:
• Paint blemishes
• Chips
• Macroscopic finish defects
Cosmetic warranty does NOT cover:
• Issues resulting from incorrect transport, handling and/or
installation (e.g.: dents, broken, warped or deformed
structures or components, cracked or otherwise damaged
glass components);
• Slight color variations on painted/enameled components;
• Differences caused by natural or artificial
lighting, location or other analogous factors; >
stains/corrosion/discoloration caused by external
substances and/or environmental factors; > labor costs,
display, floor, B-stock, out- of-box,“as is” appliances and
demo units.
How to receive service
To receive warranty services, the Purchaser must contact the
Forno Support department in order to determine the problem
and the required service procedures. Troubleshooting with
a customer service representative will be necessary before
moving forward with the service. Model number, serial number
and date of original retail purchase will be requested.
Warranty Exclusions: What Is Not Covered.
• Use of the Product in any non-residential, commercial
application.
• Use of the Product for anything other than its intended
purpose.
• Repair services provided by anyone other than a Forno
Authorized Service agency.
• Damages or repair services to correct services provided
by unauthorized parties or the use of unauthorized parts.
• Installation not in accordance with local/state/city/county
fire codes, electrical codes, gas codes, plumbing codes,
building codes, laws or regulations.
• Defects or damage due to improper storage of the
Product.
• Defects, damage or missing parts on products sold out of
the original factory packaging or from displays. > Service
calls or repairs to correct an incorrect installation of the
Product and/or related accessories.
• Replacement of parts/service calls to connect, convert
or otherwise repair the electrical wiring and/or gas line in
order to properly use the product.
• Replacement of parts/service calls to provide instructions
and information on the use of the Product.
• Replacement of parts/service calls to correct issues
arising from the product being used in a manner other
than what is normal and customary for residential use.
• Replacement of parts/service calls due to wear and tear
of components such as seals, knobs, pan supports,
shelving, cutlery baskets, buttons, touch displays,
scratched or broken ceramic-glass tops.
• Replacement of parts/service calls for lack of/improper
maintenance, including but not limited to: build up of
residues, stains, scratches, discoloration, corrosion.
• Defects and damages arising from accidents, alteration,
misuse, abuse or improper installation.
• Defects and damages arising from Product transport,
logistics and handling. Inspection of the product must be
made at time of delivery. Following receipt and inspection,
the selling dealer/delivery company must be notified of
any issues arising from handling, transport and logistics.
• Defects and damages arising from external forces beyond
the control of Forno Appliances, including but not limited
to wind, rain, sand, fires, floods, mudslides, freezing
temperatures, excessive moisture or extended exposure
to humidity, power surges,
• Lightning, structural failures surrounding the appliance
and other acts of God.
• Products whose serial number has been
altered/damaged/tampered with. In no case shall Forno
be held liable or responsible for damage to surrounding
property, including furniture, cabinetry, flooring, panels,
and other structures surrounding the Product. Forno is
neither liable nor responsible for the Product if it is located
in a remote area or an area where certified trained
technicians are not reasonably available. Purchaser must
bear any transportation and delivery costs of the Product
to the nearest Authorized Service Center or the additional
travel expenses of a certified trained technician
16
Warranty
THERE ARE NO EXPRESS WARRANTIES OTHER THAN THOSE LISTED AND DESCRIBED ABOVE, AND NO WARRANTIES, EITHER EXPRESS OR IMPLIED,
INCLUDING, BUT NOT LIMITED TO, ANY IMPLIED WARRANTIES OF MERCHANTABILITY OR FITNESS FOR A PARTICULAR PURPOSE THAT SHALL APPLY
AFTER THE EXPRESS WARRANTY PERIODS STATED ABOVE, AND NO OTHER EXPRESS WARRANTY OR GUARANTEE GIVEN BY ANY PERSON, FIRM
OR CORPORATION WITH RESPECT TO THIS PRODUCT SHALL BE BINDING ON FORNO. FORNO SHALL NOT BE LIABLE FOR LOSS OF REVENUE OR
PROFITS, FAILURE TO REALIZE SAVINGS OR OTHER BENEFITS, TIME AWAY FROM WORK, MEALS, LOSS OF FOOD OR BEVERAGES, TRAVELING OR
HOTEL EXPENSES, EXPENSES TO RENT OR PURCHASE APPLIANCES, REMODELING/CONSTRUCTION EXPENSES IN EXCESS OF DIRECT DAMAGES
WHICH ARE UNDENIABLY CAUSED EXCLUSIVELY BY FORNO OR ANY OTHER SPECIAL, INCIDENTAL OR CONSEQUENTIAL DAMAGES CAUSED BY THE
USE, MISUSE OR INABILITY TO USE THIS PRODUCT, REGARDLESS OF THE LEGAL THEORY ON WHICH THE CLAIM IS BASED, AND EVEN IF FORNO
HAS BEEN ADVISED OF THE POSSIBILITY OF SUCH DAMAGES. NOR SHALL RECOVERY OF ANY KIND AGAINST FORNO BE GREATER IN AMOUNT
THAN THE PURCHASE PRICE OF THE PRODUCT SOLD BY FORNO AND CAUSING THE ALLEGED DAMAGE. WITHOUT PREJUDICE TO THE FOREGOING,
PURCHASER ASSUMES ALL RISK AND LIABILITY FOR LOSS, DAMAGE OR INJURY TO PURCHASER AND PURCHASER’S PROPERTY AND TO OTHERS
AND THEIR PROPERTY ARISING FROM THE USE, MISUSE, OR INABILITY TO USE THIS PRODUCT SOLD BY FORNO THAT IS NOT A DIRECT RESULT OF
NEGLIGENCE ON THE PART OF FORNO THIS LIMITED WARRANTY SHALL NOT EXTEND TO ANYONE OTHER THAN THE ORIGINAL PURCHASER OF THIS
PRODUCT, IS NON-TRANSFERABLE, AND STATES YOUR EXCLUSIVE REMEDY.
Correct Disposal of this product:
This marking indicates that this appliance should not be disposed with
other household wastes. To prevent possible harm to the environment
or human health from uncontrolled waste disposal, recycle it responsibly
to promote the sustainable reuse of material resources.
Customer Support: Call 1-866-231-8893 or email: [email protected]