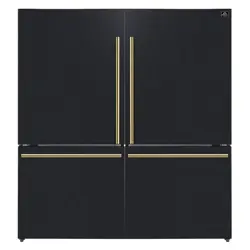

FFFFD1787-60S | FFFFD1787-60WHT | FFFFD1787-60BLK
Forno 34.4Cu.Ft. Freestanding Dual Bottom Freezer Refrigerator
BEFORE USE, PLEASE READ AND FOLLOWALL SAFETY RULES AND
OPERATING INSTRUCTIONS.
05/2025

Product Information Service Information
Model Number:
Use these numbers in any
correspondence or services calls
concerning your product.
If you received a damaged product,
immediately contact Forno.
Check the troubleshooting guide
before you call for service. It lists the
causes of minor operation problems
that you can correct yourself.
Serial Number:
Date of Purchase:
Purchase Address And
Phone:
Thank you for purchasing a Forno product. Please read the entire instruction manual before operating your new appliance
for the rst time. Whether you are an occasional user or an expert, it will be benecial to familiarize yourself with the
safety practices, features, operation and care recommendations of your appliance.
Both the model and serial number are listed inside the product. For warranty purposes, you will also need the date of
purchase .
Record this information below for future reference.
Customer Care
Services in Canada and Untied States
Keep the instruction manual handy to answer your questions. You can also nd all the information you need on-line at
www
.forno.ca.
If you don’t understand something or need more assistance, please visit our website or email: [email protected]
If there is a problem, please contact FORNO customer service. Please note that troubleshooting with a customer service
representative will be needed before being able to send a service provider. All warranty work needs to be authorized by
FORNO customer service. All our authorized service providers are carefully selected and rigorously trained by us.
Table of Contents
20
18
17
15
8
19
7
4
22
23
:$55$17<
I Important Safety Instructions
Read and follow all safety messages. Save these inst『uctions.
This safety alert symbol will help you understand situations and hazards that may
cause injury or death.
The WARNING alert means a potentially hazardous situation. Serious
injury or death may occur if not avoided.
The DANGER alert means an imminently hazardous situation. Serious
injury or death may occur if not avoided.
The CAUTION alert means a potentially hazardous situation. Moderate
or minor injury may occur if not avoided.
AwARNING
1.Please ensure that everyone using this
appliance is familiar with its operations and
safety features. This appliance is not intended
for use by persons (including children) with
reduced physical, sensory or mental capabilities
,
unless supervised or are properly instructed.
2. This appliance is intended to be used in
residential households and similar applications.
3.Keep explosive and flammable substances
away from unit. Do not store similar material in
the refrigerator.
4.Disconnect power before servicing or installing
an Ice Maker.
5. Use nonflammable cleaner.
6. Use 2 or more people to remove old unit
and install this unit.
l
food storage compartments of the appliance,
unless they are of the type recommended by
the manufacturer.
wording regarding the use of extension cords:
Do not use an extension cord or
ungrounded (two prong) adapters.
If the supply cord is damaged, it must be
replaced by the manufacturer, its service
agent or simila「lyqualified persons in order to
avoida haza心,
7.
8.
Do not use mechanical devices or other
means to accelerate the defrosting
process,othe「 than those recommended by
themanufacturer.
l l.. Keep ventilation openings, in the appliance
enclosure or in the built-in structure, clear of
obst『uction.
The instructions include the following
0.
Do not damage the refrigerant
9.
Do not use electrical appliances inside the

A DANGER
To avoid the『isks that are always present when
using an electric appliance, we recommend
that you pay aention to the instructions about
electricity below.
1. The appliance requires single phase
115V /60Hz power supply. It has a power cord
that has a 3-prong grounding plug that
minimizes the possibility of electrical shock. This
appliance must be grounded. Do not remove
grounding prong or modify the power plug.
2. The unit should be plugged into a dedicated
electrical outlet that meets all current standa『ds
and requirements. Do not plug anything else
into the same outlet and ensure the appliance is
the only thing plugged into the entire circuit. It
should have its own dedicated breaker.
Otherwise, this may overload the circuit and
cause a fire.
3.Do not modify the power plug. The power
plug must be accessible when the appliance is
installed.
4. The appliance should not be turned off with a
switch or other device.
5. Make sure that the plug is not squashed o「
damaged. Otherwise, it may cause short circuit,
electric shock or overheat and even cause a fi伦,
6.Do not insert the power plug if the socket is
loose, there is a risk of electric shock or fi『e.
7.Switch off the appliance and disconnect it
from the main power before you clean or
move it.
8.Never unplug the appliance by pulling on the
electrical cord. Always grip the plug
firmly and pull straight out from the socket to
prevent damaging the power cord.
10.Any electrical component must be
replaced or repaired by a qualified electrician
or authorized service engineer. Only genuine
replacement parts should be used.
11.To avoid eye injury, do not look direct into
the LED light located in the refrigerator
compartment. If it is not functioning correctly,
consult a qualified, registered electrician or
replace it in accordance with the cleaning
and care chapter.
12.The refrigerant isobutene (R600a) is
contained within the refrigerant circuit of the
appliance. During transportation and
installation of the appliance, ensure that none
of the components of the refrigerant circuit
becomes damaged. The refrigerant (R600a) is
flammable.
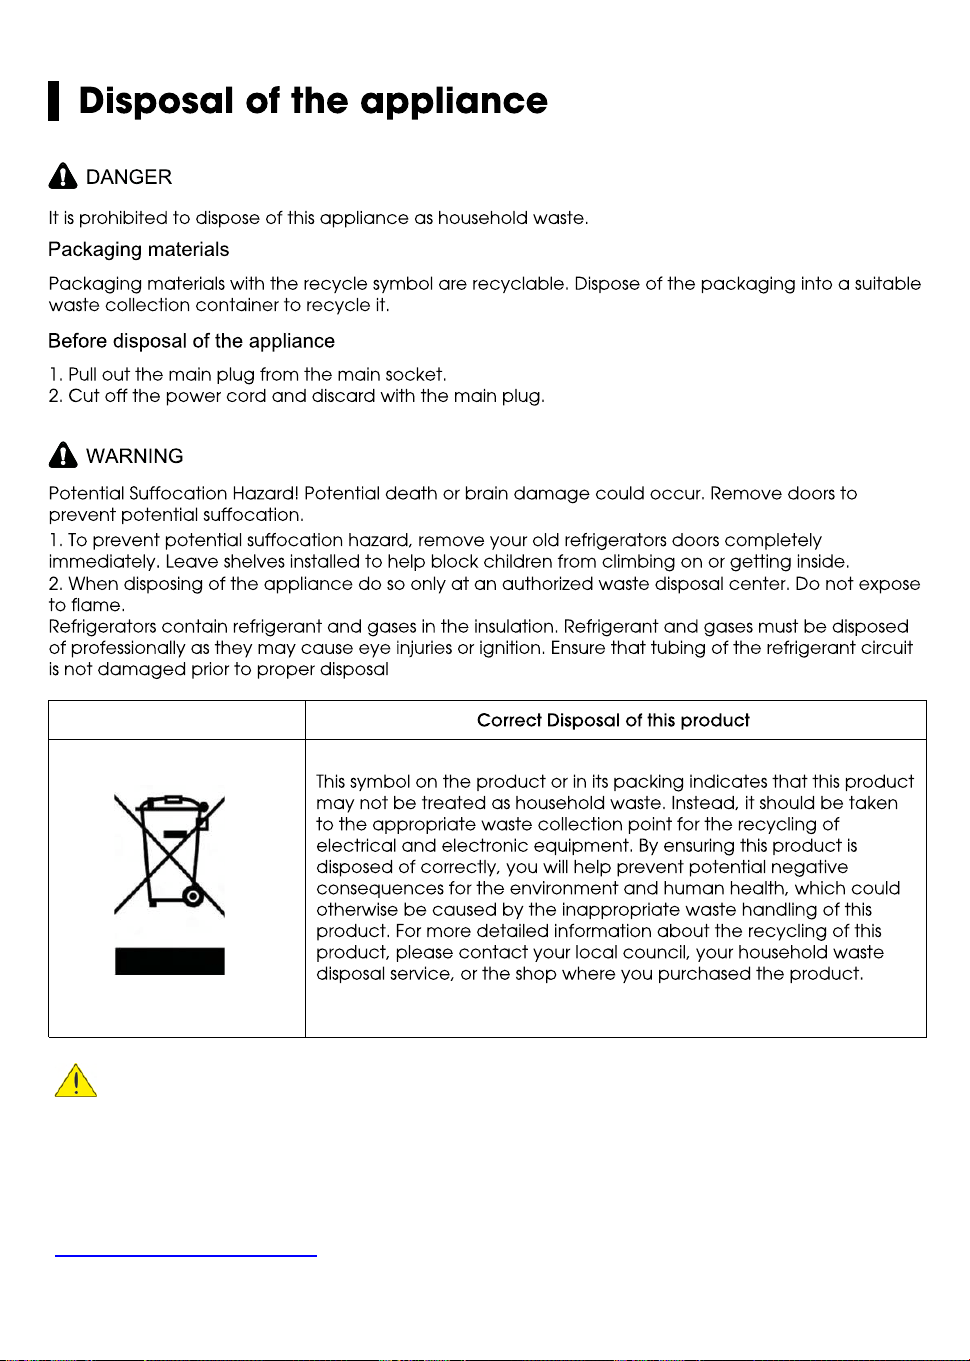
13.Risk of child entrapment. Before you throw
away your old appliance:
Take off the doors
Leave the shelves in place so that children
may not easily climb inside.
A CAUTION
1.Don't store products which contain
flammable propellants (e.g. spray cans) or
explosive substances in the appliances.
2.Avoid open flames (candles, lamps etc.)
and sources of ignition.
3.Thoroughly ventilate the room in which the
appliance is situated.
4. Unpack and check through the appliance
Should any damage be evident, dont plug in
the appliance but contact the shop immedi
ately from which you purchased it. Keep all
packing mate「ialsin this case.
5.We recommend that you wait for 4 hours
before connecting the appliance to allow the
refrigerant to flow back into the compressor.
9.Do not operate the appliance without the
cover over interior lighting.

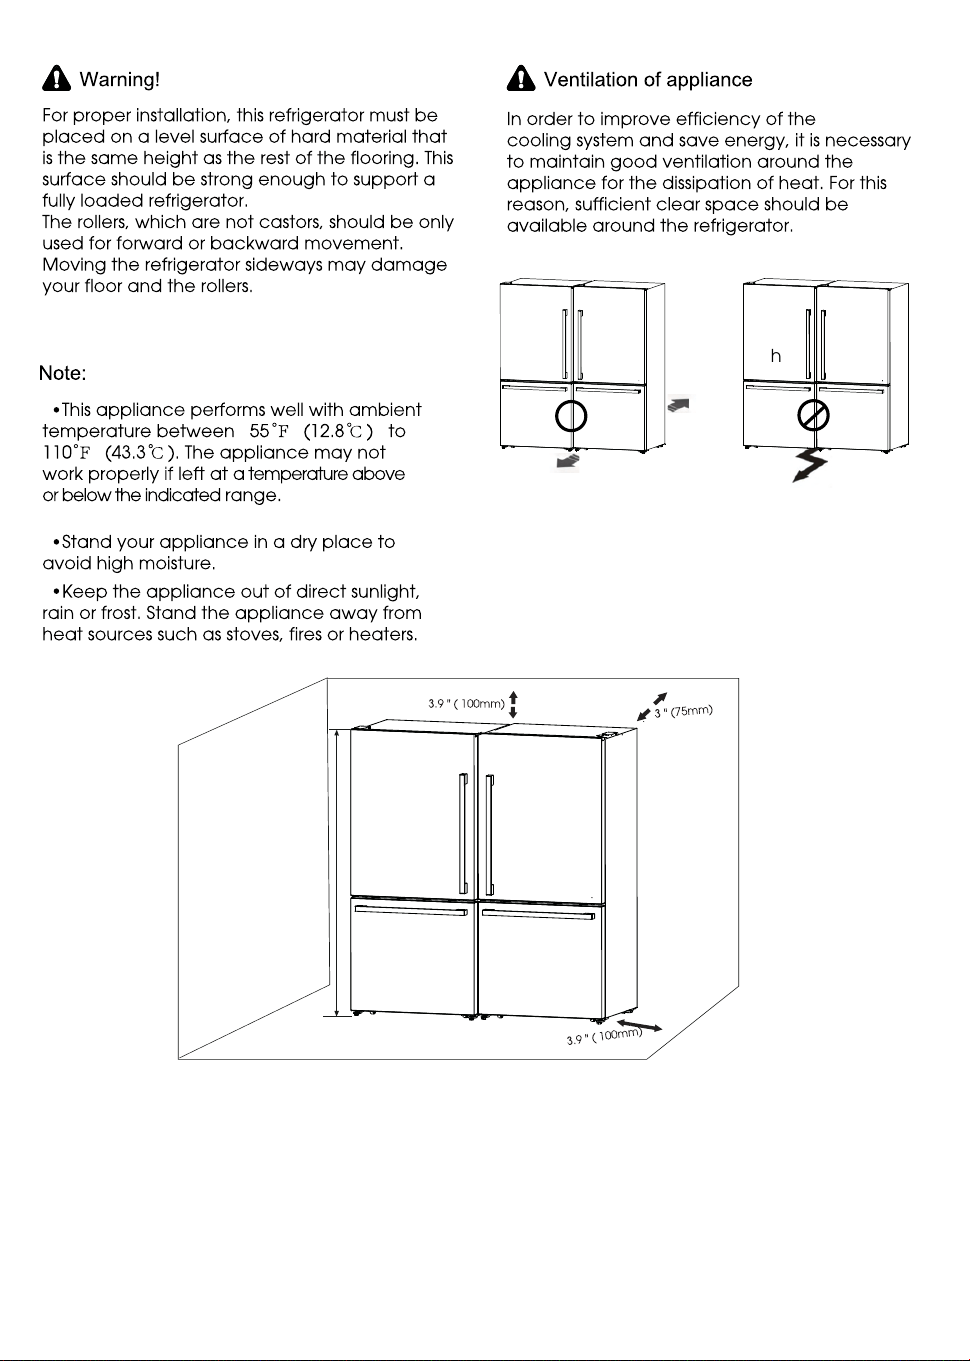
General safety and daily use
It is impoant to use your appliance safely.
We recommend that you follow the guidelines
below.
We recommend that you keep this use「S
manual with the appliance for futu「e
reference.
This appliance is intended to be used in
households and similar applications such as:
-Staff kitchen-areas in shops, offices and
other working environments;
-Clients in hotels, motels and other residential
types of environment;
-Bed and breakfast type of environments;
-Catering and similar non-retail
applications.
Lack of experience and knowledge, unless
they have supervision or been given instruc
tion concerning use of the appliance.
Children should be supervised to ensure that
they do not play with the appliance.
Store any food in acco『dance with the
storage instructions from the manufacturer.
Don't try to repair the appliance yourself. It is
dangerous to alte「thespecifications
or modify this product in any way. Any
damage to the power cord may cause a short
circuit, fire or electric shock.
Dont place too much food directly against
the air outlet on the rear wall of
both the refrigerator and freezer
compartment, as it affects sufficient air
circulation.
Safety r children and infirm persons
Keep all packaging away from children
to avoid risk of suffocation.
Protect children from being scalded by
touching the compressor at the rear bo廿om
of appliance
Dont place items on top of the appliance
as this could cause injury should they fall off.
Neve「allow children to play with the
appliance by hanging o「standingove「or on
the doors,「acks,shelves and drawers etc.
Dont place hot items near the plastic
components of this appliance.
Frozen food must not be refrozen once it
has been thawed out.
Dont store bo廿ledor canned drinks
(especially carbonated drinks) in the freezer
compartment. Bo廿esand cans may explode.
Use caution consuming popsicles or ice
cubes straight from the freezer as this can
cause freezer burn to the mouth and lips.
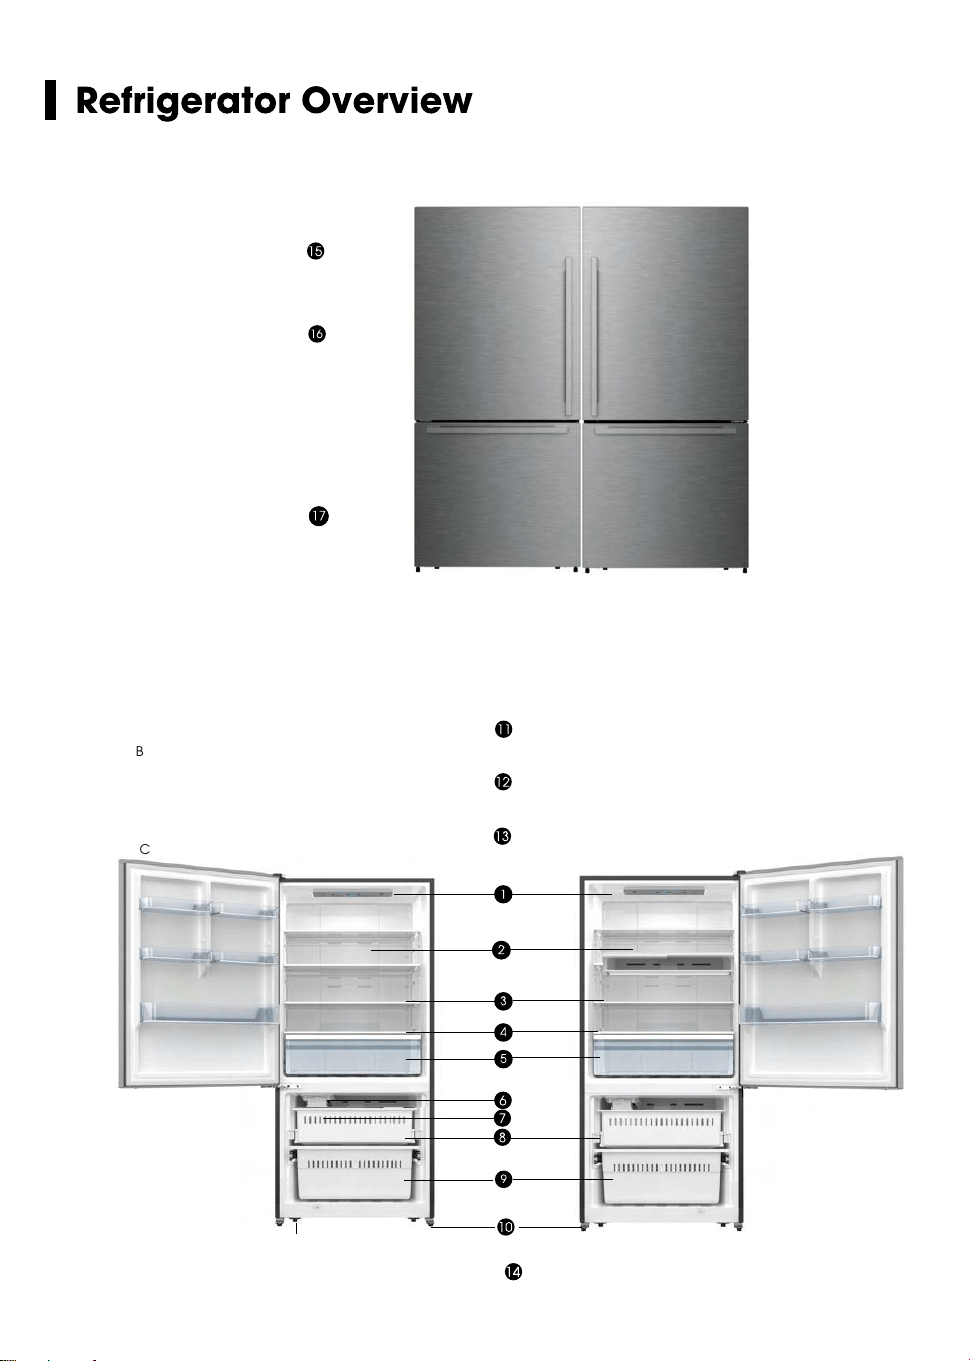
B
C
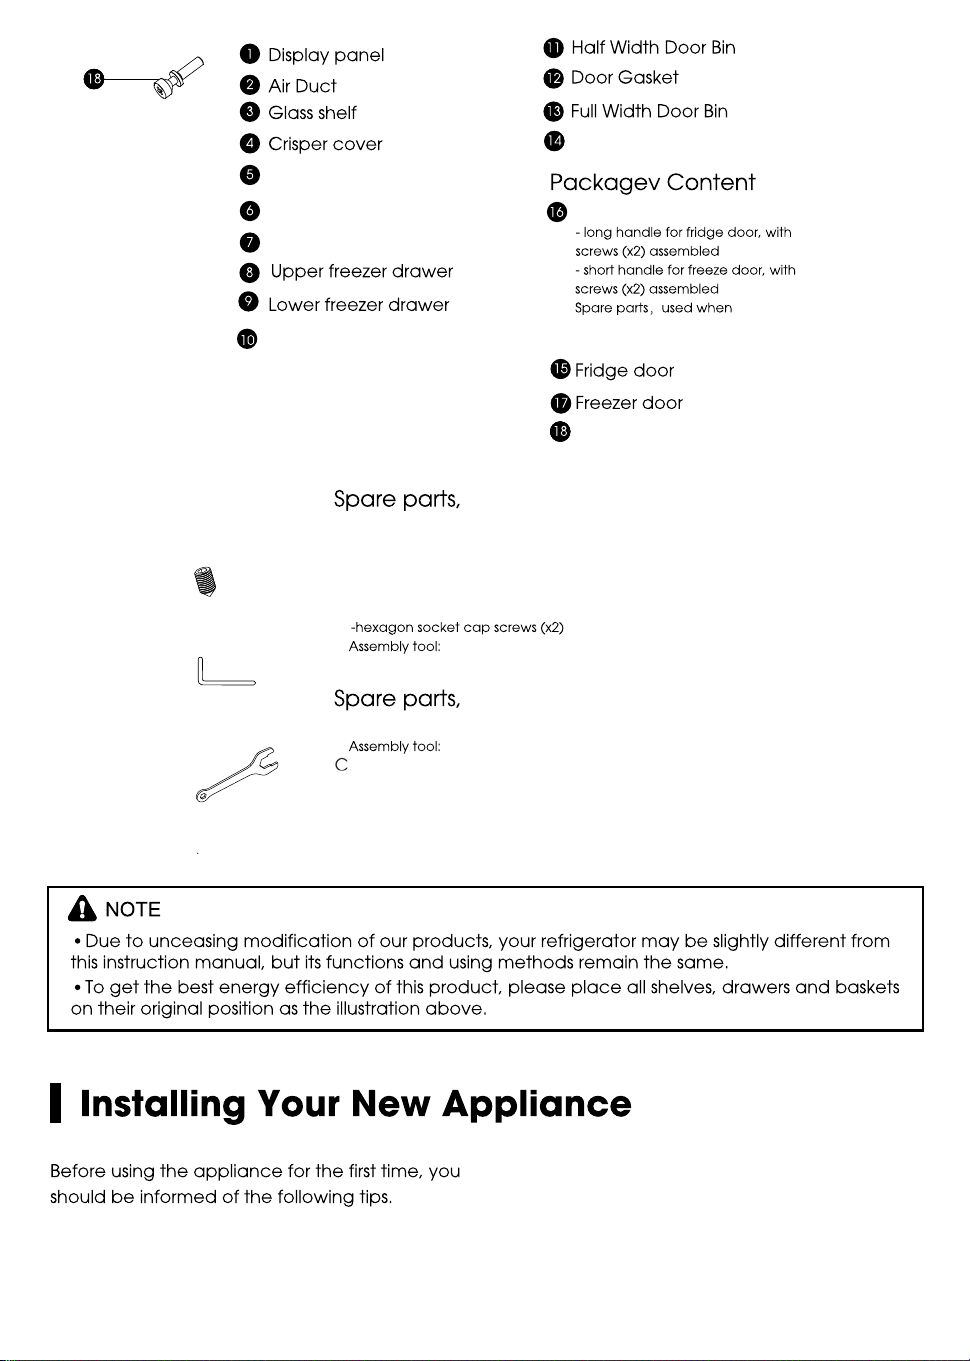
Adjustable bottom feet
Roll wheel
"
Handle supports (x4)
(x4)
screws
assembled missed
used when installing the handles
A
s
AB- llen Wrench
1
/
8
Crisper Drawer
Ice maker
Ice bucket ( inside )
-Wrench 7/ 8
"
used when adjusting the bottom feet
B
C
Handle (x4)
s
s
8
h
9
h
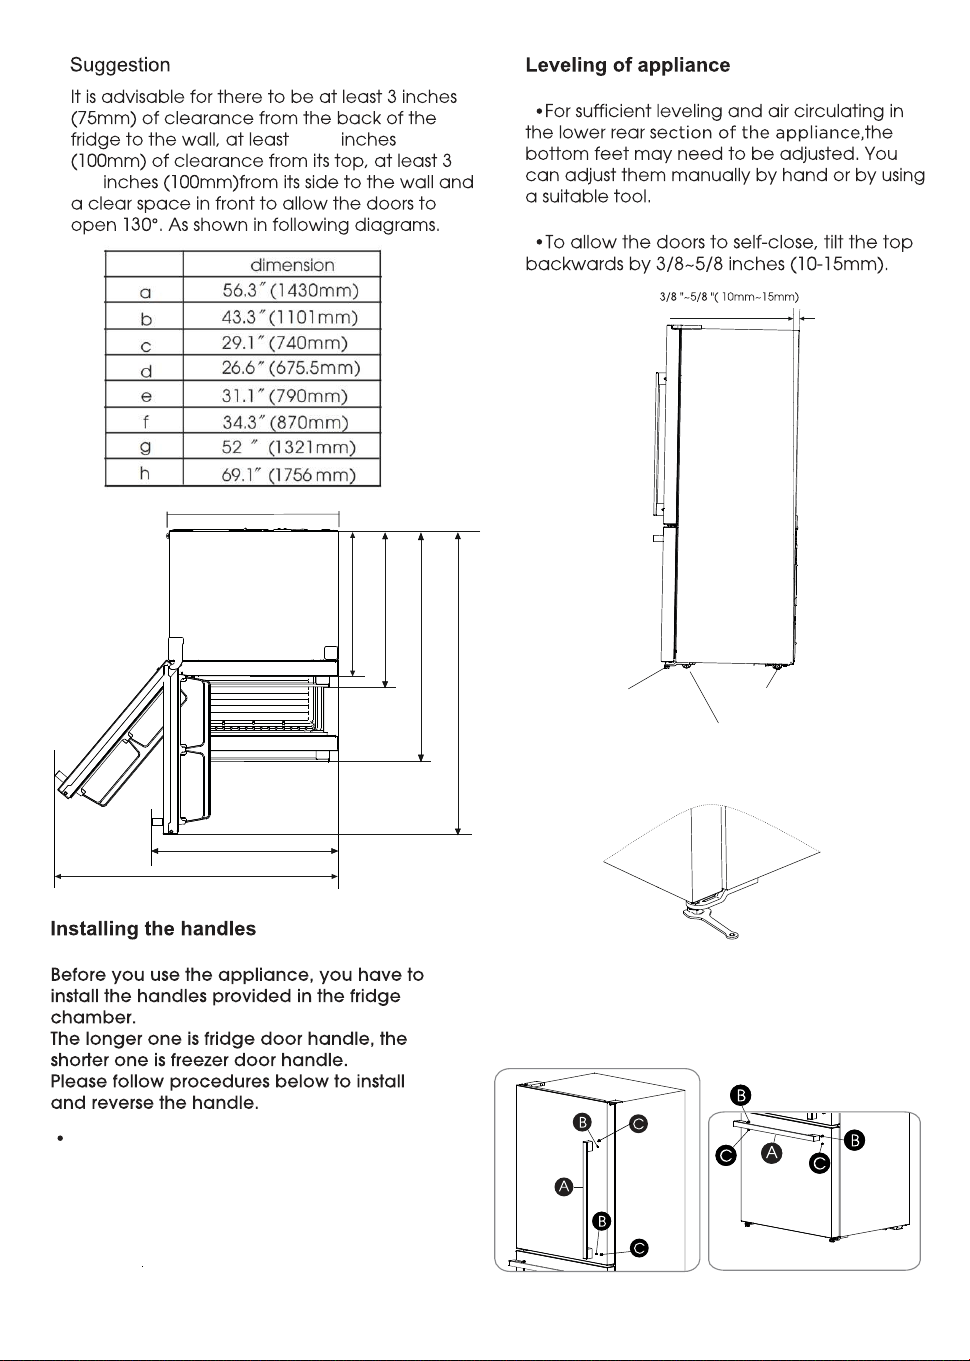
a
b
c
d
f
g
e
3.9
3.9
$GMXVWPHQWRIERWWRPIHHW
Take out the screw hole covers on the
doors, install the handle supports(C).
Place the handle (A) on the door by
fitting the handle over the handle supports (C),
then fasten the screws (B) with 3mm Allen
wrench (provided in plastic bag).
10
Bottom feet
Rear rollers
Front rollers
"
(5/16 , 8mm)
"
( 1/8 ,3mm )
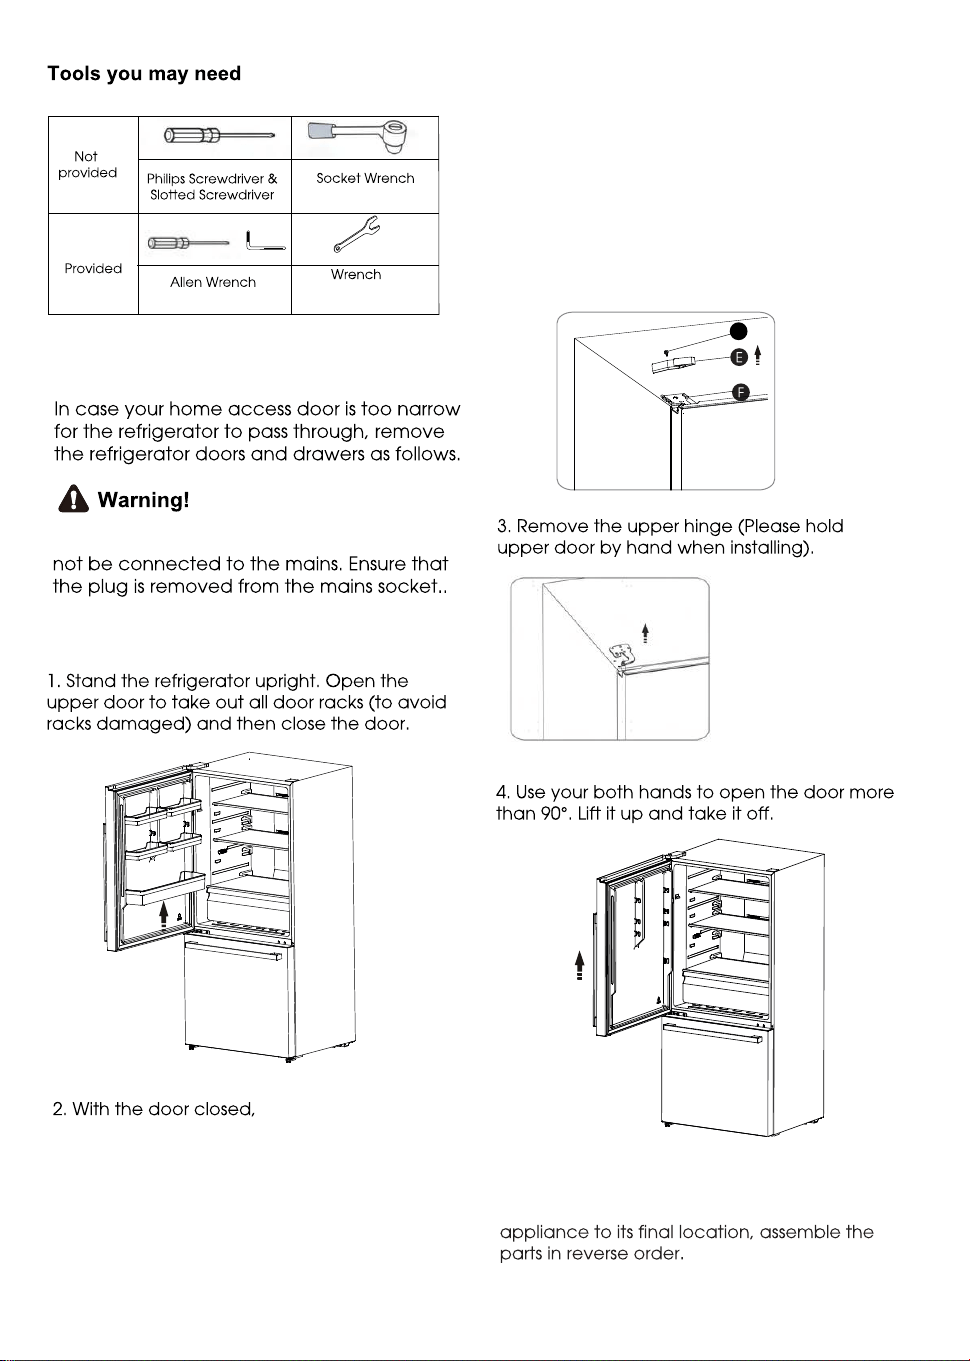
Refrigerator Door Removal
When removing the door, the appliance must
Fridge Door Removal
O
loosen the screw (O )
and remov e the upper hing e cov er (E ) on the
top rig ht side of appliance and remov etop r
special flang e screws (F ) with socket wrench.
K eep the upper hing e cov er for future reference.
Re-assembling the fridge door
To reattach the fridge door after you moved the
11
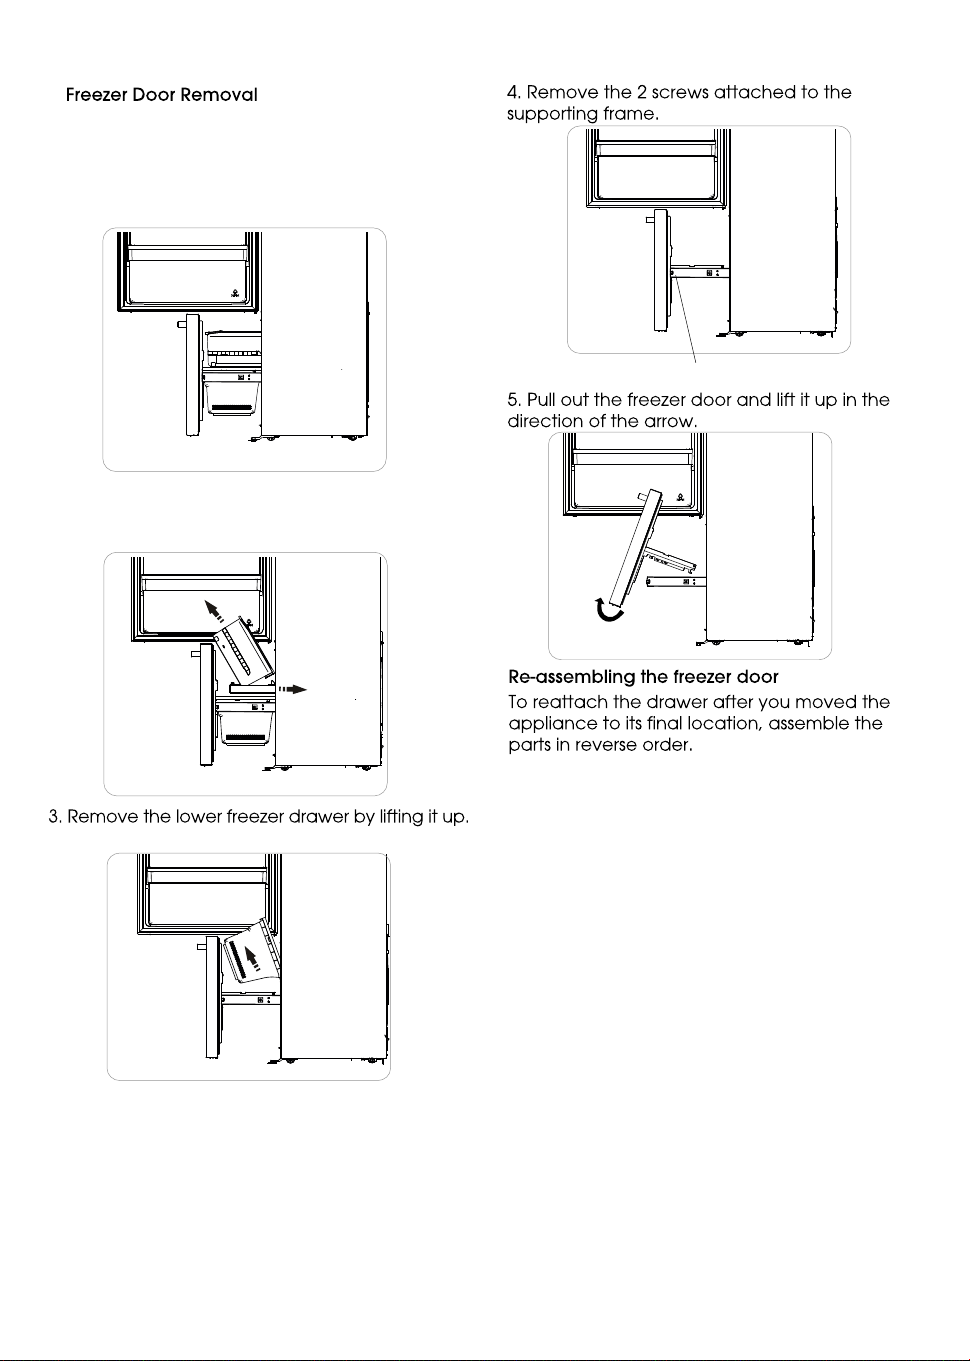
screws on the inside
2. Take out the upper freezer drawer
by lifting it up from the rail system,then
push the rail system back.
12
Installing the water lines
In order for the ice maker to operate properly,
a water line is required.
You may need to purchase a water purifying
system to do that.
The water connection must be made by a
qualified plumber.
If the refrigerator is installed in an area with low
water pressure (below 30psi/207KPa), you can
install a booster pump to compensate for the
low pressure.
-the maximum inlet water pressure is
101.5psi/700kPa;
-the minimum inlet water pressure is
30psi/207kPa.
Important:Operation outside the water
pressure range may cause malfunction and
severe,damaging water leaks.
Note:If the water pressure is less than what is
required, ice cubes could be hollow or
irregularly shaped.
1. Firstly , open the upper door , then pull out the
freezer door and upper freezer drawer to the
final position.
3. Place the free end of the 1/4" water line into
an empty container or sink.
4. Turn on main water supply and open
quarter-turn shutoff valve to flush the 1/4" water
line of any contaminants. Run water until it is
clear.
Method 2: Shutoff Valve With Saddle clamp
NOTE: Do not use a piercing-type or
3/16" (4.76 mm) saddle valve which reduces
water flow and clogs easier.
Following are two methods of connecting to your
household water supply. Use the instructions
specific to your installation.
IMPORTANT: Turn off main water supply. Turn on
nearest faucet long enough to clear the line of
water.
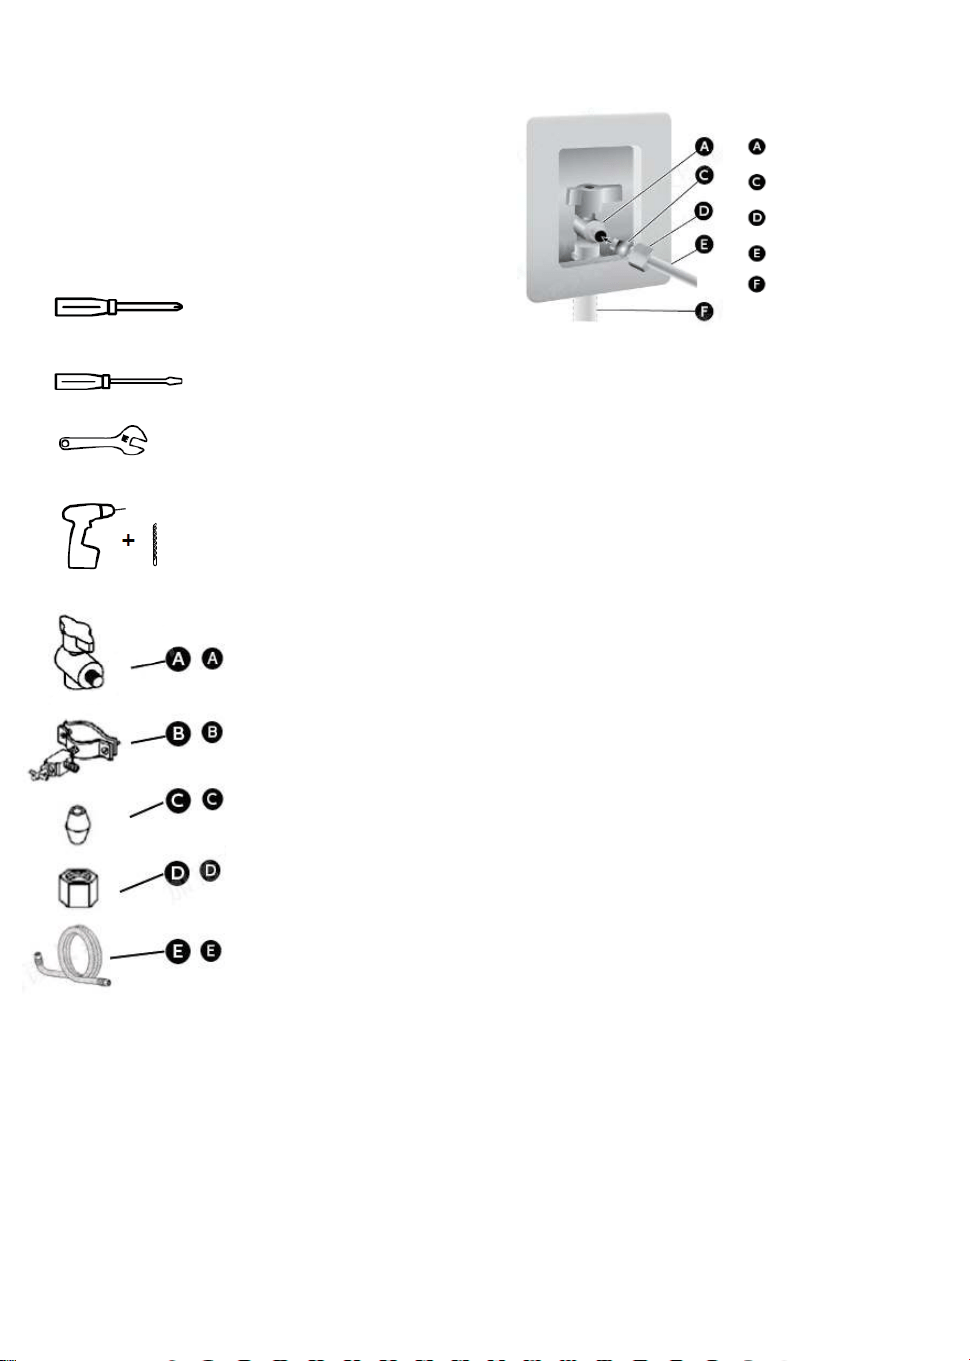
You will need the following tools(not supplied).
Phillips screwdriver
Flat-blade screwdriver
1/2" or adjustable wrench
Drill and 1/4" drill bit
Quarter-turn shutoff valve
1 PCS
1/4" shutoff valve with
saddle clamp 1 PCS
Ferrule (sleeve) 2 PCS
1/4" compression nut 2 PCS
1/4" water line 1 PCS
(1) Connect Water Line to Household Water
Method 1: Quarter-turn Shutoff Valve
Gather the required tools and parts before
starting installation.
1. Use a quarter-turn shutoff valve or the
equivalent served by a household supply line.
NOTE: To allow sufficient water flow to the
refrigerator, a minimum 1/2" household supply
line is recommended.
2. Using the ferrule (sleeve) and 1/4" compression
nut, connect the 1/4" water line to the quarter-turn
shutoff valve.
NOTE: Do not overtighten.
Quarter-turn
Shutoff Valve
Ferrule (Sleeve)
1/4" compression nut
1/4" Water Line
Household Supply Line
1. Find a 1/2" to 11/4" (12.7 mm to 31.8 mm)
vertical water inlet near the refrigerator.
IMPORTANT:
• Make sure it is a cold household supply line.
• Horizontal pipe will work, but the following
procedure must be followed: Drill on the top
side of the pipe, not the bottom. This will
help keep water away from the drill. This also
keeps normal sediment from collecting in
the valve.
2. Determine the length of 1/4" water line you
need. Measure from the connection on the rear
of the refrigerator to the water pipe. Add 7 ft
(2.1 m)to allow for cleaning. Use 1/4"
(6.35 mm) O.D. (outside diameter) water line.
3. Using a cordless drill, drill a 1/4" hole in the
household supply line you have selected.
4. Fasten the 1/4"shutoff valve to the household
supply line with the saddle clamp.Be sure the
outlet solidly in the end is 1/4" drilled hole in the
household supply line and that the washer is
under the saddle clamp.
Tighten the packing nut. Tighten the saddle
clamp screws slowly and evenly so the washer
makes a watertight seal. Do not overtighten.
13
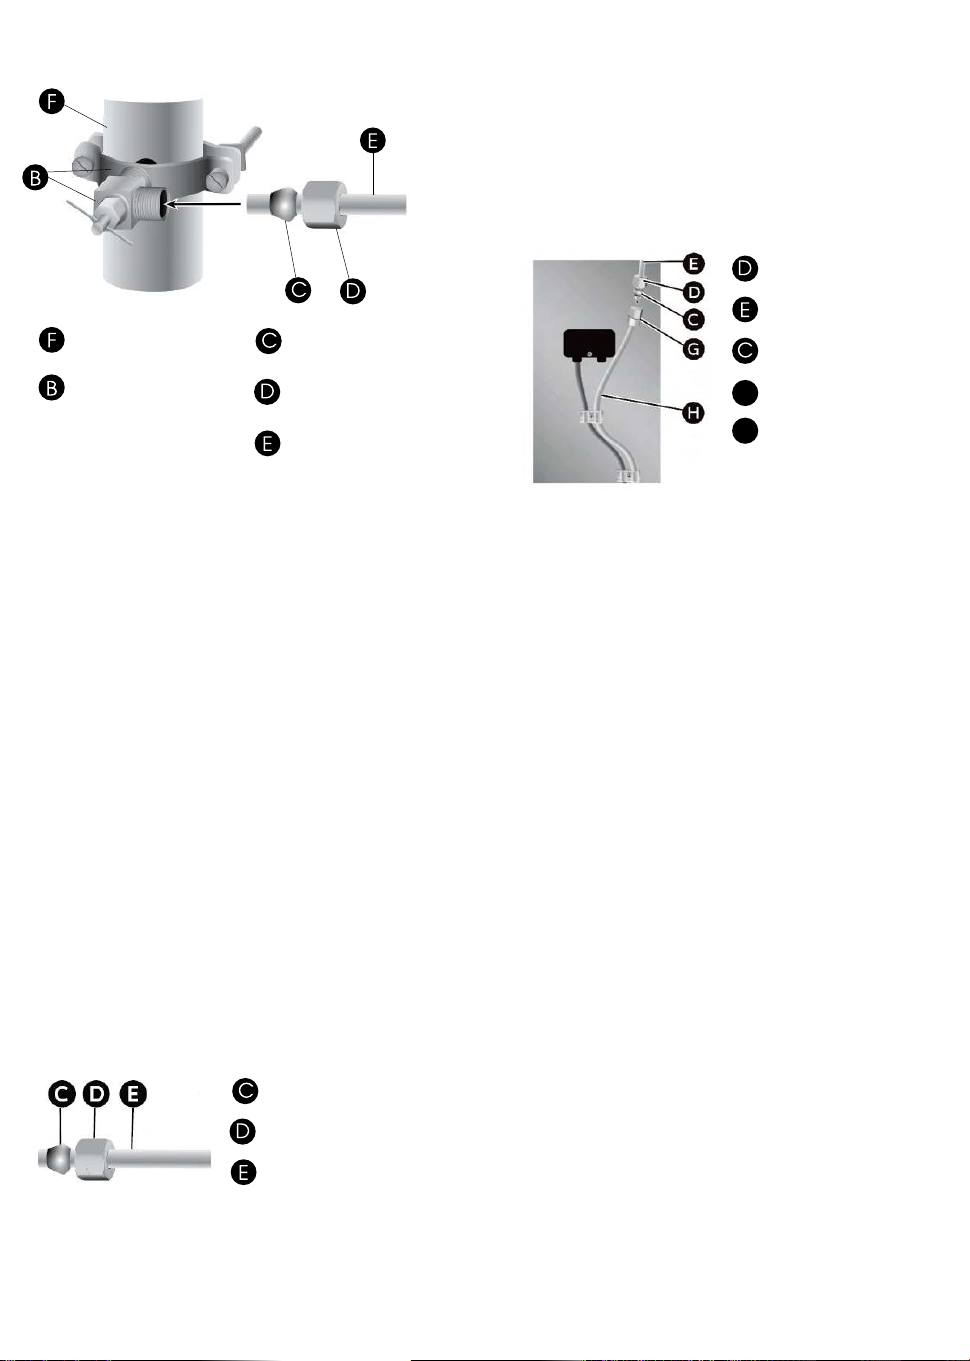
1/4" shutoff valve
with saddle clamp
Ferrule (sleeve)
1/4" compression nut
1/4" water line
Household Supply
Line
5. Slip the ferrule(sleeve) and 1/4" compression
nut on the 1/4" water line as shown. Insert the
end of the tubing into the outlet end squarely
as far as it will go. Screw 1/4" compression nut
onto outlet end with adjustable wrench.
Do not overrighten or you may crush the
1/4" water line.
6. Place the free end of the 1/4" water line into
an empty container or sink.
7. Turn on main water supply and open
shutoff valve to flush the 1/4" water line of any
contaminants. Run water until it is clear.
Connect Water Line to Refrigerator.
(2) Connect Water Line to Refrigerator
IMPORTANT: If you turn the refrigerator on before
the water is connected, turn off the ice maker.
1. Unplug refrigerator or disconnect power.
2. Close shutoff valve.
3. Thread a 1/4" compression nut and ferrule
(sleeve) onto the free end of the 1/4" water line.
Ferrule (sleeve)
1/4" compression nut
1/4" water line
4. Insert the free end of the 1/4" water line into
the brass fitting attached to the water inlet on
the back of the refrigerator.
5. Slide the 1/4" compression nut over the ferrule
(sleeve) and screw the 1/4" compression nut
onto the brass ftting.
1/4" water line
1/4" compression nut
Ferrule (sleeve)
G
H
Brass fitting
Water inlet
6. Confrm 1/4" water line is secure by gently
pulling on it.
7. Turn on water supply and check for leaks.
Correct any leaks.
14
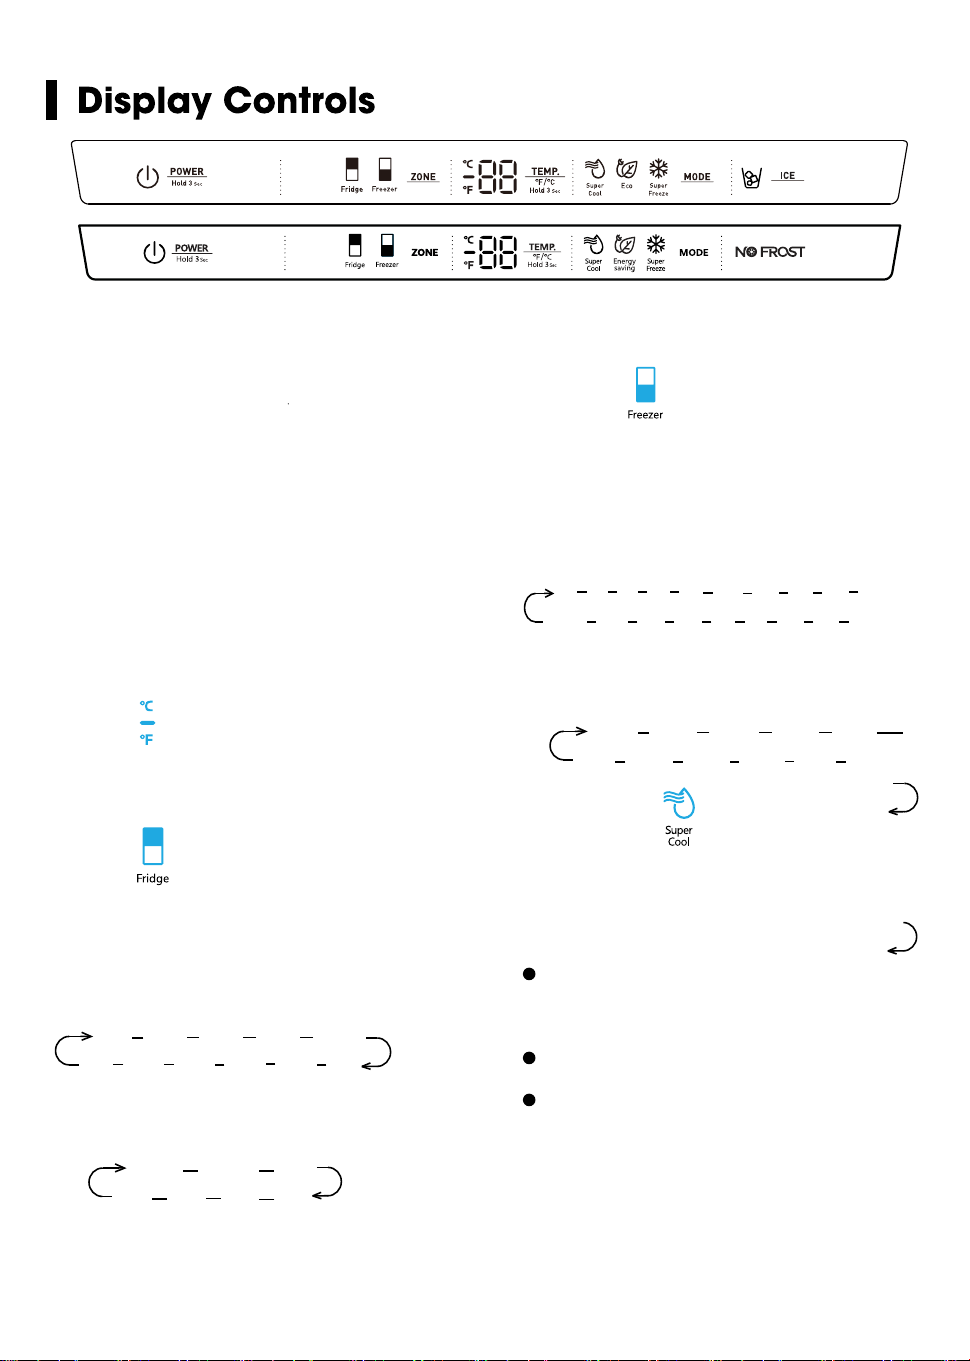
Press the “ZONE” button until the
“Freezer” icon lights up, then press the
“TEMP.” button to select a temperature
setting.
If you have set the temperature type to
Fahrenheit, the temperature settings cycle
from 7°F to -11°F.
Controlling the temperature
We recommend that when you start your
refrigerator for the first time, the
temperature for the refrigerator is set to
39°F(4°C) and the freezer is set to
0°F(-18°C). If you want to change the
temperature, follow the instructions below.
Caution! When you set a temperature, you
set an average temperature for the whole
refrigerator cabinet. Temperatures inside
each compartment may vary from
the temperature displayed on the panel,
depending on how much food you store
and where you place them. Ambient
temperature may also affect the actual
temperature inside the appliance.
To toggle between Celsius and Fahrenheit
on the display, press and hold the “TEMP.”
button for three seconds.
2. Fridge
1. °F /°C
Press the “ZONE” button until the “Fridge”
icon lights up, then press the “TEMP.”
button to select a temperature setting.
If you have set the temperature type to
Fahrenheit, the temperature settings cycle
from 44°F to 34°F.
℉
℉ 4
4
℉
3
℉
42
℉
3
6
℉
3
7
℉
3
8
℉
3
9
℉
4
0
℉
4
1
℉
If you have set the temperature type to
Celsius, the temperature settings cycle
from 7°C t
o 1
°C.
2
℃ 3℃
4
℃
5
℃
℃ 7℃
6
℃
3. Freezer
7℉ 6℉ 5℉ 4℉ 3℉ 2℉ 1℉ 0℉ -1℉ -2℉
-11℉ -10℉ -9℉ -8℉ -7℉ -6℉ -5℉ -4℉ -3℉
-14°C -15°C -16°C -17°C -18°C
-24°C -23°C -22°C -21°C -20°C -19°C
If you have set the temperature type to
Celsius, the temperature settings cycle
from -14°C to -24°C.
4. Super Cool
Super Cool can refrigerate the food
quicker and keep food fresh for a longer
period. This is useful to activate before
inserting a large amount of warm/room
temperature food.
Press the “MODE” button to activate
this function. The “Super Cool” icon will be
illuminated and the fridge temperature
indicator will display 34°F (1°C).
Super Cool will automatically turn off
after 3 hours.
When super Cool function is on you
can turn it off by pressing the “MODE” or
setting fridge temperature. To manually
turn off the Super Cool function, the fridge
1
3
5
4
34
temperature setting will revert back to the
previous setting.
15
When the door of fridge or freezer is open
over 2 minutes,
the control panel will
show
“dr
”
The door alarm wilturn off
about 8
minutes l
ater
.
To save energy, don’t keep the door open
for a long time when using refrigerator. In case
of door alarm, it can clear door alarm by closing
the doors.
Demo Mode is for store displaying only.
In this mode, the light and the display
operation is normal, but the refrigerator is not
cooling. When the refrigerator is in the Demo
Mode , if consumers open the door or no keys
operation for 30 seconds with the door opened,
the temperature control panel will show as
follow from A to F.
To exit this mode,you could press the
leftmost key and the rightmost key at the same
time for 3 seconds ,then you can see the whole
control panel light up for 1 second.
The Demo Mode stays on even if theNOTE:
refrigerator powers off.If the consumers enter
the mode with unintentional operation ,you
should exit it as soon as possible ,since the
refrigerator will not cool in this mode ,which
will cause the food going bad.
A B C D E F
m
.
Press the “MODE” button to turn on the energy
saving function, the “Energy saving” icon will
be illuminated.
When the energy saving function is on, the
temperature of fridge is automatically switched
to 43°F (6°C) and the temperature of freezer is
automatically switched to 1°F(-17°C).
When energy saving function is on you can
switch it off by pressing the “MODE” or “TEMP.”
button and the refrigerator temperature setting
will revert back to the previous setting.
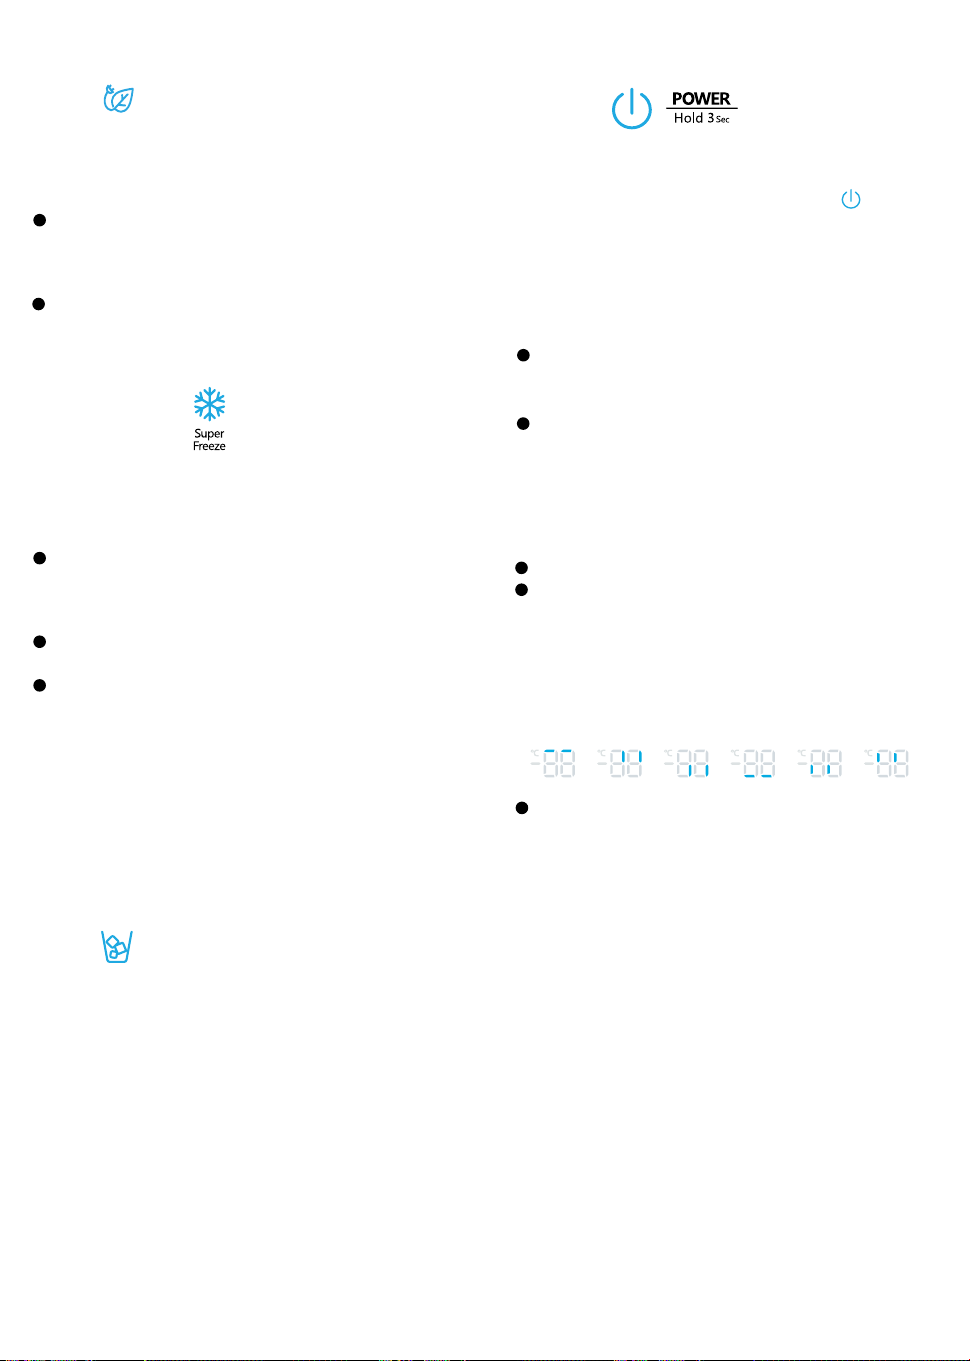
6. Super Freeze
Super Freeze will quickly lower the temperature
within the freezer so food will freeze faster than
usual. This feature also helps to keep vitamins
and nutrition of fresh food fresh for longer period.
Press the “MODE” button to activate this
function. The “Super Freeze” icon will be
illuminated and the temperature for the freezer
is set to -11°F (-24°C).
Super freezer will automatically turn off after
52
hours.
When Super Freeze function is on you can turn
it off by pressing by pressing the “MODE” or
setting freezer temperature. To manually turn
off the Super freezer function, the freezer
temperature setting will revert back to the
previous setting.
NOTE: When you selecting the Super Freeze
function, ensure there are no bottled or canned
drinks (especially carbonated drinks) in the
freezer compartment. Bottles and cans may
explode.
7. ICE
The ice maker is located inside the freezer
compartment, near the top of the compartment.
When the ice maker makes ice, the ice is stored in
ice storage box inside the upper freezer drawer.
Press the “ICE” button to turn the ice maker on or
off. When the ice maker is turned on, the icon
lights.
To use ice, open the freezer compartment door,
then pull open the upper freezer drawer and
remove ice from the storage box.
Demo mode
9. Door Alarm
8. POWER
Press and hold the “POWER” button for three
seconds to turn the power function on or off.
When the power function is on, the icon
lights and the display board will show “OF”.
NOTE:
When the power function is on, the refrigerator
is stopped cooling.
16
5. Eco
Eco
10.
17
Note:
When the ice maker dumps ice into the
ice box, any sounds are part of normal
operation.
If ice is not dispensed for a long period
of time, it may clump in the Ice box. If this
occurs, please remove all the ice and
empty the box.
In case of prolonged absence and the
ice maker is not used, close the water
valve to prevent leaks.
It is recommended that the first several ice
charges be discarded to ensure highest
quality of Ice.
Do not store cans or containers that will
burst when frozen.
CAUTION
Do not allow your children to touch the ice
maker. This could cause injury.
3.
Automatic ice maker
Ice maker makes Ice automatically.

I Cleaning and Ca『e
For hygienic reasons the appliance (including
exterior and interior accessories) should be
cleaned at least every two months.
A
CAUTION
The appliance must not be connected to the
wall outlet during cleaning. Danger of
electrical shock! Before cleaning, switch the
appliance off and remove the plug from the
wall outlet socket.
Exterior cleaning
To maintain good appearance of your
appliance, you should clean it regularly.
Spray water onto a cleaning cloth instead
of spraying directly on the surfc】ce of the
appliance. This helps ensure an even distribu
廿on of moisture to the surface.
Clean the doors, handles and cabinet
surfaces with a mild detergent and then wipe
dry with a soft cloth.
A
CAUTION
Dant use sharp objects to clean with, as
they are likely to scratch the surface.
Dant use Thinner, Car detergent, bleach,
ethereal oil, abrasive cleansers or organic
solvent such as Benzene for cleaning. They
may damage the surface of the appliance
and may cause fire.
Interior cleaning
You should clean the appliance interior
regularly. It will be easier to clean when food
stocks are low. Wipe the inside of the fridge
freezer with a weak solution of backing soda
and water, and then rinse with warm water
using a wrung-out sponge or cloth. Wipe
completely dry before replacing the shelves
and baskets. Thoroughly dry all surfaces and
removable parts before pu廿ingthem back into
place. Although this appliance automatically
defrosts, a layer of frost may occur on the freezer
compartments interior walls if the freezer door is
opened frequently or kept open too long. If the
frost is too thick, choose a time when the freezer
is nearly empty and proceed as follows:
l.Remove existing food and accessories baskets,
unplug the appliance from the main power and
leave the doors open. Ventilate the room
thoroughly to accelerate the process.
2. When defrosting is completed, clean your
freezer as described above.
A
wARNING
Do not use sharp objects to remove frost from the
freezer compartment. Only after the interior is
completely dry should the appliance be
switched back on and plugged back into the
main socket.
Door gasket cleaning
Take care to keep door gasket clean. Sticky food
and drinks can cause gasket to stick to the
cabinet and tear when you open the door. Wash
gasket with a mild detergent and warm water.
Rinse and dry it thoroughly after cleaning.
A
CAUTION
Only after the door seals are completely dry
should the appliance be powered on
Replacing the LED light
Warning: The LED light must be replaced by a
competent person. If the LED light is damaged,
follow the steps below:
l.Unplug your appliance.
2.Remove light cover by rising up and pulling out
the LED light.
3.Hold the LED light with one hand and pull it wi佑
the other hand while pressing佑econnector latch.
4.Replace LED light and snap it correctly in place
and recover the light cover.
8

I Helpful Hints and Tips
Energy Saving Tips
We recommend that you follow the tips below
to save energy.
Try to avoid keeping the door open for long
periods in order to conserve energy. Ensure
the appliance is away from any sources of
heat (direct sunlight, electric oven or cooker
etc.)
Dont set the temperature colder than
necessary.
Dont store warm food or evaporating liquid
in the appliance.
Place the appliance in a well ventilated,
humidity free, room. Please refer to Installing
your New Appliance chapter.
If the diagram shows the correct combination
for the drawe飞
,
crisperand shelves, do not
adjust the combination as this is designed to be
the most energy efficient configuration.
Hints r fresh od refrigeration
Do not place hot food directly into the
ref『igeratoror freezer, the internal temperature
will increase resulting in the compressor having
to work harder and will consume mo『eenergy.
Do cover or wrap the food, particularly if it has
a strong flavor.
Place food properly so that air can circulate
freely around it.
Hints for refrigeration
For Meat: (all types) wrap in cling wrap and
place on the glass shelf above the vegetable
drawer. Always follow food storage times and
use by dates suggested by manufacturers.
Cooked food, cold dishes, etc.:
They should be covered and placed on any
shelf.
Fruit and vegetables:
They should be ored in the special drawer provided.
Butter and cheese:
Should be wrapped in airtight foil or plastic film
wrap.
Milk boles:
Should have a lid and be stored in the door
racks.
Hints for freezing
When first starting-up or after a pe廿odout of use,
let the appliance run at least 2 hours on the highe『
se廿ingsbefore pu廿ingfood in the compartment.
Prepare food in small portions to enable it to be
rapidty and completety frozen and to make it possible
to subsequently thaw only the quantity required.
Wrap up the food in aluminum foil or cling wraps
which are airtight.
Do not allow fresh, unfrozen food to touch the
food which is already frozen to avoid tempera
ture rise of the la廿er.
Iced products, (ice cubes, popsicles): if
consumed immediately aer removal from the
freezer compartment, will probably cause frost
burns to the skin.
It is recommended to label and date each
frozen package in orde『tokeep track of the
storage time.
Hints for the storage of frozen od
Ensure that frozen food has been stored
correctly by the food retailer
Once defrosted, food will deteriorate rapidly
and should not be re-frozen. Do not exceed the
storage period indicated by the food manufac
ture『,
Switching o your appliance
If the appliance needs to be switched off for an
extended period, the following steps should be
taken prevent mold on the appliance.
l. Remove all food.
2. Remove the power plug from the main socket.
3.Clean and dry the interior thoroughly.
4. Ensure that all the doors are wedged open
sllghtly to allow air to circulate
19
I Troubleshooting
If you experience a problem with your appliance or are concerned that the appliance is not functioing
correctly, you can carry out some easy checks before calling for service, please see below.
AwARNING
l.Dont try to repair the appliance yourself. If the problem persists after you have made the checks
mentioned below, contact a qualified electrician, authorized service engineer or the shop where
you purchased the product.
2. A child entrapment warning statement is included in either the operating instructions or in a use
and care manual provided with each ref『igerator.
Problem
Possible Cause & Solution
Check whethe『 the power cord is plugged into the power outlet
properly.
Check the fuse or circuit of you『 powersupply,『eplaceif necessary.
Appliance is not
The ambient temperature is too low. Try se廿ing the chamber tempera-
WO『king cor『ectly
ture to a colder level to solve this problem.
It is normal that the freezer is not operating during the defrost cycle, or
for a short time after the appliance is switched on to protect the
compressor.
Odours from the
The interior may need to be cleaned
compaments
Some food, containers or wrapping cause odours.
The sounds below are quite normal:
Compressor running noises.
Air movement noise from the small fan motor in the freezer
compartment or other compartments.
Gurgling sound similar to water boiling.
Noisef『omthe
Popping noise during automatic defrosting.
appliance
Clicking noise before the compressor starts.
Clicking noise when you get the water.
The motor running noises when you get ice.
Other unusual noises are due to the reasons below and may need
you to check and take action:
The cabinet is not level.
The back of appliance is touching the wall.
Bo廿lesor containers have fallen or are rolling.
20
SOLUTION
POSSIBLE CAUSE(S)
PROBLEM
Straighten the water supply line.
Wait 24 hours after installation for ice
production to begin.
Contact a licensed, qualified plumber.
Ice maker is not turned on
Kink in the water line
New installation
Inadequate water pressure
The ice
maker is not
producing ice,
enough ice,
or cubes are
hollow.
About the ice maker
Press and hold "ICE" key on the panel to turn
On/Off the ice maker. See “Display Controls.”
21
WARNING: This product can expose you to chemicals including [Lead &
Lead Compounds], which is [are] known to the State of California to cause
cancer, birth defects and / or reproductive harm. To minimize exposure to
these substances. Always operate this unit according the Owner’s Manual,
and ensure that you provide proper ventilation. For more information go to
www.P65Warnings.ca.gov
22

What this limited warranty covers:
The Warranty coverage provided by Forno Appliances in this statement applies exclusively to the original Forno
appliance (“Product”) sold to the consumer (“Purchaser”) by an authorized Forno dealer/distributor/retailer,
purchased and installed in the United States or Canada, and which has always remained within the original
country of purchase (the United States or Canada). Warranty coverage is activated on the date of the Product's
original retail purchase and has a duration of two (2) years.
Warranty coverage is non-transferable. In the event of replacement of parts or of the entire product, the
replacement Product (or parts) shall assume the remaining original Warranty activated with the original retail
purchase document. This Warranty shall not be extended with respect to such replacement. Forno Appliances
will repair or replace any component/part which fails or proves defective due to materials and/or workmanship
within 2 years of the date of the original retail purchase and under conditions of ordinary residential,
non-commercial use. Repair or replacement will be free of charge, including labor at standard rates and shipping
expenses. Purchaser is responsible for making the Product reasonably accessible for service. Repair service
must be performed by a Forno Authorized Service company during normal working hours.
IMPORTANT
Retain proof of original purchase to establish warranty period. Forno’s liability on any claim of any kind, with
respect to the goods and/or services provided, shall in no event exceed the value of the goods or service or part
there of which has given rise to the claim.
30-Day Cosmetic Warranty
The Purchaser must inspect the product at the time of delivery. Forno warrants that the Product is free from
manufacturing defects in materials and workmanship for a period of thirty (30) days from date of the original retail
purchase of the Product.
This coverage includes:
- Paint blemishes
- Chips
- Macroscopic finish defects
Cosmetic warranty does NOT cover:
> issues resulting from incorrect transport, handling and/or installation (e.g.: dents, broken, warped or deformed
structures or components, cracked or otherwise damaged glass components);
> slight color variations on painted/enameled components;
> differences caused by natural or artificial lighting, location or other analogous factors;
> stains/corrosion/discoloration caused by external substances and/or environmental factors;
> labor costs, display, floor, B-stock, out- of-box,“as is” appliances and demo units.
How to receive service
To receive warranty services, the Purchaser must contact the Forno Support department in order to determine
the problem and the required service procedures. Troubleshooting with a customer service representative will be
necessary before moving forward with the service. Model number, serial number and date of original retail
purchase will be requested.
Warranty
23

THERE ARE NO EXPRESS
WARRANTIES OTHER THAN THOSE LISTED AND DESCRIBED ABOVE, AND NO
WARRANTIES, EITHER EXPRESS OR IMPLIED, INCLUDING, BUT NOT LIMITED TO, ANY IMPLIED
WARRANTIES OF MERCHANTABILITY OR FITNESS FOR A PARTICULAR PURPOSE THAT SHALL APPLY
AFTER THE EXPRESS WARRANTY PERIODS STATED ABOVE, AND NO OTHER EXPRESS WARRANTY OR
GUARANTEE GIVEN BY ANY PERSON, FIRM OR CORPORATION WITH RESPECT TO THIS PRODUCT
SHALL BE BINDING ON FORNO. FORNO SHALL NOT BE LIABLE FOR LOSS OF REVENUE OR PROFITS,
FAILURE TO REALIZE SAVINGS OR OTHER BENEFITS, TIME AWAY FROM WORK, MEALS, LOSS OF FOOD
OR BEVERAGES, TRAVELING OR HOTEL EXPENSES, EXPENSES TO RENT OR PURCHASE APPLIANCES,
REMODELING/CONSTRUCTION EXPENSES IN EXCESS OF DIRECT DAMAGES WHICH ARE UNDENIABLY
CAUSED EXCLUSIVELY BY FORNO OR ANY OTHER SPECIAL, INCIDENTAL OR CONSEQUENTIAL
DAMAGES CAUSED BY THE USE, MISUSE OR INABILITY TO USE THIS PRODUCT, REGARDLESS OF THE
LEGAL THEORY ON WHICH THE CLAIM IS BASED, AND EVEN IF FORNO HAS BEEN ADVISED OF THE
POSSIBILITY OF SUCH DAMAGES. NOR SHALL RECOVERY OF ANY KIND AGAINST FORNO BE GREATER
IN AMOUNT THAN THE PURCHASE PRICE OF THE PRODUCT SOLD BY FORNO AND CAUSING THE
ALLEGED DAMAGE.WITHOUT PREJUDICE TO THE FOREGOING, PURCHASER ASSUMES ALL RISK AND
LIABILITY FOR LOSS, DAMAGE OR INJURY TO PURCHASER AND PURCHASER’S PROPERTY AND TO
OTHERS AND THEIR
PROPERTY ARISING FROM THE USE, MISUSE, OR INABILITY TO USE THIS PRODUCT
SOLD BY FORNO THAT IS NOT A
DIRECT RESULT OF NEGLIGENCE ON THE PART OF FORNO THIS
LIMITED WARRANTY SHALL NOT EXTEND TO ANYONE OTHER THAN THE ORIGINAL PURCHASER OF
THIS PRODUCT, IS NON-TRANSFERABLE, AND STATES YOUR EXCLUSIVE REMEDY.
> Use of the Product in any non-residential,
commercial application.
> Use of the Product for anything other than its
intended purpose.
> Repair services provided by anyone other than a
Forno Authorized Service
agency.
> Damages or repair services to correct services
provided by unauthorized parties or the use of
unauthorized parts.
> Installation not in accordance with
local/state/city/county fire codes, electrical codes, gas
codes, plumbing codes, building codes, laws or
regulations.
> Defects or damage due to improper storage of the
Product.
> Defects,damage or missing parts on products sold
out of the original factory packaging or from displays.
> Service calls or repairs
to correct an incorrect
installation of the Product and/or related accessories.
> Replacement of parts/service calls to connect,
convert or otherwise repair the electrical wiring and/or
gas line in order to properly use the product.
> Replacement of parts/service calls to provide
instructions and information
on the use of the Product.
> Replacement of parts/service calls to correct issues
arising from the product being used in a manner other
than what is normal and customary for residential use.
> Replacement of parts/service calls due to wear and
tear of components such as seals, knobs, pan
supports, shelving, cutlery baskets, buttons, touch
displays, scratched or broken ceramic-glass tops.
>
Replacement of parts/service calls for lack
of/improper maintenance, including but not limited to:
build up of residues, stains,
scratches, discoloration,
corrosion.
> Defects and damages arising from accidents,
alteration, misuse, abuse or improper installation.
> Defects and damages arising from Product
transport, logistics and handling.
Inspection of the
product must be made at time of delivery. Following
receipt and inspection, the selling dealer/delivery
company must be notified of any issues arising from
handling, transport and logistics.
> Defects and damages arising from external forces
beyond the control of Forno Appliances, including but
not limited to wind, rain, sand, fires,
floods,
mudslides,
freezing temperatures, excessive moisture or
extended exposure to humidity, power surges,
lightning, structural failures surrounding the appliance
and other acts of God.
> Products whose serial number has been
altered/damaged/tampered with. In no case shall
Forno be held liable or responsible for damage to
surrounding property, including furniture, cabinetry,
flooring, panels, and other structures surrounding the
Product. Forno is neither liable nor responsible for the
Product if it is located in a remote area or an area
where certified trained technicians are not reasonably
available. Purchaser must bear any transportation and
delivery costs of the Product to the nearest Authorized
Service Center or the additional travel expenses of a
certified trained technician
Warranty Exclusions: What Is Not Covered.
24
