Freeze Me
Luftkühler
Air Cooler
Enfriador De Aire
Refroidisseur d‘air
Raffreddamento Dell‘aria
10033432

3
DE
English 15
Español 25
Français 35
Italiano 45
Sehr geehrter Kunde,
wir gratulieren Ihnen zum Erwerb Ihres Gerätes. Lesen
Sie die folgenden Hinweise sorgfältig durch und befolgen
Sie diese, um möglichen Schäden vorzubeugen. Für
Schäden, die durch Missachtung der Hinweise und
unsachgemäßen Gebrauch entstehen, übernehmen wir
keine Haftung. Scannen Sie den folgenden QR-Code,
um Zugriff auf die aktuellste Bedienungsanleitung und
weitere Informationen rund um das Produkt zu erhalten.
INHALTSVERZEICHNIS
Sicherheitshinweise 4
Geräteübersicht 5
Installation 6
Funktionen 7
Bedienung 8
Reinigung und Pege 10
Fehlerbehebung 11
Spezielle Entsorgungshinweise für Verbraucher in Deutschland 12
Hinweise zur Entsorgung 14
Hersteller & Importeur (UK) 14
TECHNISCHE DATEN
Artikelnummer 10033432
Stromversorgung 220-240 V ~ 50-60 Hz
Leistung 75 W

4
DE
SICHERHEITSHINWEISE
• Prüfen Sie vor der Benutzung die Spannung auf der Geräteplakette.
Schließen Sie das Gerät nur an Steckdosen an, die der Spannung des
Geräts entsprechen.
• Halten Sie das Kabel fern von heißen Oberächen und scharfkantigen
Gegenständen.
• Verlegen Sie das Kabel nicht unter einem Teppich und decken Sie es auch
nicht mit anderen Gegenständen oder Stoffen ab. Verlegen Sie das Kabel
so, dass keiner darüber fällt oder daran hängen bleibt.
• Benutzen Sie das Gerät nicht, wenn das Netzkabel oder der Stecker
beschädigt sind.
• Falls das Netzkabel oder der Stecker beschädigt sind, müssen sie
vom Hersteller, einem autorisierten Fachbetrieb oder einer ähnlich
qualizierten Person ersetzt werden.
• Benutzen Sie das Gerät nur in Innenräumen.
• Decken Sie das Gerät nicht ab.
• Stellen Sie das Gerät auf einen ebenen, stabilen Untergrund.
• Versichern Sie sich, dass das Gerät ausgeschaltet ist, bevor Sie den Stecker
in die Steckdose stecken.
• Bedienen sie das Gerät nicht mit nassen Händen und fassen sie auch den
Stecker und das Kabel nicht mit nassen Händen an.
• Lassen Sie das Gerät während dem Betrieb nicht unbeaufsichtigt. Schalten
Sie es aus und ziehen Sie den Stecker, wenn Sie es nicht benutzen.
• Ziehen Sie den Stecker aus der Steckdose, bevor Sie das Gerät reinigen
oder Warten.
• Ziehen sie den Stecker nicht am Kabel aus der Steckdose, sondern halten
Sie ihn beim Abziehen mit der Hand fest.
• Kinder ab 8 Jahren, physisch und körperlich eingeschränkte Menschen
dürfen das Gerät nur benutzen, wenn sie vorher von einer für Sie
verantwortlichen Aufsichtsperson ausführlich mit den Funktionen und
den Sicherheitsvorkehrungen vertraut gemacht wurden. Achten Sie
darauf, dass Kinder nicht mit dem Gerät spielen. Kinder ab 8 Jahren dürfen
das Gerät nur unter Aufsicht reinigen. Achten Sie darauf, dass Kinder
nicht mit dem Gerät spielen. Kinder dürfen das Gerät nur unter Aufsicht
reinigen und warten.
• Benutzen Sie das Gerät nur wie in dieser Anleitung beschrieben.
• Stecken Sie nicht ihr Finder oder Gegenstände in die Lüftungsöffnungen.
• Stellen Sie das Gerät nicht in die Nähe von Vorhängen, Gardinen,
Tischdecken oder ähnlichen Textilien. Sie könnten in den Lüfter gezogen
werden und diesen beschädigen.
• Benutzen Sie das Gerät nicht in Feuchträumen, wie Badezimmern.
• Benutzen Sie das Gerät nicht, bevor die Räder montiert sind oder wenn es
auf der Seite liegt.
• Wickeln Sie das Kabel vor dem Gebrauch komplett ab.
• Achten Sie darauf, dass das Gerät gerade steht.

5
DE
• Während des Betriebs, befeuchtet das Gerät die Umgebungsluft.
Vermeiden Sie jedoch zu hohe Luftfeuchtigkeit. Wir empfehlen Ihnen
eine Luftfeuchtigkeit zwischen 40-50%. Zu hohe Luftfeuchtigkeit kann zu
Schimmel oder gesundheitlichen Problemen führen.
• Stellen Sie das Gerät nur auf Untergründe, die unempndlich gegenüber
Nässe und hoher Luftfeuchtigkeit sind. Es kann immer mal vorkommen,
dass beim Ein- und Ausbau des Wassertanks ein paar Tropfen
danebengehen. Sollte das der Fall sein, wischen Sie die Wassertropfen
umgehend weg.
• Wechseln Sie das Wasser im Tank spätestens nach 3 Tagen.
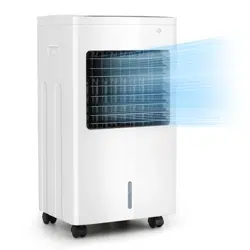
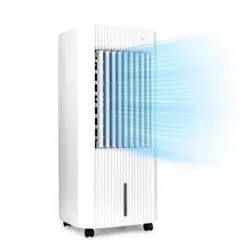
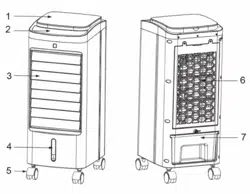
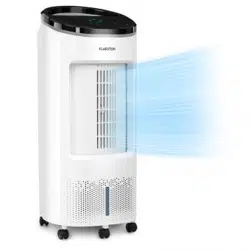
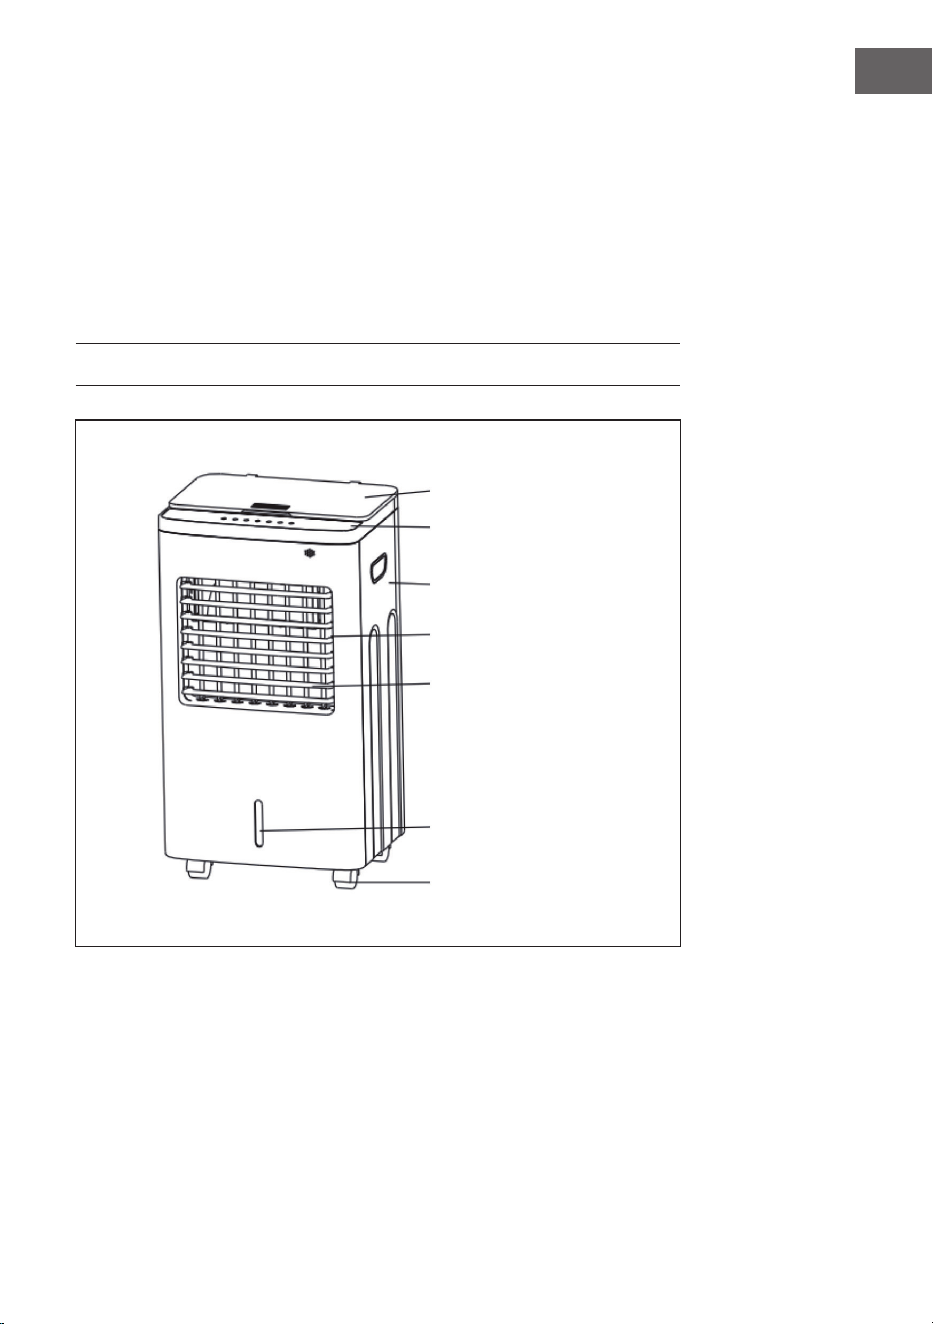
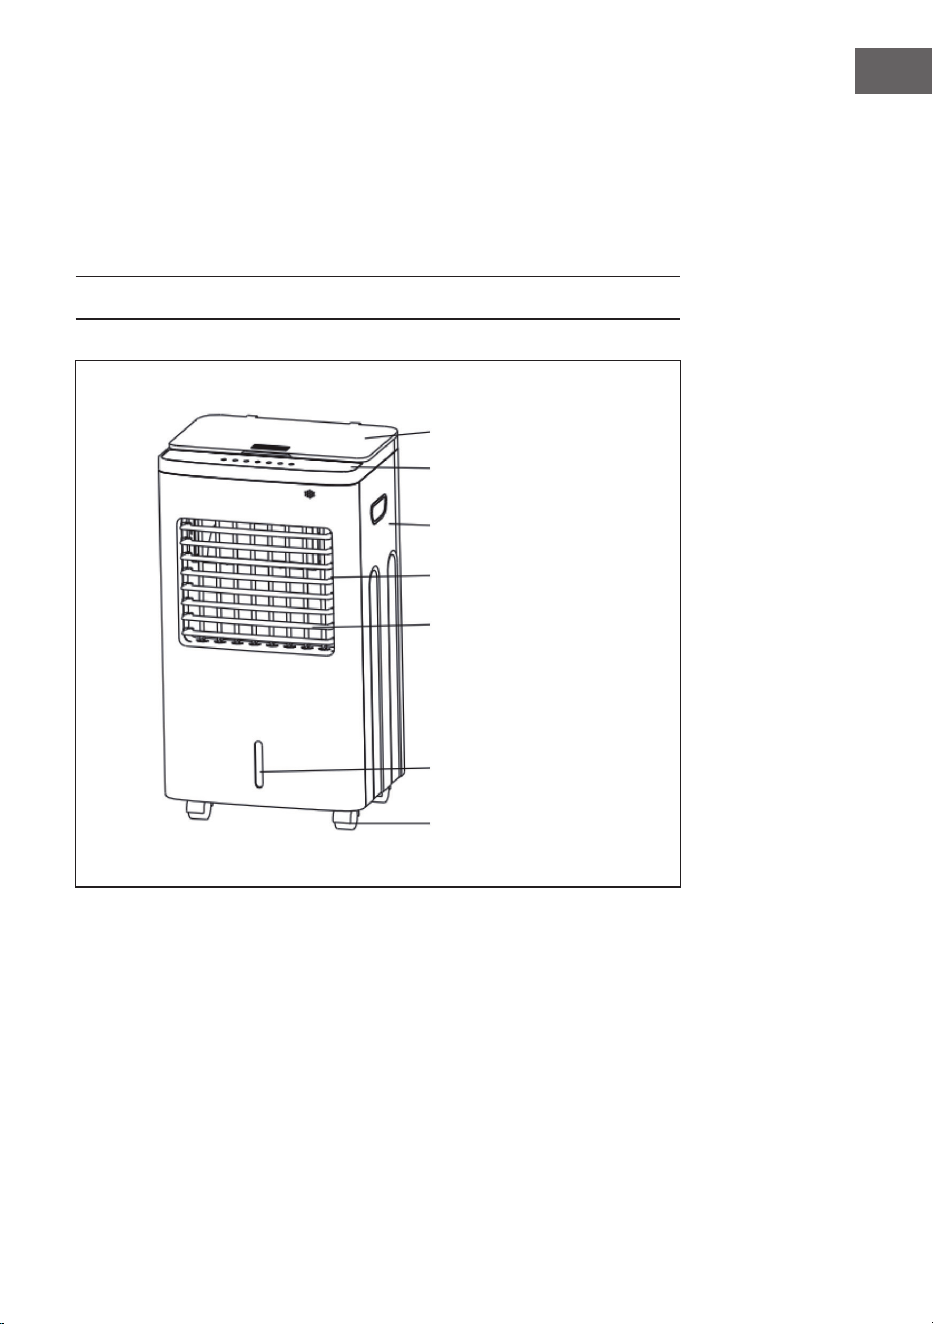
GERÄTEÜBERSICHT
Wassertankabdeckung
Bedienfeld
Seitliche Abdeckung
Luftauslass
Lüftüngsgitter
Wasserstandsanzeige
Rollen
6
DE
INSTALLATION
Anbringen der Rollen
Stellen Sie das Gerät auf eine ache Oberäche und bringen Sie die Rollen
mithilfe eines Schraubenschlüssels an.
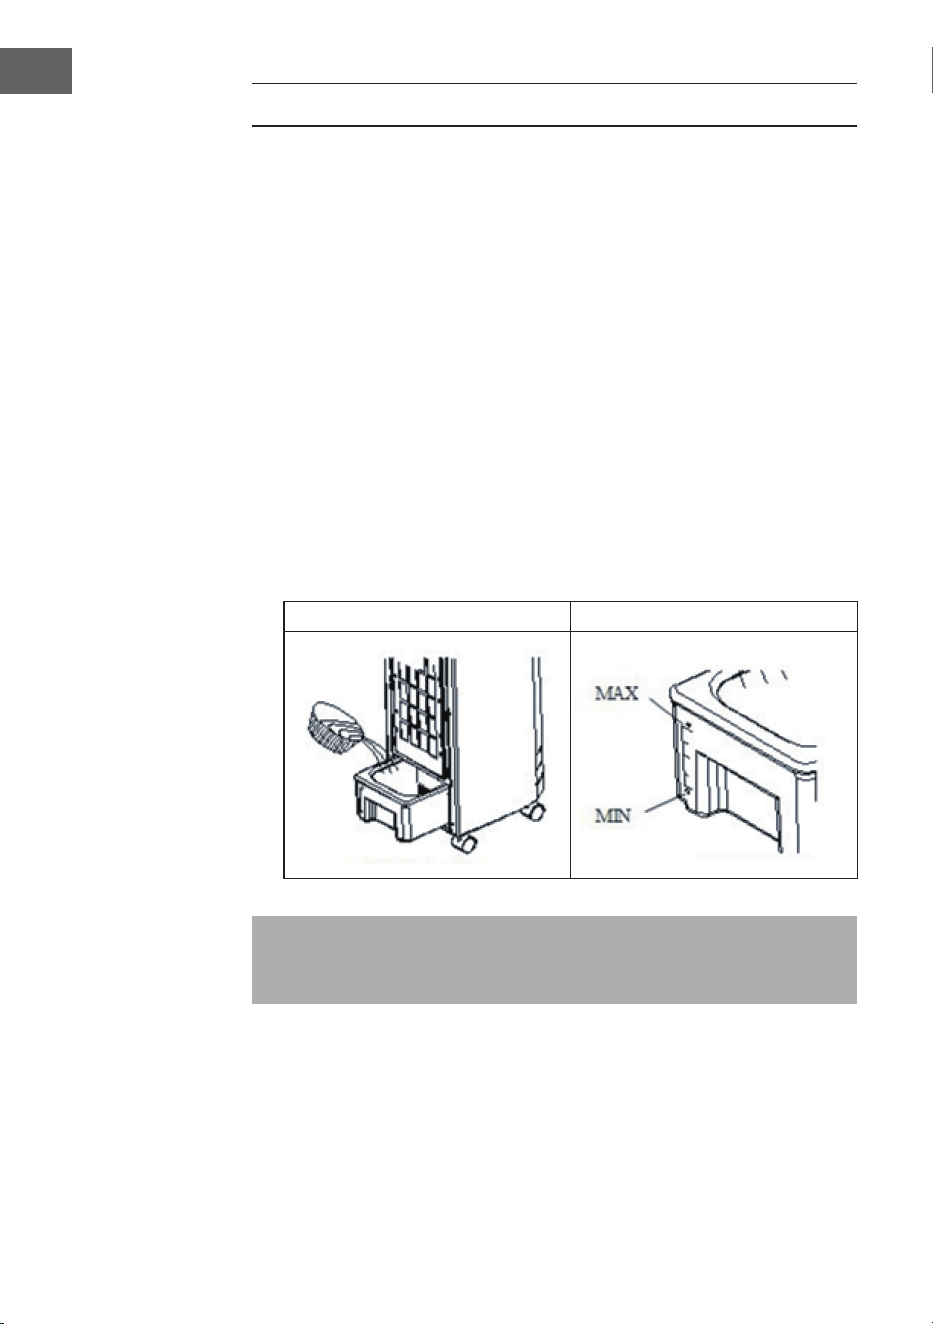
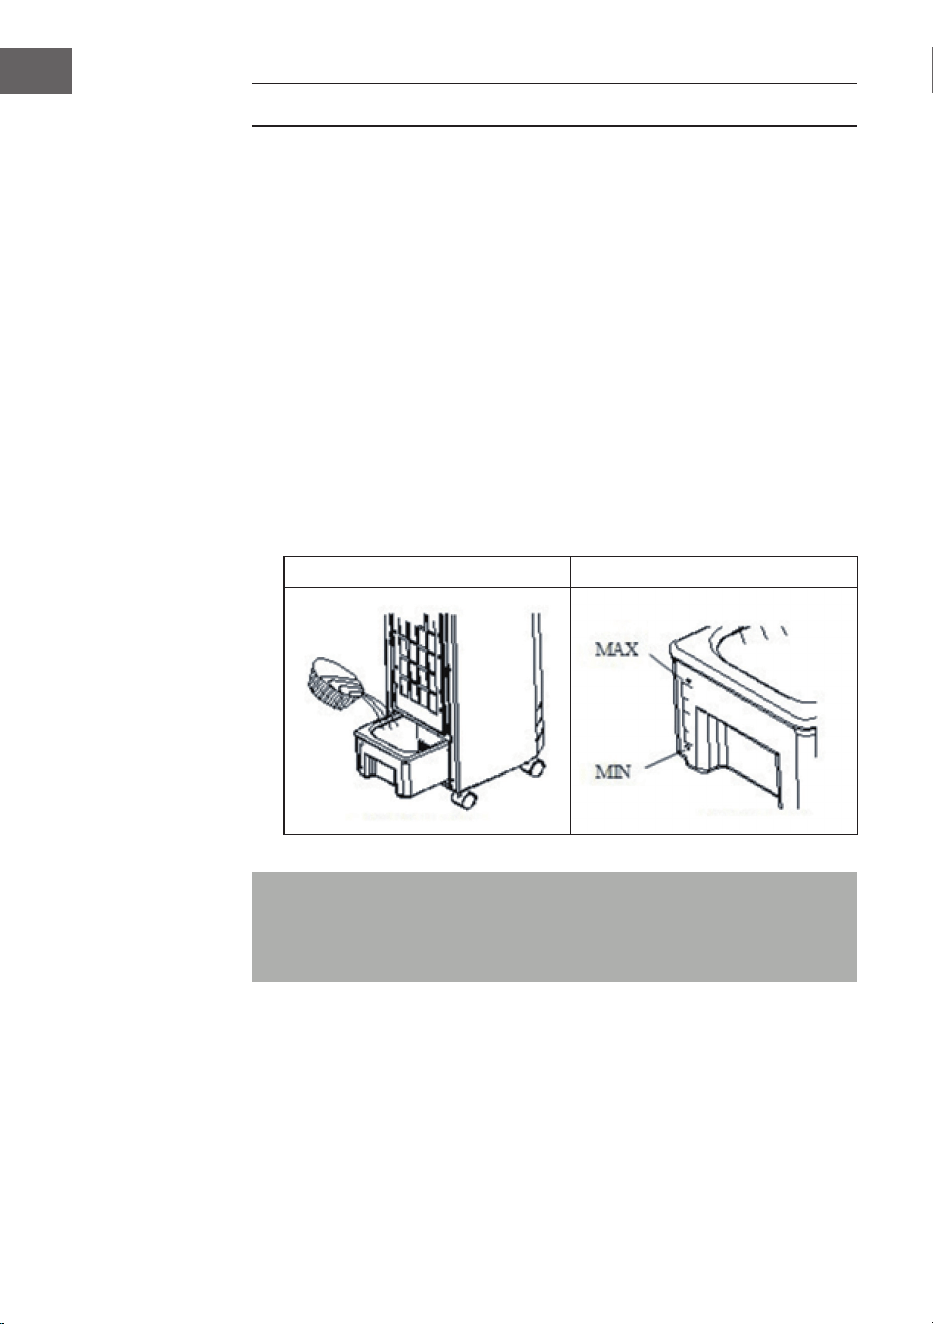
Gerät mit Wasser befüllen
Ziehen Sie den Wassertank 1/3 heraus und befüllen Sie diesen mit sauberem
Wasser (siehe Abbildung 1).
a. Achten Sie auf die Wasserstandsanzeige, wenn Sie Wasser hinzufügen
(siehe Abbildung 2).
b. Der Wasserstand sollte nicht höher als die Maximalmarkierung reichen.
Wenn Sie die Luft befeuchten möchten, sollte sich der Wasserstand nicht
unterhalb der Minimalanzeige benden.
c. Legen Sie Eis oder ein gefrorenes Kühlelement in den Wassertank, wenn
Sie den Kühleffekt verstärken möchten. Achten Sie darauf, dass der
Wasserstand nach dem hinzufügen des Eises/ Eisbehälters nicht höher ist
als die Maximalmarkierung.
Abbildung 1 Abbildung 2
Hinweis: Alternativ können Sie den Air Cooler auch bequem von oben
befüllen. Öffnen Sie hierfür die entsprechende Klappe an der Oberseite des
Gerätes, und füllen das Wasser direkt in den Wasserkreislauf ein.

7
DE
FUNKTIONEN
Kühlprinzip:
Wasser wird aus dem Wassertank nach oben gepumpt und tropft in den
Papierverdampfer. Wenn das Wasser im Papierverdampfer in Wasserdampf
umgewandelt wird, wird die Luft gekühlt. Ein kalter Wind ist zu spüren, wenn
die Luft vom Ventilator verteilt wird.
Steuerelektronik:
Sicher und langlebig, ansprechendes Aussehen.
Geschwindigkeitsanpassung und Ventilatormodus:
Es gibt drei Geschwindigkeitsstufen und Ventilatoreinstellungen.
Kühlen:
Die Technologie des Kühlens mit Eiskristallen und des Luftbefeuchtens wurde
adaptiert. Die Temperatur vor dem Luftauslass fällt und die Luftfeuchtigkeit
steigt. Die Luft kann dadurch nicht austrocknen. Sie können ebenfalls ein
gefrorenes Kühlelement in den oberen und unteren Tank legen, um die
Kühlung zu verbessern.
Wind in großem Winkel verteilen:
Das Gerät schwingt automatisch hin und her und der Wind wird so großächig
verteilt. Sie können das Gerät auch manuell einstellen, so dass es den Wind
ausschließlich in die von Ihnen bevorzugte Richtung bläst.
Fernbedienung mit großer Reichweite:
Die Fernbedienung hat eine Reichweite von bis zu 6 Metern und das Gerät
empfängt das Signal in einem Winkel von bis zu 60 Grad.
Warnton:
Wenn Sie das Tastenfeld berühren gibt das Gerät einen Warnton von sich.

8
DE
BEDIENUNG
Hauptschalter:
Stellen Sie zum Aktivieren des Geräts den Hauptschalter auf der
Geräterückseite auf „On“. Das Gerät ist nun betriebsbereit. Wenn Sie das
Gerät deaktivieren möchten, stellen Sie den Hauptschalter auf „Off“.
Ein-/ Ausschalten:
Drücken Sie zum Einschalten des Geräts diese Taste. Drücken Sie die Taste
zum Ausschalten erneut.
Geschwindigkeit:
Drücken Sie diese Taste mehrfach, um die von Ihnen gewünschte Funktion
einzustellen: Niedrig > Mittel > Hoch > Niedrig.
Kühlen:
Drücken Sie diese Taste, um die Kühlfunktion zu aktivieren. Wenn Sie diese
Taste erneut drücken wird die Kühlfunktion deaktiviert.
Hinweis: Achten Sie vor dem Aktivieren dieser Funktion darauf, dass sich
ausreichend Wasser im Wassertank bendet.
Zeit:
Wenn Sie diese Taste mehrfach drücken, können Sie in Schritten von 30
Minuten die Zeit bis zum automatischen Abschalten des Geräts einstellen. Die
Minimaleinstellung ist 30 Minuten und die Maximaleinstellung ist 7,5 Stunden.
Nach Ablauf der eingestellten Zeit schaltet sich das Gerät automatisch aus.
Schwingen:
Drücken Sie zum Ändern der Ventilatorwindrichtung diese Taste. Wenn diese
Funktion aktiviert wird, wird das entsprechende Symbol auf dem Bildschirm
angezeigt. Drücken Sie die Taste erneut, um die Funktion zu deaktivieren. Die
vertikale Ventilatorenwindrichtung kann manuell angepasst werden, indem
die Auslassklappen nach oben oder unten gerichtet werden.
Windstärke:
Wenn Sie diese Taste mehrfach drücken, können Sie zwischen den Modi
„normaler Wind“, „natürlicher Wind“ und „windstill“ auswählen. Wenn der
Modus „normaler Wind“ eingestellt ist, leuchtet keine Anzeige auf dem
Bildschirm auf. Bei den beiden anderen Modi ist dies der Fall.
9
DE
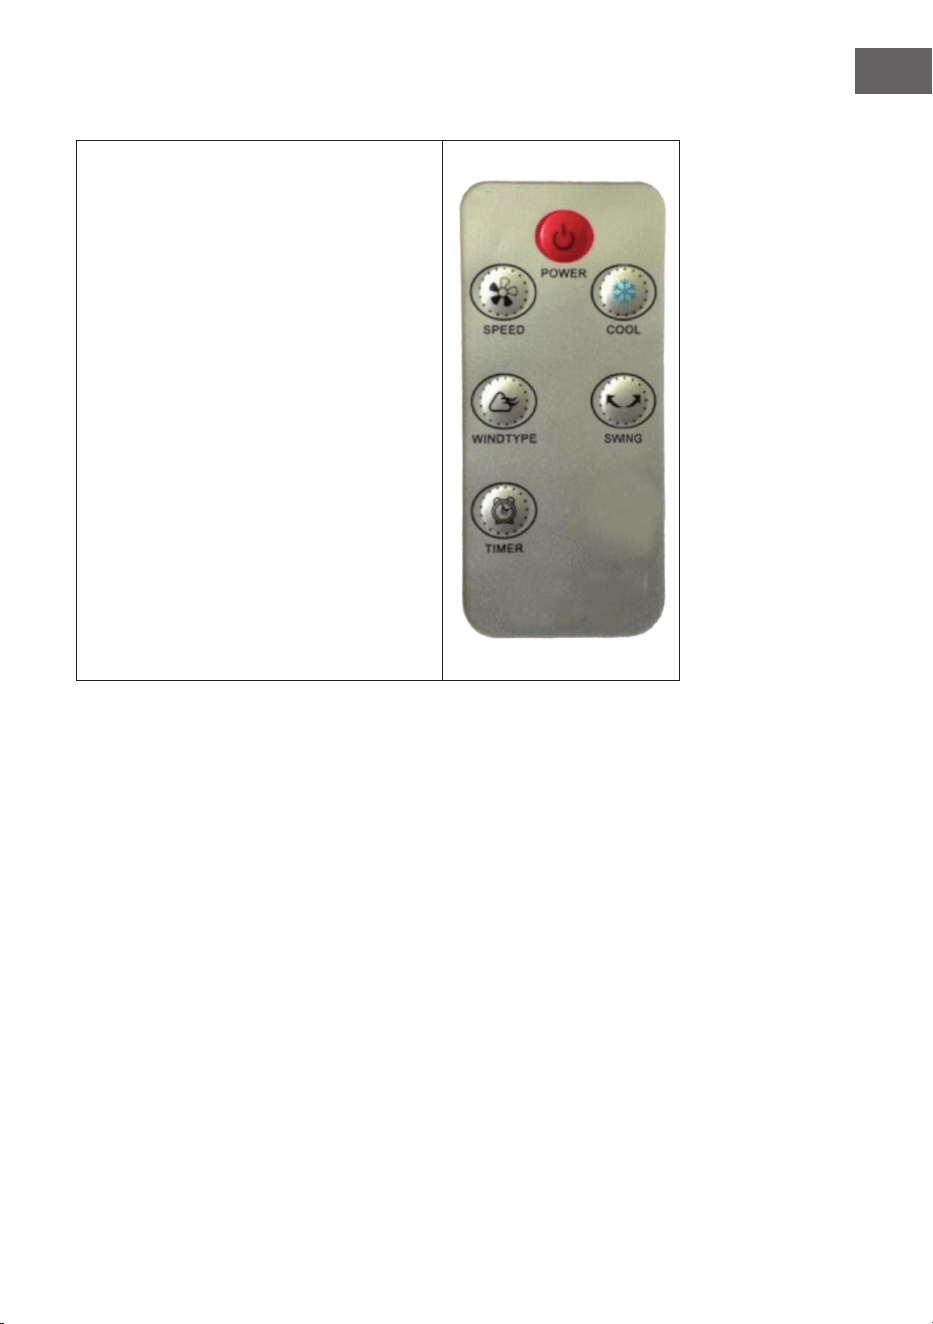
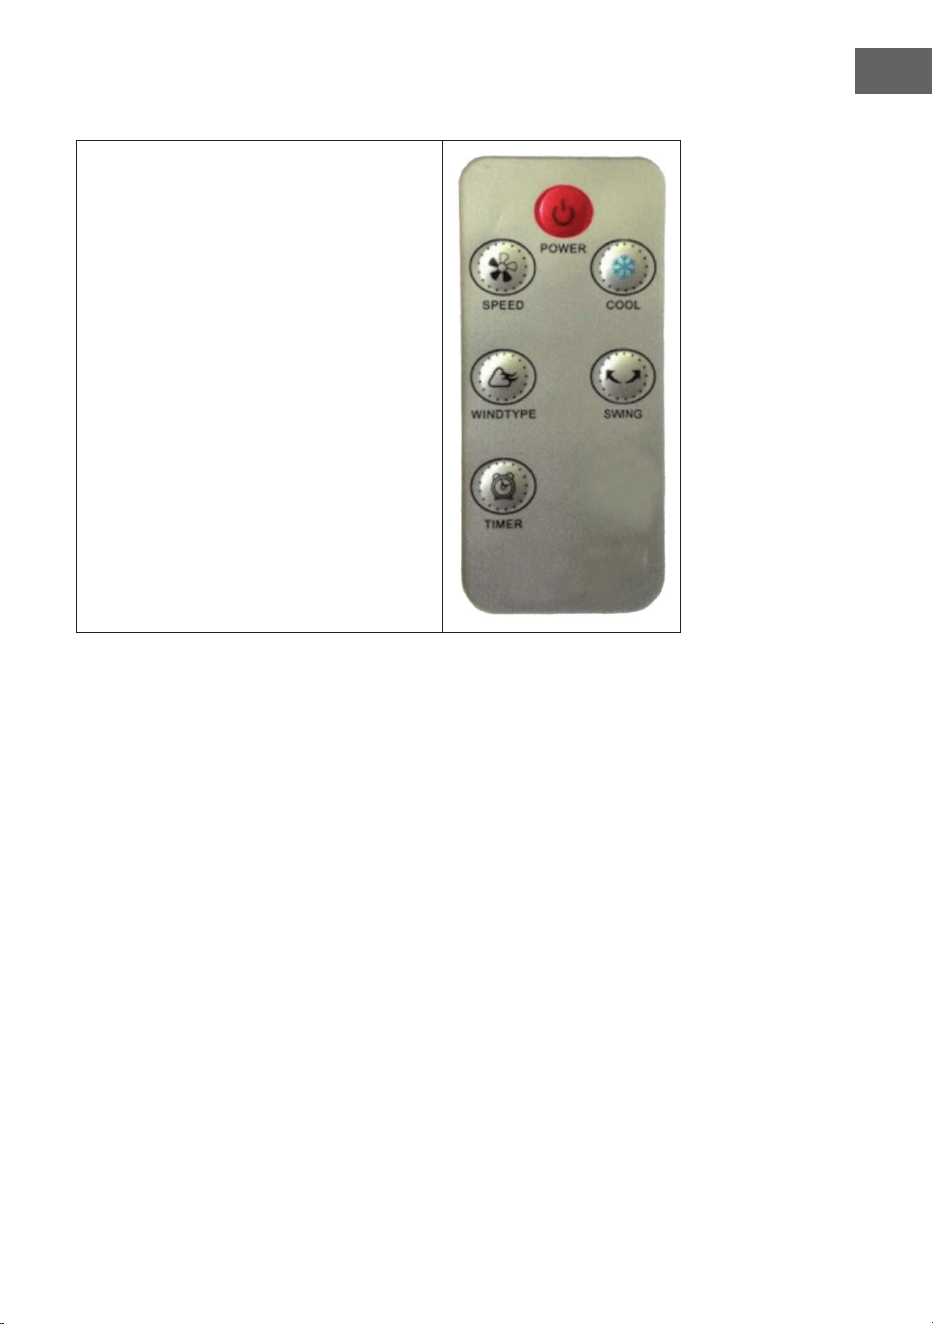
Verwendung der Fernbedienung
• Legen Sie zur Inbetriebnahme der
Fernbedienung Batterien in das
Batteriefach ein.
• Die Fernbedienung verfügt über 6
Tasten und dieselben Funktionen wie das
Bedienfeld.
• Richten Sie die Fernbedienung immer auf
den Empfänger des Geräts aus.
• Wenn Sie Fernbedienung nicht
verwenden, bewahren Sie diese an einem
sicheren Ort auf.
Wichtige Hinweise:
• Vermischen Sie niemals alte und neue
Batterien.
• Entnehmen Sie die Batterien aus dem
Batteriefach, wenn Sie das Gerät
über einen längeren Zeitraum nicht
verwenden.
• Die Fernbedienung besitzt keine
Modustaste, dieser muss von Hand am
Gerät selbst eingestellt werden.
Verwendung eines Kühlelements
Das Kühlelement soll das Wasser im Gerät kühlen, Hitze absorbieren und die
Umgebungstemperatur senken.
• Legen Sie das Kühlelement so lange in das Eisfach, bis es vollständig
gefroren ist.
• Öffnen Sie die Abdeckung des Wassertanks und legen Sie das gefrorene
Kühlelement hinein.
• Es gibt zwei Kühlelemente, welche im Wechsel verwendet werden können.
• Es besteht keine Notwendigkeit, den Kühlelementen Wasser
hinzuzufügen. Öffnen Sie die Kühlelemente keines Falls und achten Sie
darauf, dass diese nicht in die Hände von Kindern gelangen, da die Gefahr
besteht, dass diese versuchen könnten, das Innere des Kühlelements zu
essen.

10
DE
REINIGUNG UND PFLEGE
Hinweis: Vergewissern Sie sich, dass der Netzstromstecker aus der
Steckdose gezogen wurde, bevor Sie den Luftlter entfernen.
1. Reinigung des Luftlters
• Trennen Sie hierfür zunächst die Stromverbindung.
• Ziehen Sie am Griff des Luftlters, um diesen aus dem Gerät zu
entnehmen.
• Reinigen Sie den Luftlter mit einem neutralen Reinigungsmittel und einer
Bürste.
• Setzen Sie den Luftlter anschließend wieder in das Gerät ein.
2. Reinigung des Netzpolsters
• Ziehen Sie den Netzstromstecker aus der Steckdose.
• Nehmen Sie die Luftlter ab und ziehen Sie das Netzpolster heraus.
• Reinigen Sie das Netzpolster mit einem neutralen Reinigungsmittel und
einer Bürste und spülen Sie das Netzpolster anschließend mit klarem
Wasser ab.
Hinweis: Das Netzpolster muss wieder horizontal eingesetzt werden, um
ein Auslaufen zu vermeiden.
3. Reinigung des Wassertanks
• Ziehen Sie den Netzstromstecker aus der Steckdose.
• Nehmen Sie den Wassertank aus dem Gerät heraus und reinigen
Sie diesen mit einem neutralen Reinigungsmittel und spülen Sie ihn
anschließend mit klarem Wasser aus.
• Setzen Sie den Wassertank wieder in das Gerät ein.
11
DE
4. Reinigung des Gehäuses
• Reinigen Sie das Gehäuse mit einem neutralen Reinigungsmittel und
einem weichen Tuch.
Hinweis: Achten Sie darauf, dass sich nach der Reinigung kein Wasser auf
dem Bedienfeld des Geräts bendet.
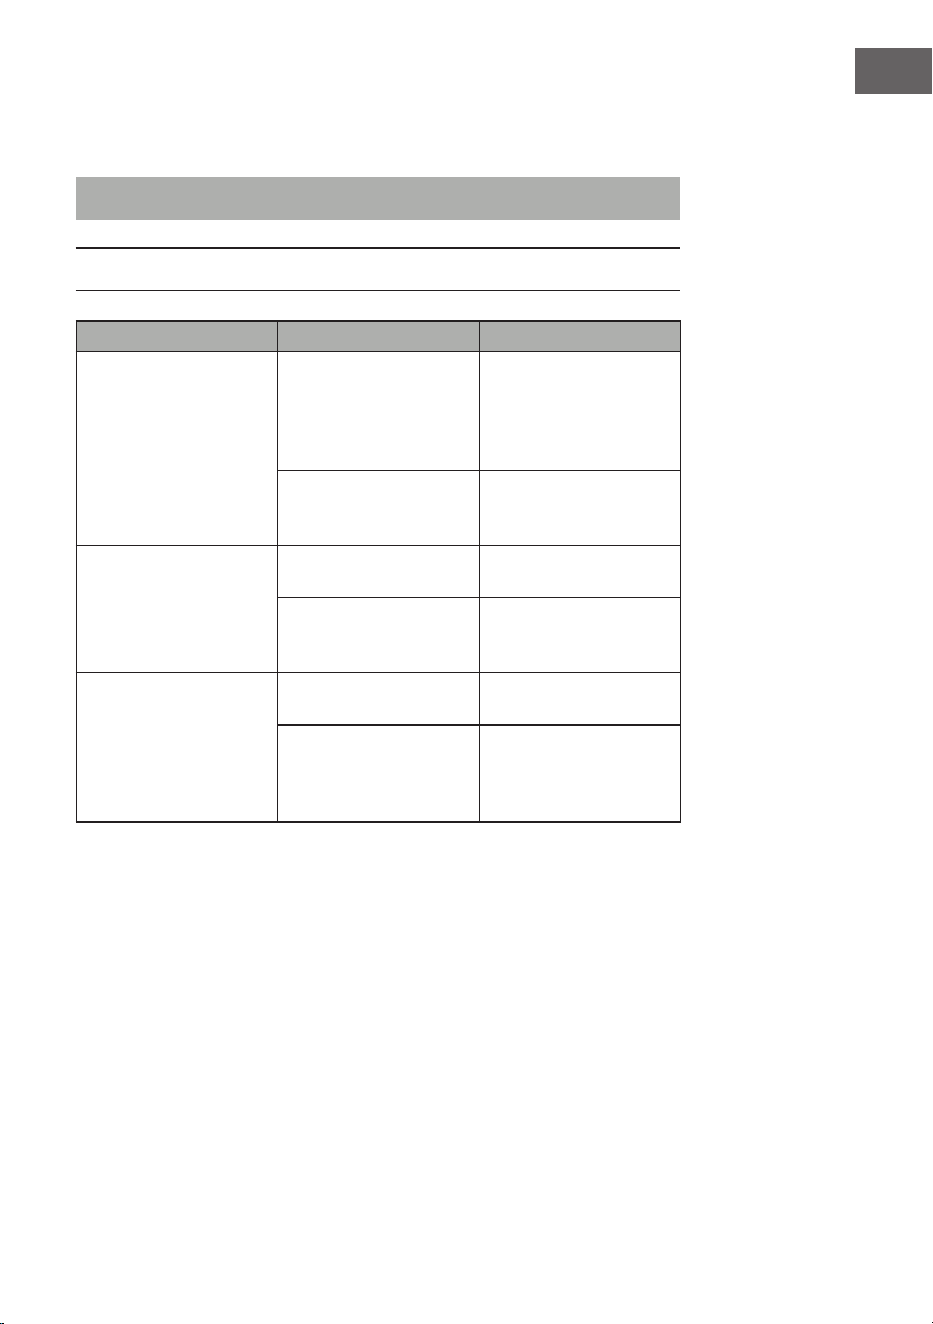
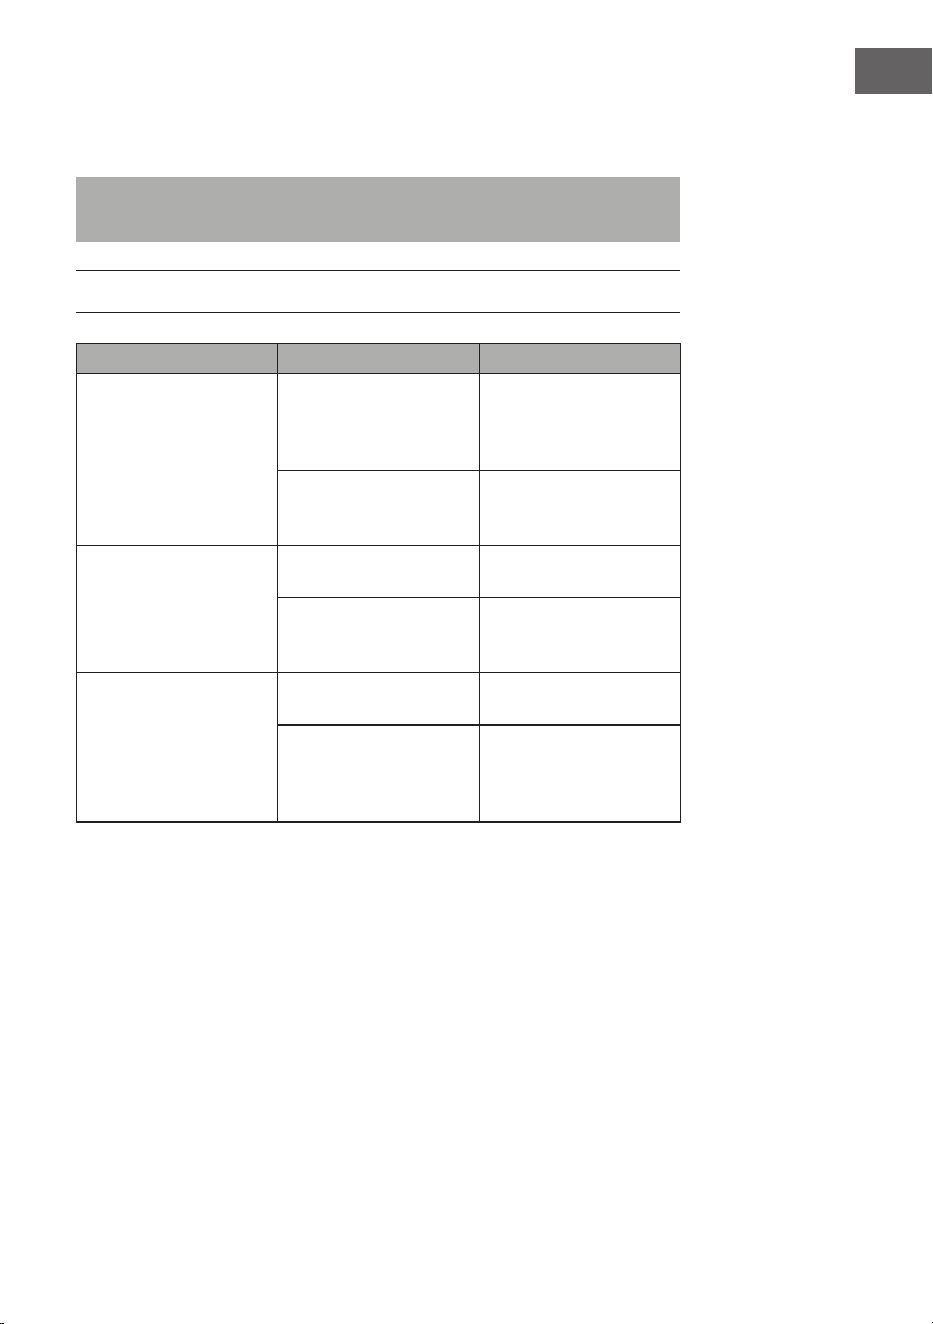
FEHLERBEHEBUNG
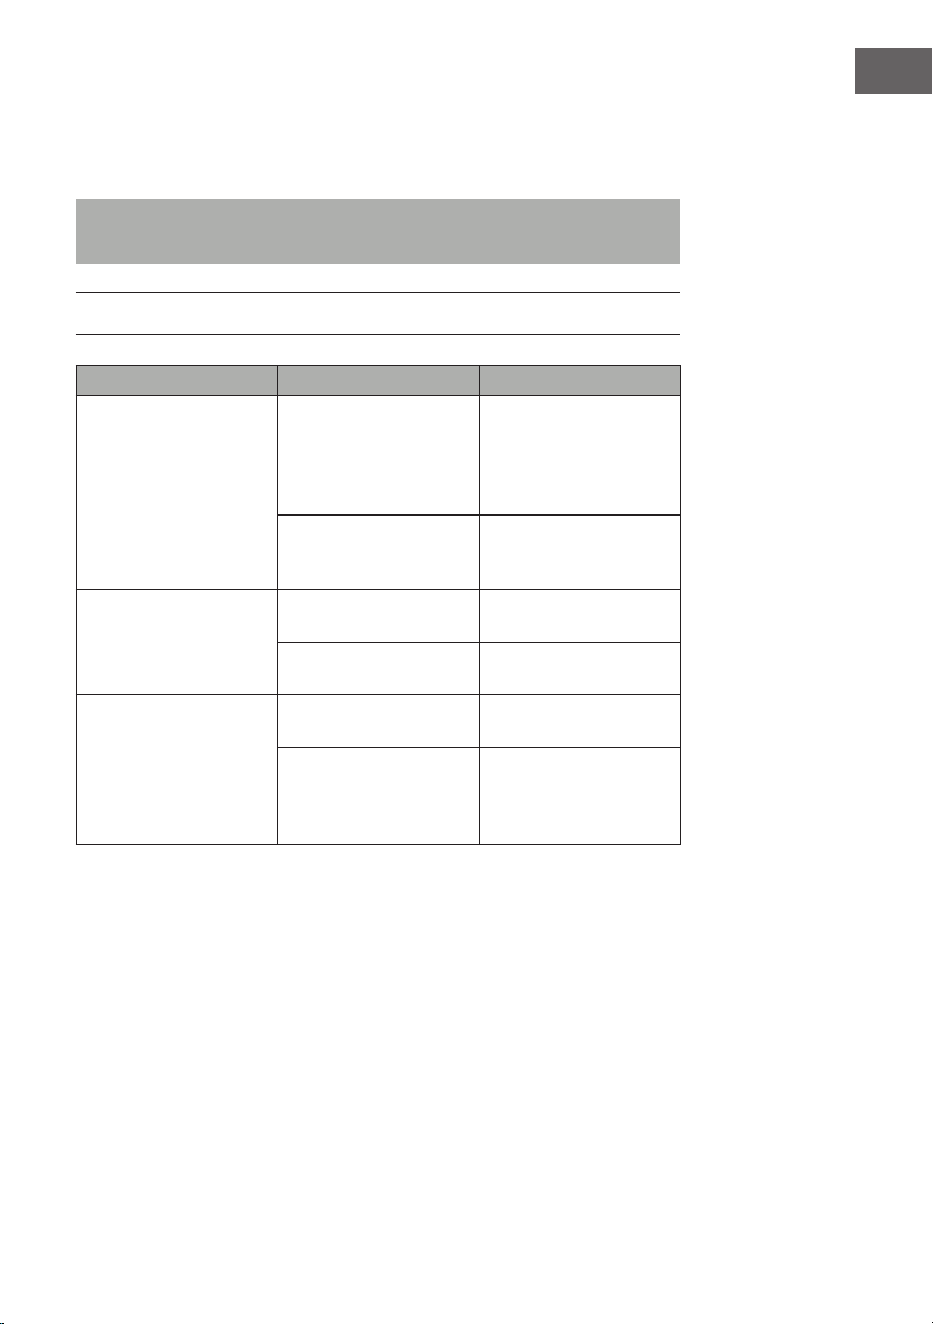
Problem Mögliche Ursache Lösungsansatz
Das Gerät reagiert nicht. Der Hauptschalter ist in
der Position „Off“ oder der
Netzstromstecker ist nicht
eingesteckt.
Stecken Sie den
Netzstromstecker in die
Steckdose und bringen Sie
den Hauptschalter in die
Position „On“.
Sie haben vergessen,
die Taste ON auf dem
Bedienfeld zu drücken.
Drücken Sie die Taste ON
auf dem Bedienfeld.
Der
Luftbefeuchtungseffekt
funktioniert nicht richtig
Die Luftlter sind durch
Staub blockiert.
Reinigen Sie die Luftlter.
Der Lufteinlass wird durch
Fremdkörper blockiert.
Entfernen Sie die
Fremdkörper.
Das Gerät reagiert nicht
oder weißt Fehlfunktionen
auf.
Keine Ursache erkennbar. Wenden Sie sich an den
Kundendienst.
Wasser ist ins
Geräteinnere gelangt oder
Fremdkörper stecken in
der Belüftungsöffnung.
Wenden Sie sich an den
Kundendienst.

12
DE
SPEZIELLE ENTSORGUNGSHINWEISE FÜR
VERBRAUCHER IN DEUTSCHLAND
Entsorgen Sie Ihre Altgeräte fachgerecht. Dadurch wird gewährleistet, dass
die Altgeräte umweltgerecht verwertet und negative Auswirkungen auf die
Umwelt und menschliche Gesundheit vermieden werden. Bei der Entsorgung
sind folgende Regeln zu beachten:
• Jeder Verbraucher ist gesetzlich verpichtet, Elektro- und
Elektronikaltgeräte (Altgeräte) sowie Batterien und Akkus
getrennt vom Hausmüll zu entsorgen. Sie erkennen die
entsprechenden Altgeräte durch folgendes Symbol der
durchgestrichene Mülltonne (WEEE Symbol).
• Sie haben Altbatterien und Altakkumulatoren, die nicht vom Altgerät
umschlossen sind, sowie Lampen, die zerstörungsfrei aus dem Altgerät
entnommen werden können, vor der Abgabe an einer Entsorgungsstelle
vom Altgerät zerstörungsfrei zu trennen.
• Bestimmte Lampen und Leuchtmittel fallen ebenso unter das Elektro- und
Elektronikgesetz und sind dementsprechend wie Altgeräte zu behandeln.
Ausgenommen sind Glühbirnen und Halogenlampen. Entsorgen Sie
Glühbirnen und Halogenlampen bitte über den Hausmüll, sofern Sie nicht
das WEEE Symbol tragen.
• Jeder Verbraucher ist für das Löschen von personenbezogenen Daten auf
dem Elektro- bzw. Elektronikgerät selbst verantwortlich.
Rücknahmepicht der Vertreiber
Vertreiber mit einer Verkaufsäche für Elektro- und Elektronikgeräte von
mindestens 400 Quadratmetern sowie Vertreiber von Lebensmitteln mit einer
Gesamtverkaufäche von mindestens 800 Quadratmetern, die mehrmals im
Kalenderjahr oder dauerhaft Elektro- und Elektronikgeräte anbieten und auf
dem Markt bereitstellen, sind verpichtet,
1 bei der Abgabe eines neuen Elektro- oder Elektronikgerätes an einen
Endnutzer ein Altgerät des Endnutzers der gleichen Geräteart, das
im Wesentlichen die gleichen Funktionen wie das neue Gerät erfüllt,
am Ort der Abgabe oder in unmittelbarer Nähe hierzu unentgeltlich
zurückzunehmen und
2 auf Verlangen des Endnutzers Altgeräte, die in keiner äußeren
Abmessung größer als 25 Zentimeter sind, im Einzelhandelsgeschäft
oder in unmittelbarer Nähe hierzu unentgeltlich zurückzunehmen; die
Rücknahme darf nicht an den Kauf eines Elektro- oder Elektronikgerätes
geknüpft werden und ist auf drei Altgeräte pro Geräteart beschränkt.

13
DE
• Bei einem Vertrieb unter Verwendung von Fernkommunikationsmitteln
ist die unentgeltliche Abholung am Ort der Abgabe auf Elektro- und
Elektronikgeräte der Kategorien 1, 2 und 4 gemäß § 2 Abs. 1 ElektroG,
nämlich „Wärmeüberträger“, „Bildschirmgeräte“ (Oberäche von mehr
als 100 cm²) oder „Großgeräte“ (letztere mit mindestens einer äußeren
Abmessung über 50Zentimeter) beschränkt. Für andere Elektro- und
Elektronikgeräte (Kategorien 3, 5, 6) ist eine Rückgabemöglichkeit in
zumutbarer Entfernung zum jeweiligen Endnutzer zu gewährleisten.
• Altgeräte dürfen kostenlos auf dem lokalen Wertstoffhof oder in
folgenden Sammelstellen in Ihrer Nähe abgegeben werden: www.take-e-
back.de
• Für Elektro- und Elektronikgeräte der Kategorien 1, 2 und 4 an bieten
wir auch die Möglichkeit einer unentgeltlichen Abholung am Ort der
Abgabe. Beim Kauf eines Neugeräts haben sie die Möglichkeit eine
Altgerätabholung über die Webseite auszuwählen.
• Batterien können überall dort kostenfrei zurückgegeben werden, wo sie
verkauft werden (z. B. Super-, Bau-, Drogeriemarkt). Auch Wertstoff- und
Recyclinghöfe nehmen Batterien zurück. Sie können Batterien auch per
Post an uns zurücksenden. Altbatterien in haushaltsüblichen Mengen
können Sie direkt bei uns von Montag bis Freitag zwischen 08:00 und
16:00 Uhr unter der folgenden Adresse unentgeltlich zurückgeben:
Chal-Tec Fulllment GmbH
Norddeutschlandstr. 3
47475 Kamp-Lintfort
• Wichtig zu beachten ist, dass Lithiumbatterien aus Sicherheitsgründen
vor der Rückgabe gegen Kurzschluss gesichert werden müssen (z. B. durch
Abkleben der Pole).
• Finden sich unter der durchgestrichenen Mülltonne auf der Batterie
zusätzlich die Zeichen Cd, Hg oder Pb ist das ein Hinweis darauf, dass die
Batterie gefährliche Schadstoffe enthält. (»Cd« steht für Cadmium, »Pb«
für Blei und »Hg« für Quecksilber).
Hinweis zur Abfallvermeidung
Indem Sie die Lebensdauer Ihrer Altgeräte verlängern, tragen Sie dazu
bei, Ressourcen efzient zu nutzen und zusätzlichen Müll zu vermeiden.
Die Lebensdauer Ihrer Altgeräte können Sie verlängern indem Sie defekte
Altgeräte reparieren lassen. Wenn sich Ihr Altgerät in gutem Zustand bendet,
könnten Sie es spenden, verschenken oder verkaufen.

14
DE
HINWEISE ZUR ENTSORGUNG
Wenn es in Ihrem Land eine gesetzliche Regelung
zur Entsorgung von elektrischen und elektronischen
Geräten gibt, weist dieses Symbol auf dem Produkt
oder auf der Verpackung darauf hin, dass dieses
Produkt nicht im Hausmüll entsorgt werden darf.
Stattdessen muss es zu einer Sammelstelle für das
Recycling von elektrischen und elektronischen Geräten
gebracht werden. Durch regelkonforme Entsorgung
schützen Sie die Umwelt und die Gesundheit
Ihrer Mitmenschen vor negativen Konsequenzen.
Informationen zum Recycling und zur Entsorgung
dieses Produkts, erhalten Sie von Ihrer örtlichen
Verwaltung oder Ihrem Hausmüllentsorgungsdienst.
Dieses Produkt enthält Batterien. Wenn es in Ihrem
Land eine gesetzliche Regelung zur Entsorgung von
Batterien gibt, dürfen die Batterien nicht im Hausmüll
entsorgt werden. Informieren Sie sich über die
örtlichen Bestimmungen zur Entsorgung von Batterien.
Durch regelkonforme Entsorgung schützen Sie die
Umwelt und die Gesundheit Ihrer Mitmenschen vor
negativen Konsequenzen.
HERSTELLER & IMPORTEUR (UK)
Hersteller:
Chal-Tec GmbH, Wallstraße 16, 10179 Berlin, Deutschland.
Importeur für Großbritannien:
Berlin Brands Group UK Limited
PO Box 42
272 Kensington High Street
London, W8 6ND
United Kingdom

15
EN
Dear Customer,
Congratulations on purchasing this equipment. Please
read this manual carefully and take care of the following
hints to avoid damages. Any failure caused by ignoring
the items and cautions mentioned in the instruction
manual is not covered by our warranty and any liability.
Scan the QR code to get access to the latest user
mannual and other information about the product.
CONTENT
Safety Instrcutions 16
Product description 17
Installation 18
Functions 19
Operation 20
Cleaning and Care 22
Troubleshooting 23
Disposal Considerations 24
Manufacturer & Importer (UK) 24
TECHNICAL DATA
Item number 10033432
Power supply 220-240 V ~ 50-60 Hz
Power consumtion 75 W

16
EN
SAFETY INSTRCUTIONS
• Connect to a main power supplier of 220-240V~ 50-60 Hz only.
• Keep the appliance and cable away from sources of heat, sharp objects or
anything that may cause damage.
• Do not place the cord under carpets. Do not cover the cord with small
clothes, shirts or other similar elements. Place the cord away from trafc
areas in order to avoid any risk of tripping over.
• Do not operate the appliance if the cable or plug damaged.
• If the supply cord is damaged, it must be replaced by the manufacturer, its
service agent or similarly qualied persons in order to avoid a hazard.
• Indoor use only.
• Do not cover the machine during using.
• Always operate on a stable at horizontal surface.
• Ensure the appliance is switched OFF before connecting to the mains
power supply.
• Always ensure that hands are dry before operating or adjusting any switch
on the product or touching the plug and mains supply connections.
• Do not leave this appliance unattended when it’s in use. Turn off and
disconnect the appliance when you leave the room for an extended period.
• Switch off the appliance and unplug from the mains socket when not in
use, before lling, cleaning or other maintain.
• To disconnect the appliance, switch it “OFF”, and then remove the plug
from outlet. Do not pull the cord to disconnect the plug.
• This appliance can be used by children aged from 8 years and above and
persons with reduced physical, sensory or mental capabilities or lack
of experience and knowledge if they have been given supervision or
instruction concerning use of the appliance in a safe way and understand
the hazards involved. Children shall not play with the appliance.
• Cleaning and user maintenance shall not be made by children without
supervision.
• Use the appliance only as described in this manual.
• Do not insert your ngers in the openings of the guard.
• Do not leave hair, tissue, tablecloths, clothes or curtains near all openings
of the fan, they could be sucked into the fan and be taken within the
internal moving parts that could cause injury or damage.
• Do not use the appliance in wet or damp locations such as bathrooms.
• Do not operate the appliance when it’s not mounted on its wheels or if it’s
lying on the side.
• Make sure the cord is completely extended before use.
• Place the appliance on a at horizontal surface. It must not be at an incline
during use.
17
EN
• When in operation, evaporative coolers moisturize the ambient air. Over-
humidication of residential rooms should be avoided. Recommendation:
40 – 50 % relative humidity. (Excessive humidity of the air can damage the
home and cause health problems.)
• The appliance may only be set up on water- and moisture-proof ooring
materials (spilling some drops of water is unavoidable when the content of
the tank is changed).
• With each and every change of tank content, completely remove residual
water from the equipment. To prevent nucleation, remove residual water
from the equipment and water tank every time after three days of use.
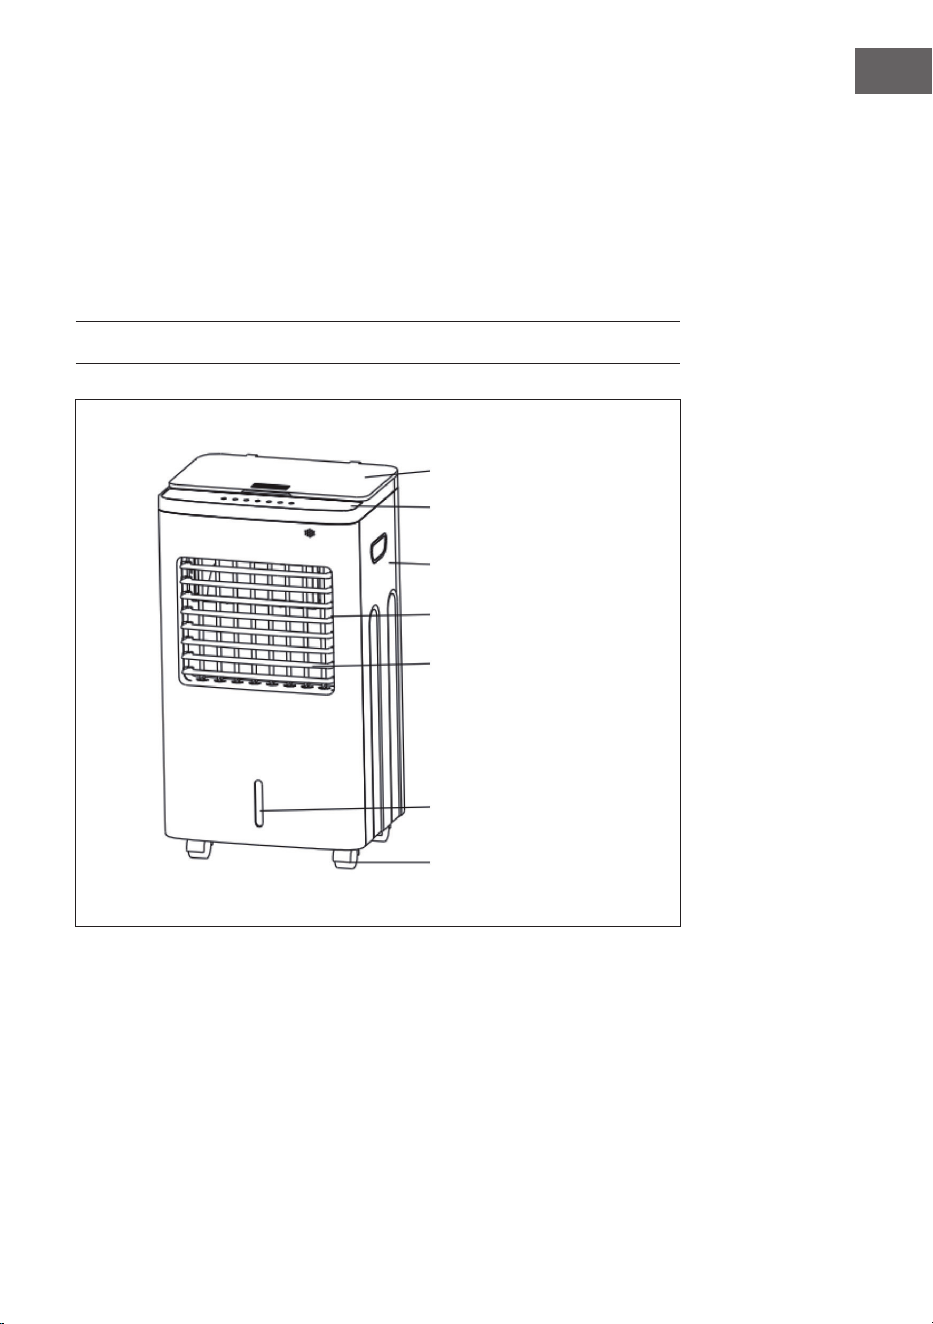
PRODUCT DESCRIPTION
Water tank cover
Control panel
Side cover
Air outlet
Cross blade
Water tank window
Caster

18
EN
INSTALLATION
Assembling castors
Put the appliance on a at surface, take out the wrench from foam box, then
assemble the castors.
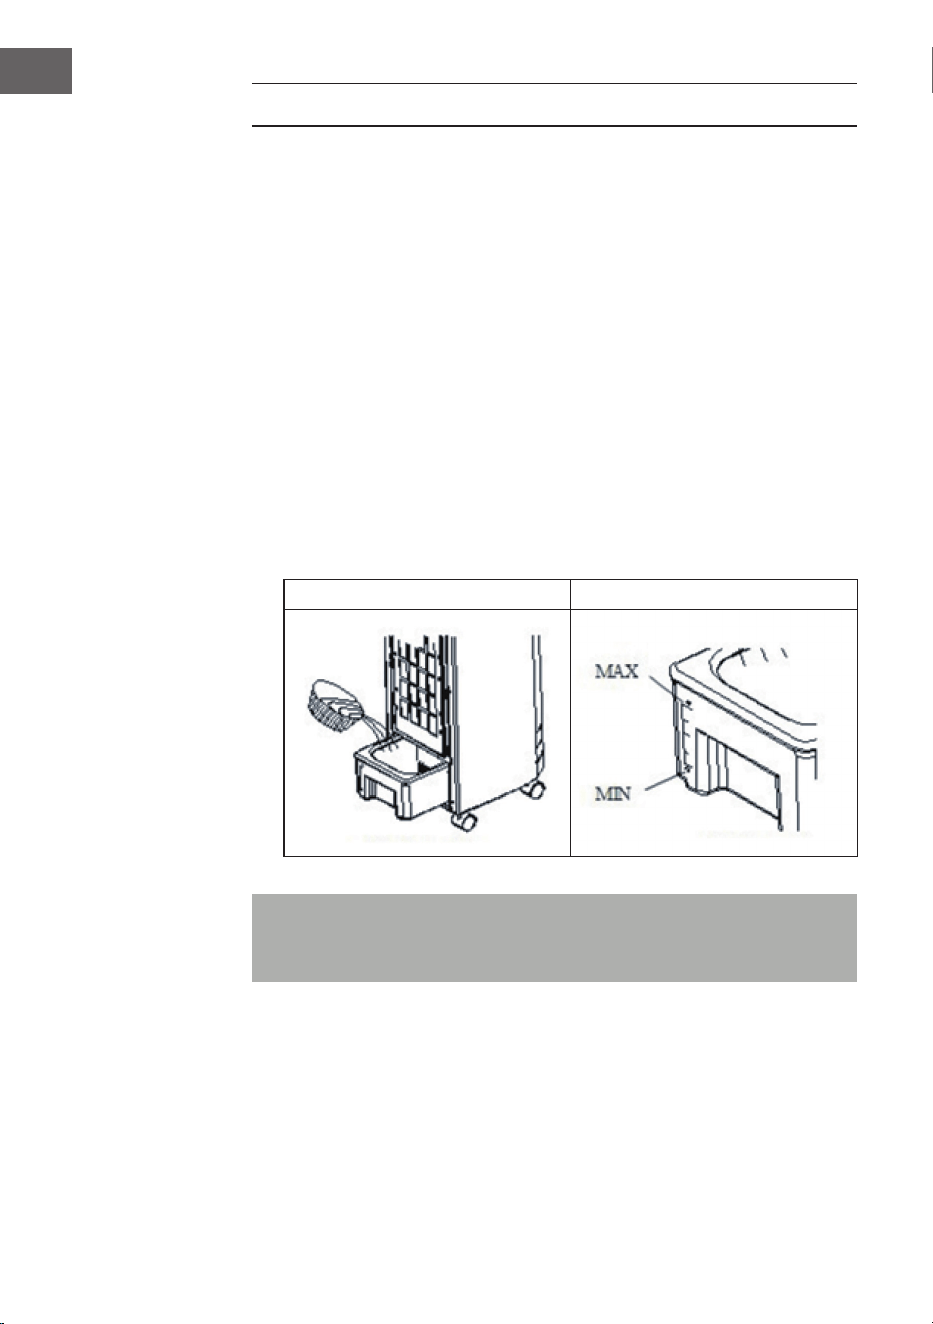
Watering:
Pull out the water tank 1/3 and ll it with clean water (see map 1).
a. Pay attention to the level of water tank when add water.(map 2)
b. The level of water tank should not over “MAX” scale at any time, when
humidifying, the total level of water tank should not below “MIN” scale.
c. Put ice or frozen ice box to the water tank if you want to strengthen the
efciency of cooling. But the total level of water tank should not over
“MAX” scale.
Map 1 Map 2
Note: Alternatively, you can also ll the Air Cooler conveniently from
above. Open the corresponding ap on the top of the unit and ll the water
directly into the water circuit.

19
EN
FUNCTIONS
Principle of Cooling:
Water is taken from the water tank by pump to the top, then the water drops
into paper evaporator . When the water in paper evaporator evaporates to
water vapor, the air is cooled. People will feel cool wind when the cool air is
delivered by fan.
Electronics control:
Safe and durable, attractive appearance.
Adjustable speed and fan mode:
Have three speeds and fan types, blow at a wide angle.
Cool:
Adopt the technology of ice crystal cooling and air humidifying, fall down the
temperature from air vent and raise relative humidity, prevent air drying.You
could put the ice box into the top tank and down tank to make the cooling be
better.
Deliver wind at a wide angle:
Swing the blades automatically, deliver wind at horizontal wide angle. Swing
the blades transversely manually, select the direction discretionarily.
Far-range remote control:
6 meters far-range remote control, receive at 60 degree wide angle.
Buzzer:
Vocalise when operating the effective keypad, use conveniently.

20
EN
OPERATION
On/Off:
At the back side: Please nd this key and turn on the power at the BACK of
appliance, the air cooler will be ready. When the appliance need stop to work,
please turn off.
Power:
On control panel : Press the key, turn on the appliance, second press, shut it
down .
Speed:
Press this key, start the appliance, the corresponding function changes as
follows when you press the key serially: LOW > MEDIUM > HIGH > LOW.
Cool
Press the key to start cooling system. It cancels this function when you press
again.
Note: Please be sure there is enough water in the water tank before press
this key.
Time:
Press this key, the timer from 0.5 to 7.5 hours options with step 0.5 hours. It
will shutdown if the timer nished.
Swing:
Press this key to change the wind direction. The swing icon will appear on
the screen when the function is activated. Press the button again to stop
the oscillation. The vertical direction of air ow can be adjusted manually by
directing the outlet louvers up and down.
Wind type:
Press this key, you can choose the normal wind, natural wind and sleeping
wind circularly. Under the situation of normal wind it has no corresponding
indicator light, but others have.

21
EN
The use of remote control
• Fit on batteries, it can works.
• There are 6 keys on the remote control,
and have the same function as control
panel.
• Should aim at the remote control
reception window when you use.
• When the remote control is not in use,
please put away it for using next time.
Important notes:
• Do not mix old battery with the new one
in use.
• Please take out the batteries for long
time nonuse.
• The remote control has no mode key, so
press the key by your hands.
The use of ice box
The ice box has a particular feature of keeping cool, it can absorb heat and cool
the environmental temperature.
• Put the ice box into the refrigerator to make sure that it iced absolutely.
• Open the door, put the frozen ice box into the water tank.
• There are two ice boxes for using circularly.
• The ice box no need to add water. Do not open it and prevent children
from eating it!

22
EN
CLEANING AND CARE
Note: Ensure that the fan is switched off from the supply mains before
removing the air lter screen.
1. Clean the air lter screen
• Cut off the power supply, pull the handle of air lter screen, remove it from
appliance.
• Clean the air lter screen with neutral detergent and banister brush, then
clean it with clear water.
• Finally, reinstall to the appliance.
2. Clean the wetted pad
• Cut off the power supply, take down the air lter screen, then draw the
wetted pad from support.
• Clean the wetted pad with neutral detergent and banister brush, then
clean it with clear water.
• Finally, reinstall to the appliance.
Attention: the wetted pad must be installed horizontally, in order to
avoid leaking.
3. Clean the water tank
• Cut off the power supply, open the door, take out the water tank, clean it
with neutral detergent, and wash it with clear water.
• Then reinstall to the appliance.

23
EN
4. Clean the shell
• Clean with neutral detergent and soft cloth.
Note: cut off the power supply when clean the appliance as there have a
high pressure in the body. Do not leave any water on the surface of control
panel.
TROUBLESHOOTING
Malfunction Causes Solution
The device is not
responding.
The main switch is in the
"Off" position or the mains
plug is not plugged in.
Plug the mains plug into
the socket and set the
main switch to the "On"
position.
The humidication effect
does not work properly.
Press the ON button on
the control panel.
The device does not react
or shows malfunctions.
The air lters are blocked
by dust.
Clean the air lters.
The air inlet is blocked by
foreign objects.
Remove the foreign
objects.
Das Gerät reagiert nicht
oder weißt Fehlfunktionen
auf.
No cause recognizable. Contact your service
representative.
Water has entered the
interior of the unit or
foreign bodies are stuck in
the ventilation opening.
Contact customer service.
24
EN
DISPOSAL CONSIDERATIONS
If there is a legal regulation for the disposal of electrical
and electronic devices in your country, this symbol
on the product or on the packaging indicates that this
product must not be disposed of with household waste.
Instead, it must be taken to a collection point for the
recycling of electrical and electronic equipment. By
disposing of it in accordance with the rules, you are
protecting the environment and the health of your
fellow human beings from negative consequences. For
information about the recycling and disposal of this
product, please contact your local authority or your
household waste disposal service.
This product contains batteries. If there is a legal
regulation for the disposal of batteries in your country,
the batteries must not be disposed of with household
waste. Find out about local regulations for disposing
of batteries. By disposing of them in accordance with
the rules, you are protecting the environment and
the health of your fellow human beings from negative
consequences.
MANUFACTURER & IMPORTER (UK)
Manufacturer:
Chal-Tec GmbH, Wallstrasse 16, 10179 Berlin, Germany.
Importer for Great Britain:
Berlin Brands Group UK Limited
PO Box 42
272 Kensington High Street
London, W8 6ND
United Kingdom

25
ES
Estimado cliente:
Le felicitamos por la adquisición de este producto. Lea
atentamente el siguiente manual y siga cuidadosamente
las instrucciones de uso con el n de evitar posibles
daños. La empresa no se responsabiliza de los daños
ocasionados por un uso indebido del producto o por haber
desatendido las indicaciones de seguridad. Escanee el
código QR para obtener acceso al manual de usuario más
reciente y otra información sobre el producto.
ÍNDICE DE CONTENIDOS
Indicaciones de seguridad 26
Vista general del aparato 27
Instalación 28
Funciones 29
Manejo 30
Limpieza y cuidado 32
Resolución de problemas 33
Indicaciones sobre la retirada del aparato 34
Fabricante e importador (reino unido) 34
DATOS TÉCNICOS
Número de artículo 10033432
Suministro eléctrico 220-240 V ~ 50-60 Hz
Potencia 75 W

26
ES
INDICACIONES DE SEGURIDAD
• Antes de utilizar el aparato, compruebe la tensión en la placa técnica
del mismo. Conecte el aparato a tomas de corriente que se adecuen a la
tensión del mismo.
• Mantenga el cable lejos de las supercies calientes y de los objetos
alados.
• No coloque el cable de alimentación debajo alfombras ni lo cubra con otros
objetos o materiales. Coloque el cable de tal manera que nadie pueda
pisarlo ni tropezar con él.
• No utilice el aparato si el cable de alimentación o el enchufe está dañado.
• Si el cable de alimentación o el enchufe está dañado, deberá ser sustituido
por el fabricante, una empresa autorizada o una persona cualicada.
• Utilice el aparato únicamente en el interior.
• No cubra el aparato.
• Coloque el aparato en una supercie nivelada y estable.
• Asegúrese de que el aparato está apagado antes de conectar el enchufe a
la toma de corriente.
• No opere el aparato ni toque el enchufe o el cable con las manos mojadas.
• No deje el aparato sin supervisión cuando está en marcha. Apague el
aparato y desconecte el enchufe de la toma de corriente si no lo utiliza.
• Antes de limpiar o inspeccionar el aparato, desconéctelo de la toma de
corriente.
• Para desconectar el aparato no tire del cable, sino del cuerpo del enchufe.
• Los niños mayores de 8 años y las personas con discapacidad física o
psíquica pueden utilizar el aparato si han sido previamente instruidos
por su tutor o supervisor sobre el funcionamiento del mismo y conocen
las funciones, así como las indicaciones de seguridad. No permita que
los niños jueguen con el aparato. Los niños mayores de 8 años solamente
podrán limpiar el aparato si se encuentran bajo supervisión.
• Utilice el aparato de acuerdo con lo descrito en estas instrucciones de uso.
• No introduzca los dedos ni ningún objeto en las rejillas de ventilación
• No coloque el aparato cerca de cortinas, manteles o textiles similares. El
ventilador podría tirar de ellos y romperlos.
• No utilice el aparato en estancias húmedas, como cuartos de baño.
• No utilice el aparato si aún no tiene las ruedas montadas o se encuentra de
lado.
• Desenrolle el cable completamente antes de utilizar el aparato.
• Asegúrese de que el aparato está en posición vertical.
27
ES
• Cuando el aparato está en marcha, humedece el aire ambiente. Evite que
la humedad del aire sea demasiado elevada. Recomendamos mantener
una humedad del aire entre 40-50 %. Una humedad del aire demasiado
elevada puede provocar la aparición de moho y problemas de salud.
• Coloque el aparato en una supercie resistente a la humedad y a la
humedad del aire elevada. Es posible que, al montar o desmontar el
depósito de agua, se derramen algunas gotas. Si es así, limpie las gotas de
inmediato.
• Cambie el agua en el depósito cada 3 días como máximo.
VISTA GENERAL DEL APARATO
Tapa del depósito de agua
Panel de control
Cubierta lateral
Salida de aire
Rejilla de ventilación
Indicador del nivel del agua
Ruedas
28
ES
INSTALACIÓN
Montaje de las ruedas
Coloque el aparato sobre una supercie plana y monte las ruedas con ayuda de
una llave.
Rellenar el aparato con agua
Extraiga 1/3 el depósito de agua y rellénelo con agua limpia (véase ilustración 1).
a. Tenga en cuenta el indicador del nivel del agua al rellenar agua (véase
ilustración 2).
b. El nivel del agua no debe ser superior a la marca máxima. Si desea
humidicar el aire, el nivel del agua no debe encontrarse por debajo de la
marca mínima.
c. Introduzca hielo o un acumulador de frío dentro del depósito si desea
intensicar el efecto frío. Asegúrese de que el nivel del agua se sitúe por
debajo de la marca máxima tras añadir el hielo/acumulador de frío.
Ilustración 1 Ilustración 2
Nota: Como alternativa puede rellenar cómodamente el refrigerador de
aire desde arriba. Para ello, abra la trampilla correspondiente situada en la
parte superior del aparato y rellene directamente el agua en el circuito de
refrigeración.

29
ES
FUNCIONES
Principio de refrigeración:
El agua se bombea del depósito hacia arriba y gotea en el vaporizador de
papel. Cuando el agua se transforme en vapor de agua en el vaporizador, el
aire se enfriará. Se notará una brisa fresca cuando el aire sea distribuido por el
ventilador.
Control electrónico:
Seguro y duradero, apariencia atractiva.
Ajuste de velocidad y modo ventilador:
Existen tres niveles de velocidad y conguración de ventilador.
Enfriar:
La tecnología de enfriado con cristales de hielo y del humidicador de aire
se ha adaptado. La temperatura antes de la salida de aire cae y aumenta la
humedad del aire. Así, el aire no puede secarse. Igualmente, puede colocar un
acumulador de frío congelado en el depósito superior e inferior para mejorar el
enfriamiento.
La brisa se distribuye en un ángulo grande:
El aparato oscila automáticamente y el aire se distribuye por una gran
supercie. También puede regular el aparato manualmente para que la brisa
solamente se oriente a la dirección que desee.
Mando a distancia con gran alcance:
El mando a distancia cuenta con un alcance efectivo de hasta 6 metros y el
aparato recibe la señal en un ángulo de hasta 60 grados.
Tono de aviso:
Cuando toque un botón del panel de control, el aparato emite un tono de aviso.

30
ES
MANEJO
Interruptor principal:
Coloque el interruptor principal situado en la parte trasera en ON para
encender el aparato. El aparato está listo para su uso. Para apagar el aparato,
coloque el interruptor principal en „OFF“.
Encender / apagar:
Para encender el aparato, pulse este botón. Pulse de nuevo para apagar.
Velocidad:
Pulse varias veces el botón para selección la función que desee:
Baja>Media>Alta>Baja.
Enfriar:
Pulse el botón para activar la función de enfriamiento. Si pulsa de nuevo este
botón, se desactiva la función de refrigeración.
Nota: Antes de activar esta función, asegúrese de que exista suciente
agua en el depósito.
Tiempo:
Si pulsa este botón varias veces, puede regular en intervalos de 30 minutos
el tiempo que transcurrirá hasta el apagado automático del aparato. El
ajuste mínimo es de 30 minutos y el ajuste máximo es de 7,5 horas. Cuando
transcurra el tiempo seleccionado, el aparato se apaga automáticamente.
Oscilación:
Para modicar la orientación del ventilador, pulse este botón. Con esta función
activada, se muestra el símbolo correspondiente en el monitor. Pulse de nuevo
el botón para desactivar la función. La orientación vertical del ventilador se
puede ajustar manualmente orientando las lamas hacia arriba o hacia abajo.
Potencia de la brisa:
Si pulsa varias veces este botón, puede elegir entre los modos „brisa normal“,
„brisa natural“ y „sin brisa“. Si se selecciona el modo „brisa normal“, no se
ilumina ningún indicador en el monitor. Con los otros dos modos, sí.

31
ES
Utilización del mando a distancia
• el mando a distancia, consérvelo en un
lugar seguro.
• Indicaciones Para poner en marcha el
mando a distancia, introduzca las pilas en
su compartimento.
• El mando a distancia dispone de 6
botones y de las mismas funciones que el
panel de control.
• Oriente el mando a distancia siempre
hacia el receptor del aparato.
Si no utiliza importantes:
• Nunca mezcle pilas viejas con nuevas.
• Retire las pilas de su compartimento si
no utiliza el aparato durante un periodo
de tiempo prolongado.
• El mando a distancia no cuenta con
botón de modo, el cual debe regularse a
mano.
Uso de un acumulador de frío
El acumulador de frío tiene como función enfriar el agua del aparato, absorber
el calor y reducir la temperatura ambiente.
• Introduzca el acumulador de frío en el congelador hasta que se congele.
• Abra la cubierta del depósito de agua e introduzca dentro el acumulador
de frío congelado.
• Existen dos acumuladores de frío que se pueden utilizar de manera
alterna.
• No es necesario añadir agua al acumulador de frío. No abra el acumulador
de frío en ningún caso y asegúrese de que no acabe en las manos de
los niños, pues existe riesgo de que intenten ingerir el contenido del
acumulador.

32
ES
LIMPIEZA Y CUIDADO
Nota: Asegúrese de que se haya desconectado el enchufe de la toma de
corriente antes de desmontar el ltro de aire.
1. Limpieza del ltro de aire
• Primero, desconecte la conexión eléctrica.
• Tire del asa del ltro de aire para extraerlo del aparato.
• Limpie el ltro de aire con un producto de limpieza neutro y un cepillo.
• Coloque el ltro de aire de nuevo en el aparato.
2. Limpieza de la esponja
• Desconecte el enchufe de la toma de corriente.
• Desmonte el ltro de aire y extraiga la esponja.
• Limpie la esponja con un limpiador neutro y un cepillo y enjuáguela con
agua limpia.
Nota: La esponja debe colocarse de nuevo en posición horizontal para
evitar un vertido.
3. Limpieza del depósito de agua
• Desconecte el enchufe de la toma de corriente.
• Limpie el depósito de agua con un limpiador neutro y enjuáguelo con agua
limpia.
• Vuelva a colocar el depósito de agua dentro del aparato.
33
ES
4. Limpieza de la carcasa
• Limpie la carcasa con un producto de limpieza neutro y un paño suave.
Nota: Asegúrese de que tras la limpieza no se ltre agua al panel de control.
RESOLUCIÓN DE PROBLEMAS
Problema Posible causa Solución propuesta
El aparato no responde. El interruptor principal se
encuentra en la posición
"Off" o el enchufe no está
conectado.
Conecte el cable de
alimentación a la toma
de corriente y coloque el
interruptor principal en la
posición "on".
Ha olvidado pulsar el
botón ON del panel de
control.
Pulse el botón ON del
panel de control.
El efecto de humidicación
de aire no funciona
correctamente.
El ltro de aire está
obstruido por el polvo.
Limpie el ltro de aire.
La entrada de aire está
obstruida por objetos
extraños.
Retire los cuerpos
extraños.
El aparato no responde
o presenta fallos en el
funcionamiento.
No hay ninguna causa
aparente.
Contacte con el servicio de
atención al cliente.
Se ha introducido agua
en el interior del aparato
o hay objetos dentro del
oricio de ventilación.
Contacte con el servicio de
atención al cliente.
34
ES
INDICACIONES SOBRE LA RETIRADA DEL
APARATO
Si en su país existe una disposición legal relativa a la
eliminación de aparatos eléctricos y electrónicos, este
símbolo estampado en el producto o en el embalaje
advierte que no debe eliminarse como residuo
doméstico. En lugar de ello, debe depositarse en un
punto de recogida de reciclaje de aparatos eléctricos y
electrónicos. Una gestión adecuada de estos residuos
previene consecuencias potencialmente negativas
para el medio ambiente y la salud de las personas.
Puede consultar más información sobre el reciclaje y
la eliminación de este producto contactando con su
administración local o con su servicio de recogida de
residuos.
Este producto contiene baterías. Si en su país existe
una disposición legal relativa a la eliminación de
baterías, estas no deben eliminarse como residuo
doméstico. Infórmese sobre la normativa vigente
relacionada con la eliminación de baterías. Una gestión
adecuada de estos residuos previene consecuencias
potencialmente negativas para el medio ambiente y la
salud de las personas.
FABRICANTE E IMPORTADOR (REINO UNIDO)
Fabricante:
Chal-Tec GmbH, Wallstraße 16, 10179 Berlín, Alemania.
Importador para Gran Bretaña:
Berlin Brands Group UK Limited
PO Box 42
272 Kensington High Street
London, W8 6ND
United Kingdom

35
FR
Chère cliente, cher client,
Toutes nos félicitations pour l’acquisition de ce nouvel
appareil. Veuillez lire attentivement et respecter les
instructions de ce mode d’emploi an d’éviter d’éventuels
dommages. Le fabricant ne saurait être tenu pour
responsable des dommages dus au non-respect des
consignes de sécurité et à la mauvaise utilisation de
l’appareil. Scannez le QR-Code pour accéder à la dernière
version du mode d‘emploi et à d‘autres informations
concernant le produit.
SOMMAIRE
Consignes de sécurité 36
Aperçu de l‘appareil 37
Installation 38
Fonctions 39
Utilisation 40
Nettoyage et entretien 42
Résolution des problèmes 43
Conseils pour le recyclage 44
Fabricant et importateur (UK) 44
FICHE TECHNIQUE
Numéro d’article 10033432
Alimentation 220-240 V ~ 50-60 Hz
Puissance 75 W

36
FR
CONSIGNES DE SÉCURITÉ
• Avant d‘utiliser l‘appareil, vériez sa tension sur la plaque signalétique. Ne
branchez l‘appareil que sur des prises dont la tension correspond à ce le
de l‘appareil.
• Tenez le câble à l‘écart des surfaces chaudes et des objets aux angles
pointus.
• Ne faites pas passer le câble sous un tapis et ne le recouvrez pas non plus
avec d‘autres objets ou tissus. Installez le câble de telle sorte que personne
ne puisse trébucher dessus ou s‘y accrocher.
• N‘utilisez pas l‘appareil si le câble secteur ou la che sont endommagés.
• Si le câble secteur ou la che sont endommagés, faites-les remplacer par le
fabricant un service professionnel agréé ou une personne de qualication
équivalente.
• Utilisez l‘appareil à l‘intérieur uniquement.
• Ne recouvrez pas l‘appareil.
• Placez l‘appareil sur une surface horizontale et stable.
• Vériez que l‘appareil est éteint avant de brancher la che dans la prise.
• N‘utilisez pas l‘appareil avec les mains mouillées et ne touchez pas non
plus à la che ou au câble d‘alimentation.
• Ne laissez pas l‘appareil en marche sans surveillance. Eteignez-le et
débranchez la che quand vous ne l‘utilisez pas.
• Débranchez la che de la prise avant de nettoyer l‘appareil ou de
l‘entretenir.
• Ne débranchez pas la che de la prise en tirant sur le câble mais tenez
toujours fermement le corps de la che.
• Les enfants et les personnes aux capacités physiques ou sensorielles
réduites peuvent utiliser l’appareil uniquement après qu’une personne
responsable de leur sécurité leur a fait assimiler les consignes d’utilisation
et de sécurité de l’appareil. Ne laissez pas les enfants jouer avec l‘appareil.
Les enfants à partir de 8 ans peuvent nettoyer l‘appareil s‘ils sont
surveillés. Veillez à ce que les enfants ne jouent pas avec l‘appareil. Les
enfants ne peuvent nettoyer ou entretenir l‘appareil que sous surveillance.
• Utilisez l‘appareil uniquement de la façon décrite dans ce mode d‘emploi.
• N‘insérez pas vos doigts ou des objets dans les ouvertures d‘aération.
• Ne placez pas l‘appareil à proximité de voilages ou de rideaux, de nappes
de tables ou autres textiles similaires. Ils risqueraient d‘être aspirés dans le
ventilateur et d‘endommager celui-ci.
• N‘utilisez pas l‘appareil dans des pièces humides telles qu‘une salle de
bains.
• N‘utilisez pas l‘appareil avant d‘avoir installé les roues ou lorsqu‘il est posé
sur le côté.
• Déroulez entièrement le câble avant d‘utiliser l‘appareil.
• Veillez à ce que l‘appareil soit installé bien verticalement.

37
FR
• Pendant le fonctionnement, l‘appareil humidie l‘air ambiant. Evitez
toutefois une trop grande humidité de l‘air. Nous vous recommandons une
teneur en humidité de 40-50%. Une humidité de l‘air trop importante peut
provoquer des moisissures ou des problèmes de santé.
• Placez l‘appareil sur une surface qui ne craigne ni l‘eau ni l‘humidité. Il peut
toujours arriver que quelques gouttes d‘eau soient renversées à côté de
l‘appareil lorsque vous retirez ou remettez le réservoir d‘eau. si cela se
produit, essuyez immédiatement les gouttes d‘eau.
• Changez l‘eau du réservoir au plus tard tous les 3 jours.
APERÇU DE L‘APPAREIL
Couvercle du réservoir d‘eau
Panneau de commande
Cache latéral
Sortie d‘air
Grille d‘aération
Afchage du niveau d‘eau
Roulettes
38
FR
INSTALLATION
Installation des roulettes
Placez l‘appareil sur une surface plane et installez les roulettes à l‘aide d‘une
clé.
Comment remplir l‘appareil avec de l‘eau
Sortez le réservoir d‘eau d‘1/3 et remplissez-le avec de l‘eau claire (voir
illustration 1).
a. Faites attention à l‘indicateur de niveau quand vous ajoutez de l‘eau (voir
illustration 2).
b. Le niveau d‘eau ne doit pas dépasser la marque maximale. Si vous
souhaitez humidier l‘air, le niveau d‘eau ne doit pas être inférieur au
niveau minimum.
c. Mettez de la glace ou un élément de refroidissement gelé dans le réservoir
d’eau lorsque vous voulez améliorer l‘effet de refroidissement. Assurez-
vous que le niveau d‘eau ne dépasse pas le repère maximum après l‘ajout
du bac à glaçons / glace.
Illustration 1 Illustration 2
Remarque : Vous pouvez aussi remplir facilement le refroidisseur d’air par
le haut. Ouvrez le clapet correspondant sur le dessus de l‘appareil et versez
l‘eau directement dans le circuit.

39
FR
FONCTIONS
Méthode de refroidissement :
L‘eau est pompée du réservoir d‘eau et coule dans l‘évaporateur en papier.
Lorsque l’eau de l’évaporateur en papier est convertie en vapeur d’eau, l’air est
refroidi. Vous pouvez ressentir de l‘air froid lorsque l‘air est distribué par le
ventilateur.
Electronique de contrôle :
Aspect sûr, durable et attrayant.
Ajustement de la vitesse et mode ventilation :
Il y a trois vitesses et réglages du ventilateur.
Refroidissement :
La technologie de refroidissement par cristaux de glace et d‘humidication de
l‘air a été adaptée. La température devant la sortie d’air diminue et l’humidité
augmente. L‘air ne peut pas s‘assécher. Vous pouvez également placer un
élément de refroidissement gelé dans les réservoirs supérieur et inférieur
pour améliorer le refroidissement.
Répartir le vent sous un grand angle :
L‘appareil bascule automatiquement d‘avant en arrière et le vent est réparti sur
une grande surface. Vous pouvez également régler l’appareil manuellement
an que le vent soufe dans une direction choisie.
Télécommande à longue portée :
La télécommande a une portée maximale de 6 mètres et l‘appareil reçoit le
signal sous un angle maximal de 60 degrés.
Signal d‘alarme :

40
FR
UTILISATION
Interrupteur principal :
Pour activer l‘appareil, mettez l‘interrupteur principal du panneau arrière sur
„On“. L‘appareil est maintenant prêt à fonctionner. Si vous souhaitez éteindre
l‘appareil, placez l‘interrupteur principal sur „Off“.
Allumer / éteindre :
Appuyez sur ce bouton pour allumer l’appareil. Appuyez sur la touche pour
éteindre à nouveau.
Vitesse :
Appuyez plusieurs fois sur cette touche pour dénir la fonction souhaitée :
Basse / Moyenne / Haute / Basse.
Refroidissement :
Appuyez sur ce bouton pour activer la fonction de refroidissement. Si
vous appuyez à nouveau sur cette touche, vous désactivez la fonction de
refroidissement.
Remarque : avant d’activer cette fonction, assurez-vous que le réservoir
contient sufsamment d’eau.
Durée :
Si vous appuyez plusieurs fois sur ce bouton, vous pouvez vous régler la durée
jusqu‘à l‘arrêt automatique de l‘appareil par incréments de 30 minutes. Le
réglage minimum est de 30 minutes et le réglage maximum est de 7,5 heures.
Lorsque la durée dénie est écoulée, l‘appareil s‘éteint automatiquement.
Basculement :
Appuyez sur ce bouton pour modier la direction du vent du ventilateur.
Lorsque cette fonction est activée, l‘icône correspondante est afchée à
l‘écran. Appuyez à nouveau sur le bouton pour désactiver la fonction. Vous
pouvez ajuster manuellement et verticalement la direction du vent du
ventilateur en dirigeant les volets de sortie vers le haut ou le bas.
Force du vent :
En appuyant plusieurs fois sur ce bouton, vous pouvez basculer entre les
modes et sélectionner „vent normal“, „vent naturel“ et „pas de vent“. Lorsque
vous choisissez le mode vent normal, aucun indicateur ne s‘allume sur l‘écran,
contrairement aux deux autres modes.

41
FR
Utilisation de la télécommande
• Insérez les piles dans leur compartiment
pour démarrer la télécommande.
• La télécommande a 6 boutons et les
mêmes fonctions que le panneau de
commande.
• Pointez toujours la télécommande vers
le récepteur de l‘appareil.
• Si vous n‘utilisez pas la télécommande,
rangez-la dans un endroit sûr.
Remarques importantes :
• Ne mélangez jamais des piles neuves et
usagées.
• Retirez les piles du compartiment à piles
si vous n’utilisez pas l’appareil pendant
une période prolongée.
• La télécommande n‘a pas de touche
de mode, vous devez régler celui-ci
manuellement sur l‘appareil lui-même.
Utilisation de l‘élément de refroidissement
L‘élément de refroidissement est conçu pour refroidir l‘eau de l‘appareil,
absorber la chaleur et abaisser la température ambiante.
• Placez l‘élément de refroidissement au congélateur jusqu‘à ce qu‘il soit
complètement gelé.
• Ouvrez le couvercle du réservoir d‘eau et insérez l‘élément de
refroidissement gelé.
• Vous pouvez utiliser deux éléments de refroidissement en alternance.
• Il n‘est pas nécessaire d‘ajouter de l‘eau aux éléments de refroidissement.
Dans tous les cas, n‘ouvrez jamais les éléments de refroidissement et
veillez à ce qu‘ils ne tombent pas entre les mains des enfants, car ils
risqueraient de vouloir en manger l‘intérieur.

42
FR
NETTOYAGE ET ENTRETIEN
Remarque : Vériez que la che secteur est débranchée avant de retirer le
ltre à air.
1. Nettoyage du ltre à air
• Débranchez d‘abord le branchement électrique.
• Tirez sur la poignée du ltre à air pour le retirer de l‘appareil.
• Nettoyez le ltre à air avec un détergent neutre et une brosse.
• Remettez ensuite le ltre à air dans l‘appareil.
2. Nettoyage du tampon en treillis (
• Débranchez le cordon d‘alimentation de la prise.
• Retirez les ltres à air et retirez le tampon en treillis.
• Nettoyez le tampon à l‘aide d‘un détergent neutre et d‘une brosse, puis
rincez le tampon à l‘eau claire.
Remarque: le tampon doit être remis en place horizontalement an
d‘éviter les fuites.
3. Nettoyage du réservoir d‘eau
• Débranchez le cordon d‘alimentation de la prise.
• Retirez le réservoir d‘eau de l‘appareil et nettoyez-le avec un détergent
neutre, puis rincez-le à l‘eau claire.
• Remettez le réservoir d‘eau en place dans l‘appareil.

43
FR
4. Nettoyage du boîtier
• Nettoyez le boîtier avec un détergent neutre et un chiffon doux.
Remarque : Assurez-vous qu‘il n‘y a pas d‘eau sur le panneau de commande
après le nettoyage.
RÉSOLUTION DES PROBLÈMES
Problème Cause possible Solution
L'appareil ne répond pas. L'interrupteur principal
est en position "Off" ou
la che secteur n'est pas
branchée.
Branchez la che dans
la prise et mettez
l’interrupteur principal en
position "On".
Vous avez oublié d'appuyer
sur le bouton ON du
panneau de commande.
Appuyez sur le bouton ON
du panneau de commande.
L'effet d'humidication
ne fonctionne pas
correctement.
Les ltres à air sont
bloqués par la poussière.
Nettoyez les ltres à air.
L'entrée d'air est bloquée
par des corps étrangers.
Enlevez les corps
étrangers.
L'appareil ne répond
pas ou est montre des
dysfonctionnements.
Pas de cause
reconnaissable.
Contactez le service
clientèle.
De l’eau a pénétré à
l’intérieur de l’appareil ou
des corps étrangers se sont
coincés dans l’ouverture de
ventilation.
Contactez le service
clientèle.

44
FR
CONSEILS POUR LE RECYCLAGE
S‘il existe une réglementation pour l‘élimination ou le
recyclage des appareils électriques et électroniques
dans votre pays, ce symbole sur le produit ou sur
l‘emballage indique que cet appareil ne doit pas
être jeté avec les ordures ménagères. Vous devez le
déposer dans un point de collecte pour le recyclage des
équipements électriques et électroniques. La mise au
rebut conforme aux règles protège l‘environnement
et la santé de vos semblables des conséquences
négatives. Pour plus d‘informations sur le recyclage
et l‘élimination de ce produit, veuillez contacter votre
autorité locale ou votre service de recyclage des
déchets ménagers.
Ce produit contient des piles. S‘il existe une
réglementation pour l‘élimination ou le recyclage
des piles dans votre pays, vous ne devez pas les jeter
avec les ordures ménagères. Renseignez-vous sur les
dispositions locales relatives à la collecte des piles
usagées. La mise au rebut conforme aux règles protège
l‘environnement et la santé de vos semblables des
conséquences négatives.
FABRICANT ET IMPORTATEUR (UK)
Fabricant :
Chal-Tec GmbH, Wallstraße 16, 10179 Berlin, Allemagne.
Importateur pour la Grande Bretagne :
Berlin Brands Group UK Limited
PO Box 42
272 Kensington High Street
London, W8 6ND
United Kingdom

45
IT
Gentile cliente,
La ringraziamo per aver acquistato il dispositivo. La
preghiamo di leggere attentamente le seguenti istruzioni
per l’uso e di seguirle per evitare possibili danni tecnici.
Non ci assumiamo alcuna responsabilità per danni
scaturiti da una mancata osservazione delle avvertenze
di sicurezza e da un uso improprio del dispositivo.
Scansionare il codice QR seguente, per accedere al
manuale d’uso più attuale e per ricevere informazioni sul
prodotto.
INDICE
Avvertenze di sicurezza 46
Descrizione del prodotto 47
Installazione 48
Utilizzo 50
Pulizia e manutenzione 52
Correzione degli errori 53
Avviso di smaltimento 54
Produttore e importatore (UK) 54
DATI TECNICI
Numero articolo 10033432
Alimentazione 220-240 V ~ 50-60 Hz
Potenza 75 W

46
IT
AVVERTENZE DI SICUREZZA
• Prima dell‘uso controllare la tensione sulla targhetta del dispositivo.
Collegare il dispositivo solo ad una presa che corrisponde alla tensione
indicata.
• Tenere lontano il cavo di alimentazione da superci calde e da oggetti
appuntiti.
• Non sistemare il cavo di alimentazione sotto un tappeto e non coprirlo
con altri oggetti o tessuti. Sistemare il cavo di alimentazione in modo che
nessuno vi possa inciampare.
• Non utilizzare il dispositivo se il cavo di alimentazione o la spina sono
danneggiati.
• Se il cavo di alimentazione o la spina sono danneggiati, farli sostituire
dal produttore, da un tecnico qualicato o da un centro assistenza
autorizzato.
• Utilizzare il dispositivo solo in ambienti chiusi.
• Non coprire il dispositivo.
• Collocare il dispositivo su una supercie piana e stabile.
• Assicurarsi che il dispositivo sia spento prima di inserire la spina nella
presa.
• Non utilizzare il dispositivo con le mani bagnate. Non toccare la spina e il
cavo di alimentazione con le mani bagnate.
• Non lasciare il dispositivo incustodito mentre è in funzione. Spegnere il
dispositivo e staccare la spina quando non è in uso.
• Staccare la spina prima di eseguire la pulizia o la manutenzione del
dispositivo.
• Non tirare il cavo per staccare la spina, bensì afferrare la spina alla base.
• I bambini di età pari o superiore a 8 anni, le persone con capacità siche,
sensoriali o mentali ridotte non possono utilizzare il dispositivo a meno
che siano attentamente sorvegliate o ben istruite relativamente all’utilizzo
del dispositivo stesso da parte di un supervisore responsabile della
loro sicurezza. Assicurarsi che i bambini non giochino con il dispositivo.
I bambini di età pari o superiore a 8 anni possono pulire il dispositivo
solo sotto supervisione. Assicurarsi che i bambini non giochino con il
dispositivo. I bambini possono pulire ed eseguire la manutenzione del
dispositivo solo sotto supervisione.
• Utilizzare il dispositivo solo come descritto in questo manuale.
• Non inlare le dita o oggetti nelle prese d‘aria.
• Non posizionare il dispositivo vicino a tende, tovaglie o simili poiché
potrebbero essere aspirati nella ventola e danneggiarla.
• Non utilizzare il dispositivo in ambienti umidi, come ad esempio bagni.
• Non utilizzare il dispositivo prima di aver montato le rotelline o quando è
posizionato su un lato.
• Srotolare completamente il cavo prima dell‘uso.
• Assicurarsi che il dispositivo sia in posizione verticale.
47
IT
• Durante l´uso, il dispositivo umidica l´ambiente. Tuttavia evitare
un‘umidità troppo elevata. Si consiglia un‘umidità compresa tra il 40-50%.
Un‘eccessiva umidità può causare muffa o problemi di salute.
• Collocare il dispositivo solo su superci resistenti all‘umidità. Durante
l‘installazione e la rimozione del serbatoio potrebbero cadere alcune
gocce. In questo caso, asciugare immediatamente le gocce d‘acqua.
• Cambiare l‘acqua nel serbatoio al massimo dopo 3 giorni.
DESCRIZIONE DEL PRODOTTO
Copertura serbatoio dell’acqua
Pannello di controllo
Copertura laterale
Uscita dell’aria
Griglia di ventilazione
Indicazione del livello
dell’acqua
Rotelle

48
IT
INSTALLAZIONE
Montare le rotelle
Posizionare il dispositivo su una supercie piana e montare le rotelle con una
chiave.
Riempire d’acqua il dispositivo
Tirare fuori il serbatoio per 1/3 e riempirlo con acqua pulita (v. immagine 1)
a. Tenere sotto controllo l’indicazione del livello quando si aggiunge acqua (v.
immagine 2).
b. Il livello dell’acqua non deve trovarsi sopra al segno di livello massimo. Se
si desidera umidicare l’aria, l’acqua non deve trovarsi sotto all’indicazione
del livello minimo.
c. Mettere ghiaccio o un elemento raffreddante congelato nel serbatoio se
si desidera incrementare l’effetto refrigerante. Assicurarsi che l’acqua
non superi l’indicazione di livello massimo dopo aver aggiunto ghiaccio/
contenitore ghiacciato.
Immagine 1 Immagine 2
Avvertenza: in alternativa è possibile anche riempire il dispositivo dall’alto.
Aprire il relativo sportello sul lato superiore del dispositivo e inserire
l’acqua direttamente nel circuito.

49
IT
FUNZIONI
Principio di raffreddamento
L’acqua viene pompata dal serbatoio verso l’alto e gocciola nel vaporizzatore
di carta. Quando l’acqua viene vaporizzata nel vaporizzatore di carta, viene
raffreddata. Si potrà percepire un’aria fredda quando viene distribuita dalla
ventola.
Sistema elettronico di controllo:
Sicuro, durevole e dall’aspetto accattivante.
Regolazione della velocità e modalità di ventilazione:
Ci sono tre velocità e impostazioni di ventilazione.
Raffreddare:
La tecnologia di raffreddamento con cristalli di ghiaccio e di umidicazione
dell’aria è stata adattata. La temperatura dell’aria in uscita viene diminuita e
l’umidità incrementa. In questo modo l’aria non si secca. Inoltre, è possibile
posizionare un elemento raffreddante congelato nel serbatoio superiore e
inferiore, in modo da migliorare il raffreddamento.
Distribuire l’aria su una supercie ampia:
Il dispositivo oscilla automaticamente e distribuisce l’aria su un’ampia
supercie. Il dispositivo può essere impostato manualmente, in modo che l’aria
venga emessa solamente nella direzione desiderata.
Telecomando con portata elevata:
Il telecomando ha una portata di massimo 6 metri e il dispositivo riceve il
segnale no a un’inclinazione di 60°.
Segnale acustico di avvertimento:
Quando si tocca il pannello dei tasti, il dispositivo emette un segnale acustico.

50
IT
UTILIZZO
Interruttore principale
Per attivare il dispositivo, mettere l’interruttore principale sul retro in
posizione “On”. Il dispositivo è ora pronto all’uso. Se si desidera disattivare il
dispositivo, mettere l’interruttore principale in posizione “Off”.
Accendere/spegnere:
Premere questo tasto per accendere il dispositivo e premerlo di nuovo per
spegnerlo.
Velocità:
Premere più volte questo tasto per impostare la funzione desiderata:
bassa>media>alta>bassa.
Raffreddare:
Premere questo tasto per attivare la funzione refrigerante. Premendolo di
nuovo, la funzione refrigerante si spegne.
Avvertenza: prima di attivare questa funzione, assicurarsi che ci sia acqua
sufciente nel serbatoio.
Tempo:
Premere più volte questo tasto per impostare lo spegnimento automatico del
dispositivo in intervalli di 30 minuti. L’impostazione massima è di 7,5 ore. Una
volta scaduto il tempo impostato, il dispositivo si spegne automaticamente.
Oscillazione:
Premere questo tasto per modicare la direzione di ventilazione. Quando
si attiva questa funzione, viene mostrato sullo schermo il simbolo relativo.
Premere di nuovo il tasto per spegnere la funzione. La direzione di ventilazione
verticale può essere regolata manualmente, orientando verso l’alto e verso il
basso lo sportello di rilascio dell’aria.
Intensità di ventilazione:
Premendo più volte questo tasto è possibile selezionare le modalità
“ventilazione normale”, “ventilazione naturale” e “senza ventilazione”. Se si
seleziona la modalità “ventilazione normale”, non si illumina alcuna indicazione
sullo schermo. Selezionando le altre due modalità si illumina un’indicazione.
51
IT
Utilizzare il telecomando
• Inserire le batterie del telecomando
nell’apposito vano per metterlo in
funzione.
• Il telecomando è dotato di 6 tasti e ha le
stesse funzioni del pannello di controllo.
• Indirizzare il telecomando sempre al
ricevitore del dispositivo.
• Se non si utilizza il telecomando,
conservarlo in un luogo sicuro.
Avvertenze importanti:
• Non mischiare mai batterie vecchie e
nuove.
• Togliere le batterie dal vano se non si
utilizza il dispositivo per lunghi periodi.
• Il telecomando non è dotato di tasto
per la modalità. Questa deve essere
impostata manualmente sul dispositivo.
Utilizzare un elemento raffreddante
L’elemento raffreddante serve a raffreddare l’acqua nel dispositivo, assorbire
calore e abbassare la temperatura ambiente.
• Mettere in freezer l’elemento raffreddante no a quando è
completamente congelato.
• Aprire la copertura del serbatoio dell’acqua e inserire l’elemento
raffreddante congelato.
• Ci sono due elementi raffreddanti da utilizzare alternativamente.
• Non è necessario aggiungere acqua agli elementi raffreddanti. Non aprire
in nessun caso gli elementi raffreddanti e assicurarsi che non niscano
nelle mani di bambini, dato che c’è il rischio che cerchino di mangiare
l’interno dell’elemento raffreddante.

52
IT
PULIZIA E MANUTENZIONE
Avvertenza: assicurarsi che la spina sia staccata dalla presa elettrica, prima
di togliere il ltro dell’aria.
1. Pulire il ltro dell’aria
• Scollegare l’alimentazione.
• Tirare l’impugnatura del ltro dell’aria per toglierlo dal dispositivo.
• Pulire il ltro con un detergente neutro e una spazzola.
• Inserire nuovamente il ltro nel dispositivo.
2. Pulire l’imbottitura a rete
• Staccare la spina dalla presa elettrica.
• Togliere il ltro e l’imbottitura a rete.
• Pulire l’imbottitura con un detergente neutro e una spazzola e sciacquarla
poi con acqua.
Avvertenza: l’imbottitura a rete deve essere inserita nuovamente in
orizzontale, per evitare perdite.
3. Pulire il serbatoio dell’acqua
• Staccare la spina dalla presa elettrica.
• Togliere il serbatoio dal dispositivo, pulirlo con un detergente neutro e
sciacquarlo con acqua.
• Inserire nuovamente il serbatoio nel dispositivo.
53
IT
4. Pulire l’alloggiamento
• Pulire l’alloggiamento con un detergente neutro e un panno morbido.
Avvertenza: assicurarsi che dopo la pulizia non ci sia acqua sul pannello di
controllo.
CORREZIONE DEGLI ERRORI
Problema Possibile causa Soluzioni
Il dispositivo non reagisce. L’interruttore principale è
in posizione “Off” o la spina
non è collegata.
Collegare la spina alla
presa elettrica e mettere
l’interruttore in posizione
“On”.
Non è stato premuto il
tasto ON sul pannello di
controllo.
Premere il tasto ON sul
pannello di controllo.
L’umidicazione dell’aria
non funziona.
I ltri dell’aria sono
bloccati dalla polvere.
Pulire i ltri dell’aria.
Il punto d’ingresso dell’aria
è bloccato da un corpo
estraneo.
Rimuovere il corpo
estraneo.
Il dispositivo non
reagisce o presenta
malfunzionamenti.
Non si riconosce alcuna
causa.
Rivolgersi al servizio di
assistenza ai clienti.
Acqua penetrata
all’interno del dispositivo
o corpi estranei nelle
aperture di ventilazione.
Rivolgersi al servizio di
assistenza ai clienti.

54
IT
AVVISO DI SMALTIMENTO
Se nel proprio paese si applicano le regolamentazioni
inerenti lo smaltimento di dispositivi elettrici ed
elettronici, questo simbolo sul prodotto o sulla
confezione segnala che questi prodotti non possono
essere smaltiti con i riuti normali e devono essere
portati a un punto di raccolta di dispositivi elettrici ed
elettronici. Grazie al corretto smaltimento dei vecchi
dispositivi si tutela il pianeta e la salute delle persone
da possibili conseguenze negative. Informazioni
riguardanti il riciclo e lo smaltimento di questi prodotti
si ottengono presso l’amministrazione locale oppure il
servizio di gestione dei riuti domestici.
Il prodotto contiene batterie. Se nel proprio paese si
applicano le regolamentazioni inerenti lo smaltimento
di batterie, non possono essere smaltite con i normali
riuti domestici. Preghiamo di informarvi sulle
regolamentazioni vigenti sullo smaltimento delle
batterie. Grazie al corretto smaltimento dei vecchi
dispositivi si tutela l’ambiente e la salute delle persone
da conseguenze negative.
PRODUTTORE E IMPORTATORE (UK)
Produttore:
Chal-Tec GmbH, Wallstraße 16, 10179 Berlino, Germania.
Importatore per la Gran Bretagna:
Berlin Brands Group UK Limited
PO Box 42
272 Kensington High Street
London, W8 6ND
United Kingdom