
INSTRUCCIONESDE
INSTALACIÓNY
FUNCIONAMIENTODELHORNO
PIROLÍTICOEMPOTRADO
CCH900PXG
ES
Estimadocliente:
Nuestroobjetivoesofrecerproductosdecalidadquesuperen
susexpectativas;porello,leofrecemosproductosfabricados
eninstalacionesmodernas,sometidoscuidadosay
especialmenteapruebasdecalidad.
Hemoselaboradoestemanualparaayudarleautilizarde
manerasegurayconlamáximaeficaciaesteaparato
fabricadoconlaúltimatecnología.
Lerecomendamosqueantesdeutilizarelhorno,lea
detenidamenteestaguíaqueincluyelainformaciónbásica
parasuinstalacióncorrectaysegura,ademásdel
mantenimientoysuformadeuso.Contacteconelservicio
técnicoautorizadomáspróximoasudomicilioparaelmontaje
delmismo.
Este manual está sujeto a modificaciones por errores
tipográficos o de redacción.

1
Índice
1-
2-
3-
4-
5-
6-
Presentaciónytamañodelproducto
Advertencias
Preparaciónparalainstalaciónyeluso
Usodelhorno
Limpiezaymantenimientodelhorno
Serviciotécnicoytransporte
2
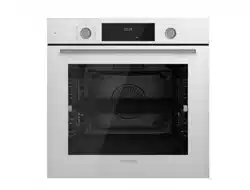
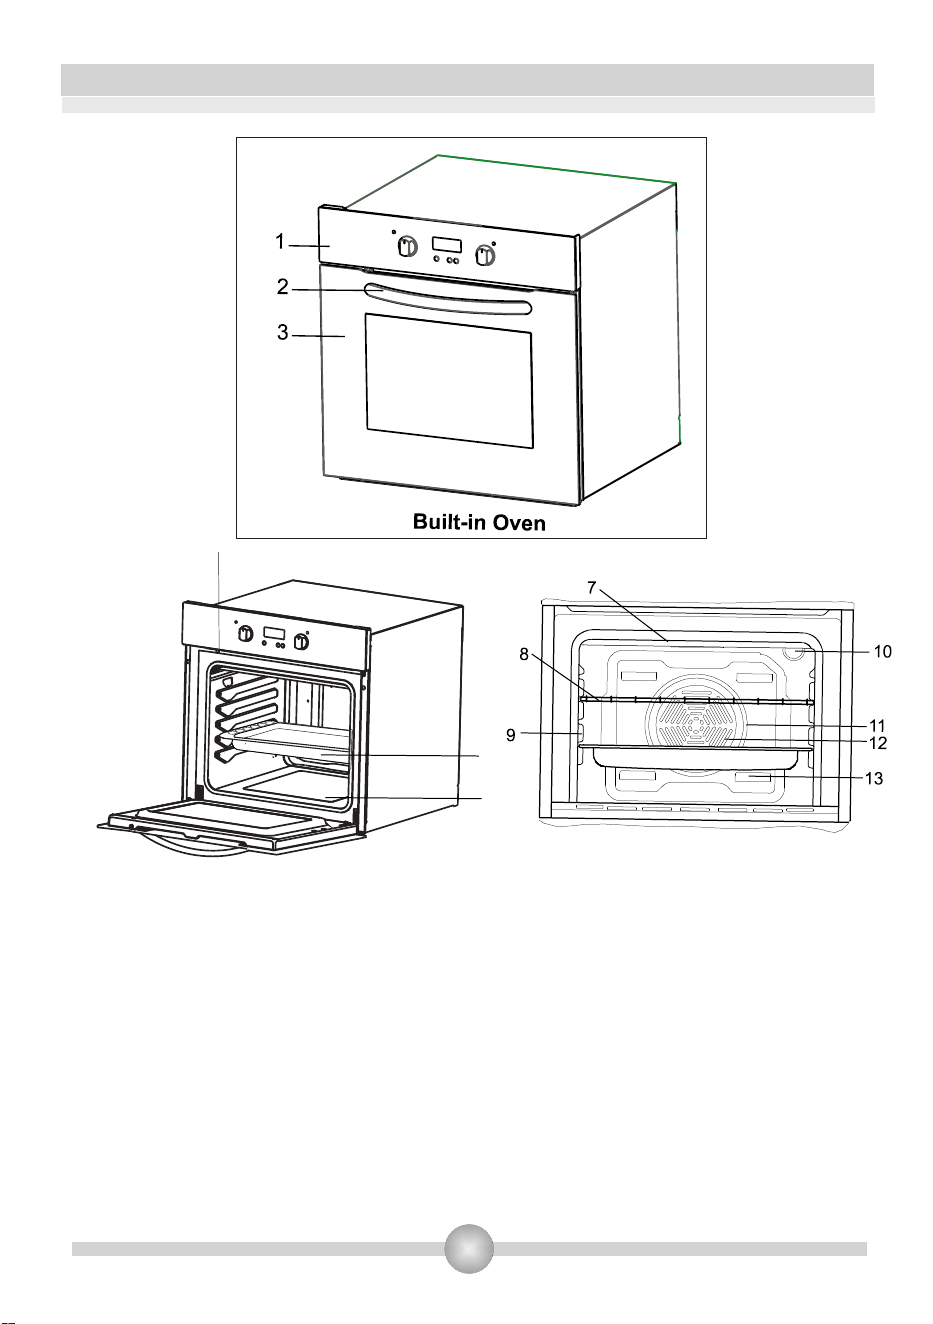
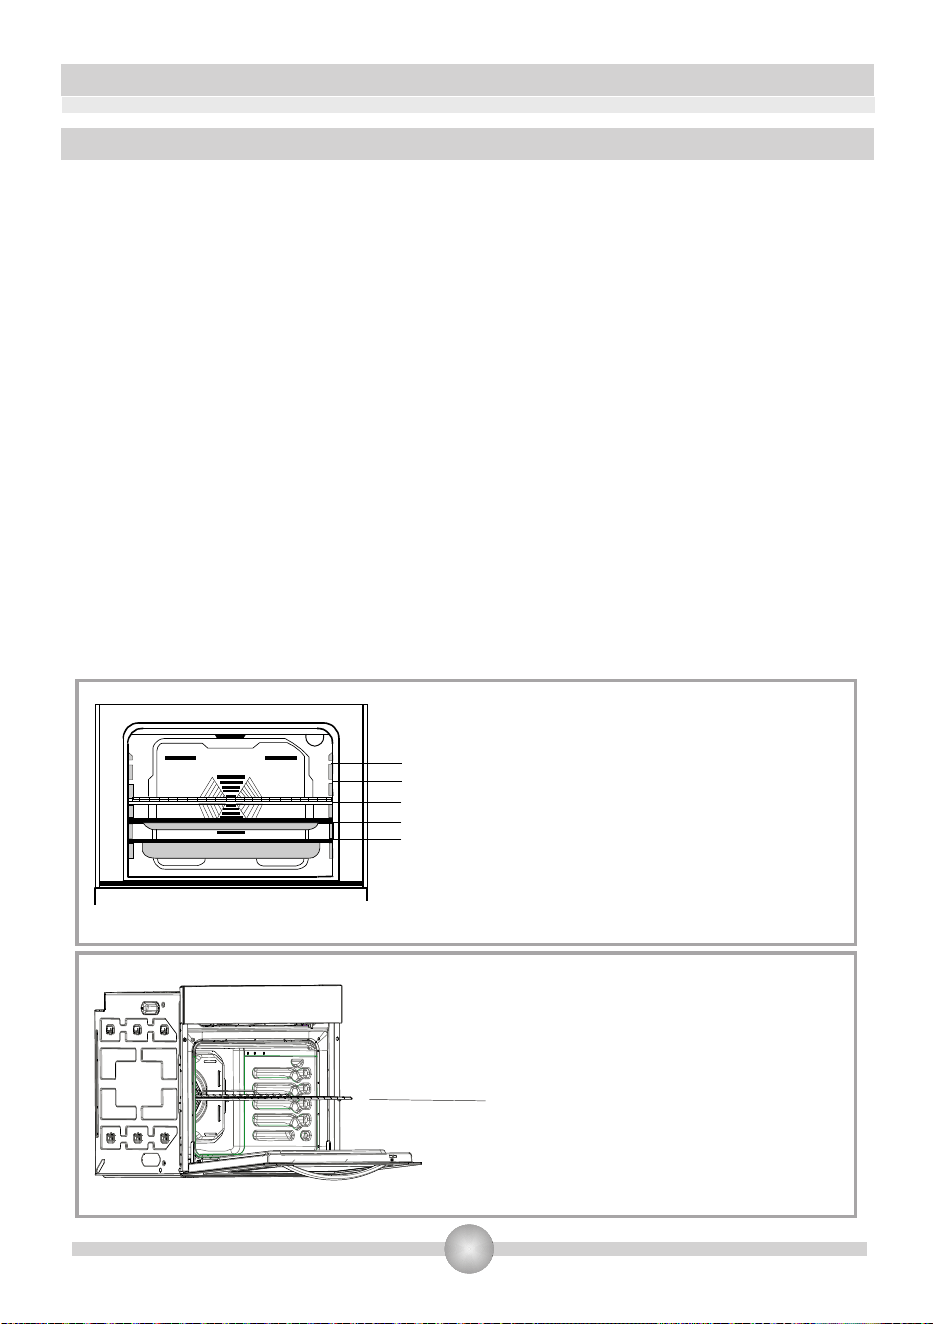
APARTADO1:PRESENTACIÓNYTAMAÑODELPRODUCTO
LISTADECOMPONENTES:
1-Paneldemandos
2-Tirador
3-PuertadelHorno
4-BloqueodelaPuerta
5-Bandeja
6-ResistenciaInferiordelHorno
(detrásdelaplaca)
7-ResistenciaSuperiordelHorno
(detrásdelaplaca)
8-Parrilla
9-Estantes
10-LuzdelHorno
11-TurboresistenciadelHorno
(detrásdelaplaca)
12-Ventilador(detrásdelaplaca)
13-RejillasdeSalidadeAire
Ilustración1
4
5
6

2. ADVERTENCIAS DE SEGURIDAD
3
LEA ESTE MANUAL DETENIDA Y COMPLETAMENTE ANTES DE UTILIZAR LA COCINA;
GUÁRDELO PARA CONSULTARLO CUANDO SEA NECESARIO.
ESTE MANUAL SE HA REDACTADO PARA MÁS DE UN MODELO. SU COCINA PODRÍA NO
TENER ALGUNAS DE LAS FUNCIONES EXPLICADAS EN ÉL. PRESTE ATENCIÓN A LAS
EXPLICAICONES QUE TENGAN ILUSTRACIONES MIENTRAS ESTÉ LEYENDO EL MANUAL DE
INSTRUCCIONES.
Advertencias Generales de Seguridad
- Este aparato lo pueden utilizar niños mayores de 8
años, personas con discapacidades mentales, físicas
y sensoriales, e incluso personas con falta de
experiencia/conocimiento, siempre y cuando se les
vigile o instruya en el uso del mismo, de modo seguro
y que entiendan los riesgos implicados. Los niños no
deben jugar con el aparato. Los niños no deberán
limpiar ni realizar el mantenimiento del mismo sin
vigilancia.
- ADVERTENCIA: El aparato se calienta durante su
uso, así como también se calientas sus partes
accesibles. Debe tenerse cuidado de no tocar los
calentadores. Mantenga alejados a los menores de 8
años, a menos que los vigile constantemente.
- ADVERTENCIA: Riesgo de incendio: no guarde
cosas sobre la superficie de cocción.
- ADVERTENCIA: En caso de que la superficie esté
agrietada, apague el aparato para evitar la posibilidad
de una descarga eléctrica.
- El aparato no está diseñado para funcionar mediante
temporizadores externos ni sistemas de control a
distancia.
- El aparato se calienta durante su uso. Debe tenerse
cuidado de no tocar los calentadores del interior del
horno.

4
- Los mangos sostenidos por poco tiempo se pueden
calentar durante el uso.
- No utilice detergentes abrasivos ni estropajos de
metal para limpiar el vidrio de la puerta del horno ni
ninguna otra superficie del horno, pues se puede rayar,
y con ello puede dar lugar a la rotura del mismo.
- No utilice aparatos de vapor para la limpieza del
aparato.
- ADVERTENCIA: Asegúrese de que el aparato esté
apagado antes de cambiar la bombilla; con ello evitará
la posibilidad de cualquier descarga eléctrica.
- ATENCIÓN: Cuando el gratinador o el grill estén
usándose, es posible que las piezas estén calientes.
Los niños pequeños deben mantenerse alejados.
'HEHUiVDFDUWRGDVODVSLH]DV\DFFHVRULRVHVWDQWHV
UHMLOODV\GHPiVGXUDQWHODOLPSLH]DSLUROtWLFD
- El aparato se fabrica de acuerdo con las normas locales e internacionales, así como con
los reglamentos aplicables.
- Los trabajos de mantenimiento y reparación deben ser realizados únicamente por técnicos
de mantenimiento autorizados. Podría correr riesgos si realiza la instalación o reparación
una persona que no pertenezca al servicio técnico oficial. Es peligroso alterar o modificar
las características del aparato en modo alguno.
- Antes de instalar la encimera, asegúrese de que sean compatibles las condiciones de la
instalación del gas (tipo de gas, presión del gas, o tensión y frecuencia eléctrica), así como
los ajustes del aparato. En la etiqueta correspondiente aparecen indicados los valores de
ajuste del aparato.
- ATENCIÓN: Este producto está destinado únicamente al uso doméstico en interiores, no
debiendo utilizarse para ningún otro propósito ni ninguna otra aplicación, como un uso no
doméstico o su uso en un entorno comercial.
- No trate de levantar o mover el aparato tirando del asa de la puerta.
- Se han tomado todas las medidas posibles para garantizar su seguridad. El vidrio puede
romperse; tenga cuidado al limpiarlo para no rallarlo. No golpee el vidrio con los accesorios.
- Asegúrese de que el cable de corriente no se dañe ni retuerza durante la instalación. Si el
cable de corriente está dañado, debe acudir al fabricante, distribuidor, servicio técnico o
similares personas capacitadas, para poder reemplazarlo y evitar así cualquier peligro.
- Cuando la puerta delantera está abierta, no permita que los niños se suban a la puerta o
se sienten sobre ella.
Advertencias sobre la Instalación
- No utilice el horno hasta que esté totalmente instalado.
- La instalación y la puesta en marcha de este aparato debe realizarla un técnico
autorizado. El fabricante no se responsabiliza de ningún daño provocado por una
instalación incorrecta o llevada a cabo por personal no autorizado.

5
- Al desembalar el aparato, asegúrese de que no se haya dañado durante el transporte. En
caso de que encuentre un defecto, no utilice el aparato y póngase en contacto con el
servicio de asistencia técnica autorizado. Los materiales utilizados para el embalaje (nylon,
grapas, corchos, etc…) pueden ser perjudiciales para los niños; por tanto, deben
recogerse y desecharse de inmediato.
- Proteja el aparato de los efectos atmosféricos. No lo exponga a los efectos del sol, la
lluvia, la nieve, el polvo, etc.
- Los muebles y materiales anexos al aparato deberán estar preparados para soportar
temperaturas mínimas de 100ºC.
Durante el uso
- Cuando utilice el horno por primera vez, habrá un cierto olor producido por los materiales
aislantes y calentadores. Por esta razón, y antes de usar el horno, hágalo funcionar en
vacío y a máxima temperatura durante 45 minutos. Al mismo tiempo, necesita ventilar
correctamente el lugar donde se encuentra instalado el horno.
- Tanto las partes internas como externas del horno se calientan durante su uso. Dé
siempre un paso atrás cuando abra la puerta del horno, a fin de permitir que salga
cualquier acumulación de vapor o calor. Existe el riesgo de quemaduras.
- No coloque materiales inflamables ni combustibles en, ni cerca de, el aparato cuando lo
esté utilizando.
- Utilice siempre guantes de horno para quitar y volver a colocar los alimentos en el
mismo.
- No deje el aparato sin vigilancia cuando esté cocinando con grasas sólidas o aceites.
Pueden prenderse fuego por el calor extremo. Nunca vierta agua sobre llamas causadas
por aceites o grasas. Tape la olla o la sartén con su tapa para detener las llamas
provocadas en esta situación y apague el fuego.
- Desenchufe el aparato si no va a utilizarlo durante un periodo prolongado de tiempo.
Mantenga apagado el mando principal. Cuando no vaya a usar el aparato, mantenga
cerrada la llave de paso del gas.
- Asegúrese de que los mandos de la cocina estén siempre en la posición "0" (apagado)
cuando no la esté utilizando.
- Las bandejas se inclinan al tirar de ellas. Tenga cuidado de no derramar los líquidos
calientes.
- Cuando la puerta o el cajón del horno estén abiertos, no introduzca nada en ellos. Puede
desequilibrar el aparato o romper la tapa.
- No introduzca objetos pesados ni inflamables (p. ej. nylon, bolsas de plástico, papel,
ropa, etc.) dentro del cajón inferior. Esto incluye recipientes con accesorios de plástico (por
ejemplo, asas).
- No cuelque toallas, paños ni trapos en el aparato ni en sus tiradores.
Durante la limpieza y el mantenimiento
- Apague siempre el aparato antes de limpiarlo o realizar cualquier tarea de
mantenimiento. Podrá hacerlo tras apagar el aparato, o desconectar éste de la corriente.
- No quite las perillas de los mandos para limpiar la banda frontal.
POR EFICIENCIA Y SEGURIDAD DEL APARATO, LE RECOMENDAMOS QUE
SIEMPRE UTILICE PIEZAS DE REPUESTO ORIGINALES Y QUE EN CASO DE
NECESIDAD SÓLO SE PONGA EN CONTACTO CON UN SERVICIO DE ASISTENCIA
TÉCNICA AUTORIZADO.

6
APARTADO3:PREPARACIÓNPARALAINSTALACIÓNYELUSO
Cuandoelijaunlugarparaelhorno,debeprestarseatencióndequenohayacerca
materialesinflamablesocombustibles,talescomocortinas,hule,etc.,quepueden
prenderfuegorápidamente.
Losmueblesanexosalhornodebenestarfabricadosconmaterialesresistentesa
temperaturasquesuperenlos50ºC.
Estemoderno,prácticoyfuncionalhornosehafabricadoconpiezasymaterialesdela
mayorcalidadysatisfarásusnecesidadesentodoslosaspectos.Asegúresedeleereste
manualparaobtenerlosmejoresresultadosynotenerningúnproblemaenelfuturo.La
informacióndadaacontinuacióncontienelasreglasnecesariasparacolocarelaparatoy
realizarlastareasdemantenimientocorrectamente.Estasreglasdeberánserleídassin
falta,especialmenteporpartedelostécnicosquecolocaránelaparato.
¡CONTACTECONELSERVICIOTÉCNICOAUTORIZADOPARALAINSTALACIÓNDEL
HORNO!
3.1.ELECCIÓNDELLUGARPARAELHORNO
Debenconsiderarsediversosaspectosalahoradeelegirunlugarparaelhorno.
Asegúresedetenerencuentalasrecomendacionesquedaremosacontinuaciónpara
evitarproblemasycualquiersituaciónpeligrosaquepudieraocasionarse.
Lasdimensionesyelmaterialdelmuebledondeseinstaleelhornodebenserlos
adecuados,yresistentealosaumentosdelatemperatura.Pararealizarunainstalación
correcta,sedebeevitarelcontactoconparteseléctricasoaisladas.Laspartesaisladasse
debencolocardetalmaneraquenosepuedanquitarutilizandoningúntipodeherramienta.
Noserecomiendainstalarelaparatocercadeunfrigoríficoodeuncongelador.Delo
contrario,severáafectadoelfuncionamientodelosaparatosantesmencionadosdebidoal
calorqueemanaelhorno.Despuésdesacarelhornodesuenvoltorio,asegúresedequeno
estédañado.Sicreequeelaparatotienecualquierdaño,noloutiliceycontacteconel
serviciotécnicoautorizadodeinmediato.
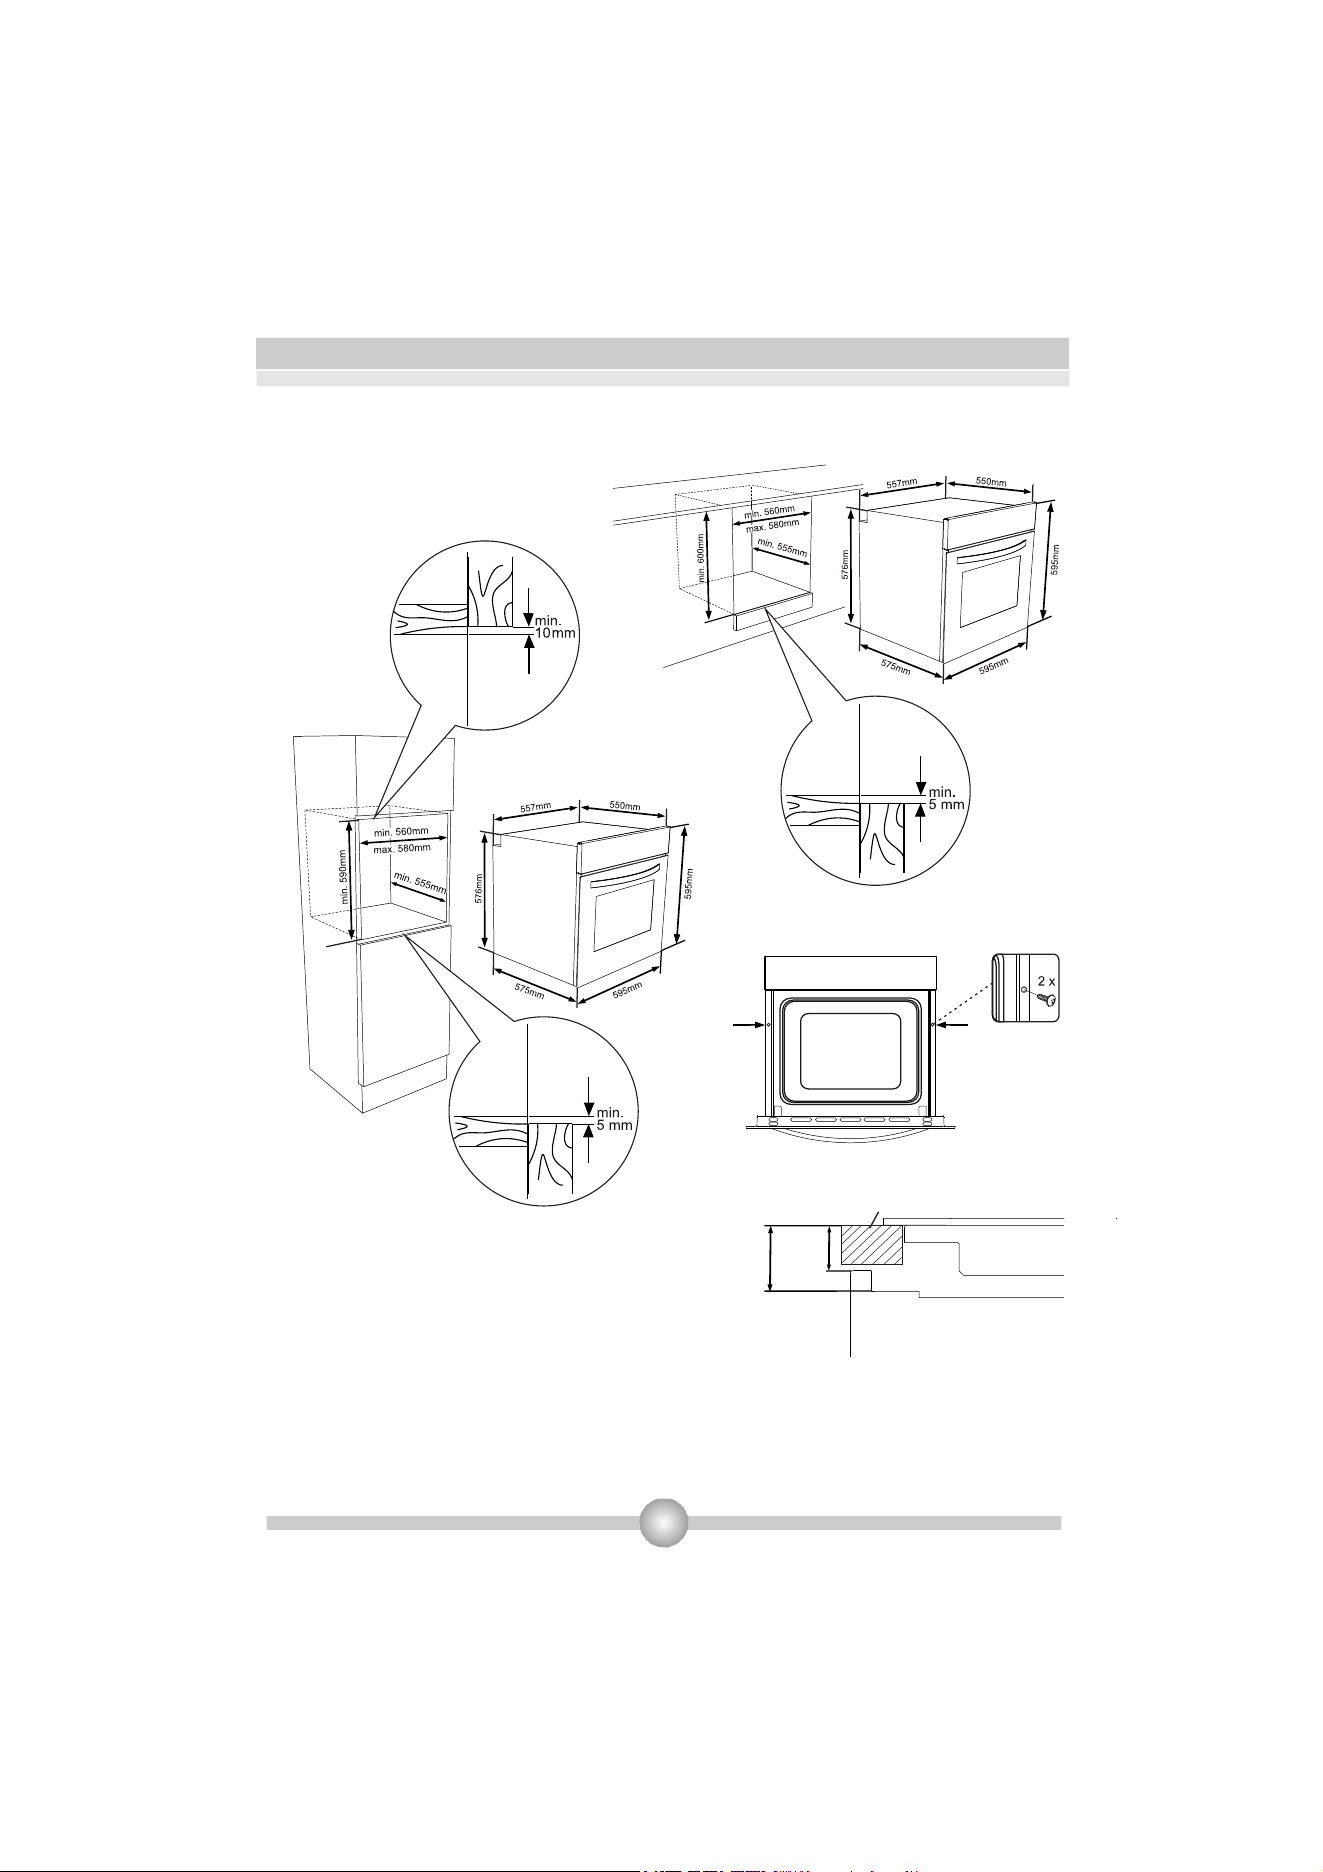
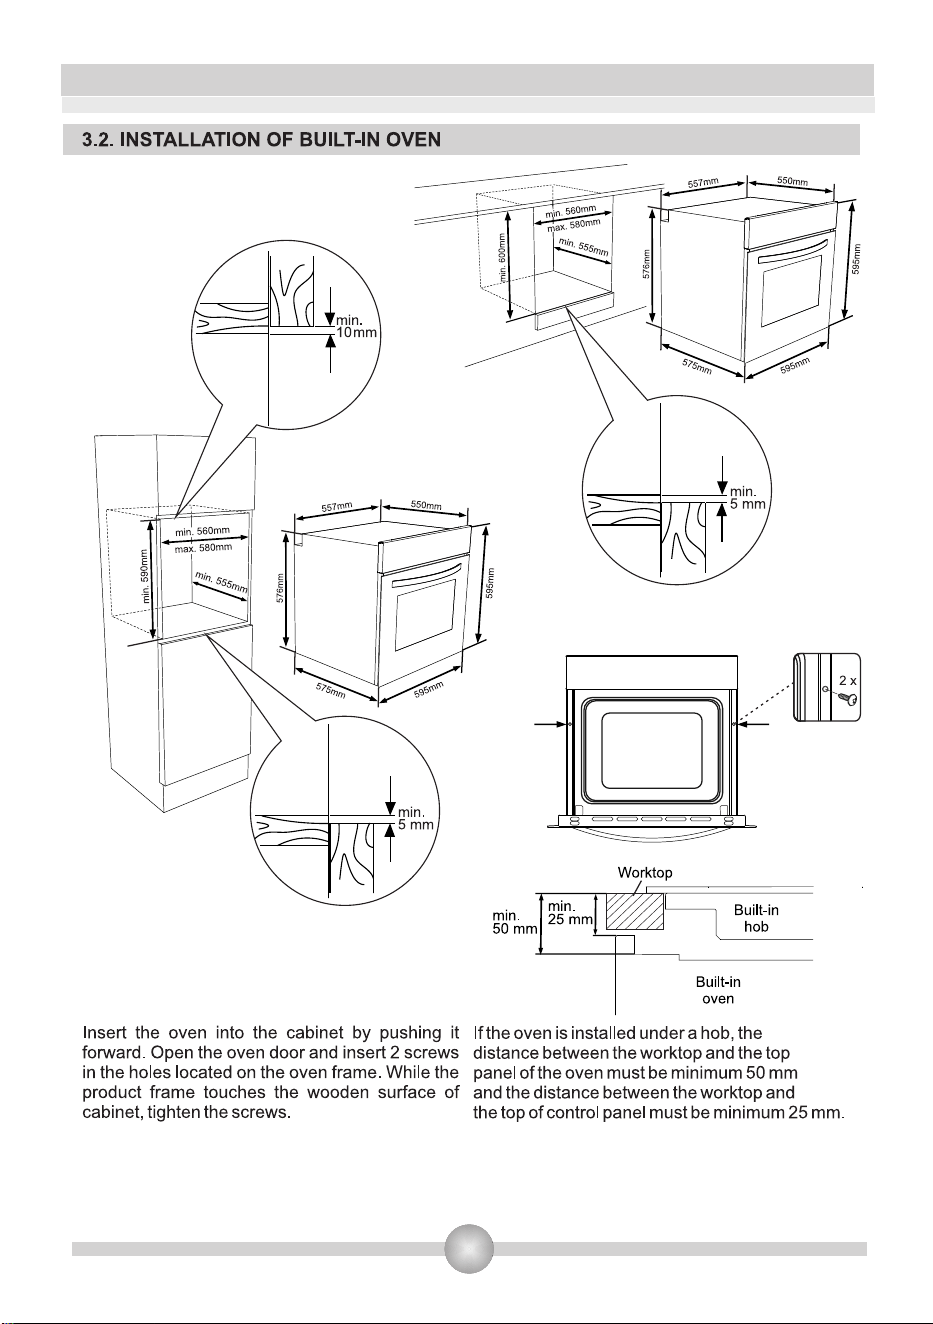
Introduzca el horno en el mueble empujándolo
hacia dentro. Abra la puerta del horno e inserte 2
tornillos en los agujeros situados en el marco del
horno. Apriete los tornillos cuando el marco del
horno entre en contacto con la superficie de
madera del armario.
Si el horno se instala bajo una placa, la distancia
entre la encimera y el panel superior del horno
debe ser de 50mm como mínimo y la distancia
entre la encimera y la parte superior del panel de
control debe ser de 25mm como mínimo.
Encimera
mín.
50mm
mín.
25mm
Placa
incorporada
Horno integrado
3.2. INSTALACIÓN DEL HORNO EMPOTRADO
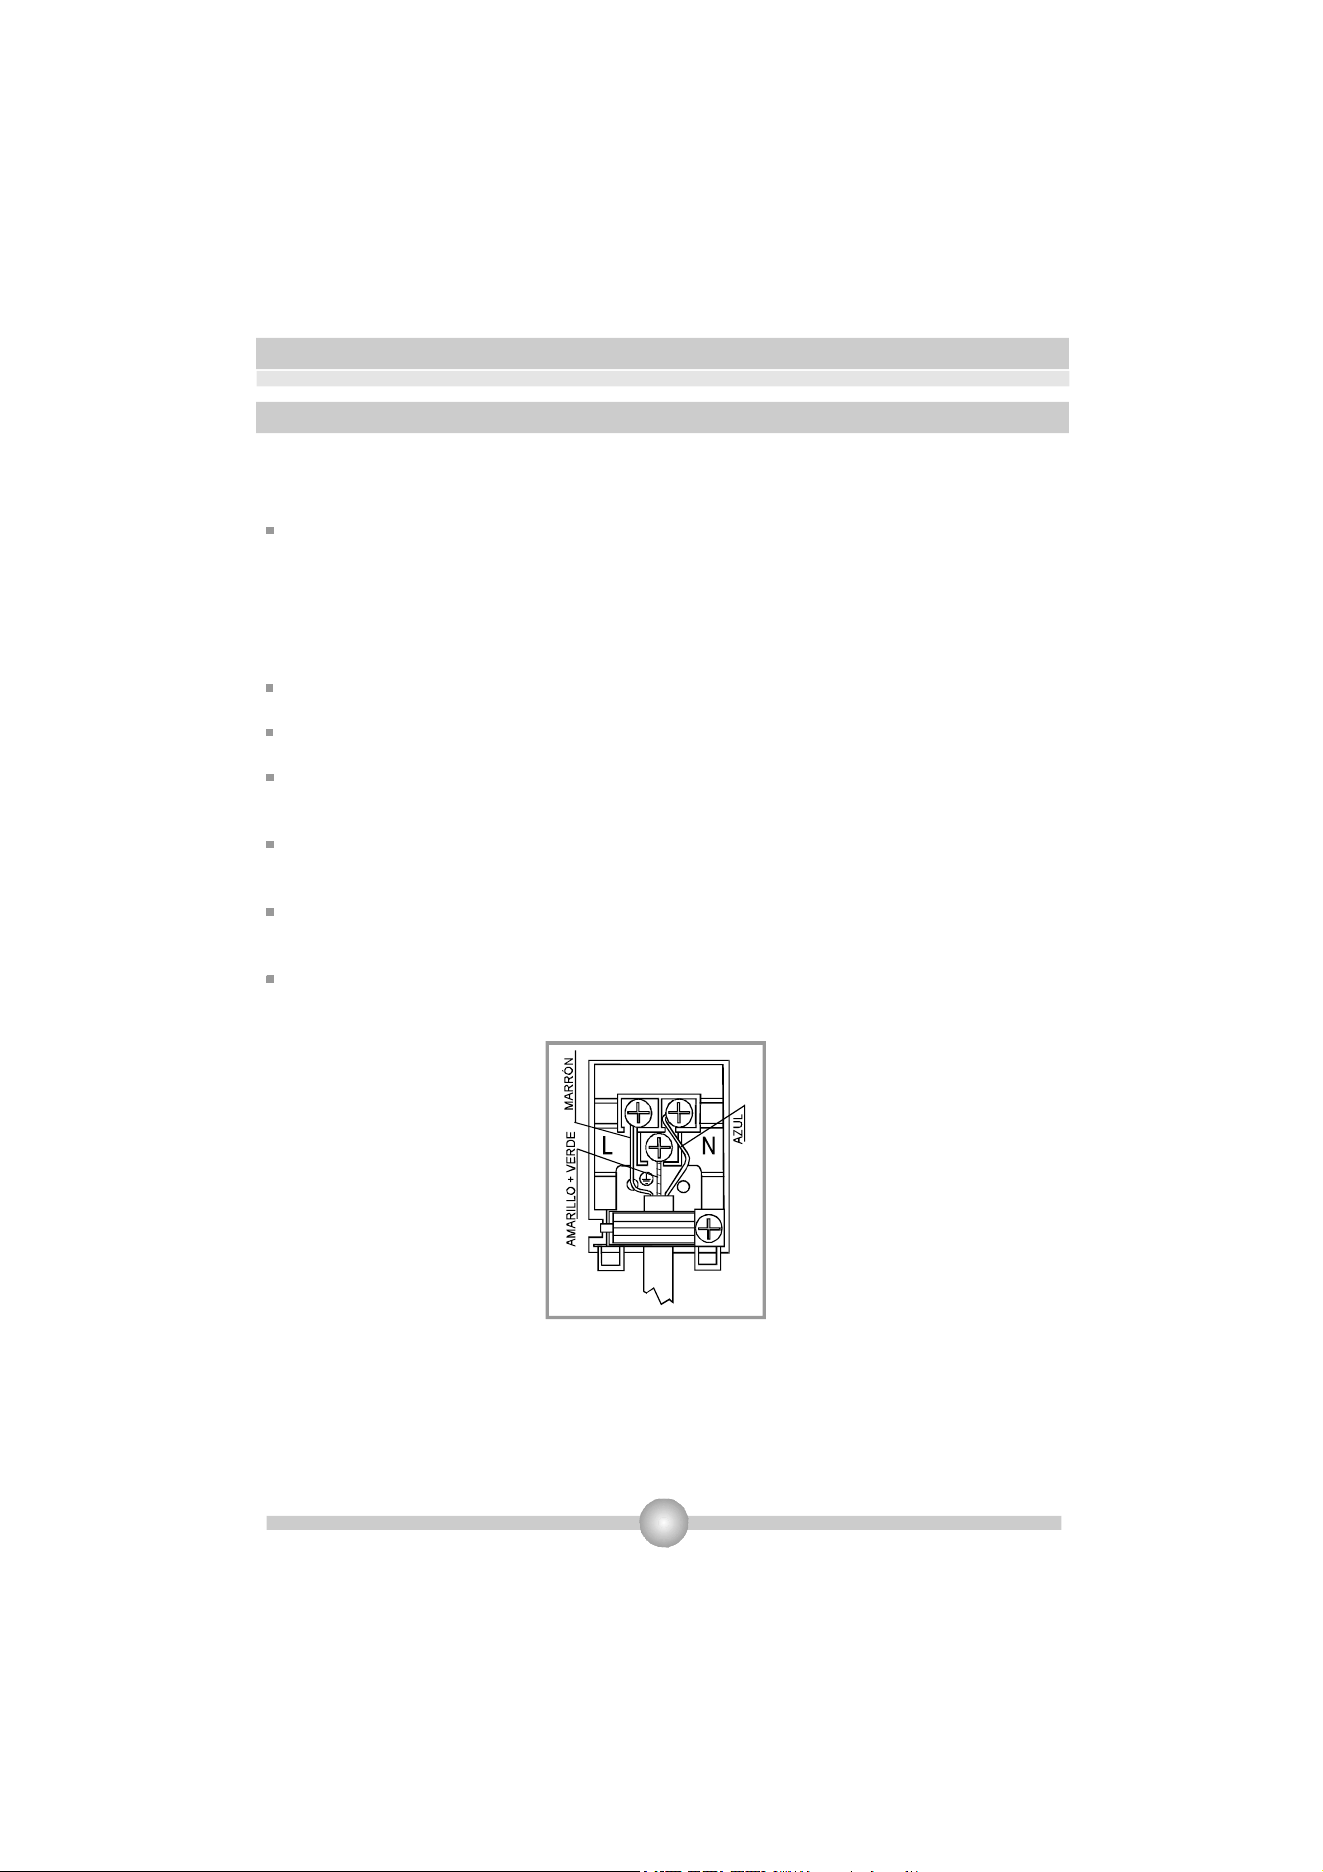
3.3.CABLEADOYSEGURIDADDELHORNOEMPOTRADO
Enelmomentoderealizarelcableadosedebencumplirlassiguientes
instrucciones:
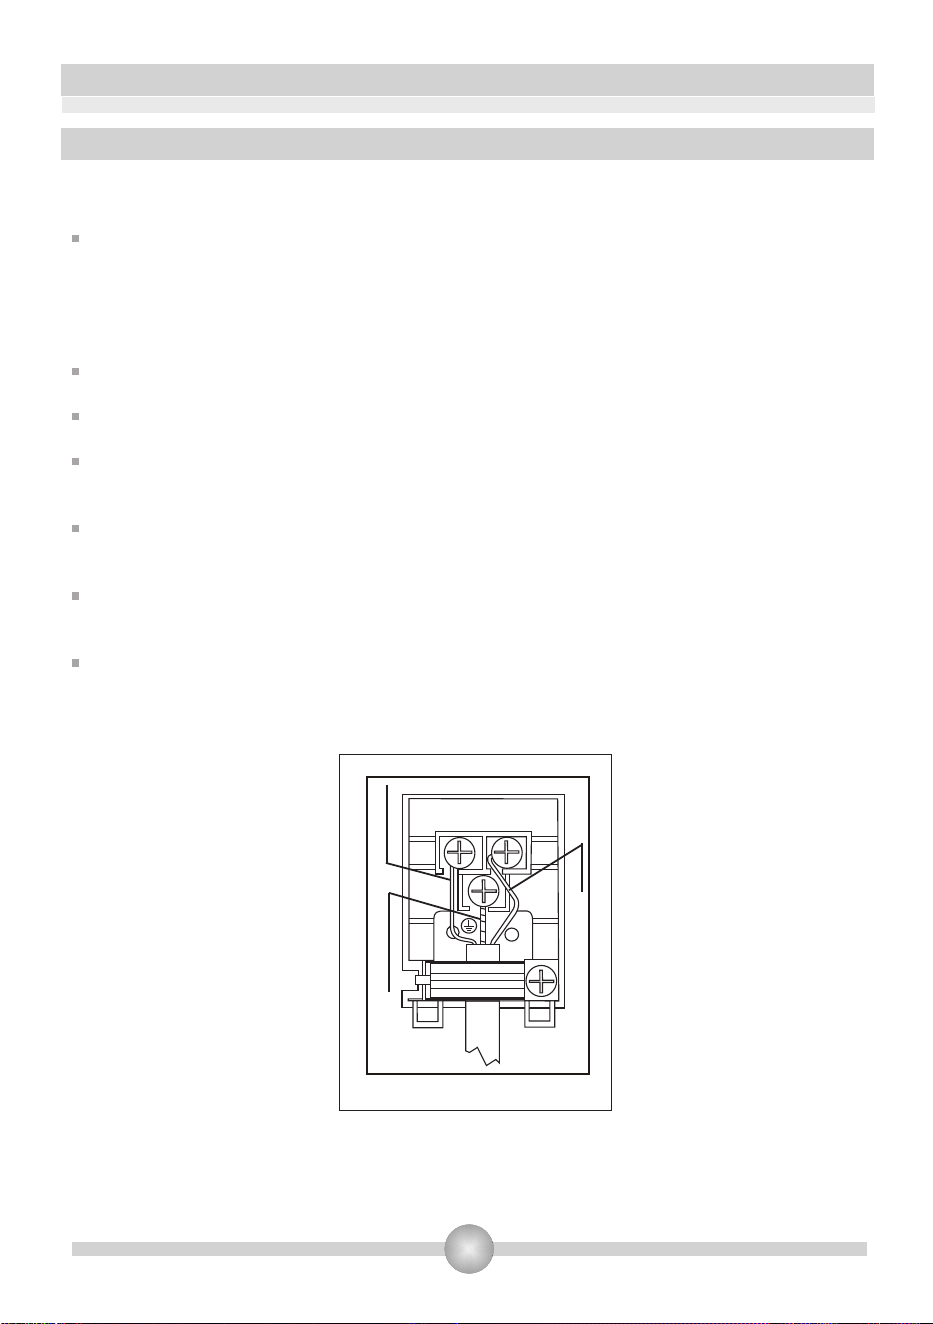
Elcabledetomaatierradebeestarconectadoconeltornilloconlamarcadeconexióna
tierra.LaconexióndelcabledebesercomosemuestraenlaIlustración3.Sienellugarde
lainstalaciónnohaytomadetierraquecumplaconlanormativa,llamealserviciotécnico
autorizadodeinmediato.Hayqueinstalarunseccionadoromnipolarenelinteriordel
circuitodealimentaciónconunaaberturadelcontactodealmenos3mm(nominal20A,de
tipoderetardofuncionamiento).
Latomaatierradebeestarcercadelaparato.Noutilicenuncauncableextensor.
Elcabledecorrientenodebeestarencontactoconlasuperficiecalientedelaparato.
Sisedañaelcabledecorriente,contacteconelserviciotécnicoautorizado.Sóloel
serviciotécnicoautorizadopuedecambiarelcabledecorriente.
Elserviciotécnicoautorizadodeberealizarelcableadodelaparato.Sedebeutilizarun
cabledecorrienteH050VV-F.
Sielcableadoesdefectuoso,puededañarelaparato.Dichodañonoseencuentra
cubiertoporlagarantía.
Elaparatoestádiseñadoparaconectarloaunacorrientede220-240V~.Siéstafuera
diferentealvalordado,llamealserviciotécnicoautorizadodeinmediato.
Ilustración3

9
3.4.AVISOSDESEGURIDADYPRECAUCIONESGENERALES
Esteaparatosefabricaconformealasinstruccionesdeseguridadpertinentesy
relacionadasconaparatoseléctricos.Sólolostécnicosdelserviciodeasistenciatécnica
autorizadosporelfabricantepodránrealizarlastareasdemantenimientoyreparación.
Realizarlainstalaciónylasreparacionessincumplirlasnormaspuedeserpeligroso.
Cuandoelaparatoestéfuncionando,lasuperficieexternasecalentará.Loselementos
quecalientanlasuperficieinternadelhornoyelvaporestaránmuycalientes.Estas
seccionesmantendránelcalorduranteunciertotiempoaunqueelaparatoestéapagado.
Nuncatoquelassuperficiescalientes.Mantengaalejadosalosniños.
Paracocinarenelhorno,sedebenajustarlosbotonesdeajustedetemperaturay
funcionamientodehornoysedebeprogramareltemporizador.Delocontrario,elhornono
funcionará.
Cuandolapuertadelhornoestéabiertaolabandejaestéextraída,nocoloquenada
encimadeellas.Puedeafectaralequilibriodelaparatooromperlapuerta.
Desenchufeelaparatocuandoestéfuncionando.
Protejaelaparatodelosefectosatmosféricos.Nolodejebajoelsol,lluvia,nieve,
suciedad,etc.
APARTADO4:USODELHORNO
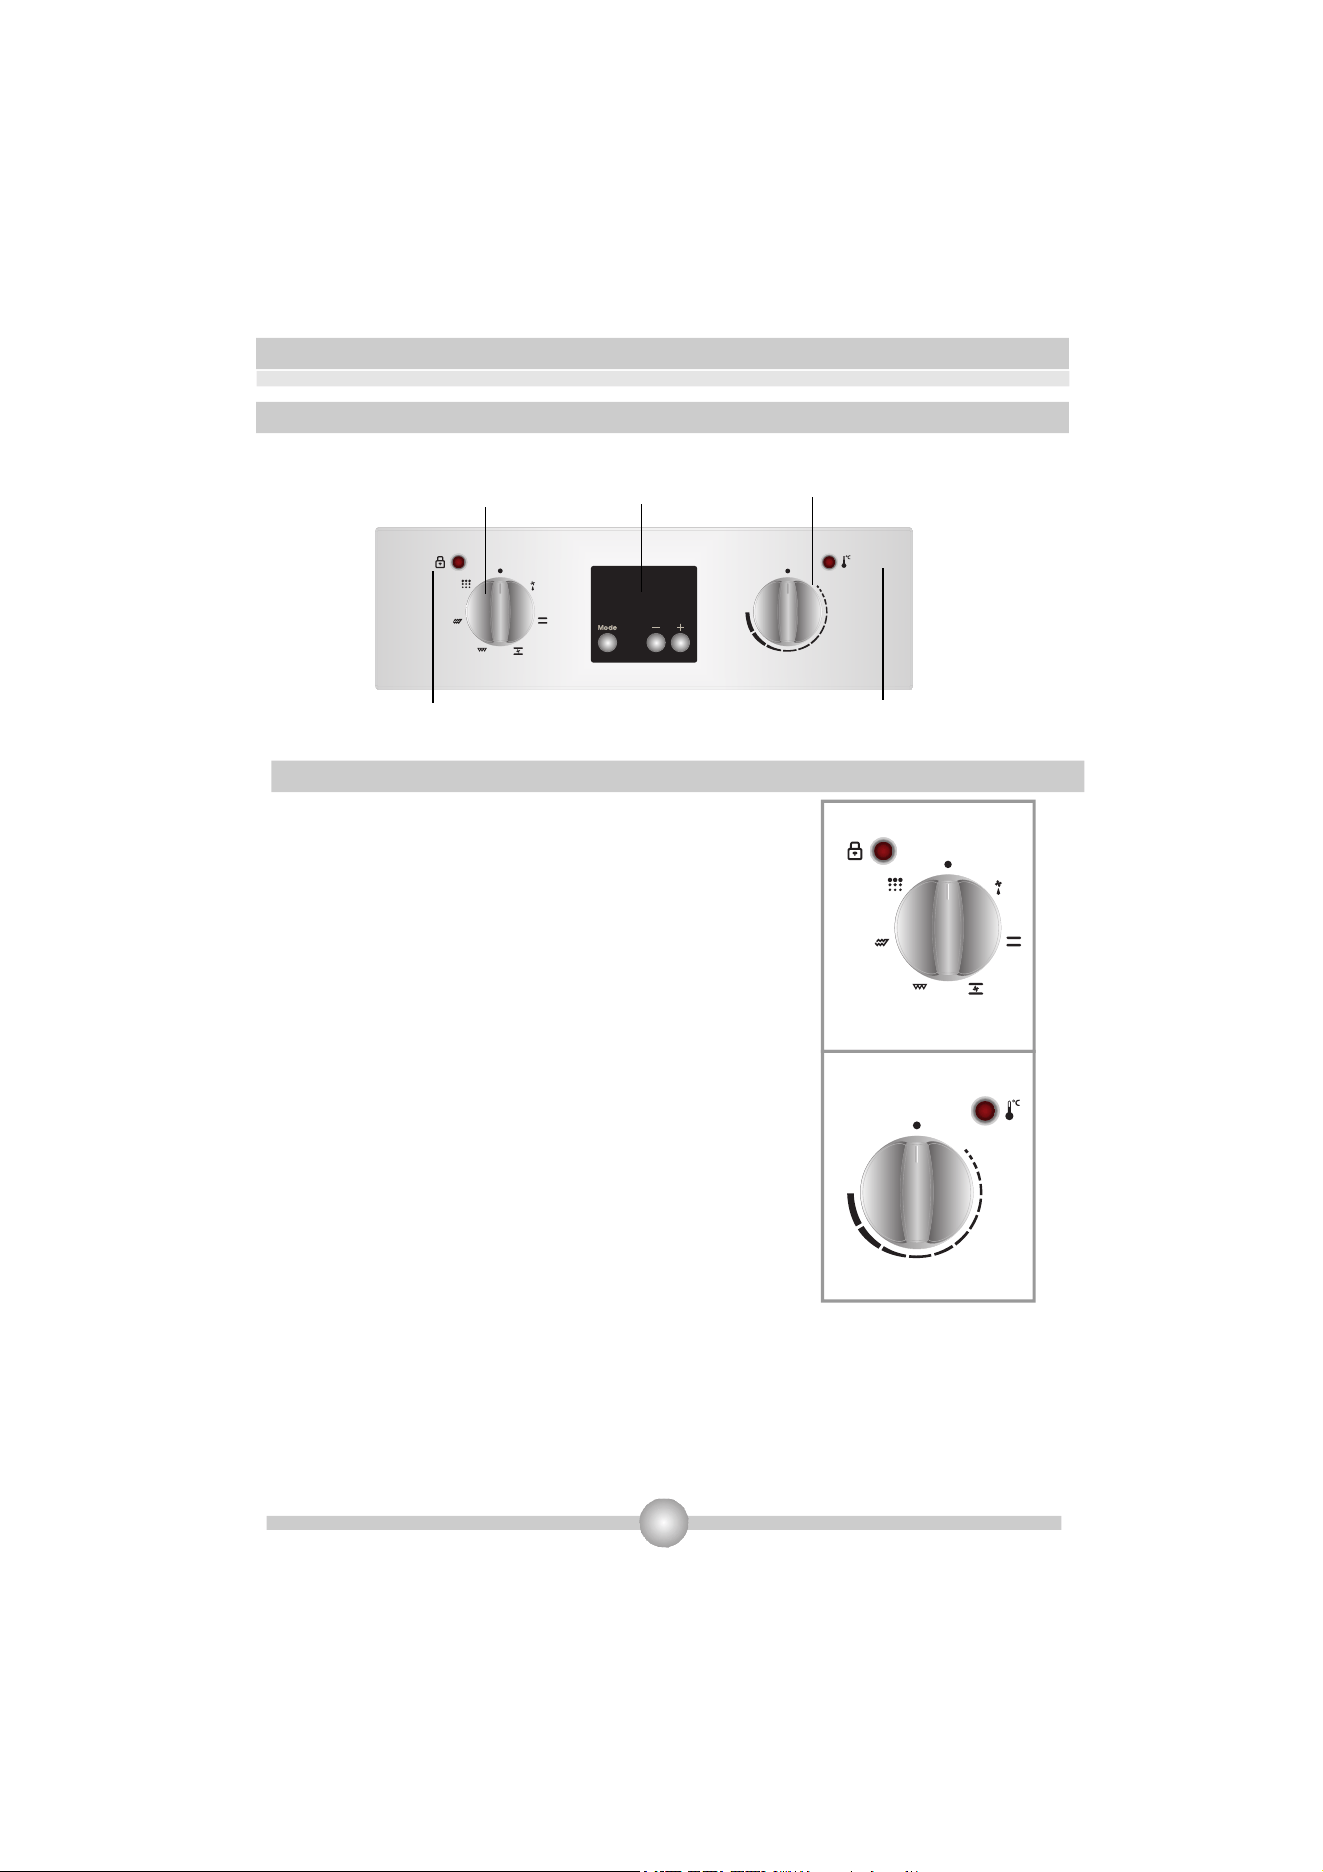
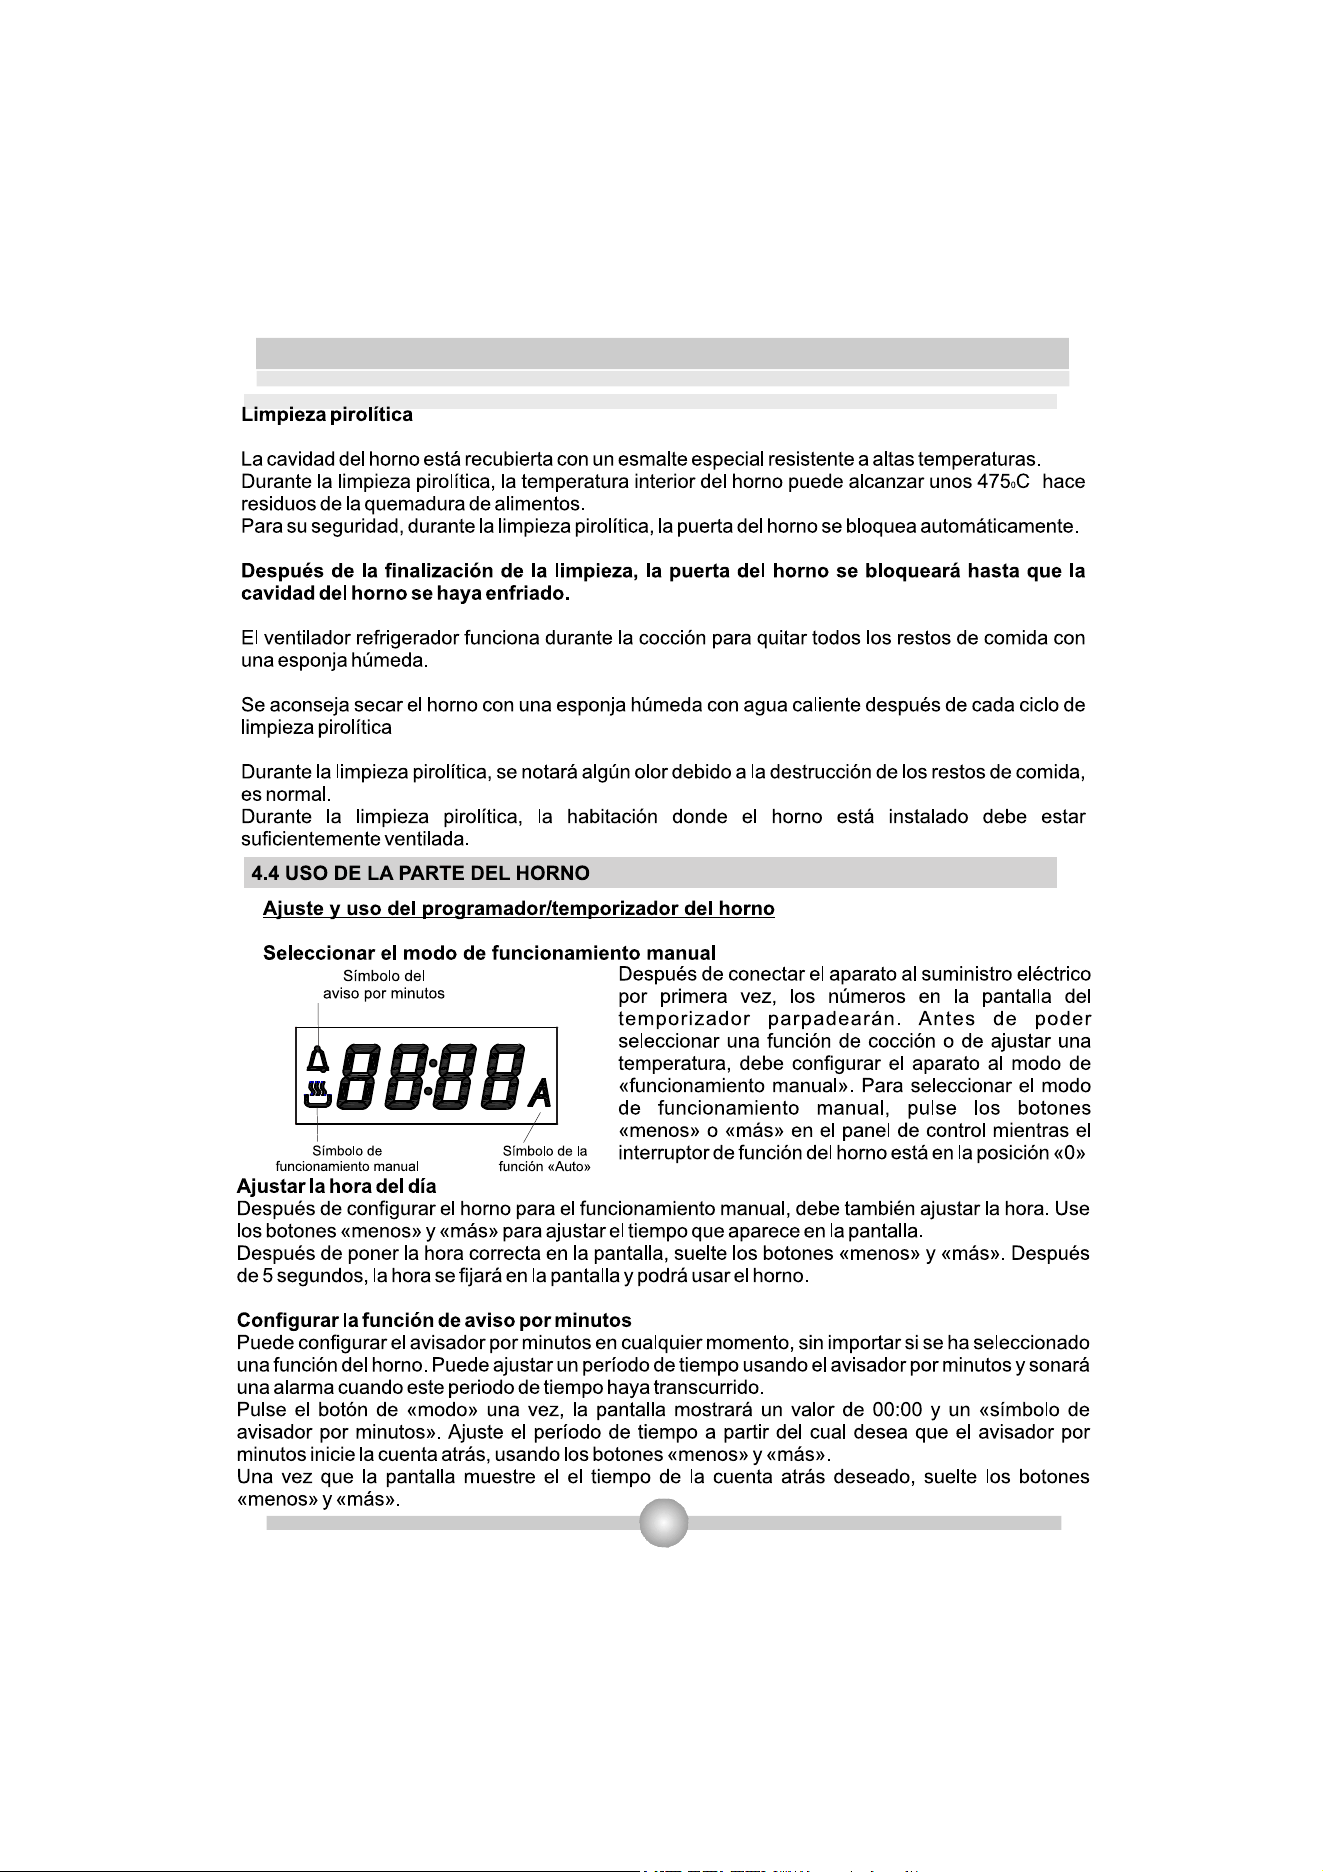
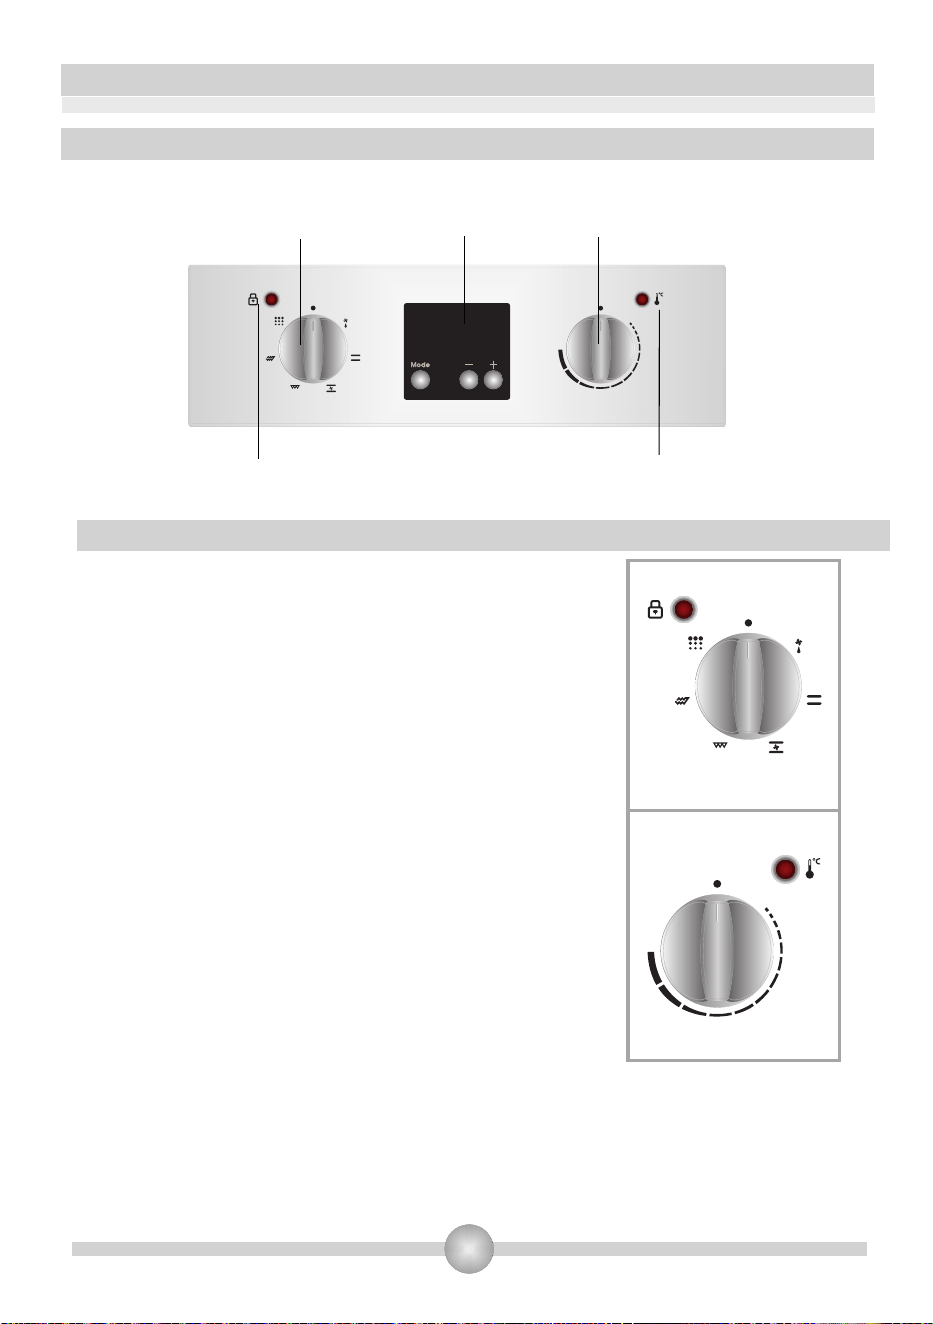
4.1PANELESDEMANDOS
BotóndeFuncionamiento
delHorno
TemporizadorDigital
LuzdeBloqueodelaPuerta
BotóndelTermostatodelHorno
LuzdelTermostatodelHorno
HornoEmpotrado
Ilustración4
Ilustración5
4.2.USODELHORNO
BotónFuncionamientodelHorno:
BotóndelTermostatodelHorno:
Paraseleccionarlasfuncionesdelhorno(ilustración
4)queseexplicanenelpróximoapartadoyenla
tabla1,ajustealavezelbotóndeselecciónde
funciónydeltermostatodelhornoalatemperatura
quedesee.Delocontrario,laetapadefunciónque
seleccionenofuncionará.
Paraseleccionarelbotóndefuncionamientodel
horno.Enlapantallasemuestralatemperatura
ajustada.Cuandolatemperaturaenelinteriordel
hornoalcanceelvalorfijado,eltermostatocortaráel
circuitoylaluzdelmismoseapagará.Cuandola
temperaturaseencuentrepordebajodelvalorfijado,
eltermostatoylaluzdeltermostatoseencenderán
nuevamente.
11
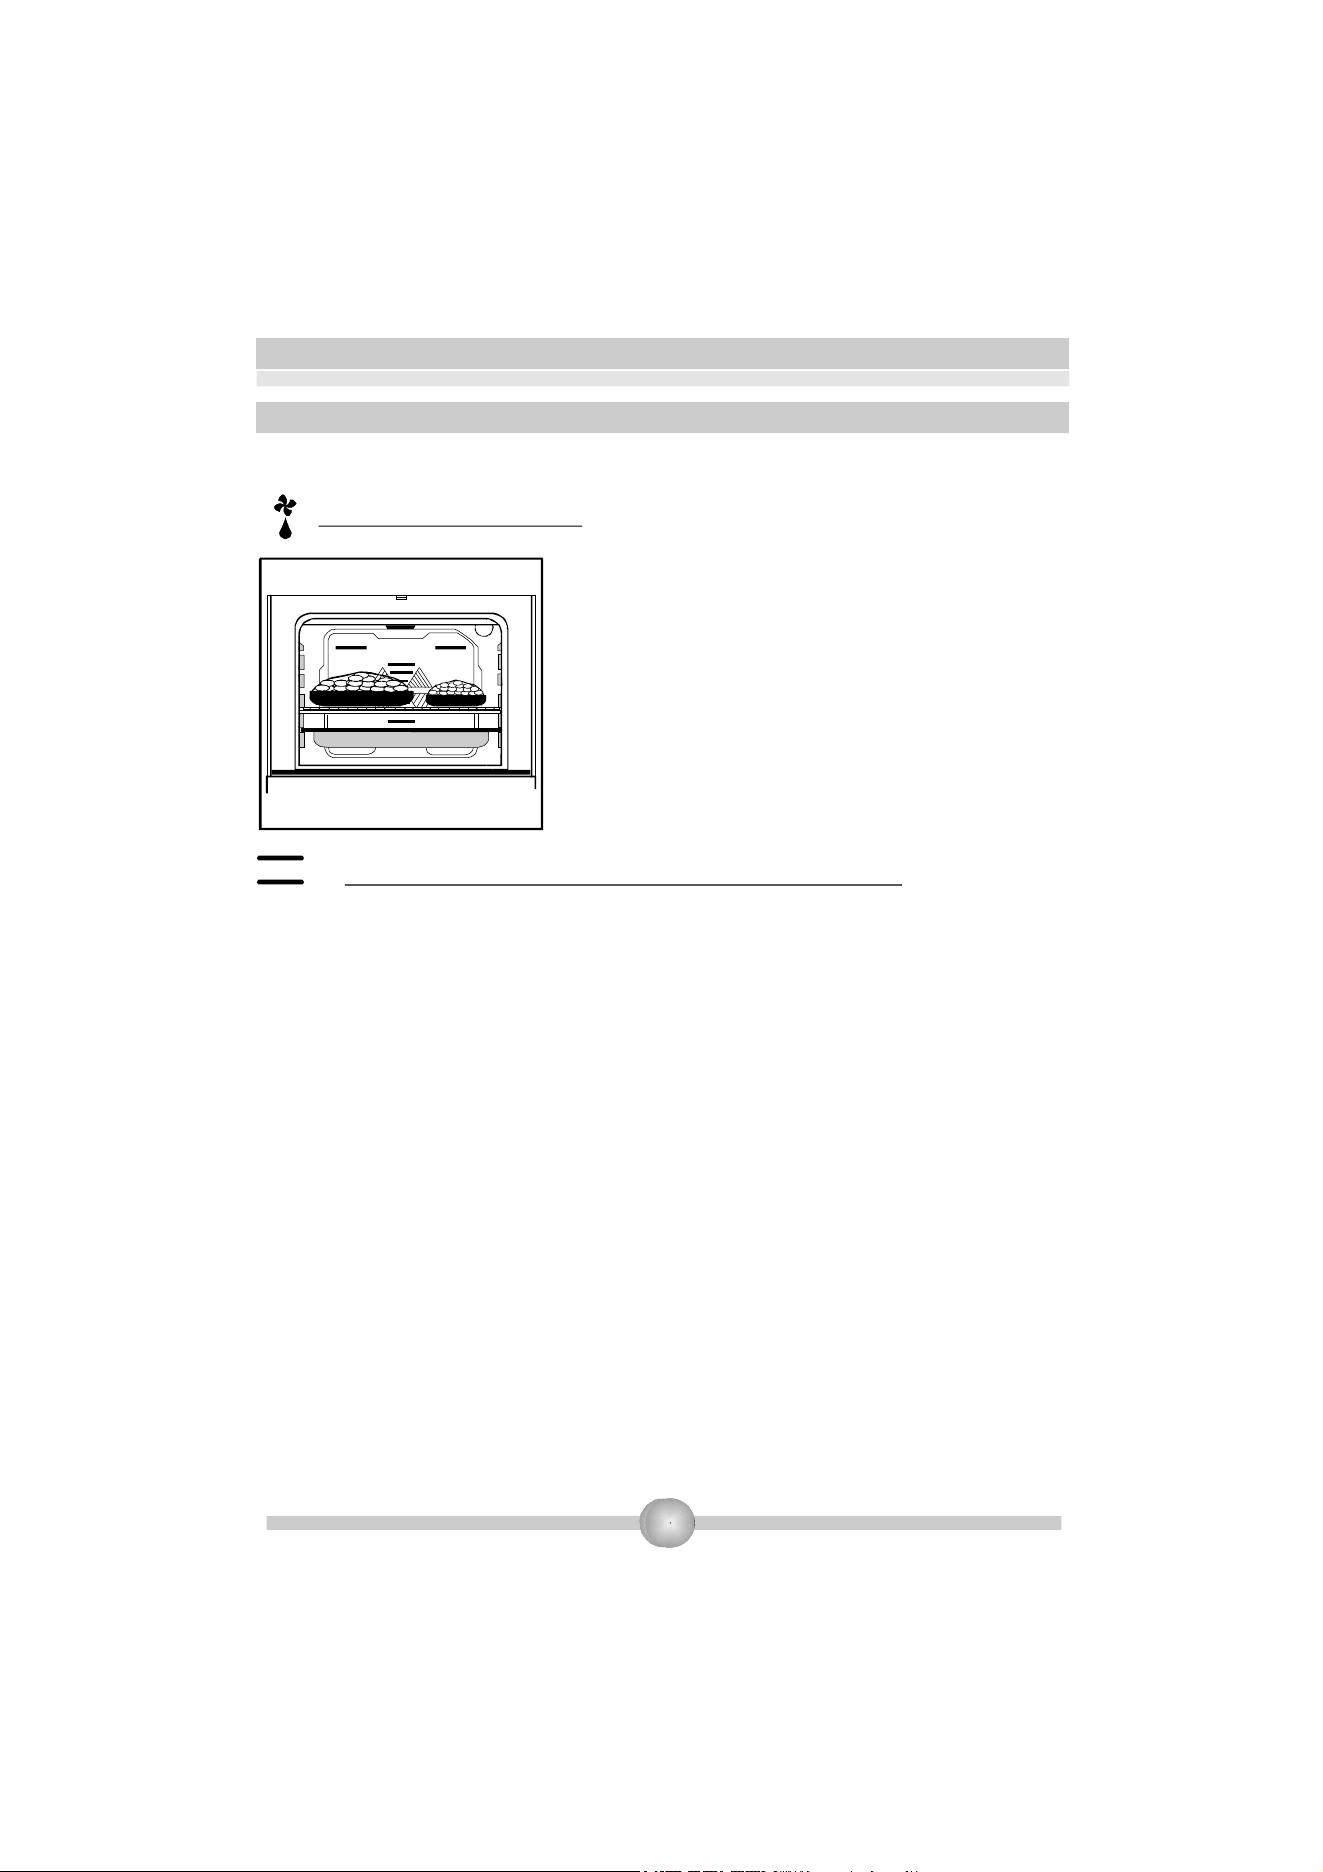
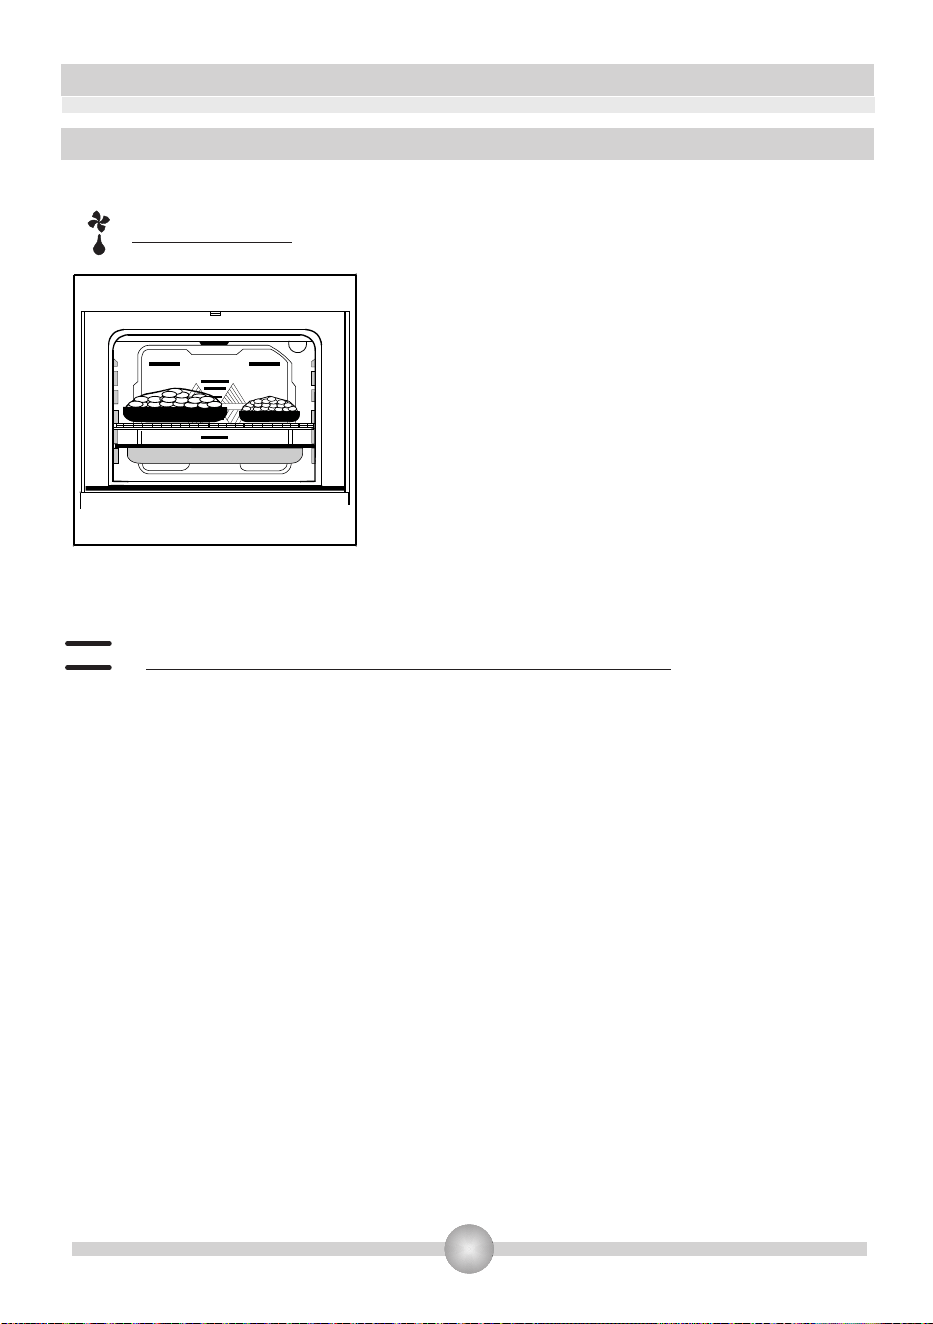
Lasfuncionesqueseexplicanacontinuaciónestándisponiblessegúnelmodelodeproducto.
:Fun
cióndedescongelación
Ilustración6
Paracomenzarcone
lprocesodedescongelación,
coloquelacomidacongeladaenelhornoypongael
botónenlamarcaindicada.Estafunciónnococinani
hornealacomida,sóloayudaadescongelarlaenun
cortoperíododetiempo.Coloquelacomidaquedesee
descongelarenelestantemetálicopondráeneltercer
estantedesdeabajohaciaarriba(ilustración6).Para
recogerelaguaacumuladaporladescongelación,
coloqueunabandejadehornoenelestanteinferior.
4.3.USODELBOTÓNDECONTROLDEFUNCIONESDELHORNO
Cuando
finalicelacocciónuhornea
do,apagueelbotóndecontroldefuncionesdelhornoy
elbotóndeltermostatoycanceleelprogramadeltemporizador,encasodeestardisponible.
Saquelacomidadelhornoycolóquelaenunlugarseguro.Asegúresedequeelhornose
enfríeporcompleto,dejandolapuertadelmismoabierta. Debidoaqueelhornoestará
caliente,manténgasealejadodelmismoymantengaalosniñosalejados.
Funcióndelcalentadorsuperior-inferior(cocciónestática):
Enestetipo
decocciónqueseconocecomoelmétodot
radicional,elcalorseemana
equitativamentedesdelasresistenciasinferioresysuperioresalhorno,asegurandouna
cocciónuniformedelapartesuperioreinferiordelalimentoqueestécocinando.Ajusteel
botóndeltermostatodelhornoalatemperaturarecomendadaenlatabladecocciónparael
tipodecocciónquedeseerealizar.Serecomiendaprecalentarelhornodurante10minutos
aproximadamente.Coloquelacomidaenunrecipienteadecuadoydéjelaquesecocine
duranteeltiemporecomendado.Estaposiciónesunadelasfuncionesprincipalespara
hace pasrtelesbizc,ochosdu,lcespastah,orneadalasa,ñ ,apizzao.
12
Funcióndelcalentadorinferiorydelturboventilador:
Éstaeslaposiciónenlacualelmotorylaspaletasdelextractorhacencircularelaireque
provienedeloscalentadoressuperioreseinferiores.
Ajusteelbotóndeltermostatodelhornoalatemperaturarecomendadaenlatablade
cocciónparaeltipodecocciónquedesearealizar.Gireelbotóndelhornoparaqueapunteal
Cuandofinalicelacocciónuhorneado,apagueelbotóndecontroldefuncionesdelhornoy
eldetemperaturaycanceleeltemporizador,encasodeestardisponible.Saquelacomida
delhornoycolóquelaenunlugarseguro.Asegúresedequeelhornoseenfríeporcompleto,
dejandolapuertadelmismoabierta.Debidoaqueelhornoestarácaliente,manténgase
alejadodelmismoymantengaalosniñosalejados.
símbolodeestafunción,ajusteeltemporizadoraltiemporecomendadoparalacoccióny
precalienteelhornodurante10minutosaproximadamente.Coloquelacomidaenun
recipienteadecuado,eintrodúzcalaenelhornoparainiciarlacocción.Enestaposición,por
logeneral,sehorneanmuybienlospasteles.Todaslaspartesdelosalimentossecocinarán
demanerauniformeenestaposición. Adecuadoparacocinarconunabandeja.
FuncionesdeParrillaydeAsadodePollos:
Gireelbotóndeltermostatodelhornoparaqueapunteaestevalordetemperatura.Después
deprecalentarelhornodurante5minutos,coloquelosalimentosenél.
Cuandofinalicelacocción,apagueelbotóndecontroldefuncionesdelhornoyeldel
termostato;canceleeltemporizador,encasodeestardisponible.Saquelacomidadelhorno
ycolóquelaenunlugarseguro.Asegúresedequeelhornoseenfríeporcompleto,dejando
lapuertadelmismoabierta. Debidoaqueelhornoestarácaliente,manténgasealejado
delhornoymantengaalosniñosalejados.
Estafunciónseutilizaparahacerplatosalaparrilla,
asarpollosyrustiU.Paracocinaralaparrilla,coloquelosalimentosenlaparrillae
introdúzcalaenelestantemásalto.Despuésdecolocarlabandejadelhornoenel
3erestante,puedecomenzarconelasado.Labandejaquesecoloqueenel3erestante
recogerálagrasaquecaigadelosalimentos. Lapuertadelhorno debeestar
cerradaylatemperaturasedebe ajustara190º.

13
Es
tafunciónseutilizaparaasarmásrápidoysuperficiesmásgrandes,asarpollosyrustir
(asarconelpinchogiratorio).Pararustir/asar,utiliceelpincho(ilustración14).Paracocinara
laparrilla,coloquelosalimentosenlaparrillaeintrodúzcalaenelestantemásalto.Después
decolocarlabandejadelhornoenel3erestante,puedecomenzarconelasado.Labandeja
quesecoloqueenel3erestanterecogerálagrasaquecaigadelosalimentos.
Gireelbotóndeltermostatodelhornoparaqueapunteaestevalordetemperatura.Después
deprecalentarelhornodurante5minutos,coloquelosalimentosenelhorno.
Cuandofinalicelacocciónuhorneado,apagueelbotóndecontroldefuncionesdelhornoy
eldeltermostato;canceleeltemporizador,encasodeestardisponible.Saquelacomidadel
hornoycolóquelaenunlugarseguro.Asegúresedequeelhornoseenfríeporcompleto,
dejandolapuertadelmismoabierta.
Lapuertadel
hornodebeestarcerradaylatemperaturasedebeajustara190º.
Funcióndelcalentadorsuperior,deasaralaparrillaydeasarpollos:
Debidoaqueelhornoestarácaliente,manténgasealejadodelmismoymanten
gaa
losniñosalejados
14
Fun
cióndelimpiezapirolítica
Antes
deactivarlafuncióndelimpiezapirolítica,eliminecualquierderrame
exc
esivoyasegúresedequeelhornoestávací
o. Nodejenadadentrodelhorno(por
ejemplo,sartenes,parrillas,bandejadehornear,grasera,etc),yaqueengranmedida
podríadañarlos.
Antesdeactivarlafuncióndelimpiezapirolítica,retirelasparrillasdelhornoylos
soportes.
Asegúresedequelapuertadelhornoestécerradaantesdeactivarlafunciónde
limpiez
apirolítica.
Cuandolafuncióndelimpiezapirolíticaestéenmarcha,esrecomendablenousaruna
placadecocciónsisemontaencimadelhorno.Estopodríacausarun
sobrecalentamientoydañosaambosaparat
os.
Duranteelciclodelimpiezapirolíticalapuertadelhornosecalienta.Losniñosdeben
m
antenersealejadoshastaquesehayaenfriado.
A
lfinaldelproc
esodelimpiezapirolítica,lapantallamuestralahoradeldía.Lapuertadel
hornoquedarábloqueadacuandosepongaenmarchalafunciónpirolítica.
La duración es de 90 minutos piro y no se puede cambiar.
19
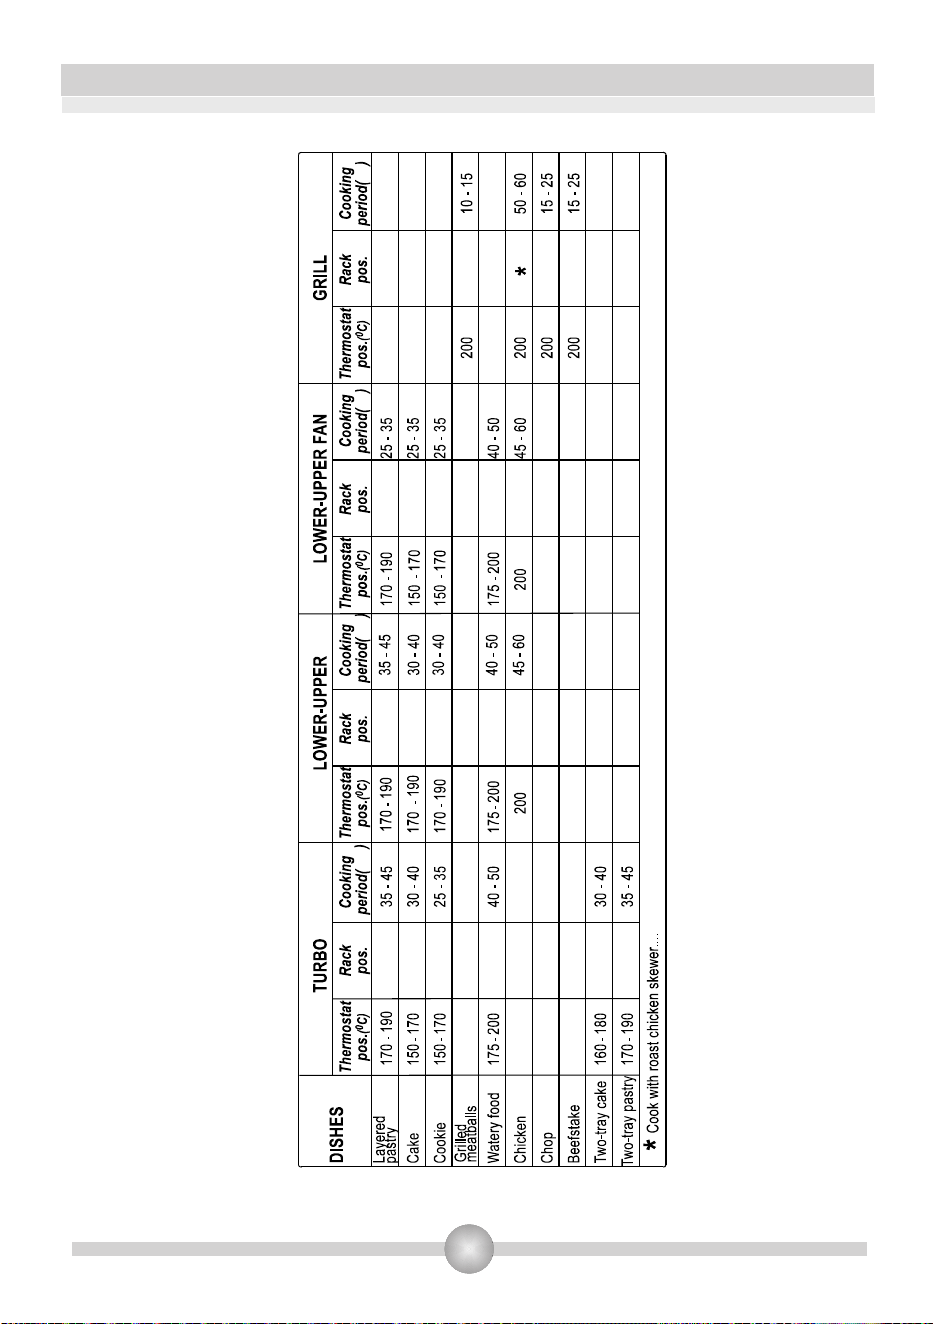
PLATOS
m~ëíÉäÉê−~=
Üçà~äÇê~Ç~
^äļåÇáÖ~ë=~=
ä~=é~êêáää~
m~ëíÉäÉë=Éå=
Ççë=Ä~åÇÉà~ë
aìäÅÉë=Éå=
Ççë=Ä~åÇÉà~ë
`çÅáåÉ=Åçå=ÄêçÅÜÉí~=ÇÉ=éçääç=~ë~Çç
Posic.
Termostato
(ºC)
Posic.
Termostato
(ºC)
Posic.
Termostato
(ºC)
Posic.
Termostato
(ºC)
Posic.
Estante
Posic.
Estante
Posic.
Estante
Posic.
Estante
Tiempo de
cocción
(min.)
Tiempo de
cocción
(min.)
Tiempo de
cocción
(min.)
Tiempo de
cocción
(min.)
TURBO INFERIOR-SUPERIOR PARRILLA GRILL
VENTILADOR
INFERIOR-SUPERIOR
N=J=O=J=P
N=J=O=J=P
N=J=O=J=P
P
N=J=Q
N=J=Q
N=J=O
N=J=O=J=P
N=J=O=J=P
N=J=O
Q
=O
N=J=O
N=J=ON=J=O
N=J=O
N=J=O
O
P=J=Q
=Q
m~ëíÉäÉë
d~ääÉí~ë
mçääçë
`çêíÉë
_áëíÉÅë
mä~íçë=
Å~äÇçëçë
20
.estante
.estante
.estante
.estante
.estante
1
4.5.ACCESORIOSDELHORNO
Serecomiendaqueutilicelosrecipientesindicadosenlatablaenfuncióndelosalimentos
quesecocinenenelhorno.Tambiénpuedeutilizarenvasesdevidrio,moldesparapasteles
ybandejasdehornoespecialesparasuusoenelhornodisponiblesenelmercado.Preste
atenciónalainformaciónqueelfabricanteofreceacercadeestetema.Siseutilizan
recipientespequeños,colóquelosenlaparrillainternajustoenelmediodelamisma.La
informaciónqueseofreceacontinuaciónestápensadaparaelusoderecipientes
esmaltados.
Silacomidaquedeseacocinarnocubretotalmentelabandejadelhornoosesacadel
congelador,obien,siseutilizaunabandejapararecogereljugoquepierdelacomida
duranteelasado,esposiblequelabandejasedeformedebidoalasaltastemperaturas
durantelacocciónofritura.Ésteesunefectofísiconormalqueseprovocadurantela
transferenciadecalor.Nodejelabandejadevidrioorecipienteenunambientefrío
inmediatamentedespuésdecocinarenellos.Noloscoloquesobresuperficiesfríasy
mojadas.Colóquelossobreunpañosecoparaqueseenfríenlentamente.Delocontrario,la
bandejaorecipientedevidriosepuederomper.Sivaaasaralaparrilla,lerecomendamos
quecoloquelaparillasobrelabandejasuministradaconelhorno(encasodequesu
productoincluyaesteelemento).Así,elaceitequesalpiqueosepierdanoensuciaráel
interiordelhorno.Sivaautilizarlaparrillagrande,coloqueunabandejaenunodelos
estantesinferioresparaevitarlaacumulacióndegrasas.Parafacilitarlalimpieza,añadaun
pocodeaguaenlabandeja.Cuandoasealaparilla,utiliceelestanteó.Engrasela
parillaparaevitarquelacomidasepeguealamisma.
Parilla:
Bandejallana:
Bandejahonda:
Seutilizaparaasaralgrillopara
colocardistintosrecipientesquenoseanla
bandejadecocción,sobreél.
Seutilizaparahornear
pastelesydulcestalescomoflanesyotros.
Seutilizaparacocinar
estofados.
Ilustración8
22
Extraccióndelaparrilla
Saquelaparrillatal
comosemuestraenla
ilustración.Tras
liberarladelosclips,
levántela.
QuitelostornillosGde
cadapanelcatalítico
esmaltado
ADVERTENCIA-
Coloque la rejilla
correctamente en
cualquier estante del
horno, empujándola
hasta el final.

23
APARTADO5:LIMPIEZAYMANTENIMIENTODELHORNO
5.1.LIMPIEZA
Cómolimpiarelinteriordelhorno
Antesdelimpiarelhorno,asegúresedequetodoslosbotonesdecontrolesténapagadosy
elaparatoestéfrío.Desenchufeelaparato.
Noutilicematerialesdelimpiezaconpartículasquepuedanrayarlaspartesesmaltadasy
pintadasdelhorno.Utilicelimpiadoresengelolíquidosquenoposeanpartículas.Noutilice
cremascáusticas,polvosdelimpiezaabrasivos,esponjasmetálicasoherramientas
contundentesdadoquepuedendañarlasuperficie.Sielexcedentedelíquidoquese
derramaensuhornosequema,puededañarelesmalte.Limpiedeinmediatocualquier
derrame.Noutiliceaparatosdevaporparalalimpiezadelhorno.
Asegúresededesenchufarelhornoantesdecomenzaralimpiarlo.Podrálimpiarmejorel
interiordelhornosiestáligeramentetemplado.Limpieelhornoconunpañosuave
humedecidoconaguayjabóndespuésdecadauso.Luego,vuelvaalimpiarloconunpaño
húmedoyséquelo.Nolimpieelhornoconlimpiadoressecosoenpolvo.Noesnecesario
limpiarlaparteposterioryloslateralesdelarmazóninternodeproductosconarmazonesde
esmaltecatalítico.Sinembargo,serecomiendaquelocambiedespuésdeunciertoperíodo
detiempoydeacuerdoconeluso.
*Lajuntadelapuertasepuedelimpiarconunaesponjaempapadaenaguatibia.Noutilice
limpiadoresabrasivosniresquebrajelajunta.
*Compruebedeformaperiódicaelestadodelasjuntasdelhorno.Siestuvierandañadas,
contacteconelserviciotécnicoautorizadomáscercanoparaqueprocedanasustituirlas.
5.2.MANTENIMIENTO
Sustitucióndelaluzdelhorno
Serecomiendaqueestatarealarealiceelserviciotécnicoautorizado.Desenchufeelhorno
yasegúresedequeestéfrío.Despuésdequitarlatapa,saquelabombilla.Coloquelanueva
bombilla,resistentea300ºC,quepodráencontrarenlosestablecimientosautorizados.
Después,coloquelatapadeproteccióndelabombillaensulugar.Despuésdeesto,elhorno
estarálistoparaserusado.

24
APARTADO6:SERVICIOTÉCNICOYTRANSPORTE
6.1.REQUISITOSANTESDECONTACTARCONELSERVICIOTÉCNICO
Sielhornonofunciona:
Sielhornonocalienta:
Silalámparadelinteriordelhornonoseenciende:
Cocción(silapartesuperiorylainferiornococinanigual):
6.2.INFORMACIÓNRELACIONADACONELTRANSPORTE
Sinotieneelembalajeoriginal:
Elhornopuedeestardesconectadodebidoaunapagón.Enlosmodeloscontemporizador,
puedequeelmismonoestéajustado.
Latemperaturapuedenohaberseajustadoconelinterruptordelcalentadordelhorno.
Debecomprobarquehayacorrienteeléctrica.Debecomprobarquelasbombillas
funcionen.Sinofuncionan,puedecambiarlassiguiendolasinstruccionesdadasparaello.
Controlelaubicacióndelosestantes,elperíododecocciónylosvaloresdecalordeacuerdo
conelmanual.
Guardeelembalajeoriginalparautilizarlocuandodebatransportarelaparato.Sigalas
señalesdetrasportedelacaja.Sujeteelhornoconcintaenlaspartessuperiores;sujete
tambiénlaspuntasycabezales,asícomolosportacacerolasalospanelesdelmismo.
Coloqueunpapelentrelacubiertasuperioryelpaneldelcocción,cubralacubiertasuperior
yluegopéguelaconcintaalassuperficieslateralesdelhorno.
Peguecartónopapelconcintaadhesivaenlacubiertafrontaldelvidriointeriordelhorno:
seráconvenientequelasbandejasylaparrilladelhornonodañenlacubiertadelmismo
durantesutraslado.Tambiéndebecubrirloslaterales.
Tomelasmedidasnecesariasparaevitarquelassuperficiesexternas(devidrioo
esmaltadas)nosegolpeen.
Siaunsiguiendoestospasossigueteniendoproblemas,comuníqueseconel
serviciotécnicoautorizado.
Sidebetransportarelaparato:
CCH900PXG
Estesímboloenelaparatooensuembalajeindicaquenodebe
tratarsecomobasuradoméstica.Ensulugar,debeentregarseenel
puntoderecogidaselectivaadecuadoparaelreciclajedeequipos
eléctricosyelectrónicos.Aldesecharesteproductodeforma
correctaevitarálasposiblesconsecuenciasnocivasparaelmedio
ambienteylasaluddelaspersonasquepodríanderivardelamala
gestióndelproductocomoresiduo.Paraobtenermásinformación
sobreelreciclajedeesteproducto,contacteconsuayuntamiento,
servicioderecogidaselectivadedesechosoconlatiendaenlaque
loadquirió.

INSTRUÇÕESDE
FUNCIONAMENTOEDE
INSTALAÇÃODOFORNO
PIROLÍTICOENCASTRÁVEL
CCH900PXG
PT

Estimadocliente,
Onossoobjectivoéoferecerprodutosdequalidade,
construídoseminstalaçõesmodernas,commuitocuidadoe
testesdequalidade.
Estemanualcontémtodasasinformaçõesnecessáriaspara
utilizaresteaparelhoconcebidocomatecnologiamais
recente,comamáximaconfiançaeeficácia.
Antesdeutilizaroaparelho,leiacomcuidadoestemanualque
contémtodaainformaçãonecessáriaparaumainstalação,
manutençãoeutilizaçãosegura.ContacteonossoServiço
Autorizadoparaamontagemdoseuproduto.
ESTE MANUAL ESTÁ SUJEITO A MODIFICAÇÕES POR ERROS
ORTOGRÁFICOS, DE REDACÇÃO OU TIPOGRÁFICOS

1
Índice
1-
2-
3-
4-
5-
6-
Apresentaçãoetamanhodoproduto
Recomendações
Preparaçãoparaainstalaçãoeutilização
Utilizaroforno
Limpezaemanutençãodoforno
Assistênciaetransporte
2
PARTE1:APRESENTAÇÃOETAMANHODOPRODUTO
DESCRIÇÃODOPRODUTO:
1-Paineldecontrolo
2-Manípulo
3-Portadoforno
4-Bloqueiodaporta
5-Tabuleiro
6-Elementoinferiordeaquecimento
(pordetrásdaplaca)
7-Elementosuperiordeaquecimento
(pordetrásdaplaca)
8-Grelha
9-Suportes
10-Lâmpadadoforno
11-Elementoturbodeaquecimento
(pordetrásdaplaca)
12-Ventilador(pordetrásdaplaca)
13-Saídasdear
Figura1
4
5
6


6
PARTE3:PREPARAÇÃOPARAAINSTALAÇÃOEUTILIZAÇÃO
Aquandodaescolhadolocal,nãodevehavernenhumprodutoinflamávelnaproximidade,
comocortinas,roupasimpermeáveis,etc.,queseincendeiamrapidamente.
Osmóveisemtornodofornodevemserfabricadoscommateriaisqueresistema
temperaturassuperioresa90ºC.
Esteaparelhomoderno,funcionaleprático,construídocommateriaisdeprimeiríssima
qualidade,saberádar-lheinteirasatisfação.Develeratentamenteestemanualde
instruçõesondeencontrarátodososconselhosúteisparaobterexcelentesresultados.
Estasinstruçõesdescrevemosprocessosdeinstalaçãoedeassistênciacorrectos.O
técnicoqueiráprocederàinstalaçãodoaparelhotambémdevelerestemanual.
CONTACTEOSERVIÇOAUTORIZADOPARAAINSTALAÇÃODOSEUFORNO!
3.1.LOCALDEINSTALAÇÃODOFORNO
Deveconsideraralgunsfactoresaquandodaescolhadolocalondevaiinstalaro
forno.Sigaasrecomendaçõesabaixoparaevitarqualquerproblemaequalquer
situaçãoperigosa!
Asdimensõesemateriaisdocompartimentoondeofornovaiserinstaladodevemser
correctaseresistentesaaumentosdetemperatura.Numainstalaçãocorrecta,deveevitaro
contactocomasparteseléctricasouisolantes.Aspartesisolantesdevemsercolocadasde
maneiraanãoserretiradasqualquerquesejaaferramentautilizada.Ainstalaçãodo
aparelhopertodeumfrigoríficooudeumcongeladornãoérecomendada.Odesempenho
dosaparelhosacimareferidosseráafectadodevidoaocalorqueemanadoforno.Apóster
retiradoofornodaembalagem,verifiqueseestenãoestádanificado.Seconstataralgum
dano,nãoutilizeoaparelhoecontacteimediatamenteoserviçodeassistênciaautorizado.
7
Introduza o forno no armário empurrando-o para
a frente. Abra a porta do forno e introduza 2
parafusos nos orifícios localizados na armação
do forno. Com o produto a tocar na superfície de
madeira do armário, aperte os parafusos.
Se o forno estiver por baixo de uma placa, a
distância entre esta e o painel superior do forno
deve ser, no mínimo, de 50mm e a distância entre
a placa e o topo do painel de controlo deverá ser,
no mínimo, 25mm.
Superfície da bancada
mín.
50mm
mín.
25mm
Placa
encastrada
Forno encastrado
3.2. INSTALAÇÃO DO FORNO ENCASTRADO
8
3.3.LIGAÇÃOESEGURANÇADOFORNOENCASTRÁVEL
Sigaasinstruçõesseguintesaquandodaligação:
Ocaboterradeveestarligadoatravésdoparafusocomosímboloterra.Aligaçãodocabo
dealimentaçãodeveserefectuadadeacordocomafigura3.Senãohouvernenhuma
tomadaterraconformeàsnormasdeinstalação,contacteoServiçoAutorizado
imediatamente.Umdisjuntordeveserinstaladonointeriordocircuitocomumaabertura
decontactodepelomenos3mm(20A,tipodefuncionamentocomdelay).
Atomadaterradeveestarpróximadoaparelho.Nuncautilizarumaextensão.
Ocabodealimentaçãonãodeveestaremcontactocomasuperfíciequente.
Seocabodealimentaçãoestiverdanificado,contacteoServiçoAutorizado.Ocabodeve
sersubstituídopeloServiçoAutorizado.
AligaçãodoaparelhodeveserefectuadapeloServiçoAutorizado.Deveutilizarumcabo
dealimentaçãodotipoH055-F.
Umaligaçãoincorrectapodedanificaroaparelho.Estetipodedanonãoserácobertopela
garantia.
Oaparelhofoiconcebidoparaserligadoaumaalimentaçãoeléctricade220-240V,sea
alimentaçãodiferirdovalorindicadoacima,contacteoServiçoAutorizadoimediatamente.
VV
Figura3

9
3.4.RECOMENDAÇÕESGERAISEPRECAUÇÕES
Oseuaparelhofoiconcebidodeacordocomasnormasdesegurançadosaparelhos
eléctricos.Asoperaçõesdemanutençãoedereparaçãodevemserefectuadaspor
técnicosautorizadosformadosnafábricaondefoiconstruídooaparelho.Asoperaçõesde
instalaçãoedereparaçãoquenãorespeitamessasnormaspodemserperigosas.
Assuperfíciesexterioresaquecemquandooaparelhoéutilizado.Oselementosque
aquecemasuperfícieinteriordofornoeovaporqueéevacuadosãoextremamente
quentesEstassecçõespermanecemquentesdurantealgumtempomesmoseoaparelho
estádesligado.Nuncadevetocarassuperfíciesquentes.Ascriançasnãodevem
aproximar-sedoforno.
Paracozinharnoseuforno,osbotõesdefunçãodofornoeosbotõesderegulaçãoda
temperaturadevemserreguladoseotemporizadordofornodeveserprogramado.Caso
contrário,ofornonãofuncionará.
Quandoaportadofornooudagavetaestáaberta,nãocoloquenadaemcimadela.Pode
desequilibraroaparelhooupartiraporta.
Desligueoaparelhoquandoestenãoéutilizado.
Protejaoseuaparelhocontraosefeitosatmosféricos.Nãooexponhaàluzsolar,àchuva,
àneve,aopóetc.

10
PARTE4:UTILIZAÇÃODOFORNO
4.1PAINÉISDECONTROLO
Botãodecontroloda
funçãodoforno
Temporizadordigital
Luzdebloqueiodaporta
Botãodotermóstatodoforno
Luzdotermóstatodoforno
Fornoencastrável
Figura4
Figura5
4.2.UTILIZAÇÃODOFORNO
Botãodecontrolodafunçãodoforno
Botãodotermóstatodoforno
:
:
Paraseleccionarasfunçõesdoforno(Figura4)
descritasnasecçãoseguinteenatabela1,deve
regularimperativamenteobotãodeselecçãoda
funçãoeobotãodotermóstatodofornona
temperaturadesejada.Casocontrário,afunção
seleccionadanãofuncionará.
Paraseleccionarobotãodecontrolodafunçãodo
forno.Atemperaturaajustadaévisualizadanoecrã.
Quandoatemperaturanointeriordofornoatingiro
valorindicado,otermóstatocortaráocircuitoealuz
dotermóstatoapagar-se-á.Quandoatemperatura
descerabaixodovalorindicado,otermóstatoligar-
se-ánovamenteealuzdotermóstatoacender-se-á.
11
4.3.UTILIZAÇÃODOBOTÃODECONTROLODAFUNÇÃODOFORNO
:Elementosdeaquecime
ntoinfe
rioresuperior(cozedurauniforme)
Nestetip
odecozeduradescritocomoométodotradicional,ocalorqueemanada
r
esistênciainferioresuperiorgaranteacozeduradaparteinferioresuperiordosalimentos
queestáacozinhar.Reguleobotãodotermóstatodoseufornonatemperatura
recomendadanatabeladecozeduradeacordocomotipodecozinhadoquevaiefectuar.
Umpré-aquecimentodofornodecercade10minutosérecomendado.Deixecozeros
alimentosnorecipienteadequadoduranteotemporecomendado.Estaposiçãoé
recomendadapar boal
ospas,téismas,saslasa,nhaspizza,.
Apósacozedura,desligueobotãodecontrolodafunçãodofornoeobotãodotermóstatoe
c
anceleoprogramadotemporizadorsedisponível.Retireosalimentosdoforno,coloque-os
numlugarseguroedeixearrefecerofornocomaportaaberta. Comoofornoestáquente,
nãodeixeascriançasaproximar-sedoforno.
Asfunçõesdispon
íveisdescritasabaixovariamdeacordocomomodelo.
Funçãodedescongelação :
Figura6
Podei
niciaradescongelaçãocolocandoosalimentos
congeladosnofornoecolocandoobotãonosinal
indicado.Estafunçãonãocozeosalimentos,sópermite
descongelarosalimentosnumcurtoperíododetempo.
Coloqueosalimentosquequerdescongelarna
prateleiraqueirácolocarnoterceirosuporteacontarde
baixo(Figura6).Pararecolheraáguaacumuladadevido
àdescongelação,insiraotabuleirodofornonaprateleira
inferior.
12
Ventiladorturbo-elemento
deaquecimentoinferior:
Es
taposiçãopermiteaoarprovenientedoselementosdeaquecimentoinferioresuperior
circularnofornoatravésdomotordoventilador.
Reguleobotãodotermóstatodoseufornonatemperaturarecomendadanatabelade
cozeduradeacordocomotipodecozinhadoquevaiefectuar.Coloqueobotãodofornono
A
pósacozedura,desligue
obotãodecontrolodafunçãodofornoeobotãodotermóstatoe
canceleoprogramadotemporizadorsedisponível.Retireosalimentosdoforno,coloque-os
numlugarseguroedeixearrefecerofornocomaportaaberta.Comoofornoestáquente,
nãodeixeascriançasaproximar-sedoforno.
símbolodestafunção,reguleotemporizadordofornonotemporecomendadoparaa
cozeduraedeixepré-aquecerofornodurante10minutos.Osalimentoscolocadosno
recipienteapropriadosãointroduzidosnosfornoeaoperaçãocomeça.Estaposiçãoéideal
paraapastelaria.Todasaspartesdosalimentosserãocozidosdemaneirauniformenesta
posição. Adequadoparaumsótabuleiro.
Grelhadoreassador:
C
oloqueobotãodotermóstatonestevalor.Deixepré-aquecer5minutosant
esdeintroduzir
osalimentosnoforno.
Apósacozedura,desligueobotãodecontrolodafunçãodofornoeobotãodotermóstatoe
canceleoprogramadotemporizador.Retireosalimentosdoforno,coloque-osnumlugar
seguroedeixearrefecerofornocomaportaaberta. Comoofornoestáquente,nãodeixe
ascriançasaproximar-sedoforno.
Estafunçãoéutilizadaparagrelhar,assarH.Paragrelhar,coloqueosalimentosem
cimadagrelhaeagrelhanosuportemaisalto.Coloqueumtabuleirononível3e
podecomeçaraoperação.Otabuleirocolocadonoterceironívelrecolheagordura
quecaidosalimentos. Quando estáagrelharalimentos,aportadofornodeve
estarfechadaeatemperaturadofornodeve estarreguladaa190º.

13
Estafunçãoéutilizadaparagrelharrapidamenteeparagrelharumasuperfíciemaior,assar
ea
ssarcomumespeto.Paraassar,utilizeoespeto(Figura14).Paragrelhar,coloqueos
alimentosemcimadagrelhaeagrelhanosuportemaisalto.Coloqueumtabuleirononível3
epodecomeçaraoperação.Otabuleirocolocadonoterceironívelrecolheagorduraquecai
dosalimentos.
Coloqueobotãodotermóstatonestevalor.Deixepré-aquecer5minutosantesdeintroduzir
osalimentosnoforno.
Apósacozedura,desligueobotãodecontrolodafunçãodofornoeobotãodotermóstatoe
canceleoprogramadotemporizadorsedisponível.Retireosalimentosdoforno,coloque-os
numlugars
eguroedeixearrefecerofornocomaportaaberta.
Quandoestáagrelharalimentos,aportadofornodeveestarfechadae
atemperaturadofornodeveestarreguladaa190º.
Elementodeaquecimentosuperior,grelhadoreassador:
Comoofornoestáquente,nãodeixeascriançasaproximar-sedoforno.
14
Funçãodelimpezapirolítica
Antesdeactiva
rafunçãodelimpezapirolítica,removaqualquersalpico
excessivoeverifiqueseofornoestávazio. Nãodeixenadanointeriordoforno(i.e
panelas,tabuleiros,etc..)porquepodemficardanificados.
Antesdeactivarafunçãodelimpezapirolítica,removaasprateleiraserespectivos
suportesdoforno.
Verifiquesea
portadofornoestáfechadaantesdeactivarafunçãodelimpeza
pirolítica.
Q
uandoafunçãodelimpezapirolíticaestáligada,érecomendadonãoutilizaraplaca
situadaacimadoforno,seexistente.Podeocorrerumsobreaq
uecimentoedanificar
ambosos
aparelhos.
Duranteociclod
elimpezapirolítica,aportadofornoaquece.Manterascriançaslonge
dofornoatéarrefecer.
Nofimdoprocessodelimpezapirolítico,oecrãapresentaahoradodia.Aportadoforno
estarábloqueadaqua
ndoafunçãopirolíticainiciar.
A duração pyro é de 90 minutos e não pode ser mudado.
19
ALIMENTOS
_çäçë=
ÇáîÉêëáÑáÅ~Ççë
_çä~ë=ÇÉ=Å~êåÉ=
ÖêÉäÜ~Ç~ë
_çäç
`ççâáÉ
cê~åÖç
`çëíÉäÉí~
_áÑÉ
_çäç=Çì~ë=
éê~íÉäÉáê~ë
m~ëíÝáë=Çì~ë=
éê~íÉäÉáê~ë
^äáãÉåíçë=Éã=
łÖì~
`çòáåÜ~Çç=Åçã=ÉëéÉíç
Posição do
termóstato
(°C)
Posição do
termóstato
(°C)
Posição do
termóstato
(°C)
Posição do
termóstato
(°C)
Posição do
suporte
Posição do
suporte
Posição do
suporte
Posição do
suporte
Período de
cozedura
(min)
Período de
cozedura
(min)
Período de
cozedura
(min)
Período de
cozedura
(min)
TURBO GRELHADORINFERIOR-SUPERIOR
VENTILADOR INFERIOR-
SUPERIOR
N=J=O=J=P
N=J=O=J=P
N=J=O=J=P
P
N=J=Q
N=J=Q
N=J=O
N=J=O=J=P
N=J=O=J=P
N=J=O
Q
=O
N=J=O
N=J=ON=J=O
N=J=O
N=J=O
O
P=J=Q
=Q

20
.suporte
.suporte
.suporte
.suporte
.suporte
1
4.5.ACESSÓRIOSUTILIZADOSNOFORNO
Érecomendadoutilizarosrecipienteindicadosnatabeladeacordocomosalimentos
cozinhadosnoforno.Podeutilizarrecipientesdevidro,recipientesparabolos,tabuleiros
especiaisparaoforno,disponíveisnomercado.Deveteremconsideraçãoasinformações
dadaspelofabricantesobreesteassunto.Seutilizarrecipientespequenos,coloque-osna
grelhainteriorparaestarembemnomeio.Ainformaçãoapresentadaabaixodeveser
seguidaparaosrecipientesesmaltados.
Seosalimentosquevãosercozinhadosnãocobremcompletamenteotabuleiro,seos
alimentosestãocongelados,ouseotabuleiroéutilizadopararecolheromolhoquecaidos
alimentosgrelhados,poderáconstataralteraçõesnaformadotabuleirodevidoaocalor
elevadoduranteacozeduraouoassado.Éumfenómenonormalquesurgeaquandoda
transferênciadocalor.Nãodeixeumrecipientedevidronumambientefrioimediatamente
depoisdautilizaçãonoforno.Nãocolocarosrecipientesdevidroemsuperfíciesfriase
molhadas.Deixe-osarrefecerlentamentenumpanoseco.Casocontrário,estespodem
partir.Sevaigrelhardentrodoseuforno,deveutilizarapingadeirafornecidacomoproduto
(seoseuprodutotemestematerial).Assim,oóleoquesaltaecainãosujaráointeriordo
forno.Seutilizaragrelha,coloqueumtabuleironoprimeironívelinferiorpararecolhera
gordura.Adicioneáguanotabuleiroparalimparmaisfacilmente.Utilizeosníveise
quandogrelharalimentoseunteagrelhaparaqueosalimentosnãofiquemcoladosà
grelha.
Grelha:
Tabuleiropoucofundo:
Tabuleirofundo:
Utilizadaparagrelharoupara
colocaroutrosrecipientesemcimadela.
Utilizadopara
sobremesascomoumpudim,etc.
Utilizadoparacozerem
lumebrando
Figura8
22
Removeraprateleira
Raiostelescópicos
Coloqueaprateleira
comoindicadona
imagem.Depoisdeter
removidoosclipes,
levantá-la.
AVISO - Colocar
cuidamente a grelha
num dos suportes
correspondentes da
cavidade do forno e
empurre a mesma
até ao fim.

23
PARTE5:LIMPEZAEMANUTENÇÃODOFORNO
5.1.LIMPEZA
Limparointeriordoforno
Verifiquesetodososbotõesdecontroloestãodesligadoseseoaparelhoestáfrioantesde
efectuaralimpeza.Desligueoaparelho.
Nãoutilizeprodutosdelimpezaquecontenhampartículasquepossamriscaraspartes
esmaltadasepintadasdoseuforno.Utilizecremesoulíquidosdelimpezaquenão
contenhampartículas.Porquepodemdanificarassuperfíciesnãoutilizecremes
desoxidantes,pósdelimpezaabrasivos,esfregõesmetálicoseferramentasduras.Caso
líquidosquetransbordaramnofogãoarderem,istopodedanificaroesmalte.Limpe
imediatamenteoslíquidosquetransbordaram.Nãoutilizeumagentedelimpezaavapor
paralimparasuaplaca.
Desligueofornoantesdeefectuaralimpeza.Obterámelhoresresultadosselimparoforno
quandoesteaindaestivermorno.Limpecomumpanomaciohumedecidoemáguaesabão
apóscadautilização.Limpenovamentecomumpanoseco.Nãoutilizenenhumprodutoem
pó.Paraosprodutosemesmaltecatalítico,nãoénecessáriolimparasparedestraseirae
laterais.Contudo,estasdevemsersubstituídasapósumcertotempo.
Ovedantedaportapodeserlimpoutilizandoumaesponjacomsabãoeáguaquente.Não
utilizarprodutosdelimpezaabrasivosenãodanificarovedante.
Verificarosvedantesdaportaperiodicamente.Seosvedantesestiveremdanificados,
contacteocentrodeassistênciamaispróximoparaefectuarasubstituição.
*
*
5.2.MANUTENÇÃO
Substituiralâmpada
Estaoperaçãodeveserefectuadapeloserviçoautorizado.Desligueofornoeverifiquese
esteestáfrio.Depoisdeterremovidoatampadalâmpada,removaalâmpada.Insirauma
novalâmpadaresistentea300ºC,quepodeencontrarnoscentrosautorizados,nolugarda
lâmpadausada.Coloquenovamenteatampa.Ofornoestáprontoausar.

24
PARTE6:ASSISTÊNCIAETRANSPORTE
6.1.
6.2.
CONDIÇÕESANTESDELIGARPARAAASSISTÊNCIA
Seofornonãofunciona;
Seofornonãoaquece;
Alâmpadadofornonãoseacende;
Cozedura(seaspartesinferioresuperiornãocozemdamesmamaneira);
INFORMAÇÕESSOBREOTRANSPORTE
Senãotemaembalagemdeorigem;
Ofornopodeestardesligado,podehaverumcorteeléctrico.Nosmodeloscom
temporizador,nãopodeajustarahora.
Ocalorpodenãoestarajustadocomobotãodecontrolodeaquecimentodoforno.
Verifiqueacorrenteeléctrica.Verifiquesealâmpadaestáqueimada.Seesteforocaso,
devesubstituiralâmpada.
Verifiqueoníveldasgrelhasedostabuleiros,otempodecozeduraeatemperaturade
acordocomomanual.
Guardeaembalagemdeorigemdoprodutoetransporteoaparelhonaembalagemde
origemRespeiteossinaisdetransportesituadosnaembalagem.Fixeatampadamesade
trabalho,ascabeçasdosqueimadoreseasgrelhasàmesadetrabalho.
Coloqueumpapelentreatampasuperioreopaineldecozedura,cubraatampasuperiore
coloquefitaadesivanasparteslateraisdoforno.
Fixeumcartãoouumpapelnaportadofornonointeriordevidroparaqueasgrelhase
tabuleirosnãodanifiquemaportaduranteotransporte.Fixetambémaportadofornoàs
paredeslaterais.
Tomeasmedidasnecessáriasparanãoriscarassuperfíciesexternas(vidroesuperfícies
pintadas).
Seosproblemasdoaparelhopersistirem,mesmoapósterefectuadoasverificações
anteriores,contacteo“Serviçodeassistênciaautorizado”.
Paratransportar;
Osímbolonoprodutoounarespectivaembalagemindicaqueeste
produtonãopodesertratadocomoolixodoméstico.Deveser
depositadonumcentroderecolhaapropriadoparaareciclagemdos
equipamentoseléctricoseelectrónicos.Aogarantiraeliminação
correctadesteproduto,estáaevitarefeitosnegativosnomeio
ambienteenasaúdehumana,quepodemsercausadosporuma
eliminaçãoincorrectadesteproduto.Paramaisinformaçõessobrea
reciclagemdesteproduto,contacteasautoridadeslocais,ocentro
derecolhadolixodomésticooualojaondecomprouoproduto.

OPERATING AND INSTALLATION
INSTRUCTIONS OF
PYROLYTIC BUILT-IN OVEN
CCH900PXG
Dear Customer,
We take offering quality products more than your expactation
as goal, offers you the products produced in modern facilities
carefully and particularly tested for quality.
Your manual is prepared in order to help you to use your
appliance that is manufactured by the most recent technology,
with confidence and maximum efficiency.
Before use of your appliance, carefully read this guide that
includes the basic information for right and safe installation,
maintenance and use. Contact to the nearest Authorized
Service for mounting of your product.

Contents
1- Presentation and size of product
2- Warnings
3- Preparation for installation and use
4- Using the oven
5- Cleaning and maintenance of your product
6- Service and Transport
PART 1: PRESENTATION AND SIZE OF PRODUCT
LIST OF COMPONENTS :
1- Control panel
2- Handle
3- Oven Door
4- Door Lock
5- Tray
6- Lower Heating Element (behind the plate)
7- Upper Heating Element (behind the plate)
8- Wire Grill
9- Racks
10- Oven Light
11- Turbo Heating Element(behind the plate)
12- Fan (behind the plate)
13- Air Outlet Shutters
Figure 1
4
5
6

PART 2: WARNINGS
READ THESE INSTRUCTIONS CAREFULLY AND COMPLETELY BEFORE USING YOUR
APPLIANCE, AND KEEP IT IN A CONVENIENT PLACE FOR REFERENCE WHEN NECESSARY.
THIS MANUAL IS PREPARED FOR MORE THAN ONE MODEL IN COMMON. YOUR APPLIANCE
MAY NOT HAVE SOME OF THE FEATURES THAT ARE EXPLAINED IN THIS MANUAL. PAY
ATTENTION TO THE EXPRESSIONS THAT HAVE FIGURES, WHILE YOU ARE READING THE
OPERATING MANUAL.
General Safety Warnings
- This appliance can be used by children aged
from 8 years and above and persons with
reduced physical, sensory or mental capabilities
or lack of experience and knowledge if they
have been given supervision or instruction
concerning use of the appliance in a safe way
and understand the hazards involved. Children
shall not play with the appliance. Cleaning and
user maintenance shall not be made by children
without supervision.
- WARNING: The appliance and its accessible
parts become hot during use. Care should be
taken to avoid touching heating elements.
Children less than 8 years of age shall be kept
away unless continuously supervised.
- WARNING: Danger of fire: do not store items
on the cooking surfaces.
- WARNING: If the surface is cracked, switch off
the appliance to avoid the possibility of electric
shock.

- The appliance is not intended to be operated
by means of an external timer or separate
remote-control system.
- During use, the appliance becomes hot. Care
should be taken to avoid touching heating
elements inside the oven.
- During use, handles held for short periods in
normal use can get hot.
- Do not use harsh abrasive cleaners or sharp
metal scrapers to clean the oven door glass and
other surface since they can scratch the surface,
which may result in shattering of the glass or
damage to the surface.
- Do not use steam cleaners for cleaning the
appliance.
- WARNING: Ensure that the appliance is
switched off before replacing the lamp to avoid
the possibility of electric shock.
- CAUTION: Accessible parts may be hot when
the cooking or grilling is in use. Young children
should be kept away.
- During pyrolytic options, excess spillage, oven
shelves, shelf supports, wire shelves and all
accessories must be removed before cleaning.

- Your appliance is produced in accordance with all applicable local and international
standards and regulations.
- Maintenance and repair work must be made only by authorized service technicians.
Installation and repair work that is carried out by unauthorized technicians may endanger
you. It is dangerous to alter or modify the specifications of the appliance in any way.
- Prior to installation, ensure that the local distribution conditions (nature of the gas and gas
pressure or electricity voltage and frequency) and the requirements of the appliance are
compatible. The requirements for this appliance are stated on the label.
- CAUTION: This appliance is designed only for cooking food and is intended for indoor
domestic household use only and should not be used for any other purpose or in any other
application, such as for non-domestic use or in a commercial environment or room heating.
- Do not try to lift or move the appliance by pulling the door handle.
- All possible security measures have been taken to ensure your safety. Since the glass
may break, you should be careful while cleaning to avoid scratching. Avoid hitting or
knocking on the glass with accessories.
- Ensure that the supply cord is not wedged during the installation. If the supply cord is
damaged, it must be replaced by the manufacturer, its service agent or similarly qualified
persons in order to prevent a hazard.
- While the oven door is open, do not let children climb on the door or sit on it.
Installation Warnings
- Do not operate the appliance before it is fully installed.
- The appliance must be installed by an authorized technician and put into use. The
producer is not responsible for any damage that might be caused by defective placement
and installation by unauthorized people.
- When you unpack the appliance, make sure that it is not damaged during transportation.
In case of any defect; do not use the appliance and contact a qualified service agent
immediately. As the materials used for packaging (nylon, staplers, styrofoam...etc) may
cause harmful effects to children, they should be collected and removed immediately.
- Protect your appliance against atmospheric effects. Do not expose it to effects such as
sun, rain, snow etc.
- The surrounding materials of the appliance (cabinet) must be able to withstand a
temperature of min 100°C.

During usage
- When you first run your oven a certain smell will emanate from the insulation materials and
the heater elements. For this reason, before using your oven, run it empty at maximum
temperature for 45 minutes. At the same time you need to properly ventilate the environment
in which the product is installed.
- During usage, the outer and inner surfaces of the oven get hot. While opening the oven
door, step back to avoid the hot steam coming out of the oven. There may be a risk of burns.
- Do not put flammable or combustible materials, in or near the appliance when it is
operating.
- Always use oven gloves to remove and replace food in the oven.
- Do not leave the cooker while cooking with solid or liquid oils. They may catch fire on
condition of extreme heating. Never pour water on to flames that are caused by oil. Cover
the saucepan or frypan with its cover in order to choke the flame that has occured in this
case and turn the cooker off.
- If you will not use the appliance for a long time, plug it off. Keep the main control switch off.
Also when you do not use the appliance, keep the gas valve off.
- Make sure the appliance control knobs are always in the "0" (stop) position when it is not
used.
- The trays incline when pulled out. Be careful not to let hot liquid spill over.
- When the door or drawer of the oven is open, do not leave anything on it. You may
unbalance your appliance or break the cover.
- Do not put heavy things or flammable or ignitable goods (nylon, plastic bag, paper,
cloth...etc) into the drawer. This includes cookware with plastic accessories (e.g. handles).
- Do not hang towels, dishcloths or clothes from the appliance or its handles.
During cleaning and maintenance
- Always turn the appliance off before operations such as cleaning or maintenance. You can
do it after plugging the appliance off or turning the main switches off.
- Do not remove the control knobs to clean the control panel.
TO MAINTAIN THE EFFICIENCY AND SAFETY OF YOUR APPLIANCE, WE
RECOMMEND YOU ALWAYS USE ORIGINAL SPARE PARTS AND TO CALL ONLY OUR
AUTHORIZED SERVICE AGENTS IN CASE OF NEED.

PART 3: PREPARATION FOR INSTALLATION AND USE
When choosing a place for the oven, attention should be paid that there are no flammable
or combustible materials in the close vicinity, such as curtains, oil, cloth etc. which quickly
catch fire.
Furnitures surrounding the oven must be made of materials resistant to temperatures
above 90 C°.
Manufactured with best quality parts and materials, this modern, functional and practical
oven will meet your needs in all respects. Make sure to read the manual to obtain successful
results and not to experience any problems in the future. The information given below contain
rules that are necessary for correct positioning and service operations. They should be read
without fail especially by the technician who will position the appliance.
CONTACT THE AUTHORIZED SERVICE FOR INSTALLATION OF YOUR OVEN!
3.1. CHOOSING A PLACE FOR THE OVEN
There are several points to pay attention to when choosing a place for your oven.
Make sure to take into account our recommendations below in order to prevent any
problems and dangerous situations, which might occur later!
The dimensions and material of the cabinet in which the oven will be installed must be
correct and resistant to increases in temperature. Installing the appliance in the close vicinity
of a refrigerator or a deep-freezer is not recommended. Otherwise, the performance of the
above-mentioned appliances will be negatively affected due to emanating heat. After
removing your oven from its packaging, be sure that the oven is not harmed. In case, you
suspect of any damage to the appliance, do not use it; immeditely contact Authorized
Service.
3.3. WIRING AND SAFETY OF BUILT_IN OVEN
The instructions given below must be followed without fail during wiring :
The earthing cable must be connected via the screw with the earthing mark. Supply cable
connection must be as shown in Figure 3. If there is no earthed outlet conforming to
regulations in the installation environment, call the Authorized Service immediately.There
is to install an all pole disconnector inside they supply circuit with a contact openning of at
least 3mm ( rated 16A).
The earthed outlet must be in close vicinity of the appliance. Never use an extension cord.
The supply cable should not contact the product’s hot surface.
In case of any damage to the supply cable, make sure to call the Authorized Service. The
cable must be replaced by the Authorized Service.
Wiring of the appliance must be performed by the Authorized Service. H05VV-F type
supply cable must be used.
Faulty wiring may damage the appliance. Such a damage will not be covered under the
warranty.
The appliance is designed to connect to 220-240V~ electricty is different than the value
given above, call the Authorized Service immediately.
Figure 3
BROWN
YELLOW+GREEN
L
N
BLUE

3.4. GENERAL WARNING AND PRECAUTIONS
Your appliance is produced in conformity with the relevant safety instructions relating to
electrical appliances. Maintanance and repair works must be performed only by
Authorized Service technicians. Installation and repair works, performed without
observing the rules may be dangerous.
The outer surfaces is heated while your appliance is operating. The elements heating the
inner surface of the oven and the steam out are extremely hot. These sections will continue
to preserve their heat for certain while even if the appliance is switched off. Never touch the
hot surfaces. Keep children away.
In order to cook in your oven, the oven function and temperature setting butttons need to be
adjusted and the oven timer, needs to be programmed. Otherwise, the oven will not
operate.
While the oven door or drawer is open, do not place anything on it. You may disturb the
balance of the appliance or break the door.
Unplug your appliance when it is not in use.
Protect your appliance from atmospheric effects. Do not leave it under the effects of the
sun,rain, snow, dust etc.
PART 4: USING THE OVEN
4.1 CONTROL PANELS
Oven Function
Control Button
Digital Timer
Door Lock Light
Oven Thermostat Button
Oven Thermostat Light
Built_in Oven
Figure 4
Figure 5
4.2. USING THE OVEN PART OF THE APPLIANCE
Oven Function Control Knob:
For you to select the oven functions (Figure 4).
Explained in the next part and in Table 1. You need
to adjust the function selection button and the oven
thermostat knob together to a temperature value
you wish to select. Otherwise, the function stage you
selected will not operate.
Oven Thermostat Knob:
For you to select the oven function control knob.
Adjusted temprature is shown on the display.
When the temperature inside your oven reaches
the value you set, the thermostat will cut the circuit
and the thermostat light will go off. When the
temperature falls below the set value, the thermostat
will again be turned on and the thermostat light
will be on.
Availability of the functions explained below vary depending on the product model.
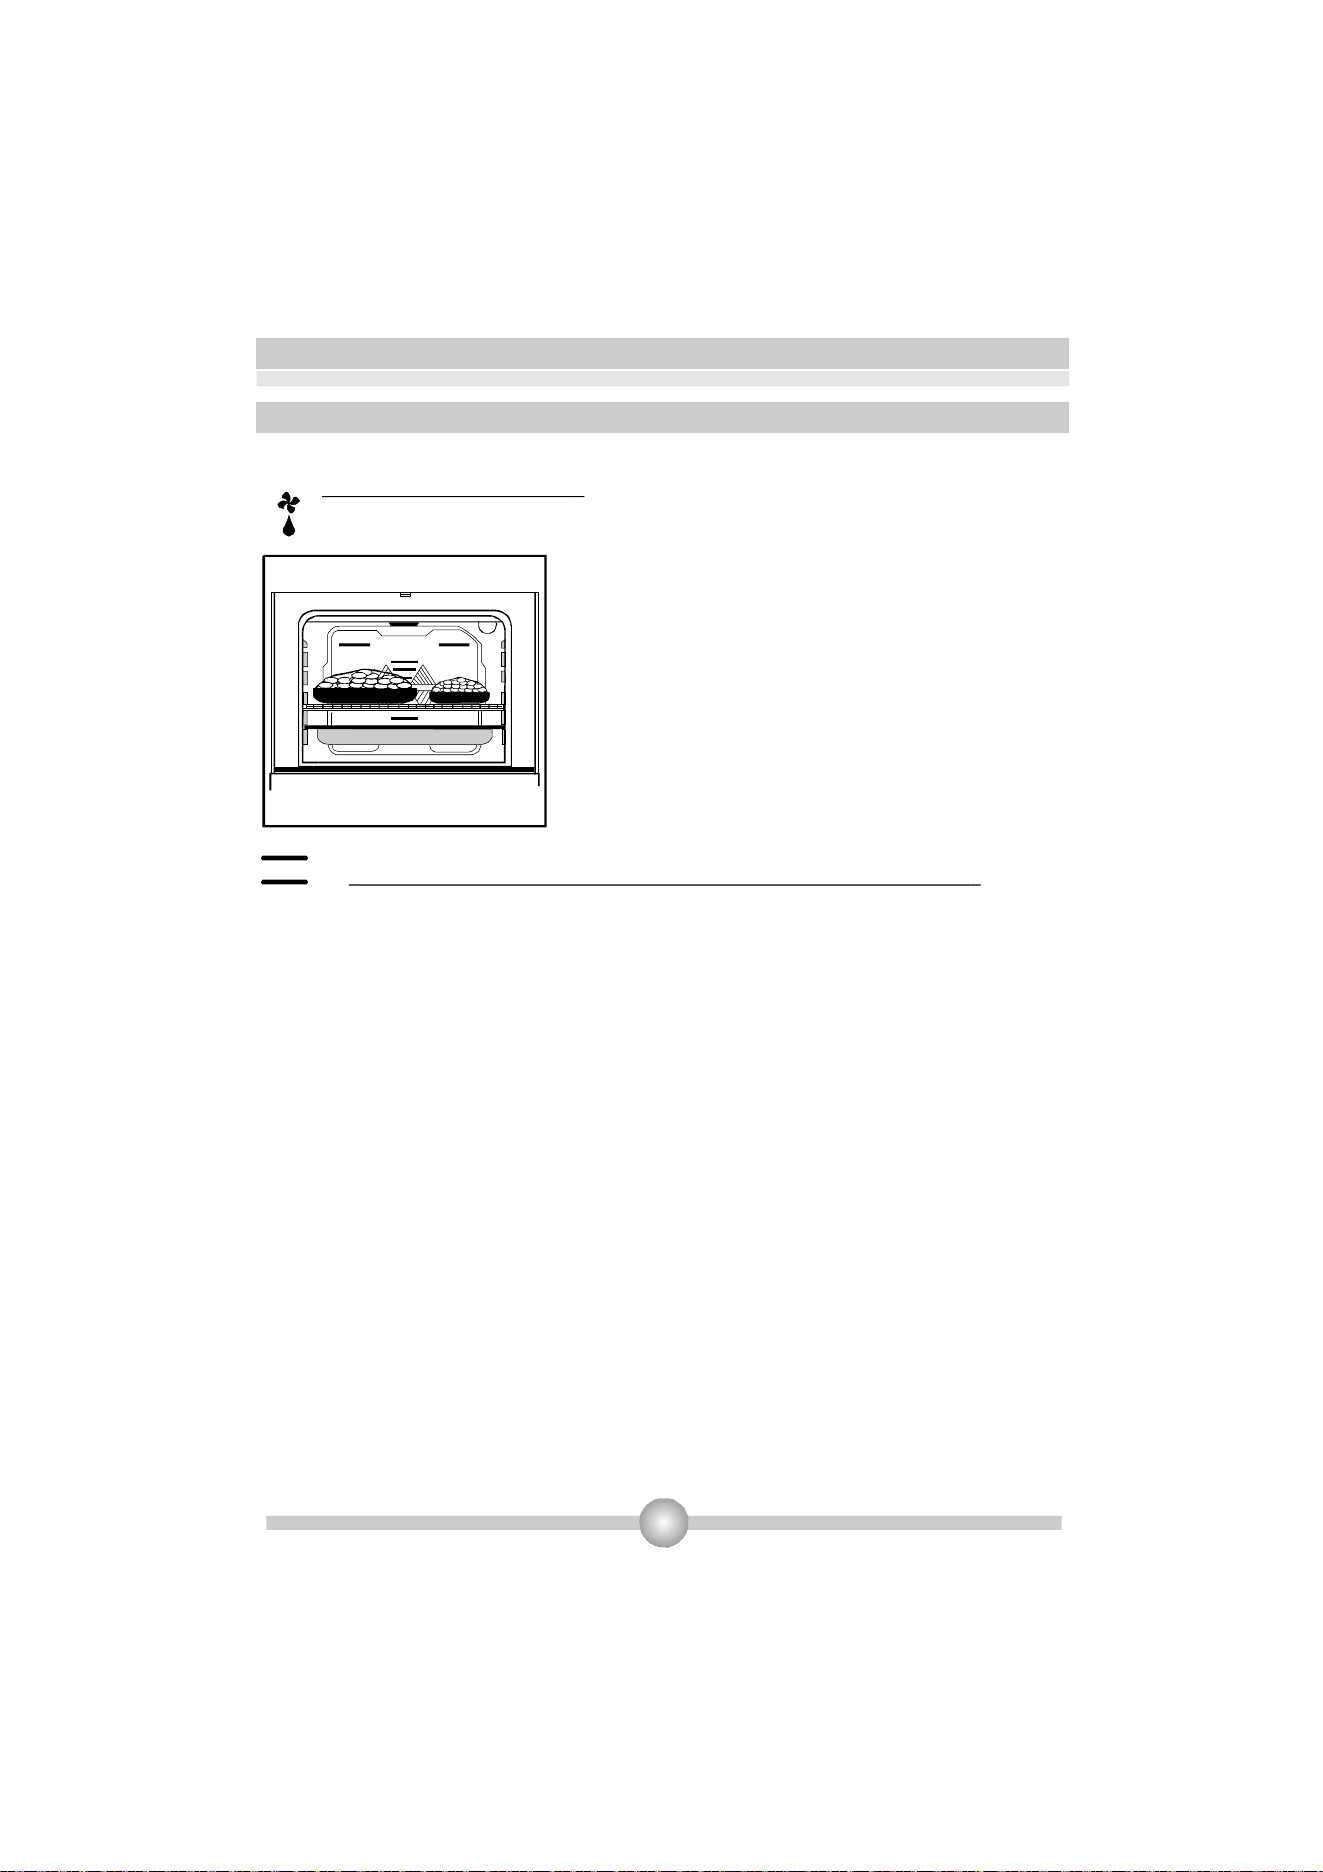
Defrost Function :
Figure 6
You can start the defrost operation by putting the frozen
food into oven and bringing the button to the indicated
mark. This function does not cook/bake the food; it only
helps defrost it within a short time. Put the food to be
defrosted on the wire rack that you will place on the third
rack support from the bottom (Figure 6). To collect the
water to accumulate due to the melting ice, insert an oven
tray into the lower rack.
4.3. USING THE OVEN FUNCTION CONTROL BUTTON
Lower-Upper Heating Element Function (Static Coking) :
In this type of cooking which is described as the traditional method, the heat emanating evenly
from the lower and upper resistors into the oven ensures even cooking of the lower and upper
side of the food that you are cooking. Adjust the thermostat botton of your oven to a
temperature recommended on the cooking table for the cooking operation you will perform. A
preheating of the oven for about 10 minutes is recommended. Leave a food to cook, which is
placed in a suitable container, for the recommended duration. This position is a preferred
function in making cakes, sponge cakes, pastry, baked pasta, lasagne, pizza.
After a cooking/baking, turn off the oven function control button and the thermostat button and
cancel the timer program if available. Take the cooked/bake food out of the oven, place it on a
safe place and ensure that the oven copmletely cools off by keepig the oven door open. As the
oven will be hot, stay away from the oven and keep your children away as well.

Fan and the Lower - Upper Heating Element Function:
This is the position where the air is coming from the lower and upper heating elements is
circulated into the oven by the fan motor and blade.
Adjust the thermostat button of your oven to temperature recommended on the cooking
table for the cooking operation yo will perform. Turn the oven button so it will point to the
symbol of this funtion, adjust the oven timer to the recommended time for cooking and
preheat the oven for about 10 minutes. The food placed in a suitable container is put into
the oven and the operation is started. This position is position where usually very good
results are obtained in baking pastry. All parts of the foods will be cooked evenly in this
position . Suitable for cooking with one tray.
After the cooking/baking, turn off the oven function control button and the temperature
setting button and cancel the timer program if available. Take the cooked/baked food
out of the oven, place it on a safe place and ensure that the oven completely cools off
by keeping the oven door open. As the oven will be hot, stay away from the oven and
keep your children away as well.
The oven's thermostat and warning lights will be turned on, the grill heating element will
start operating.
The function is used for grilling and toasting foods, use the upper shelves of oven. Lightly
brush the wire grid with oil to stop foods sticking and place foods in the center of the grid.
Always place a tray beneath to catch any drips of oil or fat. It is recommended to pre-heat
the oven about 10 minutes.
Warning: When grilling, the oven door must be closed and the oven temperature should be
adjusted to 190° C.
Grill Fan Function :
Faster Grilling Function
The oven's thermostat and warning lights will be turned on, the grill and upper heating
elements will start operating.
The function is used for faster grilling and for covering a larger surface area, such as
grilling meats, use the upper shelves of oven. Lightly brush the wire grid with oil to stop
foods sticking and place foods in the center of the grid. Always place a tray beneath to
catch any drips of oil or fat. It is recommended to pre-heat the oven about 10 minutes.
Warning: When grilling, the oven door must be closed and the oven temperature should
be adjusted to 190° C.
Before activating pyrolytic cleaning function,remove any excessive spillage and
make
sure that the oven is empty. Do not leave any thing inside the oven cavitiy (e.g.
pans,grids,baking tray,dripping pan, etc.. ) As this could heavily damage them.
Before activating the pyrolytic function, remove the oven shelves, shelf supports and
wire shelves.
Ensure that the oven door closed before activating the pyrolytic cleaning function.
When the pyrolytic cleaning function is on, it is advisable not to use a hob if it is fitted
above the oven.This could cause overheating and damage to both appliances.
During the pyrolytic cleaning cycle the oven door becomes hot.Children should be kept
away until it has cooled.
At the end of pyrolytic cleaning process,the display shows the time of day. The oven door will
be
locked when the pyrolytic function started.
Pyrolytic cleaning function
Pyrolytic Cleaning
The oven cavity is coated with a special emanel resistant to high temperatures.
During the pyrolytic cleaning operation, the temperature inside the oven can reach about
0
475 C does burning food residuals.
For your security,during the pyrolytic cleaning operation,the oven door automaticly locks.
Upon completion of the cleaning operation the oven door will be locked until the oven
cavity has cooled down.
The cooling fan operates during cooking until the oven has cooled down.After cooking, it is
advisable to remove all the food residues with a wet sponge.
It is advisable to wipe the oven over with a sponge soaked in warm water after each pyrolytic
cleaning cycle is carried out.
During the Pyrolytic operation, some smell will be emanated due to destruction of the food
residual, it is normal.
During the Pyrolytic operation, the room where the oven installed must be ventilated
sufficiently.
‘’Auto’’ function
symbol
‘’Minute Minder’’
symbol
‘’Manual operation’’
symbol
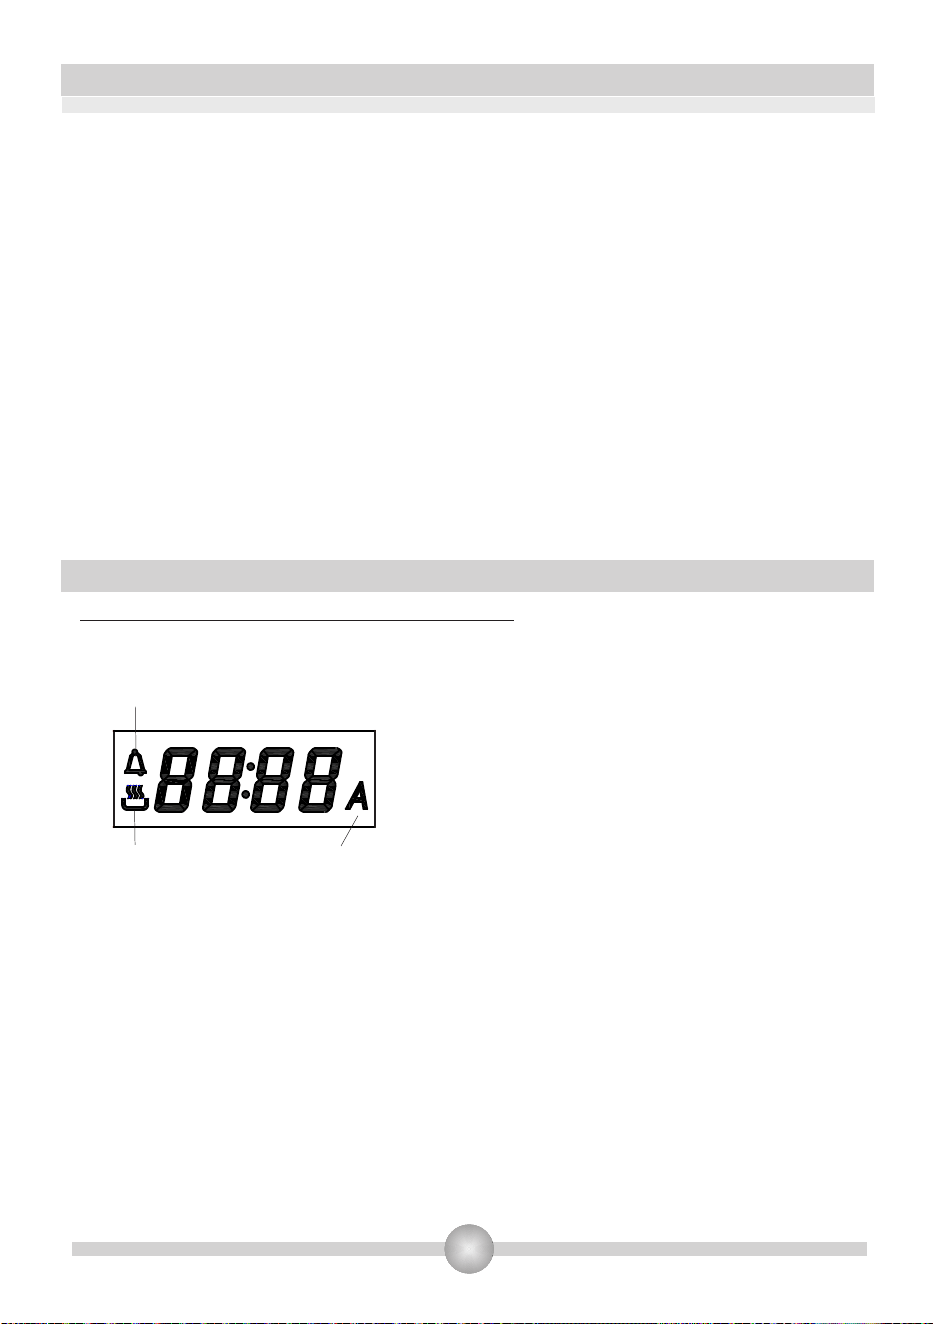
Setting and using the oven programmer/timer
Selecting manual operation mode
After your appliance is connected to your mains
supply for the first time, the numbers on the timer
display will flash. Before you can select a cooking
function or set a temperature, you must set the
appliance into "manual operation" mode. To select
manual operation mode, press the "minus" or
"plus" button on the control panel while oven
function switch is at "0" position.
Setting the time of day
After setting your oven for manual operation, you should also set the time of day. Use the
"minus" button and "plus" button to adjust the time that appears in the display.
After getting display to the correct time, release the "minus" and "plus" buttons. After 5
seconds the time will fix in the display you will be able to use your oven.
Setting the minute minder function
You are able to set minute minder at any time, regardless of whether an oven function has
been selected. You can set a period of time using the minute minder function and an alarm
will sound when this period of time has elapsed.
Press the "mode" button once, the display will show a value of 00:00 and "minute minder
symbol". Set the period of time that you wish the minute minder to countdown for, by using
the "minus" and "plus" buttons.
Once the display has got to your desired countdown time, let go of the "minus" and "plus"
buttons.
4.4 USE OF OVEN PART

The minute minder symbol will appear on the time display. Once a countdown time has been
set, it is possible to shorten or lengthen the time by using the "minus" or "plus" buttons after
pressing "mode" button once.
An alarm will sound when the countdown time has elapsed. The alarm can be silenced by
pressing the "mode" or "plus" or "minus" buttons.
Setting the duration function
This function will allow you to set a countdown time similar to the minute minder function.
However the oven will no longer continue to heat, once the countdown period has elapsed.
Use the thermostat control knob to set the temperature and oven function selector knob to
select mode of cooking that you require. The manual operation symbol will appear on the
display. It is then possible to set the duration of the cooking time that you require. Press the
"mode" button twice (until you see "dur" on display) and the display will show a value of 00:00.
Set the period of time that you wish the duration function to countdown for, by using the
"minus" and "plus" buttons. Once the display has got to your desired countdown time, let go of
the "minus" and "plus" buttons. The countdown will start immediately and the word A will
appear on the time display. Once a countdown time has been set, it is possible to shorten or
lengthen the time by using the "minus" or "plus" buttons after pressing "mode" button twice.
An alarm will sound when the countdown time has elapsed and the oven will switch off.The
word A will flash and the heating symbol will disappear. To silence the audible signal and return
the oven to manual operation mode, once the duration has been used. You should press the
"mode" or"plus" or "minus" button, the word A will disappear from the display and the manual
operation symbol will appear instead.
Important: If you do not turn the thermostat control knob and oven function selector knob 0, the
appliance will continue to operate as soon as you press the "mode" or "plus" or "minus" button.
Setting the end cook function
This function is similar to the duration function, however instead of selecting a period of time
that you wish the oven to switch off after, also you select the time of day that you wish the oven
switch off at.
Use the thermostat control knob to set the temperature and oven function selector knob to
select mode of cooking that you require. The manual operation symbol will appear on the
display. Press the "mode" button for three times (until "end" is seen on the display) and the
display will show a value of 00:00. Set time of day that you wish the oven to stop cooking at by
using the "minus" and "plus" buttons. The timer will calculate how long the cooking time will be,
based on the time of day that you have selected and show it on the display. Once the display
has got to time of day that you want the oven to stop cooking at, let go of the "minus" and "plus"
buttons. Once a countdown time has been set, it is possible to shorten or lengthen the time by
using the "minus" or "plus" buttons after pressing "mode" button for three times.
When the time of day reaches the end of cooking time that you set, the oven will switch off and
an alarm will sound. The word A will flash and the heating symbol will disappear. To silence the
audible signal and return the oven to manual operation mode, once the end cook function has
been used. To do this you should press the "mode" or "plus" or "minus" button, the word A will
disappear from the display and the manual operation symbol will appear instead.
Important: If you do not turn the thermostat control knob and oven function selector knob 0, the
appliance will continue to operate as soon as you press the "mode" or "plus" or "minus" button.

Setting the start and end time function
This function will allow you to set a time in the future that the oven switches on at and a time
that the oven will switch off at.
Use the thermostat control knob to set the temperature and oven function selector knob to
select mode of cooking that you require. Press the "mode" button twice (until "dur" is seen on
display) and the display will show a value of 00:00. Set the period of time that you wish to cook
for, by using the "minus" and "plus" buttons. The word A will appear on the timer display.
Immediately press the "mode" button ("End" will be seen on display) and the timer display will
show the value 00:00. Set the time of day that you want the oven switch off at, using the
"minus" and "plus" buttons.
The oven will calculate what time it needs to switch on at, so that your food will cook for the
length of time that you selected. It will automatically switch itself on, once it reaches the time of
day that it has calculated. When the time of day reaches the end cooking time that you set, the
oven will switch off and an alarm will sound. The word A will flash and the heating symbol will
disappear. To silence the audible signal and return the oven to manual operation mode, press
"mode" or "plus" or "minus" button, the word A will disappear from the display and the manual
operation symbol will appear instead.
Important: If you do not turn the thermostat control knob and oven function selector knob 0, the
appliance will continue to operate as soon as you press the "mode" or "plus" or "minus" button.
Adjusting the audible signal
To adjust the level of audible signal when it is sounding, if "mode" button is pressed for three
times while oven function selector knob is at "0" position, L3 will be seen on display. By
pressing "minus" or "plus" button desired sound level can be adjusted. Release the minus
button and the sound level of the audible signal will be set.
min
min
min
min
4
3-4
4
1-2
1-2
1-2-3
1-2-3
1-2-3
2
1-4
1-4
1-2
1-2
2
1-2
1-2-3
1-2-3
2
1-2
4.5. ACCESSORIES USED IN THE OVEN
It is recommended that you use the containers indicated on the table depending on the food
you will cook in your oven, you can also use glass containers, cake cutters, special oven
trays suiatble for use in your oven, available in the market. Pay attention to the information
given by the mufacturer firm concerning this issue. If small sized containers are used, place
this container on the inner grill wire so it will be precisely on the middle of the wire. The
information given below should be implemented for enamelled containers.
If the food to be cooked does not completely cover the oven tray, if the food is taken out of the
deep-freezer or if the tray is used to collect the dripping juices of the foods during the grill
operation; deformation might be observed on the tray due to high temperatures forming
during the cooking/frying operation. This is normal, physical state thay results during the
heat transfer. Do not leave a glass tray or container in a cold environment immediately after
cooking in them. Do not place them on cold and wet surfaces. Ensure that they slowly cool off
placing them on a dry piece of cloth. Otherwise, the glass tray or container might break. If you
are going to perform a grill operation in your oven, we recommend that use use the grill on
tray, supplied together with your product (if your product includes this equipment). This way,
splattering and dripping oils will not make the oven interior dirty. If you are going to use the
large wire grill, insert a tray into one of the lower racks to avoid accumulation of the oils. To
make cleaning easier, add some water into it as well. In a grilling operation, use the 3. Or the
4.rack and ail the grill to prevent the food to be grilled from sticking to the grill.
5. rack
4. rack
3. rack
2. rack
1. rack
Wire grid: Used for grills or placing
different containers other than the cooking
tray on it.
Shallow tray: Used for baking pastry such
as flans etc.
Deep tray: Used for baking stews.
Figure 3
WARNING- Fit the grid correctly into
any correspondent rack in the oven
cavity and push it to the end.
Figure 4
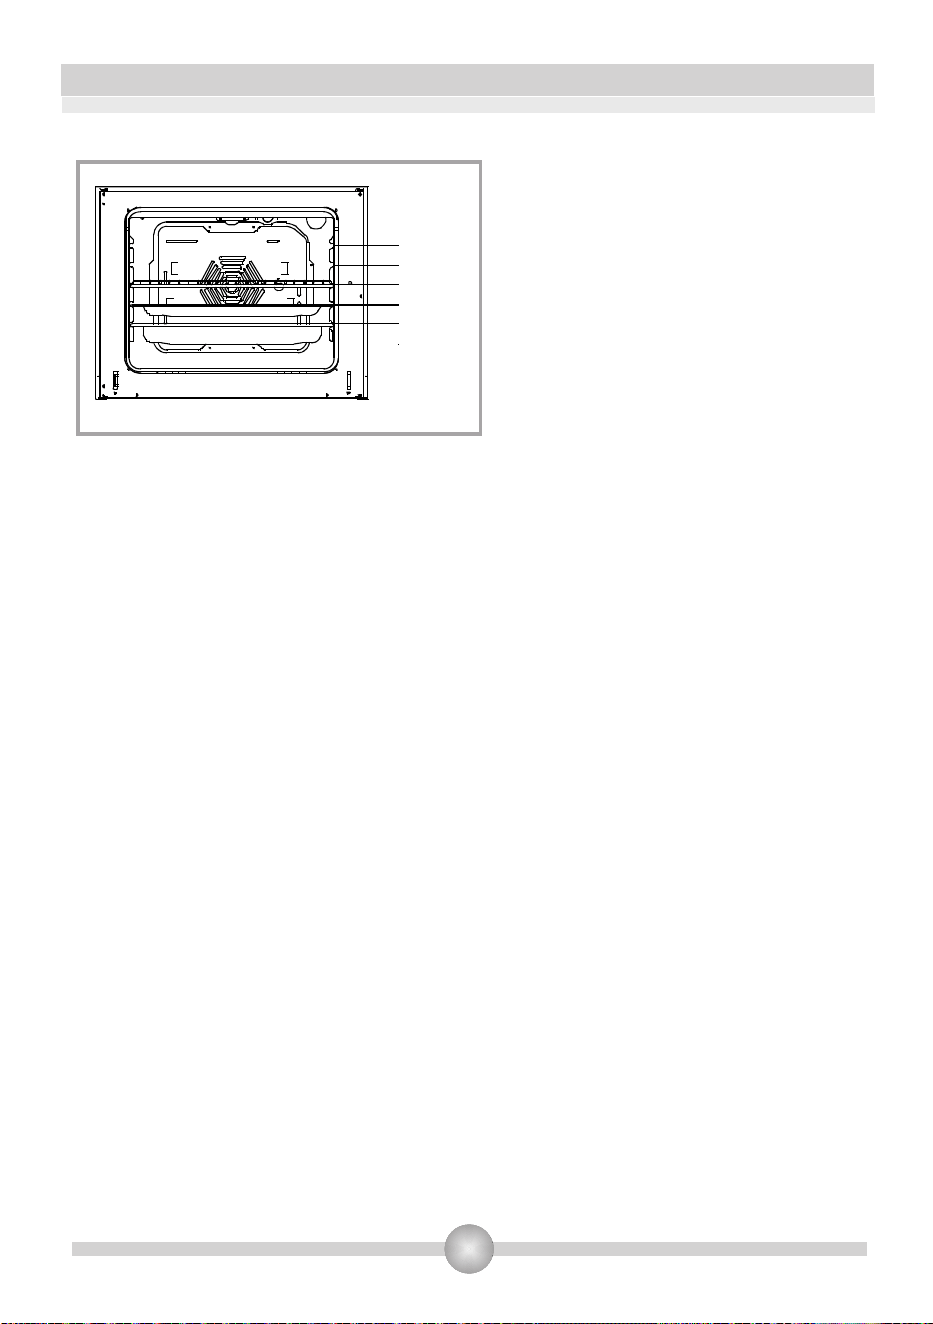
Installation of the Shelves
5.
Rack
4.
Rack
3.
Rack
2.
Rack
1.
Rack

PART 5: CLEANING AND MAINTENANCE OF YOUR OVEN
5.1. CLEANING
Before starting to clean your oven, be sure that all control buttons are off and your appliance
is cooled off. Unplug the appliance.
Do not use cleaning materials containing particles that might scratch the enamelled and
painted parts of your oven. Use cream cleaners or liquid cleaners, which do not contain
particles. As they might ahrm the surfaces, do not use caustic creams, abrasive cleaning
powders, rough wire wool or hard tools. In the event the excess liquids spilling over your
oven should burn, it may cause a damage to the enamel. Immediately clean up the split
liquids. Do not use steam cleaners for cleaning the oven.
Cleaning the interior of the oven
Make sure to unplug the oven before starting to clean it. You will obtain best results if you
clean the oven interior while the oven is slightly warm. Wipe your oven with a soft piece of
cloth dampened with soap water after each use. Then wipe it again, this time with a wetted
cloth, and wipe it dry. A complete cleaning using dry and powder type cleaners. For product
with catalytic enamel frames, the rear and side walls of the inner frame do not require
cleaning. However; depending on usage, it is recommended that you replace them after a
certain period of time.
* The door seal may be cleaned using a sponge that has been soaked in lukewarm water.
Do not use abrasive cleaners and do not crumble the seal.
* Check the door seals around the oven periodically. If the seals are damaged, please
contact your nearest Technical Service Center and make change it with new one.
5.2. MAINTENANCE
Replacing the Oven Light
It is recommended that you leave this operation to the Authorized Service. Unplug the oven
first and make sure that is cold. After removing the lid in front of the light, take also the bulb of
its place. Insert the new bulb resistant to 300ºC, which you will find at Authorized Services,
into the place of the bulb you have removed. Then fit the light protecting glass back into its
place. After that, your oven will be ready for use.

PART 6: SERVICE AND TRANSPORT
6.1. REQUIREMENTS BEFORE CONTAINING TO SERVICE
If the oven does not operate :
The oven may be plugged off, there has been a black out. On models fitted with a timer, time
may not be regulated.
If the oven does not heat :
The heat may be not adjusted with oven’s heater control switch.
If the interior lighting lamp does not light :
The electricitiy must be controlled. It must be controlled whether the lamps are defective. If
they are defective, you can change them as following the guide.
Cooking (if lower-upper part does not cook equally) :
Control the shelf locations, cooking period and heat values according to the manual.
Except these, if you still have any problem with your product, please call to the
“Authorized Service”.
6.2. INFORMATION RELATED TO TRANSPORT
If you need any transport :
Keep the original case of product and carry it with its original case when need to be carried.
Follow the transport signs on case. Tape the cooker on upper parts, hats and heads and
saucepan carriers to the cooking panels.
Place a paper between the upper cover and cooking panel, cover the upper cover, than tape
to the side surfaces of oven.
Tape carboard or paper onto the front cover on interior glass of oven as it will be suitable to
the trays, for the wire grill and trays in your oven not damage to the oven’s cover during
transport. Also tape the oven’s covers to the side walls.
If does not have the original case :
Take measure for external surfaces (glass and paintes surfaces) of oven against possible
blows.

CERTIFICADO DE GARANTÍA
Imprescindible la presentación de la factura de compra acompañada del presente certicado de garantía.
Riesgos cubiertos.
Este aparato está garantizado contra cualquier defecto de funcionamiento, siempre que se destine a uso doméstico,
procediéndose a su reparación dentro del plazo de garantía y sólo por la red de SAT autorizados.
Nuestros electrodomésticos Corberó cuentan con la garantía legal del fabricante que cubre cualquier avería o defecto durante36
meses, desde su fecha factura de 1 de enero del 2022. En caso de que fuera necesario, nosotros nos ocupamos de cualquier posible
incidencia siempre que se deba a un componente defectuoso o fallo de fabricación.
Excepciones de garantía.
• Que la fecha del certicado no coincida con la fecha de venta de la factura original.
• Averías producidas por golpe, por caída o cualquier otra causa de fuerza mayor.
• Si el apa
rato ha sido manipulado por personal no autorizado.
• Las averías producidas o derivadas como consecuencia de un uso inadecuado, por defectos de instalación,
por introducir modicaciones en el aparato que alteren su funcionamiento.
• Puestas en marcha, mantenimiento, limpiezas, componentes sujetos a desgaste, lámparas, piezas estéticas,
oxidaciones, plásticos, gomas, carcasas y cristales.
“ESTAS EXCEPCIONES ANULAN LA GARANTÍA, SIENDO LA REPARACIÓN CON CARGO AL CLIENTE”
Periodo amparado en aparatos según ley de garantias en la venta de bienes de consumo Ley vigente es “RD 7/2021”
Horario de atención Lunes a Viernes de 9h00 a 19h00. Teléfono de contacto_ 911 08 08 08 Mail de contacto_ [email protected] web_ www.corbero.es
Dirección de Servicio técnico oficial_Vidal i Ribes 8-10 08950 Esplugues de Llobregat Barcelona
Sevicio Técnico Ocial: 911 08 08 08
Los hornos microondas (a excepción de los integrables) y los hornos sobremesa en el caso de cualquier incidencia de
funcionamiento, deben de llevarse al servicio técnico más próximo por parte del cliente. No se recojen ni reparan en el
domicilio.
•
Garantía termos eléctricos. Garantía de 3 años incluyendo los costes de desplazamiento y mano de obra que
correspondan de la reparación del producto, teniendo que tener un mantenimiento una vez cada 12 meses.
Especialmente si Ud. ha instalado un aparato a gas, tenga presente como titular de la instalación, la obligatoriedad de
realizar una revisión completa de los equipos, (según Real Decreto 238 / 2013, del 5 Abril. RITE. IT3, M. Lo termos
eléctricos y calderas que incluyen depósitos acumuladores de agua caliente, para que se aplique la prestación de la
Garantía, es obligatorio que el ánodo de magnesio esté operativo y que realice la función de protección
adecuadamente. Para ello es recomendable que el ánodo se revise bianualmente por el Servicio Oficial y sea renovado
cuando fuera necesario. Periodicidad que deberá ser anual en aquellas zonas con aguas críticas (contenido de CaCO3
superiores a 200mg/L, es decir a partir de 20ºfH de dureza). Depósitos sin el correcto estado del ánodo de protección, no
tienen la cobertura de la garantía. Independientemente del tipo de depósito o producto, todas las válvulas de
sobrepresión de calefacción o a.c.s., deberán ser canalizadas para evitar daños en Ia vivienda por descargas de agua. La
garantía del producto no asume los daños causados por Ia no canalización del agua derramada por esta válvula.
•
CERTIFICATE OF GUARANTEE
The presentation of the purchase invoice accompanied by this guarantee certificate is essential.
Covered Risks.
This appliance is guaranteed against any malfunction, provided that it is intended for domestic use, proceeding to its repair within
the warranty period and only by the authorized SAT network.
Our Corberó appliances have the manufacturer's legal warranty that covers any breakdown or defect for 36 months, from the
invoice date of January 1, 2022. If necessary, we take care of any possible incident whenever it is due to a defective component or
manufacturing fault. Warranty Exceptions
Warranty Exceptions
•
That the date of the certificate does not coincide with the date of sale of the original invoice.
•
Faults produced by blow, by fall or any other cause of force majeure.
•
If the device has been manipulated by unauthorized personnel.
•
Faults produced or derived as a consequence of improper use, installation defects, or modifications to the device that
alter its operation.
•
Start-up, maintenance, cleaning, components subject to wear, lamps, aesthetic parts,
oxidation, plastics, rubbers, housings and crystals.
“THESE EXCEPTIONS VOID THE WARRANTY, THE REPAIR BEING CHARGED TO THE CUSTOMER”
Period covered in devices according to the law of guarantees in the sale of consumer goods Current law is “RD 7/2021”
Hours of operation Monday to Friday from9h00 a 19h00. Telephone contact_ 911 08 08 08 Contact email_ [email protected] web_ www.corbero.es
Official Technical Service Address_Vidal i Ribes 8-10 08950 Esplugues de Llobregat Barcelona
Official Technical Service: 911 08 08 08
Microwave ovens (with the exception of built-in ones) and tabletop ovens in the event of any incident of
operation, they must be taken to the nearest technical service by the customer. They are not collected or repaired at
home.
•
Electric thermos guarantee. 3-year warranty including travel and labor costs that correspond to the repair of the
product, having to have maintenance once every 12 months. Especially if you have installed a gas appliance, keep in
mind as the owner of the installation, the obligation to carry out a complete review of the equipment, (according to
Royal Decree 238 / 2013, of April 5. RITE. IT3, M. Lo thermos electrical and boilers that include hot water storage tanks,
for the benefit of the Guarantee to apply, it is mandatory that the magnesium anode is operational and that it performs
the protection function adequately.For this, it is recommended that the anode be checked biannually by the Official
Service and is renewed when necessary Periodicity that must be annual in those areas with critical waters (CaCO3
content greater than 200mg/L, that is, from 20ºfH of hardness) Deposits without the correct state of the protection
anode are not covered by the warranty Regardless of the type of tank or product, all heating or DHW overpressure
valves must be channeled to avoid damage and n the house due to water discharges. The product warranty does not
cover damages caused by not channeling the water spilled by this valve.
•