service E-mail: service@lifepluspro.com
Choose LifePlus, Choose A Plus Life.
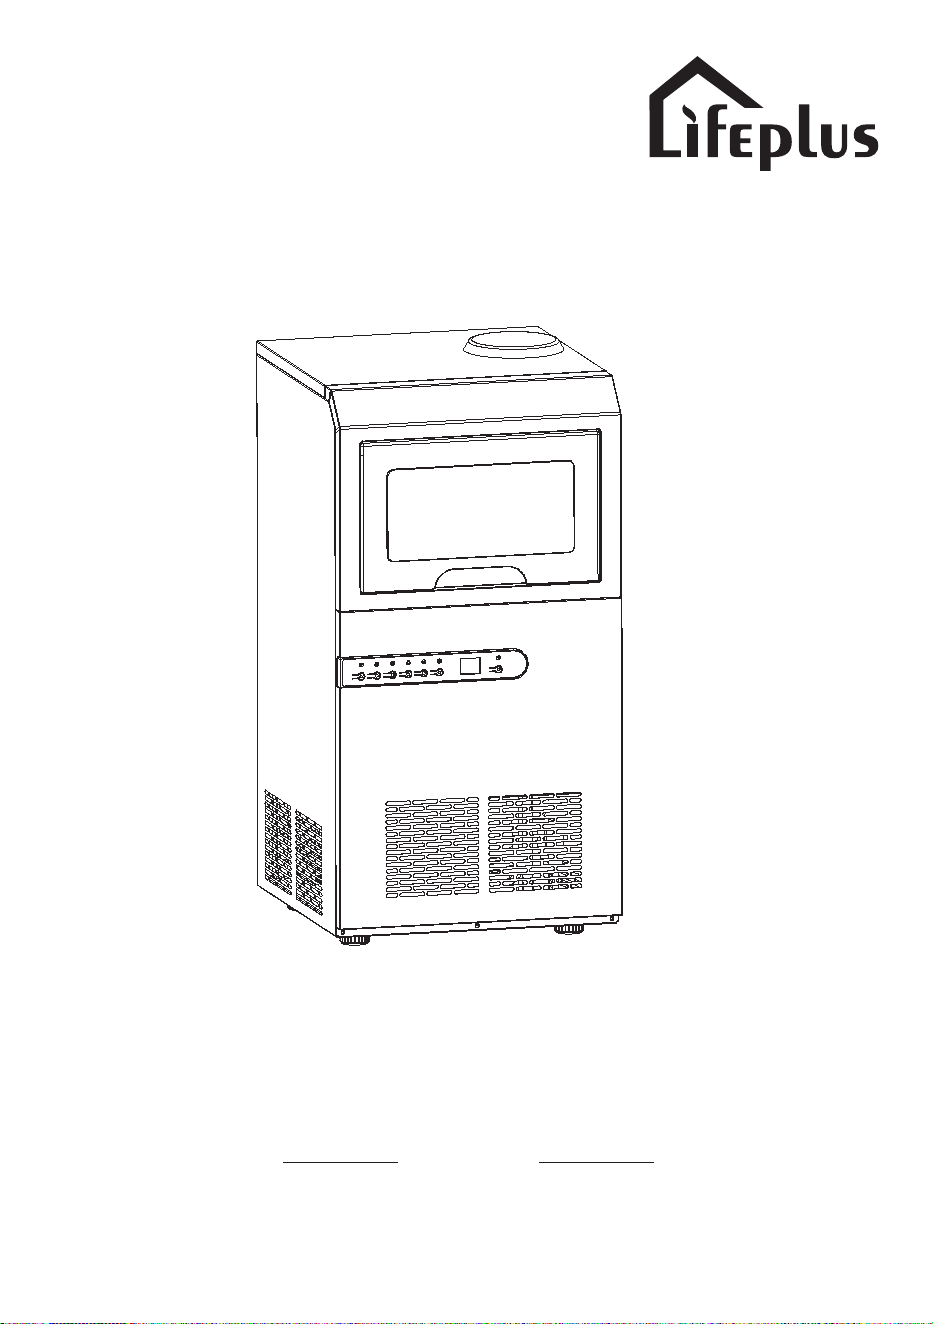
DBJ-45
Commercial Ice Maker
Product Use Guide

Please read this instruction
carefully before use.
Damage caused by
improper operation is not
covered by the warranty.
Please Note
After opening the box, please do not use it
immediately. Let the ice machine stand upright
for 24 hours first.
This is because the ice machine has experienced a long time of shipping. This
will cause uneven distribution of refrigerant in the compressor. If you use it
immediately after receiving it, it may cause damage to the compressor, and
we will not bear this compensation.
Please pay special attention to the red text

Please take a few minutes to read
this manual carefully.
GENERAL INFORMATIONINSPECTION AFTER DELIVERY PAGES4-5
Proper maintenance and operation of this
machine can provide better service.
TABLE OF CONTENTS
SECTION 1
STRUCTURE INTRODUCTION PAGES6-9
SECTION 2
PRECAUTIONS FOR SAFE OPERATION PAGES10-11
SECTION 3
PRESET DATA & PRECAUTIONS PAGES17-18
SECTION 5
CONTROL PANEL & OPERATION METHOD PAGES15-16
SECTION 6
ERROE CODES & TROUBLESHOOTING PAGES25-26
FAULT SELF-DIAGNOSIS PAGES27-30
CLEANING & MAINTENANCE PAGE31
SECTION 4
SECTION 9
SECTION 10
SPECIFICATION PAGE12
SAFETY PRECAUTIONS & WARNING PAGE13
PARTS & ACCESSORIES PAGE14
DETAILED INSTALLATION STEPS PAGES19-20
SECTION 7
DISCHARGE SEWAGE & REMOVE WATER INLET HOSE PAGES21-22
SECTION 8
OPERATING INSTRUCTIONS PAGES23-24

GENERAL INFORMATION
1. The production of this ice maker uses advanced production technology and
skilled processes, as well as the strict quality inspection, guarantees the
excellent performance of the ice maker.
2. The compressor of the ice maker is very strong and efficient, it makes the ice
making speed of the ice machine faster.
3. The design of stainless steel makes it look more fashionable and beautiful.
4. The automatic microcomputer control system can make the ice making and
harvest process automatically. It also has fault detection function, make it easier
to troubleshoot. Common faults and solutions are on page 21 - 26. If you still
can't solve the faults, please contact us via [email protected]. We will
reply you within 24 hours. Please tell us your order ID in the email.
INSPECTION AFTER DELIVERY
Thank you for choosing our ice maker. In order to ensure a happy shopping
experience for you, please pay attention to the following matters after opening
the package:
1. Dents on the ice machine;
2. Missing parts, such as drain pipe...
If the above matters occur, please contact us via [email protected] for
solutions. Please tell us your order ID in the email.
WARNING DIAGRAMS AND OPERATING
SAFETY INSTRUCTIONS
- 4 - - 5 -

GENERAL INFORMATION
1. The production of this appliance uses advanced production technology and skilled
processes, as well as the strict quality inspection, guarantees the excellent performance
of the appliance.
2. The core component of the ice maker "compressor" we use well-known brand product,
coupled with a reasonable configured refrigeration system, it makes refrigerant cooling
more reliable and lower energy consumption.
3. The metal spray shell is beautiful, corrosion-resistant and easy to clean.
4. The automatic microcomputer control system can make the ice making and harvest
process automatically. It has fault detection function, which makes it more convenient to
use and maintain.
RECEIVING AND INSPECTION
Thank you for choosing our automatic ice maker, to protect your legitimate rights,
please note the following when sign for the receiving:
1. Whether the body of the appliance is in good condition;
2. Whether the accessories are complete.
During the transportation of the appliance, the refrigerant inside the compressor
is possible not injected into the refrigeration pipe due to the dumps and handling.
Once the power resource is connected, the compressor may be damaged in a
short time. Therefore, after its receiving, it is strongly suggested the customers
to allow the appliance correctly located and “stay for 24 hours”, to allow the
refrigerant return to the compressor, and then to install and use it.
WARNING DIAGRAMS AND OPERATING
SAFETY INSTRUCTIONS
- 4 - - 5 -

- 6 - - 5 -

- 4 - - 7 -

- 8 - - 5 -
- 9 -

PRECAUTIONS FOR SAFE OPERATION
!
- 10 - - 7
AFTER RECEIVING THE ICE MAKER, LET THE ICE MAKER STAND UPRIGHT FOR 24
HOURS FIRST. OTHERWISE THE COMPRESSOR MAY BE DAMAGED .
Please do not use it outdoors. If necessary, be sure to make the ice maker
waterproof. And avoid direct sunlight, high temperature may cause ice machine failure.
Do not disassemble, repair or modify the ice maker without permission. Fire hazard
or personal injury may be caused by work errors without professors or professional
guidance.
Do not directly spray water on the ice maker, it may cause electric shock or short
circuit.
Do not locate the ice maker in a humid place or a place prone to splashing water, to
avoid the damage to the insulating material, so to prevent leakage or electric shock.
Do not earth the ice maker through a gas pipe, a water main, a telephone line, or a
lightning rod.
Do not insert metallic materials such as wires into the air vents, passage or exhaust
vents of the ice maker, to avoid electric shock or personal injury due to accidental
movement of active parts.
Do not put volatile or flammable substances into the ice maker. Storage of such
substances may cause explosion or fire hazard.
The ice maker should be repaired by professional technicians or under their
guidance.
Please keep the ice maker on a flat ground to avoid equipment failure and danger
caused by inclination.
Please use a power supply that is specified on the ice maker's label.
Disconnect the main plug from the supply socket when the ice maker gets failures.
Continued abnormal operation may cause electric shock or fire hazard.
Please remove the dust from the supply socket before plugging the power plug into it,
to avoid fire hazard.
Keep the ice maker free of obstructions and keep the ventilation open.
Do not store combustion sprays, volatile or flammable substances in the ice maker.
Storage of such substances may cause an explosion or fire hazard.
Do not use the ice maker when handling toxic or hazardous materials or radioactive
materials, as it may harm health and damage the environment.
Disconnect from the main socket before cleaning, maintaining or servicing the
appliance. To prevent electric shock or personal injury.
Do not use other electrical appliances in the ice machine. This appliance contains
flammable materials, and must be handled and recycled by qualified personnel and
institutions when discarded.
Do not damage the refrigeration circuit.
Use a grounded outlet to prevent electric shock. If there is no, the grounded socket
device must be assembled by a professional technician. The unit must be positioned so
that the plug is accessible.
Some models use flammable refrigerants and flammable foaming
agents, so beware of fire (The product is marked "Warning fire"). When
the appliance is abnormal, it must be repaired by professional personnel
and institutions.

PRECAUTIONS FOR SAFE OPERATION
!
- 6 - - 11 -
-
AFTER RECEIVING THE PRODUCT, PLEASE BE SURE TO USE IT AFTER 24
HOURS, OTHERWISE IT WILL DAMAGE THE COMPRESSOR.
Do not use the ice maker outdoor. It may cause leakage or electric shock after the ice
maker is wet by rain.
Do not disassemble, repair or modify the ice maker without permission. Fire hazard
or personal injury may be caused by work errors without professors or professional
guidance.
Do not directly spray water on the ice maker, it may cause electric shock or short
circuit.
Do not locate the ice maker in a humid place or a place prone to splashing water, to
avoid the damage to the insulating material, so to prevent leakage or electric shock.
Do not earth the ice maker through a gas pipe, a water main, a telephone line, or a
lightning rod.
Do not insert metallic materials such as wires into the air vents, passage or exhaust
vents of the ice maker, to avoid electric shock or personal injury due to accidental
movement of active parts.
Do not put volatile or flammable substances into the ice maker. Storage of such
substances may cause explosion or fire hazard.
The ice maker should be repaired or installed by professional technicians or under
their guidance.
Please locate the ice maker on a solid ground. To avoid a hazard due to tilting of the
appliance.
Please use a power supply that is specified on the ice maker's nameplate.
Disconnect the main plug from the supply socket when the ice maker gets failures.
Continued abnormal operation may cause electric shock or fire hazard.
Please remove the dust from the supply socket before plugging the power plug into it,
to avoid fire hazard.
Keep the ice maker free of obstructions and keep the ventilation open.
Do not store combustion sprays, volatile or flammable substances in the ice maker.
Storage of such substances may cause an explosion or fire hazard.
Do not use the ice maker when handling toxic or hazardous materials or radioactive
materials, as it may harm health and damage the environment.
Disconnect from the main socket before cleaning, maintaining or servicing the
appliance. To prevent electric shock or personal injury.
Do not use other electrical appliances in the ice machine. This appliance contains
flammable materials, and must be handled and recycled by qualified personnel and
institutions when discarded.
Do not damage the refrigeration circuit.
Use a grounded outlet to prevent electric shock. If there is no, the grounded socket
device must be assembled by a professional technician. The unit must be positioned so
that the plug is accessible.
Some models use flammable refrigerants and flammable foaming
agents, so beware of fire (The product is marked "Warning fire"). When
the appliance is abnormal, it must be repaired by professional personnel
and institutions.

SPECIFICATION
Model
Rated power / frequency
Ice making current
Ice harvest current
Ice cubes number / tray
Protection against electric shock
Water inlet mode
Tap water inlet pressure
Refrigerant / Weight
Insulation materials
Applicable environmental level
Gross / net weight
Product size
DBJ-45
120V/60Hz
2.8A
4.3A
45
1 Level
Tap water / bucket water
100-800KPa
R134a / 0.26lb
Cyclopentane (C5H10)
SN / N
55.3 / 52.4 LBS
14.96*16.53*29.72 INCH
SAFETY PRECAUTIONS
1. The voltage of this appliance is: 120V~ / 60Hz. If the voltage is unstable or with large
fluctuation, please install a voltage regulator.
2. Make sure the appliance is earthed, and ensure effective earthing, as well as the
earth wire must not be connected to the water pipe or gas pipe.
3. In order to protect the compressor, do not start the appliance again within 5 minutes
after power off.
4. Do not connect other appliances to the same socket.
5. If the power cord is damaged, in order to avoid danger, it must be repaired or
replaced by professionals.
6. The electrical control system has a voltage of more than 36V. If maintenance is
required during using, please have it handled by a professional technician.
WARNING:
Do not operate the ice maker when there is a gas leak in its environment. Fire hazard
may occur due to sparks caused by unplugging or plugging or the start-stop controlled by
the temperature controller, the air source should be cut off first, and allow air to circulate.
- 12 - - 9

TECHNICAL PARAMETERS
Specification
Rated power / frequency
Ice making current
Ice harvest current
Ice trays number
Protection against electric shock
Water inlet mode
Tap water inlet pressure
Refrigerant / Weight
Insulation materials
Applicable environmental level
Gross / net weight
Product size
DBJ-45
120V/60Hz
2.8A
4.3A
45 trays
1 Level
Drinking water / bucket water
100-800KPa
R134a / 0.26lb
Cyclopentane (C5H10)
SN / N
55.3 / 52.4 LBS
14.96*16.53*29.72 INCH
SAFETY PRECAUTIONS
1. The voltage of this ice maker is: 120V / 60Hz. Please solve the voltage problem before
installing.
2. In order to protect the compressor, do not start the ice maker again within 5 minutes
after power off.
3. Better not not plug other appliances in the same socket.
4. If the power cord is damaged, in order to avoid danger, it must be repaired or
replaced by professionals.
5. The working voltage of the ice machine is higher than 36V. Please do not disassemble
the ice machine when it is working.
WARNING:
Do not operate the ice maker when there is a gas leak in its environment. Fire hazard
may occur due to sparks caused by unplugging or plugging or the start-stop controlled by
the temperature controller, the gas source should be cut off first, and allow air to circulate
to outdoor.
- 8 - - 13 -
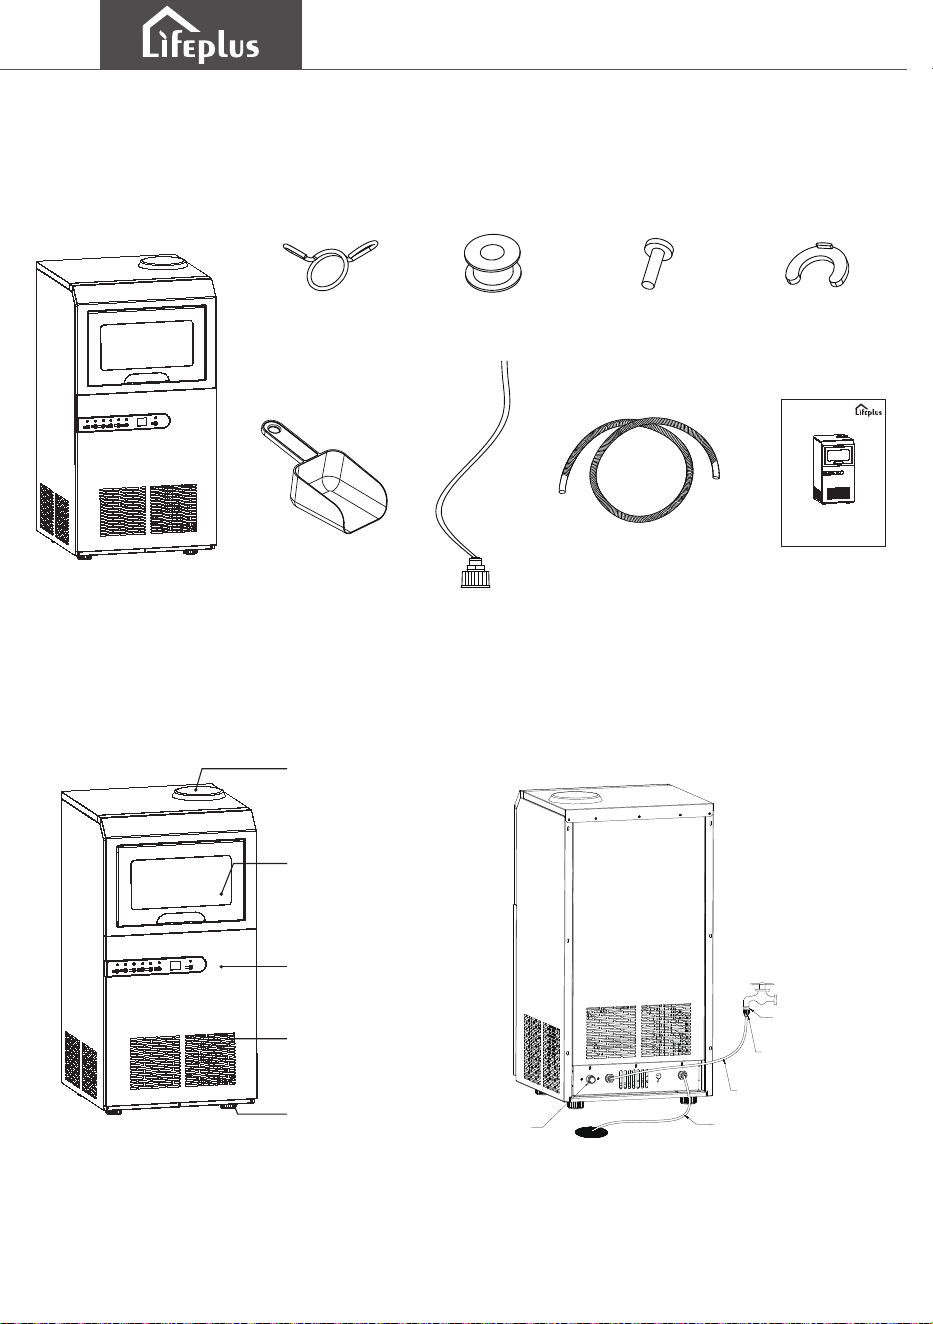
PARTS & ACCESSORIES
Commercial Ice Maker Instruction
PRODUCT DIAGRAM
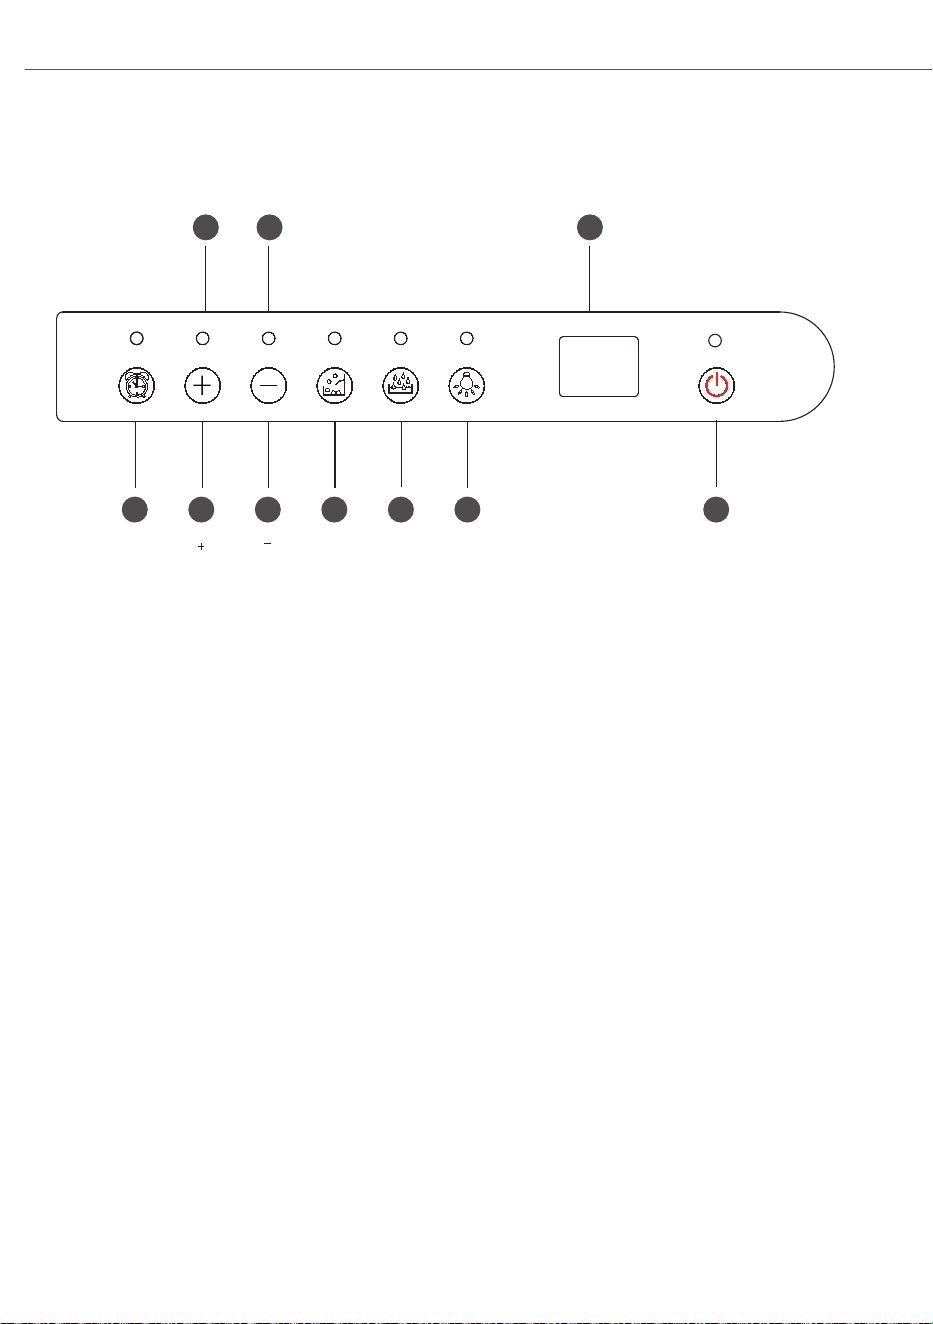
CONTROL PANEL
- 14 - - 11 -
Ice Shovel Water Inlet Hose
ICE MAKER
PRODUCT USE GUIDE
1. For reservation
2. For increasing ice-making time or reservation time
3. For decreasing ice-making time or reservation time
4. Force ice-harvest
5. For Automatic Cleaning
6. Blue light
7. For turning On or turning Off the appliance
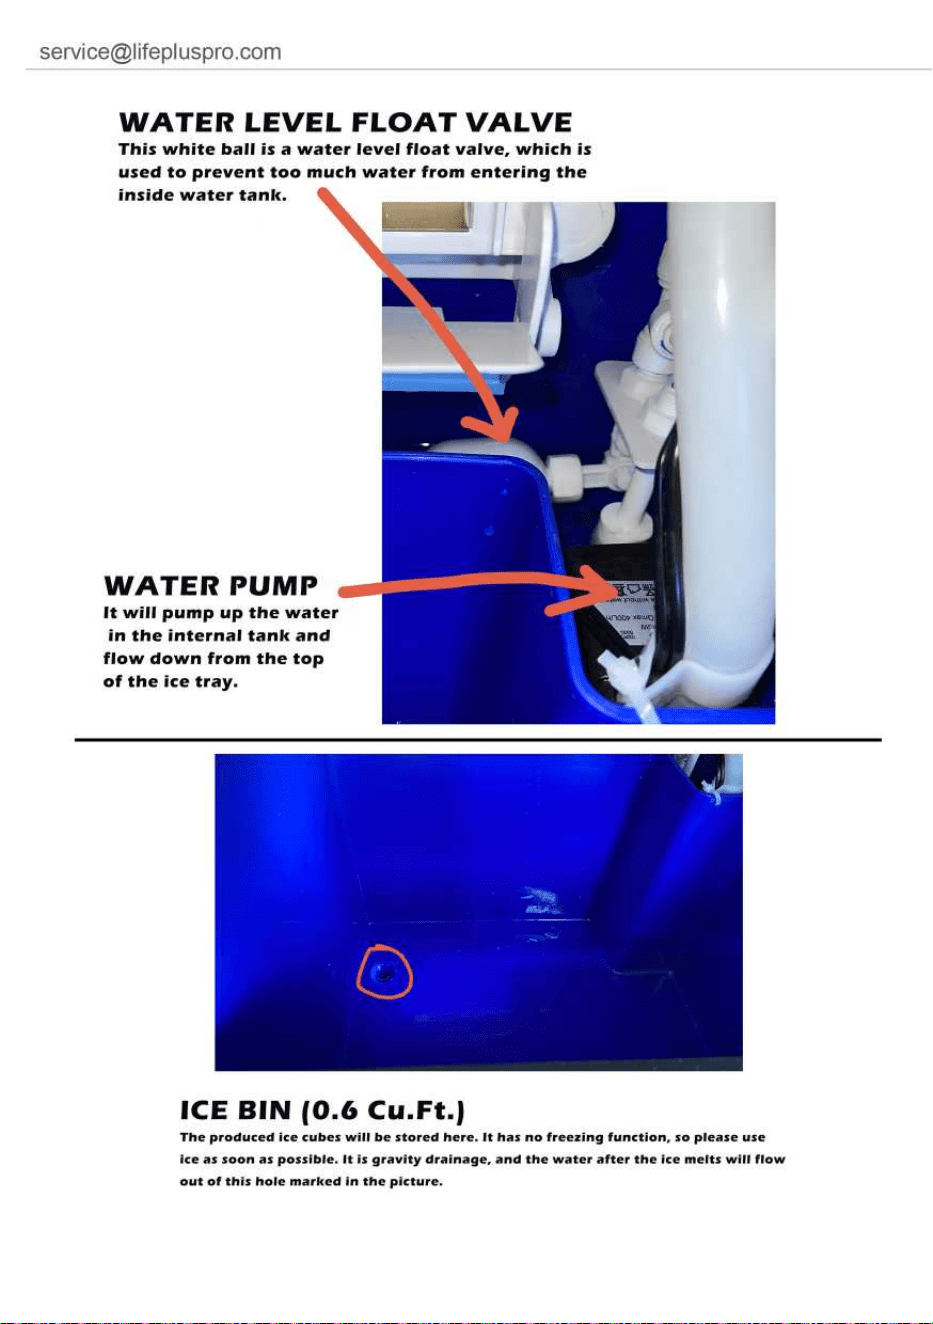
8. Indicates ice full
9. Indicates water Absense
10. Display Ice making time/ Reservation time/ Temperature
Dust cover of bucket
water inlet hole
Door of ice bin
Control panel
Hot air outlet
Foot
1 2
3
4 5
6 7
8
9 10
Timer Timer
FULL WATER
LightCleanningIce-harvest On/OffTimer
LED Display
Water drain hose
Water inlet hose
Water Inlet
Connector
Sealing Ring
Sewage outlet
(Drain the water in the water
tank after cleaning)
(Drain the melted water in
the ice tank)
Drain Hose
Snap Spring Sealing Tape Water Inlet Plug Blue Buckle
Note: the ice machine is gravity drainage, which requires
drainage holes or bottles to collect the water after the ice
melts.
PARTS & ACCESSORIES
Commercial Ice Maker Instruction
PRODUCT DIAGRAM
CONTROL PANEL
- 10 - - 15 -
Ice Spoon Inlet Pipe
ICE MAKER
PRODUCT USE GUIDE
1. Timer button: Click it, and then click the + and - buttons to preset the auto
startup and shutdown time. (Note: Set auto startup time when the ice maker is off /
Set auto shutdown time when the ice maker is making ice)
2. + button: Click it to increase the thickness of the ice by increasing the ice
making duration.
3. - button: Click it to decrease the thickness of the ice by decreasing the ice
making duration.
4. Ice-harvest button: You can click this button to interrupt ice making to get ice
quickly.
5. Self clean button: Click this button, let the ice maker self clean the ice tray,
water tank, water pipe and other internal structures. (Please make sure you hooked
up the clean water source before cleaning.)
Top cover
Door frame of
ice storage
Control panel
Front cover
Foot
1 2
3
4 5
6 7
8
9 10
Timer
FULL WATER
Ice-harvest Self Clean Blue Light Power
LED Display
Water drain pipe
The power cord hole
Water inlet pipe
Water Inlet
Connector
Sealing Ring
Sewage outlet
(Drain the water in the water
tank after cleaning)
(Drain the melted water in
the ice tank)
Attention:Please prepare a drain in advance
Drain Pipe
Snap Spring Raw Belt Drain rubber plug Blue buckle
OPERATION METHOD
Please note that all buttons do not need to be pressed for seconds, just click.

6. Blue light: Click it to light up the bule light in the ice maker.
7. Power button: Click it to turn on or turn off the ice maker.
8. Ice full indicator: When it lights up, it means that the ice machine is full of ice.
Please take out the ice for use or put them in a frozen place for storage.
9. Water shortage indicator: When it lights up, it means that the ice maker is
short of water. You can't turn on the ice machine until it goes out.
10. LED display: It will show you the timing you set, the ice making time of a single
round you set, the remaining ice making time, the ambient temperature and error
code.
- 16 -

DEFAULT ICE MAKING DURATION AND ADJUSTMENT RANGE
You may wonder what the numbers on the LED display meant before ice making. This is the ambient
temperature detected by the ice maker. In order to ensure the quality of the ice, the ice maker will preset a
default ice making duration and an adjustable duration range to prevent the ice from being too thick or too
thin.
The following is the preset data of the ice machine
- 17 -
- 17 -

- 13 -
PRECAUTIONS BEFORE INSTALLATION
CORRECT OPERATION
When using the ice maker for the first time or using it continuously, please follow
below rules!
Use an independent water source for the ice maker, and check regularly to prevent low
water pressure or pipe blocked.
Do not store anything in the ice bin, this will make the ice machine difficult to clean or
the pipes blocked.
When using the plastic door of the ice bin, open and close it gently, and do not hit the
door, and please also close the door after take out the ice.
The ice maker should be kept away from heat sources, strictly forbidden to use it in
super high or super low temperature environment. Away from direct sunlight to avoid
affecting the heat dissipation of the unit.
The ice machine is not waterproof, so please don't wash it directly with a lot of water.
You can use wet or dry rags.
If you will not use this ice maker for a long time, it should be powered on for 4-6 hours
every 2 months to prevent damage.
ENVIRONMENT
This unit is designed according to the following conditions:
1. Household Use.
2. No more than 2000 meters above sea level.
3. Temperature is not higher than 89.6, the maximum relative humidity is 80%, and the
INSTALLATION LOCATION
Transporting and moving conditions:
When transporting, keep the tank as upright as possible, and the inclination does not
exceed 45 °maximum. Do not locate it upside down or horizontally. To operate the ice
maker properly and get the best performance, please locate the ice maker as the
following conditions.
This appliance is used for similar purposes, such as:
·Staff kitchen areas in shops, offices and other working environments.
·Farm houses and by clients in hotels, motels and other residential type environment.
·Family hotel environment.
·Catering and similar non-retail applications.
- 18 -
Avoid sunlight and rain Good ventilation Placement should be stable
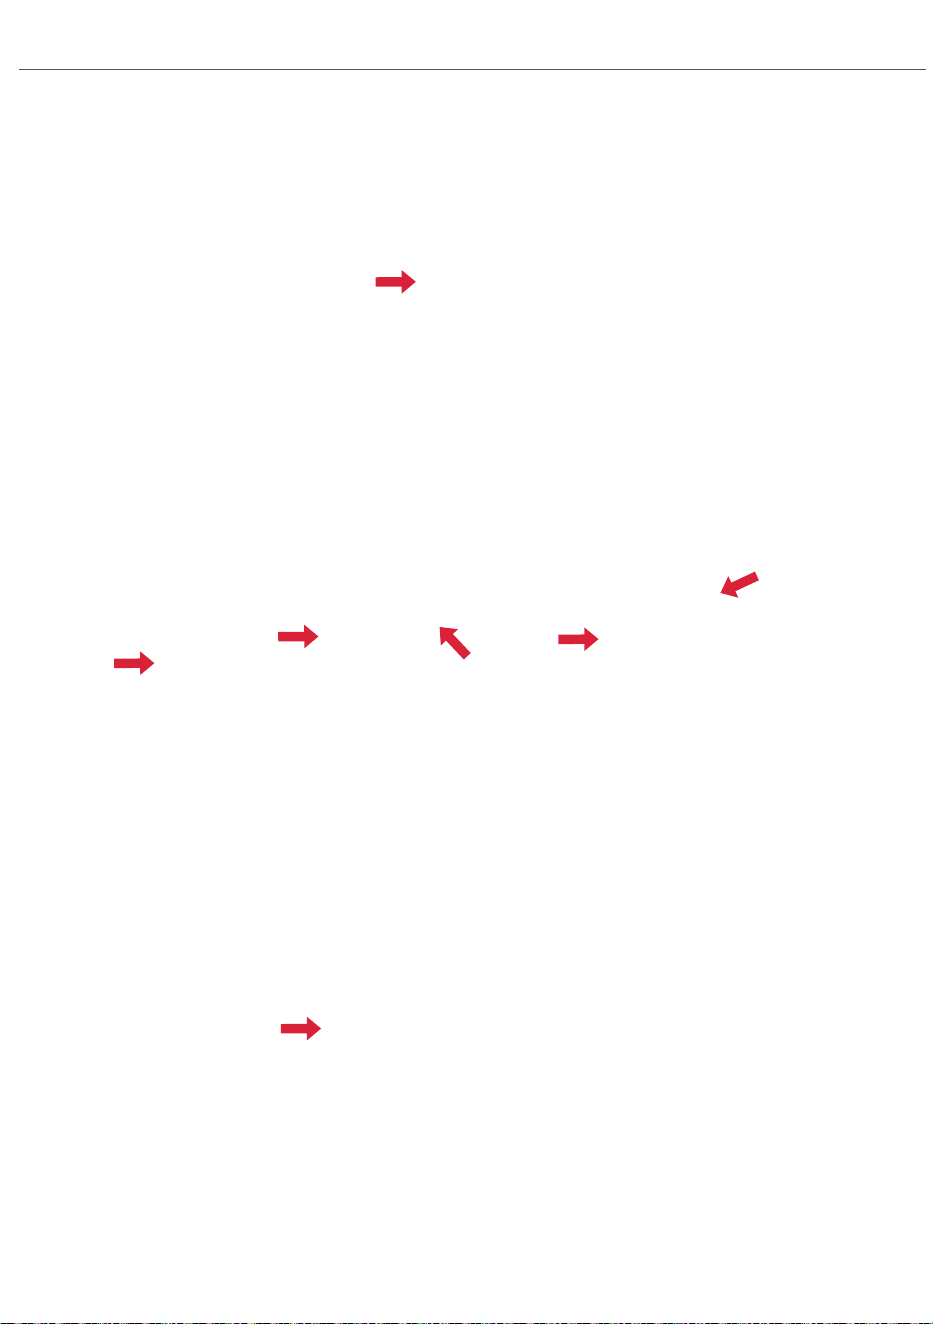
Step 1: Hook up the drain hose
1.Pull out the water outlet plug (Not
sewage outlet plug)
2.Insert the drain hose and install the
snap spring to fix the drain hose.
Step 2: Adjust the valve and insert the water inlet hose
Installation steps of tap water inlet mode
1. Wrap the sealing tape
around the faucet
2.Insert the white water
inlet hose
1.Adjust the direction of the
valve to be perpendicular
to the water pipe (tap water
inlet mode)
2.Tighten the water pipe
with the connector
3.Fix the water inlet hose
with a blue buckle
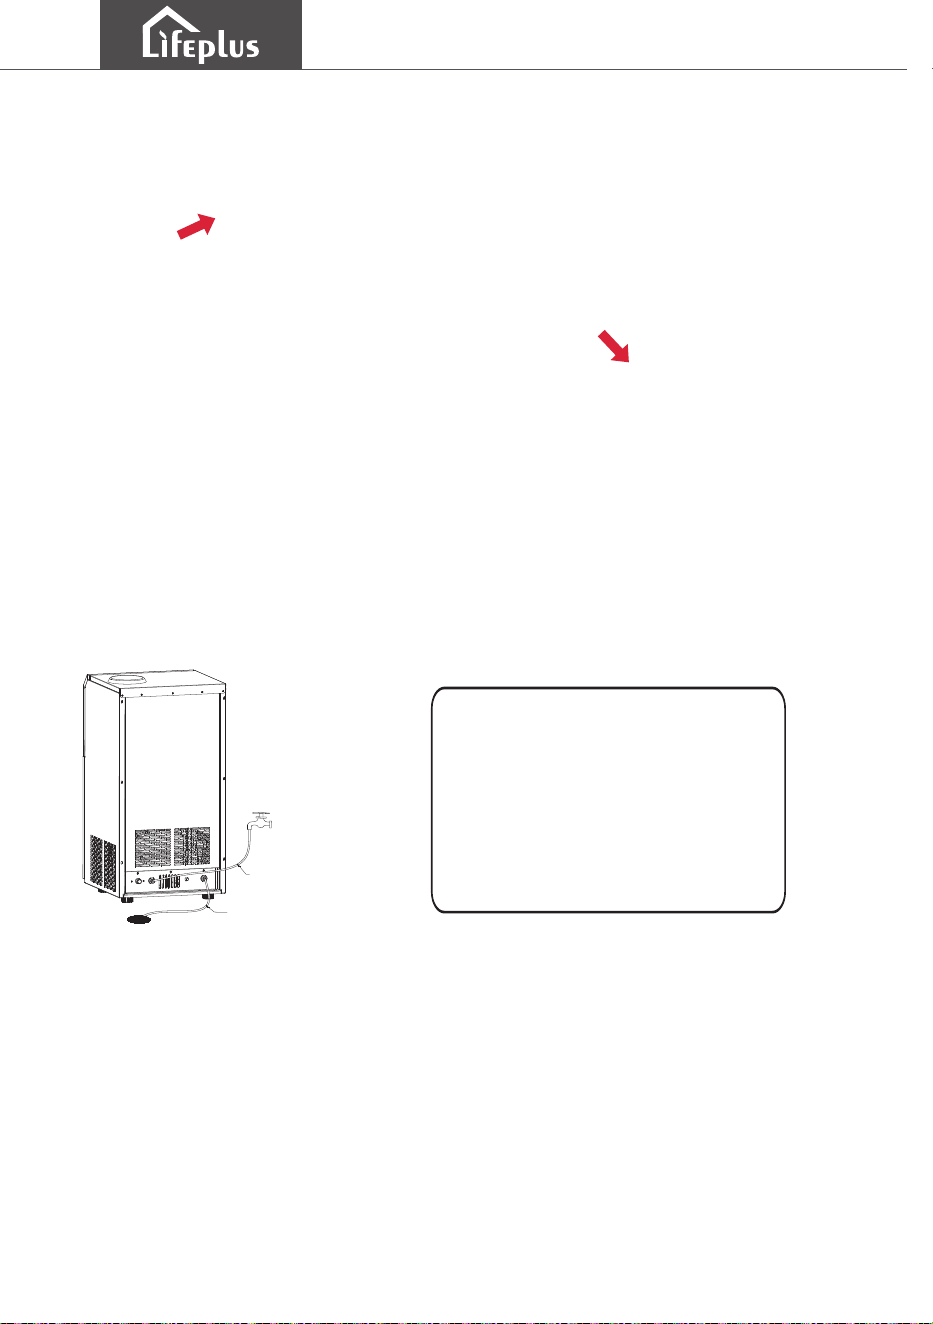
Step 3: Hook up the water source
If the complimentary
connector does not
fit your faucet,
please buy it in your
local store.
- 19 -

Installation steps of bucket water inlet mode
Step 1: Hook up the drain hose
1.Pull out the water outlet plug (Not
sewage outlet plug)
2.Insert the drain hose and install the
snap spring to fix the drain hose.
Step 2: Adjust the valve to the bucket water inlet mode
Step 3: Install the water jug
1.Adjust the valve to the direction
parallel to the water pipe.
(bucket
water inlet mode)
1.Variety of water jugs are
applicable. The diameter of the
water jug outlet needs to be less
than 3.2 inches. If water cannot
enter, try lifting the jug several
times to exhaust the air.
- 20 -

Discharge the sewage after self-cleaning.
1. Place a container that can hold at least 0.2 gallons of water under the
sewage outlet in advance
2. Pull out the sewage outlet plug slowly
3. Plug in the sewage outlet plug again
NOTE: Please cut off the water source before starting to
discharge the sewage, otherwise the water will flow out from the
sewage outlet all the time.
- 21 -
WARNING: PLEASE ONLY USE DRINKING WATER.
The pipe connections on the unit
are marked. In case of conflict,
the identification on the unit shall
prevail.
Ice bin drain pipe
Water inlet pipe
F"d1Ñ
ˇÂ"d1Ñ
Water Inlet Supply
Valve
Inlet pipe
Tap Water Supply
Bucket Water Supply
Please adjust the valve direction
correspondingly BEFORE use
Remove the Water Inlet Hose
1. Remove the small blue buckle
2.Press the white ring of the water inlet hole and
pull out the water inlet hose
WARNING: CLEAN WATER ONLY
Each outlet has been marked on
the unit. If there is a conflict with
the instruction, it may be that the
workers pasted it incorrectly.
Please take the instruction as the
standard.
Water drain hose
Water inlet hose
F"d1Ñ
ˇÂ"d1Ñ
- 22 -

OPERATING INSTRUCTIONS
ICE-MAKING:
1. After all the water hoses are hooked up, then plug in the power supply.
2. Click On/Off button to start the machine, then compressor will start to run
about 3 minutes to pre-cooling. Then click or button to adjust the time of ice
making to get different thickness of ice. The adjusted ice making time will be reflected in
the next round of ice making. (Please refer to page 13 for the ice making time range.)
3. After 3 minutes, the water pump in the ice maker start working, ice making begins.
During the ice making process, the water pump will last running, and the water will flow
down from the top of the ice tray.
4. When the ice is made, it will take about 3.5 minutes to peel off the ice. Remember
to separate the ice with a shovel, otherwise the ice machine may indicate ice full when
the ice bin only holds half of the ice .
(Note: you must wait for the water shortage indicator to go out before you can make
ice.)
ICE-HARVEST:
During the ice-harvest process, the ice tray will be heated for about 3.5 minutes, then
the ice will fall off.
When each batch of ice falls off to the ice bin, the ice may not be completely separated.
I suggest you use the ice shovel to separate the ice to hold more ice.
When the ice falls, the flap will be flipped, and then the flap will reset due to its own
weight, then the machine starts to make the next round of ice. When the ice bin holds a
lot of ice, the flap will be pressed by the ice and cannot be reset. At this time, the ice full
indicator will light up, and the ice maker will stop making ice to prevent too much ice
from being made.
FORCE ICE-HARVEST:
During the ice making process, click the ice-harvest button , the unit will enter the
ice-harvest program in advance, and will continue to run the next ice-making round
after the ice falls into the ice bin.
NOTE:
1. When each batch of ice fall off to the ice bin, please use an ice spoon to shovel
them into 45 small ice cubes to hold more ice.
2. It is recommended to put the extra ice cubes produced in an ice bag and store it in
the ice bin.
3. In summer and hot environment, it is recommended to adjust the ice thickness
range: 15 to 29 min.
In winter and cold environment, it is recommended to adjust the ice thickness range:
10 to 18 min.
ATTENTION˜
The adjusted ice making time will be reflected in the next round of ice making.
ONE-BUTTON BLUE LIGHT:
During ice making process, press the blue light button, it will light up inside the box, which
can make the ice making programs absolutely clear.
OFF-TIMER AND ON-TIMER SETTING:
After power-on, during the unit is in off-state, press the Timer button, the digital window
will flash to display the setting delay time. Press the " " or " " button to adjust
the delay time of the timer, the system will enter the On-Timer mode automatically
5 seconds after setting.
Off-Timer: After power-on, during the ice making process, press the Timer button, the
digital window will flash to display the setting delay time. Press the " " or " "
button to adjust the delay time of the timer, the system will enter the Off-Timer mode
automatically 5 seconds after setting.
CLEANING FUNCTION:
After power-on, connect the water resource, press the cleaning button , the unit will
enter the automatic cleaning program, and it will automatically stop after 10 minutes. After
the cleaning program is finished, please remove the drain plug and drain the sewage.
- 23 -

ICE-HARVEST:
During the ice-harvest process, the reversing valve is opened, the ice tray will be heated,
and the connection between the ice cube and the ice tray will be melted. When the ice
cube cannot be attached to the ice tray due to its own weight, it will fall down and one
ice-harvest is finished.
When each batch of ice fall off to the ice bin, please use an ice spoon to shovel them into
45 small ice cubes to hold more ice.
When the ice falls, the flap is flipped, and then the flap is reset due to its own weight, then
the machine starts to make the next ice. However, due to too many ice cubes are in the
ice bin, and they press against the flaps to make the flaps cannot be reset, the control
chip will judge that the ice is full and temporarily stop and will restart until the flaps are
reset.
OPERATING INSTRUCTIONS
ICE-MAKING:
1. After all the water pipes are connected, plug on the main power supply plug.
2. Press On/off button to start the motor, then compressor will start to run
about 3 minutes to pre-cooling. Then press or button to choose the time of ice
making to choose the sise of ice. The adjusted ice making time will be reflected in the
next round of ice making.
3. After 3 minutes, the circulating water pump start to work, ice making begins. During
the ice making process, the water pump will last running, and the water will flow down
from the top of the ice.
4. When the ice cube reaches the reservation time position, the program will switch to the
ice-harvest process.
FORCED ICE-HARVEST:
During the ice making process, press the ice-harvest button , the unit will enter the
ice-harvest program in advance, and will continue to run the next ice-making cycle after
the ice-harvest is finished.
˜
NOTE:
1. When each batch of ice falls off to the ice bin, we suggest you use an ice shovel to
shovel them into 45 small ice cubes to let the ice bin hold more ice.
2. We suggest you keep the produced ice cubes in ice bags and put them in the freezer
to prevent melting.
3. When the ambient temperature is high, we suggest you increase the ice making time to
prevent the ice from being too thin.
When the ambient temperature is low, we suggest you reduce the ice making time to
prevent the ice from being too thick.
There is no accurate data, please adjust it in the actual production process. The quality of
ice cubes made in the first 3 rounds after startup may not be very good. Please let it
make several more rounds of ice cubes.
ATTENTION: The adjusted ice making time will be reflected in the next round.
BLUE LIGHT:
Click the blue light button, it will light up inside the ice maker.
HOW TO SET 24H TIMING?
Auto startup timing: Do not turn on the ice maker after plugging in the power supply, click the
timer button. The number on the LED screen will change from temperature to time and
flash. At this time, you can click the and buttons to set the automatic start-up time.
Auto shutdown timing: When the ice maker is working, click the timer button. The number on the
LED screen will change from ice making time to timer time and flash. At this time, you can click
the and buttons to set the automatic start-up time.
TIMING EXPLANATION: For example, the current time is 1:00 p.m. When you set
the timing of 10 hours, Then the auto startup / shutdown time of the ice machine is
11:00 p.m.
CLEANING FUNCTION:
After turn on the ice maker, hook up the clean water. Click the button. The ice machine will
automatically start cleaning the internal pipes, ice tray, etc. It will stop after 10 minutes. After the
cleaning program is finished, please pull out the sewage plug and drain the sewage. Please place
a container to collect sewage at the sewage outlet to prevent water from splashing on the ground.
- 24 -
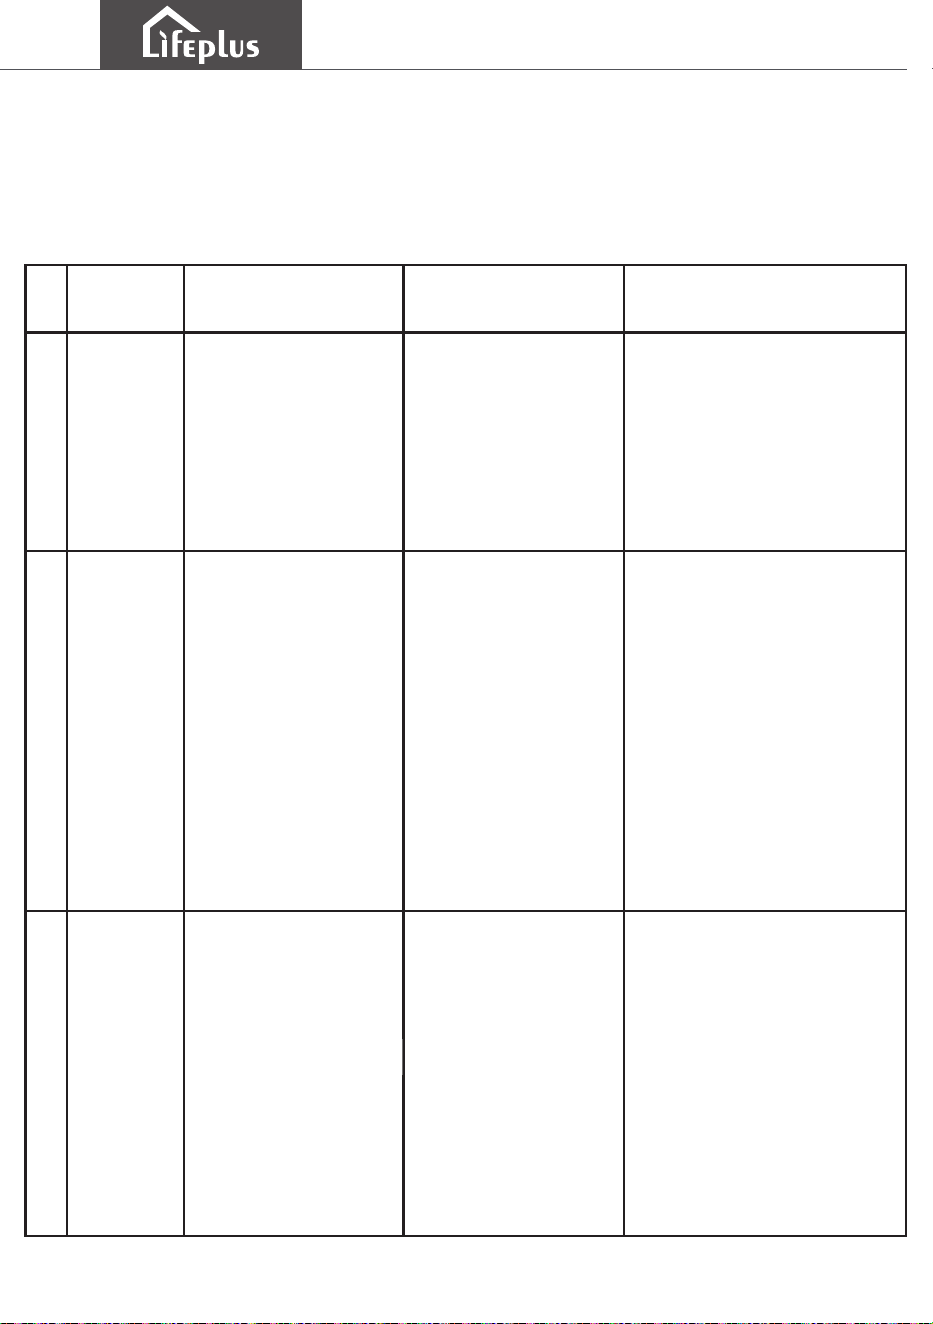
1.The machine is in
deicing condition
1.This state is deicing state, it
will change according to the
different ambient temperature.
The longest time is 3.5
minutes. After deicing, the
machine will automatically turn
into the normal ice making
state.
1.Remove the ice that is
pressed on the white flap and
the machine will reset itself
automatically
2.Manually reset, or replace
the white flap
1.Check the pressure of inlet
water (100KPa-600KPa, no
less than 100KPa)
2.Check whether the water
level switch floats, check
whether there is something
stuck it, manually reset
several times and then restart
the machine
Troubleshooting method of fan˜ 1. Turn on the power for 10 seconds and enter the standby
state. At this time, click on the "on/off" button and the fan will start to balance the temperature in
the cabin for 1 minute.Observe the air inlet at the front of the machine in this 1-minute stage. If
there is no wind, it will be regarded as fan failure.
Troubleshooting method of water pump˜ Add water. Turn on the power for 10 seconds and
enter the standby state. At this time, click the cleaning button, visually check whether the pump
is started, whether there is water flowing out of the water pipe. if there is no water flowing out, it
is considered as pump failure.
1.There is no water in
the machine
2.Water level switch
not reset, stuck by ice
or something else
1.The machine was
indeed filled with ice
2.The white flap is
blocked and cannot
flip properly
4
5
6
"00"
Red "Full"
light
keeps on
Red
"Water"
light
keeps on
- 25 -
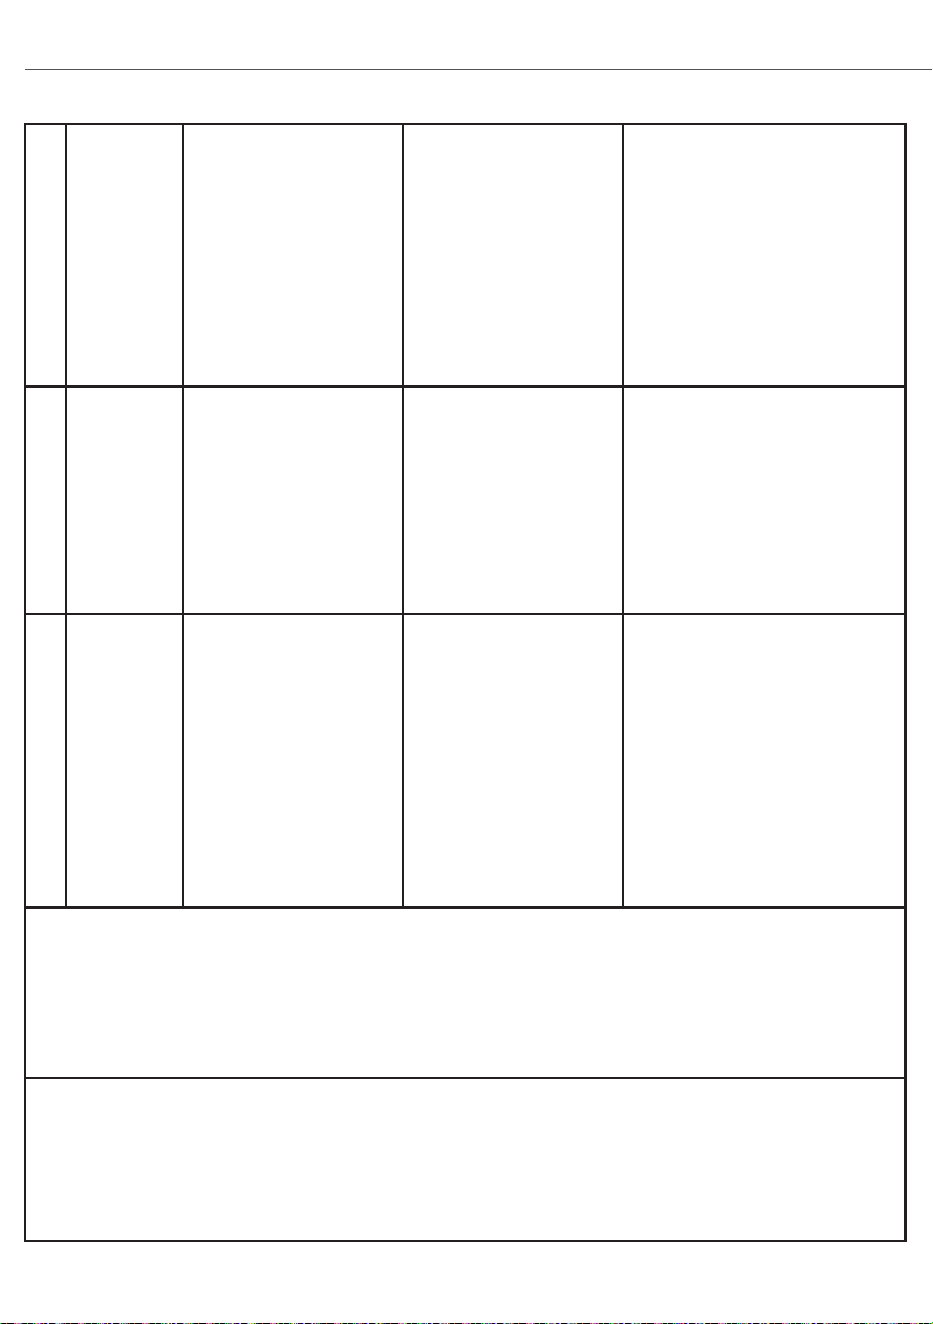
TROUBLESHOOTING
ERROR CODE
1.The lead wire of the
temperature sensor is
loose
2.Temperature sensor
failure
1.Press the cleaning button for
5 seconds.
2.Contact seller to replace it.
1. The ice did not fall
from the ice tray.
2. The ice is too small.
3. The compressor or
cooling fan is damaged
(there is no sound of
fan startup when the
ice machine is turned
on)
1. Turn off the ice maker
and let the ice on the ice
tray melt naturally or remove
it manually.
2. Increase the ice making
time to increase the ice
thickness.
3. Check whether the fan
and water pump are started.
If not, contact the seller for
replacement.
1. The working
temperature of the ice
maker is too high due
to the failure of heat
dissipation.
1
2
3
"E1"
"E2"
"E4"
DBJ-45 error code and troubleshoot
No.
Error
code
Display status
Cause of failure
Troubleshooting
1. Check the surrounding of
the machine, and there shall
be no obstruction at the
cooling port. Try to put the ice
maker in an open place to
make ice to see if the fault can
be solved.
2. Check whether the cooling
fan is started. If the fan does
not start, contact the seller for
replacement.
1.The machine is
harvesting ice
1. This state is the ice-
harvest state, and the
duration will
vary according to the
ambient temperature. The
maximum time is 3.5
minutes. After the ice
harvest, the machine will
continue to make ice.
1. Empty the ice in the ice bin
2. Remove the ice and reset
the white flap.
1. Check the water source
pressure, which is required to be
100KPa-600KPa, and the
pressure should not be lower than
100KPa.
2. Check whether the water level
float valve floats, check whether it
is stuck by other things, manually
reset the float up and down for
several times, and then restart the
ice maker.
Troubleshooting method of cooling fan — Add water. Plug in and wait for 10 seconds, then
click the "on/off" button and the cooling fan will start to balance the temperature in the cabin for
1 minute. Observe the air outlet at the front of the machine for 1 minute. If there is no airflow, it
will be regarded as fan failure.
Troubleshooting method of water pump — Add water. Plug in and wait for 10 seconds.
Click the cleaning button to see if the pump is started. There will be water flowing out from the
top of the ice tray. if there is no water flowing out, it is considered as pump failure.
1. Water does not
enter the ice maker
smoothly
2. The water level
float is not reset, stuck
by ice or other things
1.The ice bin is full
of ice
2.The white flap
under the ice tray
was pressed by the
unseparated ice.
4
5
6
"00"
"Full"
indicator
keeps on
"Water"
indicator
keeps on
- 26 -
TROUBLESHOOTING
DIGITAL WINDOW FAULT CODE
No. Error Code Schematic diagram
Cause explanation
of phenomenon
Troubleshooting
method
1.The lead wire of the
temperature sensor is
loose
2.Temperature sensor
failure
1.Check whether the lead wire
of the sensor are loose, or
replace the sensor
2.Long press the cleaning
button for 5 seconds to
continue working (ambient
temperature defaults to 32
¥ )89.6°F
1.The ice doesn't break
off
2.The ice is too small
3.No ice (fan or water
pump not started)
1.Turn off the machine and
manually remove ice from the
evaporator ice grid
2.Adjust the ice size to
increase the ice making time
3.Check whether the fan and
water pump are started. If not,
replace the parts that are not
started
1.Poor heat dissipation
results in the
condensation
temperature of the
refrigeration system
exceeding 75¥ , which
triggers high
temperature protection
1.Check around the machine,
air inlet and exhaust outlet
should not be blocked. The
product should be kept 30cm
11.8inches away from the
wall
2.Check whether the fan is
started. If the fan is not
started, troubleshoot the fan
failure
1
2
3
"E1"
"E2"
"E4"
DBJ-45 error code and troubleshooting method

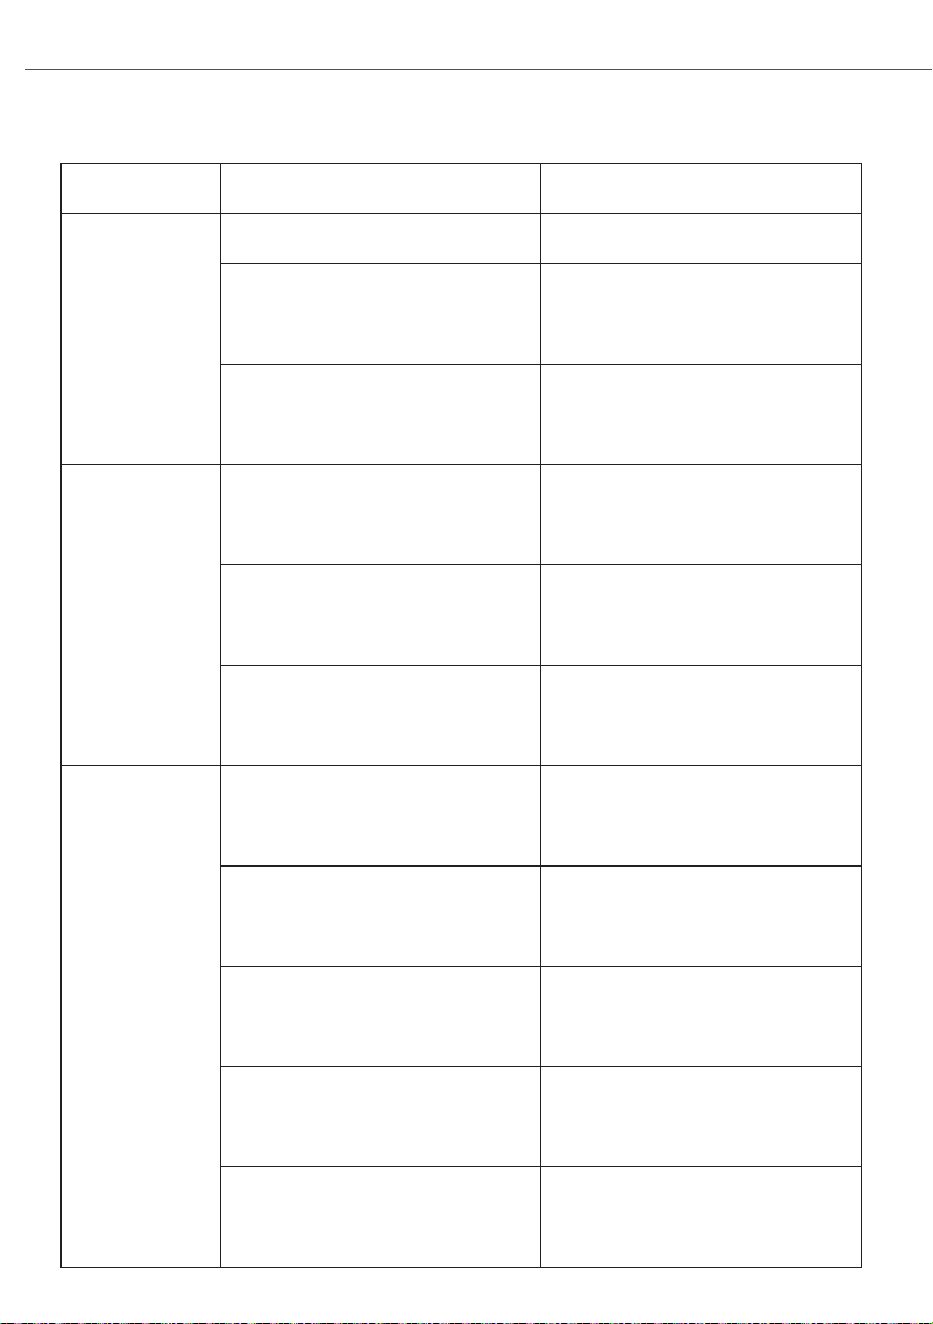
Problem
Possible cause Solution
Ice maker
does not
start
Ice maker
stops after
running
Significant
reduction in
ice cubes
production
Bad socket contact Change socket
The refrigerator is full of ice
cubes
Remove the ice cubes and
start it manually
Adjust the flap to enable
free reset
The flap is not reset
Water source is not turned
on or connected not strong
Recheck water resource
Ice maker is not located
horizontally
Adjust the feet and locate
them horizontally
Over temperature
shutdown protection
Remove the front panel
and clean the condenser
Not cleaned up for more
than two months
Remove the front panel
and clean the condenser
High water temperature
(Possible in summer)
Ambient temperature is too
high
Clean up the surrounding
Small or closed
environmental spaces
Clean surrounding and
allow air to circulate
Sink overflow
Check the water inlet valve
or mechanical float
FAULT SELF-DIAGNOSIS
1. Water pump-You can directly observe whether the water flows down from the ice tray. If
not, the water pump may malfunction.
2. Ice making——After the ice-making last running for 10 minutes, the water in the water
tank will become noticeably cold. You can directly touch the ice tray or running water to
feel the water temperature.
3. Water inlet-During the automatic cleaning process, it can be observed that water
continuously flows into the ice storage bucket from the overflow pipe of the water tank.
During the ice making process, you can reach into the water tank with your hand to feel
the amount of water, which normally accounts for more than half of the water tank.
4. If your ice maker uses tap water to make ice, and finds that the water can’t be stopped.
Please check your house water pressure. You need a pressure relif valve to control the
water pressure.
- 27 -
Problem
Possible cause Solution
Ice maker
does not
start
Ice maker
stops after
running
The
production
of ice
cubes
decreased
Bad socket contact Change socket
The ice bin is full of ice
cubes
Remove the ice cubes
The ice full sensing
plate is not reset
Adjust the ice full sensing
plate to enable reset free
Water source is not turned
on or connected not strong
Recheck water resource
Ice maker is not located
horizontally
Adjust the feet and locate
them horizontally
Over temperature
shutdown protection
Remove the front panel
and clean the condenser
Not cleaned up for more
than two months
Remove the front panel
and clean the condenser
High water temperature
(Possible in summer)
Ambient temperature is too
high
Move it to a cool room
Small or closed
environmental spaces
Clean surrounding and
allow air to circulate
FAULT SELF-DIAGNOSIS
1. Water pump-You can directly observe whether water flows down from the ice tray. If
not, the water pump may malfunction.
2. Ice making——After the ice-making last running for 10 minutes, the water in the water
tank will become noticeably cold. You can directly touch the ice tray or running water to
feel the water temperature.
3. Water inlet-During the automatic cleaning process, it can be observed that water
continuously flows into the ice storage bucket from the overflow pipe of the water tank.
During the ice making process, you can reach into the water tank with your hand to feel
the amount of water, which normally accounts for more than half of the water tank.
4. If your ice maker uses tap water to make ice, and finds that the water can’t be stopped.
Please check your house water pressure. You need a pressure relif valve to control the
water pressure.
- 28 -
Do not use hot water
Water overflow in the
inside tank
Check valve again and
reset the water level float

IF HAVE STRANGE SMELL
If the ice has a strange taste.If the ice has a disgusting or mildewy odor in the machine,
use the above steps to clean the inside of the machine.
SOUND DURING MACHINE OPERATION
The new ice maker may make unfamiliar sounds. Most sounds are normal.
For example:
* Efficient compressors emit beating or sharp sounds.
* Water splashes from the evaporator to the tank.
* At the end of each cycle, you can hear the gurgling of refrigerant flow.
* The sound of air compressed by the condenser fan over the condenser.
* In the final deicing cycle, you may hear ice falling into the box.
The
transparency
of the ice
cube is not
very good or
ice cube
shape is
irregular
Improper adjustment of ice
thickness
Reset ice thickness
Water quality is bad
Ice maker water tank or the
ice tray is very dirty
Clean the ice maker and
replace the filter
Uneven water flow above
the ice tray
The shunt tube needs to be
cleaned or the unit is not level.
Too much water above the
ice tray
Tie the water pump silicone
tube
Ice cube is too thin or too
thick
Adjust ice thickness
The ice maker is not stable
and the soles of the feet
are floating
Locate the ice maker on
a stable surface
The ice maker touches
other objects
Avoid touching other objects
The door is not
completely closed
Close the door completely
Working in high
temperature and high
humidity environment
Normal
Can't take off
ice
Excessive
noise
Condensation
on the shell
- 29 -
Install a filter on the water
inlet pipe.

IF HAVE STRANGE SMELL
If the ice has a strange smell or taste. And there is a disgusting or mildewy odor in the
machine, follow the self-clean steps to clean the machine.
SOUND DURING MACHINE OPERATION
The new ice machine may have abnormal sounds. Most sounds are
normal. For example:
* The compressor occurs beating or sharp sounds.
* Water splashes from the ice tray to the ice bin.
* At the end of each cycle, you may hear the gurgling of refrigerant flow.
* The sound of air compressed by the cooling fan over the condenser.
The
transparency
of the ice
cube is not
very good or
ice cube
shape is
irregular
Improper adjustment of ice
thickness
Reset ice thickness
Water quality is bad
Install filter and replace
filter element
Ice maker water tank or the
ice tray is very dirty
Clean the ice maker and
replace the filter
Uneven water flow above
the ice tray
The shunt tube needs to be
cleaned or the unit is not level.
Too much water above the
ice tray
Tie the water pump silicone
tube
Ice cube is too thin or too
thick
Adjust ice thickness
The ice maker is not stable
and the soles of the feet
are floating
Locate the ice maker on
a stable surface
The ice maker touches
other objects
Avoid touching other objects
The refrigerator door is not
completely closed
Close the refrigerator door
completely
Working in high
temperature and high
humidity environment
Normal
Can't take off
ice
Excessive
noise
Condensati
on on the
case
- 30 -

CLEANING AND MAINTENANCE
MAINTENANCE
Please maintain the ice maker according to this manual to ensure its performance and
service life.
1. Always keep the cold air inlet and hot air outlet at the lower end of the ice machine
unobstructed. When you need to embed it into the cabinet, please reserve a little space
around the ice machine.
2. The exterior can be cleaned with a neutral detergent solution, and then wiped clean
with a soft cloth. If necessary, commercial stainless steel cleaners and polishing agents
can be used.
3. If you install a filter element on the water system, you should check the filter element
regularly and replace it.
4. When cleaning the inside of the ice machine, you can wash the ice bin directly with
water. But don't wash other places, otherwise the circuit part of the ice machine may be
damaged. Use an cloth to clean it or let it self clean.
5. You should maintain the condenser of the ice machine every 3 months. Use a soft
brush or a vacuum cleaner with a brush to wipe the condenser fins along the direction of
the fins to ensure the performance of the fins.
6. If you will not use it for a long time, please unplug it and empty the residual water in
the water tank and water pipe of the ice machine.
- 31-
ATTENTION˜
1. Cleaning and maintenance of the ice maker is not included in the free service. Please
replace the filter regularly.
2. Before cleaning and maintenance, please make sure to turn off the water and power
and unplug.
3. Check the water source, please turn off the water resource before unplugging the water
inlet port of the ice maker, to prevent high-pressure water jets.
4. On-site service charges will be charged when there is a failure due to user errors
(such as no water, no electricity, environmental factors, etc.).
5. If severe scale is inside the ice maker, or the waterway is blocked, which causes the
abnormal performance, please clean it in time.
6. The edges of the air-cooled condenser fins are sharp, so please be careful when
cleaning.
7. Machine consumables are not covered by the warranty.
8. Please use genuine consumables, such as filters, filter elements, ice shovels, water
pipes, etc.

CLEANING AND MAINTENANCE
MAINTENANCE
Please follow this manual to maintain the ice maker, in order to improve its reliability and
service life. And while maintaining hygiene, avoid the increase of energy consumption
coefficient for the ice production.
1. Always clean the surroundings of the appliance to keep it clean. Do not block the
shutters of it.
2. The exterior can be cleaned with a neutral detergent solution, and then wiped clean
with a soft cloth. If necessary, commercial stainless steel cleaners and polishing agents
can be used.
3. The filter element should be checked regularly. Most common filter elements are
replaced half a year, and advanced filter elements should be replaced on time in
accordance with the instructions.
4. It can use a water pipe to flush directly, when cleaning the inside of the ice maker's
water tank and refrigerator. Never over pressure, and never flush the pump and above
the ice tray directly, to prevent the circuit parts from being immersed.
5. Maintenance of condenser for air-cooled ice maker: Clean the air-cooled condenser
every three months. Use a soft brush or a vacuum cleaner with a brush to scrub the
condenser fins up and down in the direction of the fins to avoid damaging the fins and
affecting the cooling performance.
Overwintering maintenance: In addition to turning off the power resource, drain the
residual water in the ice maker's water tank, inlet pipe and drain pipe.
- 32 -
ATTENTION
1. Cleaning and maintenance of the ice maker is not included in the our free service. We
suggest you use filtered water.
2. Before cleaning and maintenance, please make sure to cut off the power supply.
3. Please cut off the water source before pulling out the water inlet hose of the ice
machine to prevent high-pressure water splashing.
4. On-site service charges will be charged when there is a failure due to user errors
(such as no water, no electricity, environmental factors, etc.).
5. You should clean the ice maker regularly to prevent the internal pipes from being
blocked by scale. You can buy detergent to remove scale and use it with self-cleaning.
6. The edges of the air-cooled condenser fins are sharp, so please be careful when
cleaning.
7. The ice maker's consumables are not covered by the warranty. In case of damage,
please buy it at the local store.
HOW TO STORAGE
If you will not use it for a long time, please unplug it and empty the residual water
in the water tank and water pipe of the ice machine. Dry the interior with a clean
soft cloth (refer to maintenance and cleaning)
This sign “ ” on the product or packaging indicates that the product cannot be treated as
household waste. Should be delivered specific recycling points for electronic and electrical
products. Proper handling of this product can help prevent environmental problems
caused by improper handling of this product and harm to human health. If you need more
details about recycling, please contact the office responsible for household waste disposal
services or the manufacturer or purchase point that purchases our products.
- 33 -
Warning:
Don't touch the power supply with wet hands!
Don't pull out the machine by pulling the power code!

Service E-mail: [email protected]
Choose LifePlus, Choose A Plus Life.
ICE MAKER
PRODUCT USE GUIDE
DBJ-45
We provide great warranty service. If you encounter any difficulties, please
contact the above email for help. We will reply you within 24 hours.