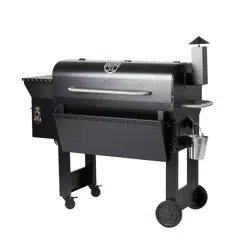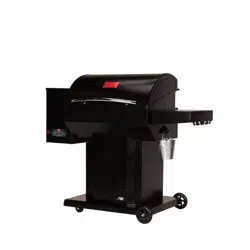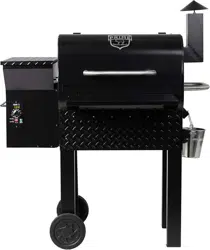
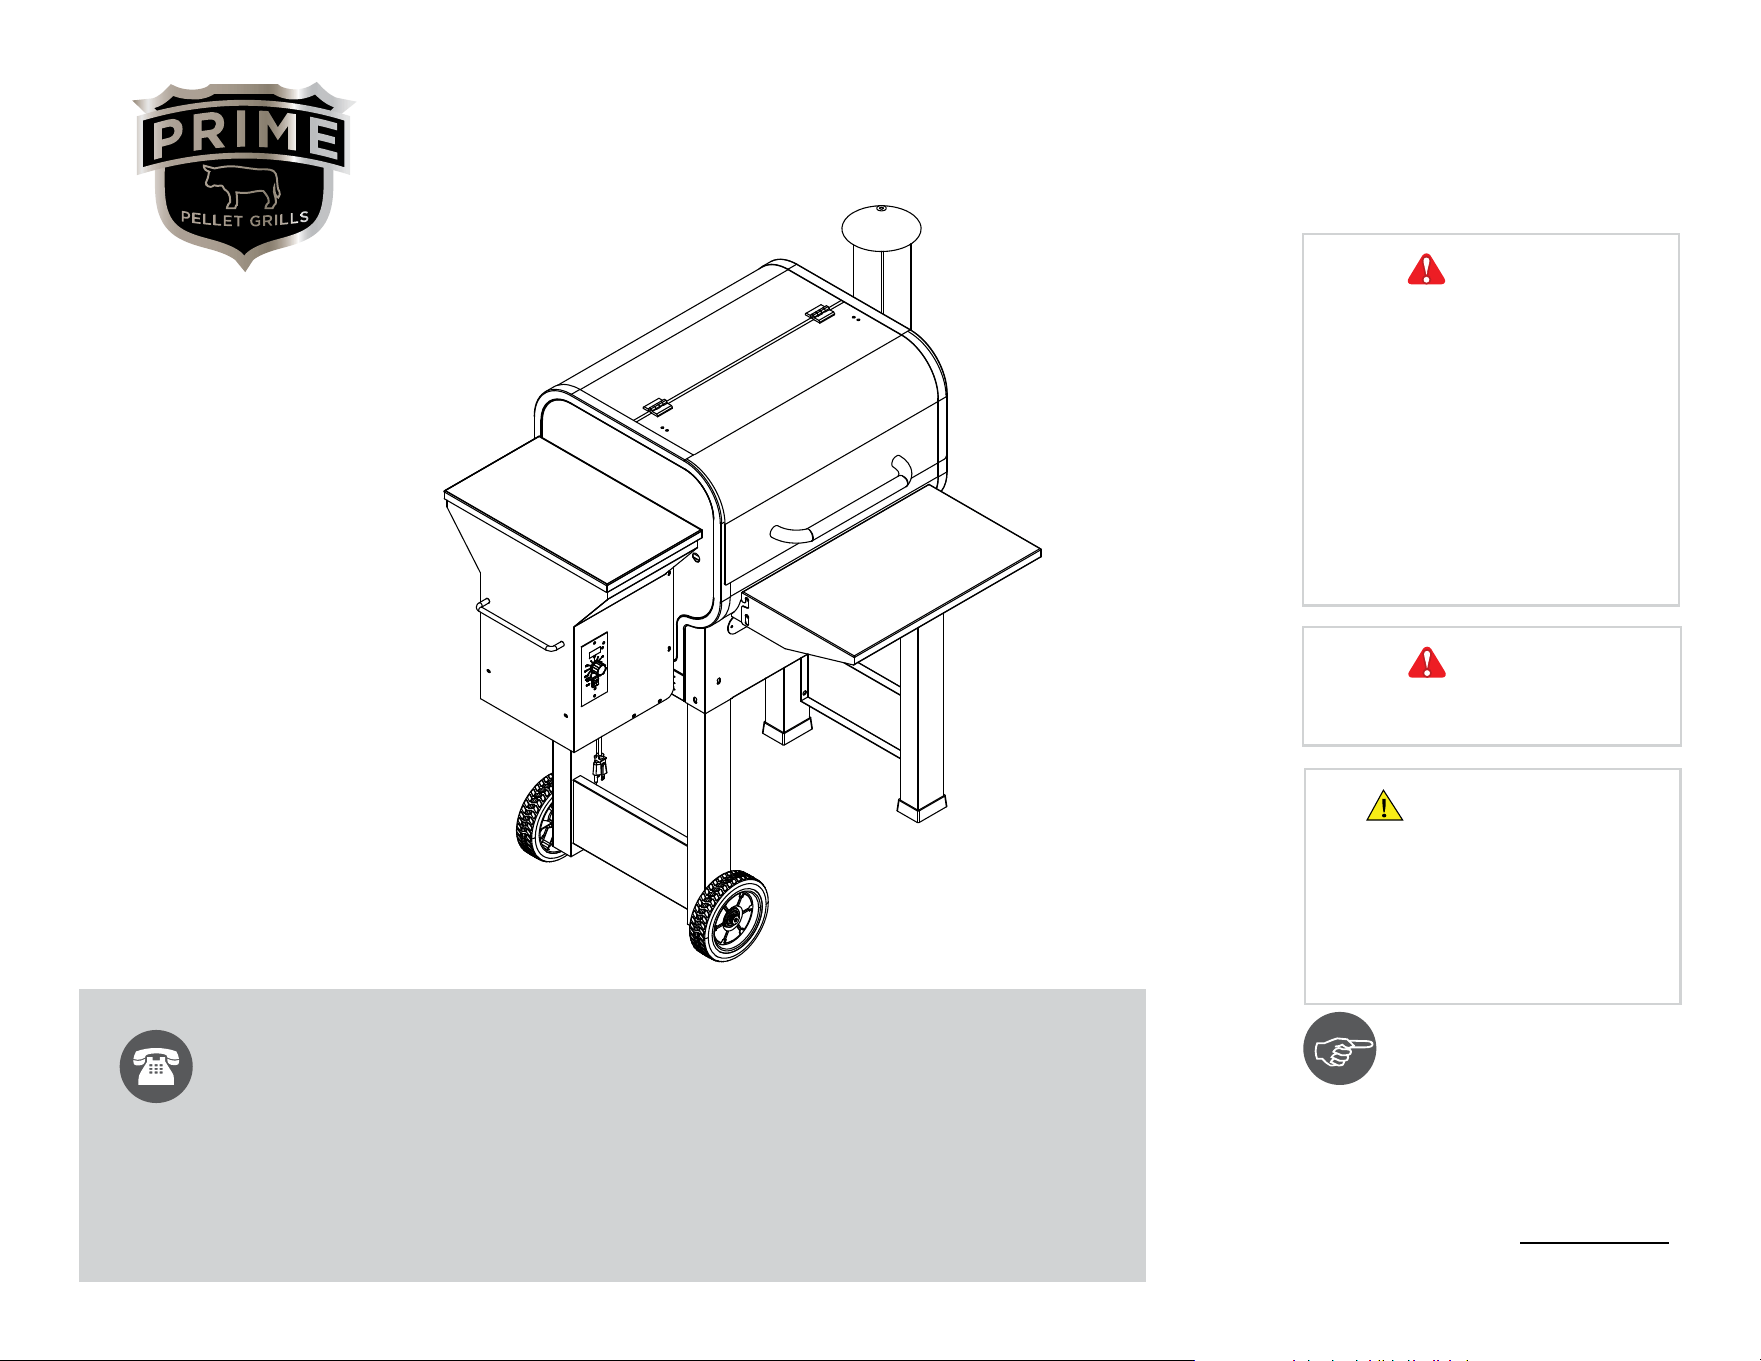
Prime Pellet Grill - KC King 600
Item#: 81221
Ignite, Inspire, Indulge
WARNING
FOR YOUR SAFETY
1. Please read this entire manual before
installation and use of this pellet fuel-
burning appliance. Failure to follow these
instructions could result in property
damage, bodily injury, or even death.
2. Contact local building or re ofcials
about restrictions and installation
inspection requirements in your area.
3. Save these instructions for future
reference.
WARNING
For Outdoor Use Only
ATTACH YOUR
RECEIPT HERE
Keep a copy of your proof of
purchase or order conrmation
which will be needed if you
need to contact us about
warranty coverage.
Purchase Date:
WARNING
This product can expose you to chemicals
including Carbon Monoxide, Lead, Chromium
(hexavalent compounds), Di(2-ethylhexyl)
phthalate (DEHP) and Diisononyl phthalate (DINP),
which are known to the State of California to cause
cancer and birth defects or other reproductive
harm. For more information, go to
www.P65Warnings.ca.gov.
12032019
Questions, problems, missing parts?
Before returning to
your retailer, our
exceptional customer service is available.
Call toll-free (866)866) 985-78779 a.m. – 9 p.m., EST
Email [email protected]
Live chat www.primepelletgrills.com
9 a.m. - 4 p.m., EST, Monday - Friday

Contact us for assistance: (866) 985-7877 | www.primepelletgrills.com TABLE OF CONTENTS | 2
TABLE OF CONTENTS / BEFORE YOU BEGIN
TABLE OF CONTENTS
Table of Contents Page 2
Before You Begin Page 2
Package Contents Page 3
Hardware Contents & Tools Included Page 4
Safety Information Page 5
Assembly Pages 6-10
First Start-Up Pages 11-15
Grill Functions Page 16
Everyday Grilling Page 17
Reigniting Your Grill Pages 18-20
Getting to Know Your Prime Pellet Grill Pages 21-22
Care of your Prime Pellet Grill Pages 23-24
Troubleshooting Pages 25-26
Warranty Page 27
BEFORE YOU BEGIN
Please read and understand this entire manual before
attempting to assemble, operate or install this appliance.
If you have any questions regarding the product,
please contact Customer Service.
Safety precautions are essential when any mechanical or
wood pellet fueled equipment is involved. Always heed
these precautions, as they are essential when using any
mechanical or wood pellet fueled equipment. Contact
local building or fire officials about restrictions and
installation inspection requirements in your area.
A MAJOR CAUSE OF FIRES
IS FAILURE TO MAINTAIN
REQUIRED CLEARANCES (AIR
SPACES) TO COMBUSTIBLE
MATERIALS. IT IS OF UTMOST
IMPORTANCE THAT THIS
PRODUCT BE INSTALLED
ONLY IN ACCORDANCE
WITH THESE INSTRUCTIONS.
Contact us for assistance: (866) 985-7877 | www.primepelletgrills.com COMPONENTS | 3
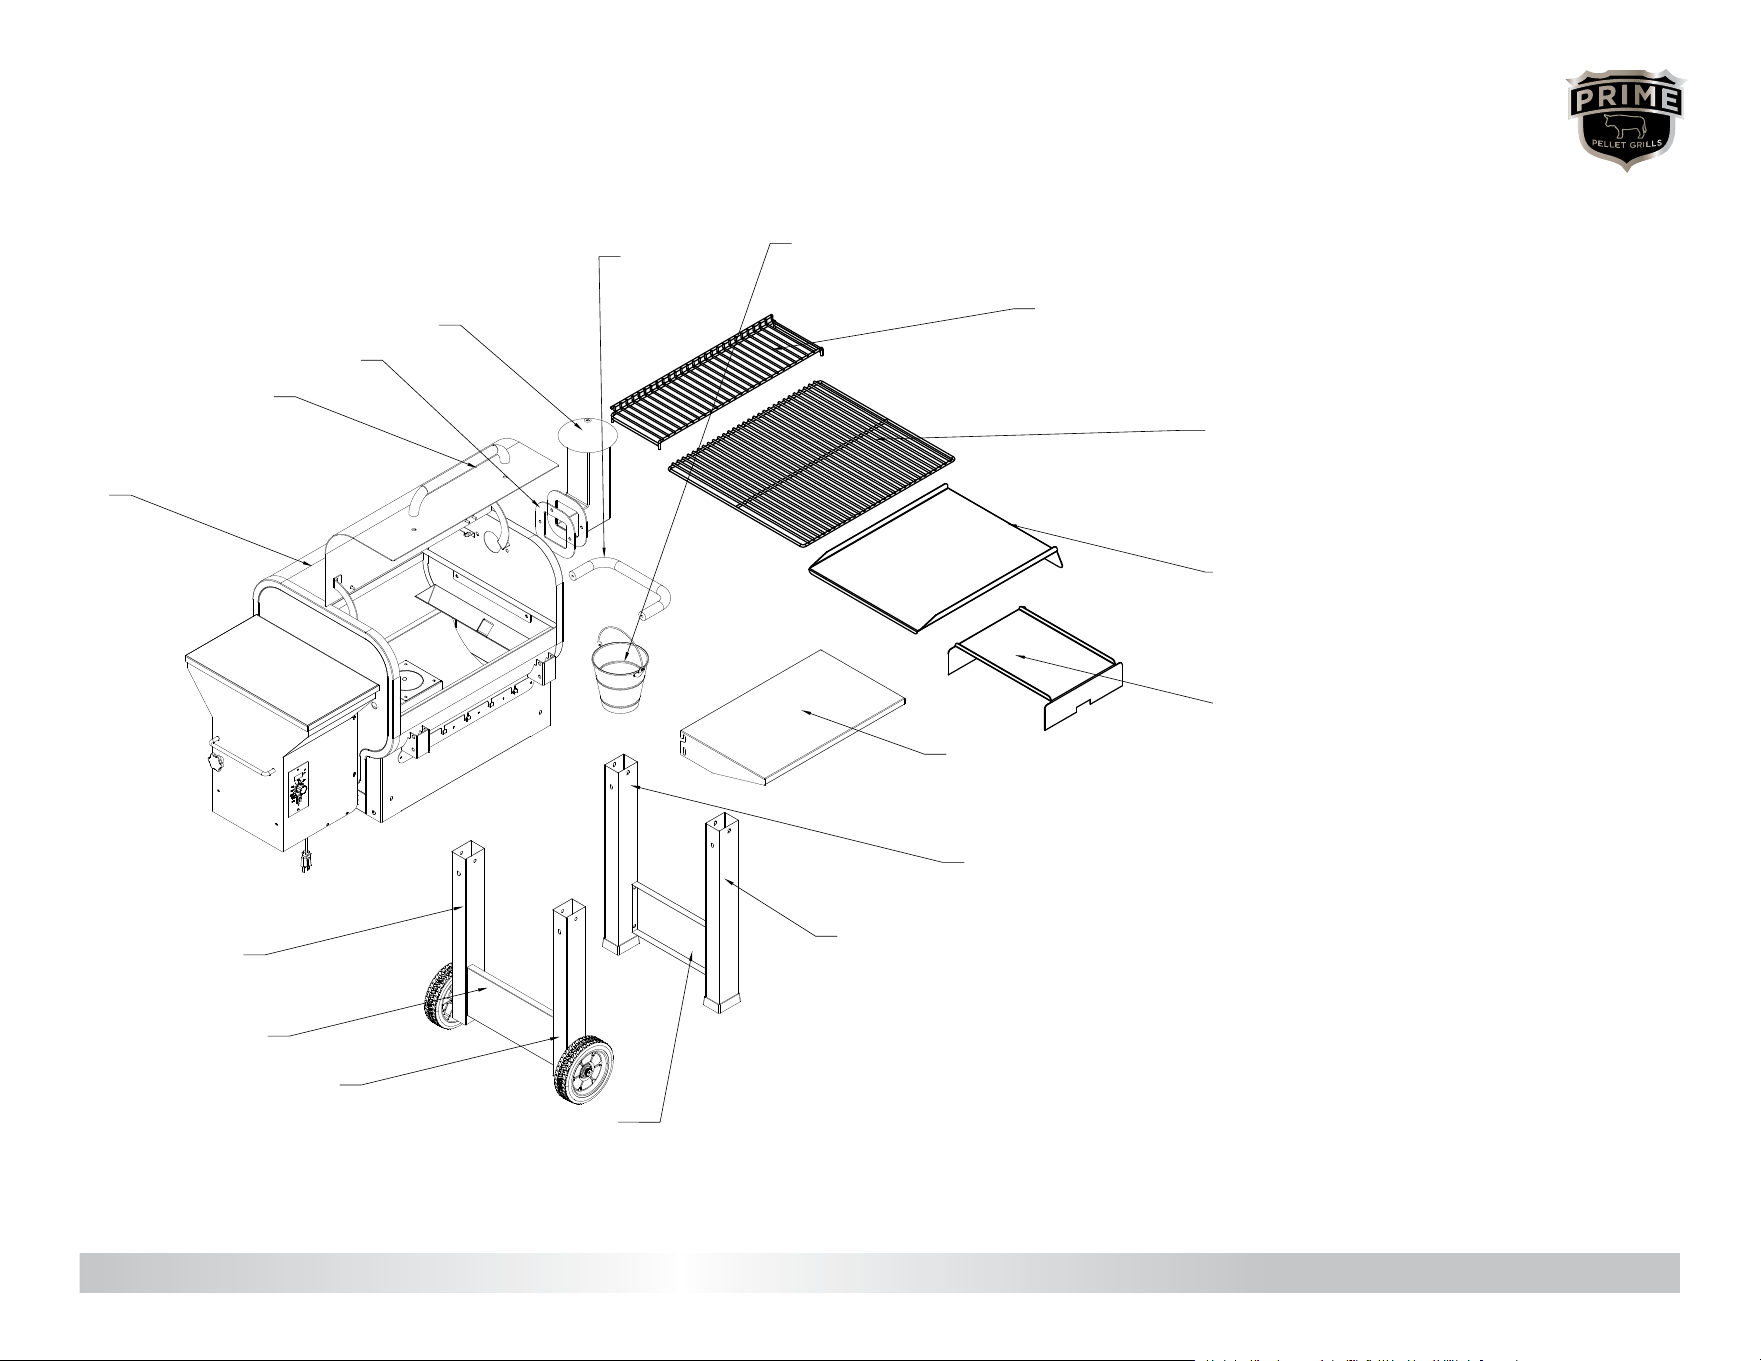
PACKAGE CONTENTS
PART DESCRIPTION
1
Grill Body
Wheeled Leg (A & B)
Support Leg (A & B)
Leg Brace (x2)
Haul Handle
Chimney Gasket
Drip Pail
Drip Pan
Main Cooking Grate
Upper Cooking Grate
Prep Shelf
Heat Bafe
Grill Door Handle
Chimney
1
2
2
4
4
3
3
9
5
6
7
8
2
3
4
5
6
7
8
9
!
#
$
%
&
!
&
%
$
#
Contact us for assistance: (866) 985-7877 | www.primepelletgrills.com HARDWARE | 4
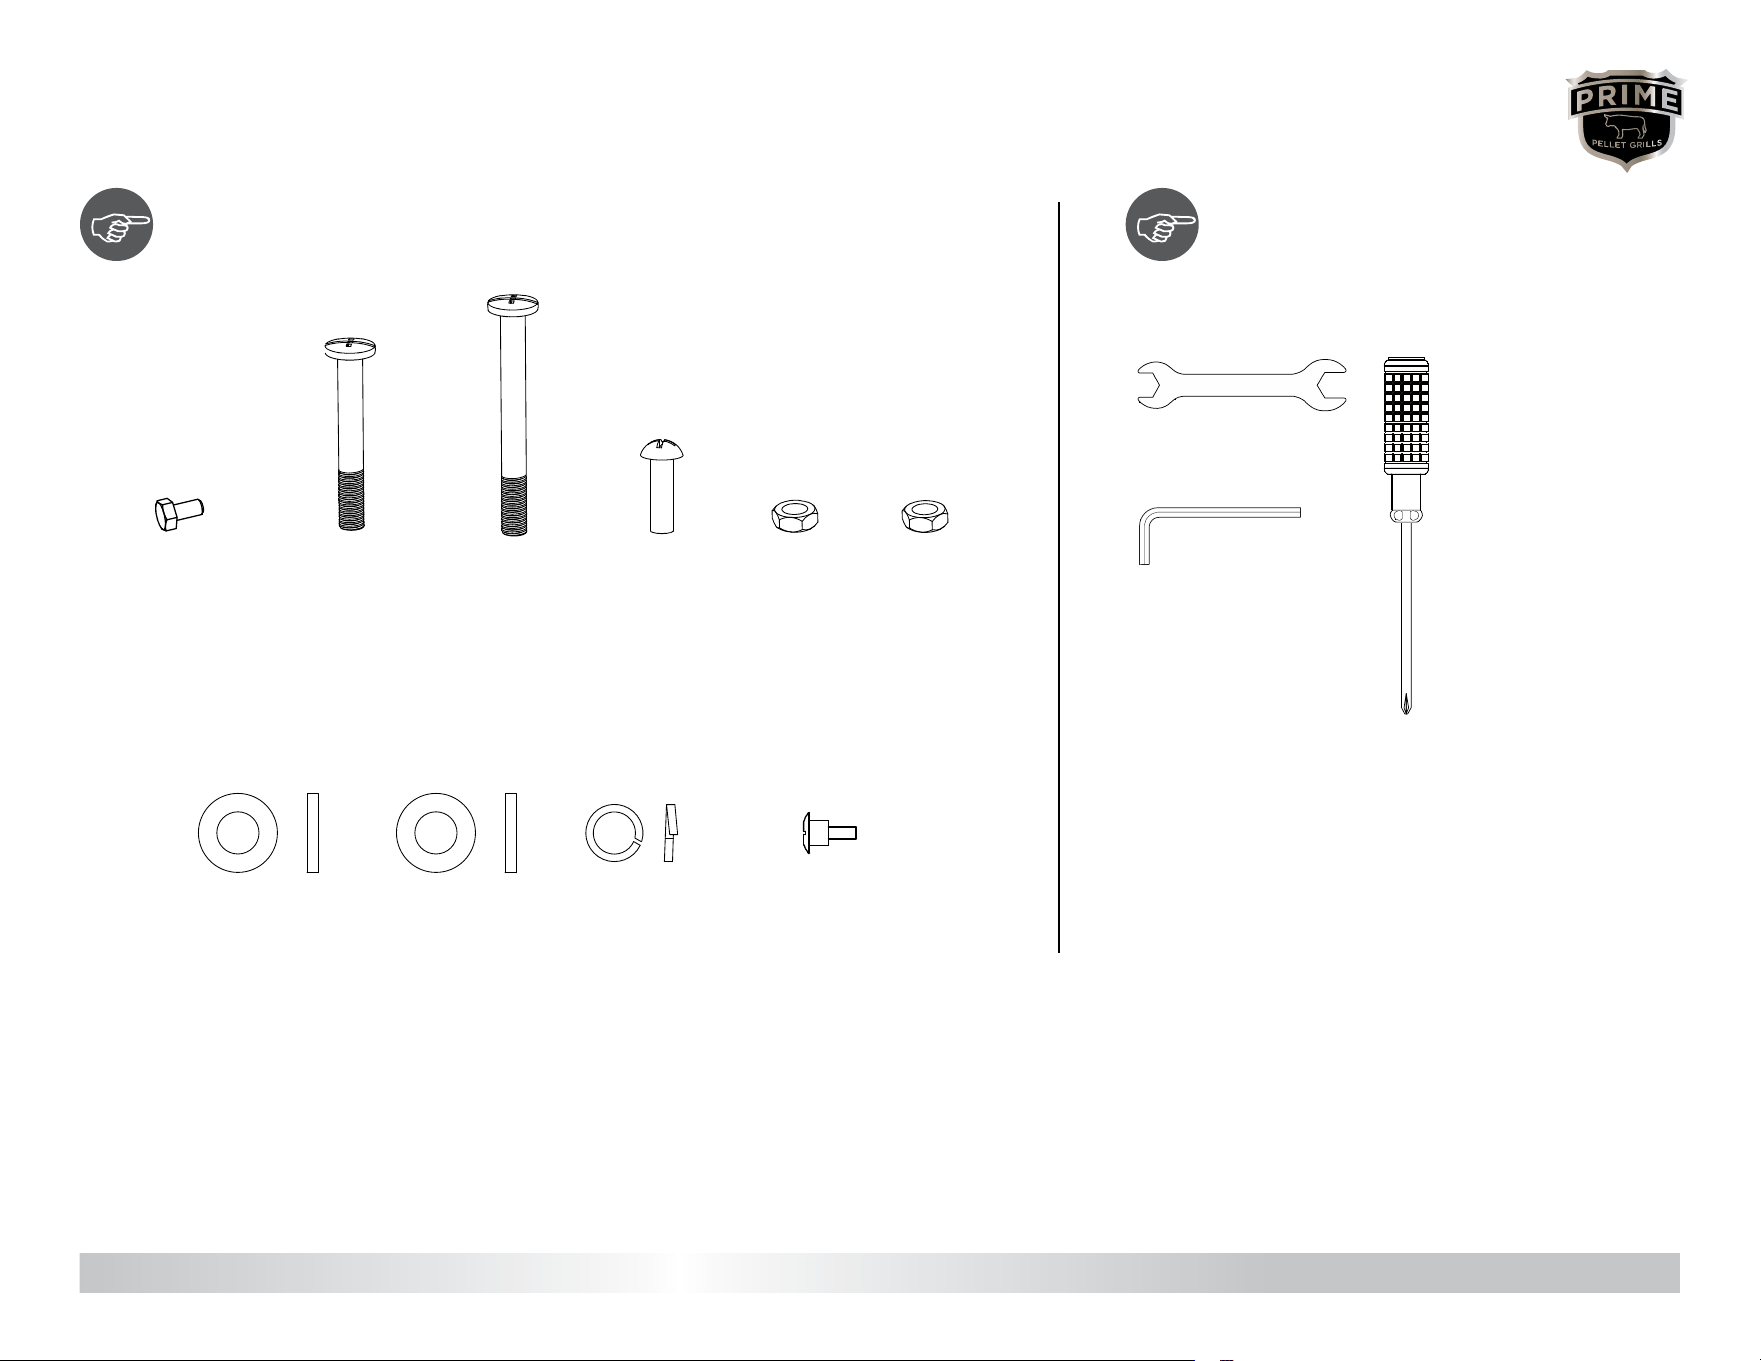
HARDWARE CONTENTS & TOOLS INCLUDED
HARDWARE CONTENTS TOOLS INCLUDED
16
6pc
A
D E
G JIF H
CB
Hex Bolt
1/4x20mm
Spring Washer
5/16
8pc16pc
A D E
G JI
F
H
Washer
5/16
CB
6pc
Washer
1/4
Shelf Axle
1/4
4pc
16
A D E
G JIF H
C
B
Bolt
5/16-18x65mm
4pc
16
A D E
G JIF H
C
Bolt
5/16-18x85mm
4pc
B
16
Bolt
A
D
E
G JIF H
1/4x20mm
8pc
C
5/16-18x85mm
B
16
A D
E
G JIF H
1/4x20mm
8pc
Nut
5/16
CB
16
2pc
Nut
1/4
A D E
G JI
F
H
CB
Wrench
Hex Key
Phillips Head
Screwdriver

Contact us for assistance: (866) 985-7877 | www.primepelletgrills.com SAFETY INFORMATION | 5
DANGER
EXPLOSION—FIRE HAZARD
• Keep solid combustibles, such as building
materials, paper, or cardboard a safe distance
away from the grill as recommended by the
instructions.
• Provide adequate clearances around air
openings into the combustion chamber.
• Never use the grill in spaces which do or may
contain volatile or airborne combustibles,
or products such as gasoline, solvents, paint
thinner, dust particles, or unknown chemicals.
• During operation, this appliance can be a
source of ignition. Keep grill area clear and
free from combustible materials, gasoline,
paint thinner, cleaning solvents and other
ammable vapors and liquids. Do not use
grill in areas with high dust content. When
operating this grill, maintain a minimum
distance of 30.48 cm./12 in. from the grill to
combustibles.
• When operating this grill under overhead
combustibles, a minimum of 101.6 cm./40 in.
Is required.
• Only use this grill outside on a
noncombustible surface and away from all
combustible materials.
• Never use gasoline, gasoline-type lantern fuel,
kerosene, charcoal lighter uid, or ammable
liquids to start or “refresh” a re in this grill. Keep
all such substances far away from this grill.
WARNING
WARNING indicates an imminently hazardous
situation which, if not avoided, will result in
death or serious injury.
WARNING
• Installation and repair should be done by
a qualied service person. The grill should
be inspected before use and annually by
a qualied service person. More frequent
cleaning may be required as necessary.
DANGER
CARBON MONOXIDE HAZARD
• This grill is a combustion appliance. All
combustion appliances produce Carbon
Monoxide (CO) during the combustion
process. This product is designed to produce
extremely minute, non-hazardous amounts
of CO if used and maintained in accordance
with all warnings and instructions.
• Carbon Monoxide (CO) poisoning produces
u-like symptoms, watery eyes, headaches,
dizziness, fatigue, and possible death. You
can’t see and you can’t smell it. It is an
invisible killer. If these symptoms are present
during operation of this product, get fresh air
immediately!
• For outdoor use only. Never use inside house,
building, or other unventilated or enclosed
areas.
• This grill consumes air (Oxygen). Do not use
in unventilated or enclosed areas to avoid
endangering your life.
• Alcohol consumption and drug use increase
the effects of Carbon Monoxide poisoning.
• Carbon Monoxide is especially toxic to mother
and child during pregnancy, infants, the
elderly, smokers, and people with blood or
circulatory system problems, such as anemia
or heart disease.
WARNING
BURN HAZARD
• Never leave grill unattended when hot or in
use.
• Keep out of reach of children. Children should
be supervised while in the vicinity of the grill.
• Never move the grill while it is operating.
• The grill must cool completely before being
moved, transported, or cleaned.
• Alert children and adults to the hazards of
high surface temperatures. Stay away from
these surfaces to avoid burning skin or
igniting clothing.
WARNING
• By-products of the combustion fuel used
by this product contain chemicals known to
the State of California to cause cancer, birth
defects, or other reproductive harm.
DANGER
• Make sure grill is plugged in to an appropriate
3-prong outlet.
• An electrical supply with a GFCI protection
is required. In order to protect against shock
hazard, locate a grounded 3-prong receptacle
in reach of the 1.8 m./6 ft. power cord. When
installing the receptacle, follow the National
Code and local codes and ordinances.
WARNING
• This grill must only be assembled and
operated in accordance with this instruction
manual and its warnings.
• Never use heating fuel pellets in this grill due
to potential hazardous contaminants and
additives that may be present.
• For best cooking results and avor, use only
Prime Pellet Grills brand wood pellets.
WARNING
• Wood pellets must be stored in a dry location
and away from heat-producing appliances
and other fuel containers.
• Keep this grill clean. Please refer to the
cleaning instructions in this instruction
manual.
• Only specied accessories should be used
with this grill.
SAFETY INFORMATION
SAFETY INFORMATION
Contact us for assistance: (866) 985-7877 | www.primepelletgrills.com ASSEMBLY | 6
ASSEMBLY
PREPARATION
Before beginning assembly, be sure to empty contents of carton and make sure all parts are present. READ ALL INSTRUCTIONS BEFORE INSTALLING AND USING THE APPLIANCE.
Place all parts on a soft, level surface for assembly. Tools Required for Assembly
Estimated Assembly Time: 60 Minutes | DO NOT over-tighten hardware!
1
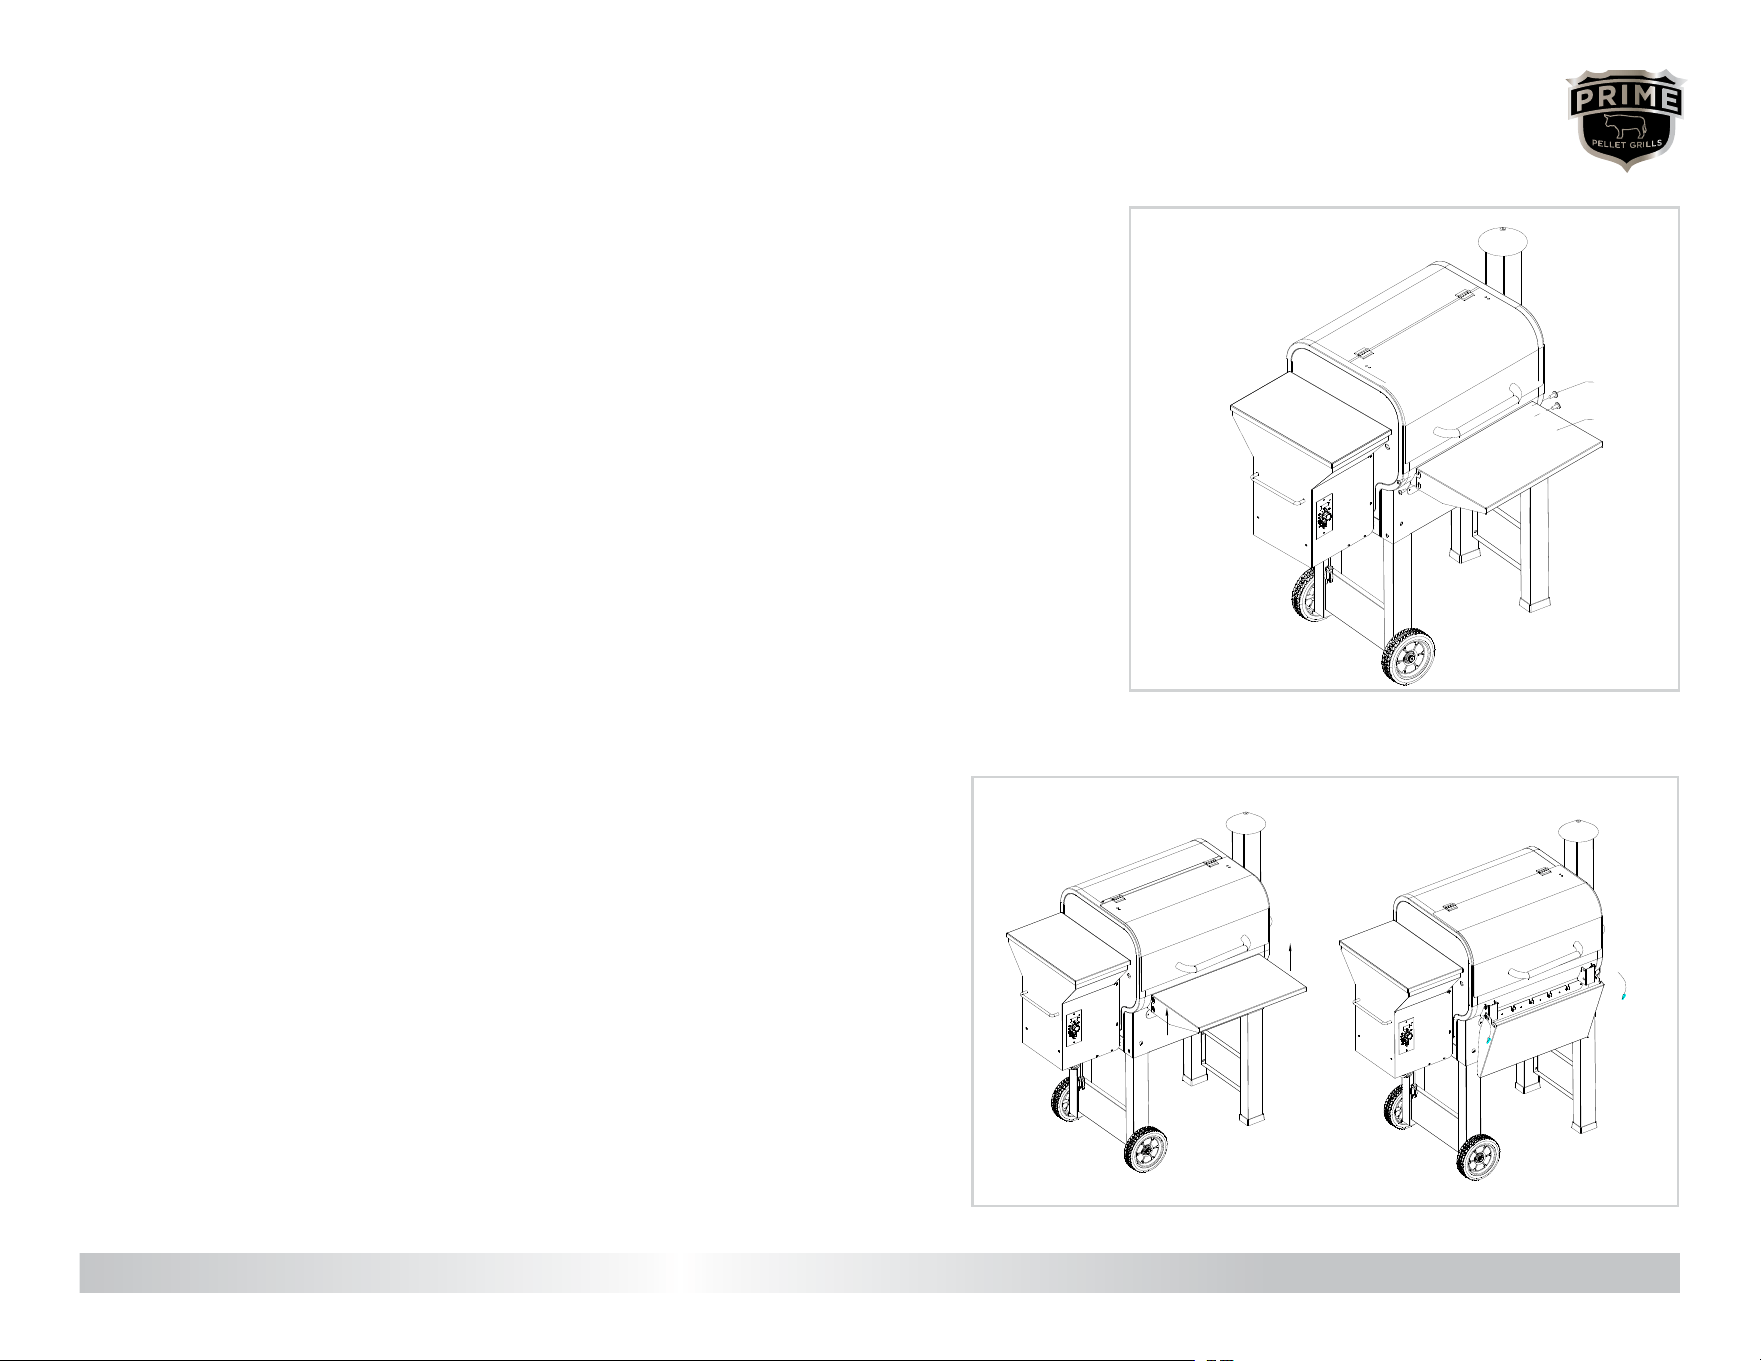
On a protected, level surface on the ground, turn the Grill Body 1 upside-down.
Attach the Wheeled Legs 2 to the HOPPER END of the Grill Body. Legs are not
interchangeable. Find the 2 aligned holes on the inside of each Leg, near the bottom
(wheeled) end. Consult diagram for proper orientation. Align bolt eyelets in each
leg with the eyelets in corners of the skirt panels of the Grill Body. Place a Washer H
on a Bolt B and insert into the front skirt panel and through the leg, fastening with
Washer H, Spring Washer I, and Nut E. Repeat with the same hardware on the
back leg. Insert a Bolt C with Washer H into each of 2 eyelets in the side skirt panel
(on either side of the hopper), and through each Wheeled Leg. Secure with the same
combination of fastening hardware H/I/E.
Attach the Support Legs 3 to the opposite end of the Grill Body. Legs are not
interchangeable. Find the 2 aligned holes on one of each Leg, near the bottom
(footed) end. Consult diagram for proper orientation. Insert Bolt B with Washer H
into the front skirt panel of the grill and through the leg, fastening with Washer H,
Spring Washer I, and Nut E. Repeat with the same hardware on the back leg. Insert
2 Bolts C into the two eyelets in the bottom edge of the side skirt panel, and through
the Wheeled Legs. Secure with the same combination of fastening hardware H/I/E.
Do not fully tighten all hardware yet.
Hardware Used:
B Bolt (5/16-18x65) x4 C Bolt (5/16-18x85) x4
E Nut (5/16) x8 H Washer (5/16) x16
I Spring Washer (5/16) x8
1
A MAJOR CAUSE OF FIRES IS FAILURE TO MAINTAIN REQUIRED CLEARANCES (AIR
SPACES) TO COMBUSTIBLE MATERIALS. IT IS OF UTMOST IMPORTANCE THAT THIS
PRODUCT BE INSTALLED ONLY IN ACCORDANCE WITH THESE INSTRUCTIONS.
H/I/E
B
B
B
B
C
C
1
C
2A
3A
3B
H
2B
Contact us for assistance: (866) 985-7877 | www.primepelletgrills.com ASSEMBLY | 7
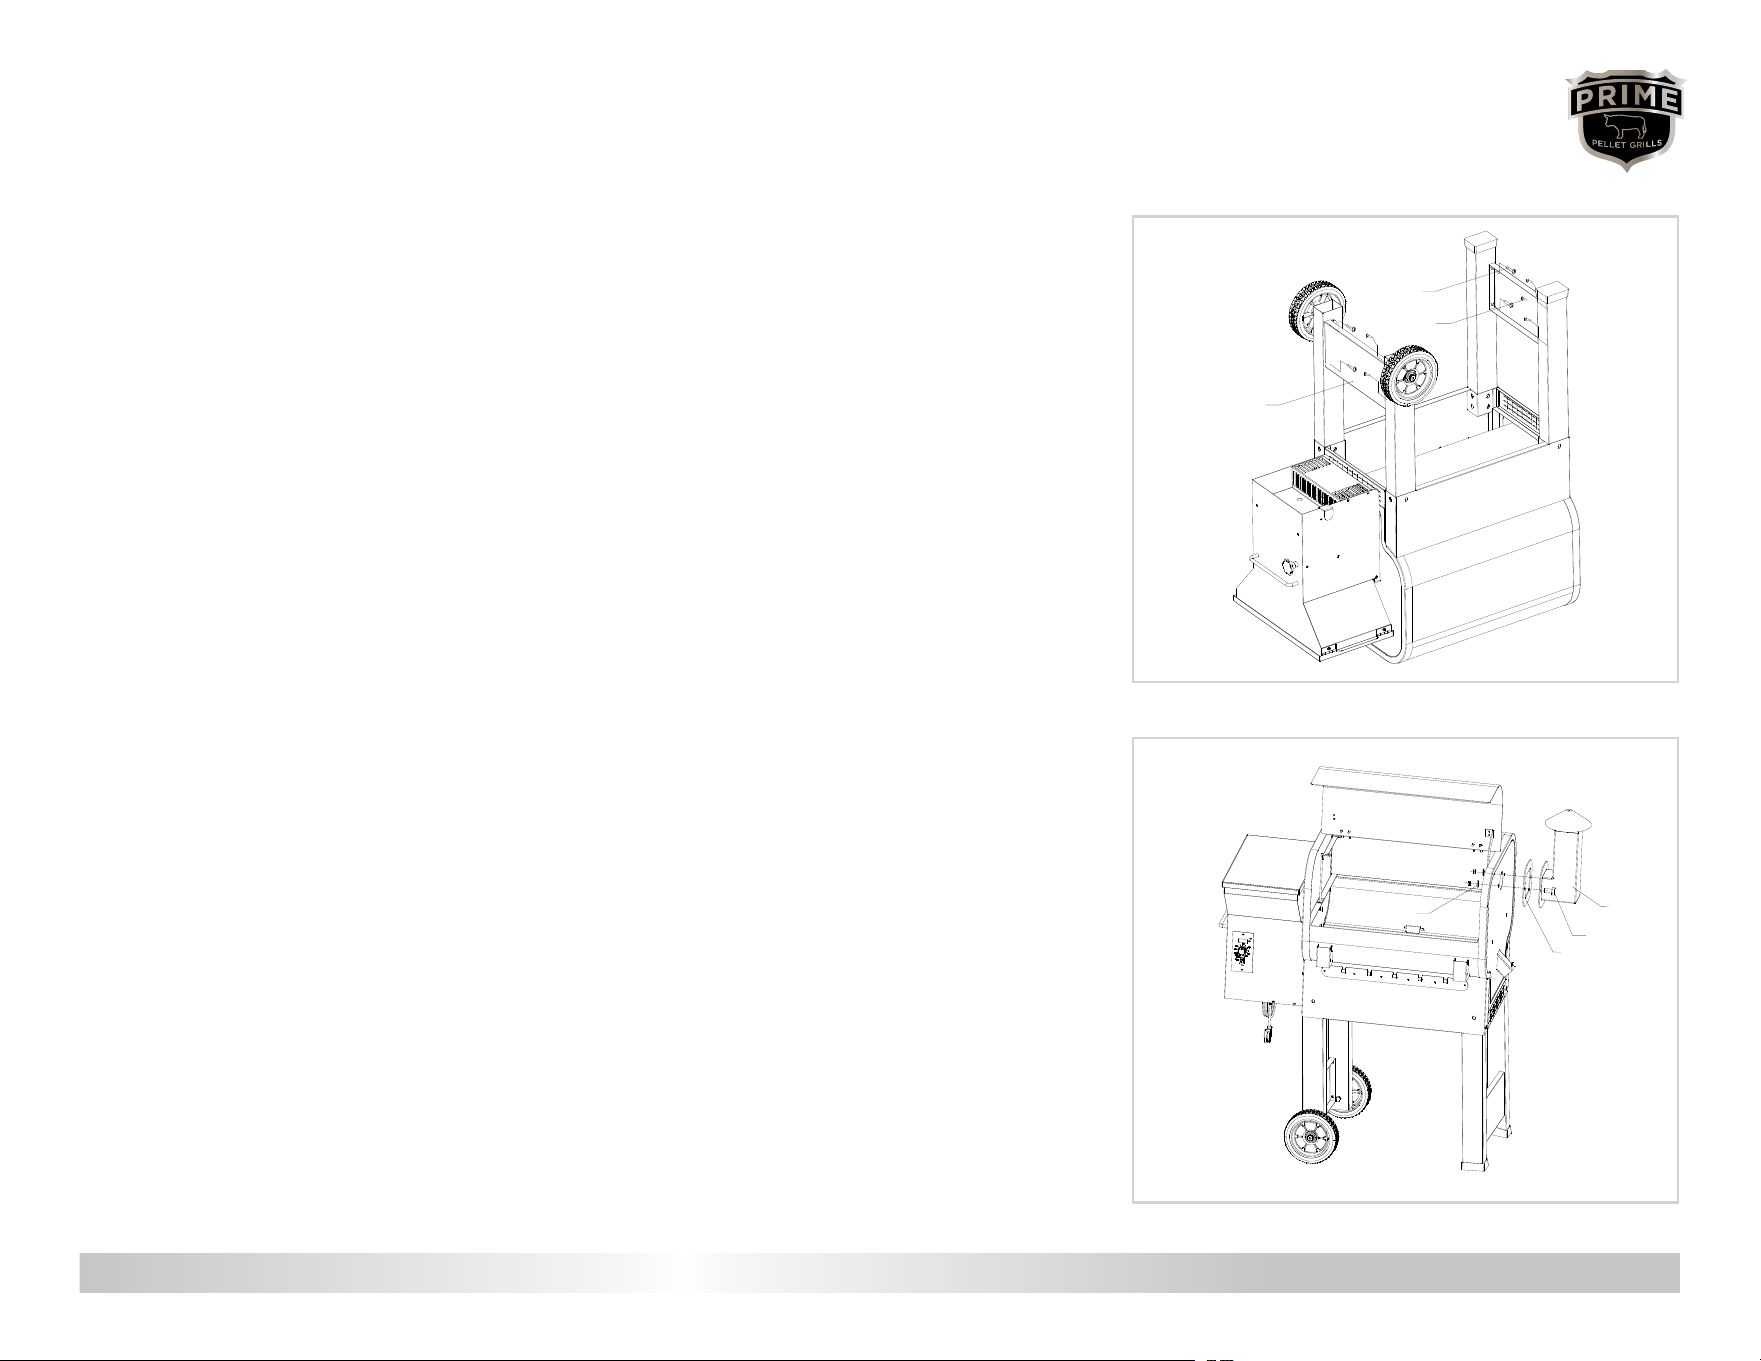
ASSEMBLY
3
Install the Chimney 7: Open the grill door. Align the Chimney Gasket 8 with the open end of the
Chimney, then align both with the eyelets on either side of the exhaust hole on the body of the
grill. Insert 2 Hex Bolts A into the eyelets and fasten them on the inside of the grill using a Washer G
and Nut F on each Hex Bolt.
Fully tighten Chimney hardware.
Hardware Used:
A Hex Bolt (1/4x20) x2
F Nut 1/4 x2
G Washer 1/4 x2
3
2
Attach the Leg Brace 4 between the Support Legs 3 using 4 Bolts D. Repeat to install the Leg
Brace between the Wheeled Legs 2.
Once all 8 Bolts are seated, fully tighten all hardware installed to this point.
With assistance, carefully turn the grill back upright.
Hardware Used:
D Bolt (1/4x20) x8
2
4
D
F/G
8
A
7
4
Contact us for assistance: (866) 985-7877 | www.primepelletgrills.com ASSEMBLY | 8
ASSEMBLY
4
Attach the Grill Door Handle 6: Select two Hex Bolts A and Washers G. Place the Washers on
the Hex Bolts and insert one through each eyelet in the grill door into either end of the Grill Door
Handle. Fully tighten both Hex Bolts.
Hardware Used:
A Hex Bolt (1/4x20) x2
G Washer (1/4) x2
4
5
5
A/G
6
A/G
5
Attach the Haul Handle 5: Select two Hex Bolts A and Washers G. Place Washers on Hex Bolts.
Locate holes in the handle brace on the inside the grill chamber below the exhaust, and insert
one Hex Bolt in each hole as shown. Align threaded bolt holes in each end of the Haul Handle with
Hex Bolts and fasten together. Fully tighten both Hex Bolts.
Hardware Used:
A Hex Bolt (1/4x20) x2
G Washer (1/4) x2
Contact us for assistance: (866) 985-7877 | www.primepelletgrills.com ASSEMBLY | 9
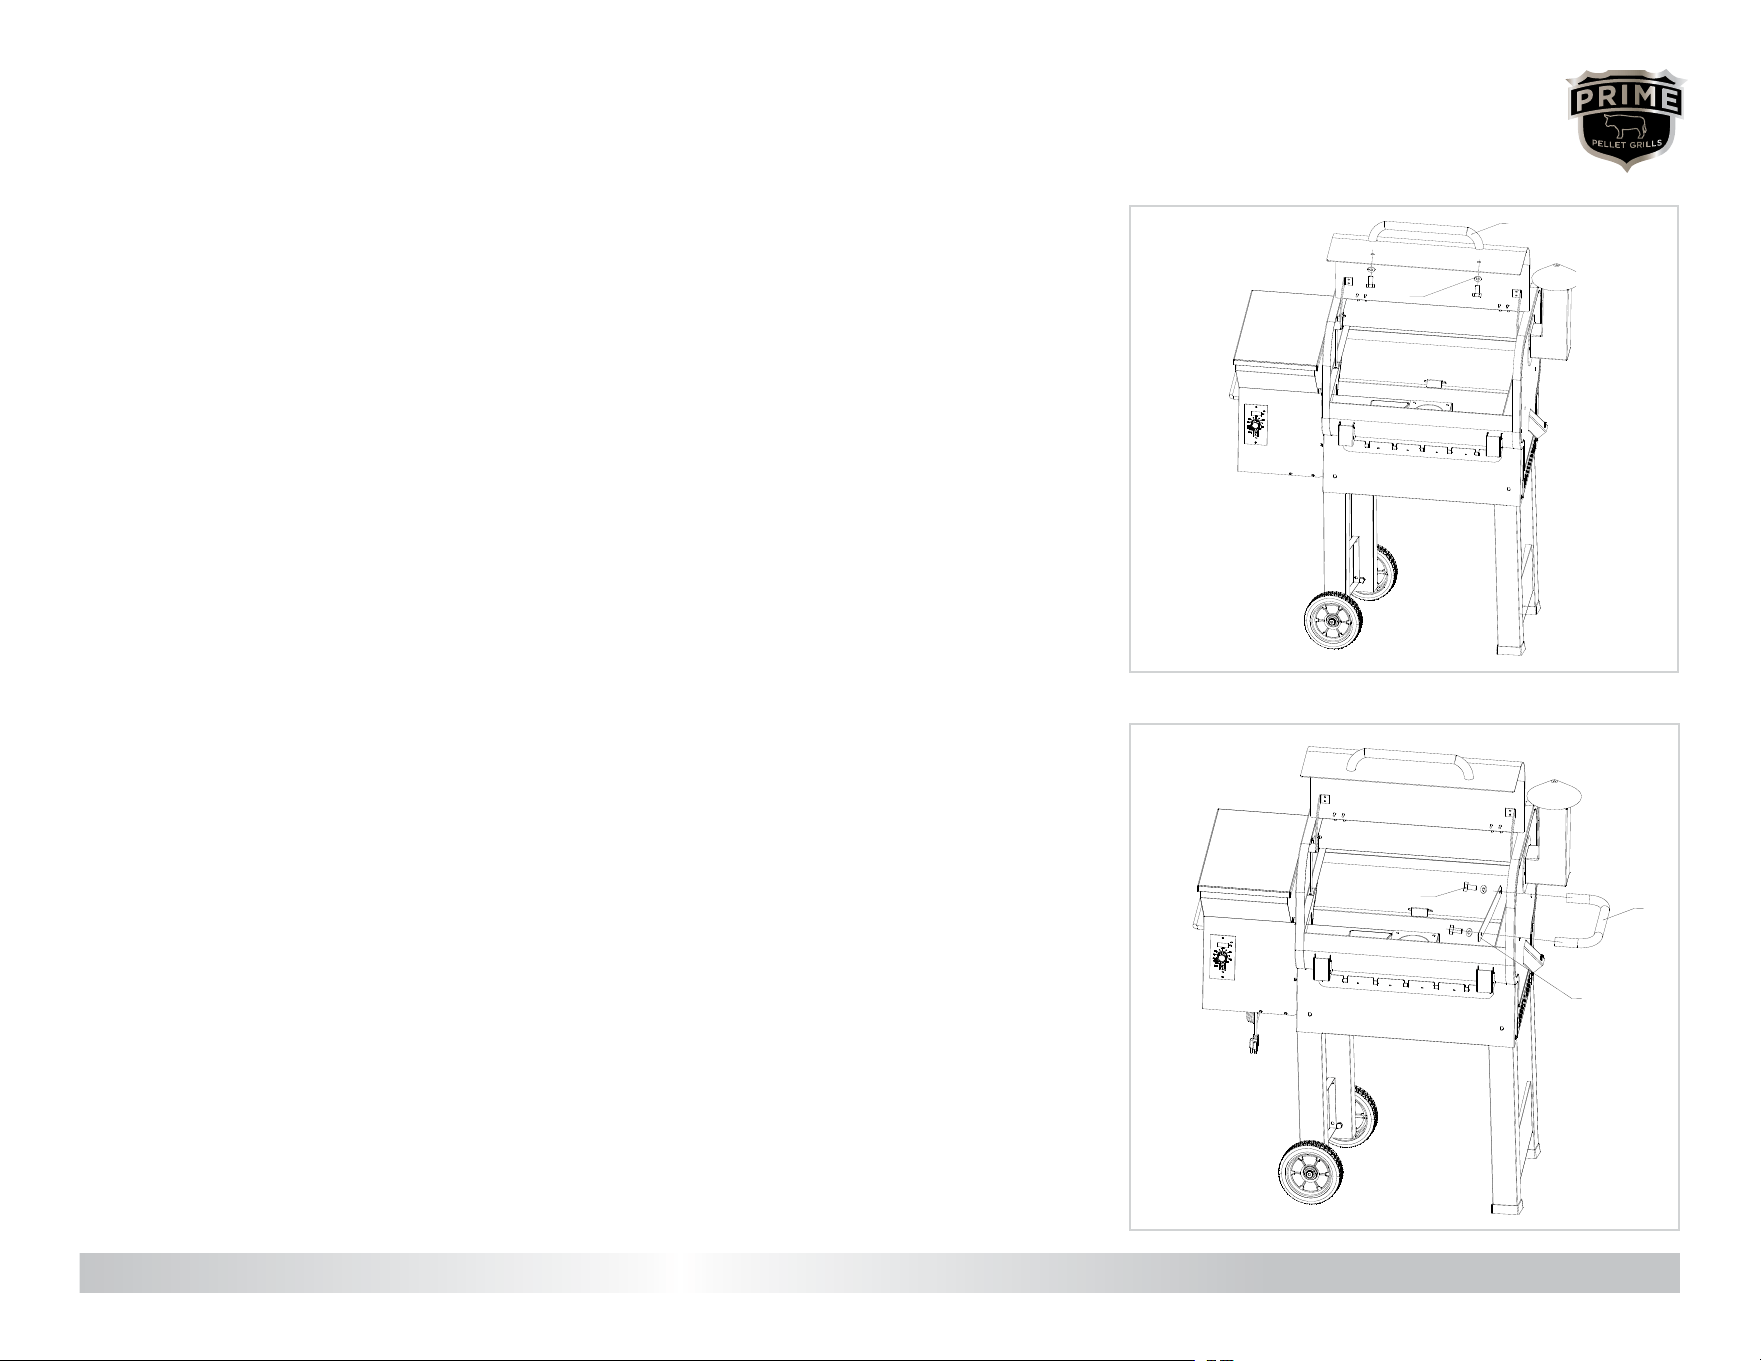
ASSEMBLY
NOTE: The Prep Shelf folds for transportation and storage. Simply lift up near the Axles
and hinge the Shelf down at.
6
6
6
Install the Prep Shelf 9 using 4 Shelf Axles J as shown. Fully tighten after all Shelf Axles are
inserted nger-tight.
Hardware Used:
J Shelf Axles x 4
J
9
Contact us for assistance: (866) 985-7877 | www.primepelletgrills.com ASSEMBLY | 10
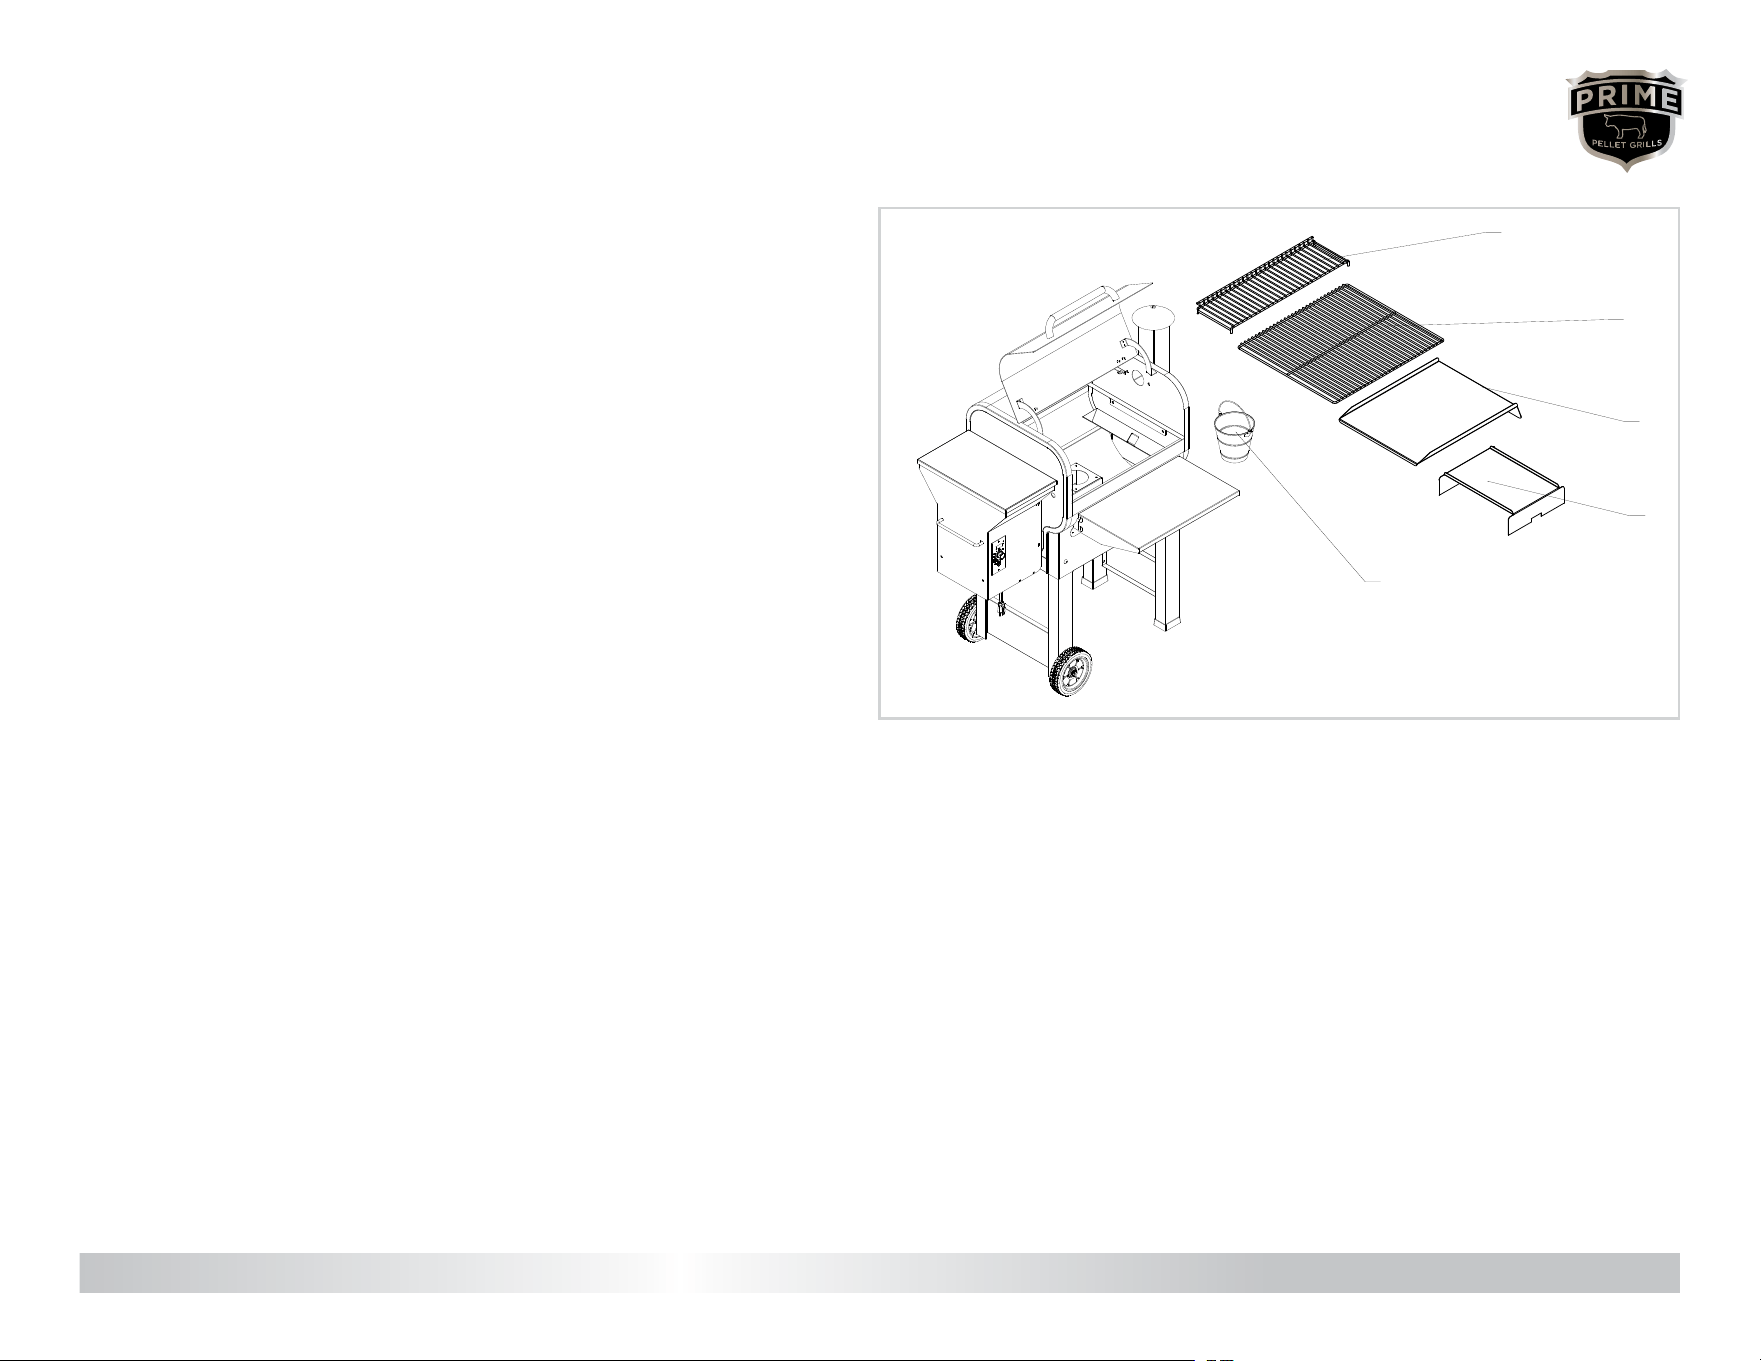
ASSEMBLY
7
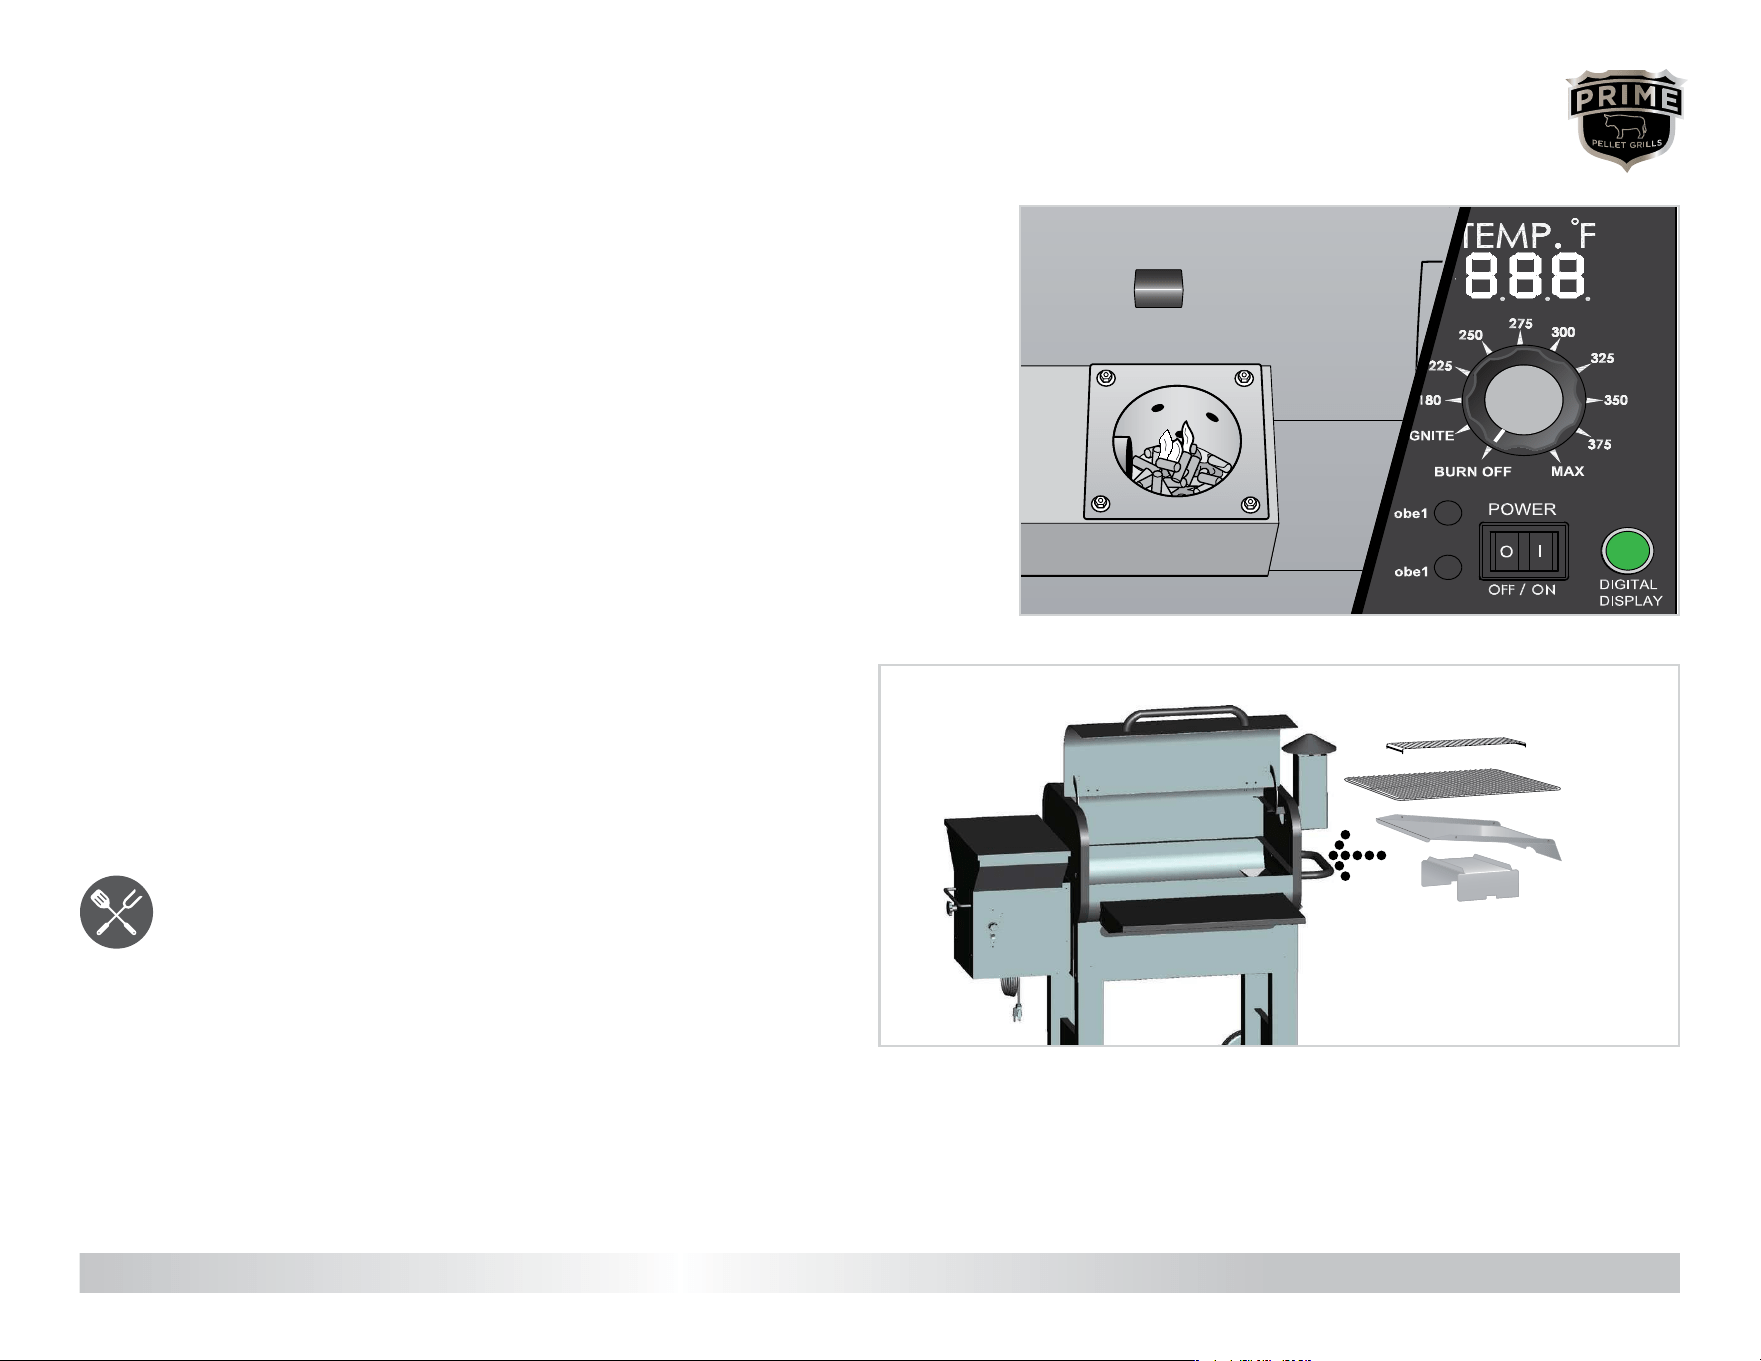
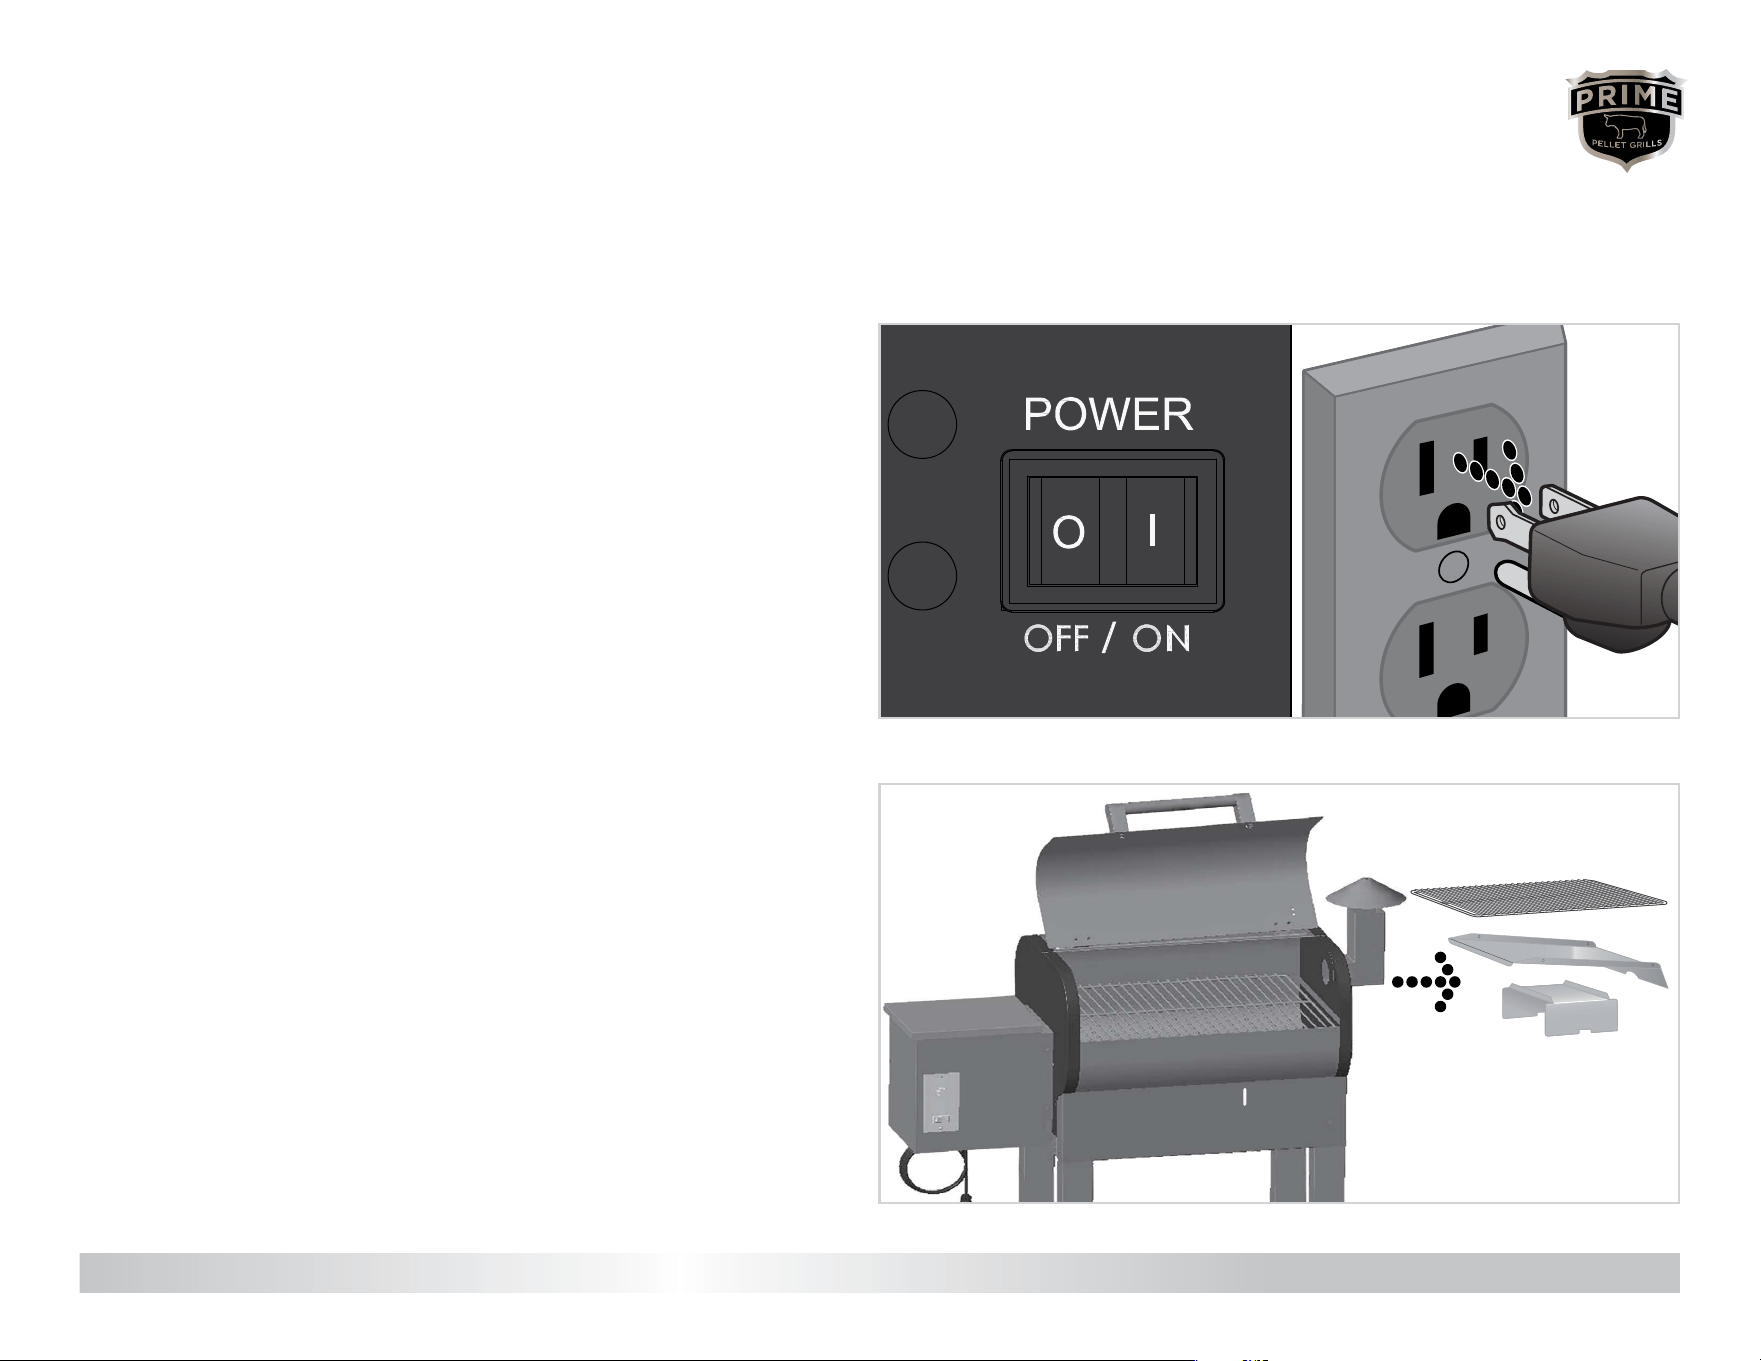
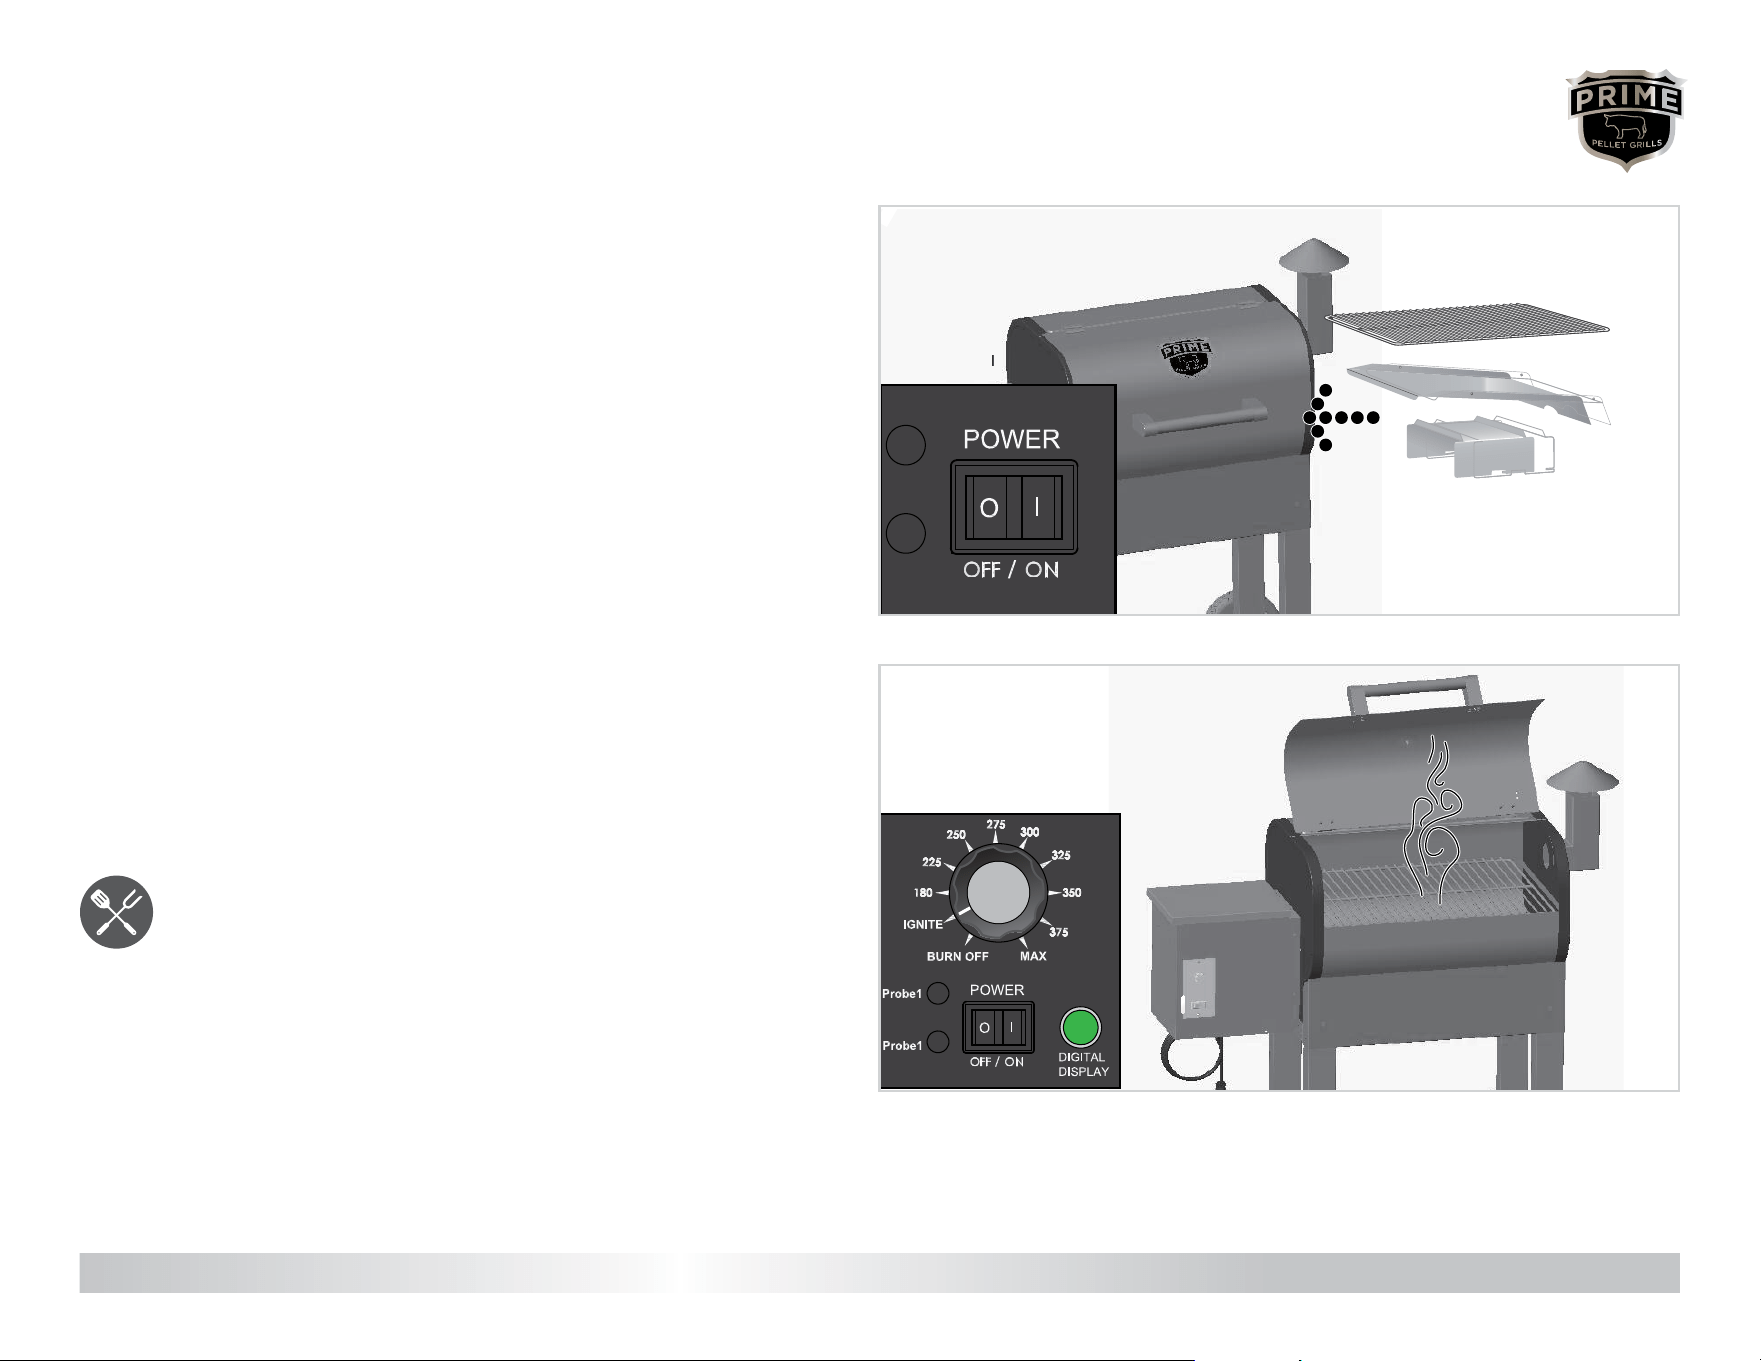
Place the interior components: First insert the Heat Bafe #, ensuring
that it is properly seated over the re pot. Position the Drip Pan $,
aligned with the grease drain tube. Finally, add the Main Cooking Grate %
and the Upper Cooking Grate &.
Hang the Drip Pail ! below the drain.
You’re almost there! Follow the instructions for “First Start-Up” of your
Prime Pellet Grill (Pages 11-15).
SAVE THESE INSTRUCTIONS.
7
!
#
$
%
&
Contact us for assistance: (866) 985-7877 | www.primepelletgrills.com OPERATION | 11
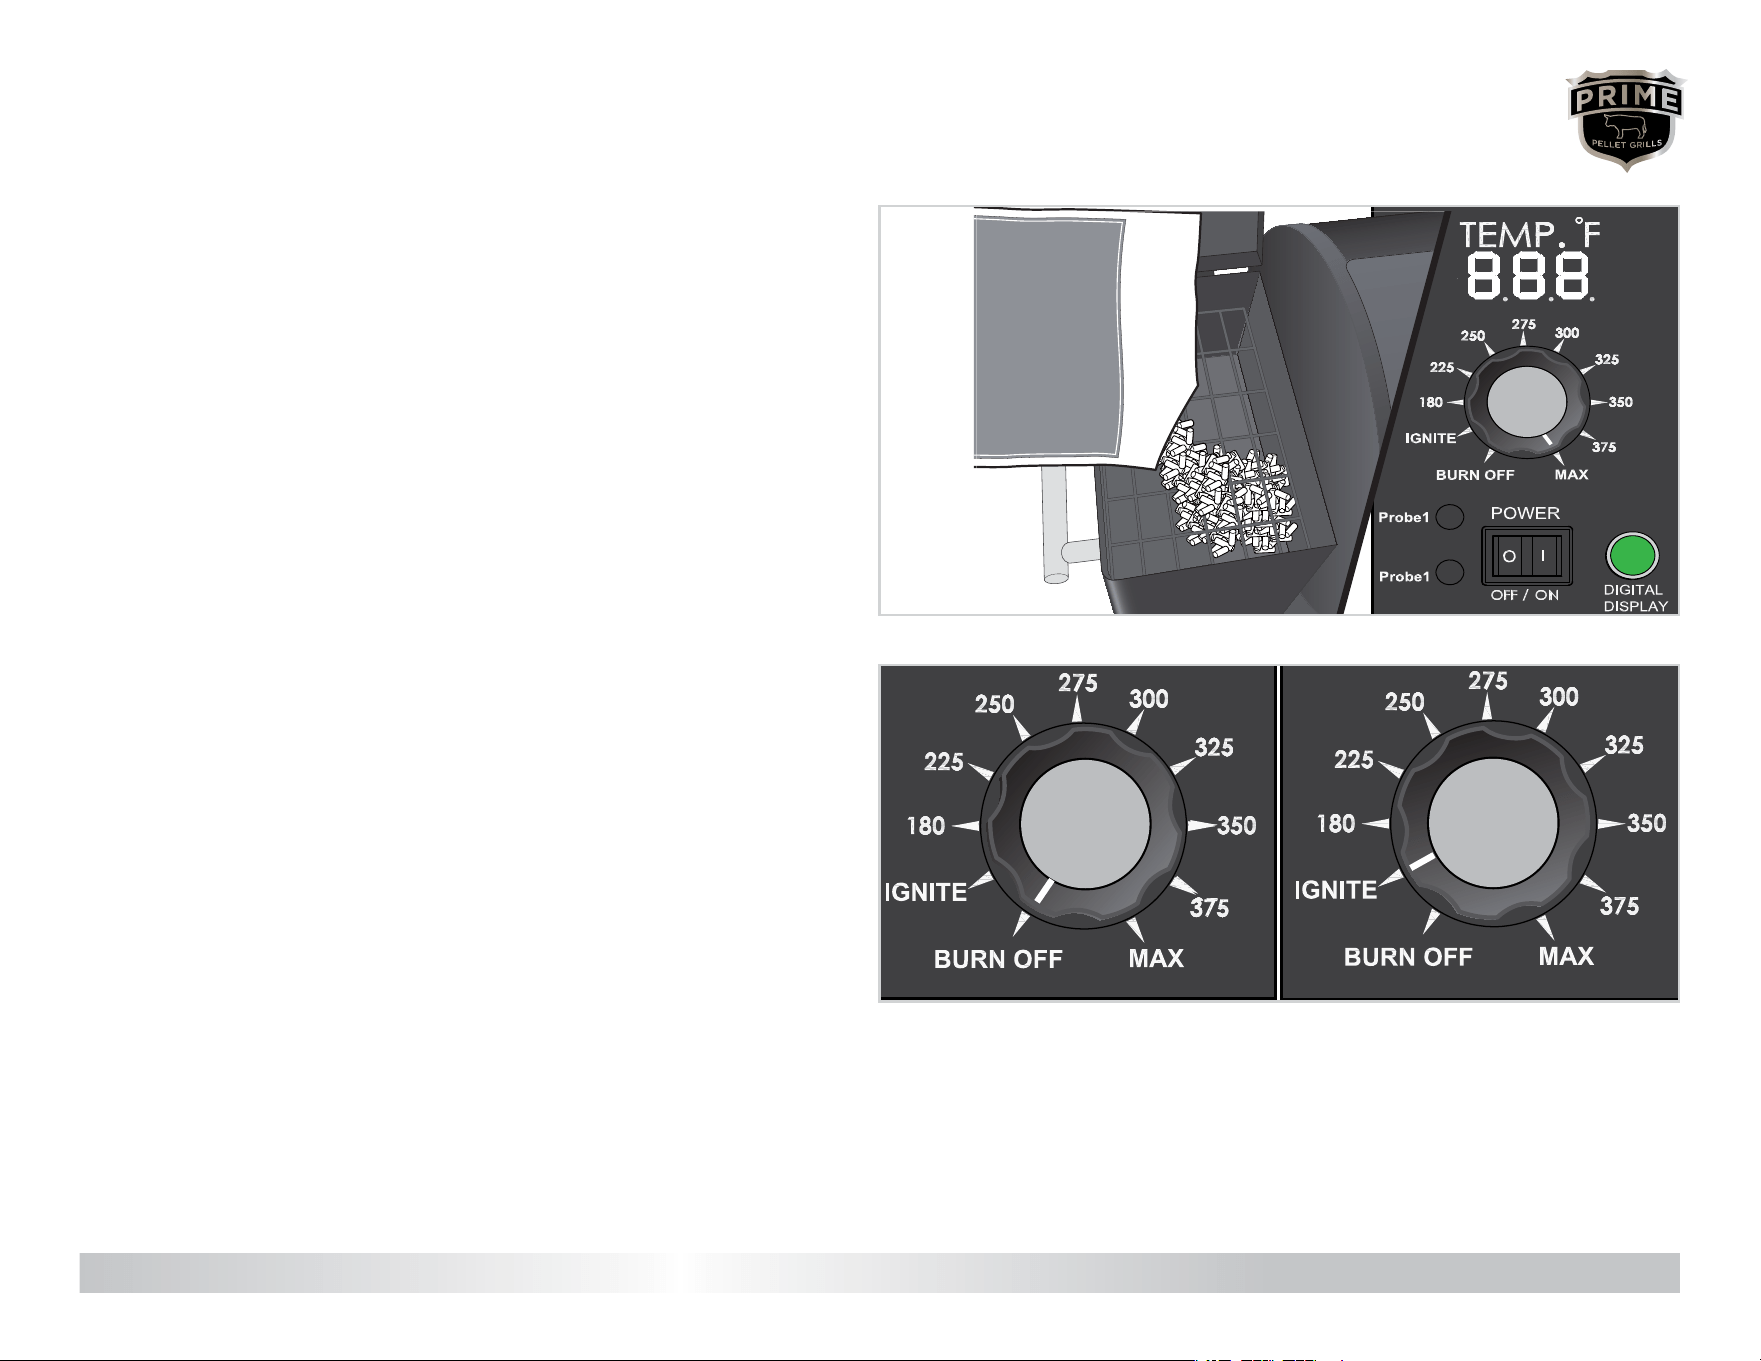
FIRST START-UP
WARNING: Before use, place your Prime Pellet Grill on a non-combustible surface in accordance with local re safety ordinances. Do not use under a combustible ceiling or overhang.
You must follow these steps before rst use (prior to adding pellets), or whenever the grill runs completely out of pellets.
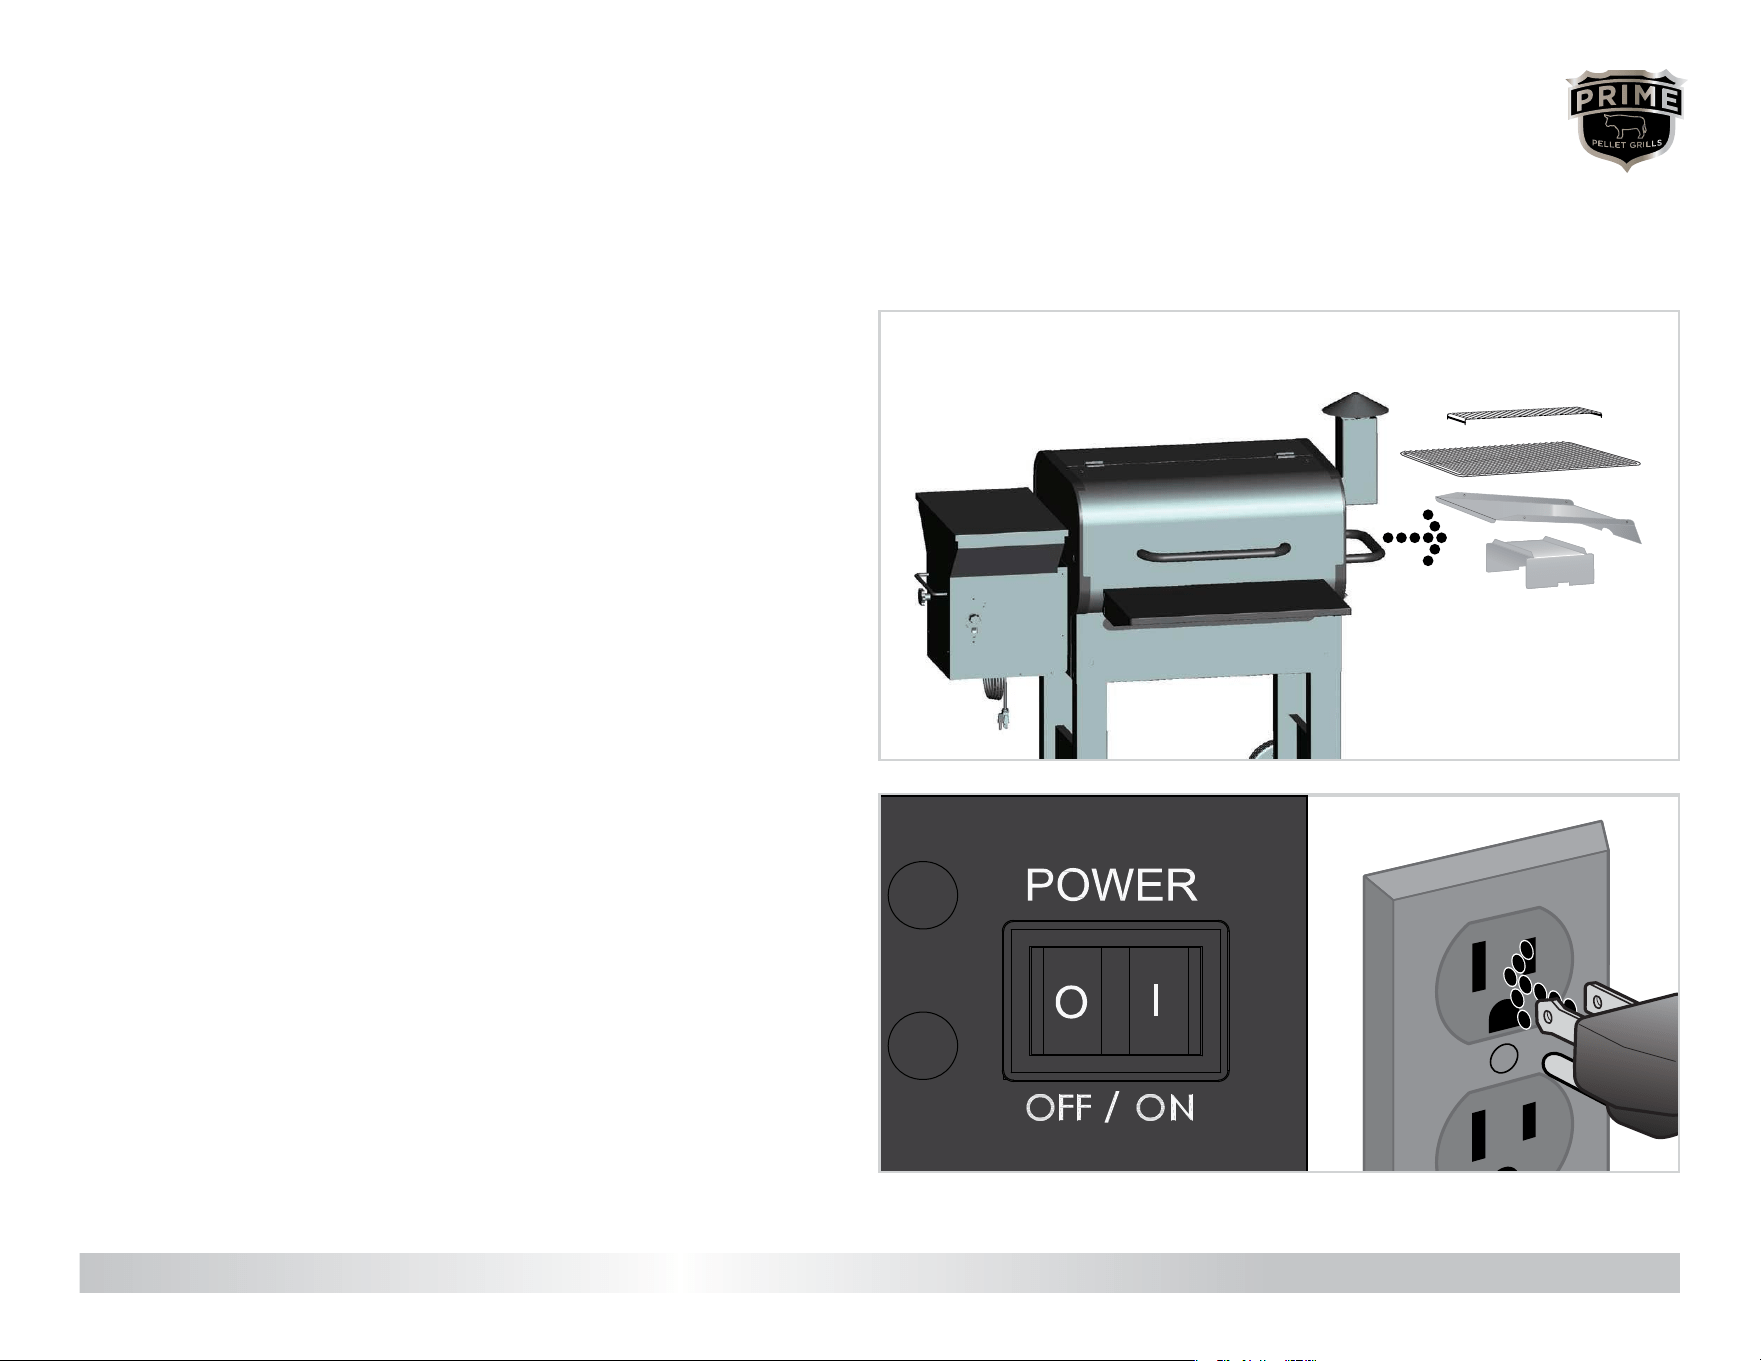
1
Take out the interior components including cooking grates, drip pan,
and heat bafe.
2
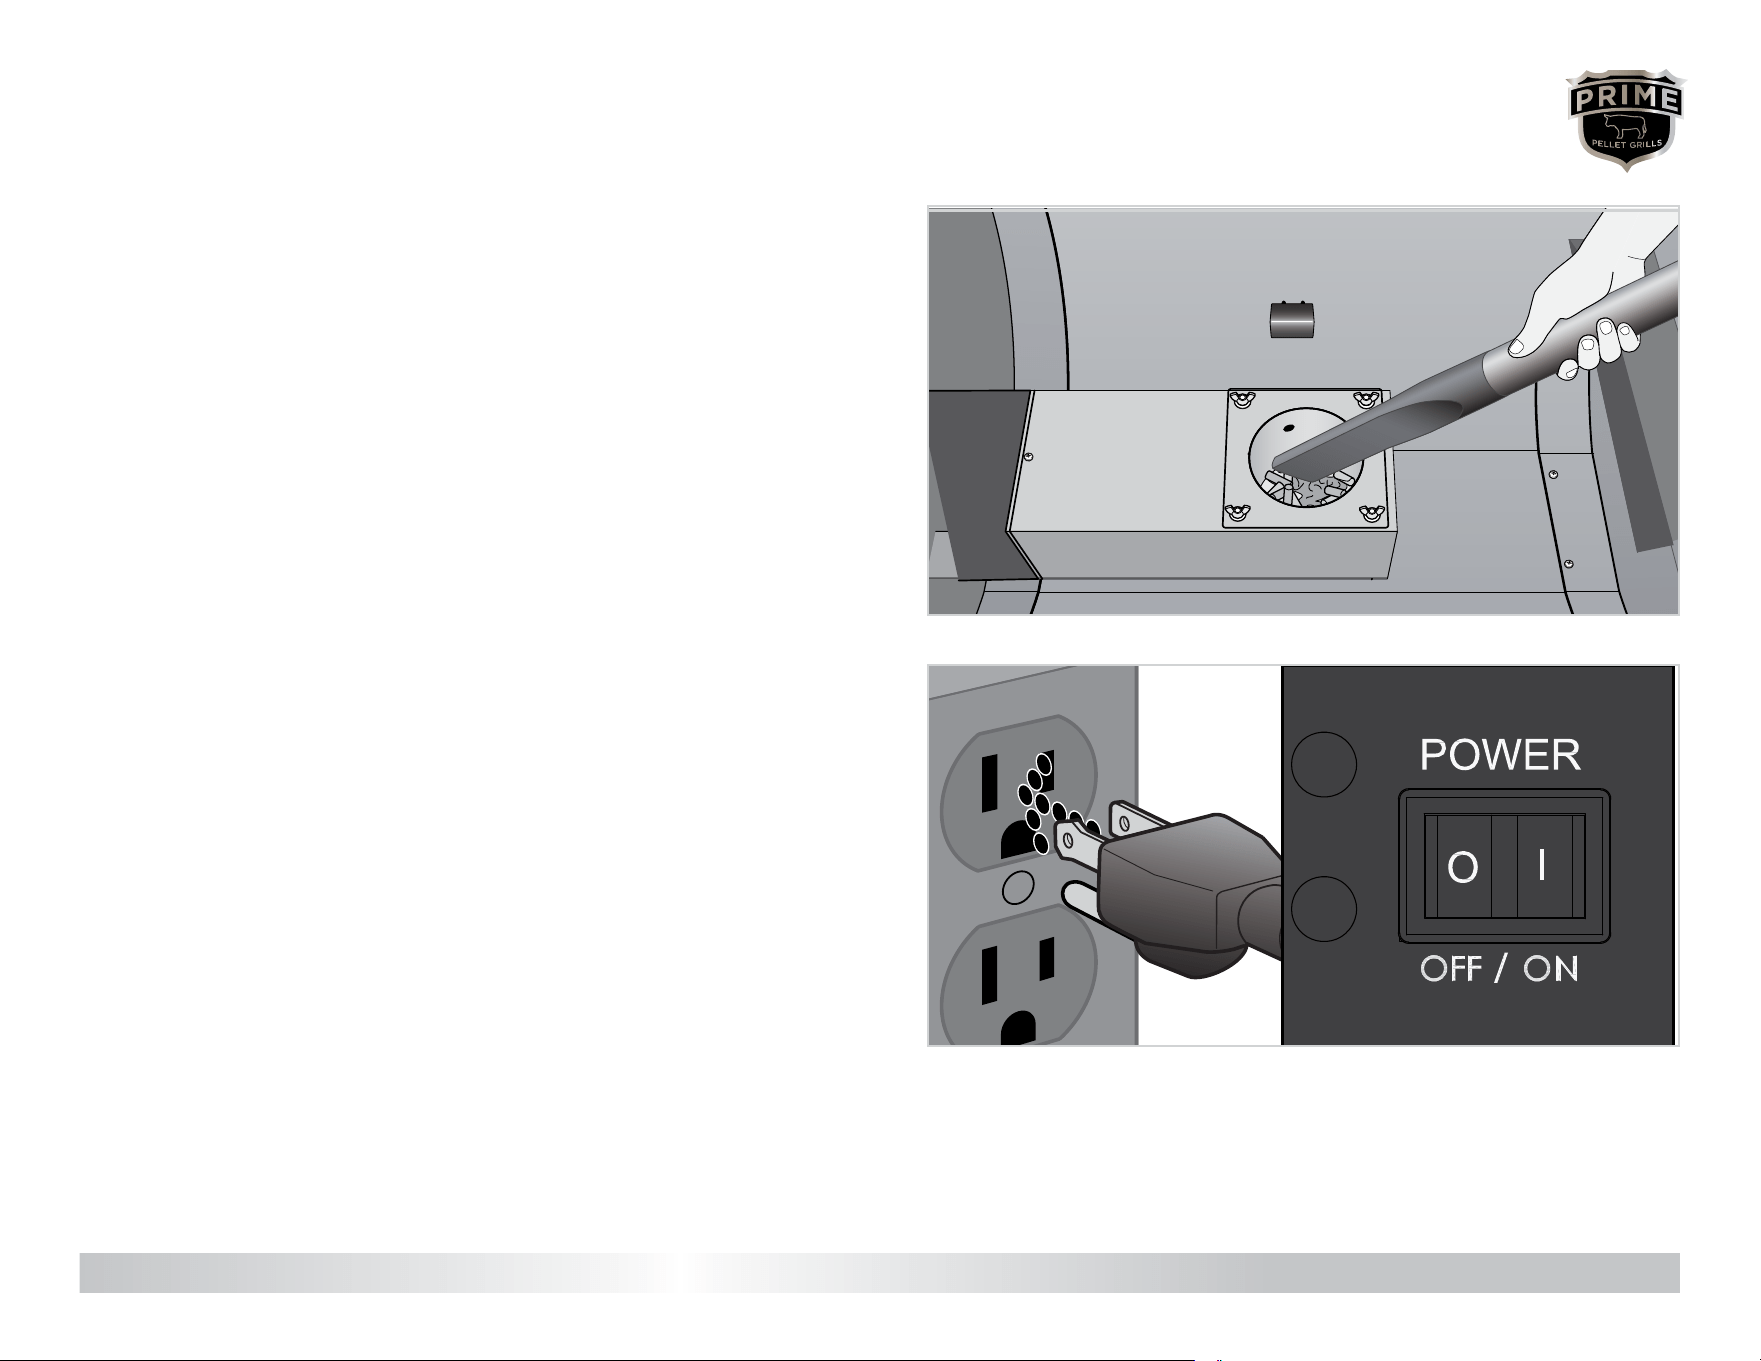
Turn the switch to OFF (O) and plug the power cord into a
grounded household outlet.
Contact us for assistance: (866) 985-7877 | www.primepelletgrills.com GRILL OPERATION | 11
FIRST START-UP
INITIAL FIRING INSTRUCTIONS
Remove the porcelain-coated grill
grate, grease drain pan, and both
the inside of the grill.
With the switch in the OFF (O)
position, plug the power cord into an
appropriate grounded electrical outlet.
ellets.
auger tube to be “charged” with pellets.
12
INITIAL FIRING INSTRUCTIONS
375Smoke
Shut Down
Cycle
High
Power
Smoke
Shut D
Cy
Po
Remove the porcelain-coated grill
grate, grease drain pan, and both
the inside of the grill.
auger tube to be “charged” with pellets.
1
1
Take out the interior components including cooking grates, grease
2
Turn the switch to OFF (O) and plug the power cord into a
grounded household outlet.
Contact us for assistance: (866) 985-7877 | www.primepelletgrills.com
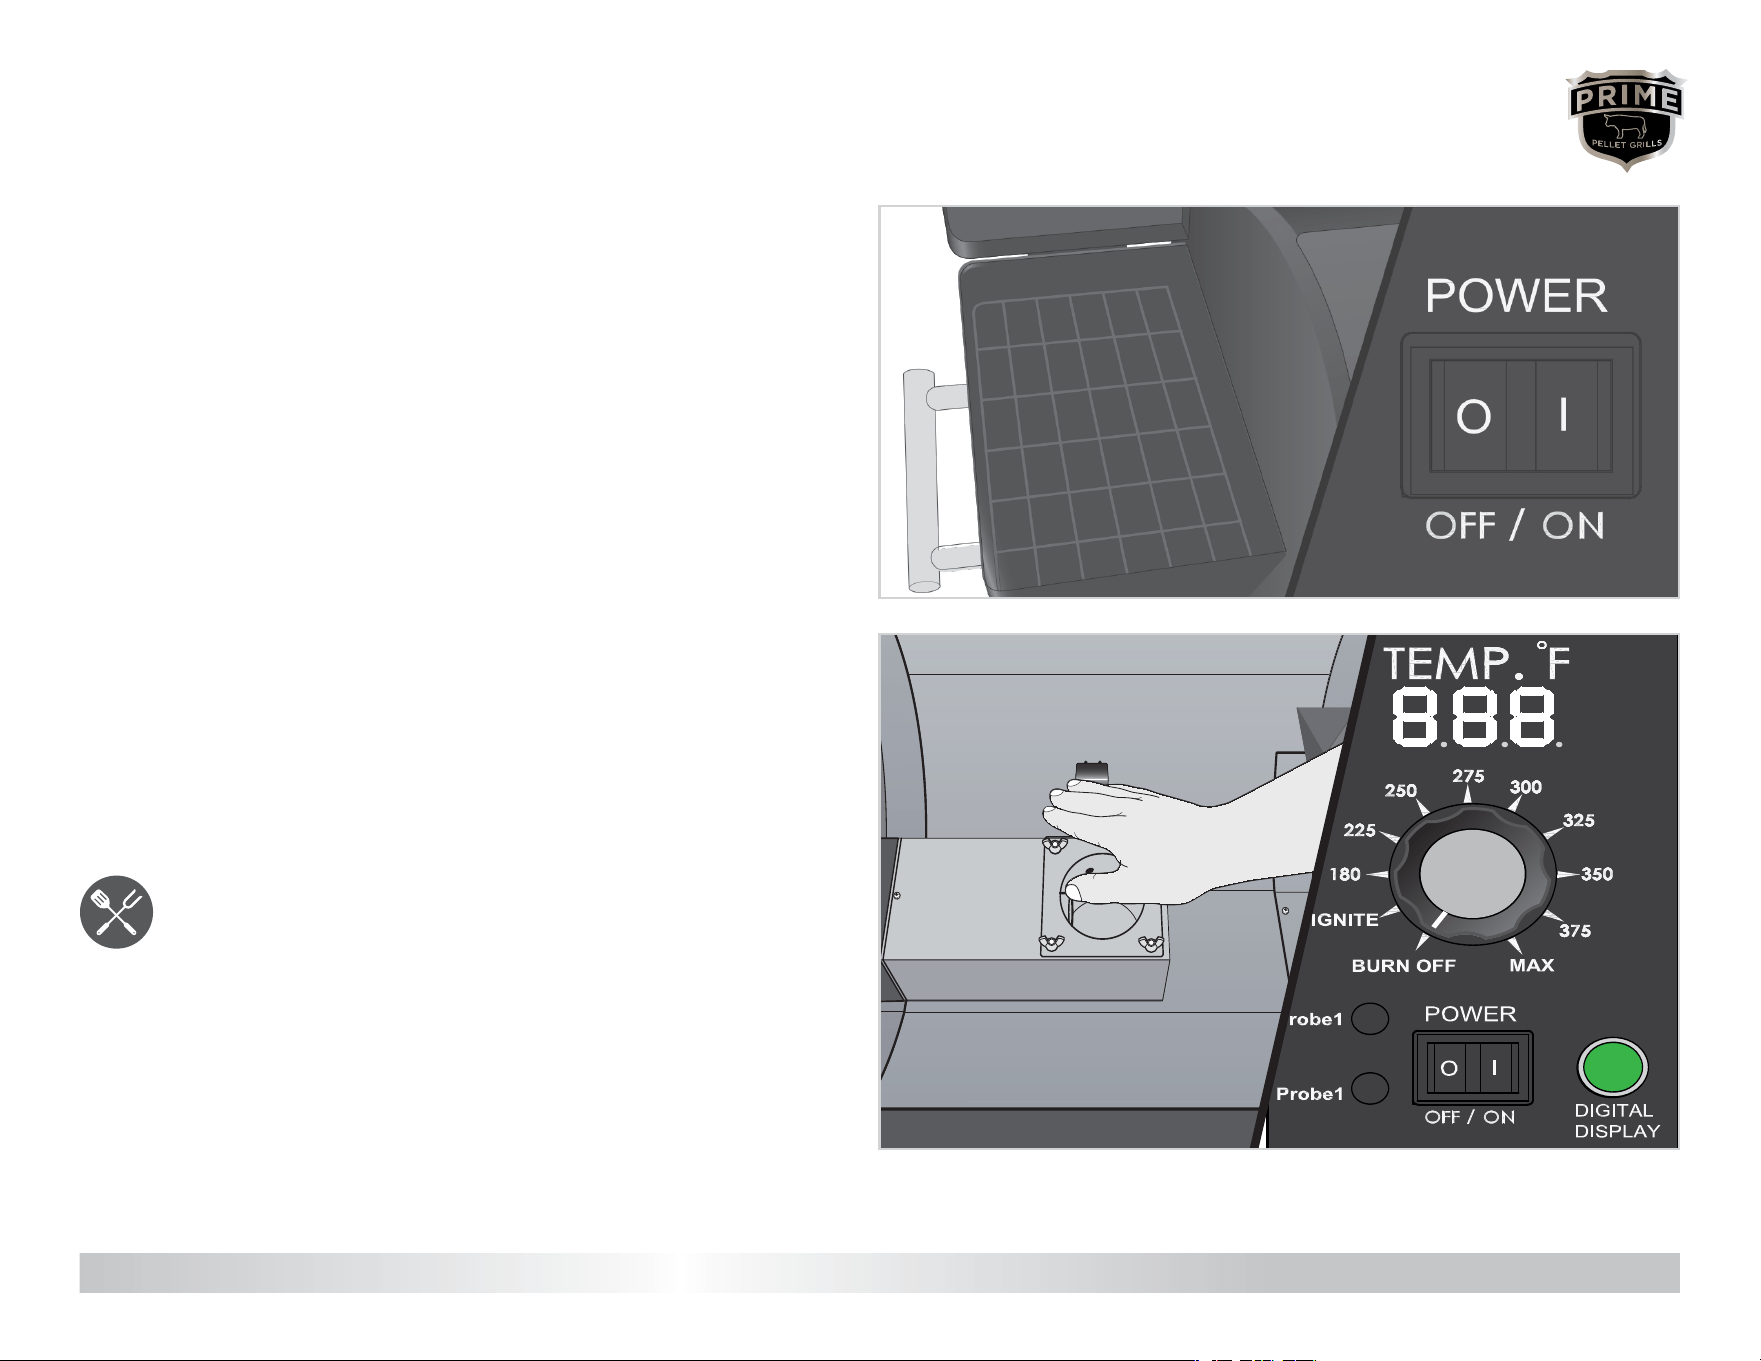
3
Check the pellet hopper and the auger for foreign objects, which
can jam the auger. Turn the switch to ON (I) and rotate the dial to
IGNITE. Verify that the auger is rotating inside the hopper.
4
Carefully extend your hand over the re pot to conrm air
movement from the draft fan. The heating rod in the re pot will
begin to redden as it heats up. CAUTION! Do not touch the heating rod.
After conrming air ow, rotate the temperature dial to BURN OFF.
Prime Pellet Pro-Tip: We recommend our highest-quality
Prime Pellet Grill Hardwood Fuel pellets for your grilling
and smoking needs. Never use pellet fuel with additives or
pellet fuel designed for heating.
Dampness and humidity are the enemy! Store your pellets
in an air-tight container to prevent mold, mildew, and poor
burn. A clean, empty pickle bucket works great!
FIRST START-UP
OPERATION | 12
Contact us for assistance: (866) 985-7877 | www.primepelletgrills.com
3
Check the pellet hopper and the auger for foreign objects, which
can jam the auger. Turn the switch to ON (I) and rotate the dial to
IGNITE. Verifythat the auger is rotating inside the hopper.
4
begin to redden as it heats up. CAUTION! Do not touch the heating rod.
Prime Pellet Pro-Tip: We recommend our highest-quality
Prime Pellet Grill Hardwood Fuel pellets for your grilling
and smoking needs. Neveruse pellet fuelwith additives or
pellet fuel designed for heating.
Dampness and humidity arethe enemy! Store your pellets
in an air-tight container to prevent mold, mildew,and poor
burn.A clean, empty pickle bucket works great!
FIRST START-UP
OPERATION | 12
Contact us for assistance: (866) 985-7877 | www.primepelletgrills.com OPERATION | 13
FIRST START-UP
5
Pour Prime Pellet Grill Hardwood Pellets into the hopper and set
the temperature dial to MAX.
6
Pellets will begin to be deposited into the re pot. When the rst
pellets reach the re pot, reset the heating rod by turning the
temperature to BURN OFF. Wait a moment, then with pellets still in the
re pot, set the dial to IGNITE.
Contact us for assistance: (866) 985-7877 | www.primepelletgrills.com OPERATION | 13
FIRST START-UP
5
Pour Prime Pellet Grill Hardwood Pellets into the hopper and set
the temperature dial to HIGH.
6
temperature to BURN OFF. Wait a moment, then with pellets still in the
F
225
180
325
275
375Smoke
Shut Down
Cycle
High
Power
CALL
SERVICE
Fill t hehopper withTraeger Har dwood
Pelletsandturnthetemperaturedial
to HIGH.
When the pellets begin to fall into the
SHUT DOWN CYCLE to reset the hot
turn the temperature dial back to
SMOKE.
56
Contact us for assistance: (866) 985-7877 | www.primepelletgrills.com OPERATION | 14
FIRST START-UP
Prime Pellet Pro-Tip: Make cleanup easier by lining
the grease pan with heavy-duty aluminum foil. The
edges of the foil should be wrapped securely to
the edges of the grease drain pan. Replace foil after
each grilling session or as needed to reduce the risk
of grease res. See page 23-24 for information on
cleaning and maintenance.
7
Wait until the rst ames are visible in the re pot. Then set the
dial to BURN OFF and turn the switch to OFF (O). Let the grill cool.
8
The interior components can now be placed in their proper
positions. First, insert the Heat Bafe, ensuring that it is properly
seated over the repot. Then position the Grease Drip Pan, aligned
with the grease drain tube. Add the Main Cooking Grate and nally
the Upper Cooking Grate.
Contact us for assistance: (866) 985-7877 | www.primepelletgrills.com OPERATION | 14
FIRST START-UP
Prime Pellet Pro-Tip: Make cleanup easier by lining
the grease pan with heavy-duty aluminum foil. The
edges of the foil should bewrapped securelyto
the edges of the grease drain pan. Replace foil after
each grilling session or as needed to reduce the risk
cleaning and maintenance.
Recommendation:
g
foil. Be su
tight against the bottom of the g
pan. Replace foil after each cook to
for mo
SHUT DOWN CYCLEandswitchto
OFF.Let thegrillcooldown.
7
225
180
325
375Smoke
Shut Down
Cycle
High
Power
225
180
325
375Smoke
Shut Down
Cycle
High
Power
225
180
325
375Smoke
Shut Down
Cycle
High
Power
Fill t hehopper wit hTraeger Hardwood
Pelletsandturnthetemperaturedial
to HIGH.
When the pellets begin to fall into the
SHUT DOWN CYCLE to reset the hot
turn the temperature dial back to
SMOKE.
56
F
225
180
325
275
375Smoke
Shut Down
Cycle
High
Power
Now you’re ready to place the
drain pan, and porcelain-coated grill
grates back into the grill.
SHUT DOWN CYCLEandswitchto
OFF.Let thegrillcooldown.
78
7dial to BURN OFF and turn the switch to OFF (O). Let the grill cool.
8
The interior components can now be placed in their proper
the Upper Cooking Grate.
Contact us for assistance: (866) 985-7877 | www.primepelletgrills.com OPERATION | 15
FIRST START-UP
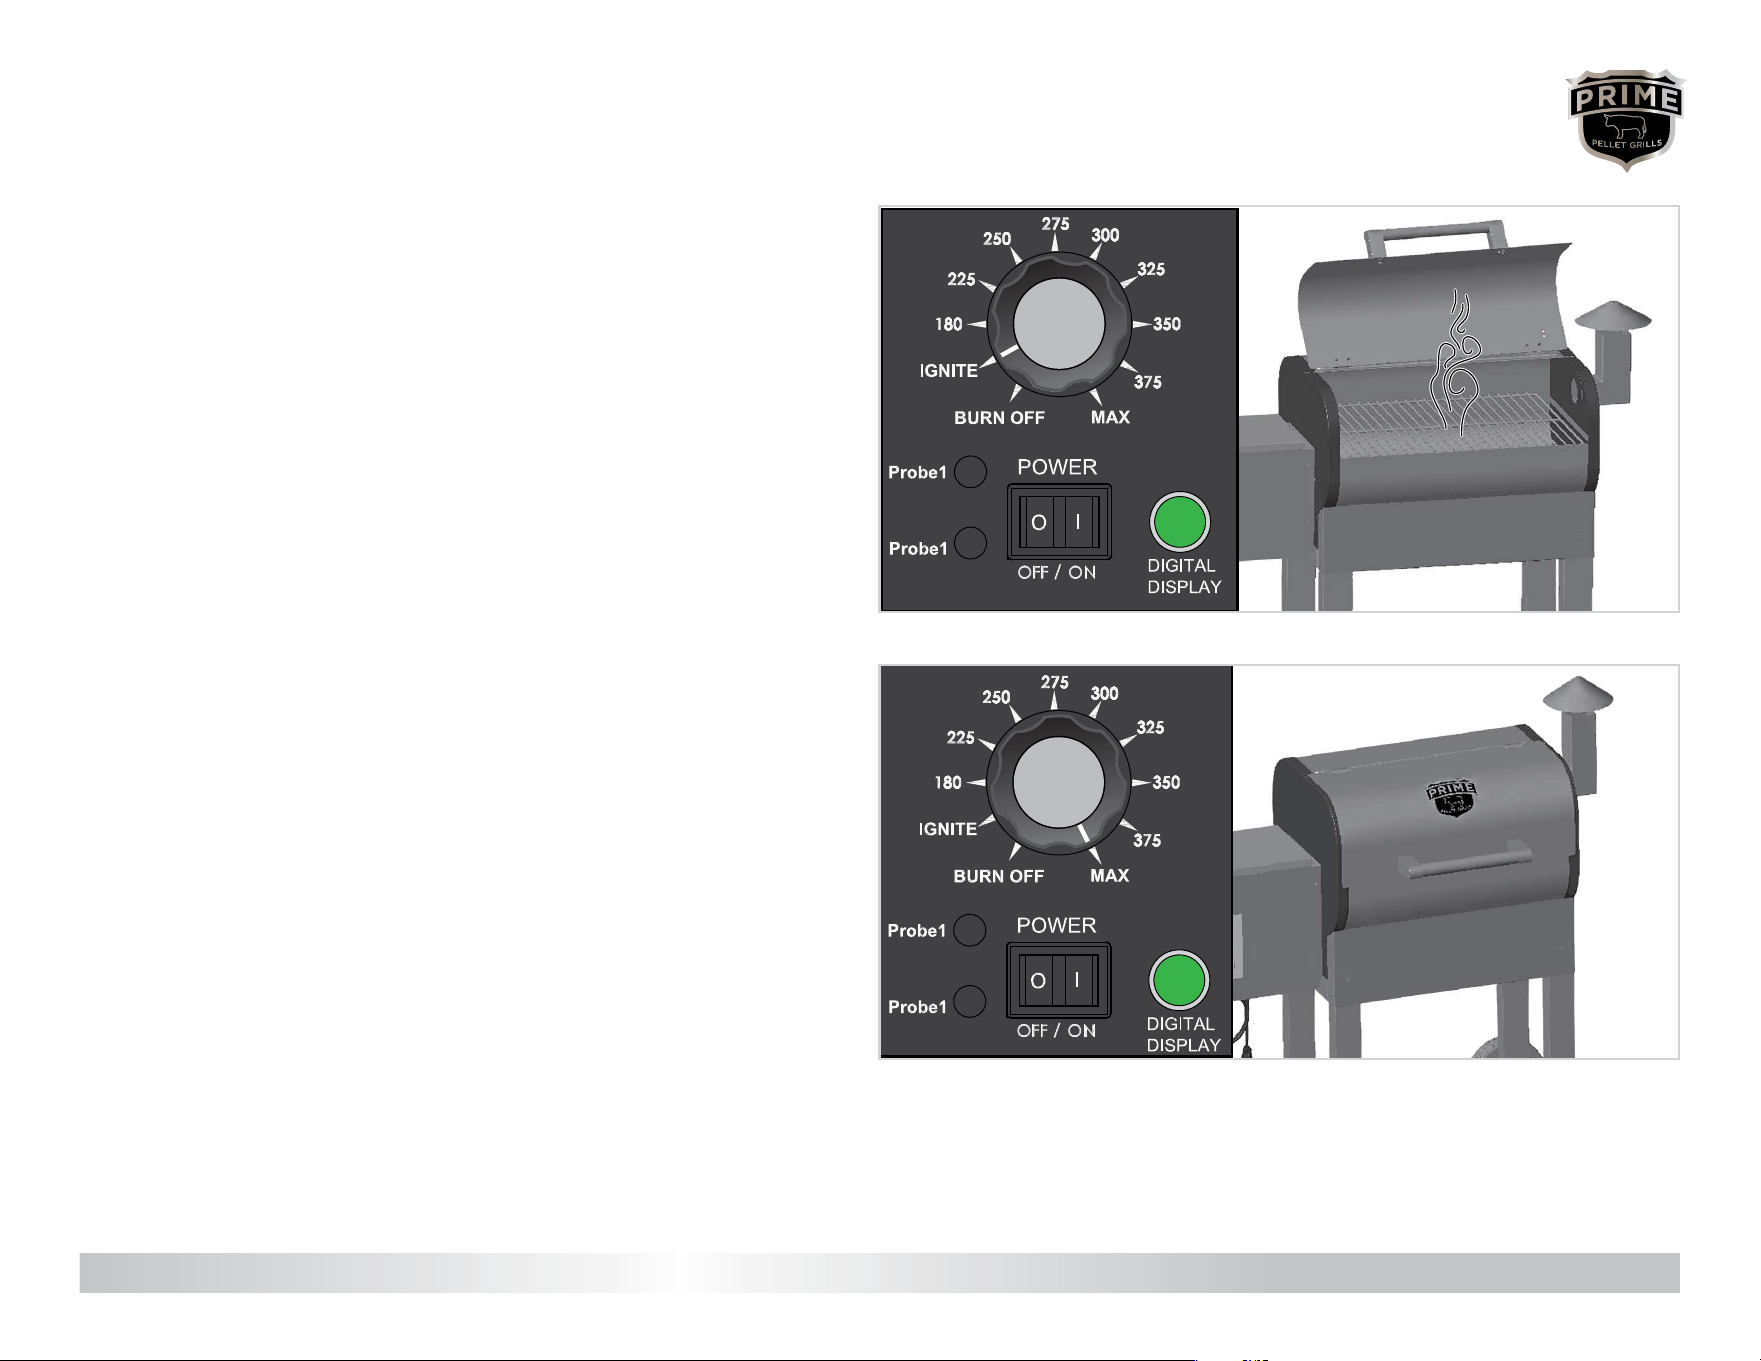
9
Leaving the grill door up, turn the switch to ON (I) and the dial to
IGNITE. Within minutes, pellets will begin to ignite and give off light
gray smoke. Once smoke rises, close the door and turn the dial to your
desired cooking temperature, or if this is the rst ring, complete the
following step.
10
Before cooking your rst meal on your Prime Pellet Grill, be sure
to properly season it: after following the steps for Initial Firing,
turn the temperature dial to MAX and let it run for 45 minutes with the
door closed.
Contact us for assistance: (866) 985-7877 | www.primepelletgrills.com OPERATION | 15
FIRST START-UP
225
180
325
275
375Smoke
Shut Down
Cycle
High
Power
With the door open, turn the switch
ON (I) and the temperature dial to
SMOKE. In about 2 minutes, the pellets
will ignite and whitish-gray smoke will
come out of the grill. After the pellets
have ignited, close the door and turn
the temperature dial to any cooking
setting desired.
Before
time, it will need to be seasoned.
Turn the temperature dial to HIGH
and let run for 45 minutes with the
door closed.
9
10
INITIAL FIRING INSTRUCTIONS (cont.)
WARNING!
·Start the grill on SMOKE setting with the door open. Once the pellets a
the temperature dial to any desired cooking temperature.
·When operating this grill, maintain a minimum clearance of 30.48 cm / 12 in f
·
in the grill.
·
more details.
225
180
Smoke
Shut D
Cy
P
With the door open, turn the switch
ON (I) and the temperature dial to
SMOKE. In about 2 minutes, the pellets
will ignite and whitish-gray smoke will
come out of the grill. After the pellets
have ignited, close the door and turn
the temperature dial to any cooking
setting desired.
9
10
INITIAL FIRING INSTRUCTIONS
CONTROLLER SHUT D
9
Leaving the grill door up, turn the switch to ON (I) and the dial to
IGNITE. Within minutes, pellets will begin to ignite and give off light
gray smoke. Once smoke rises, close the door and turn the dial to your
following step.
10to properly season it: after following the steps for Initial Firing,
turn the temperature dial to HIGH and let it run for 45 minutes with the
door closed.

Contact us for assistance: (866) 985-7877 | www.primepelletgrills.com OPERATION | 16
GRILL FUNCTIONS
WARNING!
Always start the grill with the door open and the dial set to IGNITE. After
pellets ignite and produce smoke, close the lid and adjust the dial to your
preferred cooking temperature.
• Whenever the grill is in use or cooling down after grilling, you must
maintain a minimum of 30.48 cm / 12 in between the grill and any
combustibles, including stored pellets.
• For best smoke avor and results, we recommend only food-grade
Prime Pellet Grill Hardwood Pellets. NEVER use heating fuel pellets to
cook food.
• Keep the grease drain pan and the interior of your grill clean to reduce
the risk of grease re. See pages 23 & 24 for more information.
Shutting Down the Grill: Burn Off Setting
This grill features an automatic shut down cycle. When you’re done cooking,
set the dial to BURN OFF. This will burn any pellets remaining in the re pot
while running the circulation fan. In ten minutes, the grill will shut down and the
fan will stop.
DANGER! The power switch will shut off the control and the dial will shut
off the grill power. Before servicing or cleaning the grill, controller, or other
components, fully disconnect/unplug the grill from any power source to reduce
the risk of electrical shock.
Your Prime Pellet Grill has two emergency shutoff safety features.
LOW TEMPERATURE ALARM
If the RTD temperature sensor detects sustained temperatures below 125°F, the control will trigger an alarm state and the display will show “LEr.” Power will be cut
to the internal components of the grill (auger and heating rod) until the main power switch is turned OFF (O).
HIGH TEMPERATURE ALARM
If the RTD temperature sensor detects an internal temperature exceeding 550°F, the control will trigger an alarm state and the display will show “HEr.” Power will
be cut to the internal components of the grill (auger and heating rod) until the main power switch is turned OFF (O).
If either of these alarm conditions arises, investigate to nd out what caused the low or high temperature. Contact Customer Service if you are unable to pinpoint
and remedy the issue.
SAFETY FEATURES
Contact us for assistance: (866) 985-7877 | www.primepelletgrills.com TITLE | 17
NOTE: If the temperature reading has not reached the set temperature
after ten minutes of preheating, turn the dial to BURN OFF. Now re-set to
your preferred temperature.
If the grill still fails to reach set temperature, consult Troubleshooting
(pages 25-26) for more information on grilling issues.
1
Open the door and turn the grill power to ON (I). Set the
temperature dial to IGNITE. The pellets in the re pot should ignite
within about two minutes, creating light gray smoke. Once you see
smoke, close the door and turn the dial to your preferred cooking
temperature.
2
Prior to adding food, let the grill preheat for 10 minutes with the
door closed.
OPERATION | 17Contact us for assistance: (866) 985-7877 | www.primepelletgrills.com
EVERYDAY GRILLING
Contact us for assistance: (866) 985-7877 | www.primepelletgrills.com TITLE | 17
NOTE: If the temperature reading has not reached the set temperature
after ten minutes of preheating, turn the dial to BURN OFF. Now re-set to
your preferred temperature.
If the grill still fails to reach set temperature, consult Troubleshooting
(page 16) for more information on grilling issues.
225
180
325
275
375Smoke
Shut Down
Cycle
High
Power
With the door open, turn the switch
ON (I) and the temperature dial to
SMOKE. In about 2 minutes, the pellets
will ignite and whitish-gray smoke will
come out of the grill. After the pellets
have ignited, close the door and turn
Before
time, it will need to be seasoned.
Turn the temperature dial to HIGH
and let run for 45 minutes with the
door closed.
9
10
INITIAL FIRING INSTRUCTIONS (cont.)
WARNING!
· Start the grill on SMOKE setting with the door open. Once the pellets a
the temperature dial to any desired cooking temperature.
· When operating this grill, maintain a minimum clearance of 30.48 cm / 12 in f
·
in the grill.
·
more details.
225
180
Smoke
Shut D
Cy
Po
With the door open, turn the switch
ON (I) and the temperature dial to
SMOKE. In about 2 minutes, the pellets
will ignite and whitish-gray smoke will
come out of the grill. After the pellets
have ignited, close the door and turn
the temperature dial to any cooking
setting desired.
9
10
INITIAL FIRING INSTRUCTIONS
CONTROLLER SHUT D
1
Open the door and turn the grill power to ON (I). Set the
within about two minutes, creating light gray smoke. Once you see
smoke, close the door and turn the dial to your preferred cooking
temperature.
2
Prior to adding food, let the grill preheat for 10 minutes with the
door closed.
OPERATION | 17Contact us for assistance: (866) 985-7877 | www.primepelletgrills.com
EVERYDAY GRILLING
WARNING!
· Start the grill on SMOKE setting with the door open.
the temperature dial to any desired cooking temperature.
· When operating this grill, maintain a minimum clearance of 30.4
·
in the grill.
·
more details.
With the door open, turn the switch
ON (I) and the temperature dial to
SMOKE. In about 2 minutes, the pellets
will ignite and whitish-gray smoke will
come out of the grill. After the pellets
have ignited, close the door and turn
the temperature dial to any cooking
setting desired.
9
1
INITIAL FIRING INSTRUCTIONS
CONTROLLER SHUT D
Contact us for assistance: (866) 985-7877 | www.primepelletgrills.com
REIGNITING YOUR GRILL
1
If the grill fails to light or goes out unexpectedly, turn the switch
OFF (O) and unplug the grill from power. Allow the grill to cool
completely.
2
After the grill is cool, remove any food and the grates, drain pan,
and heat bafes.
WARNING! If your grill fails to light, or if the re in the re pot goes out while cooking (and there are still pellets in the hopper), take the following action to avoid “over-ring”
your grill with excess unburned pellets in the re pot.
Contact us for assistance: (866) 985-7877 | www.primepelletgrills.com
REIGNITING YOUR GRILL
1
If the grill fails to light or goes out unexpectedly, turn the switch
OFF (O) and unplug the grill from power. Allow the grill to cool
completely.
2
After the grill is cool, remove any food and the grates, drain pan,
375Smoke
Shut Down
Cycle
High
Power
DANGER! If the grill failed to light or
(O) and disconnect the power cord.
If the grill is still hot, allow it to cool
thoroughly.
Open the door and remove all food,
the porcelain-coated grill grates, the
grease drain pan, and the upper and
WARNING!
12
REIGNITING YOUR GRILL
DANGER! If the grill failed to light or
(O) and disconnect the power cord.
If the grill is still hot, allow it to cool
thoroughly.
WARNING!
1
REIGNITING YOUR GRILL
OPERATION | 18
OPERATION | 18
Contact us for assistance: (866) 985-7877 | www.primepelletgrills.com
3
WARNING! You must remove all unburned pellets and ash
from the re pot and surrounding areas. See page 24 for more
information on ash removal.
4
Plug the grill back in to a grounded power outlet. Turn the grill
back to ON and the dial to IGNITE. The auger should push pellets
into the re pot and the heating rod will turn red. CAUTION! Do not
touch the heating rod. Wait for ames to appear in the re pot.
Contact us for assistance: (866) 985-7877 | www.primepelletgrills.com
WARNING! Remove all unburned
pellets and ash from inside and
for proper handling and disposal of
ash on page 19.)
Plug power cord into an appropriate
grounded electrical outlet and restart
the grill. Pellets should fall into the
to heat (it will start to turn red).
CAUTION! Do not touch the hot rod.
34
Power
DANGER! If the grill failed to light or
(O) and disconnect the power cord.
If the grill is still hot, allow it to cool
thoroughly.
Open the door and remove all food,
the porcelain-coated grill grates, the
grease drain pan, and the upper and
12
20
WARNING! Remove all unburned
pellets and ash from inside and
for proper handling and disposal of
ash on page 19.)
3
3
WARNING! You must remove all unburned pellets and ash
information on ash removal.
4
Plug the grill back in to a grounded power outlet. Turn the grill
back to ON and the dial to IGNITE. The auger should push pellets
REIGNITING YOUR GRILL
OPERATION | 19
REIGNITING YOUR GRILL
OPERATION | 19
Contact us for assistance: (866) 985-7877 | www.primepelletgrills.com
Prime Pellet Pro-Tip: If your grill fails to reignite, see
TROUBLESHOOTING on pages 25-26 for more tips, or
contact Prime Pellet Grills Customer Service to diagnose
the problem.
5
After verifying that there are ames in the re pot, turn the switch
to OFF (O) and let the grill cool. After the grill is cool you can
replace the heat bafes, drain pan, and grills.
6
Leaving the grill door open, turn the switch ON (I) and the dial
to IGNITE. The pellets will ignite and light gray smoke will rise.
After seeing smoke, close the door and adjust the dial to your desired
cooking temperature.
REIGNITING YOUR GRILL
OPERATION | 20
Contact us for assistance: (866) 985-7877 | www.primepelletgrills.com
O).
Let the grill cool down. Now you’re
ready to place the upper and lower
porcelain-coated grill grates back into
the grill.
NOTE: If the procedure is not successful, see “FREQUENTLY ASKED QUESTIONS” on page 22 for
troubleshooting tips or contact Traeger's VIP-365 Customer Service (see page 26) to help diagnos
problem.
5
375
Shut Down
Cycle
High
ower
With the door open, turn the switch
ON (I) and the temperature dial to
SMOKE. In about 2 minutes, the pellets
will ignite and whitish-gray smoke will
come out of the grill. After the pellets
have ignited, close the door and turn
the temperature dial to any cooking
setting desired.
O).
Let the grill cool down. Now you’re
ready to place the upper and lower
porcelain-coated grill grates back into
the grill.
56
Prime Pellet Pro-Tip: If your grill fails to reignite, see
TROUBLESHOOTING on page 16–18 for more tips, or
contact Prime Pellet Grills Customer Service to diagnose
the problem.
5 to OFF (O) and let the grill cool. After the grill is cool you can
6
Leaving the grill door open, turn the switch ON (I) and the dial
to IGNITE. The pellets will ignite and light gray smoke will rise.
After seeing smoke, close the door and adjust the dial to your desired
cooking temperature.
REIGNITING YOUR GRILL
OPERATION | 20
225
180
325
275
Shut Do
Cycle
Power
ON

Contact us for assistance: (866) 985-7877 | www.primepelletgrills.com
GETTING TO KNOW YOUR PRIME PELLET GRILL
1. During grilling, adjust the dial at any time to grill hotter or cooler, or to adjust smokiness. The HIGH setting is for grilling, while the IGNITE setting is for smoking or adding
smoke avor to foods during cooking. IGNITE can also be used as a “holding” setting of about 165° F.
2. This Prime Pellet Grill is a cooking appliance fueled by food-grade hardwood pellets. A heating element inside the grill chamber serves as the ignition point to start the
cooking ame, which then self-sustains with auger-delivered pellets.
3. CAUTION! Never add pellets by hand to the hot re pot. You can be seriously burned. Pellets should only be added to the hopper and fed to the re pot by the internal
auger. If you run out of pellets while cooking and the re burns out, let the grill cool completely and follow the instructions for “First Start-Up” on page 11.
4. CAUTION! The heat bafe must be properly seated on its brackets. The sides of the bafe should point down over the re pot. If seated incorrectly, direct heat and ame
may cause a grease re in the grill.
5. Always account for ambient temperatures when estimating grilling times. Your grill will reach cooking temperatures quickly on a hot sunny day, and more slowly on cold,
wet, or windy days.
6. Controller Function: After dialing in cooking temperature, the auger will operate until the desired temperature is reached. To maintain cooking temperature, the digital
controller will activate the auger as necessary to maintain temperature.
7. CAUTION! If you do not properly maintain the grill by cleaning the grease drain pan, drain, and drain tube, grease res are possible.
8. In the unlikely event of a grease re, immediately close the grill door and turn the switch OFF (O) to turn off the fan and reduce the oxygen in the cooking chamber. Keep the
door closed until the re extinguishes itself. If the re does not go out, sprinkle baking soda on the re.
9. CAUTION! Remove pots and pans while the operating appliance is unattended, to reduce the risk of re.
10. Do not use accessories not specied for use with this appliance.
CAUTION! Take care to avoid burns.
If the re does not extinguish, carefully remove any food from the grill using tongs or other available tools. Close the door again until the re is completely out. After the grill
has cooled completely, remove the grate and any foil used to protect the grease drain pan. Clean the grate, pan, drain, and drain tube of any accumulation of grease. Line
the pan with new foil, then put the drain pan and the cooking grate back in position, restart the grill, and resume cooking.
OPERATION | 21

Contact us for assistance: (866) 985-7877 | www.primepelletgrills.com OPERATION | 22
GETTING TO KNOW YOUR PRIME PELLET GRILL
DIGITAL READOUT
The digital display on your grill shows the current interior temperature of the grill by default. Immediately after adjusting the temperature dial, the desired temperature setting
will ash ve times before reverting to the current interior temperature.
For more precise monitoring of your food items, use the included probe thermometers. Plug one or both probes into the control panel
jacks, route through the probe eyelets in the side of the grilling chamber, and insert into the center of your food item. To view internal
temperatures, press the green “Digital Display” button once to view Probe A temperature and again to view Probe B temperature. The probe
temperature will ash ve times on the display before reverting to the interior grilling chamber temperature.
Digital probe thermometers take the guesswork out of grilling. Know when your steak reaches that perfect 130° for medium rare, or when
your chicken wings have reached the 165° safety zone. All without constant peeking and poking.
COOKING DONENESS
MEATS
Steak (Rare) - 120-125°F
Steak (Medium Rare) - 130-135°F
Sausage or Ham (pre-cooked) - 140°F
Steak/Pork (Medium) - 140-145°F
Steak/Pork (Medium Well) - 150-155°F
Steak/Pork (Well Done) - 160°F +
Sausage or Ham (Raw) - 160°F
Ground Meat or Burgers - 160°F
Ground Poultry - 165°F
Chicken/Duck - 165°F
Beef Brisket - 165-175°F
Pork Brisket - 195-200°F
SEAFOOD
Tuna (Ahi/Sashimi Grade) - 115-120°F
Scallops - 120°F
Shrimp - 120°F
Marlin, Swordsh, Tuna (Steak) - 125°F
Cod, Halibut, Salmon, Red Snapper, Sea Bass, (Steak) - 130-135°F
Trout - 135-140°F
Lobster - 145°F (140°F if shell is open)
BONUS ITEMS
Artichoke - 165°F
Eggplant (whole) - 180°F
Baked Potato - 210°F

Contact us for assistance: (866) 985-7877 | www.primepelletgrills.com CARE & MAINTENANCE | 23
CARE OF YOUR PRIME PELLET GRILL
MAINTAINING YOUR PRIME PELLET GRILL
1. CREOSOTE/GREASE ACCUMULATION
AND REMOVAL
Wood pellets burn slowly, releasing tar and vapors that combine with moisture to
form creosote. The vapors will condense and accumulate on cooler surfaces like
the grill ue/chimney, forming creosote buildup. Small airborne grease particles
can circulate through the cooking chamber and accumulate similarly. Creosote is
extremely ammable, and accumulated grease may contribute to possible res.
The grill and particularly the chimney should be inspected at least semi-annually
(twice per year) to determine when creosote or grease needs to be removed to
reduce the risk of re.
Grease drippings will fall onto the grease drain pan, channeling into the drain,
through the drain tube, and into the drip pail. All of these places should be cleaned
of accumulated grease whenever noticeable buildup occurs. Inspect these areas
at least twice a year and remove buildup.
Cleaning the Chimney Pipe
DANGER! Turn the switch to OFF (O) and unplug the grill before cleaning.
CAUTION! The grill should be cold before attempting any cleaning or
maintenance. Unscrew the chimney cap from the chimney. It can be cleaned
with soap and water, or with a biodegradable degreaser. Be sure to remove any
residual cleaner before reassembling the chimney.
With the cap off, scrape creosote and any additional buildup from the interior of
the chimney using a nonmetallic tool such as a wooden spatula or paint stirrer,
or wrap a rag around a grill cleaning tool to prevent it from scraping the surface.
You will need to clean the vertical section from the top, and the horizontal section
from inside the grill. Once the creosote and grease are loosened,
wipe all surfaces with paper towels, newspaper, or disposable rags.
Once the chimney pipe is clean, replace the cap.
Removing Grease
DANGER! Turn the switch to OFF (O) and unplug the grill before cleaning.
CAUTION! Accumulated grease is easier to clean off when the grill is still warm,
NOT HOT. Be careful not to burn yourself. Gloves are recommended.
Clean grease out of the grease drain and drain tube on a regular basis. If grease
builds up in the grease drain or plugs the drain tube, a grease re could happen.
Clean these locations often.
Remove the grill grates and drain pan to access the grease drain and drain tube
on the interior of the grill. Wipe or scrape the grease from inside the grease drain
and drain tube using a nonmetallic tool such as a wooden or stiff silicone spatula.
It may be easier to push the grease through the drain tube and into the grease
catch bucket. Wipe remaining grease residue with paper towels, newspaper, or
disposable rags, which can also be used to wipe grease from the interior of the
grill.
The drip pail may be lined with aluminum foil for easier cleanup and disposal.
Empty it regularly as needed.
Change the foil on the drain pan as necessary or after cooking pungent foods.
A clean grill will make your food taste better, reduce the risk of grease re, and
attract less wildlife, if a concern where you live.
Cleaning the Outside of the Grill
DANGER! Turn the switch to OFF (O) and unplug the grill before cleaning.
Use paper towels or a rag dampened with soap and warm water to remove
grease from the outside of your grill. DO NOT use oven cleaner, abrasives or
ammable cleaners to clean any surfaces of your grill.

Contact us for assistance: (866) 985-7877 | www.primepelletgrills.com CARE & MAINTENANCE | 24
Storage
CAUTION! If the grill is stored outside during rainy season, be sure that water can
not get into the pellet hopper. Depending on climate, you may wish to remove
pellets from the hopper between grillings or when not in use for an extended
period. Wet pellets will expand and jam your auger, and even intense humidity
may contribute to this issue. We recommend using a grill cover to protect your
grill from the weather.
Cleaning the Grates
CAUTION! Cleaning the grates is easier while they are still warm, NOT HOT. Be
careful not to burn yourself. Gloves are recommended.
After removing food, clean the grill grates with a cleaning brush or other tool.
2. ASH REMOVAL
DANGER! Turn the switch to OFF (O) and unplug the grill before cleaning.
WARNING! Let the grill cool completely before removing ash.
WARNING! Ash disposal should be done in accordance with local ordinances or
as detailed below.
Too much ash in the re pot can cause your ame to die, especially on IGNITE.
Inspect the re pot regularly. Remove any ash buildup from a COLD re pot. To
access the re pot, remove the grill grate, grease drain pan, and heat bafes.
Remove loose ash with a small metal shovel or trowel, or other implement.
Remaining or hard-to-reach ashes may be removed with a shop vac with
extreme care as detailed below:
When the grill is cold, you can use a shop-vac or other vacuum to clean ash from
in and around the re pot. A utility-type vacuum cleaner with metal collection
receptacle is best, but other types of vacuums can be used.
Ensure that the grill, re pot, and ash are cold. Empty the vacuum’s receptacle
of previously collected debris to further minimize the risk of re. Using a tube
attachment, vacuum the ash from the re pot. Immediately empty the collected
ashes into a metal receptacle such as an empty trash can with a tight-tting lid.
It is not recommended to use a vacuum that uses a collection bag, but if you plan
to use a bag vacuum, use a new, empty bag to collect ash, then immediately
dispose of the bag in a metal receptacle such as an empty trash can with a tight-
tting lid.
Dispose of ashes according to the following instructions:
WARNING! Ashes must be stored in a metal container with a tight-tting lid, on a
non-combustible surface such as a cement oor or driveway, or on the ground,
and well away from combustible materials. Ashes can be disposed of by burial in
soil or dispersal, or according to local ordinances.
CARE OF YOUR PRIME PELLET GRILL

Contact us for assistance: (866) 985-7877 | www.primepelletgrills.com TROUBLESHOOTING | 25
TROUBLESHOOTING
From time to time in every griller’s life, a problem arises. Here’s how to address the most common issues you may encounter.
HELP! My grill won’t ignite.
1. STEP 1
Check power at the electrical outlet. If the cord is plugged into a GFCI (ground
fault circuit interrupter), reset it. Attempt to restart the grill according to
instructions on page 18. Still nothing?
2. STEP 2
DANGER! Turn the switch OFF (O). Disconnect the power cord.
Remove the control panel. Check the fuse inside. Replace if needed and
reinstall the control panel.
3. STEP 3
Are the draft fan and the auger drive motor running? If so, the heating rod
probably needs to be replaced. If either are not operating, contact Customer
Service for additional troubleshooting help or to order replacement parts.
HELP! The pellets stop burning when the grill is on IGNITE.
WARNING! Under normal operation, once the dial is set to IGNITE, the heating
element begins to heat and remains on for four minutes. Pellets should begin to
ignite shortly after reaching the re pot via the auger tube, which may take 2-3
minutes. If ignition is not achieved or if the re pot loses ame while in operation,
follow these steps to avoid “over-ring” the grill with excess fuel:
1. DANGER! Switch the grill OFF (O) and UNPLUG THE POWER CORD. Let the
grill cool completely before proceeding. Remove all food, the grill grate,
grease drain pan, and heat bafe.
2. WARNING! Remove all pellets and ash from in and around the re pot.
3. Plug in the power cord and switch the grill ON (I). Verify that pellets are being
fed into the re pot and the heating element is beginning to heat (i.e. turning
red). CAUTION! Do not touch the heating rod.
4. When you see ames, turn the grill OFF (O). Let the grill cool. Replace the heat
bafe, drain pan, and grill grate. Leave the door open and turn the switch ON
(I) and turn the dial to IGNITE. Look for light gray smoke to rise from the grill.
Once the pellets begin to burn, close the door and set the dial as desired.
If the pellets still won’t ignite, contact Customer Service for further assistance.
HELP! There are no pellets in the re pot.
• Scenario A: The grill is getting power, but no pellets are moving into the re pot:
Check the hopper. Are there plenty of pellets? If not, ll the hopper. Make sure
to allow several minutes with the power on for pellets to reach the re pot via
the auger tube. Restart the grill according to instructions on page 18.
• Scenario B: The grill is on, there are plenty of pellets, and the auger is running
(verify by ensuring the cooling fan on the back of the motor is moving):
The digital controller is the problem. Contact Customer Service for assistance
in replacing it.
• Scenario C: The draft fan is running, but the auger does not move:
Check the auger system:
1. Switch the grill OFF (O). Find the small fan on the back of the
auger motor.
2. CAUTION! Keep an eye on the fan blade while you turn the
switch ON (I).
1. If the auger motor fan blade doesn’t turn, switch the grill
back OFF (O). The auger motor is defective. Contact Customer
Service to order a replacement part.
2. If the auger motor fan blade turns slightly and then stops,
keep watching while you switch the grill OFF (O). If the fan
moves slightly backwards, there is a jam in the auger system.
To clear:
• DANGER! Turn the switch OFF (O) and UNPLUG THE
POWER CORD. Empty the hopper. Check for foreign
objects and wet/decomposed pellets. The
auger will need to be removed to clear a jam.

Contact us for assistance: (866) 985-7877 | www.primepelletgrills.com TROUBLESHOOTING | 26
TROUBLESHOOTING
HELP! I need to remove the auger.
DANGER! Turn the grill switch OFF (O) and UNPLUG THE POWER CORD.
CAUTION! Allow the grill to cool completely before proceeding.
1. Carefully remove any panels required to access the auger motor.
2. Remove the screw attaching the auger motor shaft to the auger. Remove the
screw connecting the auger busing to the auger tube. Set aside.
3. Use a small pipe wrench or locking pliers to turn the auger shaft
counterclockwise. You will notice resistance until it breaks free, then the auger
will rotate smoothly.
4. Take out the auger and wipe clean. Clean out any pellets, ash, debris, or
foreign objects from the auger, auger tube, and re pot.
5. Remove any rough spots or buildup from the auger and auger tube by gently
sanding surfaces with medium-grit sandpaper. Remove any sanding grit from
the tube, re pot, and auger with a vacuum or by wiping with a soft cloth.
6. Reinstall the auger to the auger motor shaft.
HELP! My problem isn’t listed, or I need to order a part.
• Contact Prime Pellet Grills Customer Service at 866-985-7877 or via email
[email protected]. Our Florida-based customer service
professionals are here to assist from 9am—6pm EST, Monday through Friday,
and our answering service can assist by taking a message during non-business
hours.

• THERE ARE NO EXPRESS WARRANTIES EXCEPT AS LISTED ABOVE
• PURCHASER ASSUMES ALL RISKS IN THE ASSEMBLY AND
OPERATION OF THIS UNIT
• FAILURE TO FOLLOW WARNINGS AND OPERATIONAL
INSTRUCTIONS CONTAINED IN THIS MANUAL CAN RESULT IN
SEVERE PROPERTY DAMAGE AND/OR PERSONAL INJURY
• IN NO EVENT WILL PRIME PELLET GRILLS LLC, OR ITS DIRECTORS,
OFFICERS OR AGENTS BE LIABLE TO THE PURCHASER OR
ANY THIRD PARTY, WHETHER IN CONTRACT, IN TORT, OR ON
ANY OTHER BASIS, FOR ANY INDIRECT, SPECIAL, PUNITIVE,
EXEMPLARY, CONSEQUENTIAL, OR INCIDENTAL LOSS, COST, OR
DAMAGE ARISING OUT OF OR IN CONNECTION WITH THE SALE,
MAINTENANCE, USE, OR INABILITY TO USE THE PRODUCT, EVEN IF
PRIME PELLET GRILLS LLC OR ITS DIRECTORS, OFFICERS OR AGENTS
HAVE BEEN ADVISED OF THE POSSIBILITY OF SUCH LOSSES, COSTS
OR DAMAGES, OR IF SUCH LOSSES, COSTS, OR DAMAGES ARE
FORESEEABLE. IN NO EVENT WILL PRIME PELLET GRILLS LLC, OR
ITS OFFICERS, DIRECTORS, OR AGENTS BE LIABLE FOR ANY DIRECT
LOSSES, COSTS OR DAMAGES THAT EXCEED THE PURCHASE PRICE
OF THE PRODUCT.
• SOME JURISDICTIONS DO NOT ALLOW THE EXCLUSION OR
LIMITATION OF INCIDENTAL OR CONSEQUENTIAL DAMAGES, SO
THE ABOVE LIMITATION OR EXCLUSION MAY NOT APPLY TO THE
PURCHASER.
WARRANTY | 27
Important Notice
Do NOT return to place of purchase½—¿for customer service and warranty issues contact our Customer Service Center[
Distributed By:
Prime Pellet Grills, LLC
716 S 8th Street, Amelia Island, FL 32034
primepelletgrills.com
(866) 985-7877
Prime Pellet Grills
®
is a registered trademark of Prime Pellet Grills LLC. All assembly instruction presentations are the property of Prime Pellet Grills LLC and are protected by U.S. copyrights and trademarks.
All rights reserved.
Call toll-free (866)866) 985-78779 a.m. – 9 p.m., EST
Email [email protected]
Live chat www.primepelletgrills.com
9 a.m. - 4 p.m., EST, Monday - Friday
All components are warranted for a period of 3 years after date of purchase by the original owner against defects
in materials and workmanship under normal use. This warranty does NOT cover normal wear and weathering,
assembly and/or maintenance OR use in a commercial application if model is not designated as a commercial
model. At Prime Pellet Grills’ sole discretion, products under warranty will be repaired and/or replaced at no
charge to the customer. Any returns sent back to Prime Pellet Grills must be sent via prepaid freight and in the
original retail packaging.
For warranty service contact Prime Pellet Grills at the address, phone numbers or internet site and email listed in
this owner’s manual. Be sure to have your sales receipt, date of purchase and catalogue/model numbers available
when calling. All warranty service will be coordinated by Prime Pellet Grills’ Amelia Island, Florida service center.
This warranty is extended only to the original purchaser. Proof of purchase will be required before warranty service
is rendered. The sales receipt is the only valid proof of purchase. This warranty only covers failures due to defects
in materials or workmanship which occur during normal use. Failures and/or damage which result from accident,
negligence, misuse, abuse, neglect, mishandling, alteration or modication, failure to maintain, improper assembly
or maintenance, service by unauthorized agency or use of unauthorized components or damage that is attributable
to acts of God are NOT covered.
This limited warranty gives you specic legal rights and you may also have other rights which vary from jurisdiction
to jurisdiction. The provisions of the United Nations Convention on Contracts for the Sales of Goods shall not apply
to this limited warranty or the sale of products covered by this limited warranty.
3 YEAR LIMITED WARRANTY
Customers in the Contiguous US