stingersolutions.com
1
SRK-JK11HX
PN: SRK-JK11HX
Wireless
Infotainmen
t
System
10”
™
SRK-JK11HX USER GUIDE
®
®
stingersolutions.com
stingersolutions.com
2
3
SRK-JK11HX
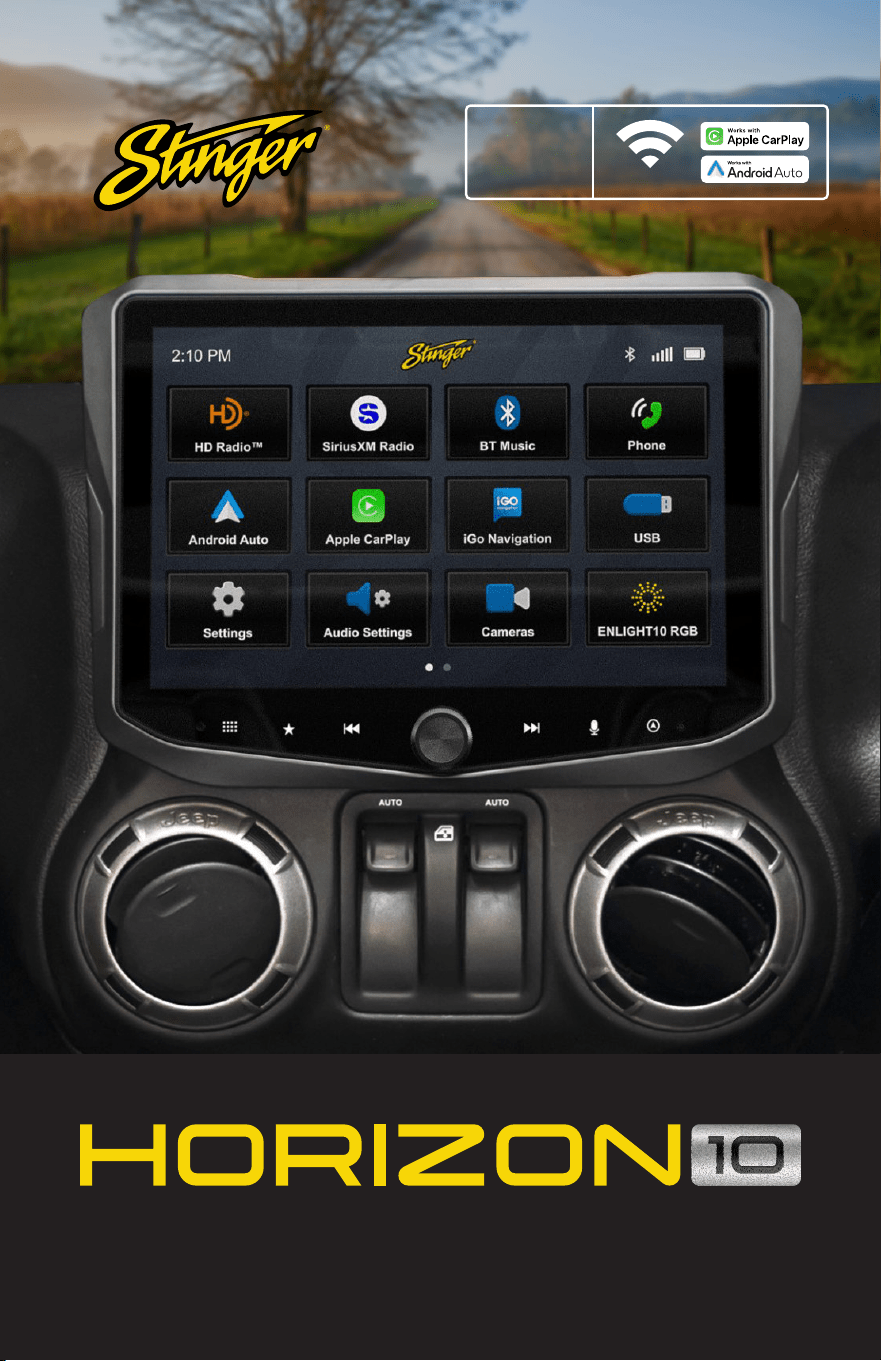
You’re ready to take on any adventure
with your Stinger HORIZON10 radio kit!
Additionally, your new SRK-JK11HX kit
enables you to replace a Jeep Wrangler
JK factory radio with a show-stopping
10-inch multimedia infotainment
system while retaining OEM features
and maintaining a ush, factory look
and feel!
About this document
This document covers features added
to the HORIZON10 by your SRK-JK11HX kit.
If you need to reference the HORIZON10
user guide, you can find it bundled
with your SRK-JK11HX or online at:
https://stingersolutions.com/products/
stinger-horizon10-10in-radio
HORIZON10 USER GUIDE
FIND YOUR HORIZON CONTENTS
WELCOME TO YOUR NEW
™
SRK-JK11HX USER GUIDE CONTENTS
Basic Operation
Vehicle Info
Vehicle Info
Gauges
Performance
Off-Road
Drivetrain
User Settings
Vehicle Settings
Cameras & Overlay
Factory USB Ports
PAC Steering Wheel Controls
Integrated Audio Settings
Updating System Firmware
4
6
6
7
8
9
10
11
12
13
14
15
16
17
®
®
stingersolutions.com
stingersolutions.com
4
5
SRK-JK11HX
THE BASICS
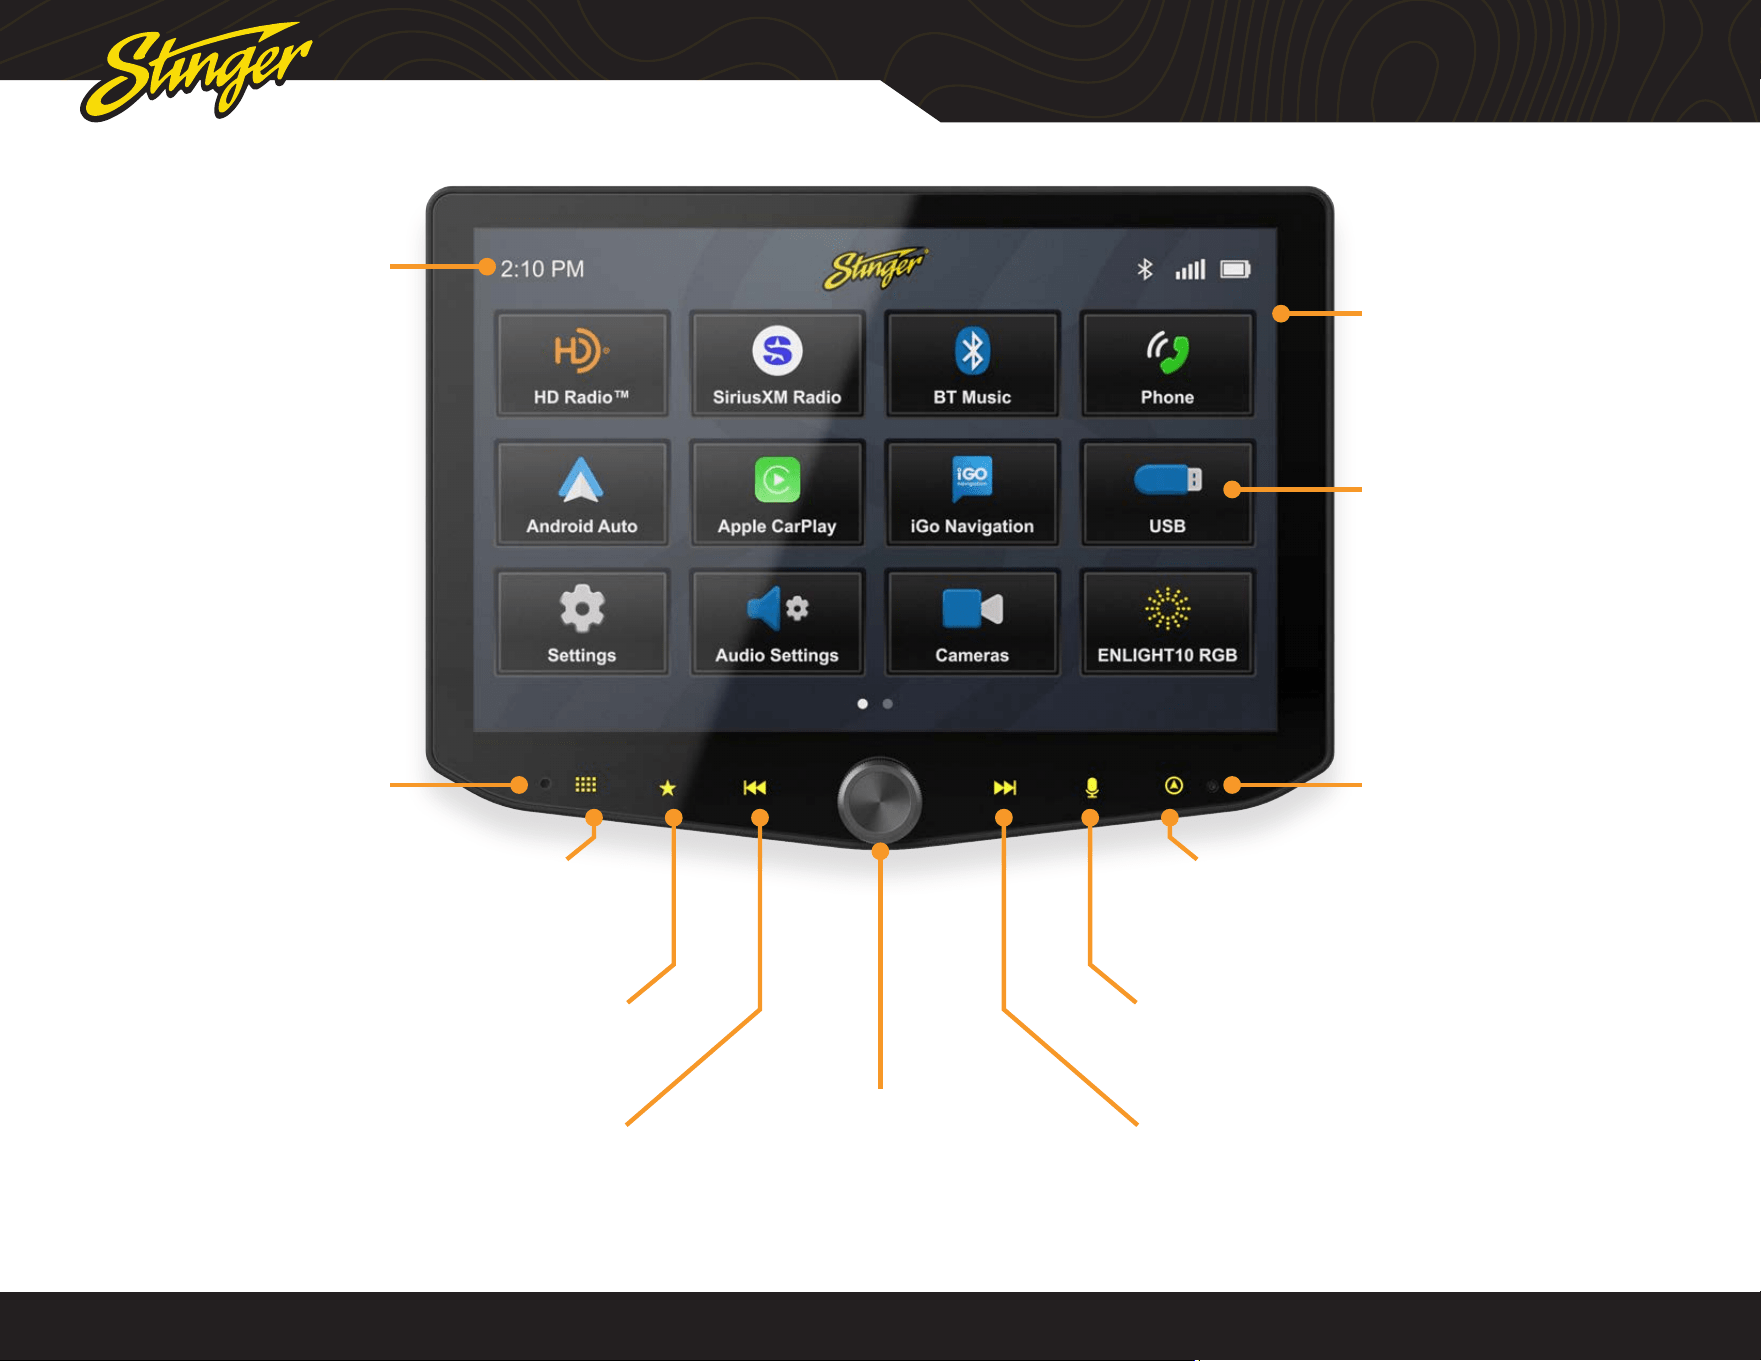
Internal Microphone Reset Button
Multifunction Knob
Turn to adjust Volume Up/Down
Press to Mute/Unmute
Press & Hold to Sleep / Wake Unit
Tune/Track Up Button
Media control: Next, Forward, Seek
Press & hold function in select sources
Favorite Button
Tap : Launch your selected favorite application
Set your favorite app in Settings; learn more on Page 32
Tune/Track Down Button
Media control: Previous, Back, Seek
Press & hold function in select sources
Home Menu Button
Tap: Access the Home Menu
Dimmed menu items are not selectable.
Clock
Tap: Adjust Clock Settings
Voice Button
Launches voice control
Navigation Button
Tap: Access Navigation
When iGo Navigation is installed, tap for iGo
Tap and Hold for Phone Navigation
Home Menu
Tap: Launch selected app
You can press and hold a
menu item to move it from
this screen.
Note: Your dash dimmer control
will adjust screen brightness.
®
®
stingersolutions.com
stingersolutions.com
6
7
SRK-JK11HX
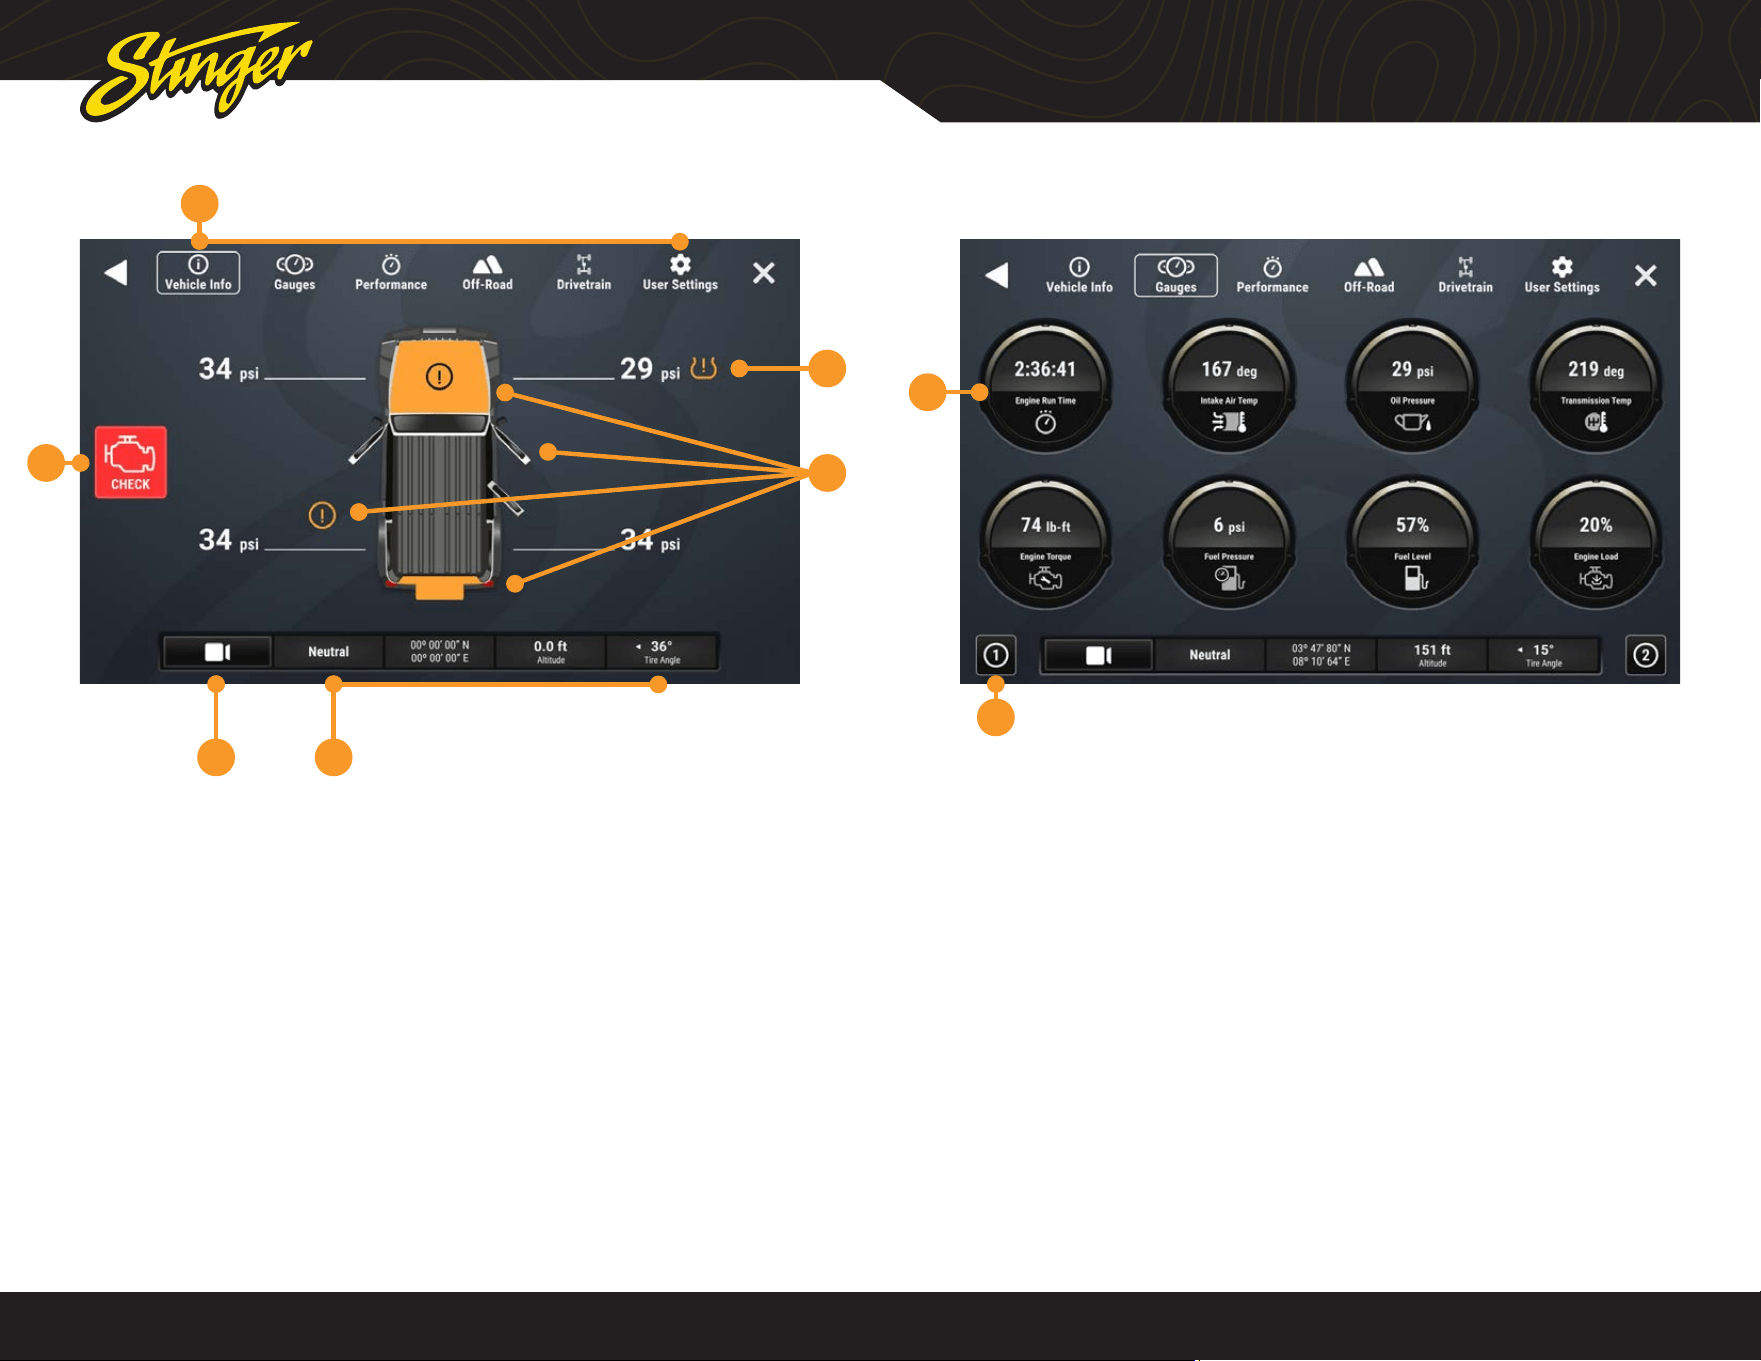
VEHICLE INFO
Press the HOME BUTTON > Vehicle Info to access the Vehicle Info functions.
6
2
3
1
45
1. Vehicle Info Menu
Access various vehicle info display
modes.
2. Tire Pressure
Low pressure warnings can be
customized in User Settings.
3. Door Closed / Opened / Off
Indicates door, hood, and rear gate
statuses.
4. Vehicle Info Footer
Available on all vehicle information
displays. Shows Transfer Case status,
GPS Coordinates, Altitude, and current
Tire Angle
5. Default Off-Road Camera
Activate default camera, can be
changed in User Settings
6. Malfunction Indicator
Displays current malfunction indicators.
Touch indicator for more information
and to clear codes.
1. Gauges
Tap a gauge to cycle through available
gauge types.
2. Gauge Setup Preset
There are two preset gauges setups.
Press and hold to save a gauge
combination and then tap that setup
again to recall that combination.
Change colors in HOME > Setting >
Display > System Highlights
Change gauge units in User Settings.
VEHICLE INFO > GAUGES
Press the HOME BUTTON > Vehicle Info > Gauges to access Gauges.
1
2
Available Gauges:
Battery Voltage
Oil Temperature
Oil Pressure
Transmission Temperature
Coolant Temperature
Fuel Pressure
Intake Air Temperature
Engine Calculated Load
Barometric Pressure
Intake Manifold
Fuel Pressure
Absolute Load
Ignition Timing
Engine Run Time
®
®
stingersolutions.com
stingersolutions.com
8
9
SRK-JK11HX
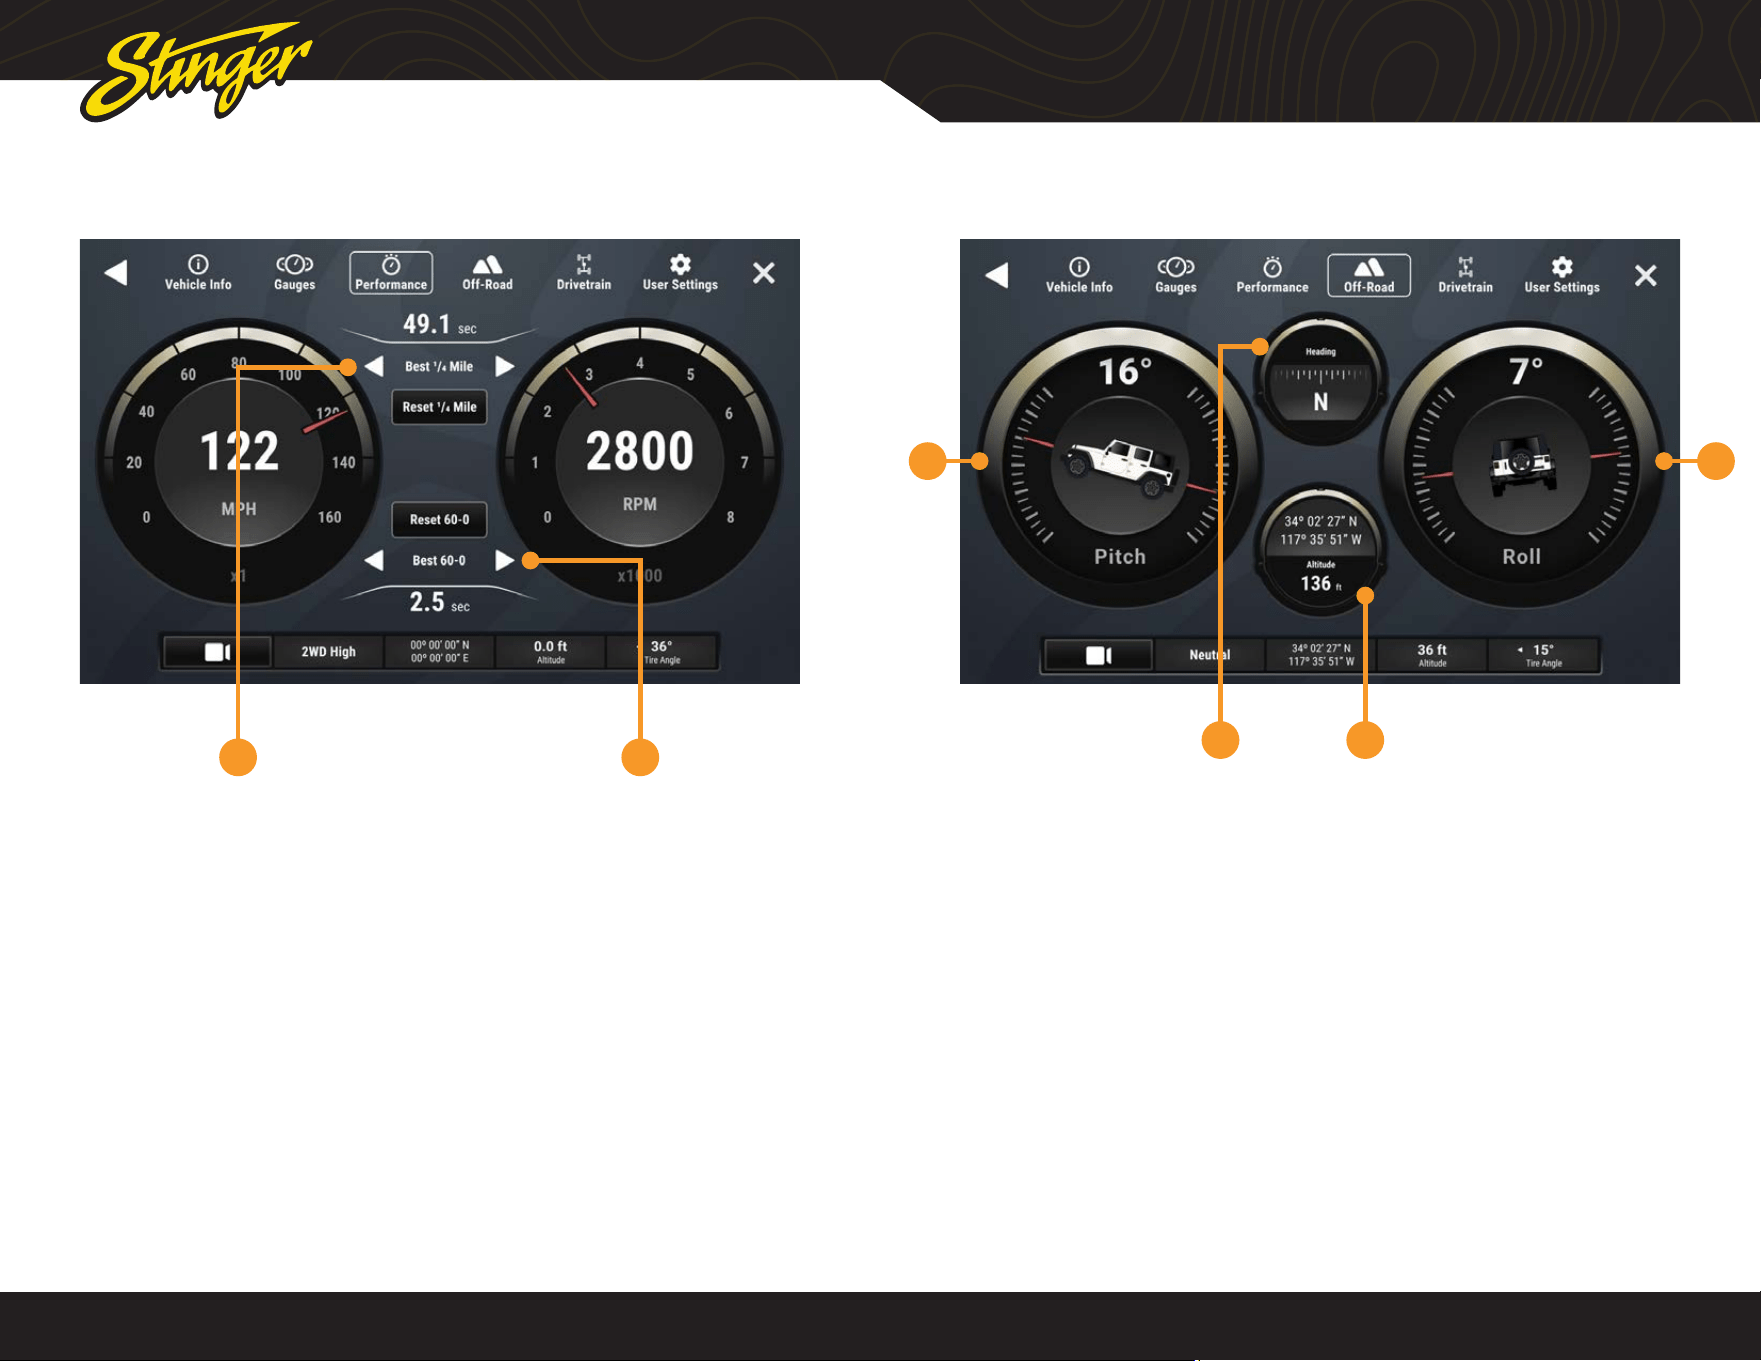
VEHICLE INFO > PERFORMANCE
Press the HOME BUTTON > Vehicle Info > Performance to access Performance.
Selecting Performance will display a
digital speedometer and tachometer
along with performance measurements.
1. Best 0-60 / ¼ Mile / 60-0
Whenever a new best performance
measurement is achieved, the results
will be displayed. Use left / right arrows
to recall best measurements. Reset best
measurements with the reset button.
2. Last 0-60 / ¼ Mile / 60-0
Use left / right arrows to recall last
measurements for each performance
metric.
1 2
VEHICLE INFO > OFF-ROAD
1 4
32
Press the HOME BUTTON > Vehicle Info > Off-Road to access Off-Road.
1. Pitch
2. Compass
3. GPS / Altitude
4. Roll
®
®
stingersolutions.com
stingersolutions.com
10
11
SRK-JK11HX
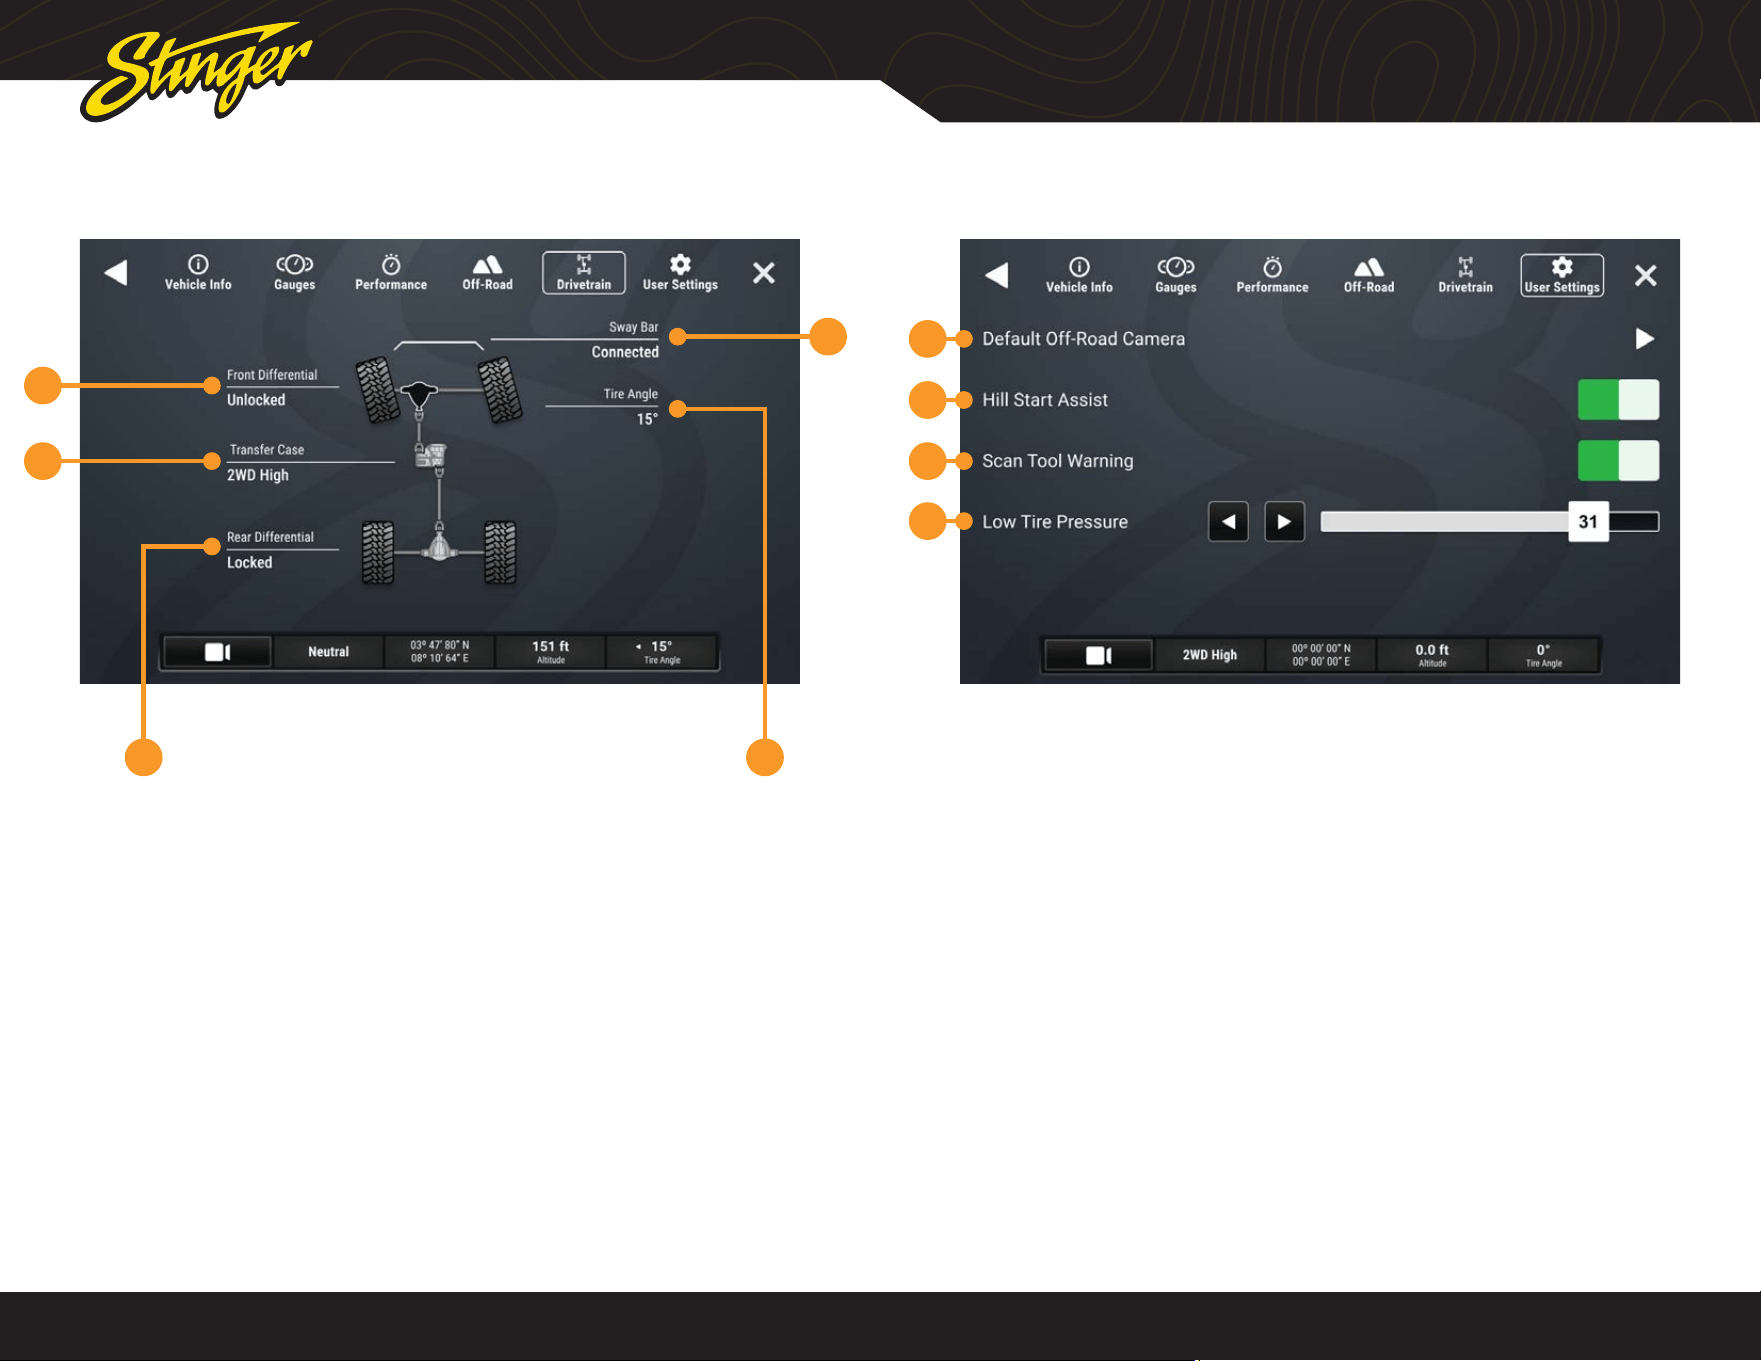
VEHICLE INFO > DRIVETRAIN
1 5
2
3
4
VEHICLE INFO > USER SETTINGS
1
2
3
4
1. Rear Axle
2. Transfer Case
3. Front Axle
4. Sway Bar
5. Tire Angle
Press the HOME BUTTON > Vehicle Info > Drivetrain to access Drivetrain
(if equipped.)
NOTE: Items on this screen may vary
according to your installed equipment.
For example, Hill Start Assist may not
appear depending on your equipment.
1. Default Off-Road Camera
Select which camera activates when
you press the camera button
2.Hill Start Assist
You can toggle hill start assist on / off.
3. Scan Tool Warning
It’s possible that you might have an
accessory installed that makes gauge
operation unreliable. If so, this control
will enable or disable the scan tool
warning on the gauge cluster.
4. Low Tire Pressure
Set the threshold, for the low tire
pressure warning shown on the vehicle
info display.
Press the HOME BUTTON > Vehicle Info > User Settings to access Settings.
®
®
stingersolutions.com
stingersolutions.com
12
13
SRK-JK11HX
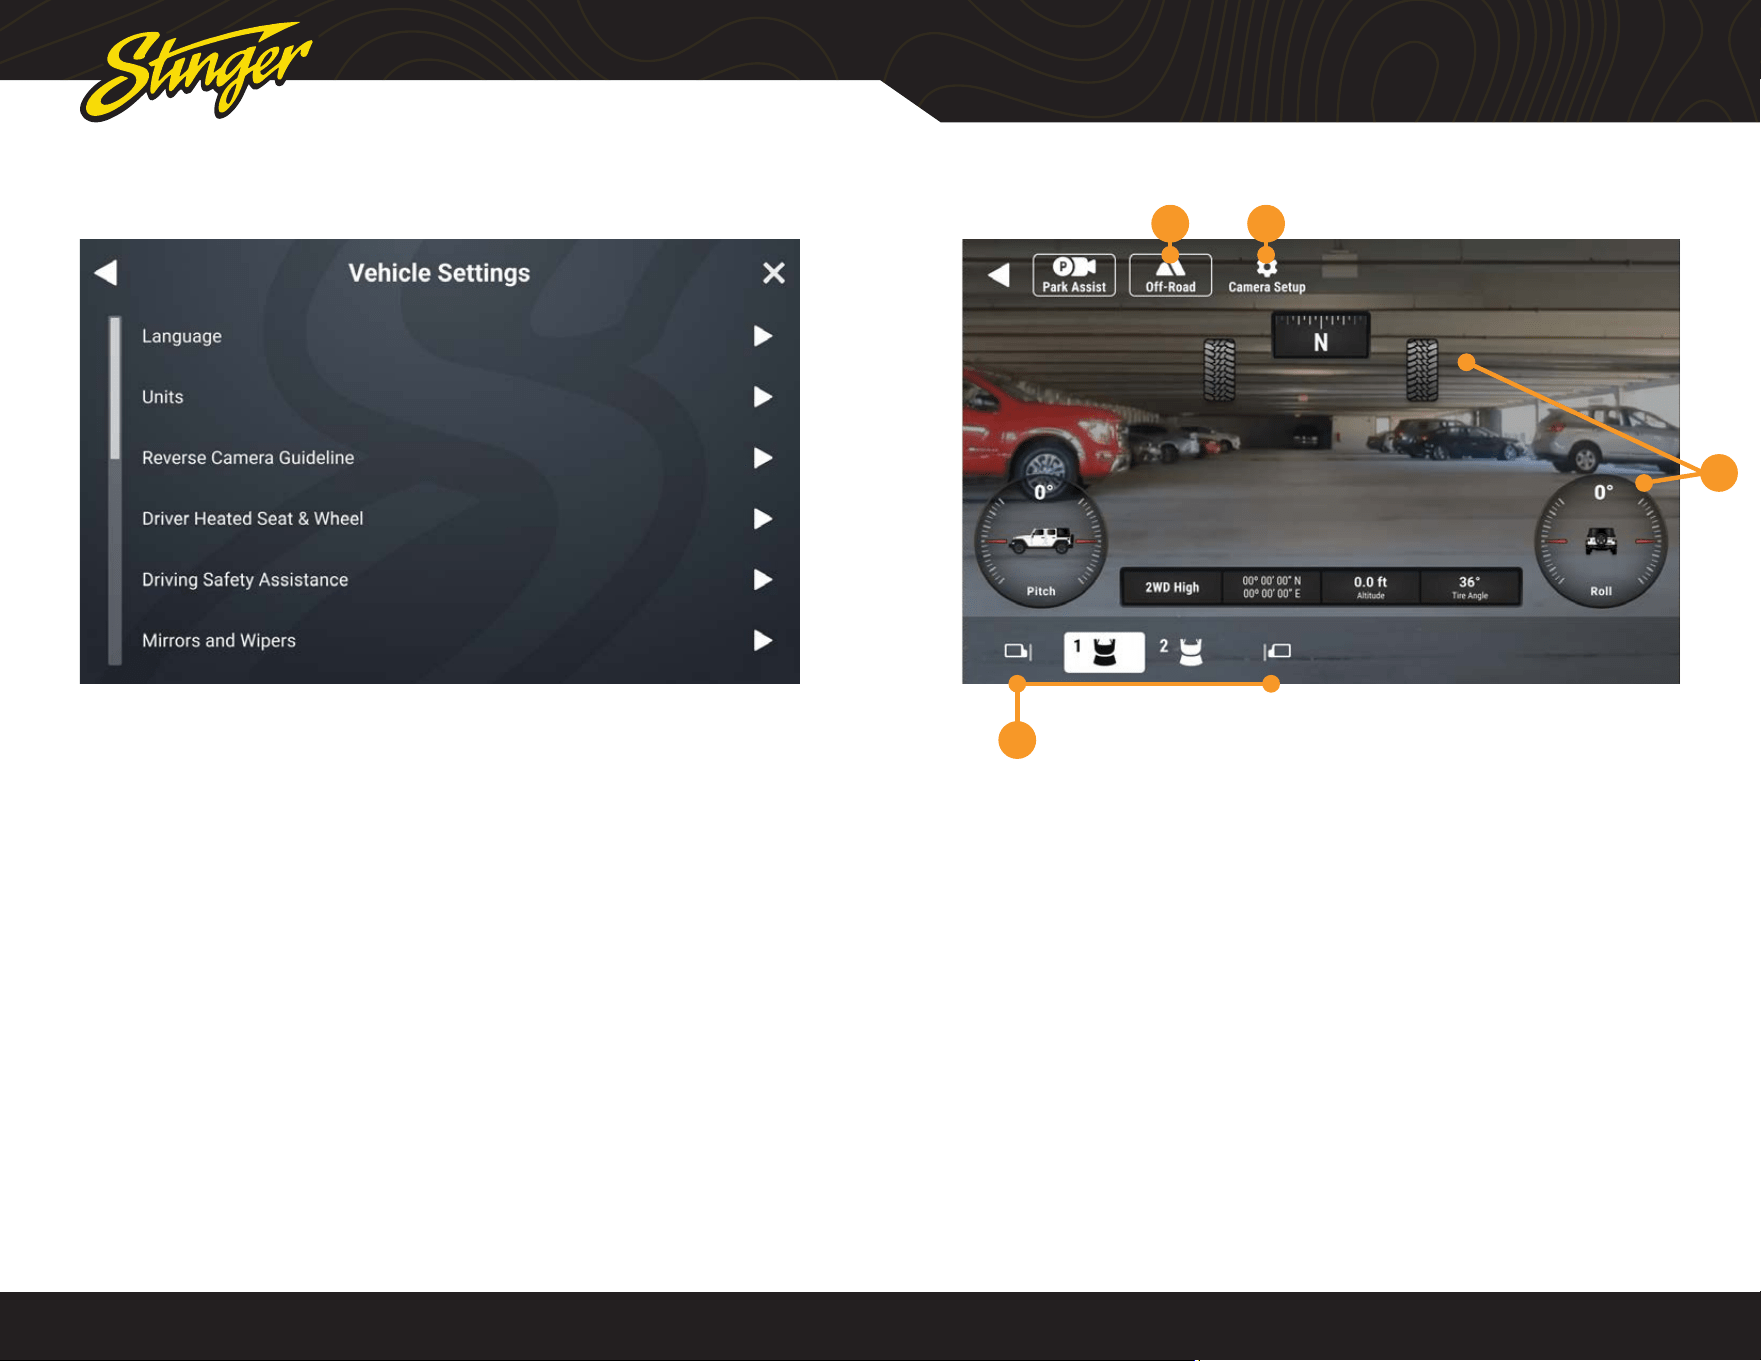
VEHICLE SETTINGS
Press the HOME BUTTON > Vehicle Settings to access Vehicle Settings
The Vehicle Settings are all the factory
vehicle settings retained from the
factory radio.
Since these are factory settings, with the
exception of the PAC Enabled Settings,
these are all explained in detail in the
uConnect section of the Jeep Owner’s
Manual.
NOTE: The listed settings are based
on how the vehicle is equipped. For
example, Aux Switches will not be
present if the vehicle is not equippped
with Aux Switches.
NOTE: Auto Start / Stop Memory will
retain adjusted Start / Stop status when
the vehicle is turned off.
CAMERA OVERLAY
4
Press the HOME BUTTON > Camera to access Camera views.
The factory rear camera will continue to
automatically display when in reverse
and can also be activated at any time
by selecting Cameras from the HOME
Menu or Tabs.
When the camera is rst activated, there
will be menu bars at the top and bottom
of the display. These bars contents
will vary depending on your installed
equipment. These bars will auto-hide
after 5 seconds
1. Off-Road Mode
Activating Off-Road Mode will display
heading, tire angle, pitch, roll, and the
vehicle information toolbar.
2. Camera Setup
Access your camera setup from this
control. Turn triggers on, off, and adjust
advanced camera features
3. Off-Road Overlay Elements
4. Camera Selection
Tap a camera icon to change cameras.
Contents of this area will change based
on your installed equipment
1 2
3
®
®
stingersolutions.com
stingersolutions.com
14
15
SRK-JK11HX
Primary USB 1:
Apple Carplay
Android Auto
USB Drive Media
Charging
Firmware Updates
Secondary USB 2:
USB Drive Media
Charging
Firmware Updates
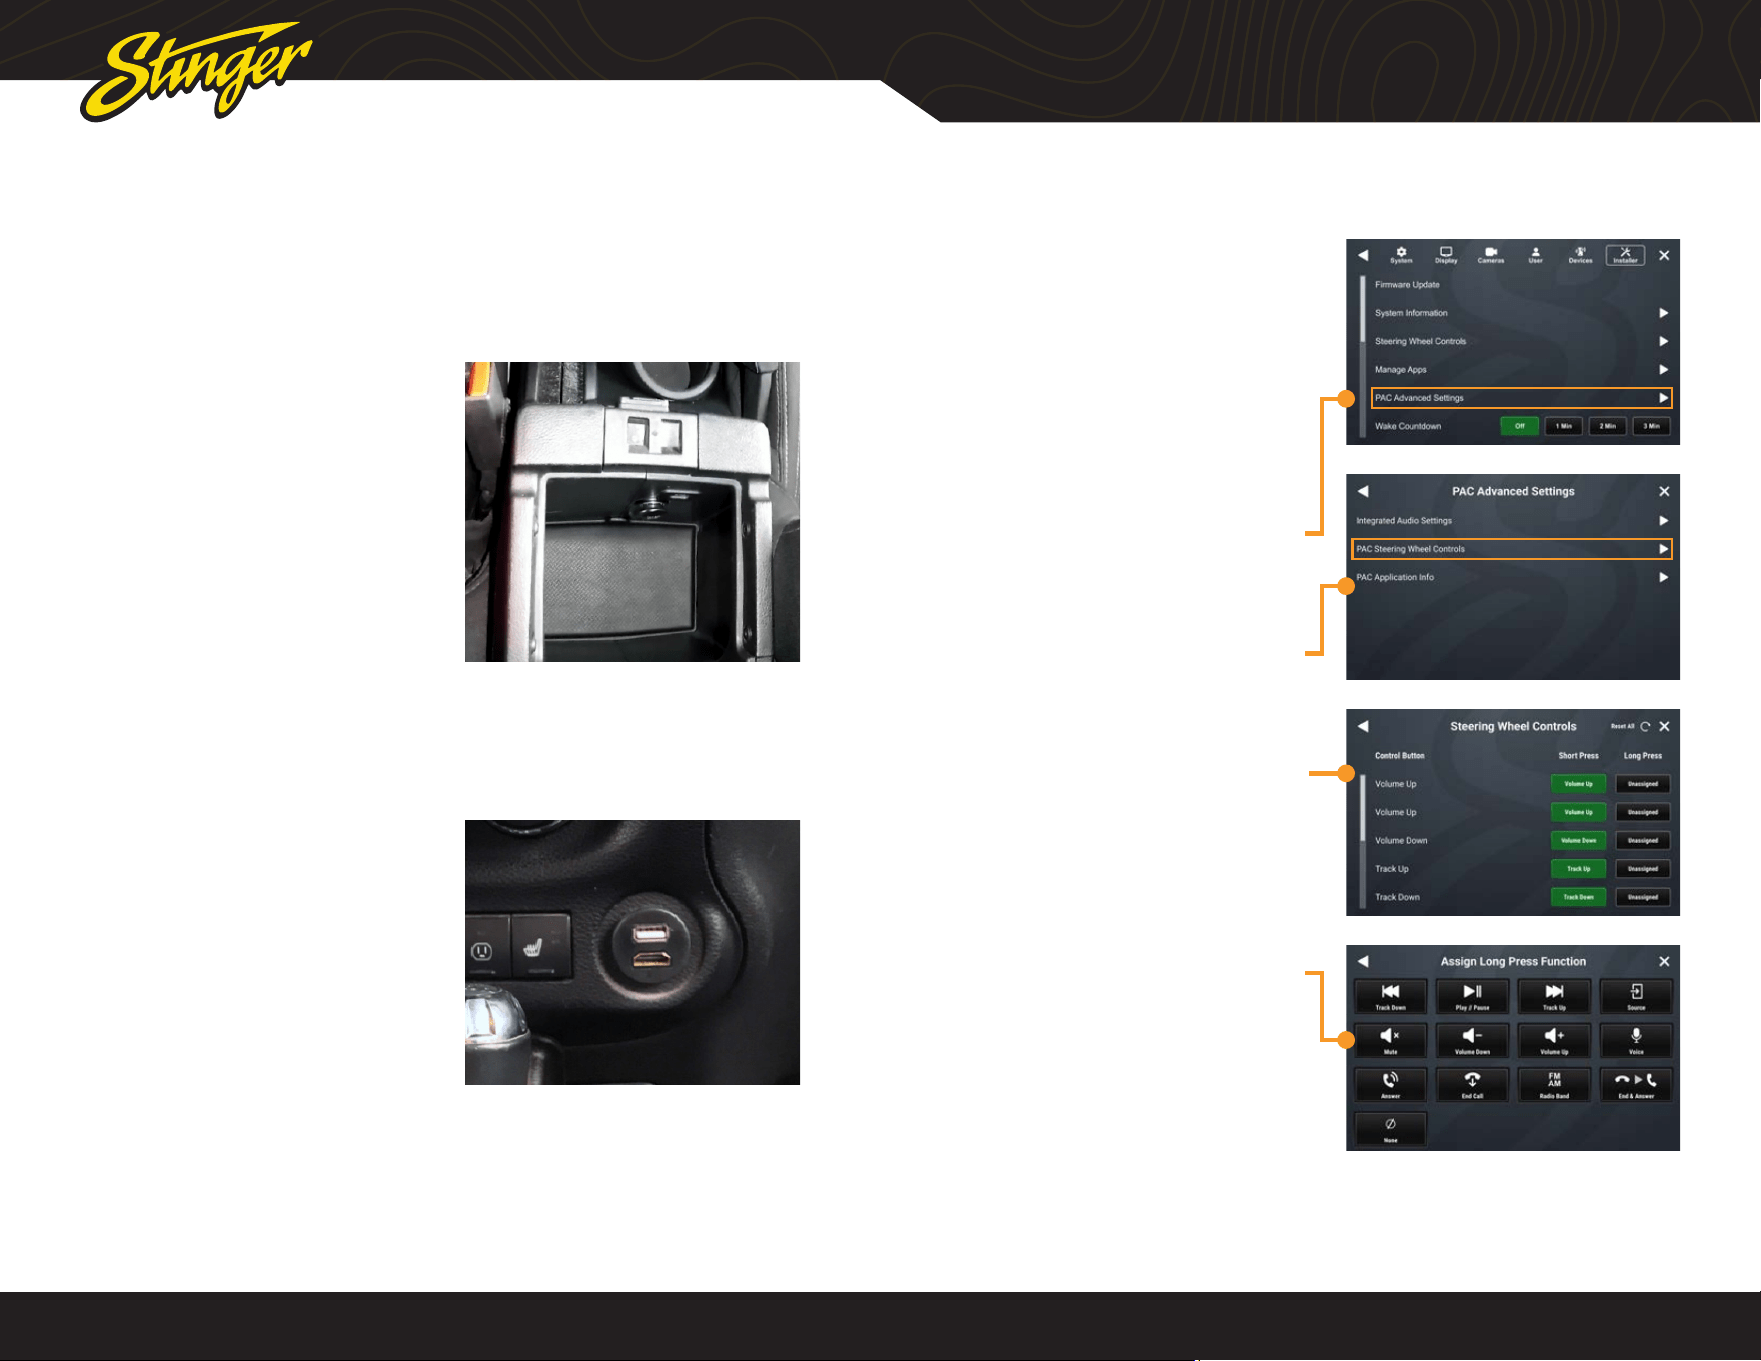
If the vehicle was equipped with
Uconnect and the PAC USB adapter is
installed, the factory USB port inside the
center console will be retained.
The PAC HDMI-USB adapter adds a USB
and HDMI port.
USB PORTS
Depending on the installation, there will be one or two USB ports. If there is only
one USB port, it will support all USB functions. If there is a second USB port, one will
support all USB functions and the other will support media, charging and rmware
updating only.
PAC STEERING WHEEL CONTROLS
The PAC interface allows retention and
customization of the factory steering
wheel control buttons.
By default they will be programmed
according to the factory functions. You
may change the function or add Long
Press functionality to any button. For
example you can assign Long Press on
Volume Down to activate Mute.
1. Access Installer Settings (Code
0052) and select PAC Advanced
Settings
2. Select PAC Steering Wheel
Controls
3. To change or add a SWC
function, touch the corresponding
short or long press assignment
4. A function menu will be
displayed with the current
function highlighted.
Select any of the functions to
assign that function to that
button.
®
®
stingersolutions.com
stingersolutions.com
16
17
SRK-JK11HX
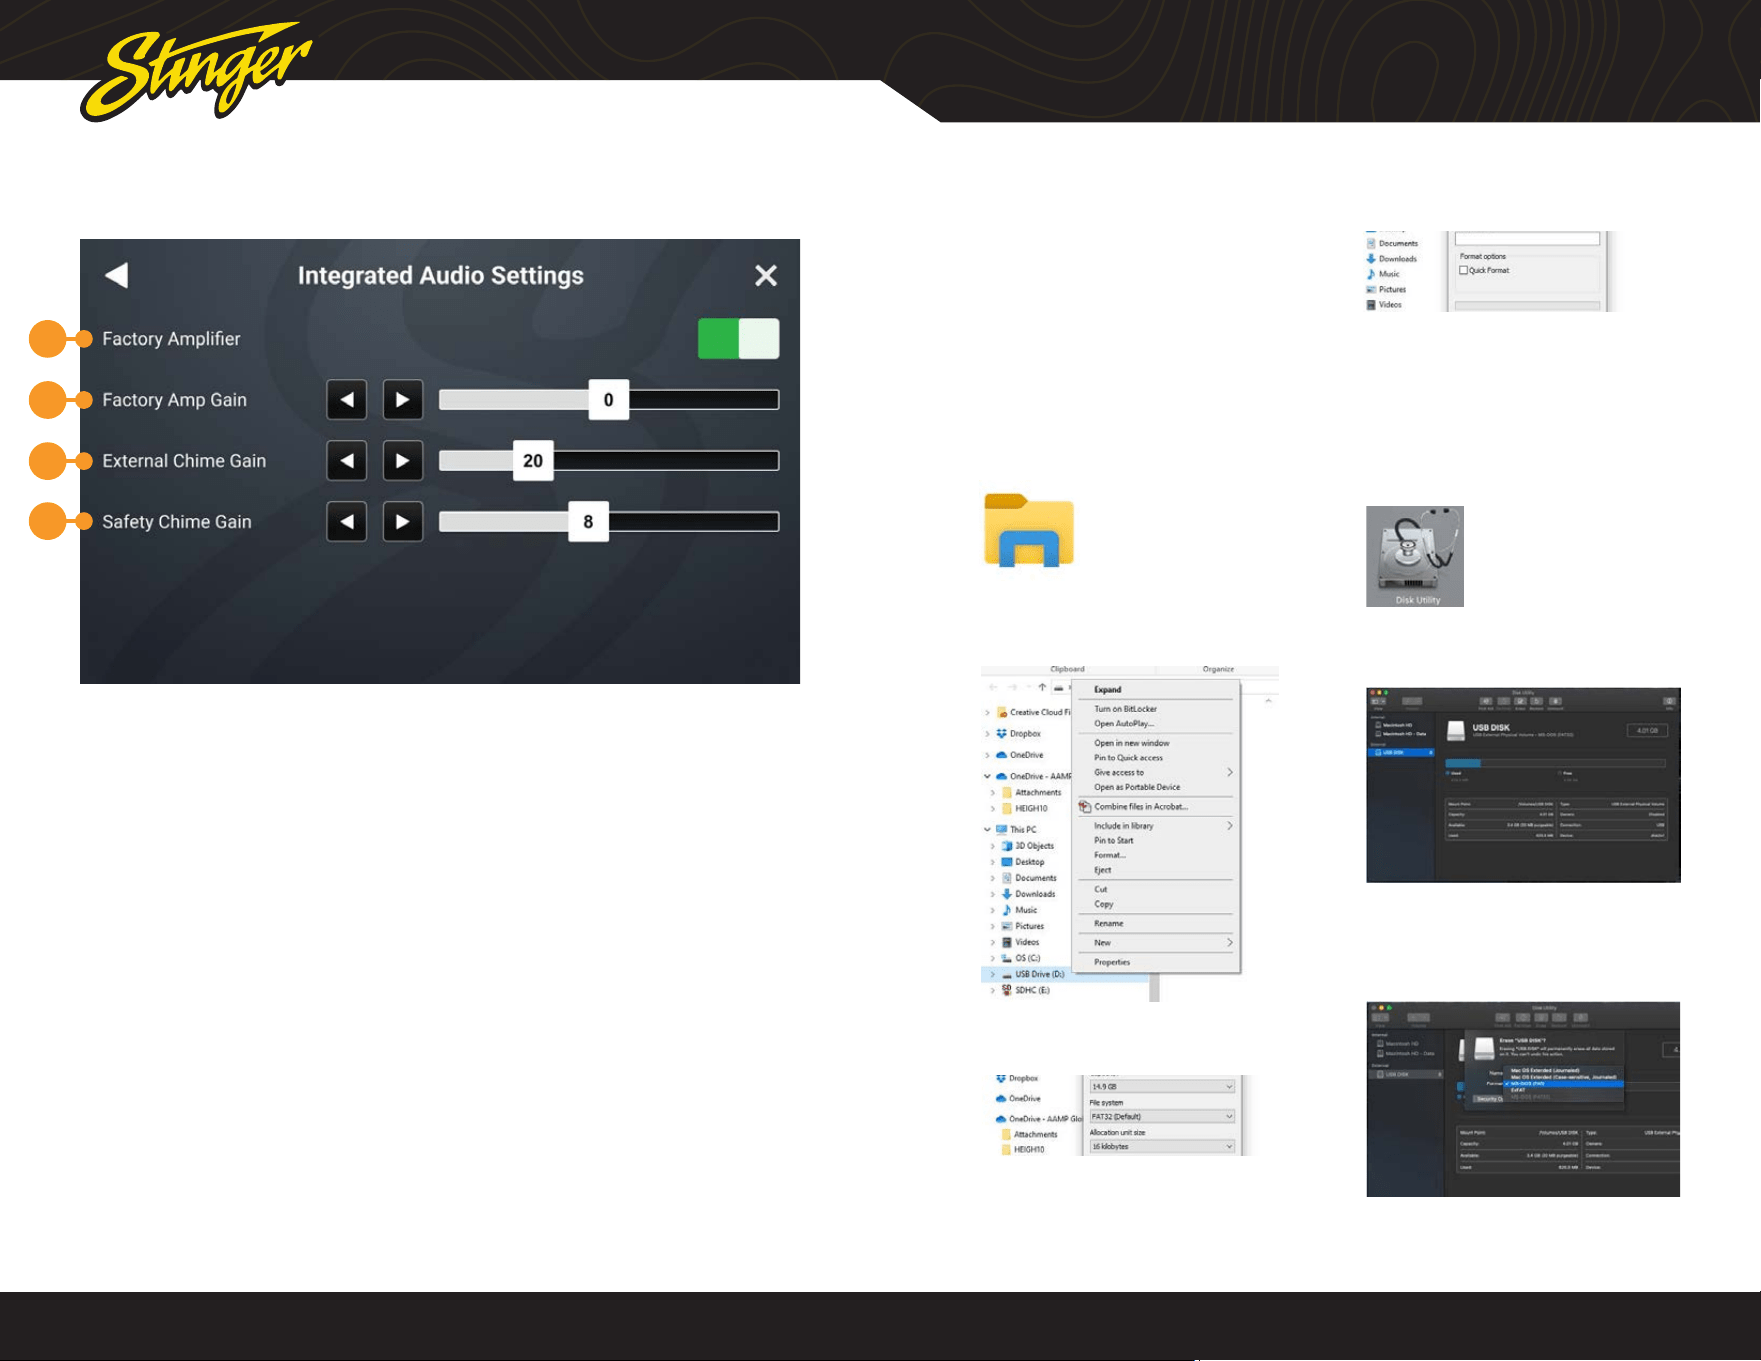
INTEGRATED AUDIO SETTINGS
1
2
3
4
UPDATING SYSTEM FIRMWARE
1. Format a USB Drive
In order to prepare a USB Flash Drive
for use with your HORIZON10 system, the
USB drive must be formatted to FAT32
/ MS-DOS(FAT).
Windows PC
1. Insert a 4GB+ USB Drive
2. Open File Explorer
3. Right click on USB Drive and
select Format
4. Select FAT 32 (Default) File
System
5. Deselect Quick Format
6. Click Start
MAC OSX
1. Insert a 4GB+ USB Drive
2. Launch the Disk Utility App from
the Utilities folder
3. Select the USB drive from the
External List and click Erase
4. Select MS-DOS(FAT) from the
format drop-down menu and
click Erase
Press the HOME BUTTON > Settings > Installer > PAC Advanced Settings >
Integrated Audio Settings to access advanced audio settings.
NOTE: If your Jeep is equipped with
premium sound (amplied), Vehicle
Audio Settings will be present here.
1. Factory Amplier
Toggle ON if factory amplifier is
present. When ON factory crossovers
and time correction are retained and
the HORIZON10’s crossovers and time
correction are disabled..
2. Factory Amplier Gain
Adjusts gain of factory amplier
3. External Chime Gain
Sets chime level of external speaker
if installed.
4. Safety Chime Gain
Sets gain level of factory chimes.
®
®
stingersolutions.com
stingersolutions.com
18
19
SRK-JK11HX
®
®
stingersolutions.com
stingersolutions.com
18
19
SRK-JK11HX
2. Download Firmware
Download the firmware file from
StingerSolutions.com. Transfer the
rmware le as-is onto the formatted
USBdrive.
The le must be in the root directory
of the USB drive. Do not unzip the le.
3. Install System Update
Insert the USB drive into any USB port
on the radio.
NOTE: When updating the rmware, all
settings will be reset to factory defaults.
Station presets, EQ presets, audio/
crossover settings, time alignment,
camera settings will all be overwritten.
You can export user settings to the
same USB drive you prepared earlier
from the Installer menu.
Your HORIZON10 will automatically
detect the rmware le, either when
you plug it into your powered radio or
on startup
Tap Update Firmware on the popup. The
update will take 6 - 8 minutes.
NOTE: Do not attempt to stop an
update. DO NOT turn off power. The
system will be damaged if power is
lost during the update process.
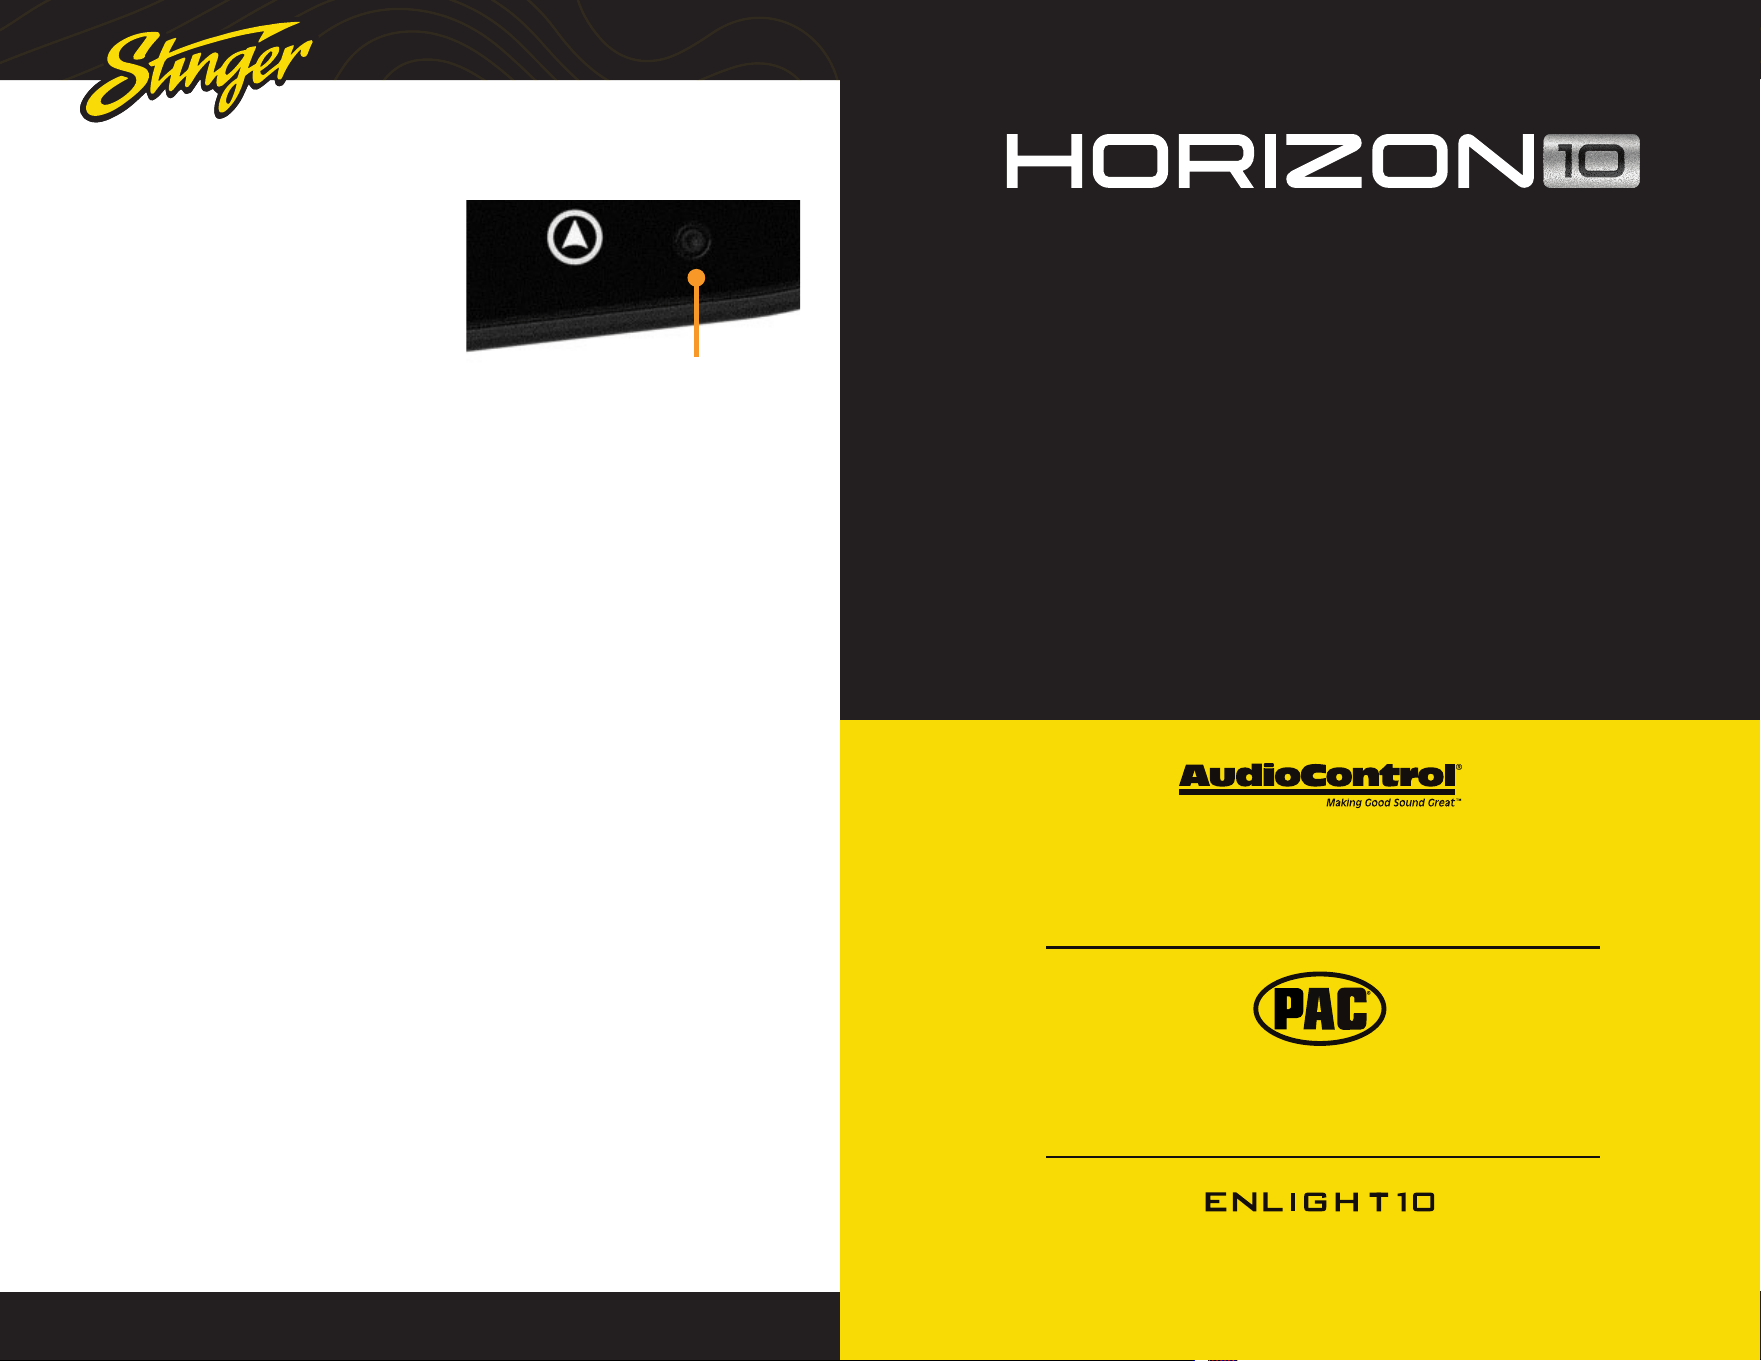
4. System Reset
When the update is complete and
display is on the Radio source, press
the Reset Button on the face of the radio.
The reset process takes 1-2 minutes,
when completed, the unit will return to
the Radio source.
5. Nap Time
Once the System Reset is complete,
turn the vehicle off, remove the key, lock
the car using the factory key fob, and
let the vehicle sit for 10 minutes. This
will ensure that the vehicle data-bus
goes to sleep and the Integration APK
will function as intended.
6. Conrm Firmware Update
Conrm rmware update by accessing
System Information in Installer settings.
Note the APP Version and visit the
HORIZON10 page at StingerSolutions.
com
Select the Firmware Tab on the product
page. The most current firmware
will be listed. The 8 digits of the APP
Version listing is the update date code
(YYYYMMDD).
Reset Button
®
stingersolutions.com
19
SRK-JK11HX
®
stingersolutions.com
19
The HORIZON10 infotainment radio boasts, a roomy
10-inch touchscreen, wireless smartphone
connection, and IP65 weather-resistance for any
adventure.
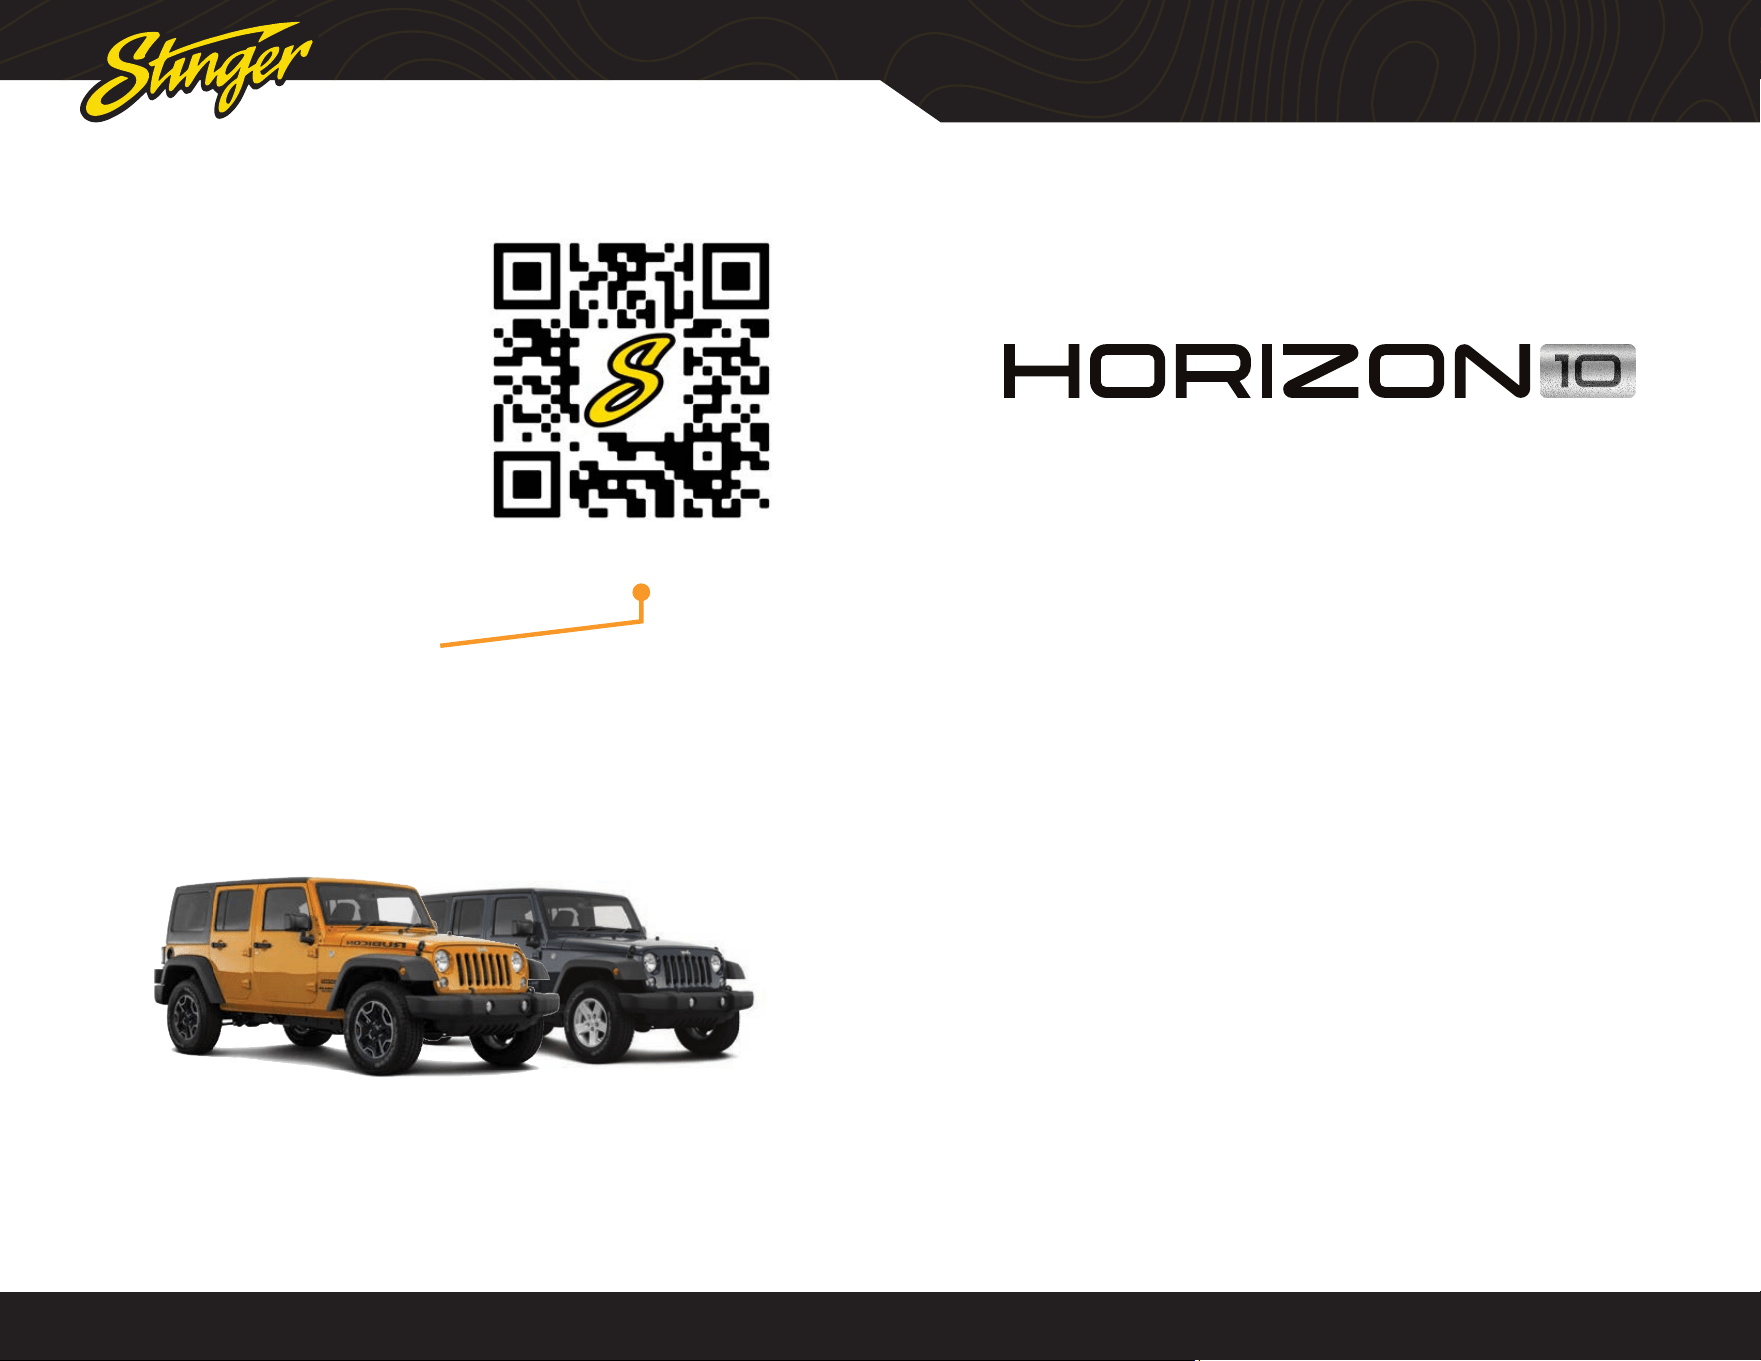
Engineered for flexibility, the HORIZON10 installs
seamlessly in single or double-din openings using
standard installation kits. Compatible with a wide
range of vehicle fitments, including on & off-road
vehicles, classic cars, RVs, golf carts, and UTVs.
Enhance your experience with
our compatIble products
™
Factory Vehicle Integration
Retain factory features and add
even more upgraded features
DM Smart DSP App Intergation
On-screen control of AudioControl’s
DM series processors and amplifiers
RGB Light Control
On-screen control of ENLIGHT10
RGB dynamic LED lighting