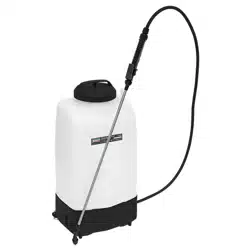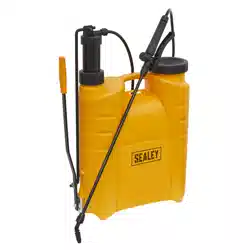
BACKPACK SPRAYER 16LTR
MODEL NO: SS4.V3
Thank you for purchasing a Sealey product. Manufactured to a high standard, this product will, if used according to these
instructions, and properly maintained, give you years of trouble free performance.
IMPORTANT: PLEASE READ THESE INSTRUCTIONS CAREFULLY. NOTE THE SAFE OPERATIONAL REQUIREMENTS, WARNINGS & CAUTIONS. USE
THE PRODUCT CORRECTLY AND WITH CARE FOR THE PURPOSE FOR WHICH IT IS INTENDED. FAILURE TO DO SO MAY CAUSE DAMAGE AND/OR
PERSONAL INJURY AND WILL INVALIDATE THE WARRANTY. KEEP THESE INSTRUCTIONS SAFE FOR FUTURE USE.
1. SAFETY
NOTE! This appliance is not intended for use by persons (including children) with reduced physical, sensory or mental capabilities
or lack of experience and knowledge, unless they have been given supervision or instruction concerning the use of the appliance
by a person responsible for their safety. Children should be supervised to ensure that they do not play with the appliance. The Sealey
Hand Pressure Sprayer Model No SS4 is safe and only becomes a safety issue when used with toxic fluids. The following safety
instructions are bullet points and cannot cover every aspect of user safety.
9 Be aware of the safety requirements (C.O.S.H.H.) for the fluids contained in the vessel.
9 Wear safety equipment as advised in (C.O.S.H.H.) statements.
9 Be aware the vessel will weigh in excess of 16kg (34lbs) when filled.
9 Read and follow all the fluid manufacturers instructions for application and safe use.
9 Empty and clean before storing the vessel inside an outbuilding away from foodstuffs and out of reach of children.
9 Label vessel with chemical used, even if water. It is highly recommended that individual vessels should be used for individual chemicals.
IMPORTANT: Cross contamination can give unexpected results. Also ensure possible spillages are avoided in transfering liquids.
8 DO NOT spray at people, animals, protected insect species, in high winds, at naked flames or sources of heat.
8 DO NOT use the pressure sprayer for any purpose other than for which it is designed.
8 DO NOT use whilst eating, drinking, smoking; under the influence of drugs, alcohol, intoxicating medication, or if fatigued.
8 DO NOT use to spray flammable liquids, solvents etc.
2. INTRODUCTION
Designed for extensive use around the garden, greenhouse and vegetable plots. Suitable for use with most garden chemicals including
pesticides, herbicides and solvent-free preservatives. Manufactured from heavy-duty polypropylene. Supplied with four interchangeable spray
nozzles and lockable trigger designed for extended use. Features adjustable double padded shoulder straps and large ller cap with integral
lter. Can be used left or right-handed by simply reversing the shoulder straps.
3. SPECIFICATION
Model No ......................................................... SS4.V3
Capacity ................................................................ 16ltr
4. ASSEMBLY
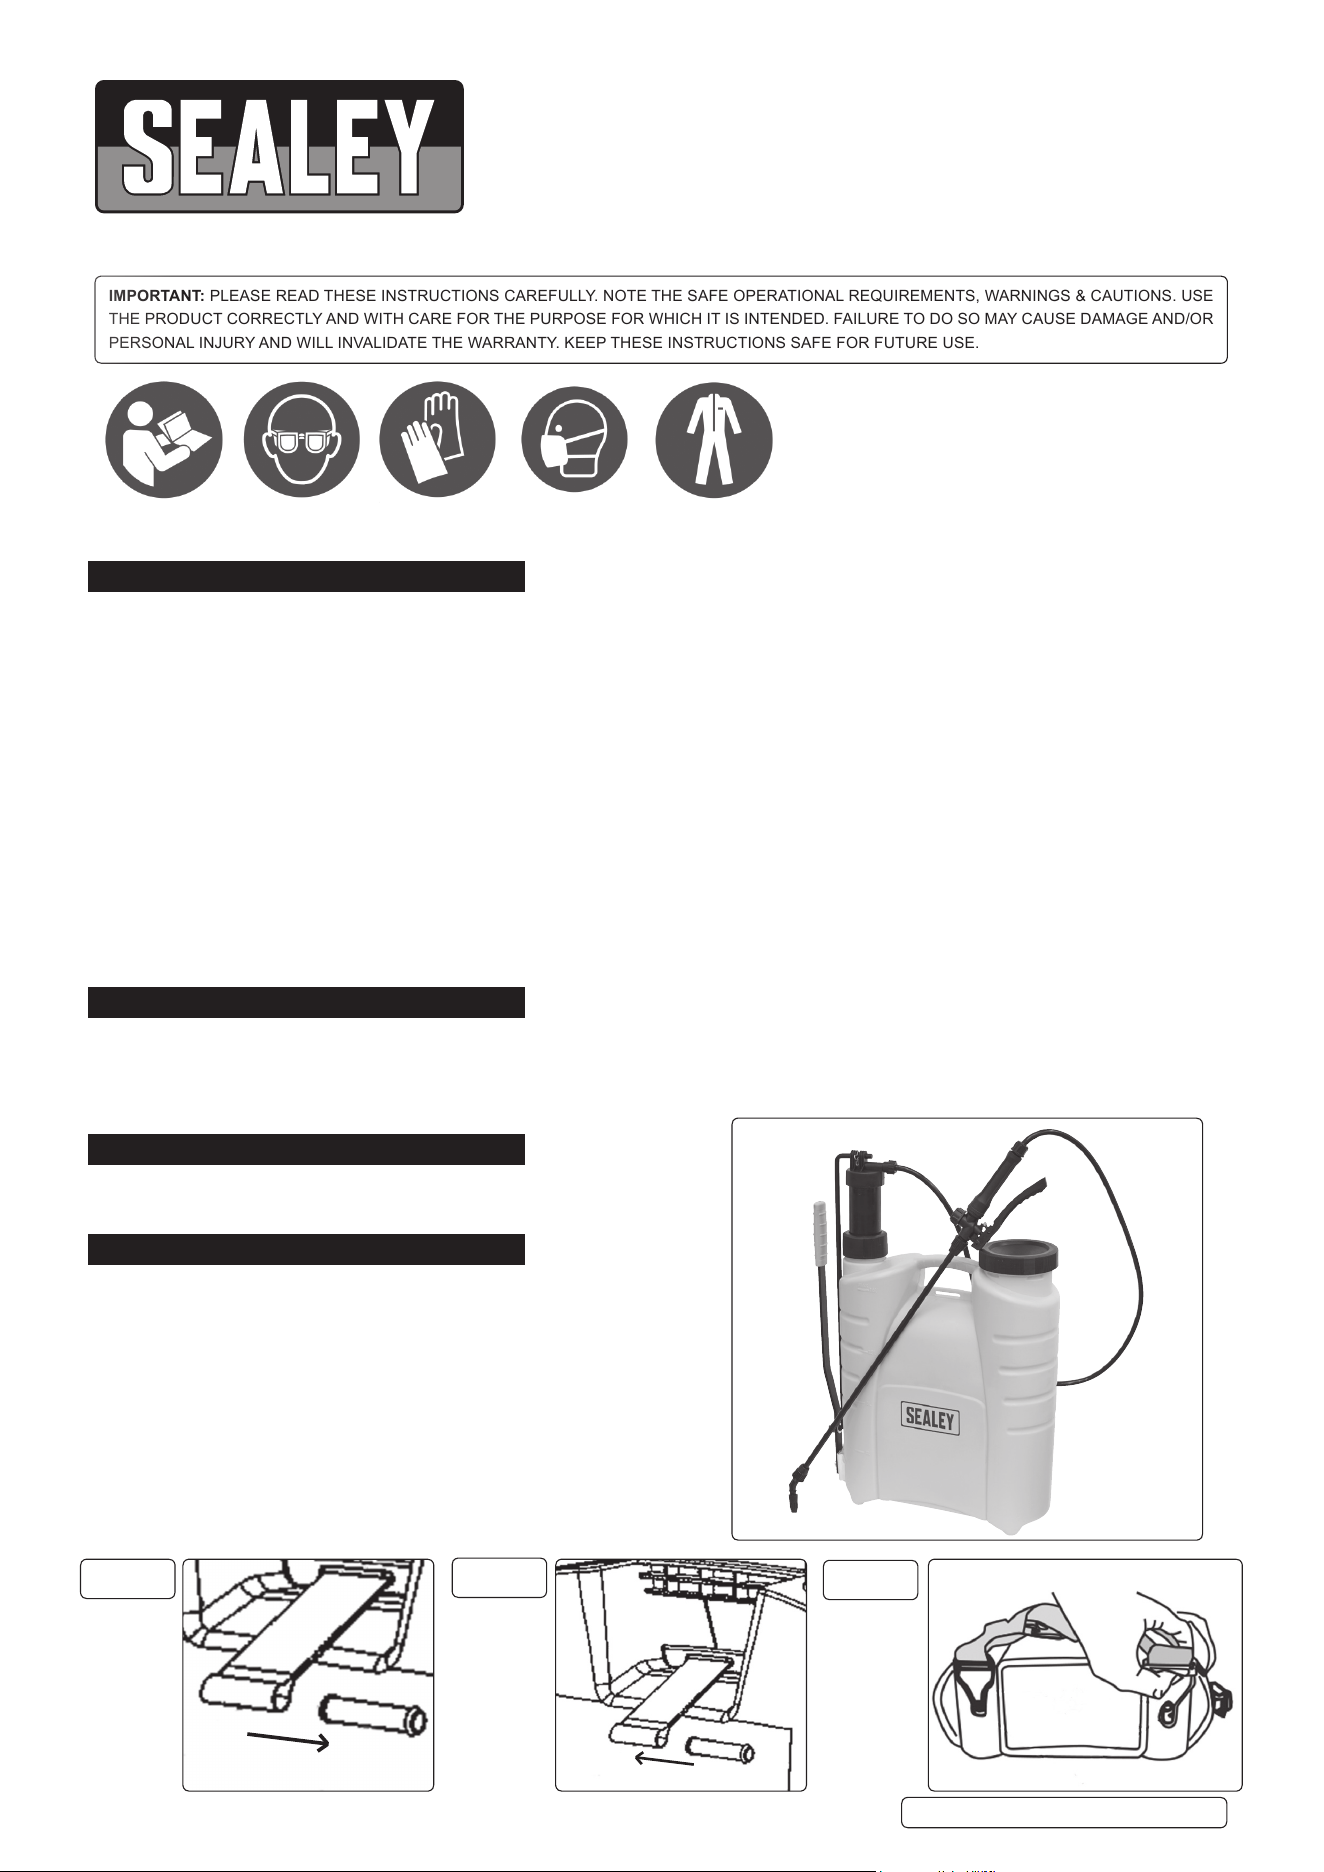
4.1. ATTACHING THE SHOULDER STRAP
4.1.1. Slide the strap retainer out of the strap (g.1).
4.1.2. Push the strap through the opening under the handle, then slide the
retainer back through the strap (g.2). The retainer should sit at
the rear of the sprayer. (Dependent on left or right handed use of the
sprayer).
NOTE: If you are right-handed the pump lever should be on the left-
handed side so that you can hold the spray lance in your right hand.
4.1.3. Pull the metal buckles onto the lugs situated on the bottom of the
backpack sprayer until you hear them click into place (g.3).
4.1.4. Adjust the length of the straps to suit.
SS4.V3 | Issue 1 22/07/19
Original Language Version
© Jack Sealey Limited
Refer to
instructions
Wear eye
protection
Wear protective
gloves
Wear protective
clothing
Wear a mask
g.1
g.2
g.3
SS4.V3 | Issue 1 22/07/19
Original Language Version
© Jack Sealey Limited
Sealey Group, Kempson Way, Suffolk Business Park, Bury St Edmunds, Suffolk. IP32 7AR
01284 757500 01284 703534 sales@sealey.co.uk www.sealey.co.uk
ENVIRONMENT PROTECTION
Recycle unwanted materials instead of disposing of them as waste. All tools, accessories and packaging should be sorted, taken to
a recycling centre and disposed of in a manner which is compatible with the environment. When the product becomes completely
unserviceable and requires disposal, drain any fluids (if applicable) into approved containers and dispose of the product and fluids
according to local regulations.
Note: It is our policy to continually improve products and as such we reserve the right to alter data, specifications and component parts without prior
notice. Please note that other versions of this product are available. If you require documentation for alternative versions, please email or call
our technical team on technical@sealey.co.uk or 01284 757505. Important: No Liability is accepted for incorrect use of this product.
Warranty: Guarantee is 12 months from purchase date, proof of which is required for any claim.
5. OPERATION
5.1. Rinse the inside of the container with warm water before use and
thoroughly dry, before using any chemicals including herbicides,
pesticides, insecticides and weed killers etc., it is advisable to
familiarise yourself with the sprayer operation by lling it with water
and testing the various spray patterns, the dry the sprayer.
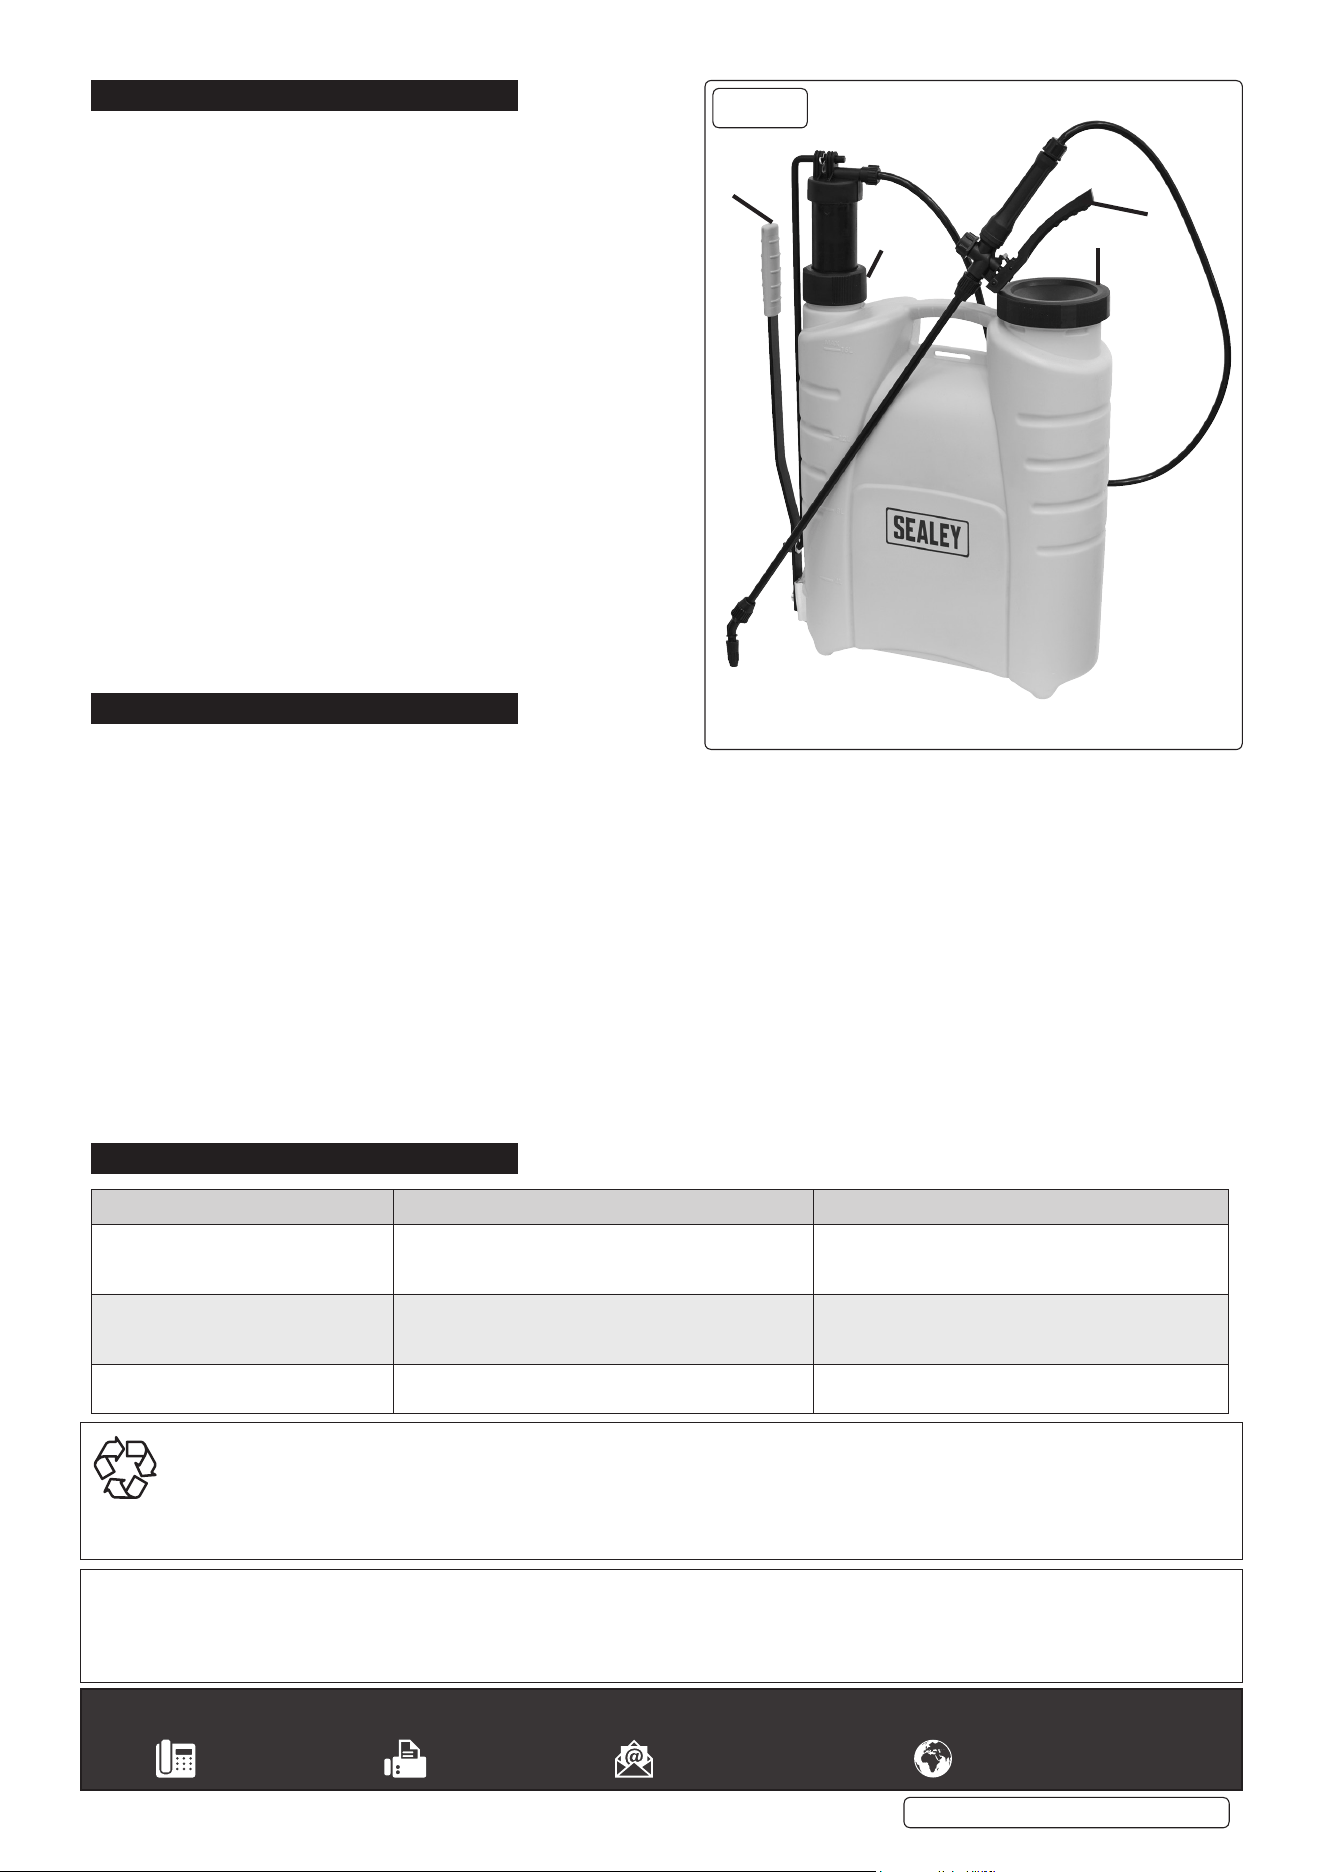
5.2. Open Container cap A (g.4) and pour in required liquid (max 16
litres), replace cap and tighten rmly by hand.
5.3. Make sure that the pump container cap B (g.4) is also tight to
prevent air escaping during use.
5.4. Place sprayer on your back, it may be easier if another person
could assist you.
IMPORTANT: Ensure the weight of the sprayer is not too heavy for
your back.
5.5. Adjust straps for comfort.
5.6. Pump handle C (g.4) and start spraying by pressing the on/off
trigger on handle assembly D (g.4).
NOTE: The handle assemble is equipped with a lock for
continuous spraying. Pivot the catch below the locking tab to lock
the trigger. To unlock, pivot the catch back to its original position.
5.7. Pump handle periodically to maintain pressure for ongoing spray ow.
5.8. Adjust the spray pattern of the nozzle by rotating it from a jet
to a mist.
5.9. The nozzle angle can be adjusted by exing the black pivot
mouldings beneath the nozzle.
6. MAINTENANCE
6.1. CLEANING THE SPRAYER
6.1.1. Release pressure from the sprayer unit before relling or replacing parts. This is done by pressing the trigger.
6.1.2. To empty the residual uid, unscrew the tank cap and empty tank. When ramaining agents need to be disposed of, refer to the
manufacturer’s label and local authority guidelines.
6.1.3. Clean sprayer with recommended cleaner for chemical used.
6.1.4. Rell the container with approximately 2 litres of recommended cleaner, then with the trigger locked for continuous spraying, pump
handle and start expelling all the liquid until empty.
6.1.5. Leave the sprayer open and allow to air dry before storage.
6.1.6. Check that the nozzle is free from sediment. If necessary, repeat the process until the sprayer is clean.
6.1.7. Clean the inlet lter and tank cap in clean water.
6.2. CLEANING THE PUMP
6.2.1. Remove the locking ring and pull the joint rod out of the pump.
6.2.2. Unscrew the pump cap and pull out the pump. Inspect the pump O-ring and install a new O-ring if necessary.
6.2.3. Carefully remove the stir part from the inner pump, then pull out the inner part of the pump and the gasket.
6.2.4. Reassemble the pump in reverse order. Re-attach the stir part.
6.2.5. Ret pump into tank. Tighten pump cap rmly by hand.
6.2.6. When assembling the pump ensure that the pump gaskets are seated properly after installation and are not squashed.
7. TROUBLESHOOTING
FAULT POSSIBLE CAUSE REMEDY
Pump does not provide pressure Valve in the tank cap blocked.
Hose connections at the pump and sprayer handle
are leaking.
Clean the tank cap.
Tighten the hose connections at the pump and
sprayer handle.
Backpack sprayer does not spray
although there is sufcient pressure
or sprayers with poor spray jet
Nozzle blocked.
Filter in sprayer handle blocked.
Clean the nozzle.
Clean the lter in the sprayer handle.
Tank is difcult to open Pressure in tank too low because the valve in the
tank
Clean the tank cap
g.4
A
B
C
D