

20V 12L
BACKPACK SPRAYER
08096
These instructions accompanying the product are the original instructions. This document is part of the product,
keep it for the life of the product passing it on to any subsequent holder of the product. Read all these instructions
before assembling, operating or maintaining this product.
This manual has been compiled by Draper Tools describing the purpose for which the product has been designed,
and contains all the necessary information to ensure its correct and safe use. By following all the general safety
instructions contained in this manual, it will ensure both product and operator safety, together with longer life of the
product itself.
All photographs and drawings in this manual are supplied by Draper Tools to help illustrate the operation of the
product.
Whilst every eort has been made to ensure the accuracy of information contained in this manual, the Draper Tools
policy of continuous improvement determines the right to make modications without prior warning.
ORIGINAL
LANGUAGE

1. TITLE PAGE
1.1 INTRODUCTION:
USER MANUAL FOR: 20V 12L Backpack Sprayer
Stock No: 08096
Part No: D20G/BS13L
1.2 REVISIONS:
Date rst published August 2021
First revision October 2023
As our user manuals are continually updated, users should make
sure that they use the very latest version.
Downloads are available from: http://drapertools.com/manuals
Draper Tools Limited Draper Tools Limited
Hursley Road Oude Graaf 8
Chandler’s Ford 6002 NL
Eastleigh WEERT
Hampshire Netherlands
SO53 1YF
UK
Website: drapertools.com
Product Help Line: +44 (0) 23 8049 4344
General Fax: +44 (0) 23 8026 0784
1.3 UNDERSTANDING THIS MANUAL’S SAFETY CONTENT:
Warning! – Information that draws attention to the risk of injury or death.
Important – Information that draws attention to the risk of damage to the product or
surroundings.
1.4 COPYRIGHT © NOTICE:
Copyright © Draper Tools Limited.
Permission is granted to reproduce this publication for personal and educational use only.
Commercial copying, redistribution, hiring or lending is prohibited.
No part of this publication may be stored in a retrieval system or transmitted in any other form or
means without written permission from Draper Tools Limited.
In all cases this copyright notice must remain intact.
– 2 –

2.1 TABLE OF CONTENTS
1. TITLE PAGE
1.1 INTRODUCTION: ......................................................................................................... 2
1.2 REVISIONS: ................................................................................................................. 2
1.3 UNDERSTANDING THIS MANUALS SAFETY CONTENT: ........................................... 2
1.4 COPYRIGHT © NOTICE: ............................................................................................. 2
2. CONTENTS
2.1 TABLE OF CONTENTS ................................................................................................ 3
3. WARRANTY
3.1 WARRANTY ................................................................................................................. 4
4. INTRODUCTION
4.1 SCOPE ......................................................................................................................... 5
4.2 SPECIFICATION ........................................................................................................... 5
4.3 HANDLING AND STORAGE......................................................................................... 5
5. HEALTH AND SAFETY INFORMATION
5.1 GENERAL SAFETY INSTRUCTIONS FOR POWER TOOL USE .................................. 6
6. TECHNICAL DESCRIPTION
6.1 IDENTIFICATION ........................................................................................................ 12
7. UNPACKING AND CHECKING
7.1 PACKAGING .............................................................................................................. 13
7.2 WHAT’S IN THE BOX ................................................................................................. 13
8. PREPARING THE BACKPACK SPRAYER
8.1 MOUNTING THE PLASTIC SPRAY HEAD AND SPRAY LANCE ............................... 14
8.2 MOUNTING AND ADJUST THE METAL SPRAY LANCE ........................................... 15
8.3 ATTACHING THE HOSE ............................................................................................. 15
8.4 MOUNTING AND ADJUSTING THE BACKPACK STRAP .......................................... 16
9. OPERATION
9.1 FILLING THE TANK .................................................................................................... 17
9.2 MOUNTING THE BATTERY PACK ............................................................................. 18
9.3 TURNING THE SPRAYER ON/OFF ............................................................................ 18
9.4 BATTERY VOLUME INDICATOR ................................................................................ 18
9.5 LOCKING ON THE HANDLE TRIGGER ..................................................................... 19
9.6 ADJUSTING THE CONE SPRAY HEAD ..................................................................... 19
9.7 SPRAYING HOME AND GARDEN CHEMICALS ........................................................ 19
10. MAINTENANCE AND TROUBLESHOOTING
10.1 MAINTENANCE .......................................................................................................... 20
10.2 OPERATING TIPS ...................................................................................................... 20
10.3 GENERAL MAINTENANCE ........................................................................................ 21
10.4 DRAINING THE TANK ................................................................................................ 21
10.5 CLEANING THE TANK AND SPRAY LANCE ASSEMBLY .......................................... 21
10.6 CLEANING THE SPRAY HEADS ................................................................................ 22
10.7 REPLACING SEALS ................................................................................................... 22
10.8 STAORAGE THE SPRAYER ....................................................................................... 22
11. EXPLANATION OF SYMBOLS
11.1 EXPLANATION OF SYMBOLS ................................................................................... 23
12. DISPOSAL
12.1 DISPOSAL .................................................................................................................. 24
2. CONTENTS
– 3 –

3.1 WARRANTY
Draper power tools have been carefully tested & inspected and are guaranteed to be free from
defective materials or workmanship.
For details of warranty and terms and conditions please visit the Draper Tools website at
www.drapertools.com/warranty
3. WARRANTY
– 4 –

4. INTRODUCTION
4.1 SCOPE
For use with water, herbicides, pesticides and solvent-free preservative treatments. This product
is suitable for enthusiasts and tradespersons alike. Any application other than that it was intended
for, is considered misuse.
4.2 SPECIFICATION
Stock no. ..................................................................................................................................08096
Part no. ..........................................................................................................................D20G/BS13L
Rated voltage ..............................................................................................................................20V
Pressure ................................................................................................................50.75PSI/72.5PSI
Liquid Flow ................................................................................................................1.2L per minute
Max. spray distance ...................................................................................................................7.6m
Working capacity ..........................................................................................................................12L
Running time ........................................................................... 110 minutes with 2.0Ah battery pack
4.3 HANDLING AND STORAGE
Care must still be taken when handling and lifting. Dropping this machine will have an eect on
the accuracy and may also result in personal injury. This machine is not a toy and must be
respected.
The environment will have a negative result on its operation if you are not careful. If the air is
damp, components will rust. If the machine is unprotected from dust and debris; components will
become clogged: And if not cleaned and maintained correctly or regularly the machine will not
perform at its best.
– 5 –

5. HEALTH AND SAFETY INFORMATION
– 6 –
5.1 GENERAL SAFETY INSTRUCTIONS FOR POWER TOOL USE
Warning! Read all safety warnings, instructions, illustrations and specications provided
with this power tool. Failure to follow all instructions listed below may result in electric shock,
re and/or serious injury.
Save all warnings and instructions for future reference.
The term “power tools” in the warnings refers to your mains-operated (corded) power tool or
battery-operated (cordless) power tool.
1) Work area safety
a) Keep work area clean and well lit. Cluttered or dark areas invite accidents.
b) Do not operate power tools in explosive atmospheres, such as in the presence of
ammable liquids, gases or dust. Power tools create sparks which may ignite the dust
or fumes.
c) Keep children and bystanders away while operating a power tool. Distractions can
cause you to lose control.
2) Electrical safety
a) Power tool plugs must match the outlet. Never modify the plug in any way. Do not
use any adapter plugs with earthed (grounded) power tools. Unmodied plugs and
matching outlets will reduce risk of electric shock.
b) Avoid body contact with earthed or grounded surfaces, such as pipes, radiators,
ranges and refrigerators. There is an increased risk of electric shock if your body is
earthed or grounded.
c) Do not expose power tools to rain or wet conditions. Water entering a power tool will
increase the risk of electric shock.
d) Do not abuse the cord. Never use the cord for carrying, pulling or unplugging the
power tool. Keep cord away from heat, oil, sharp edges or moving parts. Damaged or
entangled cords increase the risk of electric shock.
e) When operating a power tool outdoors, use an extension cord suitable for outdoor
use. Use of a cord suitable for outdoor use reduces the risk of electric shock.
f) If operating a power tool in a damp location is unavoidable, use a residual current
device (RCD) protected supply. Use of an RCD reduces the risk of electric shock.
3) Personal safety
a) Stay alert, watch what you are doing and use common sense when operating a power
tool. Do not use a power tool while you are tired or under the inuence of drugs,
alcohol or medication. A moment of inattention while operating power tools may result in
serious personal injury.
b) Use personal protective equipment Always wear eye protection. Protective equipment
such as a dust mask, non-skid safety shoes, hard hat or hearing protection use for
appropriate conditions will reduce personal injuries.
c) Prevent unintentional starting. Ensure the switch is in the off-position before
connecting to power source and/or battery pack, picking up or carrying the tool.
Carrying power tools with your nger on the switch or energising power tools that have the
switch on invites accidents.
d) Remove any adjusting key or wrench before turning the power tool on. A wrench or a
key left attached to a rotating part of the power tool may result in personal injury.
e) Do not overreach. Keep proper footing and balance at all times. This enables better
control of the power tool in unexpected situations.
f) Dress properly. Do not wear loose clothing or jewellery. Keep your hair and clothing away
from moving parts. Loose clothes, jewellery or long hair can be caught in moving parts.

5. HEALTH AND SAFETY INFORMATION
– 7 –
g) If devices are provided for the connection of dust extraction and collection facilities,
ensure these are connected and properly used. Use of dust collection can reduce
dust-related hazards.
h) Do not let familiarity gained from frequent use of tools allow you to become
complacent and ignore tool safety principles. A careless action can cause severe injury
within a fraction of a second.
4) Power tool use and care
a) Do not force the power tool. Use the correct power tool for your application. The
correct power tool will do the job better and safer at the rate for which it was designed.
b) Do not use the power tool if the switch does not turn it on and off. Any power tool that
cannot be controlled with the switch is dangerous and must be repaired.
c) Disconnect the plug from the power source and/or remove the battery pack, if
detachable, from the power tool before making any adjustments, changing
accessories, or storing power tools. Such preventive safety measures reduce the risk of
starting the power tool accidentally.
d) Store idle power tools out of the reach of children and do not allow persons
unfamiliar with the power tool or these instructions to operate the power tool. Power
tools are dangerous in the hands of untrained users.
e) Maintain power tools and accessories. Check for misalignment or binding of moving
parts, breakage of parts and any other condition that may affect the power tool’s
operation. If damaged, have the power tool repaired before use. Many accidents are
caused by poorly maintained power tools.
f) Keep cutting tools sharp and clean. Properly maintained cutting tools with sharp cutting
edges are less likely to bind and are easier to control.
g) Use the power tool, accessories and tool bits etc. in accordance with these
instructions, taking into account the working conditions and the work to be
performed. Use of the power tool for operations dierent from those intended could result
in a hazardous situation.
h) Keep handles and grasping surfaces dry, clean and free from oil and grease. Slippery
handles and grasping surfaces do not allow for safe handling and control of the tool in
unexpected situations.
5) Service
a) Have your power tool serviced by a qualied repair person using only identical
replacements parts. This will ensure that the safety of the power tool is maintained.

5. HEALTH AND SAFETY INFORMATION
– 8 –
Important safety instructions for battery cartridge
a) Before using battery cartridge, read all instructions and cautionary markings on (1) battery
charger, (2) battery, and (3) product using battery.
b) Do not disassemble battery cartridge.
c) If operating time has become excessively shorter, stop operating immediately. It may result
in a risk of over-heating, possible burns and even an explosion.
d) If electrolyte gets into your eyes, rinse them out with clear water and seek medical
attention right away. It may result in loss of your eyesight.
e) Do not short the battery cartridge:
a) Do not touch the terminals with any conductive material.
b) Avoid storing battery cartridge in a container with other metal objects such as nails,
coins, etc.
c) Do not expose battery cartridge to water or rain.
A battery short can cause a large current ow, over-heating, possible burns and even a
breakdown.
f) Do not store the tool and battery cartridge in locations where the temperature may reach
or exceed 50°C (122°F).
g) Do not incinerate the battery cartridge even if it is severely damaged or is completely worn
out. The battery cartridge can explode in a re.
h) Be careful not to drop or strike battery.
i) Do not use a damaged battery.
j) The contained lithium-ion batteries are subject to the Dangerous Goods Legislation
requirements.
For commercial transports e.g. by third parties, forwarding agents, special requirement on
packaging and labelling must be observed.
For preparation of the item being shipped, consulting an expert for hazardous material is
required.
Please also observe possibly more detailed national regulations.
Tape or mask o open contacts and pack up the battery in such a manner that it cannot
move around in the packaging.
k) Follow your local regulations relating to disposal of battery.

6. TECHNICAL DESCRIPTION
6.1 IDENTIFICATION
(1) Tank Cover
(2) Handle of Sprayer Gun
(3) Switch Trigger
(4) Hose
(5) Locking Hook
(6) Plastic Lance
(7) Hang Hook
(8) Backpack Belt
(9) Battery Pack Cartridge
(10) ON/OFF Switch
(11) Battery Volume Indicator
(12) Backpack Cushion
(13) Tank
(1)
(1)
(2)
(5)
(6)
(7)
(9)
(10)
(3)
(8)
(4)
(12)
(11)
– 9 –
7. UNPACKING AND CHECKING
7.1 PACKAGING
Carefully remove the product from the packaging and examine it for any sign of damage that may
have happened during shipping. Lay the contents out and check them against the parts shown
below. If any part is damaged or missing, please contact the Draper Help Line (the telephone
number appears on the Title page) and do not attempt to use the product.
The packaging material should be retained at least during the warranty period, in case the
machine needs to be returned for repair.
Warning!
− Some of the packaging materials used may be harmful to children. Do not leave any of these
materials in the reach of children.
− If any of the packaging is to be thrown away, make sure they are disposed of correctly,
according to local regulations.
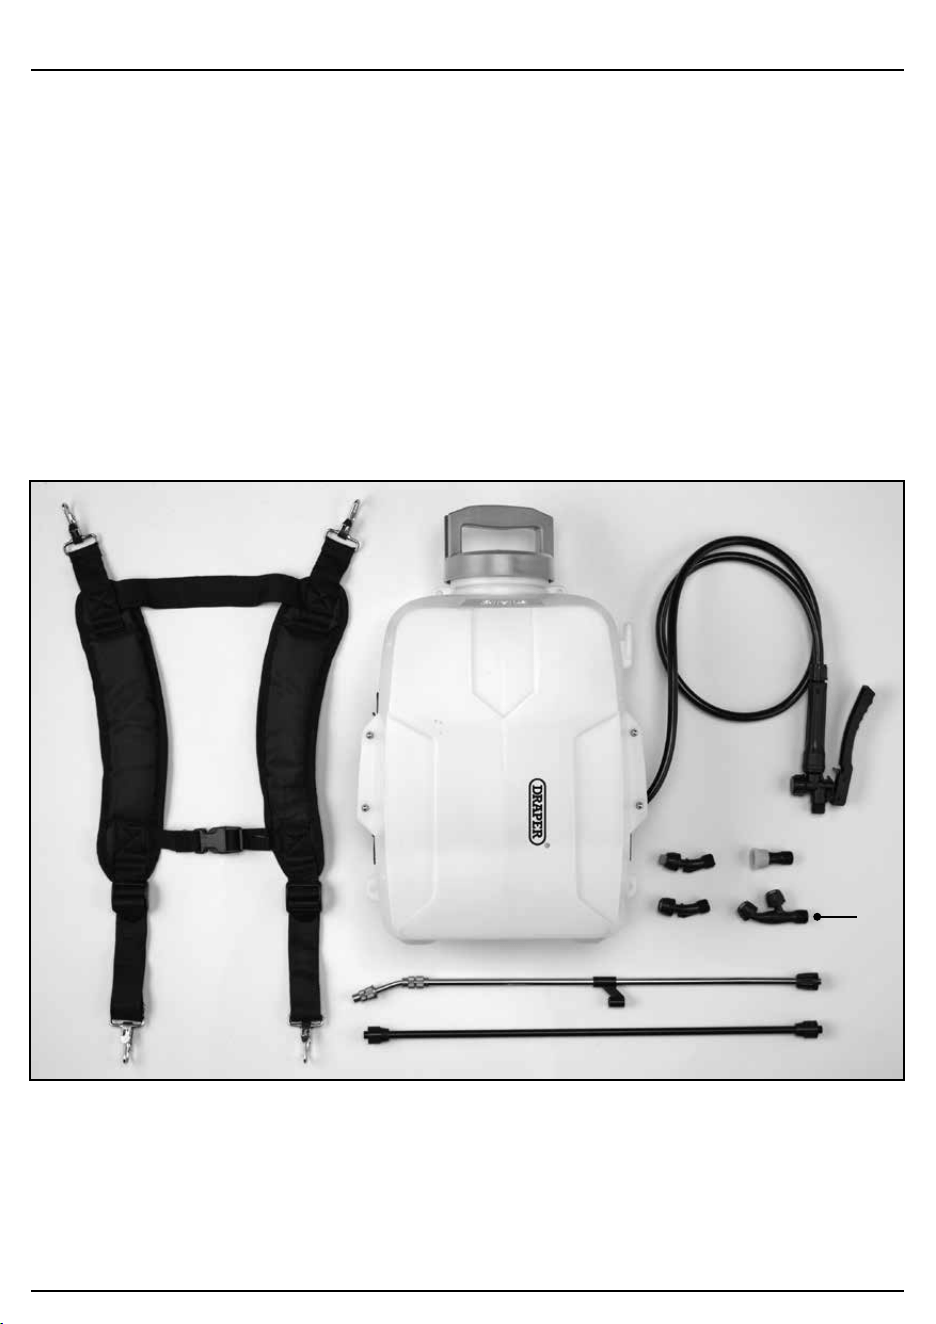
7.2 WHAT’S IN THE BOX
As well as the main product, there are several parts not tted or attached to it.
– 10 –
Note: For details of our full range of accessories and consumables, please visit drapertools.com
(14)
(14) Adjustable Spray Heads

8. PREPARING THE BACKPACK SPRAYER
8.1 MOUNTING THE PLASTIC
SPRAY HEAD AND SPRAY LANCE -
Figs 1, 2 & 3
− The machine has four dierent spray heads
supplied in the accessories.
− To mount the spray head onto the lance,
align the axis of spray head and lance, slide
the nut onto the thread coupling and hand
tighten securely. Do not over tighten.
− To mount the spray lance onto the switch
trigger handle insert the spray lance into the
switch trigger handle, then slide the nut
onto the thread coupling and hand tighten
securely.
1 FIG.
2 FIG.
3 FIG.
(3)
(5)
– 11 –
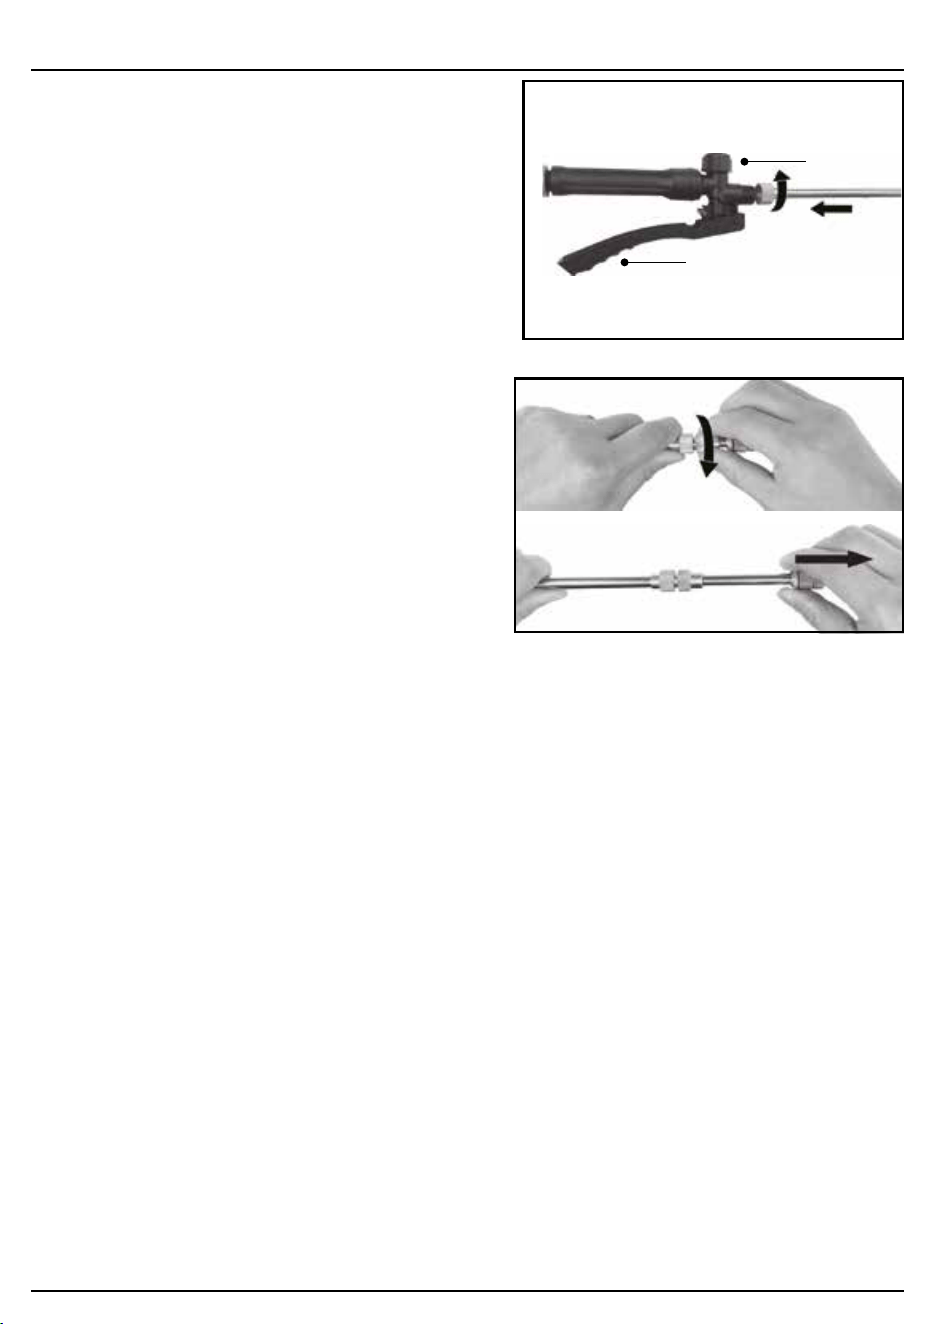
8. PREPARING THE BACKPACK SPRAYER
8.2 MOUNTING AND ADJUST THE
METAL SPRAY LANCE – FIGS. 4 & 5
− To mount the metal spray lance, align the axis
of spray lance and spray handle, then turn the
middle screw of the clockwise and fasten.
(see g. 4)
− The metal spray lance is a telescopic one,
which can be extended up to 1m long.
− To adjust the length, just do as follows
(see g. 5):
- Loosen the middle screw nut.
- Grasp the head then pull it outer forward
- After get your desired length, turn the
middle screw to fasten it.
8.3 ATTACHING THE HOSE
The hose comes preassembled to the trigger handle. If it becomes loose, follow the
instructions below.
− Slide the nut on the hose away from the hose end.
− Following this rule will reduce the risk of serious personal injury.
− Insert the hose end into the hose connector. Make sure the connection is secure.
− Slide the nut over the opening and hose end. Hand tighten. Do not over tighten.
4 FIG.
5 FIG.
(3)
(5)
– 12 –
– 13 –
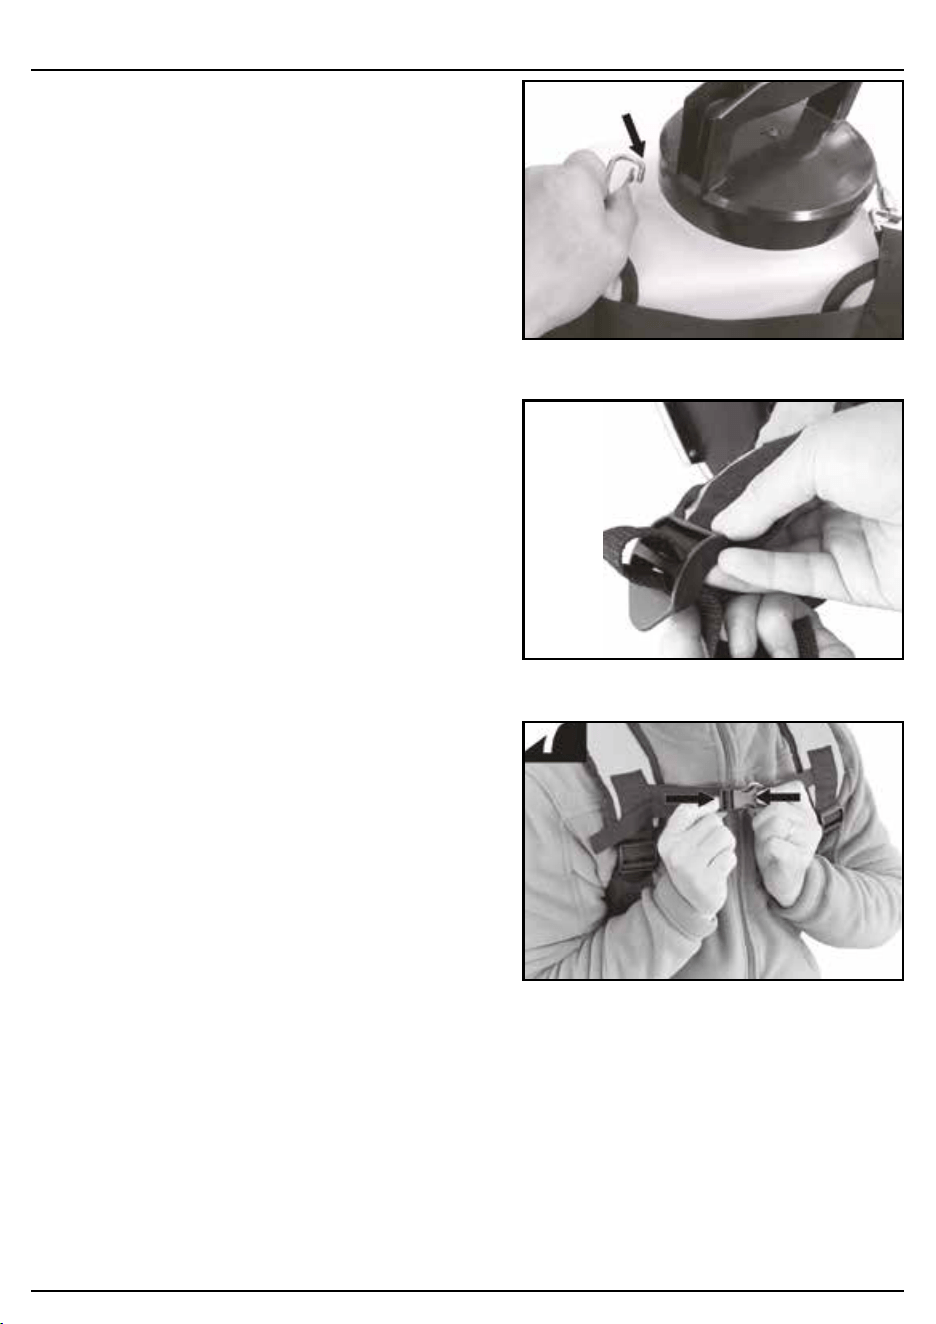
8. PREPARING THE BACKPACK SPRAYER
8.4 MOUNTING AND ADJUSTING
THE BACKPACK STRAP – FIGS. 6, 7,8
− Mounting the strap onto the tank via four metal
hooks on the strap. See g.6.
− The strap can be adjusted according the dierent
people’s body. If you feel too tighten,
it can be adjusted by loosen the belt to extend
and then fasten. See g.7.
− After adjustment, the strap can be further
secured by a breast buckle. See g.8.
6 FIG.
7 FIG.
8 FIG.
– 14 –
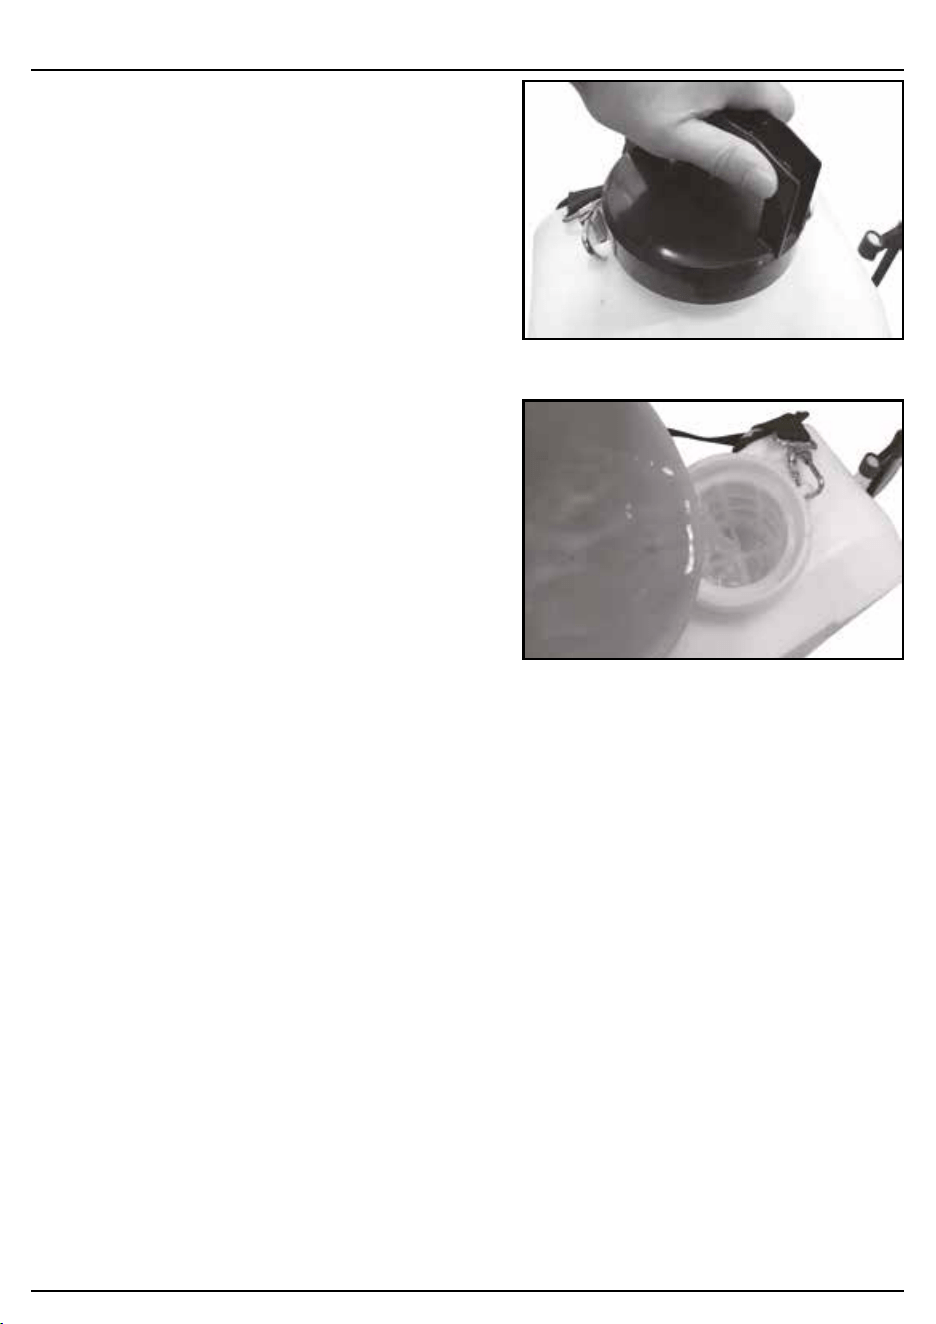
9. OPERATION
9.1 FILLING THE TANK – FIGS. 9 & 10
WARNING
− Before lling the tank, always remove the
battery pack and ensure the battery cover is
closed. Wipe up any spills before inserting the
battery pack. Following this rule will reduce the
risk of electric shock and corrosive liquids
entering the battery pack, which can cause
battery pack failure including short circuit
resulting in smoke, re, and/or serious personal
injury.
− Always follow the chemical manufacturer
instructions printed on their product labeling for
use, cleaning, and storage. Clean thoroughly
after each use, following the instructions in the
Maintenance section of this manual. Chemicals
should be stored out of the reach of children.
Failure to do so may result in serious personal
injury.
− Do not allow conductive or corrosive uids to
get inside the battery pack. If conductive or
corrosive uids are spilled on the battery, refer
to the instructions in your battery operators
manual.
− Liquids to be sprayed must be as thin as water.
Thicker liquids will not spray properly.
− Do not overll the tank.
9 FIG.
10 FIG.
NOTE:
A removable strainer prevents debris that can clog or damage the pump from entering the
tank. It may be removed when using a funnel or for cleaning. Always reinsert strainer before
re-installing cap.
− Remove the battery pack (if necessary).
− Unscrew the cap and remove it from the tank (see g.9).
− Fill the tank with the desired amount of water (up to 12 liters).
− Measure the recommended amount of liquid.
− Carefully pour the liquid into the tank (see g.10).
− Rinse the measuring container with clean water.
− Screw the cap back onto the sprayer, making sure it is tightened securely.
− Re-install the battery pack.
− Spray solutions may be premixed and poured into the sprayer, using a funnel if needed.
9. OPERATION
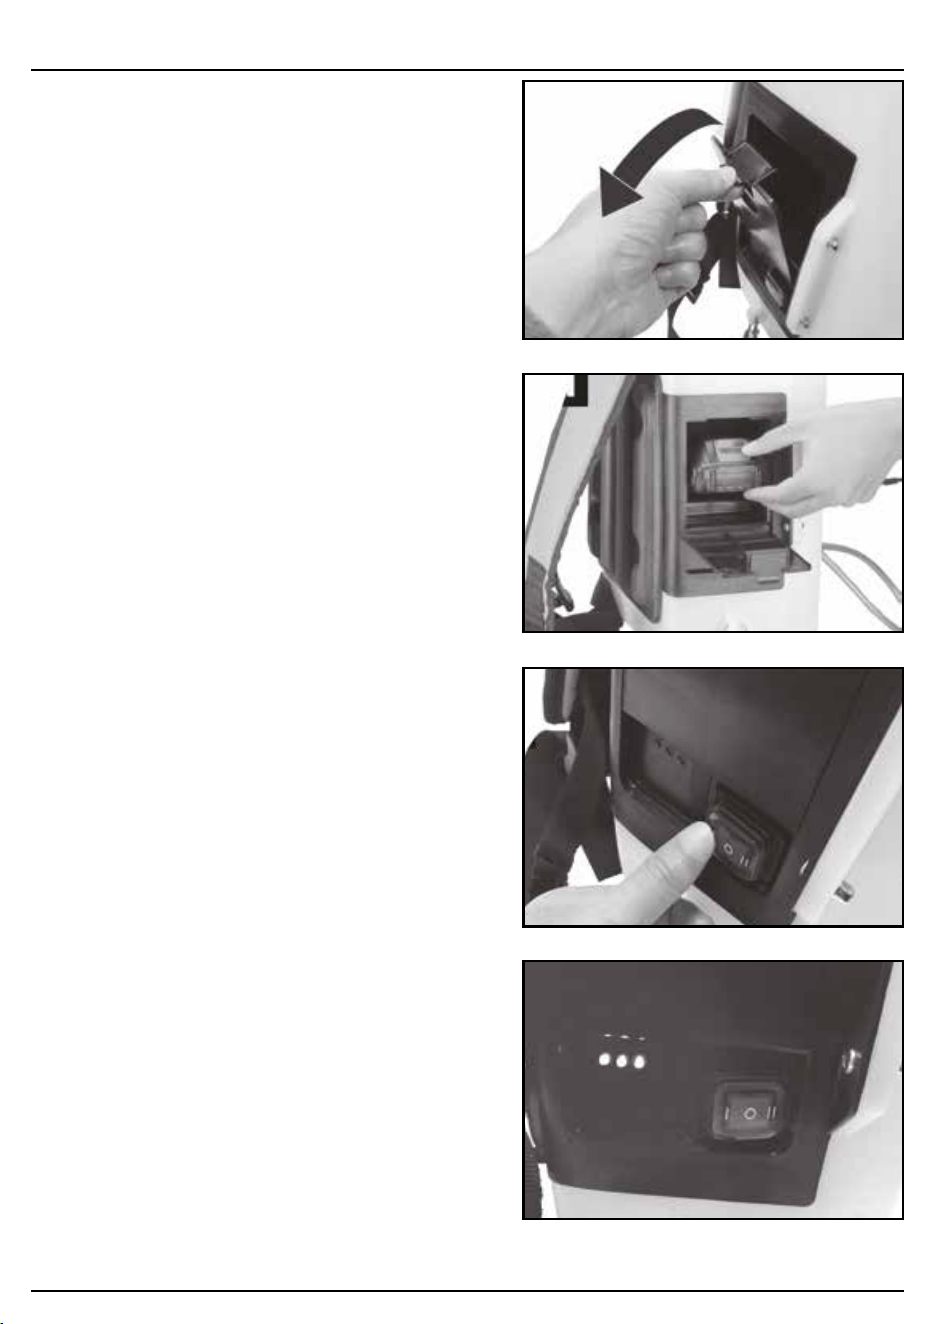
9.2 MOUNTING THE BATTERY
PACK – FIGS. 11 & 12
CAUTION
Before mounting the battery pack, make sure
the tank is clean and dry especially on the
battery cover and battery cartridge. If needed,
wipe o any dirt or spilled water.
− Press the clip on the battery cartridge cover
and pull outside (g.11).
− Insert the battery pack into the battery
cartridge, shown in g.12. After hearing a
click sound, it means the battery pack is
secured.
9.3 TURNING THE SPRAYER
ON/OFF – FIG. 13
− The sprayer was constructed as two stage
main switch, I stage is lower pressure and
the II stage is high pressure.
− To switching on, just press the switch button
on I or II position.
− To switching o, just press the switch button
on “o” position.
9.4 BATTERY VOLUME INDICATOR
- FIG.14
− The sprayer has a battery volume indicator
feature. After turn on the sprayer, the three
indicator light will on.
− If the battery pack is full, the three light will
all on. If the battery pack is empty, the light
remains only one light. Please double check
the battery pack volume. If necessary,
change a new one immediately.
11 FIG.
12 FIG.
13 FIG.
14 FIG.
– 15 –
9. OPERATION
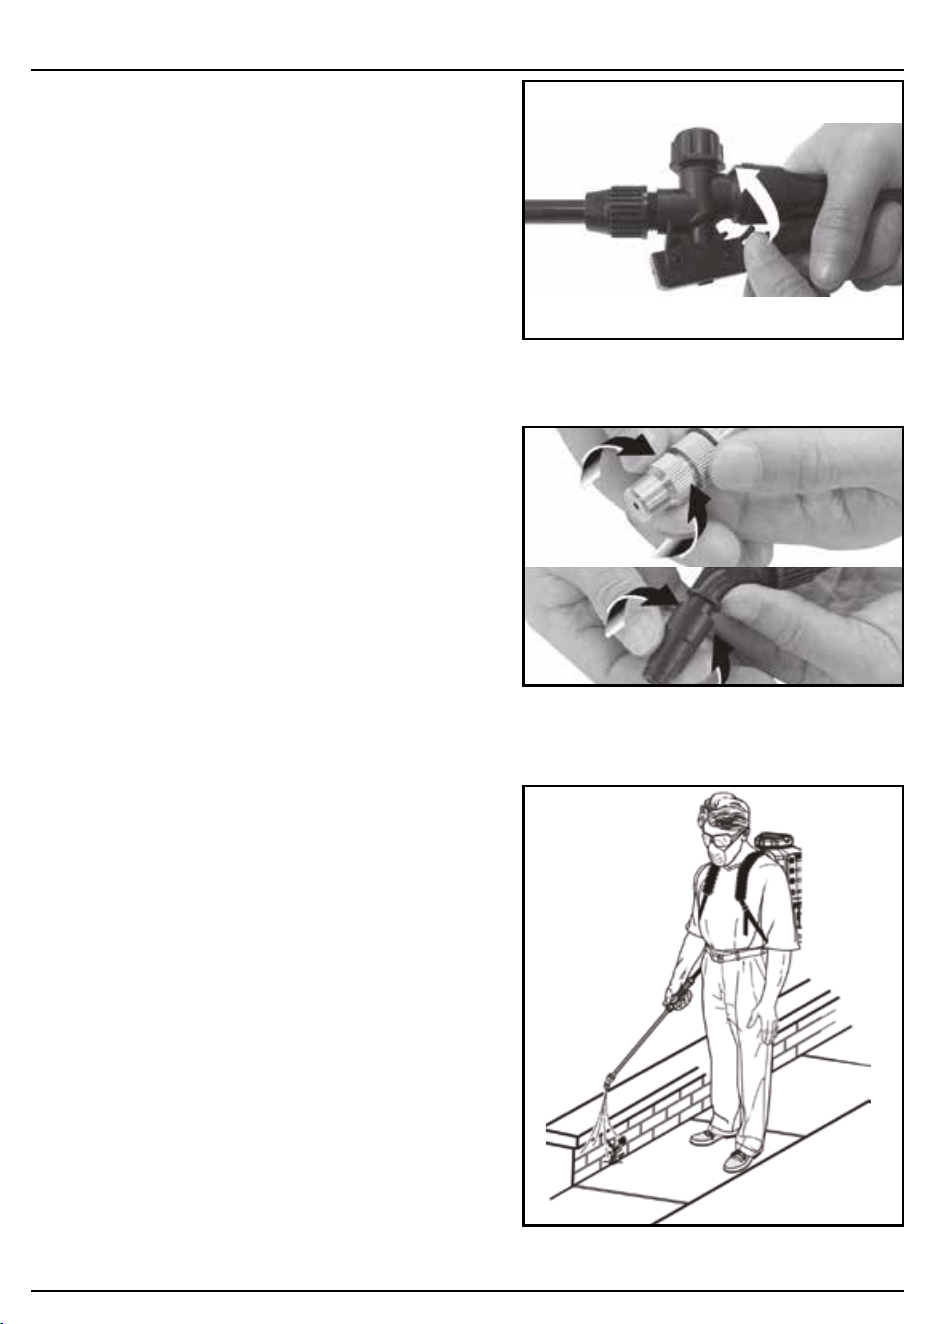
9.5 LOCKING ON THE HANDLE
TRIGGER – FIG. 15
− The lock-on feature is convenient when
spraying for an extended period of time or
when covering a large area.
− To lock-on, squeeze the trigger and slide
the locking tab forward to hook it up.
− To release the lock-on, squeeze the trigger
and slide the locking tab backward to
release the hook.
NOTE: Make sure the trigger is not locked
on before inserting the battery pack into the
sprayer.
9.6 ADJUSTING THE CONE
SPRAY HEAD – FIG.16
For the cone spray head can be adjusted from
a stream to a cone spray.
− Remove the battery pack from the tool.
− Loosen the head for a stream.
− Tighten the nozzle for a fan spray.
− For the metal spray head of the metal
lance, the spray can be adjusted from
stream to full.
− Remove the battery pack from the tool.
− Loosen the head for a water stream.
− Tighten the nozzle for a stream.
9.7 SPRAYING HOME AND GARDEN
CHEMICALS – FIG. 17
− Install the battery pack into the tool.
− Depress the ON/OFF switch button to start the
motor.
− Aim the sprayer head directly at the plants or
objects you wish to spray.
NOTE: Make sure to stand far enough from the object
being sprayed to prevent the spray from splashing
back onto you.
− Squeeze the trigger to start the spray.
− Release the trigger to stop the spray.
− Always empty, clean, and drain the tank after
every use as directed in the Maintenance section.
− Thoroughly clean the chemical sprayer before
storing or before switching to a dierent chemical.
− When you are nished with the sprayer,
thoroughly wash your hands and any area where
skin has been exposed to the spray.
15 FIG.
16 FIG.
17 FIG.
– 16 –

10.1 WARNING
− To avoid serious personal injury, always remove the battery pack from the tool when cleaning
or performing any maintenance.
− When servicing, use only identical replacement parts. Use of any other parts may create a
hazard or cause product damage.
NOTE: Periodically inspect the entire product for damaged, missing, or loose parts such as
screws, nuts, bolts, caps, etc. Tighten securely all fasteners and caps and do not operate this
product until all missing or damaged parts are replaced. Please contact customer service or a
qualied service center for assistance.
10.2 OPERATING TIPS
− Never point the spray end of the lance at yourself or others.
− Avoid spraying on windy days. Spray can be accidentally blown onto plants or objects that
should not be sprayed.
− Never spray in the direction of people or animals; always spray downwind.
− Especially in warmer weather, spray in the early morning or late afternoon. Excessive heat
can evaporate the spray before it settles.
− Never smoke, eat, or drink while operating the sprayer.
10. MAINTENANCE AND TROUBLESHOOTING
– 17 –

10.3 GENERAL MAINTENANCE
Avoid using solvents when cleaning plastic parts. Most plastics are susceptible to damage from
various types of commercial solvents and may be damaged by their use. Use clean cloths to
remove dirt, dust, oil, grease, etc.
WARNING:
Do not at any time let brake uids, gasoline, penetrating oils, etc., come in contact with plastic
parts. Chemicals can damage, weaken, or destroy plastic which may result in serious personal
injury.
10.4 DRAINING THE TANK
If there is any liquid left in the tank after spraying, the tank should be drained before cleaning.
− Remove the battery pack.
− Unscrew the cap and remove it from the tank.
− Remove the the strainer from the tank.
NOTE: Drain the contents back into the original container. Do not store chemicals in the tank.
10.5 CLEANING THE TANK AND SPRAY LANCE ASSEMBLY
If there is any liquid left in the tank after spraying, the tank should be drained before cleaning.
− Remove the battery pack.
− Unscrew the cap and remove it from the tank.
− Remove the the strainer from the tank.
NOTE: Drain the contents back into the original container. Do not store chemicals in the tank.
10. MAINTENANCE AND TROUBLESHOOTING
– 18 –
10. MAINTENANCE AND TROUBLESHOOTING
– 19 –
10.6 CLEANING THE SPRAY HEADS
If the nozzle becomes plugged, use the steps below to clear.
− Remove the battery pack.
− Unscrew and remove the spray head from the spray lance.
− Push a small wire through the cross holes to clear any debris. If necessary, rinse the cross
holes and nozzle with clean water.
− Wipe the nozzle and cross holes with a clean dry cloth and re-install the nozzle.
10.7 REPLACING SEALS
WARNING: Always follow procedures for draining and cleaning the tank before replacing the
seals. Make sure you wear rubber gloves when reaching into the chemical tank. Wash your hands
thoroughly afterwards. Failure to follow these instructions can result in a rash, skin irritation, or
other serious personal injury if you directly contact some chemicals.
Over time, seals can harden and crack, which can allow the chemical sprayer to leak. A set of
replacement seals is included. Refer to the image shown for the location of each of the seals,
then replace as needed to address any leaks that develop.
NOTE: Threading the connections to replace the seals could allow liquid to escape, so always
clean the chemical sprayer thoroughly as previously described before replacing the seals.
10.8 STAORE THE SPRAYER -
FIG 18
After cleaning, store the sprayer in a dry
place, do not put the sprayer in the sun.
The sprayer lance can be put on the hang
hook, or put on the tank cap. See g. 14.
18 FIG.
NOTE: After use, rinse the container then operate the pump with clean water to completely
empty the container and piston.
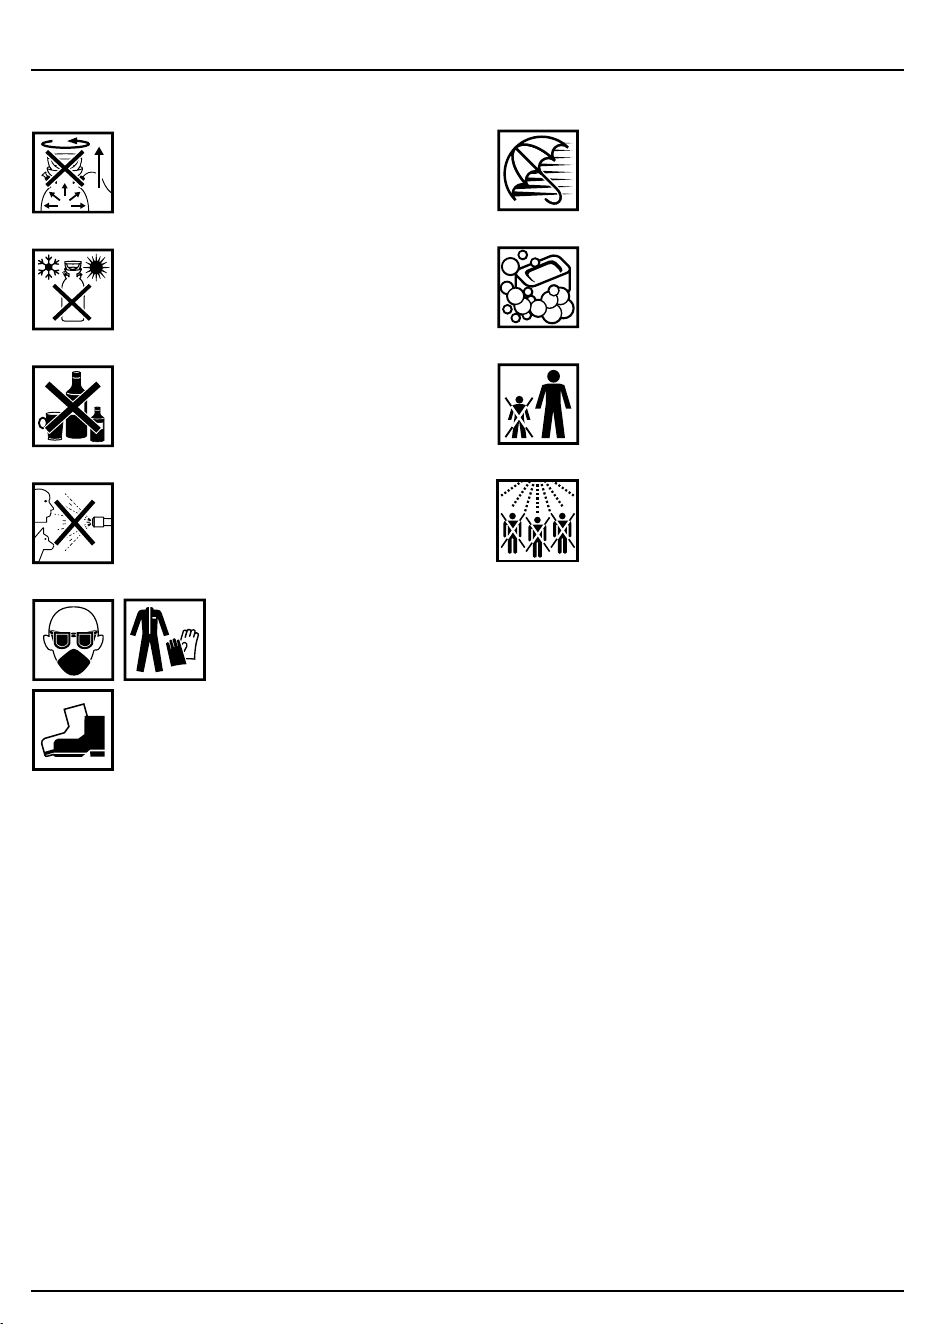
11. EXPLANATION OF SYMBOLS
11.1 EXPLANATION OF SYMBOLS
– 20 –
Never open the pump when
under pressure.
Do not leave the sprayer
exposed to heat sources or
intense cold.
Do not use for spraying food
products (wine, milk, etc.).
Do not spray toxic or harmful
liquids on persons, animals or
foodstuffs.
Use suitable protection
equipment during use.
Do not spray on windy days.
Wash hands and face after use.
Do not leave pump within the
reach of children.
Keep bystanders away whilst
using the sprayer.

12. DISPOSAL
12.1 DISPOSAL
– At the end of the machine’s working life, or when it can no longer be repaired, ensure that it is
disposed of according to national regulations.
– Contact your local authority for details of collection schemes in your area.
In all circumstances:
• Do not dispose of power tools with domestic waste.
• Do not incinerate.
• Do not dispose of WEEE* as unsorted municipal waste.
* Waste Electrical & Electronic Equipment.
– 21 –

CONTACTS
Draper Tools Limited, Hursley Road,
Chandler’s Ford, Eastleigh, Hampshire. SO53 1YF. U.K.
EU: Oude Graaf 8
6002 NL Weert (NL)
Help Line: (023) 8049 4344
Sales Desk: (023) 8049 4333
Internet: drapertools.com
E-mail: [email protected]
General Enquiries: (023) 8026 6355
Service/Warranty Repair Agent:
For aftersales servicing or warranty repairs, please contact the
Draper Tools Help Line for details of an agent in your local area.
YOUR DRAPER STOCKIST
TATL1023
©Published by Draper Tools Limited.
No part of this publication may be reproduced, stored in a retrieval system or transmitted in any form or by any
means, electronic, mechanical photocopying, recording or otherwise without prior permission in writing from Draper
Tools Ltd.
