MICROWAVE OVEN
COS-3012ORLP1SS
USER MANUAL
READ AND SAVE THESE INSTRUCTIONS.
FOR RESIDENTIAL USE ONLY.
PLEASE LEAVE THESE INSTRUCTIONS WITH THIS UNIT FOR
THE OWNER.
PLEASE RETAIN THESE INSTRUCTIONS FOR FUTURE
REFERENCE.
IMPORTANT:
INSTALLER:
OWNER:
OVER THE RANGE LOW PROFILE
MICROWAVE OVEN
Rev. 22.10


1
THANK YOU FOR YOUR PURCHASE
Thank you for your purchase. We know that you have many brands and
products to choose from and we are honored to know that you have decided
to take one of our products into your home and hope that you enjoy it.
COSMO Appliances are designed according to the strictest safety and
performance standard for the North American market. We follow the most
advanced manufacturing philosophy. Each appliance leaves the factory after
thorough quality inspection and testing. Our distributors and our service
partners are ready to answer any questions you may have regarding how to
install, use and case for your products. We hope that this manual will help you
learn to use the product in the safest and most effective manner.
Before using this product, please read through this manual carefully.
Keep
this user manual in a safe place for future reference. Please ensure that other
persons using this product are familiar with these instructions as well.
If you have any questions or concerns, please contact the dealer from whom you
purchased the product, or contact our Customer Support at:
1-888-784-3108
Reach us online at:
www.cosmoappliances.com

2
TABLE OF CONTENTS
MICROWAVE OVEN SAFETY............................................................................... 4
Important Safety Instructions ................................................................................. 5
PRODUCT OVERVIEW ......................................................................................... 9
Control Panel ........................................................................................................... 10
Display ......................................................................................................................... 11
FEATURES ........................................................................................................... 12
Clock ........................................................................................................................... 12
Timer ........................................................................................................................... 12
Settings (User Preferences) ..................................................................................... 13
Turntable ................................................................................................................... 14
USING THE MICROWAVE OVEN ........................................................................ 14
Control Lock............................................................................................................... 14
Cookware and Dinnerware ................................................................................... 15
Manual Cook (Cook Time) ...................................................................................... 16
Express Cook ............................................................................................................. 17
Popcorn ...................................................................................................................... 17
Potato ......................................................................................................................... 18
Sensor Reheat ........................................................................................................... 18
Sensor Cook ............................................................................................................... 19
Snack Menus ............................................................................................................. 19
Melt/Soften .............................................................................................................. 20
Auto Cook ................................................................................................................. 20
Auto Cook Recipes .............................................................................................. 21
Time Defrost ............................................................................................................. 26
Weight Defrost ......................................................................................................... 27
Vent Fan .................................................................................................................... 28
Cooktop Light ........................................................................................................... 28

3
MICROWAVE OVEN CARE ................................................................................ 29
General Cleaning .................................................................................................... 29
Installing/Replacing Filters and Lights ................................................................ 30
Grease Filters....................................................................................................... 30
Charcoal Filters .................................................................................................... 31
Cooktop Lights .................................................................................................... 32
Cavity Light .......................................................................................................... 33
TROUBLESHOOTING ......................................................................................... 34
LIMITED WARRANTY ........................................................................................ 36
4
MICROWAVE OVEN SAFETY
READ ALL INSTRUCTIONS BEFORE USING THE APPLIANCE
This device complies with Part 18 of the FCC Rules.
READ ALL INSTRUCTIONS BEFORE USING THE APPLIANCE
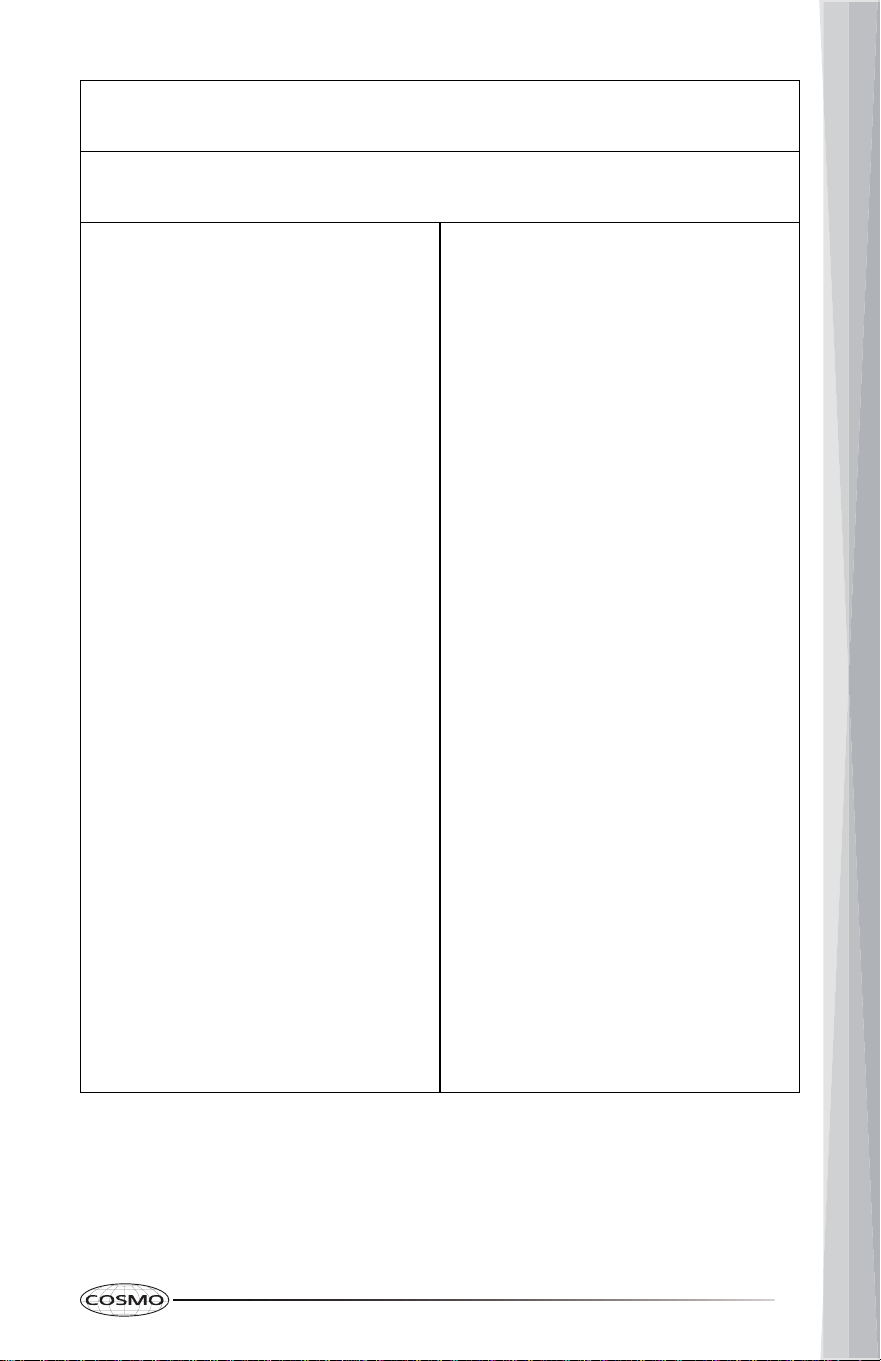
Your safety and the safety of others are very important.
We have provided many important safety messages in this manual and on
your appliance. Always read and obey all safety messages.
This is the safety alert symbol.
This symbol alerts you to potential hazards
that can kill or hurt you and others.
All safety messages will follow the safety alert
symbol and either the word "WARNING" or
"CAUTION." These words mean:
You can be killed or seriously injured if you
don't follow instructions.
A potentially hazardous situation which, if not
avoided, could result in minor or moderate
injury.
All safety messages will tell you what the potential hazard is, tell you how
to reduce the chance of injury, and tell you what can happen if the
instructions are not followed.
California Proposition 65 Warning
WARNING:
Cancer and Reproductive Harm - www.P65Warnings.ca.gov.
WARNING
CAUTION
5
IMPORTANT SAFETY INSTRUCTIONS
WARNING: To reduce the risk of burns, electric shock, fire, injury to persons,
or exposure to excessive microwave energy:
• Read all instructions before using
the microwave oven.
• Read and follow the specific
"PRECAUTIONS TO AVOID
POSSIBLE EXPOSURE TO
EXCESSIVE MICROWAVE
ENERGY" found in this section.
• The microwave oven must be
grounded. Connect only to
properly grounded outlet. See
"GROUNDING INSTRUCTIONS"
found in this section and in the
provided Installation Instructions.
• Install or locate the microwave
oven only in accordance with the
provided Installation Instructions.
• Some products such as whole
eggs in the shell and sealed
containers – for example, closed
glass jars – are able to explode
and should not be heated in the
microwave oven.
• Use the microwave oven only for
its intended use as described in
the manual. Do not use corrosive
chemicals or vapors in the
microwave oven. This type of
oven is specifically designed to
heat, cook, or dry food. It is not
designed for industrial or
laboratory use.
• As with any appliance, close
supervision is necessary when
used by children.
• Do not operate the microwave
oven if it has a damaged cord or
plug, if it is not working properly,
or if it has been damaged or
dropped.
• The microwave oven should be
serviced only by qualified service
personnel. Call an authorized
service company for examination,
repair, or adjustment.
• Do not cover or block any
openings on the microwave oven.
• Do not store this microwave oven
outdoors. Do not use the
microwave oven near water - for
example, near a kitchen sink, in a
wet basement, near a swimming
pool, or similar locations.
• Do not immerse cord or plug in
water.
• Keep cord away from heated
surfaces.
• Do not let cord hang over edge of
table or counter.
• See door surface cleaning
instructions in the "Microwave
Oven Care" section.
READ AND SAVE THESE INSTRUCTIONS
6
IMPORTANT SAFETY INSTRUCTIONS
• To reduce the risk of fire in the
oven cavity:
- Do not overcook food.
Carefully attend the
microwave oven when paper,
plastic, or other combustible
materials are placed inside the
oven to facilitate cooking.
- Remove wire twist-ties from
paper or plastic bags before
placing bags in oven.
- If materials inside the oven
ignite, keep oven door closed,
turn oven off, and disconnect
the power cord, or shut off
power at the fuse or circuit
breaker panel.
- Do not use the cavity for
storage purposes. Do not leave
paper products, cooking
utensils, or food in the cavity
when not in use.
• Do not mount over a sink.
• Do not store anything directly on
top of the microwave oven when
the microwave oven is in
operation.
• Clean Ventilating Hoods
Frequently - Grease should not
be allowed to accumulate on
hood or filter.
• When flambéing foods under the
hood, turn the fan on.
• Suitable for use above both gas
and electric cooking equipment.
• Liquids, such as water, coffee, or
tea are able to be overheated
beyond the boiling point without
appearing to be boiling. Visible
bubbling or boiling when the
container is removed from the
microwave oven is not always
present. THIS COULD RESULT IN
VERY HOT LIQUIDS SUDDENLY
BOILING OVER WHEN THE
CONTAINER IS DISTURBED OR A
SPOON OR OTHER UTENSIL IS
INSERTED INTO THE LIQUID.
To reduce the risk of injury to
persons:
- Do not overheat the liquid.
- Stir the liquid both before and
halfway through heating it.
- Do not use straight-sided
containers with narrow necks.
- After heating, allow the
container to stand in the
microwave oven for a short
time before removing the
container.
- Use extreme care when
inserting a spoon or other
utensil into the container.
• Intended to be used above
ranges with maximum width of
36" (91.44 cm).
• Use care when cleaning the vent-
hood filter. Corrosive cleaning
agents, such as lye-based oven
cleaners, may damage the filter.
READ AND SAVE THESE INSTRUCTIONS
7
PRECAUTIONS TO AVOID POSSIBLE
EXPOSURE TO EXCESSIVE
MICROWAVE ENERGY
• Do not attempt to operate this
oven with the door open since
open-door operation can result
in harmful exposure to
microwave energy. It is important
not to defeat or tamper with the
safety interlocks.
• Do not place any object between
the oven front face and the door
or allow soil or cleaner residue to
accumulate on sealing surfaces.
• Do not operate the oven if it is
damaged. It is particularly
important that the oven door
close properly and that there is
no damage to the:
(a) Door (bent),
(b) Hinges and latches (broken
or loosened),
(c) Door seals and sealing
surfaces.
• The oven should not be adjusted
or repaired by anyone except
properly qualified service
personnel.
READ AND SAVE THESE INSTRUCTIONS
8
ELECTRICAL REQUIREMENTS
• Plug into a grounded 3 prong outlet.
• Do not remove ground prong.
• Do not use an adapter.
• Do not use an extension cord.
• Failure to following these instructions can result in death, fire, or
electrical shock.
Observe all governing codes and ordinances.
Required:
• A 120 V, 60 Hz, AC only, 15 or 20 A electrical supply with a fuse or circuit
breaker.
Recommended:
• A time-delay fuse or time-delay circuit breaker.
• A separate circuit serving only this microwave oven.
GROUNDING INSTRUCTIONS
For all cord connected appliances:
The microwave oven must be grounded. In the event of an electrical short
circuit, grounding reduces the risk of electric shock by providing an escape
wire for the electric current. The microwave oven is equipped with a cord
having a grounding wire with a grounding plug. The plug must be plugged
into an outlet that is properly installed and grounded.
WARNING: Improper use of the grounding plug can result in a risk of
electric shock. Consult a qualified electrician or serviceman if the grounding
instructions are not completely understood, or if doubt exists as to whether
the microwave oven is properly grounded.
Do not use an extension cord. If the power supply cord is too short, have a
qualified electrician or serviceman install an outlet near the microwave
oven.
READ AND SAVE THESE INSTRUCTIONS
WARNING ELECTRIC SHOCK HAZARD
9
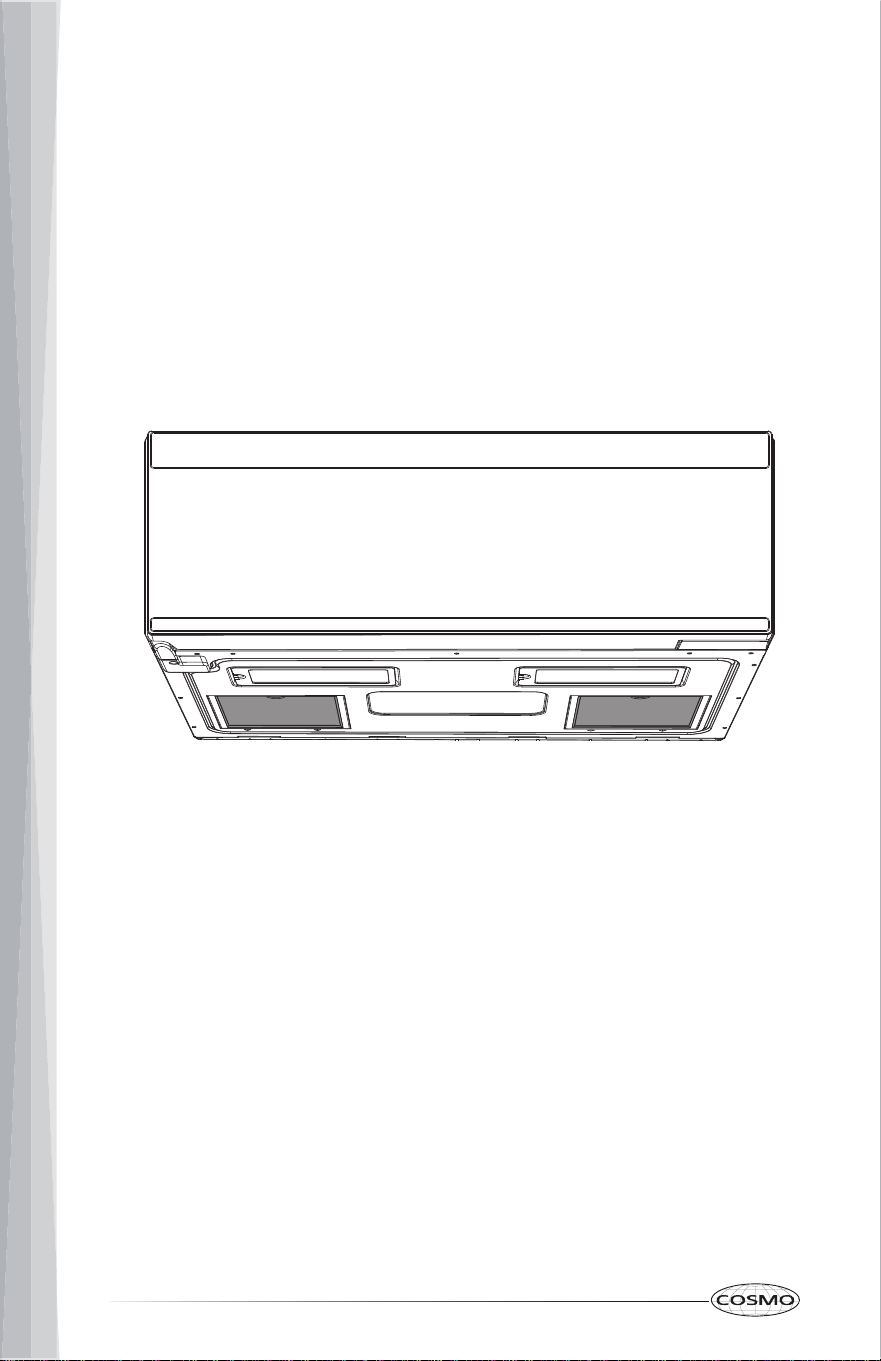
PRODUCT OVERVIEW
EXTERIOR
1. Microwave Door
2. Microwave Door Handle (Recessed)
3. Cooktop Light
4. Vent Fan
10
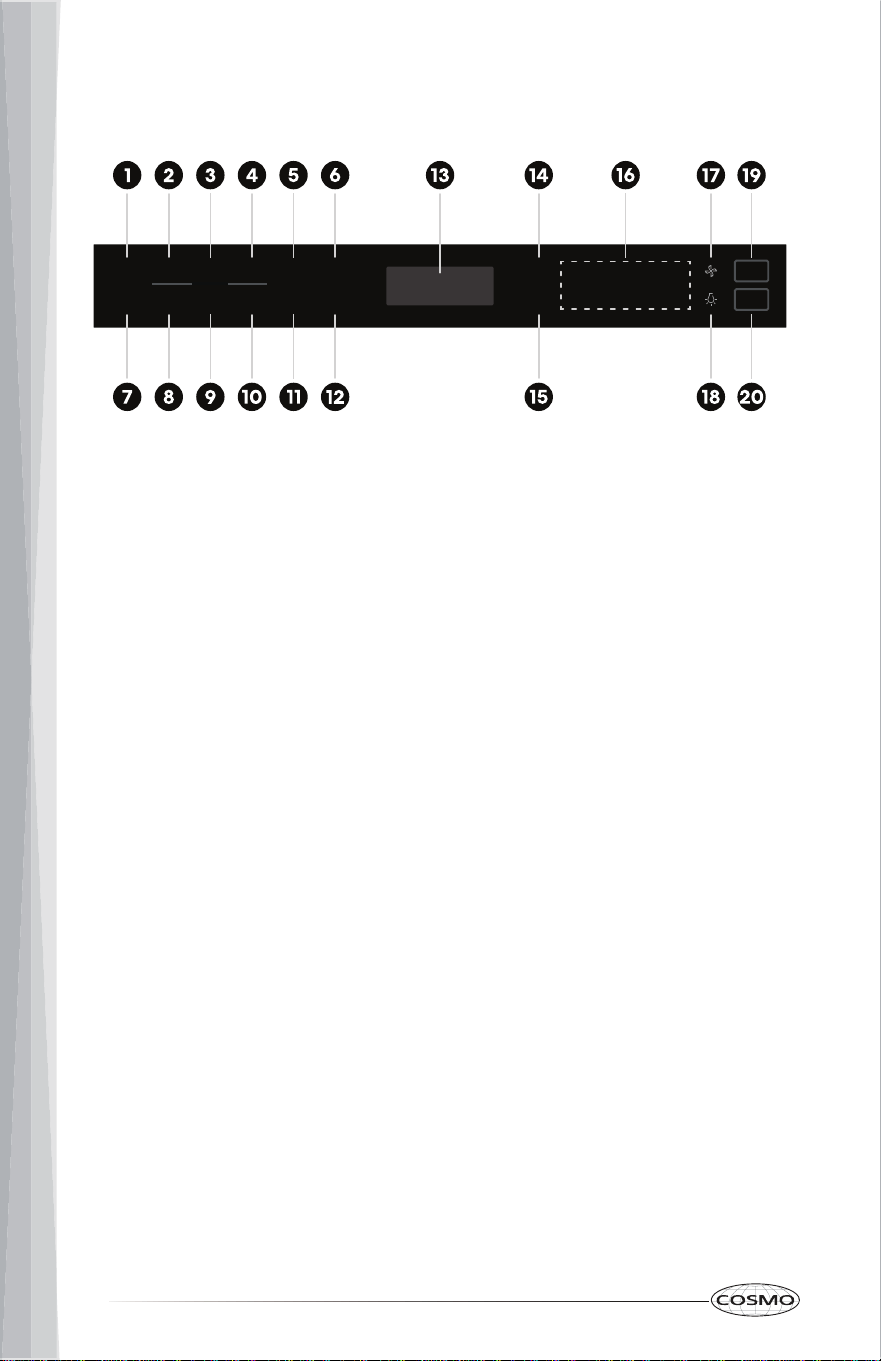
CONTROL PANEL
1. POPCORN
2. POTATO
3. SENSOR REHEAT
4. SENSOR COOK
5. TIMER/CLOCK
6. USER PREF
7. SNACK MENUS
8. MELT/SOFTEN
9. AUTO COOK
10. WEIGHT DEFROST
POPCORN
POWER
LEVEL
START
+30 SEC.
STOP
CLEAR
1
6 7 8 9 0
2 3 4 5
COOK
TIME
SNACK
MENUS
MELT/
SOFTEN
AUTO
COOK
WEIGHT
DEFROST
TIME
DEFROST
TURNTABLE
ON/OFF
POTATO
SENSOR
REHEAT
SMART SENSOR
SENSOR
COOK
TIMER/
CLOCK
USER
PREF
11. TIME DEFROST
12. TURNTABLE ON/OFF
13. DISPLAY
14. POWER LEVEL
15. COOK TIME
16. NUMBER PADS
17. VENT FAN
18. COOKTOP LIGHT
19. START/+30 SEC
20.STOP/CLEAR
11
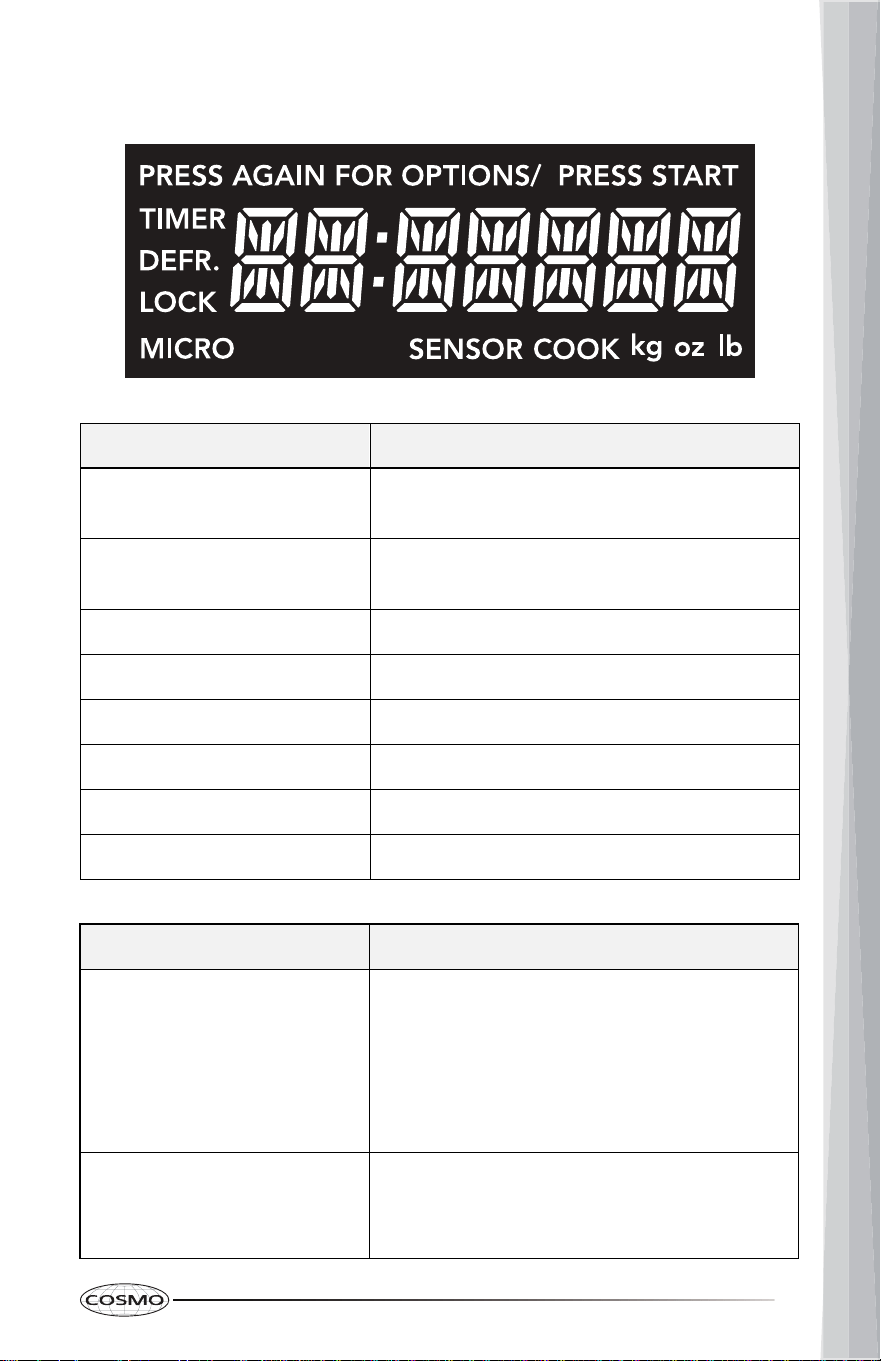
DISPLAY
Indicator Icon Description
PRESS AGAIN FOR OPTIONS
Press the same button again to toggle and
select more options.
PRESS START
Press START to begin cycle or accept the
change/input.
TIMER Timer is running.
DEFR. Defrost mode is running.
LOCK Control lock is activated.
MICRO Microwave is running.
SENSOR COOK
kg oz lb Weight unit being used.
Sensor mode is running.
Warning Message Description
"Food"
The door has been closed for 5 minutes or
more without the microwave oven being
started. This occurs to avoid unintended
starting of the microwave oven.
• Open and close the door, then start the
cycle.
"E04" Humidity sensor failure.
• Contact your appliance servicer for
assistance.
12
FEATURES
CLOCK
The clock is a 12-hour clock. It can be disabled with the STOP/CLEAR keypad
when the microwave oven is reconnected to the power.
Setting the Clock
1. Press TIMER/CLOCK twice. The default time 12:00 is shown in the display.
2. Press the numbers to enter the correct time of day. For example, to set
12:34, press the numbers 1, 2, 3, and 4.
3. Press Start. This accepts the time entered and starts the clock.
NOTE:
• When the microwave oven is running, pressing TIMER/CLOCK will
recall the current clock in the display for 2 seconds.
TIMER
The timer must be set before the microwave oven is running, and cannot be
stopped or cancelled while the microwave oven is running.
Setting the Timer (Up to 99 minutes and 99 seconds)
1. Press TIMER/CLOCK once. The "TIMER" indicator lights up in the display.
2. Press the numbers to enter the length of time. For example, to set a 30-
minute timer, press the numbers 3, 0, 0, and 0.
3. Press TIMER/CLOCK to start the timer.
4. When the set time has run out, the alarm rings until any key is pressed.
NOTE:
• When the microwave oven is running, pressing TIMER/CLOCK will
recall the remaining time in the display for 2 seconds.
Cancelling the Timer
1. Press TIMER/CLOCK. When the oven is in standby state, the display
returns to the time of day.
13
SETTINGS (USER PREFERENCES)
The microwave oven has additional settings which can be accessed using the
USER PREF keypad. These additional settings can only be adjusted while the
microwave oven is not running or the display is showing the time of day. They
will restore to default after reconnecting power or a power failure.
Settings
Touch
USER PREF
Description Default
Volume 1 time Adjust the tone volume Low
Weight Unit 2 times Change weight input unit Lb
Clock Display 3 times Enable/Disable clock display On
Demo Mode 4 times
Activate to practice using the
control without actually turning
on the magnetron.
Off
Adjusting the Volume
1. Press USER PREF 1 time, and wait for volume options to show in the
display.
2. Press USER PREF to toggle and select Low, Med, High, or Off.
3. Press START to confirm.
Selecting the Weight Unit
1. Press USER PREF 2 times, and wait for weight options to show in the
display.
2. Press USER PREF to toggle and select Lb or Kg.
3. Press START to confirm.
Setting the Clock Display
1. Press USER PREF 3 times, and wait for clock display options to show in the
display.
2. Press USER PREF to toggle and select On or Off.
3. Press START to confirm.

14
Setting the Demo Mode
1. Press USER PREF 4 times, and wait for demo mode options to show in the
display.
2. Press USER PREF to toggle and select On or Off.
3. Press START to confirm.
TURNTABLE
For best cooking results, do not operate the microwave oven without having
the turntable in place. Turntable may be turned off for manual cooking only
by pressing TURNTABLE ON/OFF.
USING THE MICROWAVE OVEN
CONTROL LOCK
The control panel can be locked to avoid unintended use of the oven.
NOTE:
• The control lock can only be activated while the microwave oven or the
timer is idle or inactive.
To Lock Control Panel:
• Press and hold STOP/CLEAR for 3 seconds or until "LOCK" appears in the
display.
NOTE:
• When locked, touching any keypad on the control panel (except
STOP/CLEAR) will not work.
To Unlock Control Panel:
• Press and hold STOP/CLEAR for 3 seconds or until "LOCK" disappears in
the display.
15
COOKWARE AND DINNERWARE
Microwave-Safe
• Browning dish (Follow manufacturer recommendations)
• Ceramic glass, glass
• Earthenware (Follow manufacturer recommendations)
• Melamine (Follow manufacturer recommendations)
• Paper towels, paper plates, napkins (Use non-recycled paper)
• Plastic wraps, bags, covers, dinnerware, containers (Follow manufacturer
recommendations)
• Pottery and clay (Follow manufacturer recommendations)
• Silicone bakeware (Follow manufacturer recommendations)
• Wax paper
Do Not Use
• Metal cookware and bakeware
• Straw or wicker
• Gold, silver, or pewter
• Non-approved meat thermometers, skewers
• Twist ties
• Foil liners, such as sandwich wrappers
• Staples
• Objects with gold or silver trim or with metallic glaze
To Test Cookware/Dinnerware:
Place dish in microwave oven with 1 cup (250 mL) of water beside it. Program 1
minute of cook time at 100%. If dish becomes hot and the water stays cool, do
not use the dish in the microwave oven.
16
MANUAL COOK (COOK TIME)
The microwave oven can accept cooking time up to 99 minutes and 99
seconds (99:99). Always enter the seconds even if they are both zeros.
1. Press COOK TIME after placing food and closing the door.
2. Press the numbers to enter the length of time.
For example, to set a 3-minute cooking, press the numbers 3, 0, and 0.
3. (Optional) Press POWER LEVEL once. Then press the corresponding power
level number key or POWER LEVEL repeatedly to select the power level
desired. Refer to the Power Level table below.
For example, to select 90% power, Press 9 or POWER LEVEL twice.
NOTE:
• The default power level is 100% (PL-HI) if POWER LEVEL is not
pressed.
4. Press START.
Power Level Touch POWER LEVEL Shortcut Number Key Display
100% 1 time 1 0 PL-HI
90% 2 times 9 PL-90
80% 3 times 8 PL-80
70% 4 times 7 PL-70
60% 5 times 6 PL-60
50% 6 times 5 PL-50
40% 7 times 4 PL-40
30% 8 times 3 PL-30
20% 9 times 2 PL-20
10% 10 times 1 PL-10
*0% 11 times 0 PL-0
* At 0% power level the microwave oven will not be heating but the internal fan will be
operating. It can be used as a quick timer to rest the hot food just cooked with the microwave
oven, or it can help reduce food odors right after cooking.
NOTE:
• When the microwave oven is running, pressing POWER LEVEL will
display the current power level for 2 seconds.
17
EXPRESS COOK
Press one of the numbers from 1 to 9 once will start the microwave oven in 2
seconds at 100% power level directly for the minutes entered.
For example, to set a 6-minute cooking at 100% power level directly:
1. Press the number 6 after placing food and closing the door. The
microwave oven will automatically start in 2 seconds.
NOTE:
• If "Food" is shown in the display after the number is pressed, open and
close the door once and the number entered should appear in the
display. The microwave oven uses a 5-minute timer from last closing of
the door to help avoid running without any food inside.
POPCORN
Pop only 1 package of popcorn at a time. Cooking results may vary by brand
and fat content.
Touch POPCORN Popcorn Options
1 time 3.3 oz
2 times 3.0 oz
To Use Popcorn Program:
1. Place food and close the door.
2. Press POPCORN to toggle and select the best matching popcorn options.
3. Press START. Listen for popping to slow to 1 pop every 1 or 2 seconds, then
press STOP/CLEAR to stop the cycle.
18
POTATO
Cooks 1-4 potatoes, 4-10 oz (113-283 g) each, in similar size. Pierce each potato
several times with a fork. Place on paper towel, around turntable edges, at
least 1" (2.5 cm) apart. Place single potato to the side of the turntable. Let
stand 5 minutes after cooking.
To Use Potato Program:
1. Press POTATO after placing food and closing the door.
2. Press START.
SENSOR REHEAT
Touch SENSOR REHEAT Sensor Reheat Options Preset Portion Size
1 time Beverage Select: 1-3 cups
2 times Soup/Sauce 1 cup
3 times Dinner Plate 1-2 plates
4 times Casserole/Lasagna 10.5 oz
5 times Roll/Muffin 1-3 slices
To Use Sensor Reheat Program:
1. Place food and close the door.
2. Press SENSOR REHEAT to toggle and select different sensor reheat
options.
3. (For Beverage only) Press START and enter the number within the range
allowed to select the best matching portion size. (e.g. Enter 2 for 2 cups.)
4. Press START.
19
SENSOR COOK
Touch SENSOR COOK Sensor Cook Options Preset Portion Size
1 time Bacon Select: 1-3 slices
2 times Frozen Dinner
3 times Rice 1-2 cups
4 times Frozen Breakfast 8-12 oz
5 times Fresh Veggies 1-4 cups
6 times Frozen Veggies 1-4 cups
To Use Sensor Cook Program:
1. Place food and close the door.
2. Press SENSOR COOK to toggle and select different sensor cook options.
3. (For Bacon only) Press START and enter the number within the range
allowed to select the best matching portion size. (e.g. Enter 2 for 2 slices.)
4. Press START.
SNACK MENUS
Touch SNACK MENUS Snack Menus Options Preset Portion Size
1 time Hot Dogs Select: 1-6 pieces
2 times Meal in a Cup 2.9 oz
3 times Frozen Kids Meal 8.8 oz
To Use Snack Menus Program:
1. Place food and close the door.
2. Press SNACK MENUS to toggle and select different snack menus options.
3. (For Hot Dogs only) Press START and enter the number within the range
allowed to select the best matching portion size. (e.g. Enter 2 for 2 pieces.)
4. Press START.
10-20 oz

20
MELT/SOFTEN
Touch MELT/SOFTEN Melt/Soften Options Preset Portion Size
1 time Melt Butter
Select: 1 or 2 sticks
2 times Melt Chocolate Select:
1 =
2 =
3 =
2 oz
4 oz
8 oz
3 times Soften Ice Cream Select:
1 =
2 =
1 Pint
1.5 Quarts
4 times Soften Cream Cheese Select:
1 =
2 =
3 oz
8 oz
To Use Snack Menus Program:
1. Place food and close the door.
2. Press MELT/SOFTEN to toggle and select different melt/soften options.
3. Press START and enter the number within the range allowed to select the
best matching portion size. (e.g. Enter 2 for 2 sticks of butter.)
4. Press START.
AUTO COOK
Touch AUTO COOK Auto Cook Options Preset Portion Size
1 time Scrambled Eggs Select: 1-6 eggs
2 times Hot Cereal 1-3 servings
3 times Frozen Pizza 1-3 slices (4 oz each)
4 times Fudge Brownies See Recipe
5 times Garlic Shrimp See Recipe
6 times Stuffed Mushrooms See Recipe
7 times Asiago Red Potatoes See Recipe
8 times
Roasted Vegetable
Medley
See Recipe
9 times Lemon Shrimp Risotto See Recipe
21
To Use Auto Cook Program:
1. Place food and close the door.
2. Press AUTO COOK to toggle and select different auto cook options.
3. (For Scrambled Eggs only) Press START and enter the number within the
range allowed to select the best matching portion size. (e.g. Enter 2 for 2
eggs.)
4. Press START.
AUTO COOK RECIPES
Fudge Brownies
Ingredients
• 3/4 cups butter
• 3oz unsweetened chocolate
• 1 1/4 cups sugar
• 1 teaspoon vanilla extract
• 2 large eggs
• 1 cup all-purpose flour
• 1 1/4 cups chopped walnuts
(5oz)
• 1/2 teaspoon baking powder
• 1/2 teaspoon salt
• 1/2 cup semisweet chocolate
chips
Method
1. Add butter and chocolate in a microwave-safe bowl, and place bowl in
the microwave oven.
2. Press AUTO COOK repeatedly to select Fudge Brownies.
3. Press START to microwave at 100% power for 1 minute.
4. Stir until mixture is smooth.
5. Add sugar, vanilla, eggs, flour, walnuts, baking powder, salt, and mix
well.
6. Pour mixture into a microwave-safe pan. Sprinkle and/or fold in
chocolate chips, and place pan in the microwave oven.
7. Press START to microwave at 100% power for 5 minutes.
8. Remove pan from the microwave oven and let it cool before cutting
and serving the brownies.
22
Garlic Shrimp
Ingredients
• 1/4 cup butter
• 6 garlic cloves (crushed/minced)
• 2 tablespoons fresh chives
(chopped)
• 2 tablespoons lemon juice
• 1 tablespoon chili pepper paste
• Salt to taste
• 1 pound large shrimp (raw,
peeled, and deveined)
Method
1. Add butter in a microwave-safe casserole dish, and place dish in the
microwave oven.
2. Press AUTO COOK repeatedly to select Garlic Shrimp.
3. Press START to microwave at 100% power for 1 minute.
4. Add garlic in the dish, and place dish in the microwave oven.
5. Press START to microwave at 100% power for 1 minute.
6. Add chives, lemon juice, chili pepper paste, salt, shrimp, and stir. Place
covered dish in the microwave oven.
7. Press START to microwave at 100% power for 4 minutes.
8. (Optional) When the microwave oven beeps once half way through the
4-minute cooking session, open the door and stir food, then close the
door to resume the cooking session.
23
Stuffed Mushrooms
Ingredients
• 1 pound whole baby bella
mushrooms
• 2 tablespoons butter (melted)
• 1 bunch green onion (chopped)
• 1/4 cup shredded Parmesan
cheese
• 2 tablespoons bread crumbs
• 1 teaspoon lemon juice
• 1/4 teaspoon garlic pepper
• Crushed red pepper to taste
Method
1. Remove and set aside mushroom stems.
2. Finely chop the mushroom stems, and combine with butter and green
onion in a microwave safe bowl. Place bowl in the microwave oven.
3. Press AUTO COOK repeatedly to select Stuffed Mushrooms.
4. Press START to microwave at 100% power for 2 minutes.
5. Add the rest of the ingredients in the bowl and mix well.
6. Arrange mushroom caps on a microwave-safe plate.
7. Stuff the mixture into the mushroom caps, and place plate in the
microwave oven.
8. Press START to microwave at 100% power for 4 minutes.
24
Asiago Red Potatoes
Ingredients
• 1 1/4 pounds red potatoes
(peeled and thinly sliced)
• 2 tablespoons all-purpose flour
• 1/2 teaspoon salt
• 1 1/4 cups milk
• 1 tablespoon butter (melted)
• 5oz shredded Asiago cheese
Method
1. Add potatoes, flour, and salt in a microwave-safe casserole dish.
2. Add milk, butter, and stir well. Place covered dish in the microwave
oven.
3. Press AUTO COOK repeatedly to select Asiago Red Potatoes.
4. Press START to microwave at 80% power for 13 minutes.
5. Sprinkle cheese, and place covered dish in the microwave oven.
6. Press START to microwave at 80% power for 2 minutes.
Roasted Vegetable Medley
Ingredients
• 1 cup baby carrots
• 1 cup yellow squash (sliced)
• 1 cup zucchini (sliced)
• 1/2 cup red bell pepper (sliced)
• 1/2 cup onion (thinly sliced)
• 1 tablespoon olive oil
• Salt, garlic, and herb
seasoning to taste
Method
1. Add carrots, squash, zucchini, red bell pepper, and onion in a
microwave-safe casserole dish.
2. Add olive oil, salt, garlic, herb seasonings, and stir. Place covered dish
in the microwave oven.
3. Press AUTO COOK repeatedly to select Roasted Vegetable Medley.
4. Press START to microwave at 100% power for 8 minutes.
25
Lemon Shrimp Risotto
Ingredients
• 2 cups Arborio rice (Italian
short-grain rice) or medium-
grain rice
• 1 pound medium shrimp
(shelled and deveined)
• 1 cup frozen peas (5oz,
thawed)
• 3/4 teaspoons salt
• 1/4 teaspoon ground black
pepper
Method
• 2 tablespoons butter
• 2 teaspoons olive oil
• 1 onion (chopped)
• 1 medium shallot (minced)
• 2 lemons
• 2 cans chicken broth (14.5oz
each)
• 1/2 cup dry white wine
1. Add butter, olive oil, onion, and shallot in a microwave-safe casserole
dish. Place dish in the microwave oven.
2. Press AUTO COOK repeatedly to select Lemon Shrimp Risotto.
3. Press START to microwave at 100% power for 2 minutes.
4. Extract grated lemon peel and lemon juice from the lemons. Add
grated lemon peel, lemon juice, chicken broth, and white wine in
another microwave-safe casserole dish. Place covered dish in the
microwave oven.
5. Press START to microwave at 100% power for 8 minutes.
6. Add rice in the dish with onion, and stir evenly. Add hot chicken broth,
and stir evenly. Place covered dish in the microwave oven.
7. Press START to microwave at 50% power for 13 minutes.
8. Add shrimp, peas, salt, pepper, and stir. Place covered dish in the
microwave oven.
9. Press START to microwave at 50% power for 5 minutes.
26
TIME DEFROST
Uses reduced power to defrost food without cooking it, and allows thawing
frozen food quicker than in the fridge.
To Use Time Defrost Program:
1. Press TIME DEFROST after placing food and closing the door.
2. Press the numbers to enter the length of defrost time.
3. Press START.
4. The microwave oven will signal as a reminder to turn over or stir the food
midway through the defrost cycle. After turning over or stirring the food,
close the door and press START again.
Time Defrost may be added when setting a Manual Cook (Cook Time).
For example, to set a time defrost before a manual cook:
1. Press COOK TIME after placing food and closing the door.
2. Press the numbers to enter the length of time.
For example, to set a 3-minute cooking, press the numbers 3, 0, and 0.
3. (Optional) Press POWER LEVEL once. Then press the corresponding power
level number key or POWER LEVEL repeatedly to select the power level
desired. Refer to the Power Level table in Manual Cook section.
For example, to select 90% power, Press 9 or POWER LEVEL twice.
NOTE:
• The default power level is 100% (PL-HI) if POWER LEVEL is not
pressed.
4. Press TIME DEFROST.
5. Press the numbers to enter the length of defrost time.
6. Press START.
7. The microwave oven will signal as a reminder to turn over or stir the food
midway through the defrost cycle. After turning over or stirring the food,
close the door and press START again.
8. When the defrost cycle is completed, the microwave oven will start the set
manual cook automatically.

27
WEIGHT DEFROST
Automatically sets the defrosting times and power levels to give even
defrosting results for meats, poultry and fish up to 6 pounds in weight.
To Use Weight Defrost Program:
1. Press WEIGHT DEFROST after placing food and closing the door.
2. Press the numbers to enter the food weight in tenths of a pound.
For examples:
- To enter 0.5 pounds, press the numbers 0 and 5.
- To enter 3.0 pounds, press the numbers 3 and 0.
3. Press START.
4. The oven will signal as a reminder to turn over or stir the food midway
through the defrost cycle. After turning over or stirring the food, close the
door and press START again.
Weight Defrost may be added when setting a Manual Cook (Cook Time).
For example, to set a weight defrost before a manual cook:
1. Press COOK TIME after placing food and closing the door.
2. Press the numbers to enter the length of time.
For example, to set a 3-minute cooking, press the numbers 3, 0, and 0.
3. (Optional) Press POWER LEVEL once. Then press the corresponding power
level number key or POWER LEVEL repeatedly to select the power level
desired. Refer to the Power Level table in Manual Cook section.
For example, to select 90% power, Press 9 or POWER LEVEL twice.
NOTE:
• The default power level is 100% (PL-HI) if POWER LEVEL is not
pressed.
4. Press WEIGHT DEFROST.
5. Press the numbers to enter the food weight in tenths of a pound.
6. Press START.
7. The microwave oven will signal as a reminder to turn over or stir the food
midway through the defrost cycle. After turning over or stirring the food,
close the door and press START again.
8. When the defrost cycle is completed, the microwave oven will start the set
manual cook automatically.
28
VENT FAN
Press Vent Fan keypad once for High fan setting. You may press this
NOTE:
COOKTOP LIGHT
Pressing Cooktop Light keypad adjusts the cooktop light setting among
• The vent fans may automatically come on at Low fan setting when the
temperature of the built-in temperature sensor near the fans is over
158°F (70°C).
• If the vent fans are automatically turned on, they will automatically
turn off when the temperature drops below 104°F (40°C).
• With the vent fans automatically turned on at Low fan setting, pressing
Vent Fan keypad can change the fan setting to High and the vent fans
will not automatically turn off. After the temperature of the built-in
temperature sensor drops below 104°F (40°C), the vent fans can be
manually turned off.
keypad again to select Low fan setting.
This microwave oven hood has 2 available speeds HIGH → LOW → OFF.
HIGH → LOW → OFF.
MICROWAVE OVEN CARE
GENERAL CLEANING
IMPORTANT: Before cleaning, make sure all controls are OFF and the
microwave oven is cool. Always follow label instructions on cleaning products.
To avoid damage to the microwave oven caused by arcing due to soil
buildup, keep cavity, microwave inlet cover, cooking rack supports, and area
where the door touches the frame clean.
Clean with mild soap, water, and a soft cloth or sponge or as indicated below.
• Grease filter: mild soap and water or dishwasher
• Door and exterior: mild soap and water, or glass cleaner applied to paper
towel
• Control panel: sponge or soft cloth and water
• Stainless steel (on some models): mild soap and water, then rinse with
clean water and dry with soft cloth, or use stainless steel cleaner
• Turntable: mild soap and water or dishwasher
29
INSTALLING/REPLACING FILTERS AND LIGHT BULBS
To purchase replacement filters or light bulbs
• Visit www.cosmoappliances.com or reference the contact information at
the end of this manual.
GREASE FILTERS
Grease filters are located on the underside of the microwave oven. The grease
filters should be removed and cleaned at least once a month.
NOTE: Do not operate the microwave oven without the filters in place.
To replace the grease filters:
1. Make sure microwave oven is unplugged or power is disconnected.
2. Push back the finger grip and pull down the grease filters from the
bottom plate.
3. Clean the grease filters monthly, or replace with a new grease filter if
necessary.
4. Put the grease filters back to the bottom plate.
30
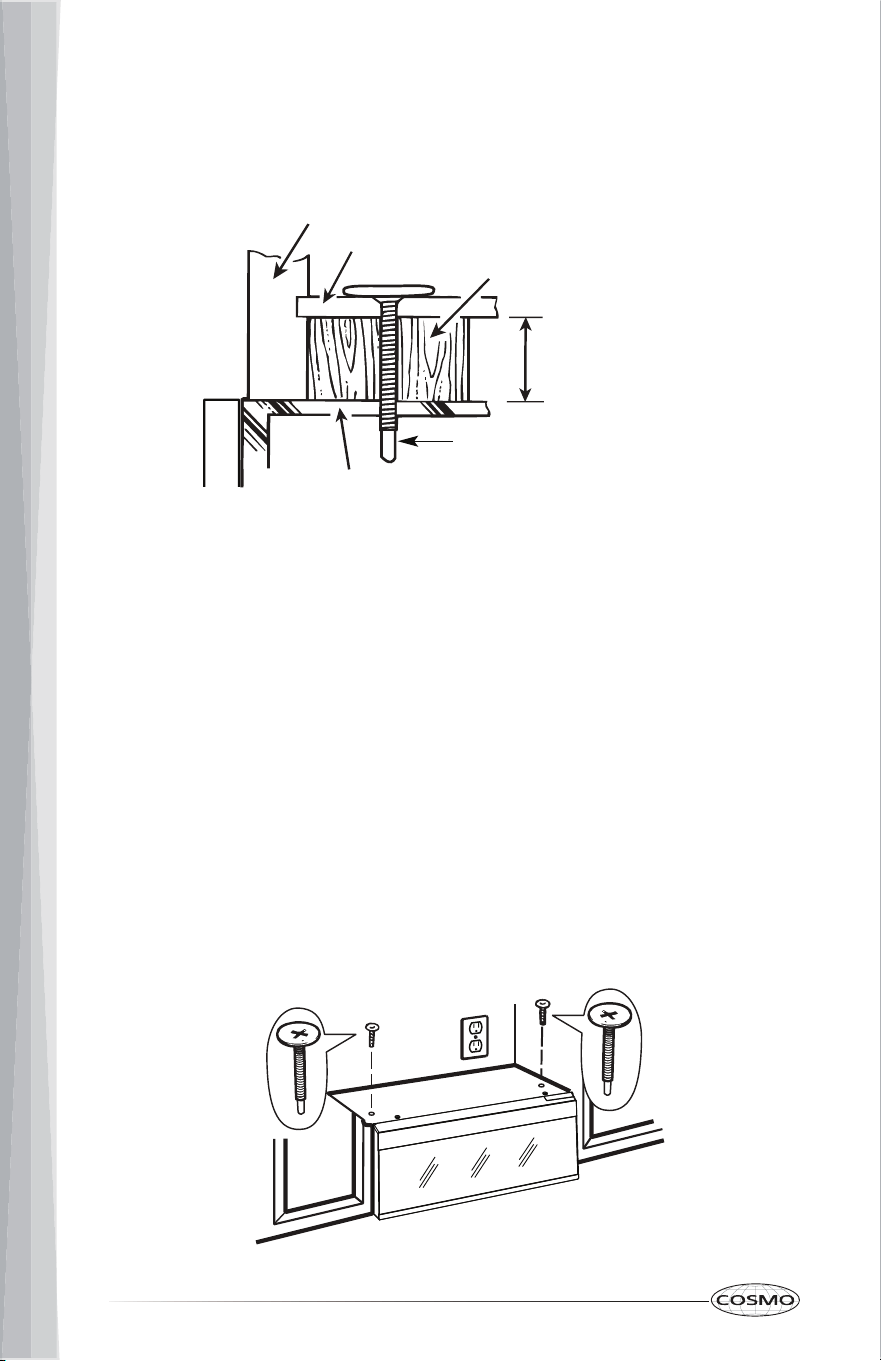
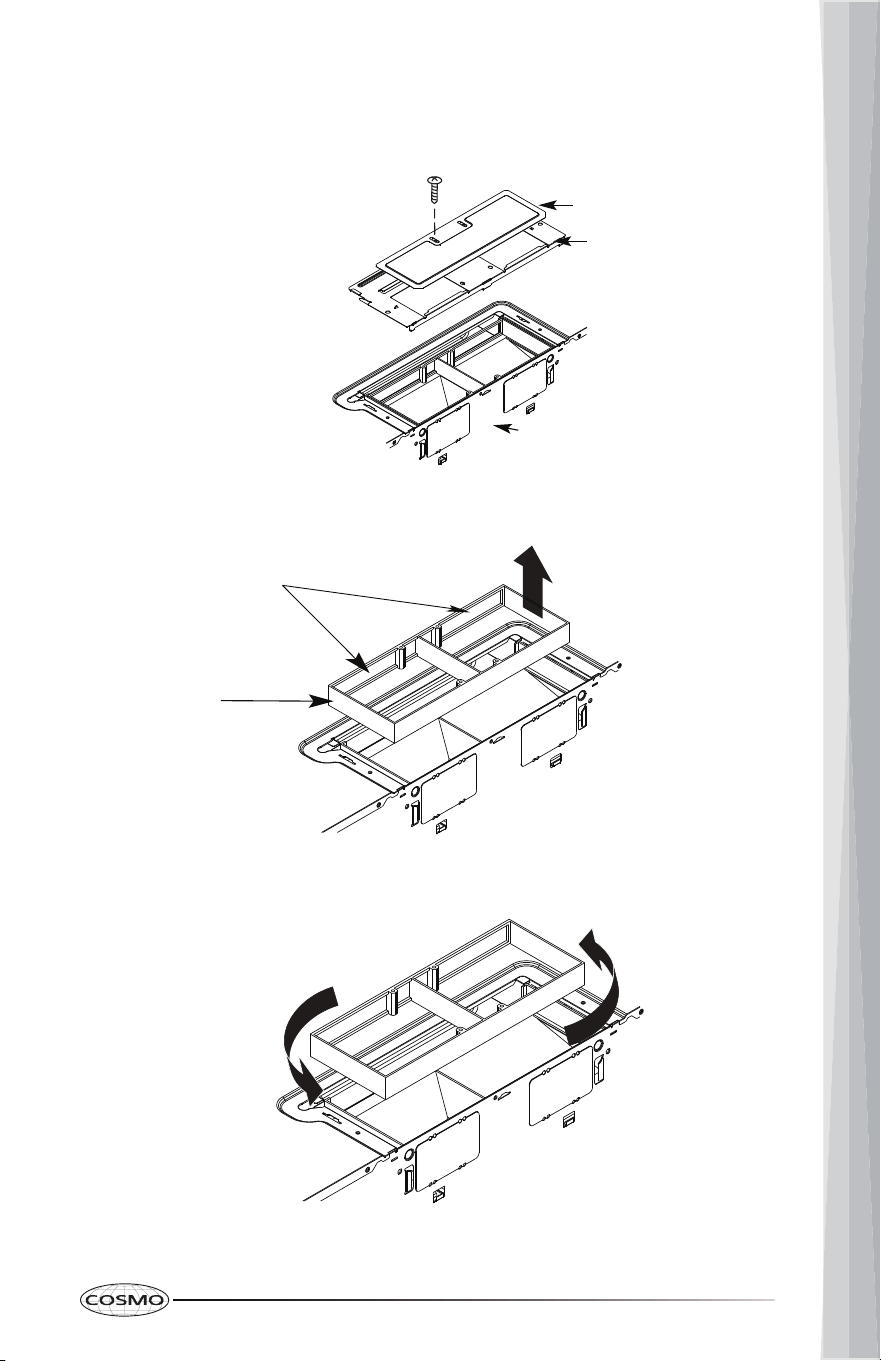
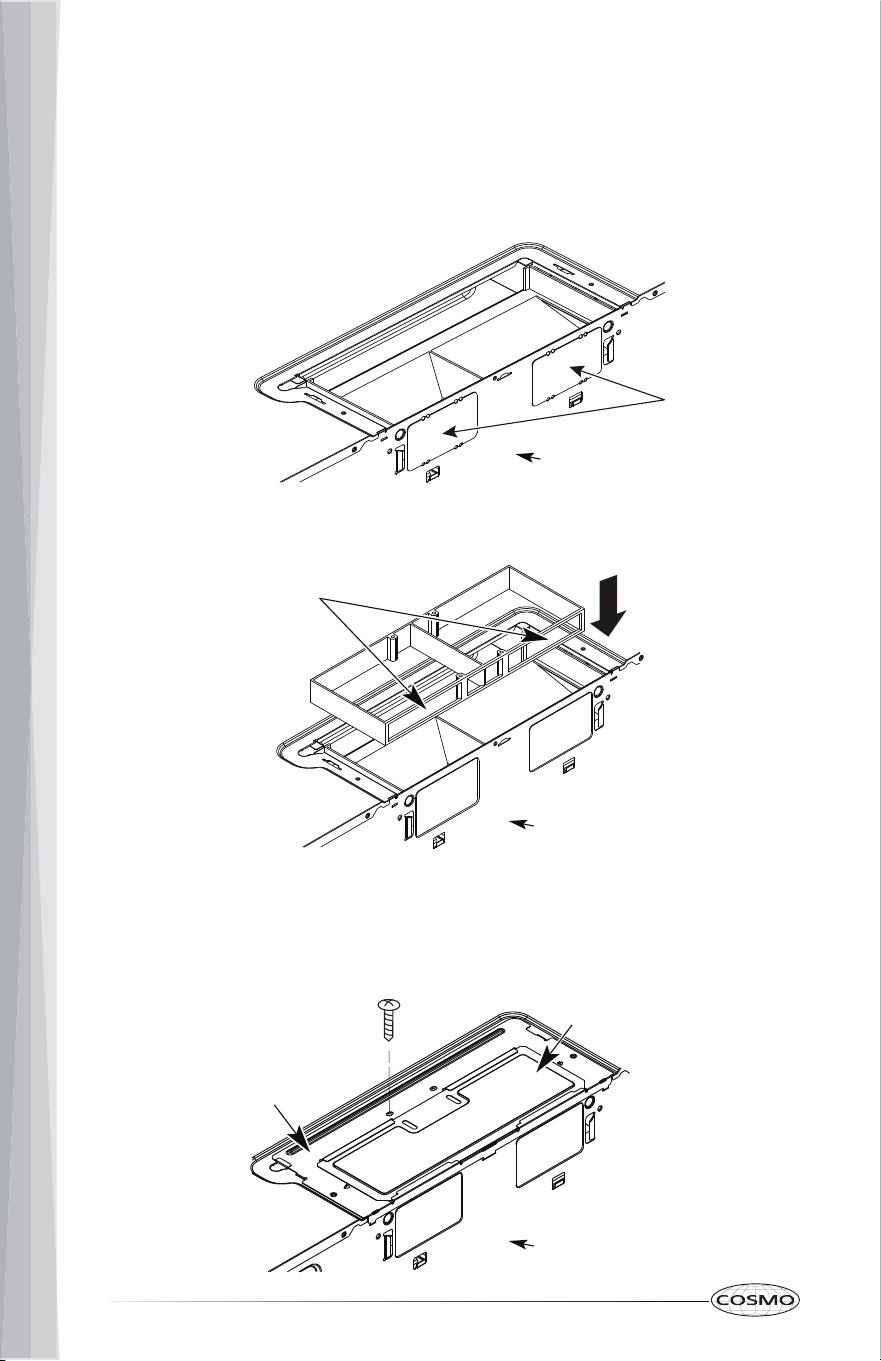
1. Make sure microwave oven is unplugged or power is disconnected.
2. Remove the two vent plate screws located on the top of the microwave
oven, and remove the vent plates.
3. Replace the charcoal filter from the vent plates.
4. Replace the vent plates on the microwave oven and tighten the screws.
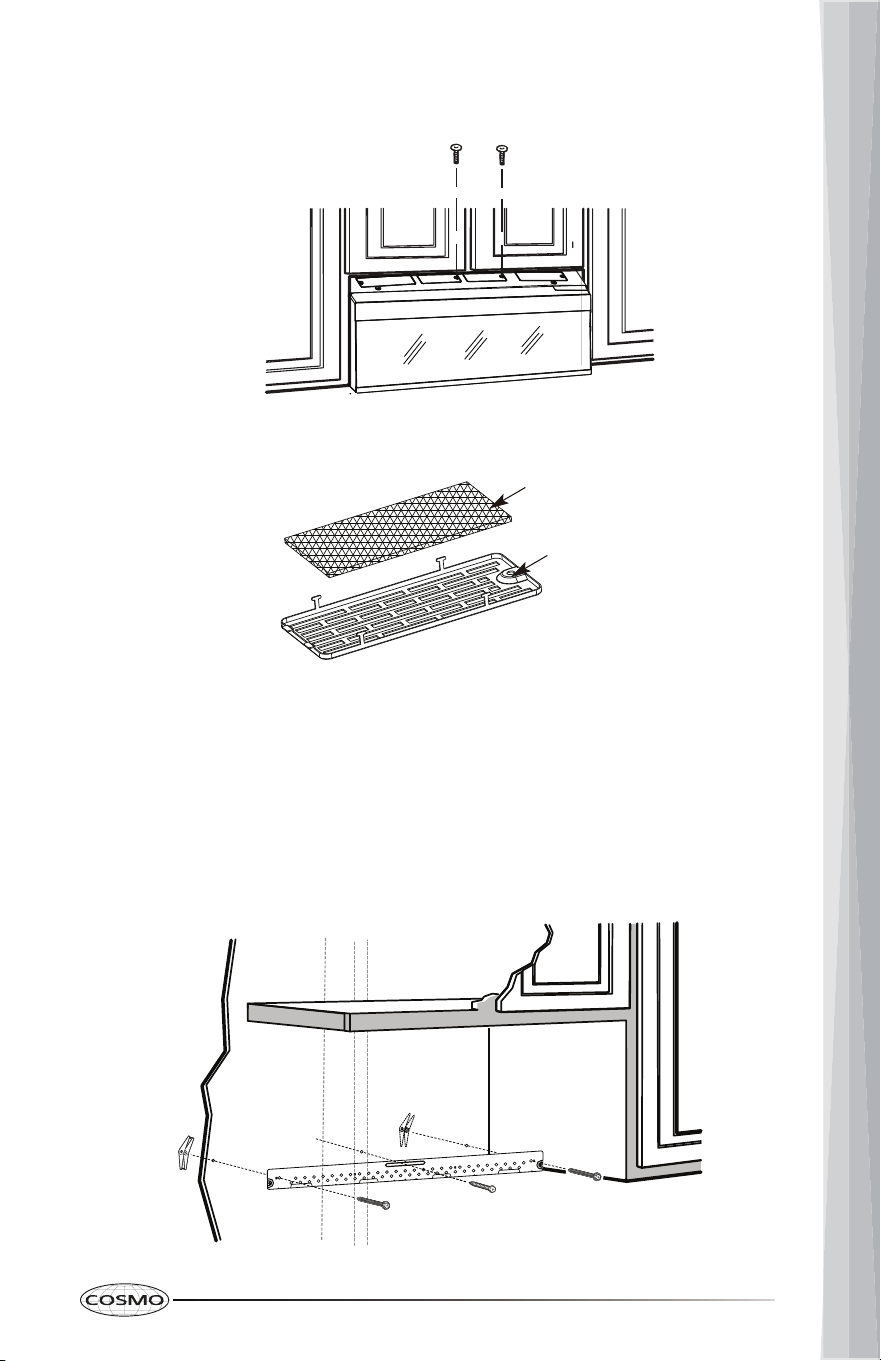
Charcoal Filter
Vent Plate
CHARCOAL FILTER
Charcoal filters are located at the top venting of the microwave oven. The
charcoal filter cannot be cleaned and should be replaced about every 6
months.
NOTE: For recirculation, do not operate the microwave oven without the filters
in place.
To Replace Charcoal Filters:
31
1. Using a Phillips screwdriver, remove the glass cover screw at the bottom
of the microwave oven.
2. Open the glass cover.
3. Remove the LED light panel screw, and disconnect the LED light panel
from its terminal.
4. Insert a new
LED light panel to the terminal and replace the LED light
panel screw.
5. Close and secure the glass cover with the screw removed in step 1.
COOKTOP LIGHTS
The cooktop lights are located on the underside of the microwave oven and
are replaceable.
To replac e the cooktop light::
Screw
LED Light Panel
32
CAVITY LIGHT
The cavity light is located at the top left of the microwave oven near the front.
To replace the cavity light:
1. Using a Phillips screwdriver, remove the metal cover screw from the top
left of the microwave oven and remove the metal cover.
2. Pull out the light from the light holder.
3. Insert a new light.
4. Reattach the metal cover with the screw removed in step 1.
33
TROUBLESHOOTING
First try the solutions suggested here. If you need further assistance or more
recommendations that may help you avoid a service call, refer to the
warranty page in this manual.
If you experience Recommended Solutions
Microwave oven
will not operate
Check the following:
• Household fuse or circuit breaker: If a household
fuse has blown or a circuit breaker has tripped,
replace the fuse or reset the circuit breaker. If the
problem continues, call an electrician.
• Magnetron: Try to heat 1 cup (250 mL) of cold
water for 2 minutes at 100% cooking power. If
water does not heat, try the steps in the bullets
below. If microwave oven still does not operate,
call for service.
• Door: Firmly close door. On some models, if a
packaging spacer is attached to inside of the
door, remove it, then firmly close door.
If a message "Food" appears in the display, the
door has been closed for 5 minutes or more
without the microwave oven being started. This
occurs to avoid unintended starting of the
microwave oven. Open and close the door, then
start the cycle.
• Control: Make sure control is set properly. Make
sure Control Lock is OFF. Make sure Demo mode
(on some models) is OFF.
Arcing in the
microwave oven
• Soil buildup: Soil buildup on cavity walls,
microwave inlet cover, cooking rack supports, and
area where the door touches the frame can cause
arcing. See "General Cleaning" in the "Microwave
Oven Care" section.
• Cookware: Use microwave-safe cookware only.
34
If you experience Recommended Solutions
Fan running
during cooktop
usage
• This is normal. The microwave oven's cooling fan,
which is separate from the vent fan, automatically
comes on during microwave oven operation to
cool the microwave oven. It may also
automatically come on and cycle on and off to
cool the microwave oven's controls while the
cooktop below is being used.
• The vent fans may also automatically come on at
low setting when the built-in temperature sensor
near the fans detects temperature over 158°F
(70°C).
Unevenly cooked
food
• Turn over or stir food midway through the
cooking.
• Completely defrost food before cooking.
• Use appropriate cooking time and power level.
• Use microwave-safe cookware only.
Overcooked food • Use appropriate cooking time and power level.
Undercooked
food
• Completely defrost food before cooking.
• Use appropriate cooking time and power level.
• Use microwave-safe cookware only.
35
LIMITED WARRANTY
WARRANTY AND SERVICE
TO RECEIVE WARRANTY SERVICE, YOUR PRODUCT MUST BE REGISTERED.
TO REGISTER AND REVIEW FULL WARRANTY DETAILS, VISIT:
WWW.COSMOAPPLIANCES.COM/WARRANTY
SCAN TO REGISTER
CUSTOMER SUPPORT
TO CHAT WITH US LIVE FOR ASSISTANCE, VISIT:
WWW.COSMOAPPLIANCES.COM/CHAT
SCAN TO CHAT
36

IMPORTANT
Do Not Return This Product To The Store
If you have a problem with this product, please contact COSMO Customer
Support at
+1 (888) 784-3108
DATED PROOF OF PURCHASE, MODEL #, AND SERIAL # REQUIRED FOR
WARRANTY SERVICE.
IMPORTANT
Ne pas Réexpédier ce Produit au Magasin
Pour tout problème concernant ce produit, veuillez contacter le service des
consommateurs Cosmo Customer Support au
+1 (888) 784-3108
UNE PREUVE D’ACHAT DATEE EST REQUISE POUR BENEFICIER DE LA GARANTIE.
IMPORTANTE
No regrese este producto a la tienda
Si tiene algún problema con este producto, por favor contacte el ayuda al
cliente COSMO al
+1 (888) 784-3108
(Válido solo en E.U.A.)
NECESITA UNA PRUEBA DE DE COMPRA FECHADA, NÚMERO DE MODELO Y DE
SERIE PARA EL SERVICIO DE LA GARANTÍA.
Correct Disposal of this product:
This marking indicates that this appliance should not be
disposed with other household wastes. To prevent
possible harm to the environment or human health from
uncontrolled waste disposal, recycle it responsibly to
promote the sustainable reuse of material resources.
37
MEMO